Embed Size (px)
Citation preview

SC6000
Reference Manual

Datalogic Automation Srl Via Lavino, 265 40050 - Monte S. Pietro Bologna - Italy SC6000 Reference Manual Ed.: 10/2012 © 2003 – 2012 Datalogic Automation S.r.l. ALL RIGHTS RESERVED. Protected to the fullest extent under U.S. and international laws. Copying, or altering of this document is prohibited without express written consent from Datalogic Automation S.r.l. Datalogic and the Datalogic logo are registered trademarks of Datalogic S.p.A. in many countries, including the U.S.A. and the E.U. Genius, PackTrack, and DARP are trademarks of Datalogic Automation S.r.l. All other brand and product names mentioned herein are for identification purposes only and may be trademarks or registered trademarks of their respective owners. Datalogic shall not be liable for technical or editorial errors or omissions contained herein, nor for incidental or consequential damages resulting from the use of this material.
08/10/12

iii
CONTENTS
REFERENCES .............................................................................................................v Reference Documentation ............................................................................................ v Services and Support ................................................................................................... v Patents.......................................................................................................................... v
COMPLIANCE.............................................................................................................vi FCC Compliance ......................................................................................................... vi Power Supply............................................................................................................... vi CE Compliance............................................................................................................ vi
GENERAL VIEW........................................................................................................vii
GUIDE TO INSTALLATION ........................................................................................ ix
1 INTRODUCTION ..........................................................................................................1 1.1 Product Description ......................................................................................................1 1.2 Model Description .........................................................................................................2 1.3 LED Indicators ..............................................................................................................2 1.4 Accessories ..................................................................................................................3
2 INSTALLATION ...........................................................................................................4 2.1 Package Contents ........................................................................................................4 2.2 Overall Dimensions.......................................................................................................5 2.3 Mechanical Mounting....................................................................................................6 2.4 Electrical Connections ..................................................................................................8 2.4.1 Main Interface ...............................................................................................................8 2.4.2 Auxiliary Interface .......................................................................................................12 2.4.3 Modem Interface.........................................................................................................12 2.4.4 Ethernet Interface .......................................................................................................13 2.4.5 DeviceNet Interface ....................................................................................................15 2.4.6 Profibus Interface........................................................................................................16 2.5 Typical Layouts...........................................................................................................17 2.5.1 Large Synchronized Network Layout..........................................................................17 2.5.2 Redundant System Layout .........................................................................................19 2.5.3 Standard SC6000 to Host Layout ...............................................................................20 2.5.4 SC6000 to Fieldbus Network Layout ..........................................................................23 2.6 Keypad and Display....................................................................................................24 2.6.1 Standard Mode ...........................................................................................................24 2.6.2 Redundancy Mode......................................................................................................27 2.6.3 Menu Mode.................................................................................................................27 2.7 Auto Packtrack™ Calibration for Reading Station Using SC6000 Menu....................29 2.7.1 Auto PackTrack Conditions and Limits .......................................................................29 2.7.2 Auto PackTrack Parameter Descriptions....................................................................30 2.7.3 Auto PackTrack Setup ................................................................................................31 2.7.4 Auto PackTrack Report...............................................................................................34 2.7.5 AutoNet Setup Mode ..................................................................................................35
3 SOFTWARE CONFIGURATION................................................................................36 3.1 Genius™ Installation...................................................................................................36 3.2 Guide to Rapid Configuration for SC6000 as Synchronized or Multidata Master............36 3.2.1 Genius™ Network Setup Through Master..................................................................38

iv
3.2.2 Alternative Slave Address Assignment.......................................................................42 3.3 Guide to Rapid Configuration for SC6000 as Controller Lon Old8K...........................42 3.4 Parameter Default Values...........................................................................................46
4 MAINTENANCE .........................................................................................................51 4.1 Datalogic Automatic Replacement Procedure (DARPTM) ...........................................51 4.2 Automatic Scanner Replacement (ASR) ....................................................................52
5 TROUBLESHOOTING ...............................................................................................54
6 TECHNICAL FEATURES...........................................................................................56
A ALTERNATIVE CONNECTIONS REFERENCE........................................................57 Power Supply - I/O (Power/Net Connector)................................................................57 Extended I/O...............................................................................................................60
GLOSSARY................................................................................................................63
INDEX.........................................................................................................................65

v
REFERENCES REFERENCE DOCUMENTATION The documentation related to the SC6000 is listed below:
PWO power supply unit
Document about the Ethernet connectivity
Document about the Profibus connectivity
Guide to Installing a Redundant System
Replacing an SC8000 Controller
Help On-Line in PDF format SERVICES AND SUPPORT Datalogic provides several services as well as technical support through its website. Log on to www.automation.datalogic.com and click on the links indicated for further information:
PRODUCTS
Search through the links to arrive at your product page which describes specific Info, Features, Applications, Models, Accessories, and Downloads including the Genius™ utility program, which allows device configuration using a PC. It provides RS232 and Ethernet interface configuration.
SERVICE
- Overview - Warranty Extensions and Maintenance Agreements
- Sales Network- Listing of Subsidiaries, Repair Centers, Partners
- Helpdesk
- Material Return Authorization PATENTS This product is covered by one or more of the following patents. U.S. patents: 6,347,740 B1; 6,629,639 B2. European patents: 851,376 B1; 1,363,228 B1. Japanese patents: 4,033,958 B2.

vi
COMPLIANCE FCC COMPLIANCE Modifications or changes to this equipment without the expressed written approval of Datalogic could void the authority to use the equipment. This device complies with PART 15 of the FCC Rules. Operation is subject to the following two conditions: (1) This device may not cause harmful interference, and (2) this device must accept any interference received, including interference which may cause undesired operation. This equipment has been tested and found to comply with the limits for a Class A digital device, pursuant to part 15 of the FCC Rules. These limits are designed to provide reasonable protection against harmful interference when the equipment is operated in a commercial environment. This equipment generates, uses, and can radiate radio frequency energy and, if not installed and used in accordance with the instruction manual, may cause harmful interference to radio communications. Operation of this equipment in a residential area is likely to cause harmful interference in which case the user will be required to correct the interference at his own expense. POWER SUPPLY This product is intended to be installed by Qualified Personnel only. CE COMPLIANCE Warning: This is a Class A product. In a domestic environment this product may cause radio interference in which case the user may be required to take adequate measures.

vii
GENERAL VIEW
SC6000 Controller
Figure A - General View
Connector Panel
Power On and Communication LEDs
Connector Panel Legend
1
3
2
LCD Display
Programming Keypad
Status LEDs
4
6
5
2
3
1
4
5
6

viii
Figure B - SC6000-1200 Standard Model Connector Panel
Modem Connector 1
Power/Net Connector2
Main Interface Connector3
Ethernet Connector 4
Auxiliary Interface Connector 5
Extended I/O Connector 6
Figure C - SC6000-1211 Profibus Model Connector Panel
Profibus Connector 1
Figure D - SC6000-1215 DeviceNet Model Connector Panel
DeviceNet Connector 1
Figure E - SC6000-1230 Dual Ethernet Model Connector Panel
Ethernet Connector 1
1
2 3 4
6 5
1
1
1
ix
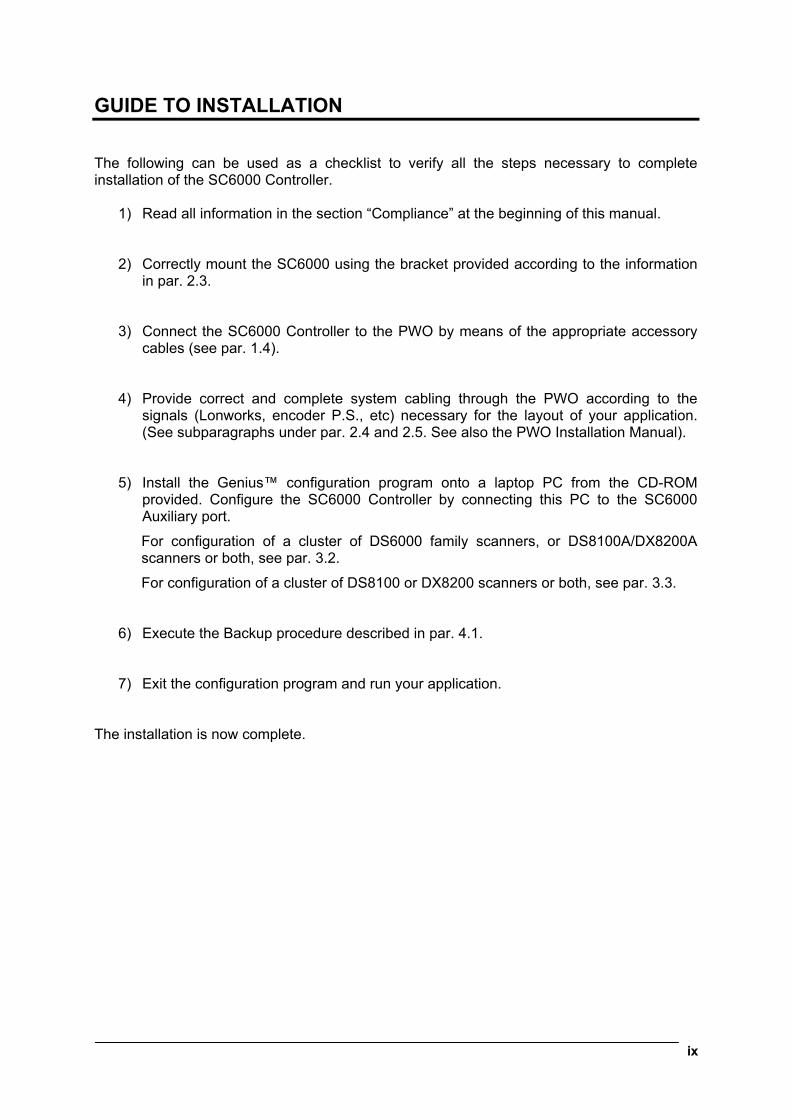
GUIDE TO INSTALLATION The following can be used as a checklist to verify all the steps necessary to complete installation of the SC6000 Controller.
1) Read all information in the section “Compliance” at the beginning of this manual.
2) Correctly mount the SC6000 using the bracket provided according to the information in par. 2.3.
3) Connect the SC6000 Controller to the PWO by means of the appropriate accessory cables (see par. 1.4).
4) Provide correct and complete system cabling through the PWO according to the signals (Lonworks, encoder P.S., etc) necessary for the layout of your application. (See subparagraphs under par. 2.4 and 2.5. See also the PWO Installation Manual).
5) Install the Genius™ configuration program onto a laptop PC from the CD-ROM provided. Configure the SC6000 Controller by connecting this PC to the SC6000 Auxiliary port.
For configuration of a cluster of DS6000 family scanners, or DS8100A/DX8200A scanners or both, see par. 3.2.
For configuration of a cluster of DS8100 or DX8200 scanners or both, see par. 3.3.
6) Execute the Backup procedure described in par. 4.1.
7) Exit the configuration program and run your application. The installation is now complete.

x

INTRODUCTION
1
1
1 INTRODUCTION 1.1 PRODUCT DESCRIPTION The new SC6000 Controller offers all the necessary functions to make the phases of installation, setup, testing, and maintenance of the omni-directional reading tunnel easy and quick. The SC6000 Controller key functions are:
Bus Controller: cluster management and Host interface of a multisided reading tunnel based on Lonworks bus;
DARPTM (Datalogic Automatic Replacement Procedure) function: automatic procedure for scanner and bus controller replacement;
Diagnostic indications on the reading station status, simple to be detected without any PC needed. This indications, based on LEDs and display, offer to the maintenance staff all the necessary information;
Easy remotization of all the reading station information, thanks to built-in Ethernet and fieldbus connectivity, and a dedicated 9-pin connector for Modem connection;
Single and Redundant System configurations;
Integration with RFID and Vision Systems; SC6000's efficiency in hybrid solutions represents a crucial competitive advantage for challenging application requirements.
Auto PackTrack™ Calibration procedure from SC6000 Menu using the onboard Keypad and Display.
Energy Saving allows allows turning on/off the motors and lasers of all network scanners according to the selected digital input, encoder, or communication channel. The time required to restart the system is less than 1 minute independently from the number of scanners connected. It is suggested to use this parameter for example when the conveyor is stopped for a lengthy period.
The SC6000 Controller is based on a robust alloy case divided into two parts: on the upper part there is the display, the keypad and the LEDs. The lower part contains the motherboard, the removable Compact-Flash memory, the Fieldbus boards and the connector panel. The simple and sturdy mechanical structure makes the SC6000 Controller the ideal solution for industrial environments. The SC6000 Controller is fully compatible both with the 6000 family and with the 8000 family (DS8100A and DX8200A) scanners. This means that the SC6000 Controller can work as a bus controller for a cluster of DS6000 family scanners, or DS8100A/DX8200A scanners or both. These slave scanner families no longer require a staggered starting sequence, therefore SC6000 starts them simultaneously. The SC6000 Controller is also compatible with DS8100 and DX8200 (Lonworks versions). It is not possible to mix DS8100/DX8200 with 6000 family or DS8100A/DX8200A.

SC6000
2
1
1.2 MODEL DESCRIPTION The SC6000 Controller is available in versions that differ in regard to the following characteristics:
200 = Standard
211 = Profibus
215 = DeviceNet
230 = Dual Ethernet
SC6000 - 1XXX
1.3 LED INDICATORS
Figure 1 – LEDs Description
Power ON and Communication LEDs1 Status LEDs 2 System Signal LEDs
Name Color State Function Power ON Green ON
OFF SC6000 Powered No Power
Tx Data Green Blinking OFF
Transmitting Data on MAIN No Data Transmission
Rx Data Green Blinking OFF
Receiving Data on MAIN No Data Reception
Ethernet Red ON OFF
Ethernet Line Connected No Ethernet Line Connected
PS Yellow ON OFF
Presence Sensor Active Presence Sensor Not Active
PS Aux Yellow ON OFF
Presence Sensor Active Presence Sensor Not Active
Tach Yellow Blinking OFF
Encoder Active Encoder Not Active
Network Red ON OFF
Lonworks OK Lonworks Error
1
2

INTRODUCTION
3
1
System Event Status LEDs
Name Color State Function Warning Red ON
Blinking OFF
Scanner Cluster Failure Scanner Cluster Warning (if enabled in Genius) Scanner Cluster OK
Status OK Green ON OFF
Controller Status OK Controller Failure
1.4 ACCESSORIES The following accessories are necessary to build a reading station based on SC6000 (the scanner-related accessories are not included):
Name Description Part Number
CAB – SC6003 25-pin cable SC6000 to PWO, 3m (for Extended I/O connections)
93A051338
CAB – SC6013 25-pin cable SC6000 to PWO, 3m (for Power/Net connections)
93A051337
CAB – SC6103 9-pin cable SC6000 to PWO, 3m (for Main Host and Modem connections)
93A051294
CAB – PWO 03 17-pin cable PWO to PWO, 3m (for redundancy)
93A051295
PWO-480 Power & Connect System, 480W 93ACC1767
Modem INSYS Modem 56K 93A051294

SC6000
4
2
2 INSTALLATION To install the system follow the given procedure:
1) Select the mounting location and mount the SC6000 Controller;
2) Mount the PWO (refer to the PWO Installation Manual);
3) Proceed with system electrical connections;
4) Install the Genius™ program on the configuration PC.
NOTE
If your system requires the SC6000 to be connected to PWO refer to the Reference Documentation section for details.
2.1 PACKAGE CONTENTS Verify that the SC6000 Controller and all the parts supplied with the equipment are present and intact when opening the packaging; the list of parts includes:
SC6000 Controller
Installation Quick Reference
SC6000 Configuration CD-ROM
Mounting brackets with knobs and washers
Figure 2 – SC6000 Package Contents
INSTALLATION
5
2
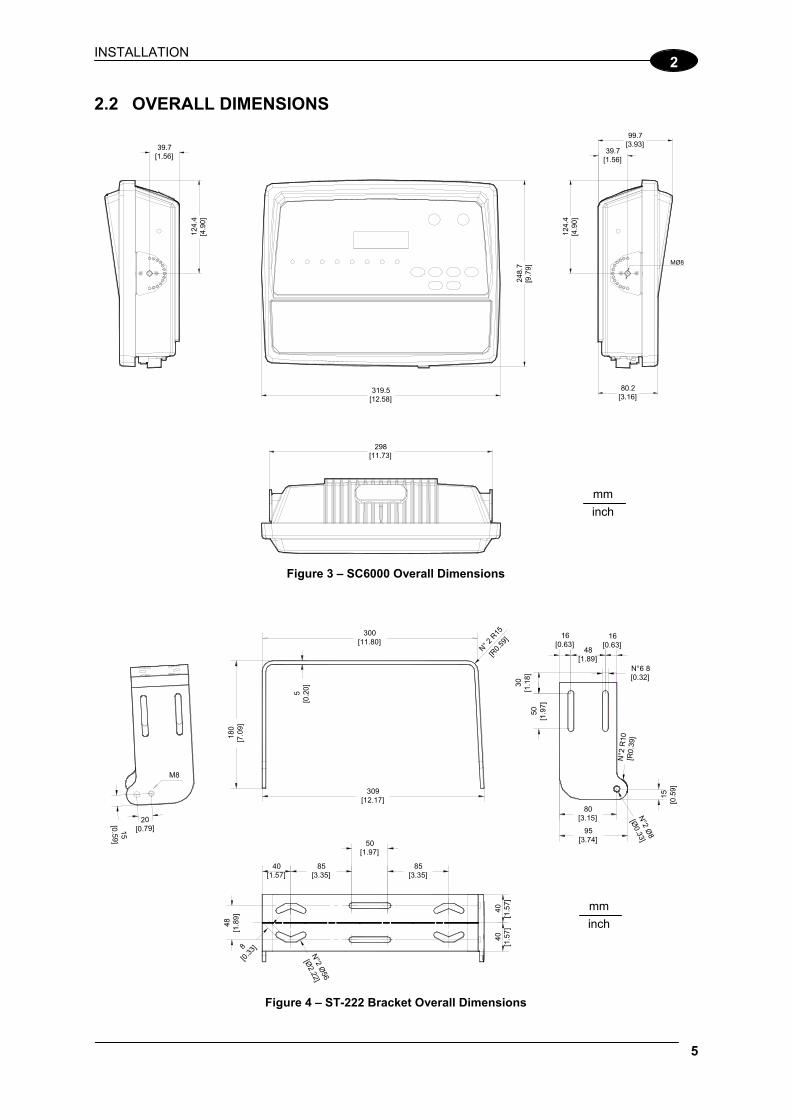
2.2 OVERALL DIMENSIONS
319.5 [12.58]
248.
7 [
9.7
9]
80.2 [3.16]
99.7 [3.93]
124
.4 [4
.90]
39.7 [1.56]
MØ8
39.7 [1.56]
124
.4 [4
.90]
298 [11.73]
Figure 3 – SC6000 Overall Dimensions
180
[7
.09
]
309 [12.17]
5 [
0.2
0]
N° 2 R
15[R
0.59
]
15
[0.59
]
50
[1.9
7]
48 [1.89]
N°6 8 [0.32]
80 [3.15]
95 [3.74]
40 [1.57]
85 [3.35]
50 [1.97]
85 [3.35]
48
[1.
89
]
300 [11.80]
40
[1.5
7]4
0 [
1.5
7]
8
[0.3
3]
N°2
R10
[R
0.3
9]
N°2 Ø
56
[Ø2.22]
M8
16 [0.63]
16 [0.63]
30
[1.
18
]
15
[0
.59
]
N°2 Ø
8
[Ø0.33]
20 [0.79]
Figure 4 – ST-222 Bracket Overall Dimensions
mm
inch
mm
inch

SC6000
6
2
2.3 MECHANICAL MOUNTING To mount the SC6000 Controller on the reading station frame proceed as follows: 1 Mount the bracket on the reading station frame: the slots on the bracket will help obtain
the best positioning. When working in environments characterized by strong vibrations, set the screws as close as possible to the bracket edges, see Figure 5.
2 Tighten the ST-222 bracket to the reading station frame using the screws and washers.
Figure 5 – Mounting the bracket on the reading station frame
3 Position the SC6000 Controller at the top of the bracket: make sure the two large round
openings coincide to the ones located at the edges of the SC6000 Controller. 4 While supporting the SC6000 Controller, rotate the whole device until it is aligned for the
best viewing position, then insert the set pin screw with locking washer until it inserts into one of the small positioning holes located on the terminal bracket.
Figure 6 – SC6000 Controller Side View with Punched Steel Ring and Relative Set Pin Screw
Set pin screw

INSTALLATION
7
2
The specially punched steel ring has been designed to obtain the most precise rotation possible in terms of angle calibration, steadiness and consequent absence of torque between both sides of device.
5 Place a locking washer and then a flat washer onto each knob. Tighten the SC6000
Controller to its bracket by screwing the knobs into their holes – one on each side.
Figure 7 – Mounting the SC6000 Controller on the bracket
The SC6000 Controller can rotate on its mounting bracket up to 90° with respect to the mounting bracket position. See figure below for suggested positions:
Figure 8 – Suggested Mounting Positions
SC6000
8
2
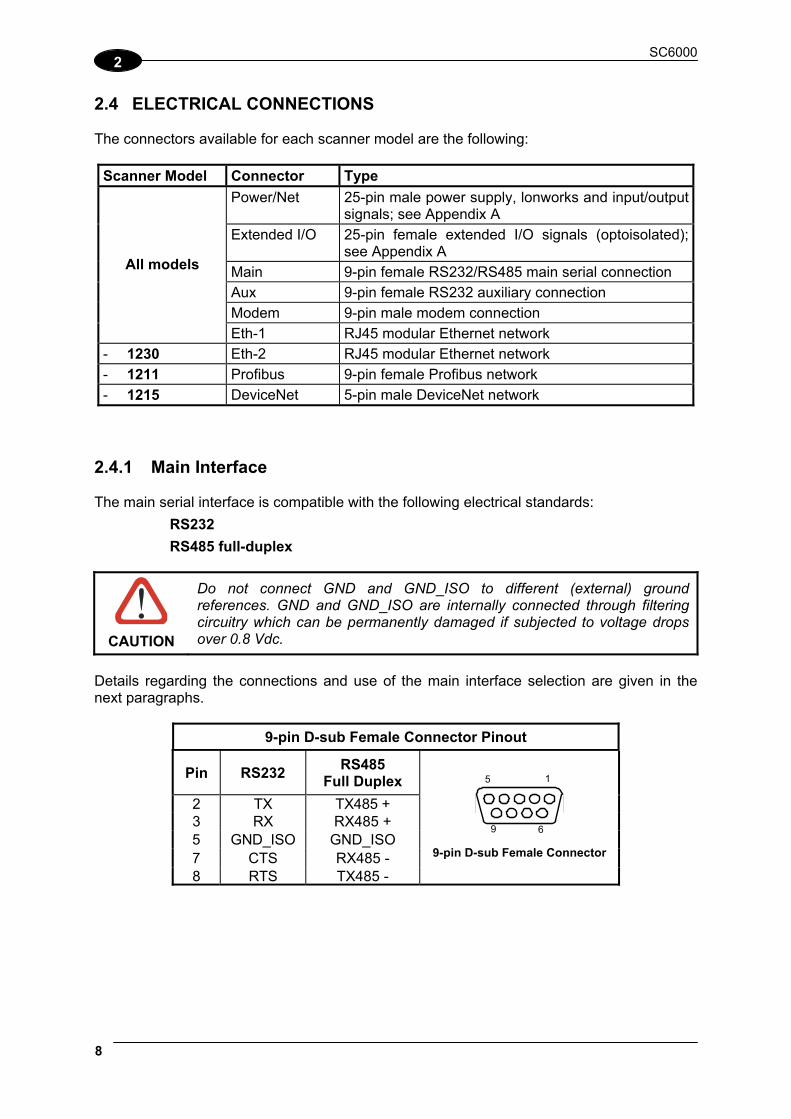
2.4 ELECTRICAL CONNECTIONS The connectors available for each scanner model are the following:
Scanner Model Connector Type
Power/Net 25-pin male power supply, lonworks and input/output signals; see Appendix A
Extended I/O 25-pin female extended I/O signals (optoisolated); see Appendix A
Main 9-pin female RS232/RS485 main serial connection
Aux 9-pin female RS232 auxiliary connection
Modem 9-pin male modem connection
All models
Eth-1 RJ45 modular Ethernet network
- 1230 Eth-2 RJ45 modular Ethernet network
- 1211 Profibus 9-pin female Profibus network
- 1215 DeviceNet 5-pin male DeviceNet network 2.4.1 Main Interface The main serial interface is compatible with the following electrical standards:
RS232
RS485 full-duplex
CAUTION
Do not connect GND and GND_ISO to different (external) ground references. GND and GND_ISO are internally connected through filtering circuitry which can be permanently damaged if subjected to voltage drops over 0.8 Vdc.
Details regarding the connections and use of the main interface selection are given in the next paragraphs.
9-pin D-sub Female Connector Pinout
Pin RS232 RS485
Full Duplex
2 TX TX485 + 3 RX RX485 + 5 GND_ISO GND_ISO 7 CTS RX485 - 8 RTS TX485 -
5 1
9 6
9-pin D-sub Female Connector

INSTALLATION
9
2
RS232 Interface The main serial interface is used for communication with the Host computer and allows both transmission of code data and controller configuration. The connections to the Host can be made as follows:
through the PWO (in which case a CAB-SC6103 cable connects the PWO to the SC6000)
directly to the SC6000 See also par. 2.5.1. It is always advisable to use shielded cables. The overall maximum cable length must be less than 15 m (49.2 ft). The following pins of the 9-pin connector are used for RS232 interface connection:
Pin Name Function
2 TX Transmit 3 RX Receive 5 GND_ISO Main signal ground 7 CTS Clear to send 8 RTS Request to send
The RTS and CTS signals control data transmission and synchronize the connected devices. If the RTS/CTS hardware protocol is enabled, the SC6000 activates the RTS output to indicate a message can be transmitted. The Host must activate the CTS input to enable the transmission.
SC6000
8 RTS
RTS
PWO
GND-ISO5
CTS7
RX3
RXTX2
TX
Shield
Host
Signal Ground
CTS
CAB-SC6103
Figure 9 - RS232 Connections: Host - PWO- SC6000
SC6000
8 RTS
RTS
GND-ISO5
CTS7
RX3
RXTX2
TX
Shield
Host
Signal Ground
CTS
Figure 10 - RS232 Connections: Host - SC6000

SC6000
10
2
RS485 Full-Duplex Interface The RS485 full-duplex interface is used for non-polled communication protocols in point-to-point connections over longer distances (max 1200 m / 3940 ft) than those acceptable for RS232 communications or in electrically noisy environments. The connections to the Host can be made as follows:
through the PWO (in which case a CAB-SC6103 cable connects the PWO to the SC6000)
directly to the SC6000 See also par. 2.5.1. The following pins of the 9-pin connector are used for RS485 full-duplex interface connection:
Pin Name Function 2 TX485 + RS485 output (+) 3 RX485 + RS485 input (+) 5 GND-ISO Main signal ground 7 RX485 - RS485 input (-) 8 TX485 - RS485 output (-)
SC6000
8 TX485-
TX-
PWO
GND-ISO5
RX485-7
RX48 5+3
RX+ TX485+2
TX+
Shield
Host
Signal Ground
RX-
CAB-SC6103
Figure 11 - RS485 Full-Duplex Interface Connections: Host - PWO- SC6000
SC6000
8 TX485-
TX-
GND-ISO5
RX485-7
RX48 5+3
RX+TX485+2
TX+
Shield
Host
Signal Ground
RX-
Figure 12 - RS485 Full-Duplex Interface Connections: Host - SC6000

INSTALLATION
11
2
NOTE
For applications that do not use RX485 signals, do not leave these lines floating but connect them to GND-ISO as shown below.
SC6000
8 TX485-
TX-
PWO
GND-ISO5
RX485-7
RX48 5+3
RX+ TX485+2
TX+
Shield
Host
Signal Ground
RX-
CAB-SC6103
Figure 13 - RS485 Full-Duplex Interface Connections Using Only TX Signals
SC6000
8 TX485-
TX-
GND-ISO5
RX4 85-7
RX485+3
RX+TX485+2
TX+
Shield
Host
Signal Ground
RX-
Figure 14 - RS485 Full-Duplex Interface Connections Using Only TX Signals: Host - SC6000

SC6000
12
2
2.4.2 Auxiliary Interface The auxiliary serial interface is equipped with RS232 interface connections. The interface can be enabled or disabled through the Genius™ configuration program. The following pins of the 9-pin connector are used for RS232 interface connection:
9-pin D-sub Female Connector Pinout
Pin Name Function 2 TX Transmit 3 RX Receive 5 GND Ground
5 1
9 6 9-pin D-sub Female Connector
SC6000 USER INTERFACE (Laptop)
5 GNDSignal Ground
TXD RXAUX3
RXD TXAUX2
Shield
Figure 15 – RS232 Auxiliary Interface Connections
2.4.3 Modem Interface SC6000 offers a dedicated 9-pin port for a Modem connection. The modem connection allows a Host to remotely control the reading station. The connections to modem can be made as follows:
through the PWO (in which case the modem is installed internally to the PWO and a CAB-SC6103 cable connects the modem from the PWO to the SC6000)
directly to the SC6000 See also par. 2.5.1.
9-pin D-sub Male Connector Pinout
Pin Name Function 1 CD Carrier detect 2 RX Receive 3 TX Transmit 4 DTR Data terminal ready5 GND Ground 6 DSR Data set ready7 RTS Request to send8 CTS Clear to send9 RI Ring indicator
1 5
6 9 9-pin D-sub Male Connector

INSTALLATION
13
2
2.4.4 Ethernet Interface This connector is available for all SC6000 Controller models and allows the Ethernet connection to the host. In the SC6000-1230 Dual Ethernet there are two Ethernet connectors for secondary host connections.
1 8
Figure 16 – SC6000 Harting RJ Industrial® Female Connector
NOTE
For Ethernet connections, always use the Harting RJ Industrial® Push Pull Ethernet connector (included in the package). This connector assures a robust connection and full IP rated protection.
Figure 17 – Harting RJ Industrial® Push Pull Male Connector
This interface and the connector pinout (see the following table) are IEEE 802.3 10 BaseT and IEEE 802.3u 100 BaseTx compliant.
RJ45 Modular Jack Pinout
Pin Name Function
1 TX + Transmitted data (+) 2 TX - Transmitted data (-) 3 RX + Received data (+) 6 RX - Received data (-)
4, 5, 7, 8 N.C. Not connected

SC6000
14
2
The Ethernet interface (NIC) can be used for TCP/IP communication with a remote or local host computer by connecting the SC6000 Controller to a LAN or directly to a host PC. The following is an example of a connection to a LAN through a Hub using a straight through cable:
SC6000
5
HUB / SWITCH
3
4
2
1
6
5
3
4
2
1
6
7
8
7
8
RX+
TX-
TX+
RX-
n. c.
n. c.
n. c.
n. c.
n. c. = not connected Figure 18 – Straight Through Cable
The following is an example of direct connection to a PC using an inverted cable:
SC6000
5
Host PC
3
4
2
1
6
5
1
4
6
3
2
7
8
7
8
RX+
TX-
TX+
RX-
n. c.
n. c.
n. c.
n. c.
n. c. = not connected Figure 19 – Inverted Cable
For further details refer to the “Ethernet Service Guide” document provided as reference documentation.

INSTALLATION
15
2
2.4.5 DeviceNet Interface The 5-pin male connector is only available in the SC6000-1215 DeviceNet model and allows connection between the host and the controller:
1
3
2
4
5
Figure 20 – DeviceNet 5-pin Male Connector
5-pin DeviceNet connector pinout
Pin Name Function
2 V + Supply voltage – positive pin 5 CAN_L CAN bus data line – L 1 SHIELD Shield 4 CAN_H CAN bus data line – H 3 V - Supply voltage – negative pin
NOTE
The power supplied on pin V+ and V- is used only to propagate power to the section of the DeviceNet board directly connected to the Bus. It is completely isolated from the SC6000 power, which must be supplied on pin 16 and pin 3, 4 of the 25-pin Power/Net connector.

SC6000
16
2
2.4.6 Profibus Interface The 9-pin female Profibus connector (white) is only available in the SC6000-1211 Profibus model and allows connection between the host and the controller:
5 1
9 6 Figure 21 – Profibus 9-pin Female Connector
9-pin D-sub Female Profibus connector pinout
Pin Name Function 1 Shield* Shield, protective ground resp. 2 N.C. Not connected 3 B-LINE (RxD/TxD-P) Received/Transmitted data-P 4 CNTR-P** Repeater control signal 5 DGND Data ground (M5V) 6 +5 V Voltage plus (P5V) 7 N.C. Not connected 8 A-LINE (RxD/TxD-N) Received/Transmitted data 9 CNTR-N** Repeater control signal
signal is optional
** signal is optional; RS485 level
The Profibus interface is used for communication with a Host and allows expanding the networking and remote diagnostic capabilities of the controller. For further details refer to the “Profibus_Fam6k.pdf” document provided as supplementary documentation.
INSTALLATION
17
2
2.5 TYPICAL LAYOUTS The following typical layouts refer to system hardware configurations, but also require the correct setup of the software configuration parameters (see par. 3.2 for details).
Other layouts require the use of a specific SC6000 Controller model.
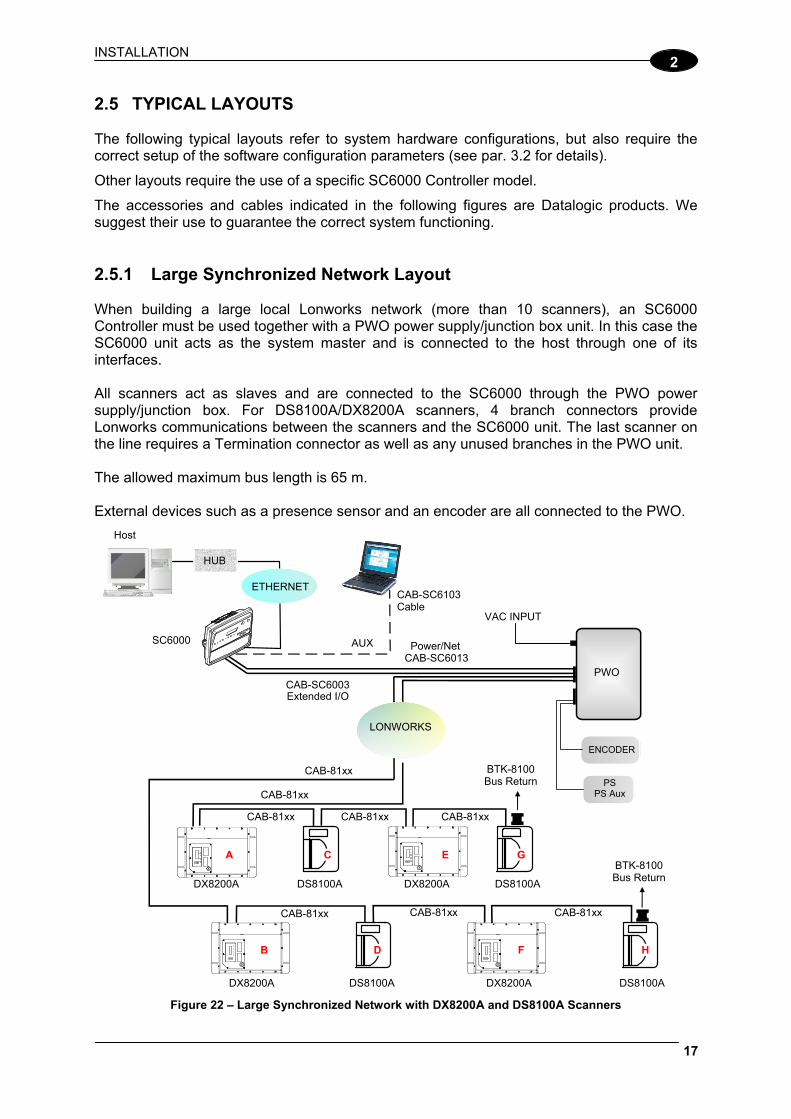
The accessories and cables indicated in the following figures are Datalogic products. We suggest their use to guarantee the correct system functioning. 2.5.1 Large Synchronized Network Layout When building a large local Lonworks network (more than 10 scanners), an SC6000 Controller must be used together with a PWO power supply/junction box unit. In this case the SC6000 unit acts as the system master and is connected to the host through one of its interfaces. All scanners act as slaves and are connected to the SC6000 through the PWO power supply/junction box. For DS8100A/DX8200A scanners, 4 branch connectors provide Lonworks communications between the scanners and the SC6000 unit. The last scanner on the line requires a Termination connector as well as any unused branches in the PWO unit. The allowed maximum bus length is 65 m. External devices such as a presence sensor and an encoder are all connected to the PWO.
Figure 22 – Large Synchronized Network with DX8200A and DS8100A Scanners
Extended I/O
Host
HUB
ETHERNET
SC6000 AUX
CAB-SC6003
CAB-SC6013Power/Net
VAC INPUT
CAB-SC6103Cable
PWO
LONWORKS
ENCODER
PS PS Aux
CAB-81xx
CAB-81xx
CAB-81xx CAB-81xx
CAB-81xx
BTK-8100Bus Return
DX8200A DS8100A DX8200A
DX8200A DS8100A DX8200A DS8100A
CAB-81xx CAB-81xx
BTK-8100Bus Return
CAB-81xx
DS8100A
B
A C E G
H FD
SC6000
18
2
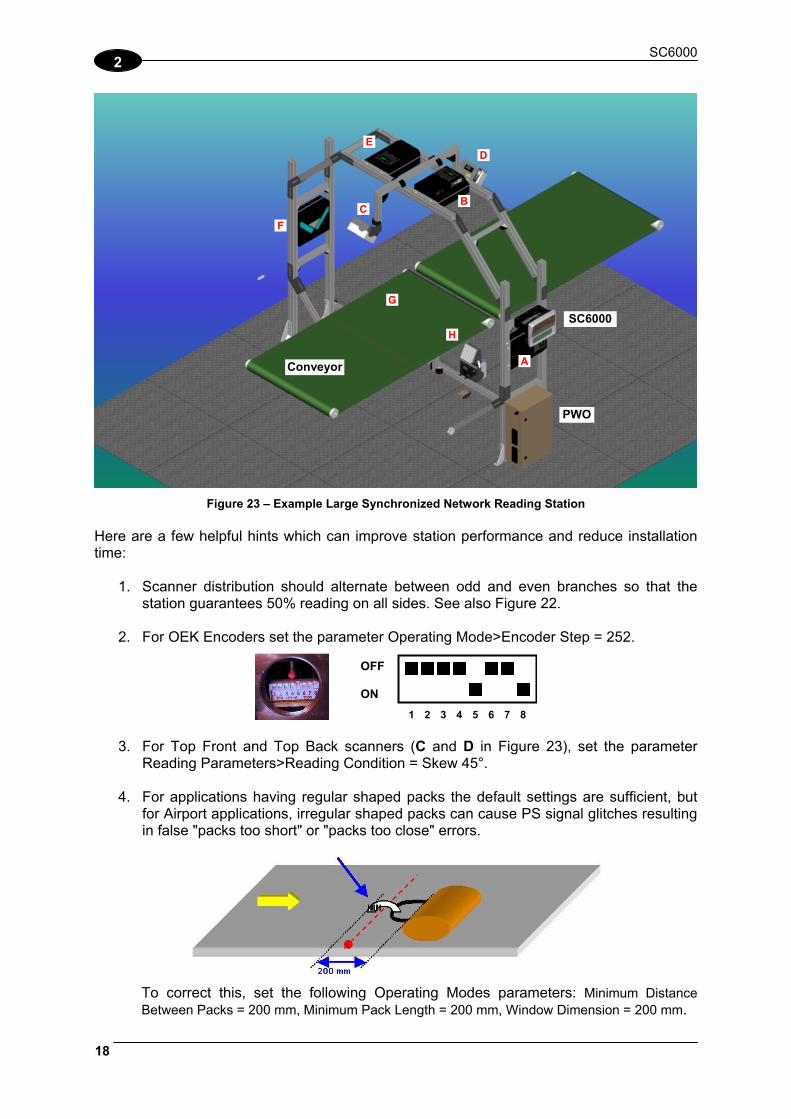
Figure 23 – Example Large Synchronized Network Reading Station
Here are a few helpful hints which can improve station performance and reduce installation time:
1. Scanner distribution should alternate between odd and even branches so that the station guarantees 50% reading on all sides. See also Figure 22.
2. For OEK Encoders set the parameter Operating Mode>Encoder Step = 252.
OFF
ON
1 2 3 4 5 6 7 8
3. For Top Front and Top Back scanners (C and D in Figure 23), set the parameter Reading Parameters>Reading Condition = Skew 45°.
4. For applications having regular shaped packs the default settings are sufficient, but
for Airport applications, irregular shaped packs can cause PS signal glitches resulting in false "packs too short" or "packs too close" errors.
To correct this, set the following Operating Modes parameters: Minimum Distance Between Packs = 200 mm, Minimum Pack Length = 200 mm, Window Dimension = 200 mm.
Conveyor
SC6000
A
H
G
C
D
B
E
F
PWO
INSTALLATION
19
2
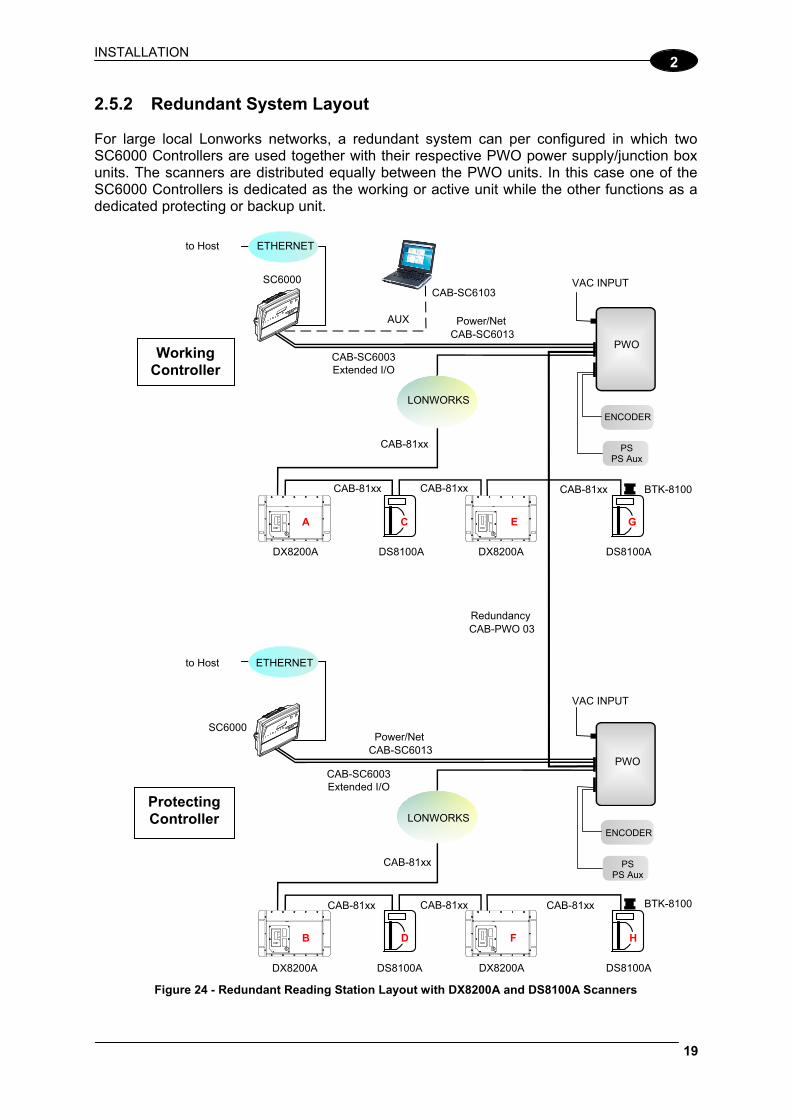
2.5.2 Redundant System Layout For large local Lonworks networks, a redundant system can per configured in which two SC6000 Controllers are used together with their respective PWO power supply/junction box units. The scanners are distributed equally between the PWO units. In this case one of the SC6000 Controllers is dedicated as the working or active unit while the other functions as a dedicated protecting or backup unit.
Figure 24 - Redundant Reading Station Layout with DX8200A and DS8100A Scanners
AUX
CAB-SC6103
Extended I/O
ETHERNET
SC6000
CAB-SC6003
CAB-SC6013Power/Net
VAC INPUT
PWO
LONWORKSENCODER
PS PS Aux
CAB-81xx
CAB-81xx
BTK-8100CAB-81xxCAB-81xx CAB-81xx
Extended I/O
ETHERNET
SC6000
CAB-SC6003
CAB-SC6013Power/Net
VAC INPUT
PWO
CAB-PWO 03Redundancy
CAB-81xxCAB-81xx CAB-81xx BTK-8100
DX8200A DS8100A DX8200A DS8100A
ENCODER
PS PS Aux
LONWORKS
Working Controller
Protecting Controller
to Host
to Host
DX8200A DS8100A DX8200A DS8100A
A
H
G C
DB
E
F

SC6000
20
2
Figure 25 – Example Redundant Reading Station
2.5.3 Standard SC6000 to Host Layout The SC6000 can be connected to the Host in several different layouts:
Ethernet direct or through Hub;
point-to-point on the Main interface using either RS232 or RS485 full-duplex communications to Host;
directly to a modem for remote Host communications.
Figure 26 – Ethernet Connection
CAB-SC6003Extended I/O
SC6000
Power/Net CAB-SC6013
NULL-MODEMCable
ETHERNET
VAC INPUT
PWO
AUX
HUB
Host
Conveyor
SC6000 Working
A
H
G
C
D
B
E
F
PWO
SC6000Protecting
PWO

INSTALLATION
21
2
Figure 27 – Main Connection through PWO
Figure 28 – Main Connection directly to SC6000
CAB-SC6003Extended I/O
SC6000
Main CAB-SC6103
NULL-MODEMCable
ETHERNET
VAC INPUT
PWO
AUX
HUB
Host Main
CAB-SC6013Power/Net
CAB-SC6003Extended I/O
SC6000
Main
NULL-MODEMCable
ETHERNET
VAC INPUT
PWO
AUX
HUB
Host
Power/Net CAB-SC6013

SC6000
22
2
Figure 29 – Modem Connection through PWO
Figure 30 – Modem Connection directly to SC6000
CAB-SC6003Extended I/O
SC6000
Power/Net CAB-SC6013
NULL-MODEMCable
ETHERNET
VAC INPUT
PWO
AUX
HUB
to Remote Host
Telephone line
CAB-SC6103 Modem
CAB-SC6003Extended I/O
SC6000
Power/Net CAB-SC6013
NULL-MODEMCable
ETHERNET
VAC INPUT
PWO
AUX
HUB
to Remote Host
Telephone line
Modem

INSTALLATION
23
2
2.5.4 SC6000 to Fieldbus Network Layout The SC6000 can be connected to a Fieldbus network (Ethernet, DeviceNet, or Profibus) to communicate with a remote host (for example, remote PC connected via Internet). Connections are made directly through cables to the Fieldbus connector and do not require any converter or adapter.
Figure 31 – Fieldbus Network
Figure 32 – Dual Ethernet Connection
CAB-SC6003Extended I/O
SC6000
Power/Net CAB-SC6013
NULL-MODEMCable
FIELDBUS
VAC INPUT
PWO
AUX
Host PLC
SC6000
NULL-MODEMCable
ETHERNET
VAC INPUT
PWO
AUX
HUB
Host 1
ETHERNET
HUB
Host 2
CAB-SC6003Extended I/O
Power/Net CAB-SC6013

SC6000
24
2
2.6 KEYPAD AND DISPLAY The SC6000 display shows different messages according to the following operating modes. Use the SC6000 keypad to scroll through the windows or navigate in the menu.
2.6.1 Standard Mode Upon startup, the Diagnostic Mask window is visualized by default. Using the UP and DOWN arrow keys it is possible to scroll through the following windows:
1) Diagnostic Mask Window 2) Reading Performance Window 3) Reading Mask Window 4) I/O Status Window 5) Conveyor Speed 6) System Info Window 7) Last Code & Read Mask 8) Alarms
Diagnostic Mask Window (Default Window) This window illustrates the status of each node (of each scanner of the cluster).
S c a n * * * * * * * *
S t a t e A B C D E F G H
The slave scanners are listed as letters (A, B, C, etc.) [or numbers (01, 02, 03, etc.) depending on the System Information Section>User Interface Style configuration parameter in Genius]. Above each scanner position a symbol indicates the scanner status according to the following convention:
– From the startup the node NID has not been discovered. ? At the startup of the system the NID has been discovered but the node does not answer to the
master. * The node status is OK. ! The node returns an error code to the diagnostic Laser Off. & The node returns an error code to the diagnostic Motor Off. % The node is in monitor mode.
Other messages can also be displayed: “Empty scan cluster“ No scanner has been discovered within the cluster. “No slave expected“ A scanner not expected by the system configuration has been discovered. “Energy Saving” The Energy Saving feature has been activated.
(see Genius™ program Help On-Line)
INSTALLATION
25
2
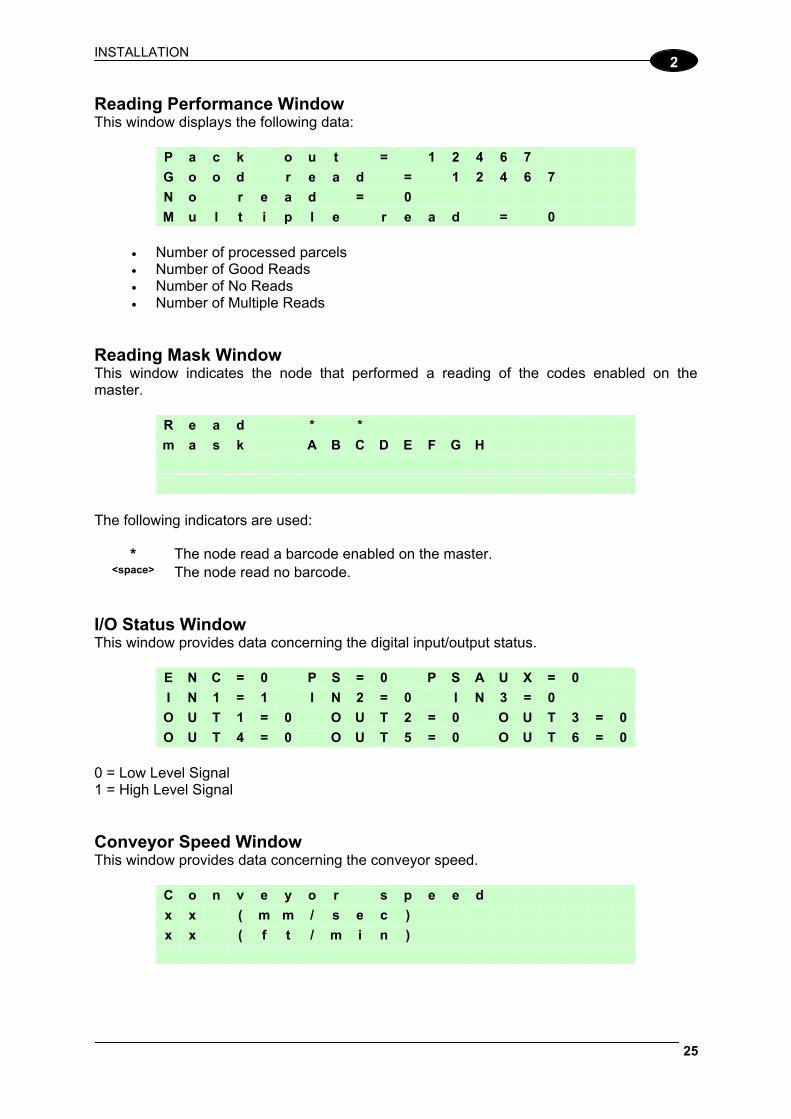
Reading Performance Window This window displays the following data:
P a c k o u t = 1 2 4 6 7
G o o d r e a d = 1 2 4 6 7
N o r e a d = 0
M u l t i p l e r e a d = 0
Number of processed parcels Number of Good Reads Number of No Reads Number of Multiple Reads
Reading Mask Window This window indicates the node that performed a reading of the codes enabled on the master.
R e a d * *
m a s k A B C D E F G H
The following indicators are used:
* The node read a barcode enabled on the master. <space> The node read no barcode.
I/O Status Window This window provides data concerning the digital input/output status.
E N C = 0 P S = 0 P S A U X = 0
I N 1 = 1 I N 2 = 0 I N 3 = 0
O U T 1 = 0 O U T 2 = 0 O U T 3 = 0
O U T 4 = 0 O U T 5 = 0 O U T 6 = 0
0 = Low Level Signal 1 = High Level Signal Conveyor Speed Window This window provides data concerning the conveyor speed.
C o n v e y o r s p e e d
x x ( m m / s e c )
x x ( f t / m i n )

SC6000
26
2
System Info Window This window provides information about the software release.
S C 6 0 0 0 6 K M a s t e r
R e l A P L _ S T D _ 1 . 0 1
A d d r 1 7 2 . 0 1 6 . 0 1 1 . x x x
For Dual Ethernet models the additional Ethernet address is also displayed. Last Code & Read Mask This window is available only when enabling the Last Code & Reading Mask Window parameter in Genius. It displays the following data fields
L a s t C o d e & R e a d M a s k
> 2 5 6 3 4 8 9 3 3 2 5 7 5 3 2 4 5 7
> A D
G 1 0 0 % N 0 % M 0 % P 0 %
Last read code (shown truncated if longer than 18 digits) List of nodes that performed the reading Statistics (Good Read Rate, No Read Rate, Multiple Read Rate, Partial Read Rate)
calculated on the last 100 codes or in continuous mode depending on the Last Code & Reading Mask Window parameter selection.
Alarms Specific diagnostic alarms are available only when they are enabled through the Genius™ configuration program.
N o a l a r m s
Up to four alarms can be displayed at a time (one per line). They are generated by the network or by the SC6000. For a list of alarms and their meaning see the Diagnostic Error Conditions page in the Help On-Line. All alarms are ordered according to their priority (failure messages have priority over warning messages). A failure message causes the Warning LED to light up. If the Display Warnings as Alarms parameter is enabled in Genius™, a warning message causes the Warning LED to blink.

INSTALLATION
27
2
2.6.2 Redundancy Mode When working in a redundant system, the SC6000 displays different windows according to its redundancy role (refer to the SC6000 Help On-Line for further details). SC6000 Active Controller Window The SC6000 working as active controller displays the diagnostic mask window, as if it is working in a single master network. SC6000 Standby Controller Window This window is displayed on the SC6000 working as standby controller. It illustrates the topology redundancy role of the controller:
“Protecting/Standby” or “Working/Standby“ 2.6.3 Menu Mode For security purposes, the menu mode is entered by pressing the Enter and Menu keys at the same time. To navigate in the menus the keypad keys are used as follows:
Press Enter to select an item or enter a branch level.
Press Clear to exit an item without saving or return to the previous branch level.
Press the Up or Down arrow keys to scroll through a branch list. It is possible to access the System menu, Setup parameters menu or the PackTrack menu: Menu Branch Branch Note System Info Shows the System Info Window Reset Reset the system (asks for confirmation) Restore DARP Restore procedure Complete Restore system configuration All Slaves Restore only all slaves configuration Controller Restore only SC6000 configuration Slave … Restore single specific slave configuration Backup DARP Backup procedure Complete Backup system configuration All Slaves Backup only all slaves configuration Controller Backup only SC6000 configuration Slave … Backup single specific slave configuration Last Codes1 Shows the last 10 codes read:
Up or Down to scroll through the list; one code per display screen
The Backup and Restore procedures can also be performed in Genius™, (see chapter 4 for details).
1 This option is available only when the Show Last Code Window parameter is enabled from Genius™.
SC6000
28
2
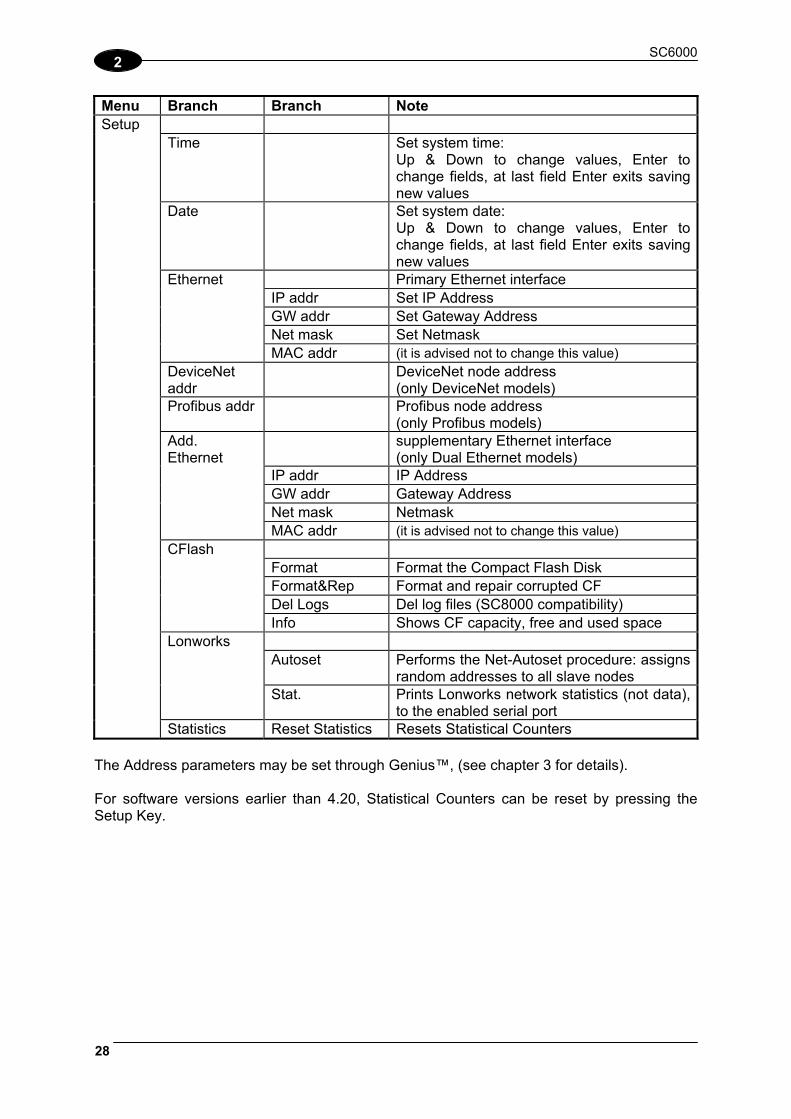
Menu Branch Branch Note Setup Time Set system time:
Up & Down to change values, Enter to change fields, at last field Enter exits saving new values
Date Set system date: Up & Down to change values, Enter to change fields, at last field Enter exits saving new values
Ethernet Primary Ethernet interface IP addr Set IP Address GW addr Set Gateway Address Net mask Set Netmask MAC addr (it is advised not to change this value)
DeviceNet addr
DeviceNet node address (only DeviceNet models)
Profibus addr Profibus node address (only Profibus models)
Add. Ethernet
supplementary Ethernet interface (only Dual Ethernet models)
IP addr IP Address GW addr Gateway Address Net mask Netmask MAC addr (it is advised not to change this value)
CFlash Format Format the Compact Flash Disk Format&Rep Format and repair corrupted CF Del Logs Del log files (SC8000 compatibility) Info Shows CF capacity, free and used space Lonworks Autoset Performs the Net-Autoset procedure: assigns
random addresses to all slave nodes Stat. Prints Lonworks network statistics (not data),
to the enabled serial port Statistics Reset Statistics Resets Statistical Counters
The Address parameters may be set through Genius™, (see chapter 3 for details). For software versions earlier than 4.20, Statistical Counters can be reset by pressing the Setup Key.

INSTALLATION
29
2
Menu Branch Default Note PackTrack Automatic PackTrack Calibration procedure for the
Reading Station working in PackTrack or Continuous Operating Modes
Version 2 Select the version number of the PCT-8000 pack Cal Type XYZ XYZ calibration is forced. X Cal Absolute Absolute X position is forced. X Offset - Set the zero point of the X-axis (4 digits in mm) Sensor 0 Set the distance (3 digits in mm) between the
photocells in the photocell array. If the system Presence Sensor and Encoder are used, set this parameter to 0.
Start Start the Auto PackTrack procedure Z Offset 0 Set a correction factor for the pack height (3 digits in
mm) The Auto PackTrack procedure when run from the SC6000 keypad, requires a system reset before the calibration is recognized. See the Auto PackTrack Setup procedure in par. 2.7.3. The Auto PackTrack setup may be performed in Genius™. For more details see the Help On-Line. 2.7 AUTO PACKTRACK™ CALIBRATION FOR READING STATION
USING SC6000 MENU 2.7.1 Auto PackTrack Conditions and Limits The Conditions and Limits for Auto PackTrack Calibration are summarized here for convenience and are also integrated into the following procedure descriptions: The following scanners are supported by Auto PackTrack Calibration: DS6400 (*see note
below), DX6400 (*see note below), DS8100A, DX8200A Before performing the Auto PackTrack Calibration procedure, if a system reset or power
reset is performed, wait for all the scanners to be available (up to 60 sec.) before proceeding.
Operating Mode must be either PackTrack or Continuous If the system Presence Sensor and Encoder are used, the correct Encoder Step value
must be set and the Presence Sensor must be connected to the SC6000 PS input. If instead the PPA-8000 Photocell Array is used, it must be connected to the SC6000 PS
and PSAUX inputs, and the Encoder, if present, must be physically disconnected. DX scanners which are calibrated automatically cannot be automatically replaced by DX
scanners with a previous sw version (earlier than 6.80). You must either update the old scanner software prior to substitution, or complete the calibration manually, after installation, by setting the PSOffset and Direction parameters.

SC6000
30
2
NOTE
The autofocus feature of DS6400 and DX6400 scanners makes Auto PackTrack Calibration difficult, therefore to assure that the procedure can correctly calibrate these scanners, it is necessary to set a fixed focus value which allows the scanner to read all the label positions useful for its calibration.
2.7.2 Auto PackTrack Parameter Descriptions The following descriptions refer to the PackTrack menu in par. 2.6.3. Version: the version of the PCT-8000 being used for calibration. This value can be read from the barcode labels on the PCT-8000. Each label has the value vnnn where v is the version number. Cal Type: the XYZ calibration is forced. The coordinates for the three axes are calibrated.
NOTE
For Oscillating Mirror scanner models the scan line must be parallel to the conveyor direction and only the Y calibration will be performed, (the X and Z axes will automatically be set to zero).
X Cal: the Absolute X position is forced. The X coordinate for all scanners is relative to the precise point (PackTrack Reference Point X, Y, Z = 0). X Offset: The X Offset moves the Absolute X coordinate (X, Y, Z= 0) for all the scanners to the desired point along the X axis which will be measured in step 7 in par. 2.7.3. Sensor: calibration will be performed either using the system Presence Sensor and Encoder (most cases), or the PPA-8000 Photocell Array, for systems where the Presence Sensor or Encoder are not present (typically Tilt-Tray or Cross-Belt applications).
NOTE
The Auto PackTrack procedure requires using the PPA-8000 Photocell Array for all systems where either the Presence Sensor or the Encoder are absent (including Continuous Operating Mode and Cargoscan applications).
If using the Presence Sensor and Encoder, the presence sensor must be connected to the SC6000 PS input and in this menu the parameter is set to 0. The Encoder Step parameter must also be set correctly.
If using the PPA-8000 you must set the Photocell distance (165 mm). The Photocell Array must be connected to the SC6000 PS and PSAUX inputs (see the relative installation manual), and the Encoder, if present, must be disconnected.
Z Offset (if necessary): for packs that are elevated above the conveyor surface (for example on tilt trays), this parameter sets an offset for the height of a pack so that Z=0 corresponds to the bottom of the pack.

INSTALLATION
31
2
2.7.3 Auto PackTrack Setup After setting the initial parameters in the PackTrack menu the Auto PackTrack setup procedure can be started:
1. Press Enter at the Start item in the PackTrack menu.
2. Press Enter to confirm the action. The SC6000 sends the message to the Slave scanners and the Display shows the Wait message.
After receiving the answer from all of the Slaves, the SC6000 shows the status of each node (of each scanner of the cluster) as in the example below.
S c a n I I I U I I I I
S t a t e A B C D E F G H
The slave scanners are listed as letters only (A, B, C, etc.) independently from the selection in the System Information Section>User Interface Style configuration parameter in Genius™. Above each scanner position a symbol indicates the scanner status according to the following convention:
U cannot be calibrated not supported by scanner software version U can be calibrated can be calibrated but the calibration procedure fails
either barcode reading or verification L Lost scanner stops responding during the procedure I Initial State scanner ready to be calibrated N Not Verified scanner calibrated but not verified C Calibrated scanner is calibrated
3. At this point the SC6000 display allows to Continue or to Stop the procedure. You can switch between the previous display windows using the Up or Down arrow keys.
If there are any nodes that show as U or L, then you should Stop the procedure and correct the problem.
If the nodes respond with I, N, or C then you can Continue with the procedure.
4. Press Enter to Continue the procedure. The SC6000 shows message Let the parcel run.
5. Place the PCT-8000 onto the moving conveyor, before the PS Line (reference point)
and parallel to a conveyor edge (i.e. right-hand edge) with its arrow in the same direction as the conveyor movement. Let it pass through the reading station. The SC6000 shows the Wait message.

SC6000
32
2
After elaborating the passage of the parcel, the SC6000 again shows the status of each node (of each scanner of the cluster) and then the Continue or Stop screen.
6. Repeat steps 3 - 5 changing the PCT-8000 X position (i.e. always before the PS Line
(reference point) and parallel to a conveyor edge but changing to the left-hand edge and/or to the center of the conveyor), until the procedure terminates.
Typically 3 passes are necessary.

INSTALLATION
33
2
7. At the last step in the sequence the display prompts to place a barcode label centered onto the physical X position (X Offset) on the conveyor and then press Enter to Continue. You have 2 minutes to read the code before the procedure ends automatically.
NOTE
Be careful that the barcode is not accidentally read in the act of placing it at the desired X Offset position, and assure that it is read by only one scanner (see the figure below). After placing the barcode label on the X coordinate, you may have to pass your hand or other opaque object over it to end this step.
Pressing Clear at any point will terminate the procedure without saving the Absolute X position alignment.
NOTE
Before resetting the SC6000, if desired, you can download the Auto PackTrack Report file from the SC6000 RAM by connecting it to Genius™ and using the Tools>File transfer… menu. See Help On-Line.
8. Manually reset the SC6000.

SC6000
34
2
2.7.4 Auto PackTrack Report The Auto PackTrack Report file can be downloaded from the SC6000 RAM by using the Tools>File transfer… menu in Genius™. The report is divided into three sections. The first section contains the general calibration parameters: -------------------------------------- PARAMETERS -------------------------------------- Calibration type XYZ X Absolute (X Offset 550) Sensor type configured Pack version 2 (Z Offset 0)
The second section contains for each node, the calibration table, and the final calibration state. -------------------------------------- PACKTRACK GLOBAL CALIBRATION TABLE DX node 5 -------------------------------------- P1: X(mm) 36 P1: Y(mm) 1077 P1: Z(mm) 10 P1: Distance(mm) 36 P1: Position 1077 P2: X(mm) 715 P2: Y(mm) 1096 P2: Z(mm) 10 P2: Distance(mm) 10 P2: Position 715 P3: X(mm) 518 P3: Y(mm) 1304 P3: Z(mm) 650 P3: Distance(mm) 1096 P3: Position 10 XP1: X(mm) 36 XP1: Y(mm) 1077 XP1: Z(mm) 10 XP1: Distance(mm) 36 XP1: Position 1077 XP2: X(mm) 715 XP2: Y(mm) 1096 XP2: Z(mm) 10 XP2: Distance(mm) 10 XP2: Position 715 XP3: X(mm) 518 XP3: Y(mm) 1304 XP3: Z(mm) 650 XP3: Distance(mm) 1096 XP3: Position 10 Calibration State VERIFIED -------------------------------------- PACKTRACK CALIBRATION TABLE DS node 6 -------------------------------------- P1: X(mm) 36 P1: Y(mm) 1077 P1: Z(mm) 10 P1: Distance(mm) 36 P1: Position 1077 P2: X(mm) 715 P2: Y(mm) 1096 P2: Z(mm) 10 P2: Distance(mm) 10 P2: Position 715 P3: X(mm) 518 P3: Y(mm) 1304 P3: Z(mm) 650 P3: Distance(mm) 1096 P3: Position 10 Calibration State VERIFIED
INSTALLATION
35
2
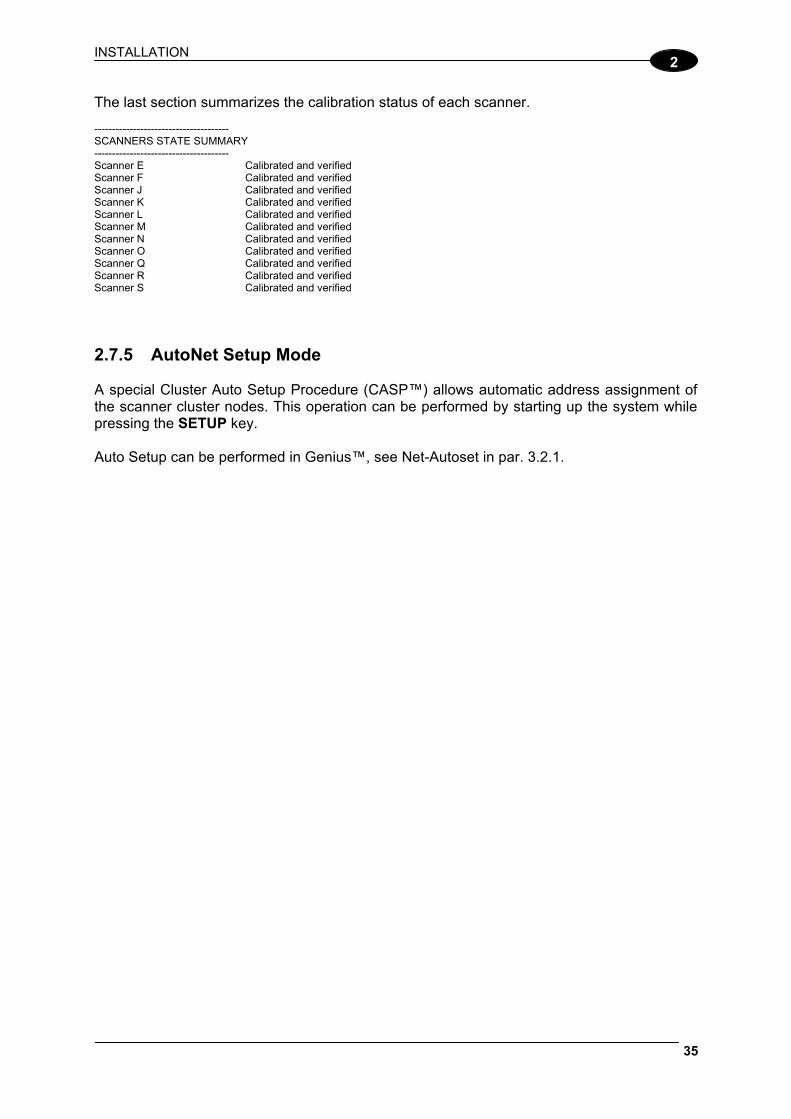
The last section summarizes the calibration status of each scanner. -------------------------------------- SCANNERS STATE SUMMARY -------------------------------------- Scanner E Calibrated and verified Scanner F Calibrated and verified Scanner J Calibrated and verified Scanner K Calibrated and verified Scanner L Calibrated and verified Scanner M Calibrated and verified Scanner N Calibrated and verified Scanner O Calibrated and verified Scanner Q Calibrated and verified Scanner R Calibrated and verified Scanner S Calibrated and verified
2.7.5 AutoNet Setup Mode A special Cluster Auto Setup Procedure (CASP™) allows automatic address assignment of the scanner cluster nodes. This operation can be performed by starting up the system while pressing the SETUP key. Auto Setup can be performed in Genius™, see Net-Autoset in par. 3.2.1.

SC6000
36
3
3 SOFTWARE CONFIGURATION 3.1 GENIUS™ INSTALLATION Genius™ is a Datalogic scanner configuration tool providing several important advantages:
Multi-language version;
Defined configuration directly stored in the device;
Communication protocol independent from the physical interface which allows the device to be considered as a remote object to be configured and monitored.
To install Genius™, proceed as follows:
1) Turn on the PC that will be used for configuration (Windows: NT, XP, Vista or 7);
2) Insert the Genius™ CD-ROM;
3) Wait for the CD to autorun and follow the installation procedure. When running Genius™, the procedure for setting the parameters is supported by a help on-line, which is displayed in an HTML browser. It can be selected from the Configuration Help option available in the Help menu. In addition, a context-sensitive help can be enabled by pressing the <F1> key after selecting the desired parameter. 3.2 GUIDE TO RAPID CONFIGURATION FOR SC6000 AS SYNCHRONIZED
OR MULTIDATA MASTER This configuration is valid when the network is composed only of DS6000, DS8100A and/or DX8200A slave scanners. 1. Run Genius™ from the configuration PC. The following window appears asking to select
the configuration mode.
Figure 33 – Genius™ Wizard Opening Window
Select Advanced. The Wizard option is not currently available for SC6000.

SOFTWARE CONFIGURATION
37
3
2. From the Device Menu select Local Device Network Settings and configure your SC6000 as Master (SYNCHRONIZED is the default value), as shown in the figure below:
Figure 34 – Local Device Network Settings
The following dialog box appears asking whether to send the updated configuration to the Local Device or not:
3. Click the “Yes” button, then click on the icon available on the Toolbar to make the “Devices” area appear next to the Parameter Explorer window. By repeatedly clicking the icon this area will be displayed or hidden.
Figure 35 – View Device Configuration
SC6000
38
3
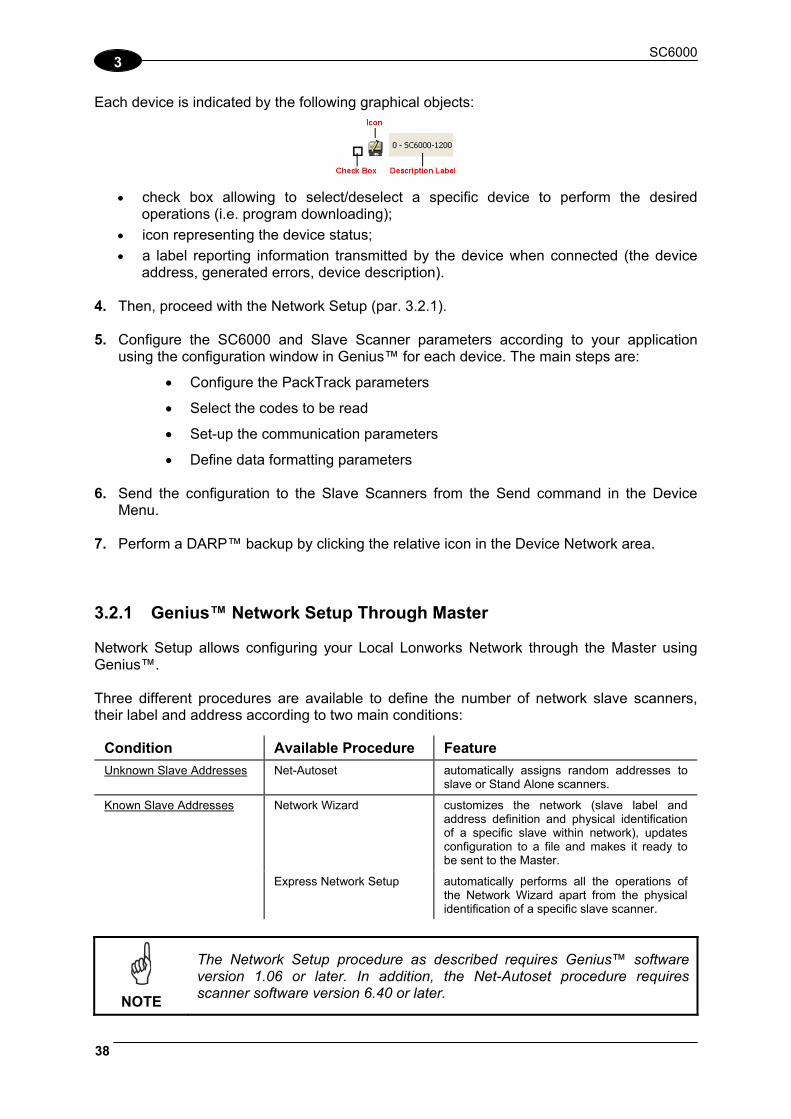
Each device is indicated by the following graphical objects:
check box allowing to select/deselect a specific device to perform the desired
operations (i.e. program downloading);
icon representing the device status;
a label reporting information transmitted by the device when connected (the device address, generated errors, device description).
4. Then, proceed with the Network Setup (par. 3.2.1). 5. Configure the SC6000 and Slave Scanner parameters according to your application
using the configuration window in Genius™ for each device. The main steps are:
Configure the PackTrack parameters
Select the codes to be read
Set-up the communication parameters
Define data formatting parameters 6. Send the configuration to the Slave Scanners from the Send command in the Device
Menu. 7. Perform a DARP™ backup by clicking the relative icon in the Device Network area. 3.2.1 Genius™ Network Setup Through Master Network Setup allows configuring your Local Lonworks Network through the Master using Genius™. Three different procedures are available to define the number of network slave scanners, their label and address according to two main conditions:
Condition Available Procedure Feature
Unknown Slave Addresses Net-Autoset automatically assigns random addresses to slave or Stand Alone scanners.
Network Wizard customizes the network (slave label and address definition and physical identification of a specific slave within network), updates configuration to a file and makes it ready to be sent to the Master.
Known Slave Addresses
Express Network Setup automatically performs all the operations of the Network Wizard apart from the physical identification of a specific slave scanner.
NOTE
The Network Setup procedure as described requires Genius™ software version 1.06 or later. In addition, the Net-Autoset procedure requires scanner software version 6.40 or later.

SOFTWARE CONFIGURATION
39
3
Proceed with the network setup by using one of the icons available on the Tool Bar according to the procedure to follow:
= Net-Autoset procedure
= Network Wizard procedure
= Express Network Setup procedure Net-Autoset This procedure is to be used when all scanner addresses and labels are unknown (typically when configuring the network for the first time or whenever a network reconfiguration is required).
By clicking the icon or selecting the “Net_Autoset” option from the right-click menu, the Net-Autoset procedure is started allowing automatic assignment of random addresses to all slave or Stand Alone scanners connected within the network. Once the procedure has been completed, it is possible to:
define customized addresses and labels through the Network Wizard;
display the scanner default labels through the Express Network Setup. Express Network Setup Before performing this procedure, a Lonworks address must be assigned to each slave scanner. The most practical method is through the Net-Autoset procedure. See par. 3.2.2 for alternative address assignment methods. Once all addresses have been assigned, the Express Network Setup is to be used when all scanner addresses and labels do not need to be modified.
By clicking on the icon or by choosing the related option from the right-click menu, the procedure is started which automatically performs the following operations:
- opening the wizard;
- polling the network to discover connected scanners;
- transferring all scanners found to the “Requested Devices” area of the wizard where your network customization is defined;
- saving the new network configuration; Once the procedure has been completed, a dialog box will appear asking whether to send the configuration to the Master. Choose the “Yes” option to start this procedure.

SC6000
40
3
Network Wizard Before performing this procedure, a Lonworks address must be assigned to each slave scanner. The most practical method is through the Net-Autoset procedure. See par. 3.2.2 for alternative address assignment methods. Once all addresses have been assigned, the Network Wizard is to be used when one or more scanner addresses and labels need to be modified.
1. Click on the button to open the Network Wizard dialog box:
a. if the slave scanners have already been configured and wired to the network, click on the Autodetect button to start a polling procedure of the current network. All slave scanners found will be represented in the “Current Devices” area. Then, select the
desired slave scanner from the “Current Devices” area and click on the icon (or drag and drop) to transfer it to the “Requested Devices” area where your network customization is defined. The following dialog box will appear allowing (if necessary) to change the slave address (“Available Device” field) and label (“Description” field):
b. if the slave scanners have not been configured and wired to the network, click on the
icon to add a new device defining its address and model. The added slave scanner will be displayed in the “Requested Devices” area. This option in any case requires that all slave scanners have their address set before the network can function.
SOFTWARE CONFIGURATION
41
3
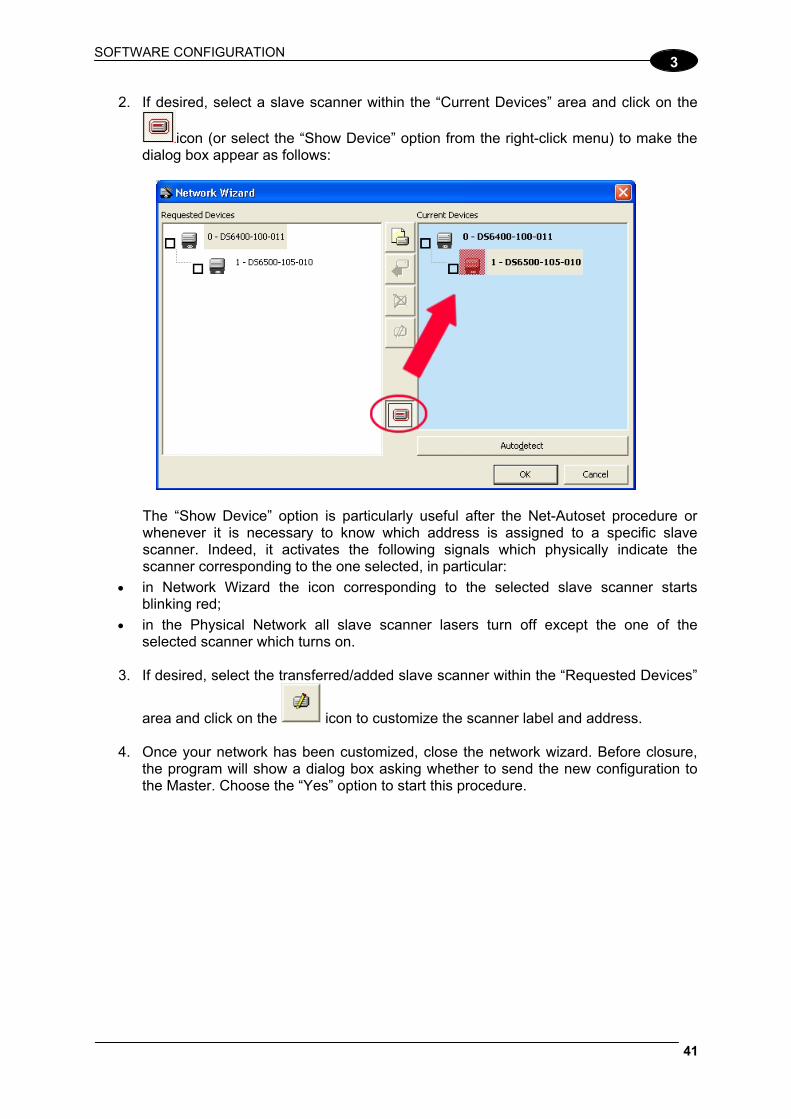
2. If desired, select a slave scanner within the “Current Devices” area and click on the
icon (or select the “Show Device” option from the right-click menu) to make the dialog box appear as follows:
The “Show Device” option is particularly useful after the Net-Autoset procedure or whenever it is necessary to know which address is assigned to a specific slave scanner. Indeed, it activates the following signals which physically indicate the scanner corresponding to the one selected, in particular:
in Network Wizard the icon corresponding to the selected slave scanner starts blinking red;
in the Physical Network all slave scanner lasers turn off except the one of the selected scanner which turns on.
3. If desired, select the transferred/added slave scanner within the “Requested Devices”
area and click on the icon to customize the scanner label and address.
4. Once your network has been customized, close the network wizard. Before closure, the program will show a dialog box asking whether to send the new configuration to the Master. Choose the “Yes” option to start this procedure.

SC6000
42
3
3.2.2 Alternative Slave Address Assignment As alternatives to Network Setup through the Master, each Slave scanner can be assigned an address through the following methods:
random address assignment from SC6000 to all slaves in the network by performing the CASP™ procedure as described in par. 0;
address setting through the Local Device Network Settings item in the Device Menu with the slave scanner connected locally to Genius™;
manual address setting through slave scanner keyboard (see par. “Internal Net” in the relative Scanner Reference Manual for details);
3.3 GUIDE TO RAPID CONFIGURATION FOR SC6000 AS CONTROLLER
LON OLD8K This configuration is valid when the network is composed of DS8100 or DX8200 slave scanners. 1) Connect to each scanner Debug port and set a Lonworks Node address which must be
different and consecutive (i.e. 1, 2, 3, 4, etc.). 2) Make all the necessary PackTrack parameter settings. 3) Run Genius™ from the configuration PC. The following window appears asking to select
the configuration mode.
Figure 36 – Genius™ Wizard Opening Window
Select Advanced. The Wizard option is not currently available for SC6000.

SOFTWARE CONFIGURATION
43
3
4) From the Device Menu select Local Device Network Settings and configure your SC6000 as Other, as shown in the figure below:
Figure 37 – Local Device Network Settings
5) From the Reading System Layout folder and configure the following parameters:
Device Assignment = Controller Lon Old8K
Number of Slaves = according to your application
Check the Modify Lon Slave Configuration
Figure 38 – SC6000 Device Assignment Configuration

SC6000
44
3
6) Configure the Common Slave Scanner parameters according to your application using the Lonworks Slave Common Parameters branch in the Reading System Layout folder.
Figure 39 – Common Slave Scanner Code Selection Configuration
7) Configure the SC6000 parameters according to your application using the various
configuration folders. The main steps are:
Configure the PackTrack parameters in the Operating Modes folder

SOFTWARE CONFIGURATION
45
3
Selecting the codes to be read in the Code Definition folder (they must be the same as those set for the slave scanners)
Set-up the communication and data formatting parameters in the Data Communications settings folder
8) Send the configuration to the Slave Scanners from the Send command in the Device
Menu.

SC6000
46
3
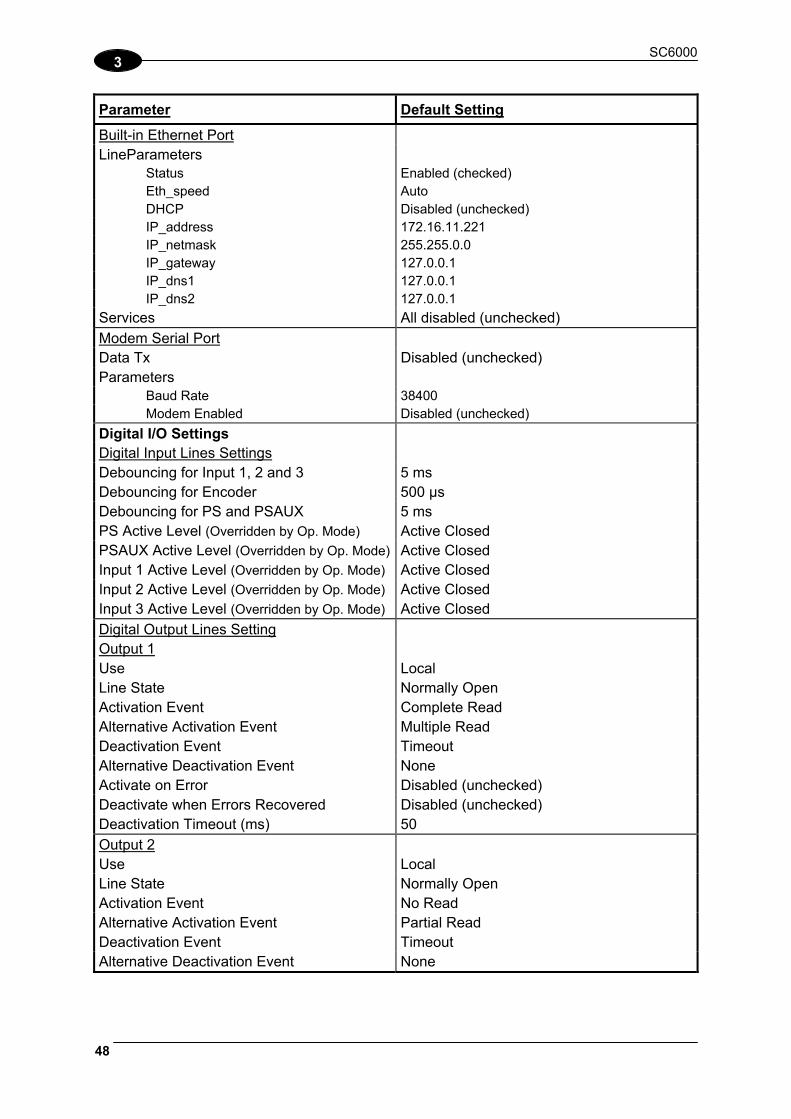
3.4 PARAMETER DEFAULT VALUES The following table contains the list of the factory default settings for the SC6000 Controller. Genius™ also allows checking the parameter default values by selecting the “Compare parameters” option available in the Tools menu and comparing the current SC6000 configuration to the default one.
Parameter Default Setting
Code Definition Code Combination Single Label No Read Message Global No Read Message No Read String (128 characters max) <CAN> Partial Read is Treated As Partial Read Multi Filters Disabled (unchecked) Code Label Settings#1 Enable Enabled (checked) Code Symbology Interleaved 2 of 5 Label Length 8 Min Code Position 0 Max Code Position 255 CheckDigit Disabled (unchecked) Pattern Match String (200 char. max) NULL
Code Label Settings#2 Enable Enabled (checked) Code Symbology Code39 Label Length Variable Minimum Label Length 1 Maximum Label Length 60 Min Code Position 0 Max Code Position 255 CheckDigit Disabled (unchecked) Pattern Match String (200 char. max.) NULL
Operating Modes Operating Mode Selection PackTrack Physical Encoder Enabled (checked) Encoder Step 400 PS Line 0 Presence Sensor Input PS Presence Sensor Input Level Active Closed Distance from PS Line to Tx Line 2500 Transmission Edge Trailing Max Number of Packs 10 Minimum Distance Error Behaviour Compose Minimum Distance between Packs 30 Minimum Pack Length Error Behaviour Discard Item Minimum Pack Length 50 Window Dimension 15 Encoder Delay Error Behaviour Safe Resync

SOFTWARE CONFIGURATION
47
3
Parameter Default Setting
Operating Modes Max Encoder Delay for Code 400 Max Consecutive Delayed Codes 3 Max Safe Resync for Node 3 Bidirectional Disabled (unchecked) Encoder Divided by 2 Disabled (unchecked) Beam Shutter Triggered Disabled (unchecked) Protocol Index Disabled (unchecked) Hybrid System Disabled
Reading System Layout Enable Automatic Replacement (D.A.R.P) Enabled (checked)
Data Communication Settings Host Application Protocol Type Standard
Data Format Header TX Start With Data Termination After No Read Message Enabled (checked) Code Identifier Disabled Standard Parameters Header String <STX> Code Position Disabled (unchecked) Code Direction Identifier Enable Disabled (unchecked) Termination String <CR><LF> Data Packet Separators <CR><LF> Code Field Length Setting Variable Length
Multidata Address Tx Disabled (unchecked)
Main Serial Port Data TX Enabled (checked) Heartbeat Disable Parameters Main Port Communication Mode Standard Main Port Electrical Interface RS232 Handshake None Baud Rate 9600 Parity None Data Bits 8 Stop Bits 1
Auxiliary Serial Port Data TX Enabled (checked) Heartbeat Disable Pass Through Disabled (checked) Parameters Baud Rate 115200 Parity None Data Bits 8 Stop Bits 1
SC6000
48
3
Parameter Default Setting
Built-in Ethernet Port LineParameters Status Enabled (checked) Eth_speed Auto DHCP Disabled (unchecked) IP_address 172.16.11.221 IP_netmask 255.255.0.0 IP_gateway 127.0.0.1 IP_dns1 127.0.0.1 IP_dns2 127.0.0.1
Services All disabled (unchecked)
Modem Serial Port Data Tx Disabled (unchecked) Parameters Baud Rate 38400 Modem Enabled Disabled (unchecked)
Digital I/O Settings Digital Input Lines Settings Debouncing for Input 1, 2 and 3 5 ms Debouncing for Encoder 500 µs Debouncing for PS and PSAUX 5 ms PS Active Level (Overridden by Op. Mode) Active Closed PSAUX Active Level (Overridden by Op. Mode) Active Closed Input 1 Active Level (Overridden by Op. Mode) Active Closed Input 2 Active Level (Overridden by Op. Mode) Active Closed Input 3 Active Level (Overridden by Op. Mode) Active Closed
Digital Output Lines Setting Output 1 Use Local Line State Normally Open Activation Event Complete Read Alternative Activation Event Multiple Read Deactivation Event Timeout Alternative Deactivation Event None Activate on Error Disabled (unchecked) Deactivate when Errors Recovered Disabled (unchecked) Deactivation Timeout (ms) 50
Output 2 Use Local Line State Normally Open Activation Event No Read Alternative Activation Event Partial Read Deactivation Event Timeout Alternative Deactivation Event None

SOFTWARE CONFIGURATION
49
3
Parameter Default Setting
Output 2 Activate on Error Disabled (unchecked) Deactivate when Errors Recovered Disabled (unchecked) Deactivation Timeout (ms) 50
Output 3 Use Local Line State Normally Open Activation Event None Alternative Activation Event None Deactivation Event None Alternative Deactivation Event None Activate on Error Disabled (unchecked) Deactivate when Errors Recovered Disabled (unchecked)
Output 4 Use Local Line State Normally Open Activation Event None Alternative Activation Event None Deactivation Event None Alternative Deactivation Event None Activate on Error Disabled (unchecked) Deactivate when all Errors Recovered Disabled (unchecked)
Output 5 Use Local Line State Normally Open Activation Event None Alternative Activation Event None Deactivation Event None Alternative Deactivation Event None Activate on Error Disabled (unchecked) Deactivate when Errors Recovered Disabled (unchecked)
Output 6 Use Local Line State Normally Open Activation Event None Alternative Activation Event None Deactivation Event None Alternative Deactivation Event None Activate on Error Disabled (unchecked) Deactivate when Errors Recovered Disabled (unchecked)
Relays Relay 1 Line State Normally Open Activation Event None Alternative Activation Event None

SC6000
50
3
Parameter Default Setting
Relays
Relay 1 Deactivation Event None Alternative Deactivation Event None Activate on Error Disabled (unchecked) Deactivate when Errors Recovered Disabled (unchecked)
Relay 2 Line State Normally Open Activation Event None Alternative Activation Event None Deactivation Event None Alternative Deactivation Event None Activate on Error Disabled (unchecked) Deactivate when Errors Recovered Disabled (unchecked)
Relay 3 Line State Normally Open Activation Event None Alternative Activation Event None Deactivation Event None Alternative Deactivation Event None Activate on Error Disabled (unchecked) Deactivate when Errors Recovered Disabled (unchecked)
System Information Section User Interface Style Standard Show Last Code Window Disabled (unchecked) Last Code & Reading Mask Window Statistics on Last 100 Codes D.A.R.P. Scanner Compatibility Check Enabled (checked)
Diagnostics PkTr Debug Msg Tx Disabled (unchecked) Enable Disabled (unchecked)
Redundancy Parameters Reds Functionality Disabled (unchecked) Topology Redundancy Role Master Alone
Energy Saving Energy Saving Configuration Disabled (unchecked)

MAINTENANCE
51
4
4 MAINTENANCE 4.1 DATALOGIC AUTOMATIC REPLACEMENT PROCEDURE (DARPTM) When SC6000 is used as a SYNCHRONIZED or MULTIDATA Master (Topology Role parameter), a DARP™ backup procedure must be performed to automatically manage scanners and SC6000 replacement in case of failure (DARP™ Restore). Once the system configuration has been completed as described in par. 3.2, launch the DARP™ backup by one of the following methods: Using Genius:
Click on the DARP™ backup icon in the Device Network area. You will be prompted to select the desired backup option (complete, all scanners, controller, or each single scanner). Using the SC6000 keypad:
1. Press the <Ent> and <Menu> keys simultaneously to enter the Menu;
2. Use the <arrow> keys to move within the menu items;
3. In the <System> menu choose <Backup> and select the desired backup option (complete, all scanners, controller, or each single scanner).
The SC6000 Controller will store the complete system configuration on the Compact Flash card. If a slave scanner has to be replaced, the corresponding configuration (node address, code configuration, PackTrack™ configuration, etc.) is automatically downloaded by the SC6000 into the new scanner at the next system startup.
NOTE
All replacement scanners must be set to the factory default values.
In case of SC6000 failure, the complete system configuration can be recovered from the Compact Flash of the damaged SC6000: by simply installing the old Compact Flash in the new SC6000, the system configuration is automatically restored and the reading station is ready to start working again.
CAUTION
Before removing the Compact Flash card, switch the SC6000 Controller off.

SC6000
52
4
In case of SC6000 failure proceed as follows:
Figure 40 - Removing the Compact Flash
1. Disconnect the device
2. Remove the rubber cover of the Compact Flash slot using a screwdriver
3. Remove the Compact Flash
4. Connect a new SC6000 to the system
5. Insert the Compact Flash card
CAUTION
Make sure not to insert the Compact Flash card upside down. Carefully insert it in the guides, so that it will not fall inside the device. Gently push it into the slot.
6. Start up the system The system configuration is automatically restored and the reading station is ready to start working again. 4.2 AUTOMATIC SCANNER REPLACEMENT (ASR) When SC6000 is used in a network of DS8100 or DX8200 scanners, (Topology Role parameter = Other; Device Assignment parameter = Controller Lon Old8K), an ASR backup procedure must be performed to automatically manage scanners and SC6000 replacement in case of failure (ASR Restore).
NOTE
In order for the ASR procedure to work on DS8100 or DX8200 slave scanners, they must have been installed according to the procedure in par. 3.3.
Once the system configuration has been completed, launch the ASR backup by one of the following methods: Using Genius:
Click on the ASR backup item in the Device Menu. You will be prompted to select the desired backup option (complete, all slaves, controller).

MAINTENANCE
53
4
Using the SC6000 keypad:
1. Press the <Ent> and <Menu> keys simultaneously to enter the Menu;
2. Use the <arrow> keys to move within the menu items;
3. In the <System> menu choose <Backup> and select the desired backup option (complete, all scanners, controller).
The SC6000 Controller will store the complete system configuration on the Compact Flash card. If a slave scanner has to be replaced, the corresponding configuration (node address, code configuration, PackTrack™ configuration, etc.) is automatically downloaded by the SC6000 into the new scanner at the next system startup.
NOTE
All replacement scanners must be set to the factory default values.
NOTE
If the SC6000 controller replaces an SC8000 controller within the network, (Topology Role parameter = Other; Device Assignment parameter = Controller Lon SC8000), refer to the "Replacing SC8000 with SC6000-PWO.pdf" document for details.

SC6000
54
5
5 TROUBLESHOOTING
NOTE
Before contacting your local Datalogic office or Datalogic Partner or ARC, it is suggested to save the device configuration to a *.ddc file by means of the Genius™ software configuration program and check the exact device model and serial number.
TROUBLESHOOTING GUIDE
Problem Suggestion
Power On: the “Power On” LED is not lit.
Is power connected? If using a power adapter, is it connected to
PWO 25-pin cable?
On Line Mode 1: the "PS” LED is not lit (when external trigger activates).
Check carefully if you are referring to the 25-pin connector of the PWO.
Is sensor connected to PWO PS input? Is power supplied to photo sensor?
On Line Mode 1: the "PS” LED is correctly lit but nothing happens (no reading results).
Is the software configuration consistent with the application condition (operating mode, etc.)? In the Genius™ software configuration program select the OPERATING MODES folder and check for related parameters.
Serial On Line Mode: the reader is not triggered (no reading results).
In the Genius™ program select the OPERATING MODE folder and check if serial on line is enabled as “On Line options” parameter value.
Are the Start-Stop strings correctly assigned?
Is the serial trigger source correctly connected and configured)?
On Line Mode and Serial On Line Mode: the reader does not respond correctly to the expected external signal end.
In the Genius™ software configuration program select the OPERATING MODES folder and check the “Reading Phase Timeout” parameterization.
Communication (Main / Aux): the device is not transmitting anything to the host.
Is serial Main / Aux cable connected? Is wiring correct? If using the Main RS232 or RS485 interface,
is the reference ground connected to GND_ISO? Be careful that it is not completely different from GND power ground.
Are serial host settings equivalent to serial device setting?
When using the Main interface, Tx Data and Rx Data LEDs must be lit during data transfer.
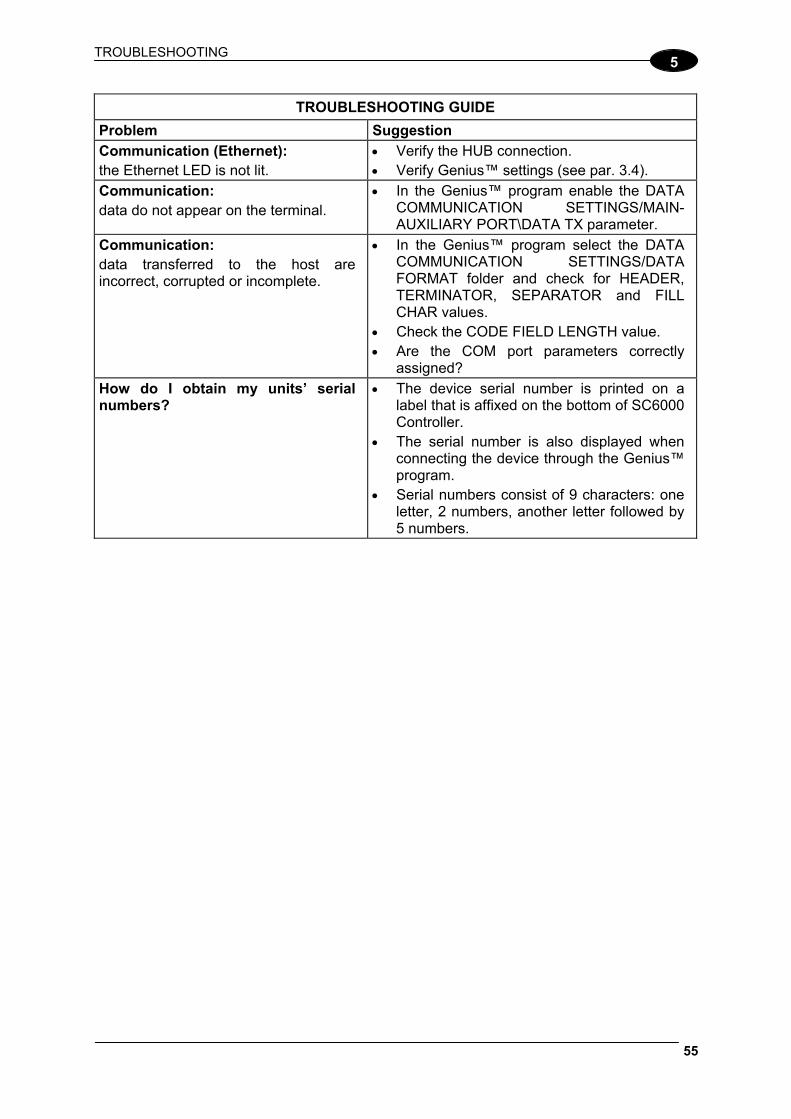
TROUBLESHOOTING
55
5
TROUBLESHOOTING GUIDE
Problem Suggestion
Communication (Ethernet): the Ethernet LED is not lit.
Verify the HUB connection. Verify Genius™ settings (see par. 3.4).
Communication: data do not appear on the terminal.
In the Genius™ program enable the DATA COMMUNICATION SETTINGS/MAIN-AUXILIARY PORT\DATA TX parameter.
Communication: data transferred to the host are incorrect, corrupted or incomplete.
In the Genius™ program select the DATA COMMUNICATION SETTINGS/DATA FORMAT folder and check for HEADER, TERMINATOR, SEPARATOR and FILL CHAR values.
Check the CODE FIELD LENGTH value. Are the COM port parameters correctly
assigned?
How do I obtain my units’ serial numbers?
The device serial number is printed on a label that is affixed on the bottom of SC6000 Controller.
The serial number is also displayed when connecting the device through the Genius™ program.
Serial numbers consist of 9 characters: one letter, 2 numbers, another letter followed by 5 numbers.
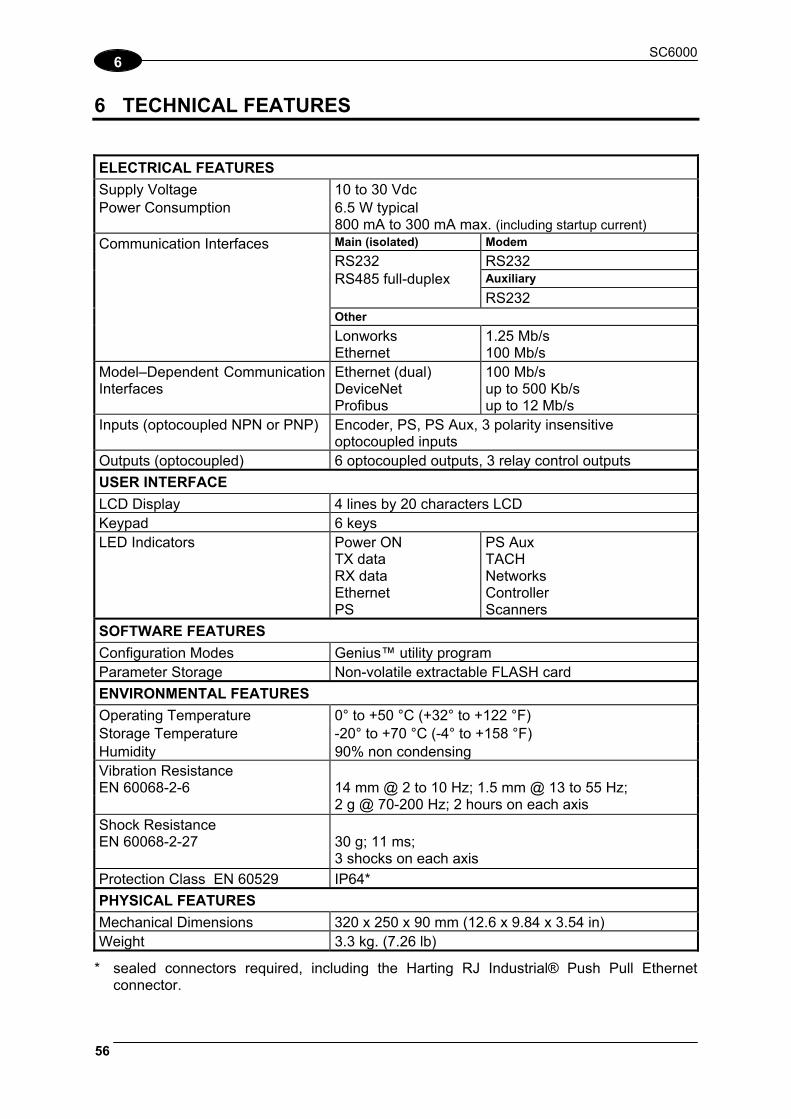
SC6000
56
6
6 TECHNICAL FEATURES
ELECTRICAL FEATURES
Supply Voltage 10 to 30 Vdc
Power Consumption 6.5 W typical 800 mA to 300 mA max. (including startup current) Main (isolated) Modem
RS232 RS232 RS485 full-duplex Auxiliary
RS232
Other
Communication Interfaces
Lonworks Ethernet
1.25 Mb/s 100 Mb/s
Model–Dependent Communication Interfaces
Ethernet (dual) DeviceNet Profibus
100 Mb/s up to 500 Kb/s up to 12 Mb/s
Inputs (optocoupled NPN or PNP) Encoder, PS, PS Aux, 3 polarity insensitive optocoupled inputs
Outputs (optocoupled) 6 optocoupled outputs, 3 relay control outputs
USER INTERFACE
LCD Display 4 lines by 20 characters LCD Keypad 6 keys LED Indicators Power ON
TX data RX data Ethernet PS
PS Aux TACH Networks Controller Scanners
SOFTWARE FEATURES
Configuration Modes Genius™ utility program Parameter Storage Non-volatile extractable FLASH card
ENVIRONMENTAL FEATURES
Operating Temperature 0° to +50 °C (+32° to +122 °F) Storage Temperature -20° to +70 °C (-4° to +158 °F) Humidity 90% non condensing Vibration Resistance EN 60068-2-6 14 mm @ 2 to 10 Hz; 1.5 mm @ 13 to 55 Hz; 2 g @ 70-200 Hz; 2 hours on each axis
Shock Resistance EN 60068-2-27 30 g; 11 ms; 3 shocks on each axis
Protection Class EN 60529 IP64*
PHYSICAL FEATURES
Mechanical Dimensions 320 x 250 x 90 mm (12.6 x 9.84 x 3.54 in) Weight 3.3 kg. (7.26 lb)
* sealed connectors required, including the Harting RJ Industrial® Push Pull Ethernet connector.

ALTERNATIVE CONNECTIONS REFERENCE
57
A
A ALTERNATIVE CONNECTIONS REFERENCE POWER SUPPLY - I/O (POWER/NET CONNECTOR) The PWO supplies 24 VDC.
25-pin D-Sub Female Connector Pinout
Pin Name Function 1 REL1 Relay output control 2 REL3 Relay output control3 GND Ground 4 GND Ground 5 ENCODER A Encoder (Tach)6 PS_AUX A Presence sensor aux.7 PS A Presence sensor8 SYS_ENC_I/O System signal9 RES Reserved
10 RES Reserved 11 SHIELD_OUT Lonworks 12 LON_OUT B Lonworks 13 LON_OUT A Lonworks 14 REL2 Relay output control15 RES Reserved 16 VS Supply voltage17 ENCODER B Encoder (Tach)18 PS_AUX B Presence sensor aux19 PS B Presence sensor20 SYS_I/O System signal21 RES Reserved 22 RES Reserved 23 SHIELD_IN Lonworks 24 LON_IN B Lonworks 25 LON_IN A Lonworks
14
1
25
13
25-pin Male D-sub Connector
Pin references with the denomination A and B are polarity insensitive signals. Power
SC6000 USER INTERFACE
3, 4 GNDV- (Ground)
V+ (15 - 30 Vdc) VS16
Shield Chassis
Figure 41 – Power Supply Connection

SC6000
58
A
Lonworks
SC6000
24
25
23
LON_IN A
LON_IN B
SHIELD_IN
13
24
25
23
LON A
LON B
SHIELD
LON_OUT A
LON_OUT B
SHIELD_OUT
12
11
13
12
11
LON A
LON B
SHIELD
USER INTERFACE
Figure 42 – SC6000 Lonworks Connection PS/PS AUX/Encoder
PS/PS AUX/ENCODER SC6000
PSIN
+ 5V
A/B
Vext
B/A
V
~
~ + -
Ground
PWO
Signal
Figure 43 - PNP Command Input with Electrical Isolation
V
PS/PS AUX/ENCODER
Ground
SC6000
PSIN
+ 5V
A/B
B/A
~
~+ -
PWO Vext
Signal
Figure 44 - NPN Command Input with Electrical Isolation

ALTERNATIVE CONNECTIONS REFERENCE
59
A
V
PS/PS AUX ENCODER
Ground
SC6000
A/B
B/A
GND
VS_INPUTS*
Signal
PWO
VS VS
PSIN
+ 5V ~
~+ -
*VS_INPUTS is connected through the 25-pin Extended I/O connector. If this connector is not used, VS_INPUTSmust be wired from one of the scanner terminals inside PWO, see the PWO Reference Manual for details.
Figure 45 - PNP Command Input Using System Power
V
PS/PS AUX ENCODER
Ground
SC6000
A/B
B/A
GND
VS_INPUTS*
Signal
PWO
VS VS
PSIN
+ 5V ~
~+ -
*VS_INPUTS is connected through the 25-pin Extended I/O connector. If this connector is not used, VS_INPUTSmust be wired from one of the scanner terminals inside PWO, see the PWO Reference Manual for details.
Figure 46 - NPN Command Input Using System Power

SC6000
60
A
EXTENDED I/O
25-pin D-Sub Male Connector Pinout
Pin Name Function 1 VS_OUTPUTS Power for outputs 2 IN1 A Input signal 1 - polarity insensitive 3 IN2 A Input signal 2 - polarity insensitive 4 IN3 A Input signal 3 - polarity insensitive 5 GND Ground 6 OUT1+ Configurable digital output 1 - positive pin 7 OUT2+ Configurable digital output 2 - positive pin 8 OUT3+ Configurable digital output 3 - positive pin 9 VS_INPUTS Power for inputs
10 OUT4+ Configurable digital output 4 - positive pin 11 OUT5+ Configurable digital output 5 - positive pin 12 OUT6+ Configurable digital output 6 - positive pin 13 GND Ground 14 GND Ground 15 IN1 B Input signal 1 - polarity insensitive 16 IN2 B Input signal 2 - polarity insensitive 17 IN3 B Input signal 3 - polarity insensitive 18 GND Ground 19 OUT1- Configurable digital output 1 - negative pin 20 OUT2- Configurable digital output 2 - negative pin 21 OUT3- Configurable digital output 3 - negative pin 22 GND Ground 23 OUT4- Configurable digital output 4 - negative pin 24 OUT5- Configurable digital output 5 - negative pin 25 OUT6- Configurable digital output 6 - negative pin
25
13
14
1
25-pin Female D-sub
Connector
Inputs All inputs are optocoupled.
USER INTERFACE SC6000
PSIN
+ 5V
A/B
Vext
B/A
V
~
~ + -
Ground
PWO
Signal
Figure 47 – PNP Command Input with Electrical Isolation
V
USER INTERFACE SC6000
PSIN
+ 5V
A/B
B/A
~
~+ -
PWO Vext
Ground
Signal
Figure 48 - NPN Command Input with Electrical Isolation
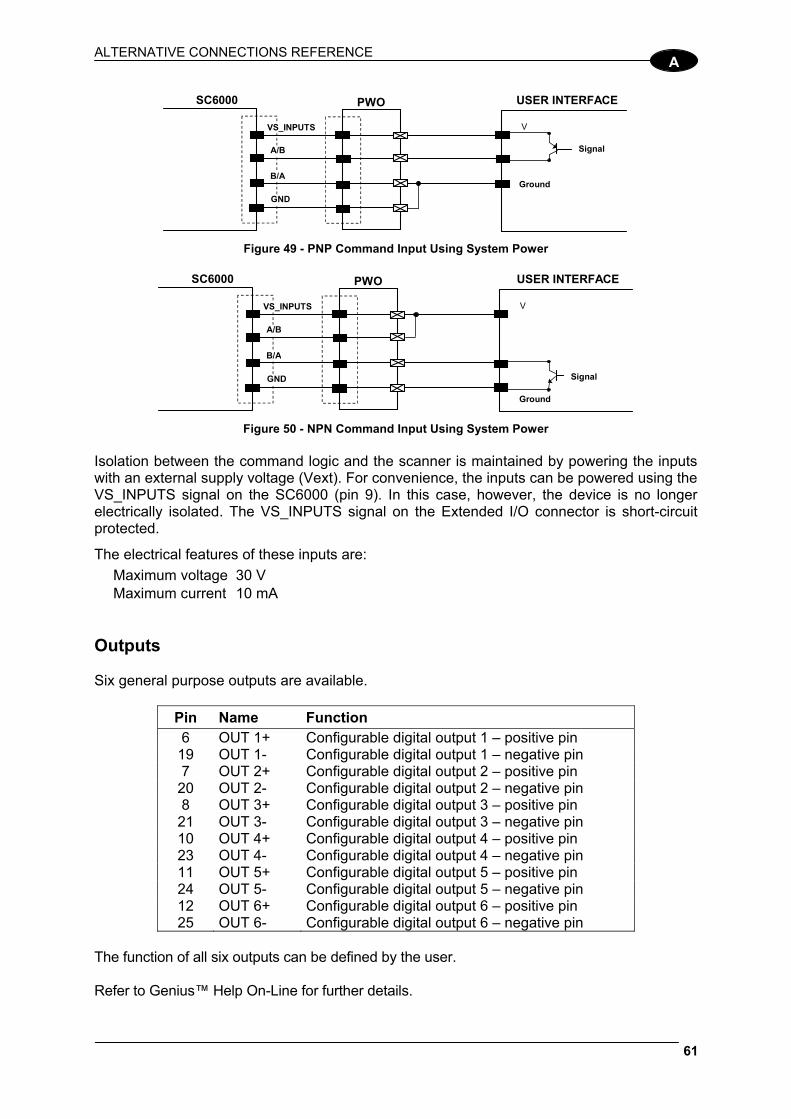
ALTERNATIVE CONNECTIONS REFERENCE
61
A
V
USER INTERFACE
Ground
SC6000
A/B
B/A
GND
VS_INPUTS
Signal
PWO
Figure 49 - PNP Command Input Using System Power
V
USER INTERFACE
Ground
SC6000
A/B
B/A
GND
VS_INPUTS
Signal
PWO
Figure 50 - NPN Command Input Using System Power
Isolation between the command logic and the scanner is maintained by powering the inputs with an external supply voltage (Vext). For convenience, the inputs can be powered using the VS_INPUTS signal on the SC6000 (pin 9). In this case, however, the device is no longer electrically isolated. The VS_INPUTS signal on the Extended I/O connector is short-circuit protected.
The electrical features of these inputs are:
Maximum voltage 30 V Maximum current 10 mA
Outputs Six general purpose outputs are available.
Pin Name Function 6 OUT 1+ Configurable digital output 1 – positive pin
19 OUT 1- Configurable digital output 1 – negative pin 7 OUT 2+ Configurable digital output 2 – positive pin
20 OUT 2- Configurable digital output 2 – negative pin 8 OUT 3+ Configurable digital output 3 – positive pin
21 OUT 3- Configurable digital output 3 – negative pin 10 OUT 4+ Configurable digital output 4 – positive pin 23 OUT 4- Configurable digital output 4 – negative pin 11 OUT 5+ Configurable digital output 5 – positive pin 24 OUT 5- Configurable digital output 5 – negative pin 12 OUT 6+ Configurable digital output 6 – positive pin 25 OUT 6- Configurable digital output 6 – negative pin
The function of all six outputs can be defined by the user. Refer to Genius™ Help On-Line for further details.

SC6000
62
A
By default, OUT1 is associated with COMPLETE READ event, which activates when the code has been read correctly. In case the reader has been programmed to read several codes within the same reading phase, the event activates when all codes have been read. OUT2 is associated with NO READ event, which activates when no code has been read.
OUT3 - OUT6 are associated with NONE, which means that the output is always in line state. Isolation between the command logic and the SC6000 is maintained by powering the outputs with an external supply voltage (Vext). For convenience, the outputs can be powered using the VS_OUTPUTS signal on the SC6000 (pin 1). In this case, however, the device is no longer electrically isolated. The VS_OUTPUTS on the Extended I/O connector is short-circuit protected. The electrical features of these outputs are:
Collector-emitter voltage 30 V Max. Collector current 130 mA Max. Saturation voltage (VCE) 1 V at 10 mA Max. Maximum power dissipation 90 mW at 50°C (Ambient temperature).
The limit requested by the maximum power dissipation is more important than that of the maximum collector current: if one of these outputs is continuously driven, the maximum current must not be more than 40 mA although 130 mA may be reached in pulse conditions.
SC6000 USER INTERFACE
+
Ground
Vext
C
E
-
PWO
V
Signal
Figure 51 - Open Collector Output Connection with Electrical Isolation
V
USER INTERFACE
Ground
SC6000
+
-
GND
VS_OUTPUTS
Signal
PWO
Figure 52 - Open Collector Output Connection Using System Power

63
GLOSSARY Barcode
A pattern of variable-width bars and spaces which represents numeric or alphanumeric data in machine-readable form. The general format of a barcode symbol consists of a leading margin, start character, data or message character, check character (if any), stop character, and trailing margin. Within this framework, each recognizable symbology uses its own unique format. Barcode Label A label that carries a barcode and can be affixed to an article. Baud Rate A unit used to measure communications speed or data transfer rate. EEPROM Electrically Erasable Programmable Read-Only Memory. An on-board non-volatile memory chip. Full Duplex Simultaneous, two-way, independent transmission in both directions. Host A computer that serves other terminals in a network, providing services such as network control, database access, special programs, supervisory programs, or programming languages. Interface A shared boundary defined by common physical interconnection characteristics, signal characteristics and meanings of interchanged signals. LED (Light Emitting Diode) A low power electronic device that can serve as a visible or near infrared light source when voltage is applied continuously or in pulses. It is commonly used as an indicator light and uses less power than an incandescent light bulb but more than a Liquid Crystal Display (LCD). LEDs have extremely long lifetimes when properly operated. Parameter A value that you specify to a program. Typically parameters are set to configure a device to have particular operating characteristics. Protocol A formal set of conventions governing the formatting and relative timing of message exchange between two communicating systems. RS232 Interface between data terminal equipment and data communication equipment employing serial binary data interchange. RS485 Interface that specifies the electrical characteristics of generators and receivers for use in balanced digital multipoint systems such as on a Multidrop line.

64
Scanner A device that examines a printed pattern (barcode) and either passes the uninterpreted data to a decoder or decodes the data and passes it onto the Host system. Serial Port An I/O port used to connect a scanner to your computer, identifiable by a 9-pin or 25-pin connector. Signal An impulse or fluctuating electrical quantity (i.e.: a voltage or current) the variations of which represent changes in information. Symbol A combination of characters including start/stop and checksum characters, as required, that form a complete scannable barcode. Trigger Signal A signal, typically provided by a photoelectric sensor or proximity switch, which informs the scanner of the presence of an object within its reading zone.

65
INDEX
A
Accessories, 3 ASR, 52 Auto PackTrack™
Conditions and Limits, 29 Parameter Descriptions, 30 Report, 34 Setup Procedure, 31
C
CE Compliance, vi Compliance, vi Connector Pinouts, 57
D
DARPTM, 51 DeviceNet Interface, 15
E
Electrical Connections, 8 Ethernet Interface, 13
F
FCC Compliance, vi
G
General View, vii Genius™ Installation, 36 Glossary, 63 Guide to Installation, ix Guide to Rapid Configuration for SC6000
as Controller Lon Old8K, 42 Guide to Rapid Configuration for SC6000
as Synchronized or Multidata Master, 36
I
Inputs, 60 Installation, 4 Interfaces
Auxiliary, 12 Main RS232, 9 Main RS485 Full Duplex, 10
K
Keypad and Display, 24
L
LED Indicators, 2 Lonworks, 58
M
Mechanical Mounting, 6 Model Description, 2 Modem, 12
N
Network Setup, 38
O
Outputs, 61 Overall Dimensions, 5
P
Package Contents, 4 Parameter Default Values, 46 Patents, v Power Supply, vi Power/Net Connector, 57 Profibus Interface, 16 PS/PS AUX/Encoder, 58
R
Reference Documentation, v
S
Services and Support, v Software Configuration, 36
T
Technical Features, 56 Troubleshooting, 54 Typical Layouts, 17

DECLARATION OF CONFORMITY EC-018
Rev.: 4
Pag.: 1 di 1
Datalogic Automation S.r.l. Via Lavino 265 40050 Monte San Pietro Bologna - Italy www.automation.datalogic.com
declares that the
SC6000; Universal Controller and all its models are in conformity with the requirements of the European Council Directives listed below:
2004 / 108 / EC EMC Directive
______________________________________________ This Declaration is based upon compliance of the products to the following standards: EN 55022 ( CLASS A ITE ), DECEMBER 2010:
INFORMATION TECHNOLOGY EQUIPMENT RADIO DISTURBANCE CHARACTERISTICS LIMITS AND METHODS OF MEASUREMENTS
EN 61000-6-2, SEPTEMBER 2005: ELECTROMAGNETIC COMPATIBILITY (EMC) PART 6-2: GENERIC STANDARDS - IMMUNITY FOR INDUSTRIAL ENVIRONMENTS
Monte San Pietro, January 26th, 2012
Paolo Morselli Quality Manager
UNI EN ISO 14001

www.automation.datalogic.com