Embed Size (px)
Citation preview
TOPFIELD
SBP-2070User Guide
High DefinitionDigital Satellite ReceiverUSB PVR-ReadyCommon Interface

ii
The lightning flash with arrowhead symbol,in an equilateral triangle, is intended to alert theuser to the presence of uninsulated “dangerousvoltage” within the product’s enclosure that maybe of sufficient magnitude to constitute a risk ofelectric shock to a person.
The exclamation point, in an equilateral tri-angle, is intended to alert the user to the presenceof important operation and maintenance instruc-tions in the literature accompanying the product.
Precautions• Read, keep and follow these instructions.• Heed all warnings.• Clean only with a dry cloth.• Do not block any of the ventilation open-
ings.• Do not install near any heat sources or in di-
rect sunlight as this will impair cooling.• Do not operate this product near water. Do
not place any of the objects filled with liq-uids, such as vases on this unit.
• Do not try to change the plug or defeat itssafety purpose. If the provided plug doesnot fit into your outlet, consult an electricianfor replacement of the obsolete outlet.
• This product is designed for indoor useonly.
• Place the digital receiver on a firm and levelsurface.
• Do not lay any objects such as magazines onthis unit.
• Do not overload power outlets. Doing somay result in a risk of fire or electrical shock.
• Never open this unit’s casing under any cir-cumstances, or the warranty will be void.
• Unplug this unit during lightning storms orwhen unused for long periods of time.
• Refer all servicing to qualified service per-sonnel. Servicing is required when the unithas been damaged in any way, such aspower supply cord or plug is damaged, liq-uid has been spilled or objects have falleninto the unit, the unit became wet from rainor moisture, does not operate normally, orhas been dropped.
• Batteries, including those which contain noheavy metals, may not be disposed withother household wastes. Please disposeof used batteries in an environmentallysound manner. Find out the legal regu-lations which apply in your area.
About this user guideThank you for purchasing our digital receiver.Please read this user guide carefully before you usethe digital receiver and keep it handy for future ref-erence.
This User Guide covers the model SBP-2070 .
• Illustrations pictured in this manual maynot be exactly the same as the actual prod-uct.
• The screenshots used in this manual maynot be exactly the same as those you see onthe actual on-screen displays.
• Designs and specifications of the digital re-ceiver and other accessories are subject tochange without any notice in order to intro-duce new features or improve the function-ality of the product.
CONTENTS iii
Contents
Contents iii
1 Introduction 11.1 Features . . . . . . . . . . . . . . . . . . . . . . . . . . . . . . 11.2 Controlling the digital receiver . . . . . . . . . . . . . . . . . . 2
1.2.1 Front panel . . . . . . . . . . . . . . . . . . . . . . . . 21.2.2 Remote control . . . . . . . . . . . . . . . . . . . . . . 5
1.3 Common Interface . . . . . . . . . . . . . . . . . . . . . . . . . 7
2 Setup 92.1 Unpacking . . . . . . . . . . . . . . . . . . . . . . . . . . . . . 92.2 Safety precautions . . . . . . . . . . . . . . . . . . . . . . . . . 92.3 Rear panel connections . . . . . . . . . . . . . . . . . . . . . . 102.4 Connecting up your digital receiver . . . . . . . . . . . . . . . 12
2.4.1 Connecting to the antenna . . . . . . . . . . . . . . . . 122.4.2 Connecting to your television set . . . . . . . . . . . . 132.4.3 Connecting to your video recorder . . . . . . . . . . . 15
2.5 Switching on for the first time . . . . . . . . . . . . . . . . . . 16
3 Service Search 183.1 Searching for broadcasting services . . . . . . . . . . . . . . . 18
3.1.1 Configuring LNB settings . . . . . . . . . . . . . . . . 193.1.2 Configuring DiSEqC 1.2 settings . . . . . . . . . . . . 213.1.3 Configuring USALS settings . . . . . . . . . . . . . . . 223.1.4 Searching for services . . . . . . . . . . . . . . . . . . 23

iv CONTENTS
3.2 Editing the transponder list . . . . . . . . . . . . . . . . . . . 263.3 Resetting to factory settings . . . . . . . . . . . . . . . . . . . 273.4 Resetting to user settings . . . . . . . . . . . . . . . . . . . . . 28
4 Preference Settings 294.1 Language settings . . . . . . . . . . . . . . . . . . . . . . . . . 29
4.1.1 Menu language . . . . . . . . . . . . . . . . . . . . . . 294.1.2 Subtitle language . . . . . . . . . . . . . . . . . . . . . 304.1.3 Audio language . . . . . . . . . . . . . . . . . . . . . . 30
4.2 Video and audio settings . . . . . . . . . . . . . . . . . . . . . 304.2.1 High definition television . . . . . . . . . . . . . . . . 314.2.2 Television aspect ratio . . . . . . . . . . . . . . . . . . 314.2.3 Colour format . . . . . . . . . . . . . . . . . . . . . . . 334.2.4 Another video device . . . . . . . . . . . . . . . . . . . 334.2.5 Audio mode . . . . . . . . . . . . . . . . . . . . . . . . 34
4.3 Local time setting . . . . . . . . . . . . . . . . . . . . . . . . . 344.4 Parental control . . . . . . . . . . . . . . . . . . . . . . . . . . 374.5 Options for recording . . . . . . . . . . . . . . . . . . . . . . . 384.6 Options for playback . . . . . . . . . . . . . . . . . . . . . . . 394.7 Options for on-screen display . . . . . . . . . . . . . . . . . . 40
5 Every Day Use 415.1 Volume control . . . . . . . . . . . . . . . . . . . . . . . . . . 415.2 Watching television . . . . . . . . . . . . . . . . . . . . . . . . 41
5.2.1 The services list . . . . . . . . . . . . . . . . . . . . . . 415.2.2 The favourite service lists . . . . . . . . . . . . . . . . 435.2.3 Viewing programme information . . . . . . . . . . . . 445.2.4 Selecting audio tracks . . . . . . . . . . . . . . . . . . 455.2.5 Selecting subtitle tracks . . . . . . . . . . . . . . . . . 455.2.6 Viewing teletext . . . . . . . . . . . . . . . . . . . . . . 46
5.3 Viewing electronic programme guide . . . . . . . . . . . . . . 465.4 Using time-shift . . . . . . . . . . . . . . . . . . . . . . . . . . 47
6 Organising Services 496.1 Editing the services list . . . . . . . . . . . . . . . . . . . . . . 496.2 Editing the favourite lists . . . . . . . . . . . . . . . . . . . . . 51

CONTENTS v
6.3 How to use on-screen keyboard . . . . . . . . . . . . . . . . . 53
7 Recording and Playback 547.1 Recording a programme . . . . . . . . . . . . . . . . . . . . . 54
7.1.1 Instant recording . . . . . . . . . . . . . . . . . . . . . 557.1.2 Timer recording . . . . . . . . . . . . . . . . . . . . . . 567.1.3 Scheduling recordings using the programme guide . . 597.1.4 Recording a pay service programme . . . . . . . . . . 59
7.2 File archive . . . . . . . . . . . . . . . . . . . . . . . . . . . . . 607.2.1 To delete a recording . . . . . . . . . . . . . . . . . . . 617.2.2 To sort recordings . . . . . . . . . . . . . . . . . . . . . 617.2.3 To lock a recording . . . . . . . . . . . . . . . . . . . . 617.2.4 To rename a recording . . . . . . . . . . . . . . . . . . 617.2.5 To make a new folder . . . . . . . . . . . . . . . . . . . 627.2.6 To move a recording to another folder . . . . . . . . . 62
7.3 Playing back a recording . . . . . . . . . . . . . . . . . . . . . 627.3.1 To navigate using the progress bar . . . . . . . . . . . 637.3.2 To play in slow motion . . . . . . . . . . . . . . . . . . 637.3.3 To play in fast motion . . . . . . . . . . . . . . . . . . . 637.3.4 To make a bookmark . . . . . . . . . . . . . . . . . . . 647.3.5 To play back a recording repeatedly . . . . . . . . . . 647.3.6 To play back recordings in sequence . . . . . . . . . . 657.3.7 To play back a scrambled recording . . . . . . . . . . . 65
7.4 Copying a recording . . . . . . . . . . . . . . . . . . . . . . . 667.5 Formatting the hard disk . . . . . . . . . . . . . . . . . . . . . 66
8 Firmware Update 678.1 From a memory stick . . . . . . . . . . . . . . . . . . . . . . . 678.2 Over the air . . . . . . . . . . . . . . . . . . . . . . . . . . . . 68


1
Chapter 1
Introduction
The SBP-2070 digital receiver is fully compliant with the inter-national Digital Video Broadcasting (DVB) standard, and thusis able to receive digital broadcasts of that standard. For itsoperation you need an antenna, which must be installed ap-propriately.
NOTEIn general we equate a channel with a frequency. However,unlike analogue broadcasts, digital broadcasts are not allassigned to their own frequencies; instead, multiple televi-sion broadcasts are transmitted through a single frequency.The frequency in digital broadcasting is usually called trans-ponder or multiplex. To reduce confusion in this manual,the word service is preferably used than channel as a termto indicate one television or radio broadcast.
1.1 Features
This digital receiver has the following features:
• Supports DiSEqC 1.0, DiSEqC 1.1, DiSEqC 1.2 and US-ALS protocols.
2 Introduction
• Can store up to 10,000 television and radio services.• You can edit the services list.• Can create lists of your favourite services.• Can view information about the current television or ra-
dio programme.• Has an electronic programme guide that provides an
overview of scheduled programmes.• Time-shift is a special technical feature available on this
digital receiver. You can pause a programme you arewatching and resume it again at a later time. Then youcan quickly go to any part of the current programme byfast forward or rewind search.
• If you have an external hard drive connected to the dig-ital receiver via the USB port, you can record televisionprogrammes into it.
1.2 Controlling the digital receiver
You can operate the digital receiver with the remote control orthe buttons on the front panel.
NOTEWhen the digital receiver is off but plugged into a wallsocket, we say that it is in standby mode; on the other hand,when it is on, it is in active mode. Even when you are notusing the digital receiver, you should keep it plugged intoa wall socket to be in standby mode so that it can run timerevents at any time.
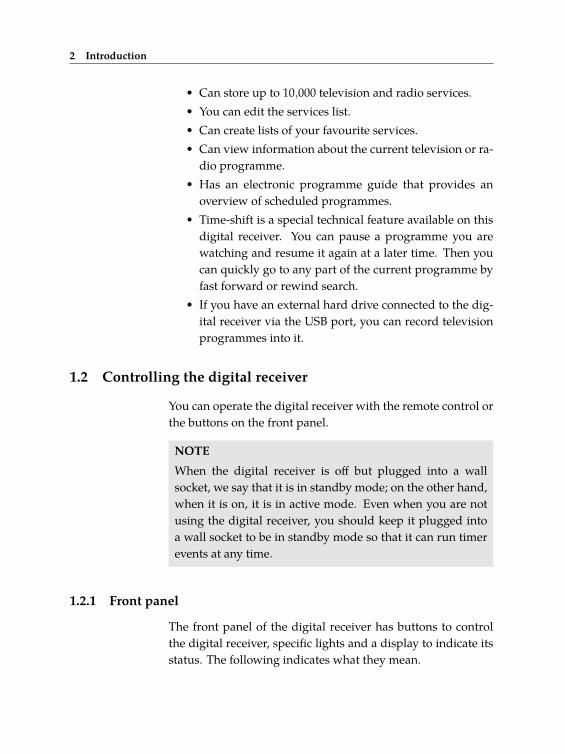
1.2.1 Front panel
The front panel of the digital receiver has buttons to controlthe digital receiver, specific lights and a display to indicate itsstatus. The following indicates what they mean.

1.2 Controlling the digital receiver 3
button switches the digital receiver between standby modeand active mode.
CHANNELc,a buttons switch to the previous or next ser-vice. They are also used to navigate in menus and inter-active screens.
VOLUMEb,d buttons decrease or increase the volume. Theyare also used to change values for menu options.
Front display displays the current service in active mode.
4 Introduction
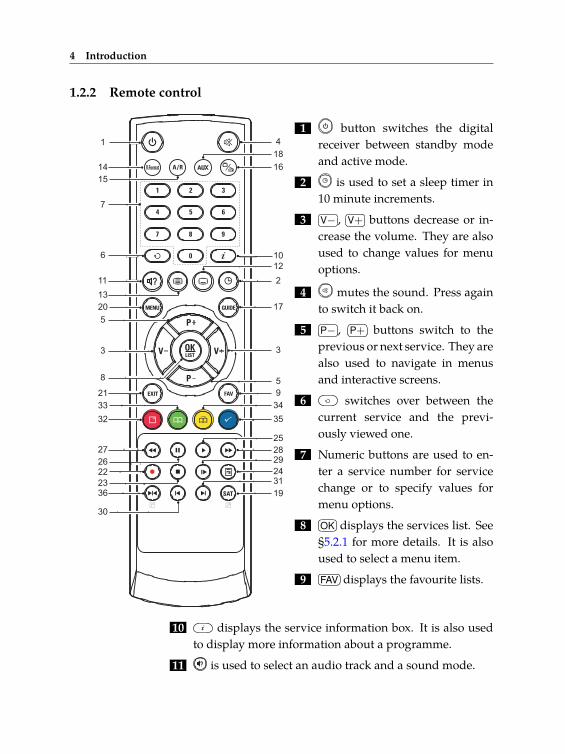
1.2.2 Remote control
14
1 4
18
16
9
12
2
17
3
5
10
35
25
28
29
24
19
31
15
7
6
11
13
20
3
8
21
27
26
22
23
36
30
32
3433
5
...1 button switches the digitalreceiver between standby modeand active mode.
...2 is used to set a sleep timer in10 minute increments.
...3�� ��V− ,
�� ��V+ buttons decrease or in-crease the volume. They are alsoused to change values for menuoptions.
...4 mutes the sound. Press againto switch it back on.
...5�� ��P− ,
�� ��P+ buttons switch to theprevious or next service. They arealso used to navigate in menusand interactive screens.
...6 switches over between thecurrent service and the previ-ously viewed one.
...7 Numeric buttons are used to en-ter a service number for servicechange or to specify values formenu options.
...8�� ��OK displays the services list. See§5.2.1 for more details. It is alsoused to select a menu item.
...9�� ��FAV displays the favourite lists.
...10 displays the service information box. It is also usedto display more information about a programme.
...11 is used to select an audio track and a sound mode.

1.2 Controlling the digital receiver 5
...12 is used to select a subtitle track.
...13 displays teletext.
...14�� ��V.Format changes video resolution. See §4.2.1 for more de-tails.
...15�� ��A/R changes aspect ratio. See §4.2.2 for more details.
...16 switches over between television services and radioservices.
...17�� ��GUIDE displays the electronic programme guide.
...18�� ��AUX switches the output of the TV SCART socket over be-tween the digital receiver and the device connected to theVCR SCART socket. See §4.2.4 for more details.
...19�� ��SAT displays the satellites list with their services list.
...20�� ��MENU displays the main menu. It is also used to return tothe previous menu from a submenu.
...21�� ��EXIT is used to exit a menu or to hide on-screen informa-tion.
...22 is used to start recording.
...23 is used to stop playback, to stop recording, or to jumpback to live television from time-shifted television.
...24 is used to display the list of recorded programmes thatare stored in the external hard drive. See §7.2 for moredetails.
...25 resumes normal playback speed, or displays theprogress bar for navigation on playback or time-shift. Toplay a recorded programme, see button ...24 .
...26 pauses live television or playback of a recorded pro-gramme.
...27 is used to start reverse playback. Subsequent pressesincrease the rewind speed.
...28 is used to start fast forward playback. Subsequentpresses increase the playback speed.

6 Introduction
...29 is used to start slow motion playback. Subsequentpresses change the playback speed.
...30 is used to jump back to the beginning of the recordingon playback.
...31 is used to jump to the end of the recording on playback.
...32 has different functions per menu.
...33 is used to make a bookmark on playback or time-shift.
...34 is used to jump to next bookmark position.
...35 has different functions per menu.
...36 has different functions per menu.
Functions of the colour buttons will be guided on the screen.
NOTEWhen using the remote control, point it at the remote sensoron the front panel of the digital receiver.
1.3 Common Interface
There are pay TV services available; theseare accessible with the use of a ConditionalAccess Module (CAM) and a subscriptioncard. A Common Interface (CI) is the slotinto which you can insert a CAM. The frontof the digital receiver has two common inter-face slots. To watch a pay service, you shouldtake the following steps:
1. Purchase a CAM and a subscription card for the pay ser-vice you want to watch.
2. Insert the subscription card into the CAM.3. Insert the CAM into a common interface on the front of
the digital receiver.

1.3 Common Interface 7
To view the information aboutthe module and subscriptioncard which is inserted into thedigital receiver, select the In-formation > Common Interfacemenu.

8 Setup
Chapter 2
Setup
2.1 Unpacking
Before going any further, check that you have received the fol-lowing items with the digital receiver.
• Remote control unit• Two batteries for the remote control (AAA 1.5 V)• One HDMI cable• A copy of this user guide
NOTEAccessories may vary according to your local area.
2.2 Safety precautions
Please read carefully the following safety precautions.
• The mains voltage must range between 90 and 250 volts.Check it before plugging the digital receiver to the wallsocket. For the power consumption of the digital re-ceiver, refer to Table 2.1.
2.3 Rear panel connections 9
• The wall socket should be near the equipment. Do notrun an extension lead to the unit.
• The mains plug shall remain readily operable so that itcan be removed easily to disconnect the power.
• When placed in a cabinet, make sure there is a minimumspace of 10 centimetres around it. For the physical spec-ification of the digital receiver, refer to Table 2.2.
• Protect the power cord from being walked on or pinched.If the cord is damaged, do not use the digital receiver andget the cord replaced.
• Refer all servicing to a qualified service technician.• To maintain proper ventilation, always leave sufficient
space around the digital receiver.
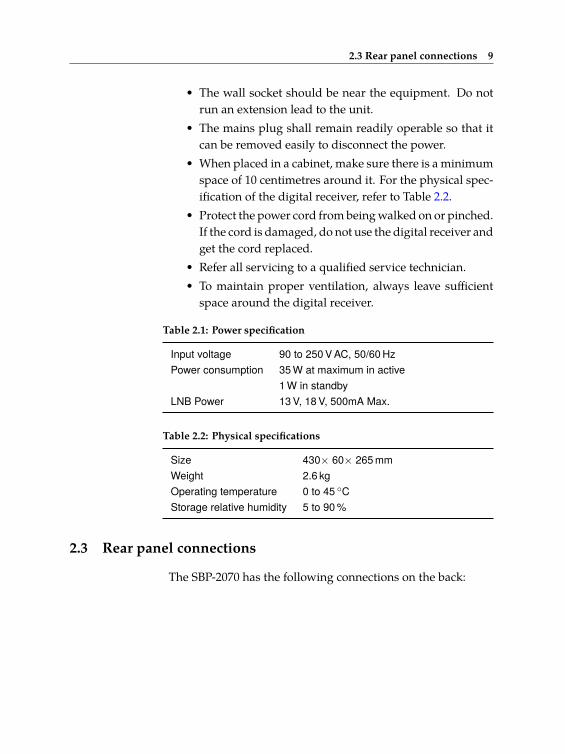
Table 2.1: Power specification
Input voltage 90 to 250 V AC, 50/60 HzPower consumption 35 W at maximum in active
1 W in standbyLNB Power 13 V, 18 V, 500mA Max.
Table 2.2: Physical specifications
Size 430× 60× 265 mmWeight 2.6 kgOperating temperature 0 to 45 ◦CStorage relative humidity 5 to 90 %
2.3 Rear panel connections
The SBP-2070 has the following connections on the back:

10 Setup
S/PDIF HDMI
USB
LNB OUTLNB IN
5V
500mA max.
VCR
TV
VID
EO
R
- A
UD
IO -
L
Y
Pb
Pr
Check what connections your television set has in comparisonwith the digital receiver.
...1 LNB IN Satellite broadcasting signal input socket(Current: Max.500mA with overload pro-tection)
...2 LNB OUT Satellite broadcasting signal output socketthrough the LNB IN socket for another dig-ital receiver
...3 TV Audio and video output socket for the tele-vision set
...4 VCR Audio and video input/output socket foranother device such as a video recorder
...5 AUDIO L/R Stereo audio output socket for the televi-sion set or the audio-video receiver (white/red)
...6 VIDEO Composite video output socket for the tele-vision set (yellow)
...7 Y/Pb/Pr Component video output socket for the tele-vision set(green/blue/red)
...8 S/PDIF Digital audio output socket for the audio-video receiver
...9 HDMI Audio and video output socket for the highdefinition television set
...10 USB USB port for firmware update and data trans-fer

2.4 Connecting up your digital receiver 11
Table 2.3: Connectors specifications
HDMI High definition video outputLeft & right audio outputDigital audio output
TV CVBS/S-Video/RGB video outputLeft & right audio output
VCR CVBS video outputLeft & right audio outputCVBS/S-Video/RGB video input for bypassLeft & right audio input for bypass
YPbPr Component video outputVIDEO Composite video (CVBS) outputAUDIO Left & right audio outputS/PDIF Digital audio outputUSB 2.0 Host 5 V DC, 500 mA
2.4 Connecting up your digital receiver
There are several ways to set up the digital receiver. Set up thedigital receiver suitably to your television and other devices.If you have any problem with your setup or need help, contactyour dealer.
2.4.1 Connecting to the antenna
Whatever sort of connection you have be-tween the digital receiver and the television,you need to connect the digital receiver to theantenna so that it can receive digital televi-sion broadcasts. Connect the antenna cableto the LNB IN connector.

12 Setup
NOTEPerhaps you are expecting that the satellite antenna couldsimultaneously catch all frequencies coming from a satelliteand send them to the digital receiver. However, the satelliteantenna only sends the frequencies that it can catch with theLNB frequency and polarisation specified by the digital re-ceiver. So if you have another digital receiver linked fromthe LNB OUT connector, you can only use it limitedly. See§3.1 for more details.
2.4.2 Connecting to your television set
For all the following connections of the digital receiver, we rec-ommend you to use the first connector to get the best picturequality. If your television does not have a matching connector,then use the next connector in the following order for a betterpicture quality.
1. HDMI connector (HDMI)2. Component connector (YPbPr)3. SCART connector (TV)4. Composite connector (VIDEO)
You should configure audio and video settings after connect-ing up the digital receiver. See §4.2 for a detailed description.
To use the HDMI output
If you have a high definition television set,you should use an HDMI cable for best re-sults. Plug one end of the cable into the HDMIsocket on the digital receiver, and plug theother end into the matching socket on yourtelevision. In this case, you do not have tomake audio connection because it can outputstereo audio or digital audio as well.
2.4 Connecting up your digital receiver 13
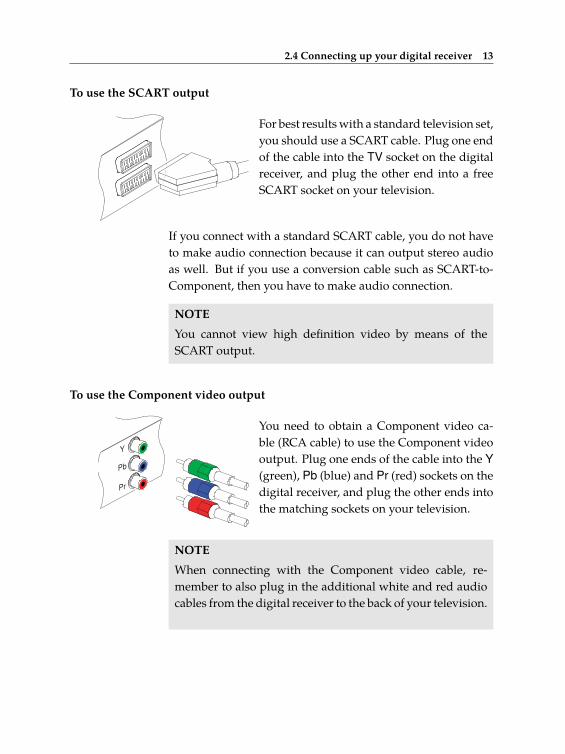
To use the SCART output
For best results with a standard television set,you should use a SCART cable. Plug one endof the cable into the TV socket on the digitalreceiver, and plug the other end into a freeSCART socket on your television.
If you connect with a standard SCART cable, you do not haveto make audio connection because it can output stereo audioas well. But if you use a conversion cable such as SCART-to-Component, then you have to make audio connection.
NOTEYou cannot view high definition video by means of theSCART output.
To use the Component video output
Y
Pb
Pr
You need to obtain a Component video ca-ble (RCA cable) to use the Component videooutput. Plug one ends of the cable into the Y(green), Pb (blue) and Pr (red) sockets on thedigital receiver, and plug the other ends intothe matching sockets on your television.
NOTEWhen connecting with the Component video cable, re-member to also plug in the additional white and red audiocables from the digital receiver to the back of your television.

14 Setup
To use the Composite video output
You need to obtain a Composite video cable(RCA cable) to use the Composite video out-put. Plug one end of the cable into the VIDEO(yellow) socket on the digital receiver, andplug the other end into the matching socketon your television.
NOTEYou cannot view high definition video by means of the Com-posite video output.
To make the audio connection
You need to obtain an audio cable (RCA ca-ble) to link the audio connectors. Plug oneends of the cable into the AUDIO L (white)and AUDIO R (red) sockets on the digi-tal receiver, and plug the other ends intothe matching sockets on your television oraudio-video receiver.To enjoy Dolby Digital audio, your televisionor audio-video receiver must be able to de-code Dolby Digital audio, and you need toobtain an S/PDIF cable.Plug one end of the cable into the S/PDIFsocket on the digital receiver, and plug theother end into the matching socket on youraudio-video receiver.
2.4.3 Connecting to your video recorder
The digital receiver can also output video through an auxiliarySCART connector to another device such as a video recorder.

2.5 Switching on for the first time 15
You need to obtain a SCART cable to link theauxiliary SCART connector. Plug one endof the cable into the VCR socket on the digi-tal receiver, and plug the other end into thematching socket on your video recorder orsuchlike.
2.5 Switching on for the first time
Now that you have your digital receiver connected, you shouldplug it into a wall socket. Ensure that your television set isturned on and on the correct video channel so that you will beable to see the display from the digital receiver.Before switching on the digital receiver, you should insert bat-teries into the remote control. Open the battery compartmentby removing the lid, and then insert the batteries observing thepolarity, which is marked on the base of the battery compart-ment.Press the button on the top left corner on the remote con-trol. In a little time, you may see a picture displaying a menu.If you do not see a picture, try pressing the
�� ��V.Format button onthe remote control. If after several tries you still get no picture,check that the television is set to the correct input. If the pictureis good, you can skip to §3.1 to search for available televisionand radio services. Otherwise, you may need to temporarilyconnect the Composite video connector (VIDEO) to your tele-vision set so that you can see the menu in order to configurethe video settings.
CAUTIONIf the digital receiver no longer reacts properly to the remotecontrol commands, the batteries may be flat. Be sure to re-place only with 1.5 V AAA size batteries, and observe thefollowing precautions.

16 Setup
• Do not mix different types of batteries, or new and oldbatteries.
• Do not use rechargeable batteries.
• Do not recharge the old batteries.
• In order to avoid any risk of explosion, observe the po-larities indicated inside the battery compartment.
• Do not subject to excessive heat such as the sun andfire.
• If you are not using the remote control for a long pe-riod of time, remove the batteries. The manufactureraccepts no liability for the damage resulting from leak-ing batteries.
• Batteries, including those which contain no heavymetals, may not be disposed with other householdwastes. Please dispose of used batteries in an environ-mentally sound manner. Find out the legal regulationswhich apply in your area.
17
Chapter 3
Service Search
After connecting up the digital receiver, you will need to per-form a service search.
NOTEIf there is no service stored, you will be not able to access allmenus. A is another name for a .
3.1 Searching for broadcasting services
This digital receiver can be operated with both fixed antennaand motorized antenna. You have to configure antenna set-tings according to your antenna system in the following order:
1. Configure LNB settings. Refer to §3.1.1.
2. Set the position of your desired satellites if you have amotorized antenna. You can control the antenna in DiS-EqC 1.2 mode or USALS mode. Refer to §3.1.2 for DiS-EqC 1.2, and refer to §3.1.3 for USALS.
3. Perform a service search.

18 Service Search
3.1.1 Configuring LNB settings
There are two large frequency bands for satellite broadcasts.One is C band which ranges approximately from 4 to 6 GHz.The other is Ku band which ranges approximately from 12 to18 GHz.
The LNB (Low Noise Block converter)is used to take a wide band of rel-atively high frequencies, amplify andconvert them to similar signals thatis carried at a much lower frequency,which is called Intermediate Frequency(IF). High frequencies from satellitesare converted into 950 to 2150 MHz bya LNB.
Select the Installation > LNBSetting menu to configure theLNB settings. You should see ascreen like the left figure.
Pressing the�� ��OK button on the Satellite Name option displays
the satellite list in alphabetic order. Select the satellite towardwhich your antenna is set to face. Even if you cannot find yourdesired satellite, you can add your desired satellite to the satel-lite list. See §3.2 for a detailed description.The digital receiver has a database of broadcasting satellitesand their transponders, containing the following information:

3.1 Searching for broadcasting services 19
satellite position, frequency range, symbol rate, polarizationand LNB frequency corresponding to the frequency range.So you might not have to specify the LNB Frequency option.However, if you have selected the Other entry at the SatelliteName option to specify a satellite that is not in the satellite list,you might have to fill in the correct LNB frequency. The abso-lute difference between a broadcasting frequency and its LNBfrequency must be within 950 to 2150 MHz. For example, if thefrequency band of your desired satellite ranges from 3660 to4118 MHz, you have to set the LNB Frequency option to 5150MHz.The LNB has to be supplied with electric power to operate. Setthe LNB Power option to On if it does not have any other powersupply.If you use a dual LNB or two antennas which is connected tothe 22 kHz tone switch box, set the 22 kHz option to On.The digital receiver is designed to be compatible with DiSEqC(Digital Satellite Equipment Control) switches. It is possibleto connect several antennas to one digital receiver by DiSEqCswitches. A DiSEqC 1.0 switch allows switching between up tofour satellite sources and a DiSEqc 1.1 switch allows switchingbetween up to 16 satellite sources.Set the DiSEqC 1.0 option and the DiSEqC 1.1 option accord-ing to your antenna configuration.
For example, to select the antenna con-nected to the A5 input in the left figure, setthe DiSEqC 1.1 option to 2 of 4 and the DiS-EqC 1.0 option to 1 of 4. If you have a miniDiSEqC 1.0 switch which has only two in-puts, you should set the DiSEqC 1.0 optionto Mini A instead of 1 of 4.

20 Service Search
3.1.2 Configuring DiSEqC 1.2 settings
Your motorized antenna will turn toward your desired satel-lites horizontally by DiSEqC 1.2.
When you switch to a service, if it is notprovided by the current satellite, it will takelonger time than usual because the antennahas to turn to its position.
To use the DiSEqC 1.2 protocol,select the Installation > Motor-ized DiSEqC 1.2 menu. Youshould see a screen like the leftfigure. At first you have to set theMotorized DiSEqC 1.2 option toEnable.
To get the correct position of your desired satellite, take thefollowing steps:
1. Choose your desired satellite at the Satellite Name op-tion.
2. Set the DiSEqC Command Mode option to User.3. Set the Motor Control option to Goto. Then the antenna
will turn toward your selected satellite by the positiondata that the digital receiver has.
4. If the receiving quality is not good, tune the antennafinely with the Movement option. If you set it to 2(E),the antenna will move to the east by two degrees. At thistime you had better check the receiving quality of everytransponder and choose the best one at the Transponder

3.1 Searching for broadcasting services 21
(or Frequency) option. It will be helpful to your fine tun-ing.
5. Finally set the Motor Control option to Store to save thetuned position when the receiving quality is best.
There are more motor control options for installers, but thisguide does not describe them. If you are an installer, refer themto the manual about the STAB rotor.
3.1.3 Configuring USALS settings
USALS (Universal Satellite Automatic Location System), alsoknown as DiSEqC 1.3, calculates the positions of all availablesatellites from your location. Compared to DiSEqC 1.2, it isno longer required to manually search and store every satelliteposition. Just pointing to a known satellite position is enough.This position will act as a central point. The USALS will thencalculate positions of visible satellites.
To use the USALS protocol, se-lect the Installation > USALSSetting menu. You should seea screen like the left figure. Atfirst you have to set the Motor-ized DiSEqC 1.3 option to En-able.
To get every satellite position calculated, take the followingsteps:
1. Choose your desired satellite at the Satellite Name op-tion.
2. Enter your location to the My Longitude option and theMy Latitude option with the
�� ��V− ,�� ��V+ and numeric but-
tons.

22 Service Search
3. Enter the position of your selected satellite to the SatelliteAngle option if it is not correct.
4. Select the Goto the position option, then the antenna willturn toward your selected satellite as calculating its po-sition.
5. If the receiving quality, which is displayed at the bottomright of the screen, is not good, then tune the antennafinely with the Move option. The changed position isautomatically saved. At this time you had better checkthe receiving quality of every transponder and choosethe best one at the Transponder (or Frequency) option.It will be helpful to your fine tuning.
3.1.4 Searching for services
To perform a service search, se-lect the Installation > Searchingmenu. You should see a screenlike the left figure.
There are in general four service search methods:
• searching every service of a satellite,• searching every service of a transponder,• searching single service of a transponder,• searching every service of a SMATV (Satellite Master An-
tenna Television) system.
Searching every service of a satellite
To search every service of a satellite, take the following steps:

3.1 Searching for broadcasting services 23
1. Choose your desired satellite at the Satellite Name op-tion.
2. Set the Search Mode option to Auto.3. If you set the Network Search option to On, the digital
receiver will check up the up-to-date channel informa-tion while searching services, but it takes a rather longertime.
With the Auto mode, the digital receiver tries to search everyservice, relying on the transponder data which is stored at thetime of manufacture. It thus may happen to fail to search all ac-tually available services since services are more often than notlaunched, discontinued, or removed into another transponder.
Searching every service of a transponder
To search every service of a transponder, take the followingsteps:
1. Choose your desired satellite at the Satellite Name op-tion.
2. Set the Search Mode option to Manual, and then pressthe
�� ��OK button to diaply additional options.3. Choose your desired transponder at the Frequency op-
tion or enter it with the numeric buttons.4. Enter the symbol rate of your desired transponder to the
Symbol Rate option with the numeric buttons.5. Set the Polarization option to match to that of your de-
sired transponder.6. If you set the Network Search option to On, the digital re-
ceiver will check up the up-to-date channel informationas searching services, but it takes rather longer time.
7. Set the Modulation option to match to that of your de-sired transponder. If the transponder is of the DVB-S2standard, you should set this option to DVB-S2 QPSK orDVB-S2 8PSK. Then the FEC option and the Pilot option

24 Service Search
will become enabled. You also should set these optionscorrectly.
NOTEYou may get transponder information from a satellite maga-zine or website such as http://www.satbeams.com or http://www.lyngsat.com.
Searching single service of a transponder
To search single service of a transponder, take the followingsteps:
1. Choose your desired satellite at the Satellite Name op-tion.
2. Set the Search Mode option to Advanced, and then pressthe
�� ��OK button to diaply additional options.3. Choose your desired transponder at the Frequency op-
tion or enter it with the numeric buttons.4. Enter the symbol rate of your desired transponder to the
Symbol Rate option with the numeric buttons.5. Set the Polarization option to match to that of your de-
sired transponder.6. Set the Modulation option to match to that of your de-
sired transponder. If the transponder is of the DVB-S2standard, you should set this option to DVB-S2 QPSK orDVB-S2 8PSK. Then the FEC option and the Pilot optionwill become enabled. You also should set these optionscorrectly.
7. At the PID option, specify the audio and video packetidentification (PID) of your desired service with the nu-meric buttons.
Searching every service of SMATV system
To search every service of a SMATV system, if the digital re-ceiver is connected to it, take the following steps:

3.2 Editing the transponder list 25
1. Choose your desired satellite at the Satellite Name op-tion.
2. Set the Search Mode option to SMATV, and then pressthe
�� ��OK button to diaply additional options.3. Choose your desired transponder at the Frequency op-
tion or enter it with the numeric buttons.4. Enter the symbol rate of your desired transponder to the
Symbol Rate option with the numeric buttons.
You can search pay services as well as free services as follows:
• To search only free services, set the FTA/Scrambled op-tion to FTA only.
• To search only pay services, set it to CAS only.• To search both free services and pay services, set it to FTA
+ CAS.
To start service search, move down to the Start Search item,and press the
�� ��OK button. The digital receiver will start tosearch for services and display a list of television and radioservices as they are found. It is common for no channels to befound until quite late in the process. When the scan is com-plete, you will see a message telling you how many serviceshave been found. Press the
�� ��OK button to save the list.
3.2 Editing the transponder list
If you failed to receive services ofa transponder because it consistsof wrong data, you can solve itby correcting the data. Select theInstallation > SAT/TP Edit menu.To change the data of a trans-ponder, take the following steps:

26 Service Search
1. Choose your desired satellite at the Satellite Name op-tion.
2. Choose your desired transponder at the Frequency op-tion.
3. Change the Polarization option to match to that of yourdesired transponder.
4. Set the Modulation option to match to that of your de-sired transponder. If the transponder is of the DVB-S2standard, you should set this option to DVB-S2 QPSK orDVB-S2 8PSK. Then the FEC option and the Pilot optionwill become enabled. You also should set these optionscorrectly.
5. To change a satellite entry’s name, select your desiredentry at the Satellite Name option and select the SATName Edit option. Then the on-screen keyboard ap-pears. Change the name and save it. See §6.3 as to howto use the on-screen keyboard.
6. Select the Save option and press the�� ��OK button to save
the changes. To stop at any time or to exit without saving,press the
�� ��EXIT button.
3.3 Resetting to factory settings
The digital receiver maintains the following data:
• Satellite list• Services list• Favourite list• Timer list• Preference settings
You can reset all data of the digital receiver. Select the Instal-lation > System Recovery > Factory Setting menu, and thenyou get asked for confirmation. With the choice of Yes, theservices list, favourite list and timer list will all be cleared, and

3.4 Resetting to user settings 27
preference options will be reset to the manufacturer’s factorysettings.
NOTEA factory reset will not delete any recorded programmes.However, you have to search services again after a factoryreset.
3.4 Resetting to user settings
You can store your own data including the following:
• Satellite list• Services list• Favourite lists• Preference settings
Also you can restore them at any time.To store your data, select the Installation>System Recovery>Store System Data menu, then you get asked for confirmation.If you select Yes, your data will be stored. Whenever you storeyour data, they are all overwritten. To restore your data, selectthe Installation > System Recovery > Recover System Datamenu, then you get asked for confirmation. With the choice ofYes, your data will be restored.You can also store your data to an external storage. To storeyour data to an external storage, select the Installation > Sys-tem Recovery>Export System Data menu, then you get askedfor confirmation. With the choice of Yes, your data will bestored. Every time you store your data, they are all overwrit-ten.To restore your data from an external storage, select the Instal-lation > System Recovery > Import System Data menu, thensystem data will be listed. Select a data and press the
�� ��OK but-ton, then your data will be restored.

28 Preference Settings
Chapter 4
Preference Settings
4.1 Language settings
You can select the language inwhich the menu will be dis-played. In addition to that, youcan select the language of audiotrack and of subtitle track. Selectthe Settings > Language menu.You should see a screen like theleft figure.
4.1.1 Menu language
The digital receiver provides menus in several different lan-guages. Set the Menu Language option to your desired lan-guage. Once you select a language, the menu will be immedi-ately displayed in the selected language.
4.2 Video and audio settings 29
4.1.2 Subtitle language
Set the 1st Subtitle Language option and the 2nd Subtitle Lan-guage option to your desired languages. When you watch aprogramme, if the programme has a subtitle track of the lan-guage that is specified for the 1st Subtitle Language, it will bedisplayed. If the first language is not available but the secondlanguage is available, the subtitle of the second language willbe displayed. If there is no available language, no subtitle willbe displayed.Apart from this setting, you can select a subtitle track with the
button. See §5.2.5 for a detailed description.
4.1.3 Audio language
Set the 1st Audio Language option and the 2nd Audio Lan-guage option to your desired languages. When you watch aprogramme, if the programme has an audio track of the lan-guage that is specified for the 1st Audio Language, it will beoutput. If the first language is not available but the second lan-guage is, the audio of the second language will be output.Apart from this setting, you can select an audio track with the
button. See §5.2.4 for a detailed description.
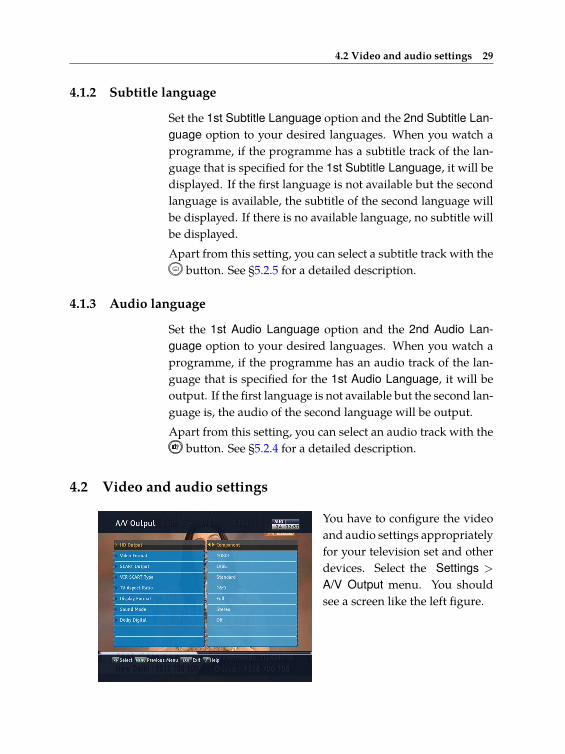
4.2 Video and audio settings
You have to configure the videoand audio settings appropriatelyfor your television set and otherdevices. Select the Settings >
A/V Output menu. You shouldsee a screen like the left figure.
30 Preference Settings
4.2.1 High definition television
The digital receiver supports various video resolutions from576 to 1080. In general, a resolution of 720 or more is consid-ered high definition. The higher the resolution is, the betterthe quality is. However, if your television set does not sup-port high definition, you cannot enjoy high definition qualitypicture.If you have the digital receiver linked to your television via theComponent video output (Y/Pb/Pr) or the HDMI output, youhave to set the HD Output option to Component. Otherwise,you have to set it to SCART. The available values for the VideoFormat option vary depending on how you set this option.Set the Video Format option as you desire. If you set this op-tion to 576P, the digital receiver will present even high defini-tion programmes in resolution of 576. On the contrary, if youset it to 1080I, the digital receiver will present even standarddefinition programmes in resolution of 1080.It is recommended to set it to Auto if you have a high definitiontelevision. With that setting the digital receiver will present aprogramme as it is without any resolution conversion. Whilewatching television you can change the resolution with the�� ��V.Format button. Whenever you press it, the video resolutionis changed in turn.
NOTEYou can enjoy only standard definition video with the fol-lowing video outputs:
• Composite video output (VIDEO)• SCART output (TV)
4.2.2 Television aspect ratio
If you have a wide-screen television, set the TV Aspect Ratiooption to 16:9.

4.2 Video and audio settings 31
You can enjoy both wide-screen programmes and normal-screen programmes with your wide-screen television as theabove figures show. To watch normal-screen programmesin full screen like the left figure, set the Display Format optionto Full. Normal-screen pictures then will be inflated to fit tothe width of the wide screen. Otherwise, to watch them in theoriginal ratio like the right figure, set it to Center. If you havea normal-screen television, set the TV Aspect Ratio option to4:3.
You cannot fully enjoy wide-screen programmes with yournormal-screen television as the above figures show. The leftfigure shows a normal picture displayed in the normal screen.To watch wide-screen programmes in the shape like the cen-tre figure, set the Display Format option to Letter Box. Wide-screen pictures then will be reduced to fit to the width of thenormal screen. Otherwise, to watch them in the shape like theright figure, set it to Center extract. Then wide-screen pictureswill be cut out on the left and right sides equally to fit to thewidth of the normal screen.

32 Preference Settings
4.2.3 Colour format
Through the TV SCART output, the digital receiver is able tooutput video in various colour formats. If you have the digitalreceiver linked to your television via this output, you shouldset the SCART Output option to your desired colour format.If you have connected via the RCA socket labeled VIDEO onthe back panel, you do not have to set this option because thedigital receiver outputs CVBS video through that RCA outputindependently of the SCART output. In general, it is knownthat the RGB colour format provides the best video quality butthe CVBS colour format does the least. So RGB would be themost desirable option for this.
4.2.4 Another video device
You can have the digital receiver linked to another video de-vice like a video recorder or a DVD player via the VCR SCARToutput. In this case, the digital receiver will operate differ-ently depending on the setting of the VCR SCART Type op-tion. If the option is set to Standard, the digital receiver willpass along the video from the video device to your televisionwhen it starts playback. But if the option is set to External A/V,the digital receiver will not pass the video automatically. Youhave to press the
�� ��AUX button to pass it along. It is impossi-ble for the digital receiver to record the video from the videodevice since the digital receiver is just a bypass for the videorecorder.
NOTEWhen the digital receiver is in standby mode, the digital re-ceiver cannot pass the video from the video device to thetelevision when it starts playback.

4.3 Local time setting 33
4.2.5 Audio mode
Basically, there are two audio sources as you can find two audiosockets on the back panel of the digital receiver. You can enjoyonly one source or both of them in either stereo or mono. Setthe Sound Mode option as you desire.Apart from this setting, you can change the sound mode withthe button. See §5.2.4 for a detailed description.The digital receiver can output two types of digital audio sig-nals via the S/PDIF output. One is an encoded signal, andthe other is a decoded signal. If you have the digital receiverlinked to your audio-video receiver via the S/PDIF output, youhave to set the Dolby Digital option to Off, which means that thedigital receiver will output encoded Dolby Digital audio with-out decoding so that your audio-video receiver can decode it.Otherwise, set it to On, then the digital receiver will outputdecoded Dolby Digital audio, scaling it down to two channels.
NOTEOnly if the service you are currently watching providesa Dolby Digital audio track, you can enjoy Dolby Digitalsound.
4.3 Local time setting
You should set your local time for timer events. If you donot set the local time correctly, the programme time table pro-vided by the programme guide may be distrustful. For the pro-gramme guide, refer to §5.3.

34 Preference Settings
Select the Settings > Timemenu. You should see a screenlike the left figure. You can setthe clock manually or use thetime signal, Greenwich MeanTime (GMT), carried as part ofthe digital television broadcast.To use Greenwich Mean Time,take the following steps:
1. Set the Mode option to Auto, then the Time Offset optionbecomes enabled.
2. Set the Time Offset option to the time difference betweenyour time zone and GMT referring to Table 4.1.
3. To get Greenwich mean time, set the GMT Collection op-tion to one among the followings:
Normal from all transpondersCAS Only from transponders of pay servicesUser Select from transponders specified by you
If you set it to User Select, then the Satellite option andthe Transponder option become enabled. Select your de-sired satellite and transponders at those options. Withthe above settings, the digital receiver will scan all speci-fied transponders one by one until it gets the GreenwichMean Time.
4. Make sure that your local time is correctly displayed onthe Local Time item.
To set the local time manually, set the Mode option to Man-ual and enter your local time to the Local Time option withthe numeric buttons. The time format is day/month/year 24-hour:minute. To change the time format to 12-hour format, setthe Time Format option to 12 Hours.
4.3 Local time setting 35
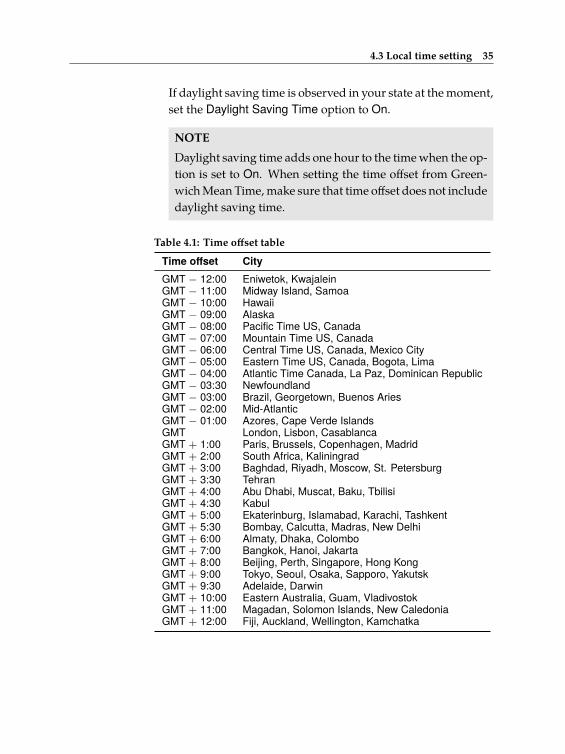
If daylight saving time is observed in your state at the moment,set the Daylight Saving Time option to On.
NOTEDaylight saving time adds one hour to the time when the op-tion is set to On. When setting the time offset from Green-wich Mean Time, make sure that time offset does not includedaylight saving time.
Table 4.1: Time offset table
Time offset CityGMT − 12:00 Eniwetok, KwajaleinGMT − 11:00 Midway Island, SamoaGMT − 10:00 HawaiiGMT − 09:00 AlaskaGMT − 08:00 Pacific Time US, CanadaGMT − 07:00 Mountain Time US, CanadaGMT − 06:00 Central Time US, Canada, Mexico CityGMT − 05:00 Eastern Time US, Canada, Bogota, LimaGMT − 04:00 Atlantic Time Canada, La Paz, Dominican RepublicGMT − 03:30 NewfoundlandGMT − 03:00 Brazil, Georgetown, Buenos AriesGMT − 02:00 Mid-AtlanticGMT − 01:00 Azores, Cape Verde IslandsGMT London, Lisbon, CasablancaGMT + 1:00 Paris, Brussels, Copenhagen, MadridGMT + 2:00 South Africa, KaliningradGMT + 3:00 Baghdad, Riyadh, Moscow, St. PetersburgGMT + 3:30 TehranGMT + 4:00 Abu Dhabi, Muscat, Baku, TbilisiGMT + 4:30 KabulGMT + 5:00 Ekaterinburg, Islamabad, Karachi, TashkentGMT + 5:30 Bombay, Calcutta, Madras, New DelhiGMT + 6:00 Almaty, Dhaka, ColomboGMT + 7:00 Bangkok, Hanoi, JakartaGMT + 8:00 Beijing, Perth, Singapore, Hong KongGMT + 9:00 Tokyo, Seoul, Osaka, Sapporo, YakutskGMT + 9:30 Adelaide, DarwinGMT + 10:00 Eastern Australia, Guam, VladivostokGMT + 11:00 Magadan, Solomon Islands, New CaledoniaGMT + 12:00 Fiji, Auckland, Wellington, Kamchatka

36 Preference Settings
4.4 Parental control
In general, television programmes are classified according tothe level of violence, nudity and language of their content.When you are watching a programme, you can check its pro-gramme classification on the information box. For the infor-mation box, see §5.2.3. You can prevent your children fromwatching specific programmes by specifying a maximum per-missible level.
Select the Settings > ParentalControl menu. You should seea screen like the left figure,and you will be asked yourPersonal Identification Number(PIN). The number is initially setto ‘0000’ as default.
If you wish to block programmes for viewers aged 15 or above,set the Censorship option to 15 (age). Setting it to No blockblocks no programme; on the other hand, setting it to Totalblock blocks every programme.
NOTEIf a programme has no rating information, your censorshipsetting will not take effect.
If anyone is trying to watch a programme that is of or above thecensorship setting, the person has to enter the personal identi-fication number to override. To change the number, select theChange PIN Code menu, then a box pops up, asking a newPIN. Enter a desired number twice for confirmation.You can also restrict uses of some menus. Selecting the AccessControl menu displays a list of menus that you can lock. If the
4.5 Options for recording 37
Time item is set to Locked, you have to enter the PIN whenaccessing the Time menu. If you enter a wrong number, youcannot use the menu. To release a locked item, set it to Un-locked.
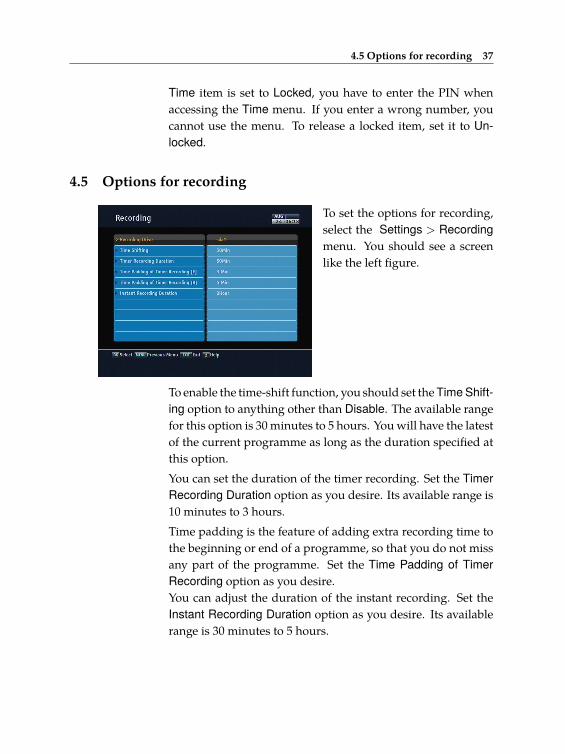
4.5 Options for recording
To set the options for recording,select the Settings > Recordingmenu. You should see a screenlike the left figure.
To enable the time-shift function, you should set the Time Shift-ing option to anything other than Disable. The available rangefor this option is 30 minutes to 5 hours. You will have the latestof the current programme as long as the duration specified atthis option.You can set the duration of the timer recording. Set the TimerRecording Duration option as you desire. Its available range is10 minutes to 3 hours.Time padding is the feature of adding extra recording time tothe beginning or end of a programme, so that you do not missany part of the programme. Set the Time Padding of TimerRecording option as you desire.You can adjust the duration of the instant recording. Set theInstant Recording Duration option as you desire. Its availablerange is 30 minutes to 5 hours.

38 Preference Settings
4.6 Options for playback
To set the options for playback,select the Settings > Playbackmenu. You should see a screenlike the left figure.
If you want to play back a recorded file from beginning, setStarting Position option to Beginning. To play back a recordedfile from the part where you were watching, set this option toContinuing.To make a descrambled copy from a scrambled recording, setthe Descramble Mode option to Auto Recording; otherwise, setthis option to Normal.You can adjust the jump interval that is for playback. Set theJump Time Interval option as you desire. Its available range is10 seconds to 3 minutes.If you want to enjoy more levels of playback speed, set the TrickMode Level option to 2x, 4x, 8x, 16x, 32x, 64x; otherwise, setit to 4x, 16x, 64x.If you have subtitle files such as .smi, .sub, .idx, and .srt, thedigital receiver can also display them. The Media Subtitle itemprovides some options for video subtitle. When you play backa video file with a subtitle file, if the subtitle does not match thevideo, then you can synchronise them by adjusting the valueof the Sync option. In addition, you can change the colour andsize of subtitle by setting the Font Color and Font Size optionsto one you prefer.

4.7 Options for on-screen display 39
4.7 Options for on-screen display
To set the options for the on-screen display (OSD), select theSettings > OSD menu. Youshould see a screen like the leftfigure.
To adjust the transparency level of the OSD, set the OSD Trans-parency option as you desire. Its available range is 0 to 50 per-cent.To adjust the display time of the information box, set the InfoBox Display Time option as you desire. Its available range is1 to 30 seconds. If you set this option to No Info Box, the in-formation box will not be displayed when you switch services.However, pressing the button will display the informationbox. If you set this option to Never Hide, the information boxwill always be displayed. For the information box, see §5.2.3.In addition, you can raise or lower the position of the infor-mation box. Set the Info Box Position option as you desire. Itsavailable range is −10 to +3 lines. The higher you set the op-tion, the lower the information box will be positioned.If any service’s name is too long to fit the width of the servicename column on the services list screen, you can get it to scrollby setting the Text Scroll option to anything other than Disable.With the choice of Full Scroll, it will be fully scrolled until itsend disappears; with the choice of Part Scroll, it will be scrolledonly to its end.

40 Every Day Use
Chapter 5
Every Day Use
5.1 Volume control
Use the�� ��V− and
�� ��V+ buttons to alter the volume to a comfort-able level. You may need to adjust the volume on your televi-sion set too. To temporarily switch off the sound, press thebutton. Press it again to restore the sound to previous level.
5.2 Watching television
To change services, press the�� ��P− or
�� ��P+ button. Pressing thebutton switches to the previously viewed service. In ad-
dition, you can switch to your desired service by entering itsservice number with the numeric buttons. You can also selecta service to watch in the services list.
5.2.1 The services list
To view the services list, press the�� ��OK button.
5.2 Watching television 41
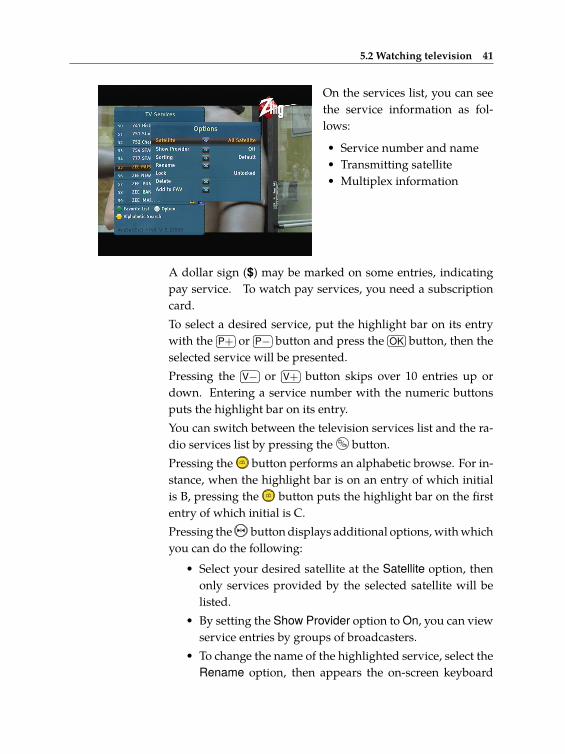
On the services list, you can seethe service information as fol-lows:
• Service number and name• Transmitting satellite• Multiplex information
A dollar sign ($) may be marked on some entries, indicatingpay service. To watch pay services, you need a subscriptioncard.To select a desired service, put the highlight bar on its entrywith the
�� ��P+ or�� ��P− button and press the
�� ��OK button, then theselected service will be presented.Pressing the
�� ��V− or�� ��V+ button skips over 10 entries up or
down. Entering a service number with the numeric buttonsputs the highlight bar on its entry.You can switch between the television services list and the ra-dio services list by pressing the button.Pressing the button performs an alphabetic browse. For in-stance, when the highlight bar is on an entry of which initialis B, pressing the button puts the highlight bar on the firstentry of which initial is C.Pressing the button displays additional options, with whichyou can do the following:
• Select your desired satellite at the Satellite option, thenonly services provided by the selected satellite will belisted.
• By setting the Show Provider option to On, you can viewservice entries by groups of broadcasters.
• To change the name of the highlighted service, select theRename option, then appears the on-screen keyboard

42 Every Day Use
with which you can enter a new name. See §6.3 as tohow to use the on-screen keyboard.
• You can prevent other family members from watchingthe highlighted service by setting the Lock option toLocked. You have to enter your personal identificationnumber to watch or unlock it.
• To delete the highlighted service, select the Delete op-tion, then you get asked for confirmation. With thechoice of Yes, the service will be deleted. If you wantto restore it as before, you have to perform service searchagain. See §3.1 for service search.
• To add the highlighted service into a favourite group, se-lect the Add to Fav option, then the favourite groups willbe displayed. Put the highlight bar on a desired groupand press the
�� ��OK button.
• You can additionally sort the services list with the Sort-ing option as follows:
Default by service numberAlphabetic by service nameSatellite by satelliteFTA–CAS from free services to pay servicesCAS–FTA from pay services to free servicesProvider by broadcasterFav–NoFav from favourite services to unfavourite ser-
vices.Transponder by transponder
5.2.2 The favourite service lists
You can select a service on a favourite list as well as on theservices list.
5.2 Watching television 43
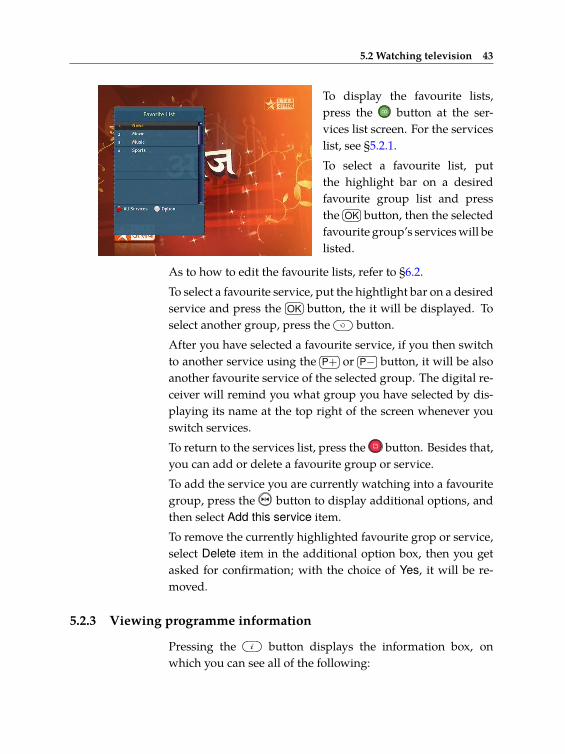
To display the favourite lists,press the button at the ser-vices list screen. For the serviceslist, see §5.2.1.To select a favourite list, putthe highlight bar on a desiredfavourite group list and pressthe
�� ��OK button, then the selectedfavourite group’s services will belisted.
As to how to edit the favourite lists, refer to §6.2.To select a favourite service, put the hightlight bar on a desiredservice and press the
�� ��OK button, the it will be displayed. Toselect another group, press the button.After you have selected a favourite service, if you then switchto another service using the
�� ��P+ or�� ��P− button, it will be also
another favourite service of the selected group. The digital re-ceiver will remind you what group you have selected by dis-playing its name at the top right of the screen whenever youswitch services.To return to the services list, press the button. Besides that,you can add or delete a favourite group or service.To add the service you are currently watching into a favouritegroup, press the button to display additional options, andthen select Add this service item.To remove the currently highlighted favourite grop or service,select Delete item in the additional option box, then you getasked for confirmation; with the choice of Yes, it will be re-moved.
5.2.3 Viewing programme information
Pressing the button displays the information box, onwhich you can see all of the following:

44 Every Day Use
• Service number and name• Transmitting satellite• Transponder information• Signal level and quality• Programme name• Programme classification sign• Programme summary• Broadcasting time• Current time
In addition, you might see the following symbols:
• Subtitle symbol ( ) if subtitle tracks are provided on thecurrent programme.
• Teletext symbol ( ) if teletext pages are provided on thecurrent service.
• Dolby Digital symbol ( ) if a Dolby Digital audiotrack is provided on the current programme.
• Lock symbol ( ) if the current service is locked.• Dollar symbol ($) if the current service is a pay service.
Pressing the button once more displays detailed informa-tion about the current programme. To hide the informationbox, press the
�� ��EXIT button.
5.2.4 Selecting audio tracks
Some programmes are provided with audio tracks in one ormore languages. Pressing the button displays available au-dio tracks. Once you select an audio track, that track will beheard. In addition, you can enjoy audio tracks in four soundmodes: Stereo, Mono, Left or Right.
5.2.5 Selecting subtitle tracks
Some programmes are provided with subtitle tracks in one ormore languages. If the current programme provides subtitle

5.3 Viewing electronic programme guide 45
tracks, the subtitle symbol ( ) will be marked on the infor-mation box. Pressing the button displays available subtitletracks. Once you select a subtitle track, it will be displayed.
5.2.6 Viewing teletext
On some services, such information as weather reports, newsor stock quotations is provided by means of teletext. If the cur-rent service provides teletext, the teletext symbol ( ) will bedisplayed on the information box. Press the button to viewteletext pages.Select a page to view by entering its page number with the nu-meric buttons. You can zoom into a teletext page with thebutton, and adjust its transparency level with the button.To clear the teletext screen, press the
�� ��EXIT button.
5.3 Viewing electronic programme guide
The Electronic Programme Guide (EPG) shows the current andscheduled programmes that are or will be available on eachservice with a short summary for each programme.
Pressing the�� ��GUIDE button dis-
plays the electronic programmeguide, on which you can see thefollowing:
• Scheduled programmes• programme summary• Broadcasting date• Broadcasting time
To see detailed information of a desired programme, put thehighlight bar on the programme with the
�� ��V− or�� ��V+ button
and press the button. To switch to another service, pressthe
�� ��P− or�� ��P+ button.

46 Every Day Use
You can travel over previous days with the button, and cantravel over next days with the button.To see the programme guide for radio broadcasts, press thebutton. To switch it back, press the button again.Pressing the button will rearrange the form, swapping thecolumns and rows. To switch it back, press the buttonagain.You can make a timer recording on the electronic programmeguide. See §7.1.3 for detailed description.
5.4 Using time-shift
You can pause and resume a live television programme, andeven rewind and replay it. When you are watching a pro-gramme and you miss something, you can rewind and replayit. Or when your attention is needed elsewhere, you can pausea live TV and resume a short time later without losing any ofthe programme.
When you do this, you are nolonger watching the live pro-gramme, instead you are watch-ing a delayed presentation. Thisis called time-shifted television.You can skip commercials untilyou catch up to the live broad-cast.
In order to use the time-shift feature, set the Time Shifting op-tion to desired duration of time. Then the digital receiver willarchive the programme as much time as you set in the option.See §4.5.The time-shift will be reset each time you change to anotherservice. With the time-shift, the following operations are pos-

5.4 Using time-shift 47
sible:
• To go back in time, hold down the button; to go for-ward, hold down the button. The progress bar is dis-played momentarily with a preview window.
• You can navigate using the progress bar, refer to §7.3.1.
• You can jump backward and forward by pressing theand buttons. You can change the jump time at theJump Time Interval option. See §4.6.
• You can change playback speed. See §7.3.2 for slow mo-tion. For fast motion, see §7.3.3.
• To check your current position in time-shift, press thebutton. The time difference compared to live pro-
gramme is displayed momentarily in top right corner ofthe screen. A value of −02:00 means two minutes be-hind the live programme.
• To end time-shift, press the button. The live pro-gramme will be displayed.
NOTEYou can adjust some options for time-shift. Refer to §4.5.

48 Organising Services
Chapter 6
Organising Services
6.1 Editing the services list
You would have got the services list after service search. Youcan rename, move, lock or delete service entries on the serviceslist.
Select the Edit Services > EditService List menu. You shouldsee a screen like the left figure.There are editing options on theleft column and service entrieson the right column.
Once you put the highlight bar on a desired option on the leftcolumn and press the
�� ��OK button, you can select a desired ser-vice to edit on the right column. To go over to the other column,press the button.To edit the radio services list, press the button, then radio
6.1 Editing the services list 49
service entries will be listed on the right column. To switchback to the television services list, press it again.To change the name of a service, select the Rename and selecta desired service; then the on-screen keyboard appears. See§6.3 as to how to use the on-screen keyboard.Unlike analogue broadcasts, each service does not have aproper service number in digital broadcasts. Service num-bers are just assigned to services in the order that they werefound in service search. So you can reassign a service num-ber by moving a service entry. To move a service entry, selectthe Move option and select a desired service; then the selectedservice becomes darker. As you move it up or down, it getsrenumbered according to the position. Press the
�� ��OK button tofix it.You can lock some services to prevent your children fromwatching them. To lock a service, select the Lock option andselect a desired service; then the selected service gets markedwith a lock symbol ( ) on it. If anyone tries to watch a lockedservice, the person has to enter the personal identificationnumber that is set to the Change PIN Code option. See §4.4for this option. Pressing the
�� ��OK button on a locked serviceentry turns it back to be unlocked.To delete a service, select the Delete option and select a desiredservice with the
�� ��OK button, and then press the�� ��EXIT button;
you get asked for confirmation. If you select Yes, the selectedservice will be deleted. If you want to undo the deleted service,there is nothing you can do but perform a service search again.Once you select the Sort option on the left column, sorting op-tions are displayed as follows:
Default by service numberAlphabetic by service nameSatellite by satelliteFTA–CAS from free services to pay servicesCAS–FTA from pay services to free services
50 Organising Services
Fav–NoFav from favourite services to unfavourite servicesProvider by broadcasterTransponder by transponder
6.2 Editing the favourite lists
You can make your own favourite service lists. In fact, you candefine multiple favourite service lists, each being a ‘group’ ofchosen services.
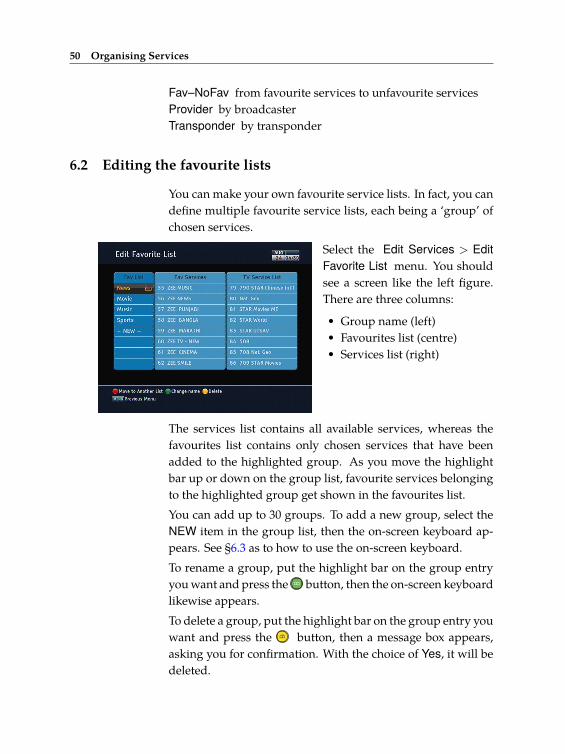
Select the Edit Services > EditFavorite List menu. You shouldsee a screen like the left figure.There are three columns:
• Group name (left)• Favourites list (centre)• Services list (right)
The services list contains all available services, whereas thefavourites list contains only chosen services that have beenadded to the highlighted group. As you move the highlightbar up or down on the group list, favourite services belongingto the highlighted group get shown in the favourites list.You can add up to 30 groups. To add a new group, select theNEW item in the group list, then the on-screen keyboard ap-pears. See §6.3 as to how to use the on-screen keyboard.To rename a group, put the highlight bar on the group entryyou want and press the button, then the on-screen keyboardlikewise appears.To delete a group, put the highlight bar on the group entry youwant and press the button, then a message box appears,asking you for confirmation. With the choice of Yes, it will bedeleted.

6.2 Editing the favourite lists 51
You can add a favourite service to a group by taking the fol-lowing steps:
1. Put the highlight bar on a desired group entry in thegroup list and press the
�� ��OK button to select it. The high-light bar then moves to the services list.
2. To add a service to the selected group, put the highlightbar on a desired service entry and press the
�� ��OK button.The selected service entry gets added to the favourite list.Repeat this step to add more entries.
3. Press the button, and the highlight bar gets moved tothe favourite list. You can delete a favourite entry withthe
�� ��OK button.
4. To select another group, press the button again, thenthe highlight bar gets moved to each column.
Furthermore, you can rearrange a group’s favourites by mov-ing a favourite entry. To move a favourite entry, put the high-light bar on the favourite entry you want and press the but-ton. Press the
�� ��V− and�� ��V+ buttons or
�� ��P+ and�� ��P− buttons to
move it to a desired place and press the�� ��OK button. To add
radio services, press the button, then radio service entriesget listed in the services list. To recall the television serviceslist after adding radio services, press the button again.As to how to use the favourite service lists you organised, referto §5.2.2.

52 Organising Services
6.3 How to use on-screen keyboard
You can move the highlight keyhorizontally with the
�� ��V− and�� ��V+ buttons and vertically withthe
�� ��P+ and�� ��P− buttons. Press-
ing the�� ��OK button on a key en-
ters its letter in the input line.
To type a space, select the Space key or alternatively press thebutton. To type lower case letters or numerals, select the
Shift key or alternatively press the button. To delete a let-ter, put the cursor to the right of the desired letter on the inputline and then select the Del key or alternatively press but-ton. You must select the Save key or alternatively press the
button to complete your typing; otherwise if you press the�� ��EXIT button, it will not be saved.

53
Chapter 7
Recording and Playback
If you want to record TV programmes, you have tolink an external hard drive to the USB port of thedigital receiver.
NOTEThe external hard drive should be formatted inthe NTFS file system. It is also recommended touse an external power socket to have the externalhard drive supplied by its own power.
7.1 Recording a programme
Once a recording gets started, a symbol like the left fig-ure will be displayed at the top right of the screen for afew seconds.
CAUTIONDo not move the digital receiver nor pull out the powerplug while it is running. It may cause damage to recorded

54 Recording and Playback
programmes. Topfield is not responsible for damages in-flicted on files that are stored on the hard drive.
7.1.1 Instant recording
To instantly record a programme you are watching at present,press the button.Pressing the button will not pause the current recordinglike it does with a video recorder. Instead, pressing the but-ton will pause the live show and begin time-shifting within thecurrent recording even with the Time Shifting option disabled.In short, it is still possible to pause a recording, but literallyrecording continues in the digital receiver.
After a recording has started,pressing the button displaysa menu like the left figure, inwhich you can set the recordingduration.
To specify an arbitrary recording duration, set the Duration op-tion as you desire with the
�� ��V− and�� ��V+ buttons and press the�� ��OK button; the recording will end at the specified time.
If the information about the next programme is provided bythe electronic programme guide, the After this program andAfter next program options will be enabled. Once the After thisprogram option is selected, the current recording will stop atthe time when the current programme is scheduled to end.Likewise, once the After next program option is selected, thecurrent recording will stop at the time when the next pro-gramme is scheduled to end.

7.1 Recording a programme 55
To stop recording, press thebutton; then a box like the
left figure appears, which showsthe programme currently beingrecorded. Select recording byusing navigation buttons thenpress
�� ��OK button to stop therecording.
While a recording is going on, you can play back one of therecorded programmes. To view the recorded programmelist, press the button or alternatively select the RecordedProgram menu. See §7.2 for detailed description about therecorded programme list.
7.1.2 Timer recording
You can set a programme to be recorded at a specific time.Even if the digital receiver is in standby mode, it will switchinto active mode and start recording at a specified time. Whenthe recording comes to the end, the digital receiver will switchback into standby mode again in one minute. However, if youpress any button on the remote control or on the front paneleven just one time, the digital receiver will not switch intostandby mode.

56 Recording and Playback
To add a timer recording, selectthe Reservation menu, then thetimer list will be displayed. Toadd a new timer event, press the
button, and a box like the leftfigure appears. Take the follow-ing steps:
1. Set the Record option to On to make a recording. If thisoption is set to Off, the digital receiver will turn on at thespecified time but not record; instead, you may recordwith your video recorder or suchlike in this case.
2. You may have two sources for recording, TV and radio.Set the Type option to your desired source.
3. Set the Satellite option to the satellite which transmits theservice you want. Pressing the
�� ��OK button on this optiondisplays a satellite list, from which you can select yourdesired satellite.
4. Set the Service option to the service which provides theprogramme you want. Pressing the
�� ��OK button on thisoption displays a services list, from which you can selectyour desired service.
5. Set the Mode option as you desire. There are five timermodes:
One Time means literally ‘one time’.Every Day means literally ‘every day’.Every Weekend means ‘Saturday and Sunday every week’.Weekly means ‘one day every week’.Every Weekday means ‘from Monday to Friday every
week’.

7.1 Recording a programme 57
If your favourite programme is broadcast at weekendsand you wish to record every episode of the programme,set the Mode option to Every Weekend.
6. Set the Date option to a desired date, on which the digitalreceiver will turn on. The date format is day/month/year-day of the week.Set the Start Time option to a desired time, at which therecording will be started. The time format is hour:minute.
7. Set the Duration option to a desired time, in which therecording will be finished.
8. Pressing the�� ��OK button on the File Name option displays
the on-screen keyboard, with which you can specify afile name for the timer recording. If you do not specifyanything, it will be named after the service name. See§6.3 as to how to use the on-screen keyboard.
9. To set a recording reservation with the above settings,select the OK item; otherwise, it will not be saved andwill not occur.
You can also edit or delete timer events in the timer list. To edita timer entry, put the highlight bar on the entry you want andpress
�� ��OK button; then appears a box in which you can changeits settings in the same manner as making a new one.To delete a timer event, put the highlight bar on the entry youwant to remove and press the button, then you get askedfor confirmation. With the choice of Yes, it will be deleted. Todelete all timer event, press the button.You can sort timer events by time with the button.

58 Recording and Playback
7.1.3 Scheduling recordings using the programme guide
If the electronic programmeguide is properly provided,you can make timer events onit. The instructions on how tomake timer recordings using theelectronic programme guide areas follows:
1. Press the�� ��GUIDE button to display the electronic pro-
gramme guide.
2. Select a programme you want to record with the naviga-tion buttons.
3. To make a timer event without recording, press the�� ��OK
button; the letter P is displayed. To make a timer eventwith recording, press it once more or alternatively pressthe button, then the letter R is displayed.
4. Pressing the�� ��OK button once more will cancel the timer.
7.1.4 Recording a pay service programme
You can record a pay service programme without the subscrip-tion card. However, you need the subscription card to playit back because it has not been descrambled. So it is recom-mended to record pay service programmes with a proper sub-scription card so that they can be descrambled and recorded.In that case, you can enjoy them without the subscription cardlike free services.To record a programme of a pay service in descrambled form,take the following steps:
1. Select a programme of a pay service you want to record.
7.2 File archive 59
2. Make sure that the subscription card is inserted in theslot on the front of the digital receiver.
3. Start recording.
4. Do not switch to other service nor use time-shift untilrecording is finished.
NOTEIf you switch to other service or use time-shift in the middleof recording a pay programme, it will be recorded withoutdescrambling from that moment. Even if the recording isonly partially descrambled, you need the subscription cardto play it back.
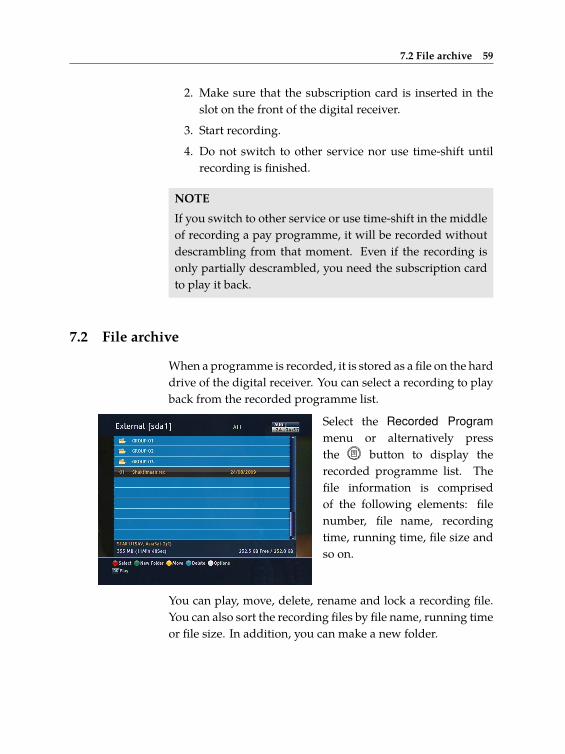
7.2 File archive
When a programme is recorded, it is stored as a file on the harddrive of the digital receiver. You can select a recording to playback from the recorded programme list.
Select the Recorded Programmenu or alternatively pressthe button to display therecorded programme list. Thefile information is comprisedof the following elements: filenumber, file name, recordingtime, running time, file size andso on.
You can play, move, delete, rename and lock a recording file.You can also sort the recording files by file name, running timeor file size. In addition, you can make a new folder.

60 Recording and Playback
7.2.1 To delete a recording
To delete a recording, put the highlight bar on it and pressthe button, then you get asked for confirmation. With thechoice of Yes, it will be deleted.
7.2.2 To sort recordings
To sort the recordings, take the following steps:
1. Press the button to display additional options.2. Set the Sorting option to Alphabetic, Time or Size as you
want.3. Press the
�� ��EXIT button.4. They will be sorted by the specified option.
7.2.3 To lock a recording
To lock a recording so that other persons cannot play or deleteit, take the following steps:
1. Put the highlight bar on a desired recording.2. Press the button to display additional options.3. Set the Lock option to Locked.4. Press the
�� ��EXIT button.5. The lock symbol ( ) is displayed on it.
If you select a locked recording to play it back, you will beasked for your personal identification number.
7.2.4 To rename a recording
To change a recording’s name, take the following steps:
1. Put the highlight bar on a desired recording.2. Press the button to display additional options.3. Select the Rename option, and the on-screen keyboard
appears. Change the name and save it. See §6.3 as tohow to use the on-screen keyboard.
7.3 Playing back a recording 61
7.2.5 To make a new folder
To make a new folder, press the button, then a new foldernamed GROUP # is created. You can change its name in thesame manner as renaming a recording. See above.
7.2.6 To move a recording to another folder
To move a recording to another folder, put the highlight baron a desired recording and press the button. If an externalhard drive is connected to the digital receiver, you get askedto select between the built-in and external hard drive. SelectInternal, then the folders are listed. Once you choose a folder,the recording is moved to it.
7.3 Playing back a recording
When a programme is recorded, its additional contents suchas audio track or subtitle track are also recorded together. Soyou can enjoy them while playing back a recording.The instructions on how to play a recording are as follows:
1. Select the Recorded Program menu or alternatively pressthe button to display the list of recorded programmes.
2. Put the highlight bar on a desired recording and pressthe
�� ��OK button, then an option box pops up.3. To play from beginning, set the Starting Position op-
tion to Beginning; to play from the point that you havestopped at the last time, set it to Continuing. To start play-back, select the Play item.
4. To stop playback, press the button.
During playback, you can enjoy the following tricks:
• To see the detailed information about the currentlyplayed recording, press the button; then the infor-mation box appears and shows its file name, runningtime, programme information, and so on.
62 Recording and Playback
• To pause playback, press the button. To resume it,press the button.
• To view the progress bar, press the button; to hide it,press the button again.
• When the progress bar is hidden, you can move to a de-sired scene by entering a progress percentage with thenumeric buttons.
7.3.1 To navigate using the progress bar
First press the button to display the progress bar.
• To go forward, hold down the�� ��V+ button; to go back-
ward, hold down the�� ��V− button.
• If there are no bookmarks, you can jump forward by theminute set to the Jump time Interval option with thebutton. See §4.6 for that option. Refer to §7.3.4 as to howto bookmark a position.
• To jump to the beginning, press the button.• To jump to the end, press the button.• To hide the progress bar, press the button again.
7.3.2 To play in slow motion
To watch in slow motion during a playback, press the but-ton. If you press it repeatedly, the playback speed changes in 4steps: 1/2, 1/4, 1/8 and 1/16 times. To resume normal speed,press the button.
7.3.3 To play in fast motion
To watch in fast motion during a playback, press the but-ton. If you press it repeatedly, the playback speed changes. Toresume normal speed, press the button.You can play not only forward but also backward in fast mo-tion. To play backward, press the button. If you press it

7.3 Playing back a recording 63
repeatedly, the playback speed changes. To resume normalspeed, press the button.You can change the playback speed in 3 steps (4, 16 and 64times) or in 6 steps (2, 4, 8, 16, 32 and 64 times). See §4.6.
7.3.4 To make a bookmark
You can mark favourite parts ofa recording by creating book-marks and then jump to them insequence. Bookmarks are storedwith the recording so that youcan use them again afterwards.To make bookmarks, take the fol-lowing steps during playback:
1. Press the button to display the progress bar.
2. To add a bookmark, press the button at a desiredscene, then you will see a small pointer appear above theprogress bar like in the picture above.
3. To jump forward to the next bookmark, press the but-ton.
7.3.5 To play back a recording repeatedly
You can play back a recording repeatedly both in whole and inpart.To play back in whole, press the button when the progressbar is hidden, then the repetition symbol ( ) is displayed onthe information box. To cancel it, press the button again.To play back in part, take the following steps:
1. Press the button to display the progress bar.

64 Recording and Playback
2. Move to the beginning scene of the part you want to playrepeatedly by holding down the
�� ��V− or�� ��V+ button.
3. Press the button, then the pointer starts to blink.
4. Move to the end scene; the selected part is marked inblack.
5. Press the button again to start repeated playback.
6. To cancel it, press the button when the progress baris displayed.
7.3.6 To play back recordings in sequence
You can play several recordings continuously in sequence byperforming the following steps:
1. Press the button or alternatively select the RecordedProgram menu to display the list of recorded pro-grammes.
2. Select each desired recording with the button. Oncea recording is selected, it gets numbered.
3. Press the button to start playback.
4. The selected recordings are played in the sequence thatthey are numbered.
5. To jump to the beginning of the next recording in thequeue, press the button to display the progress bar,then press the button.
7.3.7 To play back a scrambled recording
If you have recorded a programme of a pay service with thesubscription card, you can play it as freely like that of a freeservice. Otherwise you need the subscription card to play itback because it has been recorded without descrambling eventhough it may have been partially descrambled.On the recorded programme list, a purely green $ indicates therecording has been wholly descrambled; on the other hand, a

7.4 Copying a recording 65
yellowish green $ indicates it has been partially descrambled,and a purely yellow $ indicates it has not been descrambled atall.
7.4 Copying a recording
You can record the file in whole or in part during a playbackby performing the following steps:
1. Start playback of a recording you want.
2. Move to a scene from which you want to start copying byholding down the
�� ��V− or�� ��V+ button.
3. Press the button, then it will be copied in a new filewhich is named after the original recording with a suffixof ‘COPY’ and a number.
4. To stop copying, press the button.
7.5 Formatting the hard disk
If a new hard drive is installed, it must be formatted becauseyou can neither record nor use time-shift with an unformattedhard disk.You can delete permanently all contents stored in a hard driveby formatting it. Select the Installation > System Recovery >
Format Hard Disk menu, and then select the hard drive youwant to format.
NOTEThe hard drive on the digital receiver will be formatted inthe NTFS file system.

66 Firmware Update
Chapter 8
Firmware Update
The digital receiver has a stable and convenient firmware touse. However, once in a while a new firmware may be re-leased to improve the digital receiver. You can get the lat-est firmware and the firmware update tool, which runs onmost versions of Windows, from the Topfield website, http://www.i-topfield.com.
8.1 From a memory stick
If you have a USB memory stick, you can update the firmwarefrom it by taking the following steps:
1. Download a new firmware from the Top-field website.
2. Copy the firmware file to your memorystick.
3. Insert the USB memory stick into the USBport on the digital receiver.
4. Select the Installation > Firmware Upgrade > USBFirmware Upgrade menu, and the files in the USB mem-ory will be listed.

8.2 Over the air 67
5. Place the highlight bar on the right firmware file andpress the
�� ��OK button, and a countdown will be displayedon the front display of the digital receiver.
6. When the message of ‘END’ appears, restart the digitalreceiver.
8.2 Over the air
You can get a new firmware overthe air. Select the Installa-tion > Firmware Upgrade > OTAFirmware Upgrade menu. Youshould see a screen like the leftfigure.
Satellite Astra (19.2° E)Frequency 12603 MHzSymbol Rate 22000 KS/sPolarisation HorizontalPID 347
On the left table is presentedthe transponder informationappointed by the manufac-turer, Topfield, for firmwareupdate.
This transponder information can be changed. You can get theinformation from the website, http://www.i-topfield.com.Selecting the Start command starts firmware update.

Manufactured under license from Dolby Laboratories. “Dolby” andthe double-D symbol are trademarks of Dolby Laboratories.Correct disposal of this product
This marking shown on the product or its literature indicates thatit should not be disposed with other household wastes at the endof its working life. To prevent possible harm to the environmentor human health from uncontrolled waste disposal, please separatethis from other types of wastes and recycle it responsibly to promotethe sustainable reuse of material resources. Household users shouldcontact either the retailer where they purchased this product or theirlocal government office for details of where and how they can dis-pose this product for environmentally safe recycling. Business usersshould contact their supplier and check the terms and conditions ofthe purchase contract. This product should not be mixed with othercommercial wastes for disposal.
At any time during the life of a product Topfield Co., Ltd. may change or modify the hard-ware or software on any product to introduce new features or improve the functionality ofthe product.
Copyright © 2010, Topfield Co., Ltd. All rights reserved. English versionhttp://www.i-topfield.com