Embed Size (px)
Citation preview
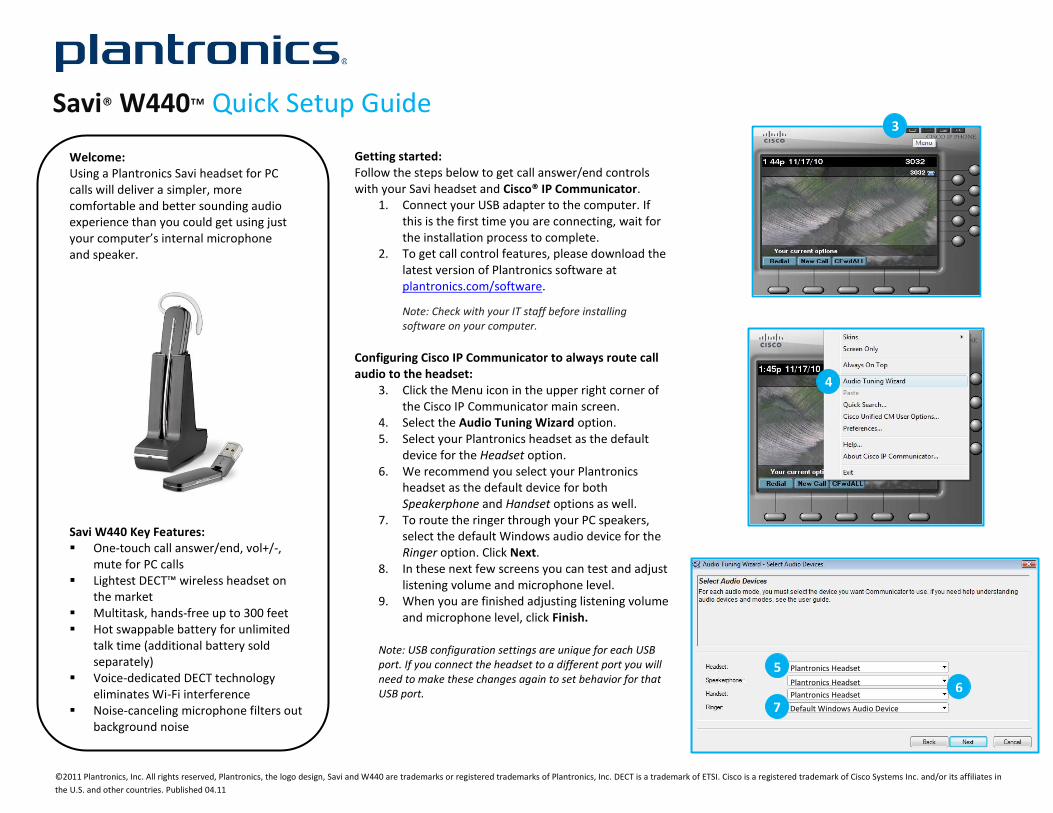
Getting started: Follow the steps below to get call answer/end controls with your Savi headset and Cisco® IP Communicator.
1. Connect your USB adapter to the computer. If this is the first time you are connecting, wait for the installation process to complete.
2. To get call control features, please download the latest version of Plantronics software at plantronics.com/software.
Note: Check with your IT staff before installing software on your computer.
Configuring Cisco IP Communicator to always route call audio to the headset:
3. Click the Menu icon in the upper right corner of the Cisco IP Communicator main screen.
4. Select the Audio Tuning Wizard option. 5. Select your Plantronics headset as the default
device for the Headset option. 6. We recommend you select your Plantronics
headset as the default device for both Speakerphone and Handset options as well.
7. To route the ringer through your PC speakers, select the default Windows audio device for the Ringer option. Click Next.
8. In these next few screens you can test and adjust listening volume and microphone level.
9. When you are finished adjusting listening volume and microphone level, click Finish.
Note: USB configuration settings are unique for each USB port. If you connect the headset to a different port you will need to make these changes again to set behavior for that USB port.
Savi® W440™ Quick Setup Guide
Welcome: Using a Plantronics Savi headset for PC calls will deliver a simpler, more comfortable and better sounding audio experience than you could get using just your computer’s internal microphone and speaker.
Plantronics Headset
©2011 Plantronics, Inc. All rights reserved, Plantronics, the logo design, Savi and W440 are trademarks or registered trademarks of Plantronics, Inc. DECT is a trademark of ETSI. Cisco is a registered trademark of Cisco Systems Inc. and/or its affiliates in
the U.S. and other countries. Published 04.11
3
Savi W440 Key Features: One-touch call answer/end, vol+/-,
mute for PC calls Lightest DECT™ wireless headset on
the market Multitask, hands-free up to 300 feet Hot swappable battery for unlimited
talk time (additional battery sold separately)
Voice-dedicated DECT technology eliminates Wi-Fi interference
Noise-canceling microphone filters out background noise
Plantronics Headset
Plantronics Headset
Default Windows Audio Device
4
5
6
7
Making and Receiving Calls with Cisco IP Communicator
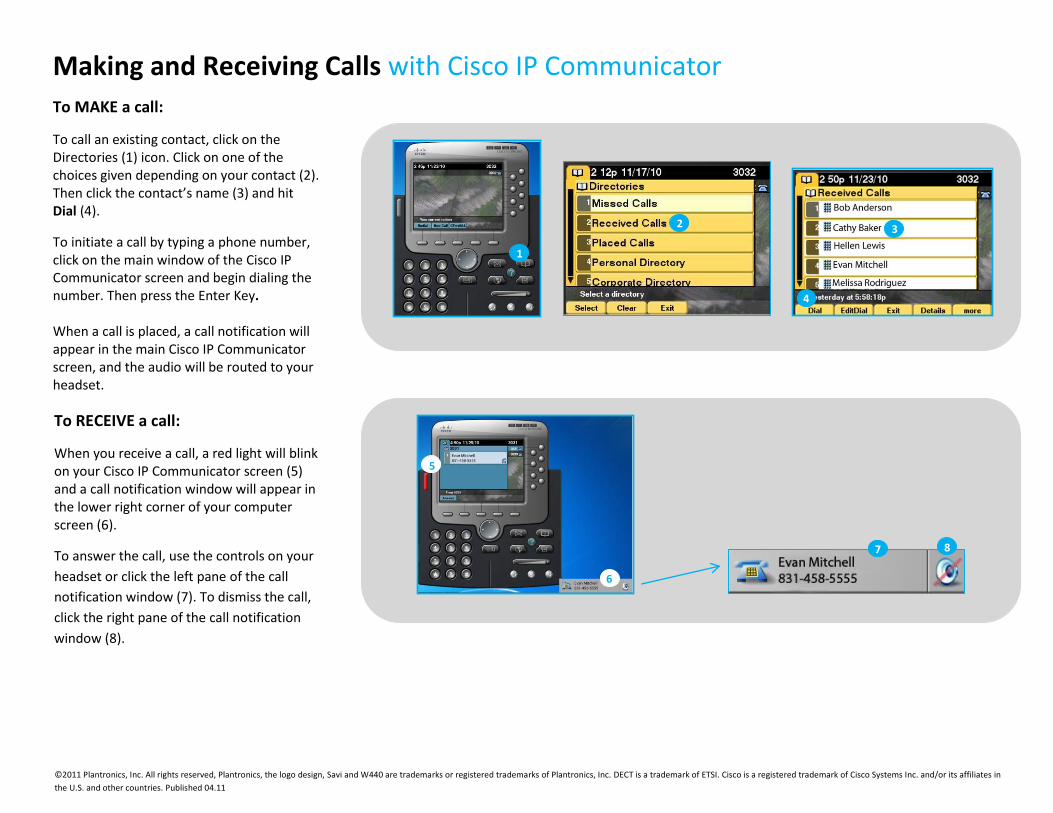
To MAKE a call:
To call an existing contact, click on the Directories (1) icon. Click on one of the choices given depending on your contact (2). Then click the contact’s name (3) and hit Dial (4).
To initiate a call by typing a phone number, click on the main window of the Cisco IP Communicator screen and begin dialing the number. Then press the Enter Key. When a call is placed, a call notification will appear in the main Cisco IP Communicator screen, and the audio will be routed to your headset.
To RECEIVE a call:
When you receive a call, a red light will blink on your Cisco IP Communicator screen (5) and a call notification window will appear in the lower right corner of your computer screen (6).
To answer the call, use the controls on your
headset or click the left pane of the call
notification window (7). To dismiss the call,
click the right pane of the call notification
window (8).
©2011 Plantronics, Inc. All rights reserved, Plantronics, the logo design, Savi and W440 are trademarks or registered trademarks of Plantronics, Inc. DECT is a trademark of ETSI. Cisco is a registered trademark of Cisco Systems Inc. and/or its affiliates in
the U.S. and other countries. Published 04.11
4
1
2 3
4
5
6
8 7


![Savi Episode 12[1]](https://img.pdfslide.us/doc/110x75/55cf8c9e5503462b138e4d4b/savi-episode-121.jpg)


![Savi Episode 14[1]](https://img.pdfslide.us/doc/110x75/55cf8c9e5503462b138e4cd9/savi-episode-141.jpg)