Embed Size (px)
Citation preview
Sash or Balancer Replacement Guide
Weight of window and door unit(s) and accessories will vary. Use a reasonable number of people with sufficient strength to lift, carry, and install window and door unit(s) and accessories. Always use appropriate lifting techniques.
Use of ladders and/or scaffolding and working at elevated levels may be hazardous. Follow equipment manufacturer's instructions for safe operation. Use extreme caution when working around window and door openings. Falling from opening may result in personal injury or death.
Improper use of hand or power tools could result in personal injury and/or product damage. Follow equipment manufacturer's instructions for safe operation. Always wear safety glasses.
Every assembly and installation is different (windloads, structural support, etc.), and Andersen strongly recommends consultation with an Andersen supplier or an experienced contractor, architect, or structural engineer prior to the assembly and installation of any Andersen product. Andersen has no responsibility in regard to the post-manufactured assembly and installation of Andersen products.
Read all instructions carefully before attempting this procedure. If you have any questions about your ability to complete this procedure, call Andersen at 1-888-888-7020 for further direction. Andersen WindowCare® service center hours are Monday through Friday, 7 a.m. to 7 p.m. Central Time and Saturday, 8 a.m. to 4 p.m. Central Time. Thank you for choosing Andersen® products.
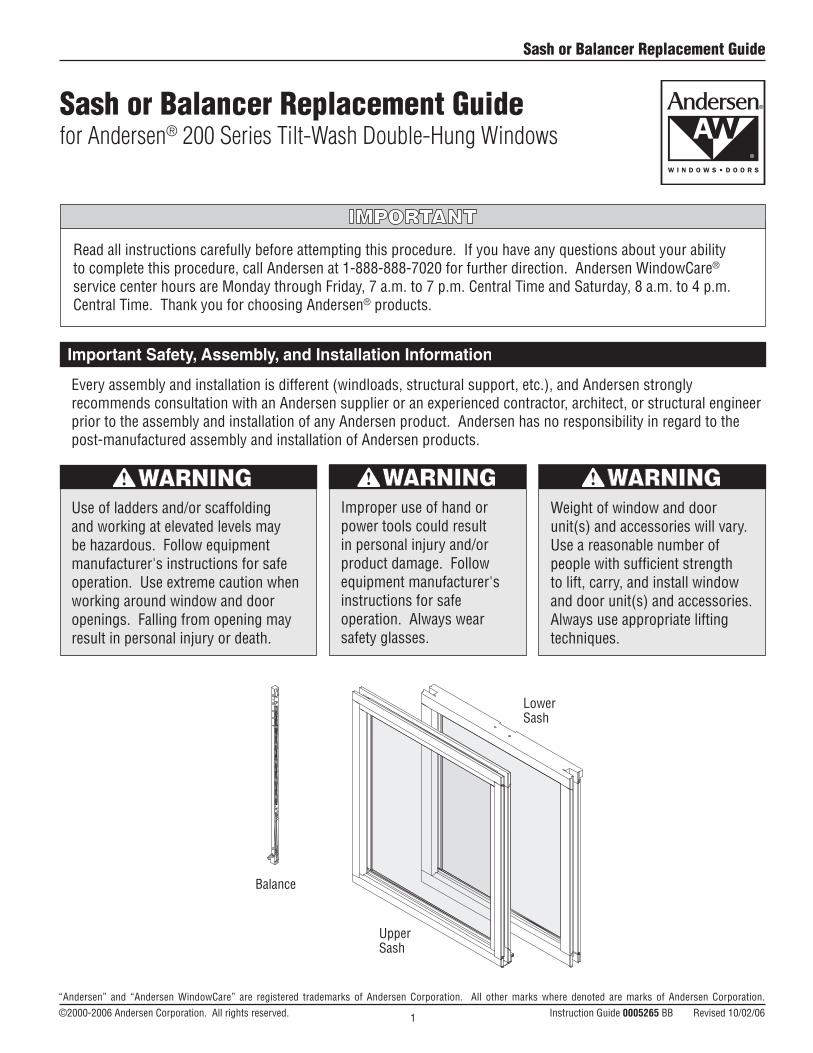
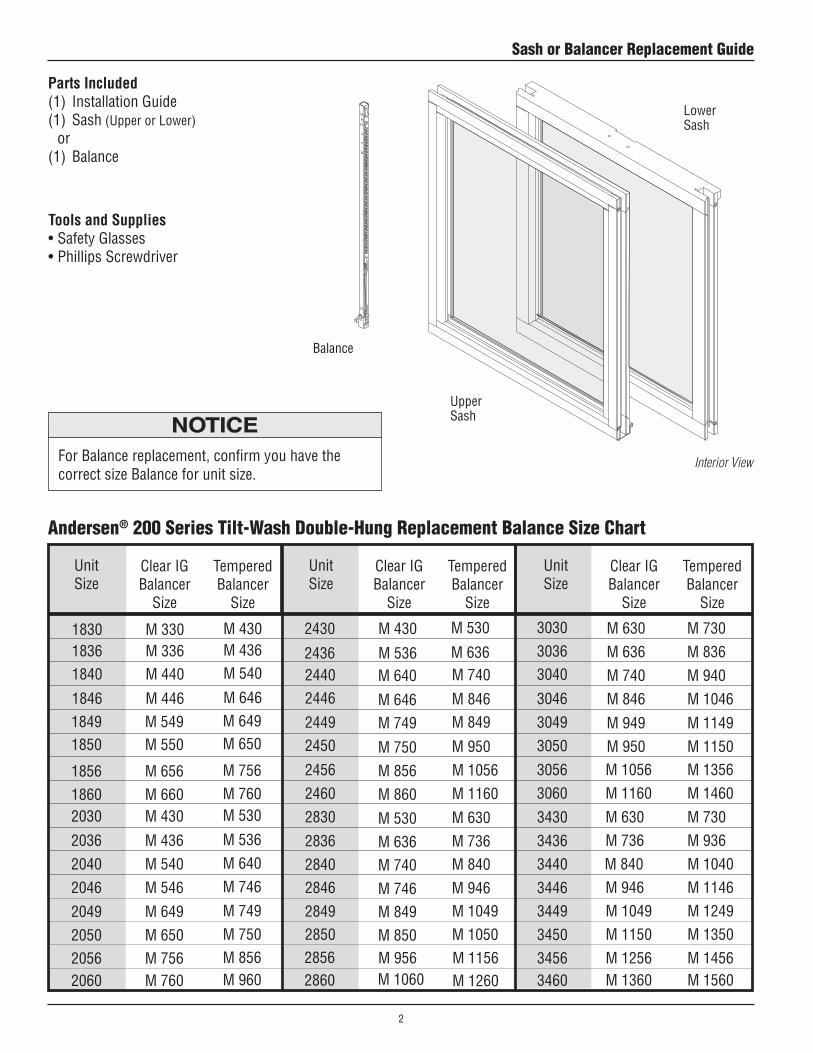
Lower Sash
Upper Sash
Balance
“Andersen” and “Andersen WindowCare” are registered trademarks of Andersen Corporation. All other marks where denoted are marks of Andersen Corporation. ©2000-2006 Andersen Corporation. All rights reserved. Instruction Guide 0005265 BB Revised 10/02/06
Sash or Balancer Replacement Guidefor Andersen® 200 Series Tilt-Wash Double-Hung Windows
1
1830 M 330 M 430 2430 M 430 M 530 M 730M 6303030
Parts Included(1) Installation Guide(1) Sash (Upper or Lower) or (1) Balance
Tools and Supplies• Safety Glasses• Phillips Screwdriver
Andersen® 200 Series Tilt-Wash Double-Hung Replacement Balance Size Chart
Lower Sash
Upper Sash
Balance
Interior ViewFor Balance replacement, confirm you have the correct size Balance for unit size.
UnitSize
Clear IGBalancer
Size
TemperedBalancer
Size
UnitSize
Clear IGBalancer
Size
TemperedBalancer
Size
UnitSize
Clear IGBalancer
Size
TemperedBalancer
Size
18501849
M 550M 549
M 650 M 649
20402036
2030
205620502049
2046
2060
M 540M 436
M 430
M 756M 650M 649
M 546
M 760
M 640M 536
M 530
M 856M 750 M 749
M 746
M 960
3036
30493046
3040
30603056
3050
M 940M 836
M 1356M 1150M 1149
M 1046
M 1460
M 740M 636
M 1056M 950M 949
M 846
M 1160
2449
2446
24602456
2450
2850
284628402836
2830
2849
M 646
M 640
M 856M 750
M 749
M 849M 850
M 740M 636M 530
M 860
M 746
M 846
M 740
M 1056M 950
M 849
M 1049M 1050
M 840M 736M 630
M 1160
M 946
2440
1836
1846
1840M 336
M 446
M 440
M 436
M 646
M 5402436 M 536 M 636
1856 M 656 M 756
1860 M 660 M 760
M 1260M 1156
M 1060M 9562856
2860
34493450
M 1249M 1350
M 1049M 1150
34563460
M 1456M 1560
M 1256M 1360
34303436
M 730M 936
M 630M 736
34403446
M 1040M 1146
M 840M 946
Sash or Balancer Replacement Guide
2
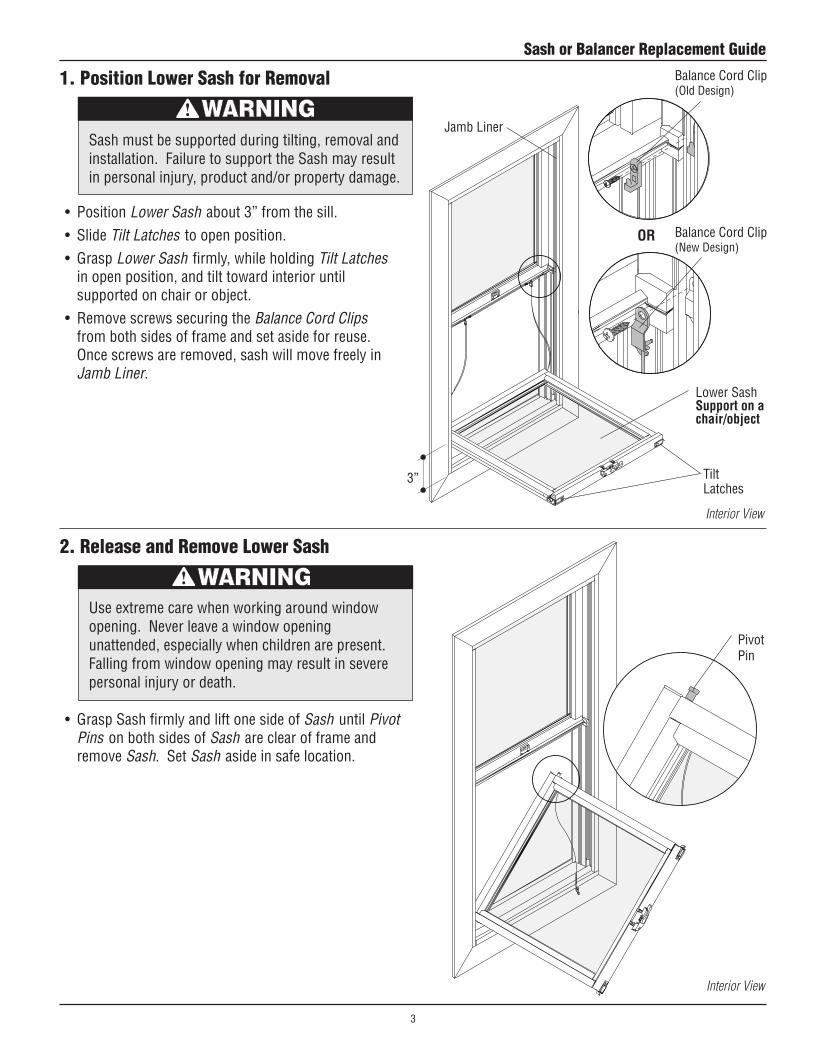
1. Position Lower Sash for Removal
• Position Lower Sash about 3” from the sill.• Slide Tilt Latches to open position.• Grasp Lower Sash firmly, while holding Tilt Latches
in open position, and tilt toward interior until supported on chair or object.
• Remove screws securing the Balance Cord Clips from both sides of frame and set aside for reuse. Once screws are removed, sash will move freely in Jamb Liner.
2. Release and Remove Lower Sash
Sash must be supported during tilting, removal and installation. Failure to support the Sash may result in personal injury, product and/or property damage.
• Grasp Sash firmly and lift one side of Sash until Pivot Pins on both sides of Sash are clear of frame and remove Sash. Set Sash aside in safe location.
Use extreme care when working around window opening. Never leave a window opening unattended, especially when children are present. Falling from window opening may result in severe personal injury or death.
3” Tilt Latches
Balance Cord Clip (New Design)
Pivot Pin
Jamb Liner
Interior View
Interior View
Lower Sash Support on a chair/object
Balance Cord Clip (Old Design)
OR
Sash or Balancer Replacement Guide
3
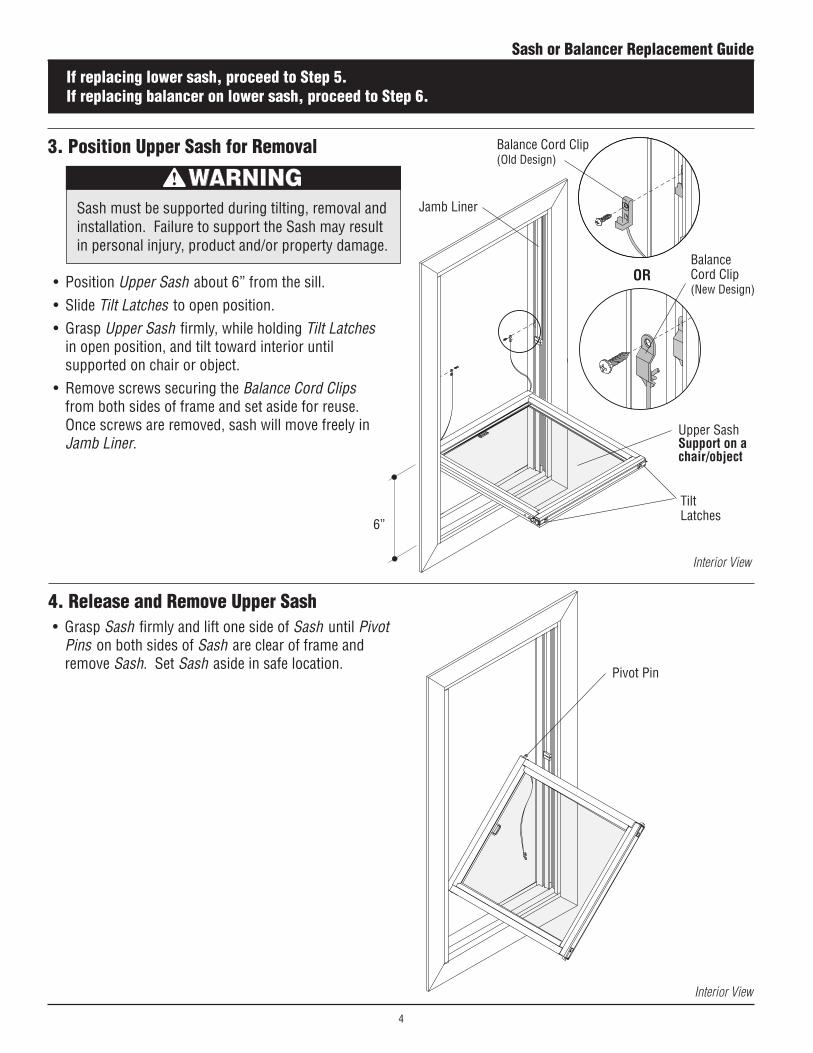
3. Position Upper Sash for Removal
• Position Upper Sash about 6” from the sill.• Slide Tilt Latches to open position.• Grasp Upper Sash firmly, while holding Tilt Latches
in open position, and tilt toward interior until supported on chair or object.
• Remove screws securing the Balance Cord Clips from both sides of frame and set aside for reuse. Once screws are removed, sash will move freely in Jamb Liner.
4. Release and Remove Upper Sash• Grasp Sash firmly and lift one side of Sash until Pivot
Pins on both sides of Sash are clear of frame and remove Sash. Set Sash aside in safe location.
6”
Tilt Latches
Pivot Pin
Interior View
Jamb LinerSash must be supported during tilting, removal and installation. Failure to support the Sash may result in personal injury, product and/or property damage.
Interior View
If replacing lower sash, proceed to Step 5. If replacing balancer on lower sash, proceed to Step 6.
Upper Sash Support on a chair/object
Balance Cord Clip (Old Design)
Balance Cord Clip (New Design)
OR
Sash or Balancer Replacement Guide
4
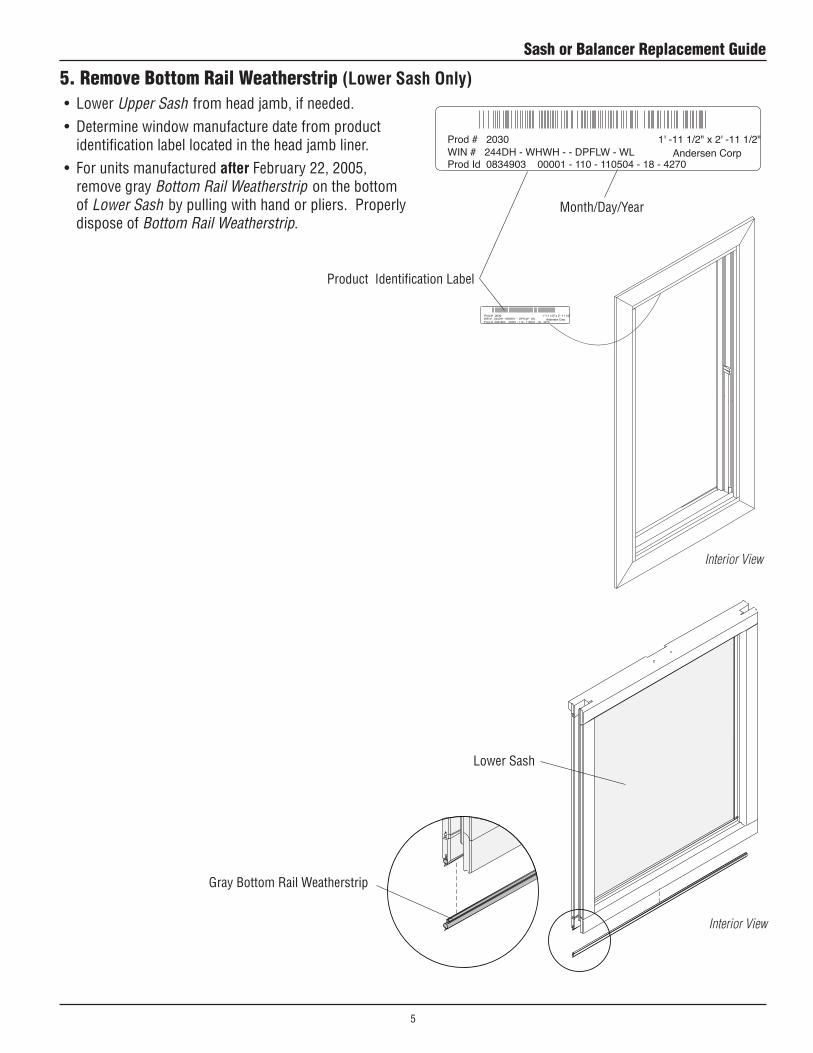
5. Remove Bottom Rail Weatherstrip (Lower Sash Only)• Lower Upper Sash from head jamb, if needed.• Determine window manufacture date from product
identification label located in the head jamb liner.• For units manufactured after February 22, 2005,
remove gray Bottom Rail Weatherstrip on the bottom of Lower Sash by pulling with hand or pliers. Properly dispose of Bottom Rail Weatherstrip.
Andersen CorpProd # 2030
Prod Id 0834903 00001 - 110 - 110504 - 18 - 4270WIN # 244DH - WHWH - - DPFLW - WL
1' -11 1/2" x 2' -11 1/2"
Andersen CorpProd # 2030
Prod Id 0834903 00001 - 110 - 110504 - 18 - 4270WIN # 244DH - WHWH - - DPFLW - WL
1' -11 1/2" x 2' -11 1/2"
Product Identification Label
Month/Day/Year
Lower Sash
Gray Bottom Rail Weatherstrip
Interior View
Interior View
Sash or Balancer Replacement Guide
5
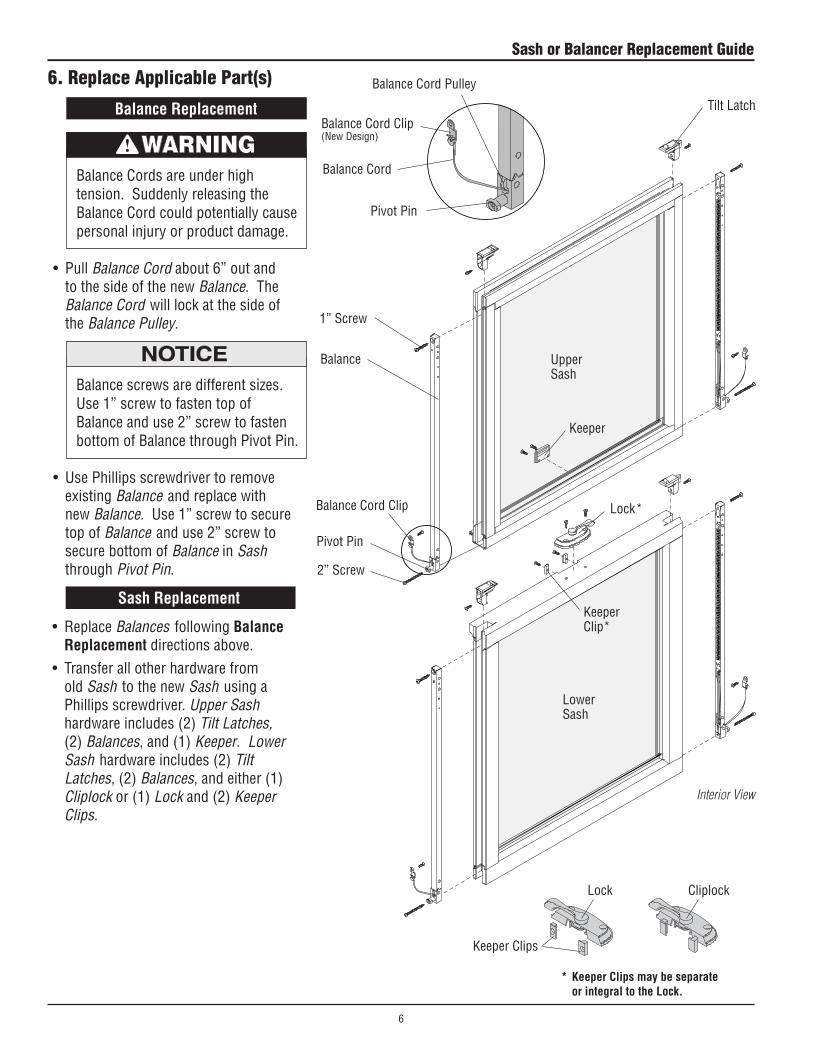
Balance
• Use Phillips screwdriver to remove existing Balance and replace with new Balance. Use 1” screw to secure top of Balance and use 2” screw to secure bottom of Balance in Sash through Pivot Pin.
6. Replace Applicable Part(s)
• Pull Balance Cord about 6” out and to the side of the new Balance. The Balance Cord will lock at the side of the Balance Pulley.
Lower Sash
Upper Sash
Balance screws are different sizes. Use 1” screw to fasten top of Balance and use 2” screw to fasten bottom of Balance through Pivot Pin.
1” Screw
2” Screw
Pivot Pin
Interior View
Balance Cords are under high tension. Suddenly releasing the Balance Cord could potentially cause personal injury or product damage.
Balance Cord Pulley
Balance Cord Clip(New Design)
Balance Cord
Pivot Pin
Keeper
Tilt Latch
Keeper Clip*
Lock*
Balance Replacement
• Replace Balances following Balance Replacement directions above.
• Transfer all other hardware from old Sash to the new Sash using a Phillips screwdriver. Upper Sash hardware includes (2) Tilt Latches, (2) Balances, and (1) Keeper. Lower Sash hardware includes (2) Tilt Latches, (2) Balances, and either (1) Cliplock or (1) Lock and (2) Keeper Clips.
Sash Replacement
* Keeper Clips may be separate or integral to the Lock.
CliplockLock
Keeper Clips
Balance Cord Clip
Sash or Balancer Replacement Guide
6
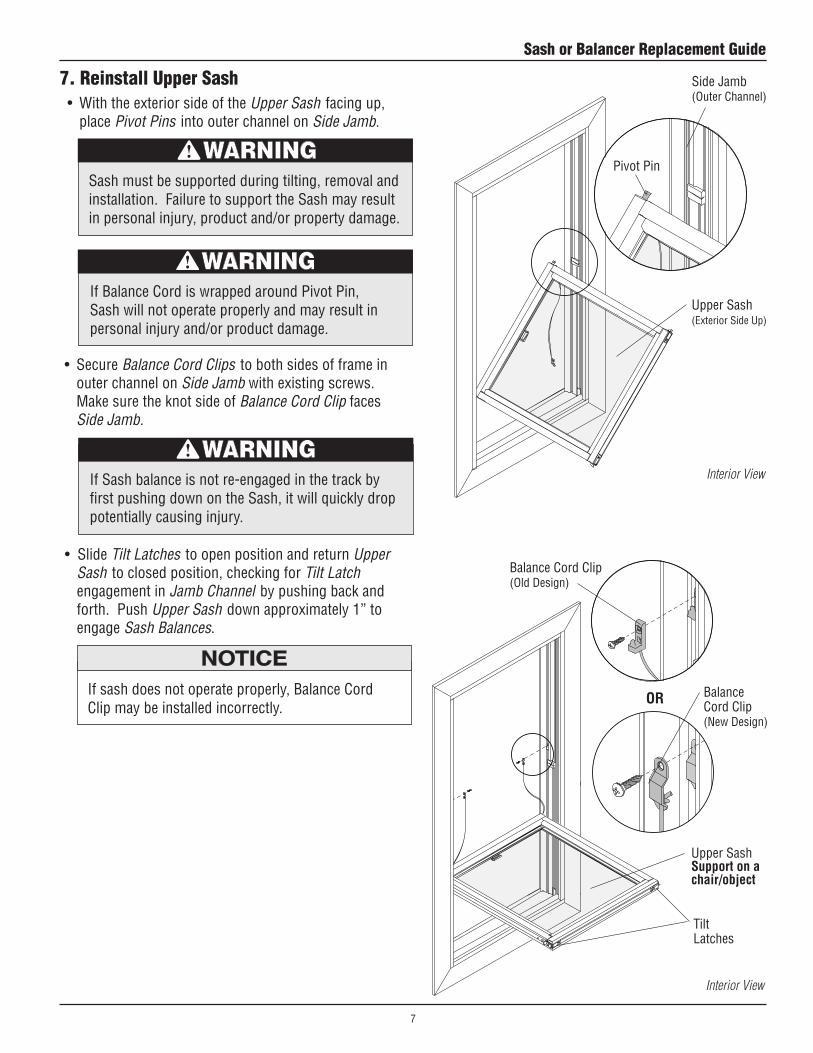
7. Reinstall Upper Sash• With the exterior side of the Upper Sash facing up,
place Pivot Pins into outer channel on Side Jamb.
Upper Sash(Exterior Side Up)
Pivot Pin
Side Jamb (Outer Channel)
Interior ViewIf Sash balance is not re-engaged in the track by first pushing down on the Sash, it will quickly drop potentially causing injury.
• Slide Tilt Latches to open position and return Upper Sash to closed position, checking for Tilt Latch engagement in Jamb Channel by pushing back and forth. Push Upper Sash down approximately 1” to engage Sash Balances.
• Secure Balance Cord Clips to both sides of frame in outer channel on Side Jamb with existing screws. Make sure the knot side of Balance Cord Clip faces Side Jamb.
If Balance Cord is wrapped around Pivot Pin, Sash will not operate properly and may result in personal injury and/or product damage.
Sash must be supported during tilting, removal and installation. Failure to support the Sash may result in personal injury, product and/or property damage.
Tilt Latches
Interior View
Upper Sash Support on a chair/object
Balance Cord Clip (Old Design)
Balance Cord Clip (New Design)
ORIf sash does not operate properly, Balance Cord Clip may be installed incorrectly.
Sash or Balancer Replacement Guide
7
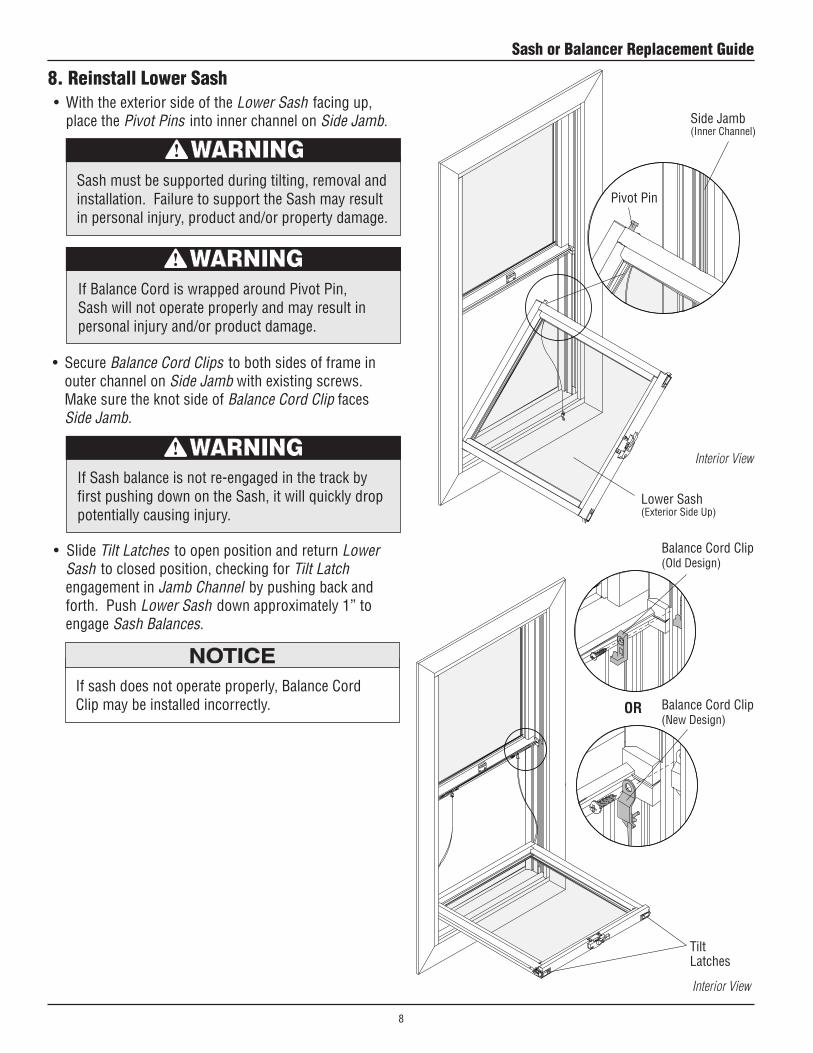
8. Reinstall Lower Sash
Pivot Pin
Lower Sash (Exterior Side Up)
• With the exterior side of the Lower Sash facing up, place the Pivot Pins into inner channel on Side Jamb. Side Jamb
(Inner Channel)
Interior ViewIf Sash balance is not re-engaged in the track by first pushing down on the Sash, it will quickly drop potentially causing injury.
• Slide Tilt Latches to open position and return Lower Sash to closed position, checking for Tilt Latch engagement in Jamb Channel by pushing back and forth. Push Lower Sash down approximately 1” to engage Sash Balances.
If Balance Cord is wrapped around Pivot Pin, Sash will not operate properly and may result in personal injury and/or product damage.
• Secure Balance Cord Clips to both sides of frame in outer channel on Side Jamb with existing screws. Make sure the knot side of Balance Cord Clip faces Side Jamb.
Sash must be supported during tilting, removal and installation. Failure to support the Sash may result in personal injury, product and/or property damage.
If sash does not operate properly, Balance Cord Clip may be installed incorrectly.
Tilt Latches
Balance Cord Clip (New Design)
Interior View
Balance Cord Clip (Old Design)
OR
Sash or Balancer Replacement Guide
8
• DO NOT expose unfinished wood to high moisture conditions, excessive heat or humidity. Finish interior wood surfaces immediately after installation. Unfinished wood surfaces will discolor, deteriorate, and/or may bow and split.
• DO NOT stain or paint weatherstrip, silicone beads, vinyl, glass, or hardware. Damage to product may occur and unit operation may be impaired.
• Acid solutions used to wash masonry/concrete will damage glass, fasteners, hardware, and metal flashing. If these solutions are used, follow the acid solution manufacturer's instructions carefully. Protect and/or cover Andersen products during the cleaning process to prevent acid contact. If acid does come in contact with unit, immediately wash all surfaces with clean water.
MAINTENANCEImmediately sand and refinish any interior wood thatbecomes stained or mildewed to prevent further discoloration and/or damage. For further information,contact your local Andersen dealer. Dealers can be found in the Yellow Pages under Windows.
Finishing, Cleaning, and Maintenance Instructions
INTERIOR FINISHING Read and follow finishing manufacturer’s instructions
and warnings on each container of finish material for priming, painting, staining, and varnishing.
CLEANING Clean exterior frame, sash members, and insect
screens using a mild detergent-and-water solution and a soft cloth or brush. DO NOT use abrasive cleaners or solutions containing corrosive solvents. For persistent dirt or grime, use a nonabrasive cleanser or a mixture of water and alcohol or ammonia.
Sash or Balancer Replacement Guide
9

This page intentionally left blank.
Sash or Balancer Replacement Guide
10