Embed Size (px)
Citation preview

SAS® Business Rules Manager 3.2: User’s Guide
SAS® Documentation
The correct bibliographic citation for this manual is as follows: SAS Institute Inc. 2016. SAS® Business Rules Manager 3.2: User’s Guide. Cary, NC: SAS Institute Inc.
SAS® Business Rules Manager 3.2: User’s Guide
Copyright © 2016, SAS Institute Inc., Cary, NC, USA
All Rights Reserved. Produced in the United States of America.
For a hard copy book: No part of this publication may be reproduced, stored in a retrieval system, or transmitted, in any form or by any means, electronic, mechanical, photocopying, or otherwise, without the prior written permission of the publisher, SAS Institute Inc.
For a web download or e-book: Your use of this publication shall be governed by the terms established by the vendor at the time you acquire this publication.
The scanning, uploading, and distribution of this book via the Internet or any other means without the permission of the publisher is illegal and punishable by law. Please purchase only authorized electronic editions and do not participate in or encourage electronic piracy of copyrighted materials. Your support of others' rights is appreciated.
U.S. Government License Rights; Restricted Rights: The Software and its documentation is commercial computer software developed at private expense and is provided with RESTRICTED RIGHTS to the United States Government. Use, duplication, or disclosure of the Software by the United States Government is subject to the license terms of this Agreement pursuant to, as applicable, FAR 12.212, DFAR 227.7202-1(a), DFAR 227.7202-3(a), and DFAR 227.7202-4, and, to the extent required under U.S. federal law, the minimum restricted rights as set out in FAR 52.227-19 (DEC 2007). If FAR 52.227-19 is applicable, this provision serves as notice under clause (c) thereof and no other notice is required to be affixed to the Software or documentation. The Government’s rights in Software and documentation shall be only those set forth in this Agreement.
SAS Institute Inc., SAS Campus Drive, Cary, NC 27513-2414
February 2017
SAS® and all other SAS Institute Inc. product or service names are registered trademarks or trademarks of SAS Institute Inc. in the USA and other countries. ® indicates USA registration.
Other brand and product names are trademarks of their respective companies.
3.2-P1:brsug

Contents
What’s New in SAS Business Rules Manager 3.2 . . . . . . . . . . . . . . . . . . . . . . . . . . . . . . viiAccessibility . . . . . . . . . . . . . . . . . . . . . . . . . . . . . . . . . . . . . . . . . . . . . . . . . . . . . . . . . . . ix
PART 1 Getting Started 1
Chapter 1 • Introduction to SAS Business Rules Manager . . . . . . . . . . . . . . . . . . . . . . . . . . . . . . 3Enterprise Decision Management Systems . . . . . . . . . . . . . . . . . . . . . . . . . . . . . . . . . . . 3About SAS Business Rules Manager . . . . . . . . . . . . . . . . . . . . . . . . . . . . . . . . . . . . . . . . 3Managing Preferences . . . . . . . . . . . . . . . . . . . . . . . . . . . . . . . . . . . . . . . . . . . . . . . . . . . 5Viewing Help and Documentation . . . . . . . . . . . . . . . . . . . . . . . . . . . . . . . . . . . . . . . . . . 7Create and Publish Business Rules . . . . . . . . . . . . . . . . . . . . . . . . . . . . . . . . . . . . . . . . . . 7
Chapter 2 • Quick Start Tutorial . . . . . . . . . . . . . . . . . . . . . . . . . . . . . . . . . . . . . . . . . . . . . . . . . . . . 9Overview of the Quick Start Tutorial . . . . . . . . . . . . . . . . . . . . . . . . . . . . . . . . . . . . . . . . 9Make the Tutorial Files Available . . . . . . . . . . . . . . . . . . . . . . . . . . . . . . . . . . . . . . . . . . 10Sign In . . . . . . . . . . . . . . . . . . . . . . . . . . . . . . . . . . . . . . . . . . . . . . . . . . . . . . . . . . . . . . . 11Define Data Sources . . . . . . . . . . . . . . . . . . . . . . . . . . . . . . . . . . . . . . . . . . . . . . . . . . . . 11Define Business Rule Folders . . . . . . . . . . . . . . . . . . . . . . . . . . . . . . . . . . . . . . . . . . . . . 13Create a Vocabulary, Entities, and Terms . . . . . . . . . . . . . . . . . . . . . . . . . . . . . . . . . . . . 14Create a Rule Set and Define Business Rules . . . . . . . . . . . . . . . . . . . . . . . . . . . . . . . . 17Create and Publish a Rule Flow . . . . . . . . . . . . . . . . . . . . . . . . . . . . . . . . . . . . . . . . . . . 20
Chapter 3 • Managing Data Tables . . . . . . . . . . . . . . . . . . . . . . . . . . . . . . . . . . . . . . . . . . . . . . . . . 21About Managing Data Tables . . . . . . . . . . . . . . . . . . . . . . . . . . . . . . . . . . . . . . . . . . . . . 21Adding Tables Using SAS Visual Data Builder . . . . . . . . . . . . . . . . . . . . . . . . . . . . . . . 22Add Tables That Are Registered in Metadata . . . . . . . . . . . . . . . . . . . . . . . . . . . . . . . . . 22Register and Add New Tables . . . . . . . . . . . . . . . . . . . . . . . . . . . . . . . . . . . . . . . . . . . . 22Edit Table Properties and View Table Metadata . . . . . . . . . . . . . . . . . . . . . . . . . . . . . . . 23View Table Data . . . . . . . . . . . . . . . . . . . . . . . . . . . . . . . . . . . . . . . . . . . . . . . . . . . . . . . 24Filter Data in the Table View . . . . . . . . . . . . . . . . . . . . . . . . . . . . . . . . . . . . . . . . . . . . . 25Create a Table Summary . . . . . . . . . . . . . . . . . . . . . . . . . . . . . . . . . . . . . . . . . . . . . . . . . 26Delete a Table Summary . . . . . . . . . . . . . . . . . . . . . . . . . . . . . . . . . . . . . . . . . . . . . . . . . 27Add Attachments to a Table . . . . . . . . . . . . . . . . . . . . . . . . . . . . . . . . . . . . . . . . . . . . . . 28Add Comments to a Table . . . . . . . . . . . . . . . . . . . . . . . . . . . . . . . . . . . . . . . . . . . . . . . 28Remove a Table . . . . . . . . . . . . . . . . . . . . . . . . . . . . . . . . . . . . . . . . . . . . . . . . . . . . . . . 28
Chapter 4 • Managing Business Rule Folders . . . . . . . . . . . . . . . . . . . . . . . . . . . . . . . . . . . . . . . . 29About Business Rules Folders . . . . . . . . . . . . . . . . . . . . . . . . . . . . . . . . . . . . . . . . . . . . 29Create New Top-Level Folders . . . . . . . . . . . . . . . . . . . . . . . . . . . . . . . . . . . . . . . . . . . . 29Create New Folders . . . . . . . . . . . . . . . . . . . . . . . . . . . . . . . . . . . . . . . . . . . . . . . . . . . . 30Move Folders . . . . . . . . . . . . . . . . . . . . . . . . . . . . . . . . . . . . . . . . . . . . . . . . . . . . . . . . . 30Delete Folders . . . . . . . . . . . . . . . . . . . . . . . . . . . . . . . . . . . . . . . . . . . . . . . . . . . . . . . . . 30
PART 2 Defining a Rules Database 31
Chapter 5 • Managing Vocabularies . . . . . . . . . . . . . . . . . . . . . . . . . . . . . . . . . . . . . . . . . . . . . . . . 33Introduction to Vocabularies, Entities, and Terms . . . . . . . . . . . . . . . . . . . . . . . . . . . . . 33Tips for Creating Entities and Terms . . . . . . . . . . . . . . . . . . . . . . . . . . . . . . . . . . . . . . . 34Create a Vocabulary . . . . . . . . . . . . . . . . . . . . . . . . . . . . . . . . . . . . . . . . . . . . . . . . . . . . 34Create an Entity . . . . . . . . . . . . . . . . . . . . . . . . . . . . . . . . . . . . . . . . . . . . . . . . . . . . . . . 35Create a Term . . . . . . . . . . . . . . . . . . . . . . . . . . . . . . . . . . . . . . . . . . . . . . . . . . . . . . . . . 35Import Terms from a Data Source . . . . . . . . . . . . . . . . . . . . . . . . . . . . . . . . . . . . . . . . . 36Specify Domain Values . . . . . . . . . . . . . . . . . . . . . . . . . . . . . . . . . . . . . . . . . . . . . . . . . . 37Edit Existing Vocabularies, Entities, or Terms . . . . . . . . . . . . . . . . . . . . . . . . . . . . . . . . 38Delete Vocabularies, Entities, or Terms . . . . . . . . . . . . . . . . . . . . . . . . . . . . . . . . . . . . . 38Move Vocabularies, Entities, Terms . . . . . . . . . . . . . . . . . . . . . . . . . . . . . . . . . . . . . . . . 38Duplicate Vocabularies, Entities, or Terms . . . . . . . . . . . . . . . . . . . . . . . . . . . . . . . . . . . 38Search for Rule Sets by Term . . . . . . . . . . . . . . . . . . . . . . . . . . . . . . . . . . . . . . . . . . . . . 39
Chapter 6 • Using Lookup Tables And Functions . . . . . . . . . . . . . . . . . . . . . . . . . . . . . . . . . . . . . 41About Lookup Tables and Functions . . . . . . . . . . . . . . . . . . . . . . . . . . . . . . . . . . . . . . . 41Create a New Lookup Table . . . . . . . . . . . . . . . . . . . . . . . . . . . . . . . . . . . . . . . . . . . . . . 42Refresh a Lookup Table . . . . . . . . . . . . . . . . . . . . . . . . . . . . . . . . . . . . . . . . . . . . . . . . . 43Delete Lookup Tables . . . . . . . . . . . . . . . . . . . . . . . . . . . . . . . . . . . . . . . . . . . . . . . . . . . 43Duplicate Lookup Tables . . . . . . . . . . . . . . . . . . . . . . . . . . . . . . . . . . . . . . . . . . . . . . . . 43Move Lookup Tables . . . . . . . . . . . . . . . . . . . . . . . . . . . . . . . . . . . . . . . . . . . . . . . . . . . 44Dictionary . . . . . . . . . . . . . . . . . . . . . . . . . . . . . . . . . . . . . . . . . . . . . . . . . . . . . . . . . . . . 44
Chapter 7 • Managing Rules and Rule Sets . . . . . . . . . . . . . . . . . . . . . . . . . . . . . . . . . . . . . . . . . . 47About Rules, Rule Sets, and Expressions . . . . . . . . . . . . . . . . . . . . . . . . . . . . . . . . . . . . 48How Rules Are Evaluated and When Rule-Fired Records Are Generated . . . . . . . . . . 49Create a New Rule Set . . . . . . . . . . . . . . . . . . . . . . . . . . . . . . . . . . . . . . . . . . . . . . . . . . 49Defining New Rules in the Rule Set . . . . . . . . . . . . . . . . . . . . . . . . . . . . . . . . . . . . . . . . 50Validate the Expressions in a Rule Set . . . . . . . . . . . . . . . . . . . . . . . . . . . . . . . . . . . . . . 64Change the Order of Rules in a Rule Set . . . . . . . . . . . . . . . . . . . . . . . . . . . . . . . . . . . . 64Copy Rules and Expressions . . . . . . . . . . . . . . . . . . . . . . . . . . . . . . . . . . . . . . . . . . . . . 65Delete Terms, Rules, and Expressions . . . . . . . . . . . . . . . . . . . . . . . . . . . . . . . . . . . . . . 66Edit the Properties of a Rule Set . . . . . . . . . . . . . . . . . . . . . . . . . . . . . . . . . . . . . . . . . . . 67Edit the Properties of a Rule . . . . . . . . . . . . . . . . . . . . . . . . . . . . . . . . . . . . . . . . . . . . . . 67Display Usage Information for a Rule Set . . . . . . . . . . . . . . . . . . . . . . . . . . . . . . . . . . . 67Managing Rule Set Versions . . . . . . . . . . . . . . . . . . . . . . . . . . . . . . . . . . . . . . . . . . . . . . 68Add Comments to a Rule Set . . . . . . . . . . . . . . . . . . . . . . . . . . . . . . . . . . . . . . . . . . . . . 70Add Attachments to a Rule Set . . . . . . . . . . . . . . . . . . . . . . . . . . . . . . . . . . . . . . . . . . . . 70Duplicate Rule Sets . . . . . . . . . . . . . . . . . . . . . . . . . . . . . . . . . . . . . . . . . . . . . . . . . . . . . 70Move Rule Sets . . . . . . . . . . . . . . . . . . . . . . . . . . . . . . . . . . . . . . . . . . . . . . . . . . . . . . . . 71Delete Rule Sets . . . . . . . . . . . . . . . . . . . . . . . . . . . . . . . . . . . . . . . . . . . . . . . . . . . . . . . 71Validate and Save a Rule Set . . . . . . . . . . . . . . . . . . . . . . . . . . . . . . . . . . . . . . . . . . . . . 71
Chapter 8 • Creating and Publishing Rule Flows . . . . . . . . . . . . . . . . . . . . . . . . . . . . . . . . . . . . . 73Introduction to Rule Flows . . . . . . . . . . . . . . . . . . . . . . . . . . . . . . . . . . . . . . . . . . . . . . . 74Simple Rule Flows, Complex Rule Flows, and BY Groups . . . . . . . . . . . . . . . . . . . . . . 74Create a Rule Flow Using the Rule Flow Editor . . . . . . . . . . . . . . . . . . . . . . . . . . . . . . 75Create a Rule Flow by Using Discovery Techniques . . . . . . . . . . . . . . . . . . . . . . . . . . . 76Open Rule Sets from the Rule Flow Editor . . . . . . . . . . . . . . . . . . . . . . . . . . . . . . . . . . 79Add Attachments to a Rule Flow . . . . . . . . . . . . . . . . . . . . . . . . . . . . . . . . . . . . . . . . . . 79Add Comments to a Rule Flow . . . . . . . . . . . . . . . . . . . . . . . . . . . . . . . . . . . . . . . . . . . 80Change the Order of the Rule Sets . . . . . . . . . . . . . . . . . . . . . . . . . . . . . . . . . . . . . . . . . 80View the Terms Used in a Rule Flow . . . . . . . . . . . . . . . . . . . . . . . . . . . . . . . . . . . . . . . 80Managing Versions of a Rule Flow . . . . . . . . . . . . . . . . . . . . . . . . . . . . . . . . . . . . . . . . 81Rename a Rule Flow . . . . . . . . . . . . . . . . . . . . . . . . . . . . . . . . . . . . . . . . . . . . . . . . . . . . 81Duplicate Rule Flows . . . . . . . . . . . . . . . . . . . . . . . . . . . . . . . . . . . . . . . . . . . . . . . . . . . 81
iv Contents

Move Rule Flows . . . . . . . . . . . . . . . . . . . . . . . . . . . . . . . . . . . . . . . . . . . . . . . . . . . . . . 82Remove Rule Sets from a Rule Flow . . . . . . . . . . . . . . . . . . . . . . . . . . . . . . . . . . . . . . . 82Delete Rule Flows . . . . . . . . . . . . . . . . . . . . . . . . . . . . . . . . . . . . . . . . . . . . . . . . . . . . . . 82Testing a Rule Flow . . . . . . . . . . . . . . . . . . . . . . . . . . . . . . . . . . . . . . . . . . . . . . . . . . . . 82Generating DATA Step Code for a Rule Flow . . . . . . . . . . . . . . . . . . . . . . . . . . . . . . . . 85Dynamically Running the Latest Rule Flow Version . . . . . . . . . . . . . . . . . . . . . . . . . . . 85Reducing Overhead in SAS Data Integration Studio . . . . . . . . . . . . . . . . . . . . . . . . . . . 86When Are Output Records Generated? . . . . . . . . . . . . . . . . . . . . . . . . . . . . . . . . . . . . . 86Publish a Rule Flow . . . . . . . . . . . . . . . . . . . . . . . . . . . . . . . . . . . . . . . . . . . . . . . . . . . . 86Display Publish Information for Rule Flows . . . . . . . . . . . . . . . . . . . . . . . . . . . . . . . . . 87Deploy a Rule Flow as a Stored Process . . . . . . . . . . . . . . . . . . . . . . . . . . . . . . . . . . . . 87Viewing Lineage Information for a Rule Flow . . . . . . . . . . . . . . . . . . . . . . . . . . . . . . . . 88
PART 3 Using SAS Workflow with SAS Business Rules Manager 91
Chapter 9 • Starting a Workflow and Working with Tasks . . . . . . . . . . . . . . . . . . . . . . . . . . . . . . 93Overview of Using Workflows . . . . . . . . . . . . . . . . . . . . . . . . . . . . . . . . . . . . . . . . . . . . 93Start a New Workflow . . . . . . . . . . . . . . . . . . . . . . . . . . . . . . . . . . . . . . . . . . . . . . . . . . 93Working with Workflow Tasks . . . . . . . . . . . . . . . . . . . . . . . . . . . . . . . . . . . . . . . . . . . . 94
Chapter 10 • Managing Workflows . . . . . . . . . . . . . . . . . . . . . . . . . . . . . . . . . . . . . . . . . . . . . . . . . 97Overview of Managing Workflows . . . . . . . . . . . . . . . . . . . . . . . . . . . . . . . . . . . . . . . . 97Viewing Workflows . . . . . . . . . . . . . . . . . . . . . . . . . . . . . . . . . . . . . . . . . . . . . . . . . . . . 98Set Mappings . . . . . . . . . . . . . . . . . . . . . . . . . . . . . . . . . . . . . . . . . . . . . . . . . . . . . . . . . 99Working with Workflow Participants . . . . . . . . . . . . . . . . . . . . . . . . . . . . . . . . . . . . . . 100Edit Task Properties . . . . . . . . . . . . . . . . . . . . . . . . . . . . . . . . . . . . . . . . . . . . . . . . . . . 102Terminate a Workflow . . . . . . . . . . . . . . . . . . . . . . . . . . . . . . . . . . . . . . . . . . . . . . . . . 102
PART 4 Appendix 103
Appendix 1 • Rule-Fired and Test Information Tables . . . . . . . . . . . . . . . . . . . . . . . . . . . . . . . . 105Overview . . . . . . . . . . . . . . . . . . . . . . . . . . . . . . . . . . . . . . . . . . . . . . . . . . . . . . . . . . . . 105Columns in the Test Information Table . . . . . . . . . . . . . . . . . . . . . . . . . . . . . . . . . . . . 106Columns in the Rule-Fired Details Table . . . . . . . . . . . . . . . . . . . . . . . . . . . . . . . . . . . 106Columns in the Rules-Fired Summary Table . . . . . . . . . . . . . . . . . . . . . . . . . . . . . . . . 107
Glossary . . . . . . . . . . . . . . . . . . . . . . . . . . . . . . . . . . . . . . . . . . . . . . . . . . . . . 109Index . . . . . . . . . . . . . . . . . . . . . . . . . . . . . . . . . . . . . . . . . . . . . . . . . . . . . . . . 113
Contents v

vi Contents

What’s New in SAS Business Rules Manager 3.2
Overview
SAS Business Rules Manager 3.2 runs on the fourth maintenance release of SAS 9.4. Major features for this release include the ability to set permissions on top-level folders and the ability to control access to import and export macros. New features and enhancements in this release enable you to perform the following tasks:
• define an administrator role for folders and set permissions on top-level folders
• control the ability to import and export business rules content
• set Read-Only privileges for vocabularies and lookup tables
• set a default application server for testing rule flows
• delete published rule flows
• generate SAS DATA step (DS1) code for rule flows
• use Oracle Database 12c for the SAS Decision Manager database
Generate SAS DATA Step Code for Rule Flows
The brm.runtime.codetype property controls whether SAS Business Rules Manager generates DS2 code or SAS DATA step (DS1) code for rule flows. See “Business Rules Manager Web Advanced Properties” in SAS Business Rules Manager: Administrator’s Guide for more information.
Define a Business Rules Folder Administrator
The brm.folder.config.enabled property and the Folder Administration capability in SAS Management Console enable you to define a role for a business rules folder administrator. Users assigned to this role control which groups have access to business rules folders and the location of tests and test data for that folder. See “Enable Business Rules Folder Administration” in SAS Business Rules Manager: Administrator’s Guide and “Create New Top-Level Folders” on page 29 for more information.
vii

Control Permission for Importing and Exporting Business Rules Content
SAS Business Rules Manager provides several macros for importing and exporting vocabularies, terms, lookup tables, rule sets, and rule flows to and from the Decision Manager database. You can limit the ability to run these macros by setting the correct properties and configuring identities in SAS Management Console. See “Configure the Ability to Import and Export Content” in SAS Business Rules Manager: Administrator’s Guide for more information.
viii SAS Business Rules Manager 3.2

Accessibility
For information about the accessibility of this product, see Accessibility Features of SAS Business Rules Manager 3.2 at support.sas.com.
ix

x SAS Business Rules Manager 3.2

Part 1
Getting Started
Chapter 1Introduction to SAS Business Rules Manager . . . . . . . . . . . . . . . . . . . . . 3
Chapter 2Quick Start Tutorial . . . . . . . . . . . . . . . . . . . . . . . . . . . . . . . . . . . . . . . . . . . . . . . 9
Chapter 3Managing Data Tables . . . . . . . . . . . . . . . . . . . . . . . . . . . . . . . . . . . . . . . . . . . 21
Chapter 4Managing Business Rule Folders . . . . . . . . . . . . . . . . . . . . . . . . . . . . . . . . 29
1

2

Chapter 1
Introduction to SAS Business Rules Manager
Enterprise Decision Management Systems . . . . . . . . . . . . . . . . . . . . . . . . . . . . . . . . . 3
About SAS Business Rules Manager . . . . . . . . . . . . . . . . . . . . . . . . . . . . . . . . . . . . . . . 3
Managing Preferences . . . . . . . . . . . . . . . . . . . . . . . . . . . . . . . . . . . . . . . . . . . . . . . . . . 5About Setting Preferences . . . . . . . . . . . . . . . . . . . . . . . . . . . . . . . . . . . . . . . . . . . . . 5Global Preferences . . . . . . . . . . . . . . . . . . . . . . . . . . . . . . . . . . . . . . . . . . . . . . . . . . . 5Decision Manager Preferences . . . . . . . . . . . . . . . . . . . . . . . . . . . . . . . . . . . . . . . . . . 6SAS Preferences Manager . . . . . . . . . . . . . . . . . . . . . . . . . . . . . . . . . . . . . . . . . . . . . 6Change the Delivery Type for Alert Notifications . . . . . . . . . . . . . . . . . . . . . . . . . . . 6
Viewing Help and Documentation . . . . . . . . . . . . . . . . . . . . . . . . . . . . . . . . . . . . . . . . . 7
Create and Publish Business Rules . . . . . . . . . . . . . . . . . . . . . . . . . . . . . . . . . . . . . . . . 7
Enterprise Decision Management SystemsEnterprise decision management systems can transform the way businesses make decisions. They enable businesses to use the information they already have to make better decisions—decisions that are based on predictive analytics rather than on past history. Decision management systems automate the process of making decisions, particularly day-to-day operational decisions. They improve the speed, efficiency, and accuracy of routine business processes, in part by reducing the need for human intervention. By automating decisions, organizations in every industry can improve interactions with customers, partners, suppliers, and employees. In addition, organizations that are highly regulated, such as financial services, health care, and insurance, can more easily achieve compliance as a result of repeatable, traceable decisions.
About SAS Business Rules ManagerBusiness rules capture the logic of business decisions and are one of the core components of decision management systems. Business rules make the decision-making process transparent and adaptable, allowing organizations to respond quickly to new information about customers and markets. They allow organizations to identify and deal with fraud, avoid unnecessary risk, and find opportunities hidden in customer data.
3

You can use SAS Business Rules Manager to create a database of business rules, connect those rules together into rules flows, and publish the rule flows for use by other applications. SAS Business Rules Manager provides the following capabilities:
data managementYou can manage your list of data tables from within the application. You can create new Base SAS libraries, add and remove tables, view table data and metadata, create and delete table summaries, and associate attachments and comments with tables. The application uses these data tables whenever it needs to access data, such as for rule discovery and rule flow testing.
vocabulary managementA business vocabulary defines entities and terms. Terms are the building blocks that you use to construct business rules. SAS Business Rules Manager enables you to easily create and edit entities and terms. For individual terms, you can create a list of allowable values, which makes creating rules even easier.
business rule authoringA business rule specifies conditions to be evaluated and action to be taken if those conditions are satisfied. For example, you can create a rule that determines whether a customer has a mortgage. That same rule can then add the outstanding balance of the mortgage to a running total of the customer’s debt. With SAS Business Rules Manager, you define the conditions and actions for each rule. You can use the Equation Editor to create the expressions for the rule.
The rule authoring features of SAS Business Rules Manager make creating rules easier and more accurate. For example, the list of allowable values for a term help avoid incorrect rules. The lists of allowable values can be updated as needed, and the lists do not prevent you from providing new values manually.
rule set managementA rule set is a logical collection of rules. A single rule set can have many rules. For example, you might have a rule set that determines a customer’s asset balance and another rule set that determines a customer’s debt level. SAS Business Rules Manager displays rules sets in decision tables. Each row of the decision table defines the conditions and actions for one rule. By using SAS Business Rules Manager, you can easily create new rule sets, reorder the rules in a rule set, add new rules to existing rule sets, and more.
You can also manage rule sets and rule flows. When a rule set or rule flow is published, the versioning features of SAS Business Rules Manager create a static version of the rule set or rule flow. This static version helps you to enforce integrity and governance over the rule sets and rule flows that are put into production.
rule flow authoring and publishingA rule flow is a logical collection of rule sets. A rule flow defines a set of rule sets and the order in which they will be executed. A single rule flow frequently corresponds to a single decision. For example, a rule flow can initially execute the rule set that determines a customer’s asset balance. Next, the rule set that determine a customer’s debt level is executed. Finally, the rule set that assign’s a customer’s loan application status is executed.
SAS Business Rules Manager makes it easy to combine rules sets into a rule flow and to publish those rule flows to the metadata server. After a rule flow has been published, it is available for use by other applications.
4 Chapter 1 • Introduction to SAS Business Rules Manager
Managing Preferences
About Setting PreferencesPreferences provide a way for you to customize the user interface. Preferences for each user are stored in metadata and are retained if your deployment is migrated or reconfigured.
You can set preferences in two ways:
by using the Preferences windowTo open the Preferences window, select File ð Preferences. There are two general categories of preferences: Global and Decision Manager preferences. See “Global Preferences” and “Decision Manager Preferences” on page 6 for more information.
by using SAS Preferences ManagerSAS Preferences Manager is a web application that provides a central facility for users to manage their preferences and settings. See “SAS Preferences Manager” on page 6 for more information.
Global PreferencesGlobal preferences apply to all SAS web applications that are displayed with the Adobe Flash Player. When you set a global preference, it applies only to the user that you are logged on as.
To set global preferences, select the Global Preferences page. The following global preferences are available:
User localespecifies the geographic region whose language and conventions are used in the applications. This setting might also apply to some SAS web applications that are not displayed with the Adobe Flash Player. The default is the browser locale. Locale changes take effect after you log off and log back on.
Note: You can also set the User locale setting by using the SAS Preferences Manager. Select the Regional menu option in SAS Preferences Manager. For more information, see “SAS Preferences Manager” on page 6.
Note: If the user locale that you specify in the preferences is different from the user locale for the SAS Workspace Server, you might receive an error when you try to sign in to the application. You might also receive encoding errors when executing tasks in SAS Business Rules Manager. If you receive an error, change the updated locale back to the original locale.
Themespecifies the collection of colors, graphics, and fonts that appear in the applications. Your site administrator can change the default theme. A theme change might take a few seconds to apply if many items and features are open in the application.
Invert application colorsinverts all of the colors in the application window, including both text and graphical elements. You can also temporarily invert or revert the colors for an individual application session by pressing Ctrl+~.
Managing Preferences 5

Override settings for focus indicatorcontrols the appearance of the highlighting that surrounds the currently selected field in the SAS Business Rules Manager interface.
Decision Manager PreferencesDecision Manager preferences apply to SAS Business Rules Manager only. To set these preferences, select Decision Manager ð General.
Show this number of recent itemscontrols the number of items that are listed in the Recent Work menu. To display this menu, select File ð Recent Work.
SAS Preferences ManagerSAS Preferences Manager is a web application that provides a common mechanism for managing preferences for SAS web applications. The application enables users to manage their preferences and administrators to set default preferences for locale, theme, alert notification, time, date, and currency.
To launch the SAS Preferences Manager, enter the URL http://host-name:port/SASPreferences in your browser window. Replace the values for host-name and port based on the location of the configured SAS Web Infrastructure Platform. For more information, see “SAS Preferences Manager” in SAS Intelligence Platform: Middle-Tier Administration Guide.
Change the Delivery Type for Alert NotificationsThe default delivery type for notifications is specified in the properties for the SAS Application Infrastructure by using the Configuration Manager plug-in to SAS Management Console. For SAS 9.4, the default delivery type is My alerts portlet. You can use SAS Preferences Manager to change your default delivery type.
Note: A SAS administrator can modify the default notification type for all users. For information about modifying the default delivery type for all users, see “Configure Alert Notifications for SAS Workflow” in SAS Business Rules Manager: Administrator’s Guide.
To specify the notification delivery preference for an individual user:
1. Enter the URL http://host-name:port/SASPreferences in your browser window to launch the SAS Preferences Manager. Replace the values for host-name and port based on the location of the configured SAS Web Infrastructure Platform.
2. Enter the user ID and password for the user account that you use to access SAS web applications.
3. Select General ð Notifications.
4. Select a format type for the e-mail notifications. The options are HTML-formatted e-mail and Plain-text e-mail.
5. Select the notification types from the Available list and click to add the selected notification types.
T I P To remove a notification type, select the type from the list and click .
6. Click Apply to update the notification settings, and click OK to save the changes.
6 Chapter 1 • Introduction to SAS Business Rules Manager

For more information, see “SAS Preferences Manager” in SAS Intelligence Platform: Middle-Tier Administration Guide.
Viewing Help and DocumentationSAS Business Rules Manager provides the following types of Help and documentation:
How-to HelpHow-to Help provides quick instructions or tips to help you complete some tasks in the application. To access how-to Help, select Help ð How To.
Embedded HelpHelp pop-up menus and tooltips provide brief descriptions of various fields.
To access a Help pop-up menu for a field, click the Help icon ( ) when it appears next to a field. You can also place the mouse pointer over an element in the SAS Business Rules Manager windows to view the associated tooltip.
SAS Business Rules Manager: User’s GuideThis document provides detailed information about the concepts and tasks that are related to using SAS Business Rules Manager. This document is available at http://support.sas.com/documentation/onlinedoc/brm.
SAS Business Rules Manager: Administrator’s GuideThis document contains information about the administration tasks that are required to set up and configure the SAS Business Rules Manager and is available at http://support.sas.com/documentation/onlinedoc/brm.
Additional resources are available from the Help menu. To access these resources, select Help ð SAS on the Web.
Create and Publish Business RulesTo create and publish business rules using SAS Business Rules Manager:
1. Add data tables to your list of data sources.
2. Create business rule folders where you want to save the business rules.
3. Create vocabularies.
4. Create entities and terms.
5. Create rule sets and rules.
6. Create rule flows.
7. (Optional) Test rule flows.
8. Publish rule flows.
After a rule flow has been published, it is available for use by other applications such as SAS Data Integration Studio. These applications map objects in the SAS Decision Manager database to objects in the input data. For example, terms are mapped to table columns or to data set variables. The output generated when a rule flow is executed is written to a data set. The location of the data set is specified by the application.
Create and Publish Business Rules 7
8 Chapter 1 • Introduction to SAS Business Rules Manager
Chapter 2
Quick Start Tutorial
Overview of the Quick Start Tutorial . . . . . . . . . . . . . . . . . . . . . . . . . . . . . . . . . . . . . . 9
Make the Tutorial Files Available . . . . . . . . . . . . . . . . . . . . . . . . . . . . . . . . . . . . . . . . 10About Making the Tutorial Files Available . . . . . . . . . . . . . . . . . . . . . . . . . . . . . . . 10Download the Tutorial Files . . . . . . . . . . . . . . . . . . . . . . . . . . . . . . . . . . . . . . . . . . . 10
Sign In . . . . . . . . . . . . . . . . . . . . . . . . . . . . . . . . . . . . . . . . . . . . . . . . . . . . . . . . . . . . . . 11
Define Data Sources . . . . . . . . . . . . . . . . . . . . . . . . . . . . . . . . . . . . . . . . . . . . . . . . . . . 11
Define Business Rule Folders . . . . . . . . . . . . . . . . . . . . . . . . . . . . . . . . . . . . . . . . . . . . 13
Create a Vocabulary, Entities, and Terms . . . . . . . . . . . . . . . . . . . . . . . . . . . . . . . . . 14
Create a Rule Set and Define Business Rules . . . . . . . . . . . . . . . . . . . . . . . . . . . . . . . 17
Create and Publish a Rule Flow . . . . . . . . . . . . . . . . . . . . . . . . . . . . . . . . . . . . . . . . . 20
Overview of the Quick Start TutorialThis Quick Start tutorial is an introduction to some of the primary features of SAS Business Rules Manager. The tutorial covers basic tasks for creating and publishing a simple rule flow for loan validation. The tutorial also shows you how to validate the installation and configuration of SAS Business Rules Manager at your site.
In this tutorial, you import a vocabulary, create a rule set, and create and publish a rule flow.
Note: In order to complete the tasks in this tutorial, your user ID must be a member of the Decision Manager Users group or must be granted equivalent permissions. See “Configuring Users, Groups, and Roles” in SAS Business Rules Manager: Administrator’s Guide for more information.
With the exception of Step 1, the steps in this tutorial are basic steps that are required to add content to the SAS Decision Manager database. In this tutorial, you complete the following steps:
1. Make the tutorial files available on the SAS Application Server.
Note: The QuickStartTutorial.zip file contains data and model files for several tutorials, including this one.
2. Sign in to SAS Business Rules Manager.
3. Define the data source needed for the tutorial.
9

4. Define business rule folders.
5. Create a vocabulary and import the terms.
6. Create a rule set and define business rules.
7. Create and publish a rule flow.
Make the Tutorial Files Available
About Making the Tutorial Files AvailableThe tutorial is designed to use the SAS Metadata Repository. Before you use tables in the SAS Metadata Repository, the tutorial data sets must be on the SAS Application Server. An administrator who has Write access to the server and a valid SASApp user ID and password can put the tables there.
The drive where you extract the tutorial ZIP file must be accessible to the SAS Metadata Repository and to tutorial users. Tutorial users can also extract tutorial ZIP files to their local computers in order to access the other files.
You can define a data library and register the tables in the SAS Metadata Repository using the Data category view in SAS Business Rules Manager.
Download the Tutorial FilesThe ZIP file QuickStartTutorial.zip contains the tutorial's data sets, models, and score code, and is available at http://support.sas.com/documentation/onlinedoc/brm/. Before you begin the tutorial, extract the tutorial files to a computer that is accessible to the SAS Metadata Server and to SAS Business Rules Manager users. If your SAS Metadata Server is separate from the SAS Application Server, the files must be placed on the SAS Application Server. Use WinZip to extract the files. If you are using a different extraction program, follow that program's instructions for extracting the files.
To download the files:
1. Create a folder on the server machine or a network drive to store the tutorial files. The instructions refer to this folder as <drive>.
Note: Users must have Read, Write, and Execute permissions to this folder and subfolders. You can create a group and add the tutorial users to that group to grant the permissions. For more information, see “Creating Operating System Accounts for Product Administrators and Users” in SAS Business Rules Manager: Administrator’s Guide.
2. Save the QuickStartTutorial.zip to <drive>.
3. Open Windows Explorer to <drive>. Right-click QuickStartTutorial.zip and select Open. Click Open.
4. Click the arrow on the Unzip button to open the Unzip from WinZip File Folder window.
Note: If you are using a previous release of Windows, from the WinZip window, click the Extract button. The Extract dialog box appears.
5. Select <drive> from the Unzip to WinZip File Folder window.
10 Chapter 2 • Quick Start Tutorial

Note: If you are using a previous release of Windows, in the Extract to box, select <drive> and click Extract.
The ZIP file contains data and models files for the tutorial. The data for the Quick Start tutorial for SAS Business Rules Manager is in the folder <drive>\QuickStartTutorial\Data.
6. UNIX only: To complete the tutorial in a UNIX environment, locate the CPORT file. Files that you use to import the data sets into UNIX are located in the QuickStartTutorial.zip file. Instructions and the sample code for performing an import are provided in the Readme.txt file. In order for a transport file to be imported successfully, the encodings of the source and target SAS sessions must be compatible. Use either latin1 or UTF-8 for your SAS sessions. For more information, see “CIMPORT Problems: Importing Transport Files ” in Base SAS Procedures Guide.
Sign InTo sign in to SAS Business Rules Manager:
1. In the address bar of your web browser, enter the URL for SAS Business Rules Manager and press Enter. The Sign In page appears.
Note: Contact your system administrator if you need the URL for SAS Business Rules Manager. The default URL is http://host_name:port/SASDecisionManager.
2. Enter a user ID and password. Your user ID might be case sensitive, depending on the operating system that is used to host the application server. Your password is case sensitive.
Note: To schedule jobs in a Windows environment, you must include the domain name when entering your user ID (for example, domain\myuserID).
3. Click Sign In.
Define Data SourcesTo register new tables in the SAS Metadata Repository and add them to the list of data sources:
1. Select Data ð Tables.
2. Click and select Register Tables. The Register Tables window appears.
Define Data Sources 11

Note: You cannot use the Register Tables option to add a table that has already been registered in the SAS Metadata Repository using the SAS Management Console. You must select Add Registered Tables instead. See “Add Tables That Are Registered in Metadata” on page 22.
3. Create a new Base SAS library.
a. Select Create a new library.
b. Specify QSTutorial for the name of the new library. The name cannot exceed 60 characters.
12 Chapter 2 • Quick Start Tutorial

c. (Optional) Specify a description for the library.
d. Specify QSTut for the libref.
e. Specify the location for the new library. This location is the folder in the SAS Metadata Repository where the library is stored.
f. Select the server and the directory where the data tables for the quick start tutorial reside (for example, C:\QuickStartTutorial\Data).
g. Click Next.
Note: If you click Cancel at this point, a folder for the library is created in the SAS Metadata Repository, but the folder does not appear in the list of data tables.
4. Click to add all of the tables to the Selected tables list.
5. Click Finish. The new library is now available in the list of data tables.
Figure 2.1 SAS Business Rules Manager Data: Tables List
Define Business Rule FoldersAll of the content in your business rules database is contained within business rules folders. You must define at least one top-level folder. To define a top-level folder:
1. Select any category under Business Rules, such as Business Rules ð Vocabularies.
2. Click , and select New Top-Level Folder.
3. Enter Tutorials for the folder name.
4. If you are a business rules folder administrator, you must also select the group that needs access to this folder. Select Decision Manager Users.
5. Click OK.
Define Business Rule Folders 13
Because multiple users might want to perform the tasks in the tutorial, each user should create a separate folder in the Tutorials folder. To create a new folder:
1. Right-click the Tutorials folder and select New Folder.
2. Enter a name for the folder such as myUserID. The examples in this tutorial use the ID sasdemo.
3. Click OK.
For more information, see Chapter 4, “Managing Business Rule Folders,” on page 29.
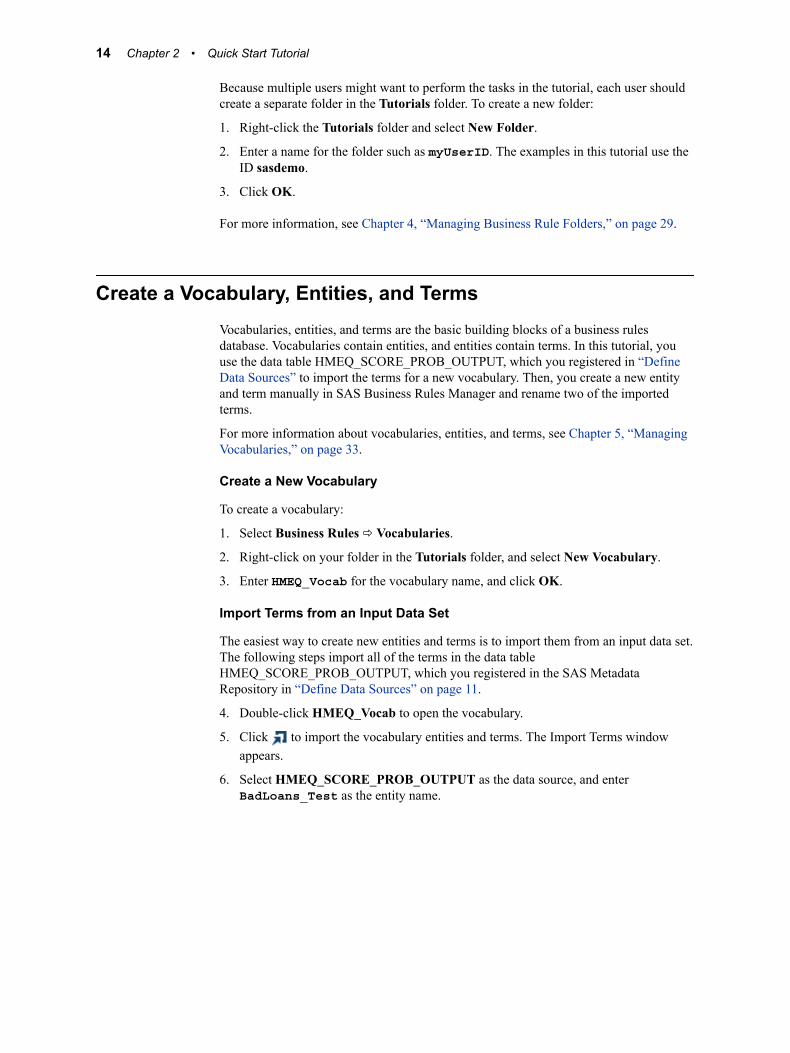
Create a Vocabulary, Entities, and TermsVocabularies, entities, and terms are the basic building blocks of a business rules database. Vocabularies contain entities, and entities contain terms. In this tutorial, you use the data table HMEQ_SCORE_PROB_OUTPUT, which you registered in “Define Data Sources” to import the terms for a new vocabulary. Then, you create a new entity and term manually in SAS Business Rules Manager and rename two of the imported terms.
For more information about vocabularies, entities, and terms, see Chapter 5, “Managing Vocabularies,” on page 33.
Create a New Vocabulary
To create a vocabulary:
1. Select Business Rules ð Vocabularies.
2. Right-click on your folder in the Tutorials folder, and select New Vocabulary.
3. Enter HMEQ_Vocab for the vocabulary name, and click OK.
Import Terms from an Input Data Set
The easiest way to create new entities and terms is to import them from an input data set. The following steps import all of the terms in the data table HMEQ_SCORE_PROB_OUTPUT, which you registered in the SAS Metadata Repository in “Define Data Sources” on page 11.
4. Double-click HMEQ_Vocab to open the vocabulary.
5. Click to import the vocabulary entities and terms. The Import Terms window appears.
6. Select HMEQ_SCORE_PROB_OUTPUT as the data source, and enter BadLoans_Test as the entity name.
14 Chapter 2 • Quick Start Tutorial
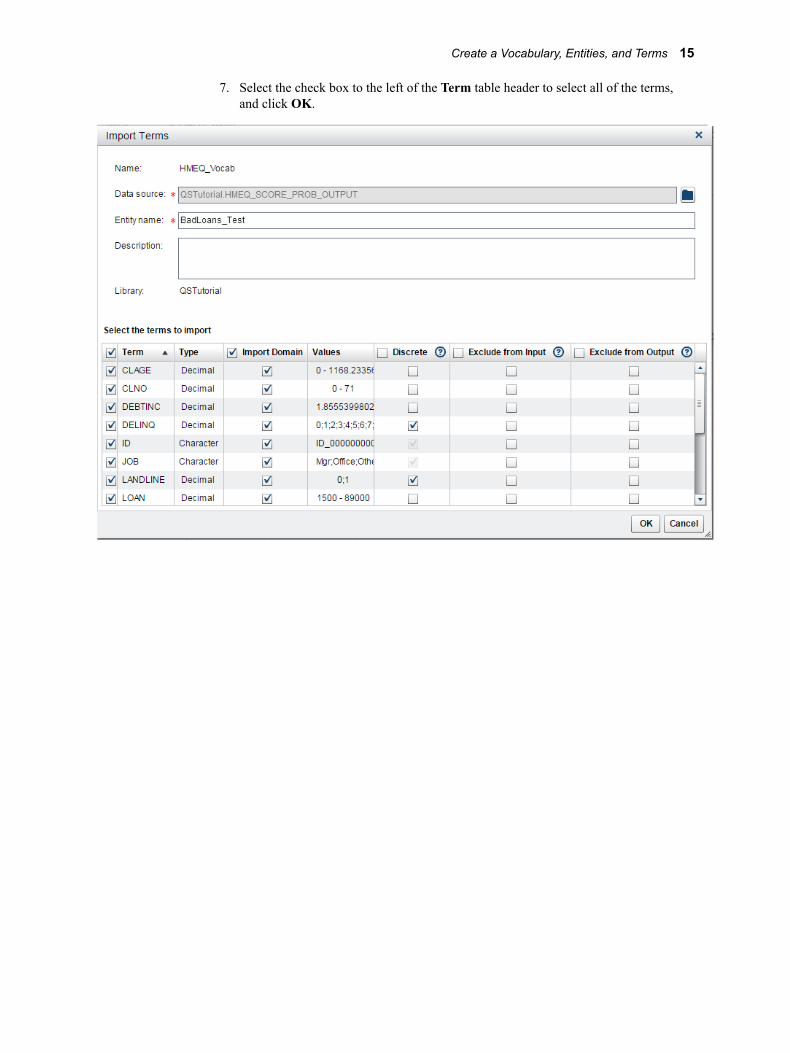
7. Select the check box to the left of the Term table header to select all of the terms, and click OK.
Create a Vocabulary, Entities, and Terms 15

SAS Business Rules Manager imports the terms and adds them to the entity named BadLoans_Test. If you expand the list, you see all of the terms that were imported.
8. Click to close the vocabulary.
Create a New Entity and New Terms
In addition to importing terms, you can create entities and terms manually. The following steps create a new entity and two new terms.
9. In the Business Rules: Vocabularies category view, expand HMEQ_Vocab, right-click the BadLoans_Test entity, and select New Term. The New Term window appears.
10. Enter DEROG as the term name, select Integer as the data type, and click OK.
11. Right-click HMEQ_Vocab and select New Entity. The New Entity window appears.
12. Enter BadLoans_Actions as the entity name, and click OK.
13. Right-click BadLoans_Actions and select New Term. The New Term window appears.
14. Enter BadLoanFlag for the term name. Select Boolean for the data type, select Exclude from input, and click OK.
16 Chapter 2 • Quick Start Tutorial

The HMEQ_Vocab vocabulary now contains two entities and several terms. You can display all of the terms in the vocabulary in the category view.
Create a Rule Set and Define Business RulesA business rule specifies conditions to be evaluated and actions to be taken if those conditions are satisfied. Rules are grouped together into rule sets. In this tutorial, you create a single rule set with three rules.
For more information, see Chapter 7, “Managing Rules and Rule Sets,” on page 47.
Create a New Rule Set
1. Select Business Rules ð Rule Sets.
2. Select your folder in the Tutorials folder.
3. Click and select New Rule Set. The New Rule Set window appears.
4. Enter LoanScoreRules for the rule set name.
Create a Rule Set and Define Business Rules 17

5. Select HMEQ_Vocab for the vocabulary and click Create. SAS Business Rules Manager opens the rule set and displays the Properties page.
Define Business Rules
To define the business rules for the new rule set, you enter condition and action expressions for the terms in the rule set into the rule set editor. The following steps define three simple rules that determine whether a loan application is a bad risk. The determination is based on the model score that was generated for the loan, among other things. For example, if the model score is less than or equal to 0.6, the loan is considered a bad risk, and the BadLoanFlag term is set to True.
6. Select the Rules page.
7. Expand the BadLoans_Test entity, and select the LANDLINE, MODELSCORE, and REASON terms.
8. Right-click on one of the highlighted terms, and select Use as Condition Term.
9. Right-click the BadLoanFlag term, and select Use as Action Term.
10. Enter the rule expressions into the rule set editor. Each row in the table represents a different rule. Enter the expressions for each term into the column for that term. You can enter expressions directly into the table cells, or you can use the equation editor. Click to open the equation editor.
Enter the expressions in the following table into the rule set editor.
Rule
Condition Terms Action Term
LANDLINE MODELSCORE REASON BadLoanFlag
Rule 1 <=.6 True
18 Chapter 2 • Quick Start Tutorial

Rule
Condition Terms Action Term
LANDLINE MODELSCORE REASON BadLoanFlag
Rule 2 = 1 >.6 AND <=.7 ‘HomeImp’ True
Rule 3 = 1 >.7 AND <=.8 ‘DebtCon’ False
T I P If you do not specify an operator at the beginning of an expression, SAS Business Rules Manager adds an equal sign to the beginning of the expression.
T I P In condition expressions, when an AND or OR operator is followed immediately by another operator, SAS Business Rules Manager inserts the column term between the AND or OR operator and the operator that follows it.
See “Define Expressions for a Rule” on page 52 and “Terms and Operators Added by SAS Business Rules Manager” on page 61 for more information.
The following display shows the decision table with the rules that are defined for the LoanScoreRules rule set.
Validate and Save the Rule Set
When you save a rule set, SAS Business Rules Manager validates the content of the rule set before saving it. However, you can validate the rule set at any time while you are creating the rule set.
11. Click to validate the rule set.
12. Click to save the rule set.
13. Click to close the rule set.
Create a Rule Set and Define Business Rules 19

Create and Publish a Rule FlowThe last major step in adding business rules content to the SAS Decision Manager database is to create and publish rule flows. A business rule flow is a logical collection of rule sets that define multiple conditions and actions. The rule flow that you create in this tutorial contains only one rule set, but most rule flows contain multiple rule sets.
For more information, see Chapter 8, “Creating and Publishing Rule Flows,” on page 73.
To create and publish a rule flow:
1. Select Business Rules ð Rule Flows.
2. Right-click on your folder in the Tutorials folder, and select New Rule Flow.
3. Enter Score_Loan for the rule flow name and click Create. SAS Business Rules Manager opens the rule flow and displays the Properties page.
4. Select the Rule Sets page.
5. In the rule sets list, right-click LoanScoreRules and select Add To Rule Flow.
6. Click to save the rule flow.
7. Click to publish the rule flow.
SAS Business Rules Manager asks you if you want to lock the rule set versions that are used in the rule flow. All rule set versions that are used in published rule flows must be locked.
8. Click Yes to lock the rule set version. The Choose a Location window appears.
9. Select the location where you want to publish the rule flow, and click OK. SAS Business Rules Manager confirms that the rule flow has been published and displays the published name and identification number of the published rule flow.
10. Click Close to close the message, and then click to close the rule flow.
20 Chapter 2 • Quick Start Tutorial

Chapter 3
Managing Data Tables
About Managing Data Tables . . . . . . . . . . . . . . . . . . . . . . . . . . . . . . . . . . . . . . . . . . . 21
Adding Tables Using SAS Visual Data Builder . . . . . . . . . . . . . . . . . . . . . . . . . . . . . 22
Add Tables That Are Registered in Metadata . . . . . . . . . . . . . . . . . . . . . . . . . . . . . . 22
Register and Add New Tables . . . . . . . . . . . . . . . . . . . . . . . . . . . . . . . . . . . . . . . . . . . 22
Edit Table Properties and View Table Metadata . . . . . . . . . . . . . . . . . . . . . . . . . . . . 23
View Table Data . . . . . . . . . . . . . . . . . . . . . . . . . . . . . . . . . . . . . . . . . . . . . . . . . . . . . . 24
Filter Data in the Table View . . . . . . . . . . . . . . . . . . . . . . . . . . . . . . . . . . . . . . . . . . . . 25
Create a Table Summary . . . . . . . . . . . . . . . . . . . . . . . . . . . . . . . . . . . . . . . . . . . . . . . 26
Delete a Table Summary . . . . . . . . . . . . . . . . . . . . . . . . . . . . . . . . . . . . . . . . . . . . . . . 27
Add Attachments to a Table . . . . . . . . . . . . . . . . . . . . . . . . . . . . . . . . . . . . . . . . . . . . 28
Add Comments to a Table . . . . . . . . . . . . . . . . . . . . . . . . . . . . . . . . . . . . . . . . . . . . . . 28
Remove a Table . . . . . . . . . . . . . . . . . . . . . . . . . . . . . . . . . . . . . . . . . . . . . . . . . . . . . . . 28
About Managing Data TablesThe Data category enables you to manage your list of data tables from within SAS Business Rules Manager. You can create new Base SAS libraries, add and remove tables, view table data and metadata, create and delete table summaries, and associate attachments and comments with tables. The application uses these data tables whenever it needs to access data, such as for importing terms, rule discovery, and rule flow testing.
You can view the list of tables by selecting Data ð Tables. There are three ways to add tables to the list.
• You can use SAS Visual Data Builder to create new tables and add them to the list. See “Adding Tables Using SAS Visual Data Builder” on page 22 for more information.
• If the table is already registered in the SAS Metadata Repository, you can add the table to the list as described in “Add Tables That Are Registered in Metadata” on page 22.
• If the table is not already registered in the SAS Metadata Repository, you can add a new table as described in “Register and Add New Tables” on page 22.
21
Note:
• SAS Business Rules Manager cannot access tables in a SAS LASR Analytic Server instance.
• If you do not have the appropriate permissions to access a folder, then the tables and libraries are not listed in the Data category view.
Adding Tables Using SAS Visual Data BuilderSAS Visual Data Builder enables analysts and data administrators to perform data preparation for analytics. You can design queries to perform joins, add calculated columns, and subset and sort data. Several productivity features speed the creation of columns based on common aggregation functions.
Once you design your queries, you can reuse them as subqueries for more sophisticated queries, export them as jobs for scheduling, or schedule them directly from the user interface.
The application has data import features that enable you to access data from spreadsheets, delimited files, and SAS data sets. Once you import the data, you can prepare it for analysis or join it with existing data.
The application provides a series of features that you can use to extract and transform data from multiple sources and create new data tables.
To access SAS Visual Data Builder, select Data ð Tables. Click to start SAS Visual Data Builder. For more information about SAS Visual Data Builder, click to access SAS Visual Analytics: User’s Guide and videos about using SAS Visual Data Builder.
Add Tables That Are Registered in MetadataIf a data table has already been registered in the SAS Metadata Repository, you can add it to the list of data sources. To add one or more tables:
1. Select Data ð Tables.
2. Click and select Add Registered Tables. The Choose an Item window appears.
3. Select the tables that you want to add, and click OK.
Register and Add New TablesYou can create new Base SAS libraries and register tables by using SAS Business Rules Manager. To register new tables in the SAS Metadata Repository and add them to the list of data sources:
1. Select Data ð Tables.
2. Click and select Register Tables. The Register Tables window appears.
22 Chapter 3 • Managing Data Tables
Note: You cannot use the Register Tables option to add a table that is already registered. You must select Add Registered Tables instead. See “Add Tables That Are Registered in Metadata” on page 22.
3. Select an existing library, or create a new Base SAS library.
To use an existing library:
a. Select Use an existing library.
b. Click and select the library.
c. Click Next.
To create a new Base SAS library:
a. Select Create a new library.
b. Specify a name for the new library. The name cannot exceed 60 characters.
c. (Optional) Specify a description for the library.
d. Specify a libref. A libref is a name that SAS uses to refer to the library. Enter a unique name of eight characters or less.
e. Select the location for the new library. This location is the folder in the SAS Metadata Repository where the library is stored.
f. Select the server and the directory where the data tables reside.
g. Click Next.
Note: If you click Cancel at this point, a folder for the library is created in the SAS Metadata Repository, but the folder does not appear in the list of data tables.
4. Select the tables that you want to add to the library, and click to add the tables to the Selected tables list. Click to add all of the tables to the Selected tables list.
5. Click Finish.
Edit Table Properties and View Table MetadataThe Properties page displays table metadata. On this page, you can edit the data source name and description, and change the table associated with the data source name.
1. Select Data ð Tables.
2. Double-click on the table whose properties you want to edit. The Properties page appears.
Edit Table Properties and View Table Metadata 23

The Properties page displays table metadata such as the number of columns, the table location, and information about each column in the table.
3. Edit the data source name and description, or click to select a different table as the data source.
4. Click to save the changes.
View Table DataTo view table data:
1. Select Data ð Tables.
2. Double-click on the table that you want to view.
3. Select the Table View page.
24 Chapter 3 • Managing Data Tables

On the Table View page, you can control the display by selecting specific columns in the Columns section. The Column Information section displays information about the currently selected column.
Note: If the name of the selected column begins with a blank space, the table cannot be displayed.
Note: The row count might not be displayed, depending on the database with which the table was created.
To sort the table based on the values in a particular column, click on the column heading. If the column is sorted in ascending order, a appears beside the column heading. When the column is sorted in descending order, a appears.
Filter Data in the Table ViewYou can filter the rows that are shown on the Table View page in either of the following ways:
• Click above the table. The Filter window appears. Enter a valid SQL expression, and click Apply.
• Right-click on a value in the table. SAS Business Rules Manager displays several predefined filter options. You can select any of these options. Depending on which option you select, you might be prompted to enter data values for the query.
Filter Data in the Table View 25
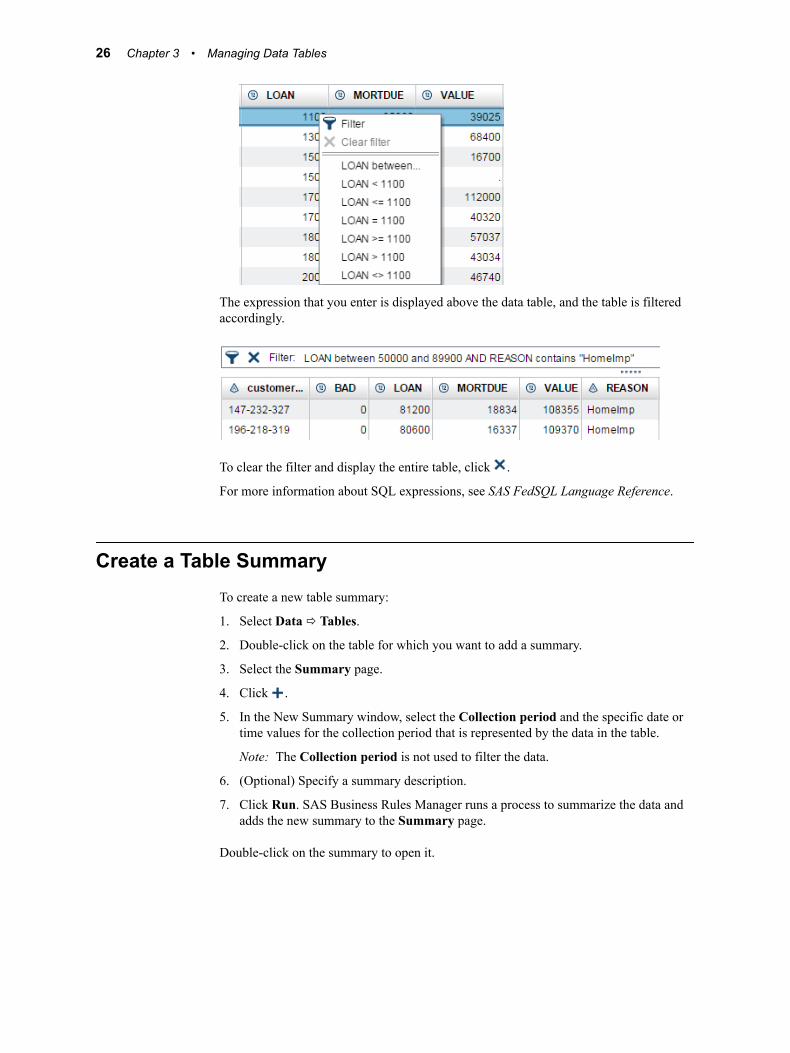
The expression that you enter is displayed above the data table, and the table is filtered accordingly.
To clear the filter and display the entire table, click .
For more information about SQL expressions, see SAS FedSQL Language Reference.
Create a Table SummaryTo create a new table summary:
1. Select Data ð Tables.
2. Double-click on the table for which you want to add a summary.
3. Select the Summary page.
4. Click .
5. In the New Summary window, select the Collection period and the specific date or time values for the collection period that is represented by the data in the table.
Note: The Collection period is not used to filter the data.
6. (Optional) Specify a summary description.
7. Click Run. SAS Business Rules Manager runs a process to summarize the data and adds the new summary to the Summary page.
Double-click on the summary to open it.
26 Chapter 3 • Managing Data Tables

The following display shows the Summary page for the HMEQ_PERF_Q1 table. The collection period represented by the data in the table is June 2015.
Delete a Table SummaryTo delete a table summary:
1. Select Data ð Tables.
2. Double-click on the table whose summary you want to delete.
3. Select the Summary page.
4. Select the summary that you want to delete.
5. Click .
Delete a Table Summary 27
Add Attachments to a TableTo add an attachment such as a document file or an image file:
1. Select the Attachments page.
2. Click , and select the attachment file.
3. Click .
Note: You can delete an attachment by selecting the attachment and clicking .
Add Comments to a TableYou can add new comments or reply to existing comments. To add a new comment:
1. Select the Comments page.
2. Enter a topic title and enter the comment. The topic title is required, and the field for comments does not appear until you enter the topic title.
3. (Optional) Click to add an attachment such as an image or a document.
4. Click Post.
To reply to an existing comment, enter your reply in the field immediately below the topic title for the existing comment, and click Post.
Click to see comments that have been posted by others.
To search for text in the comments, enter text in the search field at the top of the Comments page.
Remove a TableRemoving a table from the list of data sources does not delete the table from file system. To remove a table from the list of data sources:
1. Select Data ð Tables.
2. Select the table that you want to remove from the list.
3. Click .
28 Chapter 3 • Managing Data Tables

Chapter 4
Managing Business Rule Folders
About Business Rules Folders . . . . . . . . . . . . . . . . . . . . . . . . . . . . . . . . . . . . . . . . . . . 29
Create New Top-Level Folders . . . . . . . . . . . . . . . . . . . . . . . . . . . . . . . . . . . . . . . . . . 29
Create New Folders . . . . . . . . . . . . . . . . . . . . . . . . . . . . . . . . . . . . . . . . . . . . . . . . . . . 30
Move Folders . . . . . . . . . . . . . . . . . . . . . . . . . . . . . . . . . . . . . . . . . . . . . . . . . . . . . . . . . 30
Delete Folders . . . . . . . . . . . . . . . . . . . . . . . . . . . . . . . . . . . . . . . . . . . . . . . . . . . . . . . . 30
About Business Rules FoldersBefore you create any vocabularies, lookup tables, rule sets, or rule flows, you need to create business rules folders. Content that is related to business rules is stored in business rules folders.
All folders appear for each category in SAS Business Rules Manager. When you open a folder, only the items in the selected category appear.
Create New Top-Level FoldersNote: If folder administration is enabled for your site, the ability to create top-level
folders is limited to folder administrators. See the description of the brm.folder.config.enabled configuration property in “Business Rules Manager Web Advanced Properties” in SAS Business Rules Manager: Administrator’s Guide for more information.
If you are a folder administrator, you must specify the permissions for the folder, and you can specify locations for test information. To create a new top-level folder:
1. Select any category under Business Rules.
2. Click , and select New Top-level Folder.
3. In the New Folder window, enter the name of the new folder. Folder names are limited to 100 characters.
4. (Optional) Enter a description for the new folder. Descriptions are limited to 256 characters.
29

5. If you are a folder administrator, follow these steps:
a. Select the group that you want to have access to the new folder.
b. (Optional) Select the folder that contains test data for rule flows in the new folder.
c. (Optional) Select the library where you want the tests saved for rule flows in the new folder.
6. Click OK.
Create New FoldersTo create a new folder within another folder:
1. Select the parent folder in which you want to create a new subfolder.
2. Click , and select New Folder.
3. In the New Folder window, enter the name of the new folder. Folder names are limited to 100 characters.
4. (Optional) Enter a description for the new folder. Descriptions are limited to 256 characters.
5. Click OK.
Move FoldersNote: If folder configuration is enabled, you cannot move a top-level folder into another
folder.
You cannot move a folder up to the level of a top-level folder. A folder cannot be moved into one of its own folders. To move folders:
1. Select the folders that you want to move, and then right-click and select Move. The Choose a Location window appears.
2. Select a new location for the folders, and click Move.
Delete FoldersA folder must be empty before you can delete it. To delete folders, select the folders that you want to delete, and then click .
30 Chapter 4 • Managing Business Rule Folders

Part 2
Defining a Rules Database
Chapter 5Managing Vocabularies . . . . . . . . . . . . . . . . . . . . . . . . . . . . . . . . . . . . . . . . . . 33
Chapter 6Using Lookup Tables And Functions . . . . . . . . . . . . . . . . . . . . . . . . . . . . . 41
Chapter 7Managing Rules and Rule Sets . . . . . . . . . . . . . . . . . . . . . . . . . . . . . . . . . . . 47
Chapter 8Creating and Publishing Rule Flows . . . . . . . . . . . . . . . . . . . . . . . . . . . . . 73
31

32
Chapter 5
Managing Vocabularies
Introduction to Vocabularies, Entities, and Terms . . . . . . . . . . . . . . . . . . . . . . . . . . 33
Tips for Creating Entities and Terms . . . . . . . . . . . . . . . . . . . . . . . . . . . . . . . . . . . . . 34
Create a Vocabulary . . . . . . . . . . . . . . . . . . . . . . . . . . . . . . . . . . . . . . . . . . . . . . . . . . . 34
Create an Entity . . . . . . . . . . . . . . . . . . . . . . . . . . . . . . . . . . . . . . . . . . . . . . . . . . . . . . 35
Create a Term . . . . . . . . . . . . . . . . . . . . . . . . . . . . . . . . . . . . . . . . . . . . . . . . . . . . . . . . 35
Import Terms from a Data Source . . . . . . . . . . . . . . . . . . . . . . . . . . . . . . . . . . . . . . . 36
Specify Domain Values . . . . . . . . . . . . . . . . . . . . . . . . . . . . . . . . . . . . . . . . . . . . . . . . . 37
Edit Existing Vocabularies, Entities, or Terms . . . . . . . . . . . . . . . . . . . . . . . . . . . . . 38
Delete Vocabularies, Entities, or Terms . . . . . . . . . . . . . . . . . . . . . . . . . . . . . . . . . . . 38
Move Vocabularies, Entities, Terms . . . . . . . . . . . . . . . . . . . . . . . . . . . . . . . . . . . . . . 38
Duplicate Vocabularies, Entities, or Terms . . . . . . . . . . . . . . . . . . . . . . . . . . . . . . . . 38
Search for Rule Sets by Term . . . . . . . . . . . . . . . . . . . . . . . . . . . . . . . . . . . . . . . . . . . 39
Introduction to Vocabularies, Entities, and TermsVocabularies, entities, and terms are the basic building blocks of a SAS Decision Manager database. Vocabularies contain entities, and entities contain terms.
Object Description
Vocabulary Vocabularies contain one or more business entities. Vocabularies categorize and structure the entities and terms needed to create a rules database.
Entity An entity is an object in a business domain. For example, an entity could be Customer, Transaction, or Account. Entities contain terms. They group terms into logical units. Entities are not mapped to tables or to table columns when rules flows are published.
33

Object Description
Term A term is an attribute of an entity. For example, a customer entity might have terms such as name, address, and income. A transaction entity might contain terms for date, time, transaction amount, and account number. Terms are the objects with which you build business rules.
A business rule can have condition terms and action terms. Suppose your rule is if balance>1000 then account="premium". The term balance is a condition term, and account is an action term.
Terms are mapped to table columns by the applications that use published rule flows that are within metadata.
Tips for Creating Entities and Terms• Before you define vocabulary entities and terms, review the structure of the tables
that input values will come from. Vocabularies should be structured similarly to these tables to ensure that terms are mapped correctly to input columns. Coordinate your work with the groups that will use the vocabulary. Coordination helps ensure that the vocabulary structure meets their requirements.
• Boolean data can be represented with terms that are defined either as Boolean data types or as Character data types. In some cases, Boolean values might be better represented by using terms defined as Character. For example, if your data already uses yes and no for Boolean data, then you probably want to use a Character term to process these values rather than try to translate those values to true and false.
Create a VocabularyTo create a new vocabulary:
1. Select Business Rules ð Vocabularies.
2. Right-click on the folder where you want to create the new vocabulary, and select New Vocabulary. Alternatively, you can select the folder, click , and then select New Vocabulary. The New Vocabulary window appears.
3. Enter the name of the new vocabulary. Vocabulary names can contain up to 32 characters and must be unique within a folder. Vocabulary names are case insensitive. For example, SAS Business Rules Manager considers name to be equal to NAME.
4. (Optional) Enter a description for the new vocabulary. Descriptions are limited to 256 characters.
5. Click OK.
34 Chapter 5 • Managing Vocabularies

Create an EntityTo create a new entity from the Vocabulary category view:
1. Right-click on the vocabulary where you want to create the new entity, and select New Entity. Alternatively, you can select the vocabulary, click , and then select New Entity. The New Entity window appears.
Note: If you open a vocabulary, you can click to create a new entity.
2. Enter the name of the new entity. Entity names can contain up to 32 characters and must be unique within a vocabulary. Entity names are case insensitive. For example, SAS Business Rules Manager considers name to be equal to NAME.
3. (Optional) Enter a description for the new entity. Descriptions are limited to 256 characters.
4. Click OK.
Create a TermTo create a new term:
1. Right-click on the entity where you want to create the new term, and select New Term. Alternatively, you can select the entity, click , and then select New Term. The New Term window appears.
2. Enter the name of the new term. Term names can contain up to 32 characters and must be unique within a vocabulary. Term names are case insensitive. For example, SAS Business Rules Manager considers name to be equal to NAME.
Note: Do not use any of these operators or keywords as term names: AND, OR, IN, NOT, LIKE, TRUE, or FALSE. Do not use _N_ or any DS2 reserved word as a term name. See “Reserved Words in the DS2 Language” in SAS DS2 Language Reference.
3. (Optional) Enter a description for the new term. Descriptions are limited to 256 characters.
4. Select the data type for the new term.
5. Select the domain type for the new term.
6. (Optional) Specify the domain values for the new term. Domain values are the set of expected values for a term. See “Specify Domain Values” on page 37 for more information.
7. (Optional) Select Exclude from input if you do not want the term to be mapped to a column in an input data set. (The application expects all terms to be mapped to columns in an input data set.)
8. (Optional) Select Exclude from output to exclude a term from the output data sets that are generated by rule flows.
T I P To create a temporary term for use only while a rule flow is executing, select both Exclude from input and Exclude from output.
Create a Term 35

9. Click OK.
Import Terms from a Data SourceTo import terms from a data source:
1. Create a new vocabulary or open an existing vocabulary. For information, see “Create a Vocabulary” on page 34.
2. Click . The Import Terms window appears.
3. Select the data source from which you want to import terms. SAS Business Rules Manager displays the terms, their type, and domain information.
4. Enter the entity name where you want to add the terms.
5. (Optional) Enter a description for the entity.
6. Select the terms and domain values that you want to import.
T I P To select all of the items in a column, select the box beside the column heading.
7. Select the Discrete box for terms that have a discrete set of values. For more information, see “Specify Domain Values” on page 37.
8. All of the imported terms are included in both the input and the output unless you exclude them. Select any terms that you want to exclude. See Step 7 and Step 8 of “Create a Term” on page 35 for more information.
36 Chapter 5 • Managing Vocabularies

9. Click OK.
Specify Domain ValuesDomain values are the set of expected values for a term. Domain values are not used to validate rules. They are used to enable faster and easier rule authoring. They are displayed in the Equation Editor, which enables you to add a value to an expression by double-clicking on the value.
Domain values can include term or variable names. For continuous values, you can use the greater than (>), less than (<), and equal (=) signs to set limits for ranges. You cannot include a semi-colon (;) within a domain value. You do not need to enclose Character values in quotation marks unless the value itself contains an apostrophe (').
Separate individual domain values with a semi-colon (;).
Note: To enter continuous Date and Datetime values, enclose the values in single quotation marks, followed by a d or dt as shown in the following table.
The following table shows examples of domain values.
Table 5.1 Examples of Domain Values
Data Type Domain Type Examples
Character Discrete high risk;low risk
"d'oscail";"d'fhill"
Integer Discrete 0;800;3500
Continuous >100;<=myterm
Decimal Discrete 3.14;12.98
Continuous >1.25;<=N1
Date Discrete 01jul2012;31jul2012
Continuous >='01jan2013'd;<='31dec2013'd
Datetime Discrete 01jul2012:10:52:00;31jul2012:23:00:00
Continuous <='01jul2012:00:00:00'dt;>'31jul2012:23:00:00'dt
Boolean By default, Boolean values are set to True and False and cannot be changed.
Specify Domain Values 37

Edit Existing Vocabularies, Entities, or TermsTo edit existing items:
1. Select the items that you want to edit, and click Open in the toolbar.
2. Edit the item properties as needed.
3. Click .
Delete Vocabularies, Entities, or TermsNote: You cannot delete a vocabulary, entity, or term if it is used in a rule set.
You can delete multiple vocabularies or terms at the same time, but all of the items that you are deleting must be of the same type. You can delete only one entity at a time.
Select the items that you want to delete, and click .
Move Vocabularies, Entities, TermsNote: You cannot move a vocabulary, entity, or term if it is used in a rule set.
You can move multiple vocabularies or terms at the same time, but all of the items that you are moving must be of the same type. You can move only one entity at a time.
To move items:
1. Select the items that you want to move, and then right-click and select Move. The Choose a Location window appears.
2. Select a new location for the folders, and click Move.
When you move multiple terms and terms with the same name already exist in that destination folder, SAS Business Rules Manager also appends an underscore, a number, and Move to the term names.
Duplicate Vocabularies, Entities, or TermsYou might want to duplicate a vocabulary when, for example, your company starts a new initiative similar to a previous one, and you need a similar vocabulary to work with. Duplicating terms is useful when you have the same actions that must be performed by different entities.
To duplicate a single vocabulary, entity, or term, right-click the item that you want to duplicate and select Duplicate. The window that appears contains the same fields that are displayed when you define a new vocabulary, entity, or item. For more information, see:
38 Chapter 5 • Managing Vocabularies

• “Create a Vocabulary” on page 34
• “Create an Entity” on page 35
• “Create a Term” on page 35
You can duplicate multiple vocabularies or terms at the same time. You cannot duplicate multiple entities at the same time. To duplicate multiple vocabularies or terms:
1. Select the items that you want to duplicate. All of the items must be of the same type.
2. Right-click and select Duplicate. The Choose a Location window appears.
3. Select the location for the duplicate items, and click Duplicate.
When you duplicate multiple vocabularies or multiple terms and save the duplicates in a different folder than the original, SAS Business Rules Manager appends an underscore, a number, and Move to the names.
Search for Rule Sets by TermTo find all of the rule sets that use a specific term:
1. Select Business Rules ð Vocabularies.
2. Select the term that you want to search for and click . The Search for Rule Sets window appears.
T I P You do not have to select a term before you click . You can click , and manually enter the term that you want to search for.
3. Select the usage that you want SAS Business Rules Manager to search for.
Anywherefinds terms that are used as condition terms, action terms, or in expressions
As a condition termfinds terms that are used only as condition terms (terms that have been added to the column or row headings of the decision table)
As an action termfinds terms that are used only as action terms (terms that have been added to the column or row headings of the decision table)
In an expressionfinds terms only when they are used in rule expressions
4. Click Search. If the search returns results, SAS Business Rules Manager displays all of the rule sets and versions in which it found the term.
Search for Rule Sets by Term 39

To open one of the rule sets, select the rule set in the search results list, and click .
Note: If a term is referenced implicitly in an expression, then selecting In an expression and searching for that term does not find it. For example, if you enter the expression +10 into the rule set editor for the term myterm, then the resulting expression for myterm is =myterm+10. Because the expression that you entered into the rule set editor did not explicitly reference myterm, the search was not successful.
40 Chapter 5 • Managing Vocabularies

Chapter 6
Using Lookup Tables And Functions
About Lookup Tables and Functions . . . . . . . . . . . . . . . . . . . . . . . . . . . . . . . . . . . . . 41
Create a New Lookup Table . . . . . . . . . . . . . . . . . . . . . . . . . . . . . . . . . . . . . . . . . . . . . 42
Refresh a Lookup Table . . . . . . . . . . . . . . . . . . . . . . . . . . . . . . . . . . . . . . . . . . . . . . . . 43
Delete Lookup Tables . . . . . . . . . . . . . . . . . . . . . . . . . . . . . . . . . . . . . . . . . . . . . . . . . . 43
Duplicate Lookup Tables . . . . . . . . . . . . . . . . . . . . . . . . . . . . . . . . . . . . . . . . . . . . . . . 43
Move Lookup Tables . . . . . . . . . . . . . . . . . . . . . . . . . . . . . . . . . . . . . . . . . . . . . . . . . . 44
Dictionary . . . . . . . . . . . . . . . . . . . . . . . . . . . . . . . . . . . . . . . . . . . . . . . . . . . . . . . . . . . 44LOOKUP Function . . . . . . . . . . . . . . . . . . . . . . . . . . . . . . . . . . . . . . . . . . . . . . . . . . 44LOOKUPVALUE Function . . . . . . . . . . . . . . . . . . . . . . . . . . . . . . . . . . . . . . . . . . . 45
About Lookup Tables and FunctionsSAS Business Rules Manager provides the ability to import lookup tables and reference them from rules. Lookup tables are tables of key-value pairs. For example, you can use a lookup table to retrieve a part name based on the part code number or to retrieve the full name for a country based on its abbreviation.
You can import lookup data from comma-separated-values (CSV) files such as those created by Microsoft Excel into lookup tables in SAS Business Rules Manager. You can re-import updated CSV files as needed to refresh the lookup tables.
Note: SAS Business Rules Manager does not support CSV files that contain signature lines.
Note: You can configure the character that is used as a separator in CSV files that are imported through the SAS Business Rules Manager interface. See Step 4 of “Review Application Properties in SAS Management Console” in SAS Business Rules Manager: Administrator’s Guide for more information.
41
Figure 6.1 CSV File Imported Into SAS Business Rules Manager
In a lookup table, each lookup key is associated with a lookup value. Lookup keys must be unique within each lookup table. Character strings in lookup tables are limited to 512 characters.
SAS Business Rules Manager provides two functions, LOOKUP and LOOKUPVALUE, that enable you to determine whether a lookup key exists in a lookup table and to retrieve a lookup value from a lookup table.
Create a New Lookup TableYou create a new lookup table by importing a CSV file.
To create a new lookup table:
1. Select the Lookups category.
2. Right-click on the folder where you want to create the new lookup table, and select New Lookup Table. The New Lookup Table window appears.
3. Enter a name for the new lookup table. Names are limited to 32 characters and can contain only alphanumeric characters and underscores. Lookup table names must be unique within the SAS Decision Manager database. Lookup table names are case insensitive. For example, SAS Business Rules Manager considers NAME to be equal to name.
4. (Optional) Enter a description for the new lookup table. Descriptions are limited to 256 characters.
5. Click , and select the CSV file that contains the lookup data.
6. Click OK.
42 Chapter 6 • Using Lookup Tables And Functions

Refresh a Lookup TableTo refresh a lookup table:
1. Right-click on the lookup table that you want to refresh, and select Refresh Lookup Table. The Refresh Lookup Table window appears.
2. Click , and select the CSV file that contains the lookup data.
3. Click OK.
Note: You can also refresh a lookup table by using the %BRM_IMPORT_LOOKUP macro. See “%BRM_IMPORT_LOOKUP” in SAS Business Rules Manager: Administrator’s Guide for more information.
Delete Lookup TablesNote: You cannot delete a lookup table if it is referenced in a rule.
To delete lookup tables, select the tables that you want to delete, and click .
Duplicate Lookup TablesTo duplicate a single lookup table:
1. Right-click on the lookup table, and select Duplicate. The Duplicate window appears.
2. Enter a name for the duplicate lookup table. Names are limited to 32 characters and can contain only alphanumeric characters and underscores. Lookup table names must be unique within the SAS Decision Manager database. Lookup table names are case insensitive. For example, SAS Business Rules Manager considers NAME to be equal to name.
3. (Optional) Enter a description for the duplicate table. Descriptions are limited to 256 characters.
4. Click , and select the folder where you want to save the duplicate lookup table.
5. Click OK.
If you do not enter a new name for the duplicate table, SAS Business Rules Manager appends an underscore and a number to the duplicate table name.
To duplicate multiple lookup tables:
1. Select the tables that you want to duplicate.
2. Right-click and select Duplicate. The Choose a Location window appears.
3. Select the location where you want the save the duplicate tables, and click Duplicate.
Duplicate Lookup Tables 43

SAS Business Rules Manager appends an underscore, a number, and Move to the duplicate table names.
Move Lookup TablesYou cannot move a lookup table if it is open. To move lookup tables:
1. Select the tables that you want to move, and then right-click and select Move. The Choose a Location window appears.
2. Select a new location for the tables, and click Move.
Dictionary
LOOKUP FunctionDetermines whether a lookup key exists in a lookup table. Specify the LOOKUP function as the expression for the term whose value contains the lookup key that you want to search for.
Restrictions: You can specify the LOOKUP function in condition expressions only.If an expression contains the LOOKUP function, then the expression cannot contain anything else.
Returned data type:
Boolean
SyntaxLOOKUP ('lookup_table_name')
Required Argumentlookup_table_name
specifies the name of the lookup table that you want to search.
44 Chapter 6 • Using Lookup Tables And Functions

ExampleSuppose you have a Country_Codes lookup table that uses two-letter abbreviations for countries as the lookup key and country names as the lookup values.
To verify that the value of the term Ctry_Key exists as a lookup key in the table Country_Codes, enter the LOOKUP function as the expression for the Ctry_Key term. For example, if the Ctry_Key column in the current input record contains the value CA, then the following expression evaluates to True.
LOOKUPVALUE FunctionRetrieves a lookup value from a lookup table.
Restrictions: You can specify the LOOKUPVALUE function in action expressions only.If an expression contains the LOOKUPVALUE function, then the expression cannot contain anything else.
Returned data type:
Lookup tables are stored as character data. However, you can assign the results of the LOOKUPVALUE function to a Character, an Integer, a Decimal, a Date, a Datetime, or a Boolean action term. The LOOKUPVALUE function converts the results to match the type of the action term.
SyntaxLOOKUPVALUE ('lookup_table_name', term_or_string)
Required Argumentslookup_table_name
specifies the name of the lookup table that you want to search.
term_or_stringspecifies the lookup key for the value that you want to retrieve. Enclose character strings in quotation marks.
LOOKUPVALUE Function 45

ExampleSuppose you have a Country_Codes lookup table that uses two-letter abbreviations for countries as the lookup key and country names as the lookup values. The Country_Codes lookup table contains the lookup key CA, and the lookup value that corresponds to that key is Canada.
If the Ctry_Key column in the current input record contains the value CA, you can retrieve the lookup value that is associated with that key from the table Country_Codes with the following expression:
LOOKUPVALUE('Country_Codes',Ctry_Key)
If this expression is entered for the Country_Name action term, the expression assigns the value Canada to the term Country_Name.
46 Chapter 6 • Using Lookup Tables And Functions

Chapter 7
Managing Rules and Rule Sets
About Rules, Rule Sets, and Expressions . . . . . . . . . . . . . . . . . . . . . . . . . . . . . . . . . . 48
How Rules Are Evaluated and When Rule-Fired Records Are Generated . . . . . . 49
Create a New Rule Set . . . . . . . . . . . . . . . . . . . . . . . . . . . . . . . . . . . . . . . . . . . . . . . . . 49
Defining New Rules in the Rule Set . . . . . . . . . . . . . . . . . . . . . . . . . . . . . . . . . . . . . . . 50Add a New Rule . . . . . . . . . . . . . . . . . . . . . . . . . . . . . . . . . . . . . . . . . . . . . . . . . . . . 50Selecting the Rule Set Editor View . . . . . . . . . . . . . . . . . . . . . . . . . . . . . . . . . . . . . 50Define Expressions for a Rule . . . . . . . . . . . . . . . . . . . . . . . . . . . . . . . . . . . . . . . . . 52Controlling Which Conditions Are Evaluated . . . . . . . . . . . . . . . . . . . . . . . . . . . . . 54Tips for Entering Expressions . . . . . . . . . . . . . . . . . . . . . . . . . . . . . . . . . . . . . . . . . . 55Using the Equation Editor . . . . . . . . . . . . . . . . . . . . . . . . . . . . . . . . . . . . . . . . . . . . 55Punctuation for Data Values . . . . . . . . . . . . . . . . . . . . . . . . . . . . . . . . . . . . . . . . . . . 58Operators for Use in Expressions . . . . . . . . . . . . . . . . . . . . . . . . . . . . . . . . . . . . . . . 59Using the LIKE Operator . . . . . . . . . . . . . . . . . . . . . . . . . . . . . . . . . . . . . . . . . . . . . 60Using Functions in Expressions . . . . . . . . . . . . . . . . . . . . . . . . . . . . . . . . . . . . . . . . 61Working with Missing Values . . . . . . . . . . . . . . . . . . . . . . . . . . . . . . . . . . . . . . . . . . 61Terms and Operators Added by SAS Business Rules Manager . . . . . . . . . . . . . . . . 61Leading Plus and Minus Operators . . . . . . . . . . . . . . . . . . . . . . . . . . . . . . . . . . . . . . 62Examples of Expressions . . . . . . . . . . . . . . . . . . . . . . . . . . . . . . . . . . . . . . . . . . . . . 62
Validate the Expressions in a Rule Set . . . . . . . . . . . . . . . . . . . . . . . . . . . . . . . . . . . . 64
Change the Order of Rules in a Rule Set . . . . . . . . . . . . . . . . . . . . . . . . . . . . . . . . . . 64Move a Rule to a New Position in a Rule Set . . . . . . . . . . . . . . . . . . . . . . . . . . . . . . 65Swap Two Rules . . . . . . . . . . . . . . . . . . . . . . . . . . . . . . . . . . . . . . . . . . . . . . . . . . . . 65
Copy Rules and Expressions . . . . . . . . . . . . . . . . . . . . . . . . . . . . . . . . . . . . . . . . . . . . 65Copy an Entire Rule . . . . . . . . . . . . . . . . . . . . . . . . . . . . . . . . . . . . . . . . . . . . . . . . . 65Copy Text within a Rule . . . . . . . . . . . . . . . . . . . . . . . . . . . . . . . . . . . . . . . . . . . . . . 66
Delete Terms, Rules, and Expressions . . . . . . . . . . . . . . . . . . . . . . . . . . . . . . . . . . . . . 66Delete a Term from a Rule Set . . . . . . . . . . . . . . . . . . . . . . . . . . . . . . . . . . . . . . . . . 66Delete a Rule . . . . . . . . . . . . . . . . . . . . . . . . . . . . . . . . . . . . . . . . . . . . . . . . . . . . . . . 66Cut and Paste Text within a Rule . . . . . . . . . . . . . . . . . . . . . . . . . . . . . . . . . . . . . . . 66
Edit the Properties of a Rule Set . . . . . . . . . . . . . . . . . . . . . . . . . . . . . . . . . . . . . . . . . 67
Edit the Properties of a Rule . . . . . . . . . . . . . . . . . . . . . . . . . . . . . . . . . . . . . . . . . . . . 67
Display Usage Information for a Rule Set . . . . . . . . . . . . . . . . . . . . . . . . . . . . . . . . . 67
Managing Rule Set Versions . . . . . . . . . . . . . . . . . . . . . . . . . . . . . . . . . . . . . . . . . . . . 68About Rule Set Versions . . . . . . . . . . . . . . . . . . . . . . . . . . . . . . . . . . . . . . . . . . . . . . 68Set the Displayed Version . . . . . . . . . . . . . . . . . . . . . . . . . . . . . . . . . . . . . . . . . . . . . 68
47

Create a New Version of a Rule Set . . . . . . . . . . . . . . . . . . . . . . . . . . . . . . . . . . . . . 69Lock a Rule Set Version . . . . . . . . . . . . . . . . . . . . . . . . . . . . . . . . . . . . . . . . . . . . . . 69Edit a Version Description . . . . . . . . . . . . . . . . . . . . . . . . . . . . . . . . . . . . . . . . . . . . 69
Add Comments to a Rule Set . . . . . . . . . . . . . . . . . . . . . . . . . . . . . . . . . . . . . . . . . . . . 70
Add Attachments to a Rule Set . . . . . . . . . . . . . . . . . . . . . . . . . . . . . . . . . . . . . . . . . . 70
Duplicate Rule Sets . . . . . . . . . . . . . . . . . . . . . . . . . . . . . . . . . . . . . . . . . . . . . . . . . . . . 70
Move Rule Sets . . . . . . . . . . . . . . . . . . . . . . . . . . . . . . . . . . . . . . . . . . . . . . . . . . . . . . . 71
Delete Rule Sets . . . . . . . . . . . . . . . . . . . . . . . . . . . . . . . . . . . . . . . . . . . . . . . . . . . . . . . 71
Validate and Save a Rule Set . . . . . . . . . . . . . . . . . . . . . . . . . . . . . . . . . . . . . . . . . . . . 71
About Rules, Rule Sets, and ExpressionsA rule specifies conditions to be evaluated and actions to be taken if those conditions are satisfied. Rules are grouped together into rule sets. Rule sets are logical collections of rules that are grouped together because of interactions or dependencies between the rules or because they are processed together when they are published.
Most rules correspond to this form:
if condition_expressions then action_expressions
For example, suppose you have the following rule:
if customer_debt > customer_assets then app_status = "Decline"
In this case, customer_debt is a condition term, and customer_debt > customer_assets is a condition expression. The term app_status is an action term, and app_status = "Decline" is an action expression. To enter this rule in the rule set editor, you first need to add the terms customer_debt and app_status to the rule set editor, and then enter the expressions under the terms to which the expressions apply.
The following figure shows the rule set editor with this rule added to it:
Condition expressions are not required. Rules with only action expressions are always executed.
A single rule can have multiple terms, conditions, and actions. Multiple condition expressions within the same rule are joined together with the AND operand. For example, suppose you define the following rule in SAS Business Rules Manager:
SAS Business Rules Manager generates the following rule condition:
(Credit_Score > 700) AND (Homeowner = True)
48 Chapter 7 • Managing Rules and Rule Sets

It generates the following assignments:
Approved=True Interest_Rate=4.5
Action expressions are always assignment statements.
How Rules Are Evaluated and When Rule-Fired Records Are Generated
By default, the condition expressions for all rules in a rule set are evaluated sequentially regardless of the results of previous rules. However, you can use the ELSE and OR operators to control whether the condition expression for a rule is evaluated. See “Controlling Which Conditions Are Evaluated” on page 54 for more information.
If a rule’s condition expression evaluates to True, SAS Business Rules Manager executes the rule’s action expression.
If a rule’s condition evaluates to True, the rule is said to have fired.
By default, every time a rule fires, it generates a rule-fired record. However, you can control when rule-fired records are generated by using the Record rule-fired data check box. See Step 7 of “Add a New Rule” on page 50.
Note: A rule that does not have a condition expression does not generate a rule-fired record.
Create a New Rule SetTo create a new rule set:
1. Select Business Rules ð Rule Sets.
2. Right-click on the folder where you want to create the new rule set, and select New Rule Set. The New Rule Set window appears.
3. Enter a name for the new rule set. Rule set names are limited to 100 characters and must be unique within a folder.
4. (Optional) Enter a description for the new rule set. Descriptions are limited to 256 characters.
5. Select the vocabulary that is associated with the new rule set.
Note: If a rule set has a locked version, you cannot change the vocabulary associated with the latest version of the rule set.
6. Click Create. SAS Business Rules Manager opens the new rule set and displays the Properties page.
Create a New Rule Set 49

Defining New Rules in the Rule Set
Add a New RuleTo add a new rule:
1. Open the rule set where you want to add the new rule.
2. Select the Rules page. The default view on the Rules page is the horizontal view. See “Selecting the Rule Set Editor View” on page 50 for information about the vertical and list views
3. Click .
4. Add any additional terms that the new rule requires, and add expressions for the new rule in the table cells in the rule editor. See “Define Expressions for a Rule” on page 52 for more information.
Note: You can add up to 200 condition terms and 200 action terms to a rule set. A greater number of terms might affect performance.
5. (Optional) Change the order of the new rule. The rule order, in addition to the IF, ELSE, or OR keyword (see “Controlling Which Conditions Are Evaluated” on page 54), controls how rules are evaluated within the rule set.
T I P You can also change the order of the rules later by right-clicking on a rule and selecting either Reorder or Swap. See “Change the Order of Rules in a Rule Set” on page 64 for more information.
6. (Optional) Modify the name of the new rule on the Rule Details tab. Rule names are limited to 100 characters and must be unique within a rule set.
7. (Optional) Clear the Record rule-fired data check box on the Rule Details tab if you do not want a rule-fired record to be written each time this rule fires.
8. (Optional) Enter a description for the new rule on the Rule Details tab.
9. Click .
Selecting the Rule Set Editor ViewThere are three views available in the rule set editor: horizontal, vertical, and list. The default view is the horizontal view.
In the horizontal view, the terms used by the rules are displayed across the top of the rule set editor, and there is one row for each rule. You can return to the horizontal view from the other views by clicking .
50 Chapter 7 • Managing Rules and Rule Sets

To switch to the vertical view, click . In the vertical view, the terms used by the rules are displayed in the left column, and there is one column for each rule.
To switch to the list view, click . The list view is a simplified list of rules with operators, condition terms, action terms, and term values in one vertical list. By default, the rules are collapsed. Click to display the logic for all of the rules.
Empty expressions are hidden in the list view. If you change back to the horizontal or vertical view, the empty expressions are re-displayed.
If you switch to the list view from the horizontal or vertical views, OR operators are changed to ELSE operators. You cannot select the OR operator in the list view. If you change back to the horizontal or vertical view, the OR operators remain set to ELSE operators, and every ELSE rule is assigned the appropriate action expressions.
Defining New Rules in the Rule Set 51
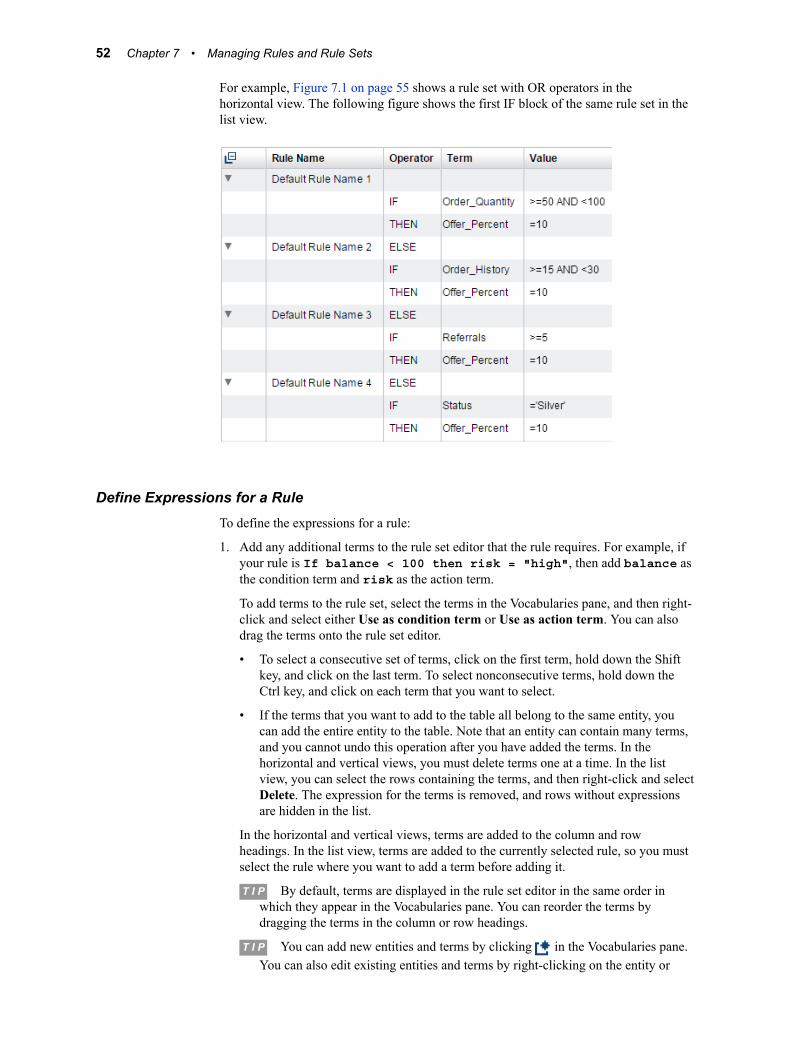
For example, Figure 7.1 on page 55 shows a rule set with OR operators in the horizontal view. The following figure shows the first IF block of the same rule set in the list view.
Define Expressions for a RuleTo define the expressions for a rule:
1. Add any additional terms to the rule set editor that the rule requires. For example, if your rule is If balance < 100 then risk = "high", then add balance as the condition term and risk as the action term.
To add terms to the rule set, select the terms in the Vocabularies pane, and then right-click and select either Use as condition term or Use as action term. You can also drag the terms onto the rule set editor.
• To select a consecutive set of terms, click on the first term, hold down the Shift key, and click on the last term. To select nonconsecutive terms, hold down the Ctrl key, and click on each term that you want to select.
• If the terms that you want to add to the table all belong to the same entity, you can add the entire entity to the table. Note that an entity can contain many terms, and you cannot undo this operation after you have added the terms. In the horizontal and vertical views, you must delete terms one at a time. In the list view, you can select the rows containing the terms, and then right-click and select Delete. The expression for the terms is removed, and rows without expressions are hidden in the list.
In the horizontal and vertical views, terms are added to the column and row headings. In the list view, terms are added to the currently selected rule, so you must select the rule where you want to add a term before adding it.
T I P By default, terms are displayed in the rule set editor in the same order in which they appear in the Vocabularies pane. You can reorder the terms by dragging the terms in the column or row headings.
T I P You can add new entities and terms by clicking in the Vocabularies pane. You can also edit existing entities and terms by right-clicking on the entity or
52 Chapter 7 • Managing Rules and Rule Sets

term and selecting the appropriate option. See “Create an Entity” on page 35 and “Create a Term” on page 35 for more information.
2. (Optional) Select the operator for the rule. The default operator is IF. See “Controlling Which Conditions Are Evaluated” on page 54 for more information.
3. For each term that is used in the new rule, specify the expression that applies to that term in the row or column for the new rule. For example, if the rule is If balance < 100 then risk = "high", the expression for balance is < 100, and the expression for risk is = "high".
Expressions can be up to 1024 characters long. They can contain numeric constants, character strings, vocabulary terms, operators, and SAS DS2 functions.
Condition expressions can contain the LOOKUP function, and action expressions can contain the LOOKUPVALUE function. However, if the expression contains the LOOKUP or LOOKUPVALUE function, then the expression cannot contain anything else.
You can enter expressions directly into the decision table, or you can use the Equation Editor to create and edit expressions. To open the Equation Editor, click in the table cell, and select .
As you enter expressions into each cell, SAS Business Rules Manager displays the rule conditions and actions, including the operators and term names that are added by SAS Business Rules Manager, on the Rule Details tab. (See “Terms and Operators Added by SAS Business Rules Manager” on page 61.) For example, suppose you enter the following rule in the editor:
SAS Business Rules Manager displays the following expressions on the Rule Details tab.
For more information about entering expressions, see the following topics:
• “Tips for Entering Expressions” on page 55
• “Using the Equation Editor” on page 55
• “Punctuation for Data Values” on page 58
• “Operators for Use in Expressions” on page 59
• “Using the LIKE Operator” on page 60
• “LOOKUP Function” on page 44
• “LOOKUPVALUE Function” on page 45
• “Using Functions in Expressions” on page 61
• “Working with Missing Values” on page 61
• “Terms and Operators Added by SAS Business Rules Manager” on page 61
• “Leading Plus and Minus Operators” on page 62
Defining New Rules in the Rule Set 53

• “Examples of Expressions” on page 62
4. Click to save the rule set. SAS Business Rules Manager validates the syntax of the expressions. If it does not detect any problems, it saves the rule set. See “Validate the Expressions in a Rule Set” on page 64 for more information.
Controlling Which Conditions Are EvaluatedYou add conditional processing within a rule set by using the IF, ELSE, and OR operators. By default, rules are assigned the keyword IF, which means that the rule’s condition is evaluated regardless of the results of previous rules. You can change this outcome by changing the operator for a rule to ELSE or OR.
If you set a rule’s operator to ELSE, then the rule’s condition is evaluated only if the previous rule’s condition evaluated to false. For example, given the rule set shown the following display, if Order_Quanitity is 12, the condition for rules 1 and 2 evaluates to false, and the condition for rule 3 evaluates to true. Therefore, the action for rule 3 is executed. The conditions for rules 4 and 5 are not evaluated.
Use the OR operator to break up very long condition expressions into multiple condition expressions or to execute the same action expression for each of the several conditions. If you assign the OR operator to a rule, then you cannot enter an action expression for the rule. If any of the conditions evaluate to true, SAS Business Rules Manager executes the action of the last rule that was assigned the IF or ELSE operator. When you have several consecutive rules that are all assigned the OR operator, only the action for the first rule whose condition evaluates to true is executed. The conditions for the remaining consecutive OR rules are not evaluated.
54 Chapter 7 • Managing Rules and Rule Sets
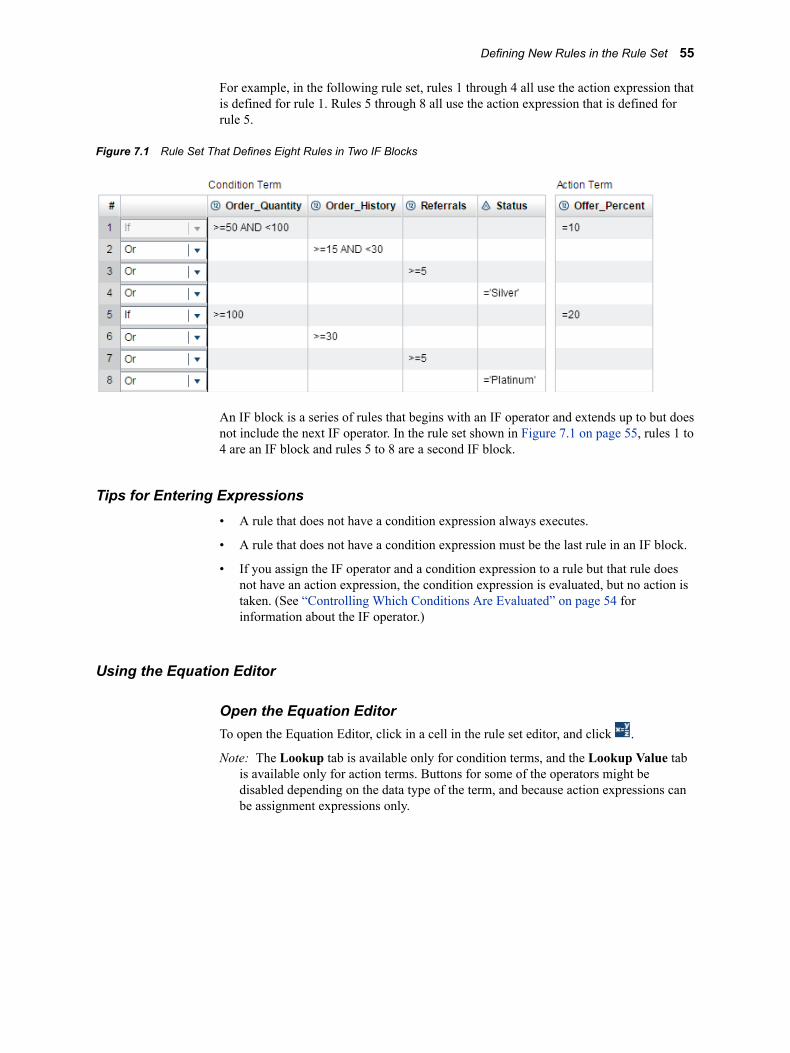
For example, in the following rule set, rules 1 through 4 all use the action expression that is defined for rule 1. Rules 5 through 8 all use the action expression that is defined for rule 5.
Figure 7.1 Rule Set That Defines Eight Rules in Two IF Blocks
An IF block is a series of rules that begins with an IF operator and extends up to but does not include the next IF operator. In the rule set shown in Figure 7.1 on page 55, rules 1 to 4 are an IF block and rules 5 to 8 are a second IF block.
Tips for Entering Expressions• A rule that does not have a condition expression always executes.
• A rule that does not have a condition expression must be the last rule in an IF block.
• If you assign the IF operator and a condition expression to a rule but that rule does not have an action expression, the condition expression is evaluated, but no action is taken. (See “Controlling Which Conditions Are Evaluated” on page 54 for information about the IF operator.)
Using the Equation Editor
Open the Equation EditorTo open the Equation Editor, click in a cell in the rule set editor, and click .
Note: The Lookup tab is available only for condition terms, and the Lookup Value tab is available only for action terms. Buttons for some of the operators might be disabled depending on the data type of the term, and because action expressions can be assignment expressions only.
Defining New Rules in the Rule Set 55

Figure 7.2 Expression Tab for a Condition Term
Build an Expression in the Equation EditorAs you add elements to an expression, the Equation Editor builds the expression in the top field of the Expression tab. Click on the operators, vocabulary terms, and domain values as needed to add them to the expression. To add date constants to the expression, click Date. To add numeric constants or character strings to the expression, enter them directly into the top field. (Remember to use the correct punctuation. See “Punctuation for Data Values” on page 58.)
To build an expression that uses a DS2 function, click the Function tab. Click on a function name to display information about the syntax for that function. Double-click on a function name to add the function to your expression.
To build an expression that uses the LOOKUP or LOOKUPVALUE functions, click the Lookup or LookupValue tabs. You can enter the LOOKUP function in condition expressions only, and you can enter the LOOKUPVALUE function in action expressions only. See “Specify the LOOKUP Function in the Equation Editor” on page 57 and “Specify the LOOKUPVALUE Function in the Equation Editor” on page 57 for more information.
When you are finished building the expression, click OK. The Equation Editor validates the syntax of the expression. If the validation is successful, the editor adds the expression to the cell in the table from which you opened the editor. You can click Validate at any time to check the syntax of the expression that you are building.
56 Chapter 7 • Managing Rules and Rule Sets

Specify the LOOKUP Function in the Equation EditorTo use the Equation Editor to enter the LOOKUP function, click the Lookup tab. Double-click on the lookup table name that you want to specify in the function call and click OK.
Figure 7.3 Lookup Tab in the Equation Editor
For more information, see “LOOKUP Function” on page 44.
Specify the LOOKUPVALUE Function in the Equation EditorTo use the Equation Editor to enter the LOOKUPVALUE function:
1. Click the LookupValue tab.
2. Double-click on the lookup table name.
3. Specify the term name or the character string that contains the lookup key value. To specify a term, double-click on the term in the Vocabulary column. To specify a character string as the lookup key value, enter the character string in the field at the top of the LookupValue tab. Enclose the string in quotation marks.
4. (Optional) Click Validate to check the syntax of the expression.
5. Click OK.
For more information, see “LOOKUPVALUE Function” on page 45.
Defining New Rules in the Rule Set 57

Figure 7.4 LookupValue Tab in the Equation Editor
Punctuation for Data ValuesValues for some data types might need to be enclosed in quotation marks, as shown in the following table. Date and Datetime values must be followed with d and dt, respectively.
Table 7.1 Punctuation Needed for Data Values
Data Type Punctuation Needed Example
Character Enclose character strings in either single or double quotation marks.
='Gold Account'
="Ineligible"
="d'oscail"
Date Enter Date values by using the format DDMMMYYYY. Enclose each value in quotation marks followed by d.
='01AUG2015'd
>='31AUG2015'd
Datetime Enter Datetime values by using the format DDMMMYYYY:HH:MM:SS. Use 24-hour clock notation. Enclose each value in quotation marks followed by dt.
='01AUG2015:15:00:00'dt
<='31AUG2015:15:00:00'dt
Boolean Boolean values are not enclosed in quotation marks. Enter only True or False.
=True
=False
58 Chapter 7 • Managing Rules and Rule Sets

Operators for Use in ExpressionsThe following table lists the operators that you can use in an expression. Do not enter a space between the elements of the operators <=, >=, or ^=. Some mnemonic equivalents for these operators cannot be used in SAS Business Rules Manager expressions. See “Operators in Expressions ” in SAS DS2 Language Reference for more information about the operators shown in the table.
Table 7.2 Operators
Operator Definition Example
* Multiply 0.085 * sales
/ Divide amount / 5
+ Add num + 3
– Subtract sale - discount
= Equal to = maxTriesAllowed
+value Leading plus* +60
^= Not equal to insufficientFunds ^= True
> Greater than daysLate > 5
< Less than num < 8
>= Greater than or equal to balance >= 1000
<= Less than or equal to balance <= 250
IN (value-list) Equal to an item in value-list in ('high','medium','low')
NOT IN (value-list) Not equal to an item in value-list not in (10,20,30)
LIKE 'pattern-matching-expression'
LIKE ('pattern-matching-expression','pattern-matching-expression')
If the term’s value matches pattern-matching-expression, the result is true.
like 'HS%PP'
like ('_976%','_223%')
expression AND expression
If both expressions are true, the result is true.
dateExpired >= '01AUG2015'd AND dateExpired <= '31AUG2015'd
expression OR expression If either expression is true, the result is true.
dateEnrolled >= '01JAN2015' OR member = True
* The application supports the leading plus (+) operator in action expressions only.
Defining New Rules in the Rule Set 59
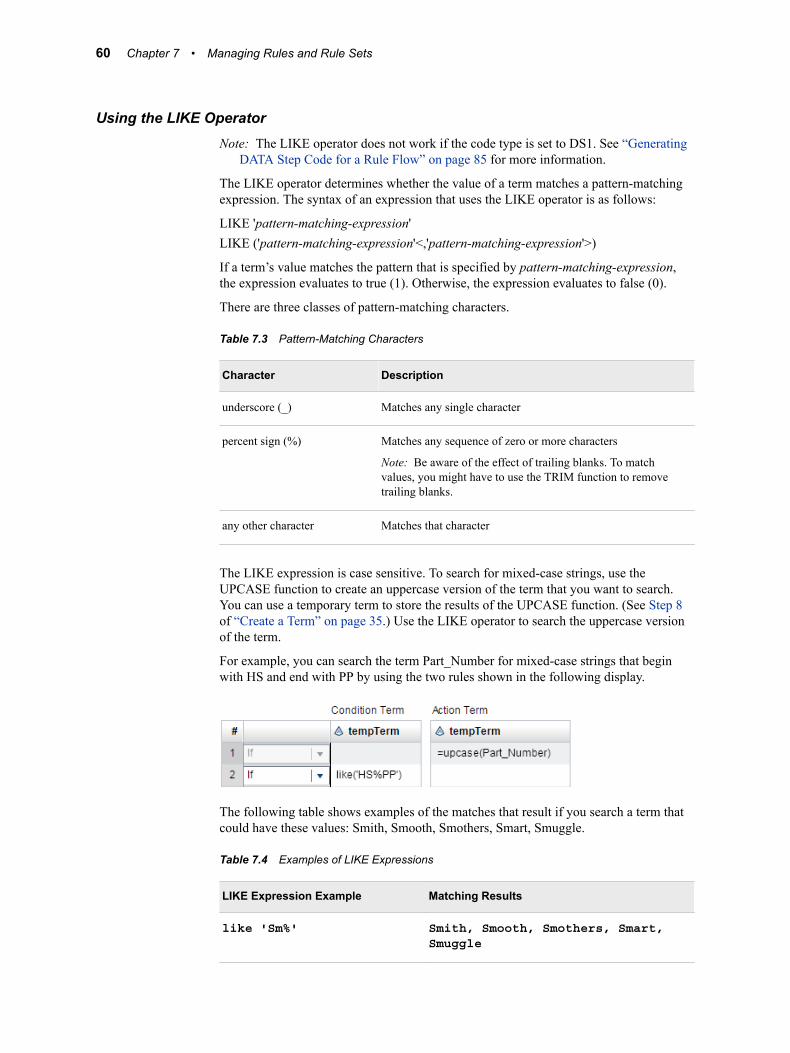
Using the LIKE OperatorNote: The LIKE operator does not work if the code type is set to DS1. See “Generating
DATA Step Code for a Rule Flow” on page 85 for more information.
The LIKE operator determines whether the value of a term matches a pattern-matching expression. The syntax of an expression that uses the LIKE operator is as follows:
LIKE 'pattern-matching-expression'LIKE ('pattern-matching-expression'<,'pattern-matching-expression'>)
If a term’s value matches the pattern that is specified by pattern-matching-expression, the expression evaluates to true (1). Otherwise, the expression evaluates to false (0).
There are three classes of pattern-matching characters.
Table 7.3 Pattern-Matching Characters
Character Description
underscore (_) Matches any single character
percent sign (%) Matches any sequence of zero or more characters
Note: Be aware of the effect of trailing blanks. To match values, you might have to use the TRIM function to remove trailing blanks.
any other character Matches that character
The LIKE expression is case sensitive. To search for mixed-case strings, use the UPCASE function to create an uppercase version of the term that you want to search. You can use a temporary term to store the results of the UPCASE function. (See Step 8 of “Create a Term” on page 35.) Use the LIKE operator to search the uppercase version of the term.
For example, you can search the term Part_Number for mixed-case strings that begin with HS and end with PP by using the two rules shown in the following display.
The following table shows examples of the matches that result if you search a term that could have these values: Smith, Smooth, Smothers, Smart, Smuggle.
Table 7.4 Examples of LIKE Expressions
LIKE Expression Example Matching Results
like 'Sm%' Smith, Smooth, Smothers, Smart, Smuggle
60 Chapter 7 • Managing Rules and Rule Sets
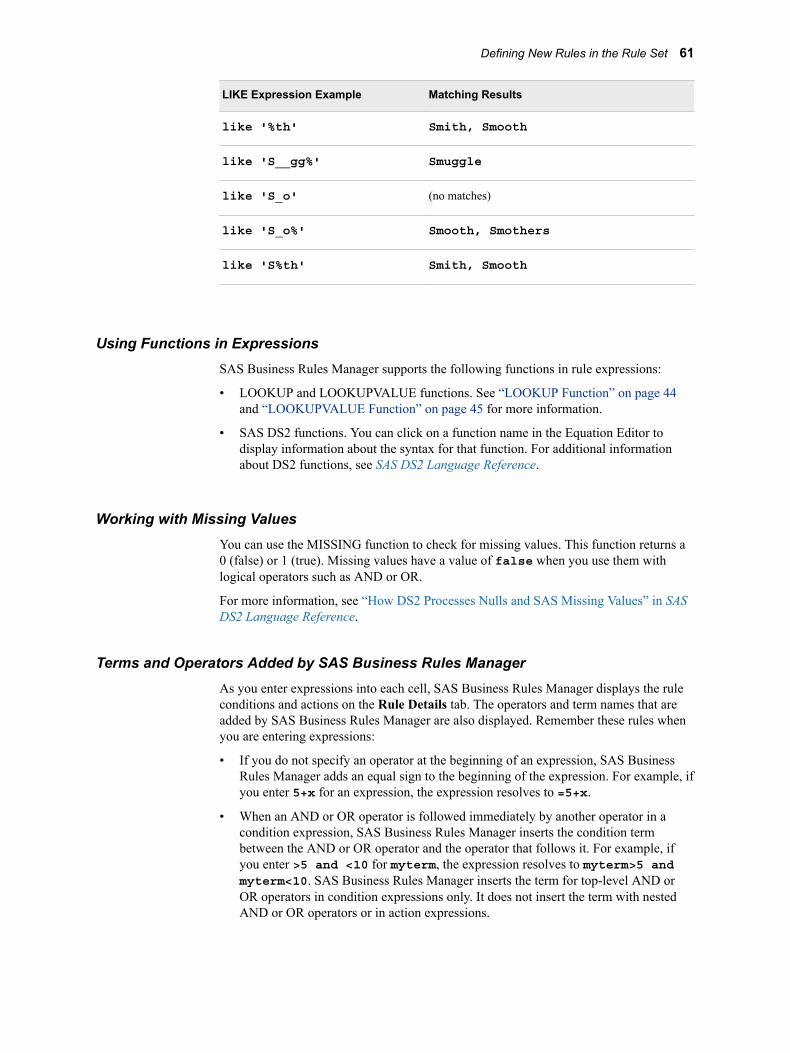
LIKE Expression Example Matching Results
like '%th' Smith, Smooth
like 'S__gg%' Smuggle
like 'S_o' (no matches)
like 'S_o%' Smooth, Smothers
like 'S%th' Smith, Smooth
Using Functions in ExpressionsSAS Business Rules Manager supports the following functions in rule expressions:
• LOOKUP and LOOKUPVALUE functions. See “LOOKUP Function” on page 44 and “LOOKUPVALUE Function” on page 45 for more information.
• SAS DS2 functions. You can click on a function name in the Equation Editor to display information about the syntax for that function. For additional information about DS2 functions, see SAS DS2 Language Reference.
Working with Missing ValuesYou can use the MISSING function to check for missing values. This function returns a 0 (false) or 1 (true). Missing values have a value of false when you use them with logical operators such as AND or OR.
For more information, see “How DS2 Processes Nulls and SAS Missing Values” in SAS DS2 Language Reference.
Terms and Operators Added by SAS Business Rules ManagerAs you enter expressions into each cell, SAS Business Rules Manager displays the rule conditions and actions on the Rule Details tab. The operators and term names that are added by SAS Business Rules Manager are also displayed. Remember these rules when you are entering expressions:
• If you do not specify an operator at the beginning of an expression, SAS Business Rules Manager adds an equal sign to the beginning of the expression. For example, if you enter 5+x for an expression, the expression resolves to =5+x.
• When an AND or OR operator is followed immediately by another operator in a condition expression, SAS Business Rules Manager inserts the condition term between the AND or OR operator and the operator that follows it. For example, if you enter >5 and <10 for myterm, the expression resolves to myterm>5 and myterm<10. SAS Business Rules Manager inserts the term for top-level AND or OR operators in condition expressions only. It does not insert the term with nested AND or OR operators or in action expressions.
Defining New Rules in the Rule Set 61

Leading Plus and Minus OperatorsIf you specify the leading plus operator in an action expression, SAS Business Rules Manager adds the term name to the expression. Leading minus operators are not supported.
The condition expression +1 is invalid. If you enter +1 as an action expression, the expression resolves to x=x + 1. The expression =+1 is invalid as both a condition and as an action expression.
If you enter -1 as either a condition or an action expression, the expression is interpreted as a negative number and not as a leading minus operator. The expression resolves to x=-1.
Examples of ExpressionsThe following table shows examples of expressions that you can specify.
Table 7.5 Examples of Expressions
Expression as Entered into the Decision Table for Term X Resulting Expression
Valid as a Condition Expression
Valid as an Action Expression
5 x=5 Yes Yes
=5 x=5 Yes Yes
+10 x=x+10 No
See Note 7.
Yes
–10 x=–10 Yes Yes
See Note 7.
"mystring" x="mystring" Yes Yes
=term1 x=term1 Yes Yes
5 or >100 x=5 or x>100 Yes No
See Note 1.
^=5 and x<10 x^=5 and x<10 Yes No
See Note 1.
^=5 or >=(100/4) x^=5 or x>=(100/4) Yes No
See Note 1.
in (10,20,30) x IN (10,20,30) Yes No
See Note 1.
62 Chapter 7 • Managing Rules and Rule Sets

Expression as Entered into the Decision Table for Term X Resulting Expression
Valid as a Condition Expression
Valid as an Action Expression
not in ('med','high') x NOT IN ('MED','HIGH') Yes No
See Note 1.
rate in ('med','high') x = rate in ('med','high') Yes Yes
See Note 8.
like ('M77__LL%','MA89_LL%')
x LIKE ('M77__LL%','MA89_LL%')
Yes No
See Note 1.
<'10JUN2012'd x<'10JUN2015'd Yes No
See Note 1.
>'10JUN2012:17:00:00'dt x>'10JUN2015:17:00:00'dt Yes No
See Note 1.
=ABS(-10) x=ABS(-10) Yes Yes
=True x=True Yes Yes
False x=False Yes Yes
&myMacroVar x=&myMacroVar Yes
See Note 2.
Yes
See Note 2.
%EVAL(&myMacroVar) x=%EVAL(&myMacroVar) Yes
See Note 2.
Yes
See Note 2.
term1=5 x=term1=5 Yes
See Note 3.
Yes
See Note 4.
term1=3 or term2=5 x=term1=3 or term2=5 Yes
See Note 5.
Yes
See Note 6.
5 or (x>10 and <20) This expression is invalid as both a condition expression and as an action expression. SAS Business Rules Manager does not add column names after nested AND or OR operators.
>"mystring" This expression is invalid as both a condition expression and as an action expression. SAS Business Rules Manager checks whether literal types are compatible with the specified operators. Character strings are not compatible with numeric operators.
=4.6927e-101 x=4.6927e-101 Yes
See Note 9.
Yes
Notes:
Defining New Rules in the Rule Set 63

1. Action expressions must be assignment expressions only.
2. SAS Business Rules Manager validates macro functions and variables based only on whether the syntax is correct. It does not check to determine whether a macro function or variable will be accessible when the rule set is executed. Macro support in expressions is controlled by a configuration property in SAS Management Console. See “Support macros in rule expressions” in SAS Business Rules Manager: Administrator’s Guide for more information.
3. This expression is valid. However, it should be avoided. As a condition statement, this expression checks to determine whether both x and term1 are equal to 5. The recommended way to enter this expression is =5 and term1=5.
4. As an action expression, this expression becomes a Boolean assignment statement. This expression determines whether term1 is equal to 5, and if so, assigns a value of 1 (true) to x. If not, it assigns a value of 0 (false) to x.
5. This expression is valid. However, it should be avoided. As a condition statement, this expression checks to determine whether both x and term1 are equal to 3 or whether term2 is equal to 5. The recommended way to enter this expression is (=5 or term1=3) or term2=5.
6. As an action expression, this expression becomes a Boolean assignment statement. This expression determines whether either term1 is equal to 3 or term2 is equal to 5, and if so, assigns a value of 1 (true) to x. If not, it assigns a value of 0 (false) to x.
7. Leading plus (+) operators are valid in action expressions only. Leading minus (–) operators are not supported. See “Leading Plus and Minus Operators” on page 62 for more information.
8. As an action expression, this expression becomes a Boolean assignment statement. The expression determines whether rate is equal to high or low, and if so, assigns a value of 1 (true) to x. If not, it assigns a value of 0 (false) to x.
9. This expression is valid. However, you should use caution when testing for equality by using scientific notation. Two numbers that appear to be the same might evaluate to different numbers because of the precision involved in scientific notation.
Validate the Expressions in a Rule SetWhen you save a rule set, SAS Business Rules Manager checks whether the syntax in the expressions is valid, and if so, saves the rule set. However, you can click to check the syntax of rule expressions at any time.
SAS Business Rules Manager checks whether the results produced by the expressions are of the correct data type for the terms to which the expressions apply. Also, when domain values are defined for a term, SAS Business Rules Manager does not check whether the values that are assigned to the term are included in the list of domain values.
Change the Order of Rules in a Rule SetThere are two ways to change the order of the rules in a rule set. You can move a single rule to a new position, and SAS Business Rules Manager adjusts the position of the
64 Chapter 7 • Managing Rules and Rule Sets
remaining rules in the rule set. Alternatively, you can swap the position of two rules, and SAS Business Rules Manager leaves the remaining rules in their original positions.
Move a Rule to a New Position in a Rule SetNote: If you move a rule that uses the ELSE or OR operator to position 1 in the rule set,
the operator is changed to IF.
To move a rule:
1. Right-click on the order number (in the horizontal and vertical views) or on the rule name (in the list view) of the rule that you want to move, and select Reorder. The Reorder the Rule window appears.
2. Select the new position number for the rule.
3. Click OK. SAS Business Rules Manager moves the rule to the new position and repositions the remaining rules up or down as needed.
Swap Two RulesNote: If you move a rule that uses the ELSE or OR operator to position 1, the operator
is changed to IF.
To swap the position of two rules:
1. Right-click on the order number (in the horizontal and vertical views) or on the rule name (in the list view) of one of the rules that you want to move, and select Swap. The Swap the Rule window appears.
2. Select the position number for the second rule that you want to move.
3. Click OK. SAS Business Rules Manager swaps the positions of the two rules and leaves all other rules in their original positions.
Copy Rules and ExpressionsYou can copy individual rules and expressions only within the same rule set.
Copy an Entire RuleTo copy and paste an entire rule:
1. Right-click on the order number (in the horizontal and vertical views) or on the rule name (in the list view) of the rule that you want to copy and select Copy.
2. Right-click in the rule set, and select Paste. SAS Business Rules Manager adds the copied rule as the last rule in the rule set. You can then edit or reorder the new rule as needed.
Copy Rules and Expressions 65

Copy Text within a RuleTo copy and paste an expression or part of an expression:
1. Select the expression that contains the text that you want to copy.
2. Select the text that you want to copy. To select all of the text in a cell, right-click and select Select All.
3. Right-click on the text and select Copy.
4. Select the expression in which you want to paste the text, and press Ctrl+V.
Delete Terms, Rules, and Expressions
Delete a Term from a Rule SetYou cannot delete a term that is used in a rule flow that has been published.
In the horizontal and vertical views, right-click on the term in the column or row heading, and select Delete Term.
Note: In the list view, if you right-click on a row containing an expression and select Delete, the expression in that row is deleted from the rule The term remains in the rule set until you delete all of the expressions that use that term.
Delete a RuleYou can delete only one rule at a time. Right-click on the order number (in the horizontal and vertical views) or on the rule name (in the list view), and select Delete Rule.
You cannot delete the last rule in a rule set. You must delete the rule set instead.
Cut and Paste Text within a RuleTo cut and paste an expression or part of an expression:
1. Select the expression that contains the text that you want to cut.
2. Select the text that you want to cut. To select all of the text in a cell, right-click and select Select All.
3. Right-click on the text and select Cut.
66 Chapter 7 • Managing Rules and Rule Sets
4. Select the expression in which you want to paste the text, and press Ctrl+V.
Edit the Properties of a Rule SetTo edit the properties of a rule set, open the rule set and select the Properties page. You can edit the name and description. If the rule set is empty, you can change the vocabulary that is associated with the rule set. If any rules have been defined for the rule set, you cannot change the vocabulary.
The Rule Set Logic section of the properties page displays all of the rules in the rule set and includes the operators and term names that have been added by SAS Business Rules Manager.
Edit the Properties of a RuleTo edit the properties of a rule:
1. Open the rule set that contains the rule, and select the Rules page.
2. Select the rule.
3. Edit the properties as needed. You can edit the name, edit the description, or select whether rule-fired data is recorded for the rule.
4. Click .
Display Usage Information for a Rule SetTo display usage information for a rule set, select the Usage page. Click List to display the terms and lookup tables that are referenced in the rule set and rule flows that use the rule set. Click Diagram to display a diagram showing the rules, rule set, and any rule flows that use the rule set.
Note: The diagram displays information from only the current version of a rule flow. If a published version of a rule flow uses a rule set but the current version of the same rule flow does not, then the rule flow does not appear in the diagram.
Display Usage Information for a Rule Set 67

Managing Rule Set Versions
About Rule Set VersionsThe latest version of a rule set is the rule set that has the highest version number. It is also the last version that you saved. You can edit only the latest version of a rule set.
Only one version of a rule set can be unlocked at a time. If you create a new version of a rule set, SAS Business Rules Manager locks the existing latest version before it creates a new latest version.
To edit a rule set, it must be unlocked. You cannot unlock a rule set. To make changes to a rule set that has been locked, you must create a new version of the rule set and make changes to the new version.
To publish a rule flow, all of the rule set versions that are referenced in the rule flow must be locked. When you publish a rule flow, SAS Business Rules Manager automatically locks any unlocked rule set versions that are used in the rule flow.
Set the Displayed Version
On the Versions page, indicates the displayed version. The displayed version is the rule set whose information is displayed on the other pages, such as the Properties and Rules pages. To change the displayed version, select the version that you want to view, and click .
68 Chapter 7 • Managing Rules and Rule Sets
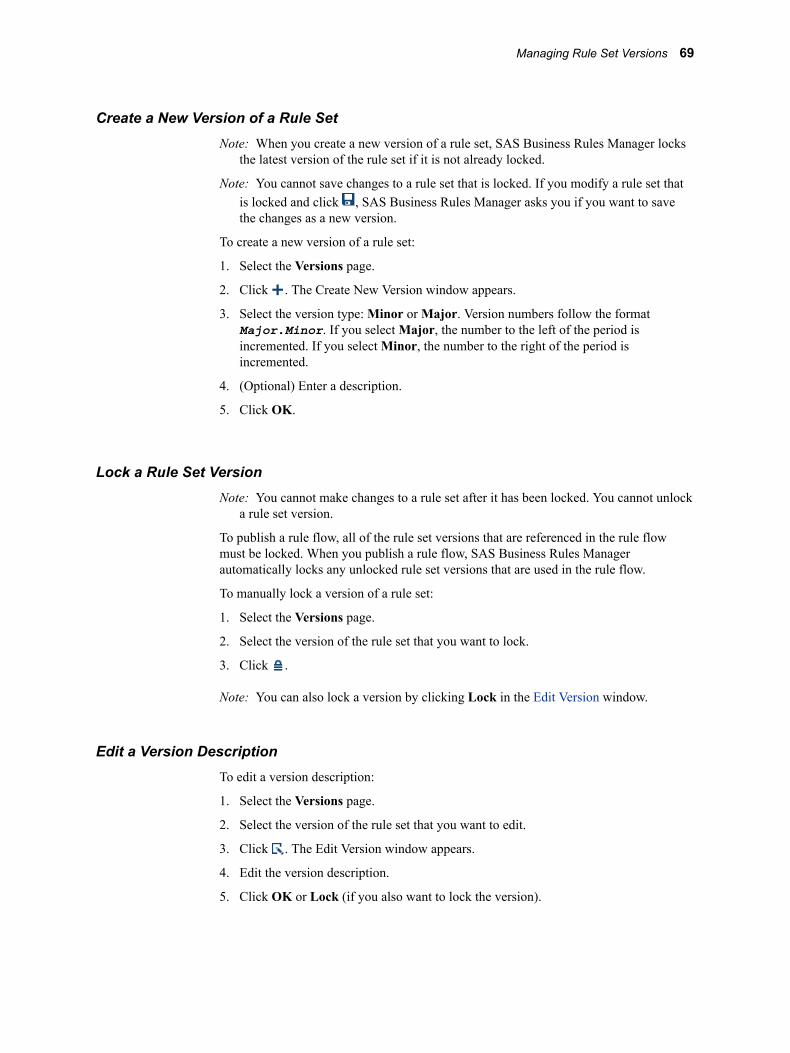
Create a New Version of a Rule SetNote: When you create a new version of a rule set, SAS Business Rules Manager locks
the latest version of the rule set if it is not already locked.
Note: You cannot save changes to a rule set that is locked. If you modify a rule set that is locked and click , SAS Business Rules Manager asks you if you want to save the changes as a new version.
To create a new version of a rule set:
1. Select the Versions page.
2. Click . The Create New Version window appears.
3. Select the version type: Minor or Major. Version numbers follow the format Major.Minor. If you select Major, the number to the left of the period is incremented. If you select Minor, the number to the right of the period is incremented.
4. (Optional) Enter a description.
5. Click OK.
Lock a Rule Set VersionNote: You cannot make changes to a rule set after it has been locked. You cannot unlock
a rule set version.
To publish a rule flow, all of the rule set versions that are referenced in the rule flow must be locked. When you publish a rule flow, SAS Business Rules Manager automatically locks any unlocked rule set versions that are used in the rule flow.
To manually lock a version of a rule set:
1. Select the Versions page.
2. Select the version of the rule set that you want to lock.
3. Click .
Note: You can also lock a version by clicking Lock in the Edit Version window.
Edit a Version DescriptionTo edit a version description:
1. Select the Versions page.
2. Select the version of the rule set that you want to edit.
3. Click . The Edit Version window appears.
4. Edit the version description.
5. Click OK or Lock (if you also want to lock the version).
Managing Rule Set Versions 69

Add Comments to a Rule SetYou can add new comments or reply to existing comments. To add a new comment:
1. Select the Comments page.
2. Enter a topic title and enter the comment. The topic title is required, and the field for comments does not appear until you enter the topic title.
3. (Optional) Click to add an attachment such as an image or a document.
4. Click Post.
To reply to an existing comment, enter your reply in the field immediately below the topic title for the existing comment, and click Post.
Click to see comments that have been posted by others.
To search for text in the comments, enter text in the search field at the top of the Comments page.
Add Attachments to a Rule SetTo add an attachment such as a document file or an image file:
1. Select the Attachments page.
2. Click , and select the attachment file.
3. Click .
Note: You can delete an attachment by selecting the attachment and clicking .
Duplicate Rule SetsTo duplicate a single rule set:
1. Right-click on the rule set and select Duplicate. The Duplicate window appears.
2. Enter the name for the duplicate rule set.
3. (Optional) Enter a description for the rule set.
4. Select the folder where you want save the duplicate rule set.
5. Select the version of the rule set that you want to duplicate.
70 Chapter 7 • Managing Rules and Rule Sets

6. Click OK. If you do not enter a new name and the folder in which you save the duplicate rule set already has a rule set with the same name, SAS Business Rules Manager appends an underscore and a number to the name.
To duplicate multiple rule sets:
1. Select the rule sets that you want to duplicate.
2. Right-click and select Duplicate. The Choose a Location window appears.
3. Select the location where you want the save the duplicate tables and click Duplicate.
SAS Business Rules Manager duplicates the current version of the selected rule sets.
If you do not enter a new name and the folder in which you save the duplicate rule set already has a rule set with the same name, SAS Business Rules Manager appends an underscore and a number to the name.
Move Rule SetsYou cannot move a rule set if it is open. To move rule sets:
1. Select the rule sets that you want to move, and then right-click and select Move. The Choose a Location window appears.
2. Select a new location for the rule sets, and click Move.
Delete Rule SetsNote: You cannot delete a rule set if it is used in a rule flow or if it is open.
To delete rule sets, select the rule sets that you want to delete, and click .
Validate and Save a Rule Set
To save changes to a rule set, click . SAS Business Rules Manager validates the syntax of the expressions and displays an error message if it finds any problems. If SAS Business Rules Manager does not detect any problems with any of the expressions, it saves the rule set. See “Validate the Expressions in a Rule Set” on page 64 for more information.
Validate and Save a Rule Set 71

72 Chapter 7 • Managing Rules and Rule Sets

Chapter 8
Creating and Publishing Rule Flows
Introduction to Rule Flows . . . . . . . . . . . . . . . . . . . . . . . . . . . . . . . . . . . . . . . . . . . . . 74
Simple Rule Flows, Complex Rule Flows, and BY Groups . . . . . . . . . . . . . . . . . . . 74
Create a Rule Flow Using the Rule Flow Editor . . . . . . . . . . . . . . . . . . . . . . . . . . . . 75
Create a Rule Flow by Using Discovery Techniques . . . . . . . . . . . . . . . . . . . . . . . . . 76About the Discovery Techniques . . . . . . . . . . . . . . . . . . . . . . . . . . . . . . . . . . . . . . . 76Create a Rule Flow by Using the New Discovery Wizard . . . . . . . . . . . . . . . . . . . . 77
Open Rule Sets from the Rule Flow Editor . . . . . . . . . . . . . . . . . . . . . . . . . . . . . . . . 79
Add Attachments to a Rule Flow . . . . . . . . . . . . . . . . . . . . . . . . . . . . . . . . . . . . . . . . 79
Add Comments to a Rule Flow . . . . . . . . . . . . . . . . . . . . . . . . . . . . . . . . . . . . . . . . . . 80
Change the Order of the Rule Sets . . . . . . . . . . . . . . . . . . . . . . . . . . . . . . . . . . . . . . . 80
View the Terms Used in a Rule Flow . . . . . . . . . . . . . . . . . . . . . . . . . . . . . . . . . . . . . 80
Managing Versions of a Rule Flow . . . . . . . . . . . . . . . . . . . . . . . . . . . . . . . . . . . . . . . 81About Rule Flow Versions . . . . . . . . . . . . . . . . . . . . . . . . . . . . . . . . . . . . . . . . . . . . 81Set the Displayed Version . . . . . . . . . . . . . . . . . . . . . . . . . . . . . . . . . . . . . . . . . . . . . 81Edit a Version Description . . . . . . . . . . . . . . . . . . . . . . . . . . . . . . . . . . . . . . . . . . . . 81
Rename a Rule Flow . . . . . . . . . . . . . . . . . . . . . . . . . . . . . . . . . . . . . . . . . . . . . . . . . . . 81
Duplicate Rule Flows . . . . . . . . . . . . . . . . . . . . . . . . . . . . . . . . . . . . . . . . . . . . . . . . . . 81
Move Rule Flows . . . . . . . . . . . . . . . . . . . . . . . . . . . . . . . . . . . . . . . . . . . . . . . . . . . . . . 82
Remove Rule Sets from a Rule Flow . . . . . . . . . . . . . . . . . . . . . . . . . . . . . . . . . . . . . . 82
Delete Rule Flows . . . . . . . . . . . . . . . . . . . . . . . . . . . . . . . . . . . . . . . . . . . . . . . . . . . . . 82
Testing a Rule Flow . . . . . . . . . . . . . . . . . . . . . . . . . . . . . . . . . . . . . . . . . . . . . . . . . . . . 82Input Data for Rule Flow Tests . . . . . . . . . . . . . . . . . . . . . . . . . . . . . . . . . . . . . . . . . 83Create and Run a New Rule Flow Test . . . . . . . . . . . . . . . . . . . . . . . . . . . . . . . . . . . 83Run a Rule Flow Test . . . . . . . . . . . . . . . . . . . . . . . . . . . . . . . . . . . . . . . . . . . . . . . . 83Copy a Rule Flow Test . . . . . . . . . . . . . . . . . . . . . . . . . . . . . . . . . . . . . . . . . . . . . . . 84Edit a Rule Flow Test . . . . . . . . . . . . . . . . . . . . . . . . . . . . . . . . . . . . . . . . . . . . . . . . 84Delete a Rule Flow Test . . . . . . . . . . . . . . . . . . . . . . . . . . . . . . . . . . . . . . . . . . . . . . 84Specify Preprocessing Code . . . . . . . . . . . . . . . . . . . . . . . . . . . . . . . . . . . . . . . . . . . 84View Rule Flow Test Results . . . . . . . . . . . . . . . . . . . . . . . . . . . . . . . . . . . . . . . . . . 84
Generating DATA Step Code for a Rule Flow . . . . . . . . . . . . . . . . . . . . . . . . . . . . . . 85
Dynamically Running the Latest Rule Flow Version . . . . . . . . . . . . . . . . . . . . . . . . 85
73

Reducing Overhead in SAS Data Integration Studio . . . . . . . . . . . . . . . . . . . . . . . . 86
When Are Output Records Generated? . . . . . . . . . . . . . . . . . . . . . . . . . . . . . . . . . . . 86
Publish a Rule Flow . . . . . . . . . . . . . . . . . . . . . . . . . . . . . . . . . . . . . . . . . . . . . . . . . . . 86
Display Publish Information for Rule Flows . . . . . . . . . . . . . . . . . . . . . . . . . . . . . . . 87
Deploy a Rule Flow as a Stored Process . . . . . . . . . . . . . . . . . . . . . . . . . . . . . . . . . . . 87
Viewing Lineage Information for a Rule Flow . . . . . . . . . . . . . . . . . . . . . . . . . . . . . 88About Lineage Information . . . . . . . . . . . . . . . . . . . . . . . . . . . . . . . . . . . . . . . . . . . 88View Lineage Information for a Rule Flow . . . . . . . . . . . . . . . . . . . . . . . . . . . . . . . 88
Introduction to Rule FlowsA business rule flow is a logical collection of multiple rule sets that define multiple conditions and actions. In general, the rule sets in a rule flow are executed in the order in which they are defined in the rule flow. However, with complex rule flows, certain sections of rule sets are usually executed more times than others. See “Simple Rule Flows, Complex Rule Flows, and BY Groups” on page 74 for more information.
After you publish a rule flow, other applications can deploy the published rule flows. The applications map terms used in the rule flow to table column in input data, evaluate the conditions in the rule flow, and execute the appropriate actions.
Simple Rule Flows, Complex Rule Flows, and BY Groups
There are two general types of rule flows: simple and complex. A simple rule flow has a single group of rule sets. All of the rule sets are run and output is generated for each input record.
A complex rule flow has at least three sections: Initial, Main, and Final. Rule sets in the Initial section are run only when the first input record is processed. Rule sets in the Main section are run for each input record. Rule sets in the Final section are run after the last input record has been processed by the rule sets in the Main section.
For complex rule flows, you can specify BY-group terms. If you specify BY-group terms, then SAS Business Rules Manager sorts the input data by those terms.
If you specify BY-group terms, SAS Business Rules Manager adds two new sections to the rule flow, Group Start and Group End. The rules sets in these sections are run with the first and last input record in each BY group.
Note: Adding rules to any of the sections in a complex rule flow is optional. You can leave unneeded sections empty.
See “When Are Output Records Generated?” on page 86 for more information.
74 Chapter 8 • Creating and Publishing Rule Flows

Create a Rule Flow Using the Rule Flow EditorTo create a rule flow:
1. Select the Business Rules ð Rule Flows category.
2. Right-click on the folder where you want to create the new rule flow, and select New Rule Flow. Alternatively, select the folder where you want to add the new rule flow, click , and select New Rule Flow. The New Rule Flow window appears.
3. Enter a name for the new rule flow. Rule flow names are limited to 32 characters and can contain any character except forward slash (/), backslash (\), left brace ({), right brace (}), colon (:), and question mark (?).
4. (Optional) Enter a description for the new rule flow. Descriptions are limited to 256 characters.
5. (Optional) Select Create output only for records that fire rules to limit the output of the rule flow. By default, all output records are written to the output data set. However, for some types of applications, only the output records for which at least one rule has fired are of interest. Limiting output is useful for applications that detect outliers, such as applications that detect fraud.
6. Click Create. SAS Business Rules Manager creates a new rule flow and opens the rule flow editor. By default, the Properties page is displayed.
7. Select the Rule Sets page.
8. (Optional) Select Complex Rule Flow from the menu in the toolbar. SAS Business Rules Manager adds Initial and Final sections to the rule flow table. The rules in these sections are run at the start and end of the rule flow.
9. Add rule sets to the rule flow. Right-click on a rule set in the Rule Sets pane, and select the appropriate Add To Section option. The options that are available depend on whether you are creating a simple or complex rule flow.
Note: A rule flow can use only rule sets that are defined for the same vocabulary. After the first rule set is added to the rule flow, the vocabulary for the rule flow is established. Only the rule sets that use the same vocabulary are displayed in the Resources pane.
Note: A rule set can be added to the same rule flow only once.
10. (Optional) If you selected Complex Rule Flow, you can specify BY-group terms. With BY-group processing, all of the input records that have the same values for the BY-group terms are processed before output is generated. One output record is written for each group.
a. Click and select the BY-group terms. SAS Business Rules Manager adds Group Start and Group End sections to the table. The rules in these groups are run at the start and end of each BY group.
b. (Optional) Add the rule sets that you want in the Group Start and Group End sections of the table.
11. (Optional) Select the version of each rule set. If the version is Use latest, then the most recently saved version of the rule set is always used when it is run. Specifying Use latest for the version is useful during rule flow development and testing. However, if the version of a rule set that is specified in the rule flow is unlocked
Create a Rule Flow Using the Rule Flow Editor 75
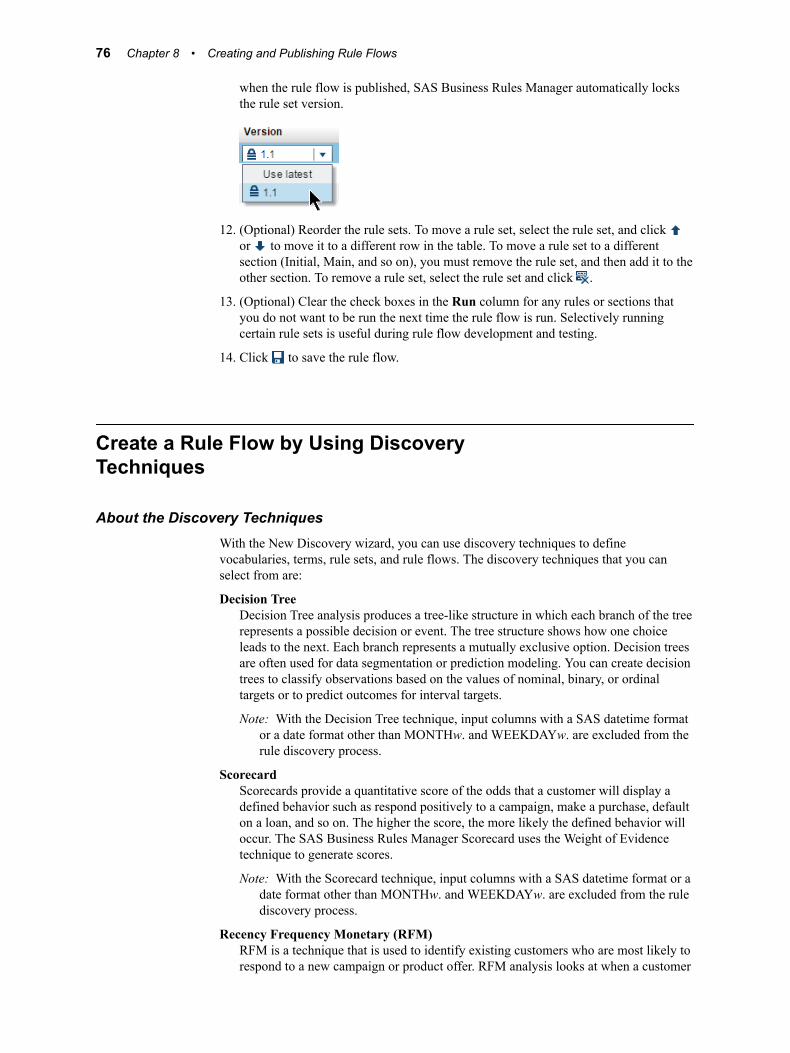
when the rule flow is published, SAS Business Rules Manager automatically locks the rule set version.
12. (Optional) Reorder the rule sets. To move a rule set, select the rule set, and click or to move it to a different row in the table. To move a rule set to a different section (Initial, Main, and so on), you must remove the rule set, and then add it to the other section. To remove a rule set, select the rule set and click .
13. (Optional) Clear the check boxes in the Run column for any rules or sections that you do not want to be run the next time the rule flow is run. Selectively running certain rule sets is useful during rule flow development and testing.
14. Click to save the rule flow.
Create a Rule Flow by Using Discovery Techniques
About the Discovery TechniquesWith the New Discovery wizard, you can use discovery techniques to define vocabularies, terms, rule sets, and rule flows. The discovery techniques that you can select from are:
Decision TreeDecision Tree analysis produces a tree-like structure in which each branch of the tree represents a possible decision or event. The tree structure shows how one choice leads to the next. Each branch represents a mutually exclusive option. Decision trees are often used for data segmentation or prediction modeling. You can create decision trees to classify observations based on the values of nominal, binary, or ordinal targets or to predict outcomes for interval targets.
Note: With the Decision Tree technique, input columns with a SAS datetime format or a date format other than MONTHw. and WEEKDAYw. are excluded from the rule discovery process.
ScorecardScorecards provide a quantitative score of the odds that a customer will display a defined behavior such as respond positively to a campaign, make a purchase, default on a loan, and so on. The higher the score, the more likely the defined behavior will occur. The SAS Business Rules Manager Scorecard uses the Weight of Evidence technique to generate scores.
Note: With the Scorecard technique, input columns with a SAS datetime format or a date format other than MONTHw. and WEEKDAYw. are excluded from the rule discovery process.
Recency Frequency Monetary (RFM)RFM is a technique that is used to identify existing customers who are most likely to respond to a new campaign or product offer. RFM analysis looks at when a customer
76 Chapter 8 • Creating and Publishing Rule Flows

last placed an order or bought something, how often the customer makes a purchase, and how much money they spend. Customers are assigned scores based on these factors.
Market BasketsMarket Basket analysis is used to predict items that are most likely to be purchased together. Market Basket analysis can be used to predict what items a customer is likely to buy.
Create a Rule Flow by Using the New Discovery WizardWhen you run the New Discovery wizard, it uses the discovery technique that you select to generate a rule flow and as many rule sets as are needed. If you do not select an existing vocabulary, the wizard also generates a vocabulary.
Note: The New Discovery wizard produces temporary data sets during the rule discovery process. Do not delete these temporary data sets before you attempt to import the results of the rule discovery process. If you delete these temporary data sets, you cannot import the generated rule sets.
Note: If folder configuration is enabled, you might not be able to import the results of the rule discovery process. See “Enable Business Rules Folder Administration” in SAS Business Rules Manager: Administrator’s Guide for more information.
To create a rule flow using the New Discovery wizard:
1. Select the Business Rules ð Rule Flows category.
2. Right-click on the folder where you want to create the new rule flow, and select New Rule Flow. Alternatively, select the folder where you want to add the new rule flow, click , and select New Rule Flow. The New Rule Flow window appears.
3. Enter a name for the new rule flow. Rule flow names are limited to 32 characters and can contain any character except forward slash (/), backslash (\), left brace ({), right brace (}), colon (:), and question mark (?).
Note: The name that you enter is also used for the vocabulary name if you do not select an existing vocabulary. Vocabulary names must be unique within the SAS Decision Manager database. Rule flow names can contain spaces but vocabulary names cannot. If the name you enter contains a space, it is converted to an underscore in the vocabulary name.
4. (Optional) Enter a description for the new rule flow. Descriptions are limited to 256 characters.
5. (Optional) Select Create output only for records that fire rules to limit the output of the rule flow. By default, all output records are written to the output data set. However, for some types of applications, only the output records for which at least one rule has fired are of interest. Limiting output is useful for applications that detect outliers, such as applications that detect fraud.
6. Select Use discovery techniques to generate rules.
7. Either select an existing vocabulary or select Create a vocabulary.
Note: If you select an existing vocabulary, and the discovery process generates a vocabulary that has a term with the same name but a different data type, you cannot import the rules that are generated.
8. Click Create. SAS Business Rules Manager opens the New Discovery window.
Create a Rule Flow by Using Discovery Techniques 77

9. Select the Discovery technique. The techniques that are available depend on the products that are licensed at your site. The Recency Frequency Monetary (RFM) technique is available with Base SAS. The Decision Tree and Scorecard techniques require a SAS/STAT license. The Market Baskets technique requires a SAS Enterprise Miner license.
10. Select the Data source that you want to use for the discovery analysis.
Note: You cannot use the Market Baskets discovery technique with data sources that contain values for the Item term that do not conform to the SAS name rules for the VALIDVARNAME=V7 system option. See “VALIDVARNAME= System Option” in SAS System Options: Reference for more information.
11. Select the setup options for the discovery technique, and click Next. The setup options depend on the technique. See Table 8.1 on page 78.
12. Select the action terms that are required for the discovery technique. See Table 8.1.
Note: If you specified an existing vocabulary in Step 7, and the action terms that you select are excluded from the output data, the rule flow will not run. See “Create a Term” on page 35 for more information.
For the RFM and Market Baskets techniques, skip to Step 14.
13. For the Decision Tree and Scorecard discovery techniques, select the input variables that you want to be used as condition terms in the rule flow. Select the terms and click to move them to the Conditions list.
14. Click Run to run the analysis. SAS Business Rules Manager displays the rule sets that were generated by the analysis. You should check the SAS log before importing the data.
15. Click Import to import the data. If the data was imported successfully, SAS Business Rules Manager displays a confirmation message telling you what data was imported and which folder it was added to.
16. (Optional) Click Rule_generation_log and Rule_import_log to download the log files to your local machine. The log filename is RuleFlowName_generation.log, and the import log filename is RuleFlowName_import.log. If rules cannot be generated or the import process fails, the log files contain detailed error messages.
17. Click Close to close the New Discovery wizard. SAS Business Rules Manager opens the new rule flow in the rule flow editor and displays the Rule Sets page.
After using the New Discovery wizard to generate and import a new rule flow, all of the rule set versions in the rule flow will be unlocked, latest versions. When you publish the rule flow, SAS Business Rules Manager automatically locks any unlocked rule sets. See “Lock a Rule Set Version” on page 69 and Step 11 in “Create a Rule Flow Using the Rule Flow Editor” on page 75 for more information.
Table 8.1 Setup Options and Terms for Discovery Techniques
Discovery Technique Setup Variables Action Terms
Decision Tree Maximum number of rules: Select the maximum number of rules that you want to be generated from the discovery analysis.
Select the terms whose values you want to predict, and click to move them to the Actions list.
78 Chapter 8 • Creating and Publishing Rule Flows

Discovery Technique Setup Variables Action Terms
Scorecard Minimum points: The scorecard points are scaled with this option as the minimum value. You can specify any nonnegative integer.
Maximum points: The scorecard points are scaled with this option as the maximum value. You can specify any positive integer that is greater than the Minimum points value.
Target variable: specifies the variable that you are modeling. The variable must have exactly two discrete values such as 0 and 1 or True and False.
Target category: specifies how the values of the target variable are mapped. The scorecard points are scaled to the likelihood of the two target variable values based on the sort order. Select High to indicate that the highest lexical value of the target variable is mapped to the Maximum points value. Select Low to indicate that the lowest lexical value of the target variable is mapped to the Maximum points value.
Recency Frequency Monetary
Select the binning method.
Independent: Simple ranks are assigned to recency, frequency, and monetary values. The three ranks are assigned independently.
Nested: A simple rank is assigned to recency values. Within each recency rank, customers are then assigned a frequency rank. Within each frequency rank, customer are assigned a monetary rank.
Customer ID: specifies a numeric or character term that uniquely identifies a customer.
Transaction date: specifies the transaction date.
Transaction amount: specifies the transaction amount.
Market Baskets Maximum number of rules: Select the maximum number of rules that you want to be generated from the discovery analysis.
ID: specifies the customer ID.
Item: specifies the item that was purchased. Each value for the item must follow the rules for valid names according to the VALIDVARNAME=V7 system option.
Open Rule Sets from the Rule Flow EditorYou can open a rule flow and some or all of its rule sets in the same layout. In the rule flow editor, either double-click on the rule sets that you want to open, or select the rule sets and click .
Add Attachments to a Rule FlowTo add an attachment such as a document file or an image file:
1. Select the Attachments page.
2. Click , and select the attachment file.
3. Click .
Add Attachments to a Rule Flow 79
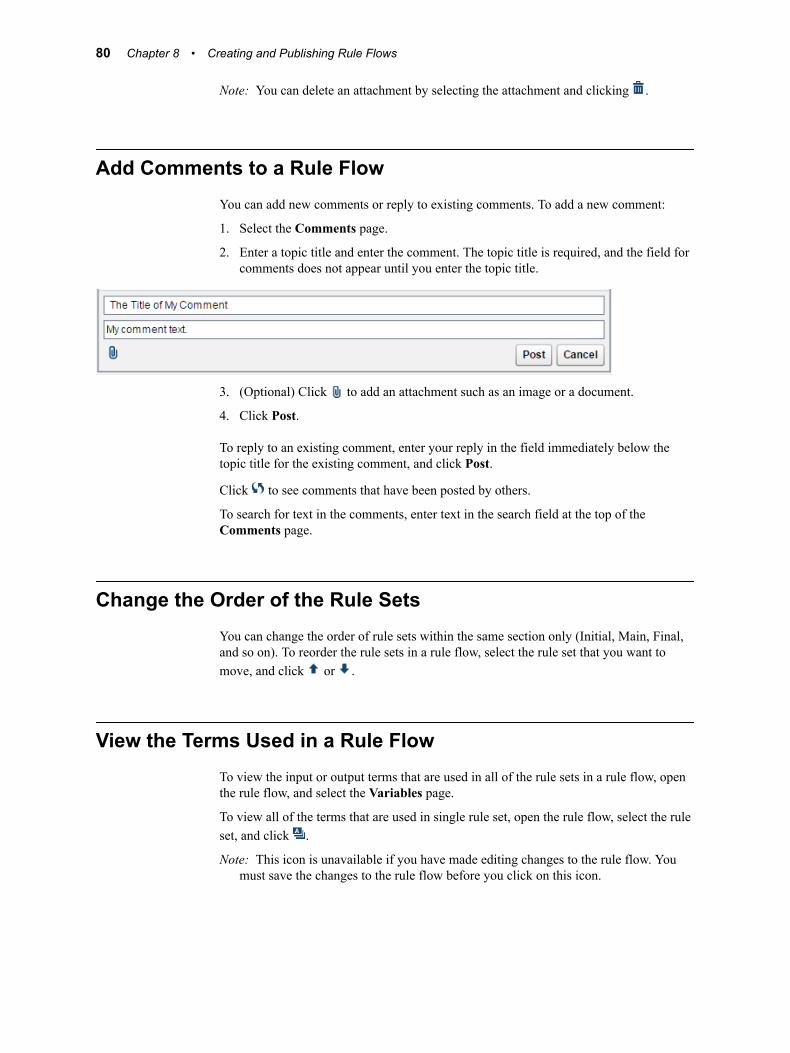
Note: You can delete an attachment by selecting the attachment and clicking .
Add Comments to a Rule FlowYou can add new comments or reply to existing comments. To add a new comment:
1. Select the Comments page.
2. Enter a topic title and enter the comment. The topic title is required, and the field for comments does not appear until you enter the topic title.
3. (Optional) Click to add an attachment such as an image or a document.
4. Click Post.
To reply to an existing comment, enter your reply in the field immediately below the topic title for the existing comment, and click Post.
Click to see comments that have been posted by others.
To search for text in the comments, enter text in the search field at the top of the Comments page.
Change the Order of the Rule SetsYou can change the order of rule sets within the same section only (Initial, Main, Final, and so on). To reorder the rule sets in a rule flow, select the rule set that you want to move, and click or .
View the Terms Used in a Rule FlowTo view the input or output terms that are used in all of the rule sets in a rule flow, open the rule flow, and select the Variables page.
To view all of the terms that are used in single rule set, open the rule flow, select the rule set, and click .
Note: This icon is unavailable if you have made editing changes to the rule flow. You must save the changes to the rule flow before you click on this icon.
80 Chapter 8 • Creating and Publishing Rule Flows

Managing Versions of a Rule Flow
About Rule Flow VersionsThe current version of a rule flow is the rule flow that has the highest version number. It is also the last version that you saved. You can edit only the latest version of a rule flow.
Only one version of a rule flow can be unlocked at a time.
When you publish the current version of a rule flow, that version is locked and assigned a version number. A new current version is created. You cannot unlock a rule flow.
Set the Displayed Version
On the Versions page, indicates the displayed version. The displayed version is the rule flow whose information is displayed on the other pages, such as the Properties and Rule Sets pages. To change the displayed version, select the version that you want to view, and click .
Edit a Version DescriptionTo edit a version description:
1. Select the Versions page.
2. Select the version of the rule flow that you want to edit.
3. Click . The Edit Version window appears.
4. Edit the version description.
5. Click OK.
Rename a Rule FlowTo rename a rule flow:
1. Close the rule flow if it is open. You cannot rename a rule flow if it is open.
2. Right-click on the rule flow and select Rename.
3. Change the name and click OK.
Duplicate Rule FlowsTo duplicate a single rule flow:
1. Right-click on the rule flow, and select Duplicate. The Duplicate window appears.
Duplicate Rule Flows 81

2. Enter the name for the duplicate rule flow.
3. (Optional) Enter a description for the rule flow.
4. Select the folder where you want save the duplicate rule flow.
5. Select the version of the rule flow that you want to duplicate.
6. Click OK. If you do not enter a new name and the folder in which you save the duplicate rule flow already has a rule flow with the same name, SAS Business Rules Manager appends an underscore and a number to the name.
To duplicate multiple rule flows:
1. Select the rule flows that you want to duplicate.
2. Right-click and select Duplicate. The Choose a Location window appears.
3. Select the location where you want the save the duplicate tables and click Duplicate.
SAS Business Rules Manager duplicates the current version of the selected rule flows.
If you do not enter a new name and the folder in which you save the duplicate rule flow already has a rule flow with the same name, SAS Business Rules Manager appends an underscore and a number to the name.
Move Rule FlowsYou cannot move a rule flow if it is open. To move rule flows:
1. Select the rule flows that you want to move, and then right-click and select Move. The Choose a Location window appears.
2. Select a new location for the rule flows, and click Move.
Remove Rule Sets from a Rule FlowTo remove rule sets from a rule flow, open the rule flow, select the rule sets, and click
.
Delete Rule Flows
To delete rule flows, select the rule flows and click .
Testing a Rule FlowYou can test a rule flow before you publish it. If necessary, you can specify initialization or setup code that you want to run before the rule flow is run. SAS Business Rules
82 Chapter 8 • Creating and Publishing Rule Flows

Manager reports rule flow results and test data such as rule-fired data. SAS Business Rules Manager saves the test results from the last time a test was run.
Input Data for Rule Flow TestsSAS Business Rules Manager expects the input data for the rule flow test to already exist and to be defined as a data table. See Chapter 3, “Managing Data Tables,” on page 21 for information about defining data tables. Your user ID must have permission to access the data.
Create and Run a New Rule Flow TestTo test a rule flow:
1. Open the rule flow that you want to test.
2. Select the Tests page.
3. Click to add a new test. The Add a New Test window appears.
4. Enter a name for the new test. Test names are limited to 30 characters.
5. (Optional) Enter a description for the test.
6. Select the data source that contains the input data for the test, and click Next.
7. Map the terms in the rule flow to columns in the input data set. If you click Map terms, the application automatically maps as many terms as possible. You can also map terms by manually selecting an input column for each rule flow input term.
8. Click Next.
9. (Optional) Enter any SAS code, such as initialization code or setup code, that you want to run before the rule flow is run. See “Specify Preprocessing Code” on page 84 for more information.
10. Click Run to run the test, or click Save to save it without running it.
If the test completes successfully, the status on the Tests tab changes to . SAS Business Rules Manager displays the Results tab on which you can view the output of the rule flow, analyze the rule-fired data, and view the SAS code that was generated and run by SAS Business Rules Manager. See “View Rule Flow Test Results” on page 84for more information.
Rule flow tests are associated with the rule flow version. After a test completes, the test version is displayed on the Tests page.
Run a Rule Flow TestTo run a rule flow test:
1. Open the rule flow that you want to test.
2. Select the Tests page.
3. Select the test that you want to run and click .
Testing a Rule Flow 83

Copy a Rule Flow TestTo copy a test:
1. Open the rule flow.
2. Select the Tests page.
3. Select the test that you want to copy and click .
Edit a Rule Flow TestTo edit a rule flow test:
1. Open the rule flow.
2. Select the Tests page.
3. Select the test that you want to edit and click .
Delete a Rule Flow TestTo delete a rule flow test:
1. Open the rule flow.
2. Select the Tests page.
3. Select the test that you want to delete and click .
Specify Preprocessing CodeTo specify code that you want to run before the rule flow is executed, enter the code during the Preprocessing step in the Add a New Test window.
You can use the &BRM_CODE_TYPE macro variable to specify whether SAS Business Rules Manager generates DS1 code for the rule flow test. See “Generating DATA Step Code for a Rule Flow” on page 85 for more information.
You can use the &DCM_USE_LATEST_VERSION macro variable to ensure that when a rule flow is run, the latest compatible version that is always used. See “Dynamically Running the Latest Rule Flow Version” on page 85 for more information.
View Rule Flow Test ResultsWhen you test a rule flow, SAS Business Rules Manager displays the output of the rule flow together with other information on the Results tab. You can filter the rows that are displayed on the Output Table tab by clicking above the output table. On the Rules Fired Analysis tab, if you select a record in the Output Records table, SAS Business Rules Manager displays the rules that fired for that record in the table at the bottom of the page. See also “When Are Output Records Generated?” on page 86.
Note: The _recordCorrelationKey column in the output table is a unique key that is added to each output record. This key enables the output records to be correlated
84 Chapter 8 • Creating and Publishing Rule Flows

with the records in the rule-fired details table. See “Columns in the Rule-Fired Details Table” on page 106.
Generating DATA Step Code for a Rule FlowYou can generate DATA step (DS1) code or DS2 code for a rule flow. In many cases, you will get better performance by specifying DS1. However, consider specifying DS2 if your input data is in Teradata, Greenplum, or Hadoop, and you have installed the SAS Code Accelerator. In addition, the LIKE operator is not supported for DS1.
The brm.runtime.codetype configuration property in SAS Management Console determines whether SAS Business Rules Manager generates DS1 code or DS2 code during rule flow testing and when a published rule flow is run. By default, this property is set to DS2. You can change this property to specify DS1.See “Business Rules Manager Web Advanced Properties” in SAS Business Rules Manager: Administrator’s Guide for more information.
To generate DS1 code for a specific rule flow regardless of the setting of the brm.runtime.codetype property, you can specify the &BRM_CODE_TYPE macro variable in preprocessing code. Define this variable in preprocessing code such as in the Preprocessing Code section of a rule flow test or in the Precode section of the Precode and Postcode tab in SAS Data Integration Studio. Define this variable before calling the %BRM_RULE_FLOW macro:
%let BRM_CODE_TYPE=DS1;
Using this macro variable helps you determine whether you want to change the brm.runtime.codetype setting.
Dynamically Running the Latest Rule Flow Version
You can use the &DCM_USE_LATEST_VERSION macro variable and either the &DCM_RULEFLOW_NAME or &DCM_DEPLOYED_RULEFLOW_NAME macro variable to ensure that when a rule flow is run, the latest version of the rule flow is always used. If you specify both &DCM_RULEFLOW_NAME and &DCM_DEPLOYED_RULEFLOW_NAME, then the name specified by &DCM_DEPLOYED_RULEFLOW_NAME is used.
For &DCM_DEPLOYED_RULEFLOW_NAME, specify the name of the published rule flow and the identification number of the rule flow. You can find the published name and identification number in the Name column of the rule flow History page. For example:
%let DCM_DEPLOYED_RULEFLOW_NAME=published_flow_name(ID_number);
Note: If you specify &DCM_RULEFLOW_NAME and SAS Business Rules Manager finds multiple rule flows that match the specified name, it writes an error message in the SAS log, and the rule flow is not executed. If you encounter this issue, specify the specific rule flow by using &DCM_DEPLOYED_RULEFLOW_NAME.
Define these macro variables in preprocessing code such as in the Preprocessing Code section of a rule flow test or in the Precode section on the Precode and Postcode tab in SAS Data Integration Studio. Define these variables before calling the %BRM_RULE_FLOW macro. For example:
Dynamically Running the Latest Rule Flow Version 85

%let DCM_USE_LATEST_VERSION=Y;%let DCM_RULEFLOW_NAME=rule_flow_name;
Note: SAS Data Integration Studio uses the latest version of the rule flow that matches the variable mappings in the Business Rules transformation. SAS Business Rules Manager writes a note in the SAS log that states which version was selected.
Reducing Overhead in SAS Data Integration Studio
If you have previously run a rule flow using the Location of generated debug code file option in SAS Data Integration Studio, you can use the &BRM_USE_EXISTING_CODE macro variable to reduce overhead when you run the same version of the same rule flow again. On the Precode and Postcode tab in SAS Data Integration Studio, set this macro variable to Y:
%LET BRM_USE_EXISTING_CODE=Y;
Setting this variable eliminates variable remapping and other checks, such as determining whether the rule flow can be run in-database.
When Are Output Records Generated?If an input record does not fire any rules, then an output record might not be created, depending on the rule flow. If an input record fires a rule, then an output record is created. In this case, the point at which output records are generated depends on the structure of the rule flow.
simple rule flowOne output record is generated for each input record.
complex rule flow without BY-group termsOne output record is generated for each input record. If there are rules in the Final section, an output record is also generated after the rules in the Final section run.
complex rule flow with BY-group termsOne output record is generated for each BY-group. This output record is generated after the rules in the Group End section run. An additional output record is generated after the rules in the Final section run.
Publish a Rule FlowPublishing is the process of writing a business rule flow to the content server. After you publish a rule flow to the content server, other applications can use it.
When you publish the current version of a rule flow, that version of the rule flow is locked and cannot be unlocked. For more information, see “Managing Versions of a Rule Flow” on page 81.
86 Chapter 8 • Creating and Publishing Rule Flows

Note: To publish a rule flow, all of the rule set versions that are referenced in the rule flow must be locked. When you publish a rule flow, SAS Business Rules Manager automatically locks any unlocked rule set versions that are used in the rule flow.
To publish a rule flow:
1. Open the rule flow.
2. If the rule flow contains changes that have not been saved, click . You cannot publish a rule flow if it contains changes that have not been saved.
3. Click . The Choose a Location window appears.
Note: If a rule flow has already been published, SAS Business Rules Manager always publishes the rule flow to the same location. It does not prompt for a location the next time the rule flow is published.
4. Select the location where you want to publish the rule flow.
Note: This window lists all of the objects that are defined in the SAS metadata folders. To limit the list to folders only, select the Show folders only check box.
Note: In the Choose a Location window, to create a new subfolder, click .
5. Click OK.
Display Publish Information for Rule FlowsPublish information for a specific version of a rule flow is available on the Versions page. The information available includes the published rule flow name, the folder path to which the rule flow was published, the date on which the version was published, and the display name or user ID of the user that published the rule flow. To display publish information for a rule flow:
1. Open the rule flow.
2. Select the Versions page.
3. Click Details for the version that you are interested in.
Deploy a Rule Flow as a Stored ProcessA stored process is a SAS program that is stored on a server and defined in metadata, and which can be executed as requested by client applications. When you deploy a rule flow as a stored process, the rule flow is made available as a stored process on the SAS Stored Process Server.
Note: To deploy a rule flow, all of the rule set versions that are referenced in the rule flow must be locked. When you deploy a rule flow, SAS Business Rules Manager automatically locks any unlocked rule set versions that are used in the rule flow.
Note: Only simple rule flows can be deployed as stored processes.
To deploy a rule flow as a stored process:
1. Open the rule flow.
Deploy a Rule Flow as a Stored Process 87

2. If the rule flow contains changes that have not been saved, click . You cannot deploy a rule flow if it contains changes that have not been saved.
3. Click . The Choose a Location window appears.
4. Select the location where you want to deploy the rule flow.
T I P This window lists all of the objects that are defined in the SAS metadata folders. To limit the list to only folders, select the Show folders only check box.
Note: To create a new subfolder in the Choose a Location window, click .
5. Click OK.
For more information about stored processes, see SAS Stored Processes: Developer’s Guide.
Viewing Lineage Information for a Rule Flow
About Lineage InformationThe lineage viewer is provided by SAS Lineage. The relationship information that is displayed by SAS Lineage is taken from the Relationship database that is a part of the SAS Web Infrastructure Platform Data Server. SAS Lineage can display most types of SAS metadata. This data includes models, rule flows, and data objects, including columns, tables, external files, stored processes, and more.
SAS Lineage displays three types of diagrams:
• a network diagram that displays all relationships
• a dependency diagram that displays governance information
• a dependency diagram that displays parent and child relationships
View Lineage Information for a Rule FlowTo view lineage information:
1. Open the rule flow and click . If you are not already signed in to SAS Lineage, you are prompted to sign in.
2. Enter your user ID and password, and click SIGN IN. SAS Lineage displays the All Relationships diagram for the rule flow.
For additional information about SAS Lineage, click Help or see SAS Lineage: User’s Guide.
88 Chapter 8 • Creating and Publishing Rule Flows

The following image shows the All Relationships diagram for a simple rule flow with one rule set.
Viewing Lineage Information for a Rule Flow 89
90 Chapter 8 • Creating and Publishing Rule Flows

Part 3
Using SAS Workflow with SAS Business Rules Manager
Chapter 9Starting a Workflow and Working with Tasks . . . . . . . . . . . . . . . . . . . . . 93
Chapter 10Managing Workflows . . . . . . . . . . . . . . . . . . . . . . . . . . . . . . . . . . . . . . . . . . . . 97
91

92

Chapter 9
Starting a Workflow and Working with Tasks
Overview of Using Workflows . . . . . . . . . . . . . . . . . . . . . . . . . . . . . . . . . . . . . . . . . . . 93
Start a New Workflow . . . . . . . . . . . . . . . . . . . . . . . . . . . . . . . . . . . . . . . . . . . . . . . . . 93
Working with Workflow Tasks . . . . . . . . . . . . . . . . . . . . . . . . . . . . . . . . . . . . . . . . . . 94
Overview of Using WorkflowsSAS Business Rules Manager uses the Workflows and My Tasks category views to use SAS Workflow. A workflow is a copy of a workflow template. A workflow can be used to track the progress of objects, such as rule flows at the version level. An authorized user can use SAS Workflow Studio to define workflow templates and to make them available to SAS Business Rules Manager for use. Workflow templates contain the set of tasks, participants, policies, statuses, and data objects that comprise a business task. The status that you select when completing a task determines the next task in the workflow.
All users can access the My Tasks category view. By default, only users that are in the Decision Manager Common Administrators group can access the Workflows category view.
For more information about user permissions, see SAS Business Rules Manager: Administrator’s Guide
Start a New WorkflowWhen you start a new workflow, it is associated with the selected version of a rule flow. For a specific version, only one workflow can be in progress at a time. To start another workflow for the same version, you must first complete the in-progress workflow, or terminate the in-progress workflow process. A workflow can be started only for a version of a rule flow that is in the state of Current.
1. Open a rule flow.
2. Click on the right-side of the object toolbar.
93

3. Enter a name for the new workflow.
4. (Optional) Enter a description for the workflow.
5. Select a template from which to create the workflow.
6. Click Start.
For more information, see Chapter 10, “Managing Workflows,” on page 97.
Working with Workflow TasksThe My Tasks category view displays the tasks for In Progress workflows that you have been assigned to as a potential owner or that have been claimed by you.
From the My Tasks category view, you can perform the following:
• open a task that pertains to the associated object
• claim and open a task that pertains to the associated rule flow
• claim a task
• release a task
94 Chapter 9 • Starting a Workflow and Working with Tasks

• view the task details and workflow diagram
To complete a task:
1. Select a task and click in order to open the associated rule flow and perform the task.
2. Navigate through the rule flow’s pages to perform the steps for the current task.
3. Click .
4. Select an action to take for the selected task. The actions that are available are the status values for the task in the workflow.
5. Click Done. The workflow process continues to the next task.
Note: Only a business administrator who has access to the Workflows category can release a task that has been claimed by another participant. For more information, see “Release a Task” on page 101.
Working with Workflow Tasks 95

96 Chapter 9 • Starting a Workflow and Working with Tasks

Chapter 10
Managing Workflows
Overview of Managing Workflows . . . . . . . . . . . . . . . . . . . . . . . . . . . . . . . . . . . . . . . 97
Viewing Workflows . . . . . . . . . . . . . . . . . . . . . . . . . . . . . . . . . . . . . . . . . . . . . . . . . . . . 98
Set Mappings . . . . . . . . . . . . . . . . . . . . . . . . . . . . . . . . . . . . . . . . . . . . . . . . . . . . . . . . . 99
Working with Workflow Participants . . . . . . . . . . . . . . . . . . . . . . . . . . . . . . . . . . . . 100Assign Participants to Tasks . . . . . . . . . . . . . . . . . . . . . . . . . . . . . . . . . . . . . . . . . . 100Remove Participants from a Task . . . . . . . . . . . . . . . . . . . . . . . . . . . . . . . . . . . . . . 101Release a Task . . . . . . . . . . . . . . . . . . . . . . . . . . . . . . . . . . . . . . . . . . . . . . . . . . . . . 101
Edit Task Properties . . . . . . . . . . . . . . . . . . . . . . . . . . . . . . . . . . . . . . . . . . . . . . . . . . 102
Terminate a Workflow . . . . . . . . . . . . . . . . . . . . . . . . . . . . . . . . . . . . . . . . . . . . . . . . 102
Overview of Managing WorkflowsSAS Business Rules Manager can be used to manage workflows. You can create new workflows, view workflows, and interact with tasks that are associated with a workflow. If a user is assigned to the workflow role of business administrator, they can influence the progress of a task by actions such as assigning a task, or releasing the task that is claimed by another user, as well as specify values for properties to share information with other users. After the workflow templates are made available, an application administrator can set the object mappings using the Workflows category view. Each workflow consists of tasks.
Note: By default, only users that are in the Decision Manager Common Administrators group can access the Workflows category view.
Select Workflows to view a list of available workflows.
97

Viewing WorkflowsOnly a user who is able to access the Workflows category view can manage workflows. Other users can view the list of tasks from the workflow task drop-down list that is accessible from the rule flow toolbar. If a user is the actual owner of a task, or assigned as a potential owner of a task, they can view the workflow diagram and tasks that in the My Tasks category view. Workflows are associated with a rule flow at the version-level.
From the Workflows category view, you can perform the following actions:
• set mappings
• terminate a workflow process
To view detailed information for a workflow, double-click a workflow name. The list of tasks, the task status, and who the task is claimed by are displayed. You can then view
98 Chapter 10 • Managing Workflows

the properties and participants that are associated with a task by selecting a task. The workflow diagram is also displayed with the current status of the workflow and its tasks.
For more information, see “Working with Workflow Participants” on page 100.
Set MappingsThere are two different types of workflow templates that can be configured for use with SAS Business Rules Manager. Workflow templates that contain tasks that are configured with an approval status are considered an approval workflow. Workflow templates that do not contain tasks with an approval status are considered a standard workflow. The rule flows object can be associated with only an approval type. After you define your workflow template, save, and activate it using SAS Workflow Studio. You must specify the templates to map to each type of object. This enables you to start a new workflow using one of the templates that are associated with the specific object.
1. Select Actions ð Set Mappings. The Set Mappings window appears.
2. Select an object and then select one or more templates to map to the object.
3. Select a type for each template. The types of templates that are available are Approval and Standard.
4. Select the default template for the object.
5. Click OK.
Set Mappings 99

Working with Workflow ParticipantsFrom the Workflow details view you can access the properties and participants that are associated with a task by selecting a task. If you are a user that is associated with the workflow role of business administrator, you can assign or remove participants, and release tasks that have been claimed by another user.
Assign Participants to TasksDefault participants might have been assigned already to tasks when a workflow definition was created.
To assign an additional participant to a task:
1. From the Workflows category view, double-click a workflow. The Workflow details view is displayed.
2. Select a task, and then click in the Participants pane. The Assign a Participant window appears.
3. Select an identity type.
4. Enter part of the user, group, or role name, and click .
Note: If you do not enter part of the name, all of the names for the selected identity type are displayed.
100 Chapter 10 • Managing Workflows

Select a name and click OK.
5. Select a workflow role for the participant.
Here are the workflow roles that you can assign to participants for a workflow task:
• Business administrator: a participant who can influence the progress of a task by actions such as assigning a task, or releasing the task claimed by another user.
• Potential owner: a participant who can claim a task in a workflow process and who becomes the actual owner of a task.
6. Click OK. The new participant is added to the list in the Participants pane.
Remove Participants from a TaskTo remove a participant from a task:
1. From the Workflows category view, double-click a workflow name.
2. Select a task, and then select a participant from the Participants pane.
Note: You cannot remove a participant who is associated with the workflow roles of business administrator or actual owner.
3. Click . A message is displayed asking if you are sure that you want to remove the participant from the task.
4. Click Yes. The user is removed from the list in the Participants pane.
Release a TaskAn authorized user with the capability to access the Workflows category view can release a task that has been claimed by a workflow participant. The name of the actual owner is displayed in the Participants pane.
To release a task:
1. In the Workflows category view, double-click a workflow name. The Workflow details view is displayed.
2. Select a task name, and click . The Claimed By value for the selected task is cleared.
Working with Workflow Participants 101
Edit Task PropertiesA task can contain properties. Properties that are editable display a triangular icon in the bottom right corner of the property value in the data grid.
To edit the properties for a task:
1. From the Workflows category view, open a workflow, and select a task. The properties that are associated with the task are displayed to the right in the Properties pane.
2. Click on the property value, and then enter a value or change the existing value.
3. To save the changes to the properties, click .
If you do not want to save the changes to the properties, click .
Terminate a WorkflowWhen you terminate a workflow process, all tasks that have not yet been completed are changed to a state of Terminated. After you terminate a workflow process, it cannot be restarted. However, you can start a new workflow for the same version.
To terminate a workflow:
1. From the Workflows category view, select a workflow name and click .
2. Click Yes to terminate the selected workflow.
102 Chapter 10 • Managing Workflows

Part 4
Appendix
Appendix 1Rule-Fired and Test Information Tables . . . . . . . . . . . . . . . . . . . . . . . . . . 105
103

104

Appendix 1
Rule-Fired and Test Information Tables
Overview . . . . . . . . . . . . . . . . . . . . . . . . . . . . . . . . . . . . . . . . . . . . . . . . . . . . . . . . . . . 105
Columns in the Test Information Table . . . . . . . . . . . . . . . . . . . . . . . . . . . . . . . . . . 106
Columns in the Rule-Fired Details Table . . . . . . . . . . . . . . . . . . . . . . . . . . . . . . . . . 106
Columns in the Rules-Fired Summary Table . . . . . . . . . . . . . . . . . . . . . . . . . . . . . . 107
OverviewWhen you run a rule flow by using either the %BRM_RULE_FLOW macro or the Business Rules transformation in SAS Data Integration Studio, three tables are generated. These tables contain rule-fired information and information about the execution of the rule flow.
Table Contents
Name Generated By SAS Data Integration Studio
Test information
A single record that contains aggregate information about the execution of the rule flow.
DCM_DEPLOYMENT_EXECUTION
Rule-fired details
One row for each time that a rule evaluates to true. There might be multiple entries for the same rule, but each entry has different values for the _recordCorrelationKey and RULE-ACTION_FIRE_ID columns.
DCM_RULE_ACTION_FIRE
Rule-fired summary
A summary of how many times each rule fired. DCM_RULE_ACTION_FIRE
When the %BRM_RULE_FLOW macro is run outside of SAS Data Integration Studio, the names of the tables are controlled by the mapping file. See “%BRM_RULE_FLOW” in SAS Business Rules Manager: Administrator’s Guide for information about the macro and the mapping file.
105

Columns in the Test Information TableDEPLMT_EXECUTION_ID
the identification string of the specific instance of the rule flow that was executed. Each time a rule flow executes, a different universally unique identifier (UUID) is generated for the specific instance of the rule flow. You can use this UUID to associate the records in the test information table with the records in the rules-fired details table.
DEPLMT_SKan internal surrogate key for the publish information for the rule flow. The publish information includes who published the rule flow, the version number that was published, and the location to which the rule flow was published.This column is also included in the rules-fired details table. You can use this column to join the two tables.
DEPLMT_NMthe name of the metadata object that was executed.
TRANSACTION_MODE_CDalways set to DIS.
Note: This column has been deprecated.
RECORDS_PROCESSED_NOthe number of records that were processed by the rule flow.
TEST_FLAGindicates whether the rule flow was run in the SAS Business Rules Manager test interface.
START_DTTMthe date and time at which the rule flow started executing.
END_DTTMthe date and time at which the rule flow finished executing.
Columns in the Rule-Fired Details TableRULE_ACTION_FIRE_ID
the UUID that is generated for each rule each time it is executed. Each time a rule executes, a different UUID is generated for the specific instance of the rule.
RULE_SET_SKthe identification number of the rule set.
RULE_SET_NMthe name of the rule set.
RULE_SKthe identification number of the rule.
RULE_NMthe name of the rule.
106 Appendix 1 • Rule-Fired and Test Information Tables

DEPLMT_SKan internal surrogate key for the publish information for the rule flow. This column is also included in the test information table. You can use this column to join the two tables.
RULE_FLOW_SKthe identification number of the rule flow.
RULE_FLOW_NMthe name of the rule flow.
RULE_FIRE_DTTMthe date and time that the rule was run.
DEPLMT_EXECUTION_IDthe identification string of the specific instance of the rule flow that was executed. Each time a rule flow executes, a different UUID is generated for the specific instance of the rule flow. You can use this UUID to associate the records in the rules-fired details table with the records in the test information table on page 106.
ENTITY_PRIMARY_KEYthe value of the term that was specified with the &BRMPrimaryEntityKey macro variable in preprocessing code.
Note: This column has been deprecated. Use the _recordCorrelationKey column instead.
TRANSACTION_DTTMthe value of the term that was specified with the &BRMTransactionDTTM macro variable in preprocessing code.
Note: This column has been deprecated. Use the _recordCorrelationKey column instead.
_recordCorrelationKeya UUID that enables you to associate records in the rules-fired details table (DCM_RULE_ACTION_FIRE) with records in the output results table. This column is also added to the output results table, so you can use this key to join the rules-fired details table and the output results table. Joining the tables enables you to enrich the information in the rules-fired details table with transaction times, composite keys, or other information.
Columns in the Rules-Fired Summary TableRULE_SK
the identification number of the rule.
RULE_NMthe name of the rule.
RULE_SET_SKthe identification number of the rule set.
RULE_SET_NMthe name of the rule set.
RULE_FLOW_SKthe identification number of the rule flow.
Columns in the Rules-Fired Summary Table 107

RULE_FLOW_NMthe name of the rule flow.
ruleFiredCountthe number of times that the rule specified by the RULE_SK field executes for all of the input records that were processed.
108 Appendix 1 • Rule-Fired and Test Information Tables

Glossary
business entityan object in your business domain. An entity has one or more terms, which are attributes of an entity. For example, the business entity could be the customer, and the associated terms could be the name, account number, account type, and so on.
business rule (rule)a statement of business logic that specifies conditions to be evaluated and actions to be taken if those conditions are satisfied.
business rule flow packagea business rule flow that has been saved to an XML file.
business rule servicea business rule flow that has been implemented as a web service.
data objectan object that holds the business data that is required to execute workflow tasks.
keySee lookup key.
library referenceSee libref.
libref (library reference)a SAS name that is associated with the location of a SAS library. For example, in the name MYLIB.MYFILE, MYLIB is the libref, and MYFILE is a file in the SAS library.
lookup key (key)a value that uniquely identifies a specific record and its order among other records in a database or table.
lookup tablea table that contains lookup keys and their corresponding values.
lookup valuethe value that is associated with a lookup key in a lookup table.
109

metadatadescriptive data about data that is stored and managed in a database, in order to facilitate access to captured and archived data for further use.
policya workflow element that associates event-driven logic with a task or subflow. Policies are usually triggered automatically by an event such as a status change or a timer event.
publishto register a business rule flow in a SAS metadata repository.
ruleSee business rule.
rule flowa logical collection of multiple rule sets that define multiple conditions and actions. Rule flows can be tested and deployed as SAS programs and services that process input data, which contain conditions, in order to create output data, which contain actions.
rule seta logical group of business rules.
SAS Content Servera server that stores digital content (such as documents, reports, and images) that is created and used by SAS client applications. To interact with the server, clients use WebDAV-based protocols for access, versioning, collaboration, security, and searching.
SAS Metadata Repositorya container for metadata that is managed by the SAS Metadata Server. See also SAS Metadata Server.
SAS Metadata Servera multi-user server that enables users to read metadata from or write metadata to one or more SAS Metadata Repositories.
swimlanea workflow diagram element that enables you to group tasks that are assigned to the same participant.
taskSee workflow task.
task statusthe outcome of a task in a workflow. The status of a task (for example, Started, Canceled, Approved) is typically used to trigger the next task.
terman attribute of a business entity. Terms might or might not have a list of valid values. For example, a customer entity might have terms such as account type or age. Valid values for the account type term might include "commercial" or "personal."
vocabularythe set of business entities that define your business domain.
110 Glossary

workflowa series of tasks, together with the participants and the logic that is required to execute the tasks. A workflow includes policies, status values, and data objects.
workflow definitiona workflow template that has been uploaded to the server and activated. Workflow definitions are used by the SAS Workflow Engine to create new workflow instances.
workflow instancea workflow that is running in the SAS Workflow Engine. After a workflow template is uploaded to the server and activated, client applications can use the template to create and run a new copy of the workflow definition. Each new copy is a workflow instance.
workflow task (task)a workflow element that associates executable logic with an event such as a status change or timer event.
workflow templatea model of a workflow that has been saved to an XML file.
Glossary 111

112 Glossary

Index
Special Characters&BRMPrimaryEntityKey macro variable
84, 107&BRMPrimaryTransactionDTTM macro
variable 84, 107, 108
Aaction expressions 48alert notifications
configuring for workflows 6attachments
adding to a rule set 70
BBoolean values
contrast with Character values 34entering 58
business ruleschanging name or description 67conditional processing 54creating 52deleting rules 66deleting text in a rule 66description of 48example 48executing 7reordering in a rule set 65swapping positions of two rules 65
BY groups 74
Ccolors, application window preference 5comments
adding to a rule set 70condition expressions 48conditional processing 54copying
rules 65text within a rule 66
DDate values, entering 58Datetime values, entering 58domain values 37
EELSE operator 54entities
creating 35deleting 38description of 33editing 38
Equation Editor 55excluding terms from input data 35excluding terms from output data 35expressions
action, description of 48condition, description of 48deleting 66entering data values in 58examples 62missing values in 61operators added by SAS Business Rules
Manager 61operators for use in 59terms added by SAS Business Rules
Manager 61using functions in 61validating 64
FFinal, rule flow section 74focus indicator, preference 6folders
about 29creating 30creating top-level 29deleting 30moving 30
functions in expressions 61
113

GGroup End, rule flow section 74Group Start, rule flow section 74
IIF operator 54Init, rule flow section 74
Llocale, preference 5lock version
rule set 69LOOKUP function 44
in the Equation Editor 57lookup key 42
verifying 44lookup table
creating 42deleting 43description 41refreshing 43
lookup value 42retrieving 45
LOOKUPVALUE function 45in the Equation Editor 57
Mmacro variables
&BRMPrimaryEntityKey 84, 107&BRMPrimaryTransactionDTTM 84,
107, 108Main, rule flow section 74manage
workflows 97missing values in expressions 61
Ooperators 54operators in expressions 59OR operator 54order of rules, changing 64
Ppreferences
global 5SAS Business Rules Manager
preferences 6SAS Preferences Manager 6setting 5
publishing rule flows 86
Rrule flows
BY groups 74changing name or description 81complex 74creating 75deleteing rule sets from 82deleting 82description of 74displaying rule sets used in 79duplicating 81moving 82publishing 86reordering rule sets in 80sections, in complex rule flows 74simple 74viewing terms in 80
rule flows, running a test 83rule flows, testing 82
input data 83preprocessing code 84viewing test results 84
rule setschanging name or description 67changing rule order 64creating 49deleting 71deleting from rule flows 82description of 49duplicating 70moving 71opening multiple 79reordering in rule flows 80saving 71usage information 67validating 64versions 68
rulesSee business rules
rules database, basic steps for creating 7
SSAS Business Rules Manager
features 3SAS Preferences Manager 6string values, entering 58
Tterms
creating 35deleting 38description of 34domain values 37editing 38
114 Index

excluding terms from input data 35excluding terms from output data 35temporary 35used in rule flows 80
theme, preference 5tutorial
make files available 10tutorials
define data sources 11sign in 11
Uusage information, rule sets 67
Vvalidating expressions 64versions
rule flow, description 81rule flow, displayed version 81rule set 68rule set, creating 69rule set, description 69rule set, displayed version 68rule set, latest version 68rule set, locking 69
vocabularies
creating 34deleting 38description of 33editing 38tips for creating 34
Wworkflow
assign participant 100participants 100release task 101remove participant 101start 93tasks 94terminate 102
Workflow 93workflow participant
assign 100remove 101
workflow taskedit properties 102release 101
workflowsalert notifications 6manage 97view 98
Index 115

116 Index