Embed Size (px)
Citation preview
VueLink for SAP PLM
An Integration betweenAutoVue Web Edition
and SAP PLM
System Administrator Manual

VueLink
ContentsINTRODUCTION .......................................................................1
How VueLink Works ....................................................................... 1SYSTEM REQUIREMENTS .....................................................3AUTOMATIC INSTALLATION ..............................................4
Running InstallShield for VueLink for SAP PLM ....................... 4MANUAL INSTALLATION ....................................................15
DMS Customization ....................................................................... 15DMS Extension ............................................................................... 15VueLink Servlet ............................................................................. 15Configuration ................................................................................. 15Verification ..................................................................................... 15Manually Installing VueLink for SAP PLM ............................... 16
DMS Customization ................................................................. 16DMS Extension ........................................................................ 16Configuration ........................................................................... 17Verification .............................................................................. 17
Installing VueLink Servlet for the Servlet Engine ...................... 17Deploying VueLink to Any J2EE-enabled Application Server ................................................................... 17Deploying VueLink to SAP J2EE Engine 7.00 ....................... 18
CONFIGURATION ...................................................................24Customizing SAP GUI forCimmetry Viewer ........................................................................... 24
Installing VueLink Module ...................................................... 24Configuring the Program's VueLink Settings .......................... 25Configuring VueLink based on Client Numbers ..................... 28Configuring VueLink based on Storage Categories ................. 29Configuring VueLink on SAP PLM System with Multiple Content Server and Cache Server ..................... 30Mapping the Viewer Application for Inplace Viewing ............ 30Mapping the Viewer Application for Outplace Viewing ......... 32Enabling the Client for Format Modification ........................... 34
Viewing Multiple Originals ........................................................... 35Setting Parameters inside vuelink.properties .............................. 36Configure web.xml for SAP J2EE Engine ................................... 39
Cimmetry Systems Corp.
VueLink
Configure vuelink.properties for SAP J2EE Engine .................. 40Completing the Configuration for XRefs .................................... 41
Object Links ............................................................................. 41Defining XRefs via the Document Structure ........................... 41
Defining Data Carrier Type .......................................................... 42Defining Custom Types for Cimmetry Documents ..................... 44Cimmetry Markup Authorization Policy .................................... 51
Sample Code ............................................................................ 52Enabling HTTPS/SSL .................................................................... 54
Updating java.security to Enable HTTPS/SSL ........................ 54VERIFICATION .......................................................................56
Verifying that VueLink Servlet is running properly .................. 56Verifying the Version of SAP JCo ................................................ 57
APPENDIX A .............................................................................59Customizing SAP to View Multiple Originals from the Product Structure .......................................................... 59Customize SAP to View Multiple Originals from the Display Document page ................................................ 61
APPENDIX B .............................................................................65com.cimmetry.vuelink.sap.core.DocID ........................................ 65
FEEDBACK ...............................................................................67General Inquiries ........................................................................... 67Sales Inquiries ................................................................................ 67Customer Support .......................................................................... 67
Cimmetry Systems Corp.
VueLink 1
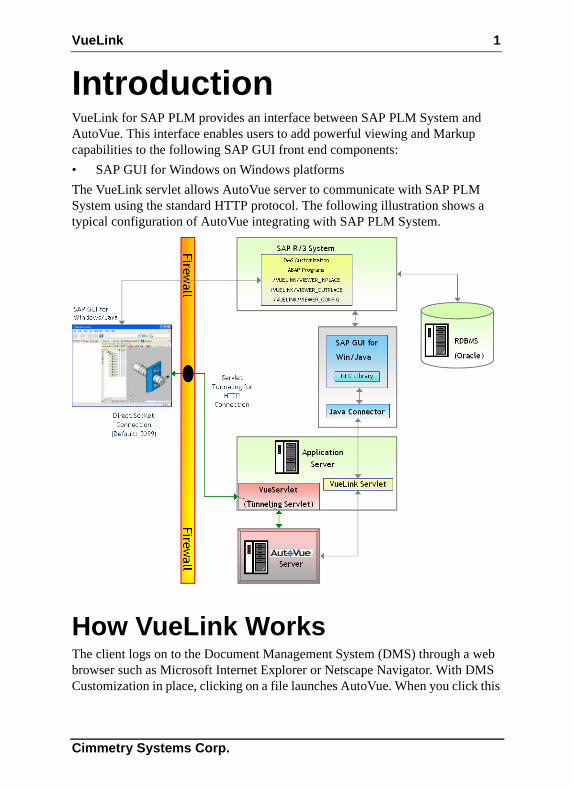
IntroductionVueLink for SAP PLM provides an interface between SAP PLM System and AutoVue. This interface enables users to add powerful viewing and Markup capabilities to the following SAP GUI front end components:
• SAP GUI for Windows on Windows platforms
The VueLink servlet allows AutoVue server to communicate with SAP PLM System using the standard HTTP protocol. The following illustration shows a typical configuration of AutoVue integrating with SAP PLM System.
How VueLink WorksThe client logs on to the Document Management System (DMS) through a web browser such as Microsoft Internet Explorer or Netscape Navigator. With DMS Customization in place, clicking on a file launches AutoVue. When you click this
Cimmetry Systems Corp.
2 VueLink
link, the AutoVue applet is launched and you can view that file inside the web browser window.
Depending on AutoVue configuration, AutoVue client communicates with AutoVue server either through servlet tunneling for HTTP connection or through direct socket connection. Then AutoVue server communicates with the VueLink servlet using standard HTTP connection. With DMS Extension installed on the server, the VueLink servlet can communicate with SAP PLM to handle any request made by AutoVue server, like file 'fetching.'
To display a composite file (a file with external references), the VueLink servlet retrieves the file along with all its component files from DMS and makes them available to AutoVue server. AutoVue server then processes them and AutoVue client displays the composite file. From here you can annotate the file, create new Markups, save Markups into DMS and open Markups from DMS.
Cimmetry Systems Corp.
VueLink 3
System RequirementsNote: For the most up-to-date list of system requirements and for a list of known issues, see the release notes available in the etc subfolder of the VueLink distribution.
• AutoVue Web Edition v19.2 (and any Service Packs for v19.2)• SAP Java Connector v2.1.7 for mySAP ERP 2005 and ECC 6.0• SAP Front End 6.40 patch level 22 and 7.10 (GUI for Windows)• One of the following Application Server/Servlet Engine with Sun's Java
Runtime Environment (JRE) v1.5.• SAP J2EE Engine v7.00• Tomcat 5.5.20
• Following SAP back end server installation:• mySAP ERP 2005 with ECC 6.0
• Following client installation:• SAP GUI for Windows v7.10 on Windows platforms
• One of the following web browsers:• Firefox 2.0 on Windows platforms• Microsoft IE 6.0Sp2 on Windows platforms
Cimmetry Systems Corp.
4 VueLink
Automatic InstallationThis document's installation instructions for installing VueLink servlet support this SAP PLM System installation:
• mySAP ERP 2005 with ECC 6.0
Before installing the VueLink for SAP PLM, ensure SAP PLM and AutoVue are installed and configured according to manufacturer’s instructions. Verify that they are operating correctly. Try testing SAP PLM and AutoVue independently to verify that the installation was successful and that all functions are available and produce the expected results.
The following instructions are for installing VueLink for SAP PLM with the help of the InstallShield Wizard.
For manual installation instructions instead, see Manual Installation.
Running InstallShield for VueLink for SAP PLMThe VueLink Installer for SAP PLM installs the VueLink servlet, and customizes and configures SAP PLM and AutoVue.
Note:
• If you have a previous copy of VueLink for SAP PLM installed, please uninstall it before proceeding with the new installation.
• SAP Java Connector should be installed for the VueLink to work. You can download SAP Java Connector from the SAP PLM market place: http://service.sap.com/netweaver.
• To be able to save Markups and metafiles, you must first define the Data Carrier Type.
To run InstallShield for VueLink:
1 Verify that SAP PLM and AutoVue are properly installed on the server computer.
2 To install VueLink for SAP PLM, run setupwin32.exe found on the distribution CD under \AutoVue_Web_Edition\vuelink_setup\ win32.
Cimmetry Systems Corp.
VueLink 5
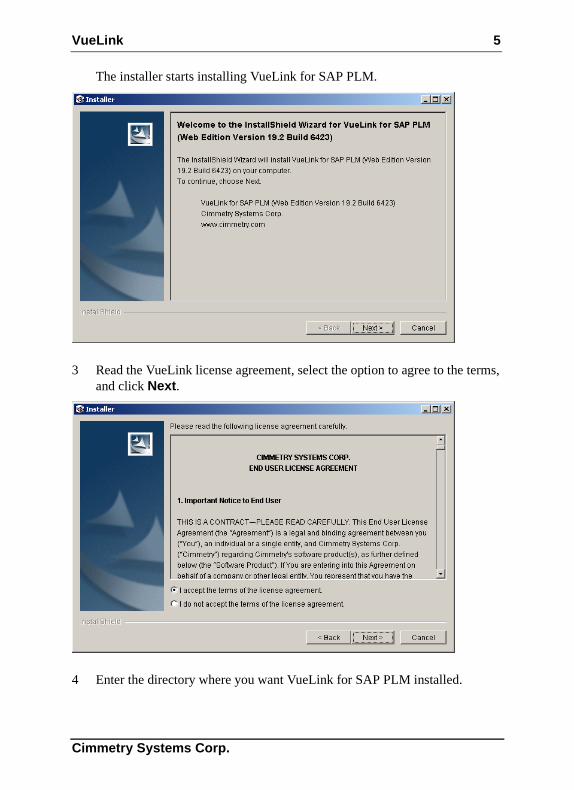
The installer starts installing VueLink for SAP PLM.
3 Read the VueLink license agreement, select the option to agree to the terms, and click Next.
4 Enter the directory where you want VueLink for SAP PLM installed.
Cimmetry Systems Corp.
6 VueLink
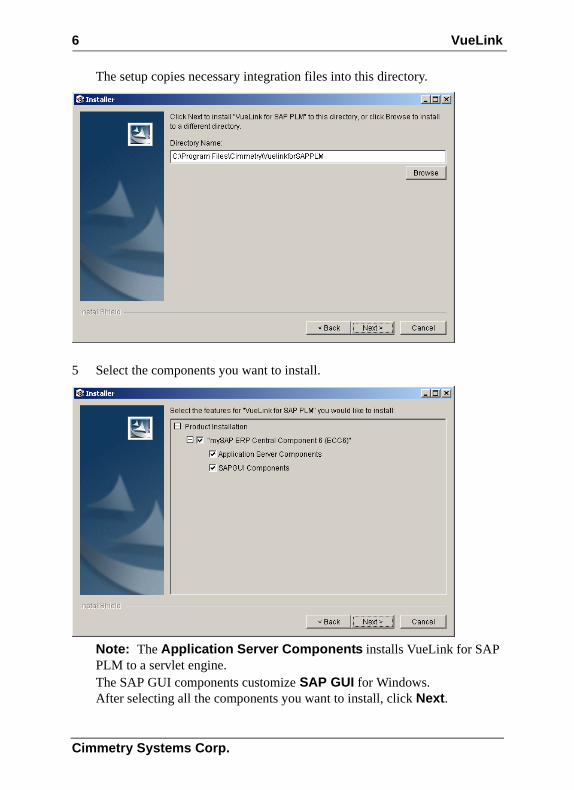
The setup copies necessary integration files into this directory.
5 Select the components you want to install.
Note: The Application Server Components installs VueLink for SAP PLM to a servlet engine.The SAP GUI components customize SAP GUI for Windows.After selecting all the components you want to install, click Next.
Cimmetry Systems Corp.
VueLink 7
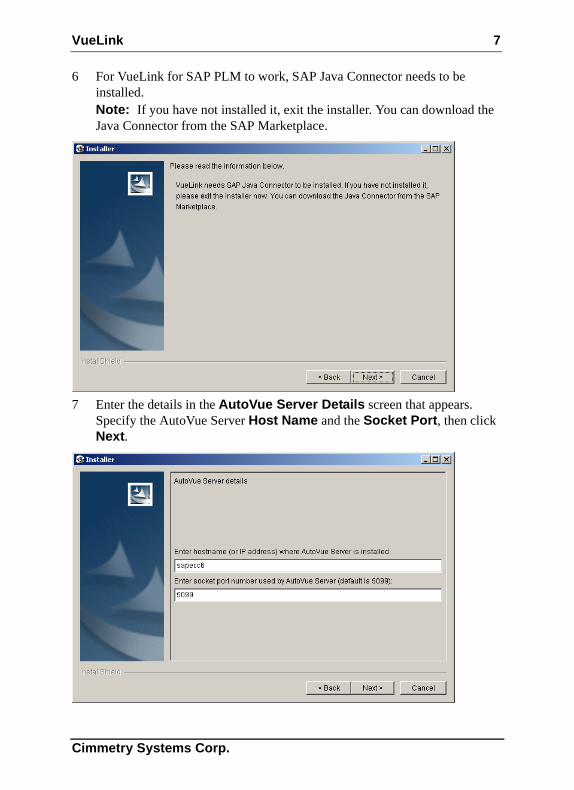
6 For VueLink for SAP PLM to work, SAP Java Connector needs to be installed. Note: If you have not installed it, exit the installer. You can download the Java Connector from the SAP Marketplace.
7 Enter the details in the AutoVue Server Details screen that appears.Specify the AutoVue Server Host Name and the Socket Port, then click Next.
Cimmetry Systems Corp.
8 VueLink
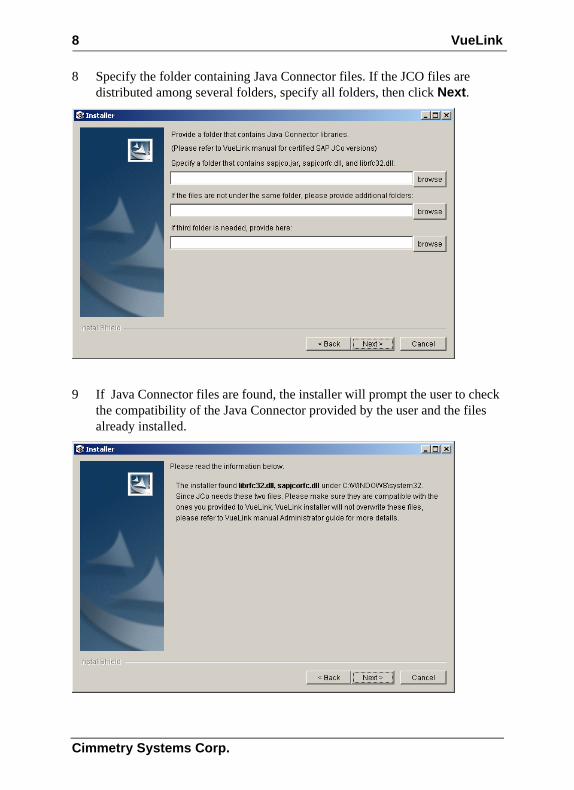
8 Specify the folder containing Java Connector files. If the JCO files are distributed among several folders, specify all folders, then click Next.
9 If Java Connector files are found, the installer will prompt the user to check the compatibility of the Java Connector provided by the user and the files already installed.
Cimmetry Systems Corp.
VueLink 9
To ensure that the Java Connector files in the systems folder are compatible with the ones provided to the VueLink, take the following steps:a. Make a backup of the Java Connector files in the system folder.b. Keep the higher version of librfc32.dll.c. If the file sapjcorfc.dll is of a different version, you need to make sure to
synchronize the Java Connector installation with VueLink and the application, since there can be only one librfc32.dll under the system folder.
d. After updating any of these files, there are three cases that need to be tested:
• Test the startup and exit of SAPGUI for Windows (if installed on the system).
• Test the startup and exit of SAP Management Console (if installed on the system).
• For VueLink, view a file where the Java Connector is actually invoked.Note: To verify the version of SAP JCo, see Verifying the Version of SAP JCo.
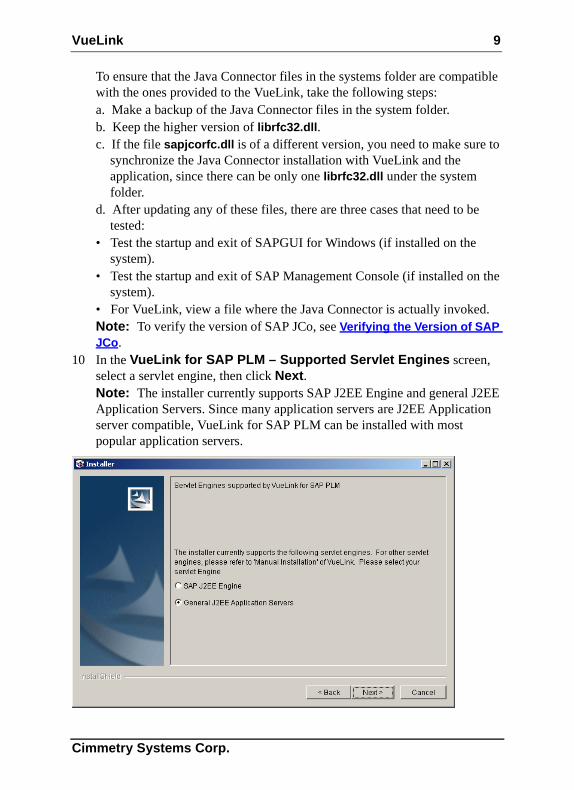
10 In the VueLink for SAP PLM – Supported Servlet Engines screen, select a servlet engine, then click Next.Note: The installer currently supports SAP J2EE Engine and general J2EE Application Servers. Since many application servers are J2EE Application server compatible, VueLink for SAP PLM can be installed with most popular application servers.
Cimmetry Systems Corp.
10 VueLink
11 If you selected SAP J2EE Engine, you will need to take some manual steps.The installer prepares a folder containing everything you need to perform these steps. For instructions, see Deploying VueLink to SAP J2EE Engine 7.00. Click Next to continue.
12 If you selected General J2EE Application Servers, the installer creates a WAR file to be easily deployed into the J2EE Application server. Refer to your J2EE Application server documentation to finish the deployment of VueLink for SAP PLM.
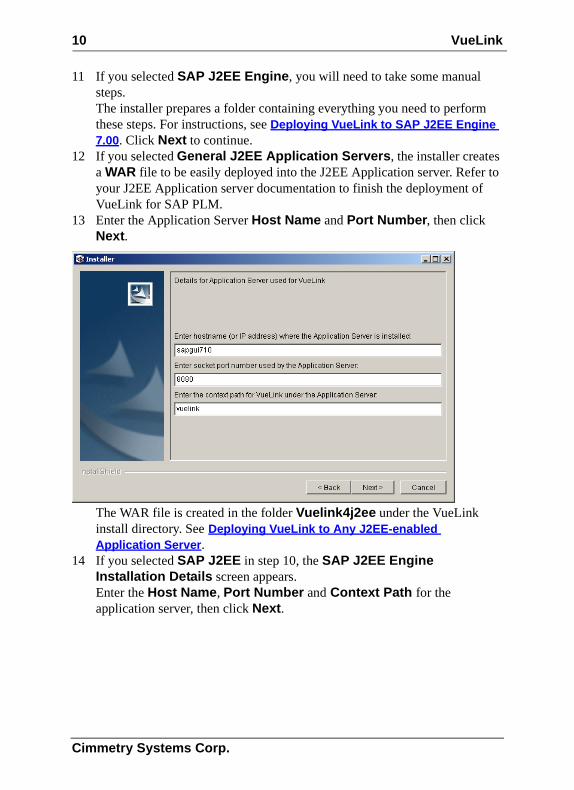
13 Enter the Application Server Host Name and Port Number, then click Next.
The WAR file is created in the folder Vuelink4j2ee under the VueLink install directory. See Deploying VueLink to Any J2EE-enabled Application Server.
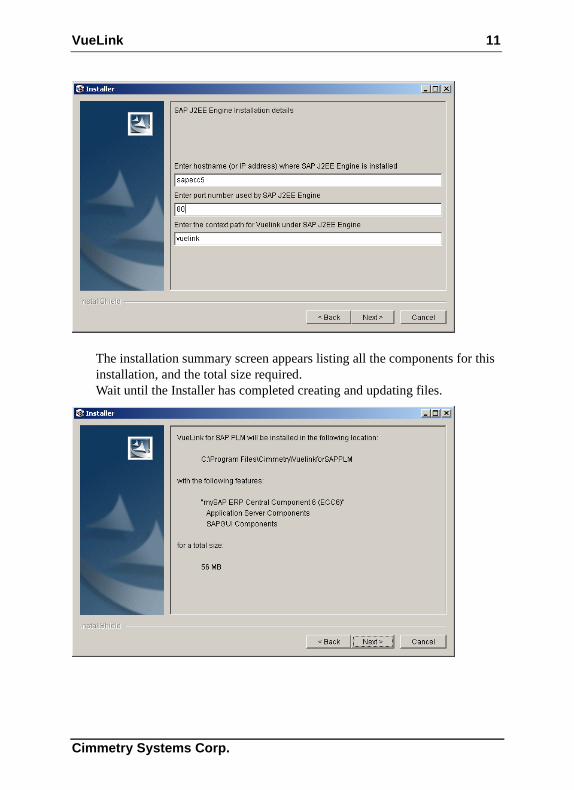
14 If you selected SAP J2EE in step 10, the SAP J2EE Engine Installation Details screen appears.Enter the Host Name, Port Number and Context Path for the application server, then click Next.
Cimmetry Systems Corp.
VueLink 11
The installation summary screen appears listing all the components for this installation, and the total size required. Wait until the Installer has completed creating and updating files.
Cimmetry Systems Corp.
12 VueLink
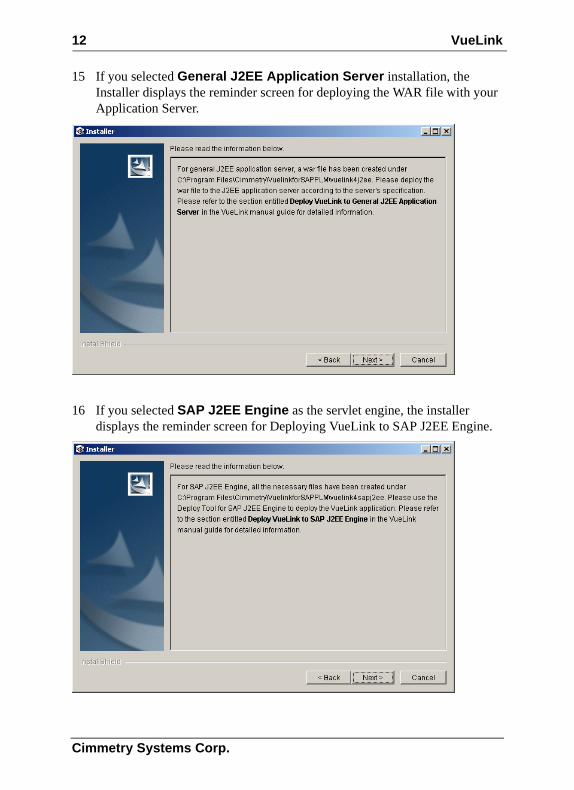
15 If you selected General J2EE Application Server installation, the Installer displays the reminder screen for deploying the WAR file with your Application Server.
16 If you selected SAP J2EE Engine as the servlet engine, the installer displays the reminder screen for Deploying VueLink to SAP J2EE Engine.
Cimmetry Systems Corp.
VueLink 13
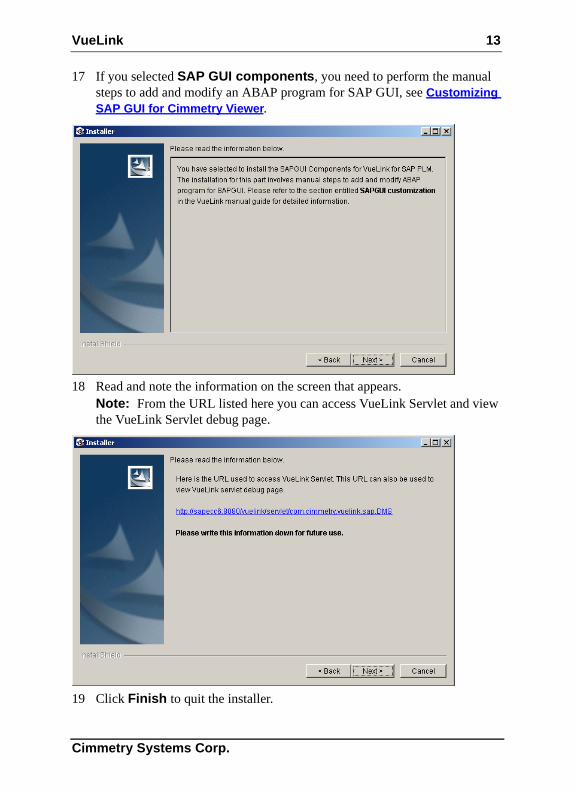
17 If you selected SAP GUI components, you need to perform the manual steps to add and modify an ABAP program for SAP GUI, see Customizing SAP GUI for Cimmetry Viewer.
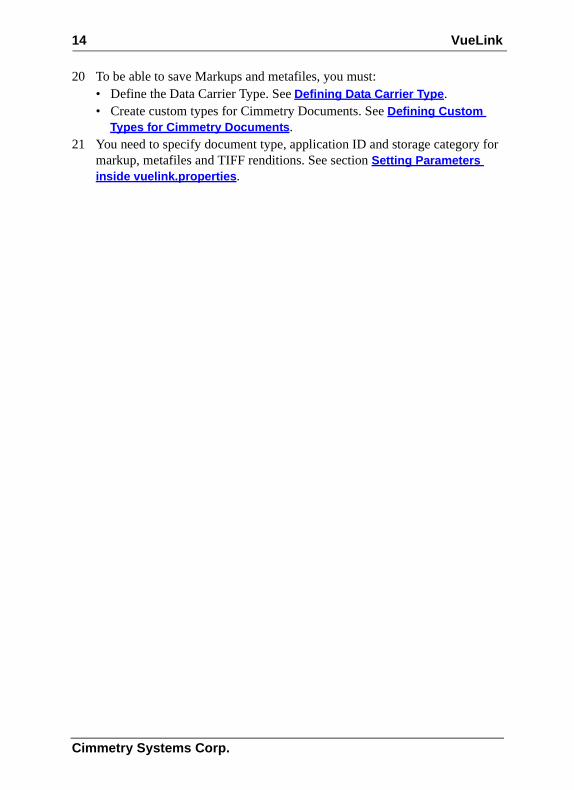
18 Read and note the information on the screen that appears. Note: From the URL listed here you can access VueLink Servlet and view the VueLink Servlet debug page.
19 Click Finish to quit the installer.
Cimmetry Systems Corp.
14 VueLink
20 To be able to save Markups and metafiles, you must:• Define the Data Carrier Type. See Defining Data Carrier Type.• Create custom types for Cimmetry Documents. See Defining Custom
Types for Cimmetry Documents.21 You need to specify document type, application ID and storage category for
markup, metafiles and TIFF renditions. See section Setting Parameters inside vuelink.properties.
Cimmetry Systems Corp.
VueLink 15
Manual InstallationThe manual installation is divided into these sections: DMS customization, DMS extension, VueLink servlet, Configuration and Verification. Follow the instructions corresponding to one of the following versions of SAP PLM:
• mySAP ERP 2005 with ECC 6.0
DMS CustomizationFollow the steps in this section to customize your DMS to trigger a mechanism that launches AutoVue applet from within DMS pages. Copying the customized files in the dms_customization folder on the distribution CD will activate this feature.
DMS ExtensionFollow these steps to add functionality to your DMS. With DMS Extension installed on the server computer, the VueLink servlet can communicate with SAP PLM to handle requests coming from AutoVue server. VueLink servlet will call upon the files you copy from the dms_extension folder on the distribution CD to allow you to run various queries inside DMS.
VueLink ServletIn this section you will install VueLink servlet into the servlet engine. The servlet engine is what loads VueLink servlet and makes it run. VueLink servlet files are located in the vuelink_servlet folder on the distribution CD.
ConfigurationSet up VueLink servlet parameter and define the Data Carrier Type.
VerificationFollow steps to verify that VueLink servlet is functioning properly.
Cimmetry Systems Corp.
16 VueLink
Before integrating AutoVue with SAP PLM, ensure that SAP PLM and AutoVue are installed and configured according to the manufacturer’s instructions. Verify that they are operating correctly. Try testing SAP PLM and AutoVue independently to verify that the installation was successful and that all functions are available and produce the expected results.
Manually Installing VueLink for SAP PLMThis section describes the steps necessary to install VueLink for SAP PLM for ECC 6.0.
Note: Make sure the Java Connector is installed before using the VueLink. SAP Java Connector should be installed for the VueLink to work. You can download SAP Java Connector from the SAP PLM market place at:
http://service.sap.com/netweaver
DMS CustomizationVerify that SAP PLM and SAP GUI for Windows are installed properly.
There are no customization steps for the VueLink.
DMS ExtensionFollow the instructions outlined in the section Customizing SAP GUI for Cimmetry Viewer to customize SAP GUI for either Cimmetry outplace viewer or inplace viewer.
VueLink ServletInstructions for installing VueLink into the servlet engine vary depending on the server used. However, the basics of the installation procedure are as follows:
1 Copy all the files found under the directory \vuelink_servlet on the distribution CD to your servlet engine's servlet directory.
2 Add these files to your servlet engine’s class path: vuelink.jar, vueservlet.jar, commons-httpclient.jar, commons-logging.jar.
3 Copy sapjco.jar and sapjcorfc.dll from the SAP Java Connector installation to C:WINDOWS\system32.
4 Create an alias for com.cimmetry.vuelink.sap.DMS.
Cimmetry Systems Corp.
VueLink 17
Note: If you want debug messages to appear in the servlet engine's console or log file, set the init parameter Verbose to 1.
5 Restart the servlet engine for the changes take effect.
Refer to Installing VueLink Servlet for the Servlet Engine for installing VueLink into the generic J2EE servlet engine and SAP J2EE application server.
ConfigurationYou must complete the steps outlined under the following section, see Configuration for more details.
1 To save Markups and metafiles you must define the Data Carrier Type, see Defining Data Carrier Type
2 Set the parameters inside vuelink.properties, see Setting Parameters inside vuelink.properties.
VerificationTo verify that VueLink works properly, see Verification.
Installing VueLink Servlet for the Servlet EngineThis section describes installing VueLink servlet to run with two servlet engines:
• General J2EE Application Server• SAP J2EE Engine
Deploying VueLink to Any J2EE-enabled Application ServerThis section describes the steps necessary to install VueLink Servlet for a J2EE application server.
If you selected General J2EE Application servers during the installation of VueLink for SAP PLM, the installer creates a WAR file with the name specified in <VueLink Install Root>\vuelink4j2ee.
The WAR file should be deployed to any J2EE application server according to its deployment requirement. Please refer to the administration guide of your J2EE application server for details about how to deploy a WAR file.
Cimmetry Systems Corp.
18 VueLink
Deploying VueLink to SAP J2EE Engine 7.00This section describes the steps necessary to install VueLink servlet with the SAP J2EE Engine 7.0 (mySAP ERP 2005 with ECC 6.0). If SAP J2EE Engine was selected during VueLink installation, a folder called vuelink4sapj2ee is created. Before deploying the VueLink with the SAP J2EE Engine, you may want to modify some settings. Please see the following sections:
• Configure web.xml for SAP J2EE Engine• Configure vuelink.properties for SAP J2EE Engine
Once all modifications are complete, you must deploy VueLink with the SAP J2EE Engine. Take the following steps to deploy VueLink with the SAP J2EE Engine:
1 Invoke Deploy Tool for SAP J2EE Engine.a. To create a new project for the deployment, select New Project from the
Project menu. The New Project dialog box appears.
2 Specify a new name for the Project in the address field and click OK. The Deploy Tool panel is displayed.
3 Click the J2EE Components tab.4 From the J2EEComponents menu, select Add Web.
The Load WAR dialog box appears.
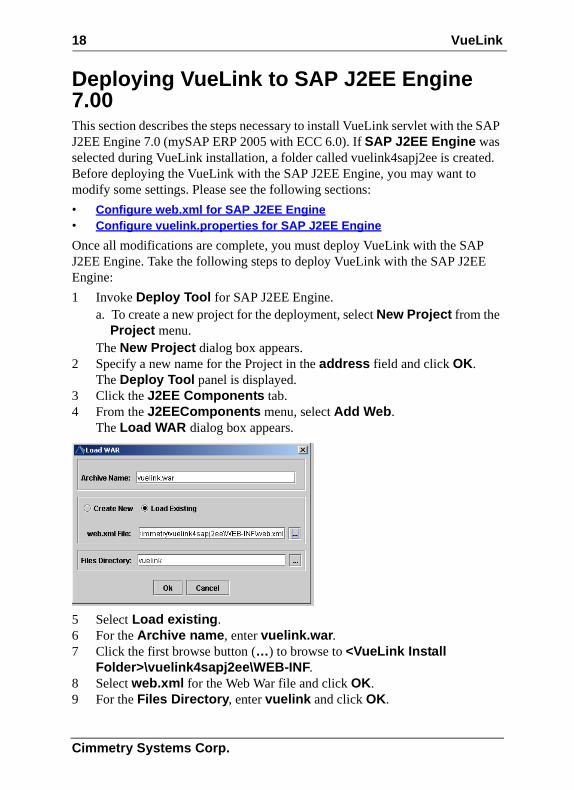
5 Select Load existing.6 For the Archive name, enter vuelink.war.7 Click the first browse button (…) to browse to <VueLink Install
Folder>\vuelink4sapj2ee\WEB-INF.8 Select web.xml for the Web War file and click OK.9 For the Files Directory, enter vuelink and click OK.
Cimmetry Systems Corp.
VueLink 19
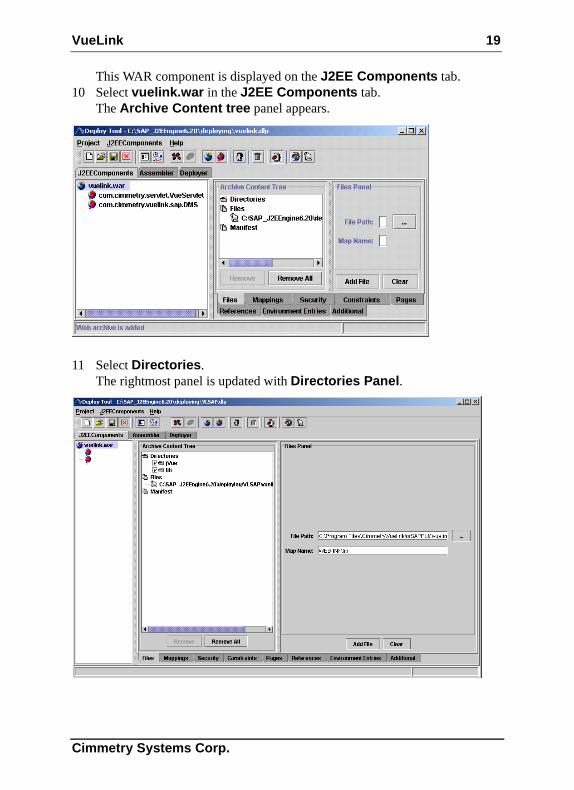
This WAR component is displayed on the J2EE Components tab.10 Select vuelink.war in the J2EE Components tab.
The Archive Content tree panel appears.
11 Select Directories. The rightmost panel is updated with Directories Panel.
Cimmetry Systems Corp.
20 VueLink
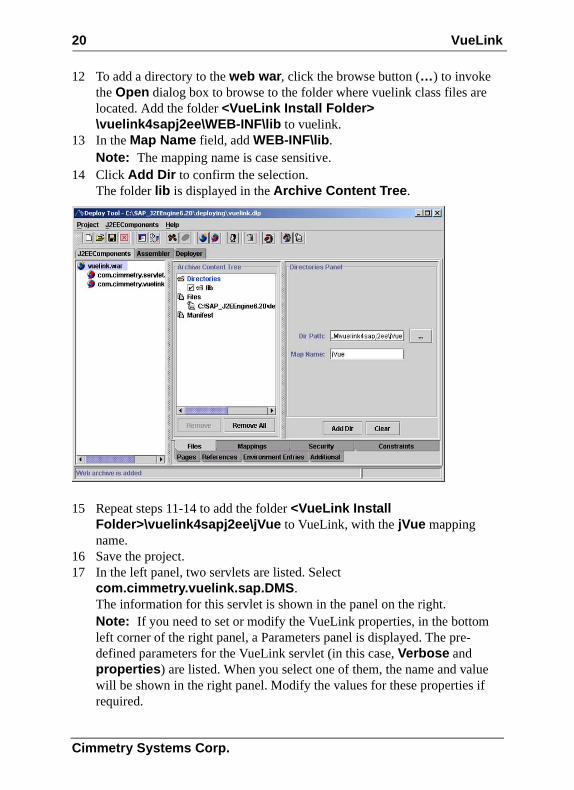
12 To add a directory to the web war, click the browse button (…) to invoke the Open dialog box to browse to the folder where vuelink class files are located. Add the folder <VueLink Install Folder>\vuelink4sapj2ee\WEB-INF\lib to vuelink.
13 In the Map Name field, add WEB-INF\lib.Note: The mapping name is case sensitive.
14 Click Add Dir to confirm the selection.The folder lib is displayed in the Archive Content Tree.
15 Repeat steps 11-14 to add the folder <VueLink Install Folder>\vuelink4sapj2ee\jVue to VueLink, with the jVue mapping name.
16 Save the project.17 In the left panel, two servlets are listed. Select
com.cimmetry.vuelink.sap.DMS.The information for this servlet is shown in the panel on the right.Note: If you need to set or modify the VueLink properties, in the bottom left corner of the right panel, a Parameters panel is displayed. The pre-defined parameters for the VueLink servlet (in this case, Verbose and properties) are listed. When you select one of them, the name and value will be shown in the right panel. Modify the values for these properties if required.
Cimmetry Systems Corp.
VueLink 21
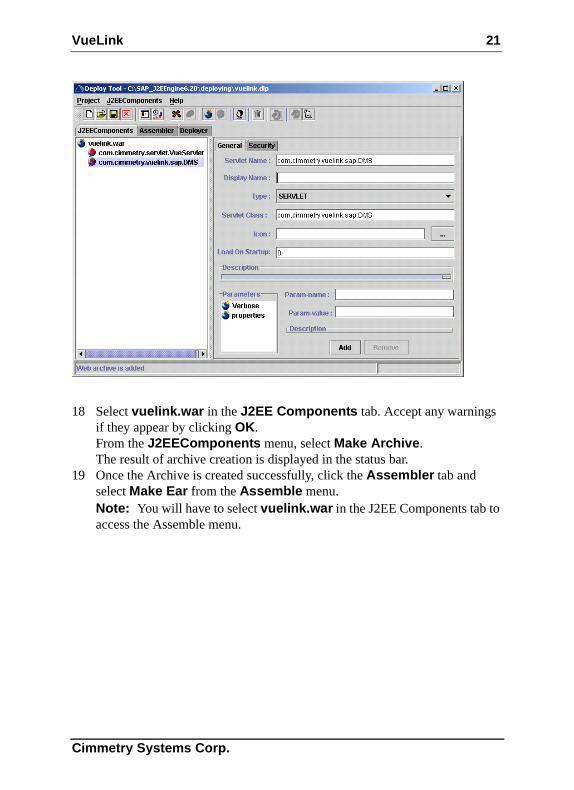
18 Select vuelink.war in the J2EE Components tab. Accept any warnings if they appear by clicking OK. From the J2EEComponents menu, select Make Archive.The result of archive creation is displayed in the status bar.
19 Once the Archive is created successfully, click the Assembler tab and select Make Ear from the Assemble menu.Note: You will have to select vuelink.war in the J2EE Components tab to access the Assemble menu.
Cimmetry Systems Corp.
22 VueLink
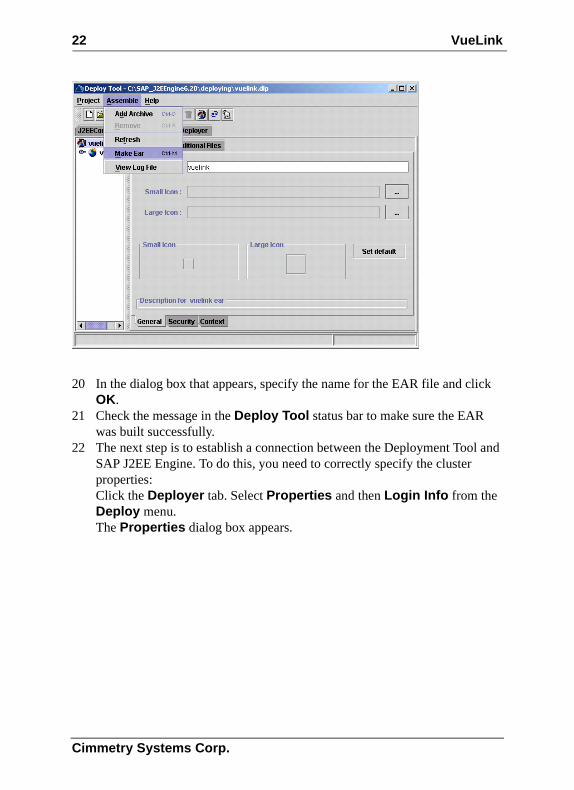
20 In the dialog box that appears, specify the name for the EAR file and click OK.
21 Check the message in the Deploy Tool status bar to make sure the EAR was built successfully.
22 The next step is to establish a connection between the Deployment Tool and SAP J2EE Engine. To do this, you need to correctly specify the cluster properties:Click the Deployer tab. Select Properties and then Login Info from the Deploy menu.The Properties dialog box appears.
Cimmetry Systems Corp.
VueLink 23
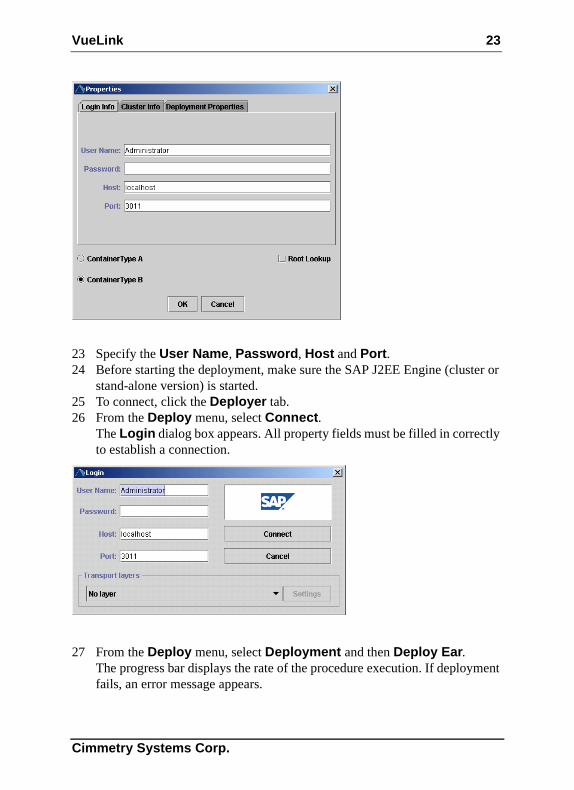
23 Specify the User Name, Password, Host and Port.24 Before starting the deployment, make sure the SAP J2EE Engine (cluster or
stand-alone version) is started.25 To connect, click the Deployer tab.26 From the Deploy menu, select Connect.
The Login dialog box appears. All property fields must be filled in correctly to establish a connection.
27 From the Deploy menu, select Deployment and then Deploy Ear.The progress bar displays the rate of the procedure execution. If deployment fails, an error message appears.
Cimmetry Systems Corp.
24 VueLink
Configuration• Customizing SAP GUI for Cimmetry Viewer• Defining Custom Types for Cimmetry Documents• Viewing Multiple Originals• Setting Parameters inside vuelink.properties• Configure web.xml for SAP J2EE Engine• Configure vuelink.properties for SAP J2EE Engine• Completing the Configuration for XRefs• Defining Data Carrier Type• Defining Custom Types for Cimmetry Documents• Cimmetry Markup Authorization Policy• Enabling HTTPS/SSL
Customizing SAP GUI forCimmetry ViewerBefore you can launch the Cimmetry viewer from the SAP GUI, you need to complete the steps in the following sections:
• Installing VueLink Module• Configuring the Program's VueLink Settings• Mapping the Viewer Application for Inplace Viewing• Mapping the Viewer Application for Outplace Viewing• Enabling the Client for Format Modification
To view multiple originals with AutoVue, see Viewing Multiple Originals.
Installing VueLink ModuleBefore installing VueLink ABAP add-on module in ECC 6.0, you need to upgrade your SAINT/SPAM of your ECC 6.0 server to at least patch level 22
1 Execute the 'SAINT' transaction.2 From the menu item Front end, select Installation Package and then Load
Packages.The Select CAR/SAR archive dialog box appears.
3 Type the location to the VueLink for SAP PLM sar file. • For ECC 6.0, the file is vuelink20000600_inst.sar.
Cimmetry Systems Corp.
VueLink 25
This file is located on the distribution CD under the directory \AutoVue_Web_Edition\dms_extension\abap.
4 Click Open.5 Click Continue and follow the Wizard's instructions.
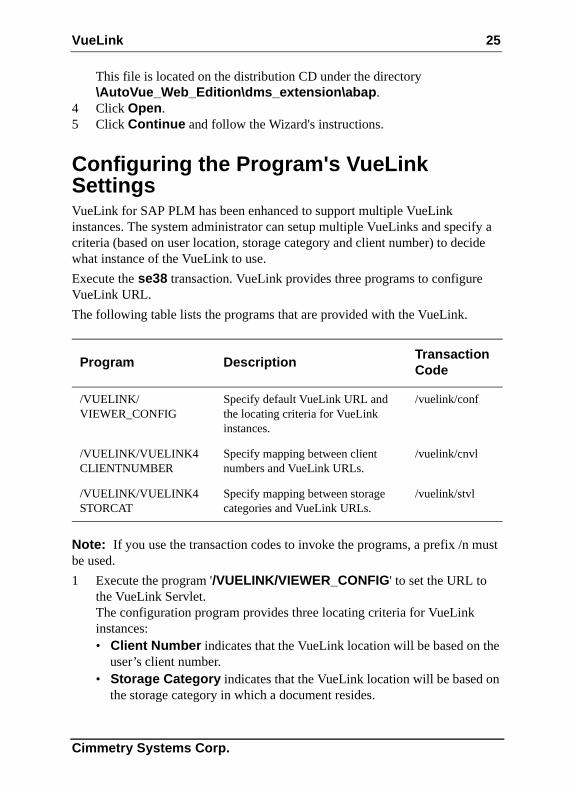
Configuring the Program's VueLink SettingsVueLink for SAP PLM has been enhanced to support multiple VueLink instances. The system administrator can setup multiple VueLinks and specify a criteria (based on user location, storage category and client number) to decide what instance of the VueLink to use.
Execute the se38 transaction. VueLink provides three programs to configure VueLink URL.
The following table lists the programs that are provided with the VueLink.
Note: If you use the transaction codes to invoke the programs, a prefix /n must be used.
1 Execute the program '/VUELINK/VIEWER_CONFIG' to set the URL to the VueLink Servlet.The configuration program provides three locating criteria for VueLink instances:• Client Number indicates that the VueLink location will be based on the
user’s client number.• Storage Category indicates that the VueLink location will be based on
the storage category in which a document resides.
Program DescriptionTransaction Code
/VUELINK/VIEWER_CONFIG
Specify default VueLink URL and the locating criteria for VueLink instances.
/vuelink/conf
/VUELINK/VUELINK4 CLIENTNUMBER
Specify mapping between client numbers and VueLink URLs.
/vuelink/cnvl
/VUELINK/VUELINK4 STORCAT
Specify mapping between storage categories and VueLink URLs.
/vuelink/stvl
Cimmetry Systems Corp.
26 VueLink
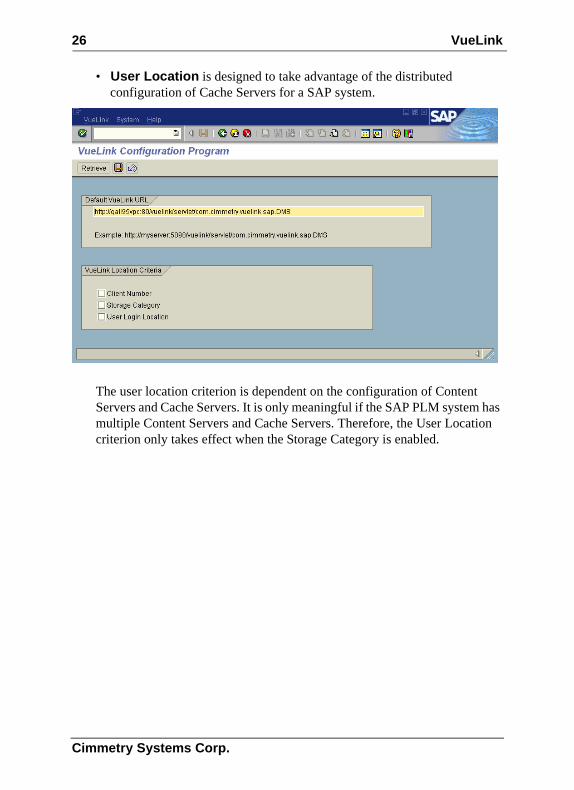
• User Location is designed to take advantage of the distributed configuration of Cache Servers for a SAP system.
The user location criterion is dependent on the configuration of Content Servers and Cache Servers. It is only meaningful if the SAP PLM system has multiple Content Servers and Cache Servers. Therefore, the User Location criterion only takes effect when the Storage Category is enabled.
Cimmetry Systems Corp.
VueLink 27
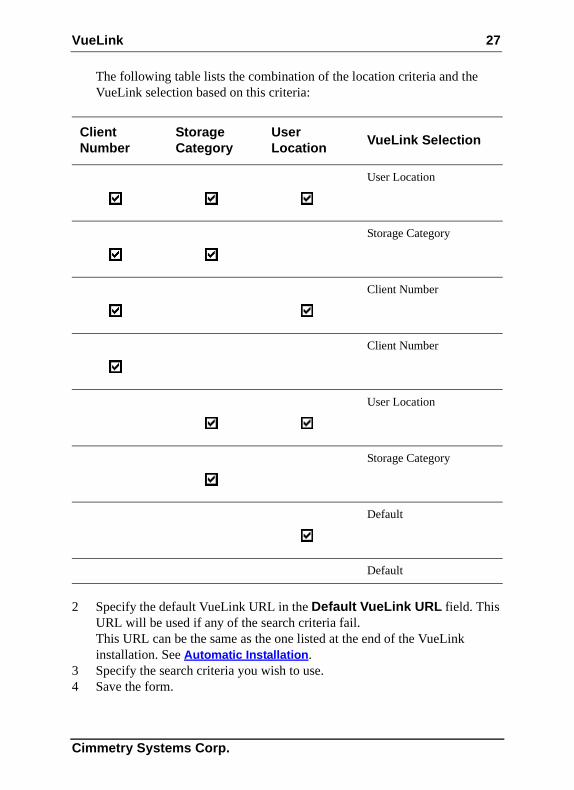
The following table lists the combination of the location criteria and the VueLink selection based on this criteria:
2 Specify the default VueLink URL in the Default VueLink URL field. This URL will be used if any of the search criteria fail.This URL can be the same as the one listed at the end of the VueLink installation. See Automatic Installation.
3 Specify the search criteria you wish to use. 4 Save the form.
Client Number
Storage Category
User Location
VueLink Selection
User Location
Storage Category
Client Number
Client Number
User Location
Storage Category
Default
Default
Cimmetry Systems Corp.
28 VueLink
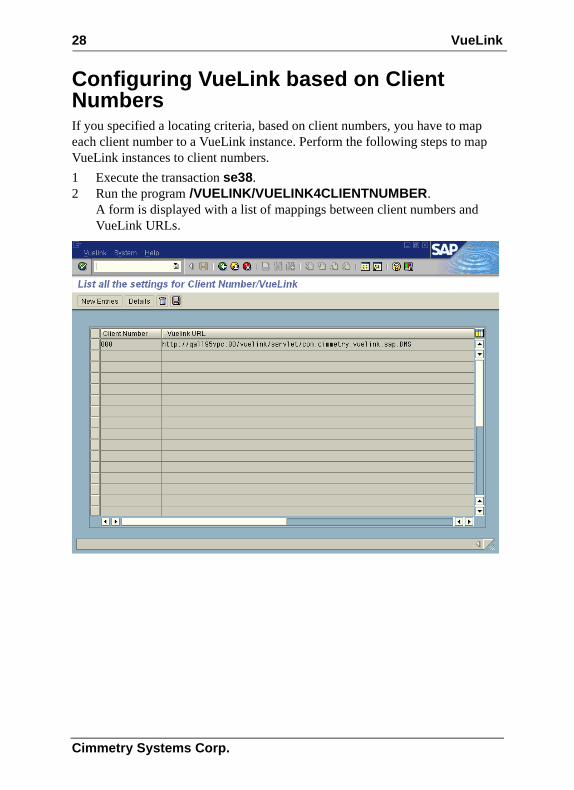
Configuring VueLink based on Client NumbersIf you specified a locating criteria, based on client numbers, you have to map each client number to a VueLink instance. Perform the following steps to map VueLink instances to client numbers.
1 Execute the transaction se38. 2 Run the program /VUELINK/VUELINK4CLIENTNUMBER.
A form is displayed with a list of mappings between client numbers and VueLink URLs.
Cimmetry Systems Corp.
VueLink 29
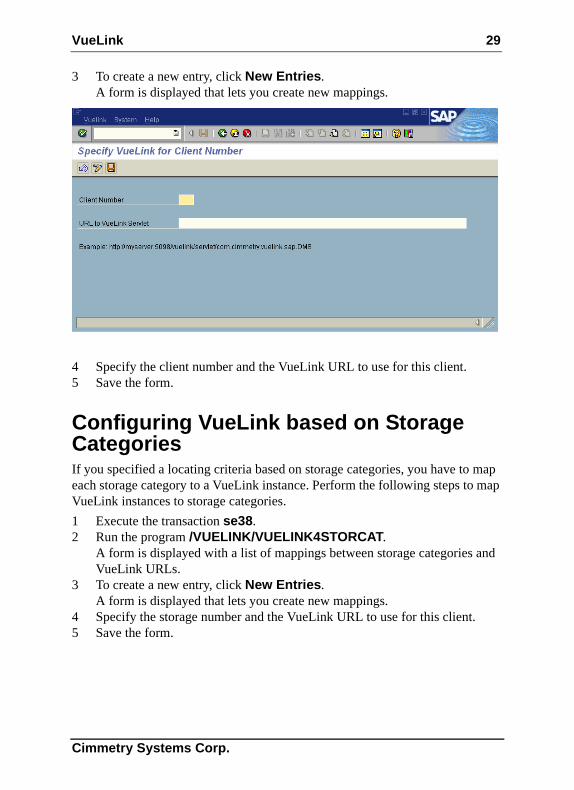
3 To create a new entry, click New Entries. A form is displayed that lets you create new mappings.
4 Specify the client number and the VueLink URL to use for this client. 5 Save the form.
Configuring VueLink based on Storage CategoriesIf you specified a locating criteria based on storage categories, you have to map each storage category to a VueLink instance. Perform the following steps to map VueLink instances to storage categories.
1 Execute the transaction se38. 2 Run the program /VUELINK/VUELINK4STORCAT.
A form is displayed with a list of mappings between storage categories and VueLink URLs.
3 To create a new entry, click New Entries. A form is displayed that lets you create new mappings.
4 Specify the storage number and the VueLink URL to use for this client. 5 Save the form.
Cimmetry Systems Corp.
30 VueLink
Configuring VueLink on SAP PLM System with Multiple Content Server and Cache Server If SAP PLM System is installed with Multiple Content Server and Cache Server, and the client near Content Server wants to open the file in Content Server, you have to specify VueLinks on SAP system and Content Server system for better performance. Perform the following steps to specify the VueLinks.
1 Execute the transaction se38.2 Run the program /VUELINK/VIEWER_CONFIG to set the URL to the
VueLink Servlet on SAP system.3 Specify the VueLink URL in the Default VueLink URL field. This URL will
be used for the requests other than Download and Save when you view a file in Content Server and Cache Server.
4 Check both Storage Category and User Login Location.5 Save the form.6 Click on Back button.7 Run the program /VUELINK/VUELINK4STORCAT.
A form is displayed with a list of mappings between storage categories and VueLink URLs.
8 To create a new entry, click New Entries. A form is displayed that lets you create new mappings.
9 Specify the storage category and the VueLink URL. 10 Save the form.
Mapping the Viewer Application for Inplace ViewingFollow the steps in this section to map the viewer application to format types for inplace viewing.
1 Log on to the SAP GUI with the right permissions for editing the Define Workstation Application screen.
2 Execute the dc30 transaction.
Cimmetry Systems Corp.
VueLink 31
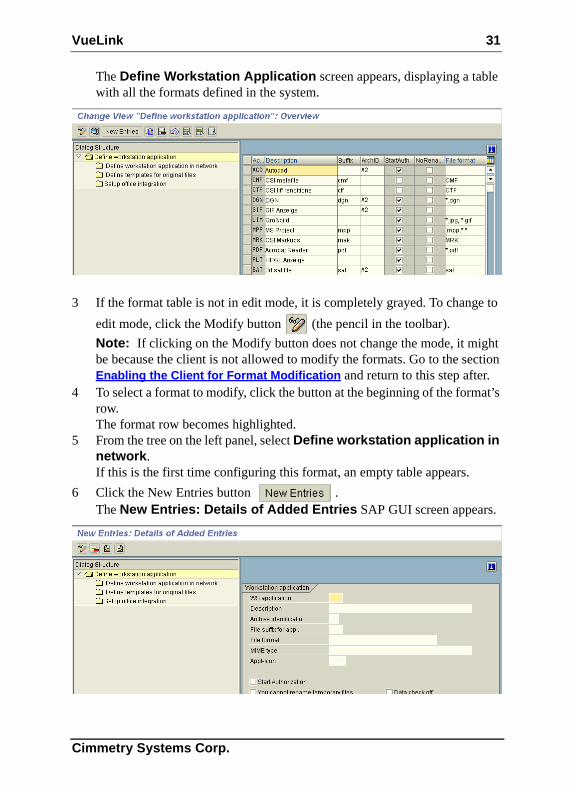
The Define Workstation Application screen appears, displaying a table with all the formats defined in the system.
3 If the format table is not in edit mode, it is completely grayed. To change to
edit mode, click the Modify button (the pencil in the toolbar).
Note: If clicking on the Modify button does not change the mode, it might be because the client is not allowed to modify the formats. Go to the section Enabling the Client for Format Modification and return to this step after.
4 To select a format to modify, click the button at the beginning of the format’s row.The format row becomes highlighted.
5 From the tree on the left panel, select Define workstation application in network.If this is the first time configuring this format, an empty table appears.
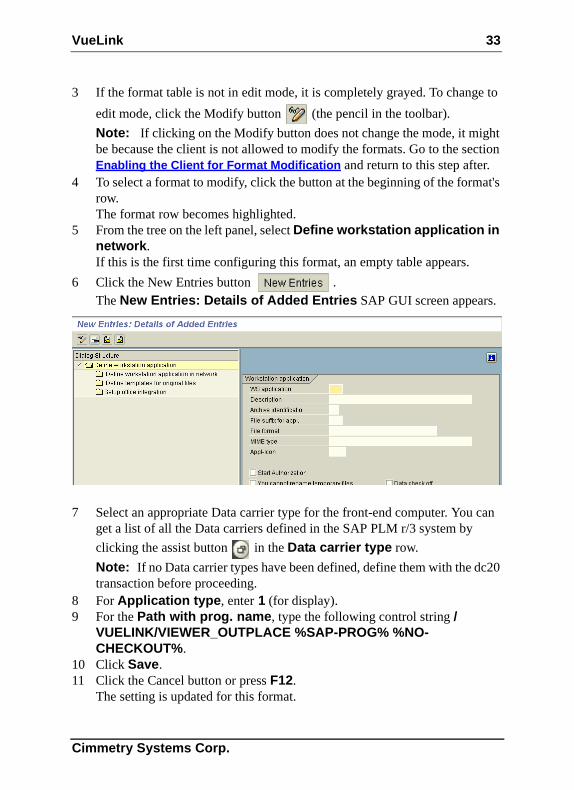
6 Click the New Entries button .The New Entries: Details of Added Entries SAP GUI screen appears.
Cimmetry Systems Corp.
32 VueLink
7 Select an appropriate Data carrier type for the front-end computer. You can get a list of all the Data carriers defined in the SAP PLM r/3 system by
clicking the assist button in the Data carrier type row.
Note: If no Data carrier types have been defined, define them with the dc20 transaction before proceeding.
8 For Application type, enter 1 (for display).9 For the Path with prog. name, type the following control string:
/VUELINK/VIEWER_INPLACE %SAP-PROG% %NO-CHECKOUT%10 Click Save.11 Click the Cancel button or press F12.
The setting is updated for this format.12 Repeat the configuration steps in this section for all the formats that need to
be integrated with VueLink for SAP PLM.
Mapping the Viewer Application for Outplace ViewingFollow the steps in this section to map the viewer application to format types for outplace viewing.
1 Log on to the SAP GUI with the right permissions for editing the Define Workstation Application screen.
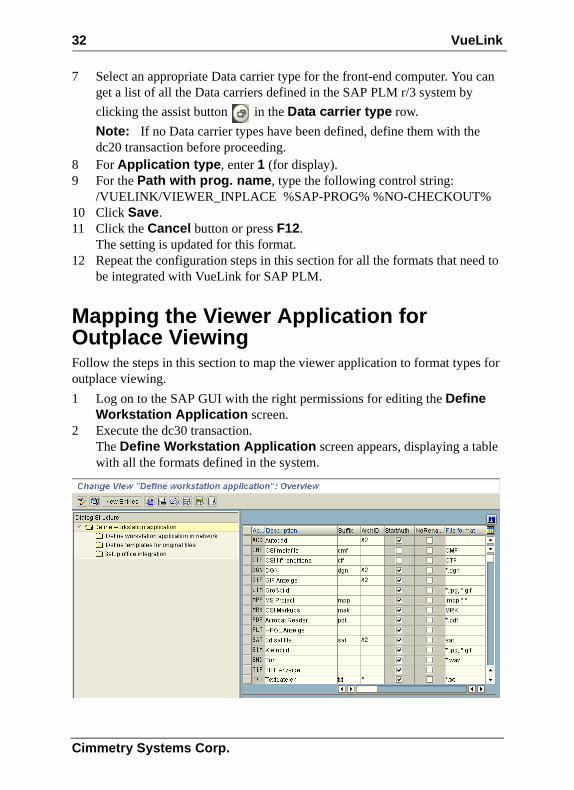
2 Execute the dc30 transaction.The Define Workstation Application screen appears, displaying a table with all the formats defined in the system.
Cimmetry Systems Corp.
VueLink 33
3 If the format table is not in edit mode, it is completely grayed. To change to
edit mode, click the Modify button (the pencil in the toolbar).
Note: If clicking on the Modify button does not change the mode, it might be because the client is not allowed to modify the formats. Go to the section Enabling the Client for Format Modification and return to this step after.
4 To select a format to modify, click the button at the beginning of the format's row.The format row becomes highlighted.
5 From the tree on the left panel, select Define workstation application in network.If this is the first time configuring this format, an empty table appears.
6 Click the New Entries button .The New Entries: Details of Added Entries SAP GUI screen appears.
7 Select an appropriate Data carrier type for the front-end computer. You can get a list of all the Data carriers defined in the SAP PLM r/3 system by
clicking the assist button in the Data carrier type row.
Note: If no Data carrier types have been defined, define them with the dc20 transaction before proceeding.
8 For Application type, enter 1 (for display).9 For the Path with prog. name, type the following control string /
VUELINK/VIEWER_OUTPLACE %SAP-PROG% %NO-CHECKOUT%.
10 Click Save.11 Click the Cancel button or press F12.
The setting is updated for this format.
Cimmetry Systems Corp.
34 VueLink
12 Repeat the configuration steps in this section for all the formats that need to be integrated with VueLink for SAP PLM.
Enabling the Client for Format ModificationFollow these steps to enable the client to modify the format listing from transaction dc30.
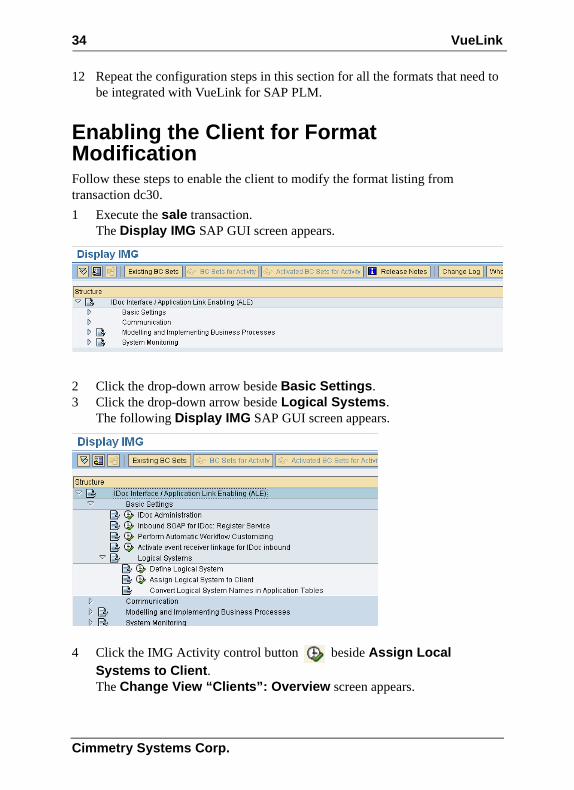
1 Execute the sale transaction.The Display IMG SAP GUI screen appears.
2 Click the drop-down arrow beside Basic Settings.3 Click the drop-down arrow beside Logical Systems.
The following Display IMG SAP GUI screen appears.
4 Click the IMG Activity control button beside Assign Local Systems to Client.The Change View “Clients”: Overview screen appears.
Cimmetry Systems Corp.
VueLink 35
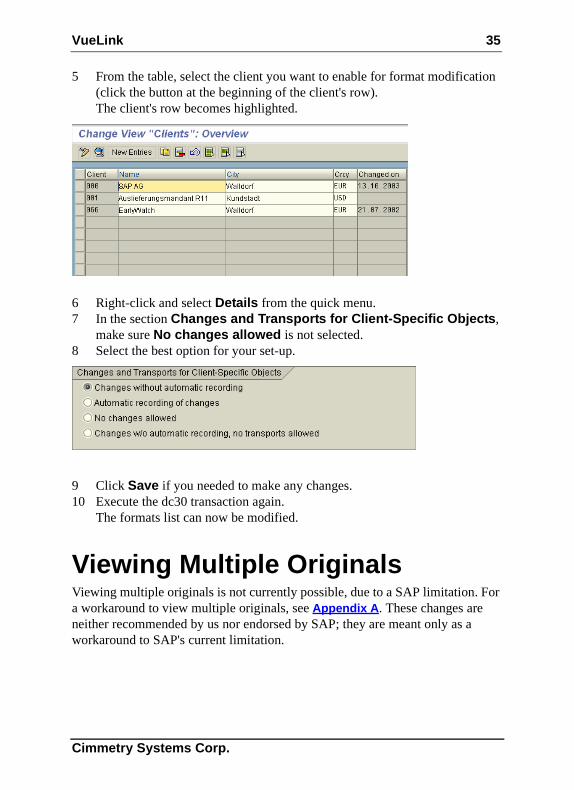
5 From the table, select the client you want to enable for format modification (click the button at the beginning of the client's row).The client's row becomes highlighted.
6 Right-click and select Details from the quick menu.7 In the section Changes and Transports for Client-Specific Objects,
make sure No changes allowed is not selected.8 Select the best option for your set-up.
9 Click Save if you needed to make any changes.10 Execute the dc30 transaction again.
The formats list can now be modified.
Viewing Multiple OriginalsViewing multiple originals is not currently possible, due to a SAP limitation. For a workaround to view multiple originals, see Appendix A. These changes are neither recommended by us nor endorsed by SAP; they are meant only as a workaround to SAP's current limitation.
Cimmetry Systems Corp.
36 VueLink
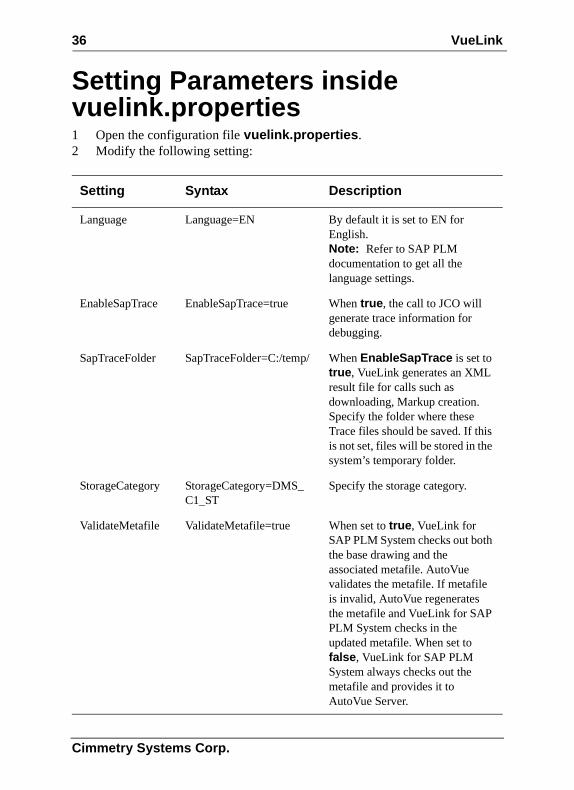
Setting Parameters inside vuelink.properties1 Open the configuration file vuelink.properties.2 Modify the following setting:
Setting Syntax Description
Language Language=EN By default it is set to EN for English. Note: Refer to SAP PLM documentation to get all the language settings.
EnableSapTrace EnableSapTrace=true When true, the call to JCO will generate trace information for debugging.
SapTraceFolder SapTraceFolder=C:/temp/ When EnableSapTrace is set to true, VueLink generates an XML result file for calls such as downloading, Markup creation. Specify the folder where these Trace files should be saved. If this is not set, files will be stored in the system’s temporary folder.
StorageCategory StorageCategory=DMS_ C1_ST
Specify the storage category.
ValidateMetafile ValidateMetafile=true When set to true, VueLink for SAP PLM System checks out both the base drawing and the associated metafile. AutoVue validates the metafile. If metafile is invalid, AutoVue regenerates the metafile and VueLink for SAP PLM System checks in the updated metafile. When set to false, VueLink for SAP PLM System always checks out the metafile and provides it to AutoVue Server.
Cimmetry Systems Corp.
VueLink 37
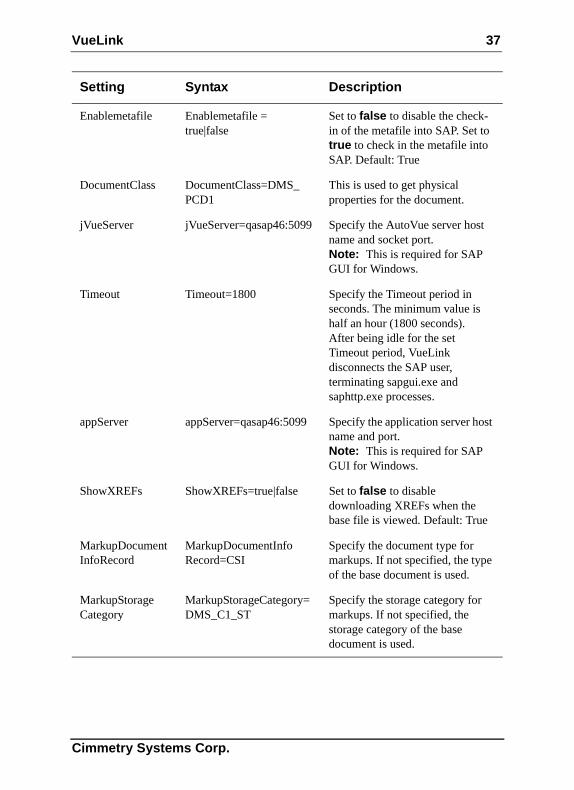
Enablemetafile Enablemetafile = true|false
Set to false to disable the check-in of the metafile into SAP. Set to true to check in the metafile into SAP. Default: True
DocumentClass DocumentClass=DMS_ PCD1
This is used to get physical properties for the document.
jVueServer jVueServer=qasap46:5099 Specify the AutoVue server host name and socket port.Note: This is required for SAP GUI for Windows.
Timeout Timeout=1800 Specify the Timeout period in seconds. The minimum value is half an hour (1800 seconds).After being idle for the set Timeout period, VueLink disconnects the SAP user, terminating sapgui.exe and saphttp.exe processes.
appServer appServer=qasap46:5099 Specify the application server host name and port.Note: This is required for SAP GUI for Windows.
ShowXREFs ShowXREFs=true|false Set to false to disable downloading XREFs when the base file is viewed. Default: True
MarkupDocument InfoRecord
MarkupDocumentInfo Record=CSI
Specify the document type for markups. If not specified, the type of the base document is used.
MarkupStorage Category
MarkupStorageCategory=DMS_C1_ST
Specify the storage category for markups. If not specified, the storage category of the base document is used.
Setting Syntax Description
Cimmetry Systems Corp.
38 VueLink
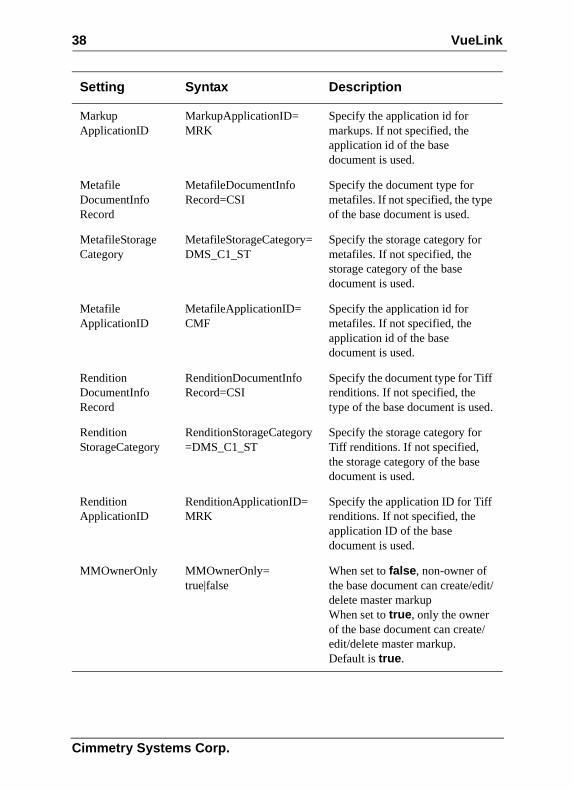
Markup ApplicationID
MarkupApplicationID= MRK
Specify the application id for markups. If not specified, the application id of the base document is used.
Metafile DocumentInfo Record
MetafileDocumentInfo Record=CSI
Specify the document type for metafiles. If not specified, the type of the base document is used.
MetafileStorage Category
MetafileStorageCategory=DMS_C1_ST
Specify the storage category for metafiles. If not specified, the storage category of the base document is used.
Metafile ApplicationID
MetafileApplicationID= CMF
Specify the application id for metafiles. If not specified, the application id of the base document is used.
Rendition DocumentInfo Record
RenditionDocumentInfo Record=CSI
Specify the document type for Tiff renditions. If not specified, the type of the base document is used.
Rendition StorageCategory
RenditionStorageCategory=DMS_C1_ST
Specify the storage category for Tiff renditions. If not specified, the storage category of the base document is used.
Rendition ApplicationID
RenditionApplicationID=MRK
Specify the application ID for Tiff renditions. If not specified, the application ID of the base document is used.
MMOwnerOnly MMOwnerOnly= true|false
When set to false, non-owner of the base document can create/edit/delete master markupWhen set to true, only the owner of the base document can create/edit/delete master markup.Default is true.
Setting Syntax Description
Cimmetry Systems Corp.

VueLink 39
Configure web.xml for SAP J2EE EngineIf you selected SAP J2EE Engine as the servlet engine when you ran the installer, the folder vuelink4sapj2ee is created under the installation root. The installation root is referred to as <VueLink Root> later in this document. All files necessary for the VueLink deployment are copied here.
1 Using a text editor such as Notepad, open the file web.xml located in <VueLink Root>\vuelink4sapj2ee\WEB-INF.
2 Locate the servlet definition for VueServlet:
There are two parameters for VueServlet you can modify:
<servlet> <servlet-name>com.cimmetry.servlet.VueServlet</servlet-name> <servlet-class>com.cimmetry.servlet.VueServlet</servlet-class> <init-param> <param-name>Verbose</param-name> <param-value>0</param-value> </init-param> <init-param> <param-name>JVueServer</param-name> <param-value><jVueServer>:5099</param-value> </init-param> </servlet>
Verbose To enable debug messages, set to 1.
JVueServer The host and port number for the AutoVue Server installation.
Cimmetry Systems Corp.
40 VueLink
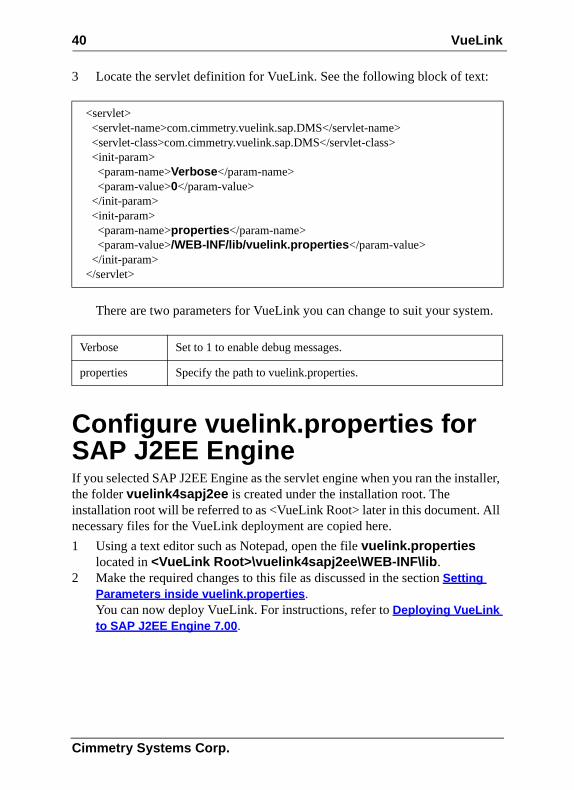
3 Locate the servlet definition for VueLink. See the following block of text:
There are two parameters for VueLink you can change to suit your system.
Configure vuelink.properties for SAP J2EE EngineIf you selected SAP J2EE Engine as the servlet engine when you ran the installer, the folder vuelink4sapj2ee is created under the installation root. The installation root will be referred to as <VueLink Root> later in this document. All necessary files for the VueLink deployment are copied here.
1 Using a text editor such as Notepad, open the file vuelink.properties located in <VueLink Root>\vuelink4sapj2ee\WEB-INF\lib.
2 Make the required changes to this file as discussed in the section Setting Parameters inside vuelink.properties.You can now deploy VueLink. For instructions, refer to Deploying VueLink to SAP J2EE Engine 7.00.
<servlet> <servlet-name>com.cimmetry.vuelink.sap.DMS</servlet-name> <servlet-class>com.cimmetry.vuelink.sap.DMS</servlet-class> <init-param> <param-name>Verbose</param-name> <param-value>0</param-value> </init-param> <init-param> <param-name>properties</param-name> <param-value>/WEB-INF/lib/vuelink.properties</param-value> </init-param> </servlet>
Verbose Set to 1 to enable debug messages.
properties Specify the path to vuelink.properties.
Cimmetry Systems Corp.
VueLink 41
Completing the Configuration for XRefsSome CAD packages such as AutoCAD & MicroStation have implemented the concept of composite or hybrid drawings. These drawings consist of many files, usually called External Reference files or XRefs. VueLink for SAP PLM provides support for XRefs. For VueLink to fetch XRefs out of SAP PLM, a relationship between the base drawing and its XRef files needs to be established. This section describes the steps necessary to establish such a relationship from within SAP GUI for Windows. VueLink for SAP PLM supports XRefs via object links and document structure.
The ShowXREFs property lets you configure the download of XREFs when the base file is viewed. The ShowXREFs property is set to True by default. When this property is set to True, all XREF files are downloaded to AutoVue Server’s Cache directory. If you wish to disable the download of all XREFs, set ShowXREFs to false.
Object LinksA document in the SAP PLM system works with the concept of object links. For XRefs, VueLink relies on the use of object links. Every object link has a description field to record some information. VueLink stores metafile and Markup files as object links. Since metafile and Markup information is created by VueLink, VueLink knows how to identify if a link is used for a Markup or for a metafile.
VueLink for SAP PLM identifies all object links within a document that are not Markups or metafiles as XRefs. VueLink downloads all files that are object links and passes them to AutoVue as XRefs for the base file.
Defining XRefs via the Document StructureXRefs are also supported via the document structure.
1 Check in the base document and all its XRefs into SAP.Note: Check in each file into its own document information record using
the cv01 transaction.
2 From the base document's Display Document page, select Environment, Document Structure, then Create menu item.
Cimmetry Systems Corp.
42 VueLink
3 Press Enter.4 Click the Document tab.5 To add XRefs, select the first row in the list.6 To locate XRefs, perform a search.7 Click Save.
Defining Data Carrier TypeTo be able to save Markups and metafiles, you must first define the Data Carrier Type.
Note:
• If this is the first time you are defining the Data Carrier, you will have to create a new request. Refer to the SAP PLM documentation for more information.
• The Data Carrier definition is meant for a front-end computer running on the Windows platform. Running FrontEnd for Java on a Macintosh computer changes the configuration significantly. For instance, C:\temp is no longer a valid directory.
To define the Data Carrier Type:
1 Make sure the user has the appropriate permissions.2 Execute the transaction “dc20”.3 Double-click Define data carrier type "server, front end".
4 Click the Modify button (the pencil in the toolbar).
Note: To create new entries, click New Entries.5 For Type, add PC.6 For Description, enter Front End Computer.7 For Path, enter C:\temp or any valid directory where documents can be
downloaded to.
8 Click Save .
Cimmetry Systems Corp.
VueLink 43
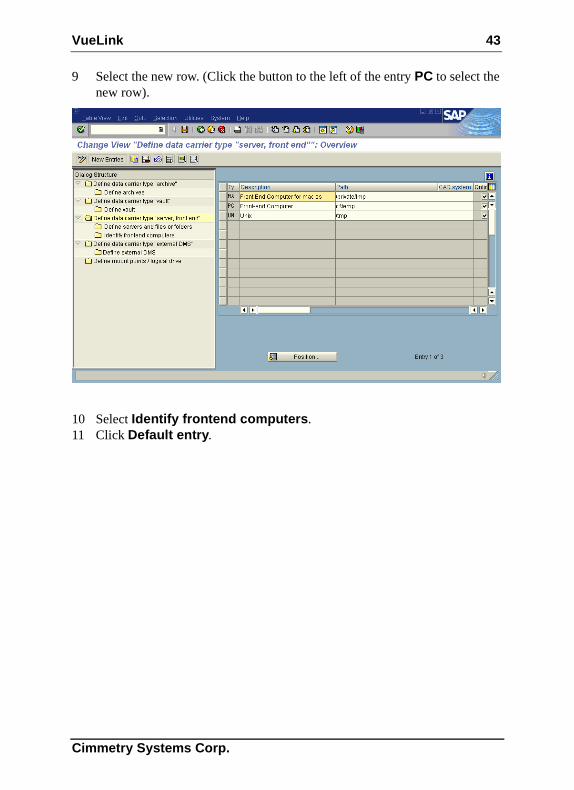
9 Select the new row. (Click the button to the left of the entry PC to select the new row).
10 Select Identify frontend computers.11 Click Default entry.
Cimmetry Systems Corp.
44 VueLink
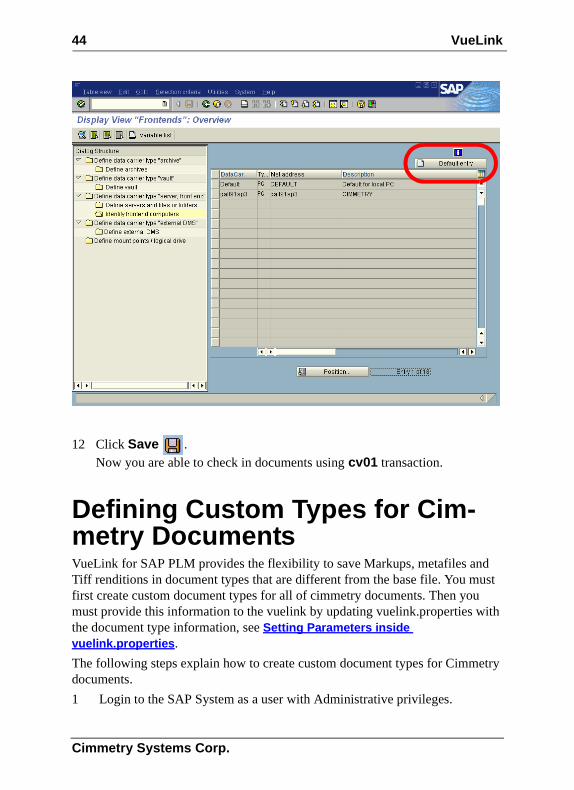
12 Click Save .Now you are able to check in documents using cv01 transaction.
Defining Custom Types for Cim-metry DocumentsVueLink for SAP PLM provides the flexibility to save Markups, metafiles and Tiff renditions in document types that are different from the base file. You must first create custom document types for all of cimmetry documents. Then you must provide this information to the vuelink by updating vuelink.properties with the document type information, see Setting Parameters inside vuelink.properties.
The following steps explain how to create custom document types for Cimmetry documents.
1 Login to the SAP System as a user with Administrative privileges.
Cimmetry Systems Corp.
VueLink 45
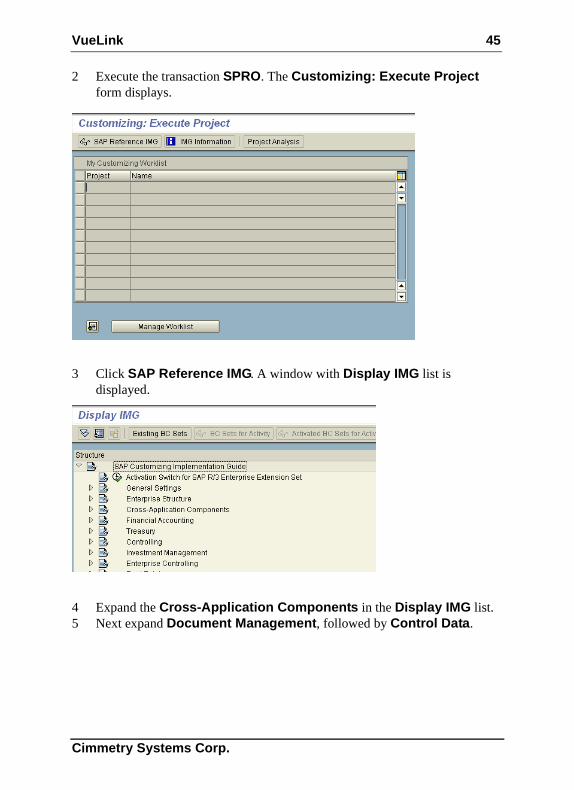
2 Execute the transaction SPRO. The Customizing: Execute Project form displays.
3 Click SAP Reference IMG. A window with Display IMG list is displayed.
4 Expand the Cross-Application Components in the Display IMG list.5 Next expand Document Management, followed by Control Data.
Cimmetry Systems Corp.
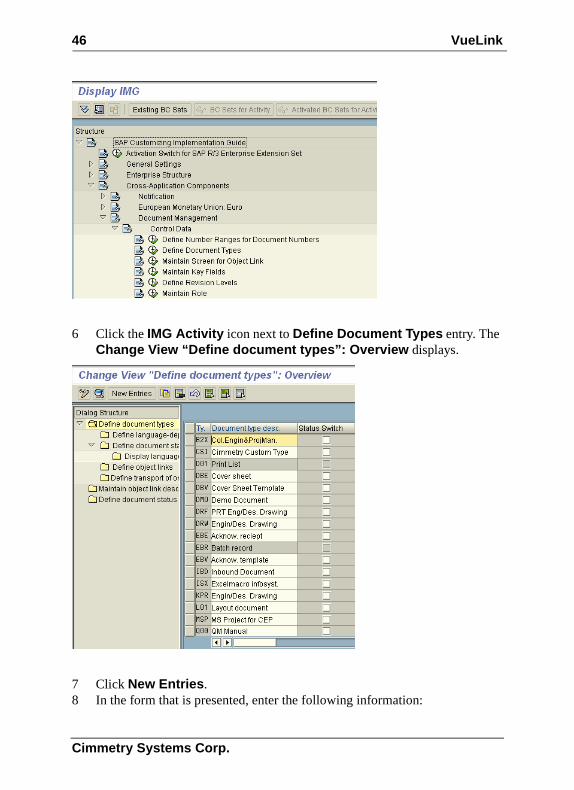
46 VueLink
6 Click the IMG Activity icon next to Define Document Types entry. The Change View “Define document types”: Overview displays.
7 Click New Entries. 8 In the form that is presented, enter the following information:
Cimmetry Systems Corp.
VueLink 47
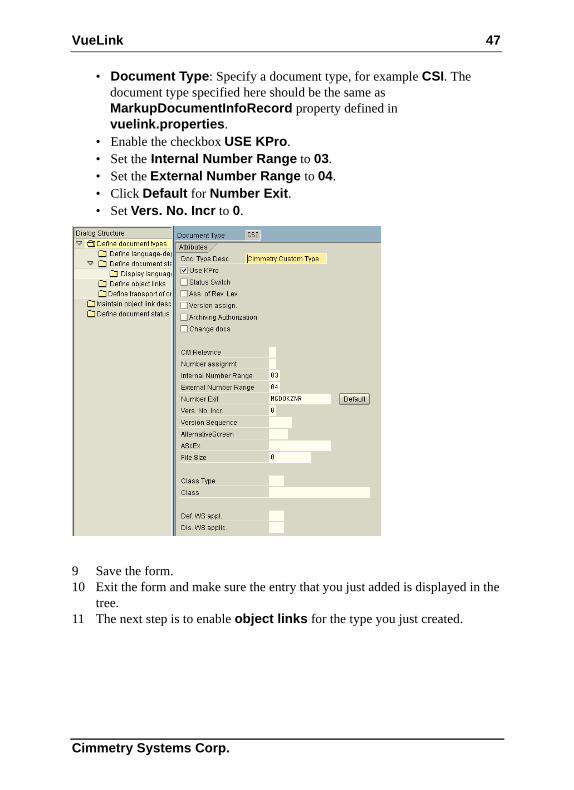
• Document Type: Specify a document type, for example CSI. The document type specified here should be the same as MarkupDocumentInfoRecord property defined in vuelink.properties.
• Enable the checkbox USE KPro.• Set the Internal Number Range to 03. • Set the External Number Range to 04. • Click Default for Number Exit.• Set Vers. No. Incr to 0.
9 Save the form.10 Exit the form and make sure the entry that you just added is displayed in the
tree.11 The next step is to enable object links for the type you just created.
Cimmetry Systems Corp.
48 VueLink
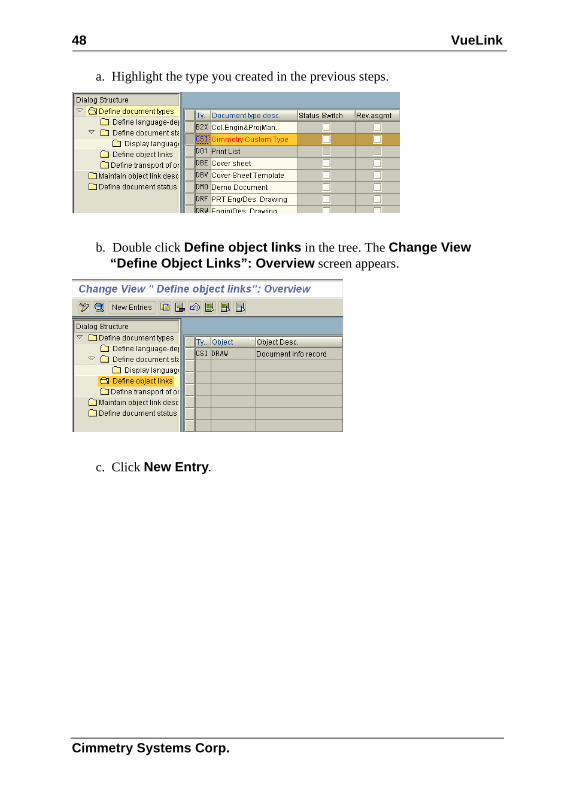
a. Highlight the type you created in the previous steps.
b. Double click Define object links in the tree. The Change View “Define Object Links”: Overview screen appears.
c. Click New Entry.
Cimmetry Systems Corp.
VueLink 49
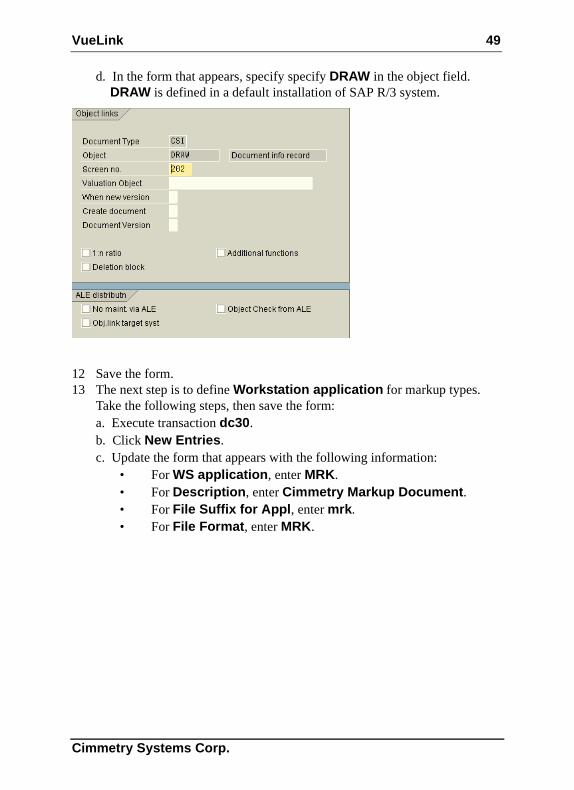
d. In the form that appears, specify specify DRAW in the object field. DRAW is defined in a default installation of SAP R/3 system.
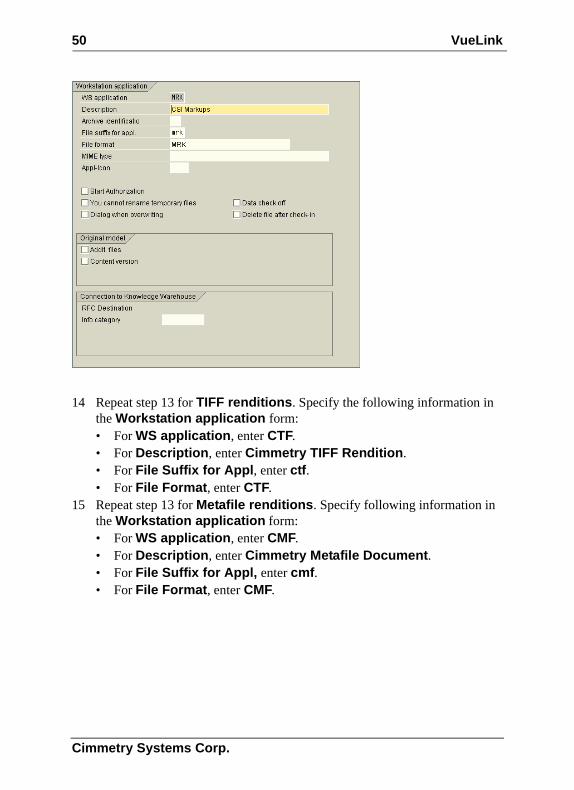
12 Save the form.13 The next step is to define Workstation application for markup types.
Take the following steps, then save the form:a. Execute transaction dc30.b. Click New Entries.c. Update the form that appears with the following information:
• For WS application, enter MRK.• For Description, enter Cimmetry Markup Document.• For File Suffix for Appl, enter mrk.• For File Format, enter MRK.
Cimmetry Systems Corp.
50 VueLink
14 Repeat step 13 for TIFF renditions. Specify the following information in the Workstation application form:• For WS application, enter CTF.• For Description, enter Cimmetry TIFF Rendition.• For File Suffix for Appl, enter ctf.• For File Format, enter CTF.
15 Repeat step 13 for Metafile renditions. Specify following information in the Workstation application form:• For WS application, enter CMF.• For Description, enter Cimmetry Metafile Document.• For File Suffix for Appl, enter cmf.• For File Format, enter CMF.
Cimmetry Systems Corp.
VueLink 51
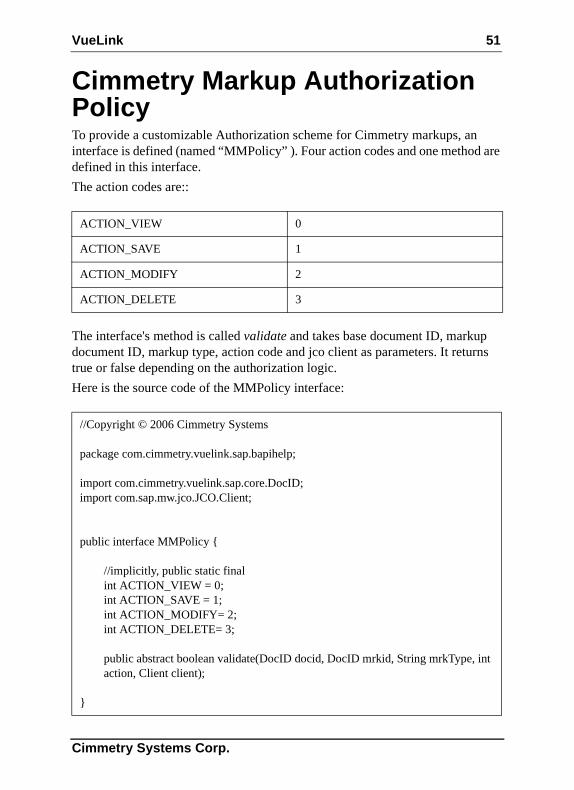
Cimmetry Markup Authorization PolicyTo provide a customizable Authorization scheme for Cimmetry markups, an interface is defined (named “MMPolicy” ). Four action codes and one method are defined in this interface.
The action codes are::
The interface's method is called validate and takes base document ID, markup document ID, markup type, action code and jco client as parameters. It returns true or false depending on the authorization logic.
Here is the source code of the MMPolicy interface:
ACTION_VIEW 0
ACTION_SAVE 1
ACTION_MODIFY 2
ACTION_DELETE 3
//Copyright © 2006 Cimmetry Systems
package com.cimmetry.vuelink.sap.bapihelp;
import com.cimmetry.vuelink.sap.core.DocID;import com.sap.mw.jco.JCO.Client;
public interface MMPolicy {
//implicitly, public static finalint ACTION_VIEW = 0;int ACTION_SAVE = 1;int ACTION_MODIFY= 2;int ACTION_DELETE= 3;
public abstract boolean validate(DocID docid, DocID mrkid, String mrkType, int action, Client client);
}
Cimmetry Systems Corp.
52 VueLink
Any custom implementation for Cimmetry markup authorization policy must implement this interface otherwise it would not be employed by the vuelink and proper error message would be propagated to user.
The fully qualified class name must be set inside vuelink.properties (MMPolicyClass).
Upon successful instantiation of custom class by VueLink, it will be deployed on any access to Cimmetry markups. Please note that action codes are not changeable.
See the following section, Sample Code, for a sample skeleton of a custom markup authorization policy class.
Sample CodeThe following code demonstrates an implementation for custom class to handle Cimmetry markup authorization policy.
The code must import two external classes, which are DocID from the com.cimmetry.vuelink.sap.core package (See Appendix B) and JCO from the com.sap.mw.jco package. The instance of these classes are passed to validate method in addition to action code that are defined in the interface.
DocID class has methods to get Documents Type, Number, Part and Version.
Client class has methods to get username and it can be used as a connection with user's credentials to SAP to perform any backend dependent action.
Cimmetry Systems Corp.

VueLink 53
After successfully implementing the custom code, you need to make it available in classpath and put its name in vuelink.properties. For the example in this section it would be:
Note: You need to restart the VueLink application for the changes to take effect.
MMPolicyClass=com.abc.MMPolicyImp
Cimmetry Systems Corp.
54 VueLink
Enabling HTTPS/SSL
Updating java.security to Enable HTTPS/SSLVueLink for SAP PLM supports connections to HTTPS (Secure HyperText Transfer Protocol) using SSL (Secure Socket Layer).
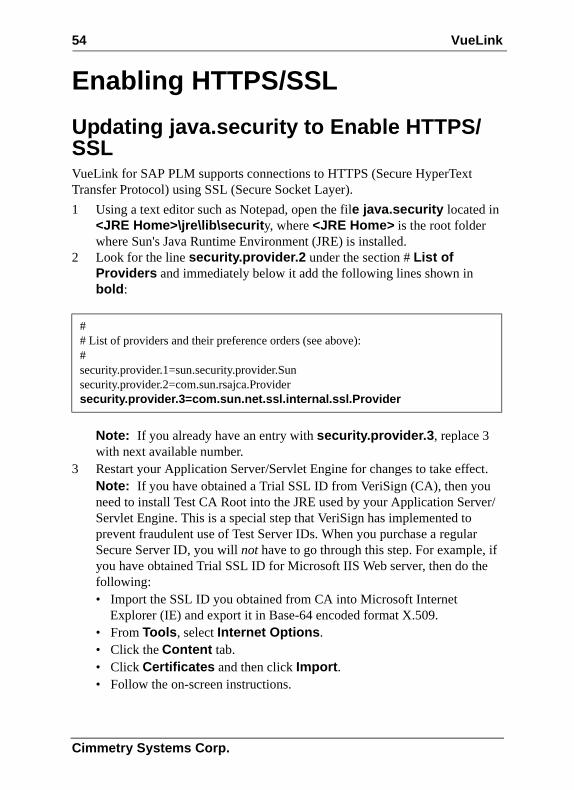
1 Using a text editor such as Notepad, open the file java.security located in <JRE Home>\jre\lib\security, where <JRE Home> is the root folder where Sun's Java Runtime Environment (JRE) is installed.
2 Look for the line security.provider.2 under the section # List of Providers and immediately below it add the following lines shown in bold:
Note: If you already have an entry with security.provider.3, replace 3 with next available number.
3 Restart your Application Server/Servlet Engine for changes to take effect.Note: If you have obtained a Trial SSL ID from VeriSign (CA), then you need to install Test CA Root into the JRE used by your Application Server/Servlet Engine. This is a special step that VeriSign has implemented to prevent fraudulent use of Test Server IDs. When you purchase a regular Secure Server ID, you will not have to go through this step. For example, if you have obtained Trial SSL ID for Microsoft IIS Web server, then do the following:• Import the SSL ID you obtained from CA into Microsoft Internet
Explorer (IE) and export it in Base-64 encoded format X.509.• From Tools, select Internet Options.• Click the Content tab.• Click Certificates and then click Import.• Follow the on-screen instructions.
## List of providers and their preference orders (see above):#security.provider.1=sun.security.provider.Sunsecurity.provider.2=com.sun.rsajca.Providersecurity.provider.3=com.sun.net.ssl.internal.ssl.Provider
Cimmetry Systems Corp.

VueLink 55
• Import the Base-64 SSL ID to the cacerts file using keytool.exe (the default password is changeit).
Example:C:\jdk1.3.1\bin>keytool -import -alias hostname -file c:\ssl3.cer –trustcacerts -v -keystore C:\jdk1.3.1\jre\lib\security\cacerts
password: changeit
Serial number: 257bc618dbdcbf7befc81c2fce739a8aValid from: Wed Apr 10 20:00:00 EDT 2002 until: Thu Apr 25 19:59:59 EDT 2002Certificate fingerprints: MD5: E5:0B:A7:36:B7:B9:76:71:72:D8:D7:7A:EB:57:5D:13 SHA1: E9:CE:9C:35:7F:28:68:7D:6D:1C:0B:4D:18:26:87:63:0C:54:05:98Trust this certificate? [no]: yesCertificate was added to keystore[Saving C:\jdk1.3.1\jre\lib\security\cacerts]
Note: You need to repeat step f. to import the SSL id into cacerts file for JRE used by AutoVue server. The location for cacerts file is <Install_dir>\jre\1.3\lib\security\cacerts where <Install_dir> is the directory where AutoVue server is installed.Example:C:\Program Files\jVue\jre\1.3\bin>keytool -import -alias hostname -filec:\ssl3.cer -trustcacerts -v -keystore C:\Program Files\jVue\jre\1.3\lib\security\cacerts
4 Restart your Application Server/Servlet Engine and the AutoVue server for changes to take effect.
5 To verify that the SSL id was successfully imported into cacerts, use the keytool utility.Example:C:\jdk1.3.1\bin>keytool -list -keystore C:\jdk1.3.1\jre\lib\security\cacerts
Cimmetry Systems Corp.
56 VueLink
Verification
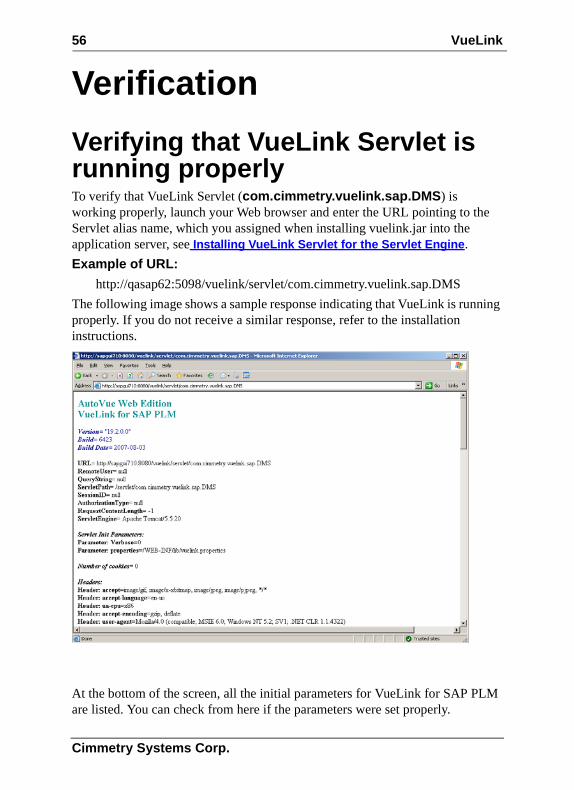
Verifying that VueLink Servlet is running properlyTo verify that VueLink Servlet (com.cimmetry.vuelink.sap.DMS) is working properly, launch your Web browser and enter the URL pointing to the Servlet alias name, which you assigned when installing vuelink.jar into the application server, see Installing VueLink Servlet for the Servlet Engine.
Example of URL:
http://qasap62:5098/vuelink/servlet/com.cimmetry.vuelink.sap.DMS
The following image shows a sample response indicating that VueLink is running properly. If you do not receive a similar response, refer to the installation instructions.
At the bottom of the screen, all the initial parameters for VueLink for SAP PLM are listed. You can check from here if the parameters were set properly.
Cimmetry Systems Corp.
VueLink 57
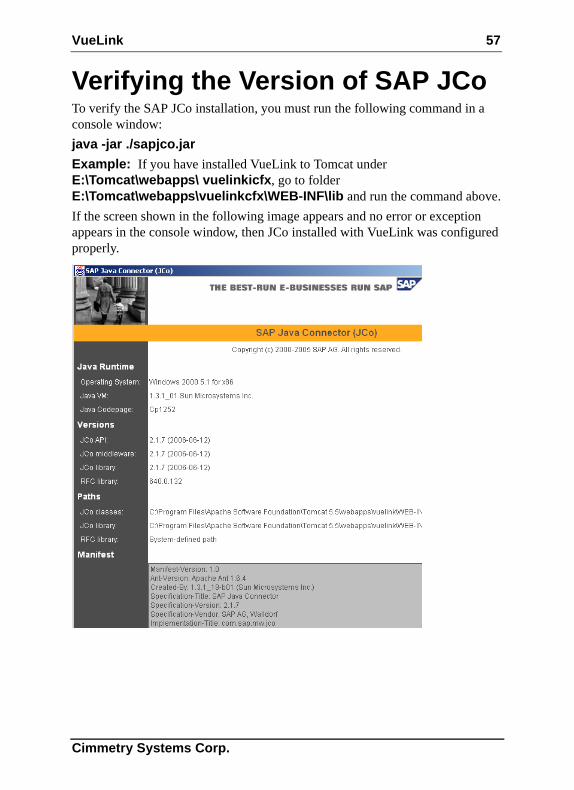
Verifying the Version of SAP JCoTo verify the SAP JCo installation, you must run the following command in a console window:
java -jar ./sapjco.jar
Example: If you have installed VueLink to Tomcat under E:\Tomcat\webapps\ vuelinkicfx, go to folder E:\Tomcat\webapps\vuelinkcfx\WEB-INF\lib and run the command above.
If the screen shown in the following image appears and no error or exception appears in the console window, then JCo installed with VueLink was configured properly.
Cimmetry Systems Corp.

58 VueLink
Cimmetry Systems Corp.
VueLink 59
Appendix AThis appendix provides a workaround for viewing multiple originals. We recommend that these steps be performed by someone with a sound knowledge of SAP and Abap customizations. It is also recommend that you consult a SAP consultant before performing these steps.
Customizing SAP to View Multiple Originals from the Product StructureComplete the following steps to customize SAP GUI to launch Cimmetry viewer so that the viewer can pick up multiple originals from the product structure.
1 Log on to SAP GUI with the right permissions for modifying an ABAP program.
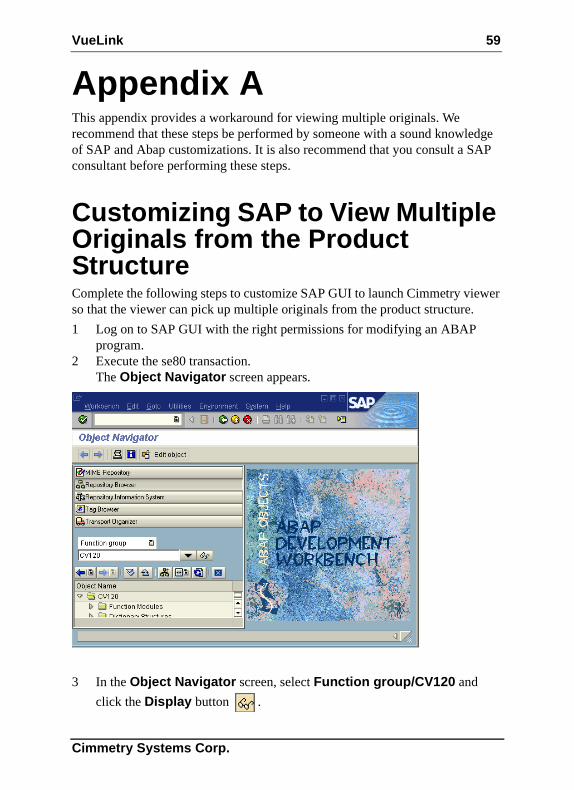
2 Execute the se80 transaction.The Object Navigator screen appears.
3 In the Object Navigator screen, select Function group/CV120 and
click the Display button .
Cimmetry Systems Corp.
60 VueLink
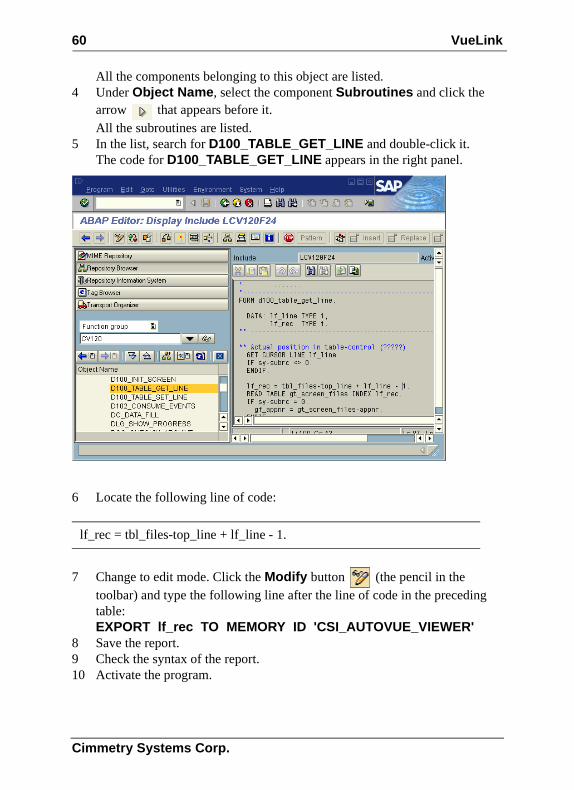
All the components belonging to this object are listed.4 Under Object Name, select the component Subroutines and click the
arrow that appears before it.All the subroutines are listed.
5 In the list, search for D100_TABLE_GET_LINE and double-click it.The code for D100_TABLE_GET_LINE appears in the right panel.
6 Locate the following line of code:
7 Change to edit mode. Click the Modify button (the pencil in the toolbar) and type the following line after the line of code in the preceding table:EXPORT lf_rec TO MEMORY ID 'CSI_AUTOVUE_VIEWER'
8 Save the report.9 Check the syntax of the report.10 Activate the program.
lf_rec = tbl_files-top_line + lf_line - 1.
Cimmetry Systems Corp.
VueLink 61
Customize SAP to View Multiple Originals from the Display Document pageComplete the following steps to customize SAPGUI to launch Cimmetry viewer so that the viewer can pick up multiple originals from the Display Document page.
1 Log on to SAP GUI with the right permissions for modifying an ABAP program.
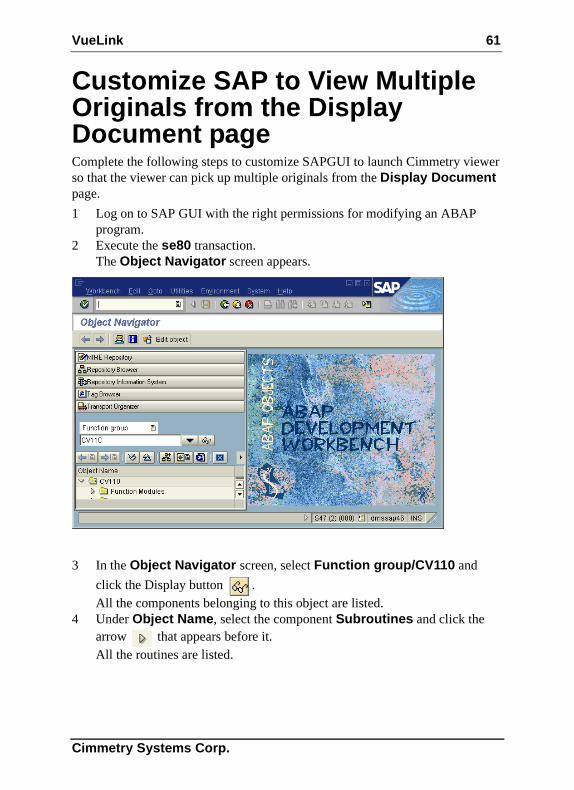
2 Execute the se80 transaction.The Object Navigator screen appears.
3 In the Object Navigator screen, select Function group/CV110 and
click the Display button .All the components belonging to this object are listed.
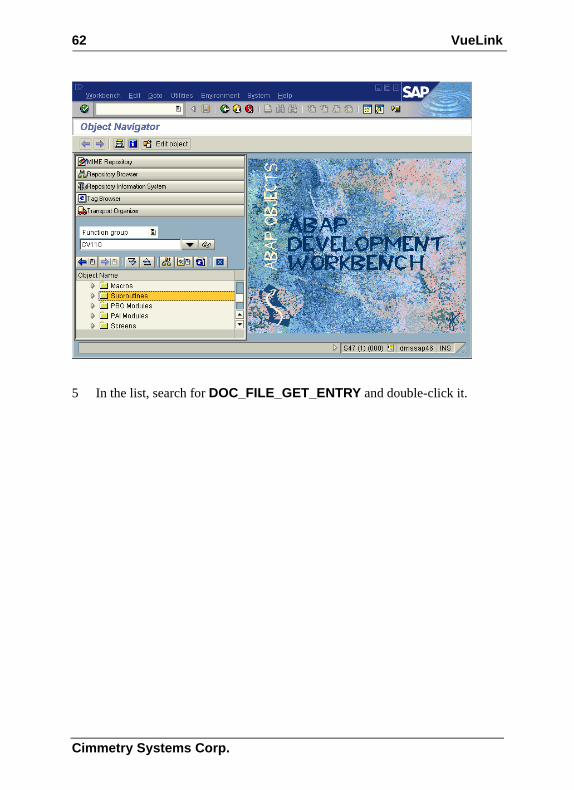
4 Under Object Name, select the component Subroutines and click the arrow that appears before it.All the routines are listed.
Cimmetry Systems Corp.
62 VueLink
5 In the list, search for DOC_FILE_GET_ENTRY and double-click it.
Cimmetry Systems Corp.
VueLink 63
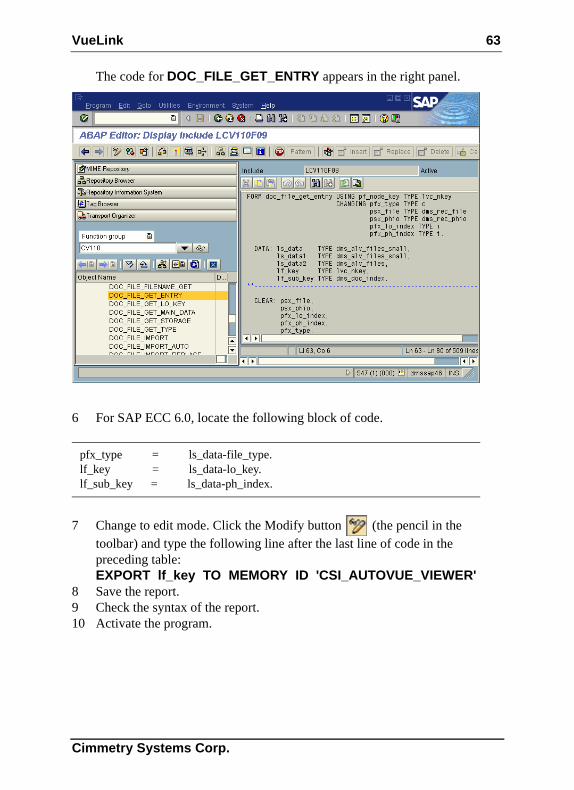
The code for DOC_FILE_GET_ENTRY appears in the right panel.
6 For SAP ECC 6.0, locate the following block of code.
7 Change to edit mode. Click the Modify button (the pencil in the toolbar) and type the following line after the last line of code in the preceding table:EXPORT lf_key TO MEMORY ID 'CSI_AUTOVUE_VIEWER'
8 Save the report.9 Check the syntax of the report.10 Activate the program.
pfx_type = ls_data-file_type.lf_key = ls_data-lo_key.lf_sub_key = ls_data-ph_index.
Cimmetry Systems Corp.

64 VueLink
Cimmetry Systems Corp.
VueLink 65
Appendix B
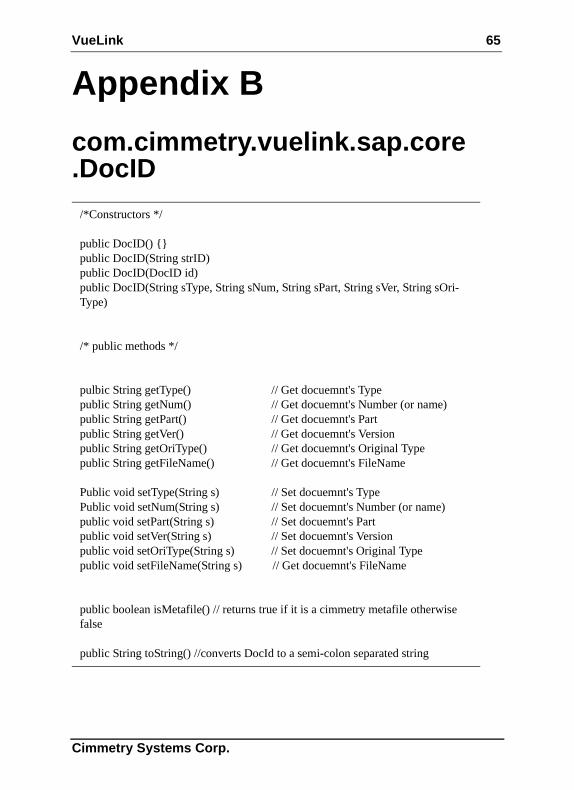
com.cimmetry.vuelink.sap.core.DocID
/*Constructors */
public DocID() {}public DocID(String strID)public DocID(DocID id)public DocID(String sType, String sNum, String sPart, String sVer, String sOri-Type)
/* public methods */
pulbic String getType() // Get docuemnt's Typepublic String getNum() // Get docuemnt's Number (or name)public String getPart() // Get docuemnt's Partpublic String getVer() // Get docuemnt's Versionpublic String getOriType() // Get docuemnt's Original Typepublic String getFileName() // Get docuemnt's FileName
Public void setType(String s) // Set docuemnt's TypePublic void setNum(String s) // Set docuemnt's Number (or name)public void setPart(String s) // Set docuemnt's Partpublic void setVer(String s) // Set docuemnt's Versionpublic void setOriType(String s) // Set docuemnt's Original Typepublic void setFileName(String s) // Get docuemnt's FileName
public boolean isMetafile() // returns true if it is a cimmetry metafile otherwise false
public String toString() //converts DocId to a semi-colon separated string
Cimmetry Systems Corp.
66 VueLink
Cimmetry Systems Corp.
VueLink 67
FeedbackCimmetry Systems products are designed according to your needs. We would appreciate your feedback, comments or suggestions. Contact us by fax, e-mail or telephone. There is a feedback button on our Web site that activates an easy-to-use feedback form. Please let us know what you think!
General Inquiries
Sales Inquiries
Customer Support
Telephone: +1 514-735-3219
Fax: (514) 735-6440
E-mail: [email protected]
Web Site: http://www.cimmetry.com
Telephone: +1 514-735-3219 or 1-800-361-1904
Fax: (514) 735-6440
E-mail: [email protected]
Telephone: +1 514-735-9941
Web Site: http://www.cimmetry.com/support
Cimmetry Systems Corp.