Embed Size (px)
DESCRIPTION
SAP
Citation preview
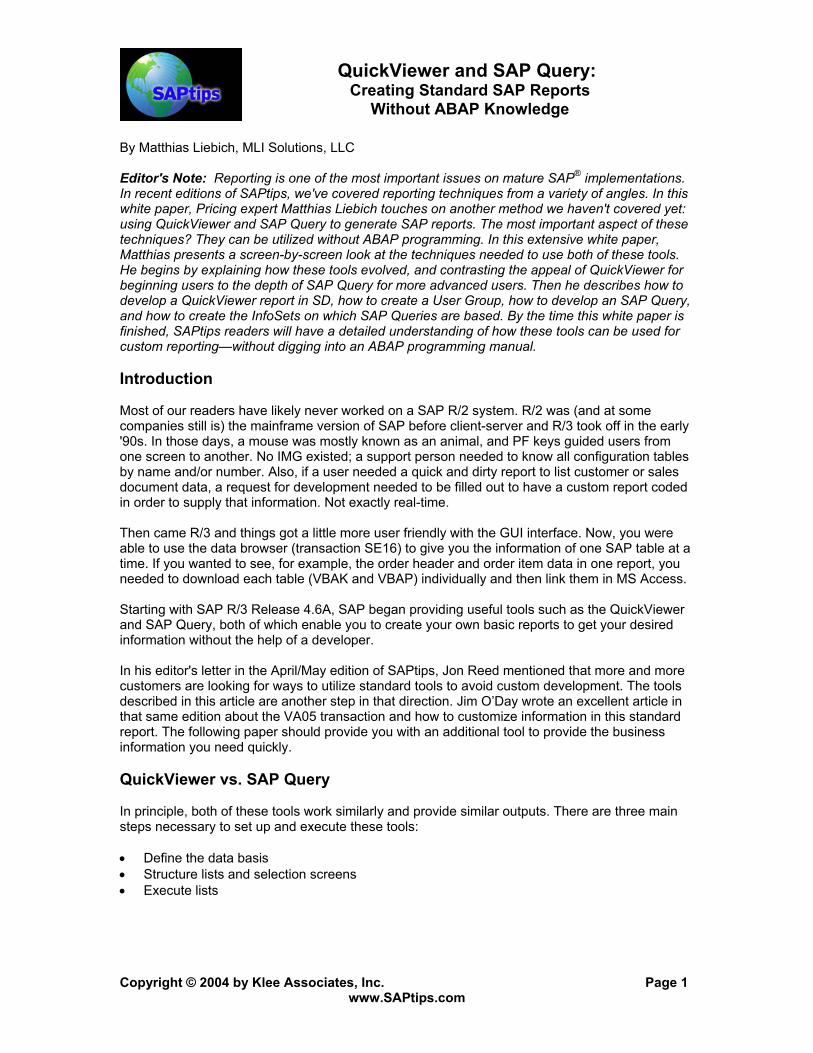
QuickViewer and SAP Query: Creating Standard SAP Reports
Without ABAP Knowledge By Matthias Liebich, MLI Solutions, LLC Editor's Note: Reporting is one of the most important issues on mature SAP® implementations. In recent editions of SAPtips, we've covered reporting techniques from a variety of angles. In this white paper, Pricing expert Matthias Liebich touches on another method we haven't covered yet: using QuickViewer and SAP Query to generate SAP reports. The most important aspect of these techniques? They can be utilized without ABAP programming. In this extensive white paper, Matthias presents a screen-by-screen look at the techniques needed to use both of these tools. He begins by explaining how these tools evolved, and contrasting the appeal of QuickViewer for beginning users to the depth of SAP Query for more advanced users. Then he describes how to develop a QuickViewer report in SD, how to create a User Group, how to develop an SAP Query, and how to create the InfoSets on which SAP Queries are based. By the time this white paper is finished, SAPtips readers will have a detailed understanding of how these tools can be used for custom reporting—without digging into an ABAP programming manual. Introduction Most of our readers have likely never worked on a SAP R/2 system. R/2 was (and at some companies still is) the mainframe version of SAP before client-server and R/3 took off in the early '90s. In those days, a mouse was mostly known as an animal, and PF keys guided users from one screen to another. No IMG existed; a support person needed to know all configuration tables by name and/or number. Also, if a user needed a quick and dirty report to list customer or sales document data, a request for development needed to be filled out to have a custom report coded in order to supply that information. Not exactly real-time. Then came R/3 and things got a little more user friendly with the GUI interface. Now, you were able to use the data browser (transaction SE16) to give you the information of one SAP table at a time. If you wanted to see, for example, the order header and order item data in one report, you needed to download each table (VBAK and VBAP) individually and then link them in MS Access. Starting with SAP R/3 Release 4.6A, SAP began providing useful tools such as the QuickViewer and SAP Query, both of which enable you to create your own basic reports to get your desired information without the help of a developer. In his editor's letter in the April/May edition of SAPtips, Jon Reed mentioned that more and more customers are looking for ways to utilize standard tools to avoid custom development. The tools described in this article are another step in that direction. Jim O’Day wrote an excellent article in that same edition about the VA05 transaction and how to customize information in this standard report. The following paper should provide you with an additional tool to provide the business information you need quickly. QuickViewer vs. SAP Query In principle, both of these tools work similarly and provide similar outputs. There are three main steps necessary to set up and execute these tools: • Define the data basis • Structure lists and selection screens • Execute lists
Copyright © 2004 by Klee Associates, Inc. Page 1
www.SAPtips.com
QuickViewer and SAP Query: Creating Standard SAP Reports
Without ABAP Knowledge QuickViewer is a simplified version of SAP Query and is intended for beginning users. As the name says, it is an ad-hoc tool for one-time use to quickly generate reports without having to program in ABAP. If a specific set of data needs to be analyzed and referenced on a regular basis, it is recommended to use SAP Query, since it is based on InfoSets, which store the data basis to be re-used for different queries (a more detailed explanation of InfoSets follows later in this paper). A main difference between the QuickViewer and the SAP Query is that QuickViewer reports are user-dependent, which means only the person who creates them can use them. SAP Queries, on the other hand, are assigned to one or more user groups. The other major distinction of the tools is that QuickViewer reports can’t be transported. However, you can define the QuickViewer in every SAP instance separately. QuickViewer allows you to create basic lists, whereas SAP Query does that but also has capabilities to create statistics and ranked lists. For the scenario in this paper, our goal is to quickly gather sales order information; in particular, we would like to know if an order item was created with reference to another sales document or if it was transmitted via EDI. Since we will do a great job in creating the QuickViewer, other users in our company would like to use this same report. We will then convert the QuickViewer into an SAP Query and make it available to multiple users via user groups.
Copyright © 2004 by Klee Associates, Inc. Page 2
www.SAPtips.com
QuickViewer and SAP Query: Creating Standard SAP Reports
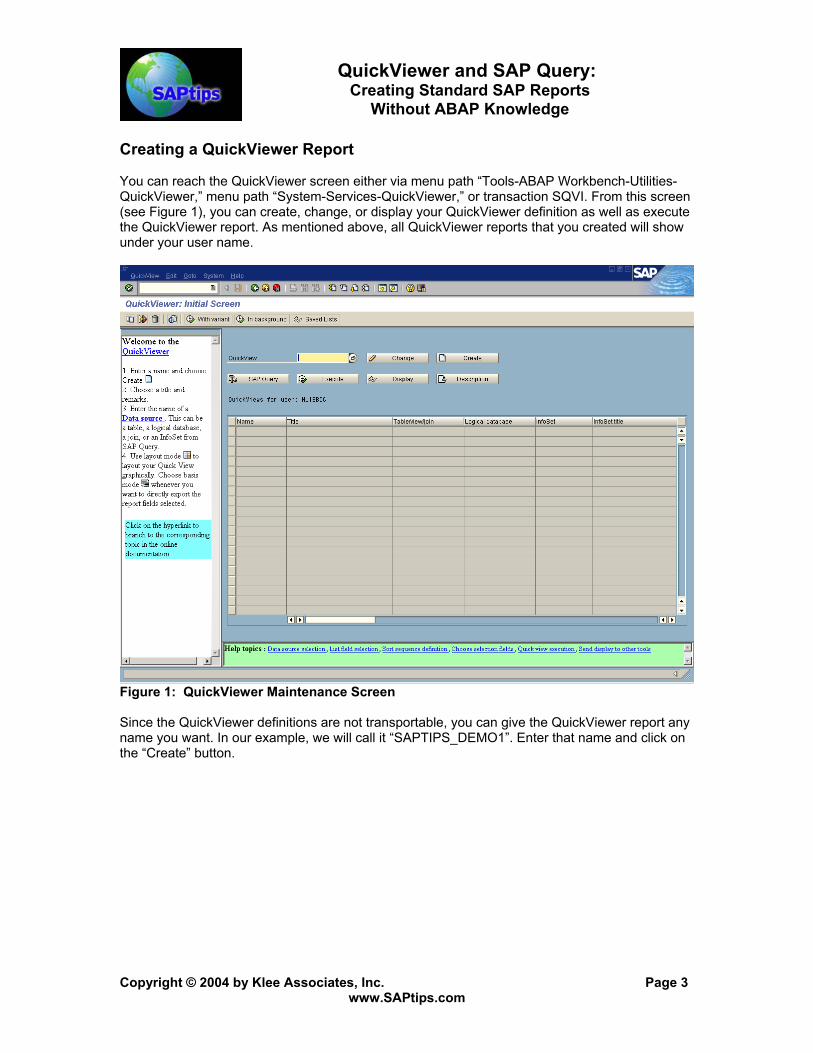
Without ABAP Knowledge Creating a QuickViewer Report You can reach the QuickViewer screen either via menu path “Tools-ABAP Workbench-Utilities-QuickViewer,” menu path “System-Services-QuickViewer,” or transaction SQVI. From this screen (see Figure 1), you can create, change, or display your QuickViewer definition as well as execute the QuickViewer report. As mentioned above, all QuickViewer reports that you created will show under your user name.
Figure 1: QuickViewer Maintenance Screen Since the QuickViewer definitions are not transportable, you can give the QuickViewer report any name you want. In our example, we will call it “SAPTIPS_DEMO1”. Enter that name and click on the “Create” button.
Copyright © 2004 by Klee Associates, Inc. Page 3
www.SAPtips.com
QuickViewer and SAP Query: Creating Standard SAP Reports
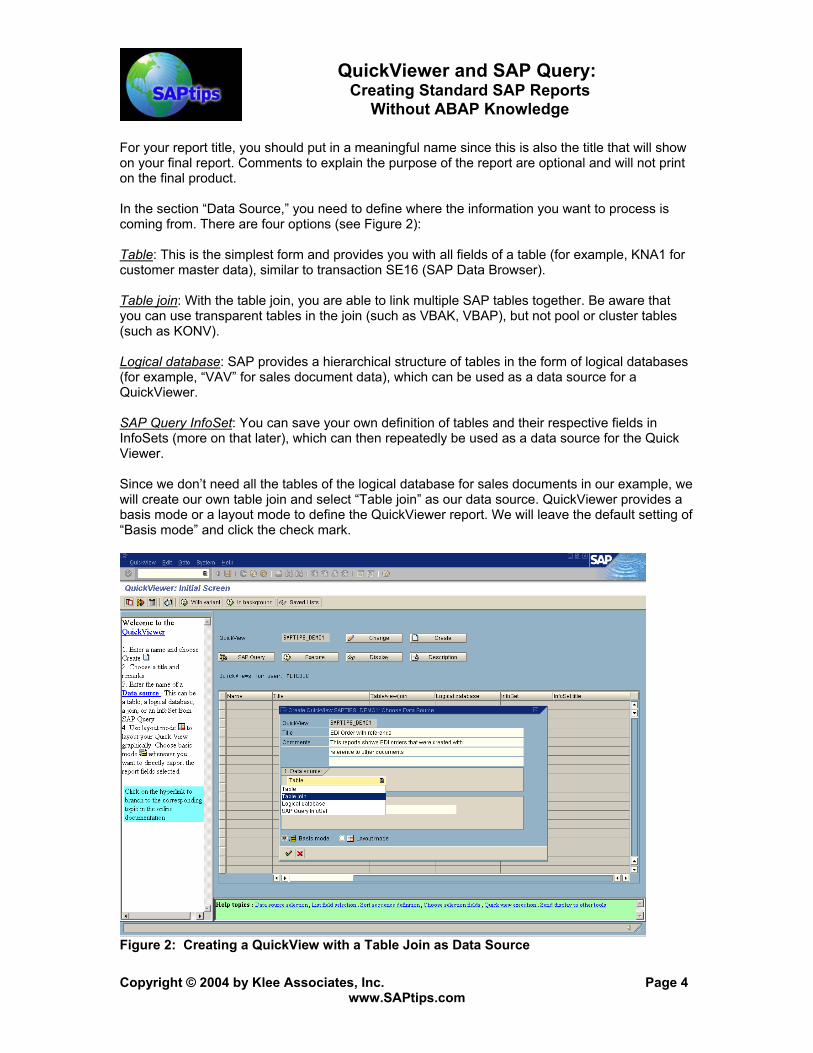
Without ABAP Knowledge For your report title, you should put in a meaningful name since this is also the title that will show on your final report. Comments to explain the purpose of the report are optional and will not print on the final product. In the section “Data Source,” you need to define where the information you want to process is coming from. There are four options (see Figure 2): Table: This is the simplest form and provides you with all fields of a table (for example, KNA1 for customer master data), similar to transaction SE16 (SAP Data Browser). Table join: With the table join, you are able to link multiple SAP tables together. Be aware that you can use transparent tables in the join (such as VBAK, VBAP), but not pool or cluster tables (such as KONV). Logical database: SAP provides a hierarchical structure of tables in the form of logical databases (for example, “VAV” for sales document data), which can be used as a data source for a QuickViewer. SAP Query InfoSet: You can save your own definition of tables and their respective fields in InfoSets (more on that later), which can then repeatedly be used as a data source for the Quick Viewer. Since we don’t need all the tables of the logical database for sales documents in our example, we will create our own table join and select “Table join” as our data source. QuickViewer provides a basis mode or a layout mode to define the QuickViewer report. We will leave the default setting of “Basis mode” and click the check mark.
Figure 2: Creating a QuickView with a Table Join as Data Source Copyright © 2004 by Klee Associates, Inc. Page 4
www.SAPtips.com
QuickViewer and SAP Query: Creating Standard SAP Reports
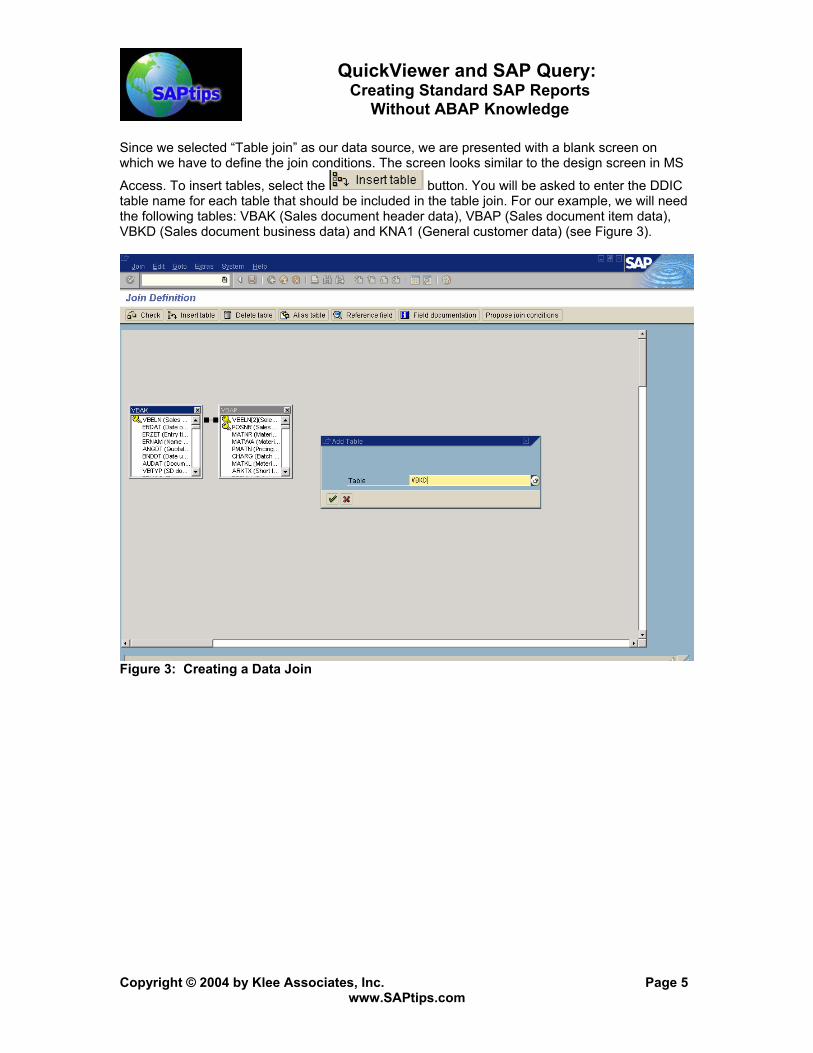
Without ABAP Knowledge Since we selected “Table join” as our data source, we are presented with a blank screen on which we have to define the join conditions. The screen looks similar to the design screen in MS
Access. To insert tables, select the button. You will be asked to enter the DDIC table name for each table that should be included in the table join. For our example, we will need the following tables: VBAK (Sales document header data), VBAP (Sales document item data), VBKD (Sales document business data) and KNA1 (General customer data) (see Figure 3).
Figure 3: Creating a Data Join
Copyright © 2004 by Klee Associates, Inc. Page 5
www.SAPtips.com
QuickViewer and SAP Query: Creating Standard SAP Reports
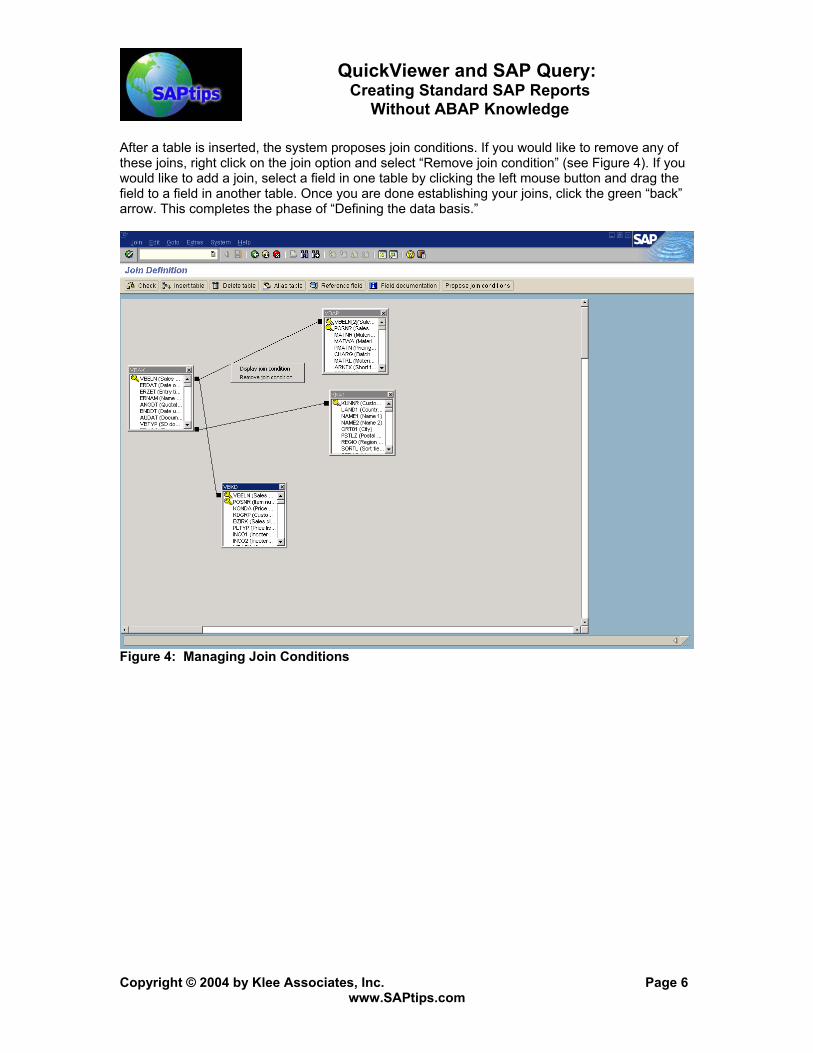
Without ABAP Knowledge After a table is inserted, the system proposes join conditions. If you would like to remove any of these joins, right click on the join option and select “Remove join condition” (see Figure 4). If you would like to add a join, select a field in one table by clicking the left mouse button and drag the field to a field in another table. Once you are done establishing your joins, click the green “back” arrow. This completes the phase of “Defining the data basis.”
Figure 4: Managing Join Conditions
Copyright © 2004 by Klee Associates, Inc. Page 6
www.SAPtips.com
QuickViewer and SAP Query: Creating Standard SAP Reports
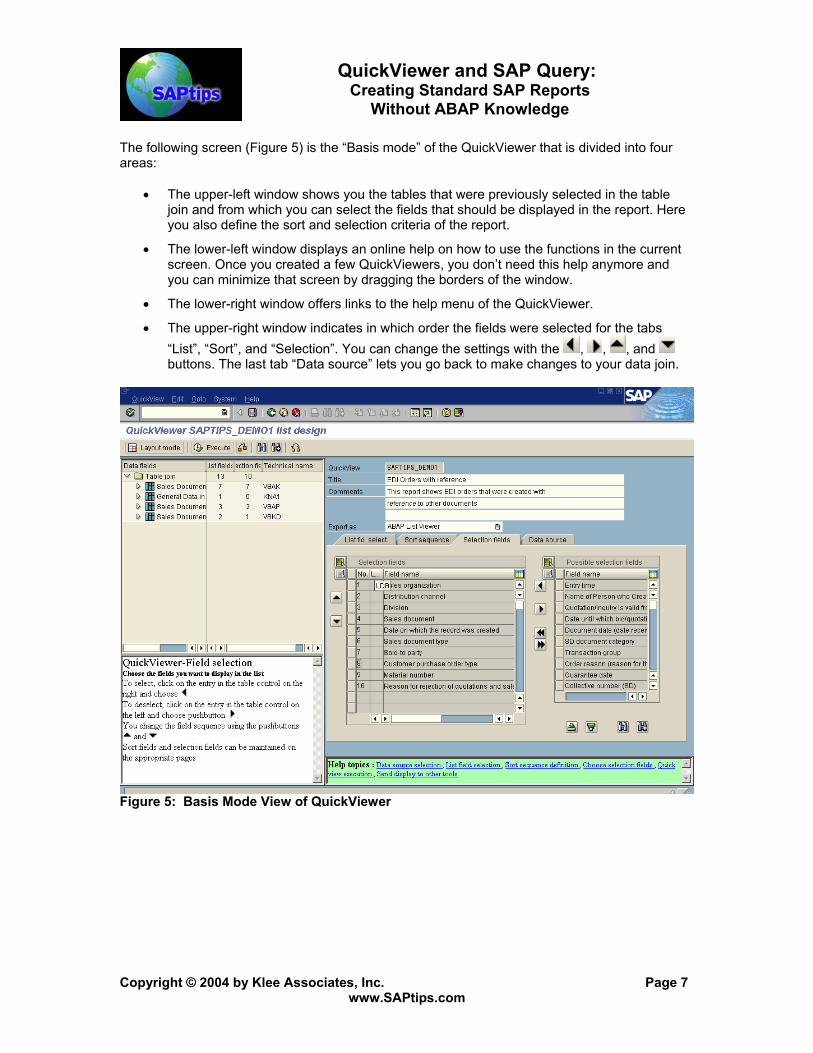
Without ABAP Knowledge The following screen (Figure 5) is the “Basis mode” of the QuickViewer that is divided into four areas:
• The upper-left window shows you the tables that were previously selected in the table join and from which you can select the fields that should be displayed in the report. Here you also define the sort and selection criteria of the report.
• The lower-left window displays an online help on how to use the functions in the current screen. Once you created a few QuickViewers, you don’t need this help anymore and you can minimize that screen by dragging the borders of the window.
• The lower-right window offers links to the help menu of the QuickViewer.
• The upper-right window indicates in which order the fields were selected for the tabs “List”, “Sort”, and “Selection”. You can change the settings with the , , , and buttons. The last tab “Data source” lets you go back to make changes to your data join.
Figure 5: Basis Mode View of QuickViewer
Copyright © 2004 by Klee Associates, Inc. Page 7
www.SAPtips.com

QuickViewer and SAP Query: Creating Standard SAP Reports
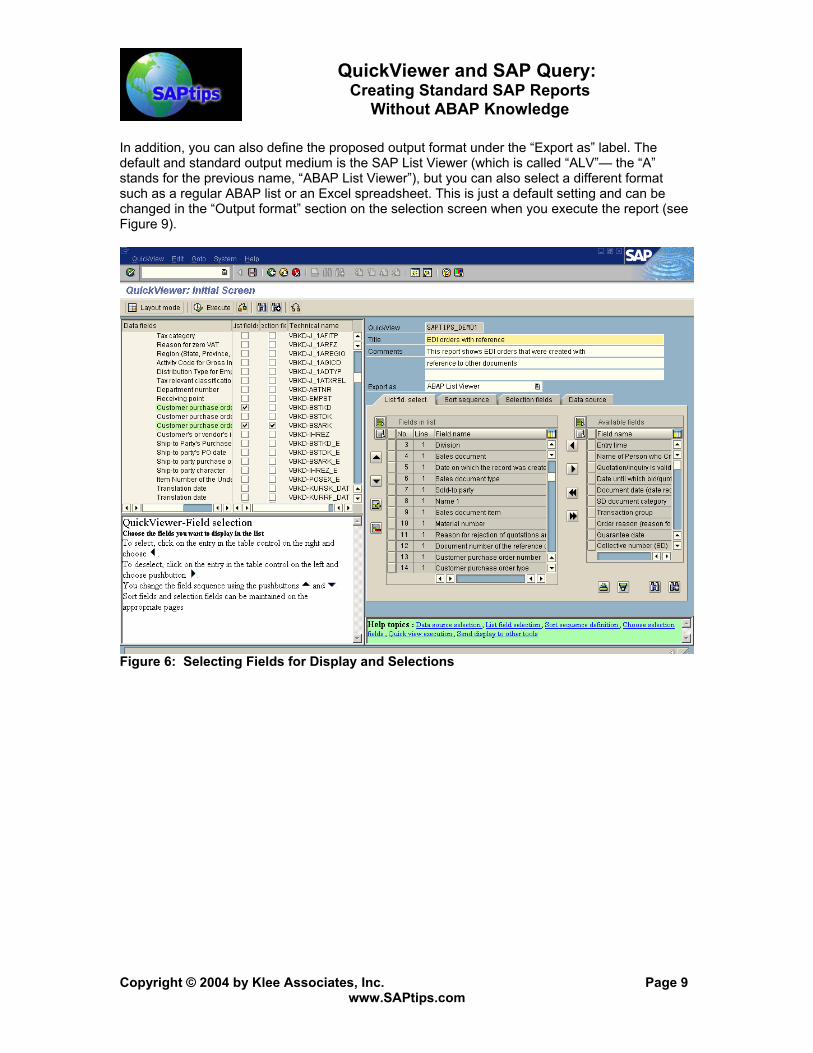
Without ABAP Knowledge Selecting the in front of a table in the upper-left window reveals the fields within that table. The first column shows the field description; the fourth column shows the respective technical name. To select fields that should be displayed in the final report, select them in the second column. To define a field as selection criteria, indicate this in the third column. The fields will appear in the list field and selection list in the order they were selected, not in the order they appear in the DDIC tables (see Figure 6). To change the order of the fields, select a field and use the and buttons to move them up and down the respective lists. For our example, we are going to select the following fields: Sales organization (VBAK-VKORG) Distribution Channel (VBAK-VTWEG) Division (VBAK-SPART) Sales document (VBAK-VBELN) Create date (VBAK-ERDAT) Sales document type (VBAK-AUART) Sold-to party (VBAK-KUNNR) Sold-to name (KNA1-NAME1) Item number (VBAP-POSNR) Material number (VBAP-MATNR) Rejection reason (VBAP-ABGRU) Reference document number (VBAP-VGBEL) Purchase order number (VBKD-BSTKD) Purchase order type (VBKD-BSARK) As selection fields, we choose: Sales organization (VBAK-VKORG) Distribution Channel (VBAK-VTWEG) Division (VBAK-SPART) Sales document (VBAK-VBELN) Create date (VBAK-ERDAT) Sales document type (VBAK-AUART) Sold-to party (VBAK-KUNNR) Purchase order type (VBKD-BSARK) Material number (VBAP-MATNR) Rejection reason (VBAP-ABGRU) Reference document number (VBAP-VGBEL)
Copyright © 2004 by Klee Associates, Inc. Page 8
www.SAPtips.com
QuickViewer and SAP Query: Creating Standard SAP Reports
Without ABAP Knowledge In addition, you can also define the proposed output format under the “Export as” label. The default and standard output medium is the SAP List Viewer (which is called “ALV”— the “A” stands for the previous name, “ABAP List Viewer”), but you can also select a different format such as a regular ABAP list or an Excel spreadsheet. This is just a default setting and can be changed in the “Output format” section on the selection screen when you execute the report (see Figure 9).
Figure 6: Selecting Fields for Display and Selections
Copyright © 2004 by Klee Associates, Inc. Page 9
www.SAPtips.com
QuickViewer and SAP Query: Creating Standard SAP Reports
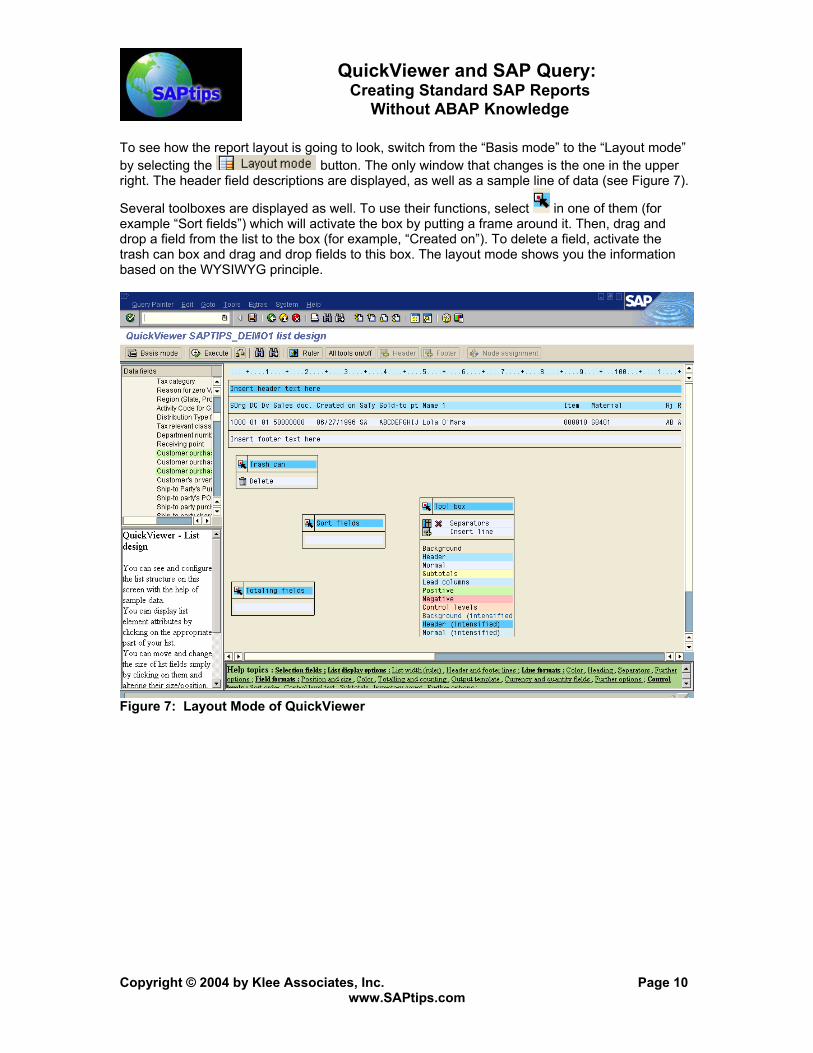
Without ABAP Knowledge To see how the report layout is going to look, switch from the “Basis mode” to the “Layout mode” by selecting the button. The only window that changes is the one in the upper right. The header field descriptions are displayed, as well as a sample line of data (see Figure 7).
Several toolboxes are displayed as well. To use their functions, select in one of them (for example “Sort fields”) which will activate the box by putting a frame around it. Then, drag and drop a field from the list to the box (for example, “Created on”). To delete a field, activate the trash can box and drag and drop fields to this box. The layout mode shows you the information based on the WYSIWYG principle.
Figure 7: Layout Mode of QuickViewer
Copyright © 2004 by Klee Associates, Inc. Page 10
www.SAPtips.com
QuickViewer and SAP Query: Creating Standard SAP Reports
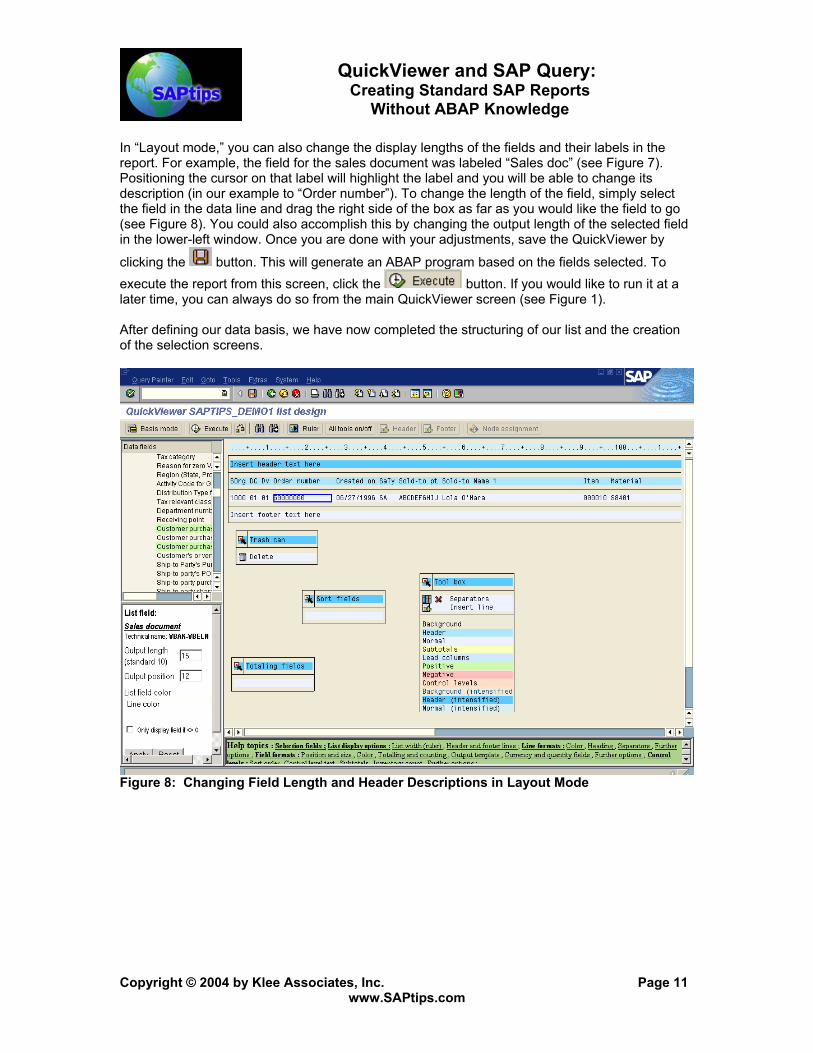
Without ABAP Knowledge In “Layout mode,” you can also change the display lengths of the fields and their labels in the report. For example, the field for the sales document was labeled “Sales doc” (see Figure 7). Positioning the cursor on that label will highlight the label and you will be able to change its description (in our example to “Order number”). To change the length of the field, simply select the field in the data line and drag the right side of the box as far as you would like the field to go (see Figure 8). You could also accomplish this by changing the output length of the selected field in the lower-left window. Once you are done with your adjustments, save the QuickViewer by
clicking the button. This will generate an ABAP program based on the fields selected. To execute the report from this screen, click the button. If you would like to run it at a later time, you can always do so from the main QuickViewer screen (see Figure 1). After defining our data basis, we have now completed the structuring of our list and the creation of the selection screens.
Figure 8: Changing Field Length and Header Descriptions in Layout Mode
Copyright © 2004 by Klee Associates, Inc. Page 11
www.SAPtips.com
QuickViewer and SAP Query: Creating Standard SAP Reports
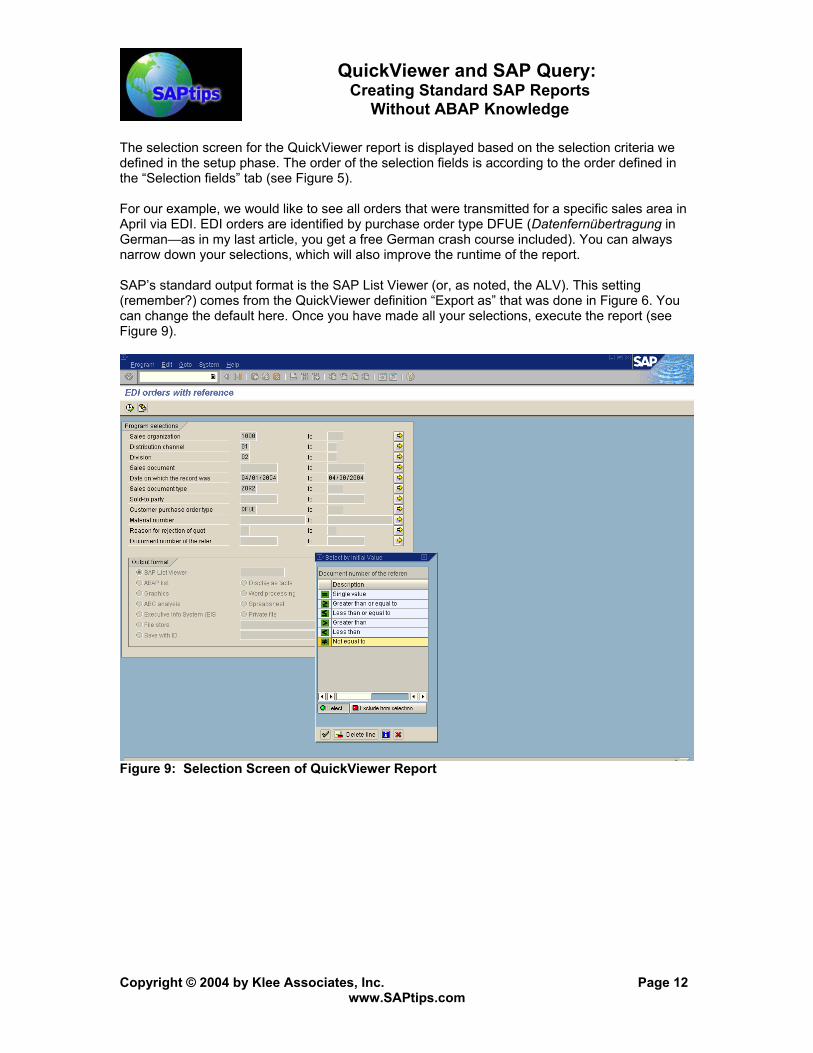
Without ABAP Knowledge The selection screen for the QuickViewer report is displayed based on the selection criteria we defined in the setup phase. The order of the selection fields is according to the order defined in the “Selection fields” tab (see Figure 5). For our example, we would like to see all orders that were transmitted for a specific sales area in April via EDI. EDI orders are identified by purchase order type DFUE (Datenfernübertragung in German—as in my last article, you get a free German crash course included). You can always narrow down your selections, which will also improve the runtime of the report. SAP’s standard output format is the SAP List Viewer (or, as noted, the ALV). This setting (remember?) comes from the QuickViewer definition “Export as” that was done in Figure 6. You can change the default here. Once you have made all your selections, execute the report (see Figure 9).
Figure 9: Selection Screen of QuickViewer Report
Copyright © 2004 by Klee Associates, Inc. Page 12
www.SAPtips.com
QuickViewer and SAP Query: Creating Standard SAP Reports
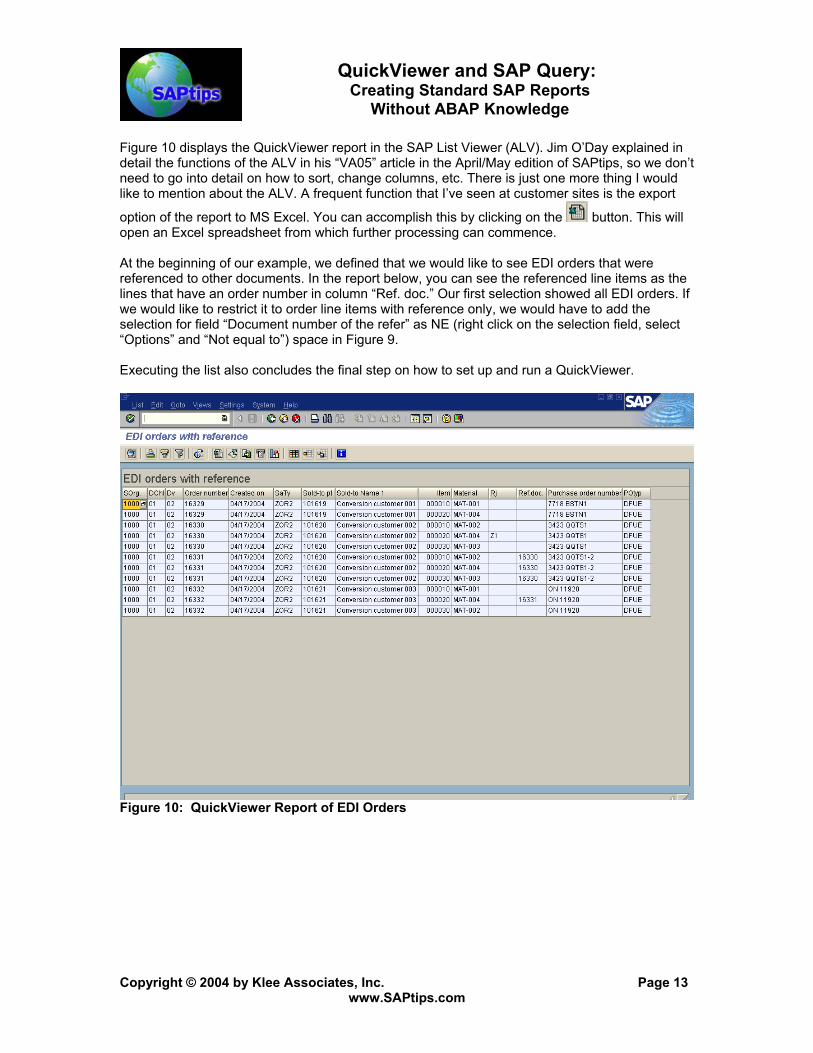
Without ABAP Knowledge Figure 10 displays the QuickViewer report in the SAP List Viewer (ALV). Jim O’Day explained in detail the functions of the ALV in his “VA05” article in the April/May edition of SAPtips, so we don’t need to go into detail on how to sort, change columns, etc. There is just one more thing I would like to mention about the ALV. A frequent function that I’ve seen at customer sites is the export
option of the report to MS Excel. You can accomplish this by clicking on the button. This will open an Excel spreadsheet from which further processing can commence. At the beginning of our example, we defined that we would like to see EDI orders that were referenced to other documents. In the report below, you can see the referenced line items as the lines that have an order number in column “Ref. doc.” Our first selection showed all EDI orders. If we would like to restrict it to order line items with reference only, we would have to add the selection for field “Document number of the refer” as NE (right click on the selection field, select “Options” and “Not equal to”) space in Figure 9. Executing the list also concludes the final step on how to set up and run a QuickViewer.
Figure 10: QuickViewer Report of EDI Orders
Copyright © 2004 by Klee Associates, Inc. Page 13
www.SAPtips.com
QuickViewer and SAP Query: Creating Standard SAP Reports
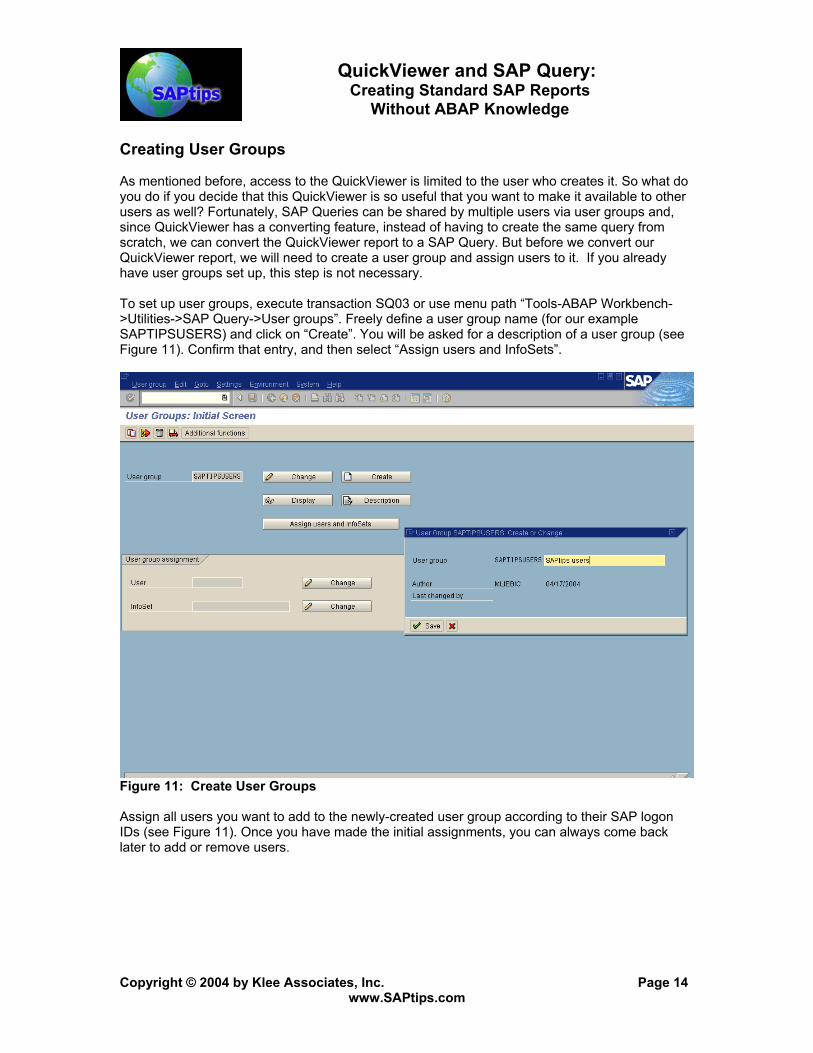
Without ABAP Knowledge Creating User Groups As mentioned before, access to the QuickViewer is limited to the user who creates it. So what do you do if you decide that this QuickViewer is so useful that you want to make it available to other users as well? Fortunately, SAP Queries can be shared by multiple users via user groups and, since QuickViewer has a converting feature, instead of having to create the same query from scratch, we can convert the QuickViewer report to a SAP Query. But before we convert our QuickViewer report, we will need to create a user group and assign users to it. If you already have user groups set up, this step is not necessary. To set up user groups, execute transaction SQ03 or use menu path “Tools-ABAP Workbench->Utilities->SAP Query->User groups”. Freely define a user group name (for our example SAPTIPSUSERS) and click on “Create”. You will be asked for a description of a user group (see Figure 11). Confirm that entry, and then select “Assign users and InfoSets”.
Figure 11: Create User Groups Assign all users you want to add to the newly-created user group according to their SAP logon IDs (see Figure 11). Once you have made the initial assignments, you can always come back later to add or remove users.
Copyright © 2004 by Klee Associates, Inc. Page 14
www.SAPtips.com
QuickViewer and SAP Query: Creating Standard SAP Reports
Without ABAP Knowledge
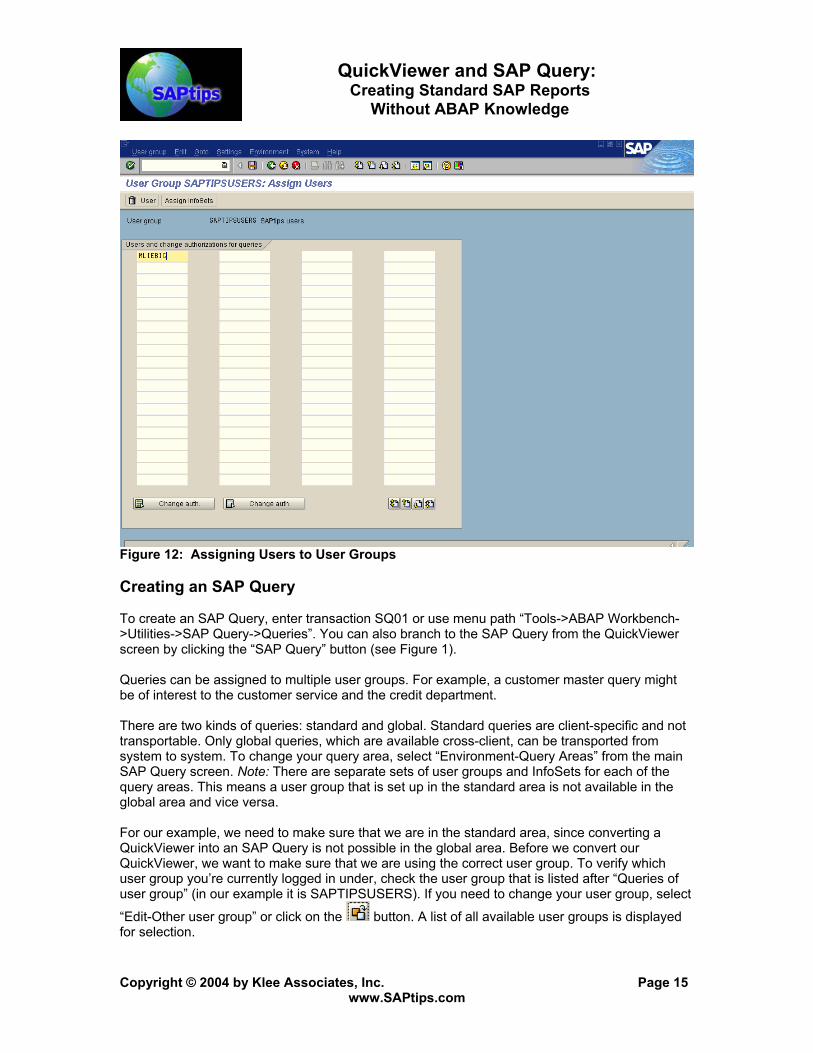
Figure 12: Assigning Users to User Groups Creating an SAP Query To create an SAP Query, enter transaction SQ01 or use menu path “Tools->ABAP Workbench->Utilities->SAP Query->Queries”. You can also branch to the SAP Query from the QuickViewer screen by clicking the “SAP Query” button (see Figure 1). Queries can be assigned to multiple user groups. For example, a customer master query might be of interest to the customer service and the credit department. There are two kinds of queries: standard and global. Standard queries are client-specific and not transportable. Only global queries, which are available cross-client, can be transported from system to system. To change your query area, select “Environment-Query Areas” from the main SAP Query screen. Note: There are separate sets of user groups and InfoSets for each of the query areas. This means a user group that is set up in the standard area is not available in the global area and vice versa. For our example, we need to make sure that we are in the standard area, since converting a QuickViewer into an SAP Query is not possible in the global area. Before we convert our QuickViewer, we want to make sure that we are using the correct user group. To verify which user group you’re currently logged in under, check the user group that is listed after “Queries of user group” (in our example it is SAPTIPSUSERS). If you need to change your user group, select
“Edit-Other user group” or click on the button. A list of all available user groups is displayed for selection. Copyright © 2004 by Klee Associates, Inc. Page 15
www.SAPtips.com
QuickViewer and SAP Query: Creating Standard SAP Reports
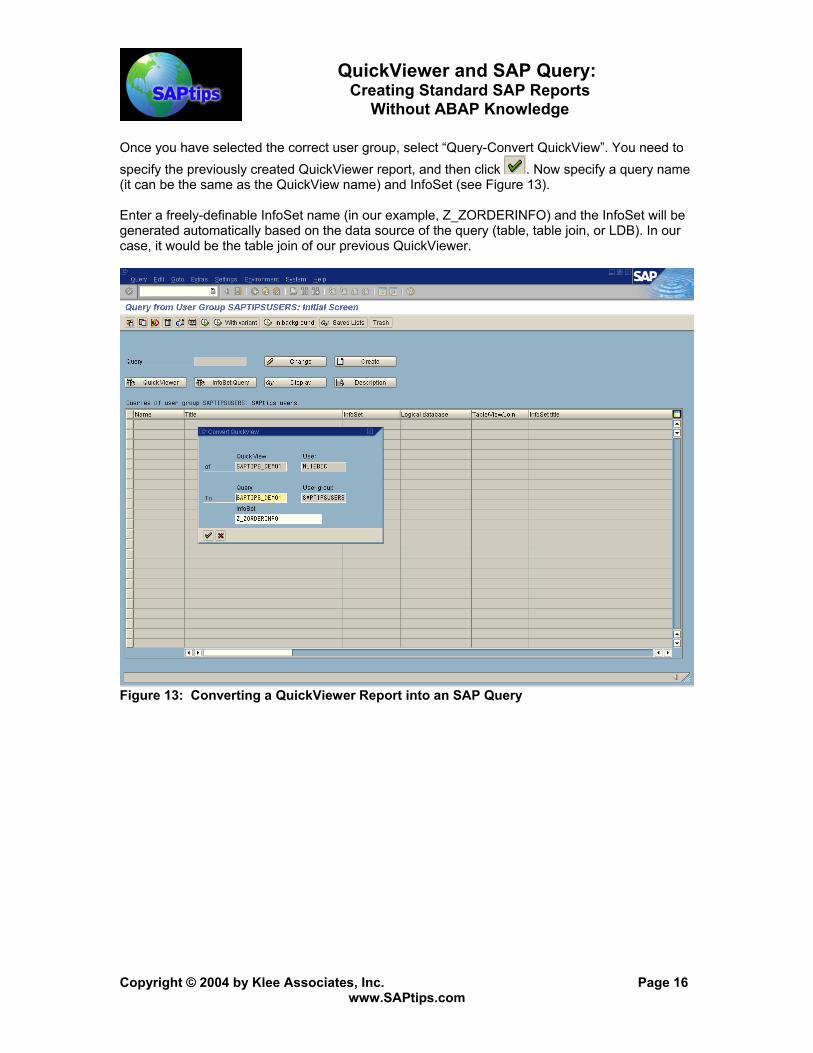
Without ABAP Knowledge Once you have selected the correct user group, select “Query-Convert QuickView”. You need to specify the previously created QuickViewer report, and then click . Now specify a query name (it can be the same as the QuickView name) and InfoSet (see Figure 13). Enter a freely-definable InfoSet name (in our example, Z_ZORDERINFO) and the InfoSet will be generated automatically based on the data source of the query (table, table join, or LDB). In our case, it would be the table join of our previous QuickViewer.
Figure 13: Converting a QuickViewer Report into an SAP Query
Copyright © 2004 by Klee Associates, Inc. Page 16
www.SAPtips.com
QuickViewer and SAP Query: Creating Standard SAP Reports
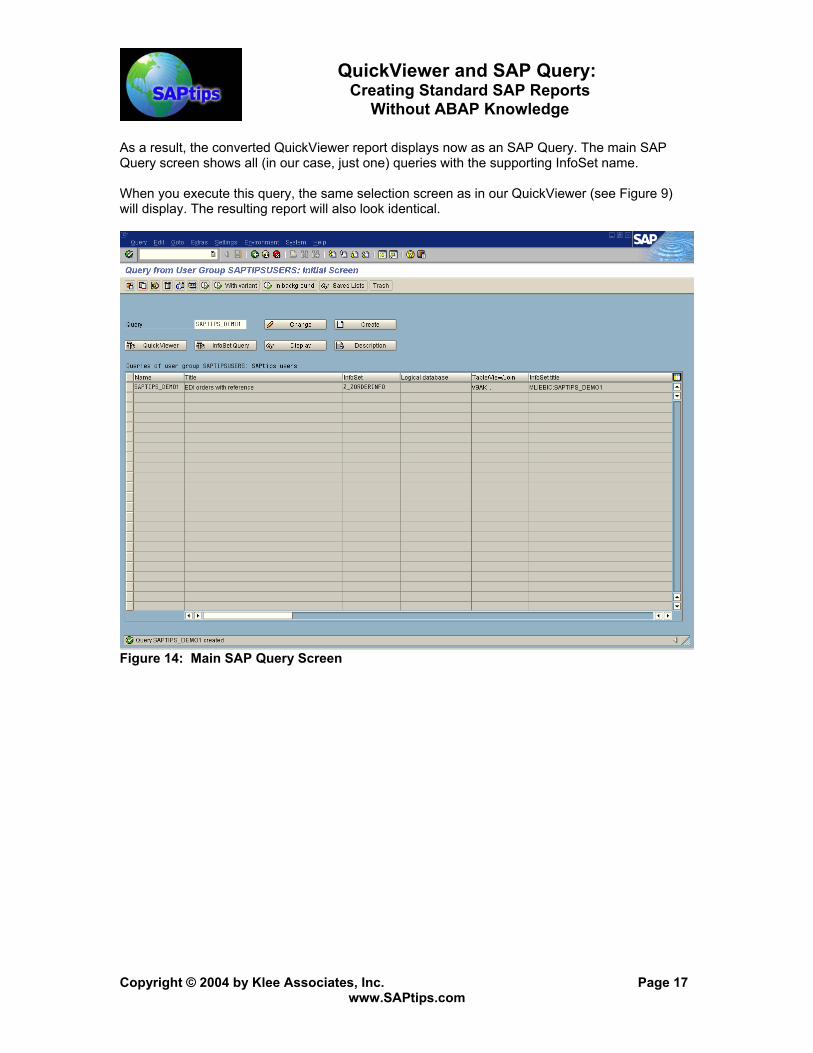
Without ABAP Knowledge As a result, the converted QuickViewer report displays now as an SAP Query. The main SAP Query screen shows all (in our case, just one) queries with the supporting InfoSet name. When you execute this query, the same selection screen as in our QuickViewer (see Figure 9) will display. The resulting report will also look identical.
Figure 14: Main SAP Query Screen
Copyright © 2004 by Klee Associates, Inc. Page 17
www.SAPtips.com
QuickViewer and SAP Query: Creating Standard SAP Reports
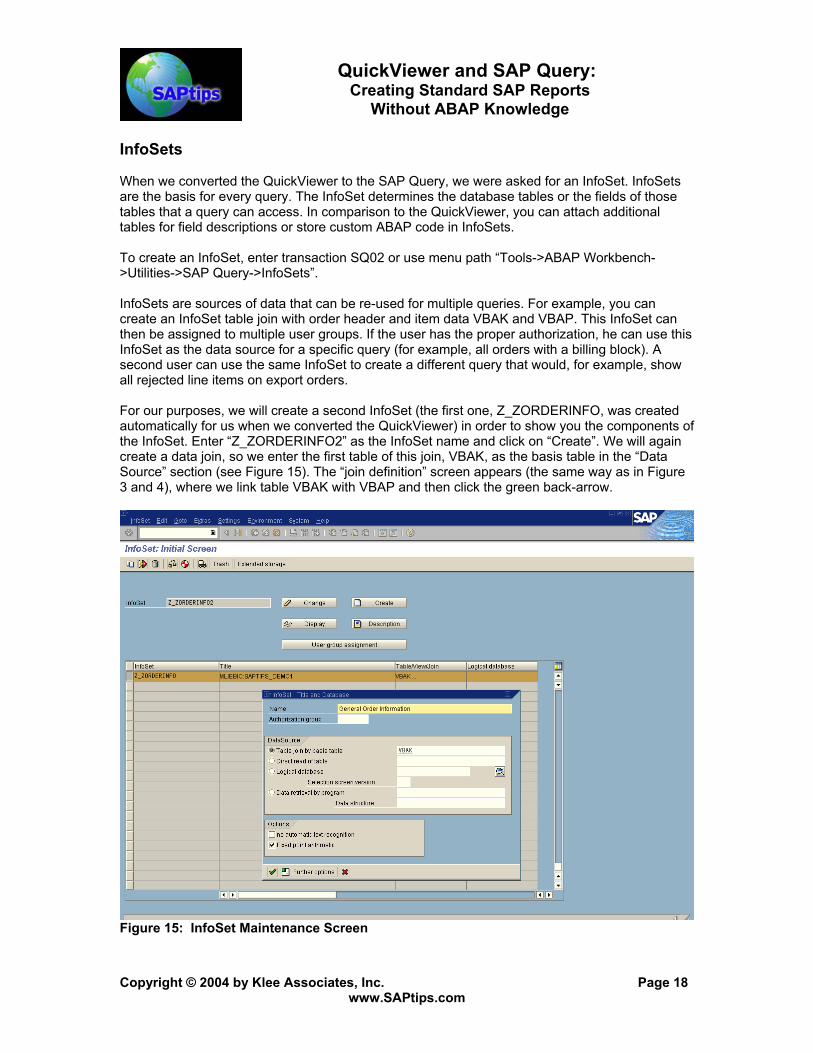
Without ABAP Knowledge InfoSets When we converted the QuickViewer to the SAP Query, we were asked for an InfoSet. InfoSets are the basis for every query. The InfoSet determines the database tables or the fields of those tables that a query can access. In comparison to the QuickViewer, you can attach additional tables for field descriptions or store custom ABAP code in InfoSets. To create an InfoSet, enter transaction SQ02 or use menu path “Tools->ABAP Workbench->Utilities->SAP Query->InfoSets”. InfoSets are sources of data that can be re-used for multiple queries. For example, you can create an InfoSet table join with order header and item data VBAK and VBAP. This InfoSet can then be assigned to multiple user groups. If the user has the proper authorization, he can use this InfoSet as the data source for a specific query (for example, all orders with a billing block). A second user can use the same InfoSet to create a different query that would, for example, show all rejected line items on export orders. For our purposes, we will create a second InfoSet (the first one, Z_ZORDERINFO, was created automatically for us when we converted the QuickViewer) in order to show you the components of the InfoSet. Enter “Z_ZORDERINFO2” as the InfoSet name and click on “Create”. We will again create a data join, so we enter the first table of this join, VBAK, as the basis table in the “Data Source” section (see Figure 15). The “join definition” screen appears (the same way as in Figure 3 and 4), where we link table VBAK with VBAP and then click the green back-arrow.
Figure 15: InfoSet Maintenance Screen
Copyright © 2004 by Klee Associates, Inc. Page 18
www.SAPtips.com
QuickViewer and SAP Query: Creating Standard SAP Reports
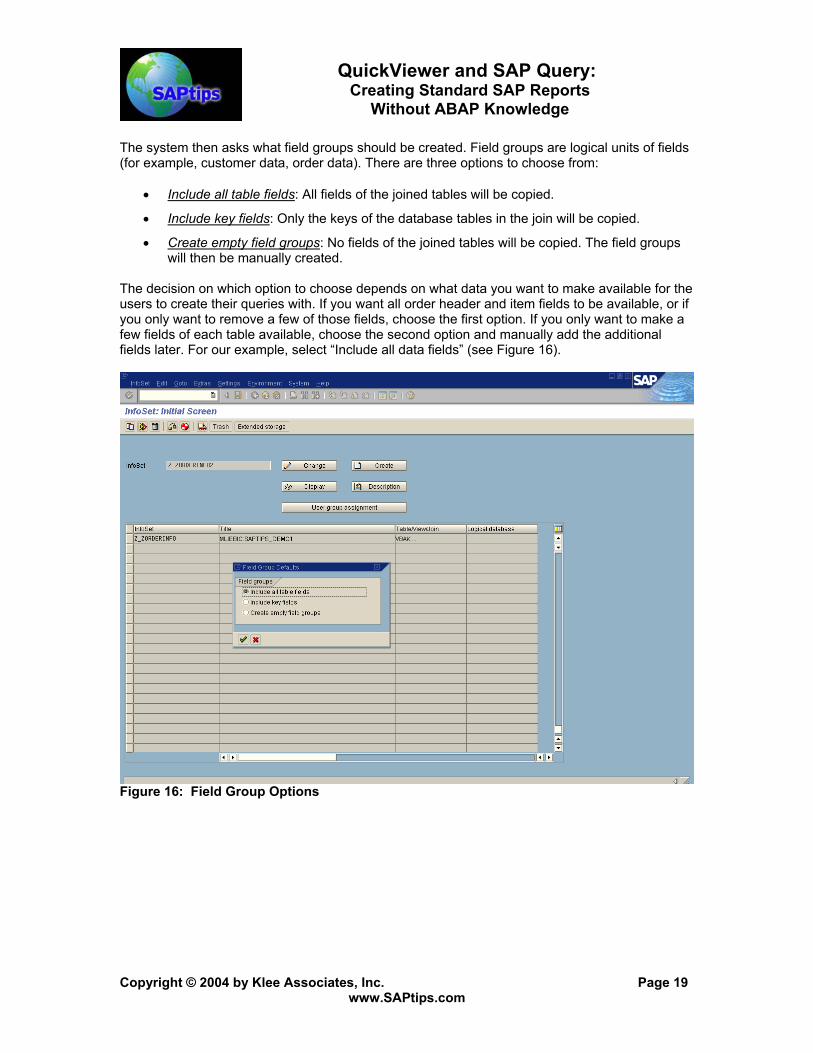
Without ABAP Knowledge The system then asks what field groups should be created. Field groups are logical units of fields (for example, customer data, order data). There are three options to choose from:
• Include all table fields: All fields of the joined tables will be copied.
• Include key fields: Only the keys of the database tables in the join will be copied.
• Create empty field groups: No fields of the joined tables will be copied. The field groups will then be manually created.
The decision on which option to choose depends on what data you want to make available for the users to create their queries with. If you want all order header and item fields to be available, or if you only want to remove a few of those fields, choose the first option. If you only want to make a few fields of each table available, choose the second option and manually add the additional fields later. For our example, select “Include all data fields” (see Figure 16).
Figure 16: Field Group Options
Copyright © 2004 by Klee Associates, Inc. Page 19
www.SAPtips.com
QuickViewer and SAP Query: Creating Standard SAP Reports
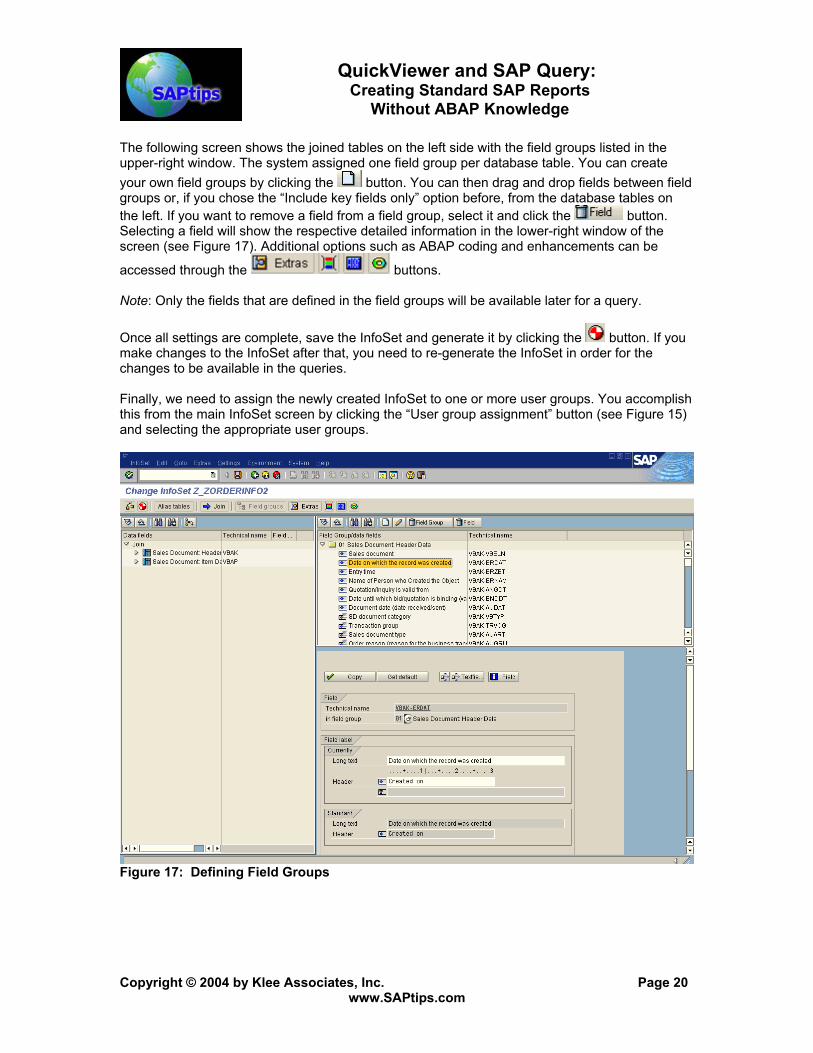
Without ABAP Knowledge The following screen shows the joined tables on the left side with the field groups listed in the upper-right window. The system assigned one field group per database table. You can create your own field groups by clicking the button. You can then drag and drop fields between field groups or, if you chose the “Include key fields only” option before, from the database tables on the left. If you want to remove a field from a field group, select it and click the button. Selecting a field will show the respective detailed information in the lower-right window of the screen (see Figure 17). Additional options such as ABAP coding and enhancements can be
accessed through the buttons. Note: Only the fields that are defined in the field groups will be available later for a query. Once all settings are complete, save the InfoSet and generate it by clicking the button. If you make changes to the InfoSet after that, you need to re-generate the InfoSet in order for the changes to be available in the queries. Finally, we need to assign the newly created InfoSet to one or more user groups. You accomplish this from the main InfoSet screen by clicking the “User group assignment” button (see Figure 15) and selecting the appropriate user groups.
Figure 17: Defining Field Groups
Copyright © 2004 by Klee Associates, Inc. Page 20
www.SAPtips.com
QuickViewer and SAP Query: Creating Standard SAP Reports
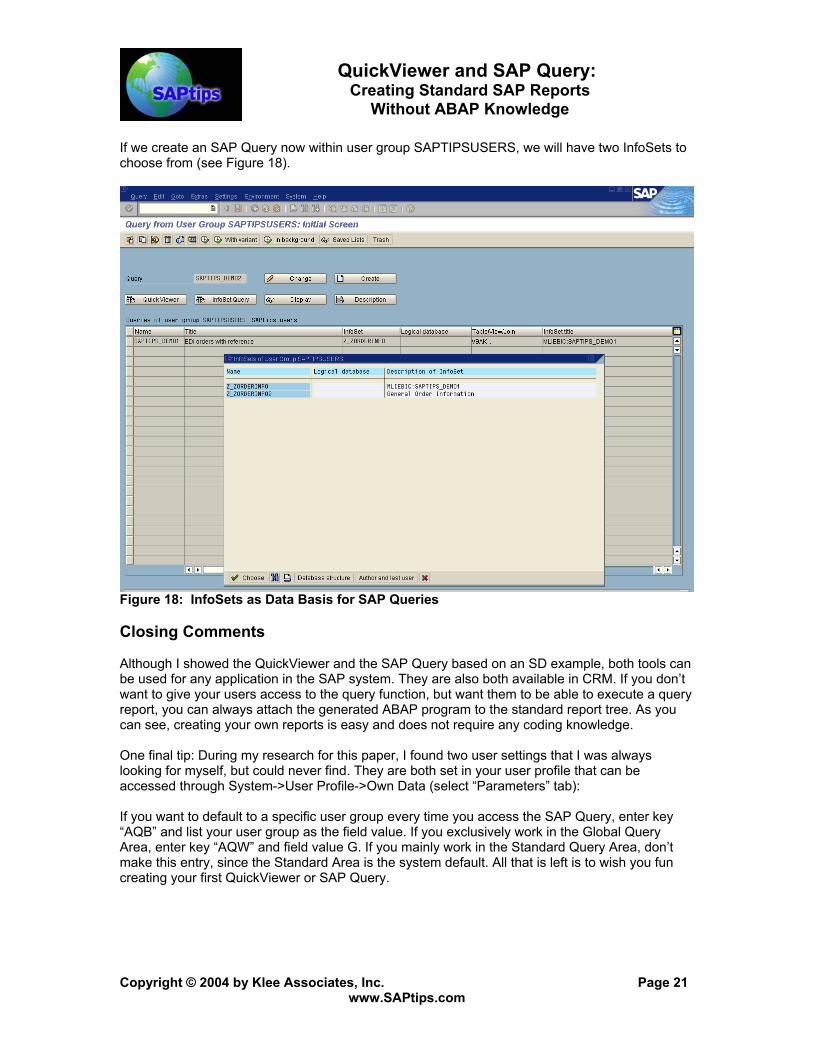
Without ABAP Knowledge If we create an SAP Query now within user group SAPTIPSUSERS, we will have two InfoSets to choose from (see Figure 18).
Figure 18: InfoSets as Data Basis for SAP Queries Closing Comments Although I showed the QuickViewer and the SAP Query based on an SD example, both tools can be used for any application in the SAP system. They are also both available in CRM. If you don’t want to give your users access to the query function, but want them to be able to execute a query report, you can always attach the generated ABAP program to the standard report tree. As you can see, creating your own reports is easy and does not require any coding knowledge. One final tip: During my research for this paper, I found two user settings that I was always looking for myself, but could never find. They are both set in your user profile that can be accessed through System->User Profile->Own Data (select “Parameters” tab): If you want to default to a specific user group every time you access the SAP Query, enter key “AQB” and list your user group as the field value. If you exclusively work in the Global Query Area, enter key “AQW” and field value G. If you mainly work in the Standard Query Area, don’t make this entry, since the Standard Area is the system default. All that is left is to wish you fun creating your first QuickViewer or SAP Query.
Copyright © 2004 by Klee Associates, Inc. Page 21
www.SAPtips.com
Copyright © 2004 by Klee Associates, Inc. Page 22
www.SAPtips.com
QuickViewer and SAP Query: Creating Standard SAP Reports
Without ABAP Knowledge
Matthias Liebich, MLI Solutions, LLC. Matthias has over 12 years of SAP SD consulting experience, acquired during numerous full life cycle implementations in the US and Germany. He is SD certified and has extensive hands-on experience in new implementations, upgrades, mergers, divestitures and bolt-on integration. Beyond the core SD functionality, Matthias is an expert in the areas of Pricing, Contracts, and Rebates. In addition to his cross-module functional knowledge, he is also proficient in ABAP, enabling him to play a leading role as link between functional and technical teams. He can be reached at [email protected]. The information in our publications and on our Website is the copyrighted work of Klee Associates, Inc. and is owned by Klee Associates, Inc. NO WARRANTY: This documentation is delivered as is, and Klee Associates, Inc. makes no warranty as to its accuracy or use. Any use of this documentation is at the risk of the user. Although we make every good faith effort to ensure accuracy, this document may include technical or other inaccuracies or typographical errors. Klee Associates, Inc. reserves the right to make changes without prior notice. NO AFFILIATION: Klee Associates, Inc. and this publication are not affiliated with or endorsed by SAP AG. SAP AG software referenced on this site is furnished under license agreements between SAP AG and its customers and can be used only within the terms of such agreements. SAP AG and mySAP are registered trademarks of SAP AG. All other company and product names used herein may be trademarks or registered trademarks of their respective owners.