Embed Size (px)
Citation preview
Implementation GuideSAP NetWeaver Identity Management Identity Provider
Target Audience ■ Technology Consultants ■ System Administrators
PUBLICDocument version: 1.10 – 2011-07-18
Document History
CAUTION
Before you start the implementation, make sure you have the latest version of this document.
You can find the latest version at the documentation page of either of the two products: SAP
NetWeaver Identity Management (http://www.sdn.sap.com/nw-identitymanagement) or SAP
NetWeaver Single Sign-On (http://www.sdn.sap.com/irj/sdn/nw-identitymanagement?
rid=/webcontent/uuid/70d49577-5863-2e10-20a8-f6cd79adf434).
The following table provides an overview of the most important document changes.
Version Date Description
1.0 2010-06-09 Initial release.
1.05 2010-12-06 Added optional configuration for adding authentication contexts and mapping to login modules. Added configuration of metadata and metadata access. Moved conceptual description of identity provider proxy to first chapter. Added configuration deletion function. Updated system requirements. Updated description of SCA download.
1.10 2011-07-18 Updated the description of using common domain cookie for identity provider discovery. Updated system requirements. Updated description of SCA download.
2/70 PUBLIC 2011-07-18
Table of Contents
Chapter 1 What is SAML 2.0 . . . . . . . . . . . . . . . . . . . . . . . . . . . . . . . . . . . . . . . . . . . . . . . 5
1.1 SSO with SAML 2.0 . . . . . . . . . . . . . . . . . . . . . . . . . . . . . . . . . . . . . . . . . . . . . . . 5
1.2 SLO with SAML 2.0 . . . . . . . . . . . . . . . . . . . . . . . . . . . . . . . . . . . . . . . . . . . . . . . 7
1.3 Identity Federation . . . . . . . . . . . . . . . . . . . . . . . . . . . . . . . . . . . . . . . . . . . . . . . 9
1.4 Common Domain and Identity Provider Discovery . . . . . . . . . . . . . . . . . . . . . 12
1.5 Identity Provider Proxy . . . . . . . . . . . . . . . . . . . . . . . . . . . . . . . . . . . . . . . . . . . 14
Chapter 2 Before Starting . . . . . . . . . . . . . . . . . . . . . . . . . . . . . . . . . . . . . . . . . . . . . . . . 21
2.1 System Requirements . . . . . . . . . . . . . . . . . . . . . . . . . . . . . . . . . . . . . . . . . . . 21
2.2 Authorizations . . . . . . . . . . . . . . . . . . . . . . . . . . . . . . . . . . . . . . . . . . . . . . . . . 21
2.3 Limitations of the Identity Provider . . . . . . . . . . . . . . . . . . . . . . . . . . . . . . . . . 22
Chapter 3 Adding an Identity Provider to Your Network . . . . . . . . . . . . . . . . . . . . . 25
3.1 Downloading and Installing the Federation Software . . . . . . . . . . . . . . . . . . . 25
3.2 Configuring the Identity Provider . . . . . . . . . . . . . . . . . . . . . . . . . . . . . . . . . . 25
3.3 Enabling the SAML Identity Provider . . . . . . . . . . . . . . . . . . . . . . . . . . . . . . . . 26
3.4 Configuring Back-Channel Communication . . . . . . . . . . . . . . . . . . . . . . . . . . 28
3.5 Configuring Front-Channel Communication . . . . . . . . . . . . . . . . . . . . . . . . . 31
3.6 Configuring Support for Enhanced Client or Proxy . . . . . . . . . . . . . . . . . . . . . 34
3.7 Trusting Service Providers . . . . . . . . . . . . . . . . . . . . . . . . . . . . . . . . . . . . . . . . 34
3.7.1 Adding Service Providers . . . . . . . . . . . . . . . . . . . . . . . . . . . . . . . . . . . . . . . . . 35
3.7.2 Updating the Configuration of Trusted Providers . . . . . . . . . . . . . . . . . . . . . . 37
3.7.3 Selecting the Keystore View for SSL for the Identity Provider . . . . . . . . . . . . . 39
3.7.4 Configuring Out-of-Band Account Linking . . . . . . . . . . . . . . . . . . . . . . . . . . . 39
3.7.5 Configuring Identity Federation with Transient Users . . . . . . . . . . . . . . . . . . . 41
3.7.6 Configuring Identity Federation with Persistent Pseudonyms . . . . . . . . . . . . . 42
3.7.7 Trust When the Host is Service Provider and Identity Provider . . . . . . . . . . . . 44
3.7.8 Adding Custom User Attributes for SAML . . . . . . . . . . . . . . . . . . . . . . . . . . . . 44
Chapter 4 Optional Configurations . . . . . . . . . . . . . . . . . . . . . . . . . . . . . . . . . . . . . . . 47
4.1 Securing SAML Bindings . . . . . . . . . . . . . . . . . . . . . . . . . . . . . . . . . . . . . . . . . 47
4.2 Enabling HTTP Access to SAML Endpoints . . . . . . . . . . . . . . . . . . . . . . . . . . . 49
2011-07-18 PUBLIC 3/70
4.3 Configuring the Metadata and Metadata Access . . . . . . . . . . . . . . . . . . . . . . . . 50
4.4 Configuring the Identity Provider for Discovery With CDCs . . . . . . . . . . . . . . 50
4.5 Including Legacy Systems in Your SAML 2.0 Landscape . . . . . . . . . . . . . . . . . . 52
4.6 Enabling Service Providers to Share Persistent Name IDs . . . . . . . . . . . . . . . . . 52
4.7 Configuring the Validity Period for SAML Messages . . . . . . . . . . . . . . . . . . . . 53
4.8 Configuring the Lifetime of Identity Provider Sessions . . . . . . . . . . . . . . . . . . . 54
4.9 Setting the Timeout for Database Lock in Clusters . . . . . . . . . . . . . . . . . . . . . 55
4.10 Configuring Identity Providers as Proxies . . . . . . . . . . . . . . . . . . . . . . . . . . . . . 55
4.11 Disabling IdP-Initiated and SP-Initiated SSO and SLO . . . . . . . . . . . . . . . . . . . . 56
4.12 Adding Custom Authentication Contexts . . . . . . . . . . . . . . . . . . . . . . . . . . . . 57
4.13 Mapping Authentication Contexts to Login Modules . . . . . . . . . . . . . . . . . . . 57
4.14 Determining the Channel Used for SLO by the Identity Provider . . . . . . . . . . 58
4.15 Disabling the SAML 2.0 Provider . . . . . . . . . . . . . . . . . . . . . . . . . . . . . . . . . . . . 59
Chapter 5 Operations and Monitoring . . . . . . . . . . . . . . . . . . . . . . . . . . . . . . . . . . . . . 61
5.1 Managing Name IDs . . . . . . . . . . . . . . . . . . . . . . . . . . . . . . . . . . . . . . . . . . . . . 61
5.2 Monitoring Identity Provider Sessions . . . . . . . . . . . . . . . . . . . . . . . . . . . . . . . 62
5.3 Auditing and Performance Monitoring . . . . . . . . . . . . . . . . . . . . . . . . . . . . . . 63
5.4 Troubleshooting on the Identity Provider . . . . . . . . . . . . . . . . . . . . . . . . . . . . 63
5.5 Performing Identity Provider-Initiated Single Sign-On . . . . . . . . . . . . . . . . . . . 63
5.6 Performing Identity Provider-Initiated Single Log-Out . . . . . . . . . . . . . . . . . . 65
5.7 Accessing the Metadata XML of SAML Identity Providers . . . . . . . . . . . . . . . . 66
4/70 PUBLIC 2011-07-18
1 What is SAML 2.0
The Security Assertion Markup Language (SAML) version 2.0 is a standard for the communication of
assertions about principals, typically users. The assertion can include the means by which a subject was
authenticated, attributes associated with the subject, and an authorization decision for a given resource.
The main benefits of SAML 2.0 are as follows:
■ SSO with SAML 2.0
SAML provides a standard for cross-domain Single Sign-On (SSO). Other methods exist for enabling
cross-domain SSO, but they require proprietary solutions to pass authentication information
across domains. SAML 2.0 supports identity-provider-initiated SSO as in SAML 1.x. SAML 2.0 also
supports service-provider-initiated SSO.
■ SLO with SAML 2.0
Single Log-Out (SLO) enables users to cleanly close all their sessions in a SAML landscape, even
across domains. Not only does this save system resources that would otherwise remain reserved
until the sessions time out, but SLO also mitigates the risk of the hijacking of unattended sessions.
■ Identity federation
Identity federation provides the means to share identity information between partners. To share
information about a user, partners must be able to identify the user, even though they may use
different identifiers for the same user. The SAML 2.0 standard defines the name identifier (name
ID) as the means to establish a common identifier. Once the name ID has been established, the user
is said to have a federated identity.
The two main components of a SAML 2.0 landscape are an identity provider and a service provider.
The service provider is a system entity that provide a set of Web applications with a common session
management, identity management, and trust management. The identity provider is a system entity
that manages identity information for principals and provides authentication services to other trusted
service providers. In other words, the service providers outsource the job of authenticating the user to
the identity provider. The identity provider maintains the list of service providers where the user is
logged in and passes on logout requests to those service providers.
The client that is trying to access the resource must be HTTP-compliant.
1.1 SSO with SAML 2.0
SAML provides a standard for cross-domain Single Sign-On (SSO). Other methods exist for enabling
cross-domain SSO, but they require proprietary solutions to pass authentication information across
1 What is SAML 2.0
1.1 SSO with SAML 2.0
2011-07-18 PUBLIC 5/70
domains. SAML 2.0 supports identity-provider-initiated SSO as in SAML 1.x. SAML 2.0 also supports
service-provider-initiated SSO.
When the identity provider initiates SSO, you must maintain links on the identity provider system to
the protected resources on the service providers. When you protect resources with SAML on a service
provider, the service provider is configured to request authentication from the identity provider.
Features
SAML provides options to pass SAML messages back and forth between the identity provider and the
service provider.
■ Front channel
SAML messages are passed back and forth over the user agent with HTTP redirect or HTTP POST
methods.
■ Back channel
Only SAML artifacts are exchanged over the user agent by the identity provider and service provider.
When a provider receives an artifact, it queries the other provider directly over SOAP.
Back-channel communication provides additional security, by ensuring that potential eavesdroppers
of the user agent only access the SAML artifacts. However, back-channel communication requires
additional round trips to resolve an authentication request. You can protect front-channel
communication with encryption and digital signatures. You can mix the communication options.
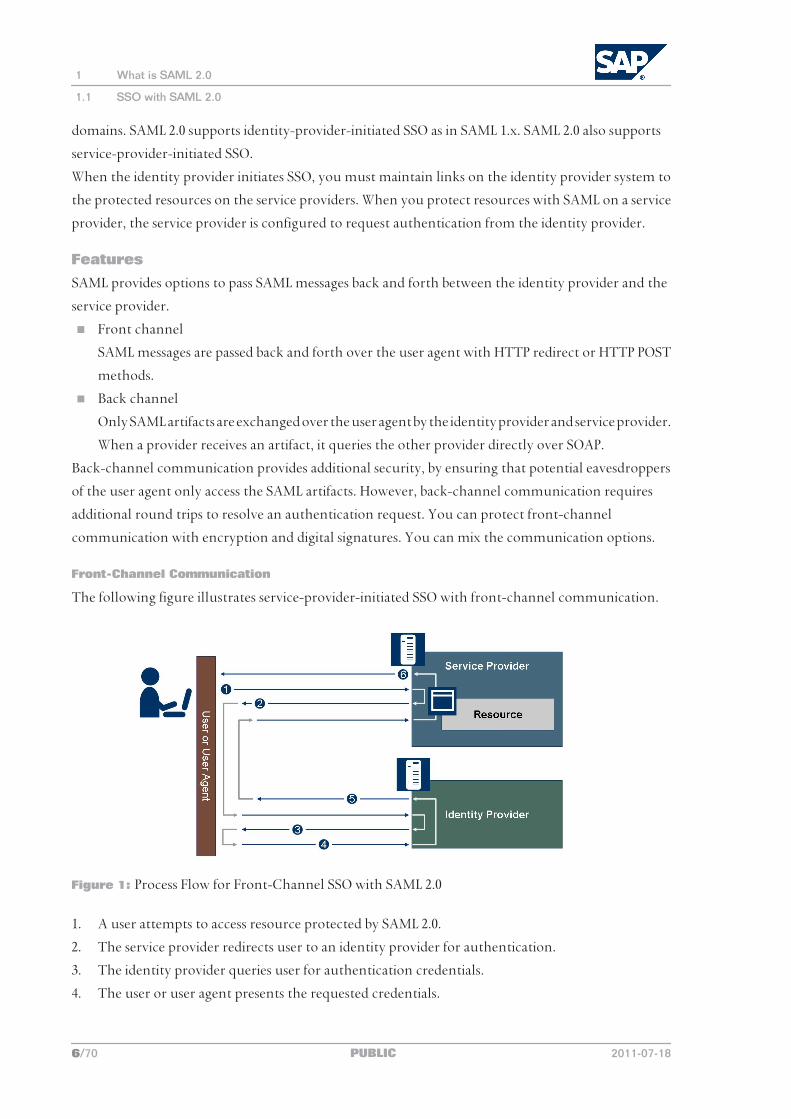
Front-Channel Communication
The following figure illustrates service-provider-initiated SSO with front-channel communication.
Figure 1: Process Flow for Front-Channel SSO with SAML 2.0
1. A user attempts to access resource protected by SAML 2.0.
2. The service provider redirects user to an identity provider for authentication.
3. The identity provider queries user for authentication credentials.
4. The user or user agent presents the requested credentials.
1 What is SAML 2.0
1.1 SSO with SAML 2.0
6/70 PUBLIC 2011-07-18
5. The identity provider returns the user to the service provider with an authentication response.
6. The service provider presents the requested resource to the user.
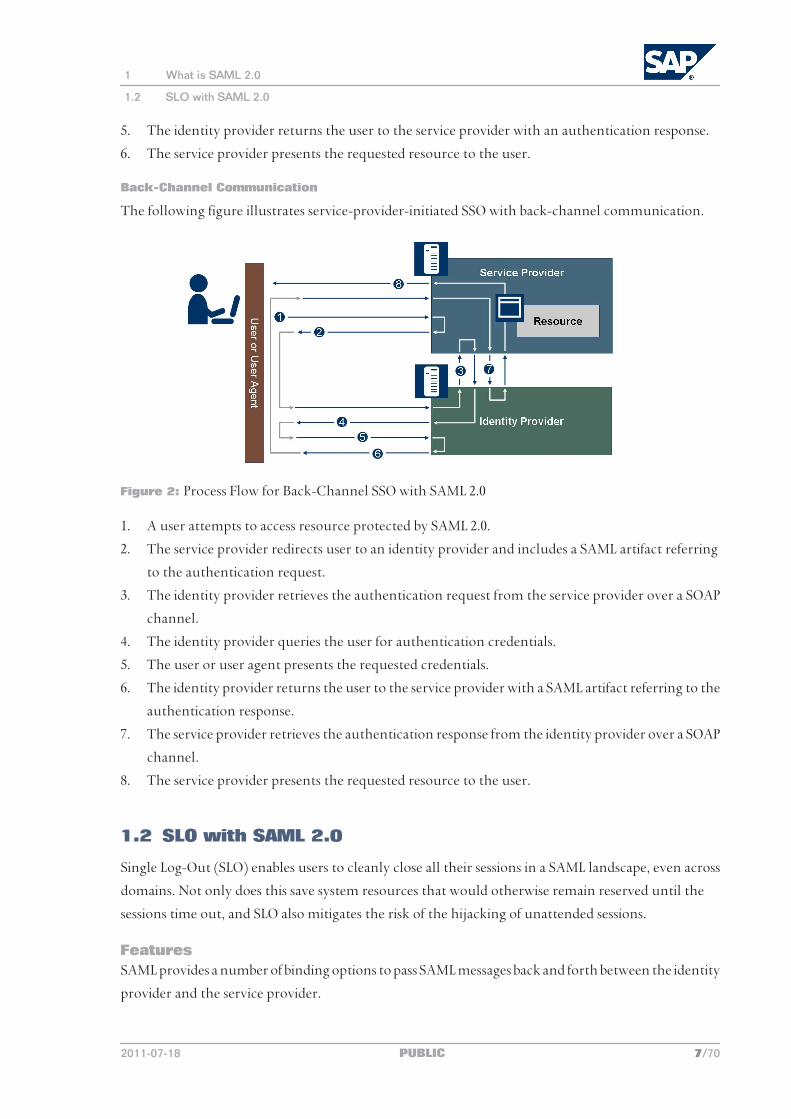
Back-Channel Communication
The following figure illustrates service-provider-initiated SSO with back-channel communication.
Figure 2: Process Flow for Back-Channel SSO with SAML 2.0
1. A user attempts to access resource protected by SAML 2.0.
2. The service provider redirects user to an identity provider and includes a SAML artifact referring
to the authentication request.
3. The identity provider retrieves the authentication request from the service provider over a SOAP
channel.
4. The identity provider queries the user for authentication credentials.
5. The user or user agent presents the requested credentials.
6. The identity provider returns the user to the service provider with a SAML artifact referring to the
authentication response.
7. The service provider retrieves the authentication response from the identity provider over a SOAP
channel.
8. The service provider presents the requested resource to the user.
1.2 SLO with SAML 2.0
Single Log-Out (SLO) enables users to cleanly close all their sessions in a SAML landscape, even across
domains. Not only does this save system resources that would otherwise remain reserved until the
sessions time out, and SLO also mitigates the risk of the hijacking of unattended sessions.
FeaturesSAML provides a number of binding options to pass SAML messages back and forth between the identity
provider and the service provider.
1 What is SAML 2.0
1.2 SLO with SAML 2.0
2011-07-18 PUBLIC 7/70
■ Front channel
For front-channel communication, SAML messages are passed back and forth over the user agent
with HTTP redirect or HTTP POST methods.
■ Back channel
For back-channel communication, the identity provider and service provider can use either SAML
artifacts or communicate directly over SOAP. For SAML artifacts, the identity provider and service
provider exchange SAML artifacts over the user agent. When a provider receives an artifact, it
queries the other provider directly over SOAP to resolve the artifact. For the SOAP binding, the
providers pass no artifacts. They exchange SAML messages directly over SOAP.
Back-channel communication provides additional security, by ensuring that potential eavesdroppers
of the user agent cannot access the SAML messages. However, the artifact binding requires additional
round trips to resolve an authentication request. You can protect front-channel communication with
encryption and digital signatures. You can mix the communication options.
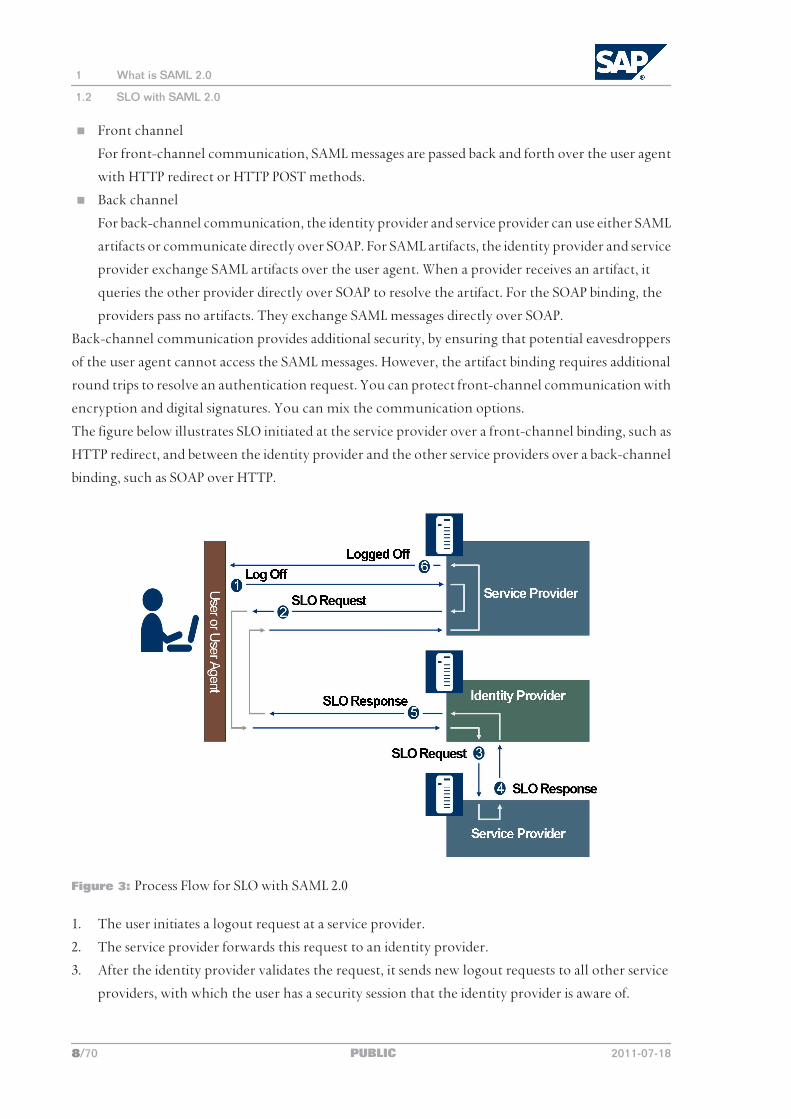
The figure below illustrates SLO initiated at the service provider over a front-channel binding, such as
HTTP redirect, and between the identity provider and the other service providers over a back-channel
binding, such as SOAP over HTTP.
Figure 3: Process Flow for SLO with SAML 2.0
1. The user initiates a logout request at a service provider.
2. The service provider forwards this request to an identity provider.
3. After the identity provider validates the request, it sends new logout requests to all other service
providers, with which the user has a security session that the identity provider is aware of.
1 What is SAML 2.0
1.2 SLO with SAML 2.0
8/70 PUBLIC 2011-07-18
4. The service providers validate the request, destroy any session information for the user, and send
a logout response to the identity provider.
5. The identity provider destroys the user's sessions and sends a response to the original service
provider.
6. The original service provider informs the user that he or she has been logged out.
1.3 Identity Federation
Identity federation provides the means to share identity information between partners. To share
information about a user, partners must be able to identify the user, even though they may use different
identifiers for the same user. The SAML 2.0 standard defines the name identifier (name ID) as the means
to establish a common identifier. Once the name ID has been established, the user is said to have a
federated identity.
The SAML 2.0 standard defines a number of name ID formats. The table below describes the name ID
formats.
Name ID Formats
Name ID Format Description
E-mail The name ID is an e-mail address.
Kerberos The name ID is a Kerberos Principal Name (KPN).
Persistent The name ID is a permanent opaque string generated by the identity provider for a service provider or an affiliation of service providers.
Transient The name ID is a temporary opaque string generated by the identity provider for a service provider for the lifetime of a security session.
Unspecified The implementation of this name ID is vendor-specific. SAP assumes this value to be either a user ID, a logon alias, or other attribute value of the user.
Windows Name The name ID is a user ID qualified by a Windows domain.
X.509 Subject Name The name ID is the subject name of an X.509 certificate.
Types of Federation
SAML describes the following types of federation:
■ Out-of-band account linking
■ Transient pseudonym identifiers
■ Persistent pseudonym identifiers
Out-of-Band Account Linking
The identities of a user in system A and system B are identified and agreed upon ahead of time between
the administrators of the two systems. This kind of agreement is supported by SAML 1.x, too. The
administrator of the identity provider and the service provider agree how the name ID used for the
user in the identity provider maps to the user in the service provider.
1 What is SAML 2.0
1.3 Identity Federation
2011-07-18 PUBLIC 9/70
EXAMPLE
Users in the identity provider always log on with their e-mail address. The logon ID and e-mail
address are identical. The administrator of the identity provider agrees to provide the
Unspecified name ID format including the logon ID. After a user successfully logs on to the
identity provider, whether by Kerberos name or client certificate or whatever, the identity provider
provides the logon ID of the user to the service provider in the SAML assertion. The service provider
is also configured to use the Unspecified name ID format and is configured to use the user
attribute for the e-mail address. The service provider searches for the user with an e-mail address
that matches. So long as the e-mail address in the service provider is unique, the service provider
can log the user on.
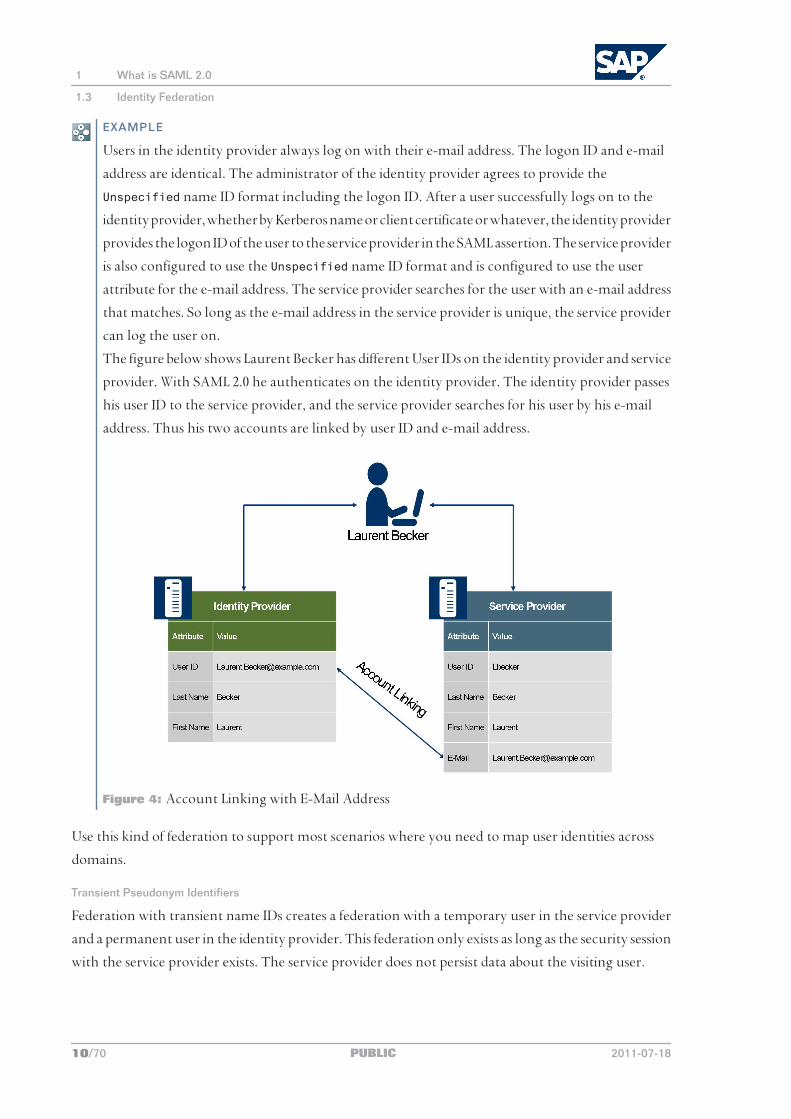
The figure below shows Laurent Becker has different User IDs on the identity provider and service
provider. With SAML 2.0 he authenticates on the identity provider. The identity provider passes
his user ID to the service provider, and the service provider searches for his user by his e-mail
address. Thus his two accounts are linked by user ID and e-mail address.
Figure 4: Account Linking with E-Mail Address
Use this kind of federation to support most scenarios where you need to map user identities across
domains.
Transient Pseudonym Identifiers
Federation with transient name IDs creates a federation with a temporary user in the service provider
and a permanent user in the identity provider. This federation only exists as long as the security session
with the service provider exists. The service provider does not persist data about the visiting user.
1 What is SAML 2.0
1.3 Identity Federation
10/70 PUBLIC 2011-07-18
User attributes and access rights are generated based on rules applied to attributes sent in SAML
messages.
Use this kind of federation when the service provider does not need to record information about users
or does not need local user accounts.
Persistent Pseudonym Identifiers
Federation with persistent name IDs establishes a permanent relationship between a user on an identity
provider and a user on a service provider or users on an affiliation of service providers. The persistent
name ID is used by an identity provider and a service provider as a common name for a single user. If
this name ID for a user is the same for multiple service providers, the service providers are said to be
affiliated or belong to an affiliation group.
Use this kind of federation to link accounts out-of-band, but without using identifiers that can be traced
back to a specific user. This increases the security of your systems by preventing eavesdroppers from
determining identities on the basis of name ID formats that pass logon IDs or e-mail addresses. It requires
you to establish the pseudonym on both providers ahead of time.
Federation with persistent name IDs also offers the following additional options:
■ Interactive federation
Federation is established on the fly. You can enable users to interactively establish federation
between existing accounts or even create their own account on the target system with self-
registration.
Use this kind of federation if you have not created persistent pseudonyms on the identity provider
and service provider ahead of time. It enables you to configure these mappings as you go.
■ Automatic creation
Federation is established on the basis of attributes passed to the target system. If the user has no
account in the target system, the service provider automatically creates the account. The attributes
are generated from rules based on SAML 2 attributes sent in SAML messages.
Use this kind of federation to create and even provision users as you federate their accounts on the
service provider.
EXAMPLE
The figure below illustrates the accounts of Laurent Becker each have an attribute for a persistent
name ID, named opaque ID. The value to use here can be agreed upon in advance by the two
system administrators or generated by the identity provider and distributed to the service provider.
When Laurent Becker authenticates on the identity provider, the service provider receives the
SAML assertion with the opaque ID as the subject. The service provider searches for the user based
on the opaque ID and logs the user on.
1 What is SAML 2.0
1.3 Identity Federation
2011-07-18 PUBLIC 11/70
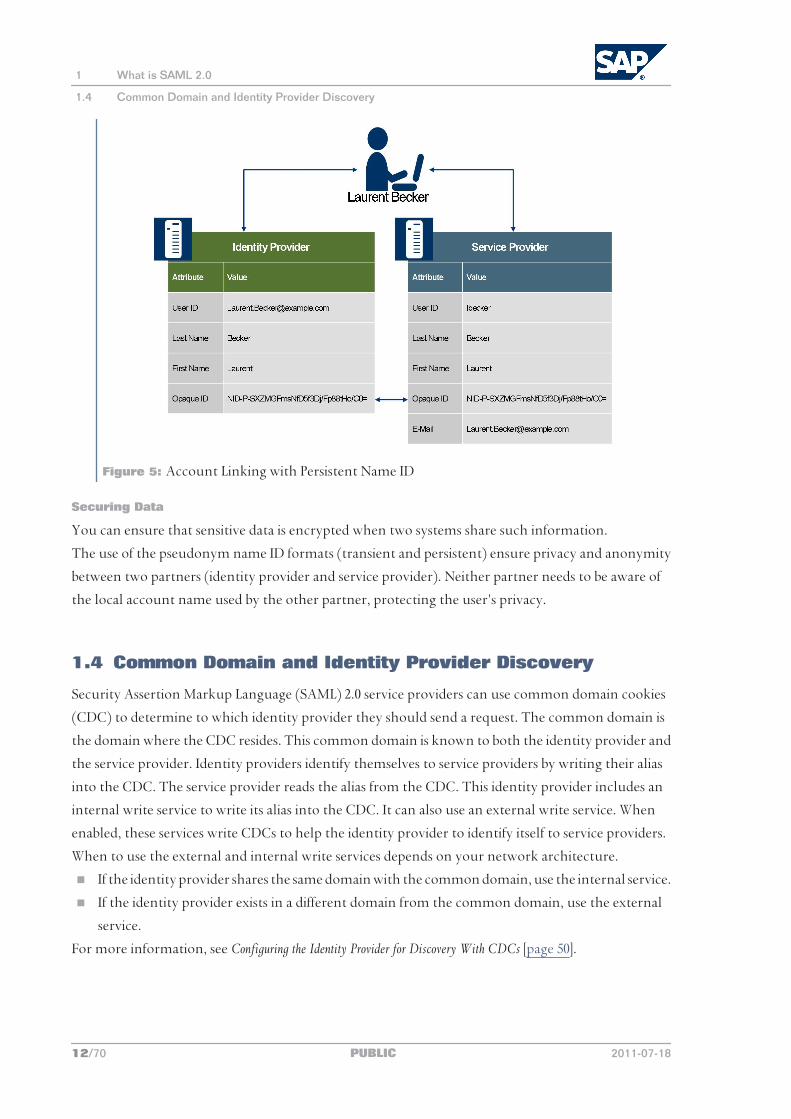
Figure 5: Account Linking with Persistent Name ID
Securing Data
You can ensure that sensitive data is encrypted when two systems share such information.
The use of the pseudonym name ID formats (transient and persistent) ensure privacy and anonymity
between two partners (identity provider and service provider). Neither partner needs to be aware of
the local account name used by the other partner, protecting the user's privacy.
1.4 Common Domain and Identity Provider Discovery
Security Assertion Markup Language (SAML) 2.0 service providers can use common domain cookies
(CDC) to determine to which identity provider they should send a request. The common domain is
the domain where the CDC resides. This common domain is known to both the identity provider and
the service provider. Identity providers identify themselves to service providers by writing their alias
into the CDC. The service provider reads the alias from the CDC. This identity provider includes an
internal write service to write its alias into the CDC. It can also use an external write service. When
enabled, these services write CDCs to help the identity provider to identify itself to service providers.
When to use the external and internal write services depends on your network architecture.
■ If the identity provider shares the same domain with the common domain, use the internal service.
■ If the identity provider exists in a different domain from the common domain, use the external
service.
For more information, see Configuring the Identity Provider for Discovery With CDCs [page 50].
1 What is SAML 2.0
1.4 Common Domain and Identity Provider Discovery
12/70 PUBLIC 2011-07-18
Example
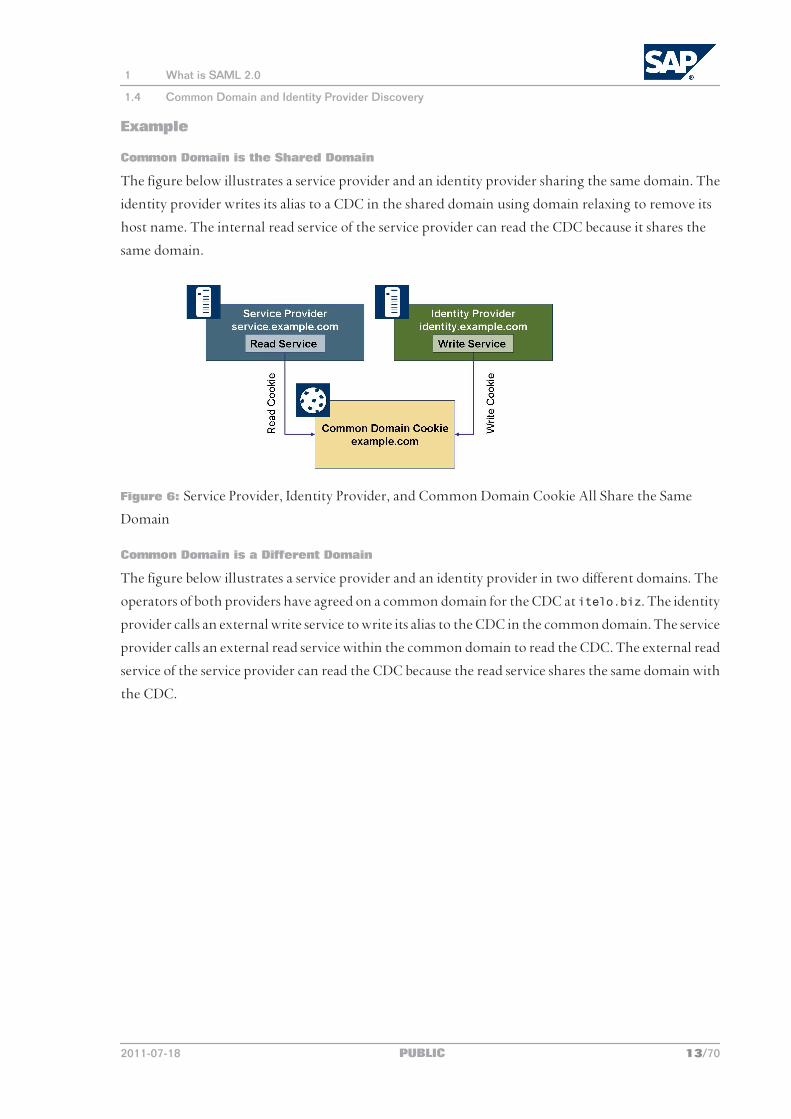
Common Domain is the Shared Domain
The figure below illustrates a service provider and an identity provider sharing the same domain. The
identity provider writes its alias to a CDC in the shared domain using domain relaxing to remove its
host name. The internal read service of the service provider can read the CDC because it shares the
same domain.
Figure 6: Service Provider, Identity Provider, and Common Domain Cookie All Share the Same
Domain
Common Domain is a Different Domain
The figure below illustrates a service provider and an identity provider in two different domains. The
operators of both providers have agreed on a common domain for the CDC at itelo.biz. The identity
provider calls an external write service to write its alias to the CDC in the common domain. The service
provider calls an external read service within the common domain to read the CDC. The external read
service of the service provider can read the CDC because the read service shares the same domain with
the CDC.
1 What is SAML 2.0
1.4 Common Domain and Identity Provider Discovery
2011-07-18 PUBLIC 13/70
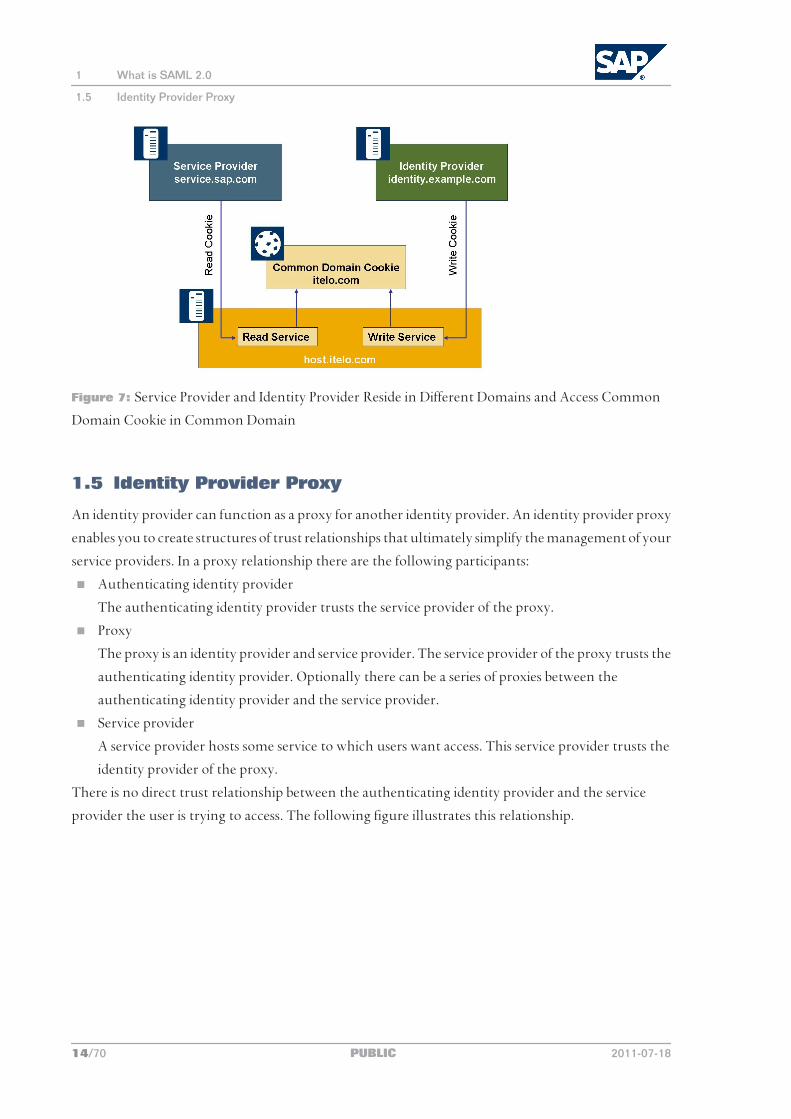
Figure 7: Service Provider and Identity Provider Reside in Different Domains and Access Common
Domain Cookie in Common Domain
1.5 Identity Provider Proxy
An identity provider can function as a proxy for another identity provider. An identity provider proxy
enables you to create structures of trust relationships that ultimately simplify the management of your
service providers. In a proxy relationship there are the following participants:
■ Authenticating identity provider
The authenticating identity provider trusts the service provider of the proxy.
■ Proxy
The proxy is an identity provider and service provider. The service provider of the proxy trusts the
authenticating identity provider. Optionally there can be a series of proxies between the
authenticating identity provider and the service provider.
■ Service provider
A service provider hosts some service to which users want access. This service provider trusts the
identity provider of the proxy.
There is no direct trust relationship between the authenticating identity provider and the service
provider the user is trying to access. The following figure illustrates this relationship.
1 What is SAML 2.0
1.5 Identity Provider Proxy
14/70 PUBLIC 2011-07-18
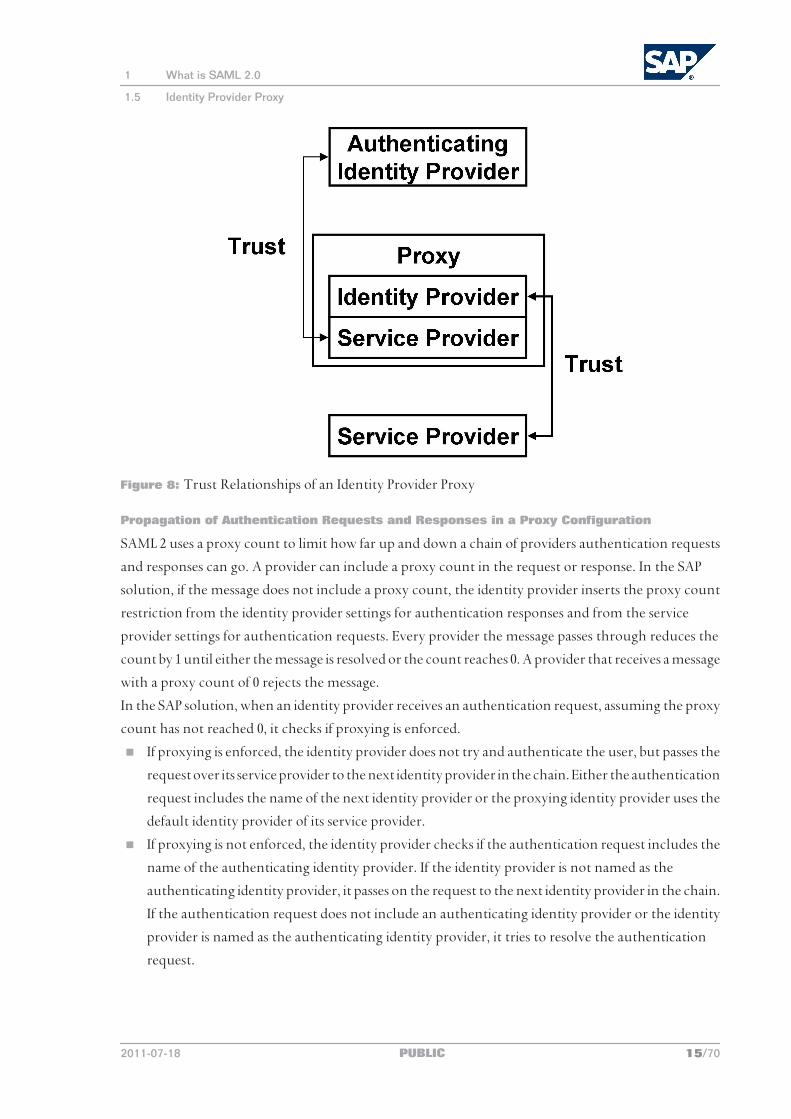
Figure 8: Trust Relationships of an Identity Provider Proxy
Propagation of Authentication Requests and Responses in a Proxy Configuration
SAML 2 uses a proxy count to limit how far up and down a chain of providers authentication requests
and responses can go. A provider can include a proxy count in the request or response. In the SAP
solution, if the message does not include a proxy count, the identity provider inserts the proxy count
restriction from the identity provider settings for authentication responses and from the service
provider settings for authentication requests. Every provider the message passes through reduces the
count by 1 until either the message is resolved or the count reaches 0. A provider that receives a message
with a proxy count of 0 rejects the message.
In the SAP solution, when an identity provider receives an authentication request, assuming the proxy
count has not reached 0, it checks if proxying is enforced.
■ If proxying is enforced, the identity provider does not try and authenticate the user, but passes the
request over its service provider to the next identity provider in the chain. Either the authentication
request includes the name of the next identity provider or the proxying identity provider uses the
default identity provider of its service provider.
■ If proxying is not enforced, the identity provider checks if the authentication request includes the
name of the authenticating identity provider. If the identity provider is not named as the
authenticating identity provider, it passes on the request to the next identity provider in the chain.
If the authentication request does not include an authenticating identity provider or the identity
provider is named as the authenticating identity provider, it tries to resolve the authentication
request.
1 What is SAML 2.0
1.5 Identity Provider Proxy
2011-07-18 PUBLIC 15/70
Constraints
A proxy configuration limits the support for Single Log-Out (SLO). A request for SLO cannot traverse
a proxy structure. It only applies to a single identity provider and its immediate service providers. This
means sessions at an identity provider above a proxying identity provider do not receive notification of
SLO. An administrator must either let these sessions time out or end them manually.
Example
Proxy Scenarios
The following sections outline some of the scenarios, where an identity provider proxy can help.
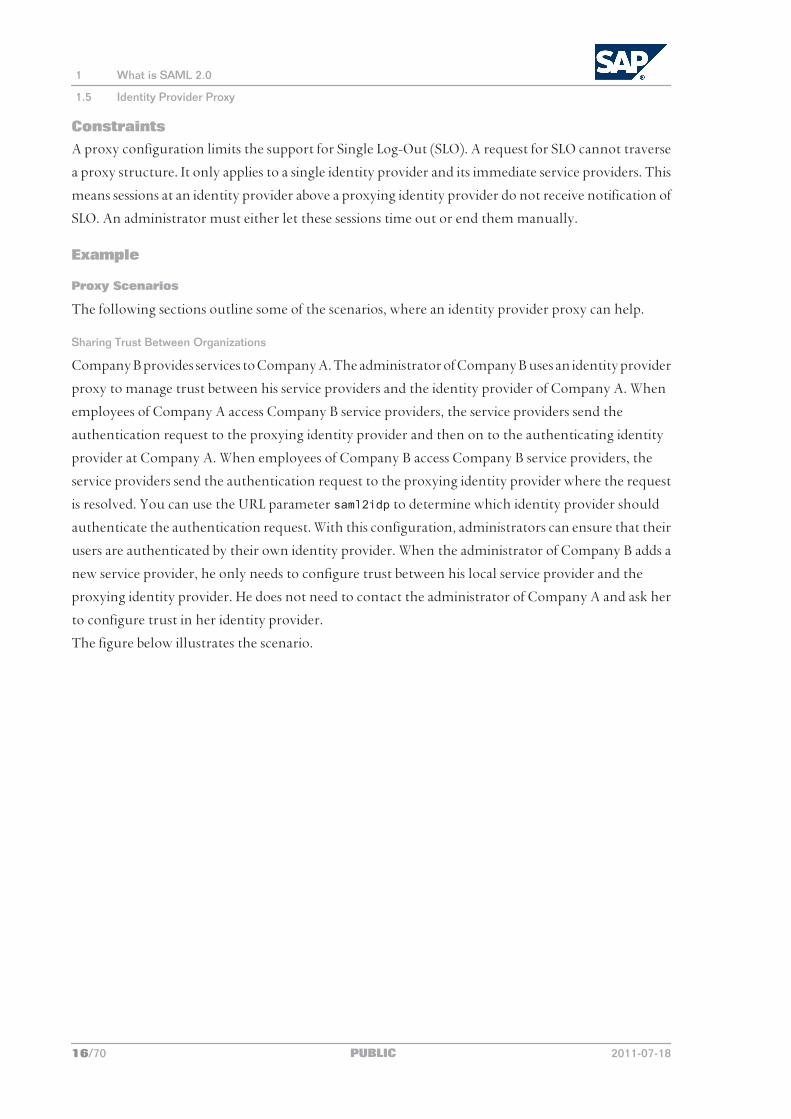
Sharing Trust Between Organizations
Company B provides services to Company A. The administrator of Company B uses an identity provider
proxy to manage trust between his service providers and the identity provider of Company A. When
employees of Company A access Company B service providers, the service providers send the
authentication request to the proxying identity provider and then on to the authenticating identity
provider at Company A. When employees of Company B access Company B service providers, the
service providers send the authentication request to the proxying identity provider where the request
is resolved. You can use the URL parameter saml2idp to determine which identity provider should
authenticate the authentication request. With this configuration, administrators can ensure that their
users are authenticated by their own identity provider. When the administrator of Company B adds a
new service provider, he only needs to configure trust between his local service provider and the
proxying identity provider. He does not need to contact the administrator of Company A and ask her
to configure trust in her identity provider.
The figure below illustrates the scenario.
1 What is SAML 2.0
1.5 Identity Provider Proxy
16/70 PUBLIC 2011-07-18
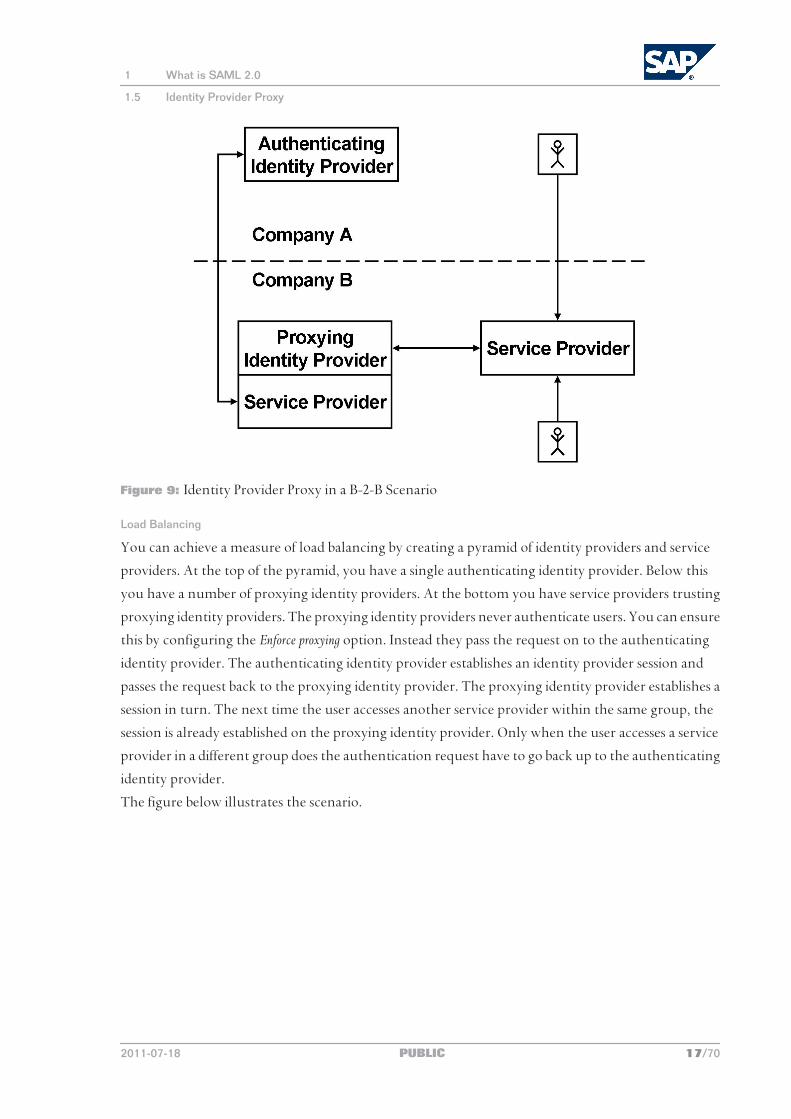
Figure 9: Identity Provider Proxy in a B-2-B Scenario
Load Balancing
You can achieve a measure of load balancing by creating a pyramid of identity providers and service
providers. At the top of the pyramid, you have a single authenticating identity provider. Below this
you have a number of proxying identity providers. At the bottom you have service providers trusting
proxying identity providers. The proxying identity providers never authenticate users. You can ensure
this by configuring the Enforce proxying option. Instead they pass the request on to the authenticating
identity provider. The authenticating identity provider establishes an identity provider session and
passes the request back to the proxying identity provider. The proxying identity provider establishes a
session in turn. The next time the user accesses another service provider within the same group, the
session is already established on the proxying identity provider. Only when the user accesses a service
provider in a different group does the authentication request have to go back up to the authenticating
identity provider.
The figure below illustrates the scenario.
1 What is SAML 2.0
1.5 Identity Provider Proxy
2011-07-18 PUBLIC 17/70
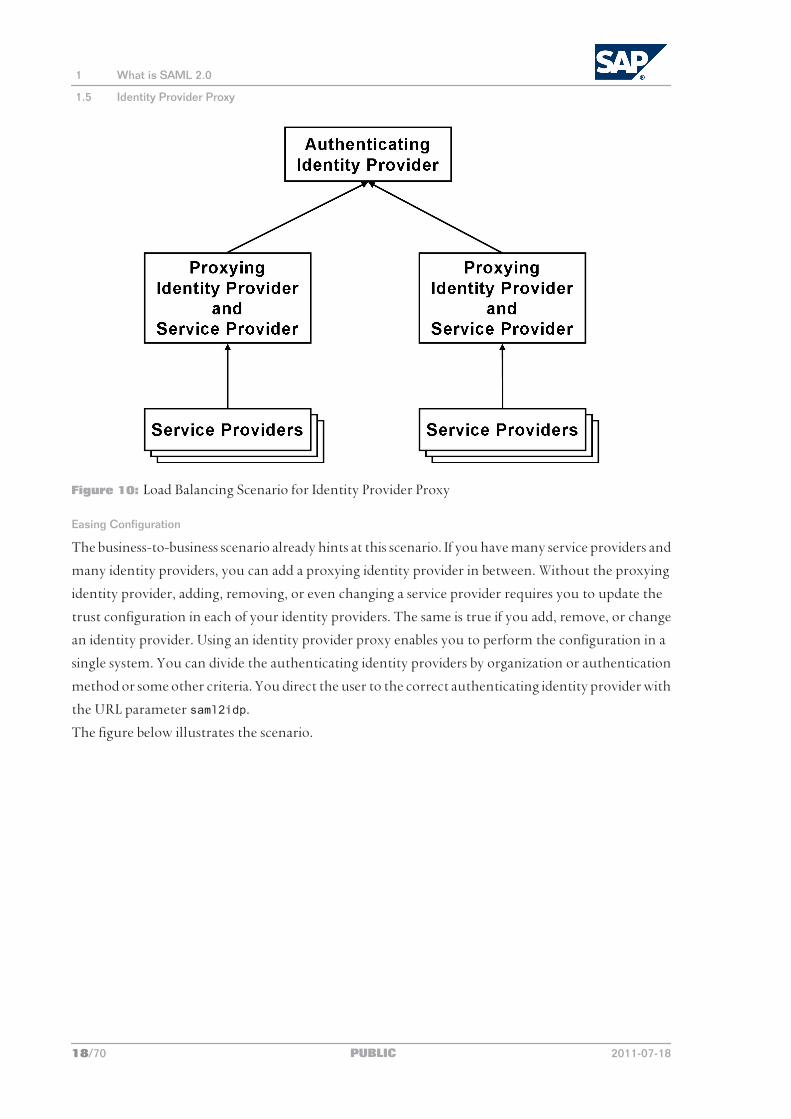
Figure 10: Load Balancing Scenario for Identity Provider Proxy
Easing Configuration
The business-to-business scenario already hints at this scenario. If you have many service providers and
many identity providers, you can add a proxying identity provider in between. Without the proxying
identity provider, adding, removing, or even changing a service provider requires you to update the
trust configuration in each of your identity providers. The same is true if you add, remove, or change
an identity provider. Using an identity provider proxy enables you to perform the configuration in a
single system. You can divide the authenticating identity providers by organization or authentication
method or some other criteria. You direct the user to the correct authenticating identity provider with
the URL parameter saml2idp.
The figure below illustrates the scenario.
1 What is SAML 2.0
1.5 Identity Provider Proxy
18/70 PUBLIC 2011-07-18
Figure 11: Proxying Identity Providers Aggregate Service Providers for Authenticating Identity
Providers
1 What is SAML 2.0
1.5 Identity Provider Proxy
2011-07-18 PUBLIC 19/70

This page is left blank for documents that are printed on both sides.
2 Before Starting
Review the following before you install and configure the identity provider for SAP NetWeaver
Application Server (AS) Java.
2.1 System Requirements
■ To support the newest user interface improvements, the host SAP NetWeaver Application Server
(AS) Java must be of release AS Java 7.2 SPS 4 or later.
User interface improvements include functions to add authentication contexts and map them to
login modules, to configure metadata and metadata access, and to delete the identity provider
configuration.
Otherwise the host AS Java must be of the following releases:
● AS Java 7.2 SPS 2 with SAP Note 1471322 applied
● AS Java 7.2 SPS 3 or later
■ You must have SAP NetWeaver Identity Management or SAP NetWeaver Single Sign-On (SAP
NetWeaver SSO) installed in your system landscape.
For more information about licensing SAP products, consult your key account manager.
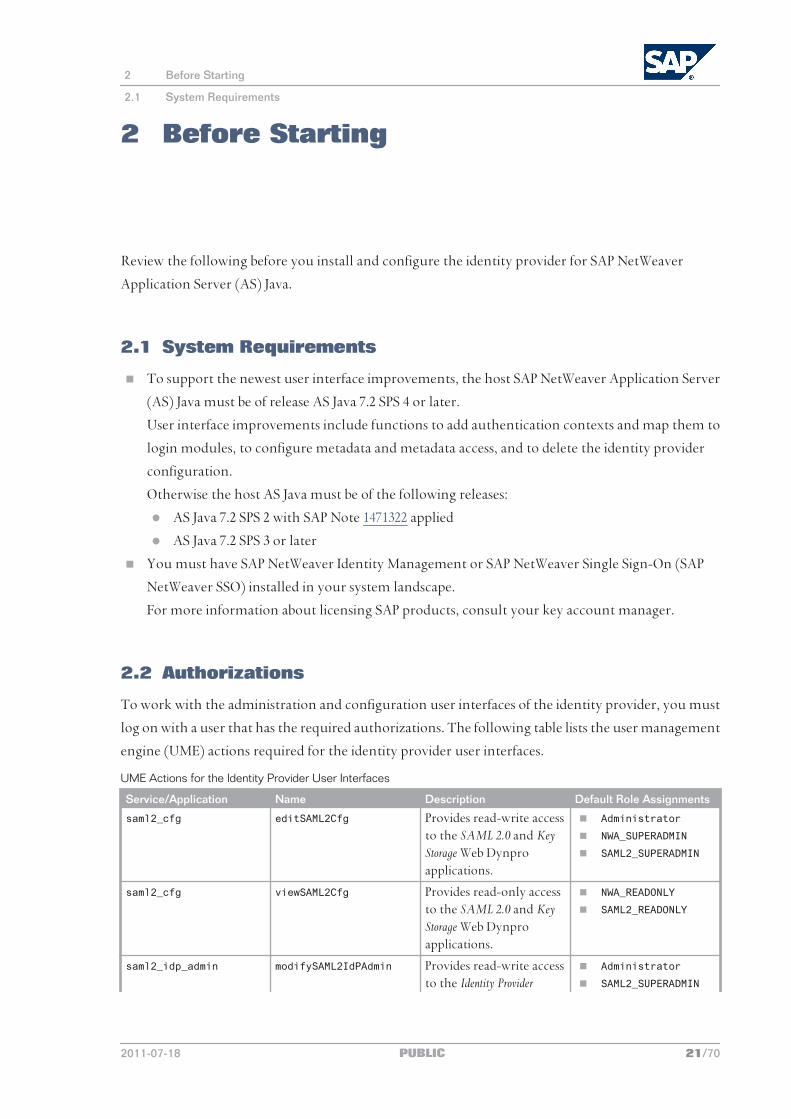
2.2 Authorizations
To work with the administration and configuration user interfaces of the identity provider, you must
log on with a user that has the required authorizations. The following table lists the user management
engine (UME) actions required for the identity provider user interfaces.
UME Actions for the Identity Provider User Interfaces
Service/Application Name Description Default Role Assignments
saml2_cfg editSAML2Cfg Provides read-write access to the SAML 2.0 and Key Storage Web Dynpro applications.
■ Administrator
■ NWA_SUPERADMIN
■ SAML2_SUPERADMIN
saml2_cfg viewSAML2Cfg Provides read-only access to the SAML 2.0 and Key Storage Web Dynpro applications.
■ NWA_READONLY
■ SAML2_READONLY
saml2_idp_admin modifySAML2IdPAdmin Provides read-write access to the Identity Provider
■ Administrator
■ SAML2_SUPERADMIN
2 Before Starting
2.1 System Requirements
2011-07-18 PUBLIC 21/70
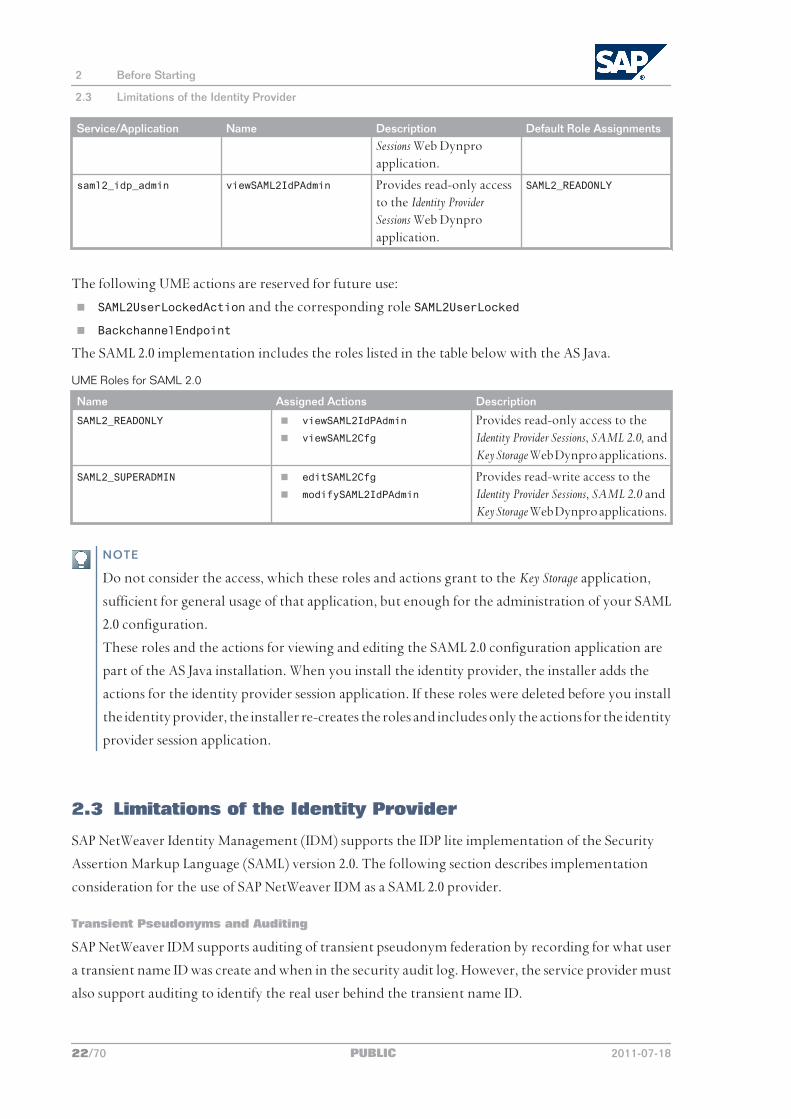
Service/Application Name Description Default Role AssignmentsSessions Web Dynpro application.
saml2_idp_admin viewSAML2IdPAdmin Provides read-only access to the Identity Provider Sessions Web Dynpro application.
SAML2_READONLY
The following UME actions are reserved for future use:
■ SAML2UserLockedAction and the corresponding role SAML2UserLocked
■ BackchannelEndpoint
The SAML 2.0 implementation includes the roles listed in the table below with the AS Java.
UME Roles for SAML 2.0
Name Assigned Actions Description
SAML2_READONLY ■ viewSAML2IdPAdmin
■ viewSAML2Cfg
Provides read-only access to the Identity Provider Sessions, SAML 2.0, and Key Storage Web Dynpro applications.
SAML2_SUPERADMIN ■ editSAML2Cfg
■ modifySAML2IdPAdmin
Provides read-write access to the Identity Provider Sessions, SAML 2.0 and Key Storage Web Dynpro applications.
NOTE
Do not consider the access, which these roles and actions grant to the Key Storage application,
sufficient for general usage of that application, but enough for the administration of your SAML
2.0 configuration.
These roles and the actions for viewing and editing the SAML 2.0 configuration application are
part of the AS Java installation. When you install the identity provider, the installer adds the
actions for the identity provider session application. If these roles were deleted before you install
the identity provider, the installer re-creates the roles and includes only the actions for the identity
provider session application.
2.3 Limitations of the Identity Provider
SAP NetWeaver Identity Management (IDM) supports the IDP lite implementation of the Security
Assertion Markup Language (SAML) version 2.0. The following section describes implementation
consideration for the use of SAP NetWeaver IDM as a SAML 2.0 provider.
Transient Pseudonyms and Auditing
SAP NetWeaver IDM supports auditing of transient pseudonym federation by recording for what user
a transient name ID was create and when in the security audit log. However, the service provider must
also support auditing to identify the real user behind the transient name ID.
2 Before Starting
2.3 Limitations of the Identity Provider
22/70 PUBLIC 2011-07-18
Identity Provider-Initiated Single Log-Out and Microsoft Internet Explorer
RECOMMENDATION
To avoid problems during Single Log-Out (SLO) initiated from the identity provider when using
Microsoft Internet Explorer 6 or 7, we recommend that you configure the browser to check for
new versions of stored pages on every visit.
2 Before Starting
2.3 Limitations of the Identity Provider
2011-07-18 PUBLIC 23/70

This page is left blank for documents that are printed on both sides.
3 Adding an Identity Provider to Your Network
This section includes an outline of the procedures required to download and configure the identity
provider for SAP NetWeaver Application Server (AS) Java.
3.1 Downloading and Installing the Federation Software
As of SAP NetWeaver Identity Management 7.1, the federation software component archive (SCA)
includes the identity provider. In SAP NetWeaver Identity Management 7.2 and later, the federation
SCA includes the security token service software, too.
For more information about the security token service, see SAP NetWeaver Identity Management Security
Token Service Implementation Guide.
Procedure
1. Go to the SAP Software Distribution Center at https://service.sap.com/swdc .
2. In the navigation pane, choose Download Support Packages and Patches .
3. In the A-Z Index, navigate to the N section.
4. Navigate to one of the two products:
■ SAP NW IDENTITY MANAGEMENT SAP NW IDENTITY MANAGEMENT 7.2 Comprised
Software Component Versions NW IDM FEDERATION 7.2
■ SAP NW SINGLE SIGN ON SAP NW SINGLE SIGN ON 1.0 Comprised Software Component
Versions NW IDM FEDERATION 7.2
5. Download and unzip the SCAIDMFEDERATION<release>.sca.
6. Deploy the SCA to the AS Java.
Use the Deployment Job view of the SAP NetWeaver Developer Studio.
3.2 Configuring the Identity Provider
This procedure provides an overview of the steps to take to configure SAP NetWeaver Application
Server (AS) Java as a Security Assertion Markup Language (SAML) 2.0 identity provider. As an identity
provider, the AS Java enables you to off-load the authentication of users from service providers. The
identity provider enables you to federate identities across domains for Single Sign-On (SSO). Once
logged on, SAML 2.0 enables Single Log-Out (SLO).
3 Adding an Identity Provider to Your Network
3.1 Downloading and Installing the Federation Software
2011-07-18 PUBLIC 25/70
Prerequisites
■ You have created any necessary keys and certificates in a keystore view dedicated to SAML.
For more information, see documentation for the keystore manager of the AS Java.
■ There is an SAML 2.0 service provider in your SAML network.
The service provider can be in the same local area network or in another domain. Your identity
provider must be able to reach the service provider over HTTP or HTTPS.
Procedure
1. Enable SAML 2.0 support and select the certificates for digital signatures and encryption.
For more information, see Enabling the SAML Identity Provider [page 26].
2. Determine how your identity provider communicates with service providers.
For more information, see the following:
■ Configuring Front-Channel Communication [page 31]
■ Configuring Back-Channel Communication [page 28]
■ Configuring Support for Enhanced Client or Proxy [page 34]
3. Trust a service provider.
For more information, see Adding Service Providers [page 35].
4. Determine how to federate the identities on the identity provider and service provider.
For more information, see the following:
■ Configuring Out-of-Band Account Linking [page 39]
■ Configuring Identity Federation with Persistent Pseudonyms [page 42]
■ Configuring Identity Federation with Transient Users [page 41]
5. Make any optional configurations.
For more information, see Optional Configurations [page 47].
3.3 Enabling the SAML Identity Provider
Use this procedure to enable Security Assertion Markup Language (SAML) 2.0 support and make the
basic configurations for a SAML 2.0 identity provider. This procedure only covers the first steps for
preparing your SAP NetWeaver Application Server (AS) Java to operate as a SAML identity provider.
Prerequisites
You have downloaded and installed the federation software.
For more information, see Downloading and Installing the Federation Software [page 25].
Procedure
1. Start SAP NetWeaver Administrator with the quick link /nwa/auth.
2. Choose the SAML 2.0 tab.
3. Continue the configuration for the current state of SAML 2.0 configuration on your system.
3 Adding an Identity Provider to Your Network
3.3 Enabling the SAML Identity Provider
26/70 PUBLIC 2011-07-18
If you have never configured your system for SAML 2.0, the system displays the following message:
System not configured to support SAML 2.0.
SAML 2.0 is Already Configured
NOTE
If you were viewing the SAML 2.0 configuration application before you installed the federation
software, you must navigate away from the application and return before you can complete the
configuration. Otherwise you cannot change the operational mode of the provider.
1. Choose Edit.
2. Enter an operation mode for the provider.
■ If there are no resources on the host AS Java you want to protect with SAML, enter Identity
Provider.
■ If there are resources on the host AS Java you want to protect with SAML, enter Identity
Provider and Service Provider.
3. Save your entries.
SAML 2.0 is not Configured
1. Choose the Enable SAML 2.0 Support pushbutton.
2. Enter a name for the provider.
3. Enter an operation mode for the provider.
■ If there are no resources on the host AS Java you want to protect with SAML, enter Identity
Provider.
■ If there are resources on the host AS Java you want to protect with SAML, enter Identity
Provider and Service Provider.
4. Configure the settings for signature and encryption.
1. Select the keystore view and the key pairs for digital signatures and encryption.
The AS Java creates the SAML2 keystore view and selects this view as the default view as soon
as you enable SAML 2. For this view, you must generate at least one public-key certificate. You
can also use another view, where you have already created key-pair certificates.
2. Determine if you want to include the public-key certificate in any digital signatures.
■ Include the certificate if you are using a public-key infrastructure for your SAML network
or if the trusted providers otherwise require the inclusion of certificates to verify digital
signatures.
■ Do not include a certificate if you are using self-signed certificates.
3. To provide a means for service providers to validate the metadata of the identity provider, sign
the configuration metadata of the identity provider.
5. Continue through the configuration wizard and enter data as desired.
3 Adding an Identity Provider to Your Network
3.3 Enabling the SAML Identity Provider
2011-07-18 PUBLIC 27/70
This procedure only covers enabling SAML 2.0 and making the signature and encryption settings.
Once enabled you can configure the bindings supported by the identity provider, trust a service
provider, and configure identity federation.
For more information, see Configuring the Identity Provider [page 25].
6. Choose the Finish pushbutton.
3.4 Configuring Back-Channel Communication
Back-channel communication uses HTTP artifact or SOAP bindings to communicate between the
service provider and the identity provider. Use back-channel communication to ensure that SAML
messages are not exposed to the client and any malicious third-parties eavesdropping on the client.
Back-channel communication requires a direct connection between a service provider and an identity
provider. If there is a firewall between the providers, direct communication may not be possible. Front-
channel communication can improve response time for Single Sign-On (SSO) as it requires fewer
roundtrips to authenticate a user.
Prerequisites
■ You have determined which back-channel bindings you want to support.
Comparison of Back-Channel Bindings
Binding Advantages Disadvantages
HTTP artifactHTTP artifact binding sends a reference to a SAML message over the client. The identity provider and the service provider then use SOAP to exchange the SAML message to which the artifact refers.
This is the only back-channel binding supported by SAML SSO.
Increases the number of roundtrips required to pass a SAML message, increasing response time.
SOAPSOAP binding sends messages directly between the identity provider and the service provider without involving the client.
Providers exchange SAML messages directly.
Firewalls can block SOAP. A domain name system (DNS) may not be able to resolve the destination of the message.
■ SAML 2.0 has been enabled on your SAP NetWeaver Application Server (AS) Java.
For more information, see Enabling the SAML Identity Provider [page 26].
Procedure
Disabling Back-Channel Communication
Use this procedure to restrict authentication to front-channel communication.
1. Start SAP NetWeaver Administrator with the quick link /nwa/auth.
2. Choose SAML 2.0 Local Provider .
3. Choose the Identity Provider Settings tab.
4. Disable the following bindings:
3 Adding an Identity Provider to Your Network
3.4 Configuring Back-Channel Communication
28/70 PUBLIC 2011-07-18
■ For the Single Sign-On service, deselect the HTTP artifact checkbox.
■ For the Single Log-Out (SLO) service, deselect the HTTP artifact and SOAP checkboxes.
5. On the General Settings tab, under Artifact Resolution Service in the Mode field, select Disabled.
6. Disable HTTP artifact and SOAP bindings from trusted service providers.
For more information, see the product documentation for your service provider.
Enabling Back-Channel Communication with HTTP Artifact
Use this procedure to accept artifacts and configure the other back-channel parameters.
1. Enabling and Configuring the Artifact Resolution Service
1. Start SAP NetWeaver Administrator with the quick link /nwa/auth.
2. Choose SAML 2.0 Local Provider .
3. Choose the General Settings tab.
4. Under Artifact Resolution Service in the Mode field, select Enabled.
5. Enter data as required.
■ To ensure that synchronization problems between systems do not interfere with the SAML
artifact connections, increase the validity period for artifacts accepted.
■ Enter the interval for deleting expired artifacts.
This property determines how often expired, unresolved artifacts are deleted from the
database. Resolved artifacts are deleted immediately. Based on the number of users you expect
to have to log on at the same time on your system, you can estimate how quickly artifacts are
added to the system. If you expect heavy usage and space is an issue for your database, set a
lower value.
CAUTION
If you set a value that is too high, your database fills with expired artifacts causing a
decrease in system performance, or worst case, causing your system to become
unresponsive.
2. Determining Which Services Accept Artifacts
On the Identity Provider Settings tab, determine for which services you want to accept artifacts from identity
providers.
■ To accept artifacts for Single Sign-On (SSO):
1. Select the HTTP Artifact checkbox under Single Sign-On Service.
2. Make any optional configurations.
For more information, see the following:
● Disabling IdP-Initiated and SP-Initiated SSO and SLO [page 56]
● Configuring the Lifetime of Identity Provider Sessions [page 54]
● Configuring Identity Providers as Proxies [page 55]
■ To accept artifacts for Single Log-Out (SLO):
3 Adding an Identity Provider to Your Network
3.4 Configuring Back-Channel Communication
2011-07-18 PUBLIC 29/70
1. Select the HTTP Artifact checkbox under Single Log-Out Service.
2. Make any optional configurations.
For more information, see the following:
● Disabling IdP-Initiated and SP-Initiated SSO and SLO [page 56]
● Determining the Channel Used for SLO by the Identity Provider [page 58]
3. Configuring the Endpoints for the Trusted Service Provider
With this procedure you configure the outgoing connection to the identity provider. This procedure
assumes that you have already trusted a service provider.
For more information about trusting a service provider, see Adding Service Providers [page 35].
1. Choose Trusted Providers.
2. Select a service provider and choose the Edit pushbutton.
3. Choose the Endpoints tab.
4. Configure the Assertion Consumer Endpoints, Single Log-Out Endpoints, and Artifact Endpoints to use HTTP
Artifact and SOAP bindings as required.
1. Add HTTP artifact bindings.
2. Enter an index value for the endpoint.
3. Enter the endpoint URLs for the services on the service provider.
5. Save your entries.
4. Configuring the Service Provider
1. Check that the service provider endpoints are configured to accept HTTP artifact bindings from
the identity provider.
2. Check that the service provider is configured to use HTTP artifact bindings to connect to the
endpoints of the identity provider.
3. Consider disabling front-channel communication bindings for the service provider endpoints.
If the identity provider only accepts back-channel communications, there is no reason to expose
the endpoint to front-channel bindings.
For more information about how to configure the service provider, see the documentation of your
service provider.
Enabling Back-Channel Communication with SOAP
Use this procedure to configure the back-channel parameters for SOAP.
1. Accepting SOAP Bindings
1. Start SAP NetWeaver Administrator with the quick link /nwa/auth.
2. Choose SAML 2.0 Local Provider .
3. Choose the Identity Provider Settings tab.
4. Under Single Log-Out Service, select the SOAP checkbox.
3 Adding an Identity Provider to Your Network
3.4 Configuring Back-Channel Communication
30/70 PUBLIC 2011-07-18
2. Configuring the Endpoints for the Trusted Identity Provider
With this procedure you configure the outgoing connection to the service provider. This procedure
assumes that you have already trusted a service provider.
For more information about trusting a service provider, see Trusting Service Providers [page 35].
1. Choose Trusted Providers.
2. Select a service provider and choose the Edit pushbutton.
3. Choose the Endpoints tab.
4. Configure the Single Log-Out Endpoints to use SOAP binding.
1. Add the SOAP binding.
2. Configure and select a destination to use from the destination service of the AS Java.
The destination must include the endpoint URL for the SLO service on the service provider.
If the service provider requires authentication for SOAP, you must also configure the
destination to use the required user.
NOTE
After configuring the endpoints, you can change the URL by editing the Location URL
field. This updates the URL used in the destination service.
3. Determine if you want the logout response sent to a different URL.
If yes, enter the custom response location in the Response Location URL column.
5. Save your entries.
3. Configuring the Service Provider
1. Check that the service provider endpoints are configured to accept HTTP artifact and SOAP
bindings from the identity provider.
2. Check that the service provider is configured to use HTTP artifact and SOAP bindings to connect
to the endpoints of the identity provider.
3. Consider disabling front-channel communication bindings for the service provider endpoints.
If the service provider only accepts back-channel communications, there is no reason to expose
the endpoints to front-channel bindings.
For more information about how to configure the service provider, see the documentation of your
service provider.
3.5 Configuring Front-Channel Communication
Front-channel communication uses HTTP POST or HTTP redirect bindings over the client between
the service provider and the identity provider. Use front-channel bindings when response time to the
client request is more important than ensuring that SAML messages are not exposed to the client or
any malicious third-parties. Back-channel communication increases the number of messages the
service provider and identity provider must exchange to log on.
3 Adding an Identity Provider to Your Network
3.5 Configuring Front-Channel Communication
2011-07-18 PUBLIC 31/70
Prerequisites
■ You have determined which front-channel bindings you want to support.
Binding Advantages Disadvantages
HTTP POST
Transports SAML messages in the body of the message. There are no length limitations. See disadvantages of HTTP redirect below.
● There may be some clients that do not support HTTP POST. ● To avoid user interaction to send the client from one server to the next,
clients employ an auto post function. The auto post function uses JavaScript. Depending on your situation, the use of JavaScript can represent a security risk.
HTTP redirect
Client sent from one server to the next without interaction from the user.
Redirect transports the SAML message in the URL. If the URL is too long, the client truncates the URL. If you use long URLs or include security options such as encryption of message elements, avoid HTTP redirect.
■ SAML 2.0 has been enabled on your SAP NetWeaver Application Server (AS) Java.
For more information, see Enabling the SAML Identity Provider [page 26].
Procedure
Disabling Front-Channel Communication
Use this procedure to restrict authentication to back-channel communication.
1. Start SAP NetWeaver Administrator with the quick link /nwa/auth.
2. Choose SAML 2.0 Local Provider .
3. Choose the Identity Provider Settings tab.
4. For the Single Sign-On and Single Log-Out (SLO) services, deselect the HTTP POST and HTTP
Redirect checkboxes.
5. Disable HTTP POST and HTTP redirect bindings from trusted service providers.
For more information, see the product documentation for your service provider.
Enabling Front-Channel Communication
Use this procedure to accept front-channel communication and configure the other front-channel
parameters.
1. Determining Which Services Accept Front-Channel Communication
1. Start SAP NetWeaver Administrator with the quick link /nwa/auth.
2. Choose SAML 2.0 Local Provider .
3. Choose the Identity Provider Settings tab
4. Determine for which services you want to accept front-channel communication from service
providers.
■ For Single Sign-On (SSO):
3 Adding an Identity Provider to Your Network
3.5 Configuring Front-Channel Communication
32/70 PUBLIC 2011-07-18
1. Select the HTTP POST or HTTP Redirect checkboxes under Single Sign-On Service.
2. Make any optional configurations.
For more information, see the following:
● Disabling IdP-Initiated and SP-Initiated SSO and SLO [page 56]
● Configuring the Lifetime of Identity Provider Sessions [page 54]
● Configuring Identity Providers as Proxies [page 55]
■ For Single Log-Out (SLO):
1. Select the HTTP POST or HTTP Redirect checkboxes under Single Log-Out Service.
2. Make any optional configurations.
For more information, see the following:
● Disabling IdP-Initiated and SP-Initiated SSO and SLO [page 56]
● Determining the Channel Used for SLO by the Identity Provider [page 58]
2. Configuring the Endpoints for the Trusted Service Provider
With this procedure you configure the outgoing connection to the service provider. This procedure
assumes that you have already trusted a service provider.
For more information about trusting a service provider, see Adding Service Providers [page 35].
1. Choose Trusted Providers.
2. Select a service provider and choose the Edit pushbutton.
3. Choose the Endpoints tab.
4. Configure any Assertion Consumer Endpoints and Single Log-Out Endpoints.
1. Add any HTTP POST and HTTP redirect bindings.
2. Set an index value as required.
3. Enter the endpoint URLs for the services on the service provider.
5. Save your entries.
3. Configuring the Service Provider
1. Check that the service provider endpoints are configured to accept HTTP POST or HTTP redirect
from the identity provider.
2. Check that the service provider is configured to use HTTP POST or HTTP redirect to connect to
the endpoints of the identity provider.
3. Consider disabling back-channel communication bindings for the service provider endpoints.
If the service provider only accepts front-channel communications, there is no reason to expose
the endpoint to back-channel bindings.
For more information about how to configure the service provider, see the documentation of your
service provider.
3 Adding an Identity Provider to Your Network
3.5 Configuring Front-Channel Communication
2011-07-18 PUBLIC 33/70
3.6 Configuring Support for Enhanced Client or Proxy
The Enhanced Client or Proxy (ECP) profile of the SAML 2.0 specification is useful in the following
situations:
■ You have a client with extended capabilities and you want the client to take on more responsibility
in the exchange. For example, the client can determine the appropriate identity provider.
■ Your client has limited capabilities so you delegate some of these tasks to an enhanced proxy. For
example, a wireless access point (WAP).
■ You cannot use other bindings. Some possible examples are as follows:
● The client does not support redirects.
● The client does not support JavaScript, preventing auto form post.
● A firewall prevents the identity provider and service provider from communicating directly,
preventing the artifact binding.
The ECP profile enables the client to contact the identity provider with the authentication request
generated by the service provider. Exchanges between the ECP and the identity provider use SOAP.
Prerequisites
The ECP knows or is capable of discovering which identity provider the service provider trusts.
Procedure
1. Start SAP NetWeaver Administrator with the quick link /nwa/auth.
2. Choose SAML 2.0 Local Provider .
3. Choose the Identity Provider Settings tab.
4. Under Single Sign-On Service, select SOAP as a supported binding.
5. Save your entries.
6. Configure the service provider to support the PAOS binding.
For more information, see the documentation supplied by the service provider vendor.
3.7 Trusting Service Providers
Trusting service providers is a two-step process. First, add a service provider to the list of trusted service
providers. This involves adding connection information as well as the exchange of public keys for
encryption and digital signatures and identification of the endpoints. Second, configure federation for
the provider. The federation configuration identifies the identity information that the service provider
requires.
3 Adding an Identity Provider to Your Network
3.6 Configuring Support for Enhanced Client or Proxy
34/70 PUBLIC 2011-07-18
3.7.1 Adding Service Providers
The identity provider provides identity information to service providers, for applications the service
providers protect. An identity provider can only do this for service providers in its list of trusted service
providers. Use this procedure to add a service provider to the list of trusted service providers.
Prerequisites
■ You have configured a service provider in your network.
■ If you intend to add the service provider manually (without using a metadata XML file), you have
imported the public-key certificates of the service provider for encryption and digital signature of
SAML messages. Import these certificates into the key storage of the SAP NetWeaver Application
Server (AS) Java.
■ If you intend to add the service provider from a metadata file, you have a means of accessing the
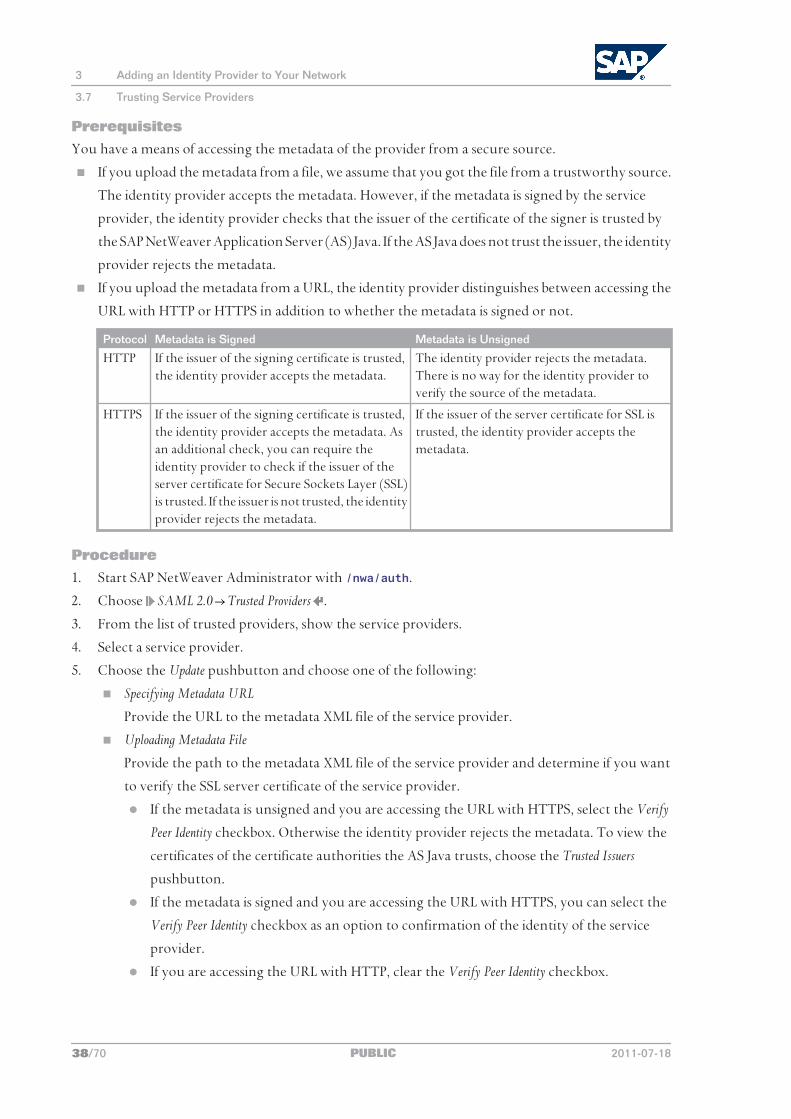
metadata of the provider from a secure source.
● If you upload the metadata from a file, we assume that you received the file from a trustworthy
source. The identity provider accepts the metadata. However, if the metadata is signed by the
service provider, the identity provider checks that the issuer of the certificate of the signer is
trusted by the AS Java. If the AS Java does not trust the issuer, the identity provider rejects the
metadata.
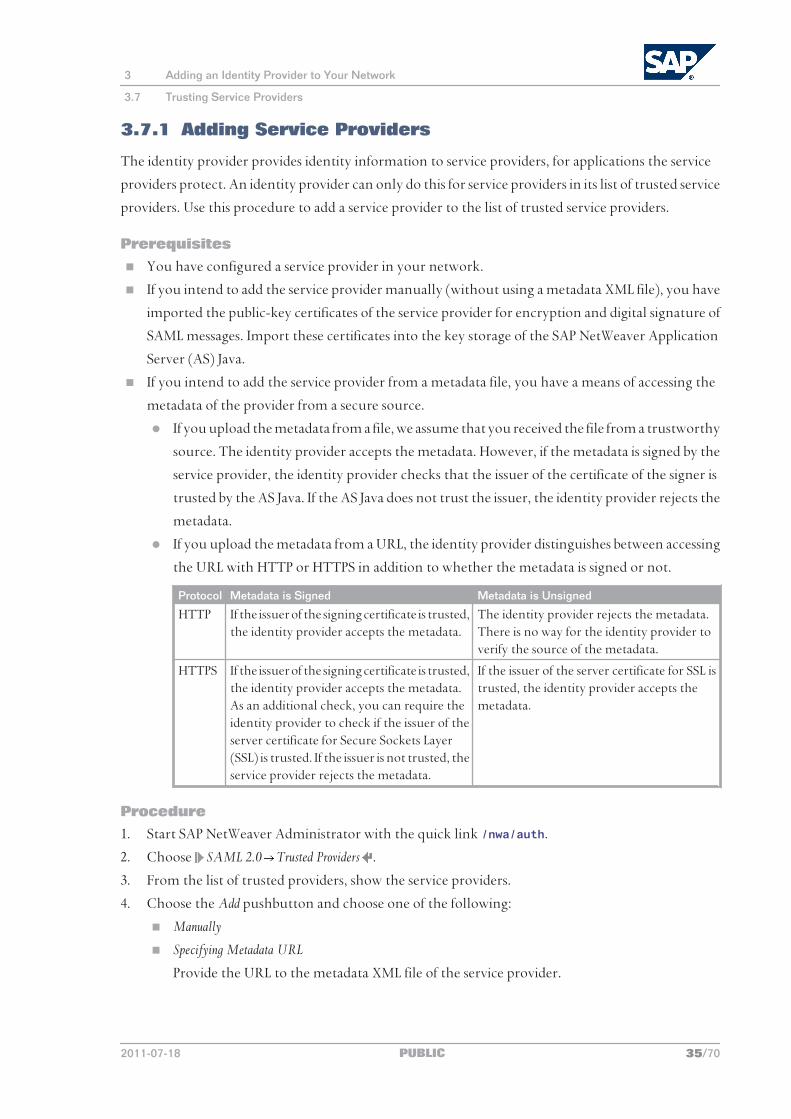
● If you upload the metadata from a URL, the identity provider distinguishes between accessing
the URL with HTTP or HTTPS in addition to whether the metadata is signed or not.
Protocol Metadata is Signed Metadata is Unsigned
HTTP If the issuer of the signing certificate is trusted, the identity provider accepts the metadata.
The identity provider rejects the metadata. There is no way for the identity provider to verify the source of the metadata.
HTTPS If the issuer of the signing certificate is trusted, the identity provider accepts the metadata. As an additional check, you can require the identity provider to check if the issuer of the server certificate for Secure Sockets Layer (SSL) is trusted. If the issuer is not trusted, the service provider rejects the metadata.
If the issuer of the server certificate for SSL is trusted, the identity provider accepts the metadata.
Procedure
1. Start SAP NetWeaver Administrator with the quick link /nwa/auth.
2. Choose SAML 2.0 Trusted Providers .
3. From the list of trusted providers, show the service providers.
4. Choose the Add pushbutton and choose one of the following:
■ Manually
■ Specifying Metadata URL
Provide the URL to the metadata XML file of the service provider.
3 Adding an Identity Provider to Your Network
3.7 Trusting Service Providers
2011-07-18 PUBLIC 35/70
■ Uploading Metadata File
Provide the path to the metadata XML file of the service provider and determine if you want
to verify the SSL server certificate of the service provider.
● If the metadata is unsigned and you are accessing the URL with HTTPS, select the Verify
Peer Identity checkbox. Otherwise the identity provider rejects the metadata. To view the
certificates of the certificate authorities the AS Java trusts, choose the Trusted Issuers
pushbutton.
● If the metadata is signed and you are accessing the URL with HTTPS, you can select the
Verify Peer Identity checkbox as an option to confirm the identity of the service provider.
● If you are accessing the URL with HTTP, clear the Verify Peer Identity checkbox.
For more information about configuring the trusted issuers, see Selecting the Keystore View for SSL
for the Identity Provider [page 39].
5. Enter a name and an alias.
CAUTION
Do not change the name of the service provider if the metadata XML file already provides it.
The name must match the name configured in the service provider exactly.
6. Enter the required data for digital signatures and encryption.
1. Select the public-key certificates from the key storage for checking the digital signature of the
service provider and encrypting messages sent to the service provider.
If you add the service provider from a metadata XML file, the public-key certificates are already
configured.
2. Choose an encryption algorithm.
NOTE
The cryptographic suite of the service provider must support the encryption algorithm
you choose or it cannot decrypt your messages.
3. Choose the signature and encryption options for requests, responses, and assertions for Single
Sign-On (SSO), Single Log-Out (SLO), and artifact resolution.
The signature and encryption options must match with those of the service provider. If the
service provider requires SAML assertions always be digitally signed and the identity provider
never signs them, then the SAML configuration cannot function.
RECOMMENDATION
Give some thought to your encryption and signature options and make choices that
make sense for your configuration. These also depend on the environment your SAML
network is working in. Systems that operate in a secured area behind a firewall have
different requirements from systems exposed to the Internet. We have the following
recommendations:
■ Encryption
3 Adding an Identity Provider to Your Network
3.7 Trusting Service Providers
36/70 PUBLIC 2011-07-18
Encrypt or require encryption for those elements that can expose authentication or
other personal data about the users. If you use the transient or persistent name ID
formats, these name IDs are already opaque. There is no need to encrypt these name
IDs. The e-mail name ID format, however, can reveal the users real name and contact
information. When using the transient and persistent name ID formats, you can
send attributes. These attributes can also reveal personal information, which you
should encrypt.
■ Digital signatures
The SAML standard provides many points in the process at which you can sign and
check for signatures. Do this only where it makes sense. For example, you can sign
the SAML assertion and the SAML response. It does not make sense for the identity
provider to sign the SAML response and then pack it in a SAML assertion and sign
it again before sending the assertion to the service provider. This would only make
sense if you developed a custom process to separate the SAML response from the
SAML assertion and send the response over a third party before the response is
processed. You can further complicate the process by using the HTTP artifact binding
and signing the artifact response. The identity provider signs the message three times.
The SAP's service provider supports signature inheritance. If the SAML 2 response
is signed, the service provider considers the SAML 2 assertion to be signed. Likewise,
if the SAML 2 artifact response is signed, the service providers considers the SAML 2
response and SAML 2 assertions it contains to be signed.
7. Enter the required data for the SSO, SLO, and artifact resolution service (ARS) endpoints.
The metadata XML provides the bindings supported by the service provider. If you add new
bindings, you must configure the service provider to support them.
8. Choose the Finish pushbutton.
3.7.2 Updating the Configuration of Trusted Providers
When you make changes to the configuration of a trusted provider, you must update the configuration
of the trust relationship to match. The following is a list of changes that require an update of the trusted
provider configuration:
■ New certificates for digital signature or encryption
You can have a primary and secondary certificate for signatures and encryption. This enables you
to span the time between when an old certificate is due to expire and you have not configured all
peers to accept the new one yet.
■ Changed signature or encryption options
■ Changed Assertion Consumer Service, Single Log-Out, or Artifact Resolution Service endpoints
3 Adding an Identity Provider to Your Network
3.7 Trusting Service Providers
2011-07-18 PUBLIC 37/70
Prerequisites
You have a means of accessing the metadata of the provider from a secure source.
■ If you upload the metadata from a file, we assume that you got the file from a trustworthy source.
The identity provider accepts the metadata. However, if the metadata is signed by the service
provider, the identity provider checks that the issuer of the certificate of the signer is trusted by
the SAP NetWeaver Application Server (AS) Java. If the AS Java does not trust the issuer, the identity
provider rejects the metadata.
■ If you upload the metadata from a URL, the identity provider distinguishes between accessing the
URL with HTTP or HTTPS in addition to whether the metadata is signed or not.
Protocol Metadata is Signed Metadata is Unsigned
HTTP If the issuer of the signing certificate is trusted, the identity provider accepts the metadata.
The identity provider rejects the metadata. There is no way for the identity provider to verify the source of the metadata.
HTTPS If the issuer of the signing certificate is trusted, the identity provider accepts the metadata. As an additional check, you can require the identity provider to check if the issuer of the server certificate for Secure Sockets Layer (SSL) is trusted. If the issuer is not trusted, the identity provider rejects the metadata.
If the issuer of the server certificate for SSL is trusted, the identity provider accepts the metadata.
Procedure
1. Start SAP NetWeaver Administrator with /nwa/auth.
2. Choose SAML 2.0 Trusted Providers .
3. From the list of trusted providers, show the service providers.
4. Select a service provider.
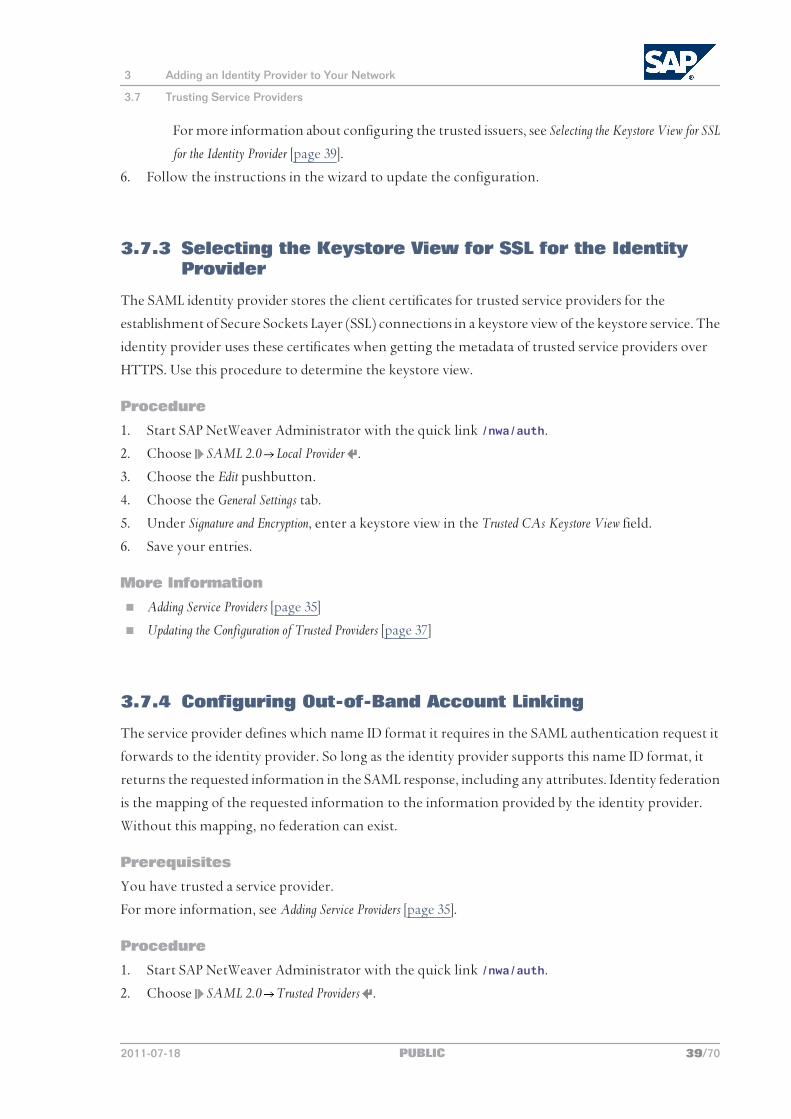
5. Choose the Update pushbutton and choose one of the following:
■ Specifying Metadata URL
Provide the URL to the metadata XML file of the service provider.
■ Uploading Metadata File
Provide the path to the metadata XML file of the service provider and determine if you want
to verify the SSL server certificate of the service provider.
● If the metadata is unsigned and you are accessing the URL with HTTPS, select the Verify
Peer Identity checkbox. Otherwise the identity provider rejects the metadata. To view the
certificates of the certificate authorities the AS Java trusts, choose the Trusted Issuers
pushbutton.
● If the metadata is signed and you are accessing the URL with HTTPS, you can select the
Verify Peer Identity checkbox as an option to confirmation of the identity of the service
provider.
● If you are accessing the URL with HTTP, clear the Verify Peer Identity checkbox.
3 Adding an Identity Provider to Your Network
3.7 Trusting Service Providers
38/70 PUBLIC 2011-07-18
For more information about configuring the trusted issuers, see Selecting the Keystore View for SSL
for the Identity Provider [page 39].
6. Follow the instructions in the wizard to update the configuration.
3.7.3 Selecting the Keystore View for SSL for the Identity Provider
The SAML identity provider stores the client certificates for trusted service providers for the
establishment of Secure Sockets Layer (SSL) connections in a keystore view of the keystore service. The
identity provider uses these certificates when getting the metadata of trusted service providers over
HTTPS. Use this procedure to determine the keystore view.
Procedure
1. Start SAP NetWeaver Administrator with the quick link /nwa/auth.
2. Choose SAML 2.0 Local Provider .
3. Choose the Edit pushbutton.
4. Choose the General Settings tab.
5. Under Signature and Encryption, enter a keystore view in the Trusted CAs Keystore View field.
6. Save your entries.
More Information
■ Adding Service Providers [page 35]
■ Updating the Configuration of Trusted Providers [page 37]
3.7.4 Configuring Out-of-Band Account Linking
The service provider defines which name ID format it requires in the SAML authentication request it
forwards to the identity provider. So long as the identity provider supports this name ID format, it
returns the requested information in the SAML response, including any attributes. Identity federation
is the mapping of the requested information to the information provided by the identity provider.
Without this mapping, no federation can exist.
Prerequisites
You have trusted a service provider.
For more information, see Adding Service Providers [page 35].
Procedure
1. Start SAP NetWeaver Administrator with the quick link /nwa/auth.
2. Choose SAML 2.0 Trusted Providers .
3 Adding an Identity Provider to Your Network
3.7 Trusting Service Providers
2011-07-18 PUBLIC 39/70
3. Select a service provider and choose the Edit pushbutton.
4. On the Identity Federation tab, choose the Add pushbutton.
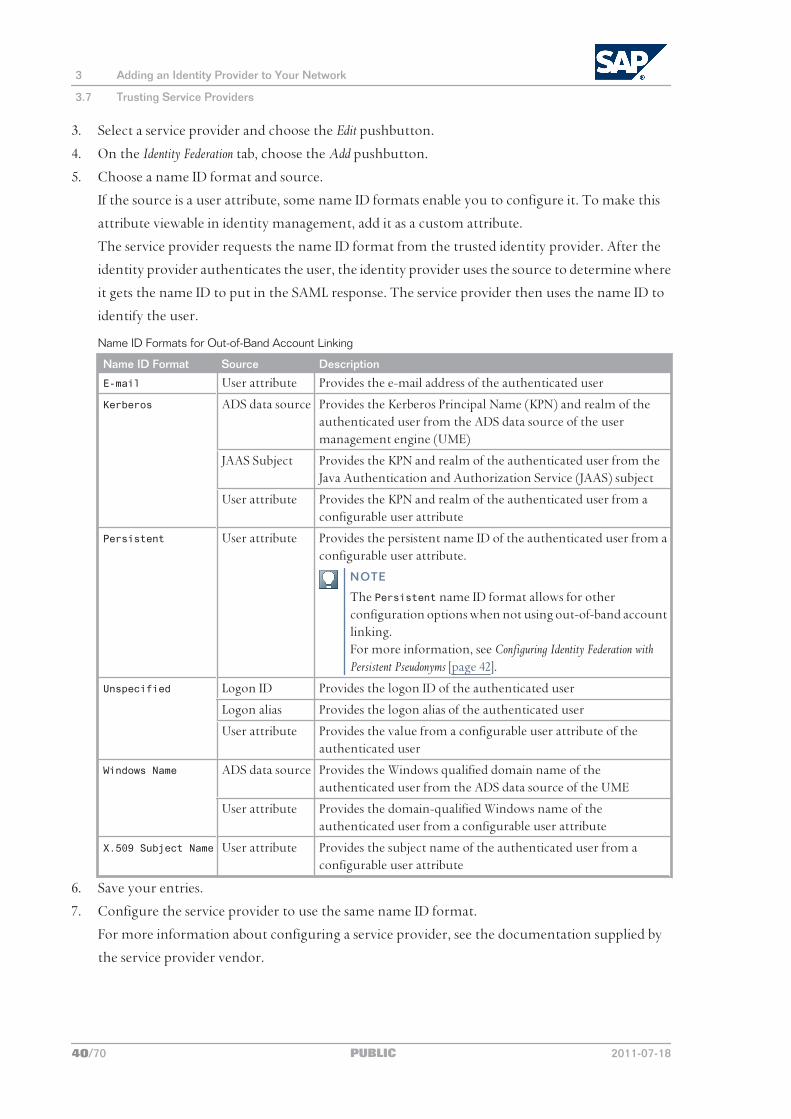
5. Choose a name ID format and source.
If the source is a user attribute, some name ID formats enable you to configure it. To make this
attribute viewable in identity management, add it as a custom attribute.
The service provider requests the name ID format from the trusted identity provider. After the
identity provider authenticates the user, the identity provider uses the source to determine where
it gets the name ID to put in the SAML response. The service provider then uses the name ID to
identify the user.
Name ID Formats for Out-of-Band Account Linking
Name ID Format Source Description
E-mail User attribute Provides the e-mail address of the authenticated user
Kerberos ADS data source Provides the Kerberos Principal Name (KPN) and realm of the authenticated user from the ADS data source of the user management engine (UME)
JAAS Subject Provides the KPN and realm of the authenticated user from the Java Authentication and Authorization Service (JAAS) subject
User attribute Provides the KPN and realm of the authenticated user from a configurable user attribute
Persistent User attribute Provides the persistent name ID of the authenticated user from a configurable user attribute.
NOTE
The Persistent name ID format allows for other configuration options when not using out-of-band account linking.For more information, see Configuring Identity Federation with Persistent Pseudonyms [page 42].
Unspecified Logon ID Provides the logon ID of the authenticated user
Logon alias Provides the logon alias of the authenticated user
User attribute Provides the value from a configurable user attribute of the authenticated user
Windows Name ADS data source Provides the Windows qualified domain name of the authenticated user from the ADS data source of the UME
User attribute Provides the domain-qualified Windows name of the authenticated user from a configurable user attribute
X.509 Subject Name User attribute Provides the subject name of the authenticated user from a configurable user attribute
6. Save your entries.
7. Configure the service provider to use the same name ID format.
For more information about configuring a service provider, see the documentation supplied by
the service provider vendor.
3 Adding an Identity Provider to Your Network
3.7 Trusting Service Providers
40/70 PUBLIC 2011-07-18

Example
Donna Moore has configured her service provider to require the E-mail name ID format. A trusted
identity provider sends her service provider a SAML response with [email protected] as
the subject. The service provider searches for a user with that value as an e-mail address. If the result
is a single user, logon succeeds.
Laurent Becker has a different user ID on the service provider and the identity provider, but his e-mail
address is the same in both systems. A simple mapping would be to have the identity provider use the
E-mail name ID format, too.
Imagine that the identity provider uses the e-mail address for the user ID and does not use an attribute
for e-mail. Then the identity provider would use the Unspecified name ID format to return the user
ID. Donna must reconfigure her service provider to match. If the identity provider cannot support the
E-mail name ID format, Donna must configure the service provider to request the Unspecified name
ID format and select the e-mail user attribute as the source.
3.7.5 Configuring Identity Federation with Transient Users
Identity federation by transient pseudonym identifiers enables service providers to provide
authenticated users with access to their systems, but they do not need to know specific details about
those users. You negotiate with the administrators of service providers to determine what kind of SAML
2 attributes they require. They determine how these attributes are mapped to user attributes, groups,
and roles in their systems, while you handle the management of the users and their authentication.
By managing SAML 2 attributes on your system, you can determine what access the users have on
service providers, without intervention by the administrators of the service providers.
Prerequisites
You have trusted a service provider.
For more information, see Adding Service Providers [page 35].
Procedure
1. Start SAP NetWeaver Administrator with the quick link /nwa/auth.
2. Choose SAML 2.0 Trusted Providers .
3. Select a service provider and choose the Edit pushbutton.
4. On the Identity Federation tab, choose the Add pushbutton.
5. Enter the name ID format Transient.
6. Create a mapping between the SAML 2 attributes and UME attributes to send with the SAML
assertion to the service provider.
You negotiate with the administrator of the service provider, which data goes into the SAML 2
attributes and how you name the attributes. The service provider interprets the SAML 2 attributes
to determine what attributes the transient user has on the service provider. The SAML 2 attributes
3 Adding an Identity Provider to Your Network
3.7 Trusting Service Providers
2011-07-18 PUBLIC 41/70
can refer to user profile, role membership, and group membership. How the service provider
interprets these attributes is dependent on the configuration and implementation of the SAML 2
service provider.
For more information, see the documentation supplied by the service provider vendor.
NOTE
To use custom UME attributes with SAML 2 attributes, you must add them for SAML on the
identity provider.
For more information, see Adding Custom User Attributes for SAML [page 44].
7. Save your entries.
8. Configure the service provider to accept the transient name ID format and map the SAML 2
attributes to transient users.
For more information about configuring a service provider, see the documentation supplied by
the service provider vendor.
3.7.6 Configuring Identity Federation with Persistent Pseudonyms
Use this procedure to enable identity federation when no previous linking between the accounts exists.
Once authenticated by the identity provider, the service provider can enable users to link their account
interactively themselves or the service provider can create a federated account automatically with
SAML 2 attributes supplied by the identity provider. If the accounts are already linked, logon occurs
with the persistent name ID.
You can also use out-of-band account linking with persistent pseudonyms, but the linking must be
established ahead of time.
For more information, see Configuring Out-of-Band Account Linking [page 39].
Prerequisites
■ You have trusted a service provider.
For more information, see Adding Service Providers [page 35].
■ You have determined if the service provider requires SAML attributes for automatic account
creation.
If the service provider is configured to support automatic account creation, the service provider
uses SAML 2 attributes and values sent by the identity provider to create user accounts. To support
this option, you must negotiate with the administrator of the service provider to determine what
data the service provider requires and how to name the SAML 2 attributes carrying the data. You
configure the identity provider to supply these attributes while configuring identity federation
with persistent pseudonyms.
3 Adding an Identity Provider to Your Network
3.7 Trusting Service Providers
42/70 PUBLIC 2011-07-18
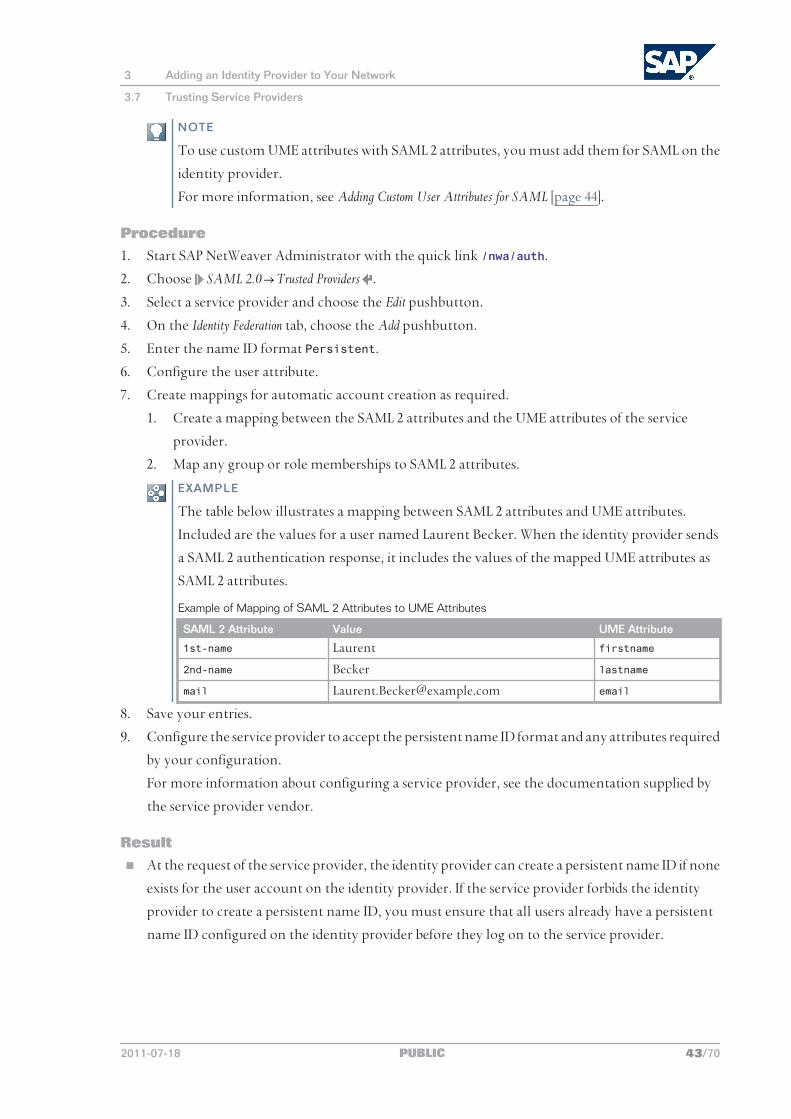
NOTE
To use custom UME attributes with SAML 2 attributes, you must add them for SAML on the
identity provider.
For more information, see Adding Custom User Attributes for SAML [page 44].
Procedure
1. Start SAP NetWeaver Administrator with the quick link /nwa/auth.
2. Choose SAML 2.0 Trusted Providers .
3. Select a service provider and choose the Edit pushbutton.
4. On the Identity Federation tab, choose the Add pushbutton.
5. Enter the name ID format Persistent.
6. Configure the user attribute.
7. Create mappings for automatic account creation as required.
1. Create a mapping between the SAML 2 attributes and the UME attributes of the service
provider.
2. Map any group or role memberships to SAML 2 attributes.
EXAMPLE
The table below illustrates a mapping between SAML 2 attributes and UME attributes.
Included are the values for a user named Laurent Becker. When the identity provider sends
a SAML 2 authentication response, it includes the values of the mapped UME attributes as
SAML 2 attributes.
Example of Mapping of SAML 2 Attributes to UME Attributes
SAML 2 Attribute Value UME Attribute
1st-name Laurent firstname
2nd-name Becker lastname
mail [email protected] email
8. Save your entries.
9. Configure the service provider to accept the persistent name ID format and any attributes required
by your configuration.
For more information about configuring a service provider, see the documentation supplied by
the service provider vendor.
Result
■ At the request of the service provider, the identity provider can create a persistent name ID if none
exists for the user account on the identity provider. If the service provider forbids the identity
provider to create a persistent name ID, you must ensure that all users already have a persistent
name ID configured on the identity provider before they log on to the service provider.
3 Adding an Identity Provider to Your Network
3.7 Trusting Service Providers
2011-07-18 PUBLIC 43/70
■ For automatic account creation, the service provider can specify that specific SAML 2 attributes
are required. For automatic account creation to succeed, you must ensure that those attributes
are populated for all users.
Example
Donna Moore has recently configured her network to SAML 2.0. The users are still logging in to each
system with a separate user ID and password. Donna has set up a new identity provider with all users
and assigned each one a persistent name ID. She has just upgraded her legacy systems to support SAML
2.0 as service providers. In each system she trusts the SAML 2.0 identity provider and requires the
Persistent name ID format. Since all the users already know their passwords in each system, she
enables interactive account linking. Whenever a user logs on to a system for the first time since
conversion, the user enters his or her logon information and the service provider adds the persistent
name ID from the identity provider to the local account. Donna does not need to go through the
laborious process of adding the persistent ID to every account in every system. The users do it
themselves.
3.7.7 Trust When the Host is Service Provider and Identity Provider
The following applies to the trust relationship between a service provider and an identity provider
enabled on the same SAP NetWeaver Application Server (AS) Java:
■ Trust is implicit between the identity provider and the service provider. You do not need to
configure trust between the two SAML 2 entities.
■ You cannot configure endpoints and name ID formats in the trust relationship. The providers
share endpoints. Every user authenticated on the identity provider is automatically authenticated
for the service provider, because the entities have the same user store and authentication
framework.
■ The service provider can trust identity providers in addition to the identity provider on the host.
3.7.8 Adding Custom User Attributes for SAML
To map user attributes other than the attributes that are part of user profile by default to SAML attributes
in a SAML 2.0 authentication response, you must add them to the system. The identity provider uses
these attributes in persistent and transient federation.
For more information, see the following:
■ Configuring Identity Federation with Persistent Pseudonyms [page 42]
■ Configuring Identity Federation with Transient Users [page 41]
3 Adding an Identity Provider to Your Network
3.7 Trusting Service Providers
44/70 PUBLIC 2011-07-18
Procedure
1. Start SAP NetWeaver Administrator with the quick link /nwa/auth.
2. Choose SAML 2.0 Local Provider .
3. Choose the Edit pushbutton.
4. Choose the User Attributes tab.
5. Choose the Add pushbutton.
6. Enter data as required.
7. Save your entries.
More Information
Other application can define custom attributes, too. You can also make existing custom attributes
available for the SAML configuration. To identify the technical names of custom attributes from other
applications, try the following:
■ If the identity management user interface has been configured to support management of the
custom attribute, you can refer to the UME configuration.
■ The attribute may be defined in the UME data source configuration file.
■ Contact the application developer or refer to the application documentation or source code.
3 Adding an Identity Provider to Your Network
3.7 Trusting Service Providers
2011-07-18 PUBLIC 45/70

This page is left blank for documents that are printed on both sides.
4 Optional Configurations
This section describes configuration options you can use to optimize or improve the operation of the
identity provider.
■ Securing SAML Bindings [page 47]
■ Enabling HTTP Access to SAML Endpoints [page 49]
■ Configuring the Metadata and Metadata Access [page 50]
■ Identifying the Identity Provider to Service Providers [page 50]
■ Including Legacy Systems in Your SAML 2.0 Landscape [page 52]
■ Enabling Service Providers to Share Persistent Name IDs [page 52]
■ Configuring the Validity Period for SAML Messages [page 53]
■ Configuring the Lifetime of Identity Provider Sessions [page 54]
■ Setting the Timeout for Database Lock in Clusters [page 55]
■ Identity Provider Proxy [page 14]
■ Configuring Identity Providers as Proxies [page 55]
■ Disabling IdP-Initiated and SP-Initiated SSO and SLO [page 56]
■ Adding Custom Authentication Contexts [page 57]
■ Mapping Authentication Contexts to Login Modules [page 57]
■ Determining the Channel Used for SLO by the Identity Provider [page 58]
4.1 Securing SAML Bindings
Depending on how you have configured the trust between your SAML identity provider and its trusted
service provider, the SAML messages exchanged can include authentication-relevant or personal
information. Information of this kind includes user ID, name, last name, address, and telephone
number. Exposing such information may expose your network to risk from eavesdroppers or violate
local compliance regulations.
The SAML standard provides signature and encryption configurations to protect SAML bindings:
■ Digital signatures validate the service of the provider.
You configure what messages the identity provider signs and what messages must be signed by the
service provider. The identity provider rejects unsigned messages that require signatures.
■ Encryption makes sensitive information unreadable without decoding.
4 Optional Configurations
4.1 Securing SAML Bindings
2011-07-18 PUBLIC 47/70
You configure what information the identity provider encodes and what information must be
encoded by the service provider. The identity provider rejects messages with unencrypted
information, where encrypted information is required.
If your network configuration allows it, you can also use back-channel communication to protect the
client from sensitive information. Even back-channel communication can require protection, if the
communication directly between service provider and identity provider is not secure.
For more information, see Configuring Back-Channel Communication [page 28].
PrerequisitesThis procedure assumes you have already configured trust with a service provider and you want to
change these settings as a follow on procedure. You can make these same settings during trust
configuration.
For more information, see Adding Service Providers [page 35].
RECOMMENDATION
This procedure also assume that the public-key certificates you use to encrypt and check digital
signatures have been configured. Although you can change the configuration public-key
certificate with this procedure, we recommend that you perform an update of the trusted provider
instead.
For more information, see Updating the Configuration of Trusted Providers [page 37].
Procedure1. Start SAP NetWeaver Administrator with the quick link /nwa/auth.
2. Choose SAML 2.0 Trusted Providers .
3. Select a service provider and choose the Edit pushbutton.
4. Choose the Signature and Encryption tab.
5. Choose the signature and encryption options for requests, responses, and assertions for Single
Sign-On (SSO), Single Log-Out (SLO), and artifact resolution.
The signature and encryption options must match with those of the service provider. If the service
provider requires SAML assertions always be digitally signed and the identity provider never signs
them, then the SAML configuration cannot function.
RECOMMENDATION
Give some thought to your encryption and signature options and make choices that make
sense for your configuration. These also depend on the environment in which your SAML
network is working. Systems that operate in a secured area behind a firewall have different
requirements from systems exposed to the Internet. We have the following
recommendations:
■ Encryption
Encrypt or require encryption for those elements that can expose authentication or other
personal data about the users. If you use the transient or persistent name ID formats,
4 Optional Configurations
4.1 Securing SAML Bindings
48/70 PUBLIC 2011-07-18
these name IDs are already opaque. There is no need to encrypt these name IDs. The e-
mail name ID format, however, can reveal the users real name and contact information.
When using the transient and persistent name ID formats, you can send attributes. These
attributes can also reveal personal information, which you should encrypt.
■ Digital signatures
The SAML standard provides many points in the process at which you can sign and check
for signatures. Do this only where it makes sense. For example, you can require signature
of the SAML assertion and the SAML response. It does not make sense for the identity
provider to sign the SAML response and then pack it in a SAML assertion and sign it again
before sending the assertion to the service provider. This would only make sense if you
developed a custom process to separate the SAML response from the SAML assertion and
send the response over a third party before the response is processed. You can further
complicate the process by using the HTTP artifact binding and requiring signature of the
artifact response. The identity provider signs the message three times.
6. Save your entries.
7. Ensure the configuration of the service provider matches the changes you made.
For more information, see the documentation supplied by the service provider vendor.
4.2 Enabling HTTP Access to SAML Endpoints
Some user agents cannot support Secure Socket Layer (SSL) to protect HTTP. To support such users,
you can enalbe the access to SAML endpoints over HTTP.
RECOMMENDATION
We recommend the use of SSL to prevent eavesdroppers from accessing authentication
information in SAML messages. You can protect authentication information with encryption and
by using the back channel.
For more information, see the following
■ Securing SAML Bindings [page 47]
■ Configuring Back-Channel Communication [page 28]
Procedure
1. Start SAP NetWeaver Administrator with the quick link /nwa/auth.
2. Choose SAML 2.0 Local Provider .
3. Choose the Edit pushbutton.
4. Choose the General Settings tab.
5. Under Miscellaneous, choose Yes in the Allow HTTP Access field.
6. Save your entries.
4 Optional Configurations
4.2 Enabling HTTP Access to SAML Endpoints
2011-07-18 PUBLIC 49/70
Result
If you change the configuration of your identity provider, update the configurations of any service
providers that trust your identity provider to match.
4.3 Configuring the Metadata and Metadata Access
Other SAML 2 providers can trust an SAML 2 provider of SAP NetWeaver Application Server (AS) Java
by accessing the metadata XML file. You can configure how the AS Java offers the metadata: by URL
or by download from the configuration user interface. You can also determine if the file should be
signed digitally and whether it includes any contact information from your organization.
Procedure
1. Start SAP NetWeaver Administrator with the quick link /nwa/auth.
2. Choose SAML 2.0 Local Provider .
3. Choose the Metadata tab.
4. Choose the Edit pushbutton.
5. Determine if you want to enable access to the metadata URL.
Public access to this URL is disabled by default. By providing access to this URL, you enable your
partners to easily configure their SAML 2 provider to trust your system. But you must consider
the security risk of exposing the endpoints and bindings you support to potential attackers.
To enable public access, enter Enabled in the Public Access field.
6. Determine if you want the metadata digitally signed.
Many SAML 2 providers require metadata XML files to be signed digitally to guarantee that the file
is genuine. Add a digital signature to ensure that other providers can verify that the metadata XML
file came from your SAML 2 provider.
To have the provider sign the metadata, enter Yes in the Sign Metadata field.
7. Enter any contact data.
Adding human-readable contact data to the metadata XML file, enables the operators of other
SAML 2 providers to contact you or your organization with questions about your provider and
the services you offer.
8. Save your entries.
More Information
Accessing the Metadata XML of SAML Identity Providers [page 66]
4.4 Configuring the Identity Provider for Discovery With CDCs
Different applications on a service provider can require different identity providers. A service provider
requires the means to discover which identity provider it should use. One way is to use a common
4 Optional Configurations
4.3 Configuring the Metadata and Metadata Access
50/70 PUBLIC 2011-07-18
domain cookie. A common domain cookie stores a list of the identity providers recently visited. A write
service for the common domain cookie is available on the identity provider side. It allows the identity
provider to append itself to the list of identity providers stored in the CDC. At the opposite side, the
service provider has a read service for the common domain cookie. It allows the service provider to
read and use the CDC identity providers list.
The identity provider can use either an internal or external write service or both. An internal CDC
write service is one that is located in the same domain as the identity provider. An external CDC write
service is one located in a different domain. If you are using an external CDC service, you need to
configure:
■ The list of sites the CDC service is allowed to redirect to, and add the identity provider to this list
■ The list of identity providers stored in the CDC, and add the identity provider to this list
For the internal CDC write service, this is not necessary.
For more information, see Common Domain and Identity Provider Discovery [page 12].
Write Service of AS Java
Every SAP NetWeaver Application Server (AS) Java 7.2 and later includes a read and write CDC service.
As an external service you can use the following URL:
https://<hostname> :<port> /saml2 /idpdiscovery /write
Procedure
Defining the CDC Write Service to be Used by the Identity Provider
1. Start SAP NetWeaver Administrator with the quick link /nwa/auth.
2. Choose SAML 2.0 Local Provider
3. Choose the Edit pushbutton.
4. Choose the Identity Provider Settings tab.
5. Specify whether you want to enable internal or external CDC write service. You can enable both
at the same time.
■ If you enabled access to the CDC internal service, determine when the cookie expires and relax
the domain until the identity provider and service provider share the common domain.
■ If you enable access to the CDC external service, enter the URL of the service including the
fully qualified domain name. Configure the external service as required.
If you enable an external CDC write service, you need to specify a valid CDC write service URL.
Configuring the External CDC Write Service
1. Open the CDC write service configuration window. This can be done in one of the following ways:
■ Directly in your Web browser
Use the following URL:
https://<hostname>:<port>/webdynpro/resources/sap.com/tc~sec~saml2~cfg~wd/
IdPDiscConfig?idp=<idp_name>
4 Optional Configurations
4.4 Configuring the Identity Provider for Discovery With CDCs
2011-07-18 PUBLIC 51/70
■ Using the SAML2 configuration interface
Open the SAML2 configuration user interface, and choose Local Provider Identity Provider Settings
Identity Provider Discovery: Common Domain Cookie (CDC) External CDC Write Service URL Configure
External CDC Write Service .
2. Choose Edit.
3. Add the identity provider’s site to the allowed redirect sites for the CDC read service.
Use the format <protocol>://<hostname>:<port>.
4. add the identity provider to the list of identity providers allowed in the common domain cookie.
5. Save your entries.
4.5 Including Legacy Systems in Your SAML 2.0 Landscape
Not all releases of SAP software support Security Assertion Markup Language (SAML) 2.0. These systems
can still benefit from having SAML 2.0 in the system landscape. Configure your identity provider to
issue logon tickets when a user logs on. This enables legacy systems within the domain to perform
Single Sign-On initiated by the SAML 2 authentication.
NOTE
If your identity provider is also a service provider, the logon ticket is only issued once, even if the
resource the user accesses is protected by the local identity provider and service provider.
Prerequisites
■ You have configured your legacy systems to accept logon tickets.
■ Ideally the user ID of users on the identity provider is identical to their user IDs on the legacy
systems. If not, you must configure user mapping.
Procedure
1. Start SAP NetWeaver Administrator with the quick link /nwa/auth.
2. Choose SAML 2.0 Local Provider .
3. Choose the Edit pushbutton.
4. Choose the General Settings tab.
5. Under Miscellaneous, enter On in the Legacy Systems Support (Issue Logon Ticket) field.
6. Save your entries.
4.6 Enabling Service Providers to Share Persistent Name IDs
A given persistent name ID exists only once per user pairing between an identity provider and a service
provider. You can configure a group of service providers to share the persistent name IDs for each user.
All service providers that take part in an affiliation, identify themselves to the identity provider with
4 Optional Configurations
4.5 Including Legacy Systems in Your SAML 2.0 Landscape
52/70 PUBLIC 2011-07-18
the affiliation ID. So long as the identity provider configuration shows the service provider is in that
affiliation, the identity provider sends the persistent name ID configured for the user in the affiliation.
The identity provider returns an error when a service provider makes an authentication request for
an affiliation it is not a member of.
Prerequisites
You have configured your identity provider to use the persistent name ID format with the target service
providers.
For more information, see Configuring Identity Federation with Persistent Pseudonyms [page 42].
Procedure
1. Start SAP NetWeaver Administrator with the quick link /nwa/auth.
2. Choose SAML 2.0 Trusted Providers .
3. Show Affiliations.
4. Choose the Add pushbutton.
5. Enter an ID for the affiliation and a user attribute and namespace to store the persistent name ID.
The identity provider writes the persistent name ID to the user record in this user attribute.
6. Add members to the affiliation.
1. Select an affiliation and choose the Edit pushbutton.
2. Under Members of affiliation "<affiliation_ID>", choose the Add pushbutton.
3. Select one or more trusted service providers.
4. Save your entries.
7. Configure any service providers that are to participate in the affiliation to use the same affiliation
ID.
For more information, see the documentation provided by your service provider vendor.
4.7 Configuring the Validity Period for SAML Messages
To secure you service provider, limit the validity period of Security Assertion Markup Language (SAML)
2.0 messages that the service provider receives. However, delays in computer networks and skewed
clocks can cause otherwise valid messages to become invalid. Use this procedure to configure how
much time before and after the instant the identity provider created the SAML message that the service
provider can accept it. The time of message creation is recorded in the SAML message in the
IssueInstant attribute.
Procedure
1. Start SAP NetWeaver Administrator with the quick link /nwa/auth.
2. Choose SAML 2.0 Local Provider .
3. Choose the Edit pushbutton.
4 Optional Configurations
4.7 Configuring the Validity Period for SAML Messages
2011-07-18 PUBLIC 53/70
4. Choose the General Settings tab.
5. Under Miscellaneous, configure the validity period for SAML messages by entering how many
minutes before and after a message was issued that it becomes invalid.
NOTE
The default validity period is up to 5 minutes before and no more than 10 minutes after the
message was created.
6. Save your entries.
4.8 Configuring the Lifetime of Identity Provider Sessions
Your strategy for identity provider sessions depends on how often your users interact with the identity
provider and how many users you have for your resources. Each HTTP session uses ICM and database
resources. You must balance this with how often you can expect to force your users to re authenticate.
Procedure
1. Start SAP NetWeaver Administrator with the quick link /nwa/auth.
2. Choose SAML 2.0 Local Provider .
3. Choose the Identity Provider Settings tab.
4. Under Single Sign-On Service
5. Configure the lifetime of identity provider sessions according to the table below.
Based on the number of users you expect to log on at the same time on your system, you can
estimate how quickly sessions are added to the system. If you expect heavy usage and space is an
issue for your database, set lower values.
CAUTION
If you set a value that is too high, your database fills with expired sessions causing a decrease
in system performance, or worst case, causing your system to become unresponsive.
Parameter Description
Identity Provider Session Timeout This property determines how long the identity provider keeps a session alive without modification. An identity provider modifies the session when a service provider requests re authentication or authentication with another authentication context.
Cleanup Interval for Expired Sessions This property determines how often expired identity provider sessions are deleted from the database.
More Information
Monitoring Identity Provider Sessions [page 62]
4 Optional Configurations
4.8 Configuring the Lifetime of Identity Provider Sessions
54/70 PUBLIC 2011-07-18
4.9 Setting the Timeout for Database Lock in Clusters
When the identity provider modifies tables in the database, it acquires a lock from the enqueue server
to ensure instances in the cluster remain consistent. You can configure the length of time the identity
provider waits for a lock. If no lock is returned, the identity provider returns an error.
Under heavy traffic the identity provider returns more errors. Increase the timeout to prevent
authorization requests from failing because of requests that time out while trying to acquire a lock.
You can decrease the timeout period to prevent authorization requests from taking too long before
coming back with an answer. However, there is a real danger that the request simply fails when the
cluster is too busy.
Procedure
1. Start SAP NetWeaver Administrator with the quick link /nwa/auth.
2. Choose SAML 2.0 Local Provider .
3. Choose the Identity Provider Settings tab.
4. Choose the Edit pushbutton.
5. Under Miscellaneous, enter a value in the Lock Obtaining Timeout field.
6. Save your entries.
4.10 Configuring Identity Providers as Proxies
An identity provider functioning as a proxy can ease the management of configuring trust when there
is a large number of identity providers and service providers in your SAML 2 landscape.
Prerequisites
■ Your identity provider is also a service provider.
For more information, see Enabling the SAML Identity Provider [page 26].
■ You have one or more identity providers to serve as authenticating identity providers in your
SAML 2 landscape.
■ You have one or more service providers in your SAML 2 landscape.
Procedure
1. Configure trust.
■ The proxying identity provider trusts service providers in your SAML 2 landscape.
For more information, see Adding Service Providers [page 35].
■ The service provider of the proxying identity provider trusts authenticating identity providers
in your SAML 2 landscape.
For more information, see the documentation for trusting identity providers on the SAP Help
Portal for SAP NetWeaver Application Server (AS) Java.
2. Start SAP NetWeaver Administrator with the quick link /nwa/auth.
4 Optional Configurations
4.9 Setting the Timeout for Database Lock in Clusters
2011-07-18 PUBLIC 55/70
3. Choose SAML 2.0 Local Provider .
4. Choose the Identity Provider Settings tab.
5. Choose the Edit pushbutton.
6. Determine if you want to enforce proxying.
Unless another identity provider is specified in the authentication request or in the URL parameter
saml2idp in the case of IdP-initiated Single Sign-On (SSO), the proxying identity provider attempts
to authenticate the user. To prevent the identity provider from authenticating the user, you can
enforce proxying.
To enforce proxying, enter Yes in the Enforce Proxying field under Single Sign-On Service (SSO).
Do not use this option if you want this identity provider to authenticate users for service providers.
7. Enter a proxy count restriction for the identity provider.
The identity provider uses the proxy count restriction if it does not receive a proxy count value in
an authentication response. The identity provider then inserts this value in the assertion it hands
down the chain.
8. Choose the Service Provider Settings tab.
9. Under Miscellaneous, enter a proxy count restriction for the service provider.
The identity provider uses the proxy count restriction if it does not receive a proxy count value in
an authentication request. The identity provider then inserts this value in the request it hands up
the chain.
10. Save your entries.
4.11 Disabling IdP-Initiated and SP-Initiated SSO and SLO
Under SAML, clients can initiate Single Sign-On (SSO) and Single Log-Out (SLO) at either the identity
provider (IdP) or the service provider (SP). You can control whether the service provider accepts SAML
messages initiated at the service provider or identity provider. Thus you determine what kind of access
clients have to your SAML landscape.
Procedure
1. Start SAP NetWeaver Administrator with the quick link /nwa/auth.
2. Choose SAML 2.0 Local Provider .
3. Choose the Identity Provider Settings tab.
4. Under Single Sign-On Service, deselect the supported types of SSO you do not want to allow.
5. Under Single Log-Out Service, deselect the supported type of SLO you do not want to allow.
6. Save your entries.
4 Optional Configurations
4.11 Disabling IdP-Initiated and SP-Initiated SSO and SLO
56/70 PUBLIC 2011-07-18
4.12 Adding Custom Authentication Contexts
If the service provider offers an authentication context for authentication requests that is not part of
the standard configuration of the identity provider, you can add the authentication context as a custom
authentication context. Your service provider can then request that the identity provider use this
context to authenticate users.
Prerequisites
You know the name of the authentication context from the operator of the service provider.
Procedure
1. Start the SAML 2.0 configuration application (transaction SAML2).
2. On the Local Provider tab, choose the Authentication Contexts tab.
3. Choose the Edit pushbutton.
4. Choose the Add pushbutton.
5. Enter a display name for the authentication context in the Alias field.
6. Enter the name of the authentication context as it is required by the service provider in the Name
field.
When required, the service provider enters the name of the authentication context in the
authentication request.
7. Save your entries.
8. Map the new authentication context to a login module.
For more information, see Mapping Authentication Contexts to Login Modules [page 57].
4.13 Mapping Authentication Contexts to Login Modules
By default the identity provider supports the following authentication contexts through the login
modules mapped in the table below.
Mapping of SAML 2 Authentication Contexts to Login Modules
Authentication Context Login Module
Kerberos SPNegoLoginModule
Password BasicPasswordLoginModule
PasswordProtectedTransport BasicPasswordLoginModule
SAPLogonTicket EvaluateTicketLoginModule
TLSClient ClientCertLoginModule
By changing these mappings or by adding new mappings you can control how users are authenticated
at the identity provider for the authentication context requested by the service provider.
4 Optional Configurations
4.12 Adding Custom Authentication Contexts
2011-07-18 PUBLIC 57/70
Prerequisites
■ The authentication context you want to map to exists.
All the authentication contexts required by the standard exist by default. You can add custom
authentication contexts.
For more information, see Adding Custom Authentication Contexts [page 57].
■ Matching login module for the authentication context exists on the SAP NetWeaver Application
Server (AS) Java.
For more information about developing custom login modules, see the online documentation at
http://help.sap.com.
Procedure
1. Start the SAML 2.0 configuration application (transaction SAML2).
2. Choose the Identity Provider Settings tab.
3. Choose the Edit pushbutton.
4. Choose the Add pushbutton.
5. Enter data as required.
6. Make any required configurations for HTTPS.
■ To enable Secure Sockets Layer support for the authentication context, select the HTTPS
checkbox.
■ To make the authentication a default HTTPS authentication context, choose Copy to Default
HTTPS Authentication Context and determine the order in which the identity provider should
take the authentication contexts.
7. Save your entries.
4.14 Determining the Channel Used for SLO by the Identity Provider
When a service provider initiates Single Log-Out (SLO), the identity provider passes on SLO requests
to other service providers using the channel configured for the default SLO endpoint for that provider.
When the identity provider initiates SLO or if the local service provider of the identity provider initiates
SLO, you can configure how the identity provider reacts.
Procedure
1. Start SAP NetWeaver Administrator with the quick link /nwa/auth.
2. Choose SAML 2.0 Local Provider .
3. Choose the Identity Provider Settings tab.
4. Under Single Log-Out Service, select the default channel for SLO.
4 Optional Configurations
4.14 Determining the Channel Used for SLO by the Identity Provider
58/70 PUBLIC 2011-07-18
Value Description
Back Channel The identity provider passes on logout requests to service providers over a SOAP binding. If there is no SLO endpoint configured for a service provider, the identity provider does not attempt to send a logout request.
Front Channel (Default) The identity provider passes on logout requests to service providers over the binding used by the default SLO endpoint for the service provider.
5. Save your entries.
4.15 Disabling the SAML 2.0 Provider
Use this procedure when you no longer need SAP NetWeaver Application Server (AS) Java to perform
as a Security Assertion Markup Language (SAML) 2 identity provider.
Prerequisites
You have ensured that all resources protected by SAML 2.0 have an alternative authentication
mechanism.
Procedure
1. Start SAP NetWeaver Administrator with the quick link /nwa/auth.
2. Choose SAML 2.0 .
3. Choose the Local Provider link.
4. Disable or delete the configuration.
■ To disable the configuration, choose the Disable pushbutton.
The AS Java saves the SAML 2.0 configuration. You can re-enable SAML 2.0 at any time.
■ To delete the configuration, choose the Delete Configuration pushbutton.
The AS Java deletes the SAML 2 configuration. You can decide to keep or delete the related
keystore entries and certificates.
4 Optional Configurations
4.15 Disabling the SAML 2.0 Provider
2011-07-18 PUBLIC 59/70

This page is left blank for documents that are printed on both sides.
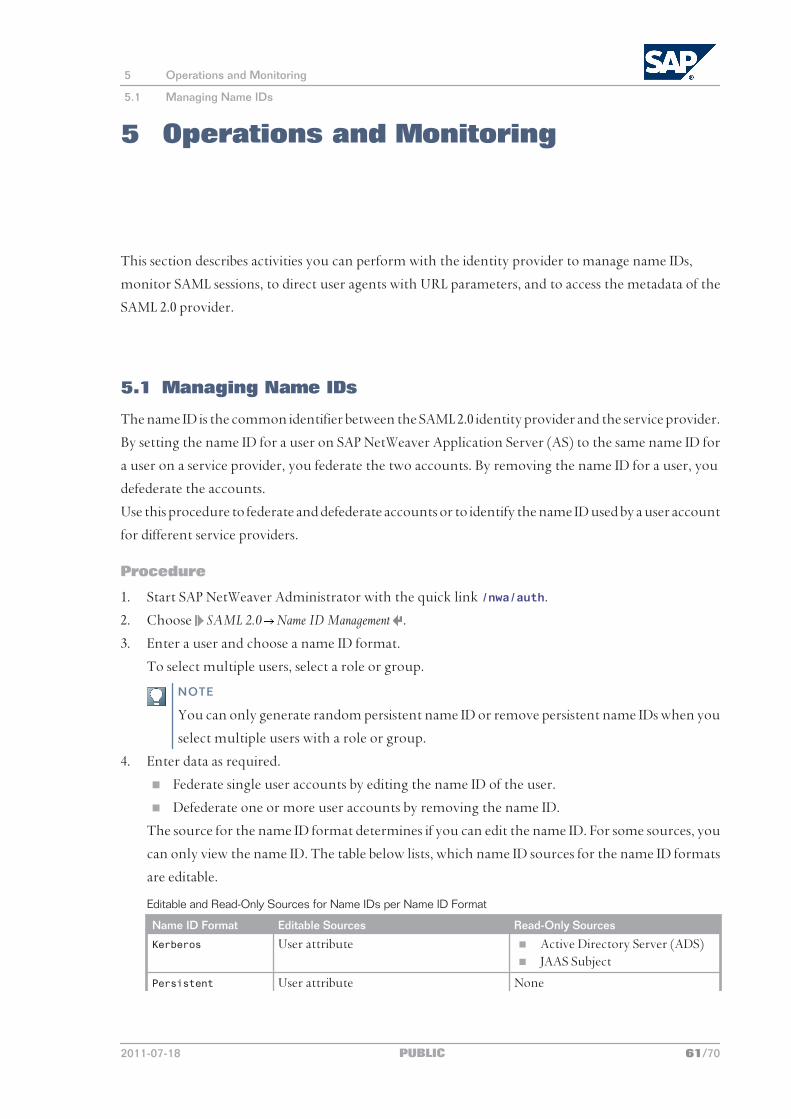
5 Operations and Monitoring
This section describes activities you can perform with the identity provider to manage name IDs,
monitor SAML sessions, to direct user agents with URL parameters, and to access the metadata of the
SAML 2.0 provider.
5.1 Managing Name IDs
The name ID is the common identifier between the SAML 2.0 identity provider and the service provider.
By setting the name ID for a user on SAP NetWeaver Application Server (AS) to the same name ID for
a user on a service provider, you federate the two accounts. By removing the name ID for a user, you
defederate the accounts.
Use this procedure to federate and defederate accounts or to identify the name ID used by a user account
for different service providers.
Procedure
1. Start SAP NetWeaver Administrator with the quick link /nwa/auth.
2. Choose SAML 2.0 Name ID Management .
3. Enter a user and choose a name ID format.
To select multiple users, select a role or group.
NOTE
You can only generate random persistent name ID or remove persistent name IDs when you
select multiple users with a role or group.
4. Enter data as required.
■ Federate single user accounts by editing the name ID of the user.
■ Defederate one or more user accounts by removing the name ID.
The source for the name ID format determines if you can edit the name ID. For some sources, you
can only view the name ID. The table below lists, which name ID sources for the name ID formats
are editable.
Editable and Read-Only Sources for Name IDs per Name ID Format
Name ID Format Editable Sources Read-Only Sources
Kerberos User attribute ■ Active Directory Server (ADS) ■ JAAS Subject
Persistent User attribute None
5 Operations and Monitoring
5.1 Managing Name IDs
2011-07-18 PUBLIC 61/70
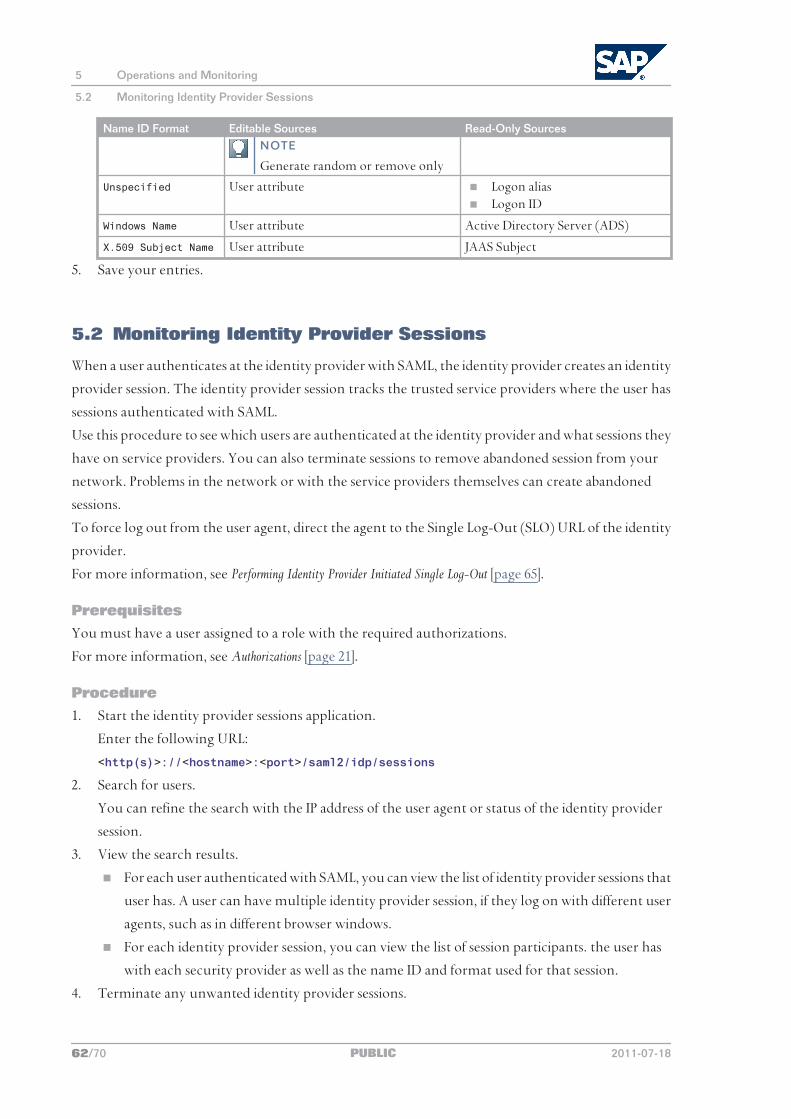
Name ID Format Editable Sources Read-Only SourcesNOTE
Generate random or remove only
Unspecified User attribute ■ Logon alias ■ Logon ID
Windows Name User attribute Active Directory Server (ADS)
X.509 Subject Name User attribute JAAS Subject
5. Save your entries.
5.2 Monitoring Identity Provider Sessions
When a user authenticates at the identity provider with SAML, the identity provider creates an identity
provider session. The identity provider session tracks the trusted service providers where the user has
sessions authenticated with SAML.
Use this procedure to see which users are authenticated at the identity provider and what sessions they
have on service providers. You can also terminate sessions to remove abandoned session from your
network. Problems in the network or with the service providers themselves can create abandoned
sessions.
To force log out from the user agent, direct the agent to the Single Log-Out (SLO) URL of the identity
provider.
For more information, see Performing Identity Provider Initiated Single Log-Out [page 65].
Prerequisites
You must have a user assigned to a role with the required authorizations.
For more information, see Authorizations [page 21].
Procedure
1. Start the identity provider sessions application.
Enter the following URL:
<http(s)>:// <hostname>: <port> /saml2 /idp /sessions
2. Search for users.
You can refine the search with the IP address of the user agent or status of the identity provider
session.
3. View the search results.
■ For each user authenticated with SAML, you can view the list of identity provider sessions that
user has. A user can have multiple identity provider session, if they log on with different user
agents, such as in different browser windows.
■ For each identity provider session, you can view the list of session participants. the user has
with each security provider as well as the name ID and format used for that session.
4. Terminate any unwanted identity provider sessions.
5 Operations and Monitoring
5.2 Monitoring Identity Provider Sessions
62/70 PUBLIC 2011-07-18
5.3 Auditing and Performance Monitoring
The identity provider uses the audit logs and performance traces of the host SAP NetWeaver Application
Server (AS) Java to record audit and performance information.
Audit Information
The identity provider uses the log viewer of the AS Java under the /System/Security/
Authentication category.
The identity provider records the following information:
■ Logout responses
■ Received logout responses
■ Authentication requests
Performance Information
The identity provider uses the Java system reports of the AS Java under the /Performance/IDP category.
The identity provider records the following information from the artifact response service:
■ Successful calls
■ Failed calls
■ Response time
5.4 Troubleshooting on the Identity Provider
ProcedureUse the security troubleshooting wizard to gather traces relating to authentication problems with
SAML 2.0
1. Start SAP NetWeaver Administrator.
2. Choose Troubleshooting Logs and Traces Security Troubleshooting Wizard .
3. Enter SAML 2.0 (info) as the incident type for diagnostics.
4. Choose the Start Diagnostics pushbutton.
5. Reproduce the problem.
6. Choose the Stop Diagnostics pushbutton.
7. Review the traces.
Try collecting traces on the service provider as well, in case that is the source of the problem.
If you still require help, collect traces again with the incident type SAML 2.0 (debug) and provide
them to SAP Support.
5.5 Performing Identity Provider-Initiated Single Sign-On
Use this procedure to start the Single Sign-On (SSO) process at the identity provider, instead of starting
with the user agent at the service provider. Some possible reasons for doing this include:
5 Operations and Monitoring
5.3 Auditing and Performance Monitoring
2011-07-18 PUBLIC 63/70
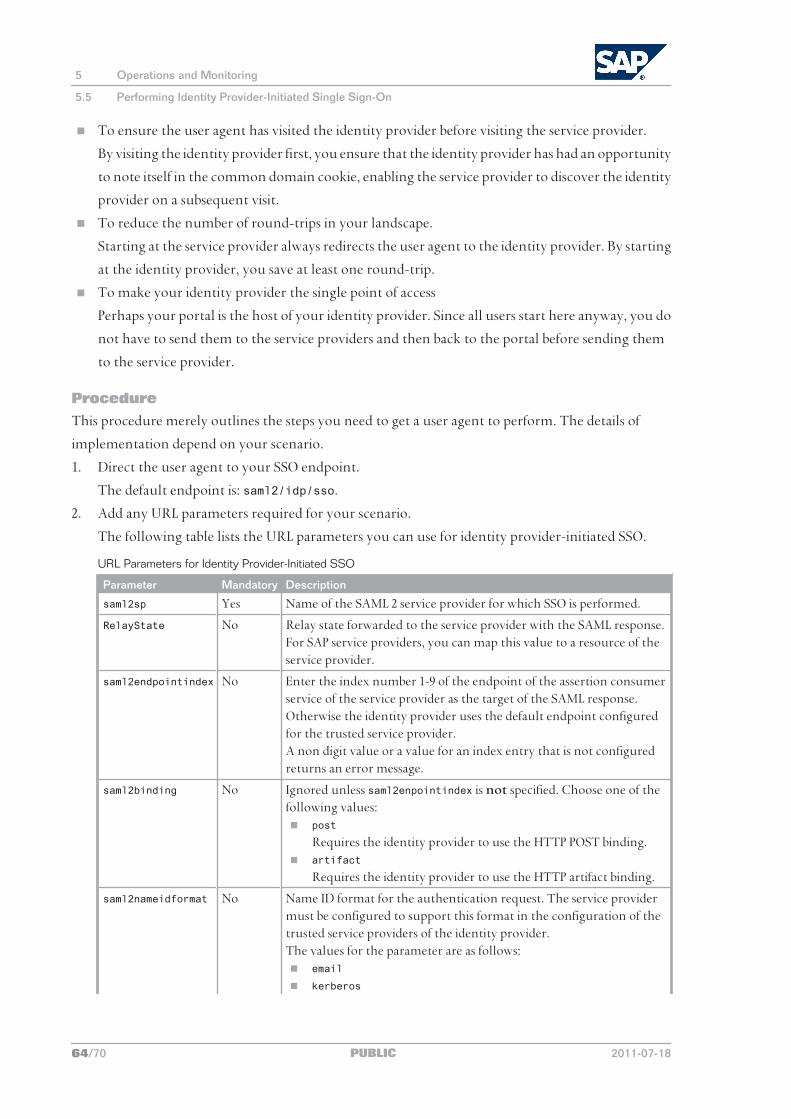
■ To ensure the user agent has visited the identity provider before visiting the service provider.
By visiting the identity provider first, you ensure that the identity provider has had an opportunity
to note itself in the common domain cookie, enabling the service provider to discover the identity
provider on a subsequent visit.
■ To reduce the number of round-trips in your landscape.
Starting at the service provider always redirects the user agent to the identity provider. By starting
at the identity provider, you save at least one round-trip.
■ To make your identity provider the single point of access
Perhaps your portal is the host of your identity provider. Since all users start here anyway, you do
not have to send them to the service providers and then back to the portal before sending them
to the service provider.
Procedure
This procedure merely outlines the steps you need to get a user agent to perform. The details of
implementation depend on your scenario.
1. Direct the user agent to your SSO endpoint.
The default endpoint is: saml2/idp/sso.
2. Add any URL parameters required for your scenario.
The following table lists the URL parameters you can use for identity provider-initiated SSO.
URL Parameters for Identity Provider-Initiated SSO
Parameter Mandatory Description
saml2sp Yes Name of the SAML 2 service provider for which SSO is performed.
RelayState No Relay state forwarded to the service provider with the SAML response.For SAP service providers, you can map this value to a resource of the service provider.
saml2endpointindex No Enter the index number 1-9 of the endpoint of the assertion consumer service of the service provider as the target of the SAML response. Otherwise the identity provider uses the default endpoint configured for the trusted service provider.A non digit value or a value for an index entry that is not configured returns an error message.
saml2binding No Ignored unless saml2enpointindex is not specified. Choose one of the following values: ■ post
Requires the identity provider to use the HTTP POST binding. ■ artifact
Requires the identity provider to use the HTTP artifact binding.
saml2nameidformat No Name ID format for the authentication request. The service provider must be configured to support this format in the configuration of the trusted service providers of the identity provider.The values for the parameter are as follows: ■ email
■ kerberos
5 Operations and Monitoring
5.5 Performing Identity Provider-Initiated Single Sign-On
64/70 PUBLIC 2011-07-18
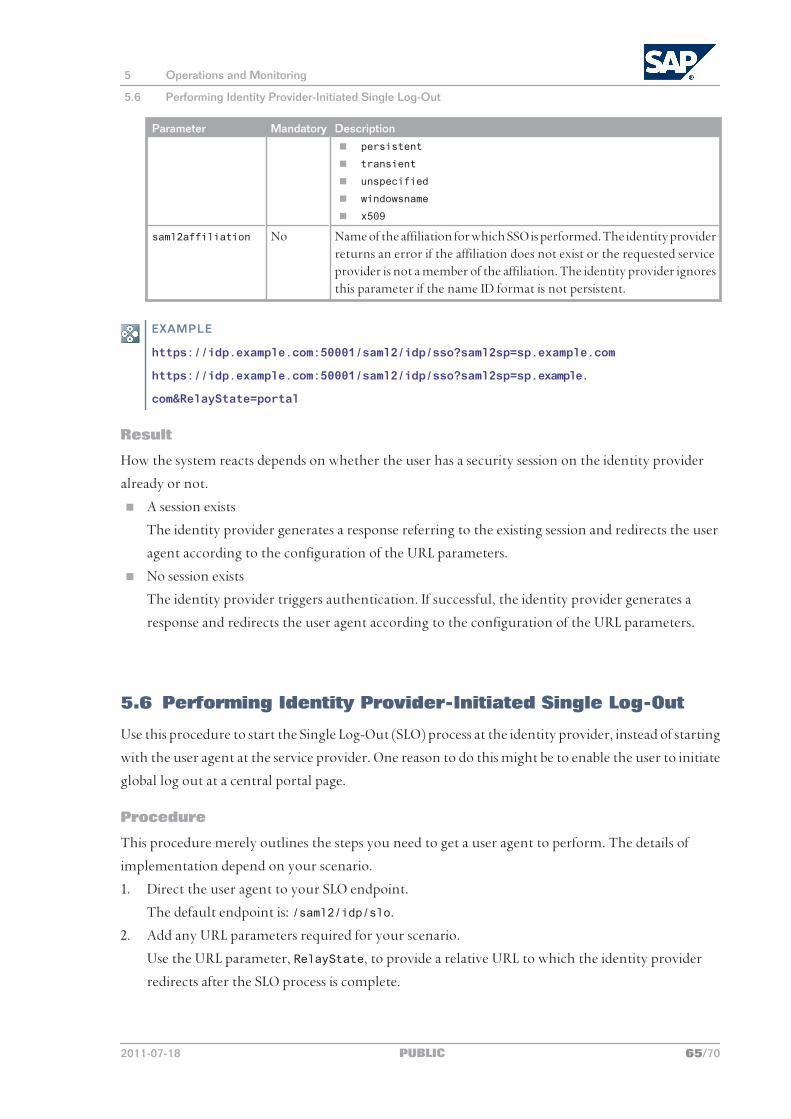
Parameter Mandatory Description
■ persistent
■ transient
■ unspecified
■ windowsname
■ x509
saml2affiliation No Name of the affiliation for which SSO is performed. The identity provider returns an error if the affiliation does not exist or the requested service provider is not a member of the affiliation. The identity provider ignores this parameter if the name ID format is not persistent.
EXAMPLE
https://idp. example. com: 50001/saml2/idp/sso? saml2sp=sp. example. com
https://idp. example. com: 50001/saml2/idp/sso? saml2sp=sp. example.
com&RelayState=portal
Result
How the system reacts depends on whether the user has a security session on the identity provider
already or not.
■ A session exists
The identity provider generates a response referring to the existing session and redirects the user
agent according to the configuration of the URL parameters.
■ No session exists
The identity provider triggers authentication. If successful, the identity provider generates a
response and redirects the user agent according to the configuration of the URL parameters.
5.6 Performing Identity Provider-Initiated Single Log-Out
Use this procedure to start the Single Log-Out (SLO) process at the identity provider, instead of starting
with the user agent at the service provider. One reason to do this might be to enable the user to initiate
global log out at a central portal page.
Procedure
This procedure merely outlines the steps you need to get a user agent to perform. The details of
implementation depend on your scenario.
1. Direct the user agent to your SLO endpoint.
The default endpoint is: /saml2/idp/slo.
2. Add any URL parameters required for your scenario.
Use the URL parameter, RelayState, to provide a relative URL to which the identity provider
redirects after the SLO process is complete.
5 Operations and Monitoring
5.6 Performing Identity Provider-Initiated Single Log-Out
2011-07-18 PUBLIC 65/70
EXAMPLE
https://idp. example. com: 50001/saml2/idp/slo
https://idp. example. com: 50001/saml2/idp/slo ?RelayState= /logout.htm
Result
Using URLs, you can trigger logout in all security sessions on the service provider and the security
session on the identity provider. After successful logout, the identity provider either displays a success
message or redirects to the URL provided in the relay state.
5.7 Accessing the Metadata XML of SAML Identity Providers
The easiest way to trust a SAML 2.0 identity provider is to import its metadata XML file. The metadata
XML file includes the following:
■ Address and name of the identity provider
■ List of endpoint configurations the identity provider supports
■ Public-key certificates for decryption and checking of the identity provider’s digital signature
This procedure explains how to access the metadata XML file of the identity provider of the SAP
NetWeaver Application Server (AS) Java.
Prerequisites
■ The SAML identity provider is enabled.
■ You have configured the endpoints for Single Sign-On (SSO), Single Log-Out (SLO), artifacts, and
SOAP you want to support. Any endpoints you configure later require you to manually reconfigure
your service provider or reimport the metadata XML file.
■ You have configured the metadata XML file and access.
The configuration of the XML file determines whether or not the metadata file is signed digitally.
It also determines how the metadata file can be accessed, by URL or download from the
configuration user interface.
For more information, see Configuring the Metadata and Metadata Access [page 50].
CAUTION
The hostname and protocol generated for the identity provider endpoints in the metadata XML
file are the same as the hostname and protocol you use to access the metadata XML file. Use the
same hostname and protocol you expect the service provider to use, when it accesses the identity
provider endpoints. If you use a hostname that the service provider cannot resolve, or a protocol
that the service provider cannot use, connections from the service provider fail.
5 Operations and Monitoring
5.7 Accessing the Metadata XML of SAML Identity Providers
66/70 PUBLIC 2011-07-18
Procedure
Downloading the Metadata XML File
1. Start SAP NetWeaver Administrator with the quick link /nwa/auth.
2. Choose SAML 2.0 Local Provider .
3. Choose the Download Metadata pushbutton.
If you require the metadata to be signed, you have the option to select another public-key certificate
to sign the metadata. Use this option if you already have another method of trust set up to sign
the metadata instead of the provider certificate.
To use this option clear the Use Provider Signing Keypair checkbox and select the required keystore
entry.
4. Choose Download Metadata and save the XML file.
Accessing the URL of the Metadata XML File
When configuring the service providers you want your SAML identity provider to trust, enter the
following URL for the AS Java host system:
https://<hostname>:<port>/saml2/metadata
NOTE
To access the metadata XML file with HTTP, you must enable HTTP access to the SAML service
provider.
For more information, see Enabling HTTP Access to SAML Endpoints [page 49].
5 Operations and Monitoring
5.7 Accessing the Metadata XML of SAML Identity Providers
2011-07-18 PUBLIC 67/70
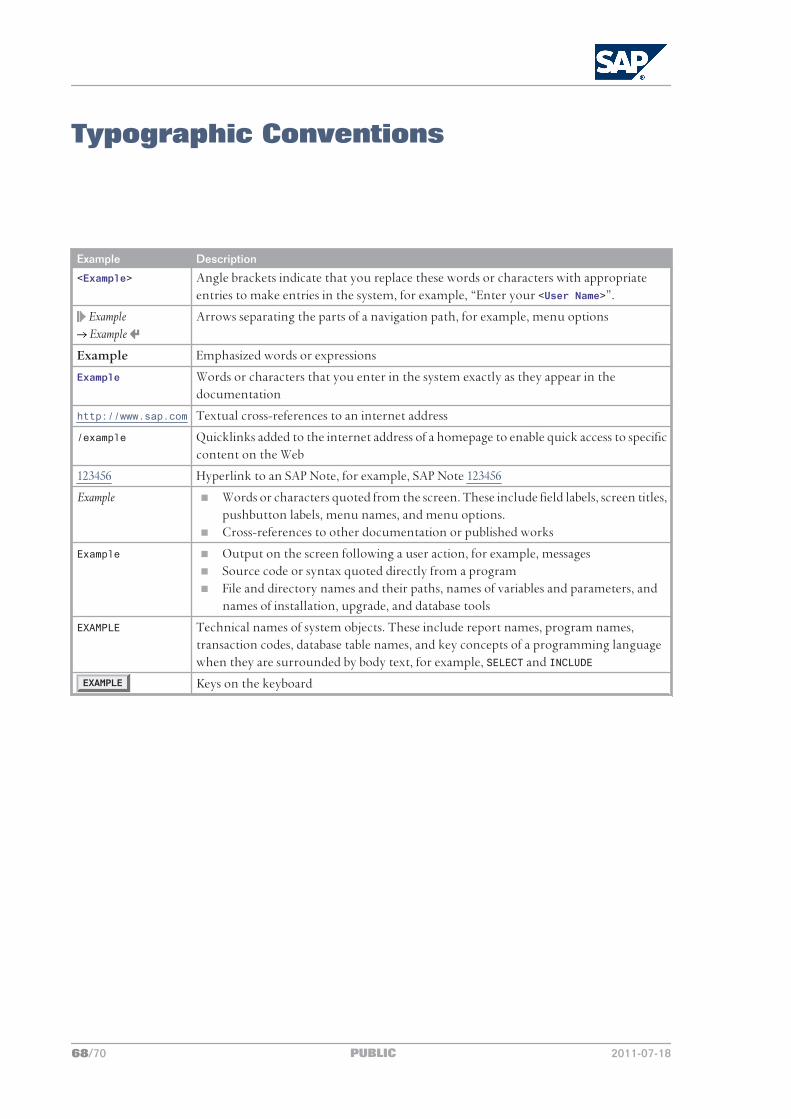
Typographic Conventions
Example Description
<Example> Angle brackets indicate that you replace these words or characters with appropriate entries to make entries in the system, for example, “Enter your <User Name>”.
ExampleExample
Arrows separating the parts of a navigation path, for example, menu options
Example Emphasized words or expressions
Example Words or characters that you enter in the system exactly as they appear in the documentation
http://www.sap.com Textual cross-references to an internet address
/example Quicklinks added to the internet address of a homepage to enable quick access to specific content on the Web
123456 Hyperlink to an SAP Note, for example, SAP Note 123456
Example ■ Words or characters quoted from the screen. These include field labels, screen titles, pushbutton labels, menu names, and menu options.
■ Cross-references to other documentation or published works
Example ■ Output on the screen following a user action, for example, messages ■ Source code or syntax quoted directly from a program ■ File and directory names and their paths, names of variables and parameters, and
names of installation, upgrade, and database tools
EXAMPLE Technical names of system objects. These include report names, program names, transaction codes, database table names, and key concepts of a programming language when they are surrounded by body text, for example, SELECT and INCLUDE
EXAMPLE Keys on the keyboard
68/70 PUBLIC 2011-07-18
SAP AGDietmar-Hopp-Allee 16
69190 WalldorfGermany
T +49/18 05/34 34 34F +49/18 05/34 34 20
www.sap.com
© Copyright 2011 SAP AG. All rights reserved.
No part of this publication may be reproduced or transmitted in any form or for any purpose without the express permission of SAP AG. The information contained herein may be changed without prior notice.Some software products marketed by SAP AG and its distributors contain proprietary software components of other software vendors.
Microsoft, Windows, Excel, Outlook, and PowerPoint are registered trademarks of Microsoft Corporation.IBM, DB2, DB2 Universal Database, System i, System i5, System p, System p5, System x, System z, System z10, System z9, z10, z9, iSeries, pSeries, xSeries, zSeries, eServer, z/VM, z/OS, i5/OS, S/390, OS/390, OS/400, AS/400, S/390 Parallel Enterprise Server, PowerVM, Power Architecture, POWER6+, POWER6, POWER5+, POWER5, POWER, OpenPower, PowerPC, BatchPipes, BladeCenter, System Storage, GPFS, HACMP, RETAIN, DB2 Connect, RACF, Redbooks, OS/2, Parallel Sysplex, MVS/ESA, AIX, Intelligent Miner, WebSphere, Netfinity, Tivoli and Informix are trademarks or registered trademarks of IBM Corporation.Linux is the registered trademark of Linus Torvalds in the U.S. and other countries.Adobe, the Adobe logo, Acrobat, PostScript, and Reader are either trademarks or registered trademarks of Adobe Systems Incorporated in the United States and/or other countries.Oracle is a registered trademark of Oracle Corporation.UNIX, X/Open, OSF/1, and Motif are registered trademarks of the Open Group.Citrix, ICA, Program Neighborhood, MetaFrame, WinFrame, VideoFrame, and MultiWin are trademarks or registered trademarks of Citrix Systems, Inc.HTML, XML, XHTML and W3C are trademarks or registered trademarks of W3C®, World Wide Web Consortium, Massachusetts Institute of Technology.Java is a registered trademark of Sun Microsystems, Inc.JavaScript is a registered trademark of Sun Microsystems, Inc., used under license for technology invented and implemented by Netscape.SAP, R/3, SAP NetWeaver, Duet, PartnerEdge, ByDesign, SAP BusinessObjects Explorer, and other SAP products and services mentioned herein as well as their respective logos are trademarks or registered trademarks of SAP AG in Germany and other countries.Business Objects and the Business Objects logo, BusinessObjects, Crystal Reports, Crystal Decisions, Web Intelligence, Xcelsius, and other Business Objects products and services mentioned herein as well as their respective logos are trademarks or registered trademarks of Business Objects Software Ltd. in the United States and in other countries.Sybase and Adaptive Server, iAnywhere, Sybase 365, SQL Anywhere, and other Sybase products and services mentioned herein as well as their respective logos are trademarks or registered trademarks of Sybase, Inc. Sybase is an SAP company.All other product and service names mentioned are the trademarks of their respective companies. Data contained in this document serves informational purposes only. National product specifications may vary.These materials are subject to change without notice. These materials are provided by SAP AG and its affiliated companies (“SAP Group”) for informational purposes only, without representation or warranty of any kind, and SAP Group shall not be liable for errors or omissions with respect to the materials. The only warranties for SAP Group products and services are those that are set forth in the express warranty statements accompanying such products and services, if any. Nothing herein should be construed as constituting an additional warranty.
DisclaimerSome components of this product are based on Java™. Any code change in these components may cause unpredictable and severe malfunctions and is therefore expressly prohibited, as is any decompilation of these components.Any Java™ Source Code delivered with this product is only to be used by SAP’s Support Services and may not be modified or altered in any way.
2011-07-18 PUBLIC 69/70

SAP AGDietmar-Hopp-Allee 1669190 WalldorfGermanyT +49/18 05/34 34 34F +49/18 05/34 34 20www.sap.com
© Copyright 2011 SAP AG. All rights reserved.No part of this publication may be reproduced or transmitted in any form or for any purpose without the express permission of SAP AG. The information contained herein may be changed without prior notice.