Embed Size (px)
Citation preview
PUBLIC
Installation Guide
SAP NetWeaver 7.0SR3 StandaloneEngine ‒ SAP liveCacheTechnology: WindowsTarget Audience
n Technology Consultants
n System Administrators
Document version: 1.0 ‒ 03/28/2008
Document History
Caution
Before you start the implementation, make sure you have the latest version of this document,which you can find here:http://service.sap.com/installnw70
The following table provides an overview of the most important document changes.
Version Date Description
1.0 3/28/2008 Initial Version
2/54 PUBLIC 03/28/2008
Table of Contents
Chapter 1 Introduction . . . . . . . . . . . . . . . . . . . . . . . 51.1 New Features . . . . . . . . . . . . . . . . . . . . . . . . 51.2 Before You Start . . . . . . . . . . . . . . . . . . . . . . . 61.2.1 SAP Notes for the Installation . . . . . . . . . . . . . . . . . . 61.2.2 More Information on SAP Service Marketplace . . . . . . . . . . . 61.2.3 Naming Conventions . . . . . . . . . . . . . . . . . . . . . 6
Chapter 2 Planning . . . . . . . . . . . . . . . . . . . . . . . . . 92.1 Software Requirements Check . . . . . . . . . . . . . . . . . 9
Chapter 3 Preparation . . . . . . . . . . . . . . . . . . . . . . . . 113.1 Choosing a liveCache System Name . . . . . . . . . . . . . . . 113.2 Checking liveCache File Systems . . . . . . . . . . . . . . . . . 113.3 Installing the Java Runtime Environment . . . . . . . . . . . . . 123.4 Preparing the Installation Media . . . . . . . . . . . . . . . . . 133.4.1 Preparing the Installation DVDs . . . . . . . . . . . . . . . . . 133.4.2 Downloading Installation DVDs from SAP Service Marketplace (Optional) . 13
Chapter 4 Installation . . . . . . . . . . . . . . . . . . . . . . . . 154.1 Installing liveCache Using SAPinst . . . . . . . . . . . . . . . . 154.1.1 Running SAPinst to Install liveCache . . . . . . . . . . . . . . . 154.1.2 Using SAPinst GUI . . . . . . . . . . . . . . . . . . . . . . 184.1.3 Interrupted Installation with SAPinst . . . . . . . . . . . . . . . 184.1.4 Performing a Remote Installation with SAPinst (Optional) . . . . . . . 204.1.5 Starting SAPinst GUI Separately (Optional) . . . . . . . . . . . . . 21
Chapter 5 Post-Installation . . . . . . . . . . . . . . . . . . . . . . 235.1 Common Post-Installation Activities . . . . . . . . . . . . . . . 235.1.1 Setting Up the Connection to the liveCache Instance . . . . . . . . . 235.1.2 Checking the liveCache Instance . . . . . . . . . . . . . . . . . 255.1.3 Changing Password of Created Users . . . . . . . . . . . . . . . 265.1.4 Setting Up a liveCache Super User . . . . . . . . . . . . . . . . 265.2 Post-Installation Activities Specific to Workforce Deployment Server . . . . 275.3 Installing the Administration Tools . . . . . . . . . . . . . . . . 275.4 Secure Sockets Layer Protocol for Database Server Communication . . . . 28
03/28/2008 PUBLIC 3/54
5.4.1 Installing the SAP Cryptographic Library . . . . . . . . . . . . . . 295.4.2 Generating the Personal Security Environment . . . . . . . . . . . 30
Chapter 6 Additional Information . . . . . . . . . . . . . . . . . . . 336.1 Operating Information for liveCache . . . . . . . . . . . . . . . 336.2 Uninstalling liveCache . . . . . . . . . . . . . . . . . . . . 336.3 Troubleshooting with SAPinst . . . . . . . . . . . . . . . . . . 33
Chapter 7 High Availability with Microsoft Cluster Service . . . . . . . . . 357.1 Planning . . . . . . . . . . . . . . . . . . . . . . . . . 367.1.1 Distribution of Components to Disks for MSCS . . . . . . . . . . . 367.1.2 Directories in an MSCS Configuration . . . . . . . . . . . . . . . 387.1.3 IP Addresses in an MSCS Configuration . . . . . . . . . . . . . . 397.1.4 Obtaining IP Addresses for MSCS . . . . . . . . . . . . . . . . . 427.2 Preparation . . . . . . . . . . . . . . . . . . . . . . . . 447.2.1 Checking Hardware and Software Requirements for MSCS . . . . . . . 457.2.2 Assigning Drive Letters for MSCS . . . . . . . . . . . . . . . . 467.2.3 Mapping Host Names to IP Addresses for MSCS . . . . . . . . . . . 467.2.4 Checking the Mapping of Host Names for MSCS . . . . . . . . . . . 477.3 Installation . . . . . . . . . . . . . . . . . . . . . . . . . 487.3.1 Installing liveCache on the First Node . . . . . . . . . . . . . . . 497.3.2 Configuring liveCache on the Additional Node . . . . . . . . . . . 50
4/54 PUBLIC 03/28/2008
1 Introduction
1 Introduction
This documentation explains how to install the server for SAP liveCache Technology. SAP liveCacheis used in SAP Supply Chain Management (SCM) and Workforce Deployment (WFD).liveCache is SAP’s memory-resident object management technology that enables higher levels ofperformance in business processing for SAP Supply Chain Management (SCM) and WorkforceDeployment (WFD) Server.
Caution
Make sure you have the latest version of this document. See the version number on the frontpage. You can always find the latest version at:http://service.sap.com/installNW70 Installation ‒ Standalone Engines
For more information about SAP SCM technology, seehttp://service.sap.com/scm SAP SCM Technology
For more information about Resource Planning, see either of the following:http://service.sap.com/crm
http://service.sap.com/cprojects
If required, you can install liveCache with Microsoft Cluser Service (MSCS). For more information,see High Availability with Microsoft Cluster Service [page 35].
1.1 New Features
Area Description
Database SAP MaxDB Release 7.6.00
Operating systems See the Product Availability Matrix (PAM) at:http://service.sap.com/pam
SAP Notes You can now access SAP Notes directly from your PDF. Place thecursor on the SAP Note <number> and double-click. A separatebrowser windows opens and the SAP Note is displayed.
Links in PDF files You can use the new links in the PDF files of the guides as follows:n Click the section headings such asNew Features to jump back to
the table of contents at the beginning of the guide.n Click an internet link such as http://service.sap.com to
jump to the corresponding internet page.
03/28/2008 PUBLIC 5/54
1 Introduction1.2 Before You Start
1.2 Before You Start
Make sure that you read the following sections before you start the installation:
n SAP Notes for the Installation [page 6]n Information Available on SAP Service Marketplace [page 6]n Naming Conventions [page 6]
1.2.1 SAP Notes for the Installation
Read the following SAP Notes, which you can find at http://service.sap.com/notes:
Note Number Title
863952 liveCache 7.6 Installation
833216 Parameter values as of liveCache version 7.6 and 7.7
305634 RFC destination for global working on the liveCache
1.2.2 More Information on SAP Service Marketplace
You can find more information on SAP Service Marketplace as follows:
Description Address
liveCache Installation Guide http://service.sap.com/installNW70
Installation Installation ‒ Standalone Engines
Product Availability Matrix (PAM) http://service.sap.com/pam
SAP Notes http://service.sap.com/notes
1.2.3 Naming Conventions
We use the following naming conventions in this documentation:
Variable Description
INST_DIR Installation directory
LC_HOST Domain or server name where the liveCache isinstalled
LC_NAME Name of liveCache instance consisting of threecapital letters
6/54 PUBLIC 03/28/2008

1 Introduction1.2 Before You Start
Variable Description
LC_HOME Directory where the liveCache software is installed
LC_USER Operating system user for the liveCache instance
03/28/2008 PUBLIC 7/54

This page is intentionally left blank.
2 Planning
2 Planning
To plan the installation you need to:
n Check the software requirements [page 9]n Check the hardware requirements by using the Quick Sizer tool, which you can find at:
http://service.sap.com/sizing
2.1 Software Requirements Check
For the most up-to-date information on the database and operating system of your product, checkthe SAP Product Availability Matrix (PAM) at:http://service.sap.com/pam
03/28/2008 PUBLIC 9/54

This page is intentionally left blank.
3 Preparation
3 Preparation
Prerequisites
You have completed planning the installation [page 9].
Process Flow
You have to complete the following preparations:
1. You choose a liveCache system name [page 11].2. You check liveCache file systems [page 11].3. You prepare the system for SAPinst [page 12].4. You prepare the installation media [page 13].
3.1 Choosing a liveCache System Name
Choose a liveCache name, <LC_NAME>, noting the following restrictions.
n The liveCache system name must be unique throughout your organization and must consist ofexactly three alphanumeric characters.
n Only uppercase letters are allowed.n The first character must be a letter (not a digit).n Since the following names are reserved for SAP systems, you cannot use them for your liveCache
system:ADD ALL AND ANY ASC B20 B30 BCO BIN COM DBA END EPS FOR GID
IBM INT KEY LOG MON NOT OFF OMS P30 RAW ROW SAP SET SGA SHG
SID SQL SYS TMP UID VAR
Note
Choose your liveCache system name carefully. It is complex to rename and you have to reinstallliveCache.
3.2 Checking liveCache File Systems
Make sure that you have enough space for the following on your disk:
03/28/2008 PUBLIC 11/54
3 Preparation3.3 Installing the Java Runtime Environment
Description Recommendation
liveCache software and LCA objects 300 MB
Additional trace files for problem analysis 3 GB
3.3 Installing the Java Runtime Environment
You need to prepare your system for SAPinst. This includes the installation of a Java RuntimeEnvironment (JRE), which is required both for SAPinst and the SAPinst GUI.
Note
If required, you can perform a remote installation using a standalone SAPinst GUI on a separateWindows or UNIX host. This lets you perform the installation on a remote host, controlling itwith the SAPinst GUI from a local host. If you want to perform a remote installation, see Performinga Remote Installation with SAPinst [page 20]. In this case, you need at least a JRE on the local host tostart the SAPinst GUI there.
Procedure
1. Check the JRE versions that are released for SAP systems in the Product Availability Matrix (PAM):a) Go to http://service.sap.com/pam.b) On the right-hand panel, choose SAP NetWeaver SAP NetWeaver 7.0 .c) Choose tabstrip JSE Platforms.For more information about the recommended JDK version and about how to obtain it, seeSAP Note 709140.
2. Make sure a valid JRE version is installed, as follows:n If JRE is not already installed
Since JRE is not part of the SAP shipment, you need to download and install it. JRE is part ofJDK (Java Development Kit).
n If JRE is already installedCheck the installed version of JRE by entering:java -version
Note
SAPinst checks environment variable SAPINST_JRE_HOME for a valid Java runtime environment.If SAPINST_JRE_HOME is not found, SAPinst also checks JAVA_HOME.
12/54 PUBLIC 03/28/2008
3 Preparation3.4 Preparing the Installation Media
3.4 Preparing the Installation Media
This section tells you how to prepare [page 13] and download [page 13] your installation media, suchas CDs or DVDs.
3.4.1 Preparing the Installation DVDs
You use this procedure to prepare the installation DVDs.
Note
You can also download installation DVDs from:http://service.sap.com/swdc Downloads Installations and Upgrades Entry by Application Group
<your solution> <release of your solution> .If you download the installation DVDs, keep in mind that DVDs might be split into severaldownloadable files. In this case you have to manually put back together the files that are requiredfor your installation after downloading them.
Recommendation
We recommend that you make all required DVDs available in parallel.
Procedure
1. Identify the required DVDs:n Installation Master DVD
n liveCache 7.6 DVD2. Use one of the following methods to make DVDs available in parallel:n Before the installation:l Have sufficient DVD drives
l Copy DVDs manually to local hard disks
n During the installation:Use the SAPinst DVD / CD Browser dialog. You can check the entered location and then copythe entire DVD to the path you entered in column Copy Package to.
3.4.2 Downloading Installation DVDs from SAP ServiceMarketplace (Optional)
You normally obtain the installation DVDs as part of the installation package from SAP.However, you can also download installation DVDs from:
03/28/2008 PUBLIC 13/54
3 Preparation3.4 Preparing the Installation Media
http://service.sap.com/swdc Downloads Installations and Upgrades Entry by Application Group<your solution> <release of your solution> <your operating system> <your database> .If you download installation DVDs, note that DVDs might be split into several files. In this case, youhave to reassemble the required files after the download.
PrerequisitesTo extract the downloaded SAR files make sure that you use the latest SAPCAR version, which youcan find on SAP Service Marketplace at http://service.sap.com/swdc. You need at least SAPCAR700 or SAPCAR 640 with patch level 4 or higher because older versions of SAPCAR can no longerunpack current SAR files. For more information, see SAP Note 212876.
Procedure
1. Create a download directory on the host on which you want to run SAPinst.2. Identify all download objects that belong to one installation DVD according to one or both of the
following:n Material number
All download objects that are part of an installation DVD have the same material number andan individual sequence number:<material_number>_<sequence_number>
Example
51031387_151031387_2...
n TitleAll objects that are part of an installation DVD have the same title, such as<solution><DVD_name><OS> or <database>RDBMS<OS> for RDBMS DVDs.
3. Download the objects to the download directory.4. Extract the individual download objects using SAPCAR, starting with the lowest sequence number
‒ for example 51031387_1, then 51031387_2, and so on.During the download SAPCAR sets up the structure of the installation DVD.
Note
SAPCAR asks if you want to replace existing files, for example LABELIDX.ASC. Always acceptwith Yes.
14/54 PUBLIC 03/28/2008
4 Installation
4 Installation
You install liveCache using SAPinst [page 15].
4.1 Installing liveCache Using SAPinst
To install liveCache, you need to run SAPinst [page 15].You might need to refer to the following information:
n Using SAPinst GUI [page 18]n Interrupted Installation with SAPinst [page 18]n Performing a Remote Installation with SAPinst (Optional) [page 20]n Starting SAPinst GUI Separately (Optional) [page 21].
4.1.1 Running SAPinst to Install liveCache
This procedure tells you how to install liveCache with SAPinst. SAPinst includes a SAPinst GUIand a GUI server, which both use Java.This section describes an installation where SAPinst, SAPinst GUI, and the GUI server are runningon the same host. If required, you can instead perform a remote installation with SAPinst [page 20], whereSAPinst GUI is running on a separate host from SAPinst and the GUI server.Note the following about SAPinst:
n When you start SAPinst, SAPinst GUI and the GUI server also start. SAPinst GUI connects via asecure SSL connection to the GUI server and the GUI server connects to SAPinst.
n SAPinst normally creates the installation directory sapinst_instdir where it keeps its logfiles, and which is located directly below the Program Files directory. If SAPinst is not able tocreate sapinst_instdir directly below the Program Files directory, SAPinst tries to createsapinst_instdir in the directory defined by the environment variable TEMP.
Recommendation
We recommend that you keep all installation directories until the system is completely andcorrectly installed.
03/28/2008 PUBLIC 15/54

4 Installation4.1 Installing liveCache Using SAPinst
n SAPinst creates a subdirectory for each installation service, called<sapinst_instdir>\<installation_service>, which is located below%ProgramFiles%\sapinst_instdir.
n The SAPinst Self-Extractor extracts the executables to a temporary directory (TEMP, TMP, TMPDIR, orSystemRoot). These executables are deleted after SAPinst has stopped running.Directories with the name sapinst_exe.xxxxxx.xxxx sometimes remain in the temporarydirectory. You can safely delete them.In the temporary directory, you can also find the SAPinst Self-Extractor log file dev_selfex.out,which might be useful if an error occurs.
Caution
If SAPinst cannot find a temporary directory, the installation terminates with the error FCO-00058.
n If you want to terminate SAPinst and the SAPinst Self-Extractor, do one of the following:l Right-click the icon for the SAPinst output window located in theWindows tray and choose Exit.l Click the icon for the SAPinst output window located in the Windows tray and choose File
Exit .
Prerequisites
n You are logged on as user with the required rights and privileges that authorize you to installthe SAPinst tool and the SAP system.
n Each SAP instance requires a separate installation directory.n You need at least 50 MB of free space in the installation directory for an installation. In addition,
you need 60-200 MB free space for the SAPinst executables.
Procedure
1. Insert the SAP Installation Master DVD in your DVD drive or mount it locally.2. Start SAPinst from the SAP Installation Master DVD by double-clicking sapinst.exe from the
following path:<DVD drive>:\IM_WINDOWS_<platform>
SAPinst GUI starts automatically by displaying theWelcome screen.However, if there is only one component to install, SAPinst directly displays the first input dialogwithout presenting theWelcome screen.
16/54 PUBLIC 03/28/2008
4 Installation4.1 Installing liveCache Using SAPinst
Note
n During the installation, the default ports 21200 and 21212 are used for communication betweenSAPinst, GUI server, and SAPinst GUI. SAPinst uses port 21200 to communicate with the GUIserver. The GUI server uses port 21212 to communicate with SAPinst GUI. You get an errormessage if one of these ports is already in use by another service.In this case, open a command prompt and change to the required directory as follows:<DVD drive>:\IM_WINDOWS_<platform>.Enter the following command in a single line:sapinst.exe SAPINST_DIALOG_PORT=<free_port_number_sapinst_gui_to_gui_server>
GUISERVER_DIALOG_PORT=<free_port_number_gui_server_to_sapinst_gui>
n For a list of all available SAPinst properties, enter the following command:sapinst —p.
3. In theWelcome screen, install the liveCache server or client:n liveCache server
Choose SAP NetWeaver 7.0 Support Release 3 Standalone Engines liveCache liveCache ServerInstallation .SAPinst creates a subdirectory for the chosen installation service below the current workingdirectory.
n liveCache clientIf you intend to use liveCache with a server other than SCM, you need to install the liveCacheclient software for the host where the SAP central or dialog instance runs. Otherwise, this isnot necessary.Choose SAP NetWeaver 7.0 Support Release 3 Standalone Engines liveCache liveCache ClientInstallation .
4. If SAPinst prompts you to log off from your system, log off and log on again.SAPinst restarts automatically.
5. Follow the instructions in the SAPinst dialogs and enter the required parameters.
Note
For more information about the input parameters, position the cursor in the field of therespective parameter and press F1 .
After you have entered all required input information, SAPinst starts the installation and displaysthe progress of the installation. If the installation was successful, the screen Finished installationsuccessfully is displayed.
6. We recommend you to delete all files in the directory %userprofile%\.sdtgui\.
More InformationTroubleshooting with SAPinst [page 33].
03/28/2008 PUBLIC 17/54
4 Installation4.1 Installing liveCache Using SAPinst
4.1.2 Using SAPinst GUI
The following table shows the most important functions that are available in SAPinst GUI:
SAPinst GUI Functions
Button / Function Key / Menu Entries Description
F1 Displays detailed information about each inputparameter.
Exit Cancels the installation with the following options:n Stop
Stops the installation without further changing theinstallation files. You can restart SAPinst to continuethe installation later from this point.
n ContinueContinues the installation.
Log off Stops the SAPinst GUI, but SAPinst and the GUI servercontinue running.
NoteIf for some reason you need to log off during theinstallation from the host where you control theinstallation with SAPinst GUI, the installationcontinues while you are logged off. You can laterreconnect to the same SAPinst installation from thesame or another host. For more information, seeStarting SAPinst GUI Separately [page 21].
Retry Performs the installation step again (if an error hasoccurred).
Stop Stops the installation without further changing theinstallation files. You can continue the installation laterfrom this point.
Continue Continues with the option you have chosen before.
4.1.3 Interrupted Installation with SAPinst
The SAP system installation might be interrupted for one of the following reasons:
n An error occurred during the dialog or processing phase:SAPinst does not abort the installation in error situations. If an error occurs, the installation pausesand a dialog box appears. The dialog box contains a short description about the choices listed inthe table below as well as a path to a log file that contains detailed information about the error.
n You interrupted the installation by choosing Exit in the SAPinst menu.
18/54 PUBLIC 03/28/2008

4 Installation4.1 Installing liveCache Using SAPinst
The following table describes the options in the dialog box:
Option Definition
Retry SAPinst retries the installation from the point of failure without repeatingany of the previous steps.This is possible because SAPinst records the installation progress in thekeydb.xml file.We recommend that you view the entries in the log files, try to solve theproblem and then choose Retry.If the same or a different error occurs again, SAPinst displays the samedialog box again.
Stop SAPinst stops the installation, closing the dialog box, the SAPinst GUI, andthe GUI server.SAPinst records the installation progress in the keydb.xml file. Therefore,you can continue the installation from the point of failure withoutrepeating any of the previous steps. See the procedure below.
Continue SAPinst continues the installation from the current point.
ProcedureThis procedure describes the steps to restart an installation, which you stopped by choosing Stop, orto continue an interrupted installation after an error situation.
1. Log on to your remote host as a user who is a member of the local administrators group.2. Insert the Installation Master DVD in your DVD drive.3. Enter the following commands at the Windows command prompt:
cd <DVD drive>:\IM_WINDOWS<platform>
sapinst.exe
4. From the tree structure in theWelcome screen, select the installation service that you want tocontinue and choose Next.
Note
If there is only one component to install, theWelcome screen does not appear.
TheWhat do you want to do? screen appears.5. In theWhat do you want to do? screen, decide between the following alternatives and confirm with OK.
03/28/2008 PUBLIC 19/54
4 Installation4.1 Installing liveCache Using SAPinst
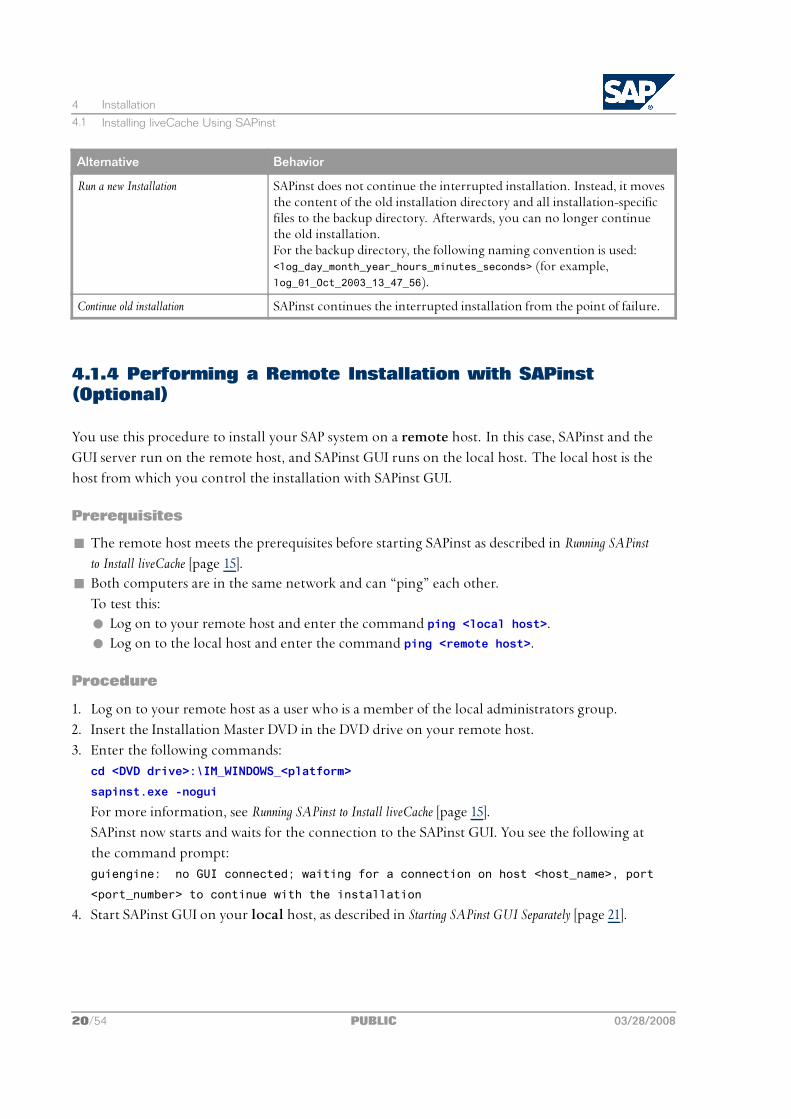
Alternative Behavior
Run a new Installation SAPinst does not continue the interrupted installation. Instead, it movesthe content of the old installation directory and all installation-specificfiles to the backup directory. Afterwards, you can no longer continuethe old installation.For the backup directory, the following naming convention is used:<log_day_month_year_hours_minutes_seconds> (for example,log_01_Oct_2003_13_47_56).
Continue old installation SAPinst continues the interrupted installation from the point of failure.
4.1.4 Performing a Remote Installation with SAPinst(Optional)
You use this procedure to install your SAP system on a remote host. In this case, SAPinst and theGUI server run on the remote host, and SAPinst GUI runs on the local host. The local host is thehost from which you control the installation with SAPinst GUI.
Prerequisites
n The remote host meets the prerequisites before starting SAPinst as described in Running SAPinstto Install liveCache [page 15].
n Both computers are in the same network and can “ping” each other.To test this:l Log on to your remote host and enter the command ping <local host>.l Log on to the local host and enter the command ping <remote host>.
Procedure
1. Log on to your remote host as a user who is a member of the local administrators group.2. Insert the Installation Master DVD in the DVD drive on your remote host.3. Enter the following commands:
cd <DVD drive>:\IM_WINDOWS_<platform>
sapinst.exe -nogui
For more information, see Running SAPinst to Install liveCache [page 15].SAPinst now starts and waits for the connection to the SAPinst GUI. You see the following atthe command prompt:guiengine: no GUI connected; waiting for a connection on host <host_name>, port
<port_number> to continue with the installation
4. Start SAPinst GUI on your local host, as described in Starting SAPinst GUI Separately [page 21].
20/54 PUBLIC 03/28/2008
4 Installation4.1 Installing liveCache Using SAPinst
4.1.5 Starting SAPinst GUI Separately (Optional)
You use this procedure to start SAPinst GUI separately. You might need to start SAPinst GUIseparately in the following cases:
n You have logged off from SAPinst.If you logged off during the installation and you later want to reconnect to the installation while itis still running, you can start SAPinst GUI separately.
n You want to perform a remote installation [page 20].If SAPinst GUI runs on a different host from SAPinst and the GUI server, you have to start SAPinstGUI separately.
PrerequisitesYou have installed the Java Runtime Environment [page 12] on the host on which you want to start SAPinstwithout SAPinst GUI.
Starting SAPinst GUI on a Windows Platform
1. Log on as a member of the local administrators group.2. Insert the SAP Installation Master DVD into your DVD drive.3. To change to the relevant directory enter the following command:
cd <DVD drive>:\IM_WINDOWS<platform>
4. Start SAPinst GUI in one of the following ways:n If SAPinst GUI runs on the same host as SAPinst and the GUI server, enter the following
command:startinstgui.bat
SAPinst GUI uses the local host as default.n If SAPinst and the GUI server runs on a different host from SAPinst GUI (remote installation),
enter the following command:startinstgui.bat -host <host_name>
<host_name> is the host name of the installation host.
Note
l If you enter the command without additional parameters, SAPinst GUI uses the local hostas default. SAPinst GUI starts and tries to connect to the GUI server and SAPinst. SinceSAPinst and the GUI server are running on another host, SAPinst GUI cannot connect andthe SAP Installation GUI Connection dialog appears.In this case, enter the name of the host on which SAPinst is running and choose Log on.The first dialog of the installation appears and you can perform the remote installationfrom your local host.
l For a list of options to start SAPinst GUI, change to the same directory as your SAPinstexecutable and enter the command startinstgui.bat -h.
03/28/2008 PUBLIC 21/54
4 Installation4.1 Installing liveCache Using SAPinst
Starting SAPinst GUI on a UNIX Platform
1. Log on as user root.
Caution
Make sure that the root user has not set any environment variables for a different SAP system ordatabase.
2. Mount your installation DVD.
Note
Mount the DVD locally. We do not recommend that you use Network File System (NFS).
3. To change to the mount directory enter the following command:cd <Installation_Master_DVD>/IM_<OS>
4. Start the SAPinst GUI in one of the following ways:n If SAPinst GUI runs on the same host as SAPinst and the GUI server, enter the following
command without additional parameters:./startInstGui.sh
SAPinst GUI uses as default the local host.n If SAPinst and the GUI server run on a different host from SAPinst GUI (remote installation),
enter the following command with additional parameters:./startInstGui.sh -host <host_name>
<host_name> is the host name of the installation host.
Note
l If you enter the command without additional parameters, SAPinst GUI uses the local hostas default. SAPinst GUI starts and tries to connect to the GUI server and SAPinst. SinceSAPinst and GUI server are running on another host, SAPinst GUI cannot connect and theSAP Installation GUI Connection dialog appears.In this case, enter the name of host on which SAPinst is running and choose Log on.The first dialog of the installation appears and you can perform the remote installationfrom your local host.
l For a list of options to start SAPinst GUI, change to the same directory as your SAPinstexecutable and enter the command ./startInstGui.sh -h.
22/54 PUBLIC 03/28/2008
5 Post-Installation
5 Post-Installation
You perform the following post-installation steps:
Caution
If you are performing a new installation of liveCache during an SCM 5.0 upgrade, to change from anunsupported operating system for liveCache ‒ such as Windows 32-bit ‒ to a supported operatingsystem, do not perform the steps listed below.The exception to this is the step Installing the Administration Tools [page 27], which you can still perform ifrequired.The required liveCache post-installation activities‒ setup of the logical database connection withtransaction LC10 and the loading of the master and transaction data ‒ occur in phase REQ_LCUPGof the SCM upgrade. For more information, see SAP Supply Chain Management 5.0 ABAP: <Your OperatingSystem and Database, which you can find as follows:http://service.sap.com/instguides SAP Business Suite Applications SAP SCM SAP SCM Server
Using SAP SCM 5.0 Server Upgrade Documentation - SAP SCM 5.0
1. You perform common post-installation activities [page 23].2. You perform post-installation activities specific to workforce deployment server [page 27].3. You install administration tools [page 27].4. If required, you install Secure Sockets Layer (SSL) protocol for database server communication [page 28].
5.1 Common Post-Installation Activities
You always need to perform the common post-installation activities listed below, regardless of theserver with which you intend to use liveCache.
5.1.1 Setting Up the Connection to the liveCache Instance
Before checking the connection, you must initialize the liveCache instance using transaction LC10.
Procedure
1. Start the SAP instances:n Windows application server
03/28/2008 PUBLIC 23/54
5 Post-Installation5.1 Common Post-Installation Activities
a) Start service SAP<SID>_<instno>.b) Start the SAP central instance using Microsoft Management Console (if not already
running).n UNIX application server
Restart all SAP central and dialog instances running on UNIX.2. Log on to the SAP System as user DDIC (production client).3. Execute the program SLCA_NON_LC_RELEVANT_CLIENT to maintain your relevant clients for
liveCache.4. Apply SAPNote 305634RFC destination for global working on the liveCache for all liveCache-relevant clients.5. Switch liveCache to state “offline” for the steps below by running the following command on
the liveCache server:dbmcli –d <SID> -u <controluser>,<password> db_offline
6. Call transaction LC10.The liveCache: Initial Screen appears.
7. In the Name of database connection field, enter LCA and choose Integration.8. If not already entered, enter values for the following fields:n The Name of database connection field is used for a NATIVE SQL connection to liveCache.n The liveCache name field is the name of the liveCache database. It can be different from the
name of the database connection.n The server name in the liveCache server name is case-sensitive. It must be the same as the output
from the command hostname in Windows or UNIX.
Note
During the installation, SAPinst prompted you to specify the DBM operator and the standardliveCache user. The DBM operator is control. The standard liveCache user is SAP<SID> by defaultbut you can change this during the liveCache installation if required. The standard liveCache useris created by the lcinit script, which is automatically executed when the liveCache is initialized.
This makes sure that the SAP system connects to the correct liveCache instance.9. Choose the Administration Report tab.10. If you have installed the Add-on LCAPPS_2005_700, enter /SAPAPO/DELETE_LC_ANCHORS
in field Follow-up Procedures of section Initialize liveCache and choose Enter, otherwise enterSLCA_INIT_FOLLOW_UP.
11. Enter the report SLCA_LCK_SYNCHOWNERS as a follow-up report of the liveCache start onthe Administration Report tab.
12. Save your entries.13. Repeat steps 6 to 8 and 12 for the database connections LDA and LEA.
Note
As of liveCache 7.6, you need the database connection LEA in addition to LCA and LDA.
24/54 PUBLIC 03/28/2008
5 Post-Installation5.1 Common Post-Installation Activities
14. To initialize the liveCache instance LCA:a) Choose Back (F3).
The liveCache: Initial Screen reappears.b) Enter LCA in the Name of database connection field.c) Choose liveCache: Monitoring.
Note
Apply SAP Note 446896 if one of the following messages appears:
n Relative node for insert not found LastError node key ...
n Cannot use node of type leaf as parent LastError node key
The screen Properties appears with a tree structure <LC_NAME>(<host name-LC_Name>) inthe left frame.
d) In the tree structure select <LC_NAME>(<host name-LC_Name>) Administration anddouble-click Operating.The liveCache Administrationmenu appears.
e) From the menu, choose Administration Initialize liveCache .Several dialog boxes appear.
f) Confirm with Yes.After initializing liveCache, initial application data is loaded as configured under Integration.
15. Create a backup.
Caution
For LDA and LEA you must not use an administration report. In addition, do not use alertmonitoring for LDA and LEA.
5.1.2 Checking the liveCache Instance
Call transaction LCA03 in a liveCache-relevant client. For more information, see Setting Up theConnection to the liveCache Instance [page 23], step 3.This transaction performs a liveCache check, consisting of a configuration check and a functionalcheck. This also checks whether all required periodic jobs are scheduled. If there are open issuesduring the configuration check, the transaction guides you to fix them immediately.If you get errors during the functional check, open an OSS message for the component BC-DB-LCA.
03/28/2008 PUBLIC 25/54
5 Post-Installation5.1 Common Post-Installation Activities
5.1.3 Changing Password of Created Users
You need to change the passwords of the users that SAPinst creates during the installation. The tablebelow lists these users. You also need to remove the contents of the installation directory and storethem securely because otherwise they might represent a security risk.
Caution
Make sure that you perform this procedure before the newly installed SAP system goes intoproduction.
Procedure
1. Change the passwords of these users.For more information, see:http://service.sap.com/securityguide
For more information about how to change the passwords for the following liveCache users,see SAP Note 25591. SAPinst sets the initial passwords for the user CONTROL to CONTROL and forthe user SUPERDBA to ADMIN.
User Type User Comment
SAP<SAPSID> liveCache database owner (that is,the owner of the database tables)
CONTROL liveCache database manageroperator
liveCache users
SUPERDBA liveCache administration user
2. Remove the contents of the installation directory and store them securely.
5.1.4 Setting Up a liveCache Super User
ProcessYou need to create a liveCache and liveCache applications super user for liveCache administration.Assign the roles SAP_APO_LC_ALL or SAP_LCA_ALL and SAP_BC_LVC_SUPERUSER to the user, asthese roles already contain all required privileges.If you want to create users with limited privileges for transaction LC10 see SAP Note 452745 for moreinformation about the authorization concept for transaction LC10.
26/54 PUBLIC 03/28/2008
5 Post-Installation5.2 Post-Installation Activities Specific to Workforce Deployment Server
5.2 Post-Installation Activities Specific to WorkforceDeployment Server
If you are using SAP liveCache with an SAP WFD Server (Software component WFMCORE 200) seeSAP Note 816727 for more information.
5.3 Installing the Administration Tools
This section describes how to install the following administration tools for SAP MaxDB and SAPliveCache on Windows systems:
n Database Manager GUI and Web DBMYou can use Database Manager GUI andWeb DBM to administer databases, including remote ones.
n SQL Studio and Web SQL StudioYou can use SQL Studio and Web SQL Studio to send SQL statements to the database and evaluatethe results.
Note
The use of these tools for the SAP liveCache is optional. If you do not want to use them, skipthis section.
For more information about these tools, see the following documentation:
n Database Manager GUI andWeb DBM
n SQL Studio andWeb SQL StudioYou can find these at:http://www.mysql.com/maxdb Documentation MaxDB Online Library Tools
Prerequisites
n You can install these administration tools on any Windows PC in your network, even if yourdatabase runs on UNIX. From the PC with the installed administration tool, you can thenadminister the database or send queries to it.
n Your PC must meet the following minimum operating system requirements:
Operating System Version
Windows NT 4.0 SP 4
Windows 2000 Any
Windows Server 2003 Any
Windows XP Any
03/28/2008 PUBLIC 27/54
5 Post-Installation5.4 Secure Sockets Layer Protocol for Database Server Communication
n Your PC must meet the following minimum hardware requirementsl Pentium II
l 64 MB RAM
l 100 MB disk spacen You can get the required files from one of the following:l The SAP liveCache DVD
l By downloading from:http://service.sap.com/patches Entry by Application Group Additional Components MaxDB
MaxDB GUI COMPONENTS/TOOLS
Caution
If SAP MaxDB or SAP liveCache is installed on the PC, you must not install the administrationtools in the same directory. You can check the directories used by SAP MaxDB or SAP liveCacheas follows:dbmcli –d <SID> -u <controluser>,<password> dbm_getpath IndepDataPath
dbmcli –d <SID> -u <controluser>,<password> dbm_getpath IndepProgPath
Process
1. Start the installation as follows:n If you are using the liveCache DVD:l DBMGUI
<DVD>:\LC_WINDOWS_<Processor>\SETUPS\DBM76.EXE
l SQL Studio<DVD>:\LC_WINDOWS_<Processor>\SETUPS\SQLSTD76.EXE
n If you are using the files from SAP Service Marketplace, simply execute the downloaded.EXE file.
Note
An installation shield guides you through the installation. If you already have an older version ofthe administration tools installed on the PC, the installation shield offers to upgrade it for you.
2. If you are prompted to restart the PC after the installation, bring down any databases that arerunning as follows:dbmcli –d <SID> -u <controluser>,<password> db_offline
5.4 Secure Sockets Layer Protocol for Database ServerCommunication
The SAP MaxDB database server supports the Secure Sockets Layer (SSL) protocol. You can use thisprotocol to communicate between the database server and its client, here the Application Server
28/54 PUBLIC 03/28/2008
5 Post-Installation5.4 Secure Sockets Layer Protocol for Database Server Communication
(AS). SSL guarantees encrypted data transfer between the SAP MaxDB database server and its clientapplications. In addition, the server authenticates itself to the client.
Caution
There is a performance cost for SSL since the data has to be encrypted, which requires time andprocessing power.
To use SSL you need to:
1. Install the SAP cryptographic library [page 29] on the client host and on the server host machines2. Generate the Personal Security Environment [page 30] (PSE) on the server (SSL Server PSE) and on the
client (SSL Client PSE).
5.4.1 Installing the SAP Cryptographic Library
The cryptographic functions required to build a database server-client connection using SecureSockets Layer (SSL) protocol are supplied by the SAP Cryptographic Library. Therefore, you needto install the SAP Cryptographic Library on the host machine of the SAP MaxDB database serverand the SAP Application Server (AS).The installation package sapcrypto.car consists of the following:
n SAP Cryptographic Library: sapcrypto.dlln License ticket: ticket
n Configuration tool: sapgenpse.exeYou use the configuration tool to generate key pairs and PSEs.
Caution
The SAP Cryptographic Library is subject to German export regulations and might not be availableto some customers. In addition, the library might be subject to the local regulations of your country.These regulations might further restrict import, use, and export or re-export of cryptographicsoftware.For more information, contact your local SAP representative.
PrerequisitesDownload the appropriate SAP Cryptographic Library installation package for your operating systemfrom http://service.sap.com/swcenter.
Procedure
1. Unpack the installation package for the SAP Cryptographic Library using sapcar.exe, which youcan find for example on your Installation Master DVD, using the following command:
03/28/2008 PUBLIC 29/54
5 Post-Installation5.4 Secure Sockets Layer Protocol for Database Server Communication
car -xvf SAPCRYPTO.CAR
Note
The remainder of the procedure as described below does not apply to client applications such asSQL Studio, which do not recognize an “independent” directory. In this case, you must copy theSAPCRYPTO installation package to the installation directory of the application. In this directoryyou need to create a directory sec, into which you copy the ticket file.
2. Copy the sapcrypto library to the lib subdirectory of the “independent program” directory.You can find the value of the independent program directory by entering the following command:dbmcli dbm_getpath IndepProgPath
Example
The independent program directory might be called the following:<drive>:\sapdb\programs\lib
3. Copy the configuration tool sapgenpse.exe to the directory <independent program>\lib.4. Create a subdirectory called sec under the “independent data” directory and copy the ticket
file into it.
Example
The result might look like the following:<drive>:\sapdb\datal\sec\ticket
5. Make sure that only the local system account is allowed to possess access rights to the secdirectory and the files it contains ‒ including the ticket file and the SSL Server PSE ‒ and thataccess is restricted to read&write. Only members of the administrator group can own the files.
ResultThe SAP Cryptographic Library is copied to the application server and the environment is correctlyconfigured so that the server can find the library at runtime.
5.4.2 Generating the Personal Security Environment
The information required by the database server or client application to communicate using SecureSockets Layer are stored in the Personal Security Environment (PSE). The required information differsaccording to whether SSL PSE is for the server or client:
n SSL Server PSEThis PSE contains the security information from the database server, for example, thepublic-private cryptographic key pair and certificate chain. To install the SSL Server PSE, you
30/54 PUBLIC 03/28/2008
5 Post-Installation5.4 Secure Sockets Layer Protocol for Database Server Communication
need to generate the PSE. You can either do this for a single database server or system-wide. TheSSL Server PSE is called SDBSSLS.exe.
n SSL Client PSEThe client requires an anonymous certificate called SDBSSLA.exe, which contains the list of thepublic keys of trustworthy database servers.
ProcedureTo generate the SSL Server PSE, proceed as follows:
Note
You need to know the naming convention for the distinguished name of the database server.The syntax of the distinguished name, which you enter in the procedure below, depends on theCertification Authority (CA) that you are using.
1. Change to the <independent programs>\lib directory.2. Set up the following environment variable:
SECUDIR=<independent data>\sec
3. Create a SSL Server PSE, SDBSSLS.pse, and generate a certificate request file, certreq, in thedirectory defined by SECUDIR (see previous step):sapgenpse gen_pse -v -r <SECUDIR>\certreq -p SDBSSLS.pse “<your distinguished
name>”
For each database server that uses a server-specific PSE, you must set up a unique certificaterequest. If you are using a valid system-wide SSL Server PSE, you only need to set up a singlecertificate request for all servers.
4. Send the certificate request to the CA for signing. You can either send it to the SAP CA or toanother CA.You must make sure that the CA offers a certificate corresponding to the PKCS#7 certificate chainformat. Thawte CA at http://www.thawte.com offers a suitable certificate, either SSL ChainedCA Cert or PKCS#7 certificate chain format.The CA validates the information contained in the certificate request, according to its ownguidelines, and sends a reply containing the public key certificate.
5. After you have received the reply from the CA, make sure that the contents of the certificaterequest have not been destroyed during download.For example, if you requested the certificate on a UNIX system and stored it on a Windows frontend, the formatting (that is, line indents and line breaks) is affected.To check the contents, open the certificate request with a text editor (such as Notepad) and repairthe line indents and the line breaks.
03/28/2008 PUBLIC 31/54
5 Post-Installation5.4 Secure Sockets Layer Protocol for Database Server Communication
Example
This is an example of a certificate request:-----BEGIN CERTIFICATE
REQUEST-----MIIBPzCBqQIBADAAMIGfMA0GCSqGSIb3DQEBAQUAA4GNADCBiQKBgQD/302IT+/Y
wpignSw7U9FWneyWz3Wil0S18aFCYkRo00wCpD8UwcaC4dds4uGT6hl2WlJ0/FOtUg+EQxonZbaRrk9sTalkn1mqx3YAUe/gEaGdf1wvuYkb0gjMk81iM/jb9BJd8srMPyoBy9jMC7v5u7+TZWmWa6RjnvClvYGgMwIDAQABoAAwDQYJKoZIhvcNAQEFBQADgYEAx2zuaTAOKPdGmxUKYlWdasUpim4vhfaHa7ZDBwipvKJ8akYCT+dpmVjhcph9E7cUjL80/6Rup5cnLAAO5FhVt5MS6zNJa9YYSN9XP+5/MPF6Q4ayJ0VryTkSpbbPrWLbKh1Dds97LQVuQ/myKIAHECwyW6t7sAFJWn4P0fdxmKo=
-----END CERTIFICATE REQUEST-----
6. Import the reply to the SSL Server PSE:a) Copy the text to a temporary file called srcert.b) Enter the following command:
sapgenpse import_own_cert -c srcert -p SDBSSLS.pse
You have generated the SSL Server PSE. You can now start the XServer as usual (if it is alreadyrunning, you must stop and restart it).
7. To check whether the SSL functionality is working correctly, view the trace file niserver_<localcomputer name>.trace in the <independent data>\wrk directory.
To generate the SSL Client PSE, proceed as follows:
1. Change to the <independent programs>\lib directory.2. Set up the following environment variable:
SECUDIR=<independent data>\sec
3. Create an anonymous client SSL Client PSE, SDBSSLA.pse in the directory defined by SECUDIR (seeprevious step):sapgenpse gen_pse -v -noreq -p SDBSSLA.pse
You can leave the distinguished name empty.Before you can establish an SSL connection to a database server, the server certificate must beentered in the PK list of the anonymous client certificate.
4. To see the database server certificate, enter the following command:„x_ping -n <servermode> -c[apture]
You can check whether to trust the database server certificate. The client certificate is not affectedby this.
5. Start the import with this command:„x_ping -n <servermode> -i[import]
6. To administer the PSE, use the configuration tool sapgenpse. For more information, enter thefollowing command:sapgenpse -h
Note
For applications such as SQL Studio replace the independent data or independent program in theabove description with the installation directory.
32/54 PUBLIC 03/28/2008
6 Additional Information
6 Additional Information
6.1 Operating Information for liveCache
If you manually reinitialize liveCache with transaction LC10, make sure that you firstdelete all administration reports, especially /SAPAPO/DELETE_LC_ANCHORS andSLCA_INIT_FOLLOW_UP, from the definition of the logical liveCache LCA connection.
6.2 Uninstalling liveCache
PrerequisitesStop liveCache with transaction LC10 in the SAP system.
Procedure
1. Drop the database instance:dbmcli -d <LC_NAME> -u <dbm_user>,<password> db_drop
2. Delete integration entries on the SAP server:a) Log on to the SAP System as user DDIC.b) Call transaction LC10.
The liveCache: Initial Screen appears.c) In the Name of database connection field, enter LCA and choose Integration.d) Choose Display Changee) Choose Delete the logical link and confirm the deletion.f) Save your entries.g) Repeat steps b to f for database connections LDA and LEA.
3. Delete the liveCache software (dependent package) using the SAP MaxDB SDBUNINST tool, asdescribed in SAP Note 599129.
You have now removed the liveCache instance.
6.3 Troubleshooting with SAPinst
This section tells you how to proceed when errors occur during the installation with SAPinst.If an error occurs, SAPinst:
03/28/2008 PUBLIC 33/54
6 Additional Information6.3 Troubleshooting with SAPinst
n Stops the installationn Displays a dialog informing you about the error
Procedure
1. To view the log file, choose View Logs.2. If an error occurs during the dialog or processing phase, do either of the following:n Try to solve the problemn Abort the installation with Exit
For more information, see Interrupted Installation with SAPinst [page 18].n Continue the installation by choosing Retry.
3. Check the log and trace files of the GUI server and SAPinst GUI in the directory%userprofile%\.sdtgui\ for errors.
4. If SAPinst GUI does not start, check the file sdtstart.err in the current %userprofile% directory.5. If SAPinst GUI aborts during the installation without an error message, restart SAPinst GUI as
described in Starting SAPinst GUI Separately.
34/54 PUBLIC 03/28/2008
7 High Availability with Microsoft Cluster Service
Only valid for: HA (MSCS)
7 High Availability with Microsoft ClusterService
You can install a high-availability SAP system with Microsoft Cluster Service (MSCS). For this type ofinstallation, you have to set up the system and configure it so that it can take advantage of the MSCSsoftware. The MSCS software improves the availability of the system and safeguards it against failureand unplanned downtime, enabling 24-hour operation, 365 days a year.
Note
In the sections on MSCS we use “SAP system” to mean liveCache.
With high availability you enable critical system components, known as “Single Points of Failure(SPOFs)”, to be automatically switched from one machine to the other, if hardware or softwareproblems arise on one machine. With the help of this switchover ‒ or failover ‒ the system cancontinue functioning normally so that unplanned system downtime is avoided.Apart from enabling failover when hardware problems occur, you can also use MSCS to avoiddowntime when you perform essential system maintenance. If you need to maintain one host(MSCS node), you can deliberately switch the cluster resources to the other host (MSCS node) andtemporarily operate it there while maintenance is in progress. When maintenance work is finishedyou can easily move the resources back to their original node and continue operating them there.
Note
n In this documentation the hosts in an MSCS cluster are referred to as first MSCS node andadditional MSCS node(s).
n When you are setting up the SAP system with MSCS, you combine standard installation steps,described earlier in this documentation, with cluster-specific steps, described here.
To install a new SAP systemwithMSCS, you have to perform a number of extra steps specially requiredfor the cluster and configure the SAP system so that it can take advantage of the cluster functionality:
n Since the cluster hardware has at least two nodes that have access to all local and shared storagedevices, you have to install some components on all nodes and observe special rules for distributingcomponents to local or shared disks.
03/28/2008 PUBLIC 35/54
7 High Availability with Microsoft Cluster Service7.1 Planning
n Since the correct configuration of network addresses is absolutely essential to enable the clusterto function properly, you have to perform a number of additional steps that are necessary toset up and check addressing.
7.1 Planning
You have to complete the following planning activities for you SAP system using Microsoft ClusterService (MSCS):
1. You decide how to distribute components to disks for MSCS [page 36].2. You read Directories in an MSCS Configuration [page 38]3. You read IP Addresses in an MSCS Configuration [page 39]4. You obtain IP addresses for MSCS [page 42].
7.1.1 Distribution of Components to Disks for MSCS
One of the central points to keep in mind when planning the MSCS installation is that the clusterhardware has two different sets of disks:
n Local disks that are connected directly to the MSCS node(s)n Shared disks that can be accessed by all MSCS nodes via a shared interconnect
Note
Shared disk is a synonym for the MSCS resource of Resource type Physical disk.
You need to install the SAP system components in both the following ways:
n Separately on all MSCS nodes to use the local storage on each node.n On the shared storage that is used in common by all MSCS nodes.
With Windows Server 2003, you can now choose between the following cluster models:
n Single Quorum Device ClusterIn this cluster model, the quorum resource maintains the cluster configuration data on a singlecluster storage device.The quorum resource is unique to a cluster installation and is always owned by one of the nodes.It has the following main functions in the cluster:l It logs changes to the cluster configuration that are entered in the Registry.l It arbitrates between competing nodes when the communication between nodes breaks down.
This means that cluster resources are forced to fail over to the node that owns the quorumresource.
n Majority Node Set Cluster
36/54 PUBLIC 03/28/2008
7 High Availability with Microsoft Cluster Service7.1 Planning
In this new cluster model, each node maintains its own copy of the cluster configuration data.The Majority Node Set resource, acting as the Quorum Resource, ensures that the clusterconfiguration data is kept consistent across the different nodes.You can use majority node set for geographically dispersed cluster configuration.SAP supports Majority Node Set Cluster if it is part of a cluster solution offered by your OriginalEquipment Manufacturer (OEM), or Independent Hardware Vendor (IHV).
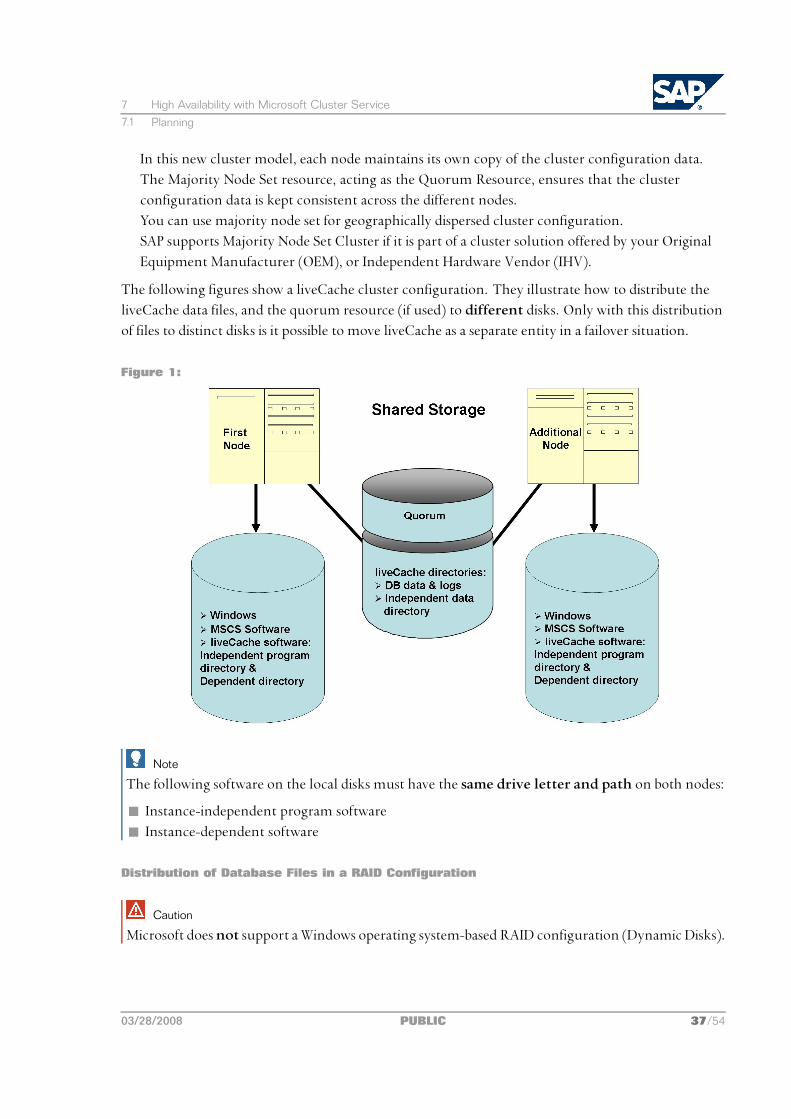
The following figures show a liveCache cluster configuration. They illustrate how to distribute theliveCache data files, and the quorum resource (if used) to different disks. Only with this distributionof files to distinct disks is it possible to move liveCache as a separate entity in a failover situation.
Figure 1:
Note
The following software on the local disks must have the same drive letter and path on both nodes:
n Instance-independent program software
n Instance-dependent software
Distribution of Database Files in a RAID Configuration
Caution
Microsoft doesnot support aWindows operating system-based RAID configuration (Dynamic Disks).
03/28/2008 PUBLIC 37/54
7 High Availability with Microsoft Cluster Service7.1 Planning
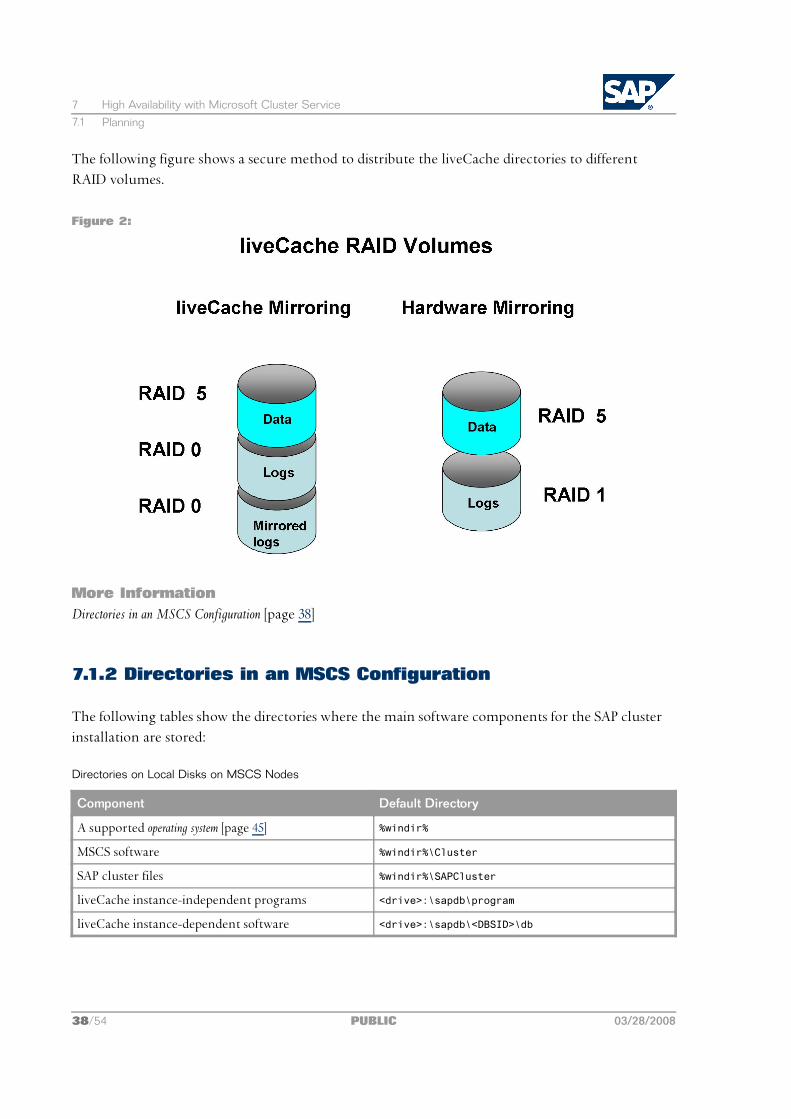
The following figure shows a secure method to distribute the liveCache directories to differentRAID volumes.
Figure 2:
More InformationDirectories in an MSCS Configuration [page 38]
7.1.2 Directories in an MSCS Configuration
The following tables show the directories where the main software components for the SAP clusterinstallation are stored:
Directories on Local Disks on MSCS Nodes
Component Default Directory
A supported operating system [page 45] %windir%
MSCS software %windir%\Cluster
SAP cluster files %windir%\SAPCluster
liveCache instance-independent programs <drive>:\sapdb\program
liveCache instance-dependent software <drive>:\sapdb\<DBSID>\db
38/54 PUBLIC 03/28/2008
7 High Availability with Microsoft Cluster Service7.1 Planning
Directories on Shared Disks
Component Default Directory
Cluster quorum resource <drive>:\MSCS
liveCache data volumes <drive>:\sapdb\<SAPSID>\sapdata\...
liveCache database log volumes <drive>:\sapdb\<SAPSID>\saplog\...
liveCache mirrored database log volumes <drive>:\sapdb\<SAPSID>\saplog\...
liveCache instance-independent data <drive>:\sapdb\data
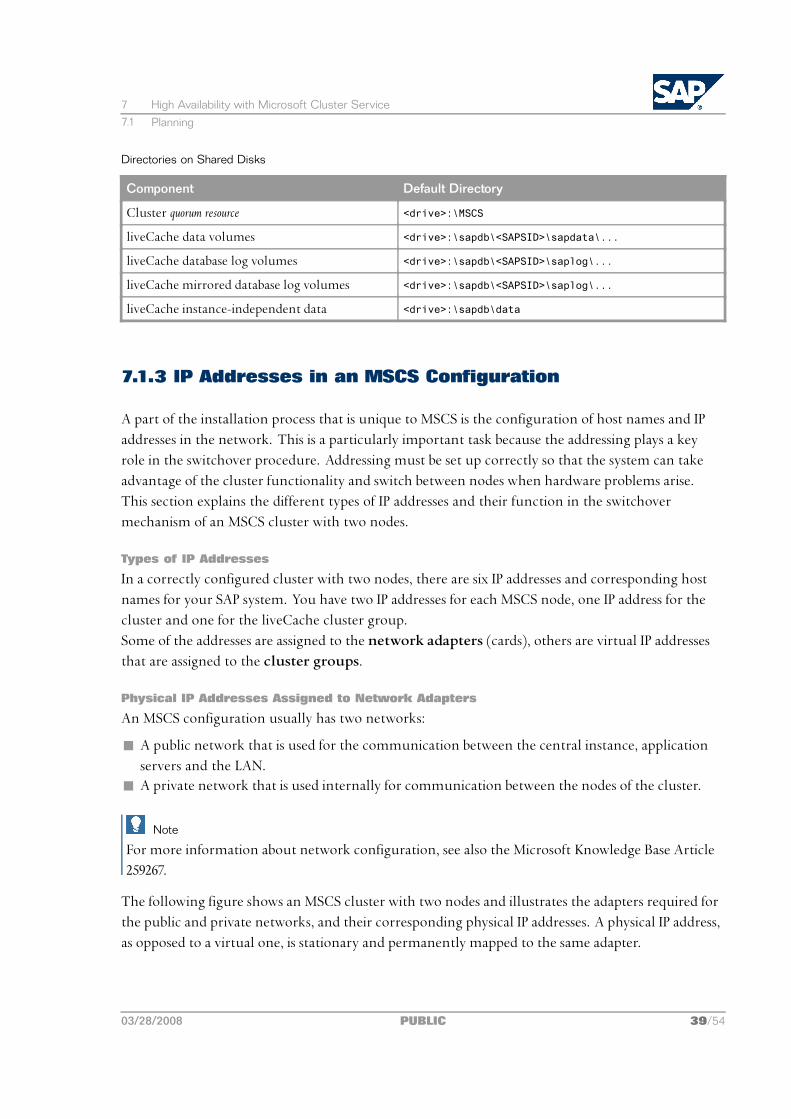
7.1.3 IP Addresses in an MSCS Configuration
A part of the installation process that is unique to MSCS is the configuration of host names and IPaddresses in the network. This is a particularly important task because the addressing plays a keyrole in the switchover procedure. Addressing must be set up correctly so that the system can takeadvantage of the cluster functionality and switch between nodes when hardware problems arise.This section explains the different types of IP addresses and their function in the switchovermechanism of an MSCS cluster with two nodes.
Types of IP Addresses
In a correctly configured cluster with two nodes, there are six IP addresses and corresponding hostnames for your SAP system. You have two IP addresses for each MSCS node, one IP address for thecluster and one for the liveCache cluster group.Some of the addresses are assigned to the network adapters (cards), others are virtual IP addressesthat are assigned to the cluster groups.
Physical IP Addresses Assigned to Network Adapters
An MSCS configuration usually has two networks:
n A public network that is used for the communication between the central instance, applicationservers and the LAN.
n A private network that is used internally for communication between the nodes of the cluster.
Note
For more information about network configuration, see also the Microsoft Knowledge Base Article259267.
The following figure shows an MSCS cluster with two nodes and illustrates the adapters required forthe public and private networks, and their corresponding physical IP addresses. A physical IP address,as opposed to a virtual one, is stationary and permanently mapped to the same adapter.
03/28/2008 PUBLIC 39/54
7 High Availability with Microsoft Cluster Service7.1 Planning
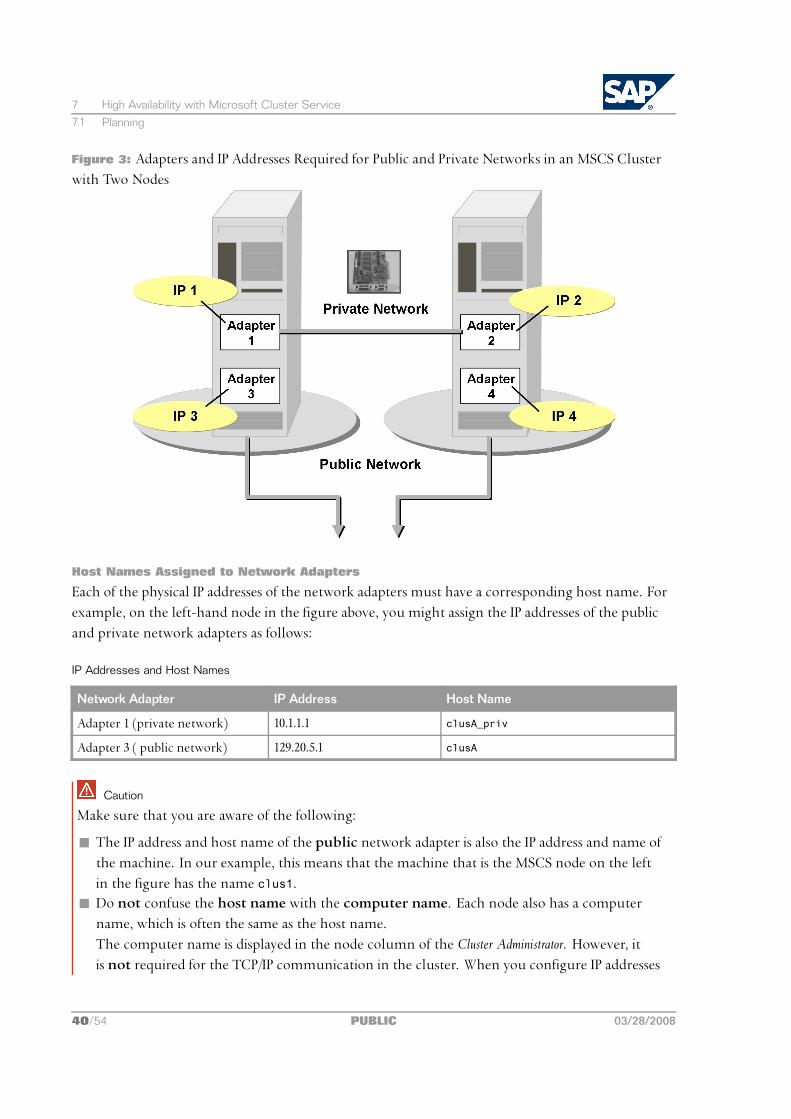
Figure 3: Adapters and IP Addresses Required for Public and Private Networks in an MSCS Clusterwith Two Nodes
Host Names Assigned to Network Adapters
Each of the physical IP addresses of the network adapters must have a corresponding host name. Forexample, on the left-hand node in the figure above, you might assign the IP addresses of the publicand private network adapters as follows:
IP Addresses and Host Names
Network Adapter IP Address Host Name
Adapter 1 (private network) 10.1.1.1 clusA_priv
Adapter 3 ( public network) 129.20.5.1 clusA
Caution
Make sure that you are aware of the following:
n The IP address and host name of the public network adapter is also the IP address and name ofthe machine. In our example, this means that the machine that is the MSCS node on the leftin the figure has the name clus1.
n Do not confuse the host name with the computer name. Each node also has a computername, which is often the same as the host name.The computer name is displayed in the node column of the Cluster Administrator. However, itis not required for the TCP/IP communication in the cluster. When you configure IP addresses
40/54 PUBLIC 03/28/2008
7 High Availability with Microsoft Cluster Service7.1 Planning
and corresponding names, keep in mind that it is the host names that are important for thecluster, not the computer names.
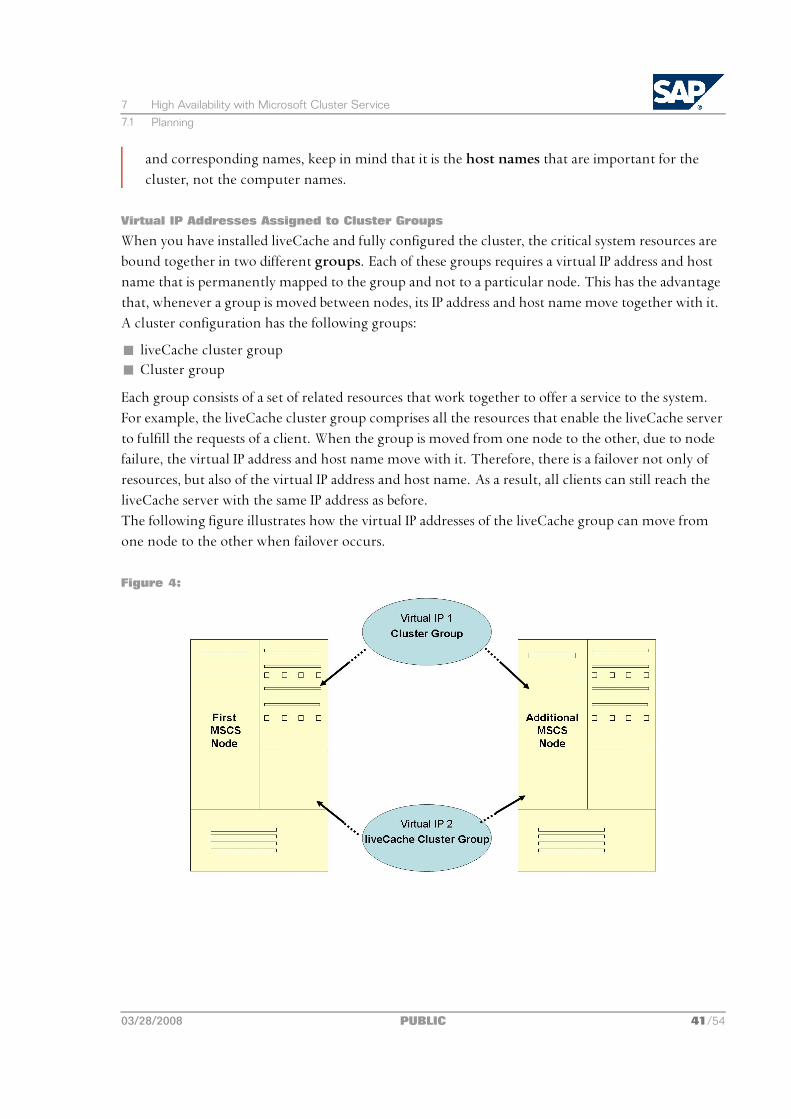
Virtual IP Addresses Assigned to Cluster Groups
When you have installed liveCache and fully configured the cluster, the critical system resources arebound together in two different groups. Each of these groups requires a virtual IP address and hostname that is permanently mapped to the group and not to a particular node. This has the advantagethat, whenever a group is moved between nodes, its IP address and host name move together with it.A cluster configuration has the following groups:
n liveCache cluster groupn Cluster group
Each group consists of a set of related resources that work together to offer a service to the system.For example, the liveCache cluster group comprises all the resources that enable the liveCache serverto fulfill the requests of a client. When the group is moved from one node to the other, due to nodefailure, the virtual IP address and host name move with it. Therefore, there is a failover not only ofresources, but also of the virtual IP address and host name. As a result, all clients can still reach theliveCache server with the same IP address as before.The following figure illustrates how the virtual IP addresses of the liveCache group can move fromone node to the other when failover occurs.
Figure 4:
03/28/2008 PUBLIC 41/54

7 High Availability with Microsoft Cluster Service7.1 Planning
7.1.4 Obtaining IP Addresses for MSCS
You need to correctly configure IP addresses for a cluster system. During the installation procedureyou have to assign at least six IP addresses and host names. You normally obtain these names andaddresses from the system administrator.
Prerequisites
n If you are installing Windows for the first time on your system, follow the procedure Obtaining IPAddresses below.
n If Windows has already been installed on your system, the host names and IP addresses of thenetwork adapters (cards) have already been defined and exist in your system.This means that you can find out the IP addresses for the network adapters using the procedureDetermining Existing IP Addresses below.However, you still need to use the table Virtual IP Addresses in the procedure Obtaining IP Addresses.
Obtaining IP AddressesAsk the system administrator to give you the addresses and host names listed in the tables below,which shows an example for a configuration with one MSCS cluster with two nodes. You need toenter the addresses and host names later during the installation process.The column Defined During indicates at which stage of the installation the addresses are defined inthe system.
Caution
Use the names exactly as specified by the system administrator, carefully observing uppercase andlowercase letters.
Physical IP Addresses
Component
Example forPhysical IPAddress
Example forPhysical HostName Purpose Defined During
First MSCS Node:adapter for privatenetwork
10.1.1.1 clusA_priv Address forinternodecommunication onthe private network
Windowsinstallation
First MSCS Node:adapter for publicnetwork
129.20.5.1 clusA Address of the firstMSCS node forcommunicationwith applicationservers and LAN(this is the same asthe address of thefirst MSCS node)
Windowsinstallation
42/54 PUBLIC 03/28/2008
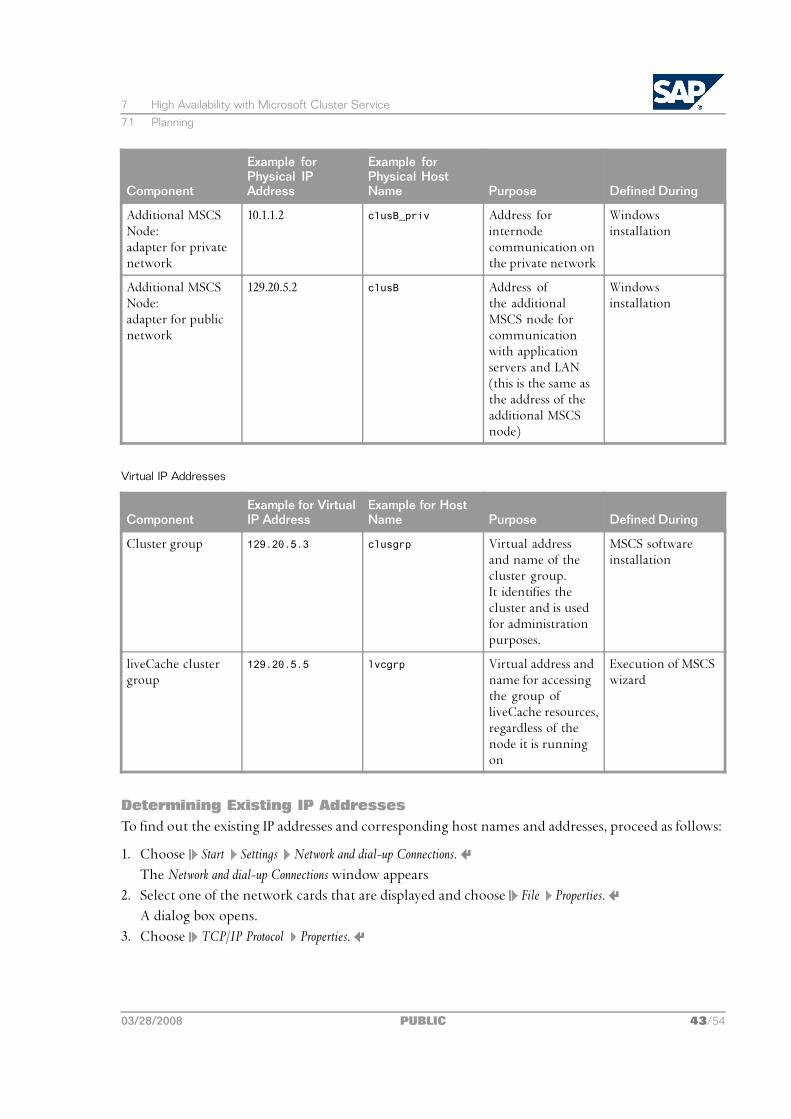
7 High Availability with Microsoft Cluster Service7.1 Planning
Component
Example forPhysical IPAddress
Example forPhysical HostName Purpose Defined During
Additional MSCSNode:adapter for privatenetwork
10.1.1.2 clusB_priv Address forinternodecommunication onthe private network
Windowsinstallation
Additional MSCSNode:adapter for publicnetwork
129.20.5.2 clusB Address ofthe additionalMSCS node forcommunicationwith applicationservers and LAN(this is the same asthe address of theadditional MSCSnode)
Windowsinstallation
Virtual IP Addresses
ComponentExample for VirtualIP Address
Example for HostName Purpose Defined During
Cluster group 129.20.5.3 clusgrp Virtual addressand name of thecluster group.It identifies thecluster and is usedfor administrationpurposes.
MSCS softwareinstallation
liveCache clustergroup
129.20.5.5 lvcgrp Virtual address andname for accessingthe group ofliveCache resources,regardless of thenode it is runningon
Execution of MSCSwizard
Determining Existing IP AddressesTo find out the existing IP addresses and corresponding host names and addresses, proceed as follows:
1. Choose Start Settings Network and dial-up Connections.The Network and dial-up Connections window appears
2. Select one of the network cards that are displayed and choose File Properties.A dialog box opens.
3. Choose TCP/IP Protocol Properties.
03/28/2008 PUBLIC 43/54
7 High Availability with Microsoft Cluster Service7.2 Preparation
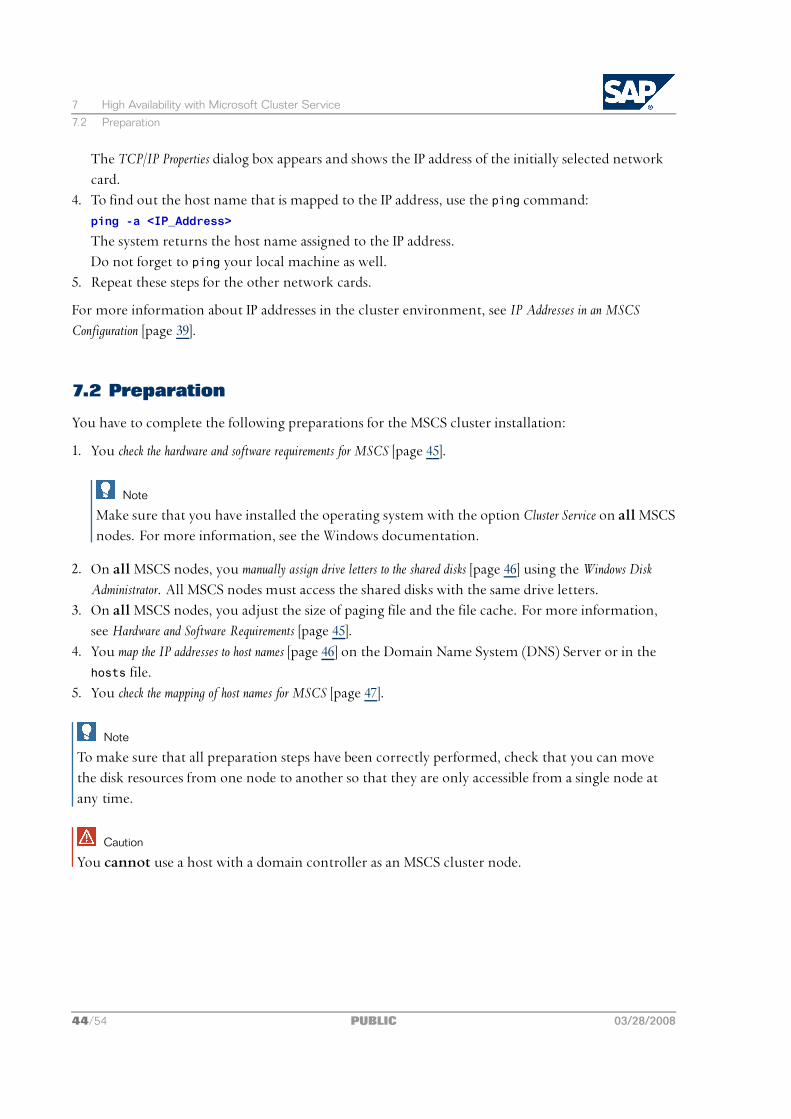
The TCP/IP Properties dialog box appears and shows the IP address of the initially selected networkcard.
4. To find out the host name that is mapped to the IP address, use the ping command:ping -a <IP_Address>
The system returns the host name assigned to the IP address.Do not forget to ping your local machine as well.
5. Repeat these steps for the other network cards.
For more information about IP addresses in the cluster environment, see IP Addresses in an MSCSConfiguration [page 39].
7.2 Preparation
You have to complete the following preparations for the MSCS cluster installation:
1. You check the hardware and software requirements for MSCS [page 45].
Note
Make sure that you have installed the operating system with the option Cluster Service on allMSCSnodes. For more information, see the Windows documentation.
2. On allMSCS nodes, you manually assign drive letters to the shared disks [page 46] using theWindows DiskAdministrator. All MSCS nodes must access the shared disks with the same drive letters.
3. On allMSCS nodes, you adjust the size of paging file and the file cache. For more information,see Hardware and Software Requirements [page 45].
4. You map the IP addresses to host names [page 46] on the Domain Name System (DNS) Server or in thehosts file.
5. You check the mapping of host names for MSCS [page 47].
Note
To make sure that all preparation steps have been correctly performed, check that you can movethe disk resources from one node to another so that they are only accessible from a single node atany time.
Caution
You cannot use a host with a domain controller as an MSCS cluster node.
44/54 PUBLIC 03/28/2008
7 High Availability with Microsoft Cluster Service7.2 Preparation
7.2.1 Checking Hardware and Software Requirements forMSCS
When you install the SAP system on cluster hardware, you have to meet the hardware requirementsshown below. This makes sure that the system can take advantage of the MSCS functionality andachieves an acceptable performance level.
Procedure
1. Check that your cluster hardware is certified.AddOn Technology Center for SAP (Add On TCS) certifies hardware platforms for SAP onMicrosoft Windows. The cluster must be included in the Microsoft list of certified clusters and itscomponents. You can access the lists at the following Internet addresses:www.microsoft.com/hcl
www.saponwin.com
2. Make sure that the MSCS nodes of the cluster are connected by a private and public network:n The public network enables communication from the MSCS nodes of the cluster to other
resources in the local area network (LAN).n The private network enables internal communication between the MSCS nodes. In particular,
it enables the Cluster Service running on all MSCS nodes to regularly exchange messages onthe state of the MSCS nodes so that the failure of resources is quickly detected.
3. Check that sufficient storage space is available.Each of the MSCS nodes in the cluster must have its own local disks and have access to shareddisks that can be reached by the MSCS nodes via a shared bus.All software ‒ except the Windows operating system, parts of liveCache, and the MSCS software ‒is stored on the shared disks.One of the shared disks must be used exclusively by the quorum (if a single quorum device clusteris used) that stores the cluster registry and records information about the state of the cluster.You require at least six shared disks.For more information about the distribution of components to local and shared disk, seeDistributionof Components to Disks for MSCS [page 36].
Note
All disk controllers must be able to support hardware-based RAID.
4. Check the RAM and paging file size on each MSCS node.5. Check that the software you install on the cluster nodes meets the following requirements:
03/28/2008 PUBLIC 45/54
7 High Availability with Microsoft Cluster Service7.2 Preparation
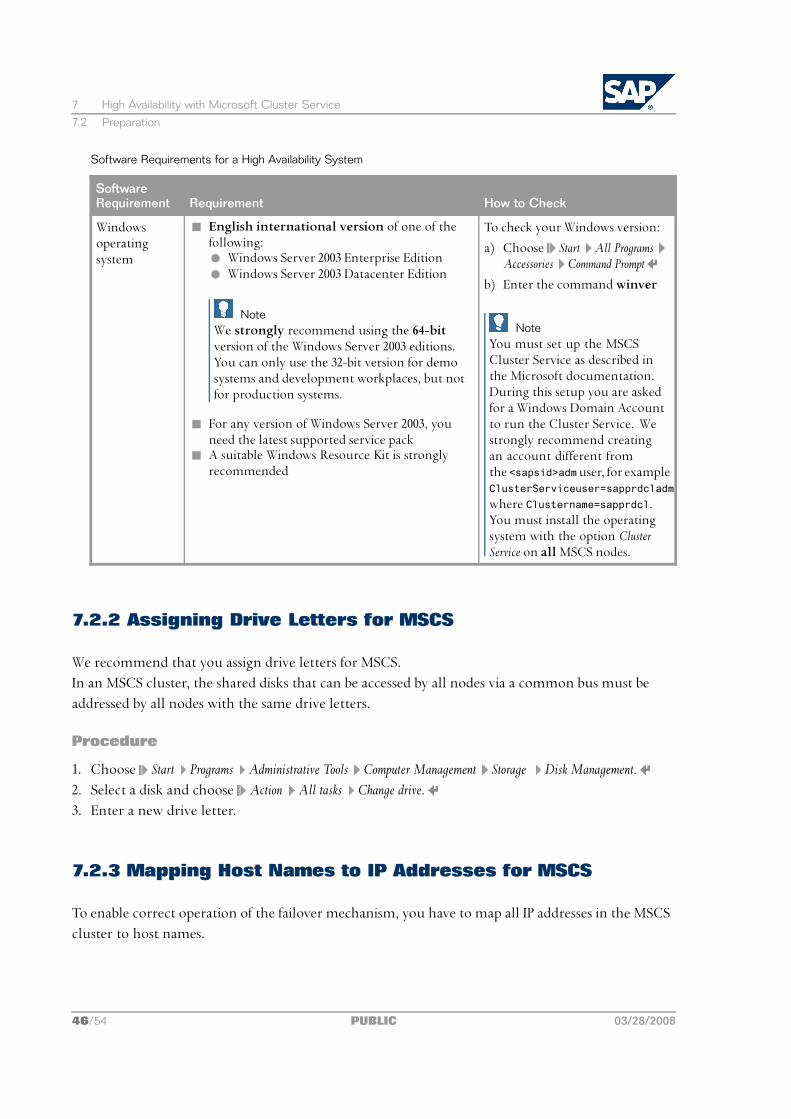
Software Requirements for a High Availability System
SoftwareRequirement Requirement How to Check
Windowsoperatingsystem
n English international version of one of thefollowing:l Windows Server 2003 Enterprise Editionl Windows Server 2003 Datacenter Edition
NoteWe strongly recommend using the 64-bitversion of the Windows Server 2003 editions.You can only use the 32-bit version for demosystems and development workplaces, but notfor production systems.
n For any version of Windows Server 2003, youneed the latest supported service pack
n A suitable Windows Resource Kit is stronglyrecommended
To check your Windows version:
a) Choose Start All ProgramsAccessories Command Prompt
b) Enter the commandwinver
NoteYou must set up the MSCSCluster Service as described inthe Microsoft documentation.During this setup you are askedfor a Windows Domain Accountto run the Cluster Service. Westrongly recommend creatingan account different fromthe <sapsid>admuser, for exampleClusterServiceuser=sapprdcladm,where Clustername=sapprdcl.You must install the operatingsystem with the option ClusterService on allMSCS nodes.
7.2.2 Assigning Drive Letters for MSCS
We recommend that you assign drive letters for MSCS.In an MSCS cluster, the shared disks that can be accessed by all nodes via a common bus must beaddressed by all nodes with the same drive letters.
Procedure
1. Choose Start Programs Administrative Tools Computer Management Storage Disk Management.2. Select a disk and choose Action All tasks Change drive.3. Enter a new drive letter.
7.2.3 Mapping Host Names to IP Addresses for MSCS
To enable correct operation of the failover mechanism, you have to map all IP addresses in the MSCScluster to host names.
46/54 PUBLIC 03/28/2008
7 High Availability with Microsoft Cluster Service7.2 Preparation
The mapping enables the system to translate host names into IP addresses. Host names are normallyused for administrative tasks because they are easier to use than the long, numeric IP addresses.However, the system can only respond to host names if they are translated into IP addresses.
Prerequisites
n You have installed the Windows operating system.n You have the list of IP addresses [page 42].n You have correctly entered all six IP addresses required for the MSCS configuration.
Caution
Missing or incorrect entries for the IP addresses can cause problems later during the installation.
ProcedureTo map the host names to the IP addresses, do one of the following:
n Map the host names to IP addresses on a Domain Name System (DNS) server.n Map the IP addresses in the Windows hosts file.
The file is located in the default Windows directory:%SystemRoot%Drive\system32\drivers\etc
Recommendation
We recommend that you perform the mapping on the DNS server because this only requires asingle entry.If you perform the mapping in the hosts file, you have to maintain the hosts file on all MSCS nodesof the cluster, and on all application servers and front ends. This is necessary because each hostin the system has its own hosts file.
7.2.4 Checking the Mapping of Host Names for MSCS
You need to check the mapping of host names to IP addresses as otherwise you might have seriousproblems later.
PrerequisitesYou have mapped the host names to the IP addresses [page 46] on the DNS Server or in the hosts file.
Procedure
1. For each IP address enter the following commands:a) ping -a <IP_Address>
The system returns the host name that is assigned to the IP address.
03/28/2008 PUBLIC 47/54
7 High Availability with Microsoft Cluster Service7.3 Installation
b) ping hostname
The system returns the IP address that is assigned to the host name.
Note
n When you enter the ping command, you only get a reply if the host exists.
n If the address you are checking already exists in the system, you also receive a reply from thehost. For example, after the installation of Windows and the configuration of the network,you get a reply when entering the IP addresses of the network adapters.
2. Compare the output with your own record of addresses and host names, and check for thefollowing possible errors:n Incorrect output of uppercase and lowercase
Make sure that you correct the error before you proceed with the installation.n Error in the network bindings
If you enter the name of the public network adapter, which is usually also the name of thelocal host, and the system returns the IP address of the private network, there is an errorin the network bindings.To correct the network bindings, do the following on allMSCS nodes:a) Choose Start Settings Network and Dial-up Connections
The Network and Dial-up Connections window appears.b) Choose Advanced Advanced Settings Adapters and Bindings
The network cards of the private and public networks are displayed for the current MSCSnode.
Note
The card of the public network must be displayed before that of the private network. Ifnecessary, change the order in which the cards are listed by using theMove Up andMoveDown arrows
7.3 Installation
The following sections provide information about how to install the SAP system for MSCS.
48/54 PUBLIC 03/28/2008
7 High Availability with Microsoft Cluster Service7.3 Installation
Note
n Make sure that you are logged on as domain administrator, unless otherwise specified.If for any reason, you are not granted domain administrators rights, you can perform theinstallation as a domain user who is a member of the local administrators group. However, thedomain administrator has to prepare the system appropriately for you. Do not use the user<sapsid>adm unless specified.
n On the first MSCS node, in the Cluster Administrator, make sure that all existing cluster groupsare online.
n If you are prompted during the installation process, log off and log on again.
n When you reboot during the installation process, resources fail over to the other node(s).Therefore, pause the other node(s) before the reboot.
You have to perform the following steps:
1. You install liveCache on the first node [page 49].2. You configure liveCache on the additional MSCS node [page 50].
7.3.1 Installing liveCache on the First Node
1. Run SAPinst [page 15] and choose:SAP NetWeaver 7.0 Support Release 3 Standalone Engines liveCache HA - liveCache on first cluster node
2. If you are installing liveCache with SAPinst for the first time and SAPinst prompts you to logoff, do the following:a) Choose OK and log on again.b) Perform step 1 above.c) Select Run a new installation and choose OK..
3. Follow the instructions in the SAPinst dialogs and enter the required parameter values.
Note
For more information about the input parameters, position the cursor on a parameter andpress F1 in SAPinst.
Caution
Make sure that you distribute the liveCache software, data, and logs correctly to local and shareddisks as described in Directories in an MSCS Configuration [page 38].
03/28/2008 PUBLIC 49/54
7 High Availability with Microsoft Cluster Service7.3 Installation
7.3.2 Configuring liveCache on the Additional Node
1. On the additional MSCS node, run SAPinst [page 15] and choose:SAP NetWeaver 7.0 Support Release 3 Standalone Engines liveCache HA - liveCache on an additional
cluster node2. Follow the instructions in the SAPinst dialogs and enter the required parameter values.
Caution
Make sure that you distribute the liveCache software data and logs correctly to local and shareddisks as described in Directories in an MSCS Configuration [page 38].
Note
For more information about the input parameters, position the cursor on a parameter andpress the F1 key in SAPinst.
End of: HA (MSCS)
50/54 PUBLIC 03/28/2008
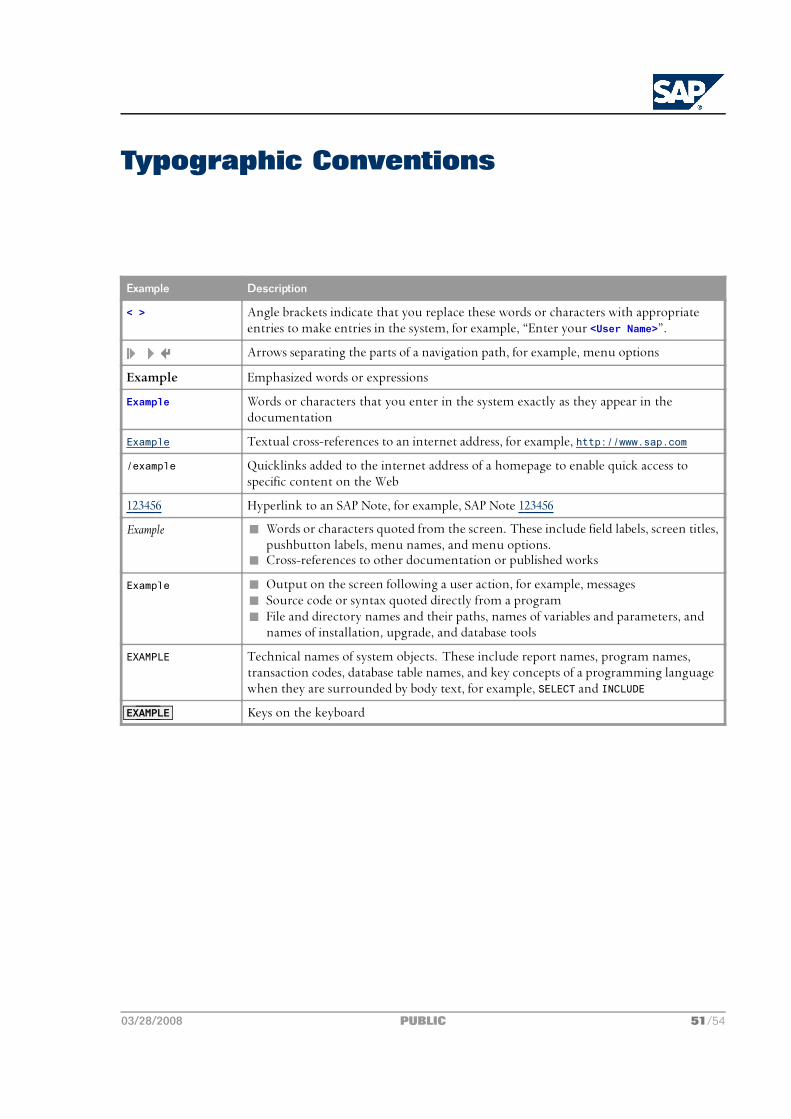
Typographic Conventions
Example Description
< > Angle brackets indicate that you replace these words or characters with appropriateentries to make entries in the system, for example, “Enter your <User Name>”.
Arrows separating the parts of a navigation path, for example, menu options
Example Emphasized words or expressions
Example Words or characters that you enter in the system exactly as they appear in thedocumentation
Example Textual cross-references to an internet address, for example, http://www.sap.com
/example Quicklinks added to the internet address of a homepage to enable quick access tospecific content on the Web
123456 Hyperlink to an SAP Note, for example, SAP Note 123456
Example n Words or characters quoted from the screen. These include field labels, screen titles,pushbutton labels, menu names, and menu options.
n Cross-references to other documentation or published works
Example n Output on the screen following a user action, for example, messagesn Source code or syntax quoted directly from a programn File and directory names and their paths, names of variables and parameters, and
names of installation, upgrade, and database tools
EXAMPLE Technical names of system objects. These include report names, program names,transaction codes, database table names, and key concepts of a programming languagewhen they are surrounded by body text, for example, SELECT and INCLUDE
EXAMPLE Keys on the keyboard
03/28/2008 PUBLIC 51/54
SAP AGDietmar-Hopp-Allee 16
69190 WalldorfGermany
T +49/18 05/34 34 34F +49/18 05/34 34 20
www.sap.com
© Copyright 2008 SAP AG. All rights reserved.
No part of this publication may be reproduced or transmitted in any form or for any purpose without the express permissionof SAP AG. The information contained herein may be changed without prior notice.Some software products marketed by SAP AG and its distributors contain proprietary software components of othersoftware vendors.
No part of this publication may be reproduced or transmitted in any form or for any purpose without the express permissionof SAP AG. The information contained herein may be changed without prior notice.Some software products marketed by SAP AG and its distributors contain proprietary software components of othersoftware vendors.Microsoft, Windows, Excel, Outlook, and PowerPoint are registered trademarks of Microsoft Corporation.IBM, DB2, DB2 Universal Database, OS/2, Parallel Sysplex, MVS/ESA, AIX, S/390, AS/400, OS/390, OS/400, iSeries, pSeries,xSeries, zSeries, System i, System i5, System p, System p5, System x, System z, System z9, z/OS, AFP, Intelligent Miner,WebSphere, Netfinity, Tivoli, Informix, i5/OS, POWER, POWER5, POWER5+, OpenPower and PowerPC are trademarks orregistered trademarks of IBM Corporation.Adobe, the Adobe logo, Acrobat, PostScript, and Reader are either trademarks or registered trademarks of Adobe SystemsIncorporated in the United States and/or other countries.Oracle is a registered trademark of Oracle Corporation.UNIX, X/Open, OSF/1, and Motif are registered trademarks of the Open Group.Citrix, ICA, Program Neighborhood, MetaFrame, WinFrame, VideoFrame, and MultiWin are trademarks or registeredtrademarks of Citrix Systems, Inc.HTML, XML, XHTML and W3C are trademarks or registered trademarks of W3C®, World Wide Web Consortium,Massachusetts Institute of Technology.Java is a registered trademark of Sun Microsystems, Inc.JavaScript is a registered trademark of Sun Microsystems, Inc., used under license for technology invented and implementedby Netscape.SAP, R/3, xApps, xApp, SAP NetWeaver, Duet, PartnerEdge, ByDesign, SAP Business ByDesign, and other SAP productsand services mentioned herein as well as their respective logos are trademarks or registered trademarks of SAP AG inGermany and in several other countries all over the world. All other product and service names mentioned are thetrademarks of their respective companies. Data contained in this document serves informational purposes only. Nationalproduct specifications may vary.These materials are subject to change without notice. These materials are provided by SAP AG and its affiliated companies("SAP Group") for informational purposes only, without representation or warranty of any kind, and SAP Group shall notbe liable for errors or omissions with respect to the materials. The only warranties for SAP Group products and services arethose that are set forth in the express warranty statements accompanying such products and services, if any. Nothing hereinshould be construed as constituting an additional warranty.
This document was created using stylesheet 2006-12-31 (V5.1beta [= 6.0 for E3]) and XSLT processor SAXON 6.5.2 fromMichael Kay (http://saxon.sf.net/), XSLT version 1.
52/54 PUBLIC 03/28/2008
DisclaimerSome components of this product are based on Java™. Any code change in these components may cause unpredictable andsevere malfunctions and is therefore expressly prohibited, as is any decompilation of these components.Any Java™ Source Code delivered with this product is only to be used by SAP’s Support Services and may not be modified oraltered in any way.
Documentation in the SAP Service MarketplaceYou can find this document at the following address: https://service.sap.com/instguides
03/28/2008 PUBLIC 53/54

SAP AGDietmar-Hopp-Allee 1669190 WalldorfGermanyT +49/18 05/34 34 34F +49/18 05/34 34 20www.sap.com
© Copyright 2008 SAP AG. All rights reserved.No part of this publication may be reproduced or transmitted in any form or for any purpose without the express permission of SAP AG. The information contained herein may bechanged without prior notice.