Embed Size (px)
Citation preview
PUBLIC
SAP Enterprise Threat Detection 1.0 SP 06Document Version: 1.13 – 2018-01-25
SAP Enterprise Threat Detection Implementation Guide
Content
1 Getting Started. . . . . . . . . . . . . . . . . . . . . . . . . . . . . . . . . . . . . . . . . . . . . . . . . . . . . . . . . . . . . . . . 51.1 What Is SAP Enterprise Threat Detection. . . . . . . . . . . . . . . . . . . . . . . . . . . . . . . . . . . . . . . . . . . . . . . 51.2 Technical System Landscape. . . . . . . . . . . . . . . . . . . . . . . . . . . . . . . . . . . . . . . . . . . . . . . . . . . . . . . 5
2 Installing SAP Enterprise Threat Detection. . . . . . . . . . . . . . . . . . . . . . . . . . . . . . . . . . . . . . . . . . . 92.1 Planning Your Installation. . . . . . . . . . . . . . . . . . . . . . . . . . . . . . . . . . . . . . . . . . . . . . . . . . . . . . . . . 10
System Requirements. . . . . . . . . . . . . . . . . . . . . . . . . . . . . . . . . . . . . . . . . . . . . . . . . . . . . . . . . 10Licensing. . . . . . . . . . . . . . . . . . . . . . . . . . . . . . . . . . . . . . . . . . . . . . . . . . . . . . . . . . . . . . . . . . 11Upgrading SAP Enterprise Threat Detection. . . . . . . . . . . . . . . . . . . . . . . . . . . . . . . . . . . . . . . . . . 11
2.2 Installing SAP HANA. . . . . . . . . . . . . . . . . . . . . . . . . . . . . . . . . . . . . . . . . . . . . . . . . . . . . . . . . . . . .132.3 Installing SAP Enterprise Threat Detection on SAP HANA. . . . . . . . . . . . . . . . . . . . . . . . . . . . . . . . . . .14
Creating Users and Assigning Authorizations. . . . . . . . . . . . . . . . . . . . . . . . . . . . . . . . . . . . . . . . . 15Activating the SQL Connection for the Technical User. . . . . . . . . . . . . . . . . . . . . . . . . . . . . . . . . . . 17Finishing the Installation. . . . . . . . . . . . . . . . . . . . . . . . . . . . . . . . . . . . . . . . . . . . . . . . . . . . . . . 17Starting Jobs for SAP Enterprise Threat Detection. . . . . . . . . . . . . . . . . . . . . . . . . . . . . . . . . . . . . 18
2.4 Installing SAP Enterprise Threat Detection on SAP HANA Smart Data Streaming. . . . . . . . . . . . . . . . . .22Importing the SAP HANA Smart Data Streaming Projects for SAP Enterprise Threat Detection. . . . . . . . . . . . . . . . . . . . . . . . . . . . . . . . . . . . . . . . . . . . . . . . . . . . . . . . . . . . . . . . . . . . . . . . . 24Creating the Cluster Workspace. . . . . . . . . . . . . . . . . . . . . . . . . . . . . . . . . . . . . . . . . . . . . . . . . . 26Creating Data Services for SAP HANA. . . . . . . . . . . . . . . . . . . . . . . . . . . . . . . . . . . . . . . . . . . . . .27Installing the SAP Enterprise Threat Detection Adapters. . . . . . . . . . . . . . . . . . . . . . . . . . . . . . . . .28Setting the Java Max Heap Size. . . . . . . . . . . . . . . . . . . . . . . . . . . . . . . . . . . . . . . . . . . . . . . . . . 33Configuring and Deploying Projects to the Cluster Workspace. . . . . . . . . . . . . . . . . . . . . . . . . . . . .33Enabling Configuration Checks. . . . . . . . . . . . . . . . . . . . . . . . . . . . . . . . . . . . . . . . . . . . . . . . . . .61Starting the Streaming Web Service. . . . . . . . . . . . . . . . . . . . . . . . . . . . . . . . . . . . . . . . . . . . . . . 62
3 Starting SAP Enterprise Threat Detection Launchpad. . . . . . . . . . . . . . . . . . . . . . . . . . . . . . . . . .64
4 Providing Logs from SAP NetWeaver Application Server for ABAP. . . . . . . . . . . . . . . . . . . . . . . . 654.1 List of Logs of SAP NetWeaver AS for ABAP. . . . . . . . . . . . . . . . . . . . . . . . . . . . . . . . . . . . . . . . . . . . 674.2 Providing Read Access Log and Security Audit Log by Immediate Log Transfer. . . . . . . . . . . . . . . . . . . . 714.3 Ensuring SAP Start Service Can Access the Gateway and HTTP Server Logs. . . . . . . . . . . . . . . . . . . . . 724.4 Providing Logs from SAP NetWeaver Application Server for ABAP by File Transfer. . . . . . . . . . . . . . . . . 74
5 Providing Logs from SAP NetWeaver Application Server for Java. . . . . . . . . . . . . . . . . . . . . . . . . .765.1 List of Logs of SAP NetWeaver AS for Java. . . . . . . . . . . . . . . . . . . . . . . . . . . . . . . . . . . . . . . . . . . . . 77
6 Providing Logs from SAP HANA. . . . . . . . . . . . . . . . . . . . . . . . . . . . . . . . . . . . . . . . . . . . . . . . . . . 78
2 P U B L I CSAP Enterprise Threat Detection Implementation Guide
Content
7 Providing Logs from Other Systems with Log Learning. . . . . . . . . . . . . . . . . . . . . . . . . . . . . . . . . 797.1 Log Layouts Supported by Log Learning. . . . . . . . . . . . . . . . . . . . . . . . . . . . . . . . . . . . . . . . . . . . . . .797.2 Overview Procedure of Providing Logs from Other Systems. . . . . . . . . . . . . . . . . . . . . . . . . . . . . . . . . 827.3 Loading Sample Logs. . . . . . . . . . . . . . . . . . . . . . . . . . . . . . . . . . . . . . . . . . . . . . . . . . . . . . . . . . . . 847.4 Parsing and Normalizing Markups. . . . . . . . . . . . . . . . . . . . . . . . . . . . . . . . . . . . . . . . . . . . . . . . . . . 85
Assigning Log Types and Semantic Events to Markups. . . . . . . . . . . . . . . . . . . . . . . . . . . . . . . . . . 86Assigning Semantic Attributes to Annotations. . . . . . . . . . . . . . . . . . . . . . . . . . . . . . . . . . . . . . . .88Parsing Markup with Value Mapping. . . . . . . . . . . . . . . . . . . . . . . . . . . . . . . . . . . . . . . . . . . . . . . 91Parsing Markup With Constant Values. . . . . . . . . . . . . . . . . . . . . . . . . . . . . . . . . . . . . . . . . . . . . 99
7.5 Testing Log Runs. . . . . . . . . . . . . . . . . . . . . . . . . . . . . . . . . . . . . . . . . . . . . . . . . . . . . . . . . . . . . . 1007.6 Making Rules for Log Runs Productive. . . . . . . . . . . . . . . . . . . . . . . . . . . . . . . . . . . . . . . . . . . . . . . 101
8 Additonal System Configurations. . . . . . . . . . . . . . . . . . . . . . . . . . . . . . . . . . . . . . . . . . . . . . . . 1028.1 Encrypting Communication Between Log Providers and the Streaming Web Service. . . . . . . . . . . . . . .1028.2 Encrypting Communication Between Log Providers and the Web Service Provider. . . . . . . . . . . . . . . . 1038.3 Defining Namespaces. . . . . . . . . . . . . . . . . . . . . . . . . . . . . . . . . . . . . . . . . . . . . . . . . . . . . . . . . . .1048.4 Knowledge Base. . . . . . . . . . . . . . . . . . . . . . . . . . . . . . . . . . . . . . . . . . . . . . . . . . . . . . . . . . . . . . 105
Working With Events. . . . . . . . . . . . . . . . . . . . . . . . . . . . . . . . . . . . . . . . . . . . . . . . . . . . . . . . . 106Adding Log Types. . . . . . . . . . . . . . . . . . . . . . . . . . . . . . . . . . . . . . . . . . . . . . . . . . . . . . . . . . . 107Assigning Attributes to Events. . . . . . . . . . . . . . . . . . . . . . . . . . . . . . . . . . . . . . . . . . . . . . . . . . 107
8.5 Synchronizing User Context Information from an Identity Management System. . . . . . . . . . . . . . . . . . 1108.6 Entering System Context Information. . . . . . . . . . . . . . . . . . . . . . . . . . . . . . . . . . . . . . . . . . . . . . . . 1148.7 Entering Subnet Context Information. . . . . . . . . . . . . . . . . . . . . . . . . . . . . . . . . . . . . . . . . . . . . . . . 115
File Format for Uploading Subnet Context Information. . . . . . . . . . . . . . . . . . . . . . . . . . . . . . . . . 1168.8 Defining Locations. . . . . . . . . . . . . . . . . . . . . . . . . . . . . . . . . . . . . . . . . . . . . . . . . . . . . . . . . . . . . 1178.9 Alert Publishing. . . . . . . . . . . . . . . . . . . . . . . . . . . . . . . . . . . . . . . . . . . . . . . . . . . . . . . . . . . . . . . 117
Configuring Alert Publishing to a REST Endpoint. . . . . . . . . . . . . . . . . . . . . . . . . . . . . . . . . . . . . . 118Configuring Alert Publishing Via Email. . . . . . . . . . . . . . . . . . . . . . . . . . . . . . . . . . . . . . . . . . . . . 121Defining Pattern Filters for Alert Publishing. . . . . . . . . . . . . . . . . . . . . . . . . . . . . . . . . . . . . . . . . 124
8.10 Monitoring the Performance of the Log Learning Adapter. . . . . . . . . . . . . . . . . . . . . . . . . . . . . . . . . . 1258.11 Archiving Log Data. . . . . . . . . . . . . . . . . . . . . . . . . . . . . . . . . . . . . . . . . . . . . . . . . . . . . . . . . . . . . 1268.12 Importing Archive Data. . . . . . . . . . . . . . . . . . . . . . . . . . . . . . . . . . . . . . . . . . . . . . . . . . . . . . . . . . 128
9 Securing SAP Enterprise Threat Detection. . . . . . . . . . . . . . . . . . . . . . . . . . . . . . . . . . . . . . . . . . 1319.1 User and Role Management. . . . . . . . . . . . . . . . . . . . . . . . . . . . . . . . . . . . . . . . . . . . . . . . . . . . . . . 1319.2 Authorizations of the Log Provider for SAP NetWeaver Application Server for ABAP. . . . . . . . . . . . . . . 1329.3 Authorizations of the Log Provider for SAP NetWeaver Application Server for Java. . . . . . . . . . . . . . . . 1339.4 Authorizations of SAP Enterprise Threat Detection in SAP HANA. . . . . . . . . . . . . . . . . . . . . . . . . . . . 1339.5 Data and Network Security. . . . . . . . . . . . . . . . . . . . . . . . . . . . . . . . . . . . . . . . . . . . . . . . . . . . . . . 1359.6 Data Protection and Privacy. . . . . . . . . . . . . . . . . . . . . . . . . . . . . . . . . . . . . . . . . . . . . . . . . . . . . . 138
A Appendix. . . . . . . . . . . . . . . . . . . . . . . . . . . . . . . . . . . . . . . . . . . . . . . . . . . . . . . . . . . . . . . . . . . 140
SAP Enterprise Threat Detection Implementation GuideContent P U B L I C 3
A.1 Recommendations When Upgrading SAP HANA Smart Data Streaming and SAP Enterprise Threat Detection. . . . . . . . . . . . . . . . . . . . . . . . . . . . . . . . . . . . . . . . . . . . . . . . . . . . . . . . . . . . . . . . . . . 140
A.2 Example of Configuration Settings in SAP Enterprise Threat Detection. . . . . . . . . . . . . . . . . . . . . . . . .141A.3 Document History. . . . . . . . . . . . . . . . . . . . . . . . . . . . . . . . . . . . . . . . . . . . . . . . . . . . . . . . . . . . . 142
4 P U B L I CSAP Enterprise Threat Detection Implementation Guide
Content
1 Getting Started
By reading this document, you will learn what SAP Enterprise Threat Detection is and how to install and configure its component parts.
To learn how to operate and customize the configuration of SAP Enterprise Threat Detection, see the SAP Enterprise Threat Detection Operations Guide.
NoteCheck for the latest version of this documentation on SAP Help Portal at http://help.sap.com/sapetd.
Follow SAP Enterprise Threat Detection on SAP Community Network at http://scn.sap.com/docs/DOC-58501 .
For the current release note and other SAP Notes about SAP Enterprise Threat Detection, see SAP Note 2517276.
We welcome your feedback under the support component BC-SEC-ETD.
1.1 What Is SAP Enterprise Threat Detection
SAP Enterprise Threat Detection enables you to do real-time evaluation of security threats in your IT landscapes by leveraging SAP and non-SAP log data.
Firewalls, virus scanners, and security policies are important parts of your arsenal to keep attackers out of your network, but they are not enough. You must harden every possible avenue of attack, while the attacker only needs to find a single weakness. SAP applications hold your most important business data. It is vitally important that you protect your SAP applications from people who want to damage or exploit your information.
SAP Enterprise Threat Detection detects potential attacks on SAP systems at the application level by gathering and analyzing log data. Whether the threat is internal or external, SAP Enterprise Threat Detection alerts you to potential attacks in real time. You have the opportunity to investigate and either dismiss the alert or pursue an actual incident.
SAP Enterprise Threat Detection provides graphical tools to enable you to navigate the log data. With the log data, you can support forensic analyses or gain new insights into your system landscape. From these new insights, you can create new attack detection patterns and run them regularly against log data as the log data comes in. Any matches to the patterns generate alerts.
1.2 Technical System Landscape
SAP Enterprise Threat Detection consists of a set of components deployed on SAP HANA, and SAP HANA Smart Data Streaming(Streaming Component). To this infrastructure you can connect log providers. We provide
SAP Enterprise Threat Detection Implementation GuideGetting Started P U B L I C 5
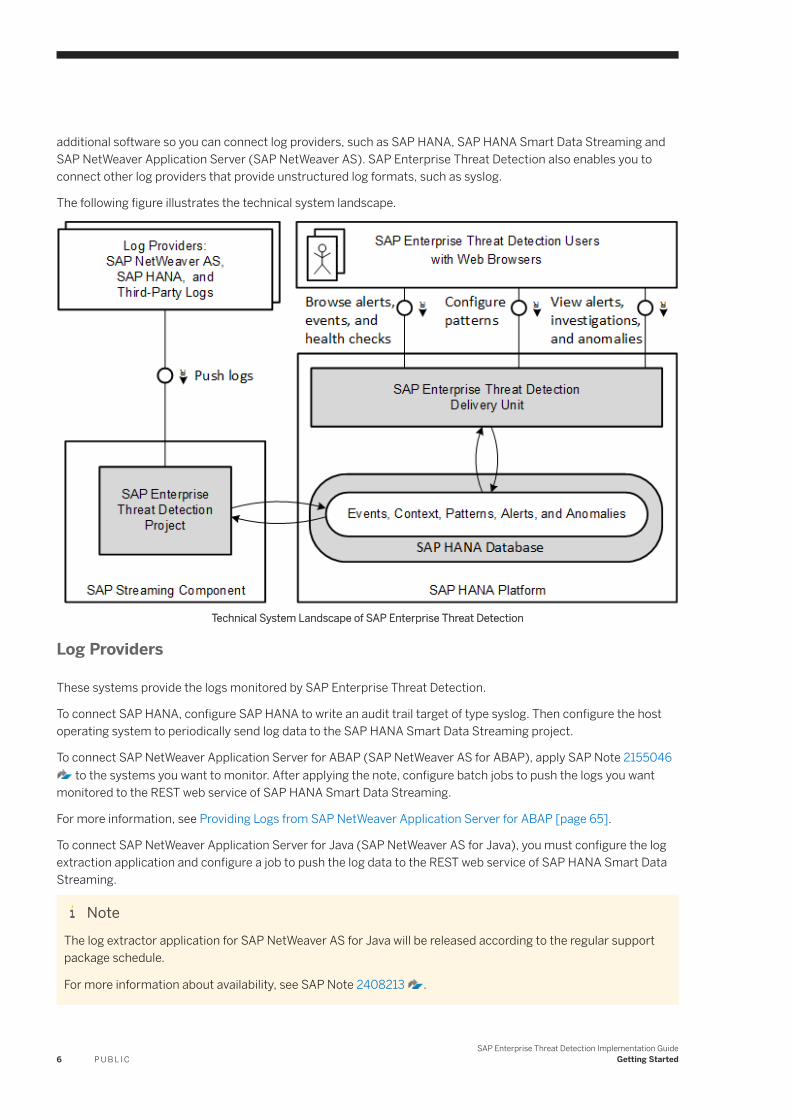
additional software so you can connect log providers, such as SAP HANA, SAP HANA Smart Data Streaming and SAP NetWeaver Application Server (SAP NetWeaver AS). SAP Enterprise Threat Detection also enables you to connect other log providers that provide unstructured log formats, such as syslog.
The following figure illustrates the technical system landscape.
Technical System Landscape of SAP Enterprise Threat Detection
Log Providers
These systems provide the logs monitored by SAP Enterprise Threat Detection.
To connect SAP HANA, configure SAP HANA to write an audit trail target of type syslog. Then configure the host operating system to periodically send log data to the SAP HANA Smart Data Streaming project.
To connect SAP NetWeaver Application Server for ABAP (SAP NetWeaver AS for ABAP), apply SAP Note 2155046 to the systems you want to monitor. After applying the note, configure batch jobs to push the logs you want
monitored to the REST web service of SAP HANA Smart Data Streaming.
For more information, see Providing Logs from SAP NetWeaver Application Server for ABAP [page 65].
To connect SAP NetWeaver Application Server for Java (SAP NetWeaver AS for Java), you must configure the log extraction application and configure a job to push the log data to the REST web service of SAP HANA Smart Data Streaming.
NoteThe log extractor application for SAP NetWeaver AS for Java will be released according to the regular support package schedule.
For more information about availability, see SAP Note 2408213 .
6 P U B L I CSAP Enterprise Threat Detection Implementation Guide
Getting Started
For more information, see Providing Logs from SAP NetWeaver Application Server for Java [page 76].
SAP Enterprise Threat Detection can learn new log formats. This enables you to connect new kinds of log providers to SAP Enterprise Threat Detection. To connect unstructured logs, you must first train SAP Enterprise Threat Detection to parse the log and load the parsing rules into SAP HANA Smart Data Streaming. This requires you to have a sample log from the new log provider. Afterwards, configure the log provider system to periodically send log data to the SAP HANA Smart Data Streaming project.
For more information, see Overview Procedure of Providing Logs from Other Systems [page 82].
To connect structured logs, you must use the development tools of SAP HANA Smart Data Streaming to create your own adapter. We provide a sample solution.
For more information, see Configuring and Deploying structured_event_import_from_file [page 52].
TipWe recommend that you protect connections between log providers and SAP Enterprise Threat Detection with transport layer security (TLS) where possible.
To archive log data, there is a project in SAP HANA Smart Data Streaming to save log data to the network file system. Another project enables you to import such files.
For more information, see Archiving Log Data [page 126].
For more information, see Installing SAP Enterprise Threat Detection on SAP HANA Smart Data Streaming [page 22].
SAP HANA Platform
SAP Enterprise Threat Detection deploys an SAP HANA product on SAP HANA platform. SAP HANA database stores the events, attack detection patterns, and context about the users and systems in your landscape. The software uses this information to generate alerts. From a browser-based application, users can browse events, configure patterns, manage alerts, and conduct investigations in your monitored network.
For more information, see Installing SAP Enterprise Threat Detection on SAP HANA [page 14].
SAP HANA Smart Data Streaming
SAP HANA Smart Data Streaming is an optional capability for SAP HANA. Installing this option enables you to collect, process, and analyze events from streaming sources in real time. SAP HANA Smart Data Streaming is a specialized option that processes streams of incoming event data in real time, and collects and acts on this information. Smart data streaming is ideally suited for situations where data arrives as events happen, and where there is value in collecting, understanding, and acting on this data right away. Data flows into streaming projects from various sources, typically through adapters, which connect the sources to the smart data streaming server. The streaming projects contain business logic, which they apply to the incoming data, typically in the form of continuous queries and rules. These streaming projects are entirely event-driven, turning the raw input streams into one or more derived streams that can be captured in the SAP HANA database, sent as alerts, posted to downstream applications, or streamed to live dashboards.
SAP Enterprise Threat Detection Implementation GuideGetting Started P U B L I C 7
TipWe recommend that you protect connections between SAP HANA Smart Data Streaming and SAP HANA platform with transport layer security (TLS).
For more information, see Installing SAP Enterprise Threat Detection on SAP HANA Smart Data Streaming [page 22].
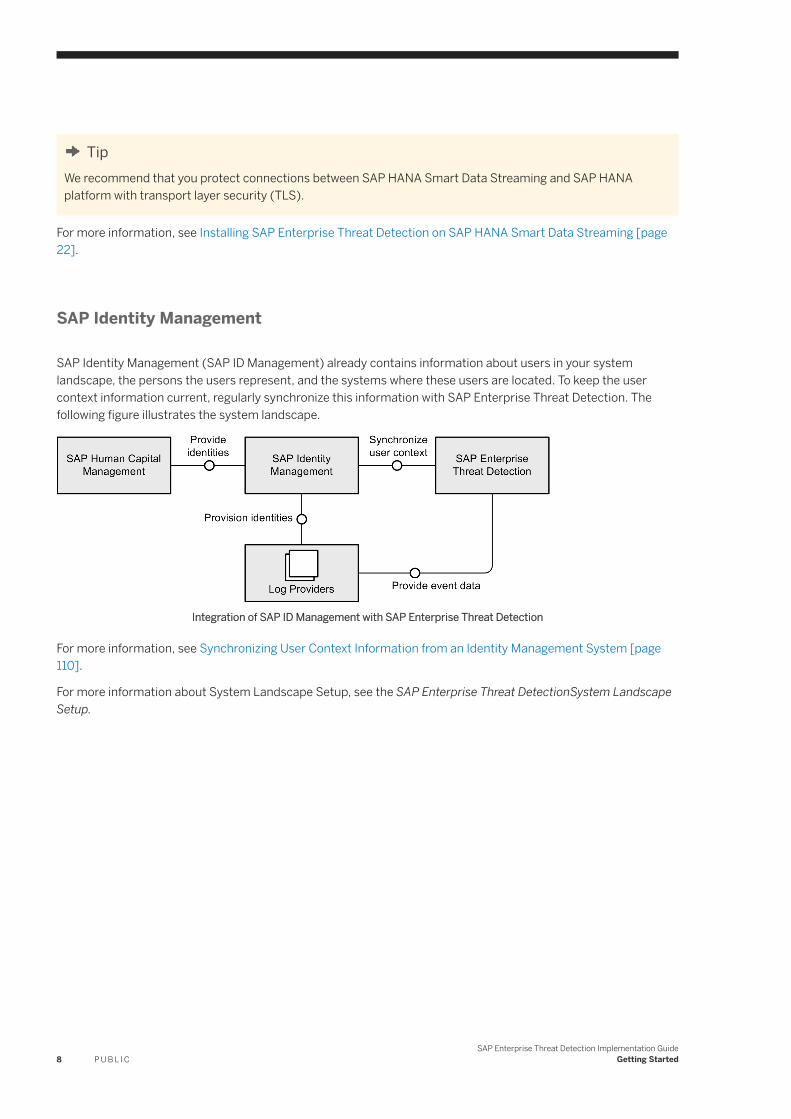
SAP Identity Management
SAP Identity Management (SAP ID Management) already contains information about users in your system landscape, the persons the users represent, and the systems where these users are located. To keep the user context information current, regularly synchronize this information with SAP Enterprise Threat Detection. The following figure illustrates the system landscape.
Integration of SAP ID Management with SAP Enterprise Threat Detection
For more information, see Synchronizing User Context Information from an Identity Management System [page 110].
For more information about System Landscape Setup, see the SAP Enterprise Threat DetectionSystem Landscape Setup.
8 P U B L I CSAP Enterprise Threat Detection Implementation Guide
Getting Started
2 Installing SAP Enterprise Threat Detection
After planning for the installation, install the SAP Enterprise Threat Detection software component on SAP HANA and SAP HANA Smart Data Streaming.
Context
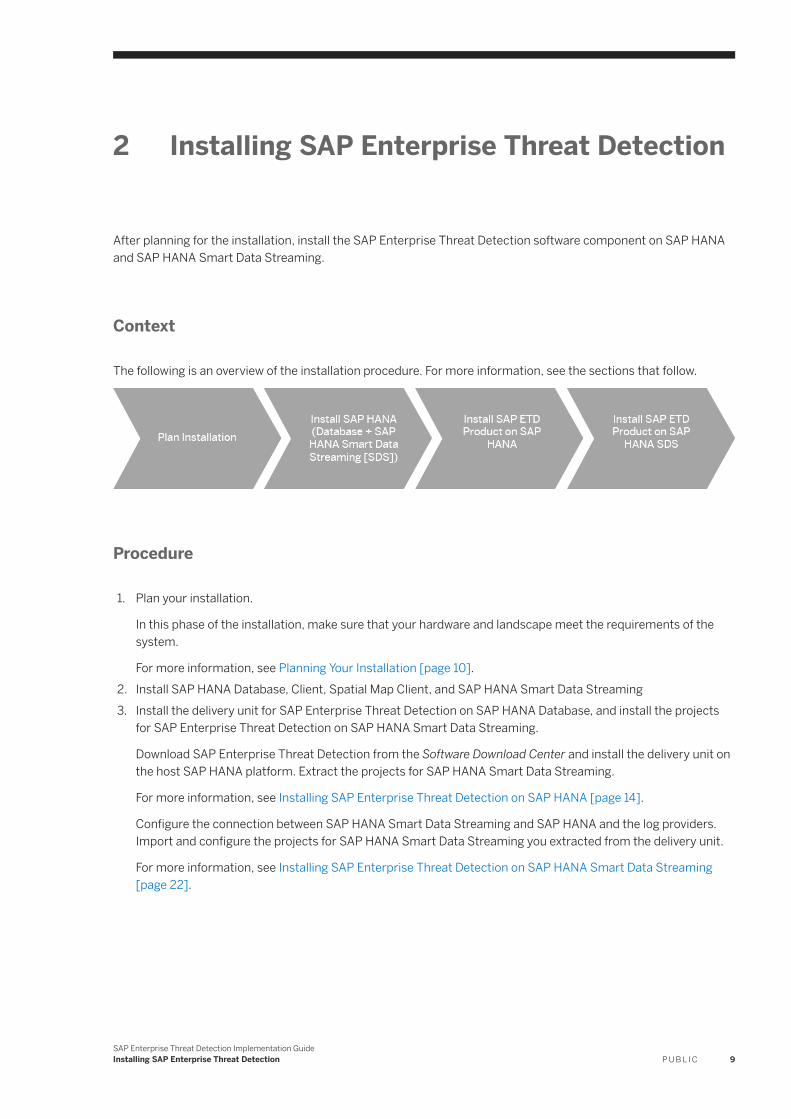
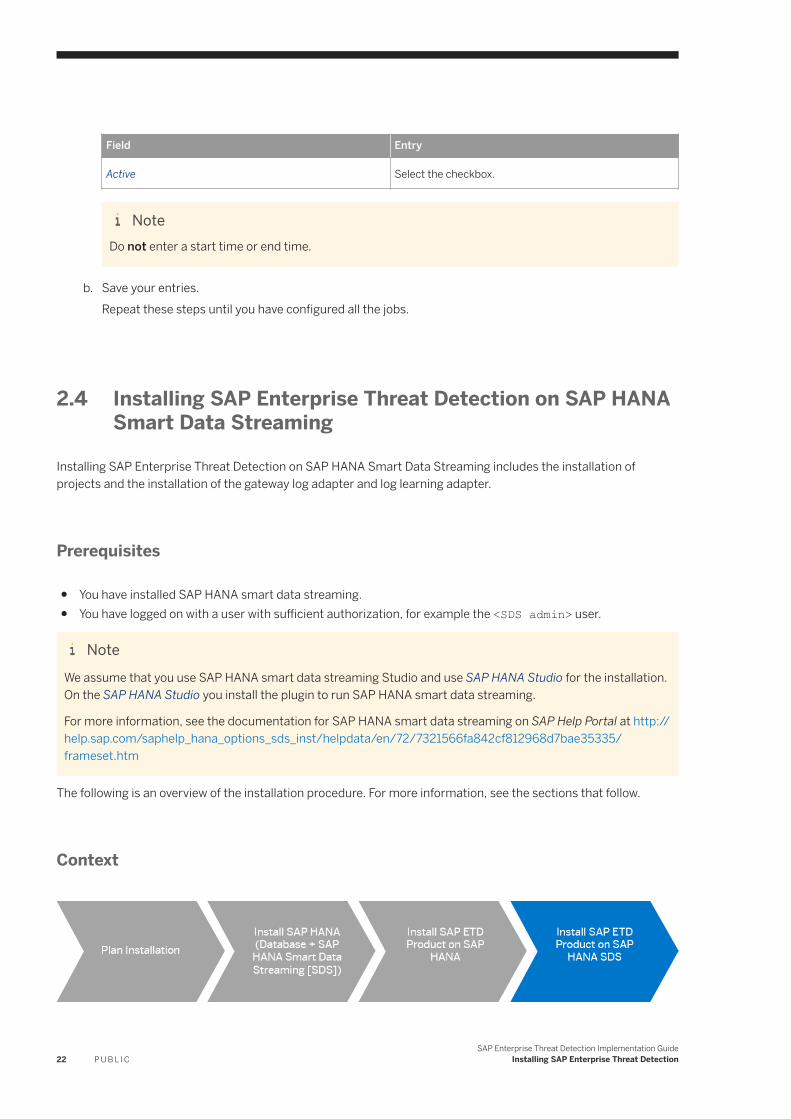
The following is an overview of the installation procedure. For more information, see the sections that follow.
Procedure
1. Plan your installation.
In this phase of the installation, make sure that your hardware and landscape meet the requirements of the system.
For more information, see Planning Your Installation [page 10].2. Install SAP HANA Database, Client, Spatial Map Client, and SAP HANA Smart Data Streaming3. Install the delivery unit for SAP Enterprise Threat Detection on SAP HANA Database, and install the projects
for SAP Enterprise Threat Detection on SAP HANA Smart Data Streaming.
Download SAP Enterprise Threat Detection from the Software Download Center and install the delivery unit on the host SAP HANA platform. Extract the projects for SAP HANA Smart Data Streaming.
For more information, see Installing SAP Enterprise Threat Detection on SAP HANA [page 14].
Configure the connection between SAP HANA Smart Data Streaming and SAP HANA and the log providers. Import and configure the projects for SAP HANA Smart Data Streaming you extracted from the delivery unit.
For more information, see Installing SAP Enterprise Threat Detection on SAP HANA Smart Data Streaming [page 22].
SAP Enterprise Threat Detection Implementation GuideInstalling SAP Enterprise Threat Detection P U B L I C 9
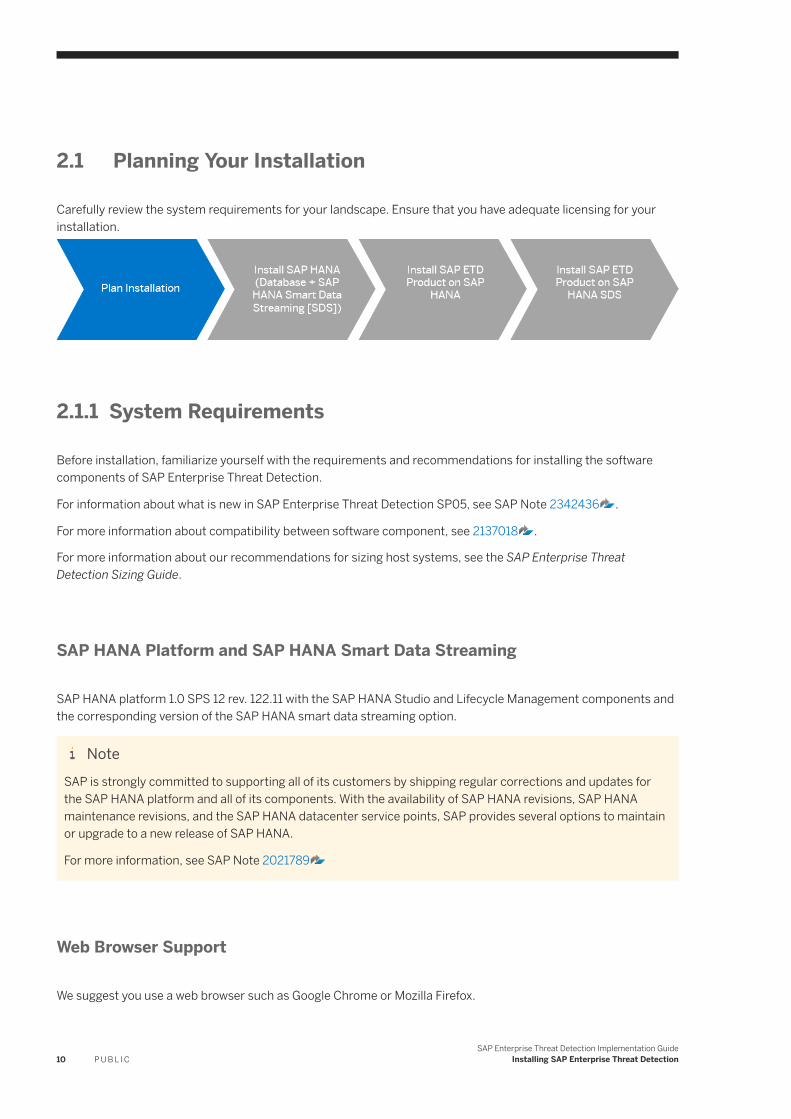
2.1 Planning Your Installation
Carefully review the system requirements for your landscape. Ensure that you have adequate licensing for your installation.
2.1.1 System Requirements
Before installation, familiarize yourself with the requirements and recommendations for installing the software components of SAP Enterprise Threat Detection.
For information about what is new in SAP Enterprise Threat Detection SP05, see SAP Note 2342436 .
For more information about compatibility between software component, see 2137018 .
For more information about our recommendations for sizing host systems, see the SAP Enterprise Threat Detection Sizing Guide.
SAP HANA Platform and SAP HANA Smart Data Streaming
SAP HANA platform 1.0 SPS 12 rev. 122.11 with the SAP HANA Studio and Lifecycle Management components and the corresponding version of the SAP HANA smart data streaming option.
NoteSAP is strongly committed to supporting all of its customers by shipping regular corrections and updates for the SAP HANA platform and all of its components. With the availability of SAP HANA revisions, SAP HANA maintenance revisions, and the SAP HANA datacenter service points, SAP provides several options to maintain or upgrade to a new release of SAP HANA.
For more information, see SAP Note 2021789
Web Browser Support
We suggest you use a web browser such as Google Chrome or Mozilla Firefox.
10 P U B L I CSAP Enterprise Threat Detection Implementation Guide
Installing SAP Enterprise Threat Detection
2.1.2 Licensing
Install a permanent SAP license. When you install your SAP system, a temporary license is automatically installed.
CautionBefore the temporary license expires, apply for a permanent license key from SAP. We recommend that you apply for a permanent license key as soon as possible after installing your system.
For more information about SAP license keys and how to obtain them, see Keys and Requests on the SAP Support Portal.
For more information, see https://support.sap.com/licensekey .
2.1.3 Upgrading SAP Enterprise Threat Detection
You upgrade to a new version of SAP Enterprise Threat Detection by installing the new version without removing data from your existing installation.
Preparing for an Upgrade
We recommend installing new versions of SAP Enterprise Threat Detection in the development system. When you have ensured that SAP Enterprise Threat Detection runs as expected, you can push the content to your productive system. For more information on how to set up such a two-tier system landscape, please see the SAP Enterprise Threat Detection Landscape Setup Guide on the SAP Help Portal at http://help.sap.com/sapetd.
1. Upgrade your SAP HANA to the latest revision of SP12.
NoteNote that during an upgrade of SAP HANA smart data streaming, the Java max heap size is reset to its default value. This default value is too low for SAP Enterprise Threat Detection. Please set it back to the value you had set before. For more information, see Setting the Java Max Heap Size [page 33].
2. Stop the log providers from sending data.
NoteNote that you might want to ensure that this log data is not lost but will be sent to SAP Enterprise Threat Detection after the upgrade.
3. Use SAP HANA studio to stop the projects of SAP HANA smart data streaming.4. Stop all jobs of SAP Enterprise Threat Detection. To stop all jobs on SAP HANA, stop the scheduler on SAP
HANA.For more information about jobs of SAP Enterprise Threat Detection, see Starting Jobs for SAP Enterprise Threat Detection [page 18].For more information about the scheduler, see the documentation of SAP HANA.
SAP Enterprise Threat Detection Implementation GuideInstalling SAP Enterprise Threat Detection P U B L I C 11

5. Note that the amount of log data in your SAP HANA database has an impact on the duration of the upgrade procedure. Consider storing your data someplace else during the upgrade.
6. If you are upgrading from SAP Enterprise Threat Detection SP04 or SP04 PL01, you must install the SP05 core delivery (HCOSECURITYMON05_0-10013386.ZIP) first, and then install the SP06 core delivery unit.
7. If you are upgrading from SAP Enterprise Threat Detection SP04 or SP04 PL01, ensure that the role sap.secmon.db::EtdUser is not assigned to any ETD catalogs or groups.You do this in Configure Role-based Cockpit Access at <protocol>://<hostname>:<port>/sap/hana/uis/clients/role-editor/RoleEditor.html?scenario=onPremise&siteId=sap.secmon.ui.mobile.launchpad%7CETDLaunchpad. Select the role sap.secmon.db::EtdUser and unassign both the catalog SAP Enterprise Threat Detection and the group SAP Enterprise Threat Detection Main Group.
8. Install the new version of SAP Enterprise Threat Detection on SAP HANA as described in the installation chapters below.
9. Install the new version of SAP Enterprise Threat Detection on SAP HANA smart data streaming as described in the installation chapters below.
NoteIf you want to use SAP Enterprise Threat Detection to detect calls of malicious domains, ensure that you have added the Dnsjava 2.1.7 open source libary to the following directory: <HANA Installation path>/streaming/cluster/<sid>/adapters/libj.
After the new installation of the adapters, ensure that only one version of the *.jar files exists. You might have to delete an old version: <HANA Installation path>/streaming/cluster/<sid>/adapters/libj.
10. Open the following URL in order to finish the installation: https://<host>:<port>/sap/secmon/services/install/finish.xsjsThis calls a script that will carry out a few minor upgrade procedures.
11. Restart all jobs and projects.12. Before you use the launchpad or any user interfaces of SAP Enterprise Threat Detection, ensure that the
browser caches on all clients are cleared, so that all alerts and other data are up-to-date.13. If you want to use the detection of malicious domains and you have installed SAP Enterprise Threat Detection
SP05 PL02 or a later version, create a new user in SAP HANA with the authorizations delivered in the sap.secmon.db::EtdDRCommitter role to enable the detection of malicious domains. This user (or an existing user whom you have given this additional role) must be entered in the data service for the dart project.
14. To be able to use all new features, ensure that your AS ABAP log providers are also updated to SP06. For more information, see 2155046 and 2477281 .
NoteIf you have implemented Notes on connected AS ABAP systems related to a newer version of SAP Enterprise Threat Detection than your SAP Enterprise Threat Detection system, specify this release in report SECM_CONFIGURATION.
12 P U B L I CSAP Enterprise Threat Detection Implementation Guide
Installing SAP Enterprise Threat Detection
NoteYou can either first update your SAP Enterprise Threat Detection system and then implement the SAP Notes in your AS ABAP systems as described here, or you can first update the AS ABAP systems and then update SAP Enterprise Threat Detection.
Upgrading Within the Current SP
In general, you can safely install patches on top of the current SP. However, check the release information in the SAP Note for the release.
2.2 Installing SAP HANA
Installing SAP HANA for SAP Enterprise Threat Detection.
Context
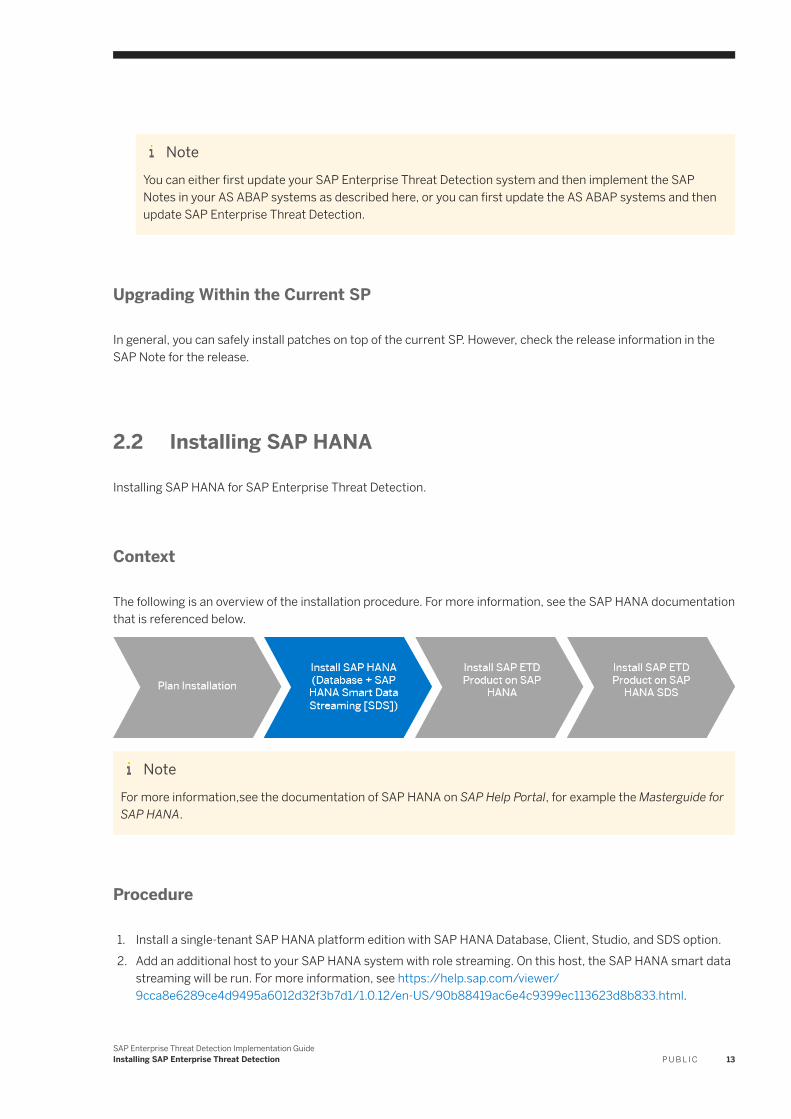
The following is an overview of the installation procedure. For more information, see the SAP HANA documentation that is referenced below.
NoteFor more information,see the documentation of SAP HANA on SAP Help Portal, for example the Masterguide for SAP HANA.
Procedure
1. Install a single-tenant SAP HANA platform edition with SAP HANA Database, Client, Studio, and SDS option.2. Add an additional host to your SAP HANA system with role streaming. On this host, the SAP HANA smart data
streaming will be run. For more information, see https://help.sap.com/viewer/9cca8e6289ce4d9495a6012d32f3b7d1/1.0.12/en-US/90b88419ac6e4c9399ec113623d8b833.html.
SAP Enterprise Threat Detection Implementation GuideInstalling SAP Enterprise Threat Detection P U B L I C 13
3. Install the SAP HANA Spatial Map Client.
With this delivery unit installed, you can view the locations of the systems in your landscape on a geographical map. For more information, see Defining Locations [page 117].
2.3 Installing SAP Enterprise Threat Detection on SAP HANA
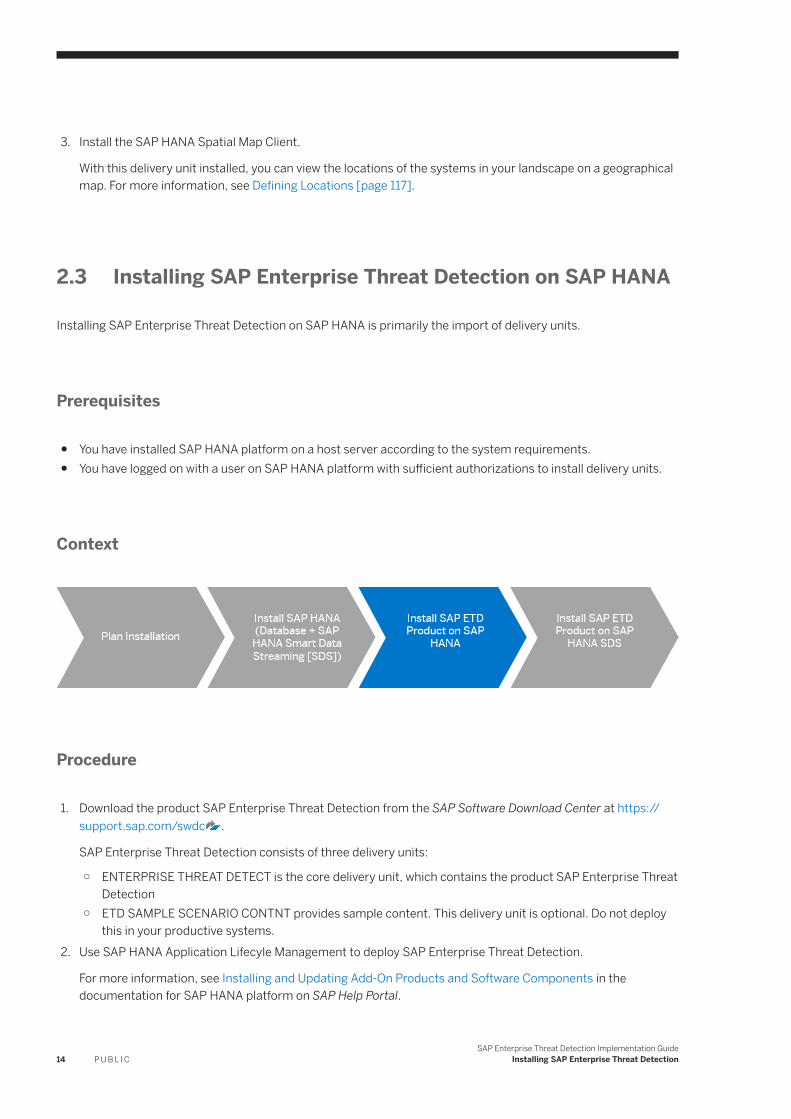
Installing SAP Enterprise Threat Detection on SAP HANA is primarily the import of delivery units.
Prerequisites
● You have installed SAP HANA platform on a host server according to the system requirements.● You have logged on with a user on SAP HANA platform with sufficient authorizations to install delivery units.
Context
Procedure
1. Download the product SAP Enterprise Threat Detection from the SAP Software Download Center at https://support.sap.com/swdc .
SAP Enterprise Threat Detection consists of three delivery units:
○ ENTERPRISE THREAT DETECT is the core delivery unit, which contains the product SAP Enterprise Threat Detection
○ ETD SAMPLE SCENARIO CONTNT provides sample content. This delivery unit is optional. Do not deploy this in your productive systems.
2. Use SAP HANA Application Lifecyle Management to deploy SAP Enterprise Threat Detection.
For more information, see Installing and Updating Add-On Products and Software Components in the documentation for SAP HANA platform on SAP Help Portal.
14 P U B L I CSAP Enterprise Threat Detection Implementation Guide
Installing SAP Enterprise Threat Detection
2.3.1 Creating Users and Assigning Authorizations
After installing the software you are ready to assign authorizations to users on SAP HANA.
Prerequisites
You have logged on with a user on SAP HANA platform with sufficient authorizations to perform user and role management. We recommend to use the database superuser SYSTEM, which is automatically created during the installation of SAP HANA.
Procedure
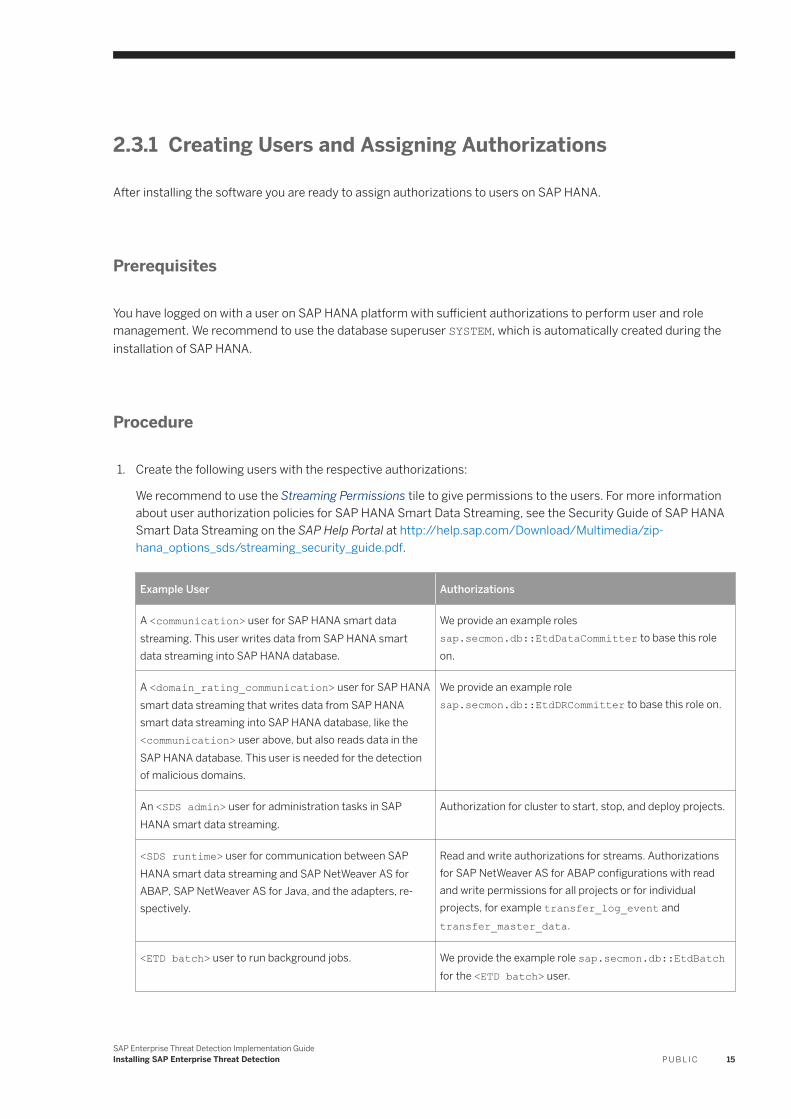
1. Create the following users with the respective authorizations:
We recommend to use the Streaming Permissions tile to give permissions to the users. For more information about user authorization policies for SAP HANA Smart Data Streaming, see the Security Guide of SAP HANA Smart Data Streaming on the SAP Help Portal at http://help.sap.com/Download/Multimedia/zip-hana_options_sds/streaming_security_guide.pdf.
Example User Authorizations
A <communication> user for SAP HANA smart data streaming. This user writes data from SAP HANA smart data streaming into SAP HANA database.
We provide an example roles sap.secmon.db::EtdDataCommitter to base this role on.
A <domain_rating_communication> user for SAP HANA smart data streaming that writes data from SAP HANA smart data streaming into SAP HANA database, like the <communication> user above, but also reads data in the SAP HANA database. This user is needed for the detection of malicious domains.
We provide an example role sap.secmon.db::EtdDRCommitter to base this role on.
An <SDS admin> user for administration tasks in SAP HANA smart data streaming.
Authorization for cluster to start, stop, and deploy projects.
<SDS runtime> user for communication between SAP HANA smart data streaming and SAP NetWeaver AS for ABAP, SAP NetWeaver AS for Java, and the adapters, respectively.
Read and write authorizations for streams. Authorizations for SAP NetWeaver AS for ABAP configurations with read and write permissions for all projects or for individual projects, for example transfer_log_event and transfer_master_data.
<ETD batch> user to run background jobs. We provide the example role sap.secmon.db::EtdBatch for the <ETD batch> user.
SAP Enterprise Threat Detection Implementation GuideInstalling SAP Enterprise Threat Detection P U B L I C 15
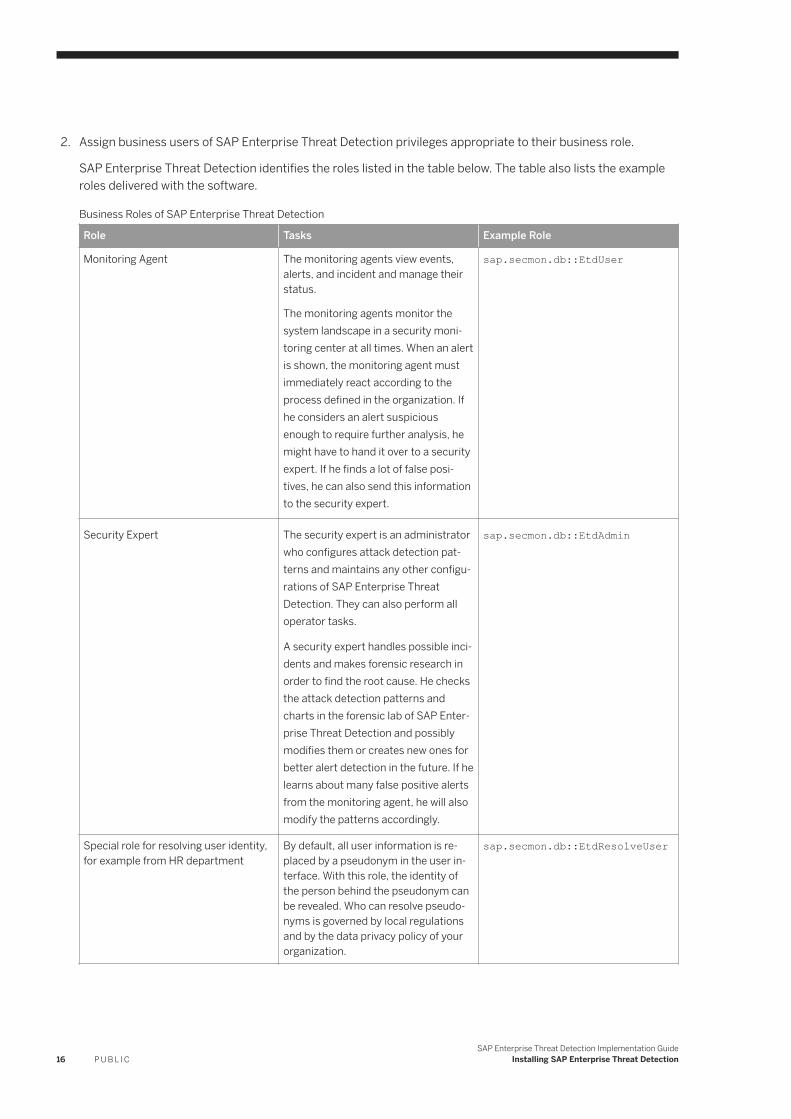
2. Assign business users of SAP Enterprise Threat Detection privileges appropriate to their business role.
SAP Enterprise Threat Detection identifies the roles listed in the table below. The table also lists the example roles delivered with the software.
Business Roles of SAP Enterprise Threat Detection
Role Tasks Example Role
Monitoring Agent The monitoring agents view events, alerts, and incident and manage their status.
The monitoring agents monitor the system landscape in a security monitoring center at all times. When an alert is shown, the monitoring agent must immediately react according to the process defined in the organization. If he considers an alert suspicious enough to require further analysis, he might have to hand it over to a security expert. If he finds a lot of false positives, he can also send this information to the security expert.
sap.secmon.db::EtdUser
Security Expert The security expert is an administrator who configures attack detection patterns and maintains any other configurations of SAP Enterprise Threat Detection. They can also perform all operator tasks.
A security expert handles possible incidents and makes forensic research in order to find the root cause. He checks the attack detection patterns and charts in the forensic lab of SAP Enterprise Threat Detection and possibly modifies them or creates new ones for better alert detection in the future. If he learns about many false positive alerts from the monitoring agent, he will also modify the patterns accordingly.
sap.secmon.db::EtdAdmin
Special role for resolving user identity, for example from HR department
By default, all user information is replaced by a pseudonym in the user interface. With this role, the identity of the person behind the pseudonym can be revealed. Who can resolve pseudonyms is governed by local regulations and by the data privacy policy of your organization.
sap.secmon.db::EtdResolveUser
16 P U B L I CSAP Enterprise Threat Detection Implementation Guide
Installing SAP Enterprise Threat Detection
For more information about the authorizations delivered with SAP Enterprise Threat Detection, see Authorizations of SAP Enterprise Threat Detection in SAP HANA [page 133].
2.3.2 Activating the SQL Connection for the Technical User
Configure this connection for the technical user to access SAP HANA database.
Prerequisites
You have an administrator user for SAP HANA with at least the following roles:
● sap.hana.xs.admin.roles::JobAdministrator● sap.hana.xs.admin.roles::SQLCCAdministrator
Procedure
1. Start the SAP HANA XS Administration Tool.
Enter the following URL in a browser:
<protocol>://<host>:<port>/sap/hana/xs/admin and search for etd_connection.
You can start this application directly at <protocol>://<host>:<port>/sap/hana/xs/admin/#/package/sap.secmon/sqlcc/etd_connection
2. Select the etd_connection.xssqlcc and choose Activate.
The technical user is created with the role sap.secmon.db::ETDTechnicalUser.
2.3.3 Finishing the Installation
Finish the instalation by calling a URL that will initialize your version of SAP Enterprise Threat Detection.
Prerequisites
You have a user with administrative rights for SAP Enterprise Threat Detection, see the "security expert" role described above under Creating Users and Assigning Authorizations.
SAP Enterprise Threat Detection Implementation GuideInstalling SAP Enterprise Threat Detection P U B L I C 17
Procedure
Open the following URL in order to finish the installation: https://<host>:<port>/sap/secmon/services/install/finish.xsjs.
2.3.4 Starting Jobs for SAP Enterprise Threat Detection
SAP Enterprise Threat Detection has a number of background jobs that must run on SAP HANA.
Prerequisites
● You have logged on with a user with administrator authorizations SAP Enterprise Threat Detection and the XS Administrator role sap.hana.xs.admin.roles::JobAdministrator.
● You have created the ETD batch users in SAP HANA to run the jobs.For more information, see Creating Users and Assigning Authorizations [page 15].
● You have enabled the job scheduler for SAP HANA XS. For example, you can do so in SAP HANA studio's Administration perspective by setting the configuration variable xsengine.ini scheduler enabled .For more information, see The XS Job Dashboard in the documentation for SAP HANA platform on SAP Help Portal.
Context
SAP Enterprise Threat Detection runs the following jobs in the background. The frequency is either hard coded or the job is started on demand. For performance reason, we recommend that you only activate the jobs that you actually need. You find more information about each job in the table below.
18 P U B L I CSAP Enterprise Threat Detection Implementation Guide
Installing SAP Enterprise Threat Detection
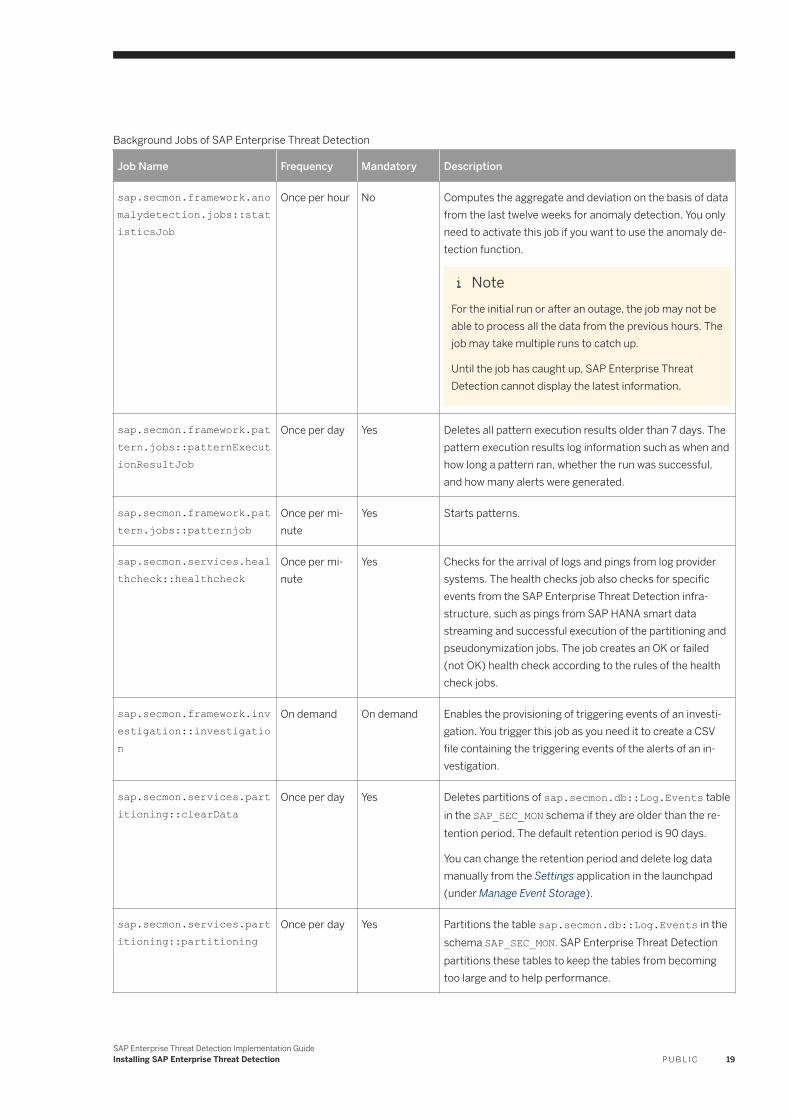
Background Jobs of SAP Enterprise Threat Detection
Job Name Frequency Mandatory Description
sap.secmon.framework.anomalydetection.jobs::statisticsJob
Once per hour No Computes the aggregate and deviation on the basis of data from the last twelve weeks for anomaly detection. You only need to activate this job if you want to use the anomaly detection function.
NoteFor the initial run or after an outage, the job may not be able to process all the data from the previous hours. The job may take multiple runs to catch up.
Until the job has caught up, SAP Enterprise Threat Detection cannot display the latest information.
sap.secmon.framework.pattern.jobs::patternExecutionResultJob
Once per day Yes Deletes all pattern execution results older than 7 days. The pattern execution results log information such as when and how long a pattern ran, whether the run was successful, and how many alerts were generated.
sap.secmon.framework.pattern.jobs::patternjob
Once per minute
Yes Starts patterns.
sap.secmon.services.healthcheck::healthcheck
Once per minute
Yes Checks for the arrival of logs and pings from log provider systems. The health checks job also checks for specific events from the SAP Enterprise Threat Detection infrastructure, such as pings from SAP HANA smart data streaming and successful execution of the partitioning and pseudonymization jobs. The job creates an OK or failed (not OK) health check according to the rules of the health check jobs.
sap.secmon.framework.investigation::investigation
On demand On demand Enables the provisioning of triggering events of an investigation. You trigger this job as you need it to create a CSV file containing the triggering events of the alerts of an investigation.
sap.secmon.services.partitioning::clearData
Once per day Yes Deletes partitions of sap.secmon.db::Log.Events table in the SAP_SEC_MON schema if they are older than the retention period. The default retention period is 90 days.
You can change the retention period and delete log data manually from the Settings application in the launchpad (under Manage Event Storage).
sap.secmon.services.partitioning::partitioning
Once per day Yes Partitions the table sap.secmon.db::Log.Events in the schema SAP_SEC_MON. SAP Enterprise Threat Detection partitions these tables to keep the tables from becoming too large and to help performance.
SAP Enterprise Threat Detection Implementation GuideInstalling SAP Enterprise Threat Detection P U B L I C 19

Job Name Frequency Mandatory Description
sap.secmon.services.pseudonymization::pseudonymization
Every 10 minutes
Yes Creates pseudonyms for users and records old pseudonyms in the pseudonym history for users.
sap.secmon.trigger.jobs::dispatcher
Every 5 seconds
Yes Checks if an event corresponding to a trigger in a pattern definition has arrived and triggers the corresponding pattern.
sap.secmon.trigger.jobs::thread
On demand Yes Allows asynchronous pattern execution.
sap.secmon.ui.browse.services2.jobs::rawdata
Once per day Yes Cleans up temporary data created by the forensic lab.
sap.secmon.framework.pattern.publishalerts.jobs::alertPublishingJob
Once per minute
No Activate this job if you want to publish alerts to external systems. For more information on alert publishing, see Alert Publishing [page 117].
Note that if you want the job to get the resolved user IDs and the user pseudonyms, you need to provide the user in this job with the sap.secmon.services::ResolveUserOnAlertService privilege.Authorizations of SAP Enterprise Threat Detection in SAP HANA [page 133].
sap.secmon.services.cleanjoblog::cleanjoblog
Once per day Yes Sweep old entries from _SYS_XS.JOB_LOG for sap.secmon.
sap.secmon.services.domainrating.internal::domainRatingInterface
Every five minutes
No You only need to activate this job if you want to use the domain rating functionality and have deployed and started the dart project.
sap.secmon.services.healthcheck::cleanhealthchecklog
Once per day Yes Sweep old entries from sap.secmon.db::HealthCheck.HealthCheckResult
sap.secmon.services.pseudonymization::cleanpseudonymhistory
Once per day Yes Sweep old entries from sap.secmon.db::Log.LogUserPseudonymHistory
sap.secmon.services.performance.jobs::perf
Every 10 seconds
No Enables the simulation of event load.
sap.secmon.services.performance.jobs::perf_stat
Every 5 minutes
No Collects statistics data for performance analyses. We recommend to only activate this job when you want to collect statistics. Deactivate it after your analysis is finished.
sap.secmon.services.util::userInterface
Every 5 minutes
Yes Processes entries from UserInterface to UserContext
20 P U B L I CSAP Enterprise Threat Detection Implementation Guide
Installing SAP Enterprise Threat Detection
Job Name Frequency Mandatory Description
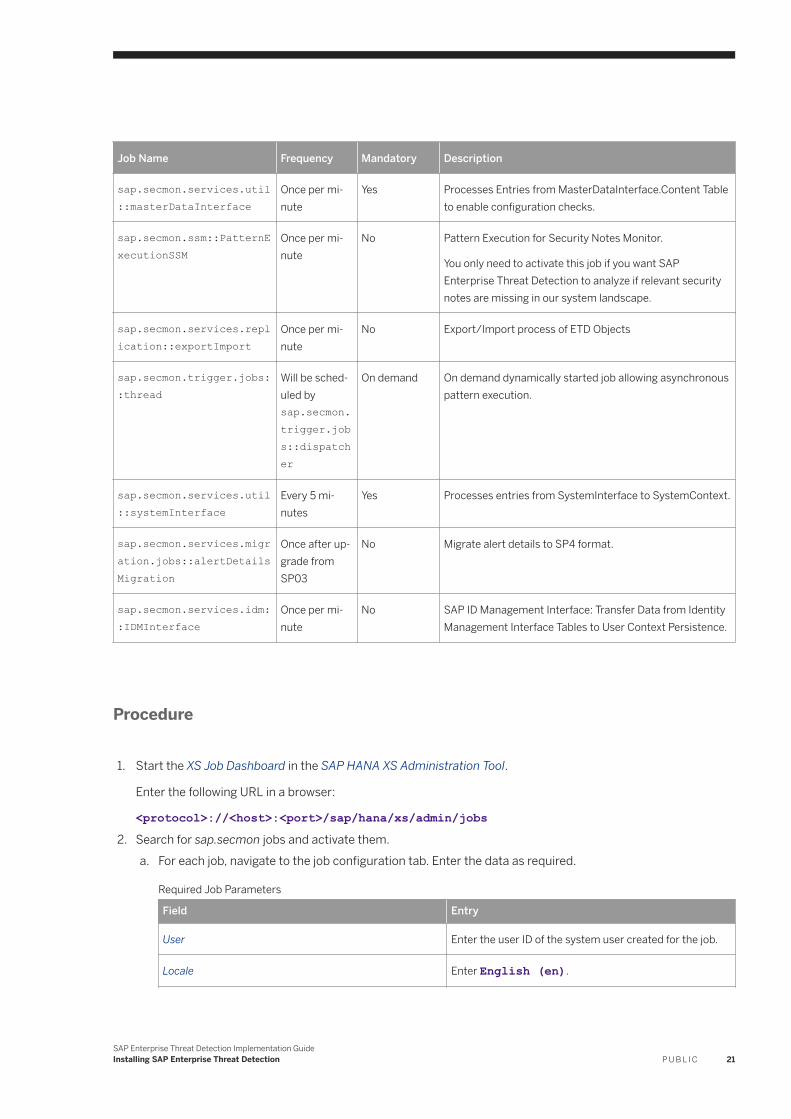
sap.secmon.services.util::masterDataInterface
Once per minute
Yes Processes Entries from MasterDataInterface.Content Table to enable configuration checks.
sap.secmon.ssm::PatternExecutionSSM
Once per minute
No Pattern Execution for Security Notes Monitor.
You only need to activate this job if you want SAP Enterprise Threat Detection to analyze if relevant security notes are missing in our system landscape.
sap.secmon.services.replication::exportImport
Once per minute
No Export/Import process of ETD Objects
sap.secmon.trigger.jobs::thread
Will be scheduled by sap.secmon.trigger.jobs::dispatcher
On demand On demand dynamically started job allowing asynchronous pattern execution.
sap.secmon.services.util::systemInterface
Every 5 minutes
Yes Processes entries from SystemInterface to SystemContext.
sap.secmon.services.migration.jobs::alertDetailsMigration
Once after upgrade from SP03
No Migrate alert details to SP4 format.
sap.secmon.services.idm::IDMInterface
Once per minute
No SAP ID Management Interface: Transfer Data from Identity Management Interface Tables to User Context Persistence.
Procedure
1. Start the XS Job Dashboard in the SAP HANA XS Administration Tool.
Enter the following URL in a browser:
<protocol>://<host>:<port>/sap/hana/xs/admin/jobs2. Search for sap.secmon jobs and activate them.
a. For each job, navigate to the job configuration tab. Enter the data as required.
Required Job Parameters
Field Entry
User Enter the user ID of the system user created for the job.
Locale Enter English (en).
SAP Enterprise Threat Detection Implementation GuideInstalling SAP Enterprise Threat Detection P U B L I C 21
Field Entry
Active Select the checkbox.
NoteDo not enter a start time or end time.
b. Save your entries.Repeat these steps until you have configured all the jobs.
2.4 Installing SAP Enterprise Threat Detection on SAP HANA Smart Data Streaming
Installing SAP Enterprise Threat Detection on SAP HANA Smart Data Streaming includes the installation of projects and the installation of the gateway log adapter and log learning adapter.
Prerequisites
● You have installed SAP HANA smart data streaming.● You have logged on with a user with sufficient authorization, for example the <SDS admin> user.
NoteWe assume that you use SAP HANA smart data streaming Studio and use SAP HANA Studio for the installation. On the SAP HANA Studio you install the plugin to run SAP HANA smart data streaming.
For more information, see the documentation for SAP HANA smart data streaming on SAP Help Portal at http://help.sap.com/saphelp_hana_options_sds_inst/helpdata/en/72/7321566fa842cf812968d7bae35335/frameset.htm
The following is an overview of the installation procedure. For more information, see the sections that follow.
Context
22 P U B L I CSAP Enterprise Threat Detection Implementation Guide
Installing SAP Enterprise Threat Detection
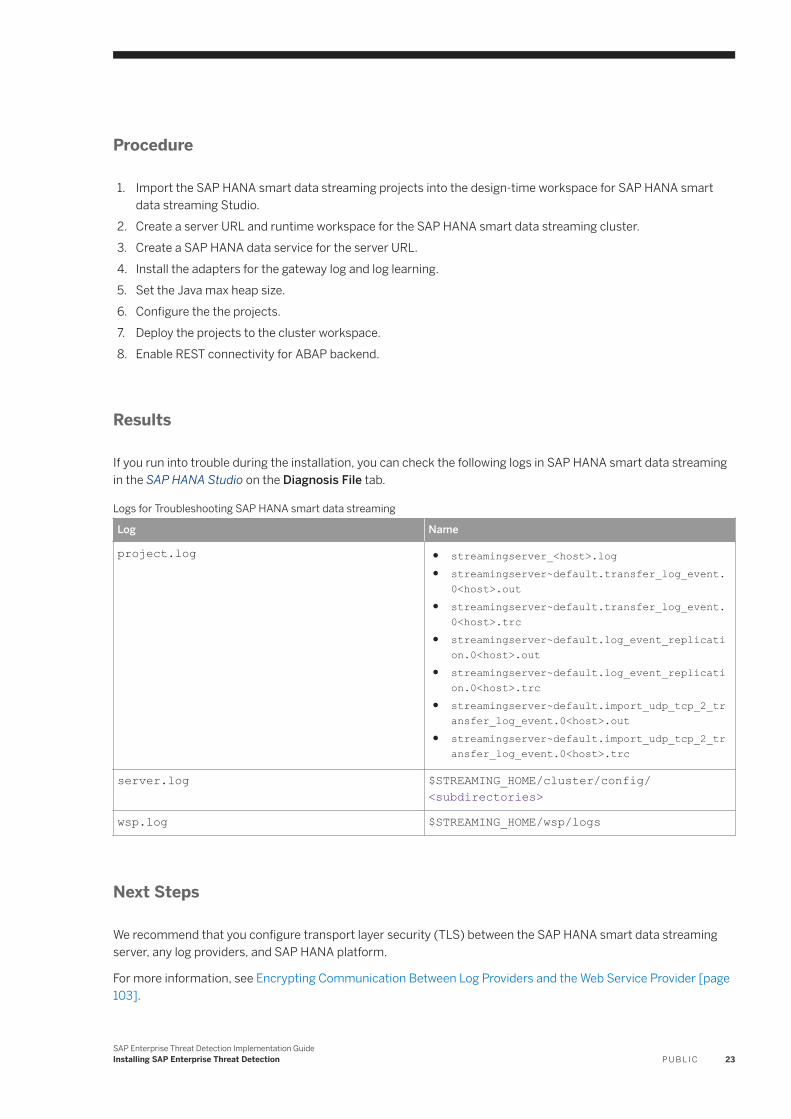
Procedure
1. Import the SAP HANA smart data streaming projects into the design-time workspace for SAP HANA smart data streaming Studio.
2. Create a server URL and runtime workspace for the SAP HANA smart data streaming cluster.3. Create a SAP HANA data service for the server URL.4. Install the adapters for the gateway log and log learning.5. Set the Java max heap size.6. Configure the the projects.7. Deploy the projects to the cluster workspace.8. Enable REST connectivity for ABAP backend.
Results
If you run into trouble during the installation, you can check the following logs in SAP HANA smart data streaming in the SAP HANA Studio on the Diagnosis File tab.
Logs for Troubleshooting SAP HANA smart data streaming
Log Name
project.log ● streamingserver_<host>.log● streamingserver~default.transfer_log_event.
0<host>.out● streamingserver~default.transfer_log_event.
0<host>.trc● streamingserver~default.log_event_replicati
on.0<host>.out● streamingserver~default.log_event_replicati
on.0<host>.trc● streamingserver~default.import_udp_tcp_2_tr
ansfer_log_event.0<host>.out● streamingserver~default.import_udp_tcp_2_tr
ansfer_log_event.0<host>.trc
server.log $STREAMING_HOME/cluster/config/<subdirectories>
wsp.log $STREAMING_HOME/wsp/logs
Next Steps
We recommend that you configure transport layer security (TLS) between the SAP HANA smart data streaming server, any log providers, and SAP HANA platform.
For more information, see Encrypting Communication Between Log Providers and the Web Service Provider [page 103].
SAP Enterprise Threat Detection Implementation GuideInstalling SAP Enterprise Threat Detection P U B L I C 23
2.4.1 Importing the SAP HANA Smart Data Streaming Projects for SAP Enterprise Threat Detection
This procedure imports the projects into the Eclipse Studio workspace for SAP HANA smart data streaming.
Prerequisites
● You have installed the delivery unit HCO_SECURITY_MON on your SAP HANA.● From the delivery unit, you have checked out the folder that contains the SAP HANA smart data streaming
projects (/sap/secmon/esp/esp_projects/projects) and made the folder available to your SAP HANA smart data streaming system.
● You have logged on to SAP HANA smart data streaming with a user that has the authorization to deploy projects (for example, the <SDS admin> described above).
Context
SAP Enterprise Threat Detection has two main SAP HANA Smart Data Streaming projects: transfer_log_event normalizes and enriches the data sent by log providers so that it can be stored as events in SAP HANA platform. The other project (transfer_master_data ) collects the user master data sent by log providers so that it can be used to provide user context for log entries in SAP HANA.
The dart project is a third project you need to import. This project enables the detection of malicious domains. There are a number of further projects that you need depending on your system landscape, for example for the replication of log data.
NoteFor more information about studio workspaces, see the Eclipse documentation.
Procedure
1. In SAP HANA Studio, open SAP HANA Streaming Development perspective.
2. In the context menu of the Project Explorer, choose Import... Existing Project into Workspace .3. Choose the Select archive file and select the archives files from where you have stored the esp projects files
from the SAP HANA delivery unit.4. Choose the project(s) you want to import.
The table below gives an overview of the projects for SAP Enterprise Threat Detection.5. Choose Finish.
24 P U B L I CSAP Enterprise Threat Detection Implementation Guide
Installing SAP Enterprise Threat Detection
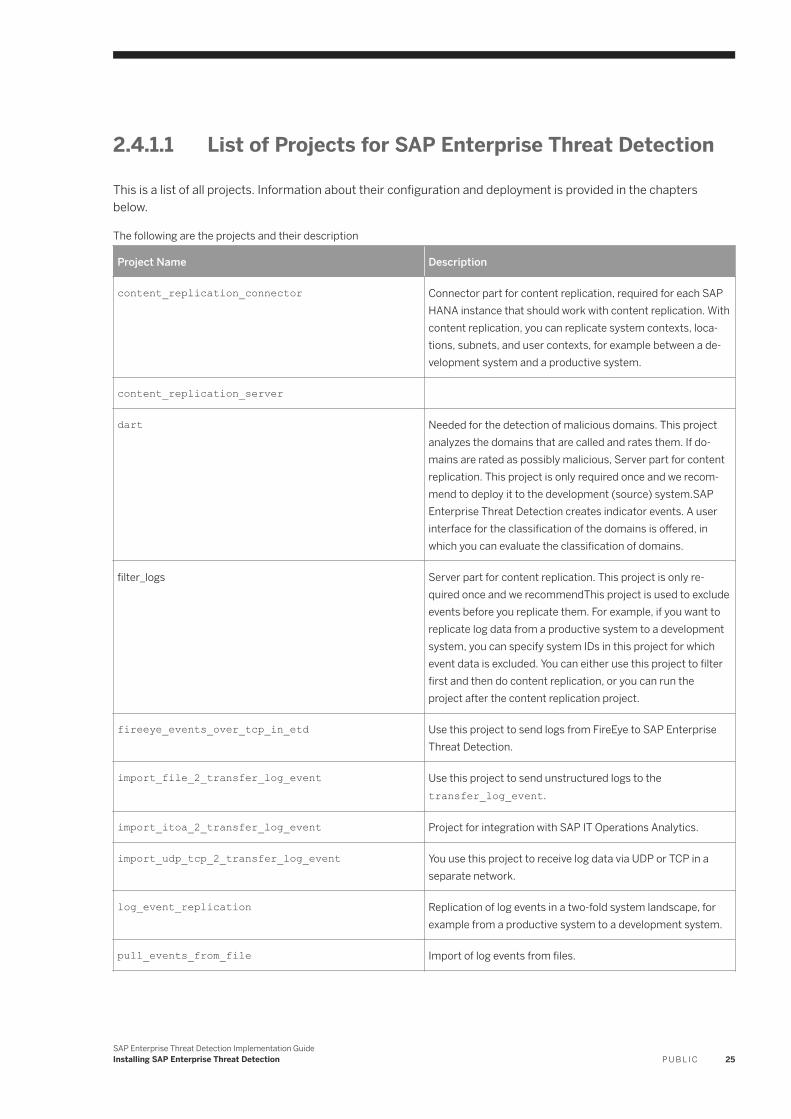
2.4.1.1 List of Projects for SAP Enterprise Threat Detection
This is a list of all projects. Information about their configuration and deployment is provided in the chapters below.
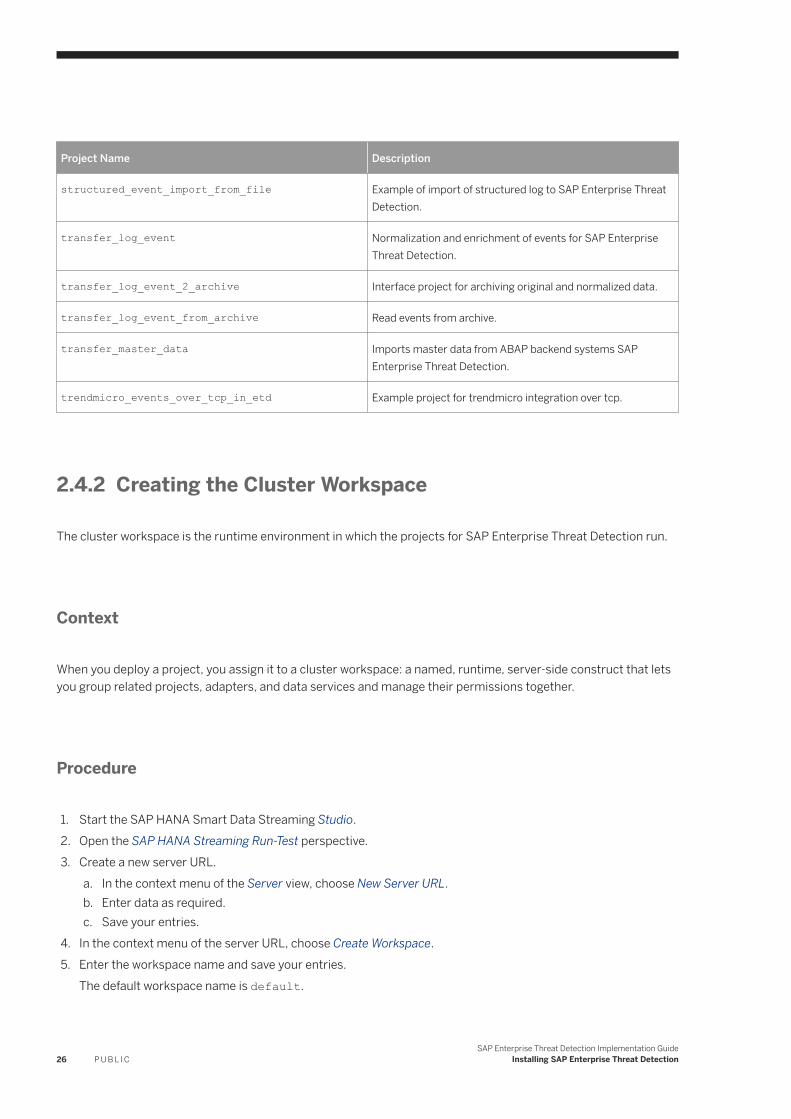
The following are the projects and their description
Project Name Description
content_replication_connector Connector part for content replication, required for each SAP HANA instance that should work with content replication. With content replication, you can replicate system contexts, locations, subnets, and user contexts, for example between a development system and a productive system.
content_replication_server
dart Needed for the detection of malicious domains. This project analyzes the domains that are called and rates them. If domains are rated as possibly malicious, Server part for content replication. This project is only required once and we recommend to deploy it to the development (source) system.SAP Enterprise Threat Detection creates indicator events. A user interface for the classification of the domains is offered, in which you can evaluate the classification of domains.
filter_logs Server part for content replication. This project is only required once and we recommendThis project is used to exclude events before you replicate them. For example, if you want to replicate log data from a productive system to a development system, you can specify system IDs in this project for which event data is excluded. You can either use this project to filter first and then do content replication, or you can run the project after the content replication project.
fireeye_events_over_tcp_in_etd Use this project to send logs from FireEye to SAP Enterprise Threat Detection.
import_file_2_transfer_log_event Use this project to send unstructured logs to the transfer_log_event.
import_itoa_2_transfer_log_event Project for integration with SAP IT Operations Analytics.
import_udp_tcp_2_transfer_log_event You use this project to receive log data via UDP or TCP in a separate network.
log_event_replication Replication of log events in a two-fold system landscape, for example from a productive system to a development system.
pull_events_from_file Import of log events from files.
SAP Enterprise Threat Detection Implementation GuideInstalling SAP Enterprise Threat Detection P U B L I C 25
Project Name Description
structured_event_import_from_file Example of import of structured log to SAP Enterprise Threat Detection.
transfer_log_event Normalization and enrichment of events for SAP Enterprise Threat Detection.
transfer_log_event_2_archive Interface project for archiving original and normalized data.
transfer_log_event_from_archive Read events from archive.
transfer_master_data Imports master data from ABAP backend systems SAP Enterprise Threat Detection.
trendmicro_events_over_tcp_in_etd Example project for trendmicro integration over tcp.
2.4.2 Creating the Cluster Workspace
The cluster workspace is the runtime environment in which the projects for SAP Enterprise Threat Detection run.
Context
When you deploy a project, you assign it to a cluster workspace: a named, runtime, server-side construct that lets you group related projects, adapters, and data services and manage their permissions together.
Procedure
1. Start the SAP HANA Smart Data Streaming Studio.2. Open the SAP HANA Streaming Run-Test perspective.3. Create a new server URL.
a. In the context menu of the Server view, choose New Server URL.b. Enter data as required.c. Save your entries.
4. In the context menu of the server URL, choose Create Workspace.5. Enter the workspace name and save your entries.
The default workspace name is default.
26 P U B L I CSAP Enterprise Threat Detection Implementation Guide
Installing SAP Enterprise Threat Detection
Next Steps
Remember the server URL and workspace name. You must know the server URL and workspace name for the following configurations:
● Configuring the adapter_config.xml in the log learning, the gateway log, and the dart adapter configurations.
● Determining the workspace to deploy the projects under.● The log provider configuration for SAP NetWeaver Application Server.
2.4.3 Creating Data Services for SAP HANA
SAP HANA Smart Data Streaming uses the SAP HANA data service to connect to SAP HANA.
Prerequisites
● You have created a cluster workspace to run the projects.● You have a user with administration rights for SAP HANA Smart Data Streaming, for example the <SDS
Admin> user described above.
Procedure
1. Create two data services that can be used in all workspaces server-wide as described in the documentation for SAP HANA Smart Data Streaming.
Fore more information, see Configuring External Database Access in the documentation for SAP HANA Smart Data Streaming on SAP Help Portal at http://help.sap.com/saphelp_hana_options_sds_conf/helpdata/en/e7/8d0f156f0f1014a048880d763bd299/content.htm?frameset=/en/e7/8d0f156f0f1014a048880d763bd299/frameset.htm¤t_toc=/en/cc/e7f7ba55ea403392517f89e74d4e98/plain.htm&node_id=23&show_children=true#jump23.
Note○ Give the SAP HANA data services names, for example <local> and <dart>. The <dart> data service
will beused in the dart project for the detection of malicious domains.○ Provide these name later when you configure the projects in the .ccr files.
2. Follow these steps to connect to SAP HANA.a. Right click on the Server-wide folder to select the Add HANA Service.b. Provide the User and Password. For the <local> data service, use the example <communication> user
described above. For the <dart> data service, use the example <domain_rating_communication> user described in chapter Creating Users and Assigning Authorizations above.
SAP Enterprise Threat Detection Implementation GuideInstalling SAP Enterprise Threat Detection P U B L I C 27
c. Check the Default HANA Server or choose from the Single or Multiple Tenant if you want to connect the SAP HANA Smart Data Streaming to a different HANA Server.
d. If you choose Single or Multiple Tenant provide Hostname and Instance.3. Check Multi-byte Character Support (Unicode System).4. Test the data service with the Discover function from the context menu.
2.4.4 Installing the SAP Enterprise Threat Detection Adapters
You install two adapters for SAP Enterprise Threat Detection with an installation script: the log learning adapter for consuming unstructured log data and the dart adapter for the detection of malicious domain calls.
Prerequisites
From the SAP Enterprise Threat Detection delivery unit, you have checked out the folder that contains the adapter files (/sap/secmon/esp/esp_projects/adapter) and copied it to your SAP HANA smart data streaming server. The <sid>adm user must have authorizations in this directory.
Procedure
1. Ensure that the script in the adapter folder (/sap/secmon/esp/esp_projects/adapter/etd_install_adapters_<esp/sds>.sh) is executable.
2. Log on to SAP HANA smart data streaming with the <sid>adm user and execute the installation script.
3. If you want to use the function to detect malicious domains, download and add the Dnsjava 2.1.7 open source library to this directory: <HANA Installation path>/streaming/cluster/<sid>/adapters/libj.
Next Steps
If you do not want to use the default port or workspace, you can specify them in the adapter_config.xml.
Related Information
Settings in rtparseradapter_config.xml and dartadapter_config.xml [page 30]
28 P U B L I CSAP Enterprise Threat Detection Implementation Guide
Installing SAP Enterprise Threat Detection
2.4.4.1 Result of the Installation Script
If you run into trouble when installing the adapters for SAP Enterprise Threat Detection with our installation script, check if the script has correctly copied the files.
Context
The following figure illustrates the folder structure in the SAP Enterprise Threat Detection delivery unit.
Overview of File Operations
After you have installed the adapters, the folders and files should be in the following locations in your SAP HANA installation directory:
● The rtparseradapter.cnxml and dartadapter.cnxml files from the common folder: <HANA Installation path>/streaming/cluster/<sid>/adapter/cnxml
● The etd_datamodel-<version>.jar, etd_runtimeparser-<version>.jar and etd_dart-<version>.jar files: <HANA Installation path>/streaming/cluster/<sid>/adapters/libj
● The rtparseradapter_config.xml and dartadapter_config.xml files: <HANA Installation path>/streaming/cluster/<sid>/adapters/config
CautionIn case of problems, ensure that you removed the *.jar files from these directories. You should avoid having multiple copies of these *.jar files in your installation.
● The parametersdefine.xsd and custommodulesdefine.xml files: <HANA Installation path>/streaming/cluster/<sid>/adapters/config.
Related Information
Settings in rtparseradapter_config.xml and dartadapter_config.xml [page 30]Examples of the adapter_config.xml files [page 31]
SAP Enterprise Threat Detection Implementation GuideInstalling SAP Enterprise Threat Detection P U B L I C 29
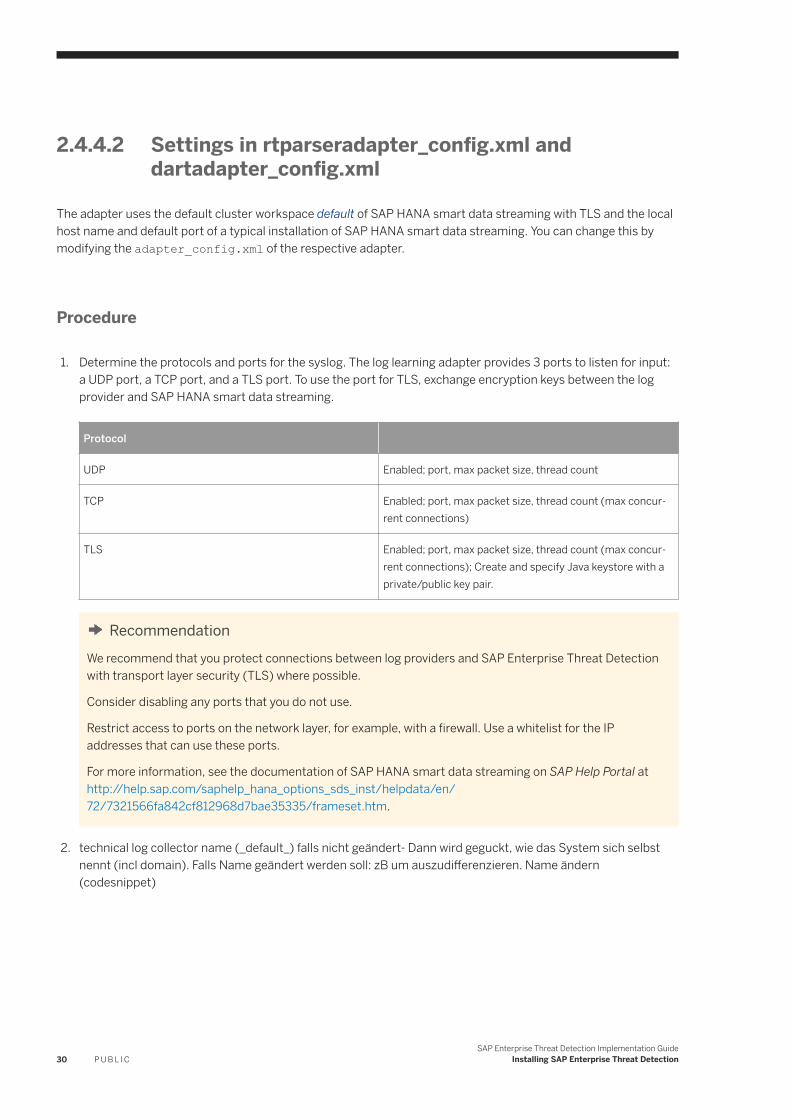
2.4.4.2 Settings in rtparseradapter_config.xml and dartadapter_config.xml
The adapter uses the default cluster workspace default of SAP HANA smart data streaming with TLS and the local host name and default port of a typical installation of SAP HANA smart data streaming. You can change this by modifying the adapter_config.xml of the respective adapter.
Procedure
1. Determine the protocols and ports for the syslog. The log learning adapter provides 3 ports to listen for input: a UDP port, a TCP port, and a TLS port. To use the port for TLS, exchange encryption keys between the log provider and SAP HANA smart data streaming.
Protocol
UDP Enabled; port, max packet size, thread count
TCP Enabled; port, max packet size, thread count (max concurrent connections)
TLS Enabled; port, max packet size, thread count (max concurrent connections); Create and specify Java keystore with a private/public key pair.
RecommendationWe recommend that you protect connections between log providers and SAP Enterprise Threat Detection with transport layer security (TLS) where possible.
Consider disabling any ports that you do not use.
Restrict access to ports on the network layer, for example, with a firewall. Use a whitelist for the IP addresses that can use these ports.
For more information, see the documentation of SAP HANA smart data streaming on SAP Help Portal at http://help.sap.com/saphelp_hana_options_sds_inst/helpdata/en/72/7321566fa842cf812968d7bae35335/frameset.htm.
2. technical log collector name (_default_) falls nicht geändert- Dann wird geguckt, wie das System sich selbst nennt (incl domain). Falls Name geändert werden soll: zB um auszudifferenzieren. Name ändern (codesnippet)
30 P U B L I CSAP Enterprise Threat Detection Implementation Guide
Installing SAP Enterprise Threat Detection
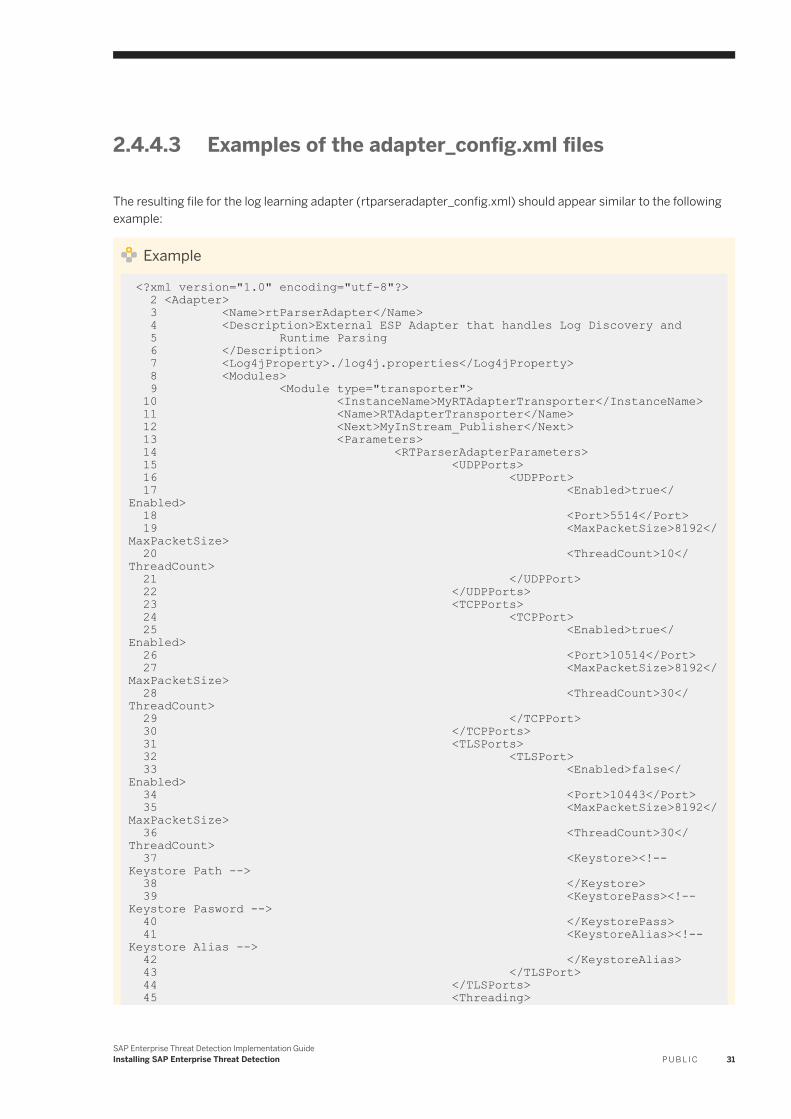
2.4.4.3 Examples of the adapter_config.xml files
The resulting file for the log learning adapter (rtparseradapter_config.xml) should appear similar to the following example:
Example
<?xml version="1.0" encoding="utf-8"?> 2 <Adapter> 3 <Name>rtParserAdapter</Name> 4 <Description>External ESP Adapter that handles Log Discovery and 5 Runtime Parsing 6 </Description> 7 <Log4jProperty>./log4j.properties</Log4jProperty> 8 <Modules> 9 <Module type="transporter"> 10 <InstanceName>MyRTAdapterTransporter</InstanceName> 11 <Name>RTAdapterTransporter</Name> 12 <Next>MyInStream_Publisher</Next> 13 <Parameters> 14 <RTParserAdapterParameters> 15 <UDPPorts> 16 <UDPPort> 17 <Enabled>true</Enabled> 18 <Port>5514</Port> 19 <MaxPacketSize>8192</MaxPacketSize> 20 <ThreadCount>10</ThreadCount> 21 </UDPPort> 22 </UDPPorts> 23 <TCPPorts> 24 <TCPPort> 25 <Enabled>true</Enabled> 26 <Port>10514</Port> 27 <MaxPacketSize>8192</MaxPacketSize> 28 <ThreadCount>30</ThreadCount> 29 </TCPPort> 30 </TCPPorts> 31 <TLSPorts> 32 <TLSPort> 33 <Enabled>false</Enabled> 34 <Port>10443</Port> 35 <MaxPacketSize>8192</MaxPacketSize> 36 <ThreadCount>30</ThreadCount> 37 <Keystore><!-- Keystore Path --> 38 </Keystore> 39 <KeystorePass><!-- Keystore Pasword --> 40 </KeystorePass> 41 <KeystoreAlias><!-- Keystore Alias --> 42 </KeystoreAlias> 43 </TLSPort> 44 </TLSPorts> 45 <Threading>
SAP Enterprise Threat Detection Implementation GuideInstalling SAP Enterprise Threat Detection P U B L I C 31

46 <Parsers>-1</Parsers> 47 <Publishers>-1</Publishers> 48 </Threading> 49 <Processing> 50 <LogCollector>false</LogCollector> 51 <LogCollectorName>_default_</LogCollectorName> 52 </Processing> 53 </RTParserAdapterParameters> 54 </Parameters> 55 </Module> 56 57 <Module type="espconnector"> 58 <InstanceName>MyInStream_Publisher</InstanceName> 59 <Name>EspPublisher</Name> 60 <Parameters> 61 <EspPublisherParameters> 62 </EspPublisherParameters> 63 </Parameters> 64 </Module> 65 </Modules> 66 67 <GlobalParameters /> 68 69 </Adapter>
The resulting file for the dart adapter should appear similar to the following example:
Example
<?xml version="1.0" encoding="utf-8"?> <Adapter> <Name>dartAdapter</Name> <Description>Domain Analysis Rating Tool</Description> <Log4jProperty>./log4j.properties</Log4jProperty> <Modules> <Module type="espconnector"> <InstanceName>MyOutStream_Subscriber</InstanceName> <Name>EspSubscriber</Name> <Next>MyDartTransporter</Next> <Parameters> <EspSubscriberParameters> </EspSubscriberParameters> </Parameters> </Module> <Module type="transporter"> <InstanceName>MyDartTransporter</InstanceName> <Name>DartTransporter</Name> <Parameters /> </Module> </Modules> <GlobalParameters /></Adapter>
32 P U B L I CSAP Enterprise Threat Detection Implementation Guide
Installing SAP Enterprise Threat Detection
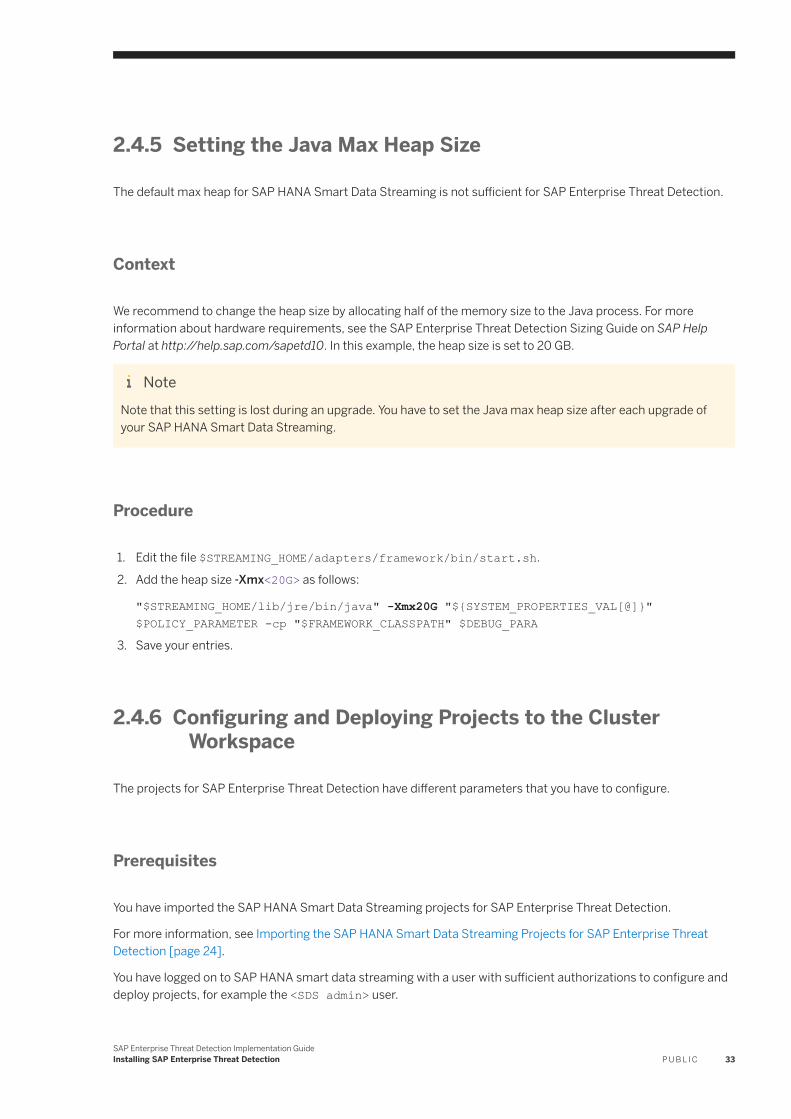
2.4.5 Setting the Java Max Heap Size
The default max heap for SAP HANA Smart Data Streaming is not sufficient for SAP Enterprise Threat Detection.
Context
We recommend to change the heap size by allocating half of the memory size to the Java process. For more information about hardware requirements, see the SAP Enterprise Threat Detection Sizing Guide on SAP Help Portal at http://help.sap.com/sapetd10. In this example, the heap size is set to 20 GB.
NoteNote that this setting is lost during an upgrade. You have to set the Java max heap size after each upgrade of your SAP HANA Smart Data Streaming.
Procedure
1. Edit the file $STREAMING_HOME/adapters/framework/bin/start.sh.
2. Add the heap size -Xmx<20G> as follows:
"$STREAMING_HOME/lib/jre/bin/java" -Xmx20G "${SYSTEM_PROPERTIES_VAL[@]}" $POLICY_PARAMETER -cp "$FRAMEWORK_CLASSPATH" $DEBUG_PARA
3. Save your entries.
2.4.6 Configuring and Deploying Projects to the Cluster Workspace
The projects for SAP Enterprise Threat Detection have different parameters that you have to configure.
Prerequisites
You have imported the SAP HANA Smart Data Streaming projects for SAP Enterprise Threat Detection.
For more information, see Importing the SAP HANA Smart Data Streaming Projects for SAP Enterprise Threat Detection [page 24].
You have logged on to SAP HANA smart data streaming with a user with sufficient authorizations to configure and deploy projects, for example the <SDS admin> user.
SAP Enterprise Threat Detection Implementation GuideInstalling SAP Enterprise Threat Detection P U B L I C 33
Context
This is the overall procedure. You find detailed information for each project in the chapters that follow.
Procedure
1. Configure the project.2. Configure the bindings, if necessary.3. Deploy the project.
Deploying the projects to their runtime environments enables the projects for streaming data.4. If you deploy a project more than once, note that you need a .ccr and .ccx file for each instance. We
recommend that you set up a central repository or directory for all of your .ccr and .ccx files outside of your SAP Enterprise Threat Detection so that you can always reuse them if you ever have to reconfigure the projects. For example, after an upgrade, the configurations might get lost.
34 P U B L I CSAP Enterprise Threat Detection Implementation Guide
Installing SAP Enterprise Threat Detection
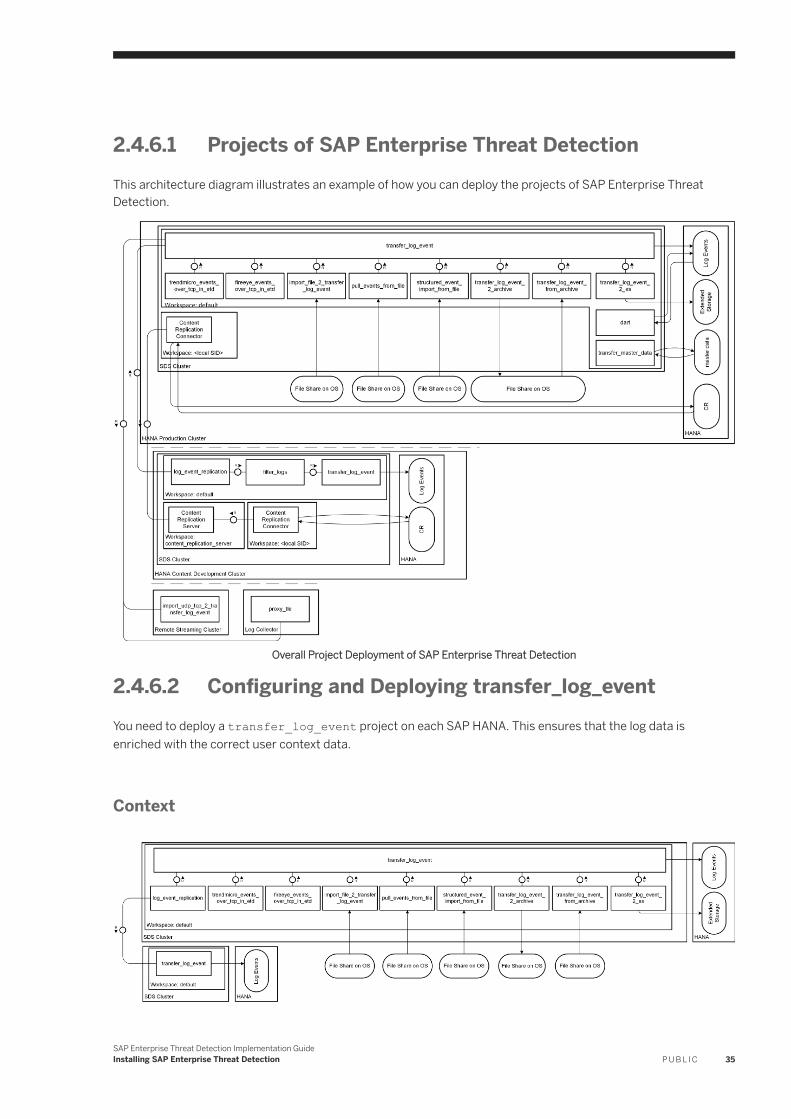
2.4.6.1 Projects of SAP Enterprise Threat DetectionThis architecture diagram illustrates an example of how you can deploy the projects of SAP Enterprise Threat Detection.
Overall Project Deployment of SAP Enterprise Threat Detection
2.4.6.2 Configuring and Deploying transfer_log_eventYou need to deploy a transfer_log_event project on each SAP HANA. This ensures that the log data is enriched with the correct user context data.
Context
SAP Enterprise Threat Detection Implementation GuideInstalling SAP Enterprise Threat Detection P U B L I C 35
Procedure
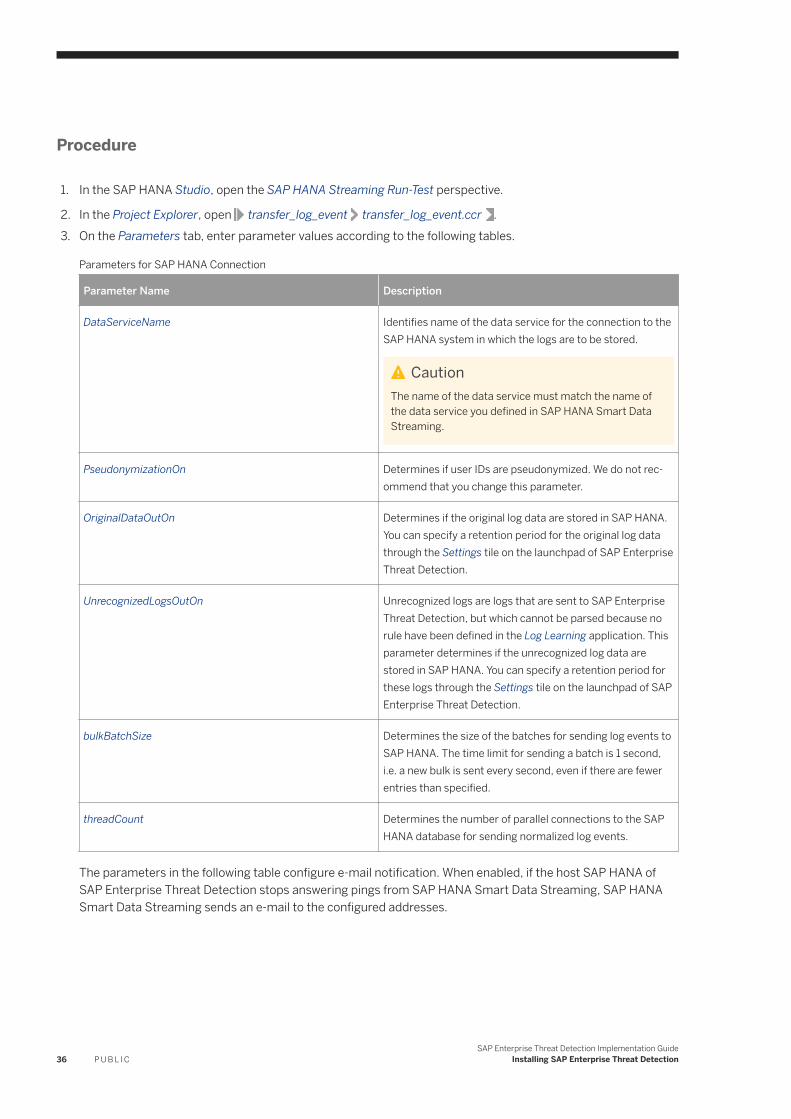
1. In the SAP HANA Studio, open the SAP HANA Streaming Run-Test perspective.
2. In the Project Explorer, open transfer_log_event transfer_log_event.ccr .3. On the Parameters tab, enter parameter values according to the following tables.
Parameters for SAP HANA Connection
Parameter Name Description
DataServiceName Identifies name of the data service for the connection to the SAP HANA system in which the logs are to be stored.
CautionThe name of the data service must match the name of the data service you defined in SAP HANA Smart Data Streaming.
PseudonymizationOn Determines if user IDs are pseudonymized. We do not recommend that you change this parameter.
OriginalDataOutOn Determines if the original log data are stored in SAP HANA. You can specify a retention period for the original log data through the Settings tile on the launchpad of SAP Enterprise Threat Detection.
UnrecognizedLogsOutOn Unrecognized logs are logs that are sent to SAP Enterprise Threat Detection, but which cannot be parsed because no rule have been defined in the Log Learning application. This parameter determines if the unrecognized log data are stored in SAP HANA. You can specify a retention period for these logs through the Settings tile on the launchpad of SAP Enterprise Threat Detection.
bulkBatchSize Determines the size of the batches for sending log events to SAP HANA. The time limit for sending a batch is 1 second, i.e. a new bulk is sent every second, even if there are fewer entries than specified.
threadCount Determines the number of parallel connections to the SAP HANA database for sending normalized log events.
The parameters in the following table configure e-mail notification. When enabled, if the host SAP HANA of SAP Enterprise Threat Detection stops answering pings from SAP HANA Smart Data Streaming, SAP HANA Smart Data Streaming sends an e-mail to the configured addresses.
36 P U B L I CSAP Enterprise Threat Detection Implementation Guide
Installing SAP Enterprise Threat Detection
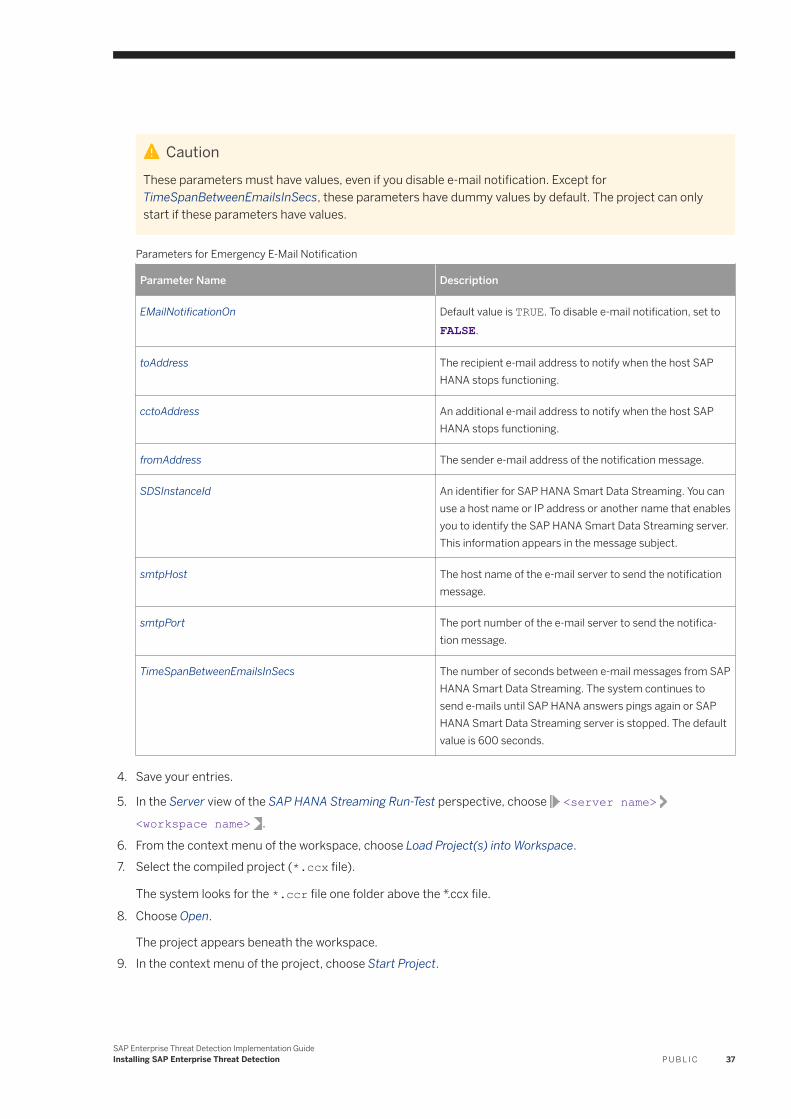
CautionThese parameters must have values, even if you disable e-mail notification. Except for TimeSpanBetweenEmailsInSecs, these parameters have dummy values by default. The project can only start if these parameters have values.
Parameters for Emergency E-Mail Notification
Parameter Name Description
EMailNotificationOn Default value is TRUE. To disable e-mail notification, set to FALSE.
toAddress The recipient e-mail address to notify when the host SAP HANA stops functioning.
cctoAddress An additional e-mail address to notify when the host SAP HANA stops functioning.
fromAddress The sender e-mail address of the notification message.
SDSInstanceId An identifier for SAP HANA Smart Data Streaming. You can use a host name or IP address or another name that enables you to identify the SAP HANA Smart Data Streaming server. This information appears in the message subject.
smtpHost The host name of the e-mail server to send the notification message.
smtpPort The port number of the e-mail server to send the notification message.
TimeSpanBetweenEmailsInSecs The number of seconds between e-mail messages from SAP HANA Smart Data Streaming. The system continues to send e-mails until SAP HANA answers pings again or SAP HANA Smart Data Streaming server is stopped. The default value is 600 seconds.
4. Save your entries.
5. In the Server view of the SAP HANA Streaming Run-Test perspective, choose <server name><workspace name> .
6. From the context menu of the workspace, choose Load Project(s) into Workspace.7. Select the compiled project (*.ccx file).
The system looks for the *.ccr file one folder above the *.ccx file.
8. Choose Open.
The project appears beneath the workspace.9. In the context menu of the project, choose Start Project.
SAP Enterprise Threat Detection Implementation GuideInstalling SAP Enterprise Threat Detection P U B L I C 37
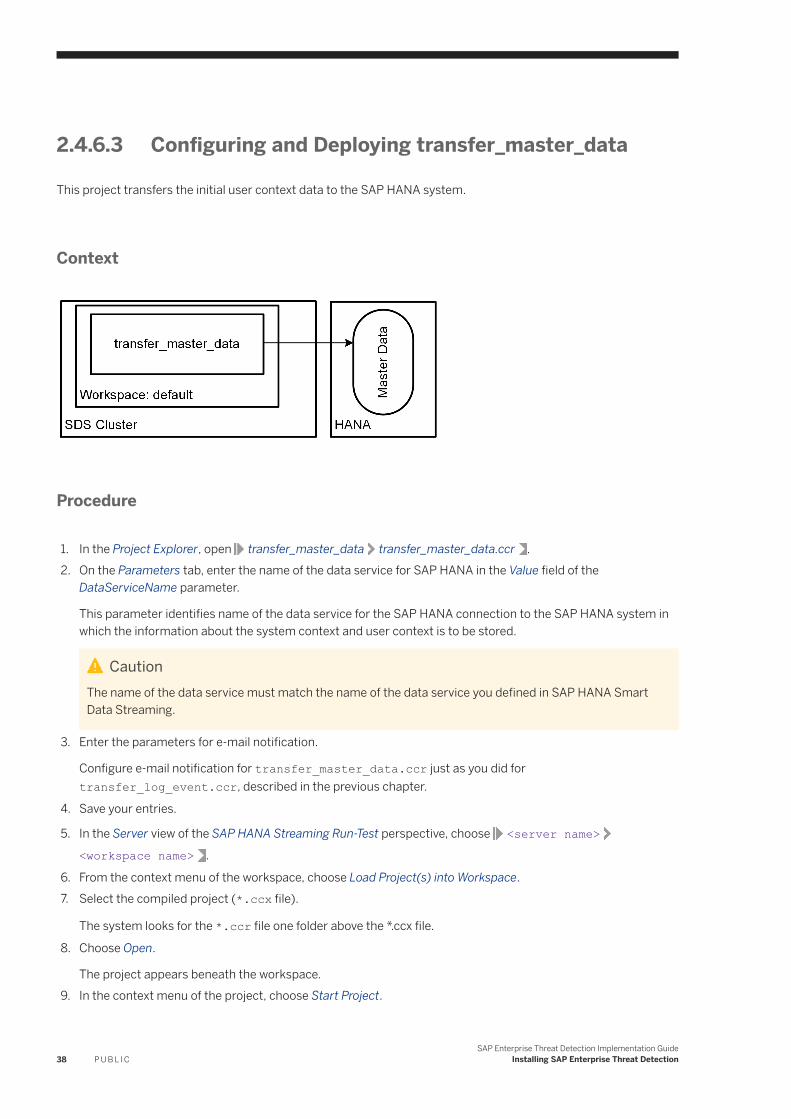
2.4.6.3 Configuring and Deploying transfer_master_data
This project transfers the initial user context data to the SAP HANA system.
Context
Procedure
1. In the Project Explorer, open transfer_master_data transfer_master_data.ccr .2. On the Parameters tab, enter the name of the data service for SAP HANA in the Value field of the
DataServiceName parameter.
This parameter identifies name of the data service for the SAP HANA connection to the SAP HANA system in which the information about the system context and user context is to be stored.
CautionThe name of the data service must match the name of the data service you defined in SAP HANA Smart Data Streaming.
3. Enter the parameters for e-mail notification.
Configure e-mail notification for transfer_master_data.ccr just as you did for transfer_log_event.ccr, described in the previous chapter.
4. Save your entries.
5. In the Server view of the SAP HANA Streaming Run-Test perspective, choose <server name><workspace name> .
6. From the context menu of the workspace, choose Load Project(s) into Workspace.7. Select the compiled project (*.ccx file).
The system looks for the *.ccr file one folder above the *.ccx file.
8. Choose Open.
The project appears beneath the workspace.9. In the context menu of the project, choose Start Project.
38 P U B L I CSAP Enterprise Threat Detection Implementation Guide
Installing SAP Enterprise Threat Detection
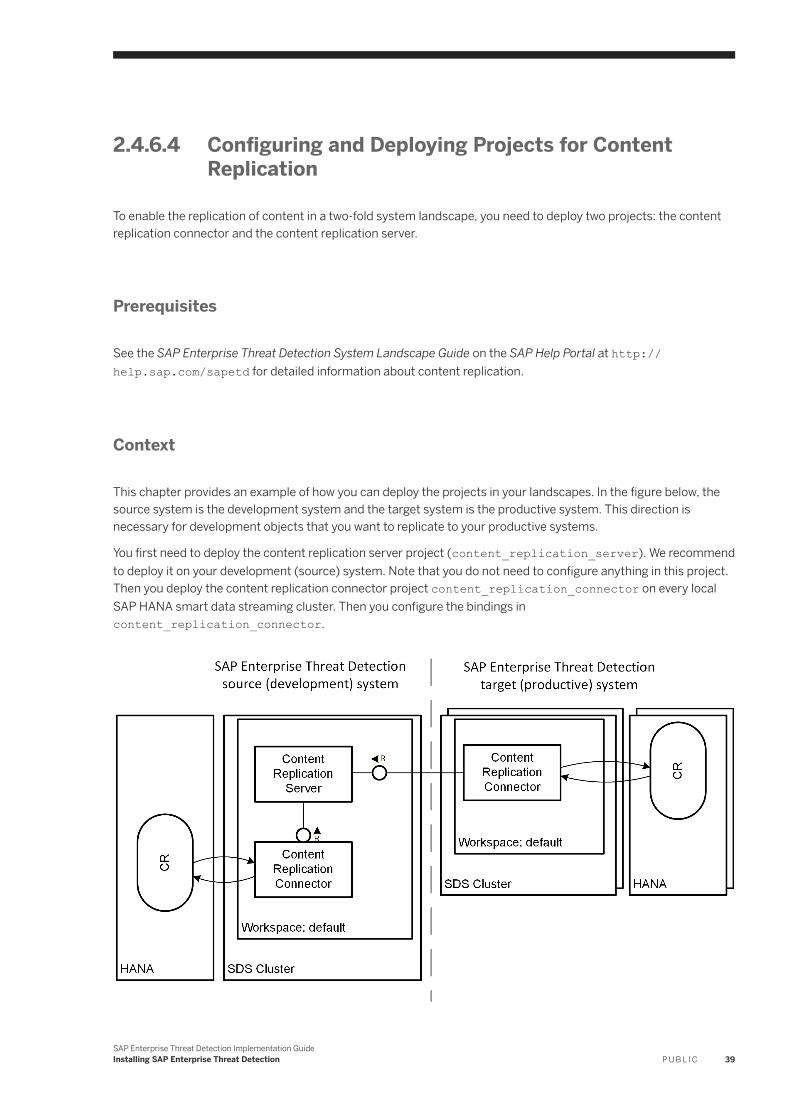
2.4.6.4 Configuring and Deploying Projects for Content Replication
To enable the replication of content in a two-fold system landscape, you need to deploy two projects: the content replication connector and the content replication server.
Prerequisites
See the SAP Enterprise Threat Detection System Landscape Guide on the SAP Help Portal at http://help.sap.com/sapetd for detailed information about content replication.
Context
This chapter provides an example of how you can deploy the projects in your landscapes. In the figure below, the source system is the development system and the target system is the productive system. This direction is necessary for development objects that you want to replicate to your productive systems.
You first need to deploy the content replication server project (content_replication_server). We recommend to deploy it on your development (source) system. Note that you do not need to configure anything in this project. Then you deploy the content replication connector project content_replication_connector on every local SAP HANA smart data streaming cluster. Then you configure the bindings in content_replication_connector.
SAP Enterprise Threat Detection Implementation GuideInstalling SAP Enterprise Threat Detection P U B L I C 39
Procedure
1. In the SAP HANA Studio, open the SAP HANA Streaming Run-Test perspective.
2. In the Project Explorer, open content_replication_connector content_replication_connector.ccr .3. On the Clusters tab, configure a connection to the cluster in which the content_replication_server
project is located.
Click Add and specify the connection:
Cluster URL esps://<content_replication_server-hostname>:<port>
The default port is 30026
Cluster manager
(If the Cluster Manager is not displayed in the user interface, right-click the cluster and choose New > Cluster Manager.)
http://<content_replication_server-hostname>:<port>
The default port is 30026. Note that the protocol is HTTP.
Type remote
Authentication Enter user credentials of a user who is authorized to read and write in content replication server project.
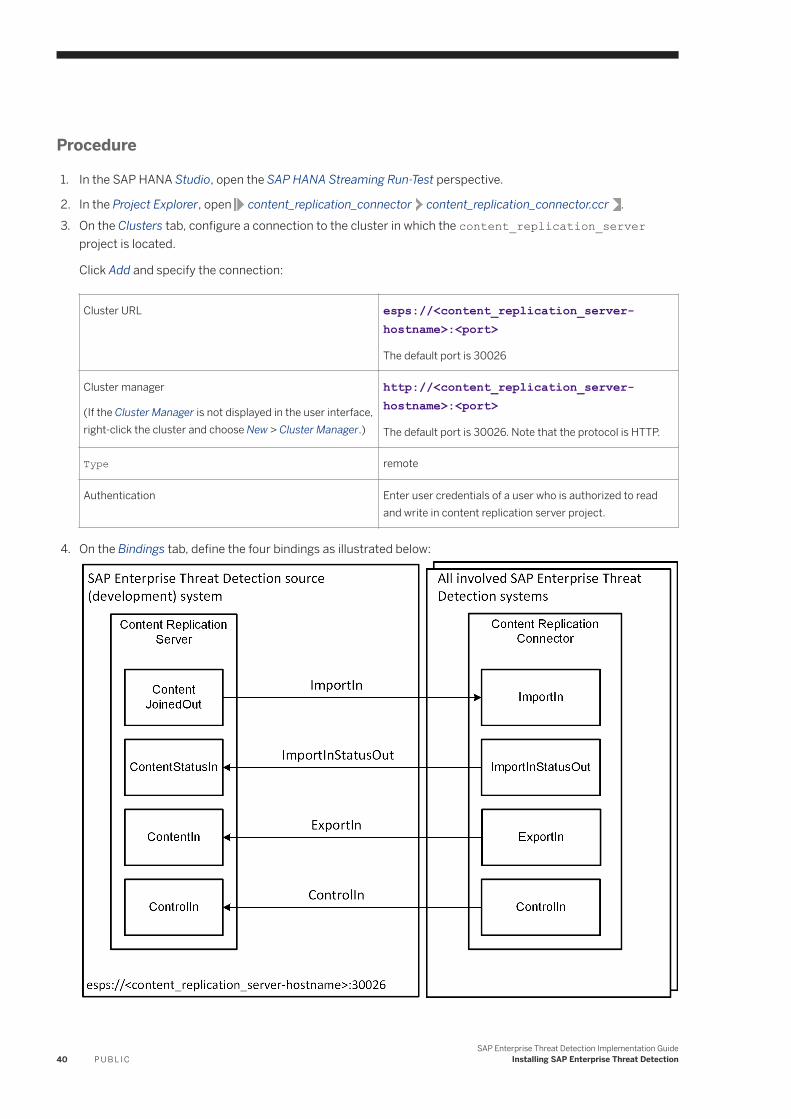
4. On the Bindings tab, define the four bindings as illustrated below:
40 P U B L I CSAP Enterprise Threat Detection Implementation Guide
Installing SAP Enterprise Threat Detection
○ ImportIn is an input binding○ ImportInStatusOut, ExportIn and ControlIn are output bindings○ For each binding, enter the cluster of the content replication server project.○ Use the Discover pushbutton. Make the settings for each binding as shown in the following table.
5. On the Parameters tab, enter the DataServiceName name for the connection to the SAP HANA, for example local For more information, see Creating Data Services for SAP HANA [page 27].
6. Save your entries.7. From the context menu of the workspace, choose Load Project(s) into Workspace.8. Select the compiled project (*.ccx file).
The system looks for the *.ccr file one folder above the *.ccx file.
9. Choose Open.
The project appears beneath the workspace.10. In the context menu of the project, choose Start Project.11. Repeat steps 7 to 10 for all instances where you want to deploy the content replication connector project.
Results
After the deployment and configuration of the projects, you configure which system replicate data to which system in the Settings tile on the launchpad of SAP Enterprise Threat Detection. For more information, see the SAP Enterprise Threat Detection System Landscape Guide on the SAP Help Portal at http://help.sap.com/sapetd.
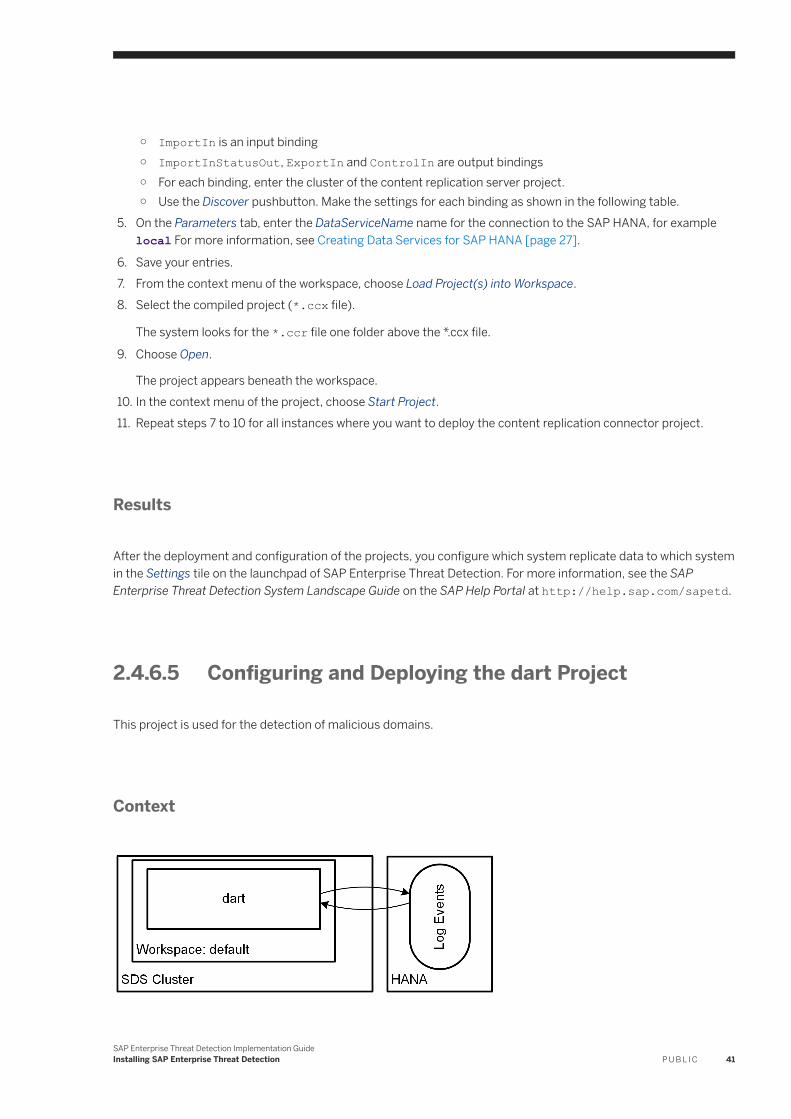
2.4.6.5 Configuring and Deploying the dart Project
This project is used for the detection of malicious domains.
Context
SAP Enterprise Threat Detection Implementation GuideInstalling SAP Enterprise Threat Detection P U B L I C 41
Procedure
1. In the SAP HANA Studio, open the SAP HANA Streaming Run-Test perspective.
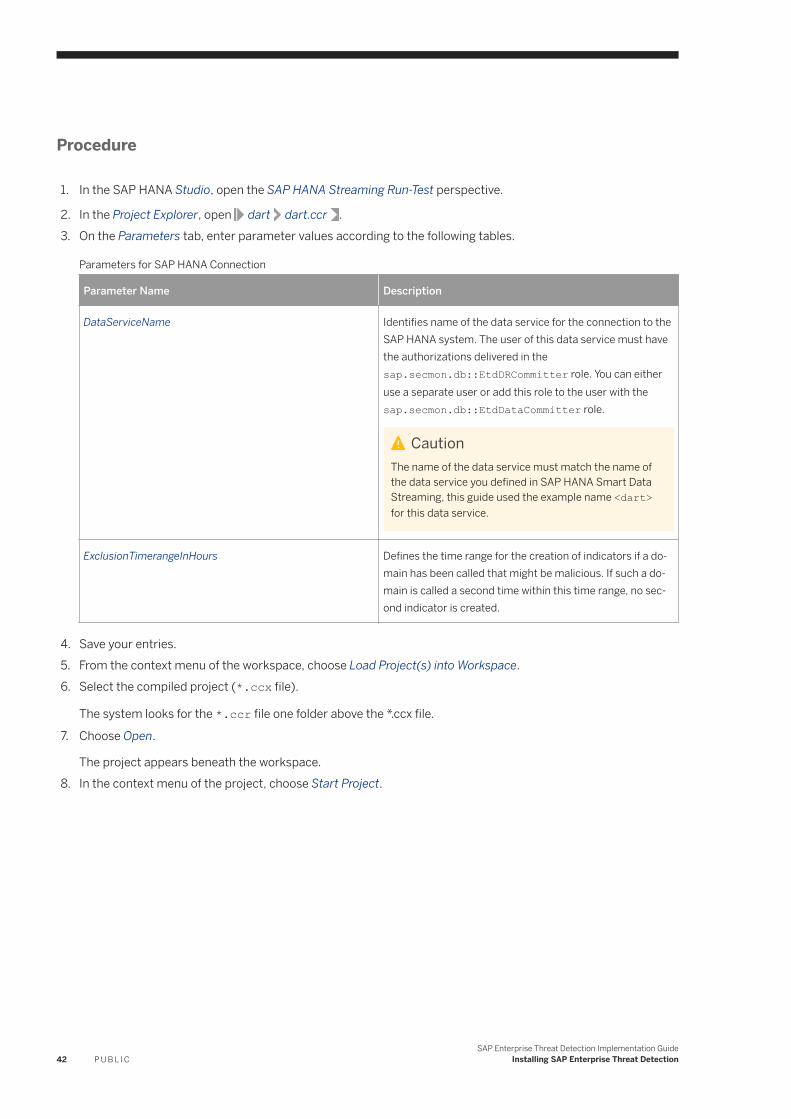
2. In the Project Explorer, open dart dart.ccr .3. On the Parameters tab, enter parameter values according to the following tables.
Parameters for SAP HANA Connection
Parameter Name Description
DataServiceName Identifies name of the data service for the connection to the SAP HANA system. The user of this data service must have the authorizations delivered in the sap.secmon.db::EtdDRCommitter role. You can either use a separate user or add this role to the user with the sap.secmon.db::EtdDataCommitter role.
CautionThe name of the data service must match the name of the data service you defined in SAP HANA Smart Data Streaming, this guide used the example name <dart> for this data service.
ExclusionTimerangeInHours Defines the time range for the creation of indicators if a domain has been called that might be malicious. If such a domain is called a second time within this time range, no second indicator is created.
4. Save your entries.5. From the context menu of the workspace, choose Load Project(s) into Workspace.6. Select the compiled project (*.ccx file).
The system looks for the *.ccr file one folder above the *.ccx file.
7. Choose Open.
The project appears beneath the workspace.8. In the context menu of the project, choose Start Project.
42 P U B L I CSAP Enterprise Threat Detection Implementation Guide
Installing SAP Enterprise Threat Detection
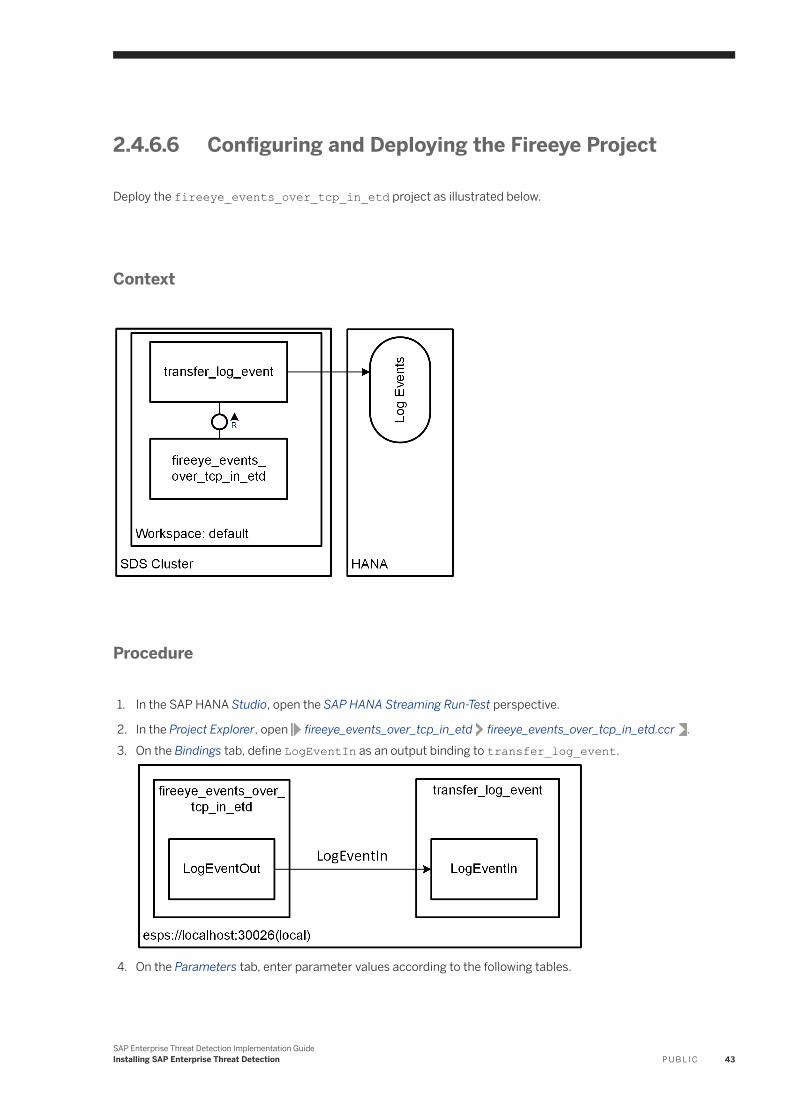
2.4.6.6 Configuring and Deploying the Fireeye Project
Deploy the fireeye_events_over_tcp_in_etd project as illustrated below.
Context
Procedure
1. In the SAP HANA Studio, open the SAP HANA Streaming Run-Test perspective.
2. In the Project Explorer, open fireeye_events_over_tcp_in_etd fireeye_events_over_tcp_in_etd.ccr .3. On the Bindings tab, define LogEventIn as an output binding to transfer_log_event.
4. On the Parameters tab, enter parameter values according to the following tables.
SAP Enterprise Threat Detection Implementation GuideInstalling SAP Enterprise Threat Detection P U B L I C 43
Parameters for SAP HANA Connection
Parameter Name Description
SocketPort Identifies the port to which fireeye events have to be sent.
5. Save your entries.6. From the context menu of the workspace, choose Load Project(s) into Workspace.7. Select the compiled project (*.ccx file).
The system looks for the *.ccr file one folder above the *.ccx file.
8. Choose Open.
The project appears beneath the workspace.9. In the context menu of the project, choose Start Project.
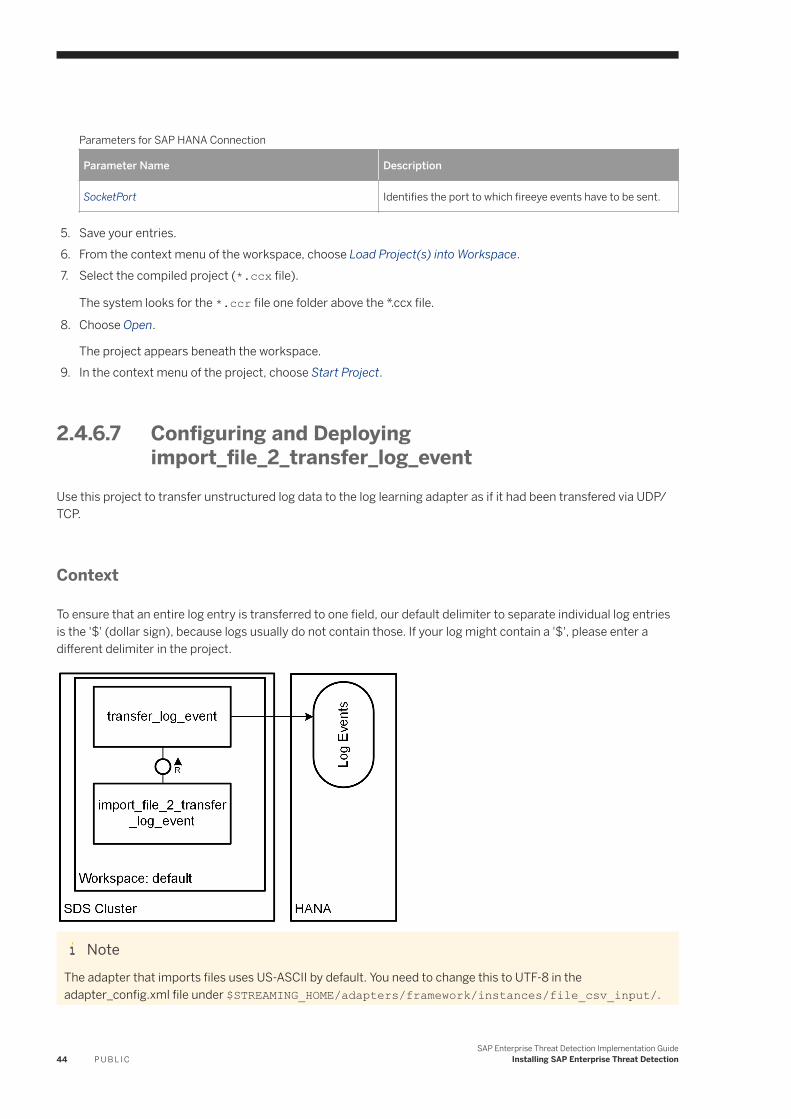
2.4.6.7 Configuring and Deploying import_file_2_transfer_log_event
Use this project to transfer unstructured log data to the log learning adapter as if it had been transfered via UDP/TCP.
Context
To ensure that an entire log entry is transferred to one field, our default delimiter to separate individual log entries is the '$' (dollar sign), because logs usually do not contain those. If your log might contain a '$', please enter a different delimiter in the project.
NoteThe adapter that imports files uses US-ASCII by default. You need to change this to UTF-8 in the adapter_config.xml file under $STREAMING_HOME/adapters/framework/instances/file_csv_input/.
44 P U B L I CSAP Enterprise Threat Detection Implementation Guide
Installing SAP Enterprise Threat Detection
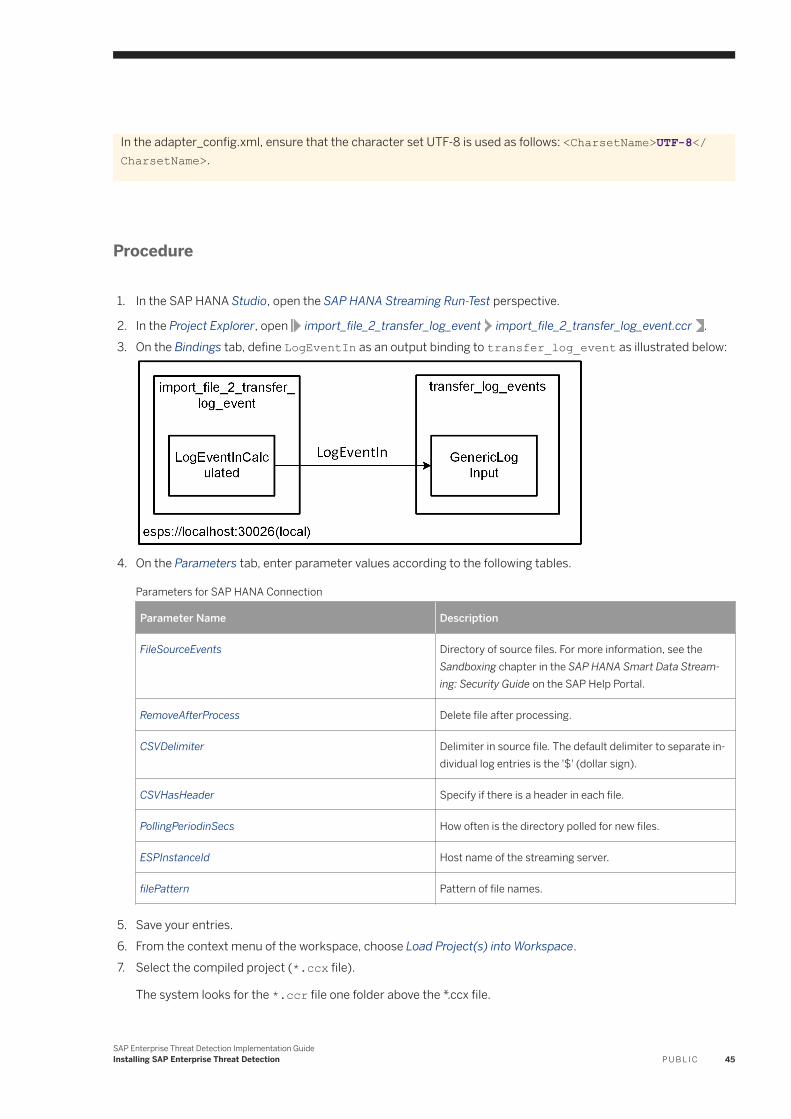
In the adapter_config.xml, ensure that the character set UTF-8 is used as follows: <CharsetName>UTF-8</CharsetName>.
Procedure
1. In the SAP HANA Studio, open the SAP HANA Streaming Run-Test perspective.
2. In the Project Explorer, open import_file_2_transfer_log_event import_file_2_transfer_log_event.ccr .3. On the Bindings tab, define LogEventIn as an output binding to transfer_log_event as illustrated below:
4. On the Parameters tab, enter parameter values according to the following tables.
Parameters for SAP HANA Connection
Parameter Name Description
FileSourceEvents Directory of source files. For more information, see the Sandboxing chapter in the SAP HANA Smart Data Streaming: Security Guide on the SAP Help Portal.
RemoveAfterProcess Delete file after processing.
CSVDelimiter Delimiter in source file. The default delimiter to separate individual log entries is the '$' (dollar sign).
CSVHasHeader Specify if there is a header in each file.
PollingPeriodinSecs How often is the directory polled for new files.
ESPInstanceId Host name of the streaming server.
filePattern Pattern of file names.
5. Save your entries.6. From the context menu of the workspace, choose Load Project(s) into Workspace.7. Select the compiled project (*.ccx file).
The system looks for the *.ccr file one folder above the *.ccx file.
SAP Enterprise Threat Detection Implementation GuideInstalling SAP Enterprise Threat Detection P U B L I C 45
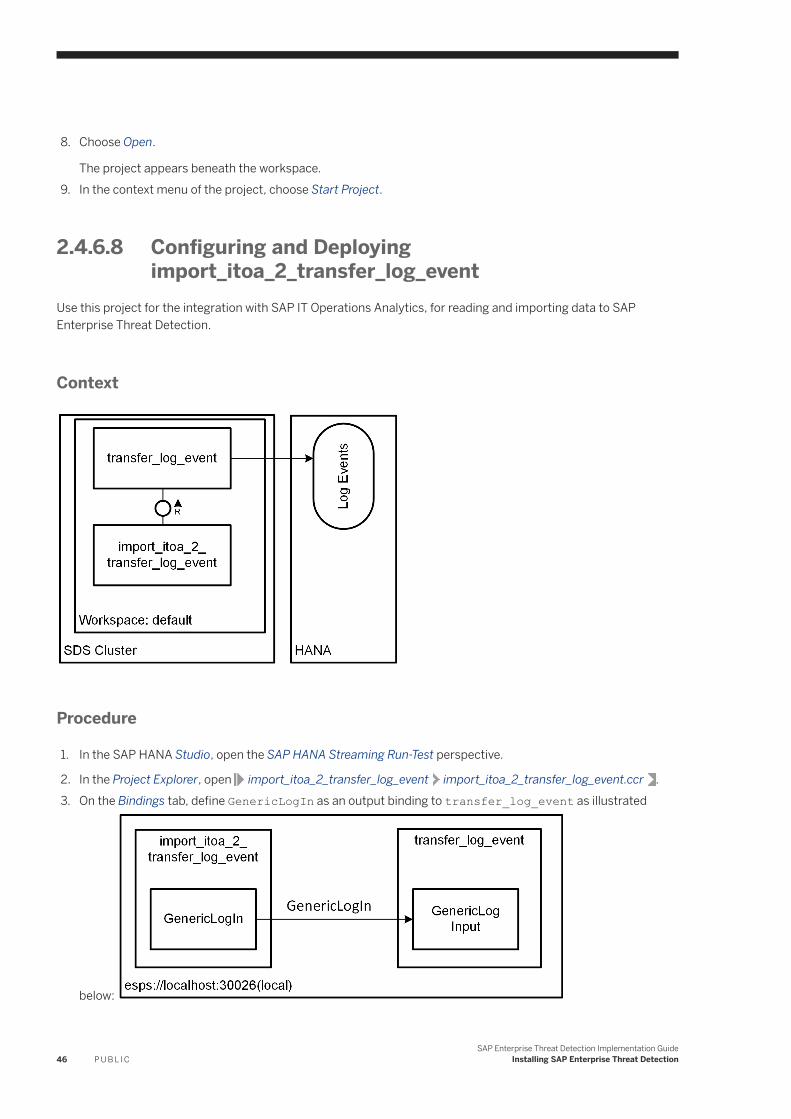
8. Choose Open.
The project appears beneath the workspace.9. In the context menu of the project, choose Start Project.
2.4.6.8 Configuring and Deploying import_itoa_2_transfer_log_event
Use this project for the integration with SAP IT Operations Analytics, for reading and importing data to SAP Enterprise Threat Detection.
Context
Procedure
1. In the SAP HANA Studio, open the SAP HANA Streaming Run-Test perspective.
2. In the Project Explorer, open import_itoa_2_transfer_log_event import_itoa_2_transfer_log_event.ccr .3. On the Bindings tab, define GenericLogIn as an output binding to transfer_log_event as illustrated
below:
46 P U B L I CSAP Enterprise Threat Detection Implementation Guide
Installing SAP Enterprise Threat Detection
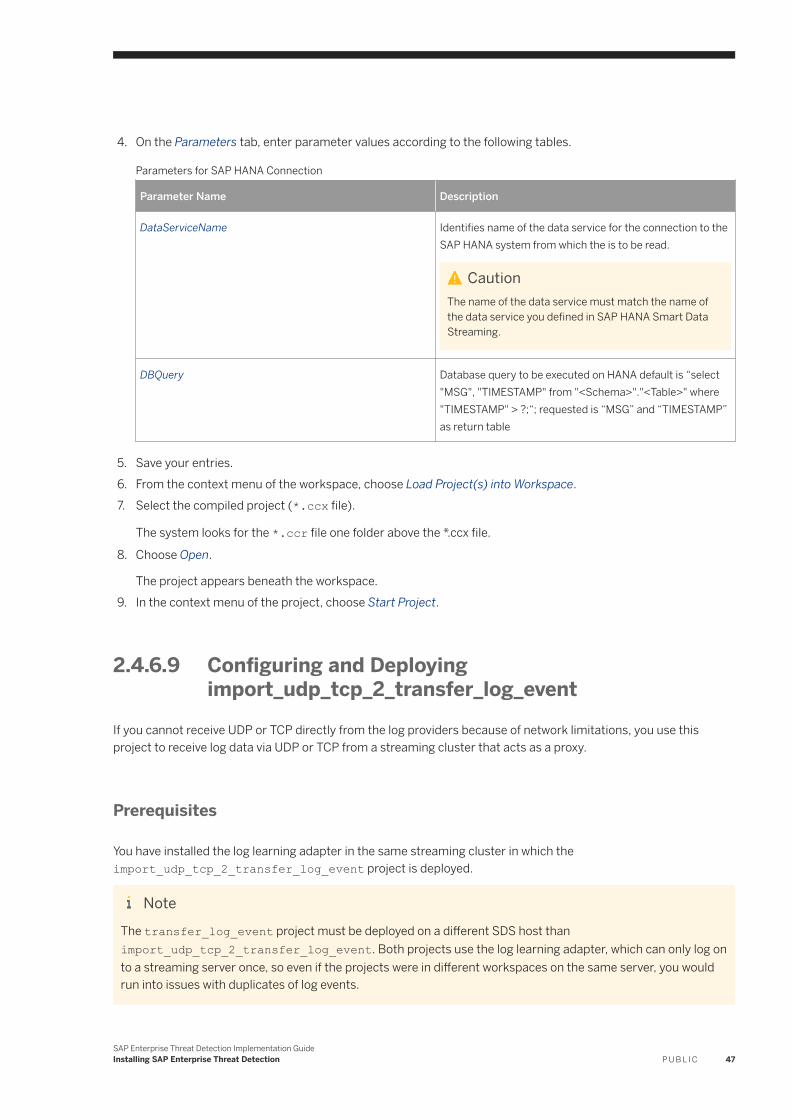
4. On the Parameters tab, enter parameter values according to the following tables.
Parameters for SAP HANA Connection
Parameter Name Description
DataServiceName Identifies name of the data service for the connection to the SAP HANA system from which the is to be read.
CautionThe name of the data service must match the name of the data service you defined in SAP HANA Smart Data Streaming.
DBQuery Database query to be executed on HANA default is “select "MSG", "TIMESTAMP" from "<Schema>"."<Table>" where "TIMESTAMP" > ?;“; requested is “MSG” and “TIMESTAMP” as return table
5. Save your entries.6. From the context menu of the workspace, choose Load Project(s) into Workspace.7. Select the compiled project (*.ccx file).
The system looks for the *.ccr file one folder above the *.ccx file.
8. Choose Open.
The project appears beneath the workspace.9. In the context menu of the project, choose Start Project.
2.4.6.9 Configuring and Deploying import_udp_tcp_2_transfer_log_event
If you cannot receive UDP or TCP directly from the log providers because of network limitations, you use this project to receive log data via UDP or TCP from a streaming cluster that acts as a proxy.
Prerequisites
You have installed the log learning adapter in the same streaming cluster in which the import_udp_tcp_2_transfer_log_event project is deployed.
NoteThe transfer_log_event project must be deployed on a different SDS host than import_udp_tcp_2_transfer_log_event. Both projects use the log learning adapter, which can only log on to a streaming server once, so even if the projects were in different workspaces on the same server, you would run into issues with duplicates of log events.
SAP Enterprise Threat Detection Implementation GuideInstalling SAP Enterprise Threat Detection P U B L I C 47
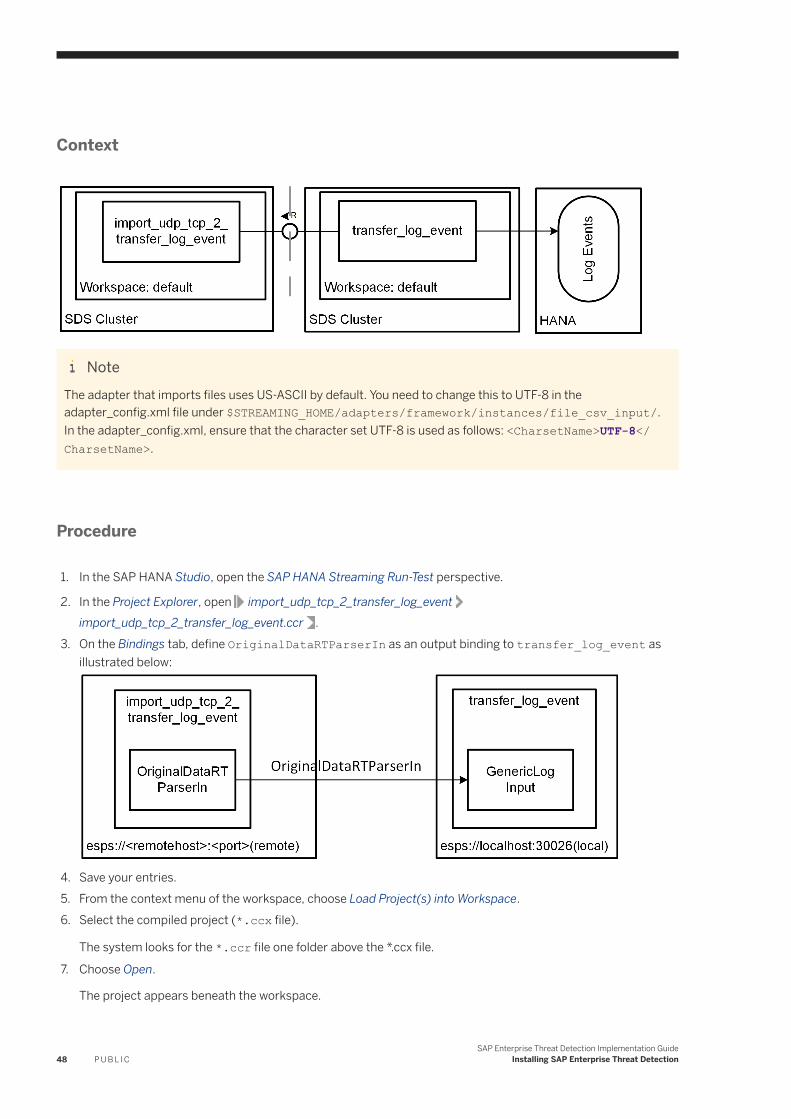
Context
NoteThe adapter that imports files uses US-ASCII by default. You need to change this to UTF-8 in the adapter_config.xml file under $STREAMING_HOME/adapters/framework/instances/file_csv_input/. In the adapter_config.xml, ensure that the character set UTF-8 is used as follows: <CharsetName>UTF-8</CharsetName>.
Procedure
1. In the SAP HANA Studio, open the SAP HANA Streaming Run-Test perspective.
2. In the Project Explorer, open import_udp_tcp_2_transfer_log_eventimport_udp_tcp_2_transfer_log_event.ccr .
3. On the Bindings tab, define OriginalDataRTParserIn as an output binding to transfer_log_event as illustrated below:
4. Save your entries.5. From the context menu of the workspace, choose Load Project(s) into Workspace.6. Select the compiled project (*.ccx file).
The system looks for the *.ccr file one folder above the *.ccx file.
7. Choose Open.
The project appears beneath the workspace.
48 P U B L I CSAP Enterprise Threat Detection Implementation Guide
Installing SAP Enterprise Threat Detection
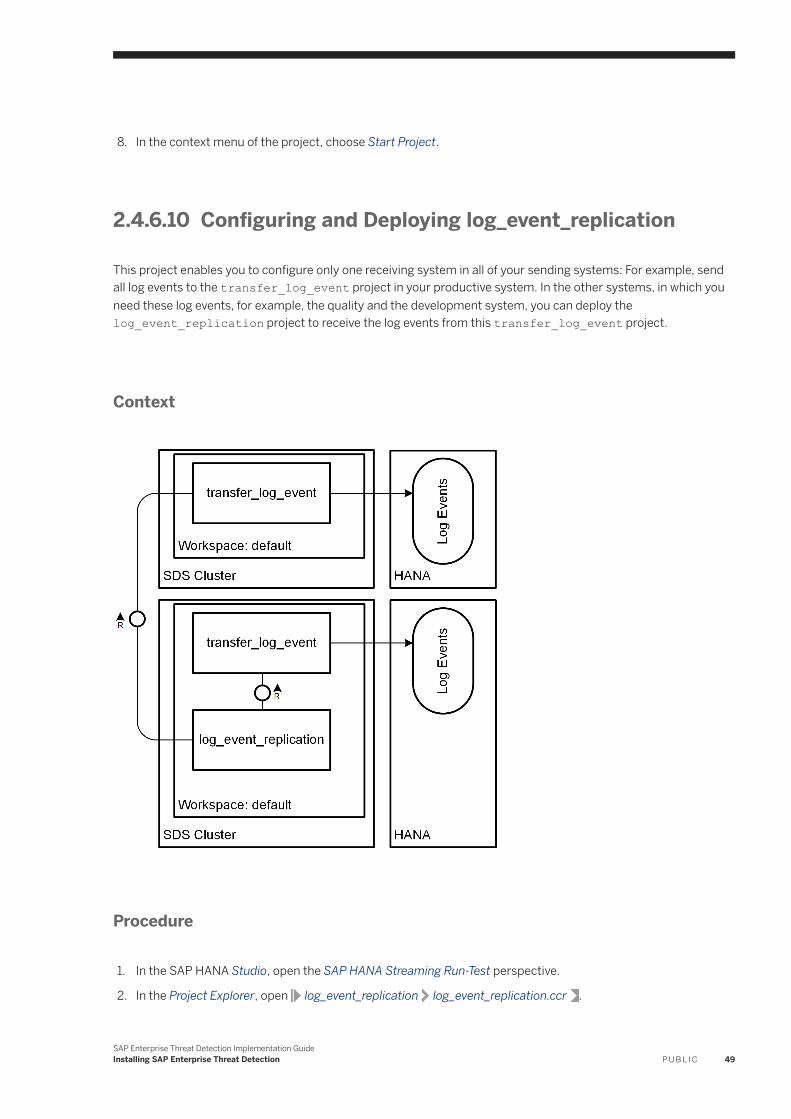
8. In the context menu of the project, choose Start Project.
2.4.6.10 Configuring and Deploying log_event_replication
This project enables you to configure only one receiving system in all of your sending systems: For example, send all log events to the transfer_log_event project in your productive system. In the other systems, in which you need these log events, for example, the quality and the development system, you can deploy the log_event_replication project to receive the log events from this transfer_log_event project.
Context
Procedure
1. In the SAP HANA Studio, open the SAP HANA Streaming Run-Test perspective.
2. In the Project Explorer, open log_event_replication log_event_replication.ccr .
SAP Enterprise Threat Detection Implementation GuideInstalling SAP Enterprise Threat Detection P U B L I C 49
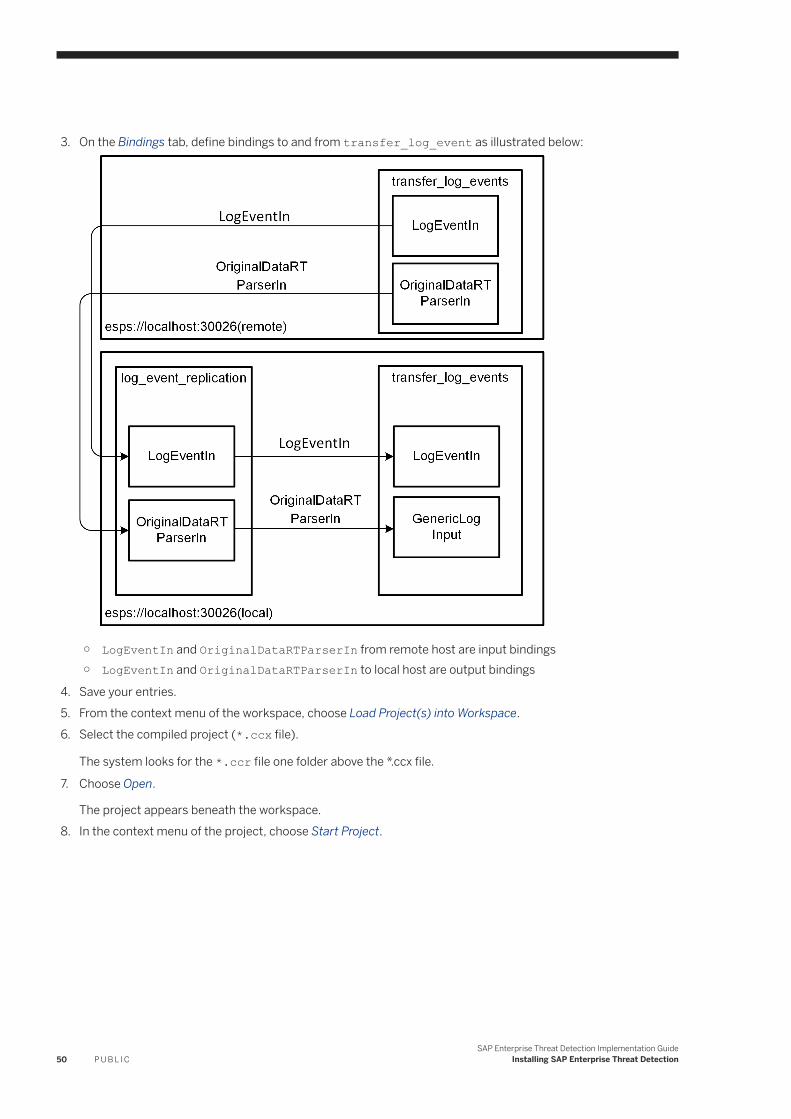
3. On the Bindings tab, define bindings to and from transfer_log_event as illustrated below:
○ LogEventIn and OriginalDataRTParserIn from remote host are input bindings○ LogEventIn and OriginalDataRTParserIn to local host are output bindings
4. Save your entries.5. From the context menu of the workspace, choose Load Project(s) into Workspace.6. Select the compiled project (*.ccx file).
The system looks for the *.ccr file one folder above the *.ccx file.
7. Choose Open.
The project appears beneath the workspace.8. In the context menu of the project, choose Start Project.
50 P U B L I CSAP Enterprise Threat Detection Implementation Guide
Installing SAP Enterprise Threat Detection
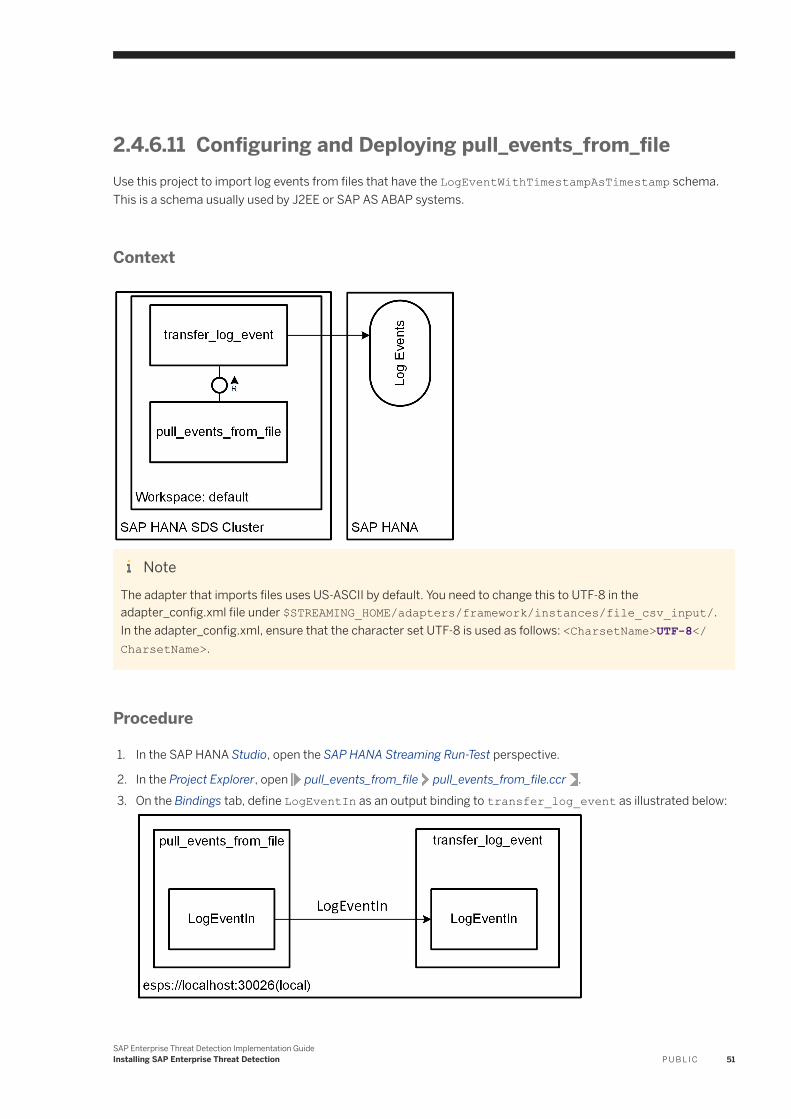
2.4.6.11 Configuring and Deploying pull_events_from_fileUse this project to import log events from files that have the LogEventWithTimestampAsTimestamp schema. This is a schema usually used by J2EE or SAP AS ABAP systems.
Context
NoteThe adapter that imports files uses US-ASCII by default. You need to change this to UTF-8 in the adapter_config.xml file under $STREAMING_HOME/adapters/framework/instances/file_csv_input/. In the adapter_config.xml, ensure that the character set UTF-8 is used as follows: <CharsetName>UTF-8</CharsetName>.
Procedure
1. In the SAP HANA Studio, open the SAP HANA Streaming Run-Test perspective.
2. In the Project Explorer, open pull_events_from_file pull_events_from_file.ccr .3. On the Bindings tab, define LogEventIn as an output binding to transfer_log_event as illustrated below:
SAP Enterprise Threat Detection Implementation GuideInstalling SAP Enterprise Threat Detection P U B L I C 51
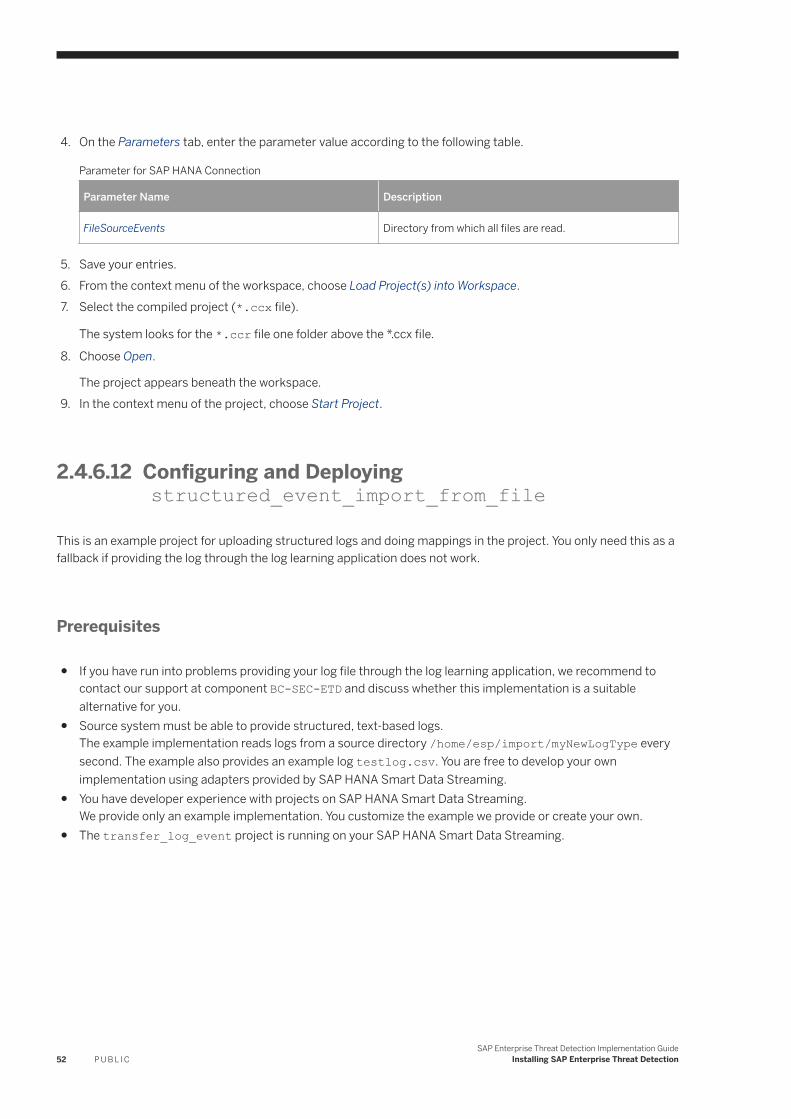
4. On the Parameters tab, enter the parameter value according to the following table.
Parameter for SAP HANA Connection
Parameter Name Description
FileSourceEvents Directory from which all files are read.
5. Save your entries.6. From the context menu of the workspace, choose Load Project(s) into Workspace.7. Select the compiled project (*.ccx file).
The system looks for the *.ccr file one folder above the *.ccx file.
8. Choose Open.
The project appears beneath the workspace.9. In the context menu of the project, choose Start Project.
2.4.6.12 Configuring and Deploying structured_event_import_from_file
This is an example project for uploading structured logs and doing mappings in the project. You only need this as a fallback if providing the log through the log learning application does not work.
Prerequisites
● If you have run into problems providing your log file through the log learning application, we recommend to contact our support at component BC-SEC-ETD and discuss whether this implementation is a suitable alternative for you.
● Source system must be able to provide structured, text-based logs.The example implementation reads logs from a source directory /home/esp/import/myNewLogType every second. The example also provides an example log testlog.csv. You are free to develop your own implementation using adapters provided by SAP HANA Smart Data Streaming.
● You have developer experience with projects on SAP HANA Smart Data Streaming.We provide only an example implementation. You customize the example we provide or create your own.
● The transfer_log_event project is running on your SAP HANA Smart Data Streaming.
52 P U B L I CSAP Enterprise Threat Detection Implementation Guide
Installing SAP Enterprise Threat Detection
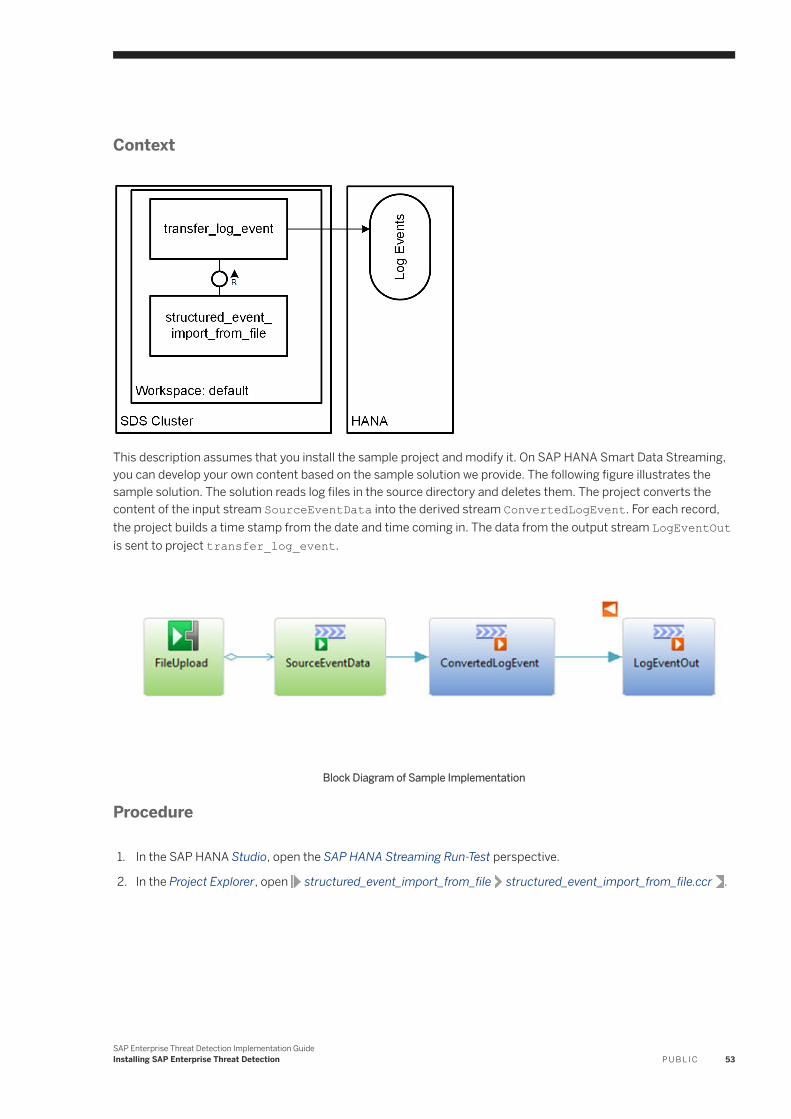
Context
This description assumes that you install the sample project and modify it. On SAP HANA Smart Data Streaming, you can develop your own content based on the sample solution we provide. The following figure illustrates the sample solution. The solution reads log files in the source directory and deletes them. The project converts the content of the input stream SourceEventData into the derived stream ConvertedLogEvent. For each record, the project builds a time stamp from the date and time coming in. The data from the output stream LogEventOut is sent to project transfer_log_event.
Block Diagram of Sample Implementation
Procedure
1. In the SAP HANA Studio, open the SAP HANA Streaming Run-Test perspective.
2. In the Project Explorer, open structured_event_import_from_file structured_event_import_from_file.ccr .
SAP Enterprise Threat Detection Implementation GuideInstalling SAP Enterprise Threat Detection P U B L I C 53
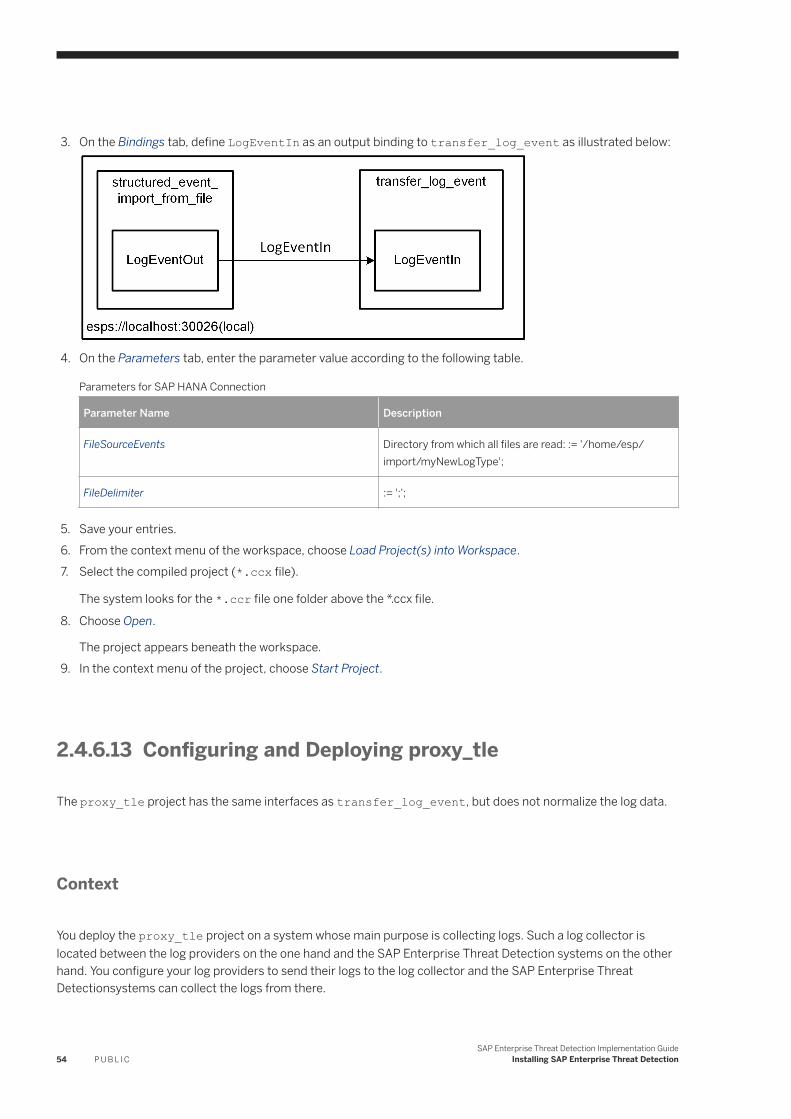
3. On the Bindings tab, define LogEventIn as an output binding to transfer_log_event as illustrated below:
4. On the Parameters tab, enter the parameter value according to the following table.
Parameters for SAP HANA Connection
Parameter Name Description
FileSourceEvents Directory from which all files are read: := '/home/esp/import/myNewLogType';
FileDelimiter := ';';
5. Save your entries.6. From the context menu of the workspace, choose Load Project(s) into Workspace.7. Select the compiled project (*.ccx file).
The system looks for the *.ccr file one folder above the *.ccx file.
8. Choose Open.
The project appears beneath the workspace.9. In the context menu of the project, choose Start Project.
2.4.6.13 Configuring and Deploying proxy_tle
The proxy_tle project has the same interfaces as transfer_log_event, but does not normalize the log data.
Context
You deploy the proxy_tle project on a system whose main purpose is collecting logs. Such a log collector is located between the log providers on the one hand and the SAP Enterprise Threat Detection systems on the other hand. You configure your log providers to send their logs to the log collector and the SAP Enterprise Threat Detectionsystems can collect the logs from there.
54 P U B L I CSAP Enterprise Threat Detection Implementation Guide
Installing SAP Enterprise Threat Detection
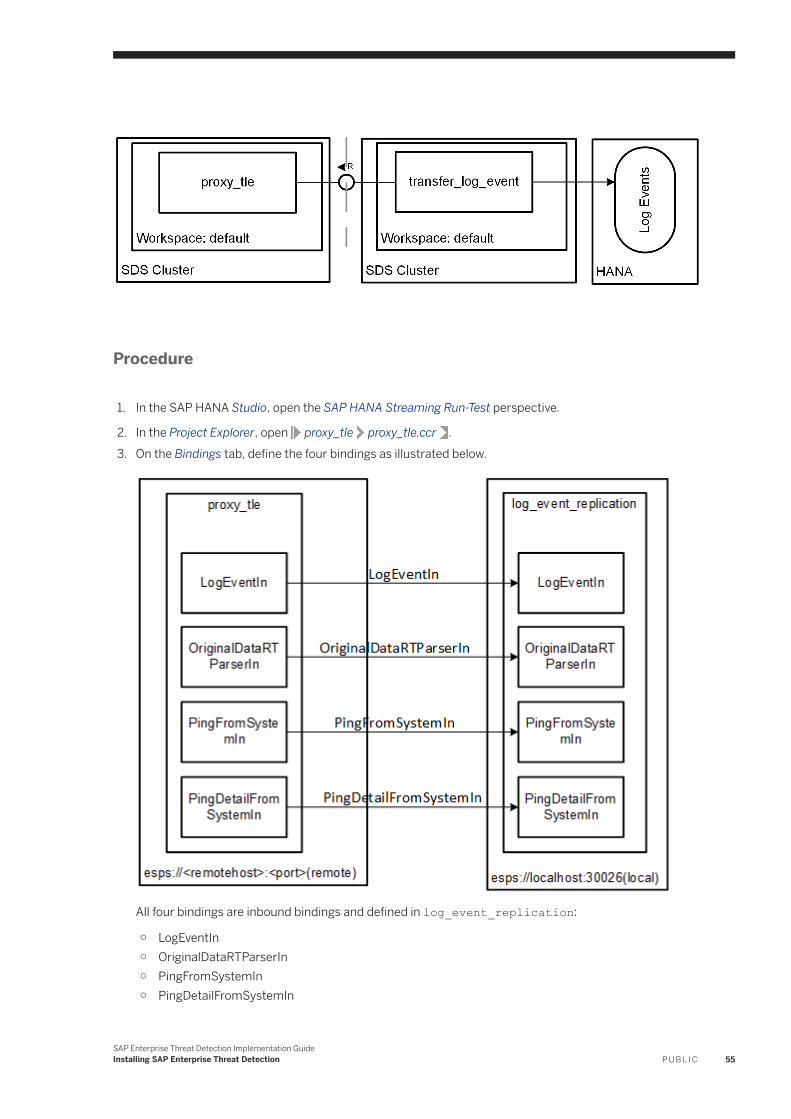
Procedure
1. In the SAP HANA Studio, open the SAP HANA Streaming Run-Test perspective.
2. In the Project Explorer, open proxy_tle proxy_tle.ccr .3. On the Bindings tab, define the four bindings as illustrated below.
All four bindings are inbound bindings and defined in log_event_replication:
○ LogEventIn○ OriginalDataRTParserIn○ PingFromSystemIn○ PingDetailFromSystemIn
SAP Enterprise Threat Detection Implementation GuideInstalling SAP Enterprise Threat Detection P U B L I C 55
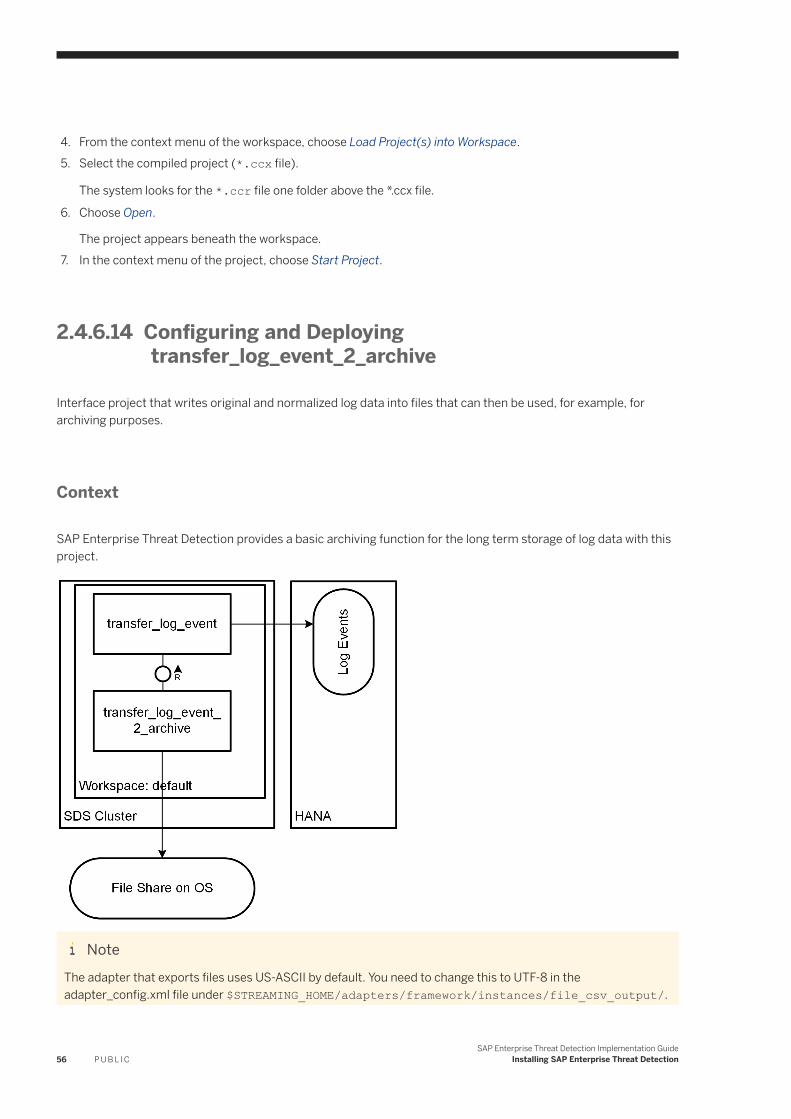
4. From the context menu of the workspace, choose Load Project(s) into Workspace.5. Select the compiled project (*.ccx file).
The system looks for the *.ccr file one folder above the *.ccx file.
6. Choose Open.
The project appears beneath the workspace.7. In the context menu of the project, choose Start Project.
2.4.6.14 Configuring and Deploying transfer_log_event_2_archive
Interface project that writes original and normalized log data into files that can then be used, for example, for archiving purposes.
Context
SAP Enterprise Threat Detection provides a basic archiving function for the long term storage of log data with this project.
NoteThe adapter that exports files uses US-ASCII by default. You need to change this to UTF-8 in the adapter_config.xml file under $STREAMING_HOME/adapters/framework/instances/file_csv_output/.
56 P U B L I CSAP Enterprise Threat Detection Implementation Guide
Installing SAP Enterprise Threat Detection
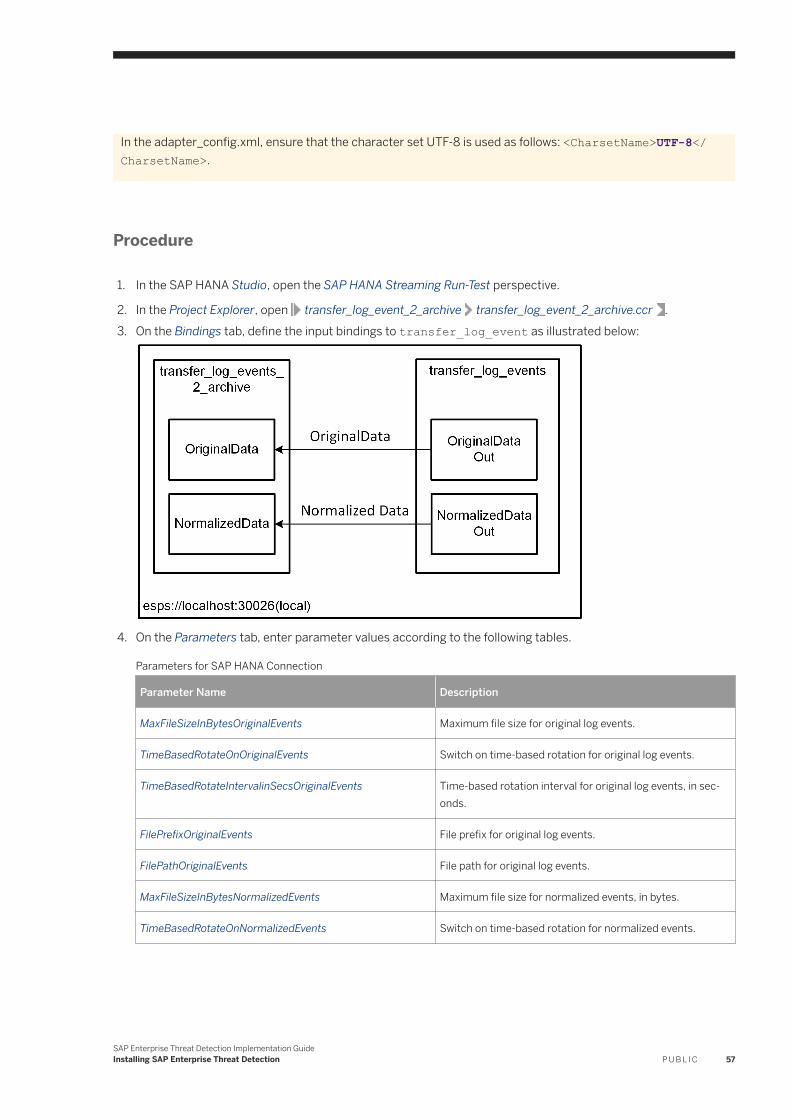
In the adapter_config.xml, ensure that the character set UTF-8 is used as follows: <CharsetName>UTF-8</CharsetName>.
Procedure
1. In the SAP HANA Studio, open the SAP HANA Streaming Run-Test perspective.
2. In the Project Explorer, open transfer_log_event_2_archive transfer_log_event_2_archive.ccr .3. On the Bindings tab, define the input bindings to transfer_log_event as illustrated below:
4. On the Parameters tab, enter parameter values according to the following tables.
Parameters for SAP HANA Connection
Parameter Name Description
MaxFileSizeInBytesOriginalEvents Maximum file size for original log events.
TimeBasedRotateOnOriginalEvents Switch on time-based rotation for original log events.
TimeBasedRotateIntervalinSecsOriginalEvents Time-based rotation interval for original log events, in seconds.
FilePrefixOriginalEvents File prefix for original log events.
FilePathOriginalEvents File path for original log events.
MaxFileSizeInBytesNormalizedEvents Maximum file size for normalized events, in bytes.
TimeBasedRotateOnNormalizedEvents Switch on time-based rotation for normalized events.
SAP Enterprise Threat Detection Implementation GuideInstalling SAP Enterprise Threat Detection P U B L I C 57
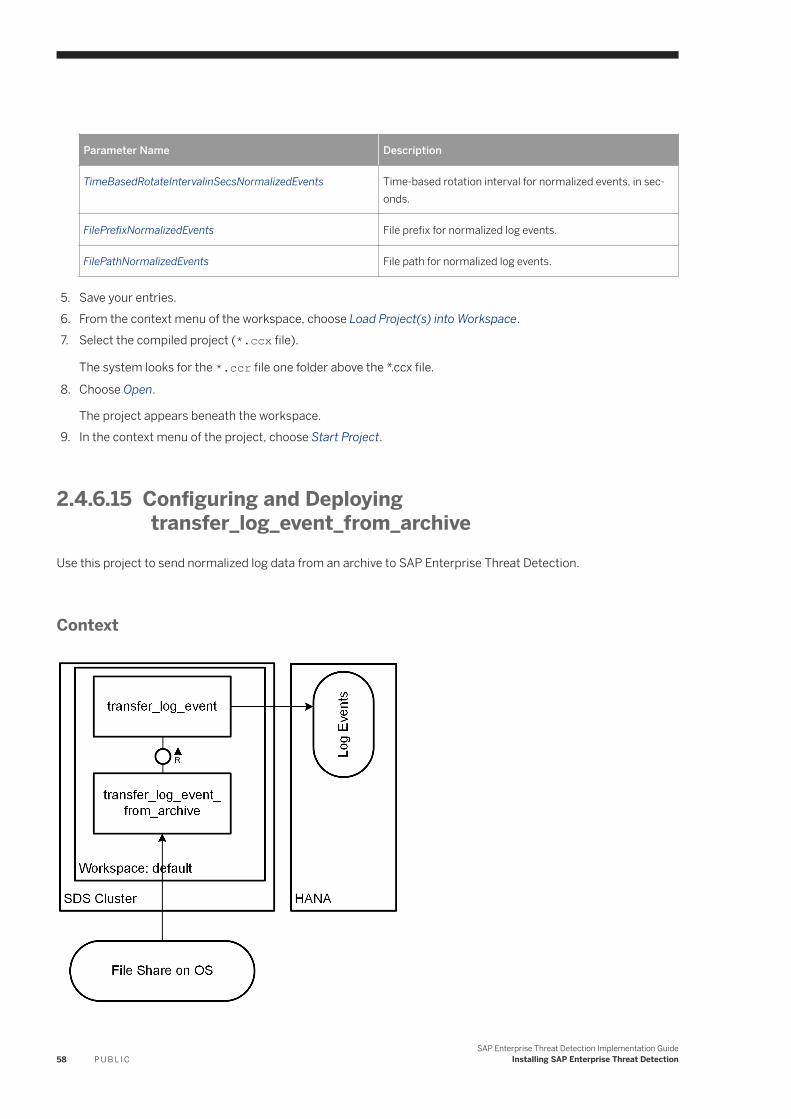
Parameter Name Description
TimeBasedRotateIntervalinSecsNormalizedEvents Time-based rotation interval for normalized events, in seconds.
FilePrefixNormalizedEvents File prefix for normalized log events.
FilePathNormalizedEvents File path for normalized log events.
5. Save your entries.6. From the context menu of the workspace, choose Load Project(s) into Workspace.7. Select the compiled project (*.ccx file).
The system looks for the *.ccr file one folder above the *.ccx file.
8. Choose Open.
The project appears beneath the workspace.9. In the context menu of the project, choose Start Project.
2.4.6.15 Configuring and Deploying transfer_log_event_from_archive
Use this project to send normalized log data from an archive to SAP Enterprise Threat Detection.
Context
58 P U B L I CSAP Enterprise Threat Detection Implementation Guide
Installing SAP Enterprise Threat Detection
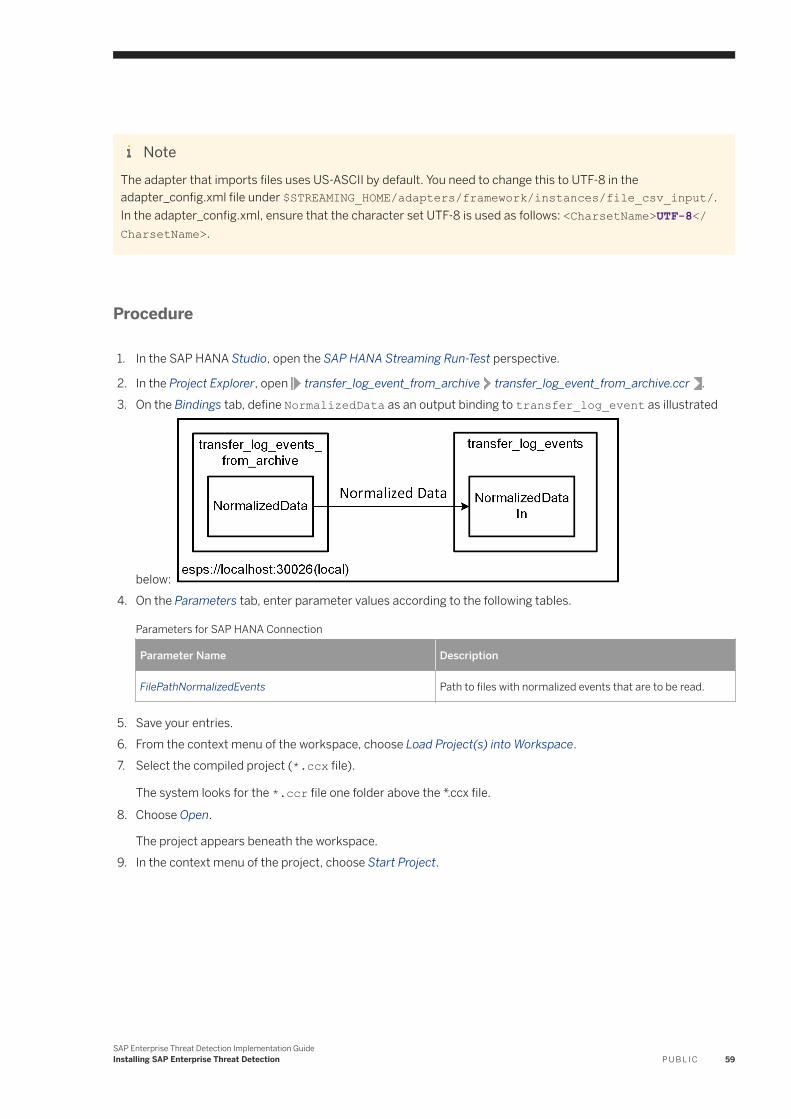
NoteThe adapter that imports files uses US-ASCII by default. You need to change this to UTF-8 in the adapter_config.xml file under $STREAMING_HOME/adapters/framework/instances/file_csv_input/. In the adapter_config.xml, ensure that the character set UTF-8 is used as follows: <CharsetName>UTF-8</CharsetName>.
Procedure
1. In the SAP HANA Studio, open the SAP HANA Streaming Run-Test perspective.
2. In the Project Explorer, open transfer_log_event_from_archive transfer_log_event_from_archive.ccr .3. On the Bindings tab, define NormalizedData as an output binding to transfer_log_event as illustrated
below: 4. On the Parameters tab, enter parameter values according to the following tables.
Parameters for SAP HANA Connection
Parameter Name Description
FilePathNormalizedEvents Path to files with normalized events that are to be read.
5. Save your entries.6. From the context menu of the workspace, choose Load Project(s) into Workspace.7. Select the compiled project (*.ccx file).
The system looks for the *.ccr file one folder above the *.ccx file.
8. Choose Open.
The project appears beneath the workspace.9. In the context menu of the project, choose Start Project.
SAP Enterprise Threat Detection Implementation GuideInstalling SAP Enterprise Threat Detection P U B L I C 59
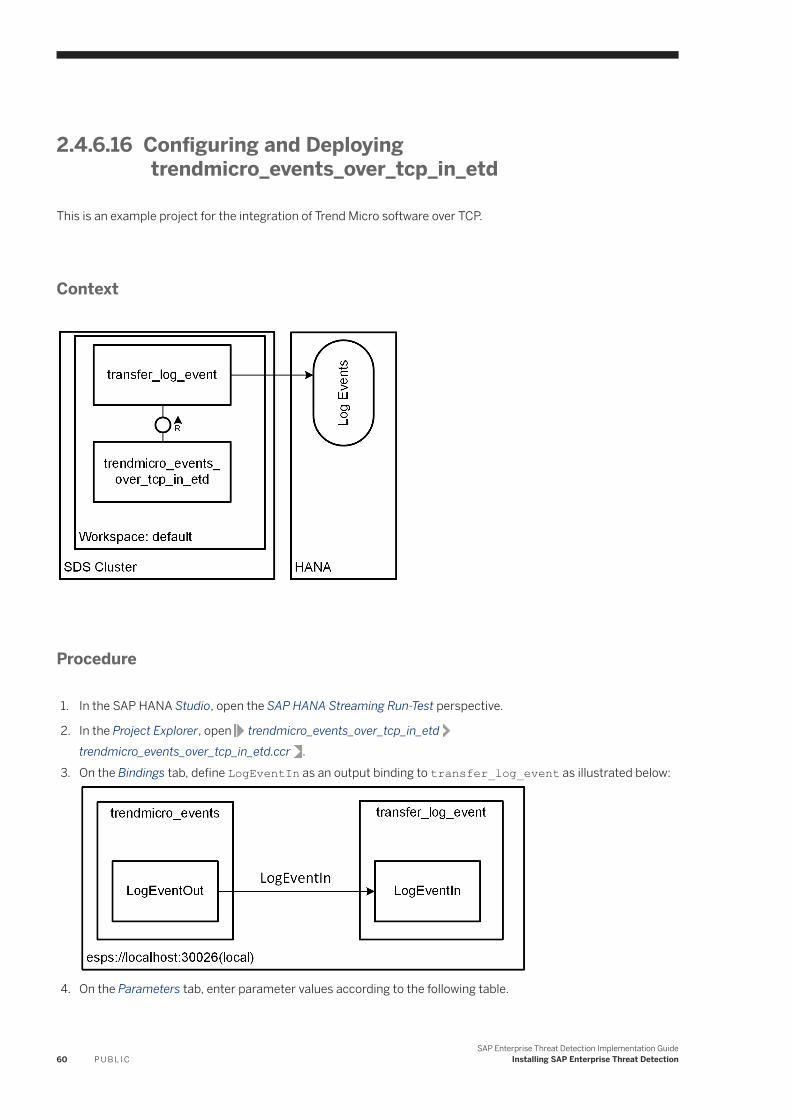
2.4.6.16 Configuring and Deploying trendmicro_events_over_tcp_in_etd
This is an example project for the integration of Trend Micro software over TCP.
Context
Procedure
1. In the SAP HANA Studio, open the SAP HANA Streaming Run-Test perspective.
2. In the Project Explorer, open trendmicro_events_over_tcp_in_etdtrendmicro_events_over_tcp_in_etd.ccr .
3. On the Bindings tab, define LogEventIn as an output binding to transfer_log_event as illustrated below:
4. On the Parameters tab, enter parameter values according to the following table.
60 P U B L I CSAP Enterprise Threat Detection Implementation Guide
Installing SAP Enterprise Threat Detection
Parameters for SAP HANA Connection
Parameter Name Description
SocketPort The port the tcp request is to be sent to.
NoOfPartitions Number of partitions for the input stream in order to distribute the load.
5. Save your entries.6. From the context menu of the workspace, choose Load Project(s) into Workspace.7. Select the compiled project (*.ccx file).
The system looks for the *.ccr file one folder above the *.ccx file.
8. Choose Open.
The project appears beneath the workspace.9. In the context menu of the project, choose Start Project.
2.4.7 Enabling Configuration Checks
Configuration checks enable SAP Enterprise Threat Detection to carry out static checks of the log providing SAP NetWeaver Application Server systems.
Context
SAP Enterprise Threat Detection delivers checks for about 50 profile parameters as well as two checks of the ABAP standard users: it checks if all standard users have changed the initial password, and if a standard user is locked. You can view the results of these checks in Forensic Lab by setting the browing context to Configuration Checks.
To be able to use the configuration check framework, carry out the following installation steps on SAP HANA smart data streaming, SAP HANA, and the SAP NetWeaver Application Server log providers.
Procedure
1. Install the HTTP Output Adapter on your SAP HANA smart data streaming. Please refer to the documentation on SAP Help Portal at https://help.sap.com/doc/saphelp_esp_51sp09_adapt/5.1.9/en-US/e7/7d42ab6f0f10148d4d80097837990f/frameset.htm.
2. Provide an adapter configuration file similar to the one described here: https://help.sap.com/doc/saphelp_esp_51sp09_adapt/5.1.9/en-US/e7/7dbd676f0f1014b47a9c90e77427e0/frameset.htm○ Set Element keepAlive to value False: <keepAlive>False</keepAlive>.○ Set element contentType to value text/plain: <contentType>text/plain</contentType>
SAP Enterprise Threat Detection Implementation GuideInstalling SAP Enterprise Threat Detection P U B L I C 61
○ Value of element httpPort (Default: 23456) is relevant for connecting the Netweaver system to the HTTP Output Adapter
3. Adjust the transfer_master_data.ccr file as follows:
○ Parameter configFilePath must refer to the adapter configuration file mentioned above. For detailed information, see https://help.sap.com/doc/saphelp_esp_51sp09_adapt/5.1.9/en-US/e7/7d42ab6f0f10148d4d80097837990f/frameset.htm. For example, /hana/shared/ETD/streaming-1_00_122_10_170516/cluster/etd/adapters/config/adapter.xml
○ Parameter baseDir must refer to SDS toolkit directory, for example, /hana/shared/ETD/streaming/STREAMING-1_0/adapters/http
4. In the SAP HANA job dashboard, activate job sap.secmon.services.util::masterDataInterface under a user with role sap.secmon.db::EtdBatch. For more information, see Starting Jobs for SAP Enterprise Threat Detection [page 18].
5. On your SAP NetWeaver Application Server log provider systems, install 2477281 .6. In the SECM_CONFIGURATION report, define the configuration with SAP Enterprise Threat Detection version
1.0 SP06 and connection parameters to Streaming HTTP Output Adapter.7. Define a variant for SECM_MASTER_DATA_2_ESP with the correct SAP Enterprise Threat Detection
configuration and mark the checkbox for Configuration Check Results.8. For security reasons, we recommend to verify imported check code before execution: In
SECM_CONFIGURATION, on the Confguration for System Settings tab, enable SSF verification.
As SSF application, use an SSF application that you define in transaction SSFA.
9. Schedule a job for SECM_MASTER_DATA_2_ESP with according variant regularly, for example, once per day.
2.4.8 Starting the Streaming Web ServiceStarting the Streaming Web Service (SWS) is the final step in configuring SAP HANA Smart Data Streaming for SAP Enterprise Threat Detection.
Prerequisites
● You have a user with administration rights for SAP HANA Smart Data Streaming, for example, use the SDS Admin User.
● Note that HTTP compression is not possible with SWS. If you use SWS, please make sure that you have not set this option in report SECM_CONFIGURATION. Note that the ping will still work, but log data will not be sent if HTTP compression is enabled.
● If you use WSP, implement 2391842 and add the JVM parameters as described in order to avoid issues with the time zone.
Context
The Streaming Web Service is a scalable gateway providing HTTP-based access to SAP HANA Smart Data Streaming. It provides higher performance and greater scalability than the older Web Services Provider, which is
62 P U B L I CSAP Enterprise Threat Detection Implementation Guide
Installing SAP Enterprise Threat Detection
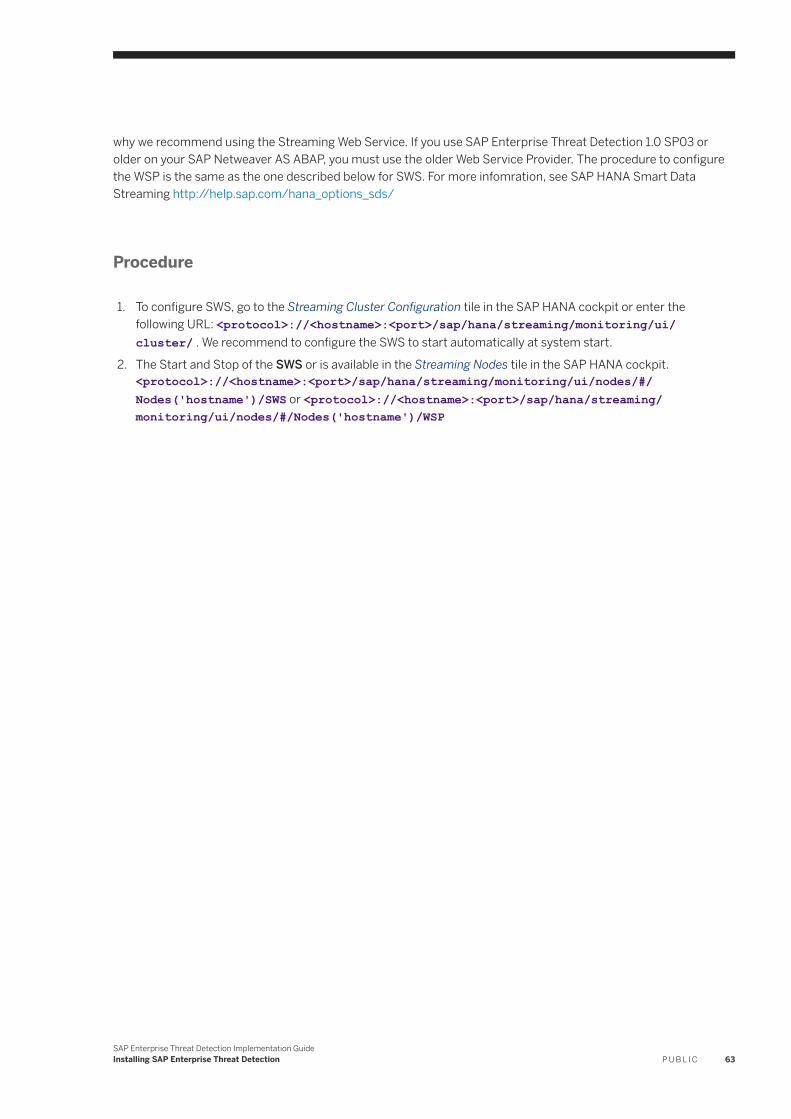
why we recommend using the Streaming Web Service. If you use SAP Enterprise Threat Detection 1.0 SP03 or older on your SAP Netweaver AS ABAP, you must use the older Web Service Provider. The procedure to configure the WSP is the same as the one described below for SWS. For more infomration, see SAP HANA Smart Data Streaming http://help.sap.com/hana_options_sds/
Procedure
1. To configure SWS, go to the Streaming Cluster Configuration tile in the SAP HANA cockpit or enter the following URL: <protocol>://<hostname>:<port>/sap/hana/streaming/monitoring/ui/cluster/ . We recommend to configure the SWS to start automatically at system start.
2. The Start and Stop of the SWS or is available in the Streaming Nodes tile in the SAP HANA cockpit. <protocol>://<hostname>:<port>/sap/hana/streaming/monitoring/ui/nodes/#/Nodes('hostname')/SWS or <protocol>://<hostname>:<port>/sap/hana/streaming/monitoring/ui/nodes/#/Nodes('hostname')/WSP
SAP Enterprise Threat Detection Implementation GuideInstalling SAP Enterprise Threat Detection P U B L I C 63
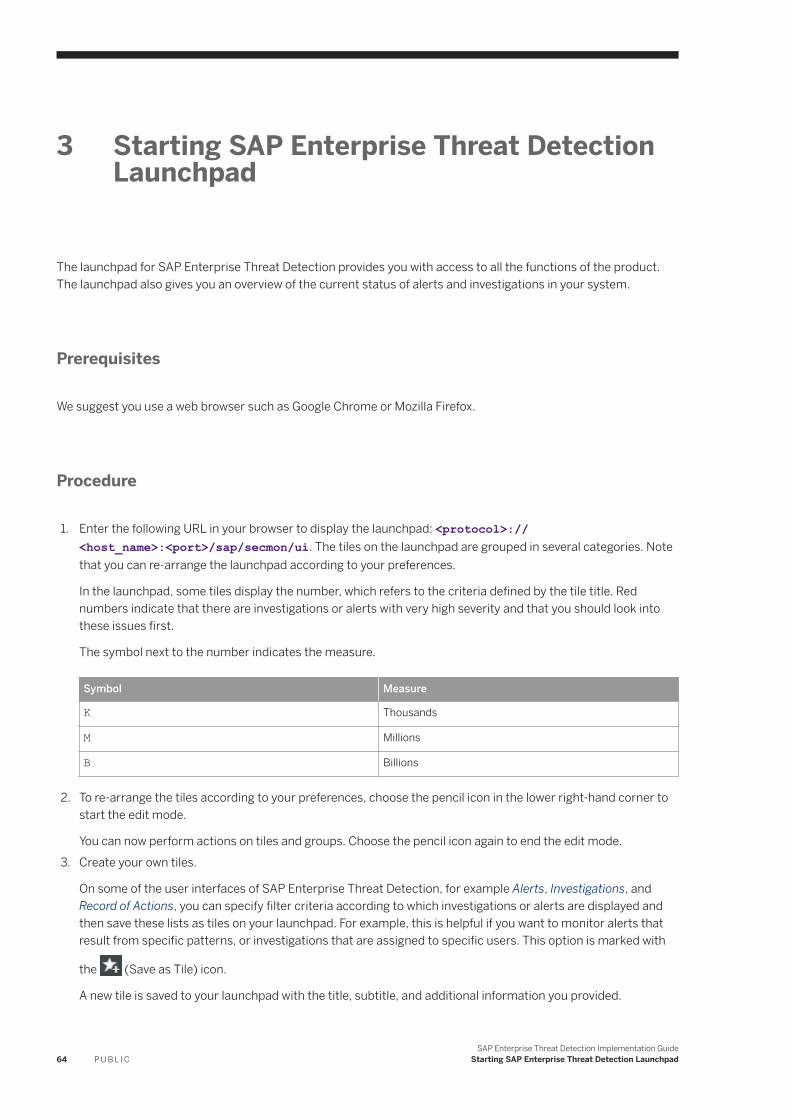
3 Starting SAP Enterprise Threat Detection Launchpad
The launchpad for SAP Enterprise Threat Detection provides you with access to all the functions of the product. The launchpad also gives you an overview of the current status of alerts and investigations in your system.
Prerequisites
We suggest you use a web browser such as Google Chrome or Mozilla Firefox.
Procedure
1. Enter the following URL in your browser to display the launchpad: <protocol>://<host_name>:<port>/sap/secmon/ui. The tiles on the launchpad are grouped in several categories. Note that you can re-arrange the launchpad according to your preferences.
In the launchpad, some tiles display the number, which refers to the criteria defined by the tile title. Red numbers indicate that there are investigations or alerts with very high severity and that you should look into these issues first.
The symbol next to the number indicates the measure.
Symbol Measure
K Thousands
M Millions
B Billions
2. To re-arrange the tiles according to your preferences, choose the pencil icon in the lower right-hand corner to start the edit mode.
You can now perform actions on tiles and groups. Choose the pencil icon again to end the edit mode.3. Create your own tiles.
On some of the user interfaces of SAP Enterprise Threat Detection, for example Alerts, Investigations, and Record of Actions, you can specify filter criteria according to which investigations or alerts are displayed and then save these lists as tiles on your launchpad. For example, this is helpful if you want to monitor alerts that result from specific patterns, or investigations that are assigned to specific users. This option is marked with
the (Save as Tile) icon.
A new tile is saved to your launchpad with the title, subtitle, and additional information you provided.
64 P U B L I CSAP Enterprise Threat Detection Implementation Guide
Starting SAP Enterprise Threat Detection Launchpad
4 Providing Logs from SAP NetWeaver Application Server for ABAP
To consume logs from SAP NetWeaver Application Server for ABAP (SAP NetWeaver AS for ABAP), install and configure a log provider on each host system for SAP NetWeaver AS for ABAP. Note that for the Read Access Log and the Security Audit Log, there is a way to immediately transfer the log data to SAP Enterprise Threat Detection with the help of default properties of the application server.
Prerequisites
● You have logged on with a user on SAP NetWeaver AS for ABAP with the required authorizations.For more information, see Authorizations of the Log Provider for SAP NetWeaver Application Server for ABAP [page 132].
● To use transport level security (TLS), configure trust between SAP NetWeaver AS for ABAP and SAP HANA Smart Data Streaming.
NoteWe recommend that you protect the data connection with TLS.
For more information, see Encrypting Communication Between Log Providers and the Web Service Provider [page 103].
Context
Note
The log provider gathers logs from SAP NetWeaver AS for ABAP and sends them on to SAP HANA Smart Data Streaming for processing. In turn, SAP HANA Smart Data Streaming sends the processed logs to SAP HANA for consumption by SAP Enterprise Threat Detection. Out of the logs, SAP Enterprise Threat Detection generates alerts.
Procedure
1. Install the SAP Enterprise Threat Detection package for SAP NetWeaver AS for ABAP on your system.
To install the package, implement SAP Notes 2155046 . We also recommend to install 2573113 .
SAP Enterprise Threat Detection Implementation GuideProviding Logs from SAP NetWeaver Application Server for ABAP P U B L I C 65
2. Configure the logs to read in the Display View (transaction SM30) for table SECM_LOGS.
Choose (Initialize Entries) to fill the table with default entries. If necessary, adjust the settings in column Log Active to your needs. Only if the value is set to True will the data for the corresponding log type be transferred to SAP Enterprise Threat Detection.
3. Configure the connection data for SAP HANA Smart Data Streaming.
Use ABAP: Program Execution (transaction SA38) to start report SECM: Configuration (SECM_CONFIGURATION).
For more information, see the report documentation.4. Test the connection. It is now possible to test the connection in three ways.
○ It is available in the SECM: Configuration report○ It is available in the SECM: Push master data to ESP report○ It is available in the SECM_LOG_2_ESP
Use ABAP: Program Execution (transaction SA38) to start report SECM: Push master data to ESP (SECM_MASTER_DATA_2_ESP).
For more information, see the report documentation.
These report provides a ping function to test the connection. Ping Streaming is now available for configuration in order to check whether the SECM: Configuration, SECM: Push master data to ESP and SECM_LOG_2_ESP are running properly or not. It sends load to the web servers (SWS or WSP). Note that there is also a transaction code SECM_MD_2_ESP for the SECM: Push master data to ESP report (SECM_MASTER_DATA_2_ESP).
5. Perform an initial load of the user and system context information.
To interpret the logs, all users involved in potential log events must be known to SAP Enterprise Threat Detection. This report sends all user master data to SAP Enterprise Threat Detection, where the data is collected and all user IDs belonging to the same natural person are combined into one user context. This user context is then given a pseudonym, which is displayed in the user interfaces of SAP Enterprise Threat Detection.
For more information, see the documentation about user context and pseudonymization in the SAP Enterprise Threat Detection Operations Guide.
a. Use ABAP: Program Execution (transaction SA38) to start report SECM: Push master data to ESP (SECM_MASTER_DATA_2_ESP).
b. Send HR and header data.c. Send user system data.d. Send implemented notes datae. Send object authorization dataf. Send object directory data
TipIf you use SAP Identity Management for identity management in your system landscape, we recommend you use SAP Identity Management as your single source of truth for user context information instead.
For more information, see Synchronizing User Context Information from an Identity Management System [page 110].
66 P U B L I CSAP Enterprise Threat Detection Implementation Guide
Providing Logs from SAP NetWeaver Application Server for ABAP

g. Send system data.For more information, see the report documentation.
6. Configure background jobs to run SECM_LOG_2_ESP and SECM_MASTER_DATA_2_ESP regularly.
Assign a technical user to run the batch jobs.
We recommend that you run SECM_LOG_2_ESP once per minute.
We recommend that you run SECM_MASTER_DATA_2_ESP once per day.
For more information, see Background Processing in the documentation for SAP NetWeaver AS for ABAP.
Related Information
Providing Read Access Log and Security Audit Log by Immediate Log Transfer [page 71]
4.1 List of Logs of SAP NetWeaver AS for ABAP
The following is a list of logs monitored by SAP Enterprise Threat Detection and a short description of the data the logs contain. Described is also how this log data is sent from SAP NetWeaver AS for ABAP to SAP HANA Smart Data Streaming and SAP HANA.
NoteNot all these logs are enabled by default. The log provider only sends data for logs that have been enabled.
For more information about enabling logs, see the documentation for the logs in the documentation for SAP NetWeaver AS for ABAP on SAP Help Portal at http://help.sap.com/nw_platform.
In table SECM_LOGS, you specify which logs are sent to SAP HANA Smart Data Streaming and SAP HANA. SAP NetWeaver AS for ABAP pushes the log data to SAP HANA Smart Data Streaming with the report SECM: Push logs to ESP (SECM_LOGS_2_ESP). The table below shows for which logs the default setting in table SECM_LOGS is TRUE.
For more information about how to configure the table and run the report, see the report documentation (transaction SA38).
SAP Enterprise Threat Detection Implementation GuideProviding Logs from SAP NetWeaver Application Server for ABAP P U B L I C 67
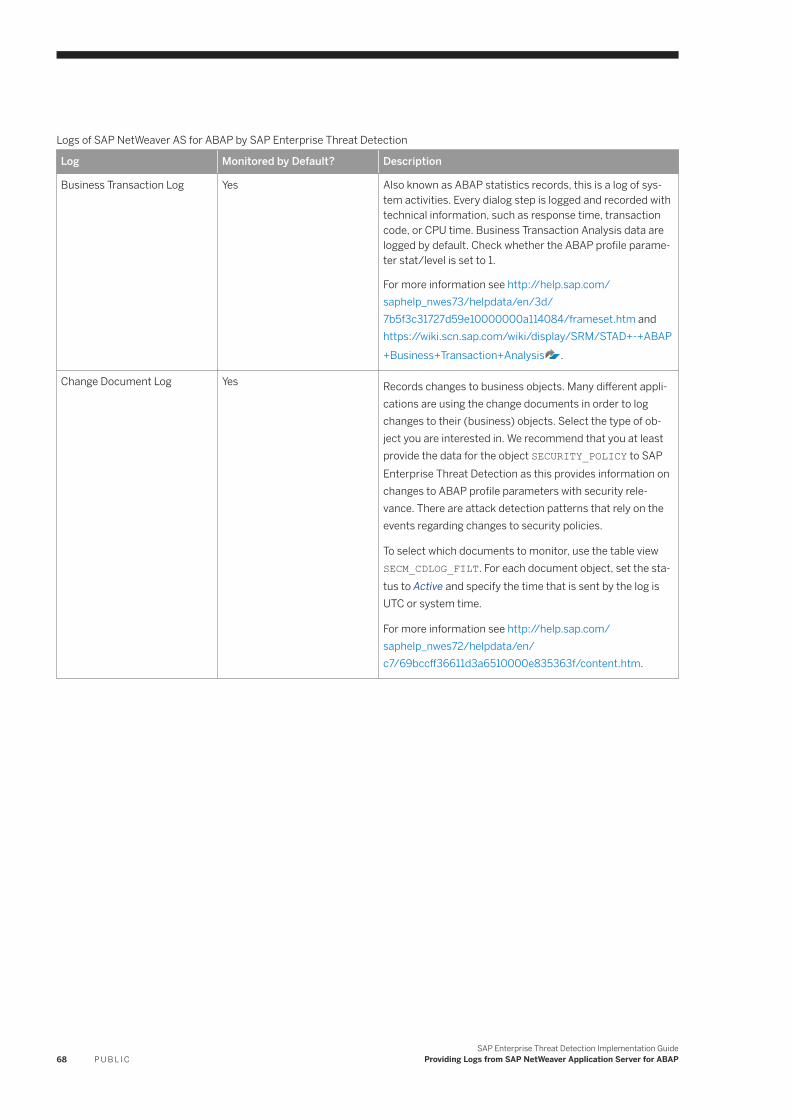
Logs of SAP NetWeaver AS for ABAP by SAP Enterprise Threat Detection
Log Monitored by Default? Description
Business Transaction Log Yes Also known as ABAP statistics records, this is a log of system activities. Every dialog step is logged and recorded with technical information, such as response time, transaction code, or CPU time. Business Transaction Analysis data are logged by default. Check whether the ABAP profile parameter stat/level is set to 1.
For more information see http://help.sap.com/saphelp_nwes73/helpdata/en/3d/7b5f3c31727d59e10000000a114084/frameset.htm and https://wiki.scn.sap.com/wiki/display/SRM/STAD+-+ABAP+Business+Transaction+Analysis .
Change Document Log Yes Records changes to business objects. Many different applications are using the change documents in order to log changes to their (business) objects. Select the type of object you are interested in. We recommend that you at least provide the data for the object SECURITY_POLICY to SAP Enterprise Threat Detection as this provides information on changes to ABAP profile parameters with security relevance. There are attack detection patterns that rely on the events regarding changes to security policies.
To select which documents to monitor, use the table view SECM_CDLOG_FILT. For each document object, set the status to Active and specify the time that is sent by the log is UTC or system time.
For more information see http://help.sap.com/saphelp_nwes72/helpdata/en/c7/69bccff36611d3a6510000e835363f/content.htm.
68 P U B L I CSAP Enterprise Threat Detection Implementation Guide
Providing Logs from SAP NetWeaver Application Server for ABAP
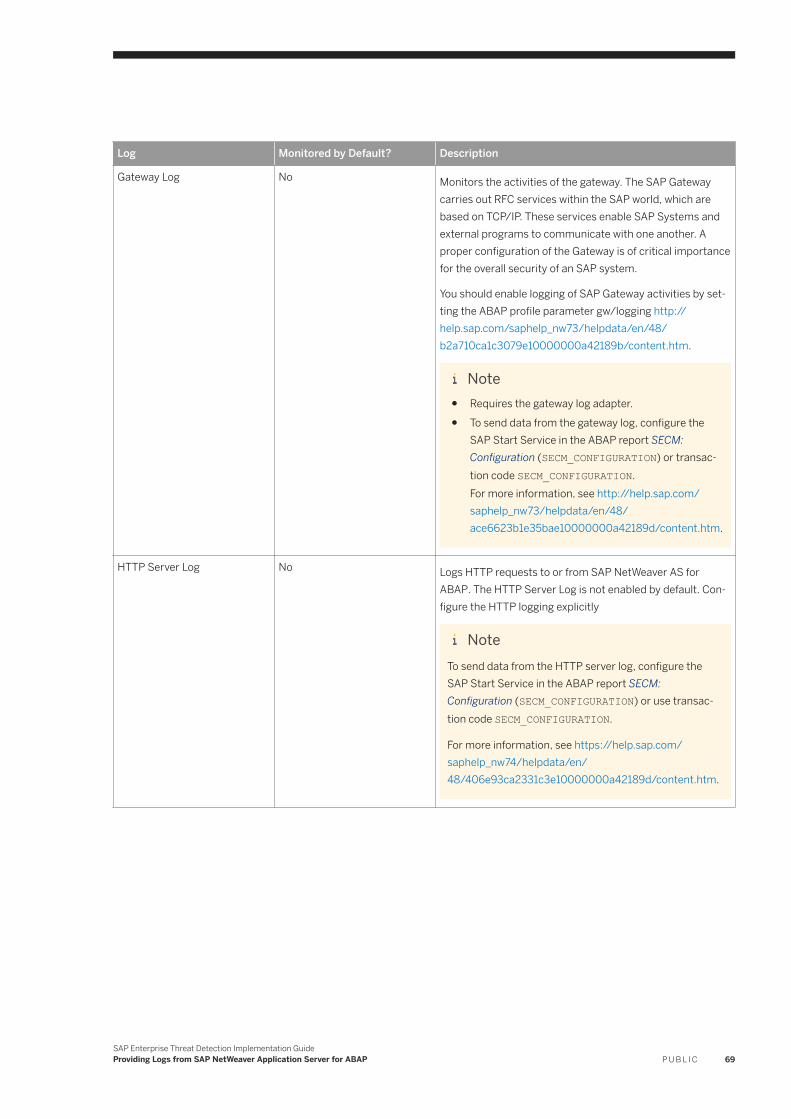
Log Monitored by Default? Description
Gateway Log No Monitors the activities of the gateway. The SAP Gateway carries out RFC services within the SAP world, which are based on TCP/IP. These services enable SAP Systems and external programs to communicate with one another. A proper configuration of the Gateway is of critical importance for the overall security of an SAP system.
You should enable logging of SAP Gateway activities by setting the ABAP profile parameter gw/logging http://help.sap.com/saphelp_nw73/helpdata/en/48/b2a710ca1c3079e10000000a42189b/content.htm.
Note● Requires the gateway log adapter.● To send data from the gateway log, configure the
SAP Start Service in the ABAP report SECM: Configuration (SECM_CONFIGURATION) or transaction code SECM_CONFIGURATION.For more information, see http://help.sap.com/saphelp_nw73/helpdata/en/48/ace6623b1e35bae10000000a42189d/content.htm.
HTTP Server Log No Logs HTTP requests to or from SAP NetWeaver AS for ABAP. The HTTP Server Log is not enabled by default. Configure the HTTP logging explicitly
NoteTo send data from the HTTP server log, configure the SAP Start Service in the ABAP report SECM: Configuration (SECM_CONFIGURATION) or use transaction code SECM_CONFIGURATION.
For more information, see https://help.sap.com/saphelp_nw74/helpdata/en/48/406e93ca2331c3e10000000a42189d/content.htm.
SAP Enterprise Threat Detection Implementation GuideProviding Logs from SAP NetWeaver Application Server for ABAP P U B L I C 69
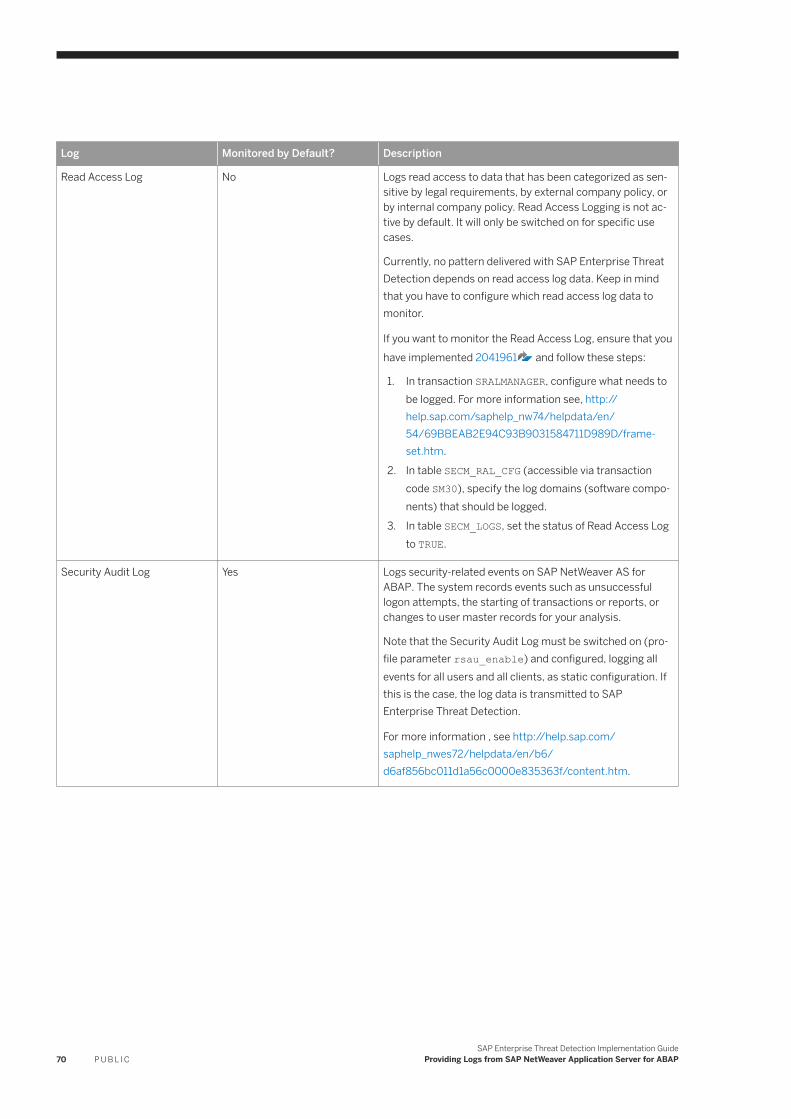
Log Monitored by Default? Description
Read Access Log No Logs read access to data that has been categorized as sensitive by legal requirements, by external company policy, or by internal company policy. Read Access Logging is not active by default. It will only be switched on for specific use cases.
Currently, no pattern delivered with SAP Enterprise Threat Detection depends on read access log data. Keep in mind that you have to configure which read access log data to monitor.
If you want to monitor the Read Access Log, ensure that you have implemented 2041961 and follow these steps:
1. In transaction SRALMANAGER, configure what needs to be logged. For more information see, http://help.sap.com/saphelp_nw74/helpdata/en/54/69BBEAB2E94C93B9031584711D989D/frameset.htm.
2. In table SECM_RAL_CFG (accessible via transaction code SM30), specify the log domains (software components) that should be logged.
3. In table SECM_LOGS, set the status of Read Access Log to TRUE.
Security Audit Log Yes Logs security-related events on SAP NetWeaver AS for ABAP. The system records events such as unsuccessful logon attempts, the starting of transactions or reports, or changes to user master records for your analysis.
Note that the Security Audit Log must be switched on (profile parameter rsau_enable) and configured, logging all events for all users and all clients, as static configuration. If this is the case, the log data is transmitted to SAP Enterprise Threat Detection.
For more information , see http://help.sap.com/saphelp_nwes72/helpdata/en/b6/d6af856bc011d1a56c0000e835363f/content.htm.
70 P U B L I CSAP Enterprise Threat Detection Implementation Guide
Providing Logs from SAP NetWeaver Application Server for ABAP

Log Monitored by Default? Description
System Log Yes Logs all system errors, warnings, user locks due to failed logon attempts from known users, and process messages. System Log is switched on by default.
NoteTo send data from the system log, configure the SAP Start Service in the ABAP report SECM: Configuration (SECM_CONFIGURATION) or use transaction code SECM_CONFIGURATION.
For more information, see http://help.sap.com/saphelp_nw70ehp2/helpdata/en/c7/69bcbaf36611d3a6510000e835363f/frameset.htm, and http://help.sap.com/saphelp_nwes72/helpdata/en/1f/8311784bc511d189750000e8322d00/frameset.htm.
User Change Log Yes Logs all changes made directly to the authorizations or profiles of users, as well as changes to the user password, the user type, the user group, the validity period, and the account number. Keep in mind that you have to configure for which clients to monitor user changes.
For more information, see https://help.sap.com/saphelp_nw70ehp2/helpdata/en/c7/69bcd8f36611d3a6510000e835363f/content.htm.
To select which clients to monitor, maintain table SECM_UCL_CLIENTS. For more information, see SAP Note
2215748 .
4.2 Providing Read Access Log and Security Audit Log by Immediate Log Transfer
Immmediate log transfer is possible for Read Access Log and Security Audit Log using an API on the kernel level of SAP NetWeaver AS for ABAP.
Prerequisites
This feature is available with SAP_BASIS 7.52 or higher with kernel 7.53 or SAP_BASIS 7.69 or higher with kernel 7.53.
Ensure that you do not transfer any logs twice. If you have configured your SAP NetWeaver AS for ABAP to send log data using the SECM_LOGS table, you should set the value to FALSE for the respective logs.
SAP Enterprise Threat Detection Implementation GuideProviding Logs from SAP NetWeaver Application Server for ABAP P U B L I C 71

Context
To use this method of log transfer, you configure a few profile parameters.
Procedure
1. In the log providing system, enter transaction code RZ11.
Note that thissetting is only valid until the application server is restarted. To make it permanent, enter it in the profileof the application server.
2. Specify etd_event_sender/enable by setting the value to on.
3. Specify the SAP HANA Smart Data Streaming host and port of the log learning adapter and the protocol to be used (default = UDP) in the etd_event_sender/server parameter.
4. (Optional) Specify the SSL Config.
4.3 Ensuring SAP Start Service Can Access the Gateway and HTTP Server Logs
Depending on your SAP NetWeaver AS for ABAP release, the SAP Start Service may not be able to access the gateway log or the HTTP server log. To enable access, modify the profile of SAP NetWeaver AS for ABAP.
Context
For the logs, add the prefix dev_ or the affix .log to the log names. You modify the log names by setting profile parameters.
As an alternative, you can patch the SAP Start Server. Implement SAP Note 877795 and see item 98 in the text of the SAP Note.
You can also configure the SAP Start Service for authentication with x.509 certificates in SECM_LOG_2_ESP. To do so, ensure that 2367684 is implemented, ensure that the SAP Start Service is enabled for HTTPS and exchange certificates between you SAP NetWeaver AS ABAP and the SAP Start Service.
Procedure
1. Start Maintain Profile Parameters (transaction RZ11).
2. Edit or add the profile parameters as shown in the following table:
72 P U B L I CSAP Enterprise Threat Detection Implementation Guide
Providing Logs from SAP NetWeaver Application Server for ABAP
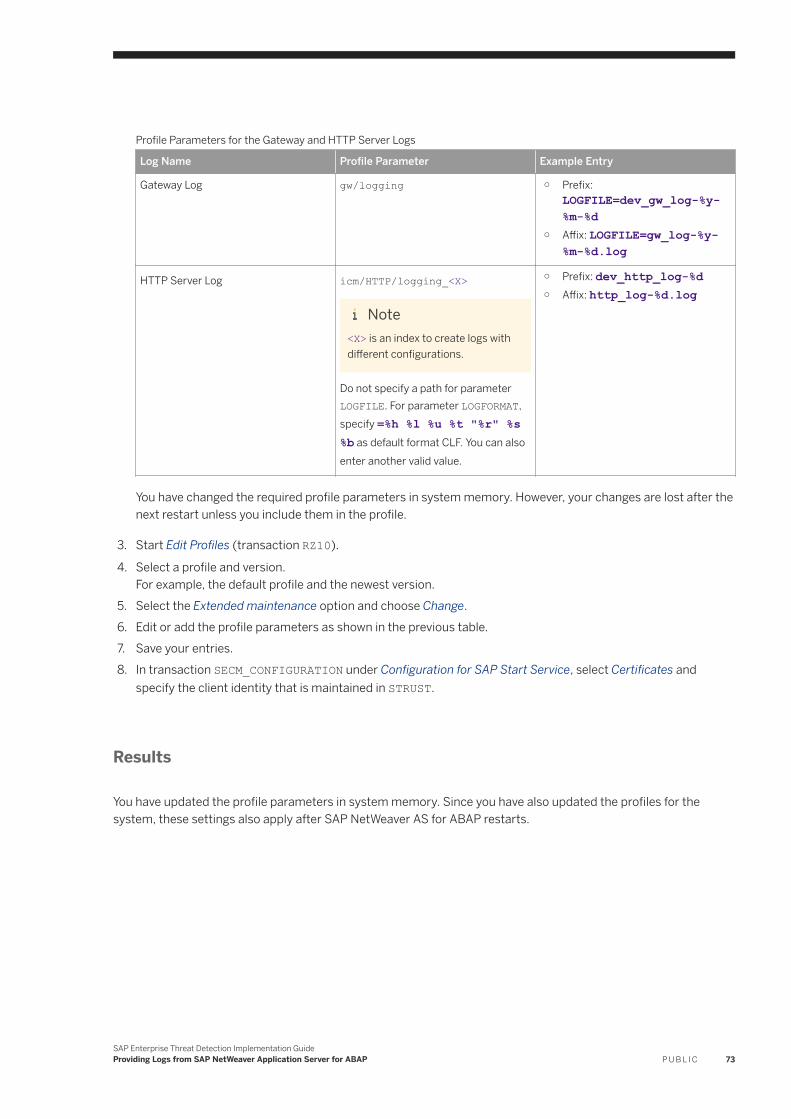
Profile Parameters for the Gateway and HTTP Server Logs
Log Name Profile Parameter Example Entry
Gateway Log gw/logging ○ Prefix: LOGFILE=dev_gw_log-%y-%m-%d
○ Affix: LOGFILE=gw_log-%y-%m-%d.log
HTTP Server Log icm/HTTP/logging_<X>
Note<X> is an index to create logs with different configurations.
Do not specify a path for parameter LOGFILE. For parameter LOGFORMAT, specify =%h %l %u %t "%r" %s %b as default format CLF. You can also enter another valid value.
○ Prefix: dev_http_log-%d○ Affix: http_log-%d.log
You have changed the required profile parameters in system memory. However, your changes are lost after the next restart unless you include them in the profile.
3. Start Edit Profiles (transaction RZ10).
4. Select a profile and version.For example, the default profile and the newest version.
5. Select the Extended maintenance option and choose Change.6. Edit or add the profile parameters as shown in the previous table.7. Save your entries.8. In transaction SECM_CONFIGURATION under Configuration for SAP Start Service, select Certificates and
specify the client identity that is maintained in STRUST.
Results
You have updated the profile parameters in system memory. Since you have also updated the profiles for the system, these settings also apply after SAP NetWeaver AS for ABAP restarts.
SAP Enterprise Threat Detection Implementation GuideProviding Logs from SAP NetWeaver Application Server for ABAP P U B L I C 73
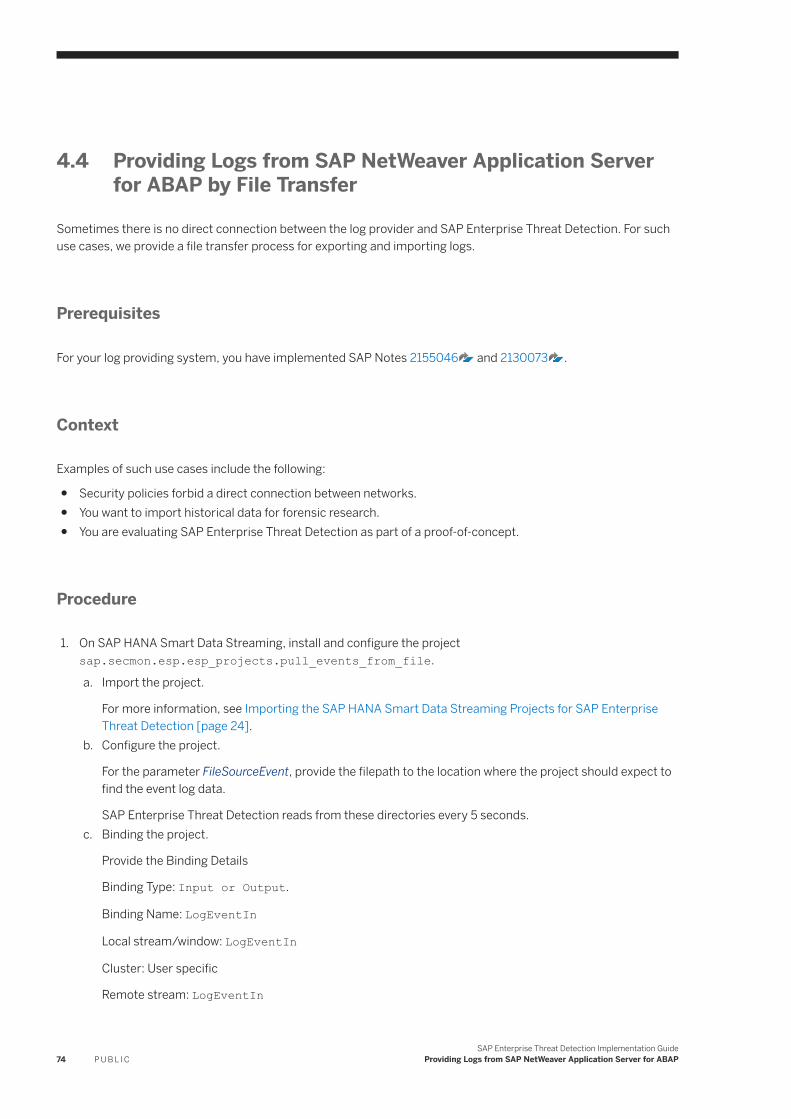
4.4 Providing Logs from SAP NetWeaver Application Server for ABAP by File Transfer
Sometimes there is no direct connection between the log provider and SAP Enterprise Threat Detection. For such use cases, we provide a file transfer process for exporting and importing logs.
Prerequisites
For your log providing system, you have implemented SAP Notes 2155046 and 2130073 .
Context
Examples of such use cases include the following:
● Security policies forbid a direct connection between networks.● You want to import historical data for forensic research.● You are evaluating SAP Enterprise Threat Detection as part of a proof-of-concept.
Procedure
1. On SAP HANA Smart Data Streaming, install and configure the project sap.secmon.esp.esp_projects.pull_events_from_file.
a. Import the project.
For more information, see Importing the SAP HANA Smart Data Streaming Projects for SAP Enterprise Threat Detection [page 24].
b. Configure the project.
For the parameter FileSourceEvent, provide the filepath to the location where the project should expect to find the event log data.
SAP Enterprise Threat Detection reads from these directories every 5 seconds.c. Binding the project.
Provide the Binding Details
Binding Type: Input or Output.
Binding Name: LogEventIn
Local stream/window: LogEventIn
Cluster: User specific
Remote stream: LogEventIn
74 P U B L I CSAP Enterprise Threat Detection Implementation Guide
Providing Logs from SAP NetWeaver Application Server for ABAP
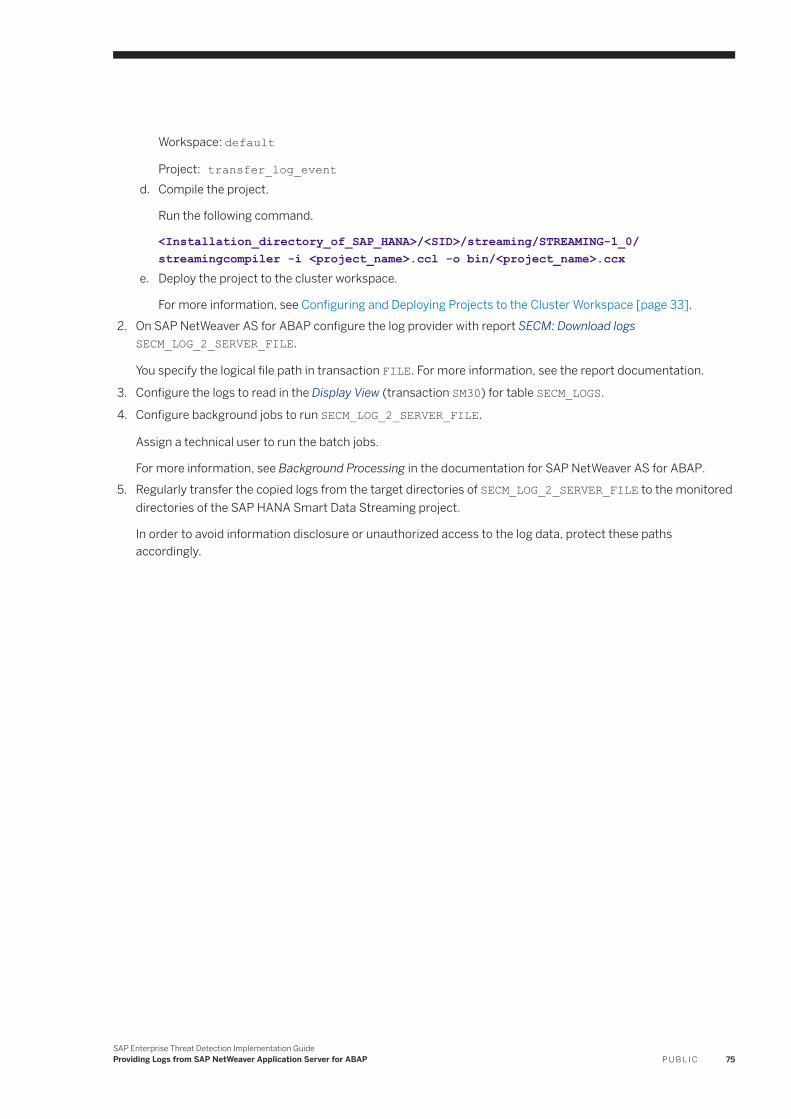
Workspace: default
Project: transfer_log_eventd. Compile the project.
Run the following command.
<Installation_directory_of_SAP_HANA>/<SID>/streaming/STREAMING-1_0/streamingcompiler -i <project_name>.ccl -o bin/<project_name>.ccx
e. Deploy the project to the cluster workspace.
For more information, see Configuring and Deploying Projects to the Cluster Workspace [page 33].2. On SAP NetWeaver AS for ABAP configure the log provider with report SECM: Download logs
SECM_LOG_2_SERVER_FILE.
You specify the logical file path in transaction FILE. For more information, see the report documentation.
3. Configure the logs to read in the Display View (transaction SM30) for table SECM_LOGS.
4. Configure background jobs to run SECM_LOG_2_SERVER_FILE.
Assign a technical user to run the batch jobs.
For more information, see Background Processing in the documentation for SAP NetWeaver AS for ABAP.5. Regularly transfer the copied logs from the target directories of SECM_LOG_2_SERVER_FILE to the monitored
directories of the SAP HANA Smart Data Streaming project.
In order to avoid information disclosure or unauthorized access to the log data, protect these paths accordingly.
SAP Enterprise Threat Detection Implementation GuideProviding Logs from SAP NetWeaver Application Server for ABAP P U B L I C 75
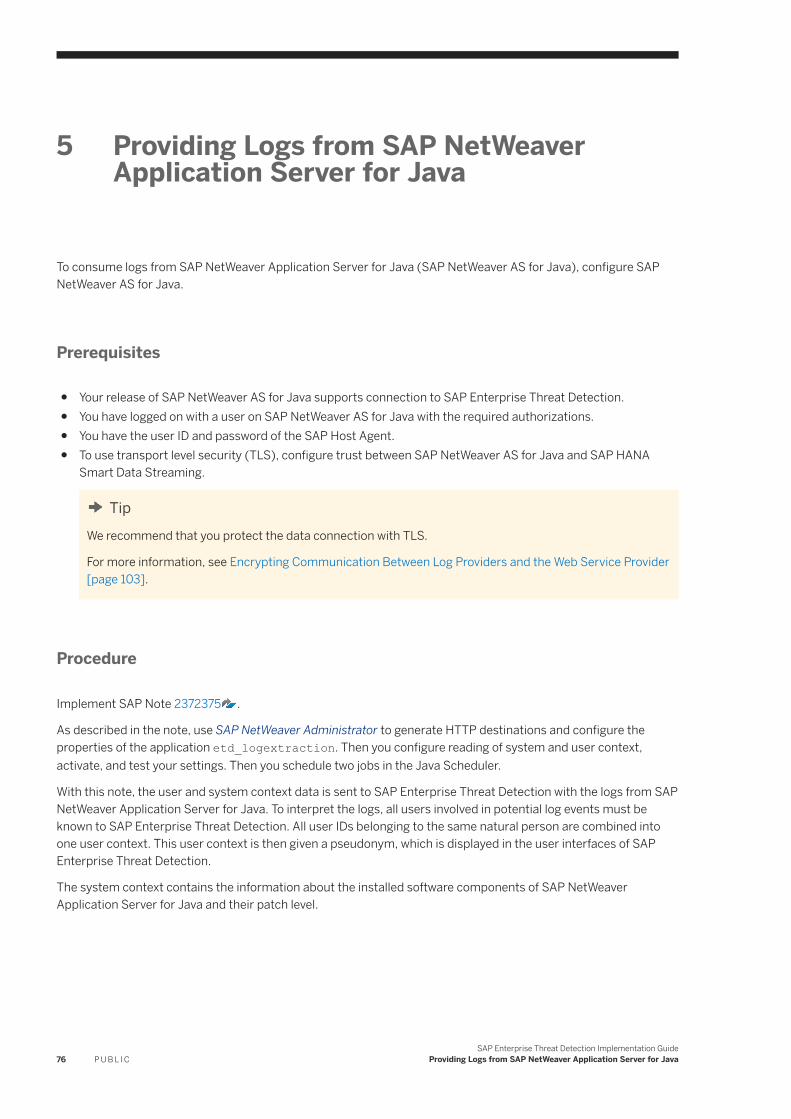
5 Providing Logs from SAP NetWeaver Application Server for Java
To consume logs from SAP NetWeaver Application Server for Java (SAP NetWeaver AS for Java), configure SAP NetWeaver AS for Java.
Prerequisites
● Your release of SAP NetWeaver AS for Java supports connection to SAP Enterprise Threat Detection.● You have logged on with a user on SAP NetWeaver AS for Java with the required authorizations.● You have the user ID and password of the SAP Host Agent.● To use transport level security (TLS), configure trust between SAP NetWeaver AS for Java and SAP HANA
Smart Data Streaming.
TipWe recommend that you protect the data connection with TLS.
For more information, see Encrypting Communication Between Log Providers and the Web Service Provider [page 103].
Procedure
Implement SAP Note 2372375 .
As described in the note, use SAP NetWeaver Administrator to generate HTTP destinations and configure the properties of the application etd_logextraction. Then you configure reading of system and user context, activate, and test your settings. Then you schedule two jobs in the Java Scheduler.
With this note, the user and system context data is sent to SAP Enterprise Threat Detection with the logs from SAP NetWeaver Application Server for Java. To interpret the logs, all users involved in potential log events must be known to SAP Enterprise Threat Detection. All user IDs belonging to the same natural person are combined into one user context. This user context is then given a pseudonym, which is displayed in the user interfaces of SAP Enterprise Threat Detection.
The system context contains the information about the installed software components of SAP NetWeaver Application Server for Java and their patch level.
76 P U B L I CSAP Enterprise Threat Detection Implementation Guide
Providing Logs from SAP NetWeaver Application Server for Java
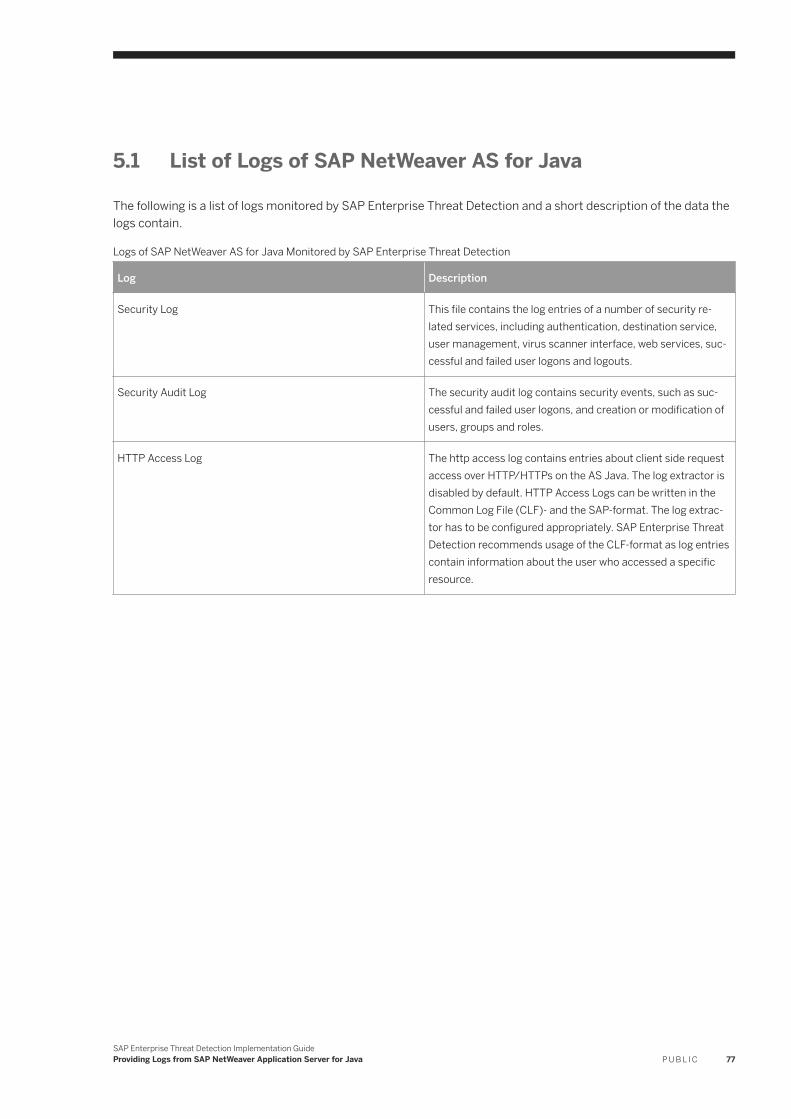
5.1 List of Logs of SAP NetWeaver AS for Java
The following is a list of logs monitored by SAP Enterprise Threat Detection and a short description of the data the logs contain.
Logs of SAP NetWeaver AS for Java Monitored by SAP Enterprise Threat Detection
Log Description
Security Log This file contains the log entries of a number of security related services, including authentication, destination service, user management, virus scanner interface, web services, successful and failed user logons and logouts.
Security Audit Log The security audit log contains security events, such as successful and failed user logons, and creation or modification of users, groups and roles.
HTTP Access Log The http access log contains entries about client side request access over HTTP/HTTPs on the AS Java. The log extractor is disabled by default. HTTP Access Logs can be written in the Common Log File (CLF)- and the SAP-format. The log extractor has to be configured appropriately. SAP Enterprise Threat Detection recommends usage of the CLF-format as log entries contain information about the user who accessed a specific resource.
SAP Enterprise Threat Detection Implementation GuideProviding Logs from SAP NetWeaver Application Server for Java P U B L I C 77
6 Providing Logs from SAP HANA
SAP Enterprise Threat Detection can consume audit trails from SAP HANA in syslog format.
Prerequisites
You have installed the log learning adapter on SAP HANA Smart Data Streaming.
For more information, see Installing SAP Enterprise Threat Detection on SAP HANA Smart Data Streaming [page 22].
Procedure
1. Configure SAP HANA to write an audit trail of the syslog type.
For more information, see Audit Trails in the documentation for SAP HANA on SAP Help Portal.2. Configure the host operating system of SAP HANA to send the data to the port of the log learning adapter on
SAP HANA Smart Data Streaming.
For more information, see the product documentation of your operating system.
78 P U B L I CSAP Enterprise Threat Detection Implementation Guide
Providing Logs from SAP HANA
7 Providing Logs from Other Systems with Log Learning
SAP Enterprise Threat Detection can process text-based logs to monitor other types of systems. Configure the system to send the log to SAP HANA Smart Data Streaming and use the Log Learning application to teach SAP Enterprise Threat Detection how to interpret the events in the log.
Context
Log Learning allows you to normalize such log data into the semantic data model of SAP Enterprise Threat Detection with its semantic events and attributes. This normalization then enables analyses and correlations across log sources. If you want to familiarize yourself with the semantic events and attributes, please see https://blogs.sap.com/2016/05/18/introduction-to-semantic-events-and-attributes/ .
The Log Learning application analyzes each entry in the log to find elements like variables and key-value lists. It represents the discovered elements as what are called annotations. For example, a timestamp is represented by the annotation <Timestamp>. During analysis each log entry is analyzed into a sequence of annotations, which might be interspersed with fixed text. This sequence is called the markup for the log entry. Entries with the same markup are grouped together, and are considered to be instances of the same entry type. The entry type is essentially a technical artefact with an ID. As a user, you work with the markup to specify how to normalize the log entry type to the semantic data model of SAP Enterprise Threat Detection.
7.1 Log Layouts Supported by Log Learning
SAP Enterprise Threat Detection differentiates between structured logs, logs with key-value lists, and free-text logs.
Structured Logs
Structured logs have a regular structure with a fixed number of elements of a log entry, separated by a fixed separator. When reading the log, everything that appears before the structured list is the header. The following is an example of an instance from a structured log with 25 positions and a timestamp in the header.The separator in this example is the " " (space) key.
2016-07-18 19:06:49 499 10.11.111.222 TCP_TUNNELED 200 4509 CONNECT - - us1.hana.ondemand.com - 123 123 111.222.3.11 tcp 0 111.222.1.11 - 123.222.1.11 OBSERVED Technology/Internet "Apache-HttpClient/4.3.6(java1.5)" - VMSAMPLE--HTTP-Service tcp://us1.hana.ondemand.com:111/ /
SAP Enterprise Threat Detection Implementation GuideProviding Logs from Other Systems with Log Learning P U B L I C 79
This instance results in the following markup: <Timestamp><StructuredList>. Within the structured list, there are 25 positions, numbered from 0 to 24.
Let's say there is the following second instance:2016-07-18 19:06:57 980 10.11.1.254 TCP_ERR_MISS 503 185 CONNECT - - connectivity.netweaver.ondemand.com - 443 200 111.121.6.11 tcp 0 147.204.6.18 - 147.204.6.18 DENIED Technology/Internet "AccAD" - VMSAMPLE-HTTP-Service tcp://connectivity.netweaver.ondemand.com:111/ /
This instance would be grouped with the first one in the same markup to be processed together.
Logs with Key-Value Lists
A log may start with a header (for example a timestamp), followed by a list of key-value pairs. The elements in a key-value list are not just listed one after another and separated by a separator, but each element consists of a key-value pair, in which the key describes the content of the element, followed by its value. Key-value lists have a separator between the key and the value, and they have a key-value pair separator between the individual key-value pairs. Just like with structured logs, there may be a header in front of the key-value list. If your log matches these criteria, you should learn it as a key-value list log and specify the separator and the key-value list separator. When working with key-value lists, keep the following in mind:
● The separator and the key-value pair separator must not be part of the header.● Key-value pairs may appear in any order in a log entry.● A particular key may only appear once per log entry.● Space characters ( ) before or after the separators are optional.● Values may be surrounded with single quotation marks ('…') or double quotation marks ("…").
For example: key='value' or key="value"The separator between key and value, like the equals sign (=), can appear within the quotation marks. The separator between the key-value pairs, such as a comma (,) can also appear within the quotation marks.For example: key1="value=3", key2="INSERT,DELETE"
● If you want to learn such a log with the log learning application, you must identify a set of keys that is unique to this log and present in each log entry. This combination of elements defines the log entry type.For example, a Sophos proxy log includes the keys sav-ev and sav-dv, which are used as identifiers. For a McAfee firewall log, the keys date, fac, area, type and pri
● Apart from the keys used for identification of a log type, all keys are optional. are always available and used as identifiers.Keys not assigned with log learning and not in the sample logs can appear in logs at runtime, but SAP Enterprise Threat Detection does not extract the relevant values. Therefore, you should ensure to use a sufficiently large sample for log learning.
The following is an example of an instance with a key-value list:HEC01-NAT-cmdb; service_id: g_http_8443; dst: 111.222.000.00; proto: tcp; xlatedst: 11.22.33.44; NAT_rulenum: 33; NAT_addtnl_rulenum: 1; product: VPN-1 & FireWall-1; service: g_http_8443; s_port: 49166; product_family: Network;
This instance results in the following markup: <Var> <KeyValue.List>
In the key-value list, there are the following keys: service_id are always available and used as, NAT_rulenum, NAT_addtnl_rulenum, product, service, s_port, product_family, proto, dst, xlatedst
80 P U B L I CSAP Enterprise Threat Detection Implementation Guide
Providing Logs from Other Systems with Log Learning
Free-Text Logs
A free-text log is a mixture of fixed text, variables, and the following type of key-value list, separated by the = character :
key=value key= valuekey =valuekey = valuekey="value"key= "value"key ="value" key = "value""key"="value""key" ="value""key"= "value" "key" = "value"
The following is an example of an instance of a free-text log:
<30>Jan 9 09:49:01 ld3796.wdf.tst inetd[36639]: 10.10.10.10 test t=1,t2=3,t3=t5
This results in the following markup:
<<Integer>><Timestamp> <Host> <Syslog>: <IP.IP> test <KeyValue.List>
The key-value list in this markup has the following keys: t, t2, t3.
JSON Logs
Logs in JSON format are also supported by SAP Enterprise Threat Detection, and they are considered free-text logs in our log learning application. Note that the JSON part of a log line can be proceeded by a header, i.e. it does not have to be a pure JSON. In the example below, there is a header with a timestamp in the JSON log: 2017-02-21T09:03:58.569+0000 {"rbkey\"/\"test":"just for test","custom":{"message":"This is a message."}}.
Other Log Types
There are naturally other log types that SAP Enterprise Threat Detection cannot parse in this release. For example:
● Logs with deep structure, for example, XML.● Logs with events spread over multiple lines
An example of this type of log is the Windows Event Log.
Logs can also be a hybrid of multiple types. Hybrid logs sometimes occur because various instances use different infrastructures to collect and report log data.
SAP Enterprise Threat Detection Implementation GuideProviding Logs from Other Systems with Log Learning P U B L I C 81
7.2 Overview Procedure of Providing Logs from Other Systems
This chapter gives an overview of how to provide logs from other systems. It outlines how to use the Log Learning application to teach SAP Enterprise Threat Detection to interpret and normalize log data.
Prerequisites
Source system must be able to provide text-based logs.
● For example, syslog is a standard for log data. The log learning adapter interprets logs in UTF-8.For more information about syslog, see RFC 5424: The Syslog Protocol.
● You have installed the log learning adapter on SAP HANA Smart Data Streaming.For more information, see chapter Installing SAP Enterprise Threat Detection on SAP HANA SDS in the SAP Enterprise Threat Detection Implementation Guide.
● The log provider must be able to send the data to the port of the log learning adapter on SAP HANA Smart Data Streaming.For more information about supported log formats, see Log Layouts Supported by Log Learning [page 79].
Context
The following is an overview of the steps required to provide logs from other systems. Details are provided in the sections that follow.
Procedure
1. Either generate sample log data in the log provider system and save it as a text file, or use a log from the Unrecognized Logs application, which is accessible from the launchpad of SAP Enterprise Threat Detection. For the detailed procedure, see Loading Sample Logs [page 84].The sample should include as many types of events that you want to monitor as possible. This is especially important for logs with key-value lists, because during the staging of the log entries, only the keys present in the sample log will be learned. Keys not included in the sample log will not be normalized.
2. Use the sample log data with the assistance of the Log Learning and Knowledge Base applications to teach SAP Enterprise Threat Detection how to normalize the log data.
The following figure illustrates the log learning process. It is an iterative process that requires testing several runs through before the log can be used productively. Once you are successful, you synchronize the rules you have taught SAP Enterprise Threat Detection with the adapter in SAP HANA Smart Data Streaming. For a detailed procedure, see Parsing and Normalizing Markups [page 85] and its subchapters.
82 P U B L I CSAP Enterprise Threat Detection Implementation Guide
Providing Logs from Other Systems with Log Learning
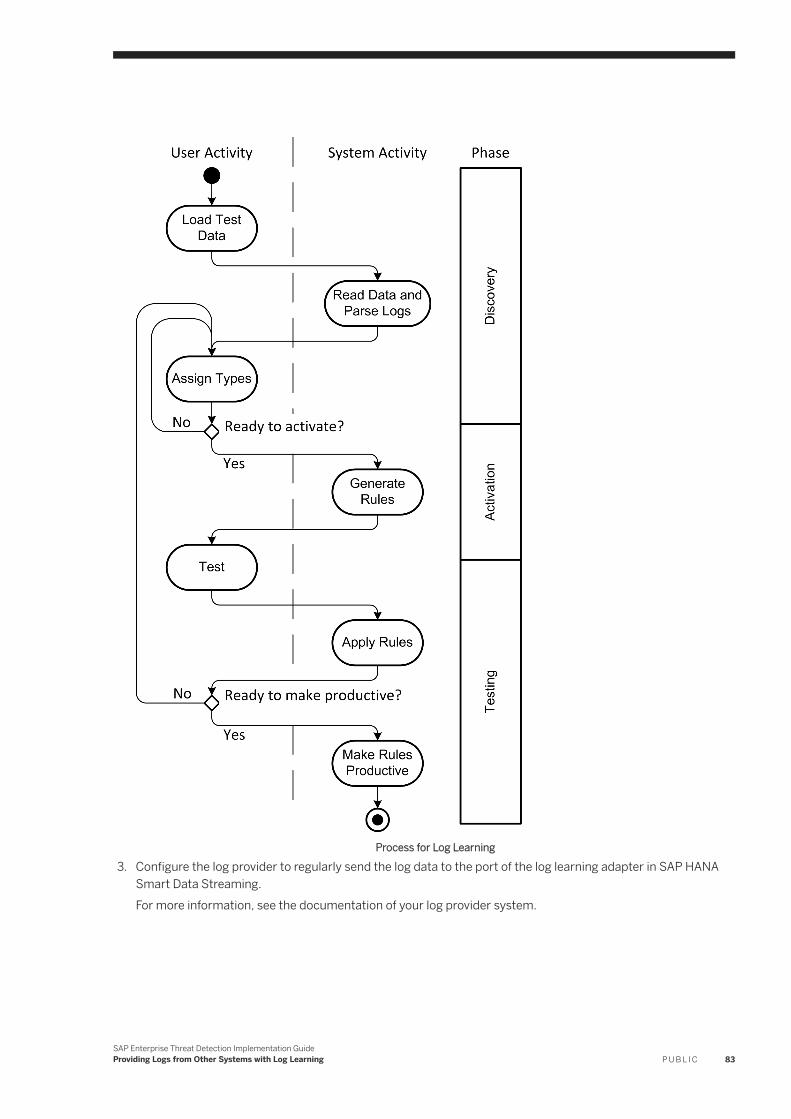
Process for Log Learning
3. Configure the log provider to regularly send the log data to the port of the log learning adapter in SAP HANA Smart Data Streaming.For more information, see the documentation of your log provider system.
SAP Enterprise Threat Detection Implementation GuideProviding Logs from Other Systems with Log Learning P U B L I C 83
Results
SAP Enterprise Threat Detection processes log data from the log provider and saves them as events in the database. Log entries that cannot be parsed according to these productive rules are saved as unrecognized logs in a separate table in the database. You can access them through the Unrecognized Logs tile in the launchpad of SAP Enterprise Threat Detection. You can think of these unrecognized logs as a type of worklist. If you have completed learning the logs you receive, this list should be empty.
7.3 Loading Sample Logs
The first step in learning a new log is loading sample log data into SAP Enterprise Threat Detection. Or you can use the unrecognized logs as a worklist for learning a new log.
Prerequisites
You have a sample log available or there are logs in the Unrecognized Logs tile in the launchpad of SAP Enterprise Threat Detection.
If the source system cannot provide a text file, you can develop a project on SAP HANA Smart Data Streaming to import the log data. We provide a sample implementation that you can modify. For more information, see Configuring and Deploying structured_event_import_from_file [page 52].
Procedure
1. From SAP Enterprise Threat Detection launchpad, in the Log Learning tile, choose Runs . Alternativly, choose Unrecognized Logs tile.
On the Unrecognized Logs user interface, use the filter options to select the log events that you want to include.
2. Choose Create.3. Enter the name of the run and, optionally, a description.4. Specify the log layout. For more information, see Log Layouts Supported by Log Learning [page 79].
If your sample is from a key-value log, specify the separator and the key-value pair separator. If it is from a structured log, specify the separator.
Note that if you choose Free Text and your log contains a key-value list, the Log Learning application will recognize the equal sign ( = ) as a separator between keys and values, and the , (comma) as the separator between the key-value pairs.
5. If you are working with a sample log in the Log Learning application, specify the location of the file.6. Choose Create.
84 P U B L I CSAP Enterprise Threat Detection Implementation Guide
Providing Logs from Other Systems with Log Learning
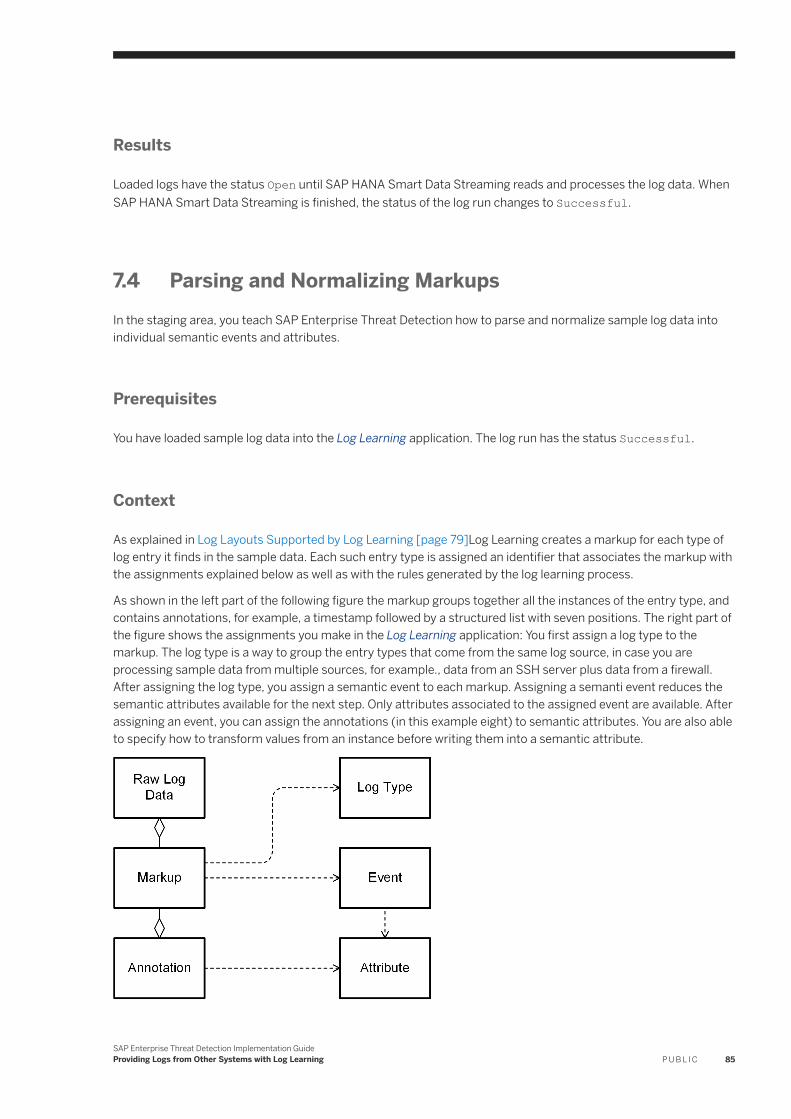
Results
Loaded logs have the status Open until SAP HANA Smart Data Streaming reads and processes the log data. When SAP HANA Smart Data Streaming is finished, the status of the log run changes to Successful.
7.4 Parsing and Normalizing MarkupsIn the staging area, you teach SAP Enterprise Threat Detection how to parse and normalize sample log data into individual semantic events and attributes.
Prerequisites
You have loaded sample log data into the Log Learning application. The log run has the status Successful.
Context
As explained in Log Layouts Supported by Log Learning [page 79]Log Learning creates a markup for each type of log entry it finds in the sample data. Each such entry type is assigned an identifier that associates the markup with the assignments explained below as well as with the rules generated by the log learning process.
As shown in the left part of the following figure the markup groups together all the instances of the entry type, and contains annotations, for example, a timestamp followed by a structured list with seven positions. The right part of the figure shows the assignments you make in the Log Learning application: You first assign a log type to the markup. The log type is a way to group the entry types that come from the same log source, in case you are processing sample data from multiple sources, for example., data from an SSH server plus data from a firewall. After assigning the log type, you assign a semantic event to each markup. Assigning a semanti event reduces the semantic attributes available for the next step. Only attributes associated to the assigned event are available. After assigning an event, you can assign the annotations (in this example eight) to semantic attributes. You are also able to specify how to transform values from an instance before writing them into a semantic attribute.
SAP Enterprise Threat Detection Implementation GuideProviding Logs from Other Systems with Log Learning P U B L I C 85
The following is an overview of the log learning process. See the detailed procedures in the sections that.
Procedure
1. From SAP Enterprise Threat Detection launchpad, in the Log Learning tile, choose Runs.2. Choose a run name.3. For each markup, assign a log type and a semantic event. For a detailed procedure, see Assigning Log Types
and Semantic Events to Markups [page 86].4. For each event, map the annotations of the markup to the corresponding attributes. For a detailed procedure,
see Assigning Semantic Attributes to Annotations [page 88].5. Optionally, work with value mapping and constant values. For detailed procedures, see Parsing Markup with
Value Mapping [page 91] and Parsing Markup With Constant Values [page 99].6. Repeat steps 3 and 4 (and maybe 5) for each of the rows in the table of markups.7. Save your entries.
Results
Test the results before making your configuration productive.
7.4.1 Assigning Log Types and Semantic Events to Markups
When learning new logs, SAP Enterprise Threat Detection groups similar log entries with markup. For each markup grouping, assign a log type and a semantic event.
Prerequisites
The log type and semantic event exist in the knowledge base.
Procedure
1. From SAP Enterprise Threat Detection launchpad, choose Runs in the Log Learning tile.2. Choose a run name.3. Select a row in the Markup column.4. For each markup, assign a log type in the Log Type column.
In this step, for each group of log entries identified by a markup, you assign the type of log from which the log entries came. If a file contains data from multiple logs, this assignment enables the tool to separate the log
86 P U B L I CSAP Enterprise Threat Detection Implementation Guide
Providing Logs from Other Systems with Log Learning
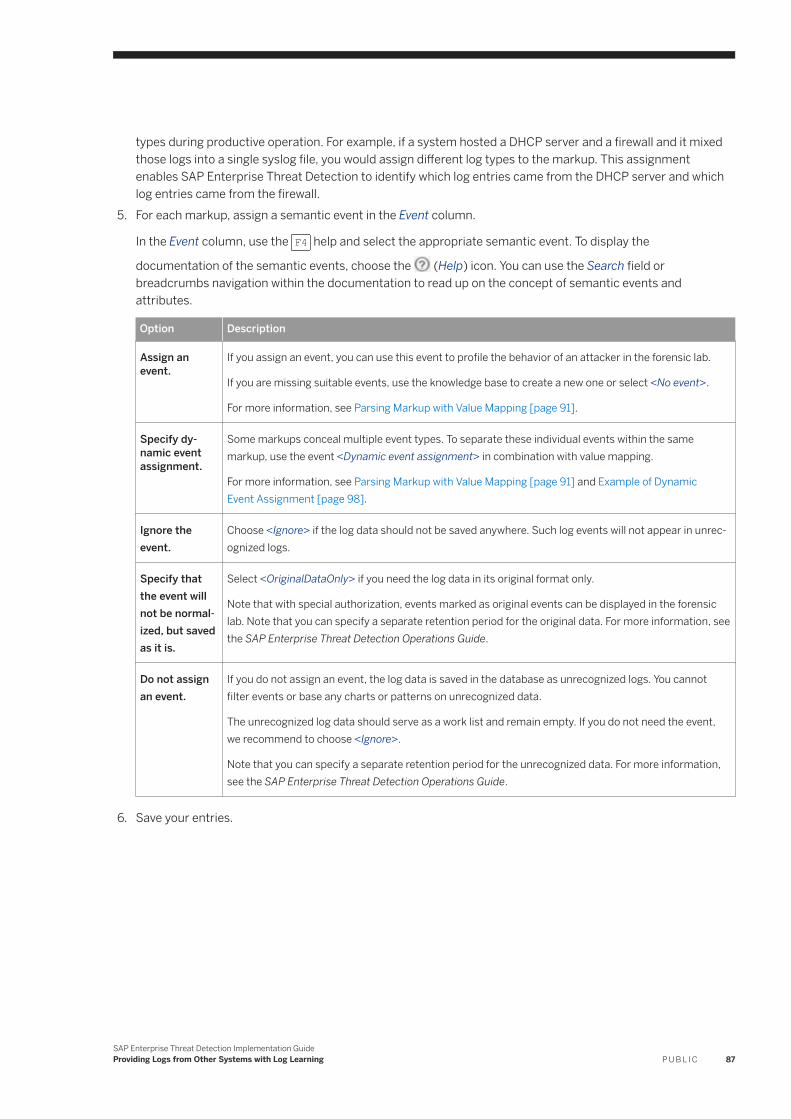
types during productive operation. For example, if a system hosted a DHCP server and a firewall and it mixed those logs into a single syslog file, you would assign different log types to the markup. This assignment enables SAP Enterprise Threat Detection to identify which log entries came from the DHCP server and which log entries came from the firewall.
5. For each markup, assign a semantic event in the Event column.
In the Event column, use the F4 help and select the appropriate semantic event. To display the
documentation of the semantic events, choose the (Help) icon. You can use the Search field or breadcrumbs navigation within the documentation to read up on the concept of semantic events and attributes.
Option Description
Assign an event.
If you assign an event, you can use this event to profile the behavior of an attacker in the forensic lab.
If you are missing suitable events, use the knowledge base to create a new one or select <No event>.
For more information, see Parsing Markup with Value Mapping [page 91].
Specify dynamic event assignment.
Some markups conceal multiple event types. To separate these individual events within the same markup, use the event <Dynamic event assignment> in combination with value mapping.
For more information, see Parsing Markup with Value Mapping [page 91] and Example of Dynamic Event Assignment [page 98].
Ignore the event.
Choose <Ignore> if the log data should not be saved anywhere. Such log events will not appear in unrecognized logs.
Specify that the event will not be normalized, but saved as it is.
Select <OriginalDataOnly> if you need the log data in its original format only.
Note that with special authorization, events marked as original events can be displayed in the forensic lab. Note that you can specify a separate retention period for the original data. For more information, see the SAP Enterprise Threat Detection Operations Guide.
Do not assign an event.
If you do not assign an event, the log data is saved in the database as unrecognized logs. You cannot filter events or base any charts or patterns on unrecognized data.
The unrecognized log data should serve as a work list and remain empty. If you do not need the event, we recommend to choose <Ignore>.
Note that you can specify a separate retention period for the unrecognized data. For more information, see the SAP Enterprise Threat Detection Operations Guide.
6. Save your entries.
SAP Enterprise Threat Detection Implementation GuideProviding Logs from Other Systems with Log Learning P U B L I C 87
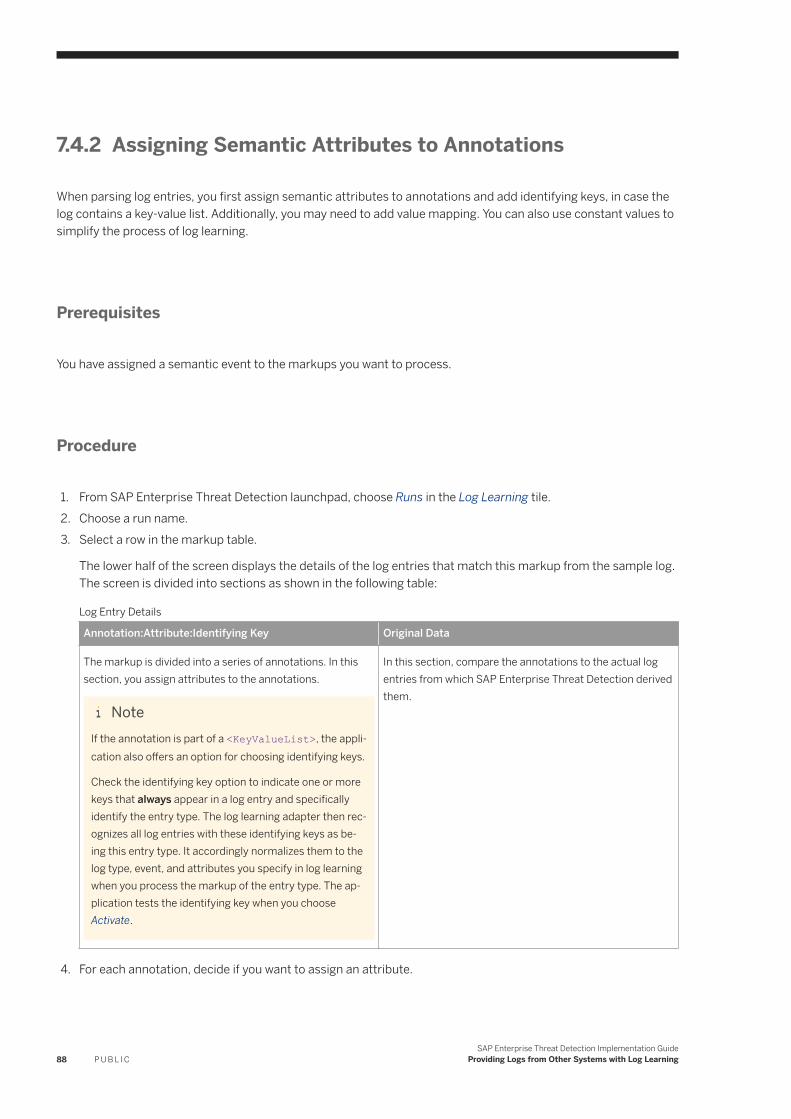
7.4.2 Assigning Semantic Attributes to Annotations
When parsing log entries, you first assign semantic attributes to annotations and add identifying keys, in case the log contains a key-value list. Additionally, you may need to add value mapping. You can also use constant values to simplify the process of log learning.
Prerequisites
You have assigned a semantic event to the markups you want to process.
Procedure
1. From SAP Enterprise Threat Detection launchpad, choose Runs in the Log Learning tile.2. Choose a run name.3. Select a row in the markup table.
The lower half of the screen displays the details of the log entries that match this markup from the sample log. The screen is divided into sections as shown in the following table:
Log Entry Details
Annotation:Attribute:Identifying Key Original Data
The markup is divided into a series of annotations. In this section, you assign attributes to the annotations.
NoteIf the annotation is part of a <KeyValueList>, the application also offers an option for choosing identifying keys.
Check the identifying key option to indicate one or more keys that always appear in a log entry and specifically identify the entry type. The log learning adapter then recognizes all log entries with these identifying keys as being this entry type. It accordingly normalizes them to the log type, event, and attributes you specify in log learning when you process the markup of the entry type. The application tests the identifying key when you choose Activate.
In this section, compare the annotations to the actual log entries from which SAP Enterprise Threat Detection derived them.
4. For each annotation, decide if you want to assign an attribute.
88 P U B L I CSAP Enterprise Threat Detection Implementation Guide
Providing Logs from Other Systems with Log Learning
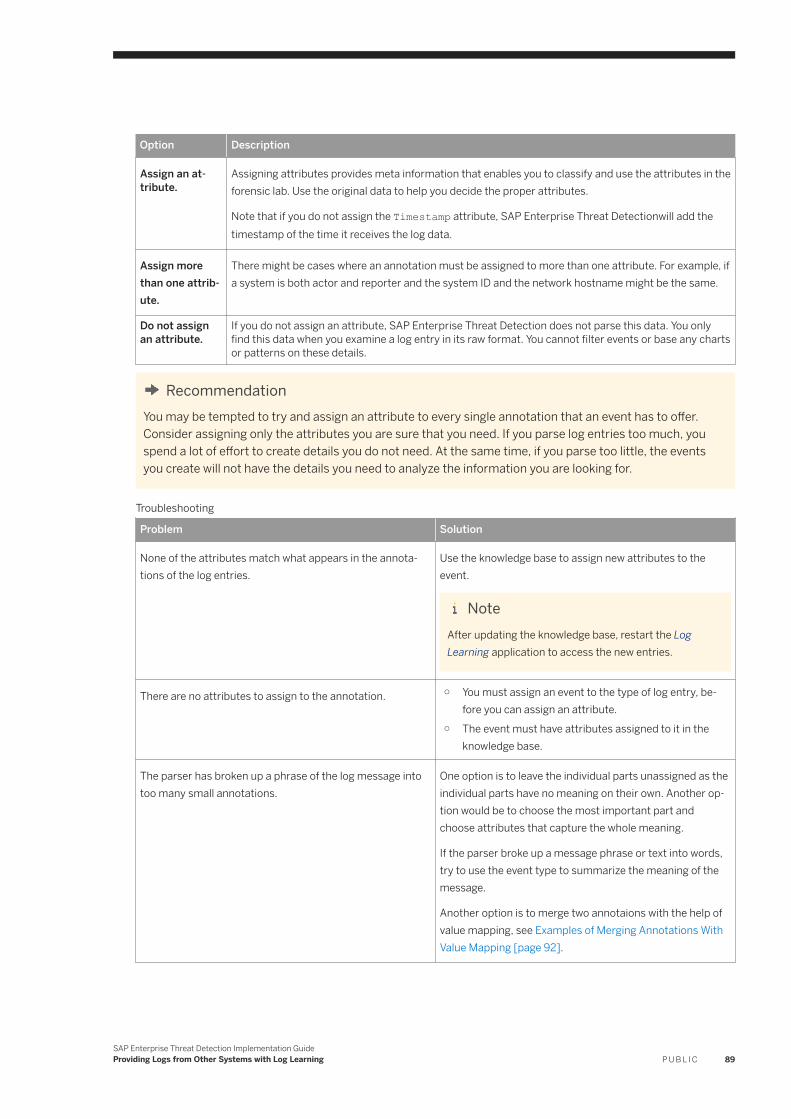
Option Description
Assign an attribute.
Assigning attributes provides meta information that enables you to classify and use the attributes in the forensic lab. Use the original data to help you decide the proper attributes.
Note that if you do not assign the Timestamp attribute, SAP Enterprise Threat Detectionwill add the timestamp of the time it receives the log data.
Assign more than one attribute.
There might be cases where an annotation must be assigned to more than one attribute. For example, if a system is both actor and reporter and the system ID and the network hostname might be the same.
Do not assign an attribute.
If you do not assign an attribute, SAP Enterprise Threat Detection does not parse this data. You only find this data when you examine a log entry in its raw format. You cannot filter events or base any charts or patterns on these details.
RecommendationYou may be tempted to try and assign an attribute to every single annotation that an event has to offer. Consider assigning only the attributes you are sure that you need. If you parse log entries too much, you spend a lot of effort to create details you do not need. At the same time, if you parse too little, the events you create will not have the details you need to analyze the information you are looking for.
Troubleshooting
Problem Solution
None of the attributes match what appears in the annotations of the log entries.
Use the knowledge base to assign new attributes to the event.
NoteAfter updating the knowledge base, restart the Log Learning application to access the new entries.
There are no attributes to assign to the annotation. ○ You must assign an event to the type of log entry, before you can assign an attribute.
○ The event must have attributes assigned to it in the knowledge base.
The parser has broken up a phrase of the log message into too many small annotations.
One option is to leave the individual parts unassigned as the individual parts have no meaning on their own. Another option would be to choose the most important part and choose attributes that capture the whole meaning.
If the parser broke up a message phrase or text into words, try to use the event type to summarize the meaning of the message.
Another option is to merge two annotaions with the help of value mapping, see Examples of Merging Annotations With Value Mapping [page 92].
SAP Enterprise Threat Detection Implementation GuideProviding Logs from Other Systems with Log Learning P U B L I C 89
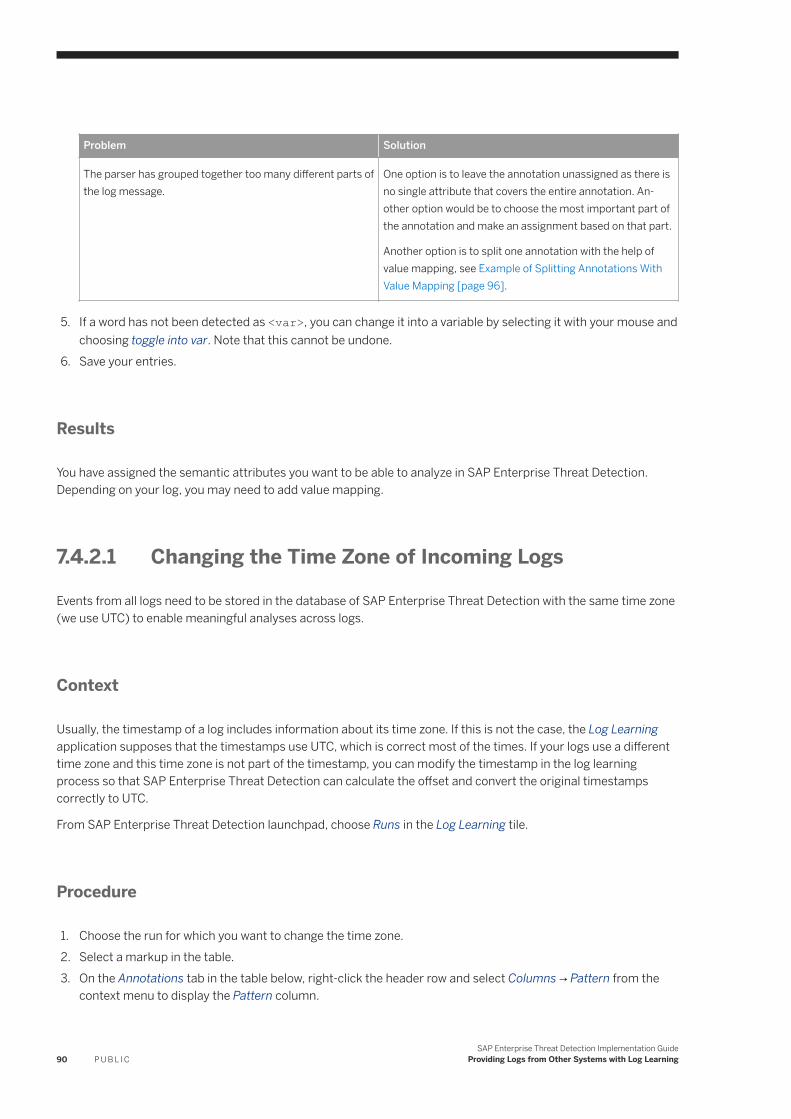
Problem Solution
The parser has grouped together too many different parts of the log message.
One option is to leave the annotation unassigned as there is no single attribute that covers the entire annotation. Another option would be to choose the most important part of the annotation and make an assignment based on that part.
Another option is to split one annotation with the help of value mapping, see Example of Splitting Annotations With Value Mapping [page 96].
5. If a word has not been detected as <var>, you can change it into a variable by selecting it with your mouse and choosing toggle into var. Note that this cannot be undone.
6. Save your entries.
Results
You have assigned the semantic attributes you want to be able to analyze in SAP Enterprise Threat Detection. Depending on your log, you may need to add value mapping.
7.4.2.1 Changing the Time Zone of Incoming Logs
Events from all logs need to be stored in the database of SAP Enterprise Threat Detection with the same time zone (we use UTC) to enable meaningful analyses across logs.
Context
Usually, the timestamp of a log includes information about its time zone. If this is not the case, the Log Learning application supposes that the timestamps use UTC, which is correct most of the times. If your logs use a different time zone and this time zone is not part of the timestamp, you can modify the timestamp in the log learning process so that SAP Enterprise Threat Detection can calculate the offset and convert the original timestamps correctly to UTC.
From SAP Enterprise Threat Detection launchpad, choose Runs in the Log Learning tile.
Procedure
1. Choose the run for which you want to change the time zone.2. Select a markup in the table.3. On the Annotations tab in the table below, right-click the header row and select Columns → Pattern from the
context menu to display the Pattern column.
90 P U B L I CSAP Enterprise Threat Detection Implementation Guide
Providing Logs from Other Systems with Log Learning
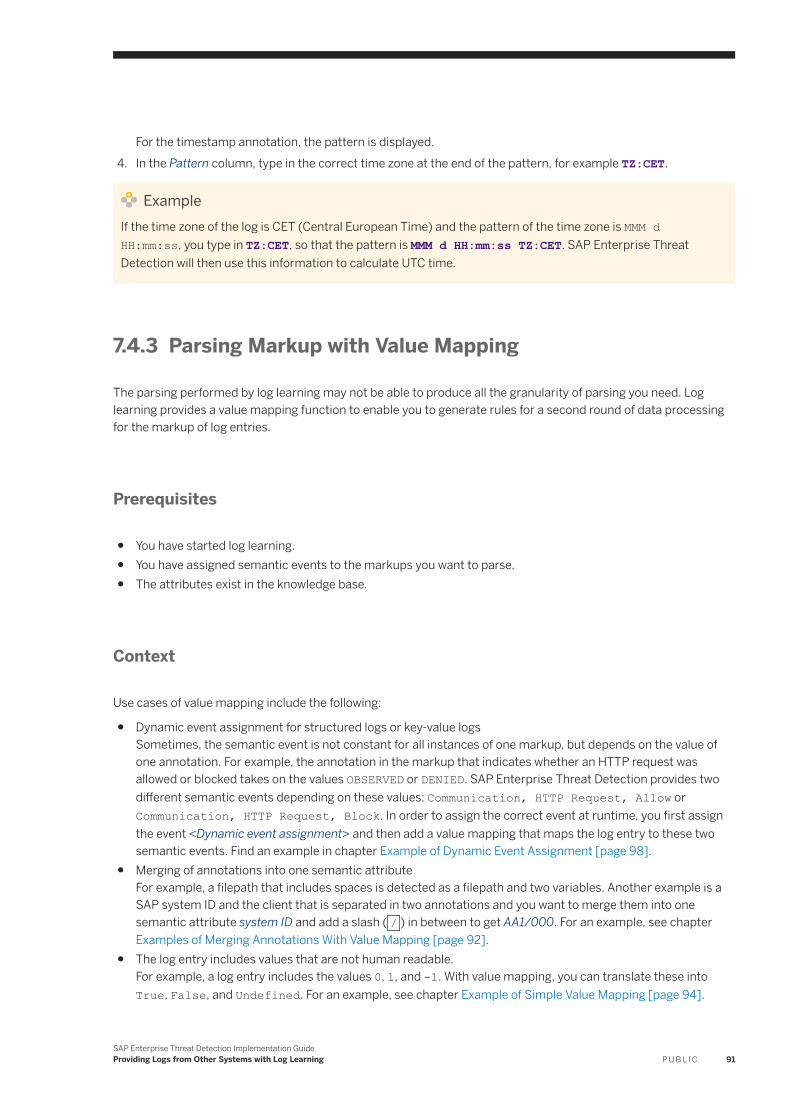
For the timestamp annotation, the pattern is displayed.4. In the Pattern column, type in the correct time zone at the end of the pattern, for example TZ:CET.
ExampleIf the time zone of the log is CET (Central European Time) and the pattern of the time zone is MMM d HH:mm:ss, you type in TZ:CET, so that the pattern is MMM d HH:mm:ss TZ:CET. SAP Enterprise Threat Detection will then use this information to calculate UTC time.
7.4.3 Parsing Markup with Value Mapping
The parsing performed by log learning may not be able to produce all the granularity of parsing you need. Log learning provides a value mapping function to enable you to generate rules for a second round of data processing for the markup of log entries.
Prerequisites
● You have started log learning.● You have assigned semantic events to the markups you want to parse.● The attributes exist in the knowledge base.
Context
Use cases of value mapping include the following:
● Dynamic event assignment for structured logs or key-value logsSometimes, the semantic event is not constant for all instances of one markup, but depends on the value of one annotation. For example, the annotation in the markup that indicates whether an HTTP request was allowed or blocked takes on the values OBSERVED or DENIED. SAP Enterprise Threat Detection provides two different semantic events depending on these values: Communication, HTTP Request, Allow or Communication, HTTP Request, Block. In order to assign the correct event at runtime, you first assign the event <Dynamic event assignment> and then add a value mapping that maps the log entry to these two semantic events. Find an example in chapter Example of Dynamic Event Assignment [page 98].
● Merging of annotations into one semantic attributeFor example, a filepath that includes spaces is detected as a filepath and two variables. Another example is a SAP system ID and the client that is separated in two annotations and you want to merge them into one semantic attribute system ID and add a slash ( / ) in between to get AA1/000. For an example, see chapter Examples of Merging Annotations With Value Mapping [page 92].
● The log entry includes values that are not human readable.For example, a log entry includes the values 0, 1, and -1. With value mapping, you can translate these into True, False, and Undefined. For an example, see chapter Example of Simple Value Mapping [page 94].
SAP Enterprise Threat Detection Implementation GuideProviding Logs from Other Systems with Log Learning P U B L I C 91
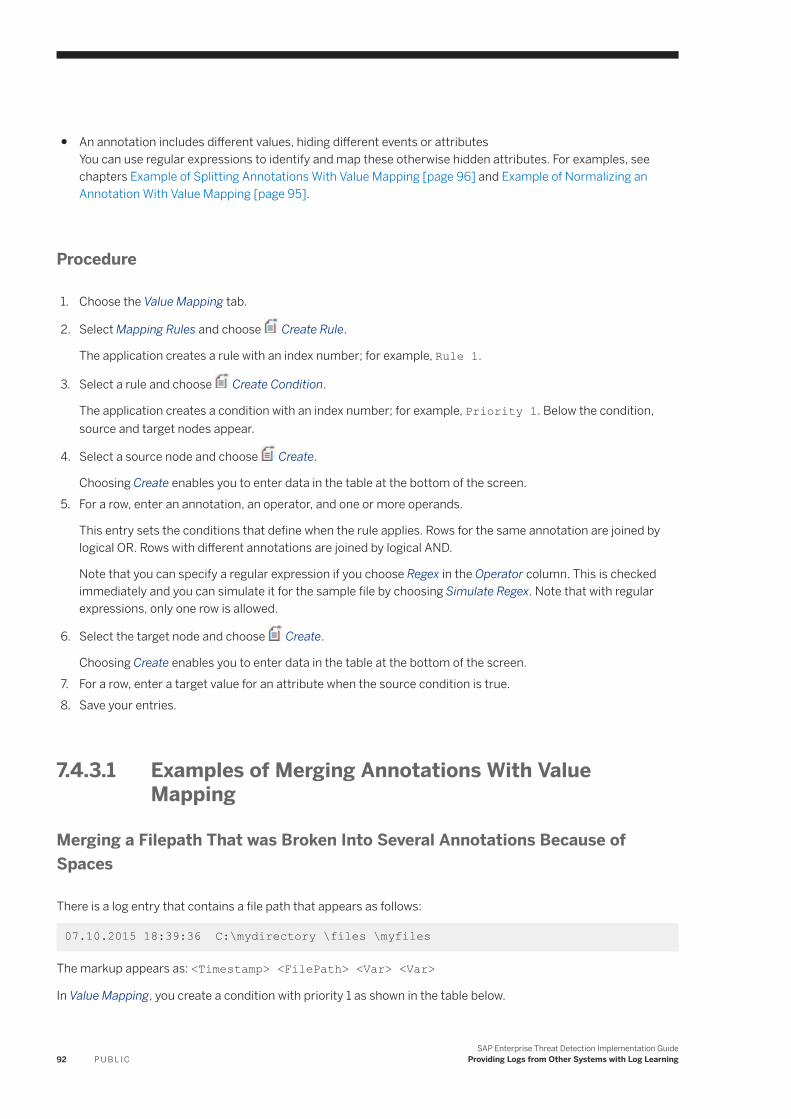
● An annotation includes different values, hiding different events or attributesYou can use regular expressions to identify and map these otherwise hidden attributes. For examples, see chapters Example of Splitting Annotations With Value Mapping [page 96] and Example of Normalizing an Annotation With Value Mapping [page 95].
Procedure
1. Choose the Value Mapping tab.
2. Select Mapping Rules and choose Create Rule.
The application creates a rule with an index number; for example, Rule 1.
3. Select a rule and choose Create Condition.
The application creates a condition with an index number; for example, Priority 1. Below the condition, source and target nodes appear.
4. Select a source node and choose Create.
Choosing Create enables you to enter data in the table at the bottom of the screen.5. For a row, enter an annotation, an operator, and one or more operands.
This entry sets the conditions that define when the rule applies. Rows for the same annotation are joined by logical OR. Rows with different annotations are joined by logical AND.
Note that you can specify a regular expression if you choose Regex in the Operator column. This is checked immediately and you can simulate it for the sample file by choosing Simulate Regex. Note that with regular expressions, only one row is allowed.
6. Select the target node and choose Create.
Choosing Create enables you to enter data in the table at the bottom of the screen.7. For a row, enter a target value for an attribute when the source condition is true.8. Save your entries.
7.4.3.1 Examples of Merging Annotations With Value Mapping
Merging a Filepath That was Broken Into Several Annotations Because of Spaces
There is a log entry that contains a file path that appears as follows:
07.10.2015 18:39:36 C:\mydirectory \files \myfiles
The markup appears as: <Timestamp> <FilePath> <Var> <Var>
In Value Mapping, you create a condition with priority 1 as shown in the table below.
92 P U B L I CSAP Enterprise Threat Detection Implementation Guide
Providing Logs from Other Systems with Log Learning
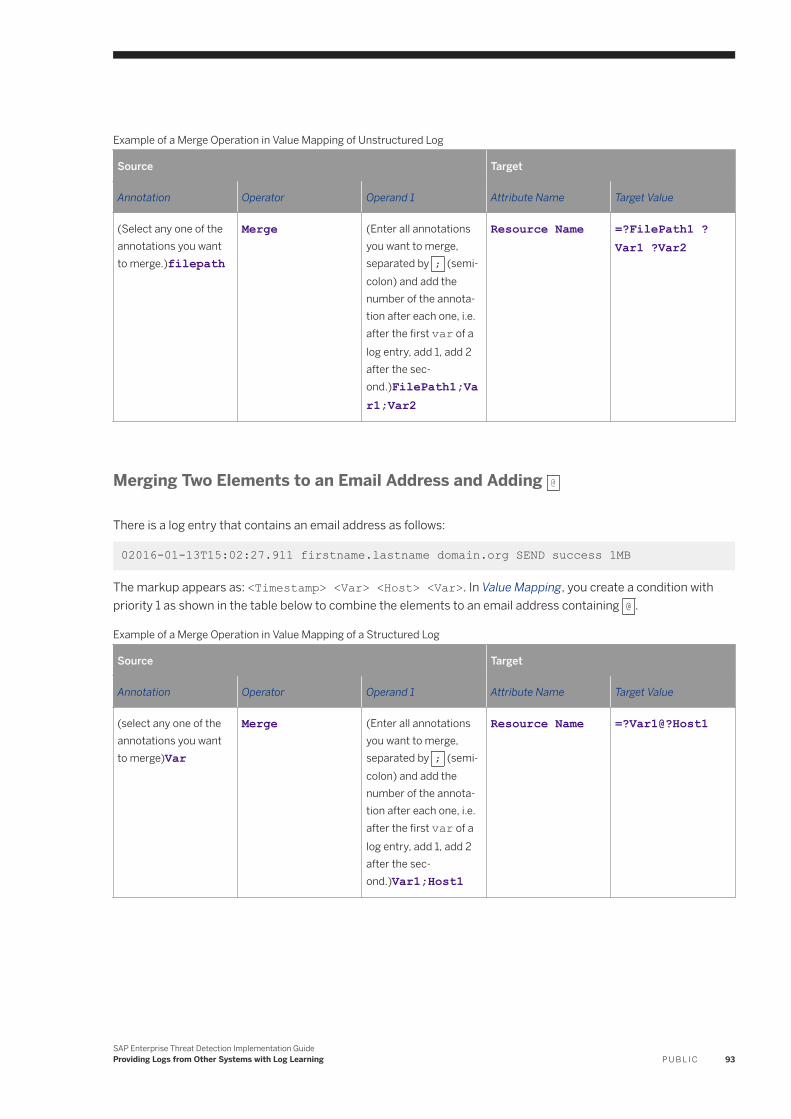
Example of a Merge Operation in Value Mapping of Unstructured Log
Source Target
Annotation Operator Operand 1 Attribute Name Target Value
(Select any one of the annotations you want to merge.)filepath
Merge (Enter all annotations you want to merge, separated by ; (semicolon) and add the number of the annotation after each one, i.e. after the first var of a log entry, add 1, add 2 after the second.)FilePath1;Var1;Var2
Resource Name =?FilePath1 ?Var1 ?Var2
Merging Two Elements to an Email Address and Adding @
There is a log entry that contains an email address as follows:
02016-01-13T15:02:27.911 firstname.lastname domain.org SEND success 1MB
The markup appears as: <Timestamp> <Var> <Host> <Var>. In Value Mapping, you create a condition with priority 1 as shown in the table below to combine the elements to an email address containing @ .
Example of a Merge Operation in Value Mapping of a Structured Log
Source Target
Annotation Operator Operand 1 Attribute Name Target Value
(select any one of the annotations you want to merge)Var
Merge (Enter all annotations you want to merge, separated by ; (semicolon) and add the number of the annotation after each one, i.e. after the first var of a log entry, add 1, add 2 after the second.)Var1;Host1
Resource Name =?Var1@?Host1
SAP Enterprise Threat Detection Implementation GuideProviding Logs from Other Systems with Log Learning P U B L I C 93
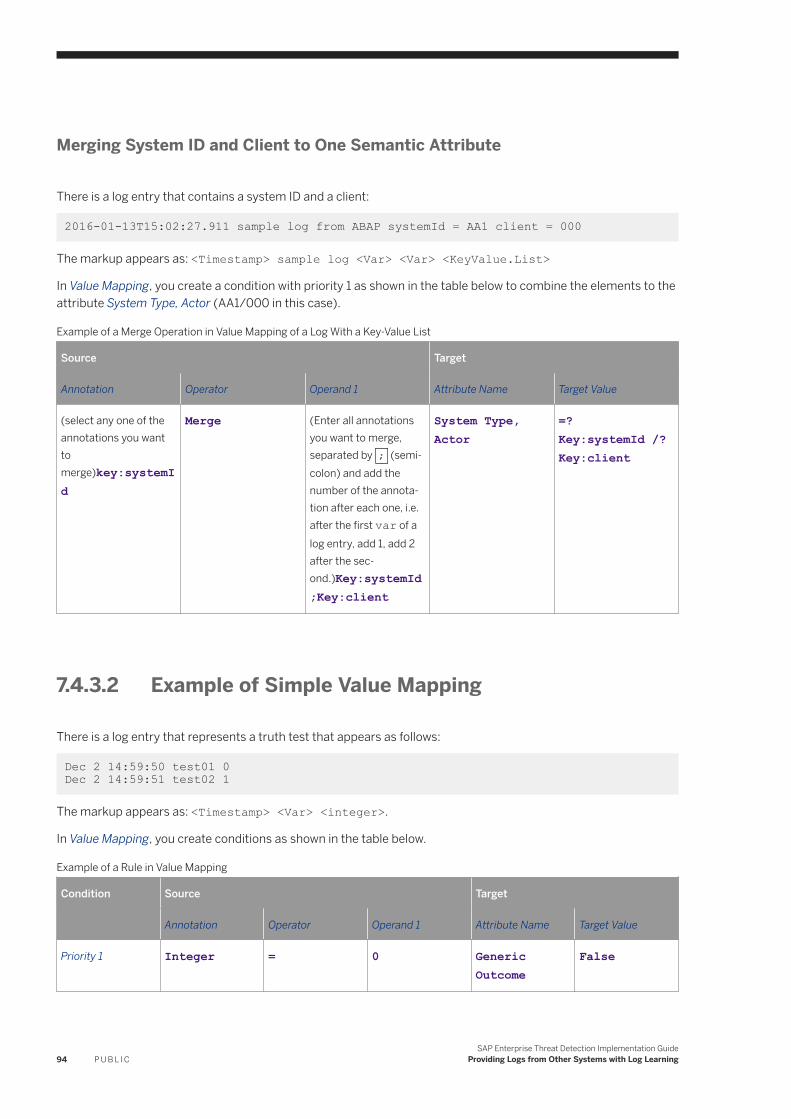
Merging System ID and Client to One Semantic Attribute
There is a log entry that contains a system ID and a client:
2016-01-13T15:02:27.911 sample log from ABAP systemId = AA1 client = 000
The markup appears as: <Timestamp> sample log <Var> <Var> <KeyValue.List>
In Value Mapping, you create a condition with priority 1 as shown in the table below to combine the elements to the attribute System Type, Actor (AA1/000 in this case).
Example of a Merge Operation in Value Mapping of a Log With a Key-Value List
Source Target
Annotation Operator Operand 1 Attribute Name Target Value
(select any one of the annotations you want to merge)key:systemId
Merge (Enter all annotations you want to merge, separated by ; (semicolon) and add the number of the annotation after each one, i.e. after the first var of a log entry, add 1, add 2 after the second.)Key:systemId ;Key:client
System Type, Actor
=?Key:systemId /?Key:client
7.4.3.2 Example of Simple Value Mapping
There is a log entry that represents a truth test that appears as follows:
Dec 2 14:59:50 test01 0 Dec 2 14:59:51 test02 1
The markup appears as: <Timestamp> <Var> <integer>.
In Value Mapping, you create conditions as shown in the table below.
Example of a Rule in Value Mapping
Condition Source Target
Annotation Operator Operand 1 Attribute Name Target Value
Priority 1 Integer = 0 Generic Outcome
False
94 P U B L I CSAP Enterprise Threat Detection Implementation Guide
Providing Logs from Other Systems with Log Learning
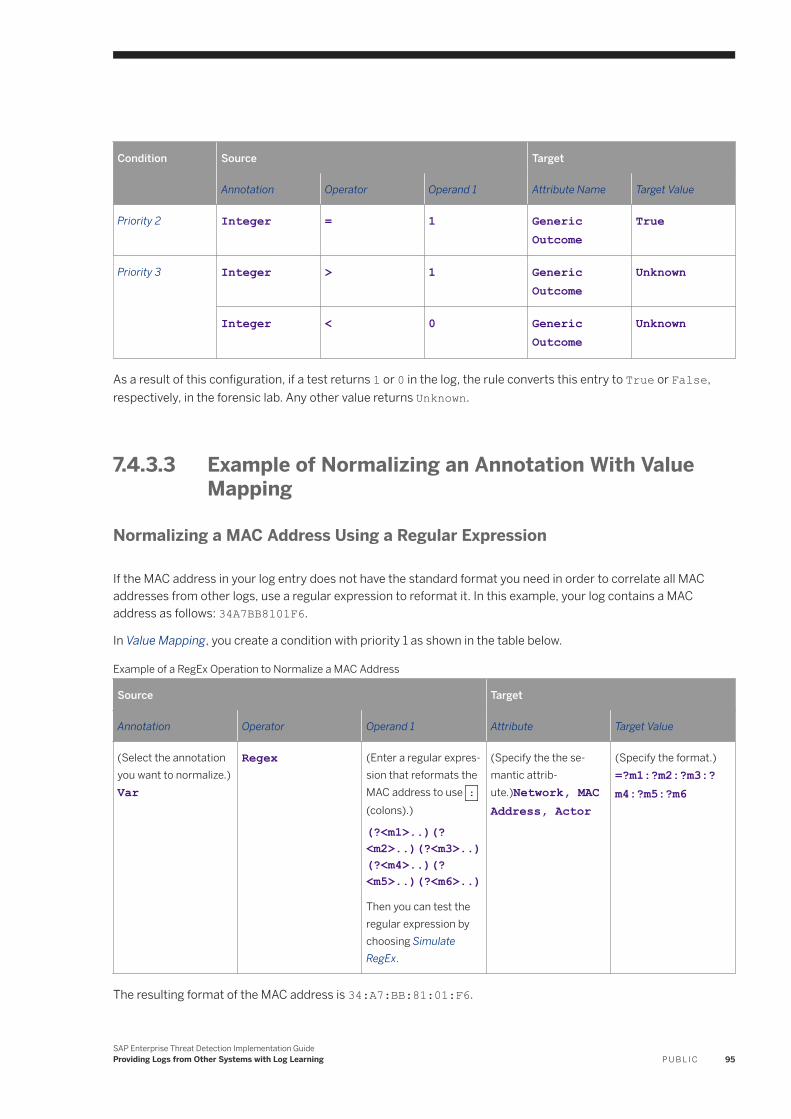
Condition Source Target
Annotation Operator Operand 1 Attribute Name Target Value
Priority 2 Integer = 1 Generic Outcome
True
Priority 3 Integer > 1 Generic Outcome
Unknown
Integer < 0 Generic Outcome
Unknown
As a result of this configuration, if a test returns 1 or 0 in the log, the rule converts this entry to True or False, respectively, in the forensic lab. Any other value returns Unknown.
7.4.3.3 Example of Normalizing an Annotation With Value Mapping
Normalizing a MAC Address Using a Regular Expression
If the MAC address in your log entry does not have the standard format you need in order to correlate all MAC addresses from other logs, use a regular expression to reformat it. In this example, your log contains a MAC address as follows: 34A7BB8101F6.
In Value Mapping, you create a condition with priority 1 as shown in the table below.
Example of a RegEx Operation to Normalize a MAC Address
Source Target
Annotation Operator Operand 1 Attribute Target Value
(Select the annotation you want to normalize.) Var
Regex (Enter a regular expression that reformats the MAC address to use : (colons).)
(?<m1>..)(?<m2>..)(?<m3>..)(?<m4>..)(?<m5>..)(?<m6>..)
Then you can test the regular expression by choosing Simulate RegEx.
(Specify the the semantic attribute.)Network, MAC Address, Actor
(Specify the format.) =?m1:?m2:?m3:?m4:?m5:?m6
The resulting format of the MAC address is 34:A7:BB:81:01:F6.
SAP Enterprise Threat Detection Implementation GuideProviding Logs from Other Systems with Log Learning P U B L I C 95
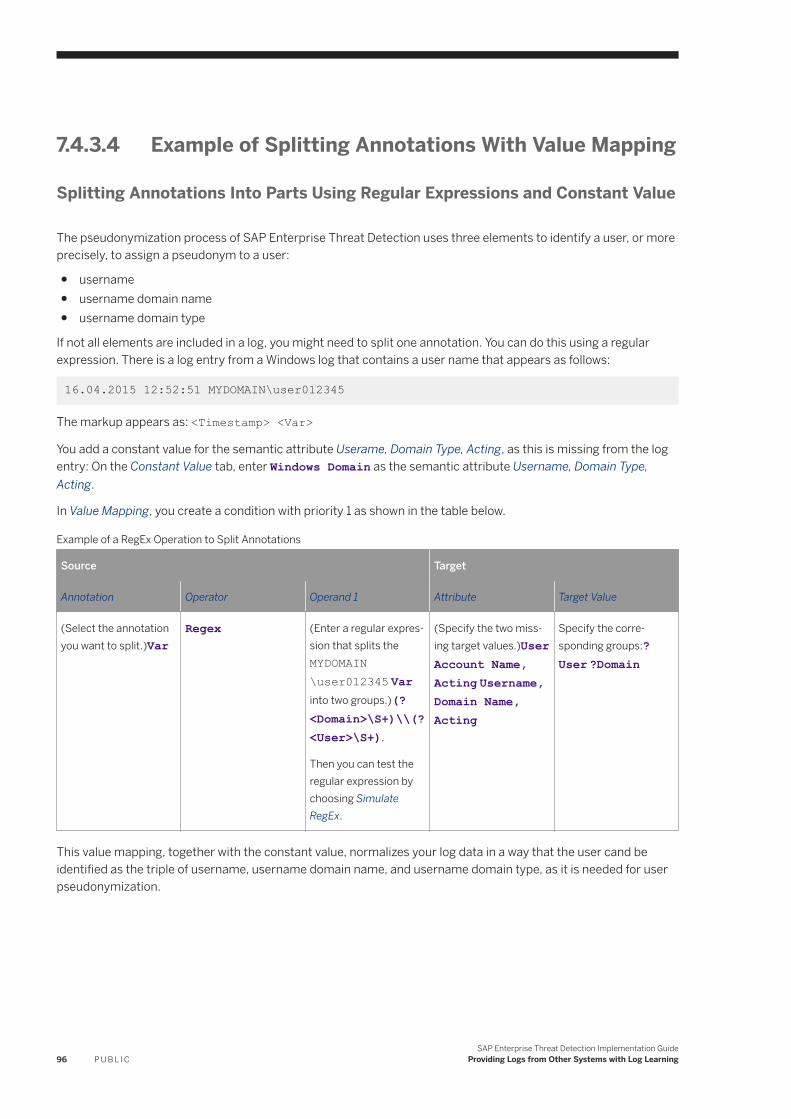
7.4.3.4 Example of Splitting Annotations With Value Mapping
Splitting Annotations Into Parts Using Regular Expressions and Constant Value
The pseudonymization process of SAP Enterprise Threat Detection uses three elements to identify a user, or more precisely, to assign a pseudonym to a user:
● username● username domain name● username domain type
If not all elements are included in a log, you might need to split one annotation. You can do this using a regular expression. There is a log entry from a Windows log that contains a user name that appears as follows:
16.04.2015 12:52:51 MYDOMAIN\user012345
The markup appears as: <Timestamp> <Var>
You add a constant value for the semantic attribute Userame, Domain Type, Acting, as this is missing from the log entry: On the Constant Value tab, enter Windows Domain as the semantic attribute Username, Domain Type, Acting.
In Value Mapping, you create a condition with priority 1 as shown in the table below.
Example of a RegEx Operation to Split Annotations
Source Target
Annotation Operator Operand 1 Attribute Target Value
(Select the annotation you want to split.)Var
Regex (Enter a regular expression that splits the MYDOMAIN\user012345 Var into two groups.)(?<Domain>\S+)\\(?<User>\S+).
Then you can test the regular expression by choosing Simulate RegEx.
(Specify the two missing target values.)User Account Name, Acting Username, Domain Name, Acting
Specify the corresponding groups:?User ?Domain
This value mapping, together with the constant value, normalizes your log data in a way that the user cand be identified as the triple of username, username domain name, and username domain type, as it is needed for user pseudonymization.
96 P U B L I CSAP Enterprise Threat Detection Implementation Guide
Providing Logs from Other Systems with Log Learning
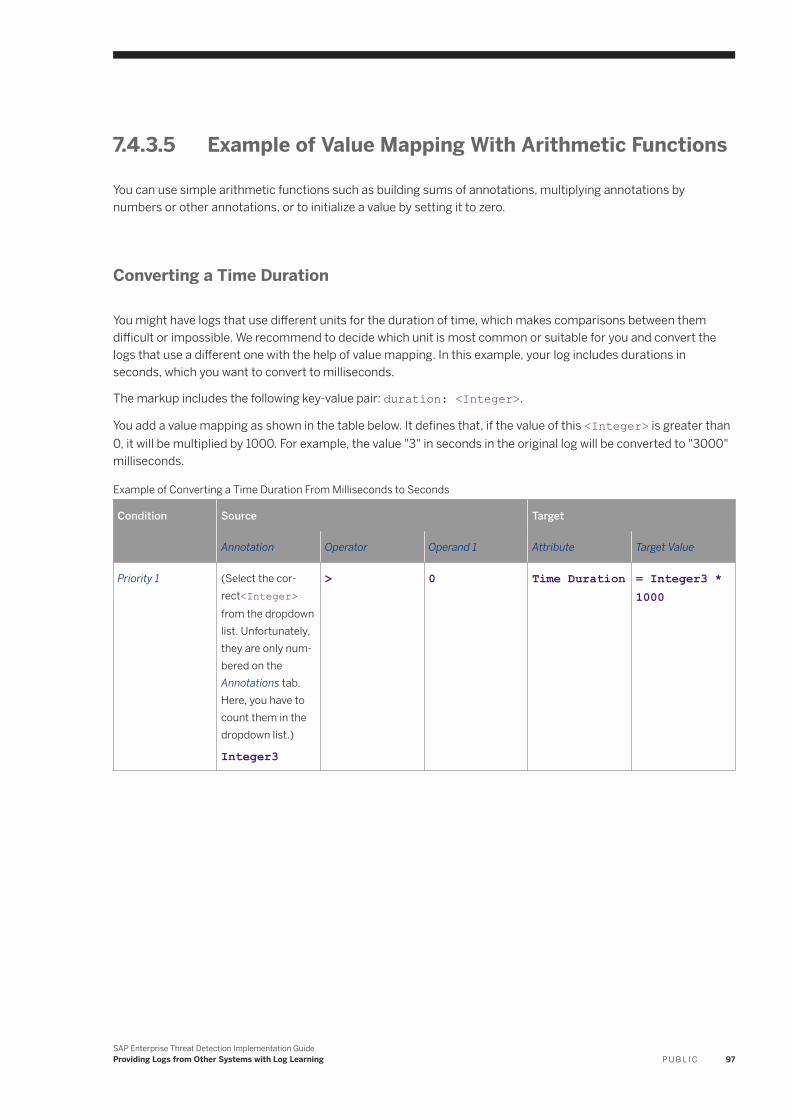
7.4.3.5 Example of Value Mapping With Arithmetic Functions
You can use simple arithmetic functions such as building sums of annotations, multiplying annotations by numbers or other annotations, or to initialize a value by setting it to zero.
Converting a Time Duration
You might have logs that use different units for the duration of time, which makes comparisons between them difficult or impossible. We recommend to decide which unit is most common or suitable for you and convert the logs that use a different one with the help of value mapping. In this example, your log includes durations in seconds, which you want to convert to milliseconds.
The markup includes the following key-value pair: duration: <Integer>.
You add a value mapping as shown in the table below. It defines that, if the value of this <Integer> is greater than 0, it will be multiplied by 1000. For example, the value "3" in seconds in the original log will be converted to "3000" milliseconds.
Example of Converting a Time Duration From Milliseconds to Seconds
Condition Source Target
Annotation Operator Operand 1 Attribute Target Value
Priority 1 (Select the correct<Integer> from the dropdown list. Unfortunately, they are only numbered on the Annotations tab. Here, you have to count them in the dropdown list.)
Integer3
> 0 Time Duration = Integer3 * 1000
SAP Enterprise Threat Detection Implementation GuideProviding Logs from Other Systems with Log Learning P U B L I C 97

7.4.3.6 Example of Dynamic Event Assignment
If the semantic event of a markup depends on the value of an annotation, you use the dynamic event assignment and then add a value mapping that assigns the correct semantic events at runtime.
Value Mapping to Assign Correct Semantic Event at Runtime
There are log instances that contain a timestamp and a structured list and thus result in the following markup:
<Timestamp><StructuredList>.
This markup groups the following instances from the original log:
2016-07-18 19:06:49 499 10.11.111.222 TCP_TUNNELED 200 4509 CONNECT - - us1.hana.ondemand.com - 123 123 111.222.3.11 tcp 0 111.222.1.11 - 123.222.1.11 OBSERVED Technology/Internet "Apache-HttpClient/4.3.6(java1.5)" - VMSAMPLE--HTTP-Service tcp://us1.hana.ondemand.com:111/ /
2016-07-18 19:06:57 980 10.11.1.254 TCP_ERR_MISS 503 185 CONNECT - - connectivity.netweaver.ondemand.com - 443 200 111.121.6.11 tcp 0 147.204.6.18 - 147.204.6.18 DENIED Technology/Internet "AccAD" - VMSAMPLE-HTTP-Service tcp://connectivity.netweaver.ondemand.com:111/ /
At one position, the result of an http request is indicated by the values OBSERVED or DENIED. Depending on this value, the following semantic events would be suitable: Communication, HTTP Request, Allow or Communication, HTTP Request, Block. In order to assign the correct event at runtime, you first assign the event <Dynamic event assignment> and then add the value mapping that maps the log entry to these two semantic events, as shown in the table below.
Example of a Value Mapping in Combination With Dynamic Event Assignment
Condition Source Target
Annotation Operator Operand 1 Attribute Name Target Value
Priority 1 (Select the correct position from the dropdown list. Unfortunately, they are only numbered on the Annotations tab. Here, you have to count them in the dropdown list.)StructuredPosition.Position
<> DENIED Event (Semantic)
Communication, HTTP Request, Allow
98 P U B L I CSAP Enterprise Threat Detection Implementation Guide
Providing Logs from Other Systems with Log Learning
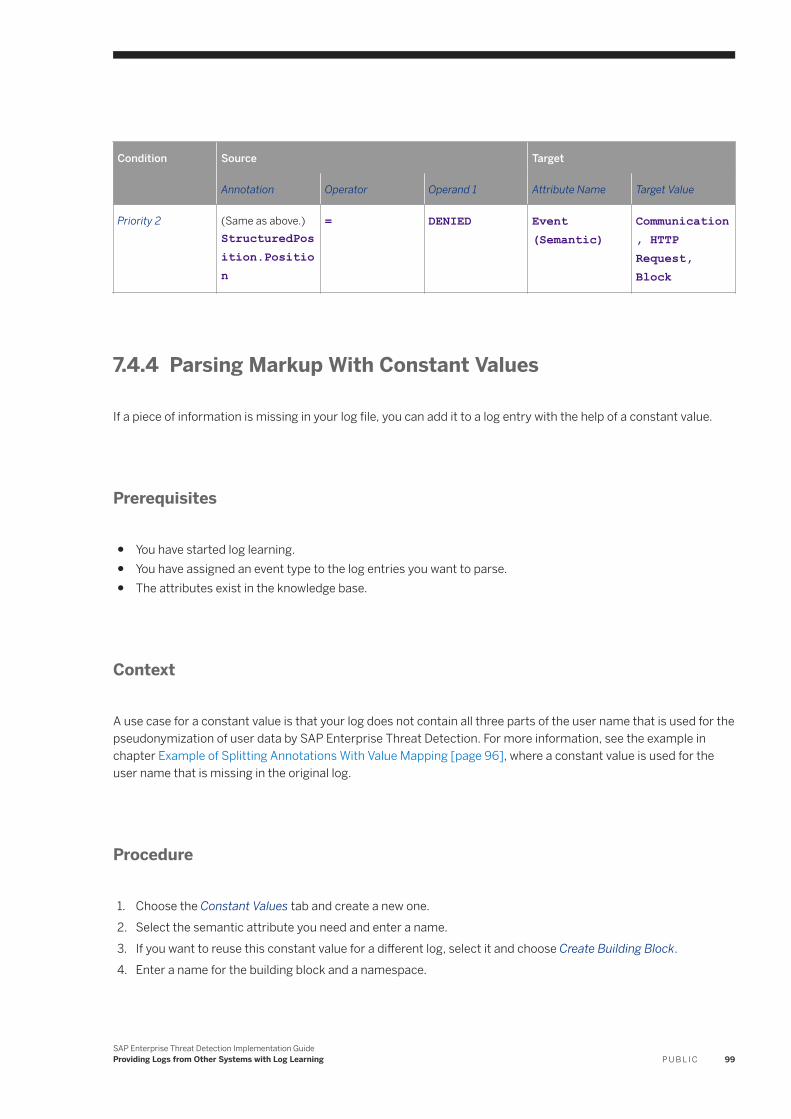
Condition Source Target
Annotation Operator Operand 1 Attribute Name Target Value
Priority 2 (Same as above.) StructuredPosition.Position
= DENIED Event (Semantic)
Communication, HTTP Request, Block
7.4.4 Parsing Markup With Constant Values
If a piece of information is missing in your log file, you can add it to a log entry with the help of a constant value.
Prerequisites
● You have started log learning.● You have assigned an event type to the log entries you want to parse.● The attributes exist in the knowledge base.
Context
A use case for a constant value is that your log does not contain all three parts of the user name that is used for the pseudonymization of user data by SAP Enterprise Threat Detection. For more information, see the example in chapter Example of Splitting Annotations With Value Mapping [page 96], where a constant value is used for the user name that is missing in the original log.
Procedure
1. Choose the Constant Values tab and create a new one.2. Select the semantic attribute you need and enter a name.3. If you want to reuse this constant value for a different log, select it and choose Create Building Block.4. Enter a name for the building block and a namespace.
SAP Enterprise Threat Detection Implementation GuideProviding Logs from Other Systems with Log Learning P U B L I C 99
Results
In this user interface, you can re-use such a building block as a constant value by choosing Add Building Block. For an overview of the existing building blocks, choose Building Blocks on the launchpad in the Log Learning tile. Here you can edit the building blocks and you see the runs that use them. You can also navigate into these runs.
7.5 Testing Log Runs
When you are ready to test the rules you created through the log entry assignments, activate the configuration and synchronize the rules with the parser in SAP HANA smart data streaming. The Test Results tab enables you to check how effective your parsing rules are at handling your sample log file.
Prerequisites
You have staged your log entries by assigning log types, events, attributes and saved the results.
Procedure
1. From SAP Enterprise Threat Detection launchpad, choose Runs in the Log Learning tile.2. Choose a run.
3. Choose Activate.
Your log run enters the Synchronization phase. SAP Enterprise Threat Detection generates the runtime rules from your configuration and synchronizes the runtime rules between the database and SAP HANA smart data streaming.
4. Wait until your log run has the status Successful.
5. Choose Test Run.
Your log run enters the Testing phase.
6. Wait until your log run has the status Successful.
SAP Enterprise Threat Detection applies the rules you activated. Log entries covered by those rules appear as events on the Test Results tab.
7. Review the event data.
Note that events that you have defined as <Ignore> events are listed here. This way, you can ensure that the assignment has worked.
100 P U B L I CSAP Enterprise Threat Detection Implementation Guide
Providing Logs from Other Systems with Log Learning
Option Description
Everything is OK. You are ready to make the log run productive.
You want to make changes. Make your changes under the Entry Types. When finished, activate your run before testing.
You realize that you have completely misconfigured the log run.
On the Staging Entry Types tab, choose Discard. This leaves your sample log file in place but removes all log, event, and attribute assignments.
7.6 Making Rules for Log Runs Productive
Once you have tested your run, you are ready to make the rules productive.
Prerequisites
You have staged your log entries by assigning log types, events and attributes, and you have activated the run. The Status of the run is Successful and the Staging Status is In Sync.
Context
Until now, you have tested the sample data and generated the rules required to parse the data. Now you move the rules from the staging area to the productive area.
Procedure
1. From SAP Enterprise Threat Detection launchpad, choose Runs in the Log Learning tile.2. Choose the run.
3. Choose Copy to Productive.
The Status of the run is Successful and the Productive Status is In Sync.
Results
You are now ready to send log data from your log provider to the port of the log learning adapter of SAP HANA smart data streaming, which parses and normalizes the log entries into events for SAP Enterprise Threat Detection.
SAP Enterprise Threat Detection Implementation GuideProviding Logs from Other Systems with Log Learning P U B L I C 101
8 Additonal System Configurations
The following sections describe additional configurations needed for SAP Enterprise Threat Detection.
8.1 Encrypting Communication Between Log Providers and the Streaming Web Service
We recommend that you use transport layer security (TLS), also known as secure sockets layer (SSL), to encrypt the connection between SAP NetWeaver Application Server (SAP NetWeaver AS) and the streaming web service for SAP HANA Smart Data Streaming.
Context
Not all versions of SAP NetWeaver AS for ABAP are able to communicate via TLSv1.2. Therefore the SWS has to be switched in compatibility mode (TLSv1) to support TLS version lower than TLSv1.2. This can olny be done in the console configuration. In this example procedure, you will see how to create a new keystore and covert it in pkcs12 format, and how to import the streaming host certificates into these files.
Procedure
1. On the SDS server, create a keystore and a new key pair with the following command:
$STREAMING_HOME/lib/jre/bin/keytool -genkeypair -keyalg RSA -keysize 2048 -validity 10000 -keystore <keystore file>
2. Import the certificate chain into the keystore. For example, <example> CA certificator.
3. Have the certificate signed by a certification authority (CA).
If you already have a PKI infrastructure, you may already have a means to have the certificate signed. If you do not, generate a certificate signing request (CSR) and send it to a CA.
For more information about generating a certificate signing request with keytool, see the documentation of the Java Development Kit.
4. Import the certificate response from the CA into the keystore.
For more information about generating a certificate signing request with keytool, see the documentation of the Java Development Kit.
5. Convert the keystore into a pem formatted keystore (PKCS12 format).6. Encrypt the server key with the cluster key.
102 P U B L I CSAP Enterprise Threat Detection Implementation Guide
Additonal System Configurations

7. Modify the configuration to support TLSv1 (called compatibility mode).a. Convert the cluster.cfg to xml and insert the following property:
In the SWS section, below the echo-mode property, add <Property expand="true" name="hcp-compatibility">true</Property>.
b. Deploy the xml file into the cluster.cfg configuration file.8. In the HANA Cockpit, use the Streaming Cluster Configuration tile to configure the streaming web service to
allow TLS (or SSL) communication and enter the path to the keystore.9. Stop and start the Streaming Web Service.10. Test the certificate at https://<host>:9093.
8.2 Encrypting Communication Between Log Providers and the Web Service Provider
We recommend that you use transport layer security (TLS), also known as secure sockets layer (SSL), to encrypt the connection between SAP NetWeaver Application Server (SAP NetWeaver AS) and the web service provider for SAP HANA Smart Data Streaming.
Procedure
1. Generate a keystore and a key pair certificate for the Web Service Provider.
You can either use your own public-key infrastructure (PKI) to generate the key pair certificate or you can use keytool from Java.
2. Have the certificate signed by a certification authority (CA).
If you already have a PKI infrastructure, you may already have a means to have the certificate signed. If you do not, generate a certificate signing request (CSR) and send it to a CA.
For more information about generating a certificate signing request with keytool, see the documentation of the Java Development Kit.
3. Import the certificate response from the CA into the keystore.
For more information about generating a certificate signing request with keytool, see the documentation of the Java Development Kit.
4. Import the standard CA certificate into the key storage of SAP NetWeaver Application Server.○ On SAP NetWeaver AS for ABAP, use Trust Manager (transaction STRUST) to import the CA certificate into
the certificate list of the SSL PSE.For more information, see Maintaining the SSL Server PSE's Certificate List on SAP Help Portal at http://help.sap.com/nw_platform.
○ On SAP NetWeaver AS for Java, use Key Storage to import the CA certificate into the ICM_SSL_<instance_ID> keystore view.For more information, see Configuring the SSL Key Pair and Trusted X.509 Certificates on SAP Help Portal at http://help.sap.com/nw_platform.
SAP Enterprise Threat Detection Implementation GuideAdditonal System Configurations P U B L I C 103

5. In the HANA Cockpit, use the Streaming Cluster Configuration tile to configure the web service provider to allow TLS (or SSL) communication and enter the path to the keystore.a. On the Web Service Provider tab, set https protocol.b. Add TLSv1.
6. Stop and restart the web service provider for SAP HANA Smart Data Streaming.For more information, see the documentation for SAP HANA smart data streaming on SAP Help Portal at http://help.sap.com/hana_options_sds.
7. Test the certificate at https://<host>:9091.
8.3 Defining Namespaces
We use namespaces to keep software objects created by SAP separate from software objects created by our customers. This enables you to share objects between systems without the danger of overwriting each other.
Prerequisites
You have decided on a namespace for your configurations and developments. All namespaces must begin with http://.
RecommendationWe recommend using your company domain as the namespace and create any subdomains as required, for example, http://company_domain/subdomain.
Context
The namespace for SAP Enterprise Threat Detection is http://sap.com/secmon. Other SAP products can deliver content for SAP Enterprise Threat Detection under the SAP namespace http://sap.com/<product_namespace>. Anything under this namespace is reserved for SAP and can be overwritten in future upgrades or releases.
Procedure
1. From SAP Enterprise Threat Detection launchpad, choose Namespaces.2. Choose Add Namespace.3. Enter the required data.4. Save your entries.
104 P U B L I CSAP Enterprise Threat Detection Implementation Guide
Additonal System Configurations
Results
The namespaces saved here are considered native to this system. You can change objects in these namespaces freely. If you export objects within these namespaces and import them in another system, they cannot be changed unless the namespace under which they were created is also added to the system.
Objects protected by namespaces include the following:
● Value lists● Values within value lists● Knowledge base entries● Patterns
NotePatterns have runtime attributes that you can configure without changing the underlying pattern.
In addition to the Namespaces application, you can also add namespaces in the forensic lab.
8.4 Knowledge Base
The knowledge base enables you to add metadata about new types of logs, the events that they include, and the component parts of those log entries.
The knowledge base application enables you to manage these elements:
● EventsYou can create new events and assign attributes to events.
● Log typesYou can add and delete log types.
● AttributesYou can look up the attributes, their data types and see whether they are available in Forensic Lab and in Log Learning.
SAP Enterprise Threat Detection Implementation GuideAdditonal System Configurations P U B L I C 105
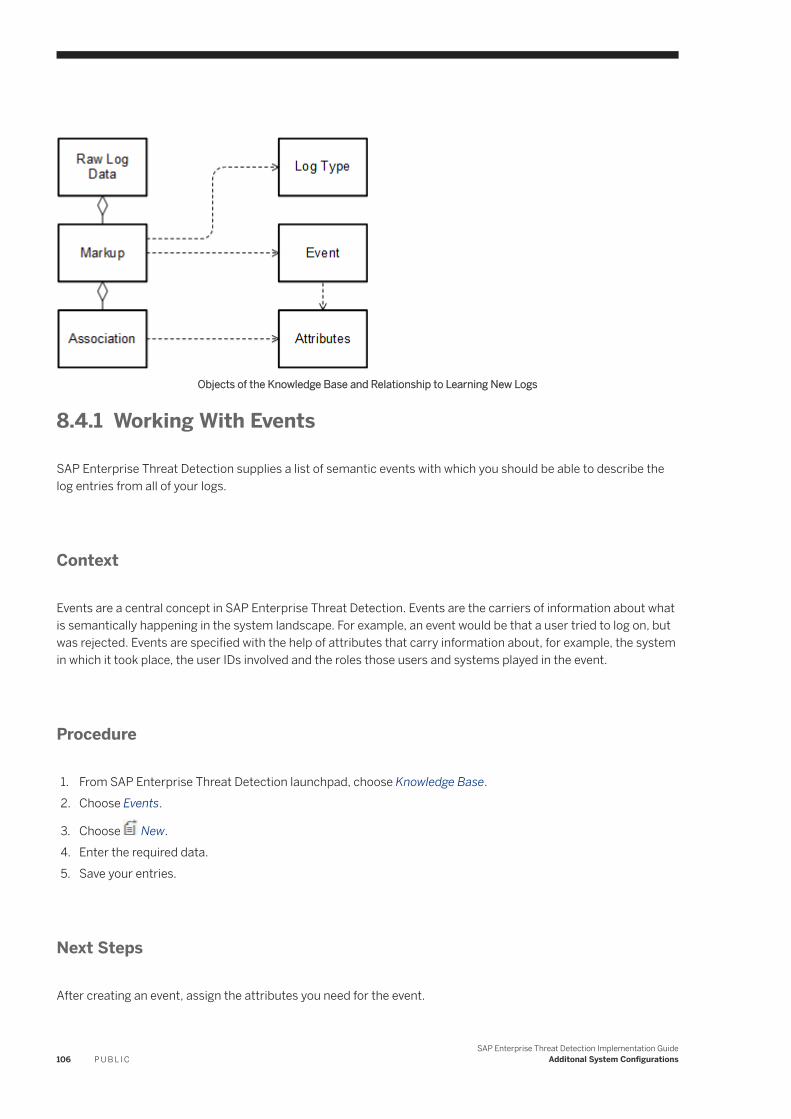
Objects of the Knowledge Base and Relationship to Learning New Logs
8.4.1 Working With Events
SAP Enterprise Threat Detection supplies a list of semantic events with which you should be able to describe the log entries from all of your logs.
Context
Events are a central concept in SAP Enterprise Threat Detection. Events are the carriers of information about what is semantically happening in the system landscape. For example, an event would be that a user tried to log on, but was rejected. Events are specified with the help of attributes that carry information about, for example, the system in which it took place, the user IDs involved and the roles those users and systems played in the event.
Procedure
1. From SAP Enterprise Threat Detection launchpad, choose Knowledge Base.2. Choose Events.
3. Choose New.4. Enter the required data.5. Save your entries.
Next Steps
After creating an event, assign the attributes you need for the event.
106 P U B L I CSAP Enterprise Threat Detection Implementation Guide
Additonal System Configurations
8.4.2 Adding Log Types
Log types enable you to identify the kind of log that produced a log entry when working with anything other than the standard log types provided by SAP. For example, your network router produces a log that you want to monitor, create a log type to monitor web traffic for your network router.
Context
You assign log types to log entries when staging log entries of new logs. The log types are then used to identify the source of events from these logs in the forensic lab.
Procedure
1. From SAP Enterprise Threat Detection launchpad, choose Knowledge Base.2. Choose Log Types.
3. Choose New.4. Enter the required data.5. Save your entries.
8.4.3 Assigning Attributes to Events
Before you can add attributes to annotations in the Log Learning application, assign the relevant attributes to events first.
Context
Without the assignment of attributes to events, you cannot map annotations to these attributes. The Log Learning application does not offer the attributes when staging a new log, unless you have configured this assignment in the Knowledge Base application. For the events that we supply, the relevant attributes have been assigned by SAP. However, you can assign further attributes to the events or delete the ones that you do not need.
Procedure
1. From SAP Enterprise Threat Detection launchpad, choose Knowledge Base.2. Choose Events.
SAP Enterprise Threat Detection Implementation GuideAdditonal System Configurations P U B L I C 107
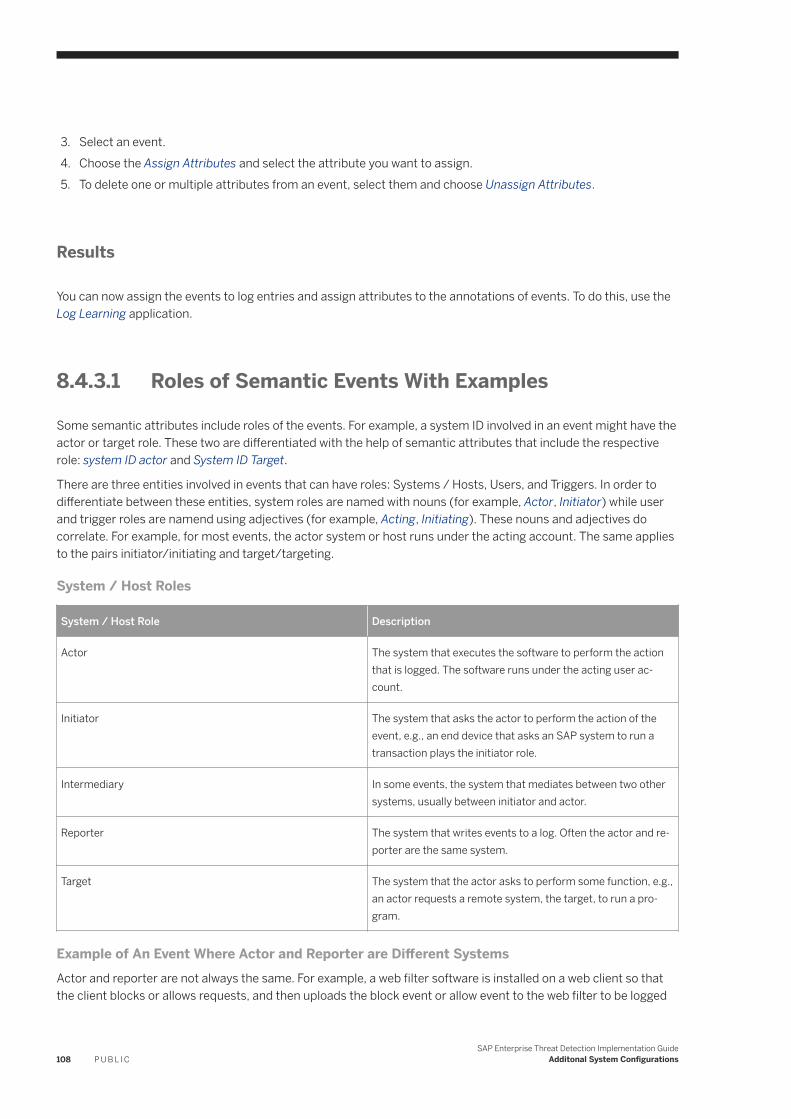
3. Select an event.4. Choose the Assign Attributes and select the attribute you want to assign.5. To delete one or multiple attributes from an event, select them and choose Unassign Attributes.
Results
You can now assign the events to log entries and assign attributes to the annotations of events. To do this, use the Log Learning application.
8.4.3.1 Roles of Semantic Events With Examples
Some semantic attributes include roles of the events. For example, a system ID involved in an event might have the actor or target role. These two are differentiated with the help of semantic attributes that include the respective role: system ID actor and System ID Target.
There are three entities involved in events that can have roles: Systems / Hosts, Users, and Triggers. In order to differentiate between these entities, system roles are named with nouns (for example, Actor, Initiator) while user and trigger roles are namend using adjectives (for example, Acting, Initiating). These nouns and adjectives do correlate. For example, for most events, the actor system or host runs under the acting account. The same applies to the pairs initiator/initiating and target/targeting.
System / Host Roles
System / Host Role Description
Actor The system that executes the software to perform the action that is logged. The software runs under the acting user account.
Initiator The system that asks the actor to perform the action of the event, e.g., an end device that asks an SAP system to run a transaction plays the initiator role.
Intermediary In some events, the system that mediates between two other systems, usually between initiator and actor.
Reporter The system that writes events to a log. Often the actor and reporter are the same system.
Target The system that the actor asks to perform some function, e.g., an actor requests a remote system, the target, to run a program.
Example of An Event Where Actor and Reporter are Different SystemsActor and reporter are not always the same. For example, a web filter software is installed on a web client so that the client blocks or allows requests, and then uploads the block event or allow event to the web filter to be logged
108 P U B L I CSAP Enterprise Threat Detection Implementation Guide
Additonal System Configurations

in the web filter log. In this case, the actor is the web client, and the reporter is the web filter. To make this clear, events that occur on the web client have Event Scenario Role of Actor set to Web_Client. If the web filter itself performs the block or allow action, Event Scenario Role of Actor is set to Web_Filter.
User Roles
User Role Description
Acting The user account under which the software on the actor system runs.
Initiating The user account under which the software on the initiator system runs.
Targeted In user administration, the account that is created, modified, or deleted.
Targeting The user account under which the software on the target system runs.
Why do we Need Different Roles for Systems and Users?
The method for representing semantic events separates system/host roles from user roles and trigger roles. One reason for this is that the system and user roles do not always coincide. Logon is a good example. Software, running on an actor, often under a system account (acting) performs authentication of a supplied user account, the targeted user.
Example of an Events with 3 Users: Logon
At the request of an initiator (for example a SAP HANA client), the actor (for example a SAP HANA database) authenticates a user account name targeted. The initiator tells the actor that his account is user account name initiating. The authentication software on the actor runs under the user account name acting.
Employee Thomas Smith logs on as D02 using his laptop. Then he logs onto an SAP HANA database using his database user account TSMITH. SAP HANA performs the logon under the user account SYSTEM. The SAP HANA database (actor) writes a log entry that has the following semantics: An actor, the SAP HANA database, authenticates a targeted user. The log entry has three user accounts with the following roles:
● D02: initiating● TSMITH: targeted● SYSTEM: acting
In this example, two systems are involved: the laptop and the HANA system. The laptop plays the role of the initiator and the SAP HANA system plays the role of the actor.
NoteNote that the user roles in forensic lab do not display the actual user account names but only the pseudonyms. For more information about pseudonymization, see Pseudonymization in the SAP Enterprise Threat Detection Operations Guide.
SAP Enterprise Threat Detection Implementation GuideAdditonal System Configurations P U B L I C 109
Trigger Roles
Trigger Role Description
Acting A trigger that causes an event to occur and/or to be logged. An audit policy is an example of a trigger. See example below.
Targeting A trigger that is the target of an action. See example below.
ExampleExample of Trigger Roles
This is a simplified example that focuses only on the trigger roles of an event: In SAP HANA, audit_policy_1 is changed and audit_policy_2 states condition: when any audit policy is changed, write an audit log entry.
The actor SAP HANA writes a log entry that has the following semantics: An actor, SAP HANA, altered an audit policy named audit_policy_1. The logging of this event was triggered by an audit policy named audit_policy_2.
The event would have the following attributes for the trigger roles:
● Trigger Type Targeted: audit policy● Trigger Name Targeted: audit_policy_1● Trigger Type Acting: audit policy● Trigger name Acting: audit_policy_2
8.5 Synchronizing User Context Information from an Identity Management System
This procedure outlines how you can use SAP Identity Management to maintain user contexts in SAP Enterprise Threat Detection. Note that you can also connect a different identity management system that uses ODBC.
Prerequisites
● You have created a user on SAP HANA with authorizations to update tables sap.secmon.db::IDM.SystemData and sap.secmon.db::IDM.Header in the SAP_SEC_MON schema.
● You have configured the job sap.secmon.services.idm:IDMInterface.xsjob on SAP HANA.For more information, see Starting Jobs for SAP Enterprise Threat Detection [page 18].
● You have development experience with SAP ID Management.SAP Enterprise Threat Detection provides database tables for the import of data from SAP ID Management. Which data you put in these tables requires custom development.
● Note that using an identity management system is an alternative to the transfer of user context data through the master data transfer in report SECM: Push master data to ESP (SECM_MASTER_DATA_2_ESP). We
110 P U B L I CSAP Enterprise Threat Detection Implementation Guide
Additonal System Configurations
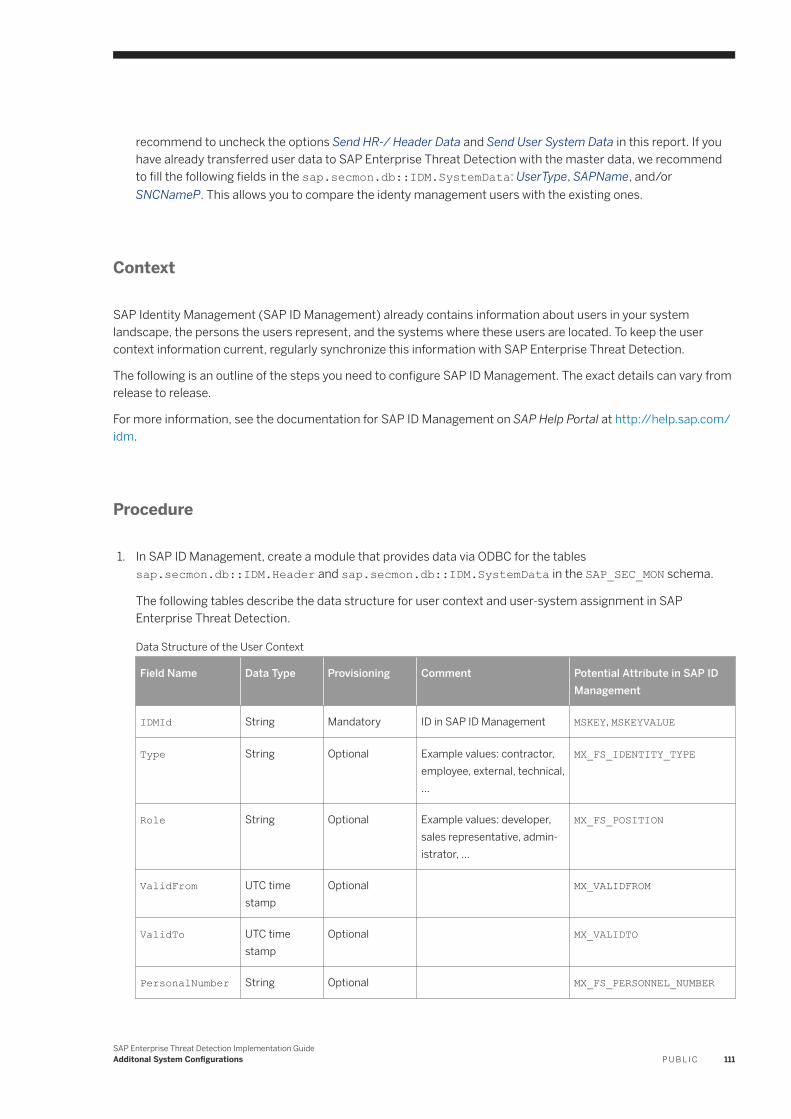
recommend to uncheck the options Send HR-/ Header Data and Send User System Data in this report. If you have already transferred user data to SAP Enterprise Threat Detection with the master data, we recommend to fill the following fields in the sap.secmon.db::IDM.SystemData: UserType, SAPName, and/or SNCNameP. This allows you to compare the identy management users with the existing ones.
Context
SAP Identity Management (SAP ID Management) already contains information about users in your system landscape, the persons the users represent, and the systems where these users are located. To keep the user context information current, regularly synchronize this information with SAP Enterprise Threat Detection.
The following is an outline of the steps you need to configure SAP ID Management. The exact details can vary from release to release.
For more information, see the documentation for SAP ID Management on SAP Help Portal at http://help.sap.com/idm.
Procedure
1. In SAP ID Management, create a module that provides data via ODBC for the tables sap.secmon.db::IDM.Header and sap.secmon.db::IDM.SystemData in the SAP_SEC_MON schema.
The following tables describe the data structure for user context and user-system assignment in SAP Enterprise Threat Detection.
Data Structure of the User Context
Field Name Data Type Provisioning Comment Potential Attribute in SAP ID Management
IDMId String Mandatory ID in SAP ID Management MSKEY, MSKEYVALUE
Type String Optional Example values: contractor, employee, external, technical, …
MX_FS_IDENTITY_TYPE
Role String Optional Example values: developer, sales representative, administrator, …
MX_FS_POSITION
ValidFrom UTC time stamp
Optional MX_VALIDFROM
ValidTo UTC time stamp
Optional MX_VALIDTO
PersonalNumber String Optional MX_FS_PERSONNEL_NUMBER
SAP Enterprise Threat Detection Implementation GuideAdditonal System Configurations P U B L I C 111
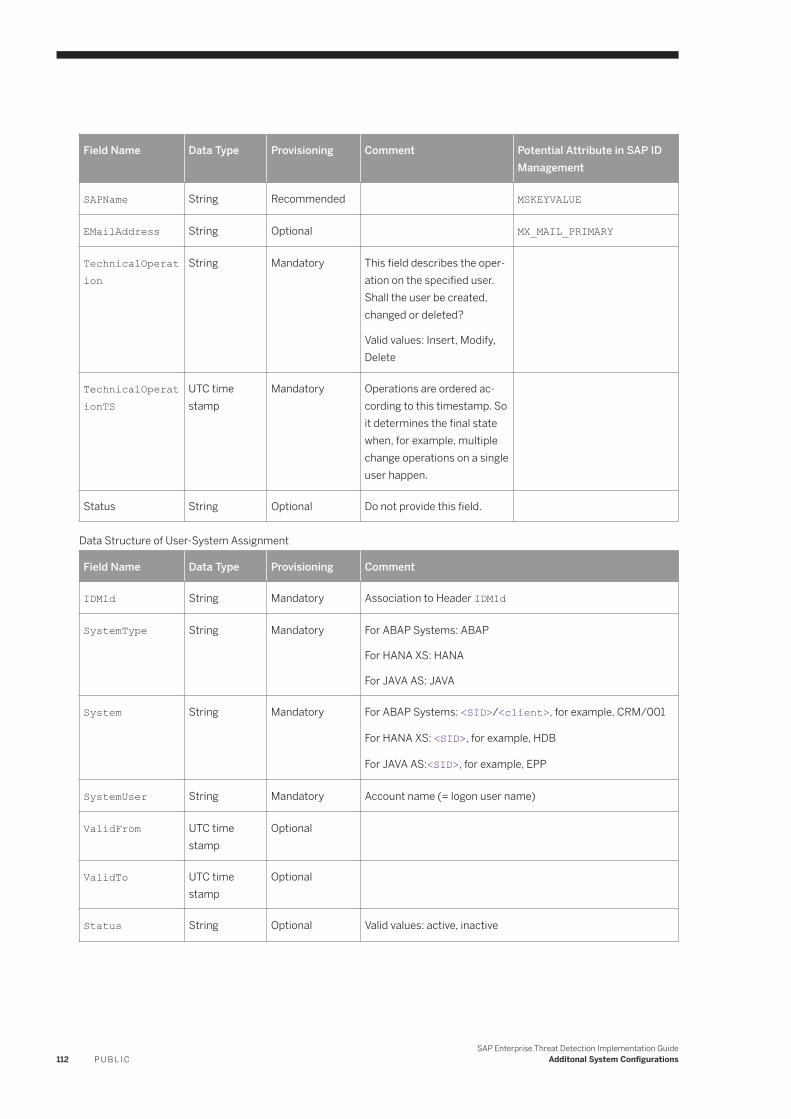
Field Name Data Type Provisioning Comment Potential Attribute in SAP ID Management
SAPName String Recommended MSKEYVALUE
EMailAddress String Optional MX_MAIL_PRIMARY
TechnicalOperation
String Mandatory This field describes the operation on the specified user. Shall the user be created, changed or deleted?
Valid values: Insert, Modify, Delete
TechnicalOperationTS
UTC time stamp
Mandatory Operations are ordered according to this timestamp. So it determines the final state when, for example, multiple change operations on a single user happen.
Status String Optional Do not provide this field.
Data Structure of User-System Assignment
Field Name Data Type Provisioning Comment
IDMId String Mandatory Association to Header IDMId
SystemType String Mandatory For ABAP Systems: ABAP
For HANA XS: HANA
For JAVA AS: JAVA
System String Mandatory For ABAP Systems: <SID>/<client>, for example, CRM/001
For HANA XS: <SID>, for example, HDB
For JAVA AS:<SID>, for example, EPP
SystemUser String Mandatory Account name (= logon user name)
ValidFrom UTC time stamp
Optional
ValidTo UTC time stamp
Optional
Status String Optional Valid values: active, inactive
112 P U B L I CSAP Enterprise Threat Detection Implementation Guide
Additonal System Configurations
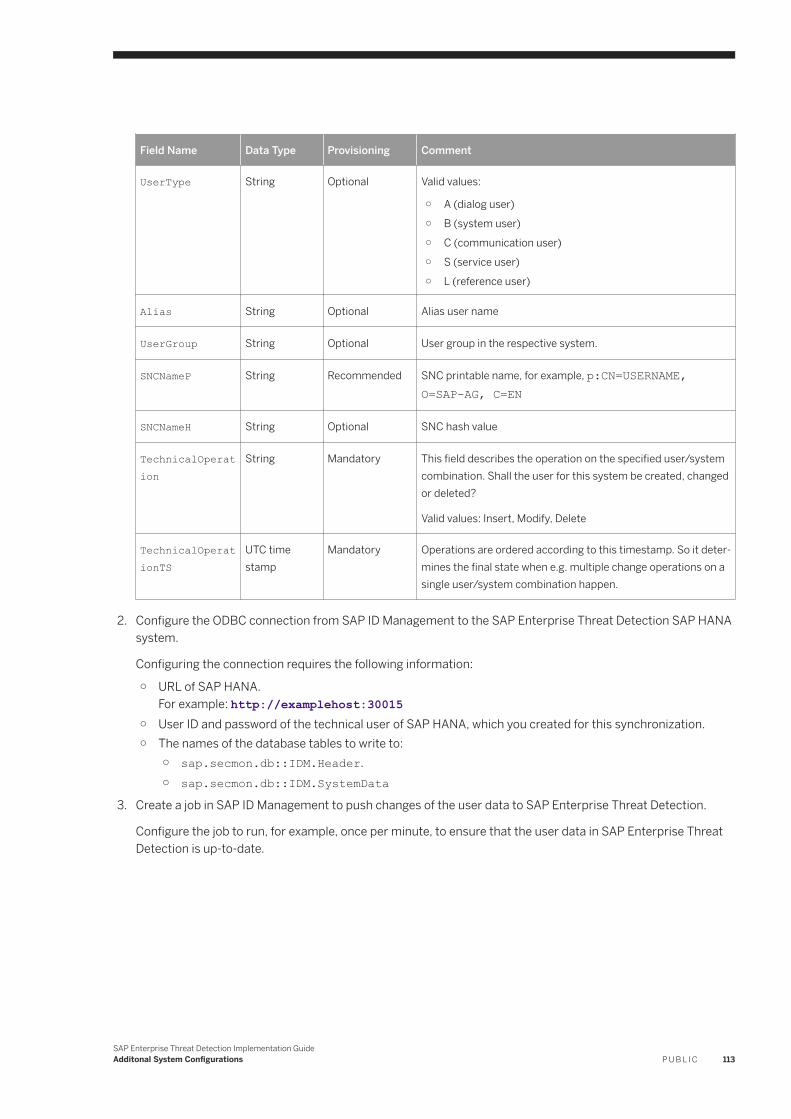
Field Name Data Type Provisioning Comment
UserType String Optional Valid values:
○ A (dialog user)○ B (system user)○ C (communication user)○ S (service user)○ L (reference user)
Alias String Optional Alias user name
UserGroup String Optional User group in the respective system.
SNCNameP String Recommended SNC printable name, for example, p:CN=USERNAME, O=SAP-AG, C=EN
SNCNameH String Optional SNC hash value
TechnicalOperation
String Mandatory This field describes the operation on the specified user/system combination. Shall the user for this system be created, changed or deleted?
Valid values: Insert, Modify, Delete
TechnicalOperationTS
UTC time stamp
Mandatory Operations are ordered according to this timestamp. So it determines the final state when e.g. multiple change operations on a single user/system combination happen.
2. Configure the ODBC connection from SAP ID Management to the SAP Enterprise Threat Detection SAP HANA system.
Configuring the connection requires the following information:
○ URL of SAP HANA.For example: http://examplehost:30015
○ User ID and password of the technical user of SAP HANA, which you created for this synchronization.○ The names of the database tables to write to:
○ sap.secmon.db::IDM.Header.○ sap.secmon.db::IDM.SystemData
3. Create a job in SAP ID Management to push changes of the user data to SAP Enterprise Threat Detection.
Configure the job to run, for example, once per minute, to ensure that the user data in SAP Enterprise Threat Detection is up-to-date.
SAP Enterprise Threat Detection Implementation GuideAdditonal System Configurations P U B L I C 113
8.6 Entering System Context Information
The log provider can transmit some data about a system when you first connect the system to SAP Enterprise Threat Detection. Enter data not supplied by the log provider.
Prerequisites
● You have a user with administrator authorizations for SAP Enterprise Threat Detection.● For SAP NetWeaver Application Server for ABAP, you have already performed an initial load of the system
context information from the log providing system.For more information, see Providing Logs from SAP NetWeaver Application Server for ABAP [page 65].
Context
The system context information provides meta information about the system, such as the role of the system, contact information for the owner of the system, its location, and how critical you consider security relevant properties of the system. The business significance of the system is used to weigh the importance of alerts in those systems and, for example, the evaluation of the Impact of Compromise of a system.
Procedure
1. From SAP Enterprise Threat Detection launchpad, choose Systems.
The application displays a list of systems and an overview of systems by role.2. Choose a system from the list.3. On the System Information tab, enter the required data.
Under Location, you can select a location that has been enetred in the Locations application. In addition to general information, contact information, and technical information about the system, you can rate the system for its business significance. The values for business significance play a significant role in determining the alert score of an alert.
For more information about alert scoring, see the SAP Enterprise Threat Detection Operations Guide.
4. Choose Save changes .
Related Information
Defining Locations [page 117]
114 P U B L I CSAP Enterprise Threat Detection Implementation Guide
Additonal System Configurations
8.7 Entering Subnet Context Information
The subnet context information provides meta information about your network, such as the subnet mask, location, contact information, and how critical you consider security relevant properties of the subnet. SAP Enterprise Threat Detection uses this information to enrich events, which include subnets.
Prerequisites
● You have defined any locations you want to use for your subnet context information.For more information, see Defining Locations [page 117].
● To load many subnet locations at once, you must have created a comma separated value (*.csv) file.For more information, see File Format for Uploading Subnet Context Information [page 116].
Procedure
1. From SAP Enterprise Threat Detection launchpad, choose Subnets.
The application displays a list of subnets and general information.
2. Choose Create Subnet.3. Enter the network address and subnet mask and choose Create Subnet.
You can upload many subnets at once by selecting a comma separated value (*.csv) file and choosing Upload File. Specify if the file contains a header.
NoteYou cannot set the location with the file upload.
4. Enter the required data.
5. Choose Save Changes .
Related Information
Defining Locations [page 117]
SAP Enterprise Threat Detection Implementation GuideAdditonal System Configurations P U B L I C 115
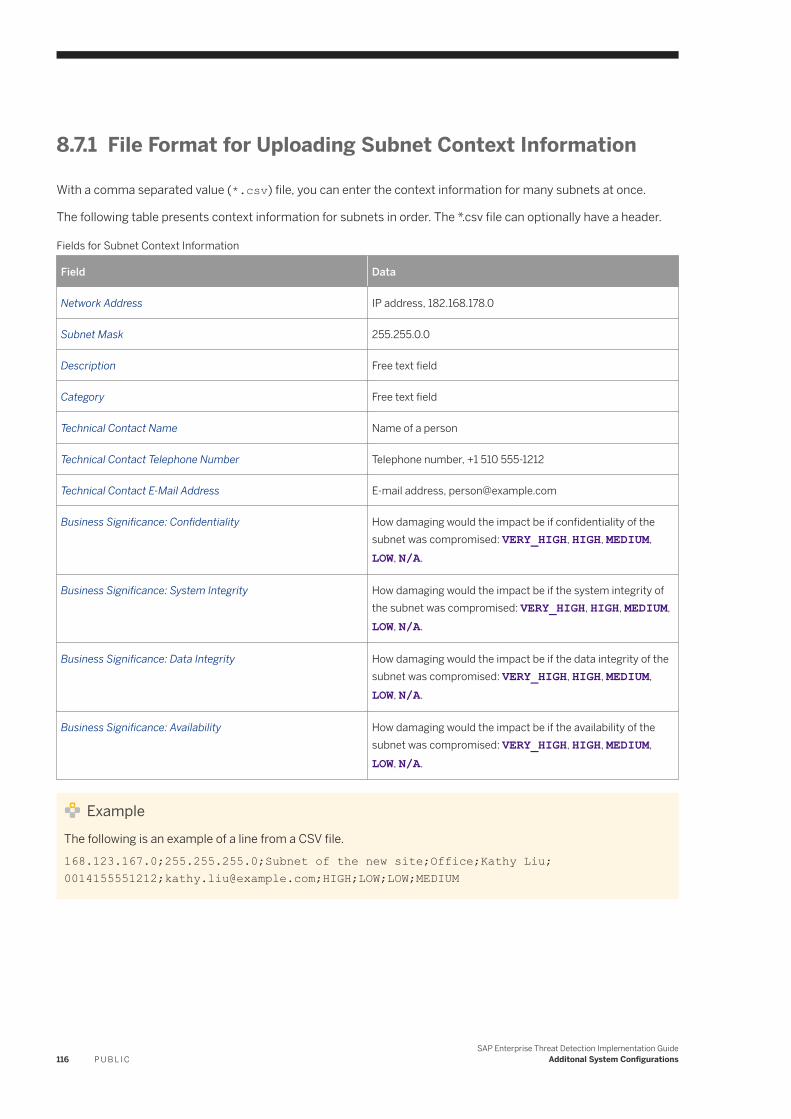
8.7.1 File Format for Uploading Subnet Context Information
With a comma separated value (*.csv) file, you can enter the context information for many subnets at once.
The following table presents context information for subnets in order. The *.csv file can optionally have a header.
Fields for Subnet Context Information
Field Data
Network Address IP address, 182.168.178.0
Subnet Mask 255.255.0.0
Description Free text field
Category Free text field
Technical Contact Name Name of a person
Technical Contact Telephone Number Telephone number, +1 510 555-1212
Technical Contact E-Mail Address E-mail address, [email protected]
Business Significance: Confidentiality How damaging would the impact be if confidentiality of the subnet was compromised: VERY_HIGH, HIGH, MEDIUM, LOW, N/A.
Business Significance: System Integrity How damaging would the impact be if the system integrity of the subnet was compromised: VERY_HIGH, HIGH, MEDIUM, LOW, N/A.
Business Significance: Data Integrity How damaging would the impact be if the data integrity of the subnet was compromised: VERY_HIGH, HIGH, MEDIUM, LOW, N/A.
Business Significance: Availability How damaging would the impact be if the availability of the subnet was compromised: VERY_HIGH, HIGH, MEDIUM, LOW, N/A.
ExampleThe following is an example of a line from a CSV file.168.123.167.0;255.255.255.0;Subnet of the new site;Office;Kathy Liu;0014155551212;[email protected];HIGH;LOW;LOW;MEDIUM
116 P U B L I CSAP Enterprise Threat Detection Implementation Guide
Additonal System Configurations
8.8 Defining Locations
Defining locations enables you to correlate geographical information with your subnet and system context.
Context
Latitude and longitude support signed degree format. For example, New York City is located at latitude 40.75 and longitude -74.00. Correlation between locations is also possible without latitude and longitude information, for example, for all logs from a specific building.
Procedure
1. From SAP Enterprise Threat Detection launchpad, choose Locations.
2. Choose Create.3. Enter a location name and choose Create Location.4. Enter the required data.
5. Choose Save .
Results
You can now use the location in the Location field of the subnet context information and the system context information. The system locations are also visible on the Threat Situation user interface.
For more information, see Entering Subnet Context Information [page 115] and Entering System Context Information [page 114].
8.9 Alert Publishing
SAP Enterprise Threat Detection can make alerts available to external systems. Alerts can be published as JSON or via emails, and you can pull alerts using a REST API in JSON format.
Information about the pattern that produced the alert, the involved systems and users, the alert IDs and a link to the alert in SAP Enterprise Threat Detection are included. You can configure a set of patterns for which alerts are sent. This set of patterns is called a pattern filter and you define it in the Settings user interface of SAP Enterprise Threat Detection. The alerts are sent once per minute.
SAP Enterprise Threat Detection Implementation GuideAdditonal System Configurations P U B L I C 117
Related Information
Configuring Alert Publishing to a REST Endpoint [page 118]Configuring Alert Publishing Via Email [page 121]Defining Pattern Filters for Alert Publishing [page 124]
8.9.1 Configuring Alert Publishing to a REST Endpoint
To exchange information about alerts with external systems, you can publish alerts as JSON or in emails. To enable alert publishing as JSON using the REST API, you configure an HTTP destination. The alerts are sent by a background job.
Prerequisites
● You have access to the SAP HANA XS Administration Tool.● Your user is assigned the following roles:
○ HTTPDestAdministrator○ RuntimeConfAdministrator
Procedure
1. Start the SAP HANA XS Administration Tool.
Enter the following URL in a browser:
<protocol>://<host>:<port>/sap/hana/xs/admin2. Navigate to the configuration of the HTTP destination alerts.xshttpdest. For example, search for it using
the search bar.
You cannot edit this HTTP destination because it did not originate in this system. Instead, you create an extension that overwrites the original.
3. Choose Create an Extension.4. Enter a host, a port and, optionally, a path prefix.
Results
You have enabled the publishing of alerts as JSON or Syslog Packaged JSON.
118 P U B L I CSAP Enterprise Threat Detection Implementation Guide
Additonal System Configurations
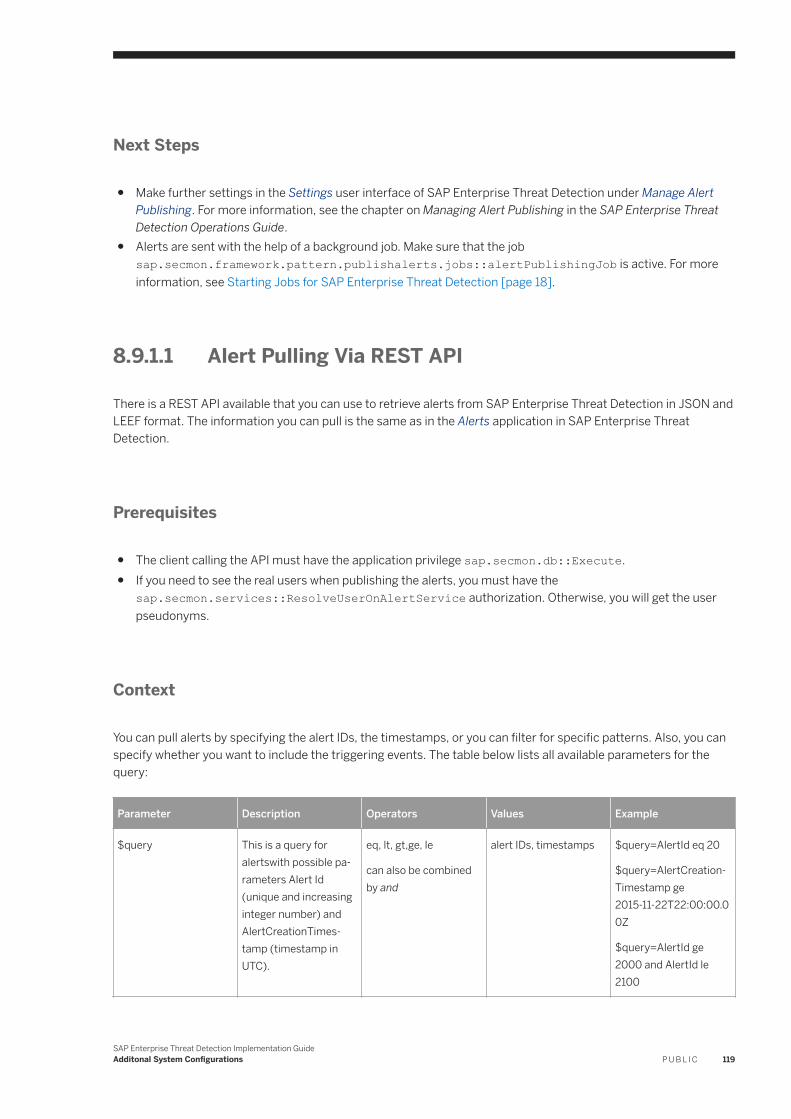
Next Steps
● Make further settings in the Settings user interface of SAP Enterprise Threat Detection under Manage Alert Publishing. For more information, see the chapter on Managing Alert Publishing in the SAP Enterprise Threat Detection Operations Guide.
● Alerts are sent with the help of a background job. Make sure that the job sap.secmon.framework.pattern.publishalerts.jobs::alertPublishingJob is active. For more information, see Starting Jobs for SAP Enterprise Threat Detection [page 18].
8.9.1.1 Alert Pulling Via REST API
There is a REST API available that you can use to retrieve alerts from SAP Enterprise Threat Detection in JSON and LEEF format. The information you can pull is the same as in the Alerts application in SAP Enterprise Threat Detection.
Prerequisites
● The client calling the API must have the application privilege sap.secmon.db::Execute.● If you need to see the real users when publishing the alerts, you must have the
sap.secmon.services::ResolveUserOnAlertService authorization. Otherwise, you will get the user pseudonyms.
Context
You can pull alerts by specifying the alert IDs, the timestamps, or you can filter for specific patterns. Also, you can specify whether you want to include the triggering events. The table below lists all available parameters for the query:
Parameter Description Operators Values Example
$query This is a query for alertswith possible parameters Alert Id (unique and increasing integer number) and AlertCreationTimestamp (timestamp in UTC).
eq, lt, gt,ge, le
can also be combined by and
alert IDs, timestamps $query=AlertId eq 20
$query=AlertCreationTimestamp ge 2015-11-22T22:00:00.00Z
$query=AlertId ge 2000 and AlertId le 2100
SAP Enterprise Threat Detection Implementation GuideAdditonal System Configurations P U B L I C 119
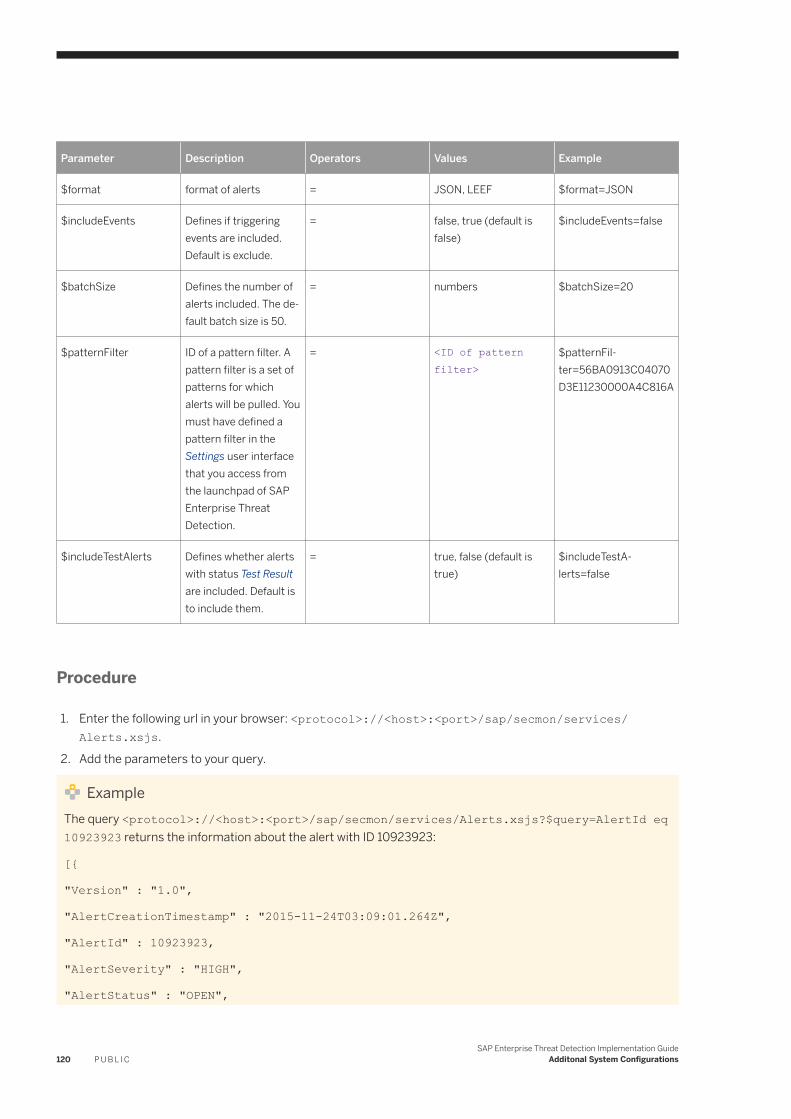
Parameter Description Operators Values Example
$format format of alerts = JSON, LEEF $format=JSON
$includeEvents Defines if triggering events are included. Default is exclude.
= false, true (default is false)
$includeEvents=false
$batchSize Defines the number of alerts included. The default batch size is 50.
= numbers $batchSize=20
$patternFilter ID of a pattern filter. A pattern filter is a set of patterns for which alerts will be pulled. You must have defined a pattern filter in the Settings user interface that you access from the launchpad of SAP Enterprise Threat Detection.
= <ID of pattern filter>
$patternFilter=56BA0913C04070D3E11230000A4C816A
$includeTestAlerts Defines whether alerts with status Test Result are included. Default is to include them.
= true, false (default is true)
$includeTestAlerts=false
Procedure
1. Enter the following url in your browser: <protocol>://<host>:<port>/sap/secmon/services/Alerts.xsjs.
2. Add the parameters to your query.
ExampleThe query <protocol>://<host>:<port>/sap/secmon/services/Alerts.xsjs?$query=AlertId eq 10923923 returns the information about the alert with ID 10923923:
[{
"Version" : "1.0",
"AlertCreationTimestamp" : "2015-11-24T03:09:01.264Z",
"AlertId" : 10923923,
"AlertSeverity" : "HIGH",
"AlertStatus" : "OPEN",
120 P U B L I CSAP Enterprise Threat Detection Implementation Guide
Additonal System Configurations
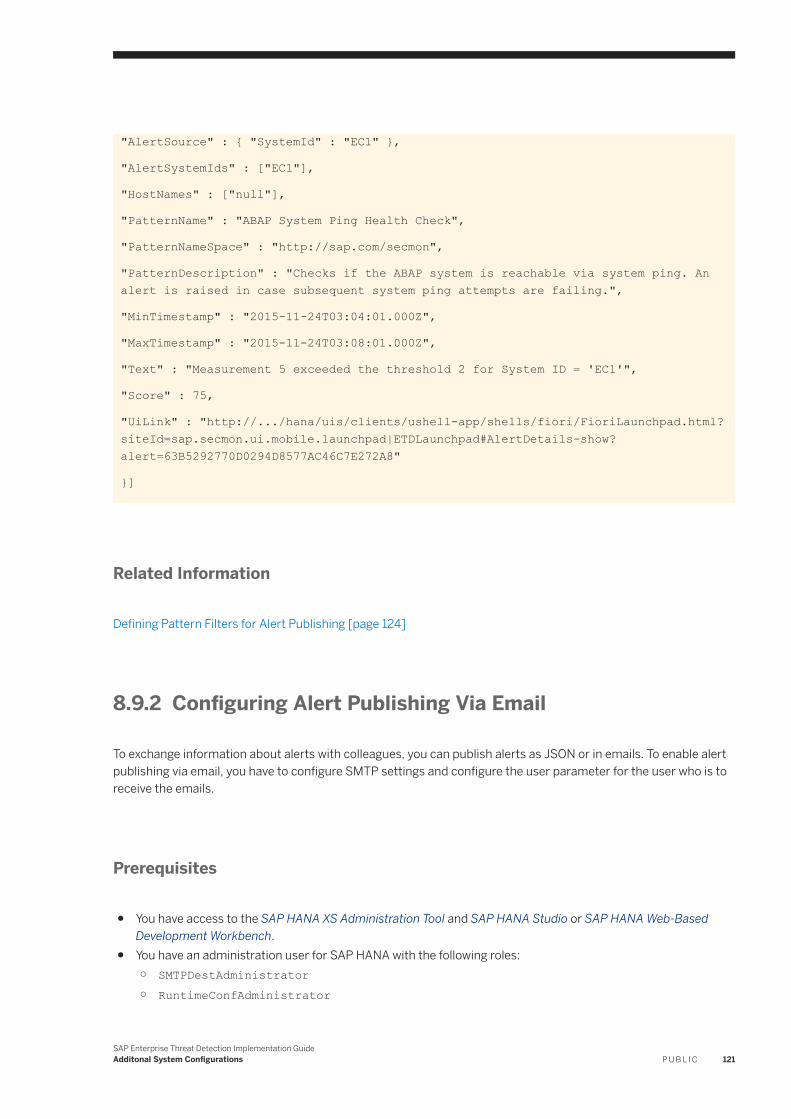
"AlertSource" : { "SystemId" : "EC1" },
"AlertSystemIds" : ["EC1"],
"HostNames" : ["null"],
"PatternName" : "ABAP System Ping Health Check",
"PatternNameSpace" : "http://sap.com/secmon",
"PatternDescription" : "Checks if the ABAP system is reachable via system ping. An alert is raised in case subsequent system ping attempts are failing.",
"MinTimestamp" : "2015-11-24T03:04:01.000Z",
"MaxTimestamp" : "2015-11-24T03:08:01.000Z",
"Text" : "Measurement 5 exceeded the threshold 2 for System ID = 'EC1'",
"Score" : 75,
"UiLink" : "http://.../hana/uis/clients/ushell-app/shells/fiori/FioriLaunchpad.html?siteId=sap.secmon.ui.mobile.launchpad|ETDLaunchpad#AlertDetails-show?alert=63B5292770D0294D8577AC46C7E272A8"
}]
Related Information
Defining Pattern Filters for Alert Publishing [page 124]
8.9.2 Configuring Alert Publishing Via Email
To exchange information about alerts with colleagues, you can publish alerts as JSON or in emails. To enable alert publishing via email, you have to configure SMTP settings and configure the user parameter for the user who is to receive the emails.
Prerequisites
● You have access to the SAP HANA XS Administration Tool and SAP HANA Studio or SAP HANA Web-Based Development Workbench.
● You have an administration user for SAP HANA with the following roles:○ SMTPDestAdministrator○ RuntimeConfAdministrator
SAP Enterprise Threat Detection Implementation GuideAdditonal System Configurations P U B L I C 121
Procedure
1. Start the SAP HANA XS Administration Tool.
Enter the following URL in a browser:
<protocol>://<host>:<port>/sap/hana/xs/admin2. Start the SMTP Configurations tool.
Choose the menu icon in the upper left-hand corner to display the list of XS Administration tools.3. Specify the mail server host and the mail server port number to open a connection.4. Specify the authentication settings required for access to the SMTP host.5. Specify the security settings for the transport-channel.6. Define the timeout setting for connections to the specified SMTP server.7. Define the socket proxy settings.8. Save your settings.
Results
You have enabled the publishing of alerts via email.
Next Steps
● Configure the user parameters of the users who are to receive alert emails. For more information, see the chapter on Configure User Parameters for Alert Publishing via Email below.
● Make further settings in the Settings user interface of SAP Enterprise Threat Detection under Manage Alert Publishing. For more information on these two steps, see the chapter on Managing Alert Publishing in the SAP Enterprise Threat Detection Operations Guide.
● Alerts are sent with the help of a background job. Make sure that the job sap.secmon.framework.pattern.publishalerts.jobs::alertPublishingJob is active. For more information, see Starting Jobs for SAP Enterprise Threat Detection [page 18].
122 P U B L I CSAP Enterprise Threat Detection Implementation Guide
Additonal System Configurations
8.9.2.1 Configure User Parameters for Alert Publishing Via Email
To exchange information about alerts with other systems, you can publish alerts in emails. To enable alert publishing via email, you have to configure SMTP settings and configure the user parameter for the user who wants to receive the emails.
Prerequisites
● Your system administrator has created an SMTP configuration. For more information, see the SAP Enterprise Threat Detection Implementation Guide under Additional System Configurations.
● You have a user with administrator authorizations.
Procedure
1. In SAP HANA Studio or the SAP HANA Web-Based Development Workbench, under Security, navigate to the user you want to receive alert emails.
2. On the User Parameters tab, select EMAIL ADDRESS and enter the user's email address.
3. Create a new parameter SEND_ALERT_MAIL_NOTIFICATIONS with the value True.
4. To only send alerts from a sepcific set of patterns, create a new parameter SEND_ALERT_PATTERN_FILTER and enter the ID of the pattern filter as the value. You can create a pattern filter in the Settings user interface that is accessible from the launchpad of SAP Enterprise Threat Detection.
5. Enter the minimum severity of alerts to be included in the email with parameter SEND_ALERT_MIN_SEVERITY. Note that the value entered here must be equal or greater than the minimum severity that is specified in the Settings user interface. For example, if the minimum severity in the Settings user interface is HIGH and you enter MEDIUM here, you will still only get alerts with severity HIGH and VERY_HIGH in the emails.
These are the values:
○ LOW○ MEDIUM○ HIGH○ VERY_HIGH
Next Steps
Make further settings in the Settings user interface of SAP Enterprise Threat Detection under Manage Alert Publishing.
SAP Enterprise Threat Detection Implementation GuideAdditonal System Configurations P U B L I C 123
8.9.3 Defining Pattern Filters for Alert Publishing
Once you have defined a pattern filter, you can use it to publish and pull alerts originating from specific patterns through a REST API in JSON format or as emails.
Procedure
1. On the Settings user interface of SAP Enterprise Threat Detection, choose the Pattern Filter tab.2. Choose Add.3. Specify a name for the pattern filter and choose OK.4. Click the name of the pattern filter and then Add.5. From the list of patterns, select the ones you want to add to the pattern filter and choose OK. You can also use
the Search function.6. To delete a pattern filter, select one from the list and choose Delete.
Next Steps
To pull alerts from the REST API, specify the URL request as documented in the Alert Pulling Via REST API chapter (see the related links below).
NoteThe user must have the application privilege sap.secmon::Execute.
Ensure that the user that pulls the alerts has the correct authorizations. As described in the above-mentioned chapter, if the real user data should be returned by the API, then the user must have the sap.secmon.services::ResolveUserOnAlertService authorizations. Otherwise, the user pseudonyms will be returned.
Related Information
Alert Pulling Via REST API [page 119]Configure User Parameters for Alert Publishing Via Email [page 123]Configuring Alert Publishing to a REST Endpoint [page 118]Configuring Alert Publishing Via Email [page 121]
124 P U B L I CSAP Enterprise Threat Detection Implementation Guide
Additonal System Configurations
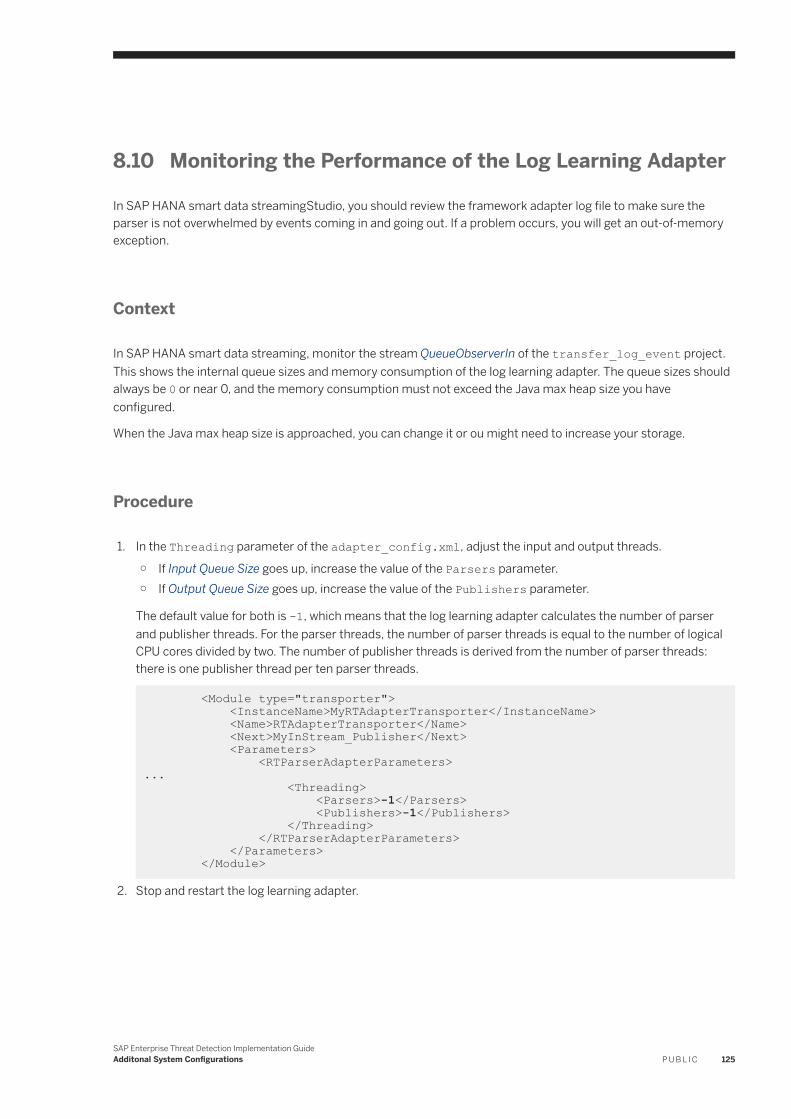
8.10 Monitoring the Performance of the Log Learning Adapter
In SAP HANA smart data streamingStudio, you should review the framework adapter log file to make sure the parser is not overwhelmed by events coming in and going out. If a problem occurs, you will get an out-of-memory exception.
Context
In SAP HANA smart data streaming, monitor the stream QueueObserverIn of the transfer_log_event project. This shows the internal queue sizes and memory consumption of the log learning adapter. The queue sizes should always be 0 or near 0, and the memory consumption must not exceed the Java max heap size you have configured.
When the Java max heap size is approached, you can change it or ou might need to increase your storage.
Procedure
1. In the Threading parameter of the adapter_config.xml, adjust the input and output threads.
○ If Input Queue Size goes up, increase the value of the Parsers parameter.○ If Output Queue Size goes up, increase the value of the Publishers parameter.
The default value for both is -1, which means that the log learning adapter calculates the number of parser and publisher threads. For the parser threads, the number of parser threads is equal to the number of logical CPU cores divided by two. The number of publisher threads is derived from the number of parser threads: there is one publisher thread per ten parser threads.
<Module type="transporter"> <InstanceName>MyRTAdapterTransporter</InstanceName> <Name>RTAdapterTransporter</Name> <Next>MyInStream_Publisher</Next> <Parameters> <RTParserAdapterParameters>... <Threading> <Parsers>-1</Parsers> <Publishers>-1</Publishers> </Threading> </RTParserAdapterParameters> </Parameters> </Module>
2. Stop and restart the log learning adapter.
SAP Enterprise Threat Detection Implementation GuideAdditonal System Configurations P U B L I C 125
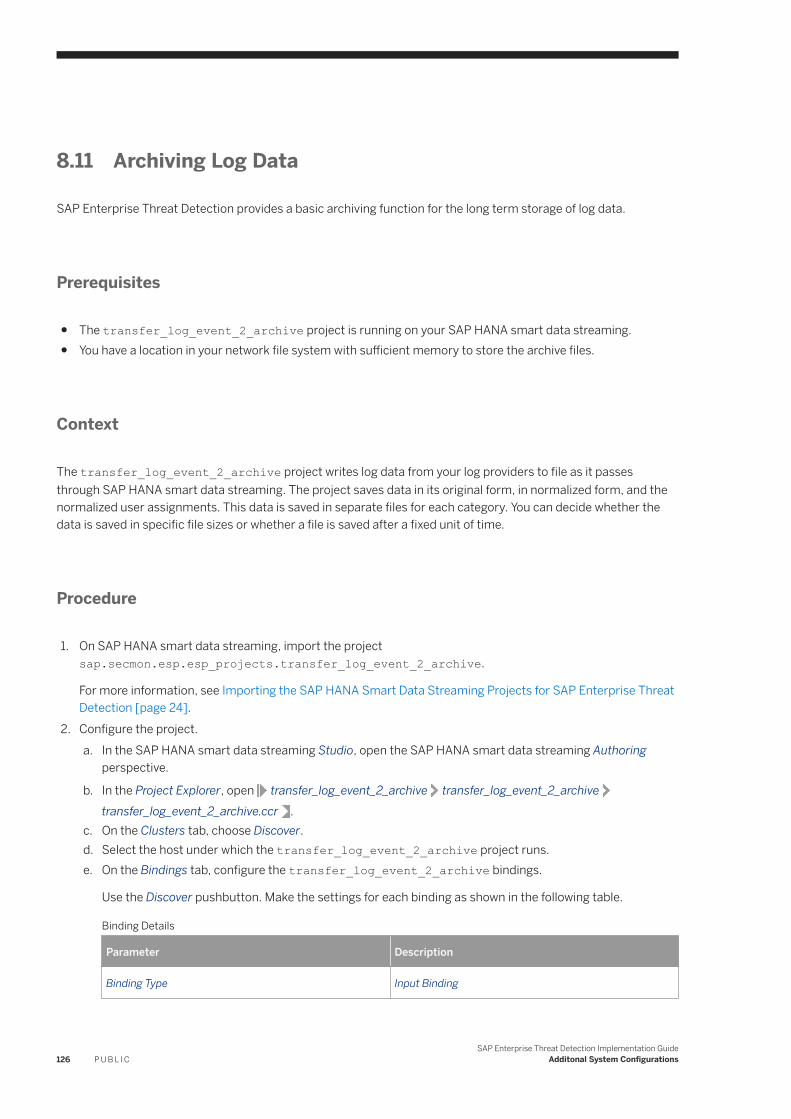
8.11 Archiving Log Data
SAP Enterprise Threat Detection provides a basic archiving function for the long term storage of log data.
Prerequisites
● The transfer_log_event_2_archive project is running on your SAP HANA smart data streaming.● You have a location in your network file system with sufficient memory to store the archive files.
Context
The transfer_log_event_2_archive project writes log data from your log providers to file as it passes through SAP HANA smart data streaming. The project saves data in its original form, in normalized form, and the normalized user assignments. This data is saved in separate files for each category. You can decide whether the data is saved in specific file sizes or whether a file is saved after a fixed unit of time.
Procedure
1. On SAP HANA smart data streaming, import the project sap.secmon.esp.esp_projects.transfer_log_event_2_archive.
For more information, see Importing the SAP HANA Smart Data Streaming Projects for SAP Enterprise Threat Detection [page 24].
2. Configure the project.a. In the SAP HANA smart data streaming Studio, open the SAP HANA smart data streaming Authoring
perspective.
b. In the Project Explorer, open transfer_log_event_2_archive transfer_log_event_2_archivetransfer_log_event_2_archive.ccr .
c. On the Clusters tab, choose Discover.d. Select the host under which the transfer_log_event_2_archive project runs.e. On the Bindings tab, configure the transfer_log_event_2_archive bindings.
Use the Discover pushbutton. Make the settings for each binding as shown in the following table.
Binding Details
Parameter Description
Binding Type Input Binding
126 P U B L I CSAP Enterprise Threat Detection Implementation Guide
Additonal System Configurations
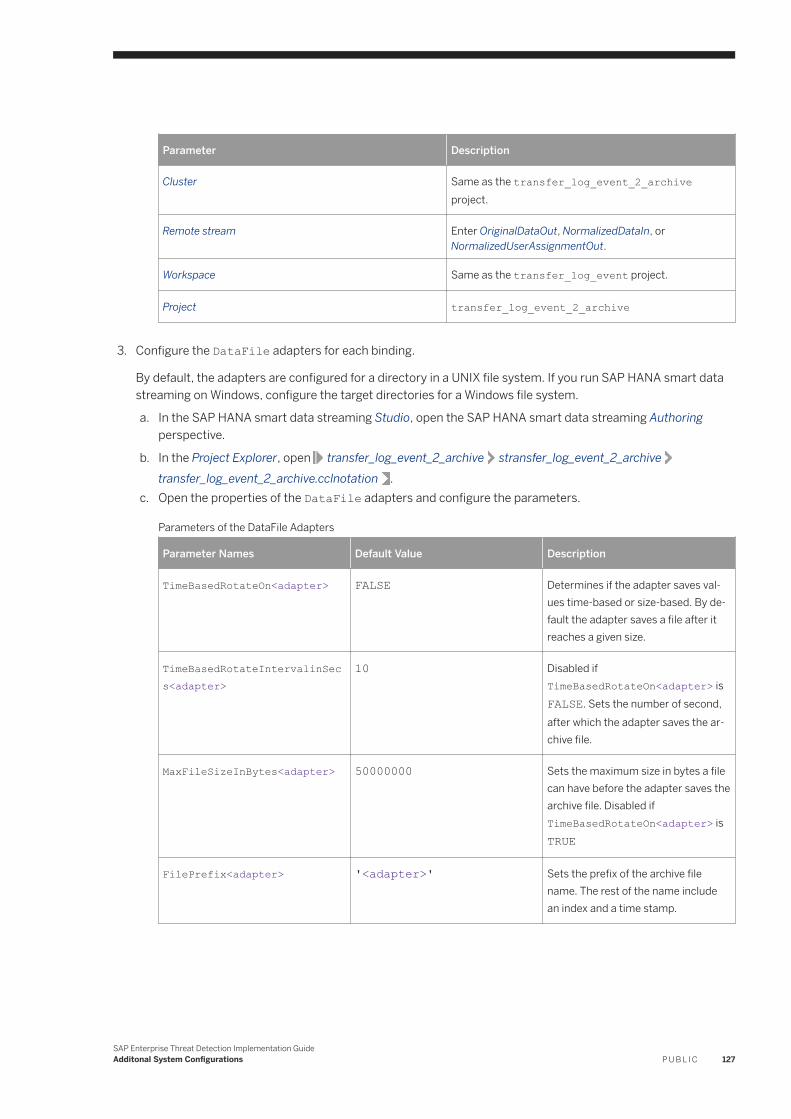
Parameter Description
Cluster Same as the transfer_log_event_2_archive project.
Remote stream Enter OriginalDataOut, NormalizedDataIn, or NormalizedUserAssignmentOut.
Workspace Same as the transfer_log_event project.
Project transfer_log_event_2_archive
3. Configure the DataFile adapters for each binding.
By default, the adapters are configured for a directory in a UNIX file system. If you run SAP HANA smart data streaming on Windows, configure the target directories for a Windows file system.
a. In the SAP HANA smart data streaming Studio, open the SAP HANA smart data streaming Authoring perspective.
b. In the Project Explorer, open transfer_log_event_2_archive stransfer_log_event_2_archivetransfer_log_event_2_archive.cclnotation .
c. Open the properties of the DataFile adapters and configure the parameters.
Parameters of the DataFile Adapters
Parameter Names Default Value Description
TimeBasedRotateOn<adapter> FALSE Determines if the adapter saves values time-based or size-based. By default the adapter saves a file after it reaches a given size.
TimeBasedRotateIntervalinSecs<adapter>
10 Disabled if TimeBasedRotateOn<adapter> is FALSE. Sets the number of second, after which the adapter saves the archive file.
MaxFileSizeInBytes<adapter> 50000000 Sets the maximum size in bytes a file can have before the adapter saves the archive file. Disabled if TimeBasedRotateOn<adapter> is TRUE
FilePrefix<adapter> '<adapter>' Sets the prefix of the archive file name. The rest of the name include an index and a time stamp.
SAP Enterprise Threat Detection Implementation GuideAdditonal System Configurations P U B L I C 127
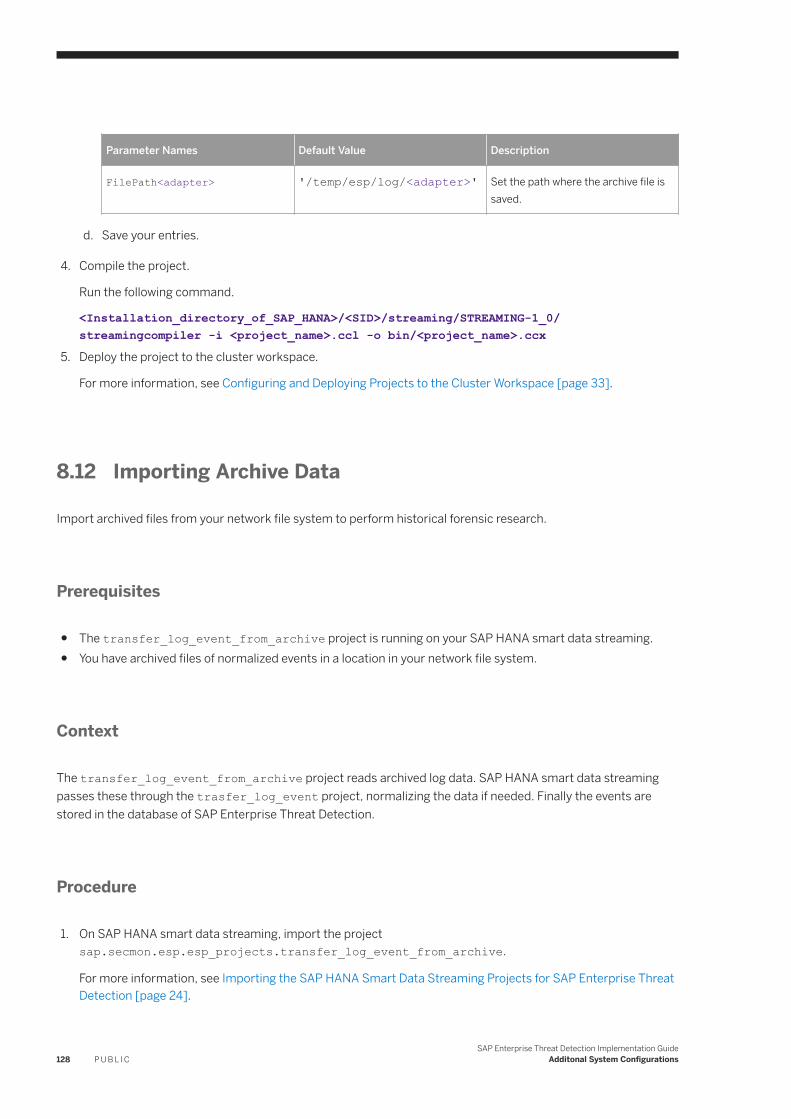
Parameter Names Default Value Description
FilePath<adapter> '/temp/esp/log/<adapter>' Set the path where the archive file is saved.
d. Save your entries.
4. Compile the project.
Run the following command.
<Installation_directory_of_SAP_HANA>/<SID>/streaming/STREAMING-1_0/streamingcompiler -i <project_name>.ccl -o bin/<project_name>.ccx
5. Deploy the project to the cluster workspace.
For more information, see Configuring and Deploying Projects to the Cluster Workspace [page 33].
8.12 Importing Archive Data
Import archived files from your network file system to perform historical forensic research.
Prerequisites
● The transfer_log_event_from_archive project is running on your SAP HANA smart data streaming.● You have archived files of normalized events in a location in your network file system.
Context
The transfer_log_event_from_archive project reads archived log data. SAP HANA smart data streaming passes these through the trasfer_log_event project, normalizing the data if needed. Finally the events are stored in the database of SAP Enterprise Threat Detection.
Procedure
1. On SAP HANA smart data streaming, import the project sap.secmon.esp.esp_projects.transfer_log_event_from_archive.
For more information, see Importing the SAP HANA Smart Data Streaming Projects for SAP Enterprise Threat Detection [page 24].
128 P U B L I CSAP Enterprise Threat Detection Implementation Guide
Additonal System Configurations
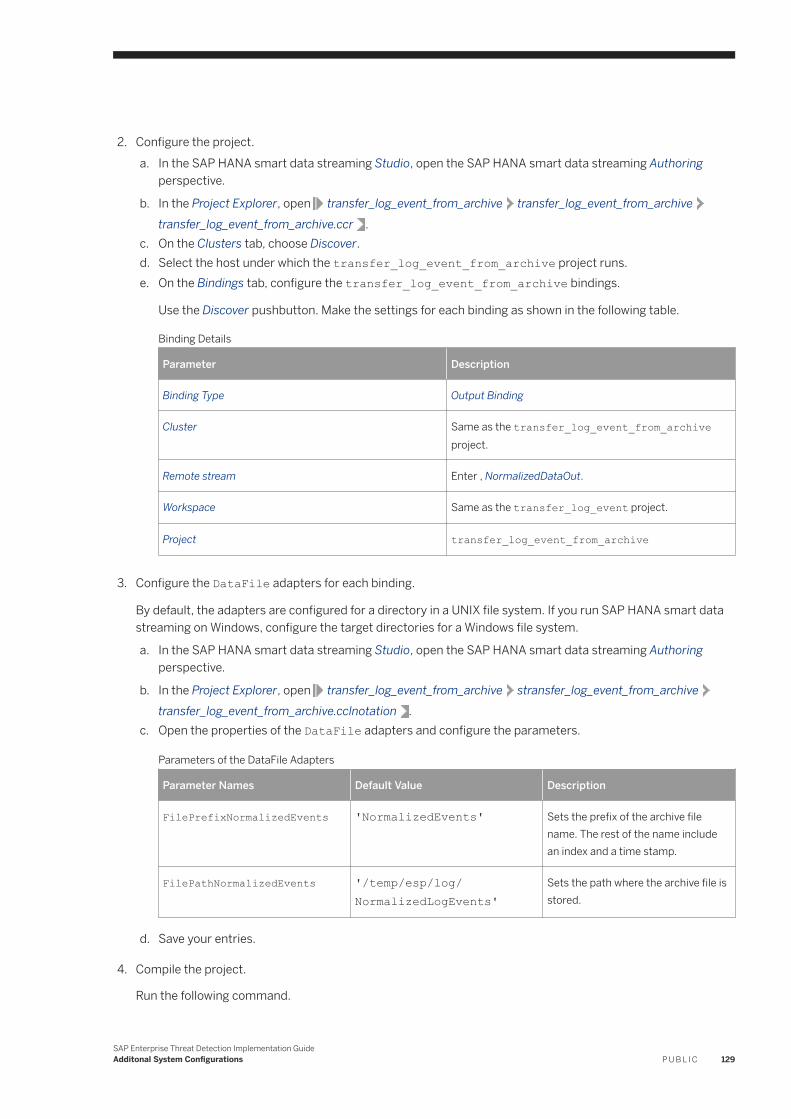
2. Configure the project.a. In the SAP HANA smart data streaming Studio, open the SAP HANA smart data streaming Authoring
perspective.
b. In the Project Explorer, open transfer_log_event_from_archive transfer_log_event_from_archivetransfer_log_event_from_archive.ccr .
c. On the Clusters tab, choose Discover.d. Select the host under which the transfer_log_event_from_archive project runs.e. On the Bindings tab, configure the transfer_log_event_from_archive bindings.
Use the Discover pushbutton. Make the settings for each binding as shown in the following table.
Binding Details
Parameter Description
Binding Type Output Binding
Cluster Same as the transfer_log_event_from_archive project.
Remote stream Enter , NormalizedDataOut.
Workspace Same as the transfer_log_event project.
Project transfer_log_event_from_archive
3. Configure the DataFile adapters for each binding.
By default, the adapters are configured for a directory in a UNIX file system. If you run SAP HANA smart data streaming on Windows, configure the target directories for a Windows file system.
a. In the SAP HANA smart data streaming Studio, open the SAP HANA smart data streaming Authoring perspective.
b. In the Project Explorer, open transfer_log_event_from_archive stransfer_log_event_from_archivetransfer_log_event_from_archive.cclnotation .
c. Open the properties of the DataFile adapters and configure the parameters.
Parameters of the DataFile Adapters
Parameter Names Default Value Description
FilePrefixNormalizedEvents 'NormalizedEvents' Sets the prefix of the archive file name. The rest of the name include an index and a time stamp.
FilePathNormalizedEvents '/temp/esp/log/NormalizedLogEvents'
Sets the path where the archive file is stored.
d. Save your entries.
4. Compile the project.
Run the following command.
SAP Enterprise Threat Detection Implementation GuideAdditonal System Configurations P U B L I C 129
<Installation_directory_of_SAP_HANA>/<SID>/streaming/STREAMING-1_0/streamingcompiler -i <project_name>.ccl -o bin/<project_name>.ccx
5. Deploy the project to the cluster workspace.
For more information, see Configuring and Deploying Projects to the Cluster Workspace [page 33].
130 P U B L I CSAP Enterprise Threat Detection Implementation Guide
Additonal System Configurations
9 Securing SAP Enterprise Threat Detection
Fundamental Security Guides
SAP Enterprise Threat Detection is built from SAP HANA platform, SAP HANA smart data streaming, and SAP NetWeaver Application Server (SAP NetWeaver AS). Therefore, the corresponding security guides also apply to SAP Enterprise Threat Detection.
Fundamental Security Guides
Product Guide Title Available at SAP Help Portal
SAP HANA platform SAP HANA Security Guide http://help.sap.com/hana_platform un
der Security Information
SAP HANA smart data streaming SAP HANA smart data streaming: Security Guide
http://help.sap.com/hana_options_sds
under Security Information
SAP NetWeaver Application Server SAP NetWeaver Application Server ABAP Security Guide
SAP NetWeaver Application Server Java Security Guide
http://help.sap.com/nw_platform under
Security Information EnglishSecurity Guides for SAP NetWeaver
Functional Units Security Guides for
the Application Server
9.1 User and Role Management
SAP Enterprise Threat Detection depends on its host systems for user and role management.
The authorizations delivered with SAP Enterprise Threat Detection are listed in the following sections. Otherwise refer to the relevant security guides for SAP HANA platform, SAP HANA Smart Data Streaming, and SAP NetWeaver AS.
NoteIn particular, because the user interface runs on SAP HANA platform, pay close attention to the guidelines in the SAP HANA Security Guide.
For more information, see SAP HANA User and Role Management in the SAP HANA Security Guide.
SAP Enterprise Threat Detection Implementation GuideSecuring SAP Enterprise Threat Detection P U B L I C 131
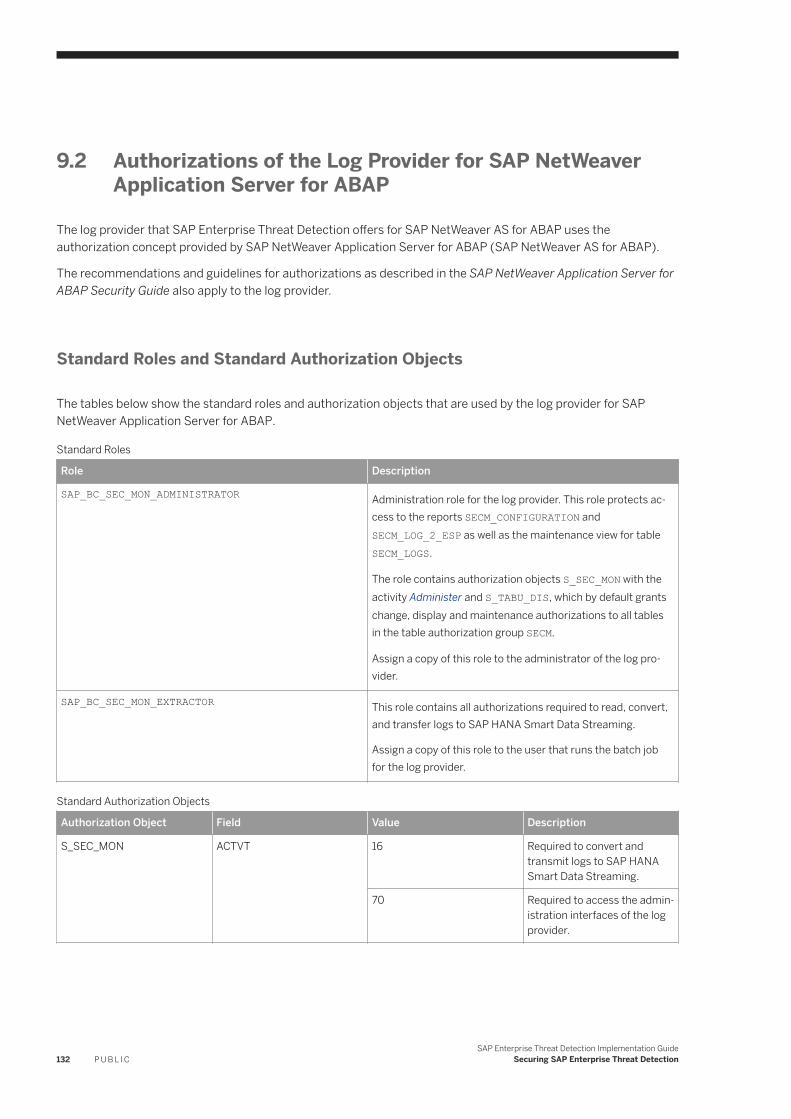
9.2 Authorizations of the Log Provider for SAP NetWeaver Application Server for ABAP
The log provider that SAP Enterprise Threat Detection offers for SAP NetWeaver AS for ABAP uses the authorization concept provided by SAP NetWeaver Application Server for ABAP (SAP NetWeaver AS for ABAP).
The recommendations and guidelines for authorizations as described in the SAP NetWeaver Application Server for ABAP Security Guide also apply to the log provider.
Standard Roles and Standard Authorization Objects
The tables below show the standard roles and authorization objects that are used by the log provider for SAP NetWeaver Application Server for ABAP.
Standard Roles
Role Description
SAP_BC_SEC_MON_ADMINISTRATOR Administration role for the log provider. This role protects access to the reports SECM_CONFIGURATION and SECM_LOG_2_ESP as well as the maintenance view for table SECM_LOGS.
The role contains authorization objects S_SEC_MON with the activity Administer and S_TABU_DIS, which by default grants change, display and maintenance authorizations to all tables in the table authorization group SECM.
Assign a copy of this role to the administrator of the log provider.
SAP_BC_SEC_MON_EXTRACTOR This role contains all authorizations required to read, convert, and transfer logs to SAP HANA Smart Data Streaming.
Assign a copy of this role to the user that runs the batch job for the log provider.
Standard Authorization Objects
Authorization Object Field Value Description
S_SEC_MON ACTVT 16 Required to convert and transmit logs to SAP HANA Smart Data Streaming.
70 Required to access the administration interfaces of the log provider.
132 P U B L I CSAP Enterprise Threat Detection Implementation Guide
Securing SAP Enterprise Threat Detection
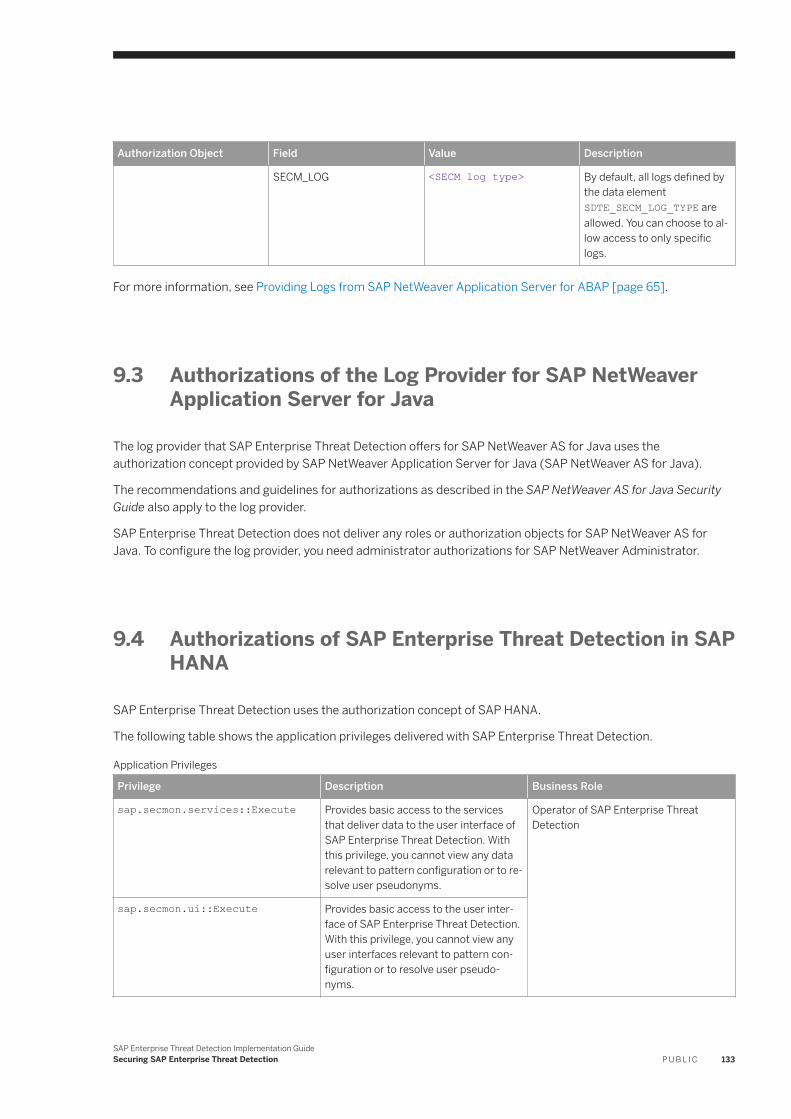
Authorization Object Field Value Description
SECM_LOG <SECM log type> By default, all logs defined by the data element SDTE_SECM_LOG_TYPE are allowed. You can choose to allow access to only specific logs.
For more information, see Providing Logs from SAP NetWeaver Application Server for ABAP [page 65].
9.3 Authorizations of the Log Provider for SAP NetWeaver Application Server for Java
The log provider that SAP Enterprise Threat Detection offers for SAP NetWeaver AS for Java uses the authorization concept provided by SAP NetWeaver Application Server for Java (SAP NetWeaver AS for Java).
The recommendations and guidelines for authorizations as described in the SAP NetWeaver AS for Java Security Guide also apply to the log provider.
SAP Enterprise Threat Detection does not deliver any roles or authorization objects for SAP NetWeaver AS for Java. To configure the log provider, you need administrator authorizations for SAP NetWeaver Administrator.
9.4 Authorizations of SAP Enterprise Threat Detection in SAP HANA
SAP Enterprise Threat Detection uses the authorization concept of SAP HANA.
The following table shows the application privileges delivered with SAP Enterprise Threat Detection.
Application Privileges
Privilege Description Business Role
sap.secmon.services::Execute Provides basic access to the services that deliver data to the user interface of SAP Enterprise Threat Detection. With this privilege, you cannot view any data relevant to pattern configuration or to resolve user pseudonyms.
Operator of SAP Enterprise Threat Detection
sap.secmon.ui::Execute Provides basic access to the user interface of SAP Enterprise Threat Detection. With this privilege, you cannot view any user interfaces relevant to pattern configuration or to resolve user pseudonyms.
SAP Enterprise Threat Detection Implementation GuideSecuring SAP Enterprise Threat Detection P U B L I C 133
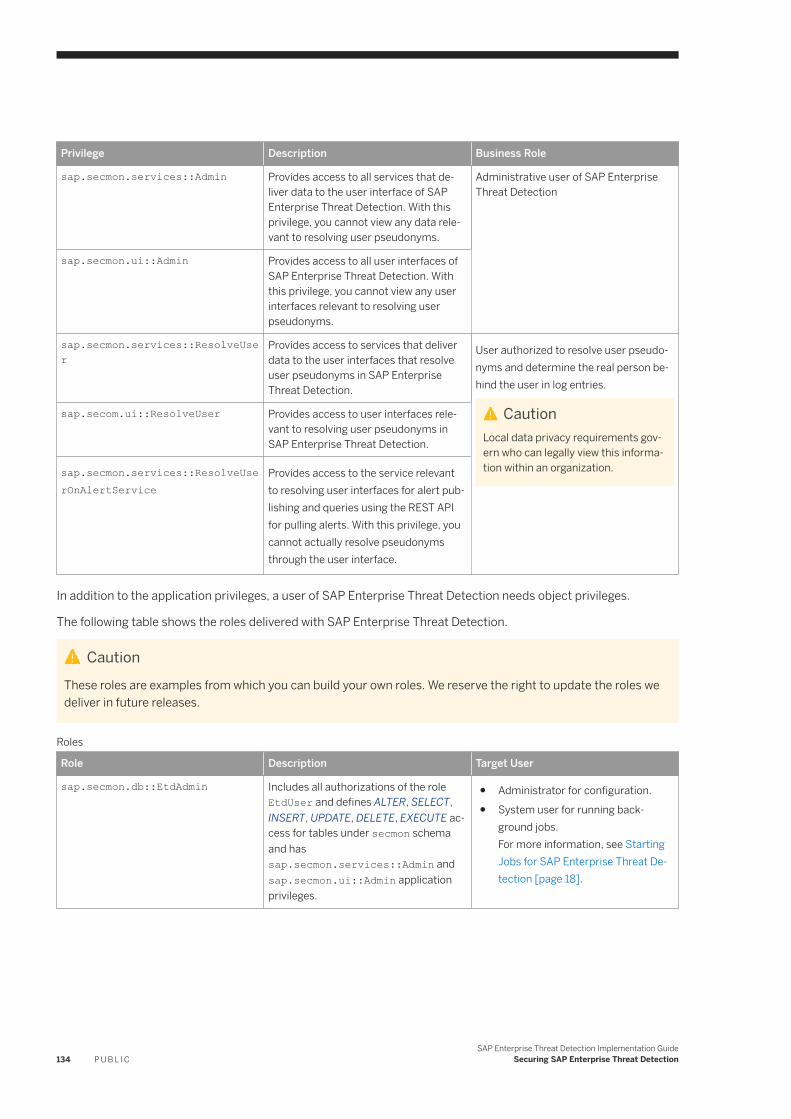
Privilege Description Business Role
sap.secmon.services::Admin Provides access to all services that deliver data to the user interface of SAP Enterprise Threat Detection. With this privilege, you cannot view any data relevant to resolving user pseudonyms.
Administrative user of SAP Enterprise Threat Detection
sap.secmon.ui::Admin Provides access to all user interfaces of SAP Enterprise Threat Detection. With this privilege, you cannot view any user interfaces relevant to resolving user pseudonyms.
sap.secmon.services::ResolveUser
Provides access to services that deliver data to the user interfaces that resolve user pseudonyms in SAP Enterprise Threat Detection.
User authorized to resolve user pseudonyms and determine the real person behind the user in log entries.
CautionLocal data privacy requirements govern who can legally view this information within an organization.
sap.secom.ui::ResolveUser Provides access to user interfaces relevant to resolving user pseudonyms in SAP Enterprise Threat Detection.
sap.secmon.services::ResolveUserOnAlertService
Provides access to the service relevant to resolving user interfaces for alert publishing and queries using the REST API for pulling alerts. With this privilege, you cannot actually resolve pseudonyms through the user interface.
In addition to the application privileges, a user of SAP Enterprise Threat Detection needs object privileges.
The following table shows the roles delivered with SAP Enterprise Threat Detection.
CautionThese roles are examples from which you can build your own roles. We reserve the right to update the roles we deliver in future releases.
Roles
Role Description Target User
sap.secmon.db::EtdAdmin Includes all authorizations of the role EtdUser and defines ALTER, SELECT, INSERT, UPDATE, DELETE, EXECUTE access for tables under secmon schema and has sap.secmon.services::Admin and sap.secmon.ui::Admin application privileges.
● Administrator for configuration.● System user for running back
ground jobs.For more information, see Starting Jobs for SAP Enterprise Threat Detection [page 18].
134 P U B L I CSAP Enterprise Threat Detection Implementation Guide
Securing SAP Enterprise Threat Detection
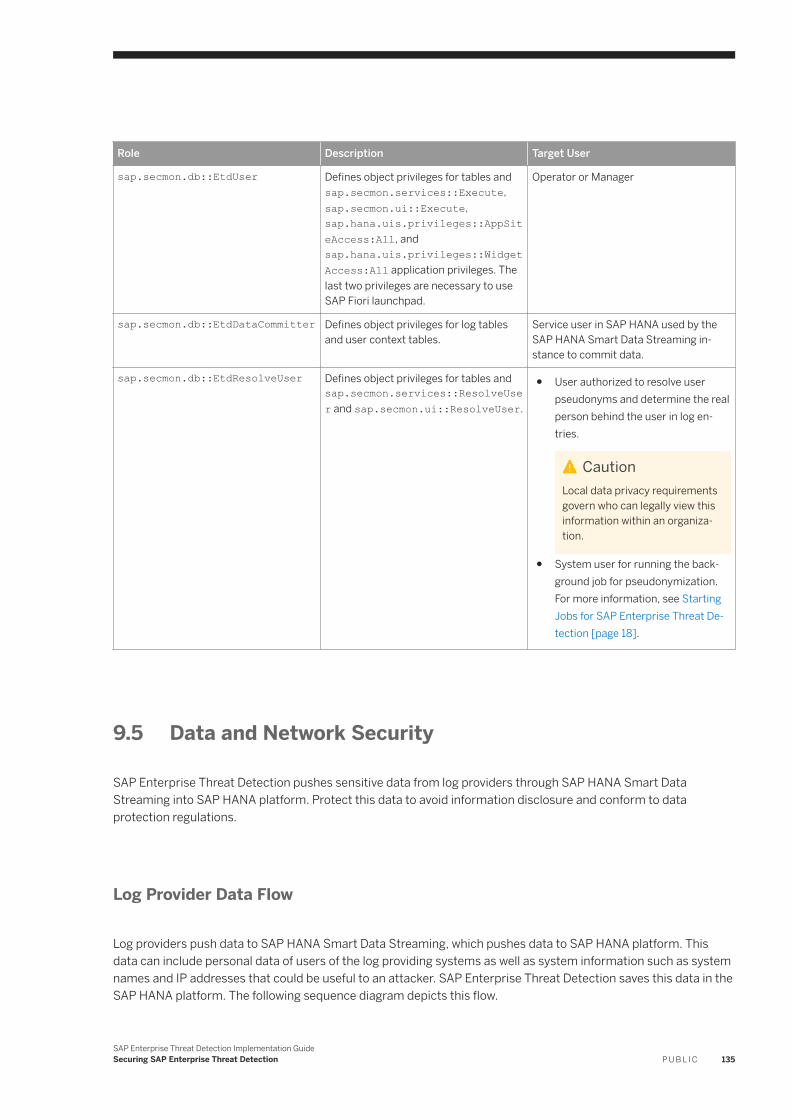
Role Description Target User
sap.secmon.db::EtdUser Defines object privileges for tables and sap.secmon.services::Execute, sap.secmon.ui::Execute, sap.hana.uis.privileges::AppSiteAccess:All, and sap.hana.uis.privileges::WidgetAccess:All application privileges. The last two privileges are necessary to use SAP Fiori launchpad.
Operator or Manager
sap.secmon.db::EtdDataCommitter Defines object privileges for log tables and user context tables.
Service user in SAP HANA used by the SAP HANA Smart Data Streaming instance to commit data.
sap.secmon.db::EtdResolveUser Defines object privileges for tables and sap.secmon.services::ResolveUser and sap.secmon.ui::ResolveUser.
● User authorized to resolve user pseudonyms and determine the real person behind the user in log entries.
CautionLocal data privacy requirements govern who can legally view this information within an organization.
● System user for running the background job for pseudonymization.For more information, see Starting Jobs for SAP Enterprise Threat Detection [page 18].
9.5 Data and Network Security
SAP Enterprise Threat Detection pushes sensitive data from log providers through SAP HANA Smart Data Streaming into SAP HANA platform. Protect this data to avoid information disclosure and conform to data protection regulations.
Log Provider Data Flow
Log providers push data to SAP HANA Smart Data Streaming, which pushes data to SAP HANA platform. This data can include personal data of users of the log providing systems as well as system information such as system names and IP addresses that could be useful to an attacker. SAP Enterprise Threat Detection saves this data in the SAP HANA platform. The following sequence diagram depicts this flow.
SAP Enterprise Threat Detection Implementation GuideSecuring SAP Enterprise Threat Detection P U B L I C 135

Data Flow for Log Providers
The data flow from log provider SAP NetWeaver Application Server to SAP HANA Smart Data Streaming runs over a web service of SAP HANA Smart Data Streaming. Protect this data flow with transport layer security (TLS). The data in the log provider is protected by the means provided by the log provider.
For more information about configuring TLS between log providers and SAP HANA Smart Data Streaming, see Encrypting Communication Between Log Providers and the Web Service Provider [page 103].
The data flow from all other log providers, such as syslog, connects with the ports of the log learning adapter on SAP HANA Smart Data Streaming. The log learning adapter provides the default ports as listed in the following table.
Ports of the Log Learning Adapter (Syslog)
Protocoll Default Port
TCP 10514
TLS 10443
UDP 5514
Check the Port element of the Parameters tag in the following file:
<HANA Installation path>/streaming/STREAMING-1_0/adapters/framework/instances/rtparseradapter/adapter_config.xml
RecommendationWe recommend locating log providers, which use UDP, within your intranet network.
The data flow from SAP HANA Smart Data Streaming to SAP HANA runs over ODBC. Protect this data flow with TLS.
For more information, see configuring TLS between SAP HANA Smart Data Streaming and SAP HANA platform, see the security guides for your release of SAP HANA Smart Data Streaming and SAP HANA:
● http://help.sap.com/hana_options_sds for SAP HANA Smart Data Streaming on SAP Help Portal
Users with access to SAP HANA Smart Data Streaming projects for SAP Enterprise Threat Detection can also view the data that passes through SAP HANA Smart Data Streaming.
136 P U B L I CSAP Enterprise Threat Detection Implementation Guide
Securing SAP Enterprise Threat Detection
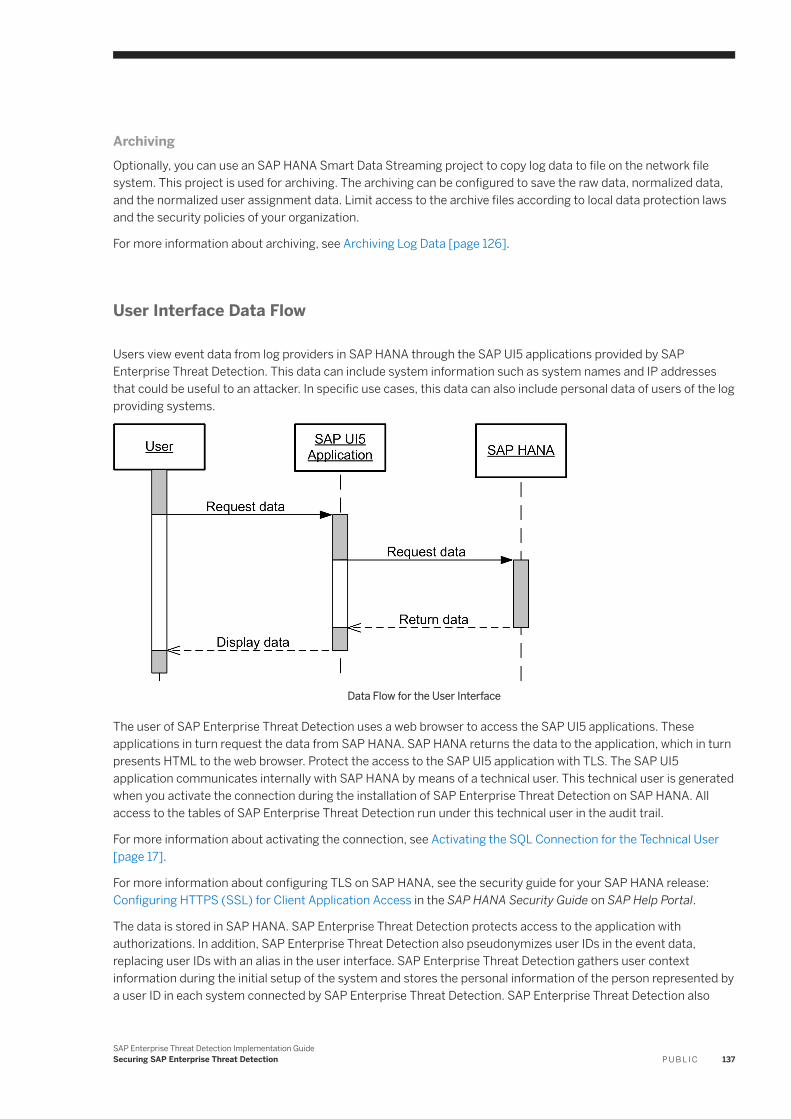
ArchivingOptionally, you can use an SAP HANA Smart Data Streaming project to copy log data to file on the network file system. This project is used for archiving. The archiving can be configured to save the raw data, normalized data, and the normalized user assignment data. Limit access to the archive files according to local data protection laws and the security policies of your organization.
For more information about archiving, see Archiving Log Data [page 126].
User Interface Data Flow
Users view event data from log providers in SAP HANA through the SAP UI5 applications provided by SAP Enterprise Threat Detection. This data can include system information such as system names and IP addresses that could be useful to an attacker. In specific use cases, this data can also include personal data of users of the log providing systems.
Data Flow for the User Interface
The user of SAP Enterprise Threat Detection uses a web browser to access the SAP UI5 applications. These applications in turn request the data from SAP HANA. SAP HANA returns the data to the application, which in turn presents HTML to the web browser. Protect the access to the SAP UI5 application with TLS. The SAP UI5 application communicates internally with SAP HANA by means of a technical user. This technical user is generated when you activate the connection during the installation of SAP Enterprise Threat Detection on SAP HANA. All access to the tables of SAP Enterprise Threat Detection run under this technical user in the audit trail.
For more information about activating the connection, see Activating the SQL Connection for the Technical User [page 17].
For more information about configuring TLS on SAP HANA, see the security guide for your SAP HANA release: Configuring HTTPS (SSL) for Client Application Access in the SAP HANA Security Guide on SAP Help Portal.
The data is stored in SAP HANA. SAP Enterprise Threat Detection protects access to the application with authorizations. In addition, SAP Enterprise Threat Detection also pseudonymizes user IDs in the event data, replacing user IDs with an alias in the user interface. SAP Enterprise Threat Detection gathers user context information during the initial setup of the system and stores the personal information of the person represented by a user ID in each system connected by SAP Enterprise Threat Detection. SAP Enterprise Threat Detection also
SAP Enterprise Threat Detection Implementation GuideSecuring SAP Enterprise Threat Detection P U B L I C 137
correlates this information between systems and tracks the pseudonyms assigned to these users. SAP Enterprise Threat Detection provides an application to reveal the identity of the person behind a pseudonym and the list of systems and user ID known to SAP Enterprise Threat Detection. The example role EtdResolveUser contains the authorizations used to protect access to this application. Your data protection policy or local regulations may define what users should have access to this application. To further protect users whose identity has been revealed, SAP Enterprise Threat Detection regenerates pseudonyms once a week. This measure prevents an administrator from looking up a user identity once and then tracking the user over time by maintaining a separate list of pseudonym-identity correlations.
CautionThe other example roles provided with SAP Enterprise Threat Detection contain authorizations to view the table data in SAP Enterprise Threat Detection. Do not grant users with these roles, who should not have access to personal information of other users, access to database management or development tools on SAP HANA, such as SAP HANA studio.
For more information about the tables used to store user information, see User Context in the SAP Enterprise Threat Detection Operations Guide.
For more information about pseudonymization, see Pseudonymization in the SAP Enterprise Threat Detection Operations Guide.
Data Encryption
TipWe recommend that you encrypt the data volumes of SAP HANA platform.
For more information, see the security guide for your SAP HANA release: Data Storage Security in SAP HANA in the SAP HANA Security Guide on SAP Help Portal.
9.6 Data Protection and Privacy
SAP HANA provides the technical enablement and infrastructure to help you to run SAP Enterprise Threat Detection in a way that complies with local regulations.
Governments place legal requirements on industry to protect data and privacy. We provide features and functions to help you meet these requirements.
NoteSAP does not provide legal advice in any form. SAP software supports data protection compliance by providing security features and data protection-relevant functions, such as blocking and deletion of personal data. In many cases, compliance with applicable data protection and privacy laws is not covered by a product feature. Furthermore, this information should not be taken as advice or a recommendation regarding additional features that would be required in specific IT environments. Decisions related to data protection must be made on a
138 P U B L I CSAP Enterprise Threat Detection Implementation Guide
Securing SAP Enterprise Threat Detection
case-by-case basis, taking into consideration the given system landscape and the applicable legal requirements. Definitions and other terms used in this documentation are not taken from a specific legal source.
SAP Enterprise Threat Detection is used to collect log data from other systems, but displays this data in pseudonymized form only. If in exceptional cases, personal data from these logs must be retrieved, SAP Enterprise Threat Detection provides application privileges to allow to resolve the real user identities. It is important to comply with legal regulations when granting such a privilege to a user of SAP Enterprise Threat Detection. SAP Enterprise Threat Detection then logs which user has resolved which user identities.
For more information, see the Determining the True Identity of Users section in the SAP Enterprise Threat Detection Operations Guide as well as the section about the application privileges in Authorizations of SAP Enterprise Threat Detection in SAP HANA [page 133].
SAP Enterprise Threat Detection stores the log data for a specific time and then deletes all older data. You can specify this retention time in the Settings user interface that is accesible through the launchpad of SAP Enterprise Threat Detection. For more information, please see the SAP Enterprise Threat Detection Operations Guide available on SAP Help Portal at https://help.sap.com/sapetd.
For more information about data protection in SAP HANA platform, see the SAP HANA Security Guide on SAP Help Portal at http://help.sap.com/hana_platform under Security Information .
SAP Enterprise Threat Detection Implementation GuideSecuring SAP Enterprise Threat Detection P U B L I C 139
A Appendix
A.1 Recommendations When Upgrading SAP HANA Smart Data Streaming and SAP Enterprise Threat Detection
In the unlikely even that you should have to upgrade your SAP HANA Smart Data Streaming during the installation of SAP Enterprise Threat Detection, there are a few pitfalls you can avoid.
● Save a copy of you license file.Find the file in Sybase/SYSAM-2_0/licenses/SYBASE.lic.If the upgrade created a temporary license, you can restore your licenses from your backup.
● Save the parameters section of any *.ccr files.When you copy over new versions of the projects, you can copy the values of these parameters back into the relevant sections.
● If installing new versions of projects for SAP Enterprise Threat Detection, be sure to select the option to delete files from disk when removing old projects from SAP HANA smart data streaming.You cannot import new version of the projects unless you have completely removed the old versions.
● If after a restart the SAP HANA services have the status DEAD, trying reading the properties of the data services in the SAP HANA smart data streaming studio. If that does not work, reinstall the services.For more information, see Creating Data Services for SAP HANA [page 27].
140 P U B L I CSAP Enterprise Threat Detection Implementation Guide
Appendix
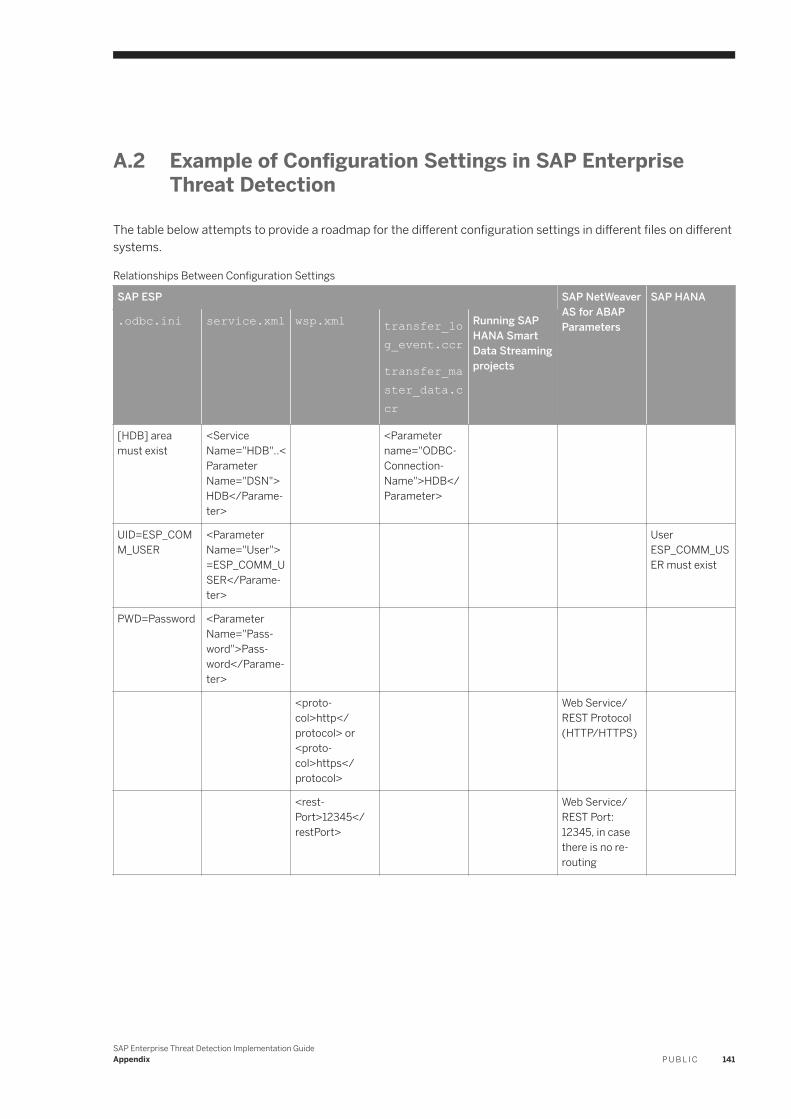
A.2 Example of Configuration Settings in SAP Enterprise Threat Detection
The table below attempts to provide a roadmap for the different configuration settings in different files on different systems.
Relationships Between Configuration Settings
SAP ESP SAP NetWeaver AS for ABAP Parameters
SAP HANA
.odbc.ini service.xml wsp.xml transfer_log_event.ccr
transfer_master_data.ccr
Running SAP HANA Smart Data Streaming projects
[HDB] area must exist
<Service Name="HDB"..<Parameter Name="DSN">HDB</Parameter>
<Parameter name="ODBCConnectionName">HDB</Parameter>
UID=ESP_COMM_USER
<Parameter Name="User">=ESP_COMM_USER</Parameter>
User ESP_COMM_USER must exist
PWD=Password <Parameter Name="Password">Password</Parameter>
<protocol>http</protocol> or <protocol>https</protocol>
Web Service/REST Protocol (HTTP/HTTPS)
<restPort>12345</restPort>
Web Service/REST Port: 12345, in case there is no re-routing
SAP Enterprise Threat Detection Implementation GuideAppendix P U B L I C 141
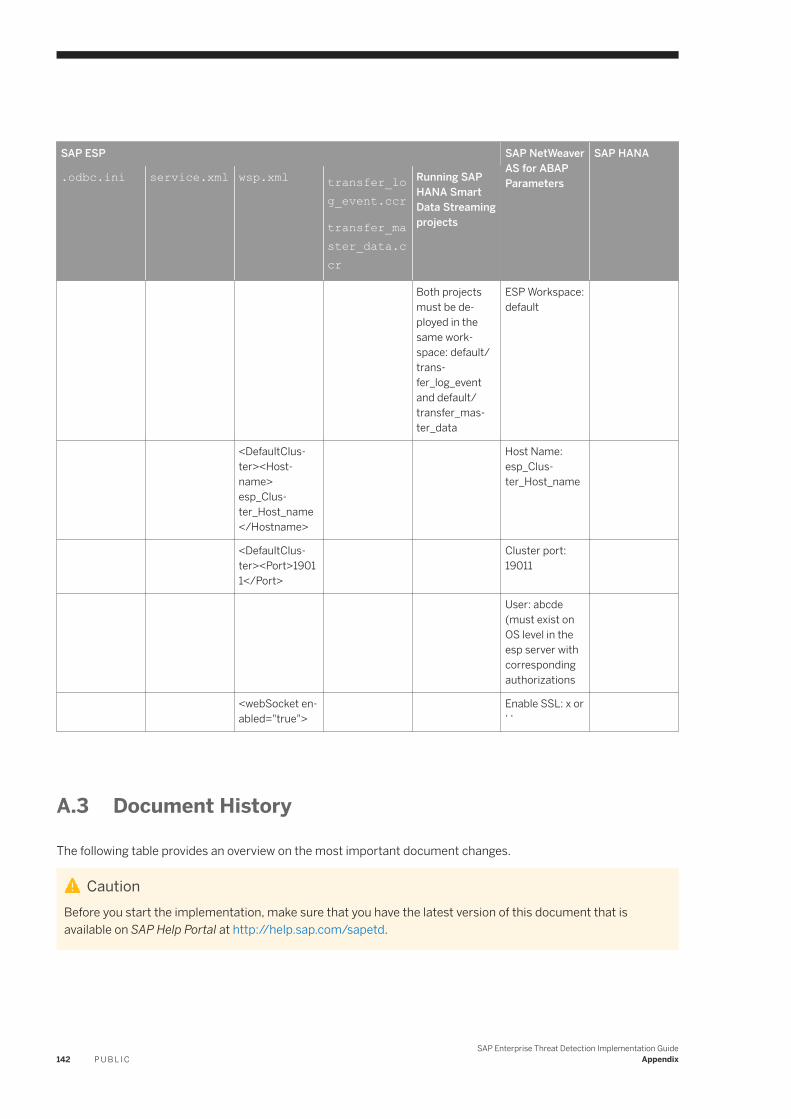
SAP ESP SAP NetWeaver AS for ABAP Parameters
SAP HANA
.odbc.ini service.xml wsp.xml transfer_log_event.ccr
transfer_master_data.ccr
Running SAP HANA Smart Data Streaming projects
Both projects must be deployed in the same workspace: default/transfer_log_event and default/transfer_master_data
ESP Workspace: default
<DefaultCluster><Hostname> esp_Cluster_Host_name </Hostname>
Host Name: esp_Cluster_Host_name
<DefaultCluster><Port>19011</Port>
Cluster port: 19011
User: abcde (must exist on OS level in the esp server with corresponding authorizations
<webSocket enabled="true">
Enable SSL: x or ‘ ‘
A.3 Document History
The following table provides an overview on the most important document changes.
CautionBefore you start the implementation, make sure that you have the latest version of this document that is available on SAP Help Portal at http://help.sap.com/sapetd.
142 P U B L I CSAP Enterprise Threat Detection Implementation Guide
Appendix
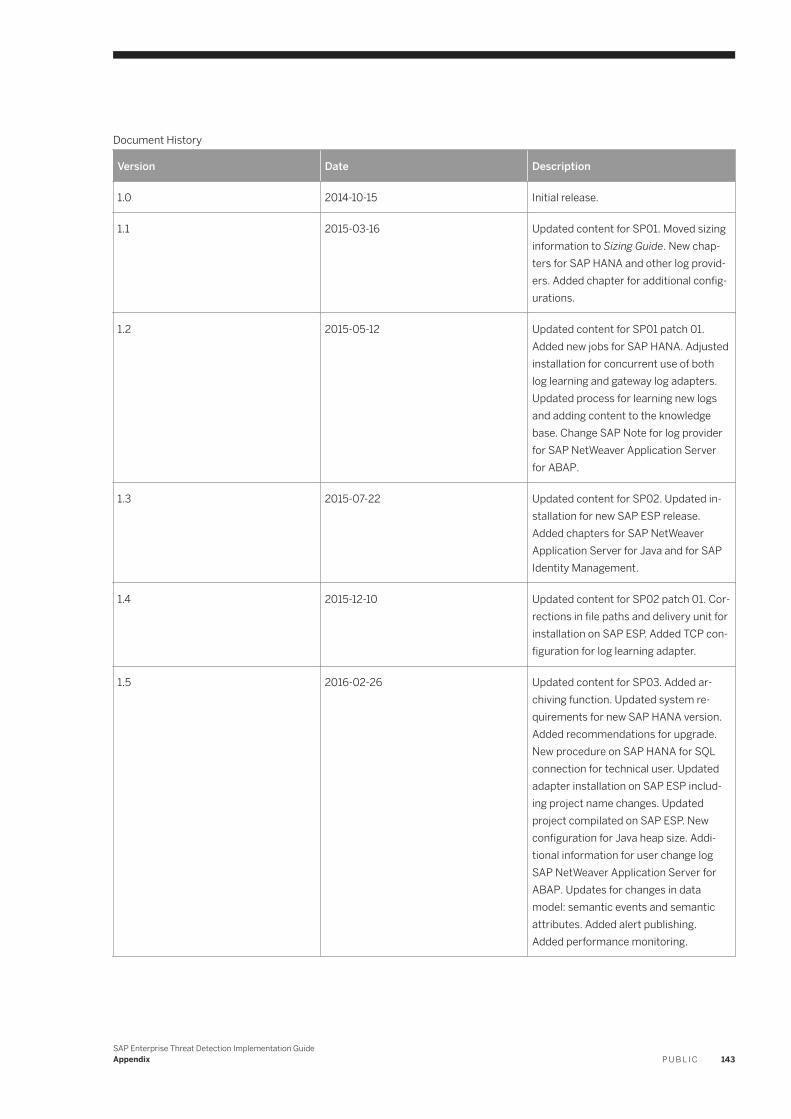
Document History
Version Date Description
1.0 2014-10-15 Initial release.
1.1 2015-03-16 Updated content for SP01. Moved sizing information to Sizing Guide. New chapters for SAP HANA and other log providers. Added chapter for additional configurations.
1.2 2015-05-12 Updated content for SP01 patch 01. Added new jobs for SAP HANA. Adjusted installation for concurrent use of both log learning and gateway log adapters. Updated process for learning new logs and adding content to the knowledge base. Change SAP Note for log provider for SAP NetWeaver Application Server for ABAP.
1.3 2015-07-22 Updated content for SP02. Updated installation for new SAP ESP release. Added chapters for SAP NetWeaver Application Server for Java and for SAP Identity Management.
1.4 2015-12-10 Updated content for SP02 patch 01. Corrections in file paths and delivery unit for installation on SAP ESP. Added TCP configuration for log learning adapter.
1.5 2016-02-26 Updated content for SP03. Added archiving function. Updated system requirements for new SAP HANA version. Added recommendations for upgrade. New procedure on SAP HANA for SQL connection for technical user. Updated adapter installation on SAP ESP including project name changes. Updated project compilated on SAP ESP. New configuration for Java heap size. Additional information for user change log SAP NetWeaver Application Server for ABAP. Updates for changes in data model: semantic events and semantic attributes. Added alert publishing. Added performance monitoring.
SAP Enterprise Threat Detection Implementation GuideAppendix P U B L I C 143
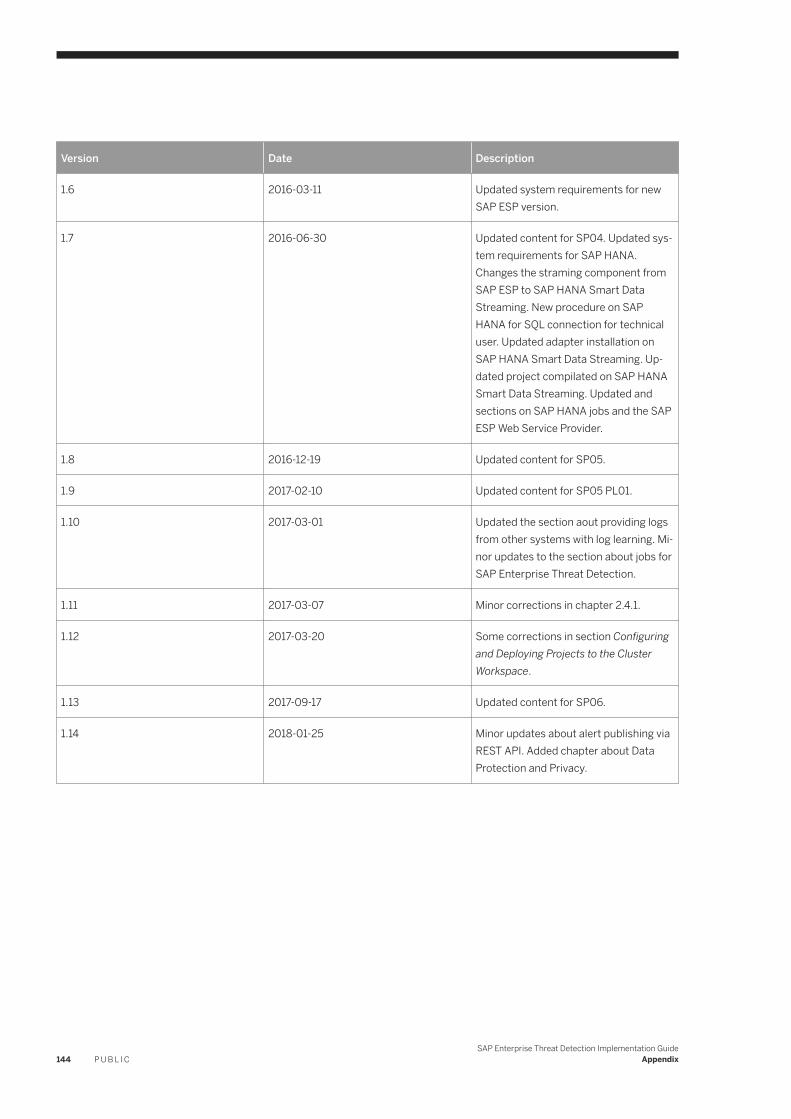
Version Date Description
1.6 2016-03-11 Updated system requirements for new SAP ESP version.
1.7 2016-06-30 Updated content for SP04. Updated system requirements for SAP HANA. Changes the straming component from SAP ESP to SAP HANA Smart Data Streaming. New procedure on SAP HANA for SQL connection for technical user. Updated adapter installation on SAP HANA Smart Data Streaming. Updated project compilated on SAP HANA Smart Data Streaming. Updated and sections on SAP HANA jobs and the SAP ESP Web Service Provider.
1.8 2016-12-19 Updated content for SP05.
1.9 2017-02-10 Updated content for SP05 PL01.
1.10 2017-03-01 Updated the section aout providing logs from other systems with log learning. Minor updates to the section about jobs for SAP Enterprise Threat Detection.
1.11 2017-03-07 Minor corrections in chapter 2.4.1.
1.12 2017-03-20 Some corrections in section Configuring and Deploying Projects to the Cluster Workspace.
1.13 2017-09-17 Updated content for SP06.
1.14 2018-01-25 Minor updates about alert publishing via REST API. Added chapter about Data Protection and Privacy.
144 P U B L I CSAP Enterprise Threat Detection Implementation Guide
Appendix

Important Disclaimers and Legal Information
Coding SamplesAny software coding and/or code lines / strings ("Code") included in this documentation are only examples and are not intended to be used in a productive system environment. The Code is only intended to better explain and visualize the syntax and phrasing rules of certain coding. SAP does not warrant the correctness and completeness of the Code given herein, and SAP shall not be liable for errors or damages caused by the usage of the Code, unless damages were caused by SAP intentionally or by SAP's gross negligence.
Gender-Neutral LanguageAs far as possible, SAP documentation is gender neutral. Depending on the context, the reader is addressed directly with "you", or a gender-neutral noun (such as "sales person" or "working days") is used. If when referring to members of both sexes, however, the third-person singular cannot be avoided or a gender-neutral noun does not exist, SAP reserves the right to use the masculine form of the noun and pronoun. This is to ensure that the documentation remains comprehensible.
Internet HyperlinksThe SAP documentation may contain hyperlinks to the Internet. These hyperlinks are intended to serve as a hint about where to find related information. SAP does not warrant the availability and correctness of this related information or the ability of this information to serve a particular purpose. SAP shall not be liable for any damages caused by the use of related information unless damages have been caused by SAP's gross negligence or willful misconduct. All links are categorized for transparency (see: https://help.sap.com/viewer/disclaimer).
SAP Enterprise Threat Detection Implementation GuideImportant Disclaimers and Legal Information P U B L I C 145

go.sap.com/registration/contact.html
© 2018 SAP SE or an SAP affiliate company. All rights reserved.No part of this publication may be reproduced or transmitted in any form or for any purpose without the express permission of SAP SE or an SAP affiliate company. The information contained herein may be changed without prior notice.Some software products marketed by SAP SE and its distributors contain proprietary software components of other software vendors. National product specifications may vary.These materials are provided by SAP SE or an SAP affiliate company for informational purposes only, without representation or warranty of any kind, and SAP or its affiliated companies shall not be liable for errors or omissions with respect to the materials. The only warranties for SAP or SAP affiliate company products and services are those that are set forth in the express warranty statements accompanying such products and services, if any. Nothing herein should be construed as constituting an additional warranty.SAP and other SAP products and services mentioned herein as well as their respective logos are trademarks or registered trademarks of SAP SE (or an SAP affiliate company) in Germany and other countries. All other product and service names mentioned are the trademarks of their respective companies.Please see https://www.sap.com/corporate/en/legal/copyright.html for additional trademark information and notices.