Embed Size (px)
Citation preview

2/17/2016 Santana 2023 Owner's Manual - TOC
http://www.kyrasjoy.com/santana2023/Santana%202023%20Owners%20Manual/Index.htm 1/3
Santana 2023 Owners Manual
Table of Contents
Chapter Contents Page
I Introduction 1 - 3
IISpecial Safety Warnings &
Limited Warrenty4 - 5
IIISet up / Fold Down /
Transportation6 - 14
IVOperating the Santana
202315 - 21
A.Water Ballast Tank
Operation.
B.Centerboard Deploy &
Retract Operation.
C.Rudder Deploy & Retract
Operation.
D. Mainsail: Raising & Furling.
E. Jib: Opening & Furling.
F. Electrical System.
G.Cabin Accomodations -
Noteworthy Tips.
V Sailing the Santana 2023 22 - 24
A.Operating Limits / Outboard
Motor.
B. Sailing Techniques.
2/17/2016 Santana 2023 Owner's Manual - TOC
http://www.kyrasjoy.com/santana2023/Santana%202023%20Owners%20Manual/Index.htm 2/3
C.Sailing in Shallow Water /Beaching.
D. Docking the Boat.
VISantana 2023 Care &
Maintenance25 - 30
A. Storage.
B.Tuning and TroubleShooting.
C.Regular MaintenanceSchedule.
D. Sails Maintenance.
E.Mast, Hardware & RiggingMaintenance.
F. Sails & Rigging Retirement.
VII Technical Specifications 31 - 32
A.General Specifications &Liability Statement.
B. Rigging Dimensions.
VIII Maintenance Log 33
Appendix A:
Dealer Preparation (Page 39 was never includedin my manual.)
34 - 39
Appendix B:Knots Used On Santana
202340
Appendix COwner's Registration Card (I sent it in before I copiedthis manual.)
N/A
Return to Home Port.
Mail to: The [email protected]

2/17/2016 OM Chapter 1
http://www.kyrasjoy.com/santana2023/Santana%202023%20Owners%20Manual/OM-Chapter%201.htm 1/6
Santana 2023 Owners & "Santa" Want-a-bies!
O.M. Chapter I
(Pages 1 - 3)
(Page 1)
Chapter I Introduction
Congratulations on the purchase of your W.D.Schock Corporation Santana 2023. We believe thissailboat to be the finest available family trailerablesailboat on the market today.
She achieves exceptional performance and superbhandling and stability for many reasons. It has a hullshape that is carefully engineered to offer optimalstability on all points of sail, high lift centerboard andrudder airfoils, a fully battened, vertical-cut mainsaildefined by a stiff mast with internal halyard, and avertical-cut jib. These features combine to ensure agreat upwind performance and excellent controlauthority in all conditions making the Santana 2023both an excellent entry-level sailboat and the mostpractical performance cruiser ever built.
The Santana 2023 incorporates some beautiful newhardware and concepts, specifically developed forthe new Santana 2000 Series, which added to theclassic existing hardware, keeps Santana sailboatsclearly ahead of our competitors. The new featuresdramatically reduce set-up and breakdown times,makes for easier interchanging of parts, decreaseweight and parasitic drag, and simplify sailboattuning capability.
PleaseNote__
Although the Santana 2023 was conceived anddesigned to maximize enjoyment and minimizeanxiety while aboard, it's performance and safetydepends on you maintaining the boat in the

2/17/2016 OM Chapter 1
http://www.kyrasjoy.com/santana2023/Santana%202023%20Owners%20Manual/OM-Chapter%201.htm 2/6
configuration it was delivered to you from the factoryor dealer. We require that you read this owner'smanual thoroughly and its instructions to the letterwhen you set up the Santana 2023, sail it, fold itdown for storage or shipping, or perform repairs ormaintenance on it. Failure to do so will compromisethe safety of your Santana 2023 and your wholefamily's enjoyment while aboard.
AbouttheSantana2000Series
This new addition to our product line has beenspecifically designed & engineered to answer theexpectations and demands of today's family. EachSantana 2000 model is a "turn-key" product,produced and delivered in a ready-to-have-fun-nowconfiguration.
The series utilizes a great number of innovativefeatures all carefully designed to make entry-levelfamily sailing an instantly gratifying experience -weekend after weekend:
-- A convenient water ballast concept providing alevel of confidence & stability unmatched in theindustry -- in any weather !
-- A one person, 7 minute set-up (or breakdown)procedure where the light-weight mast, sail, boom &all rigging stays connected.
-- Roller-furling systems for both mainsail & jib.
-- A very practical retractable center board & rudderto sail in 15 inches of water.
-- A swim platform with transom ladder.
-- A uniquely engineered (& huge!) main cabin hatchwhich offers all the advantages of a pop-top & adodger -- yet can be opened & closed by a 12 yearold.
-- A very creative & ergonomic use of interior space(with enclosed head) provides all the comfort and
2/17/2016 OM Chapter 1
http://www.kyrasjoy.com/santana2023/Santana%202023%20Owners%20Manual/OM-Chapter%201.htm 3/6
features of far bigger boats.
-- And a myriad of other innovations to neatly
enhance what is the most versatile family trailerable
ever-built -- supremely satisfying to own and sail.
(Page 2)
Design
Objectives
Performance through simplicity is always a major
W.D. Schock Corporation design criteria. The
design team of Shad Turner, Steve and Tom Schock
and Jean-Michel Bernasconi learned a great deal
more about the use of water as a stabilizing element,
behavior in light and rough air and seas, handling
coordination, tracking, and overall sailboat "feel"
during the exhaustive Santana 2000 project.
The Santana 2023 was designed to incorporate very
straight-forward characteristics in all aspects of
sailing, handling, trailering, set-up and fold-down
procedures.
The end result is that the Santana 2023 is a sailboat
which performs extremely well, yet is incredibly
"user friendly." It is strong, has impressively high
righting moments, utilizes a new generation of
hardware and more importantly, inspires superb
confidence through a very solid feel at the hands of
the novice and expert alike, without sacrificing
necessary quickness of response.
Testing
The Santana 2023 has undergone extensive testing
and has satisfied the standards of the designers and
W.D. Schock Corp. as a State-of -the-Art
recreational family trailerable sailboat.
The Santana 2023 has met or has exceeded all W.D.
Schock Corp. standards and requirements for self-
stability, unsinkability and quality and was released
to the public on March 13th 1992. You should note,
however, that the sailboat has not been tested to any

2/17/2016 OM Chapter 1
http://www.kyrasjoy.com/santana2023/Santana%202023%20Owners%20Manual/OM-Chapter%201.htm 4/6
state or federal seaworthiness specifications.
Stop!
A water ballast system, located directly underthe cabin sole, provides the majority of theSantana 2023 stability, Never attempt to sailwithout a completely full water ballast(approximate filling time: 6-7 minutes).
About theCompany
The W.D. Schock Corp. have been manufacturingsailboats since 1946. We are this country's oldestsailboat builder.
While we have produced well over 25,000 sailboats,we take a lot of pride in crafting each boat as if itwas our personal one. That attitude is felt andreflected whether you own or inspect one of ourLido 14 or one of our impressive Schock 35 orSchock 55.
During the last forty + years, W.D. Schock sailboatshave won a very impressive number of competitionsand National titles.
W.D. Schock Corp. is a family owned business andTom Schock personally oversees the construction ofeach boat. Every sailboat produced is subject torigorous quality control. When completed andinspected, It is shipped to one of W.D. SchockCorp.'s world-wide dealers whose knowledge andcommitment to the sport guarantees continuity frommanufacture to customer.
The products of such development and attitudehave, throughout this time, found favor withinnumerable skippers from novices to worldchampions.
(Page 3)
About

2/17/2016 OM Chapter 1
http://www.kyrasjoy.com/santana2023/Santana%202023%20Owners%20Manual/OM-Chapter%201.htm 5/6
Sailing
The safe operation of this or any sailboatultimately rest with you, because there is alwaysa certain level of inherent danger and because anyoutdoor sport can induce injury or death, even tovery good sailors sailing the latest equipment inperfect conditions.
Because the responsibility of sailing andmaintaining the sailboat rests entirely with you,the risks of damage or injury you may cause toothers and to yourself also rest entirely with you.
We believe that in order to safely practice thesport of sailing you must maturely accept thisresponsibility, sail conservatively, & availyourself of all safety equipment appropriate tothe conditions you sail in.
About theterminologyused in thismanual
Throughout this manual, we have avoided,purposely, the use of nautical terms. We thinkhaving to learn "a new language" detracts fromthe initial, "instant-fun" philosophy being thewhole Santana 2000 series concept. We haveused, instead, more recognizable terms and haveenclosed in parentheses, whenever possible, thecorrect nautical or technical term.
WARNING!
No sailboat is totally safe, it is entirely possibleto push the Santana 2023 beyond its tolerancesand break it. Very strong winds or seasconditions may also cause structural failure.
Your W.D. Schock Corp. Santana 2023 combinesthe best blend of high performance, ruggedconstruction and easy handling that theart/science of sailboat design allows. Properlymaintained and sailed within its design limits, itwill provide you many years of sailing pleasure.But, like any such craft, its safety is directlyproportional to your diligence in maintaining and

2/17/2016 OM Chapter 1
http://www.kyrasjoy.com/santana2023/Santana%202023%20Owners%20Manual/OM-Chapter%201.htm 6/6
Pic of a Santana logo
repairing it properly, and to your ability to sail itintelligently and conservatively.
We hope your sailboat will provide you withmany hours of great, relaxing quality family time.
All of us at W.D. Schock Corp. would like towelcome you to the growing family of SantanaSailors!
Enjoy your beautiful Santana 2023 and... see you on the water!
Return to OM Table of Contents
Return to Home Port
Mail to: The [email protected]

2/17/2016 OM Chapter 2
http://www.kyrasjoy.com/santana2023/Santana%202023%20Owners%20Manual/OM-Chapter%202.htm 1/3
Santana 2023 Owners & "Santa" Want-a-bies!
OM Chapter II
(Pages 4 - 5)
(Page4)
Special Safety Warnings
Boat
-- Do not power or sail the Santana 2023 unless the water ballast tank iscompletely full.
--Do not allow any part of the boat, trailer, mast or rigging to come incontact with any source of electrical power.
--Be ready to release all sail control lines (sheets) quickly if a gust ofwind causes the boat to lean excessively.
-- Batteries, (if so equipped), are dangerous and can produce explosivegas, corrosive acid and levels of electrical current high enough to causeburns. Do not smoke near batteries.
-- Make sure that the outboard, (if so equipped), and mast are firmlysecured to the boat during transportation.
-- Do not store fuel cans inside the boat.
-- Always shut off the outboard motor when the boat is near people isthe water. Even with low horsepower, propellers can create seriousdamage.
-- although we have made all efforts to simplify the operation of theSantana 2023, do not attempt to operate or sail the boat without basicseamanship knowledge.
Trailer
-- Make sure that the towing vehicle has enough rated power and isproperly equipped to handle the combined weights of the boat, trailerand equipment aboard the boat.
-- Insure that your boat is located on its trailer in such a manner that itcreates a trailer hitch weight between 175 and 225 lbs.
-- Never load the boat and trailer more than the amount shown on thecertification sticker, located near the hitch, on the right hand side ofyour trailer (starboard).
-- Do not trailer the boat with any water left in the water ballast.
-- Periodically insure that all wheel lug nuts on the trailer are tight.
-- Do not trailer the boat without first insuring that the boat is securelytied to its trailer ("V" shaped pad, stern lines, etc.)

2/17/2016 OM Chapter 3
http://www.kyrasjoy.com/santana2023/Santana%202023%20Owners%20Manual/OM-Chapter%203.htm 1/12
Santana 2023 Owners & "Santa" Want-a-bies!
OM Chapter III
(Pages 6 - 14)
(Page 6)
Set-up / Fold-down
Your Santana 2023's unique components were designed to setup inthe simplest, most efficient manor.
The instructions given below provide you with the step-by-stepprocedure for setting up your sailboat. By closely following theseinstructions, you can assure yourself a smooth, damage-free setup.
A: Set-up
» Step 1: Starting at the stern of the boat, untie & remove rear masttransport line.
» Step 2: Walking forward, remove all sail ties securing jib sail tomast and main sail cover. At this time, do not remove the sail tiessecuring the boom or main sail to the mast or the sail tie that keepsthe jib sail furled in position.
» Step 3: Remove bow mast transport line. (Both stern & bow masttransport lines will be used as dock lines when launching anddocking your boat).
Note: If you have equipped your Santana 2023 with a Windex™ orany other mast top accessory, we highly recommend the removal ofthese accessories if the boat is being trailered for a great distance.To reinstall these accessories, you should, prior to proceeding withstep 4, slide the mast tube forward first to provide access to the masttop from the rear of the cockpit, with the mast tube still on it'scrutch. Install the accessories, slide the mast tube back to its originallocation and proceed with step 4.
» Step 4: After insuring that the jib sail is free from the mast andstill tightly furled in its forestay cable, slide the mast base back to itsreceiving bracket located in front of the main hatch.
» Step 5: Your main sheet assembly, located inside one of the twocockpit lazarettes, has two small snap looks (Carabiners) connectedto each end of the assembly.
Clip the carabiner attached to the non-cleating main sheet block tothe small rope loop rolled over the top of the bow pulpit.
Clip the other carabiner into the thimble, at the bow end of theforestay cable.
» Step 6: Release and raise the foredeck tension lever. You are nowable to raise the mast by pulling and cleating the main sheet

2/17/2016 OM Chapter 3
http://www.kyrasjoy.com/santana2023/Santana%202023%20Owners%20Manual/OM-Chapter%203.htm 2/12
assembly. (The first couple of times, it is helpful to have someoneguide the mast laterally during that step).
Remove carabiner from thimble in forestay cable and connect thethimble to the fork fitting on top of the jib furling drum.
Note: You can choose to bypass steps 5 & 6 by simply pushing themast up from the cockpit, stepping carefully from the cockpit sole tothe cockpit seats, then onto the winch island and finally onto theclosed main hatch.
Warning!
Before raising the mast, Please insure that no part of the mastor its rigging will come in contact with a power line or anysource of electricity. You could be seriously injured or killed.
2/17/2016 OM Chapter 3
http://www.kyrasjoy.com/santana2023/Santana%202023%20Owners%20Manual/OM-Chapter%203.htm 3/12
{short description of image}
2/17/2016 OM Chapter 3
http://www.kyrasjoy.com/santana2023/Santana%202023%20Owners%20Manual/OM-Chapter%203.htm 4/12
(Page 9)
» Step 7: Place the forestay thimble terminal into the fork fitting on
tp of the jib frling drum, insert the clevis pin throgh both sides of the
fork fitting and secure the whole assembly with the safety oin
provided.
You are now in position to tension the rigging by pushing the
foredeck tension lever down and securing it to its corresponding bolt
on the stem head fitting.
Note: Prior to lowering the tension lever, insure that the main sheet
assembly has not been "trapped" underneath it.
» Step 8: Remove the mast crutch. Lower the rudder blade half-way
down securing it by cleating its retracting line to the rudder stock.
Inside the cabin, verify that the water intake and the air valves are
fully opened. (Refer to section entitled "Water Ballast Tank
Operation" below).
» Step 9: Place the boat in the water.
» Step 10: While the water ballast is filling, undo the sail tie
retaining the boom and main sail against the mast and lower the
boom.
2/17/2016 OM Chapter 3
http://www.kyrasjoy.com/santana2023/Santana%202023%20Owners%20Manual/OM-Chapter%203.htm 5/12
» Step 11: Un-cleat both jib control lines (Jib sheets) and "walk" the
ring/carabiner assembly located in front of mast base to the jib clew
and clip it into the sewn-in ring. Remove the jib sail tie.
» Step 12: Install your main sheet assembly by clipping each
carabiner to its corresponding transom or boom end tangs.
You are now ready to raise our sail (and remove the topping lift),
unfurl your jib, insure that you have enough ground clearance to
lower your center board & rudder blade, cast off and... HAVE
FUN!!
B: Pre-
sail
Inspection
Before raising the mast and placing the boat in the water:
» Walk around the boat and inspect the hull, especially below its
water line for any signs of gelcoat damage (blisters, nicks, etc.).
» Inspect both centerboard and rudder blades attachment and pivot
points for signs of wear or damage.
» Inspect all center board and rudder control lines for aging & wear.
» While at eye level, inspect hull to deck joint for signs of stress and
/ or separation.
» Inspect all running and standing rigging along the upper part of
the mast for kinks and / or frays.
Once the boat is in the water and prior to setting sail:
» Inspect all standing rigging terminals, chainplates, and all deck
hardware for signs of wear, looseness or deformation.
» Inspect mast for straighness -- A straight mast is best but you will
not critically affect the structural integrity of the rig if you stay
within the tolerances below:
- - - Plus or minus 2" longitudinally.
- - - Plus or minus 1/2" laterally.
» » If necessary, adjust the rigging tension accordingly as per
instructions in Chapter 5.
» Inspect all running rigging for signs of wear, proper routing and
knots.
» Inspect all cleats.
» Inspect all sails for tears, proper installation and tension, wear
points, broken battens and sailcloth aging / fading.
» Inspect all lifelines, pulpits and stanchions.
» Inspect tiller for excessive play.
» Inspect water ballast tank control panel, in cabin, for leaks or
valve damage.

2/17/2016 OM Chapter 3
http://www.kyrasjoy.com/santana2023/Santana%202023%20Owners%20Manual/OM-Chapter%203.htm 6/12
{short description of image}

2/17/2016 OM Chapter 3
http://www.kyrasjoy.com/santana2023/Santana%202023%20Owners%20Manual/OM-Chapter%203.htm 7/12
(Page 11)
C: Fold-downprocedure
» Step 1: Furl jib tightly and cleat both jib sheets and furling line.
Wrap sail tie around furled jib at clew level and tie securely.
Un-clip jib sheets carabiner from jib clew ring.
Pull on jib sheets from cockpit to take slack & cleat.
» Step 2: Retract center board and rudder. Secure and cleat in
position.
» Step 3: Reconnect topping lift at end of boom, take slack on main
sheet, un-cleat main halyard and with the furling handle insert in its
corresponding hole in gooseneck rod at front of mast, proceed to roll
the main sail, with its battens still in position, around the boom tube.
Install sail tie at main sail head plate level to tightly secure furled
main sail.
» Step 4: Open both water and air intake valves inside cabin, (Refer
to section entitled "WATER BALLAST TANK OPERATION"
above).
» Step 5: Place boat back on trailer, secure bow with trailer winch &
tow boat out of water.
Note: On steep launching ramps, it is not necessary to bring the bow
of the boat any closer than 2" to 3" from the "V" shaped bow pad on
the winch post. It is much easier and much less strainful on the bow
eye of the boat to "finish" the proper positioning of the boat relative
to the trailer after the water ballast is completely empty and
therefore when the boat is almost twice as light.
» Step 6: While water ballast is draining, finish raising rudder blade
in its transport position and install mast crutch, first against rudder
stock then secure it tightly against tiller tube.
» Step 7: Un-clip main sheet assembly carabiner from tang at end of
boom. Fold rolled main sail and boom assembly up against mast &
secure tightly in place with a sail tie, to be located half-way up the
boom (Approx. 7Ft. from deck). Include loose topping lift line in
sail tie.
» Step 8: Release and raise the foredeck tension lever to release all
rigging tension. You are now able to lower the mast by using the
main sheet assembly and clip it to the bow pulpit line and the
forestay cable end as described in step 6 on opposite page.

2/17/2016 OM Chapter 3
http://www.kyrasjoy.com/santana2023/Santana%202023%20Owners%20Manual/OM-Chapter%203.htm 8/12
Carefully use the main sheet assembly cleating system to slowly
lower the mast back onto its crutch. (The first couple times, it is
helpful to have help guiding the mast laterally).
» Step 9: Un-clip main sheet assembly and slide mast base off its
deck bracket's slot and forward onto its resting place on the bow
pulpit.
Note: If you have equipped your Santana 2023 with a Windex™ or
any other mast top accessory, we highly recommend the removal of
these accessories if the boat is being trailered for a great distance.
To remove these accessories, you should, prior to proceeding with
step 10, slide the mast tube forward first to provide access to the
mast top from the rear of the cockpit, with the mast tube still on its
crutch. Remove the accessories, slide the mast tube back to its
original location and proceed with step 10.
» Step 10: Place both bow & stern mast transport lines and secure
very firmly by applying a lot of tension on these two lines (use deck
cleats).
» Step 11: Secure furled jib, all lines and shrouds along mast with
sail ties. Fold jib around gooseneck rod assembly and secure tightly.
Install main cover. Insure that all shrouds have been secured for
transportation.
» Step 12: Stow away main sheet assembly. Inspect cabin for loose
objects that may need securing for transportation, close main hatch,
remove swim ladder, insure that boat is resting securely & properly
against its "V" shaped trailer bow pad, secure boat on trailer if
needed and... drive safely!
Always remember: NEATNESS COUNTS!
(Page 12)
D: SpecialTransportationTips
If your Santana 2023 is always transported in the configuration
recommended in this owner's manual, there will be very few
potential "wear points" and your boat will remain in god
condition for years to come.
Use rope or webbing rather than elastic to secure any part of
the sailboat, including the sails. Except for both bow and stern
mast transport lines which should be quite tight, take care to
not overly tighten the other sailboat tie-downs, as this can
crimp your sail.
For long trips, use plenty of padding such as bits of carpet,
foam, old socks, etc.., to protect any and/or all parts from wear
and road vibrations.
After a long trip, you should check all screws bolts and nuts for
appropriate tightness as the vibration from transportation may

2/17/2016 OM Chapter 3
http://www.kyrasjoy.com/santana2023/Santana%202023%20Owners%20Manual/OM-Chapter%203.htm 9/12
have loosened some of the boat's fasteners.
We recommend a couple of "stern lines" holding the back ofboat on its trailer while your Santana 2023 is being transportedover lots of curbs and on bumpy roads. The trailer is equippedwith a metal loop on each side to receive the stern line attachedto each stern deck cleats.
Insure that no "loose" line, shroud or rope touches or otherwiserubs against any part of the boat's finish such as Gelcoat™ ,wood, etc... as it wears and marks each part permanently. Useplenty of padding!
After having loaded the boat back on its trailer and prior topulling away, insure that: -- No loose object(s) is left in the cockpit or deck that can flyaway and get lost. -- The foredeck tension lever is re-installed on its stem fittingbolt. -- The foredeck tension lever wing-nut is securely installed onits bolt so as to not fall off during transportation. -- All running rigging is securely tied or stowed away as perfold down procedure and cannot drag alongside the boat! -- Both rudder deploy and retract line are tightly secured andcannot drag below the rudder. -- The centerboard retract line is securely fastened to its cleatand supporting the centerboard in its fully retracted position. -- The trailer has been inspected as per its owner's manualrecommendations.
Note: If your Santana 2023 is equipped with an outboardmotor, you must insure that the motor's propeller and shaft hasplenty of ground clearance (min. 10") for transportation overcurbs, driveway rises, etc...
You may elect, for long trips, to remove the motor completelyof flip the motor up. In any case insure that the motor isproperly secured with a a support line and will not bouncearound and "fatigue-stress" the transom panel.
{short description of image}

2/17/2016 OM Chapter 4
http://www.kyrasjoy.com/santana2023/Santana%202023%20Owners%20Manual/OM-Chapter%204.htm 1/10
Santana 2023 Owners & "Santa" Want-a-bies!
OM Chapter IV
(Pages 15 - 21)
(Page 15)
Operating the Santana 2023
A: WATER
BALLAST
TANK
OPERATION
Fill the Water
Ballast Tank
The Santana 2023 water ballast system is very simple in itsoperation. Gravity (the boat's weight) will take care of fillingand draining the tank. Its located directly under the boat's cabinsole and will use water from the lake, ocean, or river you willbe sailing on. Your boat's water ballast "control panel" consistsof two valves and is conveniently located in the center of thecabin.
To fill the ballast tank, you simply have to have the boat in thewater, fully open the water intake valve by unscrewing thetwist/knob down until you can no longer see any part of thethreaded rod over the control panel (so not over- tighten!),remove the air valve/plug and place it in a safe place so as tonot loose it! (You will not be able to sail without it!). The wateris now entering the tank and will need approximately 6 to 8minutes to be completely full as the water is entering. (seedrawing)
Insure that the water ballast tank is full by inserting a small drystick or your finger in the air intake hole and verify that thedistance between the hole and the water level does not exceed 4inches.
Prior to setting sail and getting under way, you first must "trap"the water ballast in it's tank by screwing the twist/knob back upuntil a mild resistance is felt. DO NOT OVER-TIGHTEN!!There should be between 2 and 3 inches of threaded rodexposed over the "control panel".
Replace the air intake valve/plug securely in it's hole to insure aproper "seal" as water will be pressing against the air intakevalve/plug when the boat heels.
Caution: Always insure that the water ballast is completely fullbefore closing the water intake valve.
Do not attempt to sail, under any circumstances, without a
completely full water ballast tank & closed water & air
intake valves.

2/17/2016 OM Chapter 4
http://www.kyrasjoy.com/santana2023/Santana%202023%20Owners%20Manual/OM-Chapter%204.htm 2/10
Drain thewater ballasttank:
To drain the tank, simply reverse the above described
procedure. Drive the boat on it's trailer, then drive the boat and
trailer out of the water so that gravity can empty the water out
of the ballast tank.
Unscrew the water intake valve down and remove the air intake
valve/plug so that air can return into the tank as the water
leaves. (see drawing)
We have found it very convenient to use the water being
drained out the tank to clean the boat!
Please note!
It is not recommended to leave the water ballast tank full for
extended periods of time. Organic growth and other
deteriorations can be prevented by "airing out" the tank at least
every 2 weeks. For cruised or sailing adventures lasting over 4
days, we recommend the use of mild water agents such as
additives used in water bads or chlorine tablets for swimming
pools (Follow the directions on the container(s) carefully).
NEVER LEAVE WATER IN THE BALLASTCONTAINER I FREEZING WEATHER, SERIOUSDAMAGE TO THE TANK AND THE WHOLE HULLCOULD RESULT!
2/17/2016 OM Chapter 4
http://www.kyrasjoy.com/santana2023/Santana%202023%20Owners%20Manual/OM-Chapter%204.htm 3/10
(Page 17)
B:
Centerboard
-- Deploy &
Retract
Operation
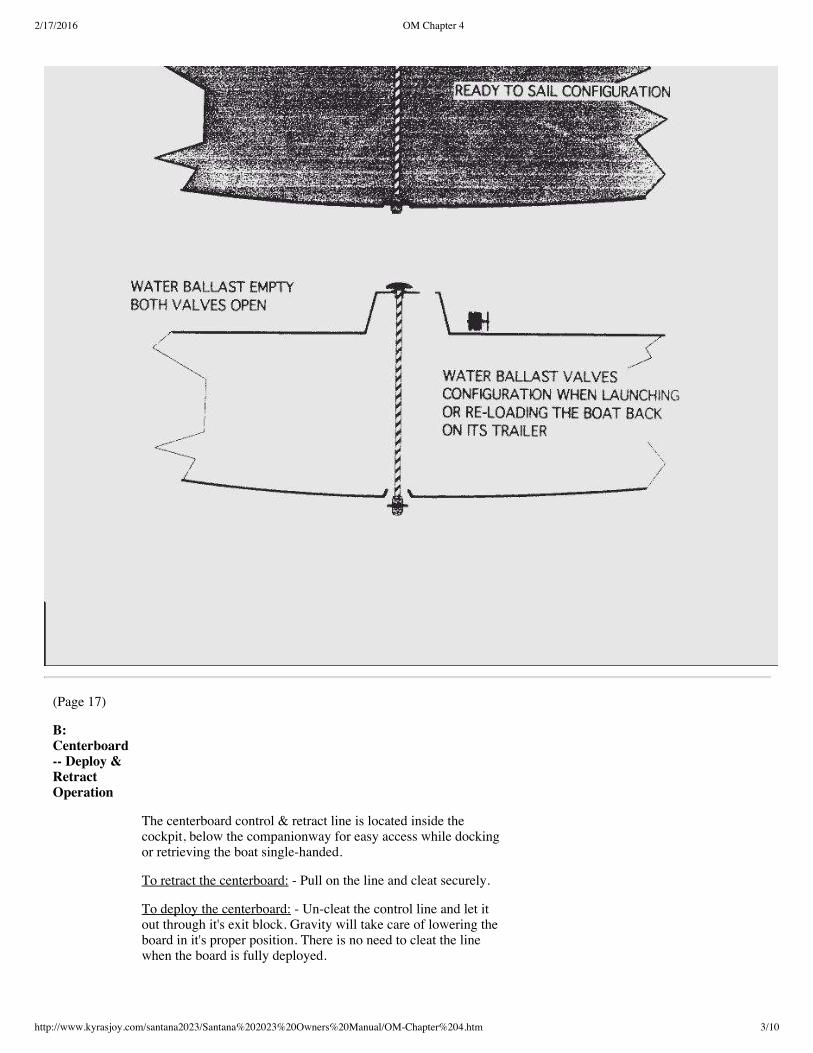
The centerboard control & retract line is located inside thecockpit, below the companionway for easy access while dockingor retrieving the boat single-handed.
To retract the centerboard: - Pull on the line and cleat securely.
To deploy the centerboard: - Un-cleat the control line and let itout through it's exit block. Gravity will take care of lowering theboard in it's proper position. There is no need to cleat the linewhen the board is fully deployed.

2/17/2016 OM Chapter 4
http://www.kyrasjoy.com/santana2023/Santana%202023%20Owners%20Manual/OM-Chapter%204.htm 4/10
During transportation, launching, sailing in shallow waters orretrieving the boat back on it's trailer, the centerboard should befully retracted inside it's trunk and it's control line securely tied tothe cleat located just below the line lead exit block.Approximately 3" are exposed below the hull when thecenterboard is fully retracted.
When sailing across the wind, (*on a reach), you may wish toretract the centerboard about half-way up (20 to 24" of exposedline in the cockpit). This will move the center of the boat sideresistance rearward and therefore better "balance" the boat for thisspecific point of sail and reduce load on the rudder.
It is best and easiest to deploy (lower) the centerboard when theboat is not in motion as any side force on the board will preventit's complete deployment. If the centerboard must be retracted ordeployed while the Santana 2023 is underway, "come up" directlyinto the wind to balance lift pressures on both sides of the boardbefore attempting to retract or deploy it.
You may wish to fully retract the centerboard while at anchor andthe boat is rocking from side to side: this will eliminate the soundof the board against it's trunk.
C: Rudder -
Deploy &
retract
Operation
The rudder deploy & retract lines are located inside the rudderstock, exiting into the cockpit through the tiller head fitting foreasy access while docking or retrieving the boat single-handed.Please notice the two slots at the top of the rudder stock / tillerhear fitting. These two slots are designed to "cleat" either deployand retract lines in their desired positions.
Prior to launching the boat, you must remove the mast crutch, andit's lower transport bolt. The rudder is now ready to be lowered toit's half-way position for launching. The rudder blade is kept inthat position by placing the knot located on the rudder retract lineover and outside and against one of the 2 cleating slots in thetiller head fitting.
To retract the rudder: - Un-cleat the rudder deploy line (if therudder is presently deployed), pull on the retract lone over thetiller head and place the simple knot already tied in the retract lineover and into one of the two slots in the tiller head fitting.
Please note: the rudder retract line will only allow you to retractthe rudder blade half-way to it's transport position. This half-wayposition provides all the clearance needed to launch and retrievethe Santana 2023 back on it's trailer as well as sail in shallowwaters.
To deploy the rudder: - Un-cleat the rudder retract line and pullon the rudder deploy line over the tiller head until the blade isfully deployed. The simple knot on the deploy line should beplaced over and into one of the two cleats/slots in the tiller headfitting.

2/17/2016 OM Chapter 4
http://www.kyrasjoy.com/santana2023/Santana%202023%20Owners%20Manual/OM-Chapter%204.htm 5/10
The Santana 2023's rudder blade has neutral buoyancy. It meansthat it will float if left un-cleated. Although it is possible to steerthe boat with the blade in it's "half-way" position (shallowwaters), it is not recommended and quite stressful on the wholerudder assembly itself.
During transportation, the Santana 2023's rudder should be fullyretracted in it's vertical position and secured with the lower mastcrutch transport bolt. It is also recommended that the rudder bladebe secure to the mast crutch itself during transportation. A littlepadding between the rudder blade and the mast crutch to preventwear on the rudder's Gelcoat™ is recommended as well.
During launching, sailing in shallow waters or retrieving the boatback on it's trailer, the mast crutch should be removed and therudder be placed in it's half-way position.

2/17/2016 OM Chapter 4
http://www.kyrasjoy.com/santana2023/Santana%202023%20Owners%20Manual/OM-Chapter%204.htm 6/10
(Page 19)
D:MainsailRaising &Furling
The mainsail should be found tightly rolled, (furled), around it'sboom tube. The sail should already have all of it's battens installed.The boom tube is kept at an approximate perpendicular angle to themast by it's topping lift line (line joining the boom end and the topof the mast.)
To keep the boom on the boat's centerline, you should first haveconnected the main sheet assembly to the boom end swivel tang andthe transom main sheet tang just over the tiller head fitting. Themain sheet assembly should not be very tight but just enough tokeep the boom on the boat's centerline.
The gooseneck assembly allows the boom to roll on itself, thereby"feeding" the mainsail up the mast in the process.
Prior to raising or furling the mainsail, the boat should always bepositioned with it's bow directly into the wind.
Raising the mainsail: Undo the sail tie keeping the mainsail rolledonto it's boom. Pull on the main halyard line located on thestarboard side of the mast and "feed" the sail, starting withe the sailhead plate, through the mast sail entry slot located approximately16" above the gooseneck assembly. Be sure to keep the yet un-inserted portion of the luff rope of the sail against the mast sail slot.
When the mainsail luff rope has been fully inserted, keep applying
2/17/2016 OM Chapter 4
http://www.kyrasjoy.com/santana2023/Santana%202023%20Owners%20Manual/OM-Chapter%204.htm 7/10
some halyard tension so as to create a clean mainsail luff sectionand cleat the halyard to the cleat located on the starboard side of themast, near the gooseneck. Coil the excess halyard line and store thecoil to itself above the cleat. Slide down and insert the reefing pininside the gooseneck hole in the mast sail slot. Remove the toppinglift line and walk it forward along the sail. Attach the topping lift tothe gooseneck assembly and slide to gooseneck reefing pin in it'scorresponding hole in the gooseneck rod. You're done.
Furling the mainsail: Place the bow of your Santana 2023 directlyinto the wind. Re-clip the topping lift line to the boom end tang.Apply just enough tension to the main sheet assembly to keep theboom tube roughly on the boat's centerline, (therefore into thewind). Insert the boom furling handle provided with the boat intothe gooseneck rod hole at the front of the mast tube and slide thegooseneck reefing pin off the gooseneck rod.
Uncleat the mainsail halyard and begine rooling the mainsail on it'sboom by turning the handle and, at the same time, letting thehalyard slip lightly in your hand.
When the mainsail is fully furled on it's boom, (plus a couple moreturns to wrap a bit of main halyard around the rolled sail), removethe mainsail furling handle and secure the rolled sail with a sail tielocated at the sail's head plates (near the gooseneck assembly).
Note: When furling the sail, it is better to roll the sail looselyaround the boom withe a minimum amount of halyard resistance asit slips through your hand and to stop every few turns to "tighten"the furled sail into a smaller, lesser diameter, roll.
Reefing the mainsail: This procedure is very similar to the mainsailfurling procedure described above with the following exceptions:
When the desired amount of mainsail area is achieved, insert themainsail reefing pin, located in the sail slot above the gooseneckassembly, in the corresponding gooseneck rod hole.
Re-tighten and re-cleat the mainsail halyard.
Disconnect the topping lift line from the boom end tang if thetopping lift was used, (if only a small part of the mainsail area needsto be reefed, it is not necessary to use the topping lift line).
{short description of image}

2/17/2016 OM Chapter 4
http://www.kyrasjoy.com/santana2023/Santana%202023%20Owners%20Manual/OM-Chapter%204.htm 8/10
(Page 21)
F: ElectricalSystem
Your Santana 2023 is equipped with a pre-wired 12 Volt
2/17/2016 OM Chapter 4
http://www.kyrasjoy.com/santana2023/Santana%202023%20Owners%20Manual/OM-Chapter%204.htm 9/10
electrical system providing power to all 3 cabin lights andboth bow and stern lights.
You will, however, need to connect a 12 volt power sourceto the system such as a regular marine (or car) battery, asolar panel and/or a 110 Volt to 12 Volt power converter forconnection while docked.
You can also use your running outboard motor, if soequipped to recharge your battery. Please refer to youroutboard motor owner's manual for proper instructions andinstallation.
The control and fuse panel for the entire electrical system isagainst the foreberth bunk riser. We have provided a storagespace directly behind this riser to install and properly securea battery which can then be connected to the control panel.Although all connections are clearly marked, we stronglyrecommend contracting a professional to perform thebattery's installation.
CAUTION ! ! - Batteries are dangerous and can produce
explosive gas, corrosive acid and levels of electrical
current high enough to cause burns, do not smoke, weld
or have any open fires near batteries.
Note: The battery must be very solidly secured in
position and in a corrosion resistant container.
Besides the switches provided on the main control and fusepanel, each cabin light is also equipped with it's ownindividual on/off switch.
G: Cabin
Accommodations
- Noteworthy
Tips -
Dinette / Cockpit Table: Your Santana 2023's cabin isequipped with a small table that can be raised or lowered tothree different positions on the boat's mast compression post.To change the height of the dinette table, simply undo thewing-nut and remove the retaining bolt off the table's supportbracket, slide the table support bracket up or down to its nextposition, align the holes in the bracket to the holes in thecompression post and re-install the retaining bolt and wing-nut tightly.
You can also easily remove the table from its support bracketby location the table's locking block under the bracketsupport aluminum U-shaped strap, twist the block 90 degreeseither direction to allow its passage through the U-shapedstrap and push the table up and away from its supportbracket.
Head Door Latch - Opening from Outside the Head: Thehead door latch is located inside the head door and accessiblefrom the outside by placing your hand along the top of thedoor and opposite the hinged side. Down inside the door, andquite reachable with your fingers, you can then feel a small

2/17/2016 OM Chapter 4
http://www.kyrasjoy.com/santana2023/Santana%202023%20Owners%20Manual/OM-Chapter%204.htm 10/10
Pic of a Santana logo
metal spring latch approximately 2 1/2" down from the topedge of the door. Push the latch toward the door and gentlypull the door open.
Return to OM Table of Contents
Return to Home Port
Mail to: The [email protected]

2/17/2016 OM Chapter 5
http://www.kyrasjoy.com/santana2023/Santana%202023%20Owners%20Manual/OM-Chapter%205.htm 1/5
Santana 2023 Owners & "Santa" Want-a-bies!
OM Chapter V
(Page 22)
Sailing the Santana 2023
This Chapter is not intended to replace proper sailing instruction,dispensed by accredited sailing instructors.
This chapter is only intended to offer recommendations specific tothe operation of the Santana 2023.
The U.S. Coast Guard Auxiliary, as well as most local communitycolleges offer free or very affordable basis sailing and seamanshipcourses. If you are inexperienced and new to the sport of sailing,we strongly urge you to enroll in such courses prior to using yourSantana 2023.
A:
Operation
Limitations
Prior to any outings on your Santana 2023, you should alwaysmonitor the weather forecast, paying special attention to windspeed and direction, any mention of impending storm(s) and fog.
If you live or intend to sail in coastal waters, you should also:
-- Give the U.S. Coast Guard a call and inquire about a potential"Small Craft Advisory" for that day.
-- Obtain a current tide and current table for your area.
With the above observations in mind, you should not operate
your Santana 2023 either under sail or under motor if:
-- The wind(s) is exceeding 25 mph (22 knots).
-- The current(s) is exceeding 5 mph (4.5 knots).
-- The swells are exceeding 6 feet.
Visibility is less than 100 feet.
You should also not exceed a rated outboard engine power of 8H.P. at the risk of stressing the transom panel of your Santana 2023beyond it's design limits. *(Note; the factory okayed the use of my 10 H.P. four stroke back
in 1998.)
Your Santana 2023's hull is very efficient and we have found that a5 H.P. outboard motor provides a very acceptable level of power inany condition.
B: Sailing
Techniques
2/17/2016 OM Chapter 5
http://www.kyrasjoy.com/santana2023/Santana%202023%20Owners%20Manual/OM-Chapter%205.htm 2/5
Light Winds:
Your Santana 2023 has delightful all-around sailing characteristicsand is especially nimble and responsive in light air. The tiller onlyrequires a light touch and there is no "muscling" involved inmaneuvering the boat, even around tight corners.
Although the Santana 2023 is "main-driven", the jib sail, despiteit's relatively small size, is very helpful in light air as it really"lifts" the bow of the boat up into the wind and greatly helps in theacceleration of the boat after a tack.
Be aware that the fully battened mainsail sail cloth layout and all-around quality makes it easy to "over-strap" (over-tension or overflatten).
Remember a golden rule of sail trim: "When in doubt, let it out!"
When tacking in light air with minimal forward speed, you maywant to delay the release of the active jib sheet until the jib saildisplays a small amount of "back wind" which will help bring thebow of the boat across the wind. Then quickly release (un-cleat)the jib sheet and bring the new jib sheet in slowly to allow theboat's new re-acceleration without stalling the jib sail.
(Page 23)
Heavy Conditions:
Your Santana 2023 displays surprising stiffness and excellent heelingresistance in strong winds. However, it is essential to be always readyto quickly uncleat the main sheet and unload the mainsail at any timein strong gusty conditions. Keep the jib sail fairly flat in suchconditions as it provides the lift forward which as it increases, will"drive" the boat into the wind... a safety feature in over-poweringconditions.
Of course, reefing the mainsail is always the best way to "dial" thedesired amount of driving power into your sails.
In strong conditions, it is also recommended to slide the main hatchback and close the forward hatch shut to prevent and accidentalswamping of the cabin.
C:
Sailing
in
Shallow
Waters
&
Beaching
Your Santana 2023 has a 15" draft allowing the boat to be sailed inshallow waters providing the center board and rudder have beenretracted and cleated in position.
Please be reminded that the rudder, when retracted, should be subject
2/17/2016 OM Chapter 5
http://www.kyrasjoy.com/santana2023/Santana%202023%20Owners%20Manual/OM-Chapter%205.htm 3/5
to lighter tiller pressures than when fully deployed.
Your Santana 2023 should be sailed or motored at very slow speed
when operated in shallow waters.
Beaching the Santana 2023.
Using the above recommendations for the shallow waters sailing,
your Santana 2023 can be beached bow first or stern first and only on
very smooth, non-abrasive terrain.
You should use your own judgement when beaching your boat. You
should consider the following factors:
-- Wind speed and direction (in relation to the beach).
-- Intensity of wave and or swells.
-- Nature of underlying terrain.
-- Tides (if applicable).
-- Number of anchors at your disposal.
-- Availability of an outboard motor (or lack of).
-- Sailing experience and proficiency.
-- Age and size of crew (as landing and launching help).
Please Note!: If you have run aground, either on purpose or by
accident, with your centerboard or rudder fully deployed, you must
first retract both or either board and cleat them in position prior to
"backing out". Severe damage to your hull, centerboard, rudder and
or support brackets would result in attempting to back up your
Santana 2023 with it's blades still stuck in the ground.
D:Dockingthe Boat.
Your Santana 2023 is veery maneuverable and docking the boat
under sail or under motor is very easy providing you follow the
simple guidelines below:
-- Install at least two dock fenders to the proper side well prior to
nearing the dock.
-- Have both bow and stern dock lines already installed on their
corresponding deck cleats ready prior to starting your docking
procedure.
-- Always try to bring the boat to dock into the wind.
-- Except in very light or no-wind conditions, be prepared to quickly
furl the mainsail and jib upon docking.
If docking under sail and bringing the boat to dock on a "close reach"
(close to the wind), you may wish to keep the jib opened and properly
trimmed until the last moment as it helps keeping the boat's lift
"balanced" and therefore more control to the docking procedure.
2/17/2016 OM Chapter 5
http://www.kyrasjoy.com/santana2023/Santana%202023%20Owners%20Manual/OM-Chapter%205.htm 4/5
If docking under motor, you should have furled both the mainsail andjib sail while motoring directly into the wind prior to starting thedocking procedure.
{short description of image}


![[Carlos Santana] Santana Shaman Guitar Songbook(BookZZ.org)](https://img.pdfslide.us/doc/110x75/55cf975f550346d03391452d/carlos-santana-santana-shaman-guitar-songbookbookzzorg.jpg)