Embed Size (px)
Citation preview
SANAKO Lab 300 v. 10.1 Setup
USER GUIDE
Copyright 1995-2010 SANAKO Corporation. All rights reserved. Sanako is a registered trademark of SANAKO Corporation. Microsoft is a registered trademark. Microsoft Access, ODBC and Windows are trademarks of Microsoft Corporation. Reachout is a trademark of Ocean Isle Software Corporation. Proxy is a trademark of Funk Software Corporation. MPEG Layer-3 audio coding technology licensed from Fraunhofer IIS and Thomson. Supply of this product does not convey a license nor imply any right to distribute MPEG Layer-3 compliant content created with this product in revenue-generating broadcast systems (terrestrial, satellite, cable and/or other distribution channels), streaming applications (via Internet, intranets and/or other networks), other content distribution systems (pay-audio or audio-on-demand applications and the like) or on physical media (compact discs, digital versatile discs, semiconductor chips, hard drives, memory cards and the like). An independent license for such use is required. For details, please visit http://mp3licensing.com. Used Software: Lab 300 and Config: Microsoft Visual C++ (trademark of Microsoft). Help and User Guide: Doc-To-Help (trademark of WexTech Systems, Inc). Installation: Wise (trademark of Wise Solutions, Inc.). Database: Solid (trademark of Solid Information Technologies, Ltd.). Document date 29.6.2010 Document Code: 1870340-10180
This equipment complies with the requirements in Part 15 of FCC Rules for a Class A computing device. Operation of this equipment in a residential area may cause unacceptable interference to radio and TV reception requiring the operator to take whatever steps are necessary to correct the interference.
SANAKO Corporation
Eurocity, Joukahaisenkatu 1, 20520 Turku, Finland Tel: (0)20 7939 500, Fax: (0)22 363 440 [email protected], [email protected], http://www.sanako.com SANAKO User Club and Discussion Forum: http://members.sanako.com
Contents i
CONTENTS
Installing the Software 1
Overview ................................................................................................................. 1 SANAKO Lab 300 Package ....................................................................... 1 Terminology ............................................................................................... 1 Different Lab 300 Systems ......................................................................... 2 Lab 300 Installation Requirements and Limitations ................................... 5 Installation Order in the Duo lab ................................................................ 6
Minimum Computer Requirements ......................................................................... 7 Operating System Limitations ................................................................................. 8 Lab 300 Full Package Installation ........................................................................... 8
1. Select Workstation ................................................................................. 8 2. Product License ..................................................................................... 9 3. Select Application Folder ....................................................................... 9 4. Select Media Folder ............................................................................. 10 5. Database Client Setup ......................................................................... 10 6. Crossroad............................................................................................. 11
Student (SANAKO Client) Installation ................................................................... 12 1. Select Workstation ............................................................................... 12 2. Select Application Folder ..................................................................... 12 3. Crossroad............................................................................................. 13
Configuring Lab 300 and Media Assistant audio settings with SoundSet ............ 14 Adjusting Record mixer settings .............................................................. 15 Adjusting Playback mixer settings ........................................................... 15 Setting volume levels ............................................................................... 16 Copying audio settings to other computers ............................................. 18
Troubleshooting .................................................................................................... 19
Using the Lab 300 Config Program 21
Overview ............................................................................................................... 21 Student Workstation Setup ...................................................................... 21 Program Source Setup (audio) ................................................................ 21 Video Network Installation ....................................................................... 22 Database Setup ....................................................................................... 23 Grouping Students ................................................................................... 23 Other Settings .......................................................................................... 23
File Menu .............................................................................................................. 23 Open ........................................................................................................ 24 Save ......................................................................................................... 24 Save As .................................................................................................... 24 Preferences .............................................................................................. 25 Advanced Preferences ............................................................................. 26 Exit ........................................................................................................... 27
Layout Menu ......................................................................................................... 27 Available Layouts ..................................................................................... 27 New Student............................................................................................. 28 Delete Student ......................................................................................... 28 Raster 0 - Raster 8 ................................................................................... 28 Grid 8 - Grid 32, Lab 300 Background Grid, Grid Off .............................. 28

ii SANAKO Lab 300 v. 9.0 Setup User Guide - English
Settings Menu ....................................................................................................... 28 Audio Sources ......................................................................................... 29 Default Sources ....................................................................................... 30 Video Sources ......................................................................................... 30 Audio – Video Source Connections ......................................................... 31 Audio Source ........................................................................................... 31 Video........................................................................................................ 31 Video Line – Student Connections .......................................................... 31 Steps in setting up the database ............................................................. 32 Database Administrator ........................................................................... 33 Update Locations ..................................................................................... 33 Update Workstations ............................................................................... 34 Video Overlay Card ................................................................................. 35 Video Window Application ....................................................................... 36 System Settings ....................................................................................... 37 Data Files ................................................................................................ 38 Link Other Applications............................................................................ 38 Digital Response Collection .................................................................... 40 Crossroad Settings .................................................................................. 41 Video Streamer ........................................................................................ 41 Podcast Settings ...................................................................................... 46
Default Size and Position of the Master Video Window ....................................... 48 Altering the Position of the Window ......................................................... 48 Altering the Size of the Window .............................................................. 48
Hardware Remote Control .................................................................................... 49 Software Remote Control and Dictionaries .......................................................... 51
Remote Control Program......................................................................... 51 Dictionary Program .................................................................................. 52 Linking Third Party Applications to the System ....................................... 53
Setup Files ............................................................................................................ 53 LABMAIN.INI File .................................................................................... 53 ENGINE.INI File ...................................................................................... 56 LABMAIN.SET File .................................................................................. 57
Glossary of Terms 59
Installing the Software 1
INSTALLING THE SOFTWARE
OVERVIEW
SANAKO LAB 300 PACKAGE
This is the SANAKO Lab 300 installation guide. Before you start installing Lab 300, be sure that you have the following items available:
1. SANAKO Lab 300 License sheet
2. Software Key for SANAKO Lab 300
3. SANAKO Lab 300 CD
TERMINOLOGY
SANAKO Lab 300 software consists of different components, which are referred to in the following sections. In addition to the listed components, Lab 300 includes some unique features, which are explained here.
Crossroad is a component that handles communication between Lab 300 and the clients (Media Assistant Duos). Crossroad is normally installed in the teacher‟s computer.
Database is used for saving media attributes, student and course data.
Media Launch is used in Lab 300 to open different media in the student computers (e.g. TXT, BMP, WAV, MPG file). The application responsible for opening an appropriate document depends on associations. Crossroad must be installed in order to use Media Launch.
Digital Response Collection is used in Lab 300 to collect student responses from Media Assistant recorders, either to a folder in the teacher‟s computer or to a server.
Computer family is a name for the group of workstations, which are connected to SCU.
2 SANAKO Lab 300 v. 9.0 Setup User Guide - English
Software Screen Transfer refers to a separate license that is used to activate software screen transfer functions in Lab 300.
Study 300 is server software for saving media, course and student data.
Study 300 Client is client software that is installed on all the computers where the Study 300 database is to be used.
CSS Net (Computer Supervisory System) means a hardware solution for remote controlling of student workstations.
When CSS Net is installed, the teacher workstation is equipped with an additional controller unit (CSS Net keypad) with two buttons. The buttons are used for switching between the Intercom and Monitor modes and closing an Intercom/Monitor connection between a student‟s and the teacher‟s computers.
DIFFERENT LAB 300 SYSTEMS
RECORDER LAB (LAN NOT REQUIRED)
Lab 300 Lab 300
Features
The Database can be used from a second teacher computer, if a LAN (Local Area Network) exists between the teacher computers.
Limitations
Media Launch and Digitial Response Collection do NOT function in Recorder Lab.
Installation
Crossroad is NOT needed in this installation.
Installing the Software 3
DUO LAB WITHOUT FILE SERVER
SANAKO Client
DR-100
SANAKO Client
Lab 300 (2)Lab 300 (1)
Features
The Media and Resource management programs are working from both of the teacher computers.
Limitations
In Windows XP environments, both Media Launch and Digital Collection work with a maximum of 40 student workstations due to limitations in Windows.
4 SANAKO Lab 300 v. 9.0 Setup User Guide - English
DUO LAB WITH FILE SERVER
SANAKO Client
SANAKO Client
Lab 300 (2)Lab 300 (1)
Features
The Media and Resource management programs are working from both of the teacher computers.
Media can be launched to all the student computers from the File Server.
Digital Collection Responses can be collected to the File Server from all the student computers.
Limitations
The Study 300 system is needed for the students to be able to access the database.
Installing the Software 5
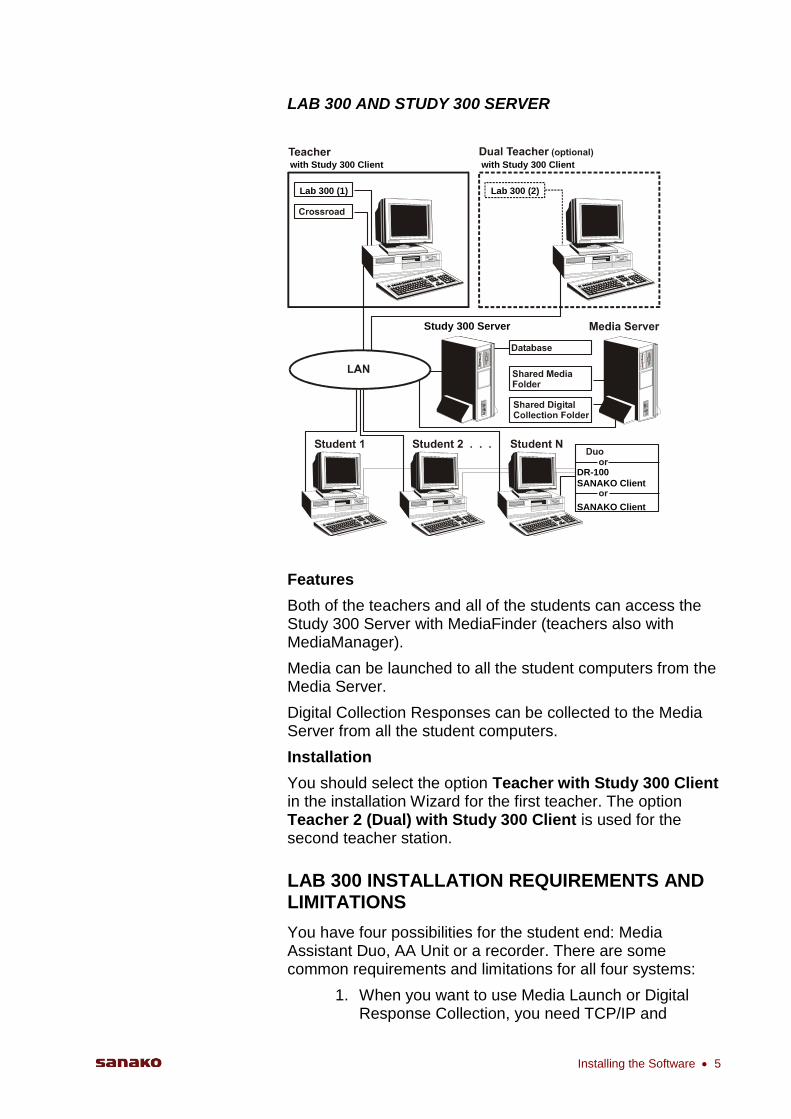
LAB 300 AND STUDY 300 SERVER
SANAKO Client
DR-100
SANAKO Client
Study 300 Server
Lab 300 (2)Lab 300 (1)
with Study 300 Clientwith Study 300 Client
Features
Both of the teachers and all of the students can access the Study 300 Server with MediaFinder (teachers also with MediaManager).
Media can be launched to all the student computers from the Media Server.
Digital Collection Responses can be collected to the Media Server from all the student computers.
Installation
You should select the option Teacher with Study 300 Client in the installation Wizard for the first teacher. The option Teacher 2 (Dual) with Study 300 Client is used for the second teacher station.
LAB 300 INSTALLATION REQUIREMENTS AND LIMITATIONS
You have four possibilities for the student end: Media Assistant Duo, AA Unit or a recorder. There are some common requirements and limitations for all four systems:
1. When you want to use Media Launch or Digital Response Collection, you need TCP/IP and
6 SANAKO Lab 300 v. 9.0 Setup User Guide - English
Microsoft File Sharing installed on the teacher‟s computer, or you need to have the media folders available on the server. At least one folder must be shared for Media Launch and one folder for Digital Response Collection.
2. Crossroad must be installed in order to use Media Launch and Digital Response Collection.
3. Attach the Software Key for Lab 300 to the USB port before running Lab 300. Please note that Lab 300 can't be started if the software key is missing.
4. When you have two teacher computers controlling one SCU, you should use Dual (or Dual with Study 300 client) installation.
The requirements and limitations for each type:
DUO
1. You ALWAYS need Crossroad to be installed to use Duo with Lab 300.
2. You do NOT need to install SANAKO Client on the student computer, because Duo installation includes the SANAKO client installation.
RECORDER OR AA UNIT
When you install Lab 300 in a recorder lab, TCP/IP is not needed on the teacher‟s computer. In the installation Wizard, select the Do Not Use Crossroad option.
INSTALLATION ORDER IN THE DUO LAB
The most convenient and automatic way to install Lab 300 is the following:
1. Install Lab 300.
2. Install Media Assistant Duo on the first student computer.
3. Adjust the first student computer‟s sound levels with the SoundSet application. For instructions on adjusting audio levels with SoundSet, see the Error! Reference source not found. section later in this guide.
4. By default the Media Assistant Duo software is shared on the teacher computer, so you can easily install Duo to student computers without using the same software CD. Install Duo from the teacher computer‟s hard disk on the student computers in sequence. In this way the Duo installation can automatically suggest the next student number,
Installing the Software 7
Computer Family name and teacher computer address.
5. Copy the mixer.cfg and volume.cfg files that were created using the SoundSet application on the first student computer to the other student computers in order to equalize the audio levels on all student computers (see Error! Reference source not found. later in this guide). Please note that if you have different sound cards on the student computers, you have to adjust each of them individually.
6. If the teacher computer has identical hardware, including sound card, with the student computers, copy the the mixer.cfg and volume.cfg files to the teacher computer (see Error! Reference source not found. later in this guide). If the teacher computer has different hardware than the student computers, run the SoundSet application on the teacher computer in order to adjust the teacher audio levels.
MINIMUM COMPUTER REQUIREMENTS
Minimum requirements for the Master Workstation PC:
- Microsoft® Windows® XP, Windows® Vista, or 32-bit Windows® 7 operating system
- 1,5 GHz processor
- 512 MB RAM
- 100 MB free space
- Sound card (For a list of suitable sound cards, please contact your local distributor)
- SVGA video adapter (1024*768 High Color)
- CD-ROM
- Mouse
- Serial port
- Local Area Network Connection
- USB Port
- Video overlay card (optional)
- An additional serial port if the EBS CSS Net is used
For a master computer to be installed in the master desk, it MUST conform to the following physical requirements:
8 SANAKO Lab 300 v. 9.0 Setup User Guide - English
- The power switch must be located on the front panel of the computer
- The keyboard connection must be located on the back panel of the computer
- The mouse, serial and parallel ports must be located on the back panel of the computer
OPERATING SYSTEM LIMITATIONS
Using the Media Launch or Digital Response Collection features in a classroom with over 10 student positions requires the use of a separate files server to host the digital learning materials
LAB 300 FULL PACKAGE INSTALLATION
The installation procedure is as follows:
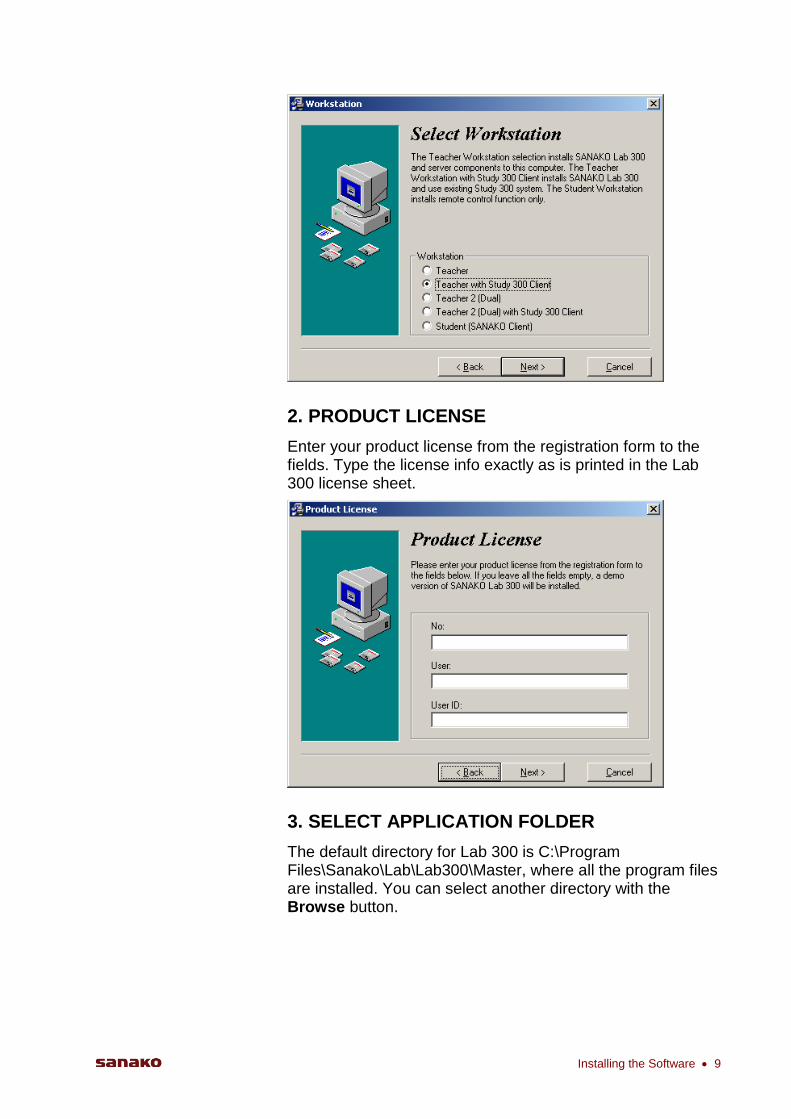
1. SELECT WORKSTATION
You must first select whether to run a teacher or a student installation.
The Teacher Workstation is for Lab 300 and the server components (Database, Crossroad).
The Teacher with Study 300 Client option should be selected when an existing Study 300 system is used as the database.
In case of a Dual teacher lab, if you have already installed the first teacher‟s Study 300, use the Teacher 2 (Dual) selection to install the second teacher‟s Study 300.
If you have already installed the first teacher‟s Study 300 and have an existing Study 300 system, use the Teacher 2 (Dual) with Study 300 Client selection to install the second teacher‟s Lab 300.
The Student option is used if you want to install the SANAKO Client only on the student computer. The Client allows for computer management functions to be used, but does not include the digital recorder application.
Installing the Software 9
2. PRODUCT LICENSE
Enter your product license from the registration form to the fields. Type the license info exactly as is printed in the Lab 300 license sheet.
3. SELECT APPLICATION FOLDER
The default directory for Lab 300 is C:\Program Files\Sanako\Lab\Lab300\Master, where all the program files are installed. You can select another directory with the Browse button.
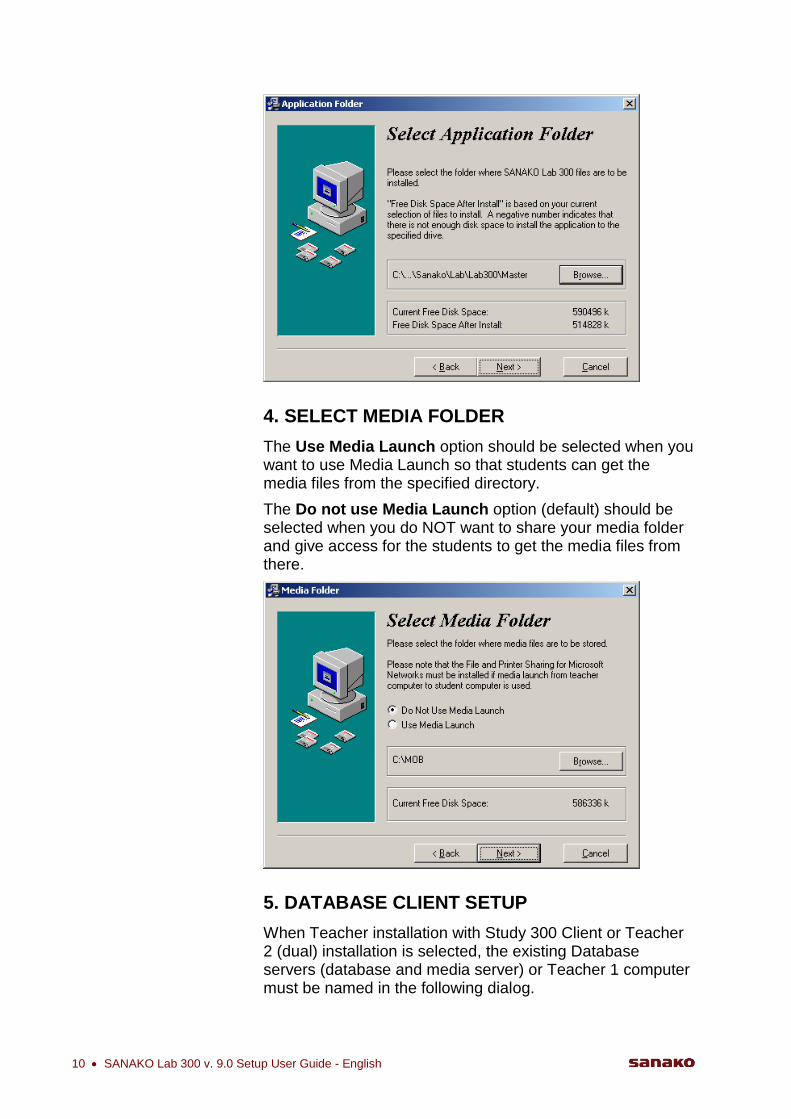
10 SANAKO Lab 300 v. 9.0 Setup User Guide - English
4. SELECT MEDIA FOLDER
The Use Media Launch option should be selected when you want to use Media Launch so that students can get the media files from the specified directory.
The Do not use Media Launch option (default) should be selected when you do NOT want to share your media folder and give access for the students to get the media files from there.
5. DATABASE CLIENT SETUP
When Teacher installation with Study 300 Client or Teacher 2 (dual) installation is selected, the existing Database servers (database and media server) or Teacher 1 computer must be named in the following dialog.
Installing the Software 11
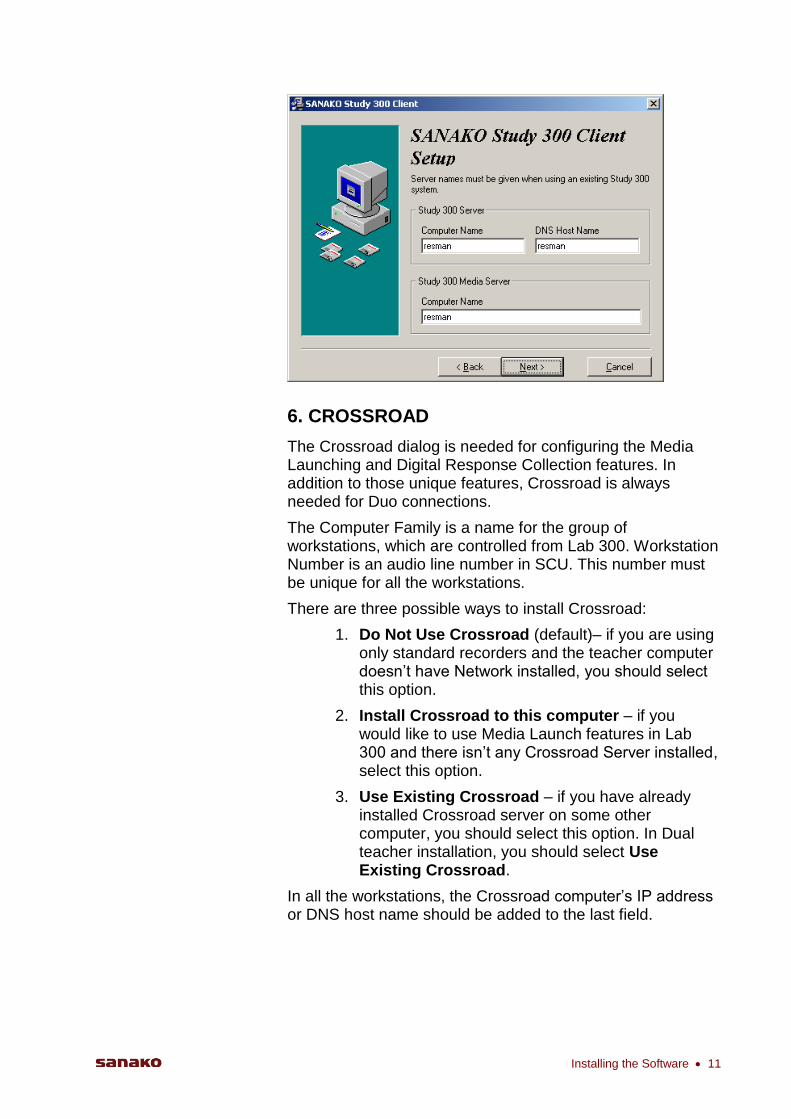
6. CROSSROAD
The Crossroad dialog is needed for configuring the Media Launching and Digital Response Collection features. In addition to those unique features, Crossroad is always needed for Duo connections.
The Computer Family is a name for the group of workstations, which are controlled from Lab 300. Workstation Number is an audio line number in SCU. This number must be unique for all the workstations.
There are three possible ways to install Crossroad:
1. Do Not Use Crossroad (default)– if you are using only standard recorders and the teacher computer doesn‟t have Network installed, you should select this option.
2. Install Crossroad to this computer – if you would like to use Media Launch features in Lab 300 and there isn‟t any Crossroad Server installed, select this option.
3. Use Existing Crossroad – if you have already installed Crossroad server on some other computer, you should select this option. In Dual teacher installation, you should select Use Existing Crossroad.
In all the workstations, the Crossroad computer‟s IP address or DNS host name should be added to the last field.
12 SANAKO Lab 300 v. 9.0 Setup User Guide - English
STUDENT (SANAKO CLIENT) INSTALLATION
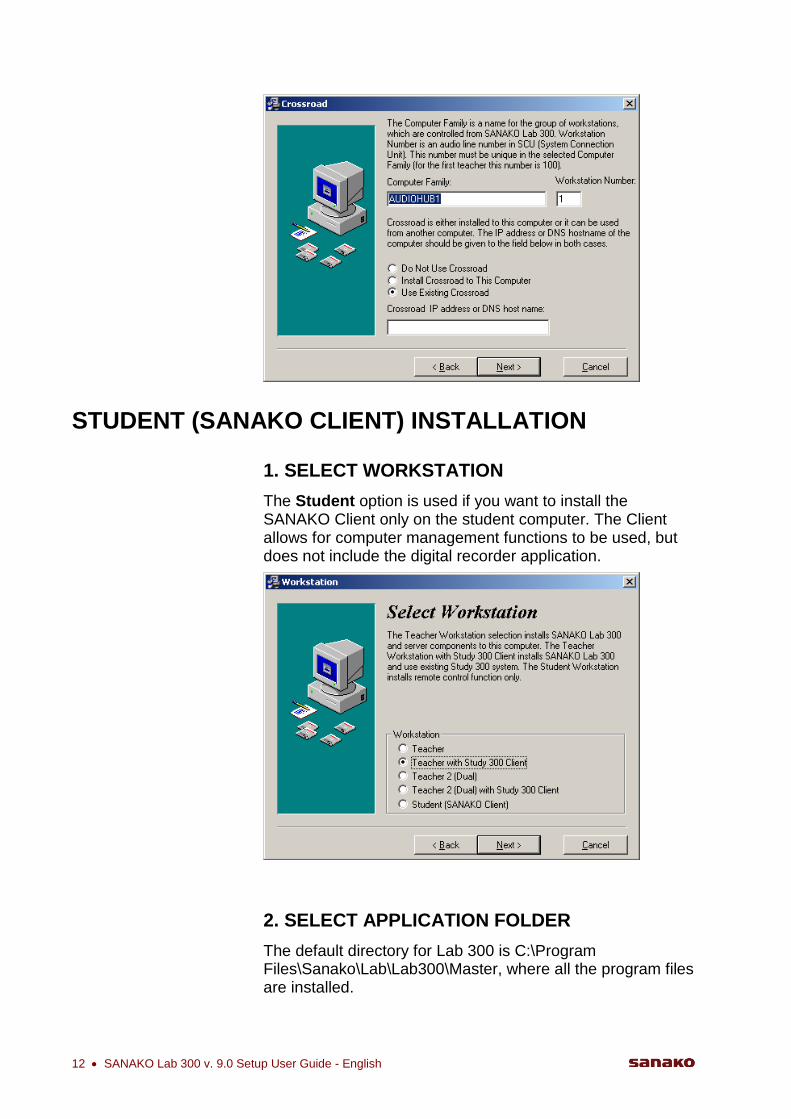
1. SELECT WORKSTATION
The Student option is used if you want to install the SANAKO Client only on the student computer. The Client allows for computer management functions to be used, but does not include the digital recorder application.
2. SELECT APPLICATION FOLDER
The default directory for Lab 300 is C:\Program Files\Sanako\Lab\Lab300\Master, where all the program files are installed.
Installing the Software 13
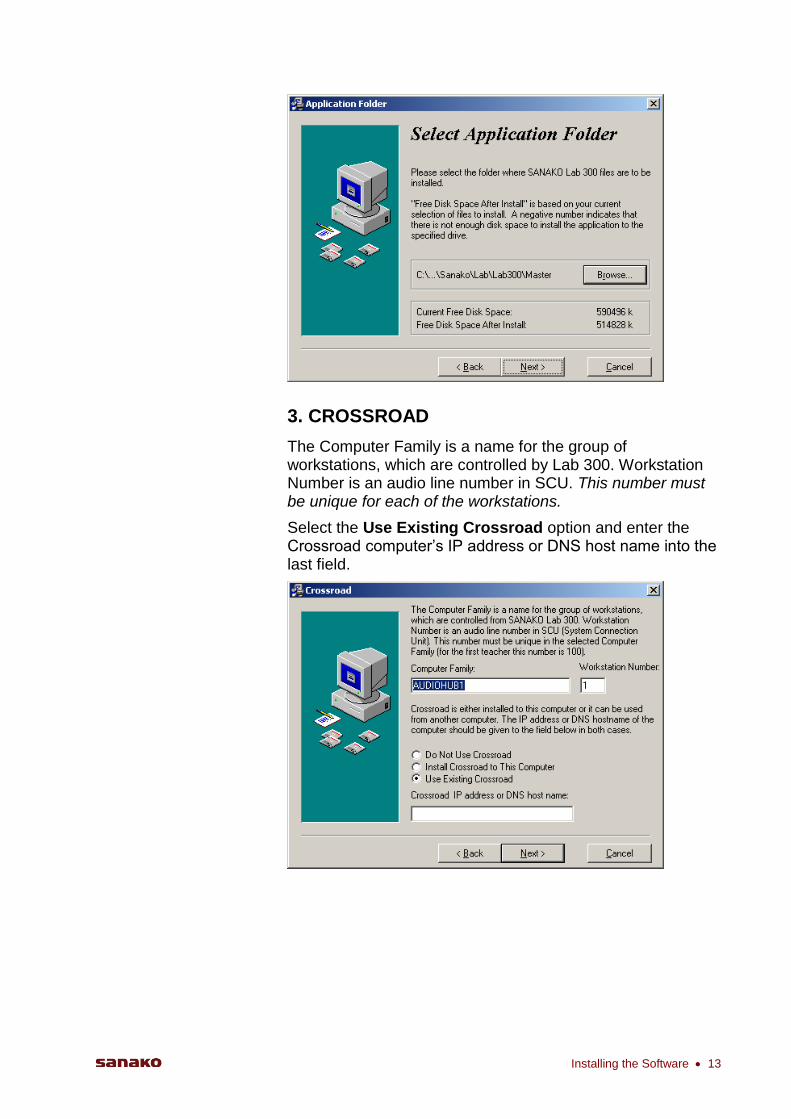
3. CROSSROAD
The Computer Family is a name for the group of workstations, which are controlled by Lab 300. Workstation Number is an audio line number in SCU. This number must be unique for each of the workstations.
Select the Use Existing Crossroad option and enter the Crossroad computer‟s IP address or DNS host name into the last field.

14 SANAKO Lab 300 v. 9.0 Setup User Guide - English
CONFIGURING LAB 300 AND MEDIA ASSISTANT AUDIO SETTINGS WITH SOUNDSET
SoundSet is an application which is used to configure Media Assistant audio levels from Media Assistant version 8.0 onwards. It replaces the old sound adjustment procedure which was used up to Media Assistant 7.0. The new SoundSet -tool will enhance compatibility with new High Definition audio sound cards and Windows Vista.
On computers with Lab 300, the SoundSet application can be found by default in the following location: C:\Program Files\Sanako\Lab\Lab 300\Master\SoundSet.exe
On computers with Media Assistant Duo, Solo or Lite, the SoundSet application can be found by default in the following location:
C:\Program Files\Sanako\Lab\Lab300\[Duo, Solo or Lite]\SoundSet.exe
Please note that the folders may vary according to selections made during the Lab 300 or Media Assistant installation process.
Currently, Media Assistant and SoundSet only operate with the default Sound Card. If you have multiple sound cards in your system, you can change the default sound card in Windows XP at Control Panel / Sounds and Audio Devices / Audio. Remember to select the correct sound card for Sound Playback and for Sound Recording.
The main window of SoundSet has five dropdown menus, where you can define which sound card lines are used for different purposes. Clicking a drop down menu opens a list of every available sound card line. At the top of the screen you can select whether to adjust Record mixer (input lines) or Playback mixer (output lines).
Installing the Software 15
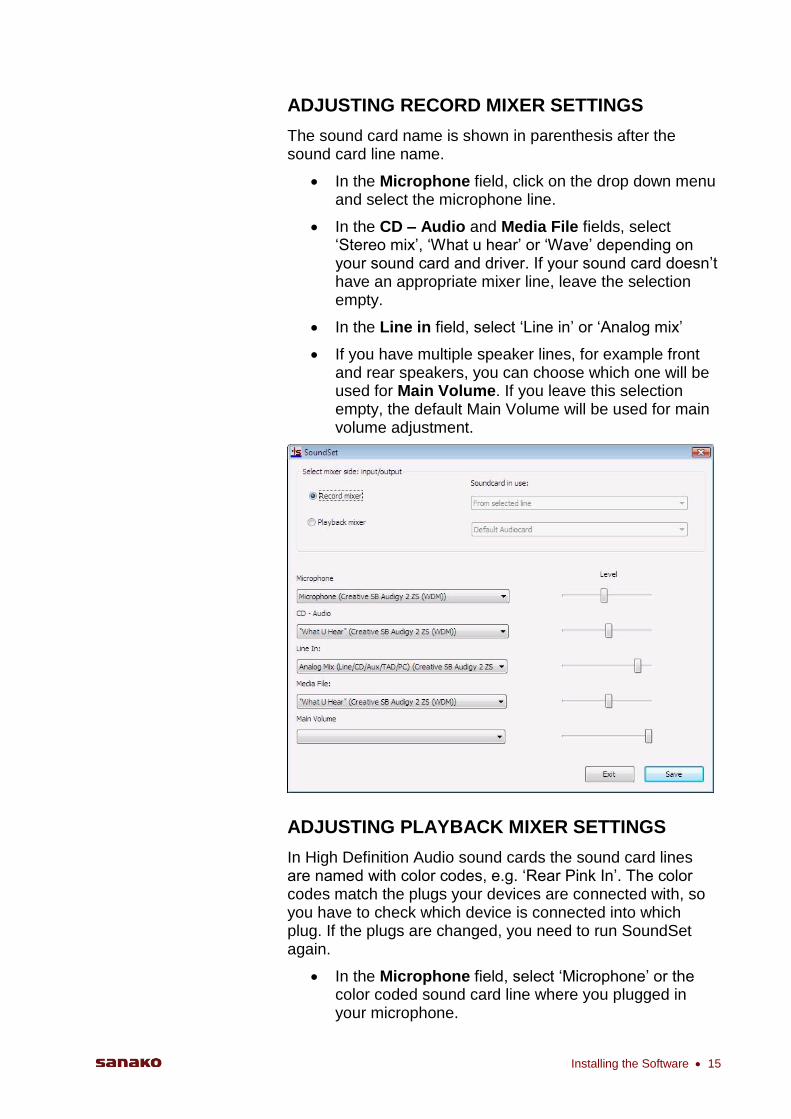
ADJUSTING RECORD MIXER SETTINGS
The sound card name is shown in parenthesis after the sound card line name.
In the Microphone field, click on the drop down menu and select the microphone line.
In the CD – Audio and Media File fields, select „Stereo mix‟, „What u hear‟ or „Wave‟ depending on your sound card and driver. If your sound card doesn‟t have an appropriate mixer line, leave the selection empty.
In the Line in field, select „Line in‟ or „Analog mix‟
If you have multiple speaker lines, for example front and rear speakers, you can choose which one will be used for Main Volume. If you leave this selection empty, the default Main Volume will be used for main volume adjustment.
ADJUSTING PLAYBACK MIXER SETTINGS
In High Definition Audio sound cards the sound card lines are named with color codes, e.g. „Rear Pink In‟. The color codes match the plugs your devices are connected with, so you have to check which device is connected into which plug. If the plugs are changed, you need to run SoundSet again.
In the Microphone field, select „Microphone‟ or the color coded sound card line where you plugged in your microphone.
16 SANAKO Lab 300 v. 9.0 Setup User Guide - English
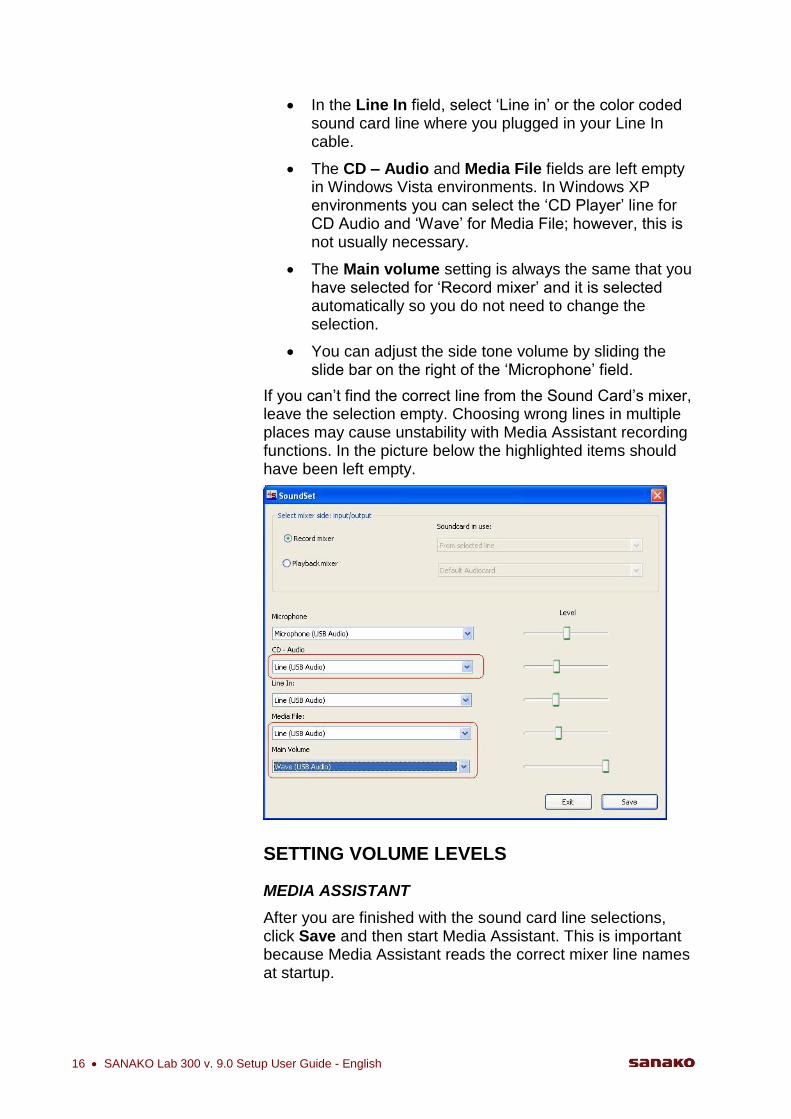
In the Line In field, select „Line in‟ or the color coded sound card line where you plugged in your Line In cable.
The CD – Audio and Media File fields are left empty in Windows Vista environments. In Windows XP environments you can select the „CD Player‟ line for CD Audio and „Wave‟ for Media File; however, this is not usually necessary.
The Main volume setting is always the same that you have selected for „Record mixer‟ and it is selected automatically so you do not need to change the selection.
You can adjust the side tone volume by sliding the slide bar on the right of the „Microphone‟ field.
If you can‟t find the correct line from the Sound Card‟s mixer, leave the selection empty. Choosing wrong lines in multiple places may cause unstability with Media Assistant recording functions. In the picture below the highlighted items should have been left empty.
SETTING VOLUME LEVELS
MEDIA ASSISTANT
After you are finished with the sound card line selections, click Save and then start Media Assistant. This is important because Media Assistant reads the correct mixer line names at startup.
Installing the Software 17
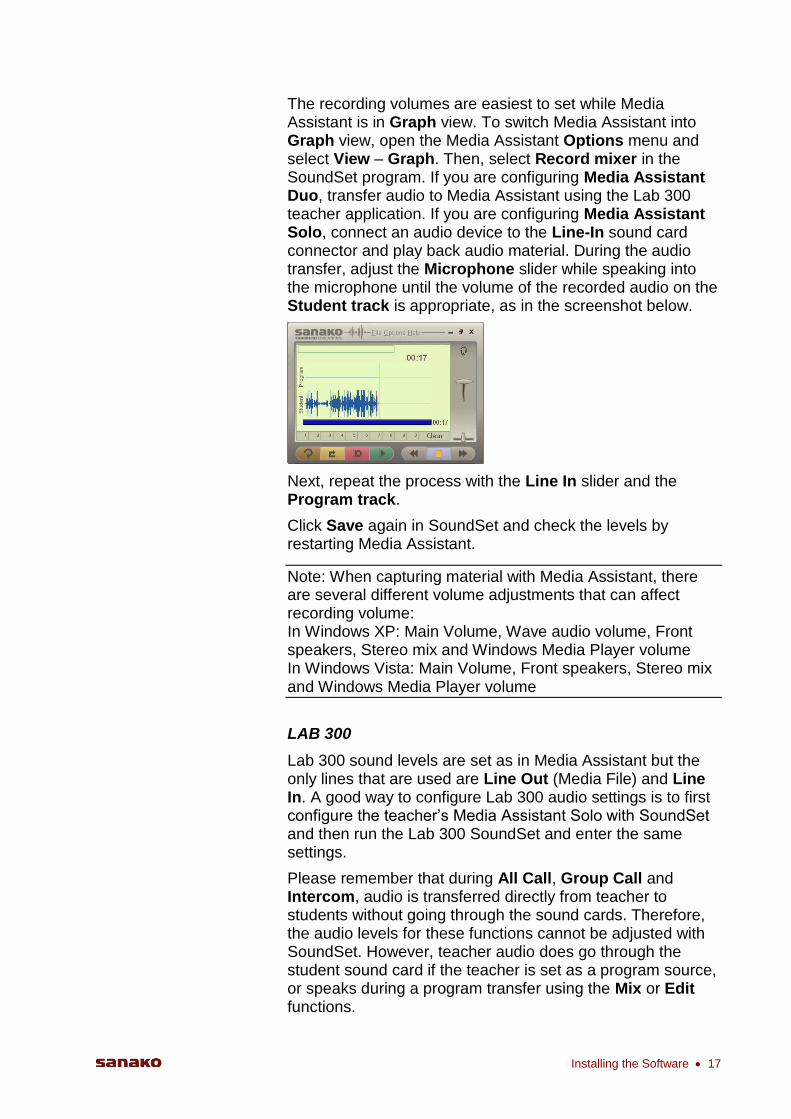
The recording volumes are easiest to set while Media Assistant is in Graph view. To switch Media Assistant into Graph view, open the Media Assistant Options menu and select View – Graph. Then, select Record mixer in the SoundSet program. If you are configuring Media Assistant Duo, transfer audio to Media Assistant using the Lab 300 teacher application. If you are configuring Media Assistant Solo, connect an audio device to the Line-In sound card connector and play back audio material. During the audio transfer, adjust the Microphone slider while speaking into the microphone until the volume of the recorded audio on the Student track is appropriate, as in the screenshot below.
Next, repeat the process with the Line In slider and the Program track.
Click Save again in SoundSet and check the levels by restarting Media Assistant.
Note: When capturing material with Media Assistant, there are several different volume adjustments that can affect recording volume: In Windows XP: Main Volume, Wave audio volume, Front speakers, Stereo mix and Windows Media Player volume In Windows Vista: Main Volume, Front speakers, Stereo mix and Windows Media Player volume
LAB 300
Lab 300 sound levels are set as in Media Assistant but the only lines that are used are Line Out (Media File) and Line In. A good way to configure Lab 300 audio settings is to first configure the teacher‟s Media Assistant Solo with SoundSet and then run the Lab 300 SoundSet and enter the same settings.
Please remember that during All Call, Group Call and Intercom, audio is transferred directly from teacher to students without going through the sound cards. Therefore, the audio levels for these functions cannot be adjusted with SoundSet. However, teacher audio does go through the student sound card if the teacher is set as a program source, or speaks during a program transfer using the Mix or Edit functions.
18 SANAKO Lab 300 v. 9.0 Setup User Guide - English
COPYING AUDIO SETTINGS TO OTHER COMPUTERS
SoundSet creates two configuration files, mixer.cfg and volume.cfg. The mixer.cfg file includes the mixer selection data and volume.cfg contains the sound levels. If you have identical hardware in multiple computers, you can copy these two SoundSet configuration files to other computers in order to equalize the audio levels on multiple computers.
You can access the configuration files at the following location:
C:\Documents and Settings\All Users\Documents\SANAKO\Lab\Lab300\
To copy the settings, simply copy the mixer.cfg and volume.cfg to the C:\Documents and Settings\All
Users\Documents\SANAKO\Lab\Lab300\ folder on another computer and overwrite the old files.
Installing the Software 19
TROUBLESHOOTING
If some of the Duos are not active in Lab 300, perform the following checks:
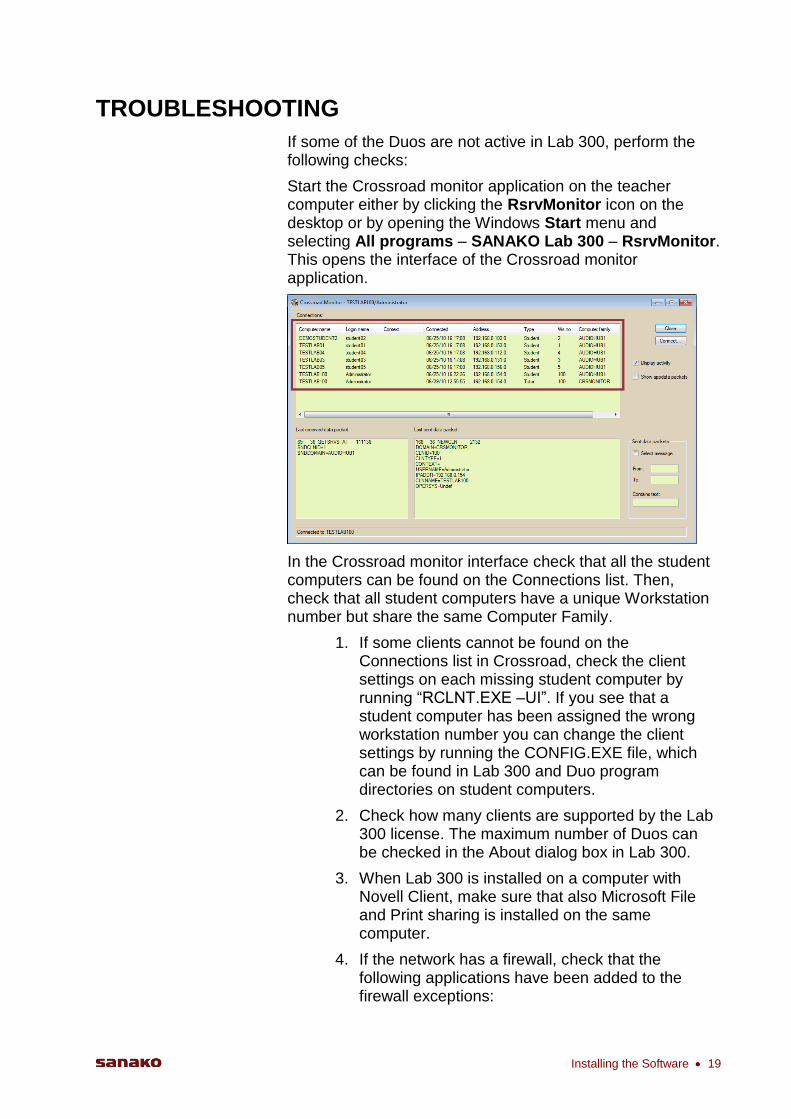
Start the Crossroad monitor application on the teacher computer either by clicking the RsrvMonitor icon on the desktop or by opening the Windows Start menu and selecting All programs – SANAKO Lab 300 – RsrvMonitor. This opens the interface of the Crossroad monitor application.
In the Crossroad monitor interface check that all the student computers can be found on the Connections list. Then, check that all student computers have a unique Workstation number but share the same Computer Family.
1. If some clients cannot be found on the Connections list in Crossroad, check the client settings on each missing student computer by running “RCLNT.EXE –UI”. If you see that a student computer has been assigned the wrong workstation number you can change the client settings by running the CONFIG.EXE file, which can be found in Lab 300 and Duo program directories on student computers.
2. Check how many clients are supported by the Lab 300 license. The maximum number of Duos can be checked in the About dialog box in Lab 300.
3. When Lab 300 is installed on a computer with Novell Client, make sure that also Microsoft File and Print sharing is installed on the same computer.
4. If the network has a firewall, check that the following applications have been added to the firewall exceptions:
20 SANAKO Lab 300 v. 9.0 Setup User Guide - English
On the teacher computer:
rsrv.exe
rclnt.exe
lab300.exe
On the student computers:
rclnt.exe
Duo.exe
When installing Lab 300 on a computer with NovellClient, do the following:
1. Install Lab 300 with the option "Do not use media launch".
2. Share the Labmedia folder, e.g. C:\Labmedia as "Labmedia".
3. Edit the defmap.ini file, located in the Lab 300 directory (C:\Program Files\Sanako\Lab\Lab300\Master) Change the value as follows: MOB1=C:\Labmedia\ToMedia to MOB1=\\<COMPUTERNAME>\Labmedia\ToMedia where <COMPUTERNAME> is the network name of the teacher's computer.

Using the Lab 300 Config Program 21
USING THE LAB 300 CONFIG PROGRAM
OVERVIEW
Before Lab 300 can be used, an installation-specific software configuration program must be run - this program is called the Lab 300 Config program. An icon for this program has been placed in the Windows Start Menu Lab 300 program group during the software installation. The following few pages discuss all the settings available in the Lab 300 Config program in detail. To make installation easier, the sections to follow have been arranged according to the menus.
STUDENT WORKSTATION SETUP
The student seating order in Lab 300, i.e. the class layout, defines the location and number of student workstations shown on the master screen. To modify the class layout, see Layout Menu.
PROGRAM SOURCE SETUP (AUDIO)
Parameters by which the system distinguishes one program source from another are defined for each source. These parameters include for example the Computer Family input number for the source and a name by which the system recognizes the source.
The SCU program source connector number 'ties' a program source to the hardware configuration.
The program source type defines the features of the audio device to be used. The program sources are divided into categories on the basis of their features and remote control options. See Audio Sources under Settings Menu.
22 SANAKO Lab 300 v. 9.0 Setup User Guide - English
VIDEO NETWORK INSTALLATION
The Video Network is used for composite video distribution in an Lab 300 lab. The following equipment can be connected to the Video Network:
1. Up to four pieces of video source equipment
2. Two teacher video monitors
3. Up to 64 video monitors for students or student groups
4. Up to 64 pieces of local video equipment for students
Every piece of video source equipment is tied in Config to one or more program source (audio). When in Lab 300 a program source is selected for a group, the defined video source is selected respectively.
The device for video output can either be an overlay card installed on a computer or a video monitor.
Different video equipment is connected to the Video Network in the following way:
1. Video monitor for Teacher 1 is connected to the Teacher Video 1 on the VD1 unit.
2. Video monitor for Teacher 2 is connected to a Video Out port on a VD2 unit.
Video program source equipment (1-4) is connected to Video Source port on the VD1 unit. When a model student‟s local video is to be shown to other students, a loopback cable should be connected from the Video Source 4 port to the Teacher Video 2 port on the VD1 unit.
Video monitors for Students or Groups are connected to the Video Out port on VD2 units. Four video monitors can be connected to one VD2 unit.
Local video equipment for Students is connected to the Video In port on VD2 units. Four pieces of video equipment can be connected to one VD2 unit.
In the Lab 300 Config, the Video Network configuration is defined for the Lab 300. The following configurations must be defined:
Define the video source for each program source (audio).
Define the VD2 video output configuration, i.e. which VD2 Video Out ports are the video monitors connected to.
Define the VD2 video input configuration for local video equipment, i.e. which VD2 Video In ports is the local video equipment connected to.
Using the Lab 300 Config Program 23
DATABASE SETUP
The database setup includes the following tasks:
1. Create the first user as an Administrator
2. Create a Location
3. Create all the Workstations
The steps are explained in detail in the following sections.
GROUPING STUDENTS
Student grouping defines the student groups at startup. The default setting places all students in Group A.
To start arranging students in groups, click Grouping.
Select students for groups by first clicking the Group button of the group to which you intend to add students. Then click the student icons one by one to place students into the selected group.
If you click All Students, all the students are added to the selected group.
OTHER SETTINGS
The environment settings define issues relating to the equipment at the master workstation, which must be checked and adjusted as appropriate. Such settings include e.g. general software preferences (see Preferences), system settings (see System Settings) and settings for optional software (see Software Remote Control and Dictionaries).
FILE MENU
The File Menu contains maintenance and save commands for the Setup files. If running, the Lab 300 program will
24 SANAKO Lab 300 v. 9.0 Setup User Guide - English
automatically initialize the SCU system (Restart function), once the settings have been saved in the Setup program.
OPEN
This command is used for opening a *.SET file to be modified. A File Open window is shown, and you must select the name of the settings file (*.SET), the contents of which you want to modify. When the Config program starts, it automatically opens LABMAIN.SET, but you can use this command to select another file.
SAVE
Select this command to save the currently opened settings file (*.SET). The contents of the opened file are replaced with your new settings. If you want to keep the old settings as well, choose Save As instead of Save.
SAVE AS
Select this command to save the currently opened settings file (*.SET) with a new name (the file you opened for editing is left intact). If you select a filename from the list, the contents of the selected file are replaced with your new settings.

Using the Lab 300 Config Program 25
PREFERENCES
Preferences is used to set certain initial settings of the main program.
It is possible to tailor the main program‟s startup configuration to suit your own needs and tastes. Select Preferences in the File Menu to open the Preferences window.
Select Language offers the teacher the opportunity to select the user interface language of the software. Before selecting the required language, ensure that the operating system has been set up to support the fonts of the chosen language.
Select Layout offers the opportunity to use different seating plans in the classroom.
Tooltips help to remember the meanings of specific toolbar icons. The tooltip is displayed when the user points the icon with the mouse. Turn tooltips on by selecting Used (default) and off by selecting Not Used.
The Database can be turned on or off by clicking Used (default) or Not Used. If the database is not used, the login window is not displayed.
Limited Access is either Used (default) or Not Used. If it is used, the students have access only to the transferred material, i.e. students can‟t listen to other students‟ recordings afterwards.
Student Microphones Muted is either On or Off (default) during program transfer. If Student Microphones Muted is on, the program is transferred ordinarily except for the student track being erased.
26 SANAKO Lab 300 v. 9.0 Setup User Guide - English
Automonitor Scan allows you to select whether Automonitor scans students by student number or by group division.
Clicking Advanced opens the Advanced Preferences window.
ADVANCED PREFERENCES
Advanced Preferences offer advanced user options.
In Automonitor Interval you can set the time (in seconds) spent on one student during the automatic monitoring of students.
In Group Call Mode you can decide what happens to the program transfer if Group Call or All Call is used during it:
1. Standard: The teacher‟s speech is heard alongside the program.
2. Transfer Pause: Program transfer is stopped and the students hear only the teacher‟s voice. The program transfer resumes automatically after the call.
3. Program Mute: Program transfer continues ordinarily, but the students hear only the teacher‟s voice during the call. (This concerns only the cassette recorder users.)
Intercom Mode allows teachers to change the functionality of student recorders during Intercom. The default is Stop + Teacher Control. It means that the student is not able to use his or her recorder during the Intercom connection. No
Using the Lab 300 Config Program 27
Effects allows the student to use the recorder together with the teacher.
In Speaker Mute it is possible to mute the classroom loudspeakers in certain situations (Intercom and Group Call) to avoid acoustic feedback.
For the Response Recording Collection you can set on or off the Automatic Pause which means that the collection routine is automatically paused after each student. Also, the Digital Collection feature can be set on or off. When you use the Digital Collection function (instead of the Analog Collection), you must set up the server directory for the responses in different tests. See Digital Response Collection.
Program transfer speed allows you to select whether programs should be transferred to students in normal speed or in four times the normal speed.
In Automatic Digitizing all analog material that is transferred to students with the Transfer function is automatically digitized. After you end the transfer, you can choose whether you want to save the digitized material. Automatic Digitizing cannot be used when transferring material with the Manual function. When Automatic Digitizing is switched On, you need to set a default saving path for the digitized material by clicking the Browse button and browsing for a suitable location.
EXIT
Select Exit to close the Config program.
LAYOUT MENU
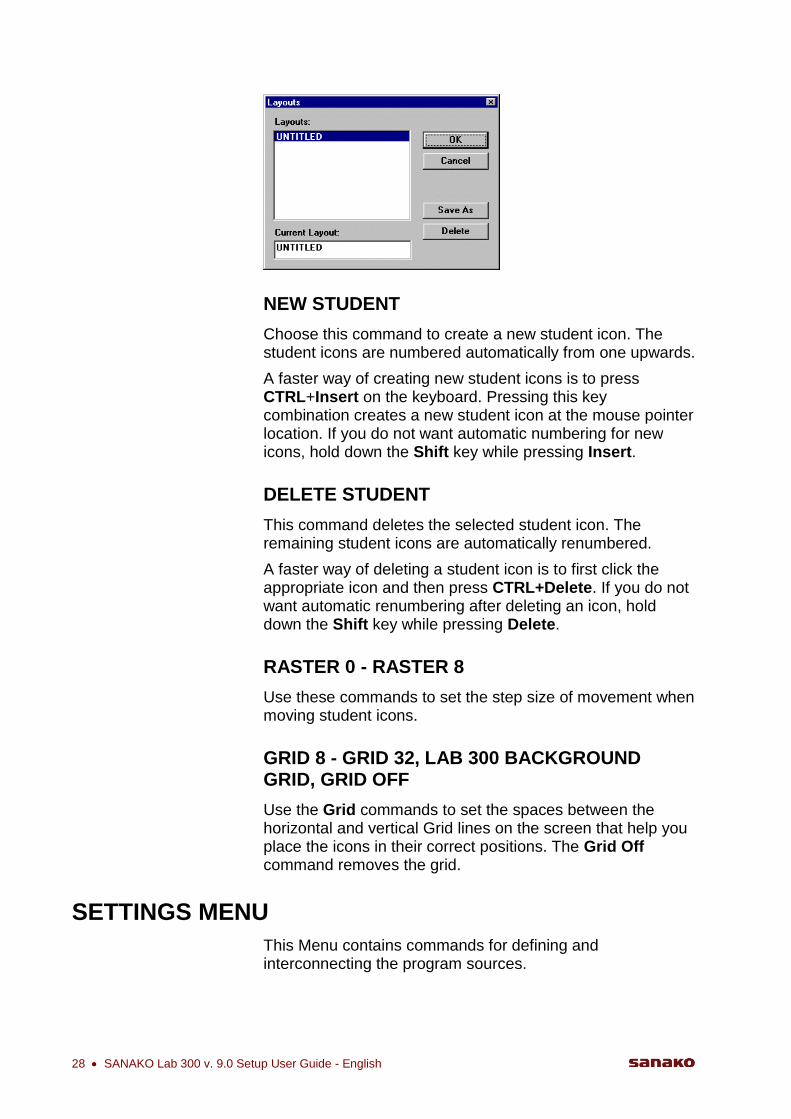
AVAILABLE LAYOUTS
You can save new student icon layouts by clicking Save As. This is especially useful if you want to create different layouts for the cases of e.g. "butterfly tables open" and "butterfly tables closed". If you want to delete a previously saved layout, select the layout name from the list box and click Delete. In case you want to save your changes to a layout, click OK.
28 SANAKO Lab 300 v. 9.0 Setup User Guide - English
NEW STUDENT
Choose this command to create a new student icon. The student icons are numbered automatically from one upwards.
A faster way of creating new student icons is to press CTRL+Insert on the keyboard. Pressing this key combination creates a new student icon at the mouse pointer location. If you do not want automatic numbering for new icons, hold down the Shift key while pressing Insert.
DELETE STUDENT
This command deletes the selected student icon. The remaining student icons are automatically renumbered.
A faster way of deleting a student icon is to first click the appropriate icon and then press CTRL+Delete. If you do not want automatic renumbering after deleting an icon, hold down the Shift key while pressing Delete.
RASTER 0 - RASTER 8
Use these commands to set the step size of movement when moving student icons.
GRID 8 - GRID 32, LAB 300 BACKGROUND GRID, GRID OFF
Use the Grid commands to set the spaces between the horizontal and vertical Grid lines on the screen that help you place the icons in their correct positions. The Grid Off command removes the grid.
SETTINGS MENU
This Menu contains commands for defining and interconnecting the program sources.
Using the Lab 300 Config Program 29
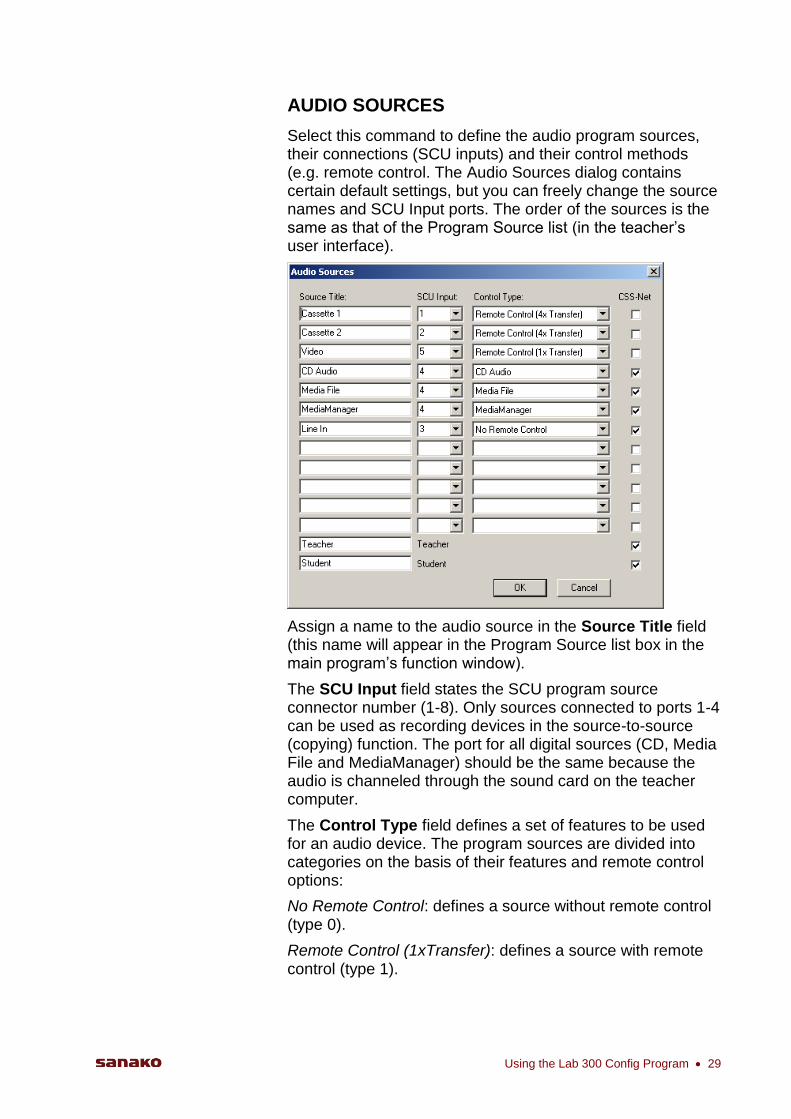
AUDIO SOURCES
Select this command to define the audio program sources, their connections (SCU inputs) and their control methods (e.g. remote control. The Audio Sources dialog contains certain default settings, but you can freely change the source names and SCU Input ports. The order of the sources is the same as that of the Program Source list (in the teacher‟s user interface).
Assign a name to the audio source in the Source Title field (this name will appear in the Program Source list box in the main program‟s function window).
The SCU Input field states the SCU program source connector number (1-8). Only sources connected to ports 1-4 can be used as recording devices in the source-to-source (copying) function. The port for all digital sources (CD, Media File and MediaManager) should be the same because the audio is channeled through the sound card on the teacher computer.
The Control Type field defines a set of features to be used for an audio device. The program sources are divided into categories on the basis of their features and remote control options:
No Remote Control: defines a source without remote control (type 0).
Remote Control (1xTransfer): defines a source with remote control (type 1).
30 SANAKO Lab 300 v. 9.0 Setup User Guide - English
Remote Control (4xTransfer): defines a program source with both remote control and 4x normal speed program transfer (type 2).
Media File: defines a media file (e.g. WAV file) as a program source (type 3).
MediaManager: defines a media file specified in the MediaManager as a program source. The MediaManager contains textual links to WAV files (type 4).
CD Audio: Defines the CD-ROM drive as a program source (type 5).
The CSS Net column is for defining the audio sources used together with the CSS Net functionality.
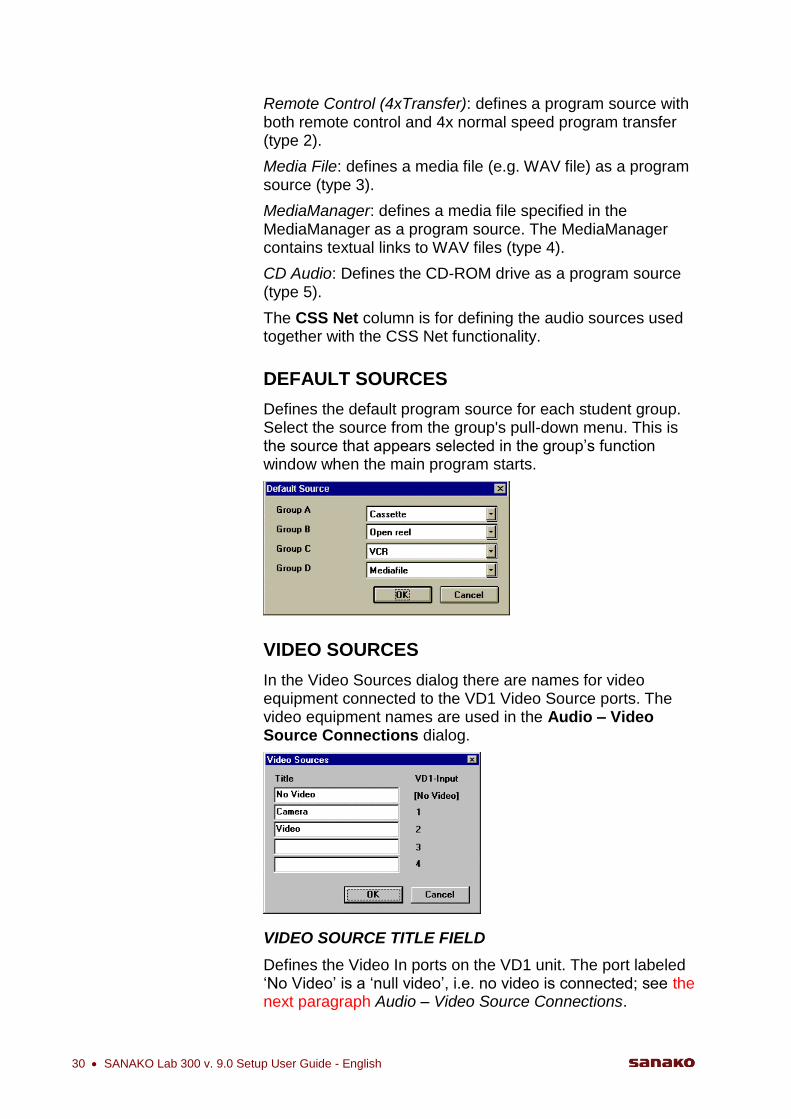
DEFAULT SOURCES
Defines the default program source for each student group. Select the source from the group's pull-down menu. This is the source that appears selected in the group‟s function window when the main program starts.
VIDEO SOURCES
In the Video Sources dialog there are names for video equipment connected to the VD1 Video Source ports. The video equipment names are used in the Audio – Video Source Connections dialog.
VIDEO SOURCE TITLE FIELD
Defines the Video In ports on the VD1 unit. The port labeled „No Video‟ is a „null video‟, i.e. no video is connected; see the next paragraph Audio – Video Source Connections.
Using the Lab 300 Config Program 31
VD1 INPUT
Defines the VD1 unit‟s connector number which the Video Source is connected to.
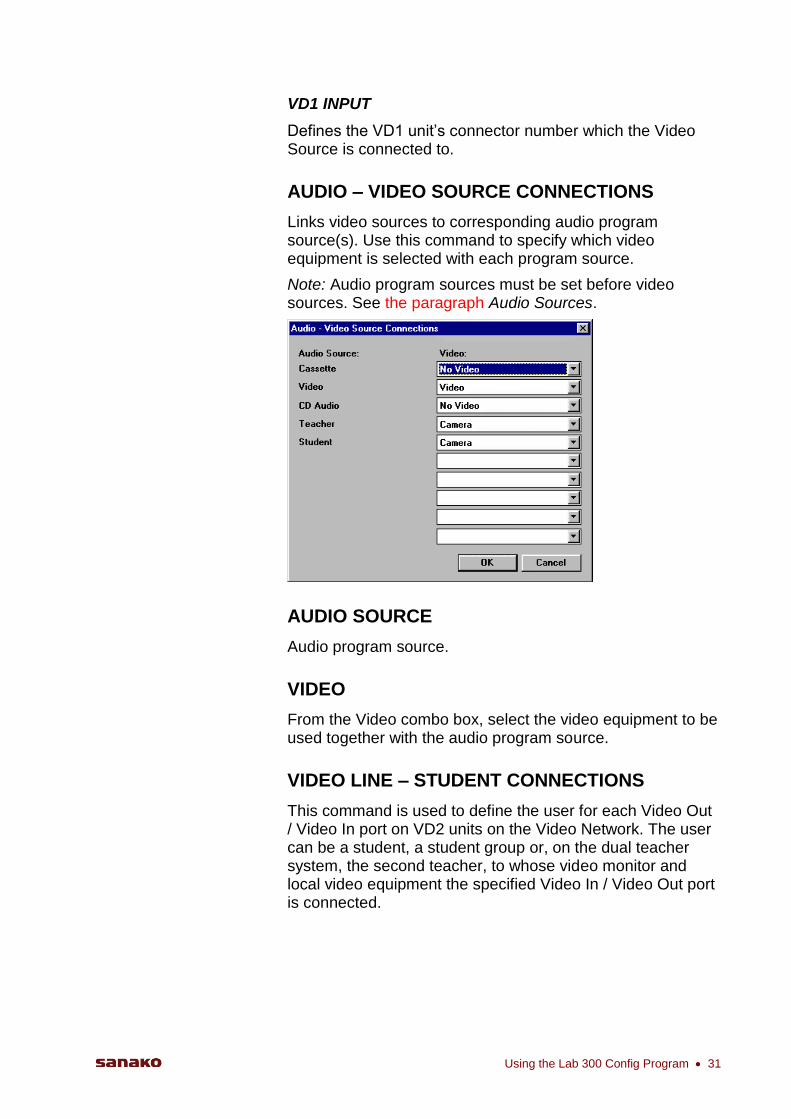
AUDIO – VIDEO SOURCE CONNECTIONS
Links video sources to corresponding audio program source(s). Use this command to specify which video equipment is selected with each program source.
Note: Audio program sources must be set before video sources. See the paragraph Audio Sources.
AUDIO SOURCE
Audio program source.
VIDEO
From the Video combo box, select the video equipment to be used together with the audio program source.
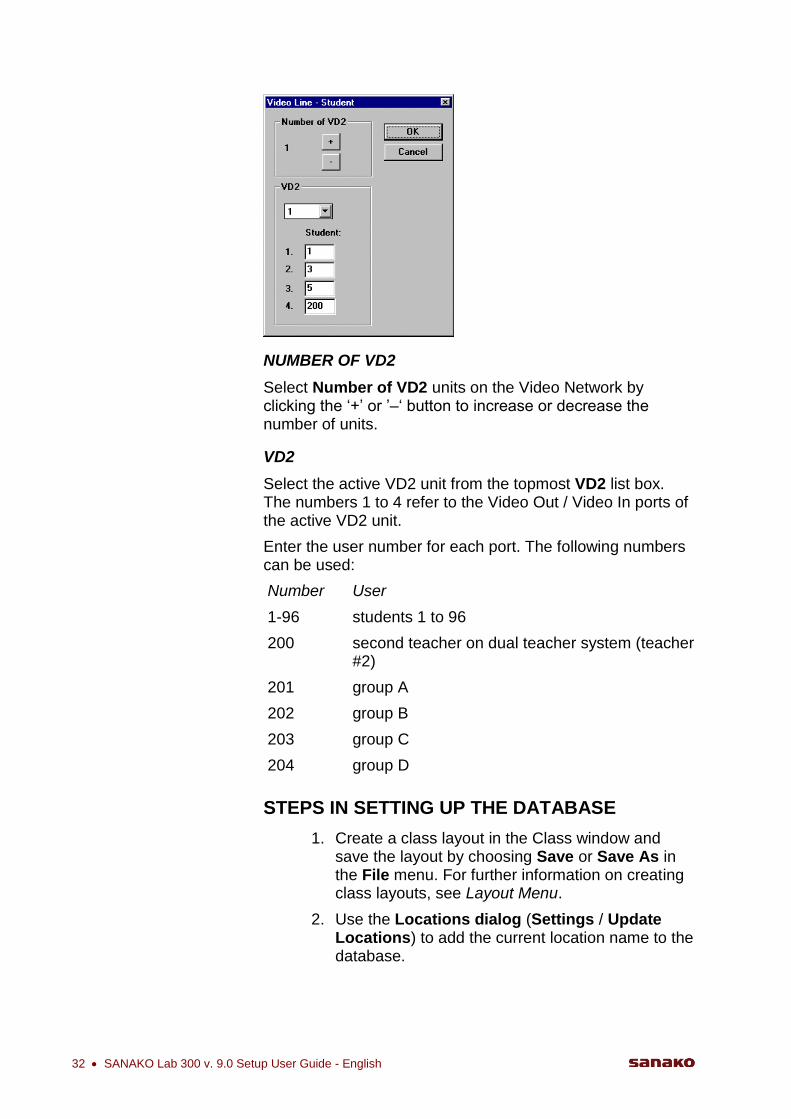
VIDEO LINE – STUDENT CONNECTIONS
This command is used to define the user for each Video Out / Video In port on VD2 units on the Video Network. The user can be a student, a student group or, on the dual teacher system, the second teacher, to whose video monitor and local video equipment the specified Video In / Video Out port is connected.
32 SANAKO Lab 300 v. 9.0 Setup User Guide - English
NUMBER OF VD2
Select Number of VD2 units on the Video Network by clicking the „+‟ or ‟–„ button to increase or decrease the number of units.
VD2
Select the active VD2 unit from the topmost VD2 list box. The numbers 1 to 4 refer to the Video Out / Video In ports of the active VD2 unit.
Enter the user number for each port. The following numbers can be used:
Number User
1-96 students 1 to 96
200 second teacher on dual teacher system (teacher #2)
201 group A
202 group B
203 group C
204 group D
STEPS IN SETTING UP THE DATABASE
1. Create a class layout in the Class window and save the layout by choosing Save or Save As in the File menu. For further information on creating class layouts, see Layout Menu.
2. Use the Locations dialog (Settings / Update Locations) to add the current location name to the database.
Using the Lab 300 Config Program 33
3. Use the Workstations dialog (Settings / Update Workstations) to add all the workstations to the database.
4. Save the location and workstation data by selecting the Save command in the File Menu.
5. If you don‟t have a Database Administrator in the database, add a new one by selecting Database Administrator in the Settings Menu.
DATABASE ADMINISTRATOR
You can use the database as an Administrator with the username “ADMIN” and the password “ADMIN”. Your first task in ResourceManager is to change the password for ADMIN so that nobody else who reads this Setup Manual can access the database!
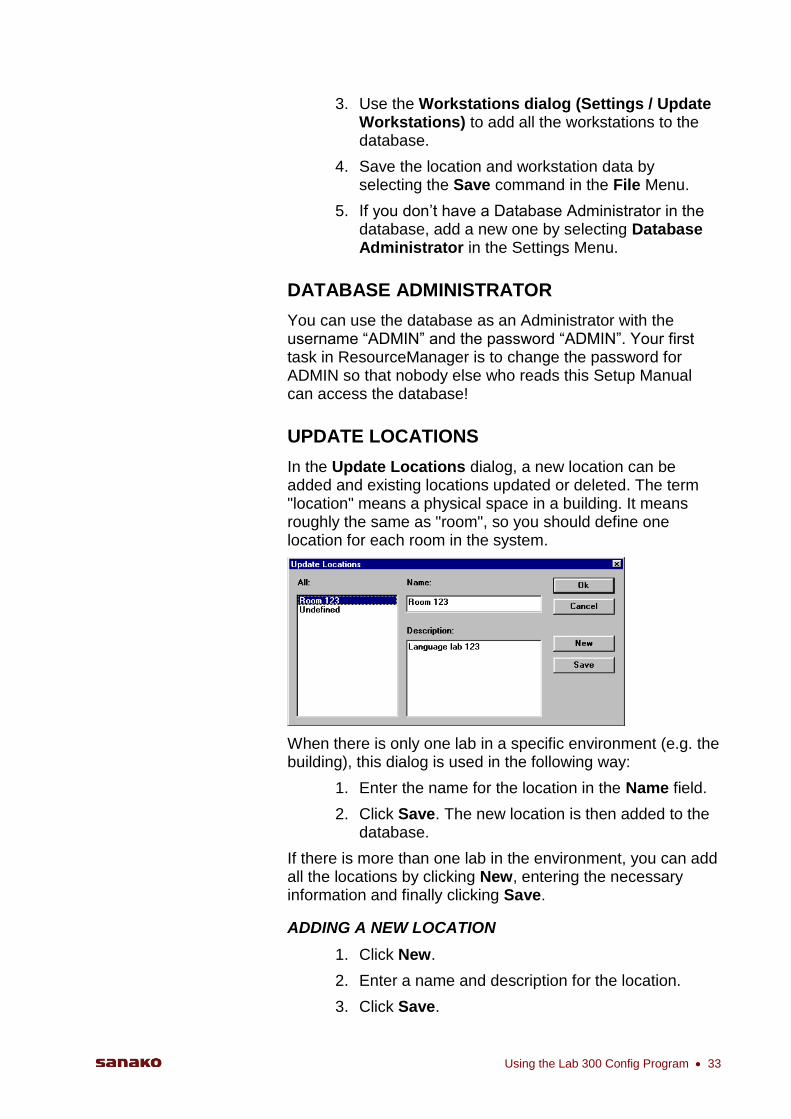
UPDATE LOCATIONS
In the Update Locations dialog, a new location can be added and existing locations updated or deleted. The term "location" means a physical space in a building. It means roughly the same as "room", so you should define one location for each room in the system.
When there is only one lab in a specific environment (e.g. the building), this dialog is used in the following way:
1. Enter the name for the location in the Name field.
2. Click Save. The new location is then added to the database.
If there is more than one lab in the environment, you can add all the locations by clicking New, entering the necessary information and finally clicking Save.
ADDING A NEW LOCATION
1. Click New.
2. Enter a name and description for the location.
3. Click Save.
34 SANAKO Lab 300 v. 9.0 Setup User Guide - English
UPDATING A LOCATION
1. Select one of the existing locations by clicking it in the list.
2. Change the information.
3. Click Save.
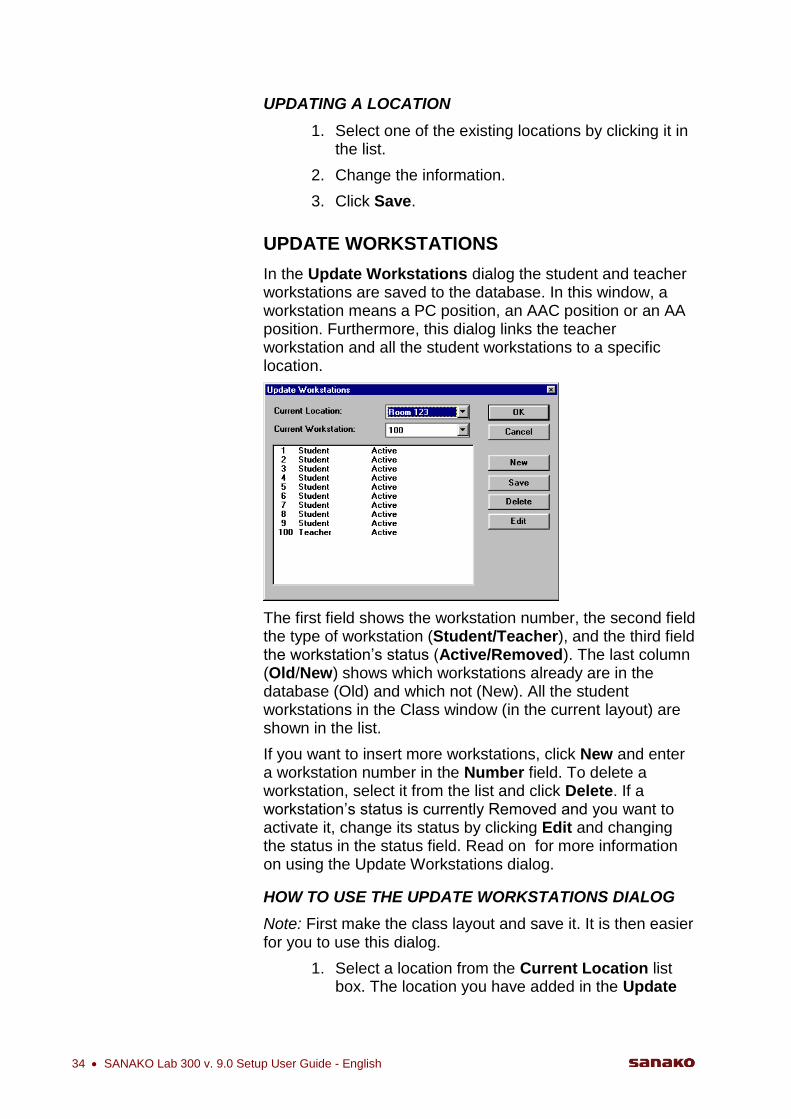
UPDATE WORKSTATIONS
In the Update Workstations dialog the student and teacher workstations are saved to the database. In this window, a workstation means a PC position, an AAC position or an AA position. Furthermore, this dialog links the teacher workstation and all the student workstations to a specific location.
The first field shows the workstation number, the second field the type of workstation (Student/Teacher), and the third field the workstation‟s status (Active/Removed). The last column (Old/New) shows which workstations already are in the database (Old) and which not (New). All the student workstations in the Class window (in the current layout) are shown in the list.
If you want to insert more workstations, click New and enter a workstation number in the Number field. To delete a workstation, select it from the list and click Delete. If a workstation‟s status is currently Removed and you want to activate it, change its status by clicking Edit and changing the status in the status field. Read on for more information on using the Update Workstations dialog.
HOW TO USE THE UPDATE WORKSTATIONS DIALOG
Note: First make the class layout and save it. It is then easier for you to use this dialog.
1. Select a location from the Current Location list box. The location you have added in the Update
Using the Lab 300 Config Program 35
Locations dialog is selected as the default location.
2. The Current Workstation setting refers to the teacher's workstation number. The default setting is 100. If you are installing another teacher computer (e.g. for a Dual Teacher System), you must enter 101 as the second teacher computer‟s setting.
3. Check that all the student workstations are listed in the Update Workstations window. Add all missing workstations.
4. When all the information is correct, click OK. If you want, you can cancel all the changes by clicking Cancel.
ADDING A NEW WORKSTATION
1. Click New. The Workstation window opens.
2. Enter the workstation number in the Number field and then select the workstation status (the default is Active).
3. Click OK in the Workstation window.
4. Click Save in the Update Workstations window.
UPDATING A WORKSTATION
1. Select one of the existing workstations from the workstation list box.
2. Click Edit. The Workstation window opens.
3. Change the workstation‟s information as appropriate.
4. Click OK in the Workstation window.
5. Click Save in the Update Workstations window.
DELETING A WORKSTATION
1. Select an existing workstation from the workstation list box.
2. Click Delete.
3. The Workstation status changes to Removed.
VIDEO OVERLAY CARD
Note: Before setting up a Video Overlay board with the Config program, you must first install the appropriate board and its drivers in the Windows operating system.
36 SANAKO Lab 300 v. 9.0 Setup User Guide - English
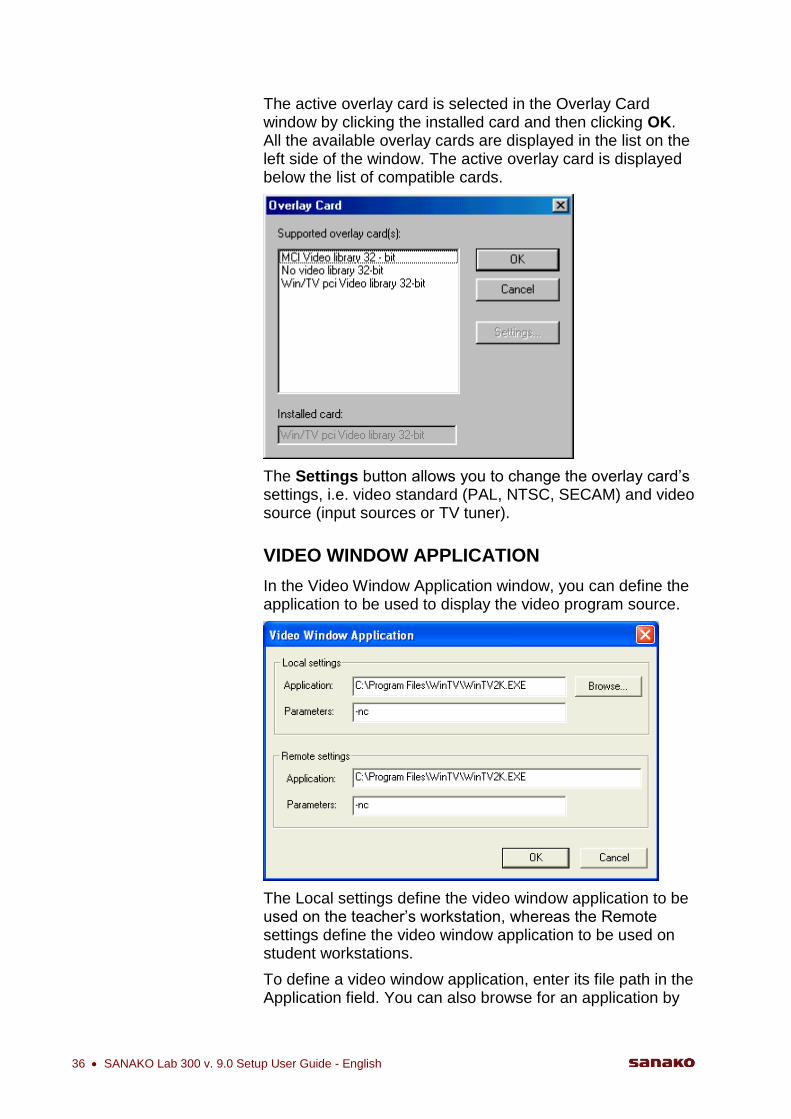
The active overlay card is selected in the Overlay Card window by clicking the installed card and then clicking OK. All the available overlay cards are displayed in the list on the left side of the window. The active overlay card is displayed below the list of compatible cards.
The Settings button allows you to change the overlay card‟s settings, i.e. video standard (PAL, NTSC, SECAM) and video source (input sources or TV tuner).
VIDEO WINDOW APPLICATION
In the Video Window Application window, you can define the application to be used to display the video program source.
The Local settings define the video window application to be used on the teacher‟s workstation, whereas the Remote settings define the video window application to be used on student workstations.
To define a video window application, enter its file path in the Application field. You can also browse for an application by
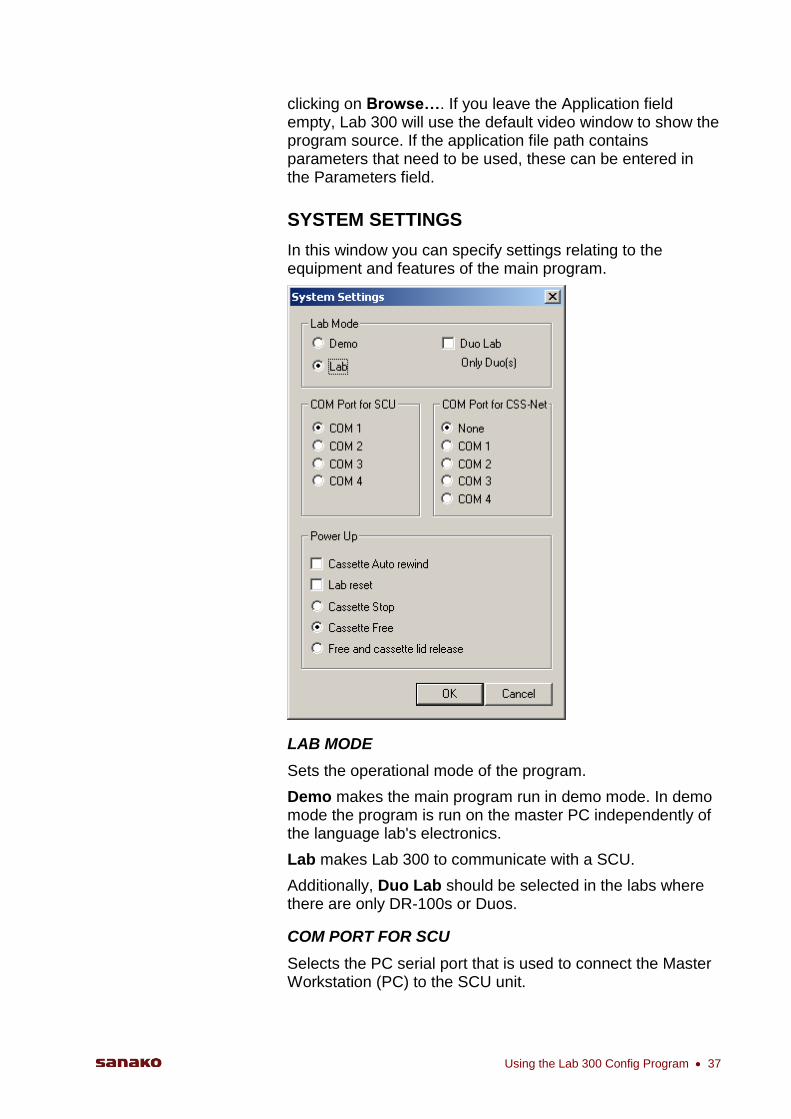
Using the Lab 300 Config Program 37
clicking on Browse…. If you leave the Application field empty, Lab 300 will use the default video window to show the program source. If the application file path contains parameters that need to be used, these can be entered in the Parameters field.
SYSTEM SETTINGS
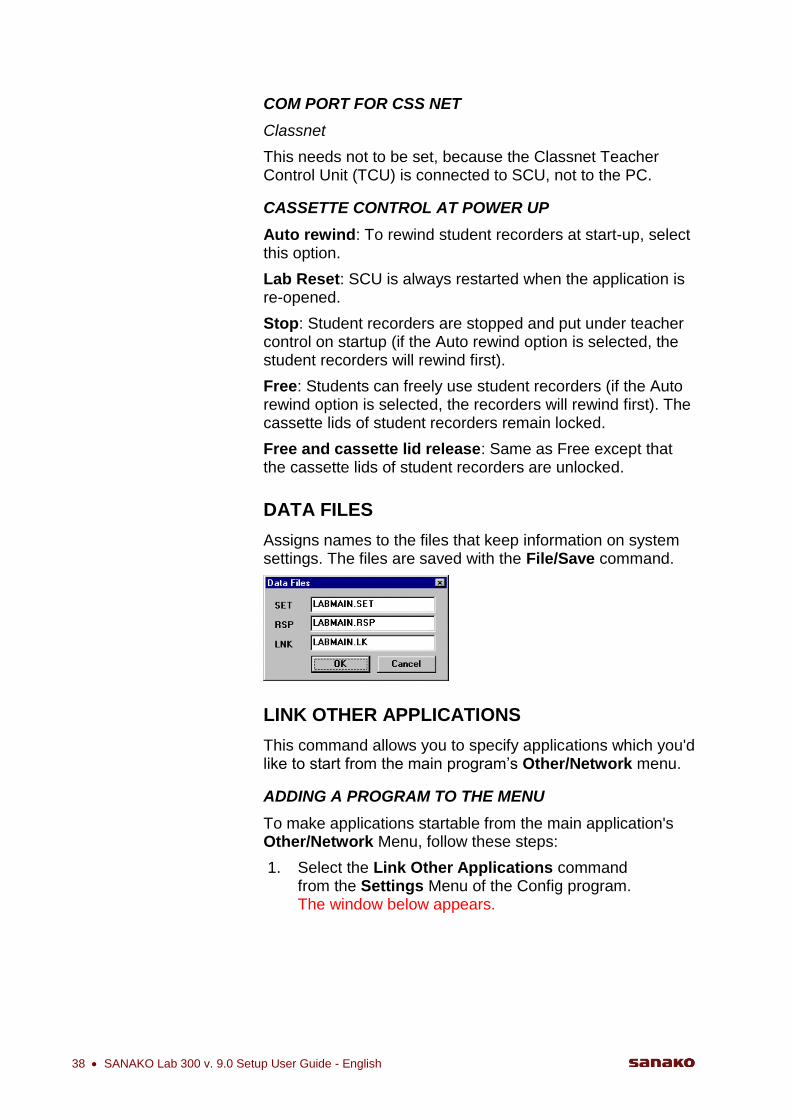
In this window you can specify settings relating to the equipment and features of the main program.
LAB MODE
Sets the operational mode of the program.
Demo makes the main program run in demo mode. In demo mode the program is run on the master PC independently of the language lab's electronics.
Lab makes Lab 300 to communicate with a SCU.
Additionally, Duo Lab should be selected in the labs where there are only DR-100s or Duos.
COM PORT FOR SCU
Selects the PC serial port that is used to connect the Master Workstation (PC) to the SCU unit.
38 SANAKO Lab 300 v. 9.0 Setup User Guide - English
COM PORT FOR CSS NET
Classnet
This needs not to be set, because the Classnet Teacher Control Unit (TCU) is connected to SCU, not to the PC.
CASSETTE CONTROL AT POWER UP
Auto rewind: To rewind student recorders at start-up, select this option.
Lab Reset: SCU is always restarted when the application is re-opened.
Stop: Student recorders are stopped and put under teacher control on startup (if the Auto rewind option is selected, the student recorders will rewind first).
Free: Students can freely use student recorders (if the Auto rewind option is selected, the recorders will rewind first). The cassette lids of student recorders remain locked.
Free and cassette lid release: Same as Free except that the cassette lids of student recorders are unlocked.
DATA FILES
Assigns names to the files that keep information on system settings. The files are saved with the File/Save command.
LINK OTHER APPLICATIONS
This command allows you to specify applications which you'd like to start from the main program‟s Other/Network menu.
ADDING A PROGRAM TO THE MENU
To make applications startable from the main application's Other/Network Menu, follow these steps:
1. Select the Link Other Applications command from the Settings Menu of the Config program. The window below appears.

Using the Lab 300 Config Program 39
2. Click New. The window below appears.
3. Enter a name in the Title field of the properties window.
4. Select the application you want to make startable by clicking Browse. Find the program in the File Open window.
5. If you want to specify startup options (command line switches etc.) for the program that you are making startable, enter them in the Options field.
6. Specify the programs INI file by clicking Browse. Then find the file with the File Open window. It is not usually necessary to specify an INI file; most programs find their INI files automatically.
7. Select the dialog type (None, Connect, Options or E-mail). This option specifies the kind of dialog window that is shown when the program to be started is selected from the Other/Network menu. None means that no dialog will be shown. The other options display one of the windows dialog will be shown. The other options display one of the windows below, and the user is expected to fill in some information. The information is forwarded to the program that you are starting.
Connect window:
40 SANAKO Lab 300 v. 9.0 Setup User Guide - English
Options window:
E-mail window:
8. Click OK to accept the settings.
REMOVING A PROGRAM FROM THE MENU
If you want to remove a program from the Other/Network menu, select the program‟s name in the Link Other Applications window and click Delete.
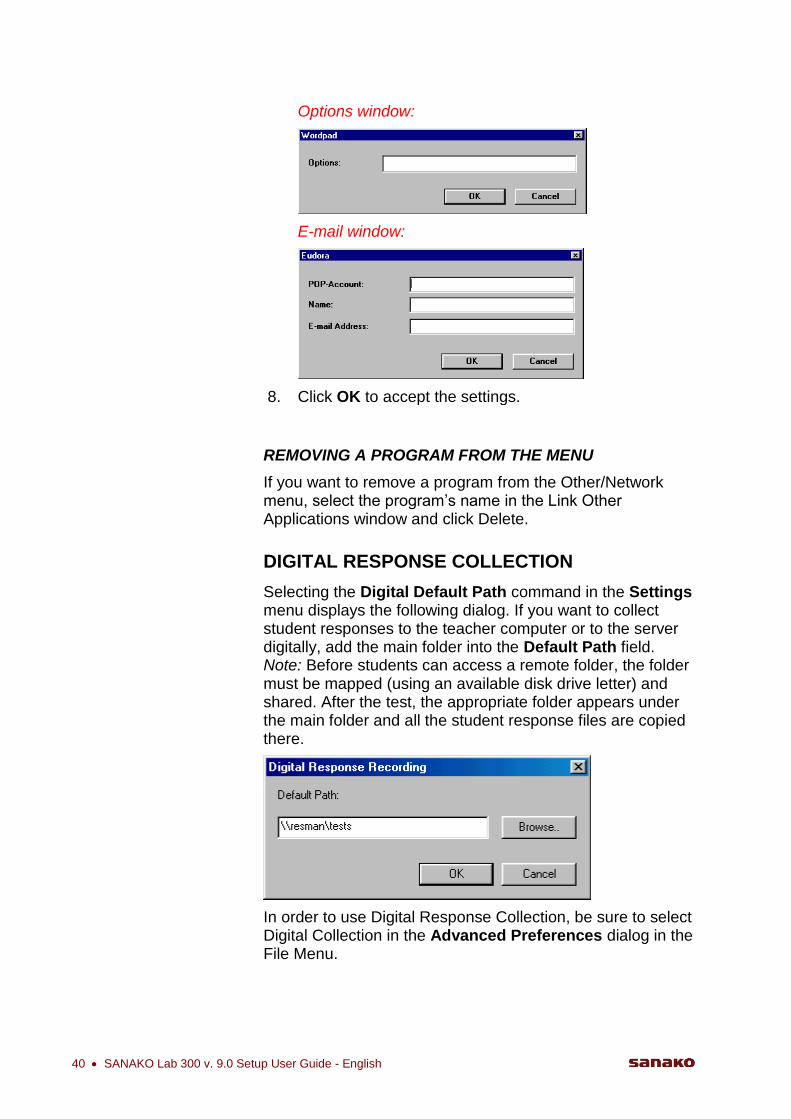
DIGITAL RESPONSE COLLECTION
Selecting the Digital Default Path command in the Settings menu displays the following dialog. If you want to collect student responses to the teacher computer or to the server digitally, add the main folder into the Default Path field. Note: Before students can access a remote folder, the folder must be mapped (using an available disk drive letter) and shared. After the test, the appropriate folder appears under the main folder and all the student response files are copied there.
In order to use Digital Response Collection, be sure to select Digital Collection in the Advanced Preferences dialog in the File Menu.
Using the Lab 300 Config Program 41
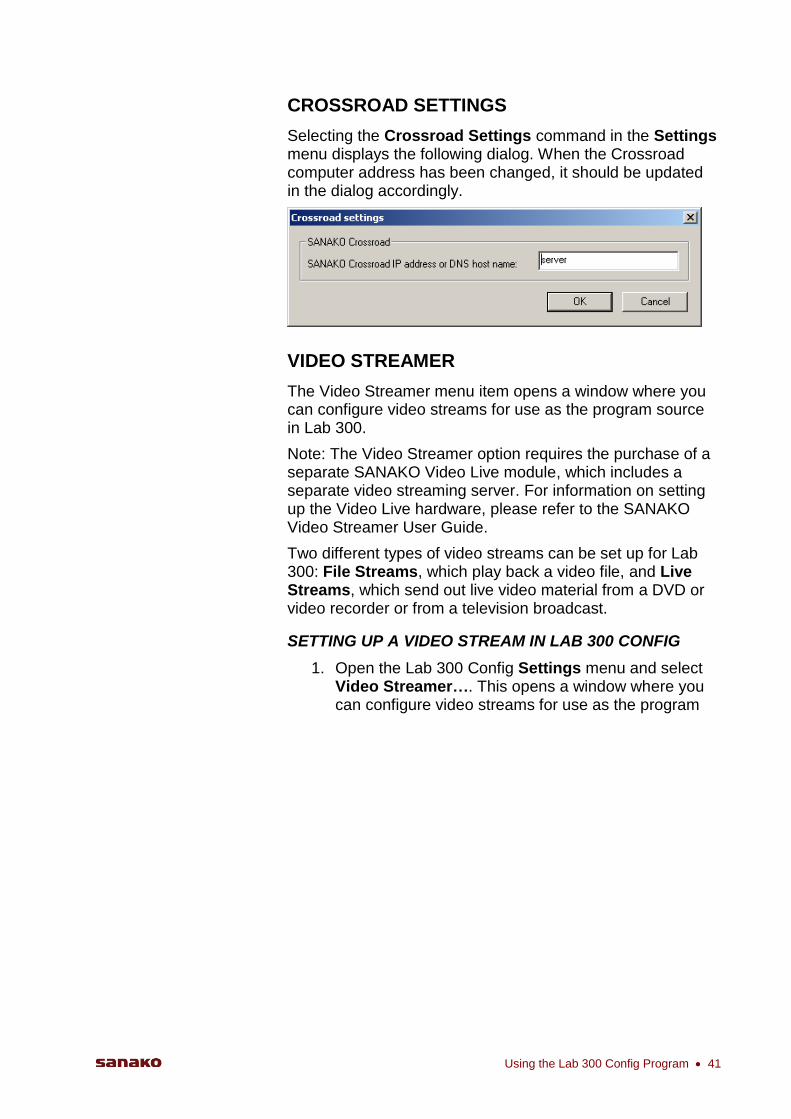
CROSSROAD SETTINGS
Selecting the Crossroad Settings command in the Settings menu displays the following dialog. When the Crossroad computer address has been changed, it should be updated in the dialog accordingly.
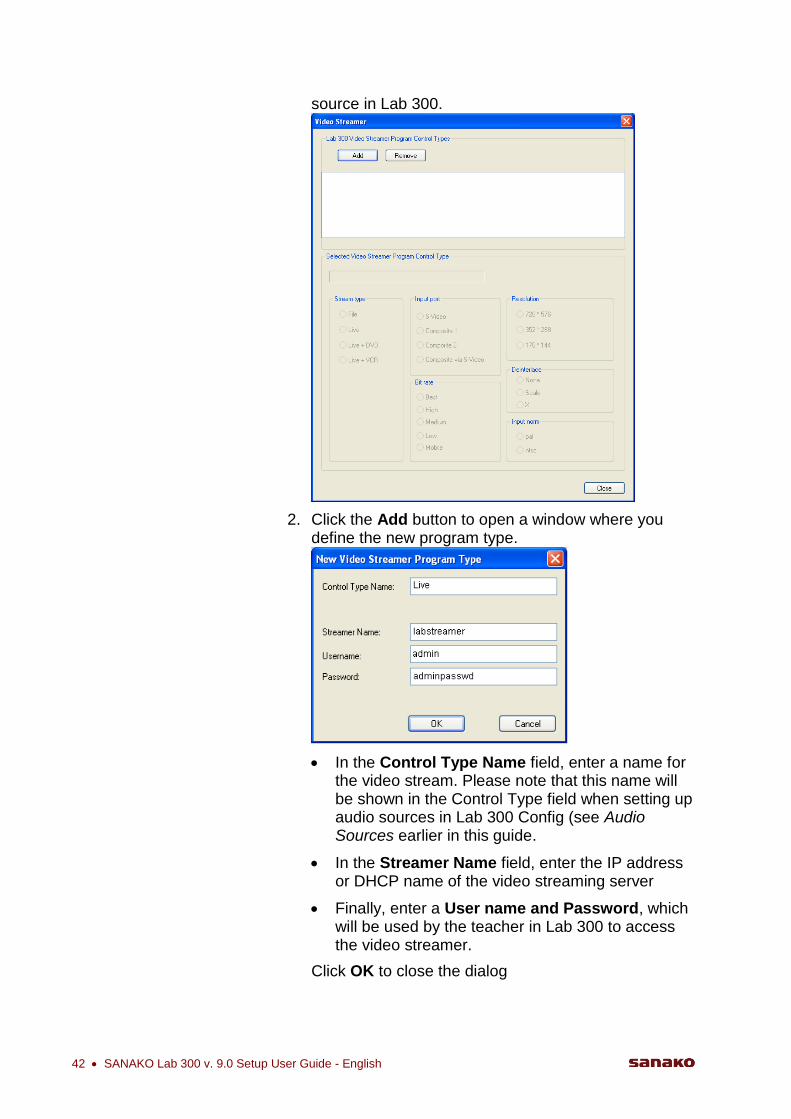
VIDEO STREAMER
The Video Streamer menu item opens a window where you can configure video streams for use as the program source in Lab 300.
Note: The Video Streamer option requires the purchase of a separate SANAKO Video Live module, which includes a separate video streaming server. For information on setting up the Video Live hardware, please refer to the SANAKO Video Streamer User Guide.
Two different types of video streams can be set up for Lab 300: File Streams, which play back a video file, and Live Streams, which send out live video material from a DVD or video recorder or from a television broadcast.
SETTING UP A VIDEO STREAM IN LAB 300 CONFIG
1. Open the Lab 300 Config Settings menu and select Video Streamer…. This opens a window where you can configure video streams for use as the program
42 SANAKO Lab 300 v. 9.0 Setup User Guide - English
source in Lab 300.
2. Click the Add button to open a window where you define the new program type.
In the Control Type Name field, enter a name for the video stream. Please note that this name will be shown in the Control Type field when setting up audio sources in Lab 300 Config (see Audio Sources earlier in this guide.
In the Streamer Name field, enter the IP address or DHCP name of the video streaming server
Finally, enter a User name and Password, which will be used by the teacher in Lab 300 to access the video streamer.
Click OK to close the dialog
Using the Lab 300 Config Program 43
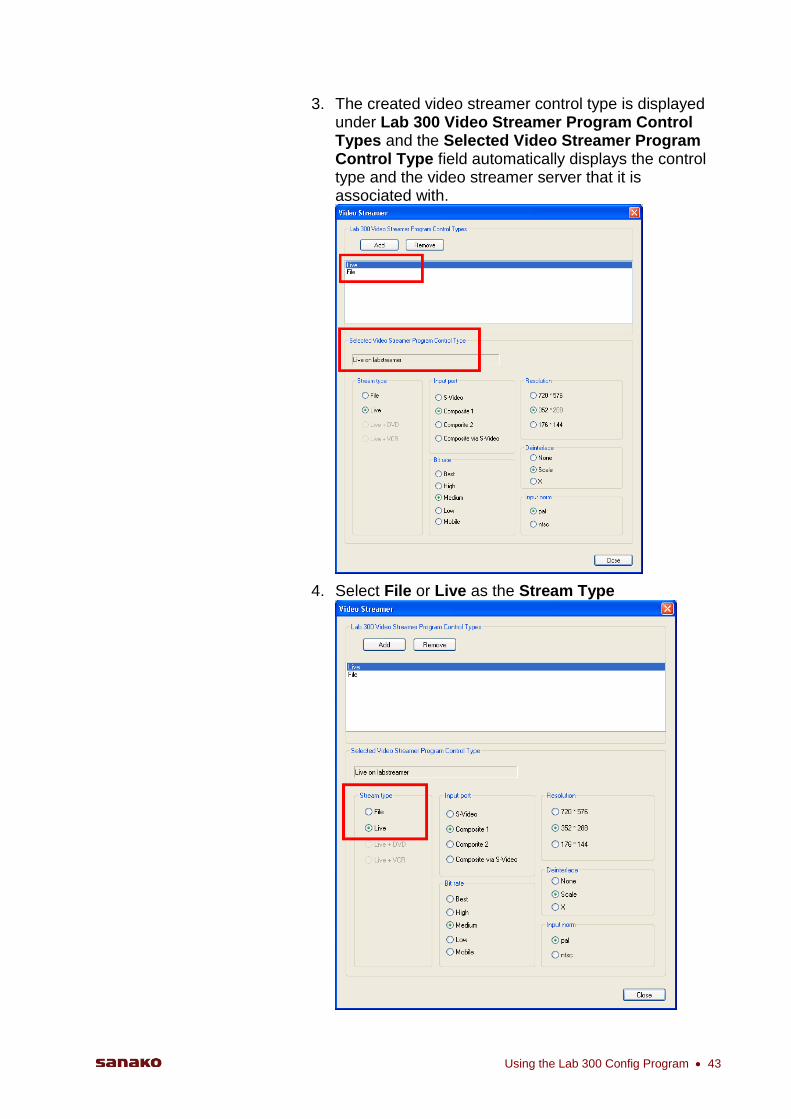
3. The created video streamer control type is displayed under Lab 300 Video Streamer Program Control Types and the Selected Video Streamer Program Control Type field automatically displays the control type and the video streamer server that it is associated with.
4. Select File or Live as the Stream Type
44 SANAKO Lab 300 v. 9.0 Setup User Guide - English
5. Repeat the procedure so you will have both Control Types, Live and File
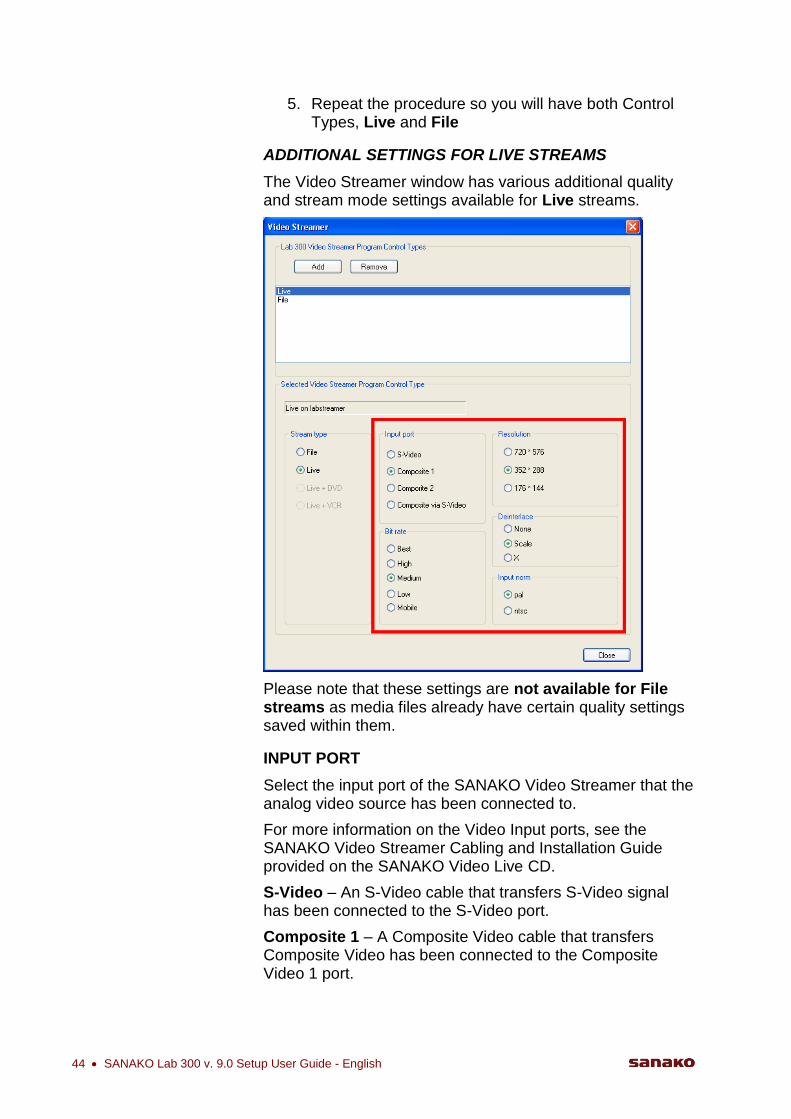
ADDITIONAL SETTINGS FOR LIVE STREAMS
The Video Streamer window has various additional quality and stream mode settings available for Live streams.
Please note that these settings are not available for File streams as media files already have certain quality settings saved within them.
INPUT PORT
Select the input port of the SANAKO Video Streamer that the analog video source has been connected to.
For more information on the Video Input ports, see the SANAKO Video Streamer Cabling and Installation Guide provided on the SANAKO Video Live CD.
S-Video – An S-Video cable that transfers S-Video signal has been connected to the S-Video port.
Composite 1 – A Composite Video cable that transfers Composite Video has been connected to the Composite Video 1 port.
Using the Lab 300 Config Program 45
Composite 2 – A Composite Video cable that transfers Composite Video has been connected to the Composite Video 2 port.
Composite via S-Video – A Composite Video cable that transfers S-Video (through an adapter) has been connected to the S-Video port.
BIT RATE
Select the quality of the video image that will be streamed. A video image with a higher bit rate will create more network traffic and will have higher performance requirements for viewing. The options for video image quality are:
Best – 8000kbit video stream (192kbit audio)
High – 3000kbit video stream (128kbit audio)
Medium – 1500kbit video stream (128kbit audio)
Low – 500kbit video stream (128kbit audio)
Mobile – 100kbit video stream (64kbit audio)
RESOLUTION
Select the size of the video window that the stream will be displayed in. A larger video image size will have higher performance requirements for viewing.
DEINTERLACE
Analog video material consists of two fields or images that are then interlaced to create a frame. You can select a deinterlacing mode for the video image.
None – This will display the video image as it is transferred from the analog source without deinterlacing.
Scale – This will prevent edge distortion by discarding every other one of the interlaced images.
X – This will blur the edge distortion in the interlaced video image. In some cases, this option may result in minor fluttering.
INPUT NORM
Input Norm refers to the analog video source and can vary according to the region you are in.
You need to select the same video norm that the analog source (eg. DVD or VCR player) is using. Otherwise, the streamed video image may be unclear.
pal – This is the common video norm used in most of Europe, Asia, Oceania, Africa and in parts of the Americas.
46 SANAKO Lab 300 v. 9.0 Setup User Guide - English
ntsc – This is the common video norm in the United States, Canada, Japan, South Korea, and parts of the Americas.
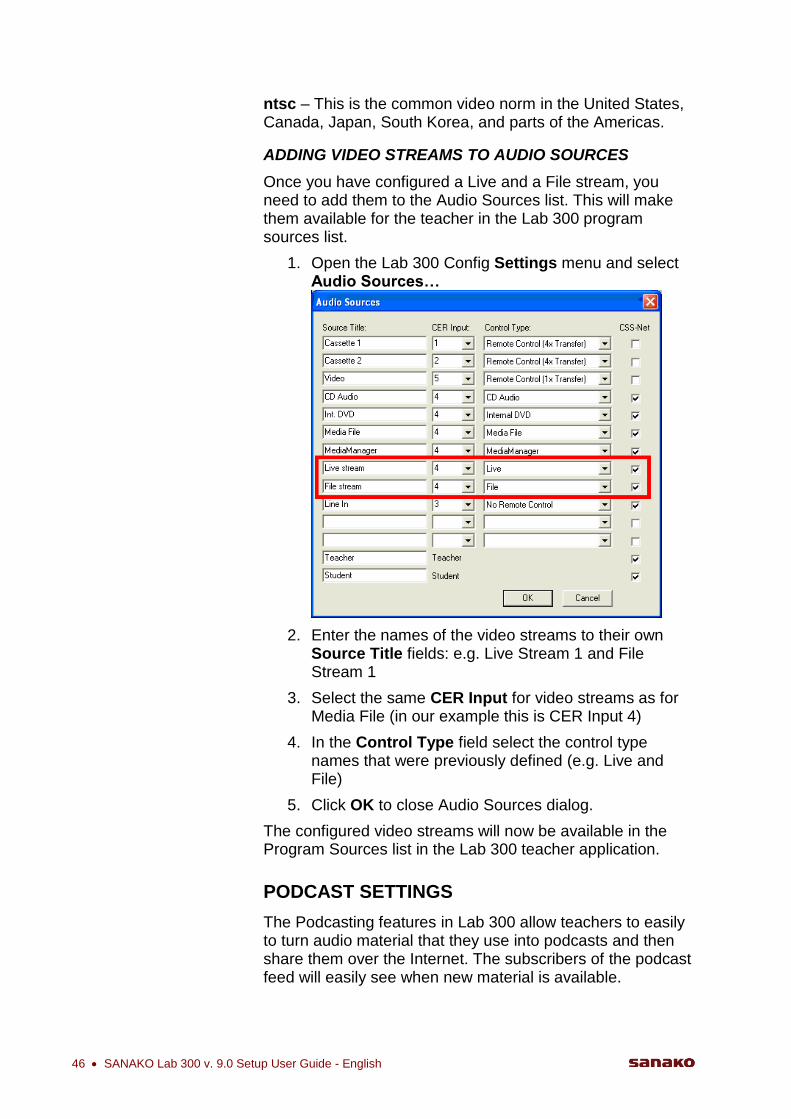
ADDING VIDEO STREAMS TO AUDIO SOURCES
Once you have configured a Live and a File stream, you need to add them to the Audio Sources list. This will make them available for the teacher in the Lab 300 program sources list.
1. Open the Lab 300 Config Settings menu and select Audio Sources…
2. Enter the names of the video streams to their own Source Title fields: e.g. Live Stream 1 and File Stream 1
3. Select the same CER Input for video streams as for Media File (in our example this is CER Input 4)
4. In the Control Type field select the control type names that were previously defined (e.g. Live and File)
5. Click OK to close Audio Sources dialog.
The configured video streams will now be available in the Program Sources list in the Lab 300 teacher application.
PODCAST SETTINGS
The Podcasting features in Lab 300 allow teachers to easily to turn audio material that they use into podcasts and then share them over the Internet. The subscribers of the podcast feed will easily see when new material is available.
Using the Lab 300 Config Program 47
Please note that the podcasting feature in Lab 300 requires a Web server with FTP access from the teacher's computer for uploading the content.
The Podcast settings in Lab 300 Config allow you to define the FTP server that will be used for hosting podcasts and to create Web locations for publishing podcasts.
In our example instructions below we want to upload podcast files of english learning material material to the following location: http://podcast.sanako.com/english/index.xml
This folder is in our example located on a FTP server: ftp://podcast.sanako.com/var/www/html/
CONFIGURING A SERVER FOR PODCASTING
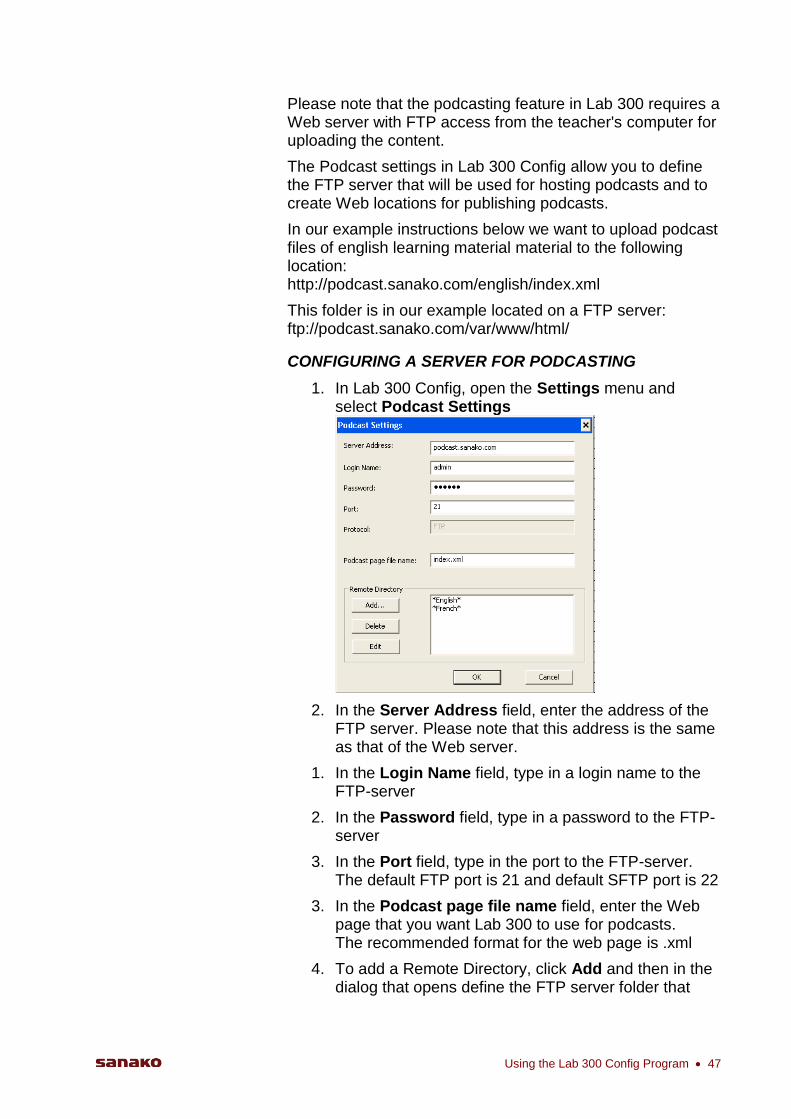
1. In Lab 300 Config, open the Settings menu and select Podcast Settings
2. In the Server Address field, enter the address of the FTP server. Please note that this address is the same as that of the Web server.
1. In the Login Name field, type in a login name to the FTP-server
2. In the Password field, type in a password to the FTP-server
3. In the Port field, type in the port to the FTP-server. The default FTP port is 21 and default SFTP port is 22
3. In the Podcast page file name field, enter the Web page that you want Lab 300 to use for podcasts. The recommended format for the web page is .xml
4. To add a Remote Directory, click Add and then in the dialog that opens define the FTP server folder that

48 SANAKO Lab 300 v. 9.0 Setup User Guide - English
you want to create
In FTP Location, enter the FTP address which is the root of the desired HTTP location. In our example the http://podcast.sanako.com/english/index.xml file can be found in the /var/www/html/english/ folder in the FTP side
In IE location, specify the FTP server folder under the main address of the Web server. In our example, the Web server main page is http://podcast.sanako.com/ and our index.xml is located in http://podcast.sanako.com/english/index.xml so we enter “english” as the IE location.
In Description enter a description of the location. This is displayed for the teachers when they select where they want to upload files.
5. After you have entered the required information, click OK to save your settings.
DEFAULT SIZE AND POSITION OF THE MASTER VIDEO WINDOW
After installing the video network and video card, you can set the default size and position of the master Video Window.
Clicking the Video Window button makes the video window appear in the student field. The position and size of this window can be adjusted.
ALTERING THE POSITION OF THE WINDOW
First move the pointer over the caption bar of the video window. Hold down the left-hand mouse button to move the window to the new position.
ALTERING THE SIZE OF THE WINDOW
First move the pointer to the bottom right-hand corner of the window, where it changes into a double-headed arrow. Hold
Using the Lab 300 Config Program 49
down the left-hand button of the mouse to adjust the window size (its shape remains constant).
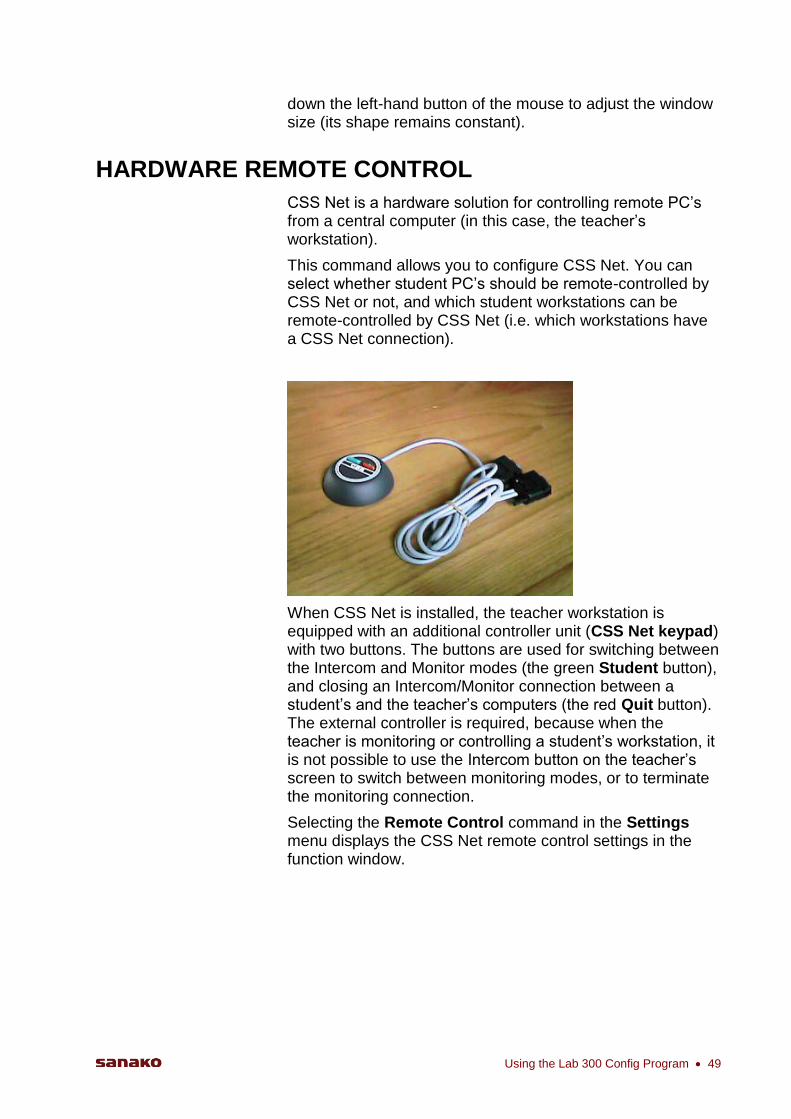
HARDWARE REMOTE CONTROL
CSS Net is a hardware solution for controlling remote PC‟s from a central computer (in this case, the teacher‟s workstation).
This command allows you to configure CSS Net. You can select whether student PC‟s should be remote-controlled by CSS Net or not, and which student workstations can be remote-controlled by CSS Net (i.e. which workstations have a CSS Net connection).
When CSS Net is installed, the teacher workstation is equipped with an additional controller unit (CSS Net keypad) with two buttons. The buttons are used for switching between the Intercom and Monitor modes (the green Student button), and closing an Intercom/Monitor connection between a student‟s and the teacher‟s computers (the red Quit button). The external controller is required, because when the teacher is monitoring or controlling a student‟s workstation, it is not possible to use the Intercom button on the teacher‟s screen to switch between monitoring modes, or to terminate the monitoring connection.
Selecting the Remote Control command in the Settings menu displays the CSS Net remote control settings in the function window.
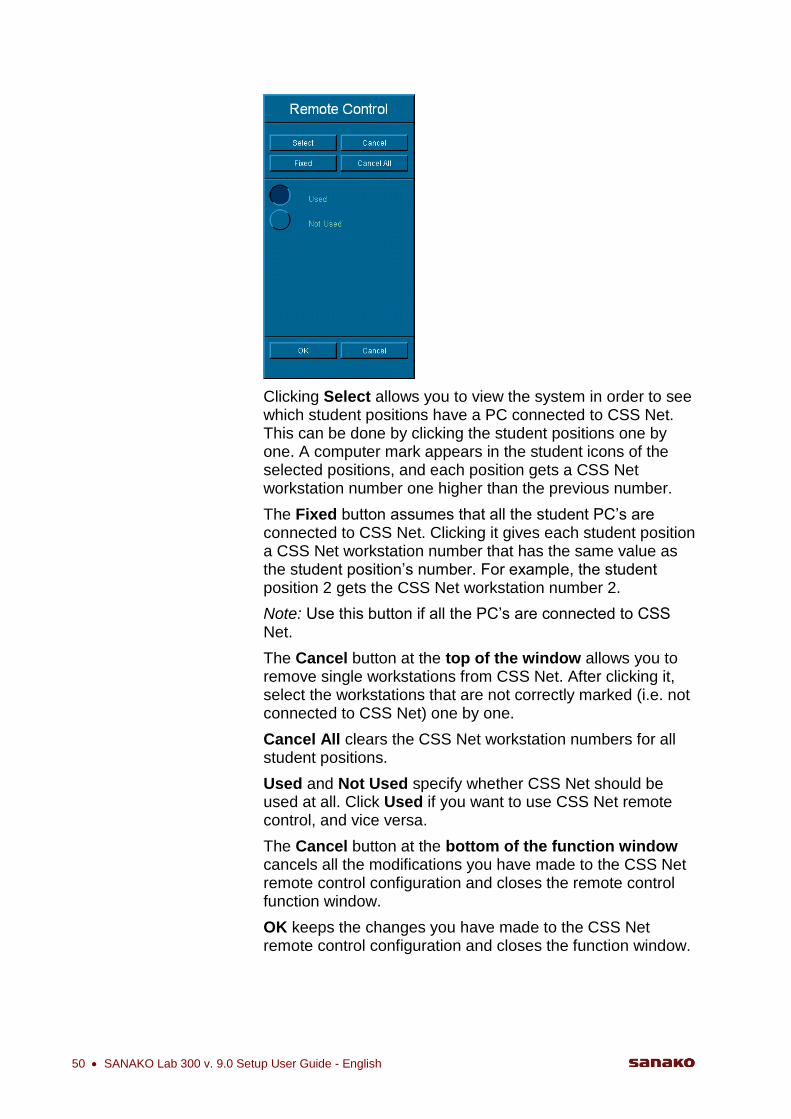
50 SANAKO Lab 300 v. 9.0 Setup User Guide - English
Clicking Select allows you to view the system in order to see which student positions have a PC connected to CSS Net. This can be done by clicking the student positions one by one. A computer mark appears in the student icons of the selected positions, and each position gets a CSS Net workstation number one higher than the previous number.
The Fixed button assumes that all the student PC‟s are connected to CSS Net. Clicking it gives each student position a CSS Net workstation number that has the same value as the student position‟s number. For example, the student position 2 gets the CSS Net workstation number 2.
Note: Use this button if all the PC‟s are connected to CSS Net.
The Cancel button at the top of the window allows you to remove single workstations from CSS Net. After clicking it, select the workstations that are not correctly marked (i.e. not connected to CSS Net) one by one.
Cancel All clears the CSS Net workstation numbers for all student positions.
Used and Not Used specify whether CSS Net should be used at all. Click Used if you want to use CSS Net remote control, and vice versa.
The Cancel button at the bottom of the function window cancels all the modifications you have made to the CSS Net remote control configuration and closes the remote control function window.
OK keeps the changes you have made to the CSS Net remote control configuration and closes the function window.
Using the Lab 300 Config Program 51
SOFTWARE REMOTE CONTROL AND DICTIONARIES
Clicking either the Remote Control button or Dictionary button displays a window asking for a path to the program and program parameters.
Use the Browse button in the window to specify the path to the program with a File Open window.
Note: You should always install the dictionary and/or remote control software in Windows 98 before specifying them in the Config program.
REMOTE CONTROL PROGRAM
A remote control program must have a way of identifying student workstations. To make the remote control program compatible with the system, student workstations must be named as follows: The name of workstation 1 is WKS1, workstation 2 is WKS2 and so on.
You must specify the command that is used to launch the remote control software, and also the possible command line options that the remote control software may need when starting up. In other words, you must define the actual command line for using remote control.
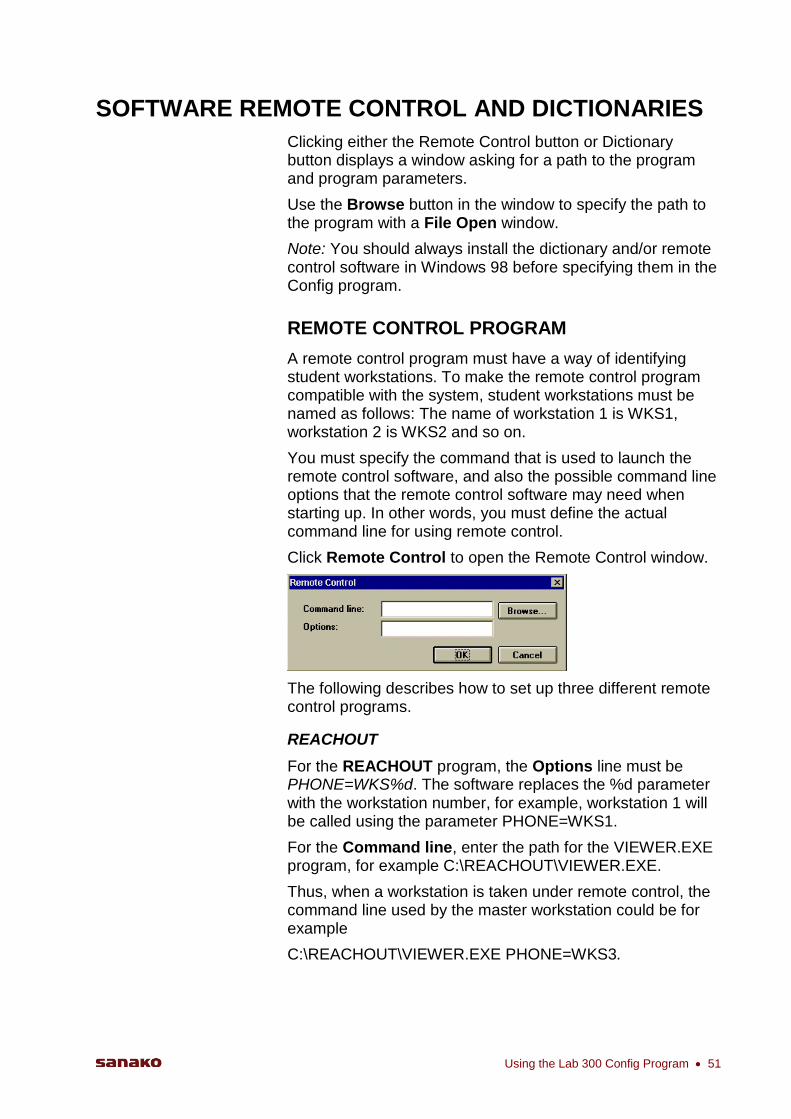
Click Remote Control to open the Remote Control window.
The following describes how to set up three different remote control programs.
REACHOUT
For the REACHOUT program, the Options line must be PHONE=WKS%d. The software replaces the %d parameter with the workstation number, for example, workstation 1 will be called using the parameter PHONE=WKS1.
For the Command line, enter the path for the VIEWER.EXE program, for example C:\REACHOUT\VIEWER.EXE.
Thus, when a workstation is taken under remote control, the command line used by the master workstation could be for example
C:\REACHOUT\VIEWER.EXE PHONE=WKS3.

52 SANAKO Lab 300 v. 9.0 Setup User Guide - English
PROXY
For the PROXY program, the Options line must be WKS%d. The software replaces the %d parameter with the workstation number, for example, workstation 1 will be called using the parameter WKS1.
For the Command line, enter the path to the PROXY.EXE program, for example C:\PROXY\PROXY.EXE.
Thus, when a workstation is taken under remote control, the command line used by the master workstation could be, for example C:\PROXY\PROXY.EXE WKS4.
PC-DUO
For the PC-DUO program, the Options line must be * /UIP /Cwks%d. The software replaces the %d parameter with the workstation number, for example, workstation 1 will be called using the parameter * /UIP /Cwks1.
For the Command line, enter the path to the PC-Duo program.
DICTIONARY PROGRAM
Any dictionary application can be installed on the teacher's computer. The teacher can open the installed dictionary application by clicking the Dictionary icon in the toolbar.
To set up a dictionary program for use with the main program, click Dictionary and the Dictionaries window opens.
To add a new dictionary to the system, click New and type the path for the dictionary application into the Path field (or use the Browse button to locate the program with a File Open window).
If your dictionary application requires command line switches, enter them into the Options field.
Type a description for the dictionary application into the Explanation field. This information appears in the list of installed dictionaries in the Dictionaries window.
When you are finished, click Add to add the program into the list of installed dictionaries.
Using the Lab 300 Config Program 53
If you want to modify the settings of your dictionaries, select the appropriate dictionary and change the information.
If you want to remove an installed dictionary, select it and click Delete.
Click OK to close the Dictionaries window.
LINKING THIRD PARTY APPLICATIONS TO THE SYSTEM
You can directly launch different applications from the main application's Other/Network Menu.
See Link Other Applications under Settings Menu for information on preparing third party applications being started from the Other/Network menu.
SETUP FILES
LABMAIN.INI FILE
The LABMAIN.INI file is the main configuration file used by the main program. The user can modify the file‟s settings using the Config program. When the user saves settings in the Config program, both the SET file and the INI file are saved. LABMAIN.INI contains all the hardware settings. There is only one INI file per environment, but there can be multiple SET files.
NAME
The application name as shown in the title bar (e.g. NAME=application).
DATAFILES
The user Setup file name, test results file name, and link file name are saved in SET, RSP and LNK constants.
For example, SET="LABMAIN.SET", RSP="LABMAIN.RSP" and LNK="LABMAIN.LNK".
MODE
Possible values for MODE are LAB and DEMO. LAB shows that the language lab is functioning normally, and DEMO indicates that the teacher's computer is not connected to the lab's electronics. You can also have the text DUOLAB under the Mode section. This means that there are only DR-100s or Duos in the lab (). In addition, there can be the “MODE = x,y“ row which can be used when additional commands are used for SCU.
54 SANAKO Lab 300 v. 9.0 Setup User Guide - English
SERIALPORT
SCU is connected to a serial port. Possible values for this port are COM1, COM2, COM3 and COM4.
VDWIN
The parameters VIDEOAPP and VIDEOPARAM can be left empty, in which case Lab 300 uses the default video window.
In case the parameter AUTOMATICVIDEO is 1, i.e. if the user selects a program source with a video attached to it, the video application or the video window launches automatically. The default value for AUTOMATICVIDEO is 0.
The video window position variables (x, y) and size variables (cx, cy) are separated by commas: x,y,cx,cy. For example: 299,124,250,200.
MASTERS
The parameters given for the program sources are: the source number (index), SCU hardware port, source type and source name.
For example:
0,1,2,Cassette
1,3,1,VCR
VIDEOS
The VD1 numbers and names for video sources.
For example:
0,None
1,Camera
2,VCR
LAYOUT
The student positions on screen (student number, x, y, cx, cy, group).
For example: 1,32,368,45,45
AUDIO/VIDEO
Audio-video pairs (SCU port and VD 1 source number).
For example: 1,1 or 2,1
STUDENTVIDEO
Video sources for students (student number and VD 2 output).
For example: 5,1
Using the Lab 300 Config Program 55
REWINDSTUDENTS
Automatic rewind of student recorders at the program Startup (ON or OFF).
MAXSTUDENTS
Maximum number of students in language lab: 0 for normal lab and 1 for interpreter lab.
EJECTCONTROL
Student recorders' Eject control. Alternative values are STOP, FREE and ENABLE.
REMOTEPROGRAM
The remote control program that is executed when the Remote Control button in the toolbar is clicked.
For example: PROGRAM=C:\PROXY\PROXY.EXE and OPTIONS=WKS%d.
COMMON
The database name is saved in the DATASOURCE constant. For example: DATASOURCE=ShMem SOLID.
The following items are for differentiating locations and workstations from each other: LOCATIONID, WORKSTATIONID, LABLOCATION1 and LABLOCATION2. These are updated, when you have used Update Locations or Update Workstations dialogs.
If the program is used in a network (connected to another computer used to drive SCU), SERVER-setup parameters are needed. IPADDRESS is a server IP address and PORT is a server port.
RSRV_ADDRESS is for the Crossroad address and RSRV_DOMAIN is for the Computer Family name (defined during the software installation).
REMOTECONTROL
On the first line, USED = NO/YES defines whether CSS is used when the Remote PC button is clicked in the main user interface. The ICMPORT item has a PC serial port number used for EBS CSS Net system.
After the first line, there is a line per each PC workstation. Each line includes a student number and PC number (CSS Net numbering)
CSS-NET
The Audio Source is connected to CSS Net via the Audio Sources dialog. The Config application saves the setting to
56 SANAKO Lab 300 v. 9.0 Setup User Guide - English
this section (e.g. 1,0 2,0 3,1, where the first and second sources do not have the CSS Net functionality and the third source has).
RESPREC
The path where all student responses are collected when Digital Response Collection is used.
TOOLBAR
This section may exist or not. If not, the default toolbar buttons are used. If this section exists and is not empty, the toolbar buttons are used in the order specified here. The button group separators are defined as SEPARATORx, where x=1,2,.... In case a button value is 1, the button is shown. If a button/separator value is 0, the button is hidden. The Grouping button and Group buttons (A, B, C, D, L) are always shown.
You can't define toolbar settings in Config. When needed, you must write these settings manually in the Labmain.ini file.
The keywords for the toolbar buttons are ALLCALL, SPEAKER, PROJECTOR, CAMERA, VIDEO, PHONECONV, PAIRDISC, GROUPCONF, DUOLAUNCH, FILELAUNCHCOPY, LOCK, SHUTDOWN, REMOTE, MODELSTUDENT, TEACHERSCREEN and SELECTALL.
For example:
VIDEO=0
SEPARATOR1=1
PHONECONV=1
ENGINE.INI FILE
ENGINE.INI (TCPIP section) includes all the settings needed in the Labeng32.exe module before Lab 300 sends all the other settings.
PORT
This is reserved for future purposes.
DOMAIN
The DOMAIN item includes a Computer Family name of the installed lab.
TCPIPADDRESS
The TCPIPADDRESS item includes an IP address or DNS host name for the Crossroad computer.
Using the Lab 300 Config Program 57
CSSPORT
When EBS CSS Net is used, the CSSPORT item must have the PC COM port (e.g. COM1)
TRTTIMEOUT
When you want to refine the transfer delay (waiting for the startup of Duos), you can change the timeout value to the TRTTIMEOUT item.
LABMAIN.SET FILE
All the user configurations are saved in the LABMAIN.SET file:
1. Preferences information (from the File menu).
2. Grouping of students.
3. Program sources for groups.

Glossary of Terms 59
GLOSSARY OF TERMS
ADMINISTRATOR
Administrators have the highest priority access to the database. They may add to, delete from and update teacher and student data, as well as other Administrators' data.
ALL CALL
When All Call is selected, the teacher's voice is heard by all the students. Student recorders in free work are stopped and come under teacher control.
AUDIO-ACTIVE COMPARATIVE STUDENT STATION
A student workstation with a recorder. The student can record program source material on one track and his/her own speech on the other track.
AUDIO-ACTIVE STUDENT STATION
There is no student recorder at this station. The student can listen to a program sent from either the master recorder or an external program source.
AUTOMONITOR
Monitors all students, moving automatically from one student to another after a certain period of time. The automonitor symbol appears on the student icon of the monitored student. Students may be monitored either by group or by student number - the choice is made in the File-Preferences window.
CALL
The student‟s way of communicating with the teacher. The word Help appears on the student icon of the calling student. When the teacher clicks the icon, a line of communication is opened and the call is accepted.
60 SANAKO Lab 300 v. 9.0 Setup User Guide - English
CAMERA
With the Camera button, the teacher sends the program from the video program source to all student monitors and the teacher's monitor. The source in question is the one connected to the first video program source connector in the video network. This would usually be the document camera.
CLASS SPEAKER
The teacher is able to route the program to the classroom loudspeaker for the whole class to listen to (without headphones). It is muted during Group Call and Intercom to avoid acoustic feedback. Muting can be switched off in Preferences.
CLASS WINDOW
Each student is represented by a numbered icon in the Class window. The icon layout is "as you see it" in the classroom.
CSS KEYPAD
When CSS Net is installed, the teacher workstation is equipped with an additional controller unit (CSS Net keypad) with two buttons. The buttons are used for switching between Intercom and Monitor modes and closing an Intercom/Monitor connection between a student‟s and the teacher‟s computers.
CSS NET
Computer Supervisory System. Hardware or software solution for remote controlling student workstations.
DATABASE
Database is used for saving media attributes, student and course data.
DIGITAL RESPONSE COLLECTION
When student responses are collected in one folder on the teacher computer or server in the Response Recording function, the process is called Digital Response Collection.
DIGITAL TRANSFER
See Media Launch.
DUAL TEACHER
Dual Teacher is a name for the second teacher position.
FREE WORK
No program transfer to the students - independent work only.
Glossary of Terms 61
FUNCTION WINDOW
This window contains all the parameter controls for a particular function (e.g. Pair Discussion).
GROUP BUTTON
Clicking buttons A, B, C, D or L activates the source control for the group indicated.
GROUP CALL
Click Group Call when you want to speak to every student in a group simultaneously. Student recorders in independent work stop and are placed under teacher control.
GROUP CONFERENCE
Members of a specific group can talk to each other once the group has been created by the teacher. One or more Group Conferences may take place at the same time. The teacher can participate interactively by clicking Mix, or use the Intercom to talk to one member of the group at a time. Student recorders are under teacher control during a Group Conference.
GROUP CONTROL
Group controls are for controlling all the student recorders in an active group.
GROUP WINDOW
The Group Window contains group program source controls, program transfer controls and group controls.
GROUPING
Students may be divided into groups to work with different tasks. The LABMAIN application has four teaching groups (A, B, C and D) to which a program can be transferred, and one Library Group (L) for independent study.
INFRARED DEVICE CONTROLLER
Infrared-controlled devices, such as a video recorder, may be remote-controlled using the Infrared Device Controller.
INTERCOM
Through Intercom, the teacher and student can hear and speak to each other. A student recorder in free work is stopped and placed under teacher control. The teacher can also control the student‟s recorder through the Student Monitor window.
62 SANAKO Lab 300 v. 9.0 Setup User Guide - English
LIBRARY GROUP
The Library Group works independently, selecting its own program sources. The teacher may monitor and talk with any student in the Library Group.
LIMITED ACCESS
If Limited Access is used, students have access only to transferred material. In other words, students can't listen to other students‟ recordings afterwards.
MARK
Students can place electronic bookmarks on the student tracks of their tapes. There are ten bookmarks all together (1,2,...9,0). The teacher can set bookmarks 6, 7, 8, 9 and 0 for a student during Monitor. The Search button is used for winding the tape to the bookmark and starting playback.
MASTER AUDIO PANEL
The Master Audio Panel (MAP) is located on the left-hand side of the master desk. There are controls for teacher headset volume and classroom loudspeaker bass, treble and volume.
MEDIA ASSISTANT DUO
Media Assistant Duo is a digital recorder.
MEDIA FILE
A media file is a digitized sound and/or picture file (e.g. WAV, AVI).
MEDIA LAUNCH
Media Launch is used in Lab 300 to open different media in the student computers (e.g. TXT, BMP, WAV, MPG file). It depends on associations, which application is responsible for opening an appropriate document.
MEDIAMANAGER
The MediaManager is a component that is used to add and modify the media data in the database.
MENU
The Menu is at the top of the Main window. The Menu items are File, Layout, Settings and Help.
MIX
An editing function which mixes a program source sound and the teacher's voice.
Glossary of Terms 63
MODEL STUDENT
A Model Student is a student who is used as the program source. The Model Student is indicated by the letter M on the student icon. The Model Student can be changed.
MONITOR
The teacher's screen shows an image of the student recorder panel through which student recorder operation can be monitored. The teacher can set bookmarks during Monitor, and can hear the student's program and speech. If the video network is in use, the teacher can see the student's video picture on the video monitor. The student will not be aware of being monitored.
PAIR DISCUSSION
This function allows students to engage in pair discussions. Both the number of students in a pair and number of the pairs may be varied, and pairs may be created across group boundaries. Students can hear the other member(s) of the pair. Student icons show the student numbers of those in Pair Discussion.
PHONE CONVERSATION
Students can take full advantage of this function to make telephone calls and take part in totally life-like conversations.
PODCASTING
You can create podcast files of audio material in Lab 300 with the Source-to-Source copying and Automatic Digitizing features. The students can then download the podcasts from a Web page and listen to the learning material on mobile devices. Lab 300 has an integrated procedure for creating Web pages to host the podcasts and for uploading the learning material. The podcasting feature requires that schools have a Web server with FTP access from the teacher computer for managing podcasts. This server is configured for podcasting with Lab 300 Config
PROGRAM SOURCE
Each device in the master desk that the teacher uses to transfer sounds or pictures to the students is referred to as a Program Source.
PROGRAM TRACK
The Student Recorder runs two tracks - the Program Track and the Student Track. The Program Track records the audio part of the Program Source.
64 SANAKO Lab 300 v. 9.0 Setup User Guide - English
PROGRAM TRANSFER
The Program Transfer controls are Transfer, Fast Transfer, Autolesson, Fast Autolesson and Manual. Program Transfer is controlled through the Group window.
REMOTE APPLICATION LAUNCH
Different Media files can be opened in the student workstations, when Remote Application modules are installed on the teacher and students‟ computers.
RESPONSE ANALYZER
The Response Analyzer is an automatic system for testing students‟ responses to multiple choice questions on the screen and/or on paper.
RESTART
Select this option to restart the main program.
SOFTWARE KEY FOR LAB 300
Software Key for Lab 300 is provided in the Lab 300 software package. Notice that you can NOT use Lab 300 without the Software Key.
SOFTWARE SCREEN TRANSFER
Activating the software screen transfer functions in Lab 300 requires a separate license. The screen transfer functionalities provide teachers with powerful tools for monitoring the activity of multiple remote computers at the time, viewing the screen of remote computers and even for remotely accessing the computers. Teachers also have the possibility of transmitting their screen to any workstation or group of workstations they select.
STATUSBAR
The Statusbar is a status row at the bottom of the main window. It is divided into four parts. Each part shows a group‟s status and the group‟s Program Source.
STUDENT AUDIO PANEL
Control keys and an information display for the student.
STUDENT ICON
The Student icon shows the student number and provides the teacher with information about the status of the student recorder.
Glossary of Terms 65
STUDENT TRACK
The student recorder runs two tracks - the Program track and the Student track. The Student track records the student's speech.
STUDY 300
Study 300 is a server software for saving media, course and student data.
TCP/IP
Network protocol for communicating between computers.
TEST
The Test menu contains the Response Analyzer and Response Recording functions.
TOOLBAR
The Toolbar is located at the top of the main window and contains control buttons.
TRANSFER
When a teacher clicks a transfer button in Lab 300, the source begins to play and the recorders or Duos begin to record. The material from the source media is thus transferred to the student workstations.
VIDEO LIVE
The SANAKO Video Live is an additional module to Lab 300. Video Live allows teachers to stream video material for the students either from analog sources, such as a DVD or VCR player, or using media files. The video streams are configured with Lab 300 Config and can be started for students similarly to other program sources. The analog video material that is streamed can be automatically digitized for future use. The Video Live module includes a separate video streamer server for managing the video learning material and the video streaming process.
VIDEO NETWORK
This network allows individual video distribution to each student.


![Cisco · s@lm@n Cisco Exam 300-080 Troubleshooting Cisco IP Telephony & Video v1.0 Version: 9.0 [ Total Questions: 157 ] Download 2017 EP 300-080 Dump PDF and VCE](https://img.pdfslide.us/doc/110x75/5f916597d6779d1de22ea686/slmn-cisco-exam-300-080-troubleshooting-cisco-ip-telephony-video-v10-version.jpg)