Embed Size (px)
Citation preview

San Juan PoolsInstallation Manual


San Juan Pools – Installation Manual • 3
WelcomeSAN JUAN BUILDERS
San Juan Fiberglass Pools would like to welcome you to the exciting world of Water! The San Juan family of professionals will do everything possible to make you a successful builder of the finest pools in the world.
Building one-piece fiberglass pools since 1958 has given San Juan the experience and knowledge to guide you along the path to success. However, we don’t rely on our track record alone. San Juan is an innovative and expanding company continuously adding new designs and processes. At our new state of the art manufacturing facilities in Arizona, Indiana and Florida, we constantly update our product line to remain at the cutting edge of one-piece fiberglass pool technology.
San Juan is dedicated to help you not only by providing the best pool with the largest selection of shapes and sizes in the world, but also with a dedicated, courteous and professional staff. Our regional representatives are willing to assist you with your sales events, provide leads, and make sure you’re equipped with all the sales and marketing material to help you close the deal. Our technical department can advise you on building award winning pools. From sales materials, ordering pools, checking on the status of orders and computer tracking, our office staff will strive to make sure your questions are answered and your pool shell arrives at your job when requested.
You also have responsibilities in this relationship. You must do your part and train yourself to be a professional pool builder. You also must learn that along with superior products and the knowledge we provide to help you reach this high level, you will need to become a professional in every aspect of your business. This includes the location and appearance of your place of business, your vehicle’s curb appeal, proper identification signage, and the organization and cleanliness of your job site. Make sure the language and music your staff uses are not offensive to the homeowner or their neighbors. Remember, people are watching and won’t forget what they see or hear. Paying attention to details will lead to your success.
Thank you for choosing San Juan, and we wish you continued success!

4 • San Juan Pools – Installation Manual
Introduction
San Juan Pools manufactured the first one-piece fiberglass pool in 1958. That pool is still in service today. The two primary reasons this pool is still in service are quality of product and proper installation.
San Juan/AECC continues to manufacture the world’s finest quality fiberglass pool, but it is up to you to install your pools properly.
The purpose of this manual is to take you step by step through each phase of the process. It is important to understand that although fiberglass pools have tremendous strength and flexibility, the supporting materials under and around the pool must be properly placed and compacted. Improper pool installations can lead to structural distortions and possible damage resulting in an unhappy customer and considerable repair expense.
The proper installation of a San Juan fiberglass swimming pool is probably the most critical factor in providing customer satisfaction and assuring continued product acceptance. The design of this manual provides the installer with the skills, and procedures for successful installations. These easy to follow instructions will help you avoid costly repairs.
This manual represents years of experience, research, and actual on the job know-how. It contains the most current information regarding procedures for the proper installation of San Juan fiberglass swimming pools. All designed to make your jobs efficient and profitable.
The material in this manual is intended as a guide only. The manufacturer makes no representation, warranties, or guarantees of any kind, expressed or implied, regarding this information. The manufacturer is not liable for any personal injuries or property damage as a result of installations done based on this information.
If there are any discrepancies between this information and state or local building codes, or if state or local codes are more comprehensive or specific about construction, design, or safety, those regulations must take precedence.
Please take the time to become familiar with this manual and refer to it frequently until you become confident in proper installation practices.
*Note: Pool damage resulting from improper installation may not be covered by San Juan’s warranty.

San Juan Pools – Installation Manual • 5
Table of ContentsWelcome ...................................................................................................3Introduction .............................................................................................4Section 1: Job Feasibility and Planning ................................................6 Restrictions, Codes and Permits Utilities Job Site Access Heavy Equipment Selecting The Pool Site Surface Water Control and Containment Existing Landscape Removal Pool Access Ajacent Structures Underground Obstacles Dirt and Sand Equipment Location Fencing Electrical Panel Job Organization Scheduling Basic Pool Instalation Tools and Supply Lists Summary
Section 2: Pool Site Plan and Layout .................................................17
Section 3: Pool Site Preparation .........................................................20 Excavation Install a Sump Line Grading the Pool Base
Section 4: Pool Delivery .......................................................................22 Pool Delivery Information Receipt and Inspection of Goods Unloading and Moving the Pool How to Roll a Pool
Section 5: Pool Installation ..................................................................27 Setting the Pool Filling and Leveling the Pool Prepare for Concrete Deck or Collar Important Tips
Section 6: Equipment Pad ...................................................................35
Section 7: Procedure for Finding Loss of Water ...............................36 Section 8: Walk Through .....................................................................37 Section 9: Rolling a Pool ......................................................................38

6 • San Juan Pools – Installation Manual
Section 1: Job Feasibility and PlanningBefore creating a proposal for your customer, you will need a fair amount of
information to determine the costs and opportunities involved with each job. Oddly enough, much of the same information needed to provide you with an idea of the costs to install the customer’s pool is also needed to plan the work of installing the pool. The information you gather for the proposal will be invaluable in making the entire installation process a smooth one. For each job you will want to explore the following topics:
3 Neighborhood Restrictions 3 Building Codes/Permits 3 Utilities 3 Job Site Access 3 Heavy Equipment 3 Selecting the Pool Site 3 Storm Water Control and Containment 3 Existing Landscape Removal 3 Yard Access 3 Underground Obstacles 3 Dirt and Sand 3 Equipment Location 3 Fencing 3 Electrical Panel 3 Job Organization 3 Job Delays Due to Weather or Backorder
Review the recommended approach for each of these topics to help you understand how to determine the feasibility of the job, as well as how to plan for the installation.
1.1 – RESTRICTIONS, CODES and PERMITSFind out from your local building officials what is required to get a building
permit for a pool. Ask if there are local requirements you may be unaware. Check with homeowner’s association or subdivision for restrictions regarding pools. It

San Juan Pools – Installation Manual • 7
may take anywhere from one day to three months to get a permit. The building department can give you a reasonable estimate on the average time required.
1.2 – UTILITIESDetermine the location or source of the utilities you will need to complete your
pool installation. Some of these are:• Water, for construction and filling of pool• Electrical, for temporary supply during construction and a permanent supply for pool equipment• Sewer, (some municipalities require backwash water to be pumped into the sewer system)• Fuel, for heater (Natural Gas, Propane, Fuel Oil, and Electric)
1.3 – JOB SITE ACCESSLarge equipment and the fiberglass shell must enter the pool site. For most
pools, a clear straight path 15 ft. wide and 15 ft. high will work well. Larger pools will require more space. A restricted access may still work by using smaller machinery, and lifting the pool over the house with a large crane. Neighbors’ yards or utility easements may also be used for access. Make sure permission is acquired before using non-homeowner access.
Check local access streets and roads to be sure they are adequate to handle the required clearances and wide turning radii.
1.4 – HEAVY EQUIPMENTDump trucks, concrete trucks, and cranes will damage driveways and side
walks. Either avoid driveways and side walks as access areas or get written releases for damage from the owner. Rubber plates can be used to protect streets and driveways. They are expensive but they last a lifetime. Plywood can also be used but it tends to get torn up by the equipment.
The most appropriate excavating machine for fiberglass pool installation is a track hoe. This machine with a 22’ or longer reach has the ability to not only excavate quickly and efficiently but can, in most cases, remove the pool from the transport trailer, walk it to the excavation and set it in place. When crane service is questionable or the terrain to the pool site is difficult. These machines can handle the load and are relatively easy to operate.
A considerable amount of sand must be moved in and around the pool during installation. A small skid steer on the job will pay for itself in time and labor savings.

8 • San Juan Pools – Installation Manual
1.5 – SELECTING THE POOL SITEDrainage, elevation and obstructions must be considered before selecting a final
pool site. Some obstructions you may find are:
• Underground wires • Gas lines • Septic tanks • Dry-well systems • Plumbing • Trees • Overhead power lines • Old foundations • Trash burial sites
Underground obstructions should be located before excavation begins. If an obstruction is unavoidable, a compromise must be reached. Keep in mind the labor and material costs of moving or replacing obstructions. Any changes made after the initial contract is signed will require an addendum or change order to the original contract.
Sun and shade can be an important factor when determining the pool site. Excessive shaded areas from trees and other buildings could result in uncomfortable swimming conditions during marginal weather months. In addition, it could considerably increase heating costs. Proper pool orientation will take advantage of sunny days for comfortable swimming condition and decreased heating costs.
The location of the pool in relation to other buildings should be both an aesthetic and practical consideration. Some alternatives to be considered are whether the pool should be laid out parallel, perpendicular, or at an angle to an existing house or building, hedge row, fence, property line setbacks or other landscape features.
Advanced knowledge of unknown subsoil conditions can be helpful in determining the placement of the pool. It is advisable under certain circumstances to probe the sub grade by boring a series of test holes. The results could suggest the best position and grade of the pool. Problems such as a rocky substrate, high water table, or clay should be located before construction begins. Moving the pool may eliminate some of these issues keeping the construction process as smooth and economical as possible. In areas of variable or questionable soil, it is advisable to hire a soil engineer.
Check the job location for grade or elevation of the pool. Keep the top surface

San Juan Pools – Installation Manual • 9
of the pool at least three to four 3- 4-inches above highest grade in the area to avoid any surface drainage back into the pool (terms used to describe the top of the decking at the edge of the pool are pool grade, final elevation or top surface). The top surface will vary due to thickness of pavers, cantilevered concrete or other surfaces used on top of the fiberglass shell’s coping.
1.6 – SURFACE WATER CONTROL AND CONTAINMENT
In the swimming pool business we always think of water as our friend. But outside the pool area, water not properly contained or diverted can cause problems. Water must be diverted away from the pool area, so setting the pool higher than the surrounding area will help. Particular attention must be paid to any run-off affecting the adjoining properties. In the very beginnings of the project water movement must be addressed. Roof downspouts must be diverted from the pool area and properly contained. Changes in grade around the pool will change run off in rainy weather. Additional run off from concrete surfaces may affect retaining walls, percolation areas, and location of drain fields. Make sure all changes proposed by the construction you plan to undertake will meet with local building codes in regard to water diversion and/or containment.
1.7 – EXISTING LANDSCAPE REMOVALThe subject of tree removal is dependent on individual preference. The decision
should be made based on the amount of landscape to be sacrificed for a low maintenance pool. Still, it should be noted that a certain amount of removal might be tolerated without disturbing the natural atmosphere of the backyard. This can be done by careful use of creative landscaping. Of course, remove any trees and shrubs located directly inside the pool layout area. Any root systems in the area requiring uniform compaction in and around the pool should also be removed. When it becomes necessary to remove trees, the entire root system should be excavated where possible. Organic material within the excavation may cause settling of pool walls, pool bottom, or the surrounding concrete deck.
1.8 – POOL ACCESSConvenient access to changing facilities and house exits also require some
thought. As you select your pool site, make a rough layout where you think

10 • San Juan Pools – Installation Manual
the pool should be located. Then consider decking and access by staking out their approximate positions. At this point you must consider child safety barrier requirements. These are extremely important and vary greatly according to region. Refer to the local codes to insure compliance.
1.9 – ADJACENT STRUCTURES
When building a pool near a house or other structure it is important that you do not undermine the foundation of the structure. In technical terms you should never cut into the angle of repose of the soil supporting any foundation. When soil is poured onto a flat surface it will form a conical shape. The angle between the outside edge of this cone and horizontal is the angle of repose of the soil. For most load bearing soils this is around 32 degrees However, there are soils with an angle of repose of as little as 20 degrees. This means an 8 foot deep hole could undermine structures as far as 24 feet away. Whenever poor quality soils are encountered it is a good idea to consult a soils engineer. In most cases, when reasonably good soils are found the rule of thumb is the excavation should be at least as far away from any foundation as it is deep (figure 1).
1.10 – UNDERGROUND OBSTACLESRocks, large boulders, water, new and/or abandoned septic tanks, old
foundations, buried trash, spongy soil, etc. can affect excavation costs, and in rare instances can make pool installation impossible. It is a good idea to explain to your customer at the outset that your bid assumes you do not run into any underground obstacles, and when an underground obstacle is encountered the original bid will have to be amended to reflect your additional cost.
1.11 – DIRT AND SANDSeveral truckloads of dirt will come out of the pool excavation depending on
Figure 1

San Juan Pools – Installation Manual • 11
the pool size. You may want this dirt in a low area of the yard. If not, it must be trucked to a local dumpsite. If there is construction going on in the neighborhood, homebuilders are often happy to have the fill dirt. www.dumpsitesnow.com is one of several web sites that may help find a location to dispose of fill dirt. In some instances dirt must be brought in to accommodate the pool and deck. Typically sand or 3/8” maximum diameter gravel are used for the compacted backfill around the pool. If you are lucky enough to excavate clean sand from the dig, this sand can be re-used as backfill. Otherwise sand, 3/8” maximum diameter gravel or other suitable material must be hauled to the job site. Keep in mind the extra costs of moving dirt or sand long distances. A 4” thick bed of compacted backfill is recommended under the floor of every pool. Where possible this should rest on undisturbed soil. Otherwise, before the 4” compacted backfill bed is created, proper compaction of the bottom of the hole is necessary.
1.12 – EQUIPMENT LOCATIONBoth pool owner and pool builder should collaborate when deciding where the
pump and filter should be located. The following points should be included in your considerations:
1. Locate equipment on a concrete slab. Be sure to make the slab large enough for all equipment, usually 3’ x 4’ slab will work. A more complicated installation with several pumps, a heater, etc. may need a much larger pad. Also consider whether an enclosure will be built over the equipment, and plan the slab size accordingly.
2. Keep the equipment as close to the pool as possible to maintain optimum performance.
3. Generally, the equipment pad should be less than 5’ above pool grade, and when possible should not be located below pool grade. More than 5’ above pool grade requires special pumps and piping. Equipment below pool grade requires special valves.
4. Consider where the backwash water will drain. Is there adequate drainage for storm water? Check for local codes requiring special methods to dispose of backwash water. Backwash water should go into the sewer system were possible and not into the storm sewer.
5. Location of the equipment is also important from an aesthetic point of view. When making the rough layout of the pool, visualize placement of the eqipment and plan for future landscaping or enclosures. Placing equipment out of sight of the immediate pool area is usually preferred.

12 • San Juan Pools – Installation Manual
1.13 – FENCINGMost municipalities require safety fencing around pools. Many will allow
a safety cover instead of a fence. Contact local officials for information about fencing requirements for pools. Most municipalities require temporary fencing around the job site during construction, especially once water is added to the pool.
1.14 – ELECTRICAL PANELCheck the electric panel box for available circuits. Older homes may need a
new service installed, especially if using an electric heat pump. Your salesman should document the size and type of electrical panel and main breaker during his initial sales call. Electrical challenges can add significantly to the cost of the job. If unsure call an electrician.
1.15 – JOB ORGANIZATIONProper job organization can be the key to making the job proceed in a smooth,
efficient and timely manner – saving you time and money.
BEFORE CONSTRUCTION BEGINS
• Have all permits required to complete the project. • Thoroughly explain the pool layout and all work to be done with the customer. Determine the final elevation. Get the customer to sign off on the lay out and final elevation. • Order your pool allowing adequate time for delivery. • Have all equipment, tools and supplies on the job site before the excavator arrives. • Schedule deliveries of sand, water and any other supplies. • Schedule the excavator, crane and all other construction equipment needed for project completion before the project begins.
1.16 –SCHEDULINGWhen scheduling, budget several days a month for make up time. You may
need this time because of weather delays, backorder of materials, or subcontractor scheduling conflicts.
We recommend the basic installation tools and supplies listed on the following pages.

San Juan Pools – Installation Manual • 13
1.17.1 – TOOLS & EQUIPMENT
1.17 – BASIC POOL INSTALLATION TOOL & SUPPLY LIST
1 ..............................................................................SHORT HANDLE SLEDGE HAMMER 1 ...................................................................................................... 16oz CLAW HAMMER 2 .............................................................................. 50-foot OR 100-foot TAPE MEASURE 1 ...................................................................................................25-foot TAPE MEASURE 2 ............................. CHANNEL LOCK PLIERS (1 - 2 ½-inches and 1 - 4-inches capacity) 1 .......................................................................................................... VISE GRIP PLIERS 1 ....................................................................................... ASSORTED SCREW DRIVERS 1 ................................................................................................................... SOCKET SET 1 ....................................................................................................................... HAND SAW 1 .................................................................................................................PRUNING SAW 1 .................................................................................................................. LASER LEVEL 1 .............................................................................................................................TRIPOD 1 ....................................................................................................................STORY POLE 1 ............................................................................. LANDSCAPE CONTRACTORS RAKE 1 ................................................................................................................ GARDEN RAKE 1 ......................................................................................BLACK FELT TIP MARKER PEN 2 .......................................................................LONG HANDLE ROUND POINT SHOVEL 2 ........................................................................................LONG HANDLE FLAT SHOVEL 1 ........................................... COMBINATION PICK MADOCK (HARD GROUND AREAS) 1 ................................................................................ CONTRACTORS WHEEL BARROW 1 ..................................SAND WASH WAND STRAIGHT (SEE INSTALLATION MANUAL) 1 .....................................SAND WASH WAND CURVED (SEE INSTALLATION MANUAL) 2 ...............................................................50-foot x 3/4-inch OR 5/8-inch GARDEN HOSE 2 ...............................................................................................HOSE SHUT OFF VALVES 8 .......................................................... 1 OR 2 TON BOTTLE JACKS ($10 TO $15 EACH) 1 .......................................................................................100’ 3/8-inch OR 1/2-inch ROPE 1 .............................................................................. 7-inch CIRCULAR SAW (OPTIONAL) 1 ................................................................................................ CHAIN SAW (OPTIONAL) 2 .............................................................................50-foot #14 WIRE EXTENSION CORD 1 .................................. CORDLESS ELECTRIC DRILL WITH #2 AND #3 PHILLIPS BITS 1 ................................................................................................3/8-inch ELECTRIC DRILL 1 .................................................................................................. ASSORTED DRILL BITS 1 ..................................................................................................................... CAULK GUN 4 ...........................................15 or 20-foot x 2-inch NYLON LIFTING SLING (OPTIONAL) 1 .................................................... 10-foot x 2-inch NYLON LIFTING SLING (OPTIONAL) 4 .......................................2’ x 3/8-inch HEAVY DUTY TRANSPORT CHAIN (OPTIONAL) 1 .................... 6’X3/8-inch HEAVY DUTY TRANaSPORT CHAIN W/1HOOK (OPTIONAL) 9 ......................................................3/8-inch CLEVIS FOR ABOVE CHAINS (OPTIONAL) 1 ..................................................... DE-WATERING PUMP (2-foot - 3-inches GASOLINE) 1 .............................................................................. 2 ½-inches HOLE SAW AND ARBOR 1 ........JIGSAW OR RECIPROCATING SAW WITH COARSE METAL CUTTING BLADES 1 4 1/2-inch ANGLE GRINDER WITH SANDING PAD AND COARSE DISCS (OPTIONAL)

14 • San Juan Pools – Installation Manual
1 ........................................................................................ 250-feet NYLON STRING LINE 1 ....................................................................................BUNDLE 24-inch WOOD STAKES 2 ...........................................CANS ORANGE CONTRACTORS MARKER SPRAY PAINT 6 ..................................................................... 4 x 4-inch x 8-foot LANDSCAPE TIMBERS 1 ............................................2 x 4-inch x 10-foot STRAIGHT BOARD FOR SCREEDING 8 .............................................................. I x 4-inch x 8-foot STRAIGHT SCREED BOARD 1 .......................................................................SMALL BOX 1 ½ -inches DECK SCREWS 1 ........................................................................................TUBE G.E. SILICONE (CLEAR) ............................................................................................................................GLOVES ..............................................................................................................RUBBER BOOTS ............................................................................................................................GRAVEL 10 .................................................... 40 LB BAGS OF ½-inch OR ¾-inch ROUGH GRAVEL 2 ........................................................................................ 1 x 2-inch x 8-foot Furing Strips
1.17.2 – SUPPLIES
REQUIRED AMOUNT OF ...............................¾-inch PVC CONDUIT AND FITTINGS REQUIRED AMOUNT OF ....................... #8* GROUND WIRE AND CONECTOR LUG
1.17.3 – ELECTRICAL SUPPLIES
REQUIRED AMOUNT OF ...........................................SCH. 40 PVC PIPE 1 1/2-inches
REQUIRED AMOUNT OF .................................................SCH. 40 PVC PIPE 2-inches 50’ ROLE ......................................................FLEXIBLE SCH. 40 PVC PIPE 1 ½-inches ........................................................MALE ADAPTOR SCH. 40PVC PIPE 1 ½ - 2-inches
....................................................... FEMALE ADAPTOR SCH. 40 PVC PIPE 1 ½-inches
.................................................. SLIP X SLIP COUPLINGS SCH 40 PVC 1 ½ - 2-inches
.................................................................. 90 DEGREE EL SCH. 40 PVC 1 ½ - 2-inches
........................................................ SLIP X SLIP STREET EL SCH. 40 PVC 1 ½-inches
..................................................................SLIP X SLIP X SLIP T 40 PVC 1 ½ - 2-inches
............................................................................SLIP CAP SCH. 40 PVC 1 ½ - 2-inches
............................................................................2 X 1 ½-inches REDUCER BUSHINGS QT .........................................................................................................PVC GLUE (CLEAR) QT ................................................................................................. PVC CLEANER (CLEAR) ............................................HAYWARD THREADED PLUGS WITH O-RING 1 ½-inches
............................................................................................2-inch RUBBER TEST PLUG QT ...................................................................................................................... BLUE GLUE
1.17.4 – PLUMBING SUPPLIES
San Juan Pools – Installation Manual • 15
1.18 – SUMMARY
1. Place your order for the pool of your choice at least 3 weeks prior to desired delivery time. 2. Order equipment from Aqu@mall. 3. Acquire all permits. The permits must be displayed at the job site. 4. Call to confirm delivery of pool one week prior to delivery. 5. Call local underground utility locaters. 6. Call to confirm ETA of pool with driver two days prior to pool delivery. 7. Have the site plan signed-off by your customer. 8. If utility re-routes are necessary, they must be done prior to excavation. 9. Arrange for excavation to take place the day of or the day before the pool arrives. 10. If dirt is to be hauled away, arrange for a dump truck or trucks to be at the site for the excavation. Arrange for extra fill dirt if required. 11. Confirm with driver the delivery locale 24 hours prior to delivery. Check load configuration to determine if additional equipment is needed to remove the pool from the delivery trailer. 12. Remove fence panels if required for access. Most municipalities require temporary safety fencing around the pool excavation while unattended. 13. Arrange for a skid steer to move sand around the pool the day the pool is set. This is also the best machine for grading and leveling the pool site and access area. 14. Aggregate must be delivered to the site before the pool is set. 15. Have ten to twelve 40 LB bags of rough stone on site at excavation for the dry well bed. 16. If fill water is a problem, make arrangements for a water truck or hoses from a neighbor’s yard. 17. Pre-schedule an electrician and deck man to preview the job before the pool installation. 18. Immediately after the pool is filled treat the water with start-up chemicals. 19. If required, arrange for fence installation at or before the pool is completed.

16 • San Juan Pools – Installation Manual
1. Place order for pool.
2. Acquire required permits.
3. Re-route utility, if necessary.
4. Call to confirm pool delivery date.
5. Order equipment.
6. Have site plan.
7. Arrange for exavation.
8. Excavate.
9. If dirt is to be hauled away, arrange for dump truck(s) at site for excavation.
10. Arrange for extra fill dirt if required.
11. Confirm pool delivery with driver. Check load configuration to determine if additionsl equipment is needed to remove to pool from the delivery trailer.
12. Arrange for a skid steer to move sand around the pool the day the pool is set.
13. Aggregate must be delivered to the site before the pool is set.
14. Have ten to twelve 40 lb. bags of rough stone on site at excavation for the sump line bed.
15. If fill water is a problem, make arrangements for a water truck.
16. Pre-schedule an electrician and deck man to preview the job before or during the pool installation.
17. If required, arrange for fence installation at or before pool completion.
Tasks 3 Wks 2 Wks 1 Wk 1 Day Pool Delivery
444
4444
4
4
4
4
4
4
4
4
4
4

San Juan Pools – Installation Manual • 17
Section 2: POOL SITE PLAN AND LAYOUTThe pool site plan is extremely important to the success of the installation. The
site plan is the key to translating the customer’s desires to a reality your installation team can create. The pool site plan shows elevation, equipment location, amount of concrete required around the pool and any landscape features (which could include waterfalls, boulder placement, any location of plants, etc). The pool site plan also shows the pool’s location relative to the home, any out buildings, property lines, overhead power lines and in-ground restrictions that cannot be rerouted. When applicable, the agreements and possible restrictions of the homeowner’s subdivision are shown. It also indicates access to and from the construction site, and any other features that are required for the success of the project.
The site plan generally should refer to the pool’s centerline. Most pool shapes are asymmetric so they do not have a true centerline. Because of this we will refer to a pool’s reference line, which generally is close to the center of the pool. Figure 2 shows a typical site plan with the location of your benchmark
Figure 2

18 • San Juan Pools – Installation Manual
(used as a reference for all elevations) and dimensions locating the pool’s reference line. All pool shapes are located on-line at www.sanjuanpools.com/downloads/engr/siteplan/ in .dwg and .pdf formats. You can use these to get exact pool shapes for your site plan.
Before laying out the pool at the job site, determine the pool and deck elevation to assure proper drainage away from the pool and residence. Then determine whether the pool will be parallel, perpendicular or at an angle to the home. Always locate the pool with the homeowner present and with his final approval.
All San Juan Pool installation dig plans are laid out and measured from the pool’s reference line. Using the site drawing, transpose the site plan to the ground, driving a stake at each end of the reference line. Attach a string between the two stakes. Estimate the location of the outside areas of the deck and mark them with contractors spray paint. At this point, the excavator should remove all sod, trees and shrubs from the area. Concrete decks built over thick sod will settle resulting in cracked concrete.
In most cases pool and deck areas are constructed on level grade. In the event the pool and deck site fall slightly below grade, dirt from the pool excavation can be placed and compacted in low areas as excavation continues (figure 3). Extreme grade variations should be
Figure 3
Figure 4

San Juan Pools – Installation Manual • 19
resolved prior to the pool excavation. Set up a builder’s level, transit, in an area with visibility to the entire pool
site. It needs to be out of the way of your excavator, crane and the mound of dirt to be created by the excavation. Set the story pole on the designated benchmark (existing concrete, door sill, etc.). Site through the transit, and mark the story pole (figure 4). Determine pool grade relative to the benchmark and mark the story pole accordingly. Refer to the appropriate dig plan for the depth of pool at each station and mark the story pole accordingly. You must account for the type of coping. A cantilevered deck will put the top of the waterline tile on the fiberglass shell 3 ½” below pool grade, exposed coping will put the top of the fiberglass shell at pool grade, and stone coping will lower the top of the fiberglass shell by the thickness of the stone.
While the excavator is removing the sod, move the story pole to several locations in the deck area to be sure the dirt grade is below the pool grade mark.
Locate and drive a stake in line with and at least 2’ beyond each end of the pool’s reference line. Using the appropriate dig plan, lay out the perimeter of the pool excavation with spray paint. Be sure to add the appropriate over-dig to the dig plan’s dimensions. Locate and mark any other points described on the dig plan. Drive stakes for the water’s edge along the reference line as shown on the dig plan (figure 5 ).
Figure 5

20 • San Juan Pools – Installation Manual
Section 3: POOL SITE PREPARATION
3.1 – EXCAVATIONIt is usually easier to dig the pool from shallow to deep. Set up your transit as
low as possible so that it is more stable, does not reflect in windows and keeps your story pole as short as possible. Also, make sure your excavator and the dirt removed from the hole do not get between the transit and the hole. You will save
Figure 6

San Juan Pools – Installation Manual • 21
on backfill if you taper the walls inward about 1 foot from top to bottom. Excavate to the appropriate elevation at each station using the story pole or a tape measure to check for proper depth. When possible, go ahead and dig a trench from the equipment pad to the pool excavation area for your plumbing. In non-sandy areas, over-dig the floor of the pool approximately 4” to allow for a bed of backfill under the pool. As excavation progresses from station to station, continually check depths per the dig plan.
3.2 – INSTALL A SUMP LINEEvery pool floor excavation should have a dry well and sump line. This sump
line may need to be used many years after the pool is set. Therefore, the end above the ground should be clearly labeled and accessible.
Dig a 2’ by 2’ square in the deepest corner of the excavation 18” deeper than the deepest point. Put 9” of ¾” gravel in this hole. Then run a piece of 8” PVC from this gravel bed vertically to deck level. Fill around the base of the 8” PVC to bring the gravel back up to the grade at the bottom of the excavation, then cover this gravel with geo textile fabric. The top of the 8” pvc will extend through the deck. This hole in the deck should be covered with a skimmer lid and collar. (figure 6).
3.3 – GRADING THE POOL BASEAs preparation for pool floor final grading the material to be used for backfill
should be on the job site before the excavation is complete. A large pool may take 8 yards of backfill for the floor alone. More sand or gravel will be required for back filling the pool walls. The amount will depend on over dig cave-ins, beginning grade variations and pool size. Before adding the sand or gravel to be used under the pool floor, remove dirt clods, rocks and any organic materials from the rough excavation.
3.3.1 – Form BoardsInstall two 4” wide form boards on each side of the hole for the entire length of
the hole (figure 7). Drive stakes beside the form boards until the top of the stake is lower than the top of the form board. Attach stakes to form board. Drive stakes until the top of the form board reaches the correct elevation. In extremely hard ground you can use steel grade stakes with pre-drilled holes.
Place backfill on the floor of the excavation on both sides of the form boards and rake to the top of the form boards. If using dry sand, wet sufficiently for good

22 • San Juan Pools – Installation Manual
compaction. Tamp the backfill, and then add extra backfill if required to have it just higher than the top of the form boards. Using a straight board, screed the backfill to the top of form boards. Fill in depressions and re-screed. Remove the form boards and be careful to remove all stakes. Take care not to overly disturb the backfill. Add backfill to fill the voids left by the now missing form boards. For pools with bottom main drains dig out an area to
accommodate the main drain and pipe. You are now ready to install your San Juan fiberglass pool.
Section 4:
Pool DeliveryTaking delivery of the pool requires: (1) an understanding of the pool delivery
directions and access to the site; (2) being diligent in taking receipt of the pool (you must sign and pay for the pool before taking it off the truck), and (3) understanding the dynamics involved in unloading the pool from the delivery truck and urning the pool upright.
4.1 – POOL DELIVERY INFORMATIONThe vehicle that will bring your San Juan Pool to your job site requires
sufficient access area to maneuver. For a 14’ wide pool there must be overhead to ground and side-to-side clearance of 15’ for straight-line movement (small tree
Figure 7

San Juan Pools – Installation Manual • 23
branches below 15’ are acceptable). Rapid road elevation changes can cause the pool edge to jam into the road surface. Tight curves will require considerably more than 15’ side-to-side clearance. Consider permanent obstacles such as trees, poles, overhead electric lines, etc. in determining the best access route to the pool site.
In the event the delivery vehicle cannot approach the job site, alternative final delivery methods should be considered. A track hoe with a minimum 22’ reach can remove the pool from the trailer at an accessible location, and then walk the pool to the job site (Plywood or rubber sheets can be leapfrogged ahead of track hoe to prevent surface damage). A crane with a minimum 35’ reach capable of supporting 5,000 lbs. at maximum extension can remove the pool and then set, move, and lift until the pool reaches the site. An extendable forklift, Lull, can lift and maneuver with the pool. Contact a local crane service for advice. The pool may also be transferred to a flat trailer for final site delivery.
Whatever equipment is used to remove the pool, there must be sufficient room for maneuvering. A minimum space for maneuvering is 35’ from side to side from the trailer when using a crane. Using a track hoe, 55’ may be required. Both methods require a minimum of 25’ overhead clearance. San Juan’s larger pools are sometimes transported on tilt trailers. These trucks and trailers may be over 55 feet long and fifteen feet high with ground clearance of less than four inches. (figure 8)
Two pools may be stacked together in one shipment. If this is the case, both pools may have to be removed and one replaced. Smaller pools delivered on flat trailers, require less overhead clearance and have more ground clearance. Under most circumstances, allow 30 minutes to one hour’s time to set up and remove a pool from the trailer.
25’ Highfor Removal
Figure 8

24 • San Juan Pools – Installation Manual
Due to the complexity of wide load transportation, delivery times are subject to delays. Should delays occur, the driver will notify you. Be sure our factory has the phone numbers where you can be reached.
When the pool is delivered, the driver is required to pick up payment for the pool prior to removing it from the trailer. Please be sure the factory has confirmed the amount, and method of payment. Make sure these funds are available at the delivery site.
It is your responsibility to have the necessary straps and chains to unload the pool. In many cases the delivery vehicle will have straps, chains and other supplies required for unloading the pool. Many drivers will assist you with the hook up and unloading of your pool. However, if a contract carrier makes the delivery you may be on your own.
4.2 – RECEIPT AND INSPECTION OF GOODSExamine the equipment, the San Juan Fiberglass Swimming Pool Kit, and
check the number and marking of cartons against the packing slip. Before starting the installation, review your equipment requirements to be sure they are correct for the particular pool installation. Do not attempt to assemble the pool with damaged materials. Confirm receipt of all necessary white goods and tile.
4.3 – UNLOADING AND MOVING THE POOLSome San Juan Pools are shipped with a brace between the two long sides.
This brace is known as a “spreader beam” and its purpose is to add support to the pool during unloading and pool placement.
When off loading the pools from a tilt trailer the combination of straps must create a situation where all four lifting eyes are carrying equal loads. Most of the pools require a 26’ strap at the top of the pool, a 15’ strap coming down the center and a 15’ strap across the bottom. Some pools may require a 26’ strap across the bottom. Notice, the center strap and the middle of the upper strap come together
San Juan Pools, Inc., 2006 30
4.2 RECEIPT AND INSPECTION OF GOODS
Examine the equipment and the San Juan Fi-berglass Swimming Pool Kit on receipt, and check the number and marking of cartons against the packing slip. Before starting the installation, review your equipment requirements to be sure they are correct for the particular pool installation. Do not attempt to as-semble the pool with damaged materials. Confirm re-ceipt of all necessary white goods and extra tile.
Some San Juan Pools are shipped with a brace be-tween the two long sides. This brace is known as a “spreader beam” and its purpose is to add support to the pool during un-loading and pool placement.
When off loading the pools from a tilt trailer there is a different combination of straps than what is used for rolling the pool over, Most of the pools require a 26’ strap at the top of the pool a 15’ strap coming down the center and a 15’ strap across the bottom, you would then adjust the center strap from left to right to adjust the level of the lift.
Two exceptions to this combination are the “oasis” and the “mirage”, they require a 26’ strap across the bottom.
4.3 UNLOADING AND MOVING THE POOL
San Juan Pools Installation Manual Section 4: Pool Delivery
Figure 9

San Juan Pools – Installation Manual • 25
at the crane’s hook. You would then adjust the eye of the center strap from left to right on the lower strap to assure all four lifting eyes are carrying equal loads (figure 9).
As we are always adding more pool models to the product line there may be some new strapping configurations in the future. The ultimate goal for off loading pools from the trailers, rolling the pools over, carrying the pools or placing them into the excavated hole is to ensure that you have the load as balanced as possible. It is easier to lift, carry or place the pool if it is balanced with the weight evenly distributed. This also ensures that you do not distort or damage your pool. Off loading the pool is the responsibility of the pool dealer not the driver or San Juan pools. We offer these recommendations as a way of assisting in your future success.
The more proficient you become in off loading, rolling and setting your pools, the more professional you look and the easier the task becomes.
4.4 – HOW TO ROLL A POOL
Strap “A” should be long enough for its center to reach the pool bottom when connected to the lifting lugs on the side of the pool that will remain on the ground when rolling the shell. Strap “A” should be inserted through the end loop of strap “B”. The combination of strap “A” and “B” should be long enough for the loose end of strap “B” to reach over the pool bottom and down the other side to the coping edge when pulled tight. Strap “C” should be inserted through the other end loop of strap “B” and connected to the lifting lugs on the side of the pool that will be raised. Be sure the combination of straps “A”, “B”, and “C” will be long enough to clear the coping edge as the pool is rolled over. If not, a short strap inserted through the loop of strap “B” and around strap “C” will work. (figure 10)
San Juan Pools, Inc., 2006 31
As we are always adding more pool models to the product line there may be some new strapping con-figurations in the future, The ultimate goal for off loading pools from the trailers, rolling the pools over or carrying the pools and placing them into the excavated hole is to ensure that you have the load as balanced as possible. It is easier to lift, carry and place the pool if it is balanced and the weight is evenly distributed, this also ensures that you do not distort or damage your pool. Off loading the pool is the responsibility of the pool dealer not the driver or San Juan pools and we offer these recommendations as a way of assisting in your future success.
The more proficient you become in off loading and rolling your pools over, the more professional you look and the easier of a task it becomes.
This is incorrect as the center strap is slack, this will cause the lift to be uneven and the majority of the lift will be pulled from one side of the pool, which could result in damage to the pool.
This is incorrect as the center strap is lack, this will cause the lift to be uneven and the majority of the lift will be pulled from one side of the pool, which could result in damage to the pool.
Figure 10

26 • San Juan Pools – Installation Manual
CAUTION: If the short strap or crane hook fails to go around strap “C,” the lifting pressure will tear the stitching on strap “B”s loop resulting in bodily damage or damage to the pool. (figure 11)
When rolling pools over, there are two simple phrases to remember. They are “chest high” and “head high”. It is our hope that you will consider these two phrases each and every time you roll a pool over. “Chest high” is the phrase to remember when rolling over pools up to 6’ deep. “Head high” is the one to remember when rolling over the deep pools. (figure 12)
Figure 11
San Juan Pools, Inc., 2006 32
4.4 HOW TO ROLL A POOL
Strap “A” should be long enough for its center to reach the pool bottom when connected to the lifting lugs on the side of the pool that will remain on the ground when rolling over. Strap “A” should be in-serted through the end loop of strap “B” the combina-tion of strap “A” and “B” should be long enough for the loose end of strap “B” to reach over the pool bot-tom and down the other side to the coping edge when pulled tight. Strap “C” should be inserted through the other end loop of strap “B” and connected to the lift-ing lugs on the side of the pool that will be raised. Be sure the combination of straps “A”, “B”, and “C” will be long enough to clear the coping edge as the pool is rolled over. If not, a short strap inserted through the loop of strap “B” and around strap “C” will work.
CAUTION: If the short strap or crane book fails to go around strap “C,” the lifting pressure will tear the stitching on strap “B”s loop resulting in bodily damage or damage to the pool.
When off rolling pools over, there are two simple phrases to remember. They are “chest high” and “head high.” It is our hope that you will consider these two phrases each and every time you roll a pool over.
Using the “chest high” or “head high” concept when strapping the pools for rolling over will enable you to feel more confident that you will roll your pools more evenly and make the rolling over procedure an easier more professional task.
“Chest high” is the phrase to remember when rolling over medium size pools (up to 5’ depth).
San Juan Pools Installation Manual Section 4: Pool Delivery
Notice when all the straps are gathered together they pull evenly “chest high.” It does not matter if you are two feet from the pool or ten feet from the pool, the straps should still gather together “chest high. “
San Juan Pools, Inc., 2006 33
San Juan Pools Installation Manual Section 4: Pool Delivery
The next phrase we need to discuss is “head high”, this is the one to remember when rolling over the larger pools.
Notice how the straps all gather together “head high”. Again it does not matter how far away from the pool you are so long as the straps all come together at “head high” When you are rolling the small or medium pools with an excavator rather than a crane it is best to strap the pool with enough slack for the boom and bucket. In other words using the “chest high” method it would be advantageous to gather the straps “chest high” six feet or so from the pool.
Whatever configuration of straps and chains you decide to utilize, using the “chest high” “head high” method will im-prove your success in rolling the pools over greatly.
The drivers usually carry the recommended straps to off load and roll the pools however it is your responsibility to have the proper straps on site at the time of delivery and as we sometimes use independent drivers to deliver your pools there is no guarantee so having your own straps is necessary to ensure an expedient delivery and off loading of your pool.
Figure 12

San Juan Pools – Installation Manual • 27
Section 5: Pool Installation
5.1 – SETTING THE POOLBefore setting the pool into the hole some installers pre-plumb their fittings.
Especially, the main drain lines. The more you do at this point the less you must do once the pool is in the hole. The down side is that you may break the fittings as you set the pool. If you follow the directions for setting the pool, then pre-plumbing the pool should not be a problem.
Attach guiding tag lines to both ends of the pool. Lift and position the pool over the excavation. Using the tag lines to hold the pool steady, communicate with your equipment operator to visually center the pool relative to the reference line as it is being lowered into the hole. When the pool is about 6” from the ground, have the operator make any final alignment adjustments. Check for adequate clearance of all fittings, especially the main drain fittings. In the event that the skimmer is already attached to the shell be sure to excavate the wall of the hole so that the skimmer will not be damaged. Do not manually push or force the pool into proper alignment. Once in position, hold the pool coping for stability and set the pool down. Take care not to create cave-ins when working near the pool edge.
Before disconnecting the pool from the crane or excavator check the four corners or extreme edges on curved pools by placing the story pole or tape measure on the coping (tile edge if so equipped) and take transit shots. The readings should be within 1” of one another. Note: Tile shots will be ½” to ¾” above the “top of shell mark” on the story pole.
When setting pools with a deep end that have one or two breaks, care must be given to make sure the breaks are well supported. Adding a 1/2” thick layer of extra sand along the break for about 6” back toward the shallow end will help fill any voids that may occur. It is a good idea to mark the breaks with paint on the shell as well as in the hole. This will help with lining them up as you lower the pool into the hole.
Walk the interior of the pool to be sure the floor is flush with the sand. Some pool floors are slightly convex, causing a gap between the pool and sand bed. If your body weight creates contact of the floor with the sand, that is acceptable. If not, remove the shell from the excavation and add sand to remove all voids for proper contact of pool shell with sand.

28 • San Juan Pools – Installation Manual
Keep in mind, it is relatively easy to raise low areas of the pool and very difficult to lower high areas. If the highest corner of the pool is acceptable for finish grade and the pool is not more than 1” out of level, then you can unhook the crane. Otherwise remove the pool, adjust the sand bed accordingly, and try again.
5.2 – FILLING AND LEVELING THE POOLBefore you backfill the shell you must plumb all fittings. If the pool is equipped
with a light or other in wall accessory, run the appropriate conduit or piping. Some municipalities require inspection of plumbing lines or bonding of light niches. Check with your building inspector to determine what inspections are required. Schedule these as close to the day the pool is set as possible.
Begin filling the pool. Do not allow more than one foot of water in the pool before leveling. To raise a low portion of the pool, measure from under the coping to the ground at the low area, subtract
2”x3”
2”x 6”-2’ Long
4” x 4”
Sand Bed
Bottle Jack
Coping
Figure 13

San Juan Pools – Installation Manual • 29
the length of the bottle jack from each of the measurements and cut a 4”x 4” or landscape timber to the appropriate length (figure 13). Position jacks and posts under the corners then jack up the corners, taking occasional transit shots until each corner comes up to the level of the highest corner (figure 14). If a corner does not need to be raised, apply enough jack pressure to hold the corner at the proper
elevation. Continually, recheck all four corners and adjust if required. Avoid raising the pool any higher than necessary. The higher the pool is lifted, the more backfill must be washed under it, and the greater the chance of creating voids.
Caution: raising the shallow end corners higher than the deep end corners may require resetting the pool.
Pools with polyhedron walls (Savannah, Scottsdale, Waikiki, Hawaiian, etc.) may have the middle of the walls higher or lower than the four corners. The middle of the walls can be lowered by allowing rising pool water pressure to push the wall out and down. Do not backfill these walls until they are at the correct elevation. Backfill will stop the wall from moving out and down. The middle of
Figure 14

30 • San Juan Pools – Installation Manual
the walls can be raised by compacting the backfill along these areas. This will push the walls in and up. Check with the transit periodically.
Figure 15 illustrates how to make a ‘sand wand’. A wand equipped with a 45-degree elbow works best for washing in the floor wall radius. Some people prefer a straight wand for steps and vertical walls. Thoroughly wash sand in and under the floor wall radii (figure 16). The water supply for the sand wand can be a garden hose from the house water supply if there is adequate water pressure. If there is not enough water pressure available, the sand wand can be attached to a sump pump and water from inside the pool can be used to jet adequate sand under the shell for proper support. Meanwhile the garden hose can continue to fill the pool.
Wash in all areas where pool water covers the pool floor. Do not backfill in areas not covered by fill water as this may lift or bulge the pool bottom. During the wash in process, someone should be in the pool kicking the floor lightly with their heel to be sure there are no hollow spots. Hollow spots will make a drum sound when kicked.
Pay particular attention to the main drain area. Hollow spots or voids allowed to remain could lead to stress cracks in the future. As water levels inside the pool continue to rise, add backfill accordingly. Continue walking the floor of the pool
4” x 4”
Sand Bed
Coping
Added Sand
Garden Hose
Pool Wall
Sand Wash-in
Wand
90º Elbow
45º Elbow3/4” Ball Valve
Hose Adapter
3/4” PVC
Mail Adapter
Brass Power Nozzle
Figure 16
Figure 15

San Juan Pools – Installation Manual • 31
throughout the backfill process (a safety rope may be need to aid walking on steep floor slopes). Check the pool level periodically during this process and if a portion of the pool has settled, raise it with the appropriate jack.
Caution: Once any given area of the pool has more than 18” of fill water over it, jacking the pool in that area will damage the shell. This type of damage is not covered by the warranty.
Never allow water outside the shell to rise above the water inside the shell. This will cause the pool to float. If too much water accumulates around the shell, connect a pump to the sump line and remove the excess water. As the water rises inside the shell add backfill outside keeping it 12” to 18” lower than the pool water. Under no circumstance should clay soil, rock, or debris be used for back fill around a San Juan pool. Always start the leveling and washing process from the deepest part of the pool, working towards the shallow end.
Although fiberglass pools are very flexible, fiberglass does not stretch. Every movement of a pool wall, floor, bench, etc. will affect another part of the pool. Forcing portions of a pool to conform to an abnormal shape may generate enough tension in another area to cause a stress crack or fracture.
When the fill water reaches the top of the first step backfill under the step. If the pool is low in the step area, install a jack and post under the coping at the lowest area and jack the step area up to level. This process would also apply to low swim outs. Check for hollow spots in the steps and swim outs the same way as the floor. Take extra time pushing backfill under steps and swim outs to fill all voids. A short 2x4 may help with pushing backfill under the steps. Continue the backfill and water compaction process until the backfill is within a couple inches of the outside of the fiberglass coping.
As soon as the back fill and compaction are complete, you can begin filtering the pool water. Because of differences in electrical potential metals in the pool water may plate the pool walls. Iron stains are reddish brown, copper stains are blue green, magnesium and cobalt stains are black. Because of this, it is critical to add a metal removing agent (not a sequestering agent) during the initial filtering process. You should receive a Bioguard metal remover with your San Juan Pool kit. Initially the pool water should be treated with this Bioguard agent.
5.3 – PREPARE FOR CONCRETE DECK OR COLLAR
Prepare for a concrete deck by digging with a flat shovel under the coping to
32 • San Juan Pools – Installation Manual
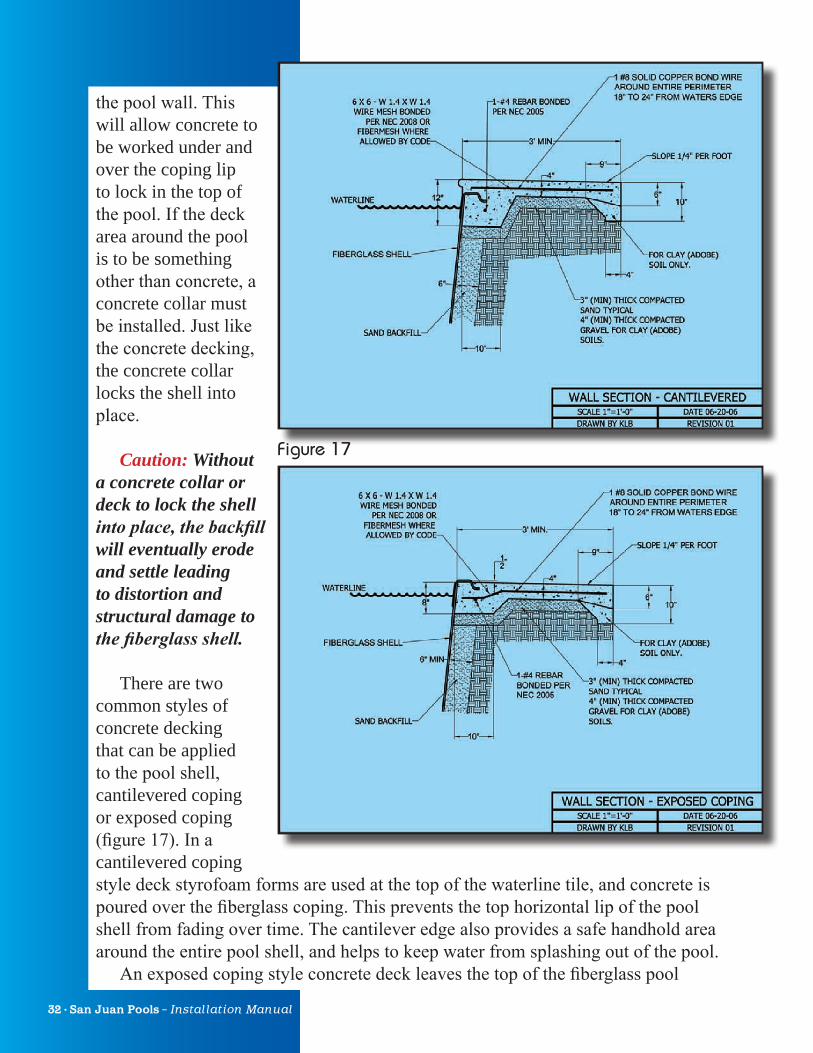
the pool wall. This will allow concrete to be worked under and over the coping lip to lock in the top of the pool. If the deck area around the pool is to be something other than concrete, a concrete collar must be installed. Just like the concrete decking, the concrete collar locks the shell into place.
Caution: Without
a concrete collar or deck to lock the shell into place, the backfill will eventually erode and settle leading to distortion and structural damage to the fiberglass shell.
There are two common styles of concrete decking that can be applied to the pool shell, cantilevered coping or exposed coping (figure 17). In a cantilevered coping style deck styrofoam forms are used at the top of the waterline tile, and concrete is poured over the fiberglass coping. This prevents the top horizontal lip of the pool shell from fading over time. The cantilever edge also provides a safe handhold area around the entire pool shell, and helps to keep water from splashing out of the pool.
An exposed coping style concrete deck leaves the top of the fiberglass pool
Figure 17

San Juan Pools – Installation Manual • 33
shell exposed to the elements. This exposed fiberglass will chalk and fade over time. Annual waxing similar to the maintenance on a fiberglass boat or car, will bring the surface back to a like new condition.
Brick, stone, and tile can also be installed on top of the fiberglass lip. Each of these materials requires a concrete collar for support (figure 18).
5.5 – IMPORTANT TIPS
1. All fittings and clamps must be absolutely watertight. Leaks can mean expensive repairs later. Pressure testing is essential. Make sure the back of the fiberglass shell is
ground smooth around all holes so that the fittings will seal to the fiberglass. 2. Pools should be placed at least three to four inches (3- to 4-inches) above
existing grade. If a pool must be placed any lower, make sure that storm water from surrounding high ground will not collect around the pool. If you have no other choice, place drain tile around the perimeter of the pool decking to drain water away.
Figure 18

34 • San Juan Pools – Installation Manual
Figure 19

San Juan Pools – Installation Manual • 35
3. Pool should be level. Check and recheck with transit before pouring concrete collar around pool.
4. Diving board jigs should be properly positioned with the centerline of pool. Level and plumb according to manufacturer’s recommendations. Diving boards should only be placed on pools that are designed for diving.
5. Never backfill with shale, rock, clay or dirt high in organic materials. 3/8-inch maximum diameter river run, pea gravel, crushed stone or sand makes the best backfill.
6. Never turn on underwater lights unless there is water in the pool. Pool lights are water cooled.
7. Refer to and study the Maintenance Manual for operating and maintenance instructions. It is very important to keep the pool water in chemical balance to ensure a sparkling and inviting pool. Start balancing the water chemistry as soon as the pool is filled.
Section 6:
Equipment PadFor plumbing of the filtration equipment please refer to individual
manufacturers requirements. We have included several basic equipment layouts (figure 19). We recommend pressure testing of the plumbing lines before backfilling the shell. This simple additional precaution can save many, many hours of painstaking repair work and additional costs later. Many municipalities require a plumbing inspection where pressure testing is required. Check with your local building inspector if in doubt. Once the equipment has been plumbed, an electrical contractor can be hired to complete the electrical connections for the pool pump, and underwater light. A licensed electrician in compliance with local and national electric codes must do all electrical connections.

36 • San Juan Pools – Installation Manual
Section 7: Procedure for Finding
Loss of WaterFirst, determine if there is an abnormal loss of water. In dry hot summer weather,
particularly if there is wind and heavy use of the pool, a pool can easily lose a 1/2 to 3/4-inch of water a day. However, under most conditions a loss of a 1/4-inch a day is not considered excessive. The best time to mark and test for water loss is overnight. The easiest test method to determine if you have a leak is to fill a bucket with water and set it on the top step. Initially the water in the bucket needs to be the same level as the water in the pool. After some period of time check to see if the water in the pool is lower than the water in the bucket. If it is, then you have a leak.
Once it is determined you have a leak, use the following procedures to locate it:
1. Turn off the filter system. Leave it off during testing. 2. Install plugs in inlet fittings, skimmers, main drain, pool sweep fittings, light conduit (behind light fixture) and any other openings in the pool. Inlets and skimmers are best sealed with threaded PVC plugs and Teflon tape. Main drains usually require expansion plugs. Be sure the hydrostatic relief valve (if there is one) in the main drain is seated and sealed. 3. As stated above, use a bucket on the top step for at least 24 hours to determine the amount of water loss. Do not allow swimmers in the pool during this period. 4. If the water level does not drop relative to your bucket, you can assume the water loss is in the plumbing, not in the shell or in a seal between the shell and a fitting.5. If the water level does drop relative to your bucket, and there is no obvious crack in the shell, then the leak is at a seal between a fitting and the fiberglass shell. 6. To find the offending fitting(s) fill a disposable syringe with phenol red from your pool chemical testing kit. Being careful not to agitate the water, inject the dye close to a suspected area. Observe the movement of the dye. If a leak is present, the dye will be drawn into the hole where water is escaping. This indicates the presence of a leak.

San Juan Pools – Installation Manual • 37
After plugging all fittings, if the water level does not drop in the pool relative to your bucket, then the leak is in the plumbing. Proceed as follows:
1. Construct a pressure testing tool as shown in figure 20, and adapt it to the swimming pool’s circulation lines.
2. With all fittings plugged methodically pressure-test each line.
Caution: Never apply more than 35 psi to plumbing lines.
4. Turn the valve off on the pressure testing tool when 35 psi is reached and watch the pressure gauge. If the line is leaking the gauge will quickly indicate a drop in pressure. If the line is not leaking the gauge will hold pressure for several minutes.
5. Repair or replace defective lines.
Section 8:
Walk-throughWhen turning the finished pool over to the customer, you have the opportunity
to establish your credibility as a builder truly concerned about the customer’s satisfaction. Walk the customer around the pool and pool area, pointing out the finished work and details.
As you walk around the site, give the customer information about the maintenance requirements for their pool, circulation components, decking, tile, plumbing, lighting, electricity, etc.
Should the customer identify unfinished items that were overlooked, have a note pad ready to create a ‘punch list’ capturing the specific tasks to be completed. Use this to create a plan to complete each task on your punch list. Assign someone to each task and schedule the day and time it will be completed. These final tasks should be completed as quickly as possible. Work with the customer to schedule the successful completion of all items identified. Often the rapid completion of these final tasks makes the difference between a satisfied and an unsatisfied customer.
Pressure Valve
Boiler Valve
Adapter for garden hose
Optional end with air valve
Figure 20

38 • San Juan Pools – Installation Manual
Section 9: Rolling a Pool
2 3 4
5 6 7
8 9 10
1

San Juan Pools – Installation Manual • 39
If you have any questions about rolling a pool, contact James Evans at
863-660-9335800-535-7946
11 12 13
14 15 16
17 18 19
20 21 22
23

rev: 102011


![AAI]E - sunshinepools.sanjuanpools.com PROPERTIES.pdfOne-Piece Swimming Pools and Spas Plastic Material Prepared for San Juan Products 2302 Lasso Lane Lakeland, Florida 33801 by RADCO](https://img.pdfslide.us/doc/110x75/5f0447c97e708231d40d32c5/aaie-propertiespdf-one-piece-swimming-pools-and-spas-plastic-material-prepared.jpg)