Embed Size (px)
Citation preview
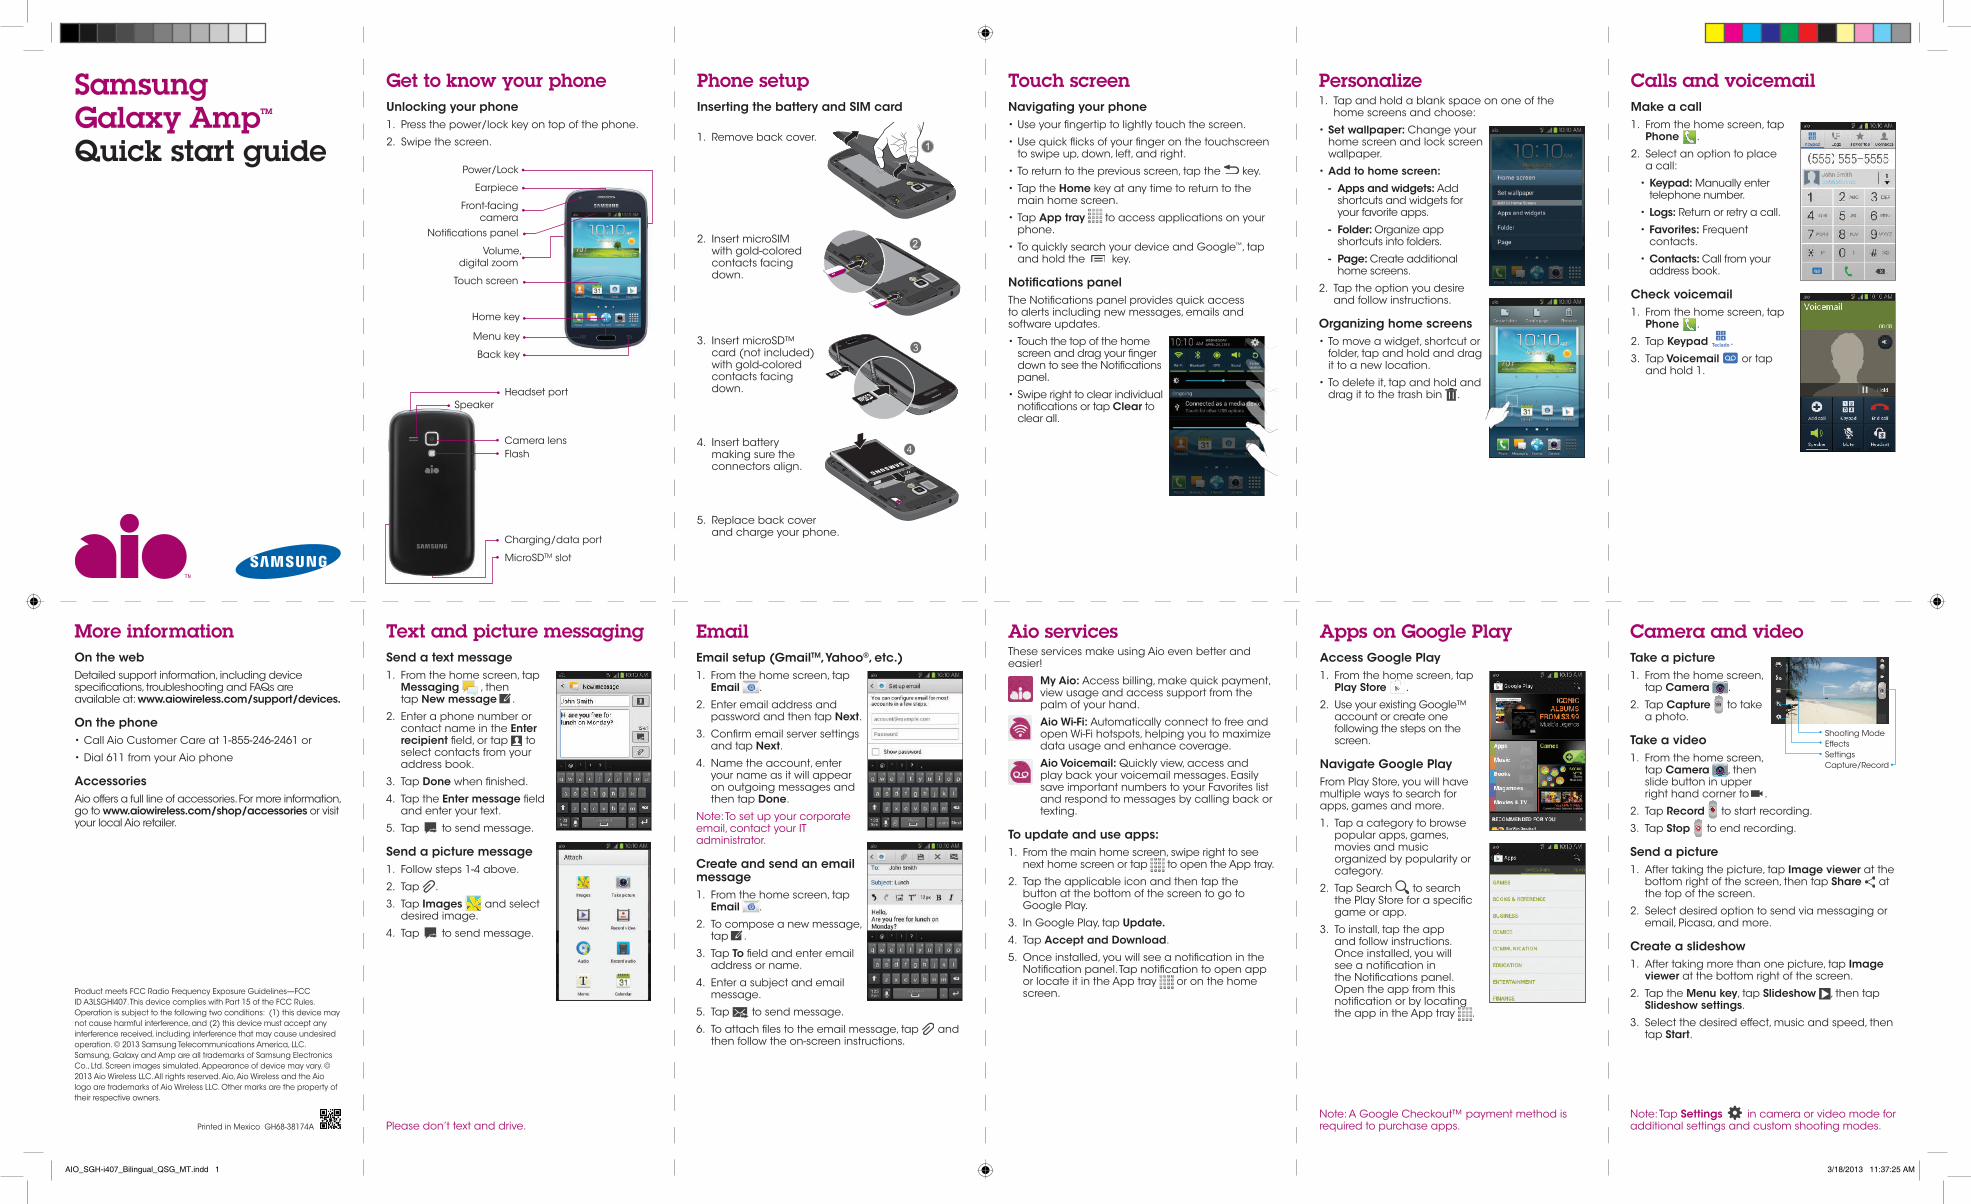
Personalize1. Tap and hold a blank space on one of the
home screens and choose:
•Set wallpaper: Change your home screen and lock screen wallpaper.
•Add to home screen:
‐ Apps and widgets: Add shortcuts and widgets for your favorite apps.
‐ Folder: Organize app shortcuts into folders.
‐ Page: Create additional home screens.
2. Tap the option you desire and follow instructions.
Organizing home screens•To move a widget, shortcut or
folder, tap and hold and drag it to a new location.
•To delete it, tap and hold and drag it to the trash bin .
Touch screenNavigating your phone•Use your fingertip to lightly touch the screen.
•Use quick flicks of your finger on the touchscreen to swipe up, down, left, and right.
•To return to the previous screen, tap the key.
•Tap the Home key at any time to return to the main home screen.
•Tap App tray to access applications on your phone.
•To quickly search your device and Google™, tap and hold the key.
Notifications panelThe Notifications panel provides quick access to alerts including new messages, emails and software updates.
•Touch the top of the home screen and drag your finger down to see the Notifications panel.
•Swipe right to clear individual notifications or tap Clear to clear all.
More informationOn the webDetailed support information, including device specifications, troubleshooting and FAQs are available at: www.aiowireless.com/support/devices.
On the phone•Call Aio Customer Care at 1-855-246-2461 or
•Dial 611 from your Aio phone
AccessoriesAio offers a full line of accessories. For more information, go to www.aiowireless.com/shop/accessories or visit your local Aio retailer.
Get to know your phoneUnlocking your phone1. Press the power/lock key on top of the phone.
2. Swipe the screen.
Phone setupInserting the battery and SIM card
1. Remove back cover.
2. Insert microSIM with gold-colored contacts facing down.
3. Insert microSD™ card (not included) with gold-colored contacts facing down.
4. Insert battery making sure the connectors align.
5. Replace back cover and charge your phone.
Headset port
Charging/data port
Flash
Speaker
Power/Lock
Earpiece
Front-facing camera
Notifications panel
Volume, digital zoom
Touch screen
Home key
MicroSDTM slot
Please don’t text and drive.
Text and picture messagingSend a text message1. From the home screen, tap
Messaging , then tap New message .
2. Enter a phone number or contact name in the Enter recipient field, or tap to select contacts from your address book.
3. Tap Done when finished.
4. Tap the Enter message field and enter your text.
5. Tap to send message.
Send a picture message1. Follow steps 1-4 above.
2. Tap .
3. Tap Images and select desired image.
4. Tap to send message.
Menu key
Back key
Camera and videoTake a picture1. From the home screen,
tap Camera .
2. Tap Capture to take a photo.
Take a video1. From the home screen,
tap Camera , then slide button in upper right hand corner to .
2. Tap Record to start recording.
3. Tap Stop to end recording.
Send a picture1. After taking the picture, tap Image viewer at the
bottom right of the screen, then tap Share at the top of the screen.
2. Select desired option to send via messaging or email, Picasa, and more.
Create a slideshow1. After taking more than one picture, tap Image
viewer at the bottom right of the screen.
2. Tap the Menu key, tap Slideshow , then tap Slideshow settings.
3. Select the desired effect, music and speed, then tap Start.
Shooting Mode Effects SettingsCapture/Record
Note: Tap Settings in camera or video mode for additional settings and custom shooting modes.
Aio servicesThese services make using Aio even better and easier!
My Aio: Access billing, make quick payment, view usage and access support from the palm of your hand.
Aio Wi-Fi: Automatically connect to free and open Wi-Fi hotspots, helping you to maximize data usage and enhance coverage.
Aio Voicemail: Quickly view, access and play back your voicemail messages. Easily save important numbers to your Favorites list and respond to messages by calling back or texting.
To update and use apps:1. From the main home screen, swipe right to see
next home screen or tap to open the App tray.
2. Tap the applicable icon and then tap the button at the bottom of the screen to go to Google Play.
3. In Google Play, tap Update.
4. Tap Accept and Download.
5. Once installed, you will see a notification in the Notification panel. Tap notification to open app or locate it in the App tray or on the home screen.
Apps on Google PlayAccess Google Play1. From the home screen, tap
Play Store .
2. Use your existing Google™ account or create one following the steps on the screen.
Navigate Google PlayFrom Play Store, you will have multiple ways to search for apps, games and more.
1. Tap a category to browse popular apps, games, movies and music organized by popularity or category.
2. Tap Search to search the Play Store for a specific game or app.
3. To install, tap the app and follow instructions. Once installed, you will see a notification in the Notifications panel. Open the app from this notification or by locating the app in the App tray .
Note: A Google Checkout™ payment method is required to purchase apps.Printed in Mexico GH68-38174A
Samsung Galaxy AmpTM
Quick start guide
Camera lens
Calls and voicemailMake a call1. From the home screen, tap
Phone .
2. Select an option to place a call:
•Keypad: Manually enter telephone number.
•Logs: Return or retry a call.
•Favorites: Frequent contacts.
•Contacts: Call from your address book.
Check voicemail1. From the home screen, tap
Phone .
2. Tap Keypad Teclado.
3. Tap Voicemail or tap and hold 1.
Product meets FCC Radio Frequency Exposure Guidelines—FCC ID A3LSGHI407. This device complies with Part 15 of the FCC Rules. Operation is subject to the following two conditions: (1) this device may not cause harmful interference, and (2) this device must accept any interference received, including interference that may cause undesired operation. © 2013 Samsung Telecommunications America, LLC. Samsung, Galaxy and Amp are all trademarks of Samsung Electronics Co., Ltd. Screen images simulated. Appearance of device may vary. © 2013 Aio Wireless LLC. All rights reserved. Aio, Aio Wireless and the Aio logo are trademarks of Aio Wireless LLC. Other marks are the property of their respective owners.
EmailEmail setup (GmailTM, Yahoo®, etc.)1. From the home screen, tap
Email .
2. Enter email address and password and then tap Next.
3. Confirm email server settings and tap Next.
4. Name the account, enter your name as it will appear on outgoing messages and then tap Done.
Note: To set up your corporate email, contact your IT administrator.
Create and send an email message 1. From the home screen, tap
Email .
2. To compose a new message, tap .
3. Tap To field and enter email address or name.
4. Enter a subject and email message.
5. Tap to send message.
6. To attach files to the email message, tap and then follow the on-screen instructions.
AIO_SGH-i407_Bilingual_QSG_MT.indd 1 3/18/2013 11:37:25 AM
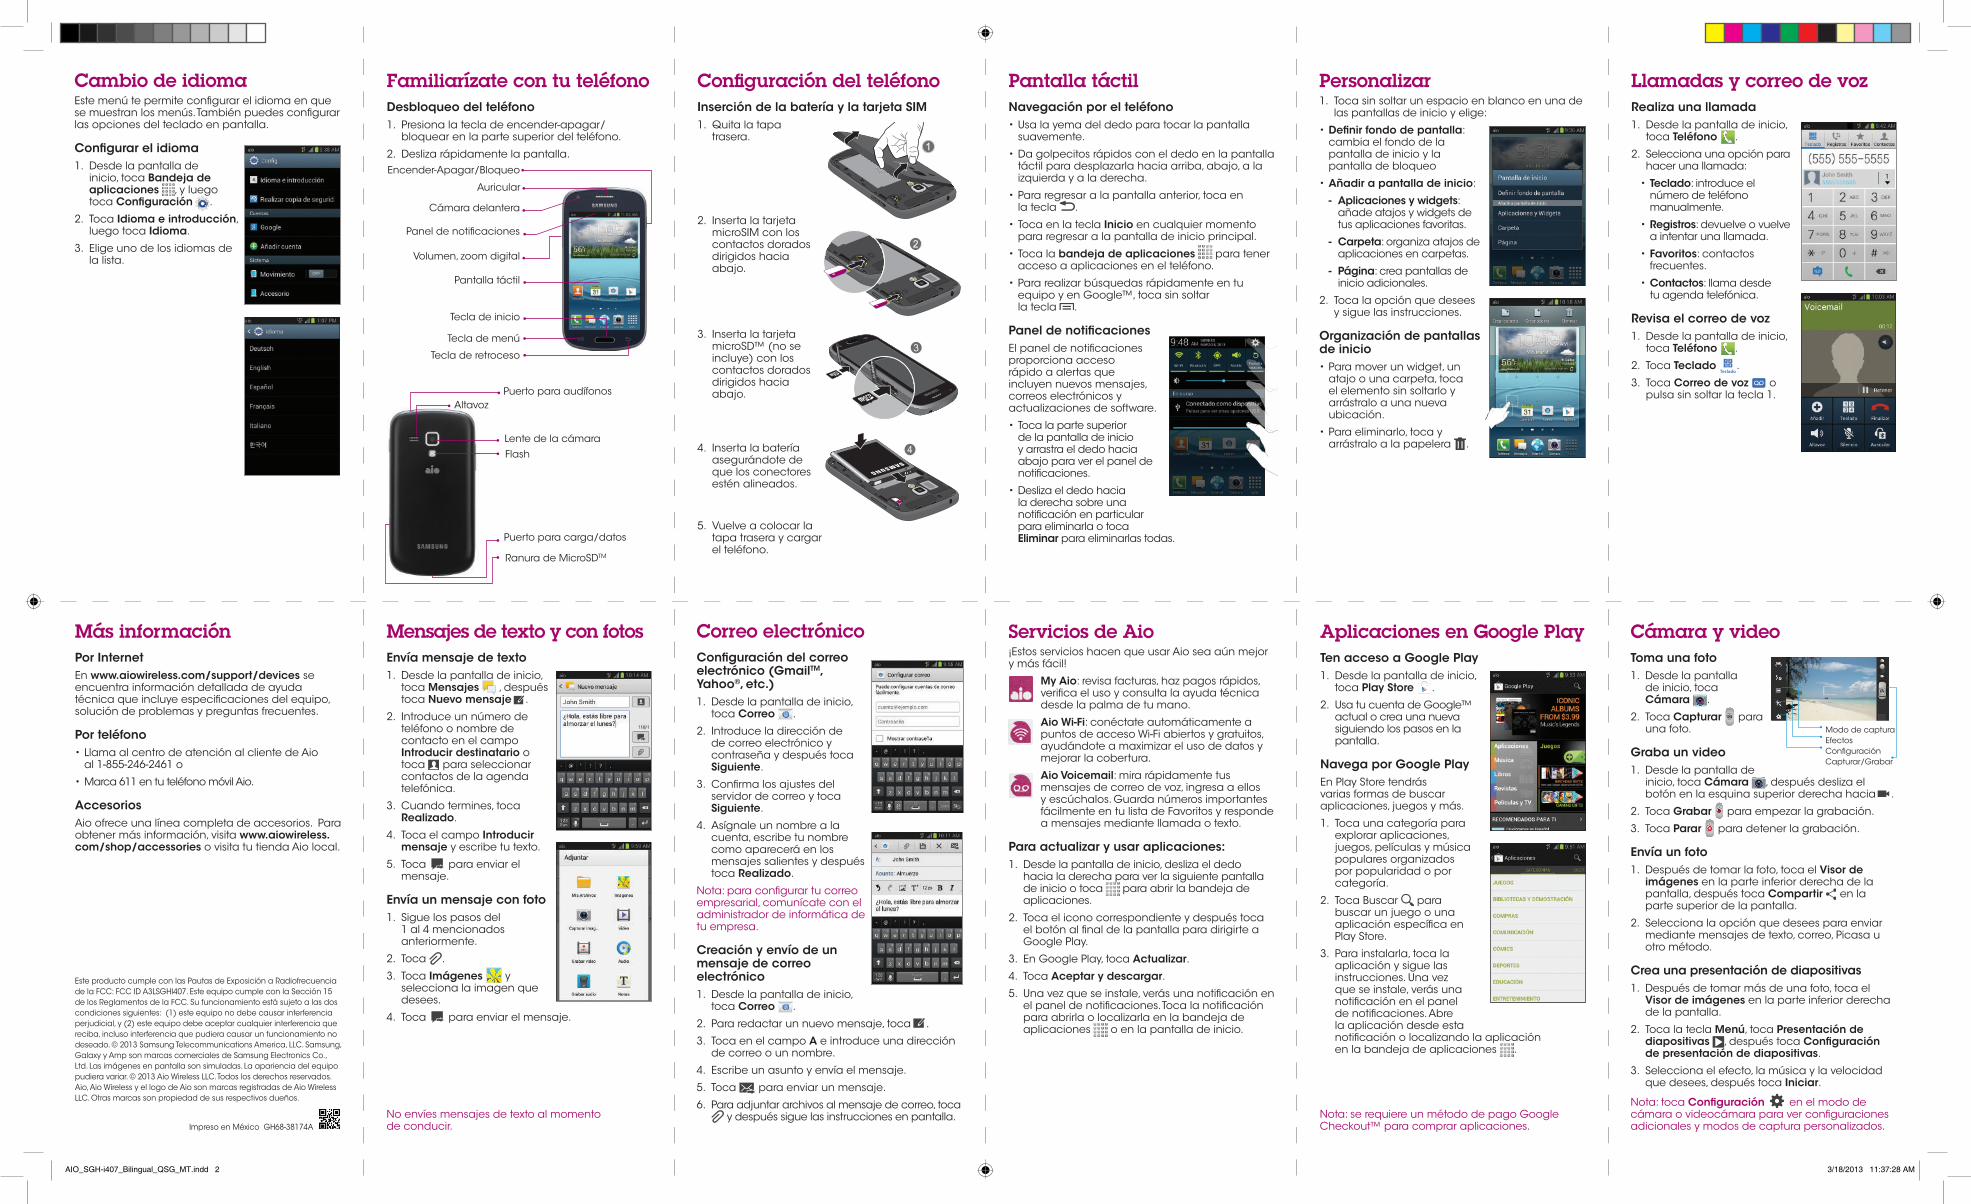
Cambio de idiomaEste menú te permite configurar el idioma en que se muestran los menús. También puedes configurar las opciones del teclado en pantalla.
Configurar el idioma1. Desde la pantalla de
inicio, toca Bandeja de aplicaciones , y luego toca Configuración .
2. Toca Idioma e introducción, luego toca Idioma.
3. Elige uno de los idiomas de la lista.
Personalizar1. Toca sin soltar un espacio en blanco en una de
las pantallas de inicio y elige:
•Definir fondo de pantalla: cambia el fondo de la pantalla de inicio y la pantalla de bloqueo
•Añadir a pantalla de inicio:
‐ Aplicaciones y widgets: añade atajos y widgets de tus aplicaciones favoritas.
‐ Carpeta: organiza atajos de aplicaciones en carpetas.
‐ Página: crea pantallas de inicio adicionales.
2. Toca la opción que desees y sigue las instrucciones.
Organización de pantallas de inicio•Para mover un widget, un
atajo o una carpeta, toca el elemento sin soltarlo y arrástralo a una nueva ubicación.
•Para eliminarlo, toca y arrástralo a la papelera .
Pantalla táctilNavegación por el teléfono•Usa la yema del dedo para tocar la pantalla
suavemente.
•Da golpecitos rápidos con el dedo en la pantalla táctil para desplazarla hacia arriba, abajo, a la izquierda y a la derecha.
•Para regresar a la pantalla anterior, toca en la tecla .
•Toca en la tecla Inicio en cualquier momento para regresar a la pantalla de inicio principal.
•Toca la bandeja de aplicaciones para tener acceso a aplicaciones en el teléfono.
•Para realizar búsquedas rápidamente en tu equipo y en Google™, toca sin soltar la tecla .
Panel de notificacionesEl panel de notificaciones proporciona acceso rápido a alertas que incluyen nuevos mensajes, correos electrónicos y actualizaciones de software.
•Toca la parte superior de la pantalla de inicio y arrastra el dedo hacia abajo para ver el panel de notificaciones.
•Desliza el dedo hacia la derecha sobre una notificación en particular para eliminarla o toca Eliminar para eliminarlas todas.
Más informaciónPor InternetEn www.aiowireless.com/support/devices se encuentra información detallada de ayuda técnica que incluye especificaciones del equipo, solución de problemas y preguntas frecuentes.
Por teléfono•Llama al centro de atención al cliente de Aio
al 1-855-246-2461 o
•Marca 611 en tu teléfono móvil Aio.
AccesoriosAio ofrece una línea completa de accesorios. Para obtener más información, visita www.aiowireless.com/shop/accessories o visita tu tienda Aio local.
Familiarízate con tu teléfonoDesbloqueo del teléfono1. Presiona la tecla de encender-apagar/
bloquear en la parte superior del teléfono.
2. Desliza rápidamente la pantalla.
Configuración del teléfonoInserción de la batería y la tarjeta SIM1. Quita la tapa
trasera.
2. Inserta la tarjeta microSIM con los contactos dorados dirigidos hacia abajo.
3. Inserta la tarjeta microSD™ (no se incluye) con los contactos dorados dirigidos hacia abajo.
4. Inserta la batería asegurándote de que los conectores estén alineados.
5. Vuelve a colocar la tapa trasera y cargar el teléfono.
Flash
Altavoz
Ranura de MicroSDTM
No envíes mensajes de texto al momento de conducir.
Mensajes de texto y con fotosEnvía mensaje de texto1. Desde la pantalla de inicio,
toca Mensajes , después toca Nuevo mensaje .
2. Introduce un número de teléfono o nombre de contacto en el campo Introducir destinatario o toca para seleccionar contactos de la agenda telefónica.
3. Cuando termines, toca Realizado.
4. Toca el campo Introducir mensaje y escribe tu texto.
5. Toca para enviar el mensaje.
Envía un mensaje con foto1. Sigue los pasos del
1 al 4 mencionados anteriormente.
2. Toca .
3. Toca Imágenes y selecciona la imagen que desees.
4. Toca para enviar el mensaje.
Cámara y videoToma una foto1. Desde la pantalla
de inicio, toca Cámara .
2. Toca Capturar para una foto.
Graba un video1. Desde la pantalla de
inicio, toca Cámara , después desliza el botón en la esquina superior derecha hacia .
2. Toca Grabar para empezar la grabación.
3. Toca Parar para detener la grabación.
Envía un foto1. Después de tomar la foto, toca el Visor de
imágenes en la parte inferior derecha de la pantalla, después toca Compartir en la parte superior de la pantalla.
2. Selecciona la opción que desees para enviar mediante mensajes de texto, correo, Picasa u otro método.
Crea una presentación de diapositivas1. Después de tomar más de una foto, toca el
Visor de imágenes en la parte inferior derecha de la pantalla.
2. Toca la tecla Menú, toca Presentación de diapositivas , después toca Configuración de presentación de diapositivas.
3. Selecciona el efecto, la música y la velocidad que desees, después toca Iniciar.
Modo de captura Efectos ConfiguraciónCapturar/Grabar
Nota: toca Configuración en el modo de cámara o videocámara para ver configuraciones adicionales y modos de captura personalizados.
Servicios de Aio¡Estos servicios hacen que usar Aio sea aún mejor y más fácil!
My Aio: revisa facturas, haz pagos rápidos, verifica el uso y consulta la ayuda técnica desde la palma de tu mano.
Aio Wi-Fi: conéctate automáticamente a puntos de acceso Wi-Fi abiertos y gratuitos, ayudándote a maximizar el uso de datos y mejorar la cobertura.
Aio Voicemail: mira rápidamente tus mensajes de correo de voz, ingresa a ellos y escúchalos. Guarda números importantes fácilmente en tu lista de Favoritos y responde a mensajes mediante llamada o texto.
Para actualizar y usar aplicaciones:1. Desde la pantalla de inicio, desliza el dedo
hacia la derecha para ver la siguiente pantalla de inicio o toca para abrir la bandeja de aplicaciones.
2. Toca el icono correspondiente y después toca el botón al final de la pantalla para dirigirte a Google Play.
3. En Google Play, toca Actualizar.
4. Toca Aceptar y descargar.
5. Una vez que se instale, verás una notificación en el panel de notificaciones. Toca la notificación para abrirla o localizarla en la bandeja de aplicaciones o en la pantalla de inicio.
Aplicaciones en Google PlayTen acceso a Google Play1. Desde la pantalla de inicio,
toca Play Store .
2. Usa tu cuenta de Google™ actual o crea una nueva siguiendo los pasos en la pantalla.
Navega por Google PlayEn Play Store tendrás varias formas de buscar aplicaciones, juegos y más.
1. Toca una categoría para explorar aplicaciones, juegos, películas y música populares organizados por popularidad o por categoría.
2. Toca Buscar para buscar un juego o una aplicación específica en Play Store.
3. Para instalarla, toca la aplicación y sigue las instrucciones. Una vez que se instale, verás una notificación en el panel de notificaciones. Abre la aplicación desde esta notificación o localizando la aplicación en la bandeja de aplicaciones .
Nota: se requiere un método de pago Google Checkout™ para comprar aplicaciones.Impreso en México GH68-38174A
Llamadas y correo de vozRealiza una llamada1. Desde la pantalla de inicio,
toca Teléfono .
2. Selecciona una opción para hacer una llamada:
•Teclado: introduce el número de teléfono manualmente.
•Registros: devuelve o vuelve a intentar una llamada.
•Favoritos: contactos frecuentes.
•Contactos: llama desde tu agenda telefónica.
Revisa el correo de voz1. Desde la pantalla de inicio,
toca Teléfono .
2. Toca Teclado Teclado
.
3. Toca Correo de voz o pulsa sin soltar la tecla 1.
Este producto cumple con las Pautas de Exposición a Radiofrecuencia de la FCC: FCC ID A3LSGHI407. Este equipo cumple con la Sección 15 de los Reglamentos de la FCC. Su funcionamiento está sujeto a las dos condiciones siguientes: (1) este equipo no debe causar interferencia perjudicial, y (2) este equipo debe aceptar cualquier interferencia que reciba, incluso interferencia que pudiera causar un funcionamiento no deseado. © 2013 Samsung Telecommunications America, LLC. Samsung, Galaxy y Amp son marcas comerciales de Samsung Electronics Co., Ltd. Las imágenes en pantalla son simuladas. La apariencia del equipo pudiera variar. © 2013 Aio Wireless LLC. Todos los derechos reservados. Aio, Aio Wireless y el logo de Aio son marcas registradas de Aio Wireless LLC. Otras marcas son propiedad de sus respectivos dueños.
Correo electrónicoConfiguración del correo electrónico (GmailTM, Yahoo®, etc.)1. Desde la pantalla de inicio,
toca Correo .
2. Introduce la dirección de de correo electrónico y contraseña y después toca Siguiente.
3. Confirma los ajustes del servidor de correo y toca Siguiente.
4. Asígnale un nombre a la cuenta, escribe tu nombre como aparecerá en los mensajes salientes y después toca Realizado.
Nota: para configurar tu correo empresarial, comunícate con el administrador de informática de tu empresa.
Creación y envío de un mensaje de correo electrónico1. Desde la pantalla de inicio,
toca Correo .
2. Para redactar un nuevo mensaje, toca .
3. Toca en el campo A e introduce una dirección de correo o un nombre.
4. Escribe un asunto y envía el mensaje.
5. Toca para enviar un mensaje.
6. Para adjuntar archivos al mensaje de correo, toca y después sigue las instrucciones en pantalla.
Encender-Apagar/Bloqueo
Auricular
Cámara delantera
Panel de notificaciones
Volumen, zoom digital
Pantalla táctil
Tecla de inicio
Tecla de menú
Tecla de retroceso
Puerto para audífonos
Lente de la cámara
Puerto para carga/datos
AIO_SGH-i407_Bilingual_QSG_MT.indd 2 3/18/2013 11:37:28 AM