Embed Size (px)
Citation preview
1
SAHARA BIKE1 RESPONSIVE
MAGENTO THEME
This document is organized as follows:
Chater I. Install ma_sahara_bike1 template
Chapter II. Features and elements of the template
Chapter III. List of extensions in this template
2
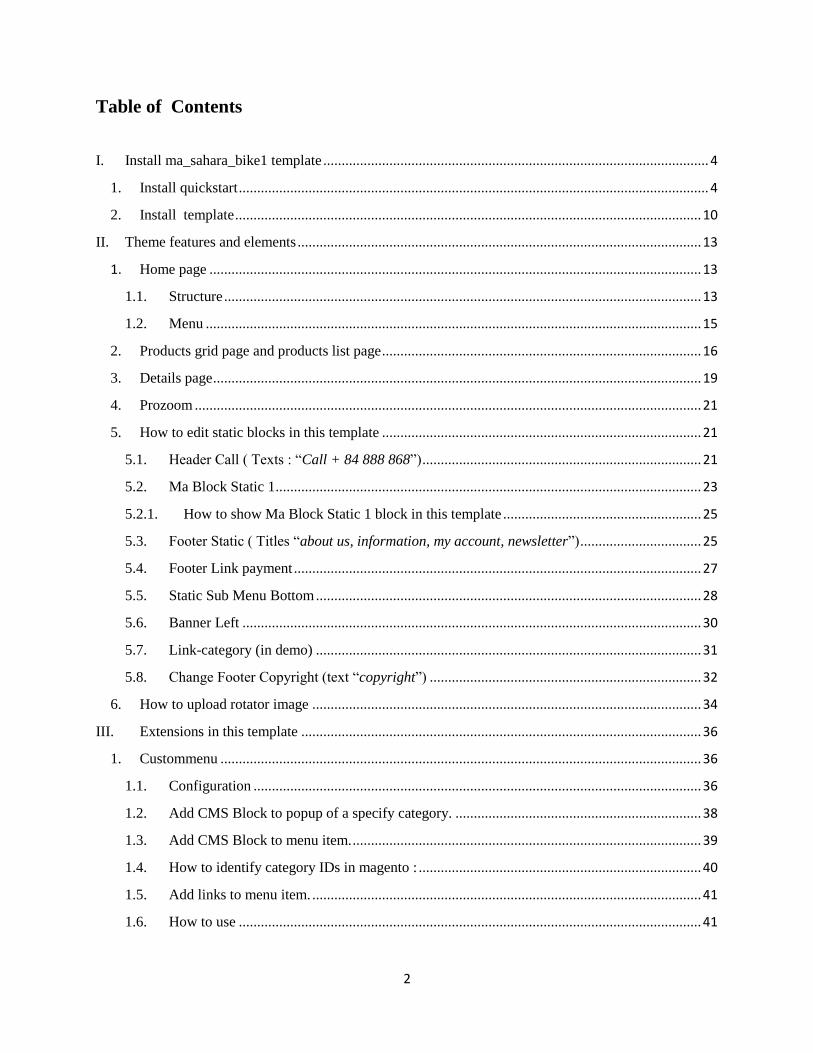
Table of Contents
I. Install ma_sahara_bike1 template ......................................................................................................... 4
1. Install quickstart ................................................................................................................................ 4
2. Install template ............................................................................................................................... 10
II. Theme features and elements .............................................................................................................. 13
1. Home page ...................................................................................................................................... 13
1.1. Structure .................................................................................................................................. 13
1.2. Menu ....................................................................................................................................... 15
2. Products grid page and products list page ....................................................................................... 16
3. Details page ..................................................................................................................................... 19
4. Prozoom .......................................................................................................................................... 21
5. How to edit static blocks in this template ....................................................................................... 21
5.1. Header Call ( Texts : “Call + 84 888 868”) ............................................................................ 21
5.2. Ma Block Static 1 .................................................................................................................... 23
5.2.1. How to show Ma Block Static 1 block in this template ...................................................... 25
5.3. Footer Static ( Titles “about us, information, my account, newsletter”) ................................. 25
5.4. Footer Link payment ............................................................................................................... 27
5.5. Static Sub Menu Bottom ......................................................................................................... 28
5.6. Banner Left ............................................................................................................................. 30
5.7. Link-category (in demo) ......................................................................................................... 31
5.8. Change Footer Copyright (text “copyright”) .......................................................................... 32
6. How to upload rotator image .......................................................................................................... 34
III. Extensions in this template ............................................................................................................. 36
1. Custommenu ................................................................................................................................... 36
1.1. Configuration .......................................................................................................................... 36
1.2. Add CMS Block to popup of a specify category. ................................................................... 38
1.3. Add CMS Block to menu item. ............................................................................................... 39
1.4. How to identify category IDs in magento : ............................................................................. 40
1.5. Add links to menu item. .......................................................................................................... 41
1.6. How to use .............................................................................................................................. 41
3
2. Banner Sequence ............................................................................................................................. 44
2.1. Configuration .......................................................................................................................... 44
2.2. How to add banner .................................................................................................................. 46
3. Product Tabs ( Titles “Featured, New, Sale”)................................................................................. 49
3.1. Configuration .......................................................................................................................... 49
3.2. Featured Products Table .......................................................................................................... 51
3.3. How to show Product Tabs extension in this template ........................................................... 52
4. Mostviewed products ( Title “ Mostviewed products”) ................................................................ 53
4.1. Configuration .......................................................................................................................... 53
5. Blog ( Title “Blog”) ........................................................................................................................ 55
5.1. Configuration this extension ................................................................................................... 55
5.2. How to creat categories ........................................................................................................... 58
5.3. How to add post ...................................................................................................................... 59
5.4. How to manage posts .............................................................................................................. 61
5.5. How to manage comments ...................................................................................................... 61
6. Upsell Slider ( Title “ Upsell products” in details page) ............................................................... 63
6.1. Configuration .......................................................................................................................... 63
7. Related Slider ( Title “ Related products” in details page) ............................................................. 65
7.1. Configuration .......................................................................................................................... 65
8. Brand slider(Title “Our Brands”) ................................................................................................... 67
8.1. Configuration .......................................................................................................................... 67
8.2. How to add logo ...................................................................................................................... 68
9. Prozoom .......................................................................................................................................... 69
9.1. Configuration .......................................................................................................................... 69
10. Layered navigation ajax ( in products page) ............................................................................... 71
10.1. Configuration ...................................................................................................................... 71
11. Ajaxcart Super ............................................................................................................................ 72
11.1. Configuration ...................................................................................................................... 72
12. Theme options ............................................................................................................................. 75
12.1. Configuration ...................................................................................................................... 75
4
I. Install ma_sahara_bike1 template
There are two ways to install a Magento Theme:
Install quickstart: By using this package, you will set the theme exactly as
our Demo with sample data.
Install only template: If you exist a magento website you can install only
template.
1. Install quickstart
Please following steps below:
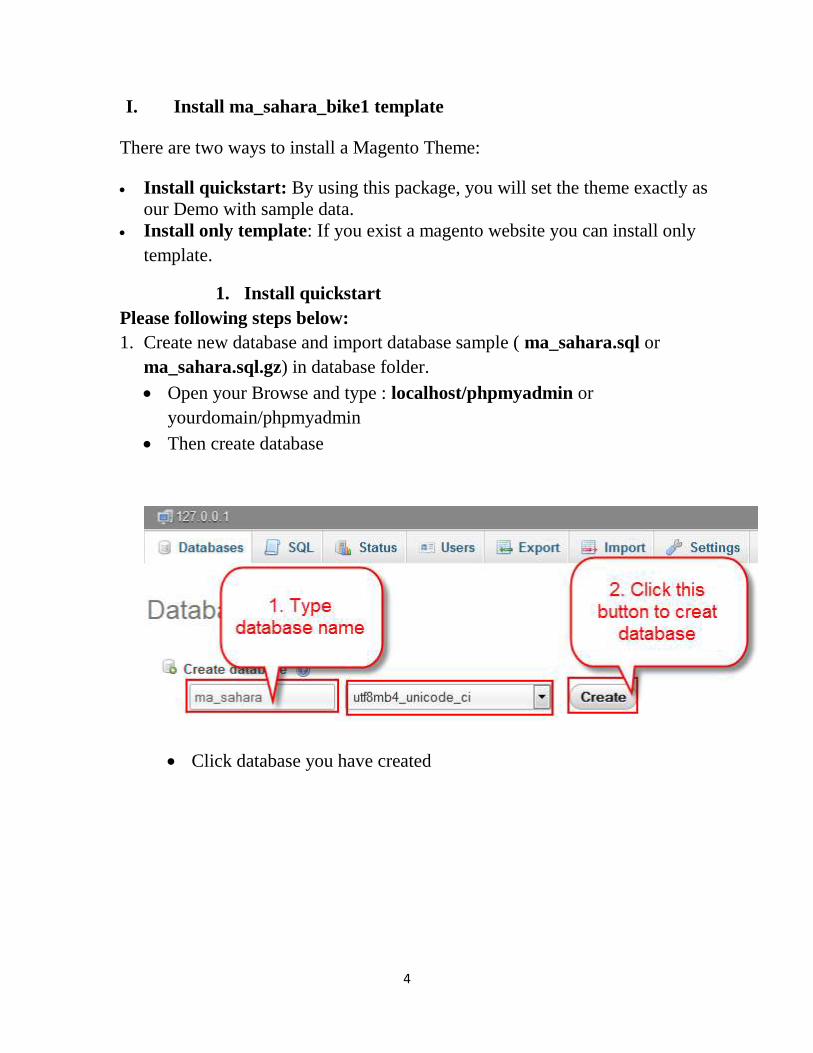
1. Create new database and import database sample ( ma_sahara.sql or
ma_sahara.sql.gz) in database folder.
Open your Browse and type : localhost/phpmyadmin or
yourdomain/phpmyadmin
Then create database
Click database you have created
5
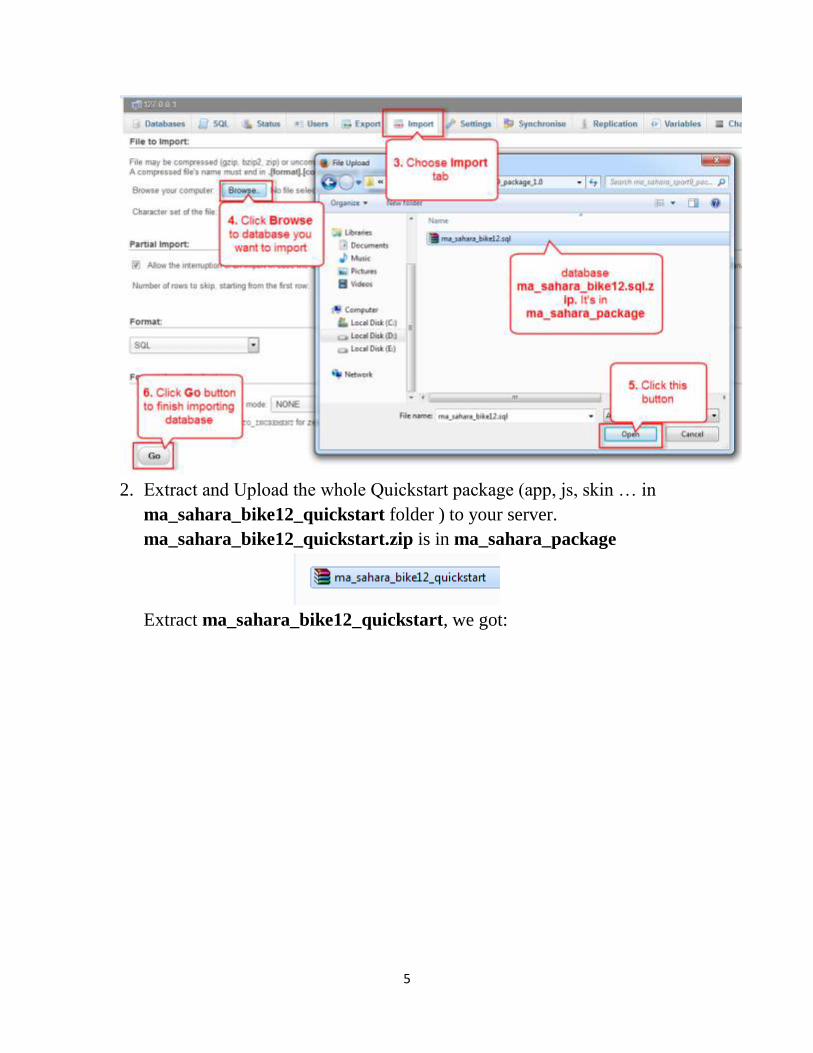
2. Extract and Upload the whole Quickstart package (app, js, skin … in
ma_sahara_bike12_quickstart folder ) to your server.
ma_sahara_bike12_quickstart.zip is in ma_sahara_package
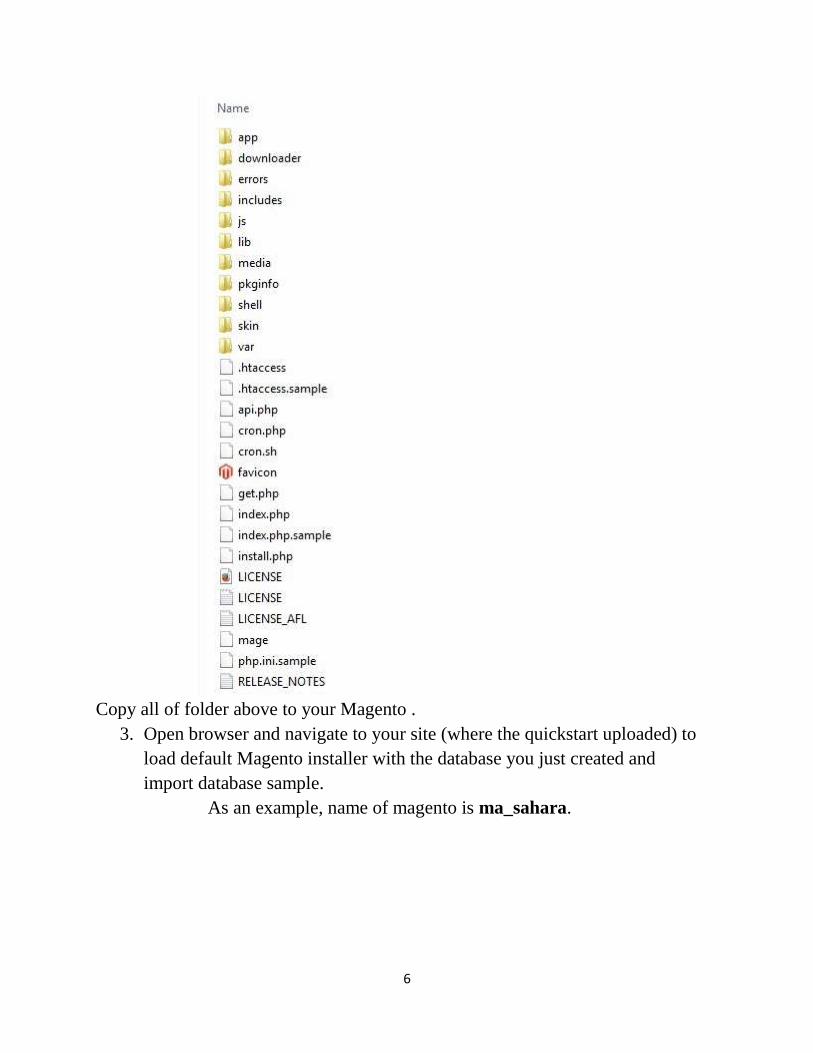
Extract ma_sahara_bike12_quickstart, we got:
6
Copy all of folder above to your Magento .
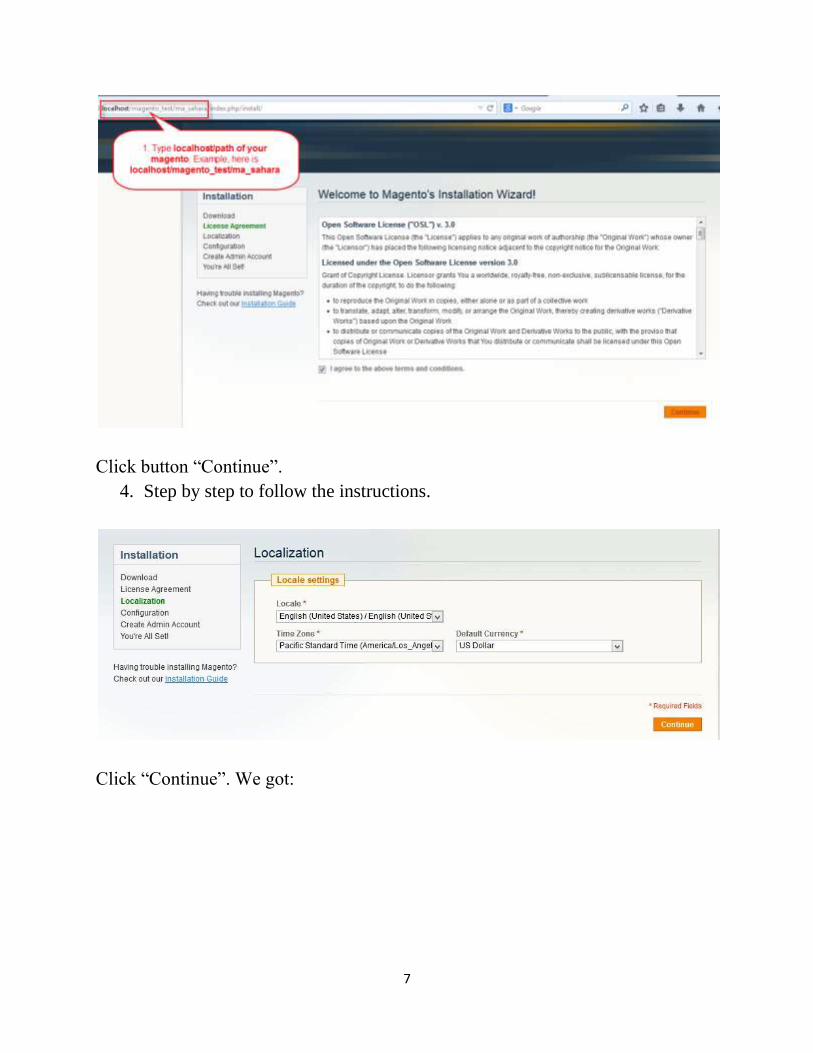
3. Open browser and navigate to your site (where the quickstart uploaded) to
load default Magento installer with the database you just created and
import database sample.
As an example, name of magento is ma_sahara.
7
Click button “Continue”.
4. Step by step to follow the instructions.
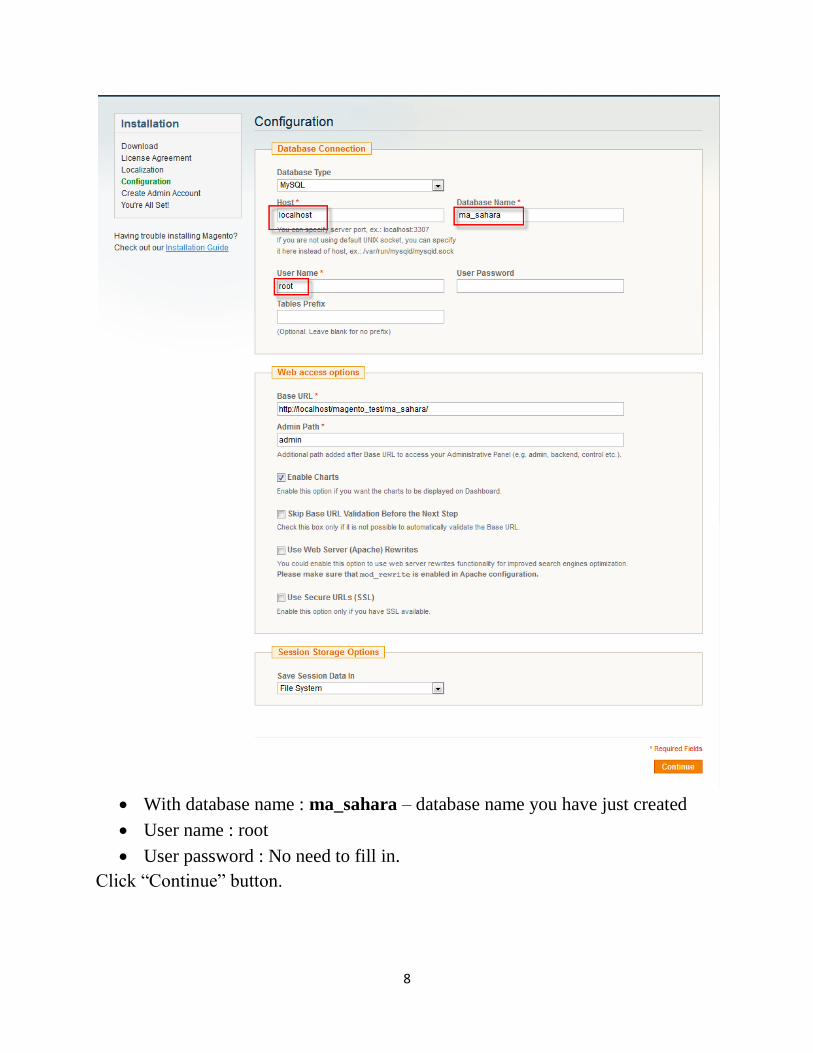
Click “Continue”. We got:
8
With database name : ma_sahara – database name you have just created
User name : root
User password : No need to fill in.
Click “Continue” button.
9
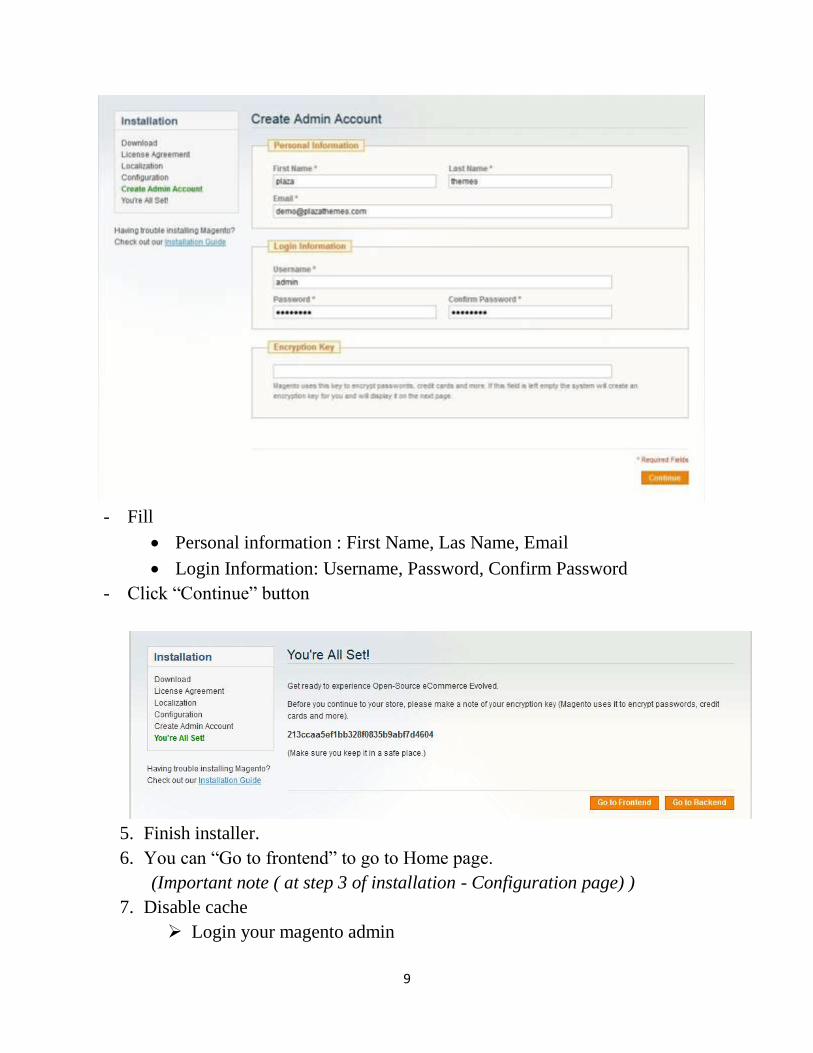
- Fill
Personal information : First Name, Las Name, Email
Login Information: Username, Password, Confirm Password
- Click “Continue” button
5. Finish installer.
6. You can “Go to frontend” to go to Home page.
(Important note ( at step 3 of installation - Configuration page) )
7. Disable cache
Login your magento admin
10
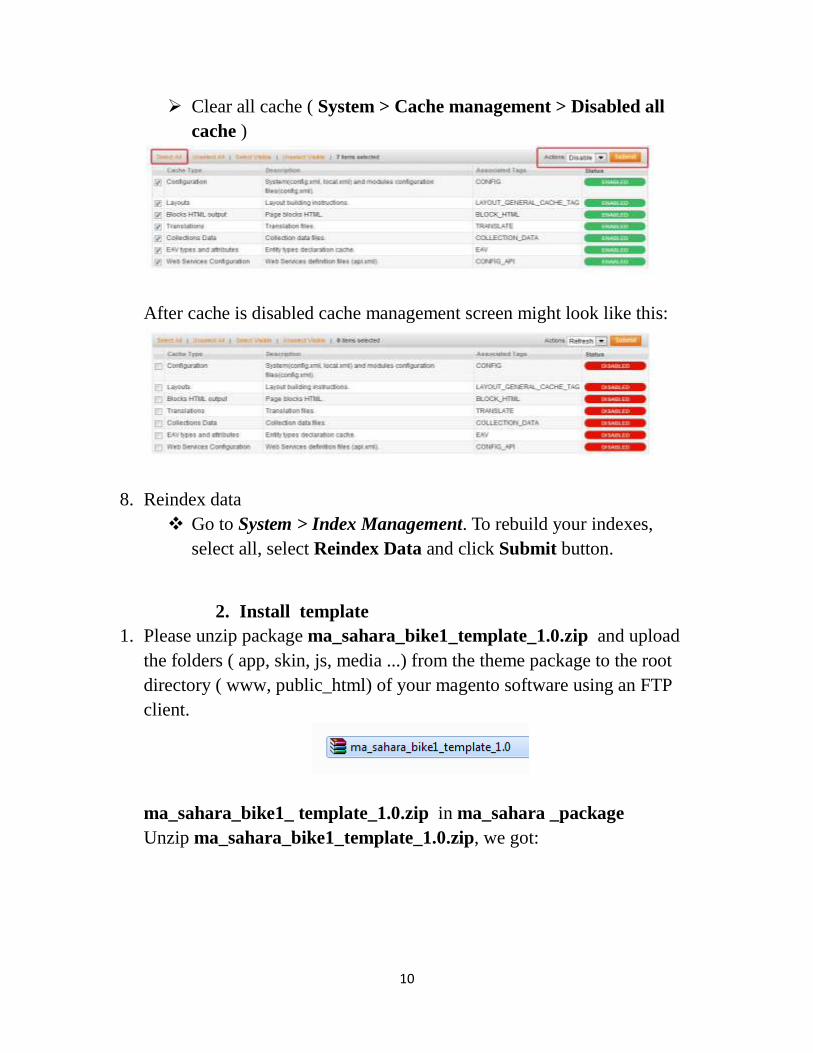
Clear all cache ( System > Cache management > Disabled all
cache )
After cache is disabled cache management screen might look like this:
8. Reindex data
Go to System > Index Management. To rebuild your indexes,
select all, select Reindex Data and click Submit button.
2. Install template
1. Please unzip package ma_sahara_bike1_template_1.0.zip and upload
the folders ( app, skin, js, media ...) from the theme package to the root
directory ( www, public_html) of your magento software using an FTP
client.
ma_sahara_bike1_ template_1.0.zip in ma_sahara _package
Unzip ma_sahara_bike1_template_1.0.zip, we got:
11
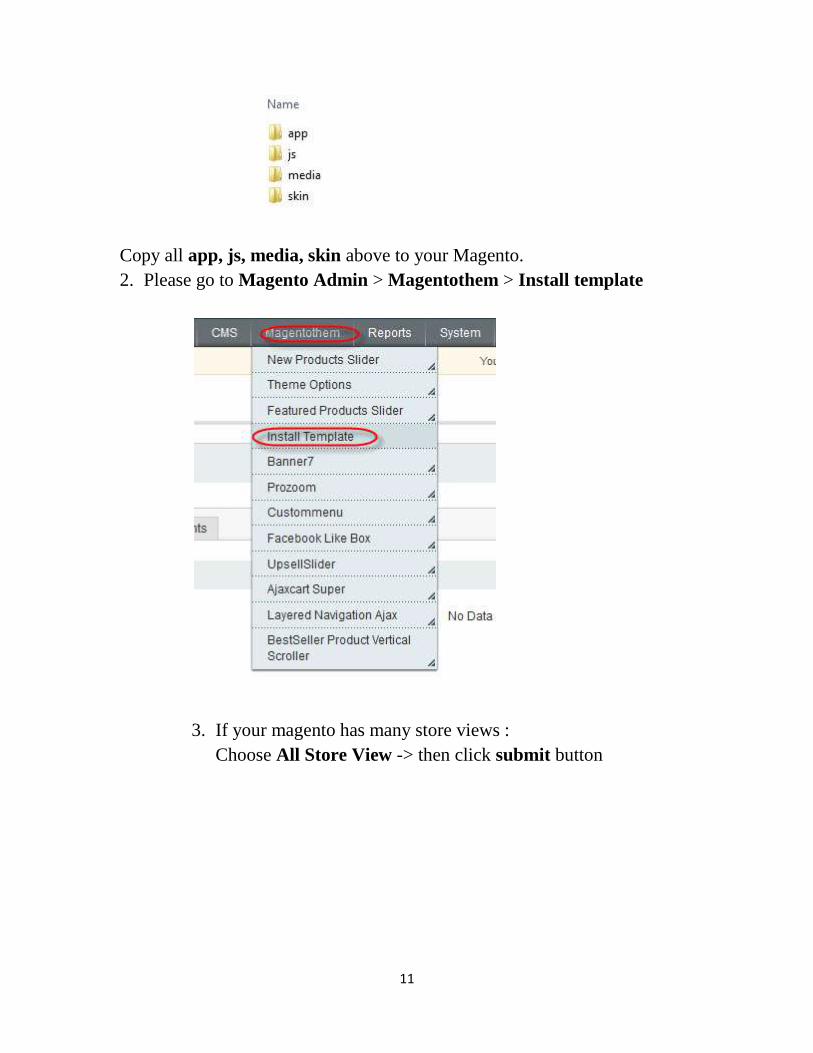
Copy all app, js, media, skin above to your Magento.
2. Please go to Magento Admin > Magentothem > Install template
3. If your magento has many store views :
Choose All Store View -> then click submit button
12
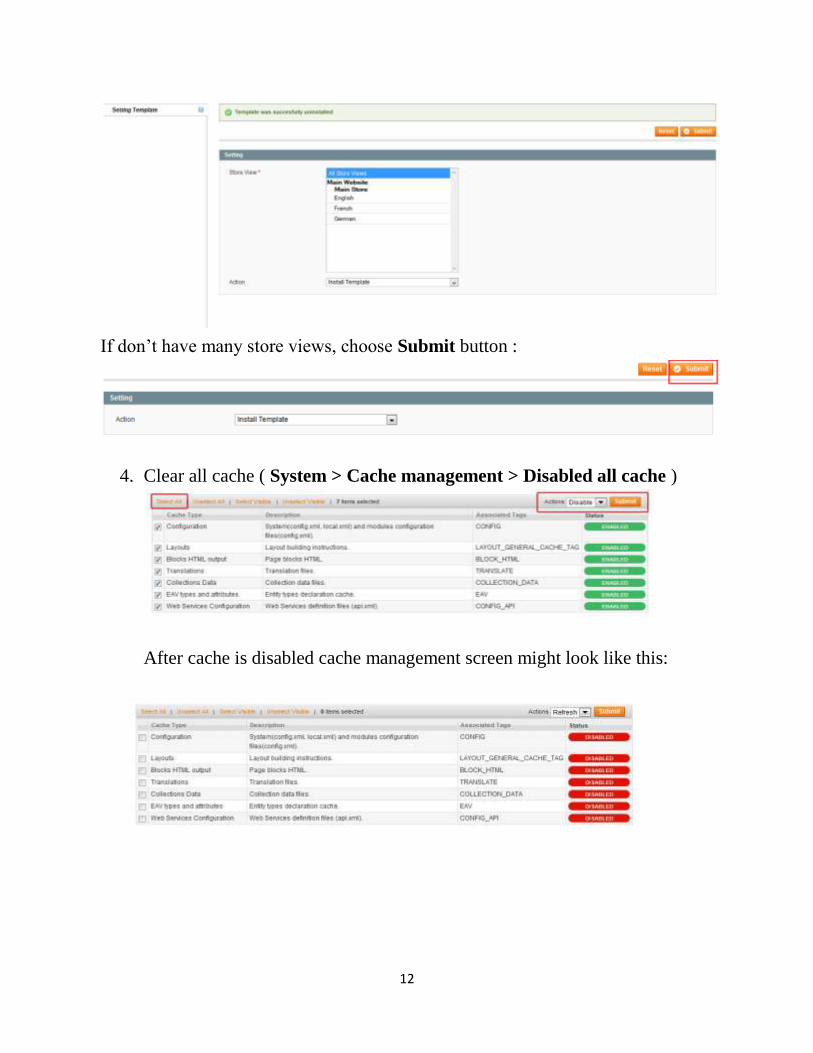
If don’t have many store views, choose Submit button :
4. Clear all cache ( System > Cache management > Disabled all cache )
After cache is disabled cache management screen might look like this:
13
II. Theme features and elements
In this chapter you can find description and configuration details of
selected elements of this theme, such as home page, built-in static blocks,
CSS classes etc.
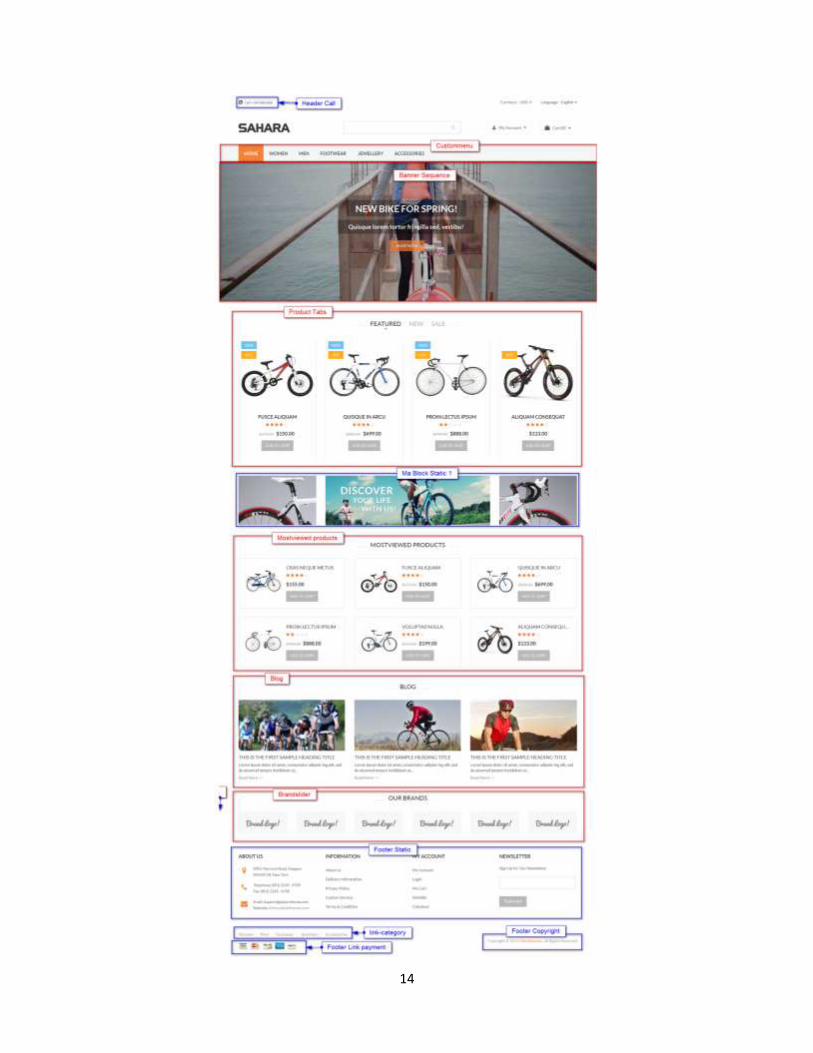
1. Home page
1.1. Structure
<image is next page>
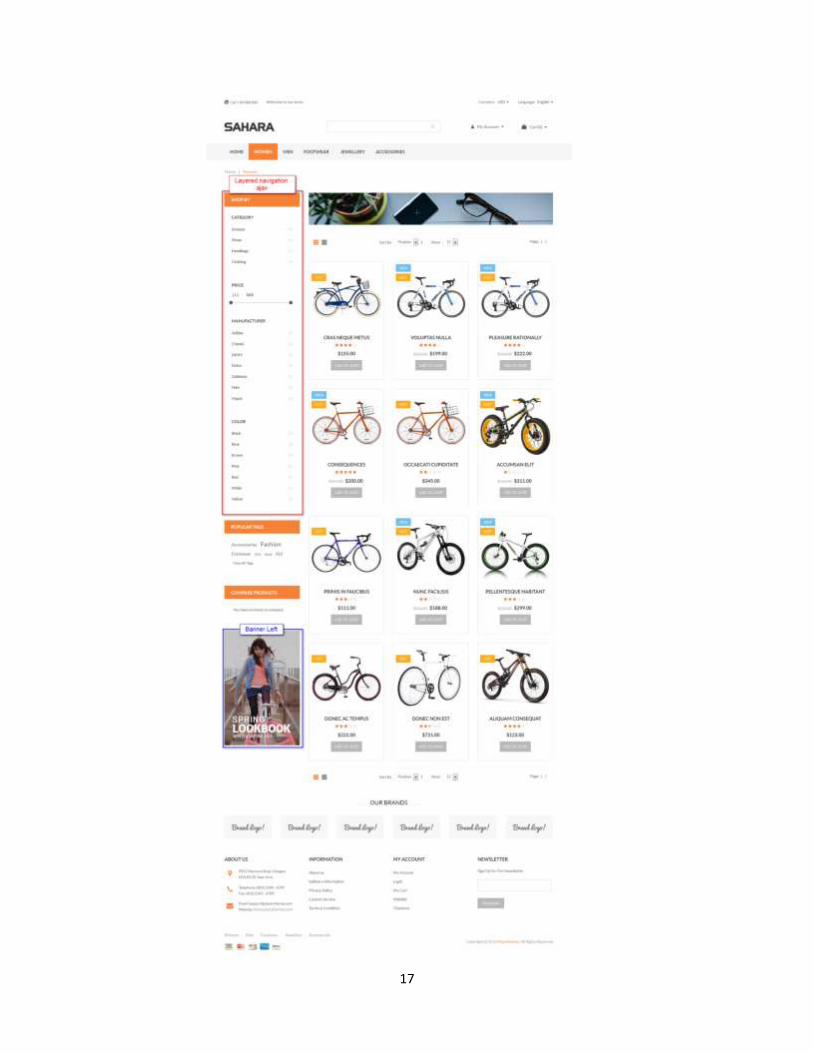
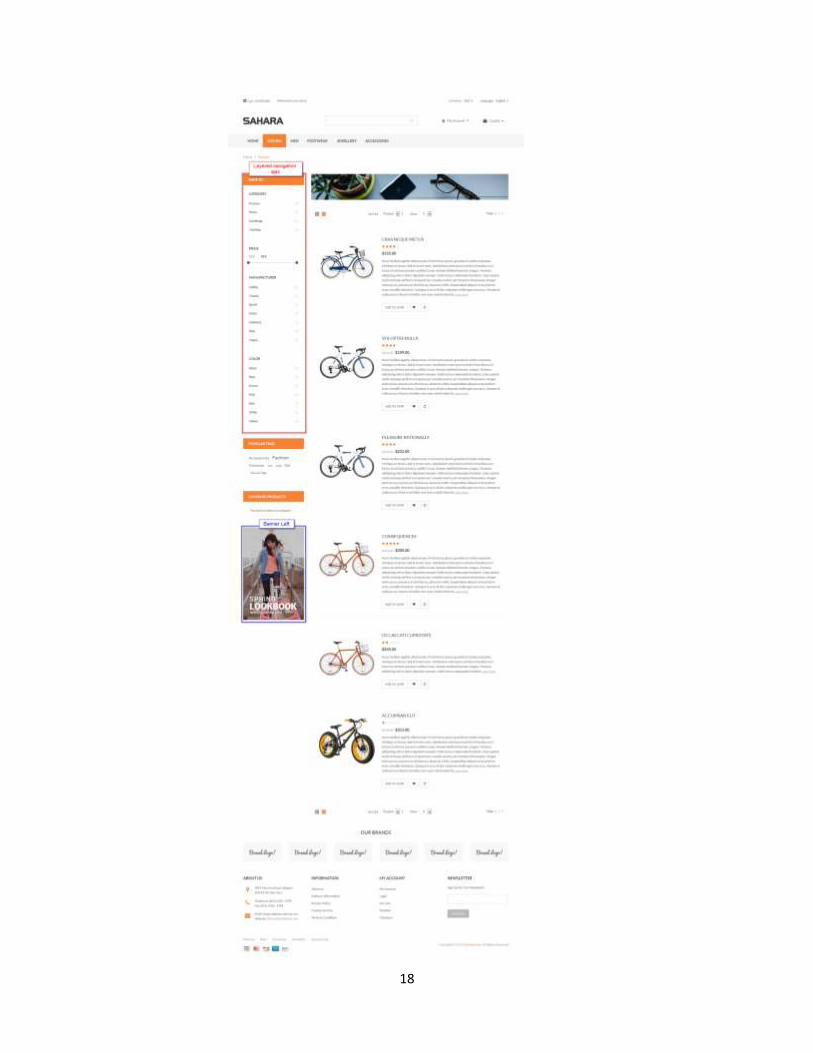
- Blue text : name of static block
- Red text : name of extension
14
15
After the theme is installed, you can import sample versions of the
home page.
To manage pages in Magento, go to CMS > Pages section. By
default in Magento a page with URL Key home is displayed as the
store’s home page. One of a few sample home pages which you
can import, has the following URL key: sahara_bike1-home-page.
So to display that page as a home page in your store, you need to
change its URL key to simple home.
Note:
If the page with that URL key already exists(which is true in
most of Magento installations) you will need to delete existing
page or change its url key.
Alternatively you can indicate which CMS page you want to use
as your home page. To do that, go to System > Configuration >
General > Web > Default Pages tab and select the desired page in
the CMS Home Page field.
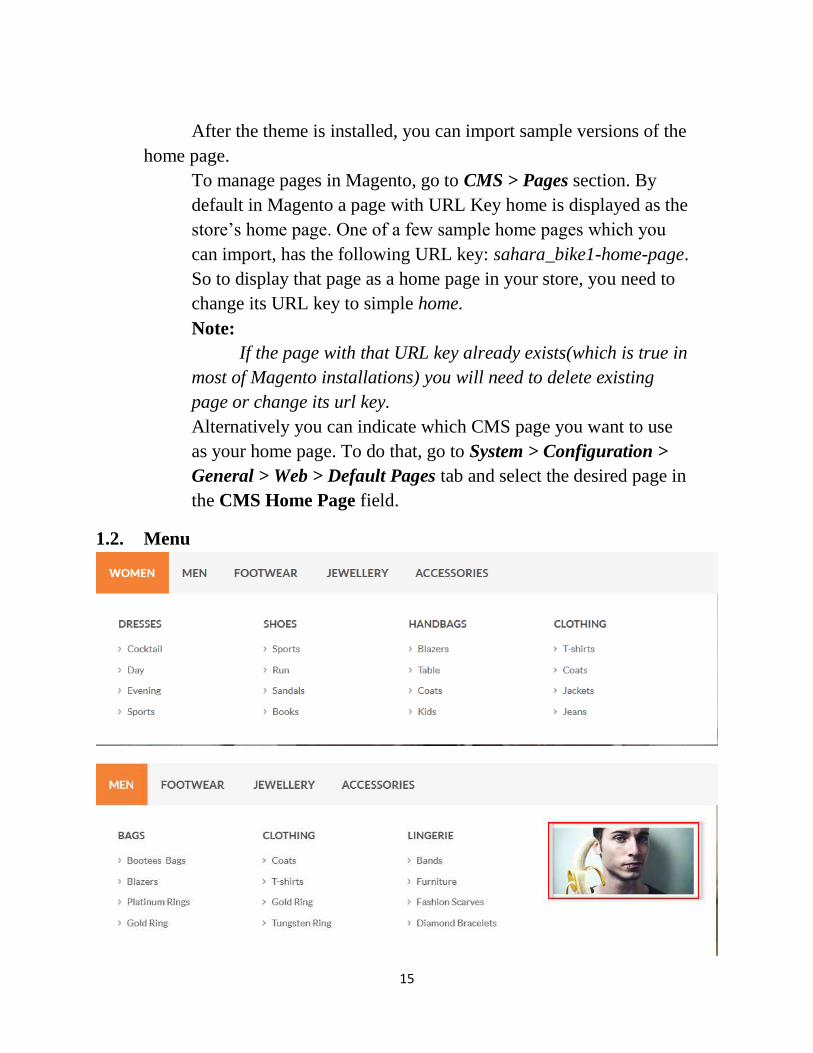
1.2. Menu
16
1.2.1. Home page layout
For every CMS page in Magento you can select page layout - the
number of columns: one, two, or three columns. To change the layout of the
home page, go to CMS > Pages, select the page, select one of the options in
the Layout field and click Save Page button
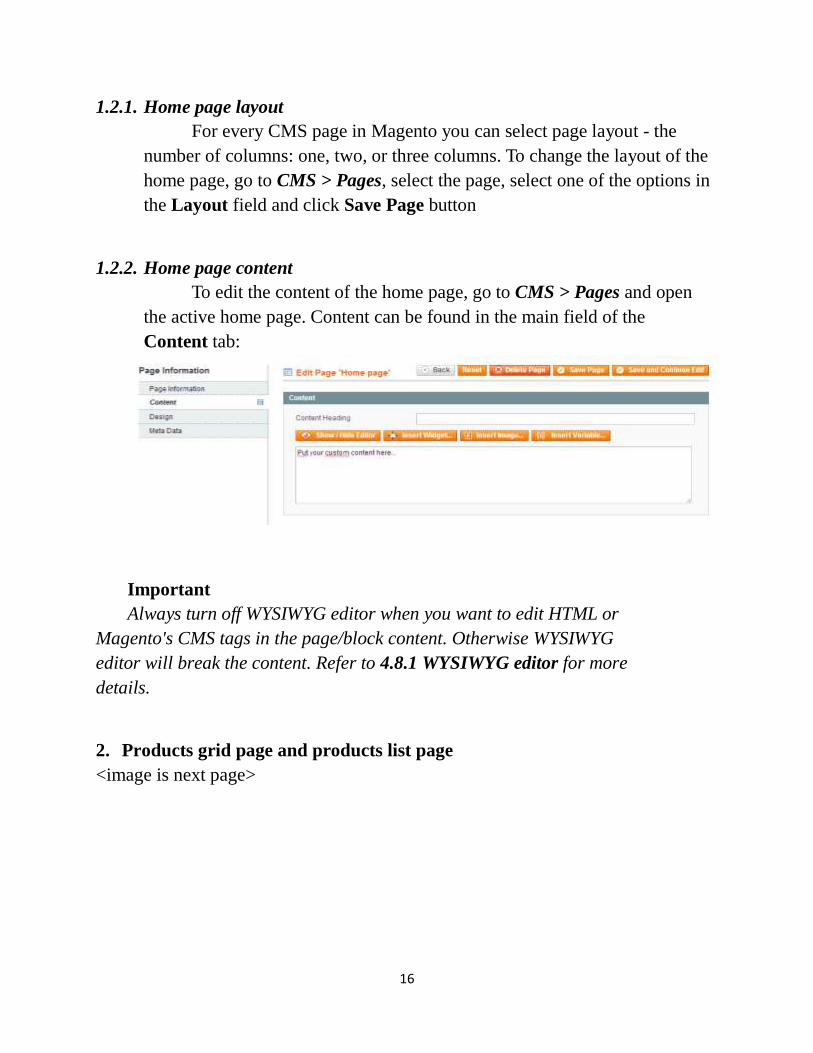
1.2.2. Home page content
To edit the content of the home page, go to CMS > Pages and open
the active home page. Content can be found in the main field of the
Content tab:
Important
Always turn off WYSIWYG editor when you want to edit HTML or
Magento's CMS tags in the page/block content. Otherwise WYSIWYG
editor will break the content. Refer to 4.8.1 WYSIWYG editor for more
details.
2. Products grid page and products list page
<image is next page>
17
18
19
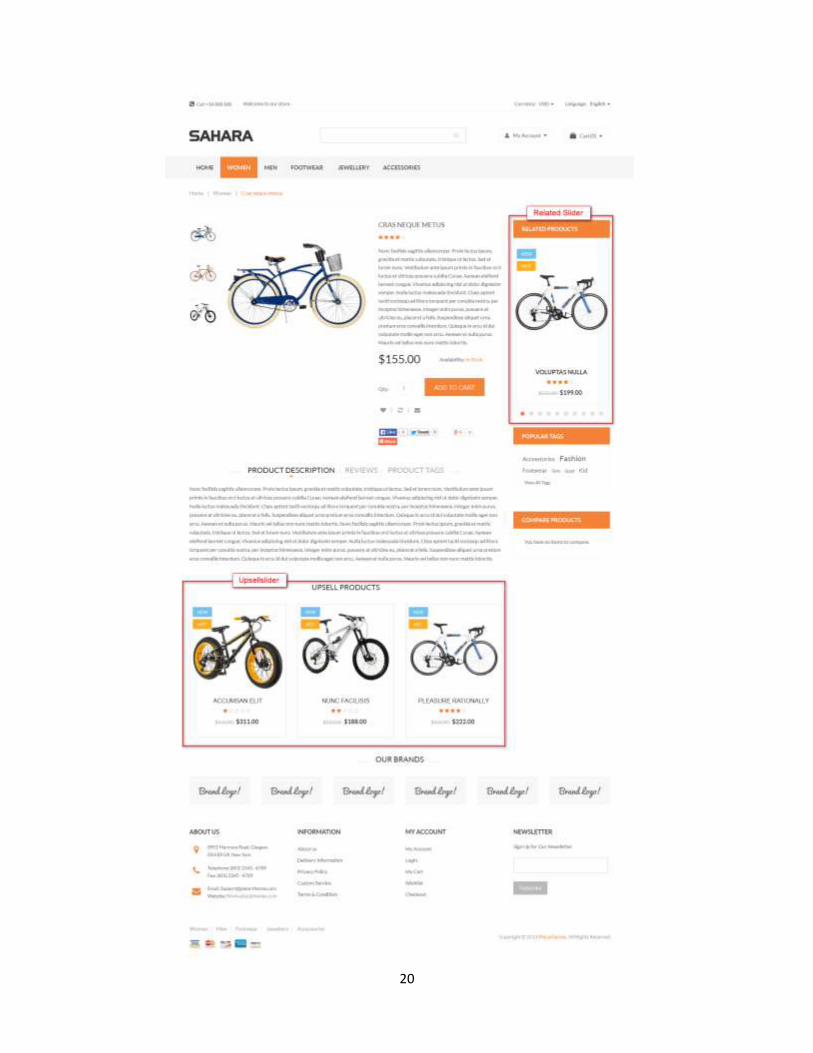
3. Details page
<image is next page>
20
21
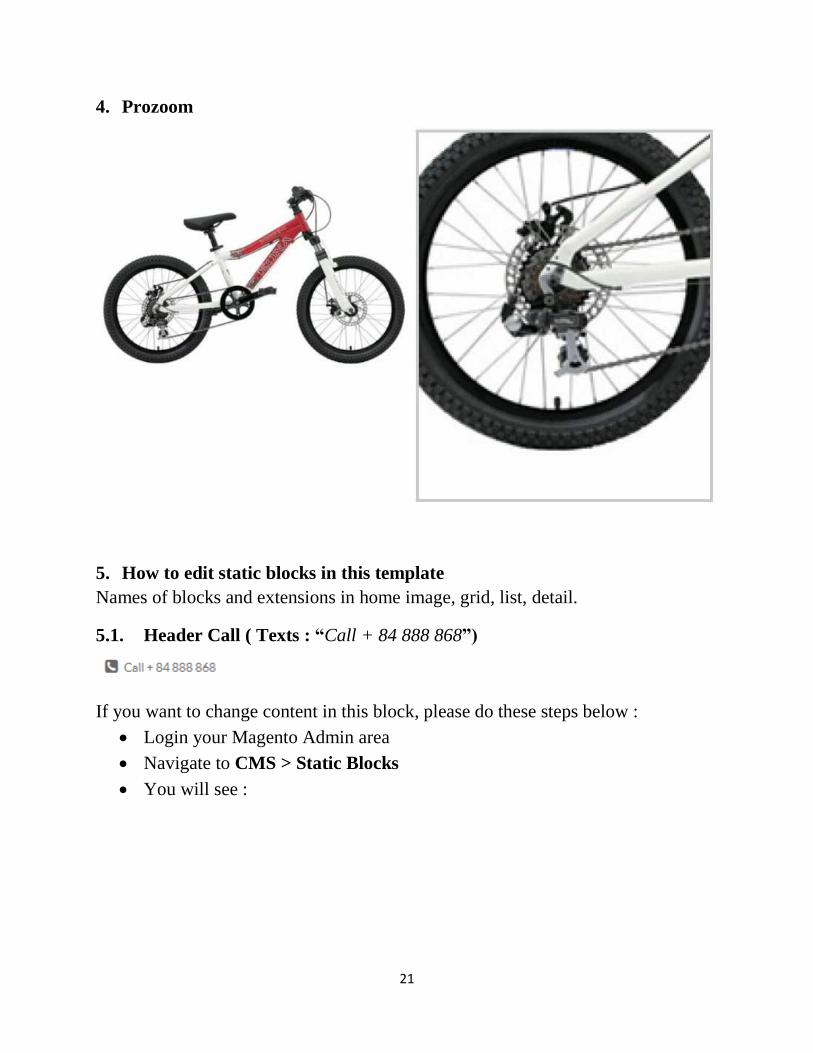
4. Prozoom
5. How to edit static blocks in this template
Names of blocks and extensions in home image, grid, list, detail.
5.1. Header Call ( Texts : “Call + 84 888 868”)
If you want to change content in this block, please do these steps below :
Login your Magento Admin area
Navigate to CMS > Static Blocks
You will see :
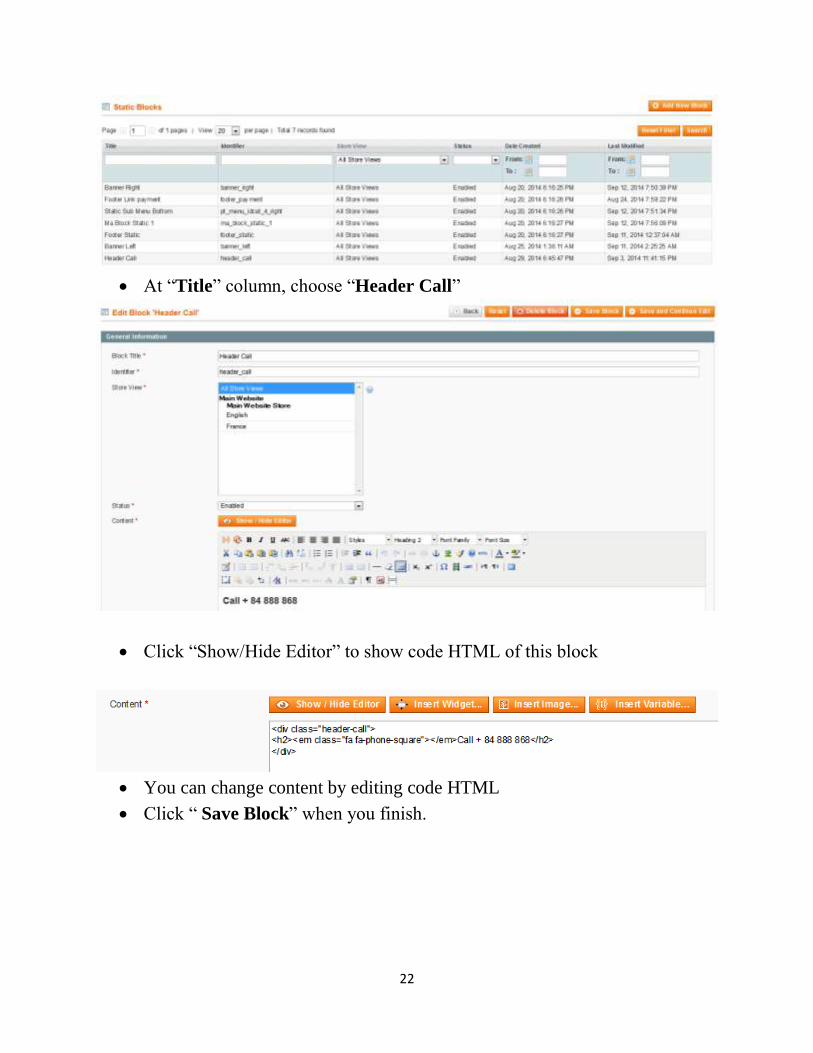
22
At “Title” column, choose “Header Call”
Click “Show/Hide Editor” to show code HTML of this block
You can change content by editing code HTML
Click “ Save Block” when you finish.
23
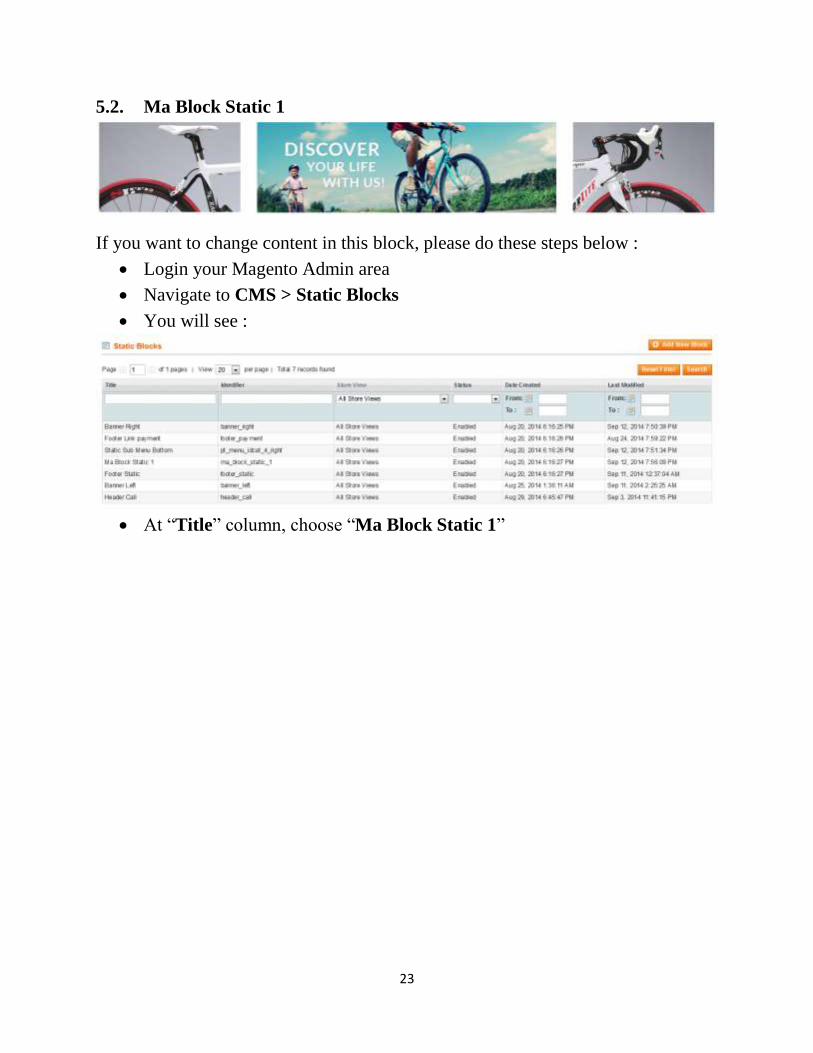
5.2. Ma Block Static 1
If you want to change content in this block, please do these steps below :
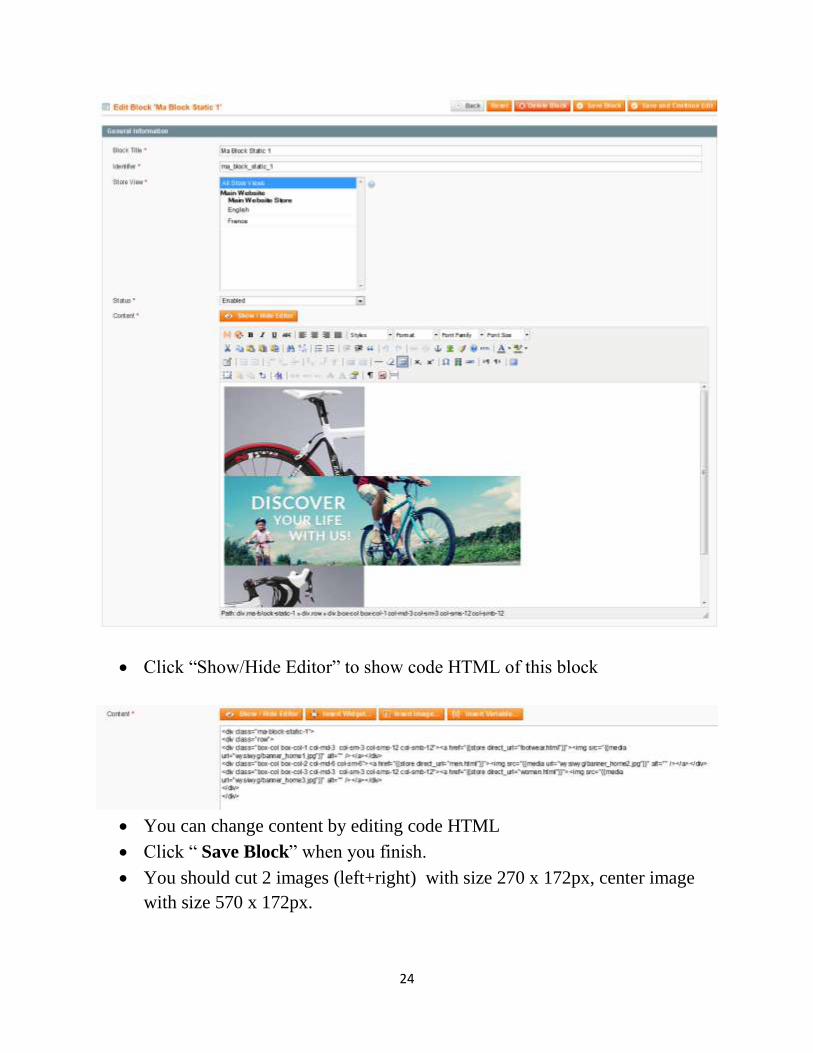
Login your Magento Admin area
Navigate to CMS > Static Blocks
You will see :
At “Title” column, choose “Ma Block Static 1”
24
Click “Show/Hide Editor” to show code HTML of this block
You can change content by editing code HTML
Click “ Save Block” when you finish.
You should cut 2 images (left+right) with size 270 x 172px, center image
with size 570 x 172px.
25
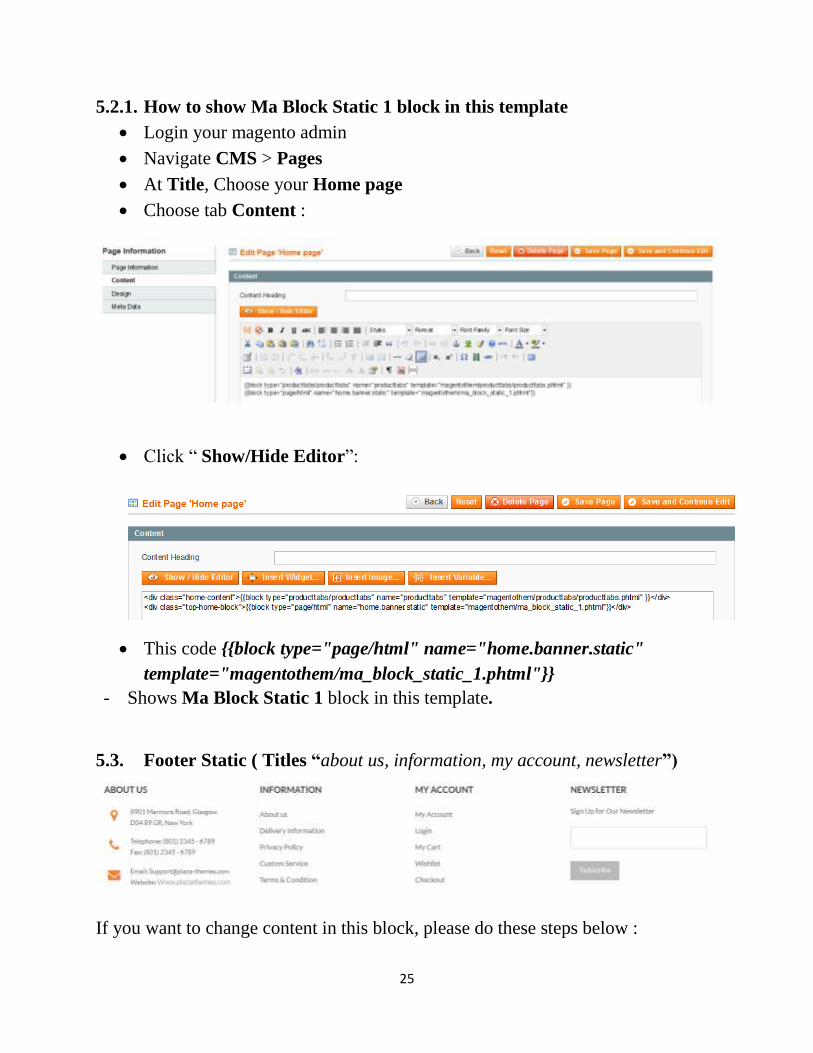
5.2.1. How to show Ma Block Static 1 block in this template
Login your magento admin
Navigate CMS > Pages
At Title, Choose your Home page
Choose tab Content :
Click “ Show/Hide Editor”:
This code {{block type="page/html" name="home.banner.static"
template="magentothem/ma_block_static_1.phtml"}}
- Shows Ma Block Static 1 block in this template.
5.3. Footer Static ( Titles “about us, information, my account, newsletter”)
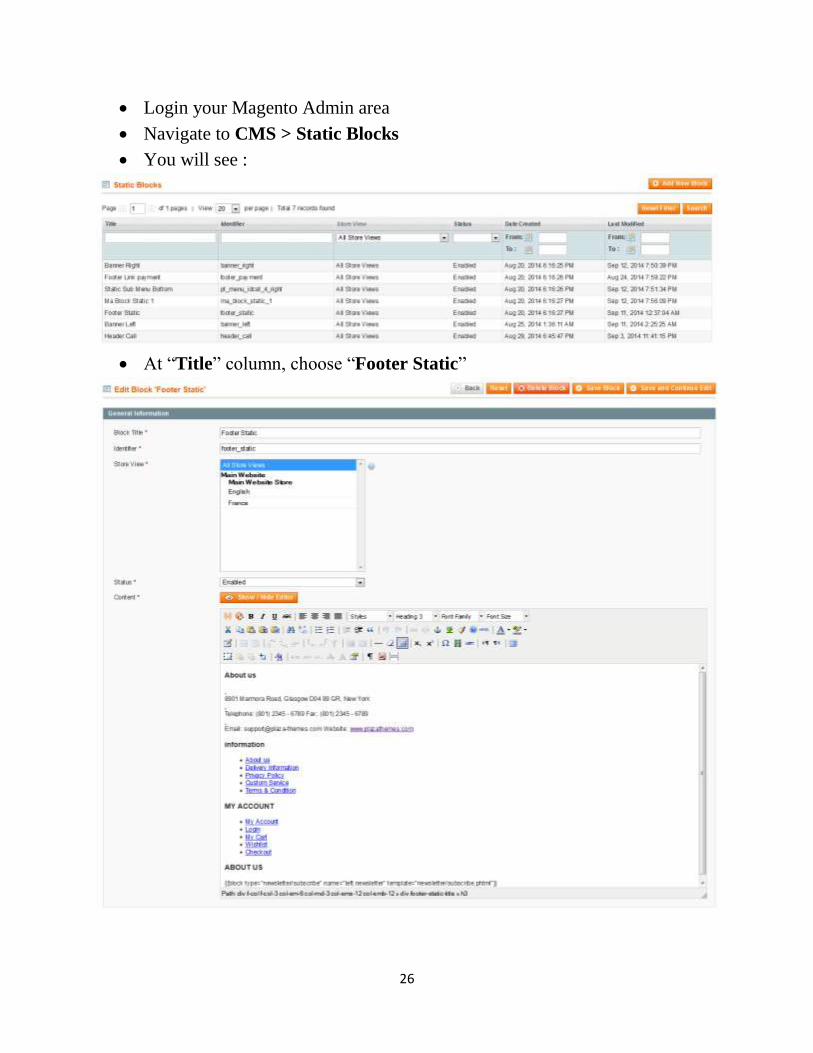
If you want to change content in this block, please do these steps below :
26
Login your Magento Admin area
Navigate to CMS > Static Blocks
You will see :
At “Title” column, choose “Footer Static”
27
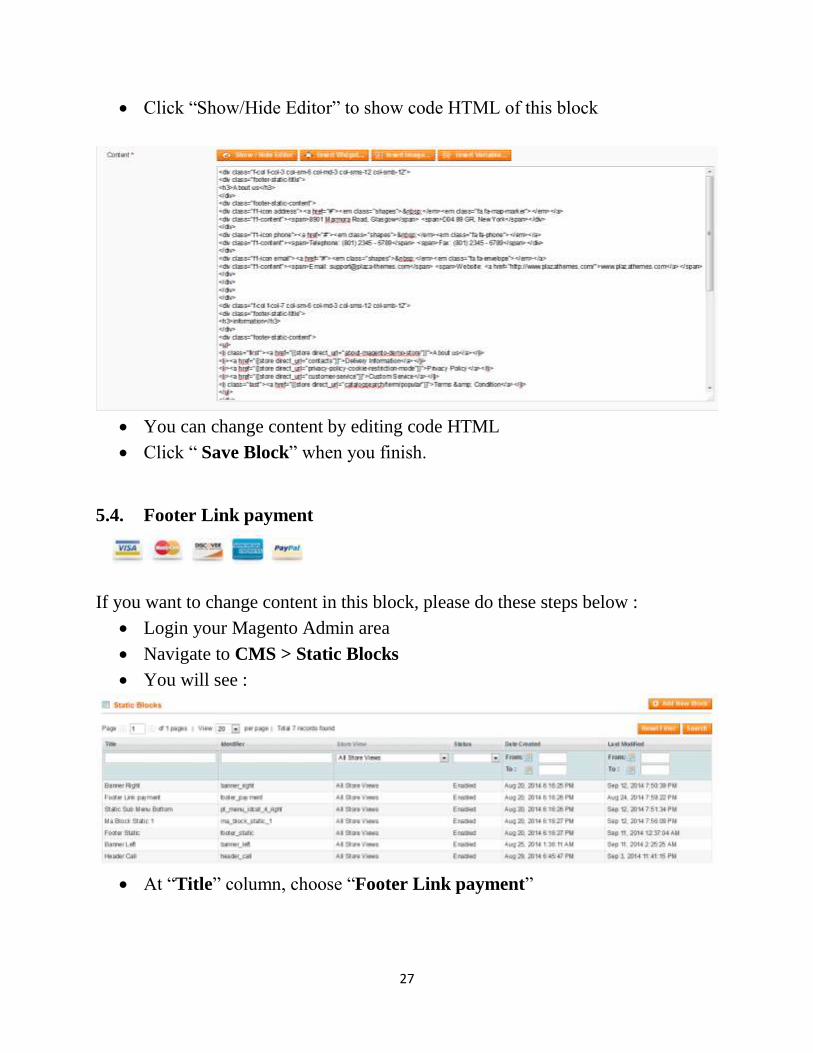
Click “Show/Hide Editor” to show code HTML of this block
You can change content by editing code HTML
Click “ Save Block” when you finish.
5.4. Footer Link payment
If you want to change content in this block, please do these steps below :
Login your Magento Admin area
Navigate to CMS > Static Blocks
You will see :
At “Title” column, choose “Footer Link payment”
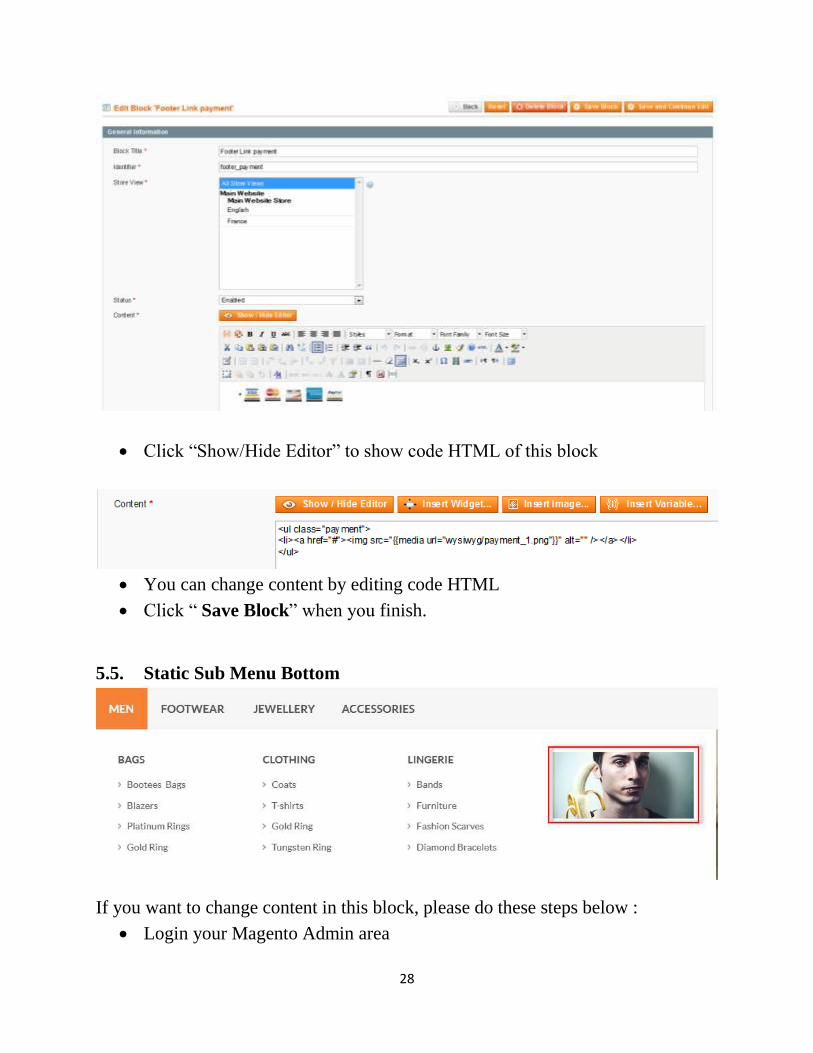
28
Click “Show/Hide Editor” to show code HTML of this block
You can change content by editing code HTML
Click “ Save Block” when you finish.
5.5. Static Sub Menu Bottom
If you want to change content in this block, please do these steps below :
Login your Magento Admin area
29
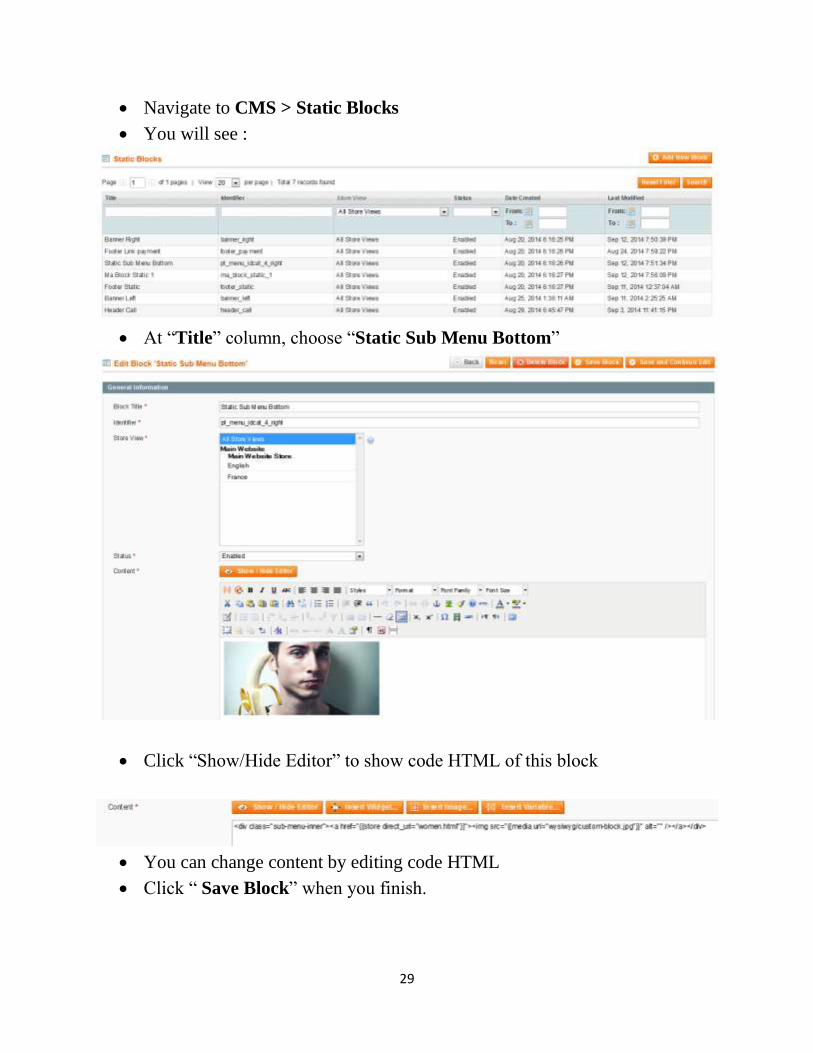
Navigate to CMS > Static Blocks
You will see :
At “Title” column, choose “Static Sub Menu Bottom”
Click “Show/Hide Editor” to show code HTML of this block
You can change content by editing code HTML
Click “ Save Block” when you finish.

30
5.6. Banner Left
If you want to change content in this block, please do these steps below :
Login your Magento Admin area
Navigate to CMS > Static Blocks
You will see :
At “Title” column, choose “Banner Left”

31
Click “Show/Hide Editor” to show code HTML of this block
You can change content by editing code HTML
Click “ Save Block” when you finish.
5.7. Link-category (in demo)
This part shows links of category of your template.
32
How to show links of categories in this template :
Access file : app\design\frontend\default\ma_sahara_bike1(your
template)\template\page\html\footer.phtml:
<div class="link-category">
<ul>
<?php $helper = $this->helper('catalog/category')
?>
<?php foreach ($helper->getStoreCategories() as
$_category): ?>
<li><a href="<?php echo
Mage::getModel('catalog/category')->setData($_category->getData())->getUrl(); ?>"
title="<?php echo $_category->getName() ?>"><?php echo $_category->getName()
?></a></li>
<?php endforeach ?>
</ul>
</div>
- This code show links of categories in this template.
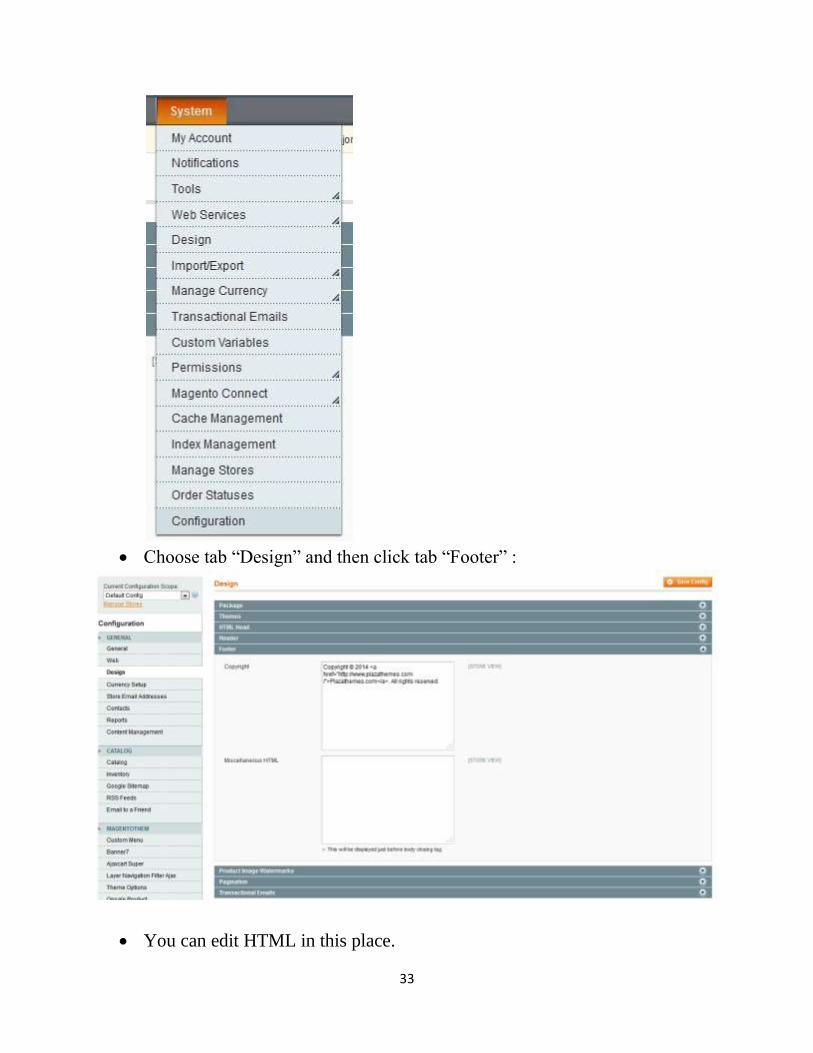
5.8. Change Footer Copyright (text “copyright”)
If you can change in Footer Copyright, please do these steps below :
Login your Magento Admin
Navigate to System > Configuration
33
Choose tab “Design” and then click tab “Footer” :
You can edit HTML in this place.
34
Click Save Config when you finish.
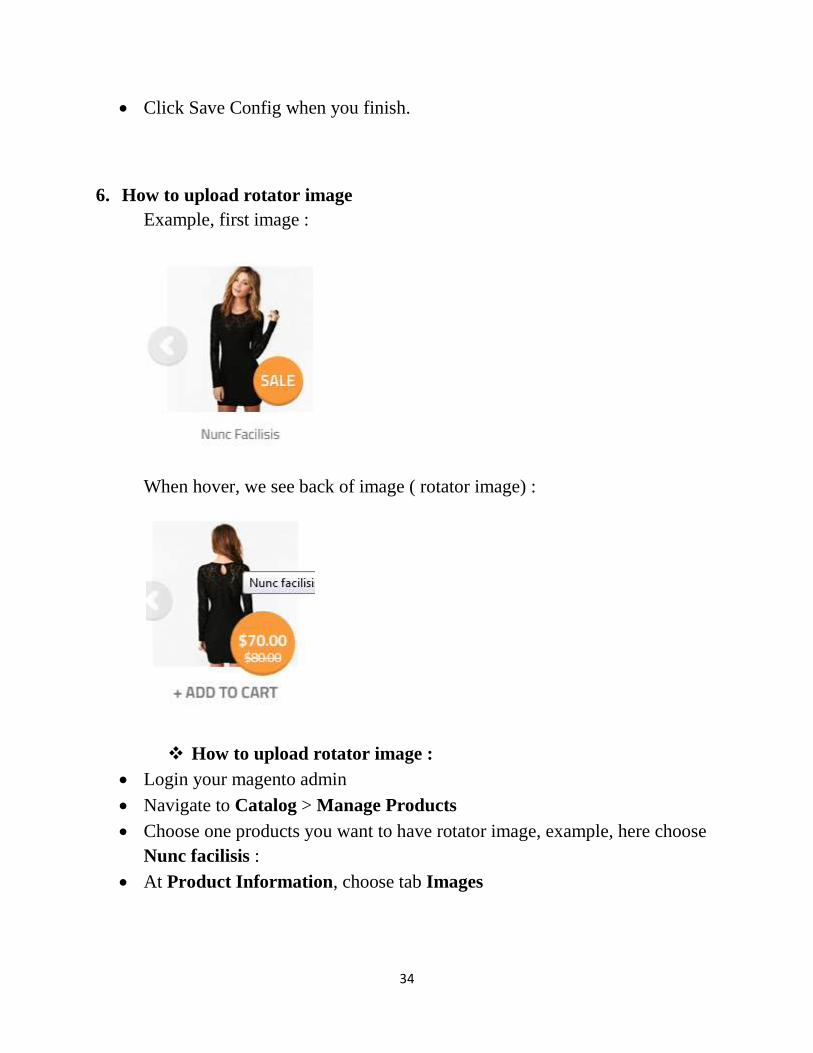
6. How to upload rotator image
Example, first image :
When hover, we see back of image ( rotator image) :
How to upload rotator image :
Login your magento admin
Navigate to Catalog > Manage Products
Choose one products you want to have rotator image, example, here choose
Nunc facilisis :
At Product Information, choose tab Images
35
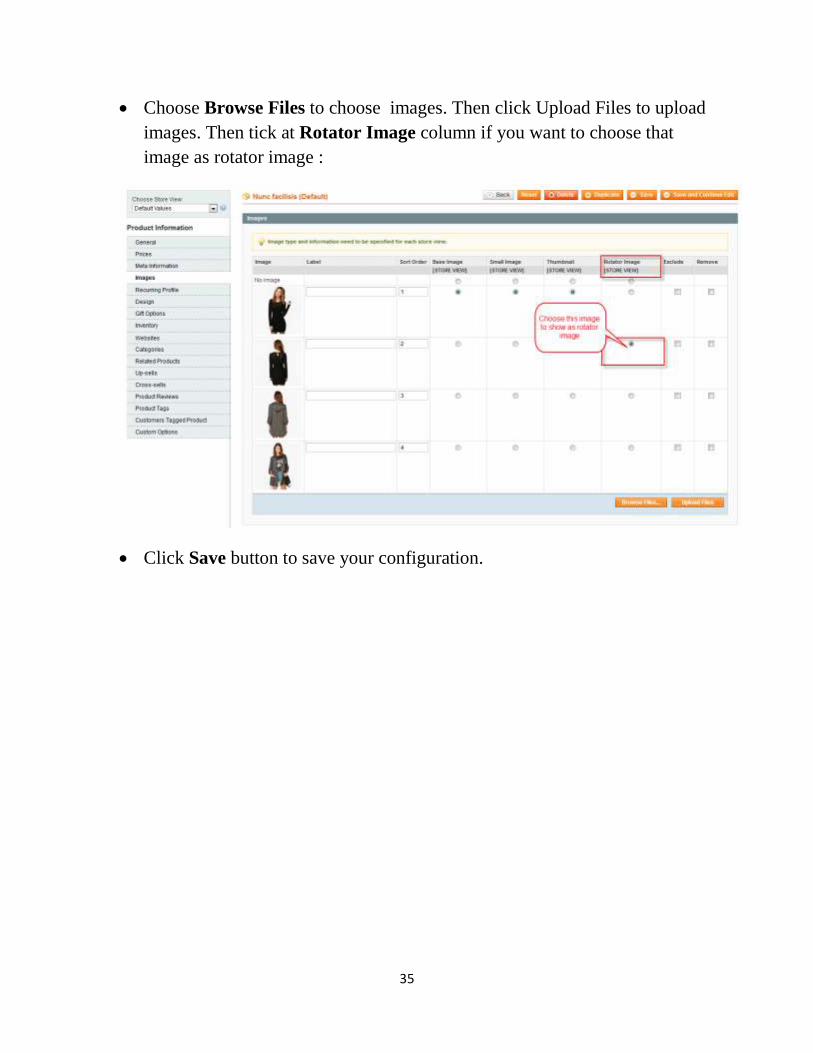
Choose Browse Files to choose images. Then click Upload Files to upload
images. Then tick at Rotator Image column if you want to choose that
image as rotator image :
Click Save button to save your configuration.
36
III. Extensions in this template
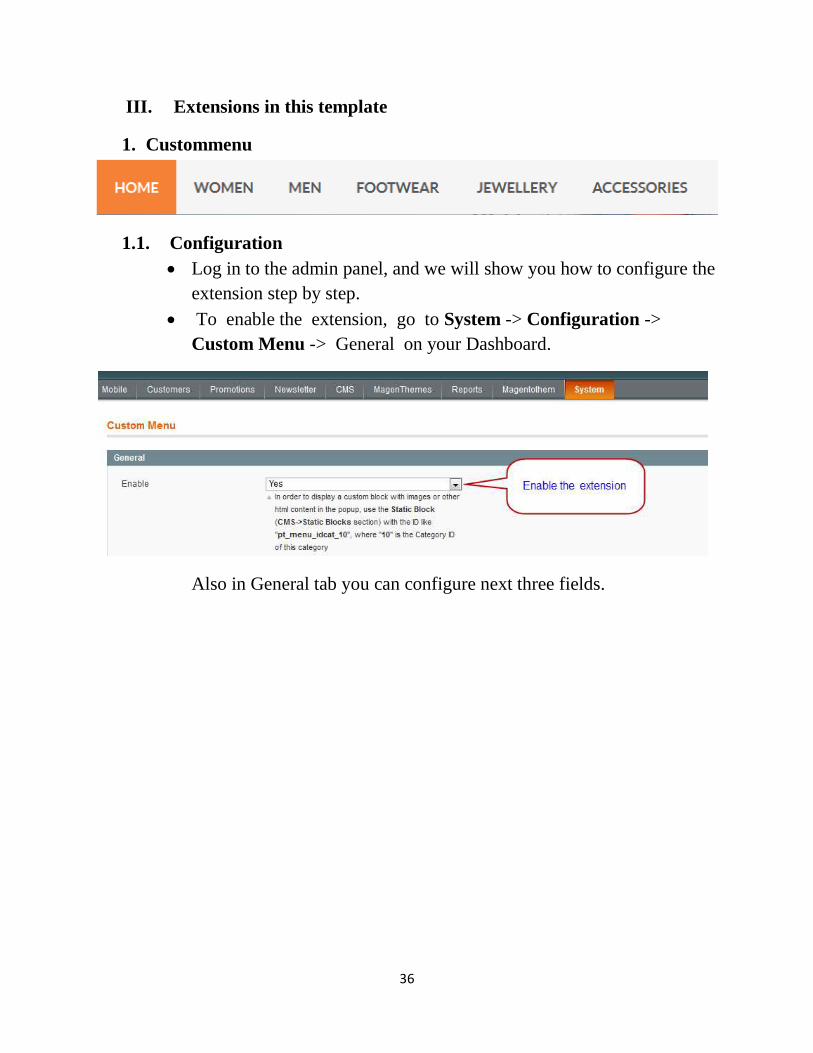
1. Custommenu
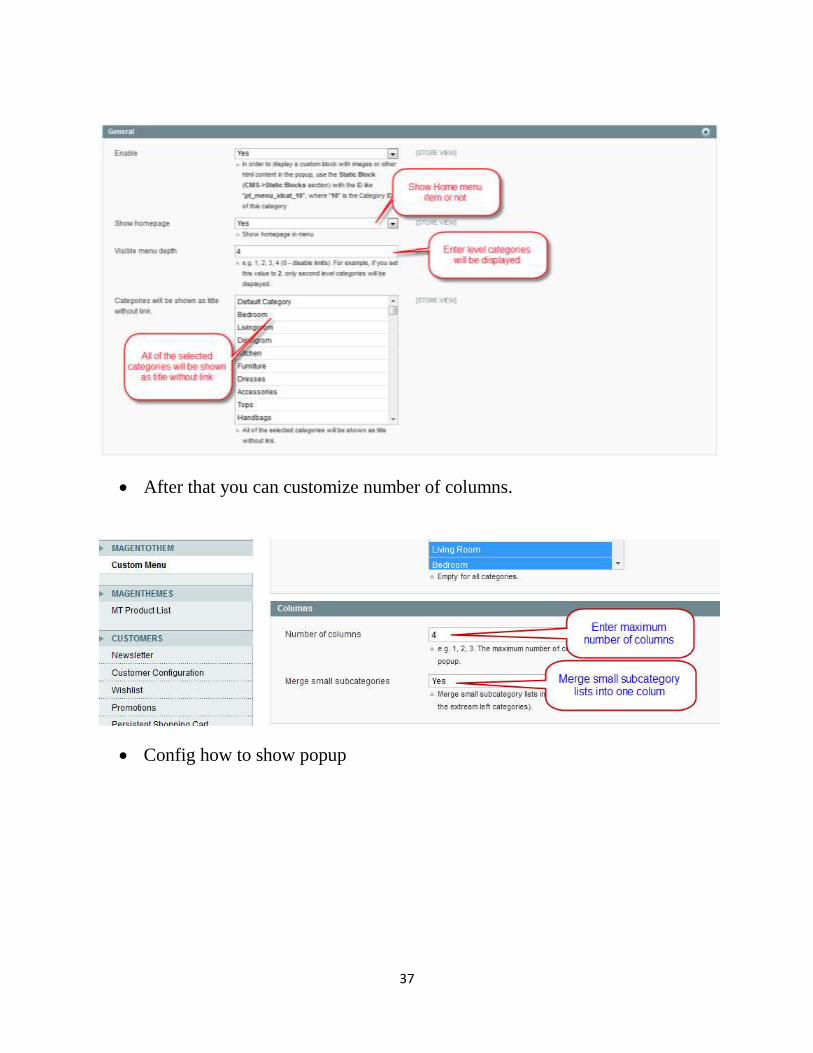
1.1. Configuration
Log in to the admin panel, and we will show you how to configure the
extension step by step.
To enable the extension, go to System -> Configuration ->
Custom Menu -> General on your Dashboard.
Also in General tab you can configure next three fields.
37
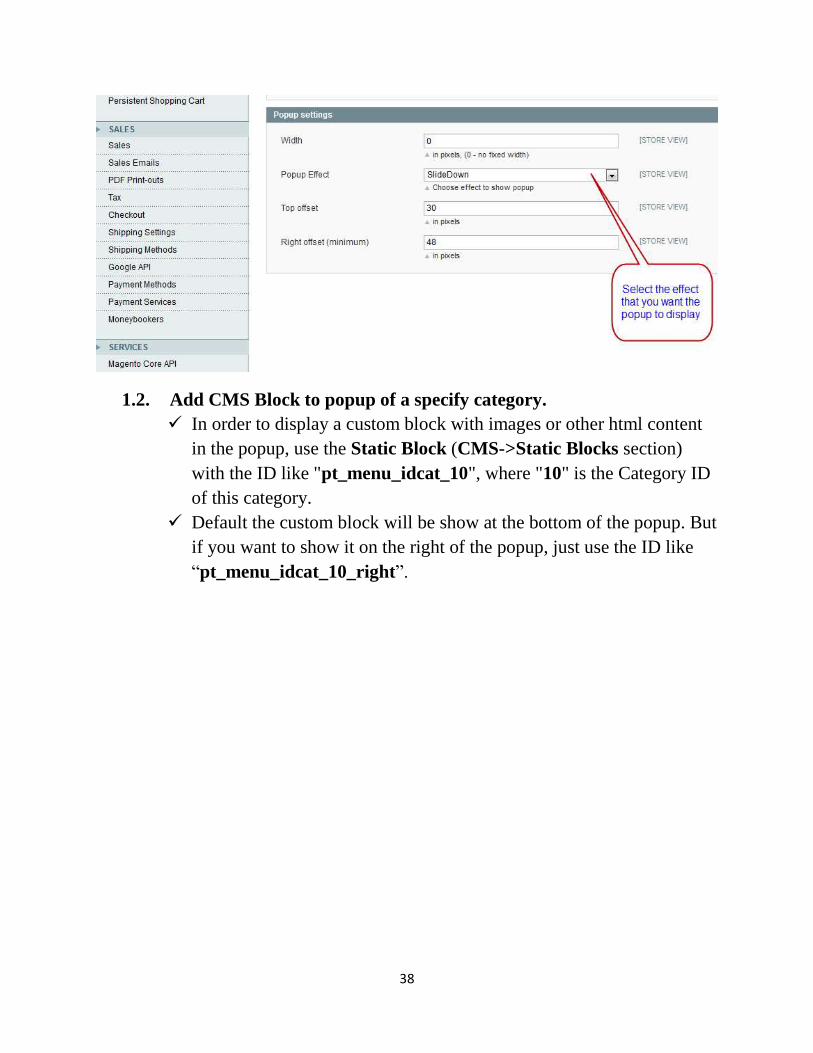
After that you can customize number of columns.
Config how to show popup
38
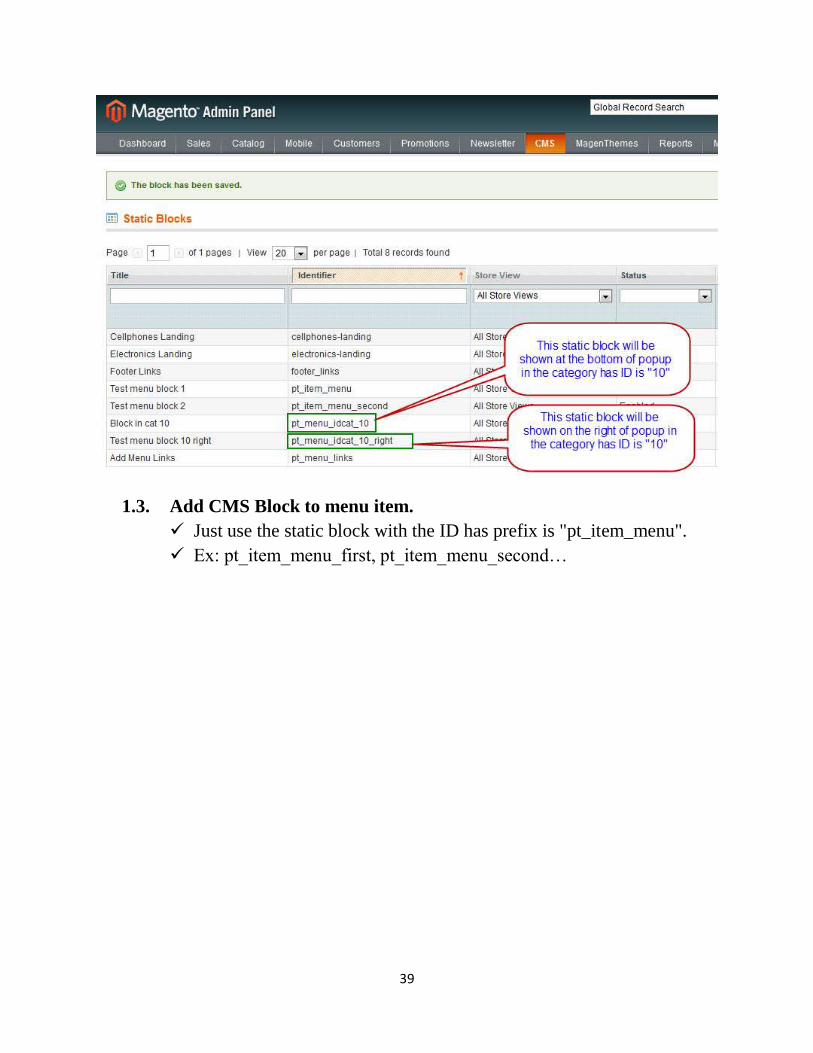
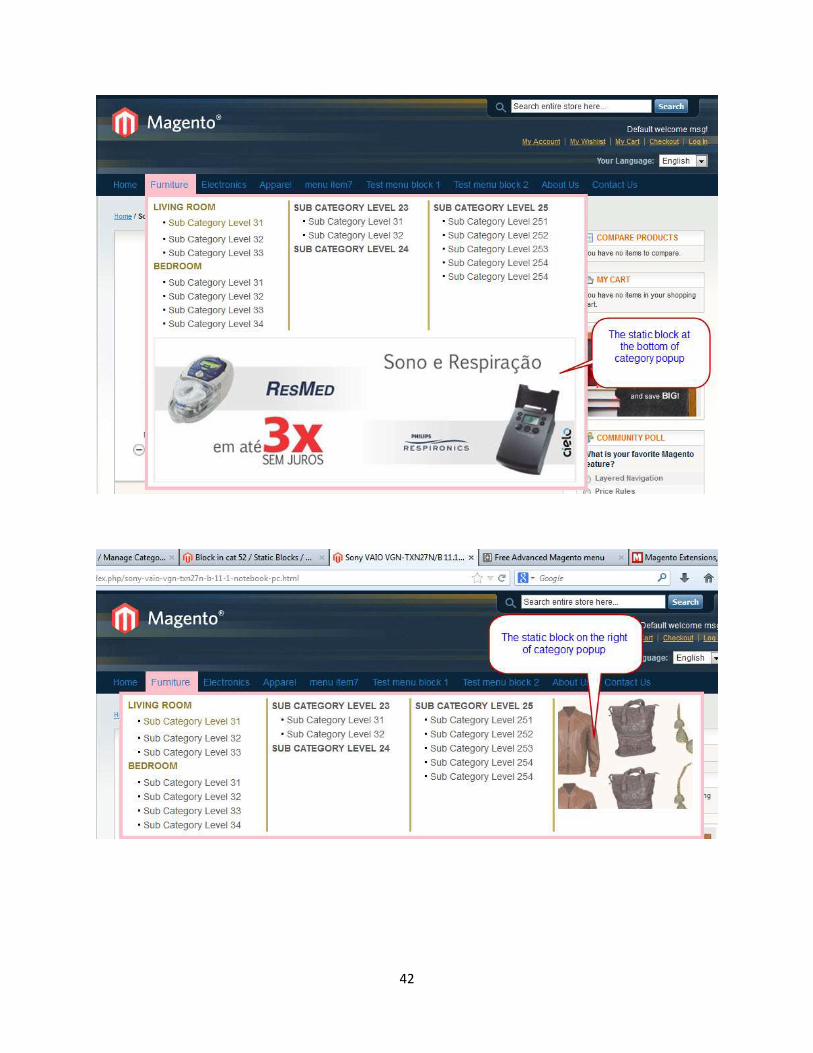
1.2. Add CMS Block to popup of a specify category.
In order to display a custom block with images or other html content
in the popup, use the Static Block (CMS->Static Blocks section)
with the ID like "pt_menu_idcat_10", where "10" is the Category ID
of this category.
Default the custom block will be show at the bottom of the popup. But
if you want to show it on the right of the popup, just use the ID like
“pt_menu_idcat_10_right”.
39
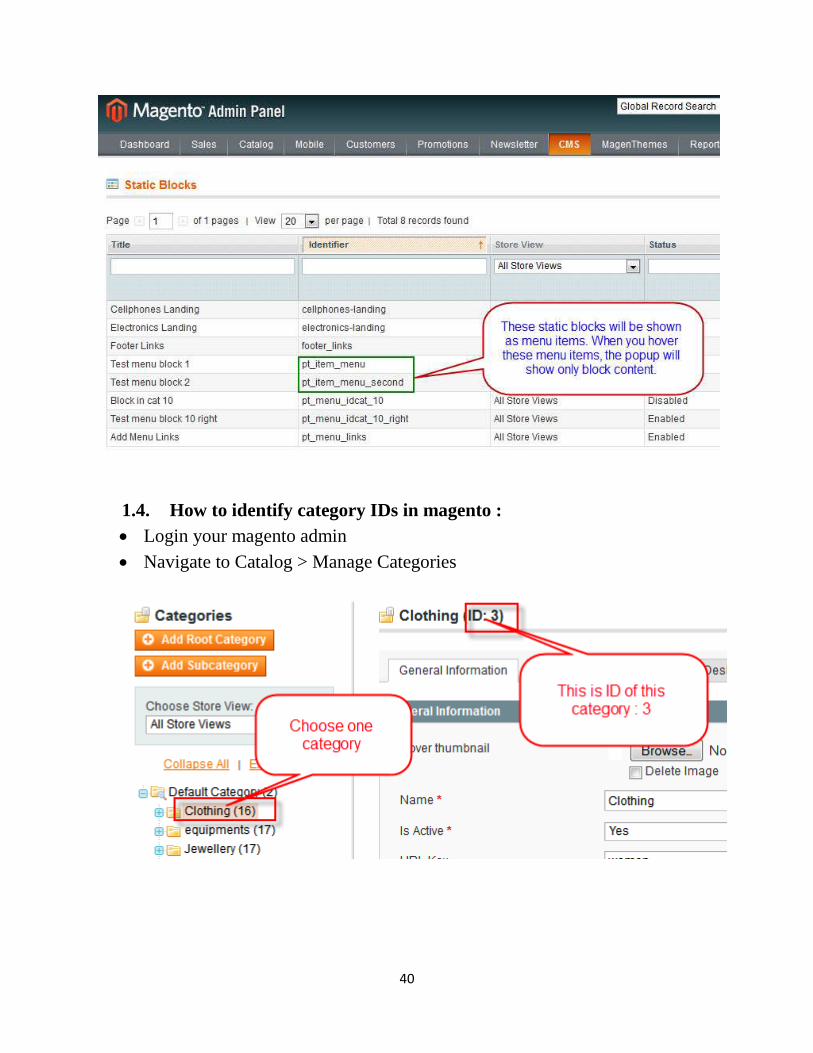
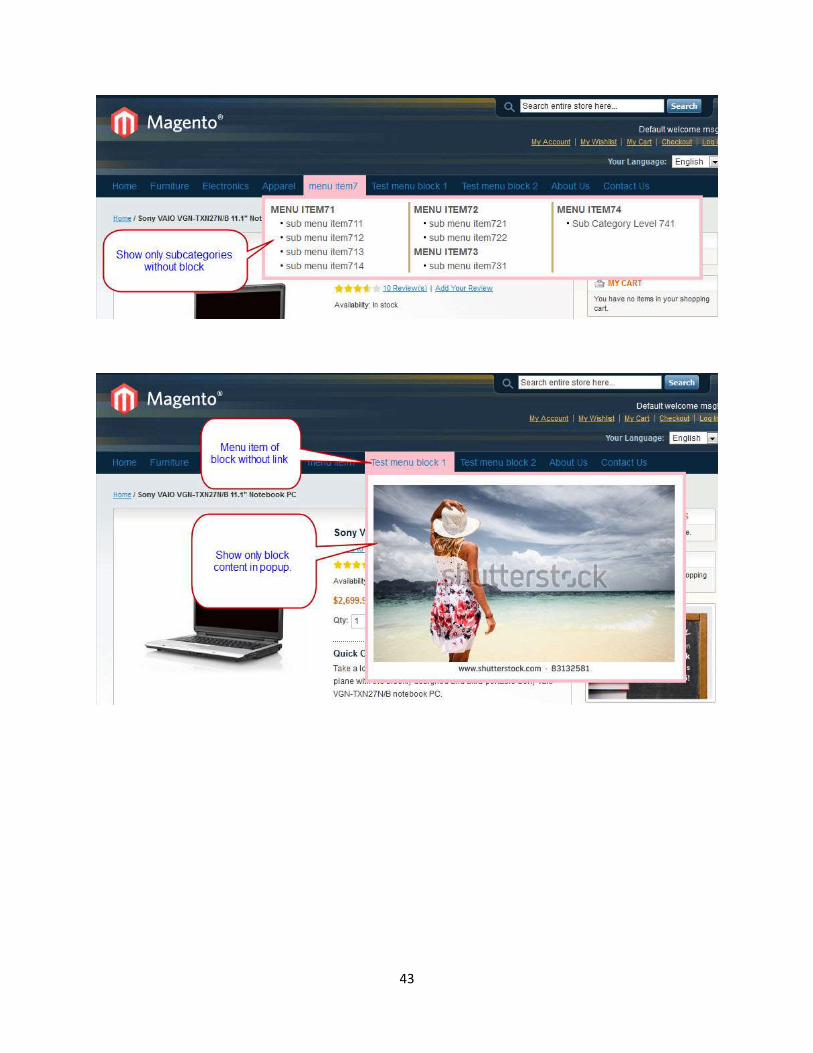
1.3. Add CMS Block to menu item.
Just use the static block with the ID has prefix is "pt_item_menu".
Ex: pt_item_menu_first, pt_item_menu_second…
40
1.4. How to identify category IDs in magento :
Login your magento admin
Navigate to Catalog > Manage Categories
41
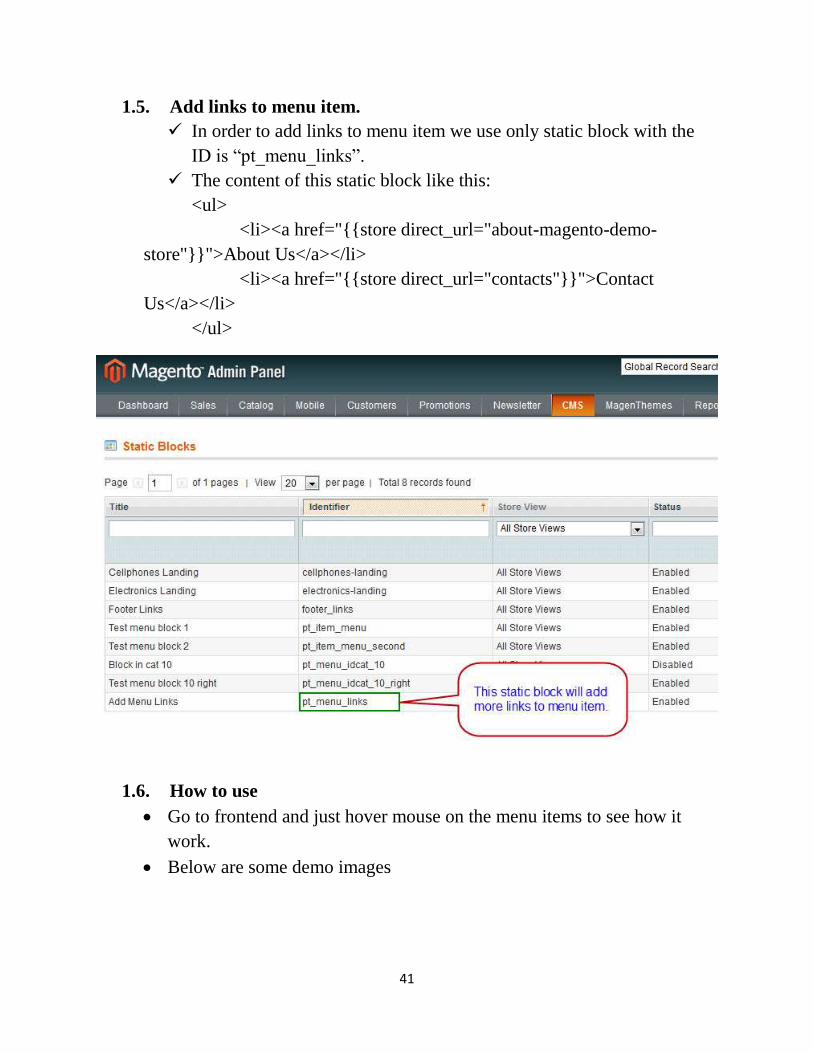
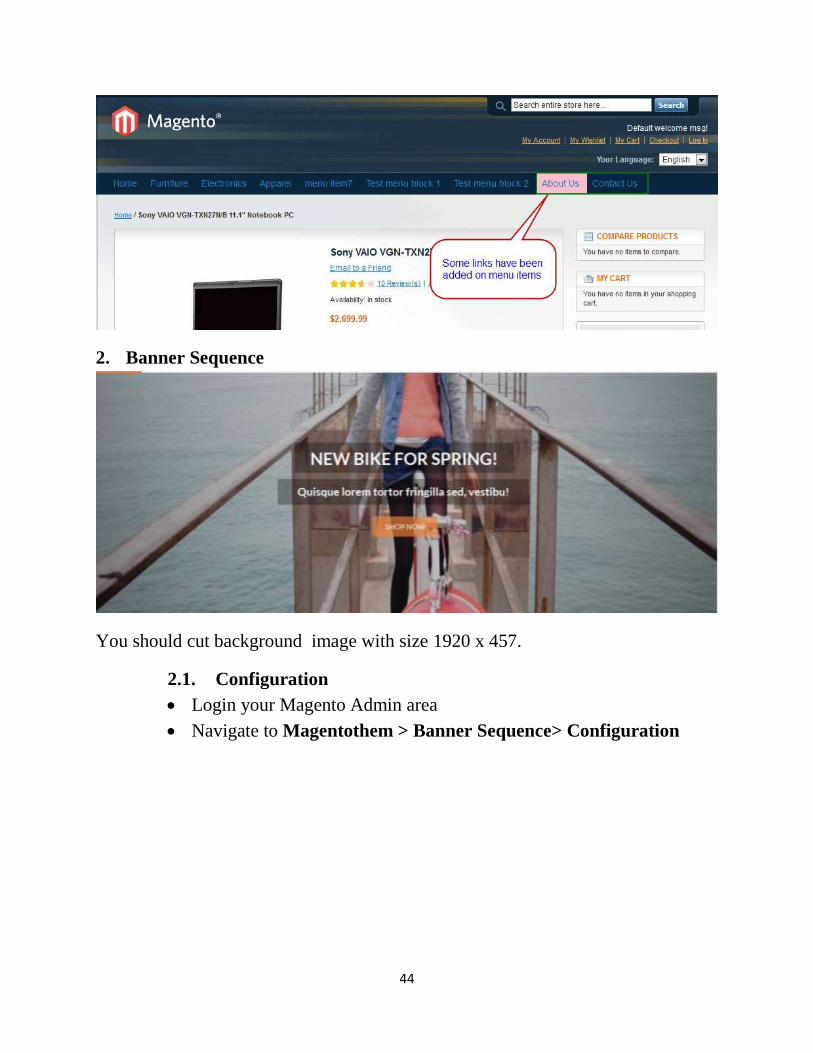
1.5. Add links to menu item.
In order to add links to menu item we use only static block with the
ID is “pt_menu_links”.
The content of this static block like this:
<ul>
<li><a href="{{store direct_url="about-magento-demo-
store"}}">About Us</a></li>
<li><a href="{{store direct_url="contacts"}}">Contact
Us</a></li>
</ul>
1.6. How to use
Go to frontend and just hover mouse on the menu items to see how it
work.
Below are some demo images
42
43
44
2. Banner Sequence
You should cut background image with size 1920 x 457.
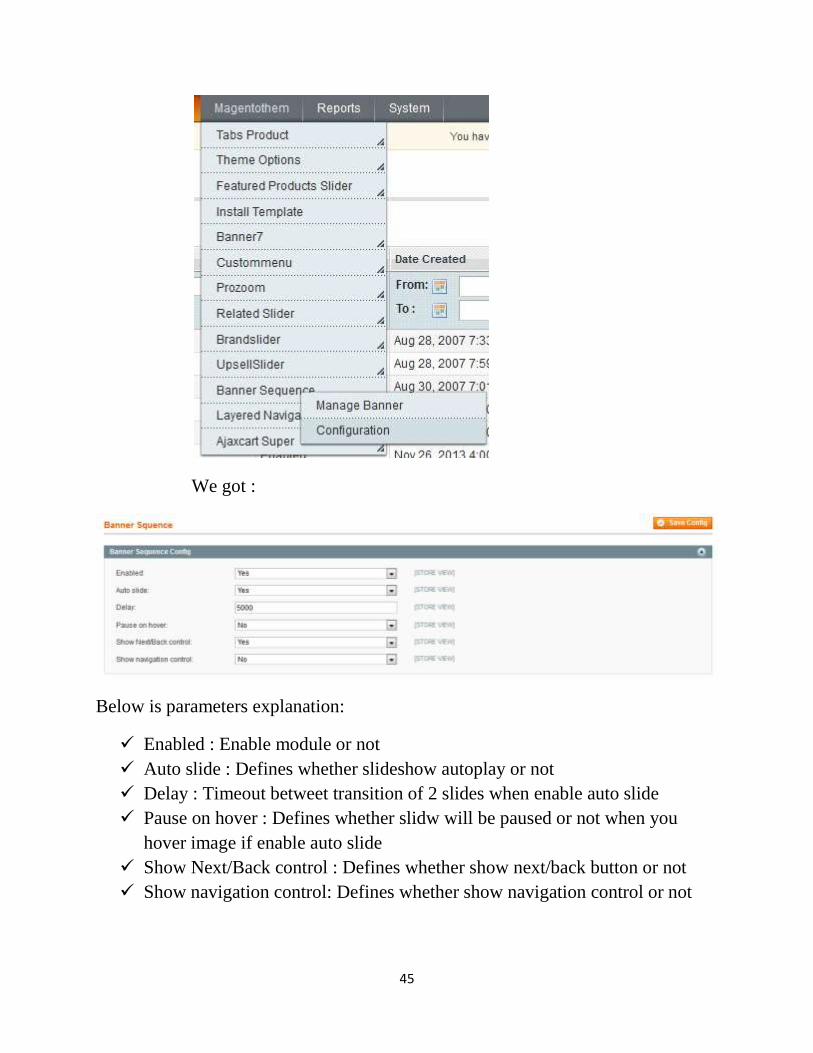
2.1. Configuration
Login your Magento Admin area
Navigate to Magentothem > Banner Sequence> Configuration
45
We got :
Below is parameters explanation:
Enabled : Enable module or not
Auto slide : Defines whether slideshow autoplay or not
Delay : Timeout betweet transition of 2 slides when enable auto slide
Pause on hover : Defines whether slidw will be paused or not when you
hover image if enable auto slide
Show Next/Back control : Defines whether show next/back button or not
Show navigation control: Defines whether show navigation control or not
46
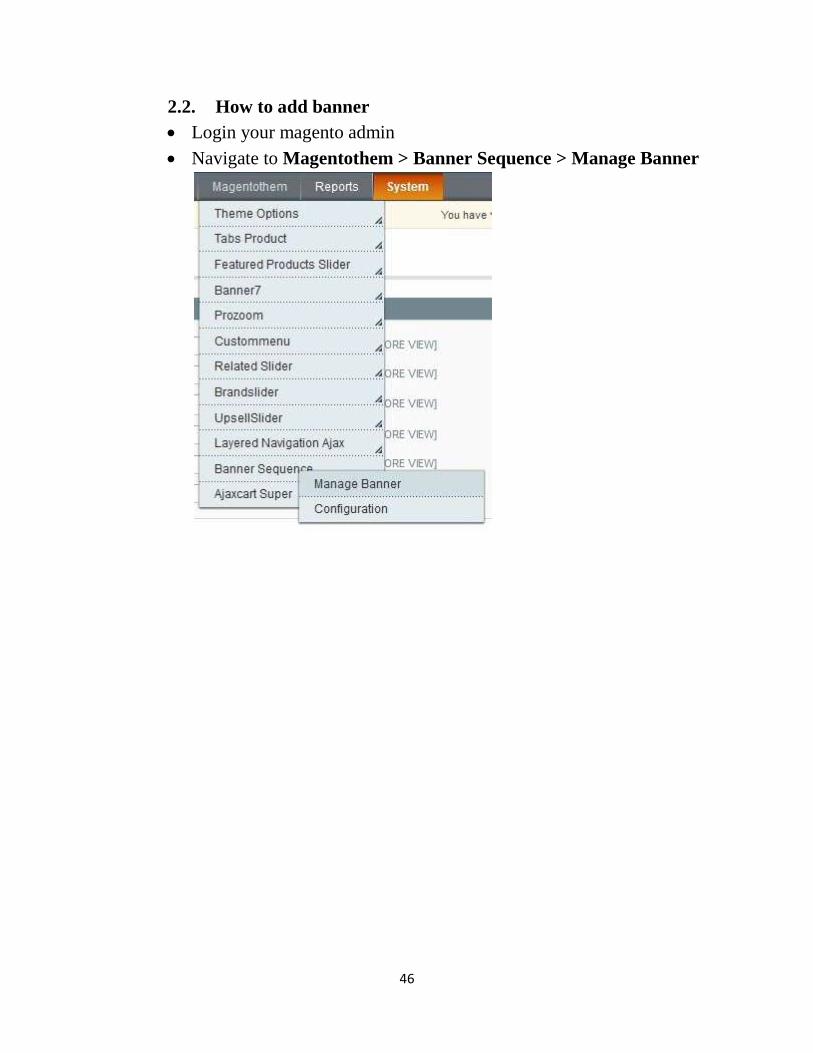
2.2. How to add banner
Login your magento admin
Navigate to Magentothem > Banner Sequence > Manage Banner
47
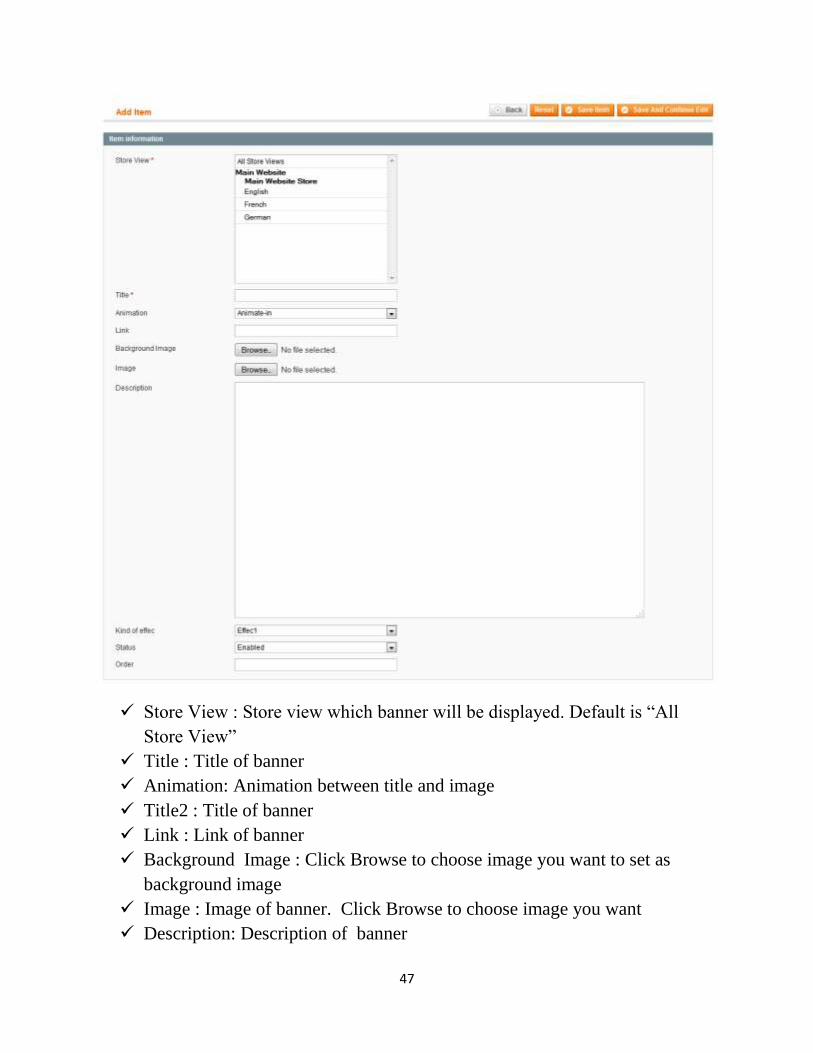
Store View : Store view which banner will be displayed. Default is “All
Store View”
Title : Title of banner
Animation: Animation between title and image
Title2 : Title of banner
Link : Link of banner
Background Image : Click Browse to choose image you want to set as
background image
Image : Image of banner. Click Browse to choose image you want
Description: Description of banner
48
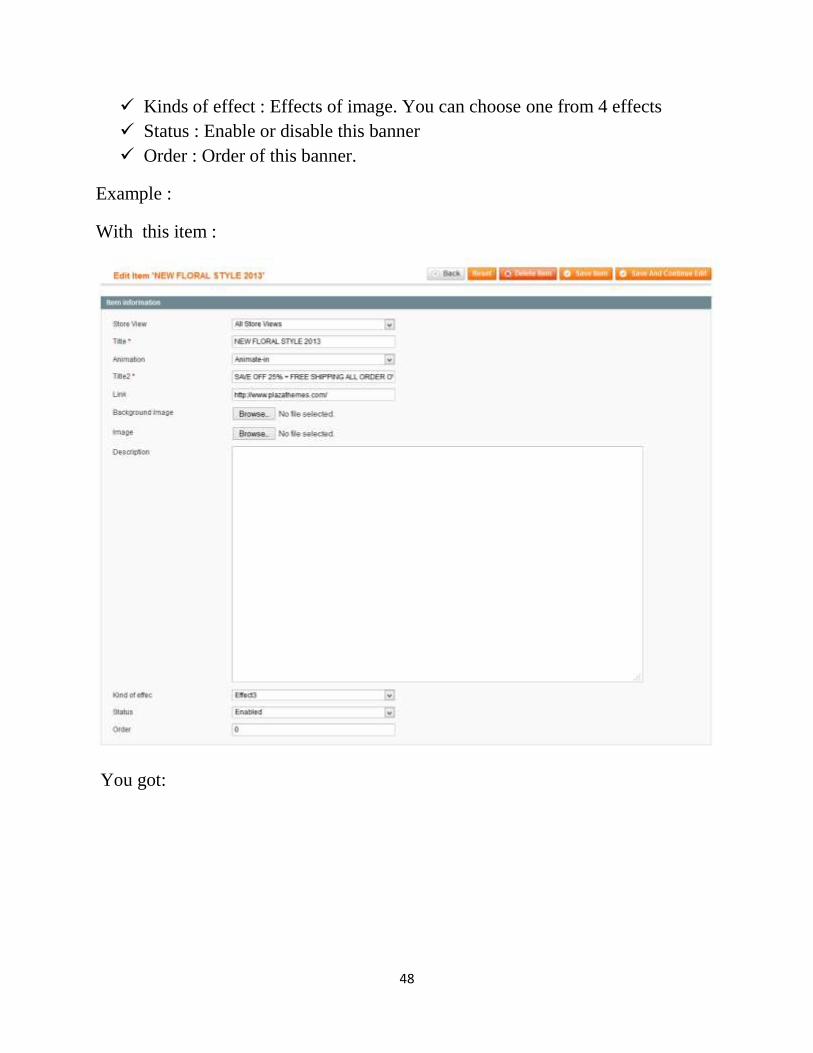
Kinds of effect : Effects of image. You can choose one from 4 effects
Status : Enable or disable this banner
Order : Order of this banner.
Example :
With this item :
You got:
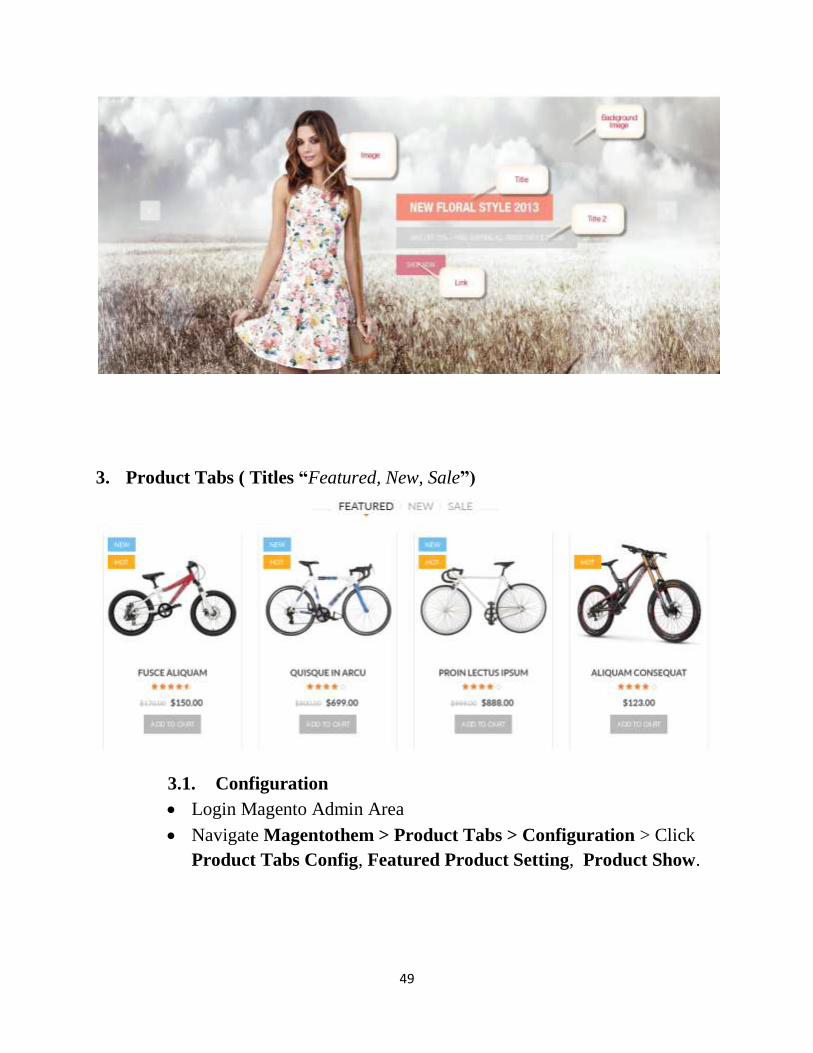
49
3. Product Tabs ( Titles “Featured, New, Sale”)
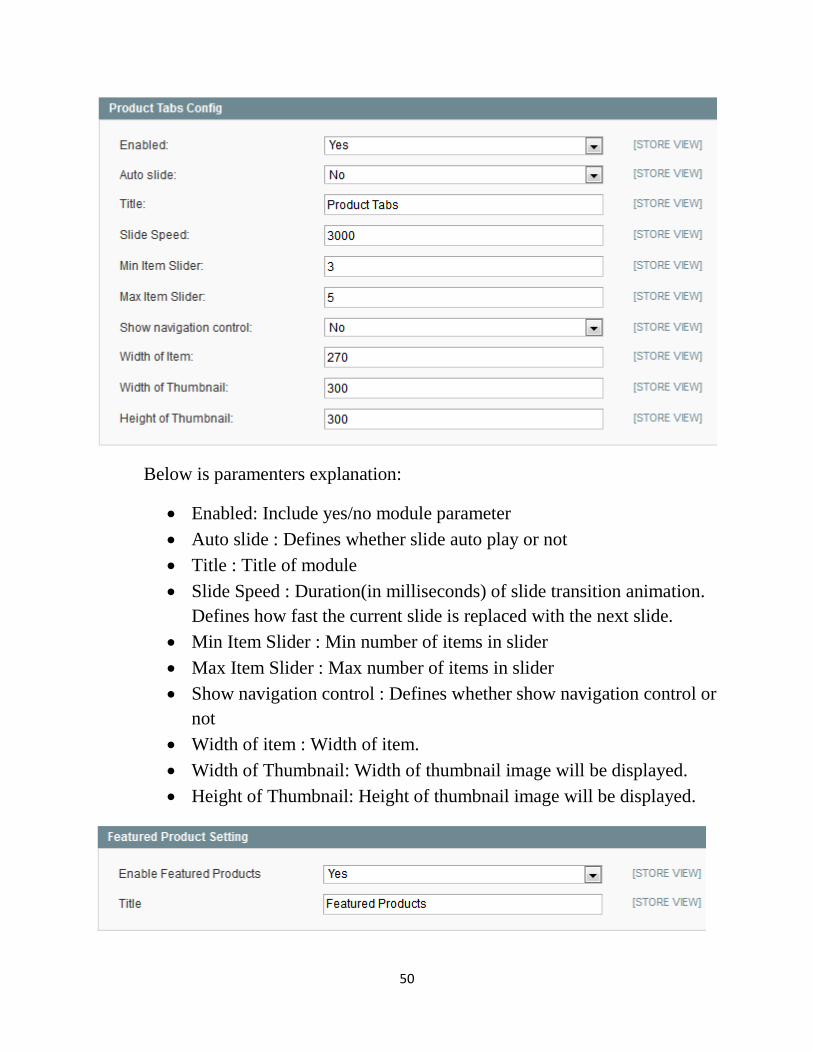
3.1. Configuration
Login Magento Admin Area
Navigate Magentothem > Product Tabs > Configuration > Click
Product Tabs Config, Featured Product Setting, Product Show.
50
Below is paramenters explanation:
Enabled: Include yes/no module parameter
Auto slide : Defines whether slide auto play or not
Title : Title of module
Slide Speed : Duration(in milliseconds) of slide transition animation.
Defines how fast the current slide is replaced with the next slide.
Min Item Slider : Min number of items in slider
Max Item Slider : Max number of items in slider
Show navigation control : Defines whether show navigation control or
not
Width of item : Width of item.
Width of Thumbnail: Width of thumbnail image will be displayed.
Height of Thumbnail: Height of thumbnail image will be displayed.
51
Enable Featured Products : Defines whether enable featured products table
or not.
Title : Title of table.
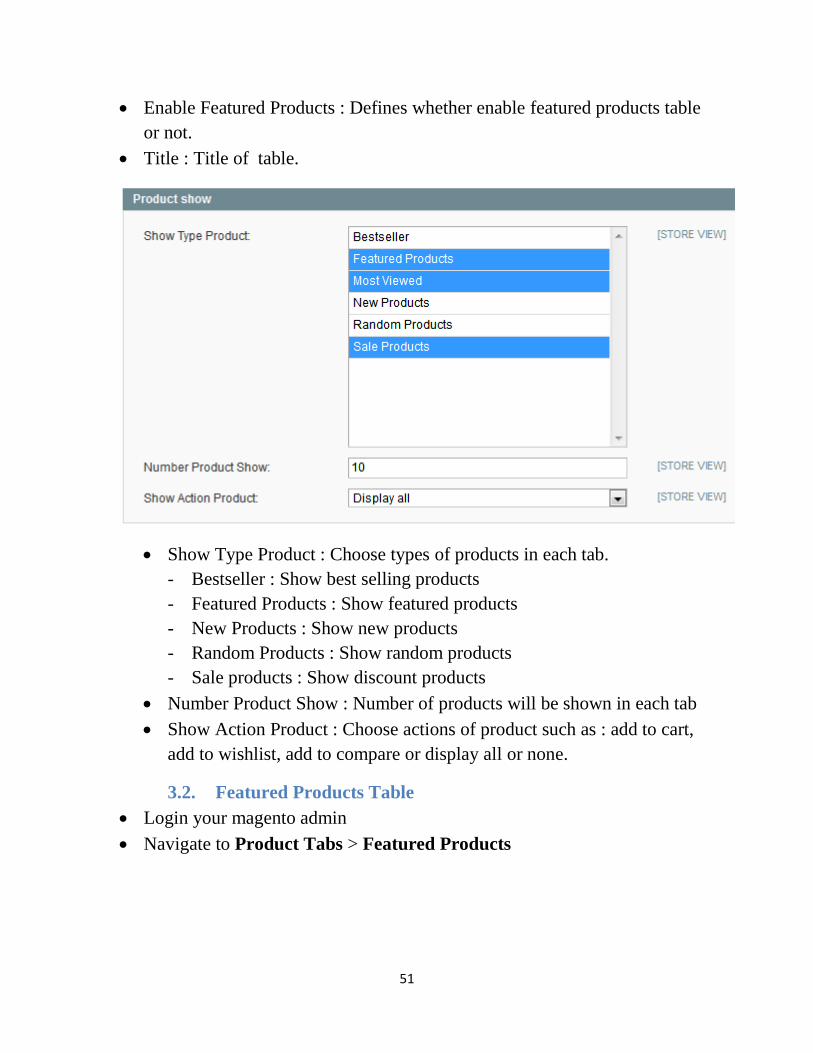
Show Type Product : Choose types of products in each tab.
- Bestseller : Show best selling products
- Featured Products : Show featured products
- New Products : Show new products
- Random Products : Show random products
- Sale products : Show discount products
Number Product Show : Number of products will be shown in each tab
Show Action Product : Choose actions of product such as : add to cart,
add to wishlist, add to compare or display all or none.
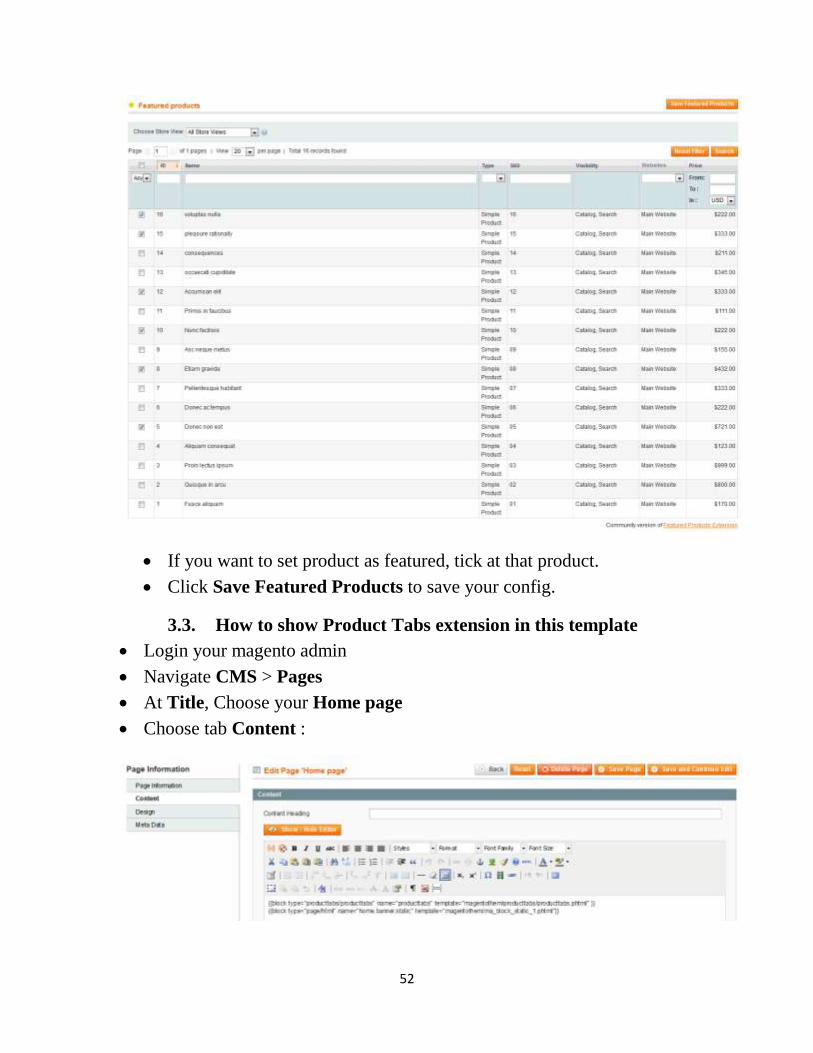
3.2. Featured Products Table
Login your magento admin
Navigate to Product Tabs > Featured Products
52
If you want to set product as featured, tick at that product.
Click Save Featured Products to save your config.
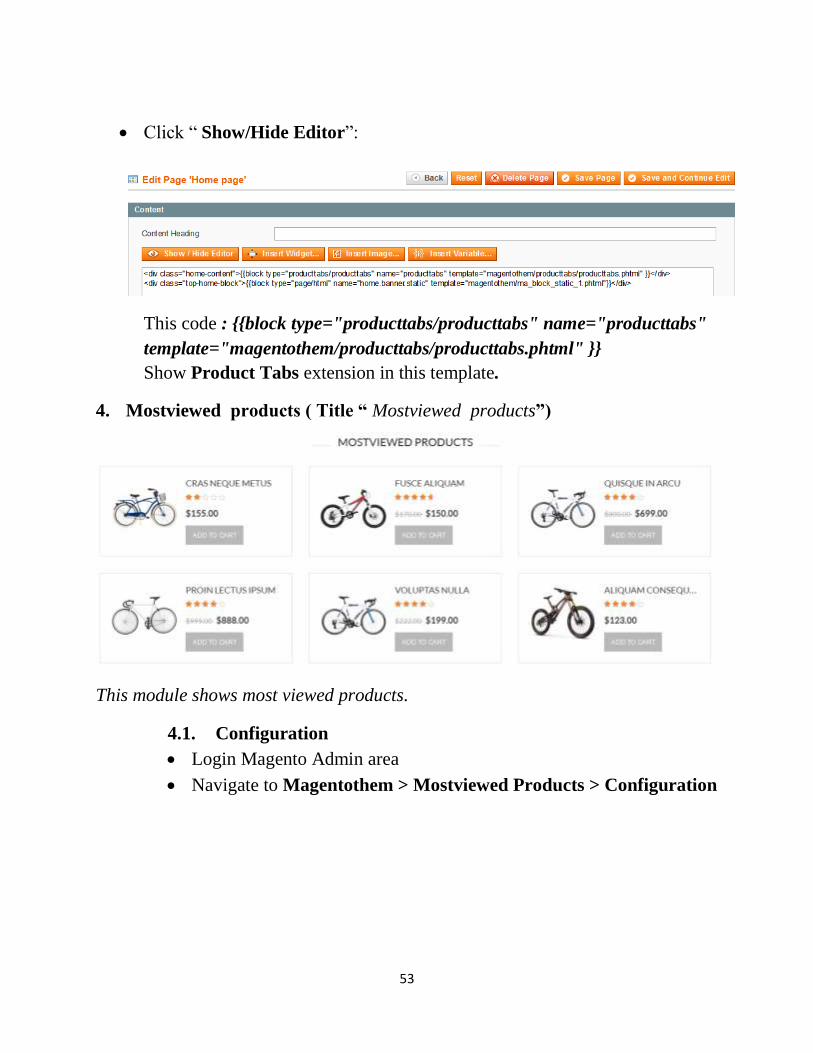
3.3. How to show Product Tabs extension in this template
Login your magento admin
Navigate CMS > Pages
At Title, Choose your Home page
Choose tab Content :
53
Click “ Show/Hide Editor”:
This code : {{block type="producttabs/producttabs" name="producttabs"
template="magentothem/producttabs/producttabs.phtml" }}
Show Product Tabs extension in this template.
4. Mostviewed products ( Title “ Mostviewed products”)
This module shows most viewed products.
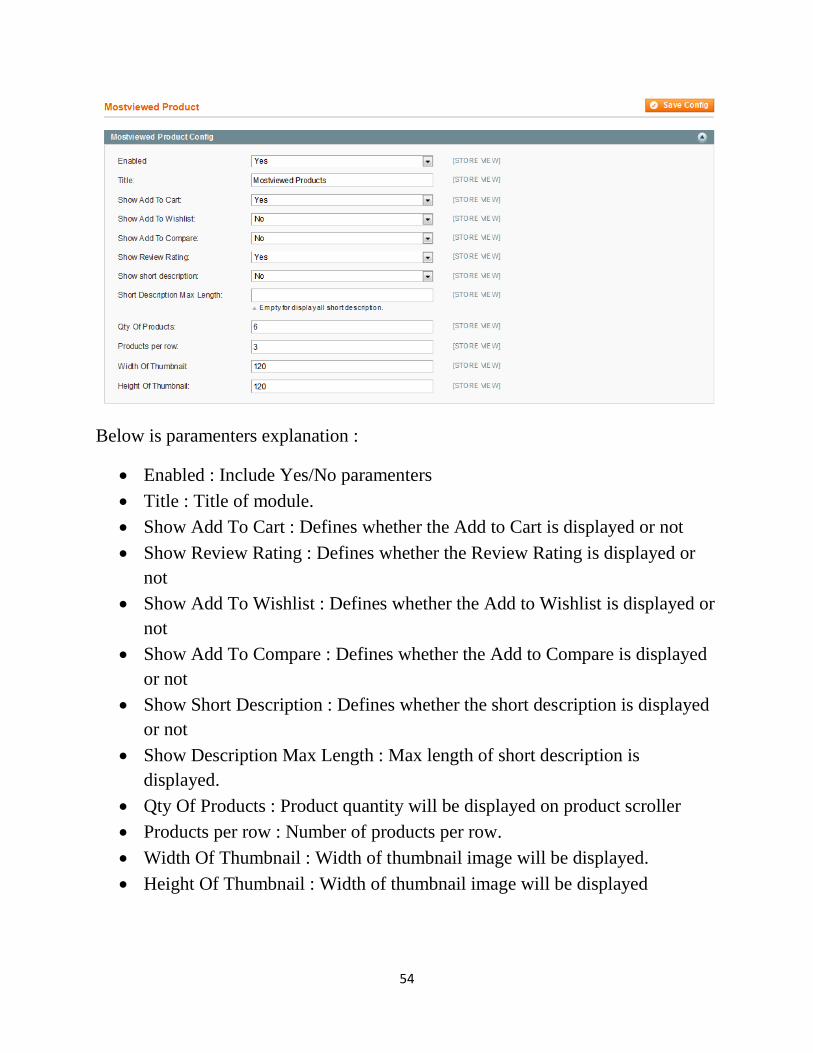
4.1. Configuration
Login Magento Admin area
Navigate to Magentothem > Mostviewed Products > Configuration
54
Below is paramenters explanation :
Enabled : Include Yes/No paramenters
Title : Title of module.
Show Add To Cart : Defines whether the Add to Cart is displayed or not
Show Review Rating : Defines whether the Review Rating is displayed or
not
Show Add To Wishlist : Defines whether the Add to Wishlist is displayed or
not
Show Add To Compare : Defines whether the Add to Compare is displayed
or not
Show Short Description : Defines whether the short description is displayed
or not
Show Description Max Length : Max length of short description is
displayed.
Qty Of Products : Product quantity will be displayed on product scroller
Products per row : Number of products per row.
Width Of Thumbnail : Width of thumbnail image will be displayed.
Height Of Thumbnail : Width of thumbnail image will be displayed
55
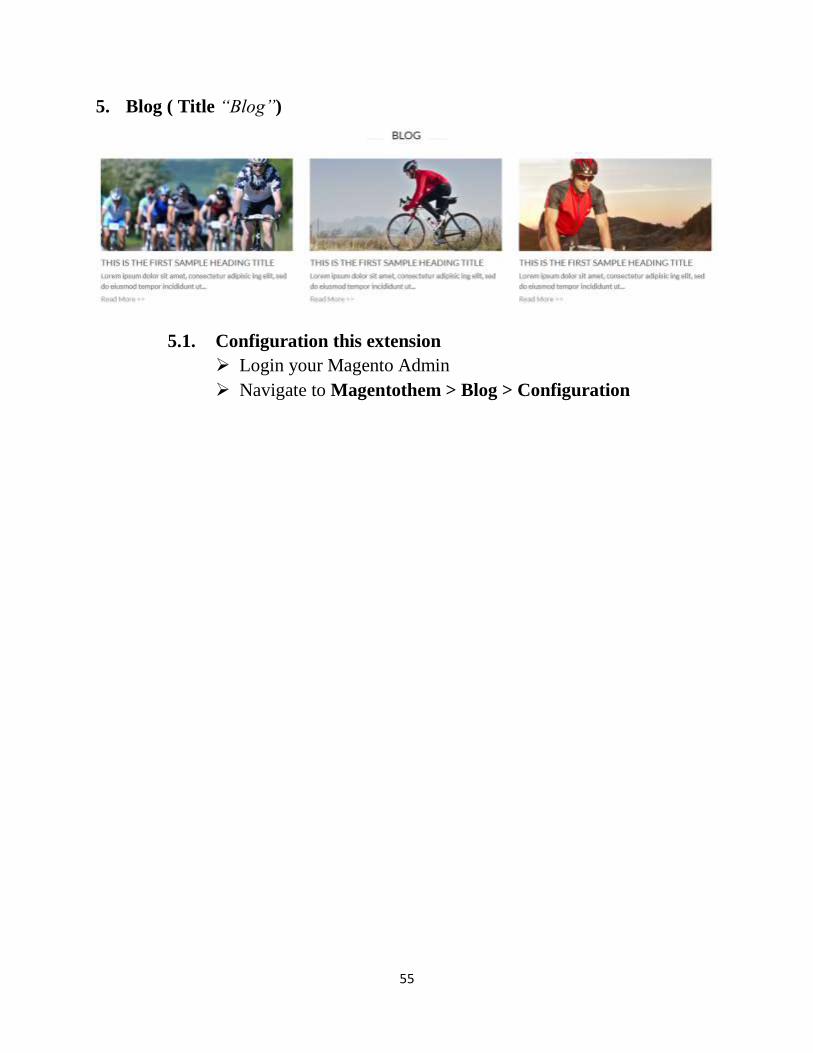
5. Blog ( Title “Blog”)
5.1. Configuration this extension
Login your Magento Admin
Navigate to Magentothem > Blog > Configuration

56
57
Some explanations :
At Blog Setting :
Enable : Defines whether enable module or not
Route to Blog :
Example URL :
http://192.168.1.2/magento_test/ma_bravia_quickstart/index.php/blog
“blog” is Route to Blog.
Blog Title : Title of blog
Page layout : Choose layout for blog page.
Date Format : Format of date
Summary Character Count : Number of characters in a post to be displayed
before it is truncated and the Read More link is added. 0 for unlimited.
Use Short Content Field : If enabled, additional "Short Content Field" is
taken instead of truncated main post.
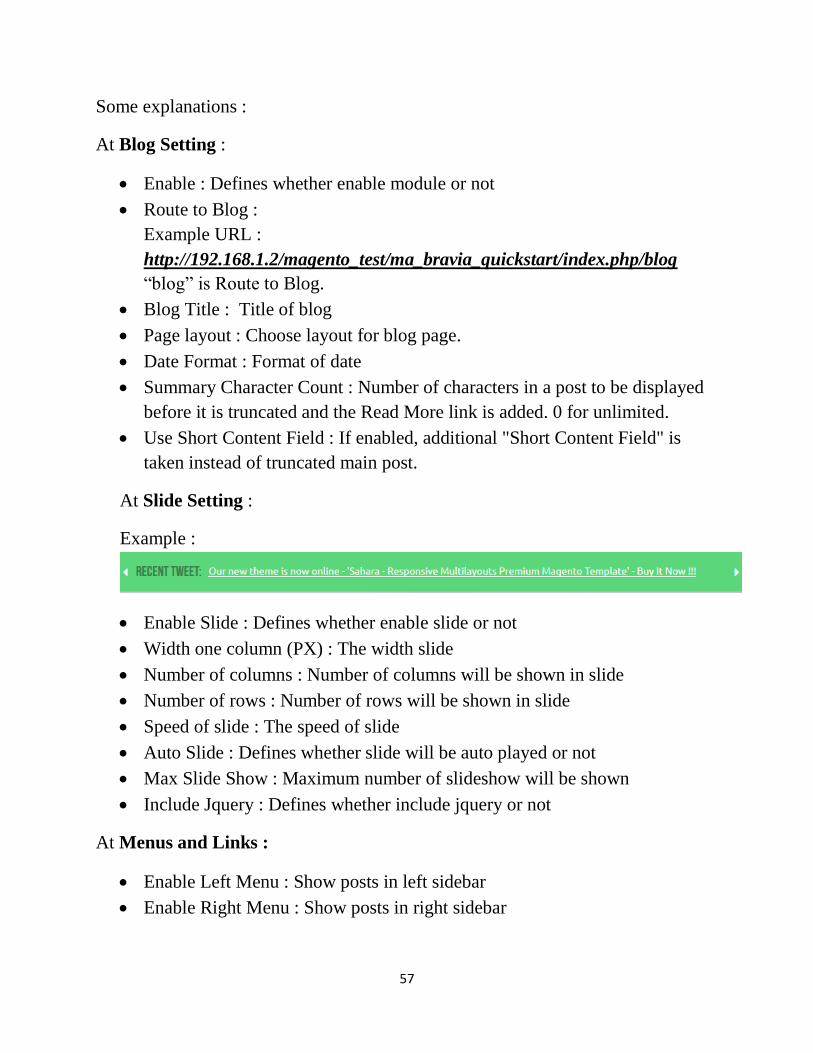
At Slide Setting :
Example :
Enable Slide : Defines whether enable slide or not
Width one column (PX) : The width slide
Number of columns : Number of columns will be shown in slide
Number of rows : Number of rows will be shown in slide
Speed of slide : The speed of slide
Auto Slide : Defines whether slide will be auto played or not
Max Slide Show : Maximum number of slideshow will be shown
Include Jquery : Defines whether include jquery or not
At Menus and Links :
Enable Left Menu : Show posts in left sidebar
Enable Right Menu : Show posts in right sidebar
58
Recent Posts : The number of recent post to be displayed in the menu. 0 to
disable.
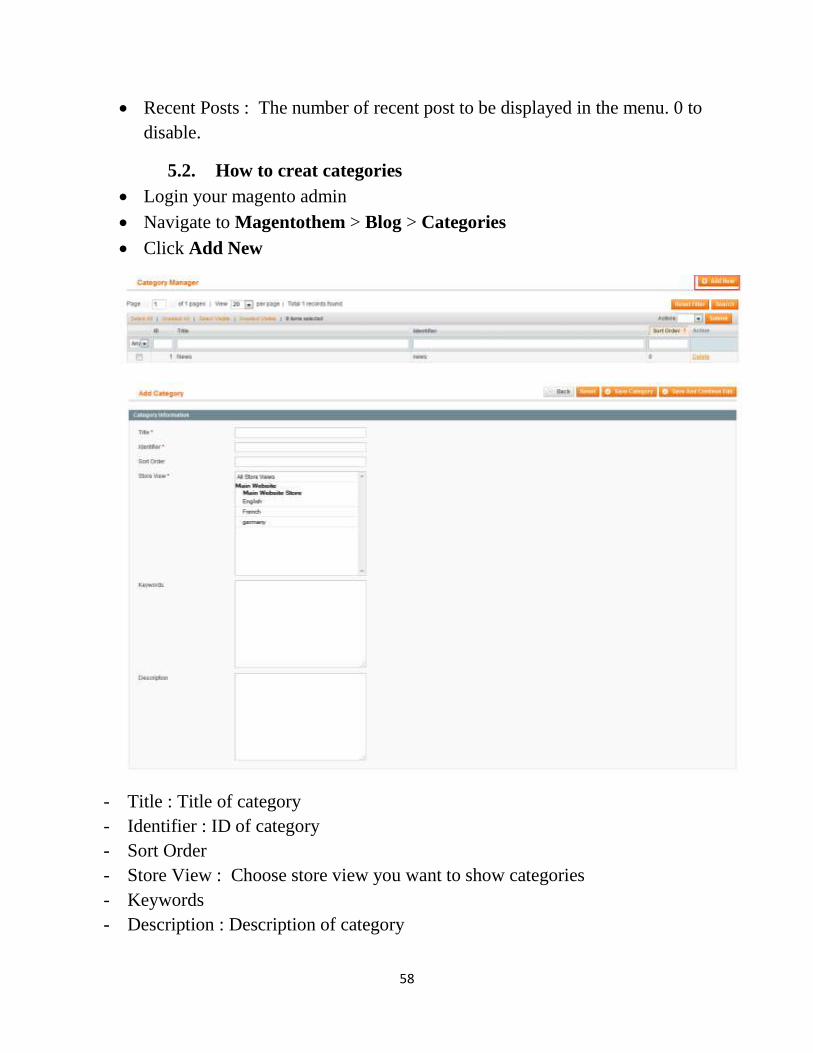
5.2. How to creat categories
Login your magento admin
Navigate to Magentothem > Blog > Categories
Click Add New
- Title : Title of category
- Identifier : ID of category
- Sort Order
- Store View : Choose store view you want to show categories
- Keywords
- Description : Description of category
59
Click Save Category to save your config.
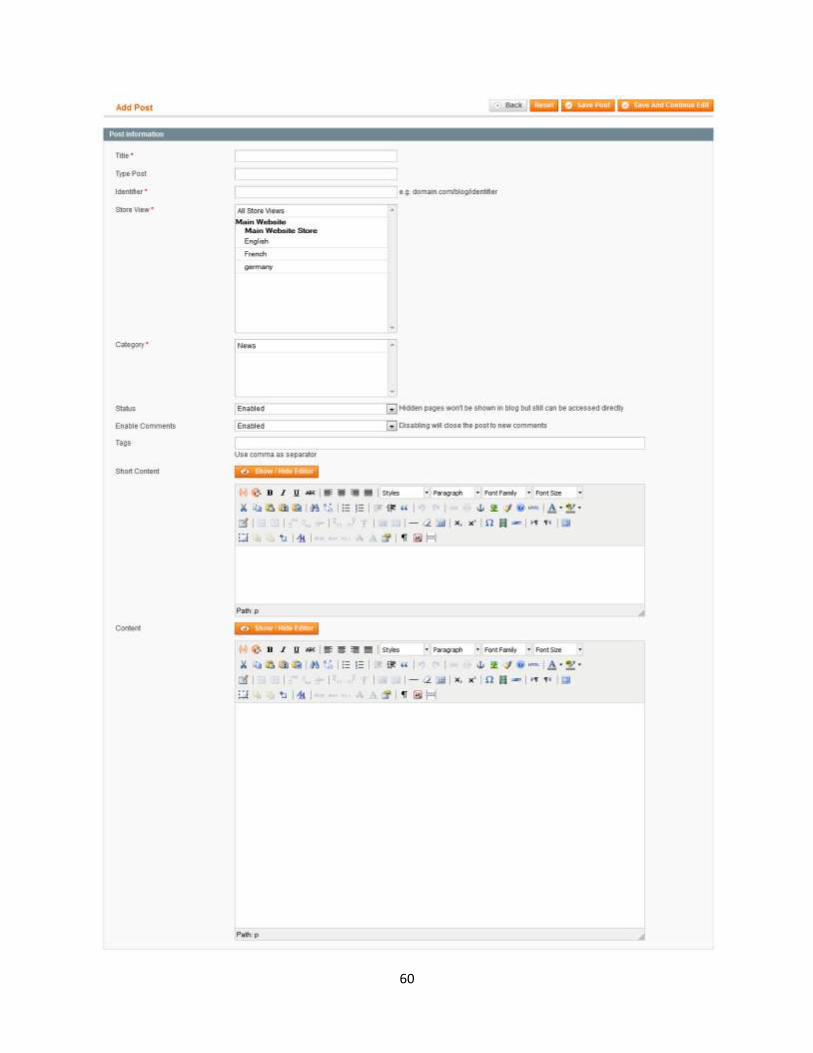
5.3. How to add post
Login your magento admin
Navigate to Magentothem > Blog > Add Post
60
61
- Title : Title of post
- Identifier : Id of post
- Store view : Choose store view for this post
- Category : Choose category for this post. Default category is News
- Status : Hidden pages won't be shown in blog but still can be accessed directly
- Enable Comments : Disabling will close the post to new comments
- Tag : Type tag
- Short Content : Click Show/Hide Editor to type short content
- Content : Click Show/Hide Editor to type content
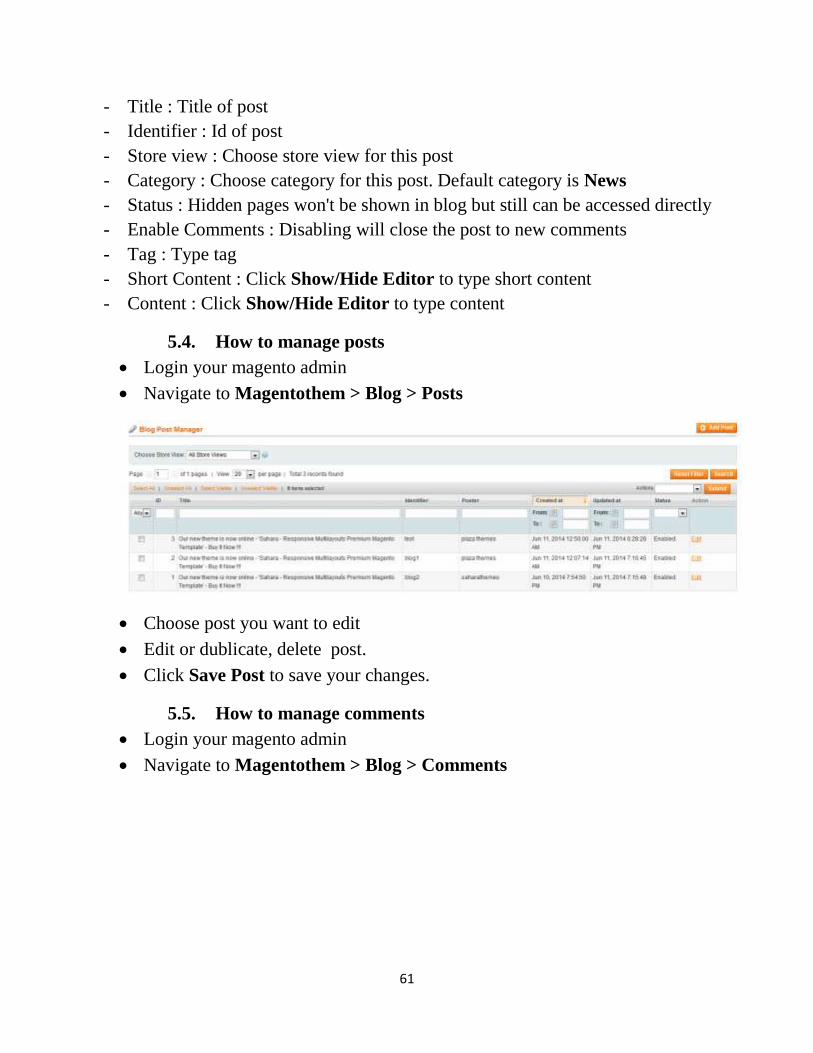
5.4. How to manage posts
Login your magento admin
Navigate to Magentothem > Blog > Posts
Choose post you want to edit
Edit or dublicate, delete post.
Click Save Post to save your changes.
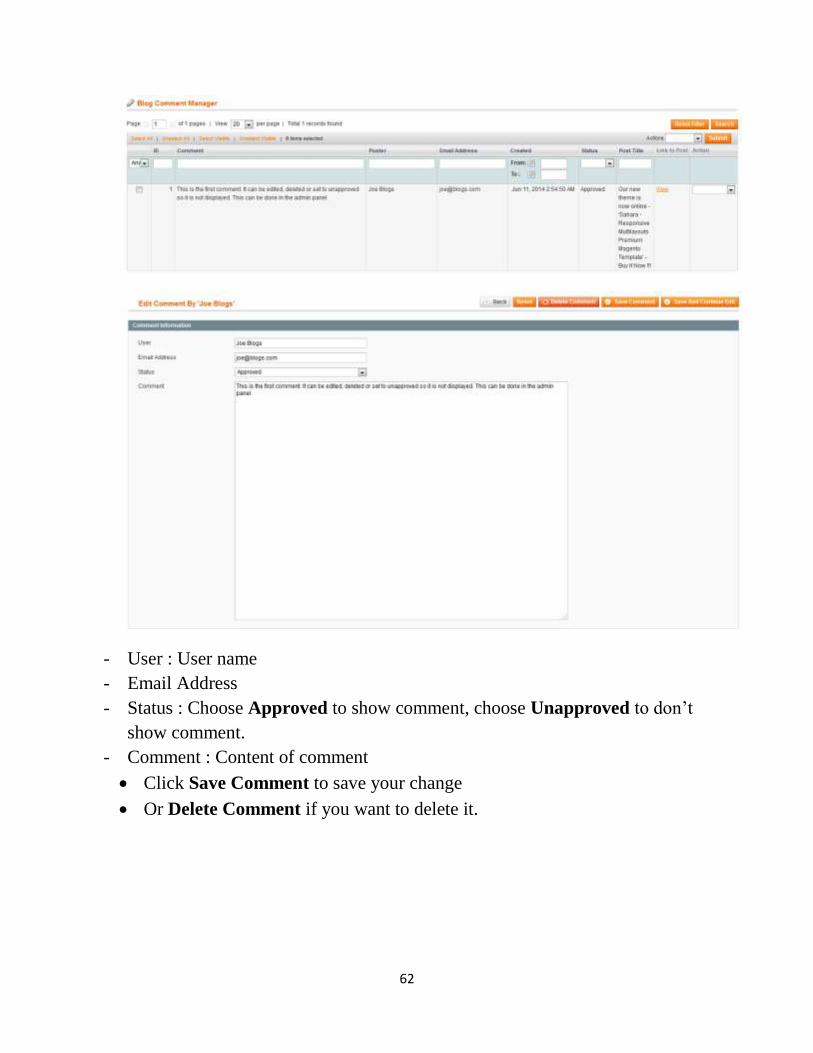
5.5. How to manage comments
Login your magento admin
Navigate to Magentothem > Blog > Comments
62
- User : User name
- Email Address
- Status : Choose Approved to show comment, choose Unapproved to don’t
show comment.
- Comment : Content of comment
Click Save Comment to save your change
Or Delete Comment if you want to delete it.
63
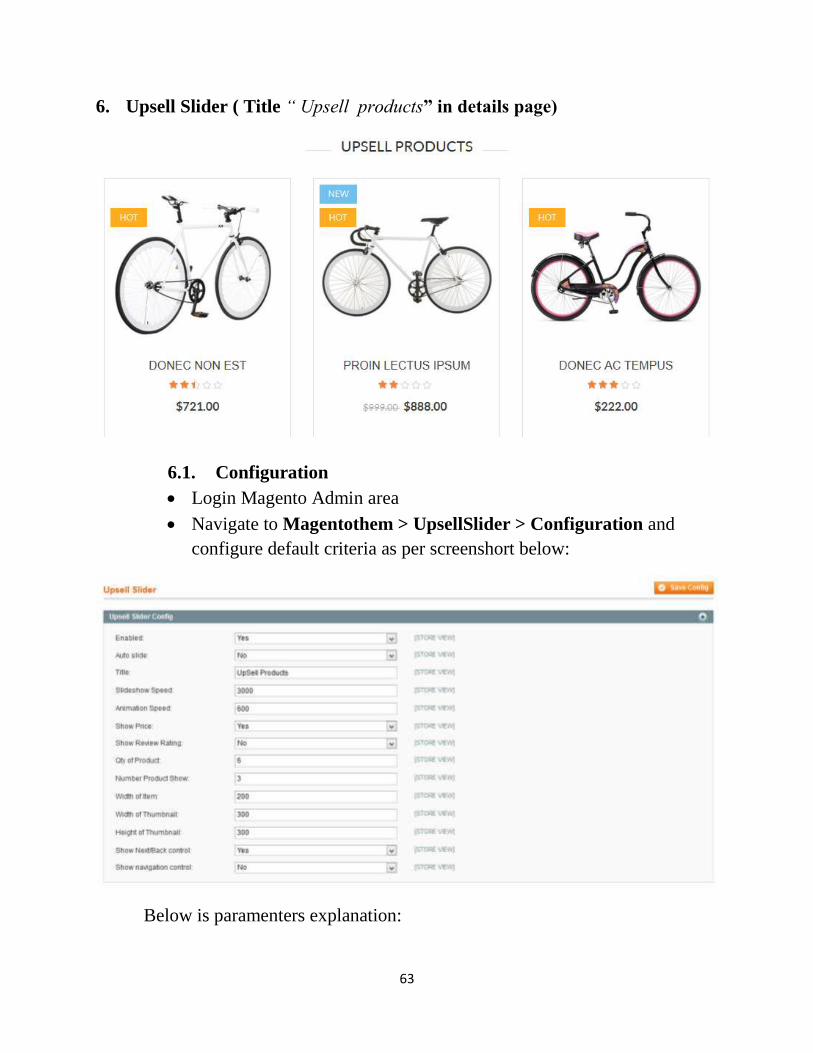
6. Upsell Slider ( Title “ Upsell products” in details page)
6.1. Configuration
Login Magento Admin area
Navigate to Magentothem > UpsellSlider > Configuration and
configure default criteria as per screenshort below:
Below is paramenters explanation:
64
Enabled: Include yes/no module paramenters
Auto slide: Enable auto scroller product
Title : Title of module
Slideshow Speed:Duration(in milliseconds) of slide transition
animation. Defines how fast the current slide is replaced with
the next slide.
Animation Speed: The speed of animations, in milliseconds
Show Price: Defines whether price of product is displayed or not
Show Review Rating: Defines whether the review rating is
displayed or not
Qty of Products: Product quantity will be accepted in this module.
Number Product Show: Number product will be displayed in a
row
Width of Thumbnail:The width of thumbnail image will be
displayed.
Height of Thumbnail: The height of thumbnail image will be
displayed
Show Next/Back control: Defines whether the next/back control is
displayed or not
Show navigation control: Defines whether the navigation control
button is displayed or not
65
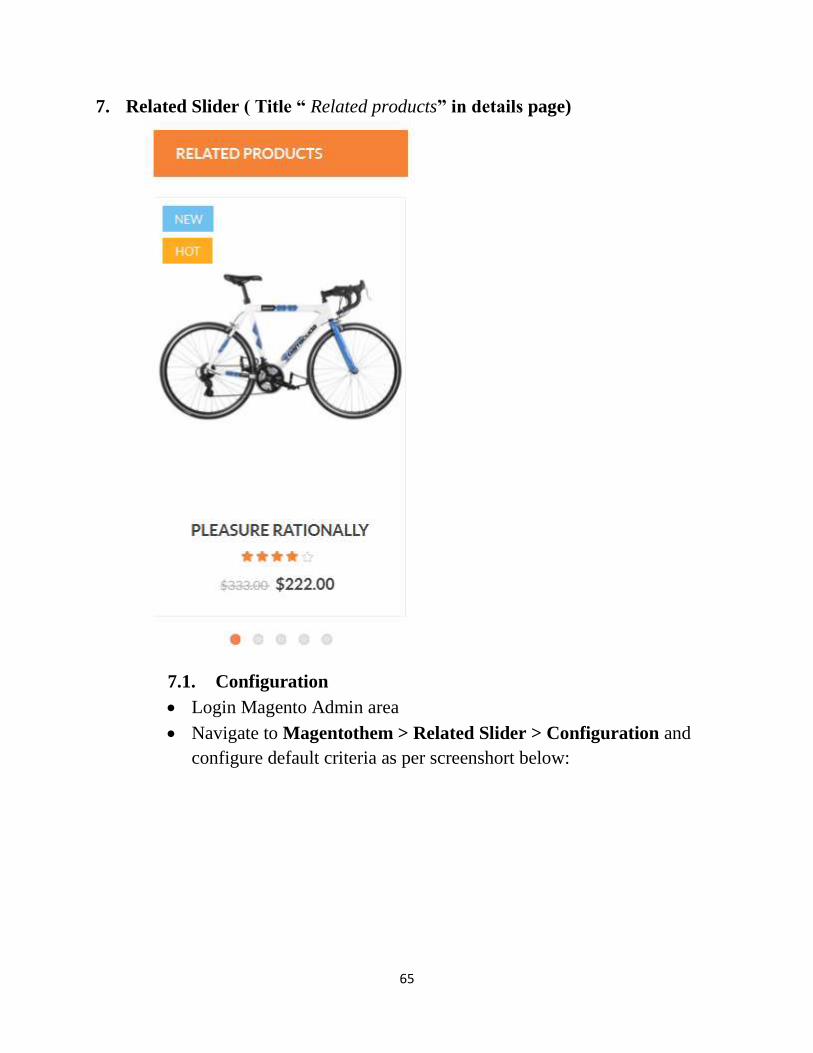
7. Related Slider ( Title “ Related products” in details page)
7.1. Configuration
Login Magento Admin area
Navigate to Magentothem > Related Slider > Configuration and
configure default criteria as per screenshort below:
66
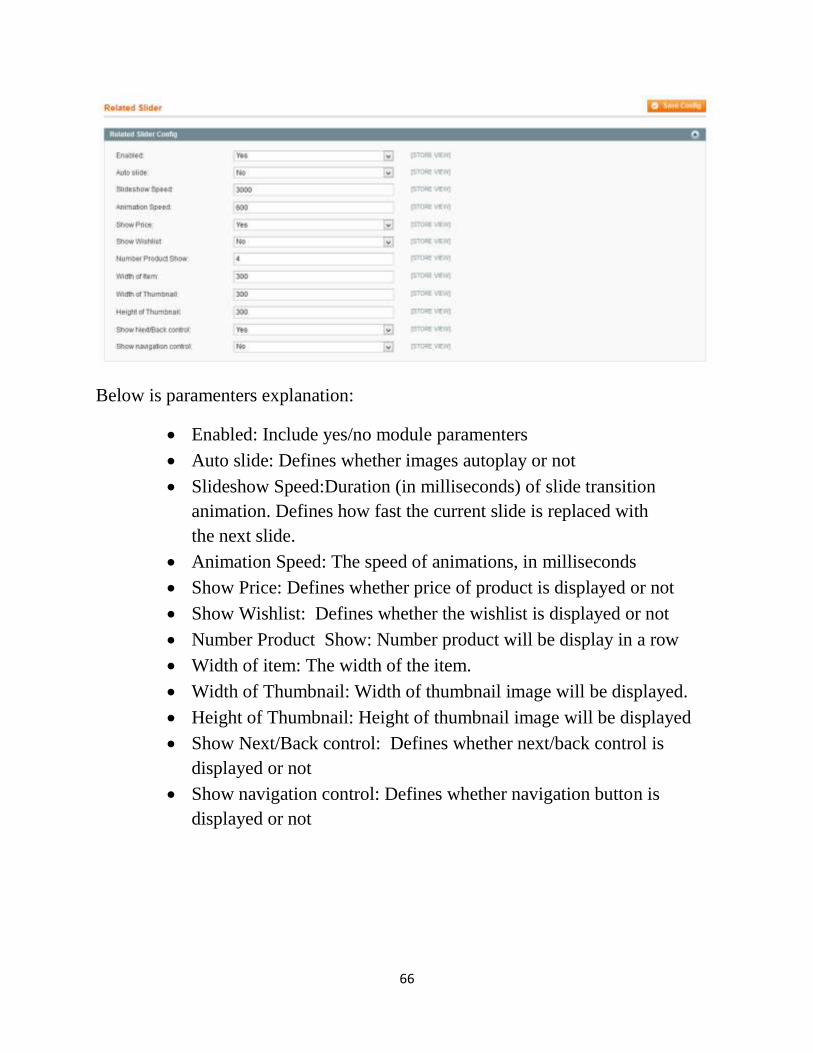
Below is paramenters explanation:
Enabled: Include yes/no module paramenters
Auto slide: Defines whether images autoplay or not
Slideshow Speed:Duration (in milliseconds) of slide transition
animation. Defines how fast the current slide is replaced with
the next slide.
Animation Speed: The speed of animations, in milliseconds
Show Price: Defines whether price of product is displayed or not
Show Wishlist: Defines whether the wishlist is displayed or not
Number Product Show: Number product will be display in a row
Width of item: The width of the item.
Width of Thumbnail: Width of thumbnail image will be displayed.
Height of Thumbnail: Height of thumbnail image will be displayed
Show Next/Back control: Defines whether next/back control is
displayed or not
Show navigation control: Defines whether navigation button is
displayed or not
67
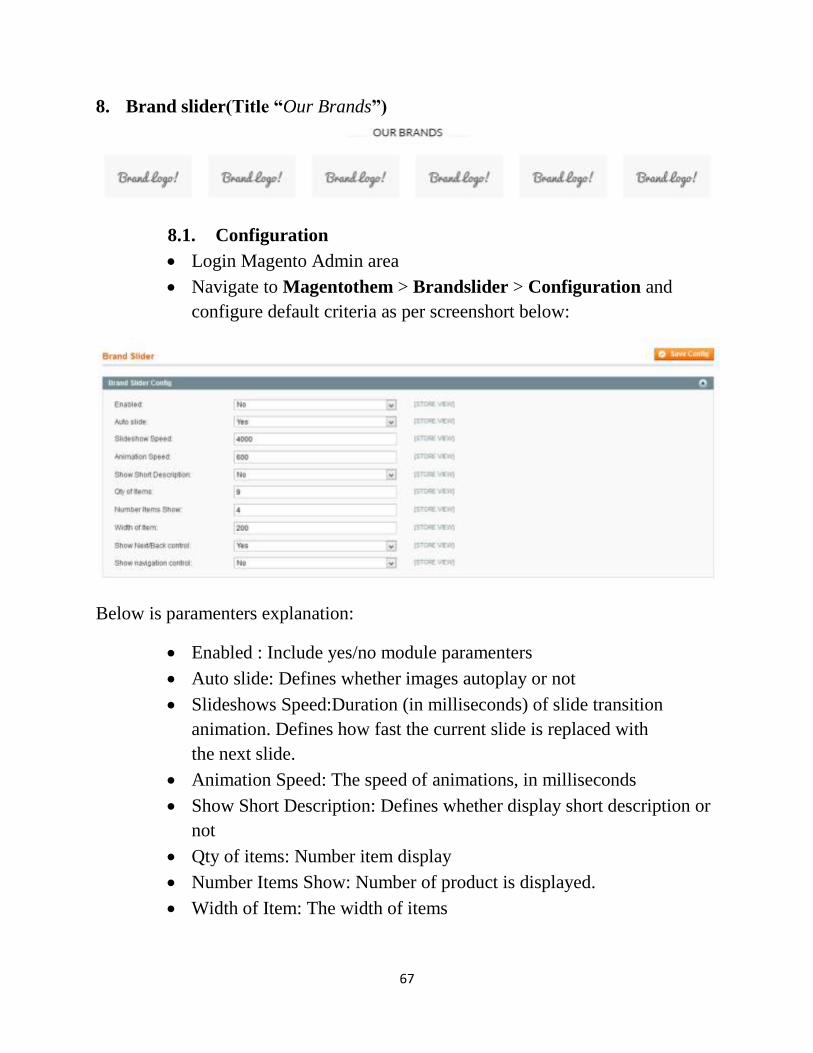
8. Brand slider(Title “Our Brands”)
8.1. Configuration
Login Magento Admin area
Navigate to Magentothem > Brandslider > Configuration and
configure default criteria as per screenshort below:
Below is paramenters explanation:
Enabled : Include yes/no module paramenters
Auto slide: Defines whether images autoplay or not
Slideshows Speed:Duration (in milliseconds) of slide transition
animation. Defines how fast the current slide is replaced with
the next slide.
Animation Speed: The speed of animations, in milliseconds
Show Short Description: Defines whether display short description or
not
Qty of items: Number item display
Number Items Show: Number of product is displayed.
Width of Item: The width of items
68
Show Next/Back control: Defines whether display next/back button or
not
Show navigation control: Defines whether display navigation or not
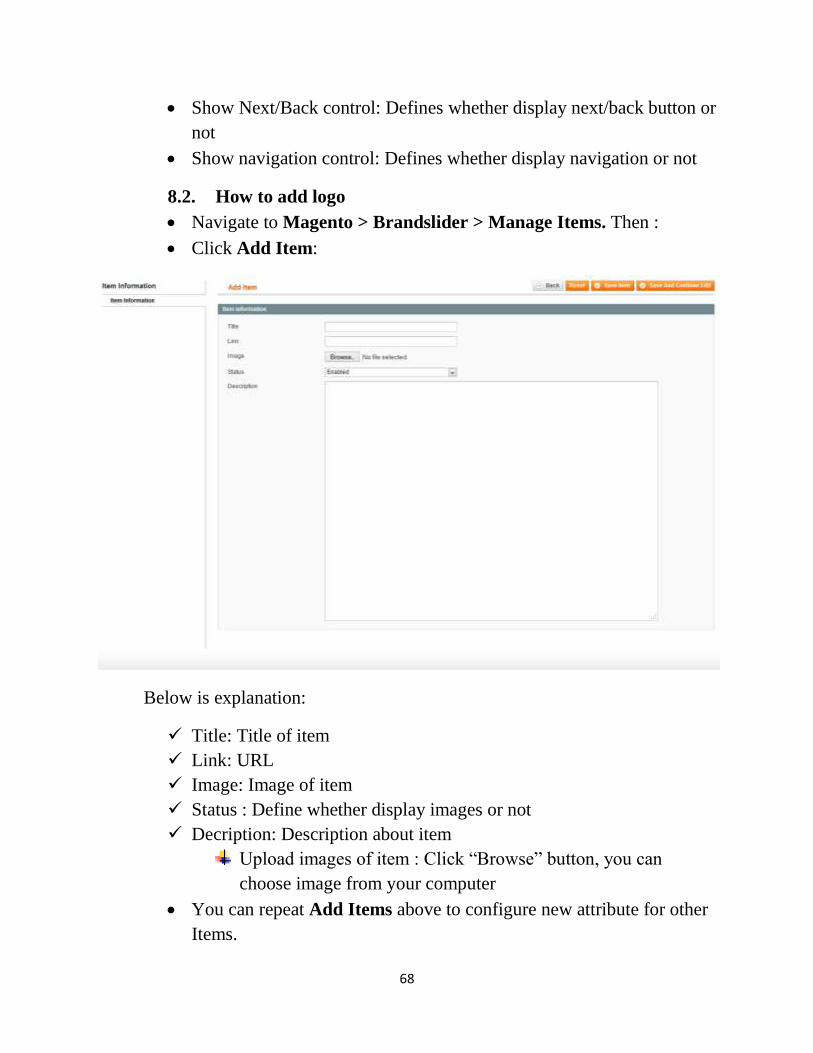
8.2. How to add logo
Navigate to Magento > Brandslider > Manage Items. Then :
Click Add Item:
Below is explanation:
Title: Title of item
Link: URL
Image: Image of item
Status : Define whether display images or not
Decription: Description about item
Upload images of item : Click “Browse” button, you can
choose image from your computer
You can repeat Add Items above to configure new attribute for other
Items.

69
When finished, click Save Item button to save your brand slider.
Log out Magento Admin, then Reindex data
9. Prozoom
9.1. Configuration
Login Magento Admin area
Navigate to Magentothem > Prozoom > Configuration and
configure default criteria as per screenshort below:
70
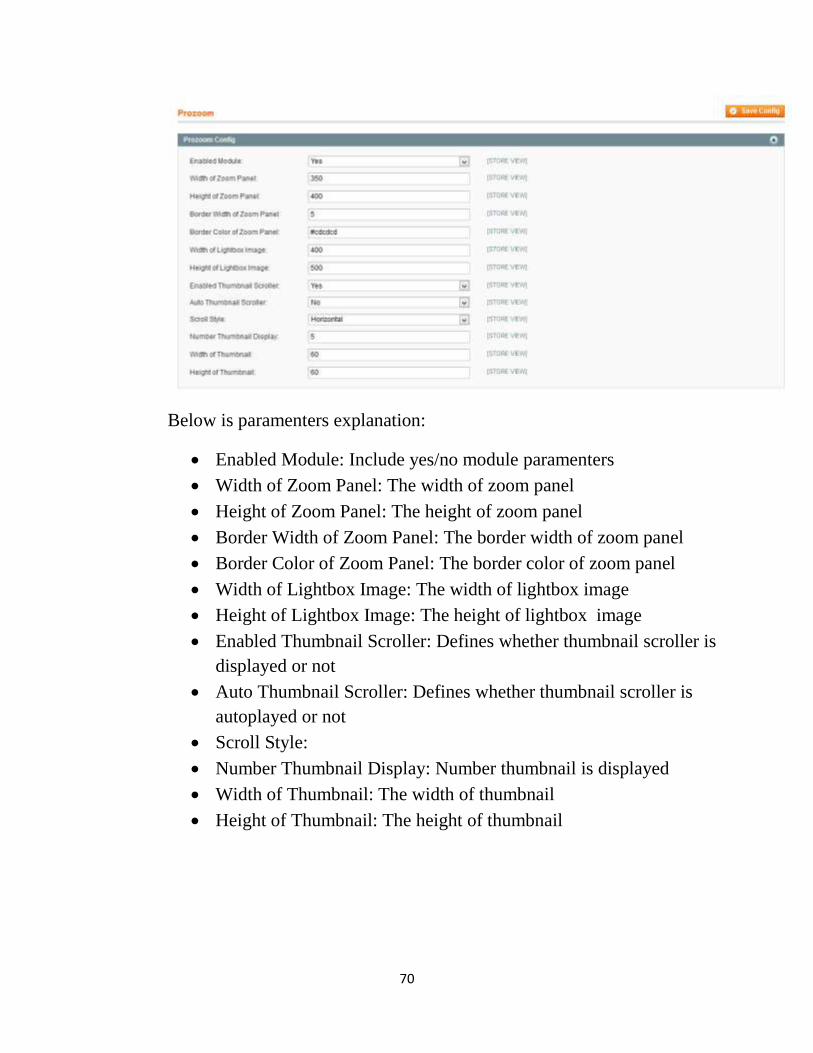
Below is paramenters explanation:
Enabled Module: Include yes/no module paramenters
Width of Zoom Panel: The width of zoom panel
Height of Zoom Panel: The height of zoom panel
Border Width of Zoom Panel: The border width of zoom panel
Border Color of Zoom Panel: The border color of zoom panel
Width of Lightbox Image: The width of lightbox image
Height of Lightbox Image: The height of lightbox image
Enabled Thumbnail Scroller: Defines whether thumbnail scroller is
displayed or not
Auto Thumbnail Scroller: Defines whether thumbnail scroller is
autoplayed or not
Scroll Style:
Number Thumbnail Display: Number thumbnail is displayed
Width of Thumbnail: The width of thumbnail
Height of Thumbnail: The height of thumbnail
71
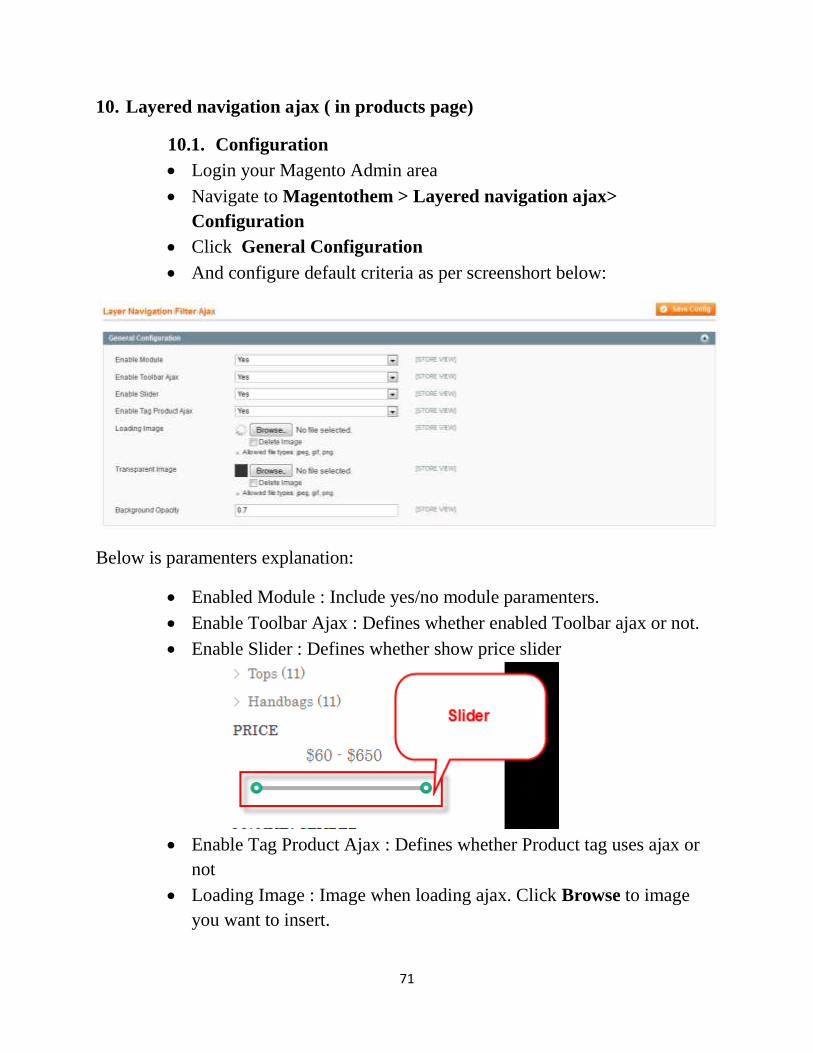
10. Layered navigation ajax ( in products page)
10.1. Configuration
Login your Magento Admin area
Navigate to Magentothem > Layered navigation ajax>
Configuration
Click General Configuration
And configure default criteria as per screenshort below:
Below is paramenters explanation:
Enabled Module : Include yes/no module paramenters.
Enable Toolbar Ajax : Defines whether enabled Toolbar ajax or not.
Enable Slider : Defines whether show price slider
Enable Tag Product Ajax : Defines whether Product tag uses ajax or
not
Loading Image : Image when loading ajax. Click Browse to image
you want to insert.
72
Transparent Image : Background image when loading ajax. Click
Browse to image you want to add.
Background Opacity : Opacity of background image.
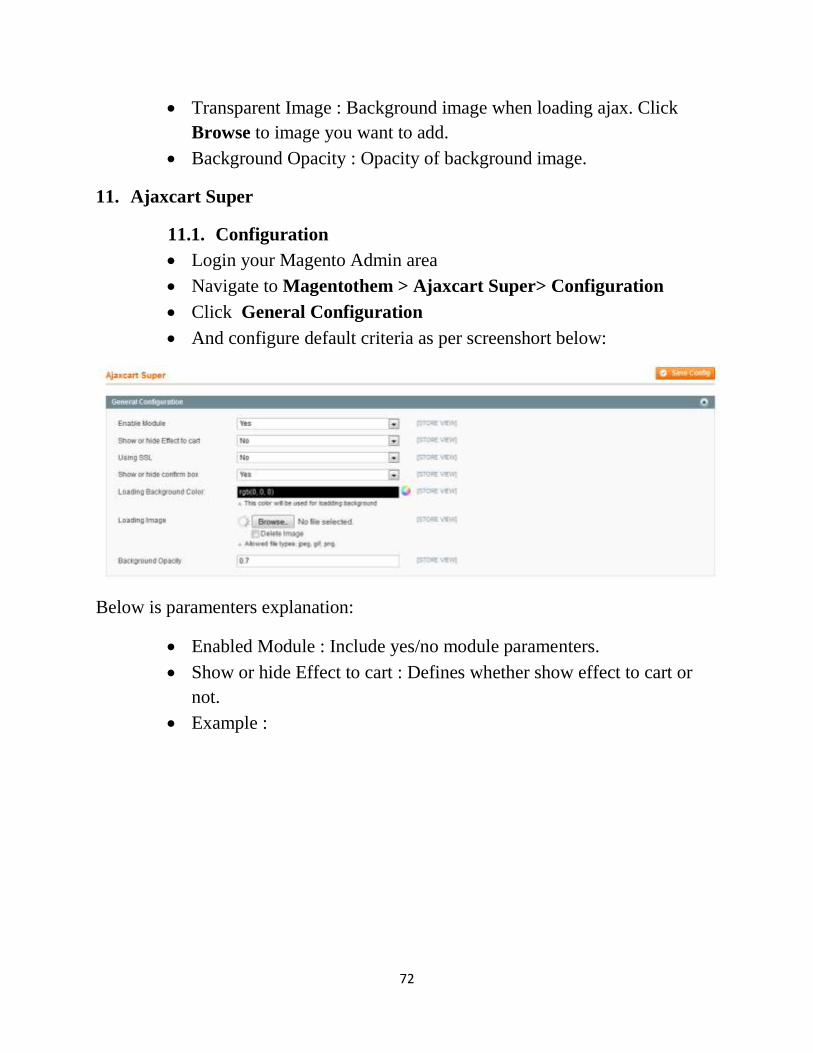
11. Ajaxcart Super
11.1. Configuration
Login your Magento Admin area
Navigate to Magentothem > Ajaxcart Super> Configuration
Click General Configuration
And configure default criteria as per screenshort below:
Below is paramenters explanation:
Enabled Module : Include yes/no module paramenters.
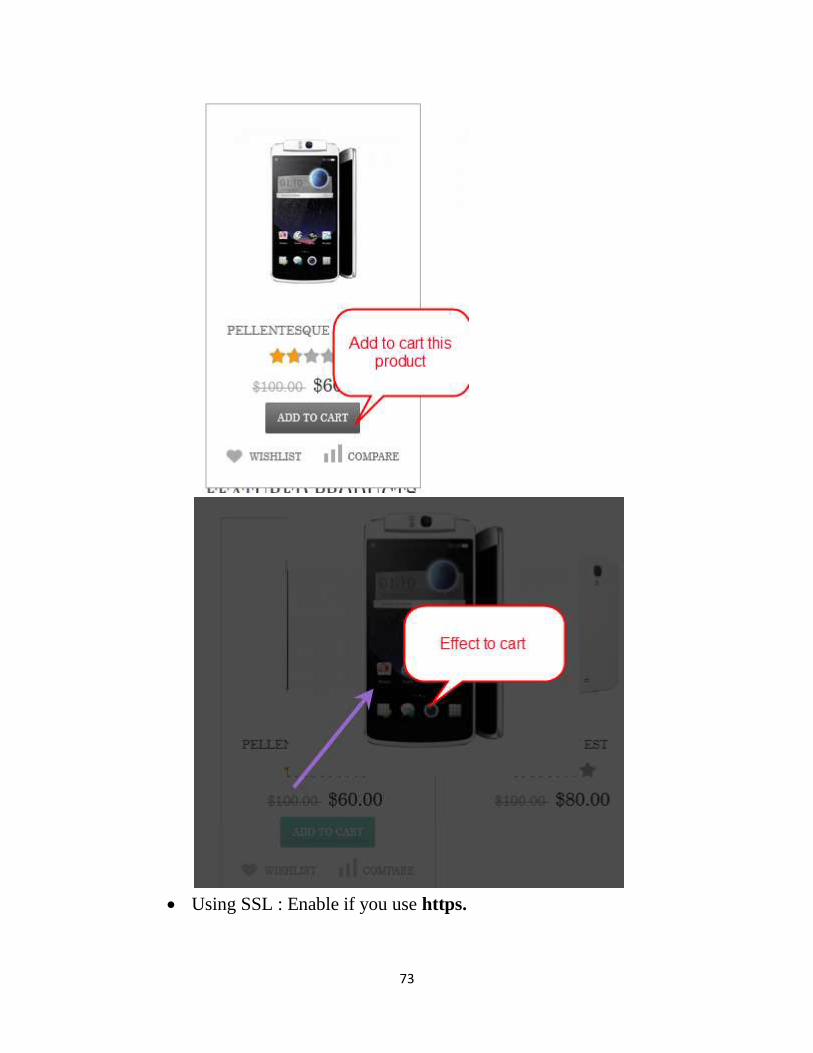
Show or hide Effect to cart : Defines whether show effect to cart or
not.
Example :
73
Using SSL : Enable if you use https.
74
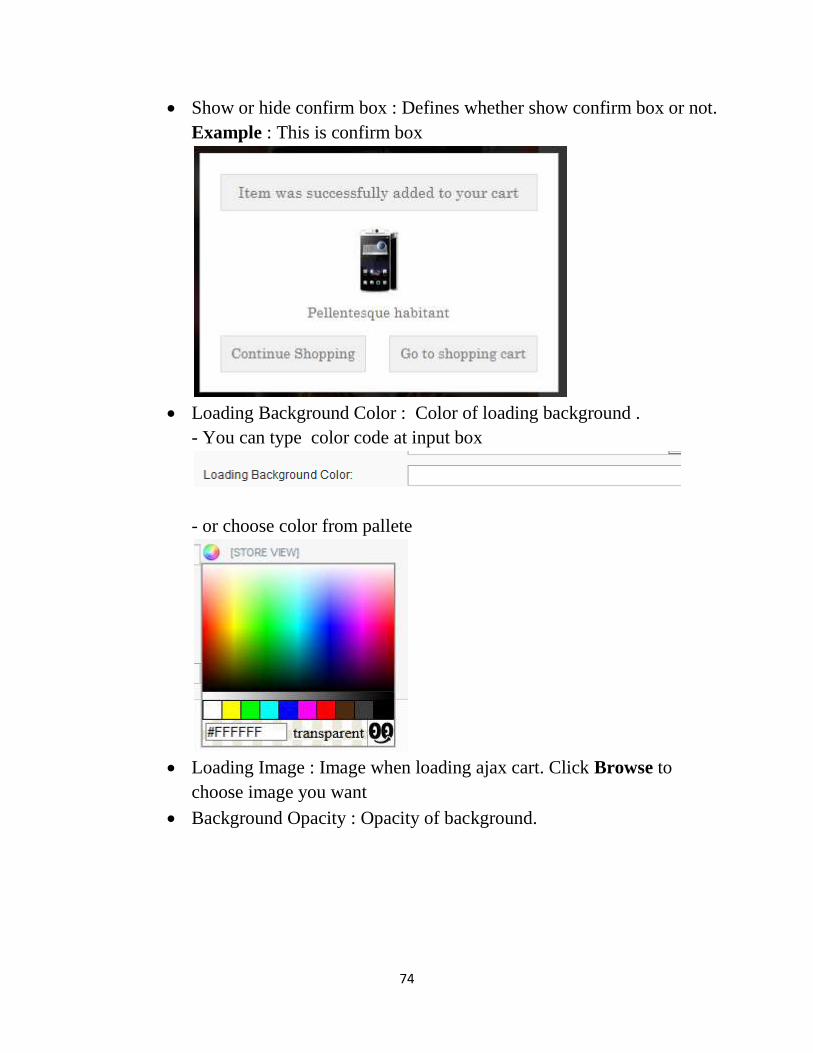
Show or hide confirm box : Defines whether show confirm box or not.
Example : This is confirm box
Loading Background Color : Color of loading background .
- You can type color code at input box
- or choose color from pallete
Loading Image : Image when loading ajax cart. Click Browse to
choose image you want
Background Opacity : Opacity of background.

75
12. Theme options
12.1. Configuration
Login your Magento Admin area
Navigate to Magentothem > Theme Options> Configuration
Click Theme Options Config
New label : Defines whether show label New or not
Sale label : Defines whether show label Sale or not
Click Save Config when you finish config.