Embed Size (px)
Citation preview
November 2013
SAGES Mobile Data Collection Administration Guide
Prepared by Johns Hopkins University Applied Physics Laboratory for the Armed Forces Health Surveillance Center, Division of GEIS Operations
SAGES Mobile Data Collection Administration Guide
i
Table of Contents
Introduction .................................................................................................................................... 2
SAGES mCollect System Administration Tasks ............................................................................... 4
How to Configure SAGES mCollect on the Sender Phone ........................................................... 4
How to Hide Menu Options from the SAGES mCollect User Interface ....................................... 8
How to Configure Security Encryption ...................................................................................... 12
SAGES mReceive System Administration Tasks ............................................................................ 16
How to Enable Automatic CSV Output ...................................................................................... 16
How to Adjust SMS Parsing Acknowledgements ...................................................................... 20
How to Setup Security Encryption ............................................................................................ 23
SAGES Mobile Data Collection Administration Guide
2
Introduction
Rapid data acquisition is arguably the most challenging aspect of establishing a successful electronic disease surveillance system. In the SAGES system, data can be collected from multiple sources (such as paper-based patient records and clinic logbooks). The process of turning the paper-based records into electronic data depends on the available technology infrastructure:
If Internet access is available, then a laptop, desktop, or other web accessible device can connect to the OpenESSENCE web application to enter data directly into the OpenESSENCE database, using the data entry forms available in the application.
If cellular coverage is available, then data can be entered by using simple cell phones to submit manually entered formatted/delimited SMS (Short Message Service) messages, or by using Android devices with data entry forms to submit auto-generated formatted/delimited SMS messages. The SMS messages are received at a central location by an Android smartphone running SAGES mReceive, which is connected to a computer hosting the OpenESSENCE database. The SMS messages are automatically pulled from the receiving phone and written into the database.
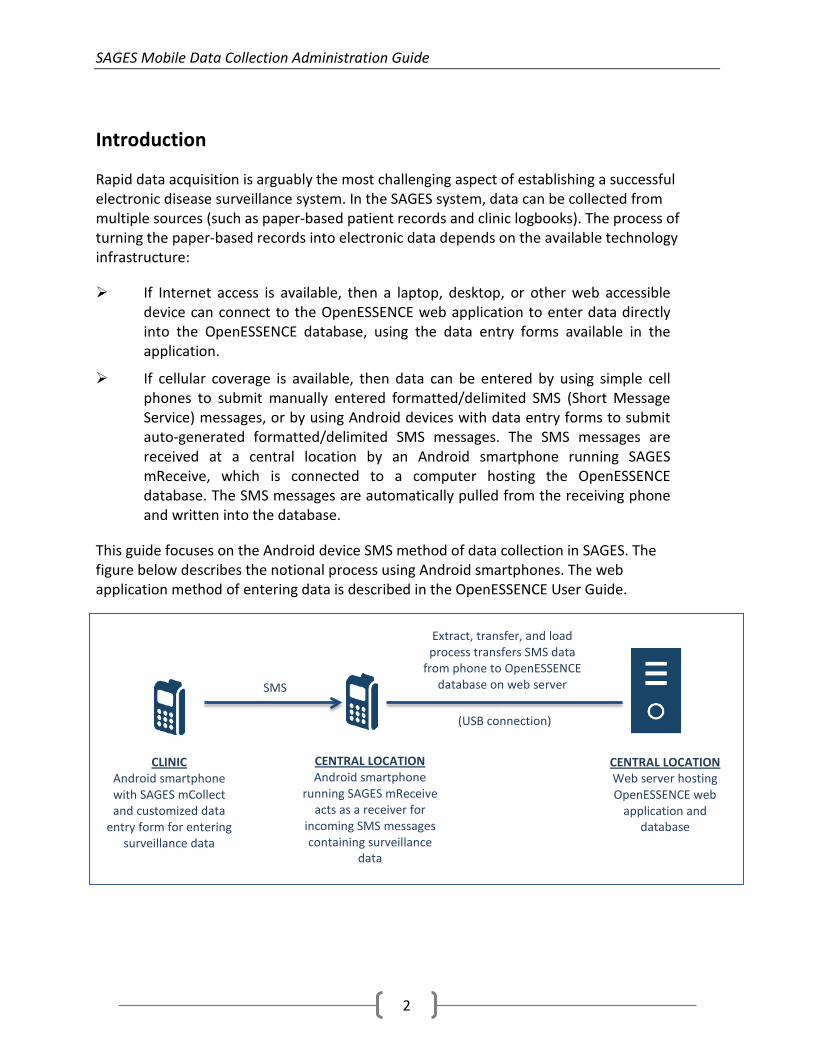
This guide focuses on the Android device SMS method of data collection in SAGES. The figure below describes the notional process using Android smartphones. The web application method of entering data is described in the OpenESSENCE User Guide.
SMS
CLINIC Android smartphone with SAGES mCollect and customized data
entry form for entering surveillance data
CENTRAL LOCATION Android smartphone
running SAGES mReceive acts as a receiver for
incoming SMS messages containing surveillance
data
CENTRAL LOCATION Web server hosting OpenESSENCE web
application and database
(USB connection)
Extract, transfer, and load process transfers SMS data
from phone to OpenESSENCE database on web server
SAGES Mobile Data Collection Administration Guide
3
The process depends on defining a data entry form (called an XForm, based on XML format) using an open source tool called ODK1 Build. The form is then loaded into an Android phone-based application called SAGES mCollect, a JHU/APL tool which is a modified version of the popular open source ODK Collect Android phone application. SAGES mCollect, in conjunction with the data entry form, enables the collection of data using a form-based interface on the Android smartphone, and the submission of that data over the SMS protocol. That data is received by an Android device running the SAGES mReceive application.
The forms used in this guide are intended to show the general look and feel of the forms. Since the forms you will be using will be customized to reflect the data you are interested in collecting, your forms will likely appear different than the ones used in this guide.
The process of creating a data entry form using ODK Build is outside the scope of this document. For the purposes of this document, it is assumed that:
1. SAGES mCollect is pre-installed on the sending phone (CLINIC phone, from the diagram above).
2. The data entry form is pre-loaded on the sending phone. 3. SAGES mReceive is pre-loaded on the receiving phone.
The SAGES mCollect and mReceive applications have been tested on Android version 2.3 and higher.
The images in this guide are based on Android version 4.1.2.
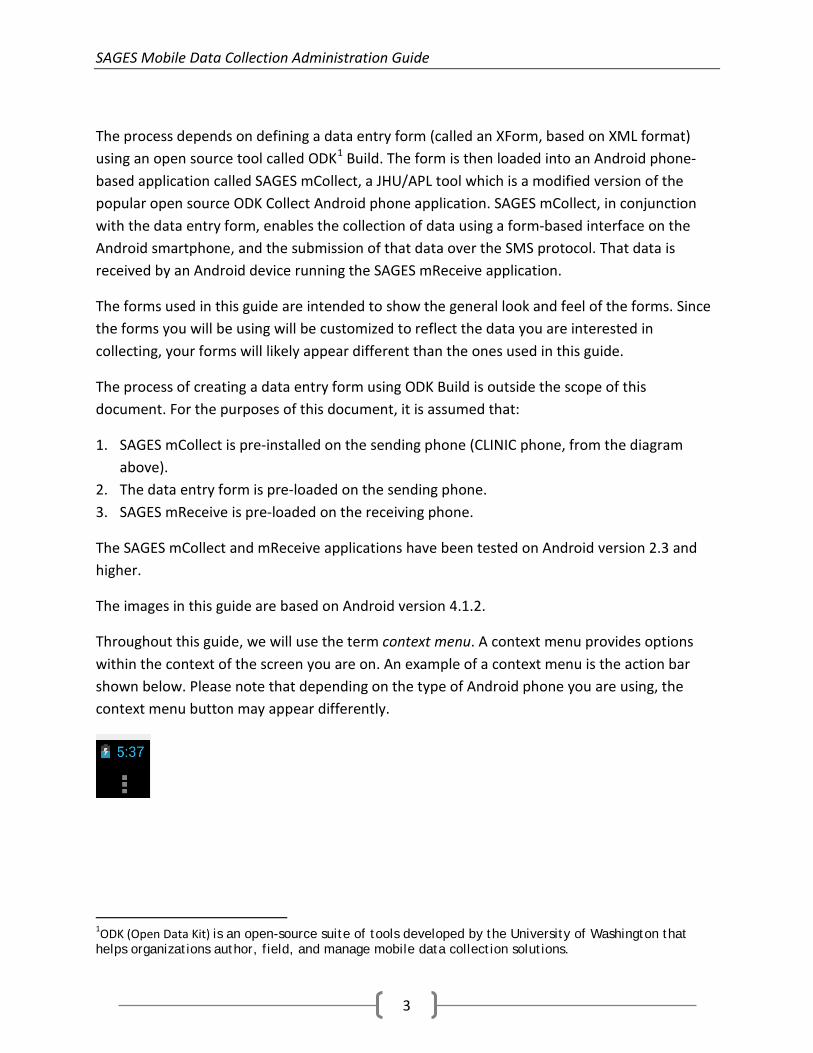
Throughout this guide, we will use the term context menu. A context menu provides options within the context of the screen you are on. An example of a context menu is the action bar shown below. Please note that depending on the type of Android phone you are using, the context menu button may appear differently.
1ODK (Open Data Kit) is an open-source suite of tools developed by the University of Washington that helps organizations author, field, and manage mobile data collection solutions.
SAGES Mobile Data Collection Administration Guide
4
SAGES mCollect System Administration Tasks
How to Configure SAGES mCollect on the Sender Phone
The following steps will enable the system administrator to configure SAGES mCollect to be able to send form data via SMS messages to the designated receiving device. The designated receiving device should be configured with SAGES mReceive. SAGES mCollect is a modified version of the ODK Collect Android app; it is modified to send SMS data with a particular format that SAGES mReceive is able to process.
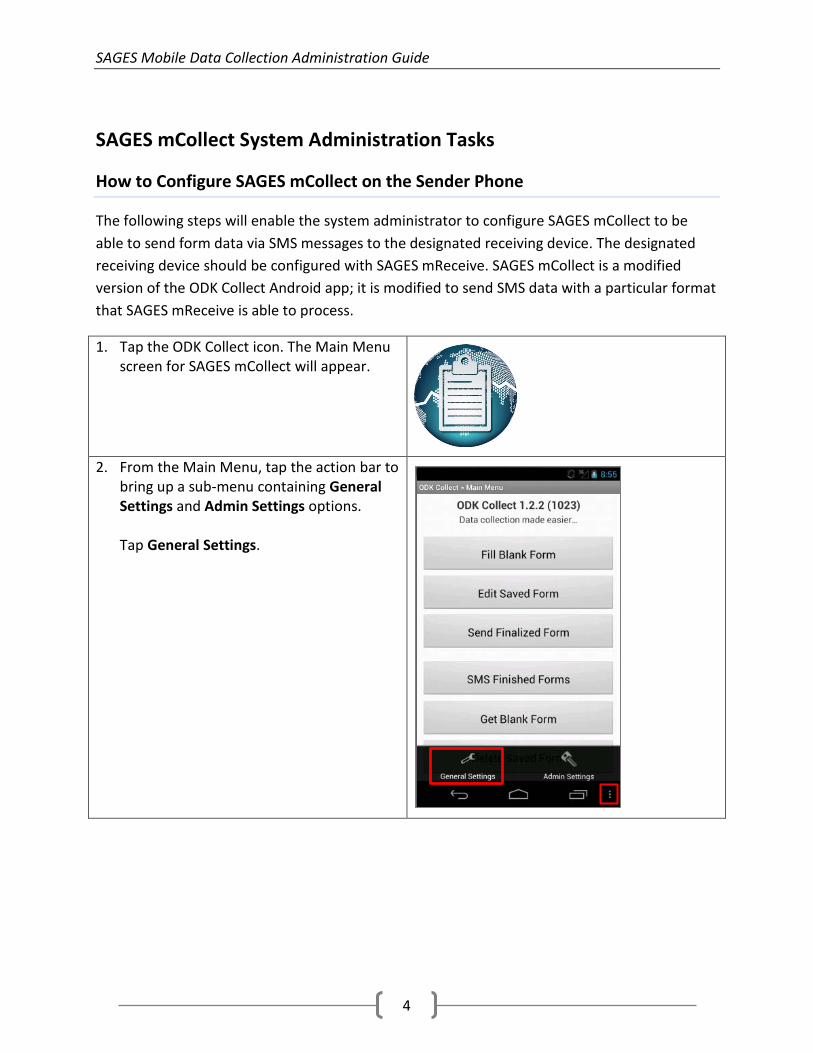
1. Tap the ODK Collect icon. The Main Menu screen for SAGES mCollect will appear.
2. From the Main Menu, tap the action bar to
bring up a sub-menu containing General Settings and Admin Settings options. Tap General Settings.
SAGES Mobile Data Collection Administration Guide
5
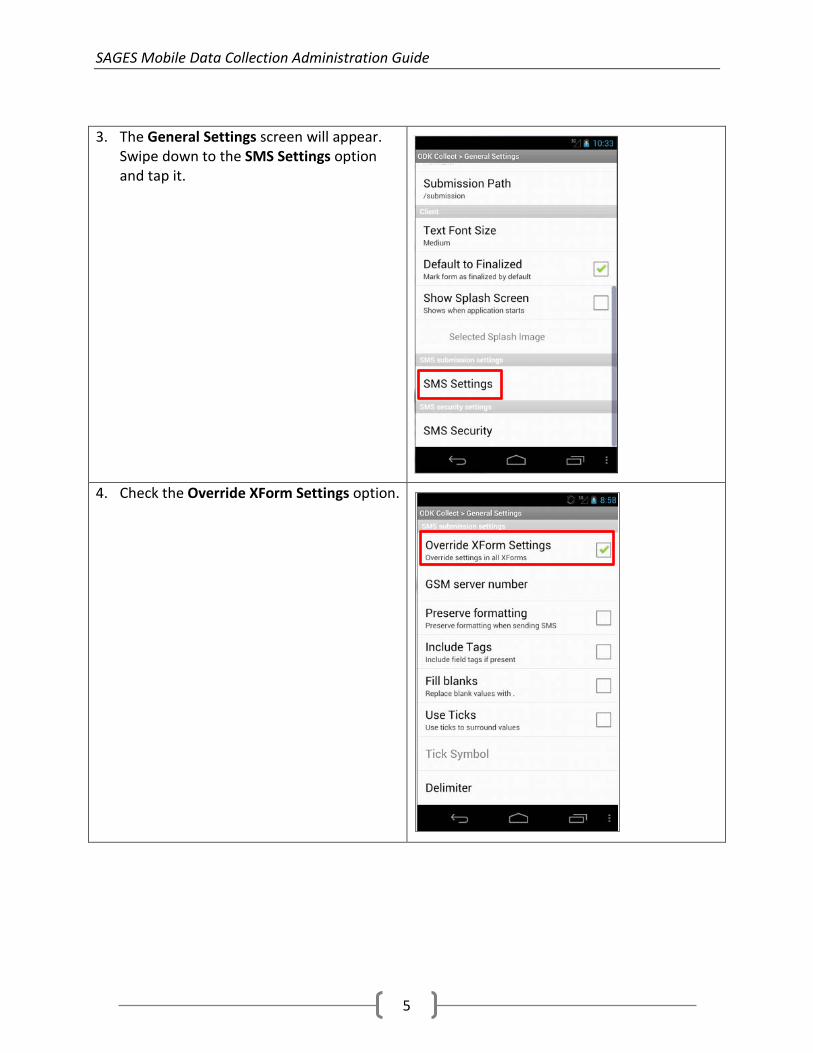
3. The General Settings screen will appear. Swipe down to the SMS Settings option and tap it.
4. Check the Override XForm Settings option.
SAGES Mobile Data Collection Administration Guide
6
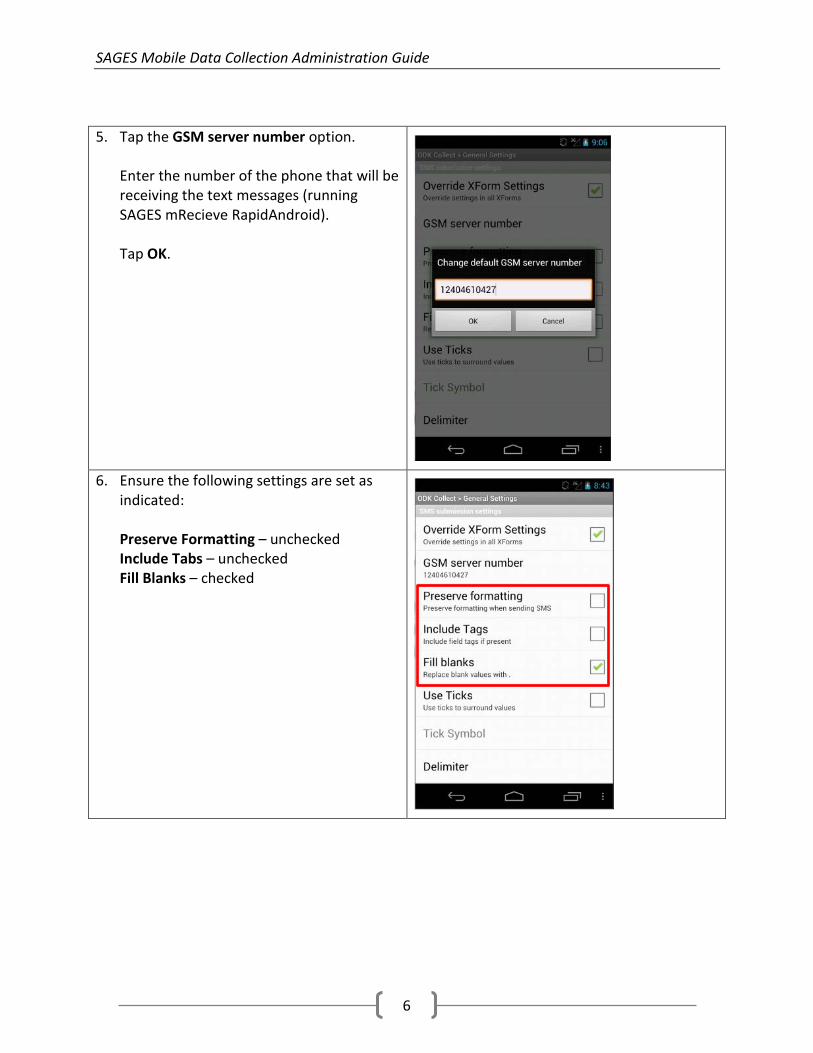
5. Tap the GSM server number option.
Enter the number of the phone that will be receiving the text messages (running SAGES mRecieve RapidAndroid). Tap OK.
6. Ensure the following settings are set as
indicated: Preserve Formatting – unchecked Include Tabs – unchecked Fill Blanks – checked
SAGES Mobile Data Collection Administration Guide
7
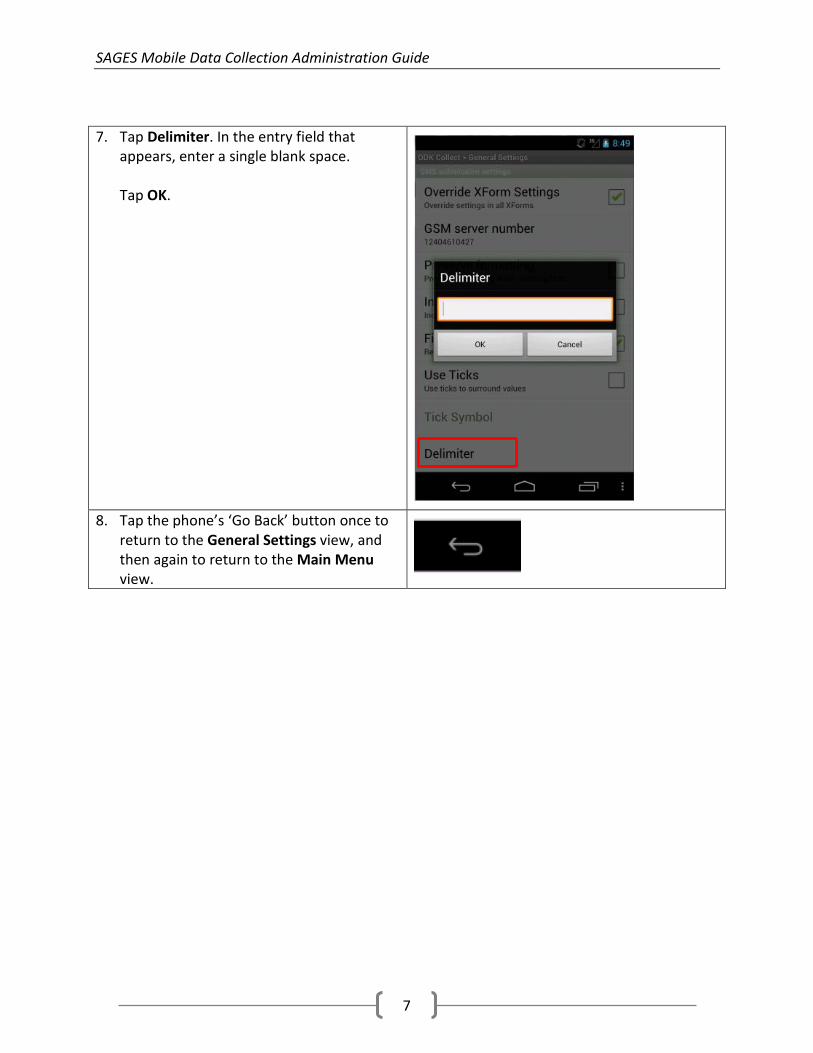
7. Tap Delimiter. In the entry field that appears, enter a single blank space. Tap OK.
8. Tap the phone’s ‘Go Back’ button once to
return to the General Settings view, and then again to return to the Main Menu view.
SAGES Mobile Data Collection Administration Guide
8
How to Hide Menu Options from the SAGES mCollect User Interface
The following steps enable the system administrator to hide unauthorized menu options from the SAGES mCollect user interface, which will help prevent accidental misuse of the system.
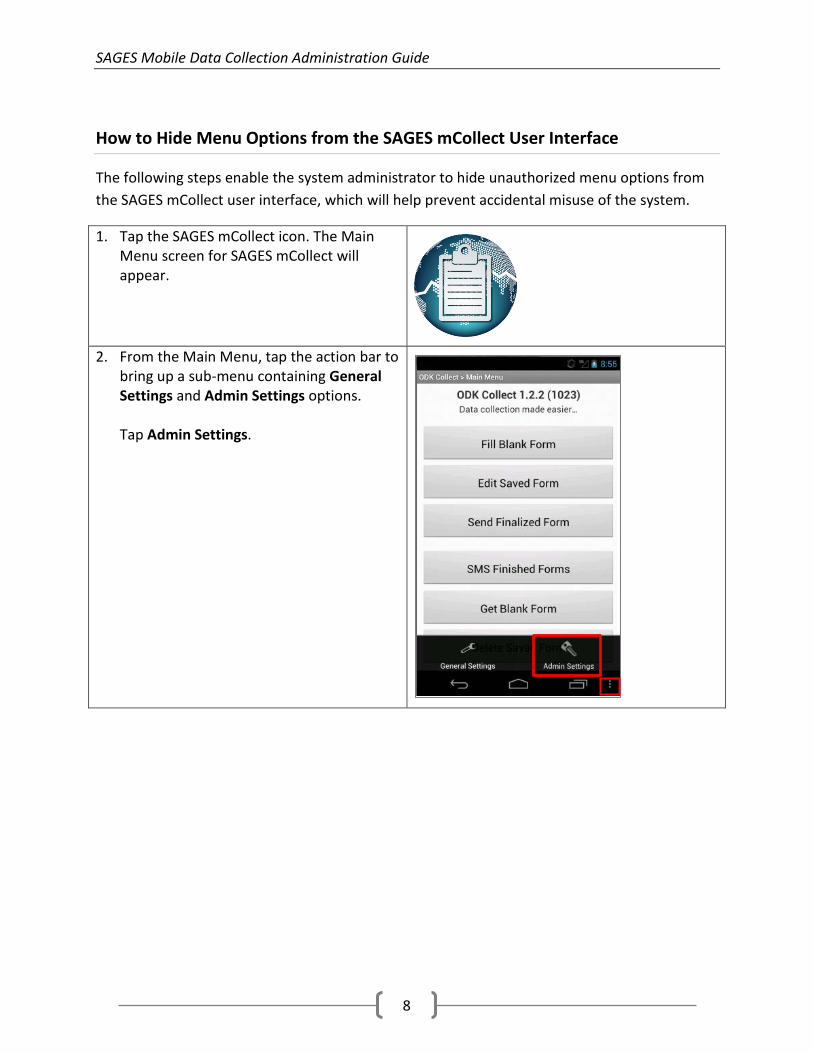
1. Tap the SAGES mCollect icon. The Main Menu screen for SAGES mCollect will appear.
2. From the Main Menu, tap the action bar to
bring up a sub-menu containing General Settings and Admin Settings options. Tap Admin Settings.
SAGES Mobile Data Collection Administration Guide
9
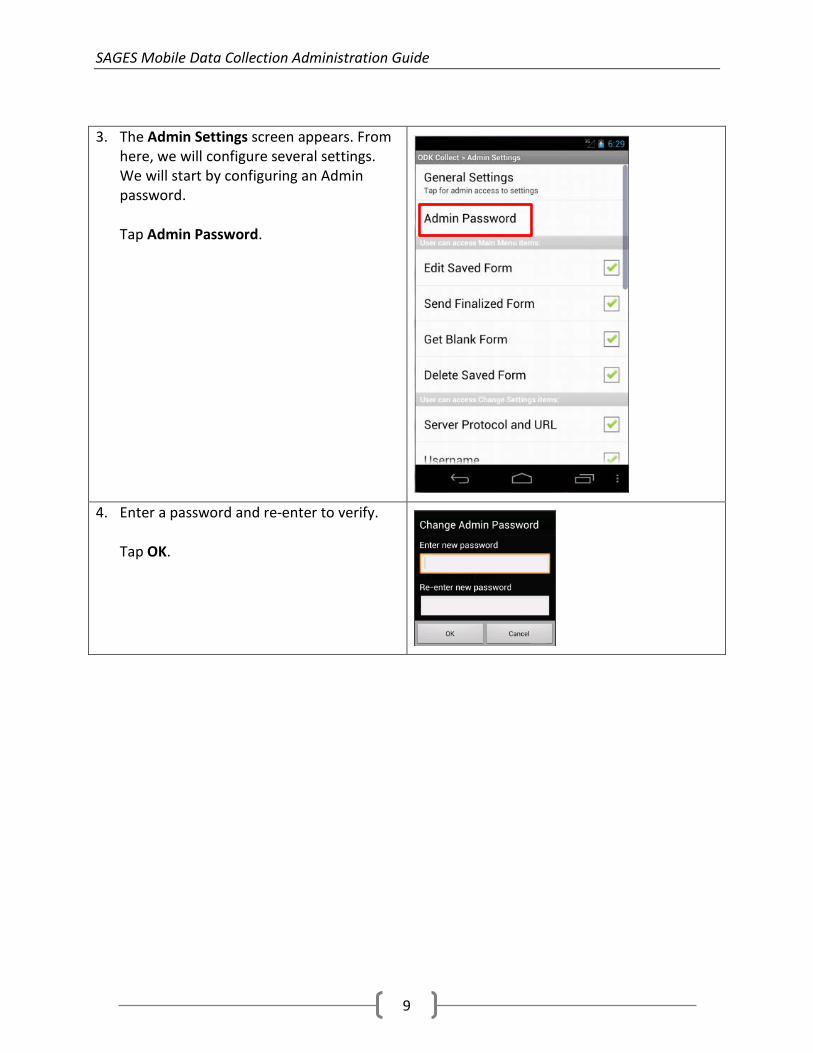
3. The Admin Settings screen appears. From here, we will configure several settings. We will start by configuring an Admin password. Tap Admin Password.
4. Enter a password and re-enter to verify.
Tap OK.
SAGES Mobile Data Collection Administration Guide
10
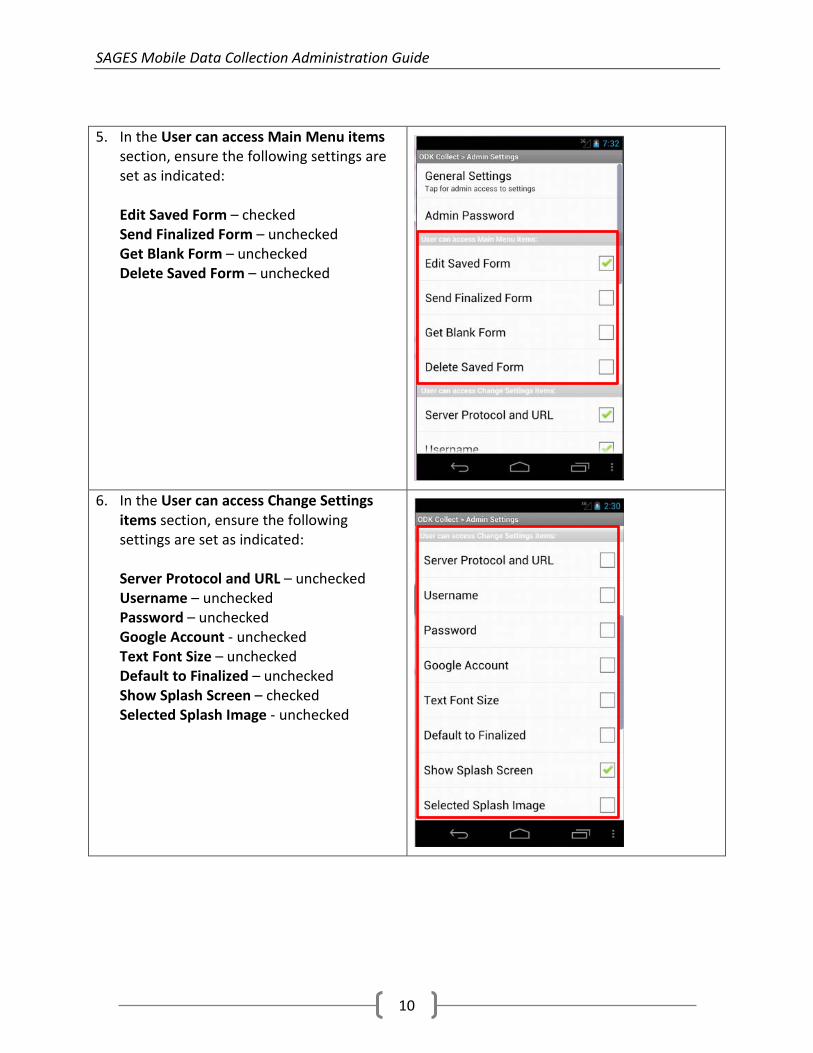
5. In the User can access Main Menu items section, ensure the following settings are set as indicated:
Edit Saved Form – checked Send Finalized Form – unchecked Get Blank Form – unchecked Delete Saved Form – unchecked
6. In the User can access Change Settings
items section, ensure the following settings are set as indicated:
Server Protocol and URL – unchecked Username – unchecked Password – unchecked Google Account - unchecked Text Font Size – unchecked Default to Finalized – unchecked Show Splash Screen – checked Selected Splash Image - unchecked
SAGES Mobile Data Collection Administration Guide
11
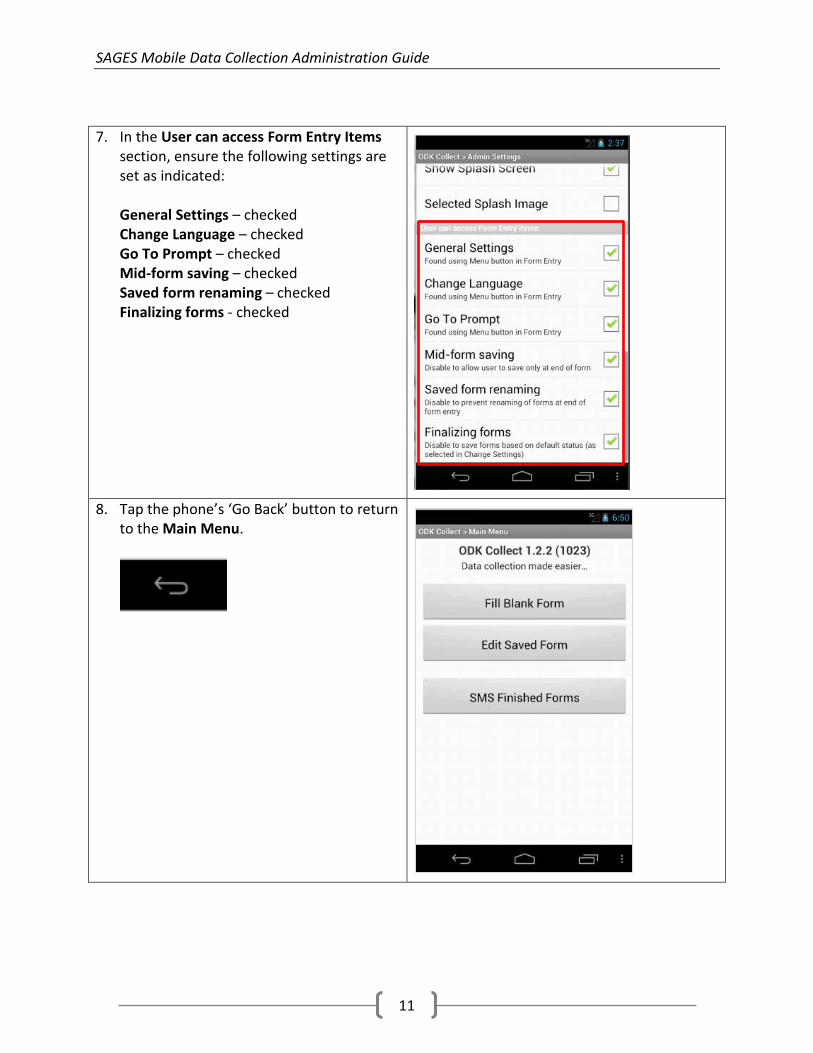
7. In the User can access Form Entry Items section, ensure the following settings are set as indicated:
General Settings – checked Change Language – checked Go To Prompt – checked Mid-form saving – checked Saved form renaming – checked Finalizing forms - checked
8. Tap the phone’s ‘Go Back’ button to return
to the Main Menu.
SAGES Mobile Data Collection Administration Guide
12
How to Configure Security Encryption
The following steps describe how a system administrator can configure a 128 bit AES encryption key on a sending phone for secure SMS transmission to the designated receiving phone. The receiving phone must be configured with the same 128 bit AES encryption key in order for decryption to occur successfully. The use of encryption on SAGES mCollect is currently a global setting for all transmissions from within SAGES mCollect – it is either always on or always off.
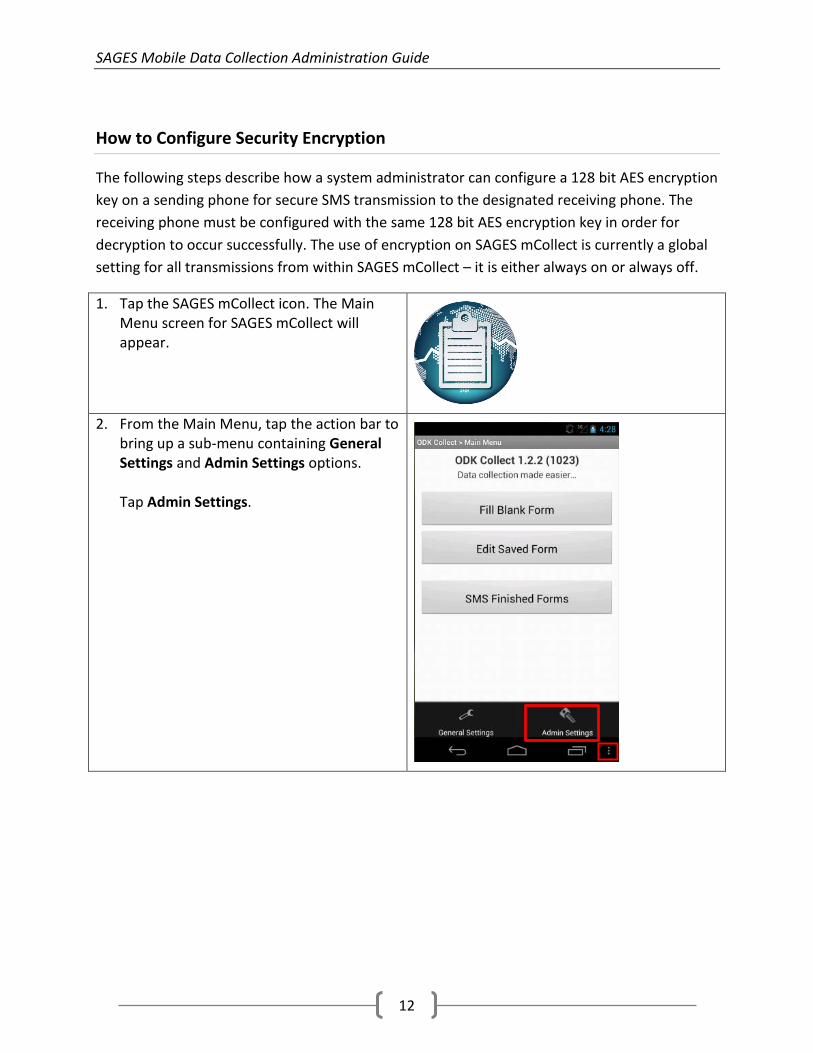
1. Tap the SAGES mCollect icon. The Main Menu screen for SAGES mCollect will appear.
2. From the Main Menu, tap the action bar to
bring up a sub-menu containing General Settings and Admin Settings options. Tap Admin Settings.
SAGES Mobile Data Collection Administration Guide
13
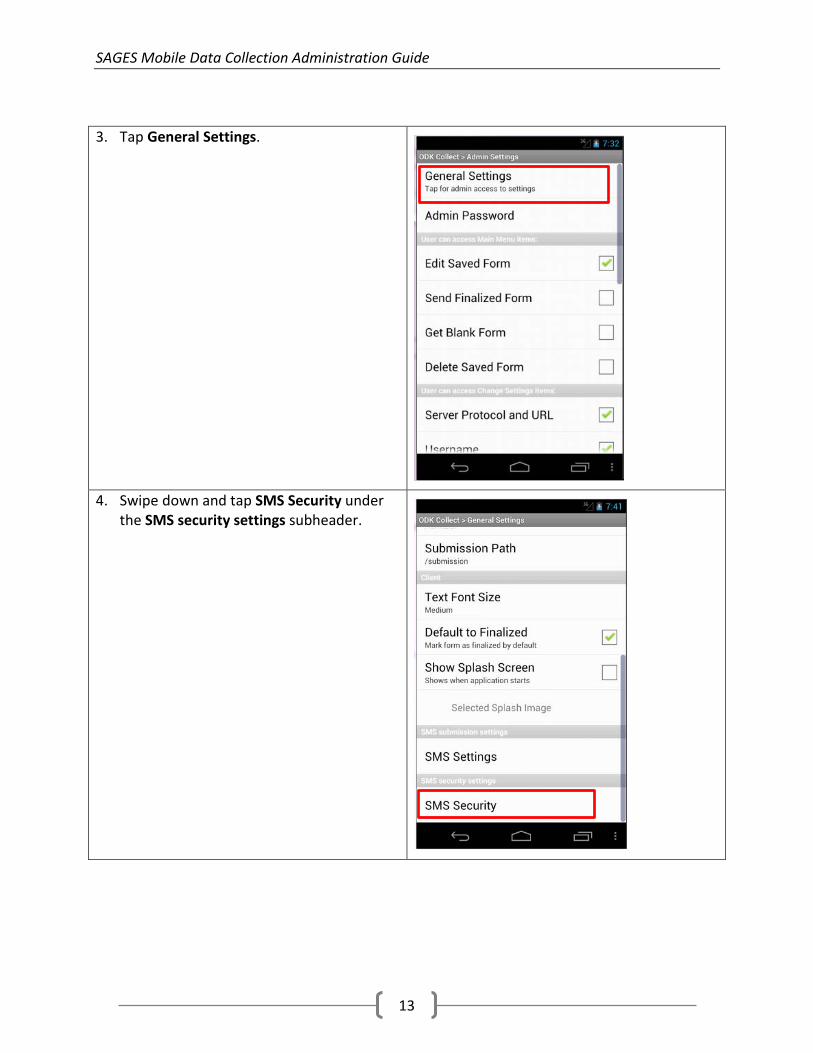
3. Tap General Settings.
4. Swipe down and tap SMS Security under
the SMS security settings subheader.
SAGES Mobile Data Collection Administration Guide
14
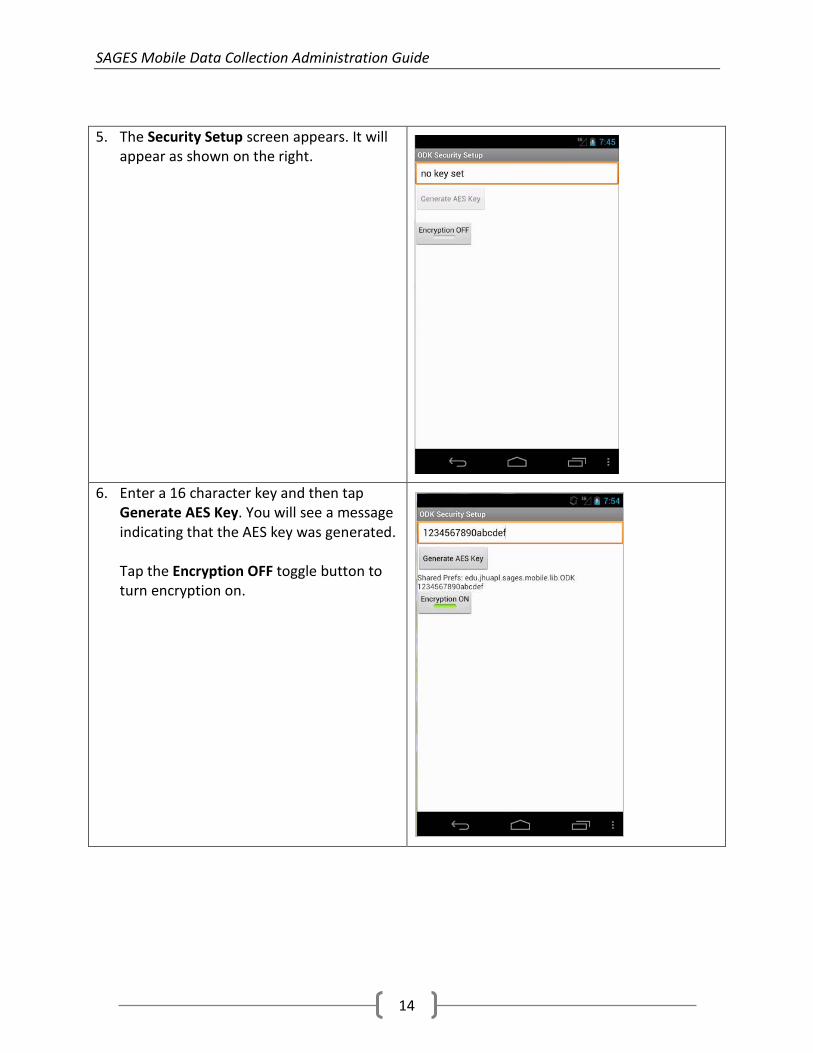
5. The Security Setup screen appears. It will appear as shown on the right.
6. Enter a 16 character key and then tap
Generate AES Key. You will see a message indicating that the AES key was generated.
Tap the Encryption OFF toggle button to turn encryption on.
SAGES Mobile Data Collection Administration Guide
15
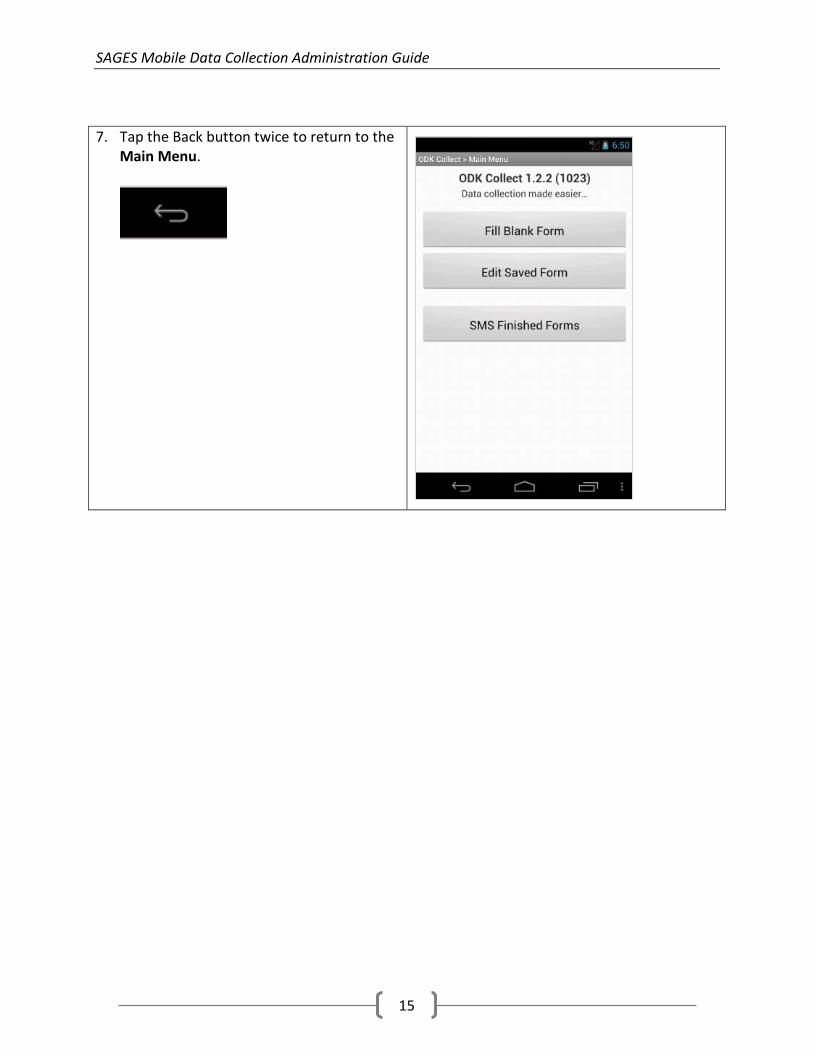
7. Tap the Back button twice to return to the Main Menu.
SAGES Mobile Data Collection Administration Guide
16
SAGES mReceive System Administration Tasks
How to Enable Automatic CSV Output
The following steps describes how to configure SAGES mReceive on the receiver phone to automatically process incoming text messages from SAGES mCollect, and output them as CSV (comma separated values) files for the ETL application. The administrator will need to configure this setting for each form that requires this behavior.
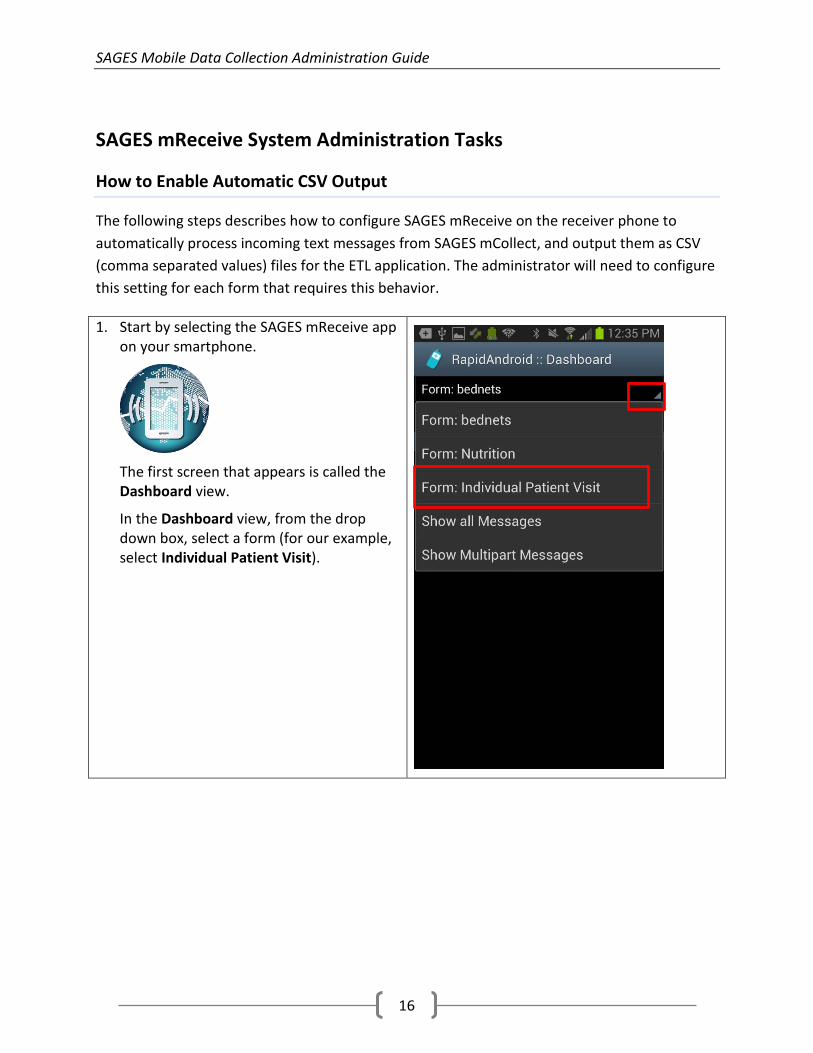
1. Start by selecting the SAGES mReceive app on your smartphone.
The first screen that appears is called the Dashboard view.
In the Dashboard view, from the drop down box, select a form (for our example, select Individual Patient Visit).
SAGES Mobile Data Collection Administration Guide
17
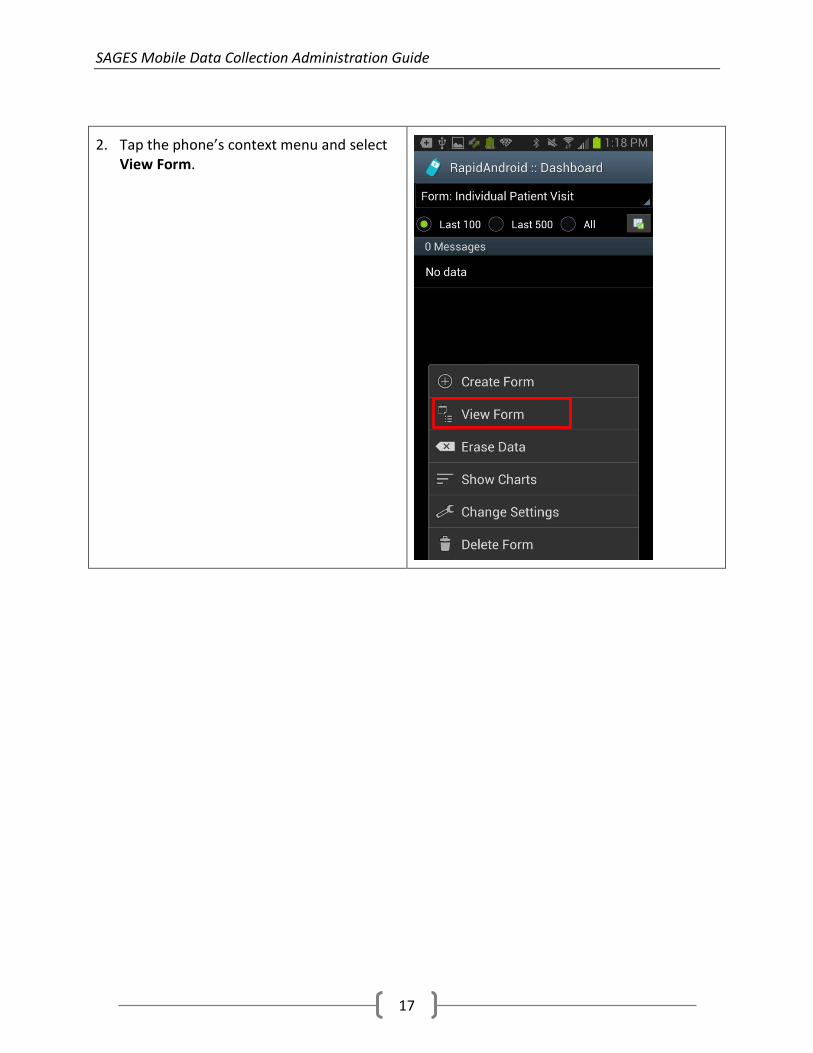
2. Tap the phone’s context menu and select View Form.
SAGES Mobile Data Collection Administration Guide
18
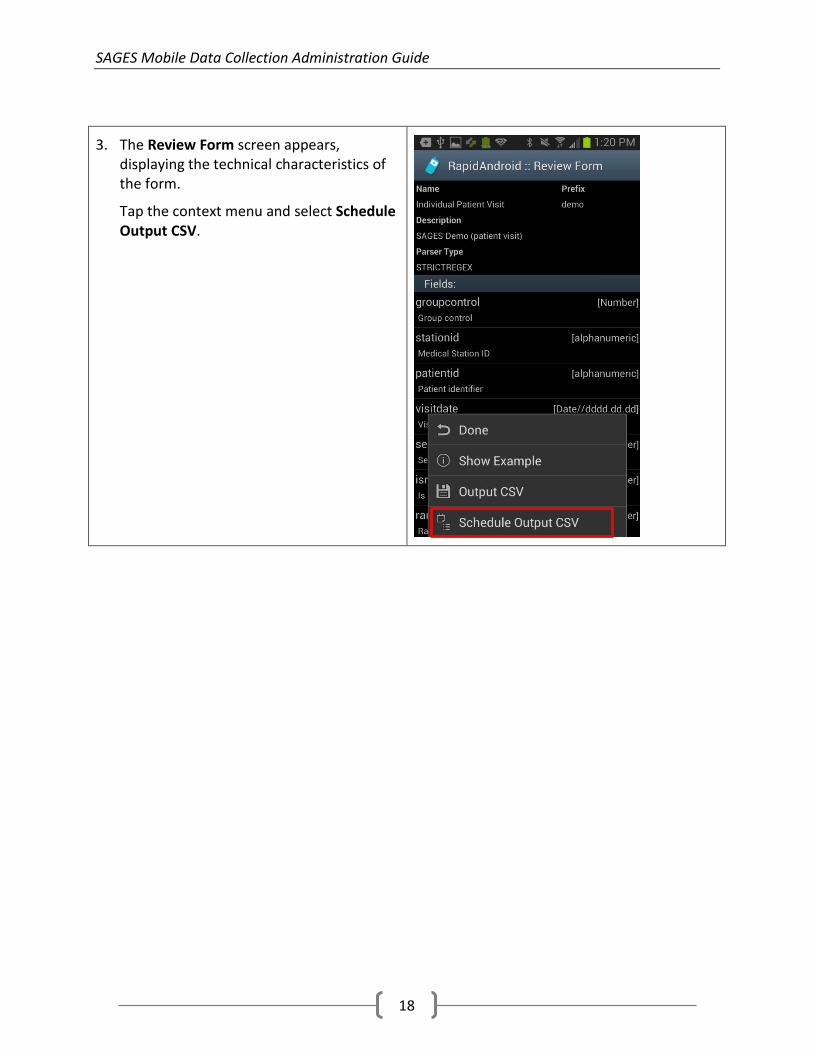
3. The Review Form screen appears, displaying the technical characteristics of the form.
Tap the context menu and select Schedule Output CSV.
SAGES Mobile Data Collection Administration Guide
19
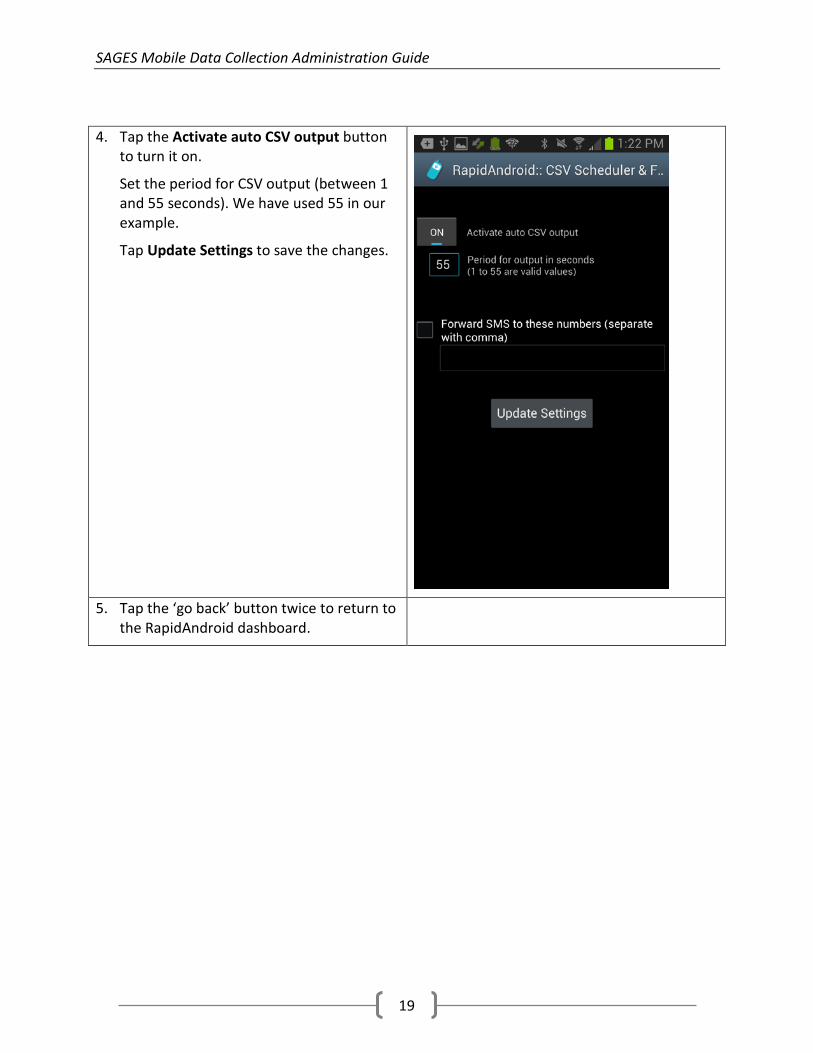
4. Tap the Activate auto CSV output button to turn it on.
Set the period for CSV output (between 1 and 55 seconds). We have used 55 in our example.
Tap Update Settings to save the changes.
5. Tap the ‘go back’ button twice to return to
the RapidAndroid dashboard.
SAGES Mobile Data Collection Administration Guide
20
How to Adjust SMS Parsing Acknowledgements
The following steps will enable the system administrator to configure SAGES mReceive to provide human friendly SMS text message responses to senders. These responses report on the outcome of processing a data submission. The SMS responses are global and can be activated for successful, failed, and in progress message processing.
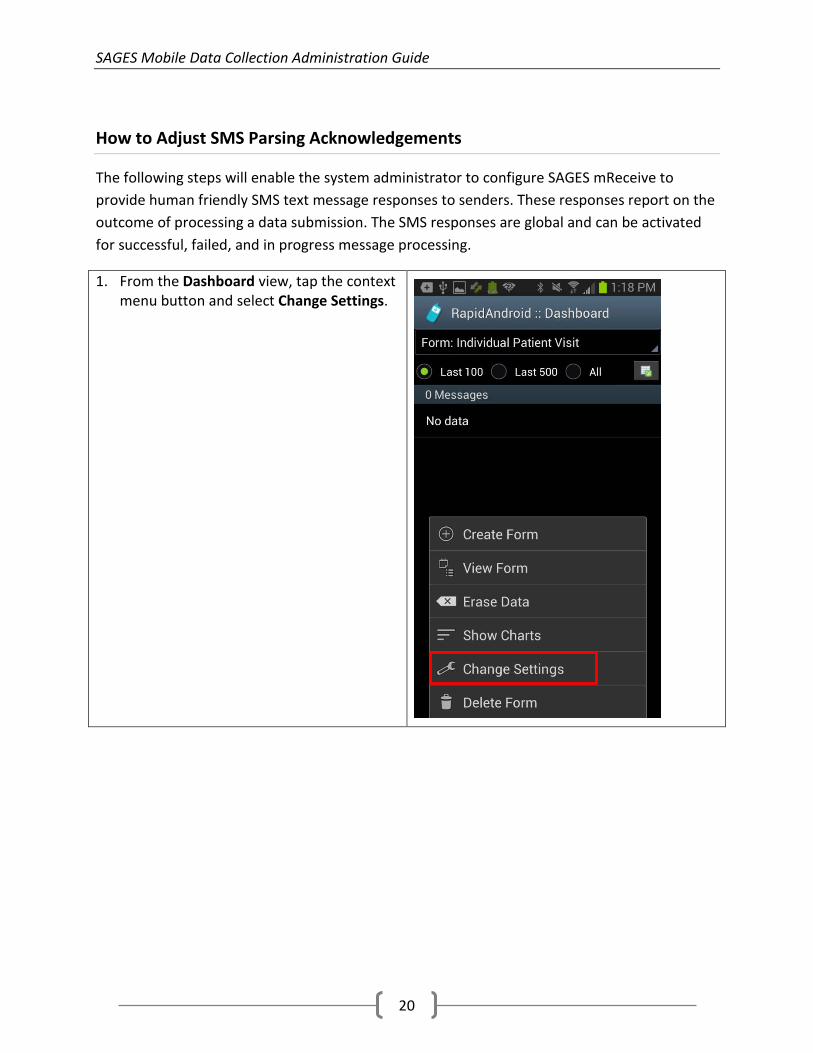
1. From the Dashboard view, tap the context menu button and select Change Settings.
SAGES Mobile Data Collection Administration Guide
21
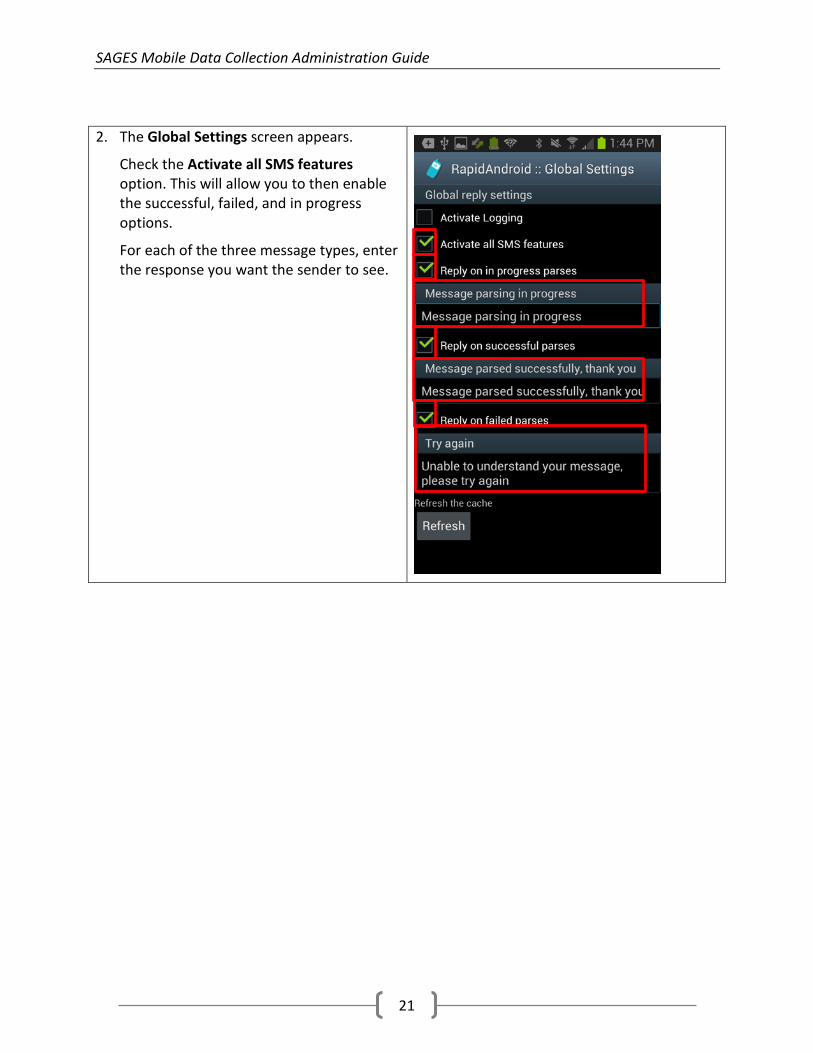
2. The Global Settings screen appears.
Check the Activate all SMS features option. This will allow you to then enable the successful, failed, and in progress options.
For each of the three message types, enter the response you want the sender to see.
SAGES Mobile Data Collection Administration Guide
22
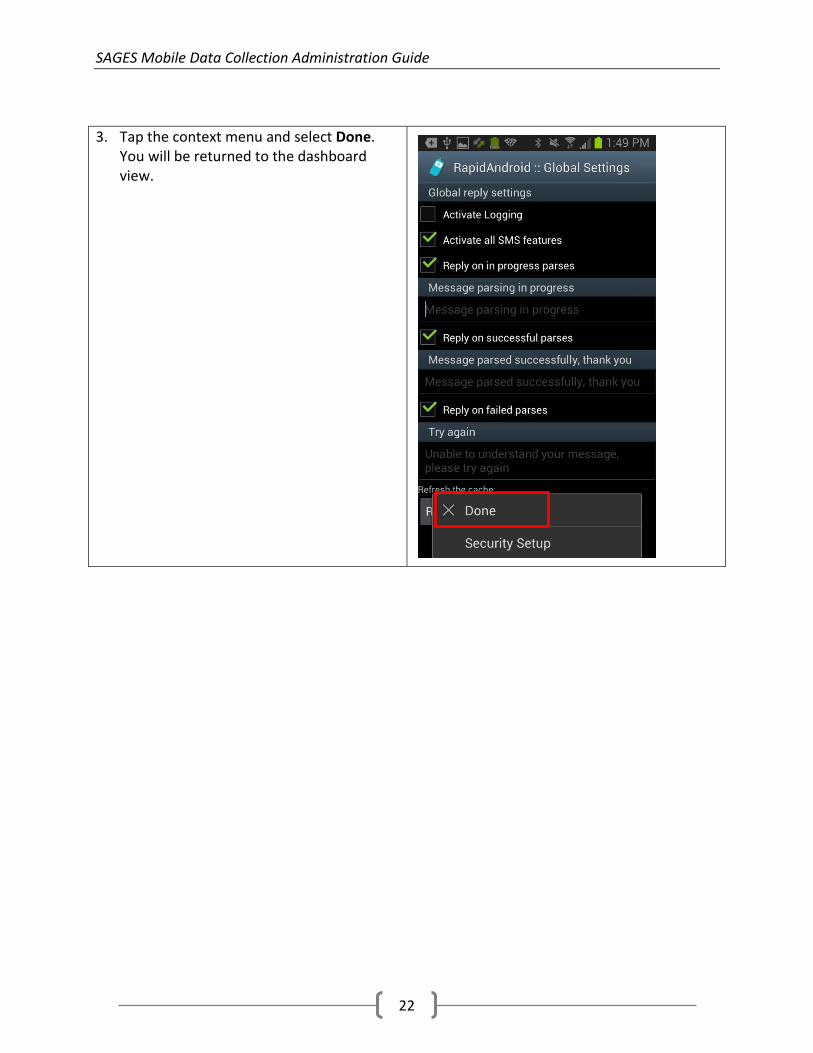
3. Tap the context menu and select Done. You will be returned to the dashboard view.
SAGES Mobile Data Collection Administration Guide
23
How to Setup Security Encryption
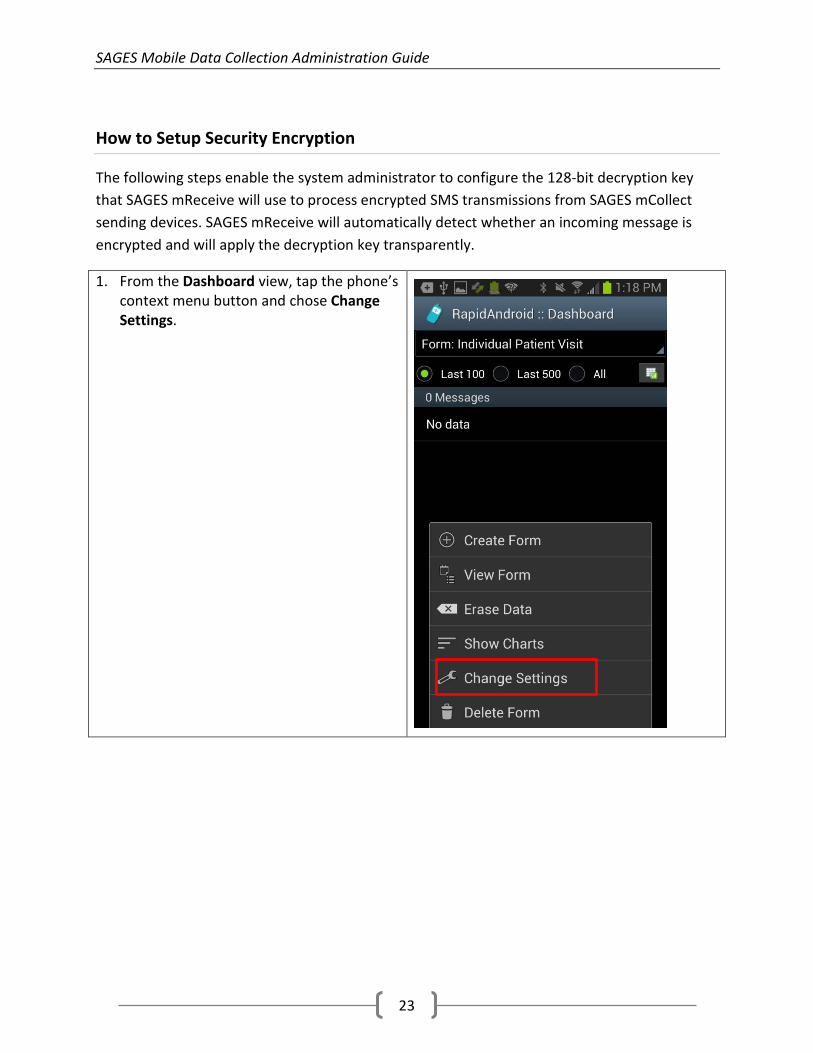
The following steps enable the system administrator to configure the 128-bit decryption key that SAGES mReceive will use to process encrypted SMS transmissions from SAGES mCollect sending devices. SAGES mReceive will automatically detect whether an incoming message is encrypted and will apply the decryption key transparently.
1. From the Dashboard view, tap the phone’s context menu button and chose Change Settings.
SAGES Mobile Data Collection Administration Guide
24
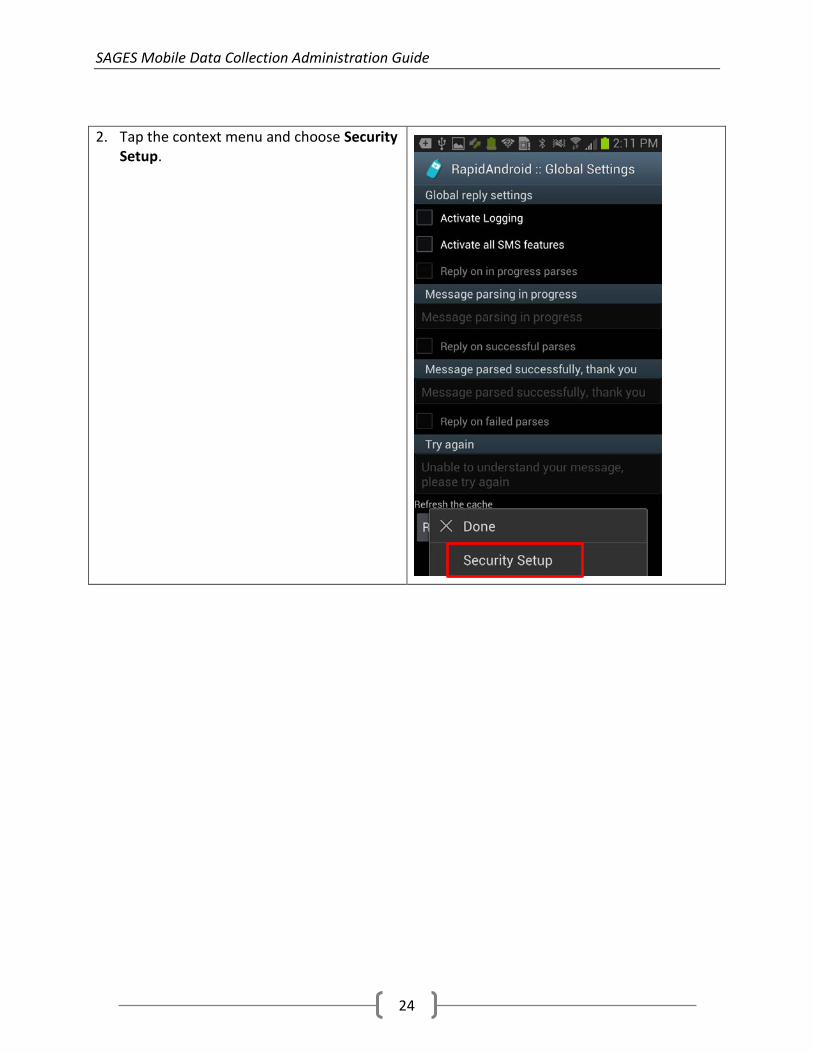
2. Tap the context menu and choose Security Setup.
SAGES Mobile Data Collection Administration Guide
25
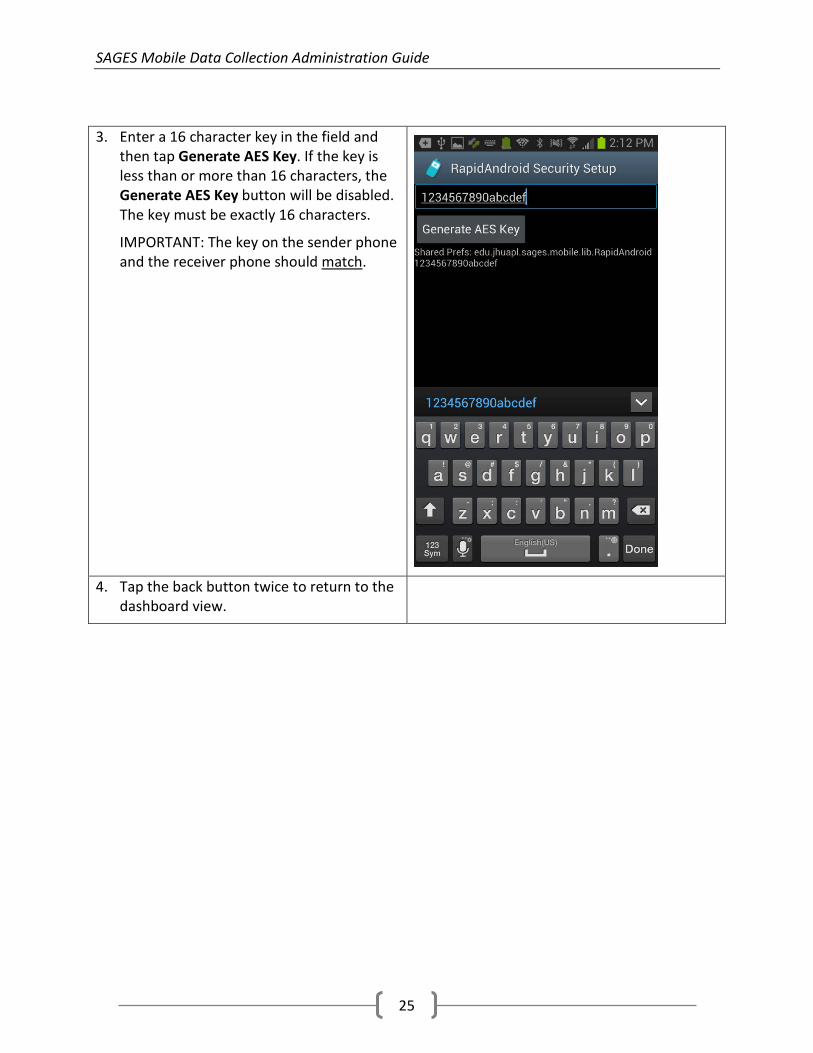
3. Enter a 16 character key in the field and then tap Generate AES Key. If the key is less than or more than 16 characters, the Generate AES Key button will be disabled. The key must be exactly 16 characters.
IMPORTANT: The key on the sender phone and the receiver phone should match.
4. Tap the back button twice to return to the
dashboard view.