Embed Size (px)
Citation preview

Sage Estimating(formerly Sage TimberlineEstimating)Installation & Administration Guide

This is a publication of Sage Software, Inc.
Document Number 20001S130301112ER 10/2012
©2012 Sage Software, Inc. All rights reserved. Sage, the Sage logos and the Sage product and servicenames mentioned herein are registered trademarks or trademarks of Sage Software, Inc., or its affiliatedentities. All other trademarks are the property of their respective owners.
Business Objects® and the Business Objects logo, BusinessObjects®, and Crystal Reports® aretrademarks or registered trademarks of Business Objects Software Ltd. in the United States and in othercountries. Business Objects is an SAP company
Microsoft® SQLServer®, Windows Vista® and theWindows logo are trademarks or registered trademarksof Microsoft Corporation in the United States and/or other countries.
Your use of this document and the Sage product(s) described herein is governed by the terms andconditions of the Sage End User License Agreement (“EULA”) or other agreement that is provided with orincluded in the Sage product. Nothing in this document supplements, modifies or amends those terms andconditions. Except as expressly stated in those terms and conditions, the information in this document isprovided by Sage “AS IS” and Sage disclaims all express, implied or statutory warranties of any kind,including but not limited to the warranties of merchantability, fitness for a particular purpose or of non-infringement. No implied license is granted to you under any Sage intellectual property or trade secret right.Sage reserves the right to revise, supplement or remove information in this document at any time withoutnotice to you or others.

Contents—Installation& Administration Guide
Chapter 1—Release Overview 1Configuration Features in Sage Estimating 1
Read the Supporting Documentation Before You Install 2
Conventions Used in this Document 2
Symbols 2
Menu Paths 3
Online Help 3
Training 3
Technical Assistance 3
Sage Customer Portal 3
Sage Customer Support Call Center 4
Upgrading Your Service Plan 4
Submitting Enhancement Requests 4
Chapter 2—System Requirements 5Supported Editions of SQL Server 5
RecommendedMinimum Processor 6
RecommendedMinimum Random Access Memory (RAM) 6
Hard Disk Space Required for Installation 7
Hardware Requirements 7
Supported Protocols 8
Access Rights 9
Elevate Permissions 9
SQL Server Permissions 9
Full Control of Specific Files and Folders Required 9
Full Control and Read Access to Specific Registry Keys Required 10
Supported Upgrade Paths 11
Sage Estimating Installation and Administration Guide Page iii

Chapter 3—Installation and Configuration 12Installation and Configuration Categories 12
A. Before You Install or Upgrade 15
B. Install/Configure SQL Server 16
C. Install Sage Estimating 16
D. Run the ConfigurationWizard 18
E. Migrate your Data (optional) 20
F. Set Up Roles and Permissions 20
Create roles and assign permissions to them 20
Set up an operator list 21
Assign an operator to a role 21
G. Set Up Firewall Exceptions 21
H. Set up LicenseManager (optional) 21
Guidelines 22
Install the Sentinel driver 22
Attach a protection device to the computer that will have LicenseManager 22
Install LicenseManager 22
Install license codes 23
Upgrade LicenseManager 24
I. After you complete your setup 24
J. Other Installation Scenarios 25
Terminal Server 25
Chapter 4—Data Migration 26Overview 27
Changes in the database structure 27
Migrating Your Data 28
Chapter 5—Configuring SQL Server 30Supported Editions of Microsoft SQL Server 2008 30
Setting up a SQL Server instance for UseWith Sage Estimating 30
Named Instance 31
AuthenticationMode 32
Collation Settings 32
Contents
Sage Estimating Installation and Administration Guide Page iv

Assigning Database Permissions 33
Setting the Firewall forWorkgroups 33
Firewall Settings (Windows XP andWindows Server 2003) 33
Firewall Settings (Windows Vista, Windows 2008 Server, andWindows 7) 33
Additional Recommendations 34
Memory 34
Database default location 34
Communication protocol 35
Copying Databases From Other Instances 35
Index—Installation & Administration Guide 37
Contents
Sage Estimating Installation and Administration Guide Page v
Chapter 1—Release OverviewSage welcomes you to Sage Estimating. Read this manual carefully to understand the installation andconfiguration process.
Configuration Features in Sage EstimatingYouwill find the following configuration features in Sage Estimating:
n Estimating Management Console. The EstimatingManagement Console allows you to view andmanage your databases, estimates, and roles and permissions. You can also use the EstimatingManagement Console to perform datamigrations, share estimate layouts, view andmanage estimates,and set up custom estimate reports.
n Configuration wizard. The Configuration wizard lets you designate a SQL Server instance to act asyour Sage Estimating server. Using the Configuration wizard, you can also create the estimatedatabase, upgrade existing data, and set up your software licensing and registration. For moreinformation, see “D. Run the ConfigurationWizard” on page 18.
Sage Estimating Installation and Administration Guide Page 1

Read the Supporting Documentation Before You InstallBe sure to read supporting documentation before you install:
l This Installation Guide includes an overview of this release, installation instructions, systemrequirements, and contact information.
l TheRelease Notes provide details about new features, database changes, known issues, andfixes. This document is available in your Sage Estimating installation files in theDocumentsfolder.
l TheGetting Started Guide provides an operational overview of the Sage Estimating software. Thisdocument is available in your Sage Estimating installation files in theDocuments folder.
l TheSQL Server Guide gives you an overview of the significant differences between the newSQL Server databases and the Pervasive databases used in previous Sage Estimating releases.This document is available on your Sage Estimating installation files in theDocuments folder.
l TheOptions Guide provides installation, setup, and operating instructions for each of the availableSage Estimating options, such as the OnScreen Takeoff Integrator or LicenseManager. Thisdocument is available in your Sage Estimating installation files in theDocuments folder.
Conventions Used in this DocumentThis document uses the following conventions:
n Information you type into the software is shown in bold font. For example: TypeMiscellaneous in thebox.
n The names of screens, windows, fields, and other features displayed by the software are shown in boldfont.
n The names of buttons you can click are enclosed in brackets with bold font. For example: [OK] or[Post].
n Names of keys are shown in capital letters. For example: ENTER or TAB. A plus sign (+) between twokey names indicates you should press the keys simultaneously.
n Variable names or names that are specific to your installationmay appear in italics and brackets. Forexample: [Drive]\\[Server].
Symbols
NOTE: This symbol is used when presenting information that is supplemental to the adjacent text.
TIP: This symbol is used when presenting helpful information for using the software.
CAUTION: This symbol is used when presenting important information to help you avoid a loss ofcritical data.
Sage Estimating Installation and Administration Guide Page 2
Chapter 1—ReleaseOverview

IMPORTANT: This symbol is used when presenting information that is critical to understand or thatrequires you to take action.
Menu PathsIn this document, menu paths show you the steps required to start a task. Menu paths appear in bold fontwith angle brackets around buttons. For example:
"If the program does not automatically start, click [Start] > Run."
Online HelpThe Sage Estimating software includes online Help, which provides answers to your questions aboutprocedures as well as items in the windows.
To access the online Help in the Sage Estimating software, click the Help button or icon, or press [F1] todisplay the help topic for that window.
To aid you in finding the information you need, the online Help for eachmodule includes the followingpanes:
n Contents pane containing links to the help topics
n Index pane containing keywords that link to help topics related to that keyword
n Search pane, where you can type text and click [Search] to locate that text in the help topics
For more information about using the online Help, see the Sage Estimating Help.
Wewould like your feedback about the online Help so we canmake improvements. Each Help topiccontains an area where you can indicate whether the topic was helpful and provide additional comments.To protect your privacy, all comments are anonymous.
TrainingSage University offers online and classroom training sessions to help you get themost out of your SageEstimating software. To access Sage University, visit www.sageu.com.
You can also get access to Sage University from the File menu by selectingHelp > Sage Estimating onthe Web > Sage University.
Technical AssistanceDepending on your support plan, you can access any of the following online services.
Sage Customer Portaln Knowledgebase: Find answers to your questions, access downloads, and subscribe to your favoritearticles. This service is available online 24/7.
Chapter 1—ReleaseOverview
Sage Estimating Installation and Administration Guide Page 3

n Live Chat:Chat online with a customer support analyst - a great option for quick questions. Chat hoursare the same as our telephone support hours (see below).
n Online Support Request:Submit an online support ticket when you have a non-urgent question. Oneof our call center support analysts will assist you. Online support hours are the same as our customersupport call center hours (see below).
Sage Customer Support Call CenterTelephone Support: When you have amore urgent question or would prefer to speak to a customer supportanalyst directly, call us at 866-991-3359. Telephone support is available Monday through Friday from 6a.m. to 5 p.m. Pacific time with the following exceptions:
n Every Thursday from 2 p.m. to 3 p.m. Pacific time (closed for customer support staff meetings)
n Standard United States holidays
n Quarterly company meetings
Upgrading Your Service PlanIf your service plan does not provide online or telephone customer support and you would like to add orupgrade a service plan, please call 800-858-7098.
Submitting Enhancement RequestsWewant to hear your suggestions for improving the software. To send us your comments, click on the Filemenu button and select Help > Sage Estimating on the Web > Submit EnhancementRequests.
Sage Estimating Installation and Administration Guide Page 4
Chapter 1—ReleaseOverview

Chapter 2—System RequirementsThe following hardware and software requirements provide a guideline. As with any software, as wecontinue to enhance Sage Estimating, you will realize optimal system performance by using up-to-datecomputer hardware. This includes memory as well as overall hardware specifications. For help in selectingthe right business-class computers for your business-class software, contact your authorized businesspartner.
Sage Estimating supports the following operating systems and service packs. The listed service packsareminimum required levels for installing Sage Estimating.
Table 1: Supported Operating Systems
Operating System Minimum Service Pack
Windows 7 Business SP1
Windows 7 Ultimate SP1
Windows 2008 Server Enterprise Edition SP2
Windows 2008 Server Standard Edition SP2
Windows Server 2003 Enterprise Edition R2 SP2
Windows Server 2003 Standard Edition R2 SP2
Windows Vista® Business SP2
Windows Vista® Ultimate SP2
Windows XP Professional SP3
NOTE: Sage Estimating also supports all 64-bit versions of these operating systems.
Supported Editions of SQL ServerSage Estimating is tested for use with only the following editions of Microsoft® SQLServer®:
n SQL Server 2008 Standard Edition, Service Pack 1 or greater
n SQLServer 2008 R2 Express Edition
n SQLServer 2008 R2 Standard Edition
Sage Estimating Installation and Administration Guide Page 5
NOTE: You can install an approved instance of SQL Server side by side on a computer whereSQL Server 2012 is also installed. Be aware that installing Sage Estimatingmay then result in an"Install completed with errors" message; however, the resulting Sage Estimating install operatescorrectly.
Recommended Minimum ProcessorA Pentium 4 (P4) or later processor with aminimum of 2 gigahertz (GHz) processing speed is required forthe server that hosts Sage Estimating as well as workstations using Sage Estimating. Having a fastprocessor on both the server and workstations will improve your performance.
Recommended Minimum Random Access Memory (RAM)A minimum of 2 gigabytes (GB) of available, openRAM is required for the server that hosts SageEstimating and for the workstations using Sage Estimating. As a general rule, themore RAM you have onthe server and workstations, the better your performance will be.
Open RAM is unallocated random access memory that is available for Sage Estimating use.
Sage Estimating Installation and Administration Guide Page 6
Chapter 2—System Requirements

Hard Disk Space Required for InstallationThe following table lists the hard disk space necessary to install Sage Estimating on a server, stand-alonecomputer, or workstation. Use this information to calculate your hard disk space requirements based onthe applications that you install. Having adequate free space on the hard disk, a fast processing speed,and adequate RAM can improve your performance.
IMPORTANT: Do not install Sage Estimating until you have sufficient hard disk space available.
Table 2: Hard Disk Space Usage
Product Available Hard Disk Space
Sage Estimating and SQL Server 2008 R2 Express Up to 3GB
Sage Estimating only Up to 1.2 GB
Hardware RequirementsSage Estimating requires the following hardware.
Table 3: Hardware Requirements
Hardware Purpose and Specifications
DVD drive For Sage Estimating installation DVDs.
Network adapter Connects computer to a network.
Must be high quality.
Printer For Sage Estimating.
Super VGA monitor For high-resolution color display.
1280 pixels by 1024 pixels recommended.
SafeNet Sentinel SuperPro hardware key (dongle) For Sage Estimating licensemanagement.
Chapter 2—System Requirements
Sage Estimating Installation and Administration Guide Page 7

Supported ProtocolsTable 4: Supported Protocols
Protocol Purpose
Transmission Control Protocol/InternetProtocol (TCP/IP)
Microsoft servers default to this protocol.
Remote Display Protocol (RDP) 5 Microsoft remote protocol, which is used in its remoteconnection applications.
Independent Computing Architecture(ICA)
Citrix remote protocol, which is used in its remoteconnection application.
Sage Estimating Installation and Administration Guide Page 8
Chapter 2—System Requirements

Access RightsThe following sections describe the access rights you need to successfully install and use SageEstimating.
Elevate PermissionsYoumust elevate your permissions before installing Sage Estimating onWindows Vista, Windows Server2008, andWindows 7. During certain installation tasks, you will receive another prompt to elevate yourprivileges. If you do not acknowledge each prompt within twominutes, the installation process will quit thetask. If this occurs, youmay receive a separate prompt asking you to retry the task. To retry the task, click[Retry] and then elevate your privileges at the prompt.
SQL Server PermissionsDatabase permissions for SQL Server instances used with Sage Estimating are now set up using theSecurity feature in the EstimatingManagement Console.
For more information on setting up SQL Server security for Sage Estimating, see “F. Set Up Roles andPermissions” on page 20.
Full Control of Specific Files and Folders RequiredTo use Sage Estimating, youmust have full control of the following files and folders on your file server,terminal server, and workstations that have Sage Estimating installed. Make sure that your systemadministrator also gives you full control of all the subfolders and files.
CAUTION: Incorrectly modifyingMicrosoft Windows security may severely affect your systemoperations. Sage is not responsible for operation problems caused by incorrectly modifying yourMicrosoft Windows security settings. To set permissions on your network orWindows operatingsystem, youmust have advanced knowledge of your network. Contact your system administrator forassistance.
NOTE: Some of these folders may be hidden. To view them onWindows XP Professional andWindows Server 2003, openWindows Explorer, select Tools > Folder Options, and select theView hidden files and folders check box on theView tab. To view them onWindows Vista,Windows 2008 Server, andWindows 7, openWindows Explorer, select Organize > Folder andSearch Options, and then select Show hidden files and folders on theView tab.
Chapter 2—System Requirements
Sage Estimating Installation and Administration Guide Page 9

Table 5: Folders and Files Requiring Operator Control
Product OperatingSystems
Required Foldersand Files Location and Specifications
SageEstimating
32-bitWindowssystems
[Drive]:\ProgramFiles \SageEstimating
This folder is located on the file server, terminal server,and workstations where you installed Sage Estimating.It is the default installation location for SageEstimating. However, depending on your systemconfiguration, your company may have renamed thisfolder or installed it to a different location.
SageEstimating
64-bitWindowssystems
[Drive]:\ProgramFiles (x86)\SageEstimating
This folder is located on the file server, terminal server,and workstations where you installed Sage Estimating.It is the default installation location for SageEstimating. However, depending on your systemconfiguration, your company may have renamed thisfolder or installed it to a different location.
SageEstimating
WindowsXP andWindowsServer2003
[Drive]:\Documentsand Settings\AllUsers\SageEstimating
-and-
[Drive]:\DocumentsandSettings\ApplicationData\SageEstimating
These folders are located on the workstation or terminalserver where you use Sage Estimating. SageEstimating installs necessary files to these folders andrequires that the user has full control of them.
SageEstimating
WindowsVista®,Windows2008Server,andWindows7
[Drive]:\Users\Public\SageEstimating
-and-
[Drive]:\ProgramData\SageEstimating
These folders are located on the workstation or terminalserver where you use Sage Estimating. SageEstimating installs necessary files to these folders andrequires that the user has full control of them.
Full Control and Read Access to Specific Registry Keys RequiredTo use Sage Estimating, youmust have full control of the followingWindows registry key on your fileserver, terminal server, and workstations that have Sage Estimating installed. Make sure that your systemadministrator also gives you full control of all subkeys.
Sage Estimating Installation and Administration Guide Page 10
Chapter 2—System Requirements
CAUTION: Incorrectly editing theMicrosoft Windows registry may severely damage your system.Sage is not responsible for damage to your system caused by editing the registry. Beforemakingchanges to the registry, contact your system administrator for assistance andmake a backup copyof all valued data. System administrators, seeMicrosoft Registry Editor Help topics for detailedinstructions.
n HKEY_CURRENT_USER
You should also have read access to the following registry keys and associated subkeys:
n HKEY_Local_Machine\Software\ODBC
n HKEY_Local_Machine\Software\Wow6432Node\Sage
Supported Upgrade PathsIf you plan to use your estimate data from a pre-version 11.1 release, youmust upgrade your data to SageTimberline Office 9.6 or later prior to migrating to Sage Estimating. Refer to “Chapter 4—DataMigration”on page 26 for datamigration instructions.
NOTE: Do not install previous releases of Sage Timberline Office after installing Sage Estimating;the new Sentinel driver is incompatible with previous releases.
You can upgrade any Windows-based Sage Timberline Office data (beginning with Sage Timberline Office1.0) to Sage Timberline Office 9.6.
If desired, you can install this beta version of Sage Estimating without uninstalling your previous SageEstimating installation. However, because the data format is different, you cannot share data between thisbeta release and Sage Timberline Office Estimating without performing datamigration.
Chapter 2—System Requirements
Sage Estimating Installation and Administration Guide Page 11

Chapter 3—Installation andConfigurationInstallation and Configuration CategoriesInstallation and configuration of Sage Estimating falls into one of three primary scenarios.
n Scenario 1: Set up in a server/workstation domain
n Scenario 2: Set up in a workgroup environment
n Scenario 3: Set up on a standalone computer
Use the following diagrams to plan the installation and configuration process for your setup scenario.
Sage Estimating Installation and Administration Guide Page 12

Figure 1: Scenario 1 (Domain server/workstation environment, databases installed on the server)
Sage Estimating Installation and Administration Guide Page 13
Chapter 3—Installation and Configuration
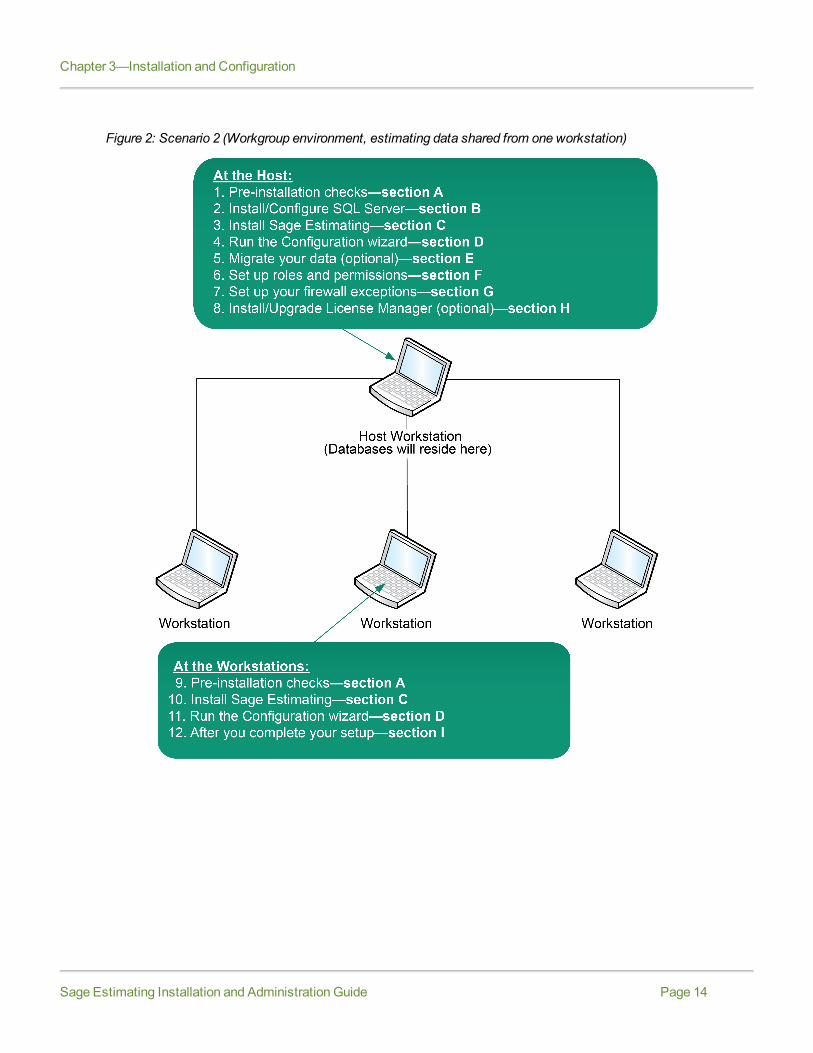
Figure 2: Scenario 2 (Workgroup environment, estimating data shared from one workstation)
Chapter 3—Installation and Configuration
Sage Estimating Installation and Administration Guide Page 14

Figure 3: Scenario 3 (Standalone workstation environment, estimating data stored on the workstation)
A. Before You Install or UpgradeEnsure you read through and understand the information in this installation guide.
1 If you are currently using a previously-released version of Sage Estimating, create a complete backupcopy of all Sage Estimating data and program files before installing this release.
2 Install the appropriate operating system service pack level, make sure that there is sufficient hard diskspace available, and ensure that your server and workstations meet all other hardware and softwarerequirements. See “Chapter 2—System Requirements” on page 5 for more information.
3 Make sure that you have full control of the necessary folders, files, and registry keys on your file server,terminal server, and workstations that will have Sage Estimating installed. For a list of the requiredfolders, files, and registry keys for your operating system, see “Chapter 2—System Requirements” onpage 5.
4 Close all programs and services for the duration of the installation. This includes programs that may berunning in the background such as antivirus, email, and backup programs.
5 If you do not have Sentinel protection devices attached to your computer, do not attach these devicesuntil after you install Sage Estimating. If you already have Sentinel protection devices attached, you canleave these devices in place during the Sage Estimating installation.
6 Decide which installation scenario to follow. See “Installation and Configuration Categories” in theprevious section.
7 Youmust have the appropriate permissions to perform certain tasks described in this chapter. Contactyour Sage Estimating administrator if you require additional permissions.
Sage Estimating Installation and Administration Guide Page 15
Chapter 3—Installation and Configuration

B. Install/Configure SQL Server Install or configure a supported version of SQL Server (SQL Server 2008 SP1, SQL Server 2008 R2, orSQL Server 2008 R2 Express) on the server or workstation where you want to store your Sage Estimatingdata. An optional copy of SQL Server 2008 R2 Express is included with the Sage Estimating installation.
n If you want to use an existing installation of SQL Server 2008 or SQL Server 2008 R2, refer to “Chapter5—Configuring SQL Server,” on page 30 for settings for creating and configuring a new instance.
n If you do not already have an installation of Microsoft® SQL Server® on the server or workstation whereyou plan to keep your Sage Estimating databases, and you want to install the SQL Server 2008 R2Express copy that comes with Sage Estimating, follow the instructions for installing Sage Estimatingfound in “C. Install Sage Estimating” on page 16 and select one of the following options during theinstall:
p Complete Sage Estimating System
p Sage Estimating Server and new instance
p Create new local SQL Server instance
If you are operating in a workstation/server environment (see “Installation and Configuration Categories”on page 12), you do not need to install SQL Server on the workstations. However, you can installSQL Server optionally if you want to maintain a local copy of your estimating data.
NOTES:
l At the instance name prompt, type a name for the new SQL Server instance (database server) inthe box and click [OK].
The default instance name is SAGE_ESTIMATING but you can give the instance any name youwant provided you do not give it the same name as any existing SQL Server instance on thecomputer.
l If you plan tomigrate existing data from Sage Timberline Office Estimating (version 9.6 or later),youmust also install SQL Server on the destination computer or server.
l The installation process may reboot your computer. If your computer reboots, log back onto yourcomputer at the prompt.
l You can install an approved instance of SQL Server side by side on a computer where SQL Server2012 is also installed. Be aware that installing Sage Estimatingmay then result in an "Installcompleted with errors" message; however, the resulting Sage Estimating install operatescorrectly.
l Sage recommends against installing SQL Server 2008 R2 Express on a domain controller.
C. Install Sage EstimatingIMPORTANT:
l Do not install Sage Estimating until you have sufficient hard disk space available. See “Hard DiskSpace Required for Installation” on page 7 for more information.
Chapter 3—Installation and Configuration
Sage Estimating Installation and Administration Guide Page 16

l Do not install previous releases of Sage 300 Construction and Real Estate after installing SageEstimating; the new Sentinel drive is incompatible with previous releases.
1 At the workstation or server, log on with full administrative rights.Full administrative rights are defined as write access to theWindows registry and all folders on thecomputer (including rights to the root of all hard drives). If you are unsure whether you have fulladministrative rights, ask your network administrator for assistance.
2 Open the Sage Estimating installation window by double-clicking theSetMeUp.exe file found in yourlocal Sage Estimating install folder.The Sage Estimating install folder is found in the location you specify during the Sage Estimatingdownload process. For example, if you download the install files to C:\Users\Public\PublicDocuments\Sage Estimating, look in this folder for theSetMeUp.exe file.
NOTE: If you have not already done so, download the Sage Estimating install files in accordance withthe instructions provided in the software notice. If you are installing Sage Estimating on a server, ensureyou save the install files in a location that all workstations can access. Then copy the install files toeach workstation where you want to install Sage Estimating.ClickingSetMeUp.exe opens the Sage Estimating installation window.
Figure 4: The Sage Estimating installation window
3 Follow the steps as prompted during the resulting installation and choose from one of the followinginstallation selections (refer to installation scenario 1, 2, and 3 on “Installation and ConfigurationCategories” on page 12.
Sage Estimating Installation and Administration Guide Page 17
Chapter 3—Installation and Configuration

p Complete Sage Estimating system. This option installs everything you need to operate SageEstimating on your local workgroup server, offline workstation, or standalone computer, including anew instance of SQL Server 2008 R2 Express. Select this option if you are installing Sage Estimatingon a stand-alone workstation or a workgroup server.
p Sage Estimating. Select this option if you are installing Sage Estimating on a workstation that willconnect to a server on a domain or in a workgroup. Selecting this option installs the Sage Estimatingsoftware and support components but does not install a new instance of SQL Server 2008 R2Express.
p Sage Estimating Server only. Select this option if you are installing Sage Estimating to a server ona domain and you want to use an existing SQL Server install on the server. Selecting this optioninstalls certain Sage Estimating components that allow you to configure the server to support SageEstimating but does not install SQL Server 2008 R2 Express or Sage Estimating.
NOTE: Youmust install this option on the same server where your SQL Server instance is installedand the existing SQL Server instancemust meet theminimum supported requirements. For moreinformation, see “Supported Editions of SQL Server” on page 5.
p Sage Estimating Server and a new instance. Select this option if you are installing to a server on adomain and you want to use the SQL Server 2008 R2 Express copy that comes with the SageEstimating install. Selecting this option automatically installs and configures a new instance ofSQL Server 2008 R2 Express for you. This option is unavailable if you already have installed SageEstimating components on the workstation or server.
p Create new local SQL Server instance. This option appears only if you have already installed SageEstimating components on the workstation or server. Select this option to install and configure a newinstance of SQL Server 2008 R2 Express.
The installation guides you through the process of installing Sage Estimating products and requiredsupport software.
NOTES:l The installation process may reboot your computer during the installation. Ensure you close allprograms and applications before starting the installation to avoid losing any data. If your computerreboots, log on to your computer again.
l If you choose to upgrade data from a previous version of Sage Estimating, the process may takeup to four hours, depending on the size of your database. Plan accordingly.
4 Repeat steps 1–3 for each workstation or server where you want to install Sage Estimating.
D. Run the Configuration WizardThe Configuration wizard installs automatically as part of the Sage Estimating installation.
1 Start the Configuration wizard by clicking on the desktop icon or selectingStart > All Programs> Sage > Estimating 13.1 > Configuration Wizard.
NOTE: ForWindows Vista®, Windows 2008 Server, andWindows 7, youmay need to elevate yourpermissions level before starting the Configuration wizard by right clicking on Configuration Wizard(or the desktop icon) and selectingRun as administrator.
Chapter 3—Installation and Configuration
Sage Estimating Installation and Administration Guide Page 18

2 In theConfiguration Wizardwindow, register your software if prompted as follows:
a Locate your product's registration name from the packing slip enclosed with the original shipment.
b Type the registration name in theRegistration name box.
c Locate each product or feature in theAvailable Features list that you want to use (left-hand pane)and double-click on it to add it to the registration list (in the detail pane).
Figure 5: Selecting Features for Registration and Activation
d In theActivation Code box of the registration list, type the activation code from the originalshipment's packing slip.
Alternatively, you can type one of the following selections in the Activation Code box for some ofthe product features:
p DEMO: Operates the software feature in demonstrationmode.
p LM: Registers the software feature separately using LicenseManager.
See “H. Set up LicenseManager (optional)” on page 21 for more information about setting up LicenseManager.
e Click [Save] to save your registration and activation selections.
3 Click Server in the left-hand pane of the Configuration wizard.
4 Select the SQL Server instance ("server") that you are using for your Sage Estimating server by clicking[Select].
5 Follow the on-screen prompts to finish configuring your Sage Estimating software.The prompts you receive vary depending on your installation. Youmay be prompted to perform one ormore of the following actions:
p If the Configuration wizard does not find a preexisting estimate database in the specified SQL Serverinstance, it prompts you to create one. Type a name for the new estimate database at the prompt.
p If you are storing existing Sage Estimating data from a previous release (version 11.1 or later) on theselected instance, the EstimatingManagement Console identifies the data for upgrade. Click[Upgrade] then follow the prompts to upgrade your data.
6 Click [Close] to exit the Configuration wizard.
Sage Estimating Installation and Administration Guide Page 19
Chapter 3—Installation and Configuration

E. Migrate your Data (optional)If you have existing estimate data from a pre-11.1 release, you canmigrate your data to Sage Estimating.You can perform this process from any computer that has access to the SQL Server instance or instanceswhere you plan to store your estimate data. See “Chapter 4—DataMigration” on page 26 for instructions.
F. Set Up Roles and PermissionsSet up roles and permissions from aworkstation where Sage Estimating is installed. If you are setting upSage Estimating in a workstation/server or workgroup environment, you need to perform the roles andpermissions setup from only one computer.
NOTE: Youmust be a Sage Estimating administrator to set up roles and permissions. The personwho installs Sage Estimating is set up automatically as a Sage Estimating administrator.
Setting up roles and permissions involves three general steps:
n Create roles and assign permissions to them.
n Set up a list of authorized Sage Estimating operators.
n Assign operators to roles.
Set up a list of operators and task/feature permissions using theSecurity feature in the EstimatingManagement Console.
Create roles and assign permissions to them1 Start the EstimatingManagement Console by selectingStart > Programs > Sage > Estimating 13.1> Estimating Management Console or by clicking on the desktop icon.
2 At the top of the EstimatingManagement Console, click [Security].
3 From theSecuritywindow of the EstimatingManagement Console, click on theRoles tab.
4 Click [Add] to open theAdd Rolewindow.
5 In theAdd Rolewindow, type a name for the new role in theName box and an extended description intheDescription box.Use the extended description to provide helpful identification information later, such as the purpose ofthe role.
6 Select the check box next to one or more tasks in the features list to provide operators and groupsassigned to the role with access to the tasks.For example, selecting a check box labeledCreate Estimate gives operators and groups within the rolethe ability to create new estimates.
7 Clear the check box next to a task to prevent operators and groups in the role from accessing it.
Chapter 3—Installation and Configuration
Sage Estimating Installation and Administration Guide Page 20
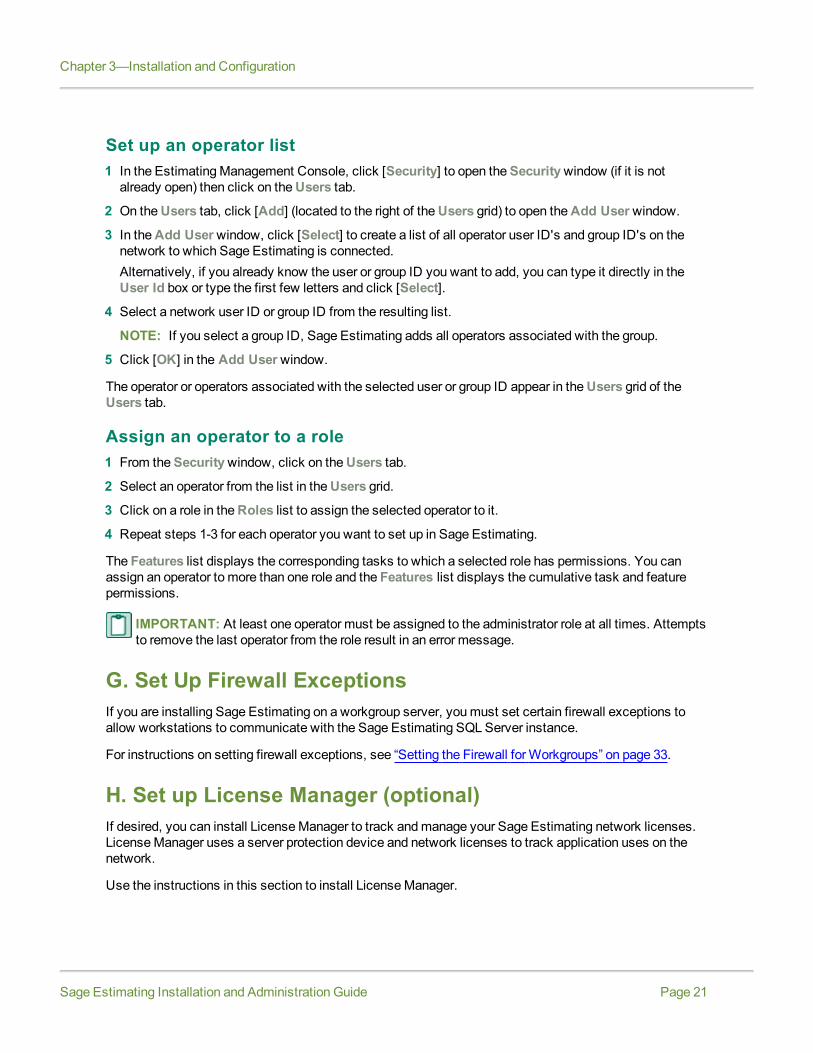
Set up an operator list1 In the EstimatingManagement Console, click [Security] to open theSecuritywindow (if it is notalready open) then click on theUsers tab.
2 On theUsers tab, click [Add] (located to the right of theUsers grid) to open theAdd Userwindow.
3 In theAdd Userwindow, click [Select] to create a list of all operator user ID's and group ID's on thenetwork to which Sage Estimating is connected.Alternatively, if you already know the user or group ID you want to add, you can type it directly in theUser Id box or type the first few letters and click [Select].
4 Select a network user ID or group ID from the resulting list.
NOTE: If you select a group ID, Sage Estimating adds all operators associated with the group.
5 Click [OK] in the Add Userwindow.
The operator or operators associated with the selected user or group ID appear in theUsers grid of theUsers tab.
Assign an operator to a role1 From theSecuritywindow, click on theUsers tab.
2 Select an operator from the list in theUsers grid.
3 Click on a role in theRoles list to assign the selected operator to it.
4 Repeat steps 1-3 for each operator you want to set up in Sage Estimating.
The Features list displays the corresponding tasks to which a selected role has permissions. You canassign an operator to more than one role and the Features list displays the cumulative task and featurepermissions.
IMPORTANT: At least one operator must be assigned to the administrator role at all times. Attemptsto remove the last operator from the role result in an error message.
G. Set Up Firewall ExceptionsIf you are installing Sage Estimating on a workgroup server, youmust set certain firewall exceptions toallow workstations to communicate with the Sage Estimating SQL Server instance.
For instructions on setting firewall exceptions, see “Setting the Firewall forWorkgroups” on page 33.
H. Set up License Manager (optional)If desired, you can install LicenseManager to track andmanage your Sage Estimating network licenses.LicenseManager uses a server protection device and network licenses to track application uses on thenetwork.
Use the instructions in this section to install LicenseManager.
Sage Estimating Installation and Administration Guide Page 21
Chapter 3—Installation and Configuration
GuidelinesPlease note the following:
n All license-managed servers and workstations must use the same network protocol (TCP/IP).
n You cannot install LicenseManager to a terminal server. If you have a terminal server, install to aworkstation.
n If you use firewall software on your license server, youmay not be able to use theWlmAdmin orWCommute applications to view or check out licenses. To resolve this issue, discuss the server’sfirewall security with your network administrator. If you are willing to adjust your firewall securitysettings on the licensemanager server, consider granting access to the lservnt.exe file.
n Check in any licenses before upgrading.
For more information about LicenseManager, seeSentinel LicenseManager System Administrator OnlineHelp (index.html). This file is in theAdditionalInstalls\LicenseManager\SysAdminHelp folder of yourSage Estimating setup and installation DVD.
Install the Sentinel driverThe Sage Estimating installation program automatically installs a Sentinel driver if you do not have one.However, if you need instructions to install the Sentinel driver manually, visit www.sagecre.com and click[Customer Support]. After you have logged on, in theKnowledgebase Search box, type How do Iinstall the Sentinel driver? See “Sage Customer Portal” on page 3 for more information about using theTechnical Support Knowledgebase.
IMPORTANT: Do not install previous releases of Sage 300 Construction and Real Estate afterinstalling Sage Estimating; the new Sentinel driver is incompatible with previous releases.
Attach a protection device to the computer that will have LicenseManager1 If you have a parallel port protection device, disconnect any hardware or peripheral devices attached tothe parallel port.
2 Plug the protection device into the parallel port or USB port.
3 If you disconnected devices in step 1, reconnect these devices.
Install License ManagerIf you already have LicenseManager installed, start with “Upgrade LicenseManager” on page 24.
1 Log on with full administrative rights. Full administrative rights are defined as write access to theWindows registry and all folders on the computer (including rights to the root of all hard drives).If you are unsure whether you have full administrative rights, ask your network administrator forassistance. Alternately, you can ask your network administrator to log on with the network administratorID before you start the installation.
Chapter 3—Installation and Configuration
Sage Estimating Installation and Administration Guide Page 22

2 Insert your Sage Estimating installation and setup DVD in the CD-ROM/DVD drive and then click[Start] > Run (Windows XP andWindows Server 2003) or [Start] > All Programs > Accessories> Run (Windows Vista, Windows 2008 Server, andWindows 7).
3 In the Runwindow, click [Browse].
4 In theBrowsewindow, select [Drive]:\AdditionalInstalls\LicenseManager\Server\Setup\Setup.exe.([Drive] represents your CD-ROM/DVD drive.)
5 Click [Open] then click [OK] to start the installation.
6 Follow the on-screen prompts. The installation automatically installs the appropriate software for theoperating system.
NOTE: Be sure to accept the default installation path when you install LicenseManager. If you need tochange the default installation path, change it to a local drive. You cannot install LicenseManager to anetwork drive.
Install license codesThe number of network licenses purchased for an application indicates the total number of concurrentnetwork uses allowed for that application.
To install license codes:
1 Verify that the Sentinel LicenseManager service is running then select one of the following.
p Windows XP and Windows Server 20003:Click [Start] > Settings > Control Panel> Administrative Tools > Services.
p Windows Vista and Windows 2008 Server: Start > Control Panel > System and Maintenance> Administrative Tools > Services.
p Windows 7: Start > Control Panel > System and Security > Administrative Tools > Services.
2 Look forSentinel RMS License Manager in the list of services.
3 Insert the Sage Estimating installation and setup DVD into the CD-ROM/DVD drive of the LicenseManager server.
4 Click [Start] > Run (Windows XP andWindows Server 2003) or click [Start] > All Programs> Accessories > Run (Windows Vista, Windows 2008 Server, andWindows 7).
5 In theRunwindow, click theOpen box and type [Drive]:\AdditionalInstalls\LicenseManager\Admin.net\Win32\WlmAdmin.exe. ([Drive] represents your CD-ROM/DVD drive.) Click [OK].
NOTE: Consider copying the entire LicenseManager folder to your local hard drive. This makesLicenseManager more accessible for futuremaintenance.
6 Install license codes using one of the followingmethods.
p To enter license codes from a file: In theWlmAdminwindow, right-click your server and selectAdd Feature > From a File > To Server and Its File. In theOpenwindow, select your license fileand click [Open]. This installs all license codes in the file.
Sage Estimating Installation and Administration Guide Page 23
Chapter 3—Installation and Configuration

p To type license codes: In theWlmAdminwindow, right-click your server and select Add Feature> From a String. In theAdd feature to server window, type your license code exactly as it appearsin the license file or on the packing slip. (The code is not case sensitive.) Be sure to select theAddfeature to server's file check box.
When you enter a license code, the software adds this code to a file named Lservrc (which has no fileextension) in the LicenseManager installation path.
7 After you enter license codes, remove the DVD and store it in a safe place.
Upgrade License ManagerTo upgrade LicenseManager, youmust use the following steps to remove the previous version of LicenseManager and then install the new version (version 8.3). Perform these steps at the computer whereLicenseManager is installed.
1 Check in any licenses before upgrading.
2 Run LoadLS.exe, located in the folder where you installed the previous version of LicenseManager(typically, C:\Program Files\Rainbow Technologies\SentinelLM7x.x.xServer\English). Click [Remove],and then click [OK] to remove the Sentinel LM licensemanager.
3 Remove the previous LicenseManager version:
p InWindows XP andWindows Server 2003: Start > Settings > Control Panel > Add or RemovePrograms.
p InWindows Vista, Windows 2008 Server, andWindows 7: Start > Control Panel > Programs> Uninstall a Program.
RemoveSentinel LM x.x.x.x. Server.
4 Install the new version of LicenseManager. See “Install LicenseManager” on page 22.
5 Copy the Lservrc file from the directory you identified in step 2 to the 8.3 directory of LicenseManager.Typically, the 8.3 directory is C:\Program Files\Common Files\SafeNetSentinel\Sentinel RMS LicenseManager\WinNT.
6 Click [Start] and then select Settings > Control Panel > Administrative Tools > Services. FindSentinel RMS License Manager in the list of services, right-click the service, and then select[Restart].
I. After you complete your setup1 Restart all programs and services that you shut down for the installation.
2 The Sage Estimating software performs a series of checks the first time you start it. If the SageEstimating software notifies you of any error conditions, correct the condition before continuing.
3 Sage Estimating provides supporting documents in theDocuments folder of the Sage Estimatinginstallation files. These documents are available in Adobe Acrobat (PDF) format only. If you do notalready have Adobe Acrobat or Acrobat Reader, you can download Adobe Acrobat fromwww.adobe.com.
Chapter 3—Installation and Configuration
Sage Estimating Installation and Administration Guide Page 24

J. Other Installation Scenarios
Terminal ServerFollow the steps for “Scenario 2 (Workgroup environment, estimating data shared from one workstation)”on page 14, with these exceptions:
n Always useAdd or Remove Programs to start an installation to a terminal server.
n If you install Sage Estimating on aWindows 2008 Server terminal server, begin the installation byselectingControl Panel > Install Application on Terminal Server. Follow the prompts and browseto the install.exe file.
n If you use another server to host Sage Estimating databases, install only Sage Estimating products tothe terminal server.
NOTE: If you install Sage Estimating products on a terminal server that uses Windows Server 2003,youmust log on to the terminal server with full administrative rights. This ensures that SageEstimating products have proper access to theWindows registry.
Sage Estimating Installation and Administration Guide Page 25
Chapter 3—Installation and Configuration

Chapter 4—Data MigrationIf you have been using a Pervasive-based version of Sage Estimating, you canmigrate (transfer) yourexisting Pervasive-based data to the new Microsoft® SQLServer® database platform if you want to use itwith this release.
NOTES:
l Youmust be using Sage 300 Construction and Real Estate 9.6 or later to migrate your data toSage Estimating.
l If you are currently using Sage 300 Construction and Real Estate 9.6, you cannot perform datamigration from a computer operating withWindows Vista®.
l If you are currently storing your Pervasive estimate data onmultiple computers, transfer allPervasive estimate data you want to use with Sage Estimating to one computer prior to migratingit to SQL Server.
Sage Estimating Installation and Administration Guide Page 26

OverviewThe process of migrating or making your existing Sage Estimating data compatible for use with the newSage Estimating is performed using the datamigration feature of the EstimatingManagement Console.This feature performs two functions when you select a Pervasive database for migration:
1 Validates your existing data for compatibility with Microsoft SQL Server.
2 Migrates or creates new SQL Server tables with your Sage Estimating data.
The EstimatingManagement Console performs these steps together when you start the datamigrationprocess. When youmigrate your Pervasive databases, the EstimatingManagement Console creates acorresponding .mdf and .ldf file in the specified SQL Server instance.
Changes in the database structureWhereas Pervasive allows you to arrange your estimates in a hierarchal folder structure within eachdatabase, Microsoft SQL Server stores all your estimates in just one estimate database. It also storesyour standard database and Address Book information separately.
Figure 6: Comparison of Pervasive and SQL Server
If you have arranged your estimates in Pervasive folders and subfolders, the EstimatingManagementConsole attempts to re-create the arrangement using "branches" in place of folders. These branches arefor organizational display purposes only; they do not change the structure of your SQL Server database.
During themigration process, the EstimatingManagement Consolemay rename some of your databasefiles to comply with SQL Server requirements. For more information on renaming database files, refer tothe EstimatingManagement Console Help.
Sage Estimating Installation and Administration Guide Page 27
Chapter 4—DataMigration
Migrating Your DataBegin the process using the EstimatingManagement Console (select Start > All Programs > Sage> Sage Estimating > Estimating Management Console).
IMPORTANT: Youmust have Sage 300 Construction and Real Estate 9.6 or later installed on thecomputer where your Pervasive SQL data is stored to perform datamigration. Youmust also have acopy of Sage 300 Construction and Real Estate 9.6 or later installed on the local computer where youare performing your datamigration.
1 Beforemigrating your data, if you are currently storing your Pervasive estimate data onmultiplecomputers, transfer all existing Pervasive estimate data, including estimates and standard databases,to one computer.To avoid data conflict, your Pervasive estimate datamust be on the same computer when youmigrateit.
2 From the EstimatingManagement Console, click [Data Migration].
3 Select step 2—Settings in the DataMigration window.
4 Click SQL Server (left-hand pane) then select a destinationAddress Book and Estimate database foryour migrated data.Click [Select] next to theAddress Book Database orEstimate Database box to specify a databasefrom the current instance.
5 Click Pervasive (left-hand pane).The EstimatingManagement Console performs an automatic check of your Pervasive databases andverifies they meet datamigration prerequisites.The EstimatingManagement Console displays one or more error messages if prerequisites are not met.Correct each error condition then try the verification process again by clicking [Reverify].
6 Click [Options] then select theEnable detailed logging check box if you want to generate detailedentries in themigration event log.Clear theEnable detailed logging check box to prevent detailedmigration event logging.
NOTE: Enabling detail loggingmay cause the datamigration process to perform slower.
7 Click step 3—Select Databases.
8 Click [Browse] and locate the path to the data folder where the Pervasive data you want to migrate islocated then click [OK].
NOTE: To avoid data conflict, your Pervasive estimate datamust be on the same computer whenyoumigrate it. Transfer all Pervasive estimate data that you want to migrate—including estimatesand standard databases—to one computer if you have not already done so.
TheData Migrationwindow displays the selected folder path in theStarting folder box.The Sage Estimating scans the selected folder for all Pervasive databases that are available formigration and displays them in a list below theStarting folder box. If desired, you can click the arrowkey to the right of the [Browse] button and perform one of the following actions:
Chapter 4—DataMigration
Sage Estimating Installation and Administration Guide Page 28

p Cancel scanning. The scan process can be lengthy, depending on the number and size of the fileswithin the selected folder. Select this option to stop the scan at any time.
p Rescan. Select this option to scan the selected folder again.
NOTE: The EstimatingManagement Console does not scan backup data folders (PEBackup folders).If the EstimatingManagement Console is unable to locate certain Pervasive databases, the databasesmay be residing in a PEBackup folder. Try renaming the PEBackup folders and restart the scan.
9 Select the check box for each Pervasive database in the list that you want to migrate.You can select estimate, Address Book, and standard databases for migration.
NOTE: Sage recommends migrating your standard databases beforemigrating your estimate data.
10 Click [Migrate] to begin themigration process.Themigration process may take some time, depending on the size of the databases you aremigrating.You can view the status of themigration from themigration event log by clicking step 4—Event log.If desired, you can also select other Pervasive databases for migration by repeating steps 1-9. Anyadditional migration jobs you schedule are placed in a queue and performed in order.
NOTES:l Ensure you select theQueued check box at the top of themigration event log to see a list ofpendingmigration jobs in the queue.
l Do not attempt to access any of the databases you aremigrating until themigration process isfinished; you cannot access a database while it is migrating.
11 Repeat steps 1-9 as necessary tomigrate all Pervasive databases you want to use with SageEstimating.
Sage Estimating Installation and Administration Guide Page 29
Chapter 4—DataMigration

Chapter 5—Configuring SQL ServerIf you are installing or upgrading Sage Estimating, and you already have a supportedMicrosoft® SQLServer® installation on your computer or server, you can use the existing SQL Server install by setting upanother instance (database server).
Supported Editions of Microsoft SQL Server 2008The following editions of Microsoft SQL Server have been tested for use with Sage Estimating:
n SQLServer 2008 Standard Edition, Service Pack 1
n SQLServer 2008 R2 Express Edition
n SQLServer 2008 R2 Standard Edition
Youmust be using one of these versions of SQL Server to operate with Sage Estimating. For informationonMicrosoft SQL Server 2008 editions, please visit www.microsoft.com.
Setting up a SQL Server instance for Use With SageEstimatingIf you have an existing instance of a supported version of Microsoft SQL Server installed, you can set upanother instance to work with Sage Estimating. (Options described in this sectionmay vary slightlydepending on the edition you are installing.)
NOTE: If you choose to uninstall your existing instance first, reboot your server before reinstalling toavoid problems with the new installation.
CAUTION: Do not change the owner of any databases in the Sage Estimating instance.
Set your new SQL Server 2008 or SQL Server 2008 R2 instance to the settings as outlined in the followingsections.
Sage Estimating Installation and Administration Guide Page 30
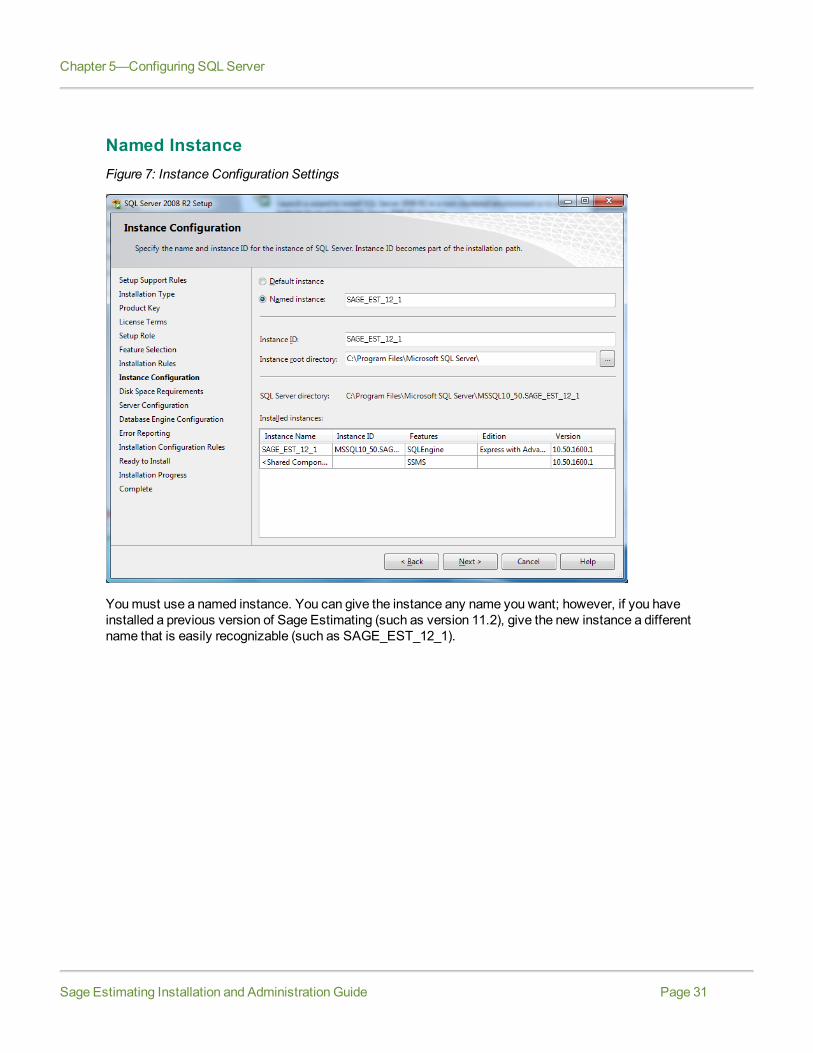
Named InstanceFigure 7: Instance Configuration Settings
Youmust use a named instance. You can give the instance any name you want; however, if you haveinstalled a previous version of Sage Estimating (such as version 11.2), give the new instance a differentname that is easily recognizable (such as SAGE_EST_12_1).
Sage Estimating Installation and Administration Guide Page 31
Chapter 5—Configuring SQL Server

Authentication ModeFigure 8: AuthenticationMode Settings
The instancemust supportMixed Mode authentication (Windows Authentication and SQL ServerAuthentication). This means eitherWindows authentication or SQL Server authentication can be used toaccess the database information.
WhenWindows authentication is used, the operator must have permissions to use SQL Server or be amember of a group that has those permissions. InWindows authenticationmode, SQL Server validatesthe account name and password using information from theWindows operating system.
When SQL Server authentication is used, the operator must have system administrator (sysadmin) rightsin SQL Server. SQL Server authentication is used for backwards compatibility and requires a strongpassword.
Collation SettingsCollation settings must be Latin1_General, case-sensitive, and accent-sensitive (Latin1_General_CS_AS).
You can customize the collation settings during the server configuration portion of the SQL Server install.In the SQL Server collation customization window, make the following selections:
Chapter 5—Configuring SQL Server
Sage Estimating Installation and Administration Guide Page 32
n Select theWindows collation designator and sort order option (instead of SQL collation, which isthe default)
n Latin1_General (for the collation designator)
n Case-sensitive
n Accent-sensitive
n Clear all other options
Assigning Database PermissionsDatabase permissions for SQL Server instances used with Sage Estimating are now set up using theSecurity feature in the EstimatingManagement Console.
For more information on setting up SQL Server security for Sage Estimating, see “F. Set Up Roles andPermissions” on page 20.
Setting the Firewall for WorkgroupsIf you are using SQL Server with a workgroup, youmust set the firewall on the workgroup server to allowworkstation computers to connect to the instance.
NOTE: If you are using SQL Server on a domain-based server, youmay still need to configure yourfirewall to allow remote communication. Refer to theSQL Server Guide for instructions.
Firewall Settings (Windows XP and Windows Server 2003)1 OpenWindows Firewall (click Start > Control Panel > Windows Firewall).
2 On theGeneral tab, select On.
3 Clear theDon't allow exceptions check box.
4 Click on theExceptions tab then click [Add Port].
5 In the Add a Portwindow, type 8004 in the Port number box.
6 Select TCP.
7 In theName box, typeSage Estimating Service (or other appropriate name) and click [OK].
8 Click [OK] again.
Firewall Settings (Windows Vista, Windows 2008 Server, and Windows7)1 OpenWindows Firewall (click Start > Control Panel > System and Security > Windows Firewall> Advanced Settings).
2 Right-click on Inbound Rules and select New Rule.
3 In the Inbound Rulewizard, select Port and click [Next].
4 Select TCP andSpecific local ports.
Sage Estimating Installation and Administration Guide Page 33
Chapter 5—Configuring SQL Server

5 In theSpecific local ports box, type 8004 then click [Next].
6 Select Allow the connection and click [Next].
7 Select theDomain, Private, andPublic check boxes then click [Next].
8 In theName box, typeSage Estimating Service (or other appropriate name) and click [Finish].
Additional RecommendationsTo ensure accurate performance, Sage strongly recommends making changes and verifications to thefollowing settings in SQL Server Management Studio and SQL Server ConfigurationManager. Failure tomake these changes may result in poor Sage Estimating performance or communication difficultiesbetween Sage Estimating and your SQL Server instance.
MemoryDetermine the amount of available memory on the server or workstation where SQL Server is installed. Toprevent SQL Server from consuming all available memory, use SQL Server Management Studio to set themaximum amount of memory (in the instance properties) to a reasonable limit (such as 4GB ) as follows:
1 Right-click on the SQL Server instance and select Properties.
2 In the Server Properties window, click Memory (left-hand pane).
3 Set theMaximum server memory amount to 4000 (or whatever limit you determine).
Database default locationIn SQL Server Management Studio, save the default database file path to the system registry as follows:
1 Right-click on the SQL Server instance and select Properties.
2 In theServer Propertieswindow, click Database Settings (left-hand pane).
3 In theDatabase Default Locations section (right-hand pane), verify the path to your instance datafolder and data log is correct. The path should be set as follows:For the data folder: {Drive}:\Program Files\Microsoft SQL Server\MSSQL10_50.{INSTANCE_NAME}\MSSQL\DATAFor the data log folder: {Drive}:\Program Files\Microsoft SQL Server\MSSQL10_50.{INSTANCE_NAME}\MSSQL\LOG
NOTE: Sage recommends keeping your SQL Server database path set to this location to back it updaily.
4 Type a 1 at the end of theData default path to temporarily change it and click [OK] to close theServerPropertieswindow.This saves themodified data default path to the system registry.
5 Right-click on the SQL Server instance and select Properties to open theServer Propertieswindowagain.
6 Change the default path back to its original setting (delete the 1 from the data path that you typed in step4) and click [OK].
Chapter 5—Configuring SQL Server
Sage Estimating Installation and Administration Guide Page 34

This saves the original setting back to the system registry.
7 Repeat steps 4-6 for the data Log folder path.
Communication protocolSet the communication protocol settings for the Sage Estimating SQL Server instance as follows:
1 Start the SQL Server ConfigurationManager by selectingStart > All Programs > SQL Server 2008 (orSQL Server 2008 R2) > Configuration Tools > SQL Server Configuration Manager.
2 In the left-hand pane of theSQL Server Configuration Manager window, click the arrow next toSQL Server Network Configuration to display all local SQL Server instances.
3 Select the instance associated with Sage Estimating (SAGE_ESTIMATING, by default).
4 In the right-hand pane right-click on a communication protocol and select Disable.
5 Repeat step 4 for all communication protocols except TCP/IP. Leave this protocol Enabled.
6 In the left-hand pane of theSQL Server Configuration Managerwindow, click the arrow next toSQL Native Client 10.0 Configuration.
7 Click Client Protocols (left-hand pane).
8 In the right-hand pane right-click on a communication protocol and select Disable.
9 Repeat step 8 for all communication protocols except TCP/IP. Leave this protocol Enabled.
10 Close the SQL Server ConfigurationManager and restart the service.
Copying Databases From Other InstancesSage Estimating allows the use of just one active SQL Server instance at a time. This instance is a"closed" SQL Server instance; Sage Estimating does not recognize databases (Address Book or standarddatabases) transferred or copied from other SQL Server instances unless they are added by way of theSearch For feature in the EstimatingManagement Console.
For example, if you have two Sage Estimating installs, Install A and Install B, you cannot copy AddressBook databases by copying them from Install A's SQL Server instance to Install B's SQL Server instancealone (using SQL Server Management Studio's built-in Copy Databases wizard, for example). Youmustalso open the EstimatingManagement Console and use theSearch For button in the Address BookCompanies/Contacts toolbar.
Sage Estimating Installation and Administration Guide Page 35
Chapter 5—Configuring SQL Server

Figure 9: Copying Databases From One SQL Server Instance to Another
Any database you add to an instancemust have the same Sage Estimating version as the other operatingdatabases. For example, if you are using Sage Estimating 13.1, and you want to add a standard databasefrom a previous Sage Estimating installation, upgrade the standard database to version 13.1 before addingit to the new instance. Refer to the EstimatingManagement Console in-product Help for instructions onusing theSearch For feature.
You can switch active SQL Server instances at any time for Sage Estimating by starting the Configurationwizard, selectingServer from the left-hand pane, and clicking [Change] from the right-hand pane.
Chapter 5—Configuring SQL Server
Sage Estimating Installation and Administration Guide Page 36

Index—Installation &AdministrationGuide
Aactivating Estimating products 19
activation 19
assigning database permissions 33
authenticationmode 32
Bbackup Pervasive data 29
Ccollation settings 32
contacting Sage 3
Ddatamigration
overview 26
prerequisites 28
process 28
database permissions 33
database structure 27
databases
migrating preexisting data 26
disk space requirements 7
Eexceptions, firewall 33
Ffeatures 1
firewall, workgroup exceptions 33
folder control requirements 9
Hhardware requirements 6-7
Iinstallation
activating Estimating products 19
collation settings 32
Estimating products 16
scenarios 12
setting up LicenseManager 21
SQL Server Express 16
terminal server 25
installing Estimating products 16
installing SQL Server Express 16
LLicenseManager
setting up 21
Sage Estimating Installation and Administration Guide Page 37
Mmigration
overview 26
prerequisites 28
process 28
mixedmode authentication 32
modifying existing instances 30
Nnew features 1
Oonline help 3
operating system requirements 5
PPEBackup folders 29
prerequisites, datamigration 28
processor requirements 6
product help 3
Rregistry keys 10
release overview 1
requirements
disk space 7
folder control 9
hardware 7
operating system 5
processor 6
SSage contact information 3
scan, data folder
restarting 29
stopping 29
setting up LicenseManager 21
software requirements 5
SQL Server
compatible editions 30
installing SQL Server Express 16
modifying existing instances 30
selecting a new instance 36
Tterminal server installation 25
Uupgrade paths 11
WWindows authentication 32
workgroup firewall exceptions 33
Sage Estimating Installation and Administration Guide Page 38