Embed Size (px)
Citation preview

Accounting User’s Guide
2012SageDacEasy

Sage DacEasy
Accounting

ii
Copyright
Information in this document is subject to change without notice. Company names and data used in examples herein are fictitious unless otherwise noted. No part of this document may be reproduced or transmitted in any form or by any means without the express written permission of Sage Software Inc, 1715 North Brown Rd, Lawrenceville, Georgia 30043.
© 1998-2011 Sage Software, Inc. All rights reserved.
Printed in the United States of America.
This document, the associated software, and the associated online documentation are the property of Sage Software, Inc. and are loaned to the user under the terms of the Limited Use License Agreement. Unauthorized copying or use of the software or any associated materials is contrary to the property rights of Sage Software, Inc. and is a violation of state and federal law. This material must be returned to Sage Software, Inc. upon demand.
Trademarks
The Sage Software logo and Sage DacEasy are registered trademarks or trademarks of Sage Software, Inc. or its affiliated entities. All other trademarks are the property of their respective owners.
Some of the artwork in this manual is modified from illustrations provided by the Corel Corporation.


v
• Table of Contents •
Chapter 1 Welcome
Overview .......................................................................................1-2Key Features..................................................................................1-3Additional Features ...................................................................1-10
Chapter 2 Getting Started
Starting Sage DacEasy Accounting ............................................2-14Exiting Sage DacEasy Accounting .............................................2-15Working With Sage DacEasy Accounting.................................2-16
Adding New Companies................................................................2-16Opening Company Files ................................................................2-17Using File Utilities .........................................................................2-17Backing Up and Restoring Your Files...........................................2-19Starting Add-On Modules.............................................................2-20
Chapter 3 Quick Tour
Accounting Fundamentals .........................................................3-22Account Types................................................................................3-23Double-Entry Accounting.............................................................3-23Posting ............................................................................................3-24Cash Versus Accrual Accounting..................................................3-25
Getting Started Checklist ...........................................................3-26Transaction Entry Checklist ......................................................3-30Periodic Routines Checklist .......................................................3-32
Chapter 4 Setting Up
Using the Security Feature .........................................................4-36Adding the Controller Password...................................................4-36Adding New Users and Assigning Access Rights .........................4-37Audit Trails ....................................................................................4-38Creating the Audit Trail Log .........................................................4-39Active/Inactive Status ....................................................................4-42Field Level Security ........................................................................4-45Add, Edit, Delete User Access Rights............................................4-46
Entering Company Information................................................4-47
Table of ContentsSage DacEasy Accounting User’s Guide
vi
Setting System Preferences ........................................................ 4-49Setting Up the Account Interface.............................................. 4-51Setting Up the Default Printer .................................................. 4-53Selecting Form Templates ......................................................... 4-53Incorporate Images to Reports and Forms............................... 4-55
Printing Forms with Company Logo ...........................................4-58Setting Up Tables ....................................................................... 4-58
Adding Terms Tables ....................................................................4-59Adding Tax Tables.........................................................................4-61
Setting Up Methods of Payment............................................... 4-63Adding or editing methods of payment .......................................4-63
Editing Custom Field Labels ..................................................... 4-64Entering Customer, Vendor & Product Defaults..................... 4-65
Entering Custom E-mail Subjects.................................................4-66Adding Accounts........................................................................ 4-68
Entering Account Setup Balances .................................................4-69Adding Customers ..................................................................... 4-71
Entering Customer Setup Balances ..............................................4-73Adding Vendors ......................................................................... 4-76
Entering Vendor Setup Balances ..................................................4-77Adding Master Items ................................................................. 4-79Adding Products ........................................................................ 4-82
Entering Product Setup Balances..................................................4-83Adding Services .......................................................................... 4-86
Chapter 5 Fixed Assets
Fixed Asset Monthly Checklist.................................................. 5-90Tax Versus Book Accounting.................................................... 5-90Adding Fixed Assets................................................................... 5-92Generating Recurring Depreciation.......................................... 5-93
Chapter 6 Working With the General Ledger
General Ledger Monthly Checklist ........................................... 6-97Entering General Ledger Transactions .........................................6-97Detail Line Commenting...............................................................6-99Attach Notes to Transactions......................................................6-100Transaction Voucher Document ................................................6-101
Using Recurring General Ledger Transactions ...................... 6-103Entering Recurring G/L Transactions ........................................6-103Generating Recurring G/L Transactions ....................................6-104

Table of ContentsSage DacEasy Accounting User’s Guide
vii
Verifying General Ledger Transactions...................................6-106Posting the General Ledger ......................................................6-107Enhanced Unposted Transactions Notification ....................6-108Printing the General Ledger Activity Report .........................6-109
General Ledger Activity Report...................................................6-111
Chapter 7 Working With Vendors
Overview ...................................................................................7-114Vendor Activity Monthly Checklist ............................................7-115
Using the Payables Ledger........................................................7-116Entering Payables Ledger Transactions ......................................7-116Attach Notes to Transactions......................................................7-119Transaction Voucher Document ................................................7-120Verifying Payables Ledger Transactions .....................................7-122Posting the Payables Ledger ........................................................7-124
Using the Purchasing Module .................................................7-126Adding Purchasing Codes ...........................................................7-127Entering Purchase Orders ...........................................................7-127Automatically Creating Purchase Orders ...................................7-129Entering Merchandise Received..................................................7-131Entering Purchase Returns..........................................................7-133Printing Purchasing Forms .........................................................7-136Verifying Purchasing Transactions.............................................7-138Posting Purchasing ......................................................................7-139
Printing Payables Reports ........................................................7-142Printing the Payments Report.....................................................7-142Printing the Accounts Payable Aging Report.............................7-143Merging Vendor Information in Microsoft Word.....................7-145
Chapter 8 Working With Customers
Overview ...................................................................................8-150Customer Activity Monthly Checklist ........................................8-151
Using the Receivables Ledger...................................................8-152Entering Receivables Ledger Transactions .................................8-152Attach Notes to Transactions......................................................8-155Transaction Voucher Document ................................................8-156Printing Transaction Voucher Documents ................................8-157Verifying Receivables Ledger Transactions ................................8-158Posting the Receivables Ledger ...................................................8-160

Table of ContentsSage DacEasy Accounting User’s Guide
viii
Using the Billing Module ........................................................ 8-162Entering Salespeople....................................................................8-162Adding Billing Codes...................................................................8-163Entering Invoices .........................................................................8-164Promotional Pricing ....................................................................8-167Entering Recurring Invoices .......................................................8-171Generating Recurring Invoices ...................................................8-172Entering Sales Returns.................................................................8-174Printing Billing Forms.................................................................8-179Verifying Billing Transactions ....................................................8-180Posting Billing..............................................................................8-181Tracking Backorders....................................................................8-184Filling Backorders ........................................................................8-185
Printing Receivables Reports................................................... 8-187Printing Customer Statements....................................................8-187Printing the Accounts Receivable Aging Report........................8-188Filter Aging Report by Past Due Days ........................................8-189Merging Customer Info with Microsoft Word..........................8-191
Chapter 9 Working with Inventory
Overview................................................................................... 9-196Assembling Items..................................................................... 9-196
Adding Component Lists ............................................................9-197Entering Assembly Transactions ................................................9-198Verifying Assembly Transactions ...............................................9-199Posting Assembly.........................................................................9-200Printing Assembly Reports..........................................................9-202
Recording Physical Inventory Counts .................................... 9-203Printing Count Sheets .................................................................9-203Entering Physical Inventory Counts...........................................9-204Verifying Physical Inventory Transactions ................................9-205Entering Inventory Adjustments ................................................9-208Printing Inventory Reports .........................................................9-210
Chapter 10 Banking
Overview................................................................................. 10-214Cash Module Monthly Checklist ..............................................10-214
Cash Ledger ............................................................................ 10-216

Table of ContentsSage DacEasy Accounting User’s Guide
ix
.................................................................................................10-216Cash Receipts .............................................................................10-218Entering Cash Receipts ..............................................................10-218Entering Comments on Cash Receipts .....................................10-221Attaching Notes to Transactions...............................................10-221
Cash Payments........................................................................10-222Entering Cash Payments............................................................10-223Entering Comments on Cash Payments...................................10-225Attaching Notes to Transactions...............................................10-225Paying Vendors With AutoPay .................................................10-226
Consolidating Invoices...........................................................10-228Recurring Payments ...............................................................10-230
Entering Recurring Payments ...................................................10-230Generating Recurring Payments ...............................................10-231
Verifying Cash Transactions..................................................10-233Printing the Cash Journal..........................................................10-233Printing Deposit Slips ................................................................10-234Printing Checks..........................................................................10-235Overriding Check-Printing Options.........................................10-238Printing OCR-Ready Checks.....................................................10-239
Posting Cash ...........................................................................10-241Reconciling Your Bank Statement.........................................10-243
Chapter 11 Financial Reporting
Overview .................................................................................11-250Printing Financial Reports .....................................................11-250
Printing the Trial Balance..........................................................11-250Printing the Balance Sheet.........................................................11-252Printing the Income Statement.................................................11-254Formatting Financial Statements ..............................................11-256
Understanding the Cash Flow Report...................................11-258Operating Activities ...................................................................11-259Investing Activities.....................................................................11-261Financing Activities ...................................................................11-262Printing the Cash Flow Statement ............................................11-263
Creating Custom Financial Reports ......................................11-264
Chapter 12 Custom Reporting
Overview .................................................................................12-270Terms used in this chapter ........................................................12-271

Table of ContentsSage DacEasy Accounting User’s Guide
x
Using the Query ..................................................................... 12-272Using the Query Checklist ........................................................12-273Completing the Header Area ....................................................12-274Selecting Fields in the Column Selection Area ........................12-274Selecting the Sort Order for the Query.....................................12-275Creating User Defined Fields ....................................................12-276
Limiting Records on a Query ................................................ 12-278Establishing Criteria ..................................................................12-278Understanding AND/OR Logic ................................................12-279Understanding Joins..................................................................12-281Printing the Query.....................................................................12-282
Using the Publisher................................................................ 12-283Using the Publisher Checklist ...................................................12-284Completing the Header and Page Header Area .......................12-285Completing the Detail Area ......................................................12-285Completing the Group Footer Area .........................................12-286Completing the Report Footer Area.........................................12-286Previewing and Printing the Final Report................................12-288
Chapter 13 Periodic Operations
Overview................................................................................. 13-290Closing Periods ...................................................................... 13-290
Period End Checklist .................................................................13-291Generating Finance Charges .....................................................13-291Closing the Period for Receivables ...........................................13-293Closing the Period for Payables ...............................................13-294Entering Account Budget Figures.............................................13-294Closing the General Ledger Period...........................................13-295Forecasting ................................................................................13-296
Closing the Year ..................................................................... 13-298Year End Checklist.....................................................................13-298Closing the Year for Receivables...............................................13-299Printing 1099 Forms..................................................................13-299Closing the Year for Payables....................................................13-300Closing the Year for Inventory .................................................13-301Closing the Year for the General Ledger ..................................13-301Purging Data Files......................................................................13-302
Entering Global Changes....................................................... 13-303

1Welcome
Overview 2
Key Features 3
Additional Features 10

WelcomeSage DacEasy Accounting User’s Guide
2
1
• Welcome •
OverviewWelcome to Sage DacEasy Accounting. Sage DacEasy Accounting is a powerful, yet easy to use, accounting system that is perfect for a growing business. You can expand Sage DacEasy Accounting with the addition of powerful add-on modules, making it the ideal out-of-the-box solution for the small business in need of robust, as well as affordable, business software.
This User’s Guide assists you with setting up your company and details basic accounting processes. You are directed to the Sage DacEasy Accounting Help system for detailed instructions on performing complex or occasional processes. In addition, “Related Help Topics” sections throughout this User’s Guide list Help topics on related subjects. Use the Contents tab or the Index tab in the Help to locate the topic.
Refer to the Getting Started Guide for assistance with using the Help, documentation conventions and other methods of obtaining assistance with your software. The Getting Started Guide also includes information on installing Sage DacEasy and adding or converting company files with the Sage DacEasy Business Center. In addition, global Sage DacEasy features such as printing and using the LookUp are explained.
Note If you choose to use the Sage DacEasy Business Center, and select a scheme with multiple Sage DacEasy programs, please note the following change regarding menu selections. When this User’s Guide instructs you to select a command from a menu in Sage DacEasy Accounting, select the Accounting menu in the Sage DacEasy Business Center, and then proceed with the steps. For example, if the User’s Guide instructs you to select Copy from the File menu, you have to select File from the Accounting menu in the Sage DacEasy Business Center, and then select Copy.

Key Features
3
1Key Features
A brief description of a few of the many powerful features in Sage DacEasy Accounting follows.
Note For a list of key features specific to the Sage DacEasy Business Center or common to all Sage DacEasy programs, refer to Chapter 1, “Welcome” in the Getting Started Guide.
Powerful Modules You Can Use Alone or Integrated
Ten powerful modules form the core of Sage DacEasy Accounting. These modules include General Ledger, Fixed Assets, Accounts Payable, Accounts Receivable, Inventory, Purchasing, Billing, Cash, Recurring and DacAccess, a custom report writer. Each module helps you keep track of vital information about your business activities. You can use these together as fully integrated modules or use each one individually as needed to suit practically any size business.
Designed Based on GAAP
Sage DacEasy is designed to follow GAAP (Generally Accepted Accounting Principles). For the experienced accountant and first-time user, this design provides the foundation you need to ensure an accurate reflection of your company’s ongoing financial position.
Streamlined Data Entry
The beauty of Sage DacEasy’s design is that you only need to enter information once. The automatic interface takes care of the rest. Sage DacEasy establishes a complete audit trail as the program processes your information. In addition, full reporting features allow you to view the information as it flows through the system. For information on setting up the interface accounts, refer to Chapter 4, "Setting Up"
Update the General Ledger Online
The Update General Ledger Online feature allows you to create and maintain associated unposted General Ledger transactions online when you enter transactions in the Receivables Ledger, Payables Ledger, Cash, Purchasing, Billing, Sage DacEasy Order Entry and Sage DacEasy Point of Sale modules. This provides you with an accurate, up-to-the-minute view of your books at any time, including activity from Sage DacEasy Order Entry and Sage DacEasy Point of Sale! Now you can have immediate access to unposted activity using DacAccess and Crystal Reports. And, the Billing module can update the General Ledger in detail. For information on setting up the Online General Ledger feature, refer to the Help topic titled “Setting System Preferences.”

WelcomeSage DacEasy Accounting User’s Guide
4
1Update the Check Register Online
The Update Check Register Online feature allows you to create and maintain associated unposted Check Register transactions at the time of entry from the source module, including add-on modules such as Sage DacEasy Order Entry and Sage DacEasy Point of Sale. This feature provides you with a real-time snapshot of all bank activity, including an accurate online balance. You can reconcile your bank accounts at any time so you no longer need to wait until the next posting cycle. when using this feature, the method of payment details from Sage DacEasy Order Entry and Sage DacEasy Point of Sale are recorded in detail in the Sage DacEasy Accounting Check Register to make it even easier to reconcile your bank account. Now you can have immediate access to unposted bank activity in DacAccess and Crystal Reports. For information on setting up the Online Check Register feature, refer to the Help topic titled “Setting System Preferences.”
Purge the Check Register At Any Time
Another new feature included in the Check Register is you are now able to purge the Check Register through a certain date. In previous versions you could only purge posted cleared checks during the Reconciliation routine. Now you can use the Purge Files routine and purge posted cleared checks from the Check Register at any time, giving you more control and flexibility. For more information on purging the Check Register, refer to the Help topic titled “Purging the Check Register.”
Increased Field Sizes
Certain fields in Sage DacEasy Accounting have been extended to accommodate larger transaction numbers. For example, Description areas of transactions have been expanded to accommodate 1024 characters. The General Ledger, Receivables Ledger, Payables Ledger, Cash Receipts and Cash Payments transaction numbers have been extended to account for the larger transaction numbers. Also, the Check Memo field has increased to allow you to record more detail on the memo line of your checks.
Easily Locate Cursor in Grids
A border now appears around the field when entering information. The watermarks on the detail area of the transactions create ease of use to easily see where you are. These allow you to easily locate your cursor and identify where fields are located.

Key Features
5
1Print Cash Receipt Voucher
This new feature gives you the ability to print a voucher when processing a Cash Receipt. When you accept payment, you can print a cash receipt voucher providing your customer with proof of payment. The cash receipt voucher uses a template similar to customer statements and invoices so the voucher is fully customizable to fit your business needs.
Improve Audit Checks
Sage DacEasy now warns you when entering a duplicate invoice number in the Receivables and Payables Ledgers. Although sometimes it is necessary to adjust an existing invoice using the Receivables or Payables Ledgers, it is often the case that the same invoice number is accidentally entered multiple times. Version 13 helps prevent this by providing a warning when a vendor or customer invoice is created that matches an existing invoice number for that vendor or customer.
Generate Minimum Finance Charge
Generating finance charges against past due invoices is not new to Sage DacEasy Accounting. But now, you can also assign each customer a minimum finance charge. The finance charge is still calculated per invoice, but if the minimum is not reached, a new finance charge is created adjusting the balance of the finance charge to the minimum amount. You can also use this feature to assess flat finance charges rather than base the charge on an outstanding balance. For more information on generating finance charges, refer to Chapter 13, "Periodic Operations"
Auto Purchase Order
Quickly and easily create purchase orders that meet the criteria you specify. Now you can easily create purchase orders based on criteria such as the number of units available compared to the number of units set as your minimum level. And, because Sage DacEasy automatically generates the purchase order transaction for you, just imagine all the time you’ll save! For more information on using the Auto Purchase Order routine, refer to Chapter 7, "Working With Vendors"
Advanced Security
Sage DacEasy’s Security feature brings you peace of mind. You can create an unlimited number of user profiles that indicate the areas of the program the user can access. You can also limit the warehouses into which users can purchase, or from which users can sell. For more information, refer to Chapter 4, "Setting Up"

WelcomeSage DacEasy Accounting User’s Guide
6
1Forecast Cash Flow With Aging Reports
You can define the aging schedule on the Accounts Receivable and Accounts Payable Aging Reports. Assign seven different time frames to track when money is due from customers or due to vendors. You can print a Detail, Summary or Audit Aging Report (which includes the source of the transaction). To further customize the report, you can choose if paid invoices are included, if advances are consolidated into a single line and age the invoices by due date or invoice date. For more information, refer to Chapter 7, "Working With Vendors" and Chapter 8, "Working With Customers"
Customizable Forms
Every aspect of your business contributes to your customers’ perception. Custom forms give your business a professional image. You can customize your billing forms, purchasing forms, checks, statements, bill of materials and labels. For more information, refer to Chapter 4, "Setting Up"
Customized Lookups
Allows users to select the columns that appear in lookups, and the width of each column displayed. The feature also includes an option to export customized lookups to an ASCII file.
E-mail Reports and Forms
Currently you may select whether to send a given report or form to the Printer, Screen, HTML, Excel, or whether to export the output to a comma delimited or text file. This feature adds e-mail to these options so that a form or a report can be sent to an em ail address directly from within Sage DacEasy.
Save Report Parameters
Sage DacEasy remembers the values entered by users for report parameters so that they are recalled as the default values the next time the report is printed.
Remove Unused AutoComplete field data
Today if you accidentally type something incorrectly in an AutoComplete field there is no way to correct that mistake. A utility has been added to remove unused AutoComplete field data.

Key Features
7
1Audit Trail
Improve auditing and defend against potential fraud. With this feature, you have a register of user activity in the system. Audit Trail records insertions, deletions, and modifications of the most relevant master and transaction tables in Sage DacEasy. This important enhancement to the security system maintains a record of who modified the information in your system, as well as what information was modified and when. The log is available to print as you desire.
Incorporate Images to Reports and Forms
Strengthen your company’s image and branding with more professional looking forms and reports. Now you may include your company logo on reports and forms. In addition, this feature may reduce your company’s expense of purchasing forms with your company logo pre-printed. Simply setup a bitmap image of your company Logo on the Company Information Dialog of each Sage DacEasy Module and indicate that you want this image to be printed in the header of all reports. You can also print the logo in your forms by adding the variable {LOGO} to your form templates. Sage DacEasy supports .bmp, .jpg, and .gif bitmap extensions.
Active/Inactive Status
Reduce the time that it takes you to lookup vendors, customers, services, and more. When you set records as inactive, these records are omitted from reports, lookups, and may not be used when making transactions. Set the status of Accounts, Customers, Vendors, Products, or Services to Inactive when you want Sage DacEasy to ignore these records without physically removing them from the company database. You may change the status of Inactive to Active when you are ready to start using these records again.
Quotes
This feature provides you with the ability to create, save, and print sales quotes for prospective or existing customers. Plus upon realizing a sale, customers can convert the stored quote to an invoice which will save you time from re-entering the information. Quotes are simply a means for you to provide a printed copy of your prices, without entering an invoice.
Increased Item Code Size
The Item code for products and services was increased from 14 characters to a 20 characters maximum. This feature allows you to accommodate Inventory coding schemes for specific industries.

WelcomeSage DacEasy Accounting User’s Guide
8
1Project/Job Tracking
This feature allows you to track revenues and expenses by specific jobs or projects setup in the Jobs Table in Sage DacEasy. To track revenues and expenses for Jobs/Projects, simply create a Job or Project and distribute amounts to it from the Transaction Entry dialogs. Job tracking is supported in General Ledger, Accounts Receivable, Accounts Payable, Billing, Cash Receipts, Cash Payments, Sage DacEasy Order Entry, and Payroll Transaction entry. The feature includes reports showing revenues and expenses per Customer/Job. Reports can be summarized by Account number or you can also print the detail of all transactions that are distributed to a jobs or project.
Change Tax Rate on Detail Lines of Invoices
This feature allows you to modify the tax rate for each detail line on an invoice. This is useful selling items that are subject to special surtax rates or for states that are implementing different tax rates for different goods or services.
Purchase Assistant
This feature allows you have smart extended description lines associated to specific products in your Inventory Products Table. Like Sales Assistant in previous versions of Sage DacEasy extended description lines may be setup as Popup, Hidden, or normal Descriptions.
Cash Ledger
The Cash Ledger feature allows you to better manage cash transactions and gain insight into the status of your bank accounts. You can use it to easily enter Cash Receipts and Payments and distribute them to a single General Ledger Account, Customer Open Invoice, or Vendor Open Invoice. In addition, the Cash Ledger dialog box presents a Grid View of all Sage DacEasy Accounting, Sage DacEasy Point of Sale, Sage DacEasy Order Entry, Sage DacEasy Payroll, or Sage DacEasy Job Costing transactions that affect the balance of your bank accounts.
Bank Reconciliation
Simplify the bank account reconciliation process using Version 2010 Reconciliation. Sage DacEasy displays payments and deposits in separate lists, allowing you to quickly locate the transactions that you need to clear as well as identify discrepancies between your account and bank statement.
Customer Purchase History
Simplify the product reorder process and make servicing your customers even easier with the new Customer Purchase Lookup feature. This feature allows you to quickly view your customers past purchases so that you can service them intelligently and easily reorder products.
Key Features
9
1Enhanced Workflows
The new Workflows page in the Sage DacEasy Business Center provides you with a process oriented visual tool which leads you through steps needed to complete different tasks, such as entering invoices and posting billing or entering and calculating payroll, as well as completing year end routines.
Reconciliation Detail Report
This new report in Sage DacEasy Accounting provides you with a clear picture of your reconciliation status for any time period.
Expanded Description Control
This new feature allows you to type multi line text for description fields found in the transaction areas for purchase orders, merchandise receipts, purchase and sales returns, invoices, orders and sales receipts. This new expanded control allows up to 1,024 characters an increase from the previous version limitation of 30 characters.
Custom E-mail Subject Lines
This new feature provides the ability to define a custom company level e-mail subject line. See Chapter 4, "Setting Up" for additional information.
Methods of Payment
This feature allows you to define a list of accepted payment methods for your company. You can then select a payment method from the list when applying payments to receipts, invoices, and payments. Sage DacEasy populates the transaction with the account you defined for the payment method, which helps ensure accurate accounting. See Chapter 4, "Setting Up" for additional information.
Sage Exchange Integration
Sage DacEasy Accounting allows you to integrate with Sage Exchange, which you can use to verify credit card payments online. See Chapter 4, "Setting Up" for additional information.
Global Changes
Sage has added Services as a selection in the File field on the Global Changes dialog box (Periodic > Global Changes) and provides several selections in the Change field for this area; Commissionable, Taxable, Serial Numbers, Measure, Price, Custom Text Label 1-6, Custom Amount Label 1-4, and Customer Date Label 1-2.

WelcomeSage DacEasy Accounting User’s Guide
10
1Additionally, Sage has added several new selections in the following areas:
• Customer - Price Group, Billing Group, Zone Code, Ship Via, Custom Text Label 1-6, Custom Amount Label 1-4, and Customer Date Label 1-2.
• Vendor - Tax Table, Terms Table, Memo, Territory, Ship Via, Type, Credit Limit, Custom Text Label 1-6, Custom Amount Label 1-4, and Customer Date Label 1-2.
• Product - BIN, Minimum, Lead Time, Reorder, Purchase Measure, Purchase Vendor, Purchase Number, Purchase Alternative Vendor 1-2, Sales Measure, Sales Price, Sales Quantity Price Break A-F, Sales Alternative Product 1-2, Taxable, Custom Text Label 1-6, Custom Amount Label 1-4, and Customer Date Label 1-2.
• Salesperson - Territory.
BIN Variable
Sage DacEasy Accounting allows you to add BIN numbers in the Detail section of invoices and merchandise received forms, which makes it easier to track your products. Select the BIN variable on the Invoice Detail Variable dialog box to add the field to the selected form.
Note To ensure accurate printing, add the BIN variable only to the Detail section of forms.
Additional Features • Add custom fields to your customer, vendor, product and service
records.
• Print deposit slips with totals.
• Track shipping methods.
• Exclude non-inventory items from Product History and Product Activity Detail reports.
• View backorders from the customer or product record.
• Create an invoice from the customer’s record.
• Adjust inventory levels with the Inventory Adjustments or Physical Inventory features.
• Assign different Accounts Receivable and Accounts Payable accounts to customers and vendors.
• Track inventory costs and units at multiple warehouses.
• Post general ledger and cash transactions online.
Additional Features
11
1• Make global changes to customers, vendors, products and salespeople.
• Print transaction listing reports and invoices with multiple sorting and range options.
• Track fixed assets and generate depreciation.
• Import general ledger transactions.
• Print a Cash Flow Statement.
• Calendar or fiscal year reporting.
• Apply receipts and payments to appropriate invoices or directly to general ledger accounts.
• Create multi-level price breaks.
• Enter adjustments while reconciling bank accounts with the option to save a work-in-progress.
• Select the type of invoice, service or product, that fits your business.
• Track detailed customer, vendor and product transaction history.
• Track sales information by salesperson.
• Choose if paid invoices are included and advances are consolidated on the Aging Report.
• Departmentalize your profits by customer groups or inventory types.
• Classify products and services as commissionable items.
• Calculate finance charges.
• Print 1099s and 1096s regardless of your financial year.
• Preset minimum stocking levels and reorder quantities that appear on the Product Alert Report.
• Assemble products and invoice finished goods.
• Optionally exclude paid invoices when printing statements.
• Attach messages to products and services using the Sales Assistant.
• Monitor the sales of services, non-inventory and inventory items.
• Consolidate multiple companies for financial reporting.
• Set up default information for customers, vendors and products.
• Purge unwanted data.

WelcomeSage DacEasy Accounting User’s Guide
12
1

2Getting Started
Starting Sage DacEasy Accounting 14
Exiting Sage DacEasy Accounting 15
Working With Sage DacEasy Accounting 16Adding New Companies 16
Opening Company Files 17
Using File Utilities 17
Backing Up and Restoring Your Files 19
Starting Add-On Modules 20
Getting StartedSage DacEasy Accounting User’s Guide
14
2
• Getting Started •This chapter gets you started using the program if you choose to run Sage DacEasy Accounting independent of the Sage DacEasy Business Center. It includes information on starting and exiting Sage DacEasy Accounting, accessing other Sage DacEasy modules, adding new companies, opening company files, file utilities and backing up your data files.
Starting Sage DacEasy AccountingIf you are using the Sage DacEasy Business Center, you do not have to start Sage DacEasy Accounting separately. When you access a command from the Sage DacEasy Accounting menu in the Sage DacEasy Business Center, the appropriate dialog box appears. Refer to Chapter 1, “Installing Sage DacEasy” in the Getting Started Guide for information on starting the Sage DacEasy Business Center.
To start Sage DacEasy Accounting independent of the Sage DacEasy Business Center, complete the following steps.
Note If you are upgrading your data from a previous version, refer to Chapter 1, “Installing Sage DacEasy” in the Getting Started Guide before completing the following steps.
To start Sage DacEasy Accounting
1 Click the Start button, point to Programs, then to Sage DacEasy, then to Modules, and then select Accounting.
If you have not registered the program, you are asked to register. If you want to register at a later time, choose No. To register the program, choose Yes. The Serial Number dialog box appears. Type your serial number and activation key using all capital letters, and then select OK.
If you have already set up a company, the default company opens and you can disregard the following steps.
If you are a new user, the Welcome to Sage DacEasy dialog box appears. You can add the sample company or add your company. Select the Open the Sample Company Data option to add the sample company or continue with the following steps to add your company.

Exiting Sage DacEasy Accounting
15
2
2 Select the Add New Company Data option. The Add Company dialog box appears.
3 Type a descriptive name for your company files. This name is used to identify the company when opening your company files.
4 Type the path where the new data files are to be located or click the Browse button and locate the folder.
Tip Select Help for more information on the Add Company dialog box.
5 Select OK to create the new company data files. The Open Company dialog box appears.
6 Double-click the company you want to open. The dialog box closes and the company’s name appears on the title bar, indicating the active company.
Exiting Sage DacEasy AccountingIf you are not using the Sage DacEasy Business Center, choose Exit from the File menu to close Sage DacEasy Accounting. You can also exit Sage DacEasy Accounting by clicking the Close button located on the Sage DacEasy Accounting title bar. A message appears confirming you want to exit the program. Choose Yes to continue.
Note A tip may appear recommending that you back up your data. Select Cancel to return to the program and make a backup or click Exit to close the program.
The Welcome to Sage DacEasy dialog box appears when new users first start the program.

Getting StartedSage DacEasy Accounting User’s Guide
16
2Working With Sage DacEasy Accounting
Now that you know how to start Sage DacEasy, you are probably eager to start tracking your company in Sage DacEasy Accounting. This section explains how to add company files and open a company. To help you keep your company running smoothly, this section also includes information on running utilities and backing up and restoring your data. If your company is interfaced with add-on Sage DacEasy modules, this section explains how you can effortlessly switch between Sage DacEasy Accounting and the add-on modules.
Tip Refer to the Sage DacEasy Business Center Guide for additional information on working with Sage DacEasy. This includes working with the Sage DacEasy Business Center, changing report layouts, using AutoComplete, sending e-mails, using the calculator, using the LookUp, using the Date Selection button, working with Sage DacEasy toolbars and more.
Adding New Companies
If you are not using the Sage DacEasy Business Center to access Sage DacEasy Accounting, you are prompted for information about your company when you start the program the first time. Sage DacEasy uses this information to create your company’s data files. This company becomes the default company and is opened automatically when you start the program.
Complete the following steps to add additional companies in Sage DacEasy Accounting.
To Add a New Company
1 Select Open from the File menu. The Open Company dialog box appears.
2 Select Add. The Add Company dialog box appears.
3 Complete each field and confirm you have the required disk space available.
You can select Help from the Add Company dialog box for a detailed description of each field.
4 Select OK to add the company.

Working With Sage DacEasy AccountingOpening Company Files
17
2Opening Company Files
You can add an unlimited number of companies; however, you can only open one company at a time if you choose not to use the Sage DacEasy Business Center. The following steps explain how to open a different company if you choose not to use the Sage DacEasy Business Center. When you select a different set of data files, Sage DacEasy closes the current data files before opening the new company files.
Tip You can include your Sage DacEasy Accounting data files in a company profile in the Sage DacEasy Business Center, and then open the company from the Sage DacEasy Business Center. This gives you all the advantages of the Sage DacEasy Business Center, including the ability to have multiple windows open at once. In addition, you don’t have to close one company before opening a different company. Refer to Chapter 1, “Installing Sage DacEasy” in the Getting Started Guide for more information.
To Open a Different Company
1 Select Open from the File menu. The Open Company dialog box appears.
You can sort on any column to help you quickly locate a company.
Double-click the company you want to open. The company information appears in the middle of the screen.
Related Help Topics
• Setting the default company
• Deleting company files
• Copying company files
• Importing data
Using File Utilities
Sage DacEasy includes a file utility function you can use to periodically check the integrity of data files and, if necessary, repair any damaged files. You can run this routine on any data files at any time; however, we recommend that you run Recover and Verify on all data files at least once a month. We recommend you back up your data before using utilities.

Getting StartedSage DacEasy Accounting User’s Guide
18
2Important You can click the Close button on the Operation Status dialog box to interrupt the Drop Indexes, Recover and Verify routines. If you choose to interrupt a routine, a confirmation screen appears. Choose Yes to stop the utility routine. Sage DacEasy completes the utility on the current file and displays a cancellation message. It is very important you return later and run the utility routine again.
To Use File Utilities
1 Select Utilities from the File menu. The File Utilities dialog box appears.
2 Type the file selection or select LookUp to select the file or group of files.
Note The Ledger Group checks all files associated with the General Ledger, Receivables Ledger and Payables Ledger. The Inventory Group checks all files associated with Physical Inventory, Assembly and Inventory Adjustments.
3 Select the file operation.
Drop Indexes — Select this option to remove any supplemental indexes from your data files.
Recover — Select this option to rebuild and optimize the file.
Verify — Select this option on a transaction header file and Sage DacEasy confirms that each transaction is located in the header and detail file and deletes any incomplete transactions. Select this option on an Open Invoice Detail file and Sage DacEasy confirms that each unposted transaction in the file exists in the transaction file and vice versa. Any missing open invoices are added to the Open Invoice Header and Detail files. If a transaction is missing, the open invoice is deleted. After running Verify, a report prints that lists each change made to a file, if any.
Transaction Viewing — Select this option to view or edit transaction files.
Because multiple files are updated when transactions are entered, it is very important to only delete transactions resulting from data corruption. To delete unposted transactions, recall the transaction on the transaction entry screen and select Delete from the detail area. Rather than deleting posted transactions, enter a reversing entry. Refer to Sage DacEasy Accounting’s Help system for more information.
4 Select OK to begin the selected operation. A confirmation box appears when the process is complete. Select Continue to return to the File Utilities dialog box.
If Transaction Viewing was selected, a list of each transaction appears. Click the Close button to return to the File Utilities dialog box.

Working With Sage DacEasy AccountingBacking Up and Restoring Your Files
19
2Backing Up and Restoring Your Files
With the Backup routine you can back up your data to a disk, to your hard drive or to a network drive. We recommend you keep a backup copy of your data files on disk so you do not lose your data in the event of a drive failure.
Tip You can back up or restore all data files in a company profile at one time using the Sage DacEasy Business Center. Refer to “Working With the Sage DacEasy Business Center” in the Sage DacEasy Business Center Guide for more information.
It is recommended that you make frequent backups of your data. It is especially important to make a backup before performing certain irreversible functions such as posting or purging. You can make a backup directly from many of these functions. In addition, you can complete the following steps to make a backup at any time.
Note Because protecting your accounting data is so important, steps on storing a complete data library are included in Chapter 5, “Working With the Sage DacEasy Business Center” in the Sage DacEasy Business Center Guide.
To Back Up or Restore Data
1 Select Backup/Restore from the File menu. The File Backup/Restore dialog box appears.
2 Select the appropriate operation: Backup or Restore.
3 Select the type of files to back up: Accounting or Payroll.
4 If necessary, edit the source of the data files and the target.
You can select Defaults to add a default target path for backing up or default source path for restoring data.
5 Select OK. A confirmation message appears.
6 Choose Yes to make or restore the backup. You are prompted to insert disks as required.
Related Help Topics
• Resetting file attributes
• Setting backup/restore defaults

Getting StartedSage DacEasy Accounting User’s Guide
20
2Starting Add-On Modules
If you are using the Sage DacEasy Business Center, you have a single entry point for all Sage DacEasy modules used by your company. If you are running the Sage DacEasy Accounting program independent of the Sage DacEasy Business Center, you can configure your Sage DacEasy Accounting program so that you can start an external Sage DacEasy module without exiting Sage DacEasy Accounting.
To start an external Sage DacEasy module while in the Sage DacEasy Accounting program, you need to make sure the external module path is set up properly in Sage DacEasy Accounting.
To Set Up Module Paths
1 Select Defaults from the Edit menu in Sage DacEasy Accounting, and then select System Preferences. The System Preferences dialog box appears.
2 Select the Paths tab, and then type the path to the program files for each Sage DacEasy program or click the Browse button to locate the program folder.
3 Select OK to save the paths. Now you can open a Sage DacEasy module from the Modules menu. The selected Sage DacEasy program starts with the Sage DacEasy Accounting program still open.

3Quick Tour
Accounting Fundamentals 22Account Types 23
Double-Entry Accounting 23
Posting 24
Cash Versus Accrual Accounting 25
Getting Started Checklist 26
Transaction Entry Checklist 30
Periodic Routines Checklist 32
Quick TourSage DacEasy Accounting User’s Guide
22
3
• Quick Tour •Once you become familiar with your new Sage DacEasy Accounting software, you will wonder how you ever managed without it. Now, you can compile information with a touch of a key that once took days to gather.
Sage DacEasy Accounting works with you regardless of your background. As you learn more about accounting and computers, the program grows with you, expanding to fit your increasing needs. For example, the novice user can print predefined standard financial reports. Whereas the experienced user can take advantage of the powerful Financial Reporter to create custom financial statements tailored to their business.
Although knowledge of accounting principles is not required to use Sage DacEasy Accounting, it helps you understand what Sage DacEasy is doing behind the scenes as it posts and updates ledgers automatically. This chapter gives a brief overview of basic accounting principles.
Use this chapter as a road map to effectively automate your accounting process. The checklists in this chapter identify each step in the accounting process, direct you to the chapter or Help topic that explains each step, and tell you why this step is important.
Accounting FundamentalsAccounting involves recording your company’s financial activity and generating useful reports to analyze your company’s financial condition. Because a variety of people may be interested in a company’s financial condition (such as bankers, investors and management), standardized reports called financial statements are used by most businesses. Financial statements are special types of financial reports that follow a prescribed format that meets GAAP (General Accepted Accounting Principle) rules. Two of the most commonly used financial statements are the Balance Sheet and Income Statement.
The Balance Sheet reflects a company’s financial condition at a point in time, showing what a company owns and what a company owes. The Balance Sheet is based on the Accounting Equation (Assets=Liabilities+Capital).
The Income Statement lists a company’s revenues, expenses and profit or loss. This report is sometimes referred to as the Profit and Loss Statement.
For information on the predefined financial statements included in Sage DacEasy and custom financial statements, refer to Chapter 11, "Financial Reporting."

Accounting FundamentalsAccount Types
23
3Account Types
Understanding basic accounting principles begins with an understanding of various types of accounts used in a bookkeeping system. Each account is typically assigned to one of the following types:
• Assets—These are items that have value. Assets can be tangible such as cash, inventory and buildings or intangible such as patents, franchises or copyrights.
• Liabilities—These are accounts that reflect what you owe to outside sources. Liabilities include accounts payable, notes payable and taxes payable.
• Equity—This is the difference between assets and liabilities. For example, if a company liquidated all its assets to pay off all debts to outside sources (liabilities), the amount left over represents the company’s net worth. This net worth is equity. Equity accounts include retained earnings and common stock. The terms Capital, Equity and Owner’s Equity are used interchangeably.
• Revenues—This represents money coming into a company and results primarily from the sale of goods or services. However, some companies have many sources of revenue. All types of income, such as a gain on the sale of a building or interest income from investments, are revenue.
• Expenses—This is the money spent generating income. Expenses include utilities, rent, payroll and cost of goods sold.
Double-Entry Accounting
You use double-entry accounting in most accounting systems, although you may not be aware of it. The double-entry method uses debits and credits to reflect changes in account balances. The phrase, “for every debit there is a credit,” best describes double-entry accounting. This means every time you debit an account you must credit another account.
If you use a checkbook to track your purchases, you may have been using double-entry accounting for years without realizing it. For example, when you write a check to pay an electric bill, you affect two accounts—your utilities expense account and your checking account. You subtract money from your checking account and add to the annual amount you pay for utilities.

Quick TourSage DacEasy Accounting User’s Guide
24
3These additions and subtractions to various accounts are debits and credits in accounting. In the last example, you debited your expense account (increasing its balance) and credited your checking account (reducing its balance). You may wonder why the expense account is increased when you actually pay off a bill. Consider what you do at the end of the year. You add all your expenses together and tell the government the amount of money you made less those expenses. Therefore, you need to keep a running total of the amount as it increases throughout the year.
Accounts are assigned to a specific group that determines the type of entry you make (debit or credit) to affect an account balance. For example, a checking account is an asset account and while a utilities account is an expense account. Since assets and expenses are debit accounts, you would apply a debit entry to increase the balance of these types of accounts. Liabilities, capital and revenue are credit accounts and therefore you would apply a credit entry to increase the balance of these types of accounts.
A common misconception is that debit means positive and credit means negative. A debit entry always increases the value of a debit account (assets and expenses), while a credit entry always decreases the value of a debit account. A debit entry to a credit account (liabilities, capital, and revenue) always decreases the value, while a credit entry increases the balance in a credit account. Use Table 3-1 to help you determine if you should issue a debit or credit to increase or decrease a balance in a particular type of account.
Posting
In most manual accounting systems, you post entries from your subsidiary ledgers (for example, Accounts Receivable and Accounts Payable) to your General Ledger at the end of the month. Posting is the process by which you update individual accounts with values from other ledgers.
Category To Increase To Decrease
Asset Debit Credit
Liability Credit Debit
Capital Credit Debit
Revenue Credit Debit
Expense Debit Credit

Accounting FundamentalsCash Versus Accrual Accounting
25
3Sage DacEasy uses the same terminology to describe the process of sending a batch of transactions entered in the subsidiary ledgers to the General Ledger and chart of accounts. Information entered into each module such as Cash, Billing or Purchasing does not typically show on financial reports until it is posted to the General Ledger.
Note If you select to use the Update General Ledger feature, you can update the General Ledger with unposted transactions from the subsidiary ledgers to view the business activity. While you can view the unposted subsidiary ledger transaction using the General Ledger Transaction Entry dialog box, the account balances are not updated with the activity until you post the appropriate subsidiary ledger.
Cash Versus Accrual Accounting
Sage DacEasy Accounting is an integrated system based on the accrual rather than cash method of accounting.
When you use the accrual method of accounting, you record revenue when it is earned and expenses when incurred. For example, if you sell a product to a customer, you enter the invoice (revenue) at the time of the transaction, regardless whether a cash exchange takes place. Likewise, if you purchase office supplies on account for your business, you would record the expense when you incur it, regardless of when you actually pay for the supplies.
Accrual basis accounting accurately portrays a company’s earnings and the cost of those earnings. In contrast, if you were using the cash method of accounting, you would not record any sales or purchases until you actually received the money or paid for merchandise.
The accounting method you choose to use is up to you. For tax reporting purposes, the Internal Revenue Service (IRS) accepts either method as a way to determine the financial stability of your company. The primary consideration is that you select a method and use it consistently. The only exception applies to a business that produces all or some of its income from inventory. IRS regulations state if inventory is an important part in accounting for income, the accrual method must be used to record sales and purchases of merchandise.
We strongly recommend you contact your accountant for advice on choosing the accounting method appropriate for your business. Your accountant can explain these methods in greater detail as they relate specifically to your business and inform you of all tax implications.

Quick TourSage DacEasy Accounting User’s Guide
26
3Getting Started Checklist
Sage DacEasy requires you to enter certain information prior to entering transactions. Use this checklist to properly set up Sage DacEasy Accounting.
The checklist directs you to the appropriate chapter or Help topic for more information on the setup step. Sage DacEasy’s Easy Setup feature guides you through entering the minimal amount of information that is required before you can enter transactions. Because Easy Setup does not provide a method for entering all data, only use this feature if you do not anticipate using the program to its fullest capabilities.
Tip The quickest and easiest way to set up your company is to add your new company using the Sage DacEasy Business Center, and then use the Setup Workflow Guide to assist you with the setup process.
The Setup Workflow Guide steps you through the setup process and includes links to each setup screen. Because it includes all setup steps related to your company profile, it is especially useful if you are interfacing with Sage DacEasy add-on modules.
Refer to Chapter 1, “Installing Sage DacEasy” in the Getting Started Guide for more information on adding your company with the Sage DacEasy Business Center. Refer to Chapter 6, “Working With Sage DacEasy Business Center Pages” in the Getting Started Guide for more information on using Workflow Guides.
Add your company
Sage DacEasy Accounting lets you track accounting information for multiple companies. You are prompted to add a company the first time you access the program. Use the File Open dialog box to add additional companies. For more information, refer to Chapter 2, "Getting Started."
Add a controller password and assign user access rights
If you choose to use the security feature, add a controller password and assign rights to specific users. The controller has full access to all areas of the program. After the controller password has been entered, each user can be added with limited access to the program. For more information, refer to Chapter 4, "Setting Up."
Add company information
Enter your company’s name and address information on the Company Information dialog box. This information prints at the top of each report. Also enter tax IDs and information specific to the structure of your financial year, which Sage DacEasy uses to post transactions into the proper period. For more information, refer to Chapter 4, "Setting Up."
Getting Started ChecklistCash Versus Accrual Accounting
27
3Note If you add your company using the Sage DacEasy Business Center, you have the option to automatically update the company information in each Sage DacEasy module when you save the new company profile. This keeps you from entering your address information more than once; however, you still need to set up the structure of your financial year.
Select system preferences
Use the System Preferences dialog box to customize the software to meet your needs. For more information, refer to Chapter 4, "Setting Up."
Add interface accounts
Sage DacEasy uses the information entered on the Account Interface dialog box when you post transactions from modules other than the General Ledger. Sage DacEasy automatically updates the General Ledger with the correct transaction based on the interface accounts you selected. For more information, refer to Chapter 4, "Setting Up."
Add labels for custom fields
You can customize up to six text fields, four numeric fields and two date fields for your customer, vendor, product and service records. After setting up the custom field labels, the labels appear on the Custom tab when editing customer, vendor, product and service records. You can then include these fields on custom reports generated with DacAccess. For more information, refer to Chapter 4, "Setting Up."
Set up customer, vendor and product defaults
If you find yourself entering the same information on each record when you add your customers, vendors or products, you might want to add the information as a default. The default information automatically appears when you add a new record. For more information, refer to Chapter 4, "Setting Up."
Set up the default printer
Sage DacEasy uses the default printer settings unless you edit the report layout. You can set any printer installed in your operating system as the default printer, and then select font and page layout information. For more information, refer to Chapter 4, "Setting Up."
Select form preferences
You can print forms to plain paper, a standard preprinted Sage DacEasy form or a custom form. Prior to printing your first form, select which form template you are using or design your own template. For more information, refer to Chapter 4, "Setting Up."

Quick TourSage DacEasy Accounting User’s Guide
28
3 Add message, price break, terms, tax, shipping, and weight unit tables
Sage DacEasy uses tables to store certain information. Assign information to a code, and then use this code instead of reentering the information throughout the program. If the information changes (e.g., tax rate changes), you only need to change the table instead of changing each record affected by the change. Sage DacEasy requires at least one tax table and one terms table if you have open- or balance forward-type customers or vendors. Sample tax tables, terms, message codes and weight units are supplied by Sage DacEasy for your convenience. For more information, refer to Chapter 4, "Setting Up."
Add accounts and setup balances
The chart of accounts stores each account balance. These account balances are used to print financial reports such as the Income Statement and Balance Sheet. When you add a company, you can select a sample chart of accounts or create your own. If you select a sample chart of accounts, you may need to make minor modifications. After your chart of accounts is complete, enter setup balances for each detail account. For more information, refer to Chapter 4, "Setting Up."
Add customers and setup balances
If you want to track information about each customer, add each customer on the Edit Customer dialog box. Balance information for the customer is updated automatically each time you post a transaction with the customer code. When you enter beginning balances, you can enter each outstanding invoice or a lump sum. The accounts receivable account is updated as you save each customer’s beginning balance. For more information, refer to Chapter 4, "Setting Up."
Add vendors and setup balances
If you want to track information about each vendor, add each vendor on the Edit Vendor dialog box. Balance information for the vendor is updated each time you post a transaction that includes the vendor code. When you enter beginning balances, you can enter each outstanding invoice or a lump sum. The accounts payable account is updated as you save each vendor’s beginning balance. For more information, refer to Chapter 4, "Setting Up."
Getting Started ChecklistCash Versus Accrual Accounting
29
3 Add warehouses and master items
If you want to track inventory located in multiple warehouses, add a record for each warehouse and master item. When you set up the master item, include each product that makes up the master item and the warehouse in which the item is stored. This allows you to track your inventory by the master item or by each warehouse. For more information, refer to Chapter 4, "Setting Up."
Tip If you are tracking inventory for multiple warehouses, you can automatically generate product codes for each warehouse when you create the master item. Then, proceed to the next step to enter the product balance for each new product code created. If you do not want to use the Generate Items feature, you can manually set up your products by following the instructions in the next step, and then return to the master item to assign the products.
Add products and setup balances
If you want to track inventory, add each product you buy and sell. You can include each item on billing and purchasing transactions. You can add finished goods with component lists and use the Assembly module to build the products. The inventory account balance is automatically updated as you enter each product’s beginning balance. For more information, refer to Chapter 4, "Setting Up."
Add services
If you want to include services on your billing or assembly transactions, add each service your company offers. For more information, refer to Chapter 4, "Setting Up."
Add fixed assets
If you want Sage DacEasy to depreciate your fixed assets, add a record for each fixed asset. You can also enter nondepreciable assets that you need to track. For more information, refer to Chapter 5, "Fixed Assets."
Add purchasing and billing codes
Use codes to include items on billing and purchasing transactions that are not products or services, for example, freight. For more information on purchasing codes, refer to Chapter 7, "Working With Vendors." For more information on billing codes, refer to Chapter 8, "Working With Customers."

Quick TourSage DacEasy Accounting User’s Guide
30
3 Add salespeople
If you want to track your sales staff ’s performance or pay commission, add each salesperson in Sage DacEasy Accounting. For more information on entering salespeople, refer to Chapter 8, "Working With Customers."
Add serial numbers
If you track serial numbers for your products and services, add each serial number. You can track the product by its serial number when you purchase and sell the product. For more information, refer to the Help topic titled “Adding serial numbers.”
Related Help Topics
• Gathering setup information
• Determining the setup date
• Determining your financial year
Transaction Entry ChecklistAccurately tracking your company’s financial records helps you grow your business. This checklist details the steps required to record your daily accounting activity in Sage DacEasy Accounting.
Enter your transactions
You can enter transactions directly into the General Ledger or enter transactions into one of the modules and let Sage DacEasy update the General Ledger for you. You also have the ability to enter recurring transactions (general ledger entries, payments and invoices) and generate them as needed.
For information on entering transactions, refer to the appropriate chapter.

Transaction Entry ChecklistCash Versus Accrual Accounting
31
3
Print any necessary forms
Print any required forms for the transactions you entered in the Billing, Purchasing and Cash modules. For example, you must print any computer checks prior to posting cash. Unless the default has been changed on the System Preferences dialog box, you are required to print the following forms when applicable: Merchandise Receipts, Purchase Returns, Invoices, Sales Returns and Checks. Although not required, you may choose to print Deposit Slips for quick and accurate bank deposits and Purchase Orders if required by your vendors. For information on printing forms, refer to the table above to locate the appropriate chapter.
Print the journal
Before posting each module, you are required to print the journal (unless the default has been changed on the System Preferences dialog box). Use this report to verify that the transactions you are about to post were entered correctly. This report is invaluable if you encounter an error during the posting process. For information on printing journals, refer to the table above to locate the appropriate chapter.
Post
When you post the General Ledger, the entries are marked as posted and the account balances are updated. When you post other modules, Sage DacEasy creates an entry in the General Ledger and the account balances are updated. Depending on the transaction, additional files might be updated; for example, the Customer file is updated when you post Billing. Because the posting process cannot be reversed, make a backup prior to posting. For information on posting each module, refer to the table above to locate the appropriate chapter.
Module Chapter
General Ledger 6, “Working with the General Ledger”
Payables Ledger and Purchasing 7, “Working with Vendors”
Receivables Ledger and Billing 8, “Working with Customers”
Assembly, Physical Inventory, and Inventory Adjustments
9, “Working with Inventory”
Cash 10, “Banking”

Quick TourSage DacEasy Accounting User’s Guide
32
3 Print reports
Reporting is the key to your accounting system. Sage DacEasy has a number of predefined reports with useful information. For information on printing predefined or custom financial statements, refer to Chapter 11, "Financial Reporting." For information on creating custom listing reports, refer to Chapter 12, "Custom Reporting."
Periodic Routines ChecklistThe following checklist details the tasks you should perform on a periodic basis.
Back up your data
Although you rarely need to restore a backup, it is important to make frequent backups in case you accidentally perform a procedure that cannot be reversed, experience a hard disk failure, or have corruption in your files. For more information, refer to Chapter 2, "Getting Started."
Tip You can back up all Sage DacEasy data files for a single company from the Sage DacEasy Business Center. Refer to, “Working With the Sage DacEasy Business Center” in the Sage DacEasy Business Center Guide for more information.
Run utilities
Your data files, like your cars, need periodic maintenance. The Recover and Verify routines work together to keep your software running smoothly. For more information, refer to Chapter 2, "Getting Started."
Reconcile your bank accounts
It is important that your bank account balances in Sage DacEasy match the balances on your bank statements. If you enter your banking transactions in the Cash module, you can use the Reconciliation feature to help you with this process. If you choose to use the Online Check Register feature, all unposted General Ledger, Receivables Ledger, Payables Ledger, Billing, Sage DacEasy Order Entry and Sage DacEasy Point of Sale transactions using a reconcilable account also appear in the Reconciliation feature along with your Cash Receipts and Cash Payments. For more information, refer to Chapter 10, "Banking."
Generate depreciation
If you depreciate your fixed assets, you know how tedious this process can be. Add a record for each fixed asset and let Sage DacEasy update your accounting information with the depreciation expense automatically. For more information, refer to Chapter 5, "Fixed Assets."

Periodic Routines ChecklistCash Versus Accrual Accounting
33
3 Generate finance charges
If you assign a finance charge percentage for your customers, you can have Sage DacEasy automatically add the proper finance charge amount to each customer account that is past due. For more information, refer to Chapter 13, "Periodic Operations."
Run period end routines
Run the Accounts Receivable and Accounts Payable Period End routines to update the Balance Information for your customers and vendors. In addition, paid invoices are removed from the aging information for all account types and invoices are combined into a single invoice for balance forward-type accounts. You also have the option to run the General Ledger Period End routine. Use this routine when you want to prevent further entries from being made in a particular period. For more information, refer to Chapter 13, "Periodic Operations."
Print 1099s
You can print a 1099 for each vendor designated as Contract Labor. For more information, refer to Chapter 13, "Periodic Operations."
Run year end routines
The Year End procedures update the historical information. In addition, the General Ledger Year End routine adjusts the periods structure. You can enter up to two years of transactions before you have to close the year. For more information, refer to Chapter 13, "Periodic Operations."
Purge data files
You can purge your data files as often as you like. If you do not purge, you have access to more historical data; however, you may run low on disk space. If disk space is low, you may want to purge all files, with the exception of the General Ledger, at the end of the year. For more information, refer to Chapter 13, "Periodic Operations."
Enter budget figures for the new year
If you would like to compare budget figures to actual figures, enter your budget figures for each account prior to entering transactions in your new year. For more information, refer to Chapter 13, "Periodic Operations."

Quick TourSage DacEasy Accounting User’s Guide
34
3

4Setting Up
Using the Security Feature 36Audit Trails 38
Add, Edit, Delete User Access Rights 46
Entering Company Information 47
Setting System Preferences 49
Setting Up the Account Interface 51
Setting Up the Default Printer 53
Selecting Form Templates 53
Incorporate Images to Reports and Forms 55
Setting Up Tables 58Adding Terms Tables 59
Adding Tax Tables 61
Setting Up Methods of Payment 63
Editing Custom Field Labels 64
Entering Customer, Vendor & Product Defaults 65Entering Custom E-mail Subjects 66
Adding Accounts 68Entering Account Setup Balances 69
Entering Customer Setup Balances 73
Adding Customers 71
Adding Vendors 76
Adding Master Items 79
Adding Products 82
Adding Services 86

Setting UpSage DacEasy Accounting User’s Guide
36
4
• Setting Up •You don’t have to be an accountant to accurately track your company’s financial position with Sage DacEasy Accounting. Sage DacEasy is an integrated accounting system. This means that you can enter transactions into various modules such as Cash and Billing and let Sage DacEasy do the accounting “behind the scenes.”
This chapter takes you through the setup process. Sage DacEasy uses the information you enter during the setup process to automatically update the General Ledger when you post your daily activity—taking the guesswork out of making the proper entry to the General Ledger.
Using the Security FeatureOne of the most important issues when using a computerized accounting system is the safety and security of your data. If you have one or more operators entering data or printing reports, you may want to restrict access to certain routines. Implementing Sage DacEasy’s security system is a three-step process. The first step is to set up a controller password. The second step is to add each user and assign their access rights. The third step is to select the Activate User Access Rights check box on the System Preferences dialog box.
For more information on activating user access rights, refer to the section titled “Setting System Preferences” in this chapter. The following information explains how to enter the controller password and add each user. It also describes other security features such as the “Audit Trail Log”, Field Level Security, setting fields status to ‘Active’ or ‘Inactive’, and assigning rights for Adding, Editing, or Deleting records from a Master Table.
Adding the Controller Password
Sage DacEasy gives you a default user (“Controller”) that has access to the entire program. Use the Edit Password dialog box to enter the controller password. The next time you start the program, type Controller in the User ID field and type the password.
To Add the Controller Password
1 Select Defaults from the Edit menu, and then select Passwords. The Edit Password dialog box appears.
2 Type the password to be used each time you log in as the controller.
It is important that you remember your password or write it down and store it in a secure place.

Using the Security FeatureAdding New Users and Assigning Access Rights
37
43 Type the password again in the Confirm Password field.
4 Select OK to save your controller password.
Adding New Users and Assigning Access Rights
After entering the controller password, the controller can set up access rights for each additional user with the Access Rights feature. From the Edit User Access dialog box you can restrict the areas in the program that each user can access and assign individual passwords for each user. You can also limit the warehouses into which users can purchase inventory and from which inventory can be sold.
To Add or Edit User Access
1 Select Defaults from the Edit menu, and then select User Access Rights. The Edit User Access dialog box appears.
2 Type a User ID and password, and then confirm the password.
3 Select the Limit Warehouses check box if you have multiple warehouses and want to limit the warehouses into which the user can purchase inventory and from which inventory can be sold.
If you select this check box, select Options, and then select Edit Warehouse Permits. A list of your warehouses appears. Select a warehouse and select Tag/Untag to give the user access or remove access. Select Tag/Untag All to give or remove the user access to all warehouses. Select OK to save the warehouse rights and return to the Edit User Access dialog box.
4 You can assign rights to each function or copy rights from another user.
To select rights, select Edit User Permits. Select a function and select Tag/Untag to give the user access or remove access. Select Tag/Untag All to give the user access to all functions or remove access to all functions. Select OK to save the user and their access rights. The Edit User Access dialog box appears ready for you to set up additional users.
Assign specific accessrights for each userfrom the Edit UserAccess dialog box.

Setting UpSage DacEasy Accounting User’s Guide
38
4To copy an existing user’s rights, type the user ID in the Copy From User field or select LookUp and select the user from the list that appears. Select OK to save the user and their access rights, and clear the Edit User Access dialog box.
You can select Help from the Edit User Access dialog box for a detailed description of each field.
Audit Trails
Improve auditing and defend against potential fraud. With this feature, you have a register of user activity in the system. Audit Trails will record insertions, deletions, and modifications of the most relevant master and transaction tables in Sage DacEasy. This important enhancement to the security system maintains a record of who modified the information in your system, as well as what information was modified and when. The log is available to print as you desire.
Note To activate the Audit Trail Log in the Sage DacEasy Accounting, Sage DacEasy Order Entry and Sage DacEasy Point-of-Sale modules, enable the Activate User Access Rights option in System Preferences. To activate the Audit Trail Log in the Sage DacEasy Payroll module enable the Generate Audit Trail check box in Preferences.
The Audit Trail Log Report gives a detailed listing of the Audit Trail records that exist for any of the Sage DacEasy modules where this feature is activated. You can filter this report by any of the Sort and Rank options available, which include Date, User ID, and Entity ID. This allows you to print a report showing for any entity all the activity in Sage DacEasy for a range of Dates and User ID’s. You may also choose the specific functions for which you want to monitor this activity.
Turning on User Access Rights
1 Select Defaults from the Edit menu, and then select Passwords. The Edit Password dialog box appears.
2 Type the password to be used each time you log in as the Controller.
This is a Master password that allows access to every function in the system. It is important to remember this password or write it down and store it in a secure place.
3 Type the password again in the Confirm Password field.
For more detailed information on creating users on the refer to the User’s Guide for each module or to the on-line help system.
4 Select Defaults from the Edit menu, and then select User Access Rights. The Edit User Access dialog box appears.

Using the Security FeatureCreating the Audit Trail Log
39
45 Type a User ID and Password, and then confirm the password. If you are
editing an existing user, Click LookUp to select the user.
6 Select the Limit Warehouse check box if you have multiple warehouses and want to limit the one for which the user can purchase or sell inventory. If you have set up your warehouses and you selected to Limit Warehouses, click on Options and then select Edit Warehouse Permits to tag the warehouses that are available to this user.
7 Click on Edit User Permits and the User Access Rights dialog box appears. Select a function and click on Tag/Untag to give or remove access to the highlighted function. You may use Tag/Untag All to assign or remove access to all the listed functions.
8 Click OK to save the user, and exit this function when you have completed creating your users.
9 Select Defaults from the Edit menu, and then select System Preferences. The Edit System Preferences dialog box appears.
10 Select the Activate User Access Rights check box to enable the Security System and press OK to save the system preferences.
Turning ON the Audit Trail Log
1 Select Defaults from the Edit menu, and then select System Preferences.
2 Click on the Activate User Access Rights check box to enable this option.
3 Click OK to save the new preference settings or Close to exit without saving.
Creating the Audit Trail Log
Sage DacEasy creates an Audit Trail record every time users perform certain types of actions such as Inserting, Updating or Deleting information, using any of Sage DacEasy’s Transaction Entry or Table Maintenance functions. The Audit Trail record includes the date and time of the action, the ID of the User who performed the action, the ID and description of the entity affected by the action, the type of action performed (Insert, Update, Delete), and a reference to the source transaction.
Entities refer to the Transaction Entry or Table Maintenance functions available in Sage DacEasy. Examples of entities are General Ledger, Accounts Receivable and Accounts Payable transaction entry.
The following list describes the entities and activities that generate an Audit Trail:

Setting UpSage DacEasy Accounting User’s Guide
40
4Entity ID Description ReferenceAccount Edit Accounts Account Number
Customer Edit Customers Customer Code
Vendor Edit Vendors Vendor Code
Product Edit Products Item Code
Service Edit Services Service Code
Master Item Edit Master Items Master Item Code
Fixed Asset Edit Fixed Assets Fix Asset Code
Purchasing Code Edit Purchasing Codes Purchase Code
Billing Code Edit Billing Codes Billing Code
Salespeople Edit Salespeople Salespeople Code
Message Edit Messages Message Code
Price Break Edit Price Breaks Price Break Code
Shipping Method Edit Shipping Methods Shipping Method Code.
Term Edit Terms Term Code
Tax Edit Taxes Tax Code
Warehouse Edit Warehouses Warehouse Code
Weight Unit Edit Weight Units Weight Unit Code
General Ledger GL Transactions GL-<Transaction #>.
Accounts Receivable AR Transactions AR-<Transaction #>
Accounts Payable AP Transactions AP-<Transaction #>
Cash Receipt Receipts Transactions <Transaction #>
Cash Autopay Autopay Generate <Transaction #>
Cash Payment Payment Transaction <Transaction #>
Cash Adjustment Cash Adjustments <Transaction #>
Reconciliation Bank Reconciliation RECON-<MM-DD-YYYY>
Void Checks Cash Void Checks <Transaction #>
Merchandise Receipt Purchase Receipts Entry <MR Number>
Merchandise Return Purchase Returns Entry <PR Number>
Invoice Invoices Entry <Invoice #>
Sales Return Sales Return Entry <SR Number>
Inventory Inventory Adjustments <Transaction #>
Assembly Assembly Transactions <Transaction #>
Physical Inventory Physical Inventory <Transaction #>

Using the Security FeatureCreating the Audit Trail Log
41
4
Printing the Audit Trail Log
1 Choose Audit Trail Log from the Reports menu for the Sage DacEasy Accounting, Sage DacEasy Point-of-Sale, or Sage DacEasy Order Entry modules.
2 Enter the Sort by and Rank by options.
3 Click OK. The Report Layout dialog box appears.
4 Select the target disposition, edit the layout if necessary, and then click OK to begin printing.
Purging the Audit Trail Log
1 Select Purge from the Periodic menu and the Purge dialog box appears.
2 Open the File drop down and choose Audit Trail Log.
3 Enter the ‘purge to’ date. This function will purge Audit Trail records with a date equal to or earlier than the ‘purge to.’

Setting UpSage DacEasy Accounting User’s Guide
42
44 Press OK to start purging.
Purging physically removes records from your company data. You must make sure this is what you want to do before performing this task.
Active/Inactive Status
Reduce the time that it takes you to lookup vendors, customers, services, and more. When you set records as inactive, these records are omitted from reports, lookups, and may not be used when making transactions. Set the status of Accounts, Customers, Vendors, Products, or Services to Inactive when you want Sage DacEasy to ignore these records without physically removing them from the company database. You may change the status of Inactive to Active when you are ready to start using these records again.
Changing the Status of Accounts
1 Select Customers from the Edit menu and the Edit Accounts dialog box appears.
2 Click on LookUp to select the customer to edit.
3 Click on the Inactive check box field to set the status of that account to Inactive. An unmarked check box means that the status is set to Active.
Sage DacEasy verifies that it can change the status of an account to Inactive without causing integrity problems to your company’s database. If the account does not meet this validation criteria, Sage DacEasy displays an error message.
4 Click OK to save the account or Click CLOSE to exit without saving.
Purging Inactive Accounts
1 Select Accounts from the Edit menu and the Edit Accounts dialog box appears.
2 Click on Options in the Edit Accounts toolbar and then Click on Purge Inactive.
The Purge Inactive function removes all Inactive accounts from the Chart of Accounts. You must be sure that this is what you want to do before running the Purge Inactive option.
3 Click on Continue to delete Inactive accounts or Cancel to stop this process and return to the Edit Accounts dialog.

Using the Security FeatureActive/Inactive Status
43
4
Changing the Status of Customers
1 Select Customers from the Edit menu and the Edit Customers dialog box appears.
2 Click on LookUp to select the customer to edit.
3 Click on the Inactive check box field to set the status of that customer to Inactive. An unmarked check box means that the customer is set to Active.
Sage DacEasy verifies that it can change the status of a customer to Inactive without causing integrity problems to your company’s database. If the customer does not meet this validation criteria Sage DacEasy displays an error message.
4 Click OK to save the customer or click CLOSE to exit without saving.
Purging Inactive Customers
1 Select Customers from the Edit menu and the Edit Customers dialog box appears.
2 Click on Options in the Edit Customers toolbar and then Click on Purge Inactive.
The Purge Inactive function removes all Inactive customers from the Customers table. You must be sure that this is what you want to do before running the Purge Inactive option.
3 Click on Continue to delete Inactive customers or Cancel to stop this process and return to the Edit Customers dialog.
Changing the Status of Vendors
1 Select Vendors from the Edit menu and the Edit Vendors dialog box appears.
2 Click on LookUp to select the vendor to edit.
3 Click on the Inactive check box field to set the status of that vendor to Inactive. An unmarked check box means that the status is set to Active.
Sage DacEasy verifies that it can change the status of a vendor to Inactive without causing integrity problems to your company’s database. If the vendor does not meet this validation criteria Sage DacEasy displays an error message.
4 Click OK to save the vendor or Click CLOSE to exit without saving.
Setting UpSage DacEasy Accounting User’s Guide
44
4
Purging Inactive Vendors
1 Select Vendors from the Edit menu and the Edit Vendors dialog box appears.
2 Click on Options in the Edit Vendors toolbar and then Click on Purge Inactive.
The Purge Inactive function removes all Inactive Vendors from the Vendors table. You must be sure that this is what you want to do before running the Purge Inactive option.
3 Click on Continue to delete Inactive Vendors or Cancel to stop this process and return to the Edit Vendors dialog.
Changing the Status of Products
1 Select Products from the Edit menu and the Edit Products dialog box appears.
2 Click on LookUp to select the Product to edit.
3 Click on the Inactive check box field to set the status of that Product to Inactive. An unmarked check box means that the status is set to Active.
Sage DacEasy verifies that it can change the status of a Product to Inactive without causing integrity problems to your company’s database. If the Product does not meet this validation criteria Sage DacEasy displays an error message.
4 Click OK to save the Product or click CLOSE to exit without saving.
Purging Inactive Products
1 Select Products from the Edit menu and the Edit Products dialog box appears.
2 Click on Options in the Edit Products toolbar and then Click on Purge Inactive.
The Purge Inactive function removes all Inactive Products from the Products table. You must be sure that this is what you want to do before running the Purge Inactive option.
3 Click on Continue to delete Inactive Products or Cancel to stop this process and return to the Edit Products dialog.
Changing the Status of Services
1 Select Services from the Edit menu and the Edit Services dialog box appears.
2 Click on LookUp to select the Service to edit.

Using the Security FeatureField Level Security
45
43 Click on the Inactive check box field to set the status of that Service to
Inactive. An unmarked check box means that the service is set to active.
Sage DacEasy verifies that it can change the status of a Service to Inactive without causing integrity problems to your company’s database. If the Service does not meet this validation criteria Sage DacEasy displays an error message.
4 Click OK to save the Product or click CLOSE to exit without saving.
Purging Inactive Services
1 Select Services from the Edit menu and the Edit Services dialog box appears.
2 Click on Options in the Edit Services toolbar and then Click on Purge Inactive.
The Purge Inactive function removes all Inactive services from the Services table. You must be sure that this is what you want to do before running the Purge Inactive option.
3 Click on Continue to delete Inactive Services or Cancel to stop this process and return to the Edit Services dialog.
Field Level Security
This feature improves the security of your data and reduces employee mistakes. Keep unauthorized employees from modifying sensitive fields such as pricing and line item discounts on Billing and Purchasing WIndows. Use this feature for fields that are pre-filled with a logical default that users should not be modify, or for toolbar options that require a higher level of security. Examples of these are the Price field or the Delete Invoices option in the Invoice form.
In addition, this feature closes known security violations by disallowing indirect unauthorized user access to certain functions. In previous
versions, once a user entered into certain option for which the user has access,
he or she may invoke other functions for which he or she does not have access.
User rights to these fields and toolbar options default to ON when a company is converted from previous versions of Sage DacEasy.
Assigning Field Level Security
1 Select Defaults from the Edit menu and then select User Access Rights. The Edit User Access dialog appears.
2 Click on LookUp to select the User you are assigning rights to.

Setting UpSage DacEasy Accounting User’s Guide
46
43 Click on Edit User Permits and the User Access Rights dialog box appears.
Find the function or field level security you want and Click on Tag/Untag to give or remove access to the user.
Tip: All new protected functions and fields were added to the end of the list in the Edit User Permits dialog.
Sage DacEasy adds field level security to the following fields and toolbar options:
Module Form Type DescriptionAccounting Invoices Toolbar Option Delete Invoices
Accounting Invoices Toolbar Option Edit Bank Account
Accounting Invoices Toolbar Option Edit Deposit
Accounting Invoices Field Billing Price
Accounting Invoices Field Line Discount
Accounting Invoices Field Tax Code
Accounting Invoice Field Total Tax
Accounting Purchasing Field Purchase Price
Accounting Purchasing Field Line Discount
Accounting Purchasing Field Tax Code
Accounting Purchasing Field Delete MR
Accounting Edit Accounts Field GL Account Status
Accounting Edit Customers Field Customer Status
Accounting Edit Vendors Field Vendor Status
Accounting Edit Services Field Service Status
Accounting Edit Product Field Product Status
Add, Edit, Delete User Access Rights
Increase the level of control for current user access rights by assigning add, edit, or delete rights for defined functions of the application. This feature allows you to determine which users can perform certain tasks within Account, Customer, Vendor, Product, and Services functions. The following table describes these rights and the permits they include:

Entering Company InformationAdd, Edit, Delete User Access Rights
47
4
The table above refers to the supported edit functions. These the following: Accounts, Customers, Vendors, Master Items, Products, Services, Fixed Assets, Terms, Taxes, Billing Codes and Purchase Codes. The Edit User Permits LookUp includes new entries to modify and delete each of these tables. The right to edit a table, found also in previous versions of Sage DacEasy, allows users to insert new records or view existing records only.
Assigning Access Rights to Edit, Modify or Delete Tables
1 Select Defaults from the Edit menu and then select User Access Rights. The Edit User Access dialog appears.
2 Click on LookUp to select the User you are assigning rights to.
3 Click on Edit User Permits and the User Access Rights dialog box appears. Find the Edit, Modify or Delete entry for the table you want and Click on Tag/Untag to give or remove access to the user.
Tip: Rights to modify and delete were added to the end of the list in the Edit User Permits dialog. Rights to Edit retained their original position from previous versions of Sage DacEasy.
Entering Company InformationEnter your company information before entering account balances or activity. The company address prints at the top of most reports in Sage DacEasy. Sage DacEasy uses the period structure to determine the accounting period to update when you post transactions. You can then print financial statements and track historical information for specific periods within your financial year. Even if you are accepting the default period structure, you still have to save the Company Information dialog box before entering any balance information or transactions.
User Rights Permissions
Edit <Table> View, Insert
Modify <Table> View, Change
Delete <Table> View, Delete

Setting UpSage DacEasy Accounting User’s Guide
48
4Note If you add your company using the Sage DacEasy Business Center, you have the option to automatically update the company information in each Sage DacEasy module when you save the new company profile. This keeps you from entering your address information more than once; however, you still need to set up the structure of your financial year. If you edit the address information in Sage DacEasy Accounting, the changes are only reflected in your Sage DacEasy Accounting data files.
The address information can be edited at any time. The period information must be entered prior to entering transactions and cannot be edited if transactions exist in the year you are attempting to edit. If you need to change the period structure after entering account activity, refer to the Help topic titled “How do I change the periods table after balances have been entered?” This Help topic is located in the Frequently Asked Questions chapter of the Troubleshooting book in the Help.
To Enter Company Information
1 Select Defaults from the Edit menu, and then select Company Information. The Company Information dialog box appears.
2 Type your company name in the header area and complete the applicable fields on the Company tab. The name and address print at the top of most reports.
3 Select the Periods tab, and then type the number of periods, description and beginning and ending dates for each period.
Enter defaultinformation about your
company on theCompany Information
dialog box.

Setting System PreferencesAdd, Edit, Delete User Access Rights
49
4Tip: Select Help from the Company Information dialog box for a detailed description of each field.
4 Select OK to save your company information.
Related Help Topics
• Entering company information with Easy Setup
• Entering accounting periods with Easy Setup
• Adding alternative company shipping addresses
• Deleting company alternative addresses
• Changing a period’s status
Setting System PreferencesThe System Preferences dialog box lets you customize how Sage DacEasy displays, prints and processes your data. You can change your selections at any time.
To Set System Preferences
1 Select Defaults from the Edit menu, and then select System Preferences. The System Preferences dialog box appears.
2 Select your preferences for each option on the General tab.
If you choose to use station IDs, each station ID stores the user’s windows positions, report layouts, backup and restore defaults, default printer settings and LookUp settings.
Tailor the program tomeet your specific needs
using the SystemPreferences dialog box.

Setting UpSage DacEasy Accounting User’s Guide
50
4You must set up a controller password before you can select the Activate User Access Rights check box.
3 Select the Cash tab and make your selections for each option.
4 Select the Billing tab and make your selections for each option.
Important: Consult an accounting professional about the ramifications of changing costing methods in the middle of your business year.
5 If you are using other Sage DacEasy programs, select the Paths tab. Type the program paths to each Sage DacEasy program you want to access using the Modules menu in Sage DacEasy Accounting.
6 Select the Ledgers tab. Select a ledger, and then set your preferences for each option. Unavailable options indicate that the option does not apply to the selected ledger.
Repeat this step for each ledger.
Note If you choose to purge transactions at post, you lose your audit trail. We strongly recommend that you do not purge the General Ledger after posting. The option to purge the General Ledger for a specific date range is available at any time using the Purge Files routine.
7 Select the Credit tab and make your selections for each option. You can choose to display a warning or prevent invoices from being created if a customer has reached their credit limit or has a past due balance.
8 Set online payment verification options for Sage DacEasy Accounting on the Online Processing page.
Note If you mark Online Credit Card Verification on the Online Processing page, Sage DacEasy Accounting will prompt you to install Sage Exchange when you open the Invoice Entry dialog box, Payments dialog box, or the Receipts dialog box.
9 Select OK to save your preferences.
Related Help Topic
• Tips for using the average cost method

Setting Up the Account InterfaceAdd, Edit, Delete User Access Rights
51
4Setting Up the Account Interface
Sage DacEasy uses the information you enter on the Account Interface dialog box each time you post a module such as Cash or Billing, using the accounts you entered to make the appropriate entry in the General Ledger.
Sage DacEasy determines which accounts to use based on the module you are posting. For example, when you sell products in the Billing module, Sage DacEasy credits the inventory account specified on the Account Interface dialog box.
If you selected one of the sample chart of account structures when you added your data files, the Account Interface dialog box already contains default account numbers; however, you can enter different interface accounts at any time. If you are setting up your own chart of accounts, you must complete the Account Interface dialog box. For more information about the account interface and a list of the fields that are required to access each module, select Help from the Account Interface dialog box. Even if you are not planning to use all the modules, you may find it easier to complete each field. Sage DacEasy only uses the information required to access the modules you use.
The account interface acts as a filter to determine the general ledger entry to make when a module is posted.
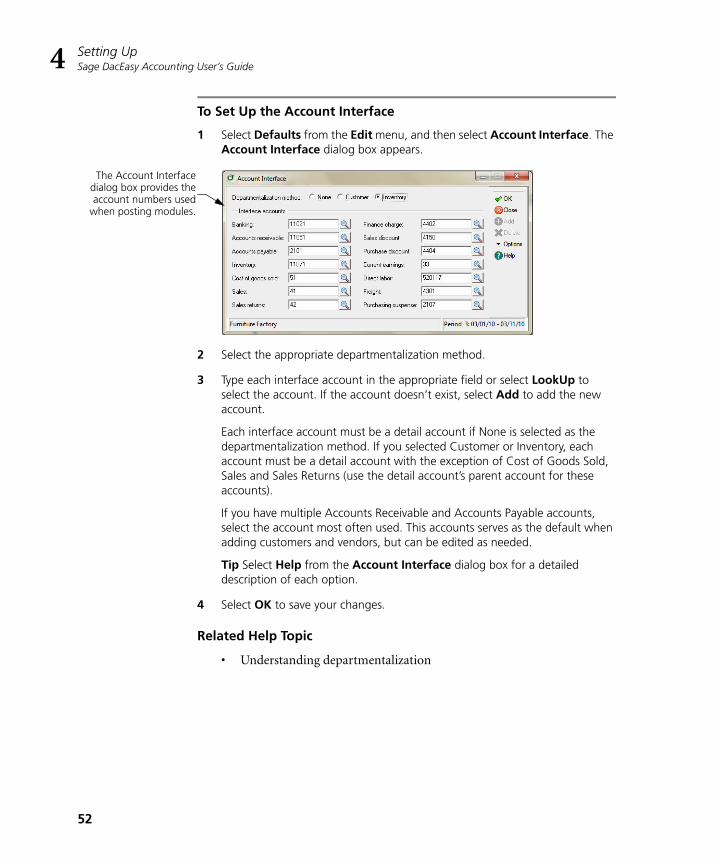
Setting UpSage DacEasy Accounting User’s Guide
52
4
To Set Up the Account Interface
1 Select Defaults from the Edit menu, and then select Account Interface. The Account Interface dialog box appears.
2 Select the appropriate departmentalization method.
3 Type each interface account in the appropriate field or select LookUp to select the account. If the account doesn’t exist, select Add to add the new account.
Each interface account must be a detail account if None is selected as the departmentalization method. If you selected Customer or Inventory, each account must be a detail account with the exception of Cost of Goods Sold, Sales and Sales Returns (use the detail account’s parent account for these accounts).
If you have multiple Accounts Receivable and Accounts Payable accounts, select the account most often used. This accounts serves as the default when adding customers and vendors, but can be edited as needed.
Tip Select Help from the Account Interface dialog box for a detailed description of each option.
4 Select OK to save your changes.
Related Help Topic
• Understanding departmentalization
The Account Interfacedialog box provides theaccount numbers used
when posting modules.

Setting Up the Default PrinterAdd, Edit, Delete User Access Rights
53
4Setting Up the Default Printer
Sage DacEasy uses the default printer settings unless you edit the report layout as described in Chapter 4, “Working With Sage DacEasy” in the Installation & New Features Guide.
To Set Up the Default Printer
1 Select Defaults from the Edit menu, and then select Printers. The Edit Default Printer dialog box appears.
Tip Select Restore Default to restore the default printer settings.
2 Select the printer in the Name box on the Printer tab.
3 Select the Fonts tab, select a section, and then select your preferences for the section.
Repeat this process for each section of the report.
4 Select the Page tab. Select your preferences for the page setup. The Width and Height boxes only apply when you select a custom paper size.
Tip: Select Help for a detailed description of each option.
5 Select OK to save your printer settings.
Tip: Select Apply to All to update the report layout for each report with the default printer settings.
Selecting Form TemplatesSage DacEasy allows you to customize your forms using form templates. Sage DacEasy stores each form template as a separate file in the data file folder. Each template has an extension of.FMT. When you install Sage DacEasy, a template is assigned to each form.
You can edit the template file or assign your own template file, if necessary. You can create as many different templates for each form as you need to satisfy different printing situations. The following steps explain how to select an existing form template. For information on editing form templates, refer to the Help topic “Editing templates.”

Setting UpSage DacEasy Accounting User’s Guide
54
4
To Select a Form Template
1 Select Defaults from the Edit menu, and then select Forms Setup. The Edit Forms Setup dialog box appears.
2 Select any form.
Note: You can also select form templates for any form from the respective print form dialog box.
3 Select Names. The Format File Names dialog box appears.
4 Select the format file you want to change.
Enter form preferenceson the Edit Forms Setup
dialog box.
Select form templates onthe Format File Names
dialog box.

Incorporate Images to Reports and FormsAdd, Edit, Delete User Access Rights
55
45 To create a new template, type a new name. To select an existing template,
type the template name or select LookUp and select the template.
Tip: Select Options and select Copy Format to make a copy of an existing template.
6 Select OK to save the selection and return to the Edit Forms Setup dialog box.
7 Complete each field on the Edit Forms Setup dialog box.
Tip: Select Help from the Edit Forms Setup dialog box for a detailed description of each field.
8 Select OK to save the form settings.
Note: If you entered a new form name, you must create the form template. Refer to the “Editing templates” topic in Help for more information.
Related Help Topics
• Editing templates
• Copying existing form templates
• Template variables
• Default form templates
• Modifying templates for 7-inch forms
• Modifying form templates for laser printers
• Modifying letter templates for dot-matrix printers
Incorporate Images to Reports and FormsStrengthen your company’s image and branding with more professional looking forms and reports. Now you may include your company logo on reports and forms. In addition, this feature may reduce your company’s expense of purchasing forms with your company logo pre-printed. Simply setup a bitmap image of your company Logo on the Company Information Dialog of each Sage DacEasy Module and indicate that you want this image to be printed in the header of all reports. You can also print the logo in your forms by adding the variable {LOGO} to your form templates. Sage DacEasy supports .bmp, .jpg, and .gif bitmap extensions.

Setting UpSage DacEasy Accounting User’s Guide
56
4
Setting the Company Logo
1 Select Defaults from the Edit menu and then select Company Information. The Company Information dialog box appears.
Note: The blank placeholder for the Company logo bitmap displays the message “Click here to select an image.”
2 Click on the bitmap placeholder and the bitmap selection dialog box appears.
Note: Sage DacEasy copies Bitmaps into an Images folder located inside the company’s data folder when doing a company backup, this folder is included. This folder is the default when the bitmap selection dialog box appears. You may locate the bitmap in other folders in your desktop or network or click OK to copy it to the Images folder.
3 Enter the path of the folder where the bitmap is located. If necessary, click on the button to the right of the folder field to find the bitmap in your desktop or network. The bitmap appears in the dialog box image placeholder.

Incorporate Images to Reports and FormsAdd, Edit, Delete User Access Rights
57
44 Click OK to associate the bitmap to the Company Information. The bitmap
appears as a thumbnail in the Company Information dialog box.
5 Click Remove Image to disassociate an exiting bitmap from the Company Information, or Cancel to stop this operation and exit the bitmap selection dialog.
6 Click on the Print bitmap on reports check box if you want the company logo to appear in all report headers.
Note: The Print bitmap on reports check box must be marked to have the logo print on report headers.
7 Click OK to save the Company Information.
Adding LOGO variable to form templates
In addition to the report header, Sage DacEasy allows you to print your company logo on the header of your customized forms. You can position the company logo horizontally across the form header.
The LOGO will always print at the top of the form positioned horizontally on the same column where the variable is placed in the template.
1 Select Defaults from the Edit menu and then select Forms Setup. The Forms Setup dialog box appears.
2 Select the form that you want to place the logo on from the form drop down box.
3 Click on Edit and the template editor will appear with the default template for the form you selected.
4 Position the cursor on the first row of your form template and Click on LookUp and then click on Control. A LookUp of the Control variables appears.
5 Select the variable LOGO from the LookUp and press ENTER to paste it unto the form template.
6 Click OK to save the template and Close to return to the menu.

Setting UpSage DacEasy Accounting User’s Guide
58
4Printing Forms with Company Logo
Printing any form containing the LOGO variable in its template will print the Company Logo image setup in the Company Information dialog.
Note: It is not necessary to enable the Print bitmap on reports check box in Company Information to have the LOGO display in your forms.
Setting Up TablesSage DacEasy uses tables to store information used repeatedly such as tax rates and payment terms. When you assign a tax table to a customer or vendor, Sage DacEasy uses the information on this table to compute the tax amount on billing and purchasing transactions. The terms table stores discount information, including the discount date and discount rate. Both the tax and terms tables are required for open- and balance forward-type customers and vendors.
In addition, you can create optional message, price break, warehouse, shipping method and weight unit tables. Use the message table feature to store each message you add to billing and purchasing transactions. These messages can be shown on the transaction entry screen or printed on forms.
Add price break tables for each price break that you offer customers. Price break tables are often used to offer discounts to customers who purchase a high volume of merchandise.
If you are using the multiple warehouse feature, set up a code for each warehouse.
Setting Up TablesAdding Terms Tables
59
4If you want to quickly enter shipping methods in the Via field when entering billing and purchasing transactions, add each shipping method that you use to the shipping method table.
If you are tracking product weights, you can define the units of measurement used when assigning weights to products. For more information on message, price break, warehouse, shipping method or weight unit tables, refer to the Help.
Related Help Topics
• Adding messages
• Deleting messages
• Adding price break tables
• Deleting price break tables
• Adding warehouses
• Deleting warehouses
• Adding shipping methods
• Entering shipping methods
• Deleting shipping methods
• Adding weight units
• Deleting weight units
Adding Terms Tables
Sage DacEasy uses the terms table to determine due dates and discount dates for invoices, purchase orders and merchandise receipts. You have two ways to define terms: Number of Days and Day of Month.
The terms code assigned to the customer or vendor automatically appears when you include the customer or vendor on a transaction; however, you can select a different terms code for the transaction.
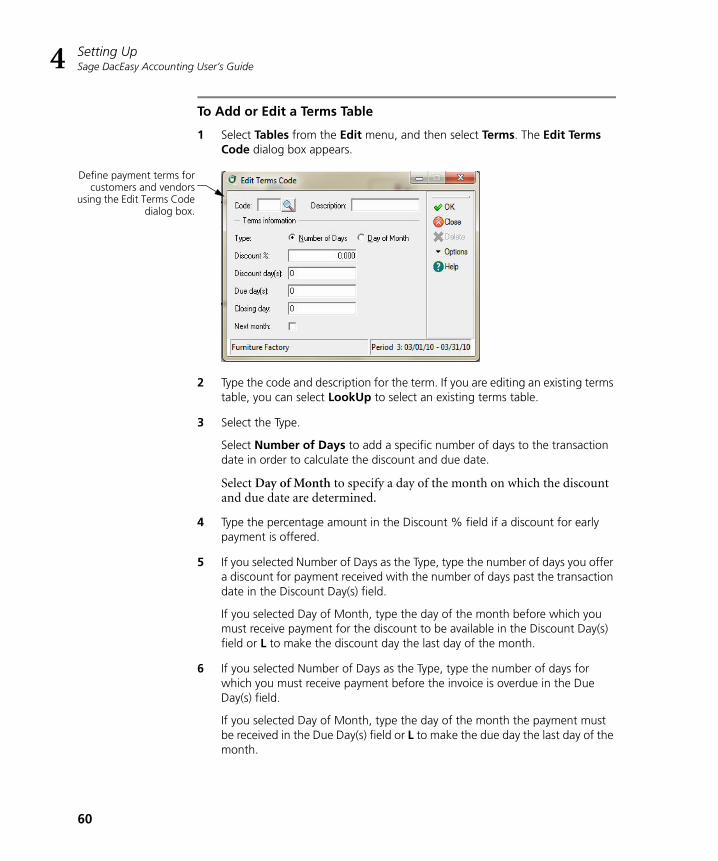
Setting UpSage DacEasy Accounting User’s Guide
60
4
To Add or Edit a Terms Table
1 Select Tables from the Edit menu, and then select Terms. The Edit Terms Code dialog box appears.
2 Type the code and description for the term. If you are editing an existing terms table, you can select LookUp to select an existing terms table.
3 Select the Type.
Select Number of Days to add a specific number of days to the transaction date in order to calculate the discount and due date.
Select Day of Month to specify a day of the month on which the discount and due date are determined.
4 Type the percentage amount in the Discount % field if a discount for early payment is offered.
5 If you selected Number of Days as the Type, type the number of days you offer a discount for payment received with the number of days past the transaction date in the Discount Day(s) field.
If you selected Day of Month, type the day of the month before which you must receive payment for the discount to be available in the Discount Day(s) field or L to make the discount day the last day of the month.
6 If you selected Number of Days as the Type, type the number of days for which you must receive payment before the invoice is overdue in the Due Day(s) field.
If you selected Day of Month, type the day of the month the payment must be received in the Due Day(s) field or L to make the due day the last day of the month.
Define payment terms forcustomers and vendors
using the Edit Terms Codedialog box.

Setting Up TablesAdding Tax Tables
61
47 If Day of Month is selected as the Type, type the last day of your billing cycle in
the Closing Day field. For example, if you end your billing cycle on the fifth of each month, type 5 as the closing day. Type L to assign the last day of the month as the closing day.
8 If Day of Month is selected as the Type, the due and discount day are a certain day every month. Select the Next Month check box if you want that day to be in the following month.
For example, assume your system date is June 9, your due day is 10 and your closing day is 15. If you clear this check box and enter an invoice, the due date is July 10 (the first 10th day of the month after the closing date). If you select this check box and enter an invoice, the due date is August 10 (the second occurrence of the 10th day of the month after the closing date).
Tip: Select Help from the Edit Terms Code dialog box for a detailed description of each field.
9 Select OK to save the terms table.
Related Help Topic
• Deleting terms tables
Adding Tax Tables
When you enter billing and purchasing transactions, Sage DacEasy calculates a sales tax amount for each transaction. Sage DacEasy determines the amount of sales tax by multiplying the sales tax percentage by the total amount of all taxable items on the transaction. Each open- and balance forward-type customer and vendor must be assigned a tax code.
You can break your sales tax rate into eight sub rates. This is helpful if you want to break the sales tax liability into its detail components, for example, state tax, county tax or city tax.
For Sage DacEasy to correctly calculate sales tax amounts for billing and purchasing transactions, you must perform the following three tasks before entering transactions:
• Set up a tax table to identify the tax rate structure and general ledger accounts to update when you post billing and purchasing transactions. Sage DacEasy allows an unlimited number of tax tables. Many businesses only need one tax table. However, if you operate businesses in different tax jurisdictions, you need to set up a separate table for each tax rate.
• Assign a tax table to each customer and vendor. Do this by entering the tax table code in the Tax Table field on the Edit Customer and Edit Vendor dialog boxes.

Setting UpSage DacEasy Accounting User’s Guide
62
4• On the Edit Product, Edit Service, Edit Billing Code and Edit
Purchasing Code dialog boxes, indicate if each item is taxable.
To Add or Edit a Tax Table
1 Select Tables from the Edit menu, and then select Tax. The Edit Tax Table dialog box appears.
2 Type a code and description for the tax table.
If you are editing an existing tax table, type the tax table code or select LookUp and select the tax table from the list that appears.
3 Select the Tax Freight check box if this tax applies to the total freight charge in the footer of the Invoice Entry dialog box. If tax does not apply, clear this check box.
4 In the Sales Tax area, enter each account affected when you charge this tax to your customers and the percentage that goes to each account. You can select LookUp to select an existing account or select Add to add a new account.
5 In the Purchase Tax area, enter the expense account affected when your vendors collect this tax from you. You can select LookUp to select an existing account or select Add to add a new account.
Tip: Select Help from the Edit Tax Table dialog box for a detailed description of each field.
6 Select OK to save the tax table.
Related Help Topics
• Viewing and editing tax code history
• Deleting tax tables
Define tax rates forcustomers and vendors
using the Edit Tax Tabledialog box.
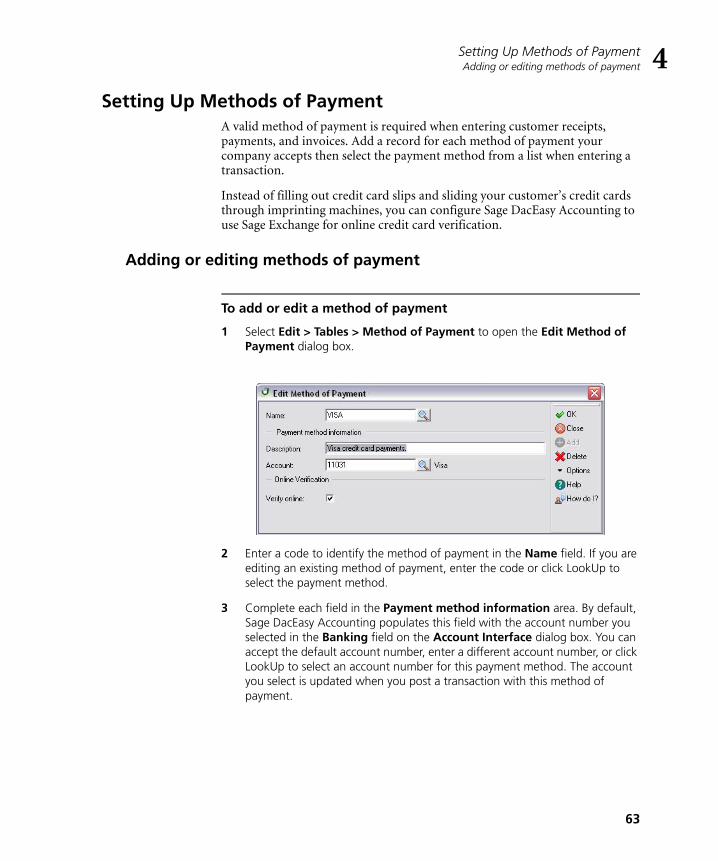
Setting Up Methods of PaymentAdding or editing methods of payment
63
4Setting Up Methods of Payment
A valid method of payment is required when entering customer receipts, payments, and invoices. Add a record for each method of payment your company accepts then select the payment method from a list when entering a transaction.
Instead of filling out credit card slips and sliding your customer’s credit cards through imprinting machines, you can configure Sage DacEasy Accounting to use Sage Exchange for online credit card verification.
Adding or editing methods of payment
To add or edit a method of payment
1 Select Edit > Tables > Method of Payment to open the Edit Method of Payment dialog box.
2 Enter a code to identify the method of payment in the Name field. If you are editing an existing method of payment, enter the code or click LookUp to select the payment method.
3 Complete each field in the Payment method information area. By default, Sage DacEasy Accounting populates this field with the account number you selected in the Banking field on the Account Interface dialog box. You can accept the default account number, enter a different account number, or click LookUp to select an account number for this payment method. The account you select is updated when you post a transaction with this method of payment.

Setting UpSage DacEasy Accounting User’s Guide
64
44 Mark Verify online if you want to use Sage Exchange to verify the payment
method status online. If you mark this option, you must also mark Online Credit Card Verification on the Online Processing page of the System Preferences dialog box (Edit > Defaults > System Preferences). Unmark this option if you do not want to verify the payment method status online.
Note If you marked Online Credit Card Verification on the Online Processing page of the System Preferences dialog box, Sage DacEasy Accounting prompts you to install the Sage Exchange application when you open the Receipts dialog box, Payments dialog box, or the Invoice Entry dialog box. Click Yes to launch the Sage Exchange installation.
5 Click OK to save the method of payment. Click Close to exit the dialog box.
Editing Custom Field LabelsYou can customize up to six text fields, four numeric fields and two date fields for your customer, vendor, product and service records. You can then include these fields on custom reports generated with DacAccess.
Note Custom field labels appear only when editing records. The default field labels appear when using custom fields in DacAccess.
To Edit Custom Field Labels
1 Select Defaults from the Edit menu, and then select Custom Field Labels. The Customers tab on the Edit Custom Field Labels dialog box appears.
2 Type a field label for each custom field you want to track for your customers. You can customize the following types of fields:
Text—You can include letters, numbers or symbols in text fields.
Amount—You can only include numbers in amount fields. Although you can type numbers in text fields, you must set custom fields up as amount fields if you want to perform calculations or edit the format of these fields in DacAccess.
Date—Date fields appear in a MM/DD/YYYY format. You can modify the format when printing custom reports with DacAccess.
3 Repeat the previous step for each additional tab (Vendors, Products and Services) as needed.
4 Select OK to save your field labels. The new field labels appear on the Custom tab when editing customer, vendor, product and service records.

Entering Customer, Vendor & Product DefaultsAdding or editing methods of payment
65
4Entering Customer, Vendor & Product Defaults
If you choose, you can enter global information about your customers, vendors and products. You only need to complete the fields that speed up the data entry process. This information automatically appears when you add a new record, but can be edited.
To Enter Customer, Vendor and Product Defaults
1 Select Defaults from the Edit menu, and then select the appropriate default menu option, Customer Default (shown below), Vendor Default or Product Default. A dialog box appears for you to enter the default information.
2 Complete each field to include as a default. If you do not want a default value in a field, leave the field blank.
Tip: Select Help from the dialog box for a detailed description of each option.
3 Select OK to save the default information.

Setting UpSage DacEasy Accounting User’s Guide
66
4Entering Custom E-mail Subjects
Sage DacEasy Accounting allows you to enter custom text to populate the subject line of e-mail messages you send to customers or vendors for transactions and packing lists. Optionally, you can also include the document number and customer or vendor name in the subject line.
To enter Custom E-mail Subjects
1 Select Defaults from the Edit menu, then select Custom E-mail Subjects to open the Transactions page of the Custom E-mail Subjects dialog box.
2 Enter the text you want to include on the subject line of e-mails for transactions in the text field for:
• Purchase Orders - Mark Order number and Vendor if you want to include the order number and vendor name in the e-mail subject line.
• Merchandise Received - Mark MR number and Vendor if you want to include the merchandise received number and vendor name in the e-mail subject line.

Entering Customer, Vendor & Product DefaultsEntering Custom E-mail Subjects
67
4• Purchase Returns - Mark Return number and Vendor if you want to
include the return number and vendor name in the e-mail subject line.
• Invoices - Mark Invoice number and Customer if you want to include invoice numbers and customer names in the e-mail subject line.
• Sales Returns - Mark Sales number and Customer if you want to include the sales return number and customer name in the e-mail subject line.
• Quotes -Mark Quote number and Customer if you want to include the quote number and customer name in the e-mail subject line.
3 Click the Packing List tab to open the Packing List page.
4 Enter the text you want to include on the subject line of e-mails for packing lists in the text field for:
• Purchase Orders Packing List - Mark Order number and Vendor if you want to include the order number and vendor name in the e-mail subject line.
• Merchandise Received Packing List - Mark MR number and Vendor if you want to include the merchandise received number and vendor name in the e-mail subject line.
• Purchase Returns Packing List - Mark Return number and Vendor if you want to include the return number and vendor name in the e-mail subject line.
• Invoices Packing List - Mark Invoice number and Customer if you want to include invoice numbers and customer names in the e-mail subject lines.
• Sales Returns Packing List - Mark Sales number and Customer if you want to include the sales return number and customer name in the e-mail subject line.
• Quotes Packing List -Mark Quote number and Customer if you want to include the quote number and customer name in the e-mail subject line.
5 Click OK to save your changes and to close the Custom E-mail Subjects dialog box.

Setting UpSage DacEasy Accounting User’s Guide
68
4Adding Accounts
The chart of accounts is the heart of your accounting system. Sage DacEasy uses the information in the chart of accounts when printing financial statements. Therefore, creating a detailed account structure produces more detailed financial statements. If you selected one of the sample chart of accounts when you added your company, you can edit the sample accounts to reflect your business.
To Add or Edit an Account
1 Select Accounts from the Edit menu. The Edit Account dialog box appears.
2 If you are adding a new account, type a code to identify the account in the Number field.
If you are editing an existing account, type the account number or select LookUp and select an account from the list that appears.
3 Type a descriptive name for the account. The name prints on reports and appears on LookUps.
4 Complete each field in the Structure area.
Note: The Group field is only available when you are setting up a level one account, no accounts exist below the account yet and the account does not have a balance or historical information. All other accounts are grouped according to the parent account’s group.
5 Complete the Transaction Information area.
Add or modify accountsfrom the Edit Account
dialog box.

Adding AccountsEntering Account Setup Balances
69
4The consolidation account is only required if you use the Consolidation feature to combine the General Ledgers of multiple companies that have different chart of account structures.
If the account is a bank account, select the Reconcilable Bank Account check box if you want to use the Cash module.
6 Assign the account to the proper cash flow group.
Tip: Select Help from the Edit Account dialog box for a detailed description of each field.
7 Select OK to save the account information.
Related Help Topics
• Structuring your chart of accounts
• Deleting accounts
• Viewing account budget figures and history
• Sample chart of accounts
• Editing bank counters
• Generating consolidation export files
Entering Account Setup Balances
After entering your accounts, enter beginning balances for each account except Accounts Receivable, Accounts Payable and Inventory. These accounts are updated when you enter the beginning balances for your customers, vendors and products (respectively). Enter all subsequent activity in the appropriate module.
When you enter each setup balance, a general ledger transaction with an SU journal code is created that uses the Journal Difference (D) account as the offset account. The balance for the Journal Different (D) account is zero after correctly entering all beginning balances from a balanced set of books.
Tip: All setup balances must be entered for the same period. You can mark the setup period as active to avoid entering balances in the wrong period. For information on changing a period’s status, refer to the Help topic titled “Changing a period’s status.”

Setting UpSage DacEasy Accounting User’s Guide
70
4
To Enter an Account Setup Balance
1 Select Accounts from the Edit menu. The Edit Account dialog box appears.
2 Type the account number in the Number field or select LookUp to select an account.
3 Select Options and then Balance. The Account Balance dialog box appears.
4 Confirm that the setup date is correct and enter the beginning balance in the Balance field.
Note: It is important that all setup balances be entered with the same setup date. If the setup date is incorrect, close this dialog box, and then press F4 to change the program date.
5 Select OK to update the account’s balance.
Tip: After entering setup balances for all accounts, print the Trial Balance for the period used to enter setup balances and confirm that the D account balance is zero. If the D account has a balance, confirm that the beginning balances were entered for all accounts (including customers, vendors and products) in the correct period.
Enter setup balances foreach account on the
Account Balance dialogbox.

Adding CustomersEntering Account Setup Balances
71
4Behind the Scenes
When you save an account setup balance, Sage DacEasy does the following accounting behind the scenes:
Note: The opposite entry is made when you enter a negative setup balance.
• Sage DacEasy debits the account you set up and credits the Journal Difference account (D) account when you enter a positive balance for an asset, expense or other debit account.
• Sage DacEasy credits the account you set up and debits the Journal Difference (D) account when you enter a positive balance for a liability, equity, revenue or other credit account.
Note: Since the Journal Difference account is the offsetting account when you enter a setup balance, it is very important that you do not use the account setup balance feature for entering daily transactions.
When you save an account setup balance, Sage DacEasy updates the following files:
• The Accounts file includes the new account balances. Sage DacEasy updates the period, current and historical balances of the accounts. The update flows to the parent accounts. You can print all financial reports to see the changes in the account balances.
• Sage DacEasy updates the General Ledger Header and Detail files with a posted summary transaction. The journal code for the transaction that posts to the General Ledger is SU. You can print the General Ledger Listing for journal code SU to see the posted summary transaction.
Related Help Topics
• Entering account balances with Easy Setup
• Adjusting account setup balances
• Verifying account setup information
Adding CustomersYou can track all, some or none of your customers in Sage DacEasy Accounting. The most common reason individual customer records are entered is to create invoices in the Receivables Ledger or Billing module. Even if you elect not to use the modules, you can still add a record for each customer to track your client database. Use this information for printing letters or mailing labels.
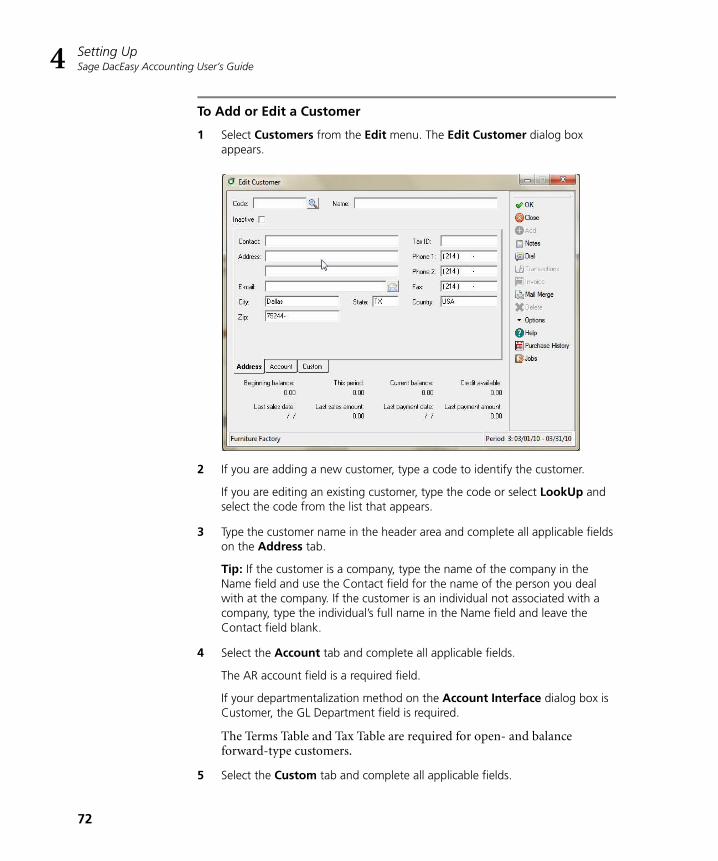
Setting UpSage DacEasy Accounting User’s Guide
72
4
To Add or Edit a Customer
1 Select Customers from the Edit menu. The Edit Customer dialog box appears.
2 If you are adding a new customer, type a code to identify the customer.
If you are editing an existing customer, type the code or select LookUp and select the code from the list that appears.
3 Type the customer name in the header area and complete all applicable fields on the Address tab.
Tip: If the customer is a company, type the name of the company in the Name field and use the Contact field for the name of the person you deal with at the company. If the customer is an individual not associated with a company, type the individual’s full name in the Name field and leave the Contact field blank.
4 Select the Account tab and complete all applicable fields.
The AR account field is a required field.
If your departmentalization method on the Account Interface dialog box is Customer, the GL Department field is required.
The Terms Table and Tax Table are required for open- and balance forward-type customers.
5 Select the Custom tab and complete all applicable fields.

Adding CustomersEntering Customer Setup Balances
73
4Tip: Select Help from the Edit Customer dialog box for a detailed description of each field.
6 Select OK to save the customer record.
Note: You cannot edit the amounts in the footer area. This area is updated when you enter a setup balance for the customer or post transactions that include the customer.
Related Help Topics
• Entering customer information with Easy Setup
• Entering invoices from the Edit Customer dialog box
• Viewing backorders from the Edit Customer dialog box
• Changing customer codes
• Adding customer alternative addresses
• Deleting customer alternative addresses
• Viewing customer transaction history
• Deleting customers
• Attaching notes to customer records
• Using the phone dialer
• Sending an e-mail
Entering Customer Setup Balances
If entering customers from an existing set of accounting records, record the beginning balance for each customer. You can enter each invoice individually or combine the outstanding invoices and enter one lump sum. Use the following procedure only when entering beginning setup balances for your customers. Subsequent customer activity must be recorded in the appropriate module, such as the Receivables Ledger, Billing or Cash.

Setting UpSage DacEasy Accounting User’s Guide
74
4
To Enter a Customer Setup Balance
1 Select Customers from the Edit menu. The Edit Customer dialog box appears.
2 Type the customer code in the Code field or select LookUp and select the code.
3 Select Options, and then select Balance. The Customer Setup Balance dialog box appears.
Note: It is important that all setup balances be entered with the same setup date. If the setup date is incorrect, close this dialog box, and then press F4 to change the program date.
4 Enter each outstanding invoice or a single invoice with the customer’s current balance.
Tip: Select Help from the Customer Setup Balance dialog box for a detailed description of each field.
5 Select OK to update the customer’s balance.
Enter setup balances foreach customer from theCustomer Setup Balance
dialog box.

Adding CustomersEntering Customer Setup Balances
75
4Behind the Scenes
When you save a customer setup balance, Sage DacEasy does the following accounting behind the scenes:
• Sage DacEasy debits Accounts Receivable and credits Journal Difference (the D account) when you enter an invoice or debit setup balance.
• Sage DacEasy credits Accounts Receivable and debits Journal Difference (the D account) when you enter a credit setup balance.
Note: Since the journal difference account is the offsetting account when you enter a setup balance, it is very important that you do not use the customer setup balance feature for daily transactions.
When you save a customer setup balance, Sage DacEasy updates the following files:
• The Accounts file includes new account balances. Sage DacEasy updates period and current balances of the accounts as well as the parent accounts to which accounts flow. You can print all financial reports to see changes in account balances.
• Sage DacEasy updates the General Ledger Header and Detail files with a posted summary transaction. This transaction is a net total of debits and credits to each account affected. The journal code for the transaction that posts to the General Ledger is SU. You can print the General Ledger Listing report for journal code SU to see the posted summary transaction.
• Sage DacEasy updates current balance and historical information in the Customer file. You can print the Customer Directory to see changes in the current balance.
• Sage DacEasy updates the Accounts Receivable Open Invoice Header and Detail files. This information prints on the Accounts Receivable Aging Report and Statements. The invoice appears on the Aging Report without an asterisk in the Code column, denoting the transaction is posted.
Related Help Topics
• Adjusting customer setup balances
• Verifying customer setup information

Setting UpSage DacEasy Accounting User’s Guide
76
4Adding Vendors
You can track all, some or none of your vendors in Sage DacEasy Accounting. The most common reason individual vendor records are entered is to create invoices in the Payables Ledger or Purchasing module, or print 1099s. Even if you elect not to use the modules, you can still add a record for each vendor to keep a database of your suppliers. Use this information for printing letters or tracking vendor addresses and phone numbers.
To Add or Edit a Vendor
1 Select Vendors from the Edit menu. The Edit Vendor dialog box appears.
2 If you are adding a new vendor, type a code to identify the vendor.
If you are editing an existing vendor, type the code or select LookUp and select the vendor from the list that appears.
3 Type the vendor name in the header area and complete all applicable fields on the Address tab.
Tip: If the vendor is a company, type the name of the company in the Name field and use the Contact field for the name of the person you deal with at the company. If the vendor is an individual not associated with a company, type the individual’s full name in the Name field and leave the Contact field blank.
4 Select the Account tab and complete all applicable fields.
The AP account field is a required field.
The Terms Table and Tax Table are required for open- and balance forward-type vendors.
Add new vendors or editvendor information from
the Edit Vendor dialogbox.

Adding VendorsEntering Vendor Setup Balances
77
45 Select the Custom tab and complete all applicable fields.
Tip: Select Help from the Edit Vendor dialog box for a detailed description of each field.
6 Select OK to save the vendor record.
Note: You cannot edit the amounts in the footer area. This area is updated when you enter a setup balance for the vendor or post transactions that include the vendor.
Related Help Topics
• Entering vendor information with Easy Setup
• Changing vendor codes
• Deleting vendors
• Attaching notes to vendor records
• Using the phone dialer
• Adding vendor alternative addresses
• Deleting vendor alternative addresses
• Viewing vendor transaction history
• Editing 1099 information
• Sending an e-mail
Entering Vendor Setup Balances
If entering vendors from an existing set of accounting records, record the beginning balance for each vendor. You can enter each invoice individually or combine the outstanding invoices and enter one lump sum. Use the following procedure only when entering beginning setup balances for your vendors. Subsequent activity must be recorded in the appropriate module, such as the Payables Ledger, Purchasing or Cash.
To Enter a Vendor Setup Balance
1 Select Vendors from the Edit menu. The Edit Vendor dialog box appears.
2 Type the vendor code in the Code field or select LookUp and select the code.
3 Select Options, and then select Balance. The Vendor Setup Balance dialog box appears.

Setting UpSage DacEasy Accounting User’s Guide
78
4Note: It is important that all setup balances be entered with the same setup date. If the setup date is incorrect, close this dialog box, and then press F4 to change the program date.
4 Enter each outstanding invoice or a single invoice with the vendor’s current balance.
Tip: Select Help from the Vendor Setup Balance dialog box for a detailed description of each field.
5 Select OK to update the vendor balance.
Behind the Scenes
When you save a vendor setup balance, Sage DacEasy does the following accounting behind the scenes:
• Sage DacEasy credits Accounts Payable and debits Journal Difference (the D account) when you enter an invoice or credit setup balance.
• Sage DacEasy debits Accounts Payable and credits Journal Difference (the D account) when you enter a debit setup balance.
Note: Since the Journal Difference is the offsetting account when you enter a setup balance, it is very important you do not use the vendor setup balance feature for daily transactions.
When you save a vendor setup balance, Sage DacEasy updates the following files:
• The Accounts file includes new account balances. Sage DacEasy updates period and current balances of accounts as well as the parent accounts to which the accounts flow. Print all financial reports to see changes in the account balances.
Enter setup balances foreach vendor on the
Vendor Setup Balancedialog box.

Adding Master ItemsEntering Vendor Setup Balances
79
4• Sage DacEasy updates the General Ledger Header and Detail files with
a posted summary transaction. This transaction is a net total of debits and credits to each account affected. The journal code for the transaction that posts to the General Ledger is SU. Print the General Ledger Listing report for journal code SU to see the posted summary transaction.
• Sage DacEasy updates current balance and historical information in the Vendor file. Print the Vendor Directory to see changes in the current balances.
• Sage DacEasy updates the Accounts Payable Open Invoice Header and Detail files. This information prints on the Accounts Payable Aging Report, Payments Report and Statements. The invoice appears on the Aging Report without an asterisk in the Code column, denoting the transaction is posted.
Related Help Topics
• Adjusting vendor setup balances
• Verifying vendor setup information
Adding Master ItemsIf you have multiple warehouses or want to create a multi-level inventory structure, add a master item for each primary product you sell. Then, associate each detail item with the master item. You can print reports based on master items and warehouses. You can also use the Generate Items feature to have Sage DacEasy automatically generate a product code for each warehouse.

Setting UpSage DacEasy Accounting User’s Guide
80
4
To Add or Edit a Master Item
1 Select Master Items from the Edit menu. The Edit Master Item dialog box appears.
2 Type a code and description to identify the master item you are adding.
If you are editing an existing master item, type the code or select LookUp and select the code from the list that appears.
3 Complete the applicable fields on the General tab.
The Purchase Fraction and Sales Fraction are required.
If your departmentalization method on the Account Interface dialog box is Inventory, the GL Department field is required.
4 Select the Billing tab, and then complete each applicable field on this tab.
5 Select the Detail Items tab, and then add each detail item using any of the following methods.
Generate Items—Select Generate Items and a new detail item is added to the Master Item file and the Product file for each warehouse. The Item Number defaults to the master item code, followed by a dash, and then the warehouse code.
You can select Options and then select Item Code Defaults to change the default naming convention.
Add master items andassign detail items from
the Edit Master Itemdialog box.
Adding Master ItemsEntering Vendor Setup Balances
81
4Select an existing item—Type an existing product code or select LookUp to select the product.
Add a new detail item—Type a product code that doesn’t exist and Sage DacEasy adds the new detail item to the Product file when you advance to the next line. The detail item defaults to the same setup as the master item.
If you don’t want to add the new item using the master item defaults, you can set up your products prior to entering your master items. For more information, refer to "Adding Products" on page 82.
Generate an item for a warehouse—Select LookUp, and then select Warehouses for the file to view. Sage DacEasy adds the new detail item to the Master Item and the Product file for the selected warehouse. The Item Number defaults to the master item code, followed by a dash, and then the warehouse code.
The detail items and the master item must have the same Purchase and Sales Fractions.
Select Help from the Edit Master Item dialog box for a detailed description of each field.
6 Select OK to save the master item record.
Related Help Topic
• Deleting master items

Setting UpSage DacEasy Accounting User’s Guide
82
4Adding Products
If you choose to take advantage of the advanced inventory tracking features available in Sage DacEasy Accounting, add a record for each product you purchase, sell or assemble.
To Add or Edit a Product
1 Select Products from the Edit menu. The Edit Product dialog box appears.
2 If you are adding a new product, type a code to identify the product.
If you are editing an existing product, type the code or select LookUp and select a code from the list that appears.
3 Type a description for the product, and then complete each applicable field on the General tab.
If your departmentalization method on the Account Interface dialog box is Inventory, the GL Department field is required.
4 Select the Purchasing tab, and then complete each applicable field. The Fraction field is required.
5 Select the Sales tab, and then complete each applicable field. The Fraction field is required.
6 Select the Billing tab, and select your preferences.
Add new products or editproduct information from
the Edit Product dialogbox.

Adding ProductsEntering Product Setup Balances
83
47 Select the Custom tab and complete all applicable fields.
You can select Help from the Edit Product dialog box for a detailed description of each field.
8 Select OK to save the product record.
You cannot edit the amounts in the footer area. This area is updated when you enter a setup balance for the product or post transactions that include the product.
Print the Product Listing to verify that each product was entered correctly. To print this report, select Inventory from the Reports menu, and then select Product Listing.
Related Help Topics
• Entering product information with Easy Setup
• Viewing backorders from the Edit Product dialog box
• Changing product codes
• Tips for using the average cost method
• Deleting products
• Attaching notes to product records
• Viewing product transaction history
• Adding serial numbers
• Adding messages and extended descriptions to products
• Adding component lists
• Printing a Bill of Materials
• Adding substitute product lists
Entering Product Setup Balances
If you set up an existing company, some products may already have inventory balances. When you add a new product, you can also enter an inventory setup balance. Use the following procedure only when entering a beginning setup balance for a product. Do not use Setup to enter daily transactions.

Setting UpSage DacEasy Accounting User’s Guide
84
4
To Enter a Product Setup Balance
1 Select Products from the Edit menu. The Edit Product dialog box appears.
2 Type the product code in the Code field or select LookUp and select the code.
3 Select Options, and then select Balance. The Setup Stock Balance dialog box appears.
It is important that all setup balances be entered with the same setup date. If the setup date is incorrect, close this dialog box, and then press F4 to change the program date.
4 Type the number of units on hand and the cost per unit. Sage DacEasy calculates the total in the Dollars field.
You can select Help from the Setup Stock Balance dialog box for a detailed description of each field.
5 Select OK to update the product’s balance.
Behind the Scenes
When you save a product setup balance, Sage DacEasy does the following accounting behind the scenes:
• Sage DacEasy debits Inventory and credits Journal Difference (the D account) when you enter a positive setup balance.
• Sage DacEasy credits Inventory and debits Journal Difference (the D account) when you enter a negative setup balance. You can only enter negative balances for items set up with Negative as the Inventory Tracking method.
Enter beginning balancesfor each product from the
Setup Stock Balancedialog box.

Adding ProductsEntering Product Setup Balances
85
4Since Journal Difference is the offsetting account when you enter a setup balance, it is very important you do not use the product setup balance feature for daily transactions.
When you save a product setup balance, Sage DacEasy updates the following files:
• The Accounts file includes new account balances. Sage DacEasy updates the period and current balance of the accounts as well as the parent account to which the accounts flow. Print all financial reports to see changes in the account balances.
• Sage DacEasy updates the General Ledger Header and Detail files with a posted summary transaction. This transaction is a net total of debits and credits to each account affected. The journal code for the transaction that posts to the General Ledger is SU. Print the General Ledger Listing report for journal code SU to see the posted summary transaction.
• Sage DacEasy updates the Product file. The on hand dollars and on hand units increase for a positive setup balance. These amounts decrease for a negative setup balance. Print the Product Activity Report to see changes in the on hand units and dollars.
• Sage DacEasy updates the Product Activity Detail file if the Track Product Transaction History check box is selected on the System Preferences dialog box.
Related Help Topics
• Verifying product setup information
• Adjusting product setup balances

Setting UpSage DacEasy Accounting User’s Guide
86
4Adding Services
With services, you do not have on hand units, dollars or cost. Create a record for each service you sell or for labor used to assemble goods.
If you sell only services, you might prefer to use the Service Invoice dialog box. To use service invoices, select the Service Invoice Entry check box on the Billing tab of the System Preferences dialog box.
To Add or Edit a Service
1 Select Services from the Edit menu. The Edit Service dialog box appears.
2 Type a code to identify the service you are adding.
If you are editing an existing service, type the code or select LookUp and select the code from the list that appears.
3 Complete the appropriate fields on the Sales tab.
GL Department is required if you selected Inventory as your departmentalization method on the Account Interface dialog box.
4 Select the Custom tab and complete all applicable fields.
You can select Help from the Edit Service dialog box for a detailed description of each field.
5 Select OK to save the service record.
Tip: Print the Service Listing to verify that each service was entered correctly. To print this report, select Inventory from the Reports menu, and then select Service Listing.
Add new services or editservice information from
the Edit Service dialogbox.

Adding ServicesEntering Product Setup Balances
87
4Related Help Topics
• Entering service information with Easy Setup
• Changing service codes
• Viewing and editing service history
• Attaching notes to service records
• Deleting services
• Adding messages and extended descriptions to services

Setting UpSage DacEasy Accounting User’s Guide
88
4

5Fixed Assets
Fixed Asset Monthly Checklist 90
Tax Versus Book Accounting 90
Adding Fixed Assets 92
Generating Recurring Depreciation 93

Fixed AssetsSage DacEasy Accounting User’s Guide
90
5
• Fixed Assets •Depreciating your fixed assets can be tedious without an automated process. With Sage DacEasy Accounting you can track vital information about your fixed assets and generate the depreciation automatically.
Sage DacEasy supports straight-line and double-declining depreciation, and makes recording these figures a simple process. All you have to do is enter the appropriate account values and numbers, the life of the asset and the method by which you want to calculate the depreciation. Sage DacEasy uses this information to make an unposted entry into the General Ledger (unless otherwise specified) each time you generate depreciation. After you print the Journal and post, your account balances reflect the appropriate depreciation figures.
Now your financial statements reflect your depreciation expense. In addition, you can generate reports on your fixed assets using the DacAccess Query and Publisher.
Use the following checklist to guide you through the process of generating and recording depreciation for fixed assets.
Fixed Asset Monthly Checklist Generate the depreciation transaction each period.
Tip: Make sure you enter the original service date, which is usually the date you purchased the asset, when setting up the fixed asset.
Print the General Ledger Journal.
Review transactions and make any necessary changes.
Back up your data.
Post the General Ledger for the period.
Tax Versus Book AccountingIt is important to note the differences between tax and book accounting when discussing fixed assets. You can use different accounting methods when you calculate depreciation—book accounting for financial reports and tax accounting for tax statements. For the purposes of tax statements, the IRS only accepts the MACRS (Modified Accelerated Cost Recovery System) depreciation method for purchases after 1986.

Tax Versus Book Accounting
91
5Because Sage DacEasy Accounting is GAAP-based (which means it follows conventions known as the Generally Accepted Accounting Principles), depreciation calculates for book accounting. Tax regulations and GAAP are different in many ways, which means taxable income and financial reporting income frequently differ. Examples of these differences might include:
• Depreciation calculates on a straight-line basis for financial reporting purposes, but by an accelerated method for tax purposes.
• Income is on an accrual basis for financial reporting purposes, but on a cash basis for tax purposes.
• Warranty costs are recognized when incurred (matched with the sales revenue) for financial reporting purposes, but recognized when paid for tax purposes.
Let’s take a closer look at one of the above examples; specifically, where tax accounting differs from book accounting, depending on whether the company is reporting to state or federal government.
Many state governments require financial reporting based on the accrual method of accounting (where businesses record the income when items are sold). However, some businesses report to the federal government using a cash method of accounting (where income is not recorded until the customer pays for it). In such situations, businesses generally keep a set of books for tax purposes and another set for financial reporting purposes. The same situation is true for many people recording depreciation of fixed assets.
For tax statements, use the MACRS depreciation method explained in the government publication 534. For book accounting, three generally accepted depreciation methods are available:
• Straight-line
• Double-declining balance
• Sum of years digits
Of these, Sage DacEasy Accounting offers the first two. In straight-line depreciation, you divide the accumulated depreciation into equal amounts and apply it throughout the useful life of the asset. In double-declining balance, the asset depreciates by a percentage of the current book value. The process of depreciating the asset continues until you reach the estimated residual value. At this point, you complete the depreciation process by writing off the remaining balance in excess of the residual value in one transaction.

Fixed AssetsSage DacEasy Accounting User’s Guide
92
5Adding Fixed Assets
Add each fixed asset you want to depreciate. You can also add nondepreciable assets you want to track, such as computer software.
To Add or Edit a Fixed Asset
1 Select Fixed Assets from the Edit menu. The Edit Fixed Asset dialog box appears.
2 Type a code and description to identify the fixed asset you are adding.
If you are editing an existing fixed asset, type the code or select LookUp and select the code from the list that appears.
3 Complete all applicable fields on the Asset tab.
4 Select the Depreciation tab and complete all applicable fields.
If you selected Open as the status, the Life field and Depreciation Accounts are required.
The Percentage field is available only if you select Accelerated as the Type.
5 Select the Balance tab and complete each field.
If you are entering an existing asset in the middle of its depreciation cycle, type the amount of depreciation already accumulated in the Accumulated Depreciation field.
You must enter the Original Value before depreciation can be generated.
You can select Help from the Edit Fixed Asset dialog box for a detailed description of each field.
6 Select OK to save the fixed asset.
Add new fixed assetsand edit asset
information from theEdit Fixed Asset dialog
box.

Generating Recurring Depreciation
93
5Related Help Topics
• Attaching notes to fixed assets
• Deleting fixed assets
• Verifying fixed asset information
Generating Recurring DepreciationAfter you have entered a fixed asset, you can use the Generation routine to automatically calculate the appropriate depreciation expense. The fixed asset record and the General Ledger are updated with the proper depreciation amounts.
To Generate Fixed Asset Depreciation
1 Select Recurring Generation from the Transactions menu, and then select Fixed Assets. The Fixed Asset Depreciation Generation dialog box appears.
2 Type the date to assign to the generated general ledger transaction.
3 Enter the range of fixed assets to depreciate.
4 Complete the remaining fields.
You can select Help from the Fixed Asset Depreciation Generation dialog box for a detailed description of each field.
5 Select OK. The fixed asset is updated with the new depreciation figures. If Create GL Entry was selected, an unposted transaction is added to the General Ledger.
Generate depreciationfor each fixed asset
from the Fixed AssetDepreciation
Generation dialog box.

Fixed AssetsSage DacEasy Accounting User’s Guide
94
5You must post the General Ledger module if you selected to create a GL entry. For steps on posting the General Ledger module, refer to Chapter 6, “Working With the General Ledger."
Behind the Scenes
When you generate a depreciation transaction for a fixed asset, Sage DacEasy updates the following files:
• If you selected the Create GL Entry check box, the General Ledger Header and Detail files include the new transaction. The transaction is a debit to the depreciation expense account and a credit to the accumulated depreciation account. You can print the General Ledger Activity Report or General Ledger Journal to see the new transaction.
• The Fixed Asset file is updated. The depreciation amount is added to the Accumulated Depreciation field and the Last Generation Date and Generations Available fields are updated.

6Working With the General Ledger
General Ledger Monthly Checklist 97Entering General Ledger Transactions 97
Detail Line Commenting 99
Attach Notes to Transactions 100
Transaction Voucher Document 101
Using Recurring General Ledger Transactions 103Entering Recurring G/L Transactions 103
Generating Recurring G/L Transactions 104
Verifying General Ledger Transactions 106
Posting the General Ledger 107
Enhanced Unposted Transactions Notification 108
Printing the General Ledger Activity Report 109General Ledger Activity Report 111

Working With the General LedgerSage DacEasy Accounting User’s Guide
96
6
• Working with the General Ledger •The General Ledger, often referred to as the GL, is the main module of your accounting system. The General Ledger serves as an audit trail—showing when and how account balances were updated. You can update this module by entering transactions directly into the General Ledger, by posting transactions from another Sage DacEasy Accounting module such as Cash or Billing, or by posting a transaction from an add-on module such as Sage DacEasy Order Entry or Sage DacEasy Point of Sale. You can use the General Ledger alone or in conjunction with any of the other modules.
Each general ledger transaction is assigned a journal code. This allows you to quickly locate certain types of transactions and report on transactions assigned to a specific group. When you post a module (for example, a subsidiary ledger such as the Receivables Ledger) outside of the General Ledger, the general ledger transaction is assigned a protected journal code. If you enter transactions directly in the General Ledger, you can group transactions using your own journal codes. If you attempt to use a protected journal code, an error message appears.
Using the General Ledger, you can automatically reverse entries at the close of an accounting period. This common accounting practice allows you to manage accrued expenses at the end of an accounting period.
The accounting information you enter is only valuable if you are able to extract useful reports to analyze your business’ financial condition. If you have not already modified the chart of accounts to meet your particular reporting needs, refer to Chapter 4, “Setting Up." To generate useful predefined or custom financial reports, refer to Chapter 11, “Financial Reporting."
Refer to Chapter 13, “Periodic Operations." for information on closing the General Ledger period and year. Close the period to prevent further entries from being made into the period. Close the year to update your historical information and update the period structure with a new year.
Note: You can enter up to two years of information before you are required to close the year.

General Ledger Monthly ChecklistEntering General Ledger Transactions
97
6General Ledger Monthly Checklist
Enter your general ledger transactions.
Generate recurring general ledger transactions, if using this feature.
Print the General Ledger Journal.
Back up your data.
Post the General Ledger for the period.
Run the General Ledger Period End process (optional).
Entering General Ledger TransactionsYou can enter all transactions directly into the General Ledger if you decide not to use the other modules in Sage DacEasy Accounting. If you choose to enter your accounting activity into the appropriate modules, the General Ledger is updated automatically when you post the modules. If you enter activity in the modules, you still will need to make occasional entries directly to the General Ledger. For example, recording interest expense on a long-term note payable.
To Enter a General Ledger Transaction
1 Select General Ledger from the Transactions menu. The General Ledger Transaction Entry dialog box appears.
Enter general ledgertransactions on the
General LedgerTransaction Entry
dialog box.

Working With the General LedgerSage DacEasy Accounting User’s Guide
98
62 Type the journal code or select LookUp and select the journal code. The
journal code allows you to group transactions together when you print your reports.
Note: Sage DacEasy reserves certain journal codes for specific modules. If you receive an error indicating the journal code you selected is a protected journal code, you must use a different journal code.
3 Press Enter in the Number field and the next available transaction number is assigned.
4 Complete the remaining fields.
Select the Reverse check box if you want to automatically reverse the entry at the close of the accounting period.
You can affect as many accounts as necessary; however, the total debits and total credits must be equal before you can save the transaction.
Tip: Select Help from the General Ledger Transaction Entry dialog box for a detailed description of each field.
5 Select OK to save the transaction.
Behind the Scenes
When you save a general ledger transaction, Sage DacEasy updates the following files:
• The General Ledger Header and Detail files include the new transaction. Sage DacEasy marks the transaction as unposted. You can print the General Ledger Activity Report and the General Ledger Journal to see unposted transactions.
• If Post General Ledger Online is selected on the System Preferences dialog box, Sage DacEasy updates the appropriate files. The General Ledger Header and Detail files are marked as posted and the General Ledger Journal Codes and Accounts files are updated.
• If Update Check Register Online is selected on the Cash tab of the System Preferences dialog box, and a reconcilable bank account was included in the general ledger transaction, Sage DacEasy updates the Check Register file so the unposted transaction appears while reconciling the bank account.
Related Help Topics
• Editing general ledger transactions
• Deleting general ledger transactions

General Ledger Monthly ChecklistDetail Line Commenting
99
6Detail Line Commenting
Avoid errors, improve auditing - enter virtually unlimited number of detail lines comments or add ample notes for reasoning General Ledger, Accounts Receivable, Payable, Cash Receipts, and Payment transactions. You enter comments in the detail grid for each transaction as description type detail lines. Description type detail lines are entered as free form text in the description column of the grid. Use them to enter additional information about the detail of the transaction.
Entering Comments on General Ledger Transactions
1 Select General Ledger from the Transactions menu. The General Ledger Transaction Entry dialog box appears.
2 Type the journal code or select LookUp and select the journal code.
3 Press Enter in the Number field to assign the next available transaction number.
4 Complete the remaining fields. Select the Reverse check box if you want to automatically reverse the entry at the close of the accounting period.
5 Enter each account and the amount to debit or credit in the detail portion of the transaction. You can affect as many accounts as necessary; however, the total debits and total credits must be equal before you can save the transaction.

Working With the General LedgerSage DacEasy Accounting User’s Guide
100
66 Enter C in the Account column and enter your comment in the description
field.
Note: You can enter one comment per detail line and as many comment lines as you need.
Attach Notes to Transactions
Improve auditing with ample amount of space to capture important information for easy reference when reasoning a General Ledger transaction. Using the Sage DacEasy notes editor you can type free form text with information pertaining to the transaction being entered. This information is associated to the transaction and it can be printed in the Transaction Journal.
To Add Notes to Transactions
1 Select the General Ledger transaction entry option from the Transactions menu.
2 Select an existing transaction from the LookUp or press enter in the Transaction Number field to create a new transaction.
3 Click Options, and then click Edit Note to display the Note Editor.
4 Type the note.
Tip: You can click Date Stamp to insert the current program date or Time Stamp to insert the current time.
5 Click Print if you want a printed copy of the note.
Tip: Click Help from the Note Editor for additional assistance on editing the note.
6 Click OK to save the note.
Note: Sage DacEasy uses the Journal Code plus the transaction number and the .ext extension for the note name. All notes are stored in the NOTES folder created inside the company data folder.
To Print Transaction Notes
1 Select the Journal option you want from the Journals menu. You can print notes for General Ledger, Payables Ledger, Receivables Ledger, Cash Receipts, and Cash Payment journals.
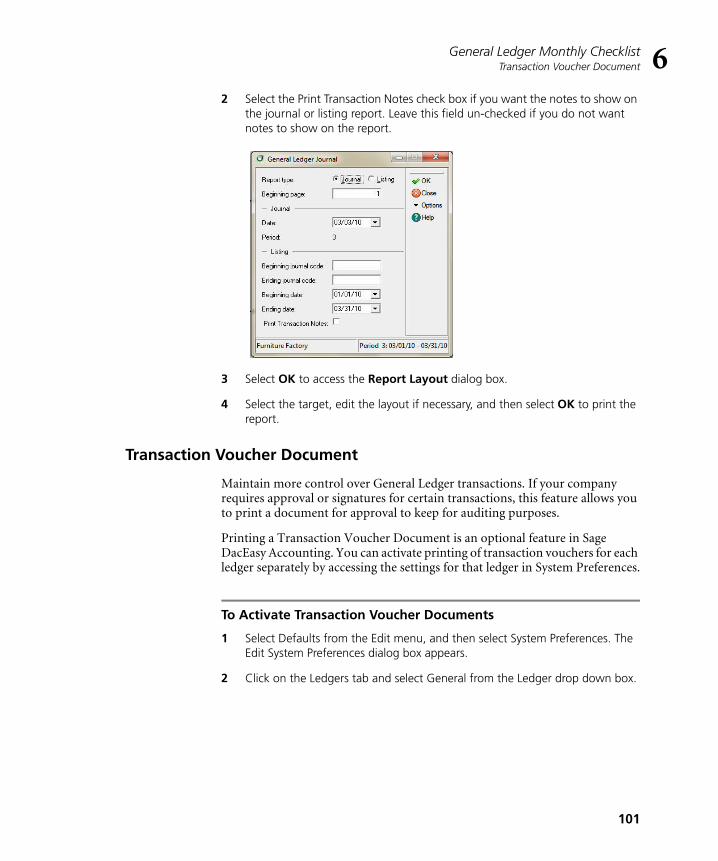
General Ledger Monthly ChecklistTransaction Voucher Document
101
62 Select the Print Transaction Notes check box if you want the notes to show on
the journal or listing report. Leave this field un-checked if you do not want notes to show on the report.
3 Select OK to access the Report Layout dialog box.
4 Select the target, edit the layout if necessary, and then select OK to print the report.
Transaction Voucher Document
Maintain more control over General Ledger transactions. If your company requires approval or signatures for certain transactions, this feature allows you to print a document for approval to keep for auditing purposes.
Printing a Transaction Voucher Document is an optional feature in Sage DacEasy Accounting. You can activate printing of transaction vouchers for each ledger separately by accessing the settings for that ledger in System Preferences.
To Activate Transaction Voucher Documents
1 Select Defaults from the Edit menu, and then select System Preferences. The Edit System Preferences dialog box appears.
2 Click on the Ledgers tab and select General from the Ledger drop down box.

Working With the General LedgerSage DacEasy Accounting User’s Guide
102
6
3 Select the Print Voucher check box to print a voucher document when you save a General Ledger Transaction.
4 Select Pause before Printing if you want Sage DacEasy to prompt you before printing the voucher document.
Tip: Select this option if you do not want to print a voucher document for all the transaction you enter. With this option selected, Sage DacEasy asks you for confirmation before printing each document.
5 Select the One Trans. Per Page if you want each Voucher Document to print on a new page. Sage DacEasy sends a form feed after printing each transaction.
Tip: Select this option if you want to want to create a paper file for each transaction you enter into your ledgers.
To Print Transaction Voucher Documents
Voucher Documents print automatically when you activate the option for the Ledger in which you are entering transactions. If you selected the Pause to Print Voucher check box in system preferences, Sage DacEasy will prompt you before printing each voucher.
1 Answer Yes and the Report Layout dialog appears.
2 Edit the layout, if necessary, and Click OK to print the document.

Using Recurring General Ledger TransactionsEntering Recurring G/L Transactions
103
6
Using Recurring General Ledger TransactionsIf you enter a particular general ledger transaction on a regular basis, you might choose to enter the information as a recurring general ledger transaction. Recurring transactions are entered one time and replicated each time you run the Generation routine.
Entering Recurring G/L Transactions
Recurring transactions are assigned to a group. You can generate recurring transactions for one or more groups.
You also limit the number of times the transaction can be generated. You can set a limit based on the number of times the transaction can be generated or you can set a termination date.

Working With the General LedgerSage DacEasy Accounting User’s Guide
104
6
To Enter a Recurring G/L Transaction
1 Select Recurring Entry from the Transactions menu, and then select General Ledger. The Recurring General Ledger Transaction Entry dialog box appears.
2 Assign the transaction to a group. You can generate multiple general ledger transactions at the same time by assigning multiple recurring transactions to the same group. To select an existing group, select LookUp and select the group from the list that appears.
3 Assign the transaction a number and journal code. You can type the journal code or select LookUp and select the journal code. The journal code allows you to group transactions together when you print your reports.
4 Select the type of transaction to generate and enter the recurring information.
5 Enter the accounts to debit and credit in the detail area of the transaction.
You can select Help from the Recurring General Ledger Transaction Entry dialog box for a detailed description of each field.
6 Select OK to save the transaction. The total debits and total credits must be equal before you can save the transaction.
Generating Recurring G/L Transactions
When you generate a recurring general ledger transaction, an unposted transaction is added to the General Ledger. Your account balances are updated when you post the General Ledger.
Enter repetitive generalledger transactions onthe Recurring General
Ledger Transaction Entrydialog box.

Using Recurring General Ledger TransactionsGenerating Recurring G/L Transactions
105
6Note: If the Post General Ledger Online check box is selected on the System Preferences dialog box, the transaction is posted to the General Ledger when you generate the transaction.
To Generate a Recurring G/L Transaction
1 Select Recurring Generation from the Transactions menu, and then select General Ledger. The Generate Recurring GL Transactions dialog box appears.
2 Type the date to assign to the generated transaction.
If the date entered as the Generation Date is after the termination date for a transaction, a general ledger transaction is not generated.
3 Enter the range of transactions to generate based on the group assigned to the recurring entries.
You can select Help from the Generate Recurring GL Transactions dialog box for a detailed description of each field.
4 Select OK. A transaction is added to the General Ledger for each recurring general ledger transaction that falls within the groups selected and the range entered.
Related Help Topics
• Editing recurring general ledger transactions
• Deleting recurring general ledger transactions
• Editing generated recurring general ledger transactions
• Deleting generated recurring general ledger transactions
Generate recurring generalledger transactions from
the Generate Recurring GLTransactions dialog box.

Working With the General LedgerSage DacEasy Accounting User’s Guide
106
6Verifying General Ledger Transactions
After you enter a series of general ledger transactions, verify your entries before posting the information. Print the General Ledger Journal to view the transactions to be posted. Unless the default has been changed on the Ledgers tab of the System Preferences dialog box, you are required to print the Journal prior to posting. Locating and correcting erroneous entries prior to posting is much easier than correcting entries after you have posted.
Note: If you choose to post the General Ledger online on the System Preferences dialog box, no entries are available on the General Ledger Journal. Journals only include unposted transactions. Print a Listing to view the posted general ledger transactions.
To Print the General Ledger Journal
1 Select General Ledger from the Journals menu. The General Ledger Journal dialog box appears.
2 Select Journal as the Report Type.
3 Type the Beginning Page number and Date. The period associated with the date appears. All unposted transactions within the period print on the Journal.
You can select Help from the General Ledger Journal dialog box for a detailed description of each field.
4 Select OK. The Report Layout dialog box appears.
5 Select the target, edit the layout if necessary, and then select OK.
Access the GeneralLedger Journal dialog
box to print the Journalprior to posting.

Posting the General LedgerGenerating Recurring G/L Transactions
107
6Posting the General Ledger
Posting transactions prevents you from making any changes to the transaction and updates the appropriate account balances in the chart of accounts. Although you can print financial statements that include unposted transactions, you might choose to include only posted transactions on official reports to ensure that the information on the reports does not change. Because a posted transaction cannot be edited, the information on your financial statements can change only if a backup is restored or adjusting entries are made.
When you post another module, such as Billing, Sage DacEasy creates and posts a transaction in the General Ledger. Therefore, you do not need to run the General Ledger Posting routine after posting one of the other modules. Use this Posting routine to post transactions you enter directly into the General Ledger module. If you use one or more of Sage DacEasy’s subsidiary ledgers, you typically only use the General Ledger to enter periodic adjusting entries.
Note: If you choose to post the General Ledger online on the System Preferences dialog box, your general ledger transactions post when you select OK on the General Ledger Transaction dialog box.
To Post the General Ledger
1 Select General Ledger from the Posting menu. The General Ledger Posting dialog box appears.
Tip: It is important to make a backup prior to posting. You can back up all data files for the company, including add-on modules, from the Sage DacEasy Business Center. Or, to access the Accounting Backup routine, select Backup from the General Ledger Posting dialog box.
2 Type the date that corresponds to the period to post. All transactions for the period are posted.
3 Clear the Purge Transactions After Posting check box to retain the transactions after posting.
Note: We strongly recommend that you do not purge when posting because the General Ledger serves as your audit trail.
4 Select OK. Each transaction appears as it is being posted. The Posting Results window appears when the process is complete.
Note: If the total Debits do not equal total Credits, restore your backup, run the Recover and Verify routines on your data files, and repeat the posting process. Refer to Chapter 2, “Getting Started." for more information on running the Recover and Verify routines using the File Utilities feature.
5 Select Continue to return to the main menu.

Working With the General LedgerSage DacEasy Accounting User’s Guide
108
6Behind the Scenes
When you post a general ledger transaction, Sage DacEasy does the following accounting behind the scenes:
• Sage DacEasy debits or credits each account as entered on the transaction.
When you post a general ledger transaction, Sage DacEasy updates the following files:
• The Accounts file includes the new account balances. Sage DacEasy updates the period and current balance of the accounts as well as the parent accounts to which the accounts flow. You can print all financial reports to see the changes in the account balances.
• Sage DacEasy updates the General Ledger Header and Detail files, marking the transaction as posted. You can print the General Ledger Activity Report or the General Ledger Listing to see the posted transactions.
• Sage DacEasy updates the Check Register file transaction and marks the check register entries as posted if the Update Check Register Online check box is selected on the Cash tab of the System Preferences dialog box, and a reconcilable bank account was included in the general ledger transactions you posted.
Related Help Topics
• Reversing posted general ledger transactions
• Printing the Listing
Enhanced Unposted Transactions Notification Certain processes in Sage DacEasy require that all transactions are posted before the process can be executed. These include General Ledger End of Period, Physical Inventory Entry, Billing Posting, and Point of Sale Receipts Posting.
Whenever you attempt to run any of these processes or data entry functions, Sage DacEasy verifies that all relevant transactions have been posted and displays an error message if this condition is not met. Sage DacEasy Version by Sage enhances this error message by specifying the period in which unposted transactions exist, and the number of unposted transactions for each period. To correct the error condition you must run the posting process for each of the periods with unposted transactions.
Note: You do not need to do any additional work to benefit from this new convenient feature. Sage DacEasy will always display the enhanced error message whenever the condition occurs.

Printing the General Ledger Activity Report Generating Recurring G/L Transactions
109
6The following table shows the processes where the enhanced message was implemented:
Printing the General Ledger Activity Report The General Ledger Activity Report is a detailed listing of all current account activity in your chart of accounts. Records on this report sort and print by account number. Sage DacEasy prints the beginning balance, transactions for a specified date range and the running balance for each account.
Only transactions in the General Ledger Header and Detail files print on the report. These include all current transactions and any transactions you have not deleted using the purge routine. In addition, Sage DacEasy only prints detail accounts on the report because all activity takes place at the detail account level.
The General Ledger Activity Report lists the transactions that move money in and out of your accounts. You can compare this report to your Trial Balance. The current balances match on these two reports under most circumstances. If they do not match, refer to the Troubleshooting section in the program’s Help system. For information on printing the Trial Balance, refer to Chapter 11, “Financial Reporting."
Note: If you are using the Update General Ledger Online feature, the General Ledger Activity report also includes unposted transactions from add-on modules such as Sage DacEasy Order Entry and Sage DacEasy Point of Sale.

Working With the General LedgerSage DacEasy Accounting User’s Guide
110
6
To Print the General Ledger Activity Report
1 Select General Ledger from the Reports menu, and then select Activity Report. The Account Activity dialog box appears.
2 Select the range of accounts and date range to include on the report.
3 Edit the default report preferences, if necessary.
Tip: Select Help from the Account Activity dialog box for a detailed description of each field.
4 Select OK to access the Report Layout dialog box.
5 Select your target, edit the layout if necessary, and then select OK to begin printing.
Access the AccountActivity dialog box to
print the General LedgerActivity Report.

Printing the General Ledger Activity Report General Ledger Activity Report
111
6General Ledger Activity Report

Working With the General LedgerSage DacEasy Accounting User’s Guide
112
6
7Working With Vendors
Overview 114Vendor Activity Monthly Checklist 115
Using the Payables Ledger 116Entering Payables Ledger Transactions 116
Attach Notes to Transactions 119
Transaction Voucher Document 120
Verifying Payables Ledger Transactions 122
Posting the Payables Ledger 124
Using the Purchasing Module 126Adding Purchasing Codes 127
Entering Purchase Orders 127
Automatically Creating Purchase Orders 129
Entering Merchandise Received 131
Entering Purchase Returns 133
Printing Purchasing Forms 136
Verifying Purchasing Transactions 138
Posting Purchasing 139
Printing Payables Reports 142Printing the Payments Report 142
Printing the Accounts Payable Aging Report 143
Merging Vendor Information in Microsoft Word 145

Working With VendorsSage DacEasy Accounting User’s Guide
114
7
• Working With Vendors •
OverviewIf you choose to track your vendors in Sage DacEasy Accounting you can use the Payables Ledger or the Purchasing module, or a combination of both to enter invoices and credits from your vendors. This chapter explains both modules and when to use each one. To record payments to your vendors refer to Chapter 10, “Banking"
Note: If you have not already entered your vendor information, refer to Chapter 4, “Setting Up"
The Accounts Payable Aging Report, Payments Report and Statements reflect invoices entered in either the Payables Ledger or Purchasing module. However, you must use the Purchasing module if you want to record inventory purchased or print purchasing forms such as purchase orders.
A complete list of the differences between the Payables Ledger and Purchasing module follows. Use this list to determine which module to use when entering vendor activity.
As Table 7-1 illustrates, there are a number of advantages to using the Purchasing module. When you use the Purchasing module, you can enter products and purchasing codes in the body of the transaction. Sage DacEasy uses this information along with the tax table assigned to the vendor to update the appropriate account balances. If you do not have the vendor invoice when the merchandise is received, you can choose to update a purchasing suspense account and record the vendor invoice in the Payables Ledger when you receive it.
Feature Payables Ledger Purchasing
Add an invoice to the vendor account ✓ ✓
Track vendor transaction history ✓ ✓
Include products on purchase orders and merchandise receipts
✓
Track serial numbers from the point of purchase ✓
Print purchase orders, merchandise receipts, or credit memos
✓
Track backordered products ✓
Automatically calculate the sales tax ✓

OverviewVendor Activity Monthly Checklist
115
7When you use the Payables Ledger, you must select one or more accounts from the chart of accounts in the body of the transaction. The Payables Ledger is typically used for adjusting invoice balances. For example, if a vendor charges you a late fee, use the Payables Ledger to adjust the invoice balance.
Vendor Activity Monthly Checklist
Post any assembly and physical inventory transactions.
Enter any purchase orders.
Print purchase orders to send to your vendors.
As you receive merchandise, recall the purchase order from the
Merchandise Received dialog box and receive the new items.
Enter vendor invoices (Perform this step if you are not using the
Purchasing module or if you chose not to update AP (Accounts Payable) when the merchandise was received) and any adjusting entries in the Payables Ledger.
Enter any purchase returns.
Print all merchandise received and purchase returns.
Enter any vendor payments using the Cash module.
Print the Journals for the period being posted.
Back up your data.
Post your transactions.
Note: You must post the Purchasing module before the Billing module each period, starting with the earliest period.
Run the Payables Period End routine. (Refer to “Closing the Period for
Payables ” on page 294 to determine if you need to perform this step.)
Related Help Topics
• Attaching notes to vendor records
• Using the phone dialer
• Viewing vendor transaction history

Working With VendorsSage DacEasy Accounting User’s Guide
116
7Using the Payables Ledger
Use the Payables Ledger to update vendor balances. You can enter all vendor activity in the Payables Ledger; however, it is more common to enter normal activity in the Purchasing module and use the Payables Ledger for adjusting entries. Such entries include adding insurance to an invoice after the invoice has been posted or adding a service fee for a returned check. You cannot enter inventory or print forms such as purchase orders using payables ledger transactions.
Entering Payables Ledger Transactions
Use the following steps as a guide when entering transactions into the Payables Ledger.
To Enter a Payables Ledger Transaction
1 Select Payables Ledger from the Transactions menu. The Payables Ledger Transaction Entry dialog box appears.
2 Press Enter in the Number field and the next available transaction number is assigned.
3 Type a vendor code or select LookUp to select a vendor.
You cannot select a Cash-type vendor for payables ledger transactions. Cash-type vendors can only be selected for Cash module transactions.
4 Select the type of transaction. Sage DacEasy updates the vendor balance based on your selection in this field.
Enter vendor activity onthe Payables Ledger
Transaction Entrydialog box.

Using the Payables LedgerEntering Payables Ledger Transactions
117
7Invoice—Select this type to enter a new invoice for the vendor and increase the vendor’s balance.
Debit—Select this type to decrease the vendor’s balance.
Credit—Select this type to increase an existing invoice balance.
5 Type a number in the Invoice field or select LookUp to select an existing invoice.
6 Complete the remaining fields in the header or select OK to advance to the detail area of the transaction.
If you are entering an invoice and the merchandise receipt has already been recorded without updating AP, you can type the purchasing transaction number in the From Order field or select LookUp to select the transaction. (Select the purchasing transaction in the Return Number field if you are entering a Debit type transaction.) The due date and discount date are calculated based on the original date and the terms on the transaction selected in the From Order field. The discount information is updated by the From Order transaction; however, you can edit the Discount Available field if needed. When you advance to the detail area, the appropriate Purchasing Suspense account appears with the amount originally charged to the account.
The date in the Transaction Information area is used as the posting date. The Original Date is used for aging the invoice. These dates must be in the same period if you want to compare the total on the Accounts Payable Aging Report to the Accounts Payable account balance.
You can select OK from any field to advance to the detail portion of the transaction.
7 Enter each account and the amount to debit or credit in the detail portion of the transaction. The first line defaults to the account set up as the AP Account for the vendor.
You can select Help from the Payables Ledger Transaction Entry dialog box for a detailed description of each field.
8 Select OK to save the transaction. The total debits and total credits must be equal before you can save the transaction.
Behind the ScenesWhen you save a payables ledger transaction, Sage DacEasy updates the following files:
• The Accounts Payable Header and Detail files include the new transaction. Sage DacEasy marks the transaction as unposted. Print the Payables Ledger Journal to see the new transactions.

Working With VendorsSage DacEasy Accounting User’s Guide
118
7• Sage DacEasy updates the Accounts Payable Open Invoice Detail file.
This information prints on the Accounts Payable Aging Report, Payments Report and Statements. An asterisk next to the code on the Aging Report indicates that the transaction is unposted. Sage DacEasy also updates the Accounts Payable Open Invoice Header file. This information is used in the Payables Reminder and AutoPay features.
• Sage DacEasy updates the vendor transaction history if you chose to track this information on the System Preferences dialog box.
• If the Update Check Register Online check box is selected on the Cash tab of the System Preferences dialog box, and a reconcilable bank account was included in the payables ledger transaction, Sage DacEasy updates the Check Register file so the unposted transaction appears while reconciling the bank account.
• If the Update General Ledger Online check box is selected on the General tab of the System Preferences dialog box, the General Ledger Header and Detail files are updated with the unposted payables ledger transaction. You can view the unposted payables ledger transaction from the General Ledger Transaction Entry dialog box, but you must return to the Payables Ledger Transaction Entry dialog box to edit the unposted transaction.
Related Help Topics
• Editing payables ledger transactions
• Deleting payables ledger transactions
• Adding NSF fees to vendor balances
Entering Comments on Payables Ledger Transaction
1 Select Payables Ledger from the Transactions menu. The Payables Ledger Transaction Entry dialog box appears.
2 Press Enter in the Number field and the next available transaction number is assigned.
3 Type a vendor code or select LookUp to select a vendor.
Note: You cannot select a Cash-type vendor for payables ledger transactions. Cash-type vendors can only be selected for Cash module transactions.
4 Complete the remaining fields in the header or select OK to advance to the detail area of the transaction.

Using the Payables LedgerAttach Notes to Transactions
119
75 Enter each account and the amount to debit or credit in the detail portion of
the transaction. You can affect as many accounts as necessary; however, the total debits and total credits must be equal before you can save the transaction.
6 Enter C in the Account column and enter your comment in the description field.
Note: You can enter one comment per detail line and as many comment lines as you need.
7 Click OK to save the transaction.
Attach Notes to Transactions
Improve auditing with ample amount of space to capture important information for easy reference when reasoning an Accounts Payables transaction. Using the Sage DacEasy notes editor you can type free form text with information pertaining to the transaction being entered. This information is associated to the transaction and it can be printed in the Transaction Journal.
To Add Notes to Transactions
1 Select the Payables Ledger transaction entry option from the Transactions menu.
2 Select an existing transaction from the LookUp or press enter in the Transaction Number field to create a new transaction.
3 Click Options, and then click Edit Note to display the Note Editor.
4 Type the note.
Tip: You can click Date Stamp to insert the current program date or Time Stamp to insert the current time.
5 Click Print if you want a printed copy of the note.
Tip: Click Help from the Note Editor for additional assistance on editing the note.
6 Click OK to save the note.
Note: Sage DacEasy uses the Journal Code plus the transaction number and the .ext extension for the note name. All notes are stored in the NOTES folder created inside the company data folder.

Working With VendorsSage DacEasy Accounting User’s Guide
120
7
To Print Transaction Notes
1 Select the Payables Ledger Journal from the Journals menu.
2 Select the Print Transaction Notes check box if you want the notes to show on the journal or listing report. Leave this field un-checked if you do not want notes to show on the report.
3 Select OK to access the Report Layout dialog box.
4 Select the target, edit the layout if necessary, and then select OK to print the report.
Transaction Voucher Document
Maintain more control over Payables Ledger transactions. If your company requires approval or signatures for certain transactions, this feature allows you to print a document for approval to keep for auditing purposes.
Printing a Transaction Voucher Document is an optional feature in Sage DacEasy Accounting. You can activate printing of transaction vouchers for each ledger separately by accessing the settings for that ledger in System Preferences.
To Activate Transaction Voucher Documents
1 Select Defaults from the Edit menu, and then select System Preferences. The Edit System Preferences dialog box appears.
2 Click on the Ledgers tab and select Payables from the Ledger drop down box.

Using the Payables LedgerTransaction Voucher Document
121
7
3 Select the Print Voucher check box to print a voucher document when you save a Payables Ledger Transaction.
4 Select Pause before Printing if you want Sage DacEasy to prompt you before printing the voucher document.
Tip: Select this option if you do not want to print a voucher document for all the transaction you enter. With this option selected, Sage DacEasy asks you for confirmation before printing each document.
5 Select the One Trans. Per Page if you want each Voucher Document to print on a new page. Sage DacEasy sends a form feed after printing each transaction.
Tip: Select this option if you want to want to create a paper file for each transaction you enter into your ledgers.
To Print Transaction Voucher Documents
Voucher Documents print automatically when you activate the option for the Ledger in which you are entering transactions. If you selected the Pause to Print Voucher check box in system preferences, Sage DacEasy will prompt you before printing each voucher.
1 Answer Yes and the Report Layout dialog appears.
2 Edit the layout, if necessary, and Click OK to print the document.

Working With VendorsSage DacEasy Accounting User’s Guide
122
7
Verifying Payables Ledger Transactions
After you enter a series of payables ledger transactions, print the Accounts Payable Journal to verify the accuracy of the entries before you post. Printing the Journal before posting is required unless you change the default on the Ledgers tab of the System Preferences dialog box. We strongly recommend that you always print the Journal prior to posting. Locating and correcting erroneous entries prior to posting is much easier than correcting entries after you have posted.

Using the Payables LedgerVerifying Payables Ledger Transactions
123
7
To Print the Accounts Payable Journal
1 Select Payables Ledger from the Journals menu. The Payables Journal dialog box appears.
2 Select Journal as the Report Type.
3 Complete the Date field. The period associated with the date appears. All unposted transactions within the period print on the Journal.
You can select Help from the Payables Journal dialog box for a detailed description of each field.
4 Select OK. The Report Layout dialog box appears.
5 Select the target, edit the layout if necessary, and then select OK.
Related Help Topic
• Printing the Listing
• Entering vendor credits
Access the PayablesJournal dialog box to
print the Journal priorto posting.

Working With VendorsSage DacEasy Accounting User’s Guide
124
7Accounts Payable Journal
Posting the Payables Ledger
The Posting routine updates the balances in the chart of accounts and the General Ledger. If your business has a high volume of activity, you might decide to post daily because it is easier to locate mistakes if you post on a frequent basis. Otherwise, you may only need to post weekly or monthly. Because the posting process updates the General Ledger, post prior to printing your reports to include the most recent activity.
The General Ledger is updated with a posted transaction when you post the Payables Ledger. Therefore, you do not have to run the General Ledger Posting routine after posting the Payables Ledger. You can create either a detail or summary general ledger transaction, depending on your selection on the Ledgers tab of the System Preferences dialog box. If you are using the Update General Ledger Online feature, the General Ledger is updated with a detail transaction when the transaction is saved, and the detail transaction is marked as posted when you run the Posting routine.

Using the Payables LedgerPosting the Payables Ledger
125
7Tip: If you choose to enable transaction processing on the Ledgers tab of the System Preferences dialog box, Sage DacEasy skips problem transactions during posting and lists the errors after posting completes. You must correct problems with these transactions, print the new Journal and post these transactions separately.
To Post the Payables Ledger
1 Select Payables Ledger from the Posting menu. The Payables Ledger Posting dialog box appears.
Tip: It is important to make a backup prior to posting. You can back up all data files for the company, including add-on modules, from the Sage DacEasy Business Center. Or, to access the Accounting Backup routine, select Backup from the Payables Ledger Posting dialog box.
2 Type a date that corresponds to the period you want to post. All transactions for the period are posted.
3 Clear the Purge Transactions After Posting check box to retain the transactions after posting.
4 Select OK. Each transaction appears as it is being posted. The Posting Results window appears when the process is complete.
Note: If the total Debits do not equal total Credits, restore your backup, run the Recover and Verify routines on your data files, and then repeat the posting process. Refer to Chapter 2, “Getting Started" for more information on running the Recover and Verify routines using the File Utilities feature.
5 Select Continue to return to the main menu.
Tip: To view each payables ledger transaction on the General Ledger Activity Report, you must select the Post Information in Detail to General Ledger check box for the Payables Ledger on the Ledgers tab of the System Preferences dialog box or select the Update General Ledger Online check box on the General tab of the System Preferences dialog box.
Behind the Scenes
When you post payables ledger transactions, Sage DacEasy does the following accounting behind the scenes:
• Sage DacEasy credits Accounts Payable if you selected either invoice or credit as the Type and debits and credits your offsetting accounts as specified on the transaction.
• Sage DacEasy debits Accounts Payable if you selected debit as the Type and credits and debits your offsetting accounts as specified on the transaction.

Working With VendorsSage DacEasy Accounting User’s Guide
126
7When you post payables ledger transactions, Sage DacEasy updates the following files:
• The Accounts file includes new account balances. Sage DacEasy updates period and current balances of accounts as well as the parent accounts to which the accounts flow. Print all financial reports to see changes in account balances.
• Sage DacEasy updates the General Ledger Header and Detail files with a posted summary or detail transaction, depending on your system preference. The journal code for the transaction that posts to the General Ledger is AP. Print the General Ledger Listing for journal code AP to see the posted transactions.
• Sage DacEasy updates the current balance and historical information in the Vendor file. Print the Vendor Directory to see changes in the current balance.
• Sage DacEasy updates the Accounts Payable Open Invoice Header and Detail files. This information prints on the Accounts Payable Aging Report and Statements. The asterisk in the Code column is removed when the invoice is posted.
• Sage DacEasy updates Payables Ledger Header and Detail files, marking transactions as posted. Print the Payables Ledger Listing to see the transactions.
• Sage DacEasy updates the Check Register file transaction and marks the check register entries as posted if the Update Check Register Online check box is selected on the Cash tab of the System Preferences dialog box, and a reconcilable bank account was included in the payables ledger transactions you posted.
Related Help Topic
• Reversing posted payables ledger transactions
Using the Purchasing ModuleThe Purchasing module lets you issue purchase orders to vendors as well as track inventory and vendor backorders by recording merchandise receipts. You can include any combination of products, messages or purchasing codes when you create purchase orders and enter merchandise received. The Purchasing module lets you create printed purchase orders, merchandise receipts and purchase returns.

Using the Purchasing ModuleAdding Purchasing Codes
127
7Adding Purchasing Codes
Before you start entering purchase orders, enter any purchasing codes that apply to your business. These codes allow you to add items to your purchase orders that are not products. For example, shipping and handling is a common purchasing code. Sage DacEasy updates the account specified for the code when you post a merchandise received transaction that includes a purchasing code.
To Add or Edit a Purchasing Code
1 Select Purchasing Codes from the Edit menu. The Edit Purchasing Code dialog box appears.
2 Type a code to identify the purchasing code you are adding. If you are editing an existing purchasing code, type the code or select LookUp and select a code from the list that appears.
3 Complete each field.
The account you enter is updated each time you post a purchasing transaction that includes this code.
Type the amount that is most often charged for the code or leave the field blank if the amount charged depends on the situation. You can enter the amount you want to charge for this code on the purchasing transaction.
You can select Help from the Edit Purchasing Code dialog box for a detailed description of each field.
4 Select OK to save the purchasing code.
Related Help Topics
• Editing purchasing codes
• Deleting purchasing codes
Entering Purchase Orders
When you need to buy merchandise for your business, your vendor might require a purchase order. A purchase order is a form used to request merchandise from a vendor and does not affect any account balances. If you choose to enter purchase orders, you can then receive merchandise from the original purchase order transaction and do not have to reenter each item as they are received.
Note: You do not have to enter a purchase order to receive merchandise in Sage DacEasy Accounting.

Working With VendorsSage DacEasy Accounting User’s Guide
128
7Note: To automatically generate a batch of purchase orders based on criteria, refer to “Automatically Creating Purchase Orders” on page 129.
To Enter a Purchase Order
1 Select Purchasing Entry from the Transactions menu, and then select Purchase Orders. The Purchase Orders dialog box appears.
2 Press Enter in the Order Number field if you are letting Sage DacEasy assign transaction numbers. Sage DacEasy assigns the next available number.
Type a unique order number if you selected to assign your own numbers on the Edit Forms Setup dialog box.
3 Complete the fields in the header area of the transaction, and then select OK to advance to the detail area of the transaction.
4 Enter each item ordered, the quantity ordered, the price and any discount in the detail area of the transaction.
Note: Sage DacEasy skips the Received and Backorder fields. These fields are updated when you enter a merchandise received transaction for the purchase order.
5 Select OK to advance to the footer area of the order.
6 Edit the tax amount if necessary.
Tip: Select Help from the Purchase Orders dialog box for a detailed description of each field.
7 Select OK to save the transaction.
Enter purchase requestson the Purchase Orders
dialog box.

Using the Purchasing ModuleAutomatically Creating Purchase Orders
129
7Behind the Scenes
When you save a purchase order, Sage DacEasy updates the following files:
• The Purchase Order Header and Detail files include the new transaction. You can print the Purchase Order Status Report to see the new transaction.
• Sage DacEasy updates the Product file. The on order units increase by the number of units ordered for each product on the purchase order.
Related Help Topics
• Editing purchase orders
• Deleting purchase orders
Automatically Creating Purchase Orders
The Auto Purchase Order feature allows you to easily create purchase orders based on certain criteria you select. This feature determines when a purchase order is necessary by calculating the number of available units you have less the number of units you have set as your minimum level on the product record and creates new purchase orders for you based on the number of units you need. You also have the option of including the number of units backordered and the number of units already on other purchase orders in this calculation.
To Create Purchase Orders With Auto Purchase Order
1 Select Purchase Entry from the Transactions menu, and then select Auto Purchase Order. The Auto Purchase Order Filter dialog box appears.
Use the Auto PurchaseOrder Filter dialog box
to create a list ofpurchase orders to be
generated.
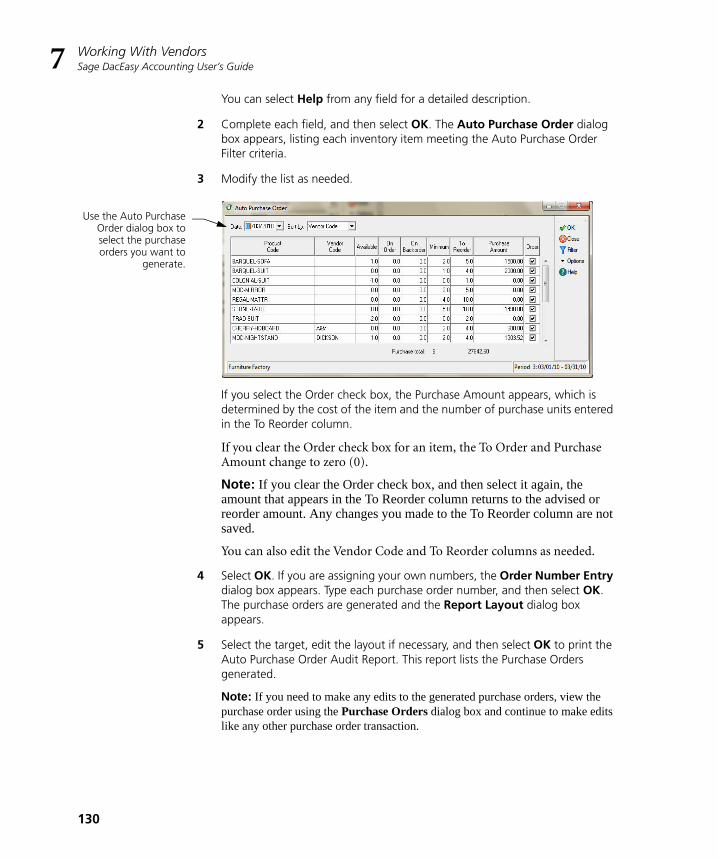
Working With VendorsSage DacEasy Accounting User’s Guide
130
7You can select Help from any field for a detailed description.
2 Complete each field, and then select OK. The Auto Purchase Order dialog box appears, listing each inventory item meeting the Auto Purchase Order Filter criteria.
3 Modify the list as needed.
If you select the Order check box, the Purchase Amount appears, which is determined by the cost of the item and the number of purchase units entered in the To Reorder column.
If you clear the Order check box for an item, the To Order and Purchase Amount change to zero (0).
Note: If you clear the Order check box, and then select it again, the amount that appears in the To Reorder column returns to the advised or reorder amount. Any changes you made to the To Reorder column are not saved.
You can also edit the Vendor Code and To Reorder columns as needed.
4 Select OK. If you are assigning your own numbers, the Order Number Entry dialog box appears. Type each purchase order number, and then select OK. The purchase orders are generated and the Report Layout dialog box appears.
5 Select the target, edit the layout if necessary, and then select OK to print the Auto Purchase Order Audit Report. This report lists the Purchase Orders generated.
Note: If you need to make any edits to the generated purchase orders, view the purchase order using the Purchase Orders dialog box and continue to make edits like any other purchase order transaction.
Use the Auto PurchaseOrder dialog box toselect the purchaseorders you want to
generate.
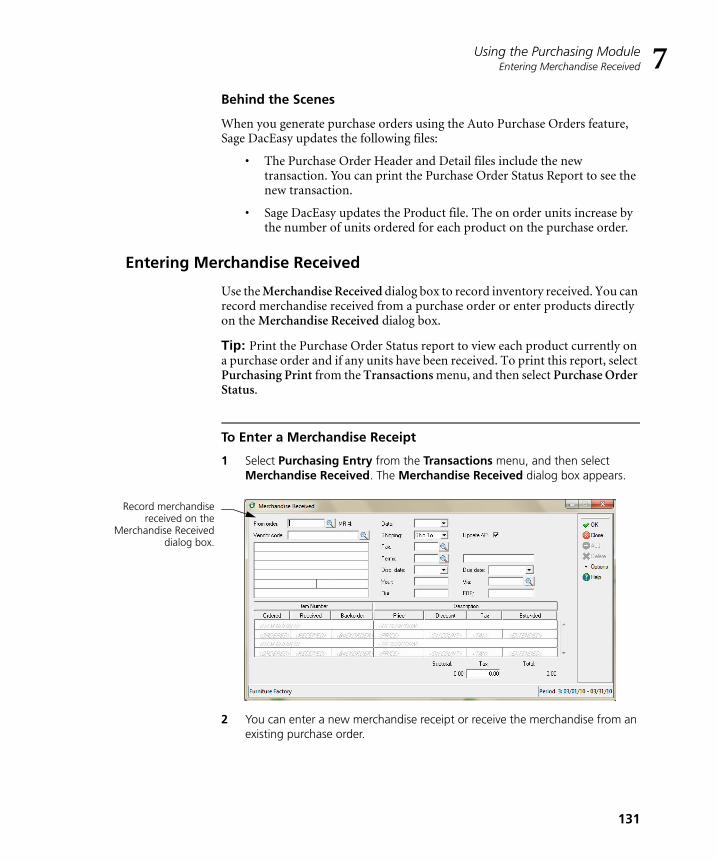
Using the Purchasing ModuleEntering Merchandise Received
131
7Behind the Scenes
When you generate purchase orders using the Auto Purchase Orders feature, Sage DacEasy updates the following files:
• The Purchase Order Header and Detail files include the new transaction. You can print the Purchase Order Status Report to see the new transaction.
• Sage DacEasy updates the Product file. The on order units increase by the number of units ordered for each product on the purchase order.
Entering Merchandise Received
Use the Merchandise Received dialog box to record inventory received. You can record merchandise received from a purchase order or enter products directly on the Merchandise Received dialog box.
Tip: Print the Purchase Order Status report to view each product currently on a purchase order and if any units have been received. To print this report, select Purchasing Print from the Transactions menu, and then select Purchase Order Status.
To Enter a Merchandise Receipt
1 Select Purchasing Entry from the Transactions menu, and then select Merchandise Received. The Merchandise Received dialog box appears.
2 You can enter a new merchandise receipt or receive the merchandise from an existing purchase order.
Record merchandisereceived on the
Merchandise Receiveddialog box.

Working With VendorsSage DacEasy Accounting User’s Guide
132
7To enter a new merchandise receipt—Press Enter in the From Order field if you are letting Sage DacEasy assign the number and Sage DacEasy assigns the next available transaction number. Type a unique transaction number if you chose to assign your own numbers on the Edit Forms Setup dialog box.
To receive merchandise from an existing purchase order—Enter the purchase order number in the From Order field or select LookUp, select Purchase Orders, and then select the purchase order from the list that appears. If a receipt has already been entered for the selected purchase order, a list of each receipt associated with the purchase order appears. Select Add New to enter a new receipt. To edit a receipt, select the existing receipt from the list.
3 Complete the fields in the header area of the transaction and select OK to advance to the detail area of the transaction.
If you select the Update AP check box, a payables ledger vendor invoice is created when you save the transaction. If you clear this check box, no vendor invoice is created and the appropriate suspense account is updated. If the vendor is assigned a Purchasing account, this account is updated; otherwise, the Purchasing Suspense account on the Account Interface dialog box is updated.
Tip: If you select the Update AP From Purchasing Module check box on the General tab of the System Preferences dialog box, the Update AP check box is also selected when entering merchandise received transactions.
4 If you are creating a new merchandise received transaction, enter each item received in the detail area of the transaction.
If you are receiving merchandise from an existing purchase order, enter the quantity received in the Received column for each item.
5 Select OK to advance to the footer area of the invoice.
6 Edit the tax amount if necessary.
Tip: Select Help from the Merchandise Received dialog box for a detailed description of each field.
7 Select OK to save the transaction.
Behind the Scenes
When you save a merchandise receipt, Sage DacEasy updates the following files:
• The Merchandise Received Header and Detail files include the new transaction. Sage DacEasy marks the transaction as unposted. Print the Purchasing Journal to see the new transaction.

Using the Purchasing ModuleEntering Purchase Returns
133
7• If the Update AP check box is selected, Sage DacEasy updates the
Accounts Payable Open Invoice Detail file. This information prints on the Accounts Payable Aging Report, Payments Report and Statements. An asterisk in the Code column on the Aging Report indicates the transaction is unposted. Also, if the Update AP check box is selected, Sage DacEasy updates the Accounts Payable Open Invoice Header file. This information is used in the Payables Reminder and AutoPay features.
• Sage DacEasy updates the Product file. The on order units decrease by the number of units received if you entered a purchase order. Sage DacEasy updates the Average cost. Sage DacEasy updates the on hand dollars by the amount of the purchase price and increases the on hand units by the number of units received for each product on the merchandise receipt. Print the Product History Report to see changes to the on hand units and dollars.
• Sage DacEasy updates the Serial Number file if you enter products with serial numbers. Sage DacEasy adds a line to the serial number history indicating the serial number is available.
• If the Update AP check box is selected, Sage DacEasy updates the Vendor Transaction History files for open invoice vendors if you chose to track history on the System Preferences dialog box.
• If the Update General Ledger Online check box is selected on the General tab of the System Preferences dialog box, the General Ledger Header and Detail files are updated with the unposted purchasing transaction. You can view the unposted purchasing transaction from the General Ledger Transaction Entry dialog box, but you must return to the Merchandise Received dialog box to edit the unposted transaction.
Related Help Topics
• Editing merchandise receipts
• Entering serial numbers on purchasing transactions
• Deleting merchandise receipts
Entering Purchase Returns
When you return merchandise to a vendor, use the Purchase Return dialog box to record this transaction. When you post the transaction, each file affected by the original receipt is updated accordingly.

Working With VendorsSage DacEasy Accounting User’s Guide
134
7
To Enter a Purchase Return
1 Select Purchasing Entry from the Transactions menu, and then select Purchase Returns. The Purchase Return dialog box appears.
2 Press Enter in the Return Number field and type the original merchandise receipt number in the Your field if you are letting Sage DacEasy assign transaction numbers. Type the original merchandise receipt number if you chose to assign your own numbers.
3 Complete the fields in the header area of the transaction, and then select OK to advance to the detail area of the transaction. If you select the Update AP check box, a vendor invoice (debit) is created when you save the transaction. If you clear this check box, no vendor invoice (debit) is created and the appropriate suspense account is updated. If the vendor is assigned a Purchasing account, this account is updated; otherwise, the Purchasing Suspense account on the Account Interface dialog box is updated.
Tip: To select a default for the Update AP check box, view the General tab on the System Preferences dialog box and use the Update AP from Purchasing Module check box.
4 Enter each item returned in the detail area of the transaction.
5 Select OK to advance to the footer area of the transaction.
6 Edit the tax amount if necessary.
You can select Help from the Purchase Return dialog box for a detailed description of each field.
7 Select OK to save the transaction.
Record merchandisereturned to vendors on
the Purchase Returndialog box.
Using the Purchasing ModuleEntering Purchase Returns
135
7Behind the Scenes
When you save a purchase return, Sage DacEasy updates the following files:
• The Merchandise Received Header and Detail files include the new transaction. Sage DacEasy marks the transaction as unposted. Print the Purchasing Journal to see the new transaction.
• If the Update AP check box is selected, Sage DacEasy updates the Accounts Payable Open Invoice Detail file. This information prints on the Accounts Payable Aging Report, Payments Report and Statements. An asterisk in the Code column on the Aging Report indicates the transaction is unposted. Sage DacEasy also updates the Accounts Payable Open Invoice Header file. This information is used in the Payables Reminder and AutoPay features.
• Sage DacEasy updates the Product file. Sage DacEasy updates the Average cost. The on hand units decrease by the number of units returned and the on hand dollars decrease by the cost for each product on the purchase return. Print the Product History Report to see changes to the on hand units and dollars.
• Sage DacEasy updates the Serial Number file if you enter products with serial numbers. Sage DacEasy adds a line to the serial number history removing the serial number from availability.
• If the Update AP check box is selected, Sage DacEasy updates the Vendor Transaction History files for open invoice vendors if you chose to track history on the System Preferences dialog box.
• If the Update General Ledger Online check box is selected on the General tab of the System Preferences dialog box, the General Ledger Header and Detail files are updated with the unposted purchasing transaction. You can view the unposted purchasing transaction from the General Ledger Transaction Entry dialog box, but you must return to the Purchase Return dialog box to edit the unposted transaction.
Related Help Topics
• Editing purchase returns
• Entering cash refunds from vendors
• Entering serial numbers on purchasing transactions
• Deleting purchase returns

Working With VendorsSage DacEasy Accounting User’s Guide
136
7Printing Purchasing Forms
One advantage of entering vendor activity in the Purchasing module instead of the Payables Ledger is the ability to print forms such as purchase orders, merchandise received and purchase returns. You must print all merchandise received and purchase returns before posting Purchasing (unless otherwise selected on the Ledgers tab of the System Preferences dialog box). You can print on plain paper or preprinted forms, using a standard template or your own custom template.
You can print purchasing forms at the point of entry or at one time using batch printing. To print a form at the point of entry, select the Print button from the footer of the transaction. The following steps explain how to print a batch of purchasing forms.
To Print Purchasing Forms
1 Select Purchasing Print from the Transactions menu, and then select the appropriate form from the submenu that appears.
Tip: The form prints according to the current default template. For information on selecting a different template, refer to Chapter 4, “Setting Up"
2 Complete each field.
Note: If you have edited or viewed a previously printed transaction and saved it, clear the Reprint check box to print the form again.
Tip: Select Help for a detailed description of each field.
3 Select OK. The Report Layout dialog box appears.
4 Select the target, edit the layout if necessary, and then select OK to print the form.
Related Help Topics
• Printing shipping labels
• Printing a test page

Using the Purchasing ModulePrinting Purchasing Forms
137
7Purchase Order

Working With VendorsSage DacEasy Accounting User’s Guide
138
7Merchandise Received
Verifying Purchasing Transactions
Before you post your purchasing transactions, you must print the Journal and verify the accuracy of your entries. Although you can change this requirement on the Ledgers tab of the System Preferences dialog box, we strongly recommend that you do not skip this step. Locating and correcting erroneous entries prior to posting is much easier than correcting entries after you have posted.
To Print the Purchasing Journal
1 Select Purchasing from the Journals menu. The Purchasing Journal dialog box appears.
2 Select Journal as the Report Type.
3 The Date field defaults to the last date in the earliest period with unposted billing or purchasing transactions. Edit the date, if necessary. The period associated with the date appears. All unposted transactions within the period print on the Journal.
Tip: Select Help from the Purchasing Journal dialog box for a detailed description of each field.

Using the Purchasing ModulePosting Purchasing
139
74 Select OK. The Report Layout dialog box appears.
5 Select the target, edit the layout if necessary, and then select OK.
Purchasing Journal
Related Help Topic
Printing the Listing
Posting Purchasing
The Posting process updates the General Ledger with the activity entered in the Purchasing module and updates the appropriate account balances. Additional files are updated depending on the information entered. For example, if you include products on a merchandise receipt, the Product file is updated.
There is no set rule when you must post; however, it is easier to locate mistakes if you post on a frequent basis. If your business has a high volume of activity, you might decide to post daily. Otherwise, you may only need to post weekly or monthly. Because the posting process updates the General Ledger, post prior to printing your reports to include the most recent activity.

Working With VendorsSage DacEasy Accounting User’s Guide
140
7
To Post Purchasing
1 Select Purchasing from the Posting menu. The Purchasing Posting dialog box appears.
The Date to Post field defaults to the earliest period that contains unposted billing or purchasing transactions. You must post billing and purchasing transactions in order by period, posting each period’s purchasing transactions before posting the same period’s billing transactions.
Tip: It is important to make a backup prior to posting. You can back up all data files for the company, including add-on modules, from the Sage DacEasy Business Center. Or, to access the Accounting Backup routine, select Backup from the Purchasing Posting dialog box.
2 Clear the Purge Transactions After Posting check box to retain the transactions after posting.
3 Select OK. Each transaction appears as it is being posted. The Posting Results window appears when the process is complete.
Note: If the total Debits do not equal total Credits, restore your backup, run the Recover and Verify routines on your data files, and then repeat the posting process. Refer to Chapter 2, “Getting Started" for more information on running the Recover and Verify routines using the File Utilities feature.
4 Select Continue to return to the main menu.
Behind the Scenes
When you post merchandise receipts, Sage DacEasy performs the following accounting behind the scenes.
Note: Sage DacEasy makes the opposite entries for purchase returns. Purchase orders do not affect your chart of accounts.
• If the Update AP check box was selected, Sage DacEasy credits Accounts Payable for the total amount of the purchase. Otherwise, the Purchasing Suspense account is credited.
• Sage DacEasy debits Inventory for the cost of the items purchased.
• Sage DacEasy debits Sales Tax Expense for the amount of the sales tax.
• If you are using purchasing codes, Sage DacEasy debits accounts set up for purchasing codes.
When you post purchasing transactions, Sage DacEasy updates the following files:

Using the Purchasing ModulePosting Purchasing
141
7• The Accounts file includes new account balances. Sage DacEasy
updates the period and current balance of accounts as well as the parent accounts to which the accounts flow. Print all financial reports to see the change in account balances.
• Sage DacEasy updates the General Ledger Header and Detail files with a posted summary transaction. This transaction is a net total of debits and credits to each account affected. If the Update General Ledger Online option is selected on the System Preferences dialog box, the detail transaction created in the General Ledger Header and Detail files when the purchasing transaction was created is marked as posted. The journal code for the transaction that posts to the General Ledger is PO. Print the General Ledger Listing for journal code PO to see the posted transaction.
• If the Update AP check box was selected, Sage DacEasy updates the current balance and historical information in the Vendor file. Print the Vendor Directory to see the change in the current balance.
• If the Update AP check box was selected, Sage DacEasy updates the Accounts Payable Open Invoice Header and Detail files. This information prints on the Accounts Payable Aging Report, Payments Report and Statements. The asterisk is removed from the Code column on the Aging Report when the transaction is posted.
• Sage DacEasy updates the Merchandise Received Header and Detail files, marking transactions as posted. Print the Purchasing Listing to see the posted transactions.
• The Tax Table file includes the purchase tax amounts from transactions. Print a report in the Query and Publisher to see changes in the tax table. Refer to Chapter 12, “Custom Reporting" for more information on the Query and Publisher.
• Sage DacEasy updates the Product file. Sage DacEasy updates the Last Purchase Price cost.
• If you chose to track product transaction history on the System Preferences dialog box, the Product Transaction History file is updated.
Related Help Topic
• Reversing posted purchasing transactions

Working With VendorsSage DacEasy Accounting User’s Guide
142
7Printing Payables Reports
Sage DacEasy Accounting includes a number of reports you can print to view your purchasing activity. The most commonly used reports are explained in this section.
Related Help Topics
• Printing letters
• Printing labels
• Printing statements
• Printing the Listing
Printing the Payments Report
The Payments Report helps you prioritize which checks must be written first. The Payments Report lets you view the posted and unposted activity for each vendor and allows you to sort the information using the method most beneficial to helping you pay your outstanding invoices.
To Print the Payments Report
1 Select Payables from the Reports menu, and then select Payments. The Payments Report dialog box appears.
2 Select the field you want to use to sort the report in the Subtotals field. A subtotal prints on each sort break.
3 Enter the range of records to include on the report, based on the invoice due date.
4 Select OK to access the Report Layout dialog box.
5 Select your target, edit the layout if necessary, and then select OK to print the report.
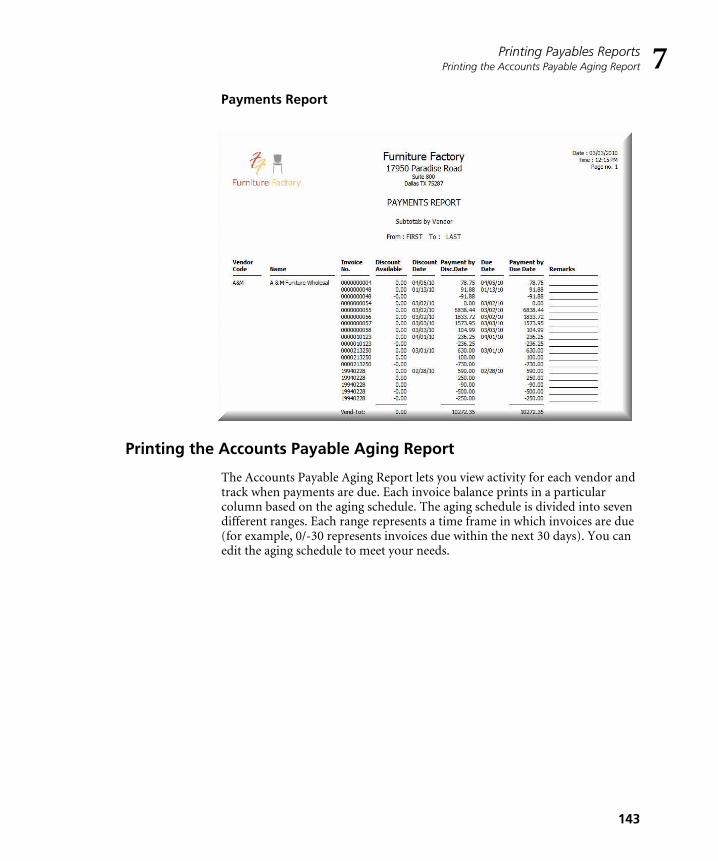
Printing Payables ReportsPrinting the Accounts Payable Aging Report
143
7Payments Report
Printing the Accounts Payable Aging Report
The Accounts Payable Aging Report lets you view activity for each vendor and track when payments are due. Each invoice balance prints in a particular column based on the aging schedule. The aging schedule is divided into seven different ranges. Each range represents a time frame in which invoices are due (for example, 0/-30 represents invoices due within the next 30 days). You can edit the aging schedule to meet your needs.

Working With VendorsSage DacEasy Accounting User’s Guide
144
7To Print the Accounts Payable Aging Report
1 Select Payables from the Reports menu, and then select Aging. The Payables Aging Report dialog box appears.
2 Edit the default report criteria, if necessary.
3 Select the Aging Schedule tab and edit this information, if necessary.
You can select Help from the Payables Aging Report dialog box for a detailed description of each field.
4 Select OK to access the Report Layout dialog box.
5 Select the target, edit the layout if necessary, and then select OK to print the report.
Access the PayablesAging Report dialog
box to print theAccounts Payable
Aging Report.

Printing Payables ReportsMerging Vendor Information in Microsoft Word
145
7Accounts Payable Aging Detail Report
Merging Vendor Information in Microsoft Word
Sage DacEasy’s seamless integration with Microsoft Word allows you to merge your vendor data with Microsoft Word documents. Use this feature to create professional letters that include your vendor information. You can e-mail or print these documents directly from Sage DacEasy or access the document in Word to take advantage of the powerful features available in Word.
You can merge a single record or a range of records. Explanations of each method follow.

Working With VendorsSage DacEasy Accounting User’s Guide
146
7
To Merge a Vendor Record With a Word Document
1 View a vendor on the Edit Vendor dialog box, and then select Mail Merge. The Direct Mail Merge Jobs dialog box appears.
2 Type the name of the job in the Job Name field or select LookUp to select an existing job.
3 Use the Main Document field to select the Word document that contains the information that stays the same for each version of the merged document. You can select an existing Word document, add a new Word document, or edit an existing document.
If you selected an existing job, the last associated Word document file name appears automatically.
To select an existing Word document—Type the name of an existing Word document or click the Browse button to locate the document. If the document is not located in the folder that contains your company’s data files, the Word document is copied to the company folder.
To add a Word document—Type a file name, and then select Edit. Sage DacEasy creates a new Word document in the company folder. The new document appears in Word. Edit the document as necessary, save the document, and then return to Sage DacEasy to continue with the mail merge.
To edit an existing Word document—Type the name of the existing Word document or click the Browse button and locate the document. Select Edit; the document appears in Word. Edit the document as necessary, save the document, and then return to Sage DacEasy to continue with the mail merge.
4 Type the closing date. This field is used when date sensitive merge fields are included in the document. For example, if you select Past Due >60 Balance as a merge field, Sage DacEasy uses the closing date to determine if the balance is over 60 days past due.
Access the Direct MailMerge Jobs dialog boxto merge your vendor
information with aWord document.

Printing Payables ReportsMerging Vendor Information in Microsoft Word
147
75 Select the Suppress Blank Lines check box if you want to skip blank lines
resulting from empty merge fields.
6 Merge your vendor data with the Word document using any of the following methods.
To e-mail the Word document—Select Send E-Mail.
To send the output to the printer—Select Print, select your printer preferences from the Print dialog box, and then select OK.
To view the output in Microsoft Word—Select View Job. The output appears in Microsoft Word. You can edit the document and apply Word functionality as needed.
To Merge a Range of Vendor Records With a Word Document
1 Select Payables from the Reports menu, and then select Mail Merge. The Vendor Mail Merge Jobs dialog box appears.
2 Type the name of the job in the Job Name field or select LookUp to select an existing job.
3 Use the Main Document field to select the Word document that contains the information that stays the same for each version of the merged document. You can select an existing Word document, add a new Word document, or edit an existing document.
Note: If you selected an existing job, the last associated Word document file name appears automatically.
Access the Vendor MailMerge Jobs dialog box
to merge a range ofvendors with a Word
document.

Working With VendorsSage DacEasy Accounting User’s Guide
148
7To select an existing Word document—Type the name of an existing Word document or click the Browse button to locate the document. If the document is not located in the folder that contains your company’s data files, the Word document is copied to the company folder.
To add a Word document—Type a file name, and then select Edit. Sage DacEasy creates a new Word document in the company folder. The new document appears in Word. Edit the document as necessary, save the document, and then return to Sage DacEasy to continue with the mail merge.
To edit an existing Word document—Type the name of the existing Word document or click the Browse button and locate the document. Select Edit; the document appears in Word. Edit the document as necessary, save the document, and then return to Sage DacEasy to continue with the mail merge.
4 Complete each field in the Filter/Sort Options area.
The Closing Date field is used when date sensitive merge fields are included in the document or as the Sort By or Rank By fields. For example, if you select Past Due >60 Balance as a merge field, Sage DacEasy uses the closing date to determine if the balance is over 60 days past due.
Select the Exclude Records Without an Address check box if you do not want to include the record in the mail merge if it does not contain an address.
Select the Exclude Records Without an E-mail Address check box if you do not want to include the record in the mail merge if it does not contain an e-mail address.
Select the Suppress Blank Lines check box if you want to skip blank lines resulting from empty merge fields.
5 Merge the selected data with the Word document using any of the following methods.
To e-mail the Word document - Select Send E-Mail.
To send the output to the printer—Select Print, select your printer preferences from the Print dialog box, and then select OK.
To view the output in Microsoft Word—Select View Job. The output appears in Microsoft Word. You can edit the document and apply Word functionality as needed.

8Working With Customers
Overview 150Customer Activity Monthly Checklist 151
Using the Receivables Ledger 152Entering Receivables Ledger Transactions 152
Attach Notes to Transactions 155
Transaction Voucher Document 156
Printing Transaction Voucher Documents 157
Verifying Receivables Ledger Transactions 158
Posting the Receivables Ledger 160
Using the Billing Module 162Entering Salespeople 162
Adding Billing Codes 163
Entering Invoices 164
Promotional Pricing 167
Entering Recurring Invoices 171
Generating Recurring Invoices 172
Entering Sales Returns 174
Printing Billing Forms 179
Verifying Billing Transactions 180
Posting Billing 181
Tracking Backorders 184
Filling Backorders 185
Printing Customer Statements 187
Printing Receivables Reports 187Printing the Accounts Receivable Aging Report 188
Filter Aging Report by Past Due Days 189
Merging Customer Info with Microsoft Word 191

Working With CustomersSage DacEasy Accounting User’s Guide
150
8
• Working With Customers •
OverviewYou can use the Receivables Ledger and Billing module to enter invoices and credits to track your customer activity. This chapter explains both modules and when to use each one. Refer to Chapter 10, “Banking." for info on customer payments.
Note: If you have not already entered your customer information, refer to Chapter 4, “Setting Up."
The Accounts Receivable Aging Report and Statements reflect invoices entered in either the Receivables Ledger or the Billing module. However, you must use the Billing module if you want to record inventory sold or print billing forms such as invoices and packing lists. Use this list to determine which module to use when entering invoices and customer activity.
As this table illustrates, there are a number of advantages to using the Billing module. Use it to enter products, services, and billing codes in the body of the transaction. Sage DacEasy uses this information along with the tax table assigned to the customer and the Account Interface to update the appropriate account balances.
When you use the Receivables Ledger, you must select one or more accounts from the chart of accounts in the detail area of the transaction. The Receivables Ledger is typically used for adjusting invoice balances.
Feature Receivables Ledger Billing
Add an invoice to the customer account ✓ ✓
Track customer transaction history ✓ ✓
Include products or services on the invoice ✓
Print a copy of the invoice or credit memo ✓
Track backordered products ✓
Departmentalize sales, sales returns, and costs of goods sold accounts
✓
Automatically calculate sales tax ✓
Track commissions ✓

OverviewCustomer Activity Monthly Checklist
151
8For example, if a customer decides to have a purchase delivered after the original invoice was entered, use the Receivables Ledger to adjust the invoice balance. Use the original invoice number, debit Accounts Receivable and credit a delivery revenue account.
Customer Activity Monthly Checklist
Post any assembly and physical inventory transactions.
Enter customer invoices in the Receivables Ledger, Billing module or both.
Generate any recurring invoices.
Enter any sales returns.
Print all invoices and sales returns.
Enter any customer payments using the Cash module.
Print the Backorder Status report if you selected the Track Customer
Backorders check box on the System Preferences dialog box.
Fill any backorders as you receive the merchandise.
Print the Journal for each module with unposted transactions.
Back up your data files.
Post each module. You must post the Purchasing module before the
Billing module each period, starting with the earliest period.
Purge old, unfulfilled backorders.
Generate finance charges if applicable, and then print statements.
Run the Receivables Period End routine. (Refer to “Closing the Period for
Receivables” on page 293 to determine if you need to perform this step.)

Working With CustomersSage DacEasy Accounting User’s Guide
152
8Related Help Topics
• Attaching notes to customer records
• Using the phone dialer
• Viewing and editing customer history
• Viewing customer transaction history
• Customer inquiry
Using the Receivables LedgerUse the Receivables Ledger to update customer balances. You can enter all customer activity in the Receivables Ledger; however, it is more common to enter normal customer activity in the Billing module and use the Receivables Ledger for adjusting entries. Such entries include adding insurance to an invoice after the invoice has been posted or adding a service fee for a returned check. You cannot enter inventory or print forms such as invoices using receivables ledger transactions.
Entering Receivables Ledger Transactions
Use the following steps as a guide when entering transactions into the Receivables Ledger.
To Enter a Receivables Ledger Transaction
1 Select Receivables Ledger from the Transactions menu. The Receivables Ledger Transaction Entry dialog box appears.
2 Press Enter in the Number field and the next available transaction number is assigned.
Enter customer activityon the Receivables Ledger
Transaction Entrydialog box.

Using the Receivables LedgerEntering Receivables Ledger Transactions
153
83 Type a customer code or select LookUp to select a customer. You cannot select
a Cash-type customer for receivables ledger transactions.
4 Select the type of transaction. Sage DacEasy updates the customer balance based on your selection in this field.
Invoice—Select this type to enter a new invoice for the customer and increase the customer balance.
Debit—Select this type to increase an existing invoice balance.
Credit—Select this type to decrease a customer’s balance.
5 Type a number in the Invoice field or select LookUp to select an existing invoice.
6 Edit the Date and options in the Invoice Information area as needed.
The date in the Transaction Information area is used as the posting date. The Original Date is used for aging the invoice.
Tip: You can select OK from any field to advance to the detail portion of the transaction.
7 Enter each account and the amount to debit or credit in the detail portion of the transaction.
Tip: You can select Help from the Receivables Ledger Transaction Entry dialog box for a detailed description of each field.
8 Select OK to save the transaction. The total debits and total credits must be equal before you can save the transaction.
Behind the Scenes
When you save a receivables ledger transaction, Sage DacEasy updates the following files:
• The Accounts Receivable Header and Detail files include the new transaction. Sage DacEasy marks the transaction as unposted. You can print the Receivables Ledger Journal to see the new transaction.
• Sage DacEasy updates the Accounts Receivable Open Invoice Detail file. This information prints on the Accounts Receivable Aging Report and Statements. An asterisk in the Code column on the Aging Report indicates the transaction is unposted.
• Sage DacEasy updates the Accounts Receivable Open Invoice Header file. This information is used in the Credit Check feature.
• Sage DacEasy updates the Customer Transaction History if you chose to track this information on the System Preferences dialog box.

Working With CustomersSage DacEasy Accounting User’s Guide
154
8• If the Update Check Register Online check box is selected on the Cash
tab of the System Preferences dialog box, and a reconcilable bank account was included in the receivables ledger transaction, Sage DacEasy updates the Check Register file so the unposted transaction appears while reconciling the bank account.
• If the Update General Ledger Online check box is selected on the General tab of the System Preferences dialog box, the General Ledger Header and Detail files are updated with the unposted receivables ledger transaction. You can view the unposted receivables ledger transaction from the General Ledger Transaction Entry dialog box, but you must return to the Receivables Ledger Transaction Entry dialog box to edit the unposted transaction.
Related Help Topics
• Editing receivables ledger transactions
• Deleting receivables ledger transactions
• Adding NSF fees to customer balances
• Writing off customer balances
Entering Comments on Receivables Ledger Transaction
1 Select Receivables Ledger from the Transactions menu. The Receivables Ledger Transaction Entry dialog box appears.
2 Press Enter in the Number field and the next available transaction number is assigned.
3 Type a customer code or select LookUp to select a customer.
Note: You cannot select a Cash-type customer for receivables ledger transactions. Cash-type customers can only be selected for Cash module transactions.
4 Complete the remaining fields in the header or select OK to advance to the detail area of the transaction.
Tip: Go to the Sage DacEasy Accounting Users’ guide for more information on working with the Receivables Ledger transactions.
5 Enter each account and the amount to debit or credit in the detail portion of the transaction. You can affect as many accounts as necessary; however, the total debits and total credits must be equal before you can save the transaction.
Using the Receivables LedgerAttach Notes to Transactions
155
86 Enter C in the Account column and enter your comment in the description
field.
Note: You can enter one comment per detail line and as many comment lines as you need.
7 Click OK to save the transaction.
Attach Notes to Transactions
Improve auditing with ample amount of space to capture important information for easy reference when reasoning an Accounts Receivable transaction. Using the Sage DacEasy notes editor you can type free form text with information pertaining to the transaction being entered. This information is associated to the transaction and it can be printed in the Transaction Journal.
To Add Notes to Transactions
1 Select the Receivables Ledger transaction entry option from the Transactions menu.
2 Select an existing transaction from the LookUp or press enter in the Transaction Number field to create a new transaction.
3 Click Options, and then click Edit Note to display the Note Editor.
4 Type the note.
Tip: You can click Date Stamp to insert the current program date or Time Stamp to insert the current time.
5 Click Print if you want a printed copy of the note.
Tip: Click Help from the Note Editor for additional assistance on editing the note.
6 Click OK to save the note.
Note: Sage DacEasy uses the Journal Code plus the transaction number and the .ext extension for the note name. All notes are stored in the NOTES folder created inside the company data folder.
To Print Transaction Notes
1 Select the Receivables Ledger Journal from the Journals menu.
2 Select the Print Transaction Notes check box if you want the notes to show on the journal or listing report. Leave this field un-checked if you do not want notes to show on the report.

Working With CustomersSage DacEasy Accounting User’s Guide
156
8
3 Select OK to access the Report Layout dialog box.
4 Select the target, edit the layout if necessary, and then select OK to print the report.
Transaction Voucher Document
Maintain more control over Receivables Ledger transactions. If your company requires approval or signatures for certain transactions, this feature allows you to print a document for approval to keep for auditing purposes.
Printing a Transaction Voucher Document is an optional feature in Sage DacEasy Accounting. You can activate printing of transaction vouchers for each ledger separately by accessing the settings for that ledger in System Preferences.
To Activate Transaction Voucher Documents
1 Select Defaults from the Edit menu, and then select System Preferences. The Edit System Preferences dialog box appears.
2 Click on the Ledgers tab and select Receivables from the Ledger drop down box.

Using the Receivables LedgerPrinting Transaction Voucher Documents
157
8
3 Select the Print Voucher check box to print a voucher document when you save a Receivables Ledger Transaction.
4 Select Pause before Printing if you want Sage DacEasy to prompt you before printing the voucher document.
Tip: Select this option if you do not want to print a voucher document for all the transaction you enter. With this option selected, Sage DacEasy asks you for confirmation before printing each document.
5 Select the One Trans. Per Page if you want each Voucher Document to print on a new page. Sage DacEasy sends a form feed after printing each transaction.
Tip: Select this option if you want to want to create a paper file for each transaction you enter into your ledgers.
Printing Transaction Voucher Documents
Voucher Documents print automatically when you activate the option for the Ledger in which you are entering transactions. If you selected the Pause to Print Voucher check box in system preferences, Sage DacEasy will prompt you before printing each voucher.

Working With CustomersSage DacEasy Accounting User’s Guide
158
8
To Print Transaction Voucher Documents
1 Answer Yes and the Report Layout dialog appears.
2 Edit the layout, if necessary, and Click OK to print the document.
Verifying Receivables Ledger Transactions
After you enter a series of receivables ledger transactions, print the Accounts Receivable Journal to verify the accuracy of the entries before you post. Printing the Journal before posting is required unless you change the default on the Ledgers tab of the System Preferences dialog box. We strongly recommend that you always print the Journal prior to posting. Locating and correcting erroneous entries prior to posting is much easier than correcting entries after you have posted.
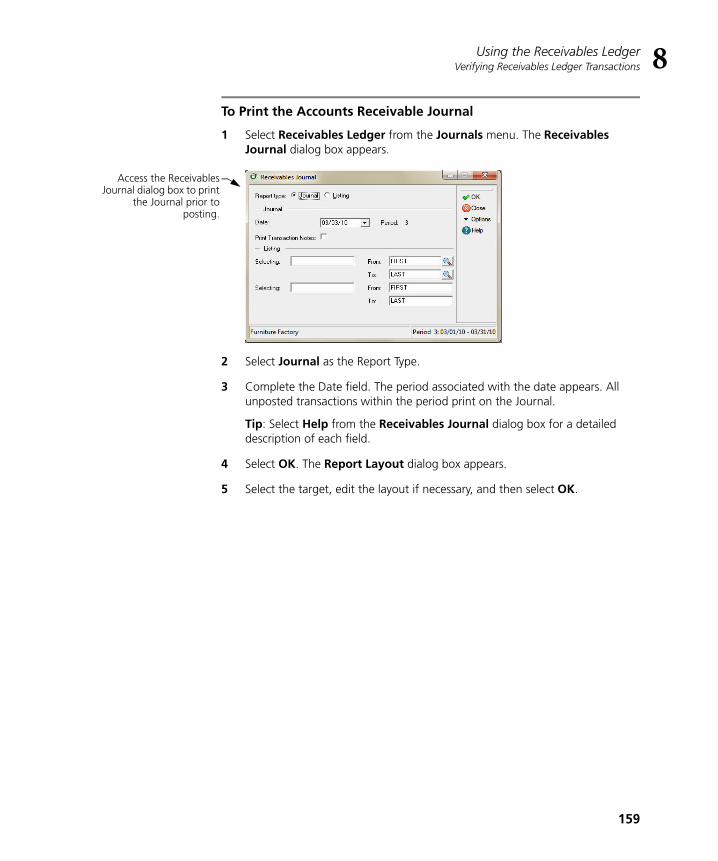
Using the Receivables LedgerVerifying Receivables Ledger Transactions
159
8
To Print the Accounts Receivable Journal
1 Select Receivables Ledger from the Journals menu. The Receivables Journal dialog box appears.
2 Select Journal as the Report Type.
3 Complete the Date field. The period associated with the date appears. All unposted transactions within the period print on the Journal.
Tip: Select Help from the Receivables Journal dialog box for a detailed description of each field.
4 Select OK. The Report Layout dialog box appears.
5 Select the target, edit the layout if necessary, and then select OK.
Access the ReceivablesJournal dialog box to print
the Journal prior toposting.

Working With CustomersSage DacEasy Accounting User’s Guide
160
8Accounts Receivable Journal
Posting the Receivables Ledger
The Posting routine updates the balances in the chart of accounts and the General Ledger. If your business has a high volume of activity, you might decide to post daily because it is easier to locate mistakes if you post on a frequent basis. Otherwise, you may only need to post weekly or monthly. Because the posting process updates the General Ledger, post prior to printing your reports to include the most recent activity.
The General Ledger is updated with a posted transaction. Therefore, you do not have to run the General Ledger Posting routine after posting the Receivables Ledger. You can create either a detail or summary general ledger transaction, depending on your selection on the Ledgers tab of the System Preferences dialog box.
If you are using the Update General Ledger Online feature, the General Ledger is updated with a detail transaction when the transaction is saved, and the detail transaction is marked as posted when you run the Posting routine.
Tip: If you choose to enable transaction processing on the Ledgers tab of the System Preferences dialog box, Sage DacEasy skips problem transactions during posting and lists any errors after posting completes. You must correct problems with these transactions, print the new Journal and post these transactions separately.

Using the Receivables LedgerPosting the Receivables Ledger
161
8
To Post the Receivables Ledger
1 Select Receivables Ledger from the Posting menu. The Receivables Ledger Posting dialog box appears.
Tip: It is important to make a backup prior to posting. From the Sage DacEasy Business Center, you can back up all data files for the company, including add-on modules. Or, to access the Accounting Backup routine, select Backup from the Receivables Ledger Posting dialog box.
2 Type a date that corresponds to the period to post. All transactions for the period are posted.
3 Clear the Purge Transactions After Posting check box to retain the transactions after posting.
4 Select OK. Each transaction appears as it is being posted. The Posting Results window appears when the process is complete.
Note: If the total Debits do not equal total Credits, restore your backup, run the Recover and Verify routines on your data files, and then repeat the posting process. Refer to Chapter 2, “Getting Started." for more info on running the Recover and Verify routines using the File Utilities feature.
5 Select Continue to return to the main menu.
Tip: To view each receivables ledger transaction on the General Ledger Activity Report, mark the Post Information in Detail to General Ledger check box for the Receivables Ledger on the Ledgers tab of the System Preferences dialog box or mark the Update General Ledger Online check box on the General tab of the System Preferences dialog box.
Behind the Scenes
When you post receivables ledger transactions, Sage DacEasy performs the following accounting behind the scenes.
• Sage DacEasy debits Accounts Receivable if you selected either invoice or debit as the Type and debits and credits your offsetting accounts as specified on the transaction.
• Sage DacEasy credits Accounts Receivable if you selected credit as the Type and credits and debits your offsetting accounts as specified on the transaction.
When you post receivables ledger transactions, Sage DacEasy updates the following files:
Working With CustomersSage DacEasy Accounting User’s Guide
162
8• The Accounts file includes new account balances. Sage DacEasy
updates period and current balances of accounts as well as the parent accounts to which the accounts flow. Print all financial reports to see changes in account balances.
• Sage DacEasy updates the General Ledger Header and Detail files with a posted summary or detail transaction, depending on your system preferences. The journal code for the transaction that posts to the General Ledger is AR. Print the General Ledger Listing for journal code AR to see the posted transactions.
• Sage DacEasy updates current balance and historical information in the Customer file. Print the Customer Directory to see the change in the current balance.
• Sage DacEasy updates the Accounts Receivable Open Invoice Header and Detail files. This information prints on the Accounts Receivable Aging Report and Statements. The asterisk in the Code column is removed when the invoice is posted.
• Sage DacEasy updates Receivables Ledger Header and Detail files, marking the transactions as posted. Print the Receivables Ledger Listing to see the transactions.
• Sage DacEasy updates the Check Register file transaction and marks the check register entries as posted if the Update Check Register Online check box is selected on the Cash tab of the System Preferences dialog box, and a reconcilable bank account was included in the receivables ledger transactions you posted.
Using the Billing ModuleBecause of the many benefits associated with the Billing module, it is likely that you will enter the majority of your customer activity in this module. If you need to track inventory or print invoices, you must enter your invoices in the Billing module. For a list of additional benefits, refer to Table 8-1.
The information that is required to use the Billing module (for example, customer, tax table and terms table) is explained in Chapter 4, “Setting Up.” In addition, you might choose to track salespeople and use billing codes. This section provides steps for setting up these features.
Entering Salespeople
You can track each salesperson’s performance by entering the salesperson code on the invoice each time the employee enters an invoice. You can use this information for bonuses, commission or performance reviews.
Using the Billing ModuleAdding Billing Codes
163
8
To Add or Edit a Salesperson
1 Select Salespeople from the Edit menu. The Edit Salesperson dialog box appears.
2 Type a code to identify the salesperson. To edit an existing salesperson, type the code or select LookUp and select the code from the list that appears.
3 Complete each field.
None of the fields update the history for the salesperson, and therefore are not required. However, the fields are useful when creating custom reports for your salespeople.
You can select Help from the Edit Salesperson dialog box for a detailed description of each field.
4 Select OK to add the salesperson.
Related Help Topics
• Viewing and editing salesperson history
• Deleting salespeople
Adding Billing Codes
Add a billing code for each item other than services and products that you want to include on billing transactions. For example, warranty is typically set up as a billing code. When you post an invoice or a sales return that includes a billing code, Sage DacEasy updates the account specified for the code.
To Add or Edit a Billing Code
1 Select Billing Codes from the Edit menu. The Edit Billing Code dialog box appears.
2 Type a code to identify the billing code you are adding. If you are editing an existing billing code, type the code or select LookUp and select the code from the list that appears.
3 Complete each field.
The account field is required and is updated each time you post a billing transaction that includes this code.
Type the amount that is most often charged for the code or leave the field blank if the amount charged depends on the situation. You can enter the amount you want to charge for this code on the billing transaction.

Working With CustomersSage DacEasy Accounting User’s Guide
164
8You can select Help from the Edit Billing Code dialog box for a detailed description of each field.
4 Select OK to save the billing code.
Related Help Topic
• Deleting billing codes
Entering Invoices
You can enter products, services and billing codes on the Invoice Entry dialog box in the Billing module. You can choose between an entry screen designed for an inventory-based business or service-based business. Make your inventory or service selection on the Billing tab of the System Preferences dialog box. The following steps explain how to create an invoice using an inventory-based entry screen in the Billing module.
To Enter an Invoice
1 Select Billing Entry from the Transactions menu, and then select Invoices. The Invoice Entry dialog box appears.
2 Press Enter in the Invoice number field if you are letting Sage DacEasy assign invoice numbers and Sage DacEasy assigns the next available invoice number.
Type a unique transaction number if you chose to assign your own numbers on the Edit Forms Setup dialog box.
3 Complete the fields in the header area of the transaction, and then select OK to advance to the detail area of the invoice.
Enter customer invoiceson the Invoice Entry
dialog box.

Using the Billing ModuleEntering Invoices
165
84 Enter each item in the detail area of the invoice along with the units ordered
and shipped, and the price.
Tip: Select Options, and then select AutoReorder to view a list of previous purchases made by the customer. You can select any item from the list to sell the same quantity of the item.
You can include the following types of items on an invoice:
Products—Type a product code; or, select LookUp, select Products as the file to view, and then select the code.
Billing Codes—Type C followed by a space, and then the code; or, select LookUp, select Codes as the file to view, and then select the code.
Message—Type M followed by a space and the message code; or, select LookUp, select Messages as the file to view, and then select the code.
Services—Type the service code; or, select LookUp, select Services as the file to view, and then select the code.
Detail Items—Select LookUp, select Master Items as the file to view, and then select the code. A list of detail items for the master item appears; select the detail item.
Description—Type D and press Enter. The cursor advances to the Description field where you can enter up to 40 characters of free-form text. This text also prints on the form.
Hidden messages—Type H and press Enter. The cursor advances to the Description field where you can enter up to 40 characters of free-form text that appears on the entry screen, but not on the printed form.
Note: If there are not enough units of a normal-type product to satisfy the amount ordered, the shortage appears in the Backorder field.
5 Complete the fields in the footer.
If you set up a freight account on the Account Interface dialog box, you can type an amount to charge for freight.
Tip: If you assigned weights to products, you can view the total weight for the invoice to assist in calculating the freight charge. To view the total weight, select Options, and then select Total Weight.
Tax is automatically calculated based on the tax code in the header of the invoice and the taxable status of each item; however, you can edit this amount if necessary.
If the customer pays cash at the time of the sale, type the amount of cash received in the Payment field and a reference, if desired, in the Reference field.

Working With CustomersSage DacEasy Accounting User’s Guide
166
8If you installed Sage Exchange to verify online payments, Sage DacEasy Accounting automatically populates the CC Approval Code field.
Note Select Help from the Invoice Entry dialog box for a detailed description of each field.
6 Select OK to save the transaction.
Behind the Scenes
When you save an invoice, Sage DacEasy performs the following accounting behind the scenes:
• The Invoice Header and Detail files include the new transaction. Sage DacEasy marks the transaction as unposted. Print the Sales Journal to see the new transaction.
• Sage DacEasy updates the Accounts Receivable Open Invoice Detail file. This information prints on the Accounts Receivable Aging Report and Statements. The Aging Report indicates the transaction is unposted with an asterisk in the Code column. Sage DacEasy also updates the Accounts Receivable Open Invoice Header file. This information is used in the Credit Check feature.
• Sage DacEasy updates the Product file if your transaction includes products. The committed units increase by the number of units shipped for each product on the invoice.
• Sage DacEasy adds the sales info to the Salesperson History file if you chose to track this info on the System Preferences dialog box.
• Sage DacEasy updates the Serial Number file if you enter products or services with serial numbers. Sage DacEasy adds a line to the serial number history.
• The Customer Transaction History file is updated if you chose to track this information on the System Preferences dialog box.
• If the Update Check Register Online check box is marked on the Cash tab of the System Preferences dialog box, and a reconcilable bank account was included in the billing transaction, Sage DacEasy updates the Check Register file so the unposted transaction appears while reconciling the bank account.
• If the Update General Ledger Online check box is selected on the General tab of the System Preferences dialog box, the General Ledger Header and Detail files are updated with the unposted billing transaction. You can view the unposted billing transaction from the General Ledger Transaction Entry dialog box, but you must return to the Invoice Entry dialog box to edit the unposted transaction.

Using the Billing ModulePromotional Pricing
167
8Related Help Topics
• Editing invoices
• Deleting invoices
• Assembling products from the Invoice Entry dialog box
• Selecting substitute products during invoice entry
• Entering assembled kits on billing transactions
• Entering serial numbers on billing transactions
• Entering invoices from the Edit Customer dialog box
• Using AutoReorder to sell items based on prior purchases
• Viewing the total weight of items on an invoice
• Promotional Pricing
Promotional Pricing
This popular feature found in Sage DacEasy Point of Sale and Sage DacEasy Order Entry is now being brought to the Sage DacEasy Accounting module. Now you may set up special promotional pricing for specific items based on a price override, a flat discount, or a percentage discount. Plus you can create customized price lists for certain customers.
The promotional price feature lets you enter special sales prices that are valid for a certain range of dates. If you are offering a sale on specific items for one week, enter the sales price you want for that week on the promotional price transaction dialog. The promotional price appears on the sales transaction when the transaction date is within the date entered on the promotional price. Furthermore, you can specify the customers to which the special promotion applies.
Note: The promotional price feature in Sage DacEasy allows you to specify whether a promotional price transaction applies to one customer, a range of customers, or all customers.
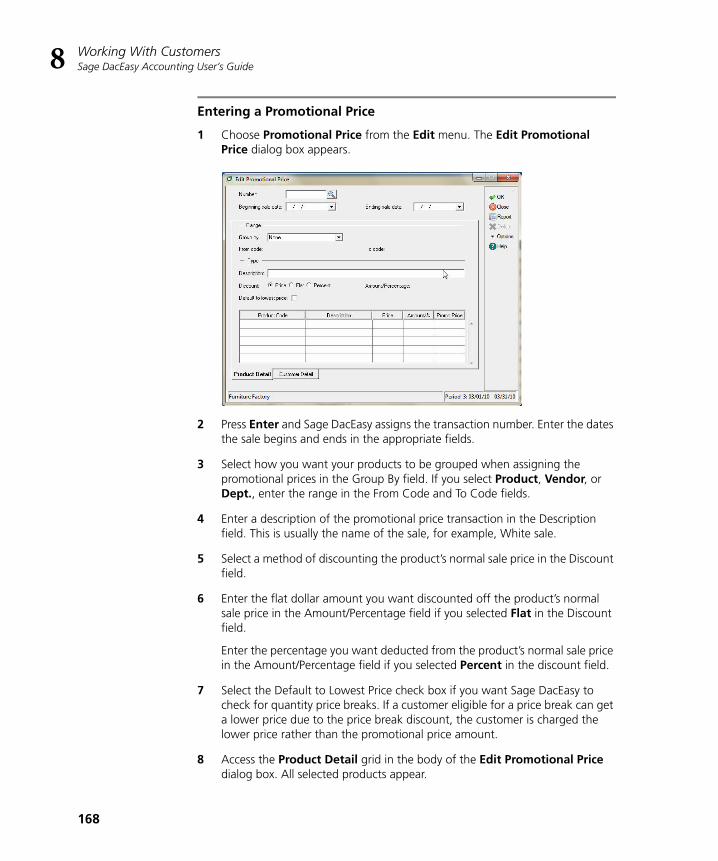
Working With CustomersSage DacEasy Accounting User’s Guide
168
8
Entering a Promotional Price
1 Choose Promotional Price from the Edit menu. The Edit Promotional Price dialog box appears.
2 Press Enter and Sage DacEasy assigns the transaction number. Enter the dates the sale begins and ends in the appropriate fields.
3 Select how you want your products to be grouped when assigning the promotional prices in the Group By field. If you select Product, Vendor, or Dept., enter the range in the From Code and To Code fields.
4 Enter a description of the promotional price transaction in the Description field. This is usually the name of the sale, for example, White sale.
5 Select a method of discounting the product’s normal sale price in the Discount field.
6 Enter the flat dollar amount you want discounted off the product’s normal sale price in the Amount/Percentage field if you selected Flat in the Discount field.
Enter the percentage you want deducted from the product’s normal sale price in the Amount/Percentage field if you selected Percent in the discount field.
7 Select the Default to Lowest Price check box if you want Sage DacEasy to check for quantity price breaks. If a customer eligible for a price break can get a lower price due to the price break discount, the customer is charged the lower price rather than the promotional price amount.
8 Access the Product Detail grid in the body of the Edit Promotional Price dialog box. All selected products appear.

Using the Billing ModulePromotional Pricing
169
8Tip: Click Options and then select Alt 1 to move to the Product Detail Grid. Click Options and then select Alt 2 to move to the Customer Detail Grid.
9 If you selected Price in the discount field, enter the sales price you want during the promotional price period in the Promo Price column.
If you selected Flat or Discount in the Discount field, Sage DacEasy automatically calculates the new price and displays it in the Promo Price column. You can edit the Promo Price if necessary.
You can click Help for more info on the Edit Promotional Price dialog box.
10 Select the Apply to all customers check box if you want the promotional price to apply to all customers.
11 Select how you want your customers to be grouped when assigning the promotional prices in the Group By field. If you select Customer, Billing Group, Department, City, or State. Enter the range in the From Code and To Code fields.
Note: Use the Group By, From Code, and To Code fields to filter the customers that populate the Customer Detail Grid. Select None in the Group By check box if you want to enter customers one by one.
12 Access the Customer Detail grid in the body of the Edit Promotional Price dialog box. All selected customers appear.
13 You can add new customers into the Customer Detail Grid by entering the customer code in the Customer Code column. Click on LookUp to select form a list of customers.
14 Select Options and then select Line Delete, or press SHIFT F6 to delete a customer from the Customer Detail Grid.
Printing the Promotional Prices Report
The promotional price listing gives you a list of the transactions entered using the Edit Promotional Prices dialog box. All items entered with a promotional price stay in the file until purged using the purge routine.

Working With CustomersSage DacEasy Accounting User’s Guide
170
81 Choose Promotional Price from the Reports menu, or while in the Edit
Promotional Price Click on Report. The Promotional Price Report dialog box appears.
2 Enter the Sort by and Rank by information.
Tip: Click Help from the Promotional Price Report dialog box for a detailed description of each field.
3 Click OK. The Report Layout dialog box appears.
4 Select the target, edit the layout if necessary, and then click OK to begin printing.
Promotional Price Report

Using the Billing ModuleEntering Recurring Invoices
171
8Entering Recurring Invoices
Use the Recurring Billing feature in Sage DacEasy Accounting for customers you bill on a regular basis. Enter the invoice once, and then generate a new invoice from the original as often as needed. You can generate recurring invoices for a particular customer based on the assigned billing group. Assign customers to a billing group on the Edit Customer dialog box. You can create and generate as many different invoices as needed.
To Enter a Recurring Invoice
1 Select Recurring Entry from the Transactions menu, and then select Invoices. The Recurring Invoice Entry dialog box appears.
2 Press Enter in the Number field and the next available number is assigned.
3 Complete the fields in the header area of the transaction, and then select OK to advance to the detail area of the invoice.
Note: Leave the Customer Code field blank if you want to generate this invoice for multiple customers.
4 Enter each item in the detail area of the invoice.
Tip: Select Help from the Recurring Invoice Entry dialog box for a detailed description of each field.
5 Select OK to save the transaction.
Behind the Scenes
When you save a recurring invoice, Sage DacEasy updates the Recurring Invoice Header and Detail files to include the new transaction.
Enter repetitive invoiceson the Recurring Invoice
Entry dialog box.
Working With CustomersSage DacEasy Accounting User’s Guide
172
8Generating Recurring Invoices
You have four options when generating recurring invoices. Each option is explained below.
• Billing group with a transaction number—You must select a recurring transaction that does not include a customer code to use this option. An invoice based on the selected recurring transaction is generated for all customers assigned to the selected billing group.
• Billing group without a transaction number—An invoice is generated for all recurring transactions that include a customer who is assigned to the selected billing group.
• Customer code with a transaction number—You cannot select a transaction that contains a different customer code. You can only select a recurring transaction with the same customer code or no customer code. An invoice is generated for the customer based on the selected transaction.
• Customer code without a transaction number—An invoice is generated for the recurring transaction that includes the customer code. You can only assign one recurring transaction per customer code.
To illustrate the various scenarios, assume you own Al’s Landscaping Service. You offer all of your customers a standard lawn maintenance plan for a set price. To automatically generate this invoice for all customers that subscribe to this service, (1) assign each of these customers to the ‘STD’ billing group, (2) create a recurring invoice for the service leaving the customer code field blank, and then (3) generate the invoice for the STD billing group for the transaction.
Now assume that you have a weekly service where the cost depends on the size of the lawn. To automatically generate all recurring invoices for the week, (1) assign each weekly customer to the ‘WEEK’ billing group, (2) create a recurring invoice for each customer with the weekly charges to the customer, and then (3) generate invoices for the WEEK billing group and leave the transaction number blank.
If you have a special package that includes several services, but is not billed on a regular basis, add the service to a recurring invoice and leave the customer code field blank. When you sell this service, you can generate the invoice by selecting the customer and the transaction number.
If you have a customer whose services vary each month, you can create the invoice with the customer code. You can then make adjustments as needed, and then generate the invoice for the customer by entering the customer code, but leaving the invoice number field blank.

Using the Billing ModuleGenerating Recurring Invoices
173
8
To Generate a Recurring Invoice
1 Select Recurring Generation from the Transactions menu, and then select Invoices. The Generate Recurring Invoices dialog box appears.
2 Type the date to assign to the generated invoices.
3 Select the method to use when generating invoices.
Select Billing Group to generate invoices for particular groups of customers. If you select this option, complete the fields in the Group Selection area.
Select Customer to generate invoices for specific customers. If you select this option, complete the fields in the Customer Selection area.
4 Type the first invoice number to be assigned in the Invoice Number field if you chose to assign your own numbers on the Edit Forms Setup dialog box.
You can select Help from the Generate Recurring Invoices dialog box for a detailed description of each field.
5 Select OK. A transaction is created in the Invoice Header and Detail files for each recurring invoice that falls within the range entered.
Behind the Scenes
When you generate recurring invoices, Sage DacEasy performs the following accounting behind the scenes:
• The Invoice Header and Detail files include the new transactions. Sage DacEasy marks the transactions as unposted. Print the Sales Journal for the Billing module to see the new transaction.
Generate recurringinvoices from the
Generate RecurringInvoices dialog box.

Working With CustomersSage DacEasy Accounting User’s Guide
174
8• Sage DacEasy updates the Accounts Receivable Open Invoice Detail
file. This information prints on the Accounts Receivable Aging Report and Statements. The Aging Report indicates the transaction is unposted with an asterisk in the Code column. Sage DacEasy also updates the Accounts Receivable Open Invoice Header file. This information is used in the Credit Check feature.
• Sage DacEasy updates the Product file if your transaction includes products. Committed units increase by the number of units shipped for each product on the invoice.
• If you selected the Track Customer Transaction History check box on the System Preferences dialog box, Sage DacEasy updates the Customer Transaction History file.
• If a salesperson exists on the Edit Customer dialog box, the Salesperson file is updated.
• If the Update Check Register Online check box is selected on the Cash tab of the System Preferences dialog box, and a reconcilable bank account was included in the billing transaction, Sage DacEasy updates the Check Register file so the unposted transaction appears while reconciling the bank account.
• If the Update General Ledger Online check box is selected on the General tab of the System Preferences dialog box, the General Ledger Header and Detail files are updated with the unposted billing transaction. You can view the unposted billing transaction from the General Ledger Transaction Entry dialog box, but you must return to the Invoice Entry dialog box to edit the unposted transaction.
Related Help Topics
• Editing recurring invoices
• Deleting recurring invoices
• Editing generated invoices
• Deleting generated invoices
Entering Sales Returns
You can credit a customer’s account in the Receivables Ledger or the Billing
module. If you want to include inventory or services on the credit or print the
credit memo, you must enter the credit as a sales return in the Billing module.

Using the Billing ModuleEntering Sales Returns
175
8
To Enter a Sales Return
1 Select Billing Entry from the Transactions menu, and then select Sales Returns. The Sales Return Entry dialog box appears.
2 Press Enter in the Return Number field if you are letting Sage DacEasy assign numbers and Sage DacEasy assigns the next available return number.
Type the original invoice number if you chose to assign your own numbers on the Edit Forms Setup dialog box.
3 Complete the fields in the header area of the transaction. Type the original invoice number in the Our field.
4 Select OK to advance to the detail area of the invoice.
5 Enter each item returned (as a positive number) in the detail area of the invoice.
Tip: Select Options, and then select AutoReturn to view a list of previous purchases made by the customer. You can select any item from the list to return the same quantity of the item.
6 Select OK to advance to the footer area of the invoice.
7 Edit the freight and tax amounts if necessary.
You can select Help from the Sales Return Entry dialog box for a detailed description of each field.
8 Select OK to save the transaction.
Enter merchandisereturned from customerson the Sales Return Entry
dialog box.

Working With CustomersSage DacEasy Accounting User’s Guide
176
8Behind the Scenes
When you save the sales return, Sage DacEasy performs the following accounting behind the scenes:
• The Invoice Header and Detail files include the new transaction. Sage DacEasy marks the transaction as unposted. Print the Sales Journal to see the new transaction.
• Sage DacEasy updates the Accounts Receivable Open Invoice Detail file. This information prints on the Accounts Receivable Aging Report and Statements. The Aging Report indicates the transaction is unposted with an asterisk in the Code column. Sage DacEasy also updates the Accounts Receivable Open Invoice Header file. This information is used in the Credit Check feature.
• Sage DacEasy updates the Product file if your transaction includes products. Committed units decrease by the number of units returned for each product on the sales return.
• Sage DacEasy adds the sales return information to the Salesperson file if you chose to track this information on the System Preferences dialog box.
• Sage DacEasy updates the Serial Number file if you enter products or services with serial numbers. Sage DacEasy adds a line to the serial number history.
• Customer transaction history updates if you chose to track this information on the System Preferences dialog box.
• If the Update Check Register Online check box is selected on the Cash tab of the System Preferences dialog box, and a reconcilable bank account was included in the billing transaction, Sage DacEasy updates the Check Register file so the unposted transaction appears while reconciling the bank account.
• If the Update General Ledger Online check box is selected on the General tab of the System Preferences dialog box, the General Ledger Header and Detail files are updated with the unposted billing transaction. You can view the unposted billing transaction from the General Ledger Transaction Entry dialog box, but you must return to the Sales Return Entry dialog box to edit the unposted transaction.
Related Help Topics
• Editing sales returns
• Deleting sales returns
• Entering assembled kits on billing transactions
• Entering serial numbers on billing transactions
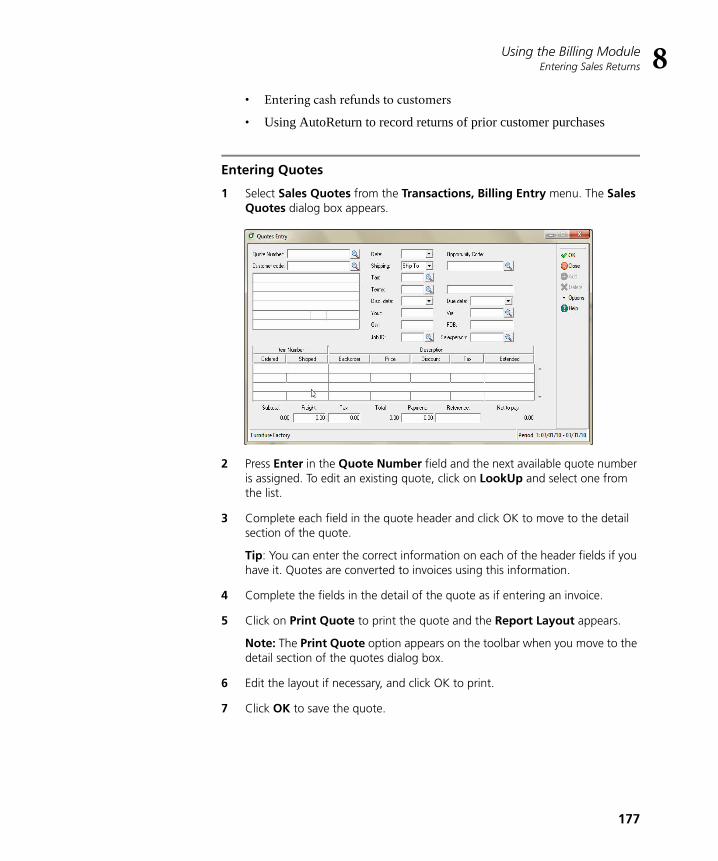
Using the Billing ModuleEntering Sales Returns
177
8• Entering cash refunds to customers
• Using AutoReturn to record returns of prior customer purchases
Entering Quotes
1 Select Sales Quotes from the Transactions, Billing Entry menu. The Sales Quotes dialog box appears.
2 Press Enter in the Quote Number field and the next available quote number is assigned. To edit an existing quote, click on LookUp and select one from the list.
3 Complete each field in the quote header and click OK to move to the detail section of the quote.
Tip: You can enter the correct information on each of the header fields if you have it. Quotes are converted to invoices using this information.
4 Complete the fields in the detail of the quote as if entering an invoice.
5 Click on Print Quote to print the quote and the Report Layout appears.
Note: The Print Quote option appears on the toolbar when you move to the detail section of the quotes dialog box.
6 Edit the layout if necessary, and click OK to print.
7 Click OK to save the quote.

Working With CustomersSage DacEasy Accounting User’s Guide
178
8
Editing the Quotes Template
1 Select Defaults from the Edit menu and then select Forms Setup. The Edit Forms Setup dialog appears.
2 Select Sales Quotes from the Form drop down box.
3 Click on Names and the Format File Names dialog appears. Enter the name of your check template in the Quotes field. Click on LookUp to select from a list of available templates.
4 To create a new template type the template name in the Quotes field. To select an existing template, type the template name or click on LookUp and select the template.
Tip: You can select Options and select Copy Format to make a copy of an existing template.
5 Click on OK to save the Format File Names and return to the Edit Forms Setup dialog.
6 Click on Edit to work on your quote template. Click OK when you finish designing or editing your template.
7 Click OK to save your quote form settings.
Select Sales Quotes in theEdit Forms Setup dialog
box.

Using the Billing ModulePrinting Billing Forms
179
8Printing Billing Forms
One advantage of using the Billing module is the ability to print forms such as invoices and credit memos (sales returns). You must print all invoices and sales returns before posting the Billing module (unless otherwise selected on the System Preferences dialog box). You can print on plain paper or preprinted forms, using a standard template or your own custom template.
You can print billing forms at the point of entry or at one time using batch printing. To print a form at the point of entry, select the Print button from the footer of the transaction. The following steps explain how to print a batch of billing forms.
Note: If you are using the Freight field, add the field to the footer of your sales return and invoice form templates. If you are using a plain paper form template provided by Sage DacEasy, you can copy the updated form template from the Dea4base folder (refer to the “Copying existing form templates” Help topic for more information). If you are using a preprinted or custom form, edit the template to add the fields (refer to the “Editing templates” Help topic for more information).
To Print Billing Forms
1 Select Billing Print from the Transactions menu, and then select the appropriate form from the submenu that appears.
Tip: The form prints according to the current default template. For info on selecting a different template, refer to Chapter 4, “Setting Up."
2 Complete each field.
Note: If you have edited or viewed a previously printed transaction and saved it, you must clear the Reprint check box to print the form again.
Tip: You can select Help for a detailed description of each field.
3 Select OK. The Report Layout dialog box appears.
4 Select the target, edit the layout if necessary, and then select OK to print the form.
Related Help Topics
• Printing shipping labels
• Printing a test page

Working With CustomersSage DacEasy Accounting User’s Guide
180
8Invoice
Verifying Billing Transactions
After you enter a series of billing transactions, you are required to print the Sales Journal to verify the accuracy of your entries prior to posting. Although you can change this requirement on the Ledgers tab of the System Preferences dialog box, we strongly recommend you print the Journal prior to posting. Locating and correcting erroneous entries prior to posting is much easier than correcting entries after you have posted.
To Print the Sales Journal
1 Select Billing from the Journals menu. The Billing Journal dialog box appears.
2 Select Journal as the Report Type.

Using the Billing ModulePosting Billing
181
83 Complete the Date field. The period associated with the date appears. All
unposted transactions within the period print on the Journal.
Tip: You can select Help from the Billing Journal dialog box for a detailed description of each field.
4 Select OK. The Report Layout dialog box appears.
5 Select the target, edit the layout if necessary, and then select OK.
Sales Journal
Related Help Topic
• Printing the Listing
Posting Billing
The Posting process updates the General Ledger with the activity entered in the Billing module and updates the appropriate account balances. Additional files are updated depending on the information entered. For example, if you include products on an invoice, the Product file is updated.
Working With CustomersSage DacEasy Accounting User’s Guide
182
8There is no set rule when you must post; however, it is easier to locate mistakes if you post on a frequent basis. If your business has a high volume of activity, you might decide to post daily. Otherwise, you may only need to post weekly or monthly. Because the posting process updates the General Ledger, post prior to printing your reports to include the most recent activity.
To Post Billing
1 Select Billing from the Posting menu. The Billing Posting dialog box appears.
The Date to Post field defaults to the earliest period that contains unposted billing or purchasing transactions. You must post billing and purchasing transactions in order by period, posting each period’s purchasing transactions before posting the same period’s billing transactions.
Tip: It is important to make a backup prior to posting. You can back up all data files for the company, including add-on modules, from the Sage DacEasy Business Center. Or, to access the Accounting Backup routine, select Backup from the Billing Posting dialog box.
2 Clear the Purge Transactions After Posting check box to retain the transactions after posting.
3 Select OK. Each transaction appears as it is being posted. The Posting Results window appears when the process is complete.
Note: If the total Debits do not equal total Credits, restore your backup, run the Recover and Verify routines on your data files, and then repeat the posting process. Refer to Chapter 2, “Getting Started." for more information on running the Recover and Verify routines using the File Utilities feature.
4 Select Continue to return to the main menu.
Behind the Scenes
When you post billing transactions, Sage DacEasy performs the following accounting behind the scenes:
Note: The opposite entry is made for sales returns.
• Sage DacEasy debits Accounts Receivable for the total amount of the sale.
• Sage DacEasy debits Cost of Goods Sold for the cost of the products sold.
• Sage DacEasy debits Checking for any payments on the invoices.
• Sage DacEasy credits Inventory for the cost of the products sold.

Using the Billing ModulePosting Billing
183
8• Sage DacEasy credits Sales for the inventory and service items on the
transaction.
• Sage DacEasy credits the accounts associated with any billing codes on the transactions.
• Sage DacEasy credits Sales Tax Liability for the sales tax amount.
• Sage DacEasy credits Freight for the amount in the footer.
Note: The cost of goods sold and sales accounts that are affected depend on your departmentalization method.
When you post billing transactions, Sage DacEasy updates the following files:
• The Accounts file includes the new account balances. Sage DacEasy updates period and current balances of accounts as well as the parent accounts to which the accounts flow. Print all financial reports to see the changes in the account balances.
• Sage DacEasy updates the General Ledger Header and Detail files with a posted summary transaction. This transaction is a net total of debits and credits to each account affected. If the Update General Ledger Online option is selected on the System Preferences dialog box, the detail transaction created in the General Ledger Header and Detail files when the billing transaction was created is marked as posted. The journal code for the transaction that post to the General Ledger is BI. Print the General Ledger Listing for journal code BI to see the posted transactions.
• Sage DacEasy updates the current balance and historical information for each affected customer in the Customer file. Print the Customer Directory to see the change in the current balance.
• Sage DacEasy updates the Product file if products are on the transactions. For invoices, the on hand dollars decrease by the cost of the units sold and the on hand units and committed units decrease by the number of units sold. Sage DacEasy updates the product historical information. Print the Product History Report to see changes in the on hand units and dollars and the history.
• Sage DacEasy updates the historical information in the Service file.
• Sage DacEasy updates the Accounts Receivable Open Invoice Header and Detail files. This information prints on the Accounts Receivable Aging Report and Statements. The Aging Report displays the transactions as posted by removing the asterisk from the Code column.
• Sage DacEasy updates the Invoice Header and Detail files, marking the transactions as posted. Print the Billing Listing to see the posted transactions.

Working With CustomersSage DacEasy Accounting User’s Guide
184
8• If you selected the Track Sales Analysis check box on the System
Preferences dialog box, Sage DacEasy updates the Sales Analysis file to include billing transaction information for use in reporting. Print a Sales Analysis report using the Query and Publisher to see new transactions. Refer to Chapter 12, “Custom Reporting." for more information on the Query and Publisher.
• If you are tracking backorders and the posted transactions contained any backordered items, the Backorder file is updated to include the items. Print the Backorder Status Report to see any new backordered items.
• The Tax Table file includes the sales tax amounts from transactions. Print a report in the Query and Publisher to see changes in the tax table. Refer to Chapter 12, “Custom Reporting." for more information on the Query and Publisher.
• The Product Transaction Detail file is updated if the Track Product Transaction History check box is selected on the System Preferences dialog box. Print the Product Activity Detail Report to see the information.
• The Check Register file is updated if an advance payment was included on a transaction.
Related Help Topic
• Reversing posted billing transactions
Tracking Backorders
With Sage DacEasy, you can track backorders and fill these backorders when the items are received into inventory. Setting the system up to track backorders is a two-step process.
Step 1: Select Normal as the Inventory Tracking method on the Edit Product dialog box for each product.
Note: You can backorder products set up as Negative; however, you have to manually edit the Shipped field to update the Backorder field when you create an invoice for the product.
Step 2: Select the Track Customer Backorders check box on the Billing tab of the System Preferences dialog box.
Every time you post the Billing module, Sage DacEasy updates the Backorder file with any backordered items. When you receive the items, you can fill the backorders using the Fill Backorder feature. Filling a backorder creates a new invoice for the customer. Print the Backorder Status Report to view each invoice with a backorder situation.

Using the Billing ModuleFilling Backorders
185
8
To Print the Backorder Status Report
1 Select Billing Print from the Transactions menu, and then select Backorder Status. The Backorder Status Report dialog box appears.
2 Select Product to view all backorders for a range of products.
Select Customer to view all backorders for a range of customers.
3 Enter the range of products or customers in the From and To fields.
4 Select OK to access the Report Layout dialog box.
5 Select the target, edit the layout if necessary, and then select OK to begin printing.
Backorder Status Report
Filling Backorders
When you enter invoices, Sage DacEasy creates a backorder each time a normal-type product is ordered and the ordered quantity is greater than the on hand quantity. You can also reduce the Shipped field to create a backorder for negative-type products. If you want to track backorders, select the Track Customer Backorders check box on the Billing tab of the System Preferences dialog box. The Backorder file is updated when you post invoices with backordered items. Use the Fill Backorders routine to create new invoices for the backordered items once they are received into inventory.

Working With CustomersSage DacEasy Accounting User’s Guide
186
8
To Fill Backorders
1 Select Billing Entry from the Transactions menu, and then select Fill Backorders. The Backorders dialog box appears.
2 Select Customer to fill backorders for a particular customer or Product to fill backorders for a particular product.
3 Type the customer or product code. If backorders do not exist for the selected code, an error message “No backorders exist for this product/customer.” appears.
4 If an error messages does not appear, complete each field in the header area of the transaction and advance to the detail area of the transaction. Each invoice containing the selected product or customer code appears.
5 Enter the quantity shipped for each invoice. If you do not have enough units on hand to fill the backorder, an error message “Product is currently out of stock.” appears.
Tip: Select Help from the Backorders dialog box for a detailed description of each field.
6 Select OK to fill the backorders. Sage DacEasy creates an unposted invoice for the customer.
The Your field of the new invoice contains the word Backorder and the Our field displays the date the invoice was generated. The date format is YYMMDD.
Related Help Topics
• Purging backorders
• Viewing backorders from the Edit Customer dialog box
Access the Backordersdialog box to fill
backordered items foryour customers.

Printing Receivables ReportsPrinting Customer Statements
187
8• Viewing backorders from the Edit Product dialog box
Printing Receivables ReportsSage DacEasy Accounting includes a number of reports you can print to view your customer activity. Explanations of the most commonly used reports follow.
Related Help Topics
• Printing letters
• Printing labels
• Printing the Listing
• Printing the Billing Analysis Reports
Printing Customer Statements
Sage DacEasy allows you to print statements for your customers. You can customize the statements to print on plain paper or on preprinted forms.
To Print Customer Statements
1 Select Receivables from the Reports menu, and then select Statements. The Customer Statements dialog box appears.
2 Complete the fields as appropriate.
Clear the Include Paid Invoices check box if you want to exclude fully paid invoices from the statements.
Access the CustomerStatements dialog box toprint statements for your
customers.

Working With CustomersSage DacEasy Accounting User’s Guide
188
8Select the Messages tab if you need to edit the default footer messages that appear at the bottom of the printed statement.
Note: The statement prints using the selected default template. To edit the template or select a new template, refer to Chapter 4, “Setting Up."
3 Select OK to access the Report Layout dialog box.
Note: If you chose Select in the Scope field, the Record Selection window appears. Choose Select to toggle the selection status for each customer. You can also select Copies Plus or Copies Minus to edit the number of copies to print. Select OK to access the Report Layout dialog box.
4 Select the target, edit the layout if necessary, and then select OK to begin printing.
Customer Statement
Printing the Accounts Receivable Aging Report
The Accounts Receivable Aging Report lets you see the total each customer owes you. The aging schedule shows you the invoices that are past due and the invoices that are not due yet. You can modify the aging schedule to meet your needs. All posted and unposted invoices, payments, finance charges, debits and credits are on the report. To remove fully paid invoices from the report, clear the Include Fully Paid Invoices check box on the Receivables Aging Report dialog box. You can also run the Receivables Period End routine to clear paid items. If all paid items do not clear, refer to the Troubleshooting guide in the program’s Help system.

Printing Receivables ReportsFilter Aging Report by Past Due Days
189
8
To Print the Accounts Receivable Aging Report
1 Select Receivables from the Reports menu, and then select Aging. The Receivables Aging Report dialog box appears.
2 Edit the default report criteria, if necessary.
3 Select the Aging Schedule tab and edit this information, if necessary.
Tip: Select Help from the Receivables Aging Report dialog box for a detailed description of each field.
4 Select OK to access the Report Layout dialog box.
5 Select the target, edit the layout if necessary, and then select OK to print the report.
Filter Aging Report by Past Due Days
With this feature you can manage your Accounts Receivable and Accounts Payable better and more efficiently. Never before has it been this easy to identify delinquent customers. This feature provides you the ability to print a list of past due invoices that fall within a specific range of days determined by you.
In Sage DacEasy you can filter your aging report by Days Past Due for each invoice. You can enter a range of past due days and only invoices that have past due days in that range print.
Tip: You can use this feature when you want to analyze the overall performance of customers with excessive past due days in their invoices.
Access the ReceivablesAging Report dialog box
to print the AccountsReceivable Aging Report.

Working With CustomersSage DacEasy Accounting User’s Guide
190
8
To Print the Aging Detail Report
1 Select Receivables from the Reports menu, and then select Aging. The Receivable Aging Report dialog box appears.
2 Edit the default report criteria, if necessary. If you want to filter the report by Days Past Due, select the Filter by Days Past Due check box. Enter the range of days past due in the From Days and To Days fields.
Tip: To print the aging schedule for customers with invoices that are between 60 and 90 days past due, enter 60 in the From Days field and 90 in the To Days field.
3 Select OK to access the Report Layout dialog box.
4 Select the target, edit the layout if necessary, and then select OK to print the report.

Printing Receivables ReportsMerging Customer Info with Microsoft Word
191
8Accounts Receivable Aging Detail Report
Merging Customer Info with Microsoft Word
Sage DacEasy’s seamless integration with Microsoft Word allows you to merge your customer data with Microsoft Word documents. Use this feature to create professional letters that include your customer information. You can e-mail or print these documents directly from Sage DacEasy or access the document in Word to take advantage of the powerful features that Word offers.
You can merge a single record or a range of records. Each method is explained
below.

Working With CustomersSage DacEasy Accounting User’s Guide
192
8
To Merge a Customer Record With a Word Document
1 View a customer on the Edit Customer dialog box, and then select Mail Merge. The Direct Mail Merge Jobs dialog box appears.
2 Type the name of the job in the Job Name field or select LookUp to select an existing job.
3 Use the Main Document field to select the Word document that contains the information that stays the same for each version of the merged document. You can select an existing Word document, add a new Word document or edit an existing document.
Note: If you selected an existing job, the last associated main document file name appears automatically.
To select an existing Word document—Type the name of an existing Word document or click the Browse button to locate the document. If the document is not located in the folder that contains your company’s data files, the Word document is copied to the company folder.
To add a Word document—Type a file name, and then select Edit. Sage DacEasy creates a new Word document in the company folder. The new document appears in Word. Edit the document as necessary, save the document, and then return to Sage DacEasy to continue with the mail merge.
To edit an existing Word document—Type the name of the existing Word document or click the Browse button and locate the document. Select Edit; the document appears in Word. Edit the document as necessary, save the document, and then return to Sage DacEasy to continue with the mail merge.
4 Type the closing date. This field is used when date sensitive merge fields are included in the document. For example, if you select Past Due >60 Balance as a merge field, Sage DacEasy uses the closing date to determine if the balance is over 60 days past due.
Access the Direct MailMerge Jobs dialog box to
merge your customerinformation with a Word
document.
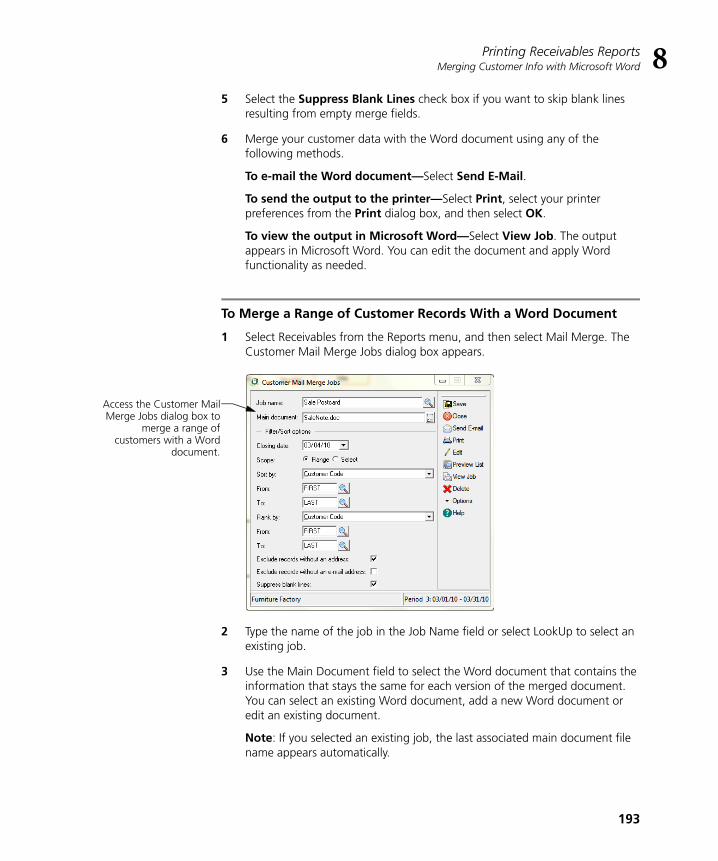
Printing Receivables ReportsMerging Customer Info with Microsoft Word
193
85 Select the Suppress Blank Lines check box if you want to skip blank lines
resulting from empty merge fields.
6 Merge your customer data with the Word document using any of the following methods.
To e-mail the Word document—Select Send E-Mail.
To send the output to the printer—Select Print, select your printer preferences from the Print dialog box, and then select OK.
To view the output in Microsoft Word—Select View Job. The output appears in Microsoft Word. You can edit the document and apply Word functionality as needed.
To Merge a Range of Customer Records With a Word Document
1 Select Receivables from the Reports menu, and then select Mail Merge. The Customer Mail Merge Jobs dialog box appears.
2 Type the name of the job in the Job Name field or select LookUp to select an existing job.
3 Use the Main Document field to select the Word document that contains the information that stays the same for each version of the merged document. You can select an existing Word document, add a new Word document or edit an existing document.
Note: If you selected an existing job, the last associated main document file name appears automatically.
Access the Customer MailMerge Jobs dialog box to
merge a range ofcustomers with a Word
document.

Working With CustomersSage DacEasy Accounting User’s Guide
194
8To select an existing Word document—Type the name of an existing Word document or click the Browse button to locate the document. If the document is not located in the folder that contains your company’s data files, the Word document is copied to the company folder.
To add a Word document—Type a file name, and then select Edit. Sage DacEasy creates a new Word document in the company folder. The new document appears in Word. Edit the document as necessary, save the document, and then return to Sage DacEasy to continue with the mail merge.
To edit an existing Word document—Type the name of the existing Word document or click the Browse button and locate the document. Select Edit; the document appears in Word. Edit the document as necessary, save the document, and then return to Sage DacEasy to continue with the mail merge.
4 Complete each field in the Filter/Sort Options area.
The Closing Date field is used when date sensitive merge fields are included in the document or as the Sort By or Rank By fields. For example, if you select Past Due >60 Balance as a merge field, Sage DacEasy uses the closing date to determine if the balance is over 60 days past due.
Select the Exclude Records Without an Address check box if you do not want to include the record in the mail merge if it does not contain an address.
Select the Exclude Records Without an E-mail Address check box if you do not want to include the record in the mail merge if it does not contain an e-mail address.
Select the Suppress Blank Lines check box if you want to skip blank lines resulting from empty merge fields.
5 Merge the selected data with the Word document using any of the following methods.
To e-mail the Word document—Select Send E-Mail.
To send the output to the printer—Select Print, select your printer preferences from the Print dialog box, and then select OK.
To view the output in Microsoft Word—Select View Job. The output appears in Microsoft Word. You can edit the document and apply Word functionality as needed.

9Working with Inventory
Overview 196
Assembling Items 196Adding Component Lists 197
Entering Assembly Transactions 198
Verifying Assembly Transactions 199
Posting Assembly 200
Printing Assembly Reports 202
Recording Physical Inventory Counts 203Printing Count Sheets 203
Entering Physical Inventory Counts 204
Verifying Physical Inventory Transactions 205
Entering Inventory Adjustments 208
Printing Inventory Reports 210

Working with InventorySage DacEasy Accounting User’s Guide
196
9
• Working with Inventory •
OverviewInventory is an important asset in most businesses and needs to be closely monitored. If you entered your product information as described in Chapter 4, “Setting Up,” you may already be aware of the powerful inventory tracking features available in Sage DacEasy Accounting. Chapter 7, “Working With Vendors,” showed you how to increase inventory levels by recording purchases of inventory from your vendors. Chapter 8, “Working With Customers,” showed you how to reduce inventory levels by selling products to your customers. This chapter explains how to adjust inventory by assembling products, recording physical inventory counts and entering inventory adjustments.
Use the Assembly feature if your business builds products (finished goods) from individual products and services (components). Sage DacEasy adjusts inventory levels accordingly, decreasing the on hand value of each component and increasing the on hand value of each finished good.
On occasion, you may need to adjust the system’s inventory count to match your physical count. Damaged items, spoilage or theft can cause a discrepancy between the physical count and the system count. You can make an adjustment with the Physical Inventory feature and reconcile the system inventory count with the physical count.
You can use the Inventory Adjustments feature to transfer items to different warehouses or adjust inventory quantities or values. When you adjust inventory quantities or values using the Inventory Adjustments feature, you specify the general ledger account to offset the inventory account. You do not have to update a customer or vendor balance when entering Inventory Adjustments.
Related Help Topics
• Attaching notes to product records
• Viewing product transaction history
• Reassigning prices
Assembling ItemsWhen you assemble a product, Sage DacEasy takes its components from inventory and transfers these to the new product. The components can be products or services. A component of one product can have its own component list as well, therefore allowing for subassemblies. You can also disassemble products to return components to stock.

Assembling ItemsAdding Component Lists
197
9Adding Component Lists
The first step in using the Assembly module is to add a component list to each finished good. A component list is a list of each product and service components used to build a product and the quantity needed of each component to build one finished product.
To Add or Edit a Component List
1 Select Products from the Edit menu. The Edit Product dialog box appears.
2 Type the product code or select LookUp and select a product from the list that appears.
3 Select Options, and then select Component List. The Component List Entry dialog box appears.
4 Enter each product and service required to build one finished good and the number of units required (based on the purchase fraction).
Tip: Select Help from the Component List Entry dialog box for a detailed description of each field.
5 Select OK to save the component list and return to the Edit Product dialog box.
Tip: Select the Assembled Kit check box on the Billing tab of the Edit Product dialog box to print the component list on the invoice when the product is sold.
Related Help Topics
• Printing a bill of materials
• Globally adjusting component lists
Record the products andservices required to
assemble products on theComponent List Entry
dialog box.

Working with InventorySage DacEasy Accounting User’s Guide
198
9Entering Assembly Transactions
After adding a component list to a finished good, you can assemble components into a finished product using the Assembly module. You must post all billing, purchasing and physical inventory transactions before entering an assembly transaction. In addition, post Sage DacEasy Point of Sale and Sage DacEasy Order Entry if you are interfacing with these add-on modules. The program does not warn you when unposted transactions exist in an add-on module. Post each add-on module interfaced with Sage DacEasy Accounting prior to completing the following steps.
To Enter an Assembly Transaction
1 Select Assembly from the Transactions menu. The Assembly Transaction Entry dialog box appears.
Note: All billing, purchasing and physical inventory transactions must be posted before you can access the Assembly Transaction Entry dialog box. If you receive an error, post the specified module. In addition, it is important that you post Sage DacEasy Order Entry and Sage DacEasy Point of Sale if you are interfacing these programs with Sage DacEasy Accounting.
2 Press Enter in the Number field and Sage DacEasy assigns the next available transaction number.
3 Complete the fields in the Transaction Information area.
4 Complete the fields in the Product Information area.
Select Assemble to build the product or Disassemble to break down the finished product and return the individual components to inventory.
Build products using theAssembly Transaction
Entry dialog box.
Assembling ItemsVerifying Assembly Transactions
199
95 Advance to the detail area of the transaction. Each component required to
build the finished good appears along with the number of units available, needed and short.
6 If a number appears in the Short field, you can select the Override check box if you want to ignore the shortage. When the transaction is posted, Sage DacEasy only subtracts the number of units available from the on hand quantities of the overridden component.
Important: Do not disassemble a product if you assembled it with an overridden component. Doing so causes an incorrect number of on hand units for the component; Sage DacEasy returns the total number of units for the overridden component to stock, regardless of the number used in the original assembly transaction.
Tip: Select Help from the Assembly Transaction Entry dialog box for a detailed description of each field.
7 Select OK to save the transaction.
Related Help Topics
• Editing assembly transactions
• Deleting assembly transactions
Behind the Scenes
When you save an assembly transaction, Sage DacEasy updates the following files:
• Sage DacEasy updates the Product file increasing committed units for components in an assembly transaction.
• Sage DacEasy updates the Product file increasing committed units for finished goods in a disassembly transaction.
• The Assembly Header and Detail files include the new transaction. You can print the Assembly Journal to see the new transaction.
Verifying Assembly Transactions
After you assemble your finished goods, print the Assembly Journal to verify the accuracy of the entries before you post. Printing the Journal before posting is required unless you change the default on the Ledgers tab of the System Preferences dialog box. We strongly recommend that you always print the Journal prior to posting. Locating and correcting erroneous entries prior to posting is much easier than correcting entries after you have posted.

Working with InventorySage DacEasy Accounting User’s Guide
200
9
To Print the Assembly Journal
1 Select Assembly from the Journals menu. The Assembly Journal dialog box appears.
2 Select Journal as the Report Type.
3 Type a date in the Date field. The period associated with the date appears. All unposted transactions within the period print on the Journal.
Tip: Select Help from the Assembly Journal dialog box for a detailed description of each field.
4 Select OK. The Report Layout dialog box appears.
5 Select the target, edit the layout if necessary, and then select OK.
Related Help Topic
• Printing the Listing
Assembly Journal
Posting Assembly
The posting process updates the General Ledger when you include a service on an assembly transaction and updates the appropriate account balances. In addition, the on hand dollars and units for your components and finished goods are updated during this process.

Assembling ItemsPosting Assembly
201
9Note: You must post assembly transactions before you can enter purchasing, billing or physical inventory transactions.
To Post Assembly
1 Select Assembly from the Posting menu. The Assembly Posting dialog box appears.
Tip: It is important to make a backup prior to posting. You can back up all data files for the company, including add-on modules, from the Sage DacEasy Business Center. Or, to access the Accounting Backup routine, select Backup from the Assembly Posting dialog box.
2 Type the date that corresponds to the period to post. All unposted transactions for the period are posted.
3 Clear the Purge Transactions After Posting check box to retain the transactions after posting.
4 Select OK. Each transaction appears as it is being posted. The Posting Results window appears when the process is complete.
Note: If the total Debits do not equal total Credits, restore your backup, run the Recover and Verify routines on your data files, and then repeat the posting process. Refer to Chapter 2, “Getting Started” for more information on running the Recover and Verify routines using the File Utilities feature.
5 Select Continue to return to the main menu.
Behind the Scenes
When you post assembly transactions that include services, Sage DacEasy does the following accounting behind the scenes:
• Sage DacEasy debits the inventory account for items being assembled. Sage DacEasy credits the direct labor account on the Account Interface dialog box.
• Sage DacEasy credits the inventory account for items being disassembled. Sage DacEasy debits the direct labor account on the Account Interface dialog box.
When you post assembly transactions, Sage DacEasy updates the following files:
• The Accounts file includes new account balances if you are assembling items that include services. Sage DacEasy updates period and current balances for the accounts as well as the parent account to which the accounts flow. Print all financial reports to see the changes in account balances.

Working with InventorySage DacEasy Accounting User’s Guide
202
9• Sage DacEasy updates the General Ledger Header and Detail files with
a posted summary transaction. The journal code for the transaction that posts to the General Ledger is AS. Print the General Ledger Listing for journal code AS to see posted transactions.
• When you assemble a product, Sage DacEasy updates the Product file with a reduction in the component stock and an increase in the finished good stock. The committed units are removed and the cost of the component transfers to the cost of the finished good. The opposite entry is made when you disassemble a product. Print the Product History Report to see changes in the on hand units and dollars.
• Sage DacEasy updates the Assembly Header and Detail files by marking the assembly transactions as posted. Print the Assembly Listing to see the posted transactions.
• Sage DacEasy updates the Product Transaction Detail file if the Track Product Transaction History check box is selected on the System Preferences dialog box. View the product history from the Edit Product dialog box or print the Product Activity Detail Report.
Related Help Topic
• Reversing posted assembly transactions
Printing Assembly Reports
Sage DacEasy includes the following assembly reports:
• Assembly Report—Prints all products assigned a component list and prints the component list for the product.
• Component Analysis—Lists each product included on a component list, the finished good product that includes the component and the number of units required to build the product.
To Print Assembly Reports
1 Select Assembly from the Reports menu, and then select the report to print. A dialog box appears for you to select the records to include on the report.
2 Complete each field.
Tip: Select Help for a detailed description of each field.
3 Select OK to access the Report Layout dialog box.
4 Select your target, edit the layout if necessary, and then select OK to begin printing.

Recording Physical Inventory CountsPrinting Count Sheets
203
9Recording Physical Inventory Counts
Use the Physical Inventory module to adjust inventory quantities in Sage DacEasy Accounting that differ from the actual physical quantity counted. Discrepancies typically result from theft, damage or data entry errors.
Printing Count Sheets
Print the Count Sheet to help you record your physical inventory quantities. You can print Count Sheets for all or a range of products.
To Print Count Sheets
1 Select Inventory from the Reports menu, and then select Count Sheets. The Product Count Sheets dialog box appears.
2 Select the range of products to include or accept the default to include all products on the report.
3 Select OK to access the Report Layout dialog box.
4 Select your target, edit the layout if necessary, and then select OK to begin printing.
Count Sheet

Working with InventorySage DacEasy Accounting User’s Guide
204
9Entering Physical Inventory Counts
You must post all billing, purchasing and assembly transactions before entering a physical inventory transaction. In addition, post Sage DacEasy Point of Sale and Sage DacEasy Order Entry if you are interfacing with these add-on modules. The program does not warn you when unposted transactions exist in an add-on module.
To Enter a Physical Inventory Transaction
1 Select Physical Inventory from the Transactions menu. The Physical Inventory dialog box appears.
Note: All billing, purchasing and assembly transactions must be posted before you can access the Physical Inventory dialog box. In addition, it is important that you post Sage DacEasy Order Entry and Sage DacEasy Point of Sale if you are interfacing these programs with Sage DacEasy Accounting. If you receive an error, post the specified module prior to entering the Physical Inventory module.
2 Type the product code or select LookUp, and then select the product from the list.
3 Type the physical amount counted (based on the purchase fraction) in the Counted field. If the product already exists on the transaction, an amount appears in the Previous Count field. To change the previously counted amount, enter the amount to add or subtract to the previous count. The new counted amount appears in the Total field.
Tip: Select Help from the Physical Inventory dialog box for a detailed description of each field.
4 Select OK to save the transaction.
Record physical inventorycounts using the Physical
Inventory dialog box.

Recording Physical Inventory CountsVerifying Physical Inventory Transactions
205
9Behind the Scenes
When you save a physical inventory transaction, Sage DacEasy updates the following file:
• The Physical Inventory file includes the new transaction. You can print the Physical Inventory Journal to see the new transaction.
Related Help Topics
• Editing physical inventory transactions
• Deleting physical inventory transactions
Verifying Physical Inventory Transactions
After you enter your inventory counts, print the Physical Inventory Journal to verify the accuracy of the entries before you post. Printing the Journal before posting is required unless you change the default on the Ledgers tab of the System Preferences dialog box. We strongly recommend that you always print the Journal prior to posting. Locating and correcting erroneous entries prior to posting is much easier than correcting entries after you have posted.
To Print the Physical Inventory Journal
1 Select Physical Inventory from the Journals menu. The Report Layout dialog box appears.
If you are departmentalized by Customer, select the Cost of Goods Sold account to update, and then select OK.
2 Select the target, edit the layout if necessary, and then select OK.

Working with InventorySage DacEasy Accounting User’s Guide
206
9Physical Inventory Journal
Posting Physical Inventory
The posting process updates the General Ledger with the activity entered on the Physical Inventory dialog box and updates the Inventory and Cost of Goods Sold account balances. You have to post your physical inventory prior to entering purchasing, billing or assembly transactions.
To Post Physical Inventory
1 Select Physical Inventory from the Posting menu. The Physical Inventory Posting dialog box appears.
Tip: It is important to make a backup prior to posting. You can back up all data files for the company, including add-on modules, from the Sage DacEasy Business Center. Or, to access the Accounting Backup routine, select Backup from the Physical Inventory Posting dialog box.
2 Type the date that corresponds to the period to post. This date is used to update the General Ledger.
3 Clear the Purge Transactions After Posting check box to retain the transactions after posting.

Recording Physical Inventory CountsVerifying Physical Inventory Transactions
207
94 Select OK.
If you are departmentalized by Customer, select the Cost of Goods Sold account to update, and then select OK.
Each transaction appears as it is being posted. The Posting Results window appears when the process is complete.
Note: If the total Debits do not equal total Credits, restore your backup, run the Recover and Verify routines on your data files, and then repeat the posting process. Refer to Chapter 2, “Getting Started” for more information on running the Recover and Verify routines using the File Utilities feature.
5 Select Continue to return to the main menu.
Behind the Scenes
When you post a physical inventory transaction, Sage DacEasy does the following accounting behind the scenes:
• Sage DacEasy debits Inventory and credits the appropriate cost of goods sold accounts when there is a net increase in inventory.
• Sage DacEasy credits Inventory and debits the appropriate cost of goods sold accounts if there is a net decrease in inventory.
When you post physical inventory transactions, Sage DacEasy updates the following files:
• The Accounts file includes new account balances. Sage DacEasy updates period and current balances of accounts as well as the parent accounts to which the accounts flow. You can print all financial reports to see changes in the account balances.
• Sage DacEasy updates the General Ledger Header and Detail files with a posted summary transaction. The journal code for the transaction that posts to the General Ledger is IN. You can print the General Ledger Listing for journal code IN to see the posted transaction.
• Sage DacEasy updates the Product file with the change to the on hand dollars and units for items on the adjustment. You can print the Product History Report to see changes to the on hand units and dollars.
• Sage DacEasy removes the transaction from the Physical Inventory file.
• If you selected the Track Product Transaction History check box on the System Preferences dialog box, Sage DacEasy updates the Product Transaction Detail file for each item entered in the adjustment. View the activity for each product from the Edit Product dialog box or print a Product Activity Detail Report.

Working with InventorySage DacEasy Accounting User’s Guide
208
9Entering Inventory Adjustments
Use the Inventory Adjustments feature to transfer items from one warehouse to another or to adjust inventory quantities or values in Sage DacEasy without affecting customer or vendor balances.
To Enter an Inventory Adjustment
1 Select Inventory Adjustments from the Transactions menu. The Inventory Adjustments dialog box appears.
2 Press Enter in the Number field and the next available number is assigned.
3 Edit the date, if necessary.
4 Select the type of action to perform.
Increase Quantity—Select this option to add to the amount of this product currently in stock.
Transfer Quantity—Select this option to move the units from one product to a different product. This is most commonly used to transfer items from one warehouse to another.
Decrease Quantity—Select this option to reduce the amount of this product currently in stock.
Increase Value—Select this option to increase the total value of this item in your inventory.
Decrease Value— Select this option to decrease the total value of this item in your inventory.
5 Complete the remaining fields based on your selection in the Type field.
Transfer inventory oradjust quantities or values
from the InventoryAdjustments dialog box.

Recording Physical Inventory CountsEntering Inventory Adjustments
209
9Increase Quantity—If you selected Increase Quantity in the Type field, select the product you are adjusting in the Item field. Type the number of units being added and the cost to use in calculating the product’s new on hand dollars. Then, select the account to update when the transaction is saved.
Transfer Quantity—If you selected Transfer Quantity in the Type field, select the product you are transferring in the From Item field, and then select the receiving product in the To Item field. Type the number of units being transferred. Sage DacEasy uses the product’s average cost to determine the new on hand dollars and uses the Inventory account as the offsetting account.
Decrease Quantity—If you selected Decrease Quantity in the Type field, select the product you are adjusting in the Item field. Type the number of units being reduced, and then select the account to update when the transaction is saved. Sage DacEasy uses the product’s average cost to calculate the new on hand dollars.
Increase Value—If you selected Increase Value in the Type field, select the product you are adjusting in the Item field. Type the amount of the adjustment as a positive number in the Adjust By field. Then, select the account to update when the transaction is saved.
Decrease Value—If you selected Decrease Value in the Type field, select the product you are adjusting in the Item field. Type the amount of the adjustment as a positive number in the Adjust By field, and then select the account to update when the transaction is saved.
Tip Select Help from the Inventory Adjustments dialog box for a detailed description of each field.
6 Select OK to save the transaction. Sage DacEasy posts the transaction to the General Ledger when you save the transaction.
Behind the Scenes
When you save an inventory adjustment transaction, Sage DacEasy does the following accounting behind the scenes:
Note: A transfer does not affect account balances.
• Sage DacEasy updates the Inventory account on the Account Interface dialog box. The account is debited when an Increase value or quantity-type transaction is saved. The account is credited when a Decrease value or quantity-type transaction is saved.
• Sage DacEasy updates the account specified on the transaction. The account is credited when an Increase value or quantity-type transaction is saved. The account is debited when a Decrease value or quantity-type transaction is saved.

Working with InventorySage DacEasy Accounting User’s Guide
210
9When you save an inventory adjustment transaction, Sage DacEasy updates the following files:
• Sage DacEasy updates the Product Transaction Detail file with the transaction. Print the Inventory Adjustments Listing to see the transactions.
• The Accounts file includes new account balances. Sage DacEasy updates period and current balances for the accounts as well as the parent account to which the accounts flow. Print all financial reports to see the changes in account balances.
• Sage DacEasy updates the General Ledger Header and Detail files with the transaction. The journal code for the transaction that posts to the General Ledger is IA. Print the General Ledger Listing for journal code IA to see the transaction.
• Sage DacEasy updates the Product file accordingly. The Average cost for the products involved is recalculated.
For transfers, the units are increased for the To Item and decreased for the From Item. The on hand dollars are adjusted based on the average cost of the item being transferred.
For Quantity adjustments, the on hand units and dollars (based on the average cost of the product) are increased or decreased accordingly.
For Value adjustments, the on hand dollars are updated.
Related Help Topic
• Editing inventory adjustments
Printing Inventory Reports
Sage DacEasy includes the following inventory and service reports:
• Product Listing—Includes most of the information on the product record without any balance information.
• Service Listing—Lists most of the information on the service record as well as the historical information.
• Price List—Lists the sales price and cost for each product. You can encode the cost to ensure that only authorized persons have access to this information.
• Price Breaks—Lists each price break table and the conditions that must be met to receive the price break.
• Master Item Activity—Lists each master item with warehouse, cost and unit information. You have the option to include each detail item.

Recording Physical Inventory CountsPrinting Inventory Reports
211
9• History Report—Access the Activity Report option to print this report,
which lists each product with balance and historical information.
• Activity Detail—Includes an audit trail of product movements. Lists each product and the transactions that include the product. You must select the Track Product Transaction History check box on the System Preferences dialog box to view all product activity on this report.
• Inventory Adjustments Listing—Lists each inventory adjustment transaction for the selected range.
• Alert Report—Lists each product at or below the specified minimum quantity for the product, the on hand units and the amount to reorder.
• Count Sheet—Lists information about each product, including the fraction, and a designated area to record the actual number of units and any remarks.
To Print Inventory Reports
1 Select Inventory from the Reports menu, and then select the report to print. A dialog box appears for you to select the records to include on the report.
2 Complete each field.
Tip: Select Help for a detailed description of each field.
3 Select OK to access the Report Layout dialog box.
4 Select the target, edit the layout if necessary, and then select OK to begin printing.
Related Help Topic
• Printing labels

Working with InventorySage DacEasy Accounting User’s Guide
212
9

10Banking
Overview 214Cash Module Monthly Checklist 214
216Entering Cash Receipts 218
Entering Comments on Cash Receipts 221
Attaching Notes to Transactions 221
Cash Payments 222Entering Cash Payments 223
Entering Comments on Cash Payments 225
Attaching Notes to Transactions 225
Paying Vendors With AutoPay 226
Consolidating Invoices 228
Recurring Payments 230Entering Recurring Payments 230
Generating Recurring Payments 231
Verifying Cash Transactions 233Printing the Cash Journal 233
Printing Deposit Slips 234
Printing Checks 235
Overriding Check-Printing Options 238
Printing OCR-Ready Checks 239
Posting Cash 241
Reconciling Your Bank Statement 243

BankingSage DacEasy Accounting User’s Guide
214
10
• Banking •
OverviewSage DacEasy Accounting includes a powerful Cash module that allows you to record cash receipts and cash payments, and then reconcile this activity with your bank statement. If you are tracking accounts receivable and accounts payable, you can apply payments to the appropriate invoices using the Cash module. You can also apply receipts and payments directly to general ledger accounts.
If you use computer checks, you can print checks at the time of entry or print a batch of checks.
To use the Cash module, you must identify at least one account as reconcilable in the chart of accounts. If you are using one of the sample chart of account structures, you can reconcile account 11021. If you are using your own account structure, designate a detail-type asset account, such as checking, as a reconcilable account.
If you are planning to use the Reconciliation feature, you have the option of using the Update Check Register Online feature, or you must enter all activity for the accounts you plan on reconciling in the Cash module. When using the Update Check Register Online feature entries from the Cash, General Ledger, Receivables Ledger, Payables Ledger and Billing modules create an unposted Check Register entry for each unposted transaction that affects a reconcilable bank account. If you do not use this feature, only entries in the Cash module update the Check Register.
Enter, print and post your cash transactions in a certain order. Use the following checklist as a general guideline for processing your day-to-day banking activity.
For more information on the Reconciliation feature, refer to “Reconciling Your Bank Statement” on page 243.
Cash Module Monthly Checklist
Update Accounts Payable by entering transactions in the Purchasing
module, Payables Ledger or both.
Update Accounts Receivable by entering transactions in the Billing
module, Receivables Ledger or both.
Print the Payments Report to help you prioritize your payments to
vendors or view upcoming payments with the Payables Reminder.
OverviewCash Module Monthly Checklist
215
10 Enter cash payments to pay off invoices or, for payments without invoices,
apply payments directly to a general ledger account. You can use the AutoPay feature to expedite this process.
Enter cash receipts to apply toward invoices or, for receipts without
invoices, apply receipts directly to a general ledger account.
Make any cash adjustments necessary. For example, apply an advance
payment to an invoice.
Generate any recurring payments.
Print any deposit slips (optional).
Print any computer checks.
Print the Cash Journal for the period being posted (unless you use manual
checks and selected the Post Cash Online check box when setting system preferences).
Back up your data.
Post Cash for the period (unless you use manual checks and selected the
Post Cash Online check box when setting system preferences).
Print the Check Register.
Print your Reconciliation Summary. Use this summary to help you
reconcile the statement you receive from your bank.
Reconcile your bank statement each month.
Related Help Topic
• Editing bank counters

BankingSage DacEasy Accounting User’s Guide
216
10Cash Ledger
The new Cash Ledger feature allows you to better manage cash transactions and gain insight into the status of your bank accounts. You can use it to easily enter Cash Receipts and Payments and distribute them to a single General Ledger Account, Customer Open Invoice, or Vendor Open Invoice. In addition, the Cash Ledger dialog box presents a Grid View of all Sage DacEasy Accounting, Sage DacEasy Point of Sale, Sage DacEasy Order Entry, Sage DacEasy Payroll, or Sage DacEasy Job Costing transactions that affect the balance of your bank accounts. You can enter single distribution transactions directly into the Cash Ledger Grid, or zoom to the Cash Receipts, Cash Payments, or Billing dialog boxes to enter multiple distribution transactions or Invoice payments. Using this Bank Account centric transaction entry method you can zoom to other areas of Sage DacEasy and return to the Cash Ledger to see your updated account balance and check register.
Note: To get an accurate up to date account balance, you must have the Update Check Register online preference turned ON. To do this, select Defaults from the Edit menu in Sage DacEasy Accounting, and then select Preferences. Click on the Cash tab, and select the check box for the Update Check Register online field.
Note: Unlike Sage DacEasy Accounting, Sage DacEasy Point of Sale, and Sage DacEasy Order Entry you must post transactions from Sage DacEasy Payroll and Sage DacEasy Job Costing before they appear in the Cash Ledger.
Working with the Cash Ledger
Select Cash Entry and Ledger from the Transactions menu. The Cash Ledger dialog box appears:
Cash Module Monthly Checklist
217
10Entering the Bank Account Number
Enter the Bank Account you wish to see the Cash Ledger Grid. Click on the LookUp icon, or Press F5 to see a list of available bank accounts. Sage DacEasy validates the Bank Account and populates the Account name field and the Cash Ledger grid with all the bank register records belonging to the bank account entered.
Note: Once you enter the detail section of the Cash Ledger dialog box, the cursor moves to the first column of the first empty line in the grid. By default, the grid buffer holds the last 30 register records in descending date order. You can displace the buffer backwards by clicking on the Prev Reg icon in the toolbar, or forward clicking on the Next Reg icon in the toolbar.
Entering single distribution Cash Receipts or Payments
1 Enter the Bank Account you wish to view in your Bank Ledger. You may Click on LookUp or Press F5 to select from a list of available bank accounts. To be a valid Bank Account, the reconcilable check box should be selected in Edit Accounts.
2 Working with the Cash Ledger Detail.
a.Transaction Type. Select one of the following transaction types
Select CASH LEDGER if you are entering a simple cash receipt or disbursement with a single distribution. CASH LEDGER types can be distributed to one valid General Ledger account or to an existing Accounts Receivable or Accounts Payable open invoice.
Select RECEIPT to zoom to the Cash Module's Cash Receipts entry dialog box. Use the RECEIPT type if you are entering a deposit with more than one distribution.
Select PAYMENT to zoom to the Cash Module's Cash Payment entry dialog box. Use the PAYMENT type if you want to enter a Computer printed check or a multiple distribution cash disbursement.
Select BILLING to zoom to the Invoice dialog box
3 Account Balance. Shows your updated Account Balance. To get an accurate up to date account balance, you must have the Update Check Register online preference turned ON. To do this, select Defaults from the Edit menu in Sage DacEasy Accounting, and then select Preferences. Click on the Cash tab, and select the check box for the Update Check Register online field.

BankingSage DacEasy Accounting User’s Guide
218
10Cash Receipts
Use the Receipts dialog box to enter receipts you deposited into your bank account. If you are not using the Update Check Register Online feature, only entries recorded in the Cash module and advance payments in Billing appear in the reconciliation. But, if you are using the Update Check Register Online feature, any reconcilable account used in the General Ledger, Receivables Ledger, Payables Ledger, Billing, Sage DacEasy Order Entry or Sage DacEasy Point of Sale module updates the Check Register allowing you to reconcile these entries along with those recorded in the Cash module.
To use the Update Check Register Online feature, select the Update Check Register Online check box on the Cash tab of the System Preferences dialog box.
Entering Cash Receipts
When you enter a cash receipt, the detail of the transaction depends on the type of receipt you enter. A list of open invoices appears when you record a receipt from an open- or balance forward-type customer or vendor. Apply the receipt to the appropriate invoice.
When you select GL in the Paid From field or select a cash-type customer or vendor, enter one or more general ledger accounts in the detail of the transaction. For example, select GL in the Paid From field to record a tax refund or a dividend payment.
To Enter Cash Receipts
1 Select Cash Entry from the Transactions menu, and then select Receipts. The Receipts dialog box appears.
Record increases to yourbank accounts on the
Receipts dialog box.

Entering Cash Receipts
219
102 Press Enter from the Number field to assign a new transaction number.
3 Complete each field in the header area of the transaction.
If you select Manual as the Check Type, you must type the check number. If you select Computer, the number is assigned when the check is printed.
When GL is selected in the Paid To field, you can still select a customer or vendor. This information prints on computer printed checks; however, the customer or vendor account is not affected by the payment.
If you are making a payment to a vendor, the value in the Memo field defaults to the memo on the Edit Vendor dialog box, but can be edited.
For manual checks, type the amount of the check in the Amount field. For computer checks, this field is updated automatically as you type payment amounts in the detail of the transaction.
Tip: To view a list of Open Invoices for the vendor or customer, select LookUp in the Amount or Reference field. To view the online bank balance, select Options, and then select Bank Balance.
If you installed Sage Exchange to verify online payments, Sage DacEasy Accounting automatically populates the CC Approval Code field.
4 Advance to the detail area of the transaction. The information that appears depends on your selection in the Paid To field.
For open- or balance forward-type customers and vendors, each open invoice appears. Type the amount to apply to each invoice in the Applied column. If you need to enter an advance, select Options, and then select Advance.
Tip: Select Options from the Reference field, and then select Auto Apply (or press F7) to automatically update the amount. AutoApply applies any available discount, and if writing a manual check, limits the payment to the To Apply amount in the header.
Note: You can only pay 14 invoices for each cash payment transaction when entering computer checks. This allows all invoices to print on the check stub.
For cash-type customers and vendors or if you select GL in the Paid To field, enter each account to affect and the amount in the Applied field.
Tip: Select Help from the Receipts dialog box for a detailed description of each field.
5 When the To Apply field is zero, select OK to save the transaction.

BankingSage DacEasy Accounting User’s Guide
220
10Behind the Scenes
When you save a cash receipt, Sage DacEasy updates the following files:
• The Cash Header and Detail files include the new transaction. Sage DacEasy marks the transaction as unposted. You can print the Cash Journal and Cash Receipts Report to see the new transaction.
• If the receipt was from an open- or balance forward-type customer or vendor, Sage DacEasy updates the Accounts Receivable or Accounts Payable Open Invoice Detail file. These files contain the information on the Aging Report and Statements. The Aging Report indicates the transaction is unposted with an asterisk in the Code column.
• If the receipt was from an open- or balance forward-type customer or vendor, Sage DacEasy updates the Accounts Receivable or Accounts Payable Open Invoice Header file. These files contain the information used for the Payables Reminder, Alerts, Credit Checks and AutoPay.
• If Post Cash Online is selected on the Cash tab of the System Preferences dialog box, Sage DacEasy updates the appropriate files. For a list of files updated, refer to “Posting Cash” on page 241.
• If you chose to track customer and vendor transaction history on the System Preferences dialog box, the Customer Transaction History or Vendor Transaction History files are updated as necessary.
• If the Update Check Register Online check box is selected on the Cash tab of the System Preferences dialog box, Sage DacEasy updates the Check Register file so the unposted transaction appears while reconciling the bank account.
• If the Update General Ledger Online check box is selected on the General tab of the System Preferences dialog box, the General Ledger Header and Detail files are updated with the unposted cash transaction. You can view the unposted cash transaction from the General Ledger Transaction Entry dialog box, but you must return to the Receipts dialog box to edit the unposted transaction.
Related Help Topics
• Editing cash receipts
• Deleting cash receipts
• Entering cash refunds from vendors

Entering Comments on Cash Receipts
221
10Entering Comments on Cash Receipts
With Sage DacEasy you can enter an unlimited number of detail line comments when the Paid From field is set to GL. Detail line comments do not apply when Customer or Vendor is selected in the Paid From field.
To Enter Comments
1 Select Cash Entry from the Transactions menu, and then select Receipts. The Receipts dialog box appears.
2 Press Enter in the Number field and the next available transaction number is assigned.
3 Complete each field in the header area of the transaction. The account entered in the Banking field on the Account Interface dialog box appears in the Bank field; however, you can type a different account number or select LookUp from the field and select a different account. Select GL in the Paid From field.
Tip: When GL is selected in the Paid From field, you can select a cash type customer or vendor in the Code field to reference the source of the receipt; however, the receipt does not affect the customer or vendor account.
4 Complete the remaining fields in the header or select OK to advance to the detail area of the transaction.
5 Enter each account and the amount to credit in the detail portion of the transaction.
6 Enter C in the Account column and enter your comment in the description field.
Note: You can enter one comment per detail line and as many comment lines as you need.
Attaching Notes to Transactions
Improve auditing with ample amount of space to capture important information for easy reference when reasoning a Cash Receipt transaction. Using the Sage DacEasy notes editor you can type free form text with information pertaining to the transaction being entered. This information is associated to the transaction and it can be printed in the Transaction Journal.

BankingSage DacEasy Accounting User’s Guide
222
10
To Add Notes to Transactions
1 Select the Cash Receipts transaction entry option from the Transactions menu.
2 Select an existing transaction from the LookUp or press enter in the Transaction Number field to create a new transaction.
3 Click Options, and then click Edit Note to display the Note Editor.
4 Type the note.
Tip: You can click Date Stamp to insert the current program date or Time Stamp to insert the current time.
5 Click Print if you want a printed copy of the note.
Tip: Click Help from the Note Editor for additional assistance on editing the note.
6 Click OK to save the note.
Note: Sage DacEasy uses the Journal Code plus the transaction number and the .ext extension for the note name. All notes are stored in the NOTES folder created inside the company data folder.
To Print Transaction Notes
1 Select the Cash Journal from the Journals menu.
2 Select the Print Transaction Notes check box if you want the notes to show on the journal or listing report. Leave this field un-checked if you do not want notes to show on the report.
Cash PaymentsThe Payments dialog box allows you to enter payments made from your bank accounts. If you are not using the Update Check Register Online feature, only entries recorded in the Cash module appear in the reconciliation. But, if you are using the Update Check Register Online feature, any reconcilable account used in the General Ledger, Receivables Ledger, Payables Ledger, Billing, Sage DacEasy Order Entry or Sage DacEasy Point of Sale module updates the Check Register allowing you to reconcile these entries along with those recorded in the Cash module. To use the Update Check Register Online feature, select the Update Check Register Online check box on the Cash tab of the System Preferences dialog box.

Cash PaymentsEntering Cash Payments
223
10Entering Cash Payments
When you enter a cash payment, the detail of the transaction depends on the type of payment you enter. A list of open invoices appears if you are recording a payment to an open- or balance forward-type vendor or customer. Apply the payment to the appropriate invoice.
When you select GL in the Paid To field or select a cash-type vendor or customer, enter one or more general ledger accounts in the detail of the transaction. For example, select GL in the Paid To field to record a COD payment.
To Enter Cash Payments
1 Select Cash Entry from the Transactions menu, and then select Payments. The Payments dialog box appears.
2 Press Enter to assign a new transaction number.
3 Modify the list as needed.
Behind the Scenes
When you save a cash payment, Sage DacEasy updates the following files:
• The Cash Header and Detail files include the new transaction. Sage DacEasy marks the transaction as unposted. You can print the Cash Journal and Cash Disbursements report to see the new transaction.
Record decreases to yourbank accounts on thePayments dialog box.

BankingSage DacEasy Accounting User’s Guide
224
10• If the payment was to an open- or balance forward-type vendor or
customer, Sage DacEasy updates the Accounts Payable or Accounts Receivable Open Invoice Detail file. These files contain the information that prints on the Aging Report and Statements. The Aging Report indicates the transaction is unposted with an asterisk in the Code column.
• If the payment was to an open- or balance forward-type vendor or customer, Sage DacEasy updates the Accounts Payable or Accounts Receivable Open Invoice Header file. These files contain the information used for the Payables Reminder, Alerts, Credit Checks and AutoPay.
• If the Post Cash Online check box is selected on the Cash tab of the System Preferences dialog box, Sage DacEasy updates the appropriate files. For a list of files updated, refer to “Posting Cash” on page 241.
Note: Computer checks must be printed at the point of entry for online posting to occur.
• If you chose to track customer and vendor transaction history on the System Preferences dialog box, these files are updated.
• If the Update Check Register Online check box is selected on the Cash tab of the System Preferences dialog box, Sage DacEasy updates the Check Register file so the unposted transaction appears while reconciling the bank account.
• If the Update General Ledger Online check box is selected on the General tab of the System Preferences dialog box, the General Ledger Header and Detail files are updated with the unposted cash transaction. You can view the unposted cash transaction from the General Ledger Transaction Entry dialog box, but you must return to the Payments dialog box to edit the unposted transaction.
• If you enabled Online Credit Card Verification on the Online Processing page of the System Preferences dialog box, Sage DacEasy Accounting uses Sage Exchange to verify the payment online then populates the CC Approval Code field with the approval code.
Related Help Topics
• Editing cash payments
• Deleting cash payments
• Entering cash refunds to customers
• Transferring funds between accounts
• Making note payable payments
Cash PaymentsEntering Comments on Cash Payments
225
10Entering Comments on Cash Payments
With Sage DacEasy you can enter an unlimited number of detail line comments when the Paid From field is set to GL. Detail line comments do not apply when Customer or Vendor is selected in the Paid From field.
To Enter Comments:
1 Select Cash Entry from the Transactions menu, and then select Payments. The Payments dialog box appears.
2 Press Enter in the Number field and the next available transaction number is assigned.
3 Complete each field in the header area of the transaction. The account entered in the Banking field on the Account Interface dialog box appears in the Bank field; however, you can type a different account number or select LookUp from the field and select a different account. Select GL in the Paid From field.
Tip: When GL is selected in the Paid From field, you can select a cash type customer or vendor in the Code field to reference the source of the receipt; however, the receipt does not affect the customer or vendor account.
4 Complete the remaining fields in the header or select OK to advance to the detail area of the transaction.
5 Enter each account and the amount to credit in the detail portion of the transaction.
6 Enter C in the Account column and enter your comment in the description field.
Note: You can enter one comment per detail line and as many comment lines as you need.
Attaching Notes to Transactions
Improve auditing with ample amount of space to capture important information for easy reference when reasoning a Cash Payment transaction. Using the Sage DacEasy notes editor you can type free form text with information pertaining to the transaction being entered. This information is associated to the transaction and it can be printed in the Transaction Journal.

BankingSage DacEasy Accounting User’s Guide
226
10
To Add Notes to Transactions
1 Select the Cash Receipts transaction entry option from the Transactions menu.
2 Select an existing transaction from the LookUp or press enter in the Transaction Number field to create a new transaction.
3 Click Options, and then click Edit Note to display the Note Editor.
4 Type the note.
Tip: You can click Date Stamp to insert the current program date or Time Stamp to insert the current time.
5 Click Print if you want a printed copy of the note.
Tip: Click Help from the Note Editor for additional assistance on editing the note.
6 Click OK to save the note.
Note: Sage DacEasy uses the Journal Code plus the transaction number and the .ext extension for the note name. All notes are stored in the NOTES folder created inside the company data folder.
To Print Transaction Notes
1 Select the Cash Journal from the Journals menu.
2 Select the Print Transaction Notes check box if you want the notes to show on the journal or listing report. Leave this field un-checked if you do not want notes to show on the report.
Paying Vendors With AutoPay
AutoPay allows you to quickly generate cash payments to all vendors that meet the criteria you specify. You can then print computer checks, print the journal and post these transactions along with any other cash payments that were entered individually.
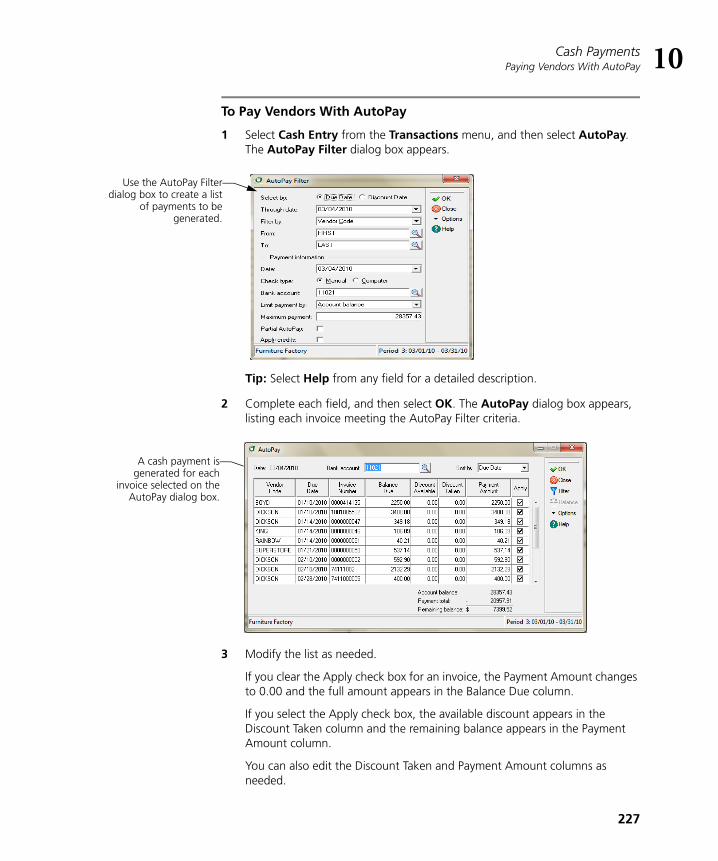
Cash PaymentsPaying Vendors With AutoPay
227
10
To Pay Vendors With AutoPay
1 Select Cash Entry from the Transactions menu, and then select AutoPay. The AutoPay Filter dialog box appears.
Tip: Select Help from any field for a detailed description.
2 Complete each field, and then select OK. The AutoPay dialog box appears, listing each invoice meeting the AutoPay Filter criteria.
3 Modify the list as needed.
If you clear the Apply check box for an invoice, the Payment Amount changes to 0.00 and the full amount appears in the Balance Due column.
If you select the Apply check box, the available discount appears in the Discount Taken column and the remaining balance appears in the Payment Amount column.
You can also edit the Discount Taken and Payment Amount columns as needed.
Use the AutoPay Filterdialog box to create a list
of payments to begenerated.
A cash payment isgenerated for each
invoice selected on theAutoPay dialog box.

BankingSage DacEasy Accounting User’s Guide
228
10Note: If you make changes to the AutoPay list, the program does not warn you when you reach your limit. Use the running total information at the bottom of the screen to see when the maximum payment is reached. Or, you can select Filter to change your selections on the AutoPay Filter dialog box and regenerate the list.
4 Select OK.
If you are generating computer checks, the payments are generated and the main menu appears.
If you are writing manual checks, the Check Number Entry dialog box appears. Type each check number, and then select OK. The cash payments are generated and the main menu appears.
Behind the Scenes
The same files that are updated when you save a cash payment are also updated when you use the Auto Pay routine to generate the payments. Refer to “Entering Cash Payments” on page 223 for the list of files updated.
Consolidating Invoices The Cash Adjustments feature lets you match payments to invoices and consolidate balances of invoices. The most common use for this routine is applying advance payments to invoices. Other adjustments include applying credits or overpayments to invoice balances and correcting entries made with the wrong invoice number.
To Enter a Cash Adjustment
1 Select Cash Entry from the Transactions menu, and then select Adjustments. The Adjustments dialog box appears.
2 Press Enter to assign a new transaction number.

Consolidating InvoicesPaying Vendors With AutoPay
229
103 Select the customer or vendor for which you are entering adjustments. When
you enter the detail portion of the transaction, each open invoice appears.
Note: The Applied and To Apply fields in the transaction header are updated as you enter amounts in the Applied field in the detail of the transaction.
4 Enter the adjustment in the Applied column for each invoice (type a negative amount to adjust a positive amount and a positive amount to adjust a negative amount). You can adjust as many invoices as necessary.
For example, assume you have an advance for 1000.00, invoice 0001 for 700.00 and invoice 0002 for 200.00. To apply the advance to both invoices, type the following amounts in the Applied column: 900.00 for the advance, -700.00 for invoice 0001 and -200.00 for invoice 0002. The advance would then have a -100.00 balance (-1000.00+900.00) and the invoices would have zero balances.
Tip: Select Help from the Adjustments dialog box for a detailed description of each field.
5 Select OK to save the transaction. The adjustments are added to the Open Invoice files as unposted cash transactions.
Note: The To Apply field must be zero before you can save the transaction.
Behind the Scenes
When you save an adjustment, the following files are affected:
• The Cash Header and Detail files include the new transaction. Sage DacEasy marks the transaction as unposted. You can print the Cash Journal to see the new transaction.
• Sage DacEasy updates the Accounts Receivable Open Invoice Detail file for customer adjustments and the Accounts Payable Open Invoice Detail file for vendor adjustments. This information prints on the Aging Report and Statements. The Aging Reports indicate unposted transactions with an asterisk in the Code column.
• Sage DacEasy updates the Accounts Receivable Open Invoice Header file for customer adjustments and the Accounts Payable Open Invoice Header file for vendor adjustments. These files contain the information used for the Payables Reminder, Alerts, Credit Checks and AutoPay.
• If the Post Cash Online check box is selected on the Cash tab of the System Preferences dialog box, Sage DacEasy updates the appropriate files. For a list of files updated, refer to “Posting Cash” on page 241.
• If you chose to track customer and vendor transaction history on the System Preferences dialog box, these files are updated.

BankingSage DacEasy Accounting User’s Guide
230
10• If the Update Check Register Online check box is selected on the Cash
tab of the System Preferences dialog box, Sage DacEasy updates the Check Register file so the unposted transaction appears while reconciling the bank account.
• If the Update General Ledger Online check box is selected on the General tab of the System Preferences dialog box, the General Ledger Header and Detail files are updated with the unposted cash transaction. You can view the unposted cash transaction from the General Ledger Transaction Entry dialog box, but you must return to the Adjustments dialog box to edit the unposted transaction.
Recurring PaymentsIf you enter similar or identical cash payments on a regular basis, enter the transaction as a recurring entry. Sage DacEasy creates a duplicate transaction from the original transaction each time you generate the payment. This is helpful for payments such as rent and note payments.
Entering Recurring Payments
You can enter any payment as a recurring transaction where the distribution is to a general ledger account other than Accounts Receivable, Accounts Payable or Inventory.
Note: You can only select GL or a cash-type customer or vendor in the Paid To field.
To Enter a Recurring Payment
1 Select Recurring Entry from the Transactions menu, and then select Payments. The Recurring Payments dialog box appears.
Enter repetitive cashpayments on the
Recurring Paymentsdialog box.

Recurring PaymentsGenerating Recurring Payments
231
102 Assign the transaction to a group. You can generate multiple payments at the
same time by assigning multiple transactions to the same group. To select an existing group, select LookUp, and then select the group from the list that appears.
3 Assign the transaction a number, and then select the Check Type.
4 Select the type of payment in the Paid To field.
Note You can only enter recurring payments for cash-type vendors or customers and general ledger accounts.
5 Type the vendor or customer code. If you select GL in the Paid To field, you can still select a customer or vendor in this field. This information prints on computer printed checks; however, the customer or vendor record is not updated.
6 Enter each account to update in the detail area of the transaction and the amount.
Tip: Select Help from the Recurring Payments dialog box for a detailed description of each field.
7 Select OK to save the transaction.
Behind the Scenes
When you save a recurring payment, Sage DacEasy updates the Recurring Cash Header and Detail files to include the new transaction.
Generating Recurring Payments
You can generate recurring payments at any time, for any bank account, and select a range of groups to generate multiple payments at once.

BankingSage DacEasy Accounting User’s Guide
232
10
To Generate a Recurring Payment
1 Select Recurring Generation from the Transactions menu, and then select Payments. The Generate Recurring Payments dialog box appears.
2 Enter the date to assign to the generated transactions.
3 Enter the range of transactions to generate based on the group assigned to the recurring entry.
4 Assign the bank account from which the payments are made.
Tip: Select Help from the Generate Recurring Payments dialog box for a detailed description of each field.
5 Select OK.
If you selected Manual as the Check Type when you entered the recurring payments, the Recurring Payments dialog box appears. Type the account number for the checking account and the check number. Select OK to continue. Repeat this process for each manual check.
An unposted cash payment is added to the Cash Header and Detail file for each recurring payment that falls within the selected range. If you chose to post online and are writing manual checks, the transaction is also posted to the General Ledger. A message appears when the process is complete.
6 Select Continue to return to the Generate Recurring Payments dialog box. You can generate additional payments or select Close to exit.
Behind the Scenes
The same files that are updated when you save a cash payment are also updated when you generate a recurring payment. Refer to “Entering Cash Payments” on page 223 for the list of files updated.
Generate recurringpayments from theGenerate Recurring
Payments dialog box.

Verifying Cash TransactionsPrinting the Cash Journal
233
10Related Help Topics
• Editing recurring payments
• Deleting recurring payments
• Editing generated recurring payments
• Deleting generated payments
Verifying Cash TransactionsAfter you enter a series of cash transactions, you must verify the accuracy of the entries before you can post.
Printing the Cash Journal
Although you can change this requirement on the Ledgers tab of the System Preferences dialog box, it is recommended that you always print the journal prior to posting. Locating and correcting erroneous entries prior to posting is much easier than correcting entries after you have posted.
Note: If you selected Post Cash Online on the System Preferences dialog box, all cash transactions other than computer checks not printed during entry are posted when the transactions are saved and do not appear on the journal.
To Print the Cash Journal
1 Select Cash from the Journals menu, and then select Cash Journal from the menu. The Cash Journal dialog box appears.
2 Select Journal as the Report Type.
3 Complete the Date field. The period associated with the date appears. All unposted transactions within the period print on the Journal.
Tip: Select Help from the Cash Journal dialog box for a detailed description of each field.
4 Select OK. The Report Layout dialog box appears.
5 Select the target, edit the layout if necessary, and then select OK.
Related Help Topics
• Printing the Listing
• Printing the Cash Receipts Report
• Printing the Cash Disbursements Report

BankingSage DacEasy Accounting User’s Guide
234
10• Printing the Online Cash Balance Report
Cash Journal
Printing Deposit Slips
You can save time and avoid mistakes when making bank deposits by printing your deposit slips (also called deposit tickets) directly from Sage DacEasy. The deposit slip includes the cash deposit and breaks down the individual checks being deposited.
The summary printed at the bottom of deposit slips includes totals for the number of items deposited, total check amounts, total cash amounts and a grand total.

Verifying Cash TransactionsPrinting Checks
235
10
To Print a Deposit Slip
1 Select Cash Print from the Transactions menu, and then select Deposit Slips. The Print Deposit Slips dialog box appears.
2 The default Banking account entered on the Account Interface dialog box appears. To print deposit slips for a different checking account, type the account number or select LookUp and select the checking account.
3 Enter the date to print on the deposit slip.
4 Select the range of deposits to include.
5 Select OK to access the Report Layout dialog box.
6 Select the target, edit the layout if necessary, and then select OK to print the deposit slip.
Printing Checks
After verifying cash transactions, the next step is to print your computer checks. You must print all checks before posting cash transactions. If you attempt to post the Cash module without printing your computer checks, an error message appears. A Checks To Print Report is available to preview checks you are going to print. This report lists only the checks not printed.
To Print the Checks to Print Report
1 Select Cash Print from the Transactions menu, and then select Checks to Print. The Report Layout dialog box appears.
2 Select the target, edit the layout if necessary, and then select OK to begin printing.
Use the Print Deposit Slipsdialog box to specify the
deposits to include on theprinted deposit slip.

BankingSage DacEasy Accounting User’s Guide
236
10Checks to Print Report
To Print Checks
1 Select Cash Print from the Transactions menu, and then select Checks. The Print Checks dialog box appears.
2 Complete each field.
Note: If you edit or view a cash payment transaction after you have printed the check, but before you have posted the transaction, the original check is voided. Because the original check is voided, be sure to clear the Reprint check box when you print the check again.
Tip: Select Help from the Print Checks dialog box for a detailed description of each field.
3 Select OK to access the Report Layout dialog box.
Tip: Select Test Page to verify that the check aligns properly on the form.
4 Select the target, edit the layout if necessary, and then select OK to begin printing.

Verifying Cash TransactionsPrinting Checks
237
10Related Help Topics
• Reprinting checks after a printer jam
• Printing a test page
Setting up Customizable Checks in Sage DacEasy Accounting
1 Select Defaults from the Edit menu and then select Forms Setup. The Edit Forms Setup dialog appears.
2 Select Checks from the Form drop down box.
3 Click on the Check Type drop down box and select Custom as your check printing option.
4 Select the Print Comments on Check Stub check box if you want detail line comments on your payment transaction to print on the check stub.
Note: For more information on detail line comments go to the Detail Line Commenting section of this users guide.
5 Click on Names and the Format File Names dialog appears. Enter the name of your check template in the Checks field. Click on LookUp to select from a list of available templates.

BankingSage DacEasy Accounting User’s Guide
238
10
6 To create a new template type the template name in the Checks field. To select an existing template, type the template name or click on LookUp and select the template.
Tip: Select Options and select Copy Format to make a copy of an existing template.
7 Click on OK to save the Format File Names and return to the Edit Forms Setup dialog.
8 Click on Edit to work on your check template. Click OK when you finish designing or editing your template.
9 Click OK to save your check form settings.
Note: Refer to the “Editing templates” and “Template Variables” topic in Help for more information on how to create or edit form templates.
Overriding Check-Printing Options
With Sage DacEasy Accounting you can define the check printing options for each of your bank accounts. To do this you edit the bank account and select Check Forms from the toolbar.
When Sage DacEasy prints checks, it looks for the check printing options in the bank account record. If it does not find any options set up, Sage DacEasy prints checks using the default configuration setup in Edit Forms Setup.

Verifying Cash TransactionsPrinting OCR-Ready Checks
239
10
To Override Check printing options
1 Select Accounts from the Edit menu and the Edit Accounts dialog appears.
2 Click on LookUp to select the account to edit.
3 Click on Options and then select Check Forms. The Edit Check Options dialog appears.
4 Select the check printing option in the Check Type drop down box.
5 If you selected Custom as your Check Type, enter the name of the check template to use for this bank account. Click on LookUp from the Check Template Name field to select an existing template.
6 If you selected Custom as your Check Type, Select Edit Form from the Check Template Name field to work on the check template. Click on OK when you finish creating or editing your template.
7 Select the Print Comments on Check Stub if you want detail line comments on your payment transaction to print on the check stub.
Note: For more information on detail line comments go to the Detail Line Commenting section of the Installation and New Features Guide.
8 Click OK to save the check printing settings.
Printing OCR-Ready Checks
This feature provides you the option to select whether you want to use an OCR Ready check format or a standard format. You may be able to save your company money by using OCR check formats because some banks offer discounts to customers when processing with this check format.
To make OCR Ready the check printing option for all bank accounts, setup OCR Checks as the check type in Edit Forms Setup. You can OCR Checks as the check type for specific bank accounts. To do this, use the Check Form option in Edit Accounts.

BankingSage DacEasy Accounting User’s Guide
240
10
To Print OCR Checks
1 Select Defaults from the Edit menu and then select Forms Setup. The Edit Forms Setup dialog appears.
2 Select Checks from the Form drop down box.
3 Click on the Check Type drop down box and select OCR Checks as your check printing option.
4 Select the Print Comments on Check Stub check box if you want detail line comments on your payment transaction to print on the check stub.
Note: For more information on detail line comments go to the Detail Line Commenting section of the Installation and New Features Guide. You can change these options at anytime.
5 Click OK to save your check form settings.
To set up OCR Checks for a specific bank account
1 Select Accounts from the Edit menu and the Edit Accounts dialog appears.
2 Click on LookUp to select the bank account to edit.
3 Click on Options and then select Check Forms. The Edit Check Options dialog appears.
4 Select OCR Checks as the printing option in the Check Type drop down box.
5 Select the Print Comments on Check Stub if you want detail line comments on your payment transaction to print on the check stub.

Posting CashPrinting OCR-Ready Checks
241
10Note: For more information on detail line comments go to the Detail Line Commenting section of the Installation and New Features Guide.
6 Click OK to save the check printing settings.
Posting CashThe posting process updates the General Ledger with the activity entered in the Cash module and updates the appropriate account balances. When you post Cash, Sage DacEasy creates and posts a summary or detail transaction in the General Ledger (depending on your setting on the System Preferences dialog box).
There is no set rule when you must post; however, it is easier to locate mistakes if you post on a frequent basis. If your business has a high volume of activity, you might decide to post daily. Otherwise, you may only need to post weekly or monthly. Because the posting process updates the General Ledger, post prior to printing your reports to include the most recent activity.
Note: If you selected Post Cash Online on the System Preferences dialog box, all cash transactions other than computer checks not printed during entry are posted when the transactions are saved.
Before posting cash transactions, you must print all computer checks and the Cash Journal for the period you are posting. The Cash Journal only prints transactions you are going to post, letting you review the accuracy of the transactions before posting.
Tip: If you choose to enable transaction processing on the Ledgers tab of the System Preferences dialog box, Sage DacEasy skips problem transactions during posting and lists errors after posting. You must correct the problem, print the new Journal and post these transactions separately.
To Post Cash
1 Select Cash from the Posting menu. The Cash Posting dialog box appears.
Tip: It is important to make a backup prior to posting. You can back up all data files for the company, including add-on modules, from the Sage DacEasy Business Center. Or, to access the Accounting Backup routine, select Backup from the Cash Posting dialog box.
2 Enter the date that corresponds to the period to post. All unposted transactions for the period are posted.
3 Clear the Purge Transactions After Posting check box to retain the transactions after posting.

BankingSage DacEasy Accounting User’s Guide
242
104 Select OK. Each transaction appears as it is being posted. The Posting
Results window appears when the process is complete.
Note: If the total Debits do not equal total Credits, restore your backup, run the Recover and Verify routines on your data files, and then repeat the posting process. Refer to “Getting Started” on page 13 for more information on running the Recover and Verify routines using the File Utilities feature.
5 Select Continue to return to the main menu.
Tip: To view each check and deposit on the General Ledger Activity Report, you must select the Post Information in Detail to General Ledger check box on the Ledgers tab of the System Preferences dialog box or select the Update General Ledger Online check box on the General tab of the System Preferences dialog box.
Behind the Scenes
When you post cash transactions, Sage DacEasy does the following accounting behind the scenes:
• Sage DacEasy debits the cash account and credits Accounts Receivable (or Accounts Payable) when you post open invoice receipts.
• Sage DacEasy debits the cash account and credits and debits the offsetting accounts as included in the transaction detail when you post a cash customer, cash vendor or general ledger receipt.
• Sage DacEasy credits the cash account and debits Accounts Payable (or Accounts Receivable) when you post open invoice payments.
• Sage DacEasy credits the cash account and debits and credits the offsetting accounts as included in the transaction detail when you post cash vendor, cash customer or general ledger payments.
• Sage DacEasy debits and credits the cash account when you make a cash adjustment. A cash adjustment has no effect on your cash balance.
When you post cash transactions, Sage DacEasy updates the following files:
• The Accounts file includes new account balances. Sage DacEasy updates period and current balances of the accounts as well as the parent accounts to which the accounts flow. You can print all financial reports to see changes in the account balances.
• Sage DacEasy updates the General Ledger Header and Detail files with a posted summary or detail transaction (depending on your system preferences). The journal code for the transaction that posts to the General Ledger is CH. Print the General Ledger Listing report for journal code CH to see the posted transaction.

Reconciling Your Bank StatementPrinting OCR-Ready Checks
243
10• Sage DacEasy updates current balance and historical information in
the Customer and Vendor files for open- and balance forward-type customers and vendors. Print the Customer Directory and the Vendor Directory to see changes in the current balance.
• Sage DacEasy updates the Accounts Receivable and Accounts Payable Open Invoice Header and Detail files for open- and balance forward-type customers and vendors. This information prints on the Aging Reports and Statements. The asterisk is removed from the Code column, indicating that the transaction is posted.
• Sage DacEasy updates the Cash Header and Detail files, marking the transactions as posted. Print the Cash Listing, Cash Receipts Report and Cash Disbursements report to see the posted transactions.
• The Check Register and Reconciliation includes new checks and deposits. Print the Check Register report to see posted checks and deposits. If you are using the Update Check Register Online feature, the Check Register entries are marked as posted.
Related Help Topics
• Reversing posted cash receipts
• Reversing posted cash payments
• Voiding posted checks
Reconciling Your Bank StatementReconciliation involves comparing the balance on your bank statement to the bank balance maintained by Sage DacEasy. If you entered all checks and deposits correctly, reconciling the two balances is easy. You cannot process a reconciliation unless the adjusted balance in Sage DacEasy Accounting matches the current balance on your bank statement.
Before accessing the Reconciliation dialog box, print the Check Register. This report lists all items currently in the Check Register file for the bank account you are reconciling. Only posted cash transactions are in the Check Register unless you are using the Update Check Register Online feature. Use the Check Register as a quick reference during the reconciliation process.

BankingSage DacEasy Accounting User’s Guide
244
10Note: To select the Update Check Register Online feature, select Defaults on the Edit menu, and then select System Preferences. Select the Update Check Register Online check box on the Cash tab. When you select this feature, check register entries are created for all unposted transactions including a reconcilable account. If you are interfacing Sage DacEasy Accounting with Sage DacEasy Point of Sale or Sage DacEasy Order Entry, check register entries are also created for any unposted transactions in those modules including a reconcilable account. These check register entries are created when you access these modules after selecting the feature in Sage DacEasy Accounting. You are prompted with a message notifying you when Sage DacEasy creates these entries.
To Print the Check Register
1 Select Cash Print from the Transactions menu, and then select Check Register. The Check Register dialog box appears.
2 Select the bank account to view and the date range of transactions to include on the report.
Tip: Select Help from the Check Register dialog box for a detailed description of each field.
3 Select OK to access the Report Layout dialog box.
4 Select the target, edit the layout if necessary, and then select OK to begin printing.

Reconciling Your Bank StatementPrinting OCR-Ready Checks
245
10Check Register Report
To Reconcile a Bank Account
1 Select Cash Entry from the Transactions menu, and then select Reconciliation. The Reconciliation dialog box appears.
Note: The account entered in the Banking field on the Account Interface dialog box appears. To reconcile a different bank account, enter the Bank account or select LookUp and select the bank account.
2 Enter the date and balance from the printed bank statement. Each cash transaction entered on or before the statement date appears with a status of C, indicating the transaction has cleared the bank. This is designed to save you time, but can be edited if necessary.
3 Confirm that the status (displayed in the last column) is correct for each entry in the Check Register. Entries that appear on the bank statement should be marked as cleared (with a C). Entries that do not appear on the bank statements should be marked as outstanding (with an O).
To change the status of any item, type the correct status (C for Clear or O for Outstanding); or, select Options, and then select Clear/Out.
Reconcile your bankbalance with your printedbank statement from theReconciliation dialog box.

BankingSage DacEasy Accounting User’s Guide
246
10Tip: You can adjust invoice balances or enter adjustments that appear on the bank statement without leaving the Reconciliation dialog box. Select Options, and then select Adjustment.
4 To print the reconciliation, select Options, and then select Print Summary. If the adjusted balance matches the statement balance, you can store the report with your bank statement. Otherwise, use this report to help you find the discrepancy.
If you need to exit the reconciliation, but need to save your work, click the Close button, and then choose Escape After Saving.
Tip: Select Help from the Reconciliation dialog box for a detailed description of each field.
5 Select OK to save the reconciliation.
Note: The Adjusted Balance must match the statement balance before the reconciliation can be processed. The Adjusted Balance is calculated based on the following formula:
Adjusted Balance = Current Balance - Outstanding Deposits + Outstanding Checks + Debit Adjustments -Credit Adjustments
6 Choose No if you want to keep the cleared checks in the Check Register file. Cleared checks do not show on future reconciliations; however, you can view them on the Check Register report.
Choose Yes if you want to remove all cleared checks from the Check Register file. This includes checks cleared on previous reconciliations.
A message, “Reconciliation completed successfully,” appears when the process is complete.
7 Choose Continue to clear the screen and return to the main menu.
Note: Use the Purge routine to purge check register entries from the Check Register file. Purging the Check Register should be performed periodically, for example at Year End to clear the file of old information.
Related Help Topic
• Entering reconciliation adjustments
• Purging files
Behind the Scenes
When you save an adjustment on a bank reconciliation, Sage DacEasy does the following accounting behind the scenes:

Reconciling Your Bank StatementPrinting OCR-Ready Checks
247
10• If you entered a positive adjustment, Sage DacEasy debits the bank
account and credits the offsetting account you entered in the Account field.
• If you entered a negative adjustment, Sage DacEasy credits the bank account and debits the offsetting account you entered in the Account field.
When you save an adjustment on a bank reconciliation, Sage DacEasy updates the following files:
• If you entered an adjustment, the Accounts file includes new account balances. Sage DacEasy updates period and current balances of accounts as well as the parent accounts to which the accounts flow. You can print all financial reports to see changes in the account balances.
• If you entered an adjustment, Sage DacEasy updates the General Ledger Header and Detail files with the posted adjusting entry. The journal code for the transaction is AJ. You can print the General Ledger Listing for journal code AJ to see the new transaction.
• If you selected the Update Check Register Online check box on the Cash tab of the System Preferences dialog box, the adjustment entry is added to the Check Register as a posted entry.

BankingSage DacEasy Accounting User’s Guide
248
10

11Financial Reporting
Overview 250
Printing Financial Reports 250Printing the Trial Balance 250
Printing the Balance Sheet 252
Printing the Income Statement 254
Formatting Financial Statements 256
Understanding the Cash Flow Report 258Operating Activities 259
Investing Activities 261
Financing Activities 262
Printing the Cash Flow Statement 263
Creating Custom Financial Reports 264

Financial ReportingSage DacEasy Accounting User’s Guide
250
11
• Financial Reporting •
OverviewAutomating your accounting process is only beneficial if you are able to view meaningful reports that include this information. By generating exactly the type of reports you need, you can accurately keep track of how well your business is doing and make the decisions needed to stay profitable. Sage DacEasy includes the most common financial reports, such as the Balance Sheet and Income Statement. In addition, you create custom financial reports using the Financial Reporter.
Printing Financial ReportsThis chapter covers the financial reports available in Sage DacEasy Accounting and the custom financial report writer that allows you to tailor your financial reports to meet your business needs.
Printing the Trial Balance
The Trial Balance lists balance information for accounts in your chart of accounts. Use this report to verify that your system is in balance. In other words, your total debits equal your total credits when including all accounts on the report. These total amounts represent the total of detail accounts only.
This report prints each account’s balance at the beginning of the period, the activity for the period and the balance at the end of the period. This report is period sensitive; that is, the account activity reflects the entire period, regardless of the date entered within the selected period.

Printing Financial ReportsPrinting the Trial Balance
251
11
To Print the Trial Balance
1 Select General Ledger from the Reports menu, and then select Trial Balance. The Trial Balance dialog box appears.
2 Complete each field as appropriate.
Tip: Select Help from the Trial Balance dialog box for a detailed description of each field.
3 Select OK and the Report Layout dialog box appears.
4 Select the target, edit the layout if necessary, and then select OK to view the report.
Print the Trial Balance tomake sure your accounts
are in balance.
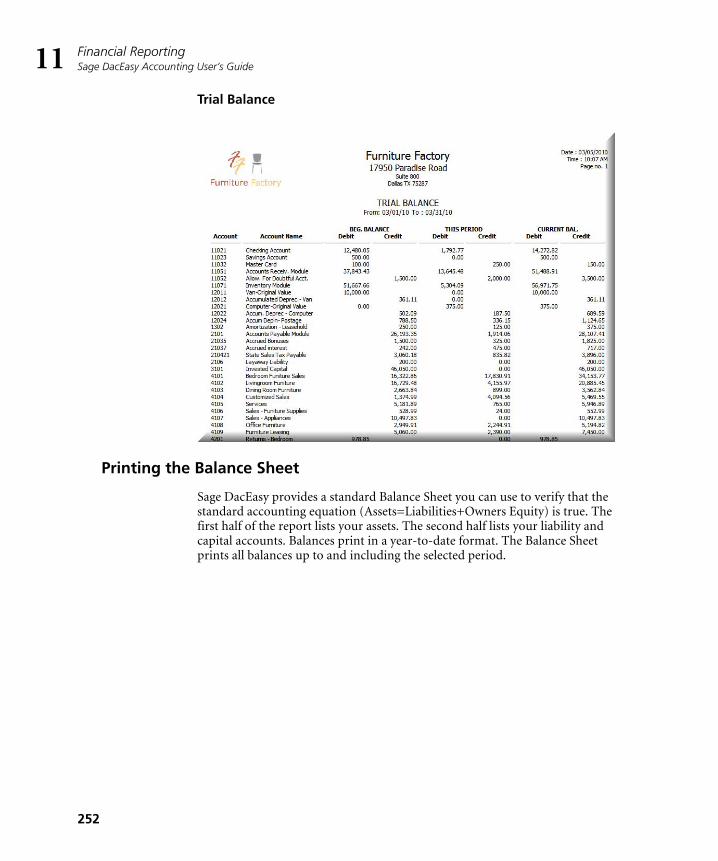
Financial ReportingSage DacEasy Accounting User’s Guide
252
11Trial Balance
Printing the Balance Sheet
Sage DacEasy provides a standard Balance Sheet you can use to verify that the standard accounting equation (Assets=Liabilities+Owners Equity) is true. The first half of the report lists your assets. The second half lists your liability and capital accounts. Balances print in a year-to-date format. The Balance Sheet prints all balances up to and including the selected period.

Printing Financial ReportsPrinting the Balance Sheet
253
11
To Print the Balance Sheet
1 Select General Ledger from the Reports menu, and then select Balance Sheet. The Balance Sheet dialog box appears.
2 Complete each field as appropriate.
Tip: Select Help from the Balance Sheet dialog box for a detailed description of each field.
3 Select OK and the Report Layout dialog box appears.
4 Select the target, edit the layout if necessary, and then select OK to view the report.
Note: The Previous and Current Year Earnings amounts are calculated figures. Sage DacEasy calculates these amounts by subtracting total expenses from total revenues.
Print the Balance Sheet toverify the accounting
equation.

Financial ReportingSage DacEasy Accounting User’s Guide
254
11Balance Sheet
Printing the Income Statement
Sage DacEasy provides a standard report called an Income Statement, which lists your revenue and expense accounts. This report also includes the profit or loss for the period and the year-to-date profit or loss.

Printing Financial ReportsPrinting the Income Statement
255
11
To Print the Income Statement
1 Select General Ledger from the Reports menu, and then select Income Statement. The Income Statement dialog box appears.
2 Complete each field as appropriate.
Tip: Select Help from the Income Statement dialog box for a detailed description of each field.
3 Select OK and the Report Layout dialog box appears.
4 Select the target, edit the layout if necessary, and then select OK to view the report.
Print the IncomeStatement to view your
profit or loss.
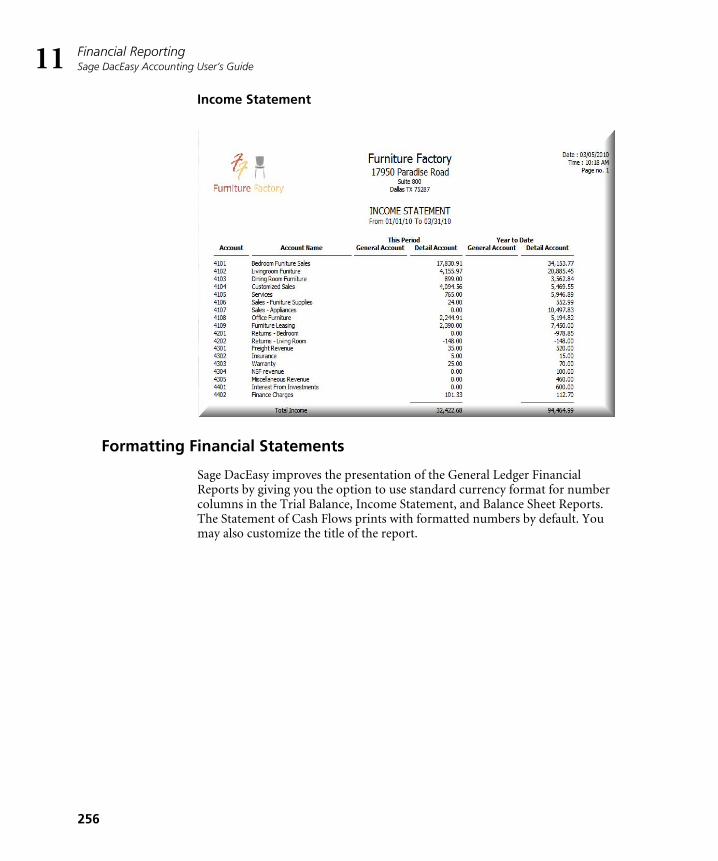
Financial ReportingSage DacEasy Accounting User’s Guide
256
11Income Statement
Formatting Financial Statements
Sage DacEasy improves the presentation of the General Ledger Financial Reports by giving you the option to use standard currency format for number columns in the Trial Balance, Income Statement, and Balance Sheet Reports. The Statement of Cash Flows prints with formatted numbers by default. You may also customize the title of the report.

Printing Financial ReportsFormatting Financial Statements
257
11
To Modify the Trial Balance Report
1 Select General Ledger from the Reports menu, and then select Trial Balance. The Trial Balance dialog box appears.
2 Select Format in the Amount Format drop down box if you want numbers to be formatted with commas. Select Normal in the Amount Format drop down box to print amounts without commas.
3 Modify the report title in the Report Title field, if necessary.
4 Click OK and the Report Layout dialog appears.
5 Select the target disposition, modify the layout if necessary, and click OK to view the report.
Note: Select Income Statements or Balance Sheet from the Reports menu and follow the same steps to modify format those reports.

Financial ReportingSage DacEasy Accounting User’s Guide
258
11Trial Balance
Understanding the Cash Flow ReportThe primary function of the cash flow statement is to provide information about a company’s cash receipts and payments during an accounting period. A secondary purpose is to provide information on a cash basis about the company’s operating, investing and financing activities. According to the Financial Accounting Standards Board (FASB), a cash flow statement allows a business to:
• Evaluate the company’s ability to generate positive future net cash flows.
• Assess the company’s ability to meet its obligations, its ability to pay dividends and its need for financing.
• Determine the reasons for differences between net income and associated cash receipts and payments.
• Assess the effects on a company’s financial position of both its cash and non-cash investing and financing transactions during a period.
The cash flow statement reports cash receipts, payments and net change in cash resulting from operating, investing and financing activities of a company during a period. The format used to show this activity reconciles the beginning and ending cash balances.
The cash flow is divided into three sections:

Understanding the Cash Flow ReportOperating Activities
259
11• Operating activities—involves the cash accounts that determine net
income. This section of the cash flow report consists of cash receipts from sales of goods and services and cash payments to vendors and employees for acquisitions of inventory and expenses.
• Investing activities—involves selling and purchasing fixed assets, creating and collecting loans and acquiring and disposing of investments.
• Financing activities—involves obtaining and repaying cash from creditors, obtaining capital from owners and providing them a return on investment.
You can create the cash flow statement in one of two ways: the direct and the indirect method. Sage DacEasy uses the indirect method. This method adjusts net income for items affecting reported net income but not affecting cash. This is the better method because it is easier to gather the data to create the report and because it focuses on the differences between net income and net cash flow from operating activities.
The Cash Flow report includes all transactions for the financial year in which you print it. The next section in this chapter explains more information about how Sage DacEasy calculates the amounts for the Operating, Investing and Financing Activity sections of the Cash Flow report.
Operating Activities
This section consists of four types of accounts. A description of each type of account is below.
Non-Cash Income
This is a theoretical approach in which an asset sells for cash and Sage DacEasy determines the non-cash income by the difference of the book value of the asset and the cash received. The account credited is Gain on Sale of Asset. You have not exchanged cash revenue, but the seller must recognize the theoretical revenue amount. Sage DacEasy always subtracts the amount gained from net income.
These are the sample accounts associated with non-cash income:
• Gain on Sale of Asset
• Loss on Sale of Asset
Non-Cash Expenses
This is another theoretical approach in which the value of an asset reduces over a period of time. No cash ever exchanges for the recording of these expenses. Sage DacEasy adds the amount expensed back to net income.

Financial ReportingSage DacEasy Accounting User’s Guide
260
11These are the sample accounts associated with non-cash expenses:
• Depreciation
• Amortization
• Leasehold Improvements
• Goodwill
Current Assets/Liabilities
The change in current assets and current liabilities is added or subtracted from net income, with the exception of cash accounts. Cash accounts calculate later in the cash flow statement. The changes in Current Assets and Current Liabilities calculate by the following formula.
Net change in Current Assets/Liabilities = Beginning Balance – Current Balance
The cash flow statement determines whether to add or subtract from net income by considering the type of account and if a positive or negative change took place. For example, if the following change occurs, Sage DacEasy performs these functions:
Sage DacEasy associates the following sample accounts with current assets and liabilities:
• Accounts Receivable
• Marketable Trade Securities
• Inventory
• Prepaid Expenses
• Accounts Payable
• Payroll Taxes Payable
• Sales Taxes Payable
Activity Function Rationale
Increase in Current Assets Subtracted from Net Income Cash was used to generate the asset.
Decrease in Current Assets Added to Net Income Cash was received due to reduction of the asset balance
Increase in Current Liabilities
Added to Net Income Cash was not used to pay current debt
Decrease in Current Liabilities
Subtracted from Net Income Cash was used to pay current debt

Understanding the Cash Flow ReportInvesting Activities
261
11• Contingent Liability
• Deferred Revenue (Current Liability)
Net Cash Provided by Operating Activities
The net cash provided by operating activities calculate in the following manner:
Net Income XXXXX.XX
Gain on Sale of Asset – XXXX.XX
Loss on Sale of Asset +XXXX.XX
Depreciation Expense +XXXX.XX
Change in Current Assets +/–XXXX.XX
Change in Current Liabilities +/–XXXX.XX
Total Operating Adjustments XXXXX.XX
Net Cash provided by Operating Activities XXXXX.XX
Investing Activities
Investing normally deals with the purchase and sale of fixed assets throughout the year. Sage DacEasy determines the year-to-date (YTD) debits and credits for each investing account. This results in a reduction or addition to cash. For example, if the following activity occurs, Sage DacEasy performs these functions.
Sage DacEasy associates the following sample accounts with Investing Activities:
• Original Value Automobile
• Original Value Office Equipment
• Original Value Building
Activity Function Rationale
Debit of Fixed Asset Subtracted from Net Cash provided by operating activities
Reduce Cash due to purchase of the asset
Credit of Fixed Asset Added to Net Cash provided by operating activities
Reduce Cash due to sale of the asset

Financial ReportingSage DacEasy Accounting User’s Guide
262
11Financing Activities
Financing normally deals with incurring or reducing long-term debt. Financing also deals with the receipt or distribution of Capital from investors. The following activities result in a reduction or addition to cash. Sage DacEasy performs the described function on the cash flow statement.
Long-Term Liabilities
Capital
Sage DacEasy associates the following sample accounts with Financing Activities:
• Owners Equity
• Owners Withdrawal
• Mortgage Payable
• Long Term Notes Payable
Cash Accounts
You must assign all cash accounts to belong to Cash Flow Group “Cash” for Sage DacEasy to correctly calculate total cash. Sage DacEasy calculates the Net Increase/Decrease in Cash provided by operating, investing and financing activities then adds or subtracts the sum of the beginning cash balances to determine the ending cash balance.
Activity Function Rationale
Reduction of Debt Subtracted from Net Cash provided by operating and investing activities
Reduce Cash due to reduction of debt
Increase in Debt Added to Net Cash provided by operating and investing activities
Increase Cash due to increase of debt not being paid
Activity Function Rationale
Decrease in Capital Subtracted from Net Cash provided by operating and investing activities
Reduce Cash due to reduction of Capital
Increase in Capital Added to Net Cash provided by operating and investing activities
Increase Cash due to increase of contributed Capital
Understanding the Cash Flow ReportPrinting the Cash Flow Statement
263
11Sage DacEasy considers the following accounts from the sample chart of accounts as cash accounts:
• Petty Cash
• Register 1
• Register 2
• Checking Account
• Payroll Account
• Savings Account
Printing the Cash Flow Statement
Since the Cash Flow Statement prints only for the year-to-date, you do not have to specify dates for the report. The Report Layout dialog box appears when you access this option.
To Print the Cash Flow Statement
1 Select General Ledger from the Reports menu, and then select Cash Flow Report. The Report Layout dialog box appears.
2 Select the target, edit the layout if necessary, and then select OK to begin printing.

Financial ReportingSage DacEasy Accounting User’s Guide
264
11Statement of Cash Flows
Creating Custom Financial ReportsSage DacEasy has a powerful financial reporter you can use to customize financial reports for your business. You can generate complex financial reports where calculations go beyond basic column arithmetic. You can print reports, view reports to the screen or export them to a file. Printing a report to a file lets you import the information into your favorite word processor, spreadsheet or database program.
Sage DacEasy’s Office Integration feature allows you to publish your financial statements in Microsoft Excel. You can then perform any calculations that might help you evaluate your company’s financial position or chart your data.
You can use any field from the Chart of Accounts file for your financial report. All reports are in columnar format; you design the columns of the report by selecting and positioning fields in the column selection portion of the screen.
You can also customize the column headings on your reports. The default heading for each column is the field name, but you can change the name to fit your specific needs.

Creating Custom Financial ReportsPrinting the Cash Flow Statement
265
11Note: You can only include accounts from the Chart of Accounts file in the Financial Reporter. To create a custom report from another file, use must create the report using DacAccess. Refer to Chapter 12, “Custom Reporting” for more information in using the DacAccess feature.
To Create a Custom Financial Report
1 Select Financial Reporter from the DacAccess menu. The Custom Financials dialog box appears.
2 Type a unique name for the report. To edit an existing report, type the report name or select LookUp and select the report.
3 Complete each option in the Layout area.
Tip: Select the Custom Header check box to access the Edit Custom Header dialog box. You can specify the information to print at the top of each page from this dialog box.
4 Complete the Column Selection area. You can select a field or type a formula in each column.
To select a field—Select Lookup and select the field from the Field List. The field appears in the current column.
Tip: To include a percentage field, you must select both the base field and percentage field. For example, to include the % This Period field, you must also include the This Period field. In addition, you must indicate the field to base the percentage calculations on by entering +% in the Formula field of the base account on the Financial Detail Records dialog box (refer to step 6). Following the same example, if you type +% in the Formula field for Total Revenue, the balance for the current period, and the period balance as a percent of Total Revenue, print for each account included on the report.
Select the columns toinclude on your report
from the CustomFinancials dialog box.

Financial ReportingSage DacEasy Accounting User’s Guide
266
11To enter a formula—Select Formula. Type the formula in the Column Value field. To insert a field in the formula, select LookUp and double-click any numeric field. A formula can contain the following operands: +, -, *, /, (, and ). Expressions inside of parenthesis are evaluated first and all expressions are evaluated on the following precedence: multiplication, division, addition, and then subtraction. Sage DacEasy evaluates formulas from left to right, with expressions inside parentheses evaluated first. Press Enter after typing the formula. “Formula” appears in the Column field. Edit this value to change the column heading.
5 Edit the column headings if necessary. To edit a column heading, type the new title over the existing text in the column field.
Tip: Select Help from the Custom Financials dialog box for a detailed description of each field.
6 Select Edit Records. The Financial Detail Records dialog box appears.
7 For each line, enter an account, text or a formula.
Tip: To add a line, select Insert. To delete a line, select Line Delete.
To enter an account—Type the account number in the Account field. Edit the formatting if necessary.
Tip: To insert the next account, select Get Next.
To enter text—Leave the Account field blank and type text in the Description field. Edit the formatting if necessary.
Note: If a variable or formula is entered in the Print Value field, this value prints along with the description.
Add accounts andformulas to your customreport from the Financial
Detail Records dialog box.

Creating Custom Financial ReportsPrinting the Cash Flow Statement
267
11To enter a formula—If the formula is based on an account, enter the account in the Account field. Type the formula in the Formula field. For example, to add the Saving Account to the Current Assets variable (CA), type the Saving Account number in the Account field, 11023, and then type +CA in the Formula field.
If the formula is not based on an account, leave the Account field blank and type the formula in the Formula field. For example, to add current assets (CA) to fixed assets (FA) and assign the result to Total Assets (TA), type TA=CA+FA in the Formula field.
You can type a formula in the Print Value field if you are not assigning the outcome to a new variable. For example, type CA+FA in the Print Value field and the resulting figure prints.
To enter multiple formulas, separate each formula with a comma.
Note: Each variable must be created before it can be used in a formula. Select Variable to add a variable. The maximum number of variables is 16. If you require additional variables, set a variable that is no longer used to zero (for example, CA=0).
8 Select Edit Footer if you want to edit the footer message that appears at the bottom of each page.
Tip: Select Help from the Financial Detail Records dialog box for a detailed description of each field.
9 Select OK to return to the Custom Financials dialog box.
10 Select Print to access the Report Layout dialog box; select the target, edit the layout if necessary, and then select OK.
11 Select OK from the Custom Financials dialog box to save the report.
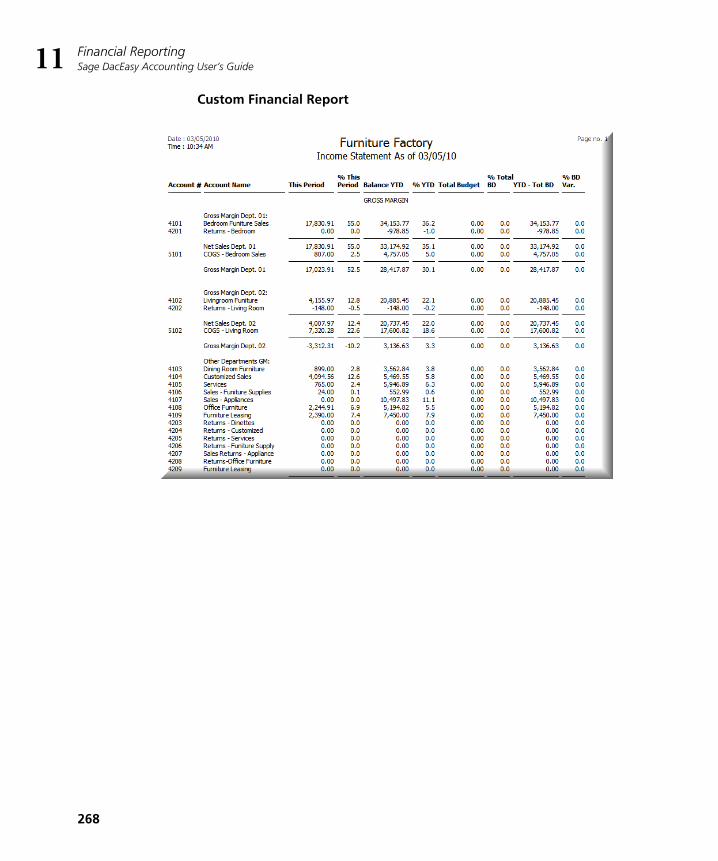
Financial ReportingSage DacEasy Accounting User’s Guide
268
11Custom Financial Report

12Custom Reporting
Overview 270Terms used in this chapter 271
Using the Query 272Using the Query Checklist 273
Completing the Header Area 274
Selecting Fields in the Column Selection Area 274
Selecting the Sort Order for the Query 275
Creating User Defined Fields 276
Limiting Records on a Query 278Establishing Criteria 278
Understanding AND/OR Logic 279
Understanding Joins 281
Printing the Query 282
Using the Publisher 283Using the Publisher Checklist 284
Completing the Header and Page Header Area 285
Completing the Detail Area 285
Completing the Group Footer Area 286
Completing the Report Footer Area 286
Previewing and Printing the Final Report 288

Custom ReportingSage DacEasy Accounting User’s Guide
270
12
• Custom Reporting •
OverviewReporting is one of the most important aspects of any business because reports inform you of the stability and profitability of your business. Sage DacEasy includes a custom reporting feature, called DacAccess, that gives you the ability to create informative reports to fit your specific needs. There are two steps to creating a report: selecting the records included in the report using the Query and defining the layout of the report using the Publisher.
The Query lets you choose up to ninety-six fields from multiple files to include on a report. The Publisher lets you create the report format, using fields selected in your Query. With the Query and Publisher, you can create listing reports with unprecedented detail. In addition, the Query and Publisher include many default reports ready for you to use.
Data is organized in a hierarchy from general to specific. Each level is defined in the following list.
Follow these steps tocreate a custom listing
report using DacAccess.

OverviewTerms used in this chapter
271
12Terms used in this chapter
• Catalog—A catalog is the largest grouping of data. It contains an associated group of files that contain related fields. For example, the Billing catalog contains files such as Billing Detail, Customers, Products, Services and Serial Numbers.
• File—A file is a group of associated records. For example, individual products your company sells are in the Product file.
• Record—A record is a group of related fields. For example, all the information found on the Edit Product dialog box for one product is considered a record.
• Field—A field is the lowest level of data. A field is each piece of information that makes up a record. For example, the GL Department field on the Edit Product dialog box is part of the product record.
Fields are referred to in the Query and Publisher because you select fields to include on your report.
• Variable—A variable is a placeholder or merge field that pulls information from a specified file.
This figure illustrates theterms used to define data
when creating a query.

Custom ReportingSage DacEasy Accounting User’s Guide
272
12Using the Query
The first step in generating a custom report is to choose the information you want to include on the report using the Query in DacAccess. Go to the Query by choosing Query on the DacAccess menu. Use this feature to create a query with information from a variety of fields in several different files. You can even create user defined fields with calculated totals using information from multiple files.
A query is a way of questioning or filtering a database. For example, assume you want to print a report that filters out products sold in the last three months. The remaining products—those products not sold during the last quarter—are the data you want in a report. In addition to limiting the records you want to print on a report, you also use queries to select the specific fields you want on a report, to sort the records and to create user defined calculations.
The Query Design dialog box is divided into three main areas, the Header area, Column Selection area and Sort Columns area. The Header area stores the Query name and catalog. The Column Selection area is where you select the fields and the criteria determining which records to pull for the query. The Sort Columns area is where you set the sorting order of the report.
This figure illustrates themany uses of the Query.

Using the QueryUsing the Query Checklist
273
12
Using the Query Checklist
Step 1—Complete the Header area with the query name and catalog.
Step 2—Select the fields for the query in the Column Selection area. Enter
user defined fields and set criteria for the fields if necessary.
Step 3—Set the sorting order in the Sort Columns area.
Step 4—Run the query to create a report listing the selected records.
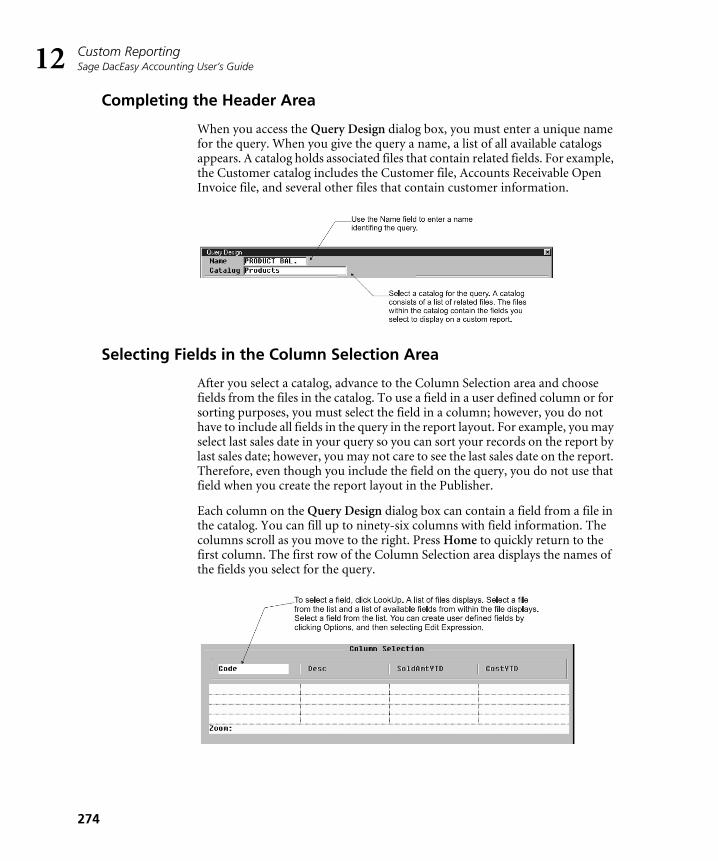
Custom ReportingSage DacEasy Accounting User’s Guide
274
12Completing the Header Area
When you access the Query Design dialog box, you must enter a unique name for the query. When you give the query a name, a list of all available catalogs appears. A catalog holds associated files that contain related fields. For example, the Customer catalog includes the Customer file, Accounts Receivable Open Invoice file, and several other files that contain customer information.
Selecting Fields in the Column Selection Area
After you select a catalog, advance to the Column Selection area and choose fields from the files in the catalog. To use a field in a user defined column or for sorting purposes, you must select the field in a column; however, you do not have to include all fields in the query in the report layout. For example, you may select last sales date in your query so you can sort your records on the report by last sales date; however, you may not care to see the last sales date on the report. Therefore, even though you include the field on the query, you do not use that field when you create the report layout in the Publisher.
Each column on the Query Design dialog box can contain a field from a file in the catalog. You can fill up to ninety-six columns with field information. The columns scroll as you move to the right. Press Home to quickly return to the first column. The first row of the Column Selection area displays the names of the fields you select for the query.

Using the QuerySelecting the Sort Order for the Query
275
12Selecting the Sort Order for the Query
Once you select your fields and set the criteria, you can specify the sorting order for the records included in the query. The sort fields define the order in which the records appear on the report. You have up to four sorting levels. If you do not specify a sorting order, Sage DacEasy sorts by the field in the first column.
To Create a Query
1 Select Query from the DacAccess menu. The Query Design dialog box appears.
2 Assign the query a unique name (up to 14 characters). If you are editing an existing query, type the name of the query or select LookUp and select the query.
3 Select the catalog that contains the files to include on the report. The cursor advances to the first row of the Column Selection area. Use this row to select the fields to include in the query.
Tip: Columns scroll as you move to the right. Press Home to return to the first column.
4 Select LookUp and the Table LookUp appears. Select the table that contains the field to include in the current column and the Column LookUp appears. Select the field to include in the current column.
Tip: In addition to selecting fields from the data files, you can create formulas to include on the report. For more information, refer to “Creating User Defined Fields” on page 276. Each field included in the user defined field must be included in the query, in addition to any fields selected as sort fields. You can exclude the field from the printed report using the Publisher.
Note: When you select LookUp from the Column Selection area, the Column LookUp appears for the last Table that was selected. To select a field from a different table, click the Close button to return to the Table LookUp.

Custom ReportingSage DacEasy Accounting User’s Guide
276
125 To edit the Column Heading on the printed report, select Options and then
select Edit Column. You can edit the Title field; however, the new column title only appears when you run the query and does not appear on the Query Design dialog box.
6 If necessary, limit the records to include on the query. The second and third rows in the Column Selection area determine which records to include on the report. If you leave these rows blank, Sage DacEasy includes all records in the query. For more information, refer to “Limiting Records on a Query” on page 278.
7 If you want to set the sorting order, select Options and select Sort Columns. The cursor advances to the first field in the Sort Columns area. Select LookUp and select the primary sort field for the report. To add a secondary sort, enter a different field in the second field in the Sort Columns area. You can enter up to four sort fields.
Note: If you do not specify a sorting order, Sage DacEasy sorts by the field in the first column.
Tip: Select Switch Sort to toggle between ascending and descending order for the selected sort field.
8 Select Run Query to view the query to the screen. Click the Close button to return to the Query Design dialog box.
Tip: To redirect the report to the printer, select Print.
9 Select OK to save the query.
Note: Use the Publisher to define the report layout. You must use the Publisher if you want to view subtotals and grand totals. Refer to “Using the Publisher” on page 283 for additional information.
Creating User Defined Fields
Besides selecting predefined fields from a file for your query, you can also define your own fields. By creating user defined fields, you can calculate mathematical operations using one or more fields. For example, if you wanted to calculate a customer’s average sales per month, you could define a field called AvgMonth and enter a formula of:
SalesAmtYTD (sales amount for purchases, year to date)/12.
Before you can use a field in a formula for a user defined field, you must first select the field as a column in the Column Selection area on the query. To create a user defined field, place the cursor in a column in the Column Selection area. Select Options, and then select Edit Expressions. The User Defined Field dialog box appears.

Using the QueryCreating User Defined Fields
277
12
To Create User Defined Fields
1 Select Options and select Edit Expression from the Column Selection area on the Query Design dialog box. The User Defined Field dialog box appears.
2 Enter a name and description for the user defined field.
3 Enter the expression. To select a field, type the field name or select LookUp and select the field. For example, to divide the current balance by 12; type Current Balance/12.
Because it is possible to have columns with identically named fields, it is necessary in certain situations to supply the table name from which the field originated. For example, there is a field called SalePrice in both the Products and the Services files. If the query includes both fields and you want to use one of the fields in a formula, you must supply the name of the table from which the field came (e.g., Prod.SalePrice). The table name appears when you click LookUp from the Expression field.
Note: To use a field in a formula, you must first select the field as a column. In addition, the field must be a decimal quantity or numeric field. Fields with Qty as part of the name are decimal fields. Fields with Units as part of the name cannot be used in an expression. For example, Order Qty is a numeric field where Order Units is not.
4 Select OK to save the user defined field.

Custom ReportingSage DacEasy Accounting User’s Guide
278
12Limiting Records on a Query
The second and third rows in the Column Selection area on the Query Design dialog box determine which records to include on the report. If you leave these rows blank, Sage DacEasy includes each record in the query. You can limit records on a query by entering criteria and by editing the join.
To limit records by entering criteria, enter a particular field value or conditions that must be met in order for a record to be included on the query.
When you create a query that pulls from two files, the query includes only those records that include the join field. The join field is used to tie multiple files together. For example, the customer code exists in both the Invoice file and the Customer file, allowing you to create a query that pulls information from both of these files. The program defaults to an equi-join; however, you can edit the query to include all of the records from one file plus the records from the second file that include the join field.
Establishing Criteria
When you select fields for your query, you are limiting the information to include in the query. You can further limit the records included on the report by placing criteria on the fields. You can enter a value as the criterion, indicating only fields that contain this value are included in the query. You can also enter an expression using logical operators to indicate the fields to include in the query. For example, to include customers with a last sale date of 12/31/1999 or prior, select Last Sale Date (LastSaleDate) as a field and enter <=12/31/1999 (less than or equal to 12/31/1999) as the criterion. The logical operator table provided lists the available operators and an example of how to use each.
You can enter multiple criteria on a single query. The relationship of your criteria depends on the rows in which you enter the criteria. There is an OR relationship between rows and an AND relationship between columns. Sage DacEasy satisfies all AND criteria before satisfying the OR criteria.

Limiting Records on a QueryUnderstanding AND/OR Logic
279
12
Understanding AND/OR Logic
The placement of your criteria in the columns and rows is very important. There is an OR relationship between rows and an AND relationship between columns. Sage DacEasy satisfies all AND criteria before satisfying the OR criteria.
Using the example above, AND logic means that records have to meet both the criteria for city and current balance in order to be included in the query.
Logical Operator Example Result
Less Than(<)
< 12/31/2009 Selects all records with a date before December 31, 2009.
Less Than or Equal to (<=)
<= 1000 Selects all records with a number less than or equal to 1000 in the field.
Greater Than (>)
> 500 Selects all records with a number greater than 500 in the field.
Greater Than or Equal to (>=)
>= L Selects all records starting with the letter L or a subsequent letter in the alphabet.
Equal to (=)
= P Selects all records with exactly P in the field.
Not Equal to (<>)
<> ADVANCE Selects all records with any text other than ADVANCE in the field.
BETWEEN BETWEEN 01/01/2009 AND 01/31/2009
Selects all records with a date between January 1, 2009 and January 31, 2009.

Custom ReportingSage DacEasy Accounting User’s Guide
280
12
Using the example above, OR logic means that records have to meet either the criteria for city or the criteria for current balance to be included in the query.
For example, if you use the Customer catalog and want to include customers that live in Dallas OR that have a last sales date before May 5, 1990, you would enter the column selections and criteria as shown in the example. This would give you a query including all customers in Dallas in addition to all the customers with a last sales date before May 5, 1990 (records that meet both criteria are not duplicated).
Query selections for customers that live in Dallas or have a last sale date before May 5, 1990.
On the other hand, if you use the Customer catalog and want to include customers that live in Dallas AND that have a last sales date before May 5, 1990, you would enter the column selections and criteria as shown in the example. This would give you a query of all the customers in Dallas with a last sales date before May 5, 1990.

Limiting Records on a QueryUnderstanding Joins
281
12Query selections for customers that live in Dallas and have a last sale date before May 5, 1990.
Understanding Joins
A join is a link between two files. For example, assume you want to print a report using the product code, units sold and serial numbers. The number of units sold is stored in the Invoice Detail file and the serial numbers are found in the Serial Number file. The product code is found in both files. Therefore, product code is the link between the two files or the join.
There are three different types of joins: equi, left outer, and right outer.
• Sage DacEasy uses the equi-join by default, which includes only records found in both files. Using the example above, Sage DacEasy only includes products with a serial number found in both the Invoice Detail file and the Serial Number file.
• If you select a left outer join, the query includes all records from the first file and only those records in the second file where the joined fields are equal. Using the same example, the query would include all sales and only the serial numbers with a product found in the Serial Number file.
• If you select a right outer join, the query includes all records from the second file and only those records in the first file where the joined fields are equal. Following the same example, the query would include all serial numbers and only the sales transactions that have a product found in the Invoice Detail file.
To Limit Records on a Query
1 Position your cursor in the appropriate box below the field used to limit the query. There is an OR relationship between rows and an AND relationship between columns. Sage DacEasy satisfies all AND criteria before satisfying the OR criteria.
2 Enter the criterion for the field.
Enter a value in the field to include only those records that have the specified value in this field.
To specify a range of records based on a particular expression, enter the expression. You can select LookUp to select an operand. For example, to include all records greater than or equal to 1000, select LookUp, select >=, and then enter 1000.

Custom ReportingSage DacEasy Accounting User’s Guide
282
12Tip: You can enter up to 18 characters in the column. If you need to enter a longer expression, select Options and select Zoom. The cursor advances to the Zoom field where you can enter up to 68 characters.
Note: The format used to enter data in an expression depends on the field type. Select Options and select Edit Column to view a field’s Data Type.
3 If you selected fields from two different files and want to edit the join, select Options and select Edit Join. The Join Editing dialog box appears. Select the type of join and select OK to return to the Query Design dialog box.
Printing the Query
When you run the query, the results appear on the screen. To direct your output to the printer, select Print. Printing your query may be helpful as you build your query. You can print the information to make sure you are pulling the correct data before you create the report layout using the Publisher.
To Print the Query
1 Choose Query on the DacAccess menu. Enter a new query or select LookUp to select a query from a list.
2 Select Run Query. The query appears on the screen.
3 Select Print. The Report Layout dialog box appears.
4 Select the target, edit the layout if necessary, and then select OK to begin printing.
Note: The columns on the Query report vary in width depending on whether you have renamed a column title or have accepted the default name. From the Query Design dialog box, select Options, and then select Print Format to print the Query format. This information is helpful when trying to determine the size of a column.
Use the Join Editing dialogbox to select the type of
join you want for thereport.

Using the PublisherPrinting the Query
283
12Related Help Topic
• Copying queries
Query List
Using the PublisherThe Publisher is the tool you use to create your report layout and print a custom report using a query. When you first access the Publisher, you see the Report Editor dialog box. The top portion of the dialog box is for the report name and data source. The data source is the query that contains the fields you can include on the report. Once you have selected a query as the data source for a report, you cannot change the data source.
Note If you need to use a different query as the data source for the report, you must create a new report layout using the Publisher.
The body of the Report Editor is divided into four areas: Page Header, Detail, Group Footer and Report Footer. Use the Page Header area to enter the information that prints on the top of each page. Use the Detail area to make your field selections for the report. The Group Footer area lets you create subtotals for your sort breaks and the Report Footer area lets you create grand totals for the report.

Custom ReportingSage DacEasy Accounting User’s Guide
284
12You can enter text into each of the four sections of the report or select from available variables such as query fields, company information fields and control options. You can use different variables in different areas of the Report Editor. The fields you chose in the query are available in all sections of the Report Editor. If a field you want to include on the report is not included in the query selected as the data source, you must save the report layout, exit the Publisher, access the query and add the necessary field to the query. Save the query and go back to the Publisher to complete the report layout.
Using the Publisher Checklist
Step 1—Complete the Header area with the report name and the name of
the query you want to use as the data source. Enter your report heading and column headings in the Page Header area.
Step 2—Complete the Detail area with the query fields you want to include
on the report.
Step 3—Complete the Group Footer area if you want subtotals on the
sorts.

Using the PublisherCompleting the Header and Page Header Area
285
12 Step 4—Complete the Report Footer area if you want to report grand
totals.
Step 5—Preview and print the final report.
Completing the Header and Page Header Area
The Header area contains a field for a report name and a query name. The fields available for the report depend on the query you select. Once you choose a query, you cannot change the query name in the Publisher. You can, however, edit the query if you need to use different fields on the report. The Page Header area holds the report heading. The report heading prints at the top of each page of the custom report.
Completing the Detail Area
The Detail area is the body of the report. This is where you select fields from
your query. You can enter text or place fields in this section. You may want to

Custom ReportingSage DacEasy Accounting User’s Guide
286
12enter text as a note, instructions or to describe the fields.
Completing the Group Footer Area
The Group Footer is for sort subtotals. If you set a sorting order in the query,
you may want each sort group to have a total for the group. For example, when
printing a commission report, you may want a total per salesperson. You can
enter text to describe the total, and then place the field you want totaled in this
section. If you do not want sort totals, leave this section blank.
Figure 12-18: Use the Group Footer area to print subtotals for each sort on the report.
Completing the Report Footer Area
The Report Footer area is for grand totals. You can also enter text into this
area. This area is similar to the Group Footer. Select the fields from your query
you want to include in the grand totals for the report.

Using the PublisherCompleting the Report Footer Area
287
12
To Create a Custom Report With the Publisher
1 Select Publisher from the DacAccess menu. The Report Editor dialog box appears.
2 Enter a unique name for the report, and then press Enter. The Report Defaults dialog box appears.
3 Complete each field on the Report Defaults dialog box.
4 In the Data Source field, enter the query name from which you want to create the report or select LookUp and select the query.
Note: The Query details the information to include on the report and must be created before the report can be laid out in the Publisher.
5 Enter a heading for the report in the Page Header section. You can enter text or select LookUp and select a variable.
Note: You can select the following types of variables: Company Text, Control Fields and Query Fields. Company Text allows you to select variables corresponding to the information you entered about your company. Control Variables include the current system date, time and page number. Query fields selected in the Page Header area are inserted as text fields to be used as column headings.
Tip: Select Options and select Center to center the lines of text or variables on the report.
6 Enter the query fields to include on the report in the Detail section. You can enter text or place fields in this section.
To insert a query field, select LookUp and select the field. If you need to include a field that is not in the list, you must edit the query. The field is inserted at the cursor position. You can use the mouse to drag a query field to a different location.
Continue placing fields into this section until all necessary fields are on the layout. It may take some trial and error to line up the fields with your column headings.
7 If you set a sorting order in the query, you may want each sort group to have a total. To include a subtotal on sorted fields, enter text to describe the total, and then place the field you want totaled in the Group Footer section. If you do not want sort totals, leave this section blank.
Note: If no fields are selected in the Sort Columns section on your query, Sage DacEasy uses the field in the first column of the query as the sort field.
8 To include grand totals on the report, select each field to total in the Report Footer section. You can also enter text in this section.
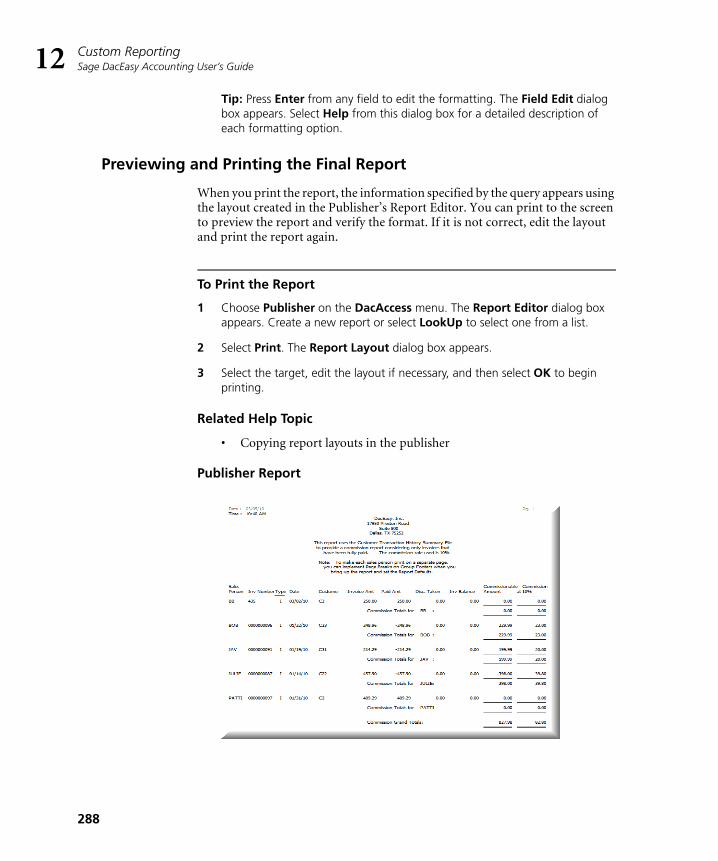
Custom ReportingSage DacEasy Accounting User’s Guide
288
12Tip: Press Enter from any field to edit the formatting. The Field Edit dialog box appears. Select Help from this dialog box for a detailed description of each formatting option.
Previewing and Printing the Final Report
When you print the report, the information specified by the query appears using the layout created in the Publisher’s Report Editor. You can print to the screen to preview the report and verify the format. If it is not correct, edit the layout and print the report again.
To Print the Report
1 Choose Publisher on the DacAccess menu. The Report Editor dialog box appears. Create a new report or select LookUp to select one from a list.
2 Select Print. The Report Layout dialog box appears.
3 Select the target, edit the layout if necessary, and then select OK to begin printing.
Related Help Topic
• Copying report layouts in the publisher
Publisher Report

13Periodic Operations
Overview 290
Closing Periods 290Period End Checklist 291
Generating Finance Charges 291
Closing the Period for Receivables 293
Closing the Period for Payables 294
Entering Account Budget Figures 294
Closing the General Ledger Period 295
Forecasting 296
Closing the Year 298Year End Checklist 298
Closing the Year for Receivables 299
Printing 1099 Forms 299
Closing the Year for Payables 300
Closing the Year for Inventory 301
Closing the Year for the General Ledger 301
Purging Data Files 302
Entering Global Changes 303

Periodic OperationsSage DacEasy Accounting User’s Guide
290
13
• Periodic Operations •
OverviewThis chapter includes information on features accessed from the Periodic menu. The commands on the Periodic menu provide access to functions that are not performed as part of your daily processing. This includes closing your period and your year as well as related functions such as generating finance charges, forecasting sales figures, purging old data and entering budget figures. It also provides access to features that allow you to change multiple records in your data files at once. This includes reassigning prices, adjusting component lists and entering global changes to the Customer, Vendor, Product or Salesperson file.
Tip: The Sage DacEasy Business Center includes Workflow Guides that step you through the Period End and Year End processes. Each Workflow Guide includes descriptions of each step and a direct link to the feature. Refer to Chapter 6, “Working With Sage DacEasy Business Center Pages” in the Installation & New Features Guide for more information.
This chapter also includes information about printing 1099 forms for contract vendors. This feature, available from the Reports menu, is used at the end of each calendar year.
Closing PeriodsThe following checklist details each step involved in closing the period.
Note: The Period End routines are optional. Refer to the appropriate section in this chapter to determine if closing the period is right for you.

Closing PeriodsPeriod End Checklist
291
13Period End Checklist
Post all modules for the period you are closing.
Back up data files. (See Chapter 2, “Getting Started.”)
Generate finance charges for customers.
Print customer statements.
Run the Receivables Ledger Period End routine.
Run the Payables Ledger Period End routine.
Run the General Ledger Period End routine.
Run File Utilities on all files. (See Chapter 2, “Getting Started.”)
Generating Finance Charges
You can automatically generate finance charges for customers. Sage DacEasy calculates these charges based on the finance charge rate and minimum charge entered on the customer record and the number of past due days on a customer’s invoice. Sage DacEasy creates a separate finance charge entry in the Accounts Receivable Open Invoice Detail file for each past due invoice and updates the Accounts Receivable Open Invoice Header file with the change. If the generated finance charge does not meet the minimum charge assigned to the customer, a separate finance charge is created to make up the remaining balance. Finance charges print as separate items on the Accounts Receivable Aging Report and Statements. In addition, Sage DacEasy ages finance charges along with the past due invoice.
The finance rate formula prorates charges on a 30-day cycle. For example, if an invoice is more than 30 days past due, Sage DacEasy assesses the full percentage of the finance charge. If an invoice is 10 days past due, Sage DacEasy uses the following formula to determine the finance charge: past due amount * (10/30 * finance charge %).
After calculating finance charges, Sage DacEasy creates a summary transaction in the General Ledger. The journal code for the transaction is AR. As Sage DacEasy generates finance charges, it prints a Finance Charge Journal. This Journal provides the audit trail necessary to verify all entries made in the General Ledger and Customer files.
We recommend you generate finance charges just before you run the Receivables Period End. This accommodates your balance forward customers; Period End compiles the open invoice detail for these customers into one sum.

Periodic OperationsSage DacEasy Accounting User’s Guide
292
13
To Generate Finance Charges
1 Select Receivables from the Periodic menu, and then select Generate Finance Charges. The Generate Finance Charges dialog box appears.
Note: It is important that you make a backup because you cannot reverse this routine after it has been run. Back up all data files for the company from the Sage DacEasy Business Center. Or, access the Accounting Backup routine, by selecting Backup from the Generate Finance Charges dialog box.
2 Enter the date used to determine past due invoices. Finance Charges are prorated based on a 30-day period. If an invoice is more than 30 days past due, it is assessed the full finance charge. If an invoice is 10 days past due, it is multiplied by a prorated percentage ((10/30) * finance charge %) to arrive at the finance charge amount. If a minimum charge is assigned to a selected customer and the generated finance charge does not meet the minimum charge amount, a separate finance charge is created to make up the remaining balance.
Tip: Select Help from the Generate Finance Charges dialog box for a detailed description of each field.
3 Select OK to generate finance charges for all customers. A Finance Charge Journal prints and a summary transaction is posted to the General Ledger with an AR journal code.
Tip: To generate finance charges for a range of customers, select Range and enter the range of customer codes. To generate finance charges for customers that do not fall within a sequential range, choose Select as the Scope. When you select OK, you can select the customers for which to generate finance charges.
Assess your customers’late charges using the
Generate Finance Chargesdialog box.

Closing PeriodsClosing the Period for Receivables
293
13Closing the Period for Receivables
The Accounts Receivable Period End routine does the following:
• Removes all paid-in-full invoices from the Accounts Receivable Open Invoice Detail file. This information appears on the Aging Report and Statements. The invoice and payments must be posted and be dated on or before the date the Period End routine is run.
• Updates the Balance Information for your customers. This Period is cleared and the amount is added to the Beginning field.
• For balance forward-type customers, all remaining posted transactions for the period are consolidated into one invoice. The date becomes the invoice number using the YYYYMMDD format.
• Updates the Accounts Receivable Open Invoice Header file. This file is used for the Credit Check and Alerts features.
Note: You should generate finance charges just prior to running the Accounts Receivable Period End routine. This is to accommodate your balance forward-type customers, because the open invoice detail for balance forward customers is compiled into one open invoice during period end.
The Accounts Receivable Period End routine does not prevent you from entering customer transactions for the period you close.
To Run the Accounts Receivable Period End Routine
1 Select Receivables from the Periodic menu, and then select Period End. The Accounts Receivable Period End dialog box appears.
Note: It is important to make a backup because you cannot reverse this routine after it has been run. You can back up all data files for the company, including add-on modules, from the Sage DacEasy Business Center. If you prefer to back up from Accounting, refer to Chapter 2, “Getting Started" for more information.
2 Enter a date corresponding to the period you want to close. The period appears below the date.
3 Select OK to close the period for Accounts Receivable. A confirmation box appears when the process is complete.
4 Select Continue to return to the main menu.

Periodic OperationsSage DacEasy Accounting User’s Guide
294
13Closing the Period for Payables
The Accounts Payable Period End routine does the following:
• Removes all paid-in-full invoices from the Accounts Payable Open Invoice Detail file. This information appears on the Aging Report, Statements and Payments Report. The invoice and all payments must be posted and be dated on or before the date the Period End routine is run.
• Updates the Balance Information area on each vendor record. This Period is cleared and the amount is added to the Beginning field.
• For balance forward-type vendors, all remaining posted transactions for the period are consolidated into one invoice. The date becomes the invoice number using the YYYYMMDD format.
• Updates the Accounts Payable Open Invoice Header file. This file is used for the Payables Reminder and Alerts features.
Note: The Accounts Payable Period End routine does not prevent you from entering Payables transactions for the period you close.
To Run the Accounts Payable Period End Routine
1 Select Payables from the Periodic menu, and then select Period End. The Accounts Payable Period End dialog box appears.
Note: It is important to make a backup because you cannot reverse this routine after it has been run. You can back up all data files for the company, including add-on modules, from the Sage DacEasy Business Center. If you prefer to back up from Accounting, refer to Chapter 2, “Getting Started" for more information.
2 Enter a date corresponding to the period you want to close. The period appears below the date.
3 Select OK to close the period for Accounts Payable. A confirmation box appears when the process is complete.
4 Select Continue to return to the main menu.
Entering Account Budget Figures
You can enter budget figures for your chart of accounts, and then view the information on financial reports and listings. You can only enter budget amounts for detail accounts. Sage DacEasy automatically passes the budget amount entered for each detail account to the parent (general) accounts above it.

Closing PeriodsClosing the General Ledger Period
295
13You can enter budget figures for your accounts using two different methods. Enter budget figures for one account at a time from the Account History dialog box or you can enter budget figures for all accounts at the same time using the General Ledger Budget routine found on the Periodic menu. Refer to Help for more information on the Account History dialog box. The steps required to enter budget figures using General Ledger Budget routine follow.
To Enter Budget Figures From the Periodic Menu
1 Select General Ledger from the Periodic menu, and then select Budget. The LookUp Account Budget window appears.
2 Double-click a detail account and the Account Budget dialog box appears.
Note: You can view budget figures for general accounts; however, you cannot edit general accounts. Each detail account updates the general accounts into which it flows.
3 Enter the budget Amounts in the appropriate periods. You can select Duplicate to repeat the amount for each period.
Tip: Select Help from the Account Budget dialog box for a detailed description of each field.
4 Select OK to update the account budget information.
Related Help Topic
• Viewing and editing account budget figures and history
Closing the General Ledger Period
The General Ledger Period End process changes the status on the periods table to closed for the selected period and all prior periods. You cannot make entries into a closed period and a closed period cannot be returned to an open or active status. You do not have to close the period prior to entering transactions in the next period. The only time you are required to close the period is prior to closing the year.
You can close an accounting period after you (1) enter and post all accounting activity for a given period and (2) print all associated reports, journals and financial reports. Use discretion when you close a period; once you close a period in the General Ledger, you cannot enter a transaction for dates falling within or before the closed period.
Note: Closing a period closes all periods prior to the selected period, in addition to the selected period.

Periodic OperationsSage DacEasy Accounting User’s Guide
296
13
To Run the General Ledger Period End Routine
1 Select General Ledger from the Periodic menu, and then select Period End. The General Ledger Period End dialog box appears.
Note: It is important to make a backup because you cannot reverse this routine after it has been run. You can back up all data files for the company, including add-on modules, from the Sage DacEasy Business Center. If you prefer to back up from Accounting, refer to Chapter 2, “Getting Started" for more information.
2 Enter a date corresponding to the period you want to close. The period appears below the date.
3 Select OK. If prior periods are not closed, a message appears warning that you will be closing more than one period. Select Yes to close the current period and all prior periods. A confirmation box appears when the process is complete.
Note: If unposted transactions exist, an error appears. You must post the specified module before closing the period.
4 Select Continue to return to the main menu.
Forecasting
You can plan for the next year by forecasting your purchasing figures for your vendors and sales figures for customers, products and services. Before you run the Year End routine, run the Forecast Calculation routine to forecast these figures.
Perform the following tasks to use the Forecasting routine:
• Prior to running the Forecast Calculation routine, print the Statistical YTD Report to view forecasted figures for the current year and compare these numbers to actual figures.
• Run the Forecast routine prior to running the Year End routine. Sage DacEasy places the forecast amounts in the Budget column on the Historical Information dialog box for each record.
• Print the Forecast Report to view the past year figures with the budgeted figures for the new year.

Closing PeriodsForecasting
297
13
To Print the Statistical YTD Report
1 Select Receivables, Payables or Inventory from the Periodic menu, and then select Print Statistical YTD. The Print Statistical YTD dialog box appears.
2 Select the sorting method and enter a range if you want to print the report for a range of records. If you do not enter a range, the default is First to Last.
3 Select OK and the Report Layout dialog box appears.
4 Select the target, edit the layout if necessary, and then select OK to view the report.
To Forecast Budget Figures
1 Select Receivables, Payables or Inventory from the Periodic menu, and then select Forecast Calculation. The Forecast Calculation dialog box appears.
2 Select the method by which to calculate the forecast figures and complete the Percent field if the percent method is chosen.
3 To calculate the forecast for a range of records, select a Sort By method and enter a range. If you do not enter a range, the default is First to Last and the forecast is calculated for all records.
Tip: Select Help from the Forecast Calculation dialog box for a detailed description of each field.
4 Select OK to calculate the forecast.
To Print the Forecast
1 Select Receivables, Payables or Inventory from the Periodic menu, and then select Print Forecast. The Print Forecast dialog box appears.
2 Select the method by which to sort the report. Enter a range if you want to limit the records that appear on the report.
3 Select OK and the Report Layout dialog box appears.
Tip: Select Help from the Print Forecast dialog box for a detailed description of each field.
4 Select the target, edit the layout if necessary, and then select OK to view the report.

Periodic OperationsSage DacEasy Accounting User’s Guide
298
13Closing the Year
There are four different year end routines in Sage DacEasy: Accounts Receivable, Accounts Payable, Inventory and General Ledger. There are two rules of thumb when closing the year:
• Run the General Ledger Year End last.
• Run all year end routines consecutively (for example, do not run Inventory Year End, and then wait a week to run Payables Year End).
The following checklist will help you plan your end-of-year tasks. While all items on the list may not apply to you, it is a general to-do list to help remind you to keep data files in order.
Year End Checklist
Complete each step on the Period End Checklist. Close all periods before running the Year End procedure. If you have any year end adjustments, enter those before closing the last period.
The Accounts Receivable and Accounts Payable Period End routines are optional. Refer to the appropriate section in this chapter to determine if running these routines is right for you.
If you are using the Forecasting feature, print the Statistical YTD Report for your receivables, payables and inventory.
If you are using the Forecasting feature, run the Forecast Calculation for receivables, payables and inventory.
If you ran the Forecast Calculation, print the Forecast Report for receivables, payables and inventory to see your forecasted figures.
Print any financial reports you may need (for example, Trial Balance, Income Statement, Balance Sheet and General Ledger Activity Report).
Print 1099 forms for contract labor vendors.
Make a backup of your data files.
Run Year End for Receivables.
Run Year End for Payables.
Run Year End for Inventory.
Run Year End for the General Ledger.
If you choose, purge your data files for the prior year.
Run File Utilities on all data files if you chose to purge.

Closing the YearClosing the Year for Receivables
299
13Closing the Year for Receivables
The Accounts Receivable Year End routine updates historical information for each customer. Sage DacEasy transfers the year-to-date figures to last year and last year’s amounts to the year-before-last. You lose balances for the year-before-last during this routine. To retain the information in the Year Before Last fields, make and store a backup of your data files for archival purposes.
Note: If you are using the Forecasting feature, run the Receivables Forecasting routine prior to running Receivables Year End.
To Run the Accounts Receivable Year End Routine
1 Select Receivables from the Periodic menu, and then select Year End. A message appears warning you to make a backup before proceeding.
You can back up all data files for the company, including add-on modules, from the Sage DacEasy Business Center. If you prefer to back up from Accounting, refer to Chapter 2, “Getting Started" for more information.
Note: It is important that all transactions for the current year are posted prior to closing the year. Run the General Ledger Period End routine for the last period of the year to ensure that transactions are not posted after the Accounts Receivable Year End routine is run.
2 Select Start Year End Close to close the year. A confirmation box appears when the process is complete.
3 Select Continue to return to the main menu.
Printing 1099 Forms
Sage DacEasy tracks the vendor information required to issue a 1099 at the end of the year. Select the Contract Labor check box on the Edit Vendor dialog box for each vendor that requires a 1099. This form indicates the amount you paid to the vendor during the year. Sage DacEasy gets this information from the Vendor Payment file. To view this information, select Options from the vendor record, and then select 1099 Information.

Periodic OperationsSage DacEasy Accounting User’s Guide
300
13
To Print 1099 Forms
1 Select Payables from the Reports menu, and then select 1099s. The 1099s dialog box appears.
2 Complete each field. The federal and state tax IDs entered on the Company Information dialog box appear, as well as the current year. You can edit these fields if necessary. A 1099 prints for each contract vendor that received payments equal to or greater than the amount entered in the Minimum field.
3 Select OK to access the Report Layout dialog box.
4 Select the target, edit the layout if necessary, and then select OK to begin printing.
Related Help Topics
• Printing a test page
• Editing 1099 information
Closing the Year for Payables
The Payables Year End routine updates the historical information for each vendor. Sage DacEasy transfers year-to-date values to last year and last year’s balances to the year-before-last. You lose balances for the year-before-last during this routine. To retain information in the Year Before Last fields, make a backup of your data files for archival purposes. If you are using Forecasting, run the Payables Forecasting routine prior to running Payables Year End.
To Run the Accounts Payable Year End Routine
1 Select Payables from the Periodic menu, and then select Year End. A message appears warning you to make a backup before proceeding.
You can back up all data files for the company, including add-on modules, from the Sage DacEasy Business Center. If you prefer to back up from Accounting, refer to Chapter 2, “Getting Started" for more information.
Note: It is important that all transactions for the current year are posted prior to closing the year. Run the General Ledger Period End routine for the last period of the year to ensure that transactions are not posted after the Accounts Payable Year End routine is run.
2 Select Start Year End Close to close the year. A confirmation box appears when the process is complete.
3 Select Continue to return to the main menu.

Closing the YearClosing the Year for Inventory
301
13Closing the Year for Inventory
The Inventory Year End routine updates historical information in the Product and Service files. Sage DacEasy transfers year-to-date balances to last year and last year’s balances to year-before-last. You lose balances for the year-before-last during this routine. To retain information in the Year Before Last fields, make and store a backup of your data files for archival purposes.
Note: If you are using the Forecasting feature, run the Inventory Forecasting routine before you run Inventory Year End.
To Run the Inventory Year End Routine
1 Select Inventory from the Periodic menu, and then select Year End. A message appears warning you to make a backup before proceeding.
You can back up all data files for the company, including add-on modules, from the Sage DacEasy Business Center. If you prefer to back up from Accounting, refer to Chapter 2, “Getting Started" for more information.
Note: It is important that all transactions for the current year are posted prior to closing the year. Run the General Ledger Period End routine for the last period of the year to ensure that transactions are not posted after the Inventory Year End routine is run.
2 Select Start Year End Close to close the year. A confirmation box appears when the process is complete.
3 Select Continue to return to the main menu.
Closing the Year for the General Ledger
When you run the General Ledger Year End routine your data files are updated as follows:
• The Periods tab on the Company Information dialog box is updated to reflect the new year (Second Year periods become First Year periods and the following year is added to the Second Year). All transactions for the year must be complete before running the Year End routine. After you close the year, you cannot enter transactions for the year.
• The Account History dialog box for each account is updated to reflect the new periods structure. Sage DacEasy transfers the This Year balance to the Last Year balance field for each period, providing you with historical information for the previous year.
• The Salesperson History dialog box is updated to reflect the new periods structure.

Periodic OperationsSage DacEasy Accounting User’s Guide
302
13• The Sales Tax History and Purchase Tax History dialog boxes are
updated to reflect the new periods structure.
• Revenue and Expense accounts are zeroed out and the net profit or loss is transferred to the current earnings account entered on the Account Interface dialog box.
After you have run Year End for receivables, payables and inventory, you are ready to close the General Ledger for the year.
Note: Before you run the Year End routine, you must run the General Ledger Period End routine for the last month of the year.
To Run the General Ledger Year End Routine
1 Select General Ledger from the Periodic menu, and then select Year End. A message appears warning you to make a backup before proceeding. You can back up all data files for the company, including add-on modules, from the Sage DacEasy Business Center. If you prefer to back up from Accounting, refer to Chapter 2, “Getting Started" for more information.
2 Select Start Year End Close to close the year. A confirmation box appears when the process is complete.
If each period has not been closed, an error appears.
If a Current Earnings account was not entered on the Account Interface dialog box, you are prompted to enter a clear to account. Enter the current earnings account or select LookUp and select the account.
3 Select Continue to return to the main menu.
Tip: After you run General Ledger Year End, the first transaction for the new year should be a transfer transaction. The transfer transaction moves the current earnings (for the year just closed) to a retained earnings account.
Purging Data Files
Use the Purge routine to remove unwanted information from your data files. If you purge a transaction file, Sage DacEasy removes all posted and deleted transactions from the file for the specified date range. In addition, you can purge customers, vendors, products, services and cleared or voided check register entries that you no longer need.

Entering Global ChangesPurging Data Files
303
13After you purge your transaction files, you can no longer view your transactions or print reports to view these transactions. For this reason, you might choose not to purge data until after you close the year. Additionally, you may choose not to purge the General Ledger since it serves as your audit trail. It is very important that you back up your data files prior to purging information. Once the data has been purged, it can only be retrieved by restoring a backup made prior to running the Purge routine.
Tip: To increase available hard disk space, run the Recover process on the file after you run the Purge routine. For more information on the Recover process, refer to Chapter 2, “Getting Started"
To Purge Files
1 Select Purge from the Periodic menu. The Purge Files dialog box appears.
2 Select the file to purge.
3 If a transaction file is selected, enter the range of transactions to purge based on the transaction date. All records up to and including the date entered are purged.
If a non-transaction file is selected, enter the ending date for the last record to purge. All records up to and including the date entered are purged.
Tip: Select Help from the Purge Files dialog box for a detailed description of each field.
4 Select OK. A confirmation message appears when the Purge process is complete.
5 Select Continue to return to the Purge Files dialog box.
Entering Global ChangesWith the Global Changes feature, Sage DacEasy allows you to change the field values of multiple records at the same time.
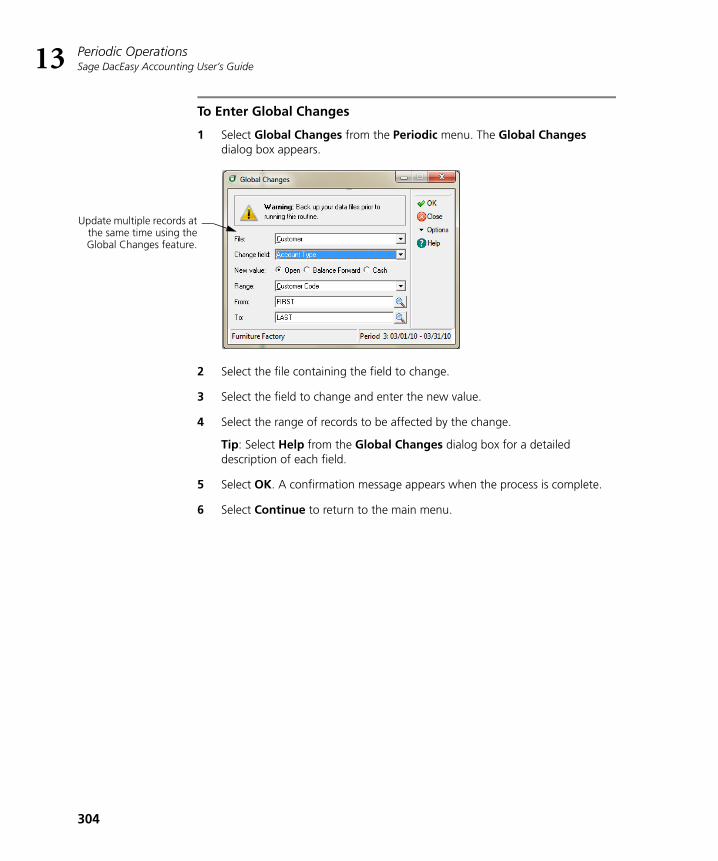
Periodic OperationsSage DacEasy Accounting User’s Guide
304
13
To Enter Global Changes
1 Select Global Changes from the Periodic menu. The Global Changes dialog box appears.
2 Select the file containing the field to change.
3 Select the field to change and enter the new value.
4 Select the range of records to be affected by the change.
Tip: Select Help from the Global Changes dialog box for a detailed description of each field.
5 Select OK. A confirmation message appears when the process is complete.
6 Select Continue to return to the main menu.
Update multiple records atthe same time using theGlobal Changes feature.

©2010 Sage Software, Inc. All rights reserved. Sage, the Sage logos, DacEasy, and the Sage product and service names mentioned herein are registered trademarks or trademarks of Sage Software, Inc., or its affiliated entities. All other trademarks are the property of their respective owners. 10-25494 08/10
1715 North Brown Road I Lawrenceville, GA 30043 I www.SageDacEasy.com