Embed Size (px)
Citation preview

Sage Abra SQL HRMS Training Pages User Guide

© 2010 Sage Software, Inc. All rights reserved. Sage, the Sage logos, and the Sage product and service names mentioned herein are registered trademarks or trademarks of Sage Software, Inc., or its affiliated entities. Business Objects, the Business Objects logo, and Crystal Reports are registered trademarks of SAP France in the United States and in other countries. NetLib is a registered trademark of Communication Horizons. OrgPlus is a trademark of HumanConcepts, LLC. TextBridge is a registered trademark of ScanSoft, Inc. Microsoft, Outlook, Windows, Windows NT, Windows Server, the .NET logo, Windows Vista and the Windows logo are trademarks or registered trademarks of Microsoft Corporation in the United States and /or other countries. The names of all other products and services are the property of their respective holders.
Sage has made every effort to ensure this documentation is correct and accurate but reserves the right to make changes without notice at its sole discretion. Use, duplication, modification, or transfer of the product described in this publication, except as expressly permitted by the Sage License Agreement is strictly prohibited. Individuals who make any unauthorized use of this product may be subject to civil and criminal penalties.
For additional assistance on this and other Sage products and services, visit our Web site at: http://www.sageabra.com

Training Pages i
Table of Contents Training Detail Pages .................................................................................................... 3
Certifications......................................................................................................................................................... 3 Class Information................................................................................................................................................. 5 Class Roster........................................................................................................................................................... 8 Courses Taken ...................................................................................................................................................... 9 Current Job.......................................................................................................................................................... 13 Demographics..................................................................................................................................................... 16 Employees Requiring the Class........................................................................................................................ 18 Required Courses............................................................................................................................................... 20 Training Programs ............................................................................................................................................. 21
Training Tasks .............................................................................................................. 23
Add a New Class ............................................................................................................................................... 23 Add a New Student ........................................................................................................................................... 24 Assign Programs ................................................................................................................................................ 25 Assign Required Courses.................................................................................................................................. 26 Close a Class ....................................................................................................................................................... 27 Delete a Student Record.................................................................................................................................... 28 Edit Class Correspondence............................................................................................................................... 29 Enroll Employees in a Class ............................................................................................................................. 31 Establish Job Requirements .............................................................................................................................. 32 Update Employee Training Information ........................................................................................................ 35 Training Processes ............................................................................................................................................. 36 Mass Update ....................................................................................................................................................... 36 Import Calculations ........................................................................................................................................... 38
Standard Reports ........................................................................................................ 41
Define Custom Criteria ..................................................................................................................................... 41 Define Report Criteria ....................................................................................................................................... 43 Print, Preview, or Export a Report .................................................................................................................. 47
Training Reports........................................................................................................... 51
Catalogs and Code Tables................................................................................................................................. 51

ii Sage Abra SQL HRMS
Class Administration Reports .......................................................................................................................... 51 Employee Training Reports.............................................................................................................................. 53 Tuition Reimbursements................................................................................................................................... 55 Sample Training Reports .................................................................................................................................. 55 Training Analysis Reports ................................................................................................................................ 55
Index ............................................................................................................................ 59
Training Pages 3
Training Detail Pages Certifications The Certifications page contains information about each certification an employee has received. It also lists certifications required for the employee’s job that might not have been received yet. Certifications required for a specific job are automatically added to the Certifications page of employees with that job.
In order to use certifications effectively, it is important to understand how they are tracked.
Track Receipt of Certifications
Some certifications require completion of a specific course. For example, an employee must take a course called Cardiopulmonary Resuscitation in order to receive CPR certification. When an employee completes the course, their Certifications page will show that they have received CPR certification.
Some certifications require completion of a certain number of courses rather than a specific course. For example, a certification called Executive Development requires completion of three courses. Your employer offers five courses associated with the certification. When an employee completes three of those five courses, their Certifications page will show that they have obtained the Executive Development certification.
Some certifications require completion of a certain number of credits or CEUs (Continuing Education Units) instead of courses. You can track these certifications by indicating how many credits or CEUs each course is worth. For example, a certification called Bank Operations Diploma requires completion of six credits. Your employer offers three courses associated with the certification and each is worth three credits. When an employee completes two of these courses, their Certifications page will show that they have obtained the Bank Operations Diploma certification.
Track Renewal of Certifications
Some certifications must be renewed on a regular basis. A certification may require a specific number of courses, credits, or CEUs for renewal. You can track certification renewals by specifying the renewal period and indicating how many courses, credits or CEUs are required for renewal.
For example, a certification called Hazardous Waste Handling requires completion of six CEUs for renewal and has a renewal period of 12 months. That means an employee who has already received the certification must complete an additional six CEUs every 12 months in order to maintain the certification. If Mary Jones received (or renewed) the Hazardous Waste Handling certification on 1/1/08, every time she completes a course associated with the certification after 1/1/08, the CEUs provided by the course will count toward renewal of the certification and will be tracked on her Certifications page.

Certifications
4 Sage Abra SQL HRMS
To Add a New Certification
1. From the Navigation Pane, select Training > View/Edit Trainee.
2. Find a trainee.
3. From the Training toolbar, select Training > Certifications.
4. Click Add.
5. On the Certification tab, select the certification you want to add to the employee. You can select it either by its code or description.
6. Enter the remaining information, using the following field descriptions.
7. When you are finished entering information on the Certification, Requirements, and User Defined tabs, click Apply and then OK to save the certification information.
Certification Field Label Field Description
Certification Description Select the certification by its description.
Certification Code Select the certification by its code.
Job Requirement If the certification is a job requirement, Abra Training displays the job title responsible for the requirement. If the certification is a job requirement for the entire employer, the employer name is displayed. If the certification is not a job requirement, No is displayed.
Required Indicates whether the certification is required for the employee’s job (Yes or No).
Automatic Update Indicate whether you want Abra Training to automatically calculate the Originally Received, Last Received, and Expiration dates based on when the employee completes the certification requirements. Select Yes or No.
Originally Received Date the employee originally received the certification. If you selected Yes in the Automatic Update field, Abra Training calculates this field automatically. If you selected No for Automatic Update, you can enter any date in this field.
Last Received Date the employee was most recently certified. If you selected Yes in the Automatic Update field, Abra Training calculates this field automatically. If you selected No for Automatic Update, you can enter any date in this field, as long as it is no earlier than the Originally Received date.
Renewal Period Number of months the certification lasts.
Expires Date the certification expires. Abra Training automatically calculates this date from the Last Received date and the Renewal Period. If you selected No in the Automatic Update field, you can change this date.

Class Information
Training Pages 5
Field Label Field Description
Days Left Number of days before the certification expires. Abra Training automatically calculates this date.
Date Required Date the certification is required. If this certification is a job requirement, Abra Training automatically fills in this date.
Requirements Tab
Note: The fields marked with an asterisk (*) in the following table originate from the Certification code table.
Field Label Field Description
Requirements for Initial Certification
Courses*: Number of courses required to initially receive the certification.
Credits*: Number of credits required to initially receive the certification.
CEU*: Number of CEUs required to initially receive the certification.
Requirements for Certification Renewal
Courses*: Number of courses required to renew the certification.
Credits*: Number of credits required to renew the certification.
CEU*: Number of CEUs required to renew the certification.
Completed Since Last Certification
Courses: Number of courses employee has completed toward the certification since the last received date. Abra Training automatically updates this when an employee completes a course.
Credits: Number of credits employee has completed toward the certification since the last received date. Abra Training automatically updates this when an employee completes a course.
CEU: Number of CEUs employee has completed toward the certification since the last received date. Abra Training automatically updates this when an employee completes a course.
User Defined Tab Use the four fields on the User Defined tab to record additional certification information. You can specify titles for user‐defined fields by selecting Setup > Training > Training Setup in the Navigation Pane.
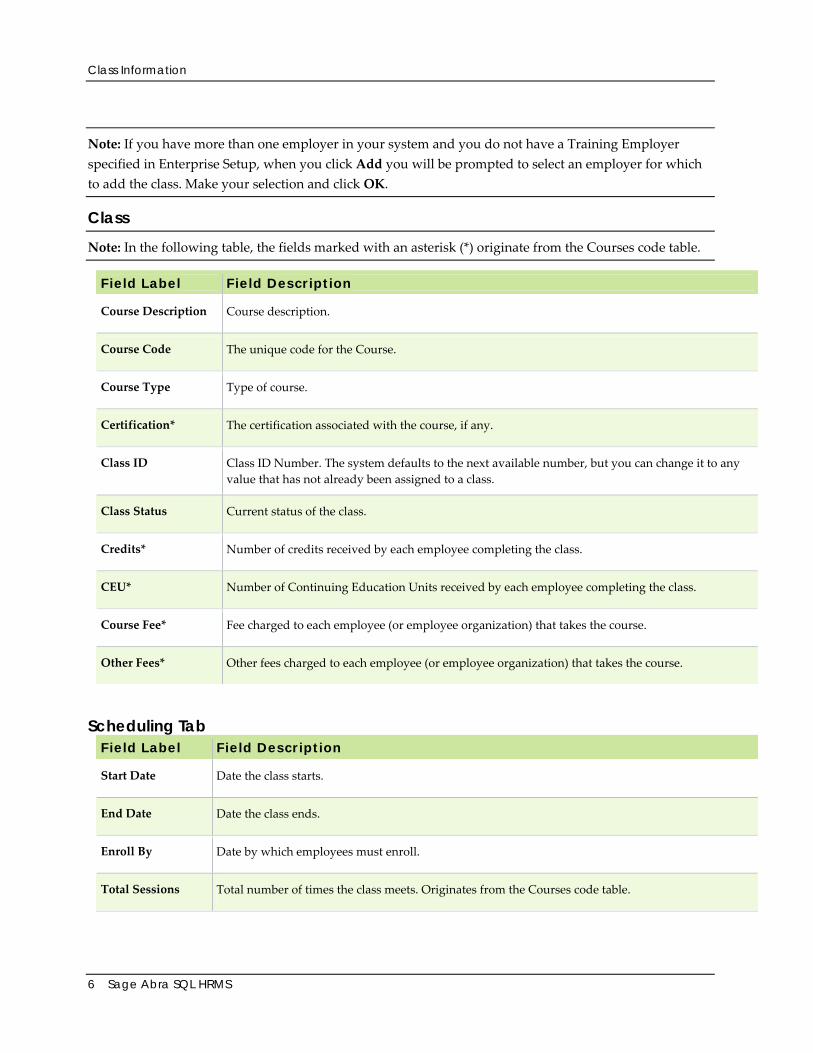
Class Information The Class Information page contains detailed information about each class you have set up. Use this page to describe the class start and end date, total sessions, instructor, and training location. You can also specify the number of students allowed in the class; when the class reaches capacity, you receive a warning when you enroll another student.
Class Information
6 Sage Abra SQL HRMS
Note: If you have more than one employer in your system and you do not have a Training Employer specified in Enterprise Setup, when you click Add you will be prompted to select an employer for which to add the class. Make your selection and click OK.
Class Note: In the following table, the fields marked with an asterisk (*) originate from the Courses code table.
Field Label Field Description
Course Description Course description.
Course Code The unique code for the Course.
Course Type Type of course.
Certification* The certification associated with the course, if any.
Class ID Class ID Number. The system defaults to the next available number, but you can change it to any value that has not already been assigned to a class.
Class Status Current status of the class.
Credits* Number of credits received by each employee completing the class.
CEU* Number of Continuing Education Units received by each employee completing the class.
Course Fee* Fee charged to each employee (or employee organization) that takes the course.
Other Fees* Other fees charged to each employee (or employee organization) that takes the course.
Scheduling Tab Field Label Field Description
Start Date Date the class starts.
End Date Date the class ends.
Enroll By Date by which employees must enroll.
Total Sessions Total number of times the class meets. Originates from the Courses code table.

Class Information
Training Pages 7
Field Label Field Description
Start Time Time of day that each session starts.
End Time Time of day that each session ends.
Total Hours Total number of hours the class takes to complete. Originates from the Courses code table.
Instructor Instructor name.
Location Training location description.
Capacity Total number of employees that can be enrolled in the class. If a training location is selected, this originates from the Training Locations code table.
Days Select the check boxes to indicate the days of the week that the sessions meet.
Check for Conflicts
To see whether a class conflicts with other classes, click the Check for Conflicts button. The system checks if the class will conflict with others assigned to the same instructor or training location. It also checks to see whether employees on the Class Roster with a status of Enrolled or In Progress are enrolled in conflicting classes. You are notified if no conflicts are found. If no conflicts are found, a report displays listing the conflicts.
When you are finished previewing the report, click the Close button to return to the Class Information page.
Costs and Ratings Tab The Costs and Ratings tab contains the following fields.
Field Label Field Description
Fixed Costs Fixed portion of the class costs, for example, the portion that stays the same regardless of the number of employees enrolled in the class.
Budgeted Costs Total costs budgeted for the class.
Actual Costs Total actual costs for the class.
Class Rating Rating given to the class by the employees that attended.
Instructor Rating Rating given to the instructor by the employees that attended.

Class Roster
8 Sage Abra SQL HRMS
User Defined Tab Use the four fields on the User Defined tab to record additional class information. You can specify titles for user‐defined fields by selecting Setup > Training > Training Setup in the Navigation Pane.
Note: Use the Notes field to enter additional information about the class.
Class Roster The Class Roster page includes all the employees that are enrolled in the selected class.
You can view the class status (Open, In Progress, or Completed), number of vacancies and the date and time of when the class starts and ends.
Click More, to view the Roster Detail page.
Click Add to add another person to the class.
Class Roster Detail Page Tabs
Note: Most of the employee information on these tabs is for display only and cannot be updated from this page.
Employee Tab In addition to basic employee information, the Employee tab contains the following fields.
Field Label Field Description
Enrollment Status Employee’s enrollment status in the course.
Job Requirement If the course is a job requirement, Training displays the job title responsible for the requirement. If the course is a job requirement for an entire employer, the employer name is displayed. If the course is not a job requirement, No is displayed.
Note: If the employee completed the course when it was not a job requirement, this field displays No even if the course was subsequently added as a job requirement.
Job Related Indicates whether the course is related to the employee’s job. If it is, Training automatically selects Yes.
Course Fee Fee charged to each employee (or employee organization) that takes the course. This originates from the Class Information page.
Other Fees Other fees charged to each employee (or employee organization) that takes the course. It originates from the Class Information page.

Courses Taken
Training Pages 9
Field Label Field Description
Grade Grade received upon completion of the course, if any.
Check for Conflicts
To see whether this class conflicts with any other classes in which the employee is enrolled, click the Check for Conflicts button. You are notified if no conflicts are found. If conflicts exist, a report displays and lists the conflicts.
When you are finished previewing the report, click the Close button to return to the Roster Detail page.
Address and Phone Tab The basic employee information on the Address and Phone tab is for display only; it cannot be updated from this page.
Job and Organization Tab The basic employee information on the Job and Organization tab is for display only; it cannot be updated from this page.
Note: The Job and Organization section displays the job title and organization levels for the employee at the time of enrollment.
User Defined Tab Use the four fields on the User Defined tab to record additional information about an employeeʹs enrollment or performance in a class. You can specify titles for user‐defined fields by selecting Setup > Training > Training Setup in the Navigation Pane.
Note: Use the Notes field to enter additional information about the class.
Courses Taken The Courses Taken page contains a record for each course the selected employee has already completed or in which the employee is currently enrolled. If an employee completes (or is enrolled in) a class set up in Abra Train, the course associated with the class is automatically added to the employee’s list of Courses Taken.
If an employee takes a class that was not set up in the Abra Train system, you can add the associated course from the Courses Taken page. For example, Jane Garcia completes a college course called Principles of Management. You do not track this course in Abra Train, but you want to include it in Jane’s training history. Add the course to your Courses code table, and then add the course to Jane’s Courses Taken page.
The Courses Taken page also enables you to update job information contained in course records.

Courses Taken
10 Sage Abra SQL HRMS
Click Add to add a new course. The Course Detail page opens and all fields are blank. The Class ID field is blank because the course you are adding does not have an associated class set up in Abra Train.
Click More to edit a course. When you edit a course, the fields in the Course Detail page are automatically filled in. If you are editing a course for which a class was set up in Abra Train, you can only edit Reimbursement, Enrollment and Fees information.
Course Tab The Course tab contains the following fields. If you are editing a course associated with a class set up in Abra Train, the course fields originate from the Class Information page. If you are editing an outside course without an associated class in Abra Train, these fields originate from the Courses code table.
Field Label Field Description
Course Description Course description.
Course Code Course code.
Course Type Type of course.
Certification The certification associated with the course, if any. This completed course counts toward the employee’s certification (if the employee has course requirements for this certification).
Credits Number of credits received by each employee completing the class.
CEU Number of CEUs received by each employee completing the class.
Course Fee Fee charged to each employee (or employee organization) that takes the course.
Other Fees Other fees charged to each employee (or employee organization) that takes the course.
Enrollment Status Employee’s enrollment status in the course.
Job Requirement If the course is a job requirement, Abra Train displays the job title responsible for the requirement. If the course is a job requirement for an entire employer, the employer name is displayed. If the course is not a job requirement, No is displayed.
Note: If the employee completed the course when it was not a job requirement, this field will display No even if the course has subsequently been added as a job requirement.
Job Related
Indicates whether the course is related to the employee’s job (Yes or No).

Courses Taken
Training Pages 11
Field Label Field Description
Grade Grade received upon completion of the course, if any.
Scheduling Tab The Scheduling tab contains the following fields. If you are editing a course associated with a class set up in Abra Train, the Total Sessions and Total Hours fields originate from the Class Information page. If you are editing an outside course without an associated class in Abra Train, these fields originate from the Courses code table.
Field Label Field Description
Start Date Date the class starts.
End Date Date the class ends.
Total Sessions Total number of times the class meets.
Start Time Time of day that each session starts.
End Time Time of day that each session ends.
Total Hours Total number of hours the class takes to complete.
Instructor Instructor name.
Location Training location description.
Days Select the check boxes to indicate the days of the week that the sessions meet.
Check for Conflicts
To see whether this class conflicts with any others in which the employee is enrolled, click the Check for Conflicts button. If no conflicts are found, Abra Train notifies you. If conflicts exist, Abra Train displays a report listing the conflicting classes.
When you are finished previewing the report, click the Close button to return to the Course Detail page.

Courses Taken
12 Sage Abra SQL HRMS
Job and Organization Tab Field Label Field Description
Job Title Employee’s job title.
Job Code Employee’s job code. Displayed automatically when you select a job title.
Note: If you also have Abra HR and job code validation is not enabled for this employee’s employer, you can enter any value in the Job Title and Job Code fields. We recommend, however, that you enable validation; otherwise, you cannot establish job requirements.
Group Employee’s EEO job group. This field appears only if you are using Abra HR.
Organization Employee’s organization levels. Select from the levels you defined during Enterprise setup.
Updating Job Information
If you change an employee’s job title, job code, or organization levels on the Current Job page, Abra Train does not automatically update these fields in existing course records. However, you can manually update job information if you want course records to reflect the changes.
When a course is added to an employee’s records (whether by adding the course to the Courses Taken page, adding the employee to the Class Roster or enrolling the employee in the class), the information on the Job and Organization tab is copied from the Current Job page. If the employee’s job information changes, you can update the fields on this tab.
Reimbursement and User Defined Tab The Reimbursement and User Defined tab of the Course Detail page contains the following fields.
Field Label Field Description
Course Fee Fee paid for the course.
Other Fees Other fees charged for the course.
Grade Grade employee received upon completion of the course, if any.

Current Job
Training Pages 13
Field Label Field Description
Reimbursement Amount Total amount that the employee was reimbursed for the course.
Date Requested Date reimbursement for the course was requested.
Approved Indicates whether reimbursement for the course was approved (Yes or No).
User‐Defined Fields Use the four user‐defined fields to record additional information about the course. You can specify titles for user‐defined fields by selecting Rules > Training > Training Setup from the menu.
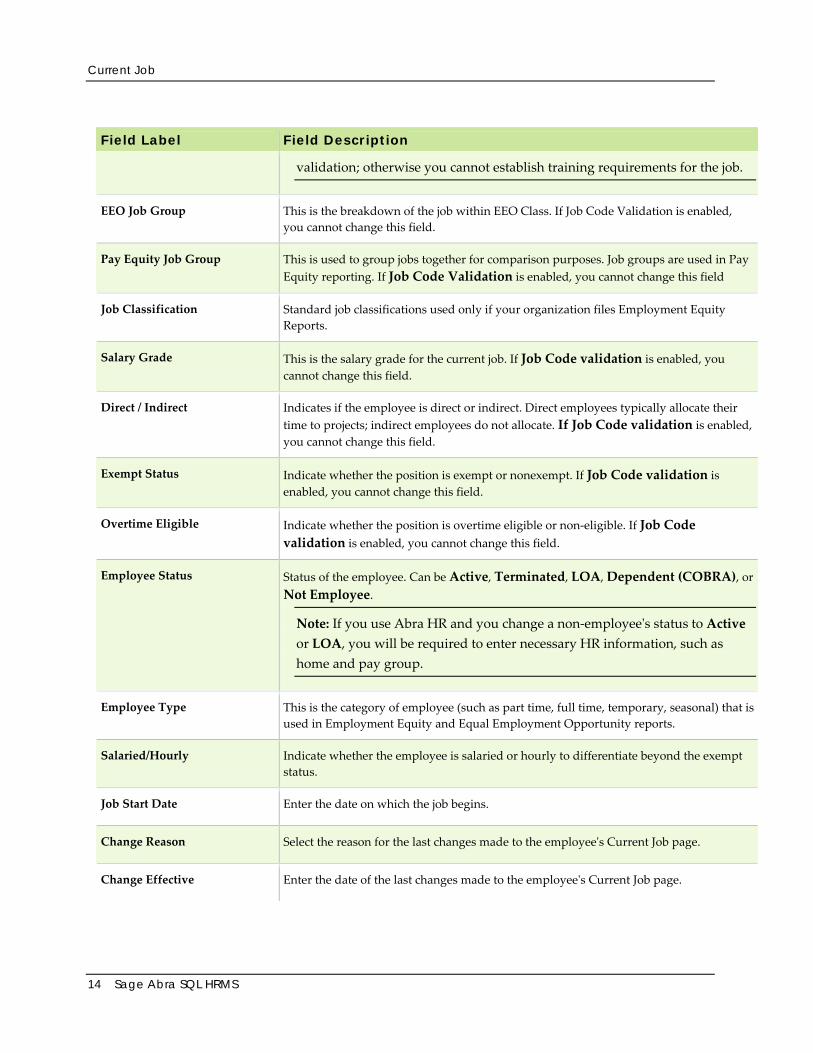
Current Job The Current Job page contains information about the employeeʹs status, current job, secondary job, job group, job classification, pay equity, organization levels, exempt status, and the dates of any changes to the information regarding the employee’s current job.
If you change an employeeʹs job title, job code, or organization levels, Abra Train checks to see whether the employee has any courses with an enrollment status of Enrolled, In Progress, or Wait List. If so, the system notifies you that you must update the Courses Taken page if you want these course records to reflect the employees new job information.
If you are also using Abra HR
update employee job information from the Current Job page within Abra HR rather than from Abra Train.
and make a change to the current job page, you will be asked whether you want to create a job history record. If you do, select the reason for the job change and enter the effective date of the change.
Job Field Label Field Description
Job Title
Enter the description of the current job.
Job Code
This is an abbreviated code of the job description and is automatically displayed when you select a job title.
Note: If you also have Abra HR installed and Job Code Validation is not enabled for this employee’s employer, you can enter any value in the Job Title and Job Code fields. We recommend, however, that you enable
Current Job
14 Sage Abra SQL HRMS
Field Label Field Description
validation; otherwise you cannot establish training requirements for the job.
EEO Job Group This is the breakdown of the job within EEO Class. If Job Code Validation is enabled, you cannot change this field.
Pay Equity Job Group This is used to group jobs together for comparison purposes. Job groups are used in Pay Equity reporting. If Job Code Validation is enabled, you cannot change this field
Job Classification Standard job classifications used only if your organization files Employment Equity Reports.
Salary Grade This is the salary grade for the current job. If Job Code validation is enabled, you cannot change this field.
Direct / Indirect Indicates if the employee is direct or indirect. Direct employees typically allocate their time to projects; indirect employees do not allocate. If Job Code validation is enabled, you cannot change this field.
Exempt Status Indicate whether the position is exempt or nonexempt. If Job Code validation is enabled, you cannot change this field.
Overtime Eligible Indicate whether the position is overtime eligible or non‐eligible. If Job Code validation is enabled, you cannot change this field.
Employee Status Status of the employee. Can be Active, Terminated, LOA, Dependent (COBRA), or Not Employee.
Note: If you use Abra HR and you change a non‐employeeʹs status to Active or LOA, you will be required to enter necessary HR information, such as home and pay group.
Employee Type This is the category of employee (such as part time, full time, temporary, seasonal) that is used in Employment Equity and Equal Employment Opportunity reports.
Salaried/Hourly Indicate whether the employee is salaried or hourly to differentiate beyond the exempt status.
Job Start Date Enter the date on which the job begins.
Change Reason Select the reason for the last changes made to the employeeʹs Current Job page.
Change Effective Enter the date of the last changes made to the employeeʹs Current Job page.

Current Job
Training Pages 15
Organization Field Label Field Description
Organization Fill in information for each level you defined during the enterprise setup. Examples include Division, Department, and Location.
Mail Stop Enter the employee’s mail stop location.
Hiring Manager Indicate whether this employee is a hiring manager. If Yes is selected, the employee is designated as a hiring manager for Abra eRecruiter. If you are not using Abra eRecruiter, you may still want to track employees who are hiring managers for the company.
Supervisor and E‐mail Address Click the Find button and select the employeeʹs manager. The employeeʹs e‐mail address automatically fills in. If you are using Abra Workforce Connections, the employee you assign as a supervisor is automatically placed in the Manager role in AWC.
To remove a supervisor, click the Remove button.
Secondary Supervisor and E‐mail Address
If you are using Abra Workforce Connections, you can assign a secondary supervisor, for example, a line supervisor to act on the employeeʹs approval requests and receive notifications and e‐mails when the employee updates personal information.
Click the Find button and select a secondary supervisor for the employee (can be the same as the Supervisor). The employeeʹs e‐mail address automatically fills in.
To remove a supervisor, click the Remove button.
Secondary Job The Secondary Job tab of the Current Job page lets you enter and maintain information about jobs other than the employeeʹs main job. When you add or edit a Secondary Job record, the employeeʹs Secondary Job page opens.
Field Label Field Description
Effective Enter the effective date of the secondary job.
End End the end date of the secondary job.
Job Title Select a description of the secondary job.

Demographics
16 Sage Abra SQL HRMS
Field Label Field Description
Job Code This is an abbreviated version of the job description. The secondary job code must differ from the current job code. If you enabled Job Code Validation, Abra HR fills in this field after you complete the Job Title field.
Salary Grade Select the salary grade for the secondary job. If you enabled Job Code Validation, Abra HR fills in this field after you complete the Job Title field.
Direct / Indirect Indicates if the employee is direct or indirect. Direct employees typically allocate their time to projects; indirect employees do not allocate.
Period Salary Enter an amount or use the arrows to select a number to indicate what the employee earns during one pay period.
Frequency Designate how often the employer pays the employee.
Annual Pay Abra HR automatically calculates the total annual pay for the secondary job according to the Period Salary and Frequency.
User Defined Tab Use the four fields on the User Defined tab to record additional information about an employeeʹs current job. You can specify titles for user‐defined fields by selecting Setup > Training > Training Setup Link in the Navigation Pane.
Note: Use the Notes field to enter additional information about the employeeʹs current job.
Demographics The Demographics page allows you to enter basic employee information, including the employee’s name, address, telephone number, and personal data. You can also enter an e‐mail address as well as attach a photograph to the employee’s record.
Address and Phone Tab Field Label Field Description
Street 1 Employee’s home street address.
Street 2 Second line of the address.
City Employee’s home city.
State Employee's state.
Zip Employee's zip.

Demographics
Training Pages 17
Field Label Field Description
County Employee’s home county.
Country Employee’s home country.
Home Employee’s home phone.
Business Employee’s business phone.
Extension Employee’s business extension.
Employee’s E‐mail Address
Employee’s e‐mail address.
If you are using Abra Workforce Connections, this is the From address for notification e‐mails.
Personal Tab Field Label
Field Description
First Employee’s first name.
Middle Employee’s middle name.
Last Employee’s last name.
Nickname Employee’s nickname. If you do not enter a nickname, Abra Train enters the first name and uses it in the Work Telephone Directory and the greeting on the Employee Benefits Statement.
Salutation A title such as Dr., Mr. or Ms.
SSN Employee's Social Security Number.
Birth Date/Age
Employee’s birth date. Abra Train fills in the Age field after you enter the date.
Marital Status
Indicates the employee’s marital status. This is a required field.
Ethnic Origin
Indicates the employee’s ethnic ID, which Abra Train uses in EEO reports. This is a required field.
Employees Requiring the Class
18 Sage Abra SQL HRMS
Field Label
Field Description
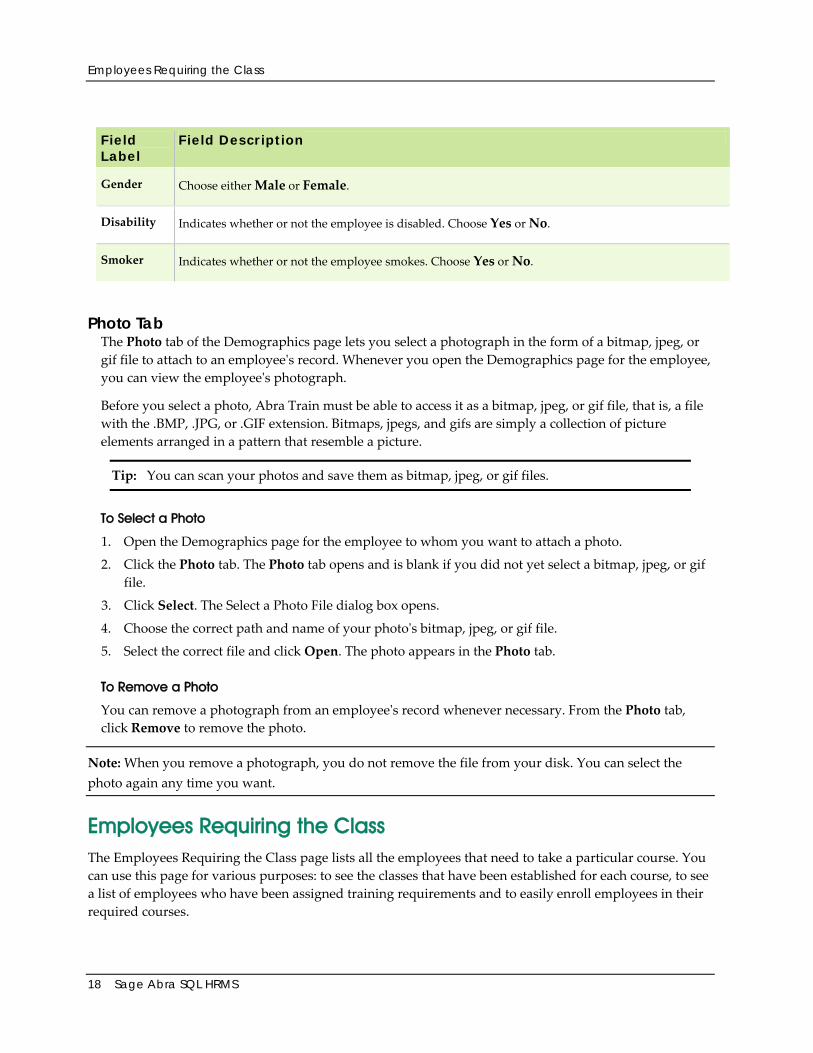
Gender Choose either Male or Female.
Disability Indicates whether or not the employee is disabled. Choose Yes or No.
Smoker Indicates whether or not the employee smokes. Choose Yes or No.
Photo Tab The Photo tab of the Demographics page lets you select a photograph in the form of a bitmap, jpeg, or gif file to attach to an employeeʹs record. Whenever you open the Demographics page for the employee, you can view the employeeʹs photograph.
Before you select a photo, Abra Train must be able to access it as a bitmap, jpeg, or gif file, that is, a file with the .BMP, .JPG, or .GIF extension. Bitmaps, jpegs, and gifs are simply a collection of picture elements arranged in a pattern that resemble a picture.
Tip: You can scan your photos and save them as bitmap, jpeg, or gif files.
To Select a Photo
1. Open the Demographics page for the employee to whom you want to attach a photo.
2. Click the Photo tab. The Photo tab opens and is blank if you did not yet select a bitmap, jpeg, or gif file.
3. Click Select. The Select a Photo File dialog box opens.
4. Choose the correct path and name of your photoʹs bitmap, jpeg, or gif file.
5. Select the correct file and click Open. The photo appears in the Photo tab.
To Remove a Photo
You can remove a photograph from an employeeʹs record whenever necessary. From the Photo tab, click Remove to remove the photo.
Note: When you remove a photograph, you do not remove the file from your disk. You can select the photo again any time you want.
Employees Requiring the Class The Employees Requiring the Class page lists all the employees that need to take a particular course. You can use this page for various purposes: to see the classes that have been established for each course, to see a list of employees who have been assigned training requirements and to easily enroll employees in their required courses.

Employees Requiring the Class
Training Pages 19
To enroll employees in the selected class click the Enroll button. The Select Employees page displays. The Available list shows all the employees who require the class. The Selected list shows those employees you select. From the Available list box, double‐click the employees you want to enroll. The selected employees appear in the right list box. If you want to remove an employee from the Selected list, highlight it and click Remove.
Note: If you select to enroll more employees than the class capacity allows, the system will warn you; however, you can still enroll the employees. Also, if you try to enroll employees who have not completed the necessary prerequisites, the system will notify you and the employees will not be enrolled.
Click More to edit an employee record, the Requirement Detail page opens.
Requirement Detail Page Tabs
The Requirement Detail page has four tabs. Most of the information is for display only and cannot be updated from this page.
Employee Tab Field Label Field Description
Priority Prioritizes the course for this employee: Critical, Normal, or Optional.
Job Requirement If the course is a job requirement, the job title responsible for the requirement is displayed. If it is a job requirement for an entire employer, the employer name is displayed. If it is not a job requirement, No is displayed.
Job Related
Indicates whether the course is related to the employee’s job (Yes or No).
Complete By Date by which course must be completed.
Date Approved Date course was approved for the employee.
Address and Phone Tab The basic employee information on the Address and Phone tab is for display only; it cannot be updated from this page.
Job and Organization Tab The information on the Job and Organization tab is for display only; it cannot be updated from this page.
User Defined Tab Use the four user‐defined fields to record additional information about the required class. These fields also appear on the Required Courses page.

Required Courses
20 Sage Abra SQL HRMS
You can specify titles for user‐defined fields by selecting Setup > Training > Training Setup Link in the Navigation Pane.
Required Courses The Required Courses page lists each course the selected employee needs to complete.
Click Add to add a required course.
Click More to edit a required course.
Course Tab
Note: The fields marked with an asterisk (*) in the following table originate from the Courses code table.
Field Label Field Description
Course Description Description of course.
Course Code Course code.
Course Type Type of course.
Certification* Certification associated with the course, if any.
Credits* Number of credits received by the employee for completing the course.
CEU* Number of CEUs received by the employee for completing the class.
Course Fee* Fee charged to the employee (or employee’s organization) for taking the course.
Other Fees* Other fees charged to the employee (or employee’s organization) for taking the course.
Enrollment Status Employee’s enrollment status in the course.
Job Requirement If course is a job requirement, the job title responsible for the requirement is displayed. If it is a job requirement for an entire employer, the employer name is displayed. If it is not a job requirement, No is displayed.
Job Related Indicates whether the course is related to the employee’s job (Yes or No).
Scheduling and User Defined Tab The Scheduling and User Defined tab of the Requirement Detail page contains the following fields.

Training Programs
Training Pages 21
Field Label Field Description
Priority Priority the course should be given when scheduling the employee for training.
Complete By Date by which the course must be completed.
Date Approved Date the course was approved for the employee.
Total Sessions Total number of times the course meets. Originates from the Courses code table.
Total Hours Total number of hours the course takes to complete. Originates from the Courses code table.
Approved By Name of supervisor who approved the course for this employee.
User‐Defined Fields Use the four user‐defined fields to record additional information about the required course. These fields also appear on the Employees Requiring the Class page. You can specify titles for user‐defined fields by selecting Setup > Training > Training Setup Link in the Navigation Pane.
Training Programs A program is a set of courses that must be completed in order to achieve a certain level of competency. The Training Programs page lists each program that has been assigned to the selected employee.
Click Add to add a training program to an employee.
Click More to edit the training program.
Program Tab The Program tab contains the following fields.
Field Label Field Description
Program Description Program description.
Program Code Program code.
Program Status Employee’s status in the program.
Job Requirement If the program is a job requirement, Abra Train displays the job title responsible for the requirement. If the program is a job requirement for an entire employer, the employer name is displayed. If the program is not a job requirement, No is displayed.
Job Related Indicates whether the program is related to the employee’s job (Yes or No).

Training Programs
22 Sage Abra SQL HRMS
Field Label Field Description
Program Starts Date the program starts.
Program Ends Date the program ends.
Grade Grade employee received upon completion of the program, if any.
Progress Tab If the program status is In Progress, Abra Train automatically calculates the fields on the tab. Otherwise, you can enter any values in these fields (except for Total Courses fields). For example, if you change the status of the program to Completed, you can manually enter the number of courses, hours, credits, and CEUs completed.
The Progress tab includes the following fields.
Field Label Field Description
Completed Courses Courses: Number of courses in the program’s curriculum that the employee has completed.
Hours: Total hours for all the courses completed.
Credits: Number of credits for all the courses completed.
CEU: Number of CEUs for all the courses completed.
Remaining Courses Courses: Number of courses in the program’s curriculum that the employee still needs to complete.
Hours: Total hours for all the courses remaining.
Credits: Number of credits for all the courses remaining.
CEU: Number of CEUs for all the courses remaining.
Total Courses Abra Train calculates these fields automatically by adding the Remaining values to the Completed values.
User Defined Tab Use the four user‐defined fields to record additional information about the program.
You can specify titles for user‐defined fields by selecting Setup > Training > Training Setup Link in the Navigation Pane.

Training Pages 23
Training Tasks Add a New Class A class is a scheduled presentation of a course, in which you can enroll a specific number of employees. The Add a New Class action enables you to schedule a new class for an existing course. You can add as many classes as you want for a particular course.
To Add a New Class
1. From the Navigation Pane, select Training > Tasks > Add a New Class.
2. Select the course for which you want to add a new class. The steps page opens and lists the steps for adding a new class.
3. Select the steps you want to complete. Complete each step now or schedule steps for yourself or another user to do later.
Note: Enter Class Information is a required step.
4. Click OK to start moving through the following steps.
Enter Class Information
The Class Information page contains basic class information, such as class date, time, location, and instructor.
When you finish entering information on the Class Information page, click OK to move to the next step.
Enroll Employees
The Enroll Employees page displays a list of employees who require the course. You can enroll employees in the list for the class you have just added.
Review Class Roster
The Class Roster page enables you to review the list of employees enrolled in the class, edit enrollment information, and add additional employees to the class roster.
When you are finished reviewing the class roster, click Continue to move to the next step.
Edit Class Enrollment Letter
The Edit Class Enrollment Letter page enables you to edit the information contained in the enrollment letter to be sent to all employees enrolled in the class. When you are finished editing the letter, click OK.

Add a New Student
24 Sage Abra SQL HRMS
Add a New Student The Add a New Student action allows you to enter new students into your system. These students may be either employees or non employees.
For example, your employer may open classes to both employees and outside students. When you add students to the system, you can specify a status of Active for active employees or Not Employee for students from outside the company.
If you are using Training, use the Add a New Student action to add both employees and non‐employees to your system.
In Sage Abra SQL HRMS, use the Add a New Student action only to add non‐employees into your system. To add employees to your system, use the Add New Hire action so that you can complete all related steps.
About Non-Employees
We recommend you set up a separate employer in Sage Abra SQL HRMS to store non‐employees. Keeping non‐employees in a separate employer provides several advantages. For example, you can set up security so that non‐employees in Training do not appear when you are working with Sage Abra SQL HRMS. You can also run separate reports in Training for non‐employees by selecting their employer in the Report Options dialog box.
To Add a New Student
1. From the Navigation Pane, select Training > Tasks > Add a New Student.
2. On the New Student tab, enter:
a. Name
b. Address
d. From the Employer Name drop‐down list, select the employer for which you are adding the new student or accept the default.
e. Training automatically provides the next applicable Employee ID. You can accept the default or assign a new ID.
f. From the Employee Status drop‐down list, select the status for the new student. Select Active if you are adding a current employee and Not Employee if you are adding an outside student.
Notes:
If you add a student with any status other than Not Employee in Sage Abra SQL HRMS, you must enter required information in the same fields required by the Add New Hire action, such as Social Security Number or and home State.
Assign Programs
Training Pages 25
If you add a student whose status is Not Employee, you should enter a home State (even though it is not required) so that the information is correct on the studentʹs Demographics page.
3. When you finish entering information for the new student, you have two choices:
Click Add to add the student and continue adding other students. Training displays the Add a New Student page again so you can add other students. When you finish adding students, click Cancel.
Click Steps to add the student and continue the action. The steps page opens and lists the steps for adding a student. Check the steps you want to complete. Complete each step now or schedule steps for yourself or another user to do later. Click OK to start moving through the following steps.
Demographics
The Demographics page contains basic student information such as name, address, personal information, and telephone number. Training automatically fills in the information you provided in the Add a New Student page. Use the rest of the page to record remaining personal information.
Current Job
The Current Job page enables you enter information about the student’s current job and organization level. This step is not required for students who are non‐employees.
Required Courses
The Required Courses page enables you to add course requirements to a student’s record.
Assign Programs This action enables you to add programs to the training requirements of an employee or a group of employees.
For example, your employer has a program called Customer Relations, which includes a series of courses aimed at improving customer service skills. Management has determined that all employees in the Customer Service department must complete this program. You can use the Assign a Program action to add the program to the training requirements of everyone in the Customer Service department.
To Assign a Program to Employees
1. From the Navigation Pane, select Training > Tasks > Assign Programs.
2. Select the program you want to assign to employees. The Assign a Program page opens. This page shows all the employees who are currently assigned to the selected program.

Assign Required Courses
26 Sage Abra SQL HRMS
3. Click Add. The Assign a Program to Employees page opens. This page contains two tabs: Employee Criteria and Defaults for Each Program. These tabs enable you to specify the employees to whom you want to assign the program and specify default enrollment information.
4. On the Employee Criteria tab, choose the specific group of employees to be assigned a program. The Employee Criteria tab is identical to the Standard Criteria tab on the report group dialog box used for generating standard reports.
5. On the Defaults for Each Program tab, specify default enrollment information for the selected employees.
The selections you make are displayed on the Program Detail page of the employees to whom you assign the program. Refer to Training Programs for additional information.
6. When you are finished specifying your employee criteria and program defaults, click OK. You will receive a verification message box indicating how many employees will be added to the list of employees assigned to the program. If only one employee will be added, the verification message box will specify the employee. Click Yes to add the employees to the list or No to return to the page without adding the employees.
Note: Employees you select on the Assign a Program to Employees page will not be added to the list of employees assigned to the program if they are already in the list or they have already completed the program.
7. If you want to save the criteria you have established for this action, click the Save button. The next time you assign a program to employees, the settings are already defined for you. This feature comes in handy if you assign programs to the same group of employees on a frequent basis.
8. If you have entered new criteria for the action but want to return to the last settings you saved, click Restore.
Assign Required Courses This action enables you to add courses to the training requirements of individual employees or groups of employees.
For example, the Administration department has just acquired a new software package, which everyone in the department must learn. Add a course for the new software training to the course code table. Then use the Assign a Required Course action to add the course to the training requirements of everyone in the Administration department.
To Assign a Required Course to Employees
1. From the Navigation Pane, select Training > Tasks > Assign Required Courses.
2. Select the course you want to assign. The Assign a Course page opens, showing all the employees who currently require the selected course.

Close a Class
Training Pages 27
Tip: To show employees who have taken the course, select the check box in the lower left corner. Only employees who are taking the course or have already completed it are displayed. The More… and Delete buttons are disabled.
3. Click Add. The Assign a Course to Employees page opens. This page contains two tabs: Employee Criteria and Defaults for Each Course. These tabs enable you to specify the employees to whom you want to assign the course and specify default enrollment information. Employees you select on the Assign a Course to Employees page are not added to the list of employees requiring the course if they are already in the list or they have already completed the course. However, if the course is associated with a certification with a renewal period, employees who have already completed the course are added to the list of those requiring the course, because they will need to complete the course again in order to maintain certification.
4. On the Employee Criteria tab, choose a specific group of employees to be assigned a course. The Employee Criteria tab is identical to the Standard Criteria tab on the report group dialog box used for generating standard reports. For detailed information on how to use this tab to select employees, see Standard Criteria Tab.
5. On the Defaults for Each Course tab, specify default enrollment information for the selected employees.
The selections you make on this tab will be displayed on the Requirements Detail page of the employees to whom you assign the course. Refer to Required Courses, for additional information.
6. When you are finished specifying your employee criteria and course defaults, click OK. You will receive a verification message box indicating how many employees will be added to the list of employees requiring the course. Click Yes to add the employees to the list.
7. To save the criteria you have established for this action, click Save. The next time you assign a course to employees, the settings are already defined for you. This feature comes in handy if you assign courses to the same group of employees on a frequent basis.
8. If you have entered new criteria for the action but want to return to the last settings you saved, click Restore.
Close a Class When a class has been completed, use the Close a Class action to close the class. Training changes the status of the class to Completed on the Class Information page and on the Courses Taken page of each employee enrolled in the class. The course is also removed from the employee’s Required Courses page, unless it is associated with a certification that has a renewal period. In that case, the course remains on the Required Courses page and the Complete By date is recalculated based on the renewal period of the certification.

Delete a Student Record
28 Sage Abra SQL HRMS
To Close a Class
1. From the Navigation Pane, select Training > Tasks > Close a Class.
2. Select the class you want to close. The steps page opens and lists the steps for closing a class.
3. Select the steps you want to complete. Complete each step now or schedule steps for yourself or another user to do later. Note that Update Class Information is a required step.
4. Click OK to start moving through the steps.
Update Class Information
On the Class Information page, Training automatically changes the class status to Completed. You can review and edit course, class, and scheduling information. When you are finished, click OK to move to the next step.
Review Class Roster
The Class Roster page allows you to review the list of employees enrolled in the class. You can add employees who took the class but who were not previously added to the Class Roster. You can also edit enrollment information.
For example, an employee enrolled in the class never showed up. Select the employee and click More…. The Roster Detail page opens. Change the employeeʹs enrollment status to No Show. Click OK to return to the Class Roster page.
Note: When you change an employee’s enrollment status to No Show or Failed, the course will remain on the employee’s Required Courses page.
When you are finished reviewing the class roster, click Close to move to the next step.
Edit Class Completion Letter
The Edit Class Completion Letter page allows you to edit the content and format of the letter to be sent to all employees who completed the class.
When you are finished editing, click OK.
Delete a Student Record The Delete a Student Record action enables you to delete students from your system.
Warning! When you delete a student, Training permanently erases all information in the student’s record and you cannot retrieve it.

Edit Class Correspondence
Training Pages 29
Note: If you are using Training, you can use this action to delete any student. In Sage Abra SQL HRMS, you can delete only students with a status of Not Employee with this action. Use the Delete Employee Record action in Sage Abra SQL HRMS to delete students with any status other than Not Employee.
To Delete a Student Record
1. From the Navigation Pane, select Training > Tasks > Delete a Student Record.
2. Find the student you want to delete. The Delete a Student Record dialog box opens and shows you the student’s name, employer, ID, and status.
3. Click OK to confirm this is the student you want to delete. Otherwise, click Cancel.
4. Click Yes to confirm the deletion or click No to stop the action.
Edit Class Correspondence Training provides pre‐formatted class correspondence letters that you can customize to meet your own needs. The Class Enrollment Letter notifies employees that they are enrolled in a particular class. The Class Completion Letter notifies employees that they have completed a particular class. Use the Edit Class Correspondence action to customize these letters for individual classes.
Tip: You can print class correspondence using the Edit Class Correspondence action or by selecting Reports > Training > Class Administration Reports from the Navigation Pane.
To Edit Class Correspondence
1. From the Navigation Pane, select Training > Tasks > Edit Class Correspondence.
2. Select the class for which you want to edit correspondence. The steps page opens and lists the steps for editing correspondence.
3. Select the steps you want to complete. Complete each step now or schedule steps for yourself or another user to do later.
4. Click OK to start moving through the steps.
Edit Class Enrollment Letter
The Edit Class Enrollment Letter page contains five tabs on which to enter information: Introduction, Employee Information, Class Information, Closing, and Sections to Include.
Introduction Tab
The Introduction tab allows you to edit the text in the letter’s greeting and introduction. Place your cursor in the text box and add, change, or delete text as needed.

Edit Class Correspondence
30 Sage Abra SQL HRMS
Select one of the Name Format radio buttons to change the way the employee’s name appears in the greeting.
Employee Information Tab
The Employee Information tab allows you to select basic employee information to include in the letter. Select the check boxes next to the employee information items you want to include.
Class Information Tab
The Class Information tab allows you to select class information to include in the letter. Select the check boxes next to the class information items you want to include.
Closing Tab
The Closing tab provides a field for customizing the closing paragraph of the letter.
Sections to Include Tab
The Sections to Include tab allows you to select from among the following information items to include in the letter: Enterprise Logo, Enterprise Name, Current Date, Employee Information, Greeting, Introduction, Class Information, and Closing. The Enterprise Logo and Enterprise Name originate from the Enterprise Setup page, and the Current Date is generated by the system. The content of the remaining sections may be edited from this page. Select the check boxes next to the items you want to appear in the letter.
Note: An Enterprise Logo must be selected on the Enterprise Setup page in order for the logo to appear on class correspondence.
Previewing Class Enrollment Letters
To preview the letters, click the Preview button. For more information about previewing, see Using Standard Reports.
From the preview window, you can print the letters by clicking the Print button. Each letter will print on a separate page.
When you are finished printing or previewing, click the Close button to return to the Edit Class Enrollment Letter page.
If you want to save your new letter as the standard for all future classes, click the Default button. Yes saves the letter as the new default and No returns you to the page without changing the default.
When you are finished making changes, click Continue to move to the next step.

Enroll Employees in a Class
Training Pages 31
Edit the Class Completion Letter
The Edit Class Completion Letter page enables you to change the content and format of the letter using the same steps described above in Edit Class Enrollment Letter. When you are finished, click OK.
Enroll Employees in a Class This action enables you to enroll employees in a class that has already been set up.
To Enroll Employees in a Class
1. From the Navigation Pane, select Training > Tasks > Enroll Employees in a Class.
Note: Only classes with a status of Open appear in the Class Find dialog box for this action.
2. Select the class for which you want to enroll employees. The steps page opens and lists the steps for enrolling employees in a class.
3. Select the steps you want to complete. Complete each step now or schedule steps for yourself or another user to do later. Note that Enroll Employees and Review Class Roster are required steps.
4. Click OK to start moving through the steps.
Enroll Employees
The Enroll Employees page displays a list of employees who require the class.
To enroll employees, click the Enroll button. The Available list shows all the employees who require the course. The Selected list shows those employees you select.
From the Available list box, double‐click the employees you want to enroll. The selected employees appear in the right list box. If you want to remove an employee from the Selected list, highlight it and click Remove.
Note: If no employees are shown on the Enroll Employees page, there are no employees who currently require the class. In this case, the Enroll button is disabled.
To edit an employee record, select an employee and click More… or click the + button. The Requirement Detail page opens.
Use the Next and Previous buttons to view the next and previous employees. Edit the enrollment information as needed. Click OK to accept the changes and return to the Enroll Employees page.
To delete an employee from the Enroll Employees page, highlight the employee’s name and click Delete. A verification message box asks if you want to remove the employee from the list. Yes removes the employee from the list and the course from the employee’s required courses. No returns you to the page without deleting the employee.
Establish Job Requirements
32 Sage Abra SQL HRMS
When you are finished, click Continue to move to the next step.
Review Class Roster
The Class Roster page allows you to review the list of employees enrolled in the class, edit enrollment information, and add employees to the class roster.
When you are finished reviewing the class roster, click Continue to move to the next step.
Edit Class Enrollment Letter
The Edit Class Enrollment Letter page enables you to edit the information contained in the enrollment letter to be sent to all employees enrolled in the class. When you are finished editing the letter, click OK.
Establish Job Requirements This action enables you to establish individual courses, training programs or certifications as training requirements for specific jobs. You can also use this action to establish a training requirement for all employees in an employer.
For example, you want to make Workplace Safety a required course for all entry level machine operators. Use the Establish Job Requirements action to add Workplace Safety to the job requirements of the job title Machine Oper 1. The course is then added to the Required Courses page for all employees with the job title of Machine Oper 1, unless they have already completed the course. In addition, when you hire a new employee with the job title Machine Oper 1, the course will automatically be added to their Required Courses page.
Establish a Course as a Job Requirement
The first time you establish a course as a job requirement, the course is added to the Required Courses page of all employees with the specified job title. If you select a course that has already been set as a requirement, the action adds the course to the Job Requirement Summary page, but does not add the new requirement to the employeeʹs Required Course records. If the course is associated with a certification, the certification is added to the Certifications page of each employee.
Establishing a Certification as a Job Requirement
When you establish a certification as a job requirement, the certification is added to the Certifications page of all employees with that job title.
Establishing a Training Program as a Job Requirement
When you establish a training program as a job requirement, the program is added to the Training Programs page of all employees with the specified job title. In addition, all the courses in the program’s curriculum are added to the Required Courses page of each employee.
Establish Job Requirements
Training Pages 33
Note: If your job codes are set up at the Enterprise level in Sage Abra SQL HRMS, you must select a Training Employer in Training to establish job requirements or you must copy your job codes to the employer level. In addition, you must enable job code validation on the HR Setup page.
To Establish Job Requirements
1. From the Navigation Pane, select Training > Tasks > Establish Job Requirements.
2. From the drop‐down list, select the employer for which you want to establish job requirements.
3. Select the job title for which you want to establish job requirements. Training automatically fills in the job code.
Note: If you want to establish a job requirement for all employees, select All Employees from the Job Title list. The job requirement will be added to all employees in the selected employer.
4. Use the Display Type radio buttons to indicate whether you want to work with individual courses, training programs, or certifications.
5. To add a job requirement, click Add. To edit a job requirement, select it and click More… or click the + button next to the job requirement. The course, training program, or certification detail page opens, depending on which radio button you have selected.
6. Make selections from the drop‐down lists or fill in data, pressing Tab to move from field to field. If you are editing, use the Next and Previous buttons to scroll through the list of job requirements.
• If you are adding, click OK to accept the addition and return to the Establish Job Requirements page.
• If you are editing, click OK to accept the changes and return to the Establish Job Requirements page.
• If you want to delete a job requirement from the Establish Job Requirements page, select it and click the Delete button. A verification message box asks if you want to delete the item from the job requirements. Click Yes to confirm the deletion and No to return you to the page without deleting the requirement.
Note: When you delete a job requirement, the course or program is deleted from the corresponding page of all employees with the specified job title, unless they have already completed the requirement. In addition, when you delete a job requirement for a program, the courses in the program’s curriculum are deleted from the Required Courses page of all employees with the specified job title. If you delete a job requirement, certifications are not deleted from any employees.

Establish Job Requirements
34 Sage Abra SQL HRMS
Course, Program and Certification Detail pages
The following fields appear on the course, program, and certification requirement detail pages.
Field Label Description
Course Description
Course, program, or certification description.
Course Code Course, program, or certification code.
Priority Default priority for the course or program.
Note You cannot select a priority for a certification requirement.
Requirement Due Date and Earliest Date Required
The selections you make for Requirement Due Date and Earliest Date Required enable Training to automatically calculate the Complete By date on the employee’s Required Courses page or the Date Required on the employee’s Certifications page.
Use the radio buttons to indicate whether the requirement must be completed before the job starts, after the job starts or on a specific date.
If you do not want to specify a due date, select None Specified.
If you select Required Before Job Starts, enter how many days before in the Days Before field.
If you select Required After Job Starts, enter how many days after in the Days After field. If zero is entered, then the required completion date will be the job start date.
If you select Required on a Specific Date, enter the month and day by which the requirement must be completed. The year automatically defaults to the year in which the job starts. For example, you enter 12/31 as the specific date. If an employee starts their job on 09/01/07, then they must complete the training requirement by 12/31/07. If the employee starts their job on 01/31/08, they must complete the training by 12/31/08.
Tip: To avoid required completion dates in the past, use the Earliest Date Required field, as described below.
Use the Earliest Date Required field to enter the date the requirement takes effect, that is, the earliest date the requirement can be due. Consider the following examples.
You establish a job requirement for all machine operators and indicate that the requirement must be completed 30 days before the job starts. Enter the Earliest Date Required as 11/01/07. A machine operator who started their job on 03/31/08 would have a required completion date of

Update Employee Training Information
Training Pages 35
03/01/08. A machine operator who started their job on 07/31/07 would have a required completion date of 11/01/07.
You establish a job requirement for all assemblers and indicate that the requirement must be completed 30 days after the job starts. Enter the Earliest Effective Date as 11/01/07. An assembler who started their job on 03/01/08 would have a required completion date of 03/31/08. However, an assembler who started their job on 09/01/05 would have a required completion date of 11/01/07.
On 11/15/07, you establish a job requirement for all nursing assistants and indicate that the requirement must be completed on 12/31. Enter the Earliest Date Required as 12/31/07. A nursing assistant who began their job on 09/01/05 would have a required completion date of 12/31/07. A nursing assistant who began their job on 03/01/07 would have a required completion date of 12/31/07. A nursing assistant who began their job on 01/01/08 would have a required completion date of 12/31/08.
Update Employee Training Information This action enables you to review and update an employee’s training information on the Required Courses, Courses Taken, Certifications, and Training Programs pages.
To Update Employee Training Information
1. From the Navigation Pane, select Training > Tasks > Update Employee Training Info.
2. Select the employee whose training information you want to update. The steps page opens and lists the steps for updating an employee’s training information.
3. Check the steps you want to complete. Complete each step now or schedule steps for yourself or another user to do later.
4. Click OK to start moving through the steps.
Required Courses
The Required Courses page enables you to review and edit courses the employee needs to take. You can also add courses to the employee’s training requirements.
When you are finished reviewing and updating the required courses, click Continue to move to the next step.
Courses Taken
The Courses Taken page enables you to review and edit courses the employee has already taken or is scheduled to take. You can also add courses to the list.
When you are finished reviewing and updating the courses taken, click Continue to move to the next step.

Training Processes
36 Sage Abra SQL HRMS
Certifications
The Certifications page enables you to review and edit the employee’s certifications. You can also add certifications to the employee.
When you are finished reviewing and updating the employee’s certifications, click Continue to move to the next step.
Training Programs
The Training Programs page enables you to review and edit training programs in which the employee is enrolled. You can also add training programs to the employee.
When you are finished reviewing and updating the employee is training programs, click Continue.
Training Processes
Mass Update The Mass Update process allows you to change the value of a field within a Sage Abra SQL HRMS database for an entire group of employees. That is, you can change data for a group of records rather than change the data for each individual record. You can update most, but not all, fields in mass. For example, Sage Abra SQL HRMS does not allow you to update the Employee ID field, because the system uses that field as the primary identification for each employee record.
Using the Mass Update process, you can select the database file to change, the field to update and the new value for the field. You can change information for all employees or for a related group. This group might include, for instance, employees employed for a certain length of time or employees with a certain job skill.
Warning! The Mass Update process can change a significant amount of information. We strongly recommend you back up your data before mass updating employee information. Backing up your data before you change it ensures you can always restore the original data and repeat the process.
If you are running a new installation of Sage Abra SQL HRMS and you want to update the Supervisor field, you must first mass update the supervisor company (pe.p_superco) and then mass update the supervisor ID number (pe.p_superno). Then run the Import Calculations process to update the supervisor name (pe.p_supervis). Similarly, if you want to update the Secondary Supervisor field, you must first mass update the secondary supervisor company (pe.p_sup2co) and then mass update the secondary supervisor ID number (pe.p_sup2no). Then run the Import Calculations process to update the secondary supervisor name (pe.p_sup2vis).
To Mass Update Information
1. From the Navigation Pane, select Employees, Time Off, or Training > Processes > Mass Update.

Mass Update
Training Pages 37
2. The Update File and Update Field drop‐down lists allow you to designate the file and the field you want to update.
3. The Records to Update field allows you to specify which records within the database to update.
4. The New Value field allows you to specify the value you want to substitute in the field you identified.
5. The OK button remains disabled until you select a file to update.
To change the bonus amount to $500 for all employees whose initial hire date is prior to June 1, 2007, the following sections demonstrate how you should use the Mass Update dialog box to accomplish this task.
File and Field To Update 1. Click the Update File drop‐down list to view the Sage Abra SQL HRMS files for which you can
perform a mass update.
2. Click the desired file. For the example, select Employee Personnel.
3. Click the Update Field drop‐down list to view the field descriptions for the file you selected. Click the field to select it. If necessary, use the scroll bar to reveal other field descriptions. For this example, select Bonus Amount. For more information about database files and fields, refer to Data Dictionary.
Records to Update If you leave this field blank, the Mass Update process updates every record in the database. If you only want to update certain records, you must identify the records by establishing a criteria expression for Sage Abra SQL HRMS to use when performing the Mass Update process. For more information about expressions, refer to Expressions and Functions.
To continue the example, update only those employees whose original hire date falls prior to June 1, 2007. You can enter the expression using one of two methods: enter the expression directly, or access the Expression Builder to help you build the expression. If you are familiar with the database field names and syntax, you can enter the following expression directly:
P_ORIGHIRE < {06/01/2007}
New Value The New Value field allows you to instruct Sage Abra SQL HRMS what the new field value should be. In the example, the new bonus amount is 500, so select the New Value box and type: 500
Note: Do not include a dollar sign or comma when you enter a new value.
The new value might be a complex value involving other fields in the database, such as P_SALARY + 500. This value indicates the bonus amount is equal to the employeeʹs salary amount plus $500. If necessary, you can use the Expression Builder to help create the entry for the new value.
Complete the Process 1. Click OK to perform the Mass Update process. Sage Abra SQL HRMS displays a message box
indicating the number of records the system should update and asks whether you want to proceed.
Import Calculations
38 Sage Abra SQL HRMS
If you want to back up your database before the system performs the mass update, click No and back up your data before you proceed. If you click Yes, Sage Abra SQL HRMS performs the mass update and indicates the number of records updated upon completion.
2. Run the Import Calculations process to ensure that all updated information is current and up‐to‐date.
Import Calculations The Import Calculations process ensures the information in several job and training related fields of the database are current and up‐to‐date. You should use this process when you:
Perform a Mass Update.
Import information from another application.
Change information with an application other than your Abra system, such as using another database application.
Information Updated by the Import Calculations Process
Abra HR automatically updates and references the current values for the following fields:
Annual salary
Compa‐ratio
Last pay change information (such as date, amount, and percent)
Total dependents and total insured dependents
Supervisor Name
If you are running a new installation of Sage Abra: Import Calculations will update the supervisor name (pe.p_supervis) after a mass update only if you have mass updated both the supervisor company (pe.p_superco) and the supervisor ID (pe.p_superno).
Secondary Supervisor Name
If you are running a new installation of Sage Abra: Import Calculations will update the secondary supervisor name (pe.p_sup2vis) after a mass update only if you have mass updated both the secondary supervisor company (pe.p_sup2co) and the secondary supervisor ID (pe.p_sup2no).
If you are also validating Job codes (determined in the employer setup information) the Import Calculations process also updates the following:
Job title
Job group
Salary grade
EEO class

Import Calculations
Training Pages 39
Exempt status
Training updates the following information • Ensures the class information on employees’ Courses Taken page is consistent with the class
information on the Class Information page.
• Updates job requirements for all employees, ensuring that all employees have been assigned the training programs, certifications, and courses that have been established as job requirements for their job codes.
• On the Required Courses page the following information is updated.
• Removes the employeesʹ completed courses from the Required Courses page, unless it is associated with a certification that has a renewal period.
• If a course on an employee’s Courses Taken page has a status of Enrolled or In Progress, the status of the corresponding course on the Required Courses page is updated.
• Any courses in the curriculum of programs on an employee’s Training Programs page that have not been completed are added to the Required Courses page.
• Re‐calculates the Courses, Hours, Credits, and CEUs completed and remaining for all programs on an employee’s Training Programs page with a status of In Progress. If all courses are completed, the program status is changed to Completed and the Program End Date is updated.
• On the Certifications page the following information is updated.
• Any completed courses on an employee’s Courses Taken page that are associated with a certification, Abra Train makes sure that certification is entered on the employee’s Certifications page.
• If a certification has an Originally Received Date and no Last Received Date, Abra Train sets the Last Received Date to the Originally Received Date.
• Abra Train totals the Courses, Credits, and CEUs for all courses completed for each certification. After the Initial Course, Credit, and CEU requirements for a certification have been reached, the Originally Received and Last Received dates are updated. Any subsequent courses are compared to the Renewal Course, Credit, and CEU requirements for the certification, and the Last Received Date is updated each time the requirements are met.
• Training calculates the Expiration Date for each certification that has a Renewal Period and a Last Received Date.
To Import Calculations
1. From the Navigation Pane, select Training > Processes > Import Calculations. Sage Abra SQL HRMS begins the process immediately and displays the number of employees updated.

Import Calculations
40 Sage Abra SQL HRMS
2. Click OK when the process is complete.

Training Pages 41
Standard Reports Sage Abra SQL HRMS provides dozens of preformatted reports designed to meet virtually any reporting need. With the standard reports, you can:
Preview reports on your monitor.
Print reports to your printer.
Export reports to a disk file for use by other software applications.
Note: You can also create your own original reports using Crystal Reports® for Sage. Refer to the Crystal Reports online Help for detailed instructions on how to use Crystal Reports.
Select Reports
Before you start working with the standard reports, you must first select a report. The first step in selecting a report is accessing the report group.
To Select a Report
1. From the Navigation Pane, select Reports> Employees, Time Off, Payroll, or Training > the report you want to work with. The Reports dialog box opens and lists the reports in the selected group.
2. Scroll through the list and highlight the report you want to run. Sage Abra SQL HRMS enables all buttons and tabs and displays the name of the report selected at the bottom of the dialog box.
3. Define the criteria for your report.
4. Print, preview, or export the report.
Define Custom Criteria The Custom Criteria function enables you to generate reports using criteria other than what is already provided in Sage Abra SQL HRMS standard selection criteria.
Note: When you use any custom criteria, Abra HR disables all other selection criteria. To clear your custom criteria selection, select the blank option from the list.
Use the Custom Criteria Table
In Sage Abra SQL HRMS, you can create expressions that define specific criteria for selecting employees. Sage Abra SQL HRMS stores these expressions in the Criteria Code table. When you set up options for your reports, you can choose a criteria code from (or add a new one to) the Criteria code table. Sage Abra then generates the report according to the expression set up for the criteria code you selected.
Define Custom Criteria
42 Sage Abra SQL HRMS
Tip: If the expression you want to create is one you will be using more than once, it is a good idea to add it to your Criteria code table. Then, it will be available for you to select any time you need it. Follow the steps below to add a new criteria code.
Select Custom Criteria Table from the Custom Criteria list. The Criteria Table dialog box opens and lists the criteria codes you defined in your Criteria Code table.
Note: If you did not define any criteria codes, only the selection Add New Code appears in the list.
To Select an Existing Criteria Code 1. From the Criteria Table dialog box, highlight the code.
2. Click OK. The expression appears in the Custom Criteria field.
To Add a New Criteria Code 1. From the Criteria Table dialog box, click Add New Code.
2. Click OK to open the Criteria Table dialog box.
3. Enter a description for your criteria.
4. Click OK. The Visual FoxPro Expression Builder opens. For detailed instructions for using the Expression Builder, refer to Expressions and Functions.
5. Create an expression. The preceding figure shows an expression to generate a report for only seasonal workers. We selected the field P_SEASONAL from the Employee Personnel database and set it equal to (Y)es.
6. When you complete the expression, click OK. The expression displays in the Custom Criteria field. Abra HR uses this expression to generate a report that includes only seasonal employees.
Use the Custom Criteria Builder
You can use the Sage Abra Criteria Builder to build expressions for your selection criteria and save them to your criteria code table.
Note: The Criteria Builder enables you to create an expression with fields only from the Employee Personnel (HRPERSNL) database. If you need to build an expression with fields from a database other than HRPERSNL, you must use the Expression Builder.
The following steps build an expression you would use to produce a report that includes Production Managers who started their jobs on or after January 1, 2002. Building this expression requires you to define two selection criteria: employees whose Job Title is Production Managers and of those Production Managers, those who started their job on or after 01/01/02.
To Create an Expression with the Criteria Builder 1. Select the Criteria Builder option from the Custom Criteria list. The Criteria Builder dialog box
opens.
Define Report Criteria
Training Pages 43
2. From the Field list, select Job Title.
3. From the Relationship list, select Equal To.
4. In the Value field, type Production Managers.
5. Since we need to define another criteria, click the And button. The first part of the expression appears in the dialog box and we are ready to enter the second criteria.
6. From the Field list, select Job Start Date.
7. From the Relationship list, select Greater Than or Equal To.
8. In the Value field, type 01/01/02.
9. Click the Done button. The dialog box now shows the complete expression.
10. To save the Expression to your criteria code table, click the Save To Criteria Table button. The Criteria Table dialog box opens.
11. Type a description for your new expression.
12. Click OK.
Note: If you want to delete all the criteria you defined and start over, click Reset. If you want to delete one criteria at a time (from the last to the first), click Undo.
Use the Expression Builder
You can access the Visual FoxPro Expression Builder any time you need to create an expression for your custom criteria. Select Visual FoxPro Expression Builder from the Custom Criteria field. The Expression Builder opens for you to start building your expression. When you have completed it, click OK. Your expression is available from the Custom Criteria field list when you generate reports within the selected report category. Refer to Expressions and Functions, for detailed instructions on using the Expression Builder.
Tip: If you only need to use fields from the Employee Personnel database (HRPERSNL) in your expression, consider using the Criteria Builder rather than the Expression Builder. The Criteria Builder is somewhat easier to use than the Expression Builder. However, if you need to build an expression with fields from any database other than HRPERSNL, you must use the Expression Builder.
Define Report Criteria When you select a report, Sage Abra SQL HRMS provides various criteria by which to generate the report. For example, if you want to sort the Employee Profile report by employee number rather than employee name, you can choose employee number as one of your sort criteria. The Reports dialog box lets you limit the data appearing on a report. If you do not limit the data, the report includes all the records. Make selections to indicate only those records meeting your specific criteria.

Define Report Criteria
44 Sage Abra SQL HRMS
The information on the tabs of the Reports dialog box enables you to tailor the output of your report. Using sorting options and selection criteria, you can produce a variety of different reports to meet your specific needs. You can:
Use standard selection criteria such as employer, organization levels, and exempt status.
Enter your own criteria to select information to include in the report.
Select specific employees to include in the report.
Select report‐specific options including (among others) the effective date or date range, a grouping by organization level, a sort order by employee name or ID, or form alignment options.
Save default report options for the next time you use the same report.
Note: After you generate a report by printing, previewing, or exporting it, Sage Abra SQL HRMS saves your selection criteria. The next time you select that report, the saved options appear in the fields. Change the selection criteria as necessary for your new report.
Report List Tab
The Report List tab enables you to select a report, set the number of copies to print and save the current report options as your defaults.
Select a Report From the list of reports, find the report you want and highlight it (click once). Sage Abra SQL HRMS enables all buttons and tabs to start defining the report options.
Specify a Print Range The Print Range enables you to print all the pages of the report or only a specific range of pages.
To print the whole report, click the All radio button. To print a specified page range, click the Page radio button and enter the first and last page numbers.
Save Report Options The Save Defaults button lets you save report options that you regularly use. Then the next time you generate the report, the settings are already defined for you. This feature comes in handy when you frequently generate a particular report.
If you have entered new settings for a report and want to return to the last settings you saved, click Restore Defaults.
Standard Criteria Tab
The Standard Criteria tab lists the general selection criteria that apply to all reports in a report group. You use these selection criteria to determine which employees will be selected for inclusion in the report.

Define Report Criteria
Training Pages 45
Select the Employer
Using the Employer field, you can choose to include in your report employees in the Enterprise, in an individual employer or in multiple employers.
Do one of the following:
Select Enterprise to include all the employees in all the employers you have set up in Sage Abra.
Select an individual employer to include only the employees in that employer.
Select Multiple to include the employees in more than one employer. When you select Multiple, a two‐list chooser opens for you to select employers.
For each employer you want to include in your report, double‐click the employer name to move it to the Selected list. Click OK.
Select Organization Levels After you select the Enterprise or one or more employers, select the specific organization levels on which to report. The names of the organization levels are the same as the titles defined when you set up the Enterprise (up to five levels).
The organization descriptions included in each list depend on two factors: the employer selection and how you set up your organization codes. For example, if you select Enterprise as your employer and all your employers are using Enterprise level organization codes, the lists contain the organization descriptions you set up for the Enterprise.
Alternately, if you select Enterprise as your employer and you set up organization codes for each employer at the employer level (that is, you set up different codes for each employer), the lists include every employer’s organization descriptions.
Note: If you see duplicate entries in the list, this means you set up different organization codes at the employer level, but the descriptions you set up for the codes are the same.
Note: If you change your employer selection, Sage Abra SQL HRMS clears all organization levels. You can then reselect your organization levels.
Select Employees
If you want to further limit your report results, you can select specific employees within the employers you selected. Using the buttons adjacent to Employee, specify which employees you want to select.
If you are using Training, you can also use the buttons to specify which courses or classes you want to include, depending on the type of training report you are running. For example, you can select classes for Class Administration reports and courses for most Training Analysis reports.
Select One Employee
Define Report Criteria
46 Sage Abra SQL HRMS
Click the Find button to select one employee. The Employee Find dialog box opens so you can find and select the employee you want to include. For more information, see Finding an Employee.
After you find the employee, Sage Abra SQL HRMS displays the selected employee’s name, employee number, and employer ID.
Note: When you select one employee, Sage Abra SQL HRMS disables all other selection criteria. If you want to cancel your employee selection, click the Update button. This re‐enables all selection criteria.
Select Multiple Employees To select multiple employees, click the Multiple button. The Employee Selection page opens. Select the employees you want to include. If you have already selected a single employee, it automatically appears in the list of selected employees.
The Available list includes all employees in the employers selected and displays the employee’s name, number, and employer ID. Double‐click to select an employee name and move it to the Selected list. Similarly, double‐click an employee name in the Selected list to move it back to the Available list.
After selecting, click OK to return to the dialog box.
Note: When you select multiple employees, Sage Abra SQL HRMS disables all other selection criteria. To cancel your multiple employee selection, click the Update button. This re‐enables all selection criteria.
Points to Consider When Selecting Specific Employees When you are defining your report selection criteria by selecting employers, organization codes, and specific employees, note that if you have already selected the employer or organization codes and then attempt to select a specific employee, you might receive a message that there are no employees matching your selection. This is because the employee you tried to select does not belong to the employer or the selected organization codes.
If you want to run the report for a specific employee, select blank for all your organization codes and then select the employee.
Select Employees by Employee Status Each employee you enter in Sage Abra SQL HRMS has an employee status.
When you generate a report, you can include employees who have an employee status of Active, Leave of Absence, or Terminated. Use the check boxes to select one or more employee statuses.
When you run reports in Training, you can select employees who are Active, Terminated, on Leave of Absence (LOA) and Non‐employees.
Select Employees by Exempt Status When you run reports in Abra HR or Time Off, use the Exempt field to generate a report to include employees by their overtime exempt status. Select Exempt or Nonexempt from the list. If you leave the field blank, the report includes both exempt and nonexempt employees.
Select Employees by a Changed Since Date

Print, Preview, or Export a Report
Training Pages 47
When you run reports in Abra HR or Time Off, you can choose to include in your report only those employees whose information has changed since a specific date. Enter the date in the Changed Since field.
Select Classes by Status When you run reports in Training, you can select classes that are Open, In Progress, Completed, and Canceled.
Define Custom Criteria To generate reports using criteria other than what is already provided in Sage Abra SQL HRMS standard selection criteria, use the Custom Criteria function.
Specific Criteria Tab
The Specific Criteria tab presents options you can set for the report you selected. Sage Abra SQL HRMS generates the report using these settings and the selection criteria you defined on the Standard Criteria tab.
The options on this tab vary from report to report within the report category you selected. Some examples of options specific to a report are date range, sort order, and effective date.
Print, Preview, or Export a Report After you determine your standard and specific selection criteria, generate your report by choosing whether to send it to your printer, preview it on the monitor, or export it to a file on the server.
Preview a Report To preview a report on the monitor, click Preview. The system opens a preview window and presents the report.
You can identify each report by its title. The title is at the top of each page of the report. The date and time the report was generated appear at the bottom of each page, along with a sequential page number. Report totals and other control numbers also appear at the end of most reports.
Reports are formatted for standard 8 1/2‐by‐11‐inch paper with a half‐inch margin on all sides.
Page Preview Toolbar When you preview a report, the page preview toolbar enables you to enlarge your view, scroll through the report, and print the report. You can see the button’s description as you position your cursor over the button.
The following table describes the buttons on the page preview toolbar.

Print, Preview, or Export a Report
48 Sage Abra SQL HRMS
Button Description
The First Page button displays the first page of the report. This button is disabled if you are previewing the first page of the report.
The Previous Page button displays the previous page of the report. This button is disabled if you are previewing the first page of the report.
The Go To Page button lets you select a specific report page to display.
The Next Page button displays the next page of the report. This button is disabled if you are previewing the last page of the report.
The Last Page button displays the last page of the report. This button is disabled if you are previewing the last page of the report.
The Zoom control lets you choose six different magnifications. You can also click your cursor anywhere in the preview window to zoom in or out on a particular area of the report. When you zoom, your cursor changes to a magnifying glass.
The Close Preview button closes the preview window and returns to the Reports dialog box.
Tip: You can also click in the report title bar to close the preview window.
Click the Print Report button to print the report.
Print a Report From the reports dialog box, click Print to open the Print Options dialog box. Select the appropriate options such as page range, number of copies, and name of printer. Note that if you have a PDF driver installed, you can create a PDF version of the report and then send it as an email attachment.
Export a Report to a File Sage Abra SQL HRMS enables you to export or save your report to a file so you can use it in a variety of different applications, such as Lotus 1‐2‐3 or Microsoft Excel.
1. Click Export to export a report to a file. The File Export Options dialog box opens.
Note: If working with Veterans Employment report, when you click Export, the File Type defaults to Electronic Submission format.
2. Select the file format to use from the File Type list. The extension in the File Name field automatically fills in according to the File Type you select.
3. Enter up to eight characters for the file name in the File Name field. Then, click Export.
Print, Preview, or Export a Report
Training Pages 49
4. Click OK. Sage Abra SQL HRMS exports the file to the ..\Sage\SageAbraSQLHRMSServer\Data\Export directory on the server.
Note: If you are using Windows 2008, Windows 7, or Windows Vista, you must reset the View properties on the C drive so that you can see the \ProgramData folder to where the reports are exported. Open Windows Explorer and do the following:
a. Go to Organize > Folder and Search Options.
b. Click the View tab.
c. Select the Show hidden files and folders button and click OK.

Print, Preview, or Export a Report
50 Sage Abra SQL HRMS
Training Pages 51
Training Reports Catalogs and Code Tables Review all the defined codes in your code tables by printing your code table reports. Use these reports as a reference before or after updating your code tables for the enterprise or each employer.
Abra Train provides the following code table reports:
Certification Codes
Class Ratings
Course Catalog
Course Types
Enrollment Status Codes
Instructor Catalog
Instructor Ratings
Job Codes
Job Requirements
Organization Codes
Priority Codes
State / Province Codes
Training Locations
Training Programs
User‐Defined Codes
Class Administration Reports The Class Administration reports allow you to track classes and participants as well as generate class enrollment and completion letters.
Class Administration reports include:
Class Completion Letters
This report prints the Class Completion Letters for all employees that have completed a selected class or group of classes. Each letter prints on a separate page and includes the following letter sections:
• Enterprise Logo
• Enterprise Name

Class Administration Reports
52 Sage Abra SQL HRMS
• Current Date
• Employee Information
• Greeting, Introduction
• Class Information
• Closing
You can select to include or exclude any of these sections or change their content by using the Edit Class Correspondence action. You can select to include employees with a particular enrollment status.
Class Enrollment Letters
This report prints the Class Enrollment Letters for all employees that are enrolled in a selected class or group of classes. Each letter prints on a separate page and includes the following letter sections:
• Enterprise Logo
• Enterprise Name
• Current Date
• Employee Information
• Greeting
• Introduction
• Class Information
• Closing
You can select to include or exclude any of these sections or change their content by using the Edit Class Correspondence action. You can select to include employees with a particular enrollment status.
Class Rosters
The Class Rosters report shows all employees on the class rosters of selected classes. The report is sorted by class start date and class ID number. Within each class group, the employees are sorted by enrollment status and last name. You can choose to include employees with a specific enrollment status or any status.
Employee Training Reports
Training Pages 53
Class Schedules
The Class Schedules report lists classes that are in progress or scheduled to begin over a specified period of time. You can also include classes that are already completed or that have been canceled. The report is sorted by class start date.
Mailing Labels
This report prints mailing labels for all employees that are enrolled in a selected class or group of classes. You can select to include employees with a particular enrollment status. The report is formatted for label sheets with 30 labels per page (three columns of 10 labels each). If you print labels for more than one class, the labels for each separate class begin on a new sheet.
Overbooked Classes
The Overbooked Classes report lists classes that have more employees enrolled than the maximum capacity allows. The report is sorted by class start date.
Participants’ Training History
This report summarizes the courses taken and the courses scheduled for each employee enrolled in a specific class. You can select more than one class, in which case a separate report is printed for each class. You can select to include employees with a particular enrollment status. If an employeeʹs status in a class is Completed, their grade (if any) appears in the Grade column; otherwise, their enrollment status appears.
Employee Training Reports The Employee Training reports allow you to track completed and required courses, training programs, and certifications for all employees, as well as training expenses and tuition reimbursements.
Employee Training reports include:
Employee Certifications
The Employee Certifications report shows all the certifications received or required by a selected group of employees. The report is sorted by employee last name. Within each employee group, the certifications are sorted by date required, with certifications that must be received the soonest listed first.

Employee Training Reports
54 Sage Abra SQL HRMS
Employee List
This report lists employees by last name. You can also select to include non‐employees. Titles and organization levels are shown, if applicable.
Employee Required Courses
The Employee Required Courses report shows all courses that employees must complete over a specified period of time. Courses for each employee are sorted by priority and the date by which they must be completed, with courses that are most important and that must be completed soonest listed first.
Employee Training Profile
The Employee Training Profile report shows courses an employee has completed as well as courses that still need to be taken. It is a combination of the Training History by Employee and Employee Required Courses reports. If an employee’s status in a course is Completed, their grade (if any) appears in the Grade column; otherwise, their enrollment status appears.
Employee Training Programs
The Employee Training Programs report lists the training programs that employees have completed over a specified period. You can also include programs that are in progress. If training programs in progress are included, the report also shows courses completed and courses still remaining within each program.
Employees with a Certification
The Employees with a Certification report lists all employees who have received or require a certification. The report is sorted by certification code. Within each certification group, you can choose to order by employee name or by expiration date. You can include all certifications or only a specific certification.
Training Expenses by Employee
The Training Expenses by Employee report shows the expenses associated with courses completed by an employee during a specified period of time. You can also include courses that are scheduled but not yet completed. If an employee’s status in a course is Completed, their grade (if any) appears in the Grade column; otherwise, their enrollment status appears.

Tuition Reimbursements
Training Pages 55
Training History by Employee
The Training History by Employee report lists courses completed by an employee over a specified period of time. You can also include courses that are scheduled but not yet completed. If an employee’s status in a course is Completed, their grade (if any) appears in the Grade column; otherwise, their enrollment status appears.
Training Schedules by Employee
The Training Schedules by Employee report lists courses that are in progress or scheduled to begin over a specified period of time. You can also include courses that have already been completed.
Tuition Reimbursements This report lists the tuition reimbursements an employee has received or requested over a specified period of time. The report is sorted by employee last name. Within each employee group, courses completed most recently are listed first. You can select to include all courses, or only those of a particular type or with a particular status. If an employee’s status in a course is Completed, their grade (if any) appears in the Grade column; otherwise, their enrollment status appears.
Sample Training Reports Training reports are grouped into the following categories:
Catalogs and Code Tables
Class Administration Reports
Employee Training Reports
Training Analysis Reports
Training Analysis Reports Training Analysis reports allow you to track course fees and expenses, class attendance, class utilization, and class ratings.
Training Analysis reports include:
Class Attendance Summary
The Class Attendance report summarizes the attendance totals for all classes offered over a period of time, grouped by course code. The report also includes the percentage of people that did not show up for class, the percentage that canceled and the percentage of available class space that was used.
Training Analysis Reports
56 Sage Abra SQL HRMS
Class Financial Summary
This report summarizes financial information for all classes offered over a period of time. Only classes with a status of completed are included in the report. The report compares budgeted costs with actual costs and total fees with actual costs. The Cost Per Student represents the additional cost per student (beyond fixed costs) and is calculated by subtracting the Average Fixed Costs from the Average Actual Costs and dividing by the Average Attendance. The Breakeven Fee is an estimate of the fee that should be charged to recover the total class costs and is calculated by dividing the Average Fixed Costs by the Average Attendance and adding the Cost Per Student.
Expenses by Course
The Expenses by Course report shows the expenses for all courses taken over a period of time, grouped by course code. You can choose to print just the total expenses for each course code or you can print the records for each course taken during the specified period. You can select to include employees with a particular enrollment status.
Expenses by Job Title
The Expenses by Job Title report shows the expenses for all courses taken over a period of time, grouped by job title. You can choose to print just the total expenses for each job title or you can print the records for each course taken during the specified period. You can select to include employees with a particular enrollment status.
Expenses by Org(anization) Level
The Expenses by Org Level report shows the expenses for all courses taken over a period of time, grouped by organization level. You can choose to print just the total expenses for each organization level or you can print the records for each course taken during the specified period. You can select to include employees with a particular enrollment status.
Training Exception
Use the Training Exception report to determine which employees need training. The report lists all employees that need to take a specific course or specific courses and is sorted by course code. You can select to sort employees by name or by priority, in which case employees to whom the course is most important and who need to complete it the soonest are listed first. You can also select to include employees who are already scheduled to take the course.

Training Analysis Reports
Training Pages 57
Training History by Course
The Training History by Course report provides a list of all employees that have completed a specific course or are scheduled to complete a course. You can also select to include a number of courses, in which case the report is sorted by course code and all employees that have completed the course are grouped together. You can select to include employees with a particular enrollment status. If an employee’s status in a course is Completed, their grade (if any) appears in the Grade column; otherwise, their enrollment status appears. You can also select a specific date range.

Training Analysis Reports
58 Sage Abra SQL HRMS

Training Pages 59
Index
A
actions
Add a New Class, 23
Add a New Student, 24
Assign Programs, 25
Assign Required Courses, 26
Close a Class, 27
Delete a Student Record, 28
Edit Class Correspondence, 29
Enroll Employees in a Class, 31
Establish Job Requirements, 32
Update Employee Training Info, 35
Add a New Class action, 23
Add a New Student action, 24
Assign Programs action, 25
Assign Required Courses action, 26
C
Certificate of Coverage report
tracking, 3
Certification code table report, 51
Certifications, 3
Class Attendance Summary report, 55
Class Completion letter
editing, 29
Class Completion Letters report, 51
class correspondence, 29
editing, 29
Class Enrollment letter, 23
editing, 23, 29, 32
Class Enrollment Letters report, 51
Class Financial Summary report, 55
Class Information, 5
Class Ratings code table report, 51
Class Roster, 8, 31
reviewing, 32
Class Rosters report, 52
Class Schedules report, 53
classes, 23
adding, 23
class conflicts, 7
class costs, 7
Class Enrollment letter, 23
class ratings, 5
class roster, 23
closing, 28
editing Class Completion letter, 29
editing Class Enrollment letter, 29
reviewing class roster, 27
updating, 27
Close a Class action, 27
code table reports

Index
60 Sage Abra SQL HRMS
Certification, 51
Class Ratings, 51
Course Types, 51
Courses, 51
Enrollment Status, 51
Instructor Catalog, 51
Instructor Ratings, 51
Job, 51
Job Requirements, 51
Organization, 51
Priority, 51
State, 51
Training Locations, 51
Training Programs, 51
User Defined, 51
User‐Defined, 51
Course Types code table report, 51
updating certifications, 35
updating courses taken, 35
updating required courses, 35
updating training programs, 35
Courses code table report, 51
Courses Taken, 9
Criteria Builder, 42
Current Job, 13
Custom Criteria Table, 41
D
defining custom criteria for reports
Criteria Builder, 42
Criteria Table, 41
Delete a Student Record action, 28
Demographics page, 16
details
Certification, 3
Class Information, 5
Class Roster, 8
Courses Taken, 9
Current Job, 13
Demographics, 16
Employees Requiring the Class, 18
Required Courses, 20
Training Programs, 21
E
Edit Class Correspondence action, 29
emailing
reports, 47
employee
adding to training program, 24
assigning programs, 25
assigning required courses, 26
enrolling in classes, 31
updating employee training information, 35
Employee Certifications report, 53
Employee List report, 53
Employee Required Courses report, 54
employee training information, 35

Index
Training Pages 61
updating certifications, 35
updating courses taken, 35
updating required courses, 35
updating training programs, 35
Employee Training Profile report, 54
Employee Training Programs report, 54
Employees Requiring the Class page, 18
Employees with a Certification report, 54
Enroll Employees in a Class action, 31
enrolling employees in classes, 31
Enrollment Status code table report, 51
Establish Job Requirements action, 32
Expenses by Course report, 56
Expenses by Job Title report, 56
Expenses by Organization Level report, 55
exporting
reports, 47
I
Import Calculations process, 38
Instructor Catalog code table report, 51
Instructor Ratings code table report, 51
J
Job code table report, 51
job requirements, 32
certifications, 32
training programs, 32
Job Requirements code table report, 51
L
letters, 29
Class Enrollment, 23, 29
M
Mailing Labels report, 51
Mass Update process, 36
mass updating
information, 36
selecting information to update, 36
O
Organization code table report, 51
Overbooked Classes report, 53
P
Page Preview toolbar, 47
Participant Training History report, 51
photograph
adding to employee record, 16
previewing reports, 47
printing reports, 47
Priority code table report, 51
processes
Import Calculations, 38
Mass Update, 36
R
report options

Index
62 Sage Abra SQL HRMS
classes and courses to include, 43
custom criteria, 41
employees to include, 43
employers to include, 43
organization levels to include, 43
report list, 44
selecting classes and courses, 43
selecting employees by status, 43
selecting organization levels, 43
selecting the employers, 43
specific criteria, 43
specific status selections, 43
standard criteria, 44
Required Courses, 20
S
secondary supervisor, 36
selecting report options
classes to include, 43
courses to include, 43
employees to include, 43
employers to include, 43
organization levels to include, 43
report list, 44
specific criteria, 41
standard criteria, 44
sending reports, 47
State code table report, 51
students, 24
Add a New Student action, 24
adding to training program, 24
deleting from training program, 28
supervisor, 36
T
toolbars
Page Preview toolbar, 47
Train
reports, 55
Training Exception report, 56
Training Expenses by Employee report, 54
Training History by Course report, 57
Training History by Employee report, 55
Training Locations code table report, 51
Training Programs, 21, 23
adding a new class, 23
adding a new student, 24
adding course for employees, 26
closing a class, 28
deleting a student record, 28
editing class correspondence, 29
establishing as job requirement, 32
Training Programs code table report, 51
training requirements, 26
adding courses for employees, 26
adding programs for employees, 25
certifications, 32
courses, 32

Index
Training Pages 63
programs, 32
Training Schedules by Employee report, 55
Tuition Reimbursements report, 53
U
Update Employee Training Info action, 35
User‐Defined code table report, 51