Embed Size (px)
Citation preview
Sage 300 ERP 2012Purchase Orders User's Guide
This is a publication of Sage Software, Inc.
Version 2012
Copyright © 2012. Sage Software, Inc. All rights reserved.
Sage, the Sage logos, and the Sage product and service names mentioned herein are registeredtrademarks or trademarks of Sage Software, Inc. or its affiliated entities. All other trademarksare the property of their respective owners.
Business Objects® and the Business Objects logo, BusinessObjects®, and Crystal Reports® aretrademarks or registered trademarks of Business Objects Software Ltd. in the United States andin other countries. Business Objects is an SAP company.
Microsoft ®SQL Server®, Windows Vista® and the Windows logo are either registeredtrademarks or trademarks of Microsoft Corporation in the United States and/or in othercountries.
The names of all other products and services are property of their respective owners.
Your use of this document and the Sage product(s) described herein is governed by the termsand conditions of the Sage End User License Agreement ("EULA") or other agreement that isprovided with or included in the Sage product. Nothing in this document supplements, modifiesor amends those terms and conditions. Except as expressly stated in those terms and conditions,the information in this document is provided by Sage "AS IS" and Sage disclaims all express,implied or statutory warranties of any kind, including but not limited to the warranties ofmerchantability, fitness for a particular purpose or of non-infringement. No implied license isgranted to you under any Sage intellectual property or trade secret right. Sage reserves theright to revise, supplement or remove information in this document at any time without notice toyou or others.
Sage End User License: http://na.sage.com/sage-na/eula
Contents
Introduction 1
Chapter 1: Setting Up Purchase Orders 3Setting up Purchase Orders 3
Selecting Options for Purchase Orders 5
About Document Numbers 6
Processing and Posting Options 8
History and Statistics 15
About Changing Purchase Orders Options 19
Currency Information 25
About Specifying Currency Information 25
Setting up Multicurrency Accounting 26
Designing a Coding Scheme For Purchase Orders Records 27
About Purchase Orders Coding Schemes 27
Integrating Purchase Orders with Other Sage 300 ERP Programs 28
About G/L Integration Options 29
About Using Purchase Orders With Accounts Receivable 37
About Using Purchase Orders With Accounts Payable 37
About Using Purchase Orders With General Ledger 38
About Using Purchase Orders With Inventory Control 39
About Using Purchase Orders With Order Entry 40
About Using Purchase Orders with Project and Job Costing 40
About Using P/O with Sage Fixed Assets 41
Adding Purchase Orders Setup Records 41
About Importing and Exporting Purchase Orders Setup Records 42
Account Sets 42
Additional Costs 45
E-mail Messages 49
Items 52
User's Guide iii
Contents
Optional Fields 56
Ship-Via Codes 64
Templates 66
Vendor Details 69
Vendor Contract Costs 71
Designing Formats for Purchase Orders Reports and Forms 73
About SAP Crystal Reports 73
About Purchase Orders Forms 74
Sample formats for Printed Forms 76
About Detail LNTYPE Codes 77
Datapipe Report Parameters for Purchase Order Forms 78
Editing Datapiped Purchase Order Forms 78
Using Non-datapiped Purchase Order Forms 80
Updating Older Datapiped Purchase Order Forms 81
Adding Purchase Orders Statistics and History 81
About Adding Purchase Statistics 81
Adding and Managing Statistics 82
Deleting Purchase Statistics 83
Chapter 2: Entering and Posting Purchase Orders Transactions 85About Transaction Processing in Purchase Orders 85
Online Posting 85
Job-Related Transactions 86
Day End Processing Updates Everything Else 86
Using P/O without Inventory Control 86
Keeping Transaction History 87
Posting Journals 87
Purchase Order Types 87
About General Ledger Journal Entries Generated by Purchase Orders 90
About Optional Fields in Transactions 90
About Vendors 92
About Importing and Exporting Purchase Orders Transactions 92
iv Sage 300 ERP Purchase Orders
Contents
Tax Information 93
Currency and Exchange 101
Requisitions 104
About Processing Requisitions 104
Creating a New Purchase Requisition 107
Editing a Requisition 110
Importing Requisitions 110
Printing Requisitions 111
Deleting a Requisition 112
Purchase Orders 113
About Processing Purchase Orders 113
Entering a Purchase Order 117
Creating Purchase Orders Automatically 124
Receipts 140
About Processing Receipts 140
Entering Receipts 151
Recording the Receipt of Items for Sage Fixed Assets 161
Invoices 164
About Processing Invoices 164
Entering an Invoice 169
Entering Additional Costs on Invoices 172
Returns 175
About Processing Returns 175
Entering Returns 181
Credit/Debit Notes 190
About Processing Credit Notes and Debit Notes 190
Entering a Credit or Debit Note for a Return or Invoice 192
Adding or Editing Details Using the Detail Items Taxes Screen 197
Entering or Editing Additional Costs on Credit and Debit Notes 198
Project and Job Costing 202
About Job-Related Transaction Details 202
About Converting Units of Measure for Committed and Actual Quantities 204
User's Guide v
Contents
About Expensing Job-Related Additional Costs 205
About Job-Related Transactions 205
About Changing Job-Related Invoices 208
Serialized and Lotted Transactions 210
About Lotted Inventory Items 210
About Serialized Inventory Items 210
Receiving and Invoicing Serialized Items 211
Returning and Issuing Credit/Debit Notes for Serialized Items 213
Receiving and Invoicing Lotted Items 214
Returning and Issuing Credit/Debit Notes for Lotted Items 215
Chapter 3: Periodic Processing in Purchase Orders 219About Periodic Processing in Purchase Orders 219
Day End Processing of P/O Transactions 220
About Day End Processing 220
About Day End Processing of Job-Related Transactions 222
About Day End Processing of Credit Notes and Debit Notes 223
About Day End Processing of Purchase Orders Invoices 224
About Day-End Processing of Purchase Orders 225
About Day End Processing of Receipts 225
About Day End Processing of Returns 226
Performing Day End Processing 227
G/L Batches and Journal Entries 229
About Creating General Ledger Batches 229
Creating a Batch of General Ledger Transactions in Purchase Orders 236
Posting a Batch of Purchase Orders Invoices in Accounts Payable 238
Clearing Historical Purchase Orders Data 239
Deleting Inactive Purchase Orders Records 242
Chapter 4: Looking Up Purchase Orders Statisticsand Information 245Viewing Pending Receipts 245
vi Sage 300 ERP Purchase Orders
Contents
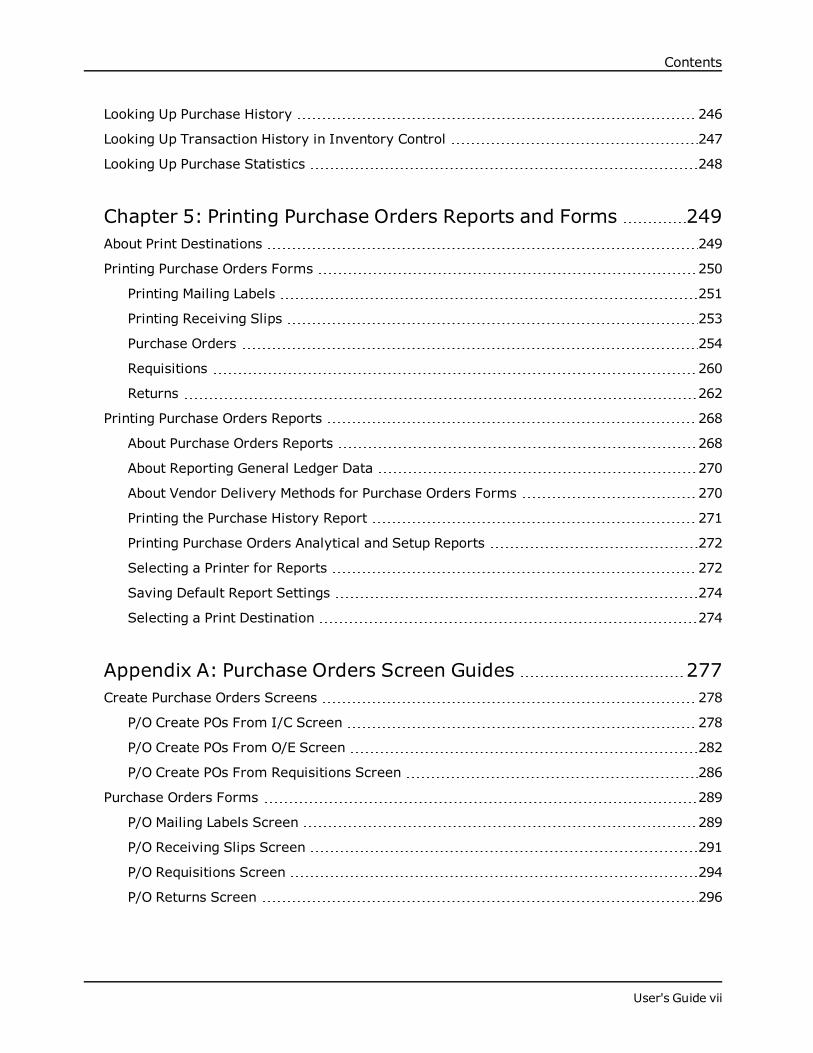
Looking Up Purchase History 246
Looking Up Transaction History in Inventory Control 247
Looking Up Purchase Statistics 248
Chapter 5: Printing Purchase Orders Reports and Forms 249About Print Destinations 249
Printing Purchase Orders Forms 250
Printing Mailing Labels 251
Printing Receiving Slips 253
Purchase Orders 254
Requisitions 260
Returns 262
Printing Purchase Orders Reports 268
About Purchase Orders Reports 268
About Reporting General Ledger Data 270
About Vendor Delivery Methods for Purchase Orders Forms 270
Printing the Purchase History Report 271
Printing Purchase Orders Analytical and Setup Reports 272
Selecting a Printer for Reports 272
Saving Default Report Settings 274
Selecting a Print Destination 274
Appendix A: Purchase Orders Screen Guides 277Create Purchase Orders Screens 278
P/O Create POs From I/C Screen 278
P/O Create POs From O/E Screen 282
P/O Create POs From Requisitions Screen 286
Purchase Orders Forms 289
P/O Mailing Labels Screen 289
P/O Receiving Slips Screen 291
P/O Requisitions Screen 294
P/O Returns Screen 296
User's Guide vii
Contents
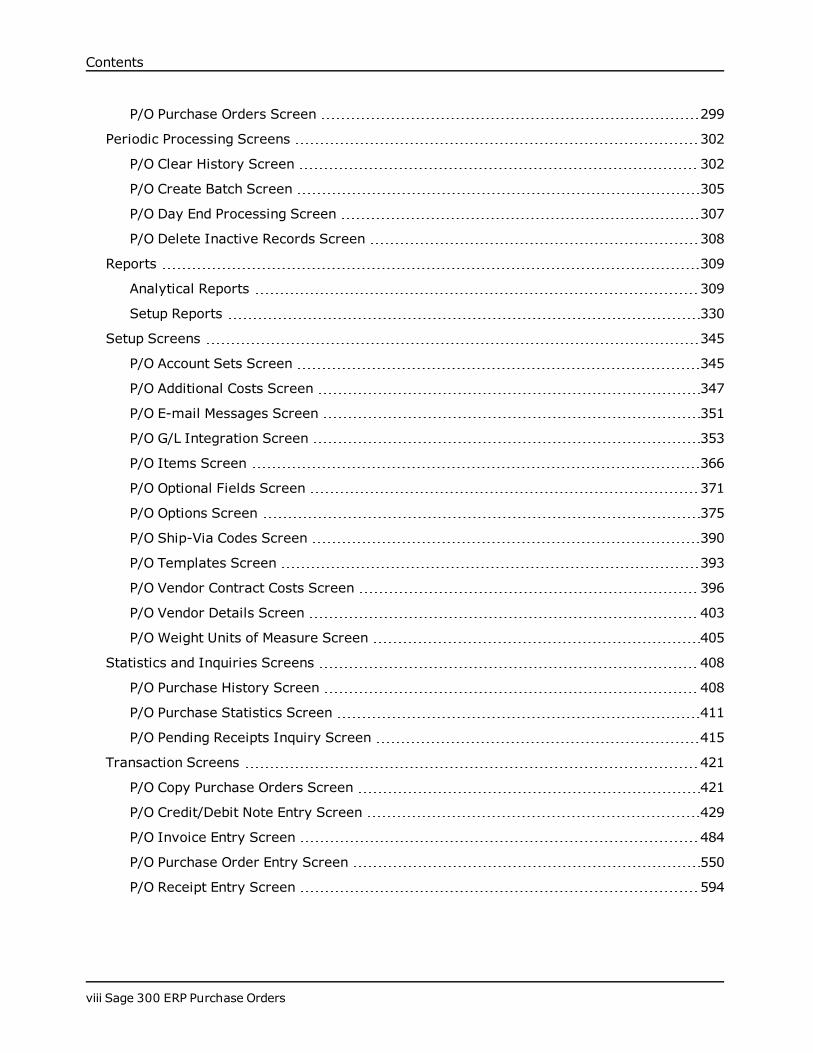
P/O Purchase Orders Screen 299
Periodic Processing Screens 302
P/O Clear History Screen 302
P/O Create Batch Screen 305
P/O Day End Processing Screen 307
P/O Delete Inactive Records Screen 308
Reports 309
Analytical Reports 309
Setup Reports 330
Setup Screens 345
P/O Account Sets Screen 345
P/O Additional Costs Screen 347
P/O E-mail Messages Screen 351
P/O G/L Integration Screen 353
P/O Items Screen 366
P/O Optional Fields Screen 371
P/O Options Screen 375
P/O Ship-Via Codes Screen 390
P/O Templates Screen 393
P/O Vendor Contract Costs Screen 396
P/O Vendor Details Screen 403
P/O Weight Units of Measure Screen 405
Statistics and Inquiries Screens 408
P/O Purchase History Screen 408
P/O Purchase Statistics Screen 411
P/O Pending Receipts Inquiry Screen 415
Transaction Screens 421
P/O Copy Purchase Orders Screen 421
P/O Credit/Debit Note Entry Screen 429
P/O Invoice Entry Screen 484
P/O Purchase Order Entry Screen 550
P/O Receipt Entry Screen 594
viii Sage 300 ERP Purchase Orders
Contents
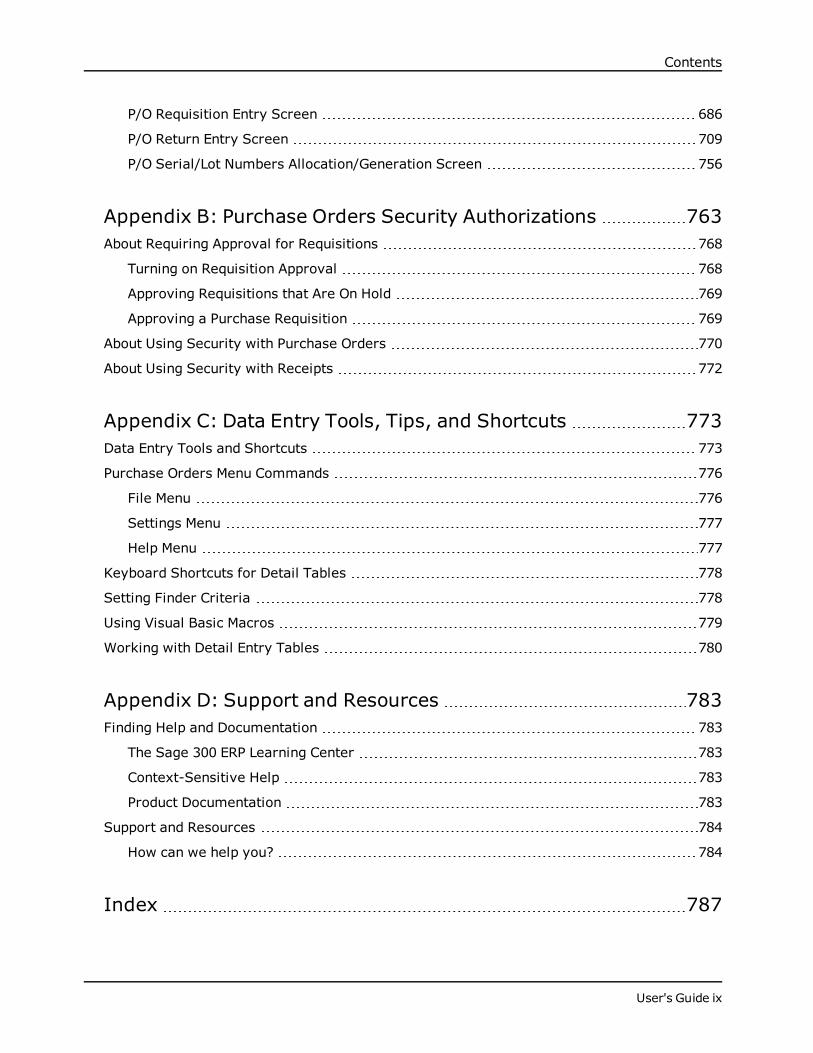
P/O Requisition Entry Screen 686
P/O Return Entry Screen 709
P/O Serial/Lot Numbers Allocation/Generation Screen 756
Appendix B: Purchase Orders Security Authorizations 763About Requiring Approval for Requisitions 768
Turning on Requisition Approval 768
Approving Requisitions that Are On Hold 769
Approving a Purchase Requisition 769
About Using Security with Purchase Orders 770
About Using Security with Receipts 772
Appendix C: Data Entry Tools, Tips, and Shortcuts 773Data Entry Tools and Shortcuts 773
Purchase Orders Menu Commands 776
File Menu 776
Settings Menu 777
Help Menu 777
Keyboard Shortcuts for Detail Tables 778
Setting Finder Criteria 778
Using Visual Basic Macros 779
Working with Detail Entry Tables 780
Appendix D: Support and Resources 783Finding Help and Documentation 783
The Sage 300 ERP Learning Center 783
Context-Sensitive Help 783
Product Documentation 783
Support and Resources 784
How can we help you? 784
Index 787
User's Guide ix

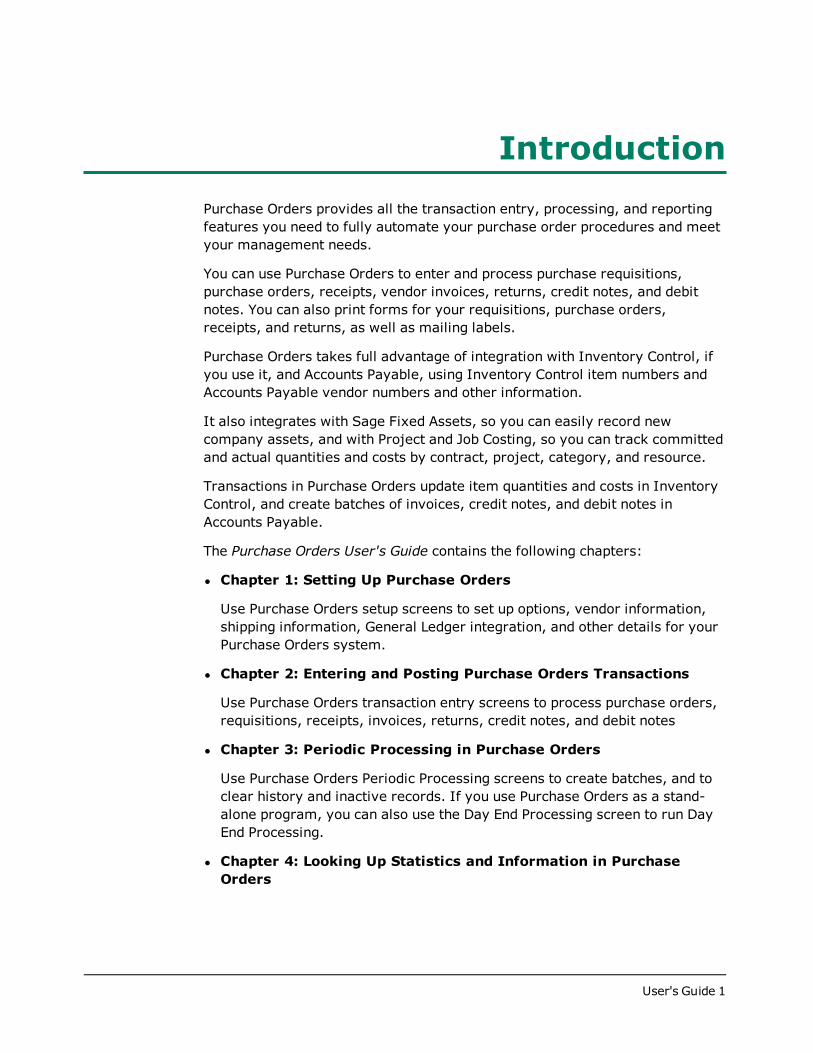
IntroductionPurchase Orders provides all the transaction entry, processing, and reportingfeatures you need to fully automate your purchase order procedures and meetyour management needs.
You can use Purchase Orders to enter and process purchase requisitions,purchase orders, receipts, vendor invoices, returns, credit notes, and debitnotes. You can also print forms for your requisitions, purchase orders,receipts, and returns, as well as mailing labels.
Purchase Orders takes full advantage of integration with Inventory Control, ifyou use it, and Accounts Payable, using Inventory Control item numbers andAccounts Payable vendor numbers and other information.
It also integrates with Sage Fixed Assets, so you can easily record newcompany assets, and with Project and Job Costing, so you can track committedand actual quantities and costs by contract, project, category, and resource.
Transactions in Purchase Orders update item quantities and costs in InventoryControl, and create batches of invoices, credit notes, and debit notes inAccounts Payable.
The Purchase Orders User's Guide contains the following chapters:
l Chapter 1: Setting Up Purchase Orders
Use Purchase Orders setup screens to set up options, vendor information,shipping information, General Ledger integration, and other details for yourPurchase Orders system.
l Chapter 2: Entering and Posting Purchase Orders Transactions
Use Purchase Orders transaction entry screens to process purchase orders,requisitions, receipts, invoices, returns, credit notes, and debit notes
l Chapter 3: Periodic Processing in Purchase Orders
Use Purchase Orders Periodic Processing screens to create batches, and toclear history and inactive records. If you use Purchase Orders as a stand-alone program, you can also use the Day End Processing screen to run DayEnd Processing.
l Chapter 4: Looking Up Statistics and Information in PurchaseOrders
User's Guide 1
Introduction
Use Purchase Orders Statistics and Inquiries screens to look up informationabout vendors and transactions.
l Chapter 5: Printing Purchase Orders Reports and Forms
Use Purchase Orders Reports screens to print setup reports and analyticalreports.
Use the report forms that come with Purchase Orders to print purchaseorders, requisitions, returns, mailing labels, and receiving slips, or select acustomized version.
l Appendix A: Purchase Orders Screen Guides
Learn how to find and use Sage 300 ERP screens. Each screen guideincludes navigation information, field help, and a list of tasks you can usethe screen to perform.
l Appendix B: Purchase Orders Security Authorizations
If security is turned on for your Sage 300 ERP system, the systemadministrator must assign these security authorizations to users forPurchase Orders screens.
l Appendix C: Data Entry Tools, Tips, and Shortcuts
Use these tools and shortcuts to speed up data entry in Sage 300 ERP.
l Appendix D: Support and Resources
Find support and resources to help get Sage 300 ERP up and runningquickly.
2 Sage 300 ERP Purchase Orders
Chapter 1: Setting UpPurchase Orders
Set up accounts, security authorizations, records, templates, options, andother details for your Purchase Orders system.
Setting up Purchase OrdersYou can use Purchase Orders with or without Inventory Control. If you aresetting up Purchase Orders as a stand-alone program (without InventoryControl), you must set up some additional records and options in PurchaseOrders.
Before you start:
l Install the following Sage 300 ERP programs:
System Manager (with Bank Services and Tax Services).
Accounts Payable.
General Ledger (if you use it).
Inventory Control (if you use it).
l Create a company database and choose company-wide options in CommonServices. If needed, add information about the currencies used in yourPurchase Orders system.
l Activate Tax Services, and then add information about the taxes used inyour Purchase Orders system.
To set up your Purchase Orders system:
1. Activate Purchase Orders, select options, and add background informationand optional fields.
a. Activate the Purchase Orders program for your data.
b. Use the Options screen to specify how your system will operate. Formore information, see "P/O Options Screen " (page 375).
User's Guide 3

Chapter 1: Setting Up Purchase Orders
c. Use the G/L Integration screen to specify how your Purchase Ordersprogram will integrate with the General Ledger module. For moreinformation, see "P/O G/L Integration Screen" (page 353).
d. Design coding schemes for your Purchase Orders records.
e. Add records and print reports for:
Account sets (stand-alone program). For more information, see"P/O Account Sets Screen " (page 345).
Additional cost codes. For more information, see "P/O AdditionalCosts Screen" (page 347).
Items (stand-alone program). For more information, see "P/OItems Screen" (page 366).
Optional Fields. For more information, see "P/O Optional FieldsScreen " (page 371).
Ship-via codes. For more information, see "P/O Ship-Via CodesScreen" (page 390).
Templates. For more information, see "P/O Templates Screen "(page 393).
Vendor contract costs. For more information, see "P/O VendorContract Costs Screen" (page 396).
Vendor details (stand-alone program). For more information,see "P/O Vendor Details Screen " (page 403).
Weight Units of Measure (stand-alone program). For moreinformation, see "P/O Weight Units of Measure Screen " (page 405).
2. Design the formats for your printed and e-mailed forms.
a. Design and test formats for printing requisitions, purchase orders,receiving slips, returns, and mailing labels, or adapt the sampleformats to print on your own forms.
b. Design and test e-mail messages for purchase orders and purchasereturns. For more information, see "P/O E-mail Messages Screen"(page 351).
3. Add current transactions.
a. Add outstanding requisitions.
4 Sage 300 ERP Purchase Orders
Selecting Options for Purchase Orders
b. Add outstanding purchase orders.
c. Add current invoices, receipts, credit notes, debit notes, and returns.
d. Print reports of the transactions you added (optional).
To properly set up your Purchase Orders system, you should enter and postall incomplete requisitions and purchase orders when you are setting up.
You use the Requisition Entry and Purchase Order Entry screens to add thetransactions. When you post purchase orders, quantities on purchase orderare updated in Inventory Control. For more information, see "P/ORequisition Entry Screen " (page 686) and "P/O Purchase Order Entry Screen" (page 550).
You can run Day End Processing after posting requisitions and purchaseorders to update history and statistics in both Purchase Orders andInventory Control (if you keep history and statistics in both programs).
You can also add some statistical information from your previous system.For more information, see "About Adding Purchase Statistics" (page 81).
4. Add historical transactions and statistics (optional).
a. Add purchasing history for previous periods and years.
b. Add purchasing statistics for previous periods and years.
c. Print the Purchase History and Purchase Statistics reports. For moreinformation, see "P/O Purchase History Report" (page 319) and "P/OPurchase Statistics Report Screen" (page 324).
5. If you are setting up Purchase Orders as a stand-alone program and youwant to allow fractional quantities, select Allow Fractional Quantities onthe Processing tab of the P/O Options screen, and add the weight unit ofmeasure.
Selecting Options for Purchase OrdersAfter you install and activate Purchase Orders for your company database, youselect Purchase Orders processing options and enter general information aboutyour purchase orders ledger. You enter this information on the P/O Optionsscreen, which you also use to change settings after setup.
User's Guide 5
Chapter 1: Setting Up Purchase Orders
About Document Numbers
Purchase Orders can automatically assign document numbers to eachpurchase order, requisition, receipt, and return document you add, or you cantype your own document numbers as you enter the transactions. (Whenentering invoices, credit notes, and debit notes, you use the documentnumbers assigned by your vendors.)
To automatically assign the consecutive, unique document numbers you needto requisitions, purchase orders, receipts, and returns, specify the numbers touse on the Document tab of the P/O Options screen. You can probably continueusing the numbering scheme from your old purchase order system.
When you first activate your Purchase Orders system, the program providesdefault document number lengths, prefixes, and numbers.
You can change all of the default information, setting a different length, prefix,and next number for each type of document.
Changing the Next Document Number
You can change document number specifications as needed, varying thelengths, prefixes, or next numbers to use.
If you want to change the next number to assign in the P/O Options screen to alower number you may have used before, you should also change the prefixfor the document type, to avoid accidentally creating duplicate numbers.
Entering Your Own Document Numbers with Transactions
If you enter your own document numbers when you add transactions inPurchase Orders, the program does not update the next number in the Optionsscreen, even if you use the same number as the program would haveassigned.
If the program tries to assign a document number that you entered manuallyfor another transaction, you will see an error message. You must then changethe next number in the Options screen for the type of document before youcan resume automatically assigning numbers.
Number of Characters in Document Numbers
The numbers you assign to requisitions, purchase orders, receipts, andreturns can be up to 22 characters long, including prefix characters, if any.You can change the number of characters in any of your document numbers atany time.
6 Sage 300 ERP Purchase Orders
Selecting Options for Purchase Orders
Although you do not have to use prefixes in your document numbers, they arean important means of identifying the transaction type and creating meaningfuldocument numbers. Each prefix must be unique and can include up to sixcharacters.
The next number to assign can contain as many characters as are permitted bythe length you specify, minus the prefix characters. If you type a shorternumber, the program places as many zeroes in front of it as are needed for thespecified length.
Purchase Orders increases the number for each document type by 1 each timeyou post a transaction of the type and let the program assign the documentnumber. You are not forced to use the number assigned by the program (youcan type your own numbers); but if you use automatic numbering, your auditingprocedures are simplified because you cannot accidentally skip any numbers.
Numbers assigned to each type of document can go as high as all 9s. They arethen automatically reset to zero.
Reusing Document Numbers
You cannot use the same prefix and document number more than once forrequisitions, purchase orders, receipts, and returns, unless you first use theClear History screen to clear completed transactions with the numbers you wishto reassign.
When you enter an existing document number, the program assumes you wishto edit the requisition, purchase order, receipt, or return, and displays theinformation for the transaction.
If necessary, you can enter more than one invoice, credit note, or debit notewith the same number in Purchase Orders, (although you cannot post duplicatedocument numbers in Accounts Payable). When you enter an existing documentnumber in the Invoice Entry or Credit/Debit Note Entry screen, the programdisplays a Finder that lets you choose whether to view the previous transactionor enter a new transaction with the same number.
Using Default Document Numbers
If you do not specify lengths, prefixes, and document numbers, but allowPurchase Orders to assign the numbers, the program automatically assigns 1 asthe first number for each document type. The assigned number is preceded bythe number of zeroes that will make up the default number of characters set bythe program as the number length.
User's Guide 7
Chapter 1: Setting Up Purchase Orders
Using Purchase Orders Document Numbers in Inventory Control and AccountsPayable
Because you can enter receipts in both Inventory Control and PurchaseOrders, and because you post Purchase Orders invoices, credit notes, anddebit notes in Accounts Payable, you may want to avoid duplicate numbers inthe three programs. You should then take care when assigning documentnumbers in Purchase Orders.
l Inventory Control receipt numbers. If you post receipts in bothPurchase Orders and Inventory Control, you can assign a different prefixand next number for receipts in the two programs so that you easily identifythe program where a receipt was entered.
l Using unique invoice, credit note, and debit note numbers. To avoidconflicts with the document numbers you assign to invoices, credit notes,and debit notes in Accounts Payable, use unique prefix and numbercombinations for these transactions when you post them in PurchaseOrders.
Processing and Posting Options
Set up Purchase Orders options for processing and posting transactions, andfor running Day End Processing.
About Selecting Processing Options
Use the Processing tab of the P/O Options screen to set options that determinehow Purchase Orders processes transactions, including whether it:
l Permits entry of transactions using item numbers that are not included inInventory Control (Allow Non-inventory Items option). For moreinformation, see "About Allowing Entry of Non-inventory Item Numbers"(page 10).
l Saves transaction history (all details of posted transactions) to a file forreporting (Keep Transaction History option).
l Keeps a list of all the vendors from whom you purchase individual items(Accumulate Purchase History option). For more information, see "AboutAccumulating Purchase History" (page 15).
l Saves statistical totals from posted transactions (Accumulate Statisticsoption). For more information, see "About Accumulating Statistics" (page16).
8 Sage 300 ERP Purchase Orders
Selecting Options for Purchase Orders
l Requires requisition approval before they can be added to purchase orders.For more information, see "About Requiring Approval for Requisitions" (page768).
You can also specify the following information:
l Default Template Code—for the information that is displayed when youenter new purchase orders and requisitions. For more information, see"About Templates" (page 66).
l The Default Item Cost—costing method for default item costs that appearfor transaction detail lines, if you use Inventory Control. For moreinformation, see "About Default Item Cost" (page 10). (If you do not useInventory Control, the default item cost is set to Vendor Cost.)
l Item Options, if you do not use Inventory Control:
Choose whether to process transactions that use fractional quantities ofitems.
Set the weight unit of measure that Purchase Orders will use to allocateadditional charges to items by weight. If necessary, you can change theweight unit of measure after setting up your system. However, if you haveentered any weights in item records, you will need to change them so theycorrespond to the new unit of measure. For more information, see "AboutWeight Units of Measure" (page 14).
Set the default aging periods by which the program groups outstandingorders on reports.
Purchase Orders groups outstanding transactions for the Aged PurchaseOrders report into five periods: a current (not due) period and fourprevious periods.
You specify the length of each aging period on the Processing tab of theP/O Options screen.
Note: You can specify different periods when you are printing the report,and you can change the default periods at any time.
In multicurrency systems, you can also check the functional currency for theledger and the choice for the Multicurrency option, and you can specify a defaultrate type. For more information, see "About Specifying Currency Information"(page 25).
User's Guide 9
Chapter 1: Setting Up Purchase Orders
About Allowing Entry of Non-inventory Item Numbers
All purchase order documents require item numbers and details before youcan save and post the transactions. The Allow Non-inventory Items option letsyou use item numbers in Purchase Orders that you have not added to yourSage 300 ERP Inventory Control system.
Non-inventory items can include non-stock items you have not added toInventory Control, items you plan to add to Inventory Control later, one-timepurchases, services, and items needed for use in your business.
Purchase Orders does not update item quantities or other information inInventory Control when you post transactions for non-inventory items. Thegeneral ledger entries for non-inventory details are created in AccountsPayable, so are not listed on the G/L Transactions List if you print it fromPurchase Orders.
When entering details for non-inventory items, you must type an itemnumber, using up to 24 characters (including separators), and a description ofup to 60 characters. You also specify a general ledger expense accountnumber for each non-inventory detail.
When Not to Use the Option
Do not select the option if you want to enter transactions only for items thatare defined in Inventory Control, so that item details posted in PurchaseOrders always update item quantities and other information in InventoryControl.
Changing Your Selection
You can change your selection for this option at any time. If you change fromallowing non-inventory items to not allowing them, you must edit any openpurchase orders and other transactions to remove non-inventory itemnumbers, or add the item numbers in Inventory Control.
About Default Item Cost
If you use Sage 300 ERP Inventory Control, you can specify during setup thetype of cost you want the program to use when selecting default unit costamounts to display for the item details you enter on transactions. The optiondisplays costs by location for the item numbers in your Inventory Controlsystem.
10 Sage 300 ERP Purchase Orders

Selecting Options for Purchase Orders
You can choose to display Most Recent Cost, Standard Cost, Average Cost, LastUnit Cost, Vendor Cost, or either of the two user-defined costs you can enterwith item records in Inventory Control.
Note: If you do not use Inventory Control, Vendor Cost is set as the defaultitem cost, and you cannot change it.
When entering transaction details, you can change the cost amount thatappears. You can also change your choice for the Default Item Cost option atany time.
About Retainage (Holdback) Accounting
If you use retainage accounting in Accounts Payable, Purchase Orders lets youaccount for retainage (or a holdback) that occurs when you withhold apercentage of an invoiced amount, usually by mutual agreement or according toa statute (such as a Builders Lien Act).
Note: You can only specify retainage if you are using Project and Job Costingand the transaction is job-related.
Before Using Retainage AccountingBefore you can process retainage in Purchase Orders, you must:
l Select the option to use retainage accounting on the Processing tab of the A/POptions screen.
l Specify default retainage settings for vendors on the Retainage tab of the A/POptions screen.
l Specify a retainage control account for each account set in your AccountsPayable system.
l Set up contracts in Project and Job Costing.
There are three steps in processing retainage:
1. Process a receipt, invoice, debit note or credit note that specifies a holdback(retainage) for the document.
2. Transfer the invoice or debit note with the retainage to Accounts Payable andpost it in that program.
3. Later, post a separate retainage invoice, debit note, or credit note to invoicethe outstanding retainage amount.
User's Guide 11
Chapter 1: Setting Up Purchase Orders
Entering Original Documents with Retainage
An invoice, debit note, or credit note from which retainage is taken is called anoriginal document.
You enter the receipt, invoice, debit note, or credit note using the standardP/O entry screens. To indicate that retainage applies to the document,however, you select the Job-Related option and the Retainage option.
Note: The Retainage option appears only if you selected the RetainageAccounting option for your Accounts Payable system.
The program then displays the Retainage tab for the entry screen, where youcan specify:
Retainage PercentageThe program uses the retainage percentage to calculate the retainage amount.
You can enter a different retainage percentage in the Retainage Percentage(%) field. When you enter a new percentage, the program recalculates theretainage amount.
Retention PeriodThe program uses the retention period to calculate the due date for theretainage document. When you change the retention period, the programrecalculates the retainage due date, and vice versa.
Retention RateYou use this field to specify how the exchange rate is determined for theretainage document. You can choose one of the following:
l Use Original Document Exchange Rate. Use the same rate as thedocument you are processing.
l Use Current Exchange Rate. Use the rate that is in effect when youprocess the retainage document.
Retention TermsYou can use different terms for retainage documents (used to process invoicesfor outstanding retainage) than you used for the original document from whichthe retainage was taken.
The program displays the code specified for retainage terms in the vendorrecord, but you can change the retainage terms for a document, if you wish.
12 Sage 300 ERP Purchase Orders
Selecting Options for Purchase Orders
Note: All tax amounts are included on the original retainage document. No taxamounts are included on the retainage invoice, debit note, or credit note thatyou process to clear the outstanding retainage amount.
Posting original invoices, debit notes, and credit notes
When you post the original retainage document in Accounts Payable, theprogram deducts the retainage from the document total, and posts the amountto the retainage control account.
For example, if you enter an invoice for $10,000 with 10% retainage, an invoiceis posted for $9,000 with retainage outstanding of $1,000.
The retainage amount remains in the control account until you invoice it inaccordance with:
l The retention period or retainage due date specified for the invoice.
l The number of days in advance specified on the A/P Options screen forgenerating retainage documents.
Adjusting Original Documents
Use Adjustment Entry in Accounts Payable to change retainage related toexisting invoices, debit notes, and credit notes. When you post the adjustment,the program adjusts the outstanding retainage account.
Note that Accounts Payable does not calculate any retainage on adjustmenttransactions. You must enter the retainage manually, whether you are adding itfor the first time, or adjusting existing retainage debits or credits.
Options for Reporting Tax on Retainage Documents
Sage 300 ERP lets you specify when to report tax on retainage amounts to meetthe requirements of your tax jurisdictions.
Example: In Canada, you report the GST for a retained amount when youissue the retainage invoice.
You can choose from three options when you set up Tax Authorities in TaxServices:
l No Reporting. If the Report Tax on Retainage Document field is set to NoReporting, users can enter values for the tax authority in the Maximum TaxAllowable and No Tax Charged Below fields.
User's Guide 13
Chapter 1: Setting Up Purchase Orders
l At Time of Retainage Document. When this option is selected, taxes arecalculated on the retainage portion of an invoice when the retained amountis invoiced.
l At Time of Original Document. When this option is selected, theprogram calculates and invoices the retainage portion of the tax up front.
About Weight Units of Measure
Note: You set up weight units of measure in Purchase Orders only if you donot use Inventory Control.
Weight units of measure (UOM) are used to express order weights. PurchaseOrders can also use the weight UOM to prorate (distribute) additional costs onorders.
In a stand-alone Purchase Orders system, you use the P/O Weight Units ofMeasure screen to set up weight units of measure for all the items in thePurchase Orders item list.
For each weight unit of measure, you specify a default weight unit of measurethat has a conversion factor of 1. All other weight UOMs are defined in termsof the default weight UOM.
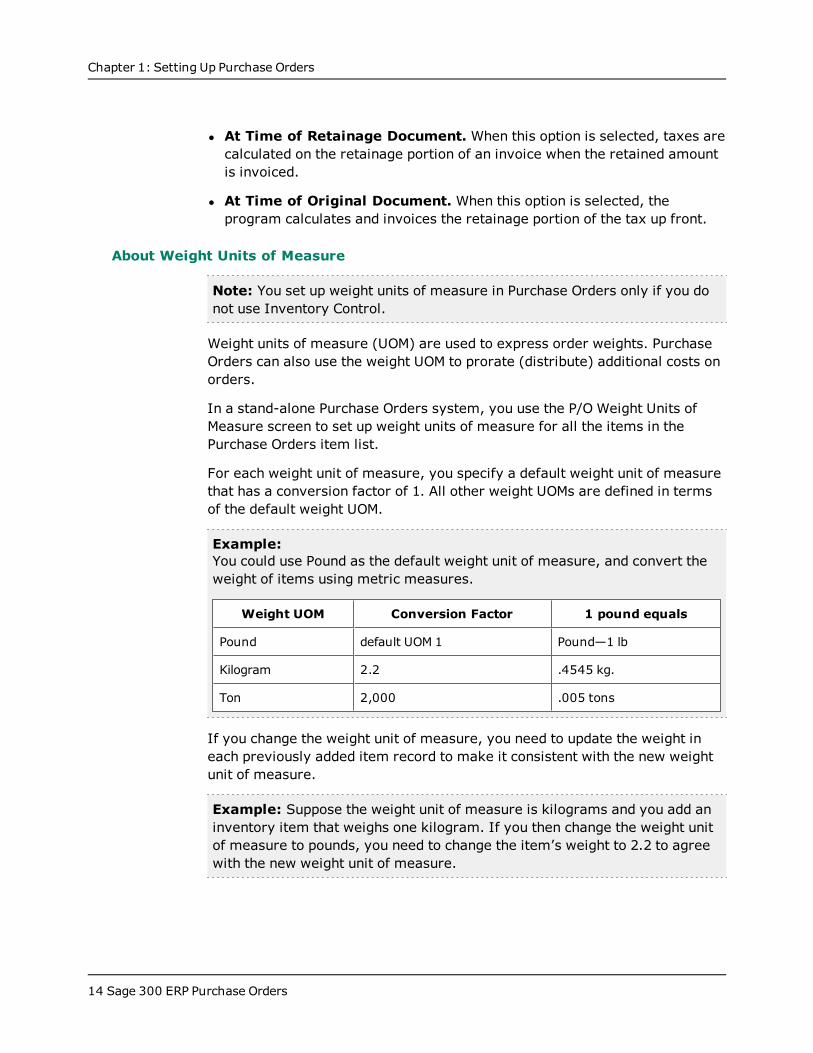
Example:You could use Pound as the default weight unit of measure, and convert theweight of items using metric measures.
Weight UOM Conversion Factor 1 pound equals
Pound default UOM 1 Pound—1 lb
Kilogram 2.2 .4545 kg.
Ton 2,000 .005 tons
If you change the weight unit of measure, you need to update the weight ineach previously added item record to make it consistent with the new weightunit of measure.
Example: Suppose the weight unit of measure is kilograms and you add aninventory item that weighs one kilogram. If you then change the weight unitof measure to pounds, you need to change the item’s weight to 2.2 to agreewith the new weight unit of measure.
14 Sage 300 ERP Purchase Orders
Selecting Options for Purchase Orders
Note: You can use fractions in weight conversion factors even if you do notuse fractional inventory quantities.
For step-by-step instructions on using the Weight Unit of Measure screen toadd, edit, or delete a weight units of measure, see "P/O Weight Units ofMeasure Screen " (page 405).
History and Statistics
Set up options for entering and maintaining transaction history and statistics.
About Accumulating Purchase History
In Purchase Orders, you can keep purchase history for analysis and reportingpurposes.
Selecting Options for Keeping History
You select options to keep history on the Processing tab of the P/O Optionsscreen.
Select the Accumulate Purchase History option to keep information aboutthe items you have purchased and the vendors who supplied them. Selectingthe option also keeps information about invoices, credit notes, debit notes, anditems you returned.
You can then view the information in the Purchase History screen, use theHistory button to look it up when you are entering transactions, and print it onthe Purchase History report.
Purchase Orders keeps purchase history by the type of year (fiscal or calendar)and period you select for the Accumulate By and Period Type options on theProcessing tab.
If you choose to accumulate by calendar year, the starting date for the year willbe January 1. If you accumulate by fiscal year, the starting date will be the firstday of your fiscal year.
Note: You can turn on or turn off the Accumulate Purchase History option atany time. If you turn off the option after you have used it, Purchase Orderskeeps the figures already accumulated until you clear them. If you turn on theoption again before clearing the history you accumulated previously, the datawill still be available, but there will be no figures for the period during whichthe option was off.
User's Guide 15
Chapter 1: Setting Up Purchase Orders
Note: You can keep data for up to 53 periods per year (54 periods in a leapyear), for any number of years.
Turning the Options On and Off
You can turn any of the options to keep history and statistics on or off at anytime. If you turn them off after you have used them, Purchase Ordersimmediately stops saving information, although it retains the figures alreadycollected until you clear (delete) them using the Clear History screen.
If you turn the option on again, there will be a gap in the collected informationcorresponding to the period when the option was not used.
For more information, see "About Selecting Processing Options" (page 8).
About Accumulating Statistics
Use the Accumulate Statistics option (on the P/O Options screen) to keepstatistical totals for all the transactions you post in Purchase Orders, includingfor each period:
l The number of posted purchase orders, receipts, invoices, returns, creditnotes, and debit notes.
l The net quantity purchased, net purchase amount, and net invoice amount.
l The largest and smallest invoice, credit note, and debit note amounts, andthe vendors for whom you posted them.
l The average invoice, credit note, and debit note amount.
You can see the information in the Purchase Statistics screen and print it onthe Purchase Statistics report.
Purchase Orders keeps purchase statistics by the type of year (fiscal orcalendar) and period you select using the Accumulate By and Period Typeoptions on the Processing tab of the P/O Options screen.
Selecting the Type of Year
If you choose to accumulate by calendar year, the starting date for the yearwill be January 1.
If you accumulate by fiscal year, the starting date will be the first day of yourfiscal year.
16 Sage 300 ERP Purchase Orders
Selecting Options for Purchase Orders
Selecting the Type of Period
You can also keep the data for up to 53 periods per year (54 periods in a leapyear), for any number of years.
Use the Period Type option to select from these period types: weekly(Sunday = day 1), seven days (beginning on the first day of the week in yourfiscal calendar), bi-weekly (Sunday = day 1), four weeks, monthly, bi-monthly,quarterly, semi-annually, annually, or fiscal period (use the Period Typeoption).
Editing Statistics
If you use the Allow Edit Of Statistics option, you can edit and import thestatistical totals that are kept by Purchase Orders.
Use the Purchase Statistics screen to edit the statistics.
Note: Normally, you do not need to change statistics, because they areupdated automatically and accurately by Purchase Orders. However, if you setup your Purchase Orders system partway through a fiscal year, you may wantto select the Allow Edit Of Statistics option so that you can enter statisticsfrom your old purchase order system for previous periods of the current yearor for previous years.
For more information, see "P/O Purchase Statistics Screen" (page 411).
Changing the Method of Accumulating Statistics
Transaction history is kept by date.
You can change the type of year and period by which Purchase Orders keepspurchase history and statistics, but you will not then be able to compare newperiod figures directly to figures in past periods.
If you need to change the type of year or period by which Purchase Ordersaccumulate purchase history and statistics after you have processedtransactions, you should either do so after year-end, or edit the statistics forthe earlier periods in the year to correct distortions. The program reminds youof this information when you change the selection for the Accumulate By orPeriod Type option for the Accumulate Statistics and Accumulate PurchaseHistory options.
Note: The Sage 300 Standard ERP maintains statistics by fiscal year andperiod.
User's Guide 17
Chapter 1: Setting Up Purchase Orders
About Keeping Transaction History
If you select Keep Transaction History in the P/O Options screen, theprogram keeps details of posted transactions until you remove them using theClear History screen.
You can print Transaction Lists of the data—and reprint requisitions, purchaseorders, receiving slips, and returns—until you clear the transaction history forthem.
Transaction and Audit Reports
You can print transaction history on the Transaction List. All transactions youposted in Purchase Orders can appear on the list until you clear them using theClear History screen.
You can also print the Payables Clearing Audit list for receipts you posted inPurchase Orders and invoices you processed using Day End Processing.
Transaction History Required for Drilldown
You must keep history to drill down from the G/L Transaction History screen inGeneral Ledger, or from the Invoice Entry screen in Accounts Payable, to theoriginating transaction in Purchase Orders.
Important!If you do not keep transaction history, Purchase Orders automaticallydeletes completed transactions when you run Day End Processing, and youwill not be able to drill down to Purchase Orders transactions from GeneralLedger or Accounts Payable. Mor e ...
Purchase Orders treats the following transactions as completed:
l Requisitions, purchase orders, receipts, and returns with a Completedstatus on all detail lines.
l All invoices, credit notes, and debit notes (these transactions arecompleted when you post them).
If you do not keep history, you cannot display or print copies of completedrequisitions, purchase orders, receipts, and returns after you run Day EndProcessing, and you cannot look up the invoices, credit notes, and debitnotes you posted before posting or running Day End Processing.
18 Sage 300 ERP Purchase Orders
Selecting Options for Purchase Orders
Allowing Editing Of Sales Statistics
If you selected the Allow Edit Of Statistics option in the P/O Options screen,you can add transaction data for inventory items, as well as for purchases andreturn quantities and amounts for the years and periods for which you keepdata in your Purchase Orders system.
Before you start:
l Make sure you have the proper security rights for this task.
l Select the Keep Item Statistics and Allow Edit Of Statistics options inthe P/O Options screen.
To change processing options for Purchase Orders:
1. Open Purchase Orders > P/O Setup > Options.
2. Click the Processing tab.
3. Change the Allow Edit Of Statistics option.
4. Click Save.
After changing statistics
l Print the Sales Statistics report to check the new record information and toupdate your printed records.
l Compare the report you printed before changing or deleting statistics tothose printed after the changes, to verify that you made the required changescorrectly.
l Clear the Allow Edit Of Statistics option on the Processing tab of the P/OOptions screen.
About Changing Purchase Orders Options
You can readily change most of your choices on the P/O Options screen. Thesechanges include:
l Company name and address.
l Multicurrency option.
l History and statistics.
User's Guide 19
Chapter 1: Setting Up Purchase Orders
Make sure you understand the impact the options have on processing withinPurchase Orders before changing any of the settings or other information inthe P/O Options screen.
Important! Before attempting to save changes to the P/O Options screen,make sure that no other users are using the data for the Purchase Orderscompany and that no other Purchase Orders screens are open for thecompany on your computer. You cannot save most changes if other PurchaseOrders screen are open.
Company Name and Address
Use the Options screen in the P/O Setup folder to change the contact name,telephone number and fax number for the Purchase Orders administration.
Use the Company screen in Common Services to change the company nameand address, or to change the contact name, telephone number, and faxnumber at the company level.
Multicurrency Option
You select the Multicurrency option in the Accounts Payable Options screen,turning it on or not for Purchase Orders as well. Once you select the option inAccounts Payable, you cannot turn it off.
If you will be using the Multicurrency option in Purchase Orders, you alsospecify a default rate type to use when converting multicurrency PurchaseOrders transactions to the functional currency.
History and Statistics
You should change the type of year and period by which you keep statisticsonly at year end. If you change partway through a year, figures will bedistorted in some periods and you will have to make corrections in all recordsfor which you keep statistics.
Note: The Sage 300 Standard ERP accumulates statistics by fiscal year andfiscal period.
Changing Purchase Orders Processing Options
You can change any of the selections and information on the P/O Optionsscreen, with a few restrictions.
20 Sage 300 ERP Purchase Orders
Selecting Options for Purchase Orders
l You cannot change the choice for the Multicurrency option. You make theselection for this option in the A/P Options screen, and can change yourchoice only in Accounts Payable. (Note that you cannot turn off theMulticurrency option once you have selected it and saved your changes to theA/P Options screen.)
l You can change the type of year (fiscal or calendar) and period by which youaccumulate item statistics (in Sage 300 Advanced ERPand Sage 300 PremiumERP), but you should do so only at fiscal or calendar year end.
l If you change either method part way through a year, the statistics alreadyaccumulated will be incorrect or in the wrong period.
For more information on options that you select or change on the Processing tabin the P/O Options screen, see "P/O Options Screen " (page 375).
Note: If you use Inventory Control, you use the I/C Options screen to specifywhen to cost inventory.
Before you start:
l Make sure that you know the effects of all changes and understand theimpact the options have on processing within Purchase Orders.
l Print the P/O Options report from the Setup Reports folder so you have arecord of your processing options before you start.
l If you are changing from updating costs during day end processing toupdating costs during posting, you must first run day end to cost alloutstanding posted transactions.
l Before saving changes to the P/O Options screen, make sure that no otherPurchase Orders screens are open for your database on your computer or onany other computer on a network. You cannot change most of your choices inthe P/O Options screen if other Purchase Orders screens are open, or otherusers are working with the Order Entry data.
To change P/O processing options:
1. Open Purchase Orders > P/O Setup > Options.
For more information, see "P/O Options Screen " (page 375).
2. Click the Processing tab.
User's Guide 21
Chapter 1: Setting Up Purchase Orders
Note: Costing items and creating subledger transactions and auditinformation during posting increases the time it takes to posttransactions. If you change from updating costs during day endprocessing to updating costs during posting, you must first run day end tocost all outstanding posted transactions.
3. Click Save to save any changes to processing options.
After changing P/O OptionsPrint the P/O Options report from the Setup Reports folder to check that thesettings were changed correctly.
Changing Posting and Day End Processing Options
Important! If you use the Inventory Control module, you select day-endprocessing and costing options in that program.
You change day end processing and costing options in Purchase Orders only ifyou do not use Inventory Control. Mor e ...
If you use Purchase Orders as a stand-alone program, you set all the followingoptions in Purchase Orders:
l When Purchase Orders creates G/L batches, and whether it should also postthem automatically. (You select this option in the P/O G/L Integrationscreen.)
l Whether Purchase Orders should post A/P batches automatically or usingthe Create Batch icon. (You select this option in the P/O Options screen.)
l When Sage 300 ERP costs inventory—either when posting transactions orwhen you run Day-End Processing.
Tip: If you have high transaction volumes or if processing speed is anissue, we suggest that you cost inventory during Day End Processing—noteach time you post a transaction in Purchase Orders.
l When to create sub-ledger and audit information. Again, if speed is aconcern, we suggest during Day End Processing.
l When to create General Ledger transaction batches, and whether it shouldalso post them automatically.
If you use Inventory Control, you set these options in the correspondingscreen in that program.
22 Sage 300 ERP Purchase Orders
Selecting Options for Purchase Orders
Note: These options also affect when Purchase Orders posts General Ledgerand Accounts Payable batches.
Before you start:
l Make sure that no other users are working with Purchase Orders, or you willnot be able to save your changes.
l Print the G/L Integration report from the Setup Reports folder so you have arecord of your G/L Integration settings before you start.
l If you are changing from updating costs during day end processing toupdating costs during posting, you must first run day end to cost alloutstanding posted transactions.
l If you are changing from using the Create G/L Batch screen to creatinggeneral ledger transactions during day-end processing, be sure to run CreateG/L Batch to process any outstanding transactions first, to avoid accidentallyomitting transactions from your general ledger batches.
l See "About Day End Processing" (page 220) to understand how Day EndProcessing works.
Note: Make sure that no one else is using the Purchase Orders data and thatno other Purchase Orders screen s are open for the company before you savechanges.
To change batch creation and posting options for A/P transactionscreated by Purchase Orders:
1. Open Purchase Orders > P/O Setup > Options.
For more information, see "P/O Options Screen " (page 375).
2. Click the Processing tab.
3. Change the Post A/P Batches option.
Note: If you choose to post A/P batches when you post P/O transactions,and you cost inventory during transaction posting, Purchase Orders willcreate and post an A/P batch each time you post an invoice.
4. When you have finished, click Save .
User's Guide 23
Chapter 1: Setting Up Purchase Orders
To change batch creation and posting options for G/L transactionscreated by Purchase Orders:
Important! If you have been using the Create Batch screen to createtransactions, print a copy of the latest G/L Transactions report, then createany outstanding transactions before changing your choice for this option.
1. Open Purchase Orders > P/O Setup > G/L Integration.
For more information, see "P/O G/L Integration Screen" (page 353).
2. Change batch creation and posting options, as needed.
3. When you have finished, click Save .
To change day end processing options:
1. Open Purchase Orders > P/O Setup > G/L Integration.
2. On the Costing tab, specify:
Whether to cost items during posting or day-end processing
When to create subledger transactions and audit information (duringposting or day-end processing).
3. When you have finished, click Save .
To change batch creation and posting options for G/L transactionscreated by Inventory Control:
Note: Inventory Control generates G/L transactions from purchase orderreceipts and returns.
1. Open Purchase Orders > P/O Setup > G/L Integration.
2. Change batch creation and posting options, as needed.
For more information, see "P/O G/L Integration Screen" (page 353).
3. When you have finished, click Save .
After changing Day End Procesing and posting options
l Print the P/O Options report from the P/O Setup Reports folder to check thatthe settings were changed correctly.
l Print the Purchase Orders G/L Integration report from the P/O Setup
24 Sage 300 ERP Purchase Orders

Currency Information
Reports folder if you changed integration settings.
l Print the I/C Options report from the I/C Setup Reports folder to check thatthe settings were changed correctly.
l Print the Inventory Control G/L Integration report from the I/C Setup Reportsfolder if you changed integration settings.
Currency InformationSpecify your functional currency, and set up your system for multicurrencyaccounting.
About Specifying Currency Information
The functional currency is the home currency in which your company books arekept.
l You select the functional currency for your Sage 300 ERP database in theCompany Profile screen in Common Services when you first set up your Sage300 ERP system.
l You cannot change the functional currency once you have selected it.
For more information about the functional currency , see the System ManagerHelp.
Accounts Payable Determines whether Purchase Orders is Multicurrency
The Multicurrency option is set for Purchase Orders in Accounts Payable, and,once it is selected, you cannot change it.
The Processing tab in the P/O Options screen indicates whether Purchase Ordersis multicurrency:
l If Accounts Payable is multicurrency, Purchase Orders is multicurrency also.
l If Accounts Payable is single-currency, Purchase Orders is single-currency.
If the Multicurrency option is turned on, the tab also displays:
l The company's functional currency.
l The company's default rate type for converting source-currency amounts tofunctional-currency equivalents.
User's Guide 25
Chapter 1: Setting Up Purchase Orders
The default rate type is displayed on transactions you enter for multicurrencyvendors you have not yet added to Accounts Payable. You can select adifferent default rate type to use for Purchase Orders at any time. You canalso select different rate types for individual transactions as you enter them.
Information about creating multicurrency records is included throughout theseHelp topics in discussions of records and activities affected by currency. For asummary of the steps to take to set up a multicurrency ledger, see "Setting upMulticurrency Accounting" (page 26).
Setting up Multicurrency Accounting
Purchase Orders lets you process transactions in any currencies your vendorsuse. This section summarizes the steps you take to set up a multicurrencyPurchase Orders system.
To create a multicurrency Purchase Orders system:
1. Turn on the Multicurrency option for the company and select a default ratetype on the Company Profile screen in Common Services.
2. Use the Common Services Currency screens to add any currency codes youneed for Purchase Orders, and enter rates for the currencies you use.
Sage 300 ERP comes with a comprehensive set of currency codes that usestandard international abbreviations and the format and number of decimalplaces that are normally used with each currency. You probably will notneed to define new codes unless you do not use the international codes.
3. Turn on the Multicurrency option on the Accounts Payable Options screen.This step automatically turns on the Multicurrency option for PurchaseOrders as well.
4. Create an account set in Accounts Payable for each currency you want touse for Accounts Payable vendors in Purchase Orders.
5. If you post transactions to add current or year-to-date requisitions orpurchase orders, enter the amounts in the vendors' currencies.
6. If you enter statistics for previous years and periods, enter the amounts inboth the functional and vendor currencies. Purchase Orders cannotcalculate equivalent amounts from statistics you enter yourself.
For more information, see "About Processing Multicurrency Transactions inPurchase Orders" (page 102).
26 Sage 300 ERP Purchase Orders

Designing a Coding Scheme For Purchase Orders Records
Designing a Coding Scheme For Purchase Orders RecordsThis section describes the codes you assign to the records you can add toPurchase Orders, and offers some tips to help you decide on the codes to use.
About Purchase Orders Coding Schemes
When designing new coding schemes, define codes that make it easy to identifyeach record type and that list records in the order you want them to appear onreports and in Finder screens.
Each code of a single type (such as an additional cost code) must be unique. Inmost cases, you should also assign unique codes to all your records, so there isno chance of confusing one type of record with another.
You can use any combination of numbers and letters in all Purchase Orderscodes. For example, all of the following would be valid ship-via codes:
l A1
l 123
l A01
l 123A
l AB1234
To simplify codes, we recommend that you:
l Use the same number of characters in all codes of the same record type.
l Use codes of at least three characters, to allow for future expansion.
l Use a system that is significant for your business, such as codes that identifya geographical region, or a type of template or cost.
l If possible, use only numbers in your codes, for consistency of sorting.
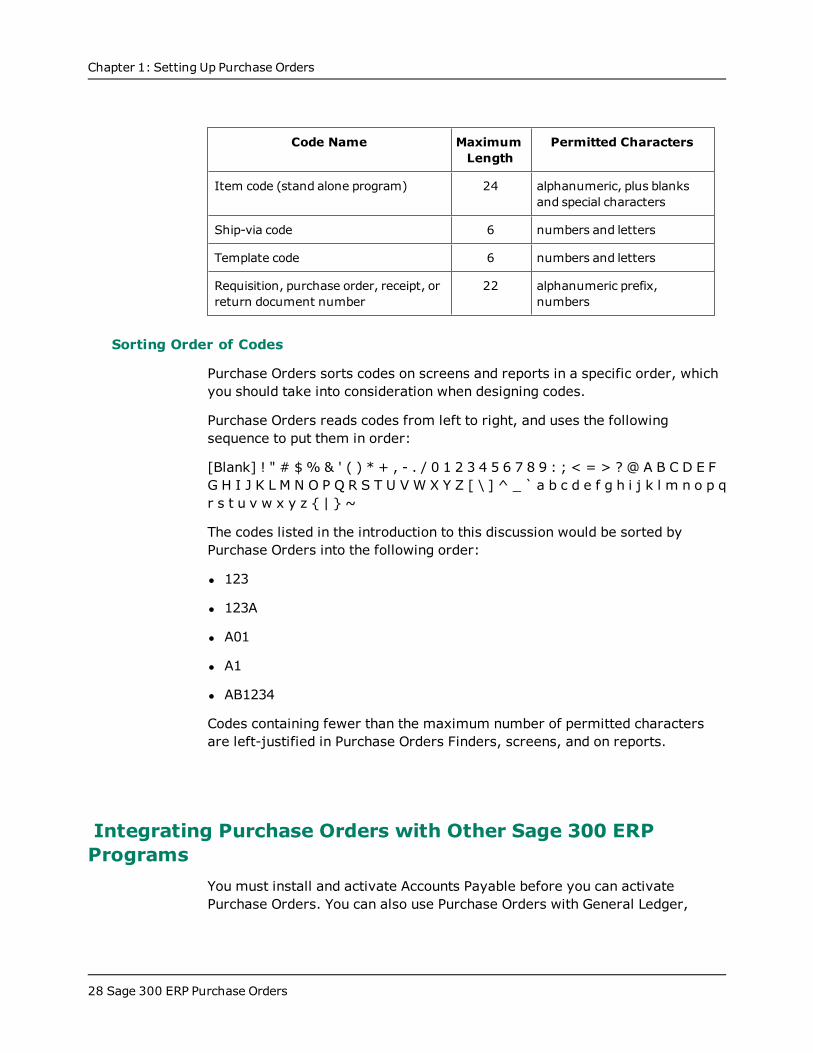
The following table shows the types of characters permitted and the maximumlength for each type of code you can define in Purchase Orders:
Code Name MaximumLength
Permitted Characters
Additional cost code 6 numbers and letters
Account set code (stand aloneprogram)
6 numbers and letters
Permitted Characters and Lengths for P/O Codes
User's Guide 27
Chapter 1: Setting Up Purchase Orders
Code Name MaximumLength
Permitted Characters
Item code (stand alone program) 24 alphanumeric, plus blanksand special characters
Ship-via code 6 numbers and letters
Template code 6 numbers and letters
Requisition, purchase order, receipt, orreturn document number
22 alphanumeric prefix,numbers
Sorting Order of Codes
Purchase Orders sorts codes on screens and reports in a specific order, whichyou should take into consideration when designing codes.
Purchase Orders reads codes from left to right, and uses the followingsequence to put them in order:
[Blank] ! " # $ % & ' ( ) * + , - . / 0 1 2 3 4 5 6 7 8 9 : ; < = > ? @ A B C D E FG H I J K L M N O P Q R S T U V W X Y Z [ \ ] ^ _ ` a b c d e f g h i j k l m n o p qr s t u v w x y z { | } ~
The codes listed in the introduction to this discussion would be sorted byPurchase Orders into the following order:
l 123
l 123A
l A01
l A1
l AB1234
Codes containing fewer than the maximum number of permitted charactersare left-justified in Purchase Orders Finders, screens, and on reports.
Integrating Purchase Orders with Other Sage 300 ERPPrograms
You must install and activate Accounts Payable before you can activatePurchase Orders. You can also use Purchase Orders with General Ledger,
28 Sage 300 ERP Purchase Orders
Integrating Purchase Orders with Other Sage 300 ERP Programs
Order Entry, and Accounts Receivable.
If you plan to use Purchase Orders with Inventory Control, rather than as a"stand-alone" program, you must install and activate Inventory Control beforeactivating Purchase Orders.
Important! If you activate Purchase Orders before activating InventoryControl, the installation program sets up Purchase Orders as a "stand-alone"program; it will not integrate with Inventory Control.
About G/L Integration Options
You use the P/O G/L Integration screen to select options that determine howPurchase Orders interacts with General Ledger, including:
l When and how to create general ledger transactions from Purchase Orderstransactions.
You use the Create G/L Transactions option to specify whether to generategeneral ledger transactions when you post transactions or run day-endprocessing, or at a later time of your choosing using the Create G/L Batchscreen.
Select On Request Using Create Batch Icon to create a batch orappend to an existing batch or transaction file only when you are ready tocreate general ledger transactions.
Note: Select this option if you want to be able to consolidate generalledger transaction details and print Purchase Orders' G/L Transactionsreport.
You must select this option if you want to consolidate general ledgertransactions and to print the G/L Transactions report in Purchase Orders.(The G/L Transactions report lists the general ledger transactions createdby Purchase Orders. You might need to print this report for your audittrail.)
Select During Posting or During Day End Processing to creategeneral ledger transactions when you post or run day-end processing.
G/L transactions are created when you cost inventory items—that is, eitherduring posting or when you run Day End Processing. Costing options areset in Inventory Control, if you use that program.
User's Guide 29
Chapter 1: Setting Up Purchase Orders
Warning! If you select one these options, you cannot print the G/LTransactions report from Purchase Orders. If you need this informationfor your audit control, print it from General Ledger. If you do not useGeneral Ledger, you may be able to print it from the general ledgersystem that you are using.
l Whether to create a new batch of general ledger transactions, or add thenew transactions to an existing batch. Mor e ...
Use the Create G/L Transactions By option to add general ledgertransactions to an existing General Ledger batch each time you post P/Otransactions, run day-end processing, or to create a new General Ledgerbatch (depending on your other options settings).
If you have installed and activated General Ledger, Purchase Orders, andInventory Control for the same company, the general ledger transactionsare automatically placed in new general ledger batches (and optionallyposted) or added to existing batches.
If your general ledger is at another location or in a separate database,general ledger transactions are appended to a file you can import intoanother general ledger, or print, and then enter manually into your generalledger.
Select Adding G/L Transactions to an Existing Batch to have only oneGeneral Ledger batch to which all transactions are appended. PurchaseOrders must use the same database as General Ledger.
l Whether to consolidate transactions with similar details, and whether toconsolidate by account only, or by a combination of account, fiscal period,and source.
Use the Consolidate G/L Batches option to specify whether toconsolidate related general ledger details into single transaction details, orto create detailed general ledger transactions (Do Not Consolidate). You canselect:
Do Not Consolidate. All the details posted in Purchase Orders will beincluded in the General Ledger transaction batch.
Tip: Choose this option if you use optional fields and pass optional fieldinformation to the General Ledger transactions.
Consolidate Transaction Details by Account. During posting, all the
30 Sage 300 ERP Purchase Orders
Integrating Purchase Orders with Other Sage 300 ERP Programs
details from a transaction with the same general ledger account number(and otherwise differ only in the amount) are combined into one detail. Nofurther consolidation occurs during G/L batch creation.
Tip: Choose this option if you do not use optional fields, but still want toassociate general ledger transactions with originating documents (fordrill down or to maintain a manual audit trail).
Consolidate by Account and Fiscal Period. All the details with thesame general ledger account number and fiscal period are combined intoone detail.
Consolidate Transaction Details by Account. All the details with thesame general ledger account number, fiscal period, and source code arecombined into one detail.
l Whether to create general ledger transactions for additional costs.
The Create G/L Entries for Expensed Additional Costs option lets youupdate your general ledger with additional cost expenses directly fromPurchase Orders, or wait until invoices are posted in Accounts Payable.
Select this option to create debit entries to expense accounts and creditentries to the Expensed Additional Cost Clearing Account when you postadditional costs. (Posting the invoices later in A/P will credit the payablescontrol account and debit the Expensed Additional Cost Clearing Account.)
Do not select this option if you want to send expenses with invoices toAccounts Payable, where posting will debit the expense accounts and creditpayables control.
Note: For job-related documents, Purchase Orders always creates G/Lentries for expensed additional costs during posting—whether you selectthis option or not.
l Whether to create general ledger transactions for non-inventory expenses.
l Default Inventory Expense Account.
Use the Default Inventory Expense Account field on the Integration tab of theP/O Options screen to specify the general ledger account that should appearwhen you enter transactions for items that are not defined in InventoryControl. You would normally select an account from the Expense section ofyour general ledger chart of accounts.
User's Guide 31
Chapter 1: Setting Up Purchase Orders
You can change the account number for individual transactions, as needed.You can also change the default account number in the P/O Options screenat any time.
If you select the Allow Non-inventory Items option, you must specify thisaccount number before you can save changes to the Options screen.
The general ledger entries for non-inventory transactions are created inAccounts Payable, and they do not appear on the Purchase Orders G/LTransactions list.
l Default Cost Expense Account Option.
Use the Default Cost Expense Account field on the Integration tab of theOptions screen to specify the general ledger account to use withtransactions that do not specify a general ledger account.
Purchase Orders creates transactions for the account, for example, whenadditional costs are expensed on a receipt then, before running Day EndProcessing, the designated general ledger expense account is deleted. Theprogram also uses the account to contain the discrepancy that can occur intax amounts when users manually prorate additional costs and change taxinformation on a receipt or invoice.
Note: You must assign the account before you can run Day Endprocessing. Day End Processing stops and displays an error message ifyou try to run it before specifying the default cost expense account.
l Expensed Additional Cost Payables Clearing Account.
This is the general ledger account that is used if you choose the option tocreate G/L entries for expensed additional costs in Purchase Orders.
If you create G/L entries in P/O, when you process the additional cost,Purchase Orders credits the payables clearing account and debits theexpense account during day-end processing (or when you run CreateBatch).
When you post the invoice in Accounts Payable, Sage 300 ERP debits thepayables clearing account and credits the payables control account.
If you do not choose the option to create G/L entries for non-inventoryexpenses in Purchase Orders, Sage 300 ERP will generate G/L entries whenthe invoice is posted in A/P, and this account will only be used for job-related transactions.
32 Sage 300 ERP Purchase Orders
Integrating Purchase Orders with Other Sage 300 ERP Programs
Note: For job-related documents, Purchase Orders will always create G/Lentries for expensed additional costs during posting—whether you selectthis option or not.
You can change the account number for individual transactions, as needed.You can also change the default account number in the Options screen at anytime.
l Non-Inventory Payables Clearing Account.
This is the general ledger account that is used if you choose the option tocreate G/L entries for non-inventory expenses in Purchase Orders whenprocessing receipts for non-inventory items.
If you create G/L entries in P/O, when you enter the receipt, Purchase Orderscredits the payables clearing account and debits the expense account duringday-end processing (or when you run Create Batch).
When you post the invoice in Accounts Payable, Sage 300 ERP debits thepayables clearing account and credits the payables control account.
If you do not choose the option to create G/L entries for non-inventoryexpenses in Purchase Orders, Sage 300 ERP will generate G/L entries whenthe invoice is posted in A/P, and this account will not be used.
Note: You can change the account number for individual transactions, asneeded. You can also change the default account number in the Optionsscreen at any time.
l Information to be sent to General Ledger with the transaction. You specifythis information on the Transactions tab. Mor e ...
You can select the type of information to include in the following generalledger transaction fields:
G/L Reference Field
G/L Entry Description Field
G/L Detail Description Field
G/L Detail Comment Field
The Integration tab also displays the day-end number up to which you havecreated general ledger batches. You can compare this number to the currentday end number in the P/O Options screen to make sure you have created alloutstanding general ledger transactions.
For more information, see "P/O G/L Integration Screen" (page 353).
User's Guide 33
Chapter 1: Setting Up Purchase Orders
Costing Options Affect P/O G/L Integration
If you want to create general ledger transactions automatically, you cancreate them when you cost inventory items—that is, either during posting orwhen you run Day End Processing, depending on costing options specified onthe I/C Options screen if you are using Inventory Control, or on the P/OOptions screen if you are using Purchase Orders as a standalone program.
If you want to create general ledger transactions when you post transactionsin Purchase Orders:
l Choose to cost inventory items during posting.
l Select During Posting for the Create G/L Transactions option on the P/OG/L Integration screen.
Note: If the program is set to cost items during Day End Processing,choose During Day End Processing, and then change the setting for costinginventory items.
If you want to create general ledger transactions when you run Day EndProcessing:
l Choose to cost inventory items during Day End Processing.
l Select During Day End Processing for the Create G/L Transactionsoption on the P/O G/L Integration screen.
Note: If the program is set to cost items during posting, choose DuringPosting, and then change the setting for costing inventory items.
Warning! If you select one these options, you cannot print the G/LTransactions report from Purchase Orders. If you need this information foryour audit control, print it from General Ledger. If you do not use GeneralLedger, you may be able to print it from the general ledger system that youare using.
Consolidating G/L Transactions
If you use the On Request Using Create Batch Icon option, you canconsolidate G/L transaction details generated from all Purchase Orderstransactions for each general ledger account by either:
l Account number and fiscal period, or
l Account number, fiscal period, and source code.
34 Sage 300 ERP Purchase Orders
Integrating Purchase Orders with Other Sage 300 ERP Programs
You cannot consolidate general ledger transactions from different PurchaseOrders transactions if you do not use the On Request Using The Create G/LBatch Icon option. If you create G/L transactions during posting, the programwill consolidate only within entries.
Note: If you consolidate transactions across originating entries, you cannotdrill down from a transaction in General Ledger to view or print the originatingtransaction in Purchase Orders. If you want to use drill down, use either DoNot Consolidate or Consolidate Transaction Details by Account.
When to Consolidate
Consolidate transaction details if you do not need a record of all details postedto each general ledger account from Purchase Orders transactions.
Consolidation reduces the amount of information in the general ledger batchand results in a shorter G/L Transactions report. Consolidation also"consolidates" the information in the Reference and Description fields for eachtransaction.
When Not to Consolidate
If you require detailed general ledger transaction information for your PurchaseOrders records, or if you want to be able to drill down from other Sage 300 ERPprograms to originating transactions in Purchase orders, use the Do NotConsolidate option.
The Do Not Consolidate option provides complete information in your generalledger transaction batch, but can result in a long G/L Transactions report and alarge general ledger batch. However, you can also consolidate transactiondetails during posting in General Ledger, if you use it.
Descriptions for Consolidated Entries and Details
Consolidation also reduces the information in the Reference and Descriptionfields for each transaction as described in the later section, "G/L Reference andDescription."
l The description given to consolidated entries is "Transactions consol. by P/Oon <date>."
l The description for consolidated details (if the original descriptions weredifferent) is "Details consol. by P/O." Consolidation will keep the originaldescriptions if they were the same for all original details.
User's Guide 35
Chapter 1: Setting Up Purchase Orders
Changing Your Choices for General Ledger Options
You can change your selections for all the general ledger options in thePurchase Orders G/L Integration screen at any time. Your new choices areused only in the general ledger transactions that are created after you makethe change, and do not affect general ledger batches that already exist.
Using Purchase Orders and General Ledger at the Same Site
If you use Sage 300 ERP General Ledger with Purchase Orders, the PurchaseOrders general ledger batches are created in General Ledger. To avoid makingaccidental changes to General Ledger batches created by Purchase Orders,select No Edit for the Edit Imported Entries option in the G/L Options screen.
Changing General Ledger Integration Options
To change General Ledger Integration options:
1. Open Purchase Orders > P/O Setup > G/L Integration.
2. On the Integration tab, select options that determine how and when tocreate transactions for the general ledger.
For help on the fields you can select on the G/L Integration screen, see"P/O G/L Integration Screen" (page 353).
3. On the Transaction tab, select information that will appear for the G/LDetail Comment, G/L Detail Description, G/L Detail Reference, and G/LEntry Description fields for each type of transaction and transaction detail.
The table lists each of the transactions produced by Purchase Orders, anddisplays the information that is currently included in G/L transactionsproduced from these P/O transactions.
a. Double-click the transaction description or transaction detailinformation that you want to change.
b. On the G/L Integration Detail screen that appears, select theinformation that you want to add to the transaction field, and then usethe Include and Exclude buttons to add or remove field information.
36 Sage 300 ERP Purchase Orders
Integrating Purchase Orders with Other Sage 300 ERP Programs
Note: You can assign one or more pieces of information (segments) toeach G/L transaction field, provided that the combined length of thesegments and separators does not exceed 60 characters. Fieldsexceeding this limit will be truncated when you post the general ledgertransactions.
c. Click Save to save the contents of the G/L transaction field.
4. Choose a different field to edit, or click Close to return to the Transactiontab.
5. Click Save to save changes to the G/L Integration screen.
After changing G/L Integration optionsPrint the G/L Integration report from the Setup Reports folder to check that thesettings were changed correctly.
About Using Purchase Orders With Accounts Receivable
If you use Accounts Receivable with Purchase Orders, you can display and editcustomer and ship-to location address information when specifying dropshipments.
When entering a job-related transaction, you also assign the A/R item numberfor billing the customer to each job-related detail.
About Using Purchase Orders With Accounts Payable
Purchase Orders uses Accounts Payable vendor records to display vendornumbers, names, addresses, tax groups, and terms codes on Purchase Orderstransactions. It also enters Accounts Payable vendor payment terms oninvoices.
You can add new vendor records to Accounts Payable from the Vendor Numberfield in Purchase Orders.
A/P Batches Created During Posting or Day-End Processing
When you run Post transactions or run Day End processing (depending on whenyou cost transactions), the Purchase Orders program creates an AccountsPayable batch containing the invoices, credit notes, and/or debit notes directlyin Accounts Payable.
User's Guide 37
Chapter 1: Setting Up Purchase Orders
Note: You choose when to cost transactions with the Cost Items Duringoption on the Processing tab of the I/C Options screen.
A/P Batches Posted Automatically or Manually
You can specify in P/O Options when to post A/P batches generated fromPurchase Orders Invoices, credit notes and debit notes:
l During Posting or Day End Processing
l On Request Using Create Batch Icon
You can also post the A/P batch using the Post Batches screen in AccountsPayable.
Note: These choices can have a large impact on the speed of processingtransactions in Purchase Orders and on the number of A/P batches thatPurchase Orders produces.
If you choose to post A/P batches automatically and you cost inventory duringtransaction posting, Purchase Orders will create and post an A/P batch foreach invoice it creates.
If you are processing a large volume of receipts, you should cost inventoryduring day-end processing or use the Create Batch icon to post A/P batches.
Optional Fields in Accounts Payable Invoices
Depending on your settings for optional fields, Purchase Orders can also passoptional field information with invoices to Accounts Payable if you use thesame optional fields for Purchase Orders invoices and Accounts Payableinvoices.
About Using Purchase Orders With General Ledger
If you use General Ledger with the same database as Purchase Orders,Purchase Orders displays and validates the General Ledger account numbersyou enter.
When the programs are used together, batches of Purchase Orders journalentries are created in General Ledger, either during posting or day-endprocessing, or when you create them using the Create Batch screen.
On the P/O Options screen, you can choose whether to:
38 Sage 300 ERP Purchase Orders
Integrating Purchase Orders with Other Sage 300 ERP Programs
l Create a new General Ledger batch each time you process Purchase Orderstransactions.
l Add new transactions to an existing batch.
You also have a Finder of General Ledger accounts on your Purchase Ordersaccount fields.
Depending on your settings for optional fields, Purchase Orders can includeoptional field information with G/L transactions if you use the same optionalfields for Purchase Orders transaction details and General Ledger accountdetails.
You can drill down for General Ledger Transaction History to the originatingtransaction in Purchase Orders.
About Using Purchase Orders With Inventory Control
If you use Inventory Control:
l Purchase Orders displays item numbers, inventory locations, and price listinformation from Inventory Control when you enter transactions. If you usethe Allow Receipt Of Non-stock Items in Inventory Control, you can also usenon-stock items in Purchase Orders transactions.
l Optional field information from inventory items will appear by default in P/Otransaction detail lines if you use the same optional fields in both programs.
l Purchase Orders transactions are processed by Day End Processing inInventory Control.
l You can use the Create POs From I/C screen to create purchase orders fromthe reorder quantities information entered for items in Inventory Control.
At posting, Purchase Orders transactions affect Inventory Control itemquantities as follows:
l Purchase orders increase the item quantities on purchase order in InventoryControl.
l Receipts increase quantities on hand in Inventory Control and decreasequantities on purchase order, if a purchase order is specified on the receipt.
l Returns of items to inventory decrease item quantities on hand in InventoryControl.
During posting or day-end processing (depending on when you do item costingin Inventory Control):
User's Guide 39
Chapter 1: Setting Up Purchase Orders
l Item costing information is updated in Inventory Control.
l Statistics and history are updated in both Purchase Orders and InventoryControl (if you keep history and statistics in both programs).
Printing item labels
When you specify a number of labels for inventory items on Purchase Ordersreceipts, the number is used by the I/C Item Labels screen to determine howmany labels to print for each item received. If you change the number of itemlabels for a detail on a previously posted Purchase Orders receipt and youhave not yet printed the labels, the number of labels is updated in InventoryControl.
About Using Purchase Orders With Order Entry
If you use Order Entry with Purchase Orders, you can use the Create POs FromO/E screen to create purchase orders from the items on sales order in OrderEntry. You can also select Order Entry sales order numbers when enteringtransactions in Purchase Orders, and print the Shippable Backorders report byorder number.
If you use the Allow Receipt Of Non-Stock Items in Inventory Control, you canaccept non-stock items from Order Entry and process them on PurchaseOrders transactions.
About Using Purchase Orders with Project and Job Costing
If you use Project and Job Costing:
l You can enter job-related transactions in Purchase Orders, where youassign items on requisitions, purchase orders, receipts, returns, creditnotes, and debit notes.
Note: You cannot mix job-related details and non-job-related details inthe same transaction.
l Job-related transactions affect the committed and actual quantities andcosts for jobs in Project and Job Costing.
Generally, only purchase orders and receipts affect the committed andactual quantities and costs in jobs. However, all P/O transactions can affectjobs if your invoices change receipt information, or if you have returns,credit notes, and debit notes.
40 Sage 300 ERP Purchase Orders
Adding Purchase Orders Setup Records
Invoices for Job-Related Receipts
Do not change a job-related invoice in Accounts Payable if the invoice originatedin Purchase Orders. Accounts Payable does not send your changes to Projectand Job Costing.
You must process invoice changes in Purchase Orders, or with an AccountsPayable transaction such as an adjustment.
Job-Related Additional Costs
Depending on the cost category, you can calculate overhead or labor burden forthe additional cost. Overhead and labor are calculated by Project and JobCosting and passed back to Purchase Orders when you post the receipt.
If job-related additional costs are expensed rather than prorated, you canspecify the contract, project, category, cost class, resource, billing type, billingrate (if appropriate), currency, A/R item number, and unit of measure for theadditional cost.
About Using P/O with Sage Fixed Assets
Sage 300 ERP provides full integration with Sage Fixed Assets, allowing you toenter asset transactions in Inventory Control, Purchase Orders, AccountsPayable, and Intercompany Transactions.
Sage Fixed Assets Integration lets you:
l In Inventory Control, identify items as financial assets when you withdrawthem from inventory for internal use by your company.
l In Purchase Orders, Accounts Payable, and Intercompany Transactions,identify items as financial assets when you purchase them.
l Send asset information to Sage Fixed Assets to set up program assets thatyou have identified in Sage 300 ERP.
Note: Sage Fixed Assets works with Purchase Orders 5.5 and higher.
Adding Purchase Orders Setup RecordsThis section describes the records you can add to Purchase Orders to streamlinedata entry and include additional information you want to keep with PurchaseOrders documents. It also describes the additional records you must add if youare setting up Purchase Orders without Sage 300 ERP Inventory Control.
User's Guide 41
Chapter 1: Setting Up Purchase Orders
About Importing and Exporting Purchase Orders Setup Records
If you currently have a computerized purchase order system, you may be ableto transfer records directly into Sage 300 ERP Purchase Orders by importingthem..
You can also export records from another Sage 300 ERP Purchase Ordersdatabase, edit them in a spreadsheet or other program to change codes,amounts, and other information, then import them into the new Sage 300 ERPPurchase Orders system you are setting up.
Purchase Orders setup records you can both import and export include:
l Additional cost codes
l Ship-via codes
l Vendor contract costs
l Templates
l E-mail messages
l Optional fields (with Transaction Analysis and Optional Field Creator)
l Account Sets (PO standalone system)
l Items (PO standalone system)
l Vendor details (PO standalone system)
l Weight units of measure (PO standalone system)
You can also import and export requisitions, purchase orders, and receipts.You can export returns, invoices, credit notes, and debit notes.
For additional information about importing and exporting all Purchase Ordersrecords and transactions, see the System Manager Help.
Account Sets
If you do not use Inventory Control, use the P/O Account Sets screen to addand manage account sets in Purchase Orders.
About Setting Up Account Sets
The Account Sets screen is available in Purchase Orders only if you do not useSage 300 ERP Inventory Control. If you use Inventory Control, you set upaccount sets using that program.
42 Sage 300 ERP Purchase Orders
Adding Purchase Orders Setup Records
Account sets are groups of general ledger accounts to which you post PurchaseOrders transactions. By defining more than one account set, you can identifytransactions for different types of items in your general ledger.
You can use as many account sets as you need for your inventory items. Forexample, you could use separate account sets for different item categories, foritems assembled in different areas, or for items obtained from differentsuppliers.
When you add an account set, you enter a unique code of up to six characters toidentify the set, and a description (for example, Assembled Items). Account setcodes can contain letters and numbers.
For each account set, you enter account numbers for the following generalledger accounts:
l Payables Clearing. A suspense account to which Purchase Orders posts the"other side" of the accounting entries for items you receive (and for previousreceipts you return to suppliers).
Purchase Orders normally generates credit entries to this account for itemsyou receive. Therefore, the account can be thought of as the accrued amountpayable for goods received. Purchase Orders debits this account when youenter receipt returns.
As you post the related vendor invoices in Sage 300 ERP Accounts Payable,offsetting journal entries (debits) related to the items purchased aregenerated against the Payables Clearing account to clear the balance that isleft in this account from posting the inventory receipt.
l Inventory/Expense. The account that you debit when you receive itemsand credit when you enter returns.
For more information, see "P/O Account Sets Screen " (page 345).
Adding Account Set Records
Note: This screen is available only if you are using Purchase Orders as astand-alone program (that is, you do not have Inventory Control installed).
You add account sets to define a group of general ledger accounts to which topost Purchase Orders transactions (if you use Purchase Orders as a stand-alonesystem without Inventory Control). Mor e ...
User's Guide 43
Chapter 1: Setting Up Purchase Orders
You must add at least one account set to Purchase Orders before you can additem records. If you add more than one account set, you can group items bythe account set to which they belong.
To add Account Set records:
1. Open Purchase Orders > P/O Setup > Account Sets.
2. In the Account Set Code field, type a code of up to six characters to identifythe account set.
3. Type a description for the account set.
4. Type the general ledger account numbers for the payables clearing andinventory/expense accounts that make up the set.
Tip: If you use Sage 300 ERP General Ledger with your Purchase Ordersdatabase, you can use the Finder icons to select general ledgeraccounts.
5. Click Add.
6. To add another record, click the New icon beside the Account Set Codefield to clear the screen for a new record, and then repeat steps 2 through5.
Managing Account Set Records
Note: You maintain account sets in Purchase Orders only in a stand-alonesystem (that is, you do not have Inventory Control installed).
You can add and delete account set records in your Purchase Orders system,and you can change the description, active status, and general ledger accountnumbers for an account set at any time. Mor e ...
New general ledger account assignments are used only in transactions youadd after the change. Existing transactions in the general ledger batch use theprevious account numbers. Make any corrections you need in existingtransactions in Sage 300 ERP General Ledger, if you use it, or in your othergeneral ledger.
If you make an account set inactive, you cannot assign it to a new itemrecord. You can post transactions for and make changes to item records thatwere assigned to the account set before you made it inactive.
44 Sage 300 ERP Purchase Orders
Adding Purchase Orders Setup Records
You cannot delete an account set that is assigned to an item number. Beforedeleting an account set, reassign any item numbers that are assigned to theaccount set to other account sets.
To edit account set records:
1. Open Purchase Orders > P/O Setup > Account Sets.
2. In the Account Set Code field, type the code for the record you want to edit,or select it using the Finder or the navigation buttons beside the field.
3. Make the changes you need.
4. Click Save.
To delete Account Set records:
1. Open Purchase Orders > P/O Setup > Account Sets.
2. In the Account Set Code field, type the code for the record you want to edit,or select it using the Finder or the navigation buttons beside the field.
3. Click Delete.
4. If a message appears asking you to confirm the deletion, click Yes.
You can also use the Delete Inactive Records screen to delete inactive accountsets. For more information, see "P/O Delete Inactive Records Screen" (page308)
Additional Costs
Enter additional cost records for extra costs you are charged by your vendors(such as shipping or handling charges).
About Additional Cost Codes
You can use additional cost codes to identify the extra costs, such as forshipping and handling, that your vendors or carriers charge on the orders theysend to you.
When you enter the codes with receipts, invoices, credit notes, or debit notes,the corresponding information is displayed for you to accept or change, asneeded.
You can also add additional costs to transactions without using additional costcodes. For more information, see "About Entering Additional Costs on Receipts"(page 145).
User's Guide 45
Chapter 1: Setting Up Purchase Orders
Creating Additional Cost Records
You choose the Additional Costs icon from the Setup folder to create recordsfor the additional costs in your Purchase Orders system. Each record includes:
l A unique code of up to six characters to identify the cost.
l An optional description of the cost.
l The vendor number (optional).
Because you can create additional cost records by vendor number, you canset up separate records for the additional costs assessed by particularvendors. When you use one of these additional cost codes with atransaction, the specified vendor number and associated tax group areautomatically displayed.
You can also set up additional cost codes without vendor numbers, then usethe code for any vendor, entering the vendor number and tax group whenusing the cost in a transaction.
Tip: If you use multicurrency accounting and you do not assign a vendornumber to the cost, you specify the currency in which you pay the cost.You can use the code for all vendors who use the same currency.
If you assign a vendor number to a cost, the vendor's currency is displayed,and you cannot change it.
l The amount of the cost (optional).
If you are creating an additional cost code for a standard charge, you canenter the amount of the charge. When you select the additional cost codefor a transaction, the set amount is displayed, but you can change it.
If the additional cost amount varies, you may prefer to leave the amount atzero in the additional cost record, then enter the amount with eachtransaction that uses the cost.
Note: If you use multicurrency accounting, you type amounts in thecurrency specified for the cost.
l The method by which you prorate the cost over items on a receipt.
You can choose to:
Expense the cost separately from the items in the transaction (noproration).
46 Sage 300 ERP Purchase Orders
Adding Purchase Orders Setup Records
Prorate the cost to item details by quantity, cost, or weight.
Note: When you prorate a cost by quantity, the program does notconvert units of measure to stocking units. For example, if you order 12boxes and 12 single units of the same item on two separate detail lines,the program prorates additional costs over 24 units, regardless of howmany single units are contained in a box.
Manually calculate and add the costs to the item details in a receipt.
For documents created in version 5.3A or earlier multicurrency ledgers, youcan use this method only when the vendor for the transaction uses thefunctional currency.
l The general ledger expense account to which you post amounts for costs youexpense (do not prorate).
l The method you use to reprorate additional costs that were prorated to itemsthat you returned.
Use the Reproration field to specify whether to reallocate costs from itemsyou returned to other items on the same receipt.
You can choose to:
Leave the additional cost (that was prorated to the returned items) asoriginally allocated in the receipt.
Prorate the additional cost from the returned items to the remaining itemson the receipt.
Expense the additional cost that was originally prorated to returned itemsto a general ledger account you specify in the additional cost record.
l The general ledger account to which you post cost amounts on returns whenyou expense the costs (that is, you do not prorate them).
l Optional field information if you added fields to the Additional Cost screen.
l The tax authorities and purchase tax classes that apply to the cost, if any.
If the cost is taxable, you specify all the tax authorities and purchase taxclasses that apply to the cost, so that Purchase Orders can calculate correcttax amounts for you when you enter transactions for the cost. When youprorate taxable additional costs, the tax amount is added to the additionalcost, then the total amount is prorated.
User's Guide 47
Chapter 1: Setting Up Purchase Orders
You select from the tax authorities and purchase tax classes you have setup for your company in the Tax Services screens in Common Services.
Adding Additional Cost Records
You add additional cost records to define codes to identify the extra costs youare charged by your vendors (such as shipping or handling charges).
To add additional cost records:
1. Open Purchase Orders > P/O Setup > Additional Costs.
2. Fill in the following fields:
Additional Cost. Type a unique code of up to six characters to identifythe additional cost record, and enter a description of the cost.
Vendor Number. If the cost is regularly charged by a particularvendor, type the vendor number or select it from the Finder. You canalso leave this field blank if you want to use the additional cost code formore than one vendor.
Currency. Select the currency in which you will enter the additionalcost.
Amount. Type the amount of the cost, if known. (If the cost varies,leave the Amount field showing zeroes.)
Proration. Specify whether to expense the cost or allocate it to itemson a receipt.
Select No Proration to charge the cost to a general ledger account, orselect a proration method (by quantity, weight, cost, or manually).
Expense Account. If you choose not to prorate the cost, type thenumber of the general ledger expense account to which you post theadditional cost. If you use Sage 300 ERP General Ledger, you can selectthe account from the Finder.
Return Proration. If you choose to prorate the cost, specify whether toprorate the cost to remaining items on a receipt when you return items.You can also leave the cost amount in the account it was posted to withthe receipt or expense it to another general ledger account.
Return Account. If you expense the cost on returns, type the generalledger account number to use.
48 Sage 300 ERP Purchase Orders

Adding Purchase Orders Setup Records
Click Add.
If the additional cost is subject to taxes, specify the tax authorities andassociated tax classes that apply. If more than one tax authority applies,press the Insert key on your keyboard to start a new line, after you havecompleted the tax information for a previous line.
3. To add another record, click the New icon beside the Additional Cost fieldto clear the screen for a new record, and then repeat steps 2 and 3.
Managing Additional Cost Records
You can edit and delete additional cost records in your Purchase Orders system.Mor e ...
You can edit additional cost records at any time.
You can change all the information, except the additional cost code. To changethe code, you first add a new record that uses the code you want, then deletethe record for the code you no longer want to use.
You can delete an additional cost only if it is not in use on an incomplete receiptor return.
To edit additional cost records:
1. Open Purchase Orders > P/O Setup > Additional Costs.
2. Type the code for the record you want to edit, or select it using the Finder orthe navigation buttons beside the Additional Cost Code field.
3. Make the changes you need.
4. Click Save.
To delete additional cost records:
1. Open Purchase Orders > P/O Setup > Additional Costs.
2. Type the code for the record you want to delete, or select it using the Finderor the navigation buttons beside the Additional Cost Code field.
3. Click Delete.
4. If a message appears asking you to confirm the deletion, click Yes.
E-mail Messages
Create e-mail messages to send with purchase orders and returns.
User's Guide 49
Chapter 1: Setting Up Purchase Orders
Creating E-mail Messages
You can e-mail purchase orders and purchase returns directly to vendors thatuse an e-mail delivery method in the A/P vendor record. When e-mailing thepurchase orders and returns, you also specify a pre-defined e-mail messageto send along with the e-mailed form. Mor e ...
Note:Before you can send the forms by e-mail, you must also do the following:
l In Accounts Payable, set the Delivery Method to E-mail or to Contact's E-mail for each vendor that you want to e-mail. (You set the deliverymethod on the Processing tab of the vendor record in Accounts Payable.)
l Choose Vendor as the Delivery Method on the Print Purchase Orders orPrint Returns screen when you print purchase orders or returns.
To create e-mail messages for purchase orders and returns:
1. Open Purchase Orders > P/O Setup > E-mail Messages.
2. Create the e-mail message that you want to send to vendors.
a. In the Message Type field, select Purchase Order or Return fromthe list.
b. Click the New button beside the Message ID field.
c. In the Message ID field, enter a code to identify this message, usingup to 16 characters.
d. In the Description field, enter a description for the message, using upto 60 characters.
e. In the E-mail Subject field, enter a subject.
Note: You can use e-mail information codes in this field. They will bereplaced by the company or document information when the messageis sent.
f. Type your message, using company or document information codes tospecify PO or return details.
Note: To identify variable information that you want to include withthe message, use information codes preceded by a dollar sign.
3. When you are satisfied with your message, click Add or Save.
50 Sage 300 ERP Purchase Orders
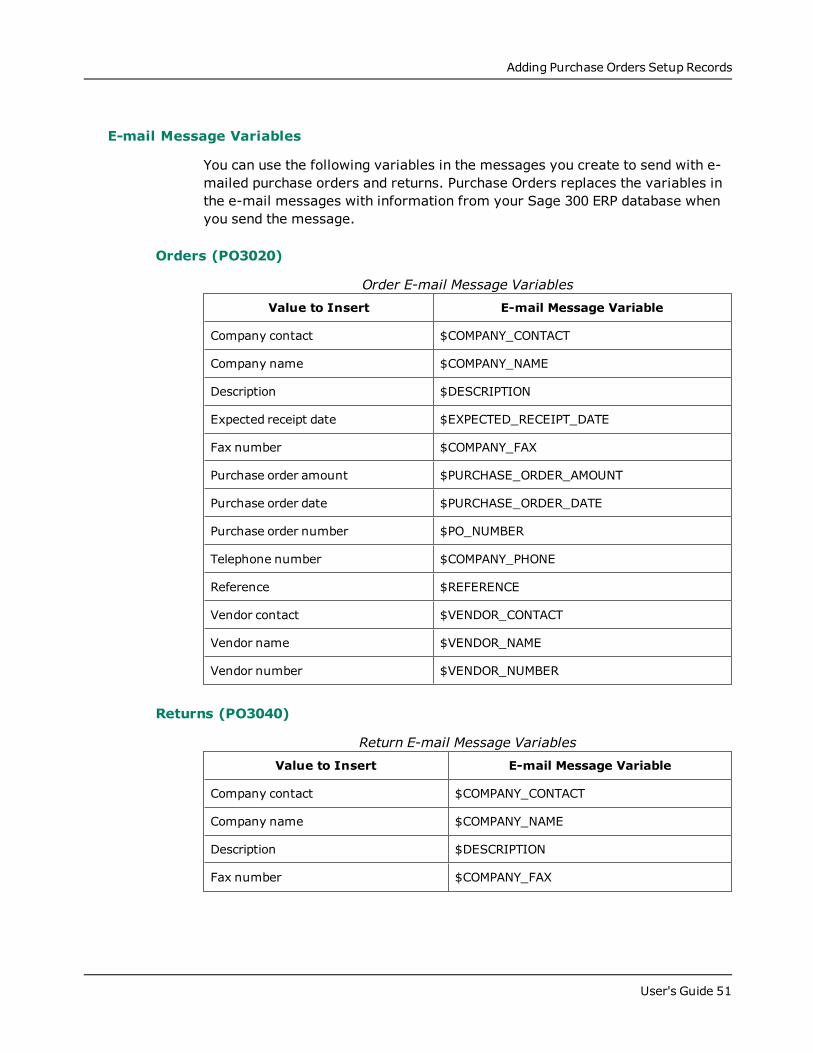
Adding Purchase Orders Setup Records
E-mail Message Variables
You can use the following variables in the messages you create to send with e-mailed purchase orders and returns. Purchase Orders replaces the variables inthe e-mail messages with information from your Sage 300 ERP database whenyou send the message.
Orders (PO3020)
Value to Insert E-mail Message Variable
Company contact $COMPANY_CONTACT
Company name $COMPANY_NAME
Description $DESCRIPTION
Expected receipt date $EXPECTED_RECEIPT_DATE
Fax number $COMPANY_FAX
Purchase order amount $PURCHASE_ORDER_AMOUNT
Purchase order date $PURCHASE_ORDER_DATE
Purchase order number $PO_NUMBER
Telephone number $COMPANY_PHONE
Reference $REFERENCE
Vendor contact $VENDOR_CONTACT
Vendor name $VENDOR_NAME
Vendor number $VENDOR_NUMBER
Order E-mail Message Variables
Returns (PO3040)
Value to Insert E-mail Message Variable
Company contact $COMPANY_CONTACT
Company name $COMPANY_NAME
Description $DESCRIPTION
Fax number $COMPANY_FAX
Return E-mail Message Variables
User's Guide 51
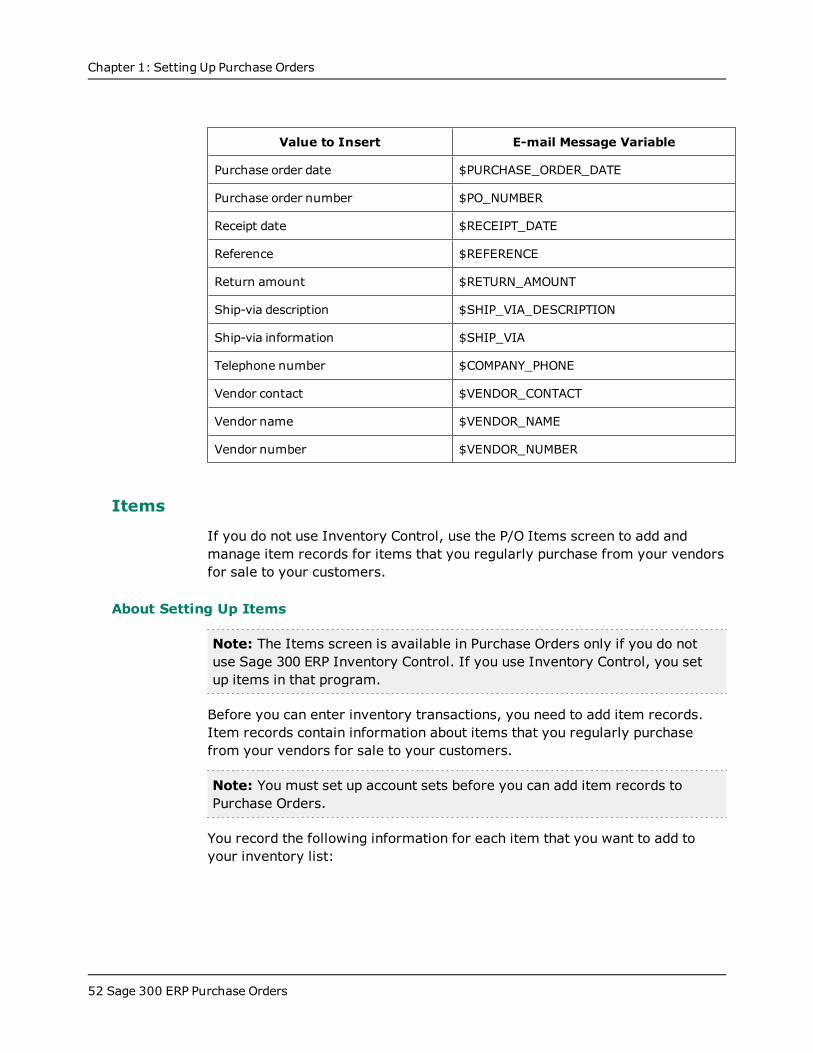
Chapter 1: Setting Up Purchase Orders
Value to Insert E-mail Message Variable
Purchase order date $PURCHASE_ORDER_DATE
Purchase order number $PO_NUMBER
Receipt date $RECEIPT_DATE
Reference $REFERENCE
Return amount $RETURN_AMOUNT
Ship-via description $SHIP_VIA_DESCRIPTION
Ship-via information $SHIP_VIA
Telephone number $COMPANY_PHONE
Vendor contact $VENDOR_CONTACT
Vendor name $VENDOR_NAME
Vendor number $VENDOR_NUMBER
Items
If you do not use Inventory Control, use the P/O Items screen to add andmanage item records for items that you regularly purchase from your vendorsfor sale to your customers.
About Setting Up Items
Note: The Items screen is available in Purchase Orders only if you do notuse Sage 300 ERP Inventory Control. If you use Inventory Control, you setup items in that program.
Before you can enter inventory transactions, you need to add item records.Item records contain information about items that you regularly purchasefrom your vendors for sale to your customers.
Note: You must set up account sets before you can add item records toPurchase Orders.
You record the following information for each item that you want to add toyour inventory list:
52 Sage 300 ERP Purchase Orders
Adding Purchase Orders Setup Records
l The number you use to identify the item. Item numbers can be up to 24characters, and can contain blanks and special characters.
l A description of the item.
l The account set the item uses. (You assign an account set to define thegeneral ledger balance-sheet accounts for the item.)
l (Optional) A commodity number if your company reports a value-added tax(VAT).
l The unit weight (the weight of one stocking unit of the item). The weight mustbe in the same weight units (such as pounds) that you specified in the Optionsscreen.
l The name of the unit of measure and the conversion factor associated withone stocking unit of the item. (For example, if the unit of measure is "dozen,"you type 12.)
l (Optional) Tax information used to calculate tax amounts, including thetaxing authority and tax classes for purchases and sales of the item.
l Up to 300 characters of additional item information.
For step-by-step instructions on using the Items screen to add, edit, or deletean item record, see "P/O Items Screen" (page 366).
You can import item records into Purchase Orders from non-Sage 300 ERPprograms, instead of entering them in the Items screen. For information aboutimporting item records, see "About Importing and Exporting Purchase OrdersSetup Records" (page 42).
Adding Item Records
Note: You add item records in Purchase Orders only if you do not haveInventory Control installed.
To add an item record:
1. Open Purchase Orders > P/O Setup > Items.
For more information on the fields on this screen, see "P/O Items Screen"(page 366)
2. In the Item Number field, type a number to identify the item.
3. In the adjacent field, enter a description of the item.
User's Guide 53
Chapter 1: Setting Up Purchase Orders
4. On the Items tab, enter the following information:
The general ledger account set you want to assign to the item. (Type oruse the Finder to select the account)
If your company reports a value added tax (VAT), the commoditynumber for the item.
The weight for one unit of the item. (The weight you enter should be interms of the Weight Unit Of Measure you entered on the Processing tabof the P/O Options screen.)
Purchase Orders lets you use up to four additional fields to includedescriptive information for the item. You can use up to 75 characters ineach of the four fields.
5. On the Units tab, add units of measure, as follows:
a. Click the table, press the Insert key, and then enter the followinginformation:
i. The name for the unit of measure (for example: dozen, gallon, ton).
ii. The conversion factor (the number of stocking units for the unit ofmeasure). For example, if the unit of measure is "dozen," you type12. You must enter the unit of measure you intend to use for thestocking unit before you can save the record. The conversion factorfor the stocking unit must be 1 (one).
6. On the Taxes tab:
a. Use the Finder to select the taxing authorities you want to assign to theitem. (You define taxing authorities in the Tax Services folder ofCommon Services.)
b. Type or select the numbers of the tax classes you want to assign to theitem for purchases for each selected tax authority.
7. On the Optional Fields tab (if it is available):
a. Click the first column heading to display the Optional Field Finder, andthen select the fields you want to add to this item (if the item fields arenot automatically inserted).
b. Enter the information for the field in the third column.
8. Click Add.
9. Repeat steps 2 through 8 for each item you want to add.
54 Sage 300 ERP Purchase Orders
Adding Purchase Orders Setup Records
Managing Item Records
Note: You can edit or delete item records in Purchase Orders only if you donot have Inventory Control installed.
You can change most of the information in an item record at any time. Mor e ...
Note:You cannot:
l Directly change an item number. You must first create a new item recordwith the new number, copy the item information to the new record, thendelete the old item record.
l Assign an item to an inactive account set.
The changes have no effect on current transactions. You will see the changesthe next time you select the item in a new transaction.
We do not recommend that you change the account set assigned to an itemrecord for which you have posted transactions. Purchase Orders warns you ifyou attempt to change an item’s account set while there are posted transactionsfor the item for which Day End Processing has not been run.
Once you make an item inactive, you cannot use it in transactions (except forpurchase order returns) unless you make it active again.
Before you start:
l Before you can delete an item record, you must have completed all receiptsinvolving the item and, if you posted any transactions for the item since thelast day-end processing, you must run day-end processing.
To edit item records:
1. Open Purchase Orders > P/O Setup > Items.
2. Type the code for the item record you want to edit or select it using theFinder or the navigation buttons next to the field.
3. Make the changes you need.
4. Click Save.
User's Guide 55

Chapter 1: Setting Up Purchase Orders
To delete Item records:
1. Open Purchase Orders > P/O Setup > Items.
2. Type the item number for the item you want to delete, or select it using theFinder or the navigation buttons beside the field.
3. Click Delete.
4. If a message appears asking you to confirm the deletion, click Yes.
Tip: You can also use the Delete Inactive Records screen to delete inactiveitem records. For more information, see "P/O Delete Inactive RecordsScreen" (page 308).
Optional Fields
If you use Sage 300 ERP Transaction Analysis and Optional Field Creator, youcan add optional fields to records, transactions, and transaction details.
About Optional Fields
Purchase Orders supports Transaction Analysis and Optional Field Creator, aseparately licensed package that you can use with any edition of Sage 300ERP.
Optional fields provide exceptional flexibility to customize your PurchaseOrders system. You can use an unlimited number of optional fields to storeadditional information with your purchase orders transactions (such asrequisitions, purchase orders, receipts, and invoices).
Note: Like all other Sage 300 ERP modules, Purchase Orders lets you addoptional fields to transaction documents and to each detail line of atransaction. It also lets you pass optional field information through thecomplete transaction cycle—from purchase requisitions, to purchase orders,to receipts, to invoices, and even to downstream ledgers like AccountsPayable and General Ledger.
Optional field information can originate with vendor and item records, andflow through requisitions, purchase orders, receipts and invoices.
56 Sage 300 ERP Purchase Orders
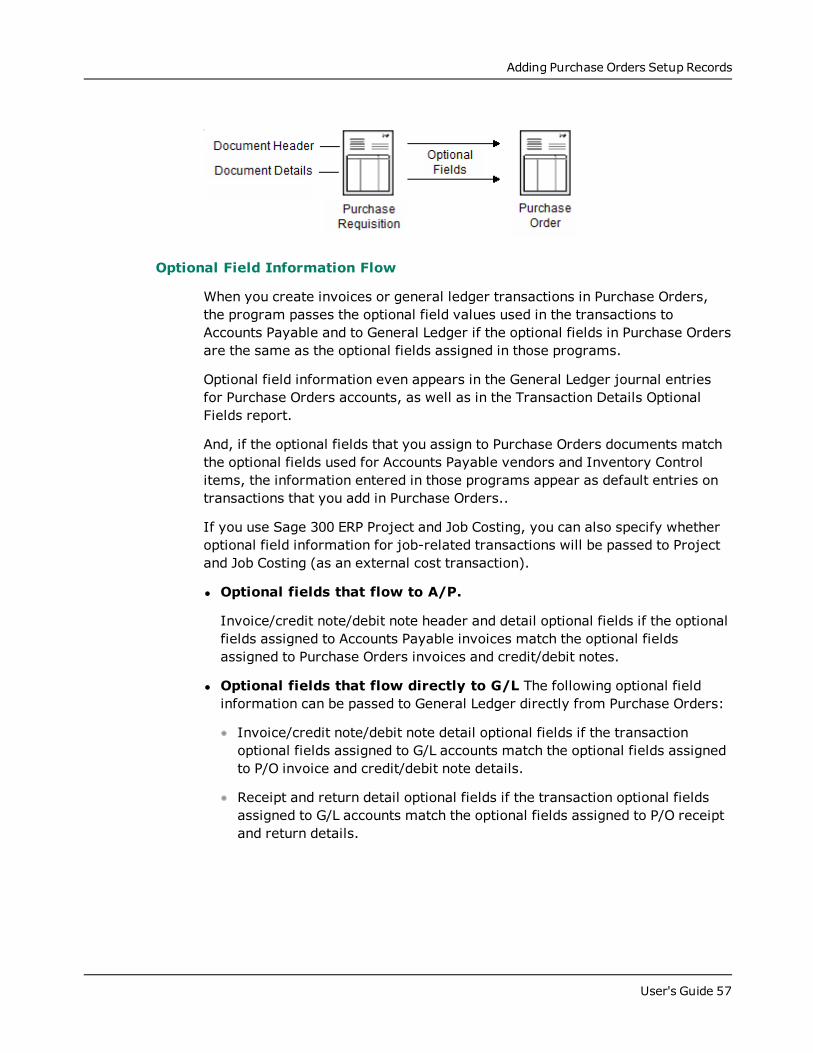
Adding Purchase Orders Setup Records
Optional Field Information Flow
When you create invoices or general ledger transactions in Purchase Orders,the program passes the optional field values used in the transactions toAccounts Payable and to General Ledger if the optional fields in Purchase Ordersare the same as the optional fields assigned in those programs.
Optional field information even appears in the General Ledger journal entriesfor Purchase Orders accounts, as well as in the Transaction Details OptionalFields report.
And, if the optional fields that you assign to Purchase Orders documents matchthe optional fields used for Accounts Payable vendors and Inventory Controlitems, the information entered in those programs appear as default entries ontransactions that you add in Purchase Orders..
If you use Sage 300 ERP Project and Job Costing, you can also specify whetheroptional field information for job-related transactions will be passed to Projectand Job Costing (as an external cost transaction).
l Optional fields that flow to A/P.
Invoice/credit note/debit note header and detail optional fields if the optionalfields assigned to Accounts Payable invoices match the optional fieldsassigned to Purchase Orders invoices and credit/debit notes.
l Optional fields that flow directly to G/L The following optional fieldinformation can be passed to General Ledger directly from Purchase Orders:
Invoice/credit note/debit note detail optional fields if the transactionoptional fields assigned to G/L accounts match the optional fields assignedto P/O invoice and credit/debit note details.
Receipt and return detail optional fields if the transaction optional fieldsassigned to G/L accounts match the optional fields assigned to P/O receiptand return details.
User's Guide 57
Chapter 1: Setting Up Purchase Orders
Generated Transactions Use Optional Fields
Purchase orders that are generated from requisitions, from low stock levels inInventory Control, and from backorders in Order Entry, also include optionalfields.
If you want information from I/C item optional fields to appear with PurchaseOrders transactions, assign the same optional fields to P/O transaction detailsas those assigned to item records in Inventory Control.
If you want optional field information to flow from requisitions, to purchaseorders, to receipts, and so on, assign the same optional fields to each P/Otransaction and transaction detail .
For more information, see "About Setting Up Optional Fields" (page 58).
About Setting Up Optional Fields
Note: You can set up and use optional fields only if Transaction Analysis andOptional Field Creator is installed.
Setting up optional fields is a two-step process. You must:
1. Set up system-wide optional fields in Common Services. Mor e ...
Before you can use optional fields in Purchase Orders, you must defineoptional fields for your Sage 300 ERP system using the Optional Fieldsscreen in Common Services.
2. Set up optional fields for use with Purchase Orders transactions andrecords. Mor e ...
You use the Optional Fields screen in the P/O Setup folder to assignoptional fields to:
Requisitions, purchase orders, receipts, invoices, returns, andcredit/debit notes.
Requisition, purchase order, receipt, invoice, return, and credit/debitnote transaction details.
Additional costs and receipt additional costs.
Receipt additional cost details, invoice additional cost details, andcredit/debit note additional cost details.
58 Sage 300 ERP Purchase Orders
Adding Purchase Orders Setup Records
Item records defined in Purchase Orders (if you are not using InventoryControl).
Important! Make sure that you use the same optional fields for invoices inAccounts Payable and for general ledger accounts in the General Ledgerprogram in order to pass information between programs. For moreinformation about how optional fields flow from one module to another in Sage300 ERP, see "About Optional Fields" (page 56).
After setting up optional fields in Purchase Orders, you can use them inPurchase Orders records and transactions.
Optional Field Settings
You specify the following settings for each optional field you set up in PurchaseOrders:
l A default value (depending on the type of field).
Note:If an optional field requires validation, you can select only a value that isassigned to the optional field in Common Services. (If the optional fieldallows blanks, you can leave the default value field blank.)
If the optional field does not use validation, you can select a value from thelist (if any were assigned in Common Services), leave the field blank, orenter any value that is consistent with the type of field (yes/no, text,number, date, amount, and so on) and does not exceed the maximumnumber of characters permitted for the optional field.
l Whether the optional field will be automatically inserted in new records ortransactions.
l Which optional fields will be passed to other Sage 300 ERP modules, andwhich will be included in transactions that are passed to General Ledger forposting to G/L accounts.
Unless you restrict the fields that are passed to other modules, all optionalfields in Purchase Orders that match optional fields in Accounts Payable andin General Ledger accounts are passed those modules.
Example: When setting up invoice detail optional fields, you click theSettings button, and then choose the types of G/L accounts that receiveoptional field information from invoice details, and the details in AccountsPayable invoices that will receive optional field information.
User's Guide 59
Chapter 1: Setting Up Purchase Orders
Note: The Settings button is available only for transactions that are sentto another Sage 300 ERP program. For example, invoices are sent toAccounts Payable, but requisitions are used only in the Purchase Ordersprogram.
Creating Validation Tables for Optional Fields
You can create a list of permitted entries for each field you add to a screen,using the Optional Tables screen in Common Services.
For information about creating optional tables, see the System Manager Help.
Adding Optional Fields to Purchase Orders that Use Datapipes
You can add optional field information to the purchase order forms that comewith the program by:
l Setting datapipe query parameters in the PORPT.INI file, so that thedatapipe will process optional fields. Mor e ...
The purchase orders datapipe allows you to extract fields from the followingdatabase tables:
APVENO (optional fields for Accounts Payable vendors).
POPORHO (optional fields for purchase order headers).
ICITEMO (optional fields for inventory items).
POPORLO (optional fields for purchase order details).
The purchase orders datapipe identifies the various types of details that itprints by parameters in PORPT.INI and by different LNTYPE codes.
LNTYPE is a field in the datapipe record provided to the Crystal report. Formore information, see "About Detail LNTYPE Codes" (page 77).
All optional fields are initially turned off in PORPT.INI.
l Using SAP Crystal Reports® for Sage 300 ERP to add the optional fields to adetail section in the report form. Mor e ...
Purchase Orders comes with four standard purchase orders formats:
60 Sage 300 ERP Purchase Orders

Adding Purchase Orders Setup Records
Two formats use datapipes (POPOR01.rpt and POPOR02.rpt).
Note: Datapipes are programs that extract and organize data to increasethe efficiency of particular reports.
Two formats read data directly from the Sage 300 ERP database(POPOR03.rpt and POPOR04.rpt).
To set the datapipe query parameters for printing purchase orders:
1. In your Sage 300 ERP program folder, locate the PORPT.INI file in the POfolder, and then open it in text editing software.
2. Search for POPOPRN.DLL for POPOR01.RPT or POPOR02.RPT.
3. To include optional field information, set the following parameters to 1:
Parameter 15 (vendor optional fields)
Parameter 16 (header optional fields)
Parameter 17 (item optional fields)
Parameter 18 (detail optional fields)
Note: If the information is not required on the forms, set the parameter to0.
4. Save, and then close the file.
5. Restart Sage 300 ERP.
After setting the datapipe query parametersUse SAP Crystal Reports® for Sage 300 ERP to edit the POPOR01.RPT orPOPOR02.RPT to use the optional fields.
For more information on designing and adapting forms and reports, see theonline document Customizing Printed Forms and Reports with the SAP CrystalReports® Designer in the User Documentation section on the Sage 300 ERPCustomer Portal athttps://customers.sagenorthamerica.com/irj/go/km/docs/sageKM/Sage AccpacERP/Ungated Customers/Browsable/Product Documentation/Accpac_UA_Resources.htm.
User's Guide 61
Chapter 1: Setting Up Purchase Orders
Setting Up Optional Fields
Note: You must install Transaction Analysis and Optional Field Creatorbefore you can use optional fields.
You add optional field records to define additional information to keep withPurchase Orders transactions and transaction details. Mor e ...
You must use the same optional fields for transactions in Purchase Orders,Accounts Payable, and General Ledger if you want to pass optional fieldinformation from Purchase Orders transactions to Accounts Payable when youcreate A/P invoice batches and to General Ledger when you create batches forG/L transactions.
Similarly, you must define the same fields for transaction details as youdefine for additional costs and item records if you want information from costsand items to appear by default in transactions. (Items are used only if you donot have Sage 300 ERP Inventory Control.)
For more overview information, see "About Optional Fields" (page 56) and"About Entering Optional Data on Transactions" (page 168).
Before you start:
l Determine which optional fields you need in Purchase Orders.
l Decide which optional field information you want to pass to other ledgerswith item records and with G/L transactions to the general ledger.
l If the optional fields you need have not been added to Sage 300 ERP, usethe Optional Fields screen in Common Services to add them.
To set up optional fields Purchase Orders transactions andtransactions details:
1. Open Purchase Orders > P/O Setup > Optional Fields.
2. For more information, see "P/O Optional Fields Screen " (page 371).
3. From the Optional Fields For list, select a transaction type.
4. Click in the optional field entry table, and then press the Insert key to starta new line.
5. Enter information for each optional field you are adding to the record,transaction, or transaction detail, as follows:
a. In the Optional Field column, click the Finder or press F5, and thenselect an optional field from the Finder list.
62 Sage 300 ERP Purchase Orders
Adding Purchase Orders Setup Records
Tip: For optional field information to flow through all transactions in thepurchasing process, you must add the same fields to each record. Forthe information to flow to Accounts Payable and General Ledger, also,you must use identical optional fields for transactions and transactiondetails in Purchase Orders and in Accounts Payable as you use foraccounts and transaction details in General Ledger.
b. To set a default value for the optional field:
c. Double-click in the Value Set column to change it to Yes. Mor e ...
The Value Set field alerts the data entry clerk that a seemingly blankoptional field actually has an entry. By looking at the Value field, youcannot tell whether it has a “blank” default value or no value at all.
d. Type or select the value to appear as the default for each optional field. Mor e ...
If the optional field you selected requires validation, you must select avalue that is defined for the optional field in Common Services. If theoptional field allows blanks, you can leave the default value field blank.
If the optional field does not use validation, you select a value that isdefined for the optional field in Common Services or leave the fieldblank.
Note: The entry must be consistent with the type of field (text,number, date, amount, and so on) and must not exceed the number ofcharacters specified for the optional field. In a Yes/No field, you canenter only Yes or No.
e. To make the optional field mandatory, double-click in the Requiredcolumn. Mor e ...
During data entry, if an optional field is required, but does not have adefault value, you must fill in the field before you can proceed. If theoptional field has a default value, you can accept the value that appears,or assign a different one.
f. If you want the optional field and its default value to appearautomatically in new records and transactions, select Yes in the AutoInsert column.
Note: If the field is a required field, the Auto Insert field changes toYes.
User's Guide 63
Chapter 1: Setting Up Purchase Orders
g. Click the Settings button, if is available, and then specify which optionalfields to send to other Sage 300 ERP subledgers and which to include intransactions sent to General Ledger.
Tip: Send to General Ledger only optional fields that are used forfinancial analysis, and only to the accounts where they are required.For more information, see "P/O Optional Fields Screen " (page 371).
h. Click Save.
After adding optional fields to P/O
l Use the Optional Fields screen in General Ledger to add optional fields toG/L transaction details, if you are passing optional fields from P/Otransaction details to G/L.
l Use the Optional Fields screen in Inventory Control if you want to addoptional fields associated with I/C items to transaction details.
Ship-Via Codes
Set up ship-via codes to identify the shipping methods or carriers you use todeliver your orders from vendors.
About Setting Up Ship-Via Codes
If you regularly use particular carriers or shipping methods when receivingitems into stock, you can set up a code to identify each method. You then typethe code on purchase orders, instead of typing in the information each time.
In the record for each ship-via code, you can type the name, address, andphone numbers of the carrier, as well as the name of a contact person orposition to call if there is a problem with a delivery. You can also enter acomment of up to 80 characters.
You do not have to use ship-via codes. Instead, you can type a description ofthe shipping method, using up to 60 characters, on each transaction you enter.You can also omit shipping information from transactions altogether.
To add ship-via records, choose the Ship-Via screen from the Setup folder.
Adding Ship-Via Records
You can add records for each carrier you use to deliver your orders fromvendors.
64 Sage 300 ERP Purchase Orders

Adding Purchase Orders Setup Records
To add a ship-via record:
1. Open Purchase Orders > P/O Setup > Ship-Via Codes.
2. In the Ship-Via Code field, type a unique code of up to six characters toidentify the ship-via record.
3. Press Tab, and then enter a description for the code.
4. Type the address, telephone and fax numbers, and contact name.
5. Type a comment of up to 80 characters, if desired.
6. Click Add.
7. To add another record, click the New icon beside the Ship-Via Code fieldto clear the screen for a new record.
Managing Ship-Via Records
You can edit or delete Ship-Via Codes in your Purchase Order system at anytime.
Note: You cannot delete ship-via records that are entered on incompleterequisitions, purchase orders, receipts, or returns.
To edit Ship-Via records:
1. Open Purchase Orders > P/O Setup > Ship-Via Codes.
2. Type the code for the record you want to edit, or select it from the Finderbeside the Ship-Via Code field.
3. Make the changes you need.
4. Click Save.
To delete Ship-Via records:
1. Open Purchase Orders > P/O Setup > Ship-Via Codes.
2. Type the code for the record you want to delete, or select it using the Finderor the navigation buttons beside the Ship-Via Code field.
3. Click Delete.
4. If a message appears asking you to confirm the deletion, click Yes.
User's Guide 65
Chapter 1: Setting Up Purchase Orders
Templates
Speed up and simplify transaction entry in Purchase Orders by setting uptemplates that specify default settings for new transactions.
About Templates
A template is a set of default information for transaction headers (theinformation that applies to all transaction details such as transaction date,vendor, FOB point, description, and reference).
You use templates to automatically fill in fields in the Requisition Entry,Purchase Order Entry, Receipt Entry, Invoice Entry, Return Entry, andCredit/Debit Note Entry screens with the information and selections you usemost often, so you do not have to retype standard information every time youadd a transaction.
Note: Templates are optional. You can enter transactions without usingtemplates.
Purchase Orders templates let you speed up and simplify transaction entry byproviding default settings which appear when you start a new transaction.
You can specify the following information for each template that you define:
l Purchase order type
l FOB point
l On hold
l Ship-to and bill-to locations (if you use Inventory Control)
l Description
l Reference
l Comment
l Ship-via code
l Tax group
l Terms
You must specify the purchase order type and tax group in a template; theother information is optional.
66 Sage 300 ERP Purchase Orders
Adding Purchase Orders Setup Records
Note: The information in a number of the template fields can also come fromother records.
Example: The On Hold, Terms, and Tax Group fields are also in the vendorrecords.
If you want to use templates, use the Templates screen, selected from the P/OSetup folder, to define them.
You must specify the purchase order type (Active, Standing, Future, Blanket)and the tax group for each template. You can also select codes for the shippingand billing locations (if you use Inventory Control), shipping method, andpayment terms you want to use. You can type an FOB point, 60-characterdescription, 60-character reference, and comment of up to 250 characters.
After setting up your templates, you can specify a default template code on theP/O Options screen. This template then provides the initial settings for everytransaction you enter.
You can change the default settings in a transaction by entering a vendornumber that uses a different tax group or terms code from the default template,or by selecting another template code that uses different settings. You can alsochange any of the individual settings provided by a template.
Note: In multicurrency systems, you can change a transaction's templateonly to another template with a tax group that uses the vendor's currency.
Assigning a Default Template Code
After setting up templates, use the Default Template Code option to specify adefault template that contains the general information that you want to appearon transaction-entry screens when you start entering a new requisition,purchase order, or other type of transaction.
This option can help you speed up data entry by automatically inserting theinformation you use most often when entering these types of documents.
Default templates. You can specify a default template on the P/O Optionsscreen to have a standard set of default vendor and purchase order settingsappear for each new transaction you create.
Changing templates and vendors. The default template provides initialsettings, but these are overridden by settings from the vendor record— andfrom another template if you choose another one after selecting the vendor.
User's Guide 67
Chapter 1: Setting Up Purchase Orders
Vendor tax group and terms.Templates override a vendor's tax group andterms. When you select a new template code, the vendor's tax group andterms will be changed consistent with the new template code.
Adding Templates
Add templates that contain default header and vendor information to use intransactions. Mor e ...
You use the templates to automatically fill in fields in the transaction-entryscreens with the information and selections you use most often, so you do nothave to enter the information every time you add a transaction.
To add templates:
1. Open Purchase Orders > P/O Setup > Templates.
2. Type a unique code of up to six characters to identify the template.
3. Type information and make selections, as needed, to define the template.
Note: You must specify a tax group and terms code for each template.
4. Click Add.
5. To add another template, click the New icon beside the Template Codefield, and then repeat steps 2 through 4 for each template you want to add.
Managing Templates
You can edit or delete templates from your Purchase Order system at anytime. However, you cannot delete the default template (selected in the P/OOptions screen). Mor e ...
You can change everything in template records except the identifying code. Tochange the code, you first add a template with the code you want to use, thendelete the template with the code you do not want.
Transactions that existed before you change the template are not affected byyour editing.
Note: In multicurrency ledgers, you can assign a template only to a vendorthat uses the same currency as the specified tax group.
To edit templates:
68 Sage 300 ERP Purchase Orders
Adding Purchase Orders Setup Records
1. Open Purchase Orders > P/O Setup > Templates.
2. Type the code for the record you want to edit, or select it from the Finderbeside the Template field.
3. Make the changes you need.
4. Click Save.
To delete templates:
1. Open Purchase Orders > P/O Setup > Templates.
2. Type the code for the record you want to delete, or select it using the Finderor the navigation buttons beside the Template field.
3. Click Delete.
4. If a message appears asking you to confirm the deletion, click Yes.
Vendor Details
If you do not use Inventory Control, use the P/O Vendor Details screen to recordthe vendors and costs for each item you purchase.
About Vendor Details
Note: The Vendor Details screen is available in Purchase Orders only if you donot use Sage 300 ERP Inventory Control. If you use Inventory Control, you setup vendor details in that program.
You use the Vendor Details screen to link each item record to up to ninevendors. You also use this screen to record details about each vendor and thecosts for the item.
When a vendor is linked to an item record, you can select the vendor's itemnumber as you enter item details on requisitions and purchase orders. PurchaseOrders fills in the cost of the item for you, and prints the vendor's item number,rather than your company's item number, on the purchase order.
You normally assign vendors to an item record in order of priority. Forexample, if you buy the same item from more than one vendor, you wouldassign Vendor 1 to the vendor you use most often.
For step-by-step instructions on using the Vendor Details screen to add, edit, ordelete a vendor details record, see "P/O Vendor Details Screen " (page 403).
User's Guide 69
Chapter 1: Setting Up Purchase Orders
Note: Before you can add vendor detail records, you need to add itemrecords in Purchase Orders and add the vendor records in Accounts Payable.
Adding Vendor Details
Note: You add vendor details in Purchase Orders only if you do not haveInventory Control installed.
You add vendor details in a stand-alone Purchase Orders system to:
l Record the vendors and costs for each item you purchase.
l Establish the order of priority of your suppliers, if you buy the same itemfrom more than one vendor.
To add vendor details for items:
1. Open Purchase Orders > P/O Setup > Vendor Details.
2. In the Item Number field, type the item number or select it using theFinder or the navigation buttons beside the field.
3. Fill in or edit the details for each vendor.
4. To add another vendor to the same item, press the Insert key.
The program automatically assigns the next highest priority number (Type)to the vendor, but you can change this to any value between 1 and 9 notalready assigned to a vendor. Fill in or edit the fields as before.
5. Click Save.
Managing Vendor Details
Note: You maintain vendor details in Purchase Orders only if you do nothave Inventory Control installed).
You can edit or delete vendor details at any time. The changes have no effecton current transactions. You will see the changes the next time you select theitem in a new transaction.
Tip: You can change any of the details for a vendor except the vendor’scurrency, if the vendor is set up in Accounts Payable.
70 Sage 300 ERP Purchase Orders
Adding Purchase Orders Setup Records
To edit vendor detail records:
1. Open Purchase Orders > P/O Setup > Vendor Details.
2. Type the item number for the record you want to edit, use the Finder tochoose an item from the list, or use the navigation buttons to move throughthe list.
3. Make the changes you need.
4. When finished, click Save.
To delete vendor detail records:
1. Open Purchase Orders > P/O Setup > Vendor Details.
2. Type an item number in the Item Number field, use the Finder to choose anitem from the list, or use the navigation buttons to move through the list ofitems.
3. Select a vendor record from the list of vendors.
4. Click Delete.
5. Click Yes if you are asked to confirm the deletion.
Vendor Contract Costs
Use the P/O Vendor Contract Costs screen to enter costs for items youpurchase, based on which vendor you purchase them from.
Managing Vendor Contract Costs
You can edit or delete vendor contract costs in Purchase Orders at any time.Your changes have no effect on current transactions. You see the changes thenext time you select the item in a new transaction.
To edit vendor contract costs:
1. Open Purchase Orders > P/O Setup > Vendor Contract Costs.
2. Choose to edit costs by vendor number or item number.
3. Enter or select the number of the vendor or item that you want to edit.
4. Double-click the line containing the costs that you want to edit.
User's Guide 71
Chapter 1: Setting Up Purchase Orders
5. Press F1 again for help on editing item cost details when the VendorContract Costs screen appears.
6. Click Save.
To delete vendor contract costs:
1. Open Purchase Orders > P/O Setup > Vendor Contract Costs.
2. Choose to delete costs by vendor number or item number.
3. Enter or select the number of the vendor or item that you want to delete.
4. Click (select) the line containing the costs that you want to delete.
Note: Double-click the line to review cost details before deleting.
5. Click Delete.
6. Click Yes if you are asked to confirm the deletion.
Setting Up Vendor Contract Costs
Add Vendor Contract Costs records to assign vendor prices to your inventoryitems. Mor e ...
Vendor contract costs appear as defaults when you add purchase orders,receipts, invoices, returns, and credit/debit notes. If no contract cost existsfor an item and vendor, Purchase Orders displays the default item costspecified in the P/O Options screen.
Tip: You can view all vendors’ contract costs in the Unit Cost item Finder inthe Purchase Order Entry, Receipt Entry, Invoice Entry, Return Entry, andCredit/Debit Note Entry screens.
To add vendor contract costs:
1. Open Purchase Orders > P/O Setup > Vendor Contract Costs.
2. Click New to start adding vendor contract costs.
Tip: If reviewing costs, choose whether to view costs for an item numberor a vendor.
3. On the P/O Vendor Contract Costs screen that appears next, enter thevendor number for which you want to set up contract costs, or select it
72 Sage 300 ERP Purchase Orders
Designing Formats for Purchase Orders Reports and Forms
using the Finder.
4. Select the first item number for which you want to enter costs.
5. Fill in the cost, discount, and tax information for the item.
6. When you have finished adding contract cost information, click Add.
Designing Formats for Purchase Orders Reports and FormsPurchase Orders comes with several formats for printing purchase orders forms(requisitions, returns, mailing labels, and receiving slips), analytical reports,and setup reports. You can use these formats "as is" or, if you use SAP CrystalReports® for Sage 300 ERP, you can customize these formats or design yourown.
About SAP Crystal Reports
All reports in Purchase Orders use SAP Crystal Reports®, and have the fileextension RPT.
You can:
l Modify any report using SAP Crystal Reports® for Sage 300 ERP.
l View previous tabs in the Print Preview screen without having to restart thereport.
l Attach reports to an e-mail using the E-mail print destination in SystemManager.
l Export reports (for the Pint Preview screen) to a large number of formats,including:
Comma-Separated Values (CSV)
Data Interchange Format
Excel 2.1, 3.0, 4.1, and 5.0
HTML
Lotus 1-2-3
ODBC
Text
Paginated test
User's Guide 73

Chapter 1: Setting Up Purchase Orders
Columnar text
Rich Text Format (RTF)
Word for Windows
Lotus Notes
Microsoft Mail
Modifying Forms
If you want to modify or create forms or repots, you must install SAP CrystalReports® for Sage 300 ERP.
For more information on designing and adapting forms and reports, see theonline document Customizing Printed Forms and Reports with the SAP CrystalReports® Designer in the User Documentation section on the Sage 300 ERPCustomer Portal athttps://customers.sagenorthamerica.com/irj/go/km/docs/sageKM/SageAccpac ERP/Ungated Customers/Browsable/Product Documentation/Accpac_UA_Resources.htm.
About Purchase Orders Forms
Purchase Orders provides standard report formats for printing copies ofPurchase Orders transactions. You can use these report forms "as is," or youcan customize them to suit your own needs using SAP Crystal Reports® forSage 300 ERP. For more information, see "About SAP Crystal Reports" (page73).
You can print forms immediately after posting Purchase Orders transactions,or you can print a range of these documents at any time.
Purchase Orders
You can print purchase orders immediately after posting, or at any time usingthe P/O Purchase Orders screen.
l To print a purchase order after posting, select Yes to print the purchaseorder after posting. For more information, see "Printing a Purchase OrderImmediately After Posting" (page 258).
l To print a range of purchase orders, open the P/O Purchase Orders screenand fill in the range of purchase orders you want to print before they arecleared from Purchase Orders. For more information, see "PrintingPurchase Orders" (page 256).
74 Sage 300 ERP Purchase Orders
Designing Formats for Purchase Orders Reports and Forms
Requisitions
You can print requisitions immediately after posting, or at any time using theP/O Requisitions screen.
l To print a requisition after posting, select Yes to print the requisition afterposting. For more information, see "Printing a Requisition Immediately AfterPosting" (page 261).
l To print a range of requisitions, open the P/O Requisitions screen and fill inthe range of requisitions you want to print before they are cleared fromPurchase Orders. For more information, see "Printing Requisitions" (page260).
Receiving Slips
You can print receiving slips immediately after posting, or at any time using theP/O Receiving Slips screen.
For more information, see "Printing Receiving Slips" (page 253).
Mailing Labels
You can print mailing labels at any time using the P/O Mailing Labels screen.
For more information, see "Printing Mailing Labels" (page 251).
Returns
You can print returns immediately after posting, or at any time using the P/OReturns screen.
l To print a return after posting, select Yes to print the return after posting.For more information, see "Printing a Return Immediately After Posting"(page 266).
l To print a range of returns, open the P/O Returns screen and fill in the rangeof returns you want to print before they are cleared from Purchase Orders.For more information, see "Printing Returns" (page 264).
Printing and E-mailing Forms
l Mailing labels. For more information, see "P/O Mailing Labels Screen"(page 289).
l Purchase orders. For more information, see "P/O Purchase Orders Screen"(page 299).
User's Guide 75
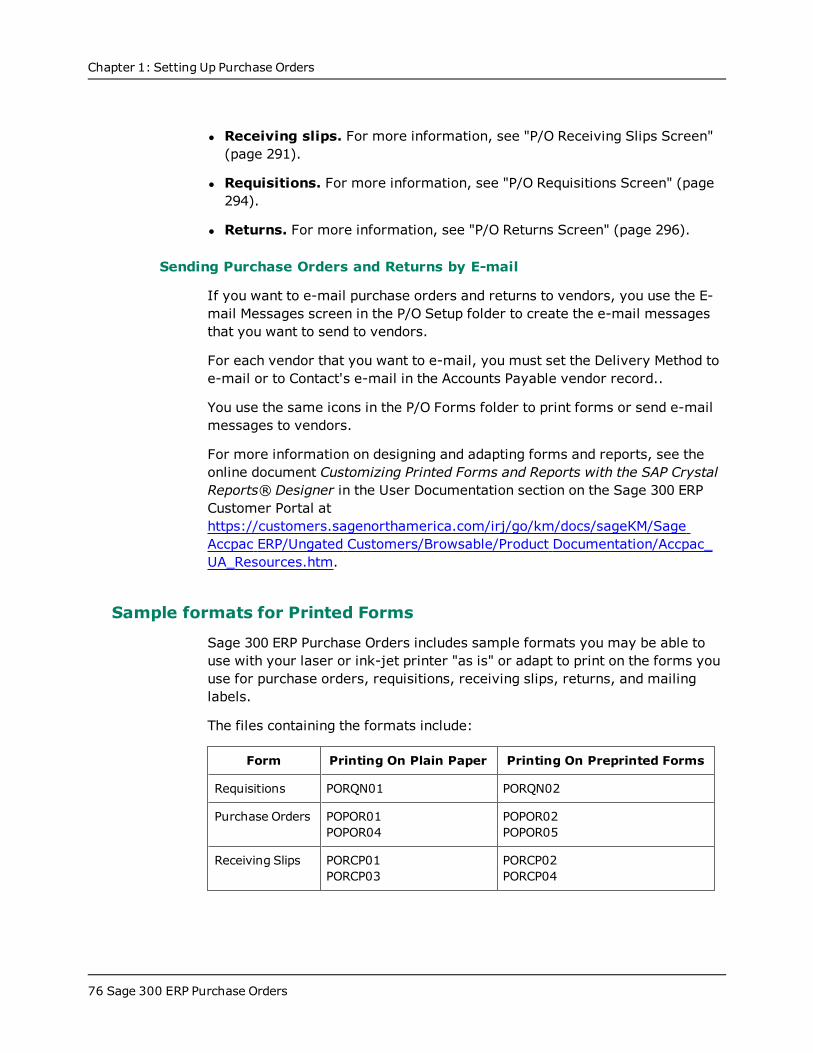
Chapter 1: Setting Up Purchase Orders
l Receiving slips. For more information, see "P/O Receiving Slips Screen"(page 291).
l Requisitions. For more information, see "P/O Requisitions Screen" (page294).
l Returns. For more information, see "P/O Returns Screen" (page 296).
Sending Purchase Orders and Returns by E-mail
If you want to e-mail purchase orders and returns to vendors, you use the E-mail Messages screen in the P/O Setup folder to create the e-mail messagesthat you want to send to vendors.
For each vendor that you want to e-mail, you must set the Delivery Method toe-mail or to Contact's e-mail in the Accounts Payable vendor record..
You use the same icons in the P/O Forms folder to print forms or send e-mailmessages to vendors.
For more information on designing and adapting forms and reports, see theonline document Customizing Printed Forms and Reports with the SAP CrystalReports® Designer in the User Documentation section on the Sage 300 ERPCustomer Portal athttps://customers.sagenorthamerica.com/irj/go/km/docs/sageKM/SageAccpac ERP/Ungated Customers/Browsable/Product Documentation/Accpac_UA_Resources.htm.
Sample formats for Printed Forms
Sage 300 ERP Purchase Orders includes sample formats you may be able touse with your laser or ink-jet printer "as is" or adapt to print on the forms youuse for purchase orders, requisitions, receiving slips, returns, and mailinglabels.
The files containing the formats include:
Form Printing On Plain Paper Printing On Preprinted Forms
Requisitions PORQN01 PORQN02
Purchase Orders POPOR01POPOR04
POPOR02POPOR05
Receiving Slips PORCP01PORCP03
PORCP02PORCP04
76 Sage 300 ERP Purchase Orders
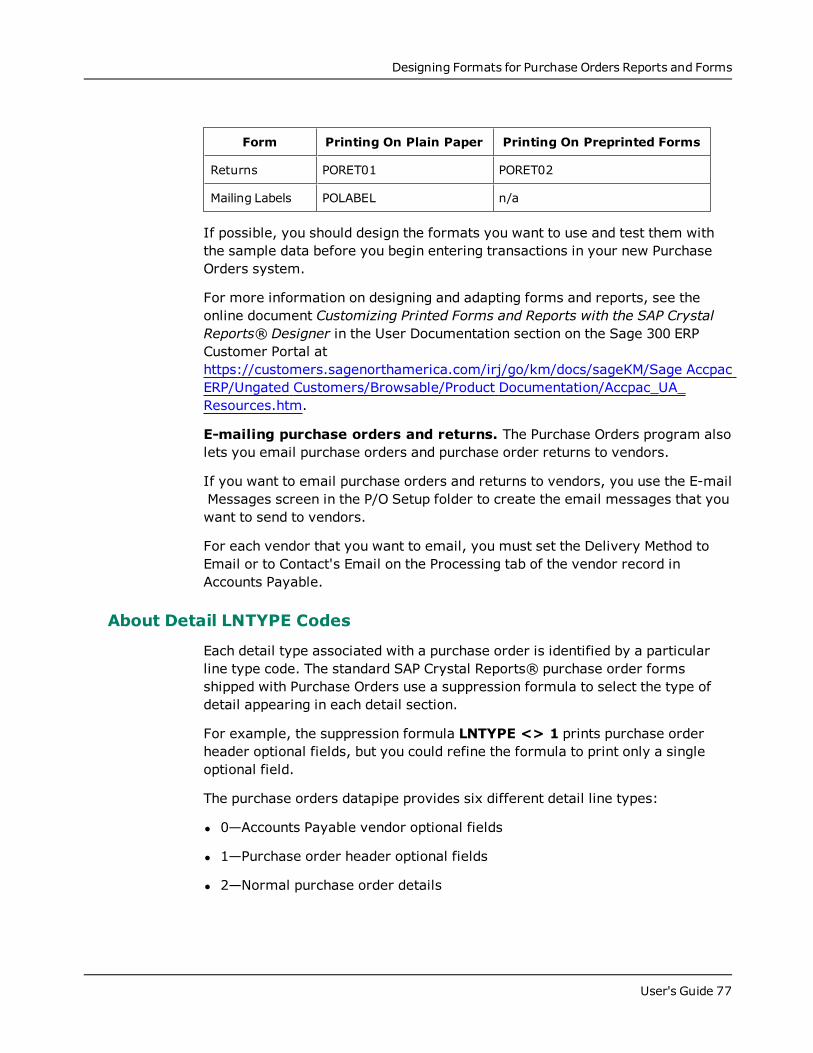
Designing Formats for Purchase Orders Reports and Forms
Form Printing On Plain Paper Printing On Preprinted Forms
Returns PORET01 PORET02
Mailing Labels POLABEL n/a
If possible, you should design the formats you want to use and test them withthe sample data before you begin entering transactions in your new PurchaseOrders system.
For more information on designing and adapting forms and reports, see theonline document Customizing Printed Forms and Reports with the SAP CrystalReports® Designer in the User Documentation section on the Sage 300 ERPCustomer Portal athttps://customers.sagenorthamerica.com/irj/go/km/docs/sageKM/Sage AccpacERP/Ungated Customers/Browsable/Product Documentation/Accpac_UA_Resources.htm.
E-mailing purchase orders and returns. The Purchase Orders program alsolets you email purchase orders and purchase order returns to vendors.
If you want to email purchase orders and returns to vendors, you use the E-mailMessages screen in the P/O Setup folder to create the email messages that youwant to send to vendors.
For each vendor that you want to email, you must set the Delivery Method toEmail or to Contact's Email on the Processing tab of the vendor record inAccounts Payable.
About Detail LNTYPE Codes
Each detail type associated with a purchase order is identified by a particularline type code. The standard SAP Crystal Reports® purchase order formsshipped with Purchase Orders use a suppression formula to select the type ofdetail appearing in each detail section.
For example, the suppression formula LNTYPE <> 1 prints purchase orderheader optional fields, but you could refine the formula to print only a singleoptional field.
The purchase orders datapipe provides six different detail line types:
l 0—Accounts Payable vendor optional fields
l 1—Purchase order header optional fields
l 2—Normal purchase order details
User's Guide 77
Chapter 1: Setting Up Purchase Orders
l 3—Inventory Control item optional fields
l 4—Purchase order detail optional fields
l 5—Comments / instructions
Datapipe Report Parameters for Purchase Order Forms
A "datapipe" is a dynamic link library (DLL) program that performs databasequeries for reports or forms.
Because datapipes are compiled and optimized for specific reports, they canprovide significant performance advantages over reports that use standarddatabase access techniques (ODBC access).
The disadvantage of datapipes is that they provide access to a fixed group offields. You cannot customize a datapiped report as much as you can customizenon-datapiped one.
For more information on designing and adapting forms and reports, see theonline document Customizing Printed Forms and Reports with the SAP CrystalReports® Designer in the User Documentation section on the Sage 300 ERPCustomer Portal athttps://customers.sagenorthamerica.com/irj/go/km/docs/sageKM/SageAccpac ERP/Ungated Customers/Browsable/Product Documentation/Accpac_UA_Resources.htm.
You can include detail comments and instructions, item information, and/orvendor information (such as website and e-mail addresses, and vendoroptional fields) on the purchase order forms. For more information aboutediting datapiped forms, see "Editing Datapiped Purchase Order Forms" (page78)
Editing Datapiped Purchase Order Forms
Purchase Orders includes both "datapiped" and "non-datapiped" purchaseorder forms. You may be able to print these templates "as is," or you can useSAP Crystal Reports® to change the layout to suit your needs (or to createyour own forms).
A "datapipe" is a dynamic link library (DLL) program that performs databasequeries for reports or forms.
Because datapipes are compiled and optimized for specific reports, they canprovide significant performance advantages over reports that use standarddatabase access techniques (ODBC access).
78 Sage 300 ERP Purchase Orders
Designing Formats for Purchase Orders Reports and Forms
The disadvantage of datapipes is that they provide access to a fixed group offields. You cannot customize a datapiped report as much as you can customizenon-datapiped one.
For more information on designing and adapting forms and reports, see theonline document Customizing Printed Forms and Reports with the SAP CrystalReports® Designer in the User Documentation section on the Sage 300 ERPCustomer Portal athttps://customers.sagenorthamerica.com/irj/go/km/docs/sageKM/Sage AccpacERP/Ungated Customers/Browsable/Product Documentation/Accpac_UA_Resources.htm.
You can also include detail comments and instructions, item information, and/orvendor information (such as Web site and e-mail addresses, and vendoroptional fields) on the purchase order forms. To do so, you set certainparameters in the PORPT.INI datapipe query to 1.(If the information is notrequired on the forms, set the parameter to 0.)
To edit datapiped purchase order forms:
1. In your Sage 300 ERP program folder, locate the PORPT.INI file, and thenopen it in text editing software.
2. To include detail comments and instructions, item information, and/orvendor information, set the following parameters to 1:
Parameter 12 (comments and instructions)
Parameter 13 (item information)
Parameter 14 (vendor information)
Parameter 15 (vendor optional fields)
Parameter 16 (header optional fields)
Parameter 17 (item optional fields)
Parameter 18 (detail optional fields)
Note: If the information is not required on the forms, set the parameter to0.
3. Save, and then close the file.
4. Restart Sage 300 ERP.
If you then want to use the datapipe version again, you must change PORPT.INIback.
User's Guide 79
Chapter 1: Setting Up Purchase Orders
Using Non-datapiped Purchase Order Forms
Purchase Orders includes both "datapiped" and "non-datapiped" purchaseorder forms. You may be able to print these templates "as is," or you can useSAP Crystal Reports® for Sage 300 ERP to change the layout to suit yourneeds (or to create your own forms). Mor e ...
A "datapipe" is a dynamic link library (DLL) program that performs databasequeries for reports or forms.
Because datapipes are compiled and optimized for specific reports, they canprovide significant performance advantages over reports that use standarddatabase access techniques (ODBC access).
The disadvantage of datapipes is that they provide access to a fixed group offields. You cannot customize a datapiped report as much as you can customizenon-datapiped one.
For more information on designing and adapting forms and reports, see theonline document Customizing Printed Forms and Reports with the SAP CrystalReports® Designer in the User Documentation section on the Sage 300 ERPCustomer Portal athttps://customers.sagenorthamerica.com/irj/go/km/docs/sageKM/SageAccpac ERP/Ungated Customers/Browsable/Product Documentation/Accpac_UA_Resources.htm.
To use the non-datapiped purchase order forms, you must edit thePORPT.INI file as follows:
1. In your Sage 300 ERP program folder, locate the PORPT.INI file, and openit in a text editor.
2. In the POPOR01 and POPOR02 sections:
a. At the beginning of the type = DATAPIPE line, type an apostrophe.
b. At the beginning of the datapipe path = ..\ line, type an apostrophe.
c. At the beginning of the datapipe query = line, type an apostrophe.
3. Save, and then close the file.
4. Restart Sage 300 ERP.
Important! If you want to use the datapipe version again, later, you mustrestore these sections in the PORPT.INI file.
80 Sage 300 ERP Purchase Orders
Adding Purchase Orders Statistics and History
Updating Older Datapiped Purchase Order Forms
If you made minor changes to older Purchase Orders forms—such as adding alogo or changing fonts—you can make exactly the same changes to the newestforms, rather than update your old forms.
To update purchase order forms from versions prior to 5.4:
1. Install the new version of Purchase Orders, ensuring that the Optional FieldsConversion utility lists all optional fields (if you use them), and then activatePurchase Orders 5.4.
2. Copy the custom form that you want to update from Sage ERPAccpac\PO5xx\ENG to Sage 300 ERP\POxx\ENG.
Note: If the old form file names are the same as your new forms, renameyour old forms before copying them to the new \ENG folder.
3. Open the old report in SAP Crystal Reports®, and then verify the database.
Adding Purchase Orders Statistics and HistoryIf you want to add purchase statistics for prior fiscal periods from your oldpurchase orders system, you should do so before you add any new purchaseorders and requisitions. Purchase Orders automatically creates statistical datafrom the transactions you post after setting up if you use the AccumulateStatistics option.
About Adding Purchase Statistics
If you set up Purchase Orders partway through a fiscal year, you may want toadd statistical data for the year to date and previous years. You should addstatistics that you want to view online or print on reports.
To add statistical information during setup or to edit it later, you must firstselect the Accumulate Statistics and Allow Edit Of Statistics options onthe P/O Options screen.
Keeping Purchase History and Statistics
Depending on the options you select for keeping purchase history and statistics,Purchase Orders automatically updates statistical information with everytransaction that you post. The program keeps this data until you clear it usingthe Clear History screen.
User's Guide 81
Chapter 1: Setting Up Purchase Orders
Entering Statistics from Your Previous Purchase Orders System
If you select the Accumulate Statistics option, Purchase Orders createsstatistics for each transaction you post.
If you also select the Allow Edit Of Statistics option, you can manuallyenter statistics from prior periods in your old purchase order system when youare setting up your new Purchase Orders system.
You use the Purchase Statistics screen to add the data to your Purchase Orderssystem, and to look at the data online or print the data on the PurchaseStatistics report. For more information, see "P/O Purchase Statistics Screen"(page 411).
For each period, you can enter:
l Number of purchase orders, receipts, invoices, and credit notes and debitnotes.
l Net quantity purchased and net purchase amount.
l Net invoice amount.
l Average invoice, credit note, and debit note amounts.
l Largest and smallest invoice, credit note, and debit note amounts, and thevendors who issued them.
Important! Do not add the same statistics twice. If you post openingand year-to-date transactions to set up your new Purchase Orders system,Purchase Orders will also create statistics for these transactions and periods(if you use the Accumulate Statistics option). If you are also addingstatistical data you want to keep in Purchase Orders, be careful not toduplicate statistics that the program has already created for you.
For more information about the historical information you can keep inPurchase Orders, see "About Accumulating Statistics" (page 16).
Adding and Managing Statistics
Before you start:
l Select the options to Accumulate Statistics and Allow Edit OfStatistics on the P/O Options screen.
82 Sage 300 ERP Purchase Orders
Adding Purchase Orders Statistics and History
l Select the type of year and period to accumulate statistics by on the P/OOptions screen.
To create or manage statistics:
1. Open Purchase Orders > P/O Statistics and Inquiries > PurchaseStatistics.
2. Choose the year and period for which to add or edit statistics, and thecurrency in which you will enter amounts (multicurrency ledgers only).
3. Add or edit statistical information in the Purchases group or the Invoices AndCredit Notes group.
If the screen does not let you enter data, close the screen and any PurchaseOrders screens that are open for the company, then select the Allow EditOf Statistics option on the P/O Options screen and save the change to thescreen.
Note: You can save changes to the P/O Options screen only when noPurchase Orders screens are open for the company on your computer or onany other workstations, if you are working on a network.
4. When finished adding the statistics for a period, click the Add button. (Thebutton name then changes to "Save.") When finished editing statistics for aperiod, choose the Save button.
Deleting Purchase Statistics
To delete statistics:
1. Open Purchase Orders > P/O Statistics and Inquiries > PurchaseStatistics.
2. Choose the year and period for which to delete statistics, and select thecurrency in which to display amounts (multicurrency ledgers only).
3. Click Delete.
If you see a message asking you to confirm that you want to delete thestatistics, click Yes.
User's Guide 83

Chapter 2: Entering and PostingPurchase Orders TransactionsUse Purchase Orders transaction entry screens to process requisitions,purchase orders, receipts, invoices, returns, credit notes, and debit notes.
About Transaction Processing in Purchase OrdersThis article describes how posting, day-end processing, and audit trails relateto transaction processing in Purchase Orders.
In Purchase Orders, you enter requisitions, purchase orders, receipts,invoices, returns, credit notes, and debit notes. The purchase order processingcycle can include:
l Posting requisitions.
l Creating and posting purchase orders from requisitions or without usingrequisitions.
l Posting receipts to purchase orders or without referencing particularpurchase orders.
l Posting returns to receipts or without referencing receipts.
l Posting invoices to receipts or without receipts (for additional costs).
l Posting credit notes to invoices or returns or without referencing invoices orreturns.
l Posting debit notes to invoices or without invoices.
Online Posting
Purchase Orders uses online transaction processing rather than batchprocessing. This means that each transaction is posted when you click Postafter entering the transaction.
When you post transactions, Purchase Orders immediately updates itemquantities on purchase order and on hand in Inventory Control, so you alwaysknow your inventory levels.
User's Guide 85
Chapter 2: Entering and Posting Purchase Orders Transactions
Item costs may be updated by posting or by running Day End Processing —depending on your setting for the Inventory Control option Cost ItemsDuring Posting or Day End Processing.
Also, depending on your I/C and P/O options, posting may add G/Ltransactions to new or existing batches, or they may be added during Day EndProcessing or, manually, using the Create Batch screen
Job-Related Transactions
For job-related transactions, posting updates committed and actual quantitiesand costs in Project and Job Costing. (Most updates to jobs arise frompurchase orders and receipts. However, Purchase Orders also updates Projectand Job Costing whenever invoices differ from the originating receipts, or ifyou have returns (with credit notes) and debit notes.
Day End Processing Updates Everything Else
You must run Day End Processing to create posting journals and update historyand statistics in both Inventory Control (if you use it) and Purchase Orders (ifyou keep history and statistics).
You may also update item costs during Day End Processing—depending onyour options in Inventory Control.
Day End Processing also creates batches of Accounts Payable invoices, creditnotes, and debit notes from Purchase Orders transactions, and creates generalledger transactions (if you use the option to create them during posting or dayend processing, and you cost items during day-end processing).
If necessary, you can run Day End Processing several times a day to keep thisinformation more current.
Using P/O without Inventory Control
If you use Purchase Orders without Sage 300 ERP Inventory Control, theprogram treats all items as non-stock items. If you use a stand-alonePurchase Orders system, it:
l Does not maintain item quantities on order or on hand.
l Does not update item costs.
l Uses the most recent cost of an item from a vendor as the default item costin Purchase Orders screens.
86 Sage 300 ERP Purchase Orders

About Transaction Processing in Purchase Orders
Keeping Transaction History
If you use the Keep Transaction History option, Purchase Orders keepstransaction details until you remove them using the Clear History screen. Youcan print reports of the data—and reprint requisitions, purchase orders,receiving slips, and returns—until you clear the transaction history for them.
If you do not keep transaction history, completed transactions are deleted whenyou run Day End Processing. Purchase Orders considers the followingtransactions to be completed:
l Requisitions and purchase orders with a Completed status (all detail lines arecompleted).
l Receipts for which an invoice has been posted for every vendor specified onthe receipt.
l Returns for which credit notes have been posted.
l Invoices, credit notes, and debit notes (complete on posting) transferred toAccounts Payable.
Important! If you do not keep history, you cannot display completedtransactions after you run Day End Processing.
Posting Journals
You can print posting journals for receipts, invoices, returns, credit notes, anddebit notes after running Day End processing.
You can print the journals until you delete the information for them, using theClear History screen.
Purchase Order Types
The type specified for a purchase order determines how the purchase order isprocessed. You can create active, standing, future, and blanket purchaseorders.
Active
An active purchase order is a purchase order you intend to processimmediately.
User's Guide 87
Chapter 2: Entering and Posting Purchase Orders Transactions
Standing
Standing purchase orders contain items you often order together. You canissue active purchase orders from standing purchase orders, as frequently asneeded.
You can create standing purchase orders that contain items you often ordertogether, and then create active purchase orders from the standing purchaseorders.
Creating active purchase orders from standing purchase orders. Tocreate an active purchase order from a standing purchase order, you call upthe standing purchase order and change the type to Active (you can also selectFuture or Blanket to create other types of purchase orders), make the changesyou need, then post the new order with a new purchase order number youtyped or a number assigned automatically by the program.
When you post a purchase order you created from a standing purchase order,the standing purchase order is retained in the system, unchanged and with itsoriginal number, regardless of how many purchase orders you issue from it.
Changing a standing purchase order. To change the contents of astanding purchase order, you display the purchase order, make the changesyou need, then post them. You can change everything about an existingstanding purchase order except its number and type. If you change thepurchase order number or type, the program assumes you are creating a newpurchase order.
Future
Future purchase orders are purchase orders you enter with a future date onwhich you expect to activate and issue the purchase order.
Day End Processing automatically activates future purchase orders on thepurchase-order date (or the first time you run Day End processing after thepurchase-order date). Alternatively, you can change the status of a futurepurchase order to Active before the purchase-order date, or change theactivation date.
Day End Processing posts newly activated future purchase orders so thatpurchasing statistics are updated and items are placed on purchase order inInventory Control.
88 Sage 300 ERP Purchase Orders
About Transaction Processing in Purchase Orders
Tip: If you usually run Day End Processing at the end of the work day, futurepurchase orders set to be activated on a certain day will not become activeuntil the end of the day. To be sure a future purchase order is ready to beprocessed on the correct date, assign a date earlier than the desired date..
Blanket
Blanket purchase orders are purchase orders you set up for a certain monetaryamount, from which you issue active purchase orders until you have used up allthe available funds.
When to use blanket purchase orders. You might use blanket purchase orderswhen you want to make a number of purchases over time, but want to avoidhaving to post a new requisition and purchase order for each purchase. Forexample, you might use a blanket purchase order to periodically replenishoffice supplies.
Blanket purchase orders are not normally used to buy inventory items. If youplan to buy a lot of inventory over time, you should process it through a largeactive purchase order, with all the details, rather than by using a blanketpurchase order.
Setting up and using blanket purchase orders. When you set up a blanketpurchase order, you specify the total amount (cost) of items that can bepurchased. With each new purchase, you add detail lines to the blanketpurchase order.
Tip: You can change the total amount allowed for a blanket purchase order atany time. If you wish, you can assign security to the Original Amount field onthe Order tab, so that only authorized persons can change the amount.
When you post new details, the amount still available is calculated anddisplayed.
When the available amount reaches zero, the blanket purchase order iscompleted and you cannot use it to make any further purchases.
Posting additional costs for blanket purchase orders. Because you do not enteradditional costs on purchase orders, and you can change costs on receiptswithout updating the purchase order, you may post a receipt total that exceedsthe available amount on the blanket purchase order. Although Purchase Orderslets you post this type of receipt, your procedures may not permit you toexceed the amount specified on the blanket purchase order.
User's Guide 89
Chapter 2: Entering and Posting Purchase Orders Transactions
About General Ledger Journal Entries Generated by Purchase Orders
This topic describes the general ledger journal entries that are created forPurchase Orders transactions.
Journal entries are created for Purchase Orders transactions in two stages:
l Posting or Day End processing creates inventory entries (or general ledgerentries, if you do not use Inventory Control) from receipts and returns.
l Accounts Payable posting creates entries from invoices, returns, creditnotes, and debit notes. (No general ledger entries are created forrequisitions or purchase orders.)
Printing the G/L Transactions Report
If you use the option to create G/L transactions using the Create Batch icon inPurchase Orders, you can print the G/L Transactions report and check theentries before creating G/L batches.
Note: If you use the option to create G/L transactions during posting,transactions are created and the report information is deleted by posting orDay End Processing (depending on when you cost inventory). You must usethe G/L Listing in General Ledger to see the information.
Taxes
Allocated taxes are posted to the same general ledger accounts as theircorresponding item or additional cost details.
Recoverable and expensed taxes are posted to the accounts specified for thetax authorities in Tax Services.
About Optional Fields in Transactions
Purchase Orders supports Transaction Analysis and Optional Field Creator, aseparately licensed package that lets you add optional fields to transactiondocuments (like purchase orders and invoices) and to each detail line of atransaction.
Note: You can use optional fields only if you use Transaction Analysis andOptional Field Creator.
90 Sage 300 ERP Purchase Orders
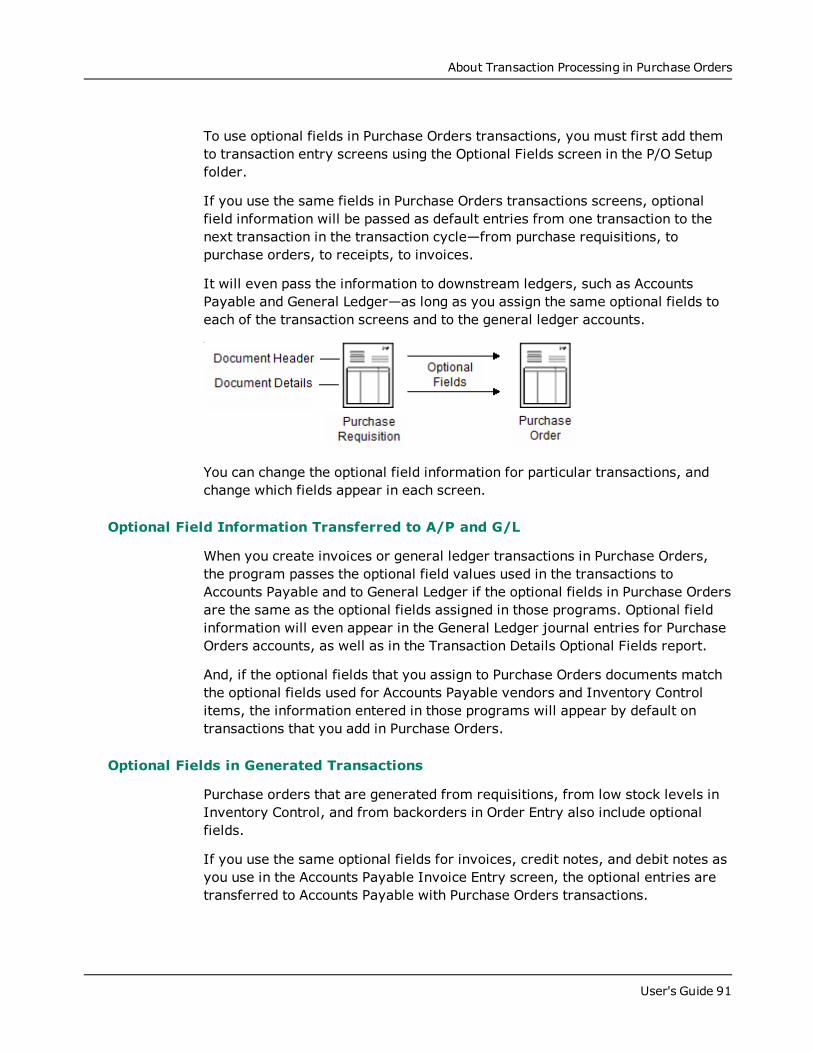
About Transaction Processing in Purchase Orders
To use optional fields in Purchase Orders transactions, you must first add themto transaction entry screens using the Optional Fields screen in the P/O Setupfolder.
If you use the same fields in Purchase Orders transactions screens, optionalfield information will be passed as default entries from one transaction to thenext transaction in the transaction cycle—from purchase requisitions, topurchase orders, to receipts, to invoices.
It will even pass the information to downstream ledgers, such as AccountsPayable and General Ledger—as long as you assign the same optional fields toeach of the transaction screens and to the general ledger accounts.
You can change the optional field information for particular transactions, andchange which fields appear in each screen.
Optional Field Information Transferred to A/P and G/L
When you create invoices or general ledger transactions in Purchase Orders,the program passes the optional field values used in the transactions toAccounts Payable and to General Ledger if the optional fields in Purchase Ordersare the same as the optional fields assigned in those programs. Optional fieldinformation will even appear in the General Ledger journal entries for PurchaseOrders accounts, as well as in the Transaction Details Optional Fields report.
And, if the optional fields that you assign to Purchase Orders documents matchthe optional fields used for Accounts Payable vendors and Inventory Controlitems, the information entered in those programs will appear by default ontransactions that you add in Purchase Orders.
Optional Fields in Generated Transactions
Purchase orders that are generated from requisitions, from low stock levels inInventory Control, and from backorders in Order Entry also include optionalfields.
If you use the same optional fields for invoices, credit notes, and debit notes asyou use in the Accounts Payable Invoice Entry screen, the optional entries aretransferred to Accounts Payable with Purchase Orders transactions.
User's Guide 91
Chapter 2: Entering and Posting Purchase Orders Transactions
About Vendors
You can add new vendor records to Accounts Payable from all of the PurchaseOrders transaction-entry screens, or type new vendor numbers then add themlater in Accounts Payable.
This feature lets you add new vendors "on the fly" so that you can entertransactions for vendors who are not in your Accounts Payable data, even ifyou do not have time or rights to add vendor accounts in Accounts Payable.
To add a new vendor record from a Purchase Orders screen, type the vendornumber, press Tab, then use the "New" icon next to the Vendor Number fieldto open the Vendors screen in Accounts Payable and add the record. When youclose the Vendors screen, you are returned to the Purchase Orders screen youwere using.
If you do not want to add the record in Accounts Payable while you areentering Purchase Orders transactions, you can just type the new vendornumber and the name of the account in the Purchase Orders transaction-entryscreen, then add the vendor to Accounts Payable later (before you post thePurchase Orders transactions).
Primary and Secondary Vendors
The primary vendor is the vendor from which you received goods. You caninclude both item details and additional cost details for primary vendors onreceipts, invoices, credit notes, and debit notes.
A secondary vendor is one that just adds charges to the receipt—such as forfreight.
The secondary vendor is the vendor who charged you costs on a shipment ofgoods, but who did not supply the goods themselves.
Note: You cannot enter item details for secondary vendors. You can enteradditional cost details only.
About Importing and Exporting Purchase Orders Transactions
Importing Transactions
You can import requisitions, purchase orders, and receipts that you previouslyexported for reuse. You cannot import documents with numbers that you havealready assigned in Purchase Orders, unless you have cleared the transactionswith those numbers.
92 Sage 300 ERP Purchase Orders
About Transaction Processing in Purchase Orders
The original file from which you imported the information is retained until youdelete it.
Purchase orders can include requisition numbers, and receipts can includepurchase order numbers. You can import additional cost details for the primaryvendor on a receipt, but you cannot import additional costs for secondaryvendors.
You cannot import multicurrency requisitions, purchase orders, or receipts intoa single-currency Purchase Orders system. Edit a multicurrency import file toremove the multicurrency fields before importing.
Exporting Transactions
You can export all Purchase Orders transaction types, including requisitions,purchase orders, receipts, invoices, returns, credit notes, and debit notes.
Use the Export command on the File menu to transfer credit note and debitnote, invoice, receipt, and return transactions created in Purchase Orders tonon-Sage 300 ERP applications, or to a file to be edited and imported later.
Before exporting, decide which fields to include in the export file. You mustselect fields for each type of record used for the transaction type. You shouldalso find out the path for the export file you want to use or create.
Tip: If you do not want to export all transactions, use the Set Criteria optionto specify which documents to export.
When you click Export, Purchase Orders exports all the transactions of thecurrent type currently in the system.
Note: Purchase Orders uses more than one database table to storetransaction records. If you are exporting any of these records (includingadditional costs), the Export dialog box shows a list of the tables that you canexport for the record once you select the export file type and the file to whichto export the data.
Tax Information
Change tax amounts, tax groups, and tax classes for Purchase Ordersdocuments.
User's Guide 93
Chapter 2: Entering and Posting Purchase Orders Transactions
About Tax Information and Amounts
Purchase Orders calculates a tax amount on purchase orders, receipts,invoices, returns, credit notes, and debit notes if all three of the followingconditions apply:
l You have entered tax rates for the applicable tax authorities and classes inTax Services.
l The vendor for the document is subject to tax.
l The transaction contains taxable items or taxable additional costs.
In Purchase Orders, tax information is calculated and displayed for individualdetails and for the total purchase order, receipt, invoice, return, credit note,or debit note. (No tax information is displayed for requisitions.)
Tax calculations are based on the rates entered for the various authorities andtax classes in Tax Services.
You can edit some tax information for individual detail lines, but you canchange tax amounts directly only for the document as a whole. To change taxamounts for the primary vendor, use the Taxes tab on the transaction-entryscreen. For secondary vendors, use the Additional Cost Vendor Taxes screen.
About Document Tax Information
The Taxes tab in Purchase Orders screens displays the tax calculations for adocument as a whole on purchase orders, invoices, returns, credit notes, anddebit notes.
For receipts, total taxes are displayed on the Taxes tab for the primaryvendor, and on the Additional Cost Vendor Taxes screen for secondaryvendors.
Tax information for a transaction total includes:
l Tax authority and description (for the vendor's tax authorities).
l The vendor's tax class and description for each tax authority. You canchange to another tax class that is assigned to the tax authority. Newvendors you have not yet added to Accounts Payable are assigned tax class1 and its corresponding description for each tax authority in the tax groupselected for the transaction.
For information about entering taxes for details, see "About Detail TaxInformation" (page 95).
94 Sage 300 ERP Purchase Orders
About Transaction Processing in Purchase Orders
Recalculating Taxes
On the Taxes tab and on the Additional Cost Vendor Taxes screen, you use theCalculate Tax button to have the program recalculate taxes using the tax tablesfrom Tax Services after you have changed tax amounts. Taxes are calculatedautomatically when you choose the Totals tab or when you post the transaction.
Changing the Tax Amount
You can change the total tax amount to correct small discrepancies, such asrounding errors. (You should correct large errors by updating the tax rates andother information for the tax authorities in Tax Services.)
l The total amount of tax that is included in the cost amounts entered for thevendor. You cannot edit this amount.
l The total amount of tax that is charged in addition to (not included in) thecost amounts entered for the vendor. You cannot edit this amount.
l Tax amount (the total of all tax amounts calculated for the transaction). Thetotal tax amount for an authority is the sum of the tax included and taxexcluded. If you change the tax amount, the program adjusts the taxamounts on the details.
Editing Taxes for the Document Vendor
Purchase Orders automatically calculates the vendor taxes on each transaction,using the rates entered in Tax Services for the tax authorities and classesassigned to the vendor in Accounts Payable.
You can change the tax class and the tax amount for each tax authority assignedto the document vendor for a transaction on the Taxes tab of the screen you areusing.
About Detail Tax Information
You can select a detail on a detail-entry grid on any transaction-entry form,then click the Item/Tax button to open a separate screen where you can viewor edit information for the selected detail, and add new details.
Note: If you are entering an additional cost, you click the Cost/Tax button toopen a similar screen that displays a single additional cost detail.
You can also open the screen by selecting the item or additional cost detail, thenclicking the Zoom button ( ).
User's Guide 95
Chapter 2: Entering and Posting Purchase Orders Transactions
Tax Information on the Detail Taxes Screens
The Detail Items/Taxes screen and the Detail Costs/Taxes screen provideadditional tax information for the detail that you do not see on the detailstable. You can check the tax information for the detail, and you can change thetax class and the tax-included status for each tax authority (if the vendor's taxauthority allows tax-included costs).
The Detail Items/Taxes screen shows, for the selected detail:
l Tax authorities and their descriptions in the vendor's tax group.
You can change to another tax class that is assigned to the tax authority.
If you enter a detail line for a non-inventory item or additional cost, or anitem that does not have the vendor's tax authority assigned to its itemrecord, the tax class for the detail is determined by the additional costcode, if any. If no additional cost code is used the class is set to 1, with thedescription entered for tax class 1 in Tax Services.
If you change an item's tax class to non-taxable for a tax authority, no taxis charged for the detail and authority, even if the vendor is subject to taxfor the authority.
l Detail tax class —whether the item is taxable.
The tax classes and class descriptions that are assigned to the taxauthority.
If necessary, you can change the tax class to another tax class that isassigned to the authority (for example, if the particular item is not taxable).You cannot change the description here.
To change the tax class description or make other changes to the specifiedtax group, use the Tax Services screens in Common Services.
l Tax Included option—whether tax is included in the cost (the defaultchoice for this option is provided from the vendor record in AccountsPayable).
The default choice for this option is provided by the vendor record inAccounts Payable or by the vendor contract cost.
Note: You can include tax in item costs and change the choice for the TaxIncluded option only if Allow Tax In Price is selected for the taxauthority in Tax Services.
96 Sage 300 ERP Purchase Orders
About Transaction Processing in Purchase Orders
l Tax amount— the total of allocated, recoverable, and expensed taxamounts for each authority.
Tax amounts in the Detail Items/Taxes screen do not include taxes chargedon additional costs that you prorated to the detail.
Similarly, tax amounts in the Detail Costs/Taxes screen show tax totals onlyfor the additional cost detail.
l Allocated Tax — the total tax amount that was allocated to the selecteddetail line for the tax authority.
This is the tax that you wish to include in the cost of an item. It can be eithertax-included or tax-excluded, but the full amount of the allocated tax isadded to item costs in Inventory Control.
l Recoverable Tax—a tax amount that is refundable.
A tax amount that is refundable to the purchaser, so is not part of the costthat is posted to the Inventory Control item record. Recoverable taxes aredisplayed only by detail line.
General ledger transactions are created during posting or Day End Processingto post recoverable taxes to the general ledger account specified for them inTax Services.
l Expensed Tax —if the tax is expensed rather than included in the value ofinventory.
A tax amount that is posted to a general ledger expense account, rather thanto the account to which you post the cost. This tax amount is not posted to theInventory Control item record.
l Tax Included—the tax that is included in the cost of the item.
Use this field to indicate whether tax amounts are included in the item cost oradditional cost amount (instead of charged in addition to the detail cost).
The default choice for this option is provided from the vendor record inAccounts Payable or from the vendor contract cost.
You can choose Yes for this option only if Allow Tax In Price is selectedfor the authority in Tax Services.
l Tax Base —the amount on which the tax is based.
This field shows the net cost of items before tax is added for the taxauthority. You cannot change the amount that appears in this field.
User's Guide 97
Chapter 2: Entering and Posting Purchase Orders Transactions
(This field is particularly useful for items that have tax included in theirprices.)
You specify whether a tax is allocated, recoverable, or expensed, and assignthe general ledger account for the tax in the Tax Authorities screen in TaxServices.
Detail Tax Calculation
Tax amounts are calculated for details when you post the transaction or clickthe Totals tab on the screen.
To check tax amounts for details before posting a transaction, select the detailon the detail table, click Item/Tax to open the Items/Taxes screen, then clickthe Calculate Taxes button. The program calculates taxes for the entiredocument, not just for the detail you were editing.
If you edit a tax amount on the Taxes tab, and then click Calculate Tax, theprogram uses the tax tables in Tax Services and your selections for the taxclass and the tax-included option to recalculate taxes.
Once taxes are calculated, you can see the allocated tax, tax-included, andnet-of-tax amounts for a detail on the detail line, but you cannot change anyinformation in these fields.
About General Ledger Transactions for Edited Taxes
New general ledger transactions are created by posting or Day End Processing(depending on when you cost inventory items) if you change tax amountswhen you:
l Edit tax information or change item quantities or costs on a posted receiptor return, or on an invoice, credit note, or debit note.
l Reprorate additional costs.
About Tax for Additional Cost Details
You enter additional costs only with receipts, invoices, credit notes, and debitnotes. The same tax information is displayed for additional cost details as foritem details.
Tax on Prorated Additional Costs
For each additional cost detail, you can choose a proration method thatspecifies how or whether to prorate the additional cost and associated
98 Sage 300 ERP Purchase Orders
About Transaction Processing in Purchase Orders
allocated tax amounts to the item costs.
Prorating Automatically
If you choose to prorate automatically, posting or Day End Processingcalculates the tax amount for each additional cost and prorates the additionalcost amount and allocated taxes to item details, according to the prorationmethod you choose (by quantity, cost, or weight).
The prorated amounts are not displayed with the affected details. They are alsonot included in the tax amounts you see in the Item Tax Distribution screen(because they are not part of the base on which taxes are calculated for items),but they are shown on the posting journals for the transactions.
Recoverable and Expensed Taxes
Journal entries for recoverable and expensed taxes are created in AccountsPayable when the invoice batch from Purchase Orders is posted.
Adding Taxes to Manually Prorated Additional Cost Amounts
If you prorate additional costs manually, you must accurately calculate the taxamount for each cost you are prorating, then allocate the full amount of the costand applicable allocated taxes to item details. You must enter the exact amountto prorate to each item detail in the Manual Proration field for the detail line onthe receipt or return.
Multicurrency Ledgers
If you use multicurrency accounting, you can enter additional costs to bemanually prorated only for vendors who use the functional currency.
Checking Manual Proration Tax Amounts
If you are manually prorating an additional cost, you can use the Additional CostVendor Taxes screen to check the allocated tax amount calculated by theprogram for the additional cost detail.
If the tax calculations for a transaction include recoverable and expensed taxes,you should calculate the allocated tax to prorate manually for each detail, usingthe Item/Tax button on the detail entry grid (on the first tab) or in DetailItems/Taxes screen.
Use the Totals tab to check the total additional cost amount (including taxes) toprorate manually to item details. The Totals tab lists:
User's Guide 99
Chapter 2: Entering and Posting Purchase Orders Transactions
l The total amount to be prorated manually (in the Additional Cost To BeAllocated field). This amount is for all vendors included in the transactionwhose costs you are prorating manually.
l The amount you have prorated so far (in the Manually Prorated field).
l The amount, if any, which has not been prorated or by which the manualproration is greater or less than the total (in the Out Of Balance field).
Changing Tax Information and Amounts on Purchase Orders Documents
To change tax amounts for purchase orders, receipts, invoices, returns, orcredit/debit notes, you can:
l Change the tax groups and tax classes for the vendor.
l Change the tax class for any of the detail lines.
l Directly change the tax amounts for the whole document.
To change the total tax amount for a document:
1. Click the Taxes tab on the the document entry screen.
2. Edit the vendor tax class if necessary, and then click the Calc. Taxesbutton to see the results of the change.
3. To manually change the total tax amount for the vendor, enter new taxtotals in the Tax Amount column.
4. Purchase Orders distributes the updated tax amounts when you move toanother tab or post the transaction.
To change tax information for single items:
1. Click the Item/Tax button on the first tab of the document entry screen.
2. Change the tax class for an authority, or the tax included option, ifnecessary.
Note:l You cannot change the Tax Included setting unless the tax authorityallows it. (Tax authorities are defined in Tax Services.)
l The tax amount is not automatically recalculated until you close thisscreen and move to another tab.
100 Sage 300 ERP Purchase Orders
About Transaction Processing in Purchase Orders
l The tax amount is not recalculated if you overrode the total tax amount onthe Taxes tab. If you want to recalculate the tax, you have to use the Calc.Taxes button on the Order tab, the Taxes tab, or on the Detail Item/Taxeswindow.
To change tax amounts for additional costs:
1. Click the Additional Costs tab, and then click the Vendor Taxes button.
2. Edit the tax class if necessary, then click the Calc. Taxes button to see theresults of the change.
3. To manually change the total tax amount for the vendor's additionalchanges, enter new tax totals in the Tax Amount column.
4. Purchase Orders distributes the updated tax amounts to the additionalcharges when you move to another tab or post the transaction.
To change tax information for a single additional cost detail:
1. Click the Additional Costs tab, and then click the Cost/Tax button to displaythe Detail Costs/Taxes screen.
2. Change the detail tax class for a tax authority, or the tax included option, ifnecessary.
Note:l You cannot change the Tax Included setting unless the tax authority allowsit. (Tax authorities are defined in Tax Services.)
l The tax amount is not automatically recalculated until you close this windowand move to another tab.
l The tax amount is not recalculated if you overrode the total tax amount onthe Vendor Taxes screen. If you want to recalculate the tax, you have touse the Calc. Taxes button on the Detail Costs/Taxes screen or on theAdditional Costs tab.
Currency and Exchange
Learn about currency exchange rates, tax reporting currencies, andmulticurrency transactions.
User's Guide 101
Chapter 2: Entering and Posting Purchase Orders Transactions
About Processing Multicurrency Transactions in Purchase Orders
You enter multicurrency transactions in Purchase Orders in the same way asfunctional-currency transactions. The only extra consideration arises if youneed to change exchange rates or assign a different tax group to thetransaction.
The currency for a transaction is displayed along with the current exchangerate when you enter a vendor number or select a tax group. (You can changethe tax group for a document only to another tax group that also uses thevendor's currency.)
To change exchange-rate information, use the Rates tab (it appears only withmulticurrency transactions for vendors who do not use the functionalcurrency). You can change the rate type, rate date, and exchange rate for thedocument.
When you post multicurrency transactions, Purchase Orders converts theamounts to the functional currency, using the exchange rate informationentered with the transaction.
About Currency Exchange Rates
If you use multicurrency accounting, you can enter exchange rate informationfor vendors who do not use the functional currency.
When you select a vendor who does not use the functional currency, a Ratestab appears in the transaction screen. This tab displays the vendor's defaultrate type, the rate date that corresponds to the document date, and theexchange rate for the rate date. You can enter different information for eachtransaction.
Exchange Rates for Retainage Amounts
If you are entering a transaction with retainage, you specify on the Retainagetab whether the retainage invoice uses the same exchange rate as the originaldocument or the current rate.
About Tax Reporting Currencies
You specify a tax reporting currency to report taxes in a currency that is notthe vendor currency or the functional currency. (This can be a requirement insome jurisdictions.)
102 Sage 300 ERP Purchase Orders

About Transaction Processing in Purchase Orders
Tax Reporting currency fields appear on purchase orders, receipts, invoices,returns, credit notes, and debit notes only if the tax reporting currency for oneor more of the tax authorities is different from your functional currency and thevendor's currency.
Set up Taxes in Common Services
You set the tax reporting currency in the Tax Services module in CommonServices.
Changing Tax Reporting Amounts in Transactions
You can change the total tax reporting amount on the Taxes tab duringtransaction entry.
If you do change the tax reporting amount, you can use the Derive button onthe Rates tab to derive the effective tax reporting exchange rate for atransaction.
User's Guide 103
Chapter 2: Entering and Posting Purchase Orders Transactions
RequisitionsEnter, import, print, and approve requisitions for planned purchases.
About Processing Requisitions
Use the P/O Requisition Entry screen to enter requisitions for purchases youplan to make and for which you need approval before you can issue purchaseorders.
If you use requisition approval, the requisition is automatically placed on holdunless it is posted by a user with approval security authorization. You cannotconvert an on-hold requisition to a purchase order.
Note: Requisitions are optional in Purchase Orders. You can enter purchaseorders with or without requisition numbers.
Use requisitions to:
l Keep current records of present and expected purchasing needs by enteringand updating requisitions as you run low or out of stock in inventory itemsand supplies.
l Specify the vendor for the items you need to purchase, either by selecting asingle vendor number for an entire requisition or by assigning a vendornumber to each detail line.
l Create purchase orders from requisitions, either by selecting details andvendors from requisitions when adding a single purchase order, or byautomatically creating a series of purchase orders from existingrequisitions.
When you enter a requisition, you specify the date on which you need to issuethe purchase order. You can also specify an expiration date that lets youdelete an unused requisition automatically during Day End Processing, so thatyou do not have to keep track of and manually clear unwanted requisitions.
When you specify a requisition number on a purchase order, the requisitiondetails that specify the vendor number are automatically included (as aredetails with no vendor number if you choose to include them). You can changethe displayed information and insert and delete detail lines to create exactlythe purchase order you need.
104 Sage 300 ERP Purchase Orders
Requisitions
Entering New Vendor Numbers
If you enter a vendor number, it becomes the default number for new detaillines you add to the requisition.
If you type a vendor number that you have not yet added to Accounts Payable,you also type the vendor's name or a description of the account.
To add a new vendor while entering a requisition, you can:
l Type the vendor number, press Tab, click the New button, and then enter thevendor information "on the fly" in Accounts Payable, before returning toPurchase Orders to finish entering the requisition.
l Type a new vendor number and name in the Requisition Entry screen, thenadd the remaining vendor information later in Accounts Payable.
If the vendor account is on hold in Accounts Payable, the requisition is placed onhold too. You cannot issue purchase orders from it until you remove the hold inAccounts Payable. You can also put a requisition on hold if you do not want tocreate purchase orders from it right away.
You cannot enter requisitions for vendors whose accounts are inactive inAccounts Payable.
Editing Requisitions
As long as a requisition exists in your Purchase Orders system, you can edit itand issue purchase orders from it. You can add new detail lines and make otherchanges to requisitions, whether a purchase order has been posted to therequisition or not.
Even if a requisition is complete, you can edit it and issue purchase orders fromit. You can add new detail lines, delete others, and make changes to incompletelines.
Deleting Requisitions
You can delete requisitions or requisition details at any time, even if a purchaseorder has been posted for the requisition or line.
Job-Related Requisitions
If the requisition is for a contract that you manage using Sage 300 ERP Projectand Job Costing, you must specify a contract and a project for each requisition
User's Guide 105
Chapter 2: Entering and Posting Purchase Orders Transactions
detail, and, depending on the project type, specify the project category, costclass and resource for the job.
You can allocate items directly to jobs, rather than receive them intoinventory.
Note:You cannot mix job-related and non-job-related items on a requisition.
Also, you cannot add serialized items or items assigned to lots to job-relatedtransactions. Instead, you must order them as non-job-related items,receive them into inventory, and then use the Material Usage screen inProject and Job Costing to move them from inventory to jobs.
About Completing Requisitions
A requisition is completed when all its detail lines have a Completed status.("Yes" appears in the Completed column or field.)
You complete requisitions by:
l Posting purchase orders for all the requisitioned items.
l Canceling outstanding requisition details.
l Specifying an expiration date, then automatically clearing the requisitionduring Day End processing.
When you post a purchase order for a requisition detail line, the line isautomatically completed, whether you ordered the full quantity or not.
Note: Once a detail line is completed, you cannot change it, even if you wantto order the remaining quantity. However, you can still create purchaseorders for quantities that remained unordered when the requisition detailwas completed.
When you post a purchase order for all the outstanding details on arequisition, the requisition is completed. You cannot make further changes tothe completed details, but you can add details to a completed requisition,making it active again.
Important! If you do not keep history, completed requisitions are deletedfrom your Purchase Orders system the next time you run Day Endprocessing.
106 Sage 300 ERP Purchase Orders
Requisitions
You can also delete completed requisitions by displaying the requisition in theRequisition Entry screen, and then clicking Delete.
Creating a New Purchase Requisition
Requisitions are optional in Purchase Orders. You can enter purchase orderswith or without requisition numbers.
If you use requisitions, Purchase Orders provides you with a requisitionapproval system to enforce purchase approvals.
For more information, see "About Requiring Approval for Requisitions" (page768).
You can enter requisitions without specifying a vendor, and you can enterrequisitions that include items from several vendors.
You can change requisitions and individual requisition detail lines until they arecompleted. When you post a purchase order that uses a requisition detail, thedetail is completed, regardless of the quantity that was ordered.
Before you start:
l If you want to assign numbers automatically, assign or verify the length,prefix, and number for Purchase Orders to assign to the next new requisitionyou create.
l If you use Transaction Analysis and Optional Field Creator (a separatepackage), define any optional fields you want to add to the Requisition Entryscreen (and the other transaction-entry screens).
l Find out the numbers of requisitions you wish to edit or delete.
To create a new requisition:
1. Open Purchase Orders > P/O Transactions > Requisition Entry.
2. Press Tab to accept *** NEW *** as the number in the Requisition Numberfield.
Purchase Orders will assign a requisition number when you post therequisition.
If you do not want Purchase Orders to assign the number automatically, youcan enter the new number yourself.
User's Guide 107
Chapter 2: Entering and Posting Purchase Orders Transactions
3. Enter the Vendor number or select it using the Finder.
You can skip the vendor number and enter a vendor name—such as for anew vendor—or you can skip the vendor fields entirely.
You can click the New button to add a new vendor record in AccountsPayable.
4. Enter a requisition date, a date required, and an expiration date.
Note: If the requisition is not completed by the expiration date, it will bedeleted when you run Day End Processing.
5. Choose whether this requisition is on hold.
Note: You cannot create purchase orders from on-hold requisitions.
6. If you are approving a requisition that was previously entered:
You must have requisition approval security rights.
You must log on with your own ID.
You must remove the On Hold status from the requisition, and then postit.
7. Choose the Job Related option if you use the Project and Job Costingmodule and this requisition is for a job.
If the purchase requisition is job-related, all items must be for particularcontracts, projects, and categories in Project and Job Costing.
Also, you cannot add serialized items or items assigned to lots to job-related transactions. Instead, you must order them as non-job-relateditems, receive them into inventory, and then use the Material Usage screenin Project and Job Costing to move them from inventory to jobs.
8. In the Requested By field, enter the name of the person requesting theorder.
Note: If you use Sage 300 ERP Payroll, you can select the requester fromthe Finder.
9. Enter the location where you want the goods delivered, and enter arequisition description and reference.
108 Sage 300 ERP Purchase Orders
Requisitions
10. Enter requisition details.
You can enter details directly in the detail entry table. (Use the tab key tomove through the columns.)
Note:Some columns may not be displayed. Purchase Orders lets you hidecolumns and change the column order.
To enter a new detail line, you may have to press Insert.
Alternatively, you can click Detail or press F9 to enter a detail on the DetailItems screen, which displays all the fields for one detail.
Enter the following information for each detail:
a. If this is a job-related requisition:
i. Double-click the Contract field and enter the contract number, orclick the Contract column heading to select a contract number usingthe Finder.
ii. Enter the project and category to which you are allocating items.
b. Double-click the Item Number field and enter an item number, or clickthe Item Number column heading to select an item number using theFinder.
c. Enter vendor information.
Note: You can leave the vendor fields blank, and you can specifydifferent vendors on each line. You can create more than one PO from asingle requisition.
d. Enter the location for the detail.
Note: The location for each detail defaults from the Location field in theheader fields.
e. Enter a Quantity Ordered.
f. To change currency exchange rates in a multicurrency system, clickDetail or press F9 to open the Detail Items screen.
11. To check the totals for the requisition, click the Totals tab.
12. Click Post to post the purchase requisition.
User's Guide 109
Chapter 2: Entering and Posting Purchase Orders Transactions
Note: If you do not have the security right to approve requisitions, therequisition will be on hold after you post it, and the Approval Status field willdisplay "Entered."
After posting the requisition
l Print copies of the requisitions you posted (if you did not print themindividually after posting them).
You can also print the purchase requisition separately, from the P/O Formsfolder.
l Enter purchase orders for the requisitions.
Editing a Requisition
To edit a requisition:
1. Open Purchase Orders > P/O Transactions > Requisition Entry.
2. Enter the requisition number of the requisition to edit.
3. Make the changes you need to the requisition information. (You can changeall information except the requisition number, detail item numbers, andcompleted requisition details.)
4. When you have finished, click Post.
5. Choose whether to print the requisition at the "Posting completed"message. (You can also choose Requisitions from the P/O Forms folder toprint requisitions.)
Importing Requisitions
To import a requisition:
1. Create the requisitions you want to import, either in another PurchaseOrders database or in a non-Sage 300 ERP program.
2. On the Requisition Entry screen, click Import on the File menu.
3. Do one of the following:
Specify the name and format of the file you want to import.
If you have created an import template for the file, choose LoadTemplate, and then select the template file.
110 Sage 300 ERP Purchase Orders
Requisitions
4. Specify default entries for any required fields that do not already haveentries.
5. If you expect to import the file again, create a template for it:
a. Click Save Template.
b. Specify a file name and path for the template file.
6. Click OK to begin importing.
After importing a file you created in a non-Sage 300 ERP program, delete thefile in the other program if you do not intend to import it again. Purchase Ordersdoes not delete files as it imports them.
Printing Requisitions
To print requisitions, choose Requisitions from the P/O Forms folder. You canalso print a single requisition using the Requisition Entry screen, right afterposting it. You can reprint requisitions until they are complete.
To print a requisition:
1. Open Purchase Orders > P/O Forms > Requisitions.
2. If you use more than one requisition form, select the file containing theformat you want to use.
3. Enter the range of requisition numbers to print. To limit printing to a singlerequisition, enter the same requisition number in both the FromRequisition Number and To Requisition Number fields.
4. If you want to print new copies of requisitions you printed before, select theInclude Requisitions Already Printed option.
5. If you are printing on preprinted forms, click Align to print a test copy andcheck that the forms are correctly inserted in your printer. (You can repeatthis step as often as needed.)
6. When ready, click Print to print the selected requisitions.
For more information on designing and adapting forms and reports, see theonline document Customizing Printed Forms and Reports with the SAP CrystalReports® Designer in the User Documentation section on the Sage 300 ERPCustomer Portal athttps://customers.sagenorthamerica.com/irj/go/km/docs/sageKM/Sage AccpacERP/Ungated Customers/Browsable/Product Documentation/Accpac_UA_Resources.htm.
User's Guide 111
Chapter 2: Entering and Posting Purchase Orders Transactions
Deleting a Requisition
You can delete requisitions from the Purchase Orders system through theRequisitions Entry screen.
To delete a requisition:
1. Open Purchase Orders > P/O Transactions > Requisition Entry.
2. Enter the requisition number of the requisition to delete.
3. Click Delete.
4. If you see a message asking you to confirm the deletion, click Yes.
112 Sage 300 ERP Purchase Orders

Purchase Orders
Purchase OrdersEnter, import, and set up security for purchase orders.
About Processing Purchase Orders
Use the Purchase Order Entry screen to issue new purchase orders and to editexisting purchase orders.
When you post a purchase order, quantities on hand for the ordered items areimmediately placed on purchase order in Inventory Control unless the purchaseorder is job-related.
If the purchase order is job-related, posting updates committed quantities andamounts in Project and Job Costing for the contract, project, and category thatyou specify (and does not change the quantity on purchase order for theinventory location).
You can enter four types of purchase orders: active, standing, future, andblanket. For more information, see "Purchase Order Types " (page 87).
The information you enter to add purchase orders includes:
l Header, vendor, and purchase order detail information. For moreinformation, see "Entering a Purchase Order" (page 117).
l Optional field information (if you use Transaction Analysis and Optional FieldCreator and you have added optional fields). For more information, see"About Optional Fields in Transactions" (page 90).
l The exchange rate for converting amounts from the vendor's currency to thefunctional currency (in multicurrency ledgers only). For more information,see "About Currency Exchange Rates" (page 102).
Specifying Requisition Numbers on Purchase Orders
You do not have to create requisitions before entering purchase orders. If youdo not use requisitions, you enter all the information and details on thepurchase order.
If you create requisitions first, the details and most of the other informationentered on the requisition appear automatically on the purchase order. You canalso choose to include requisition details with no vendor number (when thepurchase order vendor is assigned as the item's vendor type) in the purchaseorder. You can edit all the information from the requisition, and add or deletelines.
User's Guide 113
Chapter 2: Entering and Posting Purchase Orders Transactions
Selecting from More than One Requisition
You can select details from more than one requisition to create a singlepurchase order.
When you post a purchase order that references a requisition, the requisitiondetails you include are marked as completed on the requisition, whether youordered the full quantity or a greater or lesser amount. When you post apurchase order for all the outstanding details on a requisition, the requisitionis marked as completed and will be deleted the next time you run Day EndProcessing, if you do not keep transaction history.
Creating Purchase Orders Automatically
You can use the Copy Purchase Orders screen to enter a new PO by copyingthe details from one or more existing purchase orders to a new order.
You can also automatically create new POs from purchase requisitions, fromInventory Control reorder quantities, and from sales orders in the Order Entrymodule.
Non-existent vendor records. You can enter a purchase order for a vendorwho is not in Accounts Payable, but you must add the vendor before you postan invoice, credit note, or debit note for that vendor in Accounts Payable.
One-time vendors. If you frequently make one-time cash purchases, createa record for one-time vendors in Accounts Payable.
Posting Purchase Orders
When you post a purchase order:
l Item quantities on purchase order are increased in Inventory Control.
l If the purchase order is job-related, the committed quantities and costs forthe job are updated in Project and Job Costing.
l If you use the automatic-numbering option, the purchase order number isassigned and displayed.
l Information for the Purchase Order List is updated, so that you can print anaccurate list immediately.
l Purchase order lines that you set to Completed are completed.
Note: You cannot edit these lines after posting.
114 Sage 300 ERP Purchase Orders
Purchase Orders
l If you specified requisition numbers for the purchase order, requisition detaillines on the purchase order are completed on the requisitions.
Note: If a purchase order completes all the details on any specifiedrequisition, the requisition itself is completed when the purchase order isposted.
After posting, you can print copies of the purchase order.
Deleting Purchase Orders
If no receipts have been posted to a purchase order, you can delete thepurchase order or individual details on the purchase order. After posting areceipt to a purchase order, you cannot delete the purchase order or any of itsdetails.
To cancel a purchase order detail after posting a receipt, you cancel theoutstanding quantity.
To remove a completed purchase order from your system, do one of thefollowing:
l If you do not keep transaction history, run Day End Processing.
l If you keep transaction history, remove completed purchase orders using theClear History screen. For more information, see "Clearing HistoricalPurchase Orders Data" (page 239).
About Adding Purchase Order Details
You enter the information for each item on a purchase order as a separatedetail line. There are no restrictions on the number of detail lines you can add toa purchase order.
When you add a detail line, the program updates the purchase order subtotaldisplayed at the bottom of the screen.
Note: You do not enter additional costs (such as shipping and handlingcharges) on purchase orders. You add those amounts when entering receipts.
Displayed information
Purchase Orders displays the following non-editable information for each detail:
User's Guide 115

Chapter 2: Entering and Posting Purchase Orders Transactions
l The amount of tax that is included in the extended item cost. (Tax amountsare not displayed until you click the Calculate Taxes button or the Totalstab, or you post the purchase order.)
l The net cost of items with tax included in their prices (the tax base).
l Total allocated tax amount—the amount of tax that will be allocated to thecost of the item.
l The quantity of each detail that has been received (this number is updatedwhen you post receipts for the detail).
Tax information
You can check or edit tax distributions for a detail line on the DetailItems/Taxes screen. For each tax authority, you can change the item's taxclass and, if permitted by the authority, specify whether tax is included in theitem cost.
For information about calculating and editing taxes, see "About TaxInformation and Amounts" (page 94).
About Editing Purchase Orders
You can change information on any incomplete active or blanket purchaseorder, and on all future and standing purchase orders. You can even delete aposted purchase order, if no receipts are posted against it.
Multicurrency Ledgers
If you use multicurrency accounting, you can change the tax group on atransaction until you add details, but only to another tax group that uses thevendor's currency.
Editing Purchase Orders after Posting
After you post a purchase order, you can change everything you entered onthe order except:
l Purchase order number.
l Vendor number.
l Completed detail lines.
You can add detail lines to a purchase order at any time, even after postingreceipts for all the purchase order details and completing all detail lines. You
116 Sage 300 ERP Purchase Orders
Purchase Orders
can delete detail lines for which you have not received any items, and you canchange the outstanding amounts of partially received details.
If you change quantities or delete purchase order details, quantities onpurchase order are updated in Inventory Control.
About Importing Purchase Orders
You can import purchase orders that you previously exported for reuse, but youmust change the PO numbers before you import them.
You cannot import purchase orders with numbers that you have alreadyassigned in Purchase Orders, unless you have cleared the transactions withthose numbers.
The original file from which you imported the information is retained until youdelete it.
For detailed instructions about importing or exporting purchase orders, see theSystem Manager help.
Entering a Purchase Order
You use the P/O Purchase Order Entry screen to enter, edit, and post purchaseorders, including active, blanket, future, and standing purchase orders.
Before you start:
l If you require requisitions for purchase orders, add the requisitions firstusing the Requisition Entry screen.
l Make sure you have full information for each purchase order, includingvendor number, purchase order number (if you enter your own documentnumbers), requisition number (if required), your company's shipping andbilling locations or addresses for the purchase order, arrival date and type ofpurchase order, and the vendor's address, contact, phone numbers, taxgroup, and terms code.
l For each item on the order, find out the item number, unit of measure,quantity to order, and location (if you use Inventory Control). For items forwhich no record exists in your system, you also must have turned on theAllow Non-inventory Items option and know the general ledger expenseaccount for each detail.
User's Guide 117
Chapter 2: Entering and Posting Purchase Orders Transactions
l For each drop-shipment, find out the address and customer number orinventory location (if applicable, and you have Inventory Control) for theshipment.
l If you use multicurrency accounting, find out the rate type, rate date, andexchange rate to use for each purchase order.
l If the purchase order is job-related, get (for each item detail) the contract,project, category, resource (if applicable), billing type and rate, and A/Ritem number.
To create a new purchase order:
1. Open Purchase Orders > P/O Transactions > Purchase OrderEntry.
2. Press the Tab key to accept *** NEW *** in the PO Number field, and letPurchase Orders assign a purchase order number when you post thepurchase order.
If you do not want Purchase Orders to assign the number, type the newnumber in the PO Number field, and then press the Tab key.
3. In the Vendor Number field, type the vendor number or select it from theFinder.
4. If your company uses templates to fill in default field entries, select thecode in the Template field.
5. To select one or more requisitions from which to issue the purchase order,click the Zoom button beside the From Requisition field. Mor e ...
In the Create PO From Requisition screen, click the Finder to displayrequisition numbers for the selected vendor. You may have to press theInsert key first if you are adding a requisition to an existing purchaseorder.
You can select a single requisition number. You can also select severalrequisition numbers to create a purchase order that includes detailsentered on the selected requisitions for the vendor and, if you wish, anydetail lines that do not include a vendor number.
Tip: Skip these fields if you are creating a purchase order withoutreferencing a requisition.
6. If you use the Project and Job Costing module and this is a job-relatedpurchase order, select the Job Related option. Mor e ...
118 Sage 300 ERP Purchase Orders
Purchase Orders
If the purchase order is job-related, all items must be for particularcontracts, projects and categories in Project and Job Costing. Posting thepurchase order updates committed quantities and amounts for the jobs.
Also, you cannot add serialized items or items assigned to lots to job-relatedpurchase orders. Instead, you must order them on a non-job-relatedpurchase order, receive them into inventory, and then use the MaterialUsage screen in Project and Job Costing to move them from inventory tojobs.
7. Use the remaining fields in the top part of the Order tab to enter generalinformation for the purchase order.
Note: If you want to change the vendor account set, you can choose onlyfrom account sets that use the vendor's currency.
8. Tab into the detail entry table (or click the table), and then enter purchaseorder details. (You may have to press the Insert key to start a new line.)
Tip: You can click the Item/Tax button or press F9 to display a separatescreen that lets you view and edit all the information for a single detail,including tax information.
a. If this is a job-related purchase order, double-click the Contract fieldand then type the contract number, or use the Finder to select it.
You must also enter or select the project and category to which you areallocating items.
b. Double-click the Item Number field, and then enter an item number.
c. Enter a quantity in the Quantity Ordered field.
For information on other detail fields, see "P/O Purchase Order Entry Screen" (page 550)
9. Use the remaining tabs to complete the information required for thepurchase order.
To check or edit vendor's tax group or tax classes, click the Taxes tab.
To add optional field information for the order, click the Optional Fieldstab.
To change currency exchange rates in a multicurrency system, click the
User's Guide 119
Chapter 2: Entering and Posting Purchase Orders Transactions
Rates tab.
To check the totals for the order, click the Totals tab.
10. Click Post.
After postingYou can print the purchase order immediately after posting.
You can also print the purchase order later, using the Purchase Orders screenin the P/O Forms folder.
Entering a Blanket Purchase Order
Before you start:
l If you require requisitions for purchase orders, add the requisitions firstusing the Requisition Entry screen.
l Make sure you have full information for each purchase order, includingvendor number, purchase order number (if you enter your own documentnumbers), requisition number (if required), your company's shipping andbilling locations or addresses for the purchase order, arrival date and typeof purchase order, and the vendor's address, contact, phone numbers, taxgroup, and terms code.
l For each item on the order, find out the item number, unit of measure,quantity to order, and location (if you use Inventory Control). For items forwhich no record exists in your system, you also must have turned on theAllow Non-inventory Items option and know the general ledger expenseaccount for each detail.
l For each drop-shipment, find out the address and customer number orinventory location (if applicable, and you have Inventory Control) for theshipment.
l If you use multicurrency accounting, find out the rate type, rate date, andexchange rate to use for each purchase order.
l If the purchase order is job-related, get (for each item detail) the contract,project, category, resource (if applicable), billing type and rate, and A/Ritem number.
120 Sage 300 ERP Purchase Orders
Purchase Orders
To enter a blanket purchase order:
1. Open Purchase Orders > P/O Transactions > Purchase Order Entry.
2. Press the Tab key to accept *** NEW *** in the PO Number field, and letPurchase Orders assign a purchase order number when you post thepurchase order.
If you do not want Purchase Orders to assign the number, type the newnumber in the PO Number field, and then press the Tab key.
3. In the Vendor Number field, type the vendor number or select it from theFinder.
4. In the PO Type field, select Blanket.
5. In the Original Amount field, enter the total amount that can be used forthe blanket purchase order.
6. Complete the remaining Purchase Order Information and VendorInformation tabs with the information you need for the purchase order.
For more information, see "P/O Purchase Order Entry Screen " (page 550).
7. Add the details you are ready to order from the purchase order. (You do nothave to add all the details at this time.)
For more information, see "About Adding Purchase Order Details " (page115).
8. Add optional field entries (if used) and other information for the purchaseorder. For more information, see "About Optional Fields in Transactions"(page 90).
9. In multicurrency ledgers, edit the exchange rate information, if necessary.
For more information, see "About Currency Exchange Rates" (page 102).
10. Click Post.
Entering a Future Purchase Order
Before you start:
l If you require requisitions for purchase orders, add the requisitions firstusing the Requisition Entry screen.
User's Guide 121
Chapter 2: Entering and Posting Purchase Orders Transactions
l Make sure you have full information for each purchase order, includingvendor number, purchase order number (if you enter your own documentnumbers), requisition number (if required), your company's shipping andbilling locations or addresses for the purchase order, arrival date and typeof purchase order, and the vendor's address, contact, phone numbers, taxgroup, and terms code.
l For each item on the order, find out the item number, unit of measure,quantity to order, and location (if you use Inventory Control). For items forwhich no record exists in your system, you also must have turned on theAllow Non-inventory Items option and know the general ledger expenseaccount for each detail.
l For each drop-shipment, find out the address and customer number orinventory location (if applicable, and you have Inventory Control) for theshipment.
l If you use multicurrency accounting, find out the rate type, rate date, andexchange rate to use for each purchase order.
l If the purchase order is job-related, get (for each item detail) the contract,project, category, resource (if applicable), billing type and rate, and A/Ritem number.
To enter a future purchase order:
1. Open Purchase Orders > P/O Transactions > Purchase OrderEntry.
2. Press the Tab key to accept *** NEW *** in the PO Number field, and letPurchase Orders assign a purchase order number when you post thepurchase order.
If you do not want Purchase Orders to assign the number, type the newnumber in the PO Number field, and then press the Tab key.
3. In the Vendor Number field, type the vendor number or select it from theFinder.
4. In the PO Date field, type the date when you want to activate thepurchase order.
5. In the PO Type field, select Future.
6. Complete the remaining Purchase Order Information and VendorInformation tabs with the information you need for the purchase order.
For more information, see "P/O Purchase Order Entry Screen " (page 550).
122 Sage 300 ERP Purchase Orders
Purchase Orders
7. Add the details you are ready to order from the purchase order. (You do nothave to add all the details at this time.)
For more information, see "About Adding Purchase Order Details " (page115).
8. Add optional field entries (if used) and other information for the purchaseorder. For more information, see "About Optional Fields in Transactions"(page 90).
9. In multicurrency ledgers, edit the exchange rate information, if necessary.
For more information, see "About Currency Exchange Rates" (page 102).
10. Click Post.
Entering a Standing Purchase Order
Before you start:
l If you require requisitions for purchase orders, add the requisitions firstusing the Requisition Entry screen.
l Make sure you have full information for each purchase order, includingvendor number, purchase order number (if you enter your own documentnumbers), requisition number (if required), your company's shipping andbilling locations or addresses for the purchase order, arrival date and type ofpurchase order, and the vendor's address, contact, phone numbers, taxgroup, and terms code.
l For each item on the order, find out the item number, unit of measure,quantity to order, and location (if you use Inventory Control). For items forwhich no record exists in your system, you also must have turned on theAllow Non-inventory Items option and know the general ledger expenseaccount for each detail.
l For each drop-shipment, find out the address and customer number orinventory location (if applicable, and you have Inventory Control) for theshipment.
l If you use multicurrency accounting, find out the rate type, rate date, andexchange rate to use for each purchase order.
l If the purchase order is job-related, get (for each item detail) the contract,project, category, resource (if applicable), billing type and rate, and A/R itemnumber.
User's Guide 123
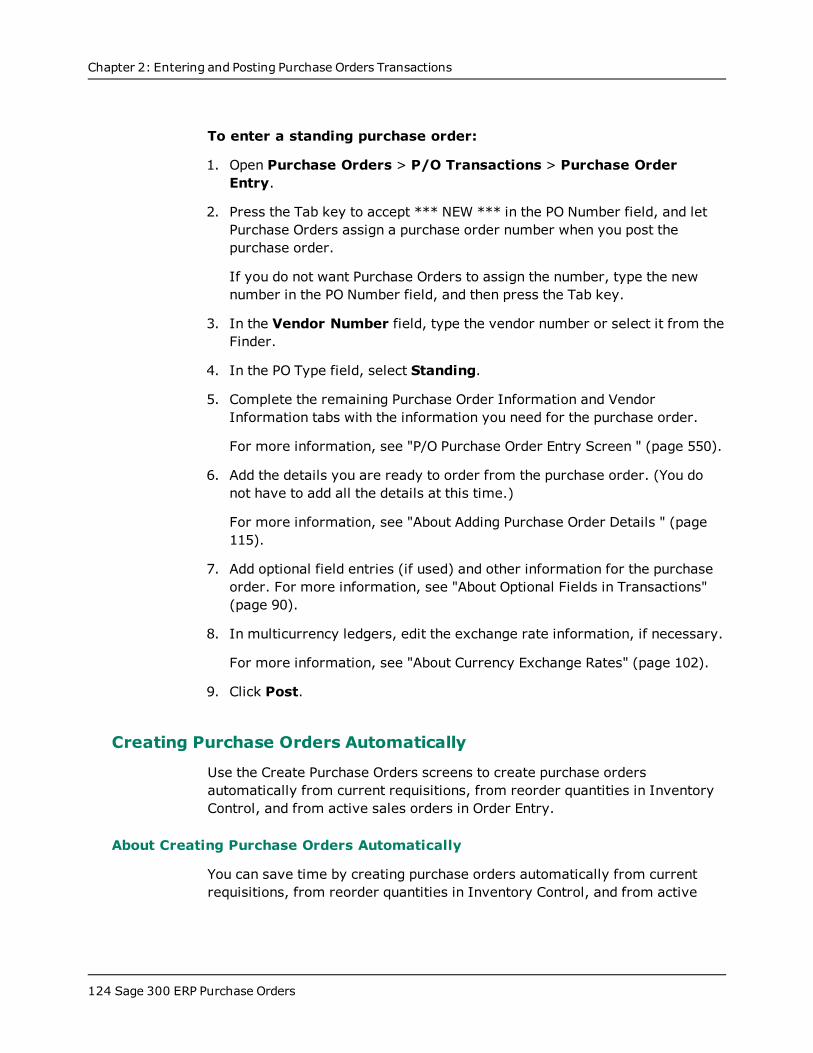
Chapter 2: Entering and Posting Purchase Orders Transactions
To enter a standing purchase order:
1. Open Purchase Orders > P/O Transactions > Purchase OrderEntry.
2. Press the Tab key to accept *** NEW *** in the PO Number field, and letPurchase Orders assign a purchase order number when you post thepurchase order.
If you do not want Purchase Orders to assign the number, type the newnumber in the PO Number field, and then press the Tab key.
3. In the Vendor Number field, type the vendor number or select it from theFinder.
4. In the PO Type field, select Standing.
5. Complete the remaining Purchase Order Information and VendorInformation tabs with the information you need for the purchase order.
For more information, see "P/O Purchase Order Entry Screen " (page 550).
6. Add the details you are ready to order from the purchase order. (You donot have to add all the details at this time.)
For more information, see "About Adding Purchase Order Details " (page115).
7. Add optional field entries (if used) and other information for the purchaseorder. For more information, see "About Optional Fields in Transactions"(page 90).
8. In multicurrency ledgers, edit the exchange rate information, if necessary.
For more information, see "About Currency Exchange Rates" (page 102).
9. Click Post.
Creating Purchase Orders Automatically
Use the Create Purchase Orders screens to create purchase ordersautomatically from current requisitions, from reorder quantities in InventoryControl, and from active sales orders in Order Entry.
About Creating Purchase Orders Automatically
You can save time by creating purchase orders automatically from currentrequisitions, from reorder quantities in Inventory Control, and from active
124 Sage 300 ERP Purchase Orders
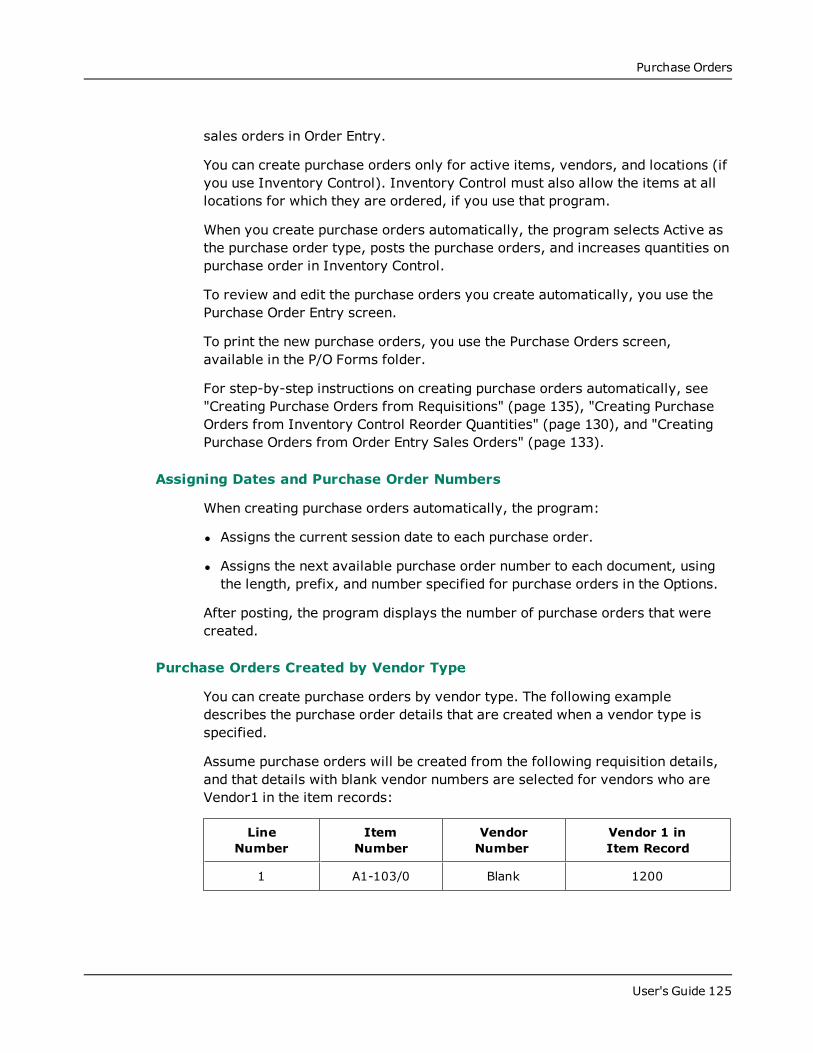
Purchase Orders
sales orders in Order Entry.
You can create purchase orders only for active items, vendors, and locations (ifyou use Inventory Control). Inventory Control must also allow the items at alllocations for which they are ordered, if you use that program.
When you create purchase orders automatically, the program selects Active asthe purchase order type, posts the purchase orders, and increases quantities onpurchase order in Inventory Control.
To review and edit the purchase orders you create automatically, you use thePurchase Order Entry screen.
To print the new purchase orders, you use the Purchase Orders screen,available in the P/O Forms folder.
For step-by-step instructions on creating purchase orders automatically, see"Creating Purchase Orders from Requisitions" (page 135), "Creating PurchaseOrders from Inventory Control Reorder Quantities" (page 130), and "CreatingPurchase Orders from Order Entry Sales Orders" (page 133).
Assigning Dates and Purchase Order Numbers
When creating purchase orders automatically, the program:
l Assigns the current session date to each purchase order.
l Assigns the next available purchase order number to each document, usingthe length, prefix, and number specified for purchase orders in the Options.
After posting, the program displays the number of purchase orders that werecreated.
Purchase Orders Created by Vendor Type
You can create purchase orders by vendor type. The following exampledescribes the purchase order details that are created when a vendor type isspecified.
Assume purchase orders will be created from the following requisition details,and that details with blank vendor numbers are selected for vendors who areVendor1 in the item records:
LineNumber
ItemNumber
VendorNumber
Vendor 1 inItem Record
1 A1-103/0 Blank 1200
User's Guide 125
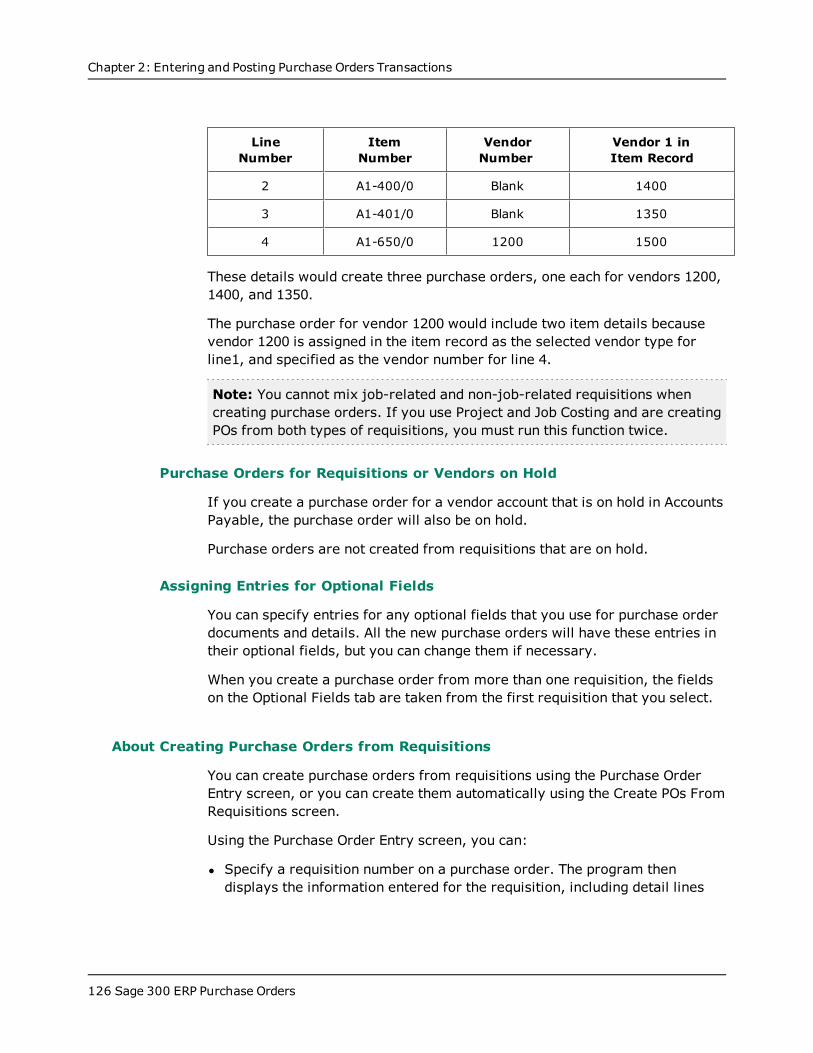
Chapter 2: Entering and Posting Purchase Orders Transactions
LineNumber
ItemNumber
VendorNumber
Vendor 1 inItem Record
2 A1-400/0 Blank 1400
3 A1-401/0 Blank 1350
4 A1-650/0 1200 1500
These details would create three purchase orders, one each for vendors 1200,1400, and 1350.
The purchase order for vendor 1200 would include two item details becausevendor 1200 is assigned in the item record as the selected vendor type forline1, and specified as the vendor number for line 4.
Note: You cannot mix job-related and non-job-related requisitions whencreating purchase orders. If you use Project and Job Costing and are creatingPOs from both types of requisitions, you must run this function twice.
Purchase Orders for Requisitions or Vendors on Hold
If you create a purchase order for a vendor account that is on hold in AccountsPayable, the purchase order will also be on hold.
Purchase orders are not created from requisitions that are on hold.
Assigning Entries for Optional Fields
You can specify entries for any optional fields that you use for purchase orderdocuments and details. All the new purchase orders will have these entries intheir optional fields, but you can change them if necessary.
When you create a purchase order from more than one requisition, the fieldson the Optional Fields tab are taken from the first requisition that you select.
About Creating Purchase Orders from Requisitions
You can create purchase orders from requisitions using the Purchase OrderEntry screen, or you can create them automatically using the Create POs FromRequisitions screen.
Using the Purchase Order Entry screen, you can:
l Specify a requisition number on a purchase order. The program thendisplays the information entered for the requisition, including detail lines
126 Sage 300 ERP Purchase Orders
Purchase Orders
that specify the vendor number and, optionally, detail lines that have novendor number.
l Select more than one requisition number for a single purchase order, to adddetails from different requisitions posted for the vendor (and for blankvendors, if desired) to a single purchase order.
l Select item details with no vendor number when the purchase order vendor isspecified as the vendor type in the item records.
l Consolidate like detail lines into single lines.
For more information, see "About Processing Purchase Orders " (page 113).
Using the Create POs From Requisitions screen, you can:
l Create purchase orders automatically from requisitions.
l Specify a range of requisitions, requisition dates, and vendors from which tocreate purchase orders.
l Optionally, consolidate item details from more than one requisition intosingle details on purchase orders.
l You can also create purchase orders from requisitions that contain detaillines without vendor numbers and you can specify entries for any optionalfields you use.
For more information, see "About Creating Purchase Orders Automatically"(page 124).
Posting Purchase Orders Created from Requisitions
Posting assigns item costs based on the default item cost type in the P/OOptions screen and the amount entered for the cost type in the item records inInventory Control (if you use it).
Posting also enters the current session date as the purchase order date, andcompletes the selected requisitions. The requisitions will be deleted the nexttime you run Day End Processing unless you keep transaction history.
About Consolidating Requisition Details on Purchase Orders
You can consolidate details from separate requisitions into single details onpurchase orders for the same vendor, item, unit of measure, and (if you useInventory Control) inventory location. The program combines all relateddetails, with the exception of details that include drop-ship addresses. A
User's Guide 127

Chapter 2: Entering and Posting Purchase Orders Transactions
separate purchase order detail is created for each requisition detail with adrop-ship address.
Important! Consolidation deletes order numbers! Any order numbersentered in requisition details are lost if you consolidate when creatingpurchase orders, but you can edit the new purchase orders to re-enter theorder numbers you need.
Example:For example, assume the following detail lines exist for a vendor on therequisitions from which you are creating purchase orders and you havechosen to consolidate details:
Line Item Loc. Qty. Unit Drop-Ship Order No.
1 A1-103/0 1 10 Ea. Yes None
2 A1-103/0 1 15 Ea. No 21234
3 A1-103/0 1 7 Ea. No 37288
4 A1-103/0 2 9 Ea. No None
The following details are included on the purchase orders:
Line Item Loc. Qty. Unit Drop-Ship Order No.
1 A1-103/0 1 10 Ea. Yes None
2 A1-103/0 1 22 Ea. No None
3 A1-103/0 2 9 Ea. No None
Lines 2 and 3 were combined because they are identical except for thequantity and order number. Notice that the line now has no order numberand that the quantities are combined.
Line1 was not consolidated because it contains a drop-ship address. Line4was not consolidated because it is for a different location.
Note: Lines will not be consolidated if they have optional fields, and theywill not be consolidated if the vendor item numbers are different.
About Determining the Quantity to Order
This article describes how to use the Reorder Quantity option to order thenumber of items you need.
128 Sage 300 ERP Purchase Orders
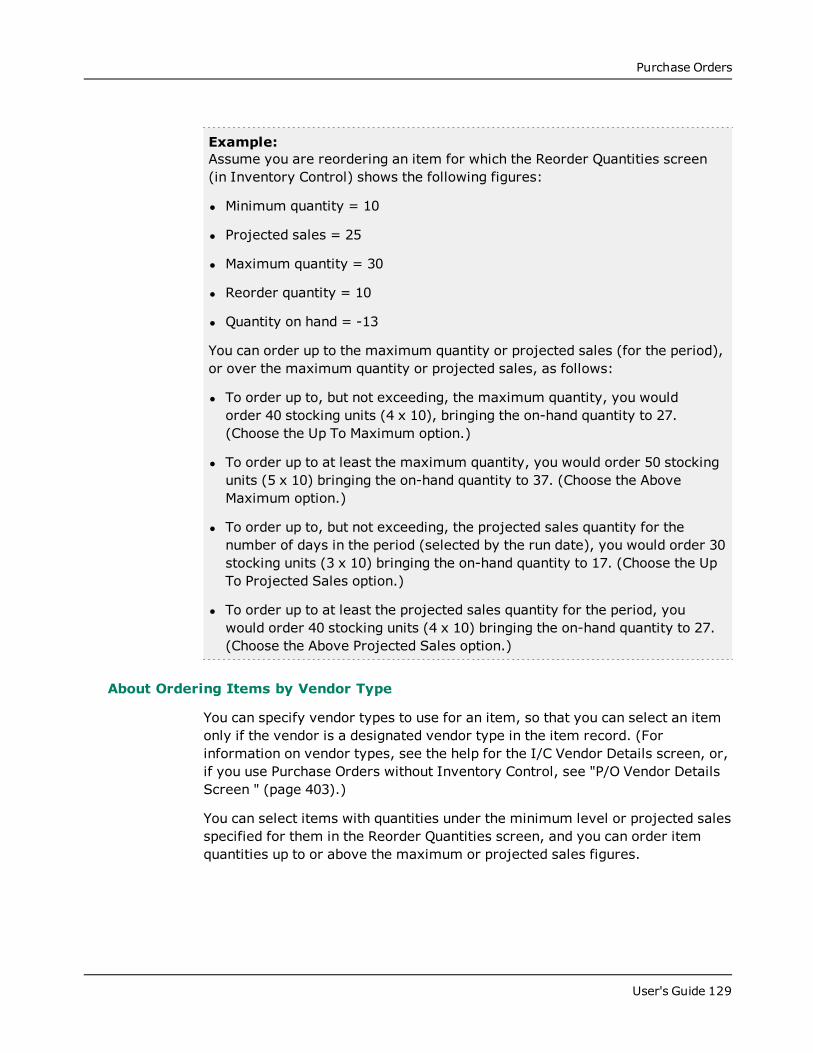
Purchase Orders
Example:Assume you are reordering an item for which the Reorder Quantities screen(in Inventory Control) shows the following figures:
l Minimum quantity = 10
l Projected sales = 25
l Maximum quantity = 30
l Reorder quantity = 10
l Quantity on hand = -13
You can order up to the maximum quantity or projected sales (for the period),or over the maximum quantity or projected sales, as follows:
l To order up to, but not exceeding, the maximum quantity, you wouldorder 40 stocking units (4 x 10), bringing the on-hand quantity to 27.(Choose the Up To Maximum option.)
l To order up to at least the maximum quantity, you would order 50 stockingunits (5 x 10) bringing the on-hand quantity to 37. (Choose the AboveMaximum option.)
l To order up to, but not exceeding, the projected sales quantity for thenumber of days in the period (selected by the run date), you would order 30stocking units (3 x 10) bringing the on-hand quantity to 17. (Choose the UpTo Projected Sales option.)
l To order up to at least the projected sales quantity for the period, youwould order 40 stocking units (4 x 10) bringing the on-hand quantity to 27.(Choose the Above Projected Sales option.)
About Ordering Items by Vendor Type
You can specify vendor types to use for an item, so that you can select an itemonly if the vendor is a designated vendor type in the item record. (Forinformation on vendor types, see the help for the I/C Vendor Details screen, or,if you use Purchase Orders without Inventory Control, see "P/O Vendor DetailsScreen " (page 403).)
You can select items with quantities under the minimum level or projected salesspecified for them in the Reorder Quantities screen, and you can order itemquantities up to or above the maximum or projected sales figures.
User's Guide 129
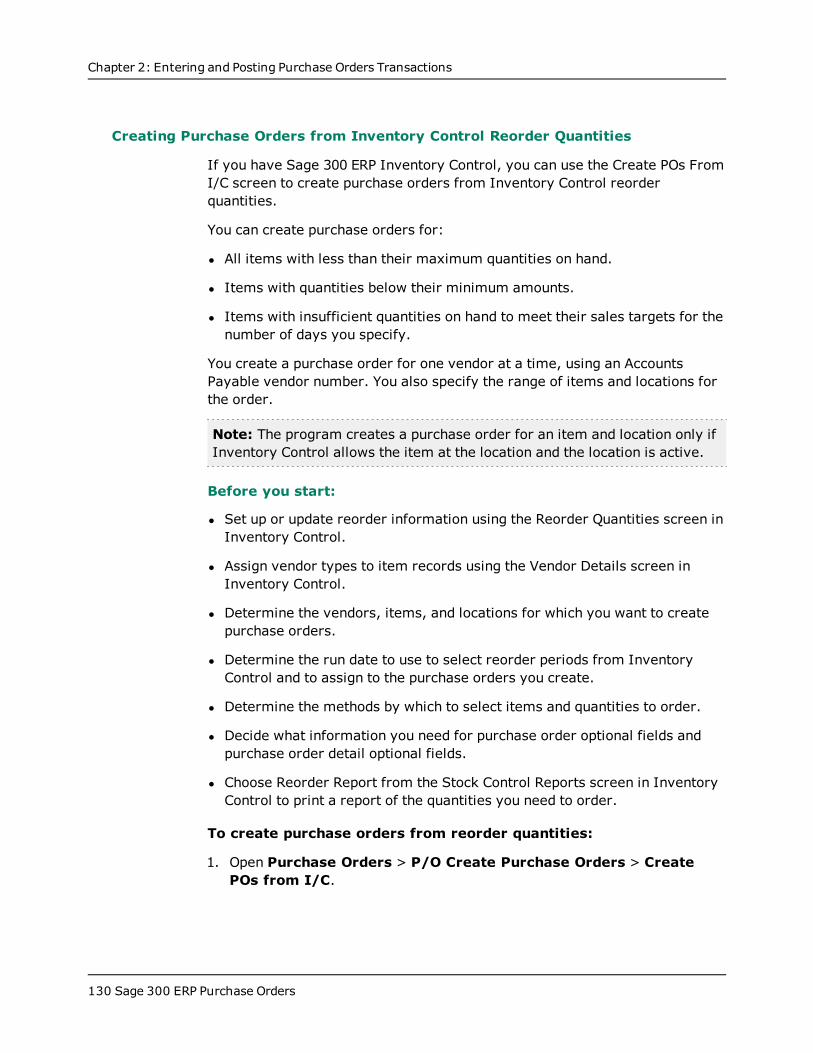
Chapter 2: Entering and Posting Purchase Orders Transactions
Creating Purchase Orders from Inventory Control Reorder Quantities
If you have Sage 300 ERP Inventory Control, you can use the Create POs FromI/C screen to create purchase orders from Inventory Control reorderquantities.
You can create purchase orders for:
l All items with less than their maximum quantities on hand.
l Items with quantities below their minimum amounts.
l Items with insufficient quantities on hand to meet their sales targets for thenumber of days you specify.
You create a purchase order for one vendor at a time, using an AccountsPayable vendor number. You also specify the range of items and locations forthe order.
Note: The program creates a purchase order for an item and location only ifInventory Control allows the item at the location and the location is active.
Before you start:
l Set up or update reorder information using the Reorder Quantities screen inInventory Control.
l Assign vendor types to item records using the Vendor Details screen inInventory Control.
l Determine the vendors, items, and locations for which you want to createpurchase orders.
l Determine the run date to use to select reorder periods from InventoryControl and to assign to the purchase orders you create.
l Determine the methods by which to select items and quantities to order.
l Decide what information you need for purchase order optional fields andpurchase order detail optional fields.
l Choose Reorder Report from the Stock Control Reports screen in InventoryControl to print a report of the quantities you need to order.
To create purchase orders from reorder quantities:
1. Open Purchase Orders > P/O Create Purchase Orders > CreatePOs from I/C.
130 Sage 300 ERP Purchase Orders
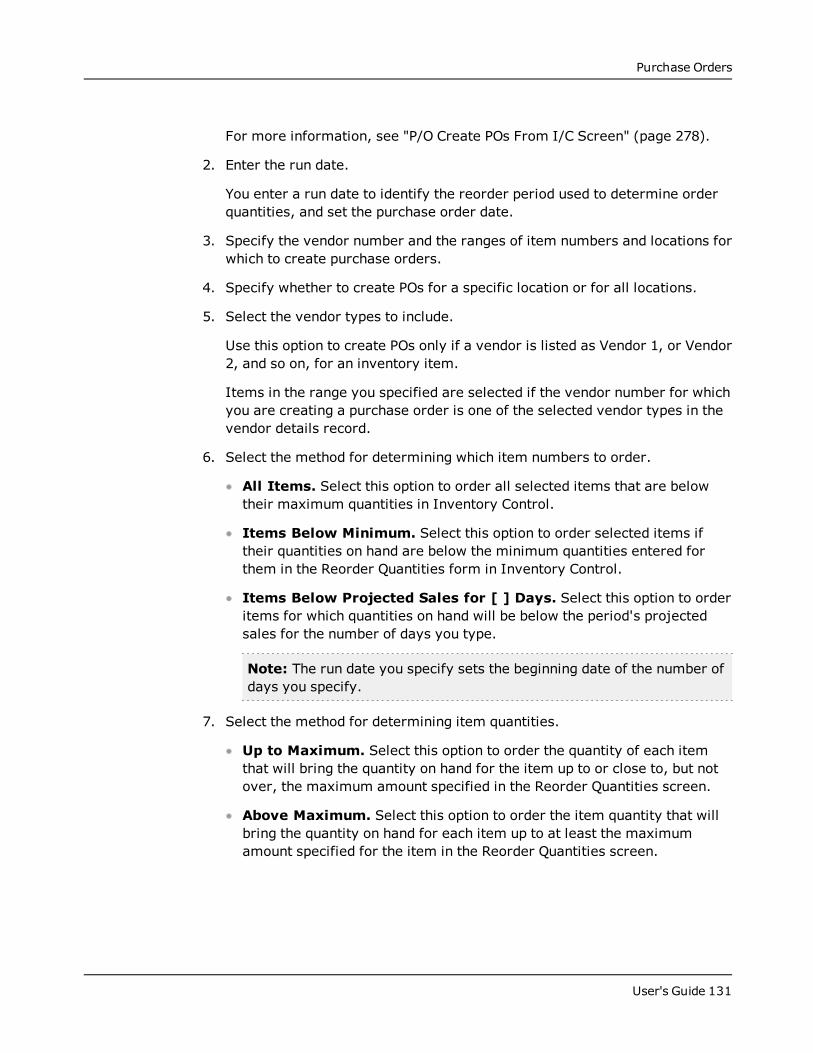
Purchase Orders
For more information, see "P/O Create POs From I/C Screen" (page 278).
2. Enter the run date.
You enter a run date to identify the reorder period used to determine orderquantities, and set the purchase order date.
3. Specify the vendor number and the ranges of item numbers and locations forwhich to create purchase orders.
4. Specify whether to create POs for a specific location or for all locations.
5. Select the vendor types to include.
Use this option to create POs only if a vendor is listed as Vendor 1, or Vendor2, and so on, for an inventory item.
Items in the range you specified are selected if the vendor number for whichyou are creating a purchase order is one of the selected vendor types in thevendor details record.
6. Select the method for determining which item numbers to order.
All Items. Select this option to order all selected items that are belowtheir maximum quantities in Inventory Control.
Items Below Minimum. Select this option to order selected items iftheir quantities on hand are below the minimum quantities entered forthem in the Reorder Quantities form in Inventory Control.
Items Below Projected Sales for [ ] Days. Select this option to orderitems for which quantities on hand will be below the period's projectedsales for the number of days you type.
Note: The run date you specify sets the beginning date of the number ofdays you specify.
7. Select the method for determining item quantities.
Up to Maximum. Select this option to order the quantity of each itemthat will bring the quantity on hand for the item up to or close to, but notover, the maximum amount specified in the Reorder Quantities screen.
Above Maximum. Select this option to order the item quantity that willbring the quantity on hand for each item up to at least the maximumamount specified for the item in the Reorder Quantities screen.
User's Guide 131
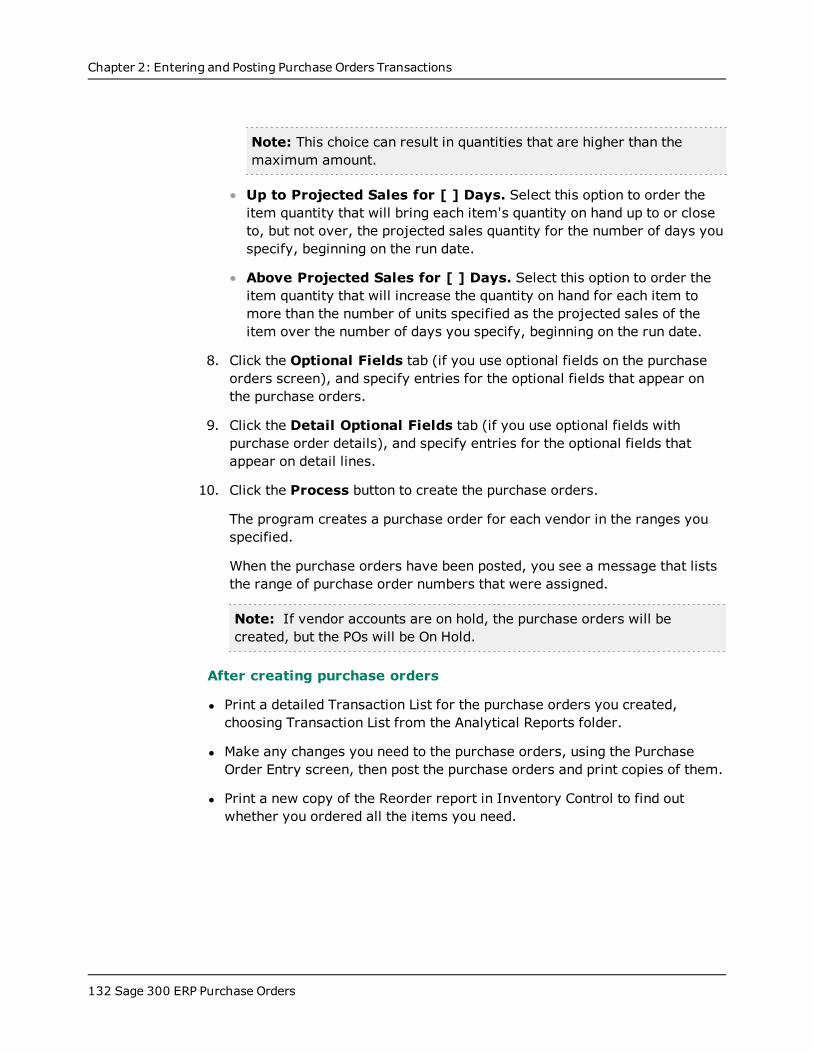
Chapter 2: Entering and Posting Purchase Orders Transactions
Note: This choice can result in quantities that are higher than themaximum amount.
Up to Projected Sales for [ ] Days. Select this option to order theitem quantity that will bring each item's quantity on hand up to or closeto, but not over, the projected sales quantity for the number of days youspecify, beginning on the run date.
Above Projected Sales for [ ] Days. Select this option to order theitem quantity that will increase the quantity on hand for each item tomore than the number of units specified as the projected sales of theitem over the number of days you specify, beginning on the run date.
8. Click the Optional Fields tab (if you use optional fields on the purchaseorders screen), and specify entries for the optional fields that appear onthe purchase orders.
9. Click the Detail Optional Fields tab (if you use optional fields withpurchase order details), and specify entries for the optional fields thatappear on detail lines.
10. Click the Process button to create the purchase orders.
The program creates a purchase order for each vendor in the ranges youspecified.
When the purchase orders have been posted, you see a message that liststhe range of purchase order numbers that were assigned.
Note: If vendor accounts are on hold, the purchase orders will becreated, but the POs will be On Hold.
After creating purchase orders
l Print a detailed Transaction List for the purchase orders you created,choosing Transaction List from the Analytical Reports folder.
l Make any changes you need to the purchase orders, using the PurchaseOrder Entry screen, then post the purchase orders and print copies of them.
l Print a new copy of the Reorder report in Inventory Control to find outwhether you ordered all the items you need.
132 Sage 300 ERP Purchase Orders
Purchase Orders
Creating Purchase Orders from Order Entry Sales Orders
If you have Sage 300 ERP Order Entry, you can create purchase orders for allitems on current active Order Entry sales orders, or only for backordered itemsor items with insufficient inventory quantities on hand to fill the orders.
Note:You cannot create purchase orders from future or standing sales orders orfrom orders that are on hold in Order Entry.
You can create purchase orders from Order Entry by ranges of customernumbers, order numbers, order dates, and expected ship dates. You can alsoconsolidate purchase orders by vendor number or create a purchase order foreach vendor listed on each order.
If you create purchase orders by vendor number, all orders for the same item,location, and vendor are consolidated into a single detail on the purchaseorder for the vendor.
If you create purchase orders by sales order, you produce a separatepurchase order for each vendor specified on the selected orders, resulting inmore than one purchase order for vendors specified on more than one order.This option retains order numbers and lets you print the Shippable Backordersreport for the transactions you post for Order Entry orders.
If you want to create purchase orders by sales order, you can still select theConsolidate Items option to consolidate like details for vendors. Consolidatedpurchase orders are shorter. Use the option if you do not print the ShippableBackorders report by order number. (Consolidation deletes order numbers.)
Before you start:
l Assign vendor types to item records in Inventory Control.
l Determine the customers, orders, dates, and vendor types for which youwant to create purchase orders.
To create purchase orders from Order Entry sales orders:
1. Open Purchase Orders > P/O Create Purchase Orders > Create POsfrom O/E.
For more information, see "P/O Create POs From O/E Screen" (page 282).
2. Use the From and To fields to specify ranges of customers, orders, orderdates, and expected ship dates by which to select the purchase orders tocreate.
User's Guide 133
Chapter 2: Entering and Posting Purchase Orders Transactions
3. Select the I/C vendor type.
4. For the Create Purchase Order for Each option, specify whether to:
Create only one purchase order for each vendor (select Vendor). Mor e ...
If you create purchase orders by vendor number, all orders for the sameitem, location, and vendor are consolidated into a single detail on thepurchase order for the vendor.
Create a separate purchase order for each order number and eachvendor listed on the order (select Order). Mor e ...
If you create purchase orders by sales order, you produce a separatepurchase order for each vendor specified on the selected orders,resulting in more than one purchase order for vendors specified on morethan one order. This option retains order numbers and lets you print theShippable Backorders report for the transactions you post for OrderEntry orders.
5. For the Include option, specify whether to order all items on the selectedorders, or only items for which you have insufficient quantities on hand, oronly items that are on backorder.
6. To include drop-ship addresses entered for items and customers on theOrder Entry orders, select Drop-Ship Items.
If you use the Drop-Ship Items option, every purchase order detail isassigned either the address entered on the sales order or the customer'saddress in Accounts Receivable.
Note: If you select this option, you cannot consolidate details.
7. To consolidate details on the purchase orders with the same item number,location, and unit of measure into single details on purchase orders, selectConsolidate Items.
Note: This option is not available if any optional fields or detail optionalfields are assigned to this screen.
8. To include non-stock items on the purchase order, select Include Non-Stock Items.
Note: This option appears only if you allow receipt of non-stock items inInventory Control.
134 Sage 300 ERP Purchase Orders
Purchase Orders
If you do not select this option, non-stock items are omitted from the Finderand treated as non-inventory items.
9. If you use optional fields with purchase orders (at the document level), clickthe Optional Fields tab, and then specify entries for the optional fields.
10. If you use optional fields with purchase order details, click the DetailOptional Fields tab, and then specify entries for the optional fields thatappear on detail lines.
11. Click the Process button to create the purchase orders.
After creating purchase orders
l Print a detailed Transaction List for the purchase orders you created,choosing Transaction List from the Analytical Reports folder.
l Make any changes you need to the purchase orders, using the Purchase OrderEntry screen.
l Print copies of the purchase orders for your records and to mail to vendors.
Creating Purchase Orders from Requisitions
You can create purchase orders for requisition details that do not have vendornumbers, assigning the vendors either by creating purchase orders for only onevendor number or by selecting a vendor type used with items in InventoryControl.
Purchase Orders does not create POs from requisitions that are on hold.
If you use Purchase Order's requisition approval system, requisitions must beentered or saved by users who are authorized to approve POs before they canbe added to purchase orders.
Before you start:
l Use the Requisition Entry screen to create or import requisitions.
l Determine the requisitions, vendors, and dates for which you want to createpurchase orders.
l If you are using Project and Job Costing, choose ether job-related or non-job-related requisitions.
In Accounts Payable:
User's Guide 135
Chapter 2: Entering and Posting Purchase Orders Transactions
l Add any new vendor numbers used in requisitions for which you want tocreate purchase orders. (The program cannot create purchase orders forvendor numbers that are not defined in Accounts Payable.)
l Make sure the vendor numbers you want to use are all active. You cannotcreate purchase orders for inactive vendors.
In Inventory Control, make sure that:
l All items you are ordering for a location are allowed at the location.
l You specified only active items and locations on the requisitions for which tocreate purchase orders.
l Choose Transaction List from the Analytical Reports folder. For moreinformation, see "P/O Transaction List Report Screen" (page 327).
l Then print a detailed list of the requisitions from which you are ready tocreate purchase orders. Make any changes you need to the requisitions,using the Requisition Entry screen.
To create purchase orders:
1. Open Purchase Orders > P/O Create Purchase Orders > CreatePOs from Requisitions.
For more information, see "P/O Create POs From Requisitions Screen"(page 286).
2. Use the From and To fields to specify ranges of requisition numbers,dates, and vendors for which to create purchase orders.
3. Select options, as follows:
Select Consolidate Items to consolidate details from separaterequisitions into single details on purchase orders for the same vendor,item, unit of measure, and (if you use Inventory Control) inventorylocation. Mor e ...
The program combines all related details, with the exception of detailsthat include drop-ship addresses. A separate purchase order detail iscreated for each requisition detail with a drop-ship address.
If you select Include Blank Vendors, you must specify the vendortype for which to create the purchase orders.
136 Sage 300 ERP Purchase Orders
Purchase Orders
Example: You can have all requisitions with blank vendors use thevendor that is listed as Vendor 1 in the items' vendor details records (inInventory Control).
if you use Project and Job Costing, select Job Related to create job-related purchase orders.
Note: You cannot mix job-related and non-job-related requisitions whencreating purchase orders. If you use Project and Job Costing and you arecreating POs from both types of requisitions, you must run this functiontwice.
4. If optional fields are assigned to purchase order (at the document level),click the Optional Fields tab, and then specify entries for the optionalfields that appear on purchase orders.
If you use the same fields on requisitions and purchase orders, the optionalfield entries on the requisition detail lines appear defaults on purchaseorders, unless you specify different entries here.
When you create a purchase order from more than one requisition, the fieldson the Optional Fields tab are taken from the first requisition that you select.
5. if you use optional fields with purchase order details, click the DetailOptional Fields tab, and then specify entries for the detail optional fields.
6. Click Process to create the purchase orders.
Purchase Orders creates a purchase order for each vendor for whom detailswere entered on requisitions in the ranges you specified.
When the purchase orders have been posted, you see a message that liststhe range of purchase order numbers that were assigned.
After creating purchase orders
l Print a detailed Transaction List for the purchase orders you created,choosing Transaction List from the Analytical Reports folder.
l Make any changes you need to the purchase orders, using the Purchase OrderEntry screen.
l Print copies of the purchase orders you need to mail to vendors and to filewith your records.
User's Guide 137
Chapter 2: Entering and Posting Purchase Orders Transactions
Copying Purchase Orders
You can use the Copy Purchase Order screen to create new purchase ordersbased on existing purchase orders.
The details from the existing POs, including item numbers, quantities ordered,costs, and other information, appear as defaults for the new purchase order.
You can select the details that you want to copy to the new purchase order,and you can change the location, expected arrival date, whether items aredrop-shipped, the quantity ordered, cost, unit of measure, unit weight, andoptional fields for any detail lines.
To create a new purchase order from one or more existing POs:
1. Open Purchase Orders > P/O Transactions > Copy PurchaseOrders.
2. In the From Vendor Number field, type the code for the vendor whosepurchase order details you want to copy for the new PO.
3. In the To Vendor Number field, type the code for the vendor for whomyou are creating the new purchase order, or use the Finder or thenavigation buttons to select it.
4. In the From PO Number and To PO Number fields, specify the range ofexisting orders (for the From Vendor) to use as the basis for the newpurchase order.
5. The tax group for the To Vendor appears as the default in the Tax Groupfield, but you can change it.
6. In the PO Type field, select the type of purchase order to copy.
7. If you are copying job-related purchase orders, select the Job Relatedoption.
8. If you want to copy costs from the original purchase orders to the newpurchase order, select the Use PO Cost option. (This choice is availableonly if both vendors use the same currency, and you have Project and JobCosting installed.)
9. Click the Go button to add the details from the existing purchase ordersto the new order.
10. In the PO Number field, type a purchase order number or accept the***New*** entry to let the program assign the next number in thepurchase order number sequence.
138 Sage 300 ERP Purchase Orders
Purchase Orders
11. In the PO Date field, enter the date for the purchase order. The programdisplays the session date as the default PO date.
12. If you need to put the new purchase order on hold, select the On Holdoption.
13. Enter a description and a reference for the PO.
14. Use the detail table on the Copy POs tab to edit the details as you require.
To delete a detail line, select it on the table, and then press the Delete key.
15. When you have finished editing information for the purchase order, click theCreate button to generate the PO.
You can then view, edit, and post the order using the Purchase Order Entryscreen.
User's Guide 139
Chapter 2: Entering and Posting Purchase Orders Transactions
ReceiptsEnter, import, export, and set up security for receipts to record items youenter into inventory.
About Processing Receipts
Use the Receipt Entry screen to receive items into inventory. For moreinformation, see "P/O Receipt Entry Screen" (page 594).
You can enter receipts with or without purchase order numbers. If you use apurchase order number on a receipt, the purchase order information isdisplayed.
If you need to edit a receipt you created from a purchase order, you canchange the vendor and header information (except for the template and taxgroup codes), delete item details, and add additional cost details, but youcannot add item details. When editing a posted receipt, you cannot deletedetail lines but you can add additional cost details.
Note: You cannot view or edit costs unless you are assigned the securityright to "Show Receipt Costing Information."
Use the Return Entry screen to return items to suppliers. For moreinformation, see "About Processing Returns" (page 175).
Effects on Inventory Control
When you post a receipt in Purchase Orders, item quantities on hand areincreased in Inventory Control for the received items.
If you post the receipt with a purchase order number, quantities on purchaseorder are reduced in Inventory Control, and the purchase order's receivedquantities and outstanding quantities are updated on the purchase order.
You can process receipts either in Purchase Orders or Inventory Control.However, we recommend that you enter all receipts in Purchase Ordersbecause Purchase Orders' Receipt Entry screen allows you to fully track andprorate additional costs, and record more information for each receipt thanyou can record in Inventory Control.
When you enter receipts with existing purchase order numbers in PurchaseOrders, the purchase orders are updated. They are not updated by receiptsyou enter in Inventory Control.
140 Sage 300 ERP Purchase Orders
Receipts
If you enter or change additional costs on invoices in Purchase Orders, you canalso prorate the new costs to the corresponding receipts.
For more information about processing receipts in Inventory Control, see"About Using Purchase Orders With Inventory Control " (page 39).
About Entering Receipts
This topic describes the information you enter for receipts and receiptadjustments on the Receipt Entry screen. For more information, see "P/OReceipt Entry Screen" (page 594).
Setup Records Required to Process Receipts
Before processing receipts, you need to set up the following Purchase Ordersrecords:
l Additional cost codes
l Optional fields (if you use them)
l Ship-via codes
l Templates
You need to select the following options for receipts on the P/O Options screen:
l Edit or verify the lengths, prefixes, and numbers you want the program toassign to receipts, if you want the numbers assigned automatically.
l Select the options to use when processing receipts.
l Select a default template code (optional).
Also, set up related records in other Sage 300 ERP programs:
l Terms codes in Accounts Payable.
l Vendor records in Accounts Payable.
l Optional fields in Inventory Control, Accounts Payable, and General Ledger
l Tax records in Common Services.
l Currency records (multicurrency ledgers) in Common Services.
l Item, price list, location, account set, and category records in InventoryControl.
l Contacts in Project and Job Costing.
User's Guide 141
Chapter 2: Entering and Posting Purchase Orders Transactions
Specifying Vendors and Purchase Orders
You can enter receipts for vendor numbers that exist in your Accounts Payabledata and for new vendors. You can add a vendor to Accounts Payable from theReceipt Entry screen.
You can also apply receipts to existing purchase orders, or you can enter areceipt that doesn't reference a purchase order.
Entering Details for Job-Related Receipts
If the receipt is for a project you are managing with Project and Job Costing,different fields appear for the details to let you enter job-related information.If the retainage option is selected in Accounts Payable, you can chooseretainage accounting for the receipt.
Note: If the receipt is being created from multiple purchase orders, allpurchase orders must be either job-related or non-job-related.
Specifying Item and Cost Details
You can enter individual item receipts and additional costs (such as shippingcharges) as separate details, and you can edit tax information for each detailand cost, and for the vendor.
You can enter additional cost details for the primary vendor (the vendorfrom whom you received the goods) or for secondary vendors (vendors whocharged costs on the shipment but did not supply the goods).
If necessary, you can assign a different vendor and tax group to eachadditional cost detail. In multicurrency ledgers, you enter all details in theprimary vendor's currency.
During receipt entry, you can look up purchasing history by vendor or itemnumber. You can also print receipts after posting them using the standardform for receiving slips supplied with Purchase Orders, or using forms youdesign.
Note: You must use the option Allow Receipt of Non-Stock Items inInventory Control to enter receipt transactions for non-stock items.
Posting Receipts
When you post a receipt in Purchase Orders, item quantities on purchase orderare reduced and quantities on hand are increased in Inventory Control.
142 Sage 300 ERP Purchase Orders
Receipts
If the receipt is job-related, Purchase Orders also updates the actual andcommitted quantities and costs for the job in Project and Job Costing.
If you specified a purchase order number on a receipt, posting enters orupdates outstanding and received quantities on detail lines in the purchaseorder, and completes purchase order detail lines that have been fully receivedor canceled. Posting also deletes purchase order details for which no quantitywas received on the receipt, so that they do not appear on the receipt if youselect it for editing after you have posted it. You should make sure you haveentered all the received quantities you want to include on a receipt before youpost it.
After posting a receipt, you cannot change additional cost information (exceptfor the amounts) and you cannot delete detail lines—although you can changethe quantity received and cost amounts, and you can add additional costs forthe primary vendor on the invoice. In multicurrency ledgers, you cannot editexchange rates.
Editing Receipts
After posting a receipt, you can no longer change the purchase order numbers,template code, or tax group, and you cannot delete any item or additional costdetails that were posted with the receipt. You can add new additional costdetails and, if the receipt does not reference a purchase order number, you canadd item details. In multicurrency ledgers, you cannot edit exchange rates.
If you change receipt quantities, quantities on hand are updated in InventoryControl.
Job-related changes to receipt quantities will change the committed and actualquantities and costs in Project and Job Costing.
If you edit an existing receipt that was created from a purchase order, you seeonly the detail lines (from the purchase order) that have a received quantity orhave a non-zero amount (other than the received quantity), such as a manualproration or a canceled quantity.
You cannot change the proration or reproration method you assign to anyadditional cost after you post the receipt. If you need to change the method,either on the receipt or for a return, you post the change as an adjustment inInventory Control.
Note: Once you have posted an invoice for the primary vendor, all thevendor's details are complete and you cannot edit them. When you haveposted invoices for all the vendors on a receipt, the receipt is complete andcan no longer be changed.
User's Guide 143
Chapter 2: Entering and Posting Purchase Orders Transactions
Invoicing Receipts
You can post invoices for receipts from the Receipt Entry screen, invoicing theitems received and additional costs charged by the primary vendor (thereceipt vendor), as well as additional costs charged on receipts by othervendors (secondary vendors).
You can also use the Invoice Entry screen to post invoices.
Entering 1099 Codes and Remit-to Locations
You can enter 1099 codes and remit-to locations in Invoice Entry or inAccounts Payable.
Important! If you need to record 1099 codes and amounts or remit-tolocations, you must enter invoices in the Invoice Entry screen, or editPurchase Orders invoices in Accounts Payable to add the codes and 1099amounts.
Assigning Serial Numbers and Lot Numbers
If you also use Serialized Inventory, you can assign serial numbers to itemsafter inserting an amount in the Quantity field. For more information, see"Receiving and Invoicing Serialized Items " (page 211).
About Importing Receipts
Use the Import command on the File menu in the Receipt Entry screen totransfer receipts created in non-Sage 300 ERP applications (or in anotherPurchase Orders database at a different location) to Purchase Orders.
Purchase Orders posts imported receipts and returns as they are imported,but does not delete the original file of transactions. To avoid importing thesame transactions twice, you should delete the file when you are finished.
You must make sure that the receipts and returns for importing use uniquedocument numbers. You cannot import a transaction that uses a documentnumber you have posted and not cleared in Purchase Orders. You can alsoimport additional costs only for the primary vendor.
Multicurrency ledgers
You cannot import multicurrency transactions into a single-currency ledger.Edit import files to remove multicurrency fields before importing.
144 Sage 300 ERP Purchase Orders
Receipts
Guidelines for importing
If the file does not contain valid data, Purchase Orders will not import it. For anexample of valid data, export receipts using the fields you plan to import laterand use this as a guide.
The import file you specify must be located on the drive and in the directorythat you select. If you are on a network, you must have access rights to theimport file and the directory.
For detailed instructions about importing receipts, see the System Managerhelp.
After importing
l Check data integrity.
l Run Day End Processing to create journal entries from the imported data.
l Print the posting journal for the type of transaction imported and use it tocheck the posted details and the general ledger distributions generated fromPurchase Orders transactions.
l Unless you need to use it again, delete the file from which you imported thetransactions.
About Exporting Receipts
Use the Export command on the File menu in the Receipt Entry screen totransfer transactions created in Purchase Orders to either of the following:
l Non-Sage 300 ERP applications.
l A file to be edited and imported later.
Before exporting, decide which fields to include in the export file. You mustselect fields for each type of record used for the selected transaction type. Youshould also determine the path for the export file you want to use or create.
When you choose Export, Purchase Orders exports all the transactions of theselected type currently in the system. If you do not want to export everything,use the Set Criteria option to specify the documents to export.
About Entering Additional Costs on Receipts
When entering a receipt, you can add additional costs charged on the shipment,such as handling charges, service charges, and duty. You can include additionalcosts charged by the primary vendor, and you can include costs charged byother vendors.
User's Guide 145
Chapter 2: Entering and Posting Purchase Orders Transactions
You enter additional cost details by vendor on the Additional Costs tab of theReceipt Entry screen. You can add as many cost details as you need for theprimary vendor and secondary vendors.
You can expense these costs or prorate them to received items. You can alsoedit additional-cost amounts on previously posted receipts that are not yetfully invoiced.
Note: If you return items, later, you can specify how to reallocate costs thatwere prorated to the returned items on the receipt.
You can post an invoice for each vendor's costs from the Receipt Entry screen,or you can enter the invoices in Invoice Entry.
Proration of Additional Costs
For each additional cost, you can choose from five proration methods. You canchoose to expense the cost (No Proration), or you can prorate it by item cost,quantity, or weight. You can also choose to prorate the cost manually.
Note: You cannot change the proration method after you post the receipt.
For examples and information about how costs are prorated, see "AboutCalculating Prorated Additional Costs" (page 150).
If you do not prorate an additional cost, you expense it to the general ledgeraccount you assigned to the additional cost record or to another account youspecify when entering the additional cost transaction.
If you want to prorate or expense a job-related cost to several jobs, you musthave a receipt detail for each of the jobs to which you want to apportion costs.
You can also specify retainage for job-related costs.
No Proration for Non-inventory Items
When entering additional costs for non-inventory items, you must select NoProration. If you try to prorate by quantity, cost, or weight, the programdisplays an error message and prevents you from posting the receipt.
Reporting Prorated Amounts
The Receipts Posting Journal lists the additional cost amounts prorated to eachitem on a receipt. Use the journal to check the amounts that were proratedautomatically during posting or Day End Processing, and to check the amountsyou prorated manually.
146 Sage 300 ERP Purchase Orders
Receipts
Tax on Additional Cost Amounts
The tax information for each additional cost detail is determined by the vendor'stax group. For each detail, you can change the tax class and specify whether taxis included in the cost amount (if allowed by the tax authority).
You can also check the tax amount for the detail and the allocated, recoverable,and expensed tax amounts. For more information, see "About Tax Informationand Amounts" (page 94).
About Specifying Vendors for Additional Costs
To add information about additional costs on a receipt, you specify the vendorwho charged the cost before entering the costs charged by each vendor.
You specify the following vendor information on the Additional Cost tab on theReceipt Entry screen:
l Vendor number and name (the code and name of the vendor who chargedyou the cost).
You can enter an existing vendor number or a new vendor number that youhave not yet added to Accounts Payable. You can also enter a new vendor'sname in Purchase Orders and add the vendor to Accounts Payable from theAdditional Costs tab in the Receipt Entry screen.
If you are adding a cost for a vendor who is not the primary vendor, you canedit the vendor's address, phone and fax numbers, and contact on a separatezoomed screen you open from the Additional Costs tab. You can also edit theinformation for an existing vendor number.
When you enter a valid vendor number, the program displays the vendor'stax group and terms.
Note: In multicurrency ledgers, the program also displays exchange rateinformation for the vendor's currency.
l Tax group (the tax authorities, classes, and related tax information thatapply to the cost). In multicurrency ledgers, the tax group you selectidentifies the currency in which the additional cost was charged.
A tax group is displayed if you use an Accounts Payable vendor number, butyou can change it, provided the vendor for the cost is not the primary vendor(from whom you received the goods). You specify the tax group for a newvendor you have not yet added to Accounts Payable.
l Terms code.
User's Guide 147
Chapter 2: Entering and Posting Purchase Orders Transactions
Use the Terms Code field to add or change the code that identifies thepayment terms the vendor allows your company.
To change a terms code, type the new code or select the code from theFinder. You must enter a terms code for each vendor and you must use oneof the terms codes you have defined in Accounts Payable.
You can also edit dates, payment, and discount information on the Termstab.
Note: In multicurrency ledgers, you can enter the rate type, rate date, andexchange rate for each secondary vendor. You use the Rate Information tabto edit currency rate information for a primary vendor who does not usefunctional currency.
Displayed Information
The program displays the subtotal, tax included, and total amounts of theadditional costs you enter for each vendor.
For more information, see "P/O Receipt Entry Screen" (page 594).
About Prorating Additional Costs on Receipts
You can choose from five proration methods for each additional cost, asfollows:
l No Proration. If you do not prorate an additional cost, you expense it to ageneral ledger account instead.
Note:When entering additional costs for non-inventory items, you must selectNo Proration. If you try to prorate by quantity, cost, or weight, theprogram displays an error message and prevents you from posting thereceipt.
l Prorate by Cost.
l Prorate by Quantity.
l Prorate by Weight.
l Prorate Manually.
You cannot change the proration method after you post a receipt.
148 Sage 300 ERP Purchase Orders
Receipts
For examples and information about how costs are prorated, see "AboutCalculating Prorated Additional Costs" (page 150).
Expensing Additional Costs
If you do not prorate an additional cost, you expense it to the general ledgeraccount you assigned to the additional cost record or to another account youspecify when entering the additional cost transaction.
Prorating Job-Related Additional Costs
If you want to allocate an additional cost to several jobs, you need to add adetail line for each job.
Returns and Adjustments
When you return items to which costs were prorated, you specify thereproration method. If you used an additional cost code on the receipt, theprogram displays the reproration method specified in the additional cost record,but you can select another method for the detail.
You can choose to leave the cost as originally prorated, reprorate it using theoriginal proration method, or expense it to the general ledger account youspecify. You can select:
l Prorate—to allocate the returned additional cost amount over the remaininggoods on the receipt using the original proration method.
l Leave—if you do not want to reprorate the additional cost to the remaininggoods on the receipt.
Tip: You can also use the Adjustments screen in Inventory Control to writeoff the additional cost to a general ledger write-off account, rather than addit to other item costs.
l Expense—to debit a general ledger expense account for the returned portionof the additional cost amount. Enter the general ledger account number towhich the expensed amount is posted.
Note: You cannot change the proration or reproration method after you postthe return.
Editing Tax Distributions
The tax information for each additional cost detail is determined by the vendor'stax group. For each detail, you can change the tax class and specify whether tax
User's Guide 149
Chapter 2: Entering and Posting Purchase Orders Transactions
is included in the cost amount (if allowed by the tax authority).
You can also check the tax amount for the detail and the allocated,recoverable, and expensed tax amounts. For more information, see "AboutTax Information and Amounts" (page 94).
Reporting Prorated Amounts
The Receipts Posting Journal lists the additional cost amounts prorated to eachitem on a receipt. Use the journal to check the amounts that were proratedautomatically during posting or Day End Processing, and to check the amountsyou prorated manually.
About Calculating Prorated Additional Costs
You can prorate additional costs to items on a receipt either automatically ormanually.
l If you prorate automatically, the extra cost amounts do not appear as partof the item detail costs in the Receipt Entry screen, although they arereported on the posting journal for each transaction.
l If you prorate manually, you click the Distribute Proration zoom button,and enter the prorated cost amounts in the Distribute Proration screen.
Prorating Automatically
Additional costs you choose to prorate automatically are apportioned acrossall items on a receipt during posting or Day End Processing, based on eachdetail's total quantity received, total weight, or extended cost, as apercentage of the receipt's total quantity, weight, or cost, respectively.
You can prorate by:
l Quantity. If you prorate by quantity, prorated amounts are calculatedbased on the quantity specified for each detail. For example, you wouldprorate a handling cost by quantity if the cost depended on the number ofitems shipped.
The program does not convert units to stocking units. If you enter two detaillines for the same item number and specify ten stocking units for the firstdetail and ten boxes (of ten stocking units each) for the second detail, thesame additional cost amount will be prorated to both details.
You cannot prorate costs for non-inventory items. You must choose NoProration.
150 Sage 300 ERP Purchase Orders
Receipts
l Weight. If you prorate by weight, prorated amounts are calculated based onthe weight specified for each detail. You would choose this proration methodfor a freight charge that was determined by the weight of the shipment.
If you do not enter a weight amount for a detail, no additional cost amountwill be calculated for it.
If no weight is specified for any of the item details, the additional costamount is prorated evenly to all item details on the receipt.
Note: The calculation is by total weight after conversion to the defaultweight unit of measure. Note also that you cannot prorate costs for non-inventory items. You must choose No Proration.
l Cost. For more information, see "About Prorating by Cost" (page 159).
About Manually Prorated Amounts
You can post a receipt only when the you have completely allocated anyadditional costs you selected for manual proration, plus their associated taxamounts.
Tip: Check the Totals tab to see whether you entered all manual prorationamounts.
You can manually prorate additional costs only to item details, including non-stock items, that have valid inventory item numbers. You cannot manuallyprorate costs to non-inventory items.
In multicurrency ledgers, you can manually prorate additional costs only forvendors who use the functional currency.
Note: For a job-related receipt, you can prorate additional costs to differentcontracts, projects, and categories. However, if you want to allocate anadditional cost to several jobs, you need to add a receipt detail line for eachjob.
Entering Receipts
You use the Receipt Entry screen to record the receipt of both inventory andnon-inventory items in Purchase Orders. When you receive items, you can alsopost an invoice for the primary vendor and for any secondary vendors for whichyou record additional costs on the receipt.
While entering receipts, you can also:
User's Guide 151
Chapter 2: Entering and Posting Purchase Orders Transactions
l Edit details on an existing receipt if you have not posted an invoice for thevendor and receipt. A receipt is complete when you have posted invoicesfor all vendors on the receipt. You cannot change a completed receipt.
l Enter or change the vendor address information.
l Enter additional costs for receipts (from primary or secondary vendors).
l Invoice receipts and additional costs.
l Identify items as fixed assets for management by Sage Fixed Assets.
l Specify drop-ship addresses for receipt details.
l Check and edit tax distributions by detail line and for the primary andsecondary vendors.
l Assign serial numbers to serialized items (if you have the SerializedInventory and Lot Tracking license installed as part of Sage 300 ERPInventory Control).
l Assign lot numbers to lotted items (if you have the Serialized Inventory andLot Tracking license installed as part of Sage 300 ERP Inventory Control).
For more information, see "About Entering Receipts" (page 141).
Before you start:
l Make sure you have complete information about the received shipment,including bills of lading and information about additional costs that pertainto this receipt.
l If you use multicurrency accounting, find out the rate type, rate date, andexchange rate to use for this receipt.
l If the receipt is job-related, make sure you know the contract, project,category, resource (if applicable), billing type and rate, and A/R itemnumber to charge for each item detail.
To enter a receipt:
1. Open Purchase Orders > P/O Transactions > Receipt Entry.
For more information, see "P/O Receipt Entry Screen" (page 594).
2. Press the Tab key to accept *** NEW *** in the Receipt Number field, andlet Purchase Orders assign a receipt number when you post the document.
152 Sage 300 ERP Purchase Orders
Receipts
If you do not want Purchase Orders to assign the number automatically, youcan type the new number yourself, and then press the Tab key.
3. In the Vendor Number field, type the vendor number or select it from theFinder.
Tip: You can skip this field, and then select the PO number. However, youmust enter the vendor number first if you are receiving goods from severalpurchase orders
4. If you are receiving goods from one purchase order, in the PO Numberfield, enter or select the purchase order number.
To select several purchase orders from which to create the receipt, click theZoom button beside the From Multiple POs field. Mor e ...
In the Create PO From PO screen, click the Finder to display purchase ordernumbers for the selected vendor. You may have to press the Insert key firstif you are adding a purchase order to an existing receipt.
You can select a single purchase order. You can also select several purchaseorder numbers to create a receipt that includes details entered on theselected purchase orders for the vendor.
Tip: Skip these fields if you are creating a receipt without referencing apurchase order.
5. If this is a job-related receipt and you did not specify a purchase ordernumber, select the Job Related option. (If you selected a job-relatedpurchase order, the job-related option is selected automatically.)
Note: You cannot mix job-related and non-job-related purchase orders ona receipt.
6. Use the remaining fields in the top part of the Receipt tab to enter generalinformation for the receipt. Mor e ...
The posting date is the date for transactions being posted to the GeneralLedger, so it also determines the contents of the Fiscal Year and Periodfields. The date applies also to the invoice.
If you use Inventory Control, select a location code to which bills for thereceipt will be sent. You can also use the Zoom button to edit theaddress.
User's Guide 153
Chapter 2: Entering and Posting Purchase Orders Transactions
If you want to change the vendor account set, you can only choose fromaccount sets that use the vendor's currency.
7. Tab into the detail entry table (or click the table), and then enter receiptdetails. (You may have to press the Insert key to start a new line.) Mor e ...
To receive all goods on purchase orders, click the Receive All button.
To partially receive goods on purchase order, enter the quantity receivedfor each item in the detail section. You can also delete lines that are notbeing received, although you do not need to delete lines if the amountreceived is "0".
You can change other information, including item descriptions, item costs(if you have appropriate security authorizations), discount amounts, itemweights, quantity canceled and outstanding, number of item labelsrequired, arrival date, comments, and optional fields.
Note: You cannot add detail lines if you are receiving specific purchaseorders.
Tip: You can click the Item/Tax. button or press F9 to display aseparate screen that lets you view and edit all the information for a singledetail, including tax information.
For information on detail fields, see "P/O Receipt Entry Screen" (page594).
8. Use the remaining tabs to complete the information required for thereceipt.
To check or edit vendor's tax group or tax classes, click the Taxes tab.
To add optional field information for the receipt, click the Optional Fieldstab.
To change currency exchange rates in a multicurrency system, click theRates tab.
To check the totals for the receipt, click the Totals tab.
9. Click Post.
After postingYou can print the receipt immediately after posting.
154 Sage 300 ERP Purchase Orders
Receipts
You can also print the receipt later, using the Receipts screen in the P/O Formsfolder.
Creating a Receipt from Multiple Purchase Orders
You can use the P/O Create Receipt From PO screen to select purchase ordersyou are receiving from the vendor.
To create a receipt from multiple purchase oders:
1. Open Purchase Orders > P/O Transactions > Receipt Entry.
2. Select From Multiple POs, then either click the Zoom button beside thefield or press the F9 key to open the Create Receipt From PO screen.
3. Use the Finder to select incomplete purchase orders for the vendor.
Note: All purchase orders must have the same tax group.
4. When you have finished entering purchase orders, click Receive.
Tips:If you enter an incorrect purchase order number, highlight it and pressthe Delete key.
To delete all the purchase order numbers or to cancel all the numberspress Close without pressing Receive.
5. Press Close to return to the Receipt Entry screen.
Creating Invoices From a Receipt Using the P/O Receipt Entry Screen
You can use the Invoices button on the Receipt Entry screen to create invoicesfor the primary vendor and any secondary vendors on a receipt.
Invoices are created during posting. You can post only one invoice for eachvendor on the receipt, and the invoice includes all charges entered for thevendor on the receipt.
Important! After posting, you cannot change information in the Invoice Entryscreen or on the receipt for item and additional costs you have invoiced.
Before you start:
l Open the P/O Receipt Entry screen, and display the receipt you are going to
User's Guide 155
Chapter 2: Entering and Posting Purchase Orders Transactions
invoice:
a. Open Purchase Orders > P/O Transactions > Receipt Entry.
b. Enter header information for the receipt, including the vendor numberand, if you are receiving an existing purchase order, specify thepurchase order number (or numbers if you are receiving multiplepurchase orders).
c. Use the Details table to receive items on the purchase order, or clickReceive All to receive all the items.
To create invoices for the primary and secondary vendors:
1. With the receipt displayed in the P/O Receipt Entry screen, click theInvoice button.
2. To create an invoice for the primary vendor, type the invoice number in theInvoice Number field at the top of the screen.
3. To create invoices for secondary vendors, type the invoice number in theInvoice Number field on the line for each vendor whose invoice you arecreating.
4. When finished, click Close to return to the Receipt tab.
5. Click Post to post the receipt and the invoices.
Adding or Editing Details Using the Detail Items/Taxes Screen
The Detail Items/Taxes screen contains the same fields as the detail entrygrid on the Receipt tab, plus additional tax-related fields that you use to viewor change tax information for a selected detail.
Rather than displaying fields for all the details in tabular format, this screenlets you see all the fields for a single detail on a separate screen.
For more information, see "P/O Receipt Entry Detail Items/Taxes Screen"(page 654).
Before you start:
l Open the Receipt Entry Detail Items/Taxes screen:
a. Open Purchase Orders > P/O Transactions > Receipt Entry.
b. Enter header information for the receipt, including the vendor numberand, if you are receiving an existing purchase order, specify the
156 Sage 300 ERP Purchase Orders
Receipts
purchase order number (or numbers if you are receiving multiplepurchase orders).
c. Select an existing detail, or enter a new one, and then press F9, or clickthe Item/Tax button.
To add or edit details in the Detail Items/Taxes screen:
1. To start a new detail line, click the New icon beside the Line Number field.
To view or edit an existing detail, type its line number or use the navigationbuttons beside the Line Number field to display the detail you want.
2. Enter the information or changes for the detail.
You can change a tax class to another tax class that is assigned to theauthority, and you can change the choice for the Tax Included option (if thetax authority permits tax-included costs).
3. When you are finished, click Close.
4. To check tax amounts for a receipt and compare the totals on the screenwith the totals on the source document, view the Totals tab.
To delete details in the Detail Items/Taxes screen:
Note: You cannot delete details after you have posted the receipt.
1. To display the detail you want to delete, type its line number or click thenavigation buttons beside the Line Number field until the line you want isdisplayed.
2. Click Delete.
If a message appears asking you to confirm the deletion, click Yes.
Adding, Editing, or Deleting Additional Costs
You use the Additional Costs tab on the Receipt Entry screen to add costs suchas handling charges, service charges, and duty to a receipt.
You can:
l Add additional costs charged on the shipment by both primary vendors andsecondary vendors, such as for handling charges, service charges, and duty.For more information, see "About Vendors" (page 92).
l You can expense costs or prorate them to received items.
User's Guide 157
Chapter 2: Entering and Posting Purchase Orders Transactions
l Edit additional-cost amounts on previously posted receipts which are notyet fully invoiced.
l Assign or edit the terms code and tax group for the additional cost vendor.
l Check the number of details and the total amount of additional costsentered for the vendor.
l In multicurrency ledgers, edit exchange rate information for vendors whodo not use the functional currency.
l Specify how to reallocate prorated costs of received items that you return.
To enter, edit, or delete additional cost details:
1. Open Purchase Orders > P/O Transactions > Receipt Entry.
For more information, see "P/O Receipt Entry Screen" (page 594).
2. On the Receipt tab, enter vendor and purchase order information, alongwith receipt quantities.
3. On the Additional Costs tab, use the Finder or the navigation buttons besidethe Additional Cost Vendors field to select an existing additional costvendor for which to enter or edit an additional cost detail, or click the Newicon to add a new vendor in Accounts Payable.
Note: A new receipt lists only the primary vendor.
4. When you have displayed the correct vendor in the vendor number field,enter or edit the additional cost details for the selected vendor in the detailentry table.
Tip: To display all the information for a selected detail on a separatescreen, or to edit tax classes or the tax included fields for the detail,select the detail, then either click the Cost/Tax button or press the F9key.
In the Proration Method field, specify whether to prorate theadditional cost to the details automatically (by quantity, cost, or weight)or manually, or not to prorate.
Note: If you are adding additional costs for non-inventory items, youmust choose No Proration. If you choose to prorate by quantity, cost,or weight, the program will display an error message and prevent youfrom posting the receipt.
158 Sage 300 ERP Purchase Orders
Receipts
To delete a detail, select it, and then click Delete. If a message appearsasking you to confirm the deletion, click Yes.
5. Click the Calculate Taxes button if you want to see tax amounts for adetail before you have posted the receipt or opened the Totals tab. (Taxamounts are not automatically calculated until you click the Taxes tab or theTotals tab, or post the receipt.)
6. If you edit tax amounts on the Taxes tab, and then use the Calculate Taxesbutton, the program replaces your changes with amounts it calculates usingthe tax tables in Tax Services.
7. Click Post.
Prorating Additional Costs on Receipts
You can prorate additional costs for a single receipt or for several receipts.
To prorate additional costs for a single receipt:
1. Select the additional cost on the Additional Cost entry table.
2. Click the Item/Tax button or press F9 to open the Detail Costs/Taxesscreen.
3. Click the Zoom button beside the Distribute Proration field.
4. Distribute the additional cost (and billing rate for billable details).
To prorate additional costs for several receipts:
1. Select the additional cost on the Additional Cost entry table.
2. Click the Cost/Tax button or press F9 to open the Detail Costs/Taxesscreen.
3. Click the Dist. Cost button to display the Cost Allocation screen.
4. Highlight the receipt you want, and then click the Distribute Prorationcolumn heading.
5. In the Distribute Proration screen that appears, distribute the additional costand the billing rate (for billable details).
About Prorating by Cost
If you prorate by cost, the program determines the additional cost for each itemdetail by calculating the cost amount cumulatively for each detail, then
User's Guide 159
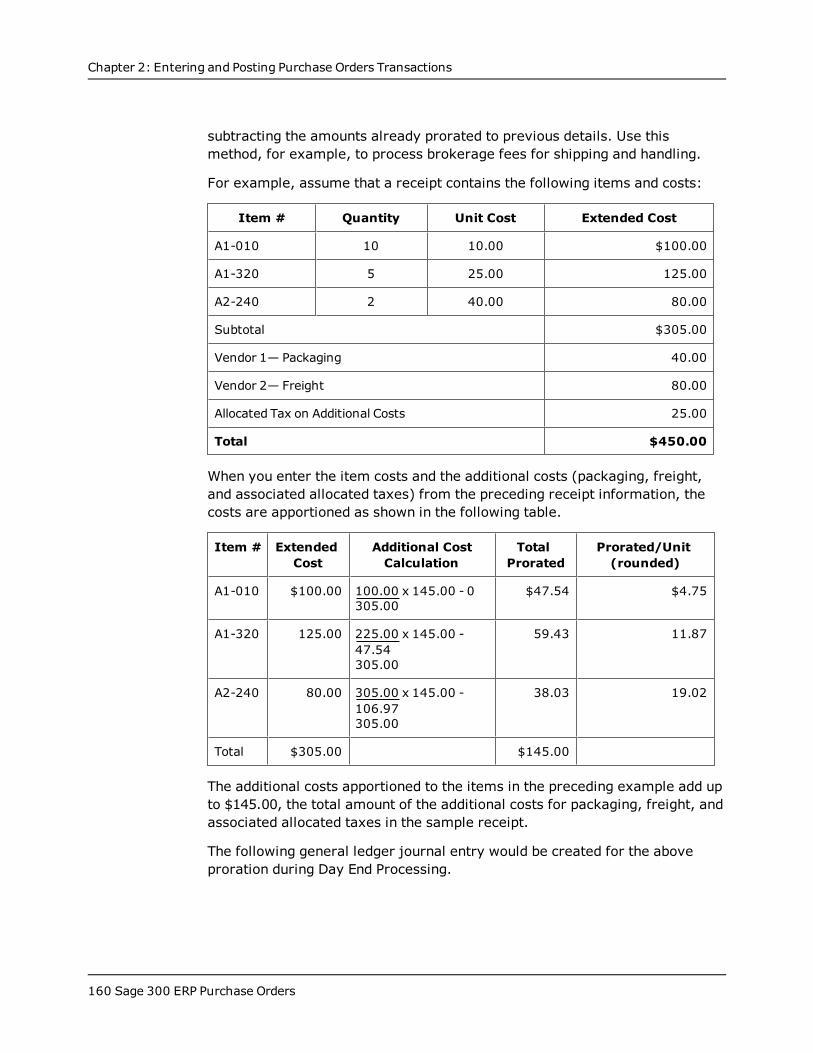
Chapter 2: Entering and Posting Purchase Orders Transactions
subtracting the amounts already prorated to previous details. Use thismethod, for example, to process brokerage fees for shipping and handling.
For example, assume that a receipt contains the following items and costs:
Item # Quantity Unit Cost Extended Cost
A1-010 10 10.00 $100.00
A1-320 5 25.00 125.00
A2-240 2 40.00 80.00
Subtotal $305.00
Vendor 1— Packaging 40.00
Vendor 2— Freight 80.00
Allocated Tax on Additional Costs 25.00
Total $450.00
When you enter the item costs and the additional costs (packaging, freight,and associated allocated taxes) from the preceding receipt information, thecosts are apportioned as shown in the following table.
Item # ExtendedCost
Additional CostCalculation
TotalProrated
Prorated/Unit(rounded)
A1-010 $100.00 100.00 x 145.00 - 0305.00
$47.54 $4.75
A1-320 125.00 225.00 x 145.00 -47.54305.00
59.43 11.87
A2-240 80.00 305.00 x 145.00 -106.97305.00
38.03 19.02
Total $305.00 $145.00
The additional costs apportioned to the items in the preceding example add upto $145.00, the total amount of the additional costs for packaging, freight, andassociated allocated taxes in the sample receipt.
The following general ledger journal entry would be created for the aboveproration during Day End Processing.
160 Sage 300 ERP Purchase Orders
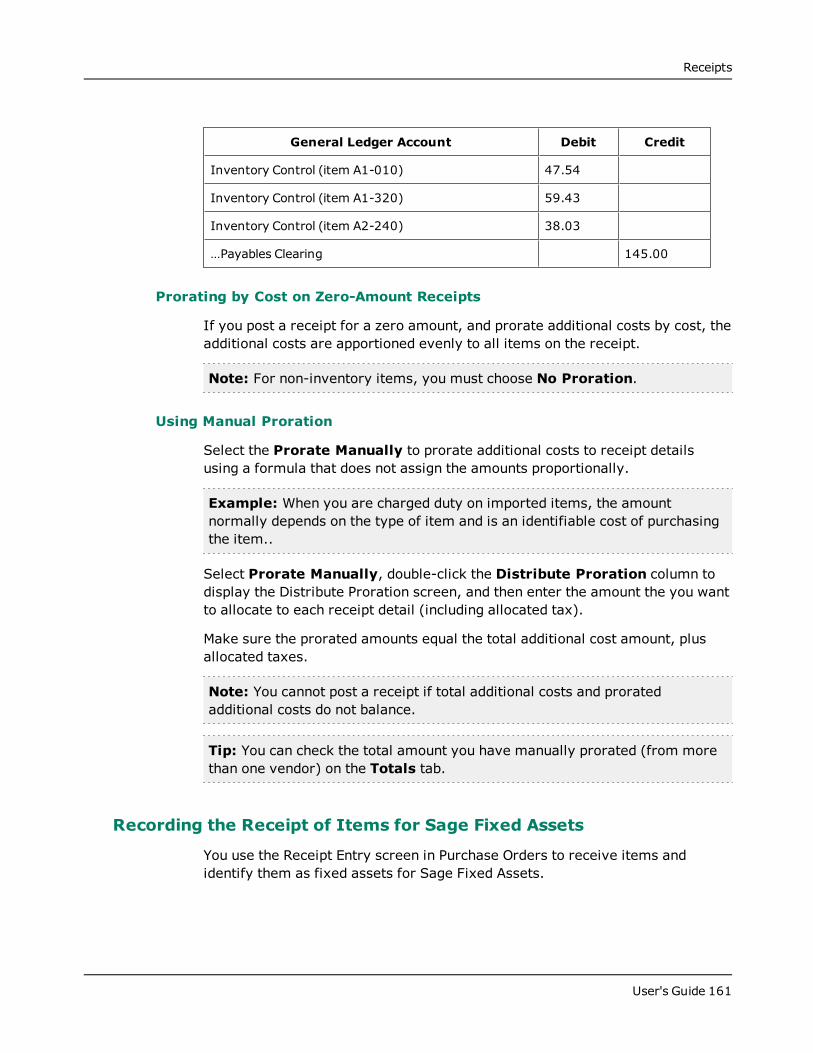
Receipts
General Ledger Account Debit Credit
Inventory Control (item A1-010) 47.54
Inventory Control (item A1-320) 59.43
Inventory Control (item A2-240) 38.03
…Payables Clearing 145.00
Prorating by Cost on Zero-Amount Receipts
If you post a receipt for a zero amount, and prorate additional costs by cost, theadditional costs are apportioned evenly to all items on the receipt.
Note: For non-inventory items, you must choose No Proration.
Using Manual Proration
Select the Prorate Manually to prorate additional costs to receipt detailsusing a formula that does not assign the amounts proportionally.
Example: When you are charged duty on imported items, the amountnormally depends on the type of item and is an identifiable cost of purchasingthe item..
Select Prorate Manually, double-click the Distribute Proration column todisplay the Distribute Proration screen, and then enter the amount the you wantto allocate to each receipt detail (including allocated tax).
Make sure the prorated amounts equal the total additional cost amount, plusallocated taxes.
Note: You cannot post a receipt if total additional costs and proratedadditional costs do not balance.
Tip: You can check the total amount you have manually prorated (from morethan one vendor) on the Totals tab.
Recording the Receipt of Items for Sage Fixed Assets
You use the Receipt Entry screen in Purchase Orders to receive items andidentify them as fixed assets for Sage Fixed Assets.
User's Guide 161
Chapter 2: Entering and Posting Purchase Orders Transactions
To record the purchase of an asset for Sage Fixed Assets:
1. Open Purchase Orders > P/O Transactions > Receipt Entry.
For more information, see "P/O Receipt Entry Screen" (page 594).
2. Create a new receipt transaction, entering header information as usual.(For detailed instructions on entering receipt transactions, see "EnteringReceipts" (page 151).)
3. Tab into the detail entry table (or click the table), and then enterinformation for the item detail, including the item number for the asset youare receiving, location, quantity, and unit of measure, as usual. Mor e ...
Tip: You can click the Item/Tax. button or press F9 to display aseparate screen that lets you view and edit all the information for a singledetail, including tax information.
4. Double-click ini the he Fixed Assets column cell to display "Yes," and thenclick the Zoom button to open the Fixed Assets screen.
5. Enter information for the asset record as follows:
a. If you want to use a different template than the one displayed on theFixed Assets screen, use the Finder for the Template field to select adifferent one. Otherwise, either accept the default template code thatappears or clear the entry from this field. (You do not have to use atemplate to create the asset in Sage Fixed Assets.)
b. Use the Description field to enter the description that you want to usefor the asset in Sage Fixed Assets.
c. If you are using more than one asset item and you want to createseparate asset records for each one in Sage Fixed Assets, select theSeparate Assets option.The program allocates the Sage Fixed Assets value entered on theFixed Assets screen proportionately to each Sage Fixed Assets record itcreates. For example, for a quantity of 10 and a value of $25,000, theprogram creates 10 asset records with a value of $2,500 each.
d. In the Fixed Asset Quantity field, type the quantity of asset itemsyou are receiving.
e. In the Fixed Asset UOM field, type the unit of measure for thequantity that you entered.
162 Sage 300 ERP Purchase Orders
Receipts
f. In the Fixed Asset Value field, type the value to book for the asset inSage Fixed Assets.
g. Click Close to return to the item detail entry screen.
6. When you have finished adding details for the transaction, click Close toreturn to the main Receipt Entry screen.
7. Click Add, and then click Close.
Note: You must run Create Assets in Sage Fixed Assets Integration toupdate Sage Fixed Assets with the asset information.
User's Guide 163
Chapter 2: Entering and Posting Purchase Orders Transactions
InvoicesEnter and post invoices, including additional costs and exchange rateinformation.
About Processing Invoices
Use the Invoice Entry screen to enter invoices for goods received andadditional costs billed, to complete receipts and provide information forinvoices that are transferred to Accounts Payable from Purchase Orders.
You can also look up posted invoices until you clear them from PurchaseOrders.
When you select a receipt for an invoice, the information entered with thereceipt is displayed. You can make any changes you need to the vendor andheader information.
Duplicate Invoice Numbers
If necessary, you can enter more than one invoice with the same invoicenumber, for either the same vendor or different vendors.
When you enter a duplicate invoice number, a message asks whether youwant to create a new invoice with the same number or display the existinginvoice with that number.
Valid Receipt Numbers Are Required
You can enter invoices only for existing receipts. When you post the invoice,the receipt details are completed for the vendor.
You can add new additional costs and prorate them for the receipts used in theinvoice. You can delete item and cost details that were posted on a receipt,and you can change the amounts and quantities (if you have rights to changequantities and costs).
When you enter the receipt number, all receipt details and other informationfor the selected vendor are displayed in Invoice Entry. You cannot change thetax group or add or delete item detail lines (for the primary vendor). You canadd additional cost details.
The receipt details that appear include all item and additional cost details forthe primary vendor, or all the additional costs for vendors who charged onlyadditional costs on the original receipt.
164 Sage 300 ERP Purchase Orders
Invoices
Note: You can enter any number of invoices for a receipt. Only receipt detailsthat have not already been fully invoiced can be used in the current invoice.Once all the details are fully invoiced, you can no longer use the receipt in aninvoice.
Invoice Details
When specify a receipt or multiple receipts for an invoice, Purchase Ordersdisplays all of the vendor's receipt details, including item details and additionalcost details, if any, for the primary vendor.
The invoice displays item details only for the primary vendor.
You can add new additional cost details on an invoice, but you cannot add ordelete item details. You also cannot delete additional cost details, although youcan change the amounts.
Posting Invoices to Cleared Receipts
If you need to post an invoice for a secondary vendor on a receipt that you havecleared from Purchase Orders, use the Credit/Debit Note Entry screen to addand post a debit note or a credit note to ensure that all costs are correctlyupdated.
Job-Related Invoices
Job-related invoices update Project and Job Costing quantities and costs only ifthe invoices differ from the posted receipts (which have already updated thecommitted and actual quantities and costs for the job).
If the invoice is job-related, changes to the quantities, billing rate, and cost willaffect the committed and actual quantities and costs for the job in Project andJob Costing. If the invoice is posted exactly like the receipt, no transactions willbe sent to Project and Job Costing.
About Invoicing Receipts
You can use the Invoice button in the Receipt Entry screen to post an invoicefor the item details and additional costs entered for the primary vendor, and forthe additional costs entered for secondary vendors.
l When you post an invoice from the primary vendor, the invoiceautomatically includes all the item and additional cost details entered for thevendor on the selected receipt, and completes the receipt details for the
User's Guide 165
Chapter 2: Entering and Posting Purchase Orders Transactions
vendor and the details on the purchase order, if any, used with the receipt.
l When you post an invoice for a secondary vendor, all the additionalcosts you entered for the vendor on the specified receipt are invoiced andcompleted at the same time.
When invoicing from the Receipt Entry screen, you enter the invoice numberfor each of the vendors for which you are posting an invoice.
Note: You can also use the Invoice Entry screen to post invoices for areceipt. For more information, see "About Processing Invoices" (page 164).
About Entering Additional Cost Details on Invoices
When entering an invoice for a receipt, you see additional costs only for thevendor selected for the invoice. Additional costs for secondary vendors appearon separate invoices.
You can add new additional costs to an invoice, and you can select anyproration method except manual proration.
You can also edit additional costs that were entered on the receipt, except foramounts that were manually prorated on the receipt. Mor e ...
Information you can edit for additional cost details includes:
l Description, reference, and comment.
l Amount.
You can change all additional cost amounts, except those that weremanually prorated on the receipt. Although you cannot delete an additionalcost detail, you can change the amount to zero.
l General ledger accounts.
Non-inventory Items
When entering additional costs for non-inventory items, you must select NoProration. If you try to prorate by quantity, cost, or weight, the programdisplays an error message and prevents you from posting the receipt.
Displayed Tax Information
Purchase Orders displays the following tax information for each additional costdetail:
166 Sage 300 ERP Purchase Orders
Invoices
l Amount of tax that is included in the extended item cost.
l Net cost of additional cost items with tax included in their prices (the taxbase).
l Total allocated tax amount—the amount of tax that will be allocated to thecost of the item.
Use the Cost/Tax button on the Additional Cost tab to view and edit taxinformation for the additional cost, as described below.
Allocating Additional Costs to Multiple Receipts
To prorate a new additional cost to multiple receipts, select the detail line andthen click the Distribute (Dist.) Cost button to open the Cost Allocation screen.You can manually enter amounts to allocate to each receipt, or you can letPurchase Orders calculate the amount to allocate according to the prorationmethod you selected on the Additional Costs tab.
If you want to prorate or expense a job-related cost to several jobs, you musthave a receipt detail for each of the jobs to which you want to apportion costs.
You can also specify retainage for job-related costs.
Editing the Tax Distribution
To check or edit tax distributions for an additional cost detail, you use theCosts/Taxes screen. (Select the detail line on the Additional Costs tab, thenclick the Cost/Tax button.)
For each tax authority, you specify:
l The tax class for the item.
Note: If you change the tax class for an additional cost that was manuallyprorated on the receipt, any resulting difference in the tax amount is postedto the default cost expense account specified in the P/O Options screen.
l Whether tax is included in the cost (if allowed by the authority).
The Costs/Taxes screen also displays the recoverable and expensed taxamounts in the tax distribution pop-up screen.
You can override the additional cost tax amount by changing the total tax on theTaxes tab. However, the program prorates the tax change to each of thedetails.
User's Guide 167
Chapter 2: Entering and Posting Purchase Orders Transactions
Tip: You can use the Calc. Taxes button to recalculate all of the tax on theinvoice.
About Entering Exchange Rate Information on Invoices
If you use multicurrency accounting, you can edit the invoice rate type, ratedate, and exchange rate for vendors who do not use the functional currency.
If you selected a receipt for the invoice, the Rates tab displays the vendor'srate date, type, and amount from the receipt and default entries for theinvoice rates. You can change the rate information for the invoice.
If you are entering a transaction with retainage, you specify on the Retainagetab whether the retainage invoice uses the same exchange rate as the originaldocument or the current rate.
About Entering Optional Data on Transactions
Optional fields are company-defined fields that can be added to any of thetransaction-entry screens and to transaction detail lines if you use TransactionAnalysis and Optional Field Creator.
Optional field entries can flow from requisitions and purchase orders to theassociated receipts and invoices if you use the same fields for all thetransaction screens.
You use the Optional Fields tab in a transaction-entry screen to enterinformation that applies to the transaction as a whole (header information).Optional fields on detail lines apply only to the single detail line. Changing theinformation in any of these fields has no effect on the transaction.
If Accounts Payable invoice header and detail optional fields are the same asthose used in Purchase Orders invoices, the optional field information can bepassed automatically to Accounts Payable.
If General Ledger transaction details optional fields defined for the GeneralLedger accounts match the transaction header and detail optional fields usedin Purchase Orders invoices, the optional field data can be passedautomatically to General Ledger (depending on your optional fields settings).
About Posting Invoices
When you click Post to post an invoice, Purchase Orders compares the total ofall details and taxes to the invoice total entered on the Invoice tab. Theinvoice is posted only if the two totals are the same.
168 Sage 300 ERP Purchase Orders
Invoices
Posting assigns the invoice number you entered, and completes the invoice andthe receipt details for the selected vendor. You cannot change or delete aninvoice after posting it, and you cannot change the receipt details for thevendor.
Effect on Inventory Control
If you changed the quantity received on an invoice, the quantity on hand inInventory Control is adjusted during posting. Otherwise, invoice posting inPurchase Orders has no effect on Inventory Control data.
Effect on Project and Job Costing
Job-related invoices update Project and Job Costing quantities and costs only ifthe invoice differs from the posted receipt.
Keeping Information for Posted Transactions
If you use the Keep Transaction History option, you can display postedinvoices in the Invoice Entry screen and print them on the Transaction List untilyou clear them from Purchase Orders. For more information, see "P/OTransaction List Report Screen" (page 327).
If you do not keep transaction history, posted invoices are deleted duringposting or Day End Processing in Inventory Control (depending on when youcost inventory). For more information, see "About Day End Processing" (page220).
Entering an Invoice
You can enter invoices when you receive goods or at any time afterward.
If an invoice arrived with the shipment, you can enter the invoice in PurchaseOrders using the Receipt Entry screen. If you also incurred charges fromadditional vendors, you can also enter the additional cost invoice numbers. Theprogram automatically creates all invoices for the received goods when youpost the receipt.
If you decide to invoice later, you use the Invoice Entry screen, which lets youenter an invoice for one or more receipts from the same vendor. (However, youcannot mix job-related and non-job-related receipts.) The Invoice Entry screenprovides full control over invoice creation, so you can edit vendor information,tax information, prices, discounts, optional field information, currencyexchange rates, and so on.
User's Guide 169
Chapter 2: Entering and Posting Purchase Orders Transactions
To invoice goods when you receive them, using the Receipt Entryscreen:
1. When you enter the receipt, enter an amount in the Quantity Receivedfield for each detail line for which you are receiving goods, or clickReceive All to receive all the goods on the purchase order.
2. Enter any additional costs on the Additional Costs tab.
3. Before you post the receipt, click the Invoice.
a. In the Invoice window that appears, type the invoice number from theprimary vendor.
b. If you entered additional costs from other vendors, enter their invoicenumbers in the Invoice Number column in the table.
c. Click Close.
4. Click Post to post the receipt.
The program also creates and posts the invoices, and then displays amessage asking if you want to print the invoice.
For more information on the Receipt Entry screen, see "P/O Receipt EntryScreen" (page 594).
To invoice one or more receipts using the Invoice Entry screen:
1. Open Purchase Orders > P/O Transactions > Invoice Entry.
For more information on the Invoice Entry screen, see "P/O Invoice EntryScreen" (page 484).
2. In the Invoice Number field, type the number of the invoice that youreceived from the vendor.
3. In the Vendor Number field, type the vendor number or select it from theFinder.
If the invoice is for several receipts or for a secondary vendor, you mustenter the vendor number.
Tip: If you are invoicing a single receipt for the primary vendor, you canskip the Vendor Number field.
4. If you are invoicing a single receipt, in the Receipt Number field, typethe receipt number or select it using the Finder.
170 Sage 300 ERP Purchase Orders
Invoices
If you are invoicing several receipts:
a. Select From Multiple Receipts, then click the Zoom button besidethe option.
b. On the Create Invoice From Receipts screen that appears, select thereceipt numbers using the Finder.
c. Click the Invoice button.
The program displays all the information from the selected receipts. Youcan then edit the information, or post the default invoice.
Note: The Invoice tab displays only details for the primary vendor. Detailsfor secondary vendors appear on the Additional Costs tab—not on theInvoice tab.
5. Check the header information for the invoice to make sure that it is correct. Mor e ...
a. In the Invoice Date field, type or select the invoice date.
b. In the Posting Date field, type or select the date to use for posting thetransaction in the general ledger. The posting date determines the yearand period to which the transaction is posted.
c. In the Remit-To Location field, enter or select the code for the addressto which you are sending your payment.
d. In the Bill-To Location field, optionally specify the location that isresponsible for paying the invoice.
e. Enter an optional description and a reference for the invoice.
6. Edit invoice details on the detail entry table, or click the Item/Tax button(or press F9) to enter details using the Items/Taxes screen. Mor e ...
For each detail, you can:
Delete a detail line if it does not appear on the vendor's invoice.
Set the Fully Invoiced field to Yes if the quantity invoiced equals theamount that you received.
Edit the following information:
Item description
Quantity invoiced (if different from the quantity received)
User's Guide 171
Chapter 2: Entering and Posting Purchase Orders Transactions
Unit cost and extended cost
Discount percentage or discount amount
Weight UOM, unit weight, and extended weight
Vendor item number
Order number
Comments
Manufacturer's item number
Optional fields
Whether the item is discountable
Tip: To change item tax classes or tax included information, use theItems/Taxes screen. (Select the detail on the detail-entry grid on theInvoice tab, then press F9 or click the Item/Tax button.)
7. Use the remaining tabs to enter additional information for the invoice.
Click the Additional Costs tab to edit invoice details for a secondaryvendor (and for primary vendor additional costs).
Click the Taxes tab to check the tax totals. You can change the tax classand tax amount for each jurisdiction, if necessary.
Click the Totals tab to check the totals for the invoice.
8. When you have finished entering information, click Post.
When posting is finished, you can print the invoice.
Entering Additional Costs on Invoices
You use the Additional Costs tab on the Invoice Entry screen to add costs suchas handling charges, service charges, and duty. You can expense costs orprorate them to received items.
You can:
l Specify how to prorate new additional costs or reprorate the costs if youreturn the items.
l Allocate new additional costs (added to the invoice) to one or morereceipts.
172 Sage 300 ERP Purchase Orders
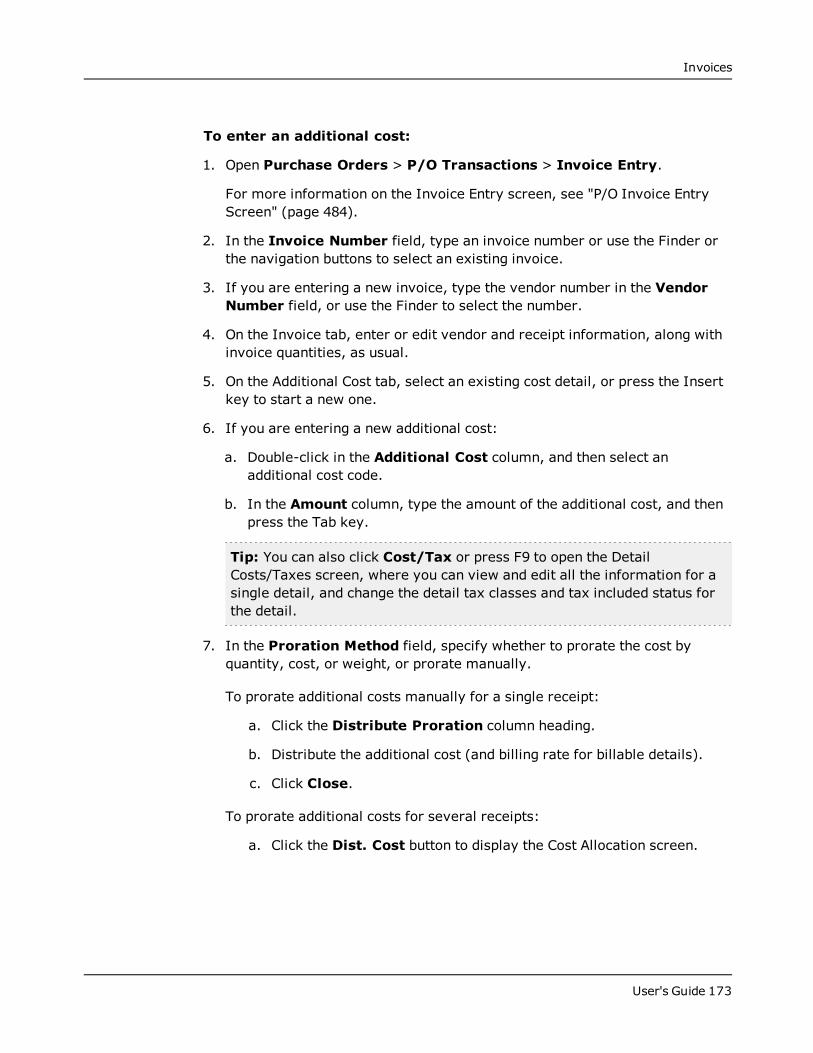
Invoices
To enter an additional cost:
1. Open Purchase Orders > P/O Transactions > Invoice Entry.
For more information on the Invoice Entry screen, see "P/O Invoice EntryScreen" (page 484).
2. In the Invoice Number field, type an invoice number or use the Finder orthe navigation buttons to select an existing invoice.
3. If you are entering a new invoice, type the vendor number in the VendorNumber field, or use the Finder to select the number.
4. On the Invoice tab, enter or edit vendor and receipt information, along withinvoice quantities, as usual.
5. On the Additional Cost tab, select an existing cost detail, or press the Insertkey to start a new one.
6. If you are entering a new additional cost:
a. Double-click in the Additional Cost column, and then select anadditional cost code.
b. In the Amount column, type the amount of the additional cost, and thenpress the Tab key.
Tip: You can also click Cost/Tax or press F9 to open the DetailCosts/Taxes screen, where you can view and edit all the information for asingle detail, and change the detail tax classes and tax included status forthe detail.
7. In the Proration Method field, specify whether to prorate the cost byquantity, cost, or weight, or prorate manually.
To prorate additional costs manually for a single receipt:
a. Click the Distribute Proration column heading.
b. Distribute the additional cost (and billing rate for billable details).
c. Click Close.
To prorate additional costs for several receipts:
a. Click the Dist. Cost button to display the Cost Allocation screen.
User's Guide 173
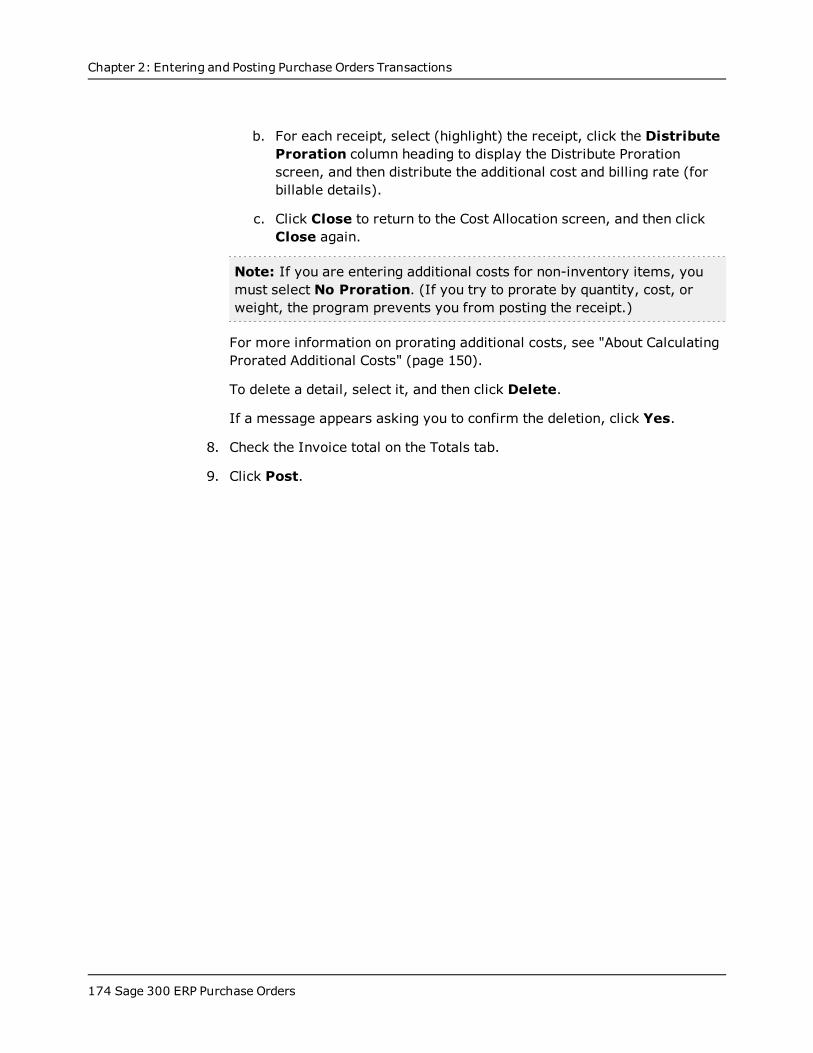
Chapter 2: Entering and Posting Purchase Orders Transactions
b. For each receipt, select (highlight) the receipt, click the DistributeProration column heading to display the Distribute Prorationscreen, and then distribute the additional cost and billing rate (forbillable details).
c. Click Close to return to the Cost Allocation screen, and then clickClose again.
Note: If you are entering additional costs for non-inventory items, youmust select No Proration. (If you try to prorate by quantity, cost, orweight, the program prevents you from posting the receipt.)
For more information on prorating additional costs, see "About CalculatingProrated Additional Costs" (page 150).
To delete a detail, select it, and then click Delete.
If a message appears asking you to confirm the deletion, click Yes.
8. Check the Invoice total on the Totals tab.
9. Click Post.
174 Sage 300 ERP Purchase Orders
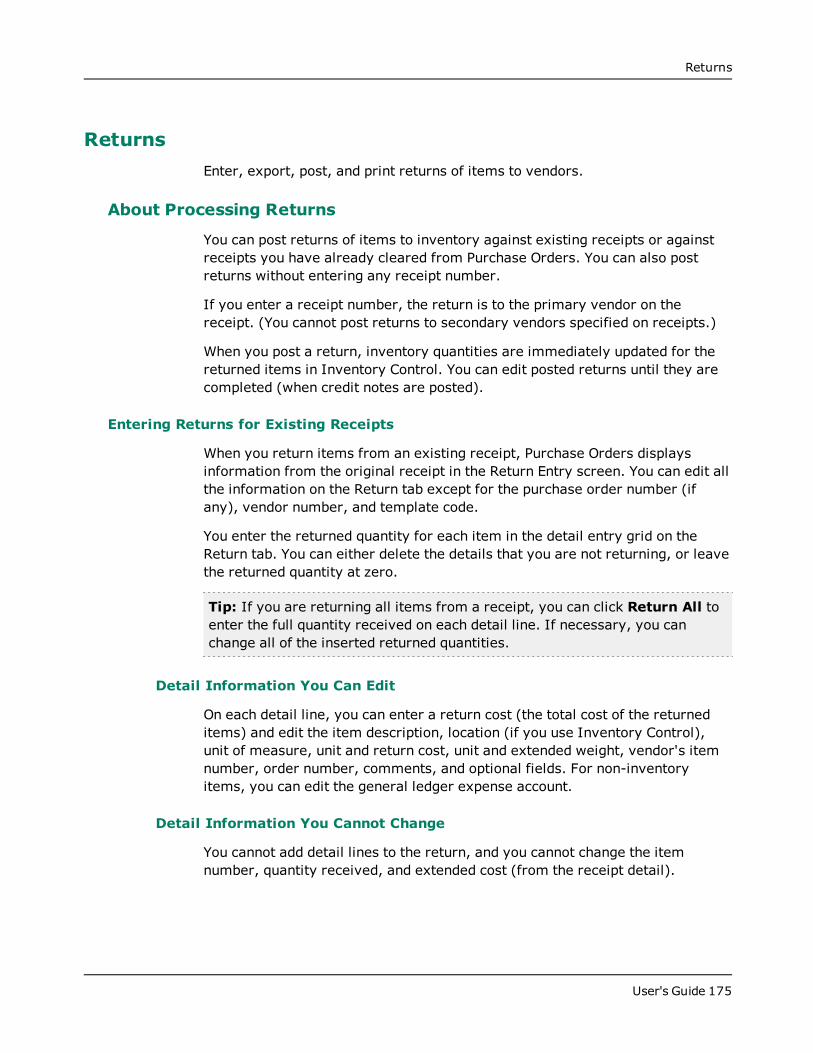
Returns
ReturnsEnter, export, post, and print returns of items to vendors.
About Processing Returns
You can post returns of items to inventory against existing receipts or againstreceipts you have already cleared from Purchase Orders. You can also postreturns without entering any receipt number.
If you enter a receipt number, the return is to the primary vendor on thereceipt. (You cannot post returns to secondary vendors specified on receipts.)
When you post a return, inventory quantities are immediately updated for thereturned items in Inventory Control. You can edit posted returns until they arecompleted (when credit notes are posted).
Entering Returns for Existing Receipts
When you return items from an existing receipt, Purchase Orders displaysinformation from the original receipt in the Return Entry screen. You can edit allthe information on the Return tab except for the purchase order number (ifany), vendor number, and template code.
You enter the returned quantity for each item in the detail entry grid on theReturn tab. You can either delete the details that you are not returning, or leavethe returned quantity at zero.
Tip: If you are returning all items from a receipt, you can click Return All toenter the full quantity received on each detail line. If necessary, you canchange all of the inserted returned quantities.
Detail Information You Can Edit
On each detail line, you can enter a return cost (the total cost of the returneditems) and edit the item description, location (if you use Inventory Control),unit of measure, unit and return cost, unit and extended weight, vendor's itemnumber, order number, comments, and optional fields. For non-inventoryitems, you can edit the general ledger expense account.
Detail Information You Cannot Change
You cannot add detail lines to the return, and you cannot change the itemnumber, quantity received, and extended cost (from the receipt detail).
User's Guide 175
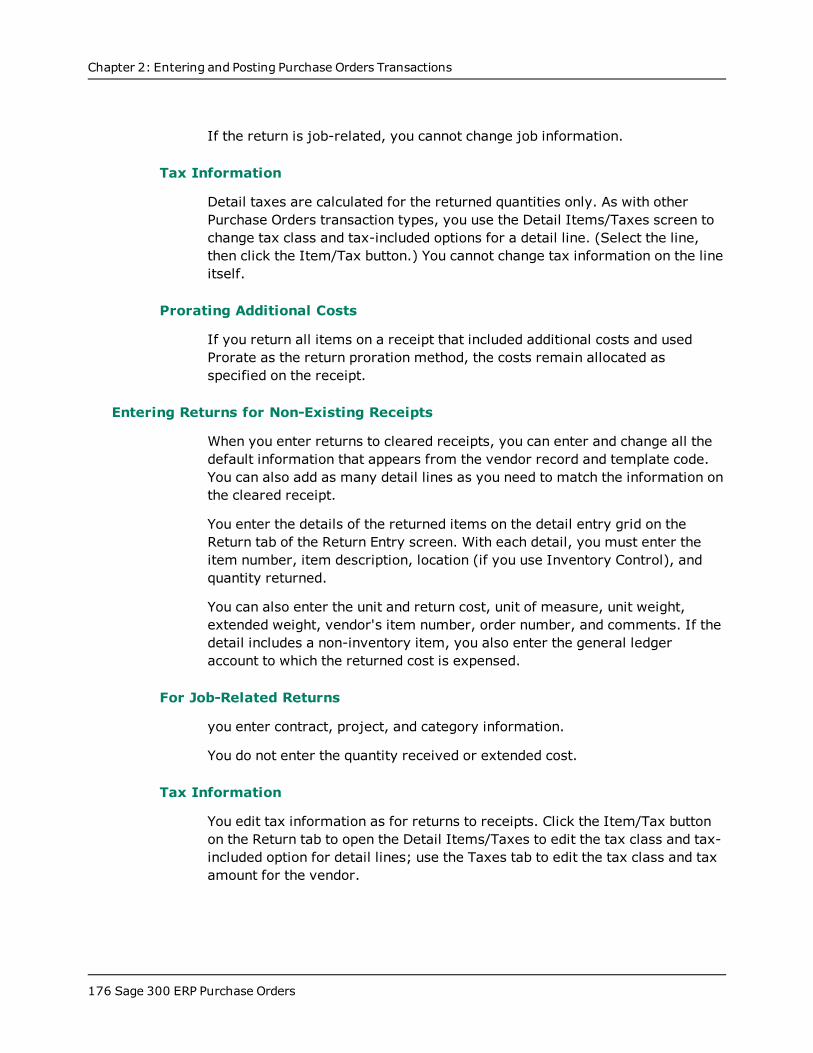
Chapter 2: Entering and Posting Purchase Orders Transactions
If the return is job-related, you cannot change job information.
Tax Information
Detail taxes are calculated for the returned quantities only. As with otherPurchase Orders transaction types, you use the Detail Items/Taxes screen tochange tax class and tax-included options for a detail line. (Select the line,then click the Item/Tax button.) You cannot change tax information on the lineitself.
Prorating Additional Costs
If you return all items on a receipt that included additional costs and usedProrate as the return proration method, the costs remain allocated asspecified on the receipt.
Entering Returns for Non-Existing Receipts
When you enter returns to cleared receipts, you can enter and change all thedefault information that appears from the vendor record and template code.You can also add as many detail lines as you need to match the information onthe cleared receipt.
You enter the details of the returned items on the detail entry grid on theReturn tab of the Return Entry screen. With each detail, you must enter theitem number, item description, location (if you use Inventory Control), andquantity returned.
You can also enter the unit and return cost, unit of measure, unit weight,extended weight, vendor's item number, order number, and comments. If thedetail includes a non-inventory item, you also enter the general ledgeraccount to which the returned cost is expensed.
For Job-Related Returns
you enter contract, project, and category information.
You do not enter the quantity received or extended cost.
Tax Information
You edit tax information as for returns to receipts. Click the Item/Tax buttonon the Return tab to open the Detail Items/Taxes to edit the tax class and tax-included option for detail lines; use the Taxes tab to edit the tax class and taxamount for the vendor.
176 Sage 300 ERP Purchase Orders
Returns
Checking Return Totals
Use the Totals tab on the Return Entry screen to check totals for the currentreturn and to specify the number of shipping labels to print.
The Totals tab lets you enter:
l A comment for the return.
l A discount percentage or a total discount amount for the return. When youenter a discount on this tab, the program distributes the total amount to thereturn details, overwriting any discounts you entered for details.
The Totals tab also displays:
l The weight of the returned items.
l Totals for the primary vendor. Information includes the total weight andnumber of details on the return and total of item details.
Note: You use the Taxes tab to view or to edit vendor tax classes or the taxamount for the tax authorities assigned to the vendor.
Posting Returns
When you post a return, item quantities on hand are immediately reduced inInventory Control. If Purchase Orders uses automatic-numbering, posting alsoassigns the return number.
Note: If the return is job-related, Purchase Orders also updates the actualquantities and costs for the job in Project and Job Costing.
Editing Returns
If you change return quantities or return costs, Inventory Control itemquantities are updated with the changes, and Day End Processing creates newgeneral ledger transactions to reflect the changes.
Note: On a job-related return, changes to returned quantities change theactual quantities and costs in Project and Job Costing.
Job-Related Returns
Job-related returns update Project and Job Costing actual quantities and costs,reducing the WIP account for the job.
User's Guide 177
Chapter 2: Entering and Posting Purchase Orders Transactions
About Exporting Returns
You can export returns to transfer return transactions created in PurchaseOrders to non-Sage 300 ERP applications, or to a file to be edited and importedlater. (On the Return Entry screen, you click File > Export.)
Before exporting, decide which fields to include in the export file. You mustselect fields for each type of record used for returns. You should also find outthe path for the export file you want to use or create.
Important! When you export, Purchase Orders exports all the postedreturns currently in the system. If you do not want to export everything, usethe Set Criteria option to specify the returns to export.
About Printing Returns
You can print returns in the following ways in Purchase Orders:
l Using the Returns screen in the P/O Forms folder to print a range of returns.
l Using the Return Entry screen to print a copy of a single return immediatelyafter you post it.
You can reprint returns until they are complete.
You can print returns from Purchase Orders using the forms that come withthe program, or you can use SAP Crystal Reports® for Sage 300 ERP to designthe return forms you want to use. Mor e ...
For more information on designing and adapting forms and reports, see theonline document Customizing Printed Forms and Reports with the SAP CrystalReports® Designer in the User Documentation section on the Sage 300 ERPCustomer Portal athttps://customers.sagenorthamerica.com/irj/go/km/docs/sageKM/SageAccpac ERP/Ungated Customers/Browsable/Product Documentation/Accpac_UA_Resources.htm.
E-mailing Returns
The Purchase Orders program also lets you e-mail purchase returns andpurchase orders to vendors.
178 Sage 300 ERP Purchase Orders
Returns
Note: You use the E-mail Messages screen in the P/O Setup folder to createan e-mail message to send to vendors along with e-mailed returns. Then, foreach vendor that you want to email, you must set the Delivery Method to E-mail or Contact's Email in the vendor record in Accounts Payable.
About Reprorating Costs on Returns
When you return items to which additional costs were prorated on the receipt,you select a reproration method that determines how to reallocate additionalcosts attached to the returned items.
If you use an additional cost code, the program displays the reproration methodspecified in the additional cost record, but you can select another method forthe detail.
You can choose to leave the cost as originally prorated, reprorate it using theoriginal proration method, or expense it to the general ledger account youspecify, as follows:
l Select Prorate to prorate the "returned" additional cost amount over theremaining goods on the receipt, using the original proration method.
l Select Leave if you do not want to reprorate the additional cost to theremaining goods on the receipt. The additional cost amount remains in theInventory Control account to which you originally posted it, and is applied toall other item costs that are posted to the control account.
Note: The Leave option is available only if you select No Proration orManual Proration for the detail.
Tip: You can also use the Adjustments screen in Inventory Control to writeoff the additional cost to a general ledger write-off account, rather than addit to other item costs.
l Select Expenseto debit a general ledger expense account for the returnedportion of the additional cost amount. Enter the general ledger accountnumber to which the expensed amount is posted.
Note:If you originally prorated the costs manually, you cannot choose to reproratethe costs from returned items. The amounts remain in the general ledgeraccounts to which they were originally posted and are part of the cost of theitems that remain in your inventory. If necessary, you can post an adjustmentto the Inventory Control general ledger account to remove the cost.
User's Guide 179
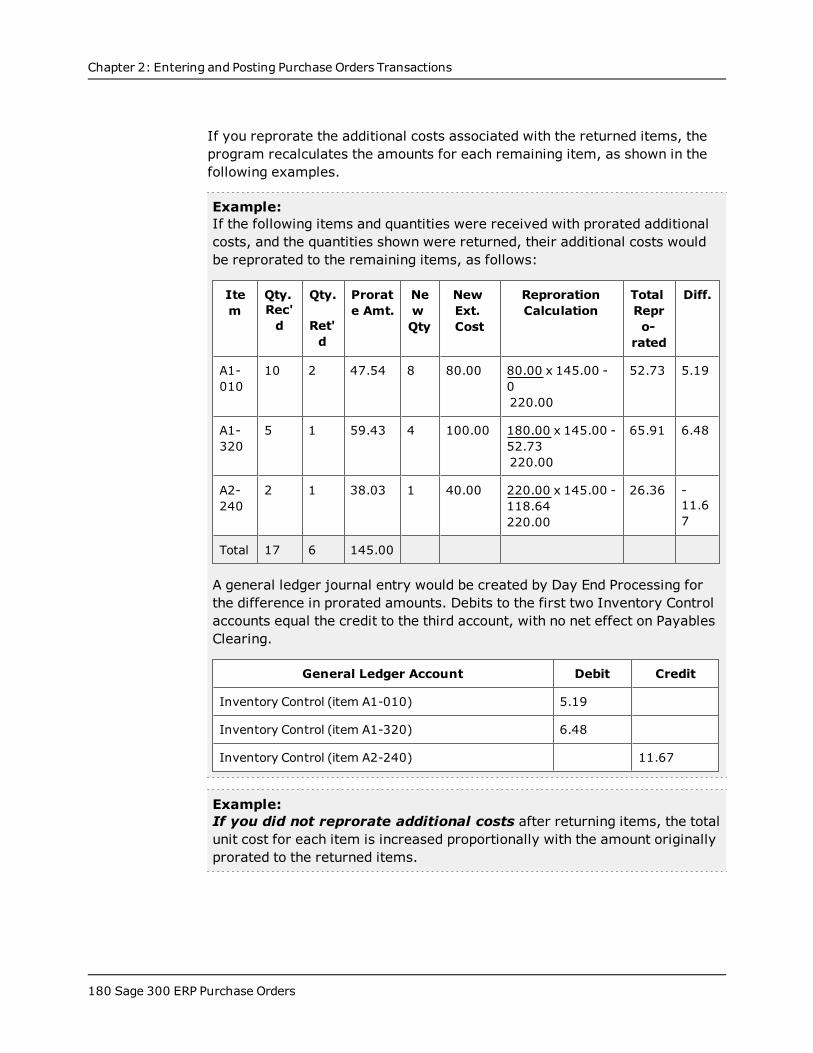
Chapter 2: Entering and Posting Purchase Orders Transactions
If you reprorate the additional costs associated with the returned items, theprogram recalculates the amounts for each remaining item, as shown in thefollowing examples.
Example:If the following items and quantities were received with prorated additionalcosts, and the quantities shown were returned, their additional costs wouldbe reprorated to the remaining items, as follows:
Item
Qty.Rec'd
Qty.
Ret'd
Prorate Amt.
NewQty
NewExt.Cost
ReprorationCalculation
TotalRepro-rated
Diff.
A1-010
10 2 47.54 8 80.00 80.00 x 145.00 -0220.00
52.73 5.19
A1-320
5 1 59.43 4 100.00 180.00 x 145.00 -52.73220.00
65.91 6.48
A2-240
2 1 38.03 1 40.00 220.00 x 145.00 -118.64220.00
26.36 -11.67
Total 17 6 145.00
A general ledger journal entry would be created by Day End Processing forthe difference in prorated amounts. Debits to the first two Inventory Controlaccounts equal the credit to the third account, with no net effect on PayablesClearing.
General Ledger Account Debit Credit
Inventory Control (item A1-010) 5.19
Inventory Control (item A1-320) 6.48
Inventory Control (item A2-240) 11.67
Example:If you did not reprorate additional costs after returning items, the totalunit cost for each item is increased proportionally with the amount originallyprorated to the returned items.
180 Sage 300 ERP Purchase Orders

Returns
Item Qty.Rec'd
Qty.Ret'd
TotalProrated
OriginalPro-rated/Unit
(rounded)
Calculation(based on ret'd
qty.)
New Add'lCost Per Unit
A1-010 10 2 47.54 4.75 47.548 5.94
A1-320 5 1 59.43 5.94 59.434 14.86
A2-240 2 1 38.03 3.80 38.031 38.03
Total 17 6 145.00
When you choose to reprorate costs on returns, the program apportions theamounts on the basis by which you originally prorated them (by cost, quantity,or weight).
Entering Returns
You can post returns of items to inventory against existing receipts or againstreceipts you have already cleared from Purchase Orders. You can also postreturns without entering any receipt number.
If you enter a receipt number, the return is posted to the primary vendor on thereceipt. (You cannot post returns to secondary vendors specified on receipts.)
When you post a return, inventory quantities are immediately updated for thereturned items in Inventory Control. You can edit posted returns until they arecompleted (when credit notes are posted).
Note:l If you change return quantities or return costs on posted returns, InventoryControl item quantities are updated with the changes, and Day EndProcessing creates new general ledger transactions to reflect the changes.
l Job-related changes to returned quantities change the actual quantities andcosts in Project and Job Costing, reducing the WIP account for the job.
Entering Returns for Existing ReceiptsWhen you return items from an existing receipt, Purchase Orders displaysinformation from the original receipt in the Return Entry screen. You can edit allthe information on the Return tab except for the purchase order number (ifany), vendor number, and template code.
User's Guide 181
Chapter 2: Entering and Posting Purchase Orders Transactions
You enter the returned quantity for each item in the detail entry table on theReturn tab of the Return Entry window. You can either delete the details thatyou are not returning, or leave the returned quantity at zero.
If you are returning all items from a receipt, you can use the Return All buttonto enter the full quantity received on each detail line. If necessary, you canchange all of the returned quantities inserted by the Return All button.
Entering Returns for Non-Existing ReceiptsWhen you enter returns to cleared receipts, you can enter and change all thedefault information that appears from the vendor record and template code.You can also add as many detail lines as you need to match the information onthe cleared receipt.
You enter the details of the returned items on the detail entry table on theReturn tab of the Return Entry window. With each detail, you must enter theitem number, item description, location (if you use Inventory Control), andquantity returned.
You can also enter the unit and return cost, unit of measure, unit weight,extended weight, vendor's item number, order number, and comments. If thedetail includes a non-inventory item, you also enter the general ledgeraccount to which the returned cost is expensed.
Prorating additional costsNo additional cost details appear on a return. You cannot edit costs or add newcosts. When you return items to which you prorated additional costs on thereceipt, the costs are allocated according to the reproration method specifiedon the receipt.
If you return all items on a receipt that included additional costs and usedProrate as the return proration method, the costs remain allocated asspecified on the receipt.
Before you start:
l If you want to assign numbers to returns automatically, use the Optionswindow to assign or verify the length, prefix, and next number for PurchaseOrders to assign to returns.
l Post any receipts from which you are returning items.
182 Sage 300 ERP Purchase Orders
Returns
l Make sure you have complete information for each return, including:
Vendor number.
Return number (if you assign your document numbers).
Receipt number, if any.
All returned item numbers and corresponding locations, units of measure,and quantities to return.
To enter a return:
1. Open Purchase Orders > P/O Transactions > Return Entry.
2. In the Return Number field, press Tab to accept ***NEW*** as the returnnumber.
Purchase Orders will assign a return number when you post the return.
Tip: If you do not want Purchase Orders to assign a number automatically,you can manually enter a number.
3. In the Vendor Number field, enter the vendor number or select it from theFinder.
Tip: You do not have to enter a vendor number. However, doing so can behelpful if you want to select a receipt number using the Finder, becausespecifying a vendor number limits the length of the receipt list.
4. In the Receipt Number field, enter the receipt number or select it from theFinder.
The program will display all of the information from the receipt that youselected, allowing you to return all items or edit the quantities and then postthe return.
5. Check the header information for the return to make sure that it is correct.
a. In the Return Date field, enter the return date or select it using theCalendar.
b. If the posting date is different from the return date, enter it in the PostingDate field.
User's Guide 183
Chapter 2: Entering and Posting Purchase Orders Transactions
Note: The posting date is the date that you want to use for posting thetransaction in the General Ledger. This date also determines the yearand period to which the transaction is posted.
c. In the Bill-To Location field, enter or select the code for the inventorylocation that is returning the items.
d. You can also specify a ship-via code for the return.
e. You can change the vendor account code to post the transaction to adifferent set of Accounts Payable control accounts.
f. Enter a description and a reference for the return.
6. To return everything from the receipt, click Return All. You can changequantities, if necessary, and delete lines which are not being returned.
7. If you are entering returns for cleared receipts (the receipt no longerexists), enter the details of the returned items on the detail entry table onthe Return tab.
For each detail, you must enter:
Item number.
Item description.
Location (if you use Inventory Control).
Quantity returned.
Unit cost.
Return cost.
Unit of measure.
Unit weight.
Extended weight.
Vendor's item number.
Order number.
Comments.
The general ledger account to which the returned cost is expensed (if thedetail includes a non-inventory item).
184 Sage 300 ERP Purchase Orders
Returns
8. For job-related returns, enter contract, project, and category information.
You do not enter the quantity received or extended cost.
9. Edit return details on the detail entry table.
For each detail, you can:
a. Delete the detail line if it's not being returned.
b. Change the Quantity Returned.
c. Edit information such as unit cost and extended cost, discount percentageor discount amount, weights, quantities, vendor item number, ordernumber (if PO is created from a customer order), comments,manufacturer's item number, and optional fields.
10. If you need to change item tax classes or tax included information, use theDetail Items/Taxes window.
To open the Detail Items/Taxes window:
a. Select a detail on the detail entry table on the Return tab.
b. Press F9 or click Item/Tax.
11. Click the Taxes tab to check the tax totals. You can change the tax class andtax amount for each jurisdiction, if necessary.
12. Click the Totals tab to check the totals for the return.
13. Click Post to post the return.
For more information, see "P/O Return Entry Screen " (page 709).
After entering a return
l Run Day End Processing in Inventory Control to:
Update inventory records.
Create general ledger entries from returns.
Create the Returns Posting Journal of transactions you posted in PurchaseOrders since the last time you ran Day End Processing.
l Print the Returns Posting Journal to check the returns you posted.
l Create credit notes from returns. When you create credit notes from returns,the credit notes complete the returns.
User's Guide 185
Chapter 2: Entering and Posting Purchase Orders Transactions
Adding or Editing Details Using the Detail Items Taxes Screen
The Detail Items/Taxes screen contains the same fields as the detail entrygrid on the Return tab, plus additional tax-related fields that you use to viewor change tax information for a selected detail.
Rather than displaying fields for all the details in tabular format, this screenlets you see all the fields for a single detail on a separate screen.
For more information, see "P/O Return Entry Detail Items/Taxes Screen "(page 736).
Before you start:
l Open the Return Entry Detail Items/Taxes screen:
a. Open Purchase Orders > P/O Transactions > Return Entry.
b. Enter header information for the return, including the vendor numberand, if you are creating a new return for an existing receipt, specify thereceipt number.
c. Select a detail line to credit or debit, and then press F9, or click theItem/Tax button.
To add a detail in the Detail Items/Taxes screen:
Note: You can add detail lines only if you are entering a return without areceipt number.
1. To add a detail, click the New button next to the Line Number field. (Ifno other detail is displayed, press tab to accept the number in the LineNumber field.)
2. Enter information for the detail.
Note: You can change a tax class to another tax class that is assigned tothe authority, and you can change the choice for the Tax Included option(if the tax authority permits tax-included costs).
3. Click Add.
To edit a detail using the Detail Items/Taxes screen:
1. To open an existing detail you want to edit, enter a line number in the LineNumber field, or select a line number using the navigation buttons beside
186 Sage 300 ERP Purchase Orders
Returns
the Line Number field.
2. Type the information or changes for the detail, then click Save.
Note: To compare tax amounts for a return on the screen with the totals onthe source document, check the Totals tab. For more information, see "P/OReturn Entry Screen " (page 709).
Entering a Return for a Cleared or Missing Invoice
You can post a return or credit note to an invoice number that has already beencleared from your Purchase Orders system, or to an invoice that you have notyet entered in your Purchase Orders system. Mor e ...
When you enter credit notes and debit notes to cleared or non-existing invoices,you can enter and change all the default information that appears from thevendor record and template code. You can also add as many detail lines andadditional cost details as you need.
Important! To credit an invoice that was deleted from Purchase Orders butstill exists in Accounts Payable, you must enter the original invoice number toensure that the credit is properly posted in Accounts Payable.
To credit an invoice that no longer exists in Purchase Orders:
1. Open Purchase Orders > P/O Transactions > Credit/Debit NoteEntry.
For information on the fields on the Credit/Debit Note Entry screen, see "P/OCredit/Debit Note Entry Screen" (page 429).
2. In the Document Number field, enter the credit note number (issued by thevendor), and then press the Tab key.
3. In the Vendor Number field, type the vendor number or use the Finder toselect it.
4. Accept Credit Note as the document type, and then fill in general (header)information for the credit note on the Credit Note tab, as follows:
a. In the From Document field, select Invoice.
b. In the Invoice Number field, type the number of the invoice you arecrediting. If you do not know the number, leave the field blank.
User's Guide 187
Chapter 2: Entering and Posting Purchase Orders Transactions
Note: If the invoice still exists in Accounts Payable, you must use thecorrect invoice number to properly credit the invoice.
c. In the Credit Note Date field, enter or select the date for the creditnote.
d. In the Posting Date field, enter or select the date to which the creditnote should be posted in the general ledger. (The posting date you enterdetermines the entry in the adjacent year/period field.)
e. In the Credit Note Total field, enter the total amount of the credit note.
f. If the original invoice was job-related, select the Job Related option.
g. Enter a description and an optional reference for the credit note.
5. Tab into the detail entry table or click the table, and then enter credit notedetails, as follows:
Tip: You may have to press the Insert key to start a new line.
a. Double-click the Item Number field, and then type an item number or amiscellaneous charge code. (If this is a job-related credit note, youhave to enter the contract and job information before you can choosethe item.)
You can also click the Item Number column heading to look up itemnumbers.
Note: If you are using a scanner, click in the Item Number fieldbefore scanning the bar code.
b. Use the tab key to move through the columns on the screen. Or, youcan click the Item/Tax... button or press F9 to display an entry screenfor adding items.
6. Use the remaining tabs, as necessary, to complete the information for thecredit note.
To add optional field information to this credit note, click the OptionalFields tab.
To change currency exchange rates in a multicurrency system, click theRates tab.
188 Sage 300 ERP Purchase Orders
Returns
To check the totals for the credit note, or to add an extended comment,click the Totals tab.
7. When you have finished, click Post to post the credit note.
User's Guide 189
Chapter 2: Entering and Posting Purchase Orders Transactions
Credit/Debit NotesEnter, export, and post credit and debit notes to credit or debit vendoraccounts.
About Processing Credit Notes and Debit Notes
You can post credit notes that apply to existing and non-existing (cleared)returns and invoices, as well as credit notes that do not reference returns orinvoices. You can post debit notes that apply to existing and non-existinginvoices, or just to the vendor.
Credit notes and debit notes are completed when you post them. You cannotrecall them after posting to make changes. When you create credit notes fromreturns, the credit notes complete the returns.
If you use the Keep Transaction History option, you can display posted creditnotes and debit notes in the Credit/Debit Note Entry screen until you use theClear History screen to clear them from Purchase Orders. If you do not keeptransaction history, posted credit notes and debit notes are deleted duringday-end processing (run in Inventory Control).
Effects on Inventory Control
Credit notes that apply to returns affect quantities and costs in InventoryControl only when the credit note adjusts returned quantities and costs.
If you adjust the returned quantities on a credit note, posting the credit noteadjusts the quantity on hand for the location in Inventory Control for thedifference between the quantity returned on the return and the quantity on thecredit note.
If you adjust the return costs on a credit note, posting the credit note orrunning Day End Processing adjusts the item costs in Inventory Control andcreates the appropriate general ledger journal entries.
When credit notes and debit notes are applied to invoices, the transactionsaffect item costs in Inventory Control, but they do not change item quantities.
Job-Related Credit Notes
Job-related credit notes generally arise from returns. They update Project andJob Costing quantities and costs only if the credit note differs from the postedreturn (which has already reduced the actual quantities and costs in WIP).
190 Sage 300 ERP Purchase Orders
Credit/Debit Notes
About Entering and Posting Credit and Debit Notes
When you select an existing invoice for a credit note or debit note, or a returnfor a credit note, the information from the original document is displayed in theCredit/Debit Note Entry screen. Some of this information cannot be changed,such as:
l Vendor number.
l Template code.
l Currency (in multicurrency ledgers).
l Key information from each detail line, such as the item number, location, andunit of measure.
Creating a Credit or Debit Note from an Invoice
If you are creating a credit note or debit note from an invoice, the quantitiesreceived from the invoice are displayed and you can either accept or changethem. The unit and extended costs are displayed as zeros.
You specify the credit or debit amount for the items you are crediting ordebiting. You then delete details you are not crediting or debiting, or leave theamounts for them at zero.
Creating a Credit or Debit Note from a Return
If you are creating a credit/debit note from a return, the program displays thequantities returned and the unit and extended costs.
If you have security rights to these fields, you can change the amounts, but youcannot delete detail lines.
If the credit/debit pertains to a serialized or lotted item, you can allocate lotnumbers and/or serial numbers when entering the note. For more information,see "Returning and Issuing Credit/Debit Notes for Serialized Items " (page213).
Entering Credits or Debits to Non-existing Invoices or Returns
When you enter credit notes and debit notes to cleared or non-existing invoices,you can enter and change all the default information that appears from thevendor record and template code. You can also add as many detail lines andadditional cost details as you need.
User's Guide 191
Chapter 2: Entering and Posting Purchase Orders Transactions
Posting Credit Notes and Debit Notes
During posting, the total of all details and taxes is compared to the documenttotal you entered. The document is posted only if the two totals are the same.
Posting assigns the document number you entered and completes the creditnote or debit note and any returns to which you posted credit notes. Youcannot change or delete a credit note or debit note after posting it.
If the credit note affects item quantities, posting updates the quantities inInventory Control.
Job-Related Credit Notes
When you post a job-related credit note that differs from the posted return,Project and Job Costing quantities and costs are updated.
Keeping History and Reviewing Posted Credit Notes and Debit Notes
If you use the Keep Transaction History option, you can display posted creditnotes and debit notes in the Credit/Debit Note Entry screen until you clearthem from Purchase Orders. If you do not keep transaction history, thetransactions are deleted during posting or day-end processing (depending onwhen you cost inventory).
About Entering Additional Costs on Credit Notes and Debit Notes
If you are creating a credit note from a return, the additional cost details forthe primary vendor are displayed from the originating receipt, if any. If youare creating a credit note or debit note from an invoice, the additional costdetails are displayed from the invoice. The additional cost amount appears aszero and you enter the amount to be credited or debited. You cannot changethe additional cost code, proration and reproration methods, or the expenseand return general ledger accounts.
You can add new additional costs on credit notes and debit notes. If you dothis, you must select No Proration as the proration method for each newadditional cost, so that the cost is expensed to a general ledger account. If youselect any other proration method, you cannot post the credit note or debitnote.
Entering a Credit or Debit Note for a Return or Invoice
If you issue a credit note for an existing Purchase Orders invoice, all thedetails of the invoice are displayed when you enter the invoice number. If
192 Sage 300 ERP Purchase Orders
Credit/Debit Notes
there are errors on the invoice, the lines containing the errors are omitted andmessages explain the errors.
When you enter an existing invoice number, the program displays all detaillines from the invoice so you can select details to credit. All item lines displaythe default credit type (Items Returned to Inventory). If you want to credit theentire invoice, click the Post button to post the credit note.
Before you start:
l Post any invoices or returns for which you are being credited or debited.
l Make sure you have complete information for each transaction. Once youpost a credit note or debit note, it is completed, and you cannot edit it.
l Find out the credit note or debit note number to use.
To credit/debit a return or invoice:
1. Open Purchase Orders > P/O Transactions > Credit/Debit NoteEntry.
For information on the fields on the Credit/Debit Note Entry screen, see "P/OCredit/Debit Note Entry Screen" (page 429).
2. In the Document Number field, enter the credit note number (issued by thevendor), and then press the Tab key.
3. In the Vendor Number field, type the vendor number or use the Finder toselect it.
4. Use the fields on the Credit Note tab to fill in general (header) informationfor the credit note, as follows:
a. In the Document Type field, select Credit Note or Debit Note.
b. In the From Document field, select Invoice or Return (if you areentering a credit note).
c. Type the return or invoice number from which you are creating the creditnote or debit note, or use the Finder to select it. The program displaysinformation from the original document.
If the return or invoice has been cleared from Purchase Orders, you willhave to add all item details and additional costs for the credit note ordebit note, and then match the credit note or debit note to the invoice inAccounts Payable. If a message appears stating that the document doesnot exist, click Close to continue.
User's Guide 193
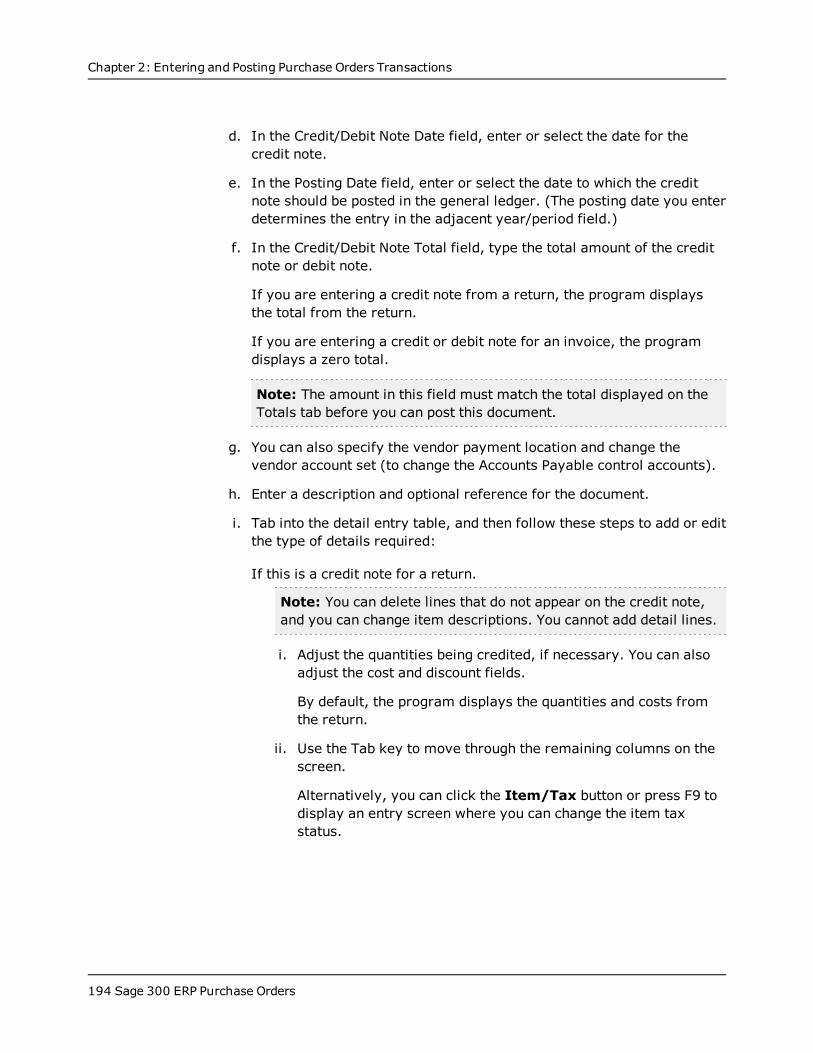
Chapter 2: Entering and Posting Purchase Orders Transactions
d. In the Credit/Debit Note Date field, enter or select the date for thecredit note.
e. In the Posting Date field, enter or select the date to which the creditnote should be posted in the general ledger. (The posting date you enterdetermines the entry in the adjacent year/period field.)
f. In the Credit/Debit Note Total field, type the total amount of the creditnote or debit note.
If you are entering a credit note from a return, the program displaysthe total from the return.
If you are entering a credit or debit note for an invoice, the programdisplays a zero total.
Note: The amount in this field must match the total displayed on theTotals tab before you can post this document.
g. You can also specify the vendor payment location and change thevendor account set (to change the Accounts Payable control accounts).
h. Enter a description and optional reference for the document.
i. Tab into the detail entry table, and then follow these steps to add or editthe type of details required:
If this is a credit note for a return.
Note: You can delete lines that do not appear on the credit note,and you can change item descriptions. You cannot add detail lines.
i. Adjust the quantities being credited, if necessary. You can alsoadjust the cost and discount fields.
By default, the program displays the quantities and costs fromthe return.
ii. Use the Tab key to move through the remaining columns on thescreen.
Alternatively, you can click the Item/Tax button or press F9 todisplay an entry screen where you can change the item taxstatus.
194 Sage 300 ERP Purchase Orders
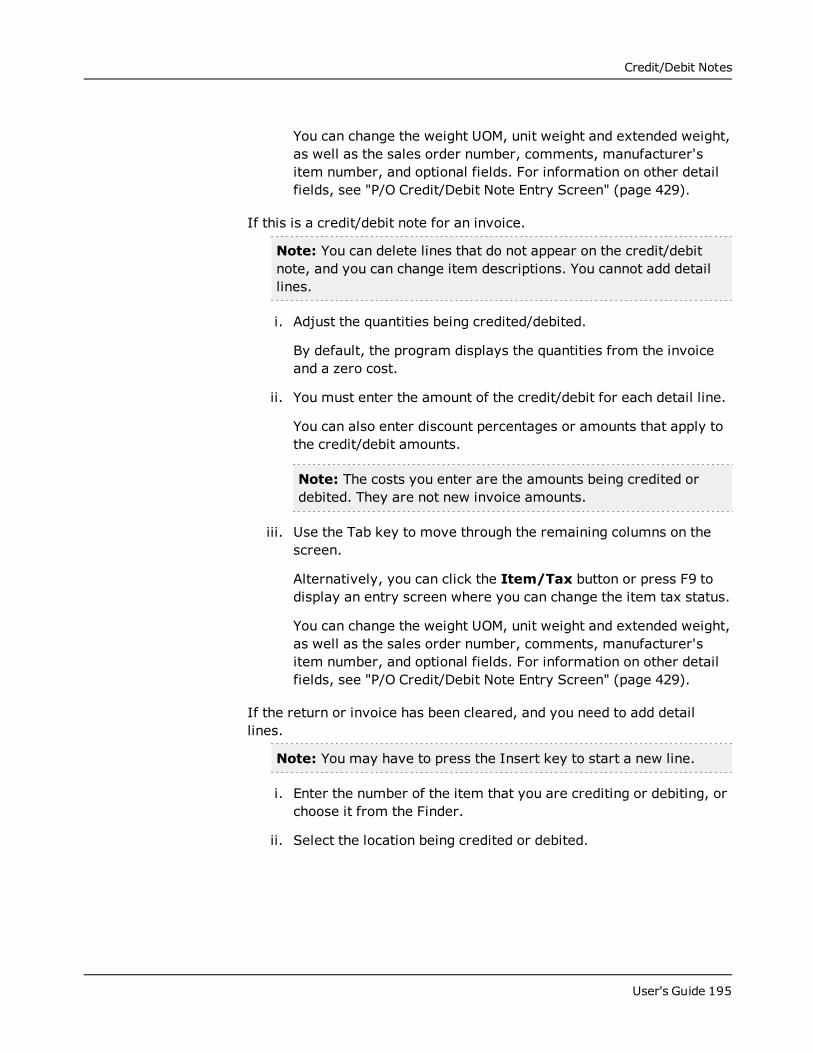
Credit/Debit Notes
You can change the weight UOM, unit weight and extended weight,as well as the sales order number, comments, manufacturer'sitem number, and optional fields. For information on other detailfields, see "P/O Credit/Debit Note Entry Screen" (page 429).
If this is a credit/debit note for an invoice.
Note: You can delete lines that do not appear on the credit/debitnote, and you can change item descriptions. You cannot add detaillines.
i. Adjust the quantities being credited/debited.
By default, the program displays the quantities from the invoiceand a zero cost.
ii. You must enter the amount of the credit/debit for each detail line.
You can also enter discount percentages or amounts that apply tothe credit/debit amounts.
Note: The costs you enter are the amounts being credited ordebited. They are not new invoice amounts.
iii. Use the Tab key to move through the remaining columns on thescreen.
Alternatively, you can click the Item/Tax button or press F9 todisplay an entry screen where you can change the item tax status.
You can change the weight UOM, unit weight and extended weight,as well as the sales order number, comments, manufacturer'sitem number, and optional fields. For information on other detailfields, see "P/O Credit/Debit Note Entry Screen" (page 429).
If the return or invoice has been cleared, and you need to add detaillines.
Note: You may have to press the Insert key to start a new line.
i. Enter the number of the item that you are crediting or debiting, orchoose it from the Finder.
ii. Select the location being credited or debited.
User's Guide 195
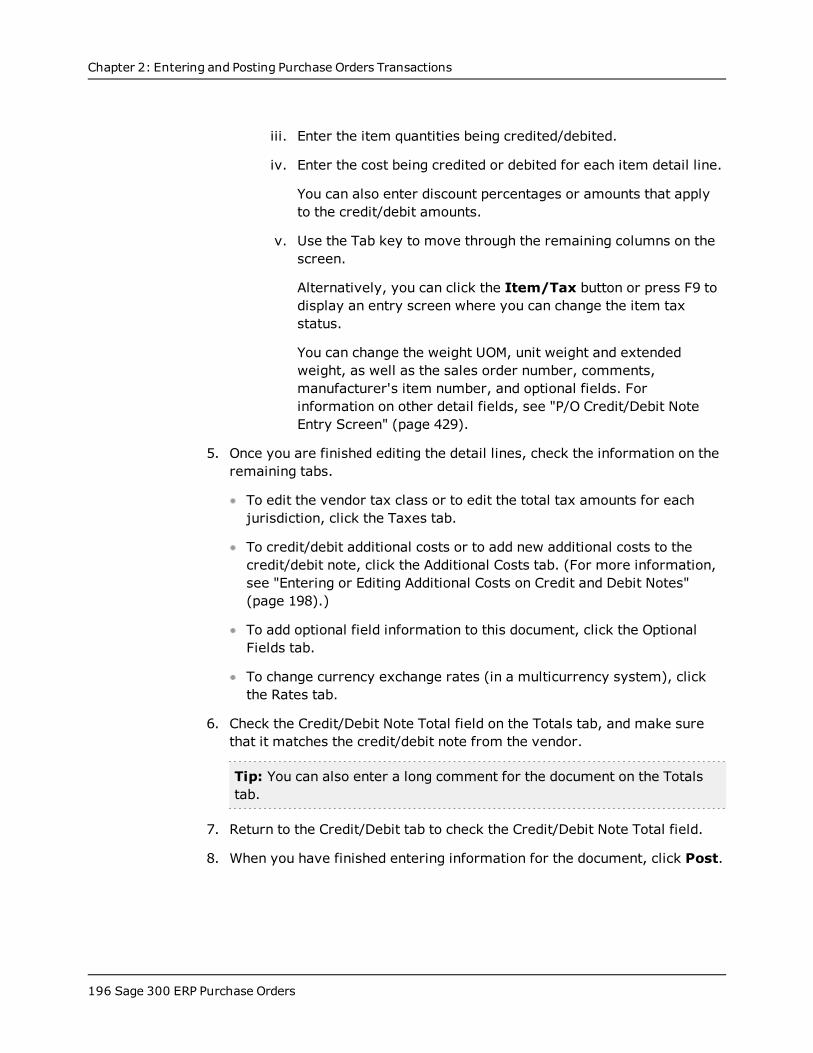
Chapter 2: Entering and Posting Purchase Orders Transactions
iii. Enter the item quantities being credited/debited.
iv. Enter the cost being credited or debited for each item detail line.
You can also enter discount percentages or amounts that applyto the credit/debit amounts.
v. Use the Tab key to move through the remaining columns on thescreen.
Alternatively, you can click the Item/Tax button or press F9 todisplay an entry screen where you can change the item taxstatus.
You can change the weight UOM, unit weight and extendedweight, as well as the sales order number, comments,manufacturer's item number, and optional fields. Forinformation on other detail fields, see "P/O Credit/Debit NoteEntry Screen" (page 429).
5. Once you are finished editing the detail lines, check the information on theremaining tabs.
To edit the vendor tax class or to edit the total tax amounts for eachjurisdiction, click the Taxes tab.
To credit/debit additional costs or to add new additional costs to thecredit/debit note, click the Additional Costs tab. (For more information,see "Entering or Editing Additional Costs on Credit and Debit Notes"(page 198).)
To add optional field information to this document, click the OptionalFields tab.
To change currency exchange rates (in a multicurrency system), clickthe Rates tab.
6. Check the Credit/Debit Note Total field on the Totals tab, and make surethat it matches the credit/debit note from the vendor.
Tip: You can also enter a long comment for the document on the Totalstab.
7. Return to the Credit/Debit tab to check the Credit/Debit Note Total field.
8. When you have finished entering information for the document, click Post.
196 Sage 300 ERP Purchase Orders

Credit/Debit Notes
Adding or Editing Details Using the Detail Items Taxes Screen
The Detail Items/Taxes screen contains the same fields as the detail entry gridon the Credit/Debit tab, plus additional tax-related fields that you use to view orchange tax information for a selected detail.
Rather than displaying fields for all the details in tabular format, this screen letsyou see all the fields for a single detail on a separate screen.
For more information, see "P/O Credit/Debit Note Entry Detail Items/TaxesScreen" (page 469).
Before you start:
l Open the Credit/Debit Note Detail Items/Taxes screen:
a. Open Purchase Orders > P/O Transactions > Credit/Debit NoteEntry.
b. Enter header information for the debit note or credit note, including thevendor number and, if you are crediting or debiting an existing invoice orreturn, specify the document number.
c. Select a detail line to credit or debit, and then press F9, or click theItem/Tax button.
To add a detail in the Detail Items/Taxes screen:
Note: You cannot add details to an invoice or a return for an existing receipt.
1. If an existing detail is displayed, click the New icon beside the Line Numberfield.
2. Type the information for the detail, and then click Add.
To edit a detail using the Detail Items/Taxes screen:
1. On the Detail Items Taxes screen, use the navigation buttons beside LineNumber field to display the detail line you want to change.
2. Make the changes you need.
You can change a tax class to another tax class that is assigned to theauthority, and you can change the choice for the Tax Included option (if thetax authority permits tax-included costs).
User's Guide 197
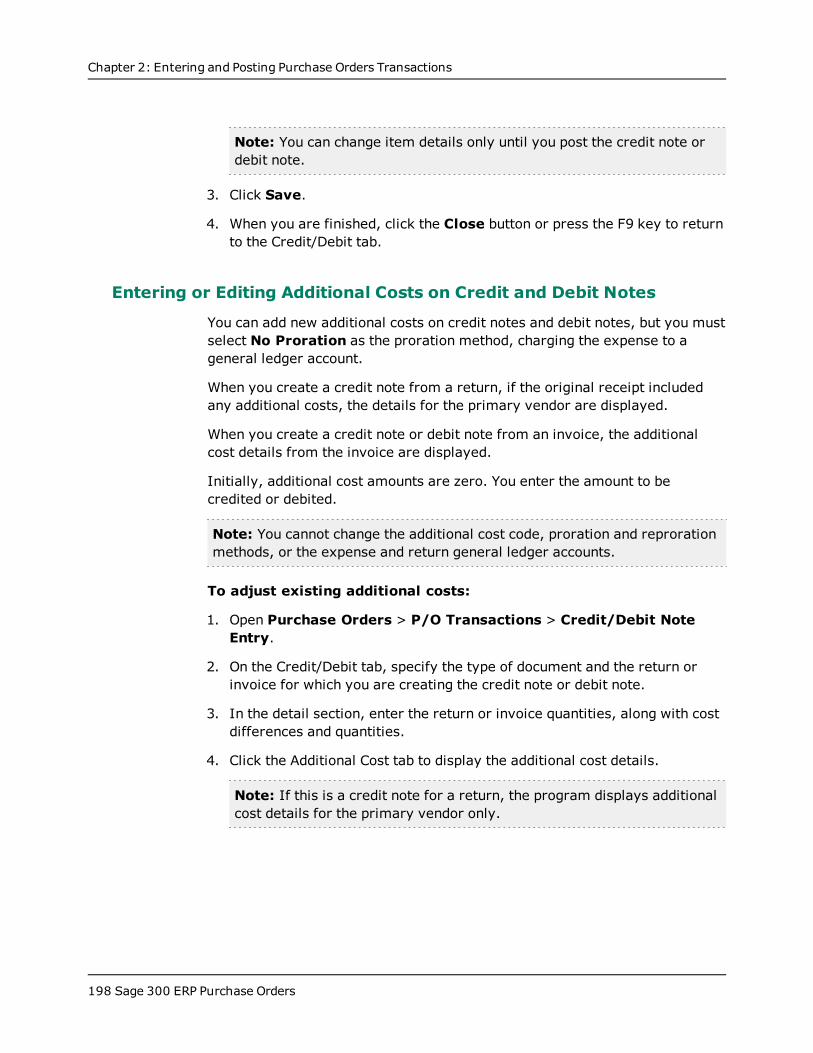
Chapter 2: Entering and Posting Purchase Orders Transactions
Note: You can change item details only until you post the credit note ordebit note.
3. Click Save.
4. When you are finished, click the Close button or press the F9 key to returnto the Credit/Debit tab.
Entering or Editing Additional Costs on Credit and Debit Notes
You can add new additional costs on credit notes and debit notes, but you mustselect No Proration as the proration method, charging the expense to ageneral ledger account. Mor e ...
When you create a credit note from a return, if the original receipt includedany additional costs, the details for the primary vendor are displayed.
When you create a credit note or debit note from an invoice, the additionalcost details from the invoice are displayed.
Initially, additional cost amounts are zero. You enter the amount to becredited or debited.
Note: You cannot change the additional cost code, proration and reprorationmethods, or the expense and return general ledger accounts.
To adjust existing additional costs:
1. Open Purchase Orders > P/O Transactions > Credit/Debit NoteEntry.
2. On the Credit/Debit tab, specify the type of document and the return orinvoice for which you are creating the credit note or debit note.
3. In the detail section, enter the return or invoice quantities, along with costdifferences and quantities.
4. Click the Additional Cost tab to display the additional cost details.
Note: If this is a credit note for a return, the program displays additionalcost details for the primary vendor only.
198 Sage 300 ERP Purchase Orders
Credit/Debit Notes
5. Select the additional cost detail that you want to adjust, and then:
a. Click the Amount field.
b. Enter the credit or debit amount for the additional cost.
Note: You cannot change the proration methods or accounts.
c. Tab to the end of the detail line to enter a reference and comment.
6. To change the detail tax class for a selected additional cost:
a. Click the Cost/Tax button or press F9 to open the Detail Costs/Taxesscreen.
b. Change the detail tax class, and then click the Calc. Taxes button torecalculate the tax.
7. To change the total tax amount for the credit note or debit note (includingthe tax for the additional cost):
a. Click the Taxes tab.
b. In the Tax Amount column, enter the total tax amount to credit or debitfor each tax authority.
To add new additional costs to debit notes:
1. On the Additional Costs tab, click the detail entry table, and then press theInsert key to start a new line.
2. Click the Additional Cost column heading to display the Finder.
3. Select the new additional cost from the Finder, and then enter informationfor the additional cost detail as follows:
a. In the Amount field, enter the amount of the additional charge.
b. Select No Proration as the proration method.
c. In the Expense Account field, specify the expense account to charge.
d. Use the Reference and Comments fields to provide more informationabout the cost.
4. To change the detail tax class for the new additional cost:
User's Guide 199
Chapter 2: Entering and Posting Purchase Orders Transactions
a. Select the additional cost on the Additional Cost entry grid.
b. Click the Cost/Tax button or press F9 to open the Detail Costs/Taxesscreen.
c. Change the detail tax class, and then click the Calc. Taxes button torecalculate the tax.
5. To change the total tax amount for the credit note or debit note (includingthe tax for the additional cost):
a. Click the Taxes tab.
b. In the Tax Amount column, enter the total tax amount to credit ordebit for each tax authority.
6. To check the additional cost totals and tax totals, click the Totals tab.
7. Click Post.
Distributing Additional Costs to Multiple Receipts on a Debit Note
You can adjust existing additional costs on a debit note for an invoice thatincluded multiple receipts. You cannot automatically prorate the costs tomultiple receipts. Instead, you identify the amount to distribute to eachreceipt on the debit note.
You can also add new additional costs to a debit note, but you cannot proratethem. You must identify a general ledger expense account to charge for thenew additional cost.
To distribute an additional cost on a debit note for multiple receipts:
1. Open Purchase Orders > P/O Transactions > Credit/Debit NoteEntry.
2. Enter header information for the debit note, including the new documentnumber, the vendor number, and the invoice number for which you arecreating the debit note.
3. Click the Additional Costs tab.
Any additional costs entered with the invoice appear on the tab, but theamounts are zero. You must enter the adjustment amount, as follows, foreach additional cost you are adjusting:
200 Sage 300 ERP Purchase Orders
Credit/Debit Notes
a. Select the additional cost you need to distribute to receipts.
b. In the Amount field, enter the amount of the additional cost.
c. Click the Dist. Cost button to open the Cost Allocation screen.
d. For each receipt number displayed, enter the amount you want todistribute to that receipt, if the correct amount is not already displayed.
Note: To restore the default distribution, or to prorate the additionalcost automatically to the receipts, click Redist.
4. When you have finished, click Close to return to the Additional Costs tab.
User's Guide 201
Chapter 2: Entering and Posting Purchase Orders Transactions
Project and Job CostingEnter job-related transactions and manage related journal entries andadditional costs.
About Job-Related Transaction Details
If you use Project and Job Costing, Purchase Orders lets you flag transactionsas job-related, so you can:
l Track committed and actual quantities and costs by contract, project, andcategory (and resource, on a standard project).
l Receive goods for a job rather than into inventory.
l Update jobs in Project and Job Costing with billing information.
l Create invoices with retainage amounts and information for AccountsPayable.
Note that if a transaction is job-related:
l All transaction details must be job-related. You cannot mix job-relateddetails and non-job-related details in the same transaction.
l Different fields appear for the details to let you enter job-relatedinformation.
l For each transaction detail, you must specify:
A contract.
A project.
Depending on the project type, the project category, cost class, andresource for the job.
Note: If you use different terms than "Contract," "Project," and"Category" in Project and Job Costing, the program displays those fieldnames instead.
l If the transaction uses retainage accounting, you must specify the holdbackpercentage and retention period for each transaction detail.
You specify the retainage rate (for a multicurrency transaction) and termsfor receipts, invoices, and debit/credit notes on the Retainage tab.
202 Sage 300 ERP Purchase Orders
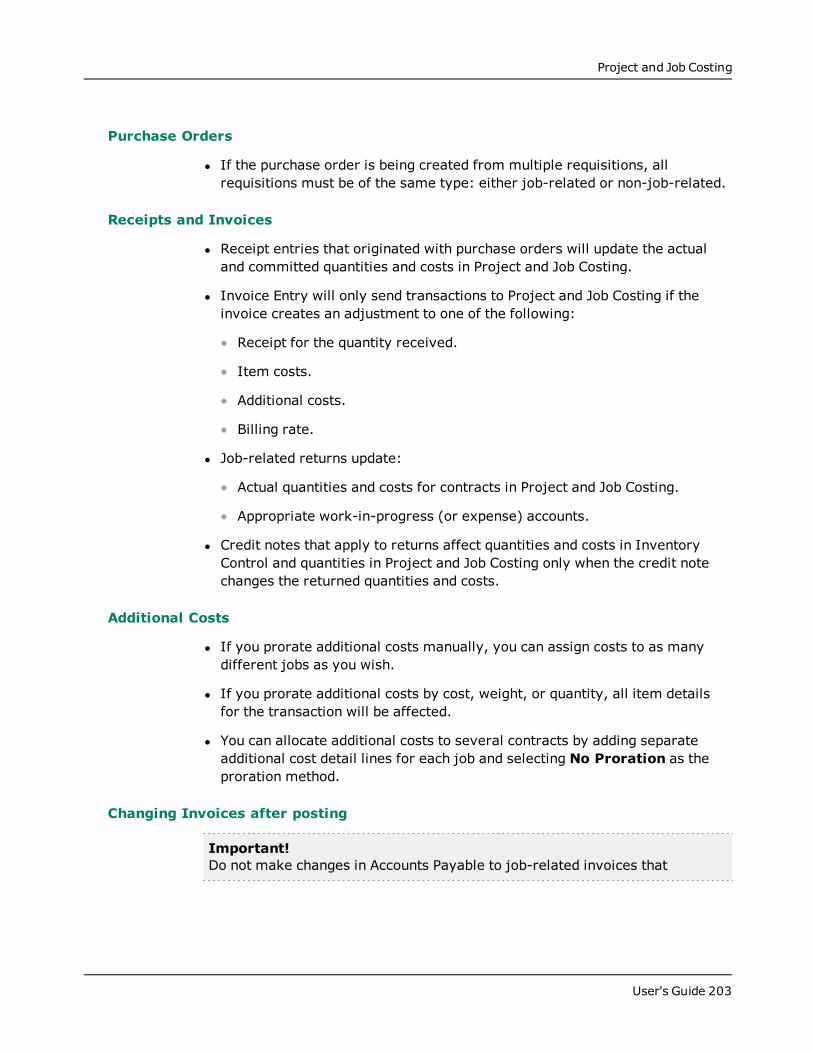
Project and Job Costing
Purchase Orders
l If the purchase order is being created from multiple requisitions, allrequisitions must be of the same type: either job-related or non-job-related.
Receipts and Invoices
l Receipt entries that originated with purchase orders will update the actualand committed quantities and costs in Project and Job Costing.
l Invoice Entry will only send transactions to Project and Job Costing if theinvoice creates an adjustment to one of the following:
Receipt for the quantity received.
Item costs.
Additional costs.
Billing rate.
l Job-related returns update:
Actual quantities and costs for contracts in Project and Job Costing.
Appropriate work-in-progress (or expense) accounts.
l Credit notes that apply to returns affect quantities and costs in InventoryControl and quantities in Project and Job Costing only when the credit notechanges the returned quantities and costs.
Additional Costs
l If you prorate additional costs manually, you can assign costs to as manydifferent jobs as you wish.
l If you prorate additional costs by cost, weight, or quantity, all item detailsfor the transaction will be affected.
l You can allocate additional costs to several contracts by adding separateadditional cost detail lines for each job and selecting No Proration as theproration method.
Changing Invoices after posting
Important!Do not make changes in Accounts Payable to job-related invoices that
User's Guide 203
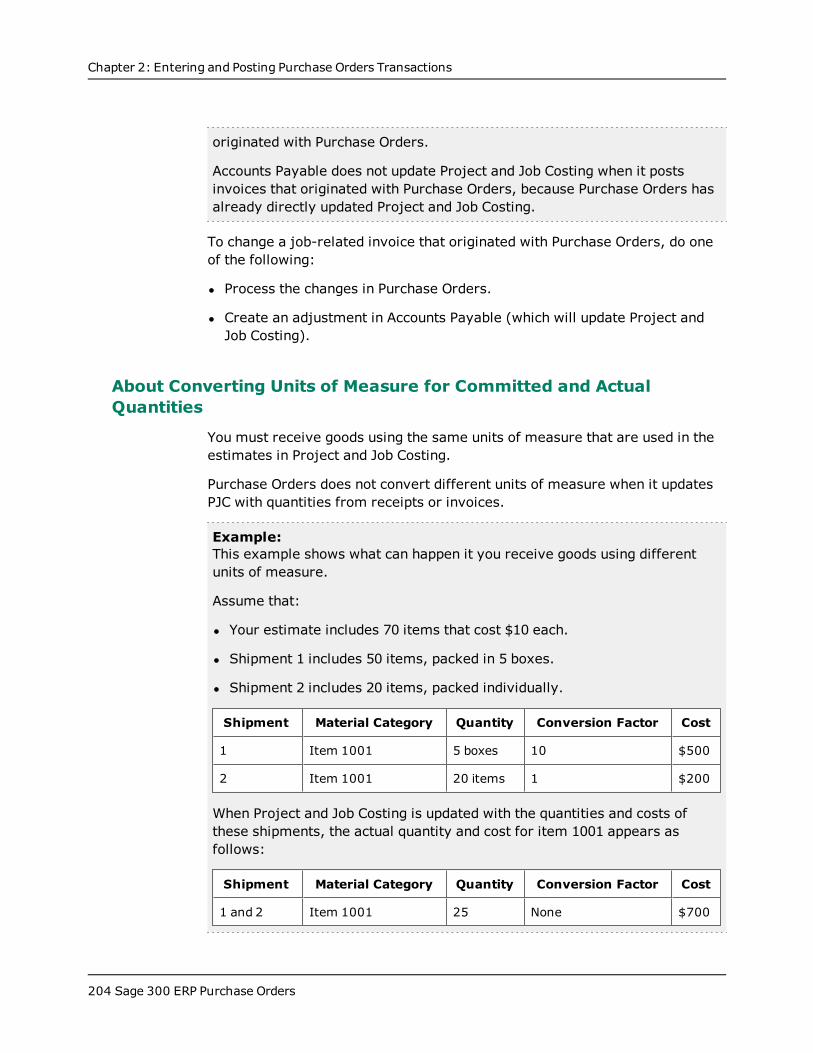
Chapter 2: Entering and Posting Purchase Orders Transactions
originated with Purchase Orders.
Accounts Payable does not update Project and Job Costing when it postsinvoices that originated with Purchase Orders, because Purchase Orders hasalready directly updated Project and Job Costing.
To change a job-related invoice that originated with Purchase Orders, do oneof the following:
l Process the changes in Purchase Orders.
l Create an adjustment in Accounts Payable (which will update Project andJob Costing).
About Converting Units of Measure for Committed and ActualQuantities
You must receive goods using the same units of measure that are used in theestimates in Project and Job Costing.
Purchase Orders does not convert different units of measure when it updatesPJC with quantities from receipts or invoices.
Example:This example shows what can happen it you receive goods using differentunits of measure.
Assume that:
l Your estimate includes 70 items that cost $10 each.
l Shipment 1 includes 50 items, packed in 5 boxes.
l Shipment 2 includes 20 items, packed individually.
Shipment Material Category Quantity Conversion Factor Cost
1 Item 1001 5 boxes 10 $500
2 Item 1001 20 items 1 $200
When Project and Job Costing is updated with the quantities and costs ofthese shipments, the actual quantity and cost for item 1001 appears asfollows:
Shipment Material Category Quantity Conversion Factor Cost
1 and 2 Item 1001 25 None $700
204 Sage 300 ERP Purchase Orders
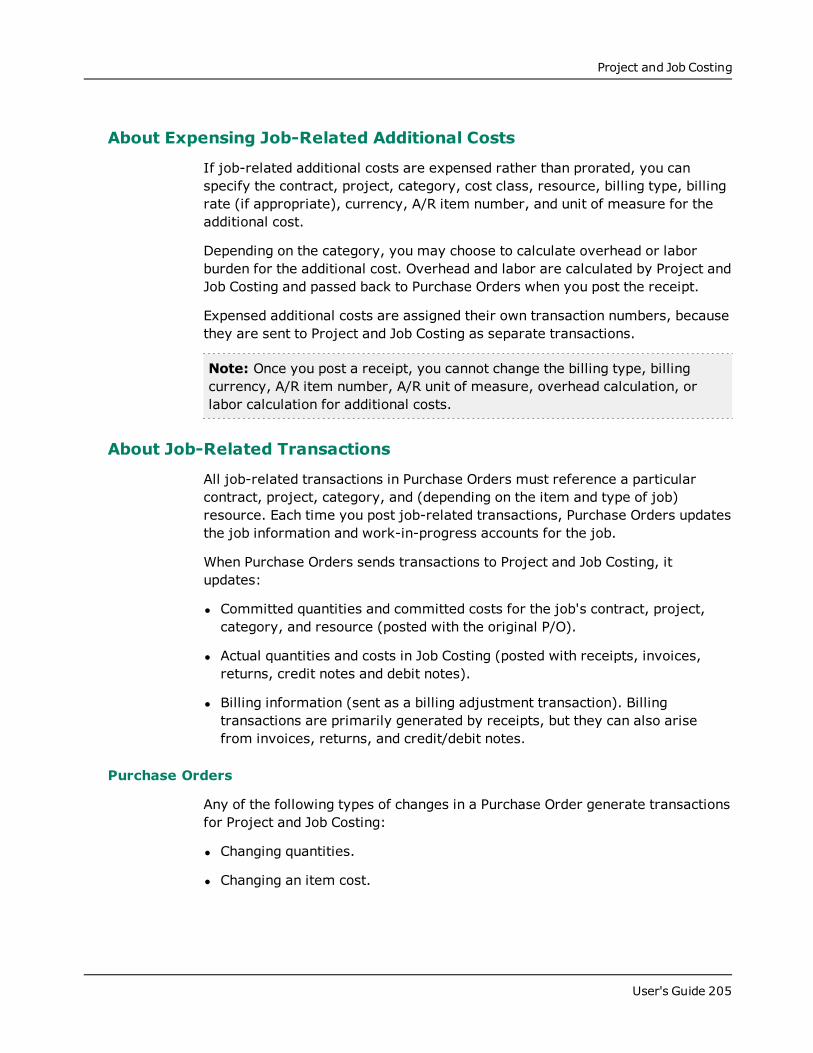
Project and Job Costing
About Expensing Job-Related Additional Costs
If job-related additional costs are expensed rather than prorated, you canspecify the contract, project, category, cost class, resource, billing type, billingrate (if appropriate), currency, A/R item number, and unit of measure for theadditional cost.
Depending on the category, you may choose to calculate overhead or laborburden for the additional cost. Overhead and labor are calculated by Project andJob Costing and passed back to Purchase Orders when you post the receipt.
Expensed additional costs are assigned their own transaction numbers, becausethey are sent to Project and Job Costing as separate transactions.
Note: Once you post a receipt, you cannot change the billing type, billingcurrency, A/R item number, A/R unit of measure, overhead calculation, orlabor calculation for additional costs.
About Job-Related Transactions
All job-related transactions in Purchase Orders must reference a particularcontract, project, category, and (depending on the item and type of job)resource. Each time you post job-related transactions, Purchase Orders updatesthe job information and work-in-progress accounts for the job.
When Purchase Orders sends transactions to Project and Job Costing, itupdates:
l Committed quantities and committed costs for the job's contract, project,category, and resource (posted with the original P/O).
l Actual quantities and costs in Job Costing (posted with receipts, invoices,returns, credit notes and debit notes).
l Billing information (sent as a billing adjustment transaction). Billingtransactions are primarily generated by receipts, but they can also arisefrom invoices, returns, and credit/debit notes.
Purchase Orders
Any of the following types of changes in a Purchase Order generate transactionsfor Project and Job Costing:
l Changing quantities.
l Changing an item cost.
User's Guide 205
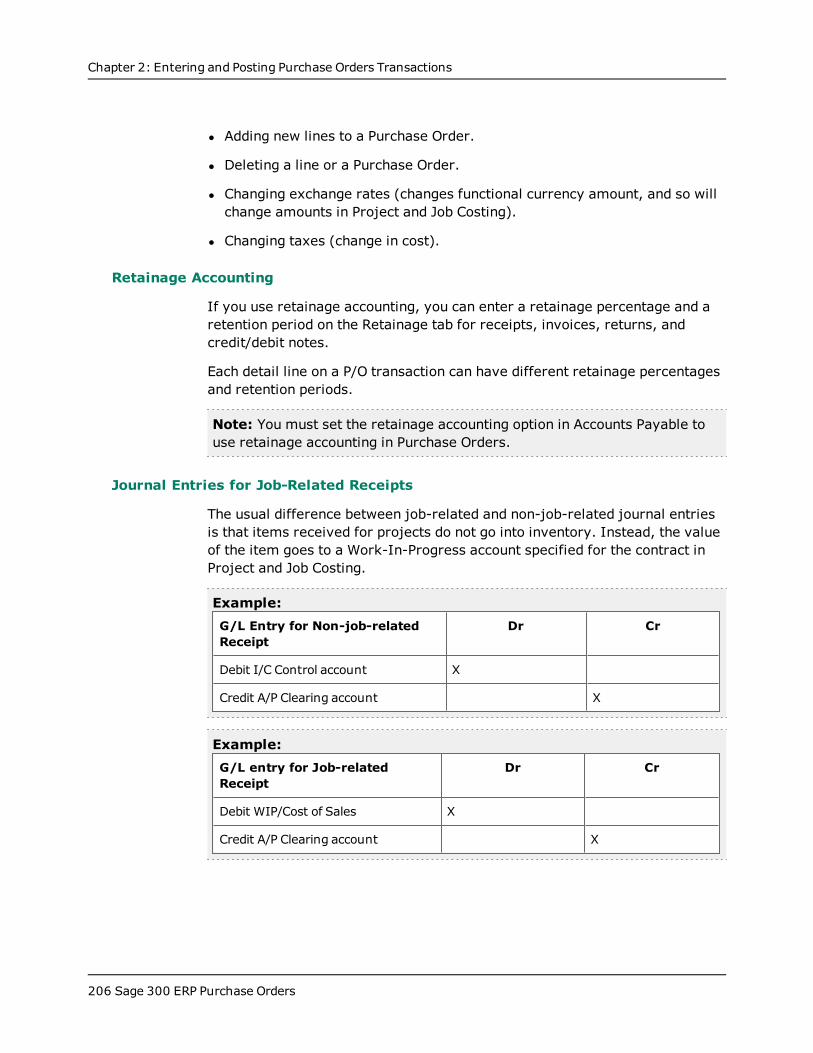
Chapter 2: Entering and Posting Purchase Orders Transactions
l Adding new lines to a Purchase Order.
l Deleting a line or a Purchase Order.
l Changing exchange rates (changes functional currency amount, and so willchange amounts in Project and Job Costing).
l Changing taxes (change in cost).
Retainage Accounting
If you use retainage accounting, you can enter a retainage percentage and aretention period on the Retainage tab for receipts, invoices, returns, andcredit/debit notes.
Each detail line on a P/O transaction can have different retainage percentagesand retention periods.
Note: You must set the retainage accounting option in Accounts Payable touse retainage accounting in Purchase Orders.
Journal Entries for Job-Related Receipts
The usual difference between job-related and non-job-related journal entriesis that items received for projects do not go into inventory. Instead, the valueof the item goes to a Work-In-Progress account specified for the contract inProject and Job Costing.
Example:G/L Entry for Non-job-relatedReceipt
Dr Cr
Debit I/C Control account X
Credit A/P Clearing account X
Example:G/L entry for Job-relatedReceipt
Dr Cr
Debit WIP/Cost of Sales X
Credit A/P Clearing account X
206 Sage 300 ERP Purchase Orders
Project and Job Costing
For non-inventory items, Purchase Orders provides an option to create generalledger entries during posting in P/O, or later when you post invoices in A/P.
For expensed additional costs, Purchase Orders always creates general ledgerentries for job-related documents during posting, although you can generate theentries in Accounts payable for non-job-related receipts.
Posting a job-related receipt for costs or additional costs will producetransactions to update actuals in Project and Job Costing, as will postingadjustments to a job-related receipt to change any of the following:
l Quantity received
l Cost
l Additional cost or amount
l Tax
l Exchange Rate
Note: Purchase Orders does not create entries for expensed taxes for Projectand Job Costing.
Additional Cost Lines and Proration
If you add an additional cost to a receipt, you can choose to prorate by cost,weight, or quantity, or you can prorate manually. If you prorate, all items areaffected. If you want to assign portions of a cost to different projects orcategories, you must enter separate lines for each portion of the cost andprorate manually.
Overhead / Labor calculations
Project and Job Costing calculates labor and overhead costs for items andpasses the results back to Purchase Orders. Purchase Orders creates thenecessary journal entries.
Overhead is usually calculated on the discounted extended amount.
If you have additional costs (such as shipping costs), you can specify that youdon’t want overhead or labor on the additional cost. (If you expense theadditional cost, the program lets you specify whether overhead or labor iscalculated.)
User's Guide 207
Chapter 2: Entering and Posting Purchase Orders Transactions
Job-Related Invoices
If a receipt is invoiced without changes to quantities and costs, and withoutany additional costs, Job Costing will be unaffected by the invoice.
If an invoice includes an adjustment to the receipt—such as a change to thecost, quantity, or billing rate—Purchase Orders sends transactions to Projectand Job Costing. These transactions do not affect the G/L or A/P.
For example:
l If you change the billing rate, Purchase Orders generates a new transactionfor the difference between the old billing rate and the new billing rate.
l If you also change quantities, Purchase Orders will also create a billingadjustment transaction for the quantity difference.
l If the receipt originated from a purchase order and you change the quantityoutstanding, Purchase Orders will update the committed quantities andcosts in Project and Job Costing.
Important! Do not change P/O invoices in Accounts Payable. Job-relatedinvoices transferred to Accounts Payable from Purchase Orders do notupdate Project and Job Costing when posted in Accounts Payable. PurchaseOrders directly updates Project and Job Costing with invoice amounts.
Job-Related Serialized Items or Items Assigned to Lots
You cannot add serialized items or items assigned to lots to job-relatedrequisitions, purchase orders, or receipts.
If you use Serialized Inventory or Lot Tracking, and you use items orserialized items or items assigned to lots in projects, you must order theseitems with non-job-related purchase orders.
When the serialized or lotted items arrive, receive them into inventory, andthen use the Material Usage screen in Project and Job Costing to move themfrom inventory to jobs.
About Changing Job-Related Invoices
Important!Do not make changes in Accounts Payable to job-related invoices thatoriginated with Purchase Orders.
208 Sage 300 ERP Purchase Orders
Project and Job Costing
Accounts Payable does not update Project and Job Costing when it postsinvoices that originated with Purchase Orders, because Purchase Orders hasalready directly updated Project and Job Costing.
To change a job-related invoice that originated with Purchase Orders, do one ofthe following:
l Process the changes in Purchase Orders.
l Create an adjustment in Accounts Payable (which will update Project and JobCosting).
User's Guide 209
Chapter 2: Entering and Posting Purchase Orders Transactions
Serialized and Lotted TransactionsIf you use Serialized Inventory and Lot Tracking, assign serial numbers andlot numbers to items that you purchase or return to the vendor.
About Lotted Inventory Items
Lotted items are goods that have lot numbers assigned to them for trackingpurposes. For example, a food distribution company can use lot numbers torecord purchases and sales of unique batches of product.
Note: Lot numbers are used for tracking stock from the point of receiptthrough to the point of sale, and can be used to track returned items fromthe customer and back to the vendor.
Lot numbers are used to track groups of items. Unlike serial numbers, a lotnumber can be allocated to multiple items.
You may be prompted to assign lot numbers to items when performing thefollowing transactions:
l Receiving inventory purchased from a vendor and entering an invoice. Formore information, see "Receiving and Invoicing Lotted Items" (page 214).
l Returning stock back to a vendor and entering debit or credit notes. Formore information, see "Returning and Issuing Credit/Debit Notes for LottedItems" (page 215).
When assigning lot numbers in Purchase Orders, you are either generatingnew lot numbers or selecting from a pool of previously created numbers. Theactual management and maintenance of lot numbers is performed usingInventory Control.
About Serialized Inventory Items
Serialized items are goods that have serial numbers assigned to them fortracking purposes. For example, an electronics retailer can use serialnumbers to record sales of inventory items that have warranty periods.
Note: Serial numbers are used for tracking stock from the point of receiptthrough to the point of sale, and can be used to track returned items fromthe customer and back to the vendor.
Serial numbers are used to track individual items, so each serial number mustbe unique to one specific item.
210 Sage 300 ERP Purchase Orders
Serialized and Lotted Transactions
You may be prompted to assign serial numbers to items when performing thefollowing transactions:
l Receiving inventory purchased from a vendor and entering an invoice. Formore information, see "Receiving and Invoicing Serialized Items " (page211).
l Returning stock back to a vendor and entering debit or credit notes. For moreinformation, see "Returning and Issuing Credit/Debit Notes for SerializedItems " (page 213).
When assigning serial numbers in Purchase Orders, you are either generatingnew serial numbers or selecting from a pool of previously created numbers. Theactual management and maintenance of serial numbers is performed usingInventory Control.
Receiving and Invoicing Serialized Items
When you receive serialized items from vendors in Purchase Orders, theprogram prompts you to assign serial numbers.
Note: Serial numbers are used for tracking stock from the point of receiptthrough to the point of sale, and can be used to track returned items from thecustomer and back to the vendor.
You use the same procedure when entering a vendor invoice, except you startwith the Invoice Entry window instead of the Receipt Entry window.
You can assign serial numbers when you receive serialized items, or when youcreate the invoice for the items, provided the item does not use the serialcosting method and the Allow Serial Quantity To Be Different From TheQuantity In The Entries option is selected on the I/C Items screen.
Generally, there are not big differences in assigning numbers during receipt orinvoicing. However, there can be an impact when using the Inventory ControlSerial Inquiry report, because this report displays only the net change from thetime of receipt to invoice, not the original receipt cost..
Example: If you enter the cost of a serialized item as two dollars duringreceipt entry, but you don't assign the serial number. Then, you use the P/OInvoice Entry window to enter the serial number, and you change the cost ofthe item to three dollars. The value that appears on the I/C Serial NumberInquiry for that transaction is one dollar.
User's Guide 211
Chapter 2: Entering and Posting Purchase Orders Transactions
To assign serial numbers when receiving serialized items:
1. Open Purchase Orders > P/O Transactions > Receipt Entry.
2. Process the receipt. For more information, see "Entering Receipts" (page151).
3. Do one of the following:
Enter a value in the Quantity Received field, and then press eitherEnter or Tab.
If the correct number already appears in the Quantity Received field,and you just want to change a serial number already assigned, click theQuantity Received column header.
Note: You cannot partially invoice receipts of serialized items.
The Serial Numbers Generation/Allocation window appears.
4. Either accept or edit the default value that appears in the Next SerialNumber field. The value in this field is the starting point for the serialnumbers you will assign.
5. Assign serial numbers in one of the following ways:
Automatically. Click Auto-Gen. to generate serial numbers for thequantities you require, starting with the value in the Next Serial Numberfield.
Manually. Click Add for each serial number you need to create. Edit theNext Serial Number value if you don't want to assign the next sequentialnumber.
Note: In both cases, assigned serial numbers appear in the details table.You can select entries in the table to change serial numbers as required.
6. Click Close.
Note: If the Remaining value is not zero, there are still serial numbersto assign. You cannot close the window until the Remaining value iszero.
After closing the Serial Numbers Generation/Allocation window, you cancomplete and post the transaction.
212 Sage 300 ERP Purchase Orders

Serialized and Lotted Transactions
Returning and Issuing Credit/Debit Notes for Serialized Items
Purchase Orders prompts you to allocate serial numbers when you returnserialized items to vendors.
Note: Serial numbers are used for tracking stock from the point of receiptthrough to the point of sale, and can be used to track returned items from thecustomer and back to the vendor.
You use the same procedure when creating a debit or credit note for a vendor,except you start with the Credit/Debit Note Entry window instead of the ReturnEntry window.
To allocate serial numbers to returned serialized items:
1. Open Purchase Orders > P/O Transactions > Return Entry.
2. Process the return. For more information, see "Entering Returns " (page181).
3. Do one of the following:
Enter a value in the Quantity Returned field for the serialized items youwant to return, and then press either Enter or Tab.
If the correct number already appears in the Quantity Returned field, andyou just want to change a serial number already allocated, click theQuantity Returned column header.
The Serial Numbers Allocation window appears.
Note: If you selected a Receipt Number in the Return Entry window, onlyserial numbers from that receipt appear in the Serial Numbers Allocationwindow.
4. If you did not select a Receipt Number in the Return Entry window, enter theserial number manually, or select it using the Finder.
5. To return all the serial numbers that appear in the details grid, click ReturnAll.
Note:The Return All button in the Return Entry window returns all items on theentire invoice.
User's Guide 213
Chapter 2: Entering and Posting Purchase Orders Transactions
The Return All button on the Serial Numbers Allocation window returnsall items for the specific detail line previously selected in the ReturnEntry window.
6. Allocate serial numbers in one of the following ways:
Automatically. Select the Auto-Allocate From option, enter or selecta value in the field that appears, and then click Auto-Alloc.
Available serial numbers appear in the grid.
Manually. Enter serial numbers manually or select them using theFinder.
7. Click Close.
Note: If the Remaining value is not zero, there are still serial numbersto allocate. You cannot close the window until the Remaining value iszero.
After closing the Serial Numbers Allocation window, you can complete andpost the transaction.
Receiving and Invoicing Lotted Items
When you receive lotted items from vendors in Purchase Orders, the programprompts you to assign lot numbers.
You use the same procedure when entering a vendor invoice, except you startwith the Invoice Entry screen instead of the Receipt Entry screen.
Note: Lot numbers are used for tracking stock from the point of receiptthrough to the point of sale, and can be used to track returned items fromthe customer and back to the vendor.
To assign lot numbers when receiving lotted items:
1. Open Purchase Orders > P/O Transactions > Receipt Entry.
For more information, see "P/O Receipt Entry Screen" (page 594).
2. Create a new receipt, entering header information as usual. (For detailedinstructions on entering receipt transactions, see "Entering Receipts" (page151).)
214 Sage 300 ERP Purchase Orders
Serialized and Lotted Transactions
Important! Lot numbers are stored and displayed by location. Therefore,you must specify a location before entering the quantity.
3. Enter a value in the Quantity Received field, and then press either theEnter key or the Tab key to display the Serial/Lot Numbers Generationscreen.
If the correct number already appears in the Quantity Received field, andyou just want to change a lot number already assigned, click the Zoombutton in the Quantity Received column heading.
Note: You cannot partially invoice receipts of lotted items.
4. Specify the number of lots and quantities in each lot using the Make X LotsOR Each Lot Has fields.
5. If desired, edit the default value that appears in the Next Lot Number field.The value in this field is the starting point for the lot numbers you willassign.
6. Assign lot numbers automatically or manually, as follows:
To generate lot numbers automatically, click the Auto Gen button. Thelot numbers are generated sequentially starting with the value in the NextLot Number field.
To assign lot numbers yourself (for example, if you do not want them tobe sequential), edit the Next Lot Number value, and then click the Addbutton for each lot number you need to create.
7. Click Close.
Important! If the Remaining value is not zero, there are still lot numbersto assign. You cannot close the screen until the Remaining value is zero.
After assigning lot numbersAfter closing the Serial/Lot Numbers Generation screen, you can complete andpost the transaction.
Returning and Issuing Credit/Debit Notes for Lotted Items
Purchase Orders prompts you to allocate lot numbers when you return lotteditems to vendors.
User's Guide 215

Chapter 2: Entering and Posting Purchase Orders Transactions
Note: Lot numbers are used for tracking stock from the point of receiptthrough to the point of sale, and can be used to track returned items fromthe customer and back to the vendor.
You also use the following procedure when entering a debit note or a creditnote for a vendor, except that you start from the Credit/Debit Note Entryscreen instead of the Return Entry screen.
To assign lot numbers to returned lotted items:
1. Open Purchase Orders > P/O Transactions > Return Entry.
For more information, see "P/O Receipt Entry Screen" (page 594).
2. Enter the return as usual, with the following differences:
a. After entering a value in the Quantity Returned field for the lotted itemsyou want to return, press the Enter key or the Tab key to display theSerial/Lot Numbers Allocation screen.
If the correct number already appears in the Quantity Returned field,and you just want to change a lot number already allocated, click theZoom button in the Quantity Returned column heading.
Note: If you selected a receipt number, only the lot numbers fromthat receipt are listed in the Serial/Lot Numbers Allocation screen. Ifyou did not select a receipt number, enter the lot number manually orselect it using the Finder.
b. To return all the lot numbers that appear in the table, click Return All."Ye"s appears in the Returned column for all items in the table.
Note: The Return All button in the Return Entry screen returns allitems on the entire invoice, while the Return All button on theSerial/Lot Numbers Allocation screen returns only items for theselected detail line.
c. Allocate lot numbers automatically or manually, as follows:
To generate lot numbers automatically, click the Auto-Allocate Fromoption, and then enter or select a value in the field that appears.Click the Auto-Alloc button to allocate lot numbers sequentiallystarting with the value in the Next Lot Number field.
To allocate lot numbers individually, select them from the Finder ortype the numbers.
216 Sage 300 ERP Purchase Orders
Serialized and Lotted Transactions
d. Click Close.
Important! If the Remaining value is not zero, there are still lotnumbers to assign. You cannot close the screen until the Remainingvalue is zero.
After assigning lot numbersAfter closing the Serial/Lot Numbers Allocation screen, you can complete andpost the transaction.
User's Guide 217

Chapter 3: Periodic Processingin Purchase Orders
At the end of each period, perform procedures such as creating batches andclearing history.
About Periodic Processing in Purchase OrdersThis topic outlines tasks you might follow as part of your weekly, bi-weekly, ormonthly procedures, and tells you how to use Purchase Orders to accomplishthese tasks.
Use the Create Batch screen (unless you create transactions during posting orday end processing) and Clear History screen to complete processing and toclear out obsolete data and records at the end of your accounting periods.
At each period end, you should:
l Create any new purchase orders you wish to process in the period.
Use the Purchase Order Entry screen and the Create Purchase Orders FromRequisitions, Create Purchase Orders From I/C, and Create Purchase OrdersFrom O/E screens.
l Post other transactions that apply to the period.
Use the Requisition Entry, Purchase Order Entry, Receipt Entry, InvoiceEntry, Return Entry, and Credit/Debit Note Entry screens.
l Print the Purchase Order Action and Aged Purchase Orders reports toidentify purchase orders that require action.
Use the Purchase Order Action and Aged Purchase Orders screens from theAnalytical Reports folder to print the reports.
l Print the G/L Transactions report, then create general ledger transactions (ifyou do not use the option to create general ledger transactions duringposting or Day End Processing). Process the batches in General Ledger, ifyou use it, or post them manually to another general ledger.
Choose the G/L Transactions icon from the Analytical Reports folder to printthe report. Choose the Create Batch screen from the Periodic Processingfolder to create the general ledger transactions.
User's Guide 219
Chapter 3: Periodic Processing in Purchase Orders
l Clear the paid transactions, posting journals, and statistics that you nolonger need.
Choose the Clear History screen from the Periodic Processing folder to clearthis information.
Sage 300 ERP will mark reports as printed no matter which print destinationyou use when you print posting journals.
l If you use Purchase Orders as a stand-alone program (without InventoryControl), use the Delete Inactive Records screen to delete inactive item andaccount set records from your Purchase orders system.
Choose the Delete Inactive Records icon from the Periodic Processing folderand specify the types and ranges of records you want to clear.
Day End Processing of P/O TransactionsRun Day End Processing to update your data in Purchase Orders, InventoryControl, Accounts Payable, and Project and Job Costing. This keeps your audittrail and reports up to date.
About Day End Processing
When you post Purchase Orders transactions that affect item quantities, theprogram immediately updates item records and quantities on purchase orderin Inventory Control, if you are using it.
Most Day End Processing tasks are performed during posting if InventoryControl uses options to cost items and create subledger transactions and auditinformation during posting. However, you must run Day End Processing tocompletely update your Purchase Orders, Inventory Control, AccountsPayable, and Project and Job Costing data.
Tip: You should run Day End Processing as part of your daily routine, to keepyour audit trail and reports up to date. You can run Day End Processing asmany times a day as you want.
Note: If you use Inventory Control, you run Day End Processing from theInventory Control folder. If you do not use Inventory Control, you run DayEnd Processing from the Purchase Orders folder. (For more informationabout running Day End Processing in a stand-alone system, see "P/O Day EndProcessing Screen " (page 307).)
220 Sage 300 ERP Purchase Orders
Day End Processing of P/O Transactions
Assign the Default Cost Expense Account
Before running Day End Processing, you must assign the general ledger accountcode for the default cost expense account on the P/O Options screen.
Day End Processing will display an error message and stop processing if theaccount is not designated.
Tasks Performed by Day End Processing
Each time you run Day End Processing, the program:
l Processes all the transactions you have posted since the last time you ranDay End Processing.
l Creates a batch of Accounts Payable invoices, credit notes, and debit notesfrom posted Purchase Orders transactions, using the next available AccountsPayable batch number.
l Creates general ledger transactions from posted receipts, returns, invoices,credit notes, and debit notes.
l Optionally posts Accounts Payable and General Ledger batches in the A/P andG/L modules.
l Updates costs in Inventory Control for non-job-related invoices, if you useInventory Control (unless you chose the Inventory Control option to docosting during posting).
l Updates quantities and costs in Project and Job Costing for job-relatedinvoices.
l Activates and posts future purchase orders that have reached their purchaseorder date. When Day End Processing is complete, you can print the new POs.
l Clears requisitions that have reached their expiration dates.
l Deletes completed transactions if you do not keep transaction history.
l Updates statistics and history in both Purchase Orders and Inventory Control(if you keep history and statistics).
l Creates the receipt, invoice, return, and credit/debit note posting journals inPurchase Orders for the new day-end sequence number.
User's Guide 221
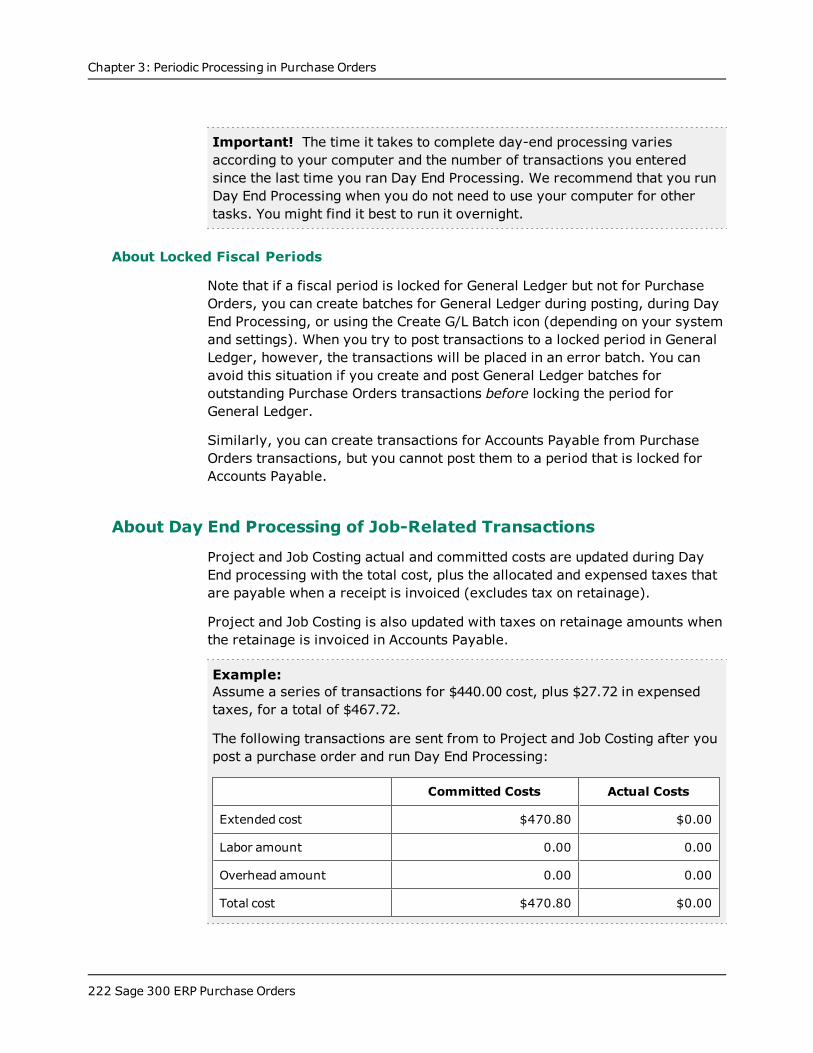
Chapter 3: Periodic Processing in Purchase Orders
Important! The time it takes to complete day-end processing variesaccording to your computer and the number of transactions you enteredsince the last time you ran Day End Processing. We recommend that you runDay End Processing when you do not need to use your computer for othertasks. You might find it best to run it overnight.
About Locked Fiscal Periods
Note that if a fiscal period is locked for General Ledger but not for PurchaseOrders, you can create batches for General Ledger during posting, during DayEnd Processing, or using the Create G/L Batch icon (depending on your systemand settings). When you try to post transactions to a locked period in GeneralLedger, however, the transactions will be placed in an error batch. You canavoid this situation if you create and post General Ledger batches foroutstanding Purchase Orders transactions before locking the period forGeneral Ledger.
Similarly, you can create transactions for Accounts Payable from PurchaseOrders transactions, but you cannot post them to a period that is locked forAccounts Payable.
About Day End Processing of Job-Related Transactions
Project and Job Costing actual and committed costs are updated during DayEnd processing with the total cost, plus the allocated and expensed taxes thatare payable when a receipt is invoiced (excludes tax on retainage).
Project and Job Costing is also updated with taxes on retainage amounts whenthe retainage is invoiced in Accounts Payable.
Example:Assume a series of transactions for $440.00 cost, plus $27.72 in expensedtaxes, for a total of $467.72.
The following transactions are sent from to Project and Job Costing after youpost a purchase order and run Day End Processing:
Committed Costs Actual Costs
Extended cost $470.80 $0.00
Labor amount 0.00 0.00
Overhead amount 0.00 0.00
Total cost $470.80 $0.00
222 Sage 300 ERP Purchase Orders
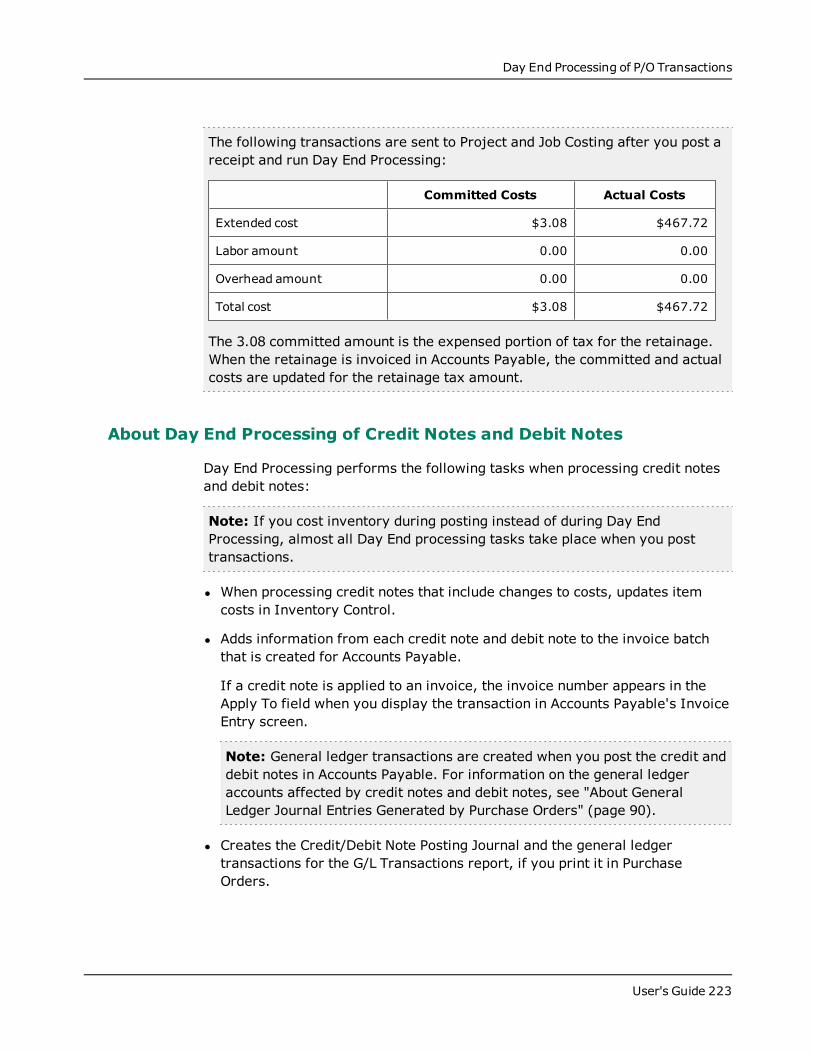
Day End Processing of P/O Transactions
The following transactions are sent to Project and Job Costing after you post areceipt and run Day End Processing:
Committed Costs Actual Costs
Extended cost $3.08 $467.72
Labor amount 0.00 0.00
Overhead amount 0.00 0.00
Total cost $3.08 $467.72
The 3.08 committed amount is the expensed portion of tax for the retainage.When the retainage is invoiced in Accounts Payable, the committed and actualcosts are updated for the retainage tax amount.
About Day End Processing of Credit Notes and Debit Notes
Day End Processing performs the following tasks when processing credit notesand debit notes:
Note: If you cost inventory during posting instead of during Day EndProcessing, almost all Day End processing tasks take place when you posttransactions.
l When processing credit notes that include changes to costs, updates itemcosts in Inventory Control.
l Adds information from each credit note and debit note to the invoice batchthat is created for Accounts Payable. Mor e ...
If a credit note is applied to an invoice, the invoice number appears in theApply To field when you display the transaction in Accounts Payable's InvoiceEntry screen.
Note: General ledger transactions are created when you post the credit anddebit notes in Accounts Payable. For information on the general ledgeraccounts affected by credit notes and debit notes, see "About GeneralLedger Journal Entries Generated by Purchase Orders" (page 90).
l Creates the Credit/Debit Note Posting Journal and the general ledgertransactions for the G/L Transactions report, if you print it in PurchaseOrders.
User's Guide 223
Chapter 3: Periodic Processing in Purchase Orders
l If you keep transaction history, updates history and statistics in PurchaseOrders and Inventory Control. If you do not keep transaction history, theprogram deletes all credit and debit notes.
About Day End Processing of Purchase Orders Invoices
Day End Processing performs the following tasks when processing P/Oinvoices:
Note: If you cost inventory during posting instead of during Day EndProcessing, almost all Day End processing tasks take place when you posttransactions.
l Creates and optionally posts a batch of invoices in Accounts Payable, with abatch type of Imported. Information for each invoice includes the remit-tolocation and 1099 code and amount, if any.
l Updates costs in Inventory Control for non-job-related invoices, if you useInventory Control.
l Updates quantities and costs in Project and Job Costing for job-relatedinvoices.
l If you keep history and statistics, updates history and statistics with invoicedata.
l Creates the Invoice Posting Journal that lists details of the invoicetransactions and the corresponding general ledger distributions.
Note: The general ledger transactions for invoices are created inAccounts Payable when the invoice batch is posted in Accounts Payable.
l If you posted invoices with new prorated additional costs, Day EndProcessing prorates the costs to the items on the receipt, updates costs inInventory Control, and creates adjusting entries for your general ledger.
You must run Day End Processing to:
l Delete invoices from Purchase Orders if you do not keep transactionhistory.
l Activate future purchase orders.
224 Sage 300 ERP Purchase Orders
Day End Processing of P/O Transactions
About Day-End Processing of Purchase Orders
Day End Processing performs the following tasks when processing purchaseorders:
Note: If you cost inventory during posting instead of during Day EndProcessing, almost all Day End processing tasks take place when you posttransactions.
l Creates active purchase orders from future purchase orders that havereached their activation dates.
l Updates quantities on purchase order in Inventory Control (that can also beviewed in Order Entry).
l Updates committed quantities in Project and Job Costing for job-relatedpurchase orders.
l If you keep history and statistics, updates purchase order history andupdates the number of purchase orders for the year and period in thePurchase Statistics screen and on the Purchase Statistics report.
l If you do not keep transaction history, deletes completed purchase orders.(Posting deletes the purchase orders if you cost items during posting).
About Day End Processing of Receipts
Day End Processing performs the following tasks when processing P/O receipts:
Note: If you cost inventory during posting instead of during Day EndProcessing, almost all Day End processing tasks take place when you posttransactions.
l Inserts the item costs as the most recent costs in Inventory Control itemrecords (unless you cost items when you post transactions). Mor e ...
For items using LIFO or FIFO costing, posting or Day End Processing createsa new LIFO or FIFO bucket for the receipt, quantity, and cost. For receiptadjustments, Day End Processing updates the buckets created for the originalreceipt. If a bucket has been cleared, Day End Processing posts any receiptadjustments to the offset bucket.
If an item is processed at more than one cost, posting or Day End Processinguses the cost from the last detail processed for an item as the most recent
User's Guide 225

Chapter 3: Periodic Processing in Purchase Orders
cost in the item record, unless the receipt cost on the last detail is zero or anegative amount.
If the last item cost is zero, posting or Day End Processing uses the lastnon-zero cost processed for the item, or if no other details are processedfor the item, does not change the most recent item cost.
l Prorates any additional costs posted with a receipt to the items on thereceipt using the methods you specified.
l Creates the Receipts Posting Journal and general ledger transactions for theprocessed receipts (except for non-inventory items and expensed additionalcosts). Mor e ...
Day End Processing does not create general ledger entries for non-inventory item details and additional cost details that you expense ratherthan prorate, because these details are posted to general ledger expenseaccounts, rather than to Inventory Control accounts. Journal entries fornon-inventory items and expensed additional costs are created when thetransactions are posted in Accounts Payable.
If you adjust a receipt after running Day End Processing, journal entries arecreated for the amount of the adjustment, including additional costs, thenext time you run day-end.
For more information about the general ledger accounts affected byreceipts, see "About General Ledger Journal Entries Generated by PurchaseOrders" (page 90).
l Completes all receipt details for vendors with invoices posted to the receipt.
l Deletes completed receipts if you do not keep transaction history.
l Updates history and statistics in Purchase Orders and Inventory Control, ifyou keep history and statistics.
About Day End Processing of Returns
Day End Processing performs the following tasks when processingP/O returns:
Note: If you cost inventory during posting instead of during Day EndProcessing, almost all Day End processing tasks take place when you posttransactions.
226 Sage 300 ERP Purchase Orders
Day End Processing of P/O Transactions
l Updates costs in Inventory Control for non-job-related invoices, if you useInventory Control.
l Updates quantities and costs in Project and Job Costing for job-relatedreturns.
l Creates general ledger transactions for the processed returns, and createsthe Return Posting Journal.
For more information about the general ledger accounts affected by returntransactions, see "About General Ledger Journal Entries Generated byPurchase Orders" (page 90).
l Adjusts and reprorates or expenses any additional costs posted with a receiptto remaining items on the receipt using the methods you specified. Mor e ...
If you expensed or prorated additional costs that were originally prorated tothe items being returned, Day End Processing expenses the costs or proratesthem to the remaining items on the original receipt. You can check theprorated amounts on the Return Posting Journal.
For more information, see "P/O Posting Journals Screen" (page 316).
l If you do not keep history, deletes completed returns.
If you keep history and statistics, updates Purchase Orders and InventoryControl history and statistics with returns information.
Performing Day End Processing
Perform Day End Processing as part of your daily routine, to keep your audittrail and reports up to date. You can run Day End Processing as many times aday as you want.
Depending on the processing options selected on the I/C Options screen, DayEnd Processing:
l Optionally updates costing data from all transactions. (You can also choose toupdate costing information during transaction posting.)
l Optionally produces general ledger journal entries from the transactions thatwere posted during the day. (You can choose to create G/L entries at thesame time as you cost items, or you can use the Create G/L Batch screen tocreate G/L transactions.)
User's Guide 227

Chapter 3: Periodic Processing in Purchase Orders
l Optionally produces other subledger journal entries from the transactionsthat were posted during the day. (If you cost items during posting, you canalso choose to create subledger entries at the same time.)
l Always updates item statistics and transaction history for I/C, O/E and P/O(if you have them).
l Creates the posting journals for each type of transaction posted.
l Deletes completed transaction detail if you do not keep transaction history.
l Activates and posts future sales orders and purchase orders that havereached their order date, and updating quantities on sales order and onpurchase order.
l Removes quotes and purchase requisitions with expiration dates up to andincluding the session date for day-end processing.
l Updates sales commissions.
Before you start:
l Post all the transactions that you want to be processed. Anytransactions you post while Day End Processing is running will not beprocessed if processing has already been completed for the transactiontype.
To be sure of processing all the day's transactions, post them beforestarting Day End Processing.
l Back up your Purchase Orders data. For information about makingbackups, see the System Manager help.
l Allow enough time to perform day-end processing. The time it takesto complete day-end processing varies according to your computer and thenumber of transactions you entered since the last time you ran Day EndProcessing.
Tip: We recommend that you run Day End Processing when you do notneed to use your computer for other tasks. You might find it best to run itovernight.
l Assign a default cost expense account. If you use Purchase Orders asa stand-alone system (without Inventory Control), you must assign adefault cost expense account in the P/O G/L Integration screen.
228 Sage 300 ERP Purchase Orders
G/L Batches and Journal Entries
To perform day-end processing in a stand-alone Purchase Orderssystem:
1. Open Purchase Orders > P/O Periodic Processing > Day EndProcessing.
(If you use Inventory Control, you must open Inventory Control > I/CPeriodic Processing > Day End Processing.)
2. Click Process.
A message appears to confirm that processing is complete.
3. Click OK or press the Enter key to close the message and the Day EndProcessing screen.
After performing Day End Processing
Before you post new transactions:
l Print the posting journals for a record of the general ledger entries createdfrom Purchase Orders transactions, both in Purchase Orders and in AccountsPayable.
l Print any reports that you need for updating your records.
l Modify options in the A/P Options screen, as needed.
G/L Batches and Journal EntriesUse the P/O Create Batch screen to create a general ledger transaction batch torecord the inventory transactions and entries to payables clearing.
About Creating General Ledger Batches
If you do not use the option to create general ledger transactions during postingor during day-end processing, you must use the Create Batch screen when youwant to create a general ledger transaction batch to record the inventorytransactions and entries to payables clearing. You can then process the batch inGeneral Ledger.
If you want to print the G/L Transactions report you must print it before youcreate the general ledger batch. When you create the batch, Purchase Ordersdeletes the information in the G/L Transactions report.
The Create Batch screen also lets you post a batch of invoices in AccountsPayable from invoices or credit/debit notes posted in Purchase Orders.
User's Guide 229
Chapter 3: Periodic Processing in Purchase Orders
You can use this screen to post A/P invoices created by Purchase Orders only ifyou selected On Request Using Create Batch Icon for the Post A/P Batchesoption on the Processing tab of the P/O Options screen.
About General Ledger Journal Entries Generated from Returns
Returns of items to vendors are assigned source code PO-RT on the G/LTransactions report.
In Inventory Control, returns debit the item's payables clearing account andcredit the item's inventory control/expense account with the value of thereturned items, prorated additional costs, and allocated taxes.
Reprorated Additional Costs
If additional costs prorated to returned items are reprorated, additionalentries are created to debit or credit the Inventory Control and PayablesClearing accounts for the remaining items on the receipt.
If you post a credit note for the return and then run Day End processing, acredit note is created in the Accounts Payable batch. When it is posted inAccounts Payable, the credit note debits the vendor's payables control accountand credits the vendor's payables clearing account with the value of thereturned items, prorated additional costs, and allocated taxes.
Non-inventory Items
When non-inventory items are returned, Day End Processing does not createany journal entries for Inventory Control accounts.
The transaction is sent to Accounts Payable as an invoice or credit note whichwill debit or credit the G/L expense account specified for the item and post thecorresponding credit or debit to the vendor's payables control account.
About General Ledger Journal Entries Generated from Receipts
Receipts are assigned source code PO-RC on the G/L Transactions report.
Receipt transactions debit the item's inventory control account and credit theitem's payables clearing account with the total of extended item cost,allocated taxes, and any prorated additional costs and their allocated taxes.
If an item uses the LIFO or FIFO costing method, the receipt number and date,item quantity received, and item cost are added to Inventory Control's receiptbuckets for the item.
230 Sage 300 ERP Purchase Orders
G/L Batches and Journal Entries
Receipt Adjustments
If receipts are edited to change item quantities or costs, additional generalledger transactions are created:
l If quantities or costs increased, the journal entries debit the inventorycontrol (or Inventory/Expense) account and credit the payables clearingaccount.
l If quantities or costs decreased, the journal entries debit the payablesclearing account and credit the inventory control account.
Non-inventory Items
If a receipt includes a non-inventory item, the expense is posted during postingor day-end processing, and the non-inventory payables clearing account iscredited.
Posting the invoice in Accounts Payable generates a general ledger entry todebit the non-inventory payables clearing account and credit the payablescontrol account.
Prorated Additional Costs Added on an Invoice
If a new additional cost is added on an invoice, general ledger journal entriesare created to prorate the cost to the receipt items, if applicable, debiting theinventory control accounts for the items and crediting the payables clearingaccount.
Job-Related Receipts
Items received for projects do not go into inventory. Instead, the value of theitem goes into a Work-In-Progress account specified for the contract in Projectand Job Costing.
When you post job-related receipts or invoices, credit notes, and debit noteswith changes to the receipt information, Purchase Orders creates general ledgerjournal entries to update the Work-In-Progress and Payables Clearing accountswith the total of extended item cost, allocated taxes, and any proratedadditional costs and their allocated taxes.
The program also updates the committed and actual quantities and costs for thecontract in Project and Job Costing.
Purchase Orders also creates transactions for any overhead associated with theitems or additional costs, and for non-inventory items (such as labor) receivedfor the job.
User's Guide 231
Chapter 3: Periodic Processing in Purchase Orders
About General Ledger Journal Entries Generated from Credit Notes
Credit notes are assigned source code PO-CR on the G/L Transactions report.
When credit notes are posted in Accounts Payable, journal entries are createdduring posting or Day End Processing to:
l Debit the vendor's payables clearing account.
l Credit the vendor's payables control account.
Credits for Additional Costs
When you post a credit note for an additional cost:
l The expense account you assign is debited.
l The vendor's payables control account is credited.
Credits to Returns
When you post a credit note to a returnwith no quantity or cost changes:
l The vendor's payables control account is debited.
l The item's payables clearing account is credited.
When you post a credit note to a return that includes cost changes:
l Purchase Orders debits or credits the payables clearing and inventorycontrol accounts.
l When the credit note is posted in Accounts Payable:
The payables control account is debited.
The payables clearing account is credited.
Credits to Invoices
When a credit note is posted for an invoice, Purchase Orders creates a journalentry to:
l Debit the payables clearing account.
l Credit the inventory control account.
Day End Processing creates a credit note for the transaction in the AccountsPayable batch. When you post the batch in Accounts Payable, a journal entry iscreated to:
232 Sage 300 ERP Purchase Orders

G/L Batches and Journal Entries
l Debit the payables control account.
l Credit the payables clearing account.
Item Cost Adjustments
When you post credit notes to adjust item costs, Day End Processing createsgeneral ledger journal entries to:
l Debit the payables clearing account.
l Credit the item's inventory control accounts.
When you post the credit note in Accounts Payable, a journal entry is createdto:
l Debit the vendor's payables control account.
l Credit the payables clearing account.
Taxes
Allocated taxes from credit notes are posted to the same general ledgeraccounts as costs.
Recoverable and expensed taxes are posted to the accounts specified for thetax authorities in Tax Services and the inventory control or payables accountsused for the related costs.
About General Ledger Journal Entries Generated from Invoices
Invoices are assigned source code PO-IN on the G/L Transactions report.
When P/O invoices are posted in Accounts Payable, journal entries for invoicesare created, as follows:
l If a receipt is invoicedwithout changes to quantities and costs, ajournal entry is created to:
Debit the item's payables clearing account.
Credit the vendor's payables control account (with the total of theextended item cost, allocated taxes, and any prorated additional costs andtheir allocated taxes).
l If quantities or costs were changed on the invoice, Purchase Orderscreates journal entries to:
User's Guide 233
Chapter 3: Periodic Processing in Purchase Orders
Debit or credit the item's inventory control (or inventory/expense)account for the difference between the receipt amount and the invoiceamount.
Debit or credit the item's payables clearing account for the differencebetween the receipt amount and the invoice amount.
Debit the Payables Clearing account for the original amount of thereceipt, net of any adjustments as listed above.
Example: If the item cost increases on an invoice, the difference betweenthe invoice cost and the receipt cost is debited to the item's inventory controlor inventory/expense account.
Prorated Additional Costs Added on an Invoice
If a new additional cost is added on an invoice, general ledger journal entriesare created by Day End Processing to:
l Debit the Inventory Control account for the cost.
l Credit the payables clearing account.
Non-inventory Items
When invoices for non-inventory items are posted in Accounts Payable,general ledger journal entries are created to:
l Debit the expense account specified for the non-inventory item.
l Credit the vendor's payables control account.
If Purchase Orders uses the option to create G/L entries for non-inventoryexpenses on receipts/returns (on the P/O G/L Integration screen), when youpost receipts, Purchase Orders creates entries to:
l Debit expense accounts.
l Credit the non-inventory payables clearing account.
When you post the invoices later in Accounts Payable, general ledger journalentries will be created to:
l Credit the payables control account.
l Debit the non-inventory payables clearing account.
234 Sage 300 ERP Purchase Orders
G/L Batches and Journal Entries
Expensed Additional Costs
If additional costs are expensed, rather than prorated to the items on a receipt,Day End Processing creates an Accounts Payable invoice to debit the additionalcost expense account and credit the vendor's payables control account when itis posted in Accounts Payable.
If Purchase Orders uses the option to create G/L entries for expensed additionalcosts, Purchase Orders creates debit entries to expense accounts and creditentries to the Expensed Additional Cost Clearing Account when you postadditional costs. (Posting the invoices later in Accounts Payable credits thepayables control account and debits the Expensed Additional Cost ClearingAccount.)
Note: If the additional costs are job-related, Purchase Orders always createsG/L entries for expensed additional costs during posting - whether you selectthis option or not.
Job-Related Items
If a job-related invoice includes an adjustment to the receipt - such as a changeto the cost, quantity, or billing rate - Purchase Orders sends transactions toProject and Job Costing. These transactions do not affect the general ledger orAccounts Payable.
Example:l If you change the billing rate, Purchase Orders generates a new transactionfor the difference between the old billing rate and the new billing rate.
l If you also change quantities, Purchase Orders will also create a billingadjustment transaction for the quantity difference.
l If the receipt originated from a purchase order and you change the quantityoutstanding, Purchase Orders will update the committed quantities andcosts in Project and Job Costing.
Warning!Do not edit job-related invoices in Accounts Payable.
Job-related invoices transferred to Accounts Payable from Purchase Orders donot update Project and Job Costing when posted in Accounts Payable.
Purchase Orders directly updates Project and Job Costing with invoiceamounts.
User's Guide 235
Chapter 3: Periodic Processing in Purchase Orders
About General Ledger Journal Entries Generated from Debit Notes
Debit notes are assigned source code PO-DB on the G/L Transactions report.
When debit notes are posted in Purchase Orders, journal entries are createdduring posting or Day End Processing to:
l Debit the item's inventory control account.
l Credit the item's payables clearing account.
When the debit notes are posted in Accounts Payable, journal entries arecreated to:
l Debit the item's payables clearing account.
l Credit the vendor's payables control account.
Taxes
Allocated taxes from debit notes are posted to the same general ledgeraccounts as their related costs.
Recoverable and expensed taxes are posted to the accounts specified for thetax authorities in Tax Services and the inventory control or payables accountsused for the related costs.
Creating a Batch of General Ledger Transactions in Purchase Orders
You use the Create Batch screen to create general ledger batches if you do notautomatically create G/L transactions when you post transactions or when yourun Day End Processing.You can find out how you currently create G/L transactions by looking at theCreate G/L Transactions option on the Integration tab of the G/L Integrationscreen (in the P/O Setup folder). For more information, see "P/O G/LIntegration Screen" (page 353).
The Create Batch screen performs two separate operations:
l Produces a batch of general ledger transactions from posted receipts (orappends to an existing general ledger batch), and optionally posts themautomatically.
You can use this screen to produce G/L batches only if you selected OnRequest Using Create G/L Batch Icon for the Create G/L Transactionsoption in the G/L Integration screen.
236 Sage 300 ERP Purchase Orders
G/L Batches and Journal Entries
l Posts a batch of invoices in Accounts Payable from invoices or credit/debitnotes posted in Purchase Orders.
You can use this screen to post A/P invoices created by Purchase Orders onlyif you selected On Request Using Create Batch Icon for the Post A/P Batchesoption on the Processing tab of the P/O Options screen.
Before you start:
l Select the On Request Using Create Batch Icon option and other generalledger options on the Integration tab of the G/L Integration screen.
l Select the On Request Using Create Batch Icon option for the Post A/PBatches option in the P/O Options form.
l Run Day End Processing to update the company’s Purchase Orders data.
For more information, see "About Periodic Processing in Purchase Orders"(page 219).
l Print the G/L Transactions report, then file it with your audit trail reports.(You must print the report before using the Create Batch screen. When youcreate general ledger transactions, the data for the G/L Transactions report isdeleted from Purchase Orders.)
For more information, see "P/O G/L Transactions Report Screen" (page 312).
To create a batch of G/L transactions:
1. Open Purchase Orders > P/O Periodic Processing > Create Batch.
2. Specify the day-end number through which to create general ledgertransactions. (You create the transactions for all outstanding day-endnumbers up to and including the number you specify.)
3. If you also want to post invoice transactions created by Purchase Orders inAccounts Payable, select Post A/P Batch.
4. Click Process.
After using
l Post the batches in General Ledger (unless they are posted automatically).
l If you use a different general ledger, update the general ledger in one of thefollowing ways:
User's Guide 237
Chapter 3: Periodic Processing in Purchase Orders
Import the CSV batch file into your general ledger, then delete the file.
Using the G/L Transactions report, transfer the entries to your generalledger manually, then delete the CSV batch file.
Posting a Batch of Purchase Orders Invoices in AccountsPayable
You can use the Create Batch screen to post Accounts Payable batches createdfrom Purchase Orders Invoices, credit notes and debit notes, depending onPurchase Orders settings for posting A/P batches and on item costing settings.
Note: You can use the Create Batch screen to post batches in AccountsPayable only if you do not automatically post batches when you post invoicetransactions or when you run Day End Processing (depending on when youcost items).
The Post A/P Batches option (on the P/O Options screen), determines how youpost A/P batches.
Costing options are set on the I/C Options screen (if you use InventoryControl), or on the P/O Options screen (if you do not use Inventory Control).
For more information about Purchase Orders options, see "P/O Options Screen" (page 375).
For information about the I/C Options screen, see the help for InventoryControl.
Before you start:
l Run Day End Processing to complete processing and update the PurchaseOrders and Inventory Control data.
l Check the Processing tab of the P/O Options screen to find out whether youcan use the Create Batch screen to post A/P batches.
To post an A/P invoice batch using the Create Batch screen:
1. Open Purchase Orders > P/O Periodic Processing > Create Batch.
2. In the Create G/L Batch Through Day End Number field, specify theday-end number through which to create general ledger transactions. (Youcreate the transactions for all outstanding day-end numbers up to andincluding the number you specify.)
238 Sage 300 ERP Purchase Orders
Clearing Historical Purchase Orders Data
3. Select Post A/P Batch to post invoice transactions created by PurchaseOrders in Accounts Payable.
4. Click Process.
After using
l Post the batches in General Ledger (unless they are posted automatically).
Clearing Historical Purchase Orders DataYou can clear transaction history, purchase order history, statistics, and postingjournals that you no longer need using the Clear History screen. (You can alsoclear P/O's item transaction history if you use Purchase Orders withoutInventory Control.)
Unless you use the options to keep Purchase Orders history and statistics, theprogram clears all completed transactions during Day End Processing, and willnot keep purchase history and statistics. You then use Clear History mainly toclear printed posting journals.
Before you start:
l Make sure you have posted all the transactions you need.
l Run Day End Processing to update Purchase Orders transactions and statisticsthat could affect records you want to clear.
For more information, see "About Day End Processing" (page 220).
l Determine the date through which to clear transaction history.
l Determine the fiscal year and period through which to clear purchasestatistics and purchasing history.
l Determine the day-end number through which to clear printed postingjournals and the types of journals to clear.
l Print reports of the data you want to clear. For example:
l Before clearing transaction history, print the Transaction List for thetransaction history you plan to clear. Also, make sure you have printedcopies of any completed requisitions, purchase orders, receiving slips, andreturns you require.
For more information, see "P/O Transaction List Report Screen" (page 327).
User's Guide 239
Chapter 3: Periodic Processing in Purchase Orders
l Before clearing purchase history, print the Purchase History report forthe historical data you plan to clear.
For more information, see "P/O Purchase History Report" (page 319).
l Before clearing sales statistics, print the Purchase Statistics report forthe statistics you plan to clear.
For more information, see "P/O Purchase Statistics Report Screen" (page324).
l Before clearing posting journals, print a copy of each posting journalyou want to clear. (Make sure you have printed the posting journals to aprinter or a file.)
l If you use the Create Batch icon to create the general ledger batch, printthe G/L Transactions report for the journals.
Note: You must print the G/L Transactions report before you use theCreate Batch icon.
l Before clearing the Payables Clearing Audit list, print the PayablesClearing Audit list for the year, period, and account sets you want to clear.
For more information, see "P/O Payables Clearing Audit List Report Screen"(page 315).
l Before clearing item transaction history (in stand-alone systemsonly), print the Item Transaction History report for the period you plan toclear.
For more information, see "P/O Item Transaction History Report Screen"(page 314).
To clear historical data:
1. Open Purchase Orders > P/O Periodic Processing > Clear History.
2. To clear transaction history, select the Transaction History option, thentype the date up to which to clear history.
Purchase Orders clears the details from requisitions, purchase orders,receipts, invoices, returns, credit notes, and debit notes that werecompleted on or before the clearing date you specify.
240 Sage 300 ERP Purchase Orders
Clearing Historical Purchase Orders Data
Completed transactions.
Requisitions are complete when a purchase order has been posted foreach requisition detail or you manually complete the line. (You canalso delete requisitions in the Requisition Entry screen.)
Purchase orders are complete when all ordered quantities have beenreceived or canceled. (You can also delete purchase orders in thePurchase Order Entry screen.)
Receipts are complete when invoices have been posted for theprimary vendor and all secondary vendors on the receipt.
Invoices, credit notes, and debit notes are complete when Day EndProcessing has added them to an Accounts Payable batch.
A return is complete when a credit note is posted to it.
Note: Cleared transactions are not reported on the Transaction Lists.
Completion dates.
Day End Processing assigns the current session date as the completiondate for transactions.
3. To clear purchase history, select the Purchasing History option, thenselect the year and period up to which to clear history, and the range andtype of records to clear.
Clear History clears purchase history through the year and period youspecify, and by the range of item numbers or vendor numbers you select.Cleared data no longer appears in the Purchase History screen or on thePurchase History report.
4. To clear purchase statistics, select the Purchase Statistics option, thenselect the year and period up to which to clear statistics.
Clear History clears purchase statistics through the year and period youspecify. Cleared statistics no longer appear in the Purchase Statistics screenor on the Purchase Statistics report.
5. To clear printed posting journals, select the Printed Posting Journalsoption, then select the type of posting journal to clear and the day-endnumber up to which to clear.
You can clear all posting journals including the journals produced during the
User's Guide 241
Chapter 3: Periodic Processing in Purchase Orders
day-end processing run you specify. You select the types of journals toclear, including any combination of journals for receipts, invoices, creditnotes and debit notes, and returns.
6. To clear the Payables Clearing Audit list, select the Payables ClearingAudit option and the year, period, and the account sets to clear.
7. To clear item transaction history, select the Item Transaction Historyoption, then select the year and period through which to clear data. (Thisoption is available only in a stand-alone Purchase Orders system.)
Use this option to remove transaction history for items maintained by thePurchase Orders program if you are not using Inventory Control. Clearedtransactions are not reported on the Transaction Lists.
8. Click Process to clear the specified data.
Deleting Inactive Purchase Orders Records
If you use Purchase Orders as a stand-alone program, you can use the DeleteInactive Records screen to remove obsolete item and account set records.
Before you start:
l Print reports.
l Update records.
l Assign Inactive status to all records you want to delete. The programremoves only records that have an Inactive status and were set to inactivewithin the range of dates you specify.
l Assign to another account set item records that are currently assigned tothe account set you want to delete.
l Run day-end processing if you have posted, since the last day-endprocessing, any transactions for items you will be deleting.
To delete inactive records:
1. Open Purchase Orders > P/O Periodic Processing > DeleteInactive Records.
2. Select the types of inactive records to delete.
3. Enter the range of codes or numbers to delete for each record type youselected, or use the Finder to select the ranges.
242 Sage 300 ERP Purchase Orders
Clearing Historical Purchase Orders Data
4. Enter a range of dates to indicate when a record must have been madeinactive to delete it. Purchase Orders selects records that have a status ofInactive and a corresponding "inactive" date within the range of dates youspecify.
5. Click Process.
6. When you have finished deleting records, click Close.
The program removes records that have an Inactive status and were set toinactive within the specified range of dates.
After deleting inactive records
l Print new copies of the reports of the types of records you deleted to updateyour files with current information. For information about reports you canprint, see "About Purchase Orders Reports" (page 268).
User's Guide 243

Chapter 4: Looking UpPurchase Orders Statistics
and InformationUse Purchase Orders Statistics and Inquiries screens to look up informationabout vendors and transactions.
Viewing Pending ReceiptsYou can review items that are expected to arrive at particular locations withina given time period (for example, in the next 7 days), and check whether therewill be sufficient stock to cover current sales orders. Mor e ...
You can search pending receipts by item number or by vendor, and also viewcompleted purchase orders to see if items were delivered within the expectedarrival times.
Pending Receipts Inquiry finds all active purchase orders that are not on holdand that fit your selection criteria. You can limit the inquiry to specificlocations.
To view pending receipts:
1. Open Purchase Orders > P/O Statistics and Inquiries > PendingReceipts Inquiry.
2. Specify whether to inquire by item or by vendor, and then select the itemnumber or vendor number for which you want to view details.
3. Select a range of locations, or skip the Location fields to display alllocations.
4. In the PO Date fields, leave the From and To fields blank to include allpurchase orders, or specify a range of PO dates.
5. In the Expected Arrival Date fields, leave the From field blank to includeall purchase orders with outstanding items, and enter the end date for theinquiry in the To field.
6. To see whether items were delivered within the expected arrival times,select Include Completed Detail Lines.
User's Guide 245
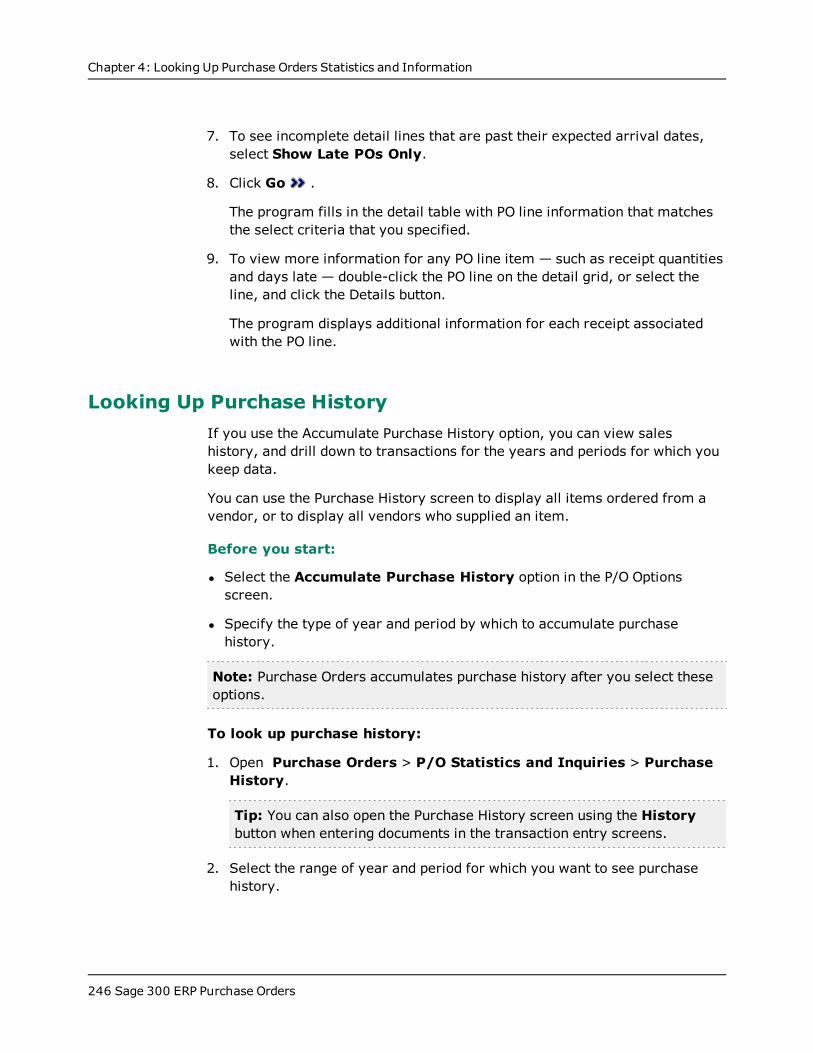
Chapter 4: Looking Up Purchase Orders Statistics and Information
7. To see incomplete detail lines that are past their expected arrival dates,select Show Late POs Only.
8. Click Go .
The program fills in the detail table with PO line information that matchesthe select criteria that you specified.
9. To view more information for any PO line item — such as receipt quantitiesand days late — double-click the PO line on the detail grid, or select theline, and click the Details button.
The program displays additional information for each receipt associatedwith the PO line.
Looking Up Purchase HistoryIf you use the Accumulate Purchase History option, you can view saleshistory, and drill down to transactions for the years and periods for which youkeep data.
You can use the Purchase History screen to display all items ordered from avendor, or to display all vendors who supplied an item.
Before you start:
l Select the Accumulate Purchase History option in the P/O Optionsscreen.
l Specify the type of year and period by which to accumulate purchasehistory.
Note: Purchase Orders accumulates purchase history after you select theseoptions.
To look up purchase history:
1. Open Purchase Orders > P/O Statistics and Inquiries > PurchaseHistory.
Tip: You can also open the Purchase History screen using the Historybutton when entering documents in the transaction entry screens.
2. Select the range of year and period for which you want to see purchasehistory.
246 Sage 300 ERP Purchase Orders
Looking Up Transaction History in Inventory Control
3. Specify whether to sort by item number or vendor number.
Select Vendor to view all of the items ordered from and returned to aparticular vendor.
Select Item Number to view all of the vendors who supplied aparticular item.
4. Choose your functional currency or the vendor currency, if you have amulticurrency system.
5. Click the Go button or press the F7 key.
If you chose Vendor in step 3, the program lists all of the item details oninvoices or returns for the vendor.
If you chose Item Number, the program lists all of the invoices and returnson which the item that you specified appears.
6. To view the transaction details for an item or vendor entry, double-click theline for which you want more information, or select the line and then clickthe Details button. The Purchase History Detail screen appears.
7. For transactions that include serialized or lotted items, you can select theentry in the table, and then click the Serial/Lot Numbers button to displaythe serial and/or lot numbers for the selected entry.
To view the details of a transaction:
1. On the Purchase History screen, click Details while reviewing history to seethe details of the transactions posted for a particular vendor or itemnumber.
2. Click Close to return to the main Purchase History screen.
Looking Up Transaction History in Inventory ControlYou can use the I/C Transaction History Inquiry screen to look up transactionscreated in Sage 300 ERP Purchase Orders, Order Entry, or Inventory Control.
To look up Purchase Orders transactions in Inventory Control:
1. Open Inventory Control I/CStatistics and Inquiries > TransactionHistory INquiry.
2. To change the fiscal year and period, select a new one from the drop-downlist beside the As At Year/Period field.
User's Guide 247
Chapter 4: Looking Up Purchase Orders Statistics and Information
3. Enter the beginning and ending item numbers, or select them using theFinders.
4. Enter the beginning and ending account set numbers, or select them usingthe Finders.
5. Enter the beginning and ending location numbers, or select them using theFinders.
6. When you are satisfied with your inquiry criteria, click the Go button.
7. A list of items matching your criteria is displayed. To view a list of recenttransactions involving an item, select the item from the list, and then clickthe Details button.
8. The list includes the document number and other information about thetransaction.
9. To drill down to the original document, highlight a transaction, and thenclick the Details button.
Sage 300 ERP displays the original transaction unless it has been clearedfrom the database.
Looking Up Purchase StatisticsIf you use the Accumulate Purchase Statistics option, you can view purchasestatistics for the years and statistical periods for which you keep data.
To look up purchase statistics:
1. Open Purchase Orders > P/O Statistics and Inquiries > PurchaseStatistics.
2. Select the year, period, and currency for which you want to see purchasestatistics.
248 Sage 300 ERP Purchase Orders
Chapter 5: PrintingPurchase Orders
Reports and FormsUse the report formats that come with Purchase Orders to print purchaseorders forms (requisitions, returns, mailing labels, and receiving slips),analytical reports, and setup reports, or select a customized version.
About Print DestinationsThere are several ways to print reports in Sage 300 ERP, depending on yourneeds. Before you print, you can select a print destination to:
l Print directly from the program to the printer, to obtain permanent copies ofthe information.
l Print the information on your screen, for quick review.
l Print to a file so that you can print the report later, import it into anotherprogram, or transfer it to other electronic media.
l Print to e-mail to send a report to an electronic mail recipient.
Note: To change the print destination for forms and reports, you must haveChange Print Destination security authorization for Administrative Services.
You select print destinations from the File menu on the Sage 300 ERP desktop.
For more information, see "Selecting a Print Destination" (page 274).
Important! When you print to any destination, the report’s status is updatedto Printed.
Tips:If you use Preview as your print destination, you can print or export thereport from the preview screen in the following ways:
l To print the report on your printer, click the printer icon on the SAPCrystal Reports® menu bar.
User's Guide 249
Chapter 5: Printing Purchase Orders Reports and Forms
l To export the report to a file, click the export icon on the SAP CrystalReports® menu bar. (You can select Crystal Reports, PDF, Excel, RTF, orCSV as the export format.)
Printing Purchase Orders FormsPurchase Orders includes forms that you can print "as is" or adapt to print onforms that you already use for requisitions, purchase orders, receiving slips,returns and mailing labels.
You can open Purchase Orders forms using the menus in the Sage 300 ERPPortal, or you can print these forms immediately after posting thecorresponding transaction.
For more information about these forms, see "About Purchase Orders Forms"(page 74).
Before you start:
l Find out which report format to use for printing the form you are workingwith.
l If you are e-mailing forms to vendors:
Use the E-mail Messages screen in the P/O Setup folder to create the e-mail message that you want to send to vendors.
Set the Delivery Method to E-mail or to Contact's E-mail for each vendorthat you want to e-mail. You set the delivery method on the Processingtab of the vendor record in Accounts Payable.
l Check the print destination for forms and reports that you are printing.
To print a form in Purchase Orders:
1. Open Purchase Orders > P/O Forms.
2. Double-click the icon for the form you want to print, or right-click the icon,and then click Open from the menu that appears.
3. Specify print options for the form.
For information about the options available on the screen you are workingwith, you can:
250 Sage 300 ERP Purchase Orders
Printing Purchase Orders Forms
Use the Related Topics link, below.
On the help Contents tab, click Screen Guides > Forms, and then clickthe name of the form.
In the screen you are using to print the form, press the F1 key.
4. If you want to review a document before printing, or to print a test copy toverify that information is aligned correctly on a preprinted form, click Align.
Clicking Align does not set document status to "Printed." To set documentstatus to "Printed," you must click Print.
5. Click Print.
Purchase Orders prints the form to your usual print destination, and sets thedocument status to "Printed."
Tips:If you use Preview as your print destination, you can print or export thereport from the preview screen in the following ways:
l To print the report on your printer, click the printer icon on the SAPCrystal Reports® report menu bar.
l To export the report to a file, click the export icon on the SAP CrystalReports® menu bar. (You can select Crystal Reports, PDF, Excel, RTF, orCSV as the export format.)
For more information about print destinations, see "About Print Destinations "(page 249).
Printing Mailing Labels
You use the P/O Mailing Labels screen to print mailing labels for sendingpurchase orders to vendors and for returning goods.
When you print mailing labels you can choose:
l The label form that you want to use.
l Whether to print labels for purchase orders or returns.
l Whether to reprint labels.
l Whether to print labels for returns marked as required when you printed thereturns.
User's Guide 251
Chapter 5: Printing Purchase Orders Reports and Forms
Before you start:
l Specify the number of labels to print for each purchase order or return onthe Totals tab of the transaction entry form.
l Decide which report format to use for printing labels.
Purchase Orders ships with two standard labels.
POLABEL.RPT. A mailing label format that prints 12 labels [2-up].
POLABELP.RPT. A mailing label format that prints 14 labels.
l Check the print destination to make sure that you are printing to the correctprinter.
To print mailing labels:
1. Open Purchase Orders > P/O Forms > Mailing Labels.
2. Fill in the following fields:
Use Label. Specify the report format that you want to use to printlabels.
You can accept the default label report format, or click Browse to selecta different one. (Purchase Orders displays the format that you last usedfor labels.)
Select. Specify whether to print labels for purchase orders or returns.
From/To. Specify the range of document numbers for which you wantto print labels.
Include Labels Already Printed. Specify whether to print new copiesof labels that you printed before.
Print Only Labels Marked Required. Specify whether to print labelsfor returns for which you selected the option Require Mailing Labelswhen you printed the returns.
3. Click Print.
Tip: If you are printing labels on a printer, you can click the Align buttonto print a sample copy of the label to check that the information prints inthe right places on label stock.
252 Sage 300 ERP Purchase Orders
Printing Purchase Orders Forms
Printing Receiving Slips
You can print receiving slips until receipts are completed. Once they arecompleted, you can no longer print them, and they will be deleted when you runDay End processing if you do not keep transaction history.
You can print a receiving slip immediately after posting the receipt in theReceipt Entry screen, or use the Receiving Slips print screen in the P/O Formsfolder when you want to print several Receiving slips together.
Before you start:
l Find out which report file to use for printing receiving slips.
l If you are printing forms, check the print destination for forms and reports.
To print receiving slips:
1. Open Purchase Orders > P/O Forms > Receiving Slips.
2. Specify options for the receipts, as follows:
Use receipt. Specify the report format to use for printing the receipts.You can accept the default format that appears, or click the Browsebutton to select a different one. (Purchase Orders displays the format thatyou last used for printing receipts.) Mor e ...
Purchase Orders ships with four standard formats for printing receivingslips:
PORCP01.RPT—for printing on blank paper.
PORCP02.RPT—for printing on preprinted forms.
PORCP03.RPT—for printing on blank paper (include quantitiesreceived and costs).
PORCP04.RPT—for printing on preprinted forms (include quantitiesreceived and costs).
Note: Pre-printed forms PORCP03.RPT and PORCP04.RPT print costinformation. If you want to hide costs on these forms, you will need tocustomize them.
From Receipt Number/To Receipt Number. Specify the range ofreceipts to print.
User's Guide 253
Chapter 5: Printing Purchase Orders Reports and Forms
Include Receipts Already Printed. Choose to print new copies ofreceipts that you printed before.
Print Serial/Lot Numbers. Choose to print the serial and/or lotnumbers of any serialized or lotted items included in the receipts.
3. Click Print.
Tip: If you are printing receiving slips on a printer, you can click theAlign button to print a sample copy to check that the information prints inthe right places on a preprinted receipt form.
Purchase Orders
Use the P/O Purchase Orders screen to print one or more purchase orders.
About Printing Purchase Orders
You can print purchase orders from the P/O Purchase Orders screen. You canalso print a purchase order directly from the P/O Purchase Order Entry screen,right after posting it. You can reprint purchase orders until they are complete.
If you wish, you can print purchase orders by type (Active, Future, Standing,Blanket), and you can choose to reprint or exclude previously printedpurchase orders, or print only incomplete purchase orders. You can also printcopies of edited purchase orders, including only the details added since thelast time you printed a purchase order.
You can print purchase orders using the forms that come with the program, oryou can change the forms. Mor e ...
For more information on designing and adapting forms and reports, see theonline document Customizing Printed Forms and Reports with the SAP CrystalReports® Designer in the User Documentation section on the Sage 300 ERPCustomer Portal athttps://customers.sagenorthamerica.com/irj/go/km/docs/sageKM/SageAccpac ERP/Ungated Customers/Browsable/Product Documentation/Accpac_UA_Resources.htm.
Printing drop-ship addresses
If the purchase order includes drop-ship addresses, all details with the samedrop-ship address are printed together on the purchase order, followed by theaddress, rather than repeating the address for each detail line that uses it.
254 Sage 300 ERP Purchase Orders
Printing Purchase Orders Forms
E-mailing purchase orders
You can email purchase orders and purchase returns to vendors.
If you want to email purchase orders to vendors, you use the Email Messagesscreen in the P/O Setup folder to create the email message that you want tosend to vendors.
For each vendor that you want to email, you must set the Delivery Method toEmail or to Contact's Email on the Processing tab of the vendor record inAccounts Payable.
E-mailing Purchase Orders to Vendors
You can use the P/O Purchase Orders print screen to send purchase orders tovendors by e-mail.
Before you start:
l Use the E-mail Messages screen in the P/O Setup folder to create the e-mailmessage that you want to send to vendors with e-mailed purchase orders.Purchase orders are sent as attachments with the e-mail messages.
For more information about setting up e-mail messages, see "Creating E-mail Messages " (page 50).
l In Accounts Payable, in the vendor record for each vendor that you want to e-mail, set the Delivery Method to Email or to Contact's Email.
For more information about setting options in vendor records, see theAccounts Payable help.
To e-mail purchase orders to vendors:
1. Open the P/O Purchase Orders print screen. Mor e ...
To e-mail a purchase order immediately after posting it:
a. Click Post while the purchase order is displayed.
b. Click Yes to print the purchase order. Purchase Orders opens the P/OPurchase Orders print screen, selecting the purchase order that you justposted.
To e-mail a range of purchase orders, open Purchase Orders > P/OForms > Purchase Orders.
2. On the P/O Purchase Orders print screen, select Vendor in the DeliveryMethod field.
User's Guide 255
Chapter 5: Printing Purchase Orders Reports and Forms
3. In the Message ID field, accept the default message ID defined forpurchase orders, or click the Zoom button, and then select the ID for adifferent e-mail message.
4. Specify other options for the purchase orders, as usual. (For help on thesefields, see "P/O Purchase Orders Screen" (page 299).)
5. Click Print.
When you select Vendor as the delivery method, Purchase Orders prints tothe destination specified in the vendor record: the current printdestination, the vendor e-mail, or the contact e-mail. (If you selected PrintDestination as the delivery method, the program would print all purchaseorders to the current print destination.)
Printing Purchase Orders
You can print purchase orders until they are completed. Once they arecompleted, you can no longer print them, and they will be deleted when yourun Day End processing if you do not keep transaction history.
You can print an order immediately after posting it in the Purchase Order Entryscreen, or use the Purchase Orders print screen in the P/O Forms folder whenyou want to print several purchase orders together. For step-by-stepinstructions on printing immediately after posting, see "Printing a PurchaseOrder Immediately After Posting" (page 258).
Before you start:
l Find out which report format to use for printing the form you are workingwith.
l If you are e-mailing forms to vendors:
Use the E-mail Messages screen in the P/O Setup folder to create the e-mail message that you want to send to vendors.
Set the Delivery Method to E-mail or to Contact's E-mail for each vendorthat you want to e-mail. You set the delivery method on the Processingtab of the vendor record in Accounts Payable.
l Check the print destination for forms and reports that you are printing.
256 Sage 300 ERP Purchase Orders
Printing Purchase Orders Forms
To print purchase orders:
1. Open Purchase Orders > P/O Forms > Purchase Orders.
For information about the Purchase Orders screen, see "P/O PurchaseOrders Screen" (page 299).
2. Specify options for the purchase orders, as follows:
Use Purchase Order. Specify the report format to use for printingpurchase orders. You can accept the default format that appears, or clickthe Browse button to select a different one. (Purchase Orders displaysthe format that you last used for printing purchase orders.) Mor e ...
Purchase Orders ships with four standard formats for printing purchaseorders:
POPOR01.RPT—for printing on blank paper.
POPOR02.RPT—for printing on preprinted forms.
POPOR04.RPT—for printing on blank paper.
POPOR05.RPT—for printing on preprinted forms.
The first two report formats connect directly to the Purchase Ordersdatabase and are easier to change if you need to customize your purchaseorder forms.
The second two formats print more quickly, but may be less adaptable toyour needs.
From Purchase Order Number/To Purchase Order Number.Specify the range of purchase orders to print.
Delivery Method. Specify how to send the purchase order to yourvendor. Mor e ...
Select Print Destination to print to your usual print destination.
Note: If printing to a printer, you can also print mailing labels forpurchase orders, and then mail the purchase orders.
Select Vendor to use the delivery method specified in each vendorrecord in the Accounts Payable program (such as e-mail).
Message ID. If you selected Vendor as the delivery method, select theID for the e-mail message you want to send with purchase orders forvendors that use e-mail as the delivery method. Mor e ...
User's Guide 257
Chapter 5: Printing Purchase Orders Reports and Forms
To view or edit the message for the selected ID, or to add a new e-mailmessage for purchase orders, click the Zoom button for the Message IDfield.
Include Active / Future / Standing / Blanket Orders. Select thetypes of purchase orders to print.
Include Purchase Orders Already Printed. Specify whether to printnew copies of purchase orders that you printed before.
Include Details Already Printed. Specify whether to include detailsthat you printed before (if you have added to the purchase order) or onlydetails added later.
Use Custom Form. Do not select this option unless you are using acustomized purchase order format that requires it. (This option is forformats that do not use the report selection criteria sent by this printwindow.)
3. Click Print.
Tip: If you are printing purchase orders on a printer, you can click theAlign button to print a sample copy to check that the information printsin the right places on a preprinted PO form.
Printing a Purchase Order Immediately After Posting
You can print purchase orders until they are completed. Once they arecompleted, you can no longer print them, and they will be deleted when yourun Day End processing if you do not keep transaction history.
You can print an order immediately after posting it in the Purchase Order Entryscreen, or use the Purchase Orders screen in the P/O Forms folder when youwant to print several purchase orders together. For step-by-step instructionson printing several purchase orders, see "Printing Purchase Orders" (page256).
Before you start:
l Find out which report format to use for printing the form you are workingwith.
l If you are e-mailing forms to vendors:
258 Sage 300 ERP Purchase Orders
Printing Purchase Orders Forms
Use the E-mail Messages screen in the P/O Setup folder to create the e-mail message that you want to send to vendors.
Set the Delivery Method to E-mail or to Contact's E-mail for each vendorthat you want to e-mail. You set the delivery method on the Processing tabof the vendor record in Accounts Payable.
l Check the print destination for forms and reports that you are printing.
To print a purchase order immediately after posting it:
1. In the Purchase Order Entry screen, click Post while the purchase order isdisplayed.
When Purchase Orders finishes posting, it displays a message askingwhether to print the purchase order.
2. Click Yes.
Purchase Orders opens the P/O Purchase Orders print screen, selecting thepurchase order that you just posted.
3. Select options for printing the purchase order, as follows:
Use Purchase Order. Use the default purchase order report format, orclick Browse to select a different one. Mor e ...
Purchase Orders ships with four standard formats for printing purchaseorders:
POPOR01.RPT—for printing on blank paper.
POPOR02.RPT—for printing on preprinted forms.
POPOR04.RPT—for printing on blank paper.
POPOR05.RPT—for printing on preprinted forms.
The first two reports connect directly to the P/O database, and are easierto change if you need to customize your purchase order forms.
The second two print more quickly, but may be less adaptable to yourneeds.
Note: Purchase Orders displays the format that you last used forpurchase orders.
Delivery Method. Specify how to send the purchase order to yourvendor. Mor e ...
User's Guide 259
Chapter 5: Printing Purchase Orders Reports and Forms
Select Print Destination to print to your usual print destination.
Select Vendor to use the delivery method (such as e-mail) specifiedin the vendor record in Accounts Payable.
Message ID. If you selected Vendor as the delivery method, select theID for the message you want to send with the e-mailed purchase order(if the vendor record uses an e-mail delivery method). Mor e ...
To view or edit the message for the selected ID, or to add a new e-mailmessage for purchase orders, click the Zoom button for the Message IDfield.
Include Details Already Printed. Choose whether to include thedetails that you printed before (if you have now added to the PO) or onlydetails added later.
Use Custom Form. Do not select this option unless you are using acustomized purchase order form that requires it. (This option is forcustom forms that do not use the report selection criteria sent by thisprint window.)
4. Click Print.
Tip: If you are printing the purchase order on a printer, you can click theAlign button to print a sample copy of the purchase order to check thatthe information prints in the right places on preprinted forms. If thesample form does not line up correctly, ensure that you have correctlyinserted the forms in the printer.
Requisitions
Use the P/O Requisitions screen to print requisitions for purchases you plan tomake and for which you may need approval before you can create purchaseorders.
Printing Requisitions
You can print purchase requisitions until they are completed. Once they arecompleted, you can no longer print them and they will be deleted when yourun Day End processing if you do not keep transaction history.
You can print a requisition immediately after posting it in the Requisition Entryscreen, or use the Requisitions print screen in the P/O Forms folder when youwant to print several requisitions together. For instructions on printing arequisition after posting it, see "Printing a Requisition Immediately After
260 Sage 300 ERP Purchase Orders
Printing Purchase Orders Forms
Posting" (page 261).
Before you start:
l Find out which report format to use for printing the requisitions.
l Check the print destination to make sure that you are printing to the correctprinter.
To print requisitions:
1. Open Purchase Orders > P/O Forms > Requisitions.
2. Specify options for the requisitions, as follows:
Use Requisition. Specify the report format to use for printingrequisitions. You can accept the default format that appears, or click theBrowse button to select a different one. (Purchase Orders displays theformat that you last used for printing requisitions.) Mor e ...
Purchase Orders ships with three standard formats for printingrequisitions:
PORQN01.RPT—for printing on blank paper.
PORQN02.RPT—for printing on preprinted forms.
PORQN03.RPT—an alternative format that includes optional fields forprinting on blank paper.
From Requisition Number/To Requisition Number. Specify therange of requisitions to print.
Include Requisitions Already Printed. Specify whether to print newcopies of requisitions that you printed before.
3. Click Print.
Tip: If you are printing requisitions on a printer, you can click the Alignbutton to print a sample copy of the label to check that the informationprints in the right places on a preprinted requisition form.
Printing a Requisition Immediately After Posting
You can print copies of requisitions only until they are completed.
Once they are completed, you can no longer print them and, unless you keeptransaction history, they will be deleted when you run Day End processing.
User's Guide 261
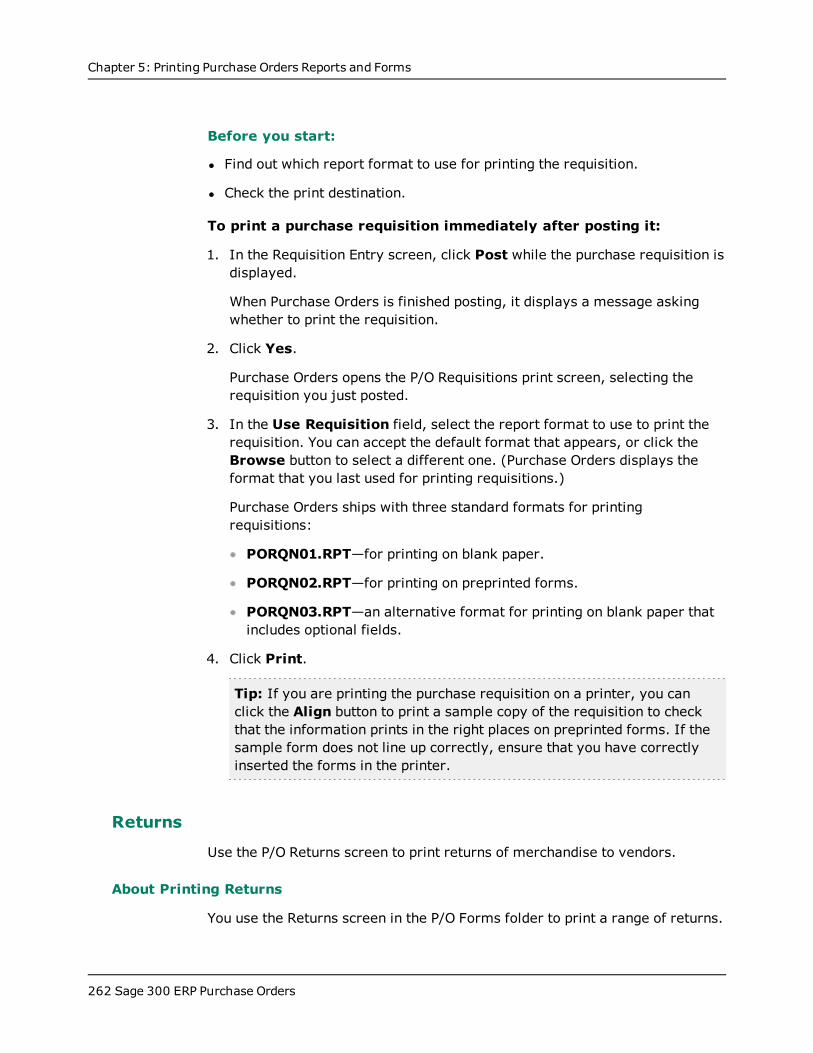
Chapter 5: Printing Purchase Orders Reports and Forms
Before you start:
l Find out which report format to use for printing the requisition.
l Check the print destination.
To print a purchase requisition immediately after posting it:
1. In the Requisition Entry screen, click Post while the purchase requisition isdisplayed.
When Purchase Orders is finished posting, it displays a message askingwhether to print the requisition.
2. Click Yes.
Purchase Orders opens the P/O Requisitions print screen, selecting therequisition you just posted.
3. In the Use Requisition field, select the report format to use to print therequisition. You can accept the default format that appears, or click theBrowse button to select a different one. (Purchase Orders displays theformat that you last used for printing requisitions.) Mor e ...
Purchase Orders ships with three standard formats for printingrequisitions:
PORQN01.RPT—for printing on blank paper.
PORQN02.RPT—for printing on preprinted forms.
PORQN03.RPT—an alternative format for printing on blank paper thatincludes optional fields.
4. Click Print.
Tip: If you are printing the purchase requisition on a printer, you canclick the Align button to print a sample copy of the requisition to checkthat the information prints in the right places on preprinted forms. If thesample form does not line up correctly, ensure that you have correctlyinserted the forms in the printer.
Returns
Use the P/O Returns screen to print returns of merchandise to vendors.
About Printing Returns
You use the Returns screen in the P/O Forms folder to print a range of returns.
262 Sage 300 ERP Purchase Orders
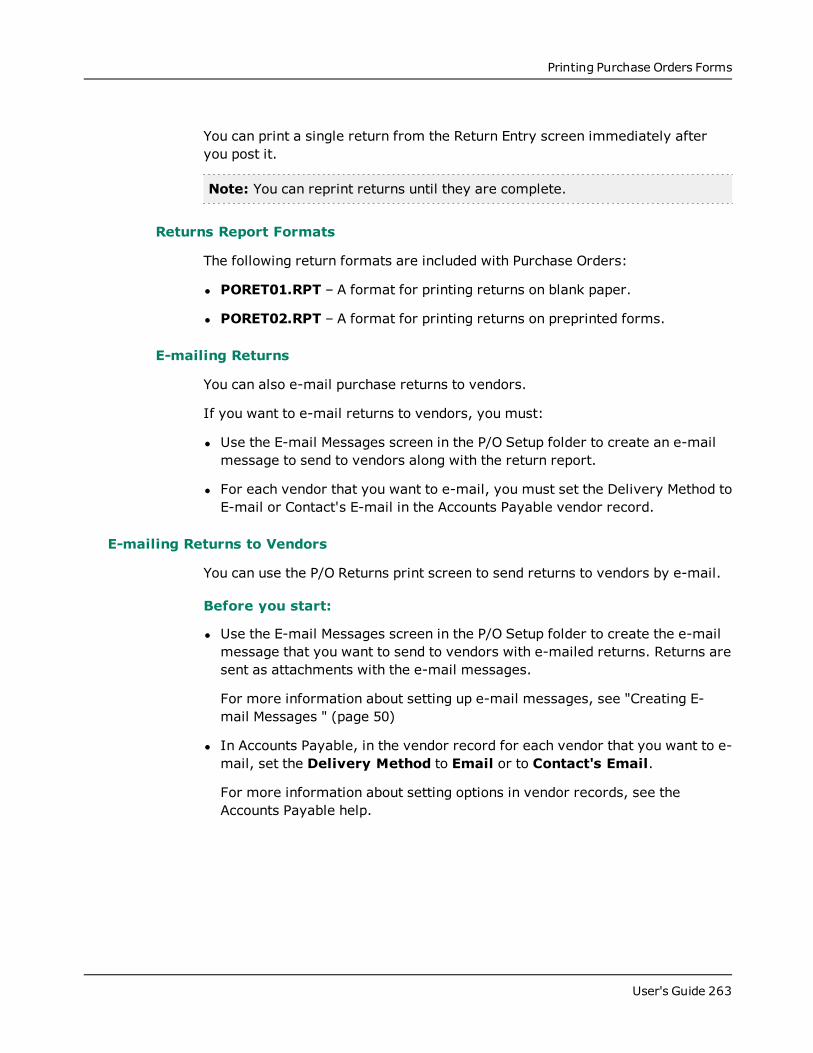
Printing Purchase Orders Forms
You can print a single return from the Return Entry screen immediately afteryou post it.
Note: You can reprint returns until they are complete.
Returns Report Formats
The following return formats are included with Purchase Orders:
l PORET01.RPT – A format for printing returns on blank paper.
l PORET02.RPT – A format for printing returns on preprinted forms.
E-mailing Returns
You can also e-mail purchase returns to vendors.
If you want to e-mail returns to vendors, you must:
l Use the E-mail Messages screen in the P/O Setup folder to create an e-mailmessage to send to vendors along with the return report.
l For each vendor that you want to e-mail, you must set the Delivery Method toE-mail or Contact's E-mail in the Accounts Payable vendor record.
E-mailing Returns to Vendors
You can use the P/O Returns print screen to send returns to vendors by e-mail.
Before you start:
l Use the E-mail Messages screen in the P/O Setup folder to create the e-mailmessage that you want to send to vendors with e-mailed returns. Returns aresent as attachments with the e-mail messages.
For more information about setting up e-mail messages, see "Creating E-mail Messages " (page 50)
l In Accounts Payable, in the vendor record for each vendor that you want to e-mail, set the Delivery Method to Email or to Contact's Email.
For more information about setting options in vendor records, see theAccounts Payable help.
User's Guide 263
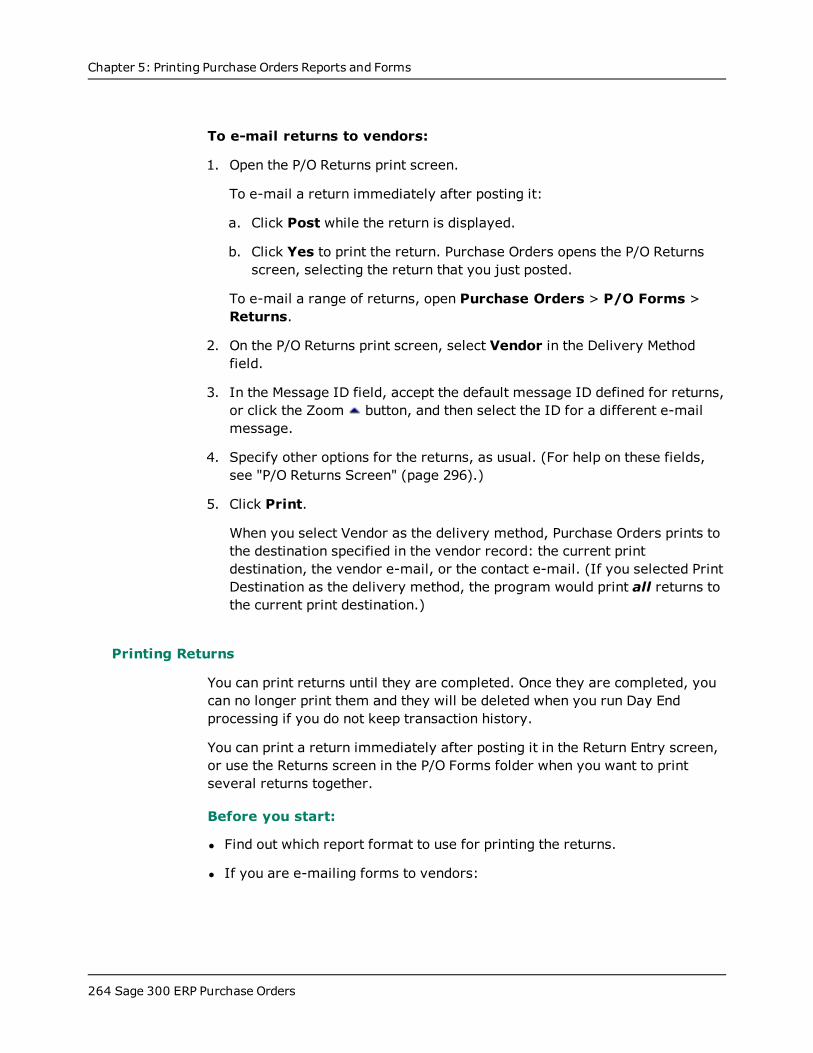
Chapter 5: Printing Purchase Orders Reports and Forms
To e-mail returns to vendors:
1. Open the P/O Returns print screen. Mor e ...
To e-mail a return immediately after posting it:
a. Click Post while the return is displayed.
b. Click Yes to print the return. Purchase Orders opens the P/O Returnsscreen, selecting the return that you just posted.
To e-mail a range of returns, open Purchase Orders > P/O Forms >Returns.
2. On the P/O Returns print screen, select Vendor in the Delivery Methodfield.
3. In the Message ID field, accept the default message ID defined for returns,or click the Zoom button, and then select the ID for a different e-mailmessage.
4. Specify other options for the returns, as usual. (For help on these fields,see "P/O Returns Screen" (page 296).)
5. Click Print.
When you select Vendor as the delivery method, Purchase Orders prints tothe destination specified in the vendor record: the current printdestination, the vendor e-mail, or the contact e-mail. (If you selected PrintDestination as the delivery method, the program would print all returns tothe current print destination.)
Printing Returns
You can print returns until they are completed. Once they are completed, youcan no longer print them and they will be deleted when you run Day Endprocessing if you do not keep transaction history.
You can print a return immediately after posting it in the Return Entry screen,or use the Returns screen in the P/O Forms folder when you want to printseveral returns together.
Before you start:
l Find out which report format to use for printing the returns.
l If you are e-mailing forms to vendors:
264 Sage 300 ERP Purchase Orders
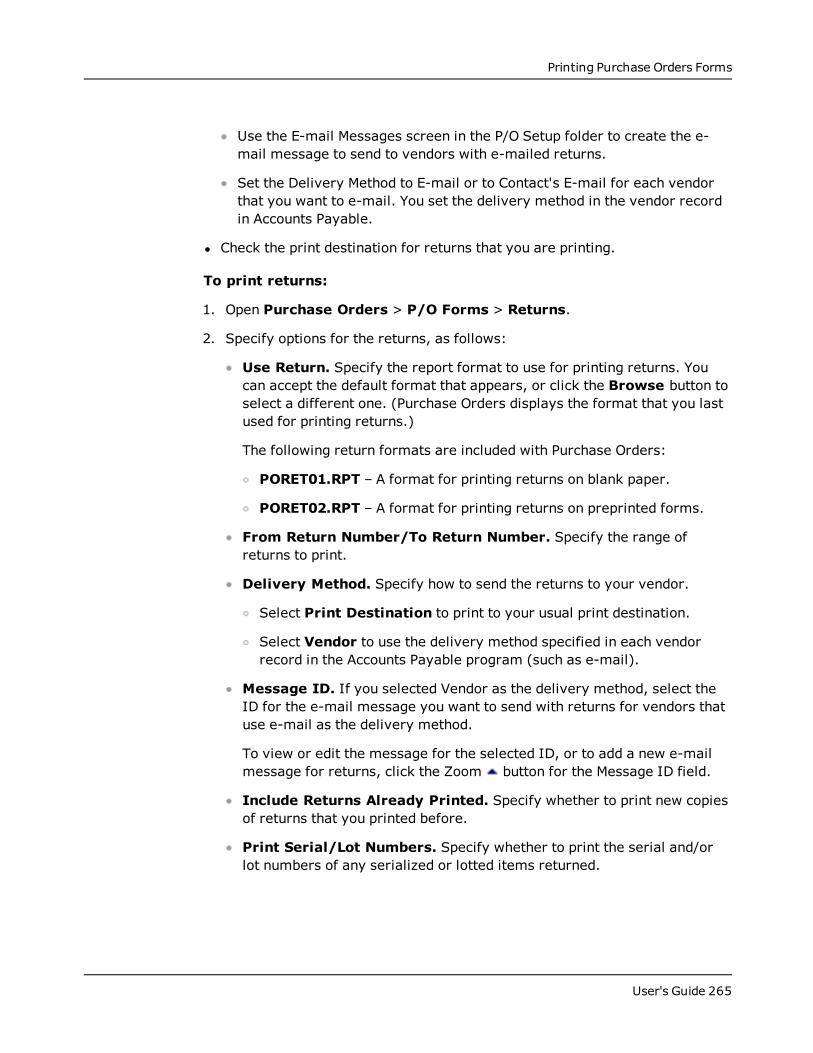
Printing Purchase Orders Forms
Use the E-mail Messages screen in the P/O Setup folder to create the e-mail message to send to vendors with e-mailed returns.
Set the Delivery Method to E-mail or to Contact's E-mail for each vendorthat you want to e-mail. You set the delivery method in the vendor recordin Accounts Payable.
l Check the print destination for returns that you are printing.
To print returns:
1. Open Purchase Orders > P/O Forms > Returns.
2. Specify options for the returns, as follows:
Use Return. Specify the report format to use for printing returns. Youcan accept the default format that appears, or click the Browse button toselect a different one. (Purchase Orders displays the format that you lastused for printing returns.) Mor e ...
The following return formats are included with Purchase Orders:
PORET01.RPT – A format for printing returns on blank paper.
PORET02.RPT – A format for printing returns on preprinted forms.
From Return Number/To Return Number. Specify the range ofreturns to print.
Delivery Method. Specify how to send the returns to your vendor. Mor e ...
Select Print Destination to print to your usual print destination.
Select Vendor to use the delivery method specified in each vendorrecord in the Accounts Payable program (such as e-mail).
Message ID. If you selected Vendor as the delivery method, select theID for the e-mail message you want to send with returns for vendors thatuse e-mail as the delivery method. Mor e ...
To view or edit the message for the selected ID, or to add a new e-mailmessage for returns, click the Zoom button for the Message ID field.
Include Returns Already Printed. Specify whether to print new copiesof returns that you printed before.
Print Serial/Lot Numbers. Specify whether to print the serial and/orlot numbers of any serialized or lotted items returned.
User's Guide 265

Chapter 5: Printing Purchase Orders Reports and Forms
Require Mailing Labels. Specify whether to print the number of labelson the Return Entry Totals tab for each return (select the option) or onlyone label per return (do not select the option).
Use Custom Form. Do not select this option unless you are using acustomized return format that requires it. (This option is for formatsthat do not use the report selection criteria sent by this print window.)
3. Click Print.
Tip: If you are printing returns on a printer, you can click the Align buttonto print a sample copy to check that the information prints in the rightplaces on a preprinted PO form.
Printing a Return Immediately After Posting
Before you start:
l Find out which report format to use for printing the form you are workingwith.
l If you are e-mailing forms to vendors:
Use the E-mail Messages screen in the P/O Setup folder to create the e-mail message that you want to send to vendors.
Set the Delivery Method to E-mail or to Contact's E-mail for each vendorthat you want to e-mail. You set the delivery method on the Processingtab of the vendor record in Accounts Payable.
l Check the print destination for forms and reports that you are printing.
To print a return immediately after posting it:
1. Click Post while the return is displayed.
When Purchase Orders is finished posting the return, it displays a messageasking whether to print the return.
2. Click Yes to print the return. Purchase Orders opens the P/O Returnsscreen and selects the return that you just posted.
3. Select options for printing the return, as follows:
Use Purchase Order. Use the default report format for returns, orclick Browse to select a different one. Mor e ...
266 Sage 300 ERP Purchase Orders
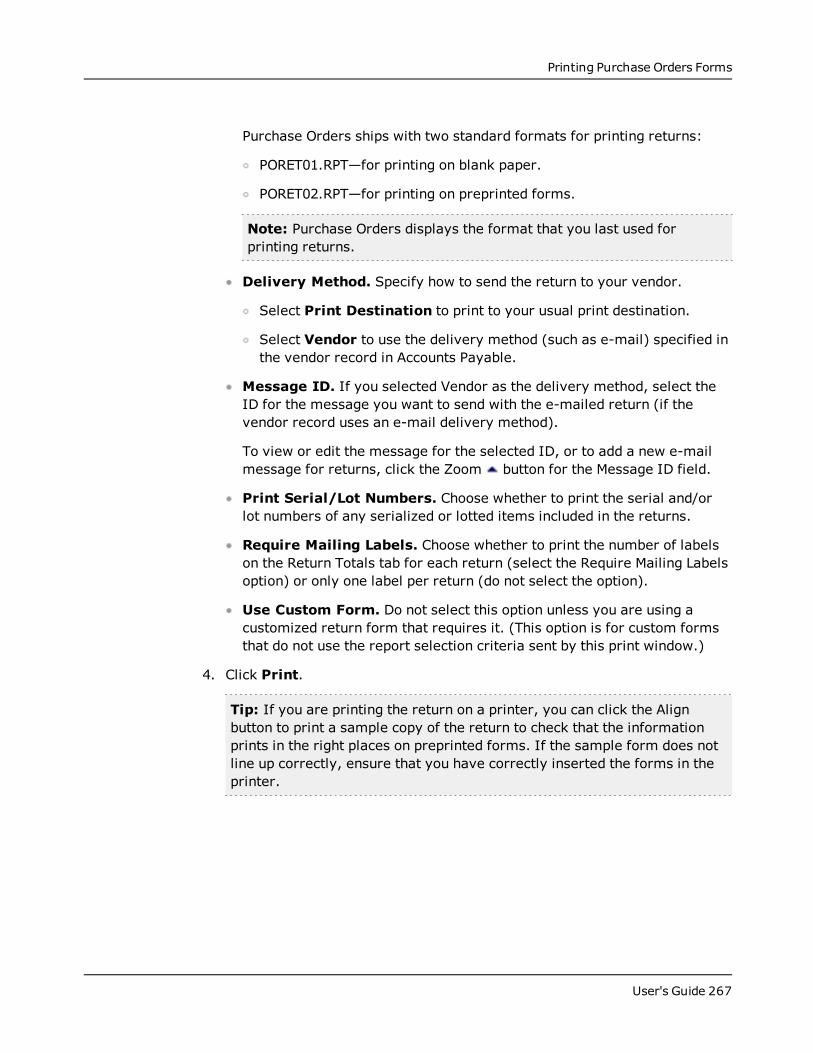
Printing Purchase Orders Forms
Purchase Orders ships with two standard formats for printing returns:
PORET01.RPT—for printing on blank paper.
PORET02.RPT—for printing on preprinted forms.
Note: Purchase Orders displays the format that you last used forprinting returns.
Delivery Method. Specify how to send the return to your vendor. Mor e ...
Select Print Destination to print to your usual print destination.
Select Vendor to use the delivery method (such as e-mail) specified inthe vendor record in Accounts Payable.
Message ID. If you selected Vendor as the delivery method, select theID for the message you want to send with the e-mailed return (if thevendor record uses an e-mail delivery method). Mor e ...
To view or edit the message for the selected ID, or to add a new e-mailmessage for returns, click the Zoom button for the Message ID field.
Print Serial/Lot Numbers. Choose whether to print the serial and/orlot numbers of any serialized or lotted items included in the returns.
Require Mailing Labels. Choose whether to print the number of labelson the Return Totals tab for each return (select the Require Mailing Labelsoption) or only one label per return (do not select the option).
Use Custom Form. Do not select this option unless you are using acustomized return form that requires it. (This option is for custom formsthat do not use the report selection criteria sent by this print window.)
4. Click Print.
Tip: If you are printing the return on a printer, you can click the Alignbutton to print a sample copy of the return to check that the informationprints in the right places on preprinted forms. If the sample form does notline up correctly, ensure that you have correctly inserted the forms in theprinter.
User's Guide 267
Printing Purchase Orders ReportsUse Purchase Orders Reports screens to print setup reports and analyticalreports.
About Purchase Orders Reports
You can print a variety of reports to help you manage your Purchase Orderssystem, and to help you analyze Purchase Orders transactions. Printed reportsalso serve as a source of backup information in case the data is damaged.
Note: If you use multicurrency accounting, some of these reports can includesource and functional-currency information.
This section contains an overview of the Purchase Orders analytical and setupreports.
Purchase Orders also comes with standard forms you can use to provideprinted copies of transactions to vendors. For more information, see "AboutPurchase Orders Forms" (page 74).
Printing Reports
Purchase Orders prints reports to your usual print destination. When you printto any destination, Order Entry updates the report status to "Printed." For moreinformation about print destinations, see "About Print Destinations " (page249).
Purchase Orders comes with several report formats that you can use "as is," oryou can adapt them for your own needs using SAP Crystal Reports® for Sage300 ERP. For more information, see "About SAP Crystal Reports" (page 73).
You can print all Purchase Orders reports on 8½-inch x 11-inch paper or A4-sized paper.
Tip: Printed reports can serve as a source of backup information in the eventthat data is lost or damaged.
For information about printing reports, see "Printing Purchase OrdersAnalytical and Setup Reports" (page 272).
User's Guide 268
Chapter 5: Printing Purchase Orders Reports and Forms
Setup Reports
Setup reports show the information entered to define records you create whensetting up or updating your Purchase Order system, and the options youselected in the P/O Options screen and G/L Integration screen.
l "P/O Options Report Screen " (page 337).
l "P/O G/L Integration Report Screen " (page 334).
l "P/O Additional Costs Report Screen " (page 331).
l "P/O E-mail Messages Report Screen " (page 333).
l "P/O Ship-Via Codes Report Screen " (page 339).
l "P/O Vendor Contract Costs Report Screen " (page 341).
l "P/O Optional Fields Report Screen " (page 336).
l "P/O Templates Report Screen " (page 340).
If you do not use Inventory Control, the program also includes:
l "P/O Account Sets Report Screen " (page 330)
l "P/O Items Report Screen " (page 335)
l "P/O Vendor Details Report Screen " (page 343).
l "P/O Weight Units of Measure Report Screen " (page 344).
When you add, delete, or change any of these records, you should print andfile the corresponding reports to keep your printed records up to date.
Analytical Reports
Purchase Orders provides Status reports that let you check on current orders,backorders, unfilled orders, lost orders, and invoicing status. Status reportsinclude:
l "P/O Purchase Order Action Report Screen" (page 321).
l "P/O Aged Purchase Orders Report Screen" (page 309).
l "P/O Shippable Backorders Report" (page 326)
Purchase Orders also provides Audit reports for printing transaction lists,posting journals, and purchase history. Audit reports include:
269 Sage 300 ERP Purchase Orders
Printing Purchase Orders Reports
l "P/O Transaction List Report Screen" (page 327).
l "P/O Posting Journals Screen" (page 316).
l "P/O Purchase History Report" (page 319).
l "P/O Purchase Statistics Report Screen" (page 324).
l "P/O Payables Clearing Audit List Report Screen" (page 315).
l "P/O G/L Transactions Report Screen" (page 312).
If you do not use Inventory Control, the program also includes:
l "P/O Item Transaction History Report Screen" (page 314)
About Reporting General Ledger Data
The G/L Transactions report is a listing of the general ledger transactionscreated by Purchase Orders that you might need to print as part of your audittrail.
If Purchase Orders uses the option to create G/L transactions using the CreateBatch icon (on the P/O G/L Integration screen), you can print the G/LTransactions report from Purchase Orders after you run day-end processing,but before you create or append to general ledger batches. You can print thisreport whether or not you use Sage 300 ERP General Ledger with the samedatabase as Purchase Orders.
However, if Purchase Orders uses the option to create G/L Transactions duringDay End Processing, you cannot print the G/L Transactions report from PurchaseOrders. If you need this transaction information for your audit trail, you canprint from your general ledger.
About Vendor Delivery Methods for Purchase Orders Forms
You can send purchase orders and returns using the delivery methods andaddresses specified in Accounts Payable vendor records. Mor e ...
Delivery methods include:
l Mail
l E-Mail
l Contact's E-Mail
User's Guide 270
Chapter 5: Printing Purchase Orders Reports and Forms
When you print purchase orders and returns, you choose to print using thevendor's delivery method (Vendor), or you print all the documents to thecurrent print destination.
If you choose Vendor, the program uses the delivery method from the vendorrecord.
l Purchase orders and returns are sent by e-mail to vendors that use an e-mail delivery method, along with the e-mail message you select when youprint these documents.
l Purchase orders and returns are printed to your usual print destination forvendors that use Mail as the delivery method.
Printing the Purchase History Report
Print the Purchase History report to obtain summary or detailed purchaseinformation by vendor or inventory item.
To print the Purchase History report:
1. Open Purchase Orders > P/O Analytical Reports > PurchaseHistory.
2. Select Detail or Summary from the Report Type list. Mor e ...
For Detail reports, you can select purchase orders by document date oryear/period, and you can include serial and lot numbers for serialized orlotted items.
For Summary reports, you can select purchase orders only by year/periodand you cannot include serial and lot numbers on the report.
3. Specify the range of year/periods or document dates for the report.
4. In the Sort By list, select how to report purchase history information (byvendor number or item number).
5. Specify the range of vendors and/or items to include on the report. Mor e ...
You can select ranges of vendor number and item numbers for Detailreports.
For Summary reports, you select numbers according to your choice for theSort By option.
271 Sage 300 ERP Purchase Orders
Printing Purchase Orders Reports
6. If you selected the Include Serial/Lot Numbers option, specify theranges of serial numbers and lot numbers to appear on the report.
7. If you use multicurrency accounting, specify the range of currency codes forwhich to print transactions (only transactions posted with the selectedcurrency codes are listed), and specify whether to print amounts in thevendor's currency or functional currency.
8. If you are printing a Detail report, you use Sage 300 ERP Project and JobCosting, and you want to include job information for all job-relatedtransactions, select Include Job Details.
9. Click Print.
Printing Purchase Orders Analytical and Setup Reports
Purchase Orders includes analytical reports that provide order statusinformation, statistics, and transaction information. It also includes setupreports that provide basic setup record information.
For more information about the reports available in Purchase Orders, see"About Purchase Orders Reports" (page 268).
Purchase Orders prints reports to your usual print destination. When you printto any destination, Order Entry updates the report status to "Printed." For moreinformation about print destinations, see "About Print Destinations " (page 249).
You can print all Purchase Orders reports on 8½-inch x 11-inch paper or A4-sized paper.
To print Purchase Orders reports:
1. Open Purchase Orders > P/O Analytical Reports or P/O SetupReports, and then select a report.
2. Specify options to include the information you need on the report.
When the Print screen appears, you can press F1 to see detailed informationabout report options.
3. Click Print.
Selecting a Printer for Reports
Sage 300 ERP lets you choose a default printer for all reports that you print, andassign different printers to specific reports (such as invoices or labels).
User's Guide 272
Chapter 5: Printing Purchase Orders Reports and Forms
To change the default printer for all reports:
1. On the Sage 300 ERP Desktop menu, select File > Page Setup.
2. Click the Printer button.
3. From the drop-down list, select the printer to use for all reports.
Note: The printer list includes all printers that have been added to thePrinters and Faxes list in Windows.
4. Click the Properties button to change settings for your printer.
5. Click OK to close the Properties screen.
6. Click OK again to return to the Page Setup screen.
7. Click the Print Destination button, and then check that the printdestination is Printer.
Note: If you are using a laser printer, you would normally select theReport Paper Size and Report Orientation options on the Print Destinationscreen.
8. Click OK on the Print Destination screen, and then click OK on the PageSetup screen.
To assign a specific report to a specific printer:
1. Open the report screen that you want to assign to a printer.
2. On the menu, click File > Print Setup.
3. Select either Default Printer (the Windows default printer, or selectSpecific Printer, and then select the printer to use for this report.
Note:The printer specified for all reports on the Page Setup screen (openedfrom the File menu on the Sage 300 ERP Desktop) appears as the defaultfor the Specific Printer setting.
The printer list includes all printers that have been added to the Printersand Faxes list in Windows.
4. Specify a paper source if you want to use a particular paper tray or paperstock for this report.
5. Click OK.
273 Sage 300 ERP Purchase Orders
Printing Purchase Orders Reports
To clear the assigned printer for this report:
1. On the Sage 300 ERP Desktop, click the icon for the report.
2. From the Object menu, select Restore Defaults , or right-click, and thenselect Restore Defaults from the list that appears.
3. In the Restore Defaults screen, select Print Settings, and then click OK.
The print setup for the report screen is restored to the desktop default.
Prompt for printer each time you print
l To have the program prompt you to choose a printer and print options eachtime you print, select the Confirm On Print option in Preferences (on the Viewmenu on the Sage 300 ERP Desktop).
Saving Default Report Settings
Sage 300 ERP lets you save report settings as defaults for printing PurchaseOrders forms (such as purchase requisitions, POs, receiving slips, returns, andmailing labels) and for several Purchase Orders Analytical reports, including theTransaction List, Purchase Order Action Report, Aged Purchase Orders, andPurchase History reports.
To save current settings as defaults:
1. Open the Purchase Orders form or report for which you want to save printingsettings.
2. Choose the settings that you want as defaults whenever you print this reportor form.
3. On the report menu, click Settings > Save Settings As Defaults.
To clear saved settings:
1. Open the Purchase Orders form or report for which you want to resetprinting settings.
2. On the report menu, click Settings > Clear Saved Settings,
Selecting a Print Destination
You can print Purchase Orders reports to a printer, to the screen, to a file, or asan attachment to an e-mail message.
User's Guide 274
Chapter 5: Printing Purchase Orders Reports and Forms
Note: You must be assigned to a security group that has authorization tochange the print destination, or the only destination available will be aphysical printer.
To set the Sage 300 ERP print destination to Printer:
Note: These instructions assume that you have set up printers in MicrosoftWindows.
1. On the Sage 300 ERP Desktop menu, click File > Print Destination.
2. Select Printer, and then click OK.
When you next print from Sage 300 ERP, the report will be sent to the defaultprinter. Mor e ...
To specify a default printer for all Sage 300 ERP reports:
1. On the Sage 300 ERP Desktop menu, click File > Page Setup.
2. Click Printer.
3. In the dialog box that appears, from the Name list, select the printer thatyou want to use as the default.
Note: The list includes all printers that have been added to the Printersand Faxes list in Microsoft Windows.
4. Click Properties to change settings for the printer.
5. Click OK to close the Properties screen.
6. Click OK again to return to the Page Setup screen.
7. Click Print Destination, and then check that the print destination is set toPrinter.
Note: If you are using a laser printer, you would normally select theReport Paper Size and Report Orientation options on the Print Destinationscreen.
8. Click OK, and then click OK again to close the Page Setup screen.
Tip: If you want to confirm the destination printer, page size, andorientation each time you print a report, on the Desktop, click View >Preferences, and then select Confirm on print.
275 Sage 300 ERP Purchase Orders
Printing Purchase Orders Reports
To print to the screen (display reports on your monitor):
1. On the Sage 300 ERP Desktop menu, click File > Print Destination.
2. Click Preview.
Note: For Web-based clients, the Preview screen appears first when you clickthe Print button.
Tip: You can print a report displayed in the Preview window by clicking thePrint Report button.
To print to a file:
1. On the Sage 300 ERP Desktop menu, click File > Print Destination.
2. Click File, then enter the drive, directory, and file name, or use the Browsebutton to scroll through the list of directories and files to select the file youwant to use.
Note: You can enter the name of a non-existent file or directory to becreated by the system when you print. When you print to a file, the reportis assigned a unique name, for example, CS1000.TXT.
To print reports as attachments to e-mail messages:
1. On the Sage 300 ERP Desktop menu, click File > Print Destination.
2. Select E-mail to create a file that can be attached to an e-mail.
3. Select either Adobe Acrobat (PDF) or Rich Text Format (RTF) as thefile format for the e-mail attachment. Mor e ...
You can open PDF files with Adobe Acrobat Reader (available as a freedownload from the Adobe Software website).
You can open RTF files with most Windows and Linux word processingprograms.
4. Click OK.
When you print using an e-mail destination Sage 300 ERP creates a PDF or RTFversion of the report, opens your default e-mail program, and attaches thereport file to a new e-mail message. Mor e ...
In Microsoft Windows, the default e-mail program is set in Internet Options, inthe Control Panel.
User's Guide 276
Appendix A: Purchase OrdersScreen Guides
Learn how to find and use Sage 300 ERP screens. Each screen guide includesnavigation information, field help, and a list of tasks you can use the screen toperform.
User's Guide 277
Appendix A: Purchase Orders Screen Guides
Create Purchase Orders ScreensUse these screens to create purchase orders automatically from currentrequisitions, from reorder quantities in Inventory Control, and from activesales orders in Order Entry.
P/O Create POs From I/C Screen
To open this screen:Open Purchase Orders > P/O Create Purchase Orders > Create POsfrom I/C.
Related tasks:
l "Creating Purchase Orders from Inventory Control Reorder Quantities"(page 130)
l "Creating Purchase Orders from Order Entry Sales Orders" (page 133)
l "Creating Purchase Orders from Requisitions" (page 135)
Overview
Use this screen to create purchase orders automatically from the reorderquantities that are defined for items in Inventory Control.
Note: You must set up vendors in Accounts Payable before you can createPurchase Orders.
For more information, see "Creating Purchase Orders from Inventory ControlReorder Quantities" (page 130).
Assigning Dates and Purchase Order Numbers
Purchase Orders creates a single purchase order for the specified vendor andfor every item and quantity that fits the criteria you defined. The programassigns the next available purchase order number to the document, using thelength, prefix, and number for purchase orders on the P/O Options screen.
Fields and Controls
Buttons
CloseClick Close to close the screen.
278 Sage 300 ERP Purchase Orders
Create Purchase Orders Screens
ProcessClick Process to create and post the purchase orders you specified.
Above MaximumSelect this option to order the item quantity that will bring the quantity onhand for each item up to at least the maximum amount specified for the itemon the I/C Reorder Quantities screen.
Note: This choice can result in quantities that are higher than themaximum amount.
Above Projected Sales for [ ] DaysSelect this option to order the item quantity that will increase the quantity onhand for each item to more than the number of units specified as theprojected sales of the item over the number of days you specify, beginningon the run date.
All ItemsSelect this option to order all selected items that are below their maximumquantities in Inventory Control.
Create If The Vendor IsIf you want to select items by their vendor types, specify the vendor typesfor which to select items.
Items in the range you specify are selected if the vendor number for whichyou are creating a purchase order is specified as one of the selected vendortypes in the vendor details record.
From/To Item NumberUse these fields to specify the range of items for which to create purchaseorders.
From/To LocationUse these fields to specify the range of locations.
From/To Vendor NumberUse these fields to specify the range of vendor numbers for which to createpurchase orders.
Items Below MinimumSelect this option to order selected items if their quantities on hand are
User's Guide 279
Appendix A: Purchase Orders Screen Guides
below the minimum quantities entered for them on the I/C ReorderQuantities screen.
Items Below Projected Sales for [ ] DaysSelect this option to order items for which quantities on hand will be belowthe period's projected sales for the number of days you specify.
Note: The run date sets the beginning date of the number of days youspecify.
Reorder Quantities ForSelect Specific Location or All Locations.
l If you select Specific Location, Purchase Orders calculates a separatereorder quantity for each location.
l If you select All Locations, Purchase Orders uses the sum of thequantities at all locations to determine the quantity to order.
Run DateSelect the date to assign to the purchase orders you create. This date isused to select the period from which to order items on the I/C ReorderQuantities screen.
Up to MaximumSelect this option to order the quantity of each item that will bring thequantity on hand for the item up to or close to, but not over, the maximumamount specified on the I/C Reorder Quantities screen.
Up to Projected Sales for [ ] DaysSelect this option to order the item quantity that will bring each item'squantity on hand up to or close to, but not over, the projected salesquantity for the number of days you specify, beginning on the run date.
Optional Fields tabThis tab appears only if optional fields are assigned to purchase orders onthe P/O Optional Fields setup screen.
Select the entries you want to insert on the Optional Fields tab of eachpurchase order you create.
If a Finder appears beside an optional field, you see a default entry forthe field, and you can select another entry from the Finder.
280 Sage 300 ERP Purchase Orders
Create Purchase Orders Screens
Detail Optional Fields tabThis tab appears only if optional fields are assigned to purchase order detailson the P/O Optional Fields setup screen.
Select the entries you want to insert on each detail line for each purchaseorder.
If a Finder appears beside an optional field, you see a default entry for thefield, and you can select another entry from the Finder.
User's Guide 281
Appendix A: Purchase Orders Screen Guides
P/O Create POs From O/E Screen
To open this screen:Open Purchase Orders > P/O Create Purchase Orders > Create POsfrom O/E.
Related tasks:
l "Creating Purchase Orders from Inventory Control Reorder Quantities"(page 130)
l "Creating Purchase Orders from Order Entry Sales Orders" (page 133)
l "Creating Purchase Orders from Requisitions" (page 135)
Overview
If you use Sage 300 ERP Order Entry with Purchase Orders, you can use theCreate POs From O/E screen to create purchase orders automatically fromOrder Entry sales orders.
The program creates a purchase order for each vendor of the specified vendortype for the items and orders that meet the criteria you specify.
For instructions on creating purchase orders from sales orders, see "CreatingPurchase Orders from Order Entry Sales Orders" (page 133).
Fields and Controls
Buttons
ProcessClick the Process button to create and post the purchase orders thatmatch your criteria.
Consolidate ItemsIf you do not select the Drop-Ship Items option, you can select this optionto consolidate details that have the same item number, location, and unit ofmeasure into single details on the purchase orders for selected vendors.
Note: The Consolidate Items check box is not available if any optionalfields are defined for purchase order documents or details.
282 Sage 300 ERP Purchase Orders
Create Purchase Orders Screens
Create Purchase Order for EachUse the Create Purchase Order For Each field to specify whether to:
l Create purchase orders by vendor number, producing only one purchaseorder for each vendor (choose Vendor), or
l Create a separate purchase order for each order number and each vendorlisted on the order (choose Order).
Drop-Ship ItemsSelect this option to include the drop-ship addresses entered for items andcustomers on the Order Entry orders.
From/To Customer NumberUse these fields to specify the first and last customer numbers in the rangeof customers for whom you want to create purchase orders.
From/To Expected Ship DatesUse these fields to specify the earliest and latest expected ship dates in therange of ship dates for which to create purchase orders. (You can use thecalendar associated with each field, or you can click the fields, and thenenter the dates manually.)
From/To Order DatesUse these fields to specify the earliest and latest order dates for which tocreate purchase orders. (You can use the calendar associated with eachfield, or you can click the fields, and then enter the dates manually.)
From/To Order NumberUse these fields to specify the the first and last order numbers in the rangeof Order Entry orders from which to create purchase orders.
I/C Vendor TypeSelect the vendor type to identify the item records for which you will createpurchase orders.
The program creates purchase orders only for item records that have theselected vendor type assigned to them.
Include Non-Stock ItemsSelect this option to include non-stock items from Order Entry orders. If youdo not choose this option, non-stock items do not appear in the Finder, andthey are treated as non-inventory items.
User's Guide 283
Appendix A: Purchase Orders Screen Guides
Note: This option appears only if you allow receipt of non-stock items inInventory Control.
ReorderUse the Reorder field to select the method by which to determine whichitems and quantities to order:
l All Items. Select this option to order all items and quantities specifiedon the selected sales orders.
l Items With Insufficient Quantities. Select this option to order onlyitems for which there are not enough units on hand in Inventory Controlto fill the selected orders.
l Items On Backorder. Select this option to order only the number ofunits of each item for which a backorder quantity exists in the selectedorders.
Note: The program subtracts any quantity of the specified items that wasadded to a previous purchase order.
Optional Fields tabYou see this tab only if you have activated optional fields for the purchaseorders screen.
Optional FieldsOn the Optional Fields tab, type or use the Finder to select the entriesyou want the program to insert on the Optional Fields tab of eachpurchase order.
You can leave optional fields blank if they do not require entries (that is,there is no Finder beside the field and no default entry in the field).
If an optional field has a Finder beside it, you see a default entry for thefield. You can select another entry from the Finder.
Detail Optional Fields tabYou see this tab only if you have activated optional fields for purchaseorder details.
Detail Optional FieldsOn the Detail Optional Fields tab, type or use the Finder to select the
284 Sage 300 ERP Purchase Orders
Create Purchase Orders Screens
entries you want the program to insert on each detail line on eachpurchase order.
You can leave optional fields blank if they do not require entries (that is,there is no Finder beside the field and no default entry in the field).
If an optional field has a Finder beside it, you see a default entry for thefield. You can select another entry from the Finder.
User's Guide 285
Appendix A: Purchase Orders Screen Guides
P/O Create POs From Requisitions Screen
To open this screen:Open Purchase Orders > P/O Create Purchase Orders > Create POsfrom Requisitions.
Related tasks:
l "Creating Purchase Orders from Inventory Control Reorder Quantities"(page 130)
l "Creating Purchase Orders from Order Entry Sales Orders" (page 133)
l "Creating Purchase Orders from Requisitions" (page 135)
Overview
Use this screen to create purchase orders automatically from the requisitionsyou have added in Purchase Orders.
For example, you can create purchase orders automatically for specifiedranges of requisition numbers, dates, and vendor numbers . You can createpurchase orders for requisition details that do not have vendor numbers,assigning vendors either by creating purchase orders for only one vendornumber or by selecting a vendor type used with items in Inventory Control.
When you create purchase orders automatically, the program selects Activeas the purchase order type, posts the purchase orders, and increasesquantities on purchase order in Inventory Control.
For more information, see "About Creating Purchase Orders Automatically"(page 124).
Fields and Controls
Buttons
ProcessClick the Process button to create and post purchase orders that matchyour specified criteria.
Consolidate ItemsIf you do not select the Drop-Ship Items option, you can select this option
286 Sage 300 ERP Purchase Orders
Create Purchase Orders Screens
to consolidate details that have the same vendor, item, unit of measure,location, and expected arrival date into single details on the purchase order.
Requisition details that include drop-ship addresses are not consolidated. Aseparate detail line is created on the purchase order for each requisitiondetail with a drop-ship address.
Note: The Consolidate Items check box is not available if any optionalfields are defined for purchase order documents or details.
From/To Requisition DateUse these fields to specify the first and last dates in the range of requisitiondates for which you are creating purchase orders.
From/To Requisition NumberUse these fields to select the first and last requisition numbers in the rangeof requisitions for which you are creating purchase orders.
From/To Vendor NumberUse these fields to select the first and last vendor numbers in the range ofvendors for which you are creating purchase orders.
Include Blank VendorsSelect this option to add requisition details with blank vendor numbers topurchase orders created for vendors who are assigned to items with thevendor type you specify in the Using I/C Vendor Type field.
Job RelatedSelect this option to create purchase orders from job-related requisitions.
Note: You cannot mix job-related and non-job-related requisitions whencreating purchase orders. If you want to create POs from both types ofrequisitions, you must run this function twice.
Using [I/C] Vendor TypeSelect this option to add requisition details without vendor numbers topurchase orders when the purchase order vendor is assigned in InventoryControl item records as the vendor type specified for the requisition details.
If you use Inventory Control, the field is named Using I/C Vendor Type. Ifyou use Purchase Orders as a stand-alone program (without InventoryControl), it is called Using Vendor Type.
User's Guide 287
Appendix A: Purchase Orders Screen Guides
Note: The Using Vendor Type option appears only if you select theInclude Blank Vendors option.
Optional Fields tabYou see this tab only if you have defined optional fields for purchase ordersdocuments.
Optional FieldsOn the Optional Fields tab, type or use the Finder to select the entriesyou want the program to insert on the Optional Fields tab of eachpurchase order.
If you use the same fields on requisitions and purchase orders, theoptional field entries on the requisition will appear by default on thepurchase orders unless you specify entries here.
If an optional field has a Finder beside it, you see a default entry for thefield. You can select another entry from the Finder.
Detail Optional Fields tabYou see this tab only if you have defined optional fields for purchase ordersdetails.
Detail Optional FieldsOn the Detail Optional Fields tab, type or use the Finder to select theentries you want the program to insert for each detail line on thepurchase order.
If you use the same fields on requisitions and purchase orders, theoptional field entries on the requisition detail lines will appear by defaulton the purchase orders unless you specify entries here.
If an optional field has a Finder beside it, you see a default entry for thefield. You can select another entry from the Finder.
288 Sage 300 ERP Purchase Orders

Purchase Orders Forms
Purchase Orders FormsUse the report forms that come with Purchase Orders to print purchase orders,requisitions, receiving slips, returns, and mailing labels, or select a customizedversion.
P/O Mailing Labels Screen
To open this screen:Open Purchase Orders > P/O Forms > Mailing Labels.
Related tasks:
l "Selecting a Print Destination" (page 274)
l "Printing Mailing Labels" (page 251)
Overview
Use mailing labels to attach address information to envelopes in which you aremailing documents to vendors and to shipments you are returning to vendors.
Mailing Labels Print Formats
Purchase Orders ships with two standard labels.
l POLABEL.RPT. A mailing label format that prints 12 labels [2-up].
l POLABELP.RPT. A mailing label format that prints 14 labels.
You can either use the label format that comes with Purchase Orders, adapt it toyour needs, or design your own.
Fields and Controls
Buttons
AlignYou can use the Align button when printing to a printer. This button letsyou print a sample copy of the mailing label to check that the labels printproperly on preprinted forms. (If the mailing information does not appearin the right places, ensure that the forms are correctly inserted in theprinter.)
User's Guide 289
Appendix A: Purchase Orders Screen Guides
PrintClick the Print button to print the mailing label.
From/ToEnter the range of purchase order numbers for which to print labels.
Include Labels Already PrintedSelect this option to print labels you have already printed.
Print Only Labels Marked RequiredSelect this option to print labels for returns for which you selected theRequire Mailing Labels option when you printed return forms.
SelectUse the Select field to choose whether to print labels for purchase ordersor returns.
Use LabelUse the Use Label field to select a mailing label format.
Purchase Orders ships with two standard labels.
l POLABEL.RPT. A mailing label format that prints 12 labels [2-up].
l POLABELP.RPT. A mailing label format that prints 14 labels.
290 Sage 300 ERP Purchase Orders
Purchase Orders Forms
P/O Receiving Slips Screen
To open this screen:Open Purchase Orders > P/O Forms > Receiving Slips.
Related tasks:
l "Selecting a Print Destination" (page 274)
l "Sample formats for Printed Forms" (page 76)
l "Printing Receiving Slips" (page 253)
Overview
A receiving slip is a detailed list of the items you received from vendors, and itincludes any additional costs posted with the receipt.
Note: You can print copies of receiving slips only until they are completed.Once they are completed, you can no longer print them and, unless you keeptransaction history, they will be deleted when you run Day End processing.
Receiving Slip Report Formats
The following receiving slip report formats are included with Sage 300 ERP:
l PORCP01.RPT— A receiving slip format for printing on blank paper.
l PORCP02.RPT— A receiving slip format for preprinted forms.
l PORCP03.RPT— An alternative format for printing on blank paper thatincludes quantities received.
l PORCP04.RPT— An alternative format for preprinted forms that includesquantities received.
Pre-printed forms PORCP03.RPT and PORCP04.RPT also print cost information.If you want to hide costs on receiving slips, you will need to customize them. Mor e ...
For more information on designing and adapting forms and reports, see theonline document Customizing Printed Forms and Reports with the SAP CrystalReports® Designer in the User Documentation section on the Sage 300 ERPCustomer Portal athttps://customers.sagenorthamerica.com/irj/go/km/docs/sageKM/Sage AccpacERP/Ungated Customers/Browsable/Product Documentation/Accpac_UA_Resources.htm.
User's Guide 291
Appendix A: Purchase Orders Screen Guides
Fields and Controls
Buttons
Align
Click the Align button if you want to print a sample copy of a documentto check that preprinted forms are correctly inserted in the printer.
PrintClick the Print button to print the report.
Include Receipts Already PrintedSelect this option if you want to include receiving slip reports that havealready been printed.
Print Serial/Lot NumbersSelect this option if you want to include serial and lot numbers on thereceiving slip.
From/To Receipt NumberUse the From and To Receipt Number fields to specify the range of receiptsfor which to print receiving slips.
Use ReceiptSelect a receiving slip report format to use.
The following receiving slip report formats are included with Sage 300 ERP:
l PORCP01.RPT— A receiving slip format for printing on blank paper.
l PORCP02.RPT— A receiving slip format for preprinted forms.
l PORCP03.RPT— An alternative format for printing on blank paper thatincludes quantities received.
l PORCP04.RPT— An alternative format for preprinted forms thatincludes quantities received.
Pre-printed forms PORCP03.RPT and PORCP04.RPT also print costinformation. If you want to hide costs on receiving slips, you will need tocustomize them. Mor e ...
For more information on designing and adapting forms and reports, see the
292 Sage 300 ERP Purchase Orders

Purchase Orders Forms
online document Customizing Printed Forms and Reports with the SAPCrystal Reports® Designer in the User Documentation section on the Sage300 ERP Customer Portal athttps://customers.sagenorthamerica.com/irj/go/km/docs/sageKM/SageAccpac ERP/Ungated Customers/Browsable/Product Documentation/Accpac_UA_Resources.htm.
User's Guide 293
Appendix A: Purchase Orders Screen Guides
P/O Requisitions Screen
To open this screen:Open Purchase Orders > P/O Forms > Requisitions.
Related tasks:
l "Printing Requisitions" (page 260)
l "Selecting a Print Destination" (page 274)
Overview
Use the P/O Requisitions screen to print a list of items you want to include onthe purchase order that you plan to issue from the requisition. It can also listthe vendors from whom you plan to purchase the items.
Note:You can print copies of requisitions only until they are completed.
Once they are completed, you can no longer print them and, unless you keeptransaction history, they will be deleted when you run Day End processing.
Requisitions Report Formats
The following requisition report formats are included with Sage 300 ERP:
l PORQN01.RPT. A requisition format for printing on blank paper.
l PORQN02.RPT. A requisition format for preprinted forms.
l PORQN03.RPT. An alternative format for printing on blank paper thatincludes optional fields.
You can also create your own requisition format using Sage 300 ERP's reportdesigner. Mor e ...
For more information on designing and adapting forms and reports, see theonline document Customizing Printed Forms and Reports with the SAP CrystalReports® Designer in the User Documentation section on the Sage 300 ERPCustomer Portal athttps://customers.sagenorthamerica.com/irj/go/km/docs/sageKM/SageAccpac ERP/Ungated Customers/Browsable/Product Documentation/Accpac_UA_Resources.htm.
294 Sage 300 ERP Purchase Orders
Purchase Orders Forms
Print a requisition immediately after posting it in the Requisition Entry screen,or use the Requisitions screen when you want to print several requisitionstogether.
Fields and Controls
Buttons
Align
Click the Align button if you want to print a sample copy of a document tocheck that preprinted forms are correctly inserted in the printer.
PrintClick the Print button to print the report.
Include Requisitions Already PrintedSelect this option if you want to include requisition reports that have alreadybeen printed.
From/To Requisition NumberEnter the range of requisition report numbers to print.
Use RequisitionSelect a requisition report format to use.
The following requisition report formats are included with Purchase Orders:
l PORQN01.RPT— A requisition format for printing on blank paper.
l PORQN02.RPT— A requisition format for preprinted forms.
l PORQN03.RPT— An alternative format for printing on blank paper thatincludes optional fields.
User's Guide 295
Appendix A: Purchase Orders Screen Guides
P/O Returns Screen
To open this screen:Open Purchase Orders > P/O Forms > Returns.
Related tasks:
l "Selecting a Print Destination" (page 274)
l "Printing Returns" (page 264)
l "E-mailing Returns to Vendors" (page 263)
Overview
A purchase return is a detailed list of the items you are returning to a vendor.
Returns Report Formats
The following return formats are included with Purchase Orders:
l PORET01.RPT – A format for printing returns on blank paper.
l PORET02.RPT – A format for printing returns on preprinted forms.
You can print returns from Purchase Orders using the forms that come withthe program, or you can use SAP Crystal Reports® for Sage 300 ERP to designthe return forms you want to use.
For more information on designing and adapting forms and reports, see theonline document Customizing Printed Forms and Reports with the SAP CrystalReports® Designer in the User Documentation section on the Sage 300 ERPCustomer Portal athttps://customers.sagenorthamerica.com/irj/go/km/docs/sageKM/SageAccpac ERP/Ungated Customers/Browsable/Product Documentation/Accpac_UA_Resources.htm.
Fields and Controls
Buttons
AlignClick the Align button if you want to print a sample copy of a documentto check that preprinted forms are correctly inserted in the printer.
296 Sage 300 ERP Purchase Orders
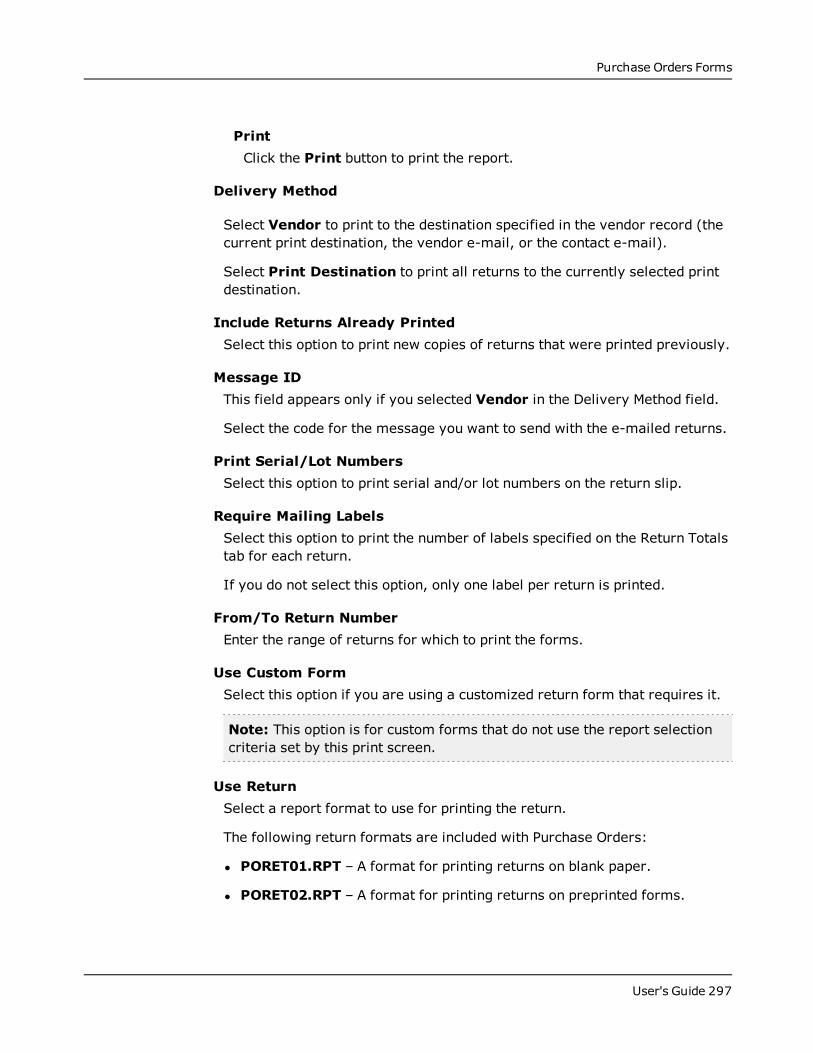
Purchase Orders Forms
PrintClick the Print button to print the report.
Delivery Method
Select Vendor to print to the destination specified in the vendor record (thecurrent print destination, the vendor e-mail, or the contact e-mail).
Select Print Destination to print all returns to the currently selected printdestination.
Include Returns Already PrintedSelect this option to print new copies of returns that were printed previously.
Message IDThis field appears only if you selected Vendor in the Delivery Method field.
Select the code for the message you want to send with the e-mailed returns.
Print Serial/Lot NumbersSelect this option to print serial and/or lot numbers on the return slip.
Require Mailing LabelsSelect this option to print the number of labels specified on the Return Totalstab for each return.
If you do not select this option, only one label per return is printed.
From/To Return NumberEnter the range of returns for which to print the forms.
Use Custom FormSelect this option if you are using a customized return form that requires it.
Note: This option is for custom forms that do not use the report selectioncriteria set by this print screen.
Use ReturnSelect a report format to use for printing the return.
The following return formats are included with Purchase Orders:
l PORET01.RPT – A format for printing returns on blank paper.
l PORET02.RPT – A format for printing returns on preprinted forms.
User's Guide 297
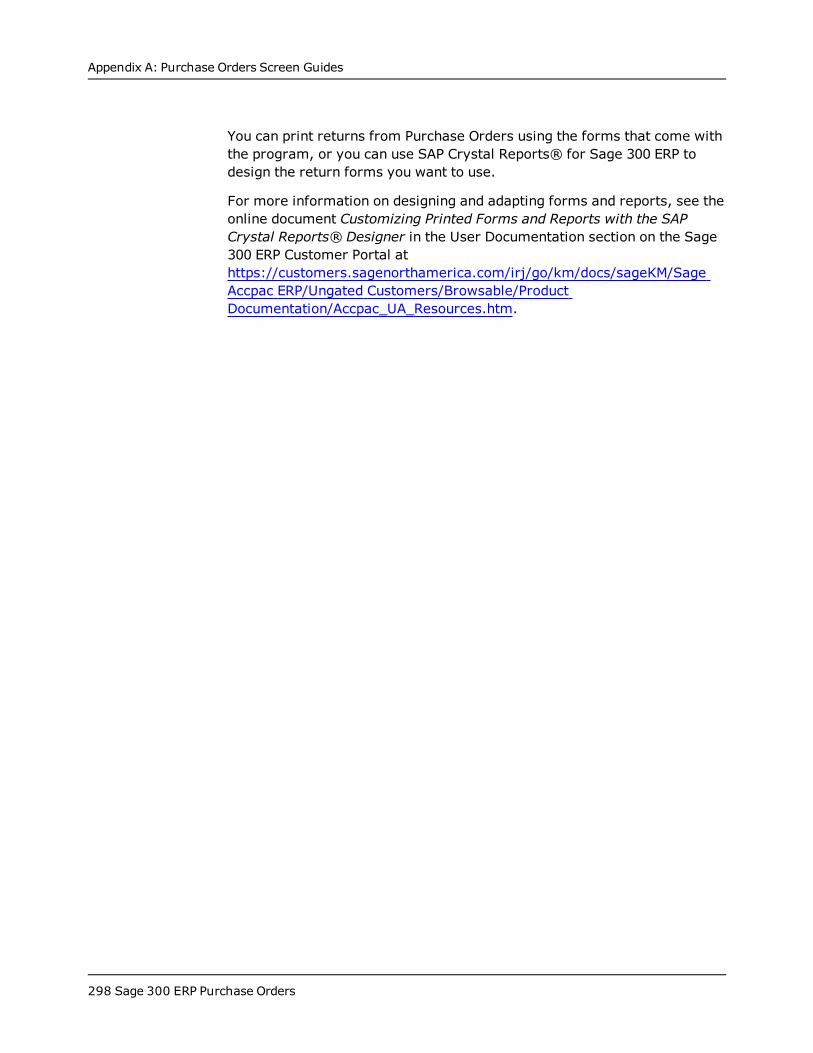
Appendix A: Purchase Orders Screen Guides
You can print returns from Purchase Orders using the forms that come withthe program, or you can use SAP Crystal Reports® for Sage 300 ERP todesign the return forms you want to use.
For more information on designing and adapting forms and reports, see theonline document Customizing Printed Forms and Reports with the SAPCrystal Reports® Designer in the User Documentation section on the Sage300 ERP Customer Portal athttps://customers.sagenorthamerica.com/irj/go/km/docs/sageKM/SageAccpac ERP/Ungated Customers/Browsable/ProductDocumentation/Accpac_UA_Resources.htm.
298 Sage 300 ERP Purchase Orders
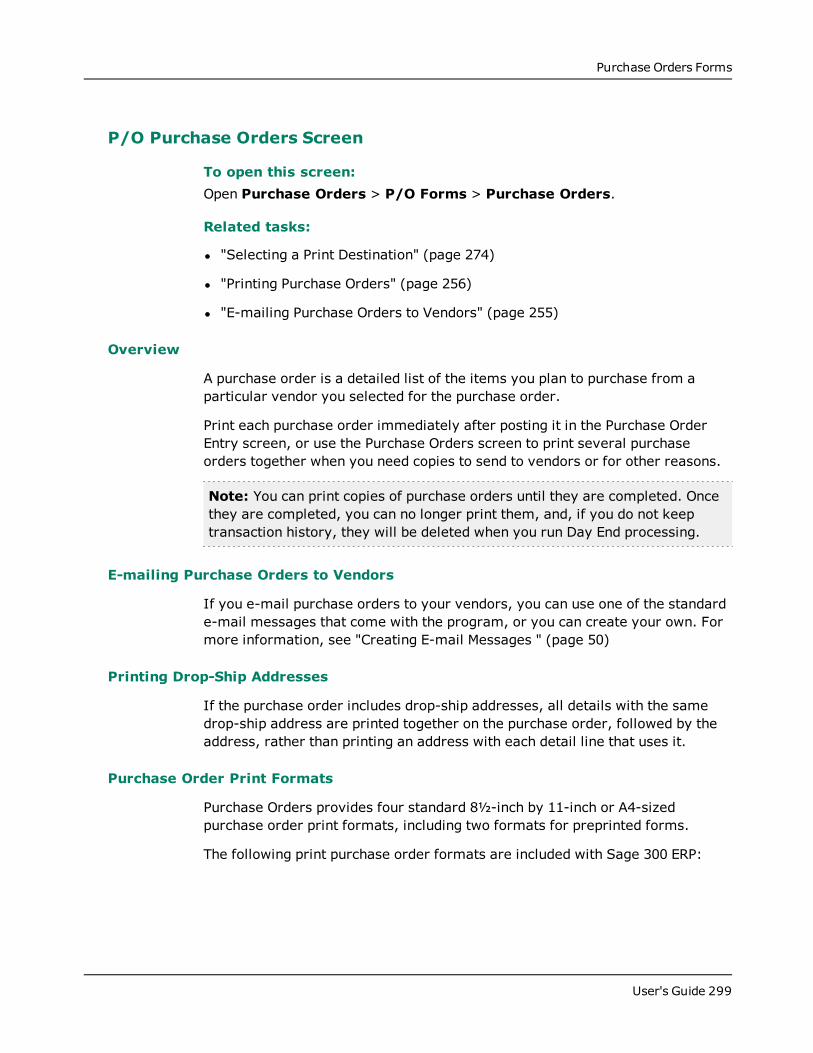
Purchase Orders Forms
P/O Purchase Orders Screen
To open this screen:Open Purchase Orders > P/O Forms > Purchase Orders.
Related tasks:
l "Selecting a Print Destination" (page 274)
l "Printing Purchase Orders" (page 256)
l "E-mailing Purchase Orders to Vendors" (page 255)
Overview
A purchase order is a detailed list of the items you plan to purchase from aparticular vendor you selected for the purchase order.
Print each purchase order immediately after posting it in the Purchase OrderEntry screen, or use the Purchase Orders screen to print several purchaseorders together when you need copies to send to vendors or for other reasons.
Note: You can print copies of purchase orders until they are completed. Oncethey are completed, you can no longer print them, and, if you do not keeptransaction history, they will be deleted when you run Day End processing.
E-mailing Purchase Orders to Vendors
If you e-mail purchase orders to your vendors, you can use one of the standarde-mail messages that come with the program, or you can create your own. Formore information, see "Creating E-mail Messages " (page 50)
Printing Drop-Ship Addresses
If the purchase order includes drop-ship addresses, all details with the samedrop-ship address are printed together on the purchase order, followed by theaddress, rather than printing an address with each detail line that uses it.
Purchase Order Print Formats
Purchase Orders provides four standard 8½-inch by 11-inch or A4-sizedpurchase order print formats, including two formats for preprinted forms.
The following print purchase order formats are included with Sage 300 ERP:
User's Guide 299
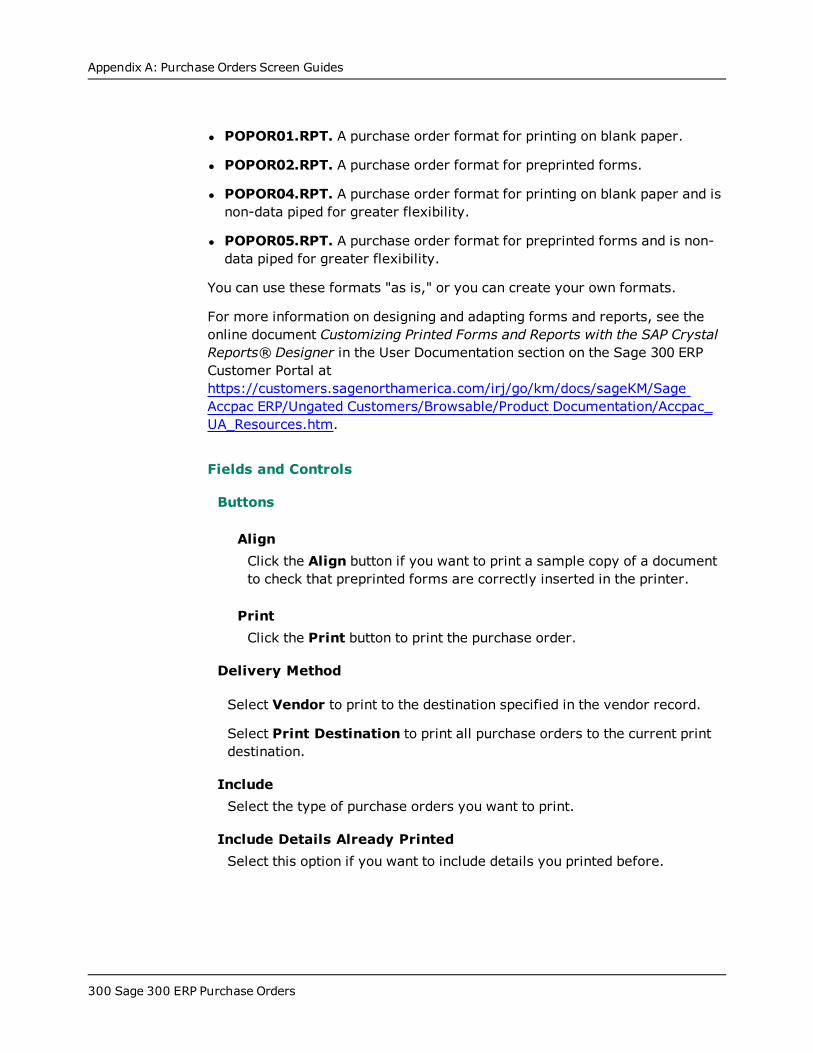
Appendix A: Purchase Orders Screen Guides
l POPOR01.RPT. A purchase order format for printing on blank paper.
l POPOR02.RPT. A purchase order format for preprinted forms.
l POPOR04.RPT. A purchase order format for printing on blank paper and isnon-data piped for greater flexibility.
l POPOR05.RPT. A purchase order format for preprinted forms and is non-data piped for greater flexibility.
You can use these formats "as is," or you can create your own formats. Mor e ...
For more information on designing and adapting forms and reports, see theonline document Customizing Printed Forms and Reports with the SAP CrystalReports® Designer in the User Documentation section on the Sage 300 ERPCustomer Portal athttps://customers.sagenorthamerica.com/irj/go/km/docs/sageKM/SageAccpac ERP/Ungated Customers/Browsable/Product Documentation/Accpac_UA_Resources.htm.
Fields and Controls
Buttons
AlignClick the Align button if you want to print a sample copy of a documentto check that preprinted forms are correctly inserted in the printer.
PrintClick the Print button to print the purchase order.
Delivery Method
Select Vendor to print to the destination specified in the vendor record.
Select Print Destination to print all purchase orders to the current printdestination.
IncludeSelect the type of purchase orders you want to print.
Include Details Already PrintedSelect this option if you want to include details you printed before.
300 Sage 300 ERP Purchase Orders
Purchase Orders Forms
Include Purchase Orders Already PrintedSelect this option if you want to print new copies of purchase orders that youhave already printed.
Message IDThis field appears only if you select Vendor in the Delivery Method field.
Select the code for the message you want to send with the e-mailedpurchase orders.
From/To Purchase Order NumberUse these fields to specify the range of purchase orders to print.
Use Custom FormSelect this option only if you are using a customized return form thatrequires it. (This option is for custom forms that do not use the reportselection criteria set by this screen.)
Use Purchase OrderThe following print purchase order formats are included with Sage 300 ERP:
l POPOR01.RPT. A purchase order format for printing on blank paper.
l POPOR02.RPT. A purchase order format for preprinted forms.
l POPOR04.RPT. A purchase order format for printing on blank paper andis non-data piped for greater flexibility.
l POPOR05.RPT. A purchase order format for preprinted forms and is non-data piped for greater flexibility.
You can use these formats "as is," or you can create your own formats. Mor e ...
For more information on designing and adapting forms and reports, see theonline document Customizing Printed Forms and Reports with the SAPCrystal Reports® Designer in the User Documentation section on the Sage300 ERP Customer Portal athttps://customers.sagenorthamerica.com/irj/go/km/docs/sageKM/SageAccpac ERP/Ungated Customers/Browsable/Product Documentation/Accpac_UA_Resources.htm.
User's Guide 301
Appendix A: Purchase Orders Screen Guides
Periodic Processing ScreensUse Purchase Orders Periodic Processing screens to create batches, and toclear history and inactive records. If you use Purchase Orders as a stand-alone program, you can also use the Day End Processing screen to run DayEnd Processing.
P/O Clear History Screen
To open this screen:Open Purchase Orders > P/O Periodic Processing > Clear History.
Related tasks:
l "Performing Day End Processing" (page 227)
l "Clearing Historical Purchase Orders Data" (page 239)
Overview
Use the Clear History screen to selectively clear (delete) data you no longerwant to keep in your Purchase Orders system, including:
l Transaction history.
l Purchasing history.
l Purchase statistics.
l Printed posting journals.
l Payables Clearing Audit list.
l If you do not use Inventory Control, item transaction history.
You can clear one or more types of data at the same time.
Fields and Controls
Credit/Debit NotesSelect this option to clear the Credit/Debit Note Posting Journal up to andincluding the specified day-end number.
302 Sage 300 ERP Purchase Orders
Periodic Processing Screens
From/ToType the range of vendor numbers or item numbers or account sets forwhich you want to clear history, or select the first and last records in therange from the respective Finders.
InvoicesSelect this option to clear the Invoice Posting Journal up to and including thespecified day-end number.
Payables Clearing AuditSelect this option to clear the Payables Clearing Audit list to the year andperiod and for the account sets you specify.
PeriodType the period up to which you want to clear data.
Purchasing history will be cleared for all years and periods up to andincluding the year and period you specify.
Printed Posting JournalsSelect the Printed Posting Journals option to clear posting journals. Thenselect the types of posting journals to clear. (You can clear any combinationof journals at a time, including Receipts, Invoices, Credit/Debit Notes, andReturns.)
If you want to change the day-end number through which the program clearsprinted posting journals, type over the number in the Through Day EndNumber field. The field displays the most recent day-end number.
Clear History clears journal data up to and including the day-end number youspecified. After clearing the journals, you can no longer print them.
Purchase StatisticsSelect this option to clear purchase statistics from the Purchase Statisticsscreen, then specify the fiscal year and period up to which to clear the data.
Purchase statistics will be cleared for all years and periods up to andincluding the year and period you specify.
Purchasing HistorySelect this option to clear data for the Purchase History screen and report,then specify the fiscal year and period up to which to clear the data, and thetype and range of records to clear.
User's Guide 303
Appendix A: Purchase Orders Screen Guides
Purchasing history will be cleared for all periods up to and including theperiod you specify.
ReceiptsSelect this option to clear the Receipts Posting Journal up to and includingthe specified day-end number.
ReturnsSelect this option to clear the Return Posting Journal up to and including thespecified day-end number.
Select bySpecify whether to clear history by vendor number or item number.
ThroughType the date up to which you want to clear data, or choose the date fromthe calendar associated with the field..
Transactions are cleared up to and including the date you specify.
Through Day End NumberType the day-end sequence number through which you want to clearposting journals.
Through YearType the year up to which you want to clear data.
Purchasing history will be cleared for all years and periods up to andincluding the year and period you specify.
Transaction HistorySelect this option if you want to clear transaction history. To select theoption, either click the field or tab to the field, then press the Spacebar.
When you select the Transaction History field, the Through field appears foryou to enter the clearing date.
304 Sage 300 ERP Purchase Orders
Periodic Processing Screens
P/O Create Batch Screen
To open this screen:Open Purchase Orders > P/O Periodic Processing > Create Batch.
Related tasks:
l "Creating a Batch of General Ledger Transactions in Purchase Orders" (page236)
l "Posting a Batch of Purchase Orders Invoices in Accounts Payable" (page238)
Overview
Use the Create Batch screen to:
l Create a batch of general ledger transactions (or append to an existinggeneral ledger batch) from the receipt, invoice, return, credit note, and debitnote transactions you posted in Purchase Orders.
You can use this screen to produce batches for the general ledger only if OnRequest Using Create Batch Icon is selected for the Create G/LTransactions option on the G/L Integration screen.
Purchase Orders creates and optionally posts the batch in General Ledger,depending on the selection for the Create G/L Transactions By option in theG/L Integration screen.
l Post a batch of invoices in Accounts Payable from invoices or credit/debitnotes posted in Purchase Orders.
You can use this screen to post invoices in Accounts Payable only if OnRequest Using Create Batch Icon is selected for the Post A/P Batchesoption on the P/O Options screen.
Fields and Controls
Create G/L BatchSelect this option to create a batch of General Ledger transactions fromposted receipts, invoices, returns, credit notes, and debit notes, or to appendtransactions to an existing General Ledger batch.
User's Guide 305
Appendix A: Purchase Orders Screen Guides
Through Day End NumberSpecify the range of day end numbers to include in the General Ledgerbatch. The program includes transactions created up to and including thespecified day-end number.
Post A/P BatchSelect this option to post a batch of invoices in Accounts Payable frominvoices or credit/debit notes posted in Purchase Orders.
306 Sage 300 ERP Purchase Orders
Periodic Processing Screens
P/O Day End Processing Screen
Note: This screen is available only if you are using Purchase Orders as astand-alone program (that is, you do not have Inventory Control installed).
To open this screen:Open Purchase Orders > P/O Periodic Processing > Day EndProcessing.
Related tasks:
l "Performing Day End Processing" (page 227)
Overview
If you use Purchase Orders as a stand-alone program, you use this screen torun Day End Processing.
Unless you cost inventory during transaction posting, you must run Day EndProcessing to update your audit trail and item statistics, to create generalledger inventory/expense transactions, and to update your Accounts Payabledata.
Note: Most Day End Processing tasks will be performed during posting if youchoose the Purchase Orders option to cost inventory items during posting.
Important! Day End Processing will not work until you assign a default costexpense account in the P/O G/L Integration screen.
User's Guide 307
Appendix A: Purchase Orders Screen Guides
P/O Delete Inactive Records Screen
Note: This screen is available only if you are using Purchase Orders as astand-alone program (that is, you do not have Inventory Control installed).
To open this screen:Open Purchase Orders > P/O Periodic Processing > Delete InactiveRecords.
Related tasks:
l " Deleting Inactive Purchase Orders Records" (page 242)
Overview
If you use Purchase Orders as a stand-alone program, you can use the DeleteInactive Records screen to remove obsolete item and account set records. Theform removes records only if they currently have an Inactive status and wereset to inactive within the range of dates you specify.
Fields and Controls
Delete Inactive Account SetsEnter the range of codes or numbers for the account set records you wishto delete, or use the Finder to select the ranges.
Delete Inactive ItemsEnter the range of codes or numbers for the item records you want todelete, or use the Finder to select the ranges.
Inactive DatesEnter a range of dates to indicate when a record must have been madeinactive to delete it.
Purchase Orders selects records that have a status of Inactive and acorresponding "inactive" date within the range of dates you specify.
The default To date is the current session date.
If you do not want to delete all the records in a range of inactive dates,process each set of records in separate ranges.
308 Sage 300 ERP Purchase Orders
Reports
ReportsUse Purchase Orders report screens to print setup reports and analyticalreports.
Analytical Reports
Print reports on Purchase Orders transactions, statistics, purchase history, andmore.
P/O Aged Purchase Orders Report Screen
To open this screen:Open Purchase Orders > P/O Analytical Reports > Aged PurchaseOrders.
Related tasks:
l "Selecting a Print Destination" (page 274)
l "Printing Purchase Orders Analytical and Setup Reports" (page 272)
Overview
Print the Aged Purchase Orders report periodically to identify purchase ordersthat have not been completed.
The Aged Purchase Orders report lists all incomplete purchase orders and theirrelative ages in the system. It compares the Aged As Of dates to the orderdates and determines the aging category to which each order belongs. Mor e ...
l The Aged As Of date which determines the aging period to which eachpurchase order belongs.
l The subtotal for the current period and each aging period, and the grand totalof all aged purchase orders.
l The amount of purchase orders for each period, expressed as a percentage ofthe grand total (single-currency ledgers only). (Shows where the bulk ofaged purchase orders occurs.)
l Amounts in the functional or vendor currency (multicurrency ledgers).
l Report subtotals and, in multicurrency ledgers, a grand total for eachcurrency.
You can list all or a range of purchase orders by purchase order number, vendornumber, or currency (in multicurrency systems). You specify the number of
User's Guide 309
Appendix A: Purchase Orders Screen Guides
days in each of three aging periods. There is also a current period and a fifthperiod, which includes purchase orders that have been outstanding for morethan the number of days in the last period you specified. (You set defaultreport periods in the P/O Options screen.)
In multicurrency ledgers, you also specify:
l The range of currency codes to use to select transactions for the report.(Only the transactions entered in the selected currencies are printed.)
l Whether to print amounts in the vendor currency or in the functionalcurrency.
Fields and Controls
Aged as ofEnter the date from which you want purchase orders aged.
All purchase orders older than the Aged As Of date fall into one of the agingperiods. Purchase orders more recent than the Aged As Of date (and up tothe cutoff date) appear in the Current column.
Cutoff DateEnter the date of the most recent purchase order you want listed. Thereport does not list orders with a document date later than this date. If youdo not want to list any current purchase orders, enter the same date youentered in the Aged as of field.
From/To Purchase OrderUse these fields to specify a range of purchase orders to include on thereport.
From/To Vendor NumberUse these fields to specify a range of vendor numbers to include on thereport.
Include Extra InformationSelect the Contact/Phone option and the Space for Comments option toinclude contact names, phone numbers, and comments on the report.
Sort BySelect the sorting order for the report: by purchase order number, vendornumber, or currency code.
310 Sage 300 ERP Purchase Orders
Reports
Use Aging PeriodsThe number of days in each report aging period. The default aging periodsare defined in the P/O Options screen.
User's Guide 311
Appendix A: Purchase Orders Screen Guides
P/O G/L Transactions Report Screen
To open this screen:Open Purchase Orders > P/O Analytical Reports > G/L Transactions.
Related tasks:
l "Selecting a Print Destination" (page 274)
l "Printing Purchase Orders Analytical and Setup Reports" (page 272)
Overview
Print the G/L Transactions report to obtain a list of the general ledger journalentries created from all transactions posted in Purchase Orders since the lasttime you created the general ledger batch. You can print detailed or summaryversions of the report.
You should print the report before you use the Create Batch screen to producegeneral ledger transactions. When you create the general ledger batch, theprogram erases the data for the G/L Transactions report.
In multicurrency systems, you can print amounts either in the functionalcurrency or in the source (vendor) currencies in which you posted thetransactions in Purchase Orders.
Note: You cannot print the G/L Transactions report if Purchase Orderscreates transactions during posting or day-end processing. Mor e ...
The option Create G/L Transactions (on the Integration tab of the P/O G/LIntegration screen) determines whether and when you can print this report:
l During Day End Processing. If Purchase Orders uses this option, theprogram sends general ledger transactions immediately to General Ledger.You can view the transactions only in General Ledger, and you cannot printthe G/L Transactions report in Purchase Orders.
l On Request Using Create Batch Icon. If Purchase Orders uses thisoption, you can print the report in Purchase Orders after you posttransactions or run Day End Processing (depending on when you costinventory), but before you create G/L batches.
312 Sage 300 ERP Purchase Orders
Reports
Tip: Remember to run Day End Processing before you create the generalledger batch if you want to include the latest costing information in the report.For more information, see "Performing Day End Processing" (page 227).
User's Guide 313

Appendix A: Purchase Orders Screen Guides
P/O Item Transaction History Report Screen
Note: This screen is available only if you are using Purchase Orders as astand-alone program (that is, you do not have Inventory Control installed).
To open this screen:Open Purchase Orders > P/O Analytical Reports > Item TransactionHistory.
Related tasks:
l "Selecting a Print Destination" (page 274)
l "Printing Purchase Orders Analytical and Setup Reports" (page 272)
Overview
If you do not use Sage 300 ERP Inventory Control, you can print the ItemTransaction History report from Purchase Orders when you want to reviewtransaction history by item, or list transactions from all posting journals.
The Item Transaction History report lists all transactions posted for the itemsassigned to the account sets and period that you select for the report. Thereport also shows the net change to the Inventory/Expense account for theaccount set and period. Mor e ...
Item transaction history is accumulated and reported according to the fiscalyear you defined in Common Services. Transactions are accumulated for thisreport only if you use the Keep Transaction History option in the P/O Optionsscreen.
Transactions cleared by the Clear History screen is not included in the report.
314 Sage 300 ERP Purchase Orders
Reports
P/O Payables Clearing Audit List Report Screen
To open this screen:Open Purchase Orders > P/O Analytical Reports > Payables ClearingAudit List.
Related tasks:
l "Selecting a Print Destination" (page 274)
l "Printing Purchase Orders Analytical and Setup Reports" (page 272)
Overview
This report lists the debits and credits posted to the Payables Clearing accountfor receipts, invoices, returns, credit notes, and debit notes. Use the list toreconcile the Payables Clearing account.
Data for the report includes everything back to the year and period from whichyou keep history. If you do not keep history, the report prints only transactionscreated by the last time you ran Day End Processing.
If you keep history, the report lists transactions that occurred during and sincethe last year and fiscal period for which you keep history.
The report shows the account sets, fiscal years, and periods you choose and, ifyou have a multicurrency ledger, it also reports in the currency you choose. Ifyou include source currencies for the report, there are also totals for eachcurrency. Mor e ...
l In a multicurrency ledger, the report shows whether you chose the functionalcurrency or a combination of the functional and source currencies. When youchoose to print the report in source and functional currency, a Currencyheading appears. The currencies are listed under each account set and thevendors are grouped by the currency they use.
l The details of the transaction are shown, including the vendor numbers andnames.
l The report shows the amount debited or credited to the account for eachreceipt, invoice, return, debit note, and credit note transaction.
l The report shows the total debits and credits by period and the total for eachaccount set (AVG. in the example) during the time specified for the report.
User's Guide 315
Appendix A: Purchase Orders Screen Guides
P/O Posting Journals Screen
To open this screen:Open Purchase Orders > P/O Analytical Reports > Posting Journals.
Related tasks:
l "Selecting a Print Destination" (page 274)
l "Printing Purchase Orders Analytical and Setup Reports" (page 272)
Overview
The Receipts, Return, Invoice, and Credit/Debit Note Posting Journals are partof your Purchase Orders audit trail.
Tip: Print the posting journals at the end of each day, as part of your day-end procedure and audit trail documentation.
The journals contain the detailed record of the general ledger transactionsarising from the receipts, invoices, returns, credit notes, and debit notesposted in Purchase Orders. Mor e ...
l On the Receipts Posting Journal, the additional cost amount prorated toeach item detail.
l Details of each transaction of the selected type. (You can list transactionsby day end number, transaction date, vendor number, or transactionnumber.)
l On the Receipts Posting Journal, the secondary (additional cost) vendor,description, amount, tax, and proration information. (Select the IncludeAdditional Costs option to include this section.)
l Tax information for the document. (Select the Include Tax Summary optionto include this section.)
l Job-related information if you have Project and Job Costing.
l Serial and lot numbers for applicable items. (Select the Include Serial/LotNumbers check box to include.)
l Optional field information if you use Optional Fields.
l On multicurrency reports, the totals for the journal in both functional and
316 Sage 300 ERP Purchase Orders
Reports
source (vendor) currencies.
l A General Ledger Distribution Summary, which includes the debit and credittotals for each account affected by the transactions on the journal. Themulticurrency version of the summary lists totals in both functional andsource (vendor) currencies.
In multicurrency systems, posting journals list the vendor's currency code foreach transaction, along with the exchange rate, rate type, and rate date. Thejournals include amounts in both the vendor's currency and the functionalcurrency.
Note that return posting journals and credit note posting journals displaynumbers as negative amounts. (This applied to quantities, extended amounts,prorated additional costs, tax summary amounts, retained amounts, and jobexpensed amounts.)
Example: If you post a return of 5 items, the return posting journal willdisplay a quantity of "-5." If you later adjust the return to 2 items, the ReturnPosting Journal will show a +3 to record the change in quantity.
Fields and Controls
From Day End NumberSpecify the range of day-end numbers for which you are printing the report.
Include Accounts Payable AuditSelect this check box to help you match postings in Purchase Orders toAccounts Payable transactions. This field is available only if Credit/DebitNotes is selected in the Select Posting Journal area.
Include Additional CostsSelect this check box to include additional costs on receipt journals. Thisfield is available only if Receipt is selected in the Select Posting Journal area.
Include Job DetailsIf you have Sage 300 ERP Project and Job Costing, select this check box toprint job-related information.
Include Optional FieldsSelect this check box to include optional field information on posting journals
User's Guide 317
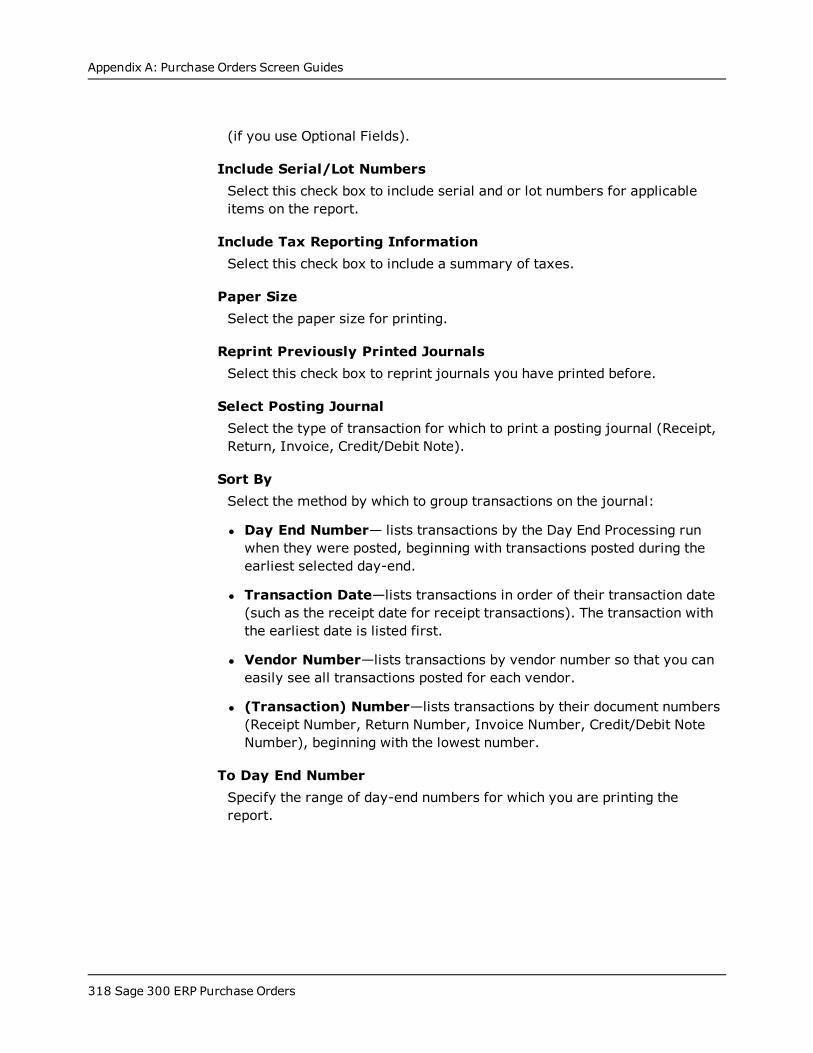
Appendix A: Purchase Orders Screen Guides
(if you use Optional Fields).
Include Serial/Lot NumbersSelect this check box to include serial and or lot numbers for applicableitems on the report.
Include Tax Reporting InformationSelect this check box to include a summary of taxes.
Paper SizeSelect the paper size for printing.
Reprint Previously Printed JournalsSelect this check box to reprint journals you have printed before.
Select Posting JournalSelect the type of transaction for which to print a posting journal (Receipt,Return, Invoice, Credit/Debit Note).
Sort BySelect the method by which to group transactions on the journal:
l Day End Number— lists transactions by the Day End Processing runwhen they were posted, beginning with transactions posted during theearliest selected day-end.
l Transaction Date—lists transactions in order of their transaction date(such as the receipt date for receipt transactions). The transaction withthe earliest date is listed first.
l Vendor Number—lists transactions by vendor number so that you caneasily see all transactions posted for each vendor.
l (Transaction) Number—lists transactions by their document numbers(Receipt Number, Return Number, Invoice Number, Credit/Debit NoteNumber), beginning with the lowest number.
To Day End NumberSpecify the range of day-end numbers for which you are printing thereport.
318 Sage 300 ERP Purchase Orders
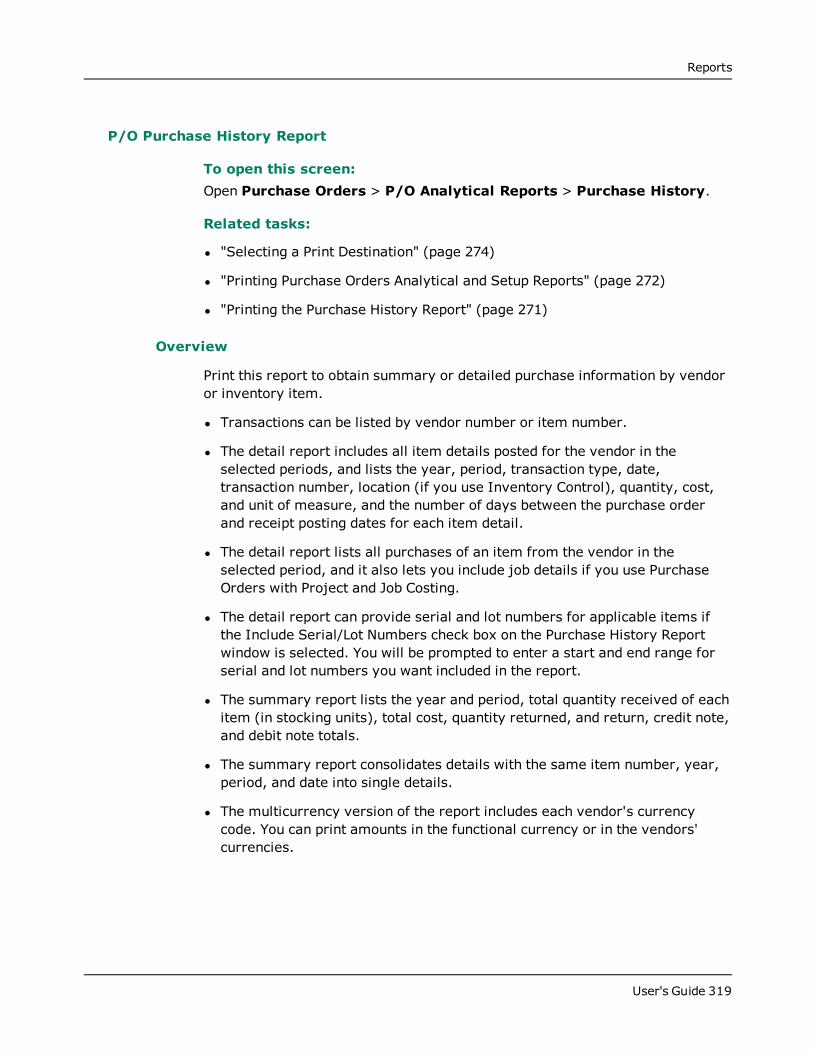
Reports
P/O Purchase History Report
To open this screen:Open Purchase Orders > P/O Analytical Reports > Purchase History.
Related tasks:
l "Selecting a Print Destination" (page 274)
l "Printing Purchase Orders Analytical and Setup Reports" (page 272)
l "Printing the Purchase History Report" (page 271)
Overview
Print this report to obtain summary or detailed purchase information by vendoror inventory item. Mor e ...
l Transactions can be listed by vendor number or item number.
l The detail report includes all item details posted for the vendor in theselected periods, and lists the year, period, transaction type, date,transaction number, location (if you use Inventory Control), quantity, cost,and unit of measure, and the number of days between the purchase orderand receipt posting dates for each item detail.
l The detail report lists all purchases of an item from the vendor in theselected period, and it also lets you include job details if you use PurchaseOrders with Project and Job Costing.
l The detail report can provide serial and lot numbers for applicable items ifthe Include Serial/Lot Numbers check box on the Purchase History Reportwindow is selected. You will be prompted to enter a start and end range forserial and lot numbers you want included in the report.
l The summary report lists the year and period, total quantity received of eachitem (in stocking units), total cost, quantity returned, and return, credit note,and debit note totals.
l The summary report consolidates details with the same item number, year,period, and date into single details.
l The multicurrency version of the report includes each vendor's currencycode. You can print amounts in the functional currency or in the vendors'currencies.
User's Guide 319

Appendix A: Purchase Orders Screen Guides
Because Summary reports provide less information than Detail reports, somefields will be hidden if you select Summary in the Report Type list. Forinstance, summary reports retrieve purchase orders from a range usingspecific years and periods, while detail reports can also select by DocumentDate and filter by Item Number.
You can use the report as a purchases journal, to record purchases by vendoror item, and to indicate the strengths and weaknesses in company purchasinghistory.
Tip: Print this report after running Day End Processing, at the end of anaccounting cycle, or any time you want to check your purchasing history.
320 Sage 300 ERP Purchase Orders
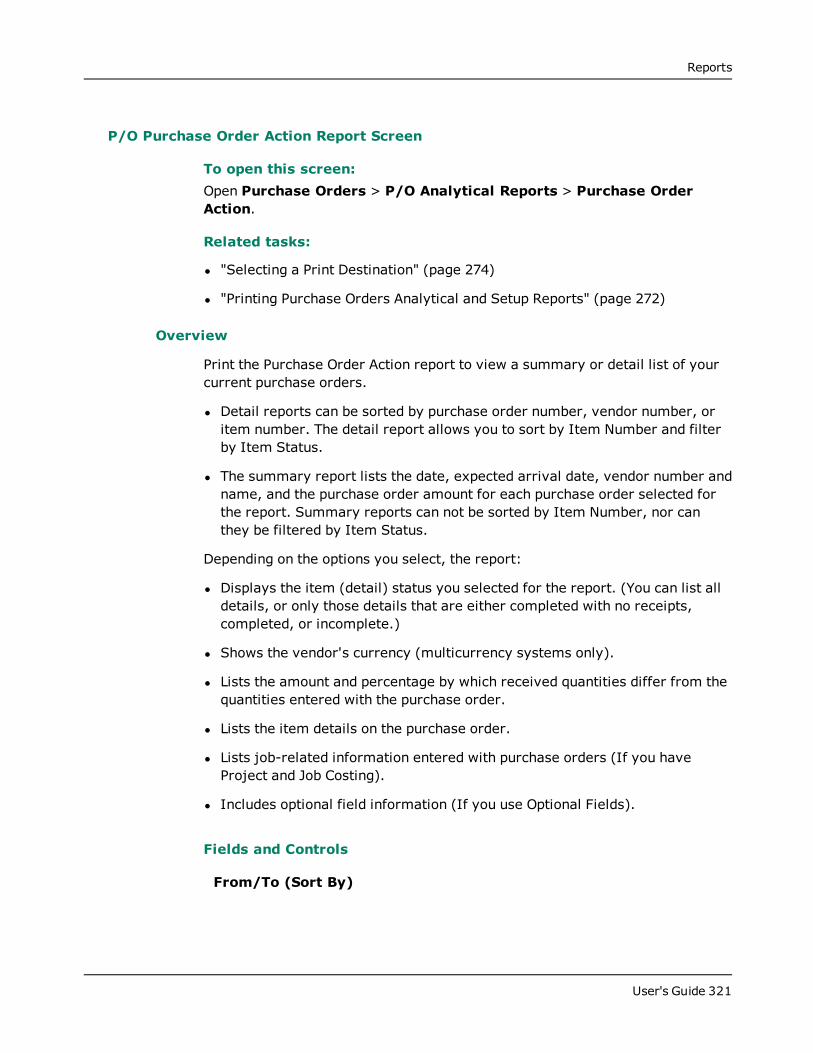
Reports
P/O Purchase Order Action Report Screen
To open this screen:Open Purchase Orders > P/O Analytical Reports > Purchase OrderAction.
Related tasks:
l "Selecting a Print Destination" (page 274)
l "Printing Purchase Orders Analytical and Setup Reports" (page 272)
Overview
Print the Purchase Order Action report to view a summary or detail list of yourcurrent purchase orders.
l Detail reports can be sorted by purchase order number, vendor number, oritem number. The detail report allows you to sort by Item Number and filterby Item Status.
l The summary report lists the date, expected arrival date, vendor number andname, and the purchase order amount for each purchase order selected forthe report. Summary reports can not be sorted by Item Number, nor canthey be filtered by Item Status.
Depending on the options you select, the report:
l Displays the item (detail) status you selected for the report. (You can list alldetails, or only those details that are either completed with no receipts,completed, or incomplete.)
l Shows the vendor's currency (multicurrency systems only).
l Lists the amount and percentage by which received quantities differ from thequantities entered with the purchase order.
l Lists the item details on the purchase order.
l Lists job-related information entered with purchase orders (If you haveProject and Job Costing).
l Includes optional field information (If you use Optional Fields).
Fields and Controls
From/To (Sort By)
User's Guide 321
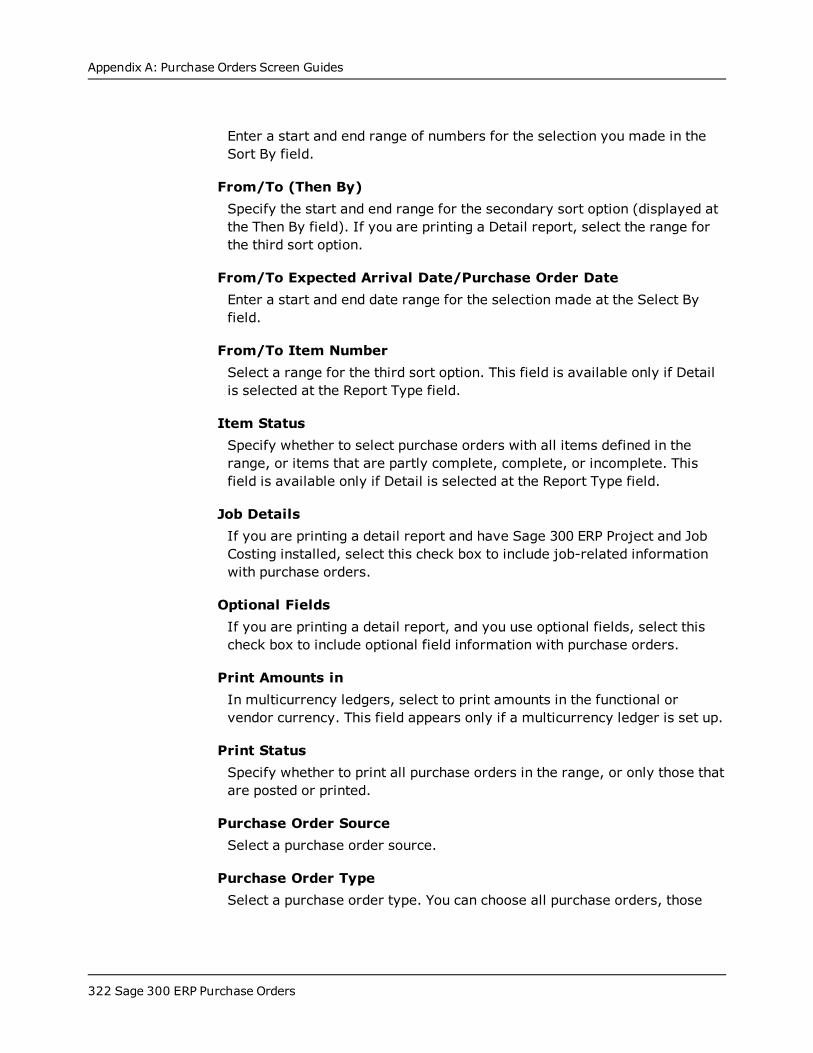
Appendix A: Purchase Orders Screen Guides
Enter a start and end range of numbers for the selection you made in theSort By field.
From/To (Then By)Specify the start and end range for the secondary sort option (displayed atthe Then By field). If you are printing a Detail report, select the range forthe third sort option.
From/To Expected Arrival Date/Purchase Order DateEnter a start and end date range for the selection made at the Select Byfield.
From/To Item NumberSelect a range for the third sort option. This field is available only if Detailis selected at the Report Type field.
Item StatusSpecify whether to select purchase orders with all items defined in therange, or items that are partly complete, complete, or incomplete. Thisfield is available only if Detail is selected at the Report Type field.
Job DetailsIf you are printing a detail report and have Sage 300 ERP Project and JobCosting installed, select this check box to include job-related informationwith purchase orders.
Optional FieldsIf you are printing a detail report, and you use optional fields, select thischeck box to include optional field information with purchase orders.
Print Amounts inIn multicurrency ledgers, select to print amounts in the functional orvendor currency. This field appears only if a multicurrency ledger is set up.
Print StatusSpecify whether to print all purchase orders in the range, or only those thatare posted or printed.
Purchase Order SourceSelect a purchase order source.
Purchase Order TypeSelect a purchase order type. You can choose all purchase orders, those
322 Sage 300 ERP Purchase Orders
Reports
that have yet to be received, partially received or are on hold.
Report TypeSelect a report type. If you select Detail, you can sort the report by purchaseorder number, vendor number, or item number. Summary reports can onlybe sorted by purchase order number or vendor number.
Select BySelect whether to list purchase orders by expected arrival date or purchaseorder date. Then enter a start and end date range for the selection made.
Sort BySpecify the start and end range for the secondary sort option, which isautomatically determined for you and displayed in the Then By field. If youare printing a detail report, select the range for the third sort option.
Then ByThis field displays a secondary sort option based on the selection made atthe Sort By field.
User's Guide 323
Appendix A: Purchase Orders Screen Guides
P/O Purchase Statistics Report Screen
To open this screen:Open Purchase Orders > P/O Analytical Reports > PurchaseStatistics.
Related tasks:
l "Selecting a Print Destination" (page 274)
l "Printing Purchase Orders Analytical and Setup Reports" (page 272)
Overview
This report lists statistics accumulated from Purchase Orders transactionssince you last cleared the purchase statistics data for the period you specify.
Statistics are reported for the type of year (fiscal or calendar) and period youspecified for the Accumulate Statistics option in the P/O Options screen. Mor e ...
Information printed on the report includes:
l Amounts in source (vendor) currencies (multicurrency reports).
l Source-currency code and description. The program prints a set of statisticsfor each source currency (multicurrency reports).
l The net purchase amount.
The net purchase amount does not include additional costs or taxes. Allother dollar amount items on the report do include additional costs andtaxes.
The report can help you understand and analyze the level of processing in yourPurchase Orders system. Note that you must use the Keep Purchase Statisticsoption in the P/O Options screen to print this report.
Tip: Print the report when you need to check the volume of purchase orders,receipts, invoices, credit notes, and debit notes you processed during aperiod. You can print the report after running Day End processing, only if youuse the Accumulate Statistics option.
Fields and Controls
Consolidate Currencies
324 Sage 300 ERP Purchase Orders
Reports
Select whether to consolidate statistics for the range of currencies youspecify. This field appears only if you have a multicurrency company.
From/To Currency
Enter a range of currency codes (to list only the purchase orders entered inthe selected currencies). This field appears only if you have a multicurrencycompany.
From Year/Period / To Year/PeriodSpecify the range of year/periods for which to print the report.
Print Amounts inSpecify whether to print amounts in vendor currency or functional currency.This field appears only if you have a multicurrency company.
User's Guide 325
Appendix A: Purchase Orders Screen Guides
P/O Shippable Backorders Report
To open this screen:Open Purchase Orders > P/O Analytical Reports > ShippableBackorders.
Related tasks:
l "Selecting a Print Destination" (page 274)
l "Printing Purchase Orders Analytical and Setup Reports" (page 272)
Overview
The Shippable Backorders report lists the sales orders that you may be able tofill as a result of receipts you have posted in Purchase Orders.
The report lists receipt details that were posted with order numbers, showingthe item and amount received at each location. (Location information appearsonly if you use Inventory Control).
The report contains meaningful data only if you enter sales order numberswith detail lines on receipts. If you use Sage 300 ERP Order Entry withPurchase Orders, you can select order numbers from Order Entry and includethem on the report.
Tip: Print the report after posting receipts to find out which sales orders youmay now be able to fill.
326 Sage 300 ERP Purchase Orders
Reports
P/O Transaction List Report Screen
To open this screen:Open Purchase Orders > P/O Analytical Reports > Transaction List.
Related tasks:
l "Selecting a Print Destination" (page 274)
l "Printing Purchase Orders Analytical and Setup Reports" (page 272)
Overview
Use the Transaction List to print detailed or summary listings of all currentPurchase Orders transactions.
Print the report for information about current transactions and, if you keeptransaction history, about past transactions you have not yet cleared.
You can sort transaction reports by transaction number or vendor number, andyou can specify a range of transaction numbers, vendor numbers, and currencycodes (if you have a multicurrency system) by which to select the transactionsto report. Mor e ...
Depending on the printing options you select, the report lists:
l The currencies selected for the report (multicurrency systems only).
l The optional information selected for the report.
l The serial and lot numbers when working with transactions involvingserialized and/or lotted items.
l Total amount of the purchase order. In multicurrency systems, the vendorcurrency is identified and the total is shown in both source (vendor) andfunctional currencies.
The summary report includes the outstanding purchase order total together withthe numbers, dates, and totals of any receipts, invoices, returns, credit notes,and debit notes that were posted with the purchase order number.
Note: If you do not keep transaction history, Purchase Orders deletestransaction information when you run Day End processing. If you keeptransaction history, you delete the data for the reports using the Clear Historyscreen at a time of your choosing.
User's Guide 327
Appendix A: Purchase Orders Screen Guides
Fields and Controls
From/To (Sort By)Select the range of transaction numbers, vendor numbers, and currencies(if you have a multicurrency system).
From/To (Then By)Select the range of transaction numbers for the secondary sort optiondisplayed at the Then By field.
IncludeSelect the additional information you want to include in the report such asthe entries from the "Information" tab for the transaction type, transactiondetails, addresses, requisition numbers (for purchase orders) andadditional costs (for receipts). You can also choose job details (for job-related transactions), and serial/lot numbers (if working with transactionsinvolving serialized/lotted items).
PrintSelect the type of transaction to print.
Report TypeSelect the type of report to print.
Sort BySpecify whether to sort the report by vendor number or transactionnumber.
SourceSpecify whether to print purchase orders or requisitions that weremanually entered or entered from the Internet.
StatusWhen printing the Purchase Order or Requisition List, select the statuses toinclude (Entered, Purchase Order Printed, Never Received, PartiallyReceived, Completed, On Hold). Also select to sort the report by vendornumber or transaction number.
Then ByThis field displays a secondary sort option based on the selection made atthe Sort By field.
328 Sage 300 ERP Purchase Orders
Reports
TypeSelect the types of purchase orders to list. These options appear only ifPurchase Orders is selected at the Print field.
User's Guide 329
Appendix A: Purchase Orders Screen Guides
Setup Reports
Print reports that list setup options for your Purchase Orders system.
P/O Account Sets Report Screen
Note: This screen is available only if you are using Purchase Orders as astand-alone program (that is, you do not have Inventory Control installed).
To open this screen:Open Purchase Orders > P/O Setup Reports > Account Sets.
Related tasks:
l "Printing Purchase Orders Analytical and Setup Reports" (page 272)
l "Selecting a Print Destination" (page 274)
Overview
If you use Purchase Orders without Inventory Control, you can print theAccount Sets report from Purchase Orders to list descriptions and numbers ofthe general ledger accounts in your Purchase Orders account sets.
The report lists, for each account set:
l The account numbers for the Payables Clearing and Inventory/Expenseaccounts.
l The date on which the account set was last edited (Last Maintained).
l The date the account set became inactive. The date appears in the InactiveOn column.
330 Sage 300 ERP Purchase Orders
Reports
P/O Additional Costs Report Screen
To open this screen:Open Purchase Orders > P/O Setup Reports > Additional Costs.
Related tasks:
l "Selecting a Print Destination" (page 274)
Overview
Print the Additional Costs report to list the information entered to define each ofthe additional cost codes used in your Purchase Orders system. Additional costsare extra charges, such as for shipping and handling, that are enteredseparately from the costs of the items you purchase, then prorated to itemcosts, if you wish. Print the report when you change information for theadditional cost codes you have defined.
Information Printed on the Report
If you list the costs by vendor number, additional costs entered without vendornumbers appear first.
The report lists each cost's default amount and proration and reprorationmethods. You can change this information when you enter the cost on a newtransaction.
When you edit an additional cost or make it inactive, the dates are listed in theLast Maintained/Inactive On column.
Fields and Controls
From Additional CostEnter a range of additional cost codes to print.
From CurrencyFor multicurrency ledgers, enter the range of currencies to include.
From Vendor NumberEnter a range of vendor numbers to print.
Include Optional FieldsSelect this option to print optional fields on the report.
User's Guide 331
Appendix A: Purchase Orders Screen Guides
Sort BySpecify whether to print data by additional cost code or vendor numberfirst.
To Additional CostEnter a range of additional cost codes to print.
To CurrencyFor multicurrency ledgers, enter the range of currencies to include.
To Vendor NumberEnter a range of vendor numbers to print.
332 Sage 300 ERP Purchase Orders
Reports
P/O E-mail Messages Report Screen
To open this screen:Open Purchase Orders > P/O Setup Reports > E-mail Messages.
Related tasks:
l "Selecting a Print Destination" (page 274)
Overview
Print the E-mail Messages report to see a list of all the e-mail messages definedfor purchase orders and returns.
Information Printed on the Report
The report includes, for each e-mail message:
l The message type.
l The message ID and description.
l The subject.
l The body of the message.
l The last maintained date.
l The Inactive date, if applicable.
User's Guide 333
Appendix A: Purchase Orders Screen Guides
P/O G/L Integration Report Screen
To open this screen:Open Purchase Orders > P/O Setup Reports > G/L Integration.
Related tasks:
l "Selecting a Print Destination" (page 274)
Overview
The G/L Integration report lists the G/L transaction and batch creation optionsand other information you entered in the G/L Integration screen to specify howyour Purchase Orders system sends transactions to General Ledger.
When to print
Print the report before and after changing options.
Information printed on the report
l General ledger integration options.
l Information transferred from source transactions to G/L transaction fields.
334 Sage 300 ERP Purchase Orders
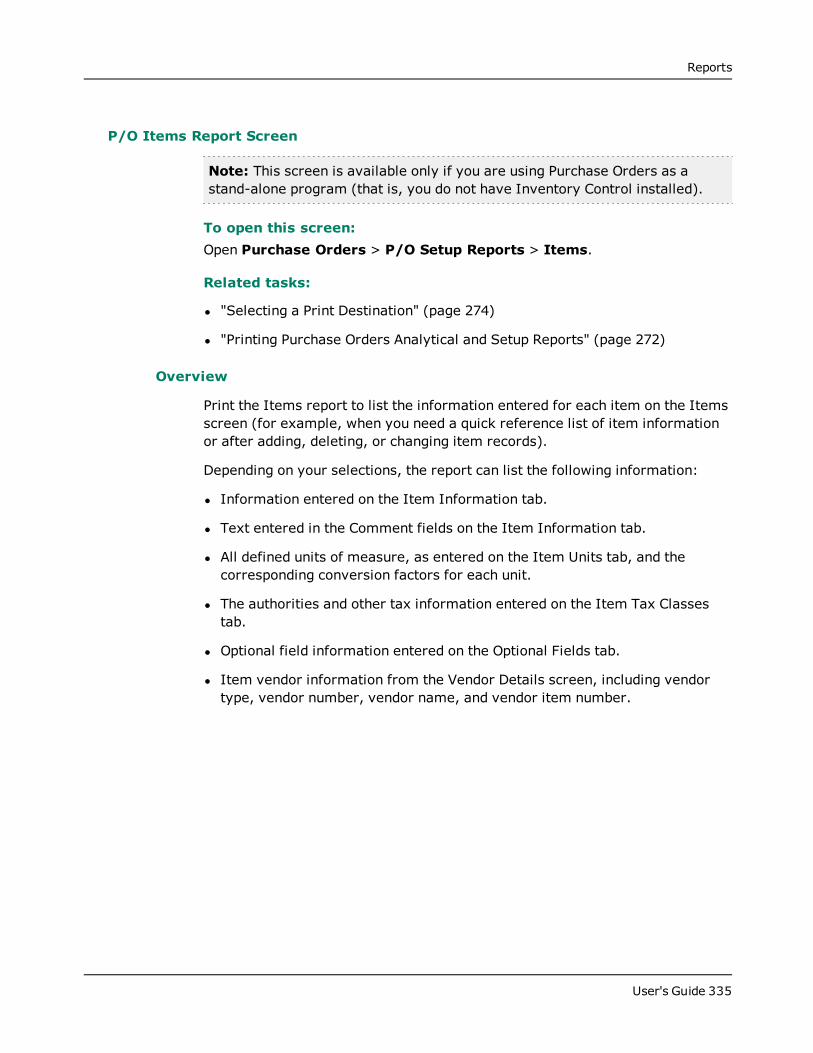
Reports
P/O Items Report Screen
Note: This screen is available only if you are using Purchase Orders as astand-alone program (that is, you do not have Inventory Control installed).
To open this screen:Open Purchase Orders > P/O Setup Reports > Items.
Related tasks:
l "Selecting a Print Destination" (page 274)
l "Printing Purchase Orders Analytical and Setup Reports" (page 272)
Overview
Print the Items report to list the information entered for each item on the Itemsscreen (for example, when you need a quick reference list of item informationor after adding, deleting, or changing item records).
Depending on your selections, the report can list the following information:
l Information entered on the Item Information tab.
l Text entered in the Comment fields on the Item Information tab.
l All defined units of measure, as entered on the Item Units tab, and thecorresponding conversion factors for each unit.
l The authorities and other tax information entered on the Item Tax Classestab.
l Optional field information entered on the Optional Fields tab.
l Item vendor information from the Vendor Details screen, including vendortype, vendor number, vendor name, and vendor item number.
User's Guide 335
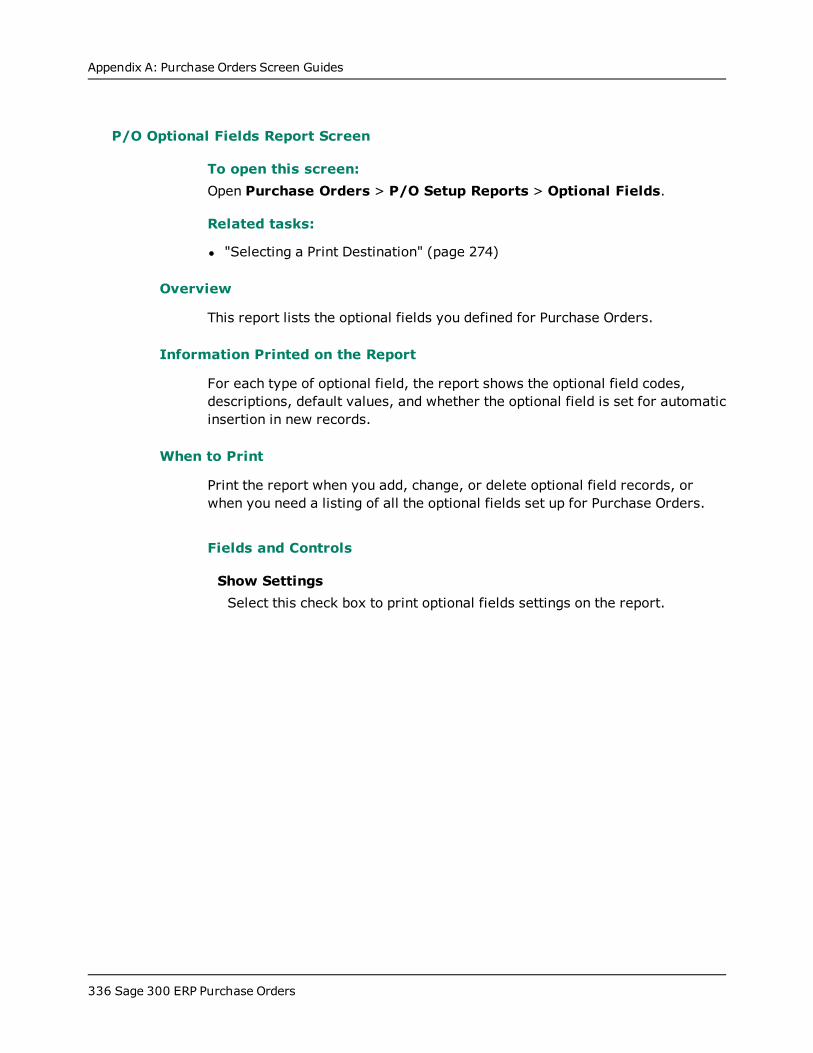
Appendix A: Purchase Orders Screen Guides
P/O Optional Fields Report Screen
To open this screen:Open Purchase Orders > P/O Setup Reports > Optional Fields.
Related tasks:
l "Selecting a Print Destination" (page 274)
Overview
This report lists the optional fields you defined for Purchase Orders.
Information Printed on the Report
For each type of optional field, the report shows the optional field codes,descriptions, default values, and whether the optional field is set for automaticinsertion in new records.
When to Print
Print the report when you add, change, or delete optional field records, orwhen you need a listing of all the optional fields set up for Purchase Orders.
Fields and Controls
Show SettingsSelect this check box to print optional fields settings on the report.
336 Sage 300 ERP Purchase Orders
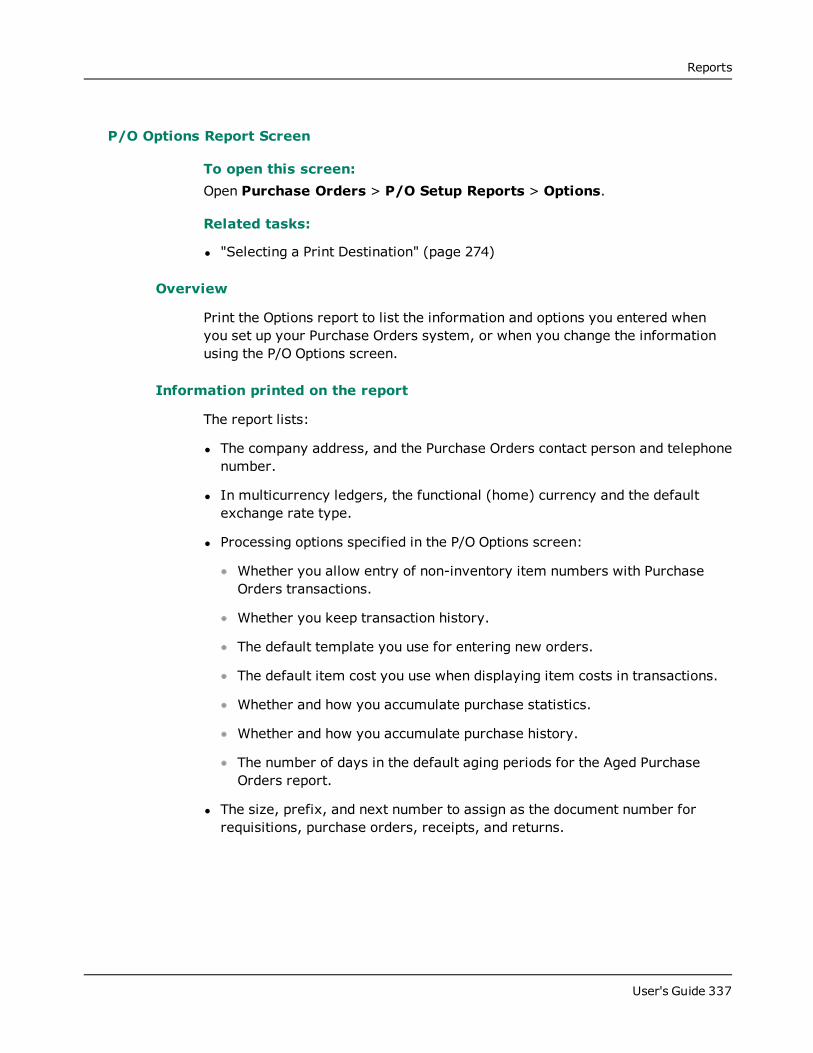
Reports
P/O Options Report Screen
To open this screen:Open Purchase Orders > P/O Setup Reports > Options.
Related tasks:
l "Selecting a Print Destination" (page 274)
Overview
Print the Options report to list the information and options you entered whenyou set up your Purchase Orders system, or when you change the informationusing the P/O Options screen.
Information printed on the report
The report lists:
l The company address, and the Purchase Orders contact person and telephonenumber.
l In multicurrency ledgers, the functional (home) currency and the defaultexchange rate type.
l Processing options specified in the P/O Options screen:
Whether you allow entry of non-inventory item numbers with PurchaseOrders transactions.
Whether you keep transaction history.
The default template you use for entering new orders.
The default item cost you use when displaying item costs in transactions.
Whether and how you accumulate purchase statistics.
Whether and how you accumulate purchase history.
The number of days in the default aging periods for the Aged PurchaseOrders report.
l The size, prefix, and next number to assign as the document number forrequisitions, purchase orders, receipts, and returns.
User's Guide 337
Appendix A: Purchase Orders Screen Guides
l How you process general ledger transactions for your Purchase Orderssystem, as well as the default inventory expense account, default costexpense account, and non-inventory payables clearing account you use.
338 Sage 300 ERP Purchase Orders
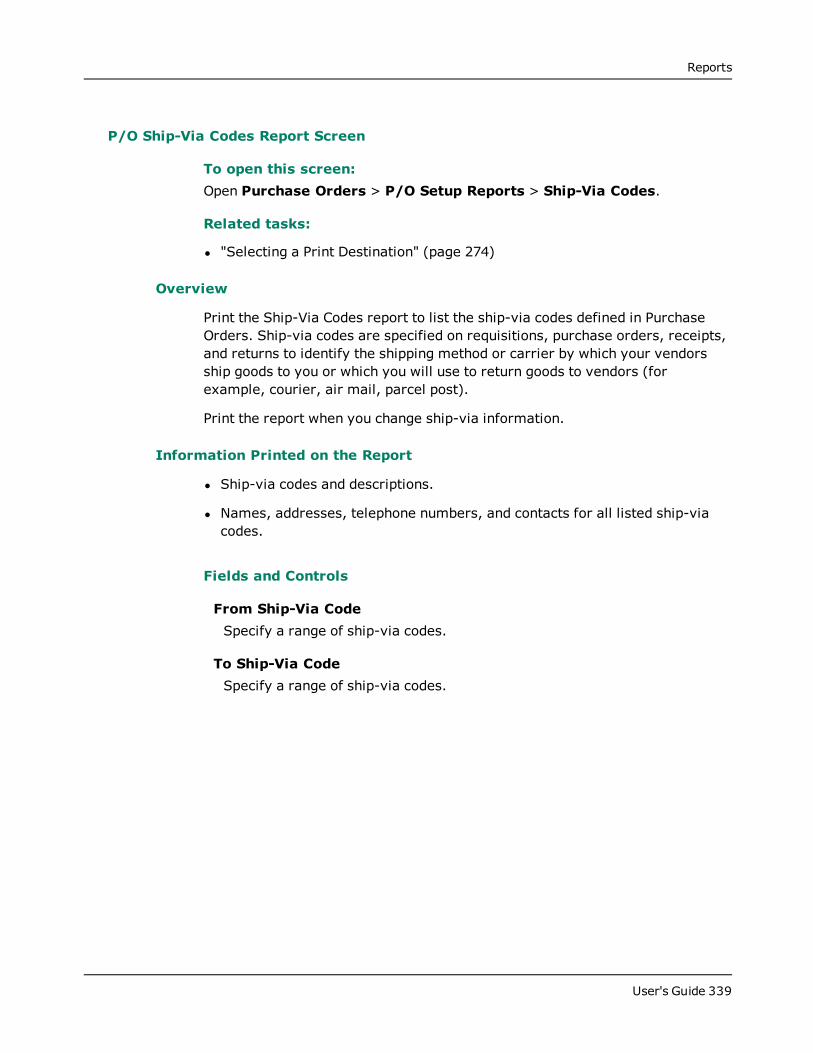
Reports
P/O Ship-Via Codes Report Screen
To open this screen:Open Purchase Orders > P/O Setup Reports > Ship-Via Codes.
Related tasks:
l "Selecting a Print Destination" (page 274)
Overview
Print the Ship-Via Codes report to list the ship-via codes defined in PurchaseOrders. Ship-via codes are specified on requisitions, purchase orders, receipts,and returns to identify the shipping method or carrier by which your vendorsship goods to you or which you will use to return goods to vendors (forexample, courier, air mail, parcel post).
Print the report when you change ship-via information.
Information Printed on the Report
l Ship-via codes and descriptions.
l Names, addresses, telephone numbers, and contacts for all listed ship-viacodes.
Fields and Controls
From Ship-Via CodeSpecify a range of ship-via codes.
To Ship-Via CodeSpecify a range of ship-via codes.
User's Guide 339
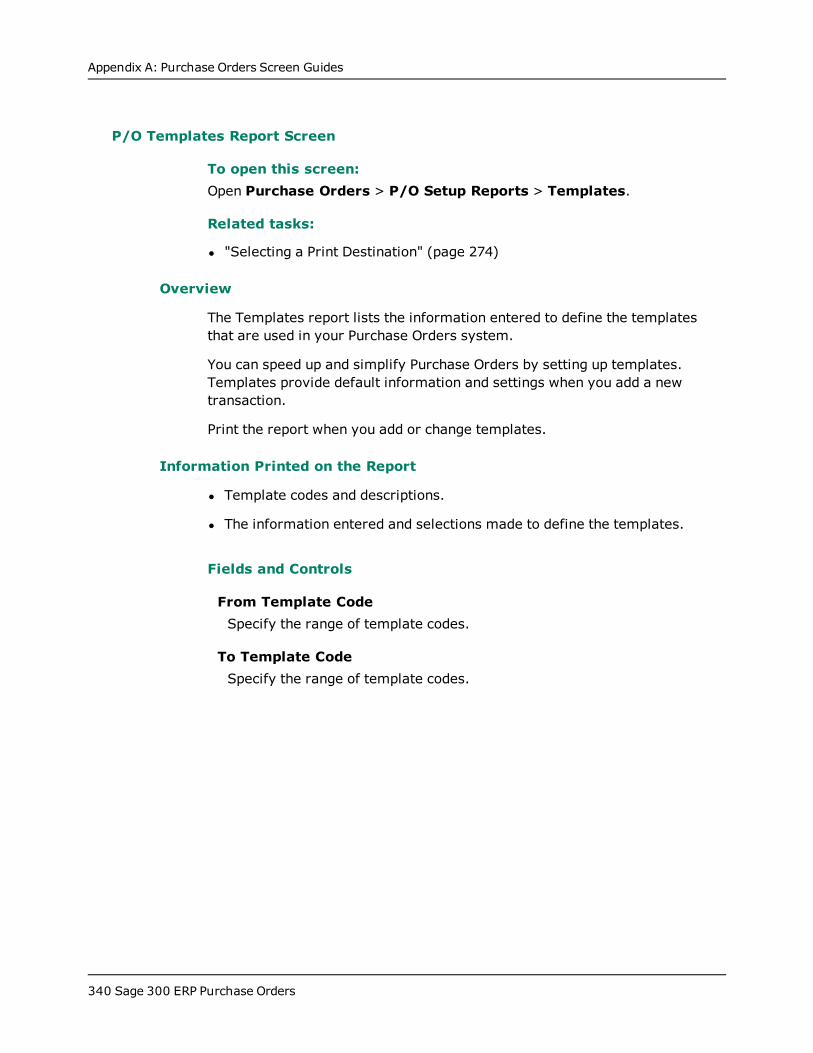
Appendix A: Purchase Orders Screen Guides
P/O Templates Report Screen
To open this screen:Open Purchase Orders > P/O Setup Reports > Templates.
Related tasks:
l "Selecting a Print Destination" (page 274)
Overview
The Templates report lists the information entered to define the templatesthat are used in your Purchase Orders system.
You can speed up and simplify Purchase Orders by setting up templates.Templates provide default information and settings when you add a newtransaction.
Print the report when you add or change templates.
Information Printed on the Report
l Template codes and descriptions.
l The information entered and selections made to define the templates.
Fields and Controls
From Template CodeSpecify the range of template codes.
To Template CodeSpecify the range of template codes.
340 Sage 300 ERP Purchase Orders
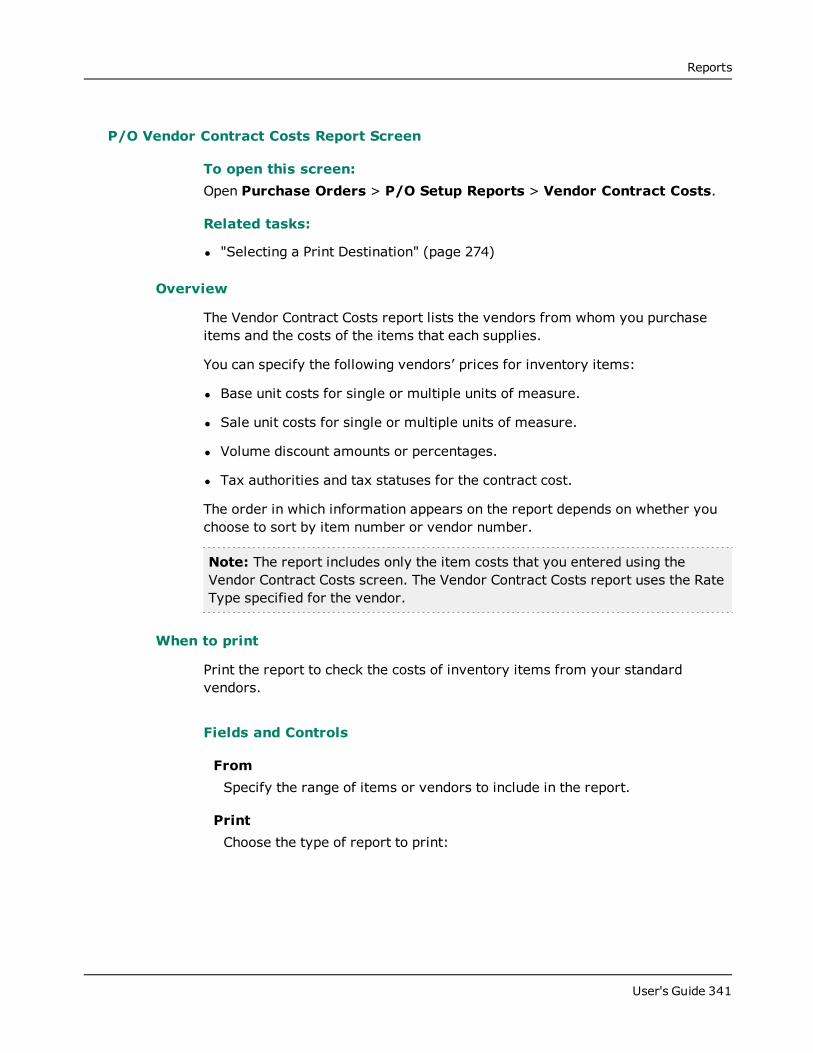
Reports
P/O Vendor Contract Costs Report Screen
To open this screen:Open Purchase Orders > P/O Setup Reports > Vendor Contract Costs.
Related tasks:
l "Selecting a Print Destination" (page 274)
Overview
The Vendor Contract Costs report lists the vendors from whom you purchaseitems and the costs of the items that each supplies.
You can specify the following vendors’ prices for inventory items:
l Base unit costs for single or multiple units of measure.
l Sale unit costs for single or multiple units of measure.
l Volume discount amounts or percentages.
l Tax authorities and tax statuses for the contract cost.
The order in which information appears on the report depends on whether youchoose to sort by item number or vendor number.
Note: The report includes only the item costs that you entered using theVendor Contract Costs screen. The Vendor Contract Costs report uses the RateType specified for the vendor.
When to print
Print the report to check the costs of inventory items from your standardvendors.
Fields and Controls
FromSpecify the range of items or vendors to include in the report.
PrintChoose the type of report to print:
User's Guide 341
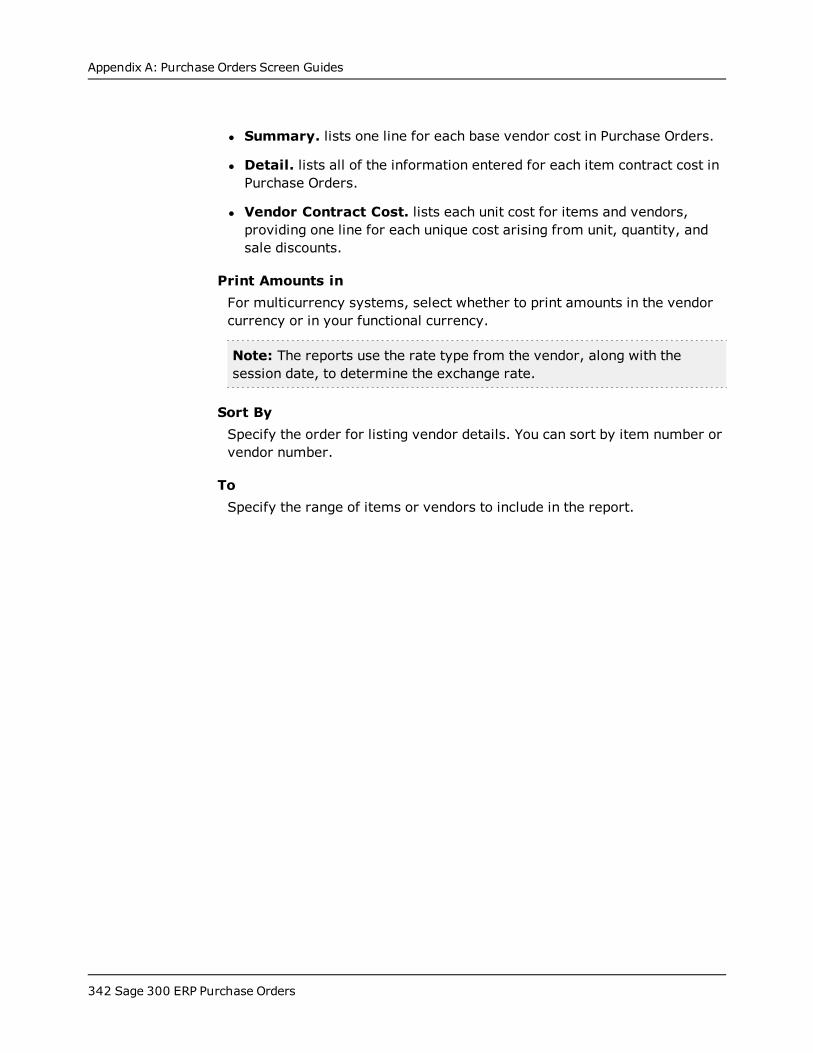
Appendix A: Purchase Orders Screen Guides
l Summary. lists one line for each base vendor cost in Purchase Orders.
l Detail. lists all of the information entered for each item contract cost inPurchase Orders.
l Vendor Contract Cost. lists each unit cost for items and vendors,providing one line for each unique cost arising from unit, quantity, andsale discounts.
Print Amounts inFor multicurrency systems, select whether to print amounts in the vendorcurrency or in your functional currency.
Note: The reports use the rate type from the vendor, along with thesession date, to determine the exchange rate.
Sort BySpecify the order for listing vendor details. You can sort by item number orvendor number.
ToSpecify the range of items or vendors to include in the report.
342 Sage 300 ERP Purchase Orders
Reports
P/O Vendor Details Report Screen
Note: This screen is available only if you are using Purchase Orders as astand-alone program (that is, you do not have Inventory Control installed).
To open this screen:Open Purchase Orders > P/O Setup Reports > Vendor Details.
Related tasks:
l "Selecting a Print Destination" (page 274)
l "Printing Purchase Orders Analytical and Setup Reports" (page 272)
Overview
The Vendor Details report lists vendors from whom you purchase items and theitems each supplies. The report includes only the vendors you have assigned toitem numbers on the Vendors tab of the Items screen.
The order in which information appears on the report depends on your sortingselection. The Vendor Details report lists:
l The number you assign to identify a vendor in Accounts Payable.
l The number you use to identify an item in Purchase Orders.
l A number you assign to the vendor (vendor type) in the vendor detailsrecord, usually to identify vendors from whom you most frequently order theitem.
User's Guide 343
Appendix A: Purchase Orders Screen Guides
P/O Weight Units of Measure Report Screen
Note: This screen is available only if you are using Purchase Orders as astand-alone program (that is, you do not have Inventory Control installed).
To open this screen:Open Purchase Orders > P/O Setup Reports >Weight Units ofMeasure.
Related tasks:
l "Selecting a Print Destination" (page 274)
l "Printing Purchase Orders Analytical and Setup Reports" (page 272)
Overview
The Weight Units of Measure report lists the information entered to define theinventory weight units of measure used in your Purchase Orders system (ifyou do not use the Inventory Control module).
The report lists the weight units of measure along with their descriptions andweight conversion factors. It also identifies the default weight unit ofmeasure.
Print the report when you add, change, or delete weight units of measure, orto provide people setting up items with a list of the weight UOMs that havealready been added.
344 Sage 300 ERP Purchase Orders
Setup Screens
Setup ScreensUse Purchase Orders setup screens to set up options, vendor information,shipping information, General Ledger integration, and other details for yourPurchase Orders system.
P/O Account Sets Screen
Note: This screen is available only if you are using Purchase Orders as astand-alone program (that is, you do not have Inventory Control installed).
To open this screen:Open Purchase Orders > P/O Setup > Account Sets.
Related tasks:
l "Adding Account Set Records " (page 43)
l "Managing Account Set Records " (page 44)
Overview
Use the Account Sets screen to define a set of general ledger accounts to whichyou post Purchase Orders transactions (if you use Purchase Orders as a stand-alone system without Inventory Control).
You must add at least one account set to Purchase Orders before you can additem records. If you add more than one account set, you can group items by theaccount set to which they belong.
Fields and Controls
Account SetType a number or code that will identify the account set record you arecreating.
The code can be up to six characters long, and contain letters and numbers.
DescriptionType a description using up to 30 characters. This description will appear onpurchase orders, receipts, invoices, etc.
User's Guide 345

Appendix A: Purchase Orders Screen Guides
If you want to describe the item more completely, use the commentsfields.
InactiveSelect this option if you do not want to use the account set in transactions.
If you make an account set inactive, you can no longer assign it totransactions.
This option is useful if you decide to delete an account set and want toensure no further transactions are entered for it.
Inventory/Expense (General Ledger Account)Type the number of the general ledger inventory or expense account todebit when you receive items and to credit when you enter returns that usethis account set code.
Last MaintainedThis field displays the date of the last change made to the record.
Payables Clearing (General Ledger Account)Type the number of the general ledger suspense account to which PurchaseOrders will post receipts and returns that use this account set code.
This account could be considered the accrued amount payable for goodsreceived.
As you post the related vendor invoices in Accounts Payable, offsettingjournal entries (debits) related to the items purchased are generatedagainst the Payables Clearing account to clear the balance that is left in thisaccount from posting P/O receipts.
346 Sage 300 ERP Purchase Orders
Setup Screens
P/O Additional Costs Screen
To open this screen:Open Purchase Orders > P/O Setup > Additional Costs.
Related tasks:
l "Adding Additional Cost Records" (page 48)
l "Managing Additional Cost Records " (page 49)
Overview
Use the Additional Costs screen to define codes to identify the extra costs youare charged by your vendors (such as shipping or handling charges).
Fields and Controls
Account CostType a number or code that will identify the account cost record you arecreating.
The code can be up to six characters long, and can contain letters andnumbers.
AmountType the amount of the additional cost, if known. If the cost varies, leavethis field blank.
CurrencyThis field is needed only if you use a multicurrency ledger.
Type the code for the currency in which you will enter the additional costamounts, or select the currency code from the Finder.
If you are adding an additional cost for a particular vendor number, youmust select the vendor's currency code, and the currency must match thecurrency for any tax authorities you assign to the cost.
DescriptionType a description using up to 30 characters. This description will appear onpurchase orders, receipts, invoices, etc.
User's Guide 347
Appendix A: Purchase Orders Screen Guides
If you want to describe the item more completely, use the commentsfields.
Expense AccountType the number of the general ledger account to which you posttransactions entered for the additional cost.
InactiveSelect this option if you do not want to use the additional cost intransactions.
If you make an additional cost inactive, you can no longer assign it toreceipts, invoices, credit notes, and debit notes. Making a cost inactiveafter entering it on a receipt has no effect on the receipt. You can still editthe inactive cost amount on the receipt, post changes to the receipt, andinvoice it with the inactive cost included.
This option is useful if you decide to delete an additional cost and want toensure no further transactions are entered for it. You can change yourentry any time.
Last MaintainedThis field displays the date of the last change made to the record.
Optional FieldsOptional fields are fields that have been added by your company to therecords or transactions in purchase orders. You must have TransactionAnalysis and Optional Field Creator to add and use optional fields.
If Optional Fields appear on the Additional Costs screen, you can click theZoom button ( ) to display the optional fields that have been assigned toadditional costs, and edit their contents.
If you assign the same optional fields to additional cost records and toinvoice additional costs, the optional field entries in additional cost recordswill appear on invoice additional cost details by default.
Optional field information can pass from invoices (or credit/debit notes) todownstream ledgers like Accounts Payable and General Ledger.
ProrationSelect the default proration method for the cost:
348 Sage 300 ERP Purchase Orders
Setup Screens
l No Proration. If you select No Proration, you must specify the generalledger expense account number for the cost.
When entering additional costs with transactions, you can select anotherproration method and you can change to another general ledger accountnumber when you are expensing the cost.
l Prorate By Weight
l Prorate By Cost
l Prorate By Quantity
l Prorate Manually
Return AccountType the number of the general ledger account to which you normallyexpense the additional cost when you return items and do not leave orreprorate the additional cost amount assigned to them. If you use GeneralLedger, you can also select the account number from the Finder.
You can specify a different account number or proration method whenentering transactions for the additional cost code.
Return ProrationSelect the method by which you allocate costs when items are returned:
l Leave
l Prorate
l Expense. If you select Expense, you must specify the general ledgerexpense account number for the return cost.
The return proration methods that are available depend on the prorationmethod you selected. For example, if you selected No Proration or ProrateManually as the proration method, Leave is automatically selected as thereturn proration method and you cannot change it.
If you selected No Proration as the proration method, when entering newadditional costs with receipts, invoices, credit notes, and debit notes, youcan select another reproration method and you can change to anothergeneral ledger account number when you are expensing the cost.
Tax AuthorityType the code for the authority that taxes the cost, or select the code fromthe Finder for the Tax Authority field.
User's Guide 349

Appendix A: Purchase Orders Screen Guides
To add another line of tax information, press Insert after entering all theinformation for a particular authority and purchase tax class.
Tax Authority DescriptionThis field displays the description entered in Common Services for the taxauthority you specified. You cannot change the description in this screen.Use the Tax Authorities screen in Common Services to change thedescriptions of tax authorities.
Tax ClassType the number of the tax class that applies to the cost for the associatedtax authority.
To add another line of tax information, press the Insert key on yourkeyboard after entering all the information for a particular authority andpurchase tax class.
Tax Class DescriptionThis field displays the description entered for the purchase tax class youspecified. You cannot change the description in this screen. Use the TaxClasses screen in Common Services to change the descriptions of taxclasses.
Vendor NumberIf you wish to assign a vendor number to the cost, type a valid number orselect it from the Finder of Accounts Payable vendor numbers. You can thenuse the additional cost on receipts only for that vendor.
Leave the field blank if you want to use the cost for any of your vendors.(In multicurrency ledgers, you can use an additional cost with a blankvendor number for any other vendor who uses the same currency.)
350 Sage 300 ERP Purchase Orders
Setup Screens
P/O E-mail Messages Screen
To open this screen:Open Purchase Orders > P/O Setup > E-mail Messages.
Related tasks:
l "Creating E-mail Messages " (page 50)
l "Setting up Purchase Orders" (page 3)
Overview
You can create e-mail messages to use when sending purchase orders andreturns, specifying codes for adding information specific to the vendor orspecific to your company. Each e-mail message is identified by a unique 16-character message ID code.
To e-mail purchase orders and returns, you must:
l Choose E-mail or Contact's E-mail as the delivery method for the vendor inthe Accounts Payable.
l You must select Vendor as the Delivery Method when you print Returns andPurchase Orders. You select the particular e-mail message that you want touse when you print the purchase orders or returns.
Fields and Controls
DescriptionEnter a description of up to 60 characters for the e-mail message.
E-mail SubjectEnter a subject line for the e-mail message. You can also use variables toinsert specific information in the subject line. For more information, see "E-mail Message Variables " (page 51).
InactiveSelect this field only when you want to make this message unavailable foruse.
Last MaintainedThis read-only field displays the system date on which the record was last
User's Guide 351
Appendix A: Purchase Orders Screen Guides
modified.
Message IDA message ID is a unique code of up to 16 characters that identifies an e-mail message. You select messages using this message ID when you sendorder confirmations, quotes, invoices, or credit notes by e-mail.
Use this field to create a new message ID, or to select an existing messageID so you can view or edit details.
Message TypeSelect the type of document for which you are creating the e-mailmessage.
352 Sage 300 ERP Purchase Orders
Setup Screens
P/O G/L Integration Screen
To open this screen:Open Purchase Orders > P/O Setup > G/L Integration.
Related tasks:
l "Changing General Ledger Integration Options" (page 36)
l "Setting up Purchase Orders" (page 3)
Overview
Use the G/L Integration screen to choose various options for integratingPurchase Orders with the General Ledger program.
Integration and Transaction Tabs
Tasks you can perform in the Integration tab:
l Specify whether to add general ledger transactions to the G/L batch duringposting or each time you run Day End Processing, or to create thetransactions at a later date.
Note: This choice can have a large impact on the speed of processingtransactions in Purchase Orders, especially if you are costing inventoryduring posting (in which case, you may want to create transactions at alater date).
l Choose whether to create a separate G/L batch each time you create the G/Lbatch (and optionally automatically post the batch) or add new transactionsto the existing batch. (This option applies only if you use General Ledger withPurchase Orders at the same location.)
l Choose whether to consolidate the G/L batch when you post, or always enterfull transaction details in the batch.
l Decide when to generate entries for non-inventory expenses and forexpensed additional costs:
Choose whether to generate G/L entries in the Purchase Orders programfor expenses from receipts and returns for non-inventory items, or havethe G/L entries for expenses created in the Accounts Payable program.
User's Guide 353
Appendix A: Purchase Orders Screen Guides
Choose whether to generate G/L entries in the Purchase Orders programfor additional cost expenses on receipts, or have the G/L entries forexpenses created in the Accounts Payable program. (This is similar to theprevious option.)
l Specify several General Ledger accounts used by the Purchase Ordersprogram:
The G/L account number of the default inventory expense account,default cost expense account, and non-inventory payables clearingaccount.
The G/L account that you want to update with expensed additional costs ifyou create general ledger transactions from Purchase Orders.
l Look up the last Day End Number for which you have created general ledgerbatches.
Tasks you can perform in the Transactions tab:
l Select the information to appear in the Entry Description, DetailDescription, and Detail Reference and Comment fields in G/L transactionsarising from invoices and shipments. (This information appears fortransactions in the G/L Transactions report.)
l Look up the last Day End Number for which you have created general ledgerbatches.
l Choose the information that you want to appear in different fields of G/Ltransactions.
l The Transaction Type column lists each type of Purchase Orderstransaction, and the remaining columns list the various G/L transactionfields for which you can specify P/O transaction information:
G/L Entry Description (derived from the P/O transaction header)
G/L Detail Description (derived from P/O transaction details)
G/L Detail Reference (derived from P/O transaction details)
G/L Detail Comments (derived from P/O transaction details)
Double-click the cell for the transaction type and G/L field that you want tospecify.
354 Sage 300 ERP Purchase Orders
Setup Screens
Changing Settings
You can change any of your choices on the G/L Integration page at any time.Any changes you make will apply only to general ledger transactions createdafter the change, and will not affect existing general ledger batches.
If you want to change from using the Create Batch screen to produce yourgeneral ledger transactions to creating them during day-end processing, besure to run Create Batch to process any outstanding transactions first, to avoidaccidentally omitting transactions from your general ledger batches.
Before Using the G/L Integration Screen
Before changing any of the settings or other information in the G/L Integrationscreen, make sure you understand the impact the options have on processingwithin Purchase Orders.
Note: You cannot change settings on the Integration tab of the G/L Integrationscreen if other Purchase Orders screens are open, or other users are workingwith the Purchase Orders database.
Make sure that no one else is using the Purchase Orders data and that no otherPurchase Orders screens are open for the company before you save changes tothe G/L Integration screen.
A/P Integration Option is Set in the P/O Options Screen
Purchase Orders also lets you choose when to post Accounts Payable batchesarising from invoices posted in Purchase Orders.
To specify when to post A/P batches generated from Purchase Orders Invoices,credit notes and debit notes, use the option Post A/P Batches During Posting orDay End Processing/On Request Using Create Batch Icon.
Creating and Posting a New G/L Batch
Purchase Orders lets you create new batches and optionally post themautomatically to the general ledger.
Note: If you choose this option, and you are creating G/L transactions whenyou post Purchase Orders transactions, the program will create a G/L batchevery time that you post a P/O transaction, and automatically post that batchin the General Ledger module.
User's Guide 355
Appendix A: Purchase Orders Screen Guides
Creating Only One Batch
To have only one General Ledger batch to which all transactions are appended,select the Adding To An Existing Batch option. Purchase Orders must use thesame database as General Ledger.
Fields and Controls
Integration tab
Consolidate G/L BatchesUse this option to specify whether to combine transaction details for thesame general ledger account into a single detail, or send unconsolidatedPurchase Orders transaction details to General Ledger.
Consolidation reduces the amount of information in the general ledgerbatch and results in a shorter G/L Transactions Listing. Consolidationalso:
l Removes transaction-specific information from the Reference andDescription fields for each transaction.
l Removes optional field information from transactions.
l Blocks drilldown from G/L transactions to the originating entries inPurchase Orders (unless consolidating by account only).
Use the Create Batch icon to consolidate details from separatetransactions
If you selected the On Request Using Create Batch Icon option to creategeneral ledger transactions, you can consolidate transaction detailsfrom all transactions for each general ledger account if you chooseConsolidate by Account and Fiscal Period or Consolidate by Account,Fiscal Period, and Source.
Consolidate details within transactions if creating batches duringposting or day end processing
If you create batches of G/L transactions during posting or day endprocessing, the program can only consolidate the details withintransactions; it cannot consolidate the details from differenttransactions.
356 Sage 300 ERP Purchase Orders

Setup Screens
Consolidation choices
l Do Not Consolidate. All the details posted in Purchase Orders will beincluded in the General Ledger transaction batch.
Choose this option if you use optional fields and pass optional fieldinformation from P/O transaction details to the G/L transaction details.
l Consolidate Transaction Details by Account. All the details withina transaction with the same general ledger account number arecombined into one detail if the G/L Detail Description and the G/L DetailReference are also the same. The program will not consolidate detailsthat have a different description or reference.
Choose this option if you do not use optional fields, but still want toassociate general ledger transactions with originating documents (fordrilldown or to maintain a manual audit trail).
l Consolidate by Account and Fiscal Period. All the details with thesame general ledger account number and fiscal period are combinedinto one detail.
This option will consolidate details from different transactions if youcreate transaction batches using the Create Batch screen.
l Consolidate by Account, Fiscal Period, and Source. All thedetails with the same general ledger account number, fiscal period,and source code are combined into one detail.
This option will consolidate details from different transactions if youcreate transaction batches using the Create Batch screen.
Note: The posting date for consolidated entries is the last date of thefiscal period.
Create G/L Entries for Expensed Additional CostsThis choice lets you choose when entries are generated for expensedadditional costs—during P/O posting/day end or when the invoices areposted in Accounts Payable. (This option is similar to the option CreateG/L Entries For Non-Inventory Expenses.)
Select this option to create debit entries to expense accounts and creditentries to the Expensed Additional Cost Clearing Account when you postadditional costs. (Posting the invoices later in A/P will credit the payablescontrol account and debit the Expensed Additional Cost Clearing Account.)
User's Guide 357
Appendix A: Purchase Orders Screen Guides
Do not select this option if you want to send expenses with invoices toAccounts Payable, where posting will debit the expense accounts andcredit payables control.
Note: For job-related documents, Purchase Orders will always createG/L entries for expensed additional costs during posting—whether youselect this option or not.
Create G/L Entries for Non-Inventory Expenses fromReceipt/ReturnThis choice lets you update your general ledger with non-inventoryexpenses directly from Purchase Orders, or wait until invoices areposted in Accounts Payable. (This option is similar to the option CreateG/L Entries For Expensed Additional Costs.)
Select this option to create debit entries to expense accounts and creditentries to the non-inventory payables clearing account when you postreceipts. (Posting the invoices later in A/P will credit the payablescontrol account and debit the non-inventory payables clearing account.)
Do not select this option if you want to send expenses with invoices toAccounts Payable, where posting will debit the expense accounts andcredit payables control.
Note: For job-related documents, Purchase Orders will always createG/L entries for non-inventory expenses during posting—whether youselect this option or not.
Create G/L TransactionsUse one of the Create G/L Transactions options to specify when to creategeneral ledger transactions:
l During Posting or Day End Processing. This option lets youcreate general ledger transactions during posting or when you runday end processing—depending on when you cost transactions.
You choose when to cost transactions with the Cost Items Duringoption on the Processing tab of the I/C Options screen. The CostItems During option gives you two choices:
During Posting (G/L transactions will be created when transactionsare posted.)
358 Sage 300 ERP Purchase Orders
Setup Screens
Day End Processing (G/L transactions will be created during day endprocessing.)
Note: These choices can have a large impact on the speed ofprocessing inventory transactions and transactions in PurchaseOrders. If you want to speed up order processing, switch to costinginventory when you run Day End Processing.
l On Request Using Create Batch Icon. This option lets you creategeneral ledger transactions at any time.
Once you create the transactions, you cannot print the G/L Transactionsreport. If you wish to print the report, select the On Request UsingCreate Batch Icon for this option. You must then print the report beforeyou use the Create Batch screen to create the transactions.
You can change your selection any time. If you were using the CreateBatch screen to create the transactions, print a copy of the latest G/LTransactions report, then create any outstanding transactions beforechanging your choice for the option.
Create G/L Transactions ByPurchase Orders lets you choose whether to add new general ledgertransactions to new batches or create new batches and optionally postthem automatically to the general ledger. You can choose:
l Adding to An Existing Batch. Add general ledger transactions to anexisting General Ledger batch.
To have only one General Ledger batch to which all transactions areappended, select the Adding To An Existing Batch option.
l Creating a New Batch. Create a new General Ledger batch each timeyou generate G/L transactions.
l Creating and Posting a New Batch. Create a new General Ledgerbatch each time you generate G/L transactions, and automatically postthe batch in the General Ledger program.
Note: Remember to create and post G/L batches for outstandingtransactions before locking periods for General Ledger.
Default Cost Expense AccountUse this option on the Integration tab of the Options screen to select the
User's Guide 359

Appendix A: Purchase Orders Screen Guides
general ledger account to which you want the program to post costamounts in transactions for which no general ledger account is specified(such as when you change the tax class for an additional cost that wasmanually prorated on a receipt, indirectly changing the tax amount aswell).
Note:l You must specify this account number before you can run Day Endprocessing.
l You can change the default account number in the Options screen atany time.
l If you use General Ledger with Purchase Orders, you can selectgeneral ledger account numbers from the Finder.
Default Inventory Expense AccountUse this option on the Integration tab of the Options screen to specifythe general ledger account to display when you enter transactions foritems that are not defined in Inventory Control.
You need to specify this account number only if you use the Allow Non-inventory Items option. If you selected Allow Non-inventory Items onthe Processing tab, you cannot save changes to the Options screen untilyou enter a number for this account.
The account number is displayed when you enter transactions for non-inventory items, but you can change it for individual transactions, asneeded. You can also change the default account number in the Optionsscreen at any time.
If you use General Ledger with Purchase Orders, you can select generalledger account numbers from the Finder.
Expensed Additional Cost Payables Clearing AccountUse this option on the Integration tab of the Options screen to select thegeneral ledger account that you want to update with expensed additionalcosts when you create general ledger transactions.
Note: You can choose when entries are generated for expensedadditional costs—during PO posting/day end or when the invoices areposted in Accounts Payable. This account is used if you create G/Ltransactions in Purchase Orders.
360 Sage 300 ERP Purchase Orders
Setup Screens
If you generate entries in PO, the program debits the expense accountand credits the payables clearing account.
You can change the default clearing account number in the Options screenat any time.
G/L Transactions Generated Through Day End NumberThis field displays the last day end number generated. You can see thenext day end number on the Documents tab in the P/O Options screen.
Non-Inventory Payables Clearing AccountUse this option on the Integration tab of the Options screen to select thegeneral ledger account that you want to update with receipts and returnsof non-inventory items when you create general ledger transactions.
Note: You can choose when entries are generated for non-inventoryexpenses—during PO posting/day end or when the invoices are posted inAccounts Payable. This account is used if you create G/L transactions inPurchase Orders.
For the receipt of a non-inventory item, the program debits the expenseaccount and credits the payables clearing account.
For the return of a non-inventory item, the entry debits the payablesclearing account and credits the expense account.
You can change the default account number in the Options screen at anytime.
If you use General Ledger with Purchase Orders, you can select generalledger account numbers from the Finder.
G/L Source Codes table
Source LedgerThis column shows the source ledger code for all general ledgertransactions created by the Purchase Orders module.
You can change the source type code for each type of transactioncreated by P/O, but you cannot change the source ledger code.
The combination of source ledger code and source type code is called asource code in the General Ledger module.
User's Guide 361
Appendix A: Purchase Orders Screen Guides
Source TypeThis column lists the two-character codes assigned to various typesof transactions that are generated by the Purchase Orders system,such as invoices, credit notes, or consolidated G/L entries.
If you want to, you can change the source type code for each type oftransaction created by Purchase Orders. You cannot change thesource ledger code.
If you change the source type code for source codes, the new sourcecodes are automatically added to the General Ledger module, but youwill have to update G/L source journal profiles to include transactionson source journals.
Transaction TypeThis column lists the various types of transactions that are generatedby the Purchase Orders system, such as invoices, credit notes, orconsolidated G/L entries.
You can change the source type code for each type of transactioncreated by P/O. You cannot change the source ledger code.
If you change the source type code for source codes, the new sourcecodes are automatically added to the General Ledger module, but youwill have to update G/L source journal profiles to include transactionson source journals.
The combination of source ledger code and source type code is calleda source code in the General Ledger module.
Transactions tab
G/L Detail CommentSelect the type of information that you want to appear withunconsolidated details in the Comment column on the G/L Transactionsreport and in that field in the general ledger batch.
You can assign one or more pieces of information (segments) to eachG/L transaction field, provided that the combined length of the segmentsand separators does not exceed 60 characters. Fields exceeding thislimit will be truncated when you post the general ledger transactions.
l If you do not consolidate general ledger transactions, information forall the G/L fields is passed to General Ledger.
362 Sage 300 ERP Purchase Orders
Setup Screens
The information you can select depends on the type of transaction forwhich you are assigning information.
For example, you can include information like the purchase ordernumber, vendor number, vendor name, receipt number, reference,source code, day end number, or entry number. You can separate piecesof information with slashes, parentheses, hyphens, periods, spaces, ornumber signs.
l When you create general ledger transactions, if no data exists in thesource transaction field, the field will be blank in the general ledgertransaction.
G/L Detail DescriptionSelect the type of information that you want to appear withunconsolidated details in the Description column on the G/L Transactionsreport and in that field in the general ledger batch. (The Detail Descriptionfield is the description on each detail line, not the main description for theGeneral Ledger transaction.)
You can assign one or more pieces of information (segments) to each G/Ltransaction field, provided that the combined length of the segments andseparators does not exceed 60 characters. Fields exceeding this limit willbe truncated when you post the general ledger transactions.
l When you consolidate general ledger transactions, the description foreach transaction is changed to "Consol. by P/O on date."
Note: When there is only one of a particular transaction type, thedescription for the transaction is whatever you selected on the G/LIntegration screen.
l If you do not consolidate general ledger transactions, information forall the G/L fields is passed to General Ledger.
The information you can select depends on the type of transaction forwhich you are assigning information.
For example, you can include information like the purchase ordernumber, vendor number, vendor name, receipt number, reference,source code, day end number, or entry number. You can separate piecesof information with slashes, parentheses, hyphens, periods, spaces, ornumber signs.
User's Guide 363
Appendix A: Purchase Orders Screen Guides
l When you create general ledger transactions, if no data exists in thesource transaction field, the field will be blank in the general ledgertransaction.
G/L Detail ReferenceSelect the type of information that you want to appear withunconsolidated details in the Reference column on the G/L Transactionsreport and in that field in the general ledger batch.
You can assign one or more pieces of information (segments) to eachG/L transaction field, provided that the combined length of the segmentsand separators does not exceed 60 characters. Fields exceeding thislimit will be truncated when you post the general ledger transactions.
l When you consolidate general ledger transactions, the description foreach transaction is changed to "Consol. by P/O on date."
Note: When there is only one of a particular transaction type, thedescription for the transaction is whatever you selected on the G/LIntegration screen.
l If you do not consolidate general ledger transactions, information forall the G/L fields is passed to General Ledger.
The information you can select depends on the type of transaction forwhich you are assigning information.
For example, you can include information like the purchase ordernumber, vendor number, vendor name, receipt number, reference,source code, day end number, or entry number. You can separate piecesof information with slashes, parentheses, hyphens, periods, spaces, ornumber signs.
l When you create general ledger transactions, if no data exists in thesource transaction field, the field will be blank in the general ledgertransaction.
G/L Entry DescriptionThe Entry Description field is the main description for the GeneralLedger transaction (not the description on each detail line).
You can assign one or more pieces of information (segments) to thedescription for each G/L transaction, provided that the combined lengthof the segments and separators does not exceed 60 characters. Fields
364 Sage 300 ERP Purchase Orders
Setup Screens
exceeding this limit will be truncated when you post general ledgertransactions.
For example, you can include information like the purchase ordernumber, vendor number, vendor name, receipt number, reference,source code, day end number, or entry number. You can separate piecesof information with slashes, parentheses, hyphens, periods, spaces, ornumber signs.
l If you use the On Request Using Create Batch Icon option toconsolidate general ledger transactions, the description for each G/Ltransaction is changed to "Consol. by P/O on date" (unless there is onlyone of a particular transaction type).
The information you can select depends on the type of transaction forwhich you are assigning information.
User's Guide 365
Appendix A: Purchase Orders Screen Guides
P/O Items Screen
Note: This screen is available only if you are using Purchase Orders as astand-alone program (that is, you do not have Inventory Control installed).
To open this screen:Open Purchase Orders > P/O Setup > Items.
Related tasks:
l "Adding Item Records " (page 53)
l "Managing Item Records" (page 55)
Overview
Use the Items screen to add a record for each item to your inventory list.
An item record includes the item code, account set, tax authority, and taxclasses that the item uses. It also includes units of measure and a unit ofweight for the item, as well as up to 300 characters of additional descriptiveinformation.
Before adding item records:
l Add the account sets you require for posting transactions to general ledgeraccounts.
l Add the taxing authorities and tax classes you require (using the TaxServices icon in the Common Services folder).
Items Tab
Use this tab to enter identifying information about the item, such as the itemnumber and description, the account set code to be used for the item intransactions, the commodity number (if you are required to report VATamounts), the unit weight for the item, as well as additional item descriptioninformation that you can print on customized forms.
Units Tab
Use this tab to enter units of measure and the conversion factor for each item.(You must enter a stocking unit of measure with a conversion factor of 1.)
366 Sage 300 ERP Purchase Orders
Setup Screens
Taxes Tab
Use this tab to enter codes for the taxing authorities you want to assign to theitem. (You define taxing authorities in the Tax Services folder of CommonServices.) You can also enter codes for the tax classes you want to assign to theitem for purchases for each selected tax authority.
Optional Fields Tab
This tab appears if you have assigned optional fields to the Items screen (usingthe Optional Fields screen in the P/O Setup folder).
Use this tab to add or change information in the optional fields that are assignedto this item.
If you have assigned the same optional fields to transaction entry screens, theinformation in these fields will appear by default on new transaction details forthis item.
To enter optional information, type or choose your entry for each optional field.
If the optional field has a Finder, you can select one of the entries from theFinder list. Depending on how the list has been set up, you may be able to leavethe field blank.
Weight Unit of Measure
You define weight units of measure using the Weight Units Of Measure screen inthe P/O Setup folder.
Select the unit of measure that you use for measuring the weight of one unit ofthis item.
The weight unit of measure record includes a conversion factor for convertingthis unit to the default weight unit of measure specified in the P/O Optionsscreen.
Fields and Controls
Item tab
Account Set CodeType or use the Finder to select the general ledger account set you wantto assign to the item.
User's Guide 367
Appendix A: Purchase Orders Screen Guides
CommentUse up to four additional fields to include descriptive information for theitem. You can type up to 80 characters in each of the four fields.
If you use customized invoices or other forms, you can have PurchaseOrders print this additional item information on the forms.
Commodity NumberIf your company reports a value added tax (VAT), type the commoditynumber for the item.
DescriptionType a description using up to 30 characters. This description willappear on purchase orders, receipts, invoices, etc.
If you want to describe the item more completely, use the commentsfields.
InactiveSelect this option if you do not want to use the item in transactions.
Note: Inactive items can still be processed in purchase order returns.
This option is useful if you decide to delete an item record, and want toensure no further transactions are entered using it. You can change yourentry any time.
Item NumberType a number or code that will identify the Item record you arecreating.
The code can be up to 24 characters long, and contain letters andnumbers as well as special characters.
Last MaintainedThis field displays the date of the last change made to the record.
Unit WeightType the weight for one unit of the item.
The weight you enter must be in terms of the Weight Unit Of Measureyou enter in the Weight Unit of Measure field.
Item weights are used by Purchase Orders to determine order weight.
368 Sage 300 ERP Purchase Orders
Setup Screens
Item Taxes tab
(Item Tax) AuthorityUse the Finder to select the taxing authorities you want to assign to theitem. (You define taxing authorities in the Tax Services folder of CommonServices.)
Purchase Tax ClassType or select the numbers of the tax classes you want to assign to theitem for purchases for each selected tax authority.
To add another line of tax information, press the Insert key on yourkeyboard after entering all the information for a particular authority andpurchase tax class.
Tax Class DescriptionPurchase Orders displays the description entered for the purchase taxclass you specified. You cannot change the description in this screen. Usethe Tax Classes screen in Common Services to change the descriptions oftax classes.
Optional Fields tabThe Optional Fields tab contains optional fields added by your company tothe Items screen. These fields will appear by default on transaction screensas long as the transaction screens contain the same optional fields.
This tab will appear only if you have Transaction Analysis and Optional FieldCreator.
Units tab
Conversion FactorType the number of stocking units for the unit of measure.
Example: If the unit of measure is “dozen,” you type 12.
You must enter the unit of measure you intend to use for the stocking unitbefore you can save the record. The conversion factor for the stockingunit must be 1 (one).
Unit Of MeasureType the names for alternative units of measure for this item (for
User's Guide 369
Appendix A: Purchase Orders Screen Guides
example, dozen, gallon, ton).
You must also enter a conversion factor for converting each alternativeunit to the default weight unit of measure that you specified in P/OOptions.
370 Sage 300 ERP Purchase Orders
Setup Screens
P/O Optional Fields Screen
To open this screen:Open Purchase Orders > P/O Setup > Optional Fields.
Related tasks:
l "Setting Up Optional Fields " (page 62)
l "Setting up Purchase Orders" (page 3)
Overview
This screen appears in the P/O Setup folder if you use Transaction Analysis andOptional Field Creator, a separately licensed package that you can purchase anduse with Purchase Orders.
You use optional fields if you want to keep additional information with PurchaseOrders transactions and records.
For more information, see "About Optional Fields" (page 56) and "AboutEntering Optional Data on Transactions" (page 168).
Optional Field Settings
Optional Field settings let you restrict the amount of information that is passedto Accounts Payable and General Ledger when you post transactions in PurchaseOrders that use optional fields.
When defining an optional field for use with transactions, click the Settingsbutton, or double-click the line on the Optional Fields grid. A separate screenopens, listing the groups of accounts in other ledgers that are affected when youpost transactions of the type for which you are defining the optional field.
Select whether you want to pass optional field information to Accounts Payablewith invoices, credit notes and debit notes, and select the account groups forwhich you want to pass values to General Ledger when you post transactionsthat include the optional field.
Note: You must also use the same optional fields in Accounts PayableInvoices to pass information to Accounts Payable, and use the same optionalfields in General Ledger accounts to pass information to General Ledger.
All account groups are initially selected for new optional fields. However, if yousend all the optional fields you use in Purchase Orders transactions to General
User's Guide 371
Appendix A: Purchase Orders Screen Guides
Ledger, your G/L may become unwieldy, and you may slow down processingconsiderably. For this reason, you should send values to General Ledger onlyfor optional fields that require financial analysis, and only to accounts wherethey are required. For example, you might want to send optional fields thatcontain vendor numbers only to revenue accounts.
If you use Sage 300 ERP Project and Job Costing, you can also specify whetheroptional field information for job-related transactions will be passed to Projectand Job Costing, if the optional fields match those used for billings.
Fields and Controls
Auto InsertSelect Yes in this field if you want the program to display the optional fieldand its default value on the screen for the type of optional field when youset up new records or enter transactions.
Select No if you do not want the optional field to appear automatically.
Example: If you define Transit Number as an optional field for Invoicesand you select Yes in the Auto Insert field, the Transit Number field willappear automatically in Invoice Entry.
Default Value and DescriptionEnter or select the value that the program will display as the default for theoptional field.
If the optional field you selected requires validation, you must select avalue that is defined for the optional field in Common Services. However, ifthe optional field allows blanks, you can leave the default value field blank.
If the optional field does not use validation, you can do one of thefollowing:
l Select a value that is defined for the optional field in Common Services.
l Leave the field blank.
l Enter a combination of alphanumeric or special characters and spaces.The entry must be consistent with the type of field (for example, text,number, date, or amount) and must not exceed the number ofcharacters specified for the optional field. In a Yes/No field, you canenter only Yes or No.
372 Sage 300 ERP Purchase Orders
Setup Screens
When you specify a value that is defined in Common Services, the programdisplays the description for the value.
Optional Field and DescriptionUse the Finder to select the optional field codes you want to use for eachtype.
You can define an unlimited number of optional fields for each type,providing the optional fields are set up in Common Services for use in yoursystem.
Note: If you want to retain optional field information from Purchase Orderstransactions when you create batches for General Ledger, you must use thesame optional fields for transaction details in Purchase Orders as you usefor accounts in General Ledger. Similarly, if you want to pass invoiceoptional field information to Accounts Payable, you must use the samefields for P/O invoices and for A/P invoices.
When you select an optional field code, the program displays the descriptionfor the optional field.
Optional Fields ForSpecify the screen and type of information to which you are adding optionalfields. You can choose:
l Additional Costs
l Requisitions
l Requisition Details
l Purchase Orders
l Purchase Order Details
l Receipts
l Receipt Details
l Receipt Additional Costs
l Receipt Additional Cost Details
l Invoices
l Invoice Details
User's Guide 373
Appendix A: Purchase Orders Screen Guides
l Invoice Additional Cost Details
l Returns
l Return Details
l Credit/Debit Notes
l Credit/Debit Note Details
l Credit/Debit Note Additional Cost Details
l Items (if you do not use Inventory Control)
RequiredYou select this option for an optional field if all the records or transactionsto which you are adding the field must use the field.
If you make an optional field a required field, it must also be insertedautomatically in new records or transactions. (You must use the Auto Insertoption for the field.)
Value SetDouble-click the Value Set column to show whether or not the optional fieldhas a default value.
This column has two purposes:
l You must set the Value Set to "Yes" in order to set a default value for theoptional field.
l The "Yes" flag provides information to the transaction-entry clerk, lettingthem know if the field contains default information.
374 Sage 300 ERP Purchase Orders

Setup Screens
P/O Options Screen
To open this screen:Open Purchase Orders > P/O Setup > Options.
Related tasks:
l "Setting up Purchase Orders" (page 3)
Overview
Use the Options screen to select options when you create your Purchase Ordersledger.
After you have set up your ledger, use this screen when you need to changeyour selections. For example, you can:
l Change the contact name, telephone number, and fax number for yourledger. (Choose the Company tab.)
l Check the choice for the Multicurrency option (set in Accounts Payable) and,if you use multicurrency accounting, specify a default rate type for thePurchase Orders ledger. (Choose the Processing tab.)
l Select options to determine whether your Purchase Orders ledger allows non-inventory items, keeps transaction and purchasing history, and accumulatesstatistics, and specify a default template code and a default cost type.(Choose the Processing tab.)
l Specify the number of days in each of three aging periods. (Choose theDocuments tab.)
l Enter the length, prefix, and next number to assign as document numbers topurchase orders, requisitions, receipts, and returns. (Choose the Documentstab.)
l If you do not use Inventory Control, choose when to cost items maintained bythe Purchase Orders module.
Note: You cannot save most changes to the P/O Options screen if any otherPurchase Orders screens are open for the company on your computer or onother workstations on a network.
User's Guide 375
Appendix A: Purchase Orders Screen Guides
Company Tab
Use the Company tab to change the contact name, telephone number, and faxnumber for Purchase Orders.
Depending on the choice of the Format Phone Numbers option in the CompanyProfile in Common Services, parentheses and hyphens may be inserted intelephone-number fields.
Note: To change the company name and address, or to change the contactname, telephone number, and fax number at the company level, use theCompany Profile screen in Common Services.
Processing Tab
Use the Processing tab to set options that determine how Purchase Ordersprocesses transactions. These settings include:
l A default rate type, if your Purchase Orders system uses multicurrencyaccounting.
For more information, see "Setting up Multicurrency Accounting" (page 26).
l Settings that determine whether you can order non-inventory items, keeptransaction history, and use a default template.
l A default cost type to display for item costs on transactions.
l Settings that determine whether to keep purchase history and statistics andthe type of year and period by which you accumulate the history andstatistics.
If you do not use inventory control, you can also change settings for the itemlists that you keep for Purchase Orders: whether you allow fractionalquantities, the weight unit of measure, and whether you cost items duringposting or during day-end processing.
Changing Processing Options
You can change your selections for all Processing options at any time.
Documents Tab
Use the Documents tab to:
376 Sage 300 ERP Purchase Orders
Setup Screens
l Set the default aging periods for the Aged Purchase Orders report.
l Assign or change the maximum length (number of characters) to use in thedocument numbers Purchase Orders assigns to purchase orders, requisitions,receipts, and returns.
l Specify an optional prefix and the next number to assign for each type ofdocument (if you allow Purchase Orders to assign document numbersautomatically, rather than type them in yourself).
Purchase Orders uses the purchase order numbers you specify to assignnumbers to purchase orders you create automatically from requisitions,Inventory Control reorder information, and Order Entry sales orders.
Changing Document Options
At any time, you can change your choices for all document-numbering options.
Note: You cannot post requisitions, purchase orders, receipts, or returns withduplicate document numbers. To keep the document numbers unique, becareful not to change to a prefix or next number that will create duplicatenumbers for a particular type of document.
Costing Tab (standalone Purchase Orders)
Important! The costing tab appears only if you are not using the InventoryControl module.
Use the Costing tab to specify when Purchase Orders costs inventory—whenever you post a transaction or only when you run Day End Processing—andto specify when it should create sub-ledger and audit information.
These settings can have a large impact on the speed of processing transactionsin Purchase Orders and on the number of A/P batches that Purchase Ordersproduces.
If you cost inventory during posting, purchase order posting will take longer.
If you create subledger batches during posting, you can also create and postA/P invoice batches at the same time as you post purchase order invoices.
For information on other processing options, see "About Selecting ProcessingOptions" (page 8).
User's Guide 377
Appendix A: Purchase Orders Screen Guides
Changing Costing Options
After setup, you can change your costing options, with the followingrestrictions:
l You can switch from costing during posting to costing during day endprocessing at any time.
However, you must run Day End Processing before switching to costingduring posting to make sure that you complete item costing and to makesure that all G/L transactions have been created properly.
Fields and Controls
Costing tabThis tab is available only if you do not use Inventory Control. (If you useInventory Control, you choose costing options on the I/C Options screen.)
Cost Items During Posting or Day End ProcessingUse this option to specify whether to cost items as soon as transactionsare posted, or when you run Day End Processing.
If you cost items at posting, every receipt or return (and, possibly,invoice, debit note and credit note) will update item costs.
This setting also determines when Purchase Orders creates subledgertransactions, and—if you create batches during posting or day endprocessing, instead of using the Create Batch icon—when it creates G/Lbatches.
Note: If you use Serialized Inventory or Lot Tracking, you must costitems and create transactions at the same time.
Create Subledger Transactions and Audit Info. During(Posting/Day End Processing)If you cost items during posting, you can choose whether to createsubledger transactions and audit information during posting or when yourun Day End Processing.
If you cost inventory items during Day End Processing, the program alsocreates subledger transactions at that time. (You cannot change thisoption.)
378 Sage 300 ERP Purchase Orders
Setup Screens
Tip: This option lets you choose between processing speed and keepingyour inventory data up-to-date. For more efficient processing, createsubledger transactions and cost inventory when you run Day EndProcessing.
Note: If you use Serialized Inventory or Lot Tracking, you must costitems and create transactions at the same time.
Documents tab
AgingPurchase Orders groups outstanding transactions for the Aged PurchaseOrders report into five periods, a current (not due) period and fourprevious periods. You specify the length of each aging period on theProcessing tab of the Purchase Order Entry screen.
You can specify different periods when you are printing the report and youcan change the default periods at any time.
Document TypeThis field displays the type of transaction for which you can automaticallyassign document numbers to Purchase Orders transactions.
LengthEnter the number of characters you want to permit in the documentnumbers Purchase Orders assigns for the corresponding transaction type.Requisition numbers, purchase order numbers, receipt numbers, andreturn numbers can all be up to 22 characters long, including prefixcharacters.
Next Day End NumberThis field displays the day end number that will be assigned when younext run Day End Processing.
Next NumberType the number to assign as the document number for the nexttransaction of each type you post in Purchase Orders.
The program increases this number by one each time you assign adocument number automatically.
User's Guide 379
Appendix A: Purchase Orders Screen Guides
If you type your own document numbers for transactions, the nextnumber is not updated in the Options screen, even if you type the exactprefix (if used) and number that Purchase Orders would have assigned.
PrefixIf desired, type a prefix of up to six characters to assign as the first partof any document numbers you choose to let Purchase Orders assignautomatically.
Processing tab
Accumulate ByUse the Accumulate By and Period Type options to specify whetherto report period historical transactions or statistics by fiscal year orcalendar year, and to specify the period type to use.
If you accumulate by calendar year, the starting date for history andstatistics will be January 1st. If you accumulate by fiscal year, thestarting date will be the first day of your fiscal year.
The Accumulate By option appears only if the corresponding KeepPurchase History or Accumulate Statistics option is turned on.
Note: You can keep data for up to 53 periods per year (54 periods in aleap year), for any number of years.
Accumulate Purchase HistorySelect the Accumulate Purchase History option to keep informationabout the items you have purchased and the vendors who suppliedthem. Selecting the option also keeps information about invoices, creditnotes, debit notes, and items you returned.
You can then view the information in the Purchase History screen, usethe History button to look it up when you are entering transactions, andprint it on the Purchase History report.
Purchase Orders keeps purchase history by the type of year (fiscal orcalendar) and period you select for the Accumulate By and Period Typeoptions on the Processing tab.
If you choose to accumulate by calendar year, the starting date for theyear will be January 1. If you accumulate by fiscal year, the startingdate will be the first day of your fiscal year.
380 Sage 300 ERP Purchase Orders

Setup Screens
Note: You can turn on or turn off the Accumulate Purchase Historyoption at any time. If you turn off the option after you have used it,Purchase Orders keeps the figures already accumulated until you clearthem. If you turn on the option again before clearing the history youaccumulated previously, the data will still be available, but there will beno figures for the period during which the option was off.
Accumulate StatisticsSelect this option if you want to accumulate statistics from postedtransactions.
When you use this option, Purchase Orders retains statistics from thetransactions processed for up to 53 periods per year (54 periods in leapyears), for any number of years. The program displays these statistics inthe Purchase Statistics screen and prints them on the Purchase Statisticsreport.
You can turn on or turn off the Accumulate Statistics option at any time. Ifyou turn off the option after you have used it, Purchase Orders keeps thestatistics already accumulated until you clear them using the ClearHistory screen. If you turn on the option again before clearing thestatistics you accumulated previously, those statistics will still beavailable, but there will be no statistics for the period during which theoption was off.
Allow Edit of Statistics(This option is available only if you select the Accumulate Statisticsoption.) Select this option if you want to:
l Add or edit statistics for previous periods of the current year or forprevious years. (You might want to do this if you set up your PurchaseOrders system partway through a fiscal year.)
l Add or edit statistics from posted transactions.
You use the Purchase Statistics screen to add and edit purchase statistics,and the Purchase Statistics report to print statistics.
You may want to turn on the option while you are setting up yourPurchase Orders system, particularly if you are creating the systempartway through an accounting year. You can then enter more completepurchase-order records by adding the statistics from your previoussystem.
User's Guide 381
Appendix A: Purchase Orders Screen Guides
Once your system is operating, you should turn off the option becausethe program automatically updates the statistics when you posttransactions.
The Allow Edit Of Statistics option appears only when the AccumulateStatistics option is turned on. You can turn on or turn off the Allow EditOf Statistics option at any time.
Allow Fractional QuantitiesThis option is available in Purchase Orders only if you do not useInventory Control.
Select this option to allow transactions that use fractional quantities(you can use up to four decimal places). You can select the AllowFractional Quantities option at any time but, once you select the option,you cannot change back.
Fractional quantities are useful if your inventory includes homogeneousitems. (Homogeneous items are those with identical elements which canbe broken down into multiple, smaller units, such as oil or grain.) Theseitems can require a wide range of units of measure.
Instead of using the smallest unit (such as ounces) as the stocking unit,you can use a larger stocking unit (such as pounds) and fractionalquantities for amounts less than a pound.
If you do not intend to enter any transactions that use fractionalquantities, you can simplify transaction entry by not selecting the AllowFractional Quantities option. This means you do not have to enterdecimal places for quantities, and it means that unnecessary decimalplaces do not appear on reports.
Allow Non-Existing VendorsPurchase Orders lets you choose whether you can add a requisition orpurchase order for a vendor that does not exist in Accounts Payable.
You can add transactions in Purchase Orders before adding the vendor inAccounts Payable, but you must use the same vendor code when youadd the vendor in Accounts Payable, and, in a multicurrency system,you must specify a tax group that matches the vendor's currency.
Finally, you must add the vendor in Accounts Payable before you canpost the invoice in A/P.
382 Sage 300 ERP Purchase Orders
Setup Screens
Allow Non-Inventory ItemsSelect this option if you want to be able to use item numbers that are notincluded in your Inventory Control system (or Purchase Orders system, ifyou do not use Inventory Control) when you enter Purchase Orderstransactions.
Do not select this option if you want to ensure that all transactions useonly items for which you have created a record in Inventory Control (or ina stand-alone Purchase Orders system). If you use Inventory Control anddo not select this option, transactions can update item quantities andcosts in Inventory Control when you post transactions in Purchase Ordersand run Day End Processing in Inventory Control.
Default Copy Costs to Purchase OrderChoose this option if you want requisition detail costs to be copied topurchase orders that are created from requisitions. You can change thissetting when entering each line of a requisition. (The choice appears onthe zoomed requisition detail screen.)
If you do not copy costs from the requisition, Purchase Orders will use thedefault item cost selected in P/O Options, but you can still use the Finderto choose any other cost kept by Sage 300 ERP, or you can enter an itemcost.
Default Item CostIf you use Inventory Control, use this option to select the type of cost youwant to display in transaction entry screens. When you enter item detailson transactions, the program displays the selected type of item costs, butyou can enter a different cost or select another cost type for individualdetails.
You can display Most Recent Cost, Standard Cost, Average Cost, Last UnitCost, Vendor Cost, or either of the two user-defined costs you can enterwith item records in Inventory Control.
Note: If you do not use Inventory Control, the Vendor Cost is set as thedefault item cost.
Default Posting DateThis option lets you specify which date the program displays by defaultfor the Posting Date when you enter receipts, invoices, returns, creditnotes, and debit notes.
You can choose from two settings:
User's Guide 383
Appendix A: Purchase Orders Screen Guides
l Document Date. Make this selection if you usually want the postingdate and fiscal period to match the document date.
If you choose this setting, the program will automatically change thedefault Posting Date if you change the date in the Receipt Date,Shipment Date, Invoice Date, Credit Note Date, or Debit Note Datefield.
l Session Date. Make this selection if you usually want the postingdate and fiscal period to match the current session date.
If you choose this setting, the program keeps the session date as thedefault posting date even if you change the document date.
The posting date determines the date that a transaction is posted toGeneral Ledger. The Fiscal Year and Period are based on the postingdate.
If you have a multicurrency system, currency revaluation also usesposting dates to select open documents for revaluation, so thatrevaluation adjustments are posted to General Ledger in the correctfiscal year/period.
Default Rate TypeWhen you turn on the Multicurrency option in Accounts Payable, you alsospecify a default rate type, such as spot rate, for converting source-currency amounts in transactions to their functional-currencyequivalents. The rate type you select in Accounts Payable appears as thedefault rate type in Purchase Orders as well, but you can change it.
To specify the default rate type, either type the code for the type orselect a code from the Finder beside the field. You must select a ratetype that is defined in the Currency screens in Common Services.
You can change the default rate type at any time.
Default Template CodeUse this option to specify a template that contains the information youwant to appear as defaults in transaction-entry screens when you startentering a new transaction.
Note: You can select a default template code only after you havedefined template codes in the Templates screen.
384 Sage 300 ERP Purchase Orders

Setup Screens
This option can help you speed up data entry by automatically insertingthe header and vendor information you use most often when enteringthese types of documents.
Note: If you use multicurrency accounting in Purchase Orders, the taxgroup for the default template must use the functional currency for thePurchase Orders ledger.
Default Weight Unit of MeasureThis field is available only if you do not use Inventory Control.
Choose the weight unit of measure which is the basic or standard unit thatyou use for measuring the weight of your inventory items—such aspounds or kilograms.
Note: Usually, you will add weight units of measure after choosinginventory options, so you will select the default unit at a later time.
Order Entry uses the weights in inventory item records to estimate thetotal weight of each order in the unit of weight you specify here.
Purchase Orders can use the weights in inventory records to prorate(distribute) additional costs on orders.
Functional CurrencyThe functional currency is selected for the company in the CompanyProfile screen in Common Services, and is displayed in the Optionsscreen.
Once the functional currency is assigned for a company, you cannotchange it. All modules activated for the company automatically use thesame functional currency.
Keep Transaction HistorySelect this option to keep transaction details.
Purchase Orders saves details for the transactions processed from thetime you select the Keep Transaction History option.
The program uses these transaction details to create the Transaction Listfor each type of transaction. Therefore:
User's Guide 385
Appendix A: Purchase Orders Screen Guides
l If you keep history, all transaction details you posted in PurchaseOrders appear on the Transaction List until they are complete and youclear them in the Clear History screen.
l If you do not keep history, the Transaction List shows only currenttransactions (incomplete requisitions, purchase orders, receipts, andreturns, as well as invoices, credit notes, and debit notes that havenot been added to the batch that Day End Processing creates forAccounts Payable).
Note: If you do not keep transaction history, you cannot drill down toPurchase Orders transactions from General Ledger or AccountsPayable transactions.
You can turn on or turn off the Keep Transaction History option at anytime.
Multicurrency optionYou set the multicurrency option in the Accounts Payable Optionsscreen. If you turn on the option in Accounts Payable, you alsoautomatically turn it on for Purchase Orders.
After you turn the option on and save your changes in Accounts Payable,you cannot turn it off.
Period TypeUse the Accumulate By and Period Type options to specify whetherto report period historical transactions or statistics by fiscal year orcalendar year, and to specify the period type to use.
If you accumulate by calendar year, the starting date for history andstatistics will be January first. If you accumulate by fiscal year, thestarting date will be the first day of your fiscal year.
The choices for period type are: Weekly, Seven Days (begins on the dayon which weeks begin in your fiscal calendar), Bi-weekly, Four Weeks,Monthly, Bi-monthly, Quarterly, Semi-annually, and Fiscal Period (if youchose to accumulate statistics by fiscal year).
The Period Type option appears only if the corresponding KeepPurchase History or Accumulate Statistics option is turned on.
Note: Sage 300 Standard ERP supports accumulation by fiscal yearand fiscal period only.
386 Sage 300 ERP Purchase Orders
Setup Screens
Post A/P BatchesThis option is available in Purchase Orders only if you use InventoryControl.
Use this option to specify when to post A/P batches generated fromPurchase Orders invoices, credit notes and debit notes:
l During Posting or Day End Processing
This option lets you post Accounts Payable invoice batches created byPurchase Orders when you post invoices or when you run day endprocessing in Inventory Control (if you have it)—depending on whenyou cost transactions in Inventory Control.
You choose when to cost transactions with the Cost Items During optionon the Processing tab of the I/C Options screen. The Cost Items Duringoption gives you two choices:
During Posting
Day End Processing
Note: These choices can have a large impact on the speed ofprocessing transactions in Purchase Orders and on the number of A/Pbatches that Purchase Orders produces.
If you post A/P batches during transaction posting, Purchase Orderswill create and post an A/P batch for each invoice it creates.
If you are processing a large volume of receipts, you should costinventory during day end processing or use the Create Batch icon topost A/P batches.
l On Request Using Create Batch Icon
This option lets you decide when to post Accounts Payable invoicebatches created by Purchase Orders. Use the Create Batch screen inPurchase Orders and select the option to Post A/P Batches.
You can also post the A/P batches created by Purchase Orders using thePost Batch screen in the Accounts Payable module.
You can change your selection any time. If you were using the CreateBatch screen to create the transactions, print a copy of the latest G/LTransactions report, and then create any outstanding transactions beforechanging your choice for the option.
User's Guide 387
Appendix A: Purchase Orders Screen Guides
Require ApprovalSelect this option if requisitions require approval before they can beconverted to purchase orders.
You must also turn on security for the system database in Sage 300 ERPdatabase setup to use database security features.
Requisition approval is based on the Requisitions Manual Approvalsecurity right which you can assign to users in the Security Group screenin Administrative Services.
l If your security group is assigned the security right to approverequisitions, all requisitions that you post are automaticallyapproved, and your User ID appears in the Approver Name field.
l If your security group is not assigned the security right to approverequisitions, all requisitions that you post are automatically put onhold, and the Approval Status field will display "Entered" until therequisition is posted by a user with approval rights.
Update Most Recent Cost and Last Cost AtThis option lets you choose when Purchase Orders updates the last costand most recent cost stored with items in Inventory Control.
You can update costs when you receive goods or when you post theinvoice for the receipt.
By default, Purchase Orders updates costs when you post receipts, andit will not change these costs when you post invoices.
This means that if you do not have final costs on your receipts, youshould change this setting to update costs when you post invoices.
Note: You can change the most recent cost and the last cost on the I/CLocation Details screen in the Inventory Control module.
Warn For Non-Inventory ItemsPurchase Orders lets you turn on or turn off warnings for items that donot exist in inventory.
Select this option if you want the program to warn you each time youadd an item to a requisition or purchase order that does not exist in yourinventory list.
388 Sage 300 ERP Purchase Orders
Setup Screens
If you are using Project and Job Costing, you may want to turn off thiswarning so it does not appear for non-material items.
User's Guide 389
Appendix A: Purchase Orders Screen Guides
P/O Ship-Via Codes Screen
To open this screen:Open Purchase Orders > P/O Setup > Ship-Via Codes.
Fields and Controls
Contact tabType the name of the person or position you contact at the carrier's officeto make arrangements or discuss shipping problems.
Ship-Via tab
AddressType the address, city, state or province, zip or postal code, and countryfor the carrier's office.
CommentType an optional comment about the ship-via record, using up to 80characters.
Fax NumberType the carrier's fax number (if any).
NameType the name or a description of the carrier, exactly as you want it toappear on Purchase Orders reports and forms.
Ship-Via CodeType a code of up to six characters to identify the carrier. You can useletters and numbers.
TelephoneType the carrier's telephone number.
Related tasks:
l "Adding Ship-Via Records " (page 64)
l "Managing Ship-Via Records " (page 65)
390 Sage 300 ERP Purchase Orders
Setup Screens
l "Setting up Purchase Orders" (page 3)
Overview
Use the Ship-Via Codes screen to set up a record for each carrier you use todeliver your orders from vendors.
Ship-via records are optional. Add them for the carriers you regularly use, sothat you have a record of each carrier's address, phone numbers, and contactpeople. You can then specify ship-via codes on purchase orders, requisitions,receipts, and returns. If you do not use ship-via records, you can still type thename of a carrier on transactions (but not the address or any otherinformation), or not specify a shipping method at all.
Fields and Controls
Contact tabType the name of the person or position you contact at the carrier's office tomake arrangements or discuss shipping problems.
Ship-Via tab
AddressType the address, city, state or province, zip or postal code, and countryfor the carrier's office.
CommentType an optional comment about the ship-via record, using up to 80characters.
Fax NumberType the carrier's fax number (if any).
NameType the name or a description of the carrier, exactly as you want it toappear on Purchase Orders reports and forms.
Ship-Via CodeType a code of up to six characters to identify the carrier. You can use
User's Guide 391
Appendix A: Purchase Orders Screen Guides
letters and numbers.
TelephoneType the carrier's telephone number.
392 Sage 300 ERP Purchase Orders
Setup Screens
P/O Templates Screen
To open this screen:Open Purchase Orders > P/O Setup > Templates.
Related tasks:
l "Adding Templates" (page 68)
l "Managing Templates " (page 68)
Overview
Use the Templates screen to create, edit, or delete sets of default header andvendor information to use in transactions.
You use the templates to automatically fill in fields in the transaction-entryscreens with the information and selections you use most often, so you do nothave to enter the information every time you add a transaction.
Order Tab
Use the Order tab to:
l Enter default information for the Order tab and for use on the first tab oftransaction-entry screens.
l Modify default template information.
Vendor Information Tab
Use the Vendor Information tab to:
l Enter default information for the Vendor tab in transaction entry screens.
l Modify default vendor information.
Fields and Controls
Template Code and DescriptionTo begin adding a new template, type a code for it, using up to sixcharacters, or choose New by clicking the New button next to theTemplate code field. You can also type a description to identify the template(in the field next to the Template field).
To edit an existing template, type its code or select it from the Finder.
User's Guide 393
Appendix A: Purchase Orders Screen Guides
Order tab
Bill-To LocationIf you use Inventory Control, type the code for the billing location youwant to assign to the template or select it from the Finder. You can alsoleave this field blank.
If you do not use Inventory Control, this field does not appear.
CommentType a default comment to use with the template, or leave the fieldblank. The comment can include up to 250 characters.
Note: You can insert line breaks by pressing Ctrl + Enter.
DescriptionType a description using up to 30 characters. This description willappear on purchase orders, receipts, invoices, etc.
If you want to describe the item more completely, use the commentsfields.
FOB PointType a default free-on-board point (the point at which the vendor beginscharging freight on orders) for the template.
You can also leave this field blank. You can change the FOB point whenyou use the template with a transaction.
On HoldSelect this option to have transactions entered with the template use "onhold" as the default.
PO TypeSelect the purchase order type for the template. You can select Active,Blanket, Future, or Standing. If you do not select a PO type, thetemplate is assumed to be Active.
ReferenceType a default reference for the template. You can change the referencewhen you use the template with a transaction, and you can also leave
394 Sage 300 ERP Purchase Orders
Setup Screens
this field blank.
Ship-To LocationIf you use Inventory Control, type the code for the default location whereyou will receive items ordered when the template is used, or select itfrom the Finder. You can also leave this field blank.
If you do not use Inventory Control, this field does not appear.
Vendor Information tab
Ship ViaType the code for the default shipping method to assign to the template,or select the code from the Finder. You can also leave this field blank.
Tax GroupType the code for the default tax group that identifies the taxingauthorities for the template, or select it from the Finder.
Note: You cannot add or save a template without a tax group.
TermsType the default payment terms code you want to use for the template.You can also select the code from the Finder, or leave the field blank. Youcan choose another terms code when you use the template with atransaction.
If you want to assign a terms code to a template, you must use one of thecodes you have defined in Accounts Payable.
User's Guide 395
Appendix A: Purchase Orders Screen Guides
P/O Vendor Contract Costs Screen
To open this screen:Open Purchase Orders > P/O Setup > Vendor Contract Costs.
Related tasks:
l "Managing Vendor Contract Costs " (page 71)
l "Setting Up Vendor Contract Costs " (page 72)
l "Setting up Purchase Orders" (page 3)
Overview
Use the Vendor Contract Costs screen to assign vendors’ prices to yourinventory items, specifying:
l Base unit costs for single or multiple units of measure.
l Sale unit costs for single or multiple units of measure.
l Volume discount amounts or percentages.
l Tax authorities and tax statuses for the contract cost.
Vendor contract costs appear as default entries when you add purchaseorders, receipts, invoices, returns, and credit/debit notes. If no contract costexists for an item and vendor, Purchase Orders displays the default item costspecified in the P/O Options screen.
You can view all vendors’ contract costs in the Unit Cost item Finder in thePurchase Order Entry, Receipt Entry, Invoice Entry, Return Entry, andCredit/Debit Note Entry screens.
The Contract Costs screen is similar to the I/C Item Pricing screen in theInventory Control module. It lets you specify basic and sale costs for single ormultiple units of measure, and specify percentage or flat amount discountsbased purchase volumes.
Note: Vendor Contract Costs are not available in Sage 300 Standard ERP.
Costs Tab
Use the Costs tab to:
396 Sage 300 ERP Purchase Orders
Setup Screens
l Change the description for the item on the purchase orders to match thevendor's description.
l Choose the base unit cost type (single unit of measure or multiple units ofmeasure).
l Enter the base cost or costs.
l Enter the unit of measure for a single base cost.
l If entering costs for multiple UOMs, specify the default cost and UOM forpurchase orders.
l Choose the sale unit cost type (single unit of measure or multiple units ofmeasure).
l Enter the sale cost or costs.
l Specify how the sale cost is calculated:
Base unit cost minus a percentage.
Base unit cost minus an amount.
Fixed amount.
l Enter the unit of measure for the cost.
l If entering costs for multiple UOMs, specify the default cost and UOM forpurchase orders.
l Enter the sale dates for the item.
Discounts Tab
Use the Discounts tab to select the method for calculating volume discounts oncosts, and enter the discount percentages or amounts to use.
Taxes Tab
Use the Taxes tab to assign the tax authorities and vendor tax classes thatapply to the item.
Fields and Controls
Item NumberType the number of the inventory item to which you want to add vendorcosts.
User's Guide 397
Appendix A: Purchase Orders Screen Guides
Vendor NumberType or use the Finder to select the number for the vendor who supplies theinventory item.
If more than one vendor supplies an item, you can enter item costs foreach of the vendors.
Costs tab
Base Unit CostEnter the regular cost for this unit of measure.
Base Unit Cost TypeChoose whether you are entering a cost for a single unit of measureonly, or for more than one unit of measure.
l If you choose Base Unit Cost for Single Unit, enter:
Base Unit Cost. The regular amount that you pay for thisinventory item.
Base Unit of Measure. The unit of measure to which the BaseUnit Cost applies.
l If you choose Base Unit Cost for Multiple Units, click the Zoombutton, and then enter:
Unit of Measure. Enter or select one of the units of measure inwhich you buy this item from the vendor.
Press the Insert key to add another unit of measure and cost.
Base Unit Cost. Enter the cost for this unit of measure.
Default. Double-click this field to switch it to “Yes” if this is theunit of measure and cost that you want to appear by default onrequisitions and purchase.
Base Unit of MeasureEnter the unit of measure to which the Base Unit Cost applies.
DefaultDouble-click this field to switch it to “Yes” if this is the unit of measureand cost that you want to appear by default on purchase orders.
398 Sage 300 ERP Purchase Orders
Setup Screens
Purchase Orders will use the lowest cost unit of measure and cost fromthe Vendor Contract Cost records.
DescriptionType a description using up to 30 characters. This description will appearon purchase orders, receipts, invoices, etc.
If you want to describe the item more completely, use the commentsfields.
Percentage/AmountEnter the sale percentage reduction or the amount off, depending on thecalculation method you choose.
For percentage and amount, the program calculates the sale cost fromthe base cost that you entered earlier.
Sale Starts/Sale EndsEnter starting and ending dates for the sale. Purchase Orders willautomatically use the sale cost if the requisition or purchase order datesfall within the sale period.
Sale Unit CostEnter the fixed sale unit cost for the item. For percentage and amount,the program calculates the sale cost from the base cost that you enteredearlier, and displays it in the Sale Unit Cost field.
Sale Unit Cost Based OnSelect one of the following methods for establishing the sale cost:
l base cost minus a percentage
l base cost minus an amount
l fixed amount
Sale Unit Cost TypeIf the vendor also gives you a standard sale price (or an alternateseasonal price), choose a single unit of measure cost or costs for multipleunits of measure.
User's Guide 399
Appendix A: Purchase Orders Screen Guides
l If you choose Sale Unit Cost for Single Unit, enter the following:
Sale Unit Cost Based On. Purchase Orders provides threemethods for establishing the sale cost—as the base cost minus apercentage, the base cost minus an amount, or as a fixed amount.
Percentage / Amount / Sale Unit Cost. Enter the salepercentage reduction, the amount off, or the fixed cost, dependingon the calculation method you choose. For percentage and amount,the program calculates the sale cost from the base cost that youentered earlier.
Sale Unit of Measure. Enter the unit of measure to which thesale applies. (You can enter base unit costs for multiple units ofmeasure, but specify a sale price for a single unit.)
Sale Starts / Sale Ends. Enter starting and ending dates for thesale. Purchase Orders will automatically use the sale cost if therequisition or purchase order dates fall within the sale period.
l If you choose Sale Unit Cost for Multiple Units, click the Zoombutton , and then enter the following:
Unit of Measure. Enter or select one of the units of measure towhich the sale applies.
Press Insert to add the cost for another unit of measure.
Sale Unit Cost Based On. Purchase Orders provides threemethods for establishing each sale cost—as the base cost minus apercentage, the base cost minus an amount, or as a fixed amount.
Percentage / Amount / Sale Unit Cost. Enter the salepercentage reduction, the amount off, or the fixed cost, dependingon the calculation method you choose. For percentage and amount,the program calculates the sale cost from the base cost that youentered earlier.
Sale Starts / Sale Ends. Enter starting and ending dates for thesale. Purchase Orders will automatically use the sale cost if therequisition or purchase order dates fall within the sale period.
Default. Double-click this field to switch it to “Yes” if this is theunit of measure and cost that you want to appear by default onrequisitions and purchase.
Discounts tab
Discount Based On
400 Sage 300 ERP Purchase Orders
Setup Screens
Choose Percentage or Amount depending on how the discount iscalculated. (For example, you might get 10% off when you order morethan 100 items.)
Discount Percentage/Discount AmountEnter the discount available when you order the quantity specified in theFrom column. The program automatically fills in the To column if you addanother discount level.
Enter the minimum volume required for the discount in the From field.
The program automatically fills in the To value when you add a seconddiscount level.
You can enter up to 10 different discount ranges in the discounts grid,specifying the From volume and the Discount Percentage or Amount(depending on the discount method).
The To field of the last line is always blank.
From/ToEnter the minimum volume required for the discount in the From field.
The program automatically fills in the To value when you add a seconddiscount level.
You can enter up to 10 different discount ranges in the discounts grid,specifying the From volume and the Discount Percentage or Amount(depending on the discount method).
The To field of the last line is always blank.
Round to a MultipleThis field appears only if you select Round Up or Round Down in theRounding Method field.
You might enter multiples such as “0.50,” “1.00,” “5.00,” or “10.00.”
Rounding applies to percentage discounts only.
Rounding MethodRounding applies to percentage discounts only.
Specify if you want to round the discount unit cost of the item calculatedby the program. You can choose no rounding, rounding up, or rounding
User's Guide 401
Appendix A: Purchase Orders Screen Guides
down. If you round the amount, you can also specify the degree ofrounding (such as to the closest dollar or closest 100 dollars).
Taxes tab
Vendor Tax AuthoritySelect the tax authority for the item contract cost. The Finder displaysonly those tax authorities that allow tax to be included in the price.
The purpose of the Taxes tab is to let you specify taxes that are includedin the item contract cost.
For example, gas prices in Canada have GST included in the price. If thecontract price was for gas, the GST tax authority would be specified onthe Taxes page.
Vendor Tax ClassThe program displays the first tax class record for the tax authority. Youcan accept or change the tax class (for example, if you are tax exemptfor this item).
402 Sage 300 ERP Purchase Orders
Setup Screens
P/O Vendor Details Screen
Note: This screen is available only if you are using Purchase Orders as astand-alone program (that is, you do not have Inventory Control installed).
To open this screen:Open Purchase Orders > P/O Setup > Vendor Details.
Related tasks:
l "Adding Vendor Details " (page 70)
l "Managing Vendor Details " (page 70)
l "Setting up Purchase Orders" (page 3)
Overview
Use the Vendor Details screen to:
l Record the vendors and costs for each item you purchase.
l Establish the order of priority of your suppliers, if you buy the same itemfrom more than one vendor.
Fields and Controls
Cost UnitEnter the cost unit (such as each, crate, or case). The program will adjustthe vendor cost accordingly.
Item NumberType the number or code of the item to which you want to add vendordetails.
Vendor ContactType the name of the contact person at the vendor company.
Vendor CostEnter the vendor’s price for the item.
Vendor CurrencyThis field is available only if you are using a multicurrency ledger.
User's Guide 403
Appendix A: Purchase Orders Screen Guides
When entering a new vendor, either type in the three-letter internationalcurrency code (for example, USD, CAD, or GBP) for the vendor’s homecurrency, or select one using the Finder. You cannot modify this field for anexisting vendor.
Vendor Item NumberType the number that the vendor uses to identify the item.
Vendor NameType the name of the vendor company.
Vendor NumberType or use the Finder to select the identification number you use for thevendor of the item.
Vendor TypeThe vendor type is a number that sets the priority for each vendor of theselected item. No two vendors can have the same priority.
You can specify up to nine vendors, and you may enter them in any orderyou please. However, when you return to the screen the program willdisplay them in ascending order.
404 Sage 300 ERP Purchase Orders
Setup Screens
P/O Weight Units of Measure Screen
Note: This screen is available only if you are using Purchase Orders as astand-alone program (that is, you do not have Inventory Control installed).
To open this screen:Open Purchase Orders > P/O Setup >Weight Units of Measure.
Related tasks:
l "Setting up Purchase Orders" (page 3)
Overview
Use the Weight Units of Measure screen to add the different units that you usefor measuring the weight of items—such as pounds, tons, kilograms, and metrictons.
The default weight unit of measure (specified on the P/O Options screen) is theunit for expressing the weight of orders in Purchase Orders if you do not use theInventory Control module.
The default weight unit of measure has a conversion factor of 1, and all otherweight UOMs are defined in terms of a default weight UOM.
Before Adding Weight Units of Measure
l Decide on the default weight unit of measure that you want to use on orders.
l Calculate the conversion factors between the default weight unit of measureand all other weight units of measure.
Requirements For Adding A Weight Unit of Measure
l The weight unit of measure.
l A description of the weight.
l The weight conversion factor between the default weight unit of measure andthe unit you are adding (as a multiple of the default weight unit of measure).
l The conversion factor for a default weight unit of measure is always 1.
l You can use fractions in weight conversion factors even if you do not usefractional inventory quantities.
User's Guide 405
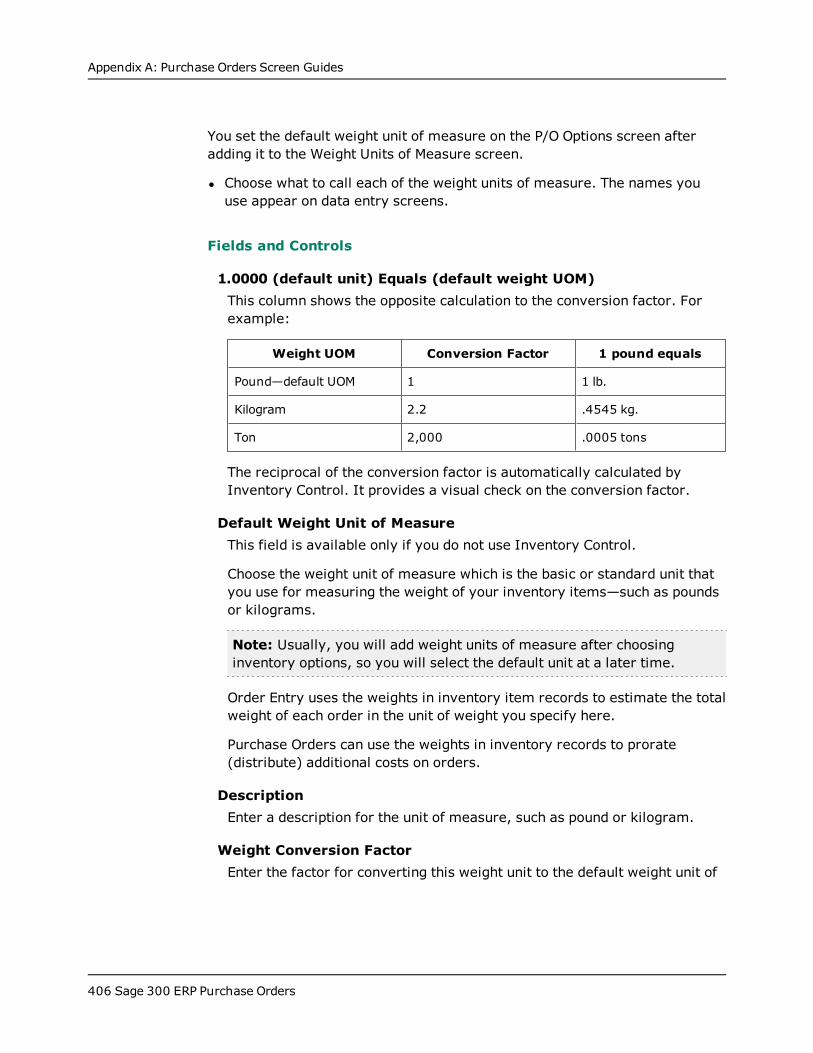
Appendix A: Purchase Orders Screen Guides
You set the default weight unit of measure on the P/O Options screen afteradding it to the Weight Units of Measure screen.
l Choose what to call each of the weight units of measure. The names youuse appear on data entry screens.
Fields and Controls
1.0000 (default unit) Equals (default weight UOM)This column shows the opposite calculation to the conversion factor. Forexample:
Weight UOM Conversion Factor 1 pound equals
Pound—default UOM 1 1 lb.
Kilogram 2.2 .4545 kg.
Ton 2,000 .0005 tons
The reciprocal of the conversion factor is automatically calculated byInventory Control. It provides a visual check on the conversion factor.
Default Weight Unit of MeasureThis field is available only if you do not use Inventory Control.
Choose the weight unit of measure which is the basic or standard unit thatyou use for measuring the weight of your inventory items—such as poundsor kilograms.
Note: Usually, you will add weight units of measure after choosinginventory options, so you will select the default unit at a later time.
Order Entry uses the weights in inventory item records to estimate the totalweight of each order in the unit of weight you specify here.
Purchase Orders can use the weights in inventory records to prorate(distribute) additional costs on orders.
DescriptionEnter a description for the unit of measure, such as pound or kilogram.
Weight Conversion FactorEnter the factor for converting this weight unit to the default weight unit of
406 Sage 300 ERP Purchase Orders

Setup Screens
measure. For example, if “pound” is the default weight unit of measure (witha conversion factor of 1), the conversion factor for “ton” would be 2,000.
You can use fractions in weight conversion factors even if you do not usefractional inventory quantities. For example, the factor to convert kilogramsto pounds would be 2.2.
Weight Unit of MeasureType the weight unit of measure as you want it to appear on data entryscreens. For example, “lb” or “kg.” You can enter an expanded description inthe next field.
User's Guide 407
Appendix A: Purchase Orders Screen Guides
Statistics and Inquiries ScreensUse Purchase Orders Statistics and Inquiries screens to look up informationabout vendors and transactions.
P/O Purchase History Screen
To open this screen:Open Purchase Orders > P/O Statistics and Inquiries > PurchaseHistory.
Secondary screens:
l "P/O Purchase History Detail Screen" (page 408)
Related tasks:
l "Looking Up Purchase History" (page 246)
Overview
Use the P/O Purchase History screen to:
l Review purchasing data that is kept by Purchase Orders if you use the KeepPurchase History option.
l See details of a selected transaction by clicking the Details button.
The screen displays all purchases and returns of items for the fiscal orcalendar years and periods for which you keep history.
Tip: You can also check purchase history for an item or a vendor whileentering a transaction by selecting a detail, and then clicking the Historybutton on the transaction entry screen.
P/O Purchase History Detail Screen
To open this screen:
1. Open Purchase Orders > P/O Statistics and Inquiries > PurchaseHistory.
2. Click Details.
408 Sage 300 ERP Purchase Orders
Statistics and Inquiries Screens
Related tasks:
l "Looking Up Purchase History" (page 246)
Overview
Use the P/O Purchase History Detail screen to check and edit the details oftransactions posted for the selected vendor or item number in the year andperiod you specified.
Information includes the year and period, transaction type and date, documentnumber, quantity, unit of measure, cost, and number of days between the timeyou issued the purchase order and posted the receipt.
If working with transactions that include serialized and lotted items, you canclick Serial/Lot Numbers to display the numbers.
Fields and Controls
Item Number and DescriptionPurchase Orders displays the item number and description for the selecteddetail.
Vendor Number and NamePurchase Orders displays the vendor number and name for the selecteddetail.
Table
Contract, Project, and CategoryThe purchase history details screen lists the contract, project andcategory for items that were purchased for jobs.
Days To ReceiveThis field displays the number of days between the time you posted thepurchase order for the item and the date you posted the first receipt ofthe item.
Document NumberThe number assigned to the transaction when you posted it. (You eithertyped the number or allowed Purchase Orders to assign it automatically.)
User's Guide 409
Appendix A: Purchase Orders Screen Guides
Extented CostThis field displays the extended cost of the selected transaction.
LocationThis field appears only if you also use Inventory Control. The Locationfield displays the code for the location at which the item was taken intoinventory.
QuantityThis field displays the number of units of the item that was purchased,returned, invoiced, credited, or debited on the selected transaction. Thequantity is expressed in the unit of measure specified for thetransaction.
Transaction DateThis field displays the date entered with the transaction.
Transaction TypeThis field identifies the type of transaction (receipt, return, invoice,credit note, or debit note).
Unit of MeasureThis field displays the unit of measure specified for the item on theselected transaction. The quantity and cost are expressed in terms ofthis unit.
Year and PeriodWhen you are displaying purchase history for a vendor number, thesefields display the year (fiscal or calendar) and period in which youposted the selected transaction. (Information is displayed by the type ofyear and period you specify on the P/O Options screen for theAccumulate Purchase History option.)
410 Sage 300 ERP Purchase Orders
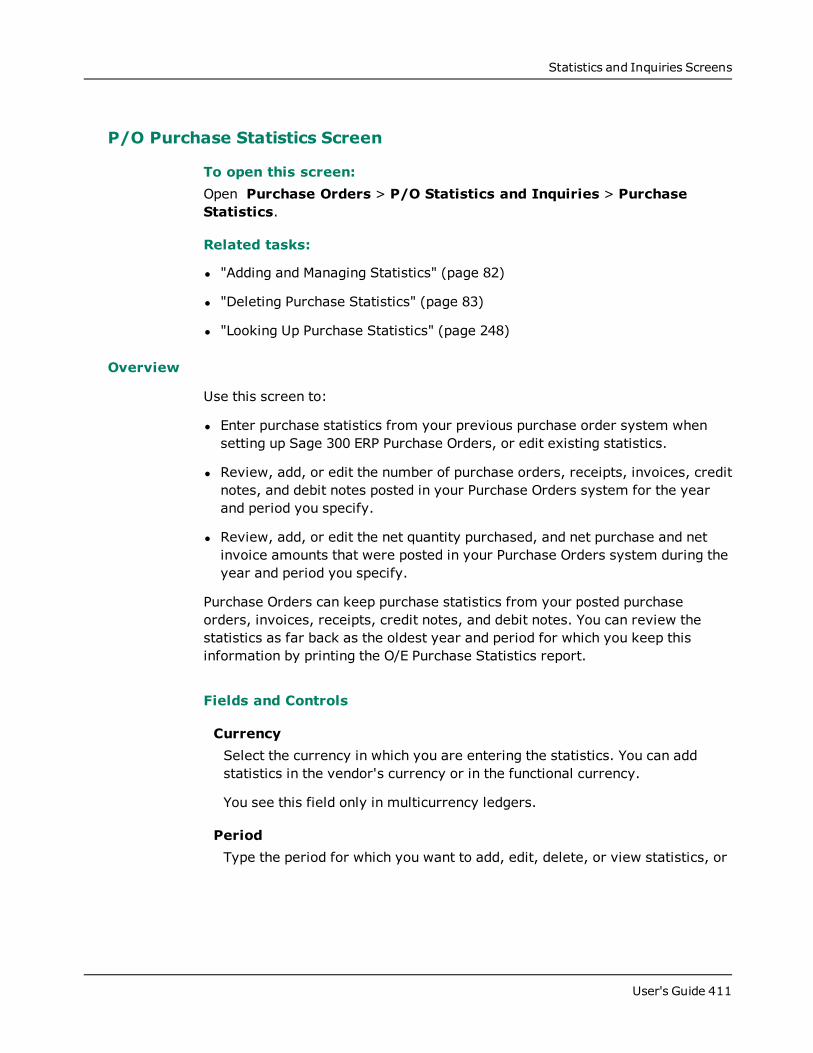
Statistics and Inquiries Screens
P/O Purchase Statistics Screen
To open this screen:Open Purchase Orders > P/O Statistics and Inquiries > PurchaseStatistics.
Related tasks:
l "Adding and Managing Statistics" (page 82)
l "Deleting Purchase Statistics" (page 83)
l "Looking Up Purchase Statistics" (page 248)
Overview
Use this screen to:
l Enter purchase statistics from your previous purchase order system whensetting up Sage 300 ERP Purchase Orders, or edit existing statistics.
l Review, add, or edit the number of purchase orders, receipts, invoices, creditnotes, and debit notes posted in your Purchase Orders system for the yearand period you specify.
l Review, add, or edit the net quantity purchased, and net purchase and netinvoice amounts that were posted in your Purchase Orders system during theyear and period you specify.
Purchase Orders can keep purchase statistics from your posted purchaseorders, invoices, receipts, credit notes, and debit notes. You can review thestatistics as far back as the oldest year and period for which you keep thisinformation by printing the O/E Purchase Statistics report.
Fields and Controls
CurrencySelect the currency in which you are entering the statistics. You can addstatistics in the vendor's currency or in the functional currency.
You see this field only in multicurrency ledgers.
PeriodType the period for which you want to add, edit, delete, or view statistics, or
User's Guide 411
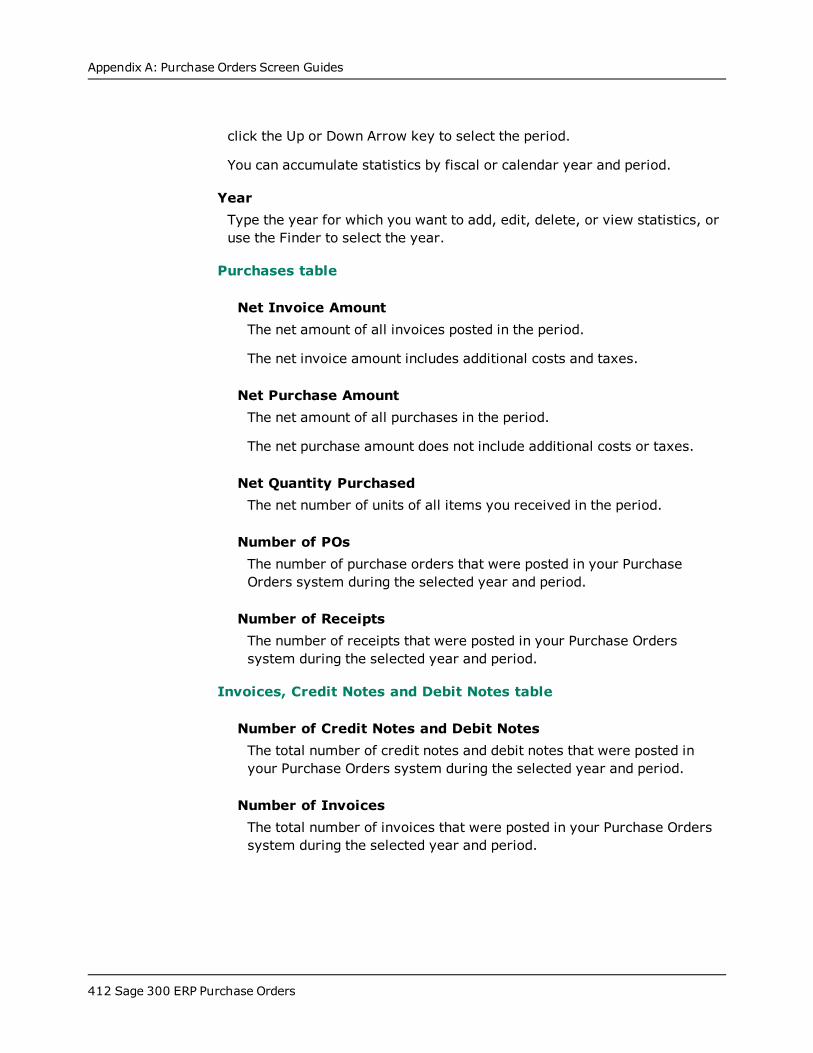
Appendix A: Purchase Orders Screen Guides
click the Up or Down Arrow key to select the period.
You can accumulate statistics by fiscal or calendar year and period.
YearType the year for which you want to add, edit, delete, or view statistics, oruse the Finder to select the year.
Purchases table
Net Invoice AmountThe net amount of all invoices posted in the period.
The net invoice amount includes additional costs and taxes.
Net Purchase AmountThe net amount of all purchases in the period.
The net purchase amount does not include additional costs or taxes.
Net Quantity PurchasedThe net number of units of all items you received in the period.
Number of POsThe number of purchase orders that were posted in your PurchaseOrders system during the selected year and period.
Number of ReceiptsThe number of receipts that were posted in your Purchase Orderssystem during the selected year and period.
Invoices, Credit Notes and Debit Notes table
Number of Credit Notes and Debit NotesThe total number of credit notes and debit notes that were posted inyour Purchase Orders system during the selected year and period.
Number of InvoicesThe total number of invoices that were posted in your Purchase Orderssystem during the selected year and period.
412 Sage 300 ERP Purchase Orders
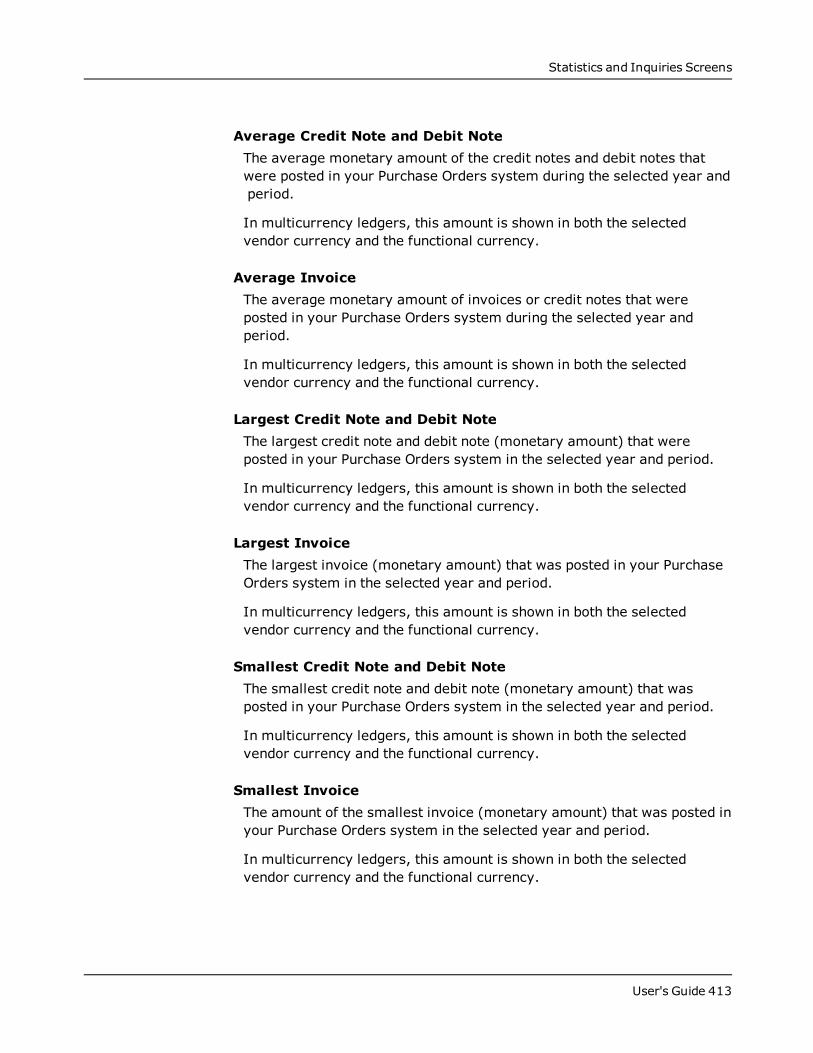
Statistics and Inquiries Screens
Average Credit Note and Debit NoteThe average monetary amount of the credit notes and debit notes thatwere posted in your Purchase Orders system during the selected year andperiod.
In multicurrency ledgers, this amount is shown in both the selectedvendor currency and the functional currency.
Average InvoiceThe average monetary amount of invoices or credit notes that wereposted in your Purchase Orders system during the selected year andperiod.
In multicurrency ledgers, this amount is shown in both the selectedvendor currency and the functional currency.
Largest Credit Note and Debit NoteThe largest credit note and debit note (monetary amount) that wereposted in your Purchase Orders system in the selected year and period.
In multicurrency ledgers, this amount is shown in both the selectedvendor currency and the functional currency.
Largest InvoiceThe largest invoice (monetary amount) that was posted in your PurchaseOrders system in the selected year and period.
In multicurrency ledgers, this amount is shown in both the selectedvendor currency and the functional currency.
Smallest Credit Note and Debit NoteThe smallest credit note and debit note (monetary amount) that wasposted in your Purchase Orders system in the selected year and period.
In multicurrency ledgers, this amount is shown in both the selectedvendor currency and the functional currency.
Smallest InvoiceThe amount of the smallest invoice (monetary amount) that was posted inyour Purchase Orders system in the selected year and period.
In multicurrency ledgers, this amount is shown in both the selectedvendor currency and the functional currency.
User's Guide 413
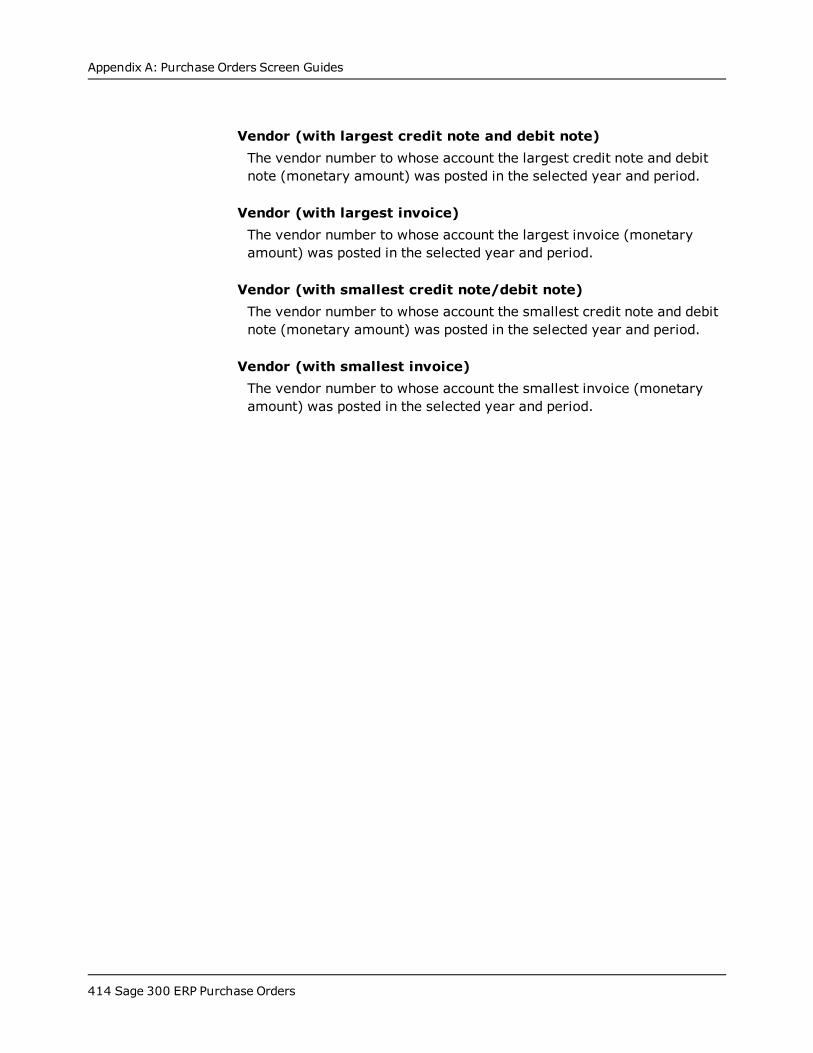
Appendix A: Purchase Orders Screen Guides
Vendor (with largest credit note and debit note)The vendor number to whose account the largest credit note and debitnote (monetary amount) was posted in the selected year and period.
Vendor (with largest invoice)The vendor number to whose account the largest invoice (monetaryamount) was posted in the selected year and period.
Vendor (with smallest credit note/debit note)The vendor number to whose account the smallest credit note and debitnote (monetary amount) was posted in the selected year and period.
Vendor (with smallest invoice)The vendor number to whose account the smallest invoice (monetaryamount) was posted in the selected year and period.
414 Sage 300 ERP Purchase Orders
Statistics and Inquiries Screens
P/O Pending Receipts Inquiry Screen
To open this screen:Open Purchase Orders > P/O Statistics and Inquiries > PendingReceipts Inquiry.
Secondary screens:
l "P/O Receipt Details Screen" (page 418)
Related tasks:
l "Viewing Pending Receipts" (page 245)
Overview
Use the P/O Pending Receipts Inquiry screen to review items that are expectedto arrive at particular locations within a given time period (for example, in thenext 7 days), and to determine whether there will be sufficient stock to coversales orders.
Purchase Orders lets you search pending receipts by item number or by vendor,and also lets you view completed purchase orders to see if items weredelivered within the expected arrival times.
The inquiry finds active, standing, future, blanket, or all purchase orders thatare not on hold and that fit the selection criteria. You can limit the inquiry tospecific locations.
For instructions on viewing pending receipts, see "Viewing Pending Receipts"(page 245).
Fields and Controls
From/To Expected Arrival DateLeave the From field blank to include all purchase orders with outstandingitems, and enter the end date for the inquiry in the To field.
Accept the default entries if you wish to view all purchase orders regardlessof their expected arrival dates.
From/To LocationEnter a range of inventory locations, or skip the Location fields to display all
User's Guide 415
Appendix A: Purchase Orders Screen Guides
locations.
This selection includes orders where the shipping location matches therange of locations that you specify.
From / To PO DateSpecify the range of document dates that you want to view. The PO Date isthe document date specified on the purchase order.
Include Completed Detail LinesSelect Include Completed Detail Lines to see if items were receivedwithin the expected arrival times.
Item NumberEnter the number of the item that you want to review. You can also use theSelect By option to review pending receipts by vendor.
PO TypeYou can choose to review all pending receipts, or select a particular type ofpurchase order, either active, standing, future, or blanket POs.
Select ByChoose whether you want to inquire by item or by vendor, and then selectthe item number or vendor number for which you want to view details.
You can press the Up or Down keys on your keyboard to make yourselection, or type I to select Item Number and V to select VendorNumber.
Show Late POs OnlyChoose this option to see detail lines that are past their expected arrivaldates.
Vendor NumberType the vendor number whose purchase orders you want to review. Youcan also use the Select By choice to review pending receipts by itemnumber.
Table
CompletedDetail lines are completed on purchase orders when the entire quantityis received or if you cancel any outstanding quantity.
416 Sage 300 ERP Purchase Orders
Statistics and Inquiries Screens
Date ReceivedIf the purchase order detail line has had receipts posted against it, thisfield displays the transaction date for the receipt.
Days LateThis field will be blank if the receipt was not (or is not) late.
If the date received was later than the expected arrival date, this fieldwill show the number of days that the goods were late.
Expected Arrival DateThe date on the purchase order when you expect the goods to arrive fromyour vendor.
Item Number and DescriptionThese fields display the item number on the purchase order that matchesthe criteria that you specified for pending receipts, as well as thedescription for the item number.
LocationThe location to which the purchase order detail item will be received,specified on the purchase order.
PO DateThis is the document date specified on the purchase order.
PO Number and DescriptionThis is the document number assigned to the purchase order where thisdetail appeared. The program also displays the description entered on thePO.
PO TypeYou can choose to review all pending receipts, or select a particular typeof purchase order, either active, standing, future, or blanket POs.
Quantity OrderedThis is the number of items originally ordered on this PO detail line.
Unit Of MeasureThis is the unit of measure for the quantity on purchase order (for
User's Guide 417
Appendix A: Purchase Orders Screen Guides
example, dozen, crate, etc.).
Vendor Number and NameThe number and name of the vendor on the purchase order.
P/O Receipt Details Screen
To open this screen:
1. Open Purchase Orders > P/O Statistics and Inquiries > PendingReceipts Inquiry.
2. Specify a range of purchase orders to view, and then double-click a PO lineon the Detail table, or select the line and click Details.
Related tasks:
l "Viewing Pending Receipts" (page 245)
Overview
Use the Receipt Details screen to view more information for any PO lineitem—such as receipt quantities and days late.
The program displays the following additional information for each receiptassociated with the PO line:
l Receipt Number
l Location
l Contract, Project, Category (if job-related)
l Quantity Ordered
l Order Unit of Measure
l Quantity Received
l Receipt Unit of Measure
l Date Received
l Expected Arrival Date
l Days Late
Fields and Controls
Item Number and Description
418 Sage 300 ERP Purchase Orders
Statistics and Inquiries Screens
These fields display the item number on the purchase order that matches thecriteria that you specified for pending receipts, as well as the description forthe item number.
PO Number and DescriptionThis is the document number assigned to the purchase order where thisdetail appeared. The program also displays the description entered on thePO.
Vendor Number and NameThe number and name of the vendor on the purchase order.
Table
Contract, Project, and CategoryIf the purchase order detail was job-related, these fields will show thecontract, project, and category for which the item was ordered.
Date ReceivedIf the purchase order detail line has had receipts posted against it, thisfield displays the transaction date for the receipt.
Days LateThis field will be blank if the receipt was not (or is not) late.
If the date received was later than the expected arrival date, this fieldwill show the number of days that the goods were late.
Expected Arrival DateThe date on the purchase order when you expect the goods to arrive fromyour vendor.
LocationThe location at which the purchase order detail item was received.
Order Unit of MeasureThis is the unit of measure for the quantity on purchase order (forexample, dozen, crate, etc.).
Quantity OrderedThis is the number of items originally ordered on this PO detail line.
User's Guide 419
Appendix A: Purchase Orders Screen Guides
Quantity ReceivedThis is the number of items that were received in this receipttransaction.
Receipt Unit of MeasureThis is the unit of measure for the quantity received (for example,dozen, crate, etc.).
Receipt NumberThe detail grid lists all of the receipts for the detail line displayed in thetop part of the screen.
This field shows the receipt numbers assigned when you received itemsfor this detail line.
420 Sage 300 ERP Purchase Orders
Transaction Screens
Transaction ScreensUse Purchase Orders transaction entry screens to process purchase orders,requisitions, receipts, invoices, returns, credit notes, and debit notes
P/O Copy Purchase Orders Screen
To open this screen:Open Purchase Orders > P/O Transactions > Copy Purchase Orders.
Related tasks:
l "Copying Purchase Orders" (page 138)
Overview
Use the Copy Purchase Orders screen to select an existing purchase order, or arange of POs, on which to base a new purchase order. The details from theexisting purchase orders, including item numbers, quantities ordered, costs,and other information, appear as defaults for the new purchase order.
You can select the details that you want to copy to the new purchase order, andyou can change the location, expected arrival date, whether items are drop-shipped, the quantity ordered, cost, unit of measure, unit weight, optional fieldsfor any detail lines, and contract information for job-related orders.
Note: You cannot add new detail lines to a purchase order. You cannot selectdifferent item codes for the detail lines and, if you are copying job-relatedpurchase orders, you cannot change the contract, project, or category.
Fields and Controls
Buttons
NewClick the New button to begin creating a new record.
From/To Vendor NumberYou can copy details from previously entered orders for the same vendor orfrom a different vendor.
User's Guide 421

Appendix A: Purchase Orders Screen Guides
In the From and To Vendor Number fields, enter or select:
l The number of the vendor with the order details that you are copying.
l The number of the vendor for whom you are creating a new order.
The Copy Orders program collects the order details from all orders youspecify and adds them to the new order that you are creating.
If the vendor currencies are the same, the program copies order detailsusing the prices from the previous orders.
If the vendors use different currencies, you specify the price list to use forthe copied order details.
You can change the prices for the new details after creating the new order.
From/To PO NumberEnter the range of existing orders that contain the details you want to usein the new order.
Click the Go button to display the details from the selected orders.
Tax GroupThe program uses the To vendor's tax group as the default. However, youcan specify a different tax group for the new order.
PO TypeSelect one of the following types of purchase orders to copy from:
l Active—to copy details from currently active purchase orders.
l Future—to copy details from future POs only.
l Standing—to copy details from purchase orders that are placedrepeatedly.
l Blanket—to copy details from POs for making a number of purchasesover time.
Job RelatedThis option is available only if you have Project and Job Costing. Select it ifyou want to copy details for job-related purchase orders.
If you select this option, the program selects job-related purchase ordersfor the specified range of purchase orders, and copies the details to a newpurchase order.
422 Sage 300 ERP Purchase Orders
Transaction Screens
Use PO CostSelect this option to copy costs from the original POs to the new PO that youare creating.
Note: In a multicurrency system, this option is available only if both Fromand To vendors use the same currency.
Copy POs tab
Amount AvailableThis field appears for blanket purchase orders. It is calculated as theoriginal amount minus the total extended costs of all detail lines in thegrid.
DescriptionUse this field to enter a description for the new purchase order you arecreating.
On HoldSelect this option if you need to place the new purchase order on hold.
If the vendor account is on hold in Accounts Payable, the purchase orderis automatically placed on hold.
Note: You can clear the On Hold status in Purchase Order Entry. You donot have to remove the On Hold status in Accounts Payable.
You can list the orders currently on hold on the Purchase Order Actionreport.
Original AmountEnter the amount of the blanket PO you are creating.
PO DateType the date for the purchase order. For a future order, enter the datethat the purchase order becomes active.
The program automatically enters the system date in this field (the dateyou type when you open the company when you start Sage 300 ERP).
User's Guide 423
Appendix A: Purchase Orders Screen Guides
This date is also used to age the order on the Aged Purchase Ordersreport.
PO NumberTo add a new purchase order, accept "New" or enter the number.
Purchase Order Entry assigns the purchase order number using thenumbering scheme defined in the Options screen in the P/O Setupfolder, unless you enter another number here.
PO TypeSelect the type of purchase order you are creating:
l Active—for a purchase order that you want to fill immediately.
l Future—for a purchase order to become active and posted when yourun Day End Processing on the specified order date. You can changethe purchase order status to Active before the purchase order date.
l Standing—for purchase orders that are placed repeatedly.
l Blanket—for a particular amount when making a number ofpurchases over time.
By default, the program chooses the same type of purchase order thatyou are copying from.
ReferenceType an optional reference for the purchase order, using up to 60characters.
The reference appears in Accounts Payable as the reference for theinvoice, and in the general ledger batch (if you select Reference for theG/L Reference Field or G/L Description field option in the G/L Integrationscreen in the Accounts Payable program, and do not consolidate thegeneral ledger transactions created by Accounts Payable).
Detail table
Contract, Project, Category, Cost Class (if job-related)If the new purchase order is job-related, you specify for eachpurchase order detail where the items or resources are going to beused. If you use different terms than ”Contract,” ”Project,” and”Category” in Project and Job Costing, the program displays theminstead.
424 Sage 300 ERP Purchase Orders
Transaction Screens
You enter/select the resource using the Item Number field.
Copy DetailUse this field to indicate whether to copy this detail line to the newpurchase order.
Double-click the field, or click the field, then press the spacebar tochange the value of the field between Yes and No.
Drop ShipTo enter a drop-ship address for a detail, click the Zoom buttonbeside the Drop Ship field, or select the field and press Shift+F9.
Select the type of address to enter, and if necessary, select thelocation code, customer number, or ship-to address code for theaddress.
Expected Arrival DateIf necessary, enter or edit the date on which you expect to receive thegoods ordered on the detail line.
If you entered a date in the Arrival Date field on the Order tab (or ona requisition from which you are creating the purchase order), the dateis used as the default expected arrival date for new details you add tothe purchase order.
Item DescriptionThe program displays the description from the item record. You canchange it for the purchase order.
Item NumberThis field displays the code for the item used in the original order.
You cannot select different item codes for the detail lines on the CopyPurchase Orders screen.
You can, however:
l Copy the detail line.
l Change the location, expected arrival date, drop-ship address,quantity ordered, cost (unit or extended), units of measure, weightunits of measure and weight, vendor item number, and optionalfields.
User's Guide 425
Appendix A: Purchase Orders Screen Guides
Line NumberLine numbers are assigned automatically by the program and youcannot change them. You use line numbers to identify details youhave entered or to recall them for editing when you are using thezoomed screen for entering detail information.
LocationThis field appears only if you use Inventory Control.
Enter the code for the location where you expect to receive theshipment (or to which you want to post drop-shipped items).
The program displays the ship-to location code, if any, entered on thefirst tab, but you can select a different location. You can omit thelocation when adding details for non-inventory items.
Note: If you change locations after assigning serial and/or lotnumbers, you must re-assign the serial and/or lot numbers.
Optional FieldsDouble-click the Optional Fields cell on the detail line or click theZoom button column heading to enter information for an optionalfield that was assigned to this transaction type in the P/O OptionalFields setup screen.
The entry in the grid will change from No to Yes.
You can also enter optional field information for the purchase orderas a whole on the Optional Fields tab.
Quantity OrderedFor new detail lines, type the item quantity to order (in the unit youselect for the Unit Of Measure field).
If you are creating a purchase order from a requisition, the quantityentered for the detail on the requisition appears in this field, but youcan change it.
Unit of MeasureEnter the unit of measure in which to order the item. If you arecreating a purchase order from a requisition, the unit of measureentered for the detail on the requisition is displayed, but you canchange it.
426 Sage 300 ERP Purchase Orders
Transaction Screens
If you are entering new detail lines, the program displays the stockingUOM by default, unless you have set up vendor contract costs using adifferent UOM.
You must use one of the units of measure that is assigned for the itemin Inventory Control.
Note: The weight UOM can be different from the order UOM.
Unit/Extended CostYou can edit the unit cost or the extended cost for a detail.
If you selected the Use PO Cost option, the cost is copied from theoriginal PO. Otherwise, the program uses the default item costspecified in the P/O Options screen.
Unit/Extended WeightThe program uses the unit weight from the original purchase orders.You can edit the unit weight or the extended weight.
Make sure that the weight you enter is for the selected weight unit ofmeasure.
Vendor Item NumberThis field displays the number that the vendor uses to identify theitem, if a vendor item number is defined for the item in InventoryControl.
Weight Unit of MeasureThis field displays the unit of measure for the item weight.
You can choose any of the weight units of measure defined inInventory Control.
Optional Fields tab
Optional Field and DescriptionFill in the value field for any optional fields that appear. If a field isrequired, you cannot save the purchase order until you fill in the value(unless the program provides a default value).
To add optional item fields that were not automatically inserted, use theInsert key to add a new line to the grid, and then use the Finder to add theoptional field.
User's Guide 427
Appendix A: Purchase Orders Screen Guides
Optional fields must be assigned to the Purchase Order Entry screenusing the P/O Optional Fields screen before you can add them topurchase orders.
When you select an optional field code, the program displays thedescription for the optional field.
Value SetThe Value Set column shows whether a blank optional field currently hasa value. (You cannot know just by looking at the field whether it has adefault value that is blank, or no value at all.)
The Value Set field will change from No to Yes if you make an entry inthe Value field.
Value and DescriptionIf the optional field is required, you cannot save the purchase order untilyou enter a value.
If the optional field you selected requires validation, you must select avalue that is defined for the optional field in Common Services (unlessthe optional field allows blanks).
If you select a value, the description for the value you select will appearin the description column.
If you delete the value, the optional field will be deleted from the grid. Ifthe field is required, you will have to reinsert it and enter a value beforeyou can save the order.
428 Sage 300 ERP Purchase Orders
Transaction Screens
P/O Credit/Debit Note Entry Screen
To open this screen:Open Purchase Orders > P/O Transactions > Credit/Debit Note Entry.
Secondary screens:
l "P/O Credit/Debit Note Entry Bill-To Location Information Screen" (page 468)
l "P/O Credit/Debit Note Entry Cost Allocation Screen" (page 481)
l "P/O Credit/Debit Note Entry Detail Comments Screen" (page 477)
l "P/O Credit/Debit Note Entry Detail Costs/Taxes Screen" (page 478)
l "P/O Credit/Debit Note Entry Detail Items/Taxes Screen" (page 469)
l "P/O Remit-To Location Screen" (page 527).
Related tasks:
l " Adding or Editing Details Using the Detail Items Taxes Screen" (page 197)
l "Entering a Credit or Debit Note for a Return or Invoice" (page 192)
l "Entering or Editing Additional Costs on Credit and Debit Notes" (page 198)
l "Entering a Return for a Cleared or Missing Invoice" (page 187)
l "Entering or Editing Additional Costs on Credit and Debit Notes" (page 198)
l "Prorating Additional Costs on Receipts" (page 159)
l "Returning and Issuing Credit/Debit Notes for Lotted Items" (page 215)
l "Returning and Issuing Credit/Debit Notes for Serialized Items " (page 213)
Overview
Use Credit/Debit Note Entry screen to enter credit notes and debit notes fromyour vendors. Mor e ...
On the P/O Credit/Debit Note Entry screen, you can:
l Review existing credit notes and debit notes.
l Enter new additional costs on credit notes and debit notes.
l Export credit notes and debit notes.
User's Guide 429
Appendix A: Purchase Orders Screen Guides
l Assign serial/lot numbers to items if you have the Serialized Inventory andLot Tracking license installed.
Additional Costs Tab
Use the Additional Costs tab to enter the additional costs your vendors chargeon credit notes and debit notes. Mor e ...
On this tab you can:
l Specify how to reprorate the costs if you returned the items.
Note: If you are adding additional costs, you must choose No Proration. Ifyou choose to prorate, the program displays an error message andprevents you from posting the credit note or debit note.
l Allocate new additional costs (added to the credit note/debit note) to one ormore receipts.
l Edit additional cost details from invoices you are crediting or debiting.
Credit/Debit Tab
The name of this tab is Credit Note or Debit Note, depending on the documenttype you selected. It provides separate sections, where you can enter or viewdocument information, as follows:
l Header. You use the top portion of the tab to enter general information thatapplies to the entire document (for example, the date, description, theinvoice or return number to which the transaction applies, the billing andremit-to locations, , and whether the document is job related).
l Details. You use the Details table to add and edit item detail lines foritems. Mor e ...
On the Details table, you can:
Enter new details for a credit note or debit note you are entering withoutan invoice or return number.
Edit the item detail lines for a credit note or debit note for an existinginvoice or return from a primary vendor. (You cannot add new detaillines when working with an existing invoice or return, and you cannotdelete detail lines displayed from returns.)
Open a separate screen to edit tax or other information for a singledetail. The Detail Items/Taxes screen displays all the fields for a single
430 Sage 300 ERP Purchase Orders
Transaction Screens
detail, including tax fields. For more information, see "P/O Credit/DebitNote Entry Detail Items/Taxes Screen" (page 469).
Optional Fields Tab
If optional fields are assigned to the Credit/Debit Note Entry screen, use theOptional Fields tab to enter optional field information that applies to the entiredebit note or credit note. Mor e ...
Optional fields and values appear automatically on this tab if you selected theAuto Insert option for those fields on the O/E Optional Fields setup screen.
If you use identical optional fields in Order Entry transactions and AccountsReceivable invoices, the information in the Order Entry fields is sent to AccountsReceivable.
Note: If an optional field is required but does not have a default value, youmust specify a value for the field.
For more information, see "About Optional Fields" (page 56).
Rates Tab
This tab appears only in multicurrency ledgers when you are entering a creditnote or debit note for a vendor who does not use the functional currency. Mor e ...
Use this tab to:
l Change the rate type, rate date, and exchange rate for converting the creditnote or debit note amount from the vendor's currency to your functional(home) currency.
l Look up the rate information entered with the invoice or return, if any, towhich you are posting a credit note or debit note.
Retainage Tab
The Retainage appears only if the receipt or invoice you are crediting ordebiting was job related and it included retainage amounts.
You use this tab for multicurrency documents to specify whether to use theoriginal retainage exchange rate for the credit/debit note, or use the currentexchange rate.
User's Guide 431
Appendix A: Purchase Orders Screen Guides
Taxes Tab
Use the Taxes tab to review and change tax information and vendor tax groupfor the credit or debit note. Mor e ...
On the Taxes tab, you can:
l View or change the vendor's tax group.
l Check tax information and edit the tax classes and amounts for the vendor'stax authorities.
Click Calculate Taxes to cancel changes you make to tax amounts. (Theprogram recalculates tax amounts using the tax tables in Tax Services.)
Totals Tab
Use the Totals tab to review and edit discounts, totals, and other finaldocument details. Mor e ...
On the Totals tab, you can:
l Enter a comment for the credit or debit note.
l Enter a discount that applies to the whole transaction.
l Verify credit note or debit note totals for the vendor.
l Check tax amounts.
l Check the estimated weight of the goods for which you were credited ordebited.
l Check the number of item and additional cost details entered for the vendoron the credit note or debit note.
l Check the document subtotal and total additional costs for the vendor.
Fields and Controls
Buttons
Calculate TaxesClick the Calculate Taxes button to see tax amounts for a detail beforeyou post the credit note or debit note or click the Totals tab. (Taxamounts are not automatically calculated until you post the credit note
432 Sage 300 ERP Purchase Orders
Transaction Screens
or debit note, or click the Taxes tab or Totals tab.)
If you edit tax amounts on the Taxes tab, and then click the CalculateTaxes button on any tab, the program replaces any tax amounts youentered on the Taxes tab with the amounts recalculated using the taxtables from Tax Services.
HistoryClick the History button to open the P/O Purchase History screen, whereyou can check information about the items you have purchased from yourvendors.
For more information, see "P/O Purchase History Screen" (page 408).
Item/Tax
Click the Item/Tax button to open the Detail Items/Taxes screen for aselected detail so that you can check the tax information, and change thetax classes and taxable status, as needed. (Select the detail line on theCredit/Debit tab, then click the Item/Tax button.)
PostClick Post to post the document, including any changes you made to anexisting document.
Document NumberEnter the number of the credit note or debit note in the the DocumentNumber field. Purchase Orders does not assign credit note and debit notenumbers.
You can:
l Start a new credit note or debit note. (Type the number in the DocumentNumber field, then press Tab.)
l Enter a credit note or debit note with the same number as a credit note ordebit note you posted previously. (Type the number, press Tab, and thenclick New in the Finder that appears.)
l View a credit note or debit note you posted previously, if you keep historyor have not yet run Day End Processing. (Type the credit note or debitnote number, or select it from the Finder. You cannot change credit notesand debit notes after posting them.)
User's Guide 433
Appendix A: Purchase Orders Screen Guides
Vendor NumberEnter the code for the vendor from whom you received the credit note ordebit note.
The vendor number sets the default tax group. In multicurrency systems,the vendor number also specifies the currency of the document.
Note: After you enter a vendor number, the field to the right displays thevendor's name.
Skip this field if you plan to specify a return or invoice number. (The returnor invoice number determines the vendor number for the credit note ordebit note.)
If you are entering a credit note or debit note without a return or invoicenumber, you can:
l Select an existing vendor using the Finder, or type the vendor number,and then press Tab.
l Add a new vendor by doing one of the following:
If you want to add the vendor record now, click the New button aftertyping the vendor number. Fill in the vendor information in AccountsPayable, click Add, then Close to return to Purchase Orders.
If you do not want to add the vendor record now, type only the vendornumber. (You can enter the vendor name on the next tab.)
Important! You must add the vendor record in Accounts Payable beforeyou can post the invoice for the vendor in the Accounts Payable program.You cannot enter credit notes or debit notes for inactive vendor accounts.For more information about adding vendors, see the Accounts Payablehelp.
Additional Costs tab
Table
Additional Cost (code and description)Type the code for the additional cost you want to add, or select thecode from the Finder. If you are adding a cost for which no code isdefined, skip this field and type the name of the cost in theDescription field (the field beside the Additional Cost field on theDetail Items/Taxes screen).
434 Sage 300 ERP Purchase Orders
Transaction Screens
You cannot change the additional cost code when editing a detail froman invoice or return.
You use the Additional Costs screen, in the P/O Setup folder, to add oredit additional cost codes in Purchase Orders.
AmountUse the Amount field to enter the amount of the cost (excluding taxes,unless you are entering a tax-included cost).
Billing Type, Billing Rate, and A/R Item Number (job-relatedonly)For additional costs on job-related credit and debit notes, the programprovides the Billing Type, Billing Rate, and AR Item Number that wasused for the invoice or return.
The invoice or return must be job-related for these fields to appear.
A/R Item NumberThis field displays the A/R item number associated with the projectresource used for the contract in Project and Job Costing. You canselect a different A/R item number only for time and materialprojects, as follows:
l On a standard project, this field displays the A/R item numberand unit of measure specified for the project resource categoryas the default. You can accept the item number or select anothervalid A/R item number.
l On a basic project, this field displays the A/R item number andunit of measure specified for the project category. You canaccept the item number or select another valid A/R item number.
l If you change the A/R item number, the item number must be avalid item number in Accounts Receivable, and the unit ofmeasure must be a valid unit of measure both for the new itemnumber and the vendor’s currency.
Cost plus and fixed price projects do not use an A/R item number.
Billing CurrencyThis field appears only in multicurrency systems for time andmaterials projects and for fixed price projects using billings and
User's Guide 435
Appendix A: Purchase Orders Screen Guides
costs or accrual-basis accounting methods.
The billing currency is the customer's currency specified on thecontract, and you cannot change it.
Billing currency is blank for Fixed Price projects using completedproject or project percentage complete methods, and for Cost Plusprojects.
Note: Billing currency is not displayed for basic or standardinternal Time and Materials projects, or for single-currencyFixed Price projects that use billings and costs or accrual-basisaccounting methods.
Billing RateThis field displays the billing rate for the specified resource (forstandard projects) or category (for basic projects).
You can edit the billing rate if the billing type is Billable. The fielddisplays 0.000000 if the billing type is Non-Billable or No Charge.
Note:l You can specify the billing rate for Time and Materials projectsand for Fixed Price projects that use Billings and Costs orAccrual-Basis accounting methods.
l Billing rate is disabled and set to 0.000000 on a basic orstandard internal contract for Time and Materials projects orfor Fixed Price projects using Billings and Costs or Accrual-Basis accounting methods.
l The billing rate cannot be negative.
l If a job-related additional cost is prorated by cost, quantity,or weight, the specified billing rate in functional currency willbe prorated to the item details for projects that are Time andMaterials or Fixed Price with an accounting method of Billingsand Costs or Accrual-Basis.
The billing rate is not prorated to item details for Cost Plus orFixed Price projects with completed project or project percentagecomplete accounting methods. Instead, it is converted to thecontract customer’s currency when it is prorated to the itemdetails during day end processing (using the current exchangerate).
436 Sage 300 ERP Purchase Orders
Transaction Screens
The prorated billing rate for each detail is not displayed (and,therefore, you cannot change it).
Note: This field is disabled if you are prorating manually.
Billing TypeThis field appears in the detail-entry section only for job-relatedpurchase orders.
The billing type indicates to Project and Job Costing whether to billthe cost to the customer. You can change this field only for a timeand materials project, as follows:
On a basic project:
For a billable project, the category billing type determines whetheryou can change the billing type for the detail. If the specifiedcategory is:
l Billable, the default billing type for the detail is billable, but youcan change it.
If the detail is billable you can specify a billing rate for the detail.
If you change the billing type for the detail to no charge or non-billable, the program sets the billing rate to zero and you cannotchange it.
l No charge or non-billable, the program sets the same billingtype for the detail, and cannot change it. You cannot specify abilling rate for the detail, which the program sets as zero.
If the project is no charge or non-billable, the detail uses thesame billing type as the project, the billing rate is set to zero,and you cannot change them.
On a standard project:
If the project is billable, the resource billing type determineswhether you can change billing type for the detail. If the specifiedresource is:
l Billable, the program displays Billable as default billing type,but you can change it for the detail. If the detail is billable, youcan specify a billing rate for the detail.
User's Guide 437
Appendix A: Purchase Orders Screen Guides
If you change the billing type for the detail to no charge or non-billable, the program sets the billing rate to zero, and youcannot change it.
l No charge or non-billable, the program sets same billingtype for the detail, and you cannot change it. You cannot specifya billing rate for the detail, which the program sets as zero.
If the project is no charge or non-billable, the detail uses thesame billing type as the project, and you cannot change it. Theprogram also sets the billing rate to zero, and you cannotchange it.
For fixed price and cost plus projects, the Billing Type field isblank. A billing type is not required for these types of projects.
Unit of MeasureThis field appears for Time and Materials projects if you selectedthe Job Related option for this transaction.
You must enter a unit of measure that is valid for the itemnumber/resource that you specified and for the contractcustomer's currency.
Note: For internal time and materials projects (basic orstandard contracts) the A/R item unit of measure will be disabledor blank.
Calculate LaborSelect the Calculate Labor field if you want Project and Job Costingto calculate labor amounts for this cost and pass the amount back toPurchase Orders. (Purchase Orders creates the G/L entries for theadditional costs.)
Do not select this option for an additional cost for which you don'twant to calculate labor.
The program also lets you specify whether overhead or labor iscalculated if you expense the additional cost.
Calculate OverheadSelect the Calculate Overhead field if you want Project and JobCosting to calculate overhead amounts for this cost and pass theamount back to Purchase Orders. (Purchase Orders creates the G/L
438 Sage 300 ERP Purchase Orders
Transaction Screens
entries for the additional costs.)
Overhead is usually calculated on the discounted extended amount.
For example, you would not select this option if an invoice or debitnote had additional shipping costs for which you didn't want tocalculate overhead or labor.
The program also lets you specify whether overhead or labor iscalculated if you expense the additional cost.
CommentsIf desired, enter a comment for the detail, using up to 250 characters.
Lines automatically wrap, but if you want to start a new line before aline wraps, press the Ctrl and Enter keys together.
To open the screen, click the Zoom button ( ) beside the field, or,with the insertion point in the field, press the Shift and F9 keys at thesame time.
Contract, Project, Category and Resource (job-related only)If the return or invoice was job-related, the program will provide thejob to which each cost was assigned. If you use different terms than“Contract,” “Project,” and “Category” in Project and Job Costing, theprogram displays them instead.
For job-related transactions, you can also specify the Billing Type,Billing Rate, AR Item Number, and AR Item UOM for the customerinvoice near the end of the detail line.
Note:l You specify this information only if you are not prorating the costto individual detail lines (No Proration). The fields are disabled ifyou are prorating by cost, quantity or weight, or proratingmanually (where you allocate costs to the individual lines on theDistribute Additional Costs screen).
l You enter/select the resource using the Item Number field.
l You cannot change these fields once you have added the detailline.
l These fields appear only for job-related credit or debit notes.
User's Guide 439
Appendix A: Purchase Orders Screen Guides
CategorySelect or enter a category that is assigned to the project in Projectand Job Costing.
ContractSpecify a contract number for each detail. You can enter or selectonly contracts that are open or on hold. (You cannot processtransactions to a contract that is on hold, if it has never beenopened.)
Cost ClassThe program displays the cost class for the category used in eachdetail. You cannot change this field.
Item Number (Resource)Use the Item Number field to identify the resource for this detail.
You must specify a resource that is assigned to the project andcategory in Project and Job Costing. You can specify an inventoryitem number, or the code for another type of resource (such as anequipment code, subcontractor code, or employee number).
Note: You cannot leave this field blank.
ProjectYou can only enter or select projects that are:
l Assigned to the contract that you selected.
l Open or on hold. (If a project that is on hold has never beenopened, you cannot select it.)
l Not closed to costs.
Distribute ProrationIf you selected manual proration, click this column heading to openthe "P/O Distribute Proration Screen" (page 544). You must calculateall the costs and associated allocated taxes to prorate manually foreach detail, then enter the amounts with the details.
Expense AccountType the account number, or select the account number from the
440 Sage 300 ERP Purchase Orders

Transaction Screens
Finder.
Line NumberTo add a new detail, skip the Line Number field. If an existing detail isdisplayed, click the New button beside the field.
To select an existing line to edit or delete, highlight the line (or type itsline number in the zoomed screen).
Note that you can edit additional cost details only until you post thecredit note or debit note.
Net of TaxThis field displays the net amount of the additional cost you entered forthe detail (excluding allocated taxes that are not included in theamount of the cost).
Proration (method)Select No Proration. You cannot prorate new additional cost details oncredit notes or debit notes, you can only expense them to a generalledger account.
Receipt NumberThe receipt number on which the original invoice or return was basedappears in this field.
ReferenceEnter optional reference information for the detail.
Reproration Method (for returning)You can select only Expense for the reproration method. You cannotreprorate additional costs from credit notes or debit notes to itemdetails.
Return Expense AccountType the number of the general ledger account to which you will postthe cost, or select the account number from the Finder.
Tax IncludedThe program displays the total amount of taxes that were included inthe cost amount of the additional cost detail.
User's Guide 441
Appendix A: Purchase Orders Screen Guides
To edit tax settings, press F9 to display the zoomed cost entryscreen.
You can also edit total tax amounts on the Taxes tab.
Allocated TaxThis field displays the amount of allocated tax for the detail.(Allocated taxes are included in the cost of the detail. Recoverableand expensed taxes are not included in detail costs.)
Distribute Proration (if prorating additional costs manually)
Item NumberThe program displays all of the items on the purchase order so youcan easily distribute the additional cost in the amount fields.
If this is a job-related Invoice, the Item Number may be a resource.
Item DescriptionThe program displays the item description from Inventory Control orthe description you entered for the detail on the purchase order.
Amount (manually prorated) (if not job-related)Enter the amount of the additional cost that is being allocated to thisline item. The amounts on all lines must add up to the total amount ofthe additional cost.
Distribute Cost (if distributing costs among several receipts)
Amount (additional cost detail total)This field displays the amount entered for the additional cost detail atthe top of the Cost Allocation screen.
Amount (prorated for each receipt)This field displays the amount of the additional cost allocated to eachreceipt when you click Reallocate.
To allocate the additional cost manually, you can enter amountsbeside each receipt number. The sum of all the amounts you allocateto receipts must equal the total amount for the additional cost detail.
442 Sage 300 ERP Purchase Orders
Transaction Screens
Billing Rate (cost allocation screen)If the receipt was job-related, Purchase Orders displays a billing ratefor the cost that you are allocating (along with the amount beingallocated).
Note: The Billing Rate is also allocated with the additional costs tomore than one receipt.
If you are prorating the cost manually to other receipts, you can entera different billing rate with each distribution.
Proration Method (display only for existing costs)You cannot change the proration method for an existing cost.
If you are adding a new additional cost, you can select Prorate ByQuantity, Prorate By Cost, or Prorate By Weight.
Note: You cannot manually prorate an additional cost on an invoiceor debit note.
If the invoice, credit note, or debit note is job-related:
l You can also adjust the retainage amounts and period if retainageapplies to the document.
l You can adjust the billing rate and currency if prorating by cost,quantity or weight.
l You can specify a single contract, project and category, or use theDistribute Proration button to distribute costs to more than onecontract, project, and/or category (if applicable) if you are proratingmanually.
Receipt NumberThe program displays the receipt numbers used in this invoice, creditnote, or debit note. You cannot change the receipt numbers.
Retainage Percentage, Amount, and PeriodIf the receipts were job-related and the credit note or debit note usesthe retainage option, the program displays additional retainage fieldsfor each receipt to which you can allocate additional costs.
The default retainage percentage and retention period that appears inthese fields depends on how you are prorating the costs.
User's Guide 443
Appendix A: Purchase Orders Screen Guides
l If prorating by cost, quantity, or prorating manually, the settingscome from the vendor record.
l If you are not prorating, the retainage settings are based on theDefault Retainage From option for the contract in Project andJob Costing.
Use the Distribute Cost button to allocate a new additional cost tomultiple receipts.
Select the additional cost detail on the Additional Costs tab, then clickthe Distribute Cost button to open the Allocate Cost screen.
Purchase Orders automatically allocates the additional cost amountaccording to the proration method you selected on the Additional Coststab. However, you can enter different amounts for each receiptmanually.
Credit/Debit tabThe name of this tab is Credit Note or Debit Note, depending on thedocument type you selected. It provides separate sections, where you canenter or view document information, as follows:
Bill-To LocationIf you use Inventory Control, select an Inventory Control location codeto which the credit note or debit note should be sent. (Normally, this isthe same location to which the matching invoice or return was sent.)
You can also use the Zoom button to open a separate screen where youcan edit the address for the code you select, or you can omit the codeand type in a billing address, or not specify a bill-to location at all.
Credit Note/Debit Note DateType the date you want to use as the credit note or debit note date. Theprogram displays the sign-on date you entered to start Sage 300 ERP.
If you want to use a different date for the G/L transactions when theyare posted in the General Ledger, you can change the posting date. (Theposting date determines the fiscal year and period displayed beside thePosting Date field.)
Credit Note TotalEnter the total credit note amount, including taxes and additional costs.This amount must equal the total of all details and taxes you enter for
444 Sage 300 ERP Purchase Orders
Transaction Screens
the credit note before you can post it.
Debit Note TotalEnter the total debit note amount, including taxes and additional costs.This amount must equal the total of all details and taxes you enter for thedebit note before you can post it.
DescriptionType an optional description for the credit note or debit note.
The description, if any, entered on the receipt is displayed, but you canchange it.
Document TypeSelect Debit Note or Credit Note from the list, if the correct choice isnot already displayed.
From DocumentIf you are entering a credit note, select the type of document that you arecrediting (either Invoice or Return).
You can enter debit notes only for invoices.
If you are crediting or debiting an invoice or return that does not exist inPurchase Orders, leave the field blank.
Invoice Date(display only)After you select the invoice number for the credit note or debit note, theinvoice date is displayed for your information.
Invoice NumberType the number of the invoice you are crediting or debiting, or select itfrom the Finder.
You can also enter an invoice number that does not exist in the PurchaseOrders system. (For example, it may have been cleared.)
Job Related(selected on original document)If the return or invoice was job-related, the Job Related option is selectedfor the credit/debit note, and you cannot change this selection.
User's Guide 445
Appendix A: Purchase Orders Screen Guides
The program supplies the contract, project, category, cost class andresource for each detail — as will the customer billing type, billing rate,and A/R item used for billing.
If you use different terms than “Contract,” “Project,” and “Category” inProject and Job Costing, the program displays them instead.
On HoldSelect On Hold to prevent a debit note from being paid in the AccountsPayable program. If you want to pay this amount, you can edit thedocument in Accounts Payable, clearing this option before posting thedocument.
When you post the invoice batch in Accounts Payable, A/P does not applyany matching prepayments if the credit note or debit note has On Holdstatus. In addition, you cannot post credit notes or debit notes if eitherthe credit (or debit) note or the specified Apply-To document is on hold.
You cannot apply a payment to a document that is on hold when usingthe Create Payment Batch screen. You must first remove the On Holdstatus using the Control Payments screen. However, you can apply thedocument manually in Payment Entry, without removing the hold, ifnecessary.
PO NumberOptionally, type the purchase order number in this field. You can type anumber that does not exist in Purchase Orders.
Posting DateEnter the posting date for the transaction.
The posting date is different from the document date. The posting dateis the date for transactions being posted to the General Ledger, so it alsodetermines the contents of the Fiscal Year and Period fields.
If you have a multicurrency system, currency revaluation uses postingdates to select open documents for revaluation purposes, and thus,revaluation adjustments are posted to General Ledger in the correctfiscal year and period.
Depending on your settings in the P/O Options screen, Purchase Ordersautomatically displays the session date or the document date by defaultin this field.
446 Sage 300 ERP Purchase Orders
Transaction Screens
You can change the posting date, but you cannot separately change thefiscal year and period.
Note: If you consolidate G/L transactions, the posting date forconsolidated entries is the last date of the fiscal period.
ReferenceType an optional reference for the credit note or debit note.
The reference, if any, from a return or invoice is displayed, but you canchange it.
Remit-To LocationIf you have defined remit-to addresses for the vendor, either type thecode for the address to use or select it from the Finder. To check that youhave selected the correct address to which to send payments for thevendor, choose the Zoom button or press F9 in the field.
If a primary remit-to address is assigned for the vendor in AccountsPayable, the code for the address appears automatically, but you canchange it.
Retainage Percentage and Period(selected on original document)If the invoice or return used retainage accounting, the program displaysadditional percentage and period retainage fields for each detail line.
The program also displays the Retainage tab, where you specify theexchange rate to use for the multicurrency retainage on credit/debitnotes.
If you clear the Retainage check box, the percentage and period retainagefields disappear from the item detail section, and the Retainage tab alsodisappears.
You can select the retainage option for job-related transactions even ifretainage was not used on the original transaction.
Note: Retainage accounting applies only to job-related transactions,and is available only if Accounts Payable uses retainage accounting.
Return Date (display only)After you select the return number for the return, the return date isdisplayed for your information.
User's Guide 447
Appendix A: Purchase Orders Screen Guides
Return NumberType the number of the return you are crediting, or select it from theFinder. (The return must exist in Purchase Orders.)
Vendor Account SetThe account set from the vendor record appears in this field as thedefault. It specifies the general ledger payables control, purchasediscounts, prepayment, and retainage accounts to which the transactionwill be distributed.
You can change the account set for a particular purchase order, receipt,return, invoice, credit note, or debit note. If you use multicurrencyaccounting, however, the new account set must use the same currencyas the vendor's account set.
Note: If you change the account set on a receipt, make sure that youuse the same account set for returns, invoices, and credit or debitnotes.
Year and Period(display only)This is the fiscal year and period to which the credit/debit notetransactions will be posted in the general ledger. You can change thefiscal period by changing the Posting Date.
You can enter a different Credit or Debit Note Date, and you can enter adifferent Posting Date for the document.
(Remember that you cannot post transactions to closed fiscal periods.)
1099/CPRS Code and AmountIf the vendor is subject to 1099 reporting, type the 1099 code andamount. (These fields appear only if the Subject To 1099 Reportingoption is selected for the vendor in Accounts Payable.)
Credit/Debit Details tableThis details table appears on the Credit/Debit tab.
Allocated TaxThis field displays the total tax amount that was allocated to theselected detail line for each tax authority.
448 Sage 300 ERP Purchase Orders
Transaction Screens
Billing Type, Billing Rate, and A/R Item Number (job-relatedonly)For job-related credit and debit notes, the program provides the BillingType, Billing Rate, and AR Item Number that was used for the invoiceor return.
The invoice or return must be job-related for these fields to appear.
A/R Item NumberThis field displays the A/R item number associated with the projectresource used for the contract in Project and Job Costing. You canselect a different A/R item number only for time and materialprojects, as follows:
l On a standard project, this field displays the A/R item numberand unit of measure specified for the project resource categoryas the default. You can accept the item number or select anothervalid A/R item number.
l On a basic project, this field displays the A/R item number andunit of measure specified for the project category. You canaccept the item number or select another valid A/R item number.
l If you change the A/R item number, the item number must be avalid item number in Accounts Receivable, and the unit ofmeasure must be a valid unit of measure both for the new itemnumber and the vendor’s currency.
Cost plus and fixed price projects do not use an A/R item number.
Billing CurrencyThis field appears only in multicurrency systems for time andmaterials projects and for fixed price projects using billings andcosts or accrual-basis accounting methods.
The billing currency is the customer's currency specified on thecontract, and you cannot change it.
Billing currency is blank for Fixed Price projects using completedproject or project percentage complete methods, and for Cost Plusprojects.
User's Guide 449
Appendix A: Purchase Orders Screen Guides
Note: Billing currency is not displayed for basic or standardinternal Time and Materials projects, or for single-currencyFixed Price projects that use billings and costs or accrual-basisaccounting methods.
Billing RateThis field displays the billing rate for the specified resource (forstandard projects) or category (for basic projects).
You can edit the billing rate if the billing type is Billable. The fielddisplays 0.000000 if the billing type is Non-Billable or No Charge.
If you are referencing an existing document, the program displaysthe original billing rate.
For new detail lines, a default billing rate appears, as follows:
l For standard projects:
For a category cost class of Subcontractor, Overhead,Miscellaneous Equipment, or Material, the default billing ratecomes from the category resource.
For a category cost class of Labor, the default billing rate isbased on the Default Billing Rate From option for theemployee resource category.
l For basic projects:
For a category cost class of Subcontractor, Overhead,Miscellaneous Equipment, or Material, the default billing ratecomes from the category.
For a category cost class of Labor, the default billing rate isbased on the Default Billing Rate From option for the laborcategory.
The Billing Rate option does not apply to internal contracts.
Note:l You can specify the billing rate for Time and Materials projectsand for Fixed Price projects that use Billings and Costs orAccrual-Basis accounting methods.
450 Sage 300 ERP Purchase Orders
Transaction Screens
l Billing rate is disabled and set to 0.000000 on a basic orstandard internal contract for Time and Materials projects or forFixed Price projects using Billings and Costs or Accrual-Basisaccounting methods.
l The billing rate cannot be negative.
Billing TypeThis field appears in the detail-entry section only for job-relatedpurchase orders.
The billing type indicates to Project and Job Costing whether to billthe cost to the customer. You can change this field only for a timeand materials project, as follows:
On a basic project:
For a billable project, the category billing type determines whetheryou can change the billing type for the detail. If the specifiedcategory is:
l Billable, the default billing type for the detail is billable, but youcan change it.
If the detail is billable you can specify a billing rate for the detail.
If you change the billing type for the detail to no charge or non-billable, the program sets the billing rate to zero and you cannotchange it.
l No charge or non-billable, the program sets the same billingtype for the detail, and cannot change it. You cannot specify abilling rate for the detail, which the program sets as zero.
If the project is no charge or non-billable, the detail uses thesame billing type as the project, the billing rate is set to zero,and you cannot change them.
On a standard project:
If the project is billable, the resource billing type determineswhether you can change billing type for the detail. If the specifiedresource is:
User's Guide 451
Appendix A: Purchase Orders Screen Guides
l Billable, the program displays Billable as default billing type,but you can change it for the detail. If the detail is billable, youcan specify a billing rate for the detail.
If you change the billing type for the detail to no charge or non-billable, the program sets the billing rate to zero, and youcannot change it.
l No charge or non-billable, the program sets same billingtype for the detail, and you cannot change it. You cannot specifya billing rate for the detail, which the program sets as zero.
If the project is no charge or non-billable, the detail uses thesame billing type as the project, and you cannot change it. Theprogram also sets the billing rate to zero, and you cannotchange it.
For fixed price and cost plus projects, the Billing Type field isblank. A billing type is not required for these types of projects.
Unit of MeasureThis field appears for Time and Materials projects if you selectedthe Job Related option for this transaction.
You must enter a unit of measure that is valid for the itemnumber/resource that you specified and for the contractcustomer's currency.
Note: For internal time and materials projects (basic orstandard contracts) the A/R item unit of measure will be disabledor blank.
CommentsTo enter comments for a selected detail line, click the Zoom button () for the field, type the remarks, then click Close. (Press the Shift
and F9 keys to open or close the screen using your keyboard.)
The program displays any comments you entered for the detail lineon an invoice or return you are crediting or debiting, but you canchange or delete them.
Contract, Project, Category and Resource (job-related only)If the return or invoice was job-related, the program will provide thejob to which each detail was assigned. If you use different terms than
452 Sage 300 ERP Purchase Orders
Transaction Screens
“Contract,” “Project,” and “Category” in Project and Job Costing, theprogram displays them instead. (The "resource" appears in the ItemNumber column.)
Purchase Orders updates the actual quantities and costs for jobs withthe amounts on credit or debit notes. For example, costs are affectedby credit and debit notes, and quantities are affected by credit notereturns. (Quantities are not affected by credit notes that referenceinvoices or debit notes.)
For job-related credit notes and debit notes:
l The Job-Related check box will be automatically selected if theinvoice or return was job-related. You cannot change it.
l You enter/select the resource using the Item Number field.
l You must select the Job-Related check box if the referencedocument no longer exists in PO.
CategorySelect or enter a category that is assigned to the project in Projectand Job Costing.
Specify a contract number for each detail. You can enter or select onlycontracts that are open or on hold. (You cannot process transactions toa contract that is on hold, if it has never been opened.)
Cost ClassThe program displays the cost class for the category used in eachdetail. You cannot change this field.
Item Number (Resource)Use the Item Number field to specify the resource for this detail.
You must specify a resource that you have assigned to the projectin Project and Job Costing (such as an equipment code or asubcontractor code). You cannot leave this field blank.
ProjectYou can only enter or select projects that are:
User's Guide 453

Appendix A: Purchase Orders Screen Guides
l Assigned to the contract that you selected.
l Open or on hold. (If a project that is on hold has never beenopened, you cannot select it.)
l Not closed to costs.
Expense AccountYou specify a general ledger expense account for non-inventory itemdetails. You can select general ledger account numbers using theFinder.
If you are working with an existing invoice or return, the programdisplays the number entered with the detail on the invoice or return,but you can change the number.
Extended CostType the extended cost for the number of units of the item that youare crediting or debiting.
If you change the extended cost, the program automaticallyrecalculates the unit cost.
Extended WeightType the extended weight for the number of units of the item forwhich you that you are crediting or debiting.
If you change the extended weight, the program automaticallyrecalculates the unit weight.
The total weight for all items on the document is displayed in theTotals tab.
Item DescriptionThe program displays the item description from the P/O VendorContract Costs record (if one exists) or from the Inventory Control orPurchase Orders item record, but you can change it.
If you entered a non-inventory item number, you can type adescription for it.
Item NumberIf you are entering a credit note or debit note to an existing invoiceor return, the program displays the item number, and you cannot
454 Sage 300 ERP Purchase Orders
Transaction Screens
change it.
If you are entering a transaction without an invoice or return number,type the item number to use or select it from the Finder. If you use theAllow Non-inventory Item Number option, you can also type an itemnumber that is not defined in your Inventory Control system.
Line NumberTo select an existing line to edit, select the line on the Credit/Debit tab,or type its line number on the Detail Items/Taxes screen. You cannotedit details of posted credit notes or debit notes.
To add a new line to a credit note or debit note you are enteringwithout an invoice or return number when another detail is displayedin the Detail Items/Taxes screen, click the New icon beside the field.
LocationIf you are entering a credit note or debit note without an invoice orreturn and if you use Inventory Control, type the location code orselect it from the Finder.
If you are entering a credit note or debit note to an existing invoice orreturn number, the program displays the location code entered for thedetail on the invoice or return. You cannot change it.
Manufacturer's Item Number (detail grid)If you entered a manufacturer's item number in the Item Number fieldon the return, credit note, or debit note, the program also displays themanufacturer's item number in the manufacturer's item numbercolumn.
Manufacturer's item numbers are alternative item numbers—such asbar codes or shortcut codes—that identify your inventory items. Youset up manufacturer's item numbers in the Inventory Control system.
You can enter manufacturer's item numbers wherever you enter itemnumbers in the Purchase Orders program.
Net Of TaxThis field displays the extended item cost, minus any applicable taxamount. You cannot edit the amount.
Non-Stock Clearing AccountUse the Non-Stock Clearing Account field to change the non-stock
User's Guide 455
Appendix A: Purchase Orders Screen Guides
clearing account associated with this item's account set.
If the item used in the detail is a non-stock item, the non-stockclearing account associated with the item's account set appears.
If you are returning a non-stock item, the non-stock clearing accountassociated with the item's account set appears. You can specify adifferent account, if necessary.
Optional FieldsOptional fields are fields that have been added by your company tothe transaction entry screens and detail lines in Purchase Orderstransactions. You must have Transaction Analysis and Optional FieldCreator to add and use optional fields.
If the Optional Fields column appears, you can click the columnheading to display the optional fields that have been assigned tocredit/debit note details, and edit their contents.
Optional field information on detail lines is inherited from anymatching optional fields in the invoice or return you are debiting orcrediting.
If the optional fields were not on the invoice or return:
l For non-job related invoices, default optional field informationcomes from item records or, if the fields do not match, from thedefault value in the P/O Optional Fields screen.
l For job-related invoices, the default optional field informationdepends on the contract style and project type.
If you use the same optional fields for categories or resources inProject and Job Costing, default optional field information will beinherited from the category for basic projects, or from theresource with standard projects.
For more information, see "About Optional Fields" (page 56).
Order NumberType the number of a sales order to which the detail applies. If youuse Sage 300 ERP Order Entry with Purchase Orders, you can alsoselect an Order Entry order number from the Finder.
You can change or erase an order number that is displayed with adetail you added on the invoice or return.
456 Sage 300 ERP Purchase Orders
Transaction Screens
QuantityType the number of units of the item for which you are being creditedor debited.
Leave this field showing zero for displayed details (from an invoice orreturn) that are not included on the debit note or credit note. You canalso delete displayed details if you are working with an invoice.
If working with serialized or lotted items, a screen appears after youspecify a quantity and press Tab or Enter, prompting you to assignserial and/or lot numbers for the item.
Receipt Number(display only)The receipt number on which the original invoice or return was basedappears in this field.
Retainage %, Retainage Amount, and Retention PeriodIf the invoice or return used retainage accounting, the program willdisplay additional percentage and period retainage fields for eachdetail line.
The program will also display the Retainage tab to let you specify theexchange rate that you want to use for the multicurrency retainage oncredit/debit notes.
If you clear the Retainage check box, the percentage and periodretainage fields disappear from the item detail section, and theRetainage tab also disappears.
Note: Retainage accounting applies only to job-related transactions,and is available only if you selected retainage accounting in theAccounts Payable program.
Default Retainage Percentage and Period
The default retainage percentage and retention period that appears inthese fields are based on the Default Retainage From option for thecontract in Project and Job Costing.
Tax IncludedIn the Detail table, this field displays the amount of tax that is includedin the extended item cost (when the cost includes tax).
User's Guide 457
Appendix A: Purchase Orders Screen Guides
On the zoomed Detail Items/taxes screen, this field displays Yes orNo to indicate whether tax amounts are included in the item cost foreach tax authority. The default choice for this option is provided fromthe vendor record in Accounts Payable or from the vendor contractcost.
Note: You can select Yes only if the tax authority is set up in TaxServices to allow tax-included costing.
You can also edit total tax amounts on the Taxes tab.
Unit CostThe program uses the unit cost to calculate the extended cost.
When adding new detail lines, you can edit the displayed cost for theitem, or enter a cost for a non-inventory item number. If you changethe unit cost, the program recalculates the extended cost.
If you are referencing an existing document, the program displaysthe cost previously specified for the item and unit of measure.
Note: In multicurrency ledgers, the cost is expressed in thevendor's currency.
If you are entering a credit note or debit note to an existing invoiceor return, you can change the cost if you have authorization to do so.Make sure that the cost you enter is the correct item cost for the unitof measure.
Click the Finder to display any vendor contract costs, regularvendor costs, and other costs maintained in Inventory Control.
If you are adding new detail lines, the program assigns costs asfollows:
l If you have set up vendor contract costs, the program displays thecontract cost for the item and unit of measure.
l If P/O does not find a valid contract cost, it uses the inventory costspecified in the P/O Options screen.
On job-related documents, the default unit cost is determined asfollows:
458 Sage 300 ERP Purchase Orders
Transaction Screens
l If the project is a standard project:
For a category cost class of Subcontractor, Overhead, orMiscellaneous Equipment, the unit cost is defaulted from thecategory resource.
For a category cost class of Labor, the default unit cost is basedon the Default Unit Cost From option for the employee resourcecategory.
For a category cost class of Material (if you are using InventoryControl), the default unit cost is based on Purchase Orders'default item cost (set in P/O Options).
For a category cost of Material (if you are not using InventoryControl), the unit cost is based on Purchase Orders vendor costs.
l If the project is a basic project:
For a category cost class of Subcontractor, Overhead, orMiscellaneous Equipment, the unit cost is defaulted from thecategory.
For a category cost class of Labor, the default unit cost is basedon the Default Unit Cost From option for the labor category.
For a category cost class of Material (if you are using InventoryControl), the default unit cost is based on Purchase Orders'default item cost (set in P/O Options).
For a category cost of Material (if you are not using InventoryControl), the unit cost is based on Purchase Orders vendor costs.
Unit of MeasureIf you are entering a credit note or debit note to an existing invoice orreturn, the program displays the unit of measure entered for the detailon the invoice or return. You cannot change it.
If you are entering new detail lines, the program displays the stockingUOM by default, unless you have set up vendor contract costs using adifferent UOM, but you can select another unit of measure from theFinder.
You must use one of the units of measure that is assigned to the itemin Inventory Control. If you are entering a detail for a non-inventoryitem, type the unit of measure.
User's Guide 459
Appendix A: Purchase Orders Screen Guides
Unit WeightType the weight of a single unit of the item that you are crediting ordebiting. The program displays the weight specified for the item onthe invoice or return or in the item record (for new item details), butyou can change it.
The program uses the unit weight to calculate the extended weight. Ifyou change the unit weight, the extended weight is recalculated.
Weight is expressed in the unit selected for the Weight Unit OfMeasure option on the I/C Options screen.
You can see the total weight for the credited or debited items byclicking the Totals tab.
Vendor Item NumberType the code the vendor uses to identify the item or edit a displayedcode, if necessary.
If the vendor's item number is specified on the invoice or return forwhich you are entering a credit note or debit note, the code appearsin this field. (You can enter vendors' item numbers when assigningvendor types in Inventory Control item records.)
Optional Fields tab
Note: This tab appears only if you have Transaction Analysis and OptionalField Creator.
If optional fields are assigned to this screen, use the Optional Fields tab toenter optional field information that applies to the entire document. Mor e ...
Optional fields and values appear automatically on this tab if you selectedthe Auto Insert option for those fields on the P/O Optional Fields setupscreen.
If you use identical optional fields for Purchase Orders and AccountsPayable transactions , optional field information from Purchase Orderstransactions is sent to Accounts Payable.
Note: If an optional field is required but does not have a default value,you must specify a value for the field.
460 Sage 300 ERP Purchase Orders
Transaction Screens
For more information, see "About Optional Fields" (page 56), "About SettingUp Optional Fields" (page 58), and "About Optional Fields in Transactions"(page 90).
Optional FieldUse the Optional Field Finder to select optional fields that are assigned (inthe P/O Optional Fields setup screen) to this type of transaction.
When you select an optional field code, Purchase Orders displays itsdescription in the next column.
Value SetThe Value Set column shows whether a blank optional field currently hasa value. (By looking at the field, you cannot know otherwise whether thefield has a blank default value or no value.)
The Value Set field changes from No to Yes if you make an entry in theValue field.
ValueUse the Value Finder to select a value created for the optional field inCommon Services.
When you select a value code, Purchase Orders displays its description inthe next column.
Rates tabThe Rates tab appears only if you use multicurrency accounting and you areentering a document for a vendor that does not use your company’sfunctional currency. You use this tab to view and edit rate information forcurrency conversion.
Currency (display only)In multicurrency ledgers, the vendor's currency code and a description ofthe currency appear on the Rates tab. All amounts you enter for the creditnote or debit note will be in the vendor's currency.
The currency is assigned for the vendor in Accounts Payable and youcannot change it in Purchase Orders.
Derive RateWhen Purchase Orders calculates the tax amount in a tax reporting
User's Guide 461
Appendix A: Purchase Orders Screen Guides
currency, the program uses the Tax Reporting Currency Exchange Ratethat appears (or that you enter) on the Rates tab.
However, if you have changed the tax reporting amount that appears onthe Taxes tab, you can click the Derive Rate button to see the actualexchange rate between the tax amount and the tax reporting amount.
In other words, the Derive Rate button appears so you can derive theexchange rate for the tax reporting currency, if you change thecalculated amount on the Taxes tab.
Exchange RateThe program displays the exchange rate currently in effect for thespecified currency and the displayed rate type and rate date, but youcan change the rate.
You receive a warning if you change an exchange rate by an amount thatexceeds the Spread setting for the currency in Common Services'Currency Rates table.
The screen also displays the exchange rate entered on the invoice orreturn, if you selected an invoice or return number for the credit note ordebit note.
Rate DateType or select the date to use to select the exchange rate for thedocument you are entering.
The program displays the rate date that is nearest the document dateyou entered, but you can specify a different date for which an exchangerate exists for the currency in Common Services' Currency Rates table.
If you change the rate date, Purchase Orders checks the rate tables fora date match, and updates the rate if necessary.
The program also displays the rate date used with the invoice or return,if you selected one for the transaction.
Rate TypeIf the rate type you want to use is not displayed, type the code orchoose it from the Finder.
The program uses rate types when converting multicurrency amounts onthe credit note or debit note to functional currency. Examples of ratetypes might be "spot rate," "average rate," and "contract rate."
462 Sage 300 ERP Purchase Orders
Transaction Screens
You define rate types using the Currency Rate Types screen in CommonServices, and assign the default rate type for Purchase Orders on theProcessing tab of the P/O Options screen.
The screen also displays the rate type used with the invoice or return, ifyou selected one for the transaction.
Retainage tabThe Retainage tab lets you specify the exchange rate that you want to use formulticurrency retainage credit and debit notes. You can:
l Use the original document exchange rate
l Use the current exchange rate
Note: This tab appears only retainage accounting was used on the originalreturn or invoice.
Taxes tab
Retainage Tax AmountThis field appears on the Taxes tab for Receipt Entry, Invoice Entry,Return Entry, and Credit/Debit Note Entry if retainage applies to thedocument.
It shows the amount of tax calculated for this authority for the retainageportion of the document if you report tax for retainage amounts when youcreate the retainage document (not when you create the originaldocument).
Retainage appears only on job-related documents if you select theRetainage option on the first tab of the transaction entry screen.
Retainage tax amounts are computed using the retainage tax base andthe tax rate for each tax authority.
Retainage Tax BaseThe retainage tax base is the amount (before included taxes) used as thebase for calculating taxes on the retained amount.
Essentially, the retainage tax base is the retainage portion of thedocument (excluding tax) if you report tax for retainage amounts at thetime that you create the retainage document (not when you create theoriginal document).
User's Guide 463
Appendix A: Purchase Orders Screen Guides
Retainage appears only on job-related documents if you select theRetainage option on the first tab of the transaction entry screen.
Retainage tax amounts are computed using the retainage tax base andthe tax rate for each tax authority.
Tax Authority and DescriptionThese columns list the codes and corresponding descriptions for all thetax authorities in the tax group specified for the document.
You enter tax information in the Tax Services module in CommonServices.
Tax AmountThe program displays the total tax amount calculated for each authorityin the vendor's tax group. You can change this amount, if necessary.
To cancel all your changes to tax amounts at the same time, choose theCalculate Taxes button.
Tax Base (display only)The tax base shows, for the tax authority, the net cost of items beforetax is added. (This field is useful for items that have tax included in theirprices.)
Tax GroupTo change the tax group, type the tax group that identifies the taxauthorities to which the vendor is subject, or select the group from theFinder. You must use a tax group that is defined for your company inCommon Services.
You must enter a valid tax group for every credit note or debit notevendor.
Tax ExcludedThe program displays the total amount of tax that is not included in itemcosts for the authority.
Tax IncludedThe program displays the total amount of tax that is included in itemcosts for the authority.
464 Sage 300 ERP Purchase Orders
Transaction Screens
You can include tax amounts in item costs only if permitted by theauthority.
Tax Reporting CurrencyTax reporting fields appear on the Taxes tab only if the tax group's taxreporting currency is different from your functional currency and thevendor's currency.
Along with the tax reporting currency, the program displays the amountof included and excluded tax to be reported in that currency on taxtracking reports for all the tax authorities listed on the document.
You set the tax reporting currency for tax groups in the Tax Servicesmodule in Common Services.
Tax Reporting TotalThis field displays the sum of the tax reporting amounts for all taxauthorities.
It appears only if the tax reporting currency for the tax group is differentfrom your functional currency and the vendor's currency.
You set the tax reporting currency for tax groups in the Tax Servicesmodule in Common Services.
Total Retainage TaxThis field appears on the Taxes tab for Receipt Entry, Invoice Entry,Return Entry, and Credit/Debit Note Entry if retainage applies to thedocument.
It shows the total amount of tax calculated for the retainage portion of thedocument if you report tax for retainage amounts when you create theretainage document (not when you create the original document).
Retainage appears on job-related documents only if you select theRetainage option on the first tab of the transaction entry screen.
Retainage tax amounts are computed using the retainage tax base andthe tax rate for each tax authority.
Total TaxThis field displays the total tax amount calculated for each authority in thevendor's tax group. You can change this amount, if necessary.
User's Guide 465
Appendix A: Purchase Orders Screen Guides
To cancel all your changes to tax amounts at the same time, click theCalculate Taxes button.
Tax Class and DescriptionThe program displays the tax classes and their correspondingdescriptions as assigned to the vendor's tax authorities. You can changeeach tax class to another tax class that is permitted by the authority.
You can change a tax class description only in Tax Services.
Totals tab
CommentType an optional comment for the credit note or debit note, using up to250 characters. The program automatically wraps text as you reach theend of a line. If you wish to insert your own line breaks, press the Ctrland Enter keys where you want a line break to occur.
Credit/Debit Note Detail SubtotalThe program displays the total of all item detail costs, if any, entered onthe credit note or debit note, including tax-included amounts. Thissubtotal does not include tax amounts that are not included in item costsor the additional costs you added for the vendor.
Credit/Debit Note TotalThe program displays the total of all item and/or additional costs andtaxes for the credit note or debit note.
Estimated TaxThis is the tax amount that will be applied to the retainage invoice (if thetax authority allows you to defer tax on retained amounts on an originalreceipt and invoice).
If you are applying all tax amounts to the original invoice, this amountwill be zero.
Retainage amounts are invoiced at a later time, in Accounts Payable.
Included TaxThis field displays the amount of tax that is included in the extendeditem cost (when the cost includes tax).
466 Sage 300 ERP Purchase Orders
Transaction Screens
Less Credit/Debit Note DiscountYou can enter an optional discount percentage or discount amount for theentire document, or enter discounts for individual detail lines.
If you enter a discount for the entire document, Purchase Orders proratesthe discount amount for the document details, overriding any discountsyou may have entered manually for the details.
Less Retainage and Net Credit/Debit Note TotalsThese fields appear if this credit or debit note is a job-related documentthat includes retainage amounts.
The Net Total is the total after retainage is deducted.
Number of CostsThe program displays the number of additional cost detail lines youentered for the document.
Check this number against source documents to make sure you enteredall the details you require.
Number of LinesThe program displays the number of item detail lines you entered for theprimary vendor on the document.
Check this number against source documents to make sure you enteredall the details you require.
Number of LinesThe program displays the number of item detail lines you entered for thedocument.
Check this number against source documents to make sure you enteredall the details you require.
Plus Additional CostsThe program displays the total amount of additional costs entered withthe credit note or debit note, excluding taxes (except taxes that areincluded in the cost amounts).
This figure appears on credit notes or debit notes that include both itemand additional cost details.
User's Guide 467

Appendix A: Purchase Orders Screen Guides
Plus Excluded TaxThis field displays the total excluded tax amount of all item andadditional cost details for the vendor. This amount does not includetaxes that are included in the cost amounts.
Total WeightThe program displays the total weight of the credited or debited goods,calculated from the weight and quantity entered for each item detail.
Use this amount to check shipping charges.
P/O Credit/Debit Note Entry Bill-To Location Information Screen
To open this screen:
1. Open Purchase Orders > P/O Transactions > Credit/Debit NoteEntry.
2. Click the Zoom button ( ) beside the Bill-To Location field, or press the F9key in the field.
Overview
Use the Bill-To Location screen to edit an existing bill-to location address or totype a new billing address for the credit note or debit note.
Note: You do not have to enter a bill-to location code or addressinformation.
Fields and Controls
AddressUse the Address field to type the address for the location, or edit thedisplayed information if necessary.
Bill-To LocationIf you use Inventory Control and you selected a bill-to location code, theprogram displays the location code.
If you do not use Inventory Control, you can click the Zoom buttonbeside the field name.
468 Sage 300 ERP Purchase Orders
Transaction Screens
Enter the bill-to location information by typing in the screen that appears.
ContactEnter the name of a contact person, department, or position.
DescriptionUse the Description field to type a description of the location, such as acompany name, or edit a displayed description if necessary. You do not haveto include a description.
E-mailUse the E-mail field to type the e-mail address for the location, or edit thedisplayed address if necessary.
Fax NumberUse the Fax Number field to type the fax number for the location or edit adisplayed number if necessary.
Phone NumberUse the Phone Number field to type the telephone number for the locationor edit a displayed number if necessary.
P/O Credit/Debit Note Entry Detail Items/Taxes Screen
To open this screen:
1. Open Purchase Orders > P/O Transactions > Credit/Debit NoteEntry.
2. Enter header information for the debit note or credit note, including thevendor number and, if you are crediting or debiting an existing invoice orreturn, specify the document number.
3. Select a detail line to credit or debit, and then press F9, or click theItem/Tax button.
Related tasks:
l "Entering a Credit or Debit Note for a Return or Invoice" (page 192)
l "Entering or Editing Additional Costs on Credit and Debit Notes" (page 198)
l "Entering a Return for a Cleared or Missing Invoice" (page 187)
l "Entering or Editing Additional Costs on Credit and Debit Notes" (page 198)
User's Guide 469
Appendix A: Purchase Orders Screen Guides
l "Prorating Additional Costs on Receipts" (page 159)
l "Returning and Issuing Credit/Debit Notes for Lotted Items" (page 215)
l "Returning and Issuing Credit/Debit Notes for Serialized Items " (page 213)
Overview
The Detail Items/Taxes screen contains the same fields as the detail entrygrid on the Credit/Debit tab, plus additional tax-related fields that you use toview or change tax information for a selected detail.
Rather than displaying fields for all the details in tabular format, this screenlets you see all the fields for a single detail on a separate screen.
Use this screen to:
l View all the fields for a single credit note or debit note detail on a separatescreen.
l Enter or edit credit note or debit note details, including tax classes and tax-included options.
Fields and Controls
Buttons
AddUse the Add button to add a detail you entered in the DetailItems/Taxes screen.
Note: You cannot add details to an invoice or a return for an existingreceipt.
Calculate TaxesClick Calc. Taxes to see tax amounts for a detail before you post thedocument.
Tax amounts are not automatically calculated until you click Post, orclick the Taxes tab or the Totals tab.
If you edit tax amounts on the Taxes tab, then click the CalculateTaxes button on any tab, the program replaces your changes withamounts recalculated using the tax tables from Tax Services.
470 Sage 300 ERP Purchase Orders
Transaction Screens
CloseClick the Close button to close the Detail Items/Taxes screen, and returnto the Credit/Debit tab. (You can also press the F9 key on your keyboard.)
SaveUse the Save button to save changes you made to a detail in the DetailItems/Taxes form.
Allocated TaxThis field displays the total tax amount that was allocated to the selecteddetail line for each tax authority.
CommentsTo view comments for a selected detail line, click the Zoom button ( )beside the Comments field. The program displays any comments entered forthe detail line on the invoice or return you are crediting or debiting, but youcan change or delete them.
To enter comments for the selected detail, click the Detail Comments table,press the Insert key, and then type the comments on the new line.
Lines automatically wrap. If you want to start a new line before the linewraps, press Enter.
Tip: You can also press the Shift and F9 keys together to open or close thescreen using your keyboard.
For more information, see "P/O Credit/Debit Note Entry Detail CommentsScreen" (page 477).
Expense AccountYou specify a general ledger expense account for non-inventory item details.You can select general ledger account numbers using the Finder.
If you are working with an existing invoice or return, the program displaysthe account number entered with the detail on the invoice or return, but youcan change the number.
Extended CostType the extended cost for the number of units of the item that you arecrediting or debiting.
If you change the extended cost, the program automatically recalculates theunit cost.
User's Guide 471
Appendix A: Purchase Orders Screen Guides
Extended WeightType the extended weight for the number of units of the item for which youthat you are crediting or debiting.
If you change the extended weight, the program automatically recalculatesthe unit weight.
The total weight for all items on the document is displayed in the Totalstab.
Item DescriptionThe program displays the item description from the P/O Vendor ContractCosts record (if one exists) or from the Inventory Control or PurchaseOrders item record, but you can change it.
If you entered a non-inventory item number, you can type a description forit.
Item NumberIf you are entering a credit note or debit note to an existing invoice orreturn, the program displays the item number, and you cannot change it.
If you are entering a transaction without an invoice or return number, typethe item number to use or select it from the Finder. If you use the AllowNon-inventory Item Number option, you can also type an item number thatis not defined in your Inventory Control system.
Line NumberTo select an existing line to edit, type its line number on the DetailItems/Taxes screen.
Note: You cannot edit details of posted credit notes or debit notes.
You can add a new line to a credit note or debit note you are entering,providing you did not specify an invoice or return number on theCredit/Debit tab. Click the New icon beside the Line Number field.
LocationIf you are entering a credit note or debit note without an invoice or returnand if you use Inventory Control, type the location code or select it fromthe Finder.
472 Sage 300 ERP Purchase Orders
Transaction Screens
If you are entering a credit note or debit note to an existing invoice or returnnumber, the program displays the location code entered for the detail on theinvoice or return. You cannot change it.
Net Of TaxThis field displays the extended item cost, minus any applicable tax amount.You cannot edit the amount.
Optional FieldsIf optional fields have been defined in Purchase Orders for credit/debit notedetails, you can click the Zoom button beside the Optional Fields field todisplay the optional fields assigned to a selected detail, and edit theircontents.
For more information about using optional fields in transactions, see "AboutOptional Fields in Transactions" (page 90).
Order NumberType the number of a sales order to which the detail applies. If you use Sage300 ERP Order Entry with Purchase Orders, you can also select an OrderEntry order number from the Finder.
You can change or erase an order number that is displayed with a detail youadded on the invoice or return.
QuantityType the number of units of the item for which you are being credited ordebited.
Leave this field showing zero for displayed details (from an invoice orreturn) that are not included on the debit note or credit note. You can alsodelete displayed details if you are working with an invoice.
If you are working with serialized or lotted items, a separate screen appearsafter you specify a quantity, and then press Tab or Enter, prompting you toassign serial and/or lot numbers for the item.
Unit CostThe program uses the unit cost to calculate the extended cost.
When adding new detail lines, you can edit the displayed cost for the item, orenter a cost for a non-inventory item number. If you change the unit cost,the program recalculates the extended cost.
User's Guide 473
Appendix A: Purchase Orders Screen Guides
If you are referencing an existing document, the program displays the costpreviously specified for the item and unit of measure.
Note: In multicurrency ledgers, the cost is expressed in the vendor'scurrency.
If you are entering a credit note or debit note to an existing invoice orreturn, you can change the cost if you have authorization to do so. Makesure that the cost you enter is the correct item cost for the unit of measure.
Click the Finder to display any vendor contract costs, regular vendorcosts, and other costs maintained in Inventory Control.
If you are adding new detail lines, the program assigns costs as follows:
l If you have set up vendor contract costs, the program displays thecontract cost for the item and unit of measure.
l If P/O does not find a valid contract cost, it uses the inventory costspecified in the P/O Options screen.
On job-related documents, the default unit cost is determined as follows:
l If the project is a standard project:
For a category cost class of Subcontractor, Overhead, orMiscellaneous Equipment, the unit cost is defaulted from the categoryresource.
For a category cost class of Labor, the default unit cost is based on theDefault Unit Cost From option for the employee resource category.
For a category cost class of Material (if you are using InventoryControl), the default unit cost is based on Purchase Orders' defaultitem cost (set in P/O Options).
For a category cost of Material (if you are not using InventoryControl), the unit cost is based on Purchase Orders vendor costs.
l If the project is a basic project:
For a category cost class of Subcontractor, Overhead, orMiscellaneous Equipment, the unit cost is defaulted from the category.
For a category cost class of Labor, the default unit cost is based on theDefault Unit Cost From option for the labor category.
474 Sage 300 ERP Purchase Orders
Transaction Screens
For a category cost class of Material (if you are using InventoryControl), the default unit cost is based on Purchase Orders' default itemcost (set in P/O Options).
For a category cost of Material (if you are not using Inventory Control),the unit cost is based on Purchase Orders vendor costs.
Unit of MeasureIf you are entering a credit note or debit note to an existing invoice orreturn, the program displays the unit of measure entered for the detail onthe invoice or return. You cannot change it.
If you are entering new detail lines, the program displays the stocking UOMby default, unless you have set up vendor contract costs using a differentUOM, but you can select another unit of measure from the Finder.
You must use one of the units of measure that is assigned to the item inInventory Control. If you are entering a detail for a non-inventory item, typethe unit of measure.
Unit WeightType the weight of a single unit of the item that you are crediting or debiting.The program displays the weight specified for the item on the invoice orreturn or in the item record (for new item details), but you can change it.
The program uses the unit weight to calculate the extended weight. If youchange the unit weight, the extended weight is recalculated.
Weight is expressed in the unit selected for the Weight Unit Of Measureoption in the I/C Options screen.
You can see the total weight for the credited or debited items by clicking theTotals tab.
Vendor Item NumberType the code the vendor uses to identify the item or edit a displayed code, ifnecessary.
If the vendor's item number is specified on the invoice or return for whichyou are entering a credit note or debit note, the code appears in this field.(You can enter vendors' item numbers when assigning vendor types inInventory Control item records.)
Tax table
Allocated TaxThis column displays the tax amounts allocated to the selected detail line
User's Guide 475
Appendix A: Purchase Orders Screen Guides
for each tax authority.
Detail Tax Class and DescriptionThese columns list the tax classes and corresponding descriptions thatare assigned to the tax authority. You can change the tax class (toanother tax class that is assigned to the authority), but not thedescription.
To change the tax class description or make other changes to theinformation for the specified tax group, use the Tax Services screens inCommon Services.
Expensed TaxThe program displays the amount of tax that is separately posted(expensed) to a general ledger account, rather than allocated to detailson the credit note or debit note.
Recoverable TaxThe program displays the amount of tax that can be recovered by yourcompany, such as, for example, recoverable Canadian Goods andServices Tax (GST) amounts.
Tax AmountThe program displays the amount of tax that is due for each authority.
For each authority, Purchase Orders calculates a tax amount if:
l The vendor is subject to tax.
l The transaction contains taxable items or taxable additional costs.
l Tax rates are specified for the tax authorities and classes in TaxServices.
You cannot edit the tax amount for a detail except indirectly, bychanging the tax class or tax-included option on the Detail Items/Taxesscreen.
To edit tax amounts for the invoice, make your changes on the Taxestab.
Tax Authority and DescriptionThese columns list the tax authorities and that are assigned to the taxgroup you specified for the document.
476 Sage 300 ERP Purchase Orders
Transaction Screens
Tax information is maintained in the Tax Services screens in CommonServices.
Tax BaseThis field shows, for the selected detail, the net cost of items before tax isadded for the tax authority. You cannot change the amount that appearsin this field.
This field is particularly useful for items that have tax included in theirprices.
Tax IncludedThis field displays the amount of tax that is included in the extended itemcost (when the cost includes tax).
P/O Credit/Debit Note Entry Detail Comments Screen
To open this screen:
1. Open Purchase Orders > P/O Transactions > Credit/Debit NoteEntry.
2. On the Credit/Debit tab, click the Comments/Instructionsfield for thedetail line you need.
3. Click the Zoom button ( ), or press the Shift and F9 keys to open the DetailComments screen.
Use this screen to enter comments for a selected detail line.
To enter or edit a comment:
1. Type the comment, pressing Enter to start each new line.
2. When finished, click Close to close the screen.
To delete comments:
1. Highlight the text to delete, then press the Delete key. If a message appearsasking you to confirm the deletion, click Yes.
2. When finished, click Close to return to detail entry.
User's Guide 477
Appendix A: Purchase Orders Screen Guides
Tip: You can also delete comments by changing the entry in theCommentsfield to No on the Credit/Debit tab. If you use this method, your remarks arenot deleted, but they are not printed on the credit note or debit note. If youdecide to use the remarks later, change the Comment field to Yes. Youroriginal remarks will reappear.
P/O Credit/Debit Note Entry Detail Costs/Taxes Screen
To open this screen:
1. Open Purchase Orders > P/O Transactions > Credit/Debit NoteEntry.
2. Enter header information for the debit note or credit note, specifying thevendor number and the invoice or return for which you are creating thedebit note or credit note.
3. On the Additional Costs tab, add or select a detail line, and then click theCost/Taxbutton or press the F9 key.
Related tasks:
l " Adding or Editing Details Using the Detail Items Taxes Screen" (page 197)
l "Entering or Editing Additional Costs on Credit and Debit Notes" (page 198)
l " Distributing Additional Costs to Multiple Receipts on a Debit Note" (page200)
Overview
The Detail Costs/Taxes screen displays all the fields for an additional cost, sothat you do not have to use the scroll bar to see all the information for a singleadditional cost detail.
Use this screen to:
l Check tax information and calculations for a selected additional cost.
l Edit the tax class and tax-included options for the tax authorities.
l Enter a comment for an additional cost.
Fields and Controls
Additional Cost (code) and DescriptionType the code for the additional cost you want to add, or select the code
478 Sage 300 ERP Purchase Orders
Transaction Screens
from the Finder. If you are adding a cost for which no code is defined, skipthis field, and then type the name of the cost in the Description field (thefield beside the Additional Cost field in the Detail Items/Taxes screen).
Note: You cannot change the additional cost code when editing a detailfrom an invoice or return.
You use the Additional Costs screen, in the P/O Setup folder, to add or editadditional cost codes in Purchase Orders.
Allocated TaxThe program displays the amount of allocated tax for the detail. (Allocatedtaxes are included in the cost of the detail. Recoverable and expensed taxesare not included in detail costs.)
AmountType the amount of the cost (excluding taxes, unless you are entering a tax-included cost).
CommentIf desired, enter a comment for the detail, using up to 250 characters.
Lines automatically wrap, but if you want to start a new line before a linewraps, press the Ctrl and Enter keys together.
To open the screen, click the Zoom button ( ) beside the field, or, with theinsertion point in the field, press the Shift and F9 keys at the same time.
Expense AccountType the account number, or select the account number from the Finder.
Expensed TaxThe program displays the amount of the tax that is separately posted(expensed) to a general ledger account, rather than allocated to details onthe invoice.
Item NumberThe program displays the item number entered for the selected detail line.
Line NumberTo add a new detail, skip the Line Number field. If an existing detail isdisplayed, click the New button beside the field.
User's Guide 479
Appendix A: Purchase Orders Screen Guides
To select an existing line to edit or delete, highlight the line (or type its linenumber in the zoomed screen).
Note: You can edit additional cost details only until you post the creditnote or debit note.
Net of TaxThe program displays the net amount of the additional cost you entered forthe detail (excluding allocated taxes that are not included in the amount ofthe cost).
Optional FieldsIf optional fields have been defined in Purchase Orders for additional costdetails in credit/debit notes, you can click the Zoom button beside theOptional Fields field to display the optional fields assigned to a selecteddetail, and edit their contents.
For more information about using optional fields in transactions, see "AboutOptional Fields in Transactions" (page 90).
ProrationSelect No Proration. You cannot prorate new additional cost details oncredit notes or debit notes. You can only expense them to a general ledgeraccount.
Recoverable TaxThe program displays the amount of the tax that can be recovered by yourcompany (for example, recoverable Canadian Goods and Services Tax(GST) amounts).
ReferenceType an optional reference for the detail.
Return Expense AccountType the number of the general ledger account to which to post the cost, orselect the account number from the Finder.
Return ProrationYou can select only Expense for the reproration method. You cannotreprorate additional costs from credit notes or debit notes to item details.
Tax AmountThe program displays the amount of tax that is due to each tax authority.
480 Sage 300 ERP Purchase Orders
Transaction Screens
Purchase Orders calculates a tax amount for each authority if:
l The vendor is subject to tax.
l The additional cost is taxable.
l Tax rates are specified for the tax authorities and classes in Tax Services.
Note: You cannot edit the tax amount for an additional cost detail (exceptindirectly, by changing the tax class or tax-included option).
Tax Authority and DescriptionThese columns list the tax authorities and corresponding descriptions thatare assigned to the specified tax group.
Tax authorities and other tax information is maintained in the Tax Servicesscreens in Common Services.
Tax BaseThe tax base shows, for each tax authority, the net cost of items before taxis added.
This field is useful for items that have tax included in their prices.
Tax Class and DescriptionThese columns list the tax classes and corresponding descriptions that areassigned to the tax authority. You can change the tax class (to another taxclass that is assigned to the authority), but not the description.
Tip: To change the tax class description or make other changes to theinformation for the specified tax group, use the Tax Services screens inCommon Services.
Tax IncludedYou can change this setting only if the tax authority allows tax to be includedin prices.
P/O Credit/Debit Note Entry Cost Allocation Screen
To open this screen:
1. Open Purchase Orders > P/O Transactions > Credit/Debit NoteEntry.
User's Guide 481

Appendix A: Purchase Orders Screen Guides
2. Enter header information for the debit note, specifying the invoice numberfor which you are creating a debit note.
3. Click the Additional Costs tab.
a. Select the additional cost you need to distribute to receipts.
b. Click the Dist. Cost button to open the Cost Allocation screen.
Related tasks:
l " Distributing Additional Costs to Multiple Receipts on a Debit Note" (page200)
Overview
Use the Cost Allocation screen to distribute an additional cost to more thanone receipt.
Note: This screen is available only if you are adjusting an existing additionalcost from an invoice that is based on multiple receipts.
You cannot automatically prorate the costs to multiple receipts. Instead, youidentify the amount to distribute to each receipt on the debit note.
You can prorate and allocate the additional cost amount manually, or you canlet Purchase Orders automatically allocate amounts to receipts according tothe proration method identified on the Additional Costs tab.
Fields and Controls
Buttons
ClearUse the Clear button to clear all amounts in the screem.
Dist. CostUse the Dist. Cost button to open the Cost Allocation screen for anadditional cost detail.
RedistributeUse the Redist. button to have Purchase Orders automatically proratethe additional cost amount for the purchase orders.
482 Sage 300 ERP Purchase Orders
Transaction Screens
Amount (additional cost detail total)The program displays the amount you enter for the additional cost detail atthe top of the Cost Allocation screen.
Amount (prorated for each receipt)The program displays the amount of the additional cost allocated to eachreceipt when you click the Redist. button.
Note: To allocate the additional cost manually, you can enter amountsbeside each receipt number. The sum of all the amounts you allocate toreceipts must equal the total amount for the additional cost.
Billing RateIf the receipt was job-related, Purchase Orders displays a billing rate for thecost that you are allocating, along with the amount being allocated.
Note: The billing rate is also used to allocate additional costs to more thanone purchase order.
If you are prorating the cost manually to other purchase orders, you canenter a different billing rate with each distribution.
Proration Method (display only)You cannot change the proration method for an existing additional cost.
Receipt NumberThe program displays the receipt numbers used in this invoice, credit note,or debit note. You cannot change the receipt numbers.
Retainage Percentage, Amount, and PeriodFor job-related documents to which retainage applies, the program displaysadditional retainage fields for each purchase order to which you can allocateadditional costs.
The default retainage percentage and retention period that appears in thesefields depends on how you are prorating the costs.
l If prorating by cost, quantity, or prorating manually, the settings comefrom the vendor record.
l If you are not prorating, the retainage settings are based on the DefaultRetainage From option for the contract in Project and Job Costing.
User's Guide 483
Appendix A: Purchase Orders Screen Guides
P/O Invoice Entry Screen
To open this screen:Open Purchase Orders > P/O Transactions > Invoice Entry.
Secondary screens:
l "P/O Additional Costs Detail Costs/Taxes Screen" (page 537)
l "P/O Bill-To Location Screen" (page 526)
l "P/O Detail Comments Screen" (page 536)
l "P/O Cost Allocation Screen" (page 542)
l "P/O Create Invoice from Receipts Screen " (page 527)
l "P/O Remit-To Location Screen" (page 527)
l "P/O Lot Numbers Generation/Allocation Screen" (page 663)
l "P/O Serial Numbers Generation/Allocation Screen" (page 667)
Related tasks:
l "Entering an Invoice" (page 169)
l "Entering Additional Costs on Invoices" (page 172)
l "Receiving and Invoicing Lotted Items" (page 214)
l "Receiving and Invoicing Serialized Items " (page 211)
Overview
Use the P/O Invoice Entry screen to:
l Enter invoices for receipts of goods into Purchase Orders.
l Review existing invoices.
l Enter additional costs for invoices, and allocate additional costs for multiplereceipts.
l Export invoices.
l Assign serial numbers to serialized items (if you have the SerializedInventory and Lot Tracking license installed as part of Inventory Control).
484 Sage 300 ERP Purchase Orders
Transaction Screens
l Assign lot numbers to lotted items (if you have the Serialized Inventory andLot Tracking license installed as part of Inventory Control).
Note: Before entering invoices, make sure you post the receipts to which theinvoices apply.
Additional Costs Tab
Use this tab to:
l Add additional costs charged on the shipment by either a primary vendor or asecondary vendor, such as for handling charges, service charges, and duty.For more information, see "About Vendors" (page 92).
l Specify how to prorate new additional costs or reprorate the costs if youreturn the items.
l Allocate new additional costs (added to the invoice) to one or more receipts.
Invoice Tab
Use this tab to enter:
l The receipt number (or numbers) to which the invoice applies.
l The invoice date.
l The invoice total.
l The billing address for the invoice.
l The remit-to location.
l An optional description and reference.
l The 1099/CPRS code and amount (for vendors who are subject to 1099 orCPRS reporting).
l Invoice details.
Optional Fields Tab
This tab appears if you have assigned optional fields to the P/O Invoice Entryscreen (using the P/O Optional Fields setup screen).
If you have assigned optional fields to invoice and additional cost details, youcan enter optional field information for each item on the individual detail lines.
User's Guide 485
Appendix A: Purchase Orders Screen Guides
For more information about optional fields, see "About Optional Fields inTransactions" (page 90).
Rates Tab
This tab appears only if you use multicurrency accounting and you areentering an invoice for a primary vendor who does not use the functionalcurrency.
Use the Rates tab to:
l Change the rate type, rate date, and exchange rate for converting theinvoice amount from the vendor's currency to your functional (home)currency.
l Look up the rate information entered with the receipt.
For more information, see "About Vendors" (page 92).
Retainage Tab
This tab appears only if you select the Retainage option for job-relatedinvoices. (This option appears only if you use retainage accounting in AccountsPayable.)
You use this tab to:
l Select payment terms for retained amounts.
l Specify whether to use the original retainage exchange rate for the receiptor use the current exchange rate (if the items were originally received inanother currency).
Taxes Tab
Use this tab to:
l Check or change the vendor's tax group.
l Check tax information or edit the tax class and tax amount for the vendor'stax authorities.
Click the Calc. Taxes button to recalculate tax amounts after changing taxclasses or the tax included option. (If you changed tax totals on the invoice,the Calc. Taxes button restores the original amounts.)
Terms Tab
Use this tab to:
486 Sage 300 ERP Purchase Orders
Transaction Screens
l Check the vendor's terms.
l Enter or edit the due date and discount terms of an invoice.
l Edit a payment schedule when you are making a series of payments overtime.
Payment terms can be as simple as a due date and a discount date and rate, orthey can include payment schedules to allow for several installment payments.
All payment terms are defined in Accounts Payable but you can change them onthe Terms tab before you post the invoice.
Totals Tab
Use this tab to:
l Check tax and detail totals.
l Verify invoice totals for the vendor.
l Enter a discount percentage or a total discount for the invoice. When youenter a discount on this tab, the program distributes the total amount to theinvoice details, overwriting any discounts you entered for details.
l Enter comments for the invoice.
l Check the estimated weight of the goods for which you were invoiced.
l Check the number of item and additional cost details entered for the vendoron the invoice.
l Check the invoice subtotal and total additional costs and excluded taxes forthe vendor.
Note:l On invoices for the primary vendor, the Totals tab shows the total weight ofthe invoiced items, number of item and additional cost detail lines, taxinformation for the invoice, invoice subtotal (net of taxes and additionalcosts), totals of additional costs and taxes, and invoice total.
l On invoices for a secondary vendor, the Totals tab shows only the numberof additional cost details, related tax information, invoice subtotal,excluded tax amount, and invoice total.
Fields and Controls
Buttons
User's Guide 487
Appendix A: Purchase Orders Screen Guides
Derive RateWhen Purchase Orders calculates the tax amount in a tax reportingcurrency, the program uses the Tax Reporting Currency Exchange Ratethat appears (or that you enter) on the Rates tab.
However, if you have changed the tax reporting amount that appears onthe Taxes tab, you can click the Derive Rate button to see the actualexchange rate between the tax amount and the tax reporting amount.
In other words, the Derive Rate button appears so you can derive theexchange rate for the tax reporting currency, if you change thecalculated amount on the Taxes tab.
Distribute CostUse the Distribute Cost button to allocate a new additional cost tomultiple receipts.
Select the additional cost detail on the Additional Costs tab, and thenclick the Distribute Cost button to open the P/O Cost Allocation screen.For more information, see "P/O Cost Allocation Screen" (page 542).
Purchase Orders automatically allocates the additional cost amountaccording to the proration method you selected on the Additional Coststab. However, you can enter different amounts for each receiptmanually.
Calc. TaxesClick the Calc. Taxes button to see tax amounts for a detail before youpost the document.
Note: Tax amounts are not calculated automatically until you click theTaxes tab or the Totals tab, or you post the purchase order.
Cost/TaxClick the Cost/Tax button to open the "P/O Additional Costs DetailCosts/Taxes Screen" (page 537). (Highlight the line on the Detail tableon the Additional Costs tab, and then click the Cost/Tax button.)
On the P/O Detail Costs/Taxes screen, you can:
l View existing additional cost details.
l Add new additional cost details.
488 Sage 300 ERP Purchase Orders
Transaction Screens
l Check the tax information or change the tax classes and taxable statusfor a single detail.
l Allocate the additional cost to multiple receipts using the DistributeCost button.
HistoryClick the History button to open the P/O Purchase History screen, whereyou can check information about the items you have purchased from yourvendors.
For more information, see "P/O Purchase History Screen" (page 408).
Item/TaxClick the Item/Tax button to open the P/O Detail Items/taxes screen fora detail so that you can check the tax information and change the taxclasses and taxable status for the selected detail. You can also add newdetails.
For more information, see "P/O Invoice Entry Detail Items/Taxes Screen"(page 528).
PostClick Post to post the document, including any changes you made to anexisting document.
CurrencyIn multicurrency ledgers, the vendor's currency code is displayed after youenter the vendor number. All amounts you enter for the invoice will be in thevendor's currency.
The currency is assigned for the vendor in Accounts Payable and you cannotchange it in Purchase Orders.
Invoice NumberUse the Invoice Number field to enter a new invoice number or select anexisting invoice.
Purchase Orders does not assign invoice numbers. You should use thenumber on the vendor invoice.
You can:
User's Guide 489
Appendix A: Purchase Orders Screen Guides
l Start a new invoice. You can click the New button beside the field toclear existing information from the screen, or simply enter the newinvoice number using up to 22 characters, and then press Tab.
l View an invoice you posted previously. Use the navigation buttonsor the Finder beside the field to select it. Note that you cannot makechanges to invoices after posting them.
If necessary, you can enter more than one invoice with the same invoicenumber, for either the same vendor or different vendors.
When you enter a duplicate invoice number, a message asks whether youwant to create a new invoice with the same number or display the existinginvoice with that number.
SubtotalThe Subtotal field displays the total of all item and additional cost detailson the invoice.
This amount does not include taxes (unless tax amounts are included indetail cost amounts).
Vendor NumberIdentifies the vendor from whom you received the invoice. The vendornumber sets the default tax group and payment terms. In multicurrencysystems, the vendor number also specifies the currency of the document.
You can enter any vendor number for the invoice, even if the vendor wasnot entered on the receipt. This feature lets you enter invoices foradditional costs that were not included on the receipt, and prorate the newcosts to the items on the receipt.
If you do not enter the vendor number before selecting a receipt number,the primary vendor number is automatically displayed, but you can changeto another vendor number to enter an invoice for additional costs that werecharged on the receipt, or for new additional costs.
l To select an existing vendor, use the Finder , or type the number andthen press Tab.
l To display address information for a selected vendor, click the Zoombutton beside the Vendor Number field.
l To add a new vendor, do one of the following:
If you want to add the vendor record now, click the New buttonafter typing the vendor number.
490 Sage 300 ERP Purchase Orders
Transaction Screens
If you do not want to add the vendor record now, enter only the vendornumber. (You can enter the vendor name on the next tab.)
Warning! Although you can add a purchase order before you add thevendor record in Accounts Payable, you should not use this option in amulticurrency system.
Additional Costs tabUse the Additional Costs tab to:
l Add additional costs charged on the shipment by either a primary vendoror a secondary vendor, such as for handling charges, service charges, andduty. For more information, see "About Vendors" (page 92).
l Specify how to prorate new additional costs or reprorate the costs if youreturn the items.
l Allocate new additional costs (added to the invoice) to one or morereceipts.
Additional CostType the code for the additional cost you want to add, or select the codefrom the Finder.
If you are adding a cost for which no code is defined, skip this field andtype the name of the cost in the Description field (the field beside theAdditional Cost field in the Detail Cost/Taxes screen).
Note: You use the Additional Costs screen (in the P/O Setup folder) tomaintain the additional cost charges you use in Purchase Orders.
AmountUse the Amount field to enter the amount of the cost (excluding taxes,unless you are entering a tax-included cost).
Billing Type, Billing Rate, and A/R Item Number (job-relatedonly)For additional costs on job-related invoices, you also specify the BillingType, Billing Rate, and AR Item Number that will be used for the customerinvoice.
These fields will only appear for job-related invoices.
User's Guide 491
Appendix A: Purchase Orders Screen Guides
A/R Item NumberThis field displays the A/R item number associated with the projectresource used for the contract in Project and Job Costing. You canselect a different A/R item number only for time and materialprojects, as follows:
l On a standard project, this field displays the A/R item number andunit of measure specified for the project resource category as thedefault. You can accept the item number or select another validA/R item number.
l On a basic project, this field displays the A/R item number and unitof measure specified for the project category. You can accept theitem number or select another valid A/R item number.
l If you change the A/R item number, the item number must be avalid item number in Accounts Receivable, and the unit of measuremust be a valid unit of measure both for the new item number andthe vendor’s currency.
Cost plus and fixed price projects do not use an A/R item number.
Billing CurrencyThis field appears only in multicurrency systems for time andmaterials projects and for fixed price projects using billings and costsor accrual-basis accounting methods.
The billing currency is the customer's currency specified on thecontract, and you cannot change it.
Billing currency is blank for Fixed Price projects using completedproject or project percentage complete methods, and for Cost Plusprojects.
Note: Billing currency is not displayed for basic or standardinternal Time and Materials projects, or for single-currency FixedPrice projects that use billings and costs or accrual-basis accountingmethods.
Billing RateThis field displays the billing rate for the specified resource (forstandard projects) or category (for basic projects).
492 Sage 300 ERP Purchase Orders
Transaction Screens
You can edit the billing rate if the billing type is Billable. The fielddisplays 0.000000 if the billing type is Non-Billable or No Charge.
Note:l You can specify the billing rate for Time and Materials projects andfor Fixed Price projects that use Billings and Costs or Accrual-Basisaccounting methods.
l Billing rate is disabled and set to 0.000000 on a basic or standardinternal contract for Time and Materials projects or for Fixed Priceprojects using Billings and Costs or Accrual-Basis accountingmethods.
l The billing rate cannot be negative.
l If a job-related additional cost is prorated by cost, quantity, orweight, the specified billing rate in functional currency will beprorated to the item details for projects that are Time andMaterials or Fixed Price with an accounting method of Billings andCosts or Accrual-Basis.
The billing rate is not prorated to item details for Cost Plus or FixedPrice projects with completed project or project percentage completeaccounting methods. Instead, it is converted to the contractcustomer’s currency when it is prorated to the item details during dayend processing (using the current exchange rate).
The prorated billing rate for each detail is not displayed (and,therefore, you cannot change it).
Billing TypeThis field appears in the detail-entry section only for job-relatedpurchase orders.
The billing type indicates to Project and Job Costing whether to bill thecost to the customer. You can change this field only for a time andmaterials project, as follows:
On a basic project:
For a billable project, the category billing type determines whetheryou can change the billing type for the detail. If the specified categoryis:
User's Guide 493
Appendix A: Purchase Orders Screen Guides
l Billable, the default billing type for the detail is billable, but youcan change it.
If the detail is billable you can specify a billing rate for the detail.
If you change the billing type for the detail to no charge or non-billable, the program sets the billing rate to zero and you cannotchange it.
l No charge or non-billable, the program sets the same billingtype for the detail, and cannot change it. You cannot specify abilling rate for the detail, which the program sets as zero.
If the project is no charge or non-billable, the detail uses the samebilling type as the project, the billing rate is set to zero, and youcannot change them.
On a standard project:
If the project is billable, the resource billing type determines whetheryou can change billing type for the detail. If the specified resource is:
l Billable, the program displays Billable as default billing type, butyou can change it for the detail. If the detail is billable, you canspecify a billing rate for the detail.
If you change the billing type for the detail to no charge or non-billable, the program sets the billing rate to zero, and you cannotchange it.
l No charge or non-billable, the program sets same billing typefor the detail, and you cannot change it. You cannot specify abilling rate for the detail, which the program sets as zero.
If the project is no charge or non-billable, the detail uses the samebilling type as the project, and you cannot change it. The programalso sets the billing rate to zero, and you cannot change it.
For fixed price and cost plus projects, the Billing Type field is blank.A billing type is not required for these types of projects.
Unit of MeasureThis field appears for Time and Materials projects if you selected theJob Related option for this transaction.
494 Sage 300 ERP Purchase Orders
Transaction Screens
You must enter a unit of measure that is valid for the itemnumber/resource that you specified and for the contract customer'scurrency.
Note: For internal time and materials projects (basic or standardcontracts) the A/R item unit of measure will be disabled or blank.
Calculate LaborSelect the Calculate Labor field if you want Project and Job Costing tocalculate labor amounts for this cost and pass the amount back toPurchase Orders. (Purchase Orders creates the G/L entries for theadditional costs.)
Do not select this option for an additional cost for which you don't want tocalculate labor.
The program also lets you specify whether overhead or labor is calculatedif you expense the additional cost.
Calculate OverheadSelect the Calculate Overhead field if you want Project and Job Costingto calculate overhead amounts for this cost and pass the amount back toPurchase Orders. (Purchase Orders creates the G/L entries for theadditional costs.)
Overhead is usually calculated on the discounted extended amount.
For example, you would not select this option if an invoice or debit notehad additional shipping costs for which you didn't want to calculateoverhead or labor.
The program also lets you specify whether overhead or labor is calculatedif you expense the additional cost.
CommentsEnter an optional comment for the document.
Any comments you entered for the detail on the receipt are included onthe invoice, but you can change or delete them.
Lines automatically wrap when you reach the end. If you want to start anew line before the line wraps, press Enter.
Contract, Project, Category and Resource (job-related only)If the invoice is job-related, specify for each additional cost detail where
User's Guide 495
Appendix A: Purchase Orders Screen Guides
the items or resources are going to be used. If you use different termsthan “Contract,” “Project,” and “Category” in Project and Job Costing,the program displays them instead.
You will also specify the Billing Type, Billing Rate, AR Item Number, andAR Item UOM for the additional cost.
Note: You specify this information only if you are not prorating thecost to individual detail lines (No Proration). The fields are disabled ifyou are prorating by cost, quantity or weight, or prorating manually(where you allocate costs to the individual lines on the DistributeAdditional Costs screen). You enter/select the resource using the ItemNumber field.
CategorySelect or enter a category that is assigned to the project in Projectand Job Costing.
ContractSpecify a contract number for each detail. You can enter or selectonly contracts that are open or on hold. (You cannot processtransactions to a contract that is on hold, if it has never beenopened.)
Cost ClassThe program displays the cost class for the category used in eachdetail. You cannot change this field.
Item Number (Resource)Use the Item Number field to identify the resource for this detail.
You must specify a resource that is assigned to the project andcategory in Project and Job Costing. You can specify an inventoryitem number, or the code for another type of resource (such as anequipment code, subcontractor code, or employee number).
Note: You cannot leave this field blank.
ProjectYou can only enter or select projects that are:
496 Sage 300 ERP Purchase Orders
Transaction Screens
l Assigned to the contract that you selected.
l Open or on hold. (If a project that is on hold has never been opened,you cannot select it.)
l Not closed to costs.
Distribute ProrationIf you selected manual proration, click this column heading to open the"P/O Distribute Proration Screen" (page 544). You must calculate all thecosts and associated allocated taxes to prorate manually for each detail,then enter the amounts with the details.
Expense AccountWhen entering an additional cost detail that you will expense to a generalledger account, enter the account number in this field.
You do not enter a general ledger account number when you select aproration method for the detail.
Line NumberTo select an existing line to edit or delete, click the line, or enter its linenumber in this field on the P/O Detail Items/Taxes screen.
Note: You cannot delete completed lines.
Net of TaxThis field displays the net amount of the additional cost you entered forthe detail (excluding allocated taxes that are not included in the amountof the cost).
Optional Fields
If optional fields have been defined in Purchase Orders for additional costdetails for a transaction screen, an Optional Fields column appears in thedetail entry table on the Additional Costs tab. You can click the columnheading to display the optional fields assigned to a selected detail, andedit their contents.
In the Detail Costs/Taxes screen, you click the Zoom button beside theOptional Fields field to display the optional fields for a detail.
User's Guide 497
Appendix A: Purchase Orders Screen Guides
For more information about using optional fields in transactions, see"About Optional Fields in Transactions" (page 90).
Proration MethodFor new additional cost details, specify whether to prorate the cost tothe received items by cost, quantity, or weight, or to expense the cost toa general ledger account.
You cannot change the proration method on an additional cost detail thatwas added to the receipt you are now invoicing. Note that you canmanually prorate additional costs only on receipts. The option is notavailable on invoices.
If you are adding additional costs for non-inventory items, you mustselect No Proration. If you choose to prorate by quantity, cost, orweight, the program will display an error message and prevent youfrom posting the invoice.
Receipt NumberPurchase Orders displays the receipt number for each detail, indicatingthe source of the detail.
ReferenceEnter optional reference information for the detail.
Return Expense AccountIn this field, enter the general ledger account number to which to postprorated additional cost amounts if you return items.
Return ProrationFor new additional cost details, choose whether to reprorate the cost tothe other items on the receipt if you return items with prorated costs.You can reprorate the cost amount, leave it as originally prorated, orexpense it to a general ledger account.
You cannot change the reproration method on an additional cost detailthat was added to the receipt you are now invoicing.
Tax IncludedThis field displays the total amount of taxes included in the additionalcost amount.
498 Sage 300 ERP Purchase Orders
Transaction Screens
Tax IncludedIn the Detail table, this field displays the amount of tax that is included inthe extended item cost (when the cost includes tax).
On the zoomed Detail Items/taxes screen, this field displays Yes or No toindicate whether tax amounts are included in the item cost for each taxauthority. The default choice for this option is provided from the vendorrecord in Accounts Payable or from the vendor contract cost.
Note: You can select Yes only if the tax authority is set up in TaxServices to allow tax-included costing.
You can also edit total tax amounts on the Taxes tab.
Allocated TaxThis field displays the amount of allocated tax for the detail. (Allocatedtaxes are included in the cost of the detail. Recoverable and expensedtaxes are not included in detail costs.)
Invoice tabUse the Invoice tab to enter:
l The receipt number (or numbers) to which the invoice applies.
l The invoice date.
l The invoice total.
l The billing address for the invoice.
l The remit-to location.
l An optional description and reference.
l The 1099/CPRS code and amount (for vendors who are subject to 1099 orCPRS reporting).
l Invoice details.
Bill-to LocationUse the Bill-to Location field to edit an existing bill-to location addressor to type a new billing address for the invoice. You do not have to enter abill-to location code or address information.
User's Guide 499

Appendix A: Purchase Orders Screen Guides
If you use Inventory Control, select a location code to which the invoicewill be sent for payment.
For more information, see "P/O Bill-To Location Screen" (page 526).
DescriptionUse the Description field to enter an optional description for theinvoice.
The description, if any, entered on the receipt is displayed but you canchange it.
From Multiple ReceiptsIf you are creating an invoice based on several receipts, select thisoption, then use the Zoom button to open the P/O Create InvoiceFrom Receipts screen.
Note: You must enter a vendor number before you can select thisoption. After you select this option, the Receipt Number field is nolonger available for the invoice. Likewise, after you enter a receiptnumber, you can no longer select From Multiple Receipts.
Use the Create Invoice From Receipts screen to select the receipts towhich the invoice applies, then click the Invoice button to add thedetails to the invoice you are creating.
For more information, see "P/O Create Invoice from Receipts Screen "(page 527).
Invoice DateUse the Invoice Date field to enter the date you want to use as theinvoice date.
You can specify a fiscal year and period that do not correspond to theinvoice date.
The program displays session date you used to sign in to Sage 300 ERP.
You can change the posting date if you want a different date for the G/Ltransactions when they are posted in the General Ledger. (The postingdate determines the fiscal year and period displayed beside the PostingDate field.)
Invoice TotalEnter the total invoice amount, including taxes and additional costs.
500 Sage 300 ERP Purchase Orders
Transaction Screens
When you post the invoice, the program checks the amount you enteredas the invoice total against the total of the details and taxes you enterwith the invoice. You cannot post the invoice if these totals do notbalance.
Job RelatedIf the receipt is job related, the Job Related option is selected, and youcannot change this selection. If you use retainage accounting, you canspecify that the invoice uses retainage.
Because the invoice is job related, fields appear in the details section,enabling you to enter the contract, project, category, cost class andresource for each detail. Additional detail fields let you enter thecustomer billing type, billing rate, and A/R item used for billing.
Note: If you use different terms than “Contract,” “Project,” and“Category” in Project and Job Costing, those terms appear here.
On HoldSelect the On Hold option to prevent this invoice from being paid inAccounts Payable.
If you want to pay this invoice later, you will have to edit the invoice inAccounts Payable, and clear this option.
PO NumberIf you are entering an invoice to a receipt that specified a purchase ordernumber, the purchase order number is displayed for your information.
Posting DateEnter the posting date for the transaction.
The posting date is different from the document date. The posting date isthe date for transactions being posted to the General Ledger, so it alsodetermines the contents of the Fiscal Year and Period fields.
If you have a multicurrency system, currency revaluation uses postingdates to select open documents for revaluation purposes, and thus,revaluation adjustments are posted to General Ledger in the correct fiscalyear and period.
User's Guide 501
Appendix A: Purchase Orders Screen Guides
Depending on your settings in the P/O Options screen, Purchase Ordersautomatically displays the session date or the document date by defaultin this field.
You can change the posting date, but you cannot separately change thefiscal year and period.
Note: If you consolidate G/L transactions, the posting date forconsolidated entries is the last date of the fiscal period.
Receipt DateAfter you select the receipt number for the invoice, the receipt date isdisplayed for your information.
Receipt NumberUse the Receipt Number field to enter the receipt number that you areinvoicing, or select it from the Finder. (The receipt must exist inPurchase Orders.)
When you enter the receipt number, all receipt details and otherinformation for the selected vendor are displayed in Invoice Entry. Youcannot change the tax group or add or delete item detail lines (for theprimary vendor). You can add additional cost details.
The receipt details that appear include all item and additional costdetails for the primary vendor, or all the additional costs for vendorswho charged only additional costs on the original receipt.
Note: You can enter any number of invoices for a receipt. Only receiptdetails that have not already been fully invoiced can be used in thecurrent invoice. Once all the details are fully invoiced, you can nolonger use the receipt in an invoice.
ReferenceEnter optional reference information for the document. If referenceinformation was entered for the receipt, it appears here, but you canchange it.
Remit-To LocationUse the Remit-To Location field to look up the address informationentered for the selected remit-to location. Address information appearsonly if you select a remit-to code for the vendor.
502 Sage 300 ERP Purchase Orders
Transaction Screens
You cannot edit information in this screen. Use Accounts Payable to addand edit remit-to locations for vendors.
If a primary remit-to address is assigned for the vendor in AccountsPayable, the code for the address appears automatically but you canchange it.
When you post the invoice, the remit-to location you specify is includedon the invoice created by Day End Processing for Accounts Payable.
RetainageIf the Retainage option is selected in Accounts Payable, you can selectretainage accounting for the invoice.
Additional retainage fields appear for each invoice detail line to let youenter a different retainage percentage and period.
On the Retainage tab, you can specify the retainage terms and specify theexchange rate that you use for multicurrency retainage invoices.
Vendor Account SetThe account set from the vendor record appears in this field as thedefault. It specifies the general ledger payables control, purchasediscounts, prepayment, and retainage accounts to which the transactionwill be distributed.
You can change the account set for a particular purchase order, receipt,return, invoice, credit note, or debit note. If you use multicurrencyaccounting, however, the new account set must use the same currency asthe vendor's account set.
Note: If you change the account set on a receipt, make sure that youuse the same account set for returns, invoices, and credit or debit notes.
Year and PeriodThis is the fiscal year and period to which the invoice transactions will beposted in the general ledger. You can change the fiscal period by changingthe posting date.
You can enter a different invoice date, and you can enter a differentposting date for the document.
Note: You cannot post transactions to closed fiscal periods.
User's Guide 503
Appendix A: Purchase Orders Screen Guides
1099/CPRS Amount and CodeThese fields appear only if the Subject To 1099 Reporting option isselected for the vendor in Accounts Payable.
For vendors who are subject to 1099 reporting, enter the 1099 code andamount.
The1099 code and amount are included on the invoice created by DayEnd Processing for Accounts Payable.
Details tableUse the Details table on the Invoice tab to:
l Edit or remove item detail lines for an invoice from a primary vendor.For more information, see "About Vendors" (page 92).
Note: You cannot add more detail lines to the invoice tab. All linesmust have been on the receipt. You can, however, add costs to theAdditional Costs tab, and you can change the quantity beinginvoiced.
l Edit received quantities, item costs, and detail discounts, if you havesecurity rights to do so.
l Enter comments and optional fields for the details.
l Display all the fields, including tax fields, for a selected detail on theP/O Item/Tax Detail screen.
Allocated TaxThis field displays the total tax amount that was allocated to theselected detail line for each tax authority.
Billing Type, Billing Rate, and A/R Item Number (job-relatedonly)For job-related invoices, you also specify the billing type, billing rate,and AR item number that will be used for the customer invoice.
You must select the Job Related option on the Invoice tab for thesefields to appear.
A/R Item NumberThis field displays the A/R item number associated with the
504 Sage 300 ERP Purchase Orders
Transaction Screens
project resource used for the contract in Project and Job Costing.You can select a different A/R item number only for time andmaterial projects, as follows:
l On a standard project, this field displays the A/R item numberand unit of measure specified for the project resource categoryas the default. You can accept the item number or select anothervalid A/R item number.
l On a basic project, this field displays the A/R item number andunit of measure specified for the project category. You canaccept the item number or select another valid A/R item number.
l If you change the A/R item number, the item number must be avalid item number in Accounts Receivable, and the unit ofmeasure must be a valid unit of measure both for the new itemnumber and the vendor’s currency.
Cost plus and fixed price projects do not use an A/R item number.
Billing CurrencyThis field appears only in multicurrency systems for time andmaterials projects and for fixed price projects using billings andcosts or accrual-basis accounting methods.
The billing currency is the customer's currency specified on thecontract, and you cannot change it.
Billing currency is blank for Fixed Price projects using completedproject or project percentage complete methods, and for Cost Plusprojects.
Note: Billing currency is not displayed for basic or standardinternal Time and Materials projects, or for single-currency FixedPrice projects that use billings and costs or accrual-basisaccounting methods.
Billing RateThis field displays the billing rate for the specified resource (forstandard projects) or category (for basic projects).
You can edit the billing rate if the billing type is Billable. The fielddisplays 0.000000 if the billing type is Non-Billable or No Charge.
User's Guide 505

Appendix A: Purchase Orders Screen Guides
Note:l You can specify the billing rate for Time and Materials projectsand for Fixed Price projects that use Billings and Costs orAccrual-Basis accounting methods.
l Billing rate is disabled and set to 0.000000 on a basic orstandard internal contract for Time and Materials projects orfor Fixed Price projects using Billings and Costs or Accrual-Basis accounting methods.
l The billing rate cannot be negative.
Billing TypeThis field appears in the detail-entry section only for job-relatedpurchase orders.
The billing type indicates to Project and Job Costing whether to billthe cost to the customer. You can change this field only for a timeand materials project, as follows:
On a basic project:
For a billable project, the category billing type determineswhether you can change the billing type for the detail. If thespecified category is:
l Billable, the default billing type for the detail is billable, butyou can change it.
If the detail is billable you can specify a billing rate for thedetail.
If you change the billing type for the detail to no charge or non-billable, the program sets the billing rate to zero and youcannot change it.
l No charge or non-billable, the program sets the same billingtype for the detail, and cannot change it. You cannot specify abilling rate for the detail, which the program sets as zero.
If the project is no charge or non-billable, the detail uses thesame billing type as the project, the billing rate is set to zero,and you cannot change them.
506 Sage 300 ERP Purchase Orders
Transaction Screens
On a standard project:
If the project is billable, the resource billing type determineswhether you can change billing type for the detail. If the specifiedresource is:
l Billable, the program displays Billable as default billing type,but you can change it for the detail. If the detail is billable, youcan specify a billing rate for the detail.
If you change the billing type for the detail to no charge or non-billable, the program sets the billing rate to zero, and you cannotchange it.
l No charge or non-billable, the program sets same billing typefor the detail, and you cannot change it. You cannot specify abilling rate for the detail, which the program sets as zero.
If the project is no charge or non-billable, the detail uses thesame billing type as the project, and you cannot change it. Theprogram also sets the billing rate to zero, and you cannot changeit.
For fixed price and cost plus projects, the Billing Type field is blank.A billing type is not required for these types of projects.
Unit of MeasureThis field appears for Time and Materials projects if you selectedthe Job Related option for this transaction.
You must enter a unit of measure that is valid for the itemnumber/resource that you specified and for the contract customer'scurrency.
Note: For internal time and materials projects (basic or standardcontracts) the A/R item unit of measure will be disabled or blank.
CommentsEnter an optional comment for the document.
Any comments you entered for the detail on the receipt are included onthe invoice, but you can change or delete them.
Lines automatically wrap when you reach the end. If you want to starta new line before the line wraps, press Enter.
User's Guide 507
Appendix A: Purchase Orders Screen Guides
Contract, Project, Category and Resource (job-related only)If the invoice is job related, specify for each purchase order detailwhere the items or resources are going to be used. If you usedifferent terms than “Contract,” “Project,” and “Category” in Projectand Job Costing, those terms appear here.
For job-related invoices:
l You must select the Job Related option for these fields to appear.
l You also specify the billing type, billing rate, and A/R item numberfor the customer invoice near the end of the detail line.
l You select the resource using the Item Number field.
l If the invoice is being created from multiple receipts, all receiptsmust be either job-related or non-job-related.
l Purchase Orders updates the committed quantities and costs forjobs with the amounts on purchase orders.
ContractSpecify a contract number for each detail. You can enter or selectonly contracts that are open or on hold. (You cannot processtransactions to a contract that is on hold, if it has never beenopened.)
Cost ClassThis field displays the cost class for the category used in eachdetail. You cannot change this field.
Item NumberUse the Item Number field to specify the resource for this detail.
You must specify a resource that you have assigned to the projectin Project and Job Costing (such as an equipment code or asubcontractor code). You cannot leave this field blank.
ProjectYou can only enter or select projects that are:
508 Sage 300 ERP Purchase Orders
Transaction Screens
l Assigned to the contract that you selected.
l Open or on hold. (If a project that is on hold has never beenopened, you cannot select it.)
l Not closed to costs.
Discount %Enter a percentage to calculate the discount amount for the itemdetail.
If you prefer not to enter discounts for individual details, you can entera discount percentage for the entire invoice on the Totals tab. PurchaseOrders then prorates the discount amount for the document details,overriding any discounts you may have entered manually for thedetails.
Discount AmountEnter an amount in the Discount Amount field to calculate anddisplay the discount percentage based on the extended cost.Alternatively, you can enter a percentage in the Discount % field,and let the program calculate the discount amount.
If you prefer not to enter discounts for individual details, you can entera discount amount for the entire invoice on the Totals tab. PurchaseOrders then prorates the discount amount for the document details,overriding any discounts you may have entered manually for thedetails.
You can enter a separate discount percentage or amount for eachdetail. When you enter a discount amount, the program calculates thediscount percentage, and displays the result in this field. If you enter apercentage, the program calculates and displays the discount amount.
Note: If you enter a discount for the invoice on the Totals tab, theprogram distributes the total discount amount to the details,overwriting any detail discounts you entered.
DiscountableSelect Yes in the Discountable field if the vendor payment termsallow early payment discount.
Discounted Extended CostThis field displays the extended cost less the discount amount.
User's Guide 509
Appendix A: Purchase Orders Screen Guides
Expense AccountIf you entered a non-inventory item number for the detail line, enterthe account number of the general ledger expense account to whichyou want to post the detail.
This field displays the number entered with the detail on the receipt,but you can change the number.
For new detail lines, this field displays the account number specifiedon the P/O Options screen for the Default Inventory ExpenseAccount option.
Extended CostEnter the extended cost for the number of units of the item that youordered.
If you change the extended cost, the program automaticallyrecalculates the unit cost.
Extended WeightEnter the extended weight for the number of units of the item thatyou ordered.
If you change the extended weight, Purchase Orders automaticallyrecalculates the unit weight.
The total weight entered for all items on the purchase order appearson the Totals tab.
Fully InvoicedUse the Fully Invoiced field to indicate whether the detail line isnow fully invoiced:
l If the quantity invoiced equals the quantity you received for thedetail, accept Yes in this field.
l If the quantity invoiced is less than the quantity received, eitherdouble-click the field or press the spacebar to select No.
Note: When working with a serialized or lotted item, Yes canappear by default when the receipt number is entered. This cannotbe changed to No for serial and lot detail lines and they will bemarked as fully invoiced even if the Quantity Invoiced field ischanged to less than the quantity received.
510 Sage 300 ERP Purchase Orders
Transaction Screens
Item DescriptionThis field displays the item description from the P/O Vendor ContractCosts record (if one exists) or from the Inventory Control or PurchaseOrders item record. If necessary, you can change it.
If you enter an item number that does not exist in Inventory Control,you also enter the description for the item. You can enter non-existentitem numbers only if you selected the Allow Non-inventory Itemsoption on the P/O Options screen.
Purchase Orders displays the item description that was entered withthe detail on the receipt, but you can change it.
Item NumberThe program displays the item number that was entered with the detailon the receipt.
Line NumberTo select an existing line to edit or delete, click the line, or enter itsline number in this field on the P/O Detail Items/Taxes screen.
Note: You cannot delete completed lines.
LocationThis field displays the location code entered for the detail on thereceipt.
Manufacturer's Item NumberIf you entered a manufacturer's item number in the Item Numberfield on the requisition or purchase order, the number appears in theManufacturer's Item Number field.
Manufacturer's item numbers are alternative item numbers— such asbar codes or shortcut codes— that identify your inventory items. Youset up manufacturer's item numbers in Inventory Control.
You can enter manufacturer's item numbers wherever you enter itemnumbers in Purchase Orders.
Net Of TaxThis field displays the extended item cost, minus any applicable taxamount. You cannot edit the amount.
User's Guide 511
Appendix A: Purchase Orders Screen Guides
Non-Stock Clearing AccountUse the Non-Stock Clearing Account field to change the non-stockclearing account associated with this item's account set.
If the item used in the detail is a non-stock item, the non-stockclearing account associated with the item's account set appears.
If you are returning a non-stock item, the non-stock clearing accountassociated with the item's account set appears. You can specify adifferent account, if necessary.
Optional FieldsOptional fields are fields that have been added by your company tothe transaction-entry screens and detail lines in purchase orderstransactions. You must have Transaction Analysis and Optional FieldCreator to add and use optional fields.
If the Optional Fields column appears, you can click the columnheading to display the optional fields that have been assigned to thisscreen, and edit their contents.
Optional field information on invoice detail lines is inherited from anymatching optional fields in the receipts.
If the optional fields were not on the receipt:
l For non-job related invoices, optional field information defaultscome from item records or, if the fields do not match, from thedefault value in the P/O Optional Fields screen.
l For job-related invoices, the optional field defaults depend on thecontract style and project type.
If you use the same optional fields for categories or resources inProject and Job Costing, default optional field information will beinherited from the category for basic projects, or from the resourcewith standard projects.
For more information, see "About Optional Fields" (page 56).
Order NumberEnter the number of a sales order for which you are creating thedetail. If you use Sage 300 ERP Order Entry with Purchase Orders,you can also use the Finder to select an Order Entry order number.
512 Sage 300 ERP Purchase Orders
Transaction Screens
You can change or erase an order number that is displayed with adetail you added from a purchase order or posted previously with thescreen.
If you change an order number that is displayed with a detail line, thenew order number does not replace the previous number on thecorresponding receipt and will not be reported on the P/O ShippableBackorders report.
You also enter the unit weight, extended weight, vendor item number,comments, and the G/L expense account specified for non-inventoryitems.
Quantity InvoicedUse the Quantity Invoiced field to edit the number of units of theitem that you received.
If the item is a serialized and/or lotted item, you may have to allocatenumbers in a separate screen. Purchase Orders displays the number ofunits entered for the detail on the receipt, in the unit of measureselected for the detail.
Be sure that any new quantity you enter is in the unit of measure thatis used for the detail. You cannot change the unit of measure on theinvoice.
If you increase or decrease the invoiced quantity, the QuantityInvoiced field is updated on the purchase order. During posting orduring Day End Processing, item costs are updated in InventoryControl and, if necessary, new general ledger transactions are createdto reflect the change.
Receipt NumberPurchase Orders displays the receipt number for each detail, indicatingthe source of the detail.
Retainage %, Retainage Amount, and Retention PeriodIf the Retainage option was selected for the receipt, retainage-related fields appear for each invoice detail line.
The default retainage percentage and retention period that appears inthese fields are based on the Default Retainage From option for thecontract in Project and Job Costing.
User's Guide 513
Appendix A: Purchase Orders Screen Guides
On the Retainage tab, you can specify the exchange rate that youwant to use for the retainage amount on multicurrency invoices.
Note: Retainage accounting applies only to job-relatedtransactions, and is available only if you selected retainageaccounting in Accounts Payable.
Tax IncludedIn the Detail table, this field displays the amount of tax that isincluded in the extended item cost (when the cost includes tax).
On the zoomed Detail Items/taxes screen, this field displays Yes orNo to indicate whether tax amounts are included in the item cost foreach tax authority. The default choice for this option is provided fromthe vendor record in Accounts Payable or from the vendor contractcost.
Note: You can select Yes only if the tax authority is set up in TaxServices to allow tax-included costing.
You can also edit total tax amounts on the Taxes tab.
Unit CostEnter the cost of a single unit of the item you are ordering in thedetail.
Purchase Orders displays a default cost as follows:
l If you have set up vendor contract costs, Purchase Orders displaysthe cost specified as a contract cost for the item and unit ofmeasure.
l If P/O does not find a valid contract cost, it uses the inventory costspecified on the P/O Options screen.
Use the Finder to view any vendor contract costs, regular vendorcosts, and other costs maintained by Inventory Control.
Purchase Orders uses the unit cost to calculate the extended cost. Ifyou change the unit cost, the extended cost is recalculated.
In multicurrency ledgers, the cost is expressed in the vendor'scurrency.
514 Sage 300 ERP Purchase Orders
Transaction Screens
Note: You can assign security to the Unit Cost and Extended Costfields, to prevent unauthorized changes to the fields.
If you use Project and Job Costing, unit cost is defaulted asfollows:
l If the project is a standard project:
For a category cost class of Subcontractor, Overhead, orMiscellaneous Equipment, the unit cost is defaulted from thecategory resource.
For a category cost class of Labor, the default unit cost is basedon the Default Unit Cost From option for the employee resourcecategory.
For a category cost class of Material (if you are using InventoryControl), the default unit cost is based on Purchase Orders'default item cost (set in P/O Options).
For a category cost of Material (if you are not using InventoryControl), the unit cost is based on Purchase Orders vendor costs.
l If the project is a basic project:
For a category cost class of Subcontractor, Overhead, orMiscellaneous Equipment, the unit cost is defaulted from thecategory.
For a category cost class of Labor, the default unit cost is basedon the Default Unit Cost From option for the labor category.
For a category cost class of Material (if you are using InventoryControl), the default unit cost is based on Purchase Orders'default item cost (set in P/O Options).
For a category cost of Material (if you are not using InventoryControl), the unit cost is based on Purchase Orders vendor costs.
Unit of MeasureThis field displays the unit of measure entered for the detail on thereceipt.
Unit WeightEnter the weight of a single unit of the item you are ordering in thedetail. On new detail lines, the weight specified in the Inventory
User's Guide 515

Appendix A: Purchase Orders Screen Guides
Control item record is displayed, but you can change it.
Purchase Orders uses the unit weight to calculate the extendedweight. If you change the unit weight, the extended weight isrecalculated.
You can select from the weight units of measure defined in PurchaseOrders. Weight is expressed in the unit selected for theWeight UnitOf Measure option on the I/C Options screen.
On invoices, enter the weight of a single unit of the item for whichyou were invoiced. The program displays the weight specified for theitem on the receipt but you can change it.
Purchase Orders uses the unit weight to calculate the extendedweight. If you change the unit weight, the extended weight isrecalculated.
You can see the total weight estimated from your entries for theinvoiced items on the Totals tab.
Vendor Item NumberEnter the code the vendor uses to identify the item.
If the vendor's item number is specified in the Inventory Control itemrecord, the code appears in this field. (Enter vendors' item numberswhen assigning vendor types in Inventory Control item records.)
If the vendor's item number is specified on the receipt for which youare entering an invoice, the code appears in this field. (You can entervendors' item numbers when assigning vendor types in InventoryControl item records.)
Optional Fields tabThe Optional Fields tab contains optional fields added by your company thatapply to the transaction as a whole. Optional fields on detail lines apply tothe individual transaction detail.
This tab appears only if you use Transaction Analysis and Optional FieldCreator.
For more information, see "About Optional Fields" (page 56).
Rates tabThis tab appears if you use multicurrency accounting. Use it to review andedit exchange rates for Purchase Orders documents.
516 Sage 300 ERP Purchase Orders
Transaction Screens
Invoice Exchange RateThe program displays the exchange rate currently in effect for thespecified currency and the displayed rate type and rate date, but you canchange the rate.
You receive a warning if you change an exchange rate by an amount thatexceeds the Spread setting for the currency in Common Services'Currency Rates table.
The program also displays the exchange rate entered on the receipt.
Invoice Rate DateType or select the date to use to select the exchange rate for thedocument you are entering.
The program displays the rate date that is nearest the document date youentered, but you can specify a different date for which an exchange rateexists for the currency in Common Services' Currency Rates table.
If you change the rate date, Purchase Orders checks the rate tables for adate match, and updates the rate if necessary.
Invoice Rate TypeUse the Invoice Rate Type field to enter the rate type code.
Purchase Orders uses rate types when converting multicurrency amountson the invoice to functional currency. Examples of rate types might be"spot rate," "average rate," and "contract rate."
You define rate types using the Currency Rate Types screen in CommonServices, and assign the default rate type for Purchase Orders on theProcessing tab of the P/O Options screen.
Receipt Exchange RateThis field displays the exchange rate entered on the receipt.
Receipt Rate DateThis field displays the rate date used with the receipt.
Receipt Rate TypeThis field displays the rate type used with the receipt.
Retainage tabThis tab appears only if you select the Retainage option for job-related
User's Guide 517
Appendix A: Purchase Orders Screen Guides
invoices. (This option appears only if you use retainage accounting inAccounts Payable.)
You use this tab to:
l Select payment terms for retained amounts.
l Specify whether to use the original retainage exchange rate for thereceipt or use the current exchange rate (if the items were originallyreceived in another currency).
Taxes tabUse the Taxes tab to:
l Check or change the vendor's tax group.
l Check tax information or edit the tax class and tax amount for thevendor's tax authorities.
Tax GroupFor new vendors (not yet added to Accounts Payable), select the taxgroup that identifies the tax authorities to which the vendor is subject.You must use a tax group that is defined for your company in CommonServices.
When entering invoice information for a vendor who is defined inAccounts Payable, you can change the default tax group.
You must enter a valid tax group for every invoice vendor.
Total TaxThis field displays the total tax amount calculated for each authority inthe vendor's tax group. You can change this amount, if necessary.
To cancel all your changes to tax amounts at the same time, click theCalculate Taxes button.
Table
Retainage Tax AmountThis field appears on the Taxes tab for Receipt Entry, Invoice Entry,Return Entry, and Credit/Debit Note Entry if retainage applies to thedocument.
518 Sage 300 ERP Purchase Orders
Transaction Screens
It shows the amount of tax calculated for this authority for theretainage portion of the document if you report tax for retainageamounts when you create the retainage document (not when youcreate the original document).
Retainage appears only on job-related documents if you select theRetainage option on the first tab of the transaction entry screen.
Retainage tax amounts are computed using the retainage tax base andthe tax rate for each tax authority.
Retainage Tax BaseThe retainage tax base is the amount (before included taxes) used asthe base for calculating taxes on the retained amount.
Essentially, the retainage tax base is the retainage portion of thedocument (excluding tax) if you report tax for retainage amounts atthe time that you create the retainage document (not when you createthe original document).
Retainage appears only on job-related documents if you select theRetainage option on the first tab of the transaction entry screen.
Retainage tax amounts are computed using the retainage tax base andthe tax rate for each tax authority.
Tax AmountThis field displays the amount of tax that is due for each authority.
For each authority, Purchase Order calculates a tax amount if:
l The vendor is subject to tax.
l The transaction contains taxable items or taxable additional costs.
l Tax rates are specified for the tax authorities and classes in TaxServices.
If no tax amounts appear, click the Calculate Taxes button.
Tax amounts are not automatically calculated on a purchase order untilyou post it or click the Totals tab.
Tax Authority and DescriptionThese columns list the codes and corresponding descriptions for all thetax authorities in the tax group specified for the document.
User's Guide 519
Appendix A: Purchase Orders Screen Guides
You enter tax information in the Tax Services module in CommonServices.
Tax Base
The tax base shows, for the tax authority, the net cost of itemsbefore tax is added. (This field is useful for items that have taxincluded in their prices.)
Tax ExcludedThe program displays the total amount of tax that is not included initem costs for the authority.
Tax IncludedThe program displays the total amount of tax that is included in itemcosts for the authority.
You can include tax amounts in item costs only if permitted by theauthority.
Tax Reporting CurrencyTax reporting fields appear on the Taxes tab only if the tax group'stax reporting currency is different from your functional currency andthe vendor's currency.
Along with the tax reporting currency, the program displays theamount of included and excluded tax to be reported in that currencyon tax tracking reports for all the tax authorities listed on thedocument.
You set the tax reporting currency for tax groups in the Tax Servicesmodule in Common Services.
Tax Reporting TotalThis field displays the sum of the tax reporting amounts for all taxauthorities.
It appears only if the tax reporting currency for the tax group isdifferent from your functional currency and the vendor's currency.
You set the tax reporting currency for tax groups in the Tax Servicesmodule in Common Services.
520 Sage 300 ERP Purchase Orders
Transaction Screens
Total Retainage TaxThis field appears on the Taxes tab for Receipt Entry, Invoice Entry,Return Entry, and Credit/Debit Note Entry if retainage applies to thedocument.
It shows the total amount of tax calculated for the retainage portion ofthe document if you report tax for retainage amounts when you createthe retainage document (not when you create the original document).
Retainage appears on job-related documents only if you select theRetainage option on the first tab of the transaction entry screen.
Retainage tax amounts are computed using the retainage tax base andthe tax rate for each tax authority.
Vendor Tax Class and Tax Class DescriptionThese columns list the tax classes that are assigned to the taxauthorities to which the vendor is subject, and their correspondingdescriptions.
You can change a tax class to another tax class that is assigned to theauthority, but not the description.
To change the description for the tax class or make other changes forthe specified tax group, use the Tax Services screens in CommonServices.
Terms tabUse the Terms tab to
l Check the vendor's terms.
l Enter or edit the due date and discount terms of an invoice.
l Edit a payment schedule when you are making a series of payments overtime.
Amount DueEnter the amount due for each of the payments in a schedule.
As of DateEnter the date from which the terms are calculated. Purchase Ordersautomatically displays the document date, but you can type another date.
User's Guide 521
Appendix A: Purchase Orders Screen Guides
For example, if the first payment is not due for six months (so youwould consider the first invoice date as six months from today), add sixmonths to the As of Date, then press the Tab key to recalculate theschedule.
Discount %This field displays the discount percentage specified for the terms code,if any.
You can change the displayed rate. If the terms code does not usediscounts, you can enter a discount percentage for the individualinvoice, if necessary.
Discount AmountThis field displays the discount amount specified for the terms code, ifany.
You can change the displayed amount. If the terms code does not usediscounts, you can enter a discount amount for the individual invoice, ifnecessary.
Discount DateIf the terms code uses discounts, this field displays the date on whichthe period for an early-payment discount expires. You can change thedate.
If the terms code does not use discounts, this field displays the sessiondate. You can assign a discount amount and date for an individualinvoice.
Due DateThis field displays the due date calculated from the invoice date and thespecifications for the terms code but you can change the date, ifnecessary.
Number of PaymentsWhen you specify a terms code that uses a payment schedule, this fielddisplays the number of payments permitted in the schedule.
You can enter payment amounts for all the payments in the schedule, orfor only some of them. You cannot enter more payments than arepermitted by the schedule.
522 Sage 300 ERP Purchase Orders

Transaction Screens
Edit the terms code in Accounts Payable to change the number ofpayments in a payment schedule.
Payment NumberWhen you are entering a payment schedule, this field displays the numberof each payment line.
Terms CodeUse the Terms Code field to add or change the code that identifies thepayment terms the vendor allows your company.
To change a terms code, type the new code or select the code from theFinder. You must enter a terms code for each vendor and you must useone of the terms codes you have defined in Accounts Payable.
You can also edit dates, payment, and discount information on the Termstab.
Totals tabUse the Totals tab to:
l Check tax and detail totals.
l Verify invoice totals for the vendor.
l Enter a discount percentage or a total discount for the invoice. When youenter a discount on this tab, the program distributes the total amount tothe invoice details, overwriting any discounts you entered for details.
l Enter comments for the invoice.
l Check the estimated weight of the goods for which you were invoiced.
l Check the number of item and additional cost details entered for thevendor on the invoice.
l Check the invoice subtotal and total additional costs and excluded taxesfor the vendor.
CommentEnter an optional comment for the invoice, up to 250 characters.
Estimated TaxThis is the tax amount that will be applied to the retainage invoice (if the
User's Guide 523
Appendix A: Purchase Orders Screen Guides
tax authority allows you to defer tax on retained amounts on an originalreceipt and invoice).
If you are applying all tax amounts to the original invoice, this amountwill be zero.
Retainage amounts are invoiced at a later time, in Accounts Payable.
Included TaxThis field displays the total amount of tax that is included in item costsfor the authority.
You can include tax amounts in item costs only if permitted by theauthority.
Invoice Detail SubtotalThis field displays the total of all item detail costs, if any, entered fromthe invoice, including tax-included amounts.
The subtotal does not include tax amounts that are not included in itemcosts or the additional costs you added for the vendor.
Less Invoice DiscountYou can enter an optional discount percentage or discount amount forthe entire document, or enter discounts for individual detail lines.
If you enter a discount for the entire document, Purchase Ordersprorates the discount amount for the document details, overriding anydiscounts you may have entered manually for the details.
Less RetainageThis field appears if this invoice is a job-related document that includesretainage amounts.
Net Invoice TotalThis field appears if this invoice is a job-related document that includesretainage amounts.
Number of CostsThe program displays the number of additional cost detail lines youentered for the document.
524 Sage 300 ERP Purchase Orders
Transaction Screens
Check this number against source documents to make sure you enteredall the details you require.
Number of LinesThe program displays the number of item detail lines you entered for theprimary vendor on the document.
Check this number against source documents to make sure you enteredall the details you require.
Plus Additional CostsThis field displays the total amount of additional costs entered with theinvoice, excluding taxes (except taxes that are included in the costamounts).
This figure appears on invoices for primary vendors that include both itemand additional cost details.
Plus Excluded TaxThis field displays the total excluded tax amount of all item and additionalcost details for the vendor. This amount does not include taxes that areincluded in the cost amounts.
Total InvoiceThis field displays the total of all item and/or additional costs and taxesfor the vendor and invoice.
Total TaxThis field displays the total tax amount calculated for each authority in thevendor's tax group. You can change this amount, if necessary.
To cancel all your changes to tax amounts at the same time, click theCalculate Taxes button.
Total WeightThis field displays the total weight of the invoiced goods, calculated fromthe weight and invoiced quantity entered for each item detail.
Use this amount to check invoiced shipping charges.
User's Guide 525
Appendix A: Purchase Orders Screen Guides
P/O Bill-To Location Screen
To open this screen:
1. Open Purchase Orders > P/O Transactions > Invoice Entry.
2. Click the Zoom button ( ) beside the Bill-To Location field, or press the F9key in the field.
Overview
Use the Bill-To Location screen to edit an existing bill-to location address or totype a new billing address for the invoice.
Fields and Controls
AddressUse the Address field to type the address for the location, or edit thedisplayed information if necessary.
Bill-To LocationIf you use Inventory Control and you selected a bill-to location code, theprogram displays the location code.
If you do not use Inventory Control, you can click the Zoom buttonbeside the field name.
Enter the bill-to location information by typing in the screen that appears.
ContactEnter the name of a contact person, department, or position.
DescriptionUse the Description field to type a description of the location, such as acompany name, or edit a displayed description if necessary. You do nothave to include a description.
E-mailUse the E-mail field to type the e-mail address for the location, or edit thedisplayed address if necessary.
Fax NumberUse the Fax Number field to type the fax number for the location or edit a
526 Sage 300 ERP Purchase Orders
Transaction Screens
displayed number if necessary.
Phone NumberUse the Phone Number field to type the telephone number for the locationor edit a displayed number if necessary.
P/O Remit-To Location Screen
To open this screen:
1. Open Purchase Orders > P/O Transactions > Invoice Entry.
2. Click the Zoom button ( ) next to the Remit-To Location field, or click theRemit-To Location field, and then press the F9 key.
Overview
Use this screen to look up the address information entered for the selectedremit-to location. Address information appears only if you select a remit-tocode for the vendor.
You cannot edit information on this screen. Use Accounts Payable to add andedit remit-to locations for vendors.
P/O Create Invoice from Receipts Screen
To open this screen:
1. Open Purchase Orders > P/O Transactions > Invoice Entry.
2. Do one of the following:
Click the Zoom button ( ) beside the From Multiple Receipts option.
Select the From Multiple Receipts option, and then press F9.
Overview
Use the P/O Create Invoice from Receipts screen to select multiple receipts andadd them to an invoice.
When you create an invoice from more than one receipt:
l All of the invoice header information (including the fields on the OptionalFields tab) will come from the first receipt that you select.
User's Guide 527
Appendix A: Purchase Orders Screen Guides
l You cannot change the tax group or add or delete item detail lines (for theprimary vendor).
l You can add additional cost details.
l The receipt details that appear include all item and additional cost detailsfor the primary vendor, or all the additional costs for vendor who chargedonly additional costs on the original receipts.
l Once all the details from a receipt are fully invoiced, you can no longer usethe receipt in an invoice
Fields and Controls
Buttons
CloseClick this button to close the screen.
Note: If you click Close without first clicking Invoice, receipt detailsare not added to the invoice.
InvoiceClick this button to add the receipt details from the selected receipts tothe invoice.
Receipt NumberIf you are creating an invoice based on multiple receipts, you use this fieldto specify the receipts to use. You can enter receipt numbers manually oryou can select them using the Finder .
P/O Invoice Entry Detail Items/Taxes Screen
To open this screen:
1. Open Purchase Orders > P/O Transactions > Invoice Entry.
2. Enter header information for the invoice, including the invoice number,vendor number, and the receipt or receipts that you are invoicing.
3. On the detail entry table, select a detail line, and then press F9 or click theItem/Tax button.
528 Sage 300 ERP Purchase Orders
Transaction Screens
Related tasks:
l "Entering an Invoice" (page 169)
l "Entering Additional Costs on Invoices" (page 172)
l "Receiving and Invoicing Lotted Items" (page 214)
l "Receiving and Invoicing Serialized Items " (page 211)
Overview
Use the Invoice Entry Detail Items/Taxes screen to check and edit invoice detaillines.
The Detail Items/Taxes screen contains the same fields as the detail entry gridon the Invoice tab, plus additional tax-related fields that you use to view orchange tax information for a selected detail.
Rather than displaying fields for all the details in tabular format, this screen letsyou see all the fields for a single detail on a separate screen without needing toscroll.
Press F9 or click Close to return to the Invoice tab.
Fields and Controls
Buttons
Calc. TaxesClick the Calc. Taxes button to see tax amounts for a detail before youpost the document.
Note: Tax amounts are not calculated automatically until you click theTaxes tab or the Totals tab, or you post the purchase order.
SaveUse the Save button to save the changes you make to a detail in theDetail Items/Taxes screen.
Allocated Tax (total for detail)The program displays the total amount of tax allocated to the detail in thetop part of the Detail Items/Taxes screen. (Allocated tax is broken down bytax authority in the tax table in the lower portion of the screen.)
User's Guide 529
Appendix A: Purchase Orders Screen Guides
Allocated taxes are included in the cost of the detail. Recoverable andexpensed taxes are not included in detail costs.
CommentsTo view comments for a selected detail line, click the Zoom button ( )beside the Comments field. The program displays any comments enteredfor the detail line on the receipt, but you can change or delete them.
Tip: You can also press the Shift and F9 keys together to open or closethe screen using your keyboard.
To enter comments for the selected detail, click the Detail Comments table,press the Insert key, and then type the comments on the new line.
Lines automatically wrap. If you want to start a new line before the linewraps, press Enter.
For more information, see "P/O Detail Comments Screen" (page 536).
Discount %You can enter a discount as a percentage or an amount. The program usesthe amount you enter in this field to calculate the discounted cost for theitem detail.
If you enter a percentage in this field, Purchase Orders calculates thediscount amount for the item detail.
Tip: If you prefer not to enter discounts for individual details, you canenter a discount percentage for the entire document on the Totals tab.Purchase Orders then prorates the discount amount for the transactiondetails, overriding any discounts you may have entered manually for thedetails.
Discount AmountThe program uses the amount you enter in this field to calculate thediscounted extended cost for the item detail. If you enter a discountamount, the program calculates and displays the discount percentagebased on the extended cost. (Alternatively, you can enter a percentage inthe Discount % field, and let the program calculate the discount amount.)
If you prefer not to enter discounts for individual details, you can enter adiscount amount for the entire receipt on the Totals tab. Purchase Ordersthen prorates the discount amount for the document details, overriding anydiscounts you may have entered manually for the details.
530 Sage 300 ERP Purchase Orders
Transaction Screens
Discounted Ext. CostThe program displays the item cost, less the discount amount, in this field.
Expense AccountIf you entered a non-inventory item number for the detail line, enter theaccount number of the general ledger expense account to which you want topost the detail.
This field displays the number entered with the detail on the receipt, but youcan change the number.
For new detail lines, this field displays the account number specified on theP/O Options screen for the Default Inventory Expense Account option.
Extended CostEnter the extended cost for the number of units of the item that you ordered.
If you change the extended cost, the program automatically recalculates theunit cost.
Extended WeightEnter the extended weight for the number of units of the item that youordered.
If you change the extended weight, Purchase Orders automaticallyrecalculates the unit weight.
The total weight entered for all items on the purchase order appears on theTotals tab.
Item DescriptionThis field displays the item description from the P/O Vendor Contract Costsrecord (if one exists) or from the Inventory Control or Purchase Orders itemrecord. If necessary, you can change it.
If you enter an item number that does not exist in Inventory Control, youalso enter the description for the item. You can enter non-existent itemnumbers only if you selected the Allow Non-inventory Items option onthe P/O Options screen.
Purchase Orders displays the item description that was entered with thedetail on the receipt, but you can change it.
Item Number (display only)The program displays the item number entered for the selected detail line.
User's Guide 531
Appendix A: Purchase Orders Screen Guides
Line NumberTo select an existing line to edit or delete, click the line, or enter its linenumber in this field on the P/O Detail Items/Taxes screen.
Note: You cannot delete completed lines.
LocationThe program displays the location code entered for the detail on thereceipt. You cannot change it.
Net Of TaxThis field displays the extended item cost, minus any applicable taxamount. You cannot edit the amount.
Optional FieldsIf optional fields have been defined for invoice details, you can click theZoom button beside the Optional Fields field to display the optional fieldsassigned to a selected detail, and edit their contents.
For more information about using optional fields in transactions, see "AboutOptional Fields in Transactions" (page 90).
Order NumberEnter the number of a sales order for which you are creating the detail. Ifyou use Sage 300 ERP Order Entry with Purchase Orders, you can also usethe Finder to select an Order Entry order number.
You can change or erase an order number that is displayed with a detailyou added from a purchase order or posted previously with the screen.
If you change an order number that is displayed with a detail line, the neworder number does not replace the previous number on the correspondingreceipt and will not be reported on the P/O Shippable Backorders report.
You also enter the unit weight, extended weight, vendor item number,comments, and the G/L expense account specified for non-inventory items.
Quantity InvoicedUse the Quantity Invoiced field to edit the number of units of the itemthat your received.
If the item is a serialized and/or lotted item, you may have to allocatenumbers in a separate screen. The program displays the number of unitsentered for the detail on the receipt, in the unit of measure selected for the
532 Sage 300 ERP Purchase Orders
Transaction Screens
detail. Be sure that any new quantity you enter is in the unit of measure thatis used for the detail. You cannot change the unit of measure on the invoice.
Receipt NumberPurchase Orders displays the receipt number for each detail, indicating thesource of the detail.
Unit CostEnter the cost of a single unit of the item you are ordering in the detail.
Purchase Orders displays a default cost as follows:
l If you have set up vendor contract costs, Purchase Orders displays thecost specified as a contract cost for the item and unit of measure.
l If P/O does not find a valid contract cost, it uses the inventory costspecified on the P/O Options screen.
Use the Finder to view any vendor contract costs, regular vendor costs,and other costs maintained by Inventory Control.
Purchase Orders uses the unit cost to calculate the extended cost. If youchange the unit cost, the extended cost is recalculated.
In multicurrency ledgers, the cost is expressed in the vendor's currency.
Note: You can assign security to the Unit Cost and Extended Cost fields, toprevent unauthorized changes to the fields.
If you use Project and Job Costing, unit cost is defaulted as follows:
l If the project is a standard project:
For a category cost class of Subcontractor, Overhead, or MiscellaneousEquipment, the unit cost is defaulted from the category resource.
For a category cost class of Labor, the default unit cost is based on theDefault Unit Cost From option for the employee resource category.
For a category cost class of Material (if you are using InventoryControl), the default unit cost is based on Purchase Orders' default itemcost (set in P/O Options).
For a category cost of Material (if you are not using Inventory Control),the unit cost is based on Purchase Orders vendor costs.
User's Guide 533
Appendix A: Purchase Orders Screen Guides
l If the project is a basic project:
For a category cost class of Subcontractor, Overhead, orMiscellaneous Equipment, the unit cost is defaulted from the category.
For a category cost class of Labor, the default unit cost is based on theDefault Unit Cost From option for the labor category.
For a category cost class of Material (if you are using InventoryControl), the default unit cost is based on Purchase Orders' defaultitem cost (set in P/O Options).
For a category cost of Material (if you are not using InventoryControl), the unit cost is based on Purchase Orders vendor costs.
Unit of MeasureEnter the unit of measure in which to order the item. If you are creating apurchase order from a requisition, the unit of measure entered for thedetail on the requisition is displayed, but you can change it.
If you are entering new detail lines, the program displays the stocking UOMby default, unless you have set up vendor contract costs using a differentUOM.
You must use one of the units of measure that is assigned for the item inInventory Control.
Note: The weight UOM can be different from the order UOM.
Unit WeightEnter the weight of a single unit of the item you are ordering in the detail.On new detail lines, the weight specified in the Inventory Control itemrecord is displayed, but you can change it.
Purchase Orders uses the unit weight to calculate the extended weight. Ifyou change the unit weight, the extended weight is recalculated.
You can select from the weight units of measure defined in PurchaseOrders. Weight is expressed in the unit selected for theWeight Unit OfMeasure option on the I/C Options screen.
On invoices, enter the weight of a single unit of the item for which you wereinvoiced. The program displays the weight specified for the item on thereceipt but you can change it.
534 Sage 300 ERP Purchase Orders
Transaction Screens
Purchase Orders uses the unit weight to calculate the extended weight. Ifyou change the unit weight, the extended weight is recalculated.
You can see the total weight estimated from your entries for the invoiceditems on the Totals tab.
Vendor Item NumberEnter the code the vendor uses to identify the item.
If the vendor's item number is specified in the Inventory Control itemrecord, the code appears in this field. (Enter vendors' item numbers whenassigning vendor types in Inventory Control item records.)
If the vendor's item number is specified on the receipt for which you areentering an invoice, the code appears in this field. (You can enter vendors'item numbers when assigning vendor types in Inventory Control itemrecords.)
Tax table
Allocated TaxThis column displays the tax amounts allocated to the selected detail linefor each tax authority.
Detail Tax Class and DescriptionThese columns list the tax classes and corresponding descriptions that areassigned to the tax authority. You can change the tax class (to another taxclass that is assigned to the authority), but not the description.
To change the tax class description or make other changes to theinformation for the specified tax group, use the Tax Services screens inCommon Services.
Expensed TaxThe program displays the amount of tax that is separately posted(expensed) to a general ledger account, rather than allocated to detailson the credit note or debit note.
Recoverable TaxThe program displays the amount of tax that can be recovered by yourcompany, such as, for example, recoverable Canadian Goods andServices Tax (GST) amounts.
User's Guide 535
Appendix A: Purchase Orders Screen Guides
Tax AmountThe program displays the amount of tax that is due for each authority.
For each authority, Purchase Orders calculates a tax amount if:
l The vendor is subject to tax.
l The transaction contains taxable items or taxable additional costs.
l Tax rates are specified for the tax authorities and classes in TaxServices.
You cannot edit the tax amount for a detail except indirectly, bychanging the tax class or tax-included option on the Detail Items/Taxesscreen.
To edit tax amounts for the invoice, make your changes on the Taxestab.
Tax Authority and DescriptionThese columns list the tax authorities and that are assigned to the taxgroup you specified for the document.
Tax information is maintained in the Tax Services screens in CommonServices.
Tax BaseThis field shows, for the selected detail, the net cost of items before taxis added for the tax authority. You cannot change the amount thatappears in this field.
This field is particularly useful for items that have tax included in theirprices.
Tax IncludedThis field displays the amount of tax that is included in the extendeditem cost (when the cost includes tax).
P/O Detail Comments Screen
To open this screen:
1. Open Purchase Orders > P/O Transactions > Invoice Entry.
2. On the Invoice tab, click the Commentsfield for the detail line you need.
536 Sage 300 ERP Purchase Orders
Transaction Screens
3. Click the Zoom button ( ), or press the Shift and F9 keys to open the DetailComments screen.
Use this screen to enter comments for a selected invoice detail line.
To enter or edit a comment:
1. Type the comment, pressing Enter to start each new line.
2. When finished, click Close to close the screen.
To delete comments:
1. Highlight the text to delete, then press the Delete key. If a message appearsasking you to confirm the deletion, click Yes.
2. When finished, click Close to return to detail entry.
Tip: You can also delete comments by changing the entry in theCommentsfield to No on the Invoice tab. If you decide before posting the invoice thatyou want to use the remarks, change the Comment field to Yes. Your originalremarks will reappear.
P/O Additional Costs Detail Costs/Taxes Screen
To open this screen:
1. Open Purchase Orders > P/O Transactions > Invoice Entry.
2. Enter header information for the invoice.
3. On the Additional Costs tab, add or select a detail line, and then click theCost/Taxbutton or press the F9 key.
Related tasks:
l "Entering Additional Costs on Invoices" (page 172)
l " Distributing Additional Costs to Multiple Receipts on a Debit Note" (page200)
Overview
Use the Additional Costs Detail screen to view or edit an additional cost detail.
Instead of presenting the details of an additional cost in a tabular format, theDetail Costs/Taxes screen displays all the fields for a single detail on a data
User's Guide 537
Appendix A: Purchase Orders Screen Guides
entry screen. In addition, it includes fields that allow you to change the taxinformation or enter a comment for a detail.
l Check tax information and calculations for a selected additional cost detail.
l Edit the tax class and tax-included options for the tax authorities.
l Add a comment for an additional cost detail.
l Add a new additional cost detail.
Fields and Controls
Buttons
AddUse the Add button to add an additional cost detail you entered on theDetail Cost/Taxes screen.
Calculate TaxUse the Calculate Tax button to recalculate tax amounts for anadditional cost detail after you change the Tax Class or Tax Includedfield. (Tax amounts are not automatically calculated until you choosePost for the invoice or select the Taxes tab or Totals tab.)
CloseUse the Close button, or press the F9 key, to close the DetailCosts/Taxes screen and return to the Additional Costs tab.
SaveUse the Save button to save changes you make to an additional cost.
Additional CostType the code for the additional cost you want to add, or select the codefrom the Finder.
If you are adding a cost for which no code is defined, skip this field andtype the name of the cost in the Description field (the field beside theAdditional Cost field in the Detail Cost/Taxes screen).
Note: You use the Additional Costs screen (in the P/O Setup folder) tomaintain the additional cost charges you use in Purchase Orders.
538 Sage 300 ERP Purchase Orders
Transaction Screens
Allocated TaxThe program displays the tax allocated for each tax authority on the DetailCosts/Taxes screen. It displays the total for the additional cost in the TotalTax field, and on the detail line on the Additional Costs tab.
Note: Allocated taxes are included in the cost of the detail. Recoverableand expensed taxes are not included in detail costs.
AmountUse the Amount field to enter the amount of the cost (excluding taxes,unless you are entering a tax-included cost).
CommentsEnter an optional comment for the document.
Any comments you entered for the detail on the receipt are included on theinvoice, but you can change or delete them.
Lines automatically wrap when you reach the end. If you want to start a newline before the line wraps, press Enter.
Detail Tax Class and DescriptionThese columns list the tax classes and corresponding descriptions that areassigned to the tax authority. In this screen, you can change the tax class (toanother tax class that is assigned to the authority) but not the description.
Tip: To change the tax class description or make other changes to theinformation for the specified tax group, use the Tax Services screens inCommon Services.
Expense AccountUse the Expense Account field to specify the general ledger account towhich to expense a selected additional cost.
Note: You do not specify a general ledger account number if you select aproration method for the additional cost.
Expensed TaxThe program displays the amount of the tax that is separately posted(expensed) to a general ledger account, rather than allocated to details onthe invoice.
User's Guide 539
Appendix A: Purchase Orders Screen Guides
Line NumberTo select an existing line to edit or delete, click the line, or enter its linenumber in this field on the P/O Detail Items/Taxes screen.
Note: You cannot delete completed lines.
Net of TaxThe program displays the net amount of the additional cost you entered forthe detail (excluding allocated taxes that are not included in the costamount).
Optional Fields (Additional Cost Details)If optional fields have been defined in Purchase Orders for additional costdetails for a transaction screen, an Optional Fields column appears in thedetail entry table on the Additional Costs tab. You can click the columnheading to display the optional fields assigned to a selected detail, and edittheir contents.
In the Detail Costs/Taxes screen, you click the Zoom button beside theOptional Fields field to display the optional fields for a detail.
For more information about using optional fields in transactions, see "AboutOptional Fields in Transactions" (page 90).
ProrationFor new additional costs , specify whether to prorate the cost to thereceived items by cost, quantity, or weight, or to expense the cost to ageneral ledger account.
If you are adding additional costs for non-inventory items, you mustchoose No Proration, or you will not be able to post the invoice.
Note: You can manually prorate additional costs only on receipts. Theoption is not available on invoices.
You cannot change the proration method for an additional cost that wasincluded on the receipt you are now invoicing.
Receipt NumberPurchase Orders displays the receipt number for each detail, indicating thesource of the detail.
Recoverable TaxThe program displays the amount of the tax that can be recovered by your
540 Sage 300 ERP Purchase Orders
Transaction Screens
company (such as, for example, recoverable Canadian Goods and ServicesTax [GST] amounts).
ReferenceEnter optional reference information for the detail.
Return Expense AccountIf you plan to expense the additional cost prorated to any items you return,specify the general ledger account number to which to post the cost.
Return ProrationFor new additional cost details, select the reproration method to use if youneed to return any of the received items, and you did not select NoProration or Prorate Manually for the Proration field.
Note: You cannot change the reproration method for an additional cost thatwas included on the receipt you are now invoicing, and you cannot expensejob-related costs.
Tax AmountThe program displays the amount of tax that is due for each tax authority.
For each authority, Purchase Orders calculates a tax amount if:
l The vendor is subject to tax.
l The additional cost is taxable.
l Tax rates are specified for the tax authorities and classes in Tax Services.
You cannot edit the tax amount for an additional cost except indirectly, bychanging the tax class or tax-included option on the Detail Cost/Taxesscreen.
Tip: To edit tax amounts for the invoice, make your changes on the Taxestab.
Tax Authority and DescriptionThese columns list the tax authorities and corresponding descriptions thatare assigned to the specified tax group.
Tax authorities and other tax information is maintained in the Tax Servicesscreens in Common Services.
User's Guide 541
Appendix A: Purchase Orders Screen Guides
Tax Base)This field shows, for the selected additional cost detail, the net cost ofitems before tax is added for the tax authority. You cannot change theamount that appears in this field.
Note: This field is particularly useful for items that have tax included intheir prices.
Tax Included (display only unless allowed by authority)The program displays the total amount of taxes that were included in theadditional cost amount.
To edit tax settings, press F9 to display the zoomed entry screen.
You can also edit total tax amounts on the Taxes tab.
Vendor NumberThe program displays the vendor number for your information.
P/O Cost Allocation Screen
To open this screen:
1. Open Purchase Orders > P/O Transactions > Invoice Entry.
2. Enter header information for the invoice, including multiple receipts thatyou are now invoicing.
3. Click the Additional Costs tab.
a. Select or add the additional cost you need to distribute to receipts.
b. Click the Dist. Cost button to open the Cost Allocation screen.
Related tasks:
l "Entering Additional Costs on Invoices" (page 172)
Overview
Use this screen to allocate a new additional cost to more than one receipt onan invoice.
Note: This screen is available only if you are adding an additional cost to aninvoice that is based on multiple receipts.
542 Sage 300 ERP Purchase Orders
Transaction Screens
You can prorate and allocate the additional cost amount manually, or you canlet Purchase Orders automatically allocate amounts to receipts according to theproration method you chose.
Fields and Controls
Buttons
ClearUse the Clear button to clear all amounts on the screen.
RedistributeUse the Redist. button to have Purchase Orders automatically distributethe additional cost amount for the receipts.
Amount (additional cost detail total)The program displays the total amount entered for the additional cost detailat the top of the Cost Allocation screen.
Amount (prorated for each receipt)The program displays the amount of the additional cost allocated to eachreceipt when you click the Redist. button.
To distribute the additional cost manually, you can enter amounts besideeach receipt number. The sum of all the amounts you allocate to receiptsmust equal the total amount for the additional cost detail.
Billing RateIf the receipt was job-related, Purchase Orders displays a billing rate for thecost that you are allocating (along with the amount being allocated).
Note: The Billing Rate is also allocated with the additional costs to morethan one receipt.
If you are prorating the cost manually to other receipts, you can enter adifferent billing rate with each distribution.
Distribute Proration (appears if manually prorating cost)Use the Distribute Proration field to open the Distribute Proration Detailsscreen.
For more information, see "P/O Distribute Proration Screen" (page 544).
User's Guide 543

Appendix A: Purchase Orders Screen Guides
Proration Method (display only)You cannot change the proration method for an existing cost.
If you are adding a new additional cost you can prorate by quantity, bycost, or by weight, or you can prorate manually.
If the invoice is job-related:
l You can also adjust the retainage amounts and period if retainageapplies to the document.
l You can adjust the billing rate and currency if prorating by cost, quantityor weight.
l You can specify a single contract, project and category, or use theDistribute Proration button to distribute costs to more than one contract,project, and/or category (if applicable) if you are prorating manually.
Receipt NumberThe program displays the receipt numbers used in this invoice. You cannotchange the receipt numbers.
Retainage Percentage, Amount, and PeriodIf the receipts were job-related and the credit note or debit note uses theretainage option, the program displays additional retainage fields for eachreceipt to which you can allocate additional costs.
The default retainage percentage and retention period that appears in thesefields depends on how you are prorating the costs.
l If prorating by cost, quantity, or prorating manually, the settings comefrom the vendor record.
l If you are not prorating, the retainage settings are based on the DefaultRetainage From option for the contract in Project and Job Costing.
P/O Distribute Proration Screen
To open this screen:
1. Open Purchase Orders > P/O Transactions > Invoice Entry.
2. Enter header information for the invoice.
3. On the Additional Costs tab, add or select a detail line, and then click theDistribute Proration column heading.
544 Sage 300 ERP Purchase Orders
Transaction Screens
Overview
You use this screen to distribute additional costs to jobs on job-related invoices.
Fields and Controls
AmountUse the Amount field to enter the amount of the additional cost that is beingallocated to this line item. The amounts on all lines must add up to the totalamount of the additional cost.
Billing Type, Billing Rate, and A/R Item NumberFor job-related additional costs that you are manually prorating, you alsospecify the billing information to be used on the customer invoice.
A/R Item NumberThis field displays the A/R item number associated with the projectresource used for the contract in Project and Job Costing. You can select adifferent A/R item number only for time and material projects, as follows:
l On a standard project, this field displays the A/R item number and unitof measure specified for the project resource category as the default.You can accept the item number or select another valid A/R itemnumber.
l On a basic project, this field displays the A/R item number and unit ofmeasure specified for the project category. You can accept the itemnumber or select another valid A/R item number.
l If you change the A/R item number, the item number must be a validitem number in Accounts Receivable, and the unit of measure must bea valid unit of measure both for the new item number and the vendor’scurrency.
Cost plus and fixed price projects do not use an A/R item number.
Billing CurrencyThis field appears only in multicurrency systems for time and materialsprojects and for fixed price projects using billings and costs or accrual-basis accounting methods.
User's Guide 545
Appendix A: Purchase Orders Screen Guides
The billing currency is the customer's currency specified on the contract,and you cannot change it.
Billing currency is blank for Fixed Price projects using completed projector project percentage complete methods, and for Cost Plus projects.
Note: Billing currency is not displayed for basic or standard internalTime and Materials projects, or for single-currency Fixed Priceprojects that use billings and costs or accrual-basis accountingmethods.
Billing RateThis field displays the billing rate for the specified resource (forstandard projects) or category (for basic projects).
You can edit the billing rate if the billing type is Billable. The fielddisplays 0.000000 if the billing type is Non-Billable or No Charge.
Note:l You can specify the billing rate for Time and Materials projects andfor Fixed Price projects that use Billings and Costs or Accrual-Basisaccounting methods.
l Billing rate is disabled and set to 0.000000 on a basic or standardinternal contract for Time and Materials projects or for Fixed Priceprojects using Billings and Costs or Accrual-Basis accountingmethods.
l The billing rate cannot be negative.
l If a job-related additional cost is prorated by cost, quantity, orweight, the specified billing rate in functional currency will beprorated to the item details for projects that are Time and Materialsor Fixed Price with an accounting method of Billings and Costs orAccrual-Basis.
The billing rate is not prorated to item details for Cost Plus or FixedPrice projects with completed project or project percentage completeaccounting methods. Instead, it is converted to the contract customer’scurrency when it is prorated to the item details during day endprocessing (using the current exchange rate).
The prorated billing rate for each detail is not displayed (and, therefore,you cannot change it).
546 Sage 300 ERP Purchase Orders
Transaction Screens
Note: This field is disabled if you are prorating manually.
Billing TypeThis field appears in the detail-entry section only for job-related purchaseorders.
The billing type indicates to Project and Job Costing whether to bill thecost to the customer. You can change this field only for a time andmaterials project, as follows:
On a basic project:
For a billable project, the category billing type determines whether youcan change the billing type for the detail. If the specified category is:
l Billable, the default billing type for the detail is billable, but you canchange it.
If the detail is billable you can specify a billing rate for the detail.
If you change the billing type for the detail to no charge or non-billable,the program sets the billing rate to zero and you cannot change it.
l No charge or non-billable, the program sets the same billing typefor the detail, and cannot change it. You cannot specify a billing rate forthe detail, which the program sets as zero.
If the project is no charge or non-billable, the detail uses the samebilling type as the project, the billing rate is set to zero, and you cannotchange them.
On a standard project:
If the project is billable, the resource billing type determines whether youcan change billing type for the detail. If the specified resource is:
l Billable, the program displays Billable as default billing type, but youcan change it for the detail. If the detail is billable, you can specify abilling rate for the detail.
If you change the billing type for the detail to no charge or non-billable,the program sets the billing rate to zero, and you cannot change it.
User's Guide 547
Appendix A: Purchase Orders Screen Guides
l No charge or non-billable, the program sets same billing type forthe detail, and you cannot change it. You cannot specify a billing ratefor the detail, which the program sets as zero.
If the project is no charge or non-billable, the detail uses the samebilling type as the project, and you cannot change it. The programalso sets the billing rate to zero, and you cannot change it.
For fixed price and cost plus projects, the Billing Type field is blank. Abilling type is not required for these types of projects.
Unit of MeasureThis field appears for Time and Materials projects if you selected theJob Related option for this transaction.
You must enter a unit of measure that is valid for the itemnumber/resource that you specified and for the contract customer'scurrency.
Note: For internal time and materials projects (basic or standardcontracts) the A/R item unit of measure will be disabled or blank.
Contract, Project, Category and ResourceFor job-related additional costs that are manually prorated, choose theitems/resources to which you are allocating the additional cost.
The program displays the “Contract,” “Project,” and “Category” that youspecified for each invoice detail line. The "resource" appears in the ItemNumber column.
You also specify the Billing Rate for the additional cost.
Note: The proration screen is available only if you choose to manuallyprorate additional costs to detail lines. The following fields from theinvoice detail lines are shown as display-only fields on this screen:Contract, Project, Category, Cost Class, Item Number, and Description.
CategorySelect or enter a category that is assigned to the project in Project andJob Costing.
ContractSpecify a contract number for each detail. You can enter or select only
548 Sage 300 ERP Purchase Orders
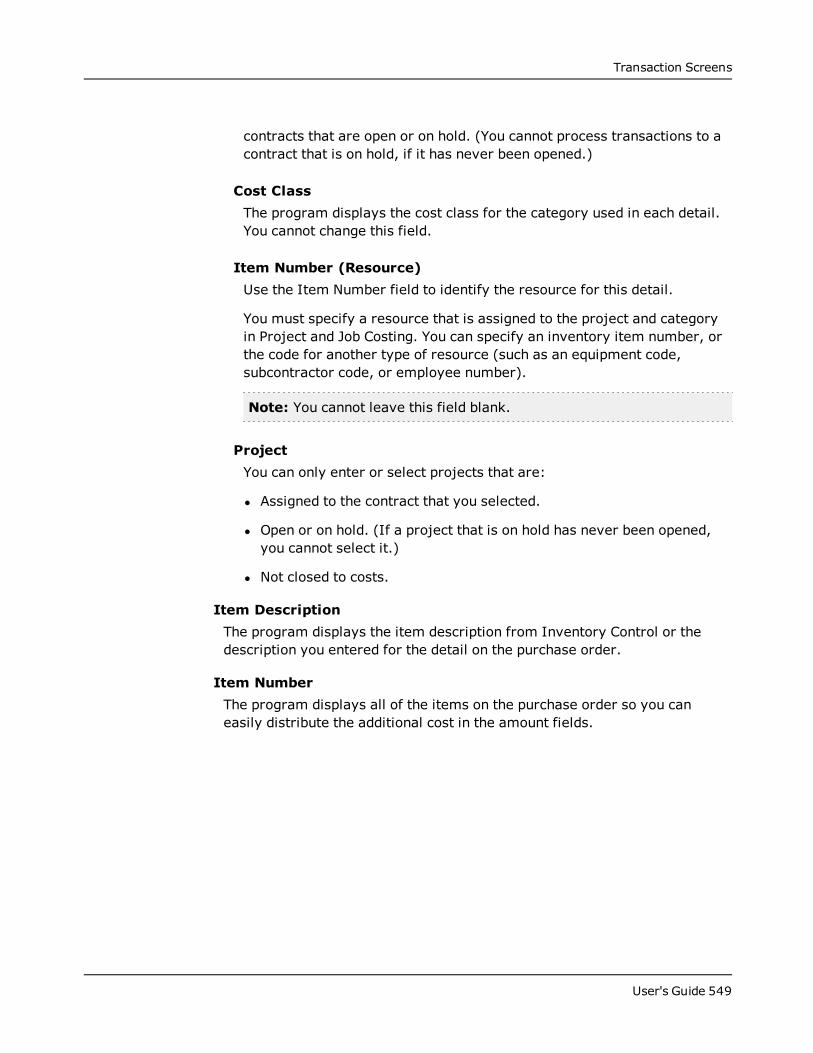
Transaction Screens
contracts that are open or on hold. (You cannot process transactions to acontract that is on hold, if it has never been opened.)
Cost ClassThe program displays the cost class for the category used in each detail.You cannot change this field.
Item Number (Resource)Use the Item Number field to identify the resource for this detail.
You must specify a resource that is assigned to the project and categoryin Project and Job Costing. You can specify an inventory item number, orthe code for another type of resource (such as an equipment code,subcontractor code, or employee number).
Note: You cannot leave this field blank.
ProjectYou can only enter or select projects that are:
l Assigned to the contract that you selected.
l Open or on hold. (If a project that is on hold has never been opened,you cannot select it.)
l Not closed to costs.
Item DescriptionThe program displays the item description from Inventory Control or thedescription you entered for the detail on the purchase order.
Item NumberThe program displays all of the items on the purchase order so you caneasily distribute the additional cost in the amount fields.
User's Guide 549
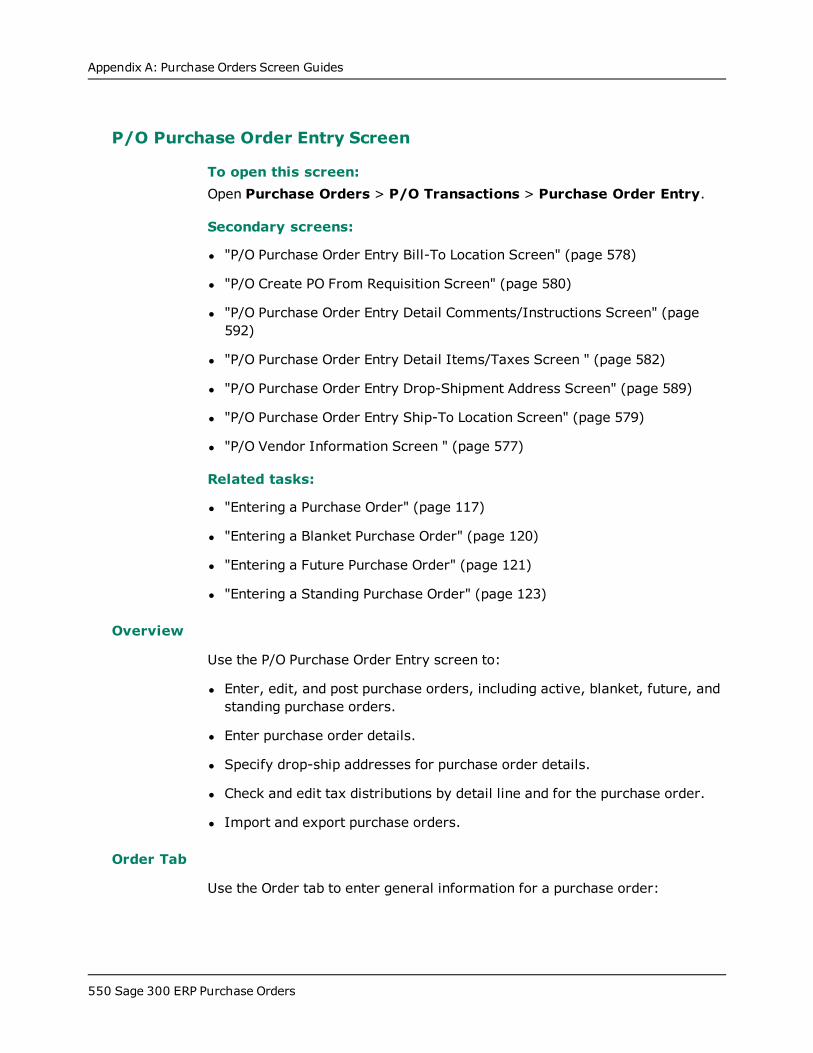
Appendix A: Purchase Orders Screen Guides
P/O Purchase Order Entry Screen
To open this screen:Open Purchase Orders > P/O Transactions > Purchase Order Entry.
Secondary screens:
l "P/O Purchase Order Entry Bill-To Location Screen" (page 578)
l "P/O Create PO From Requisition Screen" (page 580)
l "P/O Purchase Order Entry Detail Comments/Instructions Screen" (page592)
l "P/O Purchase Order Entry Detail Items/Taxes Screen " (page 582)
l "P/O Purchase Order Entry Drop-Shipment Address Screen" (page 589)
l "P/O Purchase Order Entry Ship-To Location Screen" (page 579)
l "P/O Vendor Information Screen " (page 577)
Related tasks:
l "Entering a Purchase Order" (page 117)
l "Entering a Blanket Purchase Order" (page 120)
l "Entering a Future Purchase Order" (page 121)
l "Entering a Standing Purchase Order" (page 123)
Overview
Use the P/O Purchase Order Entry screen to:
l Enter, edit, and post purchase orders, including active, blanket, future, andstanding purchase orders.
l Enter purchase order details.
l Specify drop-ship addresses for purchase order details.
l Check and edit tax distributions by detail line and for the purchase order.
l Import and export purchase orders.
Order Tab
Use the Order tab to enter general information for a purchase order:
550 Sage 300 ERP Purchase Orders
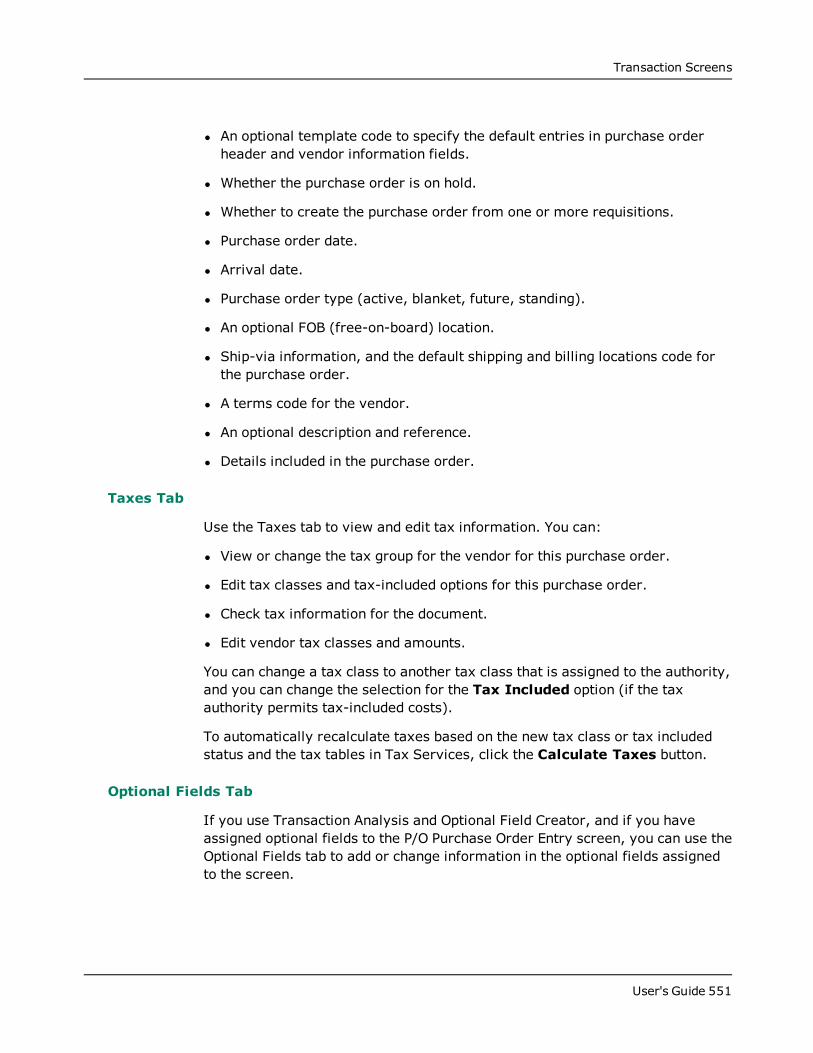
Transaction Screens
l An optional template code to specify the default entries in purchase orderheader and vendor information fields.
l Whether the purchase order is on hold.
l Whether to create the purchase order from one or more requisitions.
l Purchase order date.
l Arrival date.
l Purchase order type (active, blanket, future, standing).
l An optional FOB (free-on-board) location.
l Ship-via information, and the default shipping and billing locations code forthe purchase order.
l A terms code for the vendor.
l An optional description and reference.
l Details included in the purchase order.
Taxes Tab
Use the Taxes tab to view and edit tax information. You can:
l View or change the tax group for the vendor for this purchase order.
l Edit tax classes and tax-included options for this purchase order.
l Check tax information for the document.
l Edit vendor tax classes and amounts.
You can change a tax class to another tax class that is assigned to the authority,and you can change the selection for the Tax Included option (if the taxauthority permits tax-included costs).
To automatically recalculate taxes based on the new tax class or tax includedstatus and the tax tables in Tax Services, click the Calculate Taxes button.
Optional Fields Tab
If you use Transaction Analysis and Optional Field Creator, and if you haveassigned optional fields to the P/O Purchase Order Entry screen, you can use theOptional Fields tab to add or change information in the optional fields assignedto the screen.
User's Guide 551
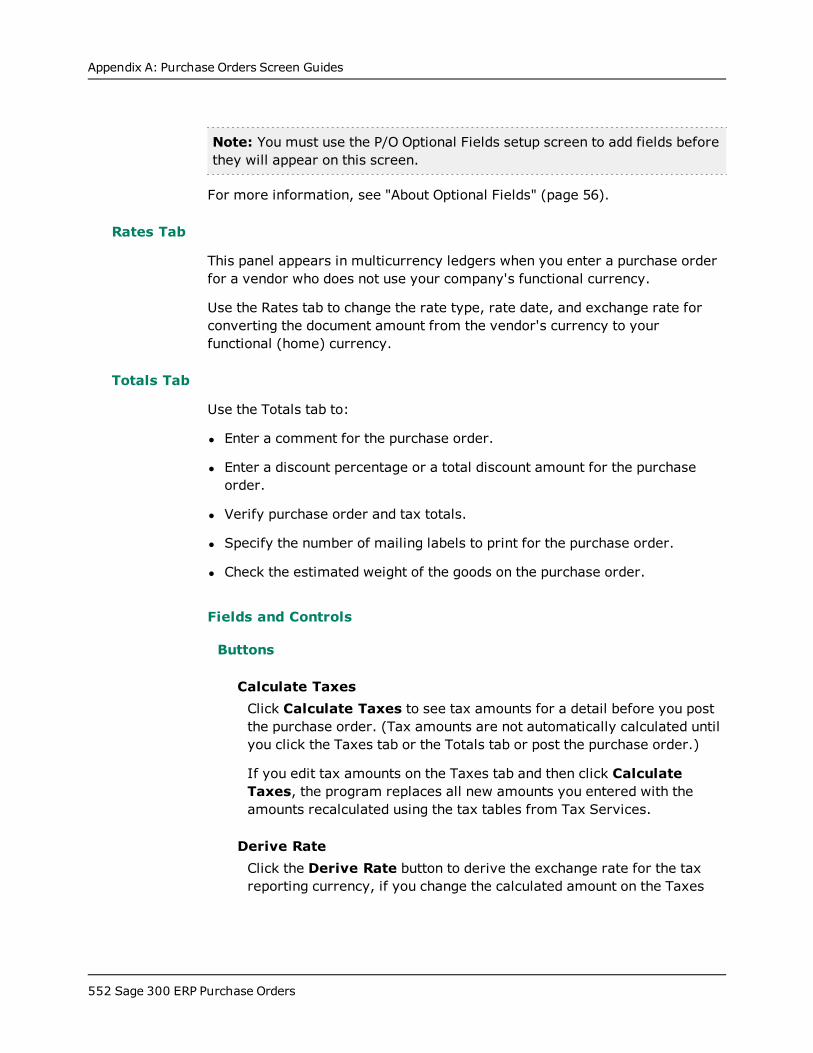
Appendix A: Purchase Orders Screen Guides
Note: You must use the P/O Optional Fields setup screen to add fields beforethey will appear on this screen.
For more information, see "About Optional Fields" (page 56).
Rates Tab
This panel appears in multicurrency ledgers when you enter a purchase orderfor a vendor who does not use your company's functional currency.
Use the Rates tab to change the rate type, rate date, and exchange rate forconverting the document amount from the vendor's currency to yourfunctional (home) currency.
Totals Tab
Use the Totals tab to:
l Enter a comment for the purchase order.
l Enter a discount percentage or a total discount amount for the purchaseorder.
l Verify purchase order and tax totals.
l Specify the number of mailing labels to print for the purchase order.
l Check the estimated weight of the goods on the purchase order.
Fields and Controls
Buttons
Calculate TaxesClick Calculate Taxes to see tax amounts for a detail before you postthe purchase order. (Tax amounts are not automatically calculated untilyou click the Taxes tab or the Totals tab or post the purchase order.)
If you edit tax amounts on the Taxes tab and then click CalculateTaxes, the program replaces all new amounts you entered with theamounts recalculated using the tax tables from Tax Services.
Derive RateClick the Derive Rate button to derive the exchange rate for the taxreporting currency, if you change the calculated amount on the Taxes
552 Sage 300 ERP Purchase Orders
Transaction Screens
tab.
When Purchase Orders calculates the tax amount in a tax reportingcurrency, it uses the Tax Reporting Currency Exchange Rate that appears(or that you enter) on the Rates tab. If you have changed the taxreporting amount that appears on the Taxes tab, you can click the DeriveRate button to see the actual exchange rate between the tax amount andthe tax reporting amount.
HistoryClick the History button to open the P/O Purchase History screen, whereyou can check information about the items you have purchased from yourvendors.
For more information, see "P/O Purchase History Screen" (page 408).
Item/TaxTo view all the information for a single item in the Detail table on aseparate Detail Items/Taxes screen, select the detail line, and then clickItem/Tax.
The P/O Detail Items/Taxes screen includes additional tax fields that letyou check tax information or change the tax classes and taxable statusfor a detail. You can check or edit information for an existing detail, andyou can enter new details.
NewClick the New button to begin creating a new record.
PostClick Post to post the document, including any changes you made to anexisting document.
Last Receipt NumberEach time you post a receipt for a purchase order, this field displays thelatest receipt number.
PO NumberA purchase order number is a unique number, up to 22 characters, which isusually assigned by the program using the prefix, length, and next numberthat you specified on the P/O Options screen.
User's Guide 553
Appendix A: Purchase Orders Screen Guides
To add a new purchase order, press the Tab key or click the New button.If you do not want Purchase Orders to assign the order number, type thenew number in this field.
To select an existing purchase order for editing, you can:
l use the Finder or navigation buttons
l Type the purchase order number, and then press Tab or Enter
You can change all information from an existing purchase order except thevendor number, template code (if any), and tax group.
Vendor NumberThe vendor number identifies the vendor to whose account you will post thedocument. This number determines the vendor and billing address, andsets the default tax group and payment terms. In multicurrency systems,the vendor number also specifies the currency of the document.
l To select an existing vendor, use the Finder , or type the number andpress Tab.
l To add a new vendor, do one of the following:
If you want to add the vendor record now, click the New buttonafter typing the vendor number, and then enter information for thevendor in Accounts Payable.
If you do not want to add the vendor record now, type only the vendornumber. (You can enter the vendor name on the next tab.)
Important! Although you can add a purchase order before you addthe vendor record in Accounts Payable, you should not use thisoption in a multicurrency system.If the tax reporting currency for the tax group that you want to usediffers from the vendor’s currency, you must create the vendorrecord before you enter the invoice.
In any case, you must create the vendor record in Accounts Payablebefore you can post an invoice in A/P.
l To edit the vendor's billing address, click the Zoom button, or click inthe Vendor Number field, and then press F9.
Note: If the vendor is on hold in Accounts Payable, the purchase orderwill also be placed on hold until you remove the hold in Accounts Payable.
554 Sage 300 ERP Purchase Orders
Transaction Screens
Order tab
Arrival DateIf known, enter the date when you expect the goods to arrive.
Bill-To LocationSelect a code for the inventory location to which you want the vendor tosend the bills for the order. You can also click the Zoom button to openthe P/O Bill-To Location screen, where you can edit the address for thecode you select.
If you prefer, you can omit the code and enter a billing address in thisfield.
DescriptionEnter an optional description of up to 60 characters for the purchaseorder.
FOB PointEnter the name of the free-on-board point, or the location where thevendor begins charging you freight on shipments.
From RequisitionTo select the requisitions from which to create a new purchase order,select the From Requisition option, and then click the Zoom button toopen the P/O Create PO from Requisition screen and select requisitions.
Note: When you create a purchase order from more than onerequisition, optional fields for the first requisition you select appear onthe Optional Fields tab for the purchase order.
Job-RelatedSelect this option if the purchase order is for a project you are managingwith Project and Job Costing.
If the purchase order is job-related:
l Additional fields appear in the Detail table that you can use to enterjob-related information.
User's Guide 555
Appendix A: Purchase Orders Screen Guides
l All items must be for contracts, projects and categories in Project andJob Costing.
l Posting the purchase order updates committed quantities andamounts for the jobs.
Note:l If you are creating a purchase order from multiple requisitions, allrequisitions must be either job-related or non-job-related.
l You cannot add serialized items or items assigned to lots to job-related purchase orders. Instead, you must use a non-job-relatedpurchase order, receive them into inventory, and then use the PJCMaterial Usage screen in Project and Job Costing to move them frominventory to jobs.
On HoldSelect this option if you need to put a purchase order on hold.
A purchase order is automatically placed on hold if the vendor account ison hold, or if the On Hold option is selected for the template beingused. If the template is on hold, you can clear the selection.
You can post a purchase order that is on hold, and posting increasesitem quantities on purchase order in Inventory Control. You cannot postreceipts for the purchase order until you remove the on-holddesignation.
You can list the purchase orders currently on hold on the P/O PurchaseOrder Action report.
Order SubtotalThis field displays the total of all items on the purchase order beforetaxes.
Original AmountEnter the maximum amount that can be ordered on a blanket purchaseorder.
The amount remaining is calculated and displayed each time you postnew details to a blanket purchase order. You cannot post details thatwould exceed the amount available.
556 Sage 300 ERP Purchase Orders

Transaction Screens
PO DateSpecify the date you want to use as the purchase order date. By default,this field displays the Sage 300 ERP session date.
This date is used by the P/O Aged Purchase Orders report to assign thepurchase order to an aging period.
When you run Day End Processing on the date you specify, all futureorders in your Purchase Orders system become active.
PO TypeSelect the purchase order type: active, standing, future, or blanket.
For more information, see "Purchase Order Types " (page 87).
ReferenceEnter an optional reference of up to 60 characters for the purchase order.
Ship-To LocationIf you use Inventory Control, enter the code for the inventory location towhich you want the vendor to ship the order.
If you do not use Inventory Control, or if you want to use a descriptionand address of a location that is not in your Inventory Control system,enter the ship-to description and address manually, or you can omit theship-to location.
The location you specify becomes the default location for the detail linesyou add to the requisition or purchase order.
You can click the Zoom button to open the P/O Ship-To LocationInformation screen, which you use to enter a ship-to address or edit theaddress for the selected code.
Ship ViaOptionally, specify the shipping method by which you expect to receivethe goods you are ordering from the vendor, and enter a description ofthe shipping method.
Template CodeThis field displays the code for the default template specified on the P/OOptions screen. You can select another template if you wish, or leave thefield blank.
User's Guide 557

Appendix A: Purchase Orders Screen Guides
The template determines which entries are displayed for the FOB point,description, reference, comment, ship-to location and bill-to location (ifyou use Inventory Control), and ship-via code.
If the vendor record has not yet been added in Accounts Payable, thetemplate also displays entries for the tax group (which specifies thecurrency in a multicurrency system) and terms.
On the P/O Options screen, you can specify a default template to displaya standard set of default vendor and purchase order settings for eachnew transaction you create. The default template provides initialsettings, but these are overridden by settings from the vendor record—and from another template if you choose another one.
For more information, see "About Templates" (page 66).
Terms CodeSelect the terms code (defined in Accounts Payable) that represents thepayment terms you expect the vendor to allow on the order.
Vendor Account SetThe account set from the vendor record appears in this field as thedefault. It specifies the general ledger payables control, purchasediscounts, prepayment, and retainage accounts to which the transactionwill be distributed.
You can change the account set for a particular purchase order, receipt,return, invoice, credit note, or debit note. If you use multicurrencyaccounting, however, the new account set must use the same currencyas the vendor's account set.
Note: If you change the account set on a receipt, make sure that youuse the same account set for returns, invoices, and credit or debitnotes.
Details table
Allocated TaxThis field displays the tax amount allocated to item details, includingtaxes that are included in item costs. Recoverable and expensed taxamounts are not included.
558 Sage 300 ERP Purchase Orders
Transaction Screens
Allocated taxes form part of the item costs that are posted fromreceipts, invoices, returns, credit notes, and debit notes to theInventory Control item records by Day End Processing.
Billing Type, Billing Rate, and A/R Item NumberThese fields appear when you select the Job Related option on theOrder tab.
For job-related purchase orders, you specify the billing type, billingcurrency, billing rate, and A/R item number (if appropriate) to use forthe customer invoice.
A/R Item NumberThis field displays the A/R item number associated with the projectresource used for the contract in Project and Job Costing. You canselect a different A/R item number only for time and materialprojects, as follows:
l On a standard project, this field displays the A/R item numberand unit of measure specified for the project resource categoryas the default. You can accept the item number or select anothervalid A/R item number.
l On a basic project, this field displays the A/R item number andunit of measure specified for the project category. You canaccept the item number or select another valid A/R item number.
l If you change the A/R item number, the item number must be avalid item number in Accounts Receivable, and the unit ofmeasure must be a valid unit of measure both for the new itemnumber and the vendor’s currency.
Cost plus and fixed price projects do not use an A/R item number.
Billing CurrencyThis field appears only in multicurrency systems for time andmaterials projects and for fixed price projects using billings andcosts or accrual-basis accounting methods.
The billing currency is the customer's currency specified on thecontract, and you cannot change it.
User's Guide 559
Appendix A: Purchase Orders Screen Guides
Billing currency is blank for Fixed Price projects using completedproject or project percentage complete methods, and for Cost Plusprojects.
Note: Billing currency is not displayed for basic or standardinternal Time and Materials projects, or for single-currencyFixed Price projects that use billings and costs or accrual-basisaccounting methods.
Billing RateThis field displays the billing rate for the specified resource (forstandard projects) or category (for basic projects).
You can edit the billing rate if the billing type is Billable. The fielddisplays 0.000000 if the billing type is Non-Billable or No Charge.
The billing rate is defaulted as follows:
l For basic projects:
For a category cost class of Subcontractor, Overhead,Miscellaneous Equipment, or Material, the billing rate isdefaulted from the category resource.
For a category cost class of Labor, the default billing rate isbased on the Default Billing Rate From option for theemployee resource category.
l For standard projects:
For a category cost class of Subcontractor, Overhead,Miscellaneous Equipment, or Material, the billing rate isdefaulted from the category.
For a category cost class of Labor, the default billing rate isbased on the Default Billing Rate From option for the laborcategory.
The Billing Rate option does not apply to internal contracts.
Note:l You can specify the billing rate for Time and Materials projectsand for Fixed Price projects that use Billings and Costs orAccrual-Basis accounting methods.
560 Sage 300 ERP Purchase Orders
Transaction Screens
l Billing rate is disabled and set to 0.000000 on a basic orstandard internal contract for Time and Materials projects or forFixed Price projects using Billings and Costs or Accrual-Basisaccounting methods.
l The billing rate cannot be negative.
Billing TypeThis field appears in the Detail table for job-related purchaseorders.
The billing type indicates to Project and Job Costing whether to billthe cost to the customer. You can change this field only for a timeand materials project or for fixed price projects that use billingsand costs or accrual-basis accounting methods (unless they areinternal contracts, in which case this field will be disabled or set tonon-billable).
Basic projects. For a billable project, the category billing typedetermines whether you can change the billing type for the detail. Ifthe specified category is:
l Billable, the default billing type for the detail is billable, but youcan change it.
If the detail is billable you can specify a billing rate for the detail.
If you change the billing type for the detail to no charge or non-billable, the program sets the billing rate to zero and you cannotchange it.
l No charge or non-billable, the program sets the same billingtype for the detail, and you cannot change it. You cannot specifya billing rate for the detail, which the program sets as zero.
If the project is no charge or non-billable, the detail uses thesame billing type as the project, the billing rate is set to zero,and you cannot change them.
Standard projects. If the project is billable, the resource billingtype determines whether you can change billing type for the detail.If the specified resource is:
l Billable, the program displays Billable as default billing type,but you can change it for the detail. If the detail is billable, you
User's Guide 561
Appendix A: Purchase Orders Screen Guides
can specify a billing rate for the detail.
If you change the billing type for the detail to no charge or non-billable, the program sets the billing rate to zero, and youcannot change it.
l No charge or non-billable, the program sets same billingtype for the detail, and you cannot change it. You cannot specifya billing rate for the detail, which the program sets as zero.
If the project is no charge or non-billable, the detail uses thesame billing type as the project, and you cannot change it. Theprogram also sets the billing rate to zero, and you cannotchange it.
For fixed price and cost plus projects, the Billing Type field isblank. A billing type is not required for these types of projects.
Unit of MeasureThis field appears for Time and Materials projects if you selectedthe Job Related option for this transaction.
You must enter a unit of measure that is valid for the itemnumber/resource that you specified and for the contractcustomer's currency.
Note: For internal time and materials projects (basic orstandard contracts) the A/R item unit of measure will be disabledor blank.
Comments/InstructionsTo enter comments or instructions for a detail line, click the Zoombutton beside the field, or press Shift+F9.
If you are creating a purchase order from a requisition, anycomments or instructions you entered for the detail line on therequisition are included on the purchase order, but you can change ordelete them.
CompletedYou can complete a line only if the outstanding quantity is zero. Ifnecessary, mark an existing line as completed using one of thefollowing methods:
562 Sage 300 ERP Purchase Orders
Transaction Screens
l In the Detail table, press any key to enter "Yes" in the Completedcolumn
l In the P/O Detail Items/Taxes screen, select the Completed option.
When you post receipts to complete a purchase order line,Completed is selected automatically.
Contract, Project, Category and Item Number/ResourceIf the purchase order is job-related, you specify for each purchaseorder detail where the items or resources are going to be used. If youuse different terms than "Contract," "Project," and "Category" inProject and Job Costing, the program displays them instead.
For job-related purchase orders, you can also specify the billing type,billing rate, and AR item number for the customer invoice near the endof the detail line.
Purchase Orders updates the committed quantities and costs for jobswith the amounts on purchase orders.
Note:l You must select the Job Related check box on the Order tab forthese fields to appear.
l If the purchase order is being created from multiple requisitions,all requisitions must be either job-related or non-job-related.
l You use the Item Number field to specify a resource.
l Cost Plus and Fixed Price projects do not use an A/R item number.
l You cannot change these fields after you add the detail line.
CategorySelect or enter a category that is assigned to the project in Projectand Job Costing.
ContractSpecify a contract number for each detail. You can enter or selectonly contracts that are open or on hold. (You cannot processtransactions to a contract that is on hold, if it has never beenopened.)
User's Guide 563
Appendix A: Purchase Orders Screen Guides
Cost ClassThe program displays the cost class for the category used in eachdetail. You cannot change this field.
Item Number (Resource)Use the Item Number field to identify the resource for this detail.
You must specify a resource that is assigned to the project andcategory in Project and Job Costing. You can specify an inventoryitem number, or the code for another type of resource (such as anequipment code, subcontractor code, or employee number).
Note: You cannot leave this field blank.
ProjectYou can only enter or select projects that are:
l Assigned to the contract that you selected.
l Open or on hold. (If a project that is on hold has never beenopened, you cannot select it.)
l Not closed to costs.
Discount %You can enter a discount as a percentage or an amount. The programuses the amount you enter in this field to calculate the discountedcost for the item detail.
If you enter a percentage in this field, Purchase Orders calculates thediscount amount for the item detail.
Tip: If you prefer not to enter discounts for individual details, youcan enter a discount percentage for the entire document on theTotals tab. Purchase Orders then prorates the discount amount forthe transaction details, overriding any discounts you may haveentered manually for the details.
Discount AmountYou can enter a discount as a percentage or an amount. The programuses the amount you enter in this field to calculate the discountedcost for the item detail.
564 Sage 300 ERP Purchase Orders
Transaction Screens
If you enter a discount amount, the program calculates and displaysthe discount percentage based on the cost. (Alternatively, you canenter a percentage in the Discount Percent field, and let the programcalculate the discount amount.)
Tip: If you prefer not to enter discounts for individual details, youcan enter a discount amount for the entire document on the Totalstab. Purchase Orders then prorates the discount amount for thetransaction details, overriding any discounts you may have enteredmanually for the details.
Discounted Extended CostThis field displays the extended cost less the discount amount.
Drop ShipTo enter a drop-ship address for a detail, click the Zoom buttonbeside the Drop Ship field, or select the field and press Shift+F9.
Select the type of address to enter, and if necessary, select thelocation code, customer number, or ship-to address code for theaddress.
Expected Arrival DateIf necessary, enter or edit the date on which you expect to receive thegoods ordered on the detail line.
If you entered a date in the Arrival Date field on the Order tab (or ona requisition from which you are creating the purchase order), the dateis used as the default expected arrival date for new details you add tothe purchase order.
Expense AccountIf you entered a non-inventory item number for the detail line, enterthe account number of the general ledger expense account to whichyou want to post the detail.
This field displays the number entered with the detail on the receipt,but you can change the number.
For new detail lines, this field displays the account number specifiedon the P/O Options screen for the Default Inventory ExpenseAccount option.
User's Guide 565
Appendix A: Purchase Orders Screen Guides
Expensed TaxThis field displays the amount of tax that is posted separately(expensed) to a general ledger account, rather than allocated todetails on the purchase order.
Tax on all non-inventory items is expensed to the general ledgeraccount you specify with the transaction (or the default inventoryexpense account you specify on the P/O Options screen).
Extended CostEnter the extended cost for the number of units of the item that youordered.
If you change the extended cost, the program automaticallyrecalculates the unit cost.
Extended WeightEnter the extended weight for the number of units of the item thatyou ordered.
If you change the extended weight, Purchase Orders automaticallyrecalculates the unit weight.
The total weight entered for all items on the purchase order appearson the Totals tab.
Item DescriptionThis field displays the item description from the P/O Vendor ContractCosts record (if one exists) or from the Inventory Control orPurchase Orders item record. If necessary, you can change it.
If you enter an item number that does not exist in Inventory Control,you also enter the description for the item. You can enter non-existent item numbers only if you selected the Allow Non-inventory Items option on the P/O Options screen.
Purchase Orders displays the item description that was entered withthe detail on the receipt, but you can change it.
Item NumberEnter the number of the item, or use the Finder to select it.
566 Sage 300 ERP Purchase Orders
Transaction Screens
If you selected the Allow Receipt Of Non-stock Items option inInventory Control and the Allow Non-inventory Items option inPurchase Orders, you can enter non-stock item numbers in this field.
If you are creating a purchase order from a requisition, the itemnumber entered with the requisition appears and you cannot change it.However, you can delete the line if necessary.
If you have added manufacturers' item numbers or bar codes inInventory control, you can enter those numbers in this field. Thesenumbers could include internally-used bar codes, UPC numbers, orISBNs, enabling you to use a scanner (or enter a short code) to enterinventory item numbers.
If you enter a manufacturer's item number, Purchase Orders replacesit with your inventory item number, and then displays themanufacturer's item number you entered in the Manufacturer'sItem Number field, near the end of the detail line.
Line NumberTo select an existing line to edit or delete, click the line, or enter itsline number in this field on the P/O Detail Items/Taxes screen.
Note: You cannot delete completed lines.
LocationThis field appears only if you use Inventory Control.
Enter the code for the location where you expect to receive theshipment (or to which you want to post drop-shipped items).
The program displays the ship-to location code, if any, entered on thefirst tab, but you can select a different location. You can omit thelocation when adding details for non-inventory items.
Note: If you change locations after assigning serial and/or lotnumbers, you must re-assign the serial and/or lot numbers.
Manufacturer's Item NumberIf you entered a manufacturer's item number in the Item Numberfield on the requisition or purchase order, the number appears in theManufacturer's Item Number field.
User's Guide 567
Appendix A: Purchase Orders Screen Guides
Manufacturer's item numbers are alternative item numbers— such asbar codes or shortcut codes— that identify your inventory items. Youset up manufacturer's item numbers in Inventory Control.
You can enter manufacturer's item numbers wherever you enter itemnumbers in Purchase Orders.
Net Of TaxThis field displays the extended item cost, minus any applicable taxamount. You cannot edit the amount.
Non-Stock Clearing AccountIf this is a non-stock item, the non-stock clearing account associatedwith the item's account set appears. You can change the account, ifnecessary.
Optional FieldsOptional fields are fields that have been added by your company tothe transaction entry screens and detail lines in purchase orderstransactions.
If you use optional fields, an Optional Fields column appears in thetable. You can click the column heading to display the optional fieldsassigned to a selected detail, and edit their contents.
Note: You must use Transaction Analysis and Optional Field Creatorto add and use optional fields.
For more information about using optional fields in transactions, see"About Optional Fields in Transactions" (page 90).
Order NumberEnter the number of a sales order for which you are creating thedetail. If you use Sage 300 ERP Order Entry with Purchase Orders,you can also use the Finder to select an Order Entry order number.
You can change or erase an order number that is displayed with adetail you added from a purchase order or posted previously with thescreen.
If you change an order number that is displayed with a detail line, thenew order number does not replace the previous number on the
568 Sage 300 ERP Purchase Orders
Transaction Screens
corresponding receipt and will not be reported on the P/O ShippableBackorders report.
You also enter the unit weight, extended weight, vendor item number,comments, and the G/L expense account specified for non-inventoryitems.
Quantity OrderedFor new detail lines, type the item quantity to order (in the unit youselect for the Unit Of Measure field).
If you are creating a purchase order from a requisition, the quantityentered for the detail on the requisition appears in this field, but youcan change it.
Quantity OutstandingOn new purchase order detail lines, this field displays the quantityordered. Each time you post a receipt for a detail, its outstandingquantity is reduced on the purchase order. When the outstandingquantity is zero, the purchase order detail line is completed and youcannot make further changes to it.
To reduce the outstanding quantity on an existing detail line you areediting, enter the desired amount (enter zero to complete a line andcancel remaining outstanding units).
Quantity ReceivedThis field displays the total amount received to date for the detail. It isupdated each time you post a receipt for the detail.
Recoverable TaxThis field displays the amount of tax that can be recovered by yourcompany (for example, recoverable Canadian Goods and Services Tax[GST] amounts).
Tax IncludedIn the Detail table, this field displays the amount of tax that is includedin the extended item cost (when the cost includes tax).
On the zoomed Detail Items/taxes screen, this field displays Yes or Noto indicate whether tax amounts are included in the item cost for eachtax authority. The default choice for this option is provided from thevendor record in Accounts Payable or from the vendor contract cost.
User's Guide 569
Appendix A: Purchase Orders Screen Guides
Note: You can select Yes only if the tax authority is set up in TaxServices to allow tax-included costing.
You can also edit total tax amounts on the Taxes tab.
Unit CostEnter the cost of a single unit of the item you are ordering in thedetail.
Purchase Orders displays a default cost as follows:
l If you have set up vendor contract costs, Purchase Orders displaysthe cost specified as a contract cost for the item and unit ofmeasure.
l If P/O does not find a valid contract cost, it uses the inventory costspecified on the P/O Options screen.
Use the Finder to view any vendor contract costs, regular vendorcosts, and other costs maintained by Inventory Control.
Purchase Orders uses the unit cost to calculate the extended cost. Ifyou change the unit cost, the extended cost is recalculated.
In multicurrency ledgers, the cost is expressed in the vendor'scurrency.
Note: You can assign security to the Unit Cost and Extended Costfields, to prevent unauthorized changes to the fields.
If you use Project and Job Costing, unit cost is defaulted asfollows:
l If the project is a standard project:
For a category cost class of Subcontractor, Overhead, orMiscellaneous Equipment, the unit cost is defaulted from thecategory resource.
For a category cost class of Labor, the default unit cost is basedon the Default Unit Cost From option for the employee resourcecategory.
For a category cost class of Material (if you are using InventoryControl), the default unit cost is based on Purchase Orders'default item cost (set in P/O Options).
570 Sage 300 ERP Purchase Orders
Transaction Screens
For a category cost of Material (if you are not using InventoryControl), the unit cost is based on Purchase Orders vendor costs.
l If the project is a basic project:
For a category cost class of Subcontractor, Overhead, orMiscellaneous Equipment, the unit cost is defaulted from thecategory.
For a category cost class of Labor, the default unit cost is basedon the Default Unit Cost From option for the labor category.
For a category cost class of Material (if you are using InventoryControl), the default unit cost is based on Purchase Orders'default item cost (set in P/O Options).
For a category cost of Material (if you are not using InventoryControl), the unit cost is based on Purchase Orders vendor costs.
Unit of MeasureEnter the unit of measure in which to order the item. If you arecreating a purchase order from a requisition, the unit of measureentered for the detail on the requisition is displayed, but you canchange it.
If you are entering new detail lines, the program displays the stockingUOM by default, unless you have set up vendor contract costs using adifferent UOM.
You must use one of the units of measure that is assigned for the itemin Inventory Control.
Note: The weight UOM can be different from the order UOM.
Unit WeightEnter the weight of a single unit of the item you are ordering in thedetail. On new detail lines, the weight specified in the InventoryControl item record is displayed, but you can change it.
Purchase Orders uses the unit weight to calculate the extended weight.If you change the unit weight, the extended weight is recalculated.
You can select from the weight units of measure defined in PurchaseOrders. Weight is expressed in the unit selected for theWeight UnitOf Measure option on the I/C Options screen.
User's Guide 571
Appendix A: Purchase Orders Screen Guides
On invoices, enter the weight of a single unit of the item for whichyou were invoiced. The program displays the weight specified for theitem on the receipt but you can change it.
Purchase Orders uses the unit weight to calculate the extendedweight. If you change the unit weight, the extended weight isrecalculated.
You can see the total weight estimated from your entries for theinvoiced items on the Totals tab.
Vendor Item NumberEnter the code the vendor uses to identify the item.
If the vendor's item number is specified in the Inventory Control itemrecord, the code appears in this field. (Enter vendors' item numberswhen assigning vendor types in Inventory Control item records.)
If the vendor's item number is specified on the receipt for which youare entering an invoice, the code appears in this field. (You can entervendors' item numbers when assigning vendor types in InventoryControl item records.)
Weight UOMThis is the unit of measure for the weight of this item on the purchaseorder—such as, pounds, kilograms, tons.
By default, the program displays the weight unit of measure from theitem record, but you can change it to another defined unit of measure(and the program will recalculate the weight accordingly).
The weight UOM for the complete order is determined by the defaultweight unit of measure set in the I/C Options (or in the P/O Optionsscreen if you do not use Inventory Control).
Taxes Tab
Tax AmountThis field displays the amount of tax that is due for each authority.
For each authority, Purchase Order calculates a tax amount if:
l The vendor is subject to tax.
l The transaction contains taxable items or taxable additional costs.
572 Sage 300 ERP Purchase Orders
Transaction Screens
l Tax rates are specified for the tax authorities and classes in TaxServices.
If no tax amounts appear, click the Calculate Taxes button.
Tax amounts are not automatically calculated on a purchase order untilyou post it or click the Totals tab.
Tax Authority and DescriptionThese columns list the codes and corresponding descriptions for all thetax authorities in the tax group specified for the document.
You enter tax information in the Tax Services module in CommonServices.
Tax BaseThis field displays the net cost of items, before tax is added, for the taxauthority.
Tip: The Tax Base field is particularly useful for items that have taxincluded in their prices.
Tax Class and DescriptionThese columns list the tax classes that are assigned to the tax authoritiesto which the vendor is subject, and their corresponding descriptions.
You can change a tax class to another tax class that is assigned to theauthority, but not the description.
To change the description for the tax class or make other changes for thespecified tax group, use the Tax Services screens in Common Services.
Tax ExcludedThe program displays the total amount of tax that is not included in itemcosts for the authority.
Tax GroupFor new vendors (not yet added to Accounts Payable), enter the tax groupcode that identifies the tax authorities to which the vendor is subject. Youmust use a tax group that is defined for your company in CommonServices.
User's Guide 573

Appendix A: Purchase Orders Screen Guides
When entering a document for an existing vendor (defined in AccountsPayable), you can change the tax group that appears as the default.
You must enter a valid tax group code with every purchase order.
Tax IncludedThe program displays the total amount of tax that is included in itemcosts for the authority.
You can include tax amounts in item costs only if permitted by theauthority.
Tax Reporting CurrencyTax reporting fields appear on the Taxes tab only if the tax group's taxreporting currency is different from your functional currency and thevendor's currency.
Along with the tax reporting currency, the program displays the amountof included and excluded tax to be reported in that currency on taxtracking reports for all the tax authorities listed on the document.
You set the tax reporting currency for tax groups in the Tax Servicesmodule in Common Services.
Tax Reporting TotalThis field displays the sum of the tax reporting amounts for all taxauthorities.
It appears only if the tax reporting currency for the tax group isdifferent from your functional currency and the vendor's currency.
You set the tax reporting currency for tax groups in the Tax Servicesmodule in Common Services.
Vendor Tax ClassThe program displays the tax classes assigned to the vendor's taxauthorities. You can change each tax class to another tax class that ispermitted by the authority.
Tax Class DescriptionThe program displays the description of each tax class. You can changethe description only in Tax Services.
574 Sage 300 ERP Purchase Orders
Transaction Screens
Optional Fields TabThe Optional Fields tab contains optional fields added by your company thatapply to the transaction as a whole. Custom fields on detail lines apply to theindividual transaction detail.
This tab appears only if you use Transaction Analysis and Optional FieldCreator, and have added optional fields to the P/O Purchase Order Entryscreen.
For more information, see "About Optional Fields" (page 56).
Rates Tab
CurrencyIn multicurrency ledgers, the vendor's currency code appears after youenter the vendor number. All amounts you enter for the purchase orderare in the vendor's currency.
The currency is assigned for the vendor in Accounts Payable and youcannot change it in Purchase Orders.
Exchange RateThe program displays the exchange rate currently in effect for thespecified currency and the displayed rate type and rate date, but you canchange the rate.
You receive a warning if you change an exchange rate by an amount thatexceeds the Spread setting for the currency in Common Services'Currency Rates table.
Rate DateType or select the date to use to select the exchange rate for thedocument you are entering.
The program displays the rate date that is nearest the document date youentered, but you can specify a different date for which an exchange rateexists for the currency in Common Services' Currency Rates table.
If you change the rate date, Purchase Orders checks the rate tables for adate match, and updates the rate if necessary.
Rate TypeIf the rate type you want to use is not displayed, enter the new code.
User's Guide 575
Appendix A: Purchase Orders Screen Guides
Purchase Orders uses rate types when converting multicurrencyamounts on the order to functional currency. Examples of rate typesmight be "spot rate," "average rate," and "contract rate."
You define rate types using the Currency Rate Types screen in CommonServices, and assign the default rate type for Purchase Orders on theProcessing tab of the P/O Options screen.
Totals Tab
CommentsEnter an optional comment for the document.
Any comments you entered for the detail on the receipt are included onthe invoice, but you can change or delete them.
Lines automatically wrap when you reach the end. If you want to start anew line before the line wraps, press Enter.
Less PO DiscountYou can enter an optional discount percentage or discount amount forthe entire document, or enter discounts for individual detail lines.
If you enter a discount for the entire document, Purchase Ordersprorates the discount amount for the document details, overriding anydiscounts you may have entered manually for the details.
Number of LabelsEnter the number of labels you want to print for the purchase order,such as to paste on envelopes you are mailing to the vendor.
The number of labels you specify is printed by the P/O Mailing Labelsscreen when you print labels for the purchase order.
Number of LinesThis field displays the number of detail lines you entered on thepurchase order.
Check this number against source documents to make sure you enteredall details for the purchase order.
Order SubtotalThis field displays the total of all detail costs entered for the purchase
576 Sage 300 ERP Purchase Orders
Transaction Screens
order, including tax-included amounts. This subtotal does not include taxamounts that are included in item costs.
Plus Excluded TaxThis field displays the total excluded tax amount of all details on thepurchase order. This amount does not include taxes that are included initem costs.
Tax IncludedThis field displays the total amount of tax included in item costs for theauthority.
You use the Tax Services screens to specify whether a tax authorityallows tax-included costs in item prices.
TotalThis field displays the total of all item costs and taxes for the purchaseorder.
Total WeightThis field displays the total estimated weight of the purchase order,calculated from the weight you enter for each item detail.
Use this amount to estimate shipping charges for the order.
P/O Vendor Information Screen
To open this screen:On a Purchase Orders transaction entry screen, click the Zoom button besidethe Vendor Number field.
Overview
Use the Vendor Information screen to specify:
l A name for a new vendor number that is not yet added to Accounts Payable.
l The vendor's address, phone numbers, and contact name.
Fields and Controls
AddressEnter the address for the vendor.
User's Guide 577
Appendix A: Purchase Orders Screen Guides
ContactEnter the name of a contact person, department, or position.
FaxEnter the vendor's fax number.
PhoneEnter the vendor's telephone number.
Vendor NameIf you specify a vendor number that has not yet been added in AccountsPayable, you can use this field to enter the new vendor's name. Otherwise,this field displays the name for the selected vendor, and cannot be edited.
Note: The vendor name appears beside the vendor number ontransaction screens.
Vendor NumberIdentifies the vendor from whom you received the document. The vendornumber sets the default tax group and payment terms. In multicurrencysystems, the vendor number also specifies the currency of the document.
P/O Purchase Order Entry Bill-To Location Screen
To open this screen:
1. Open Purchase Orders > P/O Transactions > Purchase OrderEntry.
2. Click the Zoom button ( ) beside the Bill-To Location field, or press the F9key in the field.
Overview
Use the Bill-To Location screen to edit an existing bill-to location address, orto type a new billing address for the purchase order.
You do not have to enter a bill-to location code or address information.
Fields and Controls
AddressUse the Address field to type the address for the location, or edit thedisplayed information if necessary.
578 Sage 300 ERP Purchase Orders

Transaction Screens
Bill-To LocationIf you use Inventory Control and you selected a bill-to location code, theprogram displays the location code.
If you do not use Inventory Control, you can click the Zoom button besidethe field name.
Enter the bill-to location information by typing in the screen that appears.
ContactEnter the name of a contact person, department, or position.
DescriptionUse the Description field to type a description of the location, such as acompany name, or edit a displayed description if necessary. You do not haveto include a description.
E-mailUse the E-mail field to type the e-mail address for the location, or edit thedisplayed address if necessary.
Fax NumberUse the Fax Number field to type the fax number for the location or edit adisplayed number if necessary.
Phone NumberUse the Phone Number field to type the telephone number for the locationor edit a displayed number if necessary.
P/O Purchase Order Entry Ship-To Location Screen
To open this screen:
1. Open Tasks > Browse > Purchase Orders > Purchase Order Entry.
2. Click the Zoom button ( ) beside the Ship-To Location field, or press the F9key in the field.
Overview
Use the Ship-To Location screen to edit an existing ship-to location address orto enter a new ship-to address for the purchase order. If you select anInventory Control location code, the code appears as the default location codefor the purchase order detail lines.
User's Guide 579
Appendix A: Purchase Orders Screen Guides
Fields and Controls
AddressType the address for the location where goods are to be shipped, or edit thedisplayed information if necessary.
ContactType the name of a contact person, department, or position at the ship-tolocation, and enter a phone number, fax number, and e-mail address ifappropriate (or edit the displayed contact).
DescriptionType a description of the location, such as a company name, or editdisplayed information if necessary.
Fax NumberType the fax number for the location, or edit displayed number ifnecessary.
Phone NumberType the phone number for the location, or edit displayed number ifnecessary.
Ship-To Location (display only)The program displays the code for the specified ship-to location, if any.
P/O Create PO From Requisition Screen
To open this screen:Open Menu > Tab > Module > Form Name
1. Open Tasks > Browse > Purchase Orders > Purchase Order Entry.
2. Click the Zoom button ( ) beside the From Requisition Number field, ortab to the field and then press the F9 key.
Overview
Use this screen to:
l Select a requisition from which to create a purchase order.
l Select several requisitions from which to create a single purchase order.
580 Sage 300 ERP Purchase Orders
Transaction Screens
Using requisitions is optional. You can create purchase orders withoutrequisition numbers.
To use the From Requisition Number field:
1. Click the Zoom button beside the From Requisition Number field, or tab tothe field, then press the F9 key.
2. Type the requisition number to use or select it from the Finder.
3. Choose whether to select requisition details with no vendor numbers foryour purchase order.
4. If you are including details with blank vendor numbers, choose the vendortype (optional).
5. Choose other requisition numbers, if applicable.
Note: When you create a purchase order from more than one requisition,the fields on the Optional Fields tab will be taken from the first requisitionthat you select.
6. When ready, choose the Order button. Yes appears in the Ordered columnfor each requisition and the session (sign-on) date appears in the DateOrdered column.
7. Choose Close to close the screen.
Use the following buttons to:
l Order.To select the specified requisition details, insert Yes in the Orderedcolumn for each requisition, and insert the session (sign-on) date in the DateOrdered column.
l Close.To close the Create PO From Requisition screen.
Fields and Controls
Requisition NumberType the requisition number from which you want to create a purchaseorder, or select it from the Finder.
You can select more than one requisition number for the purchase order.
Note: When you create a purchase order from more than one requisition,the fields on the Optional Fields tab will be taken from the first requisitionthat you select.
User's Guide 581
Appendix A: Purchase Orders Screen Guides
Use Blank VendorsChoose this option to add requisition details with no vendor numbers to thepurchase order.
Use I/C VendorsChoose this option to add requisition details without vendor numbers to thepurchase order if the purchase order vendor is assigned as the specifiedvendor type in the Inventory Control item records.
Ordered (display only)When you press the Order button, Purchase Orders inserts Yes in this field,to indicate that the requisition details have been added to the purchaseorder.
Date Ordered (display only)Choose this option to add requisition details with no vendor numbers to thepurchase order.
P/O Purchase Order Entry Detail Items/Taxes Screen
To open this screen:
1. Open Purchase Orders > P/O Transactions > Purchase OrderEntry.
2. Enter header information for a new purchase order, or select an existingpurchase order.
3. Select a detail line, and then press F9 or click Item/Tax.
Overview
The Detail Items/Taxes screen displays all the fields for a single detail, ratherthan rows of data for all the details of an order. The screen also displaysadditional tax information for the detail that doesn't appear on the detail-entrygrid.
Use this screen to add, edit, and delete purchase order detail lines.
Fields and Controls
Buttons
AddUse the Add button to add a new detail you entered in the Detail
582 Sage 300 ERP Purchase Orders
Transaction Screens
Items/Taxes window.
Calc. TaxesClick the Calc. Taxes button to see tax amounts for a detail before youpost the document.
Note: Tax amounts are not calculated automatically until you click theTaxes tab or the Totals tab, or you post the purchase order.
DeleteUse the Delete button to delete the detail displayed in the DetailItems/Taxes window.
SaveUse the Save button to save the changes you made to a detail you editedin the Detail Items/Taxes screen.
Allocated TaxThis field displays the total amount of tax allocated to the cost of the item.
Comments/InstructionsType a comment about the item or detail, up to 75 characters.
To open the Detail Comments/Instructions window, do one of the following:
l Click the Zoom button ( ) to the right of this option.
l Select the option, and then press Shift+F9.
CompletedIndicates whether the ordered items are outstanding or have all beenreceived or canceled.
You can specify that a line is completed when you add it, but you would notthen be able to edit the line. You normally complete lines by posting receiptsthat automatically complete lines when the full quantity is received.
You manually select Completed status for a detail when you want to cancelremaining units. You must also enter zero in the Quantity Outstanding fieldbefore posting. Alternatively, if you enter zero as the Quantity Outstanding,the Completed status is changed to Yes.
User's Guide 583

Appendix A: Purchase Orders Screen Guides
When a purchase order detail line is complete, it is omitted from thepurchase order details you see when you apply a receipt to the purchaseorder number.
Contract, Project and CategoryFor job-related purchase orders, you use these fields to enter informationfor the related job in Project and Job Costing.
Note: If you use different terms than "Contract," "Project," and"Category" in Project and Job Costing, the program displays them instead.For more information, see "About Job-Related Transaction Details " (page202).
Discount %You can enter a discount as a percentage or an amount. The program usesthe amount you enter in this field to calculate the discounted cost for theitem detail.
If you enter a percentage in this field, Purchase Orders calculates thediscount amount for the item detail.
Tip: If you prefer not to enter discounts for individual details, you canenter a discount percentage for the entire document on the Totals tab.Purchase Orders then prorates the discount amount for the transactiondetails, overriding any discounts you may have entered manually for thedetails.
Discount AmountYou can enter a discount as a percentage or an amount. The program usesthe amount you enter in this field to calculate the discounted cost for theitem detail.
If you enter a discount amount, the program calculates and displays thediscount percentage based on the cost. (Alternatively, you can enter apercentage in the Discount Percent field, and let the program calculate thediscount amount.)
Tip: If you prefer not to enter discounts for individual details, you canenter a discount amount for the entire document on the Totals tab.Purchase Orders then prorates the discount amount for the transactiondetails, overriding any discounts you may have entered manually for thedetails.
584 Sage 300 ERP Purchase Orders
Transaction Screens
Drop-ShipIndicates whether the goods are to be shipped to a different address, such asto your customer's address, or shipped to another location from the locationspecified for the detail line (if you use Inventory Control) or for the order (ifyou do not use Inventory Control).
To open the Drop-Shipment Address window, do one of the following:
l Click the Zoom button ( ) to the right of this option.
l Select the option, and then press Shift+F9.
Note: If you use Accounts Receivable, you can select a customer's addressor ship-to location for a drop shipment.
Expected Arrival DateThe date you expect to receive the item.
Extended CostThe quantity outstanding multiplied by the unit cost.
Purchase Orders calculates the extended cost, but you can change it. If youchange the amount, the unit cost is recalculated accordingly.
Extended costs are not displayed if item costs are password-protected inInventory Control, unless you type in a unit cost for the detail.
Extended WeightThe quantity ordered multiplied by the unit weight you entered for the detail.
General Ledger Expense AccountThis is the general ledger account number to which you post the expense ofnon-inventory items (if your system allows non-inventory items). You canselect the account number using the Finder for the field.
The default account number comes from the Purchase Orders G/L Integrationscreen.
Item NumberType the number of the item you are ordering, or select it from the Finder.
Note: The field to the right displays the description for the item for existingInventory Control item numbers. For non-inventory items, you can enter adescription.
User's Guide 585
Appendix A: Purchase Orders Screen Guides
You can enter a non-stock item, if Inventory Control permits them. If yourPurchase Orders system allows non-inventory items, you can also enteritem numbers that are not defined in Inventory Control.
If manufacturer's item numbers or bar codes have been added in InventoryControl, you can enter them in most item number fields. These numberscould include internally-used bar codes, UPC numbers, or ISBNs - lettingyou use a scanner (or type a short code) for entering inventory itemnumbers.
The program inserts the correct item number, and—on transaction detaillines —inserts the manufacturer's item number in the manufacturer's itemnumber field at the end of the line.
Line NumberThis field indicates the line number of the selected detail.
You can select a different detail using the navigation buttons, or by enteringthe line number. You can also create a new detail by clicking the Newbutton .
Tip: To delete the line you selected, click the Delete button. Click Yes ifa message appears asking you to confirm the deletion. You cannot deletecompleted lines.
LocationThis field appears only if you use Inventory Control.
Enter the code for the location where you expect to receive the shipment(or to which you want to post drop-shipped items).
The program displays the ship-to location code, if any, entered on the firsttab, but you can select a different location. You can omit the location whenadding details for non-inventory items.
Note: If you change locations after assigning serial and/or lot numbers,you must re-assign the serial and/or lot numbers.
Non-Stock Clearing AccountThis is the general ledger account number that you debit when you receivenon-stock items and credit when you ship them.
586 Sage 300 ERP Purchase Orders
Transaction Screens
You can use non-stock items to handle specially ordered items which you donot stock in your inventory, and to handle service charges that appear oninvoices.
You specify the default account numbers for non-stock items in the I/CAccount Sets window in Inventory Control.
Optional FieldsIf optional fields have been defined for purchase orders details , you canclick the Zoom button beside the Optional Fields field to display theoptional fields assigned to a selected detail, and edit their contents.
For more information about using optional fields in transactions, see "AboutOptional Fields in Transactions" (page 90).
Manufacturer's Item Number A manufacturer's item number is another number or code that you use for aninventory item—such as a UPC code, an internally-used bar code, aparticular part number used by the manufacturer, or a shortcut code forcommonly used inventory items.
Manufacturers' item numbers must be set up in the Inventory Controlprogram.
If you enter a manufacturer's item number in the Item Number field of atransaction detail line, Purchase Orders will replace the manufacturer's itemnumber with your inventory item number, and insert the manufacturer'sitem number in this field.
Order NumberA sales order number of up to 22 characters.
If you use Order Entry with Purchase Orders, you can select active OrderEntry order numbers from a Finder, and you can automatically createpurchase orders that contain order numbers, using the Create POs From O/Ewindow. If you use the option to Allow Receipt Of Non-stock Items inInventory Control, you can also accept non-stock items from Order Entry.
You can enter sales order numbers with purchase order details for your owninformation.
Quantity OrderedThe number of units ordered.
User's Guide 587
Appendix A: Purchase Orders Screen Guides
If you use the Allow Fractional Quantities option in Inventory Control, youcan order items in fractions of units.
When editing a purchase order, you can increase or decrease the quantityfor item details that are not yet fully received or canceled.
If you have selected the option to Allow Receipt Of Non-stock Items inInventory Control, you can enter details for them in Purchase Orders.
Quantity OutstandingThe number of item units that you have not yet received or canceled.
This field is updated when you post receipts for the purchase order anddetail line. You can edit the outstanding quantity yourself, such as to canceloutstanding units.
Quantity ReceivedThe quantity of each detail that has been received (this number is updatedwhen you post receipts for the detail).
Unit CostDisplays the unit cost from the item record. You can edit the cost in thisfield.
If you use Inventory Control, the type of cost that is displayed isdetermined by the selection for the Default Item Cost option on the I/COptions screen. You can select a different cost type for a detail line on apurchase order. Cost amounts are displayed with six decimal places.
If you do not use Inventory Control, the default item cost is the vendor costand you will not be able to use the Finder to select a different type of cost.
If item costs are password-protected in Inventory Control, users enteringpurchase orders will see zeroes as the costs of items, and costs in Findersfor the Unit Cost and Extended Cost fields will be zero, but you can stillenter a cost for the detail.
Note: For multicurrency ledgers, although costs are maintained infunctional currency in Inventory Control, the costs in Finders and unitcosts in detail lines are displayed in the vendor's currency.
Unit Of MeasureThe unit of measure for the quantity being ordered.
588 Sage 300 ERP Purchase Orders
Transaction Screens
The stocking unit for the item is displayed by default, but you can select anyother unit of measure that is assigned in the item record.
If you use the Finder to select another unit of measure, the conversion factorfor that unit of measure appears in the Finder screen. (The conversion factoris the number of stocking units contained in the alternative unit. Forexample, if you use a stocking unit of "each," and "carton" has a conversionfactor of 36, it takes 36 stocking units to equal one carton.)
Unit WeightThe weight of one unit of the item, in the unit of measure you specified forthe detail.
Vendor Item NumberThe code or number used by the vendor to identify the ordered item.
Tax AmountThe amount of tax that is included in the extended item cost. (Tax amountsare not displayed until you click the Calc. Taxes button or the Totals tab, oryou post the purchase order.)
Tax BaseThe net cost of items with tax included in their prices.
P/O Purchase Order Entry Drop-Shipment Address Screen
To open this screen:
1. Open Purchase Orders > P/O Transactions > Purchase Order Entry.
2. On the Details table, for a selected detail line, click in the Drop-Ship field,then click the Zoom button (or press the Shift and F9 keys at the sametime).
Overview
Use this screen to enter or edit address information for a detail if you want thevendor to ship items directly to a different address than the inventory locationspecified in the Location field.
User's Guide 589
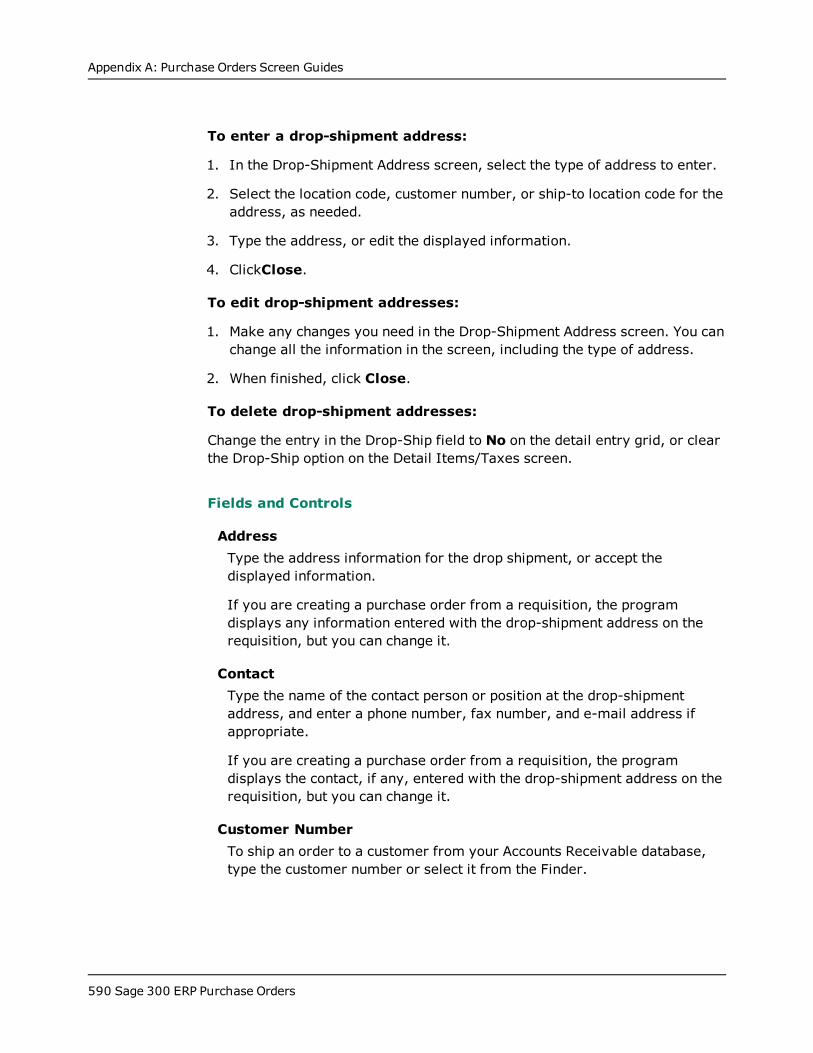
Appendix A: Purchase Orders Screen Guides
To enter a drop-shipment address:
1. In the Drop-Shipment Address screen, select the type of address to enter.
2. Select the location code, customer number, or ship-to location code for theaddress, as needed.
3. Type the address, or edit the displayed information.
4. ClickClose.
To edit drop-shipment addresses:
1. Make any changes you need in the Drop-Shipment Address screen. You canchange all the information in the screen, including the type of address.
2. When finished, click Close.
To delete drop-shipment addresses:
Change the entry in the Drop-Ship field to No on the detail entry grid, or clearthe Drop-Ship option on the Detail Items/Taxes screen.
Fields and Controls
AddressType the address information for the drop shipment, or accept thedisplayed information.
If you are creating a purchase order from a requisition, the programdisplays any information entered with the drop-shipment address on therequisition, but you can change it.
ContactType the name of the contact person or position at the drop-shipmentaddress, and enter a phone number, fax number, and e-mail address ifappropriate.
If you are creating a purchase order from a requisition, the programdisplays the contact, if any, entered with the drop-shipment address on therequisition, but you can change it.
Customer NumberTo ship an order to a customer from your Accounts Receivable database,type the customer number or select it from the Finder.
590 Sage 300 ERP Purchase Orders
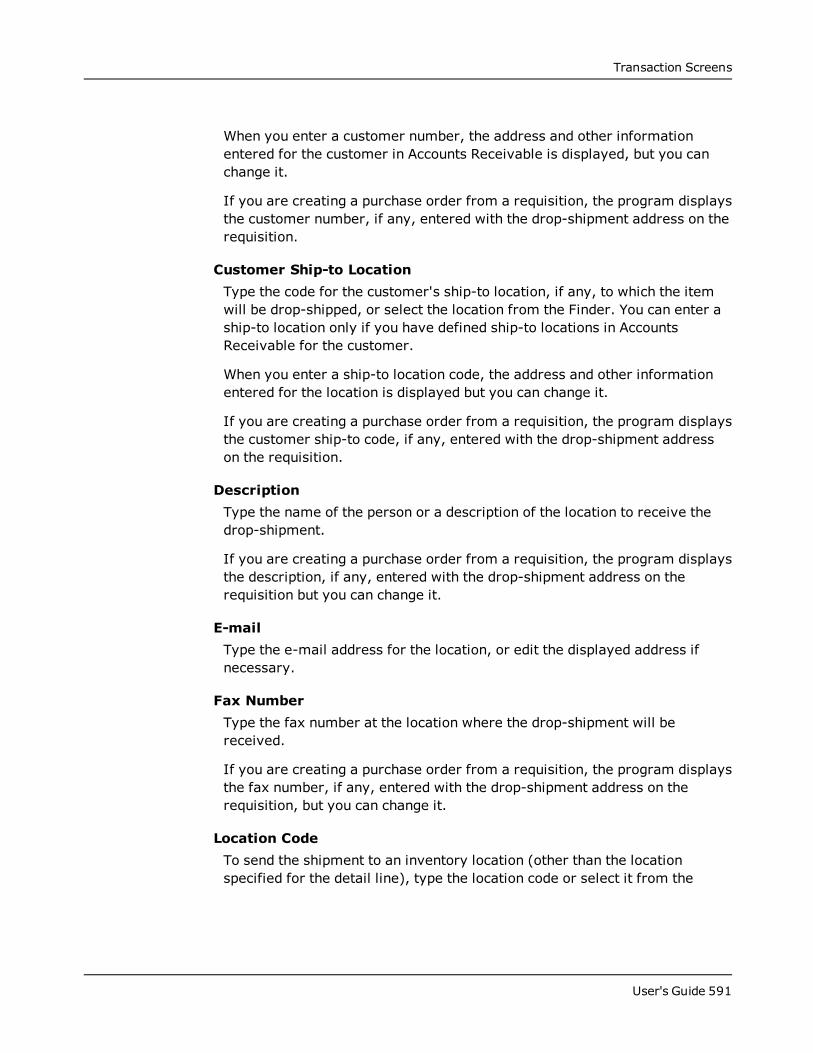
Transaction Screens
When you enter a customer number, the address and other informationentered for the customer in Accounts Receivable is displayed, but you canchange it.
If you are creating a purchase order from a requisition, the program displaysthe customer number, if any, entered with the drop-shipment address on therequisition.
Customer Ship-to LocationType the code for the customer's ship-to location, if any, to which the itemwill be drop-shipped, or select the location from the Finder. You can enter aship-to location only if you have defined ship-to locations in AccountsReceivable for the customer.
When you enter a ship-to location code, the address and other informationentered for the location is displayed but you can change it.
If you are creating a purchase order from a requisition, the program displaysthe customer ship-to code, if any, entered with the drop-shipment addresson the requisition.
DescriptionType the name of the person or a description of the location to receive thedrop-shipment.
If you are creating a purchase order from a requisition, the program displaysthe description, if any, entered with the drop-shipment address on therequisition but you can change it.
E-mailType the e-mail address for the location, or edit the displayed address ifnecessary.
Fax NumberType the fax number at the location where the drop-shipment will bereceived.
If you are creating a purchase order from a requisition, the program displaysthe fax number, if any, entered with the drop-shipment address on therequisition, but you can change it.
Location CodeTo send the shipment to an inventory location (other than the locationspecified for the detail line), type the location code or select it from the
User's Guide 591
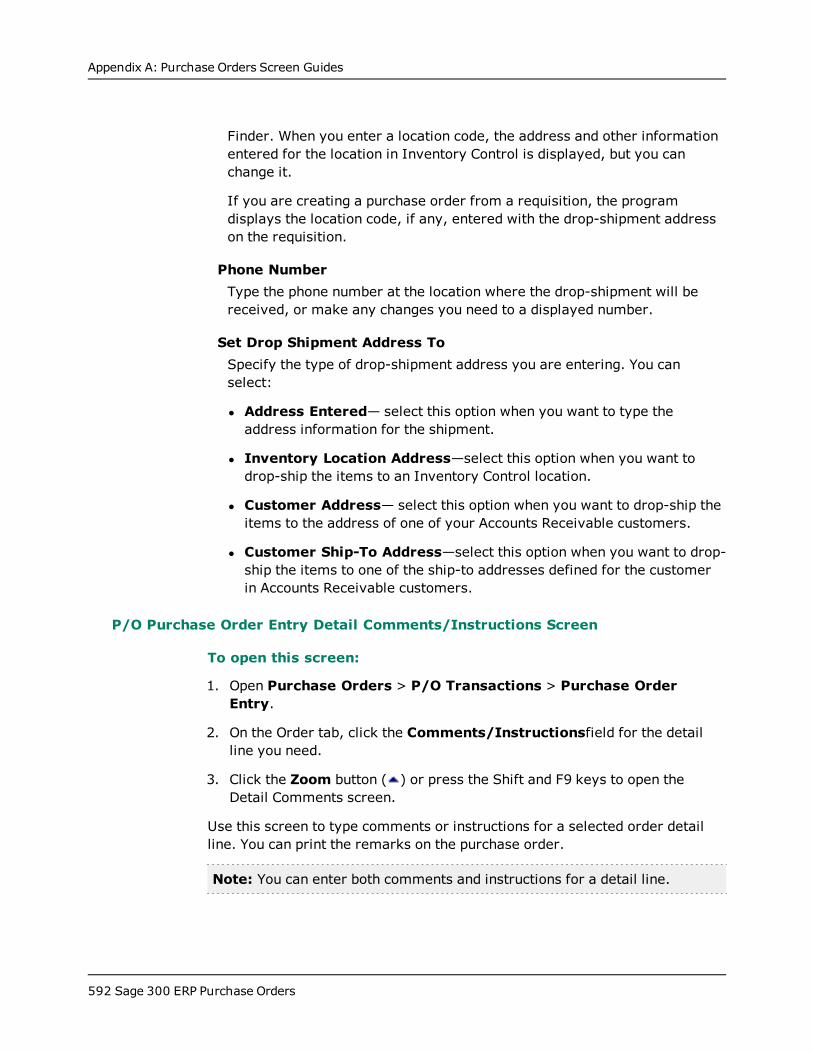
Appendix A: Purchase Orders Screen Guides
Finder. When you enter a location code, the address and other informationentered for the location in Inventory Control is displayed, but you canchange it.
If you are creating a purchase order from a requisition, the programdisplays the location code, if any, entered with the drop-shipment addresson the requisition.
Phone NumberType the phone number at the location where the drop-shipment will bereceived, or make any changes you need to a displayed number.
Set Drop Shipment Address ToSpecify the type of drop-shipment address you are entering. You canselect:
l Address Entered— select this option when you want to type theaddress information for the shipment.
l Inventory Location Address—select this option when you want todrop-ship the items to an Inventory Control location.
l Customer Address— select this option when you want to drop-ship theitems to the address of one of your Accounts Receivable customers.
l Customer Ship-To Address—select this option when you want to drop-ship the items to one of the ship-to addresses defined for the customerin Accounts Receivable customers.
P/O Purchase Order Entry Detail Comments/Instructions Screen
To open this screen:
1. Open Purchase Orders > P/O Transactions > Purchase OrderEntry.
2. On the Order tab, click the Comments/Instructionsfield for the detailline you need.
3. Click the Zoom button ( ) or press the Shift and F9 keys to open theDetail Comments screen.
Use this screen to type comments or instructions for a selected order detailline. You can print the remarks on the purchase order.
Note: You can enter both comments and instructions for a detail line.
592 Sage 300 ERP Purchase Orders
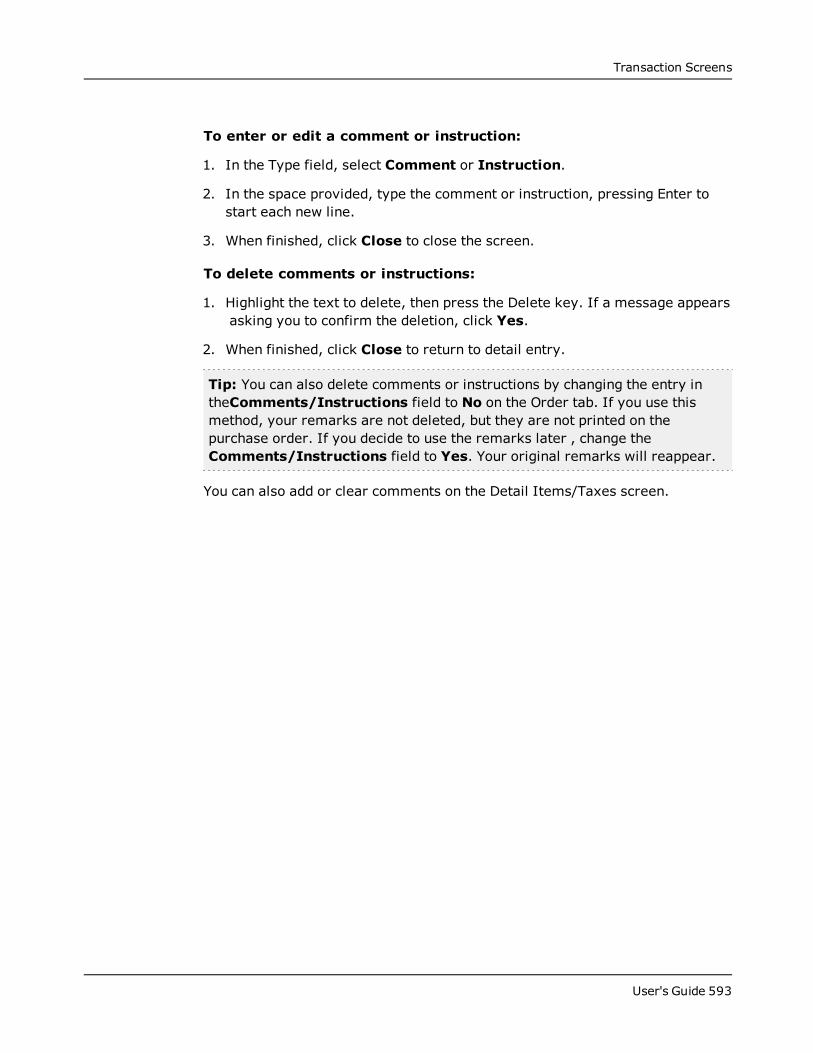
Transaction Screens
To enter or edit a comment or instruction:
1. In the Type field, select Comment or Instruction.
2. In the space provided, type the comment or instruction, pressing Enter tostart each new line.
3. When finished, click Close to close the screen.
To delete comments or instructions:
1. Highlight the text to delete, then press the Delete key. If a message appearsasking you to confirm the deletion, click Yes.
2. When finished, click Close to return to detail entry.
Tip: You can also delete comments or instructions by changing the entry intheComments/Instructions field to No on the Order tab. If you use thismethod, your remarks are not deleted, but they are not printed on thepurchase order. If you decide to use the remarks later , change theComments/Instructions field to Yes. Your original remarks will reappear.
You can also add or clear comments on the Detail Items/Taxes screen.
User's Guide 593
Appendix A: Purchase Orders Screen Guides
P/O Receipt Entry Screen
To open this screen:Open Purchase Orders > P/O Transactions > Receipt Entry.
Secondary screens:
l " P/O Fixed Assets Screen" (page 672)
l "P/O Receipt Entry Additional Cost Vendor Information Screen" (page 680)
l "P/O Receipt Entry Additional Cost Vendor Taxes Screen" (page 682)
l "P/O Receipt Entry Bill-To Location Screen" (page 648)
l "P/O Receipt Entry Detail Comments Screen" (page 673)
l "P/O Receipt Entry Detail Costs/Taxes Screen" (page 674)
l "P/O Receipt Entry Detail Items/Taxes Screen" (page 654)
l "P/O Receipt Entry Drop-Shipment Address Screen" (page 650)
l "P/O Receipt Entry Invoice Screen" (page 683)
l "P/O Receipt Entry Ship-To Location Screen" (page 649)
l "P/O Vendor Information Screen " (page 577)
Related tasks:
l " Adding or Editing Details Using the Detail Items/Taxes Screen" (page 156)
l "Entering Receipts" (page 151)
l "Printing Receiving Slips" (page 253)
l "Receiving and Invoicing Serialized Items " (page 211)
l "Receiving and Invoicing Lotted Items" (page 214)
Overview
Use the Receipt Entry screen to:
l Enter receipts of goods into Purchase Orders—for inventory or non-inventory items.
l Edit existing receipts.
594 Sage 300 ERP Purchase Orders
Transaction Screens
l Enter or change the vendor address information.
l Enter additional costs for receipts (from primary or secondary vendors).
l Invoice receipts and additional costs.
l Identify items as fixed assets for management by Sage Fixed Assets.
l Specify drop-ship addresses for receipt details.
l Check and edit tax distributions by detail line and for the primary andsecondary vendors.
l Import and export receipts.
l Assign serial numbers to serialized items (if you have the SerializedInventory and Lot Tracking license installed as part of Sage 300 ERPInventory Control).
l Assign lot numbers to lotted items (if you have the Serialized Inventory andLot Tracking license installed as part of Sage 300 ERP Inventory Control).
Integration with Sage Fixed Assets
If you use Sage Fixed Assets to manage the fixed assets in your company, youcan also mark received goods as fixed assets, and select the Sage Fixed Assetstemplate that you want to use for the new asset. Sage 300 ERPtransfers theasset information to Sage Fixed Assets when you run Create Assets in SageFixed Assets Integration.
Use the P/O Fixed Assets screen to enter information for fixed assets. For moreinformation, see " P/O Fixed Assets Screen" (page 672).
Additional Costs Tab
Use the Additional Costs tab to:
l Add additional costs charged on the shipment by both primary vendors andsecondary vendors, such as for handling charges, service charges, and duty.Mor e ...
To display additional costs you have entered for a vendor, use the navigationbuttons beside the Additional Cost Vendors field or enter the vendornumber in the Vendor Number field.
l Edit additional-cost amounts on previously posted receipts that are not yetfully invoiced.
l Assign or edit the terms code and tax group for the additional cost vendor.
User's Guide 595
Appendix A: Purchase Orders Screen Guides
l Check the number of details and the total amount of additional costsentered for the vendor.
l In multicurrency ledgers, edit exchange rate information for vendors whodo not use the functional currency.
l Specify how to reallocate prorated costs of received items that you return.
l Open the Vendor Information screen to view information for secondaryvendors. Mor e ...
To open the Vendor Information , click the Vendor Number field, and thenclick the Zoom button or press the F9 key.
l Open the Additional Cost Vendor Taxes screen to check and edit taxinformation for the vendor. Mor e ...
To open the Additional Cost Vendor Taxes screen, click the Vendor Taxesbutton.
For more information, see "P/O Receipt Entry Additional Cost Vendor TaxesScreen" (page 682).
l Open the Detail Costs/Taxes screen to check and edit tax information forthe detail. Mor e ...
To open the Detail Costs/Taxes screen, select an additional cost detail, andthen click the Cost/Tax button or press the F9 key .
For more information, see "P/O Receipt Entry Detail Costs/Taxes Screen"(page 674).
Individual additional costs appear in the details table on the tab. Totals for theselected vendor are displayed at the bottom of the Additional Costs tab.
Non-inventory Items
If you are adding additional costs for non-inventory items, you must chooseNo Proration. If you choose to prorate by quantity, cost, or weight, theprogram will display an error message and prevent you from posting thereceipt.
For step-by-step instructions on using the Additional Costs tab, see "Adding,Editing, or Deleting Additional Costs" (page 157).
596 Sage 300 ERP Purchase Orders
Transaction Screens
Optional Fields Tab
Note: This tab appears only if you have Transaction Analysis and OptionalField Creator, and receipt optional fields have been assigned to the RequisitionEntry screen using the Optional Fields setup screen.
Use the Optional Fields tab to add or change information in the optional fieldsthat apply to the transaction as a whole. You edit optional fields for requisitiondetails, separately, on the detail entry table or using the Item Details screen.
For more information about using optional fields in transactions, see "AboutOptional Fields in Transactions" (page 90).
For information about defining optional fields for the Receipt Entry screen, seethe "P/O Optional Fields Screen " (page 371).
Receipt Tab
Use the Receipt tab to enter:
l A name for new vendor accounts that are not yet added to Accounts Payable.
l The vendor's address, phone numbers, and contact name on the VendorInformation screen.
l The code that identifies the vendor's payment terms for the receipt.
l An optional template code to specify the default entries in receipt header andvendor information fields.
l The receipt date.
l An optional FOB (free-on-board) location.
l An optional shipping method or carrier.
l The default shipping and billing location codes for the receipt.
l An optional description and reference.
Use the detail information section of the Receipt tab to:
l Add item detail lines to the receipt.
l Edit or delete existing detail lines.
l Specify received quantities and discounts. If you use Project and Job costing,use the same unit of measure that is on the estimate. (For more information,
User's Guide 597
Appendix A: Purchase Orders Screen Guides
see "About Converting Units of Measure for Committed and ActualQuantities" (page 204).)
l Enter additional receipt information using comments fields and optionalfields.
l Identify items as fixed assets for management by Sage Fixed Assets.
l Open the Detail Items/Taxes screen where you can view all the fields for aselected detail at once. This screen also lets you change tax information forthe detail.
Retainage Tab
Note: This tab appear only if the receipt is job-related and you use retainageaccounting.
Use the Retainage tab to specify the retainage rate and retainage terms forthe current receipt.
You enter job-related retainage amounts, retention periods, and retainage duedates with each job detail.
Rates Tab
Note: This tab appears only in multicurrency ledgers when you enter areceipt for a primary vendor who does not use the functional currency. Formore information, see "About Vendors" (page 92).
Use the Rates tab to:
l Change the rate type, rate date, and exchange rate for converting thereceipt amount from the vendor's currency to your functional (home)currency.
l Look up the rate information entered with the purchase order (if you areentering a receipt to a purchase order).
Taxes Tab
Use the Taxes tab to specify:
l The vendor's tax group.
l Tax classes for each tax authority.
l Tax-included options and amounts for the vendor's tax authorities
598 Sage 300 ERP Purchase Orders
Transaction Screens
Click the Calculate Taxes button to cancel changes you made to tax amountsand reinsert the taxes originally calculated for the receipt by the program.
Totals Tab
Use Totals tab to:
l Enter comments for a receipt.
l Enter a discount percentage or a total discount amount for the receipt.
l Verify receipt totals for the primary vendor. For more information, see"About Vendors" (page 92).
l Check tax amounts for the primary vendor.
l Check manual proration amounts to be sure you have fully allocated allmanually prorated charges for the receipt. For more information, see "AboutManually Prorated Amounts" (page 151).
l Check the estimated weight of the goods on the receipt.
l Check the number of item and additional cost details entered for the vendoron the receipt.
l Check the receipt subtotal and total additional costs and excluded taxes forthe primary vendor.
Fields and Controls
Buttons
Calculate TaxesUse the Calculate Taxes button to recalculate tax amounts after youchange the Tax Class or Tax Included field. (Tax amounts are notautomatically calculated until you choose Post for the invoice or select theTotals tab.)
NewClick the New button to begin creating a new record.
PostUse the Post button to post the document or to post changes you havemade to existing documents.
User's Guide 599
Appendix A: Purchase Orders Screen Guides
Note: You cannot edit receipts after posting them.
Receive AllUse the Receive All button to add to the Receipt Entry screen all thedetail lines from the specified purchase orders.
Note: If working with serialized or lotted items, you cannot use theReceive All button. You must assign serial and lot numbers manually.
Receipt Number
You can enter a unique number in this field for a new receipt, using up to 22characters.
Tip: Leave the field showing ***NEW*** to let Purchase Orders assignthe receipt number during posting.
To display an existing receipt, type its number, or use the Finder or thenavigation buttons beside the Receipt Number field to select it.
Vendor NumberIdentifies the vendor from whom you received the goods. The vendornumber sets the default tax group and payment terms. In multicurrencysystems, the vendor number also specifies the currency of the document.
l To select an existing vendor, use the Finder, or type the number andpress Tab.
l To add a new vendor, do one of the following:
To add the vendor record now, click the New button after typing thevendor number. After you fill in the vendor information in AccountsPayable, click Add, then click Close to return to Purchase Orders.
If you do not want to add the vendor record now, type only the vendornumber. However, you must create the vendor record before you canpost an invoice in Accounts Payable.
Warning! Although you can add a receipt before you add the vendorrecord in Accounts Payable, you should not do so in a multicurrencysystem. If the tax reporting currency for the tax group that you want touse differs from the vendor’s currency, you must create the vendorrecord before you enter the invoice.
600 Sage 300 ERP Purchase Orders
Transaction Screens
If a vendor account is inactive, you cannot enter a receipt for the vendor.
Additional Costs Tab
Additional Cost VendorsThis field lets you use navigation buttons or the Finder to select anadditional cost vendor that you have added to a receipt. As you scrollthrough the list of existing vendors, Purchase Orders displays the vendornumber and the additional cost details you entered on the tab.
The field also lets you clear displayed information from the tab so thatyou can enter a new additional cost. (To begin a new additional cost, clickthe New button ( ) next to the Additional Cost Vendors field.)
Cost Subtotal (display only)The sum of the additional costs before excluded taxes entered on thisreceipt for the selected vendor.
Currency (multicurrency ledgers, display only)The program displays the vendor's currency (the currency associated withthe vendor's tax group). When you are adding a new vendor, the programdisplays the code for the functional currency until you select the taxgroup, then the currency for the tax group is displayed.
Exchange Rate (multicurrency ledgers)The program displays the exchange rate currently in effect for thespecified currency and the displayed rate type and rate date, but you canchange the rate.
You receive a warning if you change an exchange rate by an amount thatexceeds the Spread setting for the currency in Common Services'Currency Rates table.
Included TaxThe sum of the taxes that are included in the additional costs entered onthis receipt for the selected vendor.
Less RetainageThe Less Retainage and Net Costs Total fields appear with the additionalcosts summary at the bottom of the screen if you choose the Retainageoption on the Additional Costs tab.
User's Guide 601
Appendix A: Purchase Orders Screen Guides
The program will also display additional retainage fields for eachadditional cost detail to let you enter a different retainage percentage(or amount) and period for each additional cost.
Net Costs TotalThe Less Retainage and Net Costs Total fields appear with the additionalcosts summary at the bottom of the screen if you choose the Retainageoption on the Additional Costs tab.
The program will also display additional retainage fields for eachadditional cost detail to let you enter a different retainage percentage(or amount) and period for each additional cost.
Number of CostsThe number of additional cost detail lines entered for the selectedsecondary vendor.
Optional Fields Plus Excluded Tax (display only)The program displays the total amount of additional cost details for theprimary vendor on the receipt, excluding taxes (except taxes that areincluded in the cost amounts).
Rate Date (multicurrency ledgers)Type the date to use to select the exchange rate for the additional cost.
The program displays the rate date that is nearest the document dateyou entered, but you can specify a different date for which an exchangerate exists for the currency in Common Services' Currency Rates table.
If you change the rate date, Purchase Orders checks the rate tables fora date match, and updates the rate if necessary.
Rate Type (multicurrency ledgers)If the rate type you want to use is not displayed, type the code orchoose it from the Finder.
The program uses rate types when converting multicurrency amounts onthe receipt to functional currency. Examples of rate types might be "spotrate," "average rate," and "contract rate."
You define rate types using the Currency Rate Types screen in CommonServices, and assign the default rate type for Purchase Orders on theProcessing tab of the P/O Options screen.
602 Sage 300 ERP Purchase Orders
Transaction Screens
Retainage Percentage and Period (job-related)If the retainage option is selected for the receipt and for the additionalcost, the program displays additional retainage fields for each additionalcost detail line. If you select No Proration, you can enter a retainagepercentage and period.
Note: You can edit these fields for secondary vendors, but not for theprimary vendor.
Default Retainage Percentage and Period
The default retainage percentage and retention period that appears inthese fields depends on how you are prorating the costs.
l If prorating by cost, quantity or prorating manually, the settings arebased on the Vendor record.
l If using no proration, the retainage settings are based on the DefaultRetainage From option for the contract in Project and Job Costing.
Tax Group and descriptionFor new vendors, type the code for the tax group to use or select the codefrom the Finder. For existing vendors, the tax group is displayed, but youcan change it.
Terms Code and descriptionFor new vendors, type the terms code that represents the vendor'spayment terms for the additional cost, or select the code from the Finder.
For existing vendors, the program displays the vendor's terms code, butyou can change it to another terms code that is defined in AccountsPayable.
Total CostsThe sum of the additional costs plus taxes entered on this receipt for theselected vendor.
Vendor Account SetThe account set from the vendor record appears in this field as thedefault. It specifies the general ledger payables control, purchasediscounts, prepayment, and retainage accounts to which the transactionwill be distributed.
User's Guide 603
Appendix A: Purchase Orders Screen Guides
You can change the account set for a particular purchase order, receipt,return, invoice, credit note, or debit note. If you use multicurrencyaccounting, however, the new account set must use the same currencyas the vendor's account set.
Note: If you change the account set on a receipt, make sure that youuse the same account set for returns, invoices, and credit or debitnotes.
Vendor Number and NameIf you used the buttons beside the Additional Cost Vendors field to selectan additional cost vendor that you have already added to this receipt,the program displays the selected vendor number in this field.
You can always add an additional cost vendor to a receipt for which youhave not yet created an invoice. You can use the Finder to select avendor that exists in Accounts Payable, or you can add a new additionalcost vendor.
For information about adding a new secondary vendor to a receipt, see "Adding a New Secondary Vendor to a Receipt" (page 653).
Additional Cost details table
Additional CostType the code for the additional cost you want to add, or select thecode from the Finder.
If you are adding a cost for which no code is defined, skip this fieldand type the name of the cost in the Description field (the fieldbeside the Additional Cost field in the Detail Cost/Taxes screen).
Note: You use the Additional Costs screen (in the P/O Setup folder)to maintain the additional cost charges you use in Purchase Orders.
AmountEnter the amount of the additional cost in this field.
Billing Currency (if job-related and multicurrency, displayonly)This field appears only in multicurrency systems for time and
604 Sage 300 ERP Purchase Orders
Transaction Screens
materials projects and for fixed price projects using billings and costsor accrual-basis accounting methods.
The billing currency is the customer's currency specified on thecontract, and you cannot change it.
Note:l Billing currency is blank for Fixed Price projects using completedproject or project percentage complete methods, and for Cost Plusprojects.
l Billing currency is NOT displayed for basic or standard internalTime and Materials projects or for Fixed Price projects that usebillings and costs or accrual-basis accounting methods.
Billing Type, Billing Rate, and A/R Item Number (if job-related)
For job-related additional costs on receipts, you also specify the BillingType, Billing Rate, AR Item Number, and AR Item UOM that will beused for the customer invoice.
The following fields appear only for job-related receipts.
AR Item Number
The program displays the A/R item number associated with thecategory or Item Number/Resource used for the contract in Projectand Job Costing. You can select a different A/R item number only fortime and materials projects, as follows:
l On a standard project, the program displays the A/R item numberand unit of measure specified for the project resource category asthe default. You can accept the item number or select another validA/R item number.
l On a basic project, program displays the A/R item number and unitof measure specified for the project category. You can accept theitem number or select another valid A/R item number.
l If you change the A/R item number, the item number must be avalid item number in Accounts Receivable, and the unit of measuremust be a valid unit of measure both for the new item number andthe vendor’s currency.
User's Guide 605
Appendix A: Purchase Orders Screen Guides
Cost plus and fixed price projects do not use an A/R item number.Internal contracts for time and materials projects also do not use anAR Item Number.
AR Item UOM
This field appears for Time and Materials projects if you selected theJob Related option for this transaction.
You must enter a unit of measure that is valid for the category oritem number/resource that you specified and for the contractcustomer's currency.
Note: For internal time and materials projects (basic or standardcontracts) the A/R item unit of measure will be disabled/blank.
Billing Currency
This field appears only in multicurrency systems for time andmaterials projects and for fixed price projects using billings and costsor accrual-basis accounting methods.
The billing currency is the customer's currency specified on thecontract, and you cannot change it.
Note: Billing currency is blank for Fixed Price projects usingcompleted project or project percentage complete methods, and forCost Plus projects. It is NOT displayed for basic or standard internalTime and Materials projects or for Fixed Price projects that usebillings and costs or accrual-basis accounting methods.
Billing Rate
Purchase Orders displays the billing rate for the specified resource(for standard projects) or category (for basic projects).
You can edit the billing rate if the billing type is Billable. The field willdisplay 0.000000 if the billing type is Non-Billable or No Charge.
Note that:
l Billing rate can be specified for Time and Materials projects andfor Fixed Price projects that use Billings and Costs or Accrual-Basisaccounting methods. Billing rate is disabled and set to 0.000000 ona basic or standard internal contract for Time and Materials
606 Sage 300 ERP Purchase Orders
Transaction Screens
projects or for Fixed Price projects using billings and costs oraccrual-basis accounting methods. It cannot be negative.
l If a job-related additional cost is prorated by cost, quantity, orweight, the specified billing rate in functional currency will beprorated to the item details for projects that are Time and Materialsor Fixed Price with an accounting method of billings and costs oraccrual-basis.
The billing rate will not be prorated to item details for Cost Plus orFixed Price projects with completed project or project percentagecomplete accounting methods. Instead, it will be converted to thecontract customer’s currency when it is prorated to the item detailsduring day end processing (using the current exchange rate).
The prorated billing rate for each detail will not be displayed (and,therefore, will not be editable).
l This field is not available if you are prorating manually.
Billing Type
This field appears in the detail-entry section only for job-relatedpurchase orders.
The billing type indicates to Project and Job Costing whether to bill thecost to the customer. You can change this field only for a time andmaterials project or for a fixed price project that uses billings andcosts or accrual-basis accounting methods, as follows:
On a basic project:
l For a billable project, the category billing type determines whetheryou can change the billing type for the detail. If the specifiedcategory is:
For a billable project, the category billing type determineswhether you can change the billing type for the detail. If thespecified category is:
Billable, the default billing type for the detail is billable, butyou can change it.
If the detail is billable you can specify a billing rate for thedetail.
User's Guide 607
Appendix A: Purchase Orders Screen Guides
If you change the billing type for the detail to no charge ornon-billable, the program sets the billing rate to zero and youcannot change it.
No charge or non-billable, the program sets the same billingtype for the detail, and cannot change it. You cannot specify abilling rate for the detail, which the program sets as zero.
If the project is no charge or non-billable, the detail uses thesame billing type as the project, the billing rate is set to zero,and you cannot change them.
On a standard project:
l If the project is billable, the resource billing type determineswhether you can change billing type for the detail. If the specifiedresource is:
Billable, the program displays Billable as default billing type,but you can change it for the detail. If the detail is billable, youcan specify a billing rate for the detail. If you change the billingtype for the detail to no charge or non-billable, the program setsthe billing rate to zero, and you cannot change it.
No charge or non-billable, the program sets same billing typefor the detail, and you cannot change it. You cannot specify abilling rate for the detail, which the program sets as zero.
No charge or non-billable, the program sets same billing typefor the detail, and you cannot change it. You cannot specify abilling rate for the detail, which the program sets as zero.
l If the project is no charge or non-billable, the detail uses the samebilling type as the project, and you cannot change it. The programalso sets the billing rate to zero, and you cannot change it.
For fixed price and cost plus projects, the Billing Type field is blank.A billing type is not required for these types of projects. For internalcontracts using time and materials, or fixed price billings and costsor accrual basis, the billing type is set to non-billable.
Cost Class
The program displays the cost class for the category used in eachdetail. You cannot change this field.
608 Sage 300 ERP Purchase Orders
Transaction Screens
Calculate Labor (if job-related)Select the Calculate Labor field if you want Project and Job Costing tocalculate labor amounts for this cost and pass the amount back toPurchase Orders. (Purchase Orders creates the G/L entries for theadditional costs.)
Do not select this option for an additional cost for which you don't wantto calculate labor.
The program also lets you specify whether overhead or labor iscalculated if you expense the additional cost.
Note: This field is disabled if you specify No Proration, and youspecify a contract/project/category where the category uses a flatrate. No labor or overhead is calculated for additional costs if you areusing a flat rate per labor hour/unit or a flat rate per unit foroverhead.
Calculate Overhead (if job-related)Select the Calculate Overhead field if you want Project and Job Costingto calculate overhead amounts for this cost and pass the amount backto Purchase Orders. (Purchase Orders creates the G/L entries for theadditional costs.)
Overhead is usually calculated on the discounted extended amount.
For example, you would not select this option if a receipt hadadditional shipping costs for which you didn't want to calculateoverhead or labor.
The program also lets you specify whether overhead or labor iscalculated if you expense the additional cost.
Note: This field is disabled if you specify No Proration, and youspecify a contract/project/category where the category uses a flatrate. No labor or overhead is calculated for additional costs if you areusing a flat rate per labor hour/unit or a flat rate per unit foroverhead.
CommentsEnter an optional comment for the document.
Any comments you entered for the detail on the receipt are included onthe invoice, but you can change or delete them.
User's Guide 609
Appendix A: Purchase Orders Screen Guides
Lines automatically wrap when you reach the end. If you want tostart a new line before the line wraps, press Enter.
Contract, Project, Category, Cost Class, and ItemNumber/Resource (if job-related)For job-related receipts, either expense the additional cost or specifywhere the items or resources are going to be used. If you usedifferent terms than “Contract,” “Project,” and “Category” in Projectand Job Costing, the program displays them instead.
You also specify the Billing Type, Billing Rate, AR Item Number, andAR Item UOM for the customer invoice.
Note: You enter/select the resource using the Item Number field.These fields will appear only for job-related receipts, and beenabled only for No Proration additional costs.
CategorySelect or enter a category that is assigned to the project in Projectand Job Costing.
ContractSpecify a contract number for each detail. You can enter or selectonly contracts that are open or on hold. (You cannot processtransactions to a contract that is on hold, if it has never beenopened.)
Cost ClassThe program displays the cost class for the category used in eachdetail. You cannot change this field.
Item Number (Resource)Use the Item Number field to identify the resource for this detail.
For No Proration additional costs, use the Resource field to specifythe resource for this detail.
You must specify a resource that is assigned to the project andcategory in Project and Job Costing. You can specify an inventoryitem number, or the code for another type of resource (such as anequipment code, subcontractor code, or employee number).
610 Sage 300 ERP Purchase Orders
Transaction Screens
Note: You cannot leave this field blank.
ProjectYou can only enter or select projects that are:
l Assigned to the contract that you selected.
l Open or on hold. (If a project that is on hold has never beenopened, you cannot select it.)
l Not closed to costs.
Distribute ProrationIf you selected manual proration, click the column heading to displaythe distribution screen.
You cannot add/save a manually prorated additional cost detail lineuntil the total amount prorated manually equals the total additionalcost amount.
Taxes
You do not need to manually calculate and prorate allocated taxes. Theprogram will do that for you during day end or during posting(depending on your settings).
Non-Job-Related Receipts
You can manually prorate additional costs only to item details withvalid inventory item numbers. You cannot manually prorate costs tonon-inventory items.
Job-Related Receipts
The distribution screen lets you specify the amount allocated to eachdetail and the billing rate. All other fields are displayed only.
Expense AccountIf you entered a non-inventory item number for the detail line, enterthe account number of the general ledger expense account to whichyou want to post the detail.
This field displays the number entered with the detail on the receipt,but you can change the number.
User's Guide 611
Appendix A: Purchase Orders Screen Guides
For new detail lines, this field displays the account number specifiedon the P/O Options screen for the Default Inventory ExpenseAccount option.
Line NumberTo select an existing line to edit or delete, click the line, or enter itsline number in this field on the P/O Detail Items/Taxes screen.
Note: You cannot delete completed lines.
Net Of TaxThis field displays the extended item cost, minus any applicable taxamount. You cannot edit the amount.
Optional FieldsOptional fields appear on the Additional Costs tab for additional costthat are charged by secondary vendors.
You can also add optional fields to individual additional cost detaillines if you are not prorating the additional costs. If you are proratingby cost, quantity, weight, or manually, the optional fields column isdisabled.
If you are allocating additional costs to more than one receipt, youcan edit the optional fields for each allocation on the Cost Allocationscreen (choose the Dist. Cost button on the Additional Cost tab). Notethat you must have chosen multiple receipts on the Invoice tab inorder to distribute the costs.
If you assigned the same optional fields to additional cost recordsand to invoice additional costs, the optional field entries in additionalcost records will appear on invoices by default.
Optional field information can pass from invoices (or credit/debitnotes) to downstream ledgers like Accounts Payable and GeneralLedger.
Proration MethodSpecify whether to prorate the cost to the received items by cost,quantity, or weight, or manually, or to expense the cost to a generalledger account.
612 Sage 300 ERP Purchase Orders
Transaction Screens
Note: If you are adding additional costs for non-inventory items, youmust choose No Proration.
ReferenceType an optional reference for the detail.
Retainage Percentage, Amount, and PeriodIf the retainage option is selected for the receipt and for the additionalcost, the program will display additional retainage fields for eachadditional cost detail line. If you select No Proration for cost, you canenter a retainage percentage and period.
Note: These fields are editable for secondary vendors, but not forthe primary vendor.
Default Retainage Percentage and Period
The default retainage percentage and retention period that appears inthese fields depends on how you are prorating the costs.
l If prorating by cost, quantity or prorating manually, the settings arebased on the Vendor record.
l If using no proration, the retainage settings are based on theDefault Retainage From option for the contract in Project and JobCosting.
Return Expense AccountIn this field, enter the general ledger account number to which to postprorated additional cost amounts if you return items.
Reproration / Return ProrationThis field is called Return Proration on the Detail Costs/Taxes screen.
Select the reproration method to use if you need to return any of thereceived items and you did not select No Proration or ProrateManually as the proration method.
Note: You cannot expense job-related costs.
Tax IncludedThis field displays the total amount of taxes included in the additional
User's Guide 613
Appendix A: Purchase Orders Screen Guides
cost amount.
Tax Included (Yes or No in the zoomed cost entry screen)This field appears on the zoomed item entry screen (click theItem/Tax... button).
Use this field to indicate whether tax amounts are included in theitem cost.
To toggle between Yes and No in this field, type any character in thefield or double-click the field with a mouse.
The default choice for this option is provided from the vendor recordin Accounts Payable or from the vendor contract cost.
Note that you can choose Yes only if the tax authority is set up in TaxServices to allow tax-included costing.
Allocated TaxThis field displays the amount of allocated tax for the detail.(Allocated taxes are included in the cost of the detail. Recoverableand expensed taxes are not included in detail costs.)
Distribute Proration (if prorating additional cost manually)These fields appear in the Additional Cost table if you are manuallyprorating additional cost.
Billing Type, Billing Rate, A/R Item Number, and A/R ItemUOM (if job-related)For job-related additional costs that you are manually prorating, youalso specify the Billing Rate that will be used for the customerinvoice. The following billing fields from the receipt detail line aredisplay-only on this screen: Billing Type, Billing Currency, AR ItemNumber, and AR Item UOM.
These fields will only appear for job-related receipts.
AR Item Number
The program displays the A/R item number associated with theCategory or Item Number/Resource used for the contract in Projectand Job Costing. You can select a different A/R item number only fortime and materials projects, as follows:
614 Sage 300 ERP Purchase Orders
Transaction Screens
l On a standard project, the program displays the A/R item numberand unit of measure specified for the project resource category asthe default. You can accept the item number or select another validA/R item number.
l On a basic project, program displays the A/R item number and unitof measure specified for the project category. You can accept theitem number or select another valid A/R item number.
l If you change the A/R item number, the item number must be avalid item number in Accounts Receivable, and the unit of measuremust be a valid unit of measure both for the new item number andthe vendor’s currency.
Cost plus and fixed price projects do not use an A/R item number.Internal contracts for time and materials projects also do not use anA/R item number.
AR Item UOM
This field appears for Time and Materials projects if you selected theJob Related option for this transaction.
You must enter a unit of measure that is valid for the category or itemnumber/resource that you specified and for the contract customer'scurrency.
Note: For internal time and materials projects (basic or standardcontracts) the A/R item unit of measure will be disabled/blank.
Billing Currency
This field appears only in multicurrency systems for time andmaterials projects and for fixed price projects using billings and costsor accrual-basis accounting methods.
The billing currency is the customer's currency specified on thecontract, and you cannot change it. Note that:
l Billing currency is blank for Fixed Price projects using completedproject or project percentage complete methods, and for Cost Plusprojects.
l Billing currency is NOT displayed for basic or standard internal Timeand Materials projects or Fixed Price projects that use billings andcosts or accrual-basis accounting methods.
User's Guide 615
Appendix A: Purchase Orders Screen Guides
Billing Rate
Purchase Orders displays the billing rate for the specified resource(for standard projects) or category (for basic projects). You can editthe billing rate if the billing type is Billable. The field will display0.000000 if the billing type is Non-Billable or No Charge. Note that:
l Billing rate can be specified for Time and Materials projects andfor Fixed Price projects that use Billings and Costs or Accrual-Basisaccounting methods.
l Billing rate is disabled and set to 0.000000 on a basic or standardinternal contract for Time and Materials projects or for Fixed Priceprojects using billings and costs or accrual-basis accountingmethods.
l The billing rate cannot be negative.
Billing Type
This field appears in the detail-entry section only for job-relatedpurchase orders.
The billing type indicates to Project and Job Costing whether to billthe cost to the customer. You can change this field only for time andmaterials projects or for fixed price projects that use billings andcosts or accrual-basis accounting method, as follows:On a basic project:
l For a billable project, the category billing type determines whetheryou can change the billing type for the detail. If the specifiedcategory is:
Billable, the default billing type for the detail is billable, butyou can change it. If the detail is billable you can specify abilling rate for the detail. If you change the billing type for thedetail to no charge or non-billable, the program sets the billingrate to zero and you cannot change it.
No charge or non-billable, the program sets the same billingtype for the detail, and cannot change it. You cannot specify abilling rate for the detail, which the program sets as zero. If theproject is no charge or non-billable, the detail uses the samebilling type as the project, the billing rate is set to zero, and youcannot change them.
616 Sage 300 ERP Purchase Orders
Transaction Screens
On a standard project:
l If the project is billable, the resource billing type determineswhether you can change billing type for the detail. If the specifiedresource is:
Billable, the program displays Billable as default billing type, butyou can change it for the detail. If the detail is billable, you canspecify a billing rate for the detail.
If you change the billing type for the detail to no charge or non-billable, the program sets the billing rate to zero, and you cannotchange it.
No charge or non-billable, the program sets same billing typefor the detail, and you cannot change it. You cannot specify abilling rate for the detail, which the program sets as zero.
If the project is no charge or non-billable, the detail uses thesame billing type as the project, and you cannot change it. Theprogram also sets the billing rate to zero, and you cannot changeit.
For fixed price and cost plus projects, the Billing Type field is blank. Abilling type is not required for these types of projects. For internalcontracts using time and materials or fixed price billings and costs oraccrual-basis, the billing type is set to non-billable.
Contract, Project, Category, Cost Class, and ItemNumber/Resource (if job-related)For job-related additional costs that are manually prorated, choose theitems/resources to which you are allocating the additional cost.
The program displays the “Contract,” “Project,” and “Category” thatyou specified for each receipt detail line. The "resource" appears in theItem Number column.
You also specify the Billing Rate for the additional cost.
Note: The proration screen is available only if you choose tomanually prorate additional costs to detail lines. The following fieldsfrom the receipt detail lines are shown as display-only fields on thisscreen: Contract, Project, Category, Cost Class, Item Number, andDescription.
User's Guide 617
Appendix A: Purchase Orders Screen Guides
Category
Select or enter a category that is assigned to the project in Projectand Job Costing.
Contract
Select or enter a contract number for each detail. You can enter orselect only contracts that are open or on hold. (You cannot processtransactions to an account that is on hold, if it has never beenopened.)
Cost Class
The program displays the cost class for the category used in eachdetail. You cannot change this field.
Item Number (Resource)
Use the Item Number field to specify the resource for this detail.
You must specify a resource that you have assigned to the project inProject and Job Costing (such as an equipment code or asubcontractor code). You cannot leave this field blank.
Project
You can only enter or select projects that are:
l Assigned to the contract that you selected.
l Open or on hold. If a project that is on hold has never beenopened, you cannot select it.
l Not closed to costs.
Item NumberThe program displays all of the items on the purchase order so youcan easily distribute the additional cost in the amount fields.
If this is a job-related receipt, the Item Number may be a resource.
Item DescriptionThe program displays the item description from Inventory Control orthe description you entered for the detail on the purchase order.
618 Sage 300 ERP Purchase Orders
Transaction Screens
AmountEnter the amount of the additional cost that is being allocated to thisline item. The amounts on all lines must add up to the total amount ofthe additional cost.
Receipt Tab
Bill-To LocationIf you use Inventory Control, select a location code to which bills for thereceipt will be sent.
You can also use the Zoom button ( ) to open separate screen where youcan edit the address for the bill-to location, or you can omit the code andtype in a billing address, or not specify a bill-to location at all.
DescriptionType an optional description for the receipt, using up to 60 characters.
If you are working with an existing purchase order, the descriptionentered on the purchase order is displayed, but you can change it.
From Multiple POsTo receive all incomplete purchase orders from the vendor, click theZoom button beside the From Multiple POs option. Use the screenthat appears to add purchase orders to the receipt, as follows:
l Use the Finder to list and select purchase orders.
l Press the Insert key to move to a new line.
l After selecting the purchase orders you want to add, click Receive andthen click Close.
All the details from the purchase orders are then listed in the detailentry table on the Receipt tab.
If you select the From Multiple POs check box, the PO Number field is notavailable. The option is automatically selected if you click the Zoombutton next to the field.
Note: When you create a receipt from more than one purchase order,all of the receipt header information (including the fields on the OptionalFields tab) will come from the first purchase order that you select.
User's Guide 619
Appendix A: Purchase Orders Screen Guides
FOB PointType the name of the Free-On-Board point, or the location where thevendor begins charging you freight on shipments. You can also leavethis field blank.
Job RelatedSelect the Job Related option if the receipt is for a project you aremanaging with Project and Job Costing.
If the receipt is job-related, different fields appear for the details to letyou enter job-related information.
Note: If you are creating the receipt from multiple purchase orders,all purchase orders must be either job-related or non-job-related.Also, you cannot add serialized items or items assigned to lots to job-related receipts. Instead, you must receive them into inventory, andthen use the Material Usage screen in Project and Job Costing to movethem from inventory to jobs.
Last Receipt NumberThis field shows the number of the last receipt posted to the specifiedpurchase order. Each time you post a receipt for a particular purchaseorder, the program enters the new receipt number in this field.
Number of ReceiptsThis field displays the number of receipts that have been posted to thepurchase order selected for the current receipt. The number is updatedwith each new receipt you post to the purchase order.
PO NumberIf you are entering a receipt of a single purchase order, type thepurchase order number or select the number from the Finder of thevendor’s purchase orders.
If you specify a single purchase order number in this field, you will notbe able to use the From Multiple POs field.
You do not have to specify purchase order numbers with receipts.However, if you do specify a purchase order number, the purchaseorder details are displayed and you cannot add new details or receive aquantity that is greater than the quantity ordered on the purchase order.
620 Sage 300 ERP Purchase Orders
Transaction Screens
The Finder for this field shows only incomplete purchase order numbers.(You cannot post receipts to completed purchase orders.)
You cannot change the purchase order number after posting the receipt.
Posting DateEnter the posting date for the receipt in addition to the document date.
The posting date is the date for transactions being posted to the GeneralLedger, so it also determines the contents of the Fiscal Year and Periodfields.
If you are also entering invoice information, the posting date that youspecify here also applies to the invoice.
If you have a multicurrency system, currency revaluation also usesposting dates to select open documents for revaluation purposes andthus, revaluation adjustments are posted to General Ledger in the correctfiscal year and period.
Depending on your settings in the P/O Options screen, Purchase Ordersautomatically displays the session date or the document date by default inthis field.
You can change the posting date, but you cannot separately change thefiscal year and period.
Note: If you consolidate G/L transactions, the posting date forconsolidated entries is the last date of the fiscal period.
Receipt DateType the date you want to use as the receipt date. The program displaysthe sign-on date you entered to start Sage 300 ERP.
You can also change the posting date if you want a different date for theG/L transactions when they are posted in the General Ledger. (Theposting date determines the fiscal year and period displayed beside thePosting Date field.)
Receipt Subtotal (display only)The Subtotal field in the lower-right corner of the screen displays the totalof all items on the receipt. This amount does not include taxes andadditional costs.
User's Guide 621
Appendix A: Purchase Orders Screen Guides
ReferenceType an optional reference for the receipt.
If you are working with an existing purchase order, the reference fromthe purchase order is displayed, but you can change it.
RetainageYou can choose retainage accounting for the job-related receipts if theretainage option is selected in the Accounts Payable module.
The program will display additional retainage fields for each receiptdetail line to let you enter a different retainage percentage (or amount)and period for each detail line in the receipt.
The program will also display the Retainage tab to let you specify theretainage terms and specify the exchange rate that you use formulticurrency retainage invoices.
Ship-To LocationIf you use Inventory Control, select the location code which identifiesthe location at which the items were received.
You can also use the Zoom button (or press F9) to open a separatescreen where you can edit the address for the code you select, or youcan skip the code and type in a ship-to address. You can also omit ship-to information.
The ship-to location you specify, if any, becomes the default location fornew lines you add to a receipt.
If you are working with an existing purchase order, the location codeentered on the purchase order is displayed. You can change the code,but your change does not change the location codes entered with thedetail lines.
Ship ViaUse these fields to specify the shipping method by which you receivedthe goods from the vendor. The program displays the ship-viadescription for the code you select or for the code, if any, in thetemplate you selected for a new receipt on the Receipt tab.
Type an optional ship-via code or use the Finder to select one of theship-via codes you have defined in Purchase Orders.
622 Sage 300 ERP Purchase Orders
Transaction Screens
You can also skip the Ship Via field and type a description of the shippingmethod by which you will receive the goods in the field beside the ShipVia field, or leave both fields blank.
TermsThe vendor's terms code is displayed, but you can change it.
To change a terms code, type the new code or select the code from theFinder. You must enter a terms code for each vendor and you must useone of the terms codes you have defined in Accounts Payable.
Template CodeOn receipts entered without purchase order numbers, the defaulttemplate code, if any, is displayed, but you can change it.
If you select a new template after choosing the vendor, Purchase Orderswill replace the receipt information with the information from thetemplate.
l You cannot change the template after you have added details to thereceipt.
l You cannot change the displayed template code if you specify anexisting purchase order number or you are working with a previouslyposted receipt.
Vendor Account SetThe account set from the vendor record appears in this field as thedefault. It specifies the general ledger payables control, purchasediscounts, prepayment, and retainage accounts to which the transactionwill be distributed.
You can change the account set for a particular purchase order, receipt,return, invoice, credit note, or debit note. If you use multicurrencyaccounting, however, the new account set must use the same currency asthe vendor's account set.
Note: If you change the account set on a receipt, make sure that youuse the same account set for returns, invoices, and credit or debit notes.
Year and Period (display only)This is the fiscal year and period to which the receipt transactions will beposted in the general ledger. You can change the fiscal period by changing
User's Guide 623

Appendix A: Purchase Orders Screen Guides
the Posting Date.
You can enter a different Receipt Date, and you can enter a differentPosting Date for the document.
(Remember that you cannot post transactions to closed fiscal periods.)
Receipt Details table
Allocated Tax (display only)Shows the total tax amount that was allocated to the selected detailline for the tax authority.
Arrival DateType the date on which you received the items. The program displaysthe session date as the default, but you can change it.
Billing Type, Billing Rate, A/R Item Number, and A/R ItemUOM (if job-related)For job-related receipts, you can also specify the Billing Type, BillingRate, AR Item Number, and AR Item UOM (unit of measure) that willbe used for the customer invoice.
You must select the Job Related option in the top part of the ReceiptEntry screen for these fields to appear.
AR Item Number
The program displays the A/R item number associated with thecategory or Item Number/Resource used for the contract in Projectand Job Costing. You can select a different A/R item number only fortime and materials projects, as follows:
l On a standard project, the program displays the A/R item numberand unit of measure specified for the project resource category asthe default. You can accept the item number or select anothervalid A/R item number.
l On a basic project, program displays the A/R item number and unitof measure specified for the project category. You can accept theitem number or select another valid A/R item number.
l If you change the A/R item number, the item number must be avalid item number in Accounts Receivable, and the unit of measure
624 Sage 300 ERP Purchase Orders
Transaction Screens
must be a valid unit of measure both for the new item number andthe vendor’s currency.
Cost plus and fixed price projects do not use an A/R item number.Internal contracts for time and materials projects also do not use anA/R item number.
AR Item UOM
This field appears for Time and Materials projects if you selected theJob Related option for this transaction.
You must enter a unit of measure that is valid for the category or itemnumber/resource that you specified and for the contract customer'scurrency.
Note: For internal time and materials projects (basic or standardcontracts) the A/R item unit of measure will be disabled/blank.
Billing Currency
This field appears only in multicurrency systems for time andmaterials projects and for fixed price projects using billings and costsor accrual-basis accounting methods.
The billing currency is the customer's currency specified on thecontract, and you cannot change it. Note that:
l Billing currency is blank for Fixed Price projects using completedproject or project percentage complete methods, and for Cost Plusprojects.
l Billing currency is NOT displayed for basic or standard internal Timeand Materials projects or Fixed Price projects that use billings andcosts or accrual-basis accounting methods.
Billing Rate
Purchase Orders displays the billing rate for the specified resource (forstandard projects) or category (for basic projects). The billing rate isdefaulted as follows:
l On a standard project:
For a category cost class of Subcontractor, Overhead,Miscellaneous Equipment, or Material, the billing rate is defaultedfrom the category resource.
User's Guide 625
Appendix A: Purchase Orders Screen Guides
For a category cost class of Labor, the default billing rate isbased on the Default Billing Rate From option for the employeeresource category.
l On a basic project:
For a category cost class of Subcontractor, Overhead,Miscellaneous Equipment, or Material, the billing rate isdefaulted from the category.
For a category cost class of Labor, the default billing rate isbased on the Default Billing Rate From option for the laborcategory.
The Billing Rate option does not apply to internal contracts.
You can edit the billing rate if the billing type is Billable. The field willdisplay 0.000000 if the billing type is Non-Billable or No Charge. Notethat:
l Billing rate can be specified for Time and Materials projects andfor Fixed Price projects that use Billings and Costs or Accrual-Basisaccounting methods.
l Billing rate is disabled and set to 0.000000 on a basic or standardinternal contract for Time and Materials projects or for Fixed Priceprojects using billings and costs or accrual-basis accountingmethods.
l The billing rate cannot be negative.
Billing Type
This field appears in the detail-entry section only for job-relatedpurchase orders.
The billing type indicates to Project and Job Costing whether to billthe cost to the customer. You can change this field only for time andmaterials projects or for fixed price projects that use billings andcosts or accrual-basis accounting method, as follows:
On a basic project:
l For a billable project, the category billing type determines whetheryou can change the billing type for the detail. If the specifiedcategory is:
626 Sage 300 ERP Purchase Orders
Transaction Screens
Billable, the default billing type for the detail is billable, but youcan change it. If the detail is billable you can specify a billing ratefor the detail. If you change the billing type for the detail to nocharge or non-billable, the program sets the billing rate to zeroand you cannot change it.
No charge or non-billable, the program sets the same billingtype for the detail, and cannot change it. You cannot specify abilling rate for the detail, which the program sets as zero. If theproject is no charge or non-billable, the detail uses the samebilling type as the project, the billing rate is set to zero, and youcannot change them.
On a standard project:
l If the project is billable, the resource billing type determineswhether you can change billing type for the detail. If the specifiedresource is:
Billable, the program displays Billable as default billing type, butyou can change it for the detail. If the detail is billable, you canspecify a billing rate for the detail.
If you change the billing type for the detail to no charge or non-billable, the program sets the billing rate to zero, and you cannotchange it.
No charge or non-billable, the program sets same billing typefor the detail, and you cannot change it. You cannot specify abilling rate for the detail, which the program sets as zero.
If the project is no charge or non-billable, the detail uses thesame billing type as the project, and you cannot change it. Theprogram also sets the billing rate to zero, and you cannot changeit.
On a basic project:
For fixed price and cost plus projects, the Billing Type field is blank. Abilling type is not required for these types of projects. For internalcontracts using time and materials or fixed price billings and costs oraccrual-basis, the billing type is set to non-billable.
CommentsTo enter comments for a detail line, click the Zoom button beside thefield (or press the Shift and F9 keys at the same time in the field), typethe remarks, then click Close.
User's Guide 627
Appendix A: Purchase Orders Screen Guides
If you are creating a receipt from a purchase order, any commentsyou entered for the detail line on the purchase order are included onthe receipt, but you can change or delete them.
Completes POSelect Yes by pressing the Spacebar or by double-clicking in this fieldif you have received or canceled all the items described in the detailline.
Until you post the receipt, you can change the response back to No, ifyou wish, but you cannot change to No after posting.
Detail lines are completed on purchase orders when you specify thatthe entire quantity is received or if you cancel any outstandingquantity. Once a purchase order detail line is completed, you cannotmake any further changes to it on the purchase order. You can stilledit the detail on the receipt until you post an invoice for the primaryvendor.
Contract, Project, Category and Item Number/Resource (ifjob-related)If the receipt is job-related, specify for each receipt detail where theitems or resources are going to be used. If you use different termsthan “Contract,” “Project,” and “Category” in Project and Job Costing,the program displays them instead.
For job-related receipts, you can also specify the Billing Type, BillingRate, AR Item Number, and AR Item UOM for the customer invoicenear the end of the detail line.
Purchase Orders updates the actual and committed quantities andcosts for jobs with the amounts on receipts.
Note: You can enter/select the resource using the Item Numberfield. If the receipt is being created from multiple purchase orders,all POs must be either job-related or non-job-related. Also, youmust select the Job-Related check box in the top part of the ReceiptEntry screen for these fields to appear.
Category. Select or enter a category that is assigned to the projectin Project and Job Costing.
Contract. Select or enter a contract number for each detail. You canenter or select only contracts that are open or on hold. (You cannot
628 Sage 300 ERP Purchase Orders
Transaction Screens
process transactions to an account that is on hold, if it has never beenopened.)
Cost Class. The program displays the cost class for the category usedin each detail. You cannot change this field.
Item Number (Resource). Use the Item Number field to specify theresource for this detail.
For standard projects, you must specify a resource that you haveassigned to the project in Project and Job Costing (such as anequipment code or a subcontractor code).
For basic projects, you can select anything you want in this field toidentify the cost, but you cannot leave this field blank.
Project. You can only enter or select projects that are:
l Assigned to the contract that you selected.
l Open or on hold. If a project that is on hold has never been opened,you cannot select it.
l Not closed to costs.
Discount %You can enter a discount as a percentage or an amount. The programuses the amount you enter in this field to calculate the discounted costfor the item detail.
If you enter a percentage in this field, Purchase Orders calculates thediscount amount for the item detail.
Tip: If you prefer not to enter discounts for individual details, youcan enter a discount percentage for the entire document on the Totalstab. Purchase Orders then prorates the discount amount for thetransaction details, overriding any discounts you may have enteredmanually for the details.
Discount AmountThe program uses the amount you enter in this field to calculate thediscounted extended cost for the item detail. If you enter a discountamount, the program calculates and displays the discount percentagebased on the extended cost. (Alternatively, you can enter a percentagein the Discount % field, and let the program calculate the discount
User's Guide 629
Appendix A: Purchase Orders Screen Guides
amount.)
Tip: If you prefer not to enter discounts for individual details, youcan enter a discount amount for the entire receipt on the Totals tab.Purchase Orders then prorates the discount amount for thedocument details, overriding any discounts you may have enteredmanually for the details.
Discounted Extended CostThe program displays the item cost, less the discount amount, in thisfield.
Drop ShipTo enter a drop-ship address for a detail, click the Zoom buttonbeside the Drop Ship field, or select the field and press Shift+F9.
Select the type of address to enter, and if necessary, select thelocation code, customer number, or ship-to address code for theaddress.
Expense AccountYou specify a general ledger expense account for non-inventory itemdetails. You can select general ledger account numbers using theFinder.
The program displays the number entered with the detail on thepurchase order, if any, or the account number specified in the P/OOptions screen for the Default Inventory Expense Account option, butyou can change the number on the receipt.
Extended CostType the extended cost for the number of units of the item that youreceived.
If you change the extended cost, the program automaticallyrecalculates the unit cost.
Note: If security is turned on in Sage 300 ERP, you cannot see thisfield unless you are authorized to view costing information.
Extended WeightType the extended weight for the number of units of the item that you
630 Sage 300 ERP Purchase Orders
Transaction Screens
received.
If you change the extended weight, the program automaticallyrecalculates the unit weight.
The total weight for all items on the document is displayed in theTotals tab.
Fixed AssetsIf you use Sage Fixed Assets to manage the fixed assets in yourcompany, you can mark goods that you receive as fixed assets usingthe Fixed Assets screen. To display the Fixed Assets screen:
l In the Detail table, double-click the Fixed Assets column in thedetail line to display Yes, and then click the Fixed Assets columnheading.
l On the Detail Items/Taxes screen, select the Fixed Assets option,and then click the Zoom button.
Fill in the fields on the Fixed Assets screen that appears.
Item DescriptionThis field displays the item description from the P/O Vendor ContractCosts record (if one exists) or from the Inventory Control or PurchaseOrders item record. If necessary, you can change it.
If you enter an item number that does not exist in Inventory Control,you also enter the description for the item. You can enter non-existentitem numbers only if you selected the Allow Non-inventory Itemsoption on the P/O Options screen.
Purchase Orders displays the item description that was entered withthe detail on the receipt, but you can change it.
Item NumberType the number of the item you received, or select it from the Finder.
You can also type an item number that does not exist in your InventoryControl data if you use the Allow Non-inventory Items option (selectedin the P/O Options screen).
If you are creating a receipt from a purchase order, the item numberentered with the purchase order appears and you cannot change it.However, you can delete the line, if you wish.
User's Guide 631
Appendix A: Purchase Orders Screen Guides
To delete a detail line from the detail entry grid on the Receipt tab,select the line, then press the Delete key on your keyboard. In theDetail Items/Taxes screen, display the line, then click the Deletebutton.
If you see a message asking you to confirm your wish to delete theline, choose Yes.
Manufacturers' item numbers or bar codes. Purchase Ordersalso lets you enter manufacturers' item numbers in this field if theyhave been added in Inventory Control. These numbers could includeinternally-used bar codes, UPC numbers, or ISBNs — letting you usea scanner (or type a short code) for entering inventory itemnumbers.
If you enter a manufacturer's item number, Purchase Orders willreplace it with your inventory item number, and then display themanufacturer's item number you entered in the Manufacturer's ItemNumber field, near the end of the detail line.
Line NumberTo select an existing line to edit or delete, click the line, or enter itsline number in this field on the P/O Detail Items/Taxes screen.
Note: You cannot delete completed lines.
LocationThis field appears only if you use Inventory Control.
Enter the code for the location where you expect to receive theshipment (or to which you want to post drop-shipped items).
The program displays the ship-to location code, if any, entered on thefirst tab, but you can select a different location. You can omit thelocation when adding details for non-inventory items.
Note: If you change locations after assigning serial and/or lotnumbers, you must re-assign the serial and/or lot numbers.
Manual ProrationThis item details field appears only for documents created withPurchase Orders 5.3A and earlier.
632 Sage 300 ERP Purchase Orders
Transaction Screens
If you have added an additional cost that uses manual proration to thereceipt, type the amount to prorate to the detail. You must assign thefull amount of the manually prorated charge to item details before youcan post the receipt.
You can manually prorate additional costs only to item details withvalid inventory item numbers (including non-stock numbers, if used).You cannot manually prorate costs to non-inventory items.
Note that in multicurrency systems, you can manually prorateamounts only on receipts that are in the functional currency.
Manufacturer's Item NumberIf you entered a manufacturer's item number in the Item Numberfield on the requisition or purchase order, the number appears in theManufacturer's Item Number field.
Manufacturer's item numbers are alternative item numbers— such asbar codes or shortcut codes— that identify your inventory items. Youset up manufacturer's item numbers in Inventory Control.
You can enter manufacturer's item numbers wherever you enter itemnumbers in Purchase Orders.
Net Of TaxThis field displays the extended item cost, minus any applicable taxamount. You cannot edit the amount.
Non-Stock Clearing AccountIf you are receiving a non-stock item, the non-stock clearing accountassociated with the item's account set appears. You can specify adifferent account, if necessary.
Number of LabelsIf you want to print item labels for the received items, type thenumber of labels to print.
Note:You use the Item Labels screen in Inventory Control to print thelabels.
On the Inventory Control Item Labels screen, select Received in theFor Each Item field, then specify the receipt numbers for which you
User's Guide 633
Appendix A: Purchase Orders Screen Guides
want to print labels. The program then prints the number of labelsyou specified for each item detail on a selected Purchase Ordersreceipt.
You cannot specify a number of labels for non-inventory item details.
Optional FieldsOptional fields are fields that have been added by your company tothe transaction entry screens and detail lines in purchase orderstransactions.
If you use optional fields, an Optional Fields column appears in thetable. You can click the column heading to display the optional fieldsassigned to a selected detail, and edit their contents.
Note: You must use Transaction Analysis and Optional Field Creatorto add and use optional fields.
For more information about using optional fields in transactions, see"About Optional Fields in Transactions" (page 90).
Order NumberEnter the number of a sales order for which you are creating thedetail. If you use Sage 300 ERP Order Entry with Purchase Orders,you can also use the Finder to select an Order Entry order number.
You can change or erase an order number that is displayed with adetail you added from a purchase order or posted previously with thescreen.
If you change an order number that is displayed with a detail line, thenew order number does not replace the previous number on thecorresponding receipt and will not be reported on the P/O ShippableBackorders report.
You also enter the unit weight, extended weight, vendor itemnumber, comments, and the G/L expense account specified for non-inventory items.
PO NumberIf you selected a purchase order from the PO Number field, or fromthe Create Receipt from PO screen, the purchase order number foreach detail appears in this column.
634 Sage 300 ERP Purchase Orders
Transaction Screens
Quantity CanceledType the number of units to cancel for the detail (the number of units,if any, that you do not expect to receive).
You can enter a canceled quantity only when you are editing a detailfrom a purchase order. When you post the receipt, the QuantityOutstanding field on the purchase order is reduced by the number ofunits you canceled on the receipt.
Quantity OutstandingYou can enter an outstanding quantity (the number of units not yetreceived or canceled) on detail lines only when you are entering areceipt to a purchase order.
The Quantity Outstanding field is automatically updated by theprogram when you post a received amount, but you can also type theoutstanding quantity.
To reduce the outstanding quantity on an existing detail line you areediting, enter the desired amount; enter zero to complete a line andcancel remaining outstanding units.
When you post the receipt for a purchase order, the outstandingquantities are reduced on the purchase order. If you post a receipt forthe full outstanding quantity or for a larger quantity than was specifiedon the purchase order, the purchase order detail is completed.
Quantity ReceivedType the number of units of the item that you received.
When entering received units for a purchase order detail, you canenter a greater number than are outstanding for the detail, ifnecessary.
When you post the receipt, the outstanding quantity on the purchaseorder (if any) is updated with the number of received units, and anypurchase order details for which you did not enter a received quantityare deleted from the receipt. You must add a new receipt to receivethe other details on the purchase order.
User's Guide 635
Appendix A: Purchase Orders Screen Guides
Note: If this is a job-related receipt, you should enter the quantityusing the unit of measure that was used for the estimate in Projectand Job Costing. Purchase Orders does not convert the quantityreceived when it sends the quantity to PJC if the units of measureare different.
If you use Serialized Inventory and Lot Tracking, and the item isserialized or lotted, a separate Generation/Allocation screen appearsafter you enter the quantity of serialized or lotted items received,then press Tab or Enter. You use this screen to assign serial/lotnumbers for the item. (This screen also opens when you click theZoom button beside the Quantity field.)
Received To DateThe program displays the number of units of the item that havealready been received on the receipt.
Retainage %, Retainage Amt., and Retention Period(retainage accounting only)Retainage accounting applies only to job-related transactions, and isavailable only if you selected retainage accounting in the AccountsPayable program.
If the retainage option is selected for the receipt, the programdisplays additional retainage fields for each receipt detail line to letyou enter a retainage percentage or amount and the retention periodfor each detail line in the receipt.
The program also displays the Retainage tab to let you specify theexchange rate that you want to use for the retainage amounts onmulticurrency invoices.
If you clear the Retainage option, the percentage and retentionperiod fields disappear from the item detail section, and theRetainage tab also disappears.
Default Retainage Percentage and Period
The default retainage percentage and retention period that appears inthese fields depends on the retainage settings that were selected forthe category in the Project and Job Costing module. You can choosein PJC whether to default the retainage settings from the vendor
636 Sage 300 ERP Purchase Orders
Transaction Screens
record in Accounts Payable, or use specific retainage settings enteredfor the category.
Tax IncludedIn the Detail table, this field displays the amount of tax that is includedin the extended item cost (when the cost includes tax).
On the zoomed Detail Items/taxes screen, this field displays Yes or Noto indicate whether tax amounts are included in the item cost for eachtax authority. The default choice for this option is provided from thevendor record in Accounts Payable or from the vendor contract cost.
Note: You can select Yes only if the tax authority is set up in TaxServices to allow tax-included costing.
You can also edit total tax amounts on the Taxes tab.
Tax Reporting Amount
The Tax Reporting Amount appears for each detail if the tax group'stax reporting currency is different from your functional currency andthe vendor's currency.
On the Taxes tab, this field is the sum of the tax reporting amounts forthe entire document. You can change the amount on the Taxes tab (forexample, if you also change the Tax Amount, and then derive the TaxReporting Exchange rate on the Rates tab).
If you edit this amount, but leave the exchange rate, you can click theCalc. Taxes button to recalculate the tax reporting amount.
You set the tax reporting currency for tax groups in the Tax Servicesmodule in Common Services.
Unit CostEnter the cost of a single unit of the item you are ordering in the detail.
Purchase Orders displays a default cost as follows:
l If you have set up vendor contract costs, Purchase Orders displaysthe cost specified as a contract cost for the item and unit ofmeasure.
User's Guide 637
Appendix A: Purchase Orders Screen Guides
l If P/O does not find a valid contract cost, it uses the inventory costspecified on the P/O Options screen.
Use the Finder to view any vendor contract costs, regular vendorcosts, and other costs maintained by Inventory Control.
Purchase Orders uses the unit cost to calculate the extended cost. Ifyou change the unit cost, the extended cost is recalculated.
In multicurrency ledgers, the cost is expressed in the vendor'scurrency.
Note: You can assign security to the Unit Cost and Extended Costfields, to prevent unauthorized changes to the fields.
If you use Project and Job Costing, unit cost is defaulted asfollows:
l If the project is a standard project:
For a category cost class of Subcontractor, Overhead, orMiscellaneous Equipment, the unit cost is defaulted from thecategory resource.
For a category cost class of Labor, the default unit cost is basedon the Default Unit Cost From option for the employee resourcecategory.
For a category cost class of Material (if you are using InventoryControl), the default unit cost is based on Purchase Orders'default item cost (set in P/O Options).
For a category cost of Material (if you are not using InventoryControl), the unit cost is based on Purchase Orders vendorcosts.
l If the project is a basic project:
For a category cost class of Subcontractor, Overhead, orMiscellaneous Equipment, the unit cost is defaulted from thecategory.
For a category cost class of Labor, the default unit cost is basedon the Default Unit Cost From option for the labor category.
For a category cost class of Material (if you are using InventoryControl), the default unit cost is based on Purchase Orders'default item cost (set in P/O Options).
638 Sage 300 ERP Purchase Orders
Transaction Screens
For a category cost of Material (if you are not using InventoryControl), the unit cost is based on Purchase Orders vendor costs.
Unit of MeasureType the unit of measure in which you received the item, or select itfrom the Finder.
You must use one of the units of measure that is assigned to the itemin Inventory Control. On new detail lines, the program displays thestocking unit of measure.
If you are creating a receipt from a purchase order, the unit ofmeasure entered for the detail on the purchase order is displayed, butyou can change it.
If this is a job-related receipt, you should use the unit of measure thatwas used for the estimate in Project and Job Costing. Purchase Ordersdoes not convert the quantity received when it sends the quantity toPJC if the units of measure are different.
Unit WeightEnter the weight of a single unit of the item you are ordering in thedetail. On new detail lines, the weight specified in the InventoryControl item record is displayed, but you can change it.
Purchase Orders uses the unit weight to calculate the extended weight.If you change the unit weight, the extended weight is recalculated.
You can select from the weight units of measure defined in PurchaseOrders. Weight is expressed in the unit selected for theWeight UnitOf Measure option on the I/C Options screen.
On invoices, enter the weight of a single unit of the item for which youwere invoiced. The program displays the weight specified for the itemon the receipt but you can change it.
Purchase Orders uses the unit weight to calculate the extended weight.If you change the unit weight, the extended weight is recalculated.
You can see the total weight estimated from your entries for theinvoiced items on the Totals tab.
Vendor Item NumberEnter the code the vendor uses to identify the item.
User's Guide 639
Appendix A: Purchase Orders Screen Guides
If the vendor's item number is specified in the Inventory Control itemrecord, the code appears in this field. (Enter vendors' item numberswhen assigning vendor types in Inventory Control item records.)
If the vendor's item number is specified on the receipt for which youare entering an invoice, the code appears in this field. (You can entervendors' item numbers when assigning vendor types in InventoryControl item records.)
Weight UOMThis is the unit of measure for the weight of this item on the receipt—such as, pounds, kilograms, tons.
By default, the program displays the weight unit of measure from thepurchase order, but you can change it to another defined unit ofmeasure (and the program will recalculate the weight accordingly).For example, the item might arrive in differently sized bags thanwere ordered, leading you to change the UOM.
The weight UOM for the complete order is determined by the defaultweight unit of measure set in the I/C Options screen (or in the P/OOptions screen, if you do not use Inventory Control).
Optional Fields tab
Note: This tab appears only if you use Transaction Analysis and OptionalField Creator.
The Optional Fields tab contains optional fields added by your company thatapply to the transaction as a whole. (Optional fields on detail lines apply tothe individual transaction detail.)
For more information, see "About Optional Fields" (page 56).
Rates Tab (multicurrency ledgers)
Currency (display only)In multicurrency ledgers, the vendor's currency code is displayed afteryou enter the vendor number. All amounts you enter for the receipt willbe in the vendor's currency.
The currency is assigned for the vendor in Accounts Payable, and youcannot change it in Purchase Orders.
640 Sage 300 ERP Purchase Orders
Transaction Screens
Derive RateWhen Purchase Orders calculates the tax amount in a tax reportingcurrency, the program uses the Tax Reporting Currency Exchange Ratethat appears (or that you enter) on the Rates tab.
However, if you have changed the tax reporting amount that appears onthe Taxes tab, you can click the Derive Rate button to see the actualexchange rate between the tax amount and the tax reporting amount.
In other words, the Derive Rate button appears so you can derive theexchange rate for the tax reporting currency if you change the calculatedamount on the Taxes tab.
Purchase Order Exchange RateIf you are entering a receipt for a multicurrency purchase order, theprogram displays the exchange rate that was posted on the PO. You canenter a different rate for the receipt.
Purchase Order Rate DateIf you are entering a receipt for a multicurrency purchase order, theprogram displays the rate date for the exchange rate that was posted onthe PO. You can specify different exchange rate information for thereceipt.
Purchase Order Rate TypeIf you are entering a receipt for a multicurrency purchase order, theprogram displays the rate type that you used to select the exchange ratefor the PO. You can select a different rate type for the receipt.
Receipt Exchange RateThe program displays the exchange rate currently in effect for thespecified currency and the displayed rate type and rate date, but you canchange the rate.
You receive a warning if you change an exchange rate by an amount thatexceeds the Spread setting for the currency in Common Services'Currency Rates table.
Receipt Rate DateType the date to use to select the exchange rate for the additional cost.The program displays the rate date that is nearest the receipt date youtyped, but you can change to another date for which an exchange rate is
User's Guide 641
Appendix A: Purchase Orders Screen Guides
entered for the currency in the Currency screens in Common Services.
If you change the rate date, Purchase Orders checks the rate tables fora date match and updates the rate if necessary.
Receipt Rate TypeIf the rate type you want to use is not displayed, type the code orchoose it from the Finder.
The program uses rate types when converting multicurrency amounts onthe order to functional currency. Examples of rate types might be "spotrate," "average rate," and "contract rate."
You define rate types using the Currency Rate Types screen in CommonServices, and assign the default rate type for Purchase Orders on theProcessing tab of the P/O Options screen.
Retainage TabThe Retainage panel lets you specify:
l The exchange rate that you want to use if this is a multicurrency receipt.You can:
Use the original document exchange rate (entered for the PO)
Use the current exchange rate
l The retainage terms (defined in the Accounts Payable program). You canoverride the general terms with a percentage and retention period oneach detail line.
Note: This tab will appear only if the receipt is job-related and you useretainage accounting.
Taxes Tab
Retainage Tax AmountThis field appears on the Taxes tab for Receipt Entry, Invoice Entry,Return Entry, and Credit/Debit Note Entry if retainage applies to thedocument.
It shows the amount of tax calculated for this authority for the retainageportion of the document if you report tax for retainage amounts whenyou create the retainage document (not when you create the originaldocument).
642 Sage 300 ERP Purchase Orders
Transaction Screens
Retainage appears only on job-related documents if you select theRetainage option on the first tab of the transaction entry screen.
Retainage tax amounts are computed using the retainage tax base andthe tax rate for each tax authority.
Retainage Tax BaseThe retainage tax base is the amount (before included taxes) used as thebase for calculating taxes on the retained amount.
Essentially, the retainage tax base is the retainage portion of thedocument (excluding tax) if you report tax for retainage amounts at thetime that you create the retainage document (not when you create theoriginal document).
Retainage appears only on job-related documents if you select theRetainage option on the first tab of the transaction entry screen.
Retainage tax amounts are computed using the retainage tax base andthe tax rate for each tax authority.
Tax AmountThe program displays the total tax amount calculated for each authority inthe primary vendor's tax group. You can change this amount, ifnecessary.
To cancel all your changes to tax amounts at the same time, click theCalculate Taxes button.
Tax Authority and DescriptionThese columns list the codes and corresponding descriptions for all thetax authorities in the tax group specified for the document.
You enter tax information in the Tax Services module in CommonServices.
Tax BaseThe net cost of an item for which tax is included in its price.
Tax GroupFor new vendors (not yet added to Accounts Payable), type the tax groupthat identifies the tax authorities to which the vendor is subject, or selectthe group from the Finder. You must use a tax group that is defined foryour company in Common Services.
User's Guide 643
Appendix A: Purchase Orders Screen Guides
When entering a receipt for an existing vendor, you can change the taxgroup that appears as the default.
You must enter a valid tax group for every receipt vendor.
Tax IncludedThe program displays the total amount of tax that is included in itemcosts for the authority.
You can include tax amounts in item costs only if permitted by theauthority.
Tax ExcludedThe program displays the total amount of tax that is not included in itemcosts for the authority.
Tax Reporting CurrencyTax reporting fields appear on the Taxes tab only if the tax group's taxreporting currency is different from your functional currency and thevendor's currency.
Along with the tax reporting currency, the program displays the amountof included and excluded tax to be reported in that currency on taxtracking reports for all the tax authorities listed on the document.
You set the tax reporting currency for tax groups in the Tax Servicesmodule in Common Services.
Tax Reporting AmountThe Tax Reporting Amount appears only if the tax reporting currency forone or more of the tax group authorities is different from your functionalcurrency and the vendor's currency.
You set the tax reporting currency for taxes in the Tax Services modulein Common Services.
On the Taxes tab, this field is the sum of the tax reporting amounts forall tax authorities. You can change the amount on the Taxes tab (forexample, if you also change the Tax Amount, and then derive the TaxReporting Exchange rate on the Rates tab).
If you edit this amount, but leave the exchange rate, the tax reportingamount will be recalculated if you click the Calc. Taxes button.
644 Sage 300 ERP Purchase Orders
Transaction Screens
This field also appears for each detail line on the zoomed DetailItems/Taxes screen.
Total Retainage TaxThis field appears on the Taxes tab for Receipt Entry, Invoice Entry,Return Entry, and Credit/Debit Note Entry if retainage applies to thedocument.
It shows the total amount of tax calculated for the retainage portion of thedocument if you report tax for retainage amounts when you create theretainage document (not when you create the original document).
Retainage appears on job-related documents only if you select theRetainage option on the first tab of the transaction entry screen.
Retainage tax amounts are computed using the retainage tax base andthe tax rate for each tax authority.
Total TaxThis field displays the total tax amount calculated for each authority in thevendor's tax group. You can change this amount, if necessary.
To cancel all your changes to tax amounts at the same time, click theCalculate Taxes button.
Vendor Tax Class and Tax Class DescriptionThese columns list the tax classes that are assigned to the tax authoritiesto which the vendor is subject, and their corresponding descriptions.
You can change a tax class to another tax class that is assigned to theauthority, but not the description.
To change the description for the tax class or make other changes for thespecified tax group, use the Tax Services screens in Common Services.
Totals Tab
CommentType an optional comment for the receipt, using up to 250 characters. Theprogram automatically wraps text as you reach the end of a line. If youwish to insert your own line breaks, press the Ctrl and Enter keys whereyou want a line break to occur.
User's Guide 645
Appendix A: Purchase Orders Screen Guides
Estimated TaxThis is the tax amount that will be applied to the retainage invoice if thetax authority allows you to defer tax on retained amounts.
Retainage amounts are invoiced at a later time, in the Accounts Payablemodule.
Excluded TaxThe program displays the total amount of tax that is not included in itemcosts for the authority.
Included TaxThe program displays the total amount of tax that is included in theprimary vendor's item and additional costs for the authority.
You use the Tax Services screens to specify whether a tax authorityallows tax-included costs in item prices.
Less Receipt DiscountYou can enter an optional discount percentage or discount amount forthe entire document, or enter discounts for individual detail lines.
If you enter a discount for the entire document, Purchase Ordersprorates the discount amount for the document details, overriding anydiscounts you may have entered manually for the details.
Less RetainageThis field appears if the receipt is job-related and includes retainageamounts (in other words, will have amounts held back on the invoice).
The Net Receipt total is the amount of that will be invoiced from thisreceipt.
Retainage amounts are invoiced at a later time, in the Accounts Payablemodule.
Number of CostsThe program displays the number of additional cost detail lines youentered for the document.
Check this number against source documents to make sure you enteredall the details you require.
646 Sage 300 ERP Purchase Orders
Transaction Screens
Number of LinesThe program displays the number of item detail lines you entered for theprimary vendor on the document.
Check this number against source documents to make sure you enteredall the details you require.
Plus Additional CostsThe program displays the total amount of additional cost details for theprimary vendor on the receipt, excluding taxes (except taxes that areincluded in the cost amounts).
Plus Excluded TaxThe program displays the total excluded tax amount of all item andadditional cost details for the primary vendor on the receipt. This amountdoes not include taxes that are included in the cost amounts.
Receipt Detail SubtotalThe program displays the total of all item detail costs entered for theprimary vendor on the receipt, including tax-included amounts. Thissubtotal does not include tax amounts that are not included in item costsor the additional costs you added for the primary vendor.
Receipt TotalThe program displays the total of all item and additional costs and taxesfor the primary vendor.
Total TaxThe program displays the sum of the included and excluded taxescalculated on the receipt for the primary vendor. It does not include taxamounts calculated for secondary vendors.
Total WeightThe program displays the total estimated weight of the receipt, calculatedfrom the weight you enter for each item detail.
Use this amount to check shipping charges for the order.
User's Guide 647
Appendix A: Purchase Orders Screen Guides
P/O Receipt Entry Bill-To Location Screen
To open this screen:
1. Open Purchase Orders > P/O Transactions > Receipt Entry.
2. Click the Zoom button ( ) beside the Bill-To Location field, or press the F9key in the field.
Overview
Use the Bill-To Location screen to edit an existing bill-to location address, orto enter a new billing address for the receipt.
Note: You do not have to enter a bill-to location code or addressinformation.
Fields and Controls
AddressUse the Address field to type the address for the location, or edit thedisplayed information if necessary.
Bill-To LocationIf you use Inventory Control and you selected a bill-to location code, theprogram displays the location code.
If you do not use Inventory Control, you can click the Zoom buttonbeside the field name.
Enter the bill-to location information by typing in the screen that appears.
ContactEnter the name of a contact person, department, or position.
DescriptionUse the Description field to type a description of the location, such as acompany name, or edit a displayed description if necessary. You do nothave to include a description.
E-mailUse the E-mail field to type the e-mail address for the location, or edit the
648 Sage 300 ERP Purchase Orders
Transaction Screens
displayed address if necessary.
Fax NumberUse the Fax Number field to type the fax number for the location or edit adisplayed number if necessary.
Phone NumberUse the Phone Number field to type the telephone number for the locationor edit a displayed number if necessary.
P/O Receipt Entry Ship-To Location Screen
To open this screen:
1. Open Purchase Orders > P/O Transactions > Receipt Entry.
2. Click the Zoom button ( ) beside the Ship-To Location field, or press the F9key in the field.
Overview
Use the Ship-To Location screen to edit an existing ship-to location address orto enter a new ship-to address for the receipt.
Note: You do not have to enter a ship-to location code or address information.
Fields and Controls
AddressType the address for the location where goods are to be shipped, or edit thedisplayed information if necessary.
ContactType the name of a contact person, department, or position at the ship-tolocation, and enter a phone number, fax number, and e-mail address ifappropriate (or edit the displayed contact).
DescriptionType a description of the location, such as a company name, or editdisplayed information if necessary.
Fax NumberType the fax number for the location, or edit displayed number if necessary.
User's Guide 649
Appendix A: Purchase Orders Screen Guides
Phone NumberType the phone number for the location, or edit displayed number ifnecessary.
Ship-To Location (display only)The program displays the code for the specified ship-to location, if any.
P/O Receipt Entry Drop-Shipment Address Screen
To open this screen:
1. Open Purchase Orders > P/O Transactions > Receipt Entry.
2. On the Details table, for a selected detail line, click in the Drop-Ship field,then click the Zoom button (or press the Shift and F9 keys at the sametime).
Overview
Use this screen to enter or edit address information for a detail where thegoods were shipped directly to an address other than the inventory locationspecified for the detail line.
To enter a drop-shipment address:
1. In the Drop-Shipment Address screen, select the type of address to enter.
2. Select the location code, customer number, or ship-to location code for theaddress, as needed.
3. Type the address or edit displayed information.
4. ClickClose.
To edit a drop-shipment address:
1. Make the changes you need in the Drop-Shipment Address screen. You canchange all the information in the screen, including the type of address.
2. When finished, clickClose.
To delete drop-shipment addresses:
On the Receipt tab, change the entry in the Drop-Ship field to No for theselected detail, or clear the Drop-Ship option on the Detail Items/Taxes form(click the field or press the Shift and F9 keys at the same time in it).
650 Sage 300 ERP Purchase Orders
Transaction Screens
Fields and Controls
AddressType the address information for the drop-shipment, or accept the displayedinformation.
If you are creating a receipt from a purchase order, information entered withthe drop-shipment address on the purchase order is displayed, but you canchange it.
ContactType the name of the contact person or position at the drop-shipmentaddress, and enter a phone number, fax number, and e-mail address ifappropriate (or accept the displayed information).
If you are creating a receipt from a purchase order, the contact, if any,entered with the drop-shipment address on the purchase order is displayed,but you can change it.
Customer NumberThis field appears if you selected Customer Number or Customer Ship-ToAddress in the Set Drop-Ship Items To field.
To enter a drop-shipment to a customer from your Accounts Receivabledatabase, type the customer number or select it from the Finder.
When you enter a customer number, the address and other informationentered for the customer in Accounts Receivable is displayed, but you canchange it.
If you are creating a receipt from a purchase order, the program displaysthe customer number, if any, entered with the drop-shipment address on thepurchase order.
Customer Ship-to LocationThis field appears if you selected Customer Ship-To Address in the Set Drop-Ship Items To field.
Type the code for the customer's ship-to location, if any, at which the drop-shipped items were received, or select the location from the Finder. You canenter a ship-to location only if you have defined ship-to locations in AccountsReceivable for the customer.
User's Guide 651
Appendix A: Purchase Orders Screen Guides
When you enter a ship-to location code, the address and other informationentered for the location is displayed, but you can change it.
If you are creating a receipt from a purchase order, the program displaysthe customer ship-to code, if any, entered with the drop-shipment addresson the purchase order.
DescriptionType the name of the person or a description of the location which receivedthe drop shipment.
If you are creating a receipt from a purchase order, the description, if any,entered with the drop-shipment address on the purchase order isdisplayed, but you can change it.
E-mailType the e-mail address for the location to which the items were drop-shipped.
If you are creating a receipt from a purchase order, the e-mail address, ifany, entered with the drop-shipment address on the purchase order isdisplayed, but you can change it.
Fax NumberType the fax number at the location where the drop-shipment wasreceived.
If you are creating a receipt from a purchase order, the fax number, if any,entered with the drop-shipment address on the purchase order isdisplayed, but you can change it.
LocationThis field appears if you use Inventory Control and you selected InventoryLocation Address in the Drop-Ship Items To field.
If items were drop-shipped to an inventory location other than the locationspecified for the detail line, type the location code or select it from theFinder. When you select a location code, the address and other informationentered for the location in Inventory Control is displayed, but you canchange it.
If you are creating a receipt from a purchase order, the location code, ifany, entered with the drop-shipment address on the purchase order isdisplayed, but you can change it.
652 Sage 300 ERP Purchase Orders
Transaction Screens
Phone NumberType the phone number at the location to which the items were drop-shipped.
If you are creating a receipt from a purchase order, the phone number, ifany, entered with the drop-shipment address on the purchase order isdisplayed, but you can change it.
Set Drop Shipment Address ToSpecify the type of drop-shipment address you are entering. You can select:
l Address Entered— select this option when you want to type the addressinformation for the shipment.
l Inventory Location Address—select this option when the items weredrop-shipped to a different Inventory Control location than the designatedreceipt location.
l Customer Address— select this option when the items were drop-shipped to the address of one of your Accounts Receivable customers.
l Customer Ship-To Address—select this option when the items weredrop-shipped to one of the ship-to addresses defined for the customer inAccounts Receivable.
Adding a New Secondary Vendor to a Receipt
To add an additional cost vendor to a receipt:
1. On the Additional Costs tab, in the Vendor Number field, enter the vendornumber, and then press the Tab key.
Purchase Orders displays a message if the vendor does not exist in AccountsPayable.
2. Click OK to close the message.
3. Click the Zoom button beside the Vendor Number field.
4. In the Vendor Address Information screen that appears, enter the addressand contact information for the new secondary vendor.
5. When finished, click the Close button to return to the Additional Costs tab.
Note: To add a new Accounts Payable vendor, you must create a vendorrecord in the A/P program.
User's Guide 653
Appendix A: Purchase Orders Screen Guides
P/O Receipt Entry Detail Items/Taxes Screen
To open this screen:
1. Open Purchase Orders > P/O Transactions > Receipt Entry.
2. Enter header information for the receipt, including the vendor number and,if you are receiving an existing purchase order, specify the purchase ordernumber (or numbers if you are receiving multiple purchase orders).
3. Select an existing detail or enter a new one, and then press F9 or click theItem/Tax button.
Related tasks:
l "Entering Receipts" (page 151)
l "Printing Receiving Slips" (page 253)
l "Receiving and Invoicing Serialized Items " (page 211)
l "Receiving and Invoicing Lotted Items" (page 214)
Overview
Use this screen to add, edit, and delete receipt detail lines. You also use it toedit the tax classes and tax-included options for individual receipt details.
This screen displays the fields for a single detail in a separate window, lettingyou see all the information you entered for the detail, including taxinformation.
Fields and Controls
Buttons
Calc. TaxesClick the Calc. Taxes button to see tax amounts for a detail before youpost the document.
Note: Tax amounts are not calculated automatically until you click theTaxes tab or the Totals tab, or you post the purchase order.
CloseClick the Close button to close the Detail Items/Taxes screen.
654 Sage 300 ERP Purchase Orders
Transaction Screens
On the Detail Items/Taxes screen and the Detail Costs/Taxes screen, youcan also press the F9 key on your keyboard to close the screen.
DeleteClick the Delete button to delete the detail displayed in the zoomeddetail-entry screen.
Save/AddUse the Save button to save the changes you made to a detail you editedin the Detail Items/Taxes screen.
For a new detail, this button is called Add.
Allocated TaxThe program displays the total tax amount that has been allocated to thedetail, including taxes that are included in the item cost. Recoverable andexpensed tax amounts not included.
Allocated taxes form part of the item costs that are posted to the InventoryControl item records by Day End Processing.
Arrival DateType the date on which you received the items. The program displays thesession date as the default, but you can change it.
CommentsTo view comments for a selected detail line, click the Zoom button besidethe Comments field. The program displays any comments entered for thedetail line on the receipt, but you can change or delete them.
Tip: You can also press the Shift and F9 keys together to open or close thescreen using your keyboard.
To enter comments for the selected detail, click the Detail Comments table,press the Insert key, and then type the comments on the new line.
Lines automatically wrap. If you want to start a new line before the linewraps, press Enter.
For more information, see "P/O Detail Comments Screen" (page 536).
Discount %You can enter a discount as a percentage or an amount. The program usesthe amount you enter in this field to calculate the discounted cost for the
User's Guide 655

Appendix A: Purchase Orders Screen Guides
item detail.
If you enter a percentage in this field, Purchase Orders calculates thediscount amount for the item detail.
Tip: If you prefer not to enter discounts for individual details, you canenter a discount percentage for the entire document on the Totals tab.Purchase Orders then prorates the discount amount for the transactiondetails, overriding any discounts you may have entered manually for thedetails.
Discount AmountThe program uses the amount you enter in this field to calculate thediscounted extended cost for the item detail. If you enter a discountamount, the program calculates and displays the discount percentagebased on the extended cost. (Alternatively, you can enter a percentage inthe Discount % field, and let the program calculate the discount amount.)
If you prefer not to enter discounts for individual details, you can enter adiscount amount for the entire receipt on the Totals tab. Purchase Ordersthen prorates the discount amount for the document details, overriding anydiscounts you may have entered manually for the details.
Discounted Extended CostThe program displays the item cost, less the discount amount, in this field.
Drop ShipTo enter a drop-ship address for a detail, click the Zoom button besidethe Drop Ship field, or select the field and press Shift+F9.
Select the type of address to enter, and if necessary, select the locationcode, customer number, or ship-to address code for the address.
Expense AccountYou specify a general ledger expense account for non-inventory itemdetails. You can select general ledger account numbers using the Finder.
The program displays the number entered with the detail on the purchaseorder, if any, or the account number specified on the P/O Options screenfor the Default Inventory Expense Account option, but you can change thenumber on the receipt.
Extended CostType the extended cost for the number of units of the item that you
656 Sage 300 ERP Purchase Orders
Transaction Screens
received.
If you change the extended cost, the program automatically recalculates theunit cost.
Note: If security is turned on in Sage 300 ERP, you cannot see this fieldunless you are authorized to view costing information.
Extended WeightType the extended weight for the number of units of the item that youreceived.
If you change the extended weight, the program automatically recalculatesthe unit weight.
The total weight for all items on the document is displayed in the Totals tab.
Item NumberThe program displays the item number entered for the selected detail line.
Line NumberTo select an existing line to edit or delete, click the line, or enter its linenumber in this field on the P/O Detail Items/Taxes screen.
Note: You cannot delete completed lines.
LocationThis field appears only if you use Inventory Control.
Enter the code for the location where you expect to receive the shipment (orto which you want to post drop-shipped items).
The program displays the ship-to location code, if any, entered on the firsttab, but you can select a different location. You can omit the location whenadding details for non-inventory items.
Note: If you change locations after assigning serial and/or lot numbers,you must re-assign the serial and/or lot numbers.
Net Of TaxThis field displays the extended item cost, minus any applicable tax amount.You cannot edit the amount.
User's Guide 657
Appendix A: Purchase Orders Screen Guides
Number of LabelsIf you want to print item labels for the received items, type the number oflabels to print.
Note:You use the Item Labels screen in Inventory Control to print the labels.
In the Inventory Control Item Labels screen, select Received in the ForEach Item field, then specify the receipt numbers for which you want toprint labels. The program then prints the number of labels you specifiedfor each item detail on a selected Purchase Orders receipt.
You cannot specify a number of labels for non-inventory item details.
Optional FieldsIf optional fields have been defined in Purchase Orders for receipt details,you can click the Zoom button beside the Optional Fields field to displaythe optional fields assigned to a selected detail, and edit their contents.
For more information about using optional fields in transactions, see "AboutOptional Fields in Transactions" (page 90).
Quantity CanceledType the number of units to cancel for the detail (the number of units, ifany, that you do not expect to receive).
You can enter a canceled quantity only when you are editing a detail from apurchase order. When you post the receipt, the Quantity Outstanding fieldon the purchase order is reduced by the number of units you canceled onthe receipt.
Quantity OutstandingYou can enter an outstanding quantity (the number of units not yet receivedor canceled) on detail lines only when you are entering a receipt to apurchase order.
The Quantity Outstanding field is automatically updated by the programwhen you post a received amount, but you can also type the outstandingquantity.
To reduce the outstanding quantity on an existing detail line you areediting, enter the desired amount; enter zero to complete a line and cancelremaining outstanding units.
658 Sage 300 ERP Purchase Orders
Transaction Screens
When you post the receipt for a purchase order, the outstanding quantitiesare reduced on the purchase order. If you post a receipt for the fulloutstanding quantity or for a larger quantity than was specified on thepurchase order, the purchase order detail is completed.
Quantity ReceivedType the number of units of the item that you received.
When entering received units for a purchase order detail, you can enter agreater number than are outstanding for the detail, if necessary.
When you post the receipt, the outstanding quantity on the purchase order (ifany) is updated with the number of received units, and any purchase orderdetails for which you did not enter a received quantity are deleted from thereceipt. You must add a new receipt to receive the other details on thepurchase order.
Note: If this is a job-related receipt, you should enter the quantity usingthe unit of measure that was used for the estimate in Project and JobCosting. Purchase Orders does not convert the quantity received when itsends the quantity to PJC if the units of measure are different.
If you use Serialized Inventory and Lot Tracking, and the item is serializedor lotted, a separate Generation/Allocation screen appears after you enterthe quantity of serialized or lotted items received, then press Tab or Enter.You use this screen to assign serial/lot numbers for the item. (This screenalso opens when you click the Zoom button beside the Quantity field.)
Received To DateThe program displays the number of units of the item that have already beenreceived on the receipt.
Tax IncludedThis field displays the total amount of tax that is included in the extendeditem cost (when the cost includes tax).
Unit CostEnter the cost of a single unit of the item you are ordering in the detail.
Purchase Orders displays a default cost as follows:
l If you have set up vendor contract costs, Purchase Orders displays thecost specified as a contract cost for the item and unit of measure.
User's Guide 659
Appendix A: Purchase Orders Screen Guides
l If P/O does not find a valid contract cost, it uses the inventory costspecified on the P/O Options screen.
Use the Finder to view any vendor contract costs, regular vendor costs,and other costs maintained by Inventory Control.
Purchase Orders uses the unit cost to calculate the extended cost. If youchange the unit cost, the extended cost is recalculated.
In multicurrency ledgers, the cost is expressed in the vendor's currency.
Note: You can assign security to the Unit Cost and Extended Cost fields,to prevent unauthorized changes to the fields.
If you use Project and Job Costing, unit cost is defaulted as follows:
l If the project is a standard project:
For a category cost class of Subcontractor, Overhead, orMiscellaneous Equipment, the unit cost is defaulted from the categoryresource.
For a category cost class of Labor, the default unit cost is based on theDefault Unit Cost From option for the employee resource category.
For a category cost class of Material (if you are using InventoryControl), the default unit cost is based on Purchase Orders' defaultitem cost (set in P/O Options).
For a category cost of Material (if you are not using InventoryControl), the unit cost is based on Purchase Orders vendor costs.
l If the project is a basic project:
For a category cost class of Subcontractor, Overhead, orMiscellaneous Equipment, the unit cost is defaulted from the category.
For a category cost class of Labor, the default unit cost is based on theDefault Unit Cost From option for the labor category.
For a category cost class of Material (if you are using InventoryControl), the default unit cost is based on Purchase Orders' defaultitem cost (set in P/O Options).
For a category cost of Material (if you are not using InventoryControl), the unit cost is based on Purchase Orders vendor costs.
Unit of MeasureType the unit of measure in which you received the item, or select it from
660 Sage 300 ERP Purchase Orders
Transaction Screens
the Finder.
You must use one of the units of measure that is assigned to the item inInventory Control. On new detail lines, the program displays the stockingunit of measure.
If you are creating a receipt from a purchase order, the unit of measureentered for the detail on the purchase order is displayed, but you can changeit.
If this is a job-related receipt, you should use the unit of measure that wasused for the estimate in Project and Job Costing. Purchase Orders does notconvert the quantity received when it sends the quantity to PJC if the units ofmeasure are different.
Unit WeightEnter the weight of a single unit of the item you are ordering in the detail. Onnew detail lines, the weight specified in the Inventory Control item record isdisplayed, but you can change it.
Purchase Orders uses the unit weight to calculate the extended weight. Ifyou change the unit weight, the extended weight is recalculated.
You can select from the weight units of measure defined in Purchase Orders.Weight is expressed in the unit selected for theWeight Unit Of Measureoption on the I/C Options screen.
On invoices, enter the weight of a single unit of the item for which you wereinvoiced. The program displays the weight specified for the item on thereceipt but you can change it.
Purchase Orders uses the unit weight to calculate the extended weight. Ifyou change the unit weight, the extended weight is recalculated.
You can see the total weight estimated from your entries for the invoiceditems on the Totals tab.
Vendor Item NumberEnter the code the vendor uses to identify the item.
If the vendor's item number is specified in the Inventory Control itemrecord, the code appears in this field. (Enter vendors' item numbers whenassigning vendor types in Inventory Control item records.)
If the vendor's item number is specified on the receipt for which you areentering an invoice, the code appears in this field. (You can enter vendors'
User's Guide 661
Appendix A: Purchase Orders Screen Guides
item numbers when assigning vendor types in Inventory Control itemrecords.)
Weight UOMThis is the unit of measure for the weight of this item on the receipt—suchas pounds, kilograms, tons.
The program displays the weight unit of measure from the purchase orderas the default, but you can change it to another defined unit of measure(and the program will recalculate the weight accordingly). For example,the item might arrive in differently sized bags than were ordered, leadingyou to change the UOM.
The weight UOM for the complete order is determined by the default weightunit of measure set in the I/C Options screen (or in the P/O Options screenif you do not use Inventory Control).
Tax table
Allocated TaxThis column displays the tax amounts allocated to the selected detailline for each tax authority.
Detail Tax Class and DescriptionThese columns list the tax classes and corresponding descriptions thatare assigned to the tax authority. You can change the tax class (toanother tax class that is assigned to the authority), but not thedescription.
To change the tax class description or make other changes to theinformation for the specified tax group, use the Tax Services screens inCommon Services.
Expensed TaxThe program displays the amount of tax that is separately posted(expensed) to a general ledger account, rather than allocated to detailson the credit note or debit note.
Recoverable TaxThe program displays the amount of tax that can be recovered by yourcompany, such as, for example, recoverable Canadian Goods andServices Tax (GST) amounts.
662 Sage 300 ERP Purchase Orders
Transaction Screens
Tax AmountThe program displays the amount of tax that is due for each authority.
For each authority, Purchase Orders calculates a tax amount if:
l The vendor is subject to tax.
l The transaction contains taxable items or taxable additional costs.
l Tax rates are specified for the tax authorities and classes in TaxServices.
You cannot edit the tax amount for a detail except indirectly, by changingthe tax class or tax-included option on the Detail Items/Taxes screen.
To edit tax amounts for the invoice, make your changes on the Taxes tab.
Tax Authority and DescriptionThese columns list the tax authorities and that are assigned to the taxgroup you specified for the document.
Tax information is maintained in the Tax Services screens in CommonServices.
Tax BaseThis field shows, for the selected detail, the net cost of items before tax isadded for the tax authority. You cannot change the amount that appearsin this field.
This field is particularly useful for items that have tax included in theirprices.
Tax IncludedThis field displays the amount of tax that is included in the extended itemcost (when the cost includes tax).
P/O Lot Numbers Generation/Allocation Screen
To open this screen:
1. Open Tasks > Browse > Purchase Orders > Receipt Entry or InvoiceEntry.
2. Enter a value in the Quantity Received field, and then press either the Enterkey or the Tab key.
User's Guide 663
Appendix A: Purchase Orders Screen Guides
Related tasks:
l "Receiving and Invoicing Lotted Items" (page 214)
Overview
When you receive lotted items from vendors in Purchase Orders, the programprompts you to assign lot numbers.
Note: Lot numbers are used for tracking stock from the point of receiptthrough to the point of sale, and can be used to track returned items fromthe customer and back to the vendor.
You use the same procedure when entering a vendor invoice, except you startwith the Invoice Entry screen instead of the Receipt Entry screen.
Assigning Lot Numbers During Receipt Entry or Invoice Entry
You can assign lot numbers when you receive lotted items or when you createthe invoice for the items, provided the item does not use the lot costingmethod and the Allow Lot Quantity To Be Different From The QuantityIn The Entries option is selected on the I/C Items screen.
Generally, there are not big differences in assigning numbers during receipt orinvoicing. However, there can be an impact when using the Inventory ControlLot Inquiry report.
Note: If you chose not to assign numbers in the PO receipt screen, but did sousing the PO Invoice screen, the cost that appears in the Inventory ControlLot Inquiry report will be zero, as this inquiry reports only the net changefrom the time of receipt to invoice, not the original receipt cost.
Example: Say you enter the cost of a lotted item as two dollars duringreceipt entry, but you do not assign the lot number. Then, you use theInvoice Entry screen to enter the lot number, and you change the cost ofthe item to three dollars. The value that appears on the I/C Lot NumberInquiry for that transaction is one dollar.
Fields and Controls
Buttons
AddClick the Add button to add the lot or serial number displayed in theNext Lot Number or Next Serial Number field.
664 Sage 300 ERP Purchase Orders
Transaction Screens
Auto AllocClick the Auto Alloc button to automatically allocate lot numbers to theitems. The required number of lot numbers appears in the Lot Numberslist.
To start allocating from a specific lot number, specify this number in theAuto-Allocate From field, before you click Auto Alloc.
Auto GenThe Auto Gen button appears if you had selected the option Allow Auto-Generation of Lot Numbers in PO on the Settings tab of the I/COptions screen.
When you click the Auto Gen button, a dialog box opens, where youindicate how many lot numbers need to be created.
ClearClick the Clear button to remove lot numbers or quantities allocated, orboth, depending on the screen.
CloseClick the Close button to end the lot number allocation process.
Auto-Allocate FromUse the Auto-Allocate From field to specify the starting lot number fromwhich to automatically allocate the lot numbers.
1. Select the Auto-Allocate From check box to display a field beside it.
2. In this field, use the Finder to find and select a starting lot number, orenter it manually.
3. Click the Auto Allocate button to allocate the required number of lotnumbers, starting from the specified number.
Make Lots OR Each HasWhen you auto-generate lots, you must enter a number in one of these fieldsto define how the lots are generated:
l Make __ Lots. If you want to create a fixed number of lots, with thequantity evenly distributed across all of the lots, enter the number of lots.
User's Guide 665
Appendix A: Purchase Orders Screen Guides
Example: If you create 10 lots and have 400 items, each lot will have40 items.
OR
l Each Lot Has __. If you want to distribute a fixed quantity to each lot,enter the number to include in each lot.
Example: If you want to have 50 items in each lot, the process willgenerate the number of lots needed to accommodate the quantity ofitems.
Next Lot NumberThis field displays the next sequential lot number available for the item.Depending on which buttons are displayed, you can use this number inthese ways:
l Click Add to add the displayed number to the Lot Numbers list. Repeatthis for as many numbers as you need.
l Click Auto-Gen to add the required number of lot numbers to the LotNumbers list, starting from the displayed number.
l Click Auto-Alloc to add the required number of lot numbers to the LotNumbers list, starting from the displayed number.
When you finish, this field displays the next lot number that is nowavailable.
Count section
Allocated / Generated / Returned countThis display field indicates how many lot numbers have been selected.
Lot Qty RequiredThis field indicates how many lot numbers are required, as indicated onthe quantity field from which you accessed the Lot Numbers Allocationpop-up.
RemainingThis figure represents the quantity still to be entered on the Lot Trackingpop-up screen. This number should be zero after you have finished
666 Sage 300 ERP Purchase Orders
Transaction Screens
allocating lot numbers.
P/O Serial Numbers Generation/Allocation Screen
To open this screen:
1. Open Purchase Orders > P/O Transactions > Receipt Entry or InvoiceEntry.
2. Enter a value in the Quantity Received field, and then press either the Enterkey or the Tab key to display the Serial Numbers Generation/ Allocationscreen.
Fields and Controls
Buttons
AddAfter entering a number in the New Serial Number field, click the Addbutton to add the number to the Generated Serial Numbers list.
Auto AllocAfter entering a serial number in the blank field above the AvailableSerial Numbers list, click the Auto Alloc. button. The required serialnumbers will appear in the Returned Serial Numbers list, beginning withthat number.
Auto GenClick the Auto Gen button after entering a number in the New SerialNumber field, or after highlighting a number in the Existing SerialNumbers list.
The correct quantity of required serial numbers will appear in theGenerated Serial Numbers list, beginning with that number.
ClearClick the Clear button to remove all the serial numbers listed in theGenerated Serial Numbers or the Returned Serial Numbers lists.
A message appears, asking if this is what you really want to do.
Return AllOn the Serial Numbers Allocation screen, click the Return All button to
User's Guide 667
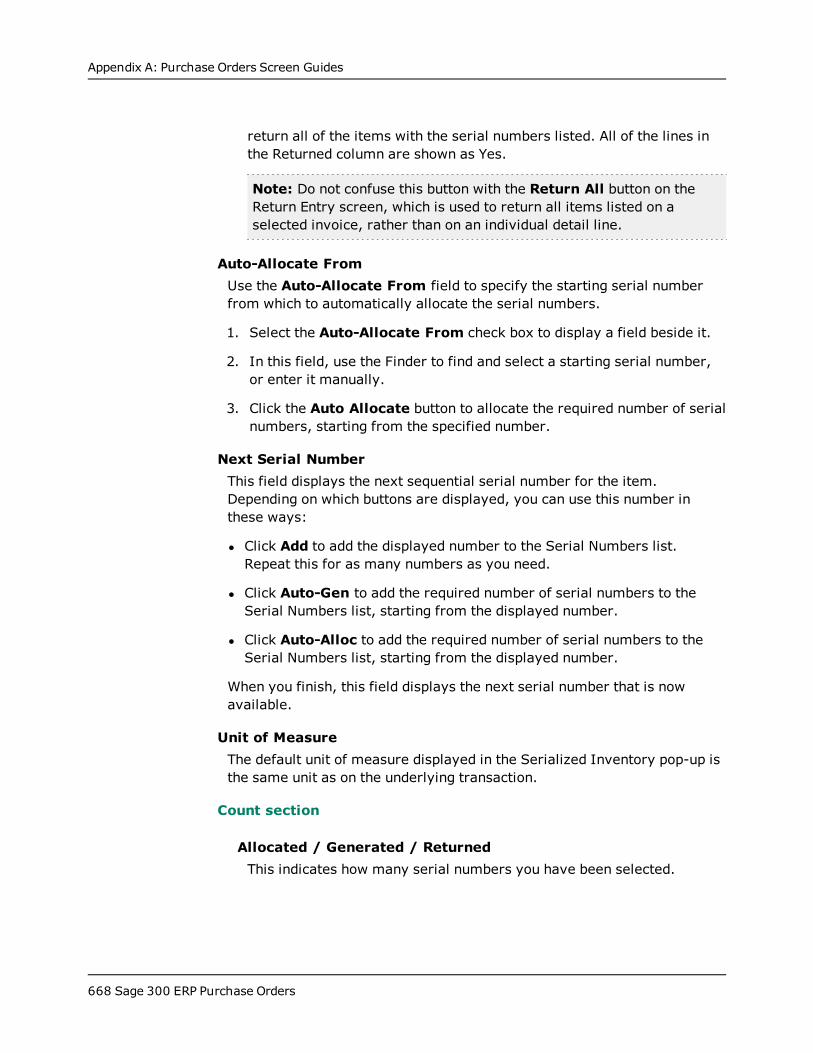
Appendix A: Purchase Orders Screen Guides
return all of the items with the serial numbers listed. All of the lines inthe Returned column are shown as Yes.
Note: Do not confuse this button with the Return All button on theReturn Entry screen, which is used to return all items listed on aselected invoice, rather than on an individual detail line.
Auto-Allocate FromUse the Auto-Allocate From field to specify the starting serial numberfrom which to automatically allocate the serial numbers.
1. Select the Auto-Allocate From check box to display a field beside it.
2. In this field, use the Finder to find and select a starting serial number,or enter it manually.
3. Click the Auto Allocate button to allocate the required number of serialnumbers, starting from the specified number.
Next Serial NumberThis field displays the next sequential serial number for the item.Depending on which buttons are displayed, you can use this number inthese ways:
l Click Add to add the displayed number to the Serial Numbers list.Repeat this for as many numbers as you need.
l Click Auto-Gen to add the required number of serial numbers to theSerial Numbers list, starting from the displayed number.
l Click Auto-Alloc to add the required number of serial numbers to theSerial Numbers list, starting from the displayed number.
When you finish, this field displays the next serial number that is nowavailable.
Unit of MeasureThe default unit of measure displayed in the Serialized Inventory pop-up isthe same unit as on the underlying transaction.
Count section
Allocated / Generated / ReturnedThis indicates how many serial numbers you have been selected.
668 Sage 300 ERP Purchase Orders
Transaction Screens
RemainingThis indicates how many serial numbers still need to be assigned.
Serial No's RequiredThis field indicates how many serial numbers are required, as indicatedon the quantity field from which you accessed the Serial NumbersAllocation screen.
Related tasks:
l "Receiving and Invoicing Serialized Items " (page 211)
Overview
When you receive serialized items from vendors in Purchase Orders, theprogram prompts you to assign serial numbers.
Note: Serial numbers are used for tracking stock from the point of receiptthrough to the point of sale, and can be used to track returned items from thecustomer and back to the vendor.
You use the same procedure when entering a vendor invoice, except you startwith the Invoice Entry screen instead of the Receipt Entry screen.
Assigning Serial Numbers During Receipt Entry or Invoice Entry
You can assign serial numbers when you receive serialized items, or when youcreate the invoice for the items, provided the item does not use the serialcosting method and the Allow Serial Quantity To Be Different From TheQuantity In The Entries option is selected on the I/C Items screen.
Generally, there are not big differences in assigning numbers during receipt orinvoicing. However, there can be an impact when using the Inventory ControlSerial Inquiry report.
User's Guide 669

Appendix A: Purchase Orders Screen Guides
Note: If you chose not to assign numbers in the P/O Receipt Entry screen,but did so using the P/O Invoice Entry screen, the cost that appears in theInventory Control Serial Inquiry report will be zero, as this inquiry reportsonly the net change from the time of receipt to invoice, not the originalreceipt cost.
Example: Say you enter the cost of a serialized item as two dollars duringreceipt entry, but you don't assign the serial number. Then, you use theP/O Invoice Entry screen to enter the serial number, and you change thecost of the item to three dollars. The value that appears on the I/C SerialNumber Inquiry for that transaction is one dollar.
Fields and Controls
Buttons
AddAfter entering a number in the New Serial Number field, click the Addbutton to add the number to the Generated Serial Numbers list.
Auto AllocAfter entering a serial number in the blank field above the AvailableSerial Numbers list, click the Auto Alloc. button. The required serialnumbers will appear in the Returned Serial Numbers list, beginning withthat number.
Auto GenClick the Auto Gen button after entering a number in the New SerialNumber field, or after highlighting a number in the Existing SerialNumbers list.
The correct quantity of required serial numbers will appear in theGenerated Serial Numbers list, beginning with that number.
ClearClick the Clear button to remove all the serial numbers listed in theGenerated Serial Numbers or the Returned Serial Numbers lists.
A message appears, asking if this is what you really want to do.
Return AllOn the Serial Numbers Allocation screen, click the Return All button to
670 Sage 300 ERP Purchase Orders
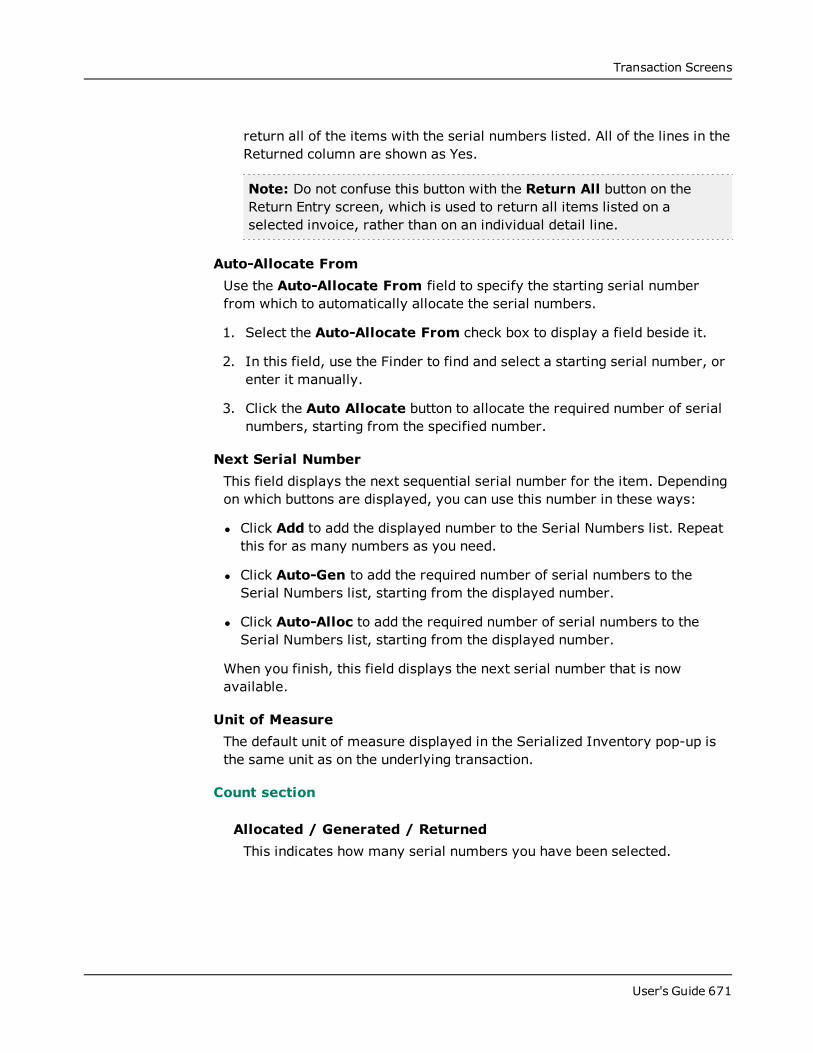
Transaction Screens
return all of the items with the serial numbers listed. All of the lines in theReturned column are shown as Yes.
Note: Do not confuse this button with the Return All button on theReturn Entry screen, which is used to return all items listed on aselected invoice, rather than on an individual detail line.
Auto-Allocate FromUse the Auto-Allocate From field to specify the starting serial numberfrom which to automatically allocate the serial numbers.
1. Select the Auto-Allocate From check box to display a field beside it.
2. In this field, use the Finder to find and select a starting serial number, orenter it manually.
3. Click the Auto Allocate button to allocate the required number of serialnumbers, starting from the specified number.
Next Serial NumberThis field displays the next sequential serial number for the item. Dependingon which buttons are displayed, you can use this number in these ways:
l Click Add to add the displayed number to the Serial Numbers list. Repeatthis for as many numbers as you need.
l Click Auto-Gen to add the required number of serial numbers to theSerial Numbers list, starting from the displayed number.
l Click Auto-Alloc to add the required number of serial numbers to theSerial Numbers list, starting from the displayed number.
When you finish, this field displays the next serial number that is nowavailable.
Unit of MeasureThe default unit of measure displayed in the Serialized Inventory pop-up isthe same unit as on the underlying transaction.
Count section
Allocated / Generated / ReturnedThis indicates how many serial numbers you have been selected.
User's Guide 671
Appendix A: Purchase Orders Screen Guides
RemainingThis indicates how many serial numbers still need to be assigned.
Serial No's RequiredThis field indicates how many serial numbers are required, as indicatedon the quantity field from which you accessed the Serial NumbersAllocation screen.
P/O Fixed Assets Screen
To open this screen:
1. Open Purchase Orders > P/O Transactions > Receipt Entry.
2. Enter receipt information as usual, including item details for the fixedassets.
3. In in the detail line, double-click the Fixed Assets column to display Yes,and then click the Fixed Assets column heading.
Note: If you enter details using the Detail Items/Taxes screen, ratherthan the Details table, select the Fixed Assets option, and then click theZoom button.
Overview
If you use Sage Fixed Assets to manage the fixed assets in your company, youcan also mark received goods as fixed assets, and select the Sage FixedAssets template that you want to use for the new asset. Sage 300 ERPtransfers the asset information to Sage Fixed Assets when you run CreateAssets in Sage Fixed Assets Integration.
Fields and Controls
Asset DescriptionUse the Description field to enter the description that you want to use forthe asset in Sage Fixed Assets.
Fixed Asset UOMType the unit of measure for the quantity you entered.
Fixed Asset ValueType the value to book for the asset in Sage Fixed Assets.
672 Sage 300 ERP Purchase Orders
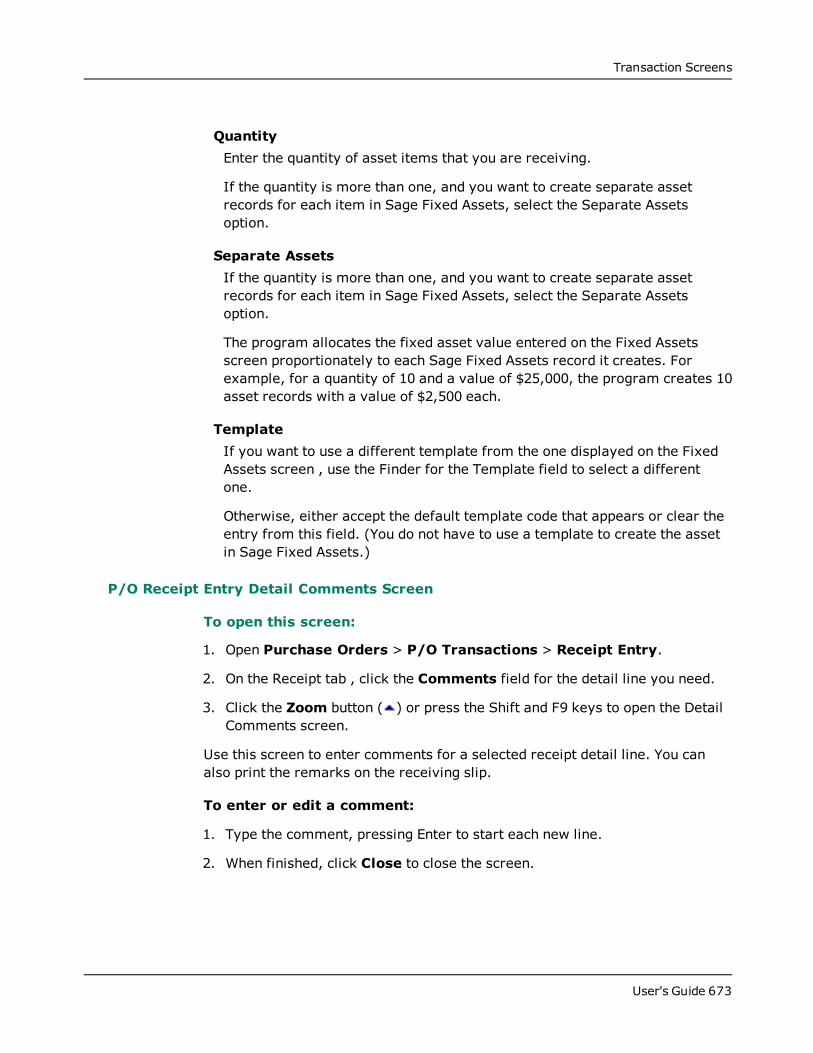
Transaction Screens
QuantityEnter the quantity of asset items that you are receiving.
If the quantity is more than one, and you want to create separate assetrecords for each item in Sage Fixed Assets, select the Separate Assetsoption.
Separate AssetsIf the quantity is more than one, and you want to create separate assetrecords for each item in Sage Fixed Assets, select the Separate Assetsoption.
The program allocates the fixed asset value entered on the Fixed Assetsscreen proportionately to each Sage Fixed Assets record it creates. Forexample, for a quantity of 10 and a value of $25,000, the program creates 10asset records with a value of $2,500 each.
TemplateIf you want to use a different template from the one displayed on the FixedAssets screen , use the Finder for the Template field to select a differentone.
Otherwise, either accept the default template code that appears or clear theentry from this field. (You do not have to use a template to create the assetin Sage Fixed Assets.)
P/O Receipt Entry Detail Comments Screen
To open this screen:
1. Open Purchase Orders > P/O Transactions > Receipt Entry.
2. On the Receipt tab , click the Comments field for the detail line you need.
3. Click the Zoom button ( ) or press the Shift and F9 keys to open the DetailComments screen.
Use this screen to enter comments for a selected receipt detail line. You canalso print the remarks on the receiving slip.
To enter or edit a comment:
1. Type the comment, pressing Enter to start each new line.
2. When finished, click Close to close the screen.
User's Guide 673
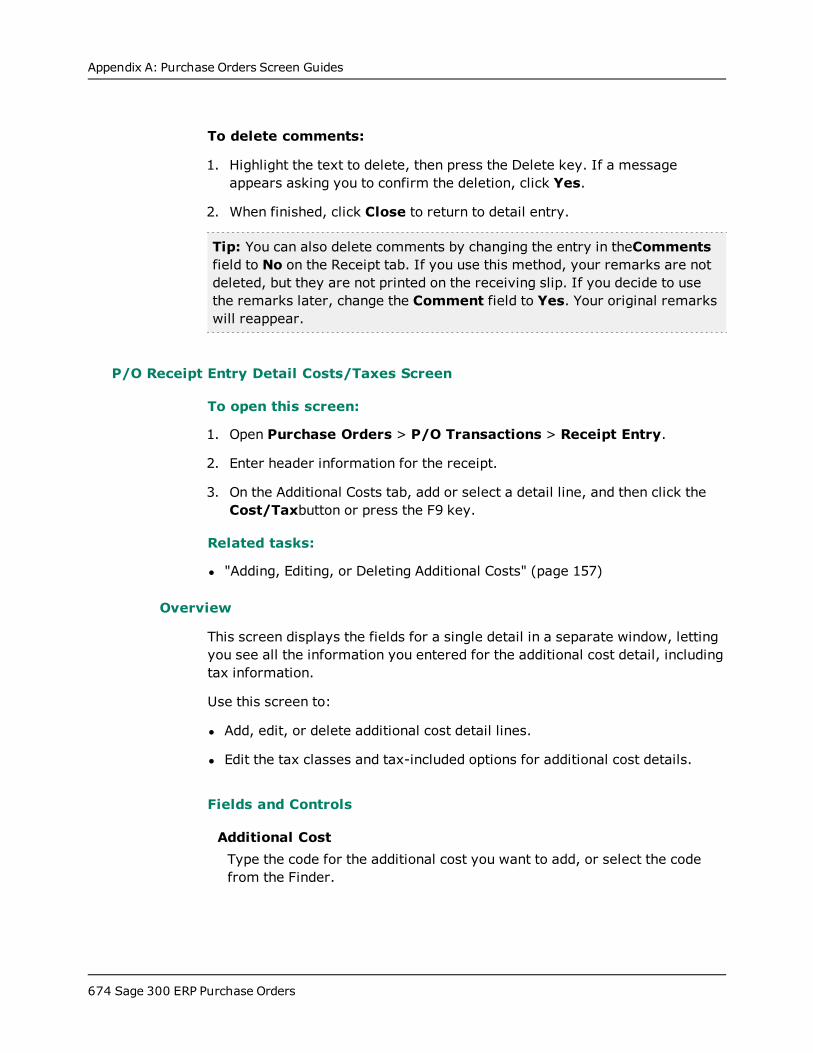
Appendix A: Purchase Orders Screen Guides
To delete comments:
1. Highlight the text to delete, then press the Delete key. If a messageappears asking you to confirm the deletion, click Yes.
2. When finished, click Close to return to detail entry.
Tip: You can also delete comments by changing the entry in theCommentsfield to No on the Receipt tab. If you use this method, your remarks are notdeleted, but they are not printed on the receiving slip. If you decide to usethe remarks later, change the Comment field to Yes. Your original remarkswill reappear.
P/O Receipt Entry Detail Costs/Taxes Screen
To open this screen:
1. Open Purchase Orders > P/O Transactions > Receipt Entry.
2. Enter header information for the receipt.
3. On the Additional Costs tab, add or select a detail line, and then click theCost/Taxbutton or press the F9 key.
Related tasks:
l "Adding, Editing, or Deleting Additional Costs" (page 157)
Overview
This screen displays the fields for a single detail in a separate window, lettingyou see all the information you entered for the additional cost detail, includingtax information.
Use this screen to:
l Add, edit, or delete additional cost detail lines.
l Edit the tax classes and tax-included options for additional cost details.
Fields and Controls
Additional CostType the code for the additional cost you want to add, or select the codefrom the Finder.
674 Sage 300 ERP Purchase Orders

Transaction Screens
If you are adding a cost for which no code is defined, skip this field and typethe name of the cost in the Description field (the field beside the AdditionalCost field in the Detail Cost/Taxes screen).
Note: You use the Additional Costs screen (in the P/O Setup folder) tomaintain the additional cost charges you use in Purchase Orders.
Allocated TaxThis field displays the amount of allocated tax for the detail. (Allocated taxesare included in the cost of the detail. Recoverable and expensed taxes arenot included in detail costs.)
AmountEnter the amount of the additional cost in this field.
CommentsEnter an optional comment for the document.
Any comments you entered for the detail on the receipt are included on theinvoice, but you can change or delete them.
Lines automatically wrap when you reach the end. If you want to start a newline before the line wraps, press Enter.
Expense AccountIf you are going to expense an additional cost, type the general ledgeraccount number in this field, or select the account number using the Finder.
Note: You do not enter a general ledger account number if you areprorating the additional cost.
Line NumberTo select an existing line to edit or delete, click the line, or enter its linenumber in this field on the P/O Detail Items/Taxes screen.
Note: You cannot delete completed lines.
Net of TaxThis field displays the net amount of the additional cost you entered for thedetail (excluding allocated taxes that are not included in the amount of thecost).
User's Guide 675
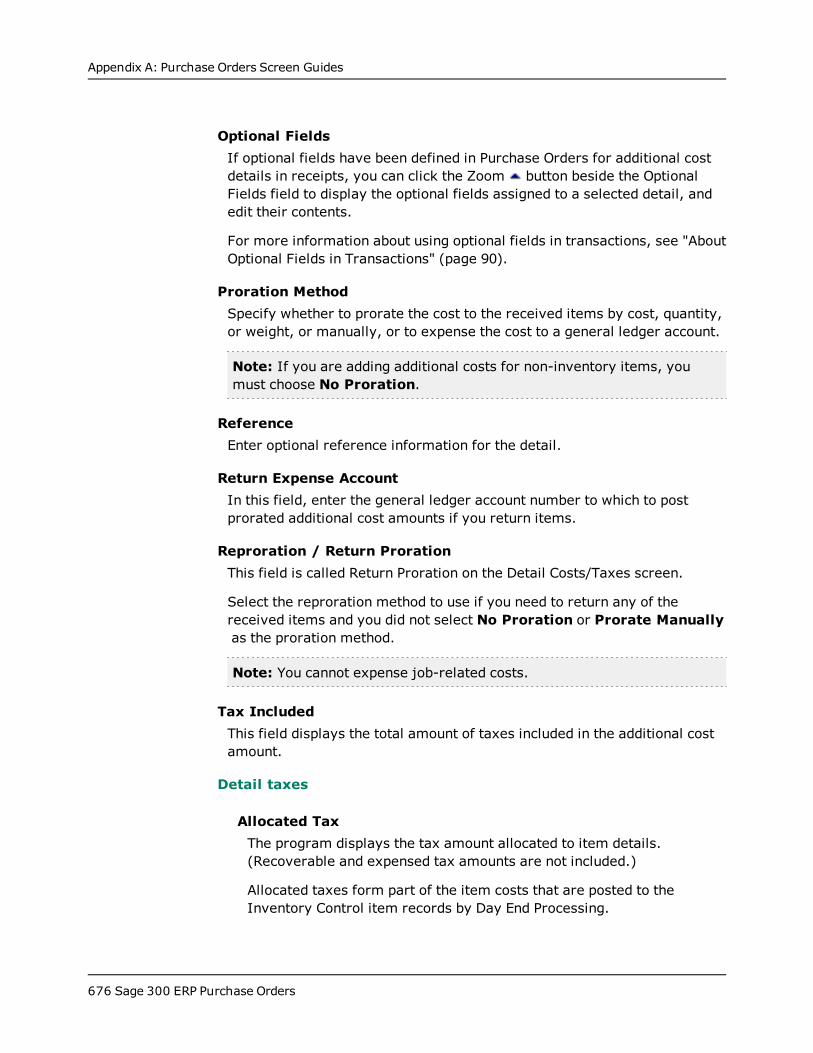
Appendix A: Purchase Orders Screen Guides
Optional FieldsIf optional fields have been defined in Purchase Orders for additional costdetails in receipts, you can click the Zoom button beside the OptionalFields field to display the optional fields assigned to a selected detail, andedit their contents.
For more information about using optional fields in transactions, see "AboutOptional Fields in Transactions" (page 90).
Proration MethodSpecify whether to prorate the cost to the received items by cost, quantity,or weight, or manually, or to expense the cost to a general ledger account.
Note: If you are adding additional costs for non-inventory items, youmust choose No Proration.
ReferenceEnter optional reference information for the detail.
Return Expense AccountIn this field, enter the general ledger account number to which to postprorated additional cost amounts if you return items.
Reproration / Return ProrationThis field is called Return Proration on the Detail Costs/Taxes screen.
Select the reproration method to use if you need to return any of thereceived items and you did not select No Proration or Prorate Manuallyas the proration method.
Note: You cannot expense job-related costs.
Tax IncludedThis field displays the total amount of taxes included in the additional costamount.
Detail taxes
Allocated TaxThe program displays the tax amount allocated to item details.(Recoverable and expensed tax amounts are not included.)
Allocated taxes form part of the item costs that are posted to theInventory Control item records by Day End Processing.
676 Sage 300 ERP Purchase Orders
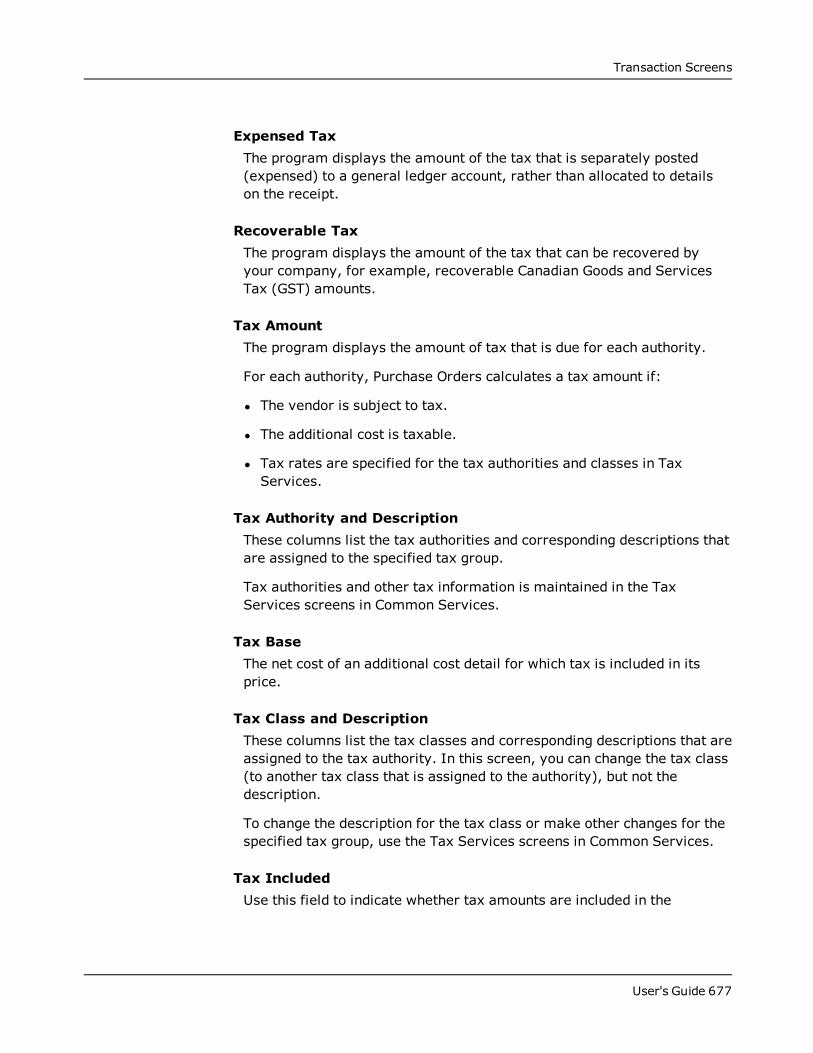
Transaction Screens
Expensed TaxThe program displays the amount of the tax that is separately posted(expensed) to a general ledger account, rather than allocated to detailson the receipt.
Recoverable TaxThe program displays the amount of the tax that can be recovered byyour company, for example, recoverable Canadian Goods and ServicesTax (GST) amounts.
Tax AmountThe program displays the amount of tax that is due for each authority.
For each authority, Purchase Orders calculates a tax amount if:
l The vendor is subject to tax.
l The additional cost is taxable.
l Tax rates are specified for the tax authorities and classes in TaxServices.
Tax Authority and DescriptionThese columns list the tax authorities and corresponding descriptions thatare assigned to the specified tax group.
Tax authorities and other tax information is maintained in the TaxServices screens in Common Services.
Tax BaseThe net cost of an additional cost detail for which tax is included in itsprice.
Tax Class and DescriptionThese columns list the tax classes and corresponding descriptions that areassigned to the tax authority. In this screen, you can change the tax class(to another tax class that is assigned to the authority), but not thedescription.
To change the description for the tax class or make other changes for thespecified tax group, use the Tax Services screens in Common Services.
Tax IncludedUse this field to indicate whether tax amounts are included in the
User's Guide 677
Appendix A: Purchase Orders Screen Guides
additional cost (instead of charged separately on the detail cost).
To toggle between Yes and No in this field, type any character in thefield, or double-click the field.
P/O Receipt Entry Cost Allocation Screen
To open this screen:
1. Open Purchase Orders > P/O Transactions > Receipt Entry.
2. Enter header information for the receipt, specifying the purchase ordernumbers for which you are creating the receipt.
3. Click the Additional Costs tab.
a. Select the additional cost you need to distribute.
b. Click the Dist. Cost button to open the Cost Allocation screen.
Related tasks:
l " Distributing Additional Costs to Multiple Receipts on a Debit Note" (page200)
Overview
Use the Cost Allocation screen to distribute an additional cost to more thanone receipt.
Note: This screen is available only if you are adjusting an existing additionalcost from an invoice that is based on multiple receipts.
You cannot automatically prorate the costs to multiple receipts. Instead, youidentify the amount to distribute to each receipt on the debit note.
You can prorate and allocate the additional cost amount manually, or you canlet Purchase Orders automatically allocate amounts to receipts according tothe proration method identified on the Additional Costs tab.
Fields and Controls
Buttons
ClearUse the Clear button to clear all amounts in the screen.
678 Sage 300 ERP Purchase Orders
Transaction Screens
Dist. CostUse the Dist. Cost button to open the Cost Allocation screen for anadditional cost detail.
RedistributeUse the Redist. button to have Purchase Orders automatically prorate theadditional cost amount for the receipts.
Amount (additional cost detail total)The program displays the amount you enter for the additional cost detail atthe top of the Cost Allocation screen.
Amount (prorated for each receipt)The program displays the amount of the additional cost allocated to eachreceipt when you click the Redist. button.
Note: To allocate the additional cost manually, you can enter amountsbeside each receipt number. The sum of all the amounts you allocate toreceipts must equal the total amount for the additional cost.
Billing RateIf the receipt was job-related, Purchase Orders displays a billing rate for thecost that you are allocating, along with the amount being allocated.
Note: The billing rate is also used to allocate additional costs to more thanone receipt.
If you are prorating the cost manually to other receipts, you can enter adifferent billing rate with each distribution.
Proration Method (display only)You cannot change the proration method for an existing additional cost.
Receipt NumberThe program displays the receipt numbers used in this invoice, credit note,or debit note. You cannot change the receipt numbers.
Retainage Percentage, Amount, and PeriodIf the receipts were job-related and the credit note or debit note uses theretainage option, the program displays additional retainage fields for eachreceipt to which you can allocate additional costs.
User's Guide 679
Appendix A: Purchase Orders Screen Guides
The default retainage percentage and retention period that appears in thesefields depends on how you are prorating the costs.
l If prorating by cost, quantity, or prorating manually, the settings comefrom the vendor record.
l If you are not prorating, the retainage settings are based on the DefaultRetainage From option for the contract in Project and Job Costing.
P/O Receipt Entry Additional Cost Vendor Information Screen
To open this screen:
1. Open Purchase Orders > P/O Transactions > Receipt Entry.
2. Enter header information for the receipt, including the primary vendor.
3. On the Additional Costs tab, select a secondary vendor for an existingadditional cost, or use the Vendor Number field to specify a differentvendor for a new additional cost. Mor e ...
Use the navigation buttons beside the Additional Cost Vendors field toselect an existing secondary vendor or use the Finder to view thesecondary vendors associated with the receipt, then select from the list thevendor whose information you want to review.
Note: The code for the secondary vendor appears in the Vendor Numberfield after selecting it using the Additional Cost Vendor field.
4. Beside the Vendor Number field (with the vendor code displayed), click theZoom button to display the address information for the secondaryvendor.
Related tasks:
l " Adding a New Secondary Vendor to a Receipt" (page 653)
Overview
Use this screen when adding or editing additional costs from secondaryvendors to enter or edit the vendor's address, contact information, phonenumber, or fax number.
680 Sage 300 ERP Purchase Orders

Transaction Screens
Note: A secondary vendor is a vendor who charged you for additional costs ona shipment of goods (for example, freight, customs brokerage fees, or specialhandling), but who did not supply the actual goods. You cannot enter itemdetails for secondary vendors. You enter only the additional cost details.
Fields and Controls
Vendor Name (display only)For new vendors, type the vendor name. You cannot edit this field forexisting vendors.
Vendor Number and NameIf you used the buttons beside the Additional Cost Vendors field to select anadditional cost vendor that you have already added to this receipt, theprogram displays the selected vendor number in this field.
You can always add an additional cost vendor to a receipt for which you havenot yet created an invoice. You can use the Finder to select a vendor thatexists in Accounts Payable, or you can add a new additional cost vendor.
For information about adding a new secondary vendor to a receipt, see "Adding a New Secondary Vendor to a Receipt" (page 653).
AddressType the vendor's address (for a new vendor) or edit a displayed address ifnecessary.
ContactType the name of a contact person, department, or position at the vendor'splace of business, and enter a phone number, fax number, and e-mailaddress if appropriate.
Fax NumberType the vendor's fax number or edit a displayed number if necessary.
PhoneType the vendor's phone number or edit a displayed number if necessary.
User's Guide 681

Appendix A: Purchase Orders Screen Guides
P/O Receipt Entry Additional Cost Vendor Taxes Screen
To open this screen:
1. Open Purchase Orders > P/O Transactions > Receipt Entry.
2. Enter the receipt, including additional costs, as usual.
3. On the Additional Costs tab, select the secondary vendor, then click theVendor Taxesbutton.
Overview
Use this screen when entering additional costs for secondary vendors to:
l Check tax information and calculations for the selected additional costvendor.
l Edit the tax class and tax-included options for the tax authorities.
Note: A secondary vendor is a vendor who charged you for additional costson a shipment of goods (for example, freight, customs brokerage fees, orspecial handling), but who did not supply the actual goods. You cannot enteritem details for secondary vendors. You enter only the additional costdetails.
To change tax information for an additional cost charged by the primaryvendor, you use the Detail Costs/Taxes screen. (On the Additional Costs tab,select the additional cost for the primary vendor, and then click the Cost/Taxbutton or press the F9 key.)
For more information, see "P/O Receipt Entry Detail Costs/Taxes Screen"(page 674).
Fields and Controls
Tax AmountThe program displays the amount of tax that is due for each authority.
For each authority, Purchase Orders calculates a tax amount if:
l The vendor is subject to tax.
l The additional cost is taxable.
l Tax rates are specified for the tax authorities and classes in TaxServices.
682 Sage 300 ERP Purchase Orders
Transaction Screens
Tax Authority and DescriptionThese columns list the tax authorities and corresponding descriptions thatare assigned to the tax group you specified for the vendor.
Tax information is added and modified in the Tax Services screens inCommon Services.
Tax BaseThis field displays the net cost of an additional cost detail for which tax isincluded in its price.
Tax ExcludedThe program calculates the tax amount that is not included in the additionalcost amount.
Tax IncludedThe program calculates the tax amount that is included in the additional costamount.
Vendor Tax Class and Tax Class DescriptionThese columns list the tax classes and corresponding descriptions that areassigned to the tax authority for the selected vendor. You can change the taxclass to another tax class that is assigned to the authority, but not thedescription.
Tip: To change the tax class description or make other changes to theinformation for the specified tax group, use the Tax Services screens inCommon Services.
P/O Receipt Entry Invoice Screen
To open this screen:
1. Open Purchase Orders > P/O Transactions > Receipt Entry.
2. Enter header information for the receipt, including the vendor number and, ifyou are receiving an existing purchase order, specify the purchase ordernumber (or numbers if you are receiving multiple purchase orders).
3. Use the Details table to receive items on the purchase order, or clickReceive All to receive all the items.
4. Click the Invoice button.
User's Guide 683
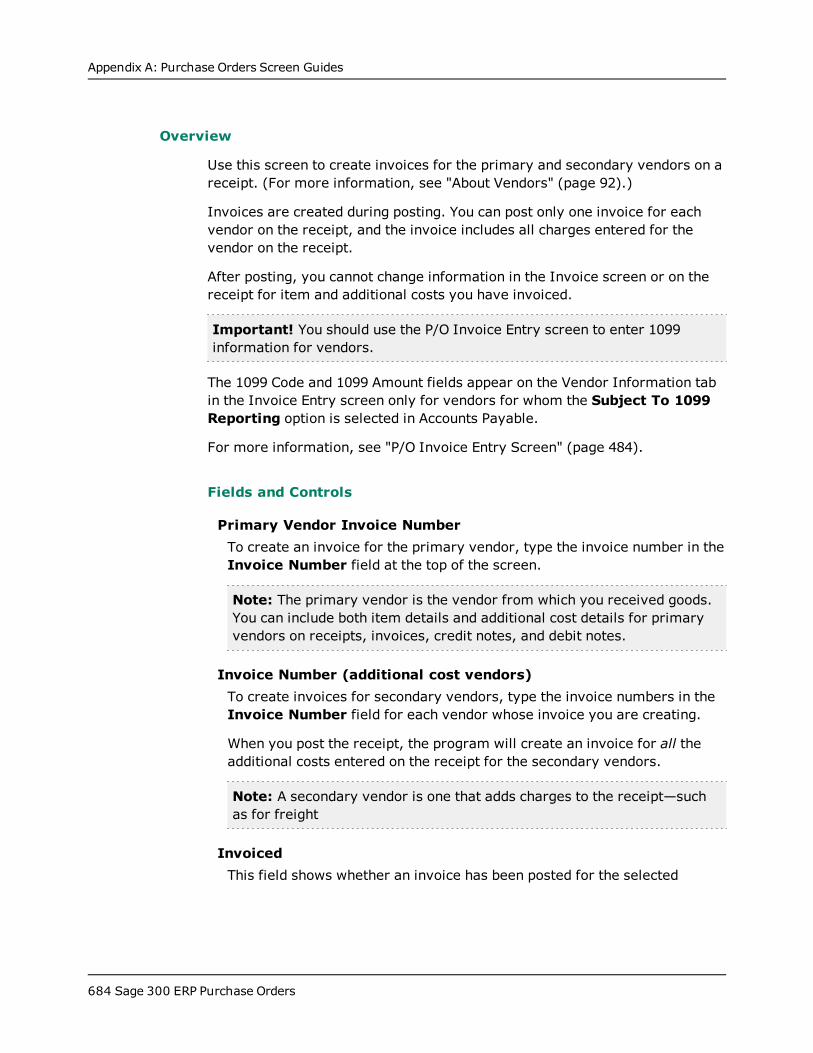
Appendix A: Purchase Orders Screen Guides
Overview
Use this screen to create invoices for the primary and secondary vendors on areceipt. (For more information, see "About Vendors" (page 92).)
Invoices are created during posting. You can post only one invoice for eachvendor on the receipt, and the invoice includes all charges entered for thevendor on the receipt.
After posting, you cannot change information in the Invoice screen or on thereceipt for item and additional costs you have invoiced.
Important! You should use the P/O Invoice Entry screen to enter 1099information for vendors.
The 1099 Code and 1099 Amount fields appear on the Vendor Information tabin the Invoice Entry screen only for vendors for whom the Subject To 1099Reporting option is selected in Accounts Payable.
For more information, see "P/O Invoice Entry Screen" (page 484).
Fields and Controls
Primary Vendor Invoice NumberTo create an invoice for the primary vendor, type the invoice number in theInvoice Number field at the top of the screen.
Note: The primary vendor is the vendor from which you received goods.You can include both item details and additional cost details for primaryvendors on receipts, invoices, credit notes, and debit notes.
Invoice Number (additional cost vendors)To create invoices for secondary vendors, type the invoice numbers in theInvoice Number field for each vendor whose invoice you are creating.
When you post the receipt, the program will create an invoice for all theadditional costs entered on the receipt for the secondary vendors.
Note: A secondary vendor is one that adds charges to the receipt—suchas for freight
InvoicedThis field shows whether an invoice has been posted for the selected
684 Sage 300 ERP Purchase Orders
Transaction Screens
secondary vendor.
You can post only one invoice for each vendor on a receipt. After you postthe invoice, you can no longer change information for the vendor on thereceipt.
Vendor Number and NameThe program displays the number and name of each secondary vendor forwhom you have added an additional cost on the receipt.
To create an invoice for all the additional cost details entered on the receiptfor a secondary vendor, select (highlight) the line for the vendor, then typethe invoice number.
User's Guide 685

Appendix A: Purchase Orders Screen Guides
P/O Requisition Entry Screen
To open this screen:Open Purchase Orders > P/O Transactions > Requisition Entry.
Secondary screens:
l "P/O Requisition Entry Detail Comments Screen" (page 703)
l "P/O Requisition Entry Detail Items Screen" (page 704)
l "P/O Requisition Entry Drop-Shipment Address Screen" (page 700)
Related tasks:
l "Creating a New Purchase Requisition " (page 107)
l "Editing a Requisition " (page 110)
l "Deleting a Requisition" (page 112)
l "Importing Requisitions " (page 110)
l "Printing Requisitions " (page 111)
Overview
Use the Requisition Entry screen to:
l Enter requisitions for purchases you plan to make and for which you mayneed approval before you can create purchase orders.
l Edit or delete requisitions you posted previously.
l Print requisitions.
l Import requisitions from other Sage 300 ERP databases or from non-Sage300 ERP programs.
l Export requisitions to other Sage 300 ERP databases or non-Sage 300 ERPprograms.
Requisitions are optional in Purchase Orders. You can enter purchase orderswith or without requisition numbers.
Note: If you use requisitions, Purchase Orders provides a requisitionapproval system to enforce purchase approvals. For more information, see"About Requiring Approval for Requisitions" (page 768).
686 Sage 300 ERP Purchase Orders
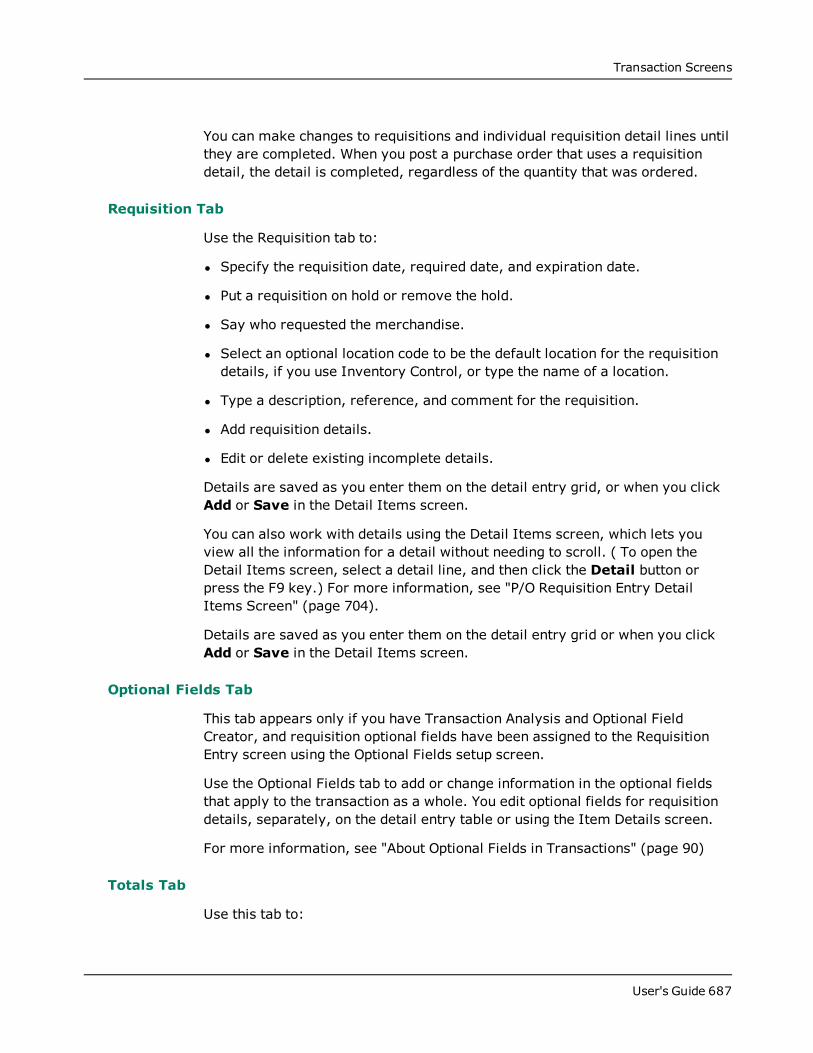
Transaction Screens
You can make changes to requisitions and individual requisition detail lines untilthey are completed. When you post a purchase order that uses a requisitiondetail, the detail is completed, regardless of the quantity that was ordered.
Requisition Tab
Use the Requisition tab to:
l Specify the requisition date, required date, and expiration date.
l Put a requisition on hold or remove the hold.
l Say who requested the merchandise.
l Select an optional location code to be the default location for the requisitiondetails, if you use Inventory Control, or type the name of a location.
l Type a description, reference, and comment for the requisition.
l Add requisition details.
l Edit or delete existing incomplete details.
Details are saved as you enter them on the detail entry grid, or when you clickAdd or Save in the Detail Items screen.
You can also work with details using the Detail Items screen, which lets youview all the information for a detail without needing to scroll. ( To open theDetail Items screen, select a detail line, and then click the Detail button orpress the F9 key.) For more information, see "P/O Requisition Entry DetailItems Screen" (page 704).
Details are saved as you enter them on the detail entry grid or when you clickAdd or Save in the Detail Items screen.
Optional Fields Tab
This tab appears only if you have Transaction Analysis and Optional FieldCreator, and requisition optional fields have been assigned to the RequisitionEntry screen using the Optional Fields setup screen.
Use the Optional Fields tab to add or change information in the optional fieldsthat apply to the transaction as a whole. You edit optional fields for requisitiondetails, separately, on the detail entry table or using the Item Details screen.
For more information, see "About Optional Fields in Transactions" (page 90)
Totals Tab
Use this tab to:
User's Guide 687
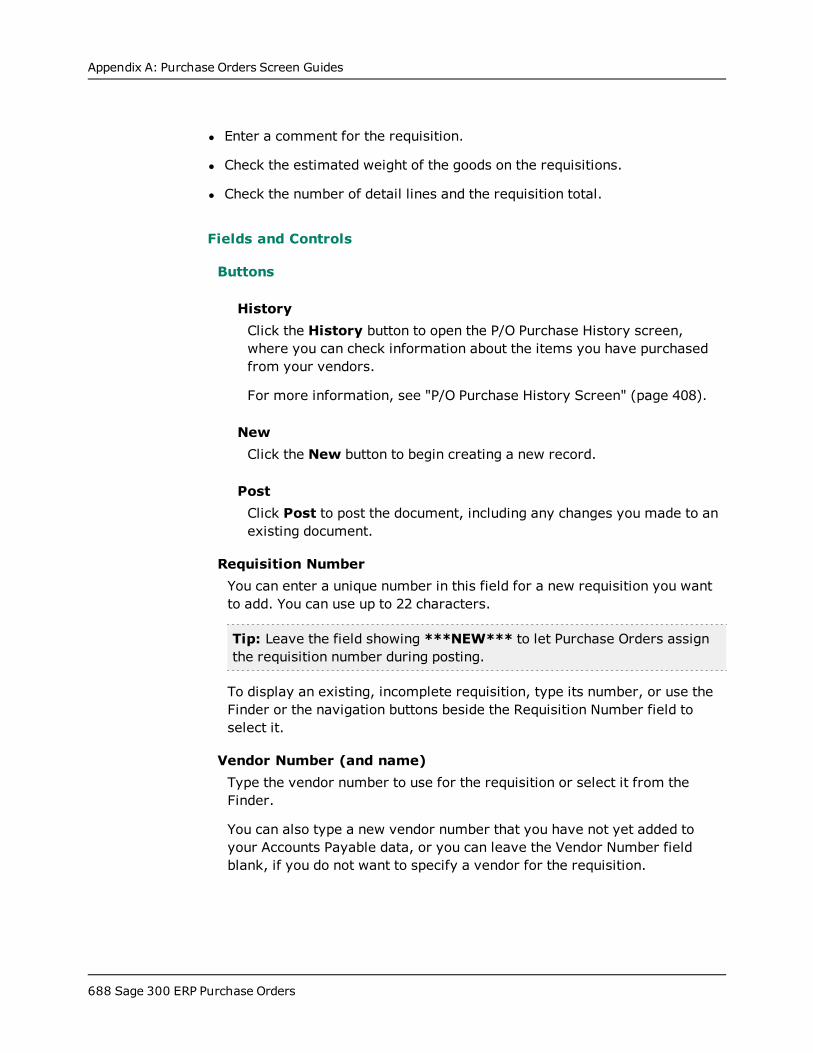
Appendix A: Purchase Orders Screen Guides
l Enter a comment for the requisition.
l Check the estimated weight of the goods on the requisitions.
l Check the number of detail lines and the requisition total.
Fields and Controls
Buttons
HistoryClick the History button to open the P/O Purchase History screen,where you can check information about the items you have purchasedfrom your vendors.
For more information, see "P/O Purchase History Screen" (page 408).
NewClick the New button to begin creating a new record.
PostClick Post to post the document, including any changes you made to anexisting document.
Requisition NumberYou can enter a unique number in this field for a new requisition you wantto add. You can use up to 22 characters.
Tip: Leave the field showing ***NEW*** to let Purchase Orders assignthe requisition number during posting.
To display an existing, incomplete requisition, type its number, or use theFinder or the navigation buttons beside the Requisition Number field toselect it.
Vendor Number (and name)Type the vendor number to use for the requisition or select it from theFinder.
You can also type a new vendor number that you have not yet added toyour Accounts Payable data, or you can leave the Vendor Number fieldblank, if you do not want to specify a vendor for the requisition.
688 Sage 300 ERP Purchase Orders
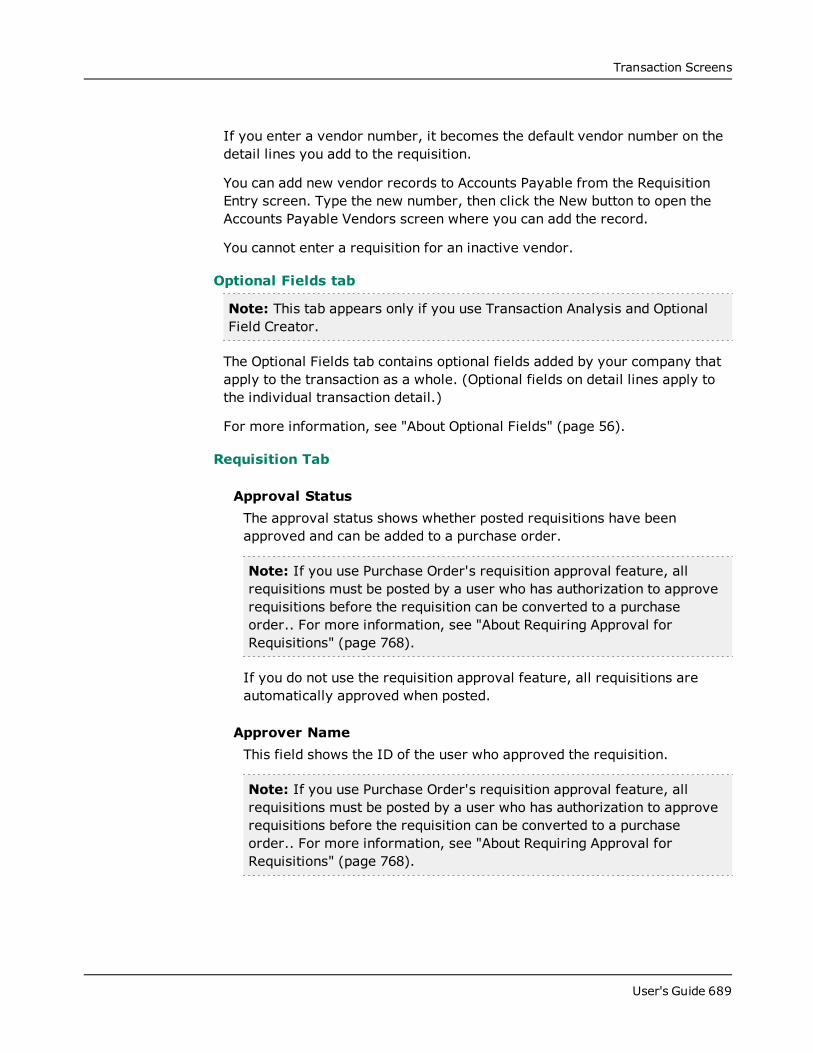
Transaction Screens
If you enter a vendor number, it becomes the default vendor number on thedetail lines you add to the requisition.
You can add new vendor records to Accounts Payable from the RequisitionEntry screen. Type the new number, then click the New button to open theAccounts Payable Vendors screen where you can add the record.
You cannot enter a requisition for an inactive vendor.
Optional Fields tab
Note: This tab appears only if you use Transaction Analysis and OptionalField Creator.
The Optional Fields tab contains optional fields added by your company thatapply to the transaction as a whole. (Optional fields on detail lines apply tothe individual transaction detail.)
For more information, see "About Optional Fields" (page 56).
Requisition Tab
Approval StatusThe approval status shows whether posted requisitions have beenapproved and can be added to a purchase order.
Note: If you use Purchase Order's requisition approval feature, allrequisitions must be posted by a user who has authorization to approverequisitions before the requisition can be converted to a purchaseorder.. For more information, see "About Requiring Approval forRequisitions" (page 768).
If you do not use the requisition approval feature, all requisitions areautomatically approved when posted.
Approver NameThis field shows the ID of the user who approved the requisition.
Note: If you use Purchase Order's requisition approval feature, allrequisitions must be posted by a user who has authorization to approverequisitions before the requisition can be converted to a purchaseorder.. For more information, see "About Requiring Approval forRequisitions" (page 768).
User's Guide 689
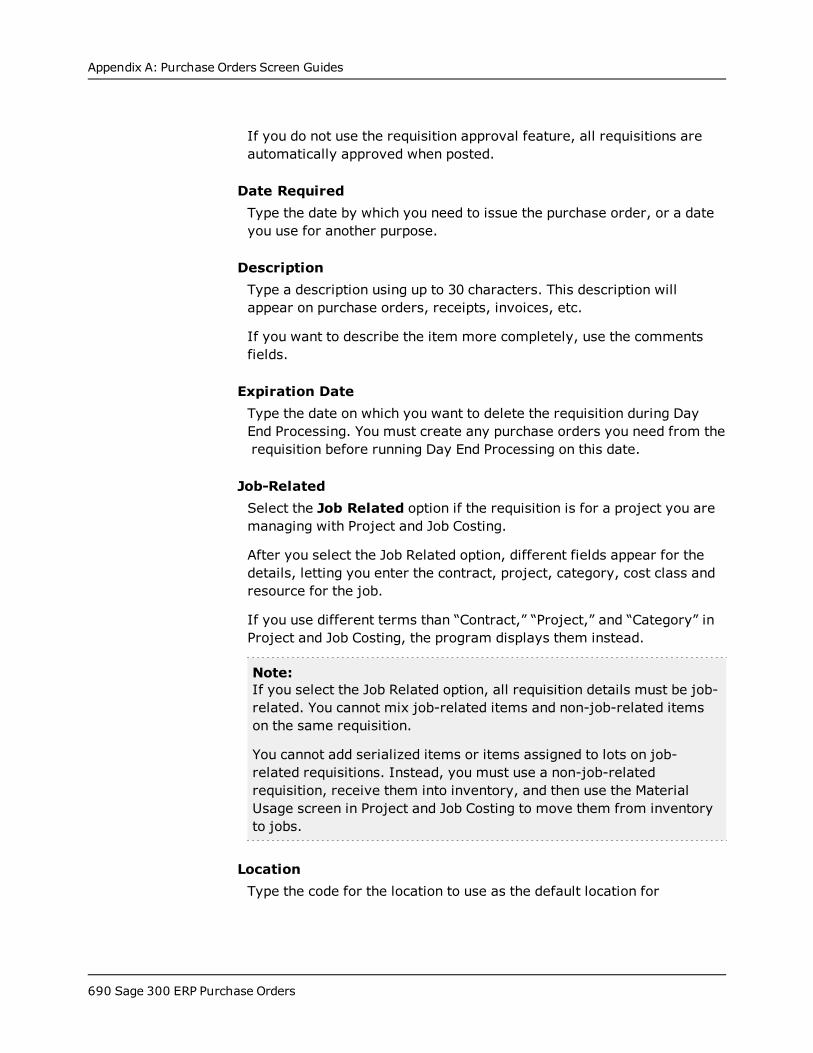
Appendix A: Purchase Orders Screen Guides
If you do not use the requisition approval feature, all requisitions areautomatically approved when posted.
Date RequiredType the date by which you need to issue the purchase order, or a dateyou use for another purpose.
DescriptionType a description using up to 30 characters. This description willappear on purchase orders, receipts, invoices, etc.
If you want to describe the item more completely, use the commentsfields.
Expiration DateType the date on which you want to delete the requisition during DayEnd Processing. You must create any purchase orders you need from therequisition before running Day End Processing on this date.
Job-RelatedSelect the Job Related option if the requisition is for a project you aremanaging with Project and Job Costing.
After you select the Job Related option, different fields appear for thedetails, letting you enter the contract, project, category, cost class andresource for the job.
If you use different terms than “Contract,” “Project,” and “Category” inProject and Job Costing, the program displays them instead.
Note:If you select the Job Related option, all requisition details must be job-related. You cannot mix job-related items and non-job-related itemson the same requisition.
You cannot add serialized items or items assigned to lots on job-related requisitions. Instead, you must use a non-job-relatedrequisition, receive them into inventory, and then use the MaterialUsage screen in Project and Job Costing to move them from inventoryto jobs.
LocationType the code for the location to use as the default location for
690 Sage 300 ERP Purchase Orders
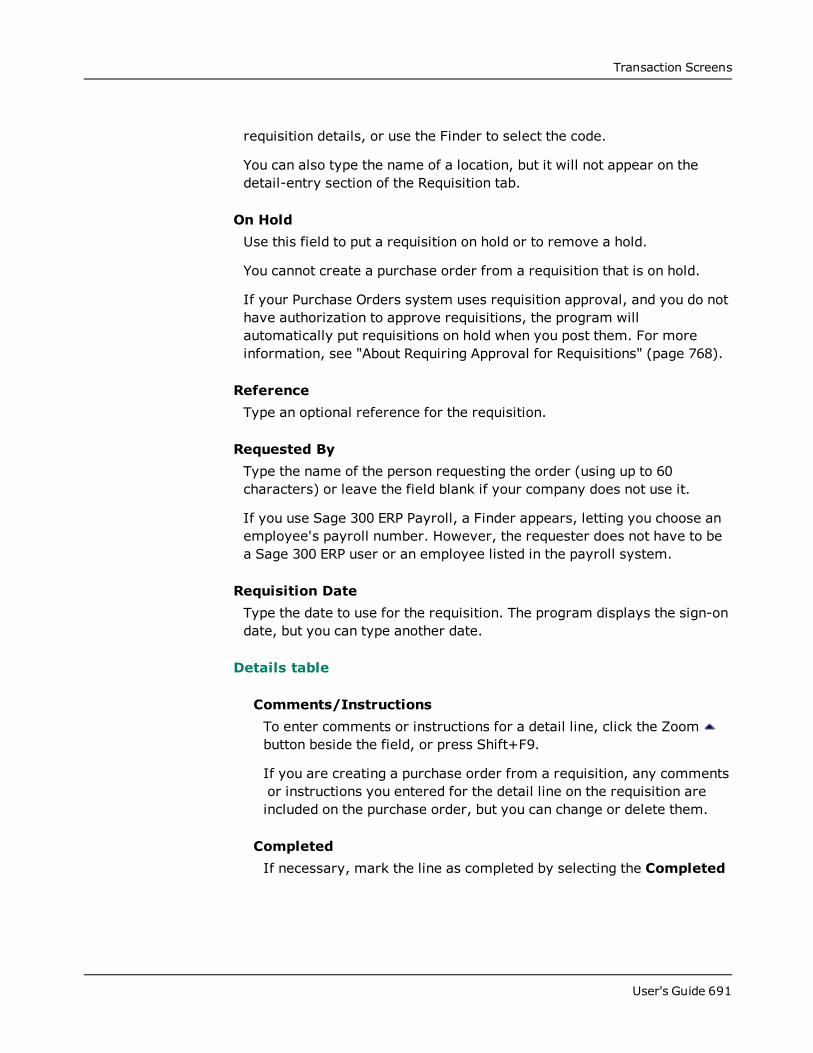
Transaction Screens
requisition details, or use the Finder to select the code.
You can also type the name of a location, but it will not appear on thedetail-entry section of the Requisition tab.
On HoldUse this field to put a requisition on hold or to remove a hold.
You cannot create a purchase order from a requisition that is on hold.
If your Purchase Orders system uses requisition approval, and you do nothave authorization to approve requisitions, the program willautomatically put requisitions on hold when you post them. For moreinformation, see "About Requiring Approval for Requisitions" (page 768).
ReferenceType an optional reference for the requisition.
Requested ByType the name of the person requesting the order (using up to 60characters) or leave the field blank if your company does not use it.
If you use Sage 300 ERP Payroll, a Finder appears, letting you choose anemployee's payroll number. However, the requester does not have to bea Sage 300 ERP user or an employee listed in the payroll system.
Requisition DateType the date to use for the requisition. The program displays the sign-ondate, but you can type another date.
Details table
Comments/InstructionsTo enter comments or instructions for a detail line, click the Zoombutton beside the field, or press Shift+F9.
If you are creating a purchase order from a requisition, any commentsor instructions you entered for the detail line on the requisition areincluded on the purchase order, but you can change or delete them.
CompletedIf necessary, mark the line as completed by selecting the Completed
User's Guide 691
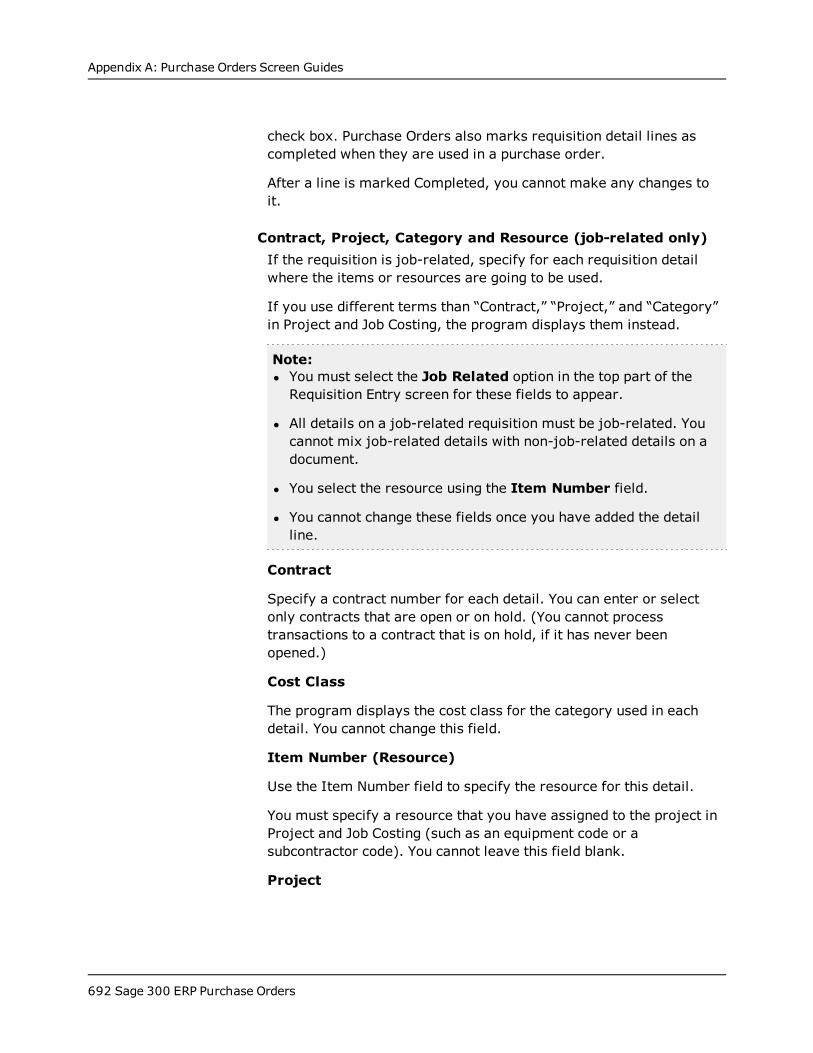
Appendix A: Purchase Orders Screen Guides
check box. Purchase Orders also marks requisition detail lines ascompleted when they are used in a purchase order.
After a line is marked Completed, you cannot make any changes toit.
Contract, Project, Category and Resource (job-related only)If the requisition is job-related, specify for each requisition detailwhere the items or resources are going to be used.
If you use different terms than “Contract,” “Project,” and “Category”in Project and Job Costing, the program displays them instead.
Note:l You must select the Job Related option in the top part of theRequisition Entry screen for these fields to appear.
l All details on a job-related requisition must be job-related. Youcannot mix job-related details with non-job-related details on adocument.
l You select the resource using the Item Number field.
l You cannot change these fields once you have added the detailline.
Contract
Specify a contract number for each detail. You can enter or selectonly contracts that are open or on hold. (You cannot processtransactions to a contract that is on hold, if it has never beenopened.)
Cost Class
The program displays the cost class for the category used in eachdetail. You cannot change this field.
Item Number (Resource)
Use the Item Number field to specify the resource for this detail.
You must specify a resource that you have assigned to the project inProject and Job Costing (such as an equipment code or asubcontractor code). You cannot leave this field blank.
Project
692 Sage 300 ERP Purchase Orders
Transaction Screens
You can only enter or select projects that are:
l Assigned to the contract that you selected.
l Open or on hold. If a project that is on hold has never been opened,you cannot select it.
l Not closed to costs.
Copy Cost to Purchase OrderSelect this option if you want to copy the costs specified on therequisition to the purchase order. For example, you would select thisoption if you negotiated particular prices for this purchase.
Do not select this option if you want to recalculate costs or take themfrom vendor records when you create the PO. For example, therequisition may provide estimates rather than a negotiated best price.
Drop-ShipUse this field to specify for a selected detail a shipping address thatdifferent from the location used for the requisition.
To open the Drop-Shipment Address screen to enter or change a drop-ship address for a selected detail, click in the Drop-Ship field, thenclick the Zoom button (or press the Shift and F9 keys at the sametime). For more information, see "P/O Receipt Entry Drop-ShipmentAddress Screen" (page 650).
Exchange RateThe program displays the exchange rate currently in effect for thespecified vendor currency, if different from your functional currency.You can change the rate for the requisition.
The exchange rate will be "1" if you don't specify a vendor because theprogram will assume your functional currency.
Expected Arrival DateType the date when you expect to receive the items.
If you specified an expected arrival date on the Requisition tab, thatdate is displayed in this field but you can change it.
Extended CostType the extended cost for the number of units of the item that you
User's Guide 693
Appendix A: Purchase Orders Screen Guides
ordered.
If you change the extended cost, the program automaticallyrecalculates the unit cost.
Extended WeightType the extended weight for the number of units of the item that youordered.
If you change the extended weight, the program automaticallyrecalculates the unit weight.
The total weight for all items on the document is displayed in theTotals tab.
Item DescriptionThe program displays the item description from Inventory Controlbut you can change it.
If you typed an item number that does not exist in Inventory Control,you type the description for it as well. You can enter non-existentitem numbers only if you selected the Allow Non-inventory Itemsoption (in the P/O Options screen).
Item NumberType the number of the item you wish to order, or select it from theFinder.
You can also type an item number that does not exist in yourInventory Control data if you use the Allow Non-inventory Itemsoption (selected in the P/O Options screen).
Purchase Orders also lets you enter manufacturers' item numbers inthis field if they have been added in Inventory Control. Thesenumbers could include internally-used bar codes, UPC numbers, orISBNs, so you can use a scanner (or type a short code) for enteringinventory item numbers.
If you enter a manufacturer's item number, Purchase Ordersreplaces it with your inventory item number, and then displays themanufacturer's item number you entered in the Manufacturer's ItemNumber field, near the end of the detail line.
Line NumberTo select an existing line to edit or delete, click the line, or enter its
694 Sage 300 ERP Purchase Orders
Transaction Screens
line number in this field on the P/O Detail Items/Taxes screen.
Note: You cannot delete completed lines.
LocationThis field appears only if you use Inventory Control.
Enter the code for the location where you expect to receive theshipment (or to which you want to post drop-shipped items).
The program displays the ship-to location code, if any, entered on thefirst tab, but you can select a different location. You can omit thelocation when adding details for non-inventory items.
Note: If you change locations after assigning serial and/or lotnumbers, you must re-assign the serial and/or lot numbers.
Manufacturer's Item NumberIf you entered a manufacturer's item number in the Item Numberfield on the requisition or purchase order, the number appears in theManufacturer's Item Number field.
Manufacturer's item numbers are alternative item numbers— such asbar codes or shortcut codes— that identify your inventory items. Youset up manufacturer's item numbers in Inventory Control.
You can enter manufacturer's item numbers wherever you enter itemnumbers in Purchase Orders.
Name (Vendor)Type a name for a new vendor number you have not yet added toAccounts Payable.
If you specified a valid Accounts Payable vendor number, the vendor'sname appears and you cannot change it.
Optional FieldsOptional fields are fields that have been added by your company to thetransaction entry screens and detail lines in purchase orderstransactions.
User's Guide 695
Appendix A: Purchase Orders Screen Guides
If you use optional fields, an Optional Fields column appears in thetable. You can click the column heading to display the optional fieldsassigned to a selected detail, and edit their contents.
Note: You must use Transaction Analysis and Optional Field Creatorto add and use optional fields.
For more information about using optional fields in transactions, see"About Optional Fields in Transactions" (page 90).
Order NumberType the number of a sales order for which you are creating therequisition detail. If you use Sage 300 ERP Order Entry with PurchaseOrders you can also select an Order Entry order number from theFinder.
Quantity OrderedType the quantity to order (expressed in the unit of measure youselect).
Rate DateType or select the date to use to select the exchange rate for thedocument you are entering.
The program displays the rate date that is nearest the document dateyou entered, but you can specify a different date for which anexchange rate exists for the currency in Common Services' CurrencyRates table.
If you change the rate date, Purchase Orders checks the rate tablesfor a date match, and updates the rate if necessary.
Unit CostEnter the cost of a single unit of the item you are ordering in thedetail.
Purchase Orders displays a default cost as follows:
l If you have set up vendor contract costs, Purchase Orders displaysthe cost specified as a contract cost for the item and unit ofmeasure.
l If P/O does not find a valid contract cost, it uses the inventory costspecified on the P/O Options screen.
696 Sage 300 ERP Purchase Orders
Transaction Screens
Use the Finder to view any vendor contract costs, regular vendorcosts, and other costs maintained by Inventory Control.
Purchase Orders uses the unit cost to calculate the extended cost. Ifyou change the unit cost, the extended cost is recalculated.
In multicurrency ledgers, the cost is expressed in the vendor'scurrency.
Note: You can assign security to the Unit Cost and Extended Costfields, to prevent unauthorized changes to the fields.
If you use Project and Job Costing, unit cost is defaulted asfollows:
l If the project is a standard project:
For a category cost class of Subcontractor, Overhead, orMiscellaneous Equipment, the unit cost is defaulted from thecategory resource.
For a category cost class of Labor, the default unit cost is basedon the Default Unit Cost From option for the employee resourcecategory.
For a category cost class of Material (if you are using InventoryControl), the default unit cost is based on Purchase Orders'default item cost (set in P/O Options).
For a category cost of Material (if you are not using InventoryControl), the unit cost is based on Purchase Orders vendor costs.
l If the project is a basic project:
For a category cost class of Subcontractor, Overhead, orMiscellaneous Equipment, the unit cost is defaulted from thecategory.
For a category cost class of Labor, the default unit cost is basedon the Default Unit Cost From option for the labor category.
For a category cost class of Material (if you are using InventoryControl), the default unit cost is based on Purchase Orders'default item cost (set in P/O Options).
For a category cost of Material (if you are not using InventoryControl), the unit cost is based on Purchase Orders vendor costs.
User's Guide 697
Appendix A: Purchase Orders Screen Guides
Unit of MeasureEnter the unit of measure in which to order the item. If you arecreating a purchase order from a requisition, the unit of measureentered for the detail on the requisition is displayed, but you canchange it.
If you are entering new detail lines, the program displays thestocking UOM by default, unless you have set up vendor contractcosts using a different UOM.
You must use one of the units of measure that is assigned for theitem in Inventory Control.
Note: The weight UOM can be different from the order UOM.
Unit WeightEnter the weight of a single unit of the item you are ordering in thedetail. On new detail lines, the weight specified in the InventoryControl item record is displayed, but you can change it.
Purchase Orders uses the unit weight to calculate the extendedweight. If you change the unit weight, the extended weight isrecalculated.
You can select from the weight units of measure defined in PurchaseOrders. Weight is expressed in the unit selected for theWeight UnitOf Measure option on the I/C Options screen.
On invoices, enter the weight of a single unit of the item for whichyou were invoiced. The program displays the weight specified for theitem on the receipt but you can change it.
Purchase Orders uses the unit weight to calculate the extendedweight. If you change the unit weight, the extended weight isrecalculated.
You can see the total weight estimated from your entries for theinvoiced items on the Totals tab.
Vendor Number (and name)Type the vendor number to use for the requisition or select it fromthe Finder.
698 Sage 300 ERP Purchase Orders
Transaction Screens
You can also type a new vendor number that you have not yet added toyour Accounts Payable data, or you can leave the Vendor Number fieldblank, if you do not want to specify a vendor for the requisition.
If you enter a vendor number, it becomes the default vendor numberon the detail lines you add to the requisition.
You can add new vendor records to Accounts Payable from theRequisition Entry screen. Type the new number, then click the Newbutton to open the Accounts Payable Vendors screen where you canadd the record.
You cannot enter a requisition for an inactive vendor.
Vendor Item NumberEnter the code the vendor uses to identify the item.
If the vendor's item number is specified in the Inventory Control itemrecord, the code appears in this field. (Enter vendors' item numberswhen assigning vendor types in Inventory Control item records.)
If the vendor's item number is specified on the receipt for which youare entering an invoice, the code appears in this field. (You can entervendors' item numbers when assigning vendor types in InventoryControl item records.)
Totals Tab
CommentsEnter an optional comment for the document.
Any comments you entered for the detail on the receipt are included onthe invoice, but you can change or delete them.
Lines automatically wrap when you reach the end. If you want to start anew line before the line wraps, press Enter.
Number of LinesThe program displays the number of item detail lines you entered for theprimary vendor on the document.
Check this number against source documents to make sure you enteredall the details you require.
User's Guide 699
Appendix A: Purchase Orders Screen Guides
Requisition TotalThe Requisition Total field on the Totals tab displays the total amount ofall items on the order requisition in the functional currency (in amulticurrency ledger). This amount does not include taxes.
Total WeightThe program displays the total estimated weight of the orderrequisition, calculated from the weight you enter for each item detail,and displayed in the default weight unit of measure specified in theInventory Control module.
You can use the weight to estimate shipping charges for the requisitionor to decide on a shipping method.
P/O Requisition Entry Drop-Shipment Address Screen
To open this screen:
1. Open Purchase Orders > P/O Transactions > Requisition Entry.
2. On the Details table, for a selected detail line, click in the Drop-Ship field,then click the Zoom button (or press the Shift and F9 keys at the sametime).
Fields and Controls
AddressType the address information for the drop shipment, or edit the displayedinformation.
ContactType the name of the contact person or position at the drop-shipmentaddress, and enter a phone number, fax number, and e-mail address ifappropriate (or accept the displayed information).
Customer NumberType the customer number for the drop shipment, or select the numberfrom the Finder. (You can select customer numbers only if you use Sage300 ERP Accounts Receivable with Purchase Orders.)
DescriptionType the name of the person or location to receive the drop shipment.
700 Sage 300 ERP Purchase Orders
Transaction Screens
Fax NumberType the fax number at the drop-shipment address.
Location CodeType the code for the location where you expect to receive the item orderedon the detail, or select the code from the Finder.
Phone NumberType the telephone number at the drop-shipment address.
Set Drop Shipment Address ToSpecify the type of drop-shipment address you are entering. You can select:
l Address Entered— select this option when you want to type the addressinformation for the shipment.
l Inventory Location Address—select this option when the items are tobe drop-shipped to a different Inventory Control location from the locationselected for the detail line.
l Customer Address— select this option when the items are to be drop-shipped to the address of one of your Accounts Receivable customers.
l Customer Ship-To Address—select this option when the items are to bedrop-shipped to one of the ship-to addresses defined for the customer inAccounts Receivable.
Ship-to LocationIf you use Sage 300 ERP Accounts Receivable with Purchase Orders, you canselect any of the ship-to locations defined in Accounts Receivable for thecustomer as the drop shipment.
Overview
Use this screen to enter or edit address information for a detail where the goodswill be shipped directly to an address other than the inventory location specifiedfor the detail line.
Note: Purchase Orders does not consolidate requisition detail lines with drop-shipment addresses when you create purchase orders by vendor number fromrequisitions.
User's Guide 701
Appendix A: Purchase Orders Screen Guides
To enter or edit a drop-shipment address:
1. In the Drop-Shipment Address screen, select the type of address to enter.
2. Select the location code, customer number, or ship-to location code for theaddress, as needed.
3. Type the address, or edit the displayed information.
4. Click Close.
To delete drop-shipment addresses:
On the Requisition tab, change the entry in the Drop-Ship field to No for theselected detail, or clear the Drop-Ship option on the Detail Items/Taxes form(click the field or press the Shift and F9 keys at the same time in it).
Fields and Controls
AddressType the address information for the drop shipment, or edit the displayedinformation.
ContactType the name of the contact person or position at the drop-shipmentaddress, and enter a phone number, fax number, and e-mail address ifappropriate (or accept the displayed information).
Customer NumberType the customer number for the drop shipment, or select the numberfrom the Finder. (You can select customer numbers only if you use Sage300 ERP Accounts Receivable with Purchase Orders.)
DescriptionType the name of the person or location to receive the drop shipment.
Fax NumberType the fax number at the drop-shipment address.
Location CodeType the code for the location where you expect to receive the itemordered on the detail, or select the code from the Finder.
702 Sage 300 ERP Purchase Orders
Transaction Screens
Phone NumberType the telephone number at the drop-shipment address.
Set Drop Shipment Address ToSpecify the type of drop-shipment address you are entering. You can select:
l Address Entered— select this option when you want to type the addressinformation for the shipment.
l Inventory Location Address—select this option when the items are tobe drop-shipped to a different Inventory Control location from the locationselected for the detail line.
l Customer Address— select this option when the items are to be drop-shipped to the address of one of your Accounts Receivable customers.
l Customer Ship-To Address—select this option when the items are to bedrop-shipped to one of the ship-to addresses defined for the customer inAccounts Receivable.
Ship-to LocationIf you use Sage 300 ERP Accounts Receivable with Purchase Orders, you canselect any of the ship-to locations defined in Accounts Receivable for thecustomer as the drop shipment.
P/O Requisition Entry Detail Comments Screen
To open this screen:
1. Open Purchase Orders > P/O Transactions > Requisition Entry.
2. On the Requisition tab, click the Comments/Instructionsfield for thedetail line you need.
3. Click the Zoom button ( ) or press the Shift and F9 keys to open the DetailComments screen.
Use this screen to enter comments or instructions for a selected requisitiondetail line. You can print the remarks on the purchase order.
Note: You can enter both comments and instructions for a detail line.
User's Guide 703
Appendix A: Purchase Orders Screen Guides
To enter or edit a comment or instruction:
1. In the Type field, select Comment or Instruction.
2. In the space provided, type the comment or instruction, pressing Enter tostart each new line.
3. When finished, click Close to close the screen.
To delete comments or instructions:
1. Highlight the text to delete, then press the Delete key. If a messageappears asking you to confirm the deletion, click Yes.
2. When finished, click Close to return to detail entry.
Tip: You can also delete comments or instructions by changing the entry intheComments/Instructions field to No on the Requisition tab. If you usethis method, your remarks are not deleted, but they are not printed on therequisition. If you decide to use the remarks later , change theComments/Instructions field to Yes. Your original remarks will reappear.
You can also add or clear comments on the Detail Items/Taxes screen.
P/O Requisition Entry Detail Items Screen
To open this screen:
1. Open Purchase Orders > P/O Transactions > Requisition Entry.
2. Select an existing requisition, or create a new one (specifying the vendornumber and other header information for the requisition).
3. Click a detail line on the Requisition tab, then either press F9 or click theDetails button to open the Detail Items screen.
Related tasks:
l "Approving a Purchase Requisition " (page 769)
l "Creating a New Purchase Requisition " (page 107)
l "Deleting a Requisition" (page 112)
l "Deleting a Requisition" (page 112)
Overview
Use this screen to add, edit, and delete requisition detail lines.
704 Sage 300 ERP Purchase Orders
Transaction Screens
This screen displays the fields for a single detail in a separate window, lettingyou see all the information you entered for the detail, including tax information.
Fields and Controls
Buttons
CloseClick the Close button to close the Detail Items/Taxes screen.
On the Detail Items/Taxes screen and the Detail Costs/Taxes screen, youcan also press the F9 key on your keyboard to close the screen.
DeleteClick the Delete button to delete the detail displayed in the zoomeddetail-entry screen.
NewUse the New button to start a new detail.
Save/AddUse the Save button to save the changes you made to a detail you editedin the Detail Items/Taxes screen.
For a new detail, this button is called Add.
Comments/InstructionsYou can type comments or instructions for the detail.
To view comments or instructions for a selected detail line, click the Zoombutton ( ) beside the Comments/Instructions field. The program displaysany comments and instructions entered for the detail line on the receipt, butyou can change or delete them.
Tip: You can also press the Shift and F9 keys together to open or close thescreen using your keyboard.
To enter comments for the selected detail, select Comment as the type,click the Comments/Instructions table, press the Insert key, and then typethe comments on the new line.
To enter instructions for the detail, select Instruction as the type.
User's Guide 705
Appendix A: Purchase Orders Screen Guides
Lines automatically wrap. If you want to start a new line before the linewraps, press Enter.
For more information, see "P/O Requisition Entry Detail Comments Screen"(page 703).
CompletedIf necessary, mark the line as completed by selecting the Completed checkbox. Purchase Orders also marks requisition detail lines as completed whenthey are used in a purchase order.
Once a line is marked as completed, you cannot make any changes to it.
Drop ShipTo enter a drop-ship address for a detail, click the Zoom button besidethe Drop Ship field, or select the field and press Shift+F9.
Select the type of address to enter, and if necessary, select the locationcode, customer number, or ship-to address code for the address.
Expected Arrival DateType the date when you expect to receive the items.
If you specified an expected arrival date on the Requisition tab, that date isdisplayed in this field but you can change it.
Item DescriptionThe program displays the item description from Inventory Control but youcan change it.
If you typed an item number that does not exist in Inventory Control, youtype the description for it as well. You can enter non-existent item numbersonly if you selected the Allow Non-inventory Items option (in the P/OOptions screen).
Item NumberType the number of the item you want to order, or select it from the Finder.
Note: The field to the right displays the description for the item forexisting Inventory Control item numbers. For non-inventory items, youcan enter a description.
You can enter a non-stock item, if Inventory Control permits them. If yourPurchase Orders system allows non-inventory items, you can also enteritem numbers that are not defined in Inventory Control.
706 Sage 300 ERP Purchase Orders
Transaction Screens
If manufacturer's item numbers or bar codes have been added in InventoryControl, you can enter them in most item number fields. These numberscould include internally-used bar codes, UPC numbers, or ISBNs - letting youuse a scanner (or type a short code) for entering inventory item numbers.
The program inserts the correct item number, and—on transaction detaillines —inserts the manufacturer's item number in the manufacturer's itemnumber field at the end of the line.
Line NumberThis field indicates the line number of the selected detail.
You can select a different detail using the navigation buttons, or by enteringthe line number. You can also create a new detail by clicking the New button.
Tip: To delete the line you selected, click the Delete button. Click Yes if amessage appears asking you to confirm the deletion. You cannot deletecompleted lines.
LocationThis is the location to which the ordered goods will be delivered. This fieldappears only if you use Inventory Control.
The program displays the ship-to location code, if any, entered on the firsttab, but you can select a different location. You can omit the location whenadding details for non-inventory items.
LocationThis field appears only if you use Inventory Control.
Enter the code for the location where you expect to receive the shipment (orto which you want to post drop-shipped items).
The program displays the ship-to location code, if any, entered on the firsttab, but you can select a different location. You can omit the location whenadding details for non-inventory items.
Optional FieldsIf optional fields have been defined in Purchase Orders for requisitiondetails, you can click the Zoom button beside the Optional Fields field todisplay the optional fields assigned to a selected detail, and edit theircontents.
User's Guide 707
Appendix A: Purchase Orders Screen Guides
For more information about using optional fields in transactions, see "AboutOptional Fields in Transactions" (page 90).
Order NumberType the number of a sales order for which you are creating the requisitiondetail. If you use Sage 300 ERP Order Entry with Purchase Orders you canalso select an Order Entry order number from the Finder.
Quantity OrderedType the quantity to order (expressed in the unit of measure you select).
Unit Of MeasureType the unit of measure in which to order the item, or select it from theFinder.
You must use one of the units of measure that is assigned for the item inInventory Control. The program displays the stocking unit of measure.
Vendor Number (and name)If you entered a vendor number for the requisition, it appears as thedefault vendor for any detail lines you add to the requisition. You canchange the vendor number for the detail by typing it or selecting it usingthe Finder.
You can also add a new vendor record to Accounts Payable by typing thenew number, then clicking the New button to open the Accounts PayableVendors screen, where you can add the record.
You cannot enter a requisition for an inactive vendor.
Vendor Item NumberEnter the code the vendor uses to identify the item.
If the vendor's item number is specified in the Inventory Control itemrecord, the code appears in this field. (Enter vendors' item numbers whenassigning vendor types in Inventory Control item records.)
If the vendor's item number is specified on the receipt for which you areentering an invoice, the code appears in this field. (You can enter vendors'item numbers when assigning vendor types in Inventory Control itemrecords.)
708 Sage 300 ERP Purchase Orders
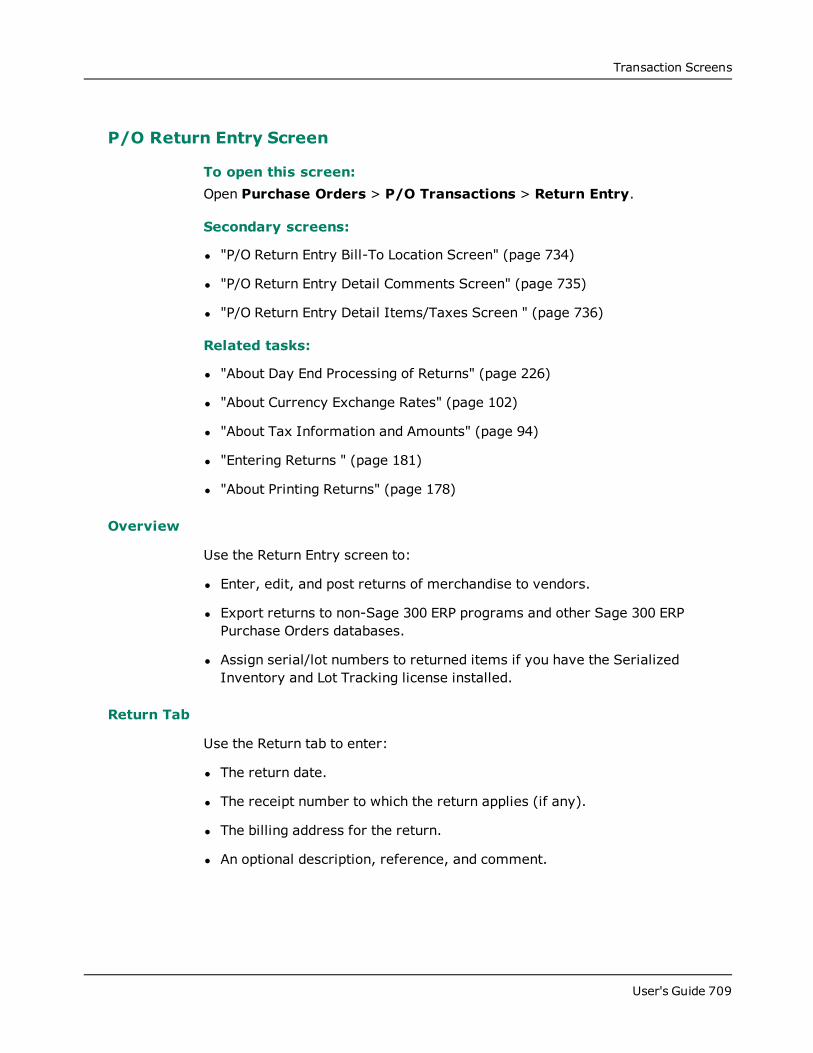
Transaction Screens
P/O Return Entry Screen
To open this screen:Open Purchase Orders > P/O Transactions > Return Entry.
Secondary screens:
l "P/O Return Entry Bill-To Location Screen" (page 734)
l "P/O Return Entry Detail Comments Screen" (page 735)
l "P/O Return Entry Detail Items/Taxes Screen " (page 736)
Related tasks:
l "About Day End Processing of Returns" (page 226)
l "About Currency Exchange Rates" (page 102)
l "About Tax Information and Amounts" (page 94)
l "Entering Returns " (page 181)
l "About Printing Returns" (page 178)
Overview
Use the Return Entry screen to:
l Enter, edit, and post returns of merchandise to vendors.
l Export returns to non-Sage 300 ERP programs and other Sage 300 ERPPurchase Orders databases.
l Assign serial/lot numbers to returned items if you have the SerializedInventory and Lot Tracking license installed.
Return Tab
Use the Return tab to enter:
l The return date.
l The receipt number to which the return applies (if any).
l The billing address for the return.
l An optional description, reference, and comment.
User's Guide 709
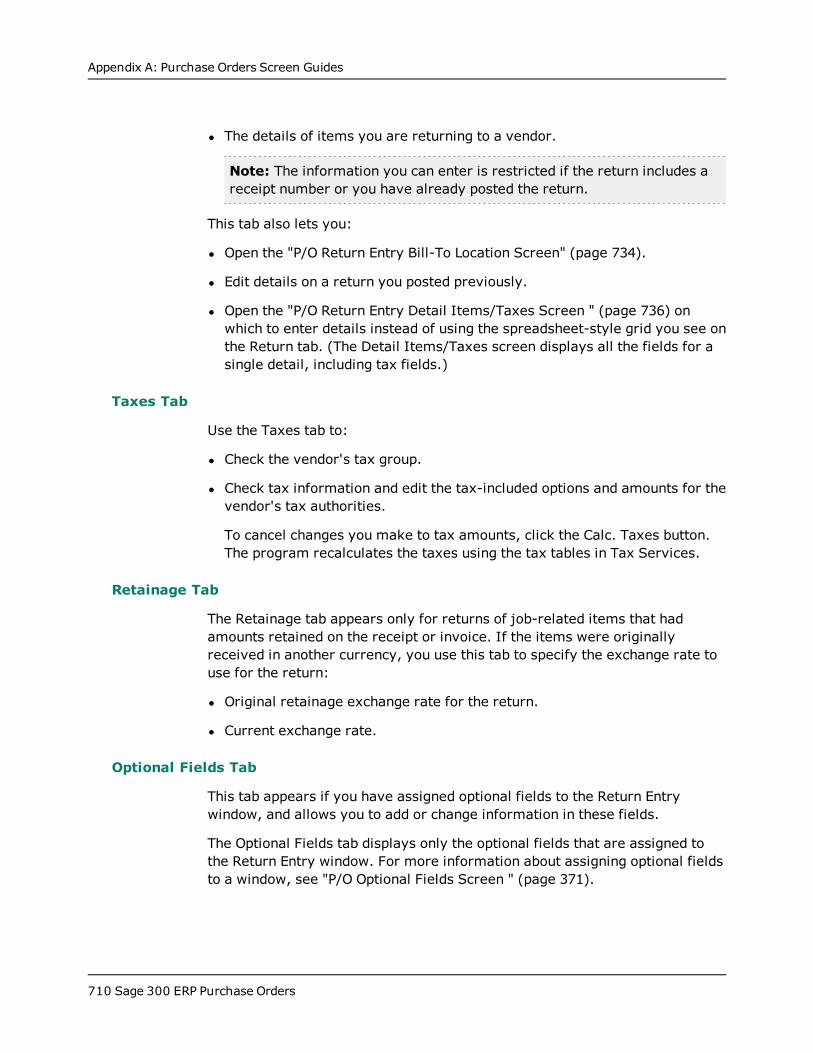
Appendix A: Purchase Orders Screen Guides
l The details of items you are returning to a vendor.
Note: The information you can enter is restricted if the return includes areceipt number or you have already posted the return.
This tab also lets you:
l Open the "P/O Return Entry Bill-To Location Screen" (page 734).
l Edit details on a return you posted previously.
l Open the "P/O Return Entry Detail Items/Taxes Screen " (page 736) onwhich to enter details instead of using the spreadsheet-style grid you see onthe Return tab. (The Detail Items/Taxes screen displays all the fields for asingle detail, including tax fields.)
Taxes Tab
Use the Taxes tab to:
l Check the vendor's tax group.
l Check tax information and edit the tax-included options and amounts for thevendor's tax authorities.
To cancel changes you make to tax amounts, click the Calc. Taxes button.The program recalculates the taxes using the tax tables in Tax Services.
Retainage Tab
The Retainage tab appears only for returns of job-related items that hadamounts retained on the receipt or invoice. If the items were originallyreceived in another currency, you use this tab to specify the exchange rate touse for the return:
l Original retainage exchange rate for the return.
l Current exchange rate.
Optional Fields Tab
This tab appears if you have assigned optional fields to the Return Entrywindow, and allows you to add or change information in these fields.
The Optional Fields tab displays only the optional fields that are assigned tothe Return Entry window. For more information about assigning optional fieldsto a window, see "P/O Optional Fields Screen " (page 371).
710 Sage 300 ERP Purchase Orders
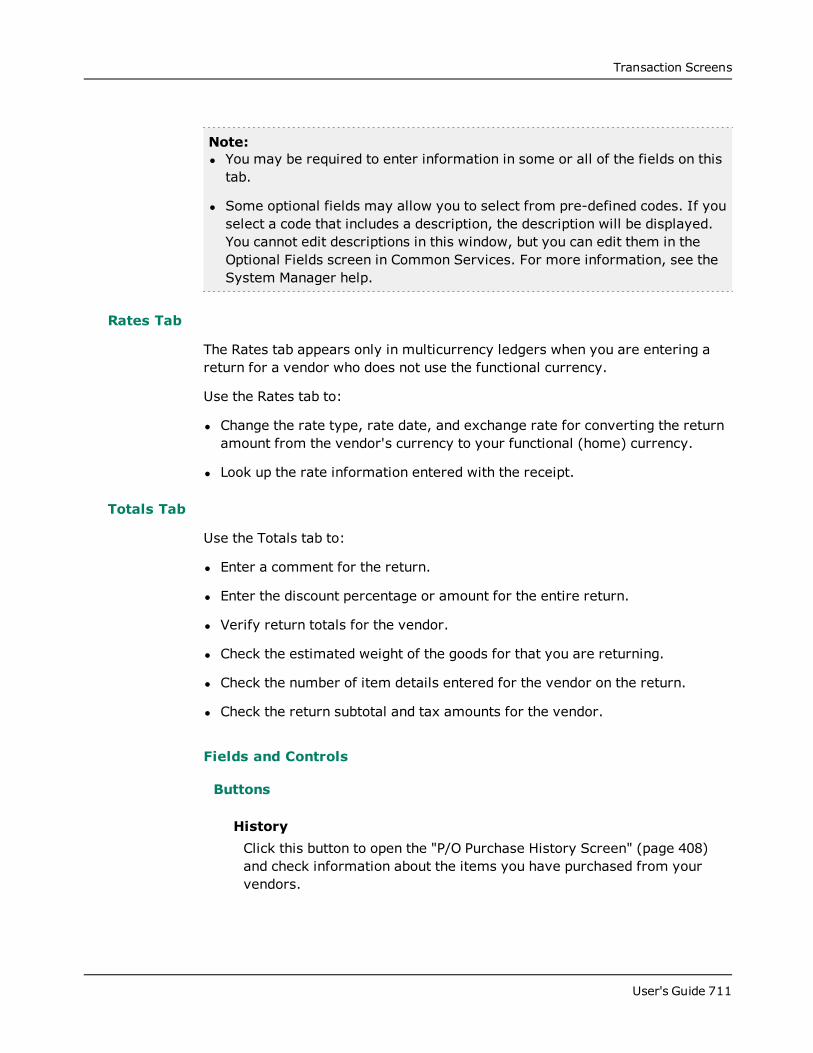
Transaction Screens
Note:l You may be required to enter information in some or all of the fields on thistab.
l Some optional fields may allow you to select from pre-defined codes. If youselect a code that includes a description, the description will be displayed.You cannot edit descriptions in this window, but you can edit them in theOptional Fields screen in Common Services. For more information, see theSystem Manager help.
Rates Tab
The Rates tab appears only in multicurrency ledgers when you are entering areturn for a vendor who does not use the functional currency.
Use the Rates tab to:
l Change the rate type, rate date, and exchange rate for converting the returnamount from the vendor's currency to your functional (home) currency.
l Look up the rate information entered with the receipt.
Totals Tab
Use the Totals tab to:
l Enter a comment for the return.
l Enter the discount percentage or amount for the entire return.
l Verify return totals for the vendor.
l Check the estimated weight of the goods for that you are returning.
l Check the number of item details entered for the vendor on the return.
l Check the return subtotal and tax amounts for the vendor.
Fields and Controls
Buttons
HistoryClick this button to open the "P/O Purchase History Screen" (page 408)and check information about the items you have purchased from yourvendors.
User's Guide 711
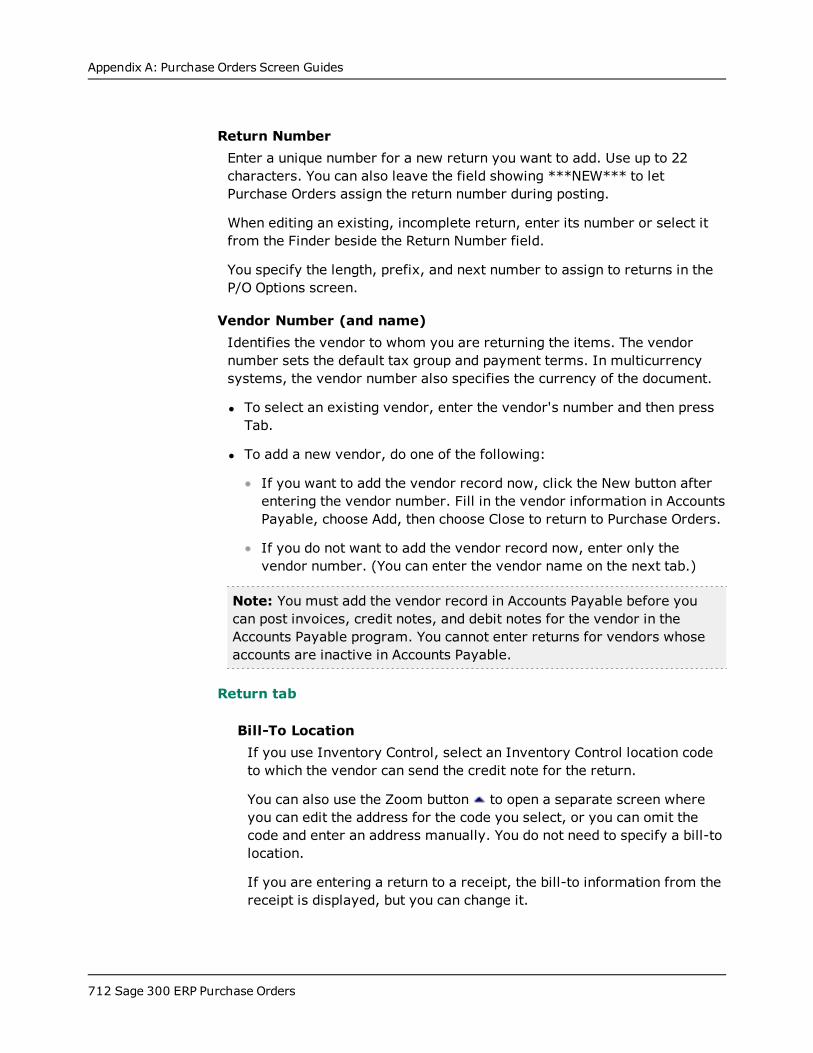
Appendix A: Purchase Orders Screen Guides
Return NumberEnter a unique number for a new return you want to add. Use up to 22characters. You can also leave the field showing ***NEW*** to letPurchase Orders assign the return number during posting.
When editing an existing, incomplete return, enter its number or select itfrom the Finder beside the Return Number field.
You specify the length, prefix, and next number to assign to returns in theP/O Options screen.
Vendor Number (and name)Identifies the vendor to whom you are returning the items. The vendornumber sets the default tax group and payment terms. In multicurrencysystems, the vendor number also specifies the currency of the document.
l To select an existing vendor, enter the vendor's number and then pressTab.
l To add a new vendor, do one of the following:
If you want to add the vendor record now, click the New button afterentering the vendor number. Fill in the vendor information in AccountsPayable, choose Add, then choose Close to return to Purchase Orders.
If you do not want to add the vendor record now, enter only thevendor number. (You can enter the vendor name on the next tab.)
Note: You must add the vendor record in Accounts Payable before youcan post invoices, credit notes, and debit notes for the vendor in theAccounts Payable program. You cannot enter returns for vendors whoseaccounts are inactive in Accounts Payable.
Return tab
Bill-To LocationIf you use Inventory Control, select an Inventory Control location codeto which the vendor can send the credit note for the return.
You can also use the Zoom button to open a separate screen whereyou can edit the address for the code you select, or you can omit thecode and enter an address manually. You do not need to specify a bill-tolocation.
If you are entering a return to a receipt, the bill-to information from thereceipt is displayed, but you can change it.
712 Sage 300 ERP Purchase Orders
Transaction Screens
You can edit bill-to information as long as the return is not complete (thatis, you have not issued a credit note from the return).
DescriptionEnter an optional description for the return.
If you are entering a return to a receipt, the description entered on thereceipt (if any) is displayed, but you can change it.
If you are editing a posted return, you cannot change the description.
Job-RelatedIf the purchase order and receipt were job-related, the Job-Related checkbox will be selected for the return, and you will not be able to change thisselection.
If you are not referencing a particular receipt, you have to choose JobRelated if you are returning materials related to a job.
The contract, project, category, cost class and resource (item numbercolumn) for each receipt detail will be provided by the program — as willthe customer billing type, billing rate, and A/R item used for billing.
Note: If you use different terms than “Contract,” “Project,” and“Category” in Project and Job Costing, the program displays theminstead.
PO Number (display only)If you are entering a return without a receipt number, you can enter apurchase order number, including a number that has not been added toPurchase Orders, or leave the field blank.
If you are entering a return to a receipt, you cannot edit the field. If thereceipt specified a purchase order number, the purchase order number isdisplayed.
Posting DateEnter the posting date for the transaction.
The posting date is different from the document date. The posting date isthe date for transactions being posted to the General Ledger, so it alsodetermines the contents of the Fiscal Year and Period fields.
User's Guide 713
Appendix A: Purchase Orders Screen Guides
If you have a multicurrency system, currency revaluation uses postingdates to select open documents for revaluation purposes, and thus,revaluation adjustments are posted to General Ledger in the correctfiscal year and period.
Depending on your settings in the P/O Options screen, Purchase Ordersautomatically displays the session date or the document date by defaultin this field.
You can change the posting date, but you cannot separately change thefiscal year and period.
Note: If you consolidate G/L transactions, the posting date forconsolidated entries is the last date of the fiscal period.
Receipt DateAfter you select the receipt number for the return, the receipt date isdisplayed for your information.
Receipt NumberEnter the number of the receipt, if any, from which you are returningitems. (The receipt must exist in Purchase Orders.)
ReferenceEnter an optional reference for the return.
If you are entering a return to a receipt, the reference entered on thereceipt (if any) is displayed, but you can change it.
If you are editing a posted return, you cannot change the reference.
RetainageIf the receipt used retainage accounting, the program will displayadditional retainage fields for each return detail line to display theretainage percentage and period for each detail line in the return.
The program will also display the Retainage tab to let you specify theexchange rate that you want to use for returns of multicurrencyretainage receipts.
Return DateEnter the date you want to use as the return date. The program displaysthe sign-on date you entered to start Sage 300 ERP.
714 Sage 300 ERP Purchase Orders
Transaction Screens
You can also change the posting date if you want a different date for theG/L transactions when they are posted in the General Ledger. (Theposting date determines the fiscal year and period displayed beside thePosting Date field.)
Return SubtotalThe Return Subtotal field in the lower-right corner of the screen displaysthe total of all item cost details on the return. This amount does notinclude taxes (unless tax amounts are included in detail cost amounts).
Ship ViaUse the Ship Via fields to specify the shipping method by which you planto return the goods to the vendor. The program displays the ship-viadescription for the code you select.
Enter an optional ship-via code or use the Finder to select one of the ship-via codes you have defined in Purchase Orders.
You can also skip the Ship Via field and enter a description of the shippingmethod in the field beside the Ship Via field, or leave both fields blank.
Template CodeEnter an optional template code from the templates defined in theTemplates screen.
The template code provides default information for the Return tab. If youselected a receipt number for the return or you are editing a previouslyposted return, you cannot change the entry in the Template Code field.
On returns you enter without receipt numbers, if the vendor recordspecifies different information from those used with the template, theinformation from the vendor record is inserted in place of the defaulttemplate information.
If you select a new template after choosing the vendor, Purchase Orderswill replace the return information and vendor information with theinformation from the new template.
You cannot change the template after you have added details to thereturn.
Vendor Account SetThe account set from the vendor record appears in this field as thedefault. It specifies the general ledger payables control, purchase
User's Guide 715
Appendix A: Purchase Orders Screen Guides
discounts, prepayment, and retainage accounts to which the transactionwill be distributed.
You can change the account set for a particular purchase order, receipt,return, invoice, credit note, or debit note. If you use multicurrencyaccounting, however, the new account set must use the same currencyas the vendor's account set.
Note: If you change the account set on a receipt, make sure that youuse the same account set for returns, invoices, and credit or debitnotes.
Year and PeriodThis is the fiscal year and period to which the return transactions will beposted in the general ledger. You can change the fiscal period bychanging the Posting Date.
You can enter a different Return Date, and you can enter a differentPosting Date for the document.
(Remember that you cannot post transactions to closed fiscal periods.)
Return Details tableOpen this table from the Return tab.
Allocated TaxThe program displays the total tax amount allocated to the detail,including taxes that are included in the item cost. Recoverable andexpensed tax amounts not included.
Allocated taxes form part of the item costs that are posted to theInventory Control item records by Day End Processing.
Billing Type, Billing Rate, and A/R Item NumberFor job-related returns, the program provides the Billing Type, BillingRate, and AR Item Number that was used for the receipt.
The Job-Related check box in the top part of the screen will beselected if the receipt was job-related.
A/R Item NumberThis field displays the A/R item number associated with the
716 Sage 300 ERP Purchase Orders

Transaction Screens
project resource used for the contract in Project and Job Costing.You can select a different A/R item number only for time andmaterial projects, as follows:
l On a standard project, this field displays the A/R item numberand unit of measure specified for the project resource categoryas the default. You can accept the item number or select anothervalid A/R item number.
l On a basic project, this field displays the A/R item number andunit of measure specified for the project category. You canaccept the item number or select another valid A/R item number.
l If you change the A/R item number, the item number must be avalid item number in Accounts Receivable, and the unit ofmeasure must be a valid unit of measure both for the new itemnumber and the vendor’s currency.
Cost plus and fixed price projects do not use an A/R item number.
Billing CurrencyThis field appears only in multicurrency systems for time andmaterials projects and for fixed price projects using billings andcosts or accrual-basis accounting methods.
The billing currency is the customer's currency specified on thecontract, and you cannot change it.
Billing currency is blank for Fixed Price projects using completedproject or project percentage complete methods, and for Cost Plusprojects.
Note: Billing currency is not displayed for basic or standardinternal Time and Materials projects, or for single-currency FixedPrice projects that use billings and costs or accrual-basisaccounting methods.
Billing RateThis field displays the billing rate for the specified resource (forstandard projects) or category (for basic projects).
You can edit the billing rate if the billing type is Billable. The fielddisplays 0.000000 if the billing type is Non-Billable or No Charge.
User's Guide 717
Appendix A: Purchase Orders Screen Guides
Note:l You can specify the billing rate for Time and Materials projectsand for Fixed Price projects that use Billings and Costs orAccrual-Basis accounting methods.
l Billing rate is disabled and set to 0.000000 on a basic orstandard internal contract for Time and Materials projects orfor Fixed Price projects using Billings and Costs or Accrual-Basis accounting methods.
l The billing rate cannot be negative.
Billing TypeThis field appears in the detail-entry section only for job-relatedpurchase orders.
The billing type indicates to Project and Job Costing whether to billthe cost to the customer. You can change this field only for a timeand materials project, as follows:
On a basic project:
For a billable project, the category billing type determineswhether you can change the billing type for the detail. If thespecified category is:
l Billable, the default billing type for the detail is billable, butyou can change it.
If the detail is billable you can specify a billing rate for thedetail.
If you change the billing type for the detail to no charge or non-billable, the program sets the billing rate to zero and youcannot change it.
l No charge or non-billable, the program sets the same billingtype for the detail, and cannot change it. You cannot specify abilling rate for the detail, which the program sets as zero.
If the project is no charge or non-billable, the detail uses thesame billing type as the project, the billing rate is set to zero,and you cannot change them.
718 Sage 300 ERP Purchase Orders
Transaction Screens
On a standard project:
If the project is billable, the resource billing type determineswhether you can change billing type for the detail. If the specifiedresource is:
l Billable, the program displays Billable as default billing type,but you can change it for the detail. If the detail is billable, youcan specify a billing rate for the detail.
If you change the billing type for the detail to no charge or non-billable, the program sets the billing rate to zero, and you cannotchange it.
l No charge or non-billable, the program sets same billing typefor the detail, and you cannot change it. You cannot specify abilling rate for the detail, which the program sets as zero.
If the project is no charge or non-billable, the detail uses thesame billing type as the project, and you cannot change it. Theprogram also sets the billing rate to zero, and you cannot changeit.
For fixed price and cost plus projects, the Billing Type field is blank.A billing type is not required for these types of projects.
Unit of MeasureThis field appears for Time and Materials projects if you selectedthe Job Related option for this transaction.
You must enter a unit of measure that is valid for the itemnumber/resource that you specified and for the contract customer'scurrency.
Note: For internal time and materials projects (basic or standardcontracts) the A/R item unit of measure will be disabled or blank.
CommentsTo enter comments for a detail line, click the Zoom button besidethe Comments field, enter comments, then click Close. (PressShift+F9 to open or close the screen using your keyboard.)
Any comments entered for the detail line on the receipt are included onthe return, but you can change or delete them.
You can print the comments on the return form.
User's Guide 719

Appendix A: Purchase Orders Screen Guides
Contract, Project, Category and ResourceIf the purchase order and receipt were job-related, the program willprovide the job to which each detail was assigned. If you usedifferent terms than “Contract,” “Project,” and “Category” in Projectand Job Costing, the program displays them instead.
Purchase Orders updates the actual quantities and costs for jobs withthe amounts on returns.
For job-related returns:
l The Job-Related check box will be automatically selected if thepurchase order and receipt were job-related.
l You enter/select the resource using the Item Number field.
CategorySelect or enter a category that is assigned to the project in Projectand Job Costing.
ContractSpecify a contract number for each detail. You can enter or selectonly contracts that are open or on hold. (You cannot processtransactions to a contract that is on hold, if it has never beenopened.)
Cost ClassThe program displays the cost class for the category used in eachdetail. You cannot change this field.
Item Number (Resource)Use the Item Number field to identify the resource for this detail.
You must specify a resource that is assigned to the project andcategory in Project and Job Costing. You can specify an inventoryitem number, or the code for another type of resource (such as anequipment code, subcontractor code, or employee number).
Note: You cannot leave this field blank.
ProjectYou can only enter or select projects that are:
720 Sage 300 ERP Purchase Orders
Transaction Screens
l Assigned to the contract that you selected.
l Open or on hold. (If a project that is on hold has never beenopened, you cannot select it.)
l Not closed to costs.
Discount %You can enter a discount as a percentage or an amount. The programuses the amount you enter in this field to calculate the discounted costfor the item detail.
If you enter a percentage in this field, Purchase Orders calculates thediscount amount for the item detail.
Tip: If you prefer not to enter discounts for individual details, youcan enter a discount percentage for the entire document on the Totalstab. Purchase Orders then prorates the discount amount for thetransaction details, overriding any discounts you may have enteredmanually for the details.
Discount AmountYou can enter a discount as a percentage or an amount. The programuses the amount you enter in this field to calculate the discounted costfor the item detail.
If you enter a discount amount, the program calculates and displaysthe discount percentage based on the cost. (Alternatively, you canenter a percentage in the Discount Percent field, and let the programcalculate the discount amount.)
Tip: If you prefer not to enter discounts for individual details, youcan enter a discount amount for the entire document on the Totalstab. Purchase Orders then prorates the discount amount for thetransaction details, overriding any discounts you may have enteredmanually for the details.
Discounted Return CostThe program displays the return cost less the discount amount in thisfield.
Expense AccountYou specify a general ledger expense account for non-inventory item
User's Guide 721
Appendix A: Purchase Orders Screen Guides
details. You can select general ledger account numbers using theFinder.
The program displays the number entered with the detail on thereceipt, if any, but you can change the number.
Extended CostIf you are entering a return to an existing receipt, the programdisplays the extended cost from the receipt, and you cannot changethe amount. This field shows zero on returns entered without receiptnumbers.
Extended WeightEnter the extended weight for the number of units of the item thatyou are returning.
If you change the extended weight, the program automaticallyrecalculates the unit weight.
The total weight for all items on the document is displayed in theTotals tab.
Item DescriptionThe program displays the description for the item number youentered, or that was entered with the detail on the receipt, but youcan change it.
If you enter an item number that is not defined in your InventoryControl system, no description is displayed. Enter the description thatyou want to use.
Item NumberOn new returns you are entering without receipt numbers, you enterthe item number or select it from the Finder. If you use the AllowNon-inventory Item Numbers option in Purchase Orders, you can alsoenter an item number that is not included in your Inventory Controldata.
If you are entering a return to a receipt or you are editing a returnyou posted previously, the program displays the item number thatwas entered with the detail. You cannot change it.
Line Number
722 Sage 300 ERP Purchase Orders
Transaction Screens
LocationThis field appears if you use Inventory Control.
If you are entering a return without a receipt number, enter the codefor the location from which you are returning the items.
If you are entering a return to a receipt or editing a previously postedreturn, the program displays the location code entered for the detail onthe receipt. You cannot change it.
Manufacturer's Item NumberIf a manufacturer's item number was used on the receipt or return, theprogram also displays the manufacturer's item number on the return.
Manufacturer's item numbers are alternative item numbers — such asbar codes or shortcut codes — that identify your inventory item. Youset up manufacturer's item numbers in the Inventory Control system.
You can enter manufacturer's item numbers wherever you enter itemnumbers in Purchase Orders.
Net Of TaxThis field displays the extended item cost, minus any applicable taxamount. You cannot edit the amount.
Non-Stock Clearing AccountUse the Non-Stock Clearing Account field to change the non-stockclearing account associated with this item's account set.
If the item used in the detail is a non-stock item, the non-stockclearing account associated with the item's account set appears.
If you are returning a non-stock item, the non-stock clearing accountassociated with the item's account set appears. You can specify adifferent account, if necessary.
Optional FieldsIf optional fields have been defined in Purchase Orders for returndetails, you can click the Zoom button beside the Optional Fieldsfield to display the optional fields assigned to a selected detail, andedit their contents.
For more information about using optional fields in transactions, see"About Optional Fields in Transactions" (page 90).
User's Guide 723
Appendix A: Purchase Orders Screen Guides
Order NumberEnter the number of a sales order to which the detail applies. If youuse Order Entry with Purchase Orders, you can also select an OrderEntry order number from the Finder.
You can change or erase an order number that is displayed with adetail you added on the receipt.
Quantity ReceivedIf you are entering a return to an existing receipt, the programdisplays the received quantity, and you cannot change the amount.This field shows zero on returns entered without receipt numbers.
Quantity ReturnedEnter the number of units of the item that you are returning.
If you are entering a return to an existing receipt or editing apreviously posted return, be sure that the return quantity you enter isin the unit of measure that is used for the detail. You cannot changethe unit of measure that was entered with the receipt or previouslyposted return.
If you do not allow negative inventory levels in Inventory Control andyou enter a return quantity that will drop the item quantity on handbelow zero, a warning message is displayed. You must then choosewhether you still want to return that quantity.
If you have the Serialized Inventory and Lot Tracking licenseinstalled, a separate screen appears after you have entered thequantity of serialized/lotted items returned, then press Tab (or pressEnter). (This screen also opens when you click the Zoom button in theQuantity column header.)
Receipt DiscountThis field displays the discount amount from the original receipt.
Return CostYou can enter a return cost on returns that do not reference a receiptnumber.
Note that if you change the displayed return cost, the unit cost isrecalculated. The program also recalculates the return cost if youchange the unit cost.
724 Sage 300 ERP Purchase Orders
Transaction Screens
If you are working with an existing receipt or return, you cannotchange either of these entries.
Retainage %, Retainage Amount, and Retention PeriodIf the Retainage option was selected for the receipt, the program willdisplay additional retainage fields for each return detail line to let youenter a retainage percentage or amount and the retention period.
The program will also display the Retainage tab to let you specify theexchange rate that you want to use for the retainage portion ofmulticurrency returns.
If you clear the Retainage option, the percentage and period retainagefields disappear from the item detail section, and the Retainage tabalso disappears.
By default, the program displays the retainage percentage/amount andretention period that was in effect for the receipt.
Note: Retainage accounting applies only to job-related transactions,and is available only if you selected retainage accounting in theAccounts Payable program.
Tax IncludedThis field displays the amount of tax that is included in the extendeditem cost (when the cost includes tax).
To edit tax settings, press F9 to display the Detail Items/Taxes screen.You can also edit total tax amounts on the Taxes tab.
Tax IncludedThis field appears on the Detail Items/Taxes screen.
Use this field to indicate whether tax amounts are included in the itemcost (instead of charged in addition to the detail cost).
To toggle between Yes and No in this field, enter any character in thefield, or double-click the field with a mouse.
The default choice for this option is provided from the vendor record inAccounts Payable or from the vendor contract cost.
You can choose Yes for this option only if the Allow Tax In Price optionis selected for the authority in Tax Services.
User's Guide 725
Appendix A: Purchase Orders Screen Guides
Unit CostThe program displays the unit cost entered for the detail on thereceipt. You can change the cost if you have security rights to do so.Make sure that the cost you enter is the correct item cost for the unitof measure.
Unit of MeasureThe program displays the unit of measure entered for the detail onthe receipt. You cannot change it.
Unit WeightIf you are adding a return without a receipt number, enter the unit ofmeasure to use or select it from the Finder. (If you entered a non-inventory item number, you cannot select a unit of measure from theFinder.)
If you are entering a return to a receipt, the program displays theunit of measure entered for the detail on the receipt. You cannotchange it.
Vendor Item NumberEnter the code the vendor uses to identify the item or edit a displayedcode, if necessary.
If the vendor's item number is specified in the item record (when youare adding a new detail) or on the receipt for which you are enteringa return, the code appears in this field. (You can enter vendors' itemnumbers when assigning vendor types in Inventory Control itemrecords.)
Weight Unit of MeasureThis is the unit of measure (such as pounds, kilograms, tons) for theweight of this item on the return.
By default, the program displays the weight unit of measure from thereceipt (if you specified one), but you can change it to anotherdefined unit of measure (and the program will recalculate the weightaccordingly).
The weight UOM for the complete return is determined by the defaultweight unit of measure set in the I/C Options screen (or in the P/OOptions screen, if you do not use Inventory Control).
726 Sage 300 ERP Purchase Orders
Transaction Screens
Taxes tab
Retainage Tax AmountThis field appears on the Taxes tab for Receipt Entry, Invoice Entry,Return Entry, and Credit/Debit Note Entry if retainage applies to thedocument.
It shows the amount of tax calculated for this authority for the retainageportion of the document if you report tax for retainage amounts when youcreate the retainage document (not when you create the originaldocument).
Retainage appears only on job-related documents if you select theRetainage option on the first tab of the transaction entry screen.
Retainage tax amounts are computed using the retainage tax base andthe tax rate for each tax authority.
Retainage Tax BaseThe retainage tax base is the amount (before included taxes) used as thebase for calculating taxes on the retained amount.
Essentially, the retainage tax base is the retainage portion of thedocument (excluding tax) if you report tax for retainage amounts at thetime that you create the retainage document (not when you create theoriginal document).
Retainage appears only on job-related documents if you select theRetainage option on the first tab of the transaction entry screen.
Retainage tax amounts are computed using the retainage tax base andthe tax rate for each tax authority.
Tax AmountThe program displays the total tax amount calculated for each authority inthe vendor's tax group. You can change this amount, if necessary.
To cancel all your changes to tax amounts at the same time, choose theCalculate Taxes button.
Tax BaseThe tax base shows, for the tax authority, the net cost of items before taxis added. (This field is useful for items that have tax included in theirprices.)
User's Guide 727
Appendix A: Purchase Orders Screen Guides
Tax GroupEnter the tax group that identifies the tax authorities to which thevendor is subject. You must use a tax group that is defined for yourcompany in Common Services.
You must enter a valid tax group for every return vendor.
Tax Authority and DescriptionThese columns list the codes and corresponding descriptions for all thetax authorities in the tax group specified for the document.
You enter tax information in the Tax Services module in CommonServices.
Tax Authority and DescriptionThe program displays the codes and descriptions of the tax authoritiesassigned to the vendor's tax group.
Note: You define codes for tax authorities and edit their descriptionsin Tax Services.
Tax Class and Tax Class DescriptionThe program displays the tax classes and their correspondingdescriptions as assigned to the vendor's tax authorities. You can changeeach tax class to another tax class that is permitted by the authority.
Note: You can change a tax class description only in Tax Services.
Tax ExcludedThe program displays the total amount of tax that is not included in itemcosts for the authority.
Tax IncludedThe program displays the total amount of tax that is included in itemcosts for the authority.
You can include tax amounts in item costs only if permitted by theauthority.
Tax Reporting CurrencyTax reporting fields appear on the Taxes tab only if the tax group's tax
728 Sage 300 ERP Purchase Orders
Transaction Screens
reporting currency is different from your functional currency and thevendor's currency.
Along with the tax reporting currency, the program displays the amountof included and excluded tax to be reported in that currency on taxtracking reports for all the tax authorities listed on the document.
You set the tax reporting currency for tax groups in the Tax Servicesmodule in Common Services.
Tax Reporting TotalThis field displays the sum of the tax reporting amounts for all taxauthorities.
It appears only if the tax reporting currency for the tax group is differentfrom your functional currency and the vendor's currency.
You set the tax reporting currency for tax groups in the Tax Servicesmodule in Common Services.
Total Retainage TaxThis field appears on the Taxes tab for Receipt Entry, Invoice Entry,Return Entry, and Credit/Debit Note Entry if retainage applies to thedocument.
It shows the total amount of tax calculated for the retainage portion of thedocument if you report tax for retainage amounts when you create theretainage document (not when you create the original document).
Retainage appears on job-related documents only if you select theRetainage option on the first tab of the transaction entry screen.
Retainage tax amounts are computed using the retainage tax base andthe tax rate for each tax authority.
Total TaxThis field displays the total tax amount calculated for each authority in thevendor's tax group. You can change this amount, if necessary.
To cancel all your changes to tax amounts at the same time, click theCalculate Taxes button.
Retainage tabThe Retainage tab lets you specify the exchange rate that you want to use forreturns of multicurrency retainage receipts. You can:
User's Guide 729
Appendix A: Purchase Orders Screen Guides
l Use the original document exchange rate
l Use the current exchange rate
Note: This tab will appear only if you used retainage accounting on theoriginal receipt or invoice.
Optional Fields tabThe Optional Fields tab contains optional fields added by your company thatapply to the transaction as a whole. Optional fields on detail lines apply tothe individual transaction detail.
Note: This tab will appear only if you have Transaction Analysis andOptional Field Creator.
Rates tabThe Rates tab appears only for multicurrency ledgers.
CurrencyDisplays the vendor's currency code and a description of the currency.All amounts you enter for the return will be in the vendor's currency.
The currency is assigned for the vendor in Accounts Payable and youcannot change it in Purchase Orders.
Derive RateWhen Purchase Orders calculates the tax amount in a tax reportingcurrency, the program uses the Tax Reporting Currency Exchange Ratethat appears (or that you enter) on the Rates tab.
However, if you have changed the tax reporting amount that appears onthe Taxes tab, you can click the Derive Rate button to see the actualexchange rate between the tax amount and the tax reporting amount.
In other words, the Derive Rate button appears so you can derive theexchange rate for the tax reporting currency, if you change thecalculated amount on the Taxes tab.
Return Exchange RateThe program displays the exchange rate currently in effect for thespecified currency and the displayed rate type and rate date, but youcan change the rate.
730 Sage 300 ERP Purchase Orders
Transaction Screens
You receive a warning if you change an exchange rate by an amount thatexceeds the Spread setting for the currency in Common Services'Currency Rates table.
If you are entering a return to a receipt, the screen also displays theexchange rate entered on the receipt.
Return Rate DateType or select the date to use to select the exchange rate for thedocument you are entering.
The program displays the rate date that is nearest the document date youentered, but you can specify a different date for which an exchange rateexists for the currency in Common Services' Currency Rates table.
If you change the rate date, Purchase Orders checks the rate tables for adate match, and updates the rate if necessary.
If you are entering a return to a receipt, the screen also displays the ratedate used with the receipt.
Return Rate TypeIf the rate type you want to use is not displayed, enter the code or chooseit from the Finder.
The program uses rate types when converting multicurrency amounts onthe invoice to functional currency. Examples of rate types might be "spotrate," "average rate," and "contract rate."
You define rate types using the Currency Rate Types screen in CommonServices, and assign the default rate type for Purchase Orders on theProcessing tab of the P/O Options screen.
If you are entering a return to a receipt, the screen also displays the ratetype used with the receipt.
Receipt Exchange RateIf you are entering a return to a receipt, the Rates tab displays theexchange rate entered on the receipt.
Receipt Rate DateIf you are entering a return to a receipt, the screen displays the rate dateused with the receipt.
User's Guide 731
Appendix A: Purchase Orders Screen Guides
Receipt Rate TypeIf you are entering a return to a receipt, the screen displays the ratetype used with the receipt.
Totals tab
CommentEnter a comment for the return, using up to 250 characters. Theprogram automatically wraps text as you reach the end of a line. If youwish to insert your own line breaks, press Ctrl+Enter where you want aline break to occur.
If you are entering a return to a receipt, the comment, if any, enteredon the receipt is displayed, but you can change it.
If you are editing a posted return, you cannot change the comment.
Estimated TaxThis is the tax amount that will be applied to the retainage invoice (if thetax authority allows you to defer tax on retained amounts on an originalreceipt and invoice).
If you are applying all tax amounts to the original invoice, this amountwill be zero.
Retainage amounts are invoiced at a later time, in Accounts Payable.
Less RetainageThis field lists any retained amounts that apply to the items beingreturned (so that the net return total will reflect the currently invoicedvalue of returned items).
This field appears only if amounts were retained on the originaldocument.
Less Return DiscountYou can enter an optional discount percentage or discount amount forthe entire document, or enter discounts for individual detail lines.
If you enter a discount for the entire document, Purchase Ordersprorates the discount amount for the document details, overriding anydiscounts you may have entered manually for the details.
732 Sage 300 ERP Purchase Orders
Transaction Screens
Net Return TotalThis field lists the net return total after deducting any retained amountsthat apply to the items being returned. (The result reflects the currentlyinvoiced value of returned items.)
This field appears only if amounts were retained on the originaldocument.
Number of LabelsThis field lets you specify the number of mailing labels to print for thereturned shipment.
Number of LinesThe program displays the number of item detail lines you entered for theprimary vendor on the document.
Check this number against source documents to make sure you enteredall the details you require.
Plus Excluded TaxThis field displays the total excluded tax amount of all item and additionalcost details for the vendor. This amount does not include taxes that areincluded in the cost amounts.
Return SubtotalThe program displays the total of all item detail costs, if any, enteredfrom the return, including tax-included amounts. This subtotal does notinclude tax amounts that are not included in item costs.
Return TotalThe program displays the total of all item costs and taxes for the vendorand return.
Tax IncludedThe program displays the total amount of tax that is included in item costsfor the authority.
You can include tax amounts in item costs only if permitted by theauthority.
Total TaxThe total tax amount is the sum of the tax included and tax excluded.
User's Guide 733
Appendix A: Purchase Orders Screen Guides
Total WeightThe program displays the total weight of the returned goods, calculatedfrom the weight and returned quantity entered for each item detail.
Use this amount to check returned shipping charges.
P/O Return Entry Bill-To Location Screen
To open this screen:
1. Open Purchase Orders > P/O Transactions > Return Entry.
2. Click the Zoom button ( ) beside the Bill-To Location field, or press the F9key in the field.
Overview
Use the Bill-To Location screen when entering returns without a receiptnumber to specify the address to which the vendor should send the credit notefor the return.
Note: If you are editing a return to a receipt, you cannot change the bill-tolocation.
Fields and Controls
AddressUse the Address field to type the address for the location, or edit thedisplayed information if necessary.
Bill-To LocationIf you use Inventory Control and you selected a bill-to location code, theprogram displays the location code.
If you do not use Inventory Control, you can click the Zoom buttonbeside the field name.
Enter the bill-to location information by typing in the screen that appears.
ContactEnter the name of a contact person, department, or position.
734 Sage 300 ERP Purchase Orders
Transaction Screens
DescriptionUse the Description field to type a description of the location, such as acompany name, or edit a displayed description if necessary. You do not haveto include a description.
E-mailUse the E-mail field to type the e-mail address for the location, or edit thedisplayed address if necessary.
Fax NumberUse the Fax Number field to type the fax number for the location or edit adisplayed number if necessary.
Phone NumberUse the Phone Number field to type the telephone number for the locationor edit a displayed number if necessary.
P/O Return Entry Detail Comments Screen
To open this screen:
1. Open Purchase Orders > P/O Transactions > Return Entry.
2. On the Return tab , click the Comments field for the detail line you need.
3. Click the Zoom button ( ) or press the Shift and F9 keys to open the DetailComments screen.
Use this screen to enter comments for a selected return detail line.
To enter or edit a comment:
1. Type the comment, pressing Enter to start each new line.
2. When finished, click Close to close the screen.
To delete comments:
1. Highlight the text to delete, then press the Delete key. If a message appearsasking you to confirm the deletion, click Yes.
2. When finished, click Close to return to detail entry.
User's Guide 735
Appendix A: Purchase Orders Screen Guides
Tip: You can also delete comments by changing the entry in theCommentsfield to No on the Return tab. If you decide before posting the return that youwant to use the remarks, change the Comment field to Yes. Your originalremarks will reappear.
P/O Return Entry Detail Items/Taxes Screen
To open this screen:
1. Open Purchase Orders > P/O Transactions > Return Entry.
2. Enter header information for the return, and, if you are creating a newreturn for an existing receipt, specify the receipt number.
3. Select a detail line, and then press F9, or click the Item/Tax button.
Related tasks:
l " Adding or Editing Details Using the Detail Items Taxes Screen" (page 186)
l "Entering Returns " (page 181)
Overview
Use this screen to check and edit return detail lines. You also use this screento check or to edit tax information for a return detail.
This screen displays all the fields for a single detail in a separate window,making it easier to see the information you entered for the detail.
Fields and Controls
Buttons
Calc. TaxesClick the Calc. Taxes button to see tax amounts for a detail before youpost the document.
Note: Tax amounts are not calculated automatically until you click theTaxes tab or the Totals tab, or you post the purchase order.
CloseClick the Close button to close the Detail Items/Taxes screen.
736 Sage 300 ERP Purchase Orders
Transaction Screens
On the Detail Items/Taxes screen and the Detail Costs/Taxes screen, youcan also press the F9 key on your keyboard to close the screen.
DeleteClick the Delete button to delete the detail displayed in the zoomeddetail-entry screen.
NewUse the New button to start a new detail.
Save/AddUse the Save button to save the changes you made to a detail you editedin the Detail Items/Taxes screen.
For a new detail, this button is called Add.
Allocated TaxThe program displays the total tax amount that has been allocated to thedetail, including taxes that are included in the item cost. Recoverable andexpensed tax amounts not included.
Allocated taxes form part of the item costs that are posted to the InventoryControl item records by Day End Processing.
Billing Type, Billing Rate, and A/R Item NumberFor job-related returns, the program provides the Billing Type, Billing Rate,and AR Item Number that was used for the receipt.
The Job-Related check box in the top part of the screen will be selected if thereceipt was job-related.
A/R Item NumberThis field displays the A/R item number associated with the projectresource used for the contract in Project and Job Costing. You can select adifferent A/R item number only for time and material projects, as follows:
l On a standard project, this field displays the A/R item number and unitof measure specified for the project resource category as the default.You can accept the item number or select another valid A/R itemnumber.
User's Guide 737
Appendix A: Purchase Orders Screen Guides
l On a basic project, this field displays the A/R item number and unit ofmeasure specified for the project category. You can accept the itemnumber or select another valid A/R item number.
l If you change the A/R item number, the item number must be a validitem number in Accounts Receivable, and the unit of measure must bea valid unit of measure both for the new item number and thevendor’s currency.
Cost plus and fixed price projects do not use an A/R item number.
Billing CurrencyThis field appears only in multicurrency systems for time and materialsprojects and for fixed price projects using billings and costs or accrual-basis accounting methods.
The billing currency is the customer's currency specified on the contract,and you cannot change it.
Billing currency is blank for Fixed Price projects using completed projector project percentage complete methods, and for Cost Plus projects.
Note: Billing currency is not displayed for basic or standard internalTime and Materials projects, or for single-currency Fixed Priceprojects that use billings and costs or accrual-basis accountingmethods.
Billing RateThis field displays the billing rate for the specified resource (forstandard projects) or category (for basic projects).
You can edit the billing rate if the billing type is Billable. The fielddisplays 0.000000 if the billing type is Non-Billable or No Charge.
Note:l You can specify the billing rate for Time and Materials projects andfor Fixed Price projects that use Billings and Costs or Accrual-Basisaccounting methods.
l Billing rate is disabled and set to 0.000000 on a basic or standardinternal contract for Time and Materials projects or for Fixed Priceprojects using Billings and Costs or Accrual-Basis accountingmethods.
738 Sage 300 ERP Purchase Orders
Transaction Screens
l The billing rate cannot be negative.
Billing TypeThis field appears in the detail-entry section only for job-related purchaseorders.
The billing type indicates to Project and Job Costing whether to bill thecost to the customer. You can change this field only for a time andmaterials project, as follows:
On a basic project:
For a billable project, the category billing type determines whether youcan change the billing type for the detail. If the specified category is:
l Billable, the default billing type for the detail is billable, but you canchange it.
If the detail is billable you can specify a billing rate for the detail.
If you change the billing type for the detail to no charge or non-billable,the program sets the billing rate to zero and you cannot change it.
l No charge or non-billable, the program sets the same billing typefor the detail, and cannot change it. You cannot specify a billing rate forthe detail, which the program sets as zero.
If the project is no charge or non-billable, the detail uses the samebilling type as the project, the billing rate is set to zero, and you cannotchange them.
On a standard project:
If the project is billable, the resource billing type determines whether youcan change billing type for the detail. If the specified resource is:
l Billable, the program displays Billable as default billing type, but youcan change it for the detail. If the detail is billable, you can specify abilling rate for the detail.
If you change the billing type for the detail to no charge or non-billable,the program sets the billing rate to zero, and you cannot change it.
User's Guide 739
Appendix A: Purchase Orders Screen Guides
l No charge or non-billable, the program sets same billing type forthe detail, and you cannot change it. You cannot specify a billing ratefor the detail, which the program sets as zero.
If the project is no charge or non-billable, the detail uses the samebilling type as the project, and you cannot change it. The programalso sets the billing rate to zero, and you cannot change it.
For fixed price and cost plus projects, the Billing Type field is blank. Abilling type is not required for these types of projects.
Unit of MeasureThis field appears for Time and Materials projects if you selected theJob Related option for this transaction.
You must enter a unit of measure that is valid for the itemnumber/resource that you specified and for the contract customer'scurrency.
Note: For internal time and materials projects (basic or standardcontracts) the A/R item unit of measure will be disabled or blank.
CommentsTo view comments for a selected detail line, click the Zoom buttonbeside the Comments field. The program displays any comments enteredfor the detail line on the receipt, but you can change or delete them.
To enter comments for the selected detail, click the Detail Comments table,press the Insert key, and then type the comments on the new line.
Lines wrap automatically. To start a new line before the line wraps, pressEnter.
For more information, see "P/O Return Entry Detail Comments Screen"(page 735).
Contract, Project, Category and ResourceIf the associated purchase order and receipt were job related, the return isalso job related. For job-related returns:
l The Job Related option is selected automatically.
l Purchase Orders displays the job to which each detail was assigned.
l You specify the resource using the Item Number field.
740 Sage 300 ERP Purchase Orders
Transaction Screens
Purchase Orders updates jobs with the actual quantities and costs on returns.
Note: If you use different terms than “Contract,” “Project,” and “Category”in Project and Job Costing, the program displays them instead.
CategorySelect or enter a category that is assigned to the project in Project andJob Costing.
ContractSpecify a contract number for each detail. You can enter or select onlycontracts that are open or on hold. (You cannot process transactions to acontract that is on hold, if it has never been opened.)
Cost ClassThe program displays the cost class for the category used in each detail.You cannot change this field.
Item Number (Resource)Use the Item Number field to identify the resource for this detail.
You must specify a resource that is assigned to the project and categoryin Project and Job Costing. You can specify an inventory item number, orthe code for another type of resource (such as an equipment code,subcontractor code, or employee number).
Note: You cannot leave this field blank.
ProjectYou can only enter or select projects that are:
l Assigned to the contract that you selected.
l Open or on hold. (If a project that is on hold has never been opened,you cannot select it.)
l Not closed to costs.
Discount %You can enter a discount as a percentage or an amount. The program usesthe amount you enter in this field to calculate the discounted cost for theitem detail.
User's Guide 741
Appendix A: Purchase Orders Screen Guides
If you enter a percentage in this field, Purchase Orders calculates thediscount amount for the item detail.
Tip: If you prefer not to enter discounts for individual details, you canenter a discount percentage for the entire document on the Totals tab.Purchase Orders then prorates the discount amount for the transactiondetails, overriding any discounts you may have entered manually for thedetails.
Discount AmountYou can enter a discount as a percentage or an amount. The program usesthe amount you enter in this field to calculate the discounted cost for theitem detail.
If you enter a discount amount, the program calculates and displays thediscount percentage based on the cost. (Alternatively, you can enter apercentage in the Discount Percent field, and let the program calculate thediscount amount.)
Tip: If you prefer not to enter discounts for individual details, you canenter a discount amount for the entire document on the Totals tab.Purchase Orders then prorates the discount amount for the transactiondetails, overriding any discounts you may have entered manually for thedetails.
Discounted Return CostThe program displays the return cost less the discount amount in this field.
Expense AccountYou specify a general ledger expense account for non-inventory itemdetails. You can select general ledger account numbers using the Finder.
The program displays the account number entered with the detail on thereceipt, if any, or the account number specified in the Options screen forthe Default Inventory Expense Account option. You can change the numberon the return.
Extended CostIf you are entering a return to an existing receipt, the program displays theextended cost from the receipt, and you cannot change the amount. Thisfield shows zero on returns entered without receipt numbers.
742 Sage 300 ERP Purchase Orders
Transaction Screens
Extended WeightEnter the extended weight for the number of units of the item that you arereturning.
If you change the extended weight, the program automatically recalculatesthe unit weight.
The total weight for all items on the document is displayed in the Totals tab.
Item DescriptionThe program displays the description for the item number you entered, orthat was entered with the detail on the receipt, but you can change it.
If you enter an item number that is not defined in your Inventory Controlsystem, no description is displayed. Enter the description that you want touse.
Item NumberOn new returns you are entering without receipt numbers, you enter the itemnumber or select it from the Finder. If you use the Allow Non-inventory ItemNumbers option in Purchase Orders, you can also enter an item number thatis not included in your Inventory Control data.
If you are entering a return to a receipt or you are editing a return youposted previously, the program displays the item number that was enteredwith the detail. You cannot change it.
Line NumberEach detail is identified with its own line number.
To select an existing line to edit or delete, click the line, or enter its linenumber in this field on the P/O Detail Items/Taxes screen.
LocationThis field appears if you use Inventory Control.
If you are entering a return without a receipt number, enter the code for thelocation from which you are returning the items.
If you are entering a return to a receipt or editing a previously posted return,the program displays the location code entered for the detail on the receipt.You cannot change it.
Manufacturer's Item NumberIf a manufacturer's item number was used on the receipt or return, the
User's Guide 743
Appendix A: Purchase Orders Screen Guides
program also displays the manufacturer's item number on the return.
Manufacturer's item numbers are alternative item numbers—such as barcodes or shortcut codes—that identify your inventory item. You set upmanufacturer's item numbers in the Inventory Control system.
You can enter manufacturer's item numbers wherever you enter itemnumbers in Purchase Orders.
Net Of TaxThis field displays the extended item cost, minus any applicable taxamount. You cannot edit the amount.
Non-Stock Clearing AccountUse the Non-Stock Clearing Account field to change the non-stockclearing account associated with this item's account set.
If the item used in the detail is a non-stock item, the non-stock clearingaccount associated with the item's account set appears.
If you are returning a non-stock item, the non-stock clearing accountassociated with the item's account set appears. You can specify a differentaccount, if necessary.
Optional FieldsIf optional fields have been defined in Purchase Orders for receipt details,you can click the Zoom button beside the Optional Fields field to displaythe optional fields assigned to a selected detail, and edit their contents.
For more information about using optional fields in transactions, see "AboutOptional Fields in Transactions" (page 90).
Order NumberEnter the number of a sales order to which the detail applies. If you useOrder Entry with Purchase Orders, you can also select an Order Entry ordernumber from the Finder.
You can change or erase an order number that is displayed with a detailyou added on the receipt.
Quantity ReceivedIf you are entering a return to an existing receipt, the program displays thereceived quantity, and you cannot change the amount. This field showszero on returns entered without receipt numbers.
744 Sage 300 ERP Purchase Orders
Transaction Screens
Quantity ReturnedEnter the number of units of the item that you are returning.
If you are entering a return to an existing receipt or editing a previouslyposted return, be sure that the return quantity you enter is in the unit ofmeasure that is used for the detail. You cannot change the unit of measurethat was entered with the receipt or previously posted return.
If you do not allow negative inventory levels in Inventory Control and youenter a return quantity that will drop the item quantity on hand below zero, awarning message is displayed. You must then choose whether you still wantto return that quantity.
If you use Serialized Inventory and Lot Tracking, a separate screen appearsafter you enter the quantity of serialized/lotted items returned, then pressTab (or press Enter). (This screen also appears when you click the Zoombutton in the Quantity column header.)
Receipt DiscountThis field displays the discount amount from the original receipt.
Retainage %, Retainage Amount, and Retention PeriodIf the Retainage option was selected for the receipt, the program displaysadditional retainage fields for each return detail line to let you enter aretainage percentage or amount and the retention period.
The program also displays the Retainage tab, where you specify theexchange rate to use for the retainage portion of multicurrency returns.
If you clear the Retainage option, the percentage and period retainage fieldsdisappear from the item detail section, and the Retainage tab alsodisappears.
By default, the program displays the retainage percentage/amount andretention period that was in effect for the receipt.
Note: Retainage accounting applies only to job-related transactions, and isavailable only if you selected retainage accounting in the Accounts Payableprogram.
Return CostYou can enter a return cost on returns that do not reference a receiptnumber.
User's Guide 745
Appendix A: Purchase Orders Screen Guides
Note that if you change the displayed return cost, the unit cost isrecalculated. The program also recalculates the return cost if you changethe unit cost.
If you are working with an existing receipt or return, you cannot changeeither of these entries.
Tax IncludedThis field appears on the Detail Items/Taxes screen.
Use this field to indicate whether tax amounts are included in the item cost(instead of charged in addition to the detail cost).
To toggle between Yes and No in this field, enter any character in the field,or double-click the field with a mouse.
The default choice for this option is provided from the vendor record inAccounts Payable or from the vendor contract cost.
You can choose Yes for this option only if the Allow Tax In Price option isselected for the authority in Tax Services.
Unit CostThe program displays the unit cost entered for the detail on the receipt. Youcan change the cost if you have security rights to do so. Make sure that thecost you enter is the correct item cost for the unit of measure.
Unit of MeasureThe program displays the unit of measure entered for the detail on thereceipt. You cannot change it.
Unit WeightIf you are adding a return without a receipt number, enter the unit ofmeasure to use or select it from the Finder. (If you entered a non-inventory item number, you cannot select a unit of measure from theFinder.)
If you are entering a return to a receipt, the program displays the unit ofmeasure entered for the detail on the receipt. You cannot change it.
Vendor Item NumberEnter the code the vendor uses to identify the item or edit a displayed code,if necessary.
746 Sage 300 ERP Purchase Orders
Transaction Screens
If the vendor's item number is specified in the item record (when you areadding a new detail) or on the receipt for which you are entering a return,the code appears in this field. (You can enter vendors' item numbers whenassigning vendor types in Inventory Control item records.)
Weight Unit of MeasureThis is the unit of measure (such as pounds, kilograms, tons) for the weightof this item on the return.
Purchase Orders displays the weight unit of measure from the receipt (if youspecified one) as the default, but you can change it to another defined unit ofmeasure. The program recalculates the weight accordingly.
The weight UOM for the complete return is determined by the default weightunit of measure set in the I/C Options screen (or in the P/O Options screen, ifyou do not use Inventory Control).
Tax table
Allocated TaxThis column displays the tax amounts allocated to the selected detail linefor each tax authority.
Detail Tax Class and DescriptionThese columns list the tax classes and corresponding descriptions that areassigned to the tax authority. You can change the tax class (to another taxclass that is assigned to the authority), but not the description.
To change the tax class description or make other changes to theinformation for the specified tax group, use the Tax Services screens inCommon Services.
Expensed TaxThe program displays the amount of tax that is separately posted(expensed) to a general ledger account, rather than allocated to detailson the credit note or debit note.
Recoverable TaxThe program displays the amount of tax that can be recovered by yourcompany, such as, for example, recoverable Canadian Goods andServices Tax (GST) amounts.
User's Guide 747
Appendix A: Purchase Orders Screen Guides
Tax AmountThe program displays the amount of tax that is due for each authority.
For each authority, Purchase Orders calculates a tax amount if:
l The vendor is subject to tax.
l The transaction contains taxable items or taxable additional costs.
l Tax rates are specified for the tax authorities and classes in TaxServices.
You cannot edit the tax amount for a detail except indirectly, bychanging the tax class or tax-included option on the Detail Items/Taxesscreen.
To edit tax amounts for the invoice, make your changes on the Taxestab.
Tax Authority and DescriptionThese columns list the tax authorities and that are assigned to the taxgroup you specified for the document.
Tax information is maintained in the Tax Services screens in CommonServices.
Tax BaseThis field shows, for the selected detail, the net cost of items before taxis added for the tax authority. You cannot change the amount thatappears in this field.
This field is particularly useful for items that have tax included in theirprices.
Tax IncludedThis field displays the amount of tax that is included in the extendeditem cost (when the cost includes tax).
P/O Lot Numbers Allocation Screen
To open this screen:
1. Open Tasks > Browse > Purchase Orders > Return Entry orDebit/Credit Note Entry.
748 Sage 300 ERP Purchase Orders
Transaction Screens
2. Enter a value in the Quantity Returnedfield for the lotted items you want toreturn, and press either the Enter or Tab key.
Related tasks:
l "Returning and Issuing Credit/Debit Notes for Lotted Items" (page 215)
Overview
Purchase Orders prompts you to allocate lot numbers when you return lotteditems to vendors. You use the P/O Lot Numbers Allocation screen to allocatethese numbers.
Note: Lot numbers are used for tracking stock from the point of receiptthrough to the point of sale, and can be used to track returned items from thecustomer and back to the vendor.
You also use the following procedure when entering a debit note or a credit notefor a vendor, except that you start from the Credit/Debit Note Entry screeninstead of the Return Entry screen.
Fields and Controls
Buttons
AddClick the Add button to add the lot or serial number displayed in the NextLot Number or Next Serial Number field.
Auto AllocClick the Auto Alloc button to automatically allocate lot numbers to theitems. The required number of lot numbers appears in the Lot Numberslist.
To start allocating from a specific lot number, specify this number in theAuto-Allocate From field, before you click Auto Alloc.
Auto GenThe Auto Gen button appears if you had selected the option Allow Auto-Generation of Lot Numbers in PO on the Settings tab of the I/COptions screen.
User's Guide 749
Appendix A: Purchase Orders Screen Guides
When you click the Auto Gen button, a dialog box opens, where youindicate how many lot numbers need to be created.
ClearClick the Clear button to remove lot numbers or quantities allocated, orboth, depending on the screen.
CloseClick the Close button to end the lot number allocation process.
Auto-Allocate FromUse the Auto-Allocate From field to specify the starting lot number fromwhich to automatically allocate the lot numbers.
1. Select the Auto-Allocate From check box to display a field beside it.
2. In this field, use the Finder to find and select a starting lot number, orenter it manually.
3. Click the Auto Allocate button to allocate the required number of lotnumbers, starting from the specified number.
Make Lots OR Each HasWhen you auto-generate lots, you must enter a number in one of thesefields to define how the lots are generated:
l Make __ Lots. If you want to create a fixed number of lots, with thequantity evenly distributed across all of the lots, enter the number oflots.
Example: If you create 10 lots and have 400 items, each lot will have40 items.
OR
l Each Lot Has __. If you want to distribute a fixed quantity to each lot,enter the number to include in each lot.
Example: If you want to have 50 items in each lot, the process willgenerate the number of lots needed to accommodate the quantity ofitems.
Next Lot NumberThis field displays the next sequential lot number available for the item.
750 Sage 300 ERP Purchase Orders

Transaction Screens
Depending on which buttons are displayed, you can use this number in theseways:
l Click Add to add the displayed number to the Lot Numbers list. Repeat thisfor as many numbers as you need.
l Click Auto-Gen to add the required number of lot numbers to the LotNumbers list, starting from the displayed number.
l Click Auto-Alloc to add the required number of lot numbers to the LotNumbers list, starting from the displayed number.
When you finish, this field displays the next lot number that is now available.
Count section
Allocated / Generated / Returned countThis display field indicates how many lot numbers have been selected.
Lot Qty RequiredThis field indicates how many lot numbers are required, as indicated onthe quantity field from which you accessed the Lot Numbers Allocationpop-up.
RemainingThis figure represents the quantity still to be entered on the Lot Trackingpop-up screen. This number should be zero after you have finishedallocating lot numbers.
P/O Serial Numbers Allocation Screen
To open this screen:
1. Open Purchase Orders > P/O Transactions > Return Entry orCredit/Debit Note Entry.
2. Enter a value in the Quantity Returned field for the serialized items youwant to return, and then press either the Enter key or the Tab key to displaythe Serial Numbers Allocation screen.
Fields and Controls
Buttons
AddAfter entering a number in the New Serial Number field, click the Add
User's Guide 751
Appendix A: Purchase Orders Screen Guides
button to add the number to the Generated Serial Numbers list.
Auto AllocAfter entering a serial number in the blank field above the AvailableSerial Numbers list, click the Auto Alloc. button. The required serialnumbers will appear in the Returned Serial Numbers list, beginning withthat number.
Auto GenClick the Auto Gen button after entering a number in the New SerialNumber field, or after highlighting a number in the Existing SerialNumbers list.
The correct quantity of required serial numbers will appear in theGenerated Serial Numbers list, beginning with that number.
ClearClick the Clear button to remove all the serial numbers listed in theGenerated Serial Numbers or the Returned Serial Numbers lists.
A message appears, asking if this is what you really want to do.
Return AllOn the Serial Numbers Allocation screen, click the Return All button toreturn all of the items with the serial numbers listed. All of the lines inthe Returned column are shown as Yes.
Note: Do not confuse this button with the Return All button on theReturn Entry screen, which is used to return all items listed on aselected invoice, rather than on an individual detail line.
Auto-Allocate FromUse the Auto-Allocate From field to specify the starting serial numberfrom which to automatically allocate the serial numbers.
1. Select the Auto-Allocate From check box to display a field beside it.
2. In this field, use the Finder to find and select a starting serial number,or enter it manually.
3. Click the Auto Allocate button to allocate the required number of serialnumbers, starting from the specified number.
752 Sage 300 ERP Purchase Orders
Transaction Screens
Next Serial NumberThis field displays the next sequential serial number for the item. Dependingon which buttons are displayed, you can use this number in these ways:
l Click Add to add the displayed number to the Serial Numbers list. Repeatthis for as many numbers as you need.
l Click Auto-Gen to add the required number of serial numbers to theSerial Numbers list, starting from the displayed number.
l Click Auto-Alloc to add the required number of serial numbers to theSerial Numbers list, starting from the displayed number.
When you finish, this field displays the next serial number that is nowavailable.
Unit of MeasureThe default unit of measure displayed in the Serialized Inventory pop-up isthe same unit as on the underlying transaction.
Count section
Allocated / Generated / ReturnedThis indicates how many serial numbers you have been selected.
RemainingThis indicates how many serial numbers still need to be assigned.
Serial No's RequiredThis field indicates how many serial numbers are required, as indicatedon the quantity field from which you accessed the Serial NumbersAllocation screen.
Related tasks:
l "Returning and Issuing Credit/Debit Notes for Serialized Items " (page 213)
Overview
Purchase Orders prompts you to allocate serial numbers when you returnserialized items to vendors. You use the P/O Serial Numbers Allocation screento allocate these numbers.
User's Guide 753
Appendix A: Purchase Orders Screen Guides
Note: Serial numbers are used for tracking stock from the point of receiptthrough to the point of sale, and can be used to track returned items fromthe customer and back to the vendor.
Fields and Controls
Buttons
AddAfter entering a number in the New Serial Number field, click the Addbutton to add the number to the Generated Serial Numbers list.
Auto AllocAfter entering a serial number in the blank field above the AvailableSerial Numbers list, click the Auto Alloc. button. The required serialnumbers will appear in the Returned Serial Numbers list, beginning withthat number.
Auto GenClick the Auto Gen button after entering a number in the New SerialNumber field, or after highlighting a number in the Existing SerialNumbers list.
The correct quantity of required serial numbers will appear in theGenerated Serial Numbers list, beginning with that number.
ClearClick the Clear button to remove all the serial numbers listed in theGenerated Serial Numbers or the Returned Serial Numbers lists.
A message appears, asking if this is what you really want to do.
Return AllOn the Serial Numbers Allocation screen, click the Return All button toreturn all of the items with the serial numbers listed. All of the lines inthe Returned column are shown as Yes.
Note: Do not confuse this button with the Return All button on theReturn Entry screen, which is used to return all items listed on aselected invoice, rather than on an individual detail line.
754 Sage 300 ERP Purchase Orders
Transaction Screens
Auto-Allocate FromUse the Auto-Allocate From field to specify the starting serial numberfrom which to automatically allocate the serial numbers.
1. Select the Auto-Allocate From check box to display a field beside it.
2. In this field, use the Finder to find and select a starting serial number, orenter it manually.
3. Click the Auto Allocate button to allocate the required number of serialnumbers, starting from the specified number.
Next Serial NumberThis field displays the next sequential serial number for the item. Dependingon which buttons are displayed, you can use this number in these ways:
l Click Add to add the displayed number to the Serial Numbers list. Repeatthis for as many numbers as you need.
l Click Auto-Gen to add the required number of serial numbers to theSerial Numbers list, starting from the displayed number.
l Click Auto-Alloc to add the required number of serial numbers to theSerial Numbers list, starting from the displayed number.
When you finish, this field displays the next serial number that is nowavailable.
Unit of MeasureThe default unit of measure displayed in the Serialized Inventory pop-up isthe same unit as on the underlying transaction.
Count section
Allocated / Generated / ReturnedThis indicates how many serial numbers you have been selected.
RemainingThis indicates how many serial numbers still need to be assigned.
Serial No's RequiredThis field indicates how many serial numbers are required, as indicatedon the quantity field from which you accessed the Serial NumbersAllocation screen.
User's Guide 755
Appendix A: Purchase Orders Screen Guides
P/O Serial/Lot Numbers Allocation/Generation Screen
To open this screen:
1. Open Purchase Orders > P/O Transactions.
2. Select the screen for the type of document you want to enter (for example,Receipt Entry or Invoice Entry).
3. Enter document information, including details for serialized or lotted items.
When you specify the quantity for a serialized or lotted item in a detail, andthen tab out of the quantity field, the respective Serial/Lot NumbersAllocation or Generation screen appears. You use it to assign the requiredserial numbers and lot numbers to items in the detail line.
Tip: You can also open the Serial/Lot Number Allocation/Generationscreen by clicking the quantity column heading (with the Zoom button).
Related tasks:
l "Receiving and Invoicing Lotted Items" (page 214)
l "Returning and Issuing Credit/Debit Notes for Lotted Items" (page 215)
l "Receiving and Invoicing Serialized Items " (page 211)
l "Returning and Issuing Credit/Debit Notes for Serialized Items " (page 213)
Overview
You use the P/O Serial/Lot Numbers Generation screen to generate serial orlot numbers when you enter receipts, invoices, and debit notes that includeserialized or lotted items.
You use the P/O Serial/Lot Numbers Allocation screen to allocate serial or lotnumbers when you enter returns and credit notes that include serialized orlotted items.
Serials Tab
On the Serials tab, you assign serial numbers to serialized items when youenter receipts, invoices, returns, debit notes, and credit notes.
Serial numbers are used to track individual items. Each serial number must beunique to one specific item.
756 Sage 300 ERP Purchase Orders
Transaction Screens
Example: An electronics retailer can use serial numbers to record sales ofitems that have warranties.
Lots Tab
On the Lots tab, you assign lot numbers to lotted items when you enterpurchase orders, receipts, invoices, returns, debit notes, and credit notes.
Lot numbers are used to track groups of items. Unlike serial numbers, a lotnumber can be allocated to multiple items.
Example: A food distribution company can use lot numbers to recordpurchases and sales of unique batches of product.
Fields and Controls
Buttons
AddClick this button to generate the number displayed in the Next SerialNumber or Next Lot Number field.
Auto Alloc.Click this button to allocate required serial numbers or lot numbersautomatically to items.
If you specify a number in the Auto-Allocate From field before you clickthe button, Inventory Control assigns numbers starting with the numberyou specify.
Allocated numbers appear in the list of serial number or lot numbers.
Auto GenClick the Auto Gen button to generate all the serial numbers or lotnumbers you require.
Note: When generating lot numbers, you must use the Make [ ] LotsOR Each Lot Has [ ] field to specify how lot numbers are generated.
The program generates and assigns serial numbers and lot numbers,starting with the next serial number or lot number you specified.
If you did not specify the next number to use, the program automaticallyassigns the next available numbers.
User's Guide 757
Appendix A: Purchase Orders Screen Guides
Clear AllClick this button to remove all allocated numbers from the list.
CloseClick Close to close the screen.
Item NumberDisplays the item number from the document detail.
LocationDisplays the location specified for the document detail.
Stock DateThe stock date is assigned when you ship items from inventory or returnthem to inventory.
The stock date is used to calculate expiry dates.
Example: If an item is received on August 1st, and the number of daysfrom which it expires is 30, August 31st will be the expiry date.
The stock date is also used to calculate quarantine release dates for lots.
Lots tab
AllocatedIndicates how many lot quantities you have allocated.
Auto-Allocate FromUse this field to specify the lot number from which to start allocatingquantities.
If you do not enter a number in this field, or if you clear the check box tothe left of this field, quantities will be allocated starting with the firstavailable lot.
GeneratedIndicates how many lot quantities you have generated and assigned tothe items you are returning to inventory.
Lot Qty RequiredIndicates the quantity you need to allocate to lots.
758 Sage 300 ERP Purchase Orders
Transaction Screens
Make [ ] Lots OR Each Lot Has [ ]Enter a number in one of these fields to specify how lot numbers aregenerated when you click the Auto-Gen. button:
l Make [ ] Lots. Enter a number in this field to generate a specificnumber of lots. The required quantity is divided equally among the lots.If you return 400 items and you specify that 10 lots should be created,each lot has 40 items.
l Each Lot Has [ ]. Enter a number in this field to generate lots with aspecific quantity in each lot. If you return 400 items and you specifythat there should be 100 items in each lot, 4 lots are generated.
Next Lot NumberThis field displays the next sequential lot number available for the item.You can:
l Click Add to add the displayed number to the Lot Numbers list.Repeat this for as many numbers as you need.
l Click Auto-Gen to add the required number of lot numbers to the LotNumbers list, starting from the displayed number.
After you add numbers, this field displays the next lot number that is nowavailable.
RemainingIndicates how many lot quantities you need to assign.
When you are allocating or generating lot quantities, this field displaysthe difference between the lot quantities required and the numberallocated or generated.
Note: You must allocate all the required lot quantities before you cansave the allocation.
Unit of MeasureDisplays the unit of measure (such as DOZEN, BOX, or EACH) for an item.
The unit of measure determines how many lot numbers are Required,Generated, and Remaining.
User's Guide 759
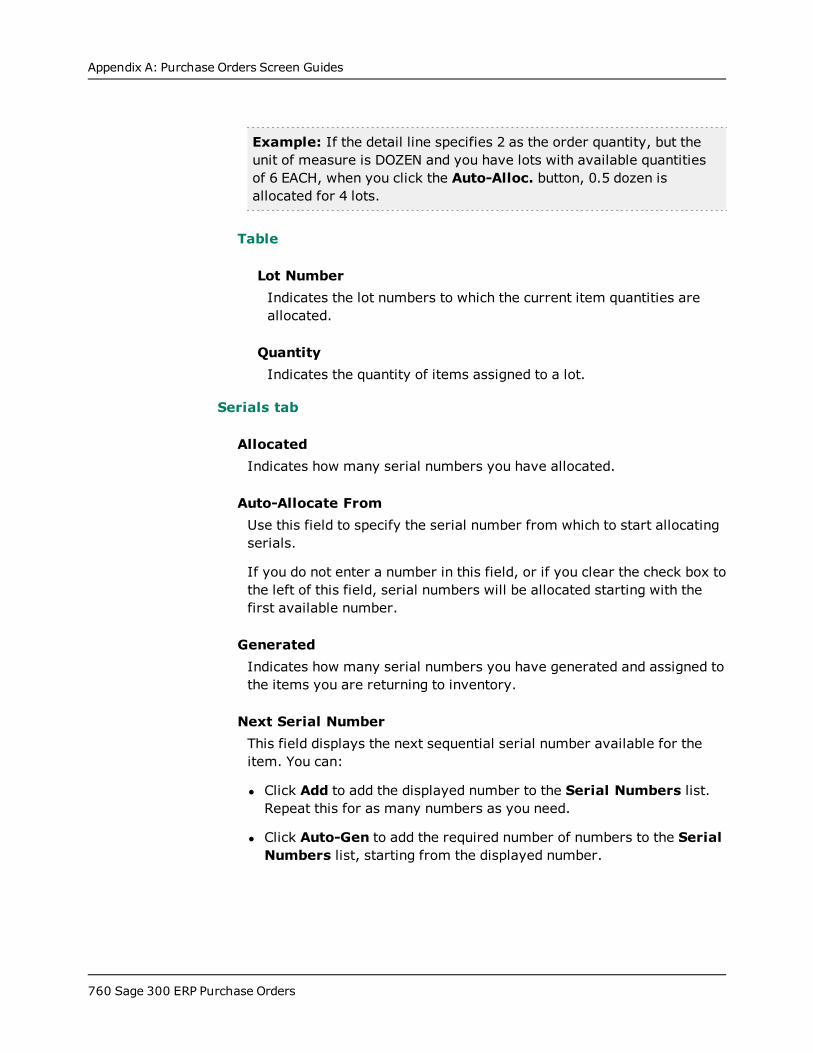
Appendix A: Purchase Orders Screen Guides
Example: If the detail line specifies 2 as the order quantity, but theunit of measure is DOZEN and you have lots with available quantitiesof 6 EACH, when you click the Auto-Alloc. button, 0.5 dozen isallocated for 4 lots.
Table
Lot NumberIndicates the lot numbers to which the current item quantities areallocated.
QuantityIndicates the quantity of items assigned to a lot.
Serials tab
AllocatedIndicates how many serial numbers you have allocated.
Auto-Allocate FromUse this field to specify the serial number from which to start allocatingserials.
If you do not enter a number in this field, or if you clear the check box tothe left of this field, serial numbers will be allocated starting with thefirst available number.
GeneratedIndicates how many serial numbers you have generated and assigned tothe items you are returning to inventory.
Next Serial NumberThis field displays the next sequential serial number available for theitem. You can:
l Click Add to add the displayed number to the Serial Numbers list.Repeat this for as many numbers as you need.
l Click Auto-Gen to add the required number of numbers to the SerialNumbers list, starting from the displayed number.
760 Sage 300 ERP Purchase Orders

Transaction Screens
After you add numbers, this field displays the next number that is nowavailable.
RemainingIndicates how many serial numbers you need to assign.
When you are allocating or generating serial numbers, this field displaysthe difference between the serial numbers required and the numberallocated or generated.
Note: You must allocate all the required serial numbers before you cansave the allocation.
Serial Nos. RequiredIndicates how many serial numbers you need to allocate.
Unit of MeasureDisplays the unit of measure (such as DOZEN, BOX, or EACH) for an item.
The unit of measure determines how many serial numbers are Required,Allocated, and Remaining.
Example: If the detail line specifies 10 as the order quantity, but theunit of measure is DOZEN, you must allocate 120 serial numbers.
Table
Serial NumberIndicates the serial numbers that are allocated to the items in thecurrent detail.
User's Guide 761


Appendix B: Purchase OrdersSecurity Authorizations
If security is turned on for your Sage 300 ERP system, the systemadministrator must assign users security authorization for Purchase Ordersscreens.
For information on turning on security, setting up security groups, andassigning authorizations, refer to the System Manager help.
Note: To change the print destination for forms and reports, you must haveChange Print Destination security authorization for Administrative Services.
To view records and to print reports in Purchase Orders, you must belong to asecurity group with Common Inquiry permission. Common Inquiryauthorization by itself does not let you edit any Purchase Orders records. Toedit records or perform processing tasks, the system administrator must grantthe group access to additional tasks from the following list:
SecurityAuthorization
Description
Sage 300 ERPInquiry
Query Purchase Orders data in the portal. If you also have ExportProcessing authorization for Purchase Orders, print or export theresults of these queries.
Common Inquiry Print setup reports.
View and print setup screens.
Cost Inquiry (instand-alone P/Osystems).
View default vendor cost during transaction entry.
With Show Receipt Costing Information authorization, also viewreceipts.
Create POsAutomatically
Automatically create purchase orders from requisitions, createPOs from I/C, create POs from O/E (if you also have TransactionInquiry authorization for O/E).
Credit/Debit NoteEntry
View, add, and post in Credit/Debit Note Entry. (Requiresadditional authorization to edit quantities and costs for returns.)
View Invoice Entry, Return List.
Purchase Orders Security Authorizations
User's Guide 763
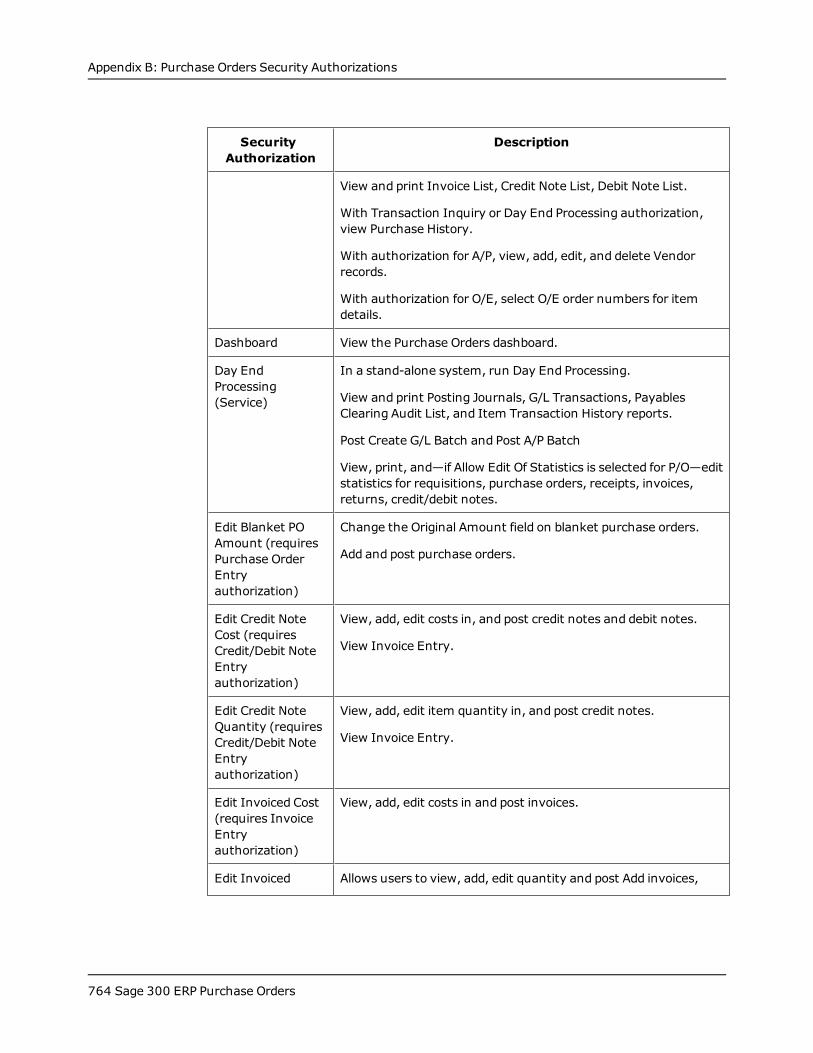
Appendix B: Purchase Orders Security Authorizations
SecurityAuthorization
Description
View and print Invoice List, Credit Note List, Debit Note List.
With Transaction Inquiry or Day End Processing authorization,view Purchase History.
With authorization for A/P, view, add, edit, and delete Vendorrecords.
With authorization for O/E, select O/E order numbers for itemdetails.
Dashboard View the Purchase Orders dashboard.
Day EndProcessing(Service)
In a stand-alone system, run Day End Processing.
View and print Posting Journals, G/L Transactions, PayablesClearing Audit List, and Item Transaction History reports.
Post Create G/L Batch and Post A/P Batch
View, print, and—if Allow Edit Of Statistics is selected for P/O—editstatistics for requisitions, purchase orders, receipts, invoices,returns, credit/debit notes.
Edit Blanket POAmount (requiresPurchase OrderEntryauthorization)
Change the Original Amount field on blanket purchase orders.
Add and post purchase orders.
Edit Credit NoteCost (requiresCredit/Debit NoteEntryauthorization)
View, add, edit costs in, and post credit notes and debit notes.
View Invoice Entry.
Edit Credit NoteQuantity (requiresCredit/Debit NoteEntryauthorization)
View, add, edit item quantity in, and post credit notes.
View Invoice Entry.
Edit Invoiced Cost(requires InvoiceEntryauthorization)
View, add, edit costs in and post invoices.
Edit Invoiced Allows users to view, add, edit quantity and post Add invoices,
764 Sage 300 ERP Purchase Orders
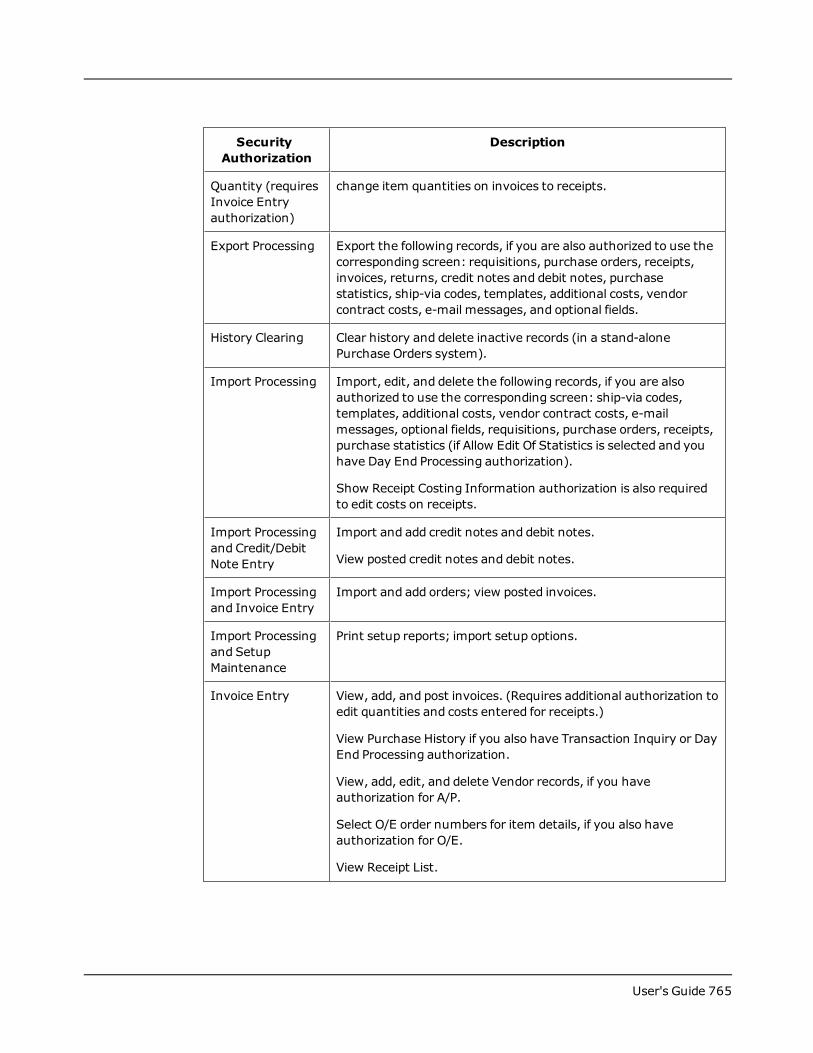
SecurityAuthorization
Description
Quantity (requiresInvoice Entryauthorization)
change item quantities on invoices to receipts.
Export Processing Export the following records, if you are also authorized to use thecorresponding screen: requisitions, purchase orders, receipts,invoices, returns, credit notes and debit notes, purchasestatistics, ship-via codes, templates, additional costs, vendorcontract costs, e-mail messages, and optional fields.
History Clearing Clear history and delete inactive records (in a stand-alonePurchase Orders system).
Import Processing Import, edit, and delete the following records, if you are alsoauthorized to use the corresponding screen: ship-via codes,templates, additional costs, vendor contract costs, e-mailmessages, optional fields, requisitions, purchase orders, receipts,purchase statistics (if Allow Edit Of Statistics is selected and youhave Day End Processing authorization).
Show Receipt Costing Information authorization is also requiredto edit costs on receipts.
Import Processingand Credit/DebitNote Entry
Import and add credit notes and debit notes.
View posted credit notes and debit notes.
Import Processingand Invoice Entry
Import and add orders; view posted invoices.
Import Processingand SetupMaintenance
Print setup reports; import setup options.
Invoice Entry View, add, and post invoices. (Requires additional authorization toedit quantities and costs entered for receipts.)
View Purchase History if you also have Transaction Inquiry or DayEnd Processing authorization.
View, add, edit, and delete Vendor records, if you haveauthorization for A/P.
Select O/E order numbers for item details, if you also haveauthorization for O/E.
View Receipt List.
User's Guide 765
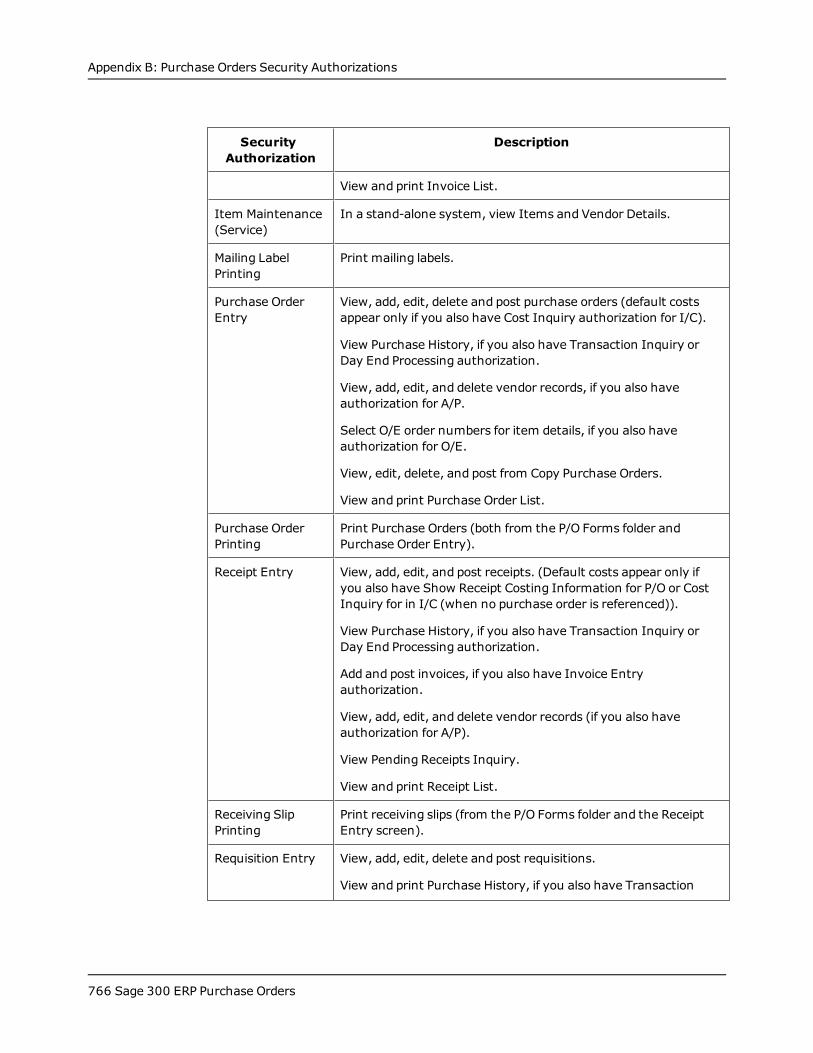
Appendix B: Purchase Orders Security Authorizations
SecurityAuthorization
Description
View and print Invoice List.
Item Maintenance(Service)
In a stand-alone system, view Items and Vendor Details.
Mailing LabelPrinting
Print mailing labels.
Purchase OrderEntry
View, add, edit, delete and post purchase orders (default costsappear only if you also have Cost Inquiry authorization for I/C).
View Purchase History, if you also have Transaction Inquiry orDay End Processing authorization.
View, add, edit, and delete vendor records, if you also haveauthorization for A/P.
Select O/E order numbers for item details, if you also haveauthorization for O/E.
View, edit, delete, and post from Copy Purchase Orders.
View and print Purchase Order List.
Purchase OrderPrinting
Print Purchase Orders (both from the P/O Forms folder andPurchase Order Entry).
Receipt Entry View, add, edit, and post receipts. (Default costs appear only ifyou also have Show Receipt Costing Information for P/O or CostInquiry for in I/C (when no purchase order is referenced)).
View Purchase History, if you also have Transaction Inquiry orDay End Processing authorization.
Add and post invoices, if you also have Invoice Entryauthorization.
View, add, edit, and delete vendor records (if you also haveauthorization for A/P).
View Pending Receipts Inquiry.
View and print Receipt List.
Receiving SlipPrinting
Print receiving slips (from the P/O Forms folder and the ReceiptEntry screen).
Requisition Entry View, add, edit, delete and post requisitions.
View and print Purchase History, if you also have Transaction
766 Sage 300 ERP Purchase Orders
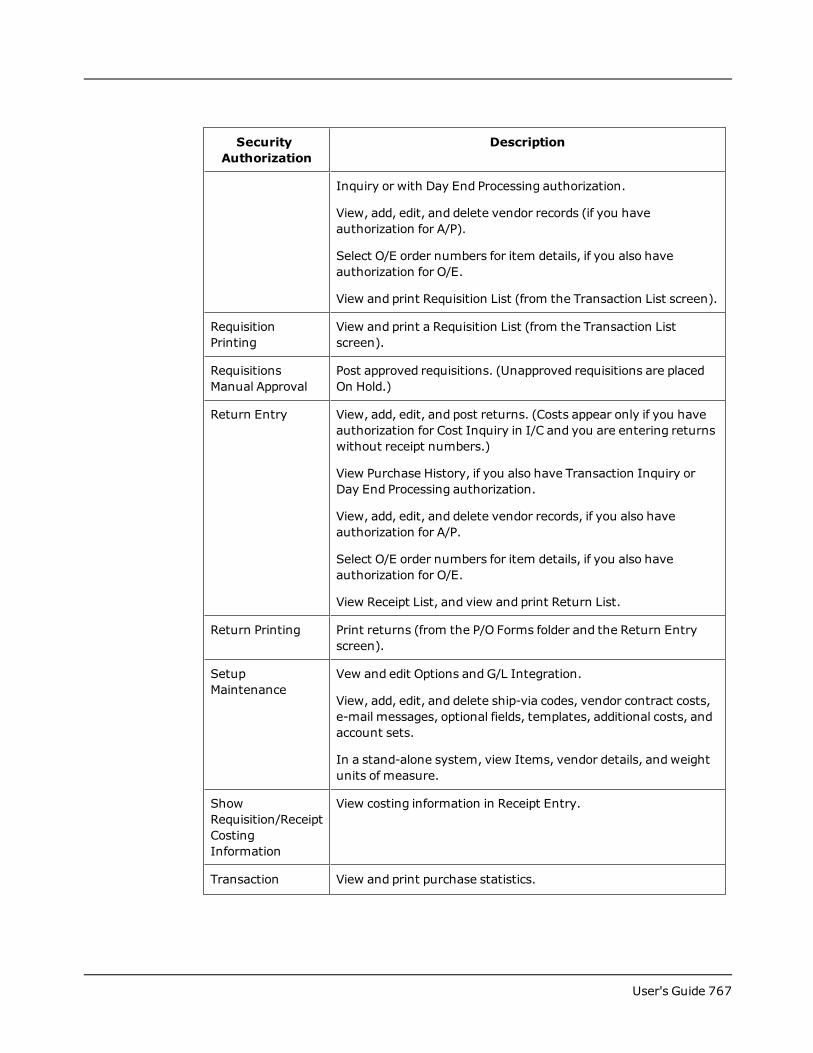
SecurityAuthorization
Description
Inquiry or with Day End Processing authorization.
View, add, edit, and delete vendor records (if you haveauthorization for A/P).
Select O/E order numbers for item details, if you also haveauthorization for O/E.
View and print Requisition List (from the Transaction List screen).
RequisitionPrinting
View and print a Requisition List (from the Transaction Listscreen).
RequisitionsManual Approval
Post approved requisitions. (Unapproved requisitions are placedOn Hold.)
Return Entry View, add, edit, and post returns. (Costs appear only if you haveauthorization for Cost Inquiry in I/C and you are entering returnswithout receipt numbers.)
View Purchase History, if you also have Transaction Inquiry orDay End Processing authorization.
View, add, edit, and delete vendor records, if you also haveauthorization for A/P.
Select O/E order numbers for item details, if you also haveauthorization for O/E.
View Receipt List, and view and print Return List.
Return Printing Print returns (from the P/O Forms folder and the Return Entryscreen).
SetupMaintenance
Vew and edit Options and G/L Integration.
View, add, edit, and delete ship-via codes, vendor contract costs,e-mail messages, optional fields, templates, additional costs, andaccount sets.
In a stand-alone system, view Items, vendor details, andweightunits of measure.
ShowRequisition/ReceiptCostingInformation
View costing information in Receipt Entry.
Transaction View and print purchase statistics.
User's Guide 767
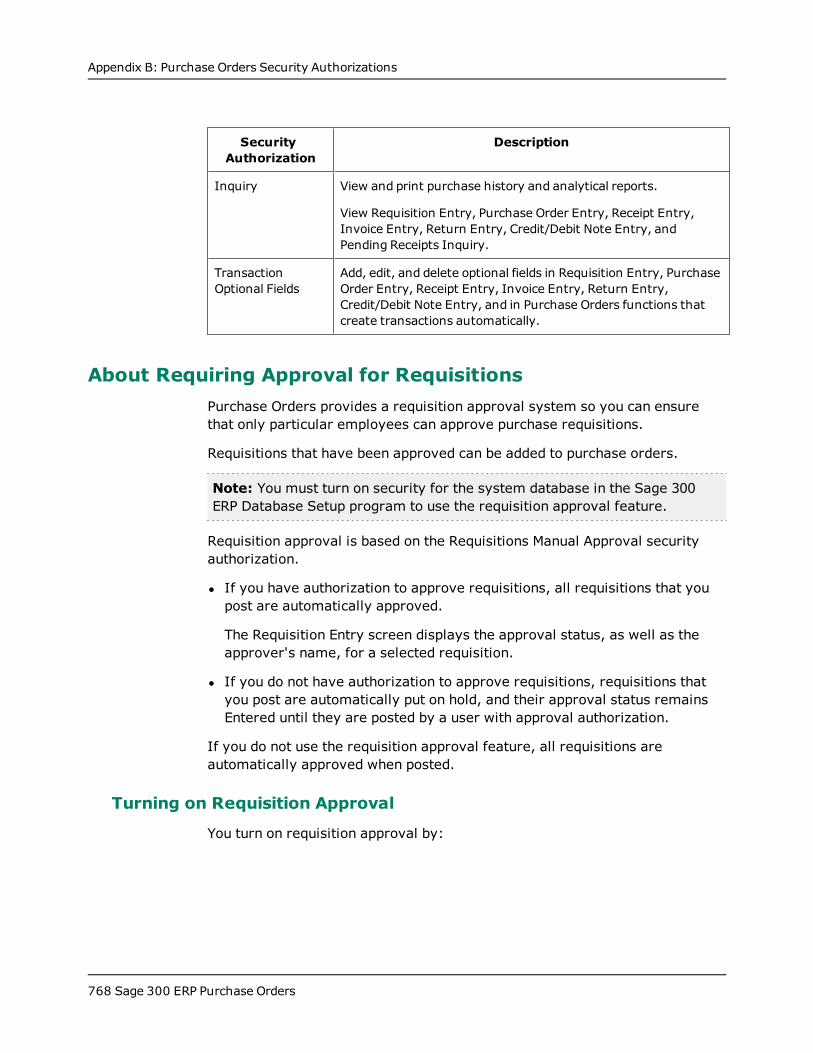
Appendix B: Purchase Orders Security Authorizations
SecurityAuthorization
Description
Inquiry View and print purchase history and analytical reports.
View Requisition Entry, Purchase Order Entry, Receipt Entry,Invoice Entry, Return Entry, Credit/Debit Note Entry, andPending Receipts Inquiry.
TransactionOptional Fields
Add, edit, and delete optional fields in Requisition Entry, PurchaseOrder Entry, Receipt Entry, Invoice Entry, Return Entry,Credit/Debit Note Entry, and in Purchase Orders functions thatcreate transactions automatically.
About Requiring Approval for RequisitionsPurchase Orders provides a requisition approval system so you can ensurethat only particular employees can approve purchase requisitions.
Requisitions that have been approved can be added to purchase orders.
Note: You must turn on security for the system database in the Sage 300ERP Database Setup program to use the requisition approval feature.
Requisition approval is based on the Requisitions Manual Approval securityauthorization.
l If you have authorization to approve requisitions, all requisitions that youpost are automatically approved.
The Requisition Entry screen displays the approval status, as well as theapprover's name, for a selected requisition.
l If you do not have authorization to approve requisitions, requisitions thatyou post are automatically put on hold, and their approval status remainsEntered until they are posted by a user with approval authorization.
If you do not use the requisition approval feature, all requisitions areautomatically approved when posted.
Turning on Requisition Approval
You turn on requisition approval by:
768 Sage 300 ERP Purchase Orders
About Requiring Approval for Requisitions
l Selecting Require Approval in the P/O Options screen.
l Turning on system-wide security in the Sage 300 ERP Database Setupprogram.
l Assigning approvers to security groups with Requisitions Manual Approvalauthorization.
l Assigning other users to security groups that do not have Requisitions ManualApproval authorization.
Approving Requisitions that Are On Hold
Requisitions posted by user who do not have authorization to approverequisitions are automatically put on hold.
Requisition approvers must open unapproved requisitions, remove the On Holdstatus, and post the requisitions again to approve them.
Approving a Purchase Requisition
If the Require Approval option is selected in the P/O Options screen, purchaserequisitions must be approved. You can approve a requisition only if you havethe Requisitions Manual Approval security right (which is assigned in theSecurity Group screen in Administrative Services).
l If your security group is assigned the security right to approve requisitions,all requisitions that you post are automatically approved, and your User IDappears in the Approver Name field after posting.
l If your security group is not assigned the security right to approverequisitions, all requisitions that you post are automatically put on hold, andthe Approval Status field will display "Entered" until the requisition is postedby a user with approval rights.
The approver will have to open the requisition, remove the on-hold status,and then post the requisition.
To approve a requisition:
1. Open Purchase Orders > P/O Transactions > Requisition Entry.
2. In the Requisition Number field, use the Finder or the navigationbuttons to select the requisition you want to approve.
User's Guide 769
Appendix B: Purchase Orders Security Authorizations
3. Confirm that requisition details and totals are correct.
Review requisition details in the detail table.
Note: Purchase Orders lets you hide columns and change columnorder.
You can also click the Detail button to review all the fields for a singledetail.
On the Totals tab, review the requisition comment and item totals.
On the Optional Fields tab, review additional information for therequisition.
4. On the Requisition tab, clear the On Hold option.
Note: You cannot create purchase orders from on-hold requisitions.
5. Click Post.
Purchase Order Entry lets you print the purchase requisition after posting. Youcan also print the purchase requisition separately, from the P/O Forms folder.
Note: If you have approval rights, the Approval Status field will say"Approved," and the description for your User ID will appear in the ApproverName field. If you do not have the security right to approve requisitions, therequisition will still be on hold after you post it, and the Approval Status fieldwill display "Entered."
About Using Security with Purchase OrdersYou can use security with the Purchase Order Entry screen, separatelyspecifying the persons who can:
l Add, edit, post, or delete:
Requisitions.
Purchase orders.
Receipts.
Returns.
770 Sage 300 ERP Purchase Orders
About Using Security with Purchase Orders
Invoices.
Credit or debit notes.
l Create purchase orders automatically from:
Requisitions.
Inventory Control.
Order Entry.
l Approve purchase requisitions.
l View cost information.
l Edit invoiced quantities or costs.
l Print:
Requisitions.
Purchase orders.
Receiving slips.
Returns.
Mailing labels.
l Edit setup information and options.
l Import or export purchase orders.
On blanket purchase orders, you can also assign security to the Original Amountfield on the Order tab of the Purchase Order Entry screen. By restricting accessto this field, you can ensure that no unauthorized changes are made to theamount.
You can assign security to item costs in Inventory Control if you do not want todisplay the item costs from Inventory Control on purchase order detail lines.The Unit Cost and Extended Cost fields will then display only zeroes in PurchaseOrders, and you enter cost amounts when entering transactions.
For more information about using security, see "Purchase Orders SecurityAuthorizations" (page 763).
User's Guide 771
Appendix B: Purchase Orders Security Authorizations
About Using Security with ReceiptsYou can use security with the Receipt Entry screen, separately specifying thepersons who can:
l Add, edit, and invoice receipts.
l View receipt costing information.
l Print receiving slips.
l Import receipts.
l Export receipts.
Purchase Orders provides a security authorization that allows warehouse staffto receive goods and enter quantities received, but prevent them from viewingcost information.
If users do not have Show Receipt Costing Information authorization,they cannot view item unit cost information on receipts—including totals,taxes, discounts, and additional cost amounts. (In other words, the Taxes tab,Additional Costs tab, and Totals tab do not appear on the Receipt Entry screenfor users who do not have this authorization.)
Note: Pre-printed forms PORCP03.RPT and PORCP04.RPT will print costinformation. To hide costs on these forms, you will need to customize them.
You can also assign security to item costs in Inventory Control if you do notwant to display the item costs from Inventory Control on receipt detail lines.The Unit Cost and Extended Cost fields will then display only zeroes inPurchase Orders, although you can enter cost amounts when enteringtransactions.
Note: Item cost security in I/C does not apply to any Vendor Contract Costsentered in Purchase Orders.
For more information about using security, see "Purchase Orders SecurityAuthorizations" (page 763).
772 Sage 300 ERP Purchase Orders

Appendix C: Data Entry Tools, Tips,and Shortcuts
Use these tools and tips to speed up data entry in Sage 300 ERP.
Data Entry Tools and ShortcutsUse these tools and shortcuts to speed up data entry in Sage 300 ERP.
Tool ShortcutKey
Description
Drilldown n/a The Drilldown button appears beside some data entryfields and in some column headings in transaction detailentry tables. Click it to view details of the record ortransaction in the corresponding field.
You can "drill down" both within Sage 300 ERP programsand between separate programs. For example, you can drilldown:
l From General Ledger transactions to original transactionentries.
l From Accounts Receivable to Order Entry.
l From Accounts Payable to Purchase Orders.
l From one transaction to an originating transaction (suchas from a credit note to the invoice) within a program.
Finder F5 The Finder appears in some data entry fields, and in sometable headings in transaction entry screens. Click it whenyou want to look up records you can select for a field.
Use the Finder to search lists of codes maintained in or usedby Sage 300 ERP programs (such as document numbers,terms codes, and account set codes). You can use menucommands in the Finder to help you search, as follows:
l On the Settings menu, select Color options to highlight afield using color for the text or for the background.
l On the Settings menu, select Field Name as ColumnHeading to use field descriptions or internal field names
Data Entry Tools and Shortcuts
User's Guide 773
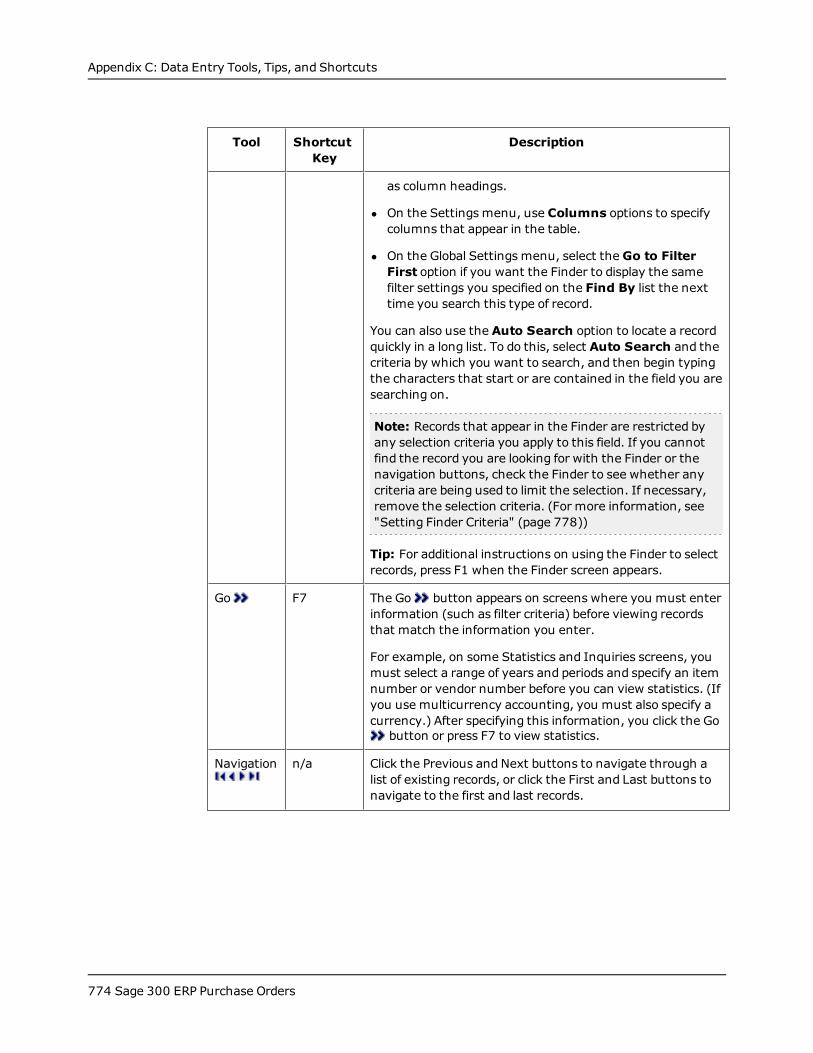
Appendix C: Data Entry Tools, Tips, and Shortcuts
Tool ShortcutKey
Description
as column headings.
l On the Settings menu, use Columns options to specifycolumns that appear in the table.
l On the Global Settings menu, select theGo to FilterFirst option if you want the Finder to display the samefilter settings you specified on the Find By list the nexttime you search this type of record.
You can also use the Auto Search option to locate a recordquickly in a long list. To do this, select Auto Search and thecriteria by which you want to search, and then begin typingthe characters that start or are contained in the field you aresearching on.
Note: Records that appear in the Finder are restricted byany selection criteria you apply to this field. If you cannotfind the record you are looking for with the Finder or thenavigation buttons, check the Finder to see whether anycriteria are being used to limit the selection. If necessary,remove the selection criteria. (For more information, see"Setting Finder Criteria" (page 778))
Tip: For additional instructions on using the Finder to selectrecords, press F1 when the Finder screen appears.
Go F7 The Go button appears on screens where you must enterinformation (such as filter criteria) before viewing recordsthat match the information you enter.
For example, on some Statistics and Inquiries screens, youmust select a range of years and periods and specify an itemnumber or vendor number before you can view statistics. (Ifyou use multicurrency accounting, you must also specify acurrency.) After specifying this information, you click the Gobutton or press F7 to view statistics.
Navigation n/a Click the Previous and Next buttons to navigate through alist of existing records, or click the First and Last buttons tonavigate to the first and last records.
774 Sage 300 ERP Purchase Orders
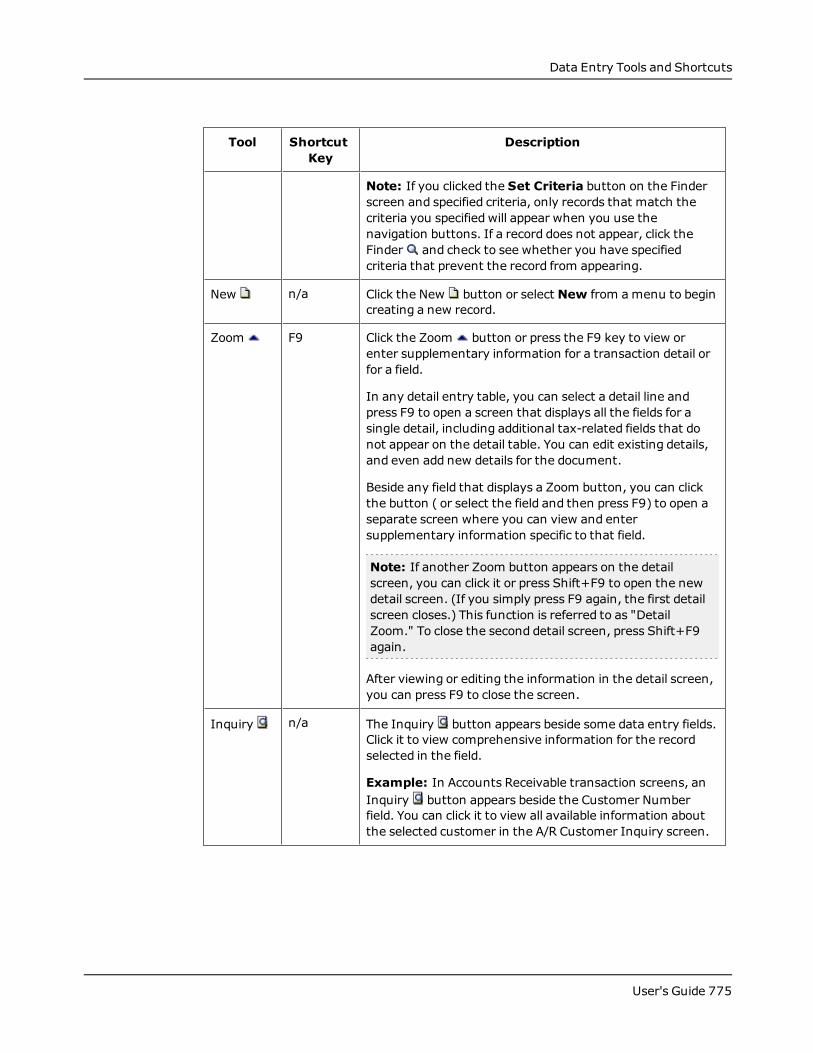
Data Entry Tools and Shortcuts
Tool ShortcutKey
Description
Note: If you clicked the Set Criteria button on the Finderscreen and specified criteria, only records that match thecriteria you specified will appear when you use thenavigation buttons. If a record does not appear, click theFinder and check to see whether you have specifiedcriteria that prevent the record from appearing.
New n/a Click the New button or select New from amenu to begincreating a new record.
Zoom F9 Click the Zoom button or press the F9 key to view orenter supplementary information for a transaction detail orfor a field.
In any detail entry table, you can select a detail line andpress F9 to open a screen that displays all the fields for asingle detail, including additional tax-related fields that donot appear on the detail table. You can edit existing details,and even add new details for the document.
Beside any field that displays a Zoom button, you can clickthe button ( or select the field and then press F9) to open aseparate screen where you can view and entersupplementary information specific to that field.
Note: If another Zoom button appears on the detailscreen, you can click it or press Shift+F9 to open the newdetail screen. (If you simply press F9 again, the first detailscreen closes.) This function is referred to as "DetailZoom." To close the second detail screen, press Shift+F9again.
After viewing or editing the information in the detail screen,you can press F9 to close the screen.
Inquiry n/a The Inquiry button appears beside some data entry fields.Click it to view comprehensive information for the recordselected in the field.
Example: In Accounts Receivable transaction screens, anInquiry button appears beside the Customer Numberfield. You can click it to view all available information aboutthe selected customer in the A/R Customer Inquiry screen.
User's Guide 775
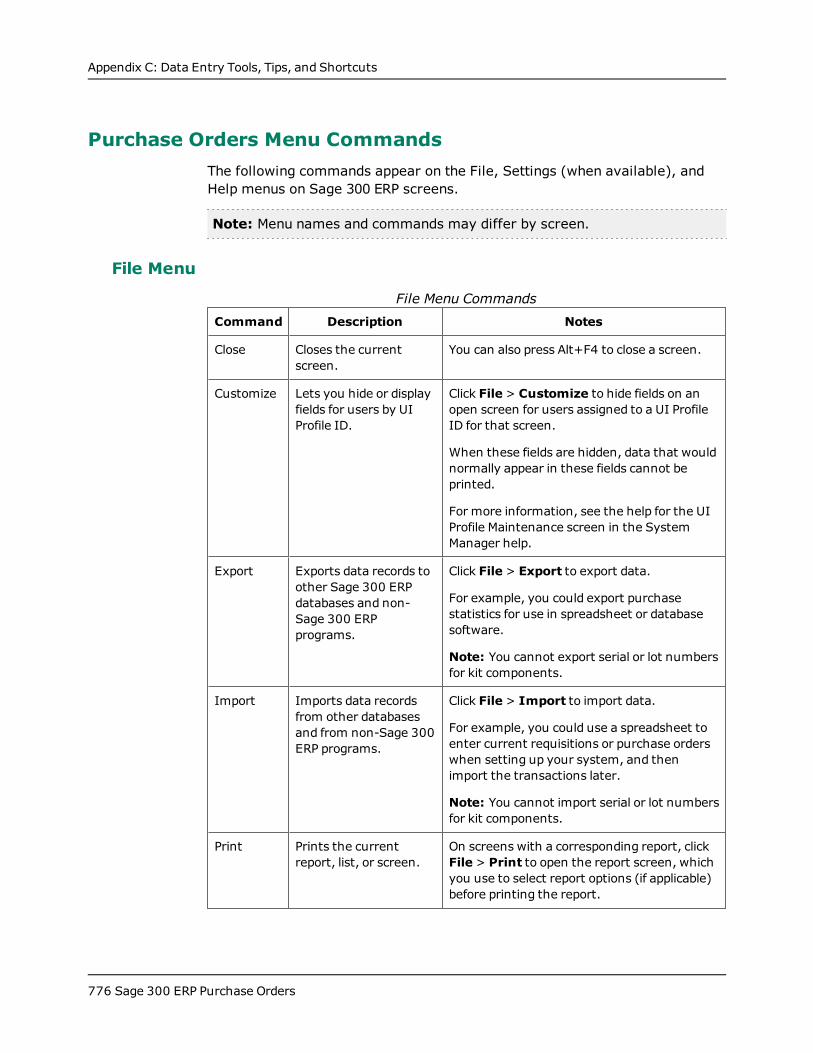
Appendix C: Data Entry Tools, Tips, and Shortcuts
Purchase Orders Menu CommandsThe following commands appear on the File, Settings (when available), andHelp menus on Sage 300 ERP screens.
Note: Menu names and commands may differ by screen.
File Menu
Command Description Notes
Close Closes the currentscreen.
You can also press Alt+F4 to close a screen.
Customize Lets you hide or displayfields for users by UIProfile ID.
Click File > Customize to hide fields on anopen screen for users assigned to a UI ProfileID for that screen.
When these fields are hidden, data that wouldnormally appear in these fields cannot beprinted.
For more information, see the help for the UIProfile Maintenance screen in the SystemManager help.
Export Exports data records toother Sage 300 ERPdatabases and non-Sage 300 ERPprograms.
Click File > Export to export data.
For example, you could export purchasestatistics for use in spreadsheet or databasesoftware.
Note: You cannot export serial or lot numbersfor kit components.
Import Imports data recordsfrom other databasesand from non-Sage 300ERP programs.
Click File > Import to import data.
For example, you could use a spreadsheet toenter current requisitions or purchase orderswhen setting up your system, and thenimport the transactions later.
Note: You cannot import serial or lot numbersfor kit components.
Print Prints the currentreport, list, or screen.
On screens with a corresponding report, clickFile > Print to open the report screen, whichyou use to select report options (if applicable)before printing the report.
File Menu Commands
776 Sage 300 ERP Purchase Orders
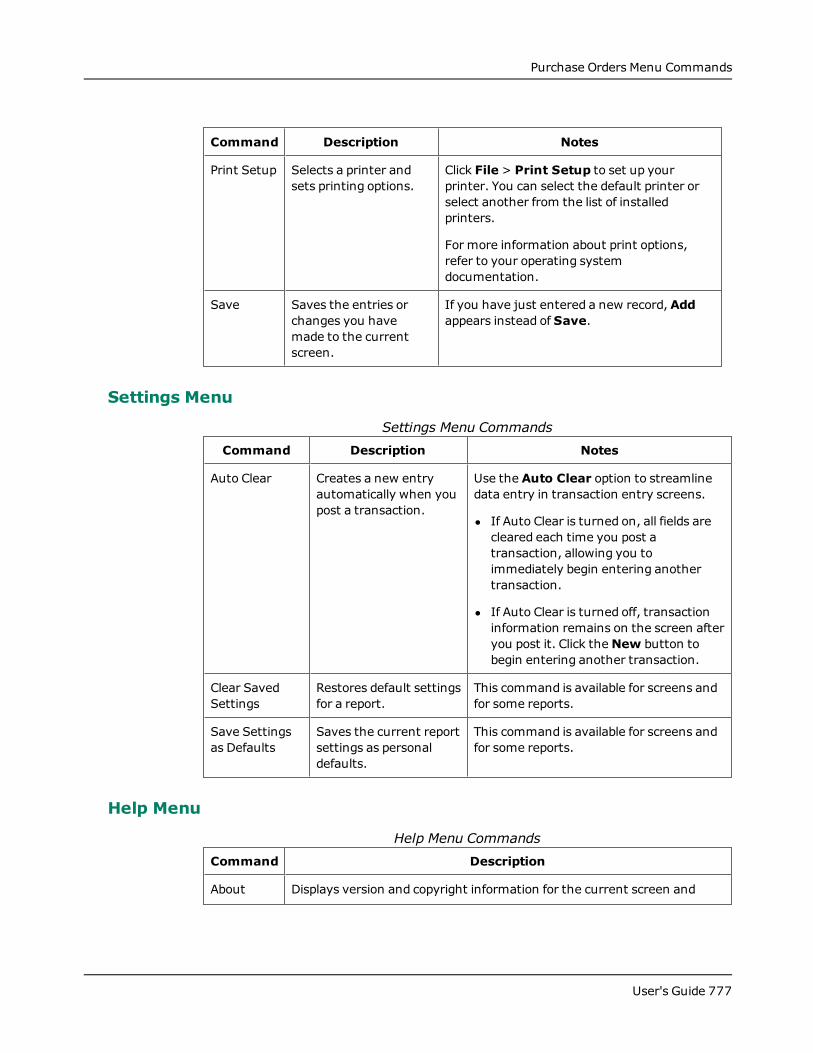
Purchase Orders Menu Commands
Command Description Notes
Print Setup Selects a printer andsets printing options.
Click File > Print Setup to set up yourprinter. You can select the default printer orselect another from the list of installedprinters.
For more information about print options,refer to your operating systemdocumentation.
Save Saves the entries orchanges you havemade to the currentscreen.
If you have just entered a new record,Addappears instead of Save.
Settings Menu
Command Description Notes
Auto Clear Creates a new entryautomatically when youpost a transaction.
Use the Auto Clear option to streamlinedata entry in transaction entry screens.
l If Auto Clear is turned on, all fields arecleared each time you post atransaction, allowing you toimmediately begin entering anothertransaction.
l If Auto Clear is turned off, transactioninformation remains on the screen afteryou post it. Click theNew button tobegin entering another transaction.
Clear SavedSettings
Restores default settingsfor a report.
This command is available for screens andfor some reports.
Save Settingsas Defaults
Saves the current reportsettings as personaldefaults.
This command is available for screens andfor some reports.
Settings Menu Commands
Help Menu
Command Description
About Displays version and copyright information for the current screen and
Help Menu Commands
User's Guide 777
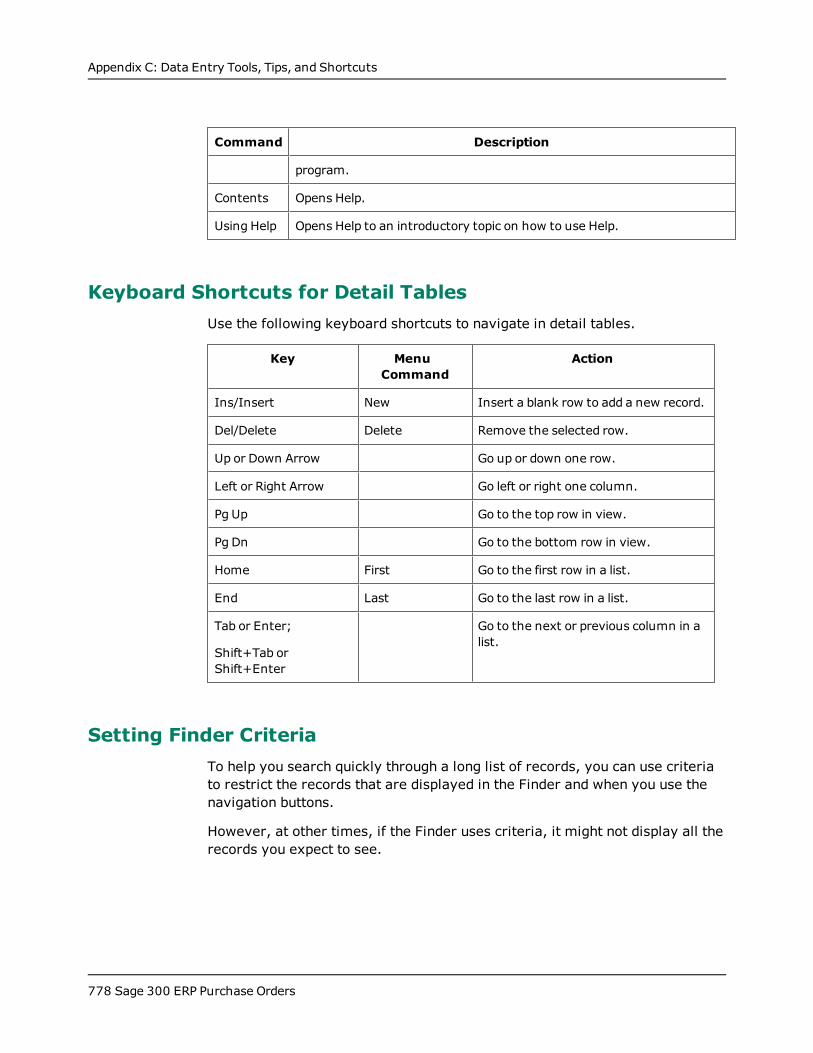
Appendix C: Data Entry Tools, Tips, and Shortcuts
Command Description
program.
Contents Opens Help.
Using Help Opens Help to an introductory topic on how to use Help.
Keyboard Shortcuts for Detail TablesUse the following keyboard shortcuts to navigate in detail tables.
Key MenuCommand
Action
Ins/Insert New Insert a blank row to add a new record.
Del/Delete Delete Remove the selected row.
Up or Down Arrow Go up or down one row.
Left or Right Arrow Go left or right one column.
Pg Up Go to the top row in view.
Pg Dn Go to the bottom row in view.
Home First Go to the first row in a list.
End Last Go to the last row in a list.
Tab or Enter;
Shift+Tab orShift+Enter
Go to the next or previous column in alist.
Setting Finder CriteriaTo help you search quickly through a long list of records, you can use criteriato restrict the records that are displayed in the Finder and when you use thenavigation buttons.
However, at other times, if the Finder uses criteria, it might not display all therecords you expect to see.
778 Sage 300 ERP Purchase Orders
Using Visual Basic Macros
To check or remove the criteria:
1. Click the Finder .
2. Click the Set Criteria button.
3. On the screen that appears, click the Clear button.
For instructions on setting criteria, click the Help button when the Set Criteriascreen appears.
Using Visual Basic MacrosSystem Manager provides full support for Microsoft Visual Basic for Applications(VBA) 6.0, allowing Purchase Orders to integrate smoothly with Microsoft’sentire Office suite.
You can record, edit, and run VBA macros from within Sage 300 ERP. You canalso continue to run VBA macros for another application that includes VBA (suchas Microsoft Excel).
Sage 300 ERP Purchase Orders comes with a workflow macro that letsemployees enter purchase requests that can be sent as e-mail attachments tomanagers for approval or rejection. The macro creates purchase orders forapproved requests.
The workflow macro consists of:
l WorkReq.avb.
This macro lets employees complete a form to request the purchase ofitems and to specify the estimated cost of the request. The request is sentas an attachment to the e-mail address specified on the request forapproval. A Purchase Orders requisition is automatically posted for therequest.
The WorkReq.avb macro should be available only to employees who haveauthorization to enter requisitions in Purchase Orders.
l Workflow.avb.
This macro lets employees send the details of requisitions for approval.The employee highlights the requisition for which approval is required,and sends it as an e-mail attachment to the manager’s e-mail address.
The Workflow.avb macro should be only to employees who haveauthorization to enter requisitions in Purchase Orders.
User's Guide 779
Appendix C: Data Entry Tools, Tips, and Shortcuts
l Workmonitor.avb.
This macro lets managers approve requests for purchases fromemployees. When a Requisition Request e-mail is received from anemployee, the manager can either approve or reject the request. If therequest is approved, a purchase order is automatically created for theitem and an e-mail confirmation is sent to the employee. If the requestis rejected, the manager can provide the reason for rejecting therequest and an e-mail is sent to the employee.
The Workmonitor.avb macro should be available only to employees whohave authorization to approve requisitions.
To run the macros from the Macro menu
1. On the Sage 300 ERP Desktop, click Macro > Run.
The Run Macro dialog box appears.
2. In the Files Of Type list, select VBA Macro Files.
3. Double-click the macro.
To add an icon for the macro to your desktop
1. On the Sage 300 ERP Desktop, select (highlight) Purchase Orders.
2. On the menu bar, click Object > New > Macro.
3. In the Title field, type a title for the macro, such as Requisition Request orRequisition Approval.
4. Click Next.
5. Click Browse, and then select the folder and the macro (for example,{installation path}\macros\workreq.avb).
6. Click Finish.
Working with Detail Entry TablesThe first tab of each transaction entry screen in Sage 300 ERP contains a detailentry table that shows the document details in tabular format.
In most cases, you can enter all the necessary details for a document right onthe table.
780 Sage 300 ERP Purchase Orders
Working with Detail Entry Tables
Tip: If there are more columns than can be displayed at one time, you can usethe horizontal scroll bar at the bottom of a list to view the additional columns.You can also rearrange the order of columns, or change column widths,consistent with how you enter data.
You can also view and edit all the fields for a single detail on a separate DetailItems/Taxes screen. To view this screen, select a detail line and click theItem/Tax button below the table, or press F9.
Note: You use the Detail Items/Taxes screen to view or change taxinformation for a detail. Detail tax fields do not appear in the detail table.
To add details using the detail table, do one of the following:
l If a blank line is highlighted, tab to the Item Number field, then either typethe item number or select it from the Finder. Enter the remaining informationfor the detail.
l To start a new line, press Insert or tab through the end of the last line on thetable.
If you want to insert a new line in a specific location, highlight the line abovethe location, and then press Insert.
Note: A detail line is saved as you enter it on the detail entry table.
To edit details using the detail table:
l Select the line you want to edit, and then enter your changes on that line.
Note: For information about using your keyboard to move within a detailtable, see "Keyboard Shortcuts for Detail Tables" (page 778)
To delete details using the detail table:
1. Select the line you want to delete.
2. Press the Delete key on your keyboard.
3. If you see a message asking you to confirm the deletion, click Yes.
User's Guide 781
Appendix C: Data Entry Tools, Tips, and Shortcuts
To edit item information or detail tax information using the DetailItems/Taxes screen:
1. Select the detail on the table, and then either click the Item/Tax button,or press F9.
2. Edit the item information and/or change the Tax Class or Tax Includedoptions for the detail.
782 Sage 300 ERP Purchase Orders
Appendix D:Support and Resources
Find support and resources to help get Sage 300 ERP up and running quickly.
Finding Help and DocumentationYou can find information about setting up and using Sage 300 ERP in the Sage300 ERP Learning Center and in the product documentation included with thisrelease.
Note: For technical support, visit our customer support website athttp://na.sage.com/sage-300-erp/product-support or contact your Sagebusiness partner.
The Sage 300 ERP Learning Center
The Learning Center is where you'll find documentation for new productfeatures and modules in the Sage 300 ERP Portal. It features articles andinformation about the portal, shortcuts, snapshots, and Inquiry.
You view the Learning Center in one of the following ways:
l Open the Sage 300 ERP Portal, and on the welcome bar at the top of thescreen, click Help > Learning Center.
l On the tab menu for any portal tab, click Help.
Context-Sensitive Help
Sage 300 ERP features context-sensitive help that you can use to quickly openand view articles and information directly from Sage 300 ERP screens.
l In the Sage 300 ERP Portal, click Help on the tab menu to view help forthe current screen.
l On the Sage 300 ERP Desktop, press F1 to view help for the current screen.
Product Documentation
Sage 300 ERP includes guides in printable PDF format, including theInstallation and Administration Guide, Upgrade Guide, and other
User's Guide 783
Appendix D: Support and Resources
documentation related to installation and setup.
These guides are available in the Docs folder on the Sage 300 ERP server, andonline in the Sage Customer Portal at:
l https://customers.sagenorthamerica.com/irj/go/km/docs/sageKM/SageAccpac ERP/Ungated Customers/Browsable/ProductDocumentation/Accpac_UA_Resources.htm.
To view the guides in the Docs folder:
l On the Windows taskbar, click Start > Programs > Sage 300 ERP >Documentation.
Support and ResourcesUse the links below to find instructions, software training, one-on-onesupport, technical specifications, or other resources to get Sage 300 ERPworking smoothly for your business.
Your Sage Business Partner is also an excellent resource to consult when youhave questions about Sage 300 ERP.
How can we help you?
I'm setting up Sage 300 ERP and need information or assistance
l Sage 300 ERP Resources online —https://customers.sagenorthamerica.com/irj/go/km/docs/sageKM/SageAccpac ERP/Ungated Customers/Browsable/ProductDocumentation/Accpac_UA_Resources.htm
Find and download user guides, technical specifications, and more.
l Sage 300 ERP Web Portal — http://www.sage300erp.com
Find a business partner, get priority support, and more.
I'm looking for instructions to complete a task in Sage 300 ERPWhile using Sage 300 ERP, you can get instructions directly from the softwarein the following ways:
784 Sage 300 ERP Purchase Orders
Support and Resources
l Contextual Help — To see topics related to your current task:
In the Sage 300 ERP Desktop, press F1
In the Sage 300 ERP Portal, press Alt+F1
l Help Topics — To explore topics and information:
In the Sage 300 ERP Desktop, click Help > Help Topics
In the Sage 300 ERP Portal, click Help > Learning Center
I think something is broken, or I'm getting error messagesSearch our knowledge base for solutions to common issues, or contact us forone-on-one assistance.
l Knowledge Base — https://customers.sagenorthamerica.com
Find answers and solutions to FAQs and known software issues.
l Support and Services — http://na.sage.com/sage-300-erp/product-support
Find links to support services or contact our support team.
l Customer Center —https://customers.sagenorthamerica.com/irj/portal/anonymous/login
Exclusive support for Sage customers.
l Partner Center — https://partners.sagenorthamerica.com
Exclusive support for Sage partners.
l Priority Software Support— http://na.sage.com/sage-300-erp/product-support
Learn how to get unlimited support by phone, e-mail, and live chat.
I’m looking for downloads, updates, or technical specificationsFind product updates, download resources, or review technical specificationsfor Sage 300 ERP.
l Sage 300 ERP Resources online —https://customers.sagenorthamerica.com/irj/go/km/docs/sageKM/SageAccpac ERP/Ungated Customers/Browsable/Product Documentation/Accpac_UA_Resources.htm
Find and download user guides, technical specifications, and more.
User's Guide 785
Appendix D: Support and Resources
l Support and Services — http://na.sage.com/sage-300-erp/product-support
Find links to support services, contact our support team, and learn how toguarantee your Sage software is always up to date.
I want to become a more skilled user of Sage 300 ERPFind links to Sage software training, online communities, and more.
l Sage University — www.sageu.com/sage300erp
Convenient, professional training options to help you achieve your businessgoals.
l Sage Summit— http://na.sage.com/sage-summit
Connect with peers and experts at our annual conference.
l Priority Software Support— http://na.sage.com/sage-300-erp/product-support
Learn how to get unlimited support by phone, e-mail, and live chat.
I want to share knowledge with other Sage 300 ERP usersFind and share tips, tricks, and solutions online in the Sage 300 ERPCommunity.
l Sage 300 ERP Community — http://community.sageaccpac.com
Explore Sage 300 ERP blogs, discussions, FAQs, resources, and more.
l Sage Summit— http://na.sage.com/sage-summit
Connect with peers and experts at our annual conference.
I want to contact a Sage 300 ERP representative
l Support and Services — http://na.sage.com/sage-300-erp/product-support
Find links to support services, contact our support team, and learn how toguarantee your Sage software is always up to date.
l Live Chat— http://community.sageaccpac.com
Chat with a Sage representative at the Sage 300 ERP Community Web site
786 Sage 300 ERP Purchase Orders

Aaccess 771
account sets 42, 330
deleting 44
editing 44
fields 345
removing 44
Account Sets Report screen 330
Account Sets screen 345
fields and controls 345
Accounts Payable
posting invoices 305
accumulating statistics 16
activate Serialized Inventory pop-ups 211,667
adding details 115, 595, 709
adding vendor details 69
additional cost codes 45, 269, 331
Additional Cost Vendor Information screen
fields and controls 681
additional costs 148, 205, 331
allocating to multiple receipts 166
deleting 49
editing 49
entering 145, 192, 430
entering on invoices 166
removing 49
Additional Costs Detail Costs/Taxesscreen 537
fields and controls 538, 674, 682
Additional Costs Report screen 331
fields and controls 331
Additional Costs screen 347
fields and controls 347
Aged Purchase Orders Report 309
Aged Purchase Orders Report screen 309
fields and controls 310
aging 309
approval for requisitions 104, 768-769
assigning lot numbers 664
assigning serial numbers 669
to P/O Receipts 211, 667
to P/O Returns 213, 751
audit trail 312, 315-316, 327
Auto-Gen button 214, 663
automatically creating purchaseorders 124, 278, 282, 286
Bbackorders 326
batches 229
creating 305
general ledger 305
User's Guide 787
Index
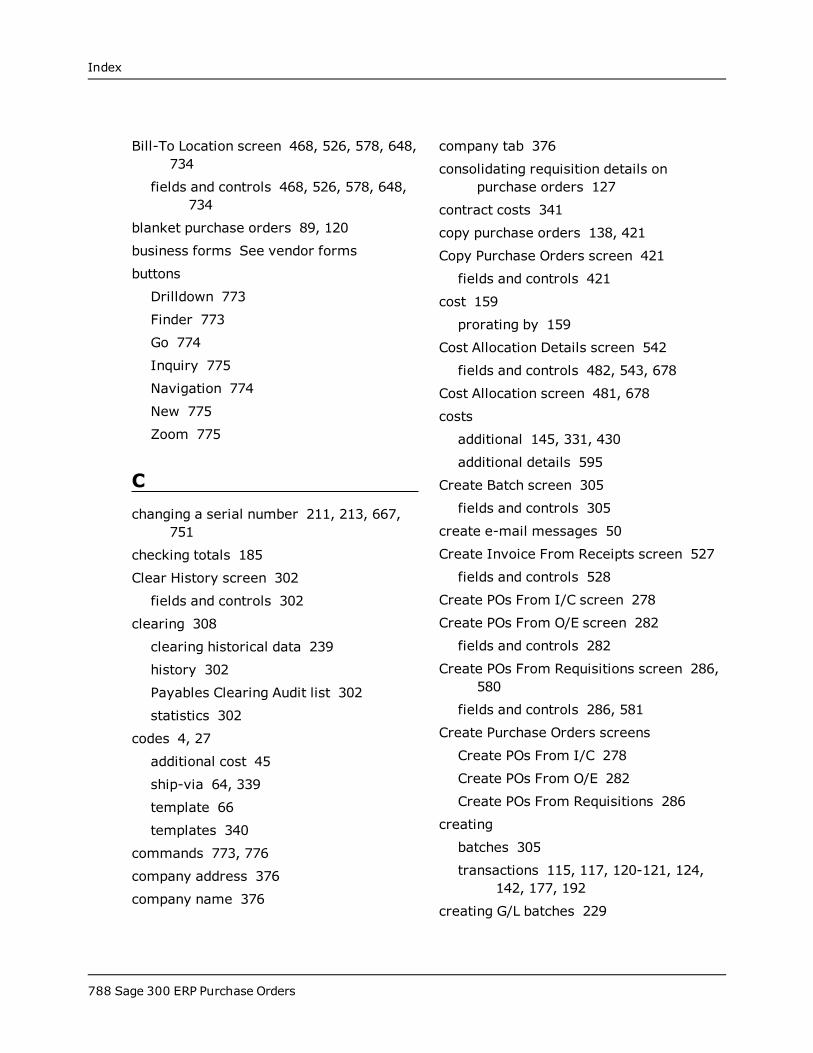
Index
Bill-To Location screen 468, 526, 578, 648,734
fields and controls 468, 526, 578, 648,734
blanket purchase orders 89, 120
business forms See vendor forms
buttons
Drilldown 773
Finder 773
Go 774
Inquiry 775
Navigation 774
New 775
Zoom 775
Cchanging a serial number 211, 213, 667,
751
checking totals 185
Clear History screen 302
fields and controls 302
clearing 308
clearing historical data 239
history 302
Payables Clearing Audit list 302
statistics 302
codes 4, 27
additional cost 45
ship-via 64, 339
template 66
templates 340
commands 773, 776
company address 376
company name 376
company tab 376
consolidating requisition details onpurchase orders 127
contract costs 341
copy purchase orders 138, 421
Copy Purchase Orders screen 421
fields and controls 421
cost 159
prorating by 159
Cost Allocation Details screen 542
fields and controls 482, 543, 678
Cost Allocation screen 481, 678
costs
additional 145, 331, 430
additional details 595
Create Batch screen 305
fields and controls 305
create e-mail messages 50
Create Invoice From Receipts screen 527
fields and controls 528
Create POs From I/C screen 278
Create POs From O/E screen 282
fields and controls 282
Create POs From Requisitions screen 286,580
fields and controls 286, 581
Create Purchase Orders screens
Create POs From I/C 278
Create POs From O/E 282
Create POs From Requisitions 286
creating
batches 305
transactions 115, 117, 120-121, 124,142, 177, 192
creating G/L batches 229
788 Sage 300 ERP Purchase Orders
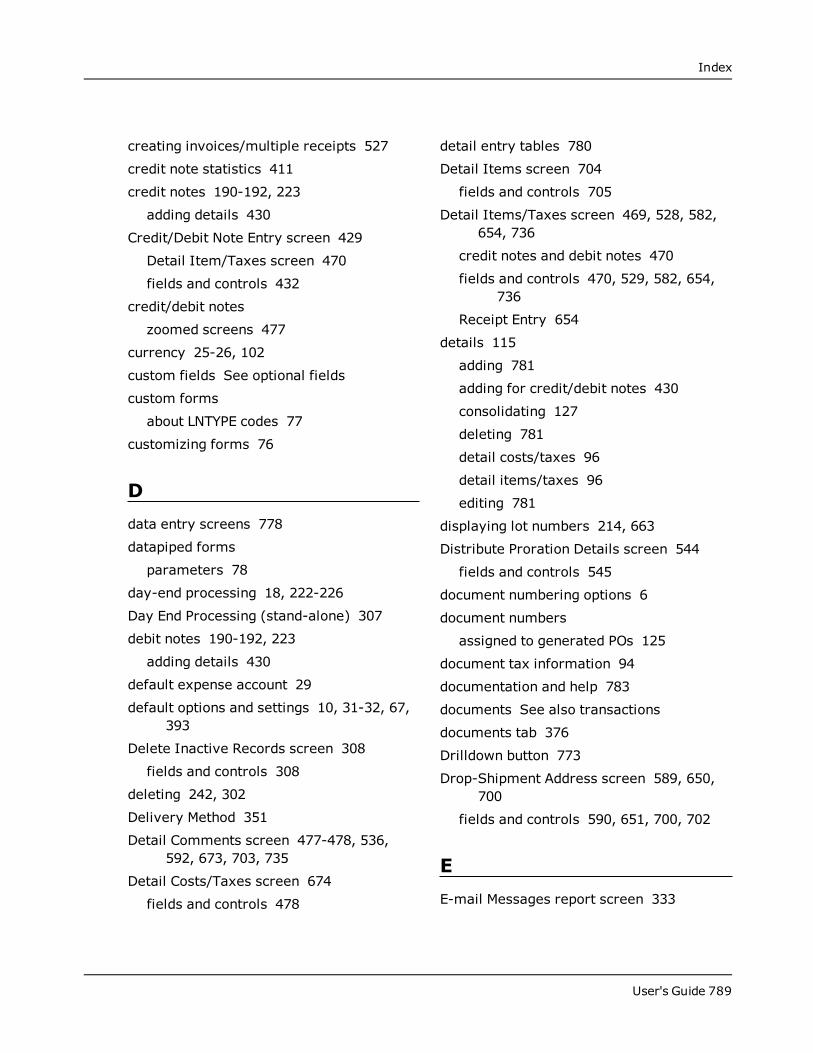
Index
creating invoices/multiple receipts 527
credit note statistics 411
credit notes 190-192, 223
adding details 430
Credit/Debit Note Entry screen 429
Detail Item/Taxes screen 470
fields and controls 432
credit/debit notes
zoomed screens 477
currency 25-26, 102
custom fields See optional fields
custom forms
about LNTYPE codes 77
customizing forms 76
Ddata entry screens 778
datapiped forms
parameters 78
day-end processing 18, 222-226
Day End Processing (stand-alone) 307
debit notes 190-192, 223
adding details 430
default expense account 29
default options and settings 10, 31-32, 67,393
Delete Inactive Records screen 308
fields and controls 308
deleting 242, 302
Delivery Method 351
Detail Comments screen 477-478, 536,592, 673, 703, 735
Detail Costs/Taxes screen 674
fields and controls 478
detail entry tables 780
Detail Items screen 704
fields and controls 705
Detail Items/Taxes screen 469, 528, 582,654, 736
credit notes and debit notes 470
fields and controls 470, 529, 582, 654,736
Receipt Entry 654
details 115
adding 781
adding for credit/debit notes 430
consolidating 127
deleting 781
detail costs/taxes 96
detail items/taxes 96
editing 781
displaying lot numbers 214, 663
Distribute Proration Details screen 544
fields and controls 545
document numbering options 6
document numbers
assigned to generated POs 125
document tax information 94
documentation and help 783
documents See also transactions
documents tab 376
Drilldown button 773
Drop-Shipment Address screen 589, 650,700
fields and controls 590, 651, 700, 702
EE-mail Messages report screen 333
User's Guide 789
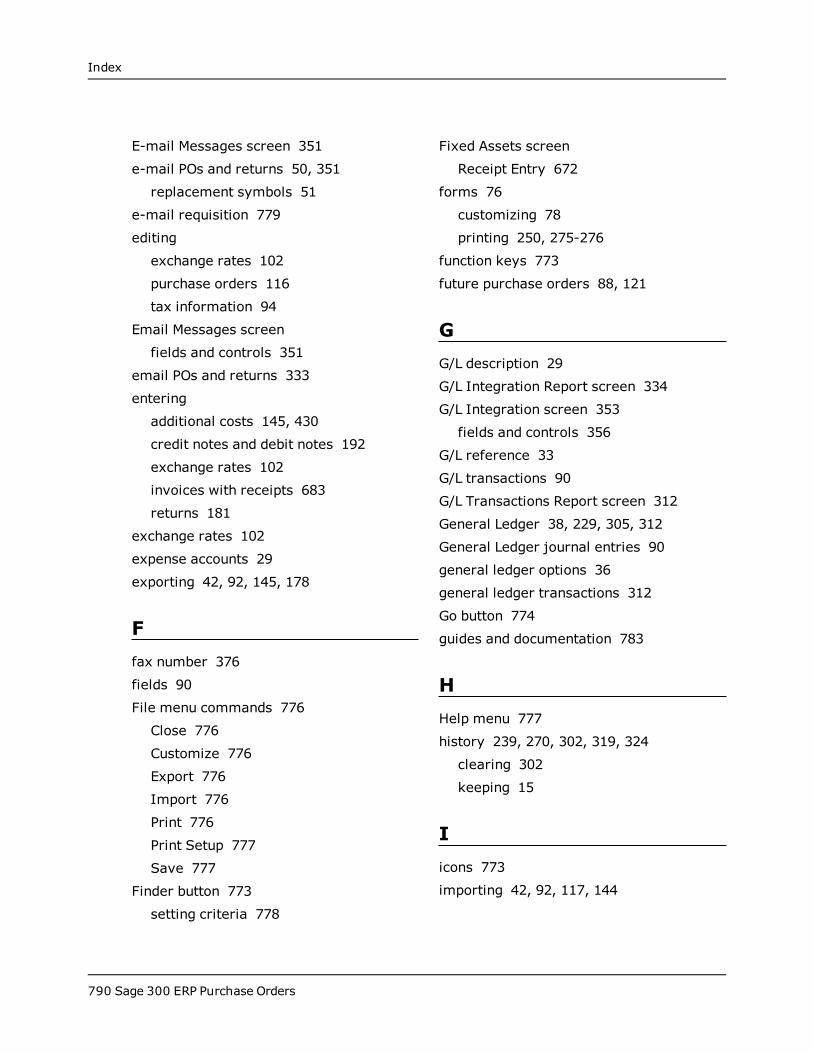
Index
E-mail Messages screen 351
e-mail POs and returns 50, 351
replacement symbols 51
e-mail requisition 779
editing
exchange rates 102
purchase orders 116
tax information 94
Email Messages screen
fields and controls 351
email POs and returns 333
entering
additional costs 145, 430
credit notes and debit notes 192
exchange rates 102
invoices with receipts 683
returns 181
exchange rates 102
expense accounts 29
exporting 42, 92, 145, 178
Ffax number 376
fields 90
File menu commands 776
Close 776
Customize 776
Export 776
Import 776
Print 776
Print Setup 777
Save 777
Finder button 773
setting criteria 778
Fixed Assets screen
Receipt Entry 672
forms 76
customizing 78
printing 250, 275-276
function keys 773
future purchase orders 88, 121
GG/L description 29
G/L Integration Report screen 334
G/L Integration screen 353
fields and controls 356
G/L reference 33
G/L transactions 90
G/L Transactions Report screen 312
General Ledger 38, 229, 305, 312
General Ledger journal entries 90
general ledger options 36
general ledger transactions 312
Go button 774
guides and documentation 783
HHelp menu 777
history 239, 270, 302, 319, 324
clearing 302
keeping 15
Iicons 773
importing 42, 92, 117, 144
790 Sage 300 ERP Purchase Orders
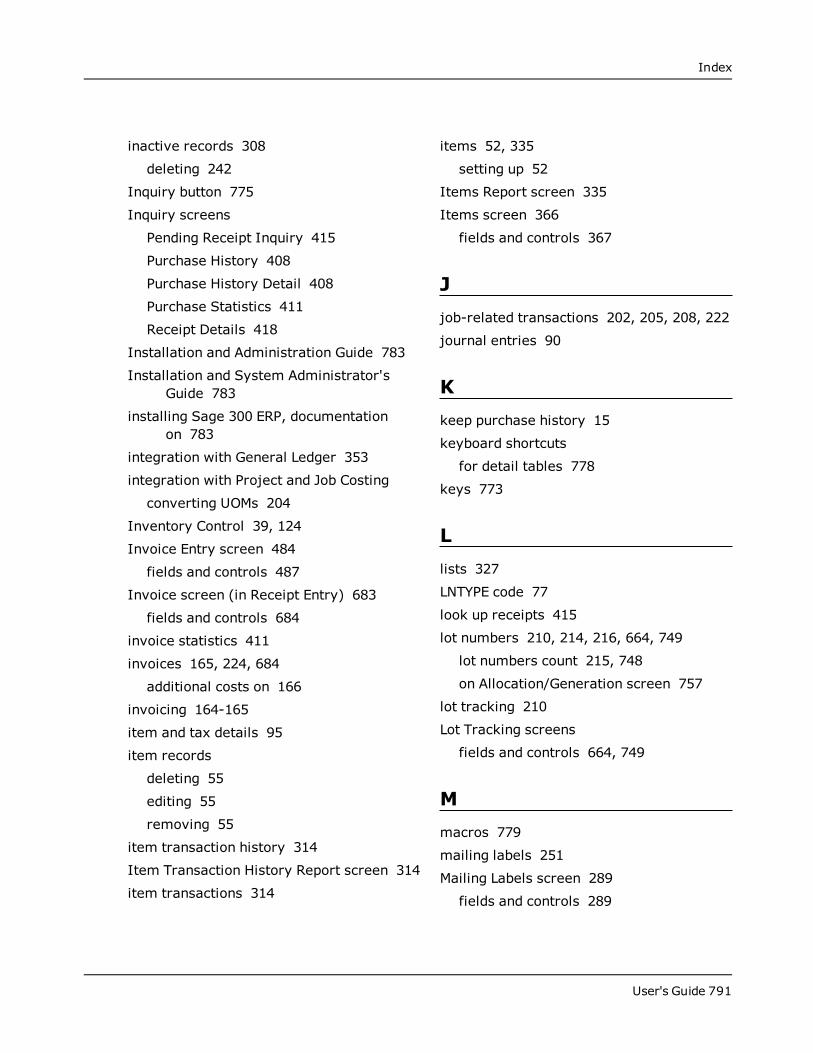
Index
inactive records 308
deleting 242
Inquiry button 775
Inquiry screens
Pending Receipt Inquiry 415
Purchase History 408
Purchase History Detail 408
Purchase Statistics 411
Receipt Details 418
Installation and Administration Guide 783
Installation and System Administrator'sGuide 783
installing Sage 300 ERP, documentationon 783
integration with General Ledger 353
integration with Project and Job Costing
converting UOMs 204
Inventory Control 39, 124
Invoice Entry screen 484
fields and controls 487
Invoice screen (in Receipt Entry) 683
fields and controls 684
invoice statistics 411
invoices 165, 224, 684
additional costs on 166
invoicing 164-165
item and tax details 95
item records
deleting 55
editing 55
removing 55
item transaction history 314
Item Transaction History Report screen 314
item transactions 314
items 52, 335
setting up 52
Items Report screen 335
Items screen 366
fields and controls 367
Jjob-related transactions 202, 205, 208, 222
journal entries 90
Kkeep purchase history 15
keyboard shortcuts
for detail tables 778
keys 773
Llists 327
LNTYPE code 77
look up receipts 415
lot numbers 210, 214, 216, 664, 749
lot numbers count 215, 748
on Allocation/Generation screen 757
lot tracking 210
Lot Tracking screens
fields and controls 664, 749
Mmacros 779
mailing labels 251
Mailing Labels screen 289
fields and controls 289
User's Guide 791
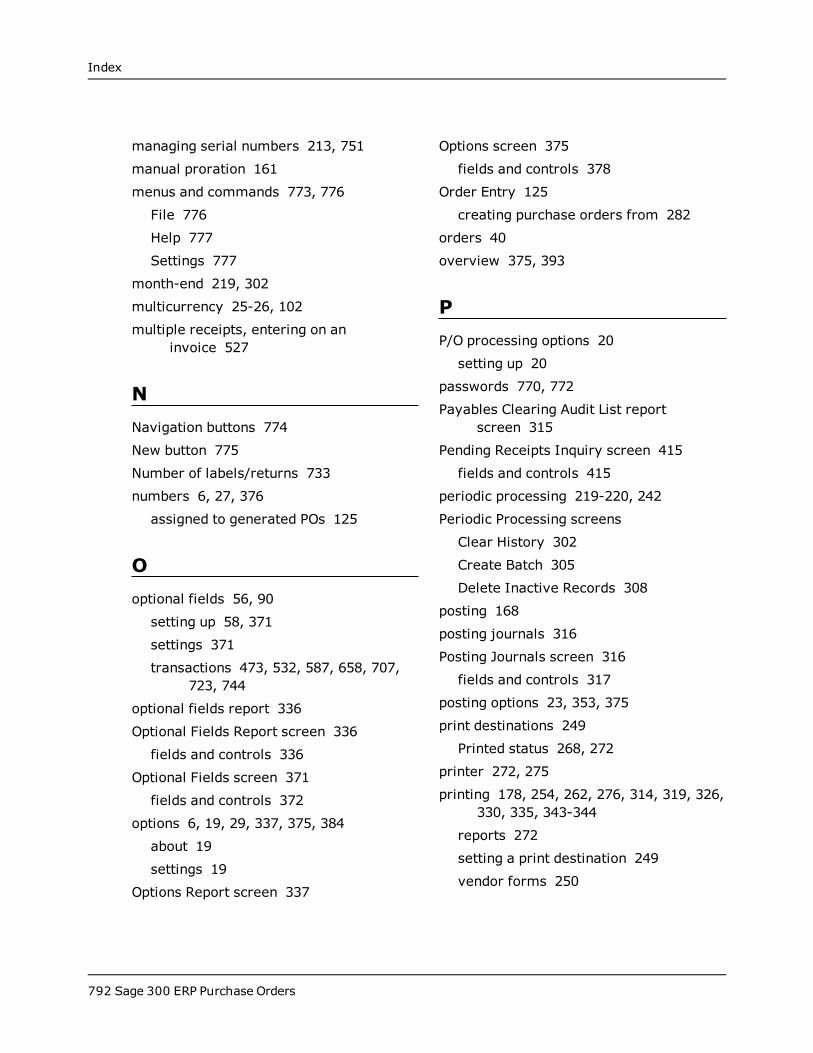
Index
managing serial numbers 213, 751
manual proration 161
menus and commands 773, 776
File 776
Help 777
Settings 777
month-end 219, 302
multicurrency 25-26, 102
multiple receipts, entering on aninvoice 527
NNavigation buttons 774
New button 775
Number of labels/returns 733
numbers 6, 27, 376
assigned to generated POs 125
Ooptional fields 56, 90
setting up 58, 371
settings 371
transactions 473, 532, 587, 658, 707,723, 744
optional fields report 336
Optional Fields Report screen 336
fields and controls 336
Optional Fields screen 371
fields and controls 372
options 6, 19, 29, 337, 375, 384
about 19
settings 19
Options Report screen 337
Options screen 375
fields and controls 378
Order Entry 125
creating purchase orders from 282
orders 40
overview 375, 393
PP/O processing options 20
setting up 20
passwords 770, 772
Payables Clearing Audit List reportscreen 315
Pending Receipts Inquiry screen 415
fields and controls 415
periodic processing 219-220, 242
Periodic Processing screens
Clear History 302
Create Batch 305
Delete Inactive Records 308
posting 168
posting journals 316
Posting Journals screen 316
fields and controls 317
posting options 23, 353, 375
print destinations 249
Printed status 268, 272
printer 272, 275
printing 178, 254, 262, 276, 314, 319, 326,330, 335, 343-344
reports 272
setting a print destination 249
vendor forms 250
792 Sage 300 ERP Purchase Orders

Index
processing 102, 140, 164, 169, 175, 190,219-220, 222-226, 237, 239, 307
processing options 376
prorating 148, 150, 159, 161
proration 47
of additional costs on invoices 166
of additional costs to received items 145
of taxes for additional costs 166
purchase 411
purchase history 319, 408
about 15
Purchase History Detail screen 408
fields and controls 409
Purchase History report
printing 271
Purchase History Report screen 319
Purchase History screen 408
purchase order
printing single 258, 261
Purchase Order Action Report screen 321
fields and controls 321
purchase order approval 113, 768-769
Purchase Order Entry screen 550
fields and controls 552
purchase order forms
editing 80
non-datapiped 80
purchase order history 319, 324
Purchase Order screens
Requisition Entry 686
purchase orders 123, 309
entering a standing PO 123
Purchase Orders 256
Purchase Orders (program) 3
purchase orders (transactions) 88-90, 102,115-117, 120-121, 124, 138, 225, 254,770
creating 282, 286
Purchase Orders codes 27
Purchase Orders forms 74
Purchase Orders G/L entries 90
Purchase Orders macros 779
Purchase Orders menu commands 776
Purchase Orders reports
about 268
Purchase Orders screen 299
fields and controls 300
Purchase Orders security 771-772
purchase statistics 16, 324, 411
Purchase Statistics Report 324
Purchase Statistics screen 411
fields and controls 324, 411
purchases 319, 324
Qquantity 457, 473, 724, 745
prorating by 150
quantity received 415
Rreceipt details 654
Detail Items/Taxes screen 654
Receipt Details screen 418
fields and controls 418
Receipt Entry
Fixed Assets screen 672
User's Guide 793
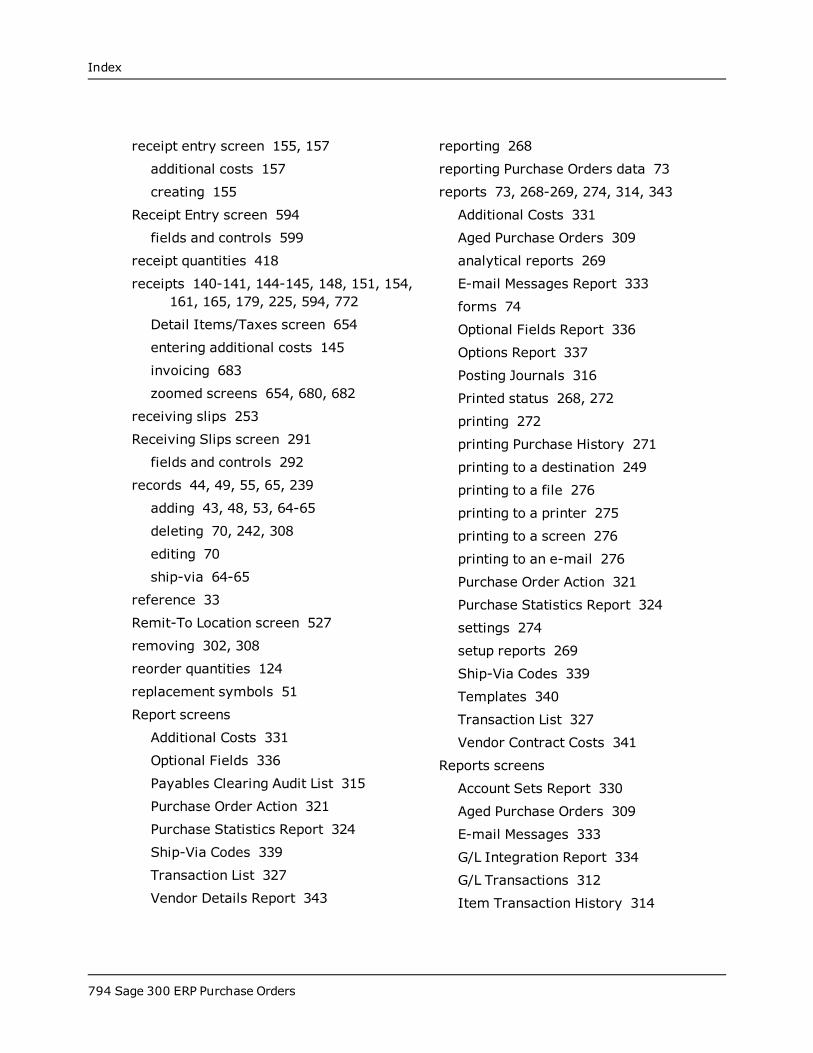
Index
receipt entry screen 155, 157
additional costs 157
creating 155
Receipt Entry screen 594
fields and controls 599
receipt quantities 418
receipts 140-141, 144-145, 148, 151, 154,161, 165, 179, 225, 594, 772
Detail Items/Taxes screen 654
entering additional costs 145
invoicing 683
zoomed screens 654, 680, 682
receiving slips 253
Receiving Slips screen 291
fields and controls 292
records 44, 49, 55, 65, 239
adding 43, 48, 53, 64-65
deleting 70, 242, 308
editing 70
ship-via 64-65
reference 33
Remit-To Location screen 527
removing 302, 308
reorder quantities 124
replacement symbols 51
Report screens
Additional Costs 331
Optional Fields 336
Payables Clearing Audit List 315
Purchase Order Action 321
Purchase Statistics Report 324
Ship-Via Codes 339
Transaction List 327
Vendor Details Report 343
reporting 268
reporting Purchase Orders data 73
reports 73, 268-269, 274, 314, 343
Additional Costs 331
Aged Purchase Orders 309
analytical reports 269
E-mail Messages Report 333
forms 74
Optional Fields Report 336
Options Report 337
Posting Journals 316
Printed status 268, 272
printing 272
printing Purchase History 271
printing to a destination 249
printing to a file 276
printing to a printer 275
printing to a screen 276
printing to an e-mail 276
Purchase Order Action 321
Purchase Statistics Report 324
settings 274
setup reports 269
Ship-Via Codes 339
Templates 340
Transaction List 327
Vendor Contract Costs 341
Reports screens
Account Sets Report 330
Aged Purchase Orders 309
E-mail Messages 333
G/L Integration Report 334
G/L Transactions 312
Item Transaction History 314
794 Sage 300 ERP Purchase Orders
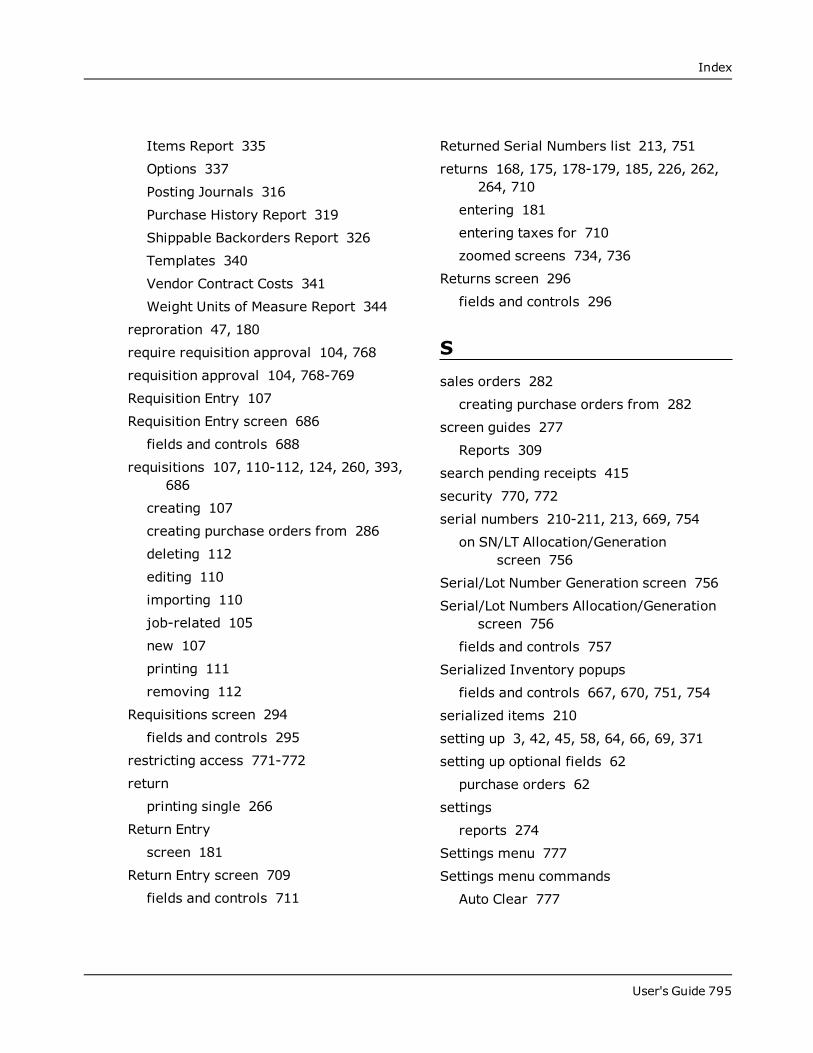
Index
Items Report 335
Options 337
Posting Journals 316
Purchase History Report 319
Shippable Backorders Report 326
Templates 340
Vendor Contract Costs 341
Weight Units of Measure Report 344
reproration 47, 180
require requisition approval 104, 768
requisition approval 104, 768-769
Requisition Entry 107
Requisition Entry screen 686
fields and controls 688
requisitions 107, 110-112, 124, 260, 393,686
creating 107
creating purchase orders from 286
deleting 112
editing 110
importing 110
job-related 105
new 107
printing 111
removing 112
Requisitions screen 294
fields and controls 295
restricting access 771-772
return
printing single 266
Return Entry
screen 181
Return Entry screen 709
fields and controls 711
Returned Serial Numbers list 213, 751
returns 168, 175, 178-179, 185, 226, 262,264, 710
entering 181
entering taxes for 710
zoomed screens 734, 736
Returns screen 296
fields and controls 296
Ssales orders 282
creating purchase orders from 282
screen guides 277
Reports 309
search pending receipts 415
security 770, 772
serial numbers 210-211, 213, 669, 754
on SN/LT Allocation/Generationscreen 756
Serial/Lot Number Generation screen 756
Serial/Lot Numbers Allocation/Generationscreen 756
fields and controls 757
Serialized Inventory popups
fields and controls 667, 670, 751, 754
serialized items 210
setting up 3, 42, 45, 58, 64, 66, 69, 371
setting up optional fields 62
purchase orders 62
settings
reports 274
Settings menu 777
Settings menu commands
Auto Clear 777
User's Guide 795
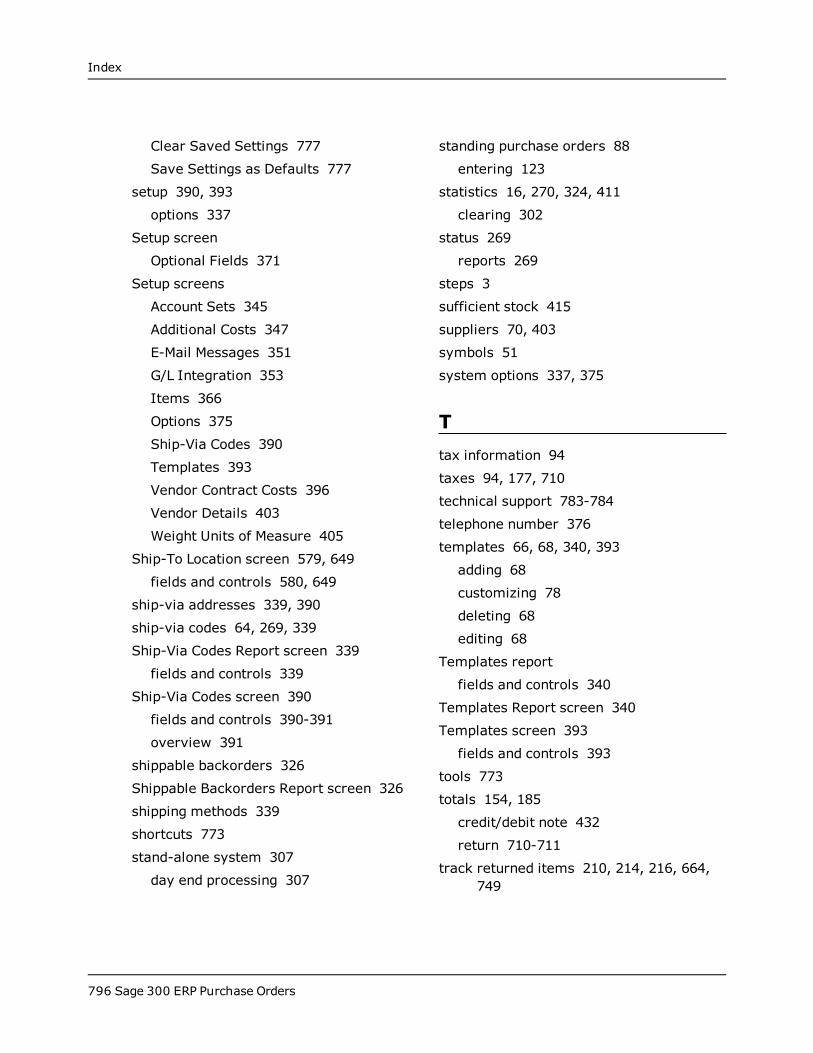
Index
Clear Saved Settings 777
Save Settings as Defaults 777
setup 390, 393
options 337
Setup screen
Optional Fields 371
Setup screens
Account Sets 345
Additional Costs 347
E-Mail Messages 351
G/L Integration 353
Items 366
Options 375
Ship-Via Codes 390
Templates 393
Vendor Contract Costs 396
Vendor Details 403
Weight Units of Measure 405
Ship-To Location screen 579, 649
fields and controls 580, 649
ship-via addresses 339, 390
ship-via codes 64, 269, 339
Ship-Via Codes Report screen 339
fields and controls 339
Ship-Via Codes screen 390
fields and controls 390-391
overview 391
shippable backorders 326
Shippable Backorders Report screen 326
shipping methods 339
shortcuts 773
stand-alone system 307
day end processing 307
standing purchase orders 88
entering 123
statistics 16, 270, 324, 411
clearing 302
status 269
reports 269
steps 3
sufficient stock 415
suppliers 70, 403
symbols 51
system options 337, 375
Ttax information 94
taxes 94, 177, 710
technical support 783-784
telephone number 376
templates 66, 68, 340, 393
adding 68
customizing 78
deleting 68
editing 68
Templates report
fields and controls 340
Templates Report screen 340
Templates screen 393
fields and controls 393
tools 773
totals 154, 185
credit/debit note 432
return 710-711
track returned items 210, 214, 216, 664,749
796 Sage 300 ERP Purchase Orders
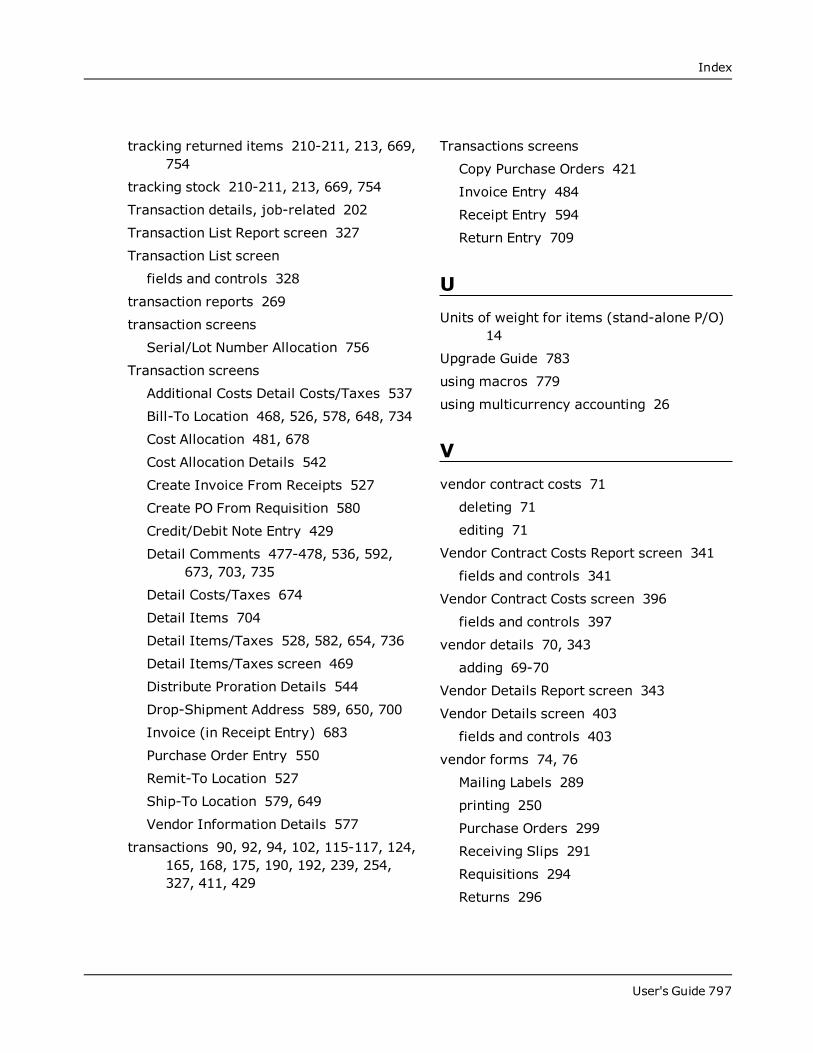
Index
tracking returned items 210-211, 213, 669,754
tracking stock 210-211, 213, 669, 754
Transaction details, job-related 202
Transaction List Report screen 327
Transaction List screen
fields and controls 328
transaction reports 269
transaction screens
Serial/Lot Number Allocation 756
Transaction screens
Additional Costs Detail Costs/Taxes 537
Bill-To Location 468, 526, 578, 648, 734
Cost Allocation 481, 678
Cost Allocation Details 542
Create Invoice From Receipts 527
Create PO From Requisition 580
Credit/Debit Note Entry 429
Detail Comments 477-478, 536, 592,673, 703, 735
Detail Costs/Taxes 674
Detail Items 704
Detail Items/Taxes 528, 582, 654, 736
Detail Items/Taxes screen 469
Distribute Proration Details 544
Drop-Shipment Address 589, 650, 700
Invoice (in Receipt Entry) 683
Purchase Order Entry 550
Remit-To Location 527
Ship-To Location 579, 649
Vendor Information Details 577
transactions 90, 92, 94, 102, 115-117, 124,165, 168, 175, 190, 192, 239, 254,327, 411, 429
Transactions screens
Copy Purchase Orders 421
Invoice Entry 484
Receipt Entry 594
Return Entry 709
UUnits of weight for items (stand-alone P/O)
14
Upgrade Guide 783
using macros 779
using multicurrency accounting 26
Vvendor contract costs 71
deleting 71
editing 71
Vendor Contract Costs Report screen 341
fields and controls 341
Vendor Contract Costs screen 396
fields and controls 397
vendor details 70, 343
adding 69-70
Vendor Details Report screen 343
Vendor Details screen 403
fields and controls 403
vendor forms 74, 76
Mailing Labels 289
printing 250
Purchase Orders 299
Receiving Slips 291
Requisitions 294
Returns 296
User's Guide 797
Index
Vendor Information Details screen 577
fields and controls 577
vendor tax information 94
View Details 408
visual basic macros 779
Wweight units of measure 344
Weight units of measure
defining (stand-alone P/O) 14
Weight Units of Measure Reportscreen 344
Weight Units of Measure screen 405
fields and controls 406
Workflow macro 779
Yyear-end 219
ZZoom button 775
798 Sage 300 ERP Purchase Orders