Embed Size (px)
Citation preview

Service Bulletin 18-042April 12, 2018 Version 3
Safety Recall: Front Seats Frame RivetsSupersedes 18-042, dated April 11, 2018, to revise the information highlighted in yellow
AFFECTED VEHICLES
Year Model Trim VIN Range
2018 Ridgeline RT-L, RTL-T, RTL-E, BlackEdition
Check the iN VIN status for eligibility.
2018 Pilot EX, EX-L, Touring, Elite Check the iN VIN status for eligibility.
REVISION SUMMARYThe TOOL INFORMATION table was added.
BACKGROUNDA limited number of 2018 Pilot and a very limited number of 2018 Ridgeline vehicles potentially were manufactured withdefective seat frame rivets in the front seats. If a vehicle with a defective rivet is involved in a crash, the seat may notoperate as designed to protect the occupant, leading to an increased potential for injury or death.
CUSTOMER NOTIFICATIONOwners of affected vehicles will be sent a notification of this campaign.
Do an iN VIN status inquiry to make sure the vehicle is shown as eligible.
Some vehicles affected by this campaign may be in your new or used vehicle inventory.
Failure to repair a vehicle subject to a recall or campaign may subject your dealership to claims or lawsuits from thecustomer or anyone else harmed as a result of such failure. To see if a vehicle in inventory is affected by this safetyrecall, do a VIN status inquiry before selling it.
CORRECTIVE ACTION• Ridgeline (RT-L, RTL-T, RTL-E, Black Edition) - Replace both driver's and passenger's seat H-frames.
• Pilot (EX-L, Touring, Elite) - Replace both driver's and passenger's seat H-frames.
• Pilot (EX) - Replace only the driver's seat H-frame.
CUSTOMER INFORMATION:The information in this bulletin is intended for use only by skilled technicians who have the proper tools, equipment, andtraining to correctly and safely maintain your vehicle. These procedures should not be attempted by “do-it-yourselfers,” and you should not assumethis bulletin applies to your vehicle, or that your vehicle has the condition described. To determine whether this information applies, contact anauthorized Honda automobile dealer.
© 2018 American Honda Motor Co., Inc. — All Rights Reserved Page 1 of 15

PARTS INFORMATION
Part Name Part Number Quantity
Driver Seat Frame - Pilot (Touring or Elite) 81605-TG7-306 1
Driver Seat Frame - Pilot (EX or EX-L) 81605-TG7-305 1
Passenger Seat Frame - Pilot (EX-L, Touring or Elite) 81205-TG7-A32 1
Driver Seat Frame - Ridgeline (RTL-E or Black) 81605-TG7-306 1
Driver Seat Frame - Ridgeline (RTL or RTL-T) 81605-TG7-305 1
Passenger Seat Frame - Ridgeline (RTL, RTL-T, RTL-E orBlack)
81205-T6Z-A41 1
TOOL INFORMATION
Part Name Part Number Quantity
Belt Buckle Release Tool 07AAF-TG7A100 1
WARRANTY CLAIM INFORMATION
OperationNumber
Description Flat RateTime
DefectCode
SymptomCode
TemplateID
Failed Part Number
8511L8 Pilot EX-L - Replacedriver's seat frame 1.3 hrs
6JC00 T0T00 A18042A 81526-TG7-A118521J0 Pilot EX-L - Replace
passenger's seat frame 1.3 hrs
8511L8
Pilot Touring/Elite -Replace driver's seatframe (includes drivingposition memory clearprocedure)
1.3 hrs
6JC00 T0T00 A18042B 81526-TG7-A11
8521J0Pilot Touring/Elite -Replace passenger'sseat frame
1.3 hrs
OperationNumber
Description Flat RateTime
DefectCode
SymptomCode
TemplateID
Failed Part Number
8511L8
Ridgeline RTL-E/Black- Replace driver's seatframe (includes drivingposition memory clearprocedure)
1.3 hrs
6JC00 T0T00 A18042C 81526-TG7-A11
8521J0Ridgeline RTL-E/Black- Replace passenger'sseat frame
1.3 hrs
Page 2 of 15

OperationNumber
Description Flat RateTime
DefectCode
SymptomCode
TemplateID
Failed Part Number
8511L8Ridgeline RTL/RTL-T -Replace driver's seatframe
1.3 hrs
6JC00 T0T00 A18042D 81526-TG7-A11
8521J0Ridgeline RTL/RTL-T -Replace passenger'sseat frame
1.3 hrs
Applies to driver's side only.
OperationNumber
Description Flat RateTime
DefectCode
SymptomCode
TemplateID
Failed Part Number
8511L8 Pilot EX- Replacedriver's seat frameonly.
1.3 hrs 6JC00 T0T00 A18042E 81526-TG7-A11
Skill Level: Repair Technician
REPAIR PROCEDURE - REMOVING THE FRONT SEATS
NOTES
• All power seats require replacement. A manual seat (Pilot EX front passenger seat) DOES NOT requirereplacement.
• SRS Components are located in this area. Review the SRS component locations and the precautions andprocedures in the service information before doing any repairs or service.
1. Remove the front seats. Refer to the service information.
NOTES
• Set the seat to the highest position before removing the seat.
• Do not remove the seat cushion cover and seat-back cover from their pads.
• Do not disconnect the battery until the seat has been adjusted as needed to remove the seats from the vehicle.
• Use special tool T/N: 07AAF-TG7A100 when removing the front passenger's seatbelt from the anchor.
2. Place the seat(s) on a level working surface.
For driver's seat repair information, go to REPAIR PROCEDURE - DRIVER'S SEAT.
For front passenger's seat repair information, go to REPAIR PROCEDURE - PASSENGER'S SEAT.
Page 3 of 15
REPAIR PROCEDURE - DRIVER'S SEAT1. Remove the rear foot covers.
2. Remove the front cushion cover.
3. Remove the outer seat recline cover.
4. Remove the upper rail outer cover.
Page 4 of 15

5. Remove the inner recline cover.
6. Disconnect the seat cushion blower bag. (Pilot Elite trim only)
NOTELeave the blower motor on the seat.
7. Remove the front foot covers.
Page 5 of 15

8. Disconnect the slide motor harness connector and harness clips.
9. Remove 2 torx bolts at the rear-right corner of the driver seat.
10. Remove 2 nuts at the remaining 3 corners.
Page 6 of 15

11. Make sure nothing is connected to the frame, then slowly lift the seat and set it aside.
12. Make sure the new frame is for the driver's side, and replace the original driver's seat frame.
Page 7 of 15

13. Slowly place the driver's seat onto the new frame.
NOTEMake sure nothing gets pinched between the seat and frame.
14. Install and hand tighten the 2 torx bolts into the rear-right corner, then the 2 nuts in the remaining 3 corners.
Page 8 of 15
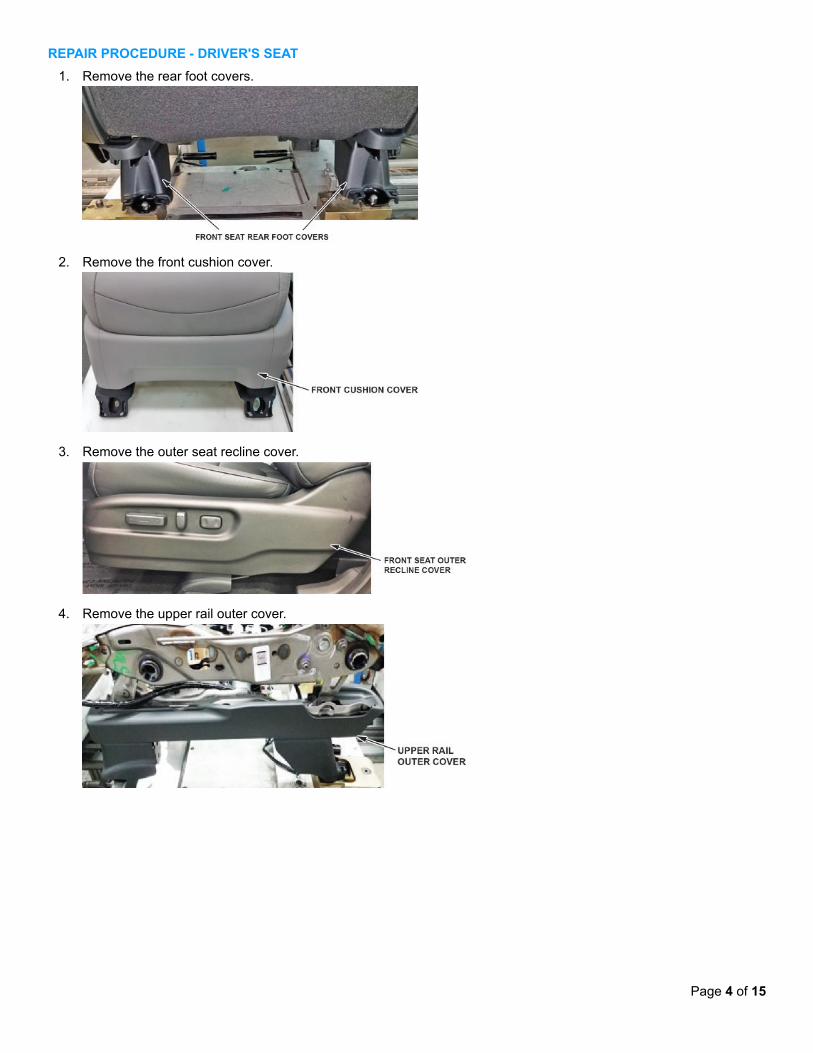
15. Torque the torx bolts and nuts to 30 N·m (22 lb-ft) in the sequence shown.
16. Install all removed parts on the driver's seat in the reverse order of removal.
17. Once you are finished with both driver's and front passenger's seat repair, go to REPAIR PROCEDURE -INSTALLING THE FRONT SEATS.
REPAIR PROCEDURE - FRONT PASSENGER'S SEAT
NOTEAll power seats require replacement. A manual seat (Pilot EX front passenger seat) DOES NOT requirereplacement.
1. Remove the rear foot covers.
2. Remove the front cushion cover.
Page 9 of 15

3. Remove the outer recline cover cap, then the outer seat recline cover.
NOTECarefully remove the recline cover cap to avoid damage.
4. Remove the inner recline cover.
5. Unclip the trim cushion hook strips and all the hook strips under the seat.
Page 10 of 15

6. Disconnect the seat cushion blower bag. (Pilot Elite trim only)
NOTELeave the blower motor on the seat.
7. Remove the front foot covers.
8. Disconnect the passenger's weight sensor connectors.
Page 11 of 15

9. Disconnect the slide motor connector.
10. Remove the weight sensor nuts on all 4 corners of the seat.
11. Make sure nothing is connected to the frame, then slowly lift the seat and set it aside.
Page 12 of 15

12. Remove the weight sensor collars.
13. Make sure the new frame is for the passenger's side, and replace the original passenger's seat frame.
14. Install the weight sensor collars.
Page 13 of 15
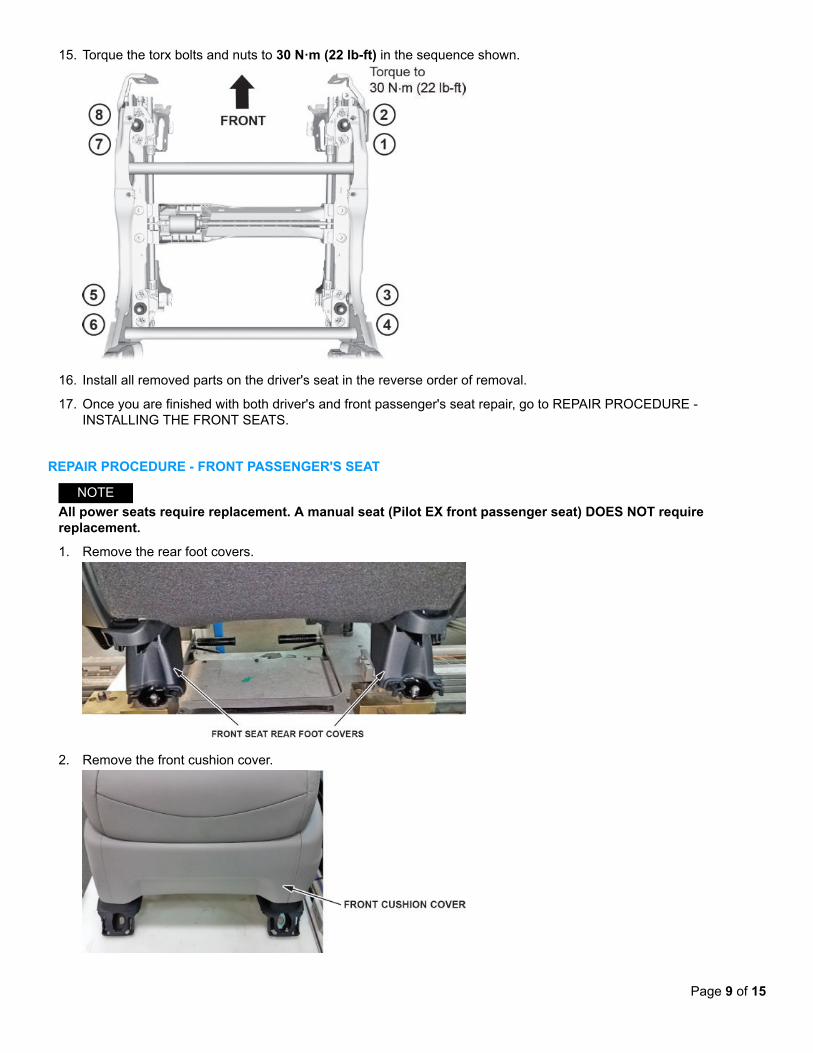
15. Slowly place the passenger's seat onto the new frame.
NOTEMake sure nothing gets pinched between the seat and frame.
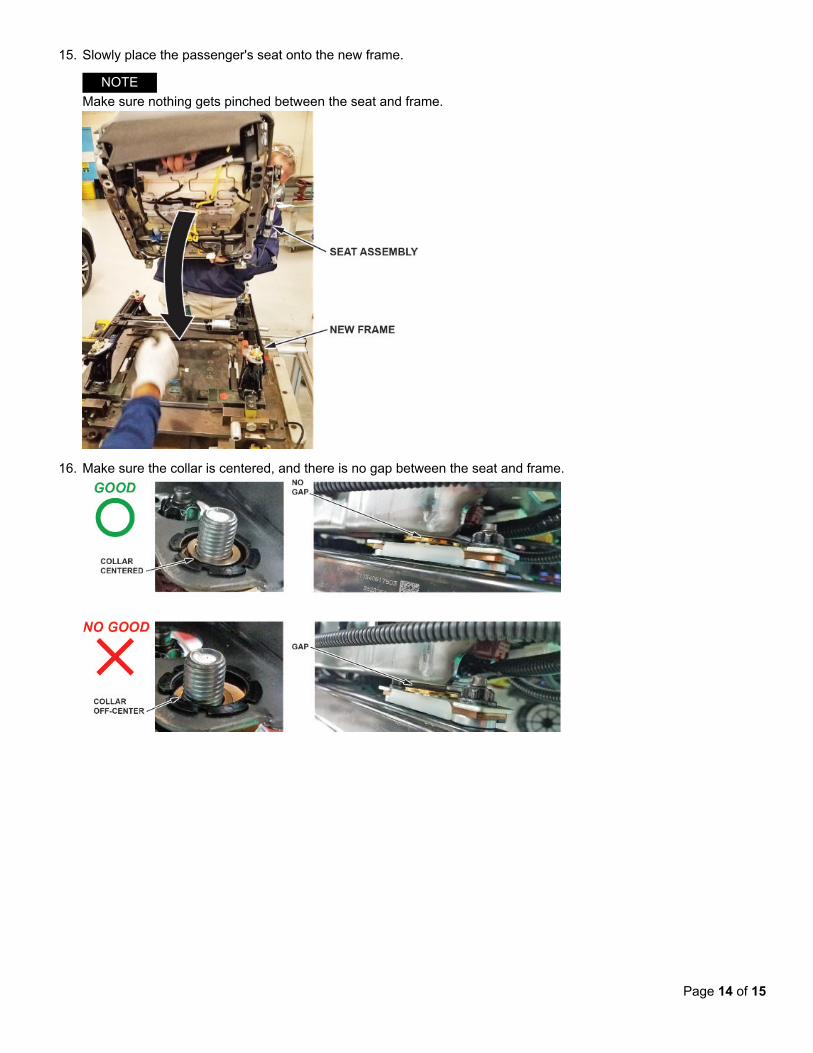
16. Make sure the collar is centered, and there is no gap between the seat and frame.
Page 14 of 15
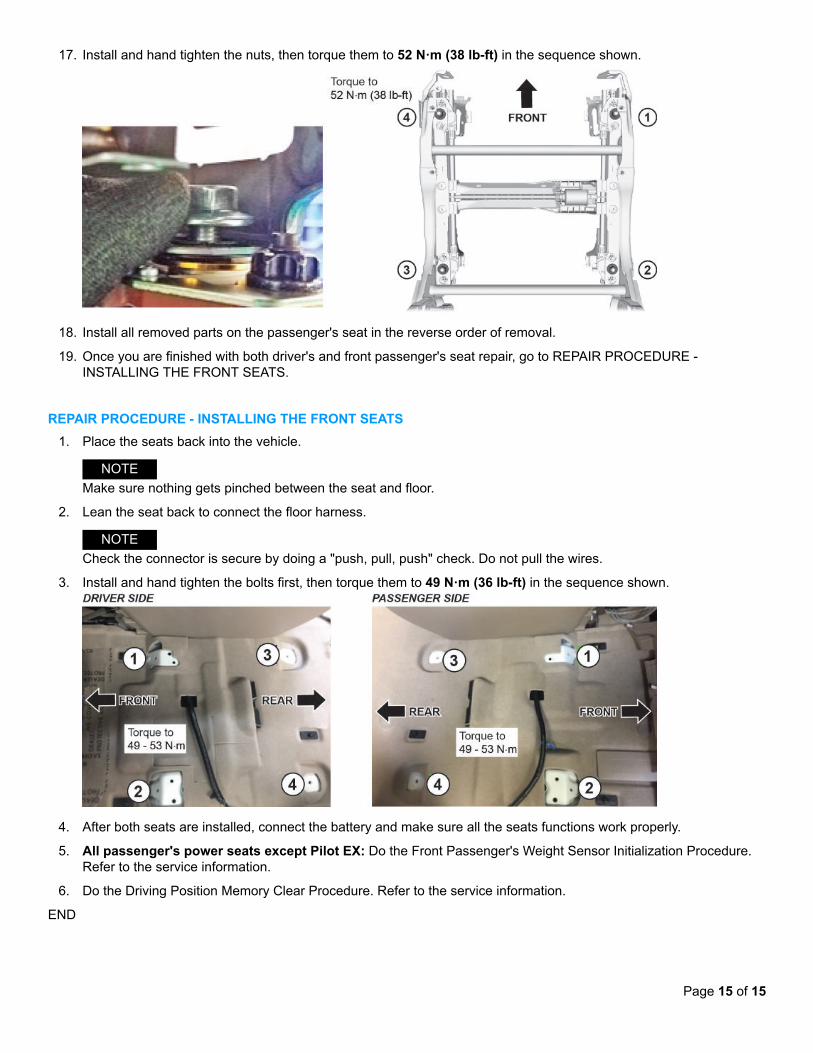
17. Install and hand tighten the nuts, then torque them to 52 N·m (38 lb-ft) in the sequence shown.
18. Install all removed parts on the passenger's seat in the reverse order of removal.
19. Once you are finished with both driver's and front passenger's seat repair, go to REPAIR PROCEDURE -INSTALLING THE FRONT SEATS.
REPAIR PROCEDURE - INSTALLING THE FRONT SEATS1. Place the seats back into the vehicle.
NOTEMake sure nothing gets pinched between the seat and floor.
2. Lean the seat back to connect the floor harness.
NOTECheck the connector is secure by doing a "push, pull, push" check. Do not pull the wires.
3. Install and hand tighten the bolts first, then torque them to 49 N·m (36 lb-ft) in the sequence shown.
4. After both seats are installed, connect the battery and make sure all the seats functions work properly.
5. All passenger's power seats except Pilot EX: Do the Front Passenger's Weight Sensor Initialization Procedure.Refer to the service information.
6. Do the Driving Position Memory Clear Procedure. Refer to the service information.
END
Page 15 of 15