Embed Size (px)
Citation preview

Safari Arms, Inand its subsidiary
SchuetzenPistol Works
.45 Automatic PistolsOwners Manual
620-626 Old Pacific Highway SEOlympia, WA 98513
(360) 459-7940
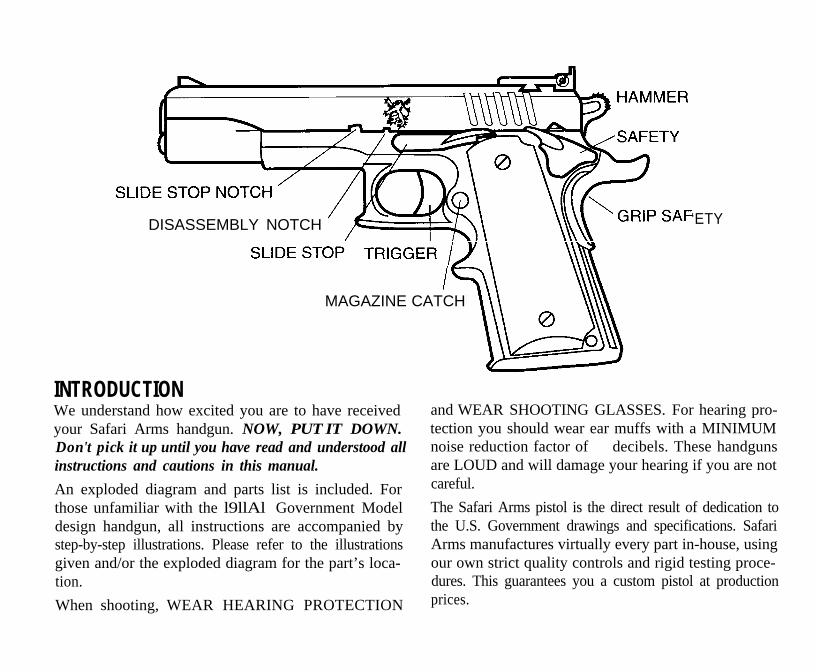
INTRODUCTION
DISASSEMBLY NOTCH
IMAGAZINE CATCH
We understand how excited you are to have receivedyour Safari Arms handgun. NOW, PUT IT DOWN.Don't pick it up until you have read and understood allinstructions and cautions in this manual.
An exploded diagram and parts list is included. Forthose unfamiliar with the l9llAl Government Modeldesign handgun, all instructions are accompanied bystep-by-step illustrations. Please refer to the illustrationsgiven and/or the exploded diagram for the part’s loca-tion.
When shooting, WEAR HEARING PROTECTION
‘ETY
and WEAR SHOOTING GLASSES. For hearing pro-tection you should wear ear muffs with a MINIMUMnoise reduction factor of 25 decibels. These handgunsare LOUD and will damage your hearing if you are notcareful.
The Safari Arms pistol is the direct result of dedication tothe U.S. Government drawings and specifications. SafariArms manufactures virtually every part in-house, usingour own strict quality controls and rigid testing proce-dures. This guarantees you a custom pistol at productionprices.

1911.45 PARTS LIST1 Slide2 LPA Adj. Rear Sight3 LPA Front Sight4 Extractor5 Firing Pin6 Firing Pin Spring7 Firing Pin Stop8 Barrel9 Barrel Link
10 Barrel Link Pin11 Barrel Bushing12 Recoil Spring13 Recoil Spring Guide14 Recoil Spring Cap15 Ejector16 Ejector Pin17 Disconnector18 Sear19 Hammer20 Hammer Strut21 Hammer Strut Pin22 Slide Stop23 Magazine Catch24 Magazine Catch Spring25 Magazine Catch Lock26 Hammer Pin27 Sear Pin28 Plunger Tube29 Slide Stop Plunger30 Plunger Spring3 1 Safety Plunger32 Thumb Safety
333435363738394041
43444546
TriggerGrip SafetySear SpringMainspring HousingMainspring Cap PinMainspring CapMainspringMainspring RetainerMainspring HousingRetainer PinGrip ScrewGrip Screw EscutcheonMagazineBarrel 36

BASIC NRA RULES FOR SAFE GUN HANDLING1. ALWAYS KEEP THE GUN POINTED IN A SAFE DIRECTION.2. ALWAYS KEEP YOUR FINGERS OFF THE TRIGGER UNTIL READY TO SHOOT.3. ALWAYS KEEP THE GUN UNLOADED UNTIL READY TO USE.4. ALWAYS TREAT YOUR GUN AS IF IT IS LOADED AND READY TO DISCHARGE.
LEAD WARNINGDischargingfirearms in poorly ventilated areas, cleaningfirearms, or handling ammunitionmay result in exposure to lead and other chemicals known to cause birth defects, reproductiveharm, cancer, and other serious physical injury. Have adequate ventilation at all times. Washhands thoroughly after exposure.
WARNING:This product is classified as a lethal weapon. Failure toread and properly execute the instructions and warn-ings in this manual could result in serious injury,death or damage to property
Do not attempt to practice loading or unloading withlive ammunition without a thorough understandingof the safe operation of this pistol.
Always treat a firearm as if it were fully loaded.
Always store and carry this product empty, with the
hammer forward on an empty chamber. Failure to doso could result in an unintentional discharge.
Keep out of reach of children.
When you squeeze the trigger, you must expect thepistol to fire and take full responsibility for youractions.
Read through the entire manual before attempting touse this product.
TABLE OF CONTENTSExploded View and Parts List, 1911 .45 ACP 3Basic Rules for Safe Gun Handling, Lead Warning, Manufacturer’s Warning 4Rules of Safety 6Ammunition 7Basic Description of Mechanism 10How to Check if Your Weapon Is Loaded 11Preparing Your Pistol for Firing 11Safety and Gun Handling 13Matchmaster “Captive” (single-pin): Disassembly, Cleaning and Reassembly 15- 19Matchmaster (2-Piece Guide Rod System): Disassembly, Cleaning and Reassembly, 20 - 25Matchmaster (One-Piece Undrilled Guide Rod System): Disassembly, Cleaning and Reassembly 26 - 30Big Deuce: Disassembly, Cleaning and Reassembly 31-35Enforcer and Cohort: Disassembly, Cleaning and Reassembly 36 - 40Manufacturer’s Warranty Instructions, 41Tips from Your Pistolsmith 42
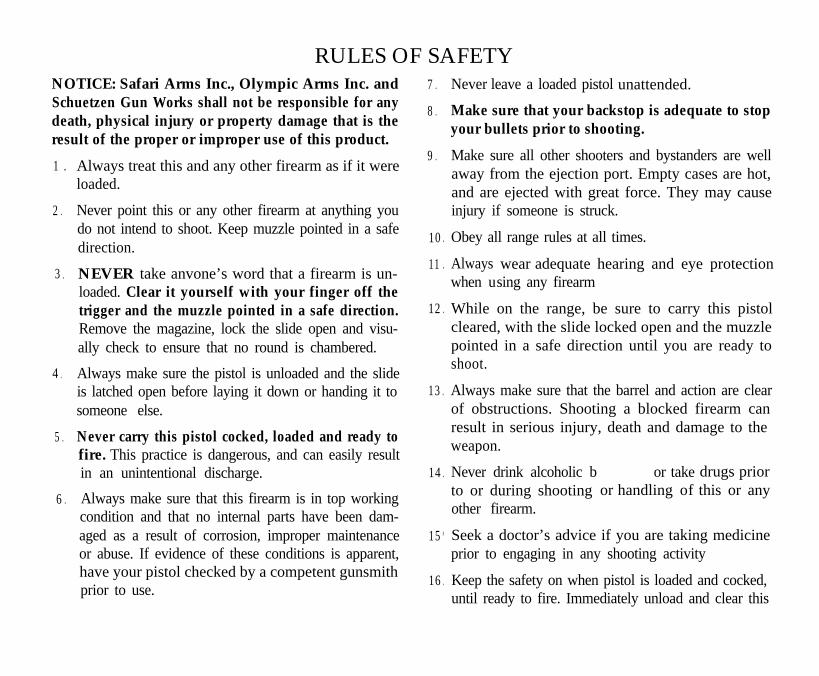
How to Determine Your Recoil System TypeThe Safari Arms Matchmaster’” has been modified over the years, and has been produced with three dif-ferent recoil systems. Instructions are provided for all three.
n rl
A hex-head opening A smooth guide rod end move the slide back until the slide stop engages.means you have a means you have either a Look at the guide rod. If there is a tiny hole drilledtwo-piece guide rod captive or a one-piece through it, you have a captive system (page 15). Ifsystem (page 20). undrilled system, so... there isn’t, you have the undrilled system (page 26).
RULES OF SAFETYNOTICE: Safari Arms Inc., Olympic Arms Inc. andSchuetzen Gun Works shall not be responsible for anydeath, physical injury or property damage that is theresult of the proper or improper use of this product.
1 .
2 .
3 .
4 .
5 .
6 .
Always treat this and any other firearm as if it wereloaded.
Never point this or any other firearm at anything youdo not intend to shoot. Keep muzzle pointed in a safedirection.
NEVER take anvone’s word that a firearm is un-loaded. Clear it yourself with your finger off thetrigger and the muzzle pointed in a safe direction.Remove the magazine, lock the slide open and visu-ally check to ensure that no round is chambered.
Always make sure the pistol is unloaded and the slideis latched open before laying it down or handing it tosomeone else.
Never carry this pistol cocked, loaded and ready tofire. This practice is dangerous, and can easily resultin an unintentional discharge.
Always make sure that this firearm is in top workingcondition and that no internal parts have been dam-aged as a result of corrosion, improper maintenanceor abuse. If evidence of these conditions is apparent,have your pistol checked by a competent gunsmithprior to use.
7 .
8 .
9 .
10 .
11 .
12 .
13 .
14 .
15 *
16 .
Never leave a loaded pistol unattended.
Make sure that your backstop is adequate to stopyour bullets prior to shooting.
Make sure all other shooters and bystanders are wellaway from the ejection port. Empty cases are hot,and are ejected with great force. They may causeinjury if someone is struck.
Obey all range rules at all times.
Always wear adequatewhen using any firearm
hearing and eye protection
While on the range, be sure to carry this pistolcleared, with the slide locked open and the muzzlepointed in a safe direction until you are ready toshoot.
Always make sure that the barrel and action are clearof obstructions. Shooting a blocked firearm canresult in serious injury, death and damage to theweapon.
Never drink alcoholic bto or during shootingother firearm.
everages or takeor handling of
drugs priorthis or any
Seek a doctor’s advice if you are taking medicineprior to engaging in any shooting activity
Keep the safety on when pistol is loaded and cocked,until ready to fire. Immediately unload and clear this
pistol when shooting sequence has been completed.
17 Never shoot at any hard or flat surface, such as rockor water. The resulting ricochets could result in phys-ical injury, death or property damage.
.
18. Never put your finger in the trigger guard until youare ready to fire.
19. Always make sure your pistol is unloaded beforecleaning.
20 .
21 .
Never force around to expldamage to the
If a firearm fai1s to fire when th
, This could cause aphysical injury and
e trigger is pulled, as
22 .
23 .
a result of slow primer ignition (hangfire), keepmuzzle pointed downrange for a minimum of 30seconds. If the round does not fire, remove the mag-azine, clear the weapon and examine the ejected,unfired cartridge. If the indentation from the firingpin is off center, light or absent, take the pistol to acompetent gunsmith. If the indent appears normalcompared to other rounds, assume the round isfaulty, separate it from the other cartridges, reloadand continue shooting.
Never use this pistol in any manner other than thatfor which it was specifically intended.
Never indulge in “horseplay” while holding anyfirearm.
AMMUNITION1. Use only high-quality, original U.S. factory-manu-
factured ammunition. Don’t oil cartridges. Don’tspray aerosol lubricants or cleaners directly ontoyour cartridges, or where excess spray may flow intocontact with them. Lubricants or other foreign mat-ter on cartridges can cause potentially dangerousammunition malfunction. Use onlv ammunition ofthe caliber for which your firearm is chambered. Theproper caliber is engraved on the barrel; never try touse any other caliber.
2. The use of reloaded, “remanufactured:’ aluminumcased, hand-loaded or other non-standard ammuni-tion voids all warranties. Reloading is a science andimproperly loaded ammunition can be dangerous.Severe damage to the pistol and serious injury to theshooter or to others may result. Always use ammuni-tion that complies with the industry performancestandards established by the Sporting Arms andAmmunition Manufacturers’ Institute, Inc. of theUnited States (SAAMI).

3. Firearms may be severely damaged and seriousinjury to the shooter or bystanders may result fromany condition causing excessive pressure inside thebarrel or chamber during firing. Excessive pressurecan be caused by powder overloads, an obstructionin the barrel, or by the use of defective cartridges.Never use dirty, corroded or damaged cartridges -they can lead to a burst cartridge case and damage tothe firearm and to the shooter as a result of theexplosive escape of high-pressure propellant gaseswithin the firearms mechanism.
4. Immediately stop shooting and check the barrel for apossible obstruction whenever:
l You have difficulty in, or feel unusual resistance inchambering a cartridge, or
l A cartridge misfires (fails to go off), or
l The mechanism fails to extract a fired cartridge
l Unburned grains of powder are discovered spilledin the mechanism, or
l A shot sounds weak or “funny”
In such circumstances it is possible that a bullet islodged part-way down the barrel. Firing a subse-quent bullet into the obstructed barrel can wreck thefirearm and cause serious injury to the shooter orbystanders.
5. Bullets can become lodged in the barrel -
l If the cartridge has been improperly loaded with-out propellant powder, or if the powder fails toignite. (Primer ignition alone will push the bullet outof the case, but does not generate enough energy topush it completely out of the barrel).
l If the bullet is not properly seated tightly in thecartridge case. When such a cartridge is extractedfrom the chamber without being fired, the bulletmay be left behind in the bore. Subsequent chamber-ing of another cartridge may push the first bullet fur-ther into the bore.
6. If there is any reason to suspect that a bullet isobstructing the barrel, immediately unload thefirearm and look through the bore. It is notsufficient to just look in the chamber. A bullet may belodged some distance down the barrel where it can-not easily be seen. If a bullet is in the bore, do notattempt to shoot it out by using another cartridge,or by blowing it out with a blank, or a cartridgefrom which the bullet has been removed. Such tech-niques can generate excessive pressure, wreck thefirearm and cause serious personal injury.
If the bullet can be easily removed with a cleaningrod, (using hand pressure only, never “hammer” abullet lodged in the bore), clean any unburned pow-der grains from the bore, chamber and mechanismbefore resuming shooting. If the bullet cannot bedislodged by tapping it with a cleaning rod, take thepistol to a gunsmith.
7 .
8 .
9 .
Dirt, corrosion, or other foreign matter on a car-tridge can cause difficulties with chambering andmay cause the cartridge case to burst upon firing.The same is true of cartridges which are damaged ordeformed.
Don’t oil your cartridges, and be sure to wipe thechamber clean of any oil preservative before youstart shooting. Oil interferes with the frictionbetween cartridge case and chamber wall that is nec-essary for safe functioning, and subjects the pistol tostress similar to that imposed by excessive pressure.
Use lubricantsfirearm. Avoid
sparingly on the moving parts of yourexcessive spraying of any aerosol gun
care product, especially where it may get on ammu-nition. All lubricants, and aerosol spray lubricants inparticular, can penetrate cartridge primers andcause misfires. Some highly penetrative lubricantscan also migrate inside carridge cases and causedeterioration of the propellant powder. When thecartridge is fired, the powder may not ignite. If onlythe primer ignites, there is a danger that the bulletmay become lodged in the barrel.
10. 1911-style pistols were designed to function bestwith bullets that have a smooth contoured nose,seated to an overall length of 1.260 to 1.270 inches(1.270 is the maximum).
Shorter, blunter ammunition, such as hollow points,will normally function best if the barrel is throatedand polished, by a competent pistolsmith, specifical-ly for the bullet configuration most desired.Throating and polishing are standard on all SafariArms pistols.
When cartridges fail to feed, check the following:
A. Substandard ammunition.
B. Magazine is poor quality, or feed lips are dam-aged.
C. Cartridge overall length too short.
D. Bullet nose too blunt.
E. Slide is short-stroking. Ammo charge is not toSAAMI specifications.
NOTE: 95% of all autopistol malfunctions are due toammunition or defective magazines.
SLIDE STOP ~ SLIDE
MAGAZINE
Q
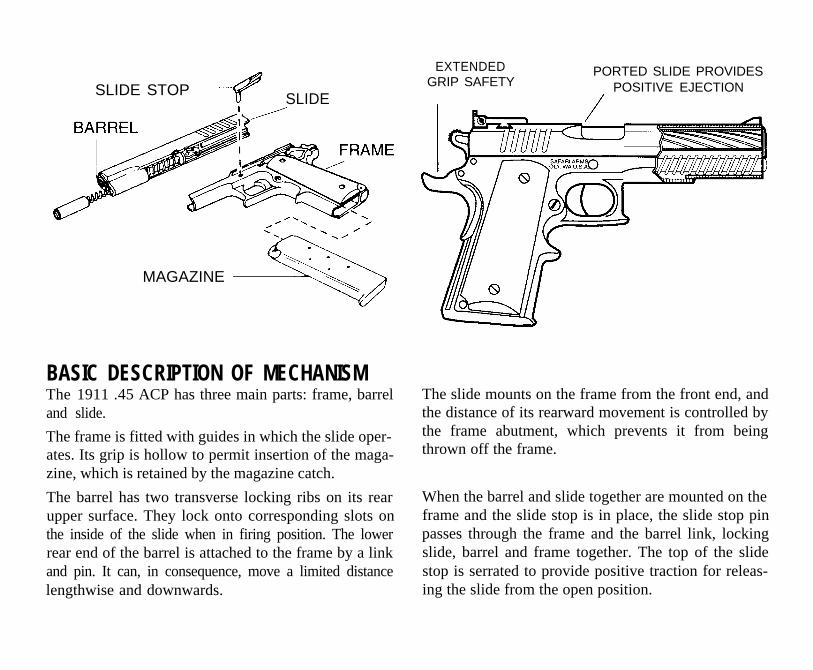
BASIC DESCRIPTION OF MECHANISMThe 1911 .45 ACP has three main parts: frame, barreland slide.
The frame is fitted with guides in which the slide oper-ates. Its grip is hollow to permit insertion of the maga-zine, which is retained by the magazine catch.
The barrel has two transverse locking ribs on its rearupper surface. They lock onto corresponding slots onthe inside of the slide when in firing position. The lowerrear end of the barrel is attached to the frame by a linkand pin. It can, in consequence, move a limited distancelengthwise and downwards.
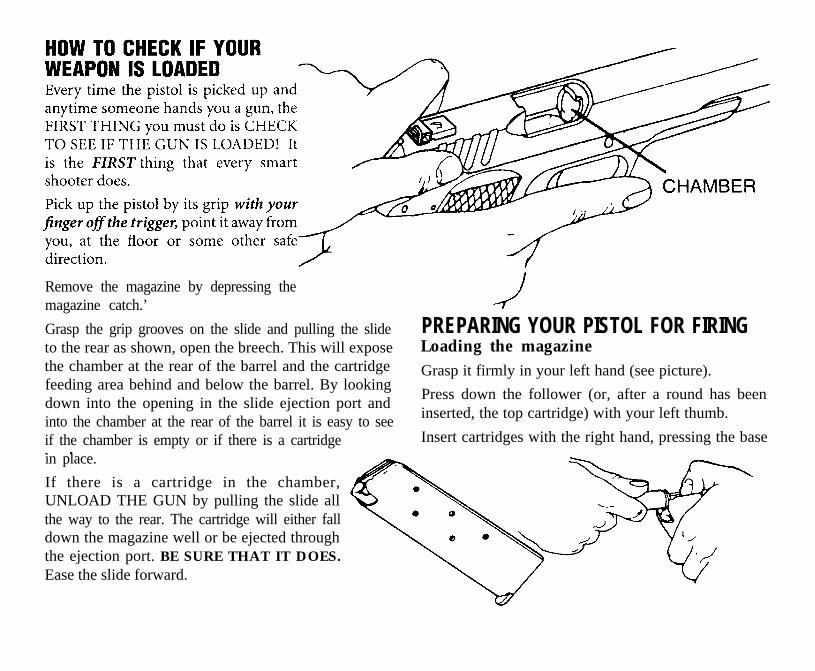
EXTENDED PORTED SLIDE PROVIDESGRIP SAFETY POSITIVE EJECTION
The slide mounts on the frame from the front end, andthe distance of its rearward movement is controlled bythe frame abutment, which prevents it from beingthrown off the frame.
When the barrel and slide together are mounted on theframe and the slide stop is in place, the slide stop pinpasses through the frame and the barrel link, lockingslide, barrel and frame together. The top of the slidestop is serrated to provide positive traction for releas-ing the slide from the open position.
Remove the magazine by depressing themagazine catch.’
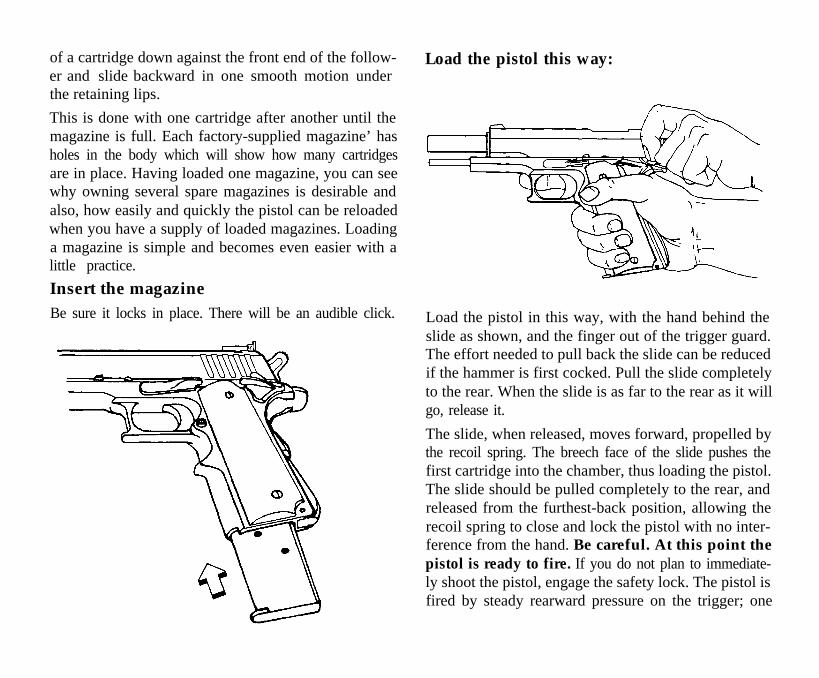
Grasp the grip grooves on the slide and pulling the slide PREPARING YOUR PISTOL FOR FIRINGto the rear as shown, open the breech. This will expose Loading the magazinethe chamber at the rear of the barrel and the cartridgefeeding area behind and below the barrel. By lookingdown into the opening in the slide ejection port andinto the chamber at the rear of the barrel it is easy to see/if the chamber is empty or if there is a cartridge
Grasp it firmly in your left hand (see picture).
Press down the follower (or, after a round has beeninserted, the top cartridge) with your left thumb.
Insert cartridges with the right hand, pressing the basein place.
If there is a cartridge in the chamber,UNLOAD THE GUN by pulling the slide allthe way to the rear. The cartridge will either falldown the magazine well or be ejected throughthe ejection port. BE SURE THAT IT DOES.Ease the slide forward.
of a cartridge down against the front end of the follow-er and slide backward in one smooth motion underthe retaining lips.
This is done with one cartridge after another until themagazine is full. Each factory-supplied magazine’ hasholes in the body which will show how many cartridgesare in place. Having loaded one magazine, you can seewhy owning several spare magazines is desirable andalso, how easily and quickly the pistol can be reloadedwhen you have a supply of loaded magazines. Loadinga magazine is simple and becomes even easier with alittle practice.
Insert the magazineBe sure it locks in place. There will be an audible click.
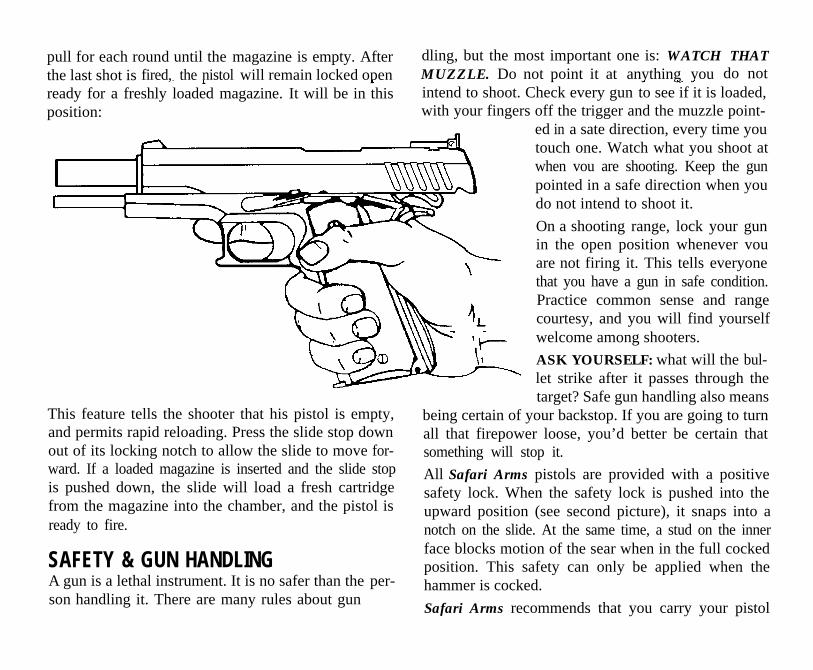
Load the pistol this way:
Load the pistol in this way, with the hand behind theslide as shown, and the finger out of the trigger guard.The effort needed to pull back the slide can be reducedif the hammer is first cocked. Pull the slide completelyto the rear. When the slide is as far to the rear as it willgo, release it.
The slide, when released, moves forward, propelled bythe recoil spring. The breech face of the slide pushes thefirst cartridge into the chamber, thus loading the pistol.The slide should be pulled completely to the rear, andreleased from the furthest-back position, allowing therecoil spring to close and lock the pistol with no inter-ference from the hand. Be careful. At this point thepistol is ready to fire. If you do not plan to immediate-ly shoot the pistol, engage the safety lock. The pistol isfired by steady rearward pressure on the trigger; one
pull for each round until the magazine is empty. After dling, but the most important one is: WATCH THATthe last shot is fired, the nistol will remain locked open MUZZLE. Do not point it at anything you do notready for a freshly loaded magazine. It will be in thisposition:
intend to shoot. Check every gun to see if it is loaded,with your fingers off the trigger and the muzzle point-
ed in a sate direction, every time youtouch one. Watch what you shoot atwhen vou are shooting. Keep the gunpointed in a safe direction when you
I \\\\\\\\\\ \
do not intend to shoot it.
On a shooting range, lock your gunin the open position whenever vouare not firing it. This tells everyonethat you have a gun in safe condition.Practice common sense and rangecourtesy, and you will find yourselfwelcome among shooters.
ASK YOURSELF: what will the bul-’ let strike after it passes through the
target? Safe gun handling also meansThis feature tells the shooter that his pistol is empty, being certain of your backstop. If you are going to turnand permits rapid reloading. Press the slide stop down all that firepower loose, you’d better be certain thatout of its locking notch to allow the slide to move for- something will stop it.ward. If a loaded magazine is inserted and the slide stopis pushed down, the slide will load a fresh cartridge
All Safari Arms pistols are provided with a positive
from the magazine into the chamber, and the pistol issafety lock. When the safety lock is pushed into the
ready to fire.upward position (see second picture), it snaps into anotch on the slide. At the same time, a stud on the inner
SAFETY & GUN HANDLINGface blocks motion of the sear when in the full cocked
A gun is a lethal instrument. It is no safer than the per-position. This safety can only be applied when thehammer is cocked.
son handling it. There are many rules about gun han- Safari Arms recommends that you carry your pistol
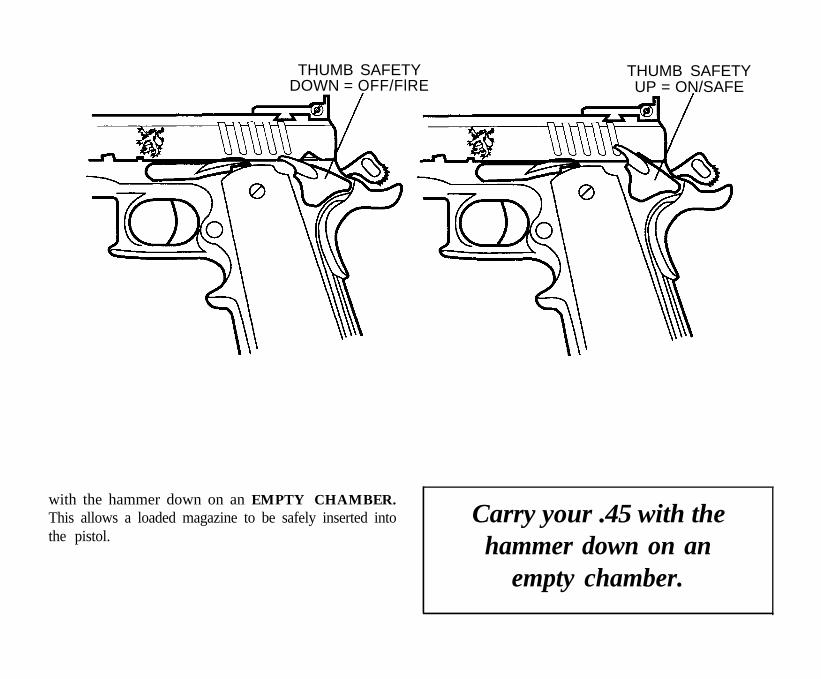
THUMB SAFETYDOWN = OFF/FlRE
THUMB SAFETYUP = ON/SAFE
with the hammer down on an EMPTY CHAMBER.This allows a loaded magazine to be safely inserted intothe pistol.
Carry your .45 with thehammer down on an
empty chamber.

MATCHMASTER'CAPTIVE' (Single-pin)For Matchmaster pistols man-ufactured after August, 1995.Remove magazine and check tomake sure pistol is unloaded.
Lock the slide back with the slidestop. Into the exposed hole in theside of the guide rod, insert thetakedown tool, a bent paper clipor a short pin or nail.
While holding the takedowntool or pin in place, ease the slideforward until the tool or pintakes up the tension (the springtension will hold it in place).
Move the slide forward a littleuntil the takedown notch is justabove the slide stop tab.
TAKEDOWN
TooL0lka
TAKEDOWN NOTCH
TAKEDOWN-nnm I x0\ \KfC-I UUL
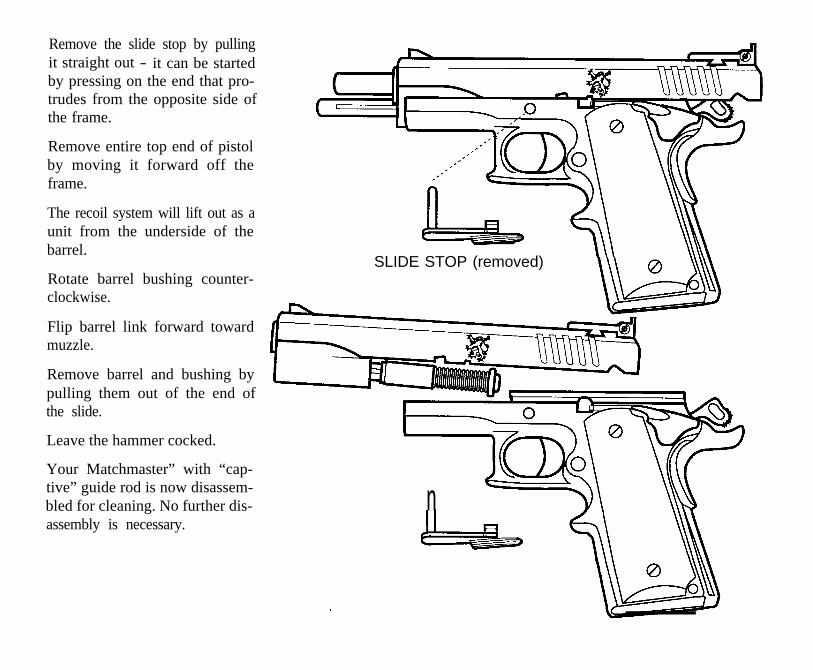
Remove the slide stop by pullingit straight out - it can be startedby pressing on the end that pro-trudes from the opposite side ofthe frame.
Remove entire top end of pistolby moving it forward off theframe.
The recoil system will lift out as aunit from the underside of thebarrel.
Rotate barrel bushing counter-clockwise.
Flip barrel link forward towardmuzzle.
Remove barrel and bushing bypulling them out of the end ofthe slide.
Leave the hammer cocked.
Your Matchmaster” with “cap-tive” guide rod is now disassem-bled for cleaning. No further dis-assembly is necessary.
SLIDE STOP (removed)
n
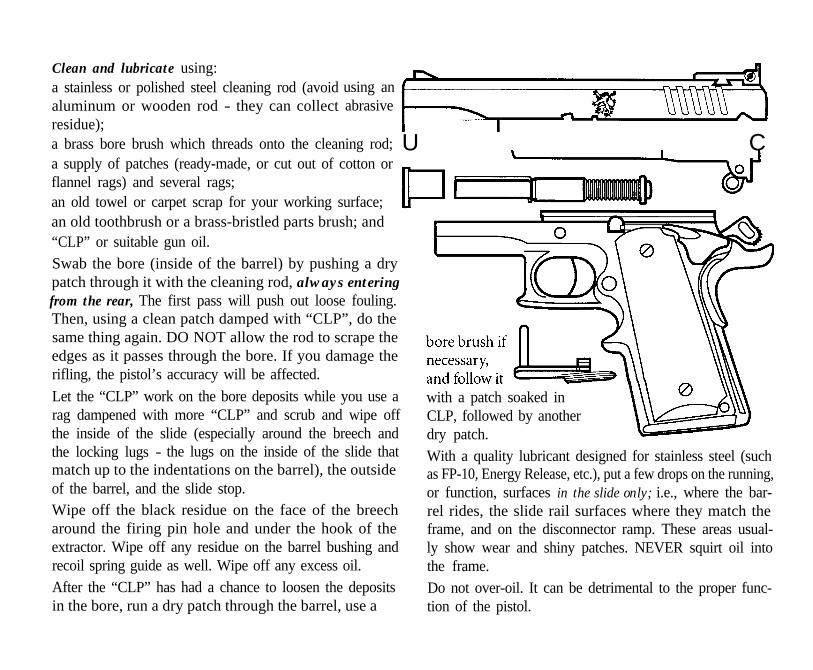
Clean and lubricate using:a stainless or polished steel cleaning rod (avoidaluminum or wooden rod - they can collectresidue);
using anabrasive
a brass bore brush which threads onto the cleaning rod; U Ca supply of patches (ready-made, or cut out of cotton orflannel rags) and several rags;an old towel or carpet scrap for your working surface;an old toothbrush or a brass-bristled parts brush; and“CLP” or suitable gun oil.Swab the bore (inside of the barrel) by pushing a drypatch through it with the cleaning rod, always enteringfrom the rear, The first pass will push out loose fouling.Then, using a clean patch damped with “CLP”, do thesame thing again. DO NOT allow the rod to scrape theedges as it passes through the bore. If you damage therifling, the pistol’s accuracy will be affected.
Let the “CLP” work on the bore deposits while you use arag dampened with more “CLP” and scrub and wipe offthe inside of the slide (especially around the breech andthe locking lugs - the lugs on the inside of the slide thatmatch up to the indentations on the barrel), the outsideof the barrel, and the slide stop.Wipe off the black residue on the face of the breecharound the firing pin hole and under the hook of theextractor. Wipe off any residue on the barrel bushing andrecoil spring guide as well. Wipe off any excess oil.After the “CLP” has had a chance to loosen the depositsin the bore, run a dry patch through the barrel, use a
P
with a patch soaked inCLP, followed by anotherdry patch.With a quality lubricant designed for stainless steel (suchas FP-10, Energy Release, etc.), put a few drops on the running,or function, surfaces in the slide only; i.e., where the bar-rel rides, the slide rail surfaces where they match theframe, and on the disconnector ramp. These areas usual-ly show wear and shiny patches. NEVER squirt oil intothe frame.Do not over-oil. It can be detrimental to the proper func-tion of the pistol.

Matchmaster Reassembly(with “Captive” recoil-spring guide system)
Turn slide upside down. Flip barrel link toward themuzzle and ease barrel into theslide until it seats on the lockinglugs in the top of the slide.
Press barrel bushing intoand twist it clockwise toFlip barrel link to the rear.
placelock.
Insert recoil spring assembly intoplace from the back of the slide.Note: because the spring is heldunder tension by the takedowntool or pin, you do not need toadjust its position relative to theslide and barrel; just make surethat the “ears” on the guide rodare properly seated against thebarrel, and the spring cap is atleast partially within the lowerportion of the slide.
Flip barrel link to upright posi-tion.
Align the grooves in the receiverwith the rails on the slide andpress them together until thebarrel link hole is visible throughthe hole for the slide stop. Insertthe slide stop.

NOTE: Do not try to align the bar-rel link, the disassembly notch andthe top of the slide stop all at thesame time. Align the link first,insert the slide stop shaft, and thenrotate the slide stop upward until italigns with the disassembly notch.
Move slide to the rear until thesemicircular protrusion on theback of the slide stop aligns withthe semi-circular disassemblynotch on the bottom of the slide.Exercise caution as you rotate theslide stop upward, or you will marthe finish.
Push inward on the slide stop untilit snaps into place.
Push the slide a little further to therear and move the slide stop intothe slide stop notch.
Pull out the takedown tool or pinand ease the slide into battery,Lower the hammer.
The pistol is now ready to have amagazine inserted.
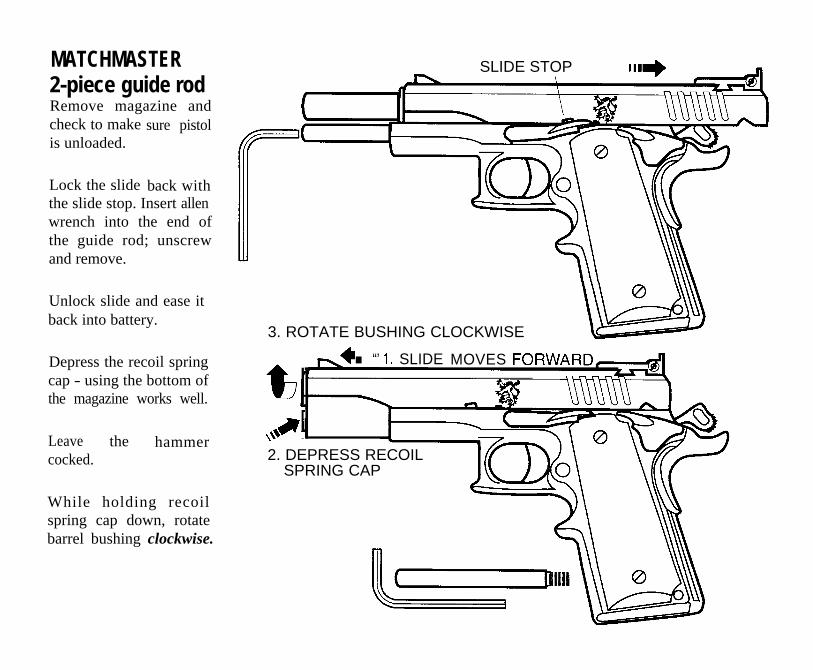
MATCHMASTER2-piece guide rodRemove magazine andcheck to makeis unloaded.
sure pistol
Lock the slide back withthe slide stop. Insert allenwrench into the end ofthe guide rod; unscrewand remove.
Unlock slide and ease itback into battery.
Depress the recoil springcap - using the bottom ofthe magazine works well.
Leave the hammercocked.
While holding recoilspring cap down, rotatebarrel bushing clockwise.
SLIDE STOP
3. ROTATE BUSHING CLOCKWISE
n “’ 1. SLIDE MOVES FORWARDA
w
a,\a2. DEPRESS RECOIL
SPRING CAP

Control the spring cap, as itis under considerable pres-sure from the spring.
Ease the recoil spring capout.
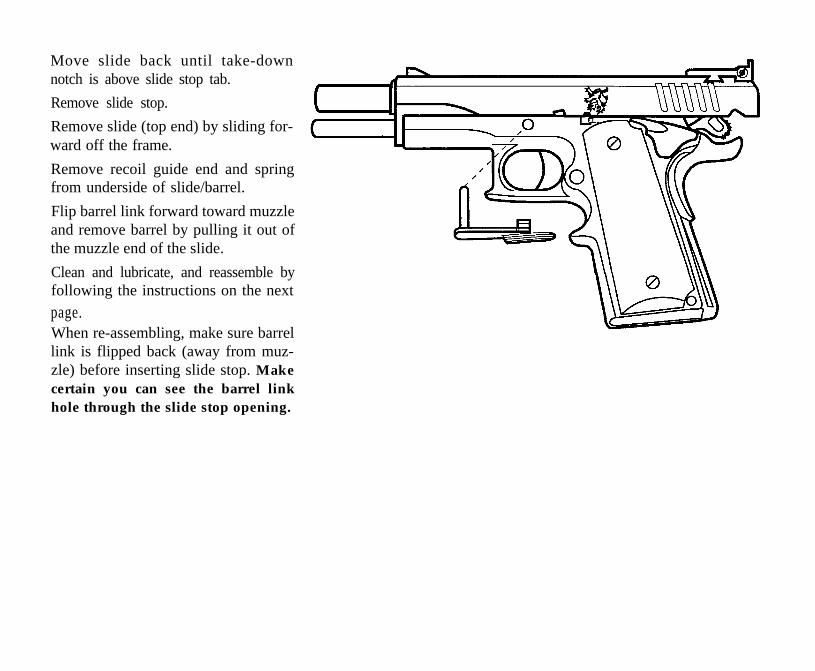
Move slide back until take-down notch is above slidestop tab.
Remove slide stop.
Remove slide (top end) bysliding forward off the frame.
Remove recoil guide end andspring from underside ofslide/barrel.
Flip barrel link forwardtoward muzzle and removebarrel by pulling it out of themuzzle end of the slide. Besure you leave the hammercocked.
No further disassembly isnecessary or advisable.
When re-assembling, makesure barrel link is flippedback (away from muzzle)before inserting slide stop.Make certain you can seethe barrel link hole throughthe slide stop opening.

Clean and lubricate using:a stainless or polished steel cleaning rod (avoid using analuminum or wooden rod - they can collect abrasiveresidue);a brass bore brush which threads onto the cleaning rod;a supply of patches (ready-made, or cut out of cotton orflannel rags) and several rags;an old towel or carpet scrap for your working surface;an old toothbrush or a brass-bristled parts brush; and“CLP” or suitable gun oil.Swab the bore (inside of the barrel) by pushing a drypatch through it with the cleaning rod, always enteringfrom the rear, The first pass will push out loose fouling.Then, using a clean patch damped with “CLP”, do thesame thing again. DO NOT allow the rod to scrape theedges as it passes through the bore. If you damage therifling, the pistol’s accuracy will be affected.Let the “CLP” work on the bore deposits while you use arag dampened with more “CLP” and scrub and wipe offthe inside of the slide (especially around the breech andthe locking lugs), the outside of the barrel, and the slidestop.Wipe off the black residue on the face of the breecharound the firing pin hole and under the hook of theextractor. Wipe off any residue on the barrel bushing andrecoil spring guide as well. Wipe off any excess oil.After the “CLP” has had a chance to loosen the depositsin the bore, run a dry patch through the barrel, use abore brush if necessary, and follow it with a patch soaked
in CLP, followed by anotherdry patch.With a quality lubricant designed for stainless steel (suchas FP-10, Energy Release, etc.) put a few drops on the running,or friction, surfaces in the slide only; i.e., where the barrelrides, the slide rail surfaces where they match the frame,and on the disconnector ramp. These areas usually showwear and shiny patches. NEVER squirt oil into theframe.Do not over-oil. It can be detrimental to the proper func-tion of the pistol.
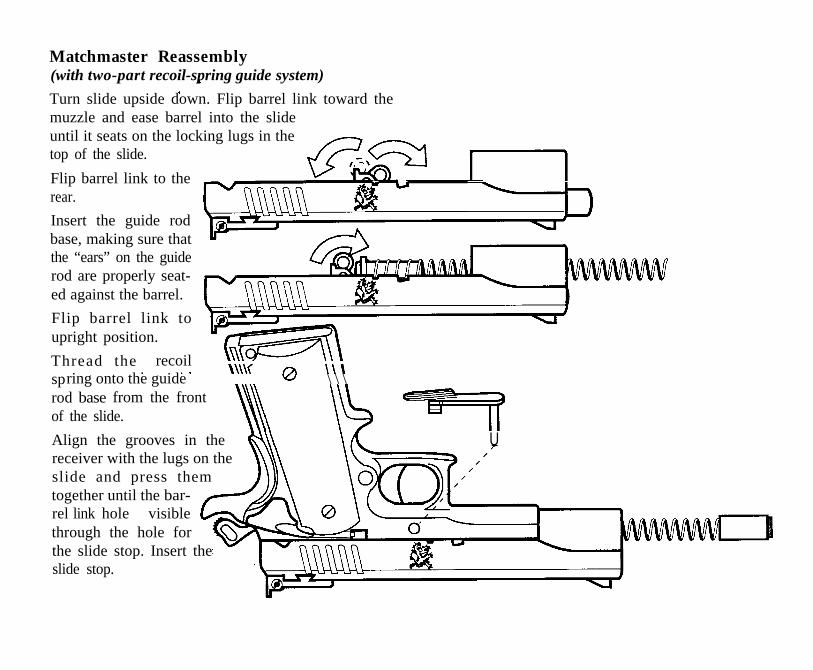
Matchmaster Reassembly(with two-part recoil-spring guide system)
Turn slide upside down. Flip barrel link toward themuzzle and ease barrel into the slideuntil it seats on the locking lugs in thetop of the slide.
Flip barrel link to therear.
Insert the guide rodbase, making sure thatthe “ears” on the guiderod are properly seat-ed against the barrel.
Flip barrel link toupright position.
Thread the recoilspring onto the guide wJ \ \ \rod basee from the frontof the slide.
\ Lb 3Align the grooves in the H\\ \A Ureceiver with the lugs on the \\~\slide and press themtogether until the bar-
I
rel link hole is visiblethrough the hole forthe slide stop. Insert theslide stop.
NOTE: Do not try to align the bar-k 1
rel link, the disassembly notch andthe top of the slide stop all at the ,/IIsame time. Align the link first, insert I/1the slide stop shaft, and then rotate
III#/the slide stop upward until it aligns
///,with the disassembly notch.
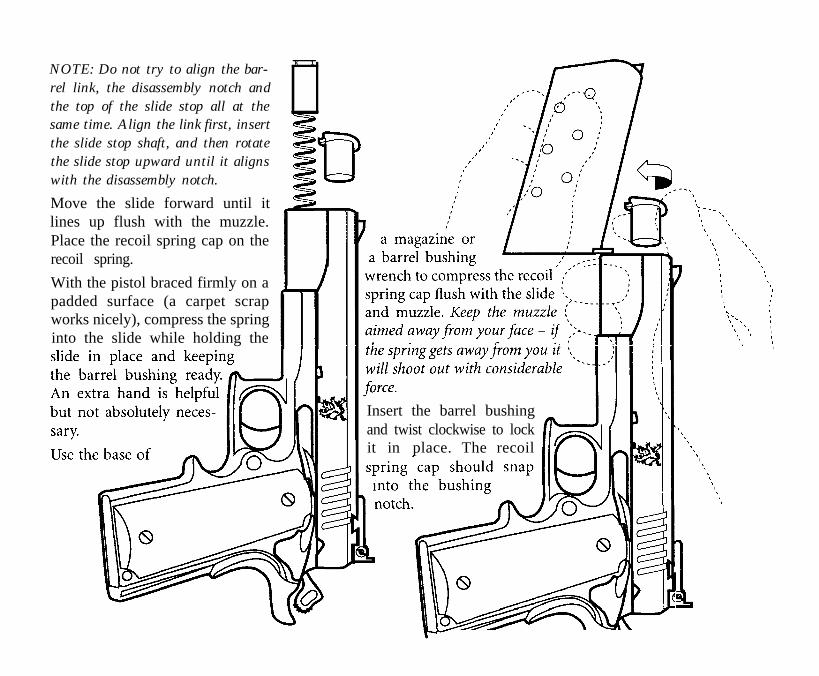
IIII \Move the slide forward until itlines up flush with the muzzle.Place the recoil spring cap on therecoil spring.
With the pistol braced firmly on apadded surface (a carpet scrapworks nicely), compress the springinto the slide while holding the
Insert the barrel bushingand twist clockwise to lockit in place. The recoil
\ \L\ --_ .\ \I \\ \\ \
\ \
\\\
\ \\ \\ \
\ \
I\
7\
I \I II \I \I I
I II I
\ I
\ I\\\ ’
I\ I
\ x I\ \\ ’
I
\I
\II
\\\\\\\
\\\\\\
\\\\
1
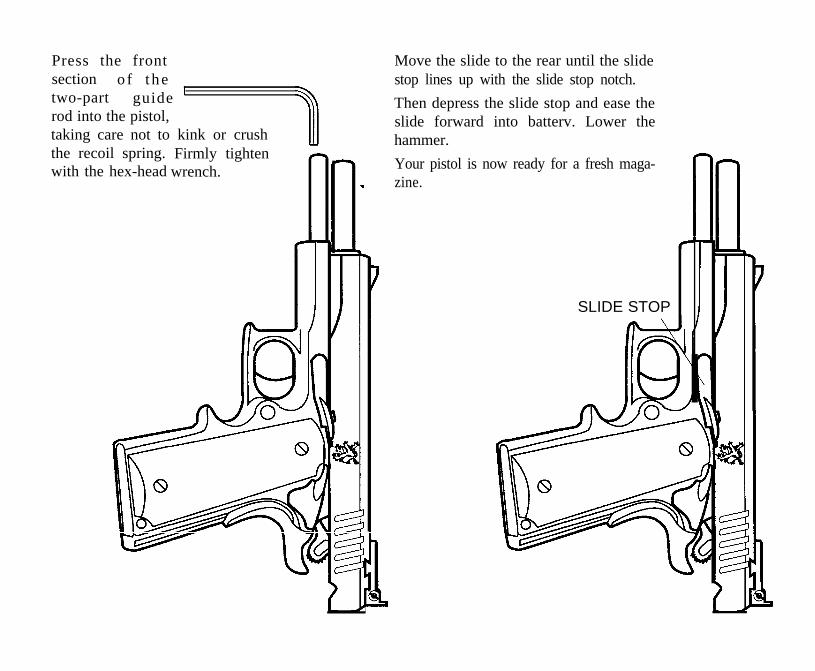
Press the frontsection o f t hetwo-part guide ’rod into the pistol,taking care not tothe recoil spring.with the hex-head
kink or crushFirmly tightenwrench.
Move the slide to the rear until the slidestop lines up with the slide stop notch.
Then depress the slide stop and ease theslide forward into batterv. Lower thehammer.
Your pistol is now ready for a fresh maga-zine.
7SLIDE STOP

MATCHMASTEROne-piece guide rod, undrilled(For Matchmasters manufactured before1995).Remove magazine and check to make surepistol is unloaded.
Cock the hammer and position the pistol\ I
7II
on a clean, padded solid surface (a scrap ofIII
carpet is excellent). Since all parts are underIII\ spring tension, DO NOT point the front of\\-1 ‘\\ \
the pistol at your face or someone else’s face\ \ \ \$ during disassembly and reassembly.
\Depress the recoil spring cap - using thebottom of the magazine works well. A barrel
bushing wrench (available at your localsporting goods store) is better.
While holding recoil sprinrotate barrel bushing clockwise. Control therecoil spring cap. It is underfrom the spring.
Ease the recoil springcap out. Remove therecoil spring.
Move slide back until take-downnotch is above slide stop tab.
Remove slide stop.
Remove slide (top end) by sliding for-ward off the frame.
Remove recoil guide end and springfrom underside of slide/barrel.
Flip barrel link forward toward muzzleand remove barrel by pulling it out ofthe muzzle end of the slide.
Clean and lubricate, and reassemble byfollowing the instructions on the next
page.When re-assembling, make sure barrellink is flipped back (away from muz-zle) before inserting slide stop. Makecertain you can see the barrel linkhole through the slide stop opening.

Clean and lubricate using:a stainless or polished steel cleaning rod (avoid using analuminum or wooden rod - they can collect abrasiveresidue);a brass bore brush which threads onto the cleaning rod;a supply of patches (ready-made, or cut out of cottonor flannel rags) and several rags;an old towel or carpet scrap for your working surface;an old toothbrush or a brass-bristled parts brush; and“CLP” or suitable gun oil.Swab the bore (inside of the barrel) by pushing a drypatch through it with the cleaning rod, always enteringfrom the rear, The first pass will push out loose fouling.Then, using a clean patch damped with “CLP”, do thesame thing again. DO NOT allow the rod to scrape theedges as it passes through the bore. If you damage therifling, the pistol’s accuracy will be affected.
Let the “CLP” work on the bore deposits while you use arag dampened with more “CLP” and scrub and wipe offthe inside of the slide (especially around the breech andthe locking lugs - the lugs on the inside of the slide thatmatch up to the indentations on the barrel), the outsideof the barrel, and the slide stop.Wipe off the black residue on the face of the breecharound the firing pin hole and under the hook of theextractor. Wipe off any residue on the barrel bushing andrecoil spring guide as well. Wipe off any excess oil.After the “CLP” has had a chance to loosen the depositsin the bore, run a dry patch through the barrel, use a
bore brush ift necessary, andfollow it with a patch soaked \ \ \in CLP, followed bv another \ \\ /zdry patch.
With a quality lubricant designed for stainless steel (suchas FP-10, Energy Release, etc.), put a few drops on the running,or friction surfaces in the slide only; i.e., where the barrelrides, the slide rail surfaces where they match the frame,and on the disconnector ramp. These areas usually showwear and shiny patches. NEVER squirt oil into theframe.
Do not over-oil. It can be detrimental to the proper func-tion of the pistol.

Matchmaster Reassembly(with full-length guide rod system)Turn slide upside down. Flip barrel link toward themuzzle and ease barrel into the slide until it seats onthe locking lugs inthe top of the slide.
Flip barrel link to the rear.Insert the full-length guide rod, mak-ing sure that the “ears” on the guide rodare properly seated against the barrel.
Flip barrel link to up-right position.Align the grooves in the receiver withthe lugs on the slide and press them
together until the barrel linkhole is visible through the holefor the slide stop. Insert the
NOTE: Do not try to align the barrellink, the disassembly notch and the top
stop all at the same time.ink first. insert the slide stop
it aligns w‘sh on your
shaft, and then rotate the slide stop upward untildisassembly notch. Be careful not to mar the fini
The slide will move _
Move the slide forward untilwith the muzzle. Thread the recoilspring onto the full-length
1 easily for alignment.it lines up
\C( guide-rod. Place the recoil
\ nvTwf spring cap on the\[lN I _\\ I I \I\\ -/\ I .‘A I spring. II II \ f/R i--SF

With the pistol braced firmly on a padded surface (a carpet scrap works nice-ly), compress the spring into the slide while holding the slide in place and
*--\ C-, . / Q., ,/
0\ keeping the barrel bushing ready, About this time you’ll wish you had a third
, I \I I II# l I hand., ,I I# -. 1f I/ \ I 0 I/ I I Use the base of a magazine or a barrel bushing wrench to compress the recoilspring cap flush with the slide and muzzle.
muzzle aimed away from your facespring gets away from you it will shoot out withconsiderable force.
\ Insert the barrel bushing and twist clock-wise to lock it in place. The recoil spring
Keep the - _- if the
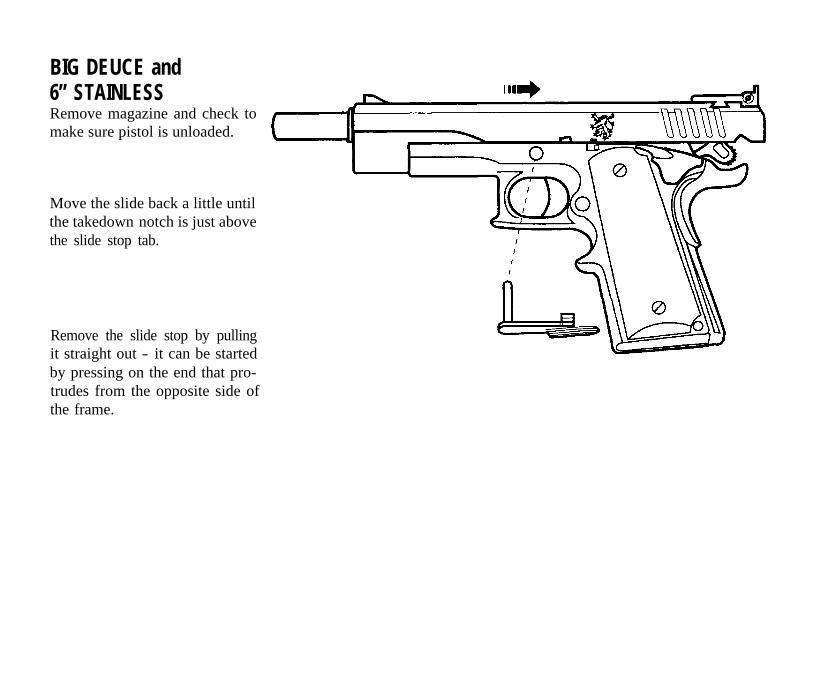
BIG DEUCE and6” STAINLESSRemove magazine and check tomake sure pistol is unloaded.
Move the slide back a little untilthe takedown notch is just abovethe slide stop tab.
Remove the slide stop by pullingit straight out - it can be startedby pressing on the end that pro-trudes from the opposite side ofthe frame.

Ease the slide forward into battery.Then, while gripping the slide andreceiver, move the slide forward offthe receiver. Maintain your grip onthe slide and its internal compo-nents (barrel and recoil unit) tokeep them from springing apart.
Carefully slide the recoil spring outof its seat - be careful that it doesn’tshoot out of your hand.
t0
#8l
L I ll a l m
a lI 8 .
Then twist the barrel bushingcounter-clockwise and remove.
I Bl\w \ Remove recoil spring cap. Flip the barrel linkn f (toward muzzle) and remove barrel
through the front of the slide.
Big Deuce or 6” Stainless .45 is nowdisassembled for cleaning - no further dis-
assembly is necessary or advisable. Clean,lubricate, and reassemble in reverse order.
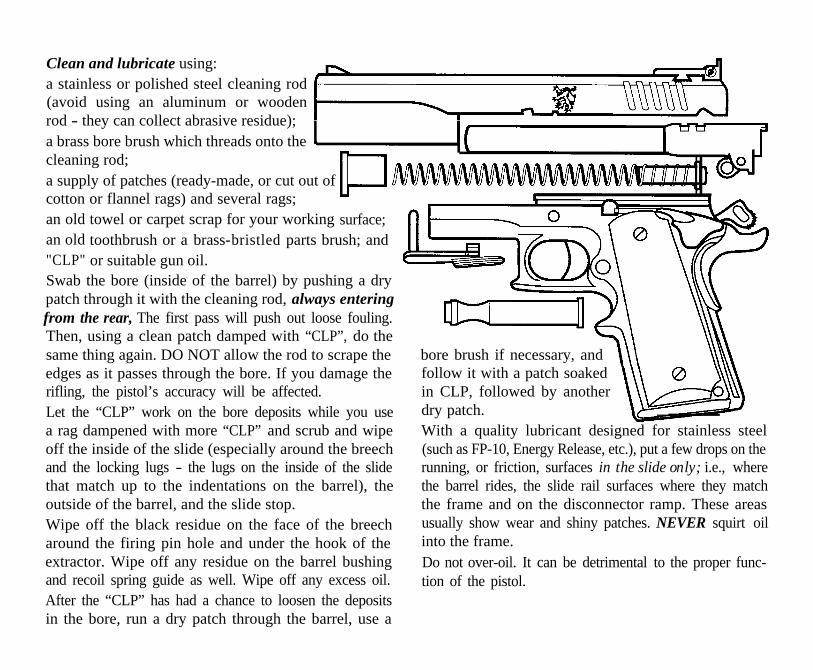
Clean and lubricate using:a stainless or polished steel cleaning rod(avoid using an aluminum or woodenrod - they can collect abrasive residue);a brass bore brush which threads onto thecleaning rod;a supply of patches (ready-made, or cut out ofcotton or flannel rags) and several rags;an old towel or carpet scrap for your working surface;an old toothbrush or a brass-"CLP"” or suitable gun oil.
bristled parts brush; and
Swab the bore (inside of the barrel) by pushing a drypatch through it with the cleaning rod, always enteringfrom the rear, The first pass will push out loose fouling.Then, using a clean patch damped with “CLP”, do thesame thing again. DO NOT allow the rod to scrape theedges as it passes through the bore. If you damage therifling, the pistol’s accuracy will be affected.Let the “CLP” work on the bore deposits while you usea rag dampened with more “CLP” and scrub and wipeoff the inside of the slide (especially around the breechand the locking lugs - the lugs on the inside of the slidethat match up to the indentations on the barrel), theoutside of the barrel, and the slide stop.Wipe off the black residue on the face of the breecharound the firing pin hole and under the hook of theextractor. Wipe off any residue on the barrel bushingand recoil spring guide as well. Wipe off any excess oil.After the “CLP” has had a chance to loosen the depositsin the bore, run a dry patch through the barrel, use a
bore brush if necessary, andfollow it with a patch soakedin CLP, followed by anotherdry patch.With a quality lubricant designed for stainless steel(such as FP-10, Energy Release, etc.), put a few drops on therunning, or friction, surfaces in the slide only; i.e., wherethe barrel rides, the slide rail surfaces where they matchthe frame and on the disconnector ramp. These areasusually show wear and shiny patches. NEVER squirt oilinto the frame.Do not over-oil. It can be detrimental to the proper func-tion of the pistol.

Big Deuce Reassembly the hole for the slide stop. Insert the slide stop.Turn slide upside down. Flip barrel link toward themuzzle and ease barrel into the slide until it seats on the
NOTE: Do not try to align the barrel link, the disassem-
locking lugs in the top of the slide.bly notch and the top of the slide stop all at the same time.Alignn the link first, insert the slide stop shaft, and then
Press in the barrel bushingand twist it clockwise tolock.
Flip barrel link to the rear.
Insert the recoil spring
capEase guide rod into recoilspring and feed it into therecoil spring cap asshown. The spring is verystiff under compressionand will try to kink or getaway from you. It is advis-able to grip the slide andcompressed spring withone hand while the otherhand feeds in the remain-der .
Flip barrel link to up-rightposition.
Align the grooves in thereceiver with the lugs onthe slide and press themtogether until the barrellink hole is visible through

rotate the slide stop upward until italigns with the disassembly notch. Becareful not to mar the finish on yourpistol. The slide will move easily foralignment.
Move the slide to the rear until theslide stop lines up with the slide stopnotch. Then depress the slide stopand ease the slide forward into bat-tery. Lower the hammer.
Your pistol is ready for loading.

ENFORCER andCOHORT
Remove magazine and check tomake sure pistol is unloaded.
Move the slide back until disas-sembly notch is positioned overretaining tab on slide stop.
TAKEDOWN NOTCH III
Y\The slide stop can now be re-moved by pulling straight out.

Remove slide unit by moving it for-ward and off the frame.
Remove the recoil system by pullingit back out of the recoil spring tun-nel. (Flip the barrel link to the rear tomake it easier).
DO NOT ATTEMPT TO DISAS-SEMBLE THE RECOIL SPRINGASSEMBLY.
The barrel can now be removed byflipping the barrel link forward andpulling the barrel out the front of theslide.
Reassembly is the reverse of theabove order. During reassembly, thebarrel link is put in the forwardposition to insert the barrel, thenmoved to the rear position to allowthe recoil system to be seated. Besure you can see the hole in the bar-rel link through the disassemblynotch before inserting the slide stop.
Note: If guide rod protrudes fromthe pistol after assembly, the pistol isincorrectly assembled. Please tryagain
Your Enforcer® or Cohort® is nowdisassembled for cleaning - no fur-ther disassembly is advisable.
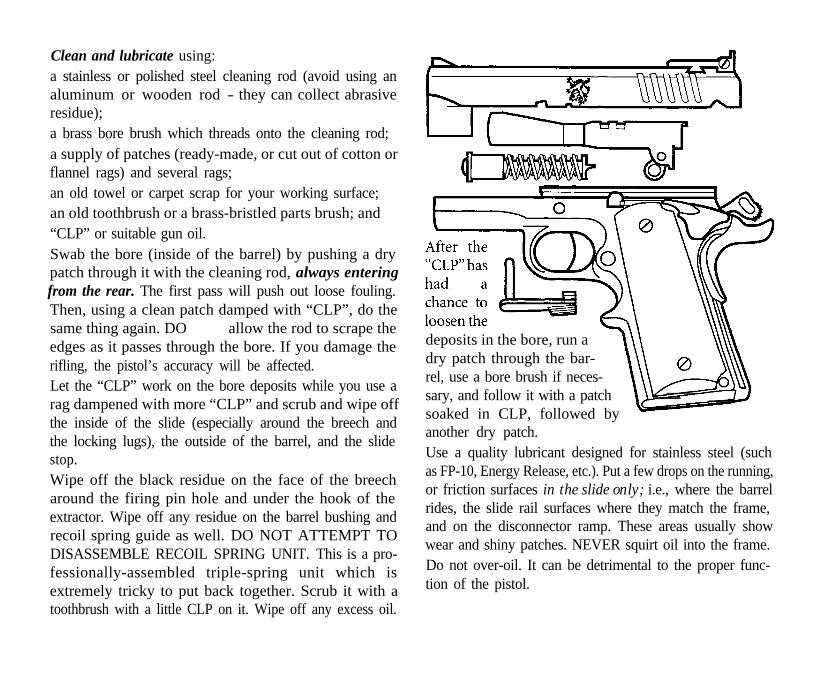
Clean and lubricate using:a stainless or polished steel cleaning rod (avoid using analuminum or wooden rod - they can collect abrasiveresidue);a brass bore brush which threads onto the cleaning rod;a supply of patches (ready-made, or cut out of cotton orflannel rags) and several rags;an old towel or carpet scrap for your working surface;an old toothbrush or a brass-bristled parts brush; and“CLP” or suitable gun oil.Swab the bore (inside of the barrel) by pushing a drypatch through it with the cleaning rod, always enteringfrom the rear. The first pass will push out loose fouling.Then, using a clean patch damped with “CLP”, do thesame thing again. DO NOT allow the rod to scrape theedges as it passes through the bore. If you damage therifling, the pistol’s accuracy will be affected.Let the “CLP” work on the bore deposits while you use arag dampened with more “CLP” and scrub and wipe offthe inside of the slide (especially around the breech andthe locking lugs), the outside of the barrel, and the slidestop.Wipe off the black residue on the face of the breecharound the firing pin hole and under the hook of theextractor. Wipe off any residue on the barrel bushing andrecoil spring guide as well. DO NOT ATTEMPT TODISASSEMBLE RECOIL SPRING UNIT. This is a pro-fessionally-assembled triple-spring unit which isextremely tricky to put back together. Scrub it with atoothbrush with a little CLP on it. Wipe off any excess oil.
deposits in the bore, run adry patch through the bar-rel, use a bore brush if neces-sary, and follow it with a patchsoaked in CLP, followed byanother dry patch.Use a quality lubricant designed for stainless steel (suchas FP-10, Energy Release, etc.). Put a few drops on the running,or friction surfaces in the slide only; i.e., where the barrelrides, the slide rail surfaces where they match the frame,and on the disconnector ramp. These areas usually showwear and shiny patches. NEVER squirt oil into the frame.Do not over-oil. It can be detrimental to the proper func-tion of the pistol.

Enforcer and Cohort ReassemblyTurn slide upside down. Flip barrel link toward themuzzle and ease barrel into the slide until it seats onthe locking lugs in the top of the slide.
Flip barrel link to the rear.
Insert the recoil spring system. NOTE: The triple-spring recoil system is not designed to be disassembledexcept by factory-trained experts. Do not take this sys-tem apart.
Flip barrel link to upright position.
Align the grooves in the receiver with the lugs on theslide and press them together until the barrel linkhole is visible through the hole for the slide stop.Insert the slide stop.
NOTE: Do not try toalign the barrel link,the disassembly notchand the top of the slidestop all at the sametime. Align the linkfirst, insert the slidestop shaft, and thenrotate the slide stopupward until it alignswith the disassemblynotch. Be careful not tomar the finish on yourpistol. The slide willmove easily for align-

ment.
Move the slide to the rear until the slide stop linesup with the slide stop notch. Then depress theslide stop and ease the slide forward into battery.Lower the hammer.
Your Enforcer or Cohort is ready for loading.
WARRANTY INFORMATIONThis “Limited Warranty” has been drafted to comply with the Magnuson-Moss Warranty Federal TradeCommission Improvement Act which is effective for goods manufactured on or after December 3 1,1995.
Safari Arms, Inc. firearms are warranted to be free from defects in material and workmanship for ten (10) yearsafter the date of original new gun retail purchase. The manufacturer agrees to correct by repair or replacement(with the same or comparable quality model) your firearm, without charge, if returned prepaid with a copy of thebill of sale and a copy of ATF Form 4473.
Safari Arms, Inc. assumes no responsibility for product malfunction or for physical injury or property damageresulting in whole or in part from criminal or negligent use of the product, improper or careless handling, unau-thorized modifications, use of defective, aluminum-cased, or hand-loaded ammunition, customer abuse orneglect of the product, or other influences beyond Safari Arms, Inc.'s control. This warranty does not apply tonormal wear of any parts, including metal, wood, plastic, rubber and other material’s surfaced finish or if unau-thorized repair and/or alteration has been performed.
This warranty does not cover repairs related to unreasonable use, corrosion, failure to provide proper mainte-nance, damaged or shopworn display guns, gun barrels damaged by an obstructed bore or guns damaged in ship-ment due to improper packing and handling.
Safari Arms, Inc. reserves the right to inspect any product before making any adjustment covered by this war-rantv.
Under no circumstances shall Safari Arms, Inc. be liable for incidental or consequential damages with respect toeconomic loss or injury or property damage whether the result of breach of express or implied warranty.
Some states do not allow the exclusion of consequential or incidental damages so the limitation may not apply toyou. This warranty gives only the original retail purchaser specific legal rights. Other rights may also be availablewhich may vary from state to state.
The terms of the warranty cannot be changed except in writing by an officer of Safari Arms, Inc.

Some Tips from Your Pistolsmith
If you have questions or problems, call mefirst, before you do something you’ll regret.
· NEVER “Hollywood” your pistol; that is,do not drop the slide on an empty cham-ber unless there is a loaded magazine inplace. After clearing, ease the slide forwardand dry fire the pistol. Dropping or slam-ming the slide on an empty pistol mayseem cool, but it will damage your pistol.
· Dry firing - provided you follow all safetyguidelines - does not hurt a 1911 pistol,but lowering the hammer into the half-cock can easily deform the sear nose we socarefully matched and stoned.
· Keep an idea of how many rounds havebeen through your pistol. Depending onwhat loads you shoot, a single recoil springshould be replaced after 2,000+ rounds
(this does not apply to the triplex springsystem on the Cohort and Enforcer).
Remember 95% of malfunctions in thesepistols are due to ammo or magazines.Keep that in mind when you consider bar-gain “Baggie Brand” ammunition or“Three for $20” magazines at the gunshow or the discount gun shop. It is true:You get what you pay for, if you’re lucky.
Use both a quality powder solvent and aquality stainless steel lube. "Shooter’sChoice" is the best powder solvent."FP-10" is the best lube. Always buy non-aerosol lube: it is better to apply a fewdrops of lube in the right place than tospray-hose an entire area with aerosol.
If in doubt, find out - call and talk toSafari Arms.