Embed Size (px)
Citation preview
S1901DVD / S2201DVDLCD TV + DVD
OWNER’S MANUAL

E - 2
SAFETY PRECAUTIONS
WARNING : TO REDUCE THE RISK OF ELECTRIC SHOCK, DO NOT REMOVE COVER (OR BACK). NO USER SERVICEABLE PARTS INSIDE. REFER SERVICING TO QUALIFIED SERVICE PERSONNEL.
CAUTION• DANGEROF EXPLOSION IF BATTERY ISINCORRECTLYREPLACED.REPLACEONLYWITHTHESAMEOREQUIVALENTTYPE.
• TO PREVENT ELECTRIC SHOCK,MATCHWIDE BLADE OF PLUG TO WIDE SLOT OF WALL OUTLET, THEN FULLY INSERT.
• USEOFCONTROLSORADJUSTMENTSORPERFORMANCEOFPROCEDURESOTHERTHANTHOSESPECIFIEDMAYRESULT INHAZARDOUSRADIATIONEXPOSURE.
WARNING :• TOREDUCETHERISkOFFIREORELECTRICSHOCk,DONOTEXPOSETHISAPPLIANCETORAINORMOISTURE.
• TOPREVENTFIREORSHOCkHAZARD,DONOTEXPOSETHISUNITTORAINORMOISTURE.DONOTPLACEOBJECTSFILLEDWITHLIQUIDSONORNEARTHISUNIT.
• SHOULDANYTROUBLEOCCUR,DISCONNECTTHEACPOWERCORDANDREFERSERVICINGTOAQUALIFIEDTECHNICIAN.
PLACEMENT INFORMATION• Donotusethisunitinplacesthatareextremelyhot,cold,dustyorhumid.
• Donotrestricttheairflowofthisunitbyplacingitsomewherewithpoorairflow,bycoveringitwithacloth,byplacingitonbeddingorcarpeting.
SAFETY INFORMATION• WhenconnectingordisconnectingtheACpowercord,griptheplugandnotthecorditself.Pullingthecordmaydamageitandcreateahazard.
• Whenyouarenotgoingtousetheunitforalongperiodoftime,disconnecttheACpowercord.
CONDENSATION INFORMATION• Whenleftinaheatedroomwhereitiswarmanddamp,waterdropletsorcondensationmayforminsidetheequipment.Whenthereiscondensationinsidetheunit,theunitmaynotfunctionnormally.Lettheunitstandfor1-2hoursbeforeturningthepoweronorgraduallyheattheroomandlettheunitdrybeforeuse.
RATING PLATE LOCATIONTheratingplateislocatedontherearoftheunit.
FCC STATEMENTSNOTE:ThisunithasbeentestedandfoundtocomplywiththelimitsforaClassBdigitaldevice,pursuantto Part 15 of the FCCRules. These limits aredesignedtoprovidereasonableprotectionagainstharmful interference in a residential installation.This unit generates, uses and can radiate radiofrequencyenergyand,ifnotinstalledandusedinaccordancewiththeinstructions,maycauseharmfulinterferencetoradiocommunication.However,thereisnoguaranteethatinterferencewillnotoccurinaparticularinstallation.Ifthisunitdoescauseharmfulinterferencetoradioortelevisionreception,whichcanbedeterminedbyturningtheunitoffandon,theuserisencouragedtotrytocorrecttheinterferencebyoneormoreofthefollowingmeasures:- Reorientorrelocatethereceivingantenna.- Increase the separation between the unit andreceiver.
- Connecttheunitintoanoutletonacircuitdifferentfromthattowhichthereceiverisconnected.
- Consult thedealer or anexperienced radio/TVtechnicianforhelp.
WARNING:Changesormodifications to thisunitnot expressly approvedby the party responsiblefor compliance could void the user authority tooperatetheunit.
ThesymbolforClassII(DoubleInsulation)
CAUTION INVISIBLE LASER RADIATION WHEN OPEN AND INTERLOCKS DEFEATED.
AVOID EXPOSURE TO BEAM
This product contains a low
power laser device.
CLASS 1 LASER PRODUCT
Theexclamationpointwithinanequilateraltriangle is intended to alert the user tothe presence of important operating and
maintenance(servicing)instructionsintheliteratureaccompanyingtheappliance.
Thelightningflashwitharrowheadsymbol,withinanequilateraltriangle,isintendedtoalerttheusertothepresenceofuninsulated
“dangerousvoltage”withintheproduct’senclosurethatmaybeofsufficientmagnitudetoconstituteariskofelectricshocktopersons.
* CAUTION MARKING WAS LOCATED AT BOTTOM ENCLOSURE OF THE APPARATUS
E - 3
IMPORTANT SAFETY INSTRUCTIONS1) Read these instructions.2) Keep these instructions.3) Heed all warnings.4) Follow all instructions.5) Do not use this apparatus near water.6) Clean only with a dry cloth.7) Do not block any ventilation openings.
Install in accordance with the manufacturer’s instructions.
8) Do not install near any heat sources such as radiators, heat registers, stoves, or otherapparatus (Includingamplifiers) thatproduce heat.
9) Do not defect the safety purpose of the polarized or grounding-type plug. A polarized plug has two blades with one wider than the other. A grounding type plug has two blades and a third grounding prong. The wide blade or the third prong is provided for your safety. Iftheprovidedplugdoesnotfitintoyourwalloutlet, consult an electrician for replacement of the obsolete outlet.
10) Protect the power cord from being walked on or pinched particularly at plugs, convenience receptacles, and the point where they exit from the apparatus.
11)Onlyuseattachments/accessoriesspecifiedby the manufacturer.
12) Use only with the cart, stand, t r ipod, bracket , or table specifiedbythemanufacturer,or sold with the apparatus. When a cart is used, use caution when moving the cart / apparatus combination to avoid injury from tip-over.
13) Unplug this apparatus during lightning storms or when unused for long periods of time.
14) Refer all servicing to qualified service personnel. Servicing is required when the apparatus has been damaged in any way, such as the power cord or plug is damaged, liquid has been spilled or objects have fallen into the apparatus, the apparatus has been exposed to rain or moisture, does not operate normally, or has been dropped.
MAINTENANCE
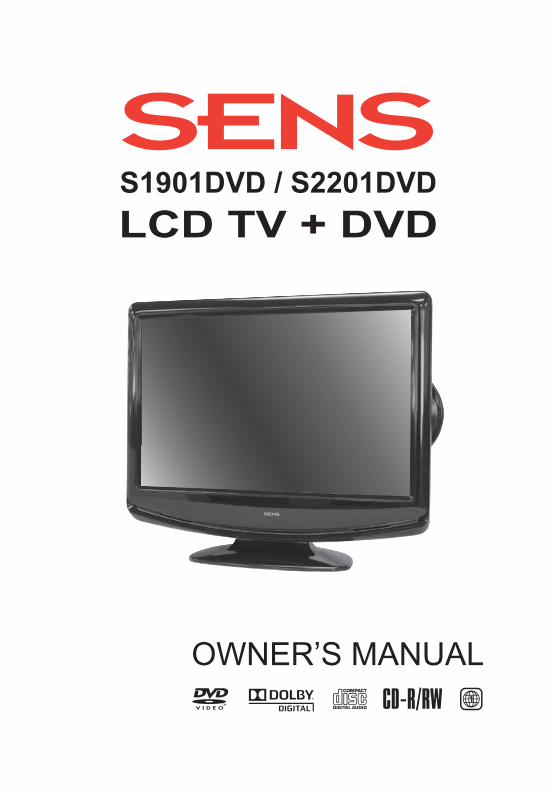
CLEANING THE DISCAdefectiveorsoileddiscinsertedintotheunitcancausesoundtodropoutduringplayback.Handlethediscbyholdingitsinnerandouteredges.• DoNOTtouchthesurfaceoftheunlabeledsideofthedisc.• DoNOTstickpaperortapeonthesurface.• DoNOTexposethedisctodirectsunlightorexcessiveheat.• NEVERusesolventssuchasbenzineoralcoholtocleanthedisc.• Cleanthediscbeforeplayback.Wipethediscfromthecenteroutwardwithacleaningcloth.• DoNOT use irregular shaped discs (example : heart shaped, octagonal, etc.). Theymay causemalfunctions.
CLEANING THE UNIT• BesuretoturntheunitoffanddisconnecttheACpowercordbeforemaintainingtheunit.• Wipetheunitwithadrysoftcloth.Ifthesurfacesareextremelydirty,wipecleanwithacloththathasbeendippedinaweaksoap-and-watersolutionandwrungoutthoroughly.Wipewithadrycloth.
• Neverusealcohol,benzine,thinner,cleaningfluidorotherchemicals.DoNOTusecompressedairtoremovedust.
IMPORTANT NOTEBeforetransportingtheunit,removethediscfromthedisccompartment.

E - 4
CONTENTSSAFETY PRECAUTIONS .......................... 2IMPORTANT SAFETY INSTRUCTIONS ............................................................................. 3MAINTENANCE ........................................ 3CONTENTS ............................................... 4QUICK INSTALLATION ............................. 5DISC FORMATS ........................................ 6ACCESSORIES ......................................... 7GETTING STARTED ................................. 7 CONTROL REFERENCE GUIDE ........ 8 – 10CONNECTIONS .............................. 11 – 14 ConnectingaTVAntenna/Cable/Satellite...............................................................11
ConnectinganA/VDevice..................11 Connecting Devices with a Composite(YellowRCA-Type)VideoOutput..........11
ConnectingDeviceswithaComposite(YellowRCA-Type)VideoInput.........................12
ConnectingaHigh-Definition(HD)Source...............................................................12
ConnectingHDMI..................................13ConnectingaPC..................................13
ConnectinganAudioAmplifier.............13 Connect thepower cord ..................... 14INSTALLATION ....................................... 14 Installing/removingthebasestand.......14 Mountingonthewall.............................14USING HEADPHONES ........................... 15UNIT OPERATION .................................. 15SOUND SYSTEM .................................... 15TV SETUP ........................................ 16 – 20Picturemenu........................................16
Audiomenu..........................................16 Timemenu............................................17 Setupmenu...................................17–18Parentalmenu...............................18–19TVmenu...............................................20
CD/DVD OPERATION ..................... 21 – 22 Playingadisc........................................21 Playingapicturefiledisc ....................21 Pausingplayback (stillmode) .............21 Stoppingplayback.................................21 Skipping toadifferent track ................21 Fast forward / fast reverse ................. 22 Slow-motionplay(DVD).......................22 Audioselection (DVD) .........................22 Subtitleselection(DVD).......................22 AngleSelection(DVD)..........................22SPECIAL FUNCTIONS ........................... 23 Displayfunction(DVD).........................23 Locatinga specific title (DVD) ............ 23Locatingaspecificchapter/track..........23
Locatingaspecifictime........................23REPEAT PLAYBACK ........................... 24 Repeatingachapter(DVD)..................24 Repeatingasingletrack(CD)..............24 Repeatingaspecificsection(DVD)(CD)...................................................................24
DVD PROGRAMMABLE MEMORY ........ 25Programmablememory........................25
Title/chapterprogrammedplayback(DVD).................................................................25
CUSTOMIZING THE DVD FUNCTION SETTINGS ............................................... 25 Languagesetup....................................25 Videosetup...........................................26 Systemsetup........................................26 TVdisplay.........................................26 Default................................................26TROUBLE SHOOTING GUIDE ............... 27

E - 5
QUICK INSTALLATION
TURNING ON THE UNIT FOR THE FIRST TIMEThefirst timeyouturnon theunit, theunitwillenter thesetupmode.Youcaneasily followthepromptmessageonthescreentocompletebasicTVsettings.
1. Press the / button to selectYes. PresstheENTER button to proceedwith the initialsetup.
2. Use the / button to selectAntenna, thenpressthe / buttontoselectAirorCATV.
3.Usethe / buttontoselectAutoScan,thenpressthe buttontoenterautoscanmenu.Usethe /buttontoselectStarttoScan,pressthe buttontobeginscanning.(IfyouselectedCATVonStep2,
youneedtoselectCableSystembeforeStarttoScan).ThesystemwillautomaticallystarttoscanandpresetallavailableTVchannels.
4. AfterscanninghasfinishedthesystemwillreturntothefirstTVchannelscanned.
Make sure the RF aer ial hasbeen connected properly to theTV ANTENNA inputjackontherearofthesystem.
Whenyouturnonyourtelevisionsetforthefirsttime,besuretoplaceitonasolidstablesurface.Toavoiddanger,donotexposetheTVtowater,oraheatsource(e.g.lamp,candle,radiator).Donotobstructtheventilationgridattherearandbesuretoleavesufficientgapsaroundtheunitasshown.

E - 6
DISC FORMATSNOTES ON COPYRIGHTIt is forbidden by law to copy, broadcast, show,broadcastoncable,playinpublicorrentcopyrightedmaterialwithoutpermission.ApparatusClaimsofU.S.PatentNos.6,836,549;6,381,747; 7,050,698; 6,516,132; and 5,583,936licensedforlimitedviewingusesonly.DVDsarecopyprotected,andanyrecordingsmadefrom these discswill be distorted.This productincorporatescopyrightprotectiontechnologythatisprotectedbymethodclaimsofcertainU.S.patentsand other intellectual property rights owned byMacrovisionCorporationandotherrightsowners.Useof this copyright protection technologymustbeauthorizedbyMacrovisionCorporation,and isintendedforhomeandotherlimitedviewingusesonly, unlessotherwiseauthorizedbyMacrovisionCorporation.Reverseengineeringordisassemblyisprohibited.
Theunitcanplay:
DVDs[8cm/12cmdisc]
AudioCDs[8cm/12cmdisc]
CD-R CD-RWCompatible
REGION MANAGEMENT INFORMATIONRegionManagement Information: This unit isdesigned andmanufactured to respond to theRegionManagement Information that isencodedonDVDs.IftheregionnumberprintedontheDVDdoesnotcorrespondtotheregionnumberofthisunit,thisunitcannotplaythatdisc.
Theregionnumberofthisequipmentis .
DISC FUNCTION OR OPERATION THAT IS NOT AVAILABLEWhen the symbol appears on the screen, itindicatesthat thefunctionoroperationattemptedisnotavailableatthattime.ThisoccursbecausetheDVDmanufacturer determines the specificfunctions.Certain functionsmaynotbeavailableonsomediscs.BesuretoreadthedocumentationprovidedwiththeDVD.
ICONS USED ON DVDsSampleIcons:
Languageselectionsforaudio
Languageselectionsforsubtitles
Screenaspectratio
Multiplecameraangles
Regioncodeindicator
NOTEWhen playing back a CD-G (Graphics) or CDEXTRAdisc,theaudioportionwillbeplayed,butthegraphicimageswillnotbeshown.
TITLES, CHAPTERS AND TRACKS• DVDsaredividedinto“TITLES”and“CHAPTERS”.Ifthedischasmorethanonemovieonit,eachmoviewouldbeaseparate“TITLE”.“CHAPTERS”aresectionsoftitles.
• AudioCDsaredividedinto“TRACkS”.A“TRACk”isusuallyonesongonanAudioCD.
NOTENumbers identifyeach title, chapterand trackonadisc.Mostdiscshavethesenumbersrecordonthem,butsomedonot.
NOTES ON UNAUTHORIZED DISCSYoumaynotbeabletoplaybacksomeDVDsonthisequipmentiftheywerepurchasedfromoutsideyourgeographicareaormadeforbusinesspurposes.

E - 7
ACCESSORIESPlease check and identify the supplied accessories.
Remotecontrol(withbatteries)......................................................................................................x1
GETTING STARTEDUSING THE REMOTE CONTROL• Pointtheremotecontrolattheremotesensorlocatedontheunit.• When there isa strongambient light source, theperformanceof the infrared remotesensormaybedegraded,causingunreliableoperation.
• Therecommendedeffectivedistanceforremoteoperationisabout16feet(5meters).
TO INSTALL THE BATTERIES1.Openthebatterydoor.
Manyuniversalremotecontrolshavea“learning”feature.Werecommendyouusethatfeaturetoprogramtheremotecontrol.Foranyquestionsorproblemsrelatedtoprogrammingauniversalremotecontrol,youmustcontactthecustomerservicedepartmentoftheuniversalremotecontrolmanufacturerforassistance,orrefertotheinstructionsincludedwiththeuniversalremotecontrol.Wecannotofferassistanceinprogramminguniversalremotecontrols.
BATTERY REPLACEMENTWhenthebatteriesbecomeweak,theoperatingdistanceoftheremotecontrolisgreatlyreducedandyouwillneedtoreplacethebatteries.
CAUTION:Dangerofexplosionifbatteryisincorrectlyreplaced.
NOTES• Iftheremotecontrolisnotgoingtobeusedforalongtime,removethebatteriestoavoiddamagecausedbybatteryleakagecorrosion.
• Donotmixoldandnewbatteries.DonotmixALkALINE,standard(CARBON-ZINC)orrechargeable(NICkEL-CADMIUM)batteries.
• Alwaysremovebatteriesassoonastheybecomeweak.• Weakbatteriescanleakandseverelydamagetheremotecontrol.
2.Insert2“AAA”batteries.
WARNING :•Donotdisposeofbatteriesinafire.Batteriesmayexplodeorleak.•Batteriesshallnotbeexposedtoexcessiveheatsuchassunshine,fireorthelike.

E - 8
CONTROL REFERENCE GUIDE
1. STANDBY / ON button Press to turn ON the unit or put it in
STANDBY(OFF)mode.2. TV button PresstoswitchtoTVmode. DVD button PresstoswitchtoDVDmode. AV button PresstoswitchtosourceconnectedtoAV
IN. HD button Press to switch to source connected to
YUVIN(component)/HDMImode.3. Number (0 - 9) buttons4. •[dot]button Usetoenterdigitalsub-channels.(i.e.11.3
or12.7)
5. MENU button Presstodisplaytheon-screenTVmenu.6. VOLUME (- / +) buttons Presstoadjustthevolumelevel.7. CURSOR ( , , , ) buttons Press to highlight selectionsonamenu
screenandadjustcertainsettings. ENTER button Press to confirm selections on amenu
screen.8. / buttons :Fastreverseplayback. :Fastforwardplayback.9. PREV button Presstoselectpreviouschaptersortracks
onadisc.10. SUBTITLE button Presstoselectoneofthesubtitlelanguages
programmedonaDVD.11. ANGLE button Press toswitch thecameraangleof the
video presentation when scenes withmultiplecameraanglesarerecordedonaDVD.
12. TITLE button PresstoshowtheTitlemenu.13. GOTO button Presstoskipdirectlytoaspecificlocation
onaDVD/CD.14. MEMORY button Presstosetpredeterminedplayback. CLEAR button Presstoclearinputselections.15. MTS button Press to switch betweenMONOsound,
STEREO sound and SecondaryAudioProgram(SAP).
CC button Press to activate theClosedCaptioning
feature. This function only works onprogramsbroadcastedwithcaptions.
16. EXIT button Press to exit theTVSETUPmenu and
returndirectlytonormalviewing. SLEEP button PresstosettheSLEEPtimer.Theunitwill
remainonforthetimethatisset,andwillautomaticallyshutoffafterwards.
E - 9
CONTROL REFERENCE GUIDE
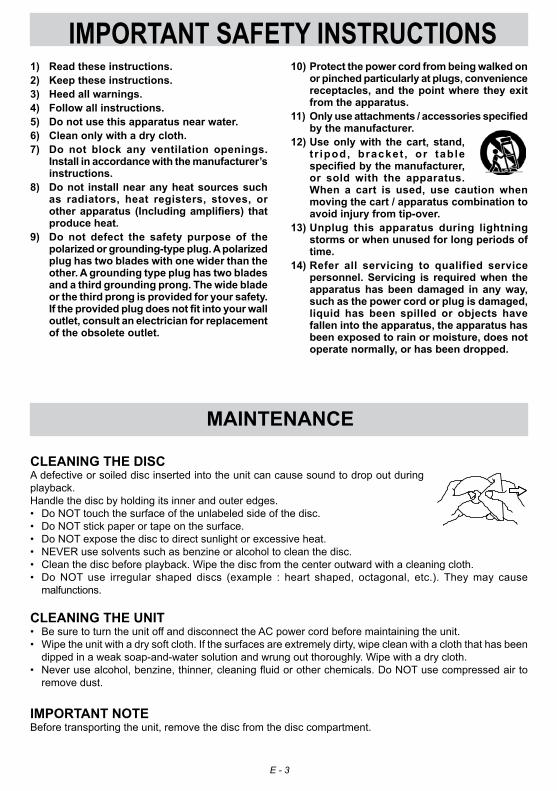
17. FUNCTION button PresstoswitchbetweenTV/AVIN/YUV
IN/DVD/HDMI/PCIN.18. LAST CH button Press to switch repeatedly between the
lasttwochannelsdisplayed.19. MUTE button Presstoturnoffthesound.20. CH / CH buttons Press / tochangethechannels.21. NEXT button Presstoselectthenextchapterortrack
onadisc.
22. button Presstostopplayingadisc. Press togo toa folder listofpicturefile
list. PLAY button Presstostartandresumeplaybackofa
disc. PAUSE button Presstopauseplaybackandsingleframe
advanceonaDVD.23. AUDIO button Press to select audio soundtracks on
aDVDor change theoutputmodeof aCD.
24. SLOW button Presstoperformslowforwardplaybackof
aDVD.25. DVD MENU button Press to enter themainmenu of the
DVD.26. SETUP button PresstoenterandexittheSETUPmenu
oftheDVD.27. A-B button Press to perform point-to-point repeat
playbackonaDVDorCD. REPEAT button Press to repeat a chapter or title of a
DVD. Press to repeat a single track orwhole
CD.28. DISPLAY button Press to changedisc status information
displayedonthescreen. SOUND button Presstoselectfrompresetsoundsettings
tomatchthetypeofshowyouarewatching.(Standard/Music/Movie/Personal)
29. LCD MODE button PresstosetsizeofLCDdisplay. PICTURE button Selectfrompresetscreendisplaysettings
tomatchthetypeofshowyouarewatching.(Standard/Soft/Movie/Personal)
E - 10
CONTROL REFERENCE GUIDE
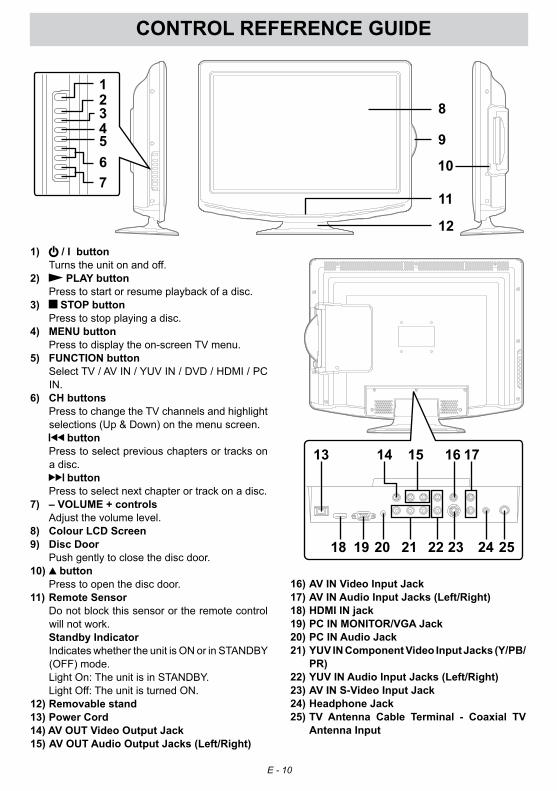
1) / I button Turnstheunitonandoff.2) PLAY button Presstostartorresumeplaybackofadisc.3) STOP button Presstostopplayingadisc.4) MENU button Presstodisplaytheon-screenTVmenu.5) FUNCTION button SelectTV/AVIN/YUVIN/DVD/HDMI/PC
IN.6) CH buttons PresstochangetheTVchannelsandhighlight
selections(Up&Down)onthemenuscreen. button Presstoselectpreviouschaptersortrackson
adisc. button Presstoselectnextchapterortrackonadisc.7) – VOLUME + controls Adjustthevolumelevel.8) Colour LCD Screen9) Disc Door Pushgentlytoclosethediscdoor.10) button Presstoopenthediscdoor.11) Remote Sensor Donotblockthissensorortheremotecontrol
willnotwork. Standby Indicator IndicateswhethertheunitisONorinSTANDBY
(OFF)mode. LightOn:TheunitisinSTANDBY. LightOff:TheunitisturnedON.12) Removable stand13) Power Cord 14) AV OUT Video Output Jack15) AV OUT Audio Output Jacks (Left/Right)
16) AV IN Video Input Jack17) AV IN Audio Input Jacks (Left/Right)18) HDMI IN jack19) PC IN MONITOR/VGA Jack20) PC IN Audio Jack21) YUV IN Component Video Input Jacks (Y/PB/
PR)22) YUV IN Audio Input Jacks (Left/Right)23) AV IN S-Video Input Jack24) Headphone Jack25) TV Antenna Cable Terminal - Coaxial TV
Antenna Input
12345
7
8
9
10
11
12
6
13 14 15 16 17
18 19 20 21 22 23 24 25

E - 11
CONNECTIONSCONNECTING A TV ANTENNA / CABLE / SATELLITEToviewtelevisionchannelscorrectly,asignalmustbereceivedfromoneofthefollowingsources:- Anindoororoutdooraerialantenna- Acablesystem- Asatellitesystem
CONNECTING AN A/V DEVICEToconnecttootherequipmentsuchasaVCR,camcorder,satellitesystemorcable,etc.
NOTEPleaserefertotheusermanualfortheotherequipmentformoreinformation.
ToAUDIOINjacks(AV IN)
ToS-VIDEOINjack
Connecting a Digital AntennaThetunerinthisTVreceivesATSCTVsignalsfromanantenna.ThisdigitalTVcanreceivestandard(SDTV)andhighdefinition(HDTV)overtheairbroadcasts.
Connecting an Analog Antenna or DeviceThetunerinthisTVreceivesNTSCTVsignals,analogcablesignalsortheRFoutputfromasatellitereceiver,VCRorcablebox.
ToS-VIDEOOUT/AUDIOOUTjacks
Satellite,cableorTVantennacabletoTVANTENNAterminal(cablenotincluded)
Connec t ing to a VCR / Camcorder / Satellite System / Cable Connect theAUDIO andS-VIDEOcable(notincluded)asshown.Make sure you connect the cablefrom the other equipment (AUDIO OUT andS-VIDEO OUT)tothisunit(AUDIO IN andS-VIDEO IN).
CONNECTING DEVICES WITH A COMPOSITE (YELLOW RCA-TYPE) VIDEO OUTPUTToconnectA/VdevicessuchasaVCR,videogamesystemorcamcorder.
Connecting to a VCR / Video Game System / Camcorder ConnecttheAUDIO/VIDEOcable(notincluded)asshown.Makesureyouconnectthecablefromtheotherequipment(AUDIO andVIDEO OUT)tothisunit(AUDIO andVIDEO IN).
NOTEPleaserefertotheusermanualfortheotherequipmentformoreinformation.
ToAUDIO/VIDEOINjacks(AV IN)
ToAUDIO/VIDEOOUTjacks

E - 12
CONNECTIONSCONNECTING DEVICES WITH A COMPOSITE (YELLOW RCA-TYPE) VIDEO INPUTToconnectA/VdevicessuchasaVCR,PVRorcamcorder.
Connecting to a VCR / PVR / Camcorder Connect theAUDIO / VIDEOcable(notincluded)asshown.
Make sure you connect thecablefromtheotherequipment(AUDIO andVIDEO IN)tothisunit(AUDIO andVIDEO OUT).
NOTEPleaserefertotheusermanualfortheotherequipmentformoreinformation.
ToAUDIO/VIDEOOUTjacks
ToAUDIO/VIDEOINjacks
CONNECTING A HIGH-DEFINITION (HD) SOURCEHigh-Definition(HD)DeviceswithcomponentvideooutputmustbeconnectedtotheYUVinput.Connectthecomponentvideocableandaudiocable(notincluded)asshown.Makesureyouconnectthecomponentvideocableandaudiocablefromtheotherequipment(COMPONENT VIDEO OUT andAUDIO OUT)tothisunit(COMPONENT VIDEO IN andAUDIO IN - YUV IN).
NOTEWhenconnectingaDVDplayertothetelevision,thepictureresolutionissolelydependentupontheresolutionsupportedbytheDVDplayerattached.DVDplayerresolutionsvaryfrom480ito1080i,andthisunitcansupportDVDplayersuptoamaximumresolutionof1080i.
ToAUDIOINjacks(YUV IN) ToAUDIO
OUTjacks
ToCOMPONENTVIDEOINjacks(YUV IN)
ToCOMPONENTVIDEOOUTjacks
*May requireasubscriptionfor receivingHD channels.Check with your cable/satelliteserviceproviderfordetails.

E - 13
CONNECTIONS
CONNECTING A PCConnectthe15-pinD-SUBPC/VGAconnectorfromyourcomputertothe15-pinD-SUBPC/VGAinputonthisunitusingamonitorcableandanaudiocable(notincluded)asshown.
Make sure you connect the cable from thecomputer (PC Connector andAUDIO - PC OUT)tothisunit(MONITOR / VGA andAUDIO - PC IN).
CONNECTING AN AUDIO AMPLIFIERThis connection allows you to use an audioamplifierandexternalspeakers.
Connect theAUDIO cable (not included) asshown.
Makesureyouconnectthecablefromtheotherequipment (AUDIO IN) to this unit (AUDIO OUT).
ToAUDIOOUTjacks
ToAUDIOINjacks
CONNECTING HDMIHDMI(HighDefinitionMultimediaInterface)supportsbothvideoandaudioonasingledigitalconnectionforusewithDVDplayers,DTV,set-topboxesandotherdigitalAVdevices.HDMIwasdevelopedtoprovidethetechnologiesofHighBandwidthDigitalContentProtection(HDCP)aswellasDigitalVisualInterface(DVI)inonespecification.HDCPisusedtoprotectdigitalcontenttransmittedandreceivedbyDVI-compliantorHDMI-compliantdisplays.HDMIhasthecapabilitytosupportstandard,enhancedorhigh-definitionvideoplusstandardtomulti-channelsurround-soundaudio.HDMIfeaturesincludeuncompresseddigitalvideo,abandwidthofupto2.2gigabytespersecond(withHDTVsignals),oneconnector(insteadofseveralcablesand connectors), and communication between theAVsourceandAVdevicessuchasDTVs.HDMI, the HDMI logo and High-DefinitionMultimedia Interface are trademarks or registeredtrademarksofHDMIlicensingLLC.ConnecttheHDMIcable(notincluded)asshown:Make sure you connect the cable from the sourceequipment(HDMI OUT)tothisunit(HDMI IN).Tooperatetheconnecteddeviceandplaythesource,firstpresstheFUNCTIONbuttontoselecttheHDMImode.

E - 14
CONNECTIONS
INSTALLATION
MOUNTING ON THE WALLThis unit is VESA-compliant, and is designed to bewall-mountedwithaVESA-compliant3”x3”(75mmx75mm)mountingkitdesigned forflat-panelTVs (soldseparately).Mountthisunitaccordingtotheinstructionsincludedinthemountingkit.
NOTERemove thebase standbeforemounting theunit onthewall.
3”
3”
CONNECT THE POWER CORD• ConnecttheACpowercordintoawalloutlet.• Pressthe / I buttonontheunitorremotecontroltoturnontheunit.
NOTE• BesuretheACpowercordisdisconnectedandallfunctionsareoffbeforemakingconnections.
• Make sure that all the components are connectedcorrectly.
• To prevent electrical shock, match wide blade of plug to wide slot of wall outlet, then fully insert.
• Whenyouarenotgoingtousetheunitforalongperiodoftime,disconnectthepowercord.
• Theapparatusshallnotbeexposedtodrippingorsplashingandthatnoobjectsfilledwithliquids,suchasvases,shallbeplacedonapparatus.
• Mainsplugisusedasthedisconnectdevice.Itshallremainreadilyoperableandshouldnotbeobstructedduringintendeduse.Tobecompletelydisconnectedtheapparatusfromsupplymains,themainsplugoftheapparatusshallbedisconnectedfromthemainssocketoutletcompletely.
INSTALLING / REMOVING THE BASE STANDWARNING: The LCD Display is very fragile, and must be protected at all times when removing the base stand. Be sure that no hard or sharp object, or anything that could scratch or damage the LCD display, comes into contact with it. Do NOT exert pressure on the front of the unit at any time because the screen could crack.1. Disconnect all cables or cords connected to the unit.2. Lay the unit down on a flat surface with the back side facing up. Please make sure to place a soft cushioned
material (such as a pillow or thick piece of foam) beneath the screen.
4. To remove the base stand, keep pressing the locking area of the base stand and pull downwards to release the base stand.
3. To install the base stand, place the base stand on the mounting slot, push the stand till it locks.
ToACwalloutlet

E - 15
USING HEADPHONES• Turndownthevolumebeforeconnectingheadphonestotheunit,thenadjustthevolumetoyourdesiredlevel.
• When headphones a reconnected,nosoundwillcomefromthefrontspeakers.
NOTEAvoidlisteningtosoundathighlevels for prolonged periods oftime.Thismaybeharmfultoyouandmaycausehearingloss.
Headphones (1/8”[3.5mmdiameterplug)
TURNING THE UNIT ONWhentheACpoweradapterisconnected,pressthe / I buttonontheunittoturniton.PresstheFUNCTIONbuttontoselectthedesiredmode(TV/AVIN/YUVIN/DVD/HDMI/PCIN).IfyouselectDVD,theDVDlogowillappearonthescreen.
NOTEWhentheunitisnotgoingtobeusedforalongtime,disconnecttheACpoweradapterfromACpoweroutlet.
DOLBY DIGITAL (FOR DVD)DolbyDigitalisasoundsystemdevelopedbyDolbyLaboratoriesInc.ThisunitautomaticallyrecognizesDVDsthathavebeenrecordedwithDolbyDigital.NotallDolbyDigitalsourcesarerecordedwith6channels.SomesourcesmarkedDolbyDigitalmayberecordedinDolbySurround,a2channelsystem.Lookforthislogoonyourunit.
ManufacturedunderlicensefromDolbyLaboratories.‘Dolby’andthedouble-DsymbolaretrademarksofDolbyLaboratories.
UNIT OPERATION
SOUND SYSTEM
E - 16
TV SETUP
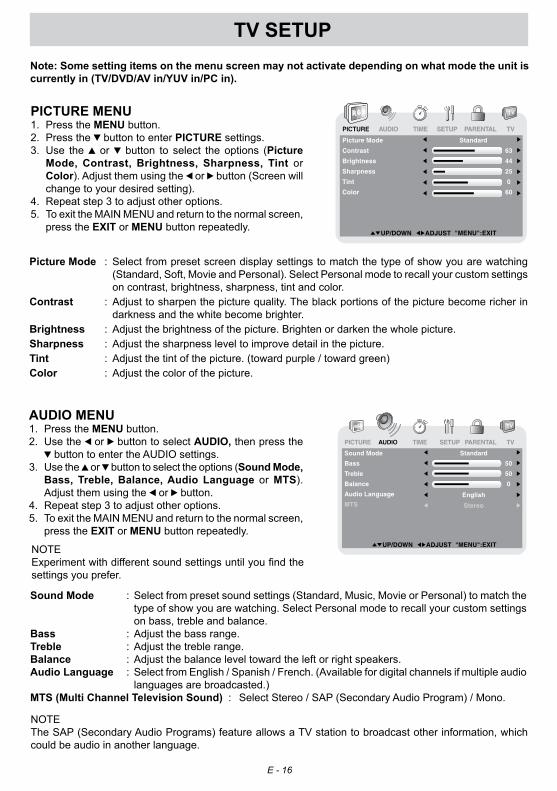
PICTURE MENU1. PresstheMENUbutton.2. Pressthe buttontoenterPICTURE settings.3. Use the or button to select theoptions (Picture
Mode, Contrast, Brightness, Sharpness, Tint or Color).Adjustthemusingthe or button(Screenwillchangetoyourdesiredsetting).
4. Repeatstep3toadjustotheroptions.5. ToexittheMAINMENUandreturntothenormalscreen,
presstheEXIT orMENUbuttonrepeatedly.
Note: Some setting items on the menu screen may not activate depending on what mode the unit is currently in (TV/DVD/AV in/YUV in/PC in).
Picture Mode : Selectfrompresetscreendisplaysettingstomatchthetypeofshowyouarewatching(Standard,Soft,MovieandPersonal).SelectPersonalmodetorecallyourcustomsettingsoncontrast,brightness,sharpness,tintandcolor.
Contrast : Adjusttosharpenthepicturequality.Theblackportionsofthepicturebecomericherindarknessandthewhitebecomebrighter.
Brightness : Adjustthebrightnessofthepicture.Brightenordarkenthewholepicture.Sharpness : Adjustthesharpnessleveltoimprovedetailinthepicture.Tint : Adjustthetintofthepicture.(towardpurple/towardgreen)Color : Adjustthecolorofthepicture.
AUDIO MENU1. PresstheMENUbutton.2. Usethe or buttontoselectAUDIO, thenpressthe
buttontoentertheAUDIOsettings.3. Usethe or buttontoselecttheoptions(Sound Mode,
Bass, Treble, Balance, Audio Language or MTS).Adjustthemusingthe or button.
4. Repeatstep3toadjustotheroptions.5. ToexittheMAINMENUandreturntothenormalscreen,
presstheEXITorMENU buttonrepeatedly.
Sound Mode : Selectfrompresetsoundsettings(Standard,Music,MovieorPersonal)tomatchthetypeofshowyouarewatching.SelectPersonalmodetorecallyourcustomsettingsonbass,trebleandbalance.
Bass : Adjustthebassrange.Treble : Adjustthetreblerange.Balance : Adjustthebalanceleveltowardtheleftorrightspeakers.Audio Language :SelectfromEnglish/Spanish/French.(Availablefordigitalchannelsifmultipleaudio
languagesarebroadcasted.)MTS (Multi Channel Television Sound) : SelectStereo/SAP(SecondaryAudioProgram)/Mono.
NOTEExperimentwithdifferentsoundsettingsuntilyoufindthesettingsyouprefer.
NOTETheSAP(SecondaryAudioPrograms)featureallowsaTVstationtobroadcastotherinformation,whichcouldbeaudioinanotherlanguage.

E - 17
TV SETUPTIME MENU1. PresstheMENUbutton.2. Usethe or buttontoselectTIME, thenpressthe
buttontoentertheTIMEsettings.3. Use the or button to select the options (OSD
Duration, Sleep Timer, Time Zone or Day Saving Time).Adjustthemusingthe or button.
4. Repeatstep3toadjustotheroptions.5. To exit theMAINMENUand return to the normal
screen,presstheEXIT orMENUbuttonrepeatedly.
OSD (On Screen Display) Duration :SelectthelengthoftimefortheOnscreenmenuisdisplayed:15Sec/30Sec/45Sec/60Sec.
Sleep Timer : SelectthelengthoftimebeforetheunitautomaticallychangestoStandbymode:Off->5Minutes->10Minutes->15Minutes->30Minutes->60Minutes->90Minutes->120Minutes->Off.
Time Zone : SelectthetimezonefromEastern/Central/Mountain/Pacific/Alaska/Hawaii.Day Saving Time : SelectOntoactivatedaylightsavingstime.Clock :Displaythecurrenttime.
SETUP MENU1. PresstheMENUbutton.2. Usethe or buttontoselectSETUP, thenpressthe
buttontoentertheSETUPsettings.3. Use the or button to select the options (OSD
Language, Color Mode, PC Set Up, Closed Caption or Restore Setting).Adjustthemusingthe or button(Screenwillchangetoyourdesiredsetting);orpressthe buttontogointothedetailedsettings.
4. Press theMENU button to return to the previousmenu.
5. Repeatsteps3and4toadjustotheroptions.6. ToexittheMAINMENUandreturntothenormalscreen,
presstheEXIT orMENUbuttonrepeatedly.
OSD (On Screen Display) Language :SelectOn-screenmenu language fromEnglish / French /Spanish.
Color Mode : Adjust thethreecolor temperatureof thepicture.ChoosefromNormal(balanced),Warm(redwhite),orCool(bluewhite)modes.
Restore Setting : IfyouresettheTVtothefactorysettings,allyourpresentsettingsonPICTUREandAUDIOwillbeerasedandreplacedbythefactory’sdefaultsettings.
E - 18
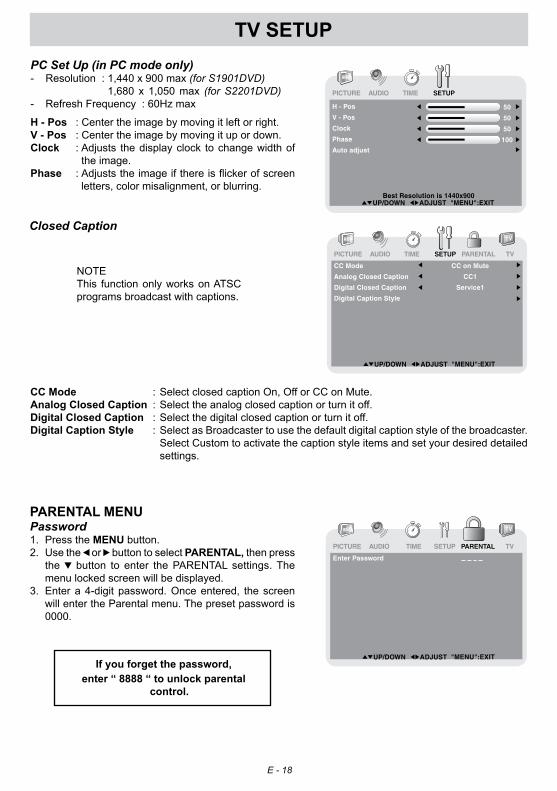
TV SETUPPC Set Up (in PC mode only)- Resolution:1,440x900max(for S1901DVD) 1,680 x 1,050max (for S2201DVD)- RefreshFrequency:60Hzmax
H - Pos :Centertheimagebymovingitleftorright.V - Pos :Centertheimagebymovingitupordown.Clock :Adjusts thedisplayclock tochangewidthof
theimage.Phase :Adjuststheimageifthereisflickerofscreen
letters,colormisalignment,orblurring.
Closed Caption
CC Mode :SelectclosedcaptionOn,OfforCConMute.Analog Closed Caption :Selecttheanalogclosedcaptionorturnitoff.Digital Closed Caption :Selectthedigitalclosedcaptionorturnitoff.Digital Caption Style :SelectasBroadcastertousethedefaultdigitalcaptionstyleofthebroadcaster.
SelectCustomtoactivatethecaptionstyleitemsandsetyourdesireddetailedsettings.
NOTEThis functiononlyworksonATSCprogramsbroadcastwithcaptions.
PARENTAL MENUPassword1.PresstheMENUbutton.2. Usethe or buttontoselectPARENTAL, thenpress
the button to enter thePARENTAL settings.Themenulockedscreenwillbedisplayed.
3.Entera4-digitpassword.Onceentered, thescreenwillentertheParentalmenu.Thepresetpasswordis0000.
If you forget the password, enter “ 8888 “ to unlock parental
control.

E - 19
TV SETUPParental1.Usethe or buttontoselectvariousParentalsettings.
Adjustthemusingthe or button,orpressthe buttontogointothedetailedsettings.
2.PresstheMENUbuttontoreturntothepreviousmenu.3.Repeatsteps1-2toadjustotheroptions.4.ToexittheMAINMENUandreturntothenormalscreen,
presstheEXITorMENU buttonrepeatedly.
TV-Y :Recommendedforallchildren.TV-Y7 :Recommendedforallchildrenage7andabove.TV-G :GeneralAudience.TV-PG :ParentalGuidanceSuggested.TV-14 :ParentalStronglyCautioned.TV-MA :MatureAudienceOnly.
N/A :Notrated.G :GENERALAUDIENCES,Suitableforallages.PG :PARENTALGUIDANCESUGGESTED-Somematerialmaynotbesuitablefor
children.PG-13 :PARENTSSTRONGLYCAUTIONED-Somematerialmaybeinappropriatefor
childrenunder13.R :RESTRICTED,Under17requiresaccompanyingparentoradultguardianfor
viewinginmovietheaters.NC-17 :Noone17orunderadmittedinmovietheaters,X :AdultsOnly.
E :Exempt.C :Children.C8+ :Recommendedforchildrenage8andolder.G :GENERALAUDIENCES,Suitableforallages.PG :PARENTALGUIDANCESUGGESTED-Somematerialmaynotbesuitablefor
children.14+ :Viewers14yearsandolder.18+ :AdultProgramming.
E :Exempt.G :GENERALAUDIENCES,Suitableforallages.8ans+ :Notrecommendedforyoungchildren.13ans+:Notsuitableforchildrenundertheageof13.16ans+:Notsuitableforchildrenundertheageof16.18ans+:AdultProgramming.
U.S.MPAARatings
U.S.TVRatings
CanadianEnglishRatings
CanadianFrenchRatings
Change Password :Enter theold password (thepresetpassword is 0000 if you did notchangeit),thenenternewpasswordand confirm it.(Remember yourpassword!)
Rating Enable :SelectOntoeditthefollowingparentalitems.SelectOfftodisableparentalcontrol.US :SetTVandMPAAratings.Canada :SetCanadaEnglishandCanadaFrenchratings.RRT Setting :SetRatingRegionTable.Reset RRT :ResetRatingRegionTabletothedefaultsettings.

E - 20
TV SETUP
Antenna :Air(over-the-airbroadcasts,Ch2-69)orCATV(cable/satellitebroadcasts,CH1-135)modeareavailable.
Auto Scan :Searchforusablestationsandstoretheminmemory.Auto Scan Add CH : Searchformoreusablestationsandaddtheminmemory.Thestationsstoredbefore
arestillkept.Channel Skip : Skipweakchannelsandthechannelsyoudon’tlike.Channel No. : SelectadifferentTVchannel.Channel Label :Displayandeditthechannellabel.DTV Signal :Displaythesignalstrength(fordigitalTVchannelsonly).
TV MENU (For TV Mode Only)1. PresstheMENUbutton.2. Usethe or buttontoselectTV, thenpressthe
buttontoentertheTVsettings.3. Usethe or buttontoselecttheoptions(Antenna,
Auto Scan, Auto Scan Add CH, Channel Skip, Channel No., Channel Label or DTV Signal).Adjustthemusingthe or button,orpressthe buttontogointothedetailedsettings.
4. Press theMENU button to return to the previousmenu.
5. Repeatsteps3and4toadjustotheroptions.6. To exit theMAINMENUand return to the normal
screen,presstheEXIT orMENUbuttonrepeatedly.
Channel Skip1. Usethe or buttontoselectachannel.(Pressthe
buttontoselectthelastchannelofthepage;pressagain togo to thenextpage.Press the button toselect the first channel of the page; press again toreturntothepreviouspage.)
2. Press theENTER button to shift betweenOn /Off.(SelectOntoskiptheselectedchannel.Thechannelwill notappearwhenyoupress theCH / CH button.)
Channel LabelYoucaneditalabelforeachchannel.1. Usethe or buttontoselectthenumberorletter.
Use the or button tomove and edit the nextcharacter.
2. Afterediting,theChannelandChannelLabelwillbeshownonthescreenwhenyoupresstheDISPLAYbutton.

E - 21
This owner’s manual explains the basic instructions of this unit. Some DVDs are produced to limit operation during playback. For example, many DVDs do not allow users to skip government warnings, or in some cases previews or other features. This is not a defect in the unit. Refer to the instruction notes of discs.“ ” may appear on the screen during operation. A “ ” means that the desired operation is not permitted by the unit or disc.
PlAying A DiSc1. Press the / i button to turn the unit on.2. Press the FUncTiOn button to select DVD mode. See CUSTOMIZING THE DVD FUNCTION SETTINGS before proceeding to step 3.3. Press the button to open the disc door.4. Hold the disc by its edge and gently push it onto the spindle, with the label side facing the front, until you
hear a “click”.5. Push the disc door gently to close it. It takes a short while for your unit to load the disc. After loading, for
most DVDs, the unit will automatically take you main menu or start playing. If the unit does not automatically start playing the DVD, press the PlAy button.
PlAying A PicTURE FilE DiScThis unit can play picture files recorded on CD-R and CD-RW discs.1. Press the button to open the disc door.2. Hold the disc by its edge and gently push it onto the spindle, with the label side facing the front, until you
hear a “click”.3. Push the door gently to close it. The picture files on the disc will be displayed one by one automatically.4. Press the STOP button to go to the folder list.5. Press the or button to highlight a file to play. Press the PlAy button to start playback.
NOTE• You can press the PAUSE button to interrupt playback, and press the PlAy button to resume
playback.• You also can use the GOTO function or use the numbered buttons to enter the image number to quickly
select any image.• Press the AnglE button on the remote control to rotate the picture orientation by 90°.
PAUSing PlAybAck (STill mODE)Press the PAUSE button. To resume normal playback, press the PlAy button. Each time you press the PAUSE button, the picture advances one frame.
SkiPPing TO A DiFFEREnT TRAck• Press the PREV button to go back to previous chapters/tracks.• Press the nEXT button to advance chapters/tracks. • For an Audio CD, use the number buttons (remote control only) to go directly to that track number.
STOPPing PlAybAckPress the STOP button at the location where you want to interrupt playback. To resume playback at the position where the disc was stopped, press the PlAy button.If you press the STOP button twice, the unit’ s memory will be cleared and pressing the PlAy button will reset the disc to the beginning.
cD/DVD OPERATiOn
E - 22
cD/DVD OPERATiOn
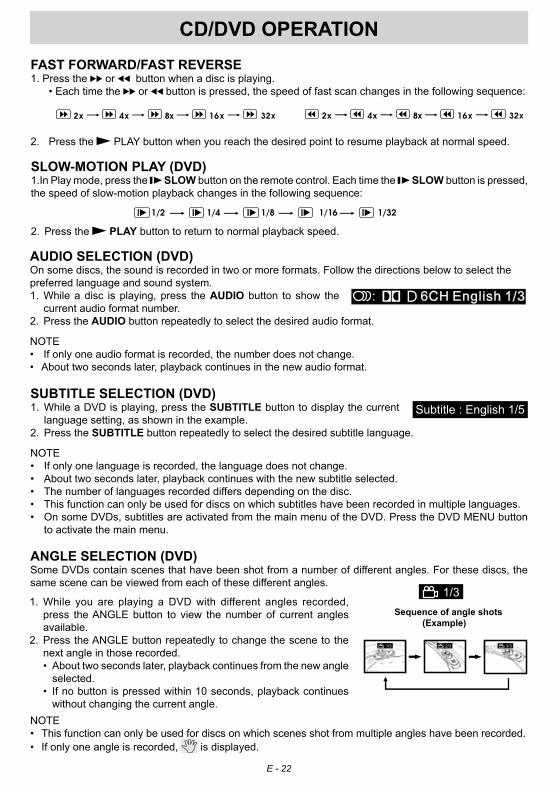
SlOW-mOTiOn PlAy (DVD)1.In Play mode, press the SlOW button on the remote control. Each time the SlOW button is pressed, the speed of slow-motion playback changes in the following sequence:
2. Press the PlAy button to return to normal playback speed.
AUDiO SElEcTiOn (DVD)On some discs, the sound is recorded in two or more formats. Follow the directions below to select the preferred language and sound system.1. While a disc is playing, press the AUDiO button to show the
current audio format number.2. Press the AUDiO button repeatedly to select the desired audio format.
NOTE• If only one audio format is recorded, the number does not change.• About two seconds later, playback continues in the new audio format.
SUbTiTlE SElEcTiOn (DVD)1. While a DVD is playing, press the SUbTiTlE button to display the current
language setting, as shown in the example.2. Press the SUbTiTlE button repeatedly to select the desired subtitle language.
NOTE• If only one language is recorded, the language does not change.• About two seconds later, playback continues with the new subtitle selected.• The number of languages recorded differs depending on the disc. • This function can only be used for discs on which subtitles have been recorded in multiple languages.• On some DVDs, subtitles are activated from the main menu of the DVD. Press the DVD MENU button
to activate the main menu.
AnglE SElEcTiOn (DVD)Some DVDs contain scenes that have been shot from a number of different angles. For these discs, the same scene can be viewed from each of these different angles.
1. While you are playing a DVD with different angles recorded, press the ANGLE button to view the number of current angles available.
2. Press the ANGLE button repeatedly to change the scene to the next angle in those recorded.
• About two seconds later, playback continues from the new angle selected.
• If no button is pressed within 10 seconds, playback continues without changing the current angle.
FAST FORWARD/FAST REVERSE1. Press the or button when a disc is playing. • Each time the or button is pressed, the speed of fast scan changes in the following sequence:
2. Press the PLAY button when you reach the desired point to resume playback at normal speed.
1/2 1/4 1/8 1/16 1/32
1/3
1/3 2/3 3/3
Sequence of angle shots(Example)
NOTE• This function can only be used for discs on which scenes shot from multiple angles have been recorded.• If only one angle is recorded, is displayed.
E - 23
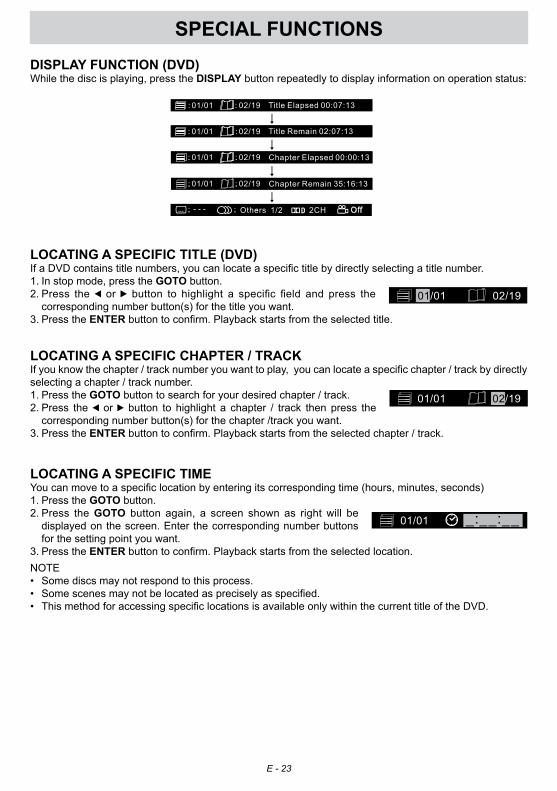
DiSPlAy FUncTiOn (DVD)While the disc is playing, press the DiSPlAy button repeatedly to display information on operation status:
SPEciAl FUncTiOnS
lOcATing A SPEciFic chAPTER / TRAckIf you know the chapter / track number you want to play, you can locate a specific chapter / track by directly selecting a chapter / track number.1. Press the gOTO button to search for your desired chapter / track.2. Press the or button to highlight a chapter / track then press the
corresponding number button(s) for the chapter /track you want.3. Press the EnTER button to confirm. Playback starts from the selected chapter / track.
lOcATing A SPEciFic TiTlE (DVD)If a DVD contains title numbers, you can locate a specific title by directly selecting a title number.1. In stop mode, press the gOTO button.2. Press the or button to highlight a specific field and press the
corresponding number button(s) for the title you want.3. Press the EnTER button to confirm. Playback starts from the selected title.
lOcATing A SPEciFic TimEYou can move to a specific location by entering its corresponding time (hours, minutes, seconds)1. Press the gOTO button.2. Press the gOTO button again, a screen shown as right will be
displayed on the screen. Enter the corresponding number buttons for the setting point you want.
3. Press the EnTER button to confirm. Playback starts from the selected location.NOTE • Some discs may not respond to this process.• Some scenes may not be located as precisely as specified.• This method for accessing specific locations is available only within the current title of the DVD.

E - 24
You can play a specific title or chapter repeatedly. (Title repeat, chapter repeat, entire DVD repeat, A-B repeat)
REPEATing A chAPTER (DVD)You can play the same chapter repeatedly.1. While the disc is playing, press the REPEAT button until the indicator displays on the screen.
The current chapter is played repeatedly.
REPEATing A TiTlEYou can play the same title repeatedly.2. While the disc is playing, press the REPEAT button until the indicator displays on the screen.
The current title is played repeatedly.
REPEATing AllYou can play the the entire DVD repeatedly.3. While the disc is playing, press the REPEAT button until the indicator displays on the screen. The
entire DVD is played repeatedly.
TO RESUmE nORmAl PlAybAck4. While the disc is playing, press the REPEAT button until the indicator displays on the screen.
You can play a single track or an entire disc repeatedly.
REPEATing A SinglE TRAck (cD)You can play the same track repeatedly.1. While the disc is playing, press the REPEAT button until the indicator displays on the screen.
The current track is played repeatedly.
REPEATing An EnTiRE DiSc2. While the disc is playing, press the REPEAT button until the indicator displays on the screen. The
entire disc is played repeatedly.
TO RESUmE nORmAl PlAybAck3. Press the REPEAT button until the indicator displays on the screen.
REPEATing A SPEciFic SEcTiOn (DVD) (cD)You can play a specific section repeatedly.1. While the disc is playing, press the A-b button at the beginning of the section ( is displayed) you
want to play repeatedly.2. Press the A-b button again at the end of the section ( is displayed) you want to play
repeatedly.3. The unit will immediately begin replaying your selection.
TO RESUmE nORmAl PlAybAck4. While the disc is playing, press the A-b button until the indicator displays on the screen.
NOTE• A-B repeat can only be used within the same title. If the start and end of the section to be repeated are
in different titles, A-B repeat is cancelled.• The A-B repeat function does not operate in scenes where different camera angles are recorded.
REPEAT PlAybAck

E - 25
DVD PROgRAmmAblE mEmORy
PROgRAmmAblE mEmORyThe two types of programmed playback provided by this unit is title/chapter programmed playback.
TiTlE/chAPTER PROgRAmmED PlAybAck (DVD)1. Press the mEmORy button in PLAY mode. A screen will be shown
as right.2. Press the button to highlight the Title. Press the or button to
choose the desired title. Press the button again to highlight the Chapter. Press the or button to choose the desired Chapter. Press the EnTER button to confirm. The highlight bar will move to the next item automatically.
3. Repeat step 2 to add additional titles and chapters.4. Press the PlAy button to start the programmed playback.
lAngUAgE SETUP1. In Stop mode, press the SETUP button.2. Use the or button to select the option Language Setup,
then press the button to move the highlight bar on OSD Language. (Note that Audio, Subtitle and DVD Menu can be activated by pressing the STOP button twice.)
3. Use the button to move the highlight bar, then use the or button to select your preferred language, and press the EnTER button to confirm.
4. Press the button to go back to the previous menu. Repeat steps 2 and 3 to adjust other options.
5. To exit the SETUP MENU and return to the normal screen, highlight the Exit Setup Mode ( ) and press the EnTER button.
cUSTOmiZing ThE DVD FUncTiOn SETTingS
NOTE• Some DVDs may not play in the audio language selected. A prior language may be programmed on the
disc.• Some DVDs may be set to display subtitles in a language other than the one selected. A prior subtitle
language may be programmed on the disc.• Some DVDs allow you to change subtitle selections via the disc menu only. If this is the case, press the
DVD MENU button and choose the appropriate subtitle from the selection on the disc menu.• Some DVDs may not include your pre-selected language. In this case, the DVD player automatically
displays disc menus consistent with the disc’s initial language setting.
Select Play Clear
Select Play Clear
Language Setup
: Select
OSD LanguageAudioSubtitleDVD Menu

E - 26
ViDEO SETUP1. In Stop mode, press the SETUP button.2. Use the or button to select the Video Setup.3. Press the button to highlight the TV TYPE.4. Use the or button to select the desired TV type.5. To exit the SETUP MENU and return to the normal screen,
highlight the Exit Setup Mode ( ) and press the EnTER button.
TV TyPEPan Scan• When wide-screen video is played, this mode clips the right and left sides of the
image so that it can be viewed on a conventional screen.• Some wide-screen DVDs that do not permit Pan Scan mode playback are
automatically played in letterbox mode (black bands that appear at the top and bottom of the screen).
Letter Box• When wide-screen video is played in this mode on a conventional screen, black
bands appear at the top and bottom of the screen.Wide screen• This is the correct mode for playing wide-screen videos on the unit or other external
wide-screens.
NOTE• The displayable picture size is preset on the DVD. Therefore the playback picture
of some DVDs may not conform to the picture size you select.• When you play DVDs recorded in the 4:3 aspect ratio, the playback picture will
always appears in the 4:3 aspect ratio regardless of the TV TYPE setting.• If the screen mode is still not correct, press the LCD MODE button repeatedly to
adjust it.
SySTEm SETUP1. In Stop mode, press the SETUP button.2. Use the or button to select the System Setup option.3. Press the button to highlight the Default.4. Use the or button to select the desired setup option.5. To exit the SETUP MENU and return to the normal screen,
highlight the Exit Setup Mode ( ) and press the EnTER button.
cUSTOmiZing ThE DVD FUncTiOn SETTingS
DEFAUlT It takes 3-5 seconds to reset the DVD settings to the factory default.
Pan Scan
letter box
Wide-screen
Cut off when a wide-screen video image is played.
Video Setup
: Select
TV Type Pan ScanLetter BoxWide Screen
System Setup
: Select
Default YesNo
E - 27
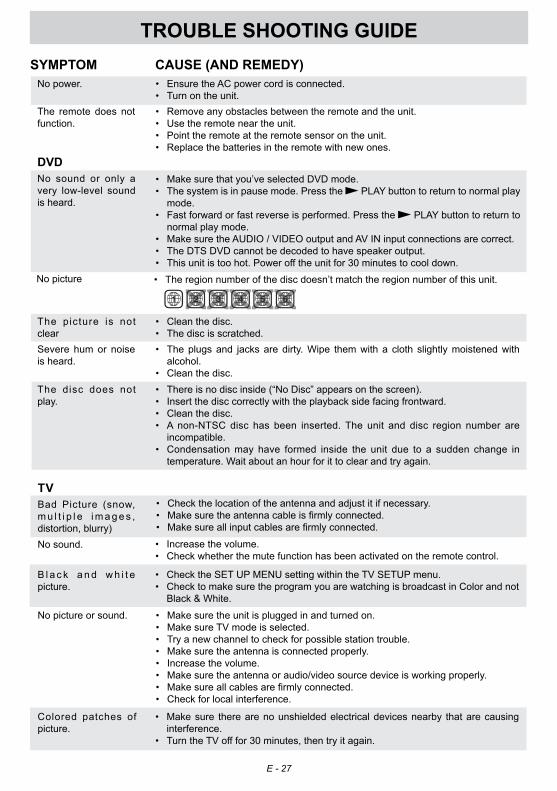
SymPTOm cAUSE (AnD REmEDy)• Ensure the AC power cord is connected.• Turn on the unit. • Remove any obstacles between the remote and the unit.• Use the remote near the unit.• Point the remote at the remote sensor on the unit.• Replace the batteries in the remote with new ones.
No power.
The remote does not function.
TROUblE ShOOTing gUiDE
• Check the location of the antenna and adjust it if necessary.• Make sure the antenna cable is firmly connected.• Make sure all input cables are firmly connected.
TVBad Picture (snow, m u l t i p l e i m a g e s , distortion, blurry)
• Increase the volume.• Check whether the mute function has been activated on the remote control.
No sound.
B l a c k a n d w h i t e picture.
No picture or sound.
• Check the SET UP MENU setting within the TV SETUP menu.• Check to make sure the program you are watching is broadcast in Color and not
Black & White.
• Make sure the unit is plugged in and turned on.• Make sure TV mode is selected.• Try a new channel to check for possible station trouble.• Make sure the antenna is connected properly.• Increase the volume. • Make sure the antenna or audio/video source device is working properly.• Make sure all cables are firmly connected.• Check for local interference.
Colored patches of picture.
• Make sure there are no unshielded electrical devices nearby that are causing interference.
• Turn the TV off for 30 minutes, then try it again.
• Make sure that you’ve selected DVD mode. • The system is in pause mode. Press the PLAY button to return to normal play
mode.• Fast forward or fast reverse is performed. Press the PLAY button to return to
normal play mode.• Make sure the AUDIO / VIDEO output and AV IN input connections are correct.• The DTS DVD cannot be decoded to have speaker output.• This unit is too hot. Power off the unit for 30 minutes to cool down.
DVDNo sound or only a very low-level sound is heard.
• There is no disc inside (“No Disc” appears on the screen).• Insert the disc correctly with the playback side facing frontward.• Clean the disc.• A non-NTSC disc has been inserted. The unit and disc region number are
incompatible.• Condensation may have formed inside the unit due to a sudden change in
temperature. Wait about an hour for it to clear and try again.
• The plugs and jacks are dirty. Wipe them with a cloth slightly moistened with alcohol.
• Clean the disc.
• Clean the disc.• The disc is scratched.
The picture is not clear Severe hum or noise is heard.
The disc does not play.
No picture • The region number of the disc doesn’t match the region number of this unit.