Embed Size (px)
Citation preview
1–DogCare and Training, Level I
KANSAS 4–H
Kansas State University Agricultural Research Station and Cooperative Extension Service
Kansas 4-H Dog Care and Training ProjectLeader Notebook Level I
Choosing a Type and Breed of Dog .......................................................................... 3
Where Do I Get a Dog? ........................................................................................... 13
Beginning to Set Goals in Your Dog Care and Training Project ............................ 21
Where Do I Keep My Dog? ..................................................................................... 25
Attention Training ................................................................................................... 31
Muzzles and Flews—Dog Parts .............................................................................. 35
Pre-Novice Obedience—Lesson One ...................................................................... 41
House Manners for Your Dog ................................................................................. 51
Pre-Novice Obedience—Lesson Two ..................................................................... 55
Your Best Friend ..................................................................................................... 69
Pre-Novice Obedience—Lesson Three ................................................................... 73
Feeding Your Dog ................................................................................................... 85
Pre-Novice Obedience—Lesson Four ..................................................................... 91
Selecting Dog Equipment ...................................................................................... 105
Pre-Novice Obedience—Lesson Five ................................................................... 111
Have Dog—Will Travel ........................................................................................ 123
Pre-Novice Obedience—Lesson Six ..................................................................... 127
Basic Grooming ..................................................................................................... 139
Pre-Novice Obedience—Lesson Seven ................................................................. 149
Introduction to Showmanship ................................................................................ 163
Pre-Novice Obedience—Lesson Eight .................................................................. 169
Handling the Lead ................................................................................................. 181
Showmanship Training Patterns ............................................................................ 185
Posing the Dog for Individual Examination .......................................................... 195
Preparing for the Show .......................................................................................... 199
Graduation Games ................................................................................................. 205

2–DogCare and Training, Level I
3–DogCare and Training, Level I
KANSAS 4–H
What Members Will Learn . . .
ABOUT THE PROJECT:• Factors to consider when selecting a dog
ABOUT THEMSELVES:• Evaluating information to make sound decisions
Materials Needed:• Member Handout #1, Matching Cards—Dog Breeds and Descrip-
tions• Chalkboard and chalk, markerboard, or newsprint and marker• Member Handout #2, Dog Problem Stories• Activity Sheet #1, Family Questionnaire
ACTIVITY TIME NEEDED: 45 MINUTES
ACTIVITY
MATCHING GAMEThere are over 200 different breeds of dogs in addition to all kinds ofmixed breed dogs. Each breed has differences that set it apart from theothers. Today we will be matching cards with pictures of dogs withdescriptions of dogs. The person who has the card that matches yours willbe your partner for today.
When you find your partner, learn their name and then find out theanswers to these two questions:
1. What kind of a dog do you have or would like to have?
2. Why are you in the Dog Project?
Now that you know a bit about your partner, please introduce them to us.
Leader NotesMatching GameThis is a get acquainted and warm-up
activity. Distribute the Matching Game
dog picture cards to half of the members
and the corresponding descriptions to
the other half. Then either have a
member read the description to the
group to find their partner or have the
members check the descriptions and
pictures with each other. When each
member has found the card that matches
their card they should interview their
partner to find out their name, the kind
of dog they have (if any), and why they
are in the Dog Project. Have the
members introduce each other to the
group, including the answers given to
the questions.
Choosing a Type and Breed of DogDog Care and Training, Level I
4–DogCare and Training, Level I
ACTIVITYLeader NotesBrainstorming
Use sheets of newsprint, a chalkboard or
a marker board to write down the
member’s responses so they all can see.
In true brainstorming you do not pass
value judgments on the contributions—
just write them down. Some responses
for the positive may include: good
friend, watchdog. Some responses for
the negative side may include: biting,
urinating in the house, costs money for
food, gets house dirty, and barking. The
members will likely have a much longer
list of negatives than positives. This is
an excellent opportunity to point out
how important is the role of good friend/
companion. It can outweigh all of the
negatives, in fact, it must in order for
the dog to be a success in the family.
Dog ProblemsThis is actually a nature vs. nurture
discussion. Make another chart with
categories of CANNOT BE CHANGED,
CAN BE CHANGED, and a middle
category of HARD TO CHANGE. Some
characteristics, like size, cannot be
changed. Some problems, like jumping
up on people, can be changed with
training. Other problems, depending on
the breed of dog, can be very difficult to
change. A terrier has been bred to dig,
therefore, it will be very difficult to train
one not to dig. The problems in the
HARD TO CHANGE category are
subject to debate. The discussion is an
important part of this activity. The
concept that some complaints people
may have about their dog could have
been avoided by thinking ahead and
considering the breed of dog before
purchase is also important.
Possible answers:CANNOT BE CHANGED: Too much
time to groom (longcoat), too big, too
small, eats too much
May be HARD TO CHANGE: Won’t
settle down, digs up the yard, barks too
much, gets hair all over the house,
CHOOSING A TYPE AND BREED OF DOG
BRAINSTORMINGGetting a dog is a big decision. Many people don’t realize that they arecommitting to 12 or 14 years of responsibility for the puppy that they buy.Sometimes they only think of the positive side of owning a dog and donot consider the negative things. Let’s see if we can get some ideas of thethings people might like about having a dog and also think of some of thethings people might not like about having a dog. Probably the best thingabout owning a dog is the way it is a good companion to you. What aresome other ideas?
DOG PROBLEMSLet’s consider the complaints people may have about a dog. Some of thethings people complain about cannot be changed and some things can bechanged with training. Let’s decide if these complaints can be changed orsolved: Takes too much time to groom, too big, too small, jumps up onpeople, chews the rugs, won’t settle down, gets hair all over the house,urinates in the house, bites, pulls on the leash, chases the cat, eats toomuch, has fleas, digs up the yard, barks too much, fights with other dogs.
5–DogCare and Training, Level I
KANSAS 4–H
ACTIVITY Leader Notes
chases the cat, fights with other dogs.
CAN BE CHANGED: Jumps up on
people, chews rugs, urinates in the
house, pulls on the leash, has fleas.
Dog StoriesRead the dog stories from Member
Handout #2 and have the members
decide if this problem could be solved.
Possible Answers:
1. Cannot Be Changed—Shadow will
always have a long coat. She needs
someone who will groom her
regularly or will have her groomed
regularly.
2. Can Be Changed—Champ needs to
be properly housetrained so he can
stay with the family.
3. Hard to Change—It will help when
Champ is housetrained so he can stay
with the family and get more
attention.
4. Cannot Be Changed—Lucky will
always be small.
5. Can Be Changed—Goldie needs to
be trained to not jump up.
6. Can Be Changed—Mrs. Case needs
to get rid of the fleas in her house
and yard and Spot’s bed as well as
killing the fleas on Spot.
DOG STORIESListen to these stories about dogs whose owners are giving up on them.Decide if the problem Cannot Be Changed, Can Be Changed, or may beHard to Change.
THE DOG FOR YOUThis activity is for you to take home. Interview your family to learn theiropinions on getting a dog. If you already have a dog pretend that you willbe looking for a new one. Consider why you want a dog? Companion?Hunting? Stock dog for farm? etc.
DIALOGUE FOR CRITICAL THINKING:Share:
1. What is one good thing about owning a dog?
2. What might be a problem with owning a dog?
Process:3. What is a problem you have had with a dog?
4. What could have been done differently to prevent or solve theproblem?
Generalize:5. Why is it important to consider good points and bad points when
making a decision?
Apply:6. What are some strategies to use when making a decision?
7. When are some times that you need to make decisions?
GOING FURTHER:1. Attend a dog show to view different breeds of dogs.
2. Visit the local dog shelter or Humane Society.
3. Start a scrapbook of dog photos and descriptions cut from magazines.
4. Interview a dog owner to find out what is involved in owning a dog.
5. Visit a library and look at some books about dogs.
6. Watch a professional dog show on TV.
Use Activity Sheet #1, "Family
Questionnaire" to find out how
your family feels about getting a
dog.

6–DogCare and Training, Level I
REFERENCES:Author:Chris Odell, Obedience and Agility Instructor, Hutchinson, KS Kennel
ClubJames P. Adams, Extension Specialist, 4-H and Youth Programs, Kansas
State University
Reviewed by:Dog Care and Training Design Team
ACTIVITYLeader Notes
CHOOSING A TYPE AND BREED OF DOG

7–DogCare and Training, Level I
KANSAS 4–H
CHOOSING A TYPE AND BREED OF DOGDOG CARE AND TRAINING, LEVEL IMember Handout #1, Matching Games—Dog Breeds and Descriptions
1. Small dog (10–11 inches)
2. Short white hair
3. Erect ears, medium tail
4. Hunts down tunnels
1. Small dog (9–12 inches)
2. Curly white hair, needs specialtrimming
3. Drop ears, curled tail
4. Bred to be a companion
1. Medium dog (12–15 inches)
2. Short hair
3. Long ears and tail
4. Rabbit hunter
1. Large dog (22–25 inches)2. Short hair, yellow, brown or
black3. Short ears, long tail4. Hunting dog—loves
water
1. Large dog (20–25 inches)
2. Medium length hair, gold color
3. Short ear, long tail
4. Hunting dog—loveswater
BEAGLE
GOLDENRETRIEVER
WESTHIGHLAND
WHITETERRIER(WESTIE)
LABRADORRETRIEVER
BICHONFRISE
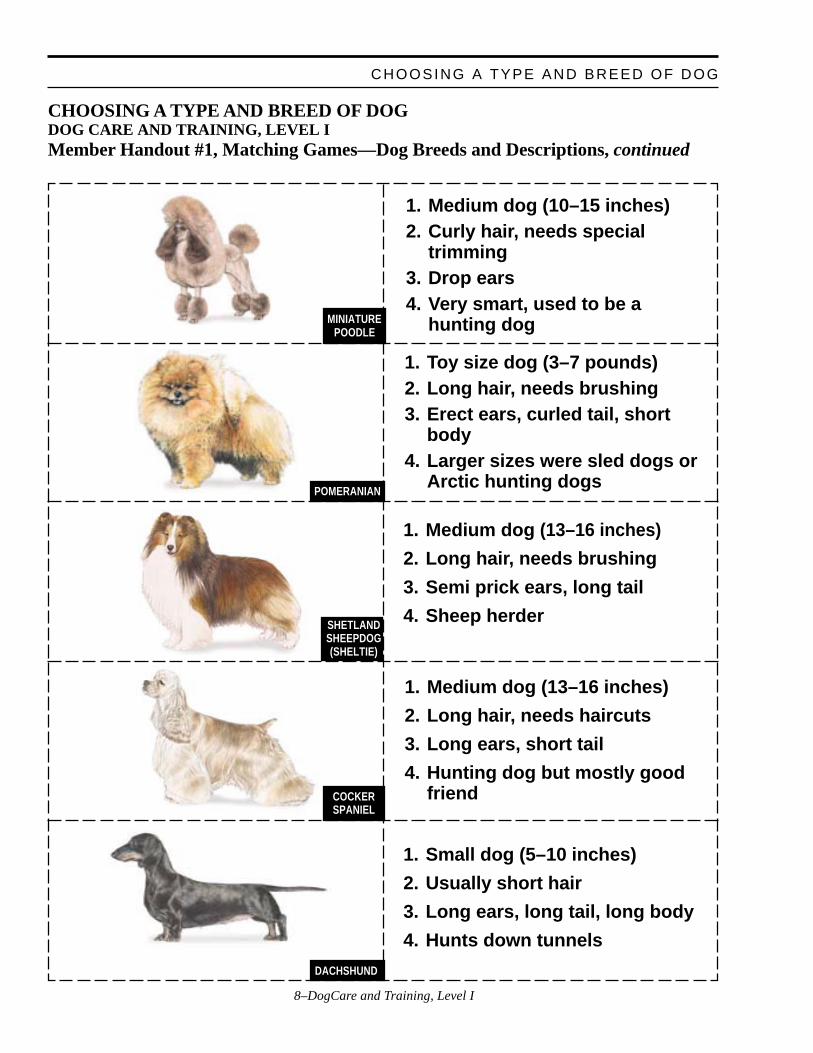
8–DogCare and Training, Level I
CHOOSING A TYPE AND BREED OF DOG
1. Toy size dog (3–7 pounds)2. Long hair, needs brushing3. Erect ears, curled tail, short
body4. Larger sizes were sled dogs or
Arctic hunting dogs
1. Medium dog (10–15 inches)2. Curly hair, needs special
trimming3. Drop ears4. Very smart, used to be a
hunting dog
1. Medium dog (13–16 inches)
2. Long hair, needs brushing
3. Semi prick ears, long tail
4. Sheep herder
1. Medium dog (13–16 inches)
2. Long hair, needs haircuts
3. Long ears, short tail
4. Hunting dog but mostly goodfriend
1. Small dog (5–10 inches)
2. Usually short hair
3. Long ears, long tail, long body
4. Hunts down tunnels
CHOOSING A TYPE AND BREED OF DOGDOG CARE AND TRAINING, LEVEL IMember Handout #1, Matching Games—Dog Breeds and Descriptions, continued
MINIATUREPOODLE
COCKERSPANIEL
POMERANIAN
SHETLANDSHEEPDOG(SHELTIE)
DACHSHUND
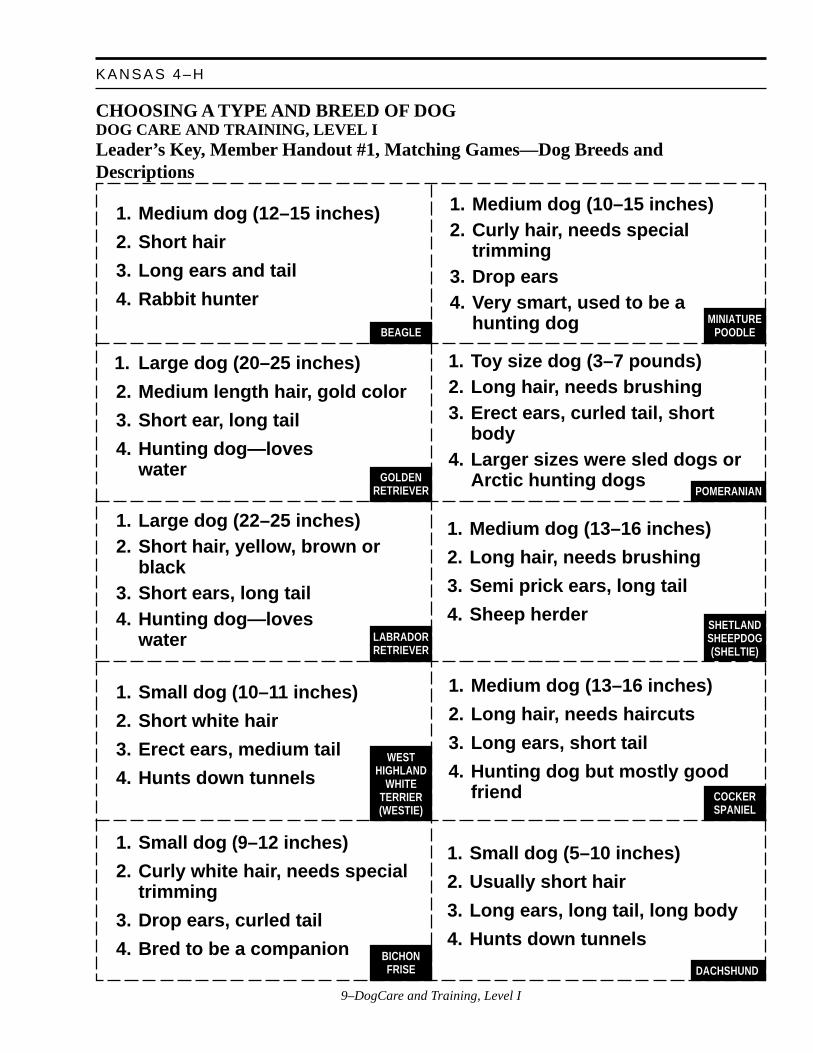
9–DogCare and Training, Level I
KANSAS 4–H
MINIATUREPOODLE
COCKERSPANIEL
GOLDENRETRIEVER
LABRADORRETRIEVER
POMERANIAN
SHETLANDSHEEPDOG(SHELTIE)
DACHSHUND
BEAGLE
WESTHIGHLAND
WHITETERRIER(WESTIE)
BICHONFRISE
1. Small dog (10–11 inches)
2. Short white hair
3. Erect ears, medium tail
4. Hunts down tunnels
1. Small dog (9–12 inches)
2. Curly white hair, needs specialtrimming
3. Drop ears, curled tail
4. Bred to be a companion
1. Medium dog (12–15 inches)
2. Short hair
3. Long ears and tail
4. Rabbit hunter
1. Large dog (22–25 inches)2. Short hair, yellow, brown or
black3. Short ears, long tail4. Hunting dog—loves
water
1. Large dog (20–25 inches)
2. Medium length hair, gold color
3. Short ear, long tail
4. Hunting dog—loveswater
1. Toy size dog (3–7 pounds)2. Long hair, needs brushing3. Erect ears, curled tail, short
body4. Larger sizes were sled dogs or
Arctic hunting dogs
1. Medium dog (10–15 inches)2. Curly hair, needs special
trimming3. Drop ears4. Very smart, used to be a
hunting dog
1. Medium dog (13–16 inches)
2. Long hair, needs brushing
3. Semi prick ears, long tail
4. Sheep herder
1. Medium dog (13–16 inches)
2. Long hair, needs haircuts
3. Long ears, short tail
4. Hunting dog but mostly goodfriend
1. Small dog (5–10 inches)
2. Usually short hair
3. Long ears, long tail, long body
4. Hunts down tunnels
CHOOSING A TYPE AND BREED OF DOGDOG CARE AND TRAINING, LEVEL ILeader’s Key, Member Handout #1, Matching Games—Dog Breeds andDescriptions
10–DogCare and Training, Level I
CHOOSING A TYPE AND BREED OF DOG
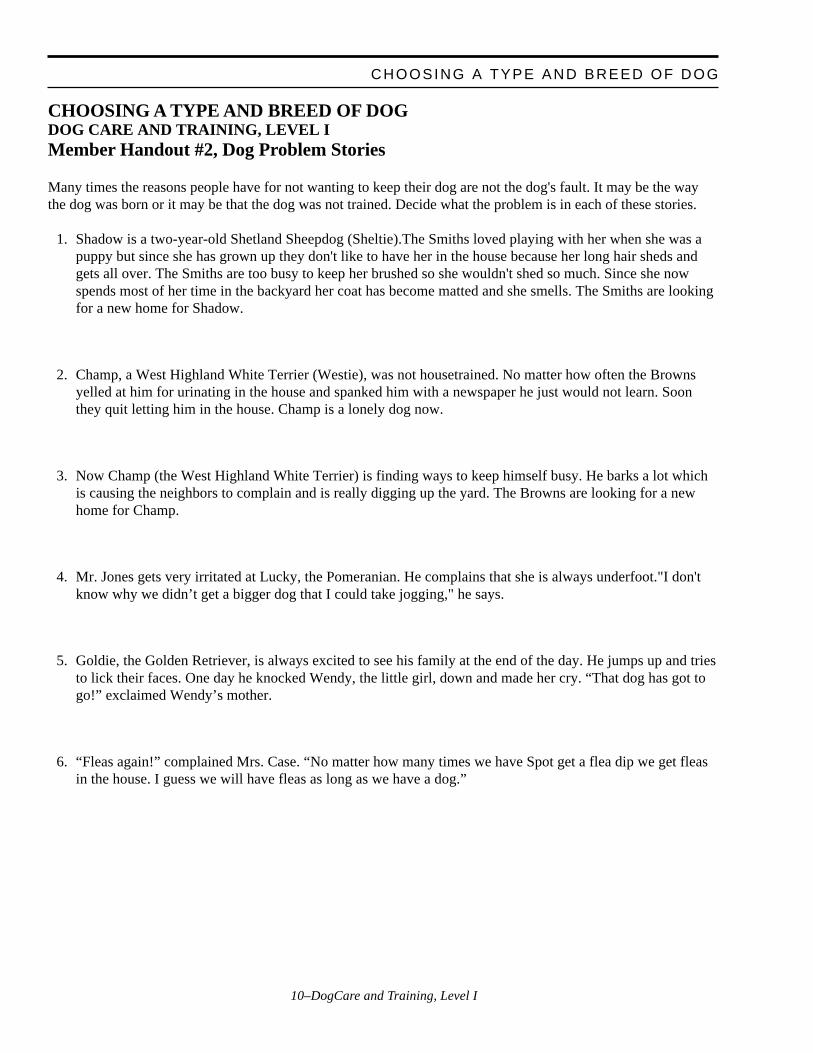
CHOOSING A TYPE AND BREED OF DOGDOG CARE AND TRAINING, LEVEL IMember Handout #2, Dog Problem Stories
Many times the reasons people have for not wanting to keep their dog are not the dog's fault. It may be the waythe dog was born or it may be that the dog was not trained. Decide what the problem is in each of these stories.
1. Shadow is a two-year-old Shetland Sheepdog (Sheltie).The Smiths loved playing with her when she was apuppy but since she has grown up they don't like to have her in the house because her long hair sheds andgets all over. The Smiths are too busy to keep her brushed so she wouldn't shed so much. Since she nowspends most of her time in the backyard her coat has become matted and she smells. The Smiths are lookingfor a new home for Shadow.
2. Champ, a West Highland White Terrier (Westie), was not housetrained. No matter how often the Brownsyelled at him for urinating in the house and spanked him with a newspaper he just would not learn. Soonthey quit letting him in the house. Champ is a lonely dog now.
3. Now Champ (the West Highland White Terrier) is finding ways to keep himself busy. He barks a lot whichis causing the neighbors to complain and is really digging up the yard. The Browns are looking for a newhome for Champ.
4. Mr. Jones gets very irritated at Lucky, the Pomeranian. He complains that she is always underfoot."I don'tknow why we didn’t get a bigger dog that I could take jogging," he says.
5. Goldie, the Golden Retriever, is always excited to see his family at the end of the day. He jumps up and triesto lick their faces. One day he knocked Wendy, the little girl, down and made her cry. “That dog has got togo!” exclaimed Wendy’s mother.
6. “Fleas again!” complained Mrs. Case. “No matter how many times we have Spot get a flea dip we get fleasin the house. I guess we will have fleas as long as we have a dog.”
11–DogCare and Training, Level I
KANSAS 4–H
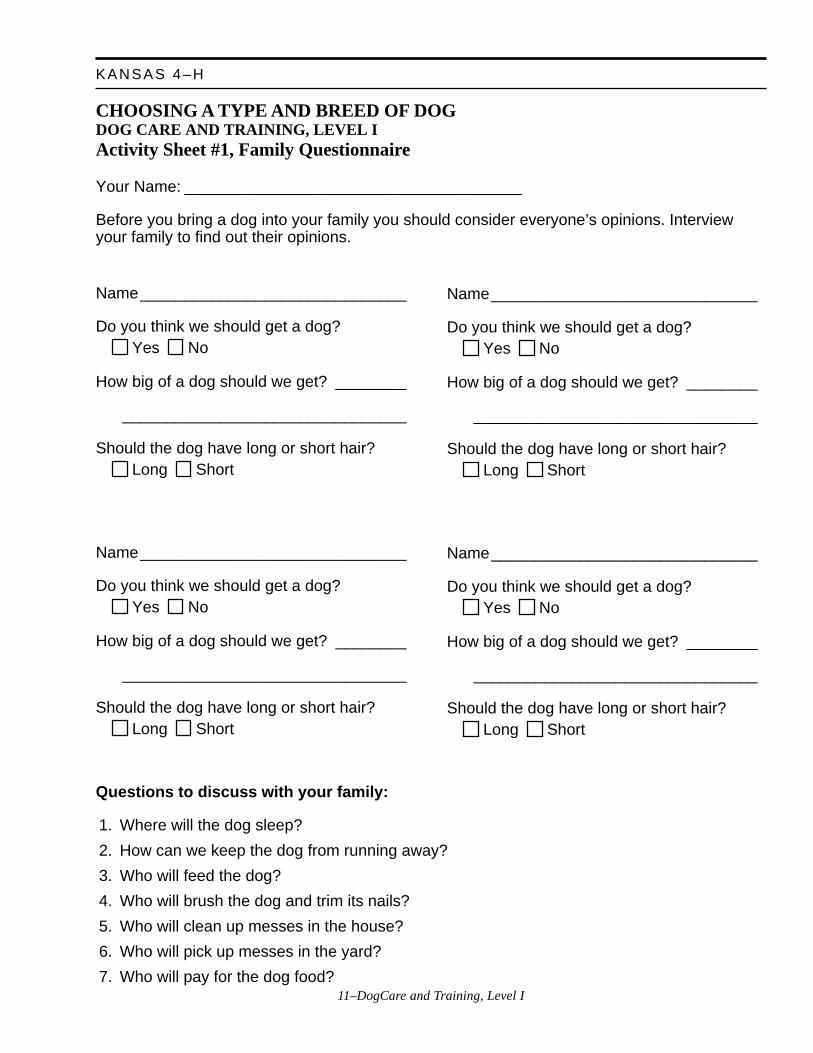
CHOOSING A TYPE AND BREED OF DOGDOG CARE AND TRAINING, LEVEL IActivity Sheet #1, Family Questionnaire
Your Name: ______________________________________
Before you bring a dog into your family you should consider everyone’s opinions. Interviewyour family to find out their opinions.
Name______________________________
Do you think we should get a dog? Yes No
How big of a dog should we get? ________
________________________________
Should the dog have long or short hair? Long Short
Name______________________________
Do you think we should get a dog? Yes No
How big of a dog should we get? ________
________________________________
Should the dog have long or short hair? Long Short
Name______________________________
Do you think we should get a dog? Yes No
How big of a dog should we get? ________
________________________________
Should the dog have long or short hair? Long Short
Name______________________________
Do you think we should get a dog? Yes No
How big of a dog should we get? ________
________________________________
Should the dog have long or short hair? Long Short
Questions to discuss with your family:
1. Where will the dog sleep?
2. How can we keep the dog from running away?
3. Who will feed the dog?
4. Who will brush the dog and trim its nails?
5. Who will clean up messes in the house?
6. Who will pick up messes in the yard?
7. Who will pay for the dog food?

12–DogCare and Training, Level I
CHOOSING A TYPE AND BREED OF DOG
13–DogCare and Training, Level I
KANSAS 4–H
Leader Notes
If a board is available write the questions,
male or female?, mixed breed or pure-
bred?, etc. Then mark the number of
members deciding each choice. Include
a column for undecided or “makes no
difference.”
Technically, a female is a bitch and a
male is a dog. This is the terminology
used by the American Kennel Club.
However, both the United Kennel Club
and the Canadian Kennel Club designate
the sexes as male and female which you
may decide are more appropriate terms
to use, especially in the company of
non-dog-oriented people.
When the members discuss their choice
of male or female they may choose female
so they can breed her. Aside from the
tremendous responsibility of breeding
puppies and the fact that thousands of
unwanted dogs are euthanized every
What Members Will Learn . . .
ABOUT THE PROJECT:• Considerations when choosing a dog
ABOUT THEMSELVES:• To make decisions based on information
Materials Needed:• Marker board or chalk board (optional)• A stuffed dog• Activity Sheet #2, Dog’s I Know• Member Handout #3, Purchasing a Dog—Role Plays
ACTIVITY TIME NEEDED: 60 MINUTES
ACTIVITY
Now that you have considered the kind and size of dog you want to get,there are still other decisions. These include: male or female; purebred ormixed breed; puppy, young dog, adult; and where to get the dog.
MALE OR FEMALE?Males may be a little larger than females. They will usually want to roammore and may be hard to control when they are around a female in season.Males urinate to mark their territory - sometimes in the house. Long-haireddogs may be harder to keep clean as they urinate on themselves when theylift their leg. However, most of these problems are eliminated when youhave your male dog neutered and he will be healthier, too. You will also notbe adding to the problem of unwanted dogs.
Females will usually come into season twice a year. Each season will lastabout one month. During this time you will need to keep her shut up soshe doesn’t become pregnant. She will also leave blood spots all over thehouse so you’ll need to have her wear a diaper, keep her in a crate, orkeep her outside. You may not compete in 4-H dog events while she is inseason and may not be allowed to bring her to training class. All of theseproblems are solved when you have her spayed, plus she will be healthierand you will not be adding to the problem of unwanted dogs.
One other consideration when choosing the sex of your dog is that often two
Where Do I Get a Dog?Dog Care and Training, Level I
14–DogCare and Training, Level I
ACTIVITYLeader Notes
dogs of opposite sexes will get along better than two dogs of the same sex.Do you already have a dog that your new dog will need to get along with?
Which sex would you prefer, male or female? Why?
PUREBRED OR MIXED BREED?Purebred dogs have parents both of the same breed. To be sure the dog ispurebred you should get registration papers when you get the dog. If thedog is a purebred puppy you will know what it will look like when itgrows up and can tell pretty much how it will behave. Purebred dogs willcost more. You can register a purebred dog and show it in AmericanKennel Club obedience and agility trials.
Mixed breed dogs have parents of different breeds or of unknown breeds.You will not know what your puppy will look or act like when it growsup. Mixed breeds come in all sizes, colors, and coat lengths. You willhave a dog like no other. Mixed breed dogs can do everything purebreddogs can except show in American Kennel Club events. Mixed breeds canbe in all 4-H activities. Mixed breeds are usually free or inexpensive andif you get a mixed breed dog you are probably saving that dog’s life!
Would you choose a purebred or mixed breed dog? Why?
PUPPY, YOUNG DOG, OR ADULT?A puppy can be a lot of fun but it is also a lot of work. The puppy stagelasts until about 4-5 months. During this time the puppy needs a lot ofattention and training and should not be left alone for more than 4 hours ata time. Many families have a lot of love to give a dog but don’t have thetime for a puppy.
A young dog doesn’t need as much time as a puppy but may not be fullytrained when you get it. You will need patience but can start teaching itthings right away. If it isn’t already housetrained it will be old enough tobe housetrained now. Its shots should give it enough protection so thatyou can take it out without worrying about diseases.
An adult dog is ready for your love but usually won’t need as much ofyour time as a puppy or young dog. You will know what its adult tem-perament will be like. If you get a dog as an adult you are very likelysaving its life.
Would you chose a puppy, young dog, or an adult dog? Why?
WHERE TO GET A DOG:Shelter or Humane Society: You can find mostly mixed breeds but alsosome purebred dogs, puppies, young dogs and adults at a shelter. In somecases you may be saving a dog’s life by adopting it from a shelter (someshelters are no-kill). These dogs are usually low-cost but shelters shouldrequire that the adopted dogs are spayed or neutered.
year, the years of companionship with a
dog should be of more consideration
than her productivity as a breeder.
It is a myth that mixed breed dogs are
healthier than purebred dogs. Provided
that the purebred dog is from a reputable
breeder who carefully screens the dogs
he or she breeds, the purebred dogs
should be healthier.
It is also a myth that purebred dogs are
smarter or mixed breed dogs are
smarter. The type of “smart” that a dog
is will differ according to breed or mix
of breeds but neither purebred or mixed
breed should be considered smarter.
Sporting, herding and working breeds
which have been bred for years to work
closely with people may be more
trainable than hounds and terriers which
have been bred to work independently.
Although puppies are so appealing and
often the first choice when choosing a
new dog, they do need lots of attention
and early training to become the best
dog they have the potential to become.
In many situations getting a puppy is
just not fair to the puppy or the family.
People may think that an older dog will
not bond to the family. Except in very
rare cases this is not true. Consider the
dogs that are raised by one family and
then trained to be a service dog for a
blind or physically handicapped person.
Few would question the devotion of
these dogs.
WHERE DO I GET A DOG?
15–DogCare and Training, Level I
KANSAS 4–H
Pet Store: Pet stores have mostly purebred puppies. Most pet stores shipin puppies and you will not know how the puppies were raised beforethey came to the store. Often this is the most expensive place to get a dog.
Friends: A friend may have a dog or a puppy who needs a home. Whenyou get a dog from a friend you will know how the dog or puppy wasraised and, if it is a puppy, you will know what the parents are like.
Breeders: This can be a good place to get a dog. They will have purebreddogs of one or two breeds but will not always have puppies or dogs forsale. You may be placed on a waiting list as they do not want to breedpuppies unless they are sure there are homes for them. A good breederwill always be trying to raise dogs that are better than the parents and theyare concerned about what happens to the dogs they sell. They will ask youquestions to be sure you are the right family for the dog you buy and willgive you advice on raising the dog.
Breed Rescue: Many breeds have a rescue program. People who love thebreed rescue unwanted dogs of that breed and usually care for them intheir homes until a new home can be found. These dogs are usually adultsand have been trained. You may be asked questions to make sure you arethe right family for the dog you buy.
PURCHASING A DOGNow that you have some ideas of what kind of a dog you’d like to get,let’s pretend that you are going to buy one.
DIALOGUE FOR CRITICAL THINKING:Share:
1. Which role play did you do?
2. How did you feel when pretending to buy a dog?
Process:3. What are some of the choices you will need to make when you
decide to get a dog?
4. Why does it make a difference if your dog is purebred or mixedbreed?
5. Why does it make a difference where you purchase a dog?
Generalize:6. How can having information about different choices help you to
make a decision?
7. How can you get information about different choices?
ACTIVITY Leader Notes
An important concept to develop here is
that buying a dog should never be an
impulse purchase. Many pet shops count
on the impulse purchase—after all, it is
hard to resist cute puppies and they have
several (or many) breeds to choose
from. Sometimes purchasing from
friends is also impulse-based. It can be
hard to go home without a puppy when
you visit a friend’s litter, especially if
you had already been considering
getting a dog. Getting a dog from a
shelter or Humane Society can be an
impulse purchase but people generally
have decided that they want a dog
before visiting a shelter. If you find the
dog you want on your first visit you may
need to decide to get it right away since
some shelters are required to euthanize
dogs that have been in the shelter a
specified time. This may not allow time
to consider the purchase. Getting a dog
from a breeder or a breed rescue
program will usually mean waiting for a
dog to be born or for one to be rescued
but the waiting period will allow for
second thoughts and to properly prepare
for the new dog.
Pass out Member Handout #3, Purchas-
ing a Dog.—Role Plays.
This will be a role playing activity. If
possible, have some older members take
the role of dog seller. If older members
are not available, you or another adult
should take the role of dog seller. You
may decide to have two members role
play each situation as a team to allow
for greater participation or to give a
member more confidence. If stuffed
dogs are available use them as props for
the activity. The scripts are intended to
get each play off to a start. The dialogue
may be ad-libbed.
When the role playing activity is
completed, or after each segment, talk
about what was portrayed.
16–DogCare and Training, Level I
Apply:8. What is a decision you’ve made recently? Did you have enough
information to help you make your decision?
GOING FURTHER:1.Interview the owners of several dogs you know. Complete theinterview sheets and report back on your findings at the nextmeeting.
2. Read classified ads in newspaper for available dogs.
3. Visit Humane Society or shelter for dog prospects.
REFERENCES:Author:Chris Odell, Obedience and Agility Intructor, Hutchinson, KS Kennel
ClubJames P. Adams, Extension Specialist, 4-H and Youth Programs, Kansas
State University
Reviewed by:Dog Care and Training Design Team
ACTIVITYLeader Notes
WHERE DO I GET A DOG?
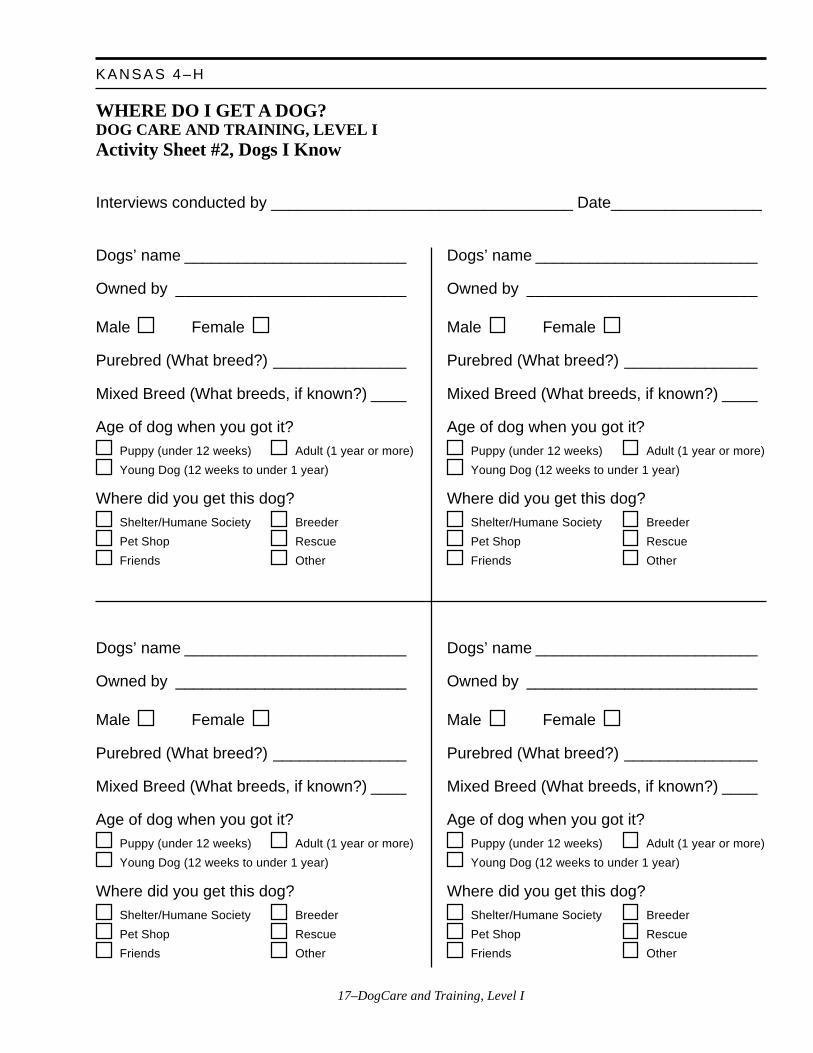
Give each member Activity Sheet, #2,
Dogs I Know.
17–DogCare and Training, Level I
KANSAS 4–H
WHERE DO I GET A DOG?DOG CARE AND TRAINING, LEVEL IActivity Sheet #2, Dogs I Know
Interviews conducted by __________________________________ Date_________________
Dogs’ name _________________________
Owned by __________________________
Male Female
Purebred (What breed?) _______________
Mixed Breed (What breeds, if known?) ____
Age of dog when you got it?Puppy (under 12 weeks) Adult (1 year or more)
Young Dog (12 weeks to under 1 year)
Where did you get this dog?Shelter/Humane Society Breeder
Pet Shop Rescue
Friends Other
18–DogCare and Training, Level I
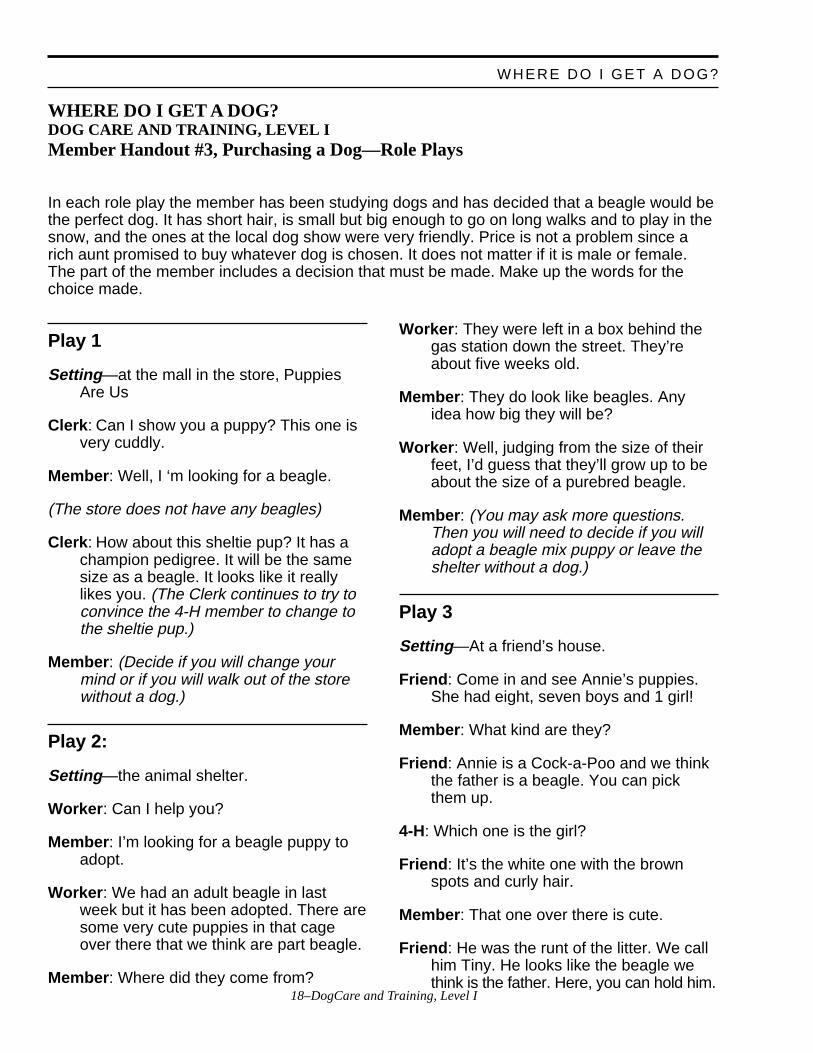
WHERE DO I GET A DOG?DOG CARE AND TRAINING, LEVEL IMember Handout #3, Purchasing a Dog—Role Plays
In each role play the member has been studying dogs and has decided that a beagle would bethe perfect dog. It has short hair, is small but big enough to go on long walks and to play in thesnow, and the ones at the local dog show were very friendly. Price is not a problem since arich aunt promised to buy whatever dog is chosen. It does not matter if it is male or female.The part of the member includes a decision that must be made. Make up the words for thechoice made.
WHERE DO I GET A DOG?
Play 1
Setting—at the mall in the store, PuppiesAre Us
Clerk: Can I show you a puppy? This one isvery cuddly.
Member: Well, I ‘m looking for a beagle.
(The store does not have any beagles)
Clerk: How about this sheltie pup? It has achampion pedigree. It will be the samesize as a beagle. It looks like it reallylikes you. (The Clerk continues to try toconvince the 4-H member to change tothe sheltie pup.)
Member: (Decide if you will change yourmind or if you will walk out of the storewithout a dog.)
Play 2:
Setting—the animal shelter.
Worker: Can I help you?
Member: I’m looking for a beagle puppy toadopt.
Worker: We had an adult beagle in lastweek but it has been adopted. There aresome very cute puppies in that cageover there that we think are part beagle.
Member: Where did they come from?
Worker: They were left in a box behind thegas station down the street. They’reabout five weeks old.
Member: They do look like beagles. Anyidea how big they will be?
Worker: Well, judging from the size of theirfeet, I’d guess that they’ll grow up to beabout the size of a purebred beagle.
Member: (You may ask more questions.Then you will need to decide if you willadopt a beagle mix puppy or leave theshelter without a dog.)
Play 3
Setting—At a friend’s house.
Friend: Come in and see Annie’s puppies.She had eight, seven boys and 1 girl!
Member: What kind are they?
Friend: Annie is a Cock-a-Poo and we thinkthe father is a beagle. You can pickthem up.
4-H: Which one is the girl?
Friend: It’s the white one with the brownspots and curly hair.
Member: That one over there is cute.
Friend: He was the runt of the litter. We callhim Tiny. He looks like the beagle wethink is the father. Here, you can hold him.
19–DogCare and Training, Level I
KANSAS 4–H
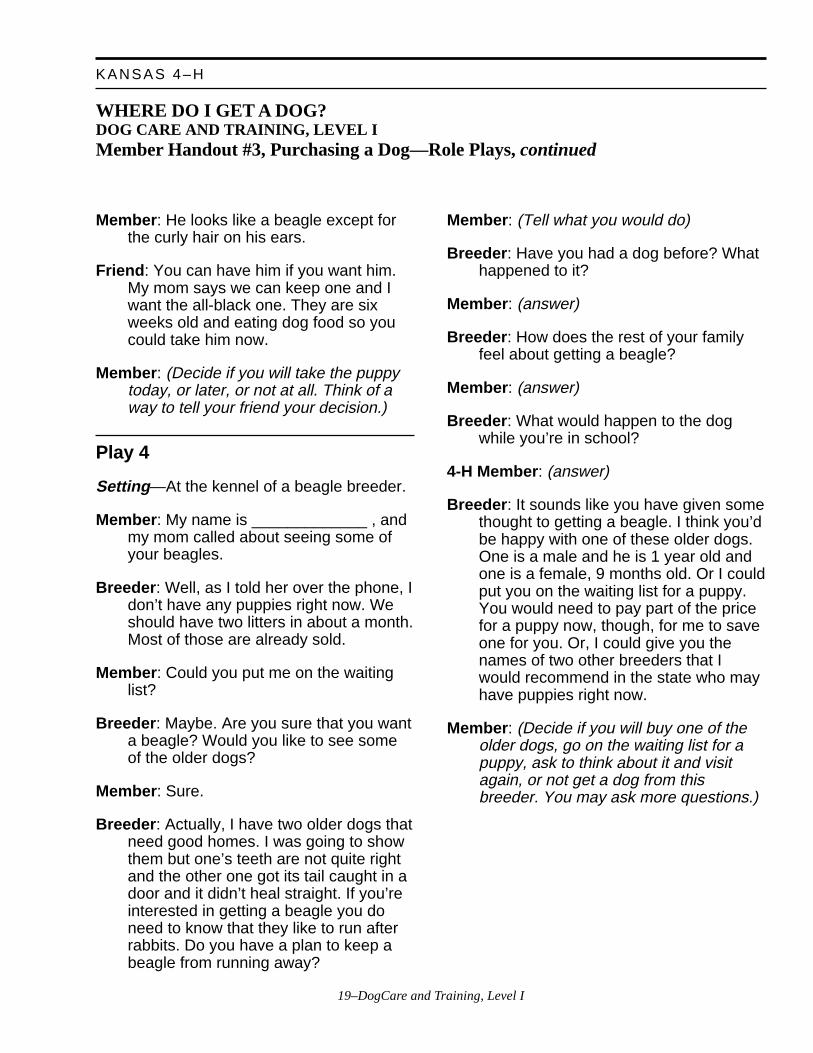
WHERE DO I GET A DOG?DOG CARE AND TRAINING, LEVEL IMember Handout #3, Purchasing a Dog—Role Plays, continued
Member: He looks like a beagle except forthe curly hair on his ears.
Friend: You can have him if you want him.My mom says we can keep one and Iwant the all-black one. They are sixweeks old and eating dog food so youcould take him now.
Member: (Decide if you will take the puppytoday, or later, or not at all. Think of away to tell your friend your decision.)
Play 4
Setting—At the kennel of a beagle breeder.
Member: My name is _____________ , andmy mom called about seeing some ofyour beagles.
Breeder: Well, as I told her over the phone, Idon’t have any puppies right now. Weshould have two litters in about a month.Most of those are already sold.
Member: Could you put me on the waitinglist?
Breeder: Maybe. Are you sure that you wanta beagle? Would you like to see someof the older dogs?
Member: Sure.
Breeder: Actually, I have two older dogs thatneed good homes. I was going to showthem but one’s teeth are not quite rightand the other one got its tail caught in adoor and it didn’t heal straight. If you’reinterested in getting a beagle you doneed to know that they like to run afterrabbits. Do you have a plan to keep abeagle from running away?
Member: (Tell what you would do)
Breeder: Have you had a dog before? Whathappened to it?
Member: (answer)
Breeder: How does the rest of your familyfeel about getting a beagle?
Member: (answer)
Breeder: What would happen to the dogwhile you’re in school?
4-H Member: (answer)
Breeder: It sounds like you have given somethought to getting a beagle. I think you’dbe happy with one of these older dogs.One is a male and he is 1 year old andone is a female, 9 months old. Or I couldput you on the waiting list for a puppy.You would need to pay part of the pricefor a puppy now, though, for me to saveone for you. Or, I could give you thenames of two other breeders that Iwould recommend in the state who mayhave puppies right now.
Member: (Decide if you will buy one of theolder dogs, go on the waiting list for apuppy, ask to think about it and visitagain, or not get a dog from thisbreeder. You may ask more questions.)

20–DogCare and Training, Level I
WHERE DO I GET A DOG?
21–DogCare and Training, Level I
KANSAS 4–H
Beginning to Set Goals in Your Dog Careand Training ProjectDog Care and Training, Level I
What Members Will Learn . . .
ABOUT THE PROJECT:• How to set project goals
ABOUT THEMSELVES:• The importance of setting goals
Materials Needed:• Chalkboard or flip chart• Dog Care and Training Member Guide and Annual Report (MG-36)• Member Handout #4, Learning Topics
ACTIVITY TIME NEEDED: 30 MINUTES
ACTIVITY
Each year you will set several goals to accomplish during the project year.Goals help you get where you want to go.
If this is your first year, you may want to have just one goal to select yourproject dog. Remember that before you select a dog, you must makeseveral decisions covered in the first two lessons.
List one or two goals (MAP Step 1) on page 2 for this project year.
Breaking a goal into steps (MAP Step 2) helps you better understand theaction needed to make that goal a reality. Some goals have many steps,some have few.
With each step you need to set a deadline (MAP Step 3). Deadlines arewhen you expect to have that step of your goal done. As you meet thedeadline you set for each step, you need to use an energizer (MAP Step4). Energizers encourage you to move toward your goals by offering asmall reward for meeting your deadline.
Now complete MAP Steps 6 to 7. You have set your goals for Year 1 ofyour Dog Care and Training project.
Leader Notes
Put participants into groups of three or
four. Mix new project members with
youth who have had some experience
with dog care and training or other
animal projects. Hand out Member
Guide and Annual Report (MG-36) plus
Member Handout #4, Learning Topics.
Let them help each other decide what
their goals for the year will be.
Allow time for them to share their goals
with a project friend and sign each
other’s MAP Worksheets.
22–DogCare and Training, Level I
BEGINNING TO SET GOALS IN YOUR DOG CARE AND TRAIN ING PROJECT
DIALOGUE FOR CRITICAL THINKING:Share:
1. What is your first goal for the project year?
2. What goal do you like best? Why?
Process:3. Why are these goals important?
4. Why is it important to set goals?
Generalize:5. What are the advantages of working in a group when setting goals?
Apply:6. What other groups have you worked in where you needed to set goals
to help you make a decision?
GOING FURTHER:1. Use the goal setting process to set group goals.
REFERENCES:Author:James P. Adams, Extension Specialist, 4-H and Youth Programs, Kansas
State University
Reviewed by:Dog Care and Training Design Team
ACTIVITYLeader Notes

23–DogCare and Training, Level I
KANSAS 4–H
BEGINNING TO SET GOALS IN THE DOG CARE AND TRAINING PROJECTDOG CARE AND TRAINING, LEVEL IMember Handout #4, Learning Topics
Place a check mark next to five of the most interesting topics you would like to learn about in your Dog Care andTraining Project.
Think Back:Please write one or two things you have learned about dogs to far. What is something you have learnedabout yourself while studying dogs?
Where Do I Keep My dog?
Attention Training
Muzzles and Flews - Dog parts
Pre-Novice Obedience Lessons
House Manners for Your Dog
Your Best Friend
Feeding Your Dog
Selecting Dog Equipment
Have Dog - Will Travel
Basic Grooming
Introduction to Showmanship
Handling the Lead
Showmanship Training Patterns
Posing the Dog for Individual Examination
Preparing for the Show

24–DogCare and Training, Level I
BEGINNING TO SET GOALS IN YOUR DOG CARE AND TRAIN ING PROJECT
25–DogCare and Training, Level I
KANSAS 4–H
Where Do I Keep MyDog?Dog Care and Training, Level I
What Members Will Learn . . .
ABOUT THE PROJECT:• How to provide housing for your dog
ABOUT THEMSELVES:• How to plan ahead to meet needs
Materials needed:• Dog crates of several types and sizes (if available)• Stuffed dog(s)• Catalogs from dog supply companies• Paper, pencils, markers, scissors, glue• Member Handout #5, Sample Dog House Plan
ACTIVITY TIME NEEDED: 45 MINUTES
ACTIVITY
Where will your dog live? The best place for a dog to live is in the housewith your family. Sometimes, however, it is necessary for your dog to liveoutside. One reason to keep a dog outside is when someone in your familyhas allergies to dogs.
Outside: If your dog will be living outside it will need a weatherproofhouse. If you get a dog that has been kept indoors or get a puppy in thelate fall or winter it will need to stay inside until the weather gets warmer.Don’t keep a dog outside in the cold weather if it has been used to stayinginside a warm house. If you have a good warm dog house many dogs canstay outside if they get used to it gradually. If your dog is kept outside youwill need to make a special effort to give it lots of attention. Dogs aresocial animals and you need to provide the companionship they would getfrom their pack.
What are some characteristics of a dog (or breed) that would enable it toadapt to living outside? What are some characteristics of a dog (or breed)that would make it less able to live outside?
Inside: Your dog will need an accident-proof place to stay until it ishousebroken. Plan to keep it in a small area where the floor is easilycleaned. This may mean blocking off a corner of a laundry room orkitchen. This area should be where it can be part of the family. A dogcrate is very helpful for training your dog. It should be large enough to be
Leader Notes
Note: Consider the type and breed of
dog as to best location. Some breeds
must be kept outside, while others are
strictly house dogs. Have members
make a list of "Inside" and "Outside"
dogs.
26–DogCare and Training, Level I
a bedroom but not so large that it is a bedroom and a bathroom! Your dogshould not be left in the crate for more than 4 hours at a time during theday—how long can you last without going to the bathroom? Once yourdog is completely housetrained you may decide to get a special dog bedand to let it sleep in other places. Many people like to have their dog sleepin their bedroom, but letting your dog sleep on your bed may lead toproblems. A dog that sleeps on your bed may feel that it is in charge ofyou, that it is the boss. Also, if your dog should get fleas or ticks it mayleave them in your bed. Not only may you get fleas, you will have toclean and spray your bedding as well as your dog’s bedding.
Your yard: You should have an escape-proof fenced yard for your dog.Another choice is to have a smaller area fenced in for a dog run. This canbe a good choice for a dog that lives outdoors and also for dogs that climbfences. A dog run can be fenced over the top for a dog that tries to climbout. Your dog should not be tied out for long periods of time. A dog lefttied without supervision is in danger from other dogs attacking it orteasing it. They can get their chain tangled and not be able to get to shadeor water. Dogs tied out often become problem barkers and diggers. Somepeople, those who live in apartments for example, keep dogs withouthaving a yard for them. These people must be very committed to walkingtheir dog two to four times every day (more often with puppies) for thedog’s exercise and time to relieve itself.
Doghouses: Big enough for your adult dog to stand up and turn around in.Should be insulated against cold and heat and waterproof. The roof shouldbe sloping. The floor needs to be raised off of the ground for air circula-tion in the summer. A door flap is needed in the winter. The house shouldbe placed out of the summer sun and turned so the door is facing awayfrom winds. You will need to be able to open the house to clean anddisinfect it. Hay or straw will provide warm bedding in the winter—a thinlayer will do in the summer.
Dog Run: A dog run will keep your dog safe. You will need to be able togo into it easily to clean it out daily. The ideal surface is concrete which iseasily cleaned off. Gravel is the second best choice. It is important thatyour dog is not left in the mud! There also needs to be shade for the dog.
Dog Crate: For almost every dog a crate is an invaluable tool. If your dogstays in the house the crate is a safe place for it when you can’t watch it. Itwill help in housetraining your dog since dogs will avoid relievingthemselves in their den. If you have guests who don’t like dogs or havelittle children, your dog can stay in the crate. If you travel with your dog,a crate is a safe way for your dog to ride (just like a carseat is a safe wayfor an infant to ride). If you stay at a motel your dog will be more wel-come if you bring a crate. If your dog has to stay at the veterinary hospitalit will be more at ease if it is comfortable staying in a crate. There arethree main types of crates: plastic, wire, and fabric. Let’s look at thesekinds of crates.
ACTIVITYLeader Notes
Pass out Member Handout #5, Sample
Dog House Plan.
Dog Crates: Try to have examples of
different sizes and types of dog crates. A
crate should be large enough for the dog
to lie down. Use the stuffed dog as an
example of size. Most likely the crate
will be too large for your stuffed dog.
WHERE DO I KEEP MY DOG?
27–DogCare and Training, Level I
KANSAS 4–H
ACTIVITY Leader Notes
Answers to questions:
1. The plastic crate is safest for travel.
The fabric crate is finger-proof and
insect-proof. A plastic crate is the
second-best choice to keep fingers
out of your dog’s mouth.
2. Wire and fabric are the coolest
crates due to good ventilation. The
plastic crate, which is more
enclosed, will be warmer.
3. Fabric crates are the lightest and
most compact to carry. Plastic crates
are not heavy but are very bulky
and awkward. Wire crates fold
down to a compact size but are
heavy.
4. Generally, if only one crate will be
purchased, the plastic is the best. A
drawback to the fabric crate is that
some dogs will attempt to chew
their way out. The fabric crate may
also be more difficult to clean.
Have member create on a sheet of paper
a design for their dog’s housing. They
can draw their yard, doghouse, dog run,
crate, dog bed (and areas where the crate
and bed will be located). If you have
product catalogs the members could cut
out pictures of the doghouse, crate, and
dog bed they would choose for their
dog. These could be pasted onto their
drawing. When they have finished they
can tell the others what they have
chosen and why it is a good choice for
their dog. Put the design sheet in their
record book.
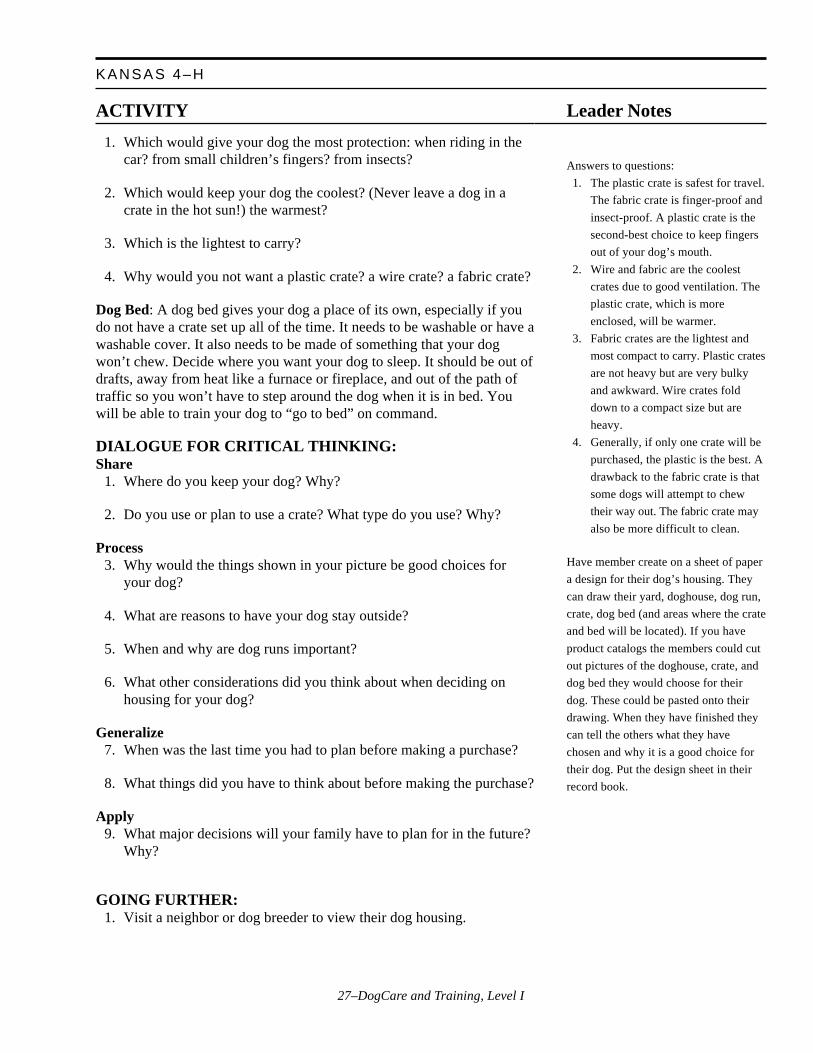
1. Which would give your dog the most protection: when riding in thecar? from small children’s fingers? from insects?
2. Which would keep your dog the coolest? (Never leave a dog in acrate in the hot sun!) the warmest?
3. Which is the lightest to carry?
4. Why would you not want a plastic crate? a wire crate? a fabric crate?
Dog Bed: A dog bed gives your dog a place of its own, especially if youdo not have a crate set up all of the time. It needs to be washable or have awashable cover. It also needs to be made of something that your dogwon’t chew. Decide where you want your dog to sleep. It should be out ofdrafts, away from heat like a furnace or fireplace, and out of the path oftraffic so you won’t have to step around the dog when it is in bed. Youwill be able to train your dog to “go to bed” on command.
DIALOGUE FOR CRITICAL THINKING:Share
1. Where do you keep your dog? Why?
2. Do you use or plan to use a crate? What type do you use? Why?
Process3. Why would the things shown in your picture be good choices for
your dog?
4. What are reasons to have your dog stay outside?
5. When and why are dog runs important?
6. What other considerations did you think about when deciding onhousing for your dog?
Generalize7. When was the last time you had to plan before making a purchase?
8. What things did you have to think about before making the purchase?
Apply9. What major decisions will your family have to plan for in the future?
Why?
GOING FURTHER:1. Visit a neighbor or dog breeder to view their dog housing.
28–DogCare and Training, Level I
WHERE DO I KEEP MY DOG?
ACTIVITYLeader Notes
REFERENCES:Charles R. Self. “Making Pet Houses, Carriers and Other Projects.”
c1991.
Author:Chris Odell, Obedience and Agility Instructor, Hutchinson, KS Kennel
ClubJames P. Adams, Extension Specialist, 4-H and Youth Programs, Kansas
State University
Reviewed by:Dog Care and Training Design Team
29–DogCare and Training, Level I
KANSAS 4–H
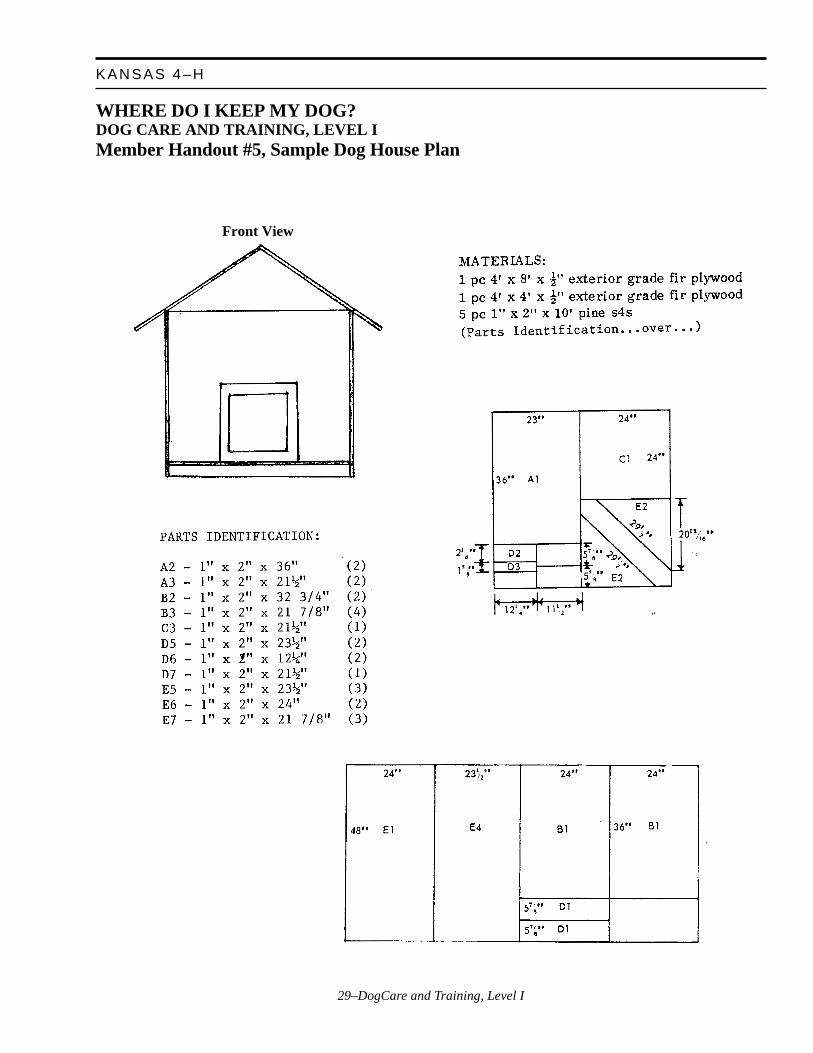
WHERE DO I KEEP MY DOG?DOG CARE AND TRAINING, LEVEL IMember Handout #5, Sample Dog House Plan
Front View
30–DogCare and Training, Level I
WHERE DO I KEEP MY DOG?
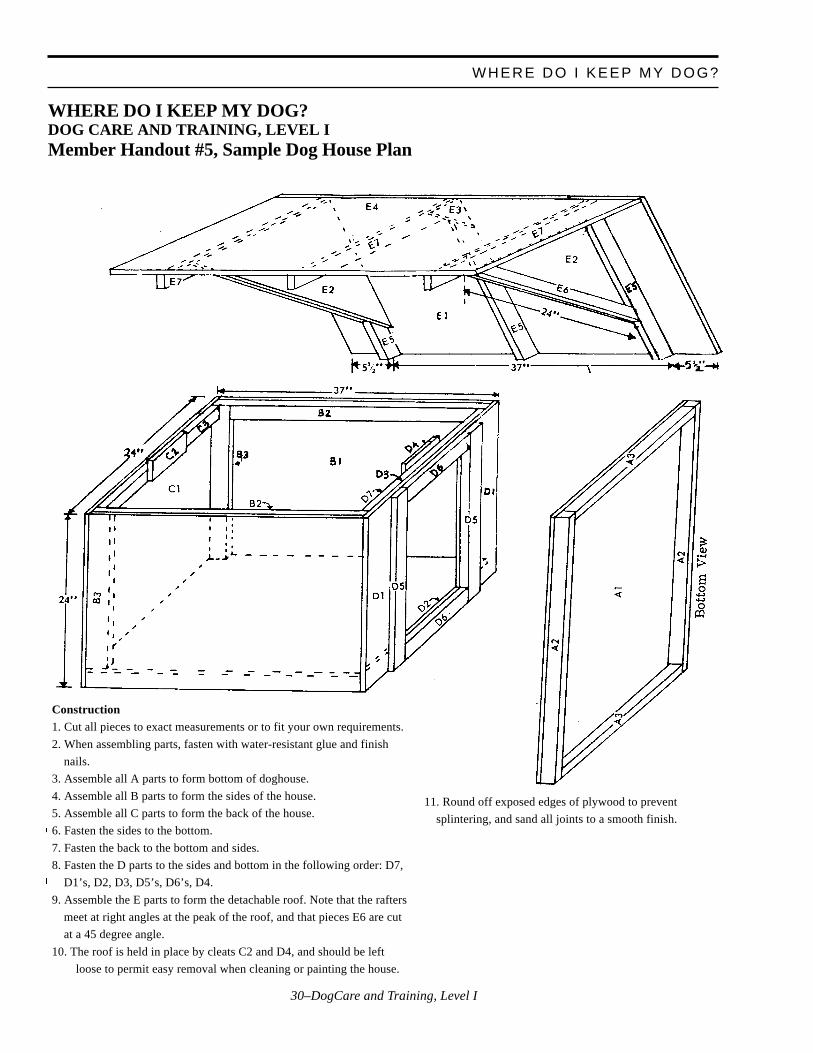
WHERE DO I KEEP MY DOG?DOG CARE AND TRAINING, LEVEL IMember Handout #5, Sample Dog House Plan
Construction1. Cut all pieces to exact measurements or to fit your own requirements.
2. When assembling parts, fasten with water-resistant glue and finish
nails.
3. Assemble all A parts to form bottom of doghouse.
4. Assemble all B parts to form the sides of the house.
5. Assemble all C parts to form the back of the house.
6. Fasten the sides to the bottom.
7. Fasten the back to the bottom and sides.
8. Fasten the D parts to the sides and bottom in the following order: D7,
D1’s, D2, D3, D5’s, D6’s, D4.
9. Assemble the E parts to form the detachable roof. Note that the rafters
meet at right angles at the peak of the roof, and that pieces E6 are cut
at a 45 degree angle.
10. The roof is held in place by cleats C2 and D4, and should be left
loose to permit easy removal when cleaning or painting the house.
11. Round off exposed edges of plywood to prevent
splintering, and sand all joints to a smooth finish.
31–DogCare and Training, Level I
KANSAS 4–H
Attention TrainingDog Care and Training, Level I
Leader Notes
What Members Will Learn . . .
ABOUT THE PROJECT:• How to keep their dog’s attention focused on them.• How to turn their dog “On” and “Off”
ABOUT THEMSELVES:• Patience• Importance of concentration• Importance of repetition and detail
Materials Needed:• A well-trained dog that demonstrates attention to its handler. At least
three different types of collars, i.e. buckle, fabric choke, chain choke,pinch/prong, that fit the demo dog and that the dog has becomeaccustomed to.
• Each member needs to have their dog equipped with a well-fittingobedience training collar and lead.
ACTIVITY TIME NEEDED: 45 TO 60 MINUTES
ACTIVITY
Without a doubt the biggest mistake that is made today in training classesis that the first things dogs are taught is to heel, sit, down and come. Then,months later, when the member expresses a desire to show and competewith the dog, they come to the unanimous conclusion that they had betterget the dog’s attention! Showmanship cannot be accomplished withoutthe dog’s attention. Proper heeling in obedience cannot be done withoutthe dog’s attention. So, it is strongly recommended that you have thedog’s attention BEFORE you even attempt to teach the dog to heel.
The more attention the handler has from the dog, the easier it is to trainthe dog and the better it will perform. You can teach the dog attentionwith gimmicks but in the long run it must be enforced with correction. Ifevery aspect of training is done with the dog’s attention it passes back upthe lead to having a very accomplished and confident handler.
None of us—humans or dogs—work all the time. We all like to play andrelax. In order for the dog to become reliable and accurate in obeying ourcommands the dog must give us its undivided attention. It is not fair forus to demand such concentration from the dog for long periods of time.
32–DogCare and Training, Level I
So, we have to create an “On” and “Off” switch which lets the dog knowwhen it is working and when it is not. It is very important that the handlerknow when the dog is on a command and make sure to enforce thecommand.
We have all observed handlers at shows or at practice turn to their dogand say “Heel” and then proceed to walk leisurely toward the bathroom,water fountain or friends while the dog ranges back and forth at the end ofa six-foot leash lagging, sniffing and goofing off. Did the handler reallymean “heel” or maybe he meant “Let’s go over here”? “Heel” shouldmean only one thing to the dog and that would be “Walk at my left sidedog of mine.”
Think about what you say and only say what you mean, and then enforce.If your dog jumps up on you, do you say “Get "Down"”? Do you reallymean “down” (as in lay “down” on the floor) or would “Off” have beenmore appropriate? When you leave your house, do you turn to your dogand say, “Now you Stay home, honey”? Is that the same “Stay” commandthat you will use in the ring? How is the dog going to know the differ-ence?
“OFF” Switch CommandLet’s teach the “Off” switch command with a demo dog first. With thedemo dog in a sit or stand at your left side give the command “Okay” or“Free,” throw your hand up over your head and yell, cheer, laugh and playwith your dog in a friendly loving manner. Throwing your hands up overyour head draws the dog’s attention toward your face. Encourage the dogto come toward you for Praise. Praise loudly for about 10 seconds thengradually calm the dog and demonstrate the “Off” switch. Command“Okay” or “Free” again followed by about 10 seconds of Praise.
This “Off” switch command will be very easy to teach and the handlerswill be proud of themselves and their dogs for learning so quickly. Thehandlers will now look forward to learning how to teach the “On” switchcommand. What the handlers do not realize is that the most difficult thingthat they have to teach their dog is how to concentrate and pay attention towhat the handler is doing.
“ON” Switch CommandWith a demo dog in a sit or stand at your left side command attention bysaying the dog’s name in a normal, happy tone and volume. As soon asthe dog looks up at the handler Praise the dog with your voice and asmile. Wait for about five seconds and then release with the “Off” switchcommand of “Okay” or “Free.” Demonstrate the “On” switch again forabout five seconds and release and Praise the demo dog.
Before you can even begin to expect the dog to give you its attention ithad to know that it is possible to sit or stand and look up at its handler,and you must have a dog that has learned to accept eye contact. This may
ATTENTION TRAIN ING
ACTIVITYLeader Notes
Position all of the handlers at least 15
feet apart and have them do the “Off”
switch command when the leader
instructs: “Release and Praise your
dogs.”
Encourage enthusiasm and good jobs of
praising by the handlers.
DO NOT hurry through this lesson.Return to it whenever you realize that
some of the handlers do not have their
dog’s attention. It not only teaches the
dogs attention—it also makes the
handler realize that they have to pay
attention to their dog and the instructor
or leader.
33–DogCare and Training, Level I
KANSAS 4–H
sound silly but a lot of breeds of dogs are developed to act independentlyand will have to be trained to give eye contact to their handler. This canbe accomplished by using patience and praising the dog every time itlooks at you. Any time that you come in contact with your dog in dailycontacts in the house or yard and it looks at you, you must respond with asmile and Praise.
Encourage the dog to come to you every chance you get and get it to lookinto your eyes as you talk, Praise, pet, brush, smile and simply let it knowthat you think it is special. Get down on the floor or ground with your dogand establish eye contact on the dog’s level—make it positive. Dogsusually like this kind of behavior and bonding takes place quickly. Avoidstaring or glaring as this could be misinterpreted to be a challenge. Do notroughhouse or allow the dog to bite or chew on you. It is simply to helpthe dog want to maintain eye contact with you.
Puppies learn eye contact and attention rather quickly. Older dogs usuallyrequire more time in training to give attention but it is achievable with allages and breeds.
All leads are to be held with your left hand close to your dog’s head andyour dog will be sitting at your left side in Heel Position. After youcommand attention by saying your dogs name, since you really mean“Dog—Sit and pay attention to me,” you must enforce the attention part.You may find that simply talking to your dog will get it to look up at you.If this works, Praise it as soon as it looks up, and then release it with your“Okay” or “Free” (“Off” switch).
Follow up with seconds of Praise and happy time.
A lot of the dogs gave attention but some did not. This is how we willdeal with not giving attention.
We will reward any attention with Praise and enforce any lack of attentionby touching the top of the dog’s head with your left hand, baiting withfood treats or a dog toy, or reaching down and giving a gentle pull on thedog’s whiskers to encourage it to look up. Anything goes to get the dog’sattention except for mean or very loud commands. You will find out thatpleasant, normal tones of your voice and a smile will work wonders. Youknow that is is very hard to smile and sound anything but pleasant.
Let’s try the “On” switch command again using a different way to get thedog to look up at you. Do two repetitions of the “On” switch and “Off”switch commands. Work to get your dog to give you 2 seconds of atten-tion while sitting in Heel Position and then release it with your “Off”switch for 5 seconds of Praise and petting.
Your goal this next week will be to get your dog to give you its undividedattention for five seconds in an area with little or no distraction. Always
Leader Notes
Solicit ideas from the handlers on how
to keep their dog’s attention focused on
them such as using treats, smiling,
holding a toy, hand signals, and / or
holding the dog’s head up.
Teaching the “On” switch command.
Handlers are to be spaced approximately
15 feet apart with the dogs equipped
with obedience collars and leads.
Watch other handlers and dogs around
you so that the dogs do not interfere
with each other.
Practice two repetitions of “On” switch
and “Off” switch commands.
ACTIVITY
34–DogCare and Training, Level I
use the dog’s name as your “On” switch command and follow your “Off”switch release command of “Free” or “Okay” with at least five seconds ofPraise and play time.
Some dogs may be very stubborn about learning this. You will find thatyou may even have to lift a dog’s eyes up toward you by reaching underits chin and turning its head up toward you.
Do not allow your dog to lean on you or put its foot on your foot.
DIALOGUE FOR CRITICAL THINKING:Share:
1. What did you need to do to get your dog to look at you?
2. If the method you used failed to work, what else could you try?
Process:3. Why is teaching the dog to give you attention important?
Generalize:4. When your teacher or someone else is working with you or your
class, what are some ways they use to get your attention?
5. How does the teacher let you know when you do not need to payattention?
Apply:6. What are some ways that you could use to train yourself to pay better
attention?
REFERENCES:"Beyond Basic Dog Training." Howell, c1991
Author:Diane L Bauman—Adapted by Keith NeuwayJames P. Adams, Extension Specialist, 4-H and Youth Programs, Kansas
State University
Reviewed by:Dog Care and Training Design Team
ATTENTION TRAIN ING
ACTIVITYLeader Notes
Practice this at least five times during
each training session. It’s the best thing
that you will ever teach your dog.
Incorporate attention work into every
aspect of the training. Review this
lesson any time that the handler / dog
team does not demonstrate attention.
Encourage the handlers to work up to 30
seconds of attention without distrac-
tions, (This is usually attainable with 3
to 4 weeks of training.) Then add mild
distractions for proofing.
Corrections for not giving attention will
be quick tugs on the lead followed by
Praise as soon as the dog makes eye
contact. If the correction is not effective,
have the handler put a different collar on
the dog and try again until they get
attention. There’s always a way to make
it work.
If food or toys are used for attention try
to wean them away rather quickly or the
dog will be focusing its attention on the
food or toy instead of the handler’s face,
eyes or body.
However, food treats held in the
handler’s mouth seem to work great for
most dogs. Our mouth is where the
commands come from.
35–DogCare and Training, Level I
KANSAS 4–H
What Members Will Learn . . .
ABOUT THE PROJECT:• The body parts of the dog
ABOUT THEMSELVES:• Communicating with others. Knowing correct terminology increases
the ability to express oneself precisely.
Materials Needed:• Activity Sheet #3, Dog Anatomy Poster Labels• Activity Sheet #4, Dog Anatomy• Leader’s Key, Activity Sheet #4, Dog Anatomy• Dog anatomy poster and labels• Live dog (optional)• Reference materials which include dog anatomy
ACTIVITY TIME NEEDED: 30 MINUTES
ACTIVITY
Do you know the names of the body parts of a dog? Using more precisewords will help you to communicate better with others about dogs. As anexample of not communicating clearly let’s try a quick experiment.Everyone touch your own arm.
Let’s try this again. Everyone touch your elbow.
This second part of the experiment everyone got right. What was differentabout the direction I gave you? If I said to touch your shoulder, upperarm, forearm, or wrist would you know where to touch? This also appliesto parts of a dog. Instead of saying “leg,” others will know more preciselywhat you mean if you said “forearm,” “pastern,” “elbow,” “stifle” or “hock.”
Let’s take a look at this poster to see the names of some of the parts ofthe dog.
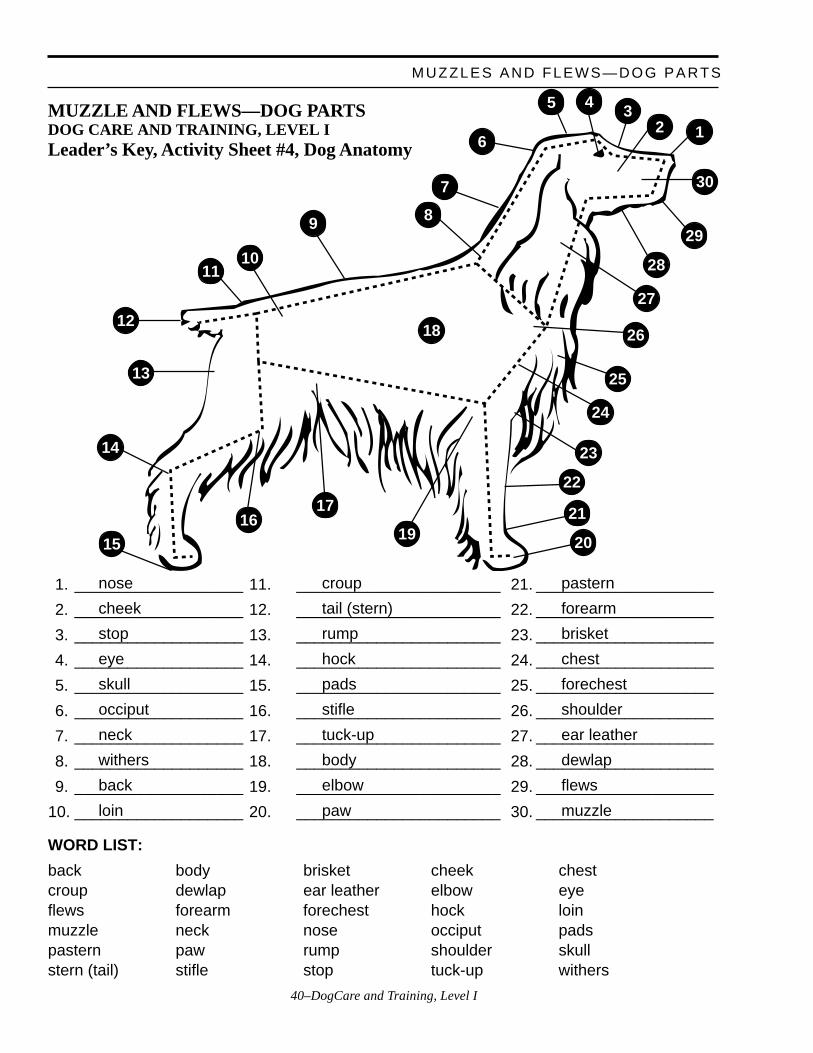
BACK—The portion of the dog between the withers and the croup.
BODY—The portion of the dog excluding the head, legs, and tail.
BRISKET—The chest or ribcage between and just behind the front legs.
Muzzles and Flews—Dog PartsDog Care and Training, Level I
Leader Notes
Without identifying the wrist tell each
member that is touching their wrist that
they are “right,” tell the others they are
“wrong.” You could have them guess
that the wrist is what you really meant.
Tell everyone that is touching their
elbow that they are “right.”
Note: Use this lesson for a few minutes
each week by selecting six parts to
learn each week. Quiz bowl or skill-a-
thon format could also be used.
36–DogCare and Training, Level I
CHEEK—The fleshy regions at the side of the head.
CHEST—The part of the body that is enclosed by the ribs.
CROUP—The area where the tail joins the body.
DEWLAP—The loose, pendulous skin under the throat and neck.
EAR LEATHER—The lobe of the outer ear.
ELBOW—The joint between the forearm and the upper arm.
EYE—Opening on each side of head at the base of the skull.
FLEWS—Pendulous upper lip.
FOREARM—The lower arm—between the elbow and the wrist.
FORECHEST—Part of the chest below and in front of the shoulder.
HOCK—Joint on the hindlimb, between lower thigh and rear pastern.
LOIN—The area between the end of the ribcage and the start of the pelvis.
MUZZLE—The head in front of the eyes—jaws, lips and nose.
NECK—Between the body and the shoulder.
NOSE—The external portion of the nose.
OCCIPUT—Bump at the top rear of the skull.
PADS—Tough paw portion on the underside of the foot.
PASTERN—Part of the foreleg between knee and foot (hock and paw).
PAW—The foot.
RUMP—The upper surface of the pelvic region. Begins at the end of theloins and blends into the croup.
SHOULDER—The top section of the foreleg, from withers to the elbow.
SKULL—The bony framework of the head.
STIFLE—The joint of the hind leg between the upper and lower thighs.The knee.
STOP—The area of the head between the eyes and the muzzle where theskull bends.
ACTIVITYLeader Notes
Divide your group into two or more
teams. Each team will select a label for
the poster and will, in turn, place it on
the correct spot. If a label is incorrect it
may be replaced by the correct one.
Next, read the list of definitions of the
body parts and have the members
identify if the poster is labeled correctly
or incorrectly. Make changes as needed.
MUZZLES AND FLEWS—DOG PARTS
37–DogCare and Training, Level I
KANSAS 4–H
TAIL (STERN)—Final portion of the spine.
TUCK-UP—Abdomen of dog drawn up to produce a “waist.”
WITHERS—Top of the shoulder blades—just behind the base of theneck. A dog’s height is measured from the withers.
DIALOGUE FOR CRITICAL THINKINGShare:
1. Which terms did you already know?
2. Which of the terms were new to you?
Process:3. How many dog parts can you name?
4. Why is it important to know the specific parts of a dog?
Generalize:5. How does knowing various terms help you understand other subject
areas?
6. How do you prefer to learn names of parts?
Apply:7. What other learning devices do you like to use?
REFERENCES:Authors:Chris Odell, Obedience and Agility Instructor, Hutchinson, KS Kennel
ClubJames P. Adams, Extension Specialist, 4-H and Youth Programs, Kansas
State University
Reviewed by:Dog Care and Training Design Team
Leader NotesACTIVITY
Once the poster is correctly labeled the
members may make their own keys by
correctly labeling their diagrams. If time
allows you can have the members quiz
each other over the body parts. A live
dog will enhance this activity.
38–DogCare and Training, Level I
MUZZLES AND FLEWS—DOG PARTS
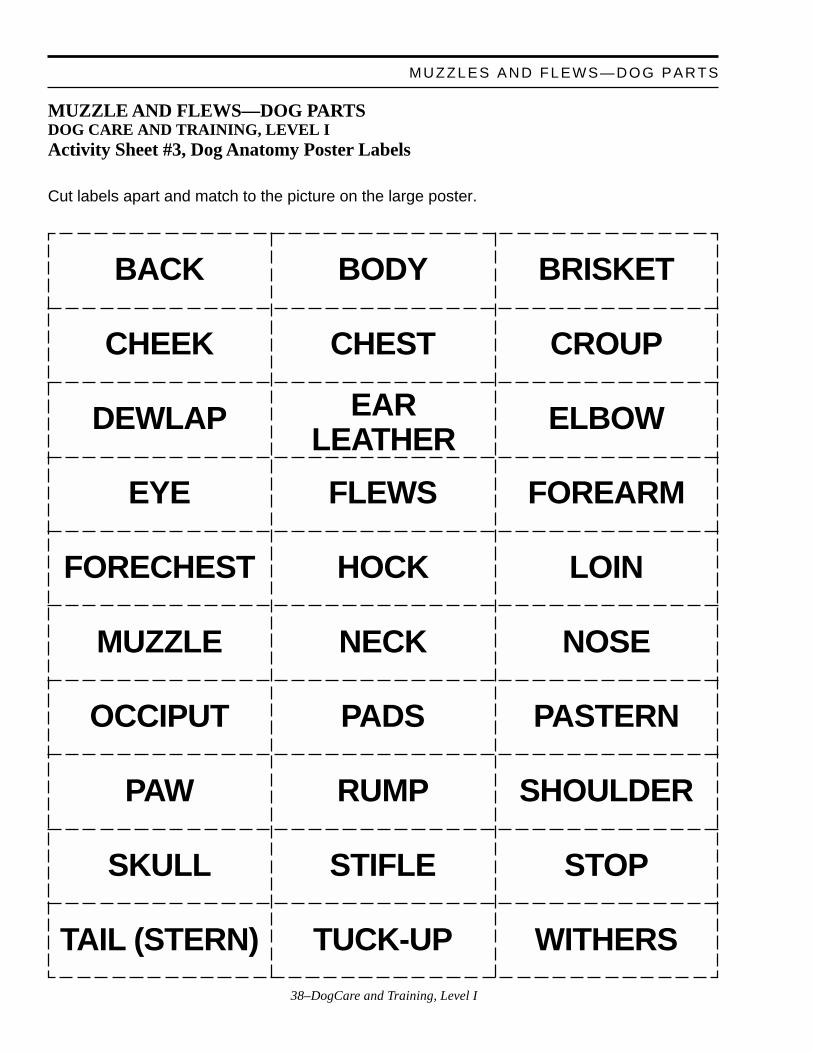
MUZZLE AND FLEWS—DOG PARTSDOG CARE AND TRAINING, LEVEL IActivity Sheet #3, Dog Anatomy Poster Labels
Cut labels apart and match to the picture on the large poster.
BACK BODY BRISKET
CHEEK CHEST CROUP
DEWLAP ELBOW
EYE FLEWS FOREARM
FORECHEST HOCK LOIN
MUZZLE NECK NOSE
OCCIPUT PADS PASTERN
PAW RUMP SHOULDER
SKULL STIFLE STOP
TAIL (STERN) TUCK-UP WITHERS
EARLEATHER

39–DogCare and Training, Level I
KANSAS 4–H
1. ___________________ 11. _______________________ 21. ____________________
2. ___________________ 12. _______________________ 22. ____________________
3. ___________________ 13. _______________________ 23. ____________________
4. ___________________ 14. _______________________ 24. ____________________
5. ___________________ 15. _______________________ 25. ____________________
6. ___________________ 16. _______________________ 26. ____________________
7. ___________________ 17. _______________________ 27. ____________________
8. ___________________ 18. _______________________ 28. ____________________
9. ___________________ 19. _______________________ 29. ____________________
10. ___________________ 20. _______________________ 30. ____________________
WORD LIST:
back body brisket cheek chestcroup dewlap ear leather elbow eyeflews forearm forechest hock loinmuzzle neck nose occiput padspastern paw rump shoulder skullstern (tail) stifle stop tuck-up withers
MUZZLE AND FLEWS—DOG PARTSDOG CARE AND TRAINING, LEVEL IActivity Sheet #4, Dog Anatomy
28
29
30
12345
6
7
8
27
26
25
24
9
1011
12
13
14
15
1617
19 20
21
22
18
23
40–DogCare and Training, Level I
MUZZLES AND FLEWS—DOG PARTS
1. ___________________ 11. _______________________ 21. ____________________
2. ___________________ 12. _______________________ 22. ____________________
3. ___________________ 13. _______________________ 23. ____________________
4. ___________________ 14. _______________________ 24. ____________________
5. ___________________ 15. _______________________ 25. ____________________
6. ___________________ 16. _______________________ 26. ____________________
7. ___________________ 17. _______________________ 27. ____________________
8. ___________________ 18. _______________________ 28. ____________________
9. ___________________ 19. _______________________ 29. ____________________
10. ___________________ 20. _______________________ 30. ____________________
WORD LIST:
back body brisket cheek chestcroup dewlap ear leather elbow eyeflews forearm forechest hock loinmuzzle neck nose occiput padspastern paw rump shoulder skullstern (tail) stifle stop tuck-up withers
28
29
30
12345
6
7
8
27
26
25
24
9
1011
12
13
14
15
1617
19 20
21
22
18
23
nose croup pastern
cheek tail (stern) forearm
stop rump brisket
eye hock chest
skull pads forechest
occiput stifle shoulder
neck tuck-up ear leather
withers body dewlap
back elbow flews
loin paw muzzle
MUZZLE AND FLEWS—DOG PARTSDOG CARE AND TRAINING, LEVEL ILeader’s Key, Activity Sheet #4, Dog Anatomy
41–DogCare and Training, Level I
KANSAS 4–H
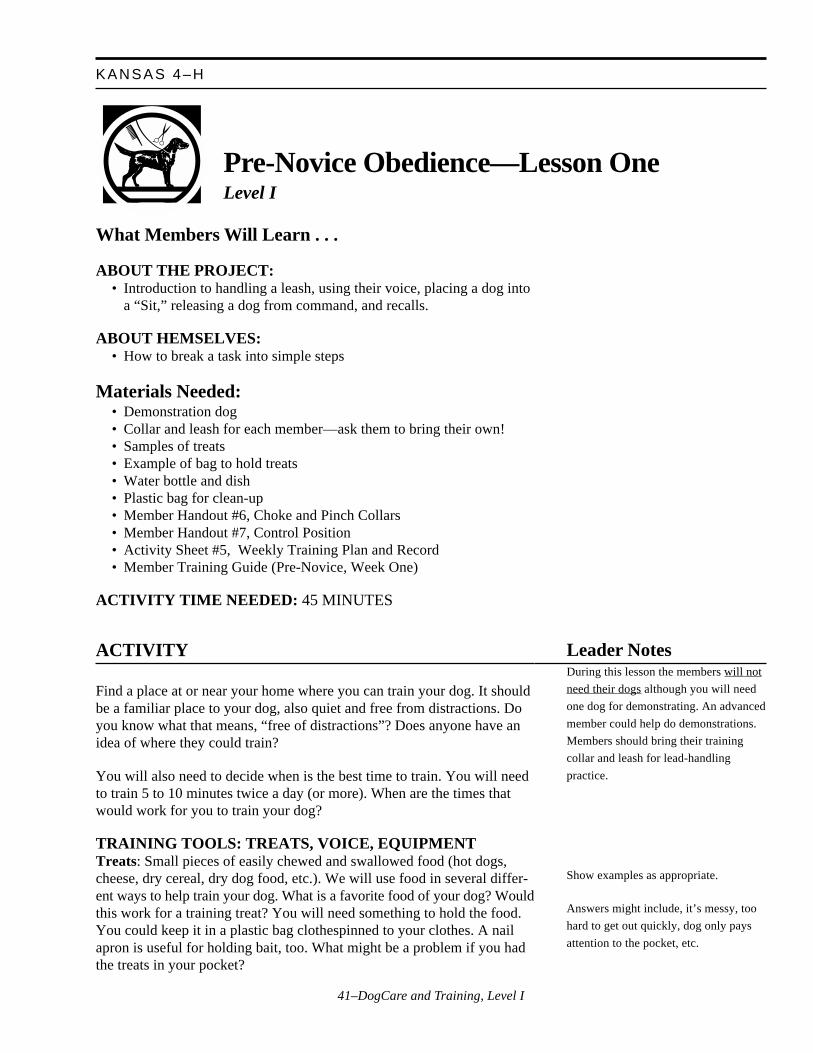
Pre-Novice Obedience—Lesson OneLevel I
What Members Will Learn . . .
ABOUT THE PROJECT:• Introduction to handling a leash, using their voice, placing a dog into
a “Sit,” releasing a dog from command, and recalls.
ABOUT HEMSELVES:• How to break a task into simple steps
Materials Needed:• Demonstration dog• Collar and leash for each member—ask them to bring their own!• Samples of treats• Example of bag to hold treats• Water bottle and dish• Plastic bag for clean-up• Member Handout #6, Choke and Pinch Collars• Member Handout #7, Control Position• Activity Sheet #5, Weekly Training Plan and Record• Member Training Guide (Pre-Novice, Week One)
ACTIVITY TIME NEEDED: 45 MINUTES
ACTIVITY
Find a place at or near your home where you can train your dog. It shouldbe a familiar place to your dog, also quiet and free from distractions. Doyou know what that means, “free of distractions”? Does anyone have anidea of where they could train?
You will also need to decide when is the best time to train. You will needto train 5 to 10 minutes twice a day (or more). When are the times thatwould work for you to train your dog?
TRAINING TOOLS: TREATS, VOICE, EQUIPMENTTreats: Small pieces of easily chewed and swallowed food (hot dogs,cheese, dry cereal, dry dog food, etc.). We will use food in several differ-ent ways to help train your dog. What is a favorite food of your dog? Wouldthis work for a training treat? You will need something to hold the food.You could keep it in a plastic bag clothespinned to your clothes. A nailapron is useful for holding bait, too. What might be a problem if you hadthe treats in your pocket?
Leader NotesDuring this lesson the members will not
need their dogs although you will need
one dog for demonstrating. An advanced
member could help do demonstrations.
Members should bring their training
collar and leash for lead-handling
practice.
Show examples as appropriate.
Answers might include, it’s messy, too
hard to get out quickly, dog only pays
attention to the pocket, etc.
42–DogCare and Training, Level I
Voice: Your voice is the most important training tool that you have. Youwill be learning to use it in many ways—to command, to praise, to excite,to calm, and to correct. Who can say “Sit” as a command? “Good dog” aspraise? “Free” to excite your dog? “Easy” in a calming voice? “Stop It” asa correction?
Equipment: A good training collar. Pinch collars are scary- looking butalmost everyone will need one. A pinch collar is a great equalizer becauseit will allow you to control a dog that may outweigh you. Choke collarsdo look friendlier but they act by choking the dog. A word of caution—never ever leave a pinch (or choke) collar on a dog that you are notworking with. These collars could get caught on a fence or other thingsand your dog could become scared and get hurt. Many dogs have died bystrangling when they were tied up with a choke collar.
The leash should be leather, pressed cotton or nylon. Avoid chain leashessince they are too rough on hands and are difficult to hold in one hand.The leash should be 2 to 6 feet long and be as lightweight as possiblewithout having it break.
HOLDING THE LEASHHook the loop of your leash over your thumb (never over your wrist).Close your fingers over the loop, making a fist of your hand.
CONTROL POSITIONLeash is in your right hand which is on your right thigh. It runs throughyour left hand to the dog. It should have enough slack that the leash snaphangs straight down.
Get your collar and leash so we can practice holding the leash and controlposition.
Sit: Your dog will sit with your verbal command and the guiding of yourhands and remain there for about 15 seconds until you release it. We aretrying to teach the dogs what to do when we say “SIT.”
1. Kneel with your dog standing in front of you with its head facing tothe right. If your dog is small enough, you may place it on a tablewith a non-slip surface. Your left hand should be on your dog’s back.Hold the collar at the front of the neck with your right hand. Yourright hand is actually on the dog’s chest.
2. As your left hand strokes down the back, over the tail and tucks forwardbehind the back of the knees, you give the verbal command “SIT.”
3. Gently push with your right hand until the dog sits.
4. Hold gently in place for 15 seconds, Praise and then release.
ACTIVITY
PRE-NOVICE OBEDIENCE—LESSON ONE
Leader Notes
Have the group practice saying each
command with proper tone and
inflexion.
Show examples of collars and how they
work. Rever to Member Handout #6,
Choke and Pinch Collar.
Use Member Handout #7, Control
Position as a take home reminder.
Demonstrate the first lesson in teaching
“"Sit".”
If you have a dog that is large or taller
than the child when kneeling, then have
the child stand.
Demonstrate a release.
43–DogCare and Training, Level I
KANSAS 4–H
FREEThis is a command used to Release your dog from the previous command.You should give this command in a very upbeat, happy voice. If you dogis sitting or laying down, it can get up.
CONTROLLED WALKINGYour dog will walk on a leash without “fighting” the leash. We want to besure that all of the dogs will walk on a leash when you come next week.
Put your dog on a leash of at least 4 feet long. Let your dog go where itwants to go with you following for a little while. When you are ready,coax your dog to go where you want to go. Use a pleasant voice and treatsto encourage your dog to go with you. There is no formal command forthis exercise. Later we will do a “HEEL” command.
RECALLComing to you should always be the BEST THING IN YOUR DOG’SLIFE. This week prepare for later lessons in calling your dog to you.Practice calling your dog to you for no other reason than to give them atreat, some praise and/or a toy. Then let them go back to what they weredoing. From now on NEVER call your dog to come to you for anythingthat he may regard as unpleasant or punishing. (If you need to do some-thing the dog doesn’t like such as give it a bath or giving a pill, you go tothe dog and get it.) Use the commands “DOG’S NAME, COME.” Let’stry a recall game that you and one or more of your family can play withyour dog.
TOUCHINGThis week get your dog used to your touch. Practice handling your dog allover its body, including feet, ears, tail, mouth, and belly. Combine thiswith your daily grooming sessions. You can also use treats to make this apleasant experience. Why do you think this is a useful thing for your dogto learn?
FEEDINGDo not feed your dog for 3 to 4 hours before coming to class or starting atraining session. If you have been leaving food out for your dog to free-feed, you should now consider switching to a scheduled feeding time ortimes. You will have greater success with your housebreaking problemsand obedience training if you do. Give your dog plenty of time to relievethemselves before you come to class.
HOMEWORKPractice at home is what brings success. It is not fair to expect your dog tolearn if you don’t take time for practice. Two or more short (5 to 10minutes) periods of training are better for your dog than one long period.Plan to practice at least 5 days a week. Dogs learn by repetition so repeateach exercise 3 or 4 times. They also learn by what is rewarding for themso make each training session enjoyable. If you get to a point where you
Leader Notes
Demonstrate controlled walking.
If your demonstration dog will come to
other people try a group recall game.
Leave the dog on a leash. Members
stand or kneel in a circle, each has a dog
treat. The first member calls the dog,
touches the collar when it comes, and
then gives the treat. A member across
the circle repeats this. Continue until all
members have called the dog. If the dog
does not come to a member then that
member should gently take the dog by
the collar and walk backwards to the
place in the circle. The member should
praise the dog as a treat is given.
Give each member Activity Sheet #5,
Weekly Training Plan and Record. Help
members outline 10-14 short training
periods for the week,
Remind members to use their training
outline, handouts and training guide and
then place in their record book.
ACTIVITY:
44–DogCare and Training, Level I
or the dog are getting frustrated, stop, do something that the dog alreadyknows, praise, and then end the session.
NEXT WEEKWhen you come to class next week, use the control position for your dog.Bring treats for your dog and a bag to carry them in. Have a plastic bagwith you in case you need to clean up after your dog, and bring water foryour dog—learning is thirsty work!
DIALOGUE FOR CRITICAL THINKING:Share:
1. What commands did we learn in this lesson?
2. What commands does your dog already know?
Process:3. Why might you need to re-teach a command you’ve already taught to
your dog?
4. Why is it important to use your hands to guide your dog into a Sit—even if it already knows the command?
5. What can you do if your dog doesn’t come to you when you com-mand “COME”?
Generalize:6. How do you learn to do chores at your house?
7. What happens when you do not understand the directions whenlearning a new chore?
Apply:
ACTIVITYLeader Notes
At this point in the training what the
member should do is begin to reteach
the command using the instructions in
this lesson.
PRE-NOVICE OBEDIENCE—LESSON ONE
8. What can you do to make your household jobs more fun and easier todo?
GOING FURTHER:1. Observe other training methods.
REFERENCES:Authors:Chris Odell, Obedience and Agility Instructor, Hutchinson, KS, Kennel
ClubJames P. Adams, Specialist, 4–H and Youth Programs, K-State Research
and Extension
Reviewed by:Dog Care and Training Design Team
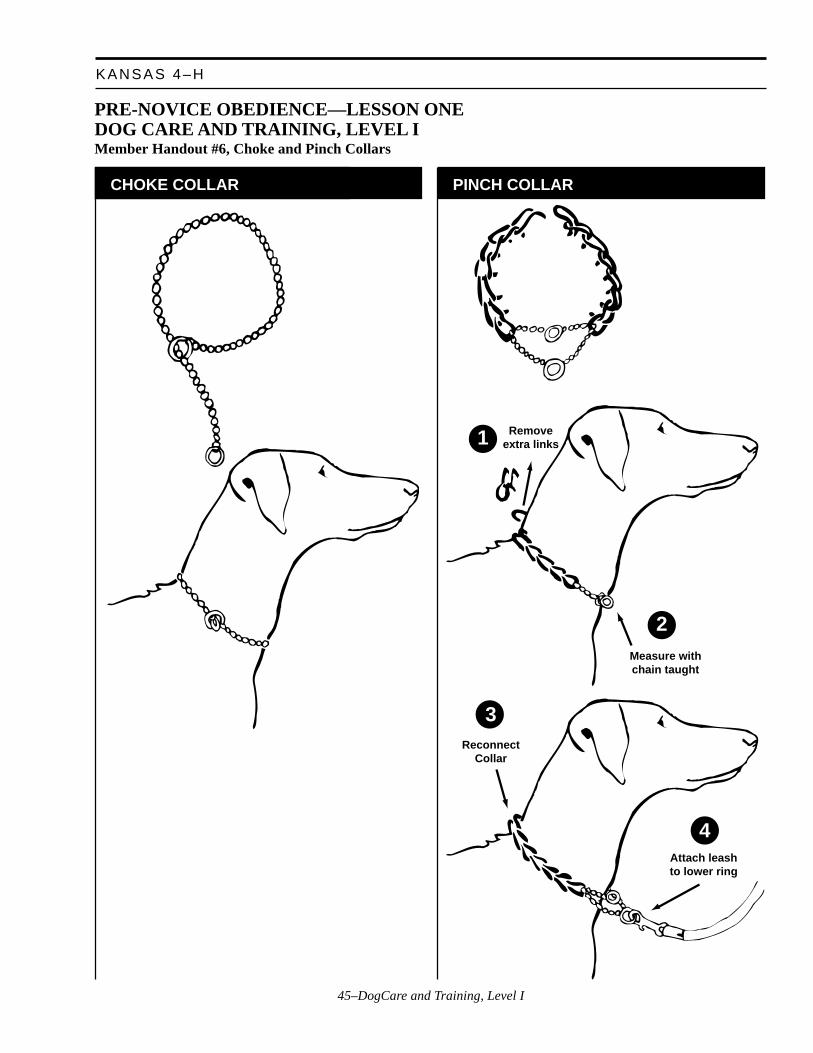
45–DogCare and Training, Level I
KANSAS 4–H
PRE-NOVICE OBEDIENCE—LESSON ONEDOG CARE AND TRAINING, LEVEL IMember Handout #6, Choke and Pinch Collars
CHOKE COLLARCHOKE COLLAR PINCH COLLAR
Removeextra links
Measure withchain taught
Attach leashto lower ring
ReconnectCollar
1
2
3
4
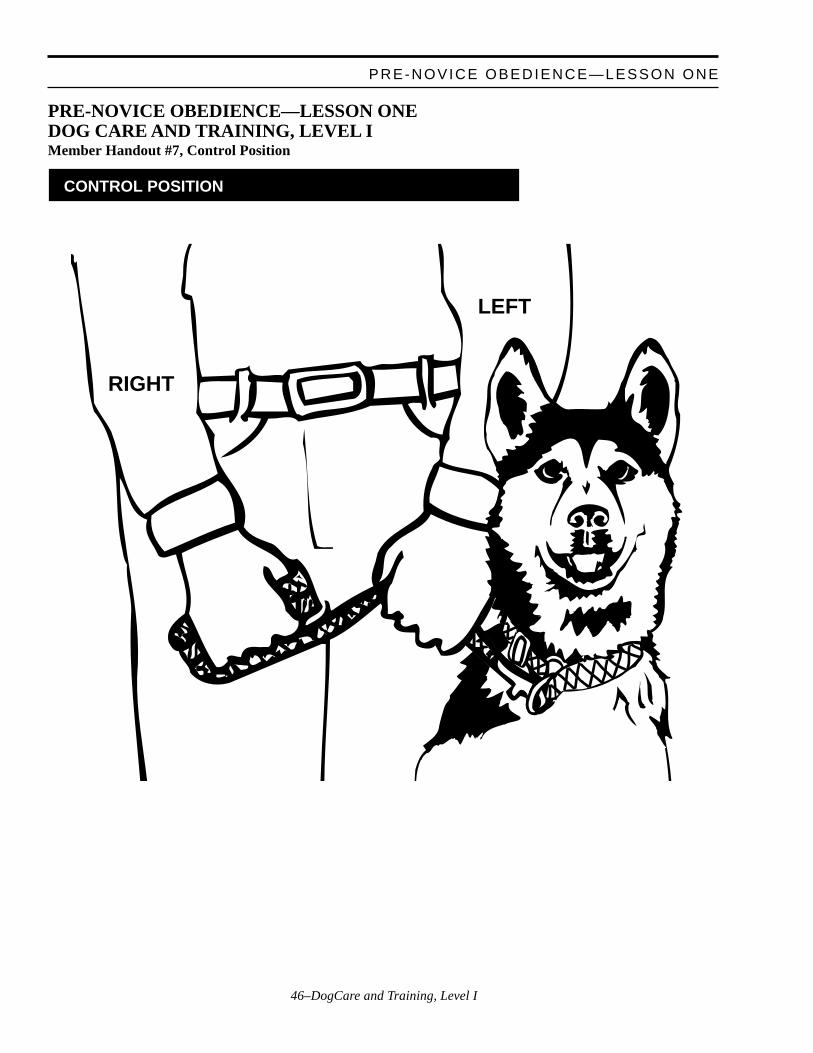
46–DogCare and Training, Level I
PRE-NOVICE OBEDIENCE—LESSON ONE
PRE-NOVICE OBEDIENCE—LESSON ONEDOG CARE AND TRAINING, LEVEL IMember Handout #7, Control Position
CONTROL POSITION
RIGHT
LEFT

47–DogCare and Training, Level I
KANSAS 4–H
PRE-NOVICE OBEDIENCE—LESSON ONEDOG CARE AND TRAINING, LEVEL IActivity Sheet #5, Training Plan and Record
Name______________________________ Dog _________________________________
Tuck into "Sit", controlled walking, release, recall, touching. Record date and time to teacheach of these commands and the result.
Day/ What’s your planTime for this session? How did it work?
1.
2. good start
3.
4. keep working
5.
6. practice brings results
7.
8. above average!
9.
10. great work
11.
12. headed for Super Dog!
13.
14. go to the head of the class
48–DogCare and Training, Level I
PRE-NOVICE OBEDIENCE—LESSON ONE
PRE-NOVICE OBEDIENCE—LESSON ONEDOG CARE AND TRAINING, LEVEL IMember Training Guide
During this week find a place in or near your homewhere you can train your dog. It should be a familiarplace to your dog, also quiet and free from distrac-tions.
Training Tools:• Treats: Easily chewed and swallowed food (hot
dogs, cheese, cereal, dry dog food, etc.) and abag to carry them in.
• Voice: Your voice is the most important trainingtool that you have. You will use it in many ways.
• Equipment: A good training collar. Never everleave a chain training collar on a dog that youare not working with. These collars could getcaught on a fence or on other things and yourdog could become scared and get hurt.
• The leash should be leather, pressed cotton ornylon. The leash should be 2 to 6 feet long andbe as lightweight as possible without having itbreak.
• Also bring: Plastic bag for picking up after yourdog, water and dish for your dog.
HOLDING THE LEASHHook the loop of your leash over your thumb (neverover your wrist). Close your fingers over the loop,making a fist of your hand.
CONTROL POSITIONLeash is in your right hand which is on your rightthigh. It runs through your left hand, which is on yourleft thigh, to the dog. It should have enough slack thatthe leash snap hangs straight down.
SIT—Your goal: Your dog will sit with your com-mand and the guiding of your hands and remain therefor about 15 seconds.
1. Kneel with your dog standing in front of youwith its head facing to the right. If you have alarge dog you may stand. Your left hand shouldbe on your dog’s back. Hold the collar at thefront of the neck with your right hand. Yourright hand is actually on the dog’s chest.
2. As your left hand strokes down the back, overthe tail and tucks forward behind the back of hisknees, you give the verbal command “"Sit".”
3. Gently push with your right hand until the dogsits.
4. Hold gently in place for 15 seconds, Praise andthen release.
FREE—This is a command used to RELEASE yourdog from the previous command. You should givethis command in a very upbeat, happy voice.
CONTROLLED WALKINGYour goal: Your dog will walk on a leash without“fighting” the leash.
Put your dog on a leash of at least 4 feet long. Letyour dog go where it wants to go with you followingfor a little while. When you are ready, coax your dogto go where you want to go. Use a pleasant voice andtreats to encourage your dog to go with you. There isno formal command for this exercise.
RECALL—Coming to you should always be theBEST THING IN YOUR DOG’S LIFE. This weekprepare for later lessons in calling your dog to you.Practice calling your dog to you for no other reasonthan to give them a treat, some praise and/or a toy.Then let them go back to what they were doing. Fromnow on NEVER call your dog to come to you foranything that it may regard as unpleasant or punish-ing. If you need to, you go to the dog. Use the com-mands “DOG’S NAME.” “COME.”
TOUCHING—This week get your dog used to yourtouch. Practice handling your dog all over its body,including feet, ears, tail, mouth, and belly. Combinethis with your daily grooming sessions. You can alsouse treats to make this a pleasant experience.
FEEDING—Do not feed your dog for 3 to 4 hoursbefore coming to class or starting a training session.Give your dog plenty of time to relieve itself beforeyou come to class.
49–DogCare and Training, Level I
KANSAS 4–H
HOMEWORKIt is not fair to expect your dog to learn if you don’ttake time for practice. Two or more short (10 min-utes) periods of training are better for your dog thanone long period. Plan to practice at least 5 days aweek. Dogs learn by repetition so repeat each exer-cise 3 or 4 times. They also learn by what is reward-ing for them so make each training session enjoyable.If you get to a point where you, or the dog, are bothgetting frustrated, stop, do something that the dogalready knows, praise, and then end the session.
NEXT WEEKBring your dog on a leash, keeping your dog incontrol position. Bring treats for your dog and yourtreat bag. Also have a plastic bag to pick up afteryour dog (just in case) and water for your dog—training is thirsty work!

50–DogCare and Training, Level I
51–DogCare and Training, Level I
KANSAS 4–H
House Manners for Your DogDog Care and Training, Level I
What Members Will Learn . . .
ABOUT THE PROJECT:• How to train their dog to be welcome in the house
ABOUT THEMSELVES:• How to establish rules• Sound decision-making
Materials Needed:• Stuffed dog• Collar and leash
Activity Sheet #6, Housebreaking/Training Record
ACTIVITY TIME NEEDED: 30 MINUTES
ACTIVITY
HousetrainingHousetraining, also called housebreaking, is training your dog to noturinate or defecate in the house. First, try to anticipate when your dog willneed to urinate or defecate and to have your dog in its “toilet area” at thattime. This will mean that you will need to supervise your dog whenever itis not in its crate or confined area. You will also need to decide where youwant your dog to urinate and defecate. You can train your dog to just useone area of the yard which will make cleaning the yard easier for you aswell as eliminate having messes all over the yard.
You will need to make a schedule for you (or someone else in the family)to take a puppy on lead to the toilet area at these times:
1. When the puppy wakes up (first thing in the morning as well as aftera nap);
2. After the puppy eats and/or drinks;
3. After playing hard;
4. Before going to bed.
This may mean that you carry your puppy to the toilet area but keep it inthe area with your leash until it has urinated. This is not playtime—this is
Leader Notes
Present and discuss the material. Then
get out the stuffed dog, collar and leash.
You will have the members act out
taking a puppy (from a crate, if available)
to the toilet area and giving a command
for the puppy to urinate. You can
challenge the members to have the best
coaxing/praising voices. The purpose of
this role-playing is twofold. One is to
reinforce the method of housetraining.
The second is to have the members
practice using their voice as a training
tool which will be of benefit when they
begin the obedience training.
52–DogCare and Training, Level I
business. Choose a word to use to command your dog to urinate—“potty”is often used. Say the word in a coaching voice as you wait for your dogto urinate. If it shows no interest in doing so, take him back inside to hiscrate for about 15 minutes and then try again. If it does urinate, praise it,give it a treat and allow it playtime in the yard or in the house. You willneed to follow this process, rain or shine, vacations and school days untilyour puppy is reliable in the house.
If your puppy makes a mistake in the house you may yell “STOP” only ifyou catch it in the act. Then carry it to the toilet area. Praise it if it uri-nates there. If you do not catch it in the act DO NOT punish it. It is yourfault for not having it in the toilet area when it needed to go. The dog isnot bad for urinating (this is a basic life process). It was just in the wrongplace. Clean up the mess and promise to do a better job of watching yourpuppy. Clean the area with a cleaner for urine stains or with a solution of20% white vinegar and 80% water in a spray bottle .
Housetraining an older dog may be easier since it will have bladdercontrol but may be more difficult since it has had time to practice badhabits. You will need to follow the same procedure as for the puppy butyou will not need to take your dog out as frequently. However, it isimportant that your dog is supervised when loose in the house until it isreliably housetrained.
Now, let’s pretend that you have a puppy that you are housetraining.Decide a time that you should take your puppy to the toilet area. Take itthere and demonstrate giving a “urinate” command and praising thepuppy when it is done.
DIALOGUE FOR CRITICAL THINKING:Share:
1. What is your idea for a command for your dog to eliminate?
2. Where do you plan to have your dog’s toilet area?
Process:3. Why is it important for a dog to be housetrained?
4. What if it stays outside all of the time?
Generalize:5. Why is it your fault if your dog urinates in the house? How can you
prevent this from happening?
Apply:6. Where can you get help in making decisions?
7. Who can help you develop a schedule and make it work?
ACTIVITYLeader Notes
HOUSE MANNERS FOR YOUR DOG
Give each member Activity Sheet #6,
Housebreaking/Training Record to use with
their new puppy.
53–DogCare and Training, Level I
KANSAS 4–H
ACTIVITY Leader Notes
GOING FURTHER:1. Work on this lesson at home. Report back at the next meeting.
REFERENCES:Authors:Chris Odell, Obedience and Agility Instructor, Hutchinson, KS, Kennel
ClubJames P. Adams, Specialist, 4–H and Youth Programs, K-State Research
and Extension
Reviewed by:Dog Care and Training Design Team
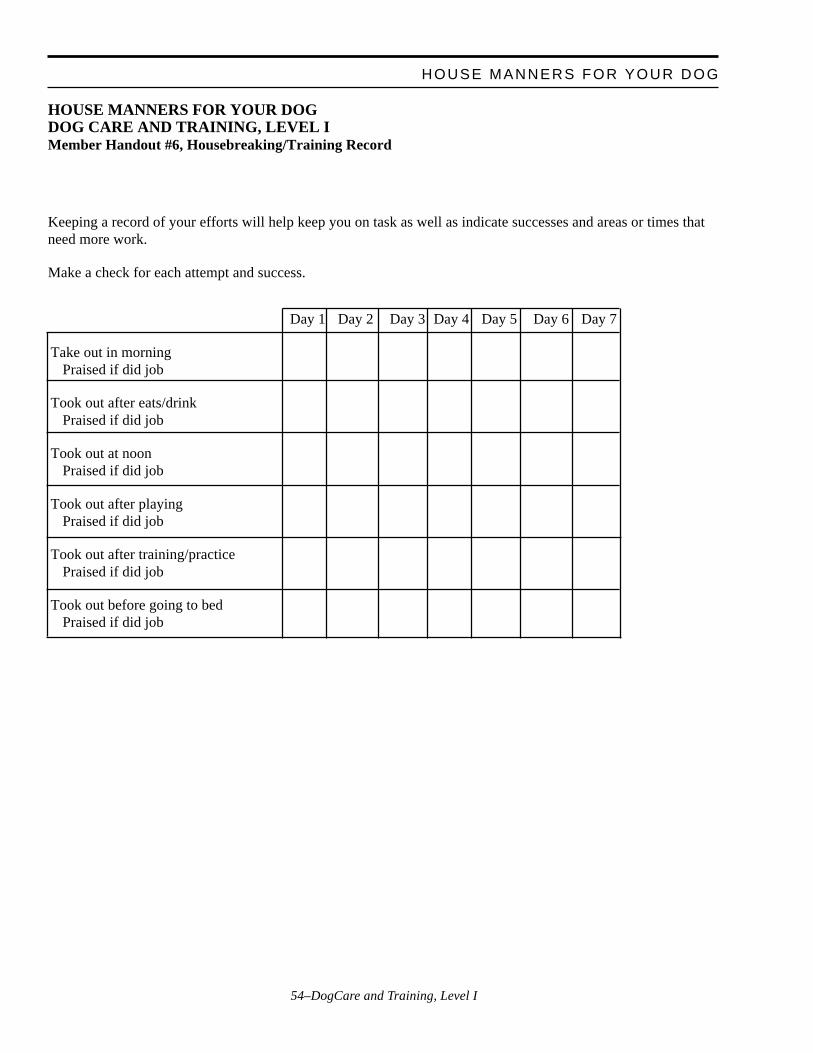
54–DogCare and Training, Level I
HOUSE MANNERS FOR YOUR DOG
HOUSE MANNERS FOR YOUR DOGDOG CARE AND TRAINING, LEVEL IMember Handout #6, Housebreaking/Training Record
Keeping a record of your efforts will help keep you on task as well as indicate successes and areas or times thatneed more work.
Make a check for each attempt and success.
Day 1 Day 2 Day 3 Day 4 Day 5 Day 6 Day 7
Take out in morningPraised if did job
Took out after eats/drinkPraised if did job
Took out at noonPraised if did job
Took out after playingPraised if did job
Took out after training/practicePraised if did job
Took out before going to bedPraised if did job
55–DogCare and Training, Level I
KANSAS 4–H
Pre-Novice Obedience—Lesson TwoDog Care and Training, Level I
What Members Will Learn . . .
ABOUT THE PROJECT:• Hand signals for Sit and Down• Use of food as a lure to move the dog, Heel Position• Long Down
ABOUT THEMSELVES:• Communication—ways to communicate when learning a common
language
Materials Needed:• Demonstration Dog (could be handled by an advanced member)• Member Handout #8, Teaching the Down with a Food Lure• Member Handout #9, Right Turn in Place• Member Handout #10, About Turn• Activity Sheet #7, Lesson Two Training Plan and Record• Member Training Guide (Pre-Novice, Week Two)
ACTIVITY TIME NEEDED: 60 MINUTES
ACTIVITY
Reminder:All dogs should be in control position when they come into the trainingarea. If this is the first time the dogs have been together watch for prob-lems between dogs. Stress to the trainers to keep their dogs close tothem—just because their dog is friendly doesn’t mean that the other dogswill welcome attention. Separate dogs that are very interested in eachother, friendly or otherwise. Do not allow the trainers to let their dogsplay with each other. The dog should be paying attention to its trainer but,just as important, the trainer should be focused on their dog.
Reminder:Arrange the class in a semi-circle facing you, giving each dog and traineras much space as possible. The trainers should be sitting on the floor withtheir dogs beside them on their left side. It will be helpful to have them siton their leash. They should remain sitting until the first demonstration ispresented and they are instructed to try it themselves.
Today’s lesson will be building on last week’s homework. In fact, eachlesson will build on the homework from the lesson before so be sure that
Leader NotesThis lesson should follow the lesson on
Attention Training. The Attention
Training Lesson, or parts of it, will need
to be reviewed several times during Pre-
Novice Obedience Training)
Do a homework check. How many
practiced 10 or more times? etc.
56–DogCare and Training, Level I
PRE-NOVICE OBEDIENCE—LESSON TWO
you practice. You are cheating your dog if you don’t help it learn at home.The dogs that practiced on being tucked into a Sit will have an easier timelearning the Sit with hand signal and the Sit with heeling.
Today we are going to use food to begin to teach our dogs the handsignals for Sit and Down. You will be using the food to get the dog to payattention to your hand. By following the food the dog should move intoposition without being forced. The dog is just learning what you want it todo in this lesson.
We will be using the Commands “SIT,” “DOWN,” “FREE” and “HEEL”in this lesson. “SIT” and “DOWN” are two separate commands—don’tconfuse your dog by telling him to “Sit Down.”
1. Give a command only once—then place your dog into position.Teach your dog that the command is “SIT”—not “SIT,SIT,SIT”
2. Do not use the dog’s name with the commands SIT or DOWN (andlater Stand and STAY). Using its name is a signal to move.
3. Do use the dog’s name when you say “HEEL.” Your instructionsheet will say “ROVER, HEEL.” Use your dog’s name in place ofRover’s.
4. Expect your dog to continue to obey your command until you giveanother command. If you say “SIT,” your dog should remain sittinguntil you give another command such as “DOWN” or “HEEL.” Inthese beginning lessons the time between commands should beshort—no more than 10 seconds. When you are done, the releasecommand to give is “FREE.”
5. Do not give a command unless you are ready to make the dog followit. Never let him ignore a command.
Part 1—Sit and DownREVIEW the homework lesson on Sit. Trainers should be kneeling orstanding on their leash, not holding it. Trainers with small dogs should beon their knees facing the right side of the dog. Trainers with large dogsmay need to stand.
1. Hold the collar at the front of the neck with the right hand.
2. With the left hand stroke down the back, over its tail and tuckforward behind the back of the dog’s knees and command “SIT.”
3. Gently push with your right hand until the dog sits.
4. Hold in place for 15 seconds, Praise and then Release.
ACTIVITYLeader Notes
Review Sit Command from the Pre-
Novice—Week One.
57–DogCare and Training, Level I
KANSAS 4–H
Have the trainers review the Sit a second time and then sit down withtheir dogs for the next instructions and demonstration.
PRAISE VS. PETTINGThe rule on praise is that it should be with your voice only—do not pet.Remember that your voice is a training tool—make it work for you.
SIT/DOWNGoal: Your dog will sit and down on your command when following a lure.
DEMONSTRATE, then instruct class in practice.
1. Leash under trainer’s knees or feet, dog is sitting. Trainer’s left handis on shoulders, right hand has a treat. Get the dog’s attention on thetreat, hold it at the dog’s eye level.
2. Command “DOWN” as you bring your right hand with the treatstraight down in front of the dog and then out in an “L” shape.
3. As the dog follows the hand with the treat it will lie down. (Use yourleft hand to prevent it from walking towards the treat.)
4. Praise and give the treat when the dog is down completely—elbows,too!
5. If the dog sits up you have another chance to practice the Down.
6. When the dog is in a down position hold the collar at the back of theneck with your left hand.
7. Have a treat in your right hand, just in front of the dog’s face.
8. Command “SIT” as you move the treat toward the dog and up so itwill have to sit to follow the treat.
9. When the dog is sitting, Praise and give the treat.
Practice three sets of Down/Sit with Praise and then a treat every time thedog follows your command.
Put the treats away for the rest of the lesson.
Leader NotesA dog being petted can become so
focused on the pleasurable feeling that
he can not attend to the action being
reinforced. Save petting until after the
Release. At the end of many exercises
the trainers should PAUSE (quietly),
Praise (verbally), and then release
(FREE!) the dog from formal command
to relax and yes, be petted.
This is the “induce” stage of teaching
the Sit.
Teaching these commands with a lure is
also the beginning of teaching hand
signals. Although hand signals are not
required until the Utility Level of
Obedience, they are easy to teach now.
Some dogs respond better to signals
than to verbal commands and they are
impressive for the members to demon-
strate to others.
If trainers are using pinch collars have
them hold both of the chains so the
collar will guide, not correct. Better yet,
have a flat buckle collar on the dog in
addition to the pinch. The buckle collar
to be used to guide, the pinch collar to
be used to control. The leash would be
attached to the pinch collar.
Refer to Member Handout #8, Teaching
the Down with a Food Lure as a review.
ACTIVITY:
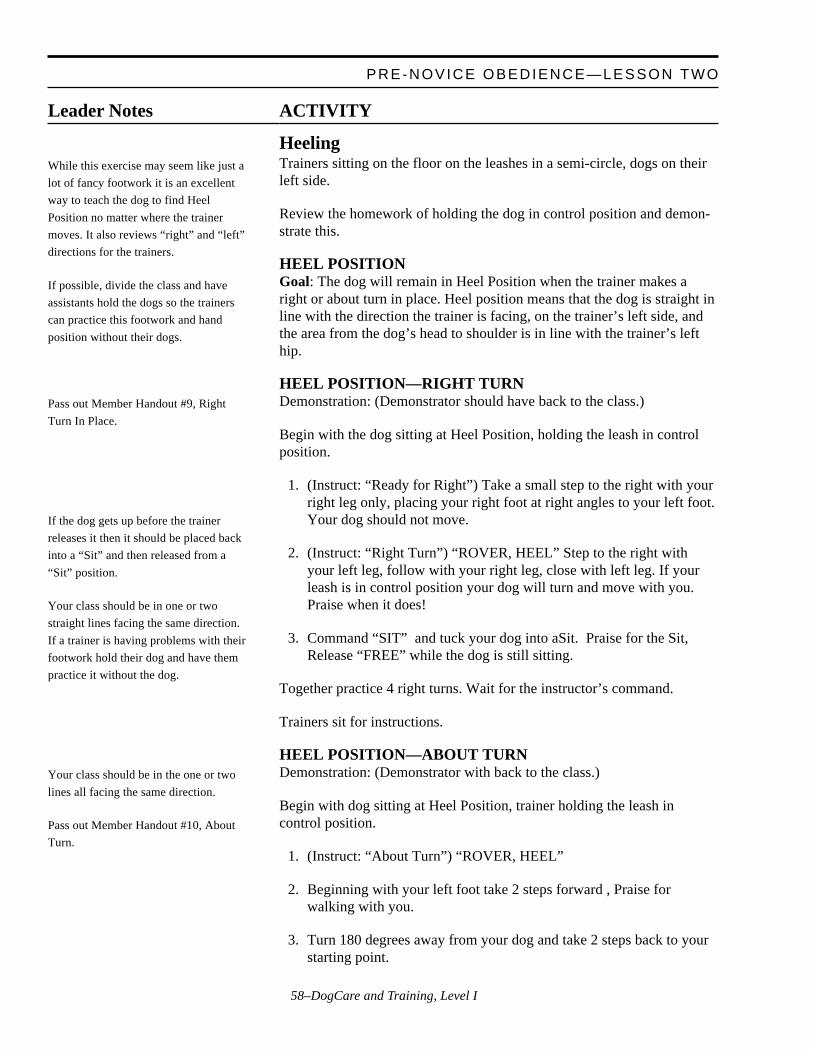
58–DogCare and Training, Level I
HeelingTrainers sitting on the floor on the leashes in a semi-circle, dogs on theirleft side.
Review the homework of holding the dog in control position and demon-strate this.
HEEL POSITIONGoal: The dog will remain in Heel Position when the trainer makes aright or about turn in place. Heel position means that the dog is straight inline with the direction the trainer is facing, on the trainer’s left side, andthe area from the dog’s head to shoulder is in line with the trainer’s lefthip.
HEEL POSITION—RIGHT TURNDemonstration: (Demonstrator should have back to the class.)
Begin with the dog sitting at Heel Position, holding the leash in controlposition.
1. (Instruct: “Ready for Right”) Take a small step to the right with yourright leg only, placing your right foot at right angles to your left foot.Your dog should not move.
2. (Instruct: “Right Turn”) “ROVER, HEEL” Step to the right withyour left leg, follow with your right leg, close with left leg. If yourleash is in control position your dog will turn and move with you.Praise when it does!
3. Command “SIT” and tuck your dog into aSit. Praise for the Sit,Release “FREE” while the dog is still sitting.
Together practice 4 right turns. Wait for the instructor’s command.
Trainers sit for instructions.
HEEL POSITION—ABOUT TURNDemonstration: (Demonstrator with back to the class.)
Begin with dog sitting at Heel Position, trainer holding the leash incontrol position.
1. (Instruct: “About Turn”) “ROVER, HEEL”
2. Beginning with your left foot take 2 steps forward , Praise forwalking with you.
3. Turn 180 degrees away from your dog and take 2 steps back to yourstarting point.
PRE-NOVICE OBEDIENCE—LESSON TWO
ACTIVITYLeader Notes
While this exercise may seem like just a
lot of fancy footwork it is an excellent
way to teach the dog to find Heel
Position no matter where the trainer
moves. It also reviews “right” and “left”
directions for the trainers.
If possible, divide the class and have
assistants hold the dogs so the trainers
can practice this footwork and hand
position without their dogs.
Pass out Member Handout #9, Right
Turn In Place.
If the dog gets up before the trainer
releases it then it should be placed back
into a “Sit” and then released from a
“Sit” position.
Your class should be in one or two
straight lines facing the same direction.
If a trainer is having problems with their
footwork hold their dog and have them
practice it without the dog.
Your class should be in the one or two
lines all facing the same direction.
Pass out Member Handout #10, About
Turn.
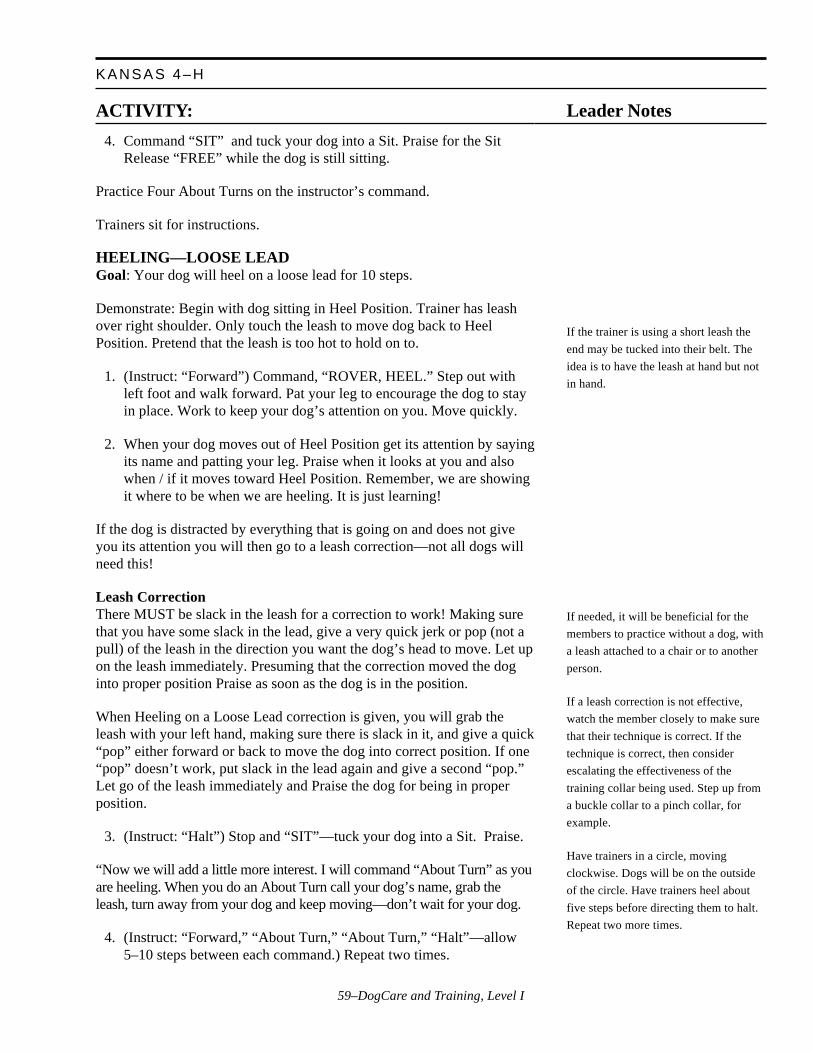
59–DogCare and Training, Level I
KANSAS 4–H
4. Command “SIT” and tuck your dog into a Sit. Praise for the SitRelease “FREE” while the dog is still sitting.
Practice Four About Turns on the instructor’s command.
Trainers sit for instructions.
HEELING—LOOSE LEADGoal: Your dog will heel on a loose lead for 10 steps.
Demonstrate: Begin with dog sitting in Heel Position. Trainer has leashover right shoulder. Only touch the leash to move dog back to HeelPosition. Pretend that the leash is too hot to hold on to.
1. (Instruct: “Forward”) Command, “ROVER, HEEL.” Step out withleft foot and walk forward. Pat your leg to encourage the dog to stayin place. Work to keep your dog’s attention on you. Move quickly.
2. When your dog moves out of Heel Position get its attention by sayingits name and patting your leg. Praise when it looks at you and alsowhen / if it moves toward Heel Position. Remember, we are showingit where to be when we are heeling. It is just learning!
If the dog is distracted by everything that is going on and does not giveyou its attention you will then go to a leash correction—not all dogs willneed this!
Leash CorrectionThere MUST be slack in the leash for a correction to work! Making surethat you have some slack in the lead, give a very quick jerk or pop (not apull) of the leash in the direction you want the dog’s head to move. Let upon the leash immediately. Presuming that the correction moved the doginto proper position Praise as soon as the dog is in the position.
When Heeling on a Loose Lead correction is given, you will grab theleash with your left hand, making sure there is slack in it, and give a quick“pop” either forward or back to move the dog into correct position. If one“pop” doesn’t work, put slack in the lead again and give a second “pop.”Let go of the leash immediately and Praise the dog for being in properposition.
3. (Instruct: “Halt”) Stop and “SIT”—tuck your dog into a Sit. Praise.
“Now we will add a little more interest. I will command “About Turn” as youare heeling. When you do an About Turn call your dog’s name, grab theleash, turn away from your dog and keep moving—don’t wait for your dog.
4. (Instruct: “Forward,” “About Turn,” “About Turn,” “Halt”—allow5–10 steps between each command.) Repeat two times.
Leader Notes
If the trainer is using a short leash the
end may be tucked into their belt. The
idea is to have the leash at hand but not
in hand.
If needed, it will be beneficial for the
members to practice without a dog, with
a leash attached to a chair or to another
person.
If a leash correction is not effective,
watch the member closely to make sure
that their technique is correct. If the
technique is correct, then consider
escalating the effectiveness of the
training collar being used. Step up from
a buckle collar to a pinch collar, for
example.
Have trainers in a circle, moving
clockwise. Dogs will be on the outside
of the circle. Have trainers heel about
five steps before directing them to halt.
Repeat two more times.
ACTIVITY:
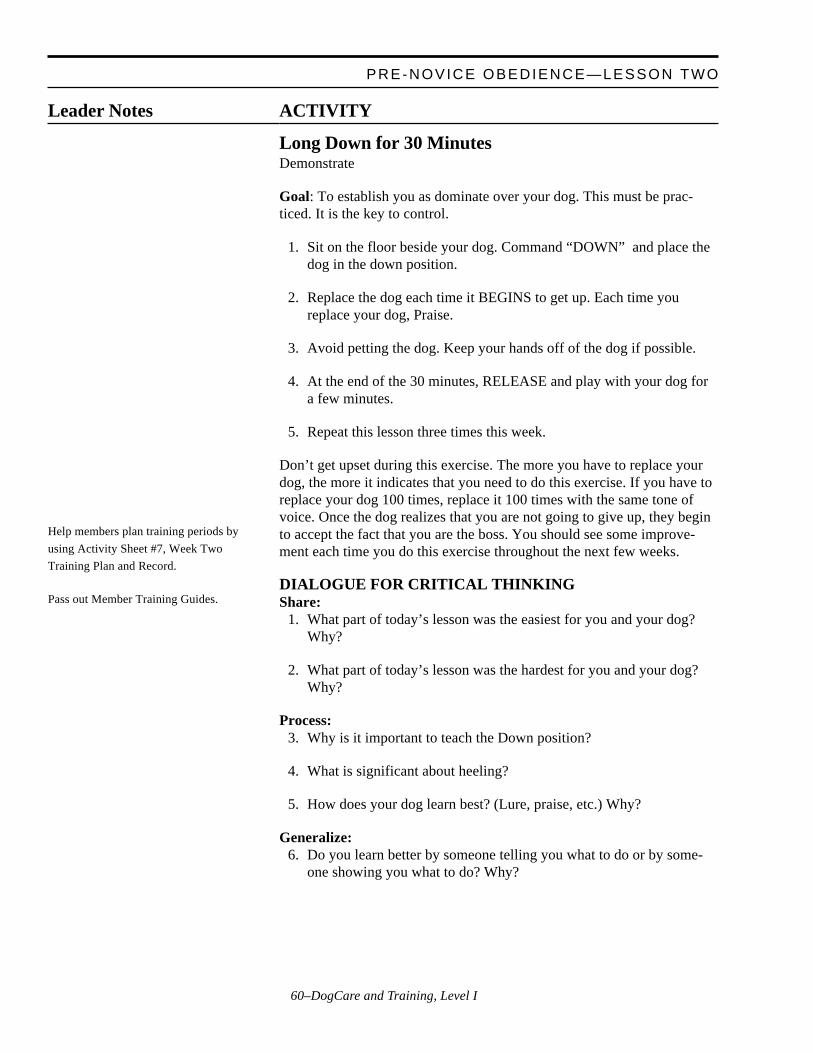
60–DogCare and Training, Level I
Long Down for 30 MinutesDemonstrate
Goal: To establish you as dominate over your dog. This must be prac-ticed. It is the key to control.
1. Sit on the floor beside your dog. Command “DOWN” and place thedog in the down position.
2. Replace the dog each time it BEGINS to get up. Each time youreplace your dog, Praise.
3. Avoid petting the dog. Keep your hands off of the dog if possible.
4. At the end of the 30 minutes, RELEASE and play with your dog fora few minutes.
5. Repeat this lesson three times this week.
Don’t get upset during this exercise. The more you have to replace yourdog, the more it indicates that you need to do this exercise. If you have toreplace your dog 100 times, replace it 100 times with the same tone ofvoice. Once the dog realizes that you are not going to give up, they beginto accept the fact that you are the boss. You should see some improve-ment each time you do this exercise throughout the next few weeks.
DIALOGUE FOR CRITICAL THINKINGShare:
1. What part of today’s lesson was the easiest for you and your dog?Why?
2. What part of today’s lesson was the hardest for you and your dog?Why?
Process:3. Why is it important to teach the Down position?
4. What is significant about heeling?
5. How does your dog learn best? (Lure, praise, etc.) Why?
Generalize:6. Do you learn better by someone telling you what to do or by some-
one showing you what to do? Why?
PRE-NOVICE OBEDIENCE—LESSON TWO
ACTIVITYLeader Notes
Help members plan training periods by
using Activity Sheet #7, Week Two
Training Plan and Record.
Pass out Member Training Guides.
61–DogCare and Training, Level I
KANSAS 4–H
Apply:7. Sometimes we are telling someone how to do something but they
don’t seem to understand. What could you do to make the instruc-tions clearer?
GOING FURTHER:
REFERENCES:Authors:Chris Odell, Obedience and Agility Instructor, Hutchinson, KS, Kennel
ClubJames P. Adams, Specialist, 4–H and Youth Programs, K-State Research
and Extension
Reviewed by:Dog Care and Training Design Team
Leader NotesACTIVITY:
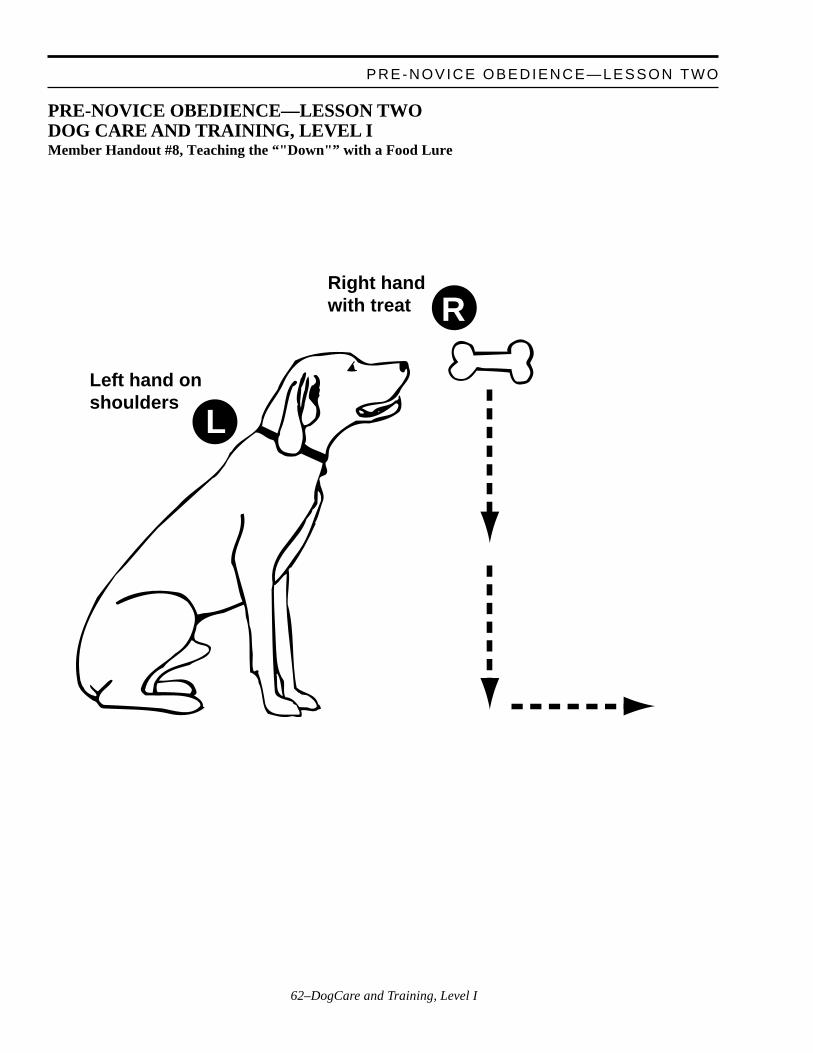
62–DogCare and Training, Level I
L
R
Left hand on shoulders
Right handwith treat
PRE-NOVICE OBEDIENCE—LESSON TWODOG CARE AND TRAINING, LEVEL IMember Handout #8, Teaching the “"Down"” with a Food Lure
PRE-NOVICE OBEDIENCE—LESSON TWO
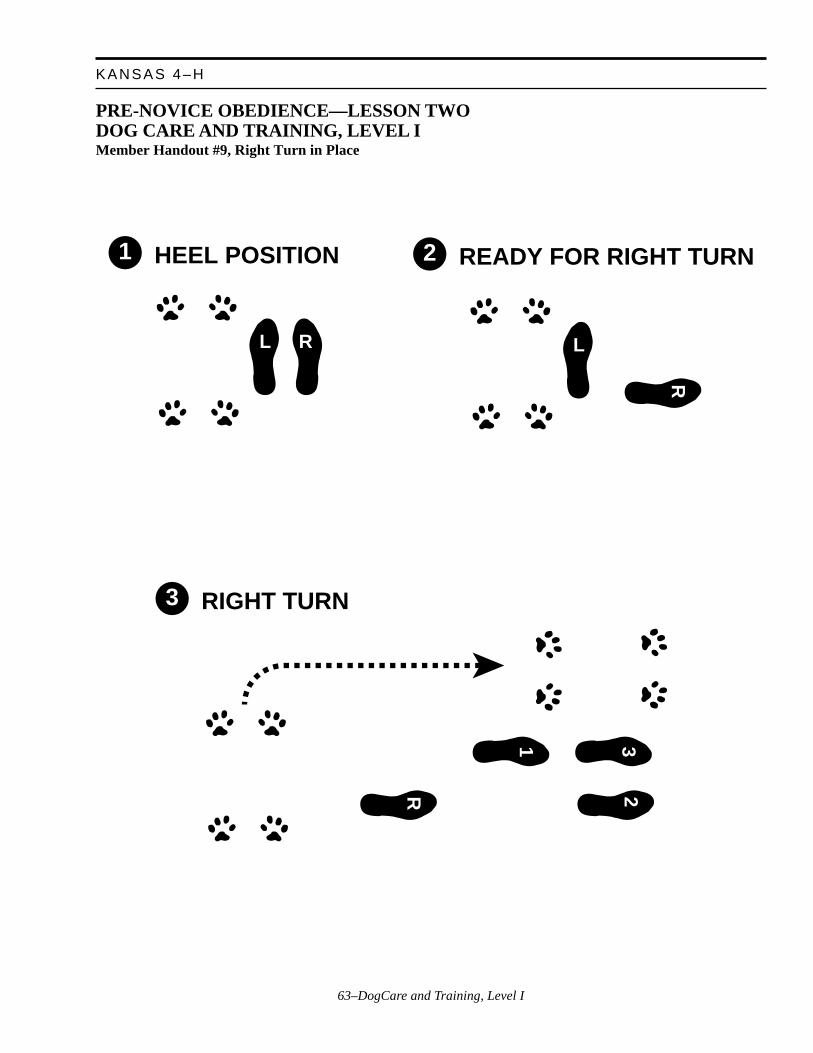
63–DogCare and Training, Level I
KANSAS 4–H
1
L R
HEEL POSITION 2
L
R
READY FOR RIGHT TURN
3
1 3
R 2
RIGHT TURN
PRE-NOVICE OBEDIENCE—LESSON TWODOG CARE AND TRAINING, LEVEL IMember Handout #9, Right Turn in Place
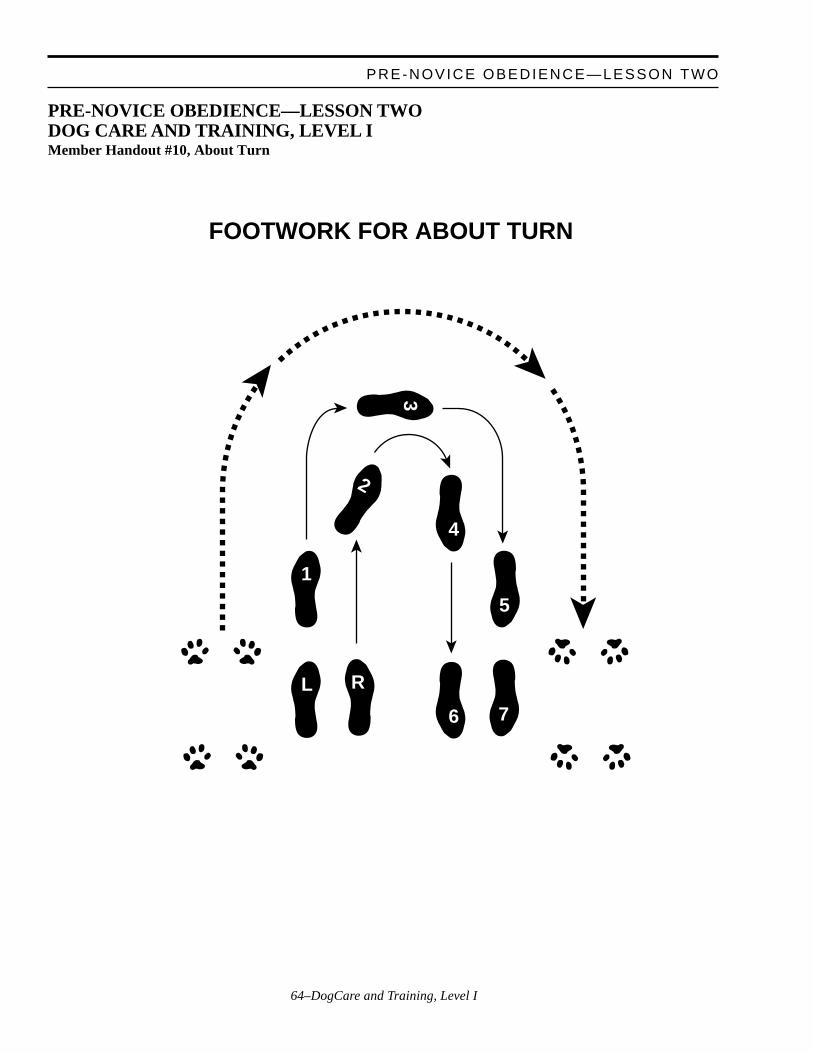
64–DogCare and Training, Level I
PRE-NOVICE OBEDIENCE—LESSON TWODOG CARE AND TRAINING, LEVEL IMember Handout #10, About Turn
L
1
5
3
R
76
4
2
FOOTWORK FOR ABOUT TURN
PRE-NOVICE OBEDIENCE—LESSON TWO
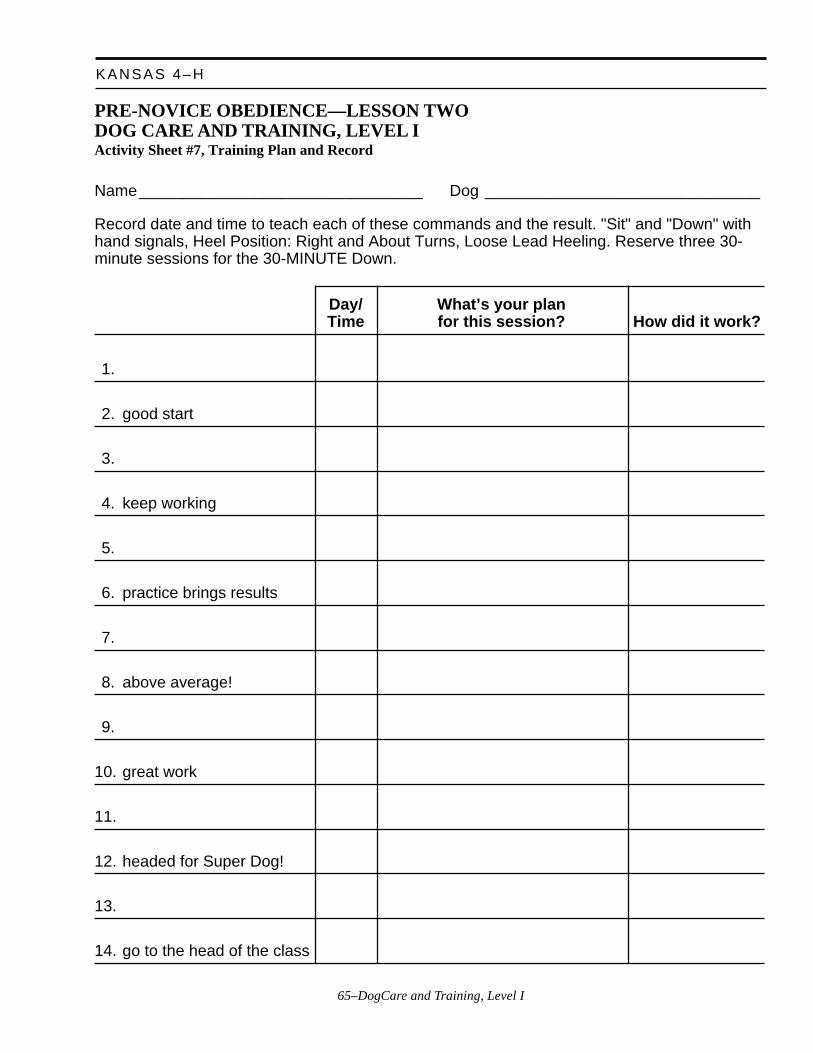
65–DogCare and Training, Level I
KANSAS 4–H
PRE-NOVICE OBEDIENCE—LESSON TWODOG CARE AND TRAINING, LEVEL IActivity Sheet #7, Training Plan and Record
Name________________________________ Dog _______________________________
Record date and time to teach each of these commands and the result. "Sit" and "Down" withhand signals, Heel Position: Right and About Turns, Loose Lead Heeling. Reserve three 30-minute sessions for the 30-MINUTE Down.
Day/ What’s your planTime for this session? How did it work?
1.
2. good start
3.
4. keep working
5.
6. practice brings results
7.
8. above average!
9.
10. great work
11.
12. headed for Super Dog!
13.
14. go to the head of the class
66–DogCare and Training, Level I
PRE-NOVICE OBEDIENCE—LESSON TWO
PRE-NOVICE OBEDIENCE—LESSON TWODOG CARE AND TRAINING, LEVEL IActivity Sheet #7, Training Plan and Record (Con't.)Practice at home is what brings success!
Location:• A familiar place in or near your home, quiet and
free of distractions.
Training Tools:• Treats, training collar, leash, your dog
ACTIVITY TIME NEEDED: 5–10 MINUTESAT LEAST 10 TIMES THIS WEEK
Commands: “SIT,” “DOWN,” “FREE”and “HEEL”
1. Do give a command only once—then place yourdog into position. Teach your dog that thecommand is “SIT”—not “SIT, SIT, SIT.”
2. Do not use your dog’s name with the commands“SIT” or “DOWN” (and later “STAND” and“STAY”). Using its name is a signal to move.
3. Do use your dog’s name when you say “HEEL.”Your instruction sheet will say “ROVER,HEEL.” Use your dog’s name in place ofRover’s.
4. Do expect your dog to continue to obey yourcommand until you give another command. Ifyou say “SIT” your dog should remain sittinguntil you give another command such as“DOWN” or “HEEL.” If you are done therelease command to give is “FREE.”
5. Do not give a command unless you are ready tomake your dog follow it. Never let the dogignore a command.
6. Do Remember to Praise your dog when it isdoing well—don’t pet.
SIT and DOWNGoal: Your dog will Sit and Down on your com-mand when following a lure. Practice three sets ofDown/Sit using a command and hand signal (with atreat). Praise, then give your dog a treat every time.
DOWN1. Leash under your knees or feet, dog is sitting.
Put your left hand on dog’s shoulders, right handhas a treat. Get your dog’s attention on the treat,hold it at your dog’s eye level.
2. Command “DOWN” as you bring your righthand with the treat straight down in front of yourdog and then out in an “L” shape.
3. As your dog follows the hand with the treat itwill lie down. (Use your left hand to prevent thedog from walking towards the treat.)
4. Praise and give the treat when it is down com-pletely—elbows, too!
SIT5. When your dog is in a DOWN position hold the
collar at the back of the neck with your left hand.
6. Have a treat in your right hand, just in front ofyour dog’s face.
7. Command “SIT” as you move the treat towardyour dog and up so it will have to sit to followthe treat.
8. When your dog is sitting Praise and give it thetreat.
HeelingHEEL POSITIONGoal: your dog will remain in Heel Position whenyou make a right or about turn in place.
Heel Position means that your dog is straight in linewith the direction you are facing, on your left side,and that the area from your dog’s head to shoulder isin line with the your left hip.
HEEL POSITION—RIGHT TURN:PRACTICE FOUR RIGHT TURNSBegin with your dog sitting at Heel Position, holdingthe leash in control position.
67–DogCare and Training, Level I
KANSAS 4–H
1. Take a large step to the right with your right legonly, placing your right foot at right angles toyour left foot. Your dog should not move.
2. “ROVER, HEEL.” Step to the right with yourleft leg, right leg, close with left leg. If yourleash is in control position your dog will turn andmove with you. Praise when it does!
3. Command “SIT” and tuck your dog into a Sit.Praise for the Sit, Release “FREE” while yourdog is still sitting.
HEEL POSITION—ABOUT TURN:PRACTICE TWO ABOUT TURNSBegin with dog sitting at Heel Position, holding theleash in control position.
1. “ROVER, HEEL.”
2. Beginning with your left foot take two stepsforward , Praise for walking with you.
3. Turn 180 degrees away from your dog and taketwo steps back to your starting point.
4. Command “SIT” and tuck your dog into a Sit.Praise for the Sit, Release “FREE” while yourdog is still sitting.
HEELING—LOOSE LEAD: PRACTICETHREE TIMESGoal: Heel with a loose lead for 10 steps.
1. Begin with your dog sitting in Heel Position.
2. Put the leash over your right shoulder. Only touchthe leash to move dog back to Heel Position.Pretend that the leash is too hot to hold on to.
3. Command, “ROVER, HEEL.” Step out withyour left foot and walk forward. Pat your leg toencourage your dog to stay in place. Work tokeep your dog’s attention on you. Move quickly.
4. When your dog moves out of Heel Position firstcall its name to get its attention and pat your leg
to show it where to be. If this is not effectivegrab the leash with your left hand, make surethere is some slack in it, and give it a quick“pop” to move your dog back into position. Letgo of the leash immediately and Praise your dogfor being in proper position.
ABOUT TURN5. Call your dog’s name and grasp the leash.
6. Turn away from your dog and continue movingin the opposite direction.
HALT7. Stop. “SIT”—tuck your dog into a Sit. Praise.
Long Down for 30 MinutesGoal: To teach your dog that you are the boss. Thismust be practiced. It is the key to control. Practicethis in an area without distractions. It is not playtimefor your dog but you may watch TV or read whileyou are practicing this.
1. Sit on the floor beside your dog. Command“DOWN” and place your dog in the down posi-tion.
2. Replace your dog each time it BEGINS to getup. Each time you replace your dog, Praise.
3. Avoid petting your dog. Keep your hands off ofyour dog if possible.
4. At the end of the 30 minutes, RELEASE andplay with your dog for a few minutes.
5. Repeat this lesson three times this week.
Don’t get upset during this exercise. The more youhave to replace your dog, the more you need to dothis exercise. If you have to replace your dog 100 times,replace it 100 times with the same tone of voice.Once your dog realizes that you are not going to giveup, it will begin to accept the fact that you are theboss You should see some improvement each timeyou do this exercise throughout the next few weeks.
68–DogCare and Training, Level I
PRE-NOVICE OBEDIENCE—LESSON TWO
69–DogCare and Training, Level I
KANSAS 4–H
Your Best FriendDog Care and Training, Level I
What Members Will Learn . . .
ABOUT THE PROJECT:• Evaluating a dog’s Behavior
ABOUT THEMSELVES:• Building Relationships with others
Materials Needed:• Activity Sheet #8, Dog Behavior Chart• Activity Sheet #9, Dog Owner Behavior chart
ACTIVITY TIME NEEDED: 30 MINUTES
ACTIVITY
What is it about dogs that makes them important to you? Think about adog that is special to you—your own or someone else’s.
Complete the Behavior Chart for this dog. What are some other ways adog can show it likes you?
What are some ways an owner can show a dog that it is wanted and liked?
What three words would you use to describe the feelings you have aboutthis dog?
Leader Notes
You may need behavoir charts for more
than one dog for each member. Pass out
Activity Sheet #8, Dog Behavior Chart.
Pass out Activity Sheet #9, Dog Owner
Behavior Chart.
Have members bring behavior activity
sheets to next meeting to show and
discuss.
70–DogCare and Training, Level I
DIALOGUE FOR CRITICAL THINKING:Share:
1. Why do you like dogs?
2. Why is having a dog important to you?
3. Describe the dog’s behavior.
Process:4. Why are dogs so easy to like?
5. What makes a dog a good friend?
Generalize:6. What are two ways a friend or family member helps you and shows
you that he or she cares for you?
Apply:7. How can you be a better friend?
GOING FURTHER:1. Make a display of pictures of dogs relating to people.
2. Write a story about a time a dog made you feel better.
RESOURCES:“Wiggles ‘n’ Wags”: Dog 1. 4-H Skills for Life Animal Science Series.
North Central Region Extension Publication 415-1993. c1993. pp. 8-9
Authors:Chris Odell, Obedience and Agility Instructor, Hutchinson, KS, Kennel
ClubJames P. Adams, Specialist, 4–H and Youth Programs, K-State Research
and Extension
Reviewed by:Dog Care and Training Design Team
ACTIVITYLeader Notes
YOUR BEST FRIEND
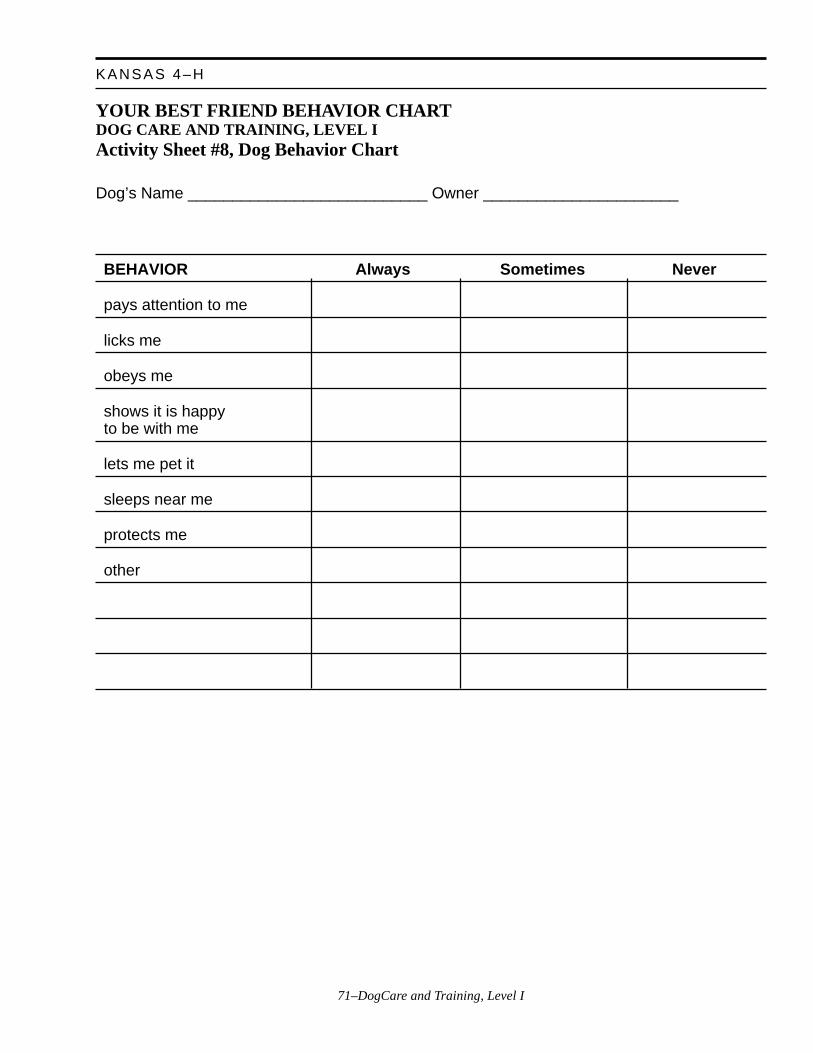
71–DogCare and Training, Level I
KANSAS 4–H
YOUR BEST FRIEND BEHAVIOR CHARTDOG CARE AND TRAINING, LEVEL IActivity Sheet #8, Dog Behavior Chart
Dog’s Name ___________________________ Owner ______________________
BEHAVIOR Always Sometimes Never
pays attention to me
licks me
obeys me
shows it is happyto be with me
lets me pet it
sleeps near me
protects me
other
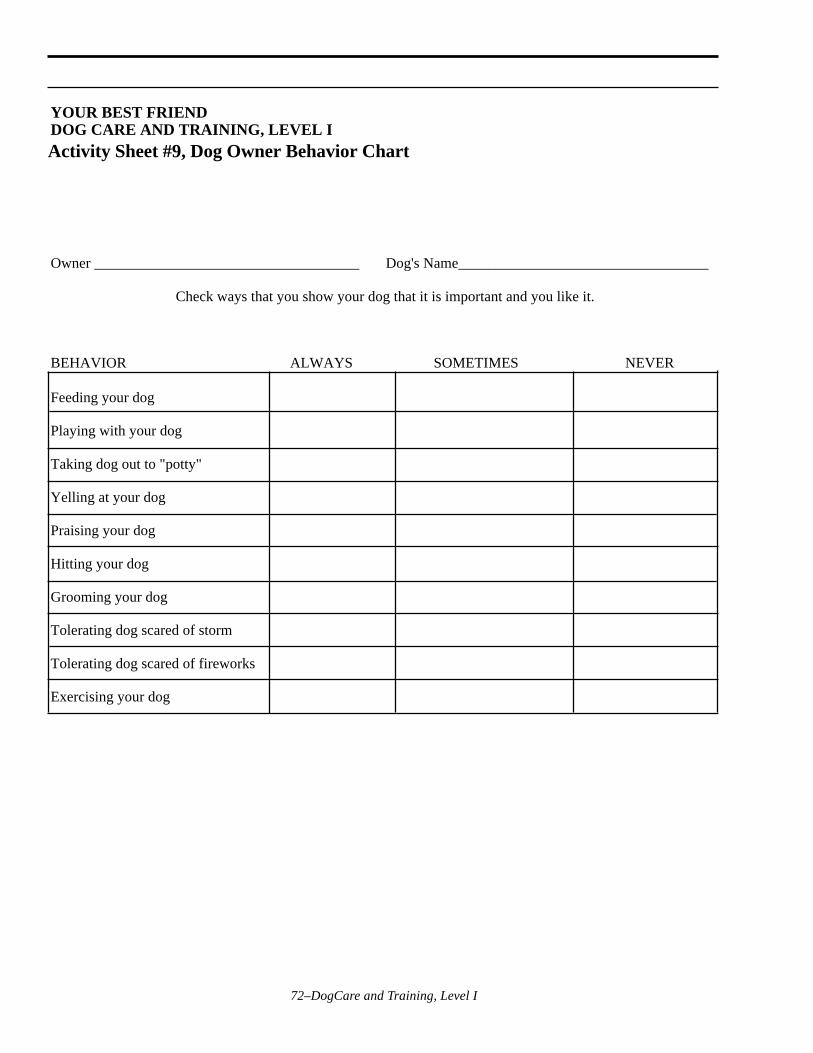
72–DogCare and Training, Level I
YOUR BEST FRIENDDOG CARE AND TRAINING, LEVEL IActivity Sheet #9, Dog Owner Behavior Chart
Owner ____________________________________ Dog's Name__________________________________
Check ways that you show your dog that it is important and you like it.
BEHAVIOR ALWAYS SOMETIMES NEVER
Feeding your dog
Playing with your dog
Taking dog out to "potty"
Yelling at your dog
Praising your dog
Hitting your dog
Grooming your dog
Tolerating dog scared of storm
Tolerating dog scared of fireworks
Exercising your dog
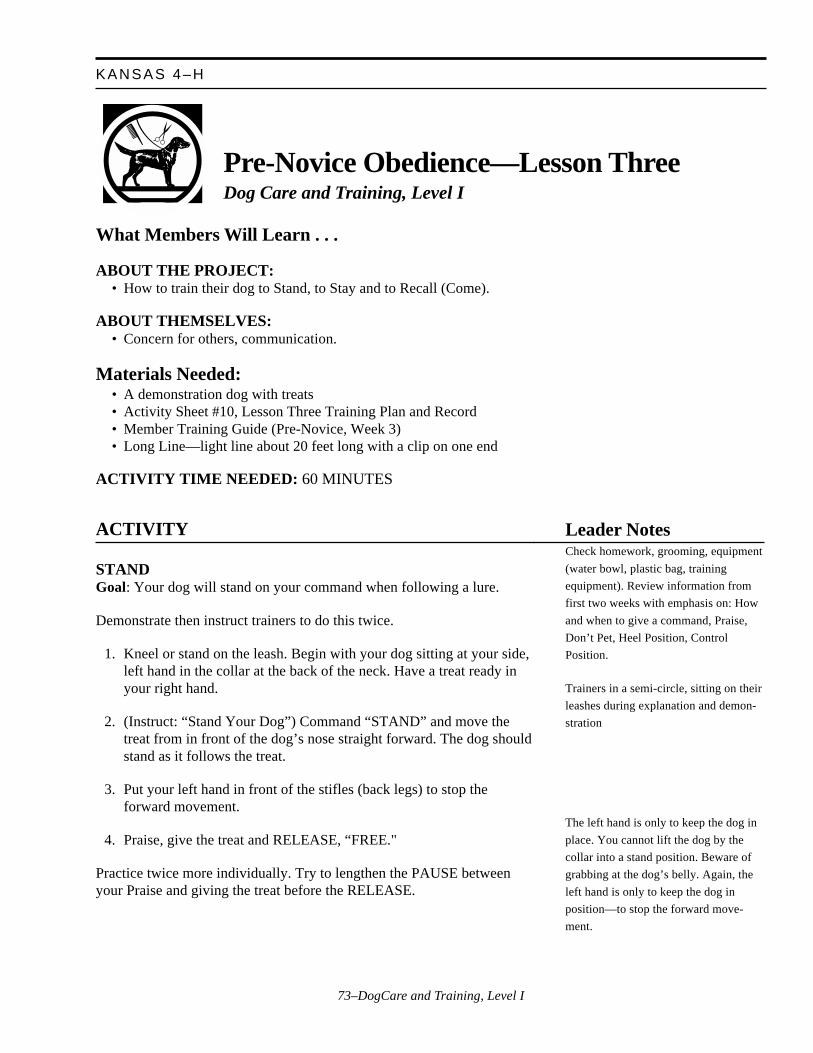
73–DogCare and Training, Level I
KANSAS 4–H
Pre-Novice Obedience—Lesson ThreeDog Care and Training, Level I
What Members Will Learn . . .
ABOUT THE PROJECT:• How to train their dog to Stand, to Stay and to Recall (Come).
ABOUT THEMSELVES:• Concern for others, communication.
Materials Needed:• A demonstration dog with treats• Activity Sheet #10, Lesson Three Training Plan and Record• Member Training Guide (Pre-Novice, Week 3)• Long Line—light line about 20 feet long with a clip on one end
ACTIVITY TIME NEEDED: 60 MINUTES
ACTIVITY
STANDGoal: Your dog will stand on your command when following a lure.
Demonstrate then instruct trainers to do this twice.
1. Kneel or stand on the leash. Begin with your dog sitting at your side,left hand in the collar at the back of the neck. Have a treat ready inyour right hand.
2. (Instruct: “Stand Your Dog”) Command “STAND” and move thetreat from in front of the dog’s nose straight forward. The dog shouldstand as it follows the treat.
3. Put your left hand in front of the stifles (back legs) to stop theforward movement.
4. Praise, give the treat and RELEASE, “FREE."
Practice twice more individually. Try to lengthen the PAUSE betweenyour Praise and giving the treat before the RELEASE.
Leader NotesCheck homework, grooming, equipment
(water bowl, plastic bag, training
equipment). Review information from
first two weeks with emphasis on: How
and when to give a command, Praise,
Don’t Pet, Heel Position, Control
Position.
Trainers in a semi-circle, sitting on their
leashes during explanation and demon-
stration
The left hand is only to keep the dog in
place. You cannot lift the dog by the
collar into a stand position. Beware of
grabbing at the dog’s belly. Again, the
left hand is only to keep the dog in
position—to stop the forward move-
ment.
74–DogCare and Training, Level I
SIT AND DOWNGoal: Your dog will Sit and Down on your command/ hand signal whilefollowing a lure and with you in front of him.
Demonstrate then instruct trainers in doing three sets of Sit and Down.
DOWN1. Begin with your dog sitting. Hold its collar with your left hand under
the chin. Kneel in front of your dog.
2. Hold the treat in your right hand in front of your dog’s nose.
3. (Instruct: “Down Your Dog”) Command “DOWN” move the treatdown and gently pull down with your left hand on the collar.
4. Praise, give treat.
SIT5. Begin with your dog down. Hold the collar with your left hand at the
back of the neck. Kneel in front of your dog.
6. Hold the treat in your right hand in front of its nose.
7. (Instruct: “Sit Your Dog”) Command “SIT,” move the treat up andgently pull up with your left hand on the collar.
8. Praise and give treat.
SIT-STAYGoal: Your dog will Sit and Stay for one minute while you are standingdirectly in front of it.
Today we will be teaching the command “STAY.” This means don’tmove from this position. If your dog is sitting it must remain sitting. Donot use your dog’s name with this command but you will always be ableto say “STAY” plus give a hand signal so we’ll learn and practice themtogether.
DEMONSTRATE: Then lead the trainers in practicing this twice.
1. Your dog should be in Heel Position. Hold the leash in your lefthand, a little above the snap, at the back of the dog’s neck. The leashshould be directly above the dog’s head with slight tension.
2. (Instruct: “Leave Your Dogs”) Give the Stay hand signal, right hand,palm flat, in front of the dog’s nose as you give the command“STAY.”
3. Step forward with your right foot. Turn and stand directly in front ofyour dog—toe to toe. Place both hands on the leash, if desired.
ACTIVITYLeader Notes
Be sure that the trainers are applying
collar pressure, even when the dog
doesn’t need it, because next week
you’ll eliminate the treats for this
exercise.
PRE-NOVICE OBEDIENCE—LESSON THREE
75–DogCare and Training, Level I
KANSAS 4–H
4. Do not hold the leash too tightly—you should not be holding the dogup.
5. After the dog has remained in this position for a short period (startfor 10 seconds and work up to 1 minute), pivot back to Heel Position.Wait 5 seconds, release the pressure on the leash, wait 5 seconds,Praise, RELEASE, “FREE.”
WHEN YOUR DOG BREAKS THE STAY (STANDS UP,LAYS DOWN, ETC.)
6. Keep your eyes on your dog and replace it as soon as it begins tomove.
Remember, it is still learning.
7. If the dog is already standing or laying down you must return to HeelPosition and replace them into the sit .
8. As soon as the dog is sitting again, Praise for the Sit and Command“STAY.”
SIT FOR EXAMINATIONGoal: Your dog will sit beside you when someone comes to pet it.
Sit for examination is a safety exercise. It is what you should have yourdog do when someone comes to pet it. You should never pet a strange dogwithout asking permission, but many people, especially little children,don’t follow that rule. This exercise allows you to tell your dog what todo and that it is all right for this person to pet it.
DEMONSTRATE then lead the trainers in practice.
1. Begin with dog in Heel Position. Hold leash in left hand at the backof the dog’s neck.
2. An examiner will come up to you and ask “May I pet your dog?”
3. Tell them “Yes” and signal and command “STAY.”
4. The examiner will pet your dog. Your dog should not stand up, jumpup, or try to get away. Replace it into theSit if it moves. If it acceptsthe petting, PRAISE, PAUSE, RELEASE,, “FREE”!
Outside of this class you do not have to let people pet your dog. You canpolitely tell people no.
Leader Notes
Most dogs will drop their head when
moving out of the Sit into the Down or
Stand, so correct if you see the dog start
to drop it’s head. The correction is the
same as discussed last week for heeling:
let some slack into the leash, give a
quick “pop” in the direction you want
the dog’s head to move—in this case,
up—release the tension, and Praise the
dog for now being in the desired
position.
The adult doing the petting should ask
each trainer, “May I pet your dog.” This
is the cue for the trainer to prepare their
dog to accept being petted. This week
the “petting” (or examination) need only
be a touch on the head. Beware of dogs
that act shy and do not push them into
acceptance of petting. Work with them
in small steps beginning with sniffing
you or even with you just standing near
them to build their confidence. In later
lessons the trainers will learn a Stand for
Examination which they will perform in
Obedience and Showmanship ( a
modified version) Competitions.
ACTIVITY:
76–DogCare and Training, Level I
Heeling
HEEL POSITION—RIGHT TURN AND ABOUT TURNDEMONSTRATE (with back to the class)
RIGHT TURNREVIEW of the lesson from Week 2. Lead the trainers in making 4 RightTurns. Then explain the next progression and lead the class in making 4more Right Turns.
1. Begin with your dog in Heel Position, your leash in Control Position.
2. (Instruct: “Ready for Right”) Take a small step to the right with yourright foot, pointing that foot to the right. Your dog should not move.
3. (Instruct: “Right Turn”) “ROVER, HEEL” Step with your left foot,bringing it next to the right and stop.
4. Command “SIT” and tuck your dog into a Sit. Praise for the Sit.
ABOUT TURNREVIEW the lesson from Week 2. Lead the trainers in making 2 AboutTurns as review.
Present next progression and lead the trainers in making 2 more AboutTurns.
5. Dog in Heel Position, leash in Control Position.
6. (Instruct: “About Turn”) Command “ROVER, HEEL.”
7. Take one step forward, turn, and take one more step forward.
8. Stop. Command “SIT” and tuck dog into Sit. Praise.
HEELING—LOOSE LEADPRACTICE Lesson from Week 2.
Begin with dogs sitting in Heel Position. Trainers have their leashes overtheir right shoulder. Only touch the leash to move dog back to HeelPosition.
1. (Instruct: “Forward”) Command, “ROVER, HEEL” Step out withleft foot and walk forward. Move quickly.
2. When the dog moves out of Heel Position grab the leash with yourleft hand and give it a quick “pop” to move the dog back into posi-tion. Let go of the leash immediately and praise the dog for being inproper position.
ACTIVITYLeader Notes
Your class should be in one or two
straight lines facing the same direction.
Have trainers in a circle, moving
clockwise. Dogs will be on the outside
of the circle. Have trainers heel about 20
steps before directing them to halt.
Repeat once.
PRE-NOVICE OBEDIENCE—LESSON THREE
77–DogCare and Training, Level I
KANSAS 4–H
3. (Instruct: “Halt”) Stop and “SIT” —tuck your dog into a Sit. Praise.
4. (Instruct: “Forward,” “About Turn,” “About Turn,” “Halt”—allow5—10 steps between each command.)
HEELING—AUTOMATIC SITGoal: When heeling, your dog will sit when you stop.
Demonstrate:
Begin with dog sitting in Heel Position. Hold leash in your right hand,with your right arm across your body.
1. (Instruct: “Forward”) Command “ROVER, HEEL” and walk straightahead.
2. (Instruct: “Halt”) Stop. Command “SIT.” “Pop” straight up on theleash with your right hand and tuck your dog into a Sit with your left.Praise.
3. Repeat once.
4. Repeat a third time and do not say “SIT.”
Recalls
COME-FOREDemonstration: Dog is in Heel Position, Leash is in Control Position.
1. (Instruct: “Forward”) Command “ROVER, HEEL.”
2. (Instruct: “Call Your Dog”) Let some slack into the leash. Begin towalk backwards.
3. Command “ROVER, COME.”
4. When your dog catches up to you stop and Praise.
RECALL FROM A STAY1. Heel your dog about 12 feet straight out from the line and turn and
face the space you left.
2. Sit the dog. Remove the lead. Instructor holds the collar.
3. Command and signal “STAY.”
4. Return to your place in line. Turn and face your dog.
5. Get down on your knees. Hold out your hands, palms up. Smile.
Leader Notes
Have the trainers moving in a clockwise
circle. Only have them heel about five
steps before they Halt. The first two
times they should command “SIT” once,
and then make their dog Sit. The third
time there is no command given for the
dog to Sit.
Trainers should be moving clockwise.
Allow about five steps of Heeling before
trainers call their dog. Watch that they
don’t trip over backward. Lead the
trainers in practicing this three times.
Have trainers line up along one side of
the training area. This is an off-lead
exercise. If your area is not escape-proof
attach a long line to the collar. You will
control this line.
ACTIVITY:
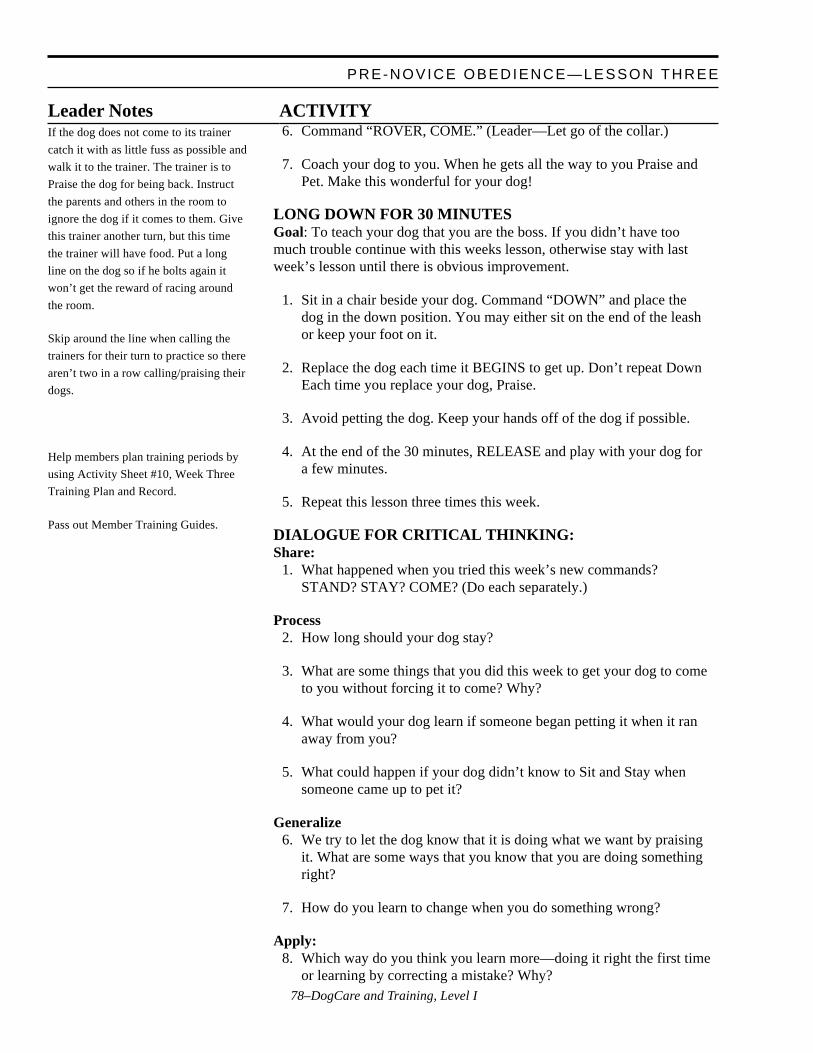
78–DogCare and Training, Level I
6. Command “ROVER, COME.” (Leader—Let go of the collar.)
7. Coach your dog to you. When he gets all the way to you Praise andPet. Make this wonderful for your dog!
LONG DOWN FOR 30 MINUTESGoal: To teach your dog that you are the boss. If you didn’t have toomuch trouble continue with this weeks lesson, otherwise stay with lastweek’s lesson until there is obvious improvement.
1. Sit in a chair beside your dog. Command “DOWN” and place thedog in the down position. You may either sit on the end of the leashor keep your foot on it.
2. Replace the dog each time it BEGINS to get up. Don’t repeat DownEach time you replace your dog, Praise.
3. Avoid petting the dog. Keep your hands off of the dog if possible.
4. At the end of the 30 minutes, RELEASE and play with your dog fora few minutes.
5. Repeat this lesson three times this week.
DIALOGUE FOR CRITICAL THINKING:Share:
1. What happened when you tried this week’s new commands?STAND? STAY? COME? (Do each separately.)
Process2. How long should your dog stay?
3. What are some things that you did this week to get your dog to cometo you without forcing it to come? Why?
4. What would your dog learn if someone began petting it when it ranaway from you?
5. What could happen if your dog didn’t know to Sit and Stay whensomeone came up to pet it?
Generalize6. We try to let the dog know that it is doing what we want by praising
it. What are some ways that you know that you are doing somethingright?
7. How do you learn to change when you do something wrong?
Apply:8. Which way do you think you learn more—doing it right the first time
or learning by correcting a mistake? Why?
PRE-NOVICE OBEDIENCE—LESSON THREE
ACTIVITYLeader NotesIf the dog does not come to its trainer
catch it with as little fuss as possible and
walk it to the trainer. The trainer is to
Praise the dog for being back. Instruct
the parents and others in the room to
ignore the dog if it comes to them. Give
this trainer another turn, but this time
the trainer will have food. Put a long
line on the dog so if he bolts again it
won’t get the reward of racing around
the room.
Skip around the line when calling the
trainers for their turn to practice so there
aren’t two in a row calling/praising their
dogs.
Help members plan training periods by
using Activity Sheet #10, Week Three
Training Plan and Record.
Pass out Member Training Guides.
79–DogCare and Training, Level I
KANSAS 4–H
Leader NotesACTIVITY:
GOING FURTHER:1. Study positive use of errors.
2. Observe these commands at a show.
REFERENCES:Authors:Chris Odell, Obedience and Agility Instructor, Hutchinson, KS, Kennel
ClubJames P. Adams, Specialist, 4–H and Youth Programs, K-State Research
and Extension
Reviewed by:Dog Care and Training Design Team
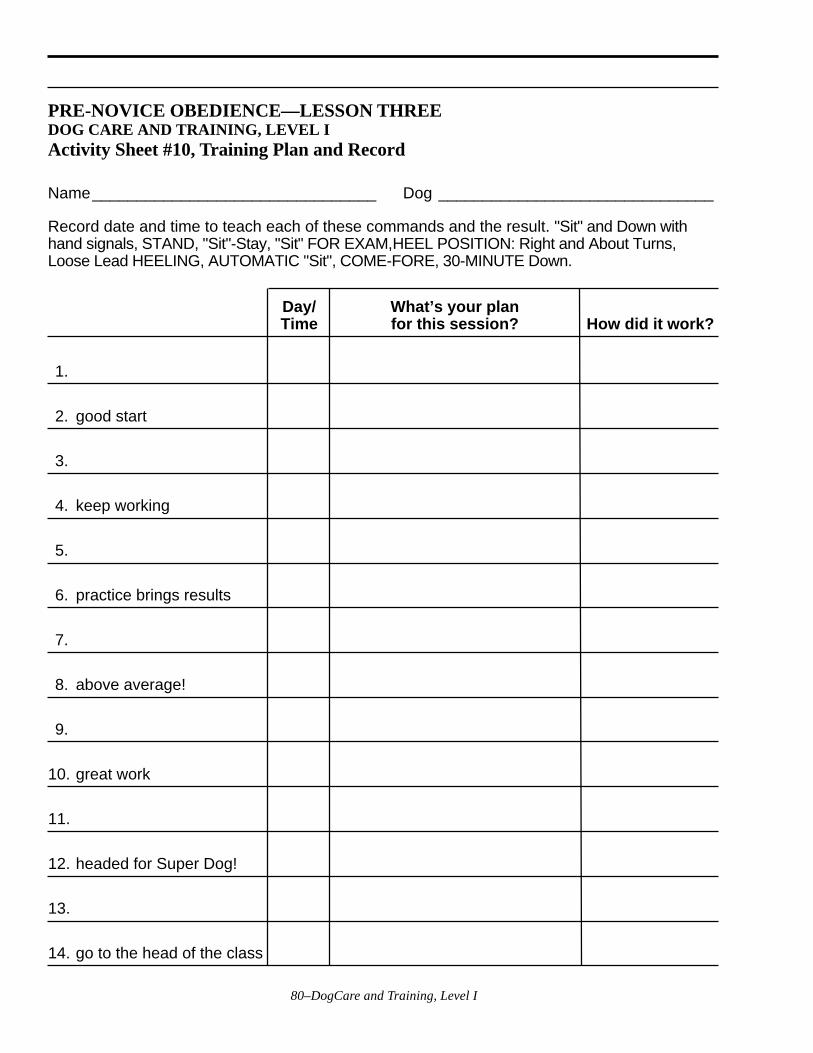
80–DogCare and Training, Level I
PRE-NOVICE OBEDIENCE—LESSON THREEDOG CARE AND TRAINING, LEVEL IActivity Sheet #10, Training Plan and Record
Name________________________________ Dog _______________________________
Record date and time to teach each of these commands and the result. "Sit" and Down withhand signals, STAND, "Sit"-Stay, "Sit" FOR EXAM,HEEL POSITION: Right and About Turns,Loose Lead HEELING, AUTOMATIC "Sit", COME-FORE, 30-MINUTE Down.
Day/ What’s your planTime for this session? How did it work?
1.
2. good start
3.
4. keep working
5.
6. practice brings results
7.
8. above average!
9.
10. great work
11.
12. headed for Super Dog!
13.
14. go to the head of the class
81–DogCare and Training, Level I
KANSAS 4–H PRE-NOVICE OBEDIENCE—LESSON THREE
Training Tools:• Treats• Training collar• Leash• Your dog• A helper to examine your dog
ACTIVITY TIME NEEDED: 30 MINUTESTHREE TIMES THIS WEEK, 5-10 MINUTESAT LEAST SEVEN TIMES THIS WEEK
COMMANDS: “SIT.” “DOWN.” “STAND.”“STAY.” “HEEL.” “COME. “FREE.”
SIT/DOWN/STAND/STAYREVIEW SIT and DOWN with a lure (from LessonTwo)
STANDGoal: Your dog will stand on your command whenfollowing a lure.
1. Kneel or stand on the leash. Begin with your dogsitting at your side, left hand in the collar at theback of the neck. Have a treat ready in your righthand.
2. Command “STAND” and move the treat from infront of your dog’s nose straight forward. yourdog should stand as it follows the treat.
3. Put your left hand in front of the stifles (backlegs) to stop the forward movement.
4. Praise, give the treat and RELEASE, “FREE.”
Try to lengthen the pauses between Praise, giving thetreat and the RELEASE.
SIT AND DOWNGoal: Your dog will Sit and Down on your com-mand/ hand signal while following a lure and withyou in front of it.
PRE-NOVICE OBEDIENCE—LESSON THREEDOG CARE AND TRAINING, LEVEL IMember Training Guide
DOWN1. Begin with your dog sitting. Hold the collar with
your left hand under the chin. Kneel in front ofyour dog.
2. Hold the treat in your right hand in front of yourdog’s nose.
3. Command “DOWN,” move the treat down andgently pull down with your left hand on thecollar.
4. Praise, give treat.
SIT5. Begin with your dog down. Hold the collar with
your left hand at the back of the neck. Kneel infront of your dog.
6. Hold the treat in your right hand in front of itsnose.
7. Command “SIT,” move the treat up and gentlypull up with your left hand on the collar.
8. Praise and give treat.
SIT-STAYGoal: Your dog will Sit and Stay for one minutewhile you are standing directly in front of it.
1. Your dog should be in Heel Position. Hold theleash in your left hand, a little above the snap, atthe back of your dog’s neck. The leash should bedirectly above your dog’s head with slighttension.
2. Give the Stay hand signal, right hand, palm flat,in front of your dog’s nose as you give thecommand “STAY.”
3. Step forward with your right foot. Turn andstand directly in front of your dog—toes to toes.Place both hands on the leash, if desired.
4. Do not hold the leash too tightly—you shouldnot be holding your dog up.
82–DogCare and Training, Level I
5. After your dog has remained in this position for ashort period (start for 10 seconds and work up to 1minute during the week, pivot back to Heel Position.
6. Wait 5 seconds, relax the leash, wait 5 seconds,PRAISE, RELEASE, “FREE.”
WHEN YOUR DOG BREAKS THE STAY(STANDS UP, LAYS DOWN, ETC.)
7. Keep your eyes on your dog and replace it as soon asit begins to move.
Remember, it is still learning.
8. If your dog is already standing or laying down youmust return to Heel Position and replace them intothe Sit.
9. As soon as your dog is sitting again, Praise for theSit and Command “STAY.”
SIT FOR EXAMINATIONGoal: Your dog will sit beside you when someone comesto pet it.
1. Begin with dog in Heel Position. Hold leash in lefthand at the back of your dog’s neck.
2. An examiner will come up to you and ask “May I petyour dog"?
3. Tell them “Yes” and signal and command “STAY.”
4. The examiner will pet your dog. Your dog shouldnot stand up, jump up, or try to get away. Replace itinto the Sit if it moves. If it accepts the petting,PRAISE, PAUSE, RELEASE, “FREE”!
Heeling
HEEL POSITION—RIGHT TURN ANDABOUT TURN
RIGHT TURNREVIEW of the lesson from Week 2. Make 4 RightTurns.
1. Begin with your dog in Heel Position, your leashin Control Position.
2. Take a small step to the right with your rightfoot, pointing that foot to the right. Your dogshould not move.
3. “ROVER, HEEL” Step with your left foot,bringing it next to the right and stop.
4. Command “SIT” and tuck your dog into a Sit.Praise for the Sit.
ABOUT TURNREVIEW the lesson from Week 2.
5. Dog in Heel Position, leash in Control Position.
6. Command “ROVER, HEEL.”
7. Take one step forward, turn, and take one morestep forward.
8. Stop. Command “SIT,” and tuck dog into Sit. Praise.
HEELING—LOOSE LEADPRACTICE Lesson from Week 2.
Begin with dog sitting in Heel Position with yourleash over right shoulder. Only touch the leash tomove dog back to heel position.
1. Command, “ROVER, HEEL” Step out with leftfoot and walk forward. Move quickly.
2. When your dog moves out of Heel Position grabthe leash with your left hand and give it a quick“pop” to move your dog back into position. Letgo of the leash immediately and Praise your dogfor being in proper position.
3. Stop and Sit—tuck your dog into a Sit. Praise.
83–DogCare and Training, Level I
KANSAS 4–H PRE-NOVICE OBEDIENCE—LESSON THREE
HEELING—AUTOMATIC SITGoal: When heeling, your dog will Sit when youstop.
Begin with dog sitting in Heel Position. Hold leash inyour right hand, with your right arm across yourbody.
1. Command “ROVER, HEEL” and walk straightahead.
2. Stop. Command “SIT.” “Pop” straight up on theleash with your right hand and tuck your doginto a sit with your left. Praise.
3. Repeat once.
4. Repeat a third time and do not say “SIT.”
Recalls
COME-FOREDog is in Heel Position, Leash is in Control Position.
1. Command “ROVER, HEEL”
2. Let some slack into the leash. Begin to walkbackwards.
3. Command “ROVER, COME.”
4. When your dog catches up to you stop andPraise.
LONG DOWN FOR 30 MINUTESGoal: To teach your dog that you are the boss. If youdidn’t have too much trouble continue with thisweeks lesson, otherwise stay with last week’s lessonuntil there is obvious improvement.
1. Sit in a chair beside your dog. Command“DOWN” and place your dog in the Downposition. You may either sit on the end of theleash or keep your foot on it.
2. Replace your dog each time it BEGINS to getup. Don’t repeat “DOWN.” Each time youreplace your dog, Praise.
3. Avoid petting your dog. Keep your hands off ofyour dog if possible.
4. At the end of the 30 minutes, RELEASE andplay with your dog for a few minutes.
5. Repeat this lesson three times this week.

84–DogCare and Training, Level I
85–DogCare and Training, Level I
KANSAS 4–H
Feeding Your DogDog Care and Training, Level I
What Members Will Learn . . .
ABOUT THE PROJECT:• How to feed a dog
ABOUT THEMSELVES:• The importance of responsibility
Materials Needed:• Samples of food
• Dry (kibble) in one or more sizes• Canned• Semi-moist
• Three bowls• Can opener• Measuring cup, teaspoon• Samples of good and bad choices of training treats• Dry dog food and human cereal box ingredient labels• Activity Sheet #11, Food Label Quiz
ACTIVITY TIME NEEDED: 30 MINUTES
ACTIVITY
Since our dogs can’t run to the grocery store and purchase their own foodit is up to us to choose what they will eat. You should consider thesethings about the food you give your dog:
1. Is it healthy?
2. Does it taste good?
3. What does it cost?
4. Age of dog (puppy, mature, old).
5. Dog breed and appropriate weight.
We basically have three types of food to choose from:
CANNED FOOD is the most expensive, but it is also the most palatable(tastes the best to dogs). It has no preservatives but it will spoil if left
Leader Notes
Note: Have members weigh their dog
and bring that weight to this lesson.
Types of food: Show the types of food
as you present the information.
After you present the information have
members determine the suggested
amount to feed a dog weighing ___
pounds and then measure out that
amount into one of the bowls. Check
before the lesson to determine a dog’s
weight to use that would be fed one can
or less of food so you’ll have enough for
this activity. The members may struggle
with the can opener and they might
consider that to be a disadvantage of
canned food.

86–DogCare and Training, Level I
sitting out. It is the messiest to feed. Since it is very soft it is the easiestfor a dog with bad or no teeth to eat. The high water content may causefeces to be very soft.
SEMI-MOIST FOOD is moderately priced and is average in palatability.It does have preservatives but can be left unrefridgerated. It is not verymessy and is easy to chew. Because of the high salt content it is importantthat the dog has access to plenty of fresh water.
DRY FOOD (kibble) is the least expensive food and is average in palat-ability. It does have preservatives, but can spoil if left out in humidweather. It is important that your dog has plenty of fresh water to drinksince it will not get much moisture in the food. Many people feel thatcrunching the kibble helps keep the dog’s teeth clean but this has not beenproven. It does exercise the chewing muscles. Kibble is made in manydifferent sizes.
What kind of food do you feed your dog?
When you choose your dog’s first food it is a good idea to keep feedingthe same food as it had before you got it. If you decide to change foods doit gradually. Some dogs do not adjust to changes in food very well. On thefirst feeding add just a little of the new food to the old brand. Continuefeeding more of the new and less of the old until you have switchedcompletely. Try to keep your dog eating the same food all of the time.Watch how the food seems to affect your dog. If its energy level is notright, if the skin is dry or the coat dull or if the stools are very hard orvery soft then it could be time for a change in the food. Ask your veteri-narian or breeder for a recommendation.
HOW MUCH TO FEED?Most foods recommend a certain amount to feed your dog determined byhow much your dog weighs. Can you find that information on thesepackages? What is your dog's weight in pounds? How much do thesepackages indicate we should feed of each kind? Measure that amount intoone of these bowls so we can compare. Of course, these amounts are justsuggestions to begin with. Your dog may need more or less but we canuse these amounts for comparison.
With these foods, which do you need the most of to feed your dog? Howmight this be a problem?
Although we found the “recommended” amount of food to feed a dogaccording to its weight, many dogs will require a different amount. Somedogs are termed “easy keepers” which implies that they don’t eat a lot,while others are so active that they seem to eat a great deal. One way totell if your dog is getting enough food is to check the body. With mostbreeds, when they are at a proper body weight you should be able to feeltheir ribs without “digging around” but not be able to see them. You can
ACTIVITYLeader Notes
Give each group of two to three
members a dry dog food label and a
human cereal box label. Use Activity
Sheet #6, Food Label Quiz, to compare
ingredient amounts, then discuss.
FEEDING YOUR DOG
87–DogCare and Training, Level I
KANSAS 4–H
also do the 15 minute check. Give the dog its food. After 15 minutes pickup and measure what is left. At the next feeding give it that much less. Ifit eats it all in 15 minutes and acts constantly hungry you may need toincrease the amount of food you give. There are some dogs, however, thatseem to be “bottomless pits”—always hungry. Do not increase theamount you feed them too rapidly or else they may become too heavy.
Feeding puppies (under 6 months) requires special care. If they becomefat their bones may not be able to adequately carry the extra weight. Notgetting enough to eat may cause poor growth. Check the body conditionof a puppy every week and adjust the amount you feed accordingly.
HOW SHOULD YOU FEED YOUR DOG?FREE CHOICE FEEDINGWith this method you would keep food out all of the time for your dog toeat when it wants and as much as it wants.
Advantages:• the least amount of work
Disadvantages:• dog may overeat• you can’t tell if a dog is not eating• other animals (pets, birds, insects, squirrels) may eat the food• the food may spoil• housetraining will be more difficult• may encourage picky eating
TIME RESTRICTED FEEDINGWith this method unlimited food is given to the dog for a limited amountof time, usually 10 to 15 minutes, usually twice a day.
Advantages:• May put less stress on the digestive system• You can tell if a dog isn’t eating• May make housebreaking easier• Dog will look to you as a source of food• Discourages picky eaters
Disadvantages:• May lead to eating more• You must be available to feed your dog
MEAL RESTRICTED FEEDINGWith this method the dog is given a measured amount of food.
Advantages:• If you have one dog and if other animals can’t get into the food you
know if your dog is eating and how much it eats
ACTIVITY Leader Notes
Puppies should gain 1–2 grams per day
per pound of anticipated adult weight.
Puppies need more calories and
nutrients than adult dogs. Divide their
day’s food into 3–4 feedings. They will
not be able to eat enough at one time to
meet their needs.
88–DogCare and Training, Level I
Disadvantages:• May encourage picky eating• May make housebreaking more difficult
TIME-AND-MEAL-RESTRICTED FEEDINGA measured amount is offered for a limited time, usually 10 to 15 min-utes, twice a day.
Advantages:• You know exactly how much your dog is eating• Will make housebreaking easier• Discourages picky eaters• Your dog views you as the source of food
Disadvantages:You must be available to feed your dog
ALL FEEDING METHODSThrow out leftover food after each meal. Wash the bowl. Empty, wash,and refill the water bowl daily. Water bowls can become contaminatedby saliva and some dogs will not drink from them and become dehy-drated.
Which way do you feed your dog? Why?
SNACKSDo not let your dog train you to share your food with it. Dogs can learn tobe a great nuisance by begging for food. If you use treats in your trainingconsider them as part of your dog’s meal, not as extra food. It would nottake too much extra food to make your dog gain weight. Some ideas fortraining treats are small pieces of kibble, dry cereal, slices of low-salthotdog, bites of cooked liver or other meat or “string” cheese. A trainingtreat should be small and easily carried and given to the dog. Treats thatyou can buy at the grocery store for dogs are okay once in a while butthey are usually expensive and many are not nutritionally balanced.NEVER FEED YOUR DOG CHOCOLATE AS IT IS TOXIC (POISON)TO DOGS.
Look at this sampling of foods that might be chosen for training treats.Choose one and tell why it would or would not be a good choice for atraining treat.
DIALOGUE FOR CRITICAL THINKINGShare:
1. What are the types of food you can buy for dogs?
2. What type of food do you feed your dog? Why?
ACTIVITYLeader Notes
Set out a variety of training treats. Try
to have at least one choice per member.
Have some poor choices such as
chocolate, a large dog biscuit, and
something hard to handle such as potato
chips. Have the members answer in
terms of their own dog—a Labrador
Retriever needs a larger size treat than a
Pomeranian.
FEEDING YOUR DOG

89–DogCare and Training, Level I
KANSAS 4–H
Process:3. What is an example of a good training treat?
4. What did you learn about a feeding schedule?
Generalize:5. When do you get snacks?
6. What are some healthy snacks for you?
7. What are unhealthy treats for you?
Apply:8. What do you think your parents consider when planning meals for
the family?
GOING FURTHER:Go to the grocery store and look at labels of food. How much would youneed to feed your dog? How expensive is it? What is the main ingredient?
REFERENCES:The Complete Dog Book for Kids: Official Publication of the American
Kennel Club. Howell, 1996. pp. 222-3FAX from Sue Berryhill, Veterinary Affairs, Hill’s, 2-13-97
Authors:Chris Odell, Obedience and Agility Instructor, Hutchinson, KS, Kennel
ClubJames P. Adams, Specialist, 4–H and Youth Programs, K-State Research
and Extension
Reviewed by:Dog Care and Training Design Team
ACTIVITY Leader Notes
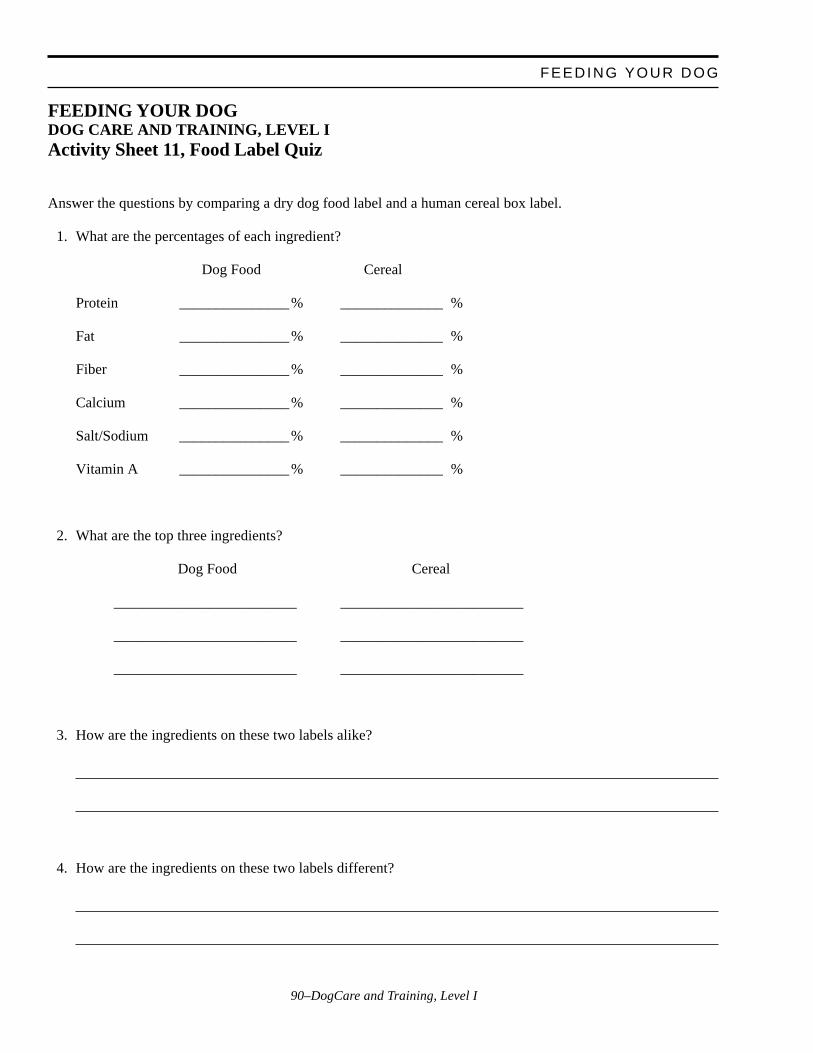
90–DogCare and Training, Level I
FEEDING YOUR DOG
FEEDING YOUR DOGDOG CARE AND TRAINING, LEVEL IActivity Sheet 11, Food Label Quiz
Answer the questions by comparing a dry dog food label and a human cereal box label.
1. What are the percentages of each ingredient?
Dog Food Cereal
Protein _______________ % ______________ %
Fat _______________ % ______________ %
Fiber _______________ % ______________ %
Calcium _______________ % ______________ %
Salt/Sodium _______________ % ______________ %
Vitamin A _______________ % ______________ %
2. What are the top three ingredients?
Dog Food Cereal
_________________________ _________________________
_________________________ _________________________
_________________________ _________________________
3. How are the ingredients on these two labels alike?
4. How are the ingredients on these two labels different?
91–DogCare and Training, Level I
KANSAS 4–H
Pre-Novice Obedience—Lesson FourDog Care and Training, Level I
What Members Will Learn . . .
ABOUT THE PROJECT:• Loose lead heeling cannot happen until the dog is paying attention
and the handler allows slack in the lead.
ABOUT THEMSELVES:• Mistakes are wonderful opportunities to learn.
Materials Needed:• A demonstration dog with treats• Member Handout #11, Loose Lead/Sit with Hand Signals• Activity Sheet #12, Lesson Four Training Plan and Record• Long Line—light line about 20 feet long with a clip on one end• Member Training Guide (Pre-Novice—Week Four)
ACTIVITY TIME NEEDED: 60 MINUTES
ACTIVITY
SIT/DOWN/STAND/STAY
SIT AND DOWN WITH HAND SIGNALSGoal: Your dog will begin to respond to your hand signal with voicecommand.
1. REVIEW Lesson #3, Sit and Down with member kneeling in front ofdog, left hand guiding with collar, right hand with treat.
2. Kneel in front of your dog again, left hand in collar.
3. (Instruct: “Down Your Dog”) Raise your right hand straight up,Command “DOWN” and swing your arm down as you apply pres-sure to the collar to move the dog down. Praise.
4. With your dog still down, stand up in front of it.
5. Hold the leash in your left hand. It should be without slack but nottight.
6. (Instruct: “Sit your Dog”) Command “SIT,” step toward your dogwith your right foot and hit the leash with the upswing of your righthand. Praise.
Leader NotesThe repetition and review of previous
lessons each week before adding new
command is essential to the training
process.
Provide Member Handout #11, Loose
Lead/Sit with Hand Signals
92–DogCare and Training, Level I
REPEAT steps 2–6.
STANDYour dog will stand and stay for 30 seconds while you stand beside it.
1. Stand on the leash. Begin with your dog sitting at your left side, lefthand in collar. Have a treat ready in your right hand.
2. (Instruct: “Stand Your Dog”) Command “STAND” and move thetreat from in front of your dog’s nose straight forward. The dogshould stand as it follows the treat.
3. Put your left hand in front of the stifles (knees) to stop forwardmovement.
4. Praise, give the treat.
5. Command and signal “STAY.”
6. Drop your left hand and stand up straight beside your dog.
7. Count to 10 (silently), Praise again, and RELEASE, “FREE.”
In your practice add more time until you can count to 30.
If your dog begins to sit put your left hand in front of the stifles again toremind it of the stand position. DO NOT lift it into position. If it sitscompletely go back to the start and stand it again.
SIT-STAYGoal: Your dog will Sit and Stay with mild distractions while you arestanding directly in front of it.
Begin with the rings of the collar at the back of the dog’s neck.
1. (Instruct: “Sit Your Dogs”) Command your dog to “SIT.”
2. (Instruct: “ Leave Your Dogs”) Command and signal your dog to“STAY.”
3. Step out briskly on your right foot, and pivot in front of your dog,toes to toes.
4. Introduce mild distractions. When your dog breaks, replace it andpraise when it is back in the proper position.
5. (Instruct: “Return to Your Dog”) Pivot back to your dog.
6. (Instruct: “Exercise Finished”) PAUSE, PRAISE, RELEASE.
ACTIVITYLeader Notes
The dog should be in the Sit position
from previous steps.
The purpose of distractions is to entice
the dog into making a mistake. The dog
that “goofs” and is corrected will learn
that Stay means Stay even if there is a
distraction. The dog that makes no
mistakes during this part of the lesson
has learned nothing. This is a very hard
concept for the trainers—they want their
dogs to be right—but it is learning by
trial-and-error on the dog’s part.
This session will use very mild distrac-
tions. Walk behind the dogs and/or stand
in the center and call “puppy, puppy,
puppy.” If the dog glances at the
distraction but returns its attention to the
trainer it should be quietly praised.
PRE-NOVICE OBEDIENCE—LESSON FOUR
93–DogCare and Training, Level I
KANSAS 4–H
SIT-STAYGoal: Your dog will Sit and Stay for one minute while you are 2-3 feet infront of it. The dog will remain sitting until you return to Heel Positionand release it.
Begin with the rings of the collar under the dog’s chin.
1. (Instruct: “Sit Your Dogs”) Command your dog to “SIT.”
2. (Instruct: “Leave Your Dogs”) Command and signal your dog to“STAY.”
3. Step out briskly on your right foot, and go 2-3 feet and turn and standdirectly in front of your dog.
4. The leash should be without slack, but not tight. When the dogattempts to get up, step toward the dog and snap up on the lead tocorrect. This correction is the same way we are using to teach the Sithand signal.
5. Face your dog and remain for 10 seconds. ( Work up to one minuteduring the week. If you reach the one-minute goal, begin to introducemild distractions.) Replace your dog when it breaks. Praise each timeyou replace your dog once it is again in the correct position.
6. (Instruct: “Return to your Dog”) Return to Heel Position by walkingquickly around behind your dog. If your dog gets up as you aremoving around, replace the dog.
7. (Instruct: Exercise Finished”) PAUSE, PRAISE, RELEASE,“FREE."
SIT FOR EXAMINATIONGoal: Your dog will sit beside you when someone comes to pet it.
1. Begin with dog in Heel Position. Hold leash in left hand at the backof the dog’s neck.
2. An examiner will come up to you and ask “May I pet your dog?”
3. Tell them “Yes” and signal and command “STAY.”
4. The examiner will pet your dog. Your dog should not stand up, jumpup, or try to get away. Replace it into the Sit if it moves. If it acceptsthe petting, PRAISE, PAUSE, RELEASE, “FREE.”
DOWN—STAYGoal: Your dog will remain in a Down-Stay for one minute while youstand in front of it.
Leader Notes
Stress stepping out briskly—beginning
trainers typically will tip-toe or back
away from their dog.
This week the “petting” (or examina-
tion) should be a touch on the head, a
touch on the shoulders, and a touch on
the lower back. Again, beware of dogs
that act shy and do not push them into
acceptance of petting. Work with them
in small steps beginning with sniffing
you or even with you just standing near
them to build their confidence. If
possible, have each dog examined by
two people.
ACTIVITY:
94–DogCare and Training, Level I
Begin with your dog sitting at your left side.
1. (Instruct: “Down Your Dog”) Command “DOWN” and place yourdog into a down position by guiding with the collar. You may wish touse food to lure the dog down. Praise quietly once the dog is Down.
2. Stand up straight beside the dog and hold the lead in your left hand.
3. (Instruct: “Leave Your Dog”) Place your right hand, palm flat, infront of the dog’s nose as you give the command, “STAY.”
4. Step forward on your right foot, turn and stand directly in front of thedog (toes to toes).
5. After you and your dog have remained in this position for a shortperiod (begin with 10 seconds and work up to one minute), pivotback to Heel Position.
6. PAUSE 5 seconds, PRAISE, and RELEASE, “FREE.”
WHEN YOUR DOG BREAKS THE STAYReplace the dog into the down position by pushing on its shoulders. Ifneeded, return to Heel Position and guide the dog down with the collar.When the dog is down praise verbally to let it know that it is now correct.
Heeling
HEEL POSITION—RIGHT TURN AND ABOUT TURN
RIGHT TURNREVIEW of the lesson from Week 3. Make 2 Right Turns. Then explainthe next progression and make 4 more Right Turns.
1. Begin with your dog in Heel Position, your leash in Control Position.
2. (Instruct: “Right Turn”) Command “ROVER, HEEL.” Take a step tothe right with your right foot, bring up your left foot and halt.
3. Command “SIT” and tuck your dog into a Sit. Praise.
ABOUT TURNREVIEW Lesson from Week 3. Make 2 About Turns.
HEELING—LOOSE LEADREVIEW Lesson from Week 3 with leash over shoulder.
(Instruct: “Forward.” “About Turn.” “Halt.” etc.)
PRE-NOVICE OBEDIENCE—LESSON FOUR
ACTIVITYLeader Notes
95–DogCare and Training, Level I
KANSAS 4–H
EVALUATE THE TRAINERS.If a trainer is keeping their dog’s attention without constantly gripping theleash—one or two corrections are ok—then they have “graduated” toholding the leash. They should now heel with the leash held in ControlPosition. It must be loose when the dog is in Heel Position—the snapshould hang down and there will be a “loop” in the leash. If the trainerregresses and begins holding the leash without slack then they must goback to having it over their shoulder. Continue to check progress on thisevery week. Heeling with a loose leash is required for obedience competi-tion and is a prerequisite for training off-lead heeling in the Novice class.
After EVALUATION practice Heeling with a Loose Lead for 2 minutes.
HEELING CIRCLES LEFT AND RIGHTGoal: Your dog will remain in Heel Position when you change speed anddirection.
DEMONSTRATE, then lead trainers in practice.
Now we’re going to add something new to the heeling. Since this is newwe’ll have everyone have their leash in Control Position. Pretend thatyour left hand is glued to your leg.
Begin with the dog sitting in Heel Position.
1. (Instruct: “Circle Left”) Command “ROVER, HEEL.” Begin withyour left foot and take a step forward and then walk in a large circleto the left. Take very exaggerated slow steps—your dog will have togo even slower to stay in Heel Position.
2. When you have completed your circle stop, Command “SIT” and Sityour dog. Praise.
DEMONSTRATE, then lead trainers in practice.
3. (Instruct: “Circle Right”) Command “ROVER, HEEL.” Begin withyour left foot and take a step forward and then trot in a large circle tothe right. Take short choppy steps—your dog will have to go evenfaster to stay in Heel Position.
4. When you have completed your circle, stop. Command “SIT” and Sityour dog. Praise.
(Instruct two circles right. Trainers must be facing clockwise to do aCircle Right.)
Leader Notes
This exercise has three purposes. It will
give some variety to the heeling
practice, it is a practice of changes of
pace, and it is an introduction to Figure
8 Heeling.
Instruct two circles left. Each trainer
will be making their own circle, about 5
feet in diameter. If the trainers are
arranged in a large circle they must be
facing counterclockwise to do a Circle
Left.
Have the trainers moving in a clockwise
circle. Only have them heel about 5
steps before they Halt. The first two
times they should command “SIT” once,
and then make their dog Sit. The third
time there is no command given for the
dog to Sit.
ACTIVITY:
96–DogCare and Training, Level I
HEELING—AUTOMATIC SITGoal: When heeling, your dog will sit when you stop.)
Begin with dog sitting in Heel Position. Hold leash in your left hand.
1. (Instruct: “Forward”) Command “ROVER, HEEL” and walk straightahead.
2. (Instruct: “Halt”) Stop. Command “SIT.” “Pop” straight up on theleash with your left hand.
3. Repeat once.
4. Repeat a third time and do not say “SIT.”
Recalls
COME-FORE (USING A TREAT TO LURE INTO A SIT)1. (Instruct: “Forward”) Command “ROVER, HEEL.”
2. (Instruct: “Call Your Dog”) Let some slack into the leash. Begin towalk backwards.
3. Command “ROVER, COME.”
4. When your dog catches up to you stop. Using the treat as a lureCommand “SIT.”
5. When the dog sits, Praise and give the treat. Your dog should now besitting in front of you. Pivot yourself to Heel Position. Praise.
6. (Instruct: “Exercise Finished”) RELEASE, “FREE.”
RECALL FROM A STAY WITH SIT IN FRONT1.Heel your dog about 12 feet straight out from the line and turn and
face the space you left.
2.Sit the dog. Remove the lead. Instructor holds the collar.
3.Command and signal “STAY.”
4.Return to your place in line. Turn and face your dog. Smile.
5. (Instruct: “Call your dog.”) Command “ROVER, COME.”(LEADER—Let go of the collar.)
6. Coach your dog to you. When it gets all the way to you Commandand signal (with lure) “SIT.” Praise and give treat. RELEASE,“FREE.” Pet your dog and make this wonderful for your dog!
PRE-NOVICE OBEDIENCE—LESSON FOUR
ACTIVITYLeader NotesThis week the tuck into a Sit is elimi-
nated. If needed, some trainers may
need to continue with the tuck and they
will need to hold the leash in their right
hand.
Allow about five steps of Heeling before
trainers call their dog. Watch that they
don’t trip over backward. Lead the
trainers in practicing this three times.
Have trainers line up along one side of
the training area. This is an off-lead
exercise. If your area is not escape-proof
attach a long line to the collar. You will
control this line. Trainer needs a treat—
don’t show it to the dog until it gets to
you and you are luring it into a Sit. The
food is being used as a lure for the Sit—
not a bribe for the recall.
97–DogCare and Training, Level I
KANSAS 4–H
RECALL RULE: If you command “COME,” your dog has to come and itmust be rewarding for it to be with you once it gets there. Do not call yourdog unless you can make it come to you.
LONG DOWN FOR 30 MINUTESGoal: To establish you as boss.
1. Command your dog to “DOWN.” You may move about the room,but do not leave your dog’s sight.
2. Replace the dog each time it BEGINS to get up. Don’t repeatDOWN. Each time you replace your dog, Praise. If you need toreplace twice, then stay beside your dog.
3. At the end of the 30 minutes, RELEASE and play with your dog fora few minutes.
4. Repeat this lesson three times this week.
DIALOGUE FOR CRITICAL THINKINGShare:
1. What is the most difficult command for your dog to remember?Why?
2. What do you think you need to do to correct your dog’s most com-mon error? Why?
Process:3. What would be an example of a distraction?
4. Why do we use distractions when training our dogs?
5. Why is it important for your dog to heel with a loose lead?
Generalize:6. How can your dog learn when it makes a mistake? Why?
7. How can making mistakes help you learn?
Apply:8. What will you do differently the next time you make a mistake?
Why?
GOING FURTHER:
Leader Notes
Help members plan training periods by
using Activity Sheet #12, Week Four
Training Plan and Record.
Pass out Member Training Guide.
(Pre-Novice - Week Four)
ACTIVITY:
98–DogCare and Training, Level I
PRE-NOVICE OBEDIENCE—LESSON FOUR
REFERENCES:Authors:Chris Odell, Obedience and Agility Instructor, Hutchinson, KS, Kennel
ClubJames P. Adams, Specialist, 4–H and Youth Programs, K-State Research
and Extension
Reviewed by:Dog Care and Training Design Team
ACTIVITYLeader Notes
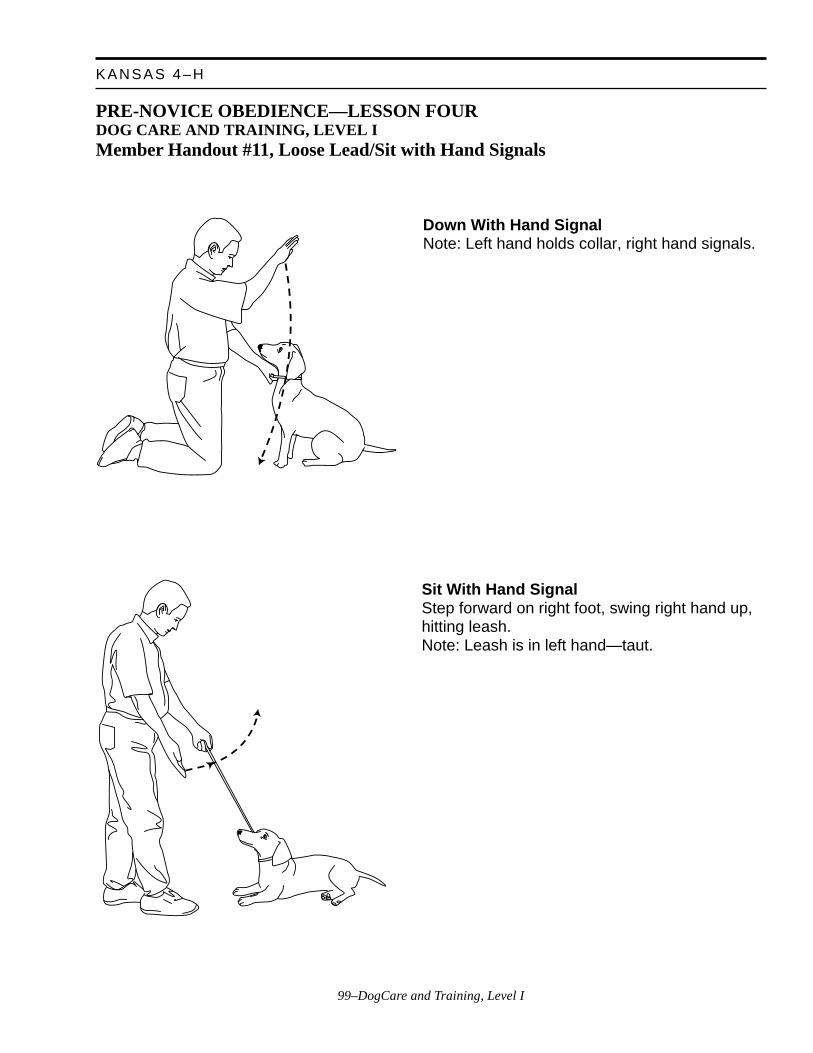
99–DogCare and Training, Level I
KANSAS 4–H
PRE-NOVICE OBEDIENCE—LESSON FOURDOG CARE AND TRAINING, LEVEL IMember Handout #11, Loose Lead/Sit with Hand Signals
Down With Hand SignalNote: Left hand holds collar, right hand signals.
Sit With Hand SignalStep forward on right foot, swing right hand up,hitting leash.Note: Leash is in left hand—taut.
100–DogCare and Training, Level I
PRE-NOVICE OBEDIENCE—LESSON FOUR
PRE-NOVICE OBEDIENCE—LESSON FOURDOG CARE AND TRAINING, LEVEL IActivity Sheet #12, Lesson Four Training Plan and RecordName________________________________ Dog _______________________________
Sit and Down with hand signals, Stand, Sit-Stay, Sit For Exam, Heel Position: Right and AboutTurns, Loose Lead Heeling, A utomatic Sit, Come-Fore, 30-MINUTE Down
Day/ What’s your planTime for this session? How did it work?
1.
2. good start
3.
4. keep working
5.
6. practice brings results
7.
8. above average!
9.
10. great work
11.
12. headed for Super Dog!
13.
14. go to the head of the class
101–DogCare and Training, Level I
KANSAS 4–H
Location:• Practice at least two times this week in a differ-
ent place with no distractions. Try an emptyparking lot or playground.
Training Tools:• Treats• Training collar• Leash• Your dog• A helper to examine your dog
ACTIVITY TIME NEEDED: 30 MINUTESTHREE TIMES THIS WEEK, 5-10 MINUTESAT LEAST SEVEN TIMES THIS WEEK
COMMANDS: “SIT.” “DOWN.” “STAND.”“STAY.” “HEEL.” “COME.” “FREE.”
SIT/DOWN/STAY/STAND
SIT AND DOWN WITH HAND SIGNALSGoal: Your dog will begin to respond to your handsignal with voice command.
1. REVIEW Lesson Three, Sit and Down withhandler kneeling in front of dog, left handguiding with collar, right hand with treat.
2. Kneel in front of your dog again. Left hand incollar.
3. Raise your right hand straight up, Command“DOWN” and swing your arm down as youapply pressure to the collar to move your dogdown. Praise.
4. With your dog still down, stand up in front of it.
5. Hold the leash in your left hand. It should be tautbut not tight.
6. Your right hand should be at your right side,palm facing your dog.
7. Command “SIT,” step toward your dog withyour right foot and hit the leash with the upswingof your right hand. Praise.
STAND—Your dog will Stand and Stay for 30seconds while you stand beside it.
1. Stand on the leash. Begin with your dog sittingat your left side, left hand in collar. Have a treatready in your right hand.
2. Command “STAND” and move the treat from infront of your dog’s nose straight forward. yourdog should stand as it follows the treat.
3. Put your left hand in front of the stifles (knees)to stop forward movement.
4. Praise, give the treat.
5. Command and signal “STAY.”
6. Drop your left hand and stand up straight besideyour dog.
7. Count to 10 (silently), Praise again, and RE-LEASE, “FREE.”
In your practice add more time until you can countto 30.
If your dog begins to sit, put your left hand in front ofthe stifles again to remind it of the stand position. DONOT lift it into position. If it sits completely, go backto the start and stand it again.
SIT-STAYGoal: Your dog will Sit and Stay with mild distrac-tions while you are standing directly in front of it.
Begin with the rings of the collar at the back of yourdog’s neck.
1. Command your dog to “SIT.”
2. Command and signal your dog to “STAY.”
PRE-NOVICE OBEDIENCE—LESSON FOURDOG CARE AND TRAINING, LEVEL IMember Training Guide
102–DogCare and Training, Level I
3. Step out briskly on your right foot, and pivot infront of your dog, toe to toe.
4. Introduce mild distractions. When your dogbreaks, replace it and Praise when it is back inthe proper position.
5. Pivot back to your dog.
6. PAUSE, PRAISE, RELEASE.
SIT-STAYGoal: Your dog will Sit and Stay for one minutewhile you are 2-3 feet in front of it. Your dog willremain sitting until you return to Heel Position andrelease it.
Begin with the rings of the collar under your dog’schin.
1. Command your dog to “SIT.”
2. Command and signal your dog to “STAY.”
3. Step out briskly on your right foot, and go 2-3feet and turn and stand directly in front of yourdog.
4. The leash should be without slack, but not tight.When your dog attempts to get up, step towardyour dog and slap up on the lead to correct. Thiscorrection is the same way we are using to teachthe Sit hand signal.
5. Face your dog and remain for 10 seconds. (Workup to one minute during the week. If you reachthe one-minute goal, begin to introduce milddistractions.) Replace your dog when it breaks.Praise each time you replace your dog once it isagain in the correct position.
6. Return to Heel Position by walking quicklyaround behind your dog. If your dog gets up asyou are moving around, replace your dog.
7. PAUSE, PRAISE, RELEASE, “FREE.”
SIT FOR EXAMINATIONGoal: Your dog will sit beside you when someonecomes to pet it.
1. Begin with dog in Heel Position. Hold leash inleft hand at the back of your dog’s neck.
2. An examiner will come up to you and ask “MayI pet your dog"?
3. Tell them “Yes” and signal and command“STAY.”
4. The examiner will pet your dog. Your dogshould not stand up, jump up, or try to get away.Replace it into the Sit if it moves. If it acceptsthe petting, PRAISE, PAUSE, RELEASE,“FREE”!
DOWN—STAYGoal: Your dog will remain in a Down-Stay for oneminute while you stand in front of it.
Begin with your dog sitting at your left side.
1. Command”DOWN” and place your dog into aDown position by guiding with the collar. Youmay wish to use food to lure your dog down.Praise quiet once your dog is down.
2. Stand up straight beside your dog and hold thelead in your left hand.
3. Place your right hand, palm flat, in front of yourdog’s nose as you give the command, “STAY.”
4. Step forward on your right foot, turn and standdirectly in front of your dog (toes to toes).
5. After you and your dog have remained in thisposition for a short period (begin with 10 sec-onds and work up to one minute), pivot back toHeel Position.
6. PAUSE 5 seconds, PRAISE, and RELEASE,“FREE.”
PRE-NOVICE OBEDIENCE—LESSON FOUR
103–DogCare and Training, Level I
KANSAS 4–H
WHEN YOUR DOG BREAKS THE STAYReplace your dog into the down position by pushingon its shoulders. If needed, return to Heel Positionand guide your dog down with the collar. When yourdog is down Praise verbally to let it know that it isnow correct.
Heeling
HEEL POSITION—RIGHT TURN ANDABOUT TURN
RIGHT TURNREVIEW of the lesson from Week 3. Make 2 RightTurns.
1. Begin with your dog in Heel Position, your leashin Control Position.
2. Command “ROVER, HEEL.” Take a step to theright with your right foot, bring up your left footand halt.
3. Command “SIT” and tuck your dog into a Sit.Praise.
ABOUT TURNREVIEW lesson from Week 3. Make 2 About Turns.
HEELING—LOOSE LEADREVIEW Lesson from Week 3 with leash overshoulder.
HEELING CIRCLES LEFT AND RIGHTGoal: Your dog will remain in Heel Position whenyou change speed and direction.
Begin with your dog sitting in Heel Position.
1. Command “ROVER, HEEL.” Begin with yourleft foot and take a step forward and then walk ina large circle to the left. Take very exaggeratedslow steps—your dog will have to go evenslower to stay in Heel Position.
2. When you have completed your circle stop,Command “SIT” and Sit your dog. Praise.
3. Command “ROVER, HEEL.” Begin with yourleft foot and take a step forward and then trot ina large circle to the right. Take short choppysteps—your dog will have to go even faster tostay in Heel Position.
4. When you have completed your circle, stop.Command”SIT” and Sit your dog. Praise.
HEELING—AUTOMATIC SITGoal: When heeling, your dog will Sit when youstop.
Begin with dog sitting in Heel Position. Hold leash inyour left hand.
1. Command “ROVER, HEEL,” and walk straightahead.
2. Stop. Command “SIT.” “Pop” straight up on theleash with your left hand.
3. Repeat once.
4. Repeat a third time and do not say “SIT.”
Recalls
COME-FORE (USING A TREAT TO LUREINTO A SIT.)
1. Command “ROVER, HEEL,” and heel forwards.
2. Let some slack into the leash. Begin to walkbackwards.
3. Command “ROVER, COME.”
4. When your dog catches up to you stop. Using thetreat as a lure, Command “SIT.”
5. When your dog sits, Praise and give the treat.Your dog should now be sitting in front of you.Pivot yourself to Heel Position. Praise.
6. RELEASE, “FREE.”
104–DogCare and Training, Level I
RECALL RULE: If you command “COME,” yourdog has to come and it must be rewarding for it to bewith you once it gets there. Do not call your dogunless you can make it come to you.
LONG DOWN FOR 30 MINUTESGoal: To establish you as boss.
1. Command your dog to “"Down".” You maymove about the room, but do not leave yourdog’s sight.
2. Replace your dog each time it BEGINS to getup. Don’t repeat “"Down".” Each time youreplace your dog, Praise. If you need to replacetwice, then stay beside your dog.
3. At the end of the 30 minutes, RELEASE andplay with your dog for a few minutes.
4. Repeat this lesson three times this week.
PRE-NOVICE OBEDIENCE—LESSON FOUR
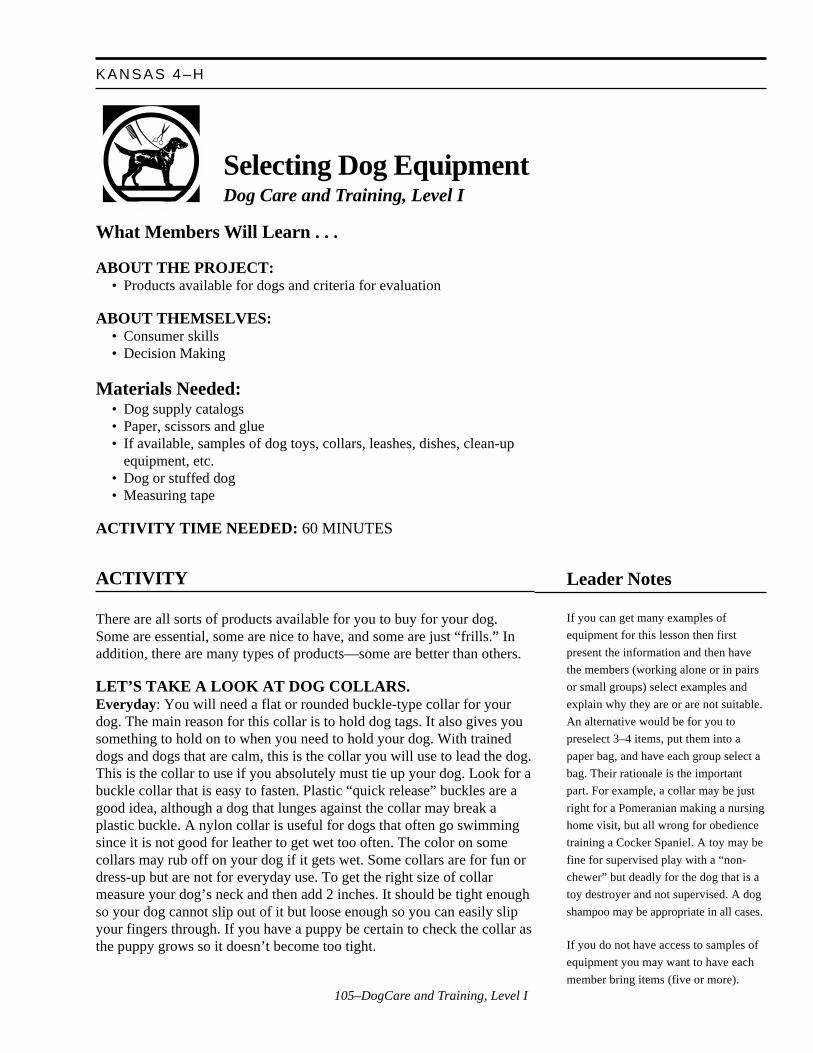
105–DogCare and Training, Level I
KANSAS 4–H
What Members Will Learn . . .
ABOUT THE PROJECT:• Products available for dogs and criteria for evaluation
ABOUT THEMSELVES:• Consumer skills• Decision Making
Materials Needed:• Dog supply catalogs• Paper, scissors and glue• If available, samples of dog toys, collars, leashes, dishes, clean-up
equipment, etc.• Dog or stuffed dog• Measuring tape
ACTIVITY TIME NEEDED: 60 MINUTES
ACTIVITY
There are all sorts of products available for you to buy for your dog.Some are essential, some are nice to have, and some are just “frills.” Inaddition, there are many types of products—some are better than others.
LET’S TAKE A LOOK AT DOG COLLARS.Everyday: You will need a flat or rounded buckle-type collar for yourdog. The main reason for this collar is to hold dog tags. It also gives yousomething to hold on to when you need to hold your dog. With traineddogs and dogs that are calm, this is the collar you will use to lead the dog.This is the collar to use if you absolutely must tie up your dog. Look for abuckle collar that is easy to fasten. Plastic “quick release” buckles are agood idea, although a dog that lunges against the collar may break aplastic buckle. A nylon collar is useful for dogs that often go swimmingsince it is not good for leather to get wet too often. The color on somecollars may rub off on your dog if it gets wet. Some collars are for fun ordress-up but are not for everyday use. To get the right size of collarmeasure your dog’s neck and then add 2 inches. It should be tight enoughso your dog cannot slip out of it but loose enough so you can easily slipyour fingers through. If you have a puppy be certain to check the collar asthe puppy grows so it doesn’t become too tight.
Leader Notes
If you can get many examples of
equipment for this lesson then first
present the information and then have
the members (working alone or in pairs
or small groups) select examples and
explain why they are or are not suitable.
An alternative would be for you to
preselect 3–4 items, put them into a
paper bag, and have each group select a
bag. Their rationale is the important
part. For example, a collar may be just
right for a Pomeranian making a nursing
home visit, but all wrong for obedience
training a Cocker Spaniel. A toy may be
fine for supervised play with a “non-
chewer” but deadly for the dog that is a
toy destroyer and not supervised. A dog
shampoo may be appropriate in all cases.
If you do not have access to samples of
equipment you may want to have each
member bring items (five or more).
Selecting Dog EquipmentDog Care and Training, Level I
106–DogCare and Training, Level I
Some people use a harness for their dog. Generally, a harness is usedwhen you want your dog to pull such as pulling a sled or when your dogis tracking. Sometimes it is useful for small dogs with very short neckssuch as Pugs. It should not be used for obedience training.
Training: You will need a chain link slip collar (also known as a chokecollar) to show your dog in Obedience. There are also choke collars madeof nylon. This type of collar used to be the only collar used for training adog. However, some dogs would pull against this type of collar enough sothey no longer paid attention to their handler. Some handlers would jerkhard enough on the choke collar that the dog would have neck injuries. Achoke collar can be tightened enough to strangle and kill a dog so it needsto be used with care. To fit a choke collar you may need to try it on yourdog. It should be the shortest possible length that will fit over the dog’shead.
A pinch collar is useful for training a dog that pulls on a leash. A motherdog puts her mouth or teeth on the pup to make him behave. A puppyinstinctively knows what that sensation means. A pinch collar lets you putteeth on the dog. Pinch collars come in 4 sizes. The mini or micro size isfor toy breeds. Most other breeds will use a small size. Dogs the size of aLabrador Retriever will probably need a medium size. Some giant breedsmay need the large size. A smaller size will work better, but if the dogpulls too hard on it the links may pull apart.The pinch collar does notslide over the dog’s head but is put on by unfastening the links. Links canbe added or removed to adjust the length of the collar. It should fit snuglyenough that the two chains are straight. A training collar should never beleft on a dog when it is not being trained.
Dog tag: You will need an identification tag attached to the buckle collar.(No tags should be attached to the chain training collar.) If your dog getslost it can’t tell its name and phone number so you need to be sure theinformation is available. A flat tag is a good choice since it is quiet andnot likely to get caught in a fence, etc. If you have a small dog try to get asmall tag. Discuss with your parents what information to put on the tag. Aphone number (or two) is the most important information to have on it. Ifyou are vacationing with your dog you may want to have a special tagwith a friend’s phone number on it. Be sure to get new tags if you move!
Leash (also called a lead): You will need a 6 foot leash to show your dogin pre-novice but you may need a shorter (two to 4 foot) for training. Itshould be made of leather, cotton webbing, or nylon webbing. A width of3⁄8 to 1⁄2 inch will work well for most dogs. If a large dog is being trained awider leash may be needed. A very small dog will need a smaller leash—maybe as small as a leather shoelace. Do not use a chain leash. You can’tcoil it up in your hand, it may hurt your hand, and it is noisy.
A long line (20 to 30 feet long) can be made from a lightweight cord. Thiswill be used to keep control of your dog when you are more than 6 feet
ACTIVITYLeader Notes
Another choice would be to prepare
cards with pictures and descriptions of
items that you have found in catalogs or
have the members cut out pictures of
appropriate equipment from a catalog.
A chain training collar should never be
left on the dog when it is not being
trained. This means when the dog is
loose in the yard or if it is left tied up.
Emphasize this to the members—it
could save a dog’s life and a child’s
heartbreak. Pinch collars are emphasized
over choke collars for several reasons—
the main one is that it is “power
steering” for the child. A child can
manage a dog on a pinch that would be
impossible on a choke collar. There are
disadvantages to a pinch collar, however.
First, it looks cruel. (It is not. A pinch is
kinder than a choke.) It is not allowed at
a dog show but by the time you get to
the show the dog should be trained.
Another disadvantage is that once a
trainer begins to use the pinch collar
they do not want to stop using it. Beware
—do not put a pinch collar on a dog that
is aggressive. If absolutely necessary
you can stop an aggressive dog with a
choke collar (by strangling) but you
can’t stop one with a pinch collar.
If you have a willing dog (or a stuffed
dog) you can have the members practice
measuring the neck for a collar and/or
putting collars onto the dog.
A narrower leash will be easier for a
child to gather up in his or her hand so it
is a better choice if it is strong enough to
control the dog. However, it does need
to be wide enough to hold on to without
hurting their hands. Avoid leashes with
big heavy snaps, especially on smaller
dogs.
SELECTING DOG EQUIPMENT

107–DogCare and Training, Level I
KANSAS 4–H
ACTIVITY Leader Notes
away. A flexi-lead (a long leash that rolls up inside a plastic handle) couldalso be used for long distance control.
A very short leash or tab, 6 inches or less, can be very useful for advancedobedience training and agility training.
For showmanship you may need a one-piece collar and leash called ashow lead. For larger dogs you will want a fine-link choke chain and anarrow leash.
There are many fancy and special leashes that you can buy. These are funto use when showing off your dog. However, use a plain leash for trainingyour dog and for showing it in obedience and conformation. Fancyequipment will not impress the judge!
Dishes: Choose food dishes large enough to hold one meal’s worth offood. A water dish should not be so large that the dog can get into it butshould be large. Metal dishes work well since they are easily cleaned andnot as attractive to chew as plastic dishes. Also, some dogs are allergic toplastic dishes. Pottery dishes are also a good choice although you do needto replace them if they get cracks which could be a hide-out for germs!Get separate food and water dishes—the one-piece sets get water in thefood and food in the water which is not very sanitary. Many dogs needwater dishes that are resistant to tipping over. Tipped-over water dishesgive you wet floors or muddy yards as well as a thirsty dog.
Clean-Up: You should always carry bags to clean up after your dog. Topick up your yard you may want to get “poop scoops,” a small shovel anda scoop on long handles. It will make cleaning up much easier.
Grooming Supplies: You will need a comb and some type of a brush foryour dog. These will depend on the type of hair your dog has. Nailclippers are needed for all dogs. Blunt-pointed scissors are good to use totrim hair from between your dog’s pads and to trim off the whiskers forshowmanship. You may need other types of scissors or clippers forgrooming your dog. A toothbrush can be used to keep your dog’s teethhealthy. There are brushes that fit on your finger, pads to wipe off teeth,and pads on handles for cleaning teeth. You can get special dog tooth-paste or just use water. You will need dog shampoo for bathing. Most“people” shampoo is too strong for dogs. There are shampoos designed toimprove the color of the dog’s coat and shampoos to kill fleas. You willprobably want a cream rinse/conditioner for long-haired dogs.
Toys: You can use toys to play with your dog and to train it. Toys are alsoused for your dog to play with by itself. There are two types of toys—those that are made to be eaten and those that aren’t. Some dogs, how-ever, consider all toys to be edible so you need to supervise your dogwhen it has a toy that is destructible. Good choices for toys that you willsupervise are balls (be sure that they are not small enough to swallow),
Flexi-leads can be dangerous and you
may want to restrict their use to outside
of class. It is easy for a dog to get to the
end of the lead and then be out of
control. The line can get wrapped
around people and dogs causing injuries.
A lead for showmanship should be of
the type used for the breed (or the breed
most like the member’s dog) in
conformation shows such as AKC. This
may take some research on the
member’s part. For example, a one-
piece lead which would be used for a
Cocker Spaniel is generally not used for
an English Springer Spaniel—the
handler would not be able to show the
Springer to its best advantage.
Emphasize the importance of always
picking up the dogs feces—unless it is
in their own yard and they don’t care.
Closable sandwich (or larger) bags are
very handy. Teach the members to slide
the bag over their hand, pick up the
feces, and then pull the bag inside out
over their hand. Member with large dogs
may need two bags if their hands are
small. Check to see if the members have
their bags when they bring their dogs to
classes.
Grooming supplies, aside from tooth-
brushes and nail clippers, are fairly
individual according to the breed of dog.
These will be discussed further in the
lesson on grooming. Baby nail scissors
may be recycled for use on dog whiskers.
Good toys are individual to the dog.
Some dogs eat tennis balls while others
will carry them around waiting for
someone to throw them. Of course a toy
should not have parts that are easily
pulled off and eaten.
108–DogCare and Training, Level I
flying saucer-discs, stuffed chew toys and knotted rope (cotton, notnylon). These would also be safe for many dogs to play with alone.Squeaker toys are a lot of fun for dogs but you will need to limit their playsince many dogs will destroy them and try to get the squeaker. Hardplastic bones such as Nylabones may be too hard for some dogs’ teeth butmany dogs get along with them fine and they do come in many sizes andshapes. A softer plastic bone (Gummibone) is an alternative. A “kong”toy of hard rubber is another choice for play both with and withoutsupervision.
Many people provide beef bones to keep their dogs busy. Sterilized bonescan be purchased as a dog toy or you could get 6-inch or longer beef legbones and sterilize them yourself. With a piece of hotdog or a little peanutbutter inside your dog will keep occupied for a long time. Rawhide bonesare often chosen as toy/treats for dogs and most dogs will like them. Lookfor “Made in the U.S.A.” rawhides since other countries may use harmfulchemicals in making them. If your dog swallows pieces of rawhide(instead of chewing on it) it can make him sick. Either buy larger sizerawhides or don’t get them at all for a rawhide swallower.
DIALOGUE FOR CRITICAL THINKING:Share:
1. What pieces of dog equipment do you use? Why?
2. What is one piece you would like to get? Why?
Process:3. Why are some products only suitable for a specific dog?
4. When is a buckle collar appropriate?
5. Why is there a different type of collar for obedience training?
Generalize:6. What are some items that you purchase that would not be suitable for
a parent? Why?
Apply:7. What are the differences between popular brand name products and
most generic names?
8. How can you determine which is best?
GOING FURTHER:1. Pick one or two items that your dog needs and price them at two or
three different stores. Decide how you will earn the money to payfor the items.
ACTIVITYLeader Notes
SELECTING DOG EQUIPMENT
109–DogCare and Training, Level I
KANSAS 4–H
REFERENCES:Authors:Chris Odell, Obedience and Agility Instructor, Hutchinson, KS, Kennel
ClubJames P. Adams, Specialist, 4–H and Youth Programs, K-State Research
and Extension
Reviewed by:Dog Care and Training Design Team
ACTIVITY Leader Notes

110–DogCare and Training, Level I
SELECTING DOG EQUIPMENT
111–DogCare and Training, Level I
KANSAS 4–H
Pre-Novice Obedience—Lesson FiveDog Care and Training, Level I
What Members Will Learn . . .
ABOUT THE PROJECT:• Training your dog to be comfortable around strangers when you tell
him it is okay.
ABOUT THEMSELVES:• The value of repetition and planning.
Materials Needed:• A demonstration dog with treats• Activity Sheet #13, Lesson Five Training Plan and Record• Long Line—light line about 20 feet long with a clip on one end• Member Training Guide (Pre-Novice—Week 5)
ACTIVITY TIME NEEDED: 60 MINUTES
ACTIVITY
SIT/DOWN/STAND/STAY
SIT AND DOWN WITH HAND SIGNALSGoal: Your dog will begin to respond to your hand signal with voicecommand.
1. REVIEW Lesson Four, Sit and Down.
2. Stand 3 feet in front of your dog. Have the leash taut and in your lefthand.
3. (Instruct: “Down Your Dog”) Command and signal “DOWN” as youstep toward your dog with your right foot and slap down on the leash.Praise.
4. With your dog still down, stand up in front of him.
5. Hold the leash in your left hand. It should be taut but not tight.
6. (Instruct: “Sit your Dog”) Command “SIT,” step toward your dogwith your right foot and hit the leash with the upswing of your righthand. Praise.
Do each signal three times
Leader Notes
Continue to review lessons from
previous weeks. If teams have not
mastered previous lessons, do not
continue with new commands!
112–DogCare and Training, Level I
STAND—Your dog will stand and stay for 30 seconds while you stand infront of it.
1. Stand on the leash. Begin with your dog sitting at your left side, lefthand in collar. Have a treat ready in your right hand.
2. (Instruct: “Stand Your Dog”) Command “STAND” and move thetreat from in front of your dog’s nose straight forward. The dogshould stand as he follows the treat.
3. Put your left hand in front of the stifles (knees) to stop forwardmovement.
4. Praise, give the treat.
5. Command and signal “STAY.”
6. Drop your left hand and step in front of your dog.
7. Count to 10 (silently).
8. Pivot back to Heel Position. PAUSE, PRAISE, RELEASE ,“FREE.”
In your practice add more time until you can count to 30.
SIT-STAYGoal: Your dog will Sit and Stay with mild distractions while you arestanding three feet in front of it.
Begin with the rings of the collar under the dog’s chin. Leash in your lefthand.
1. (Instruct: “Sit Your Dogs”) Command your dog to “SIT.”
2. (Instruct: “ Leave Your Dogs”) Command and signal your dog to“STAY."
3. Step out briskly on your right foot, and go 3 feet in front of your dog.
4. Introduce mild distractions. If your dog breaks, correct by steppingforward on your right foot and slapping up on the leash with yourright hand. (the Sit signal.)
5. (Instruct: “Return to Your Dog”) Walk around behind your dog toget to Heel Position.
6. (Instruct: “Exercise Finished”) PAUSE, PRAISE, RELEASE.
SIT-STAYGoal: Your dog will Sit and Stay for one minute while you are 6 feet infront of it. The dog will remain sitting until you return to Heel Positionand release it.
ACTIVITYLeader Notes
The purpose of distractions is to entice
the dog into making a mistake. The dog
that “goofs” and is corrected will learn
that Stay means Stay even if there is a
distraction. The dog that makes no
mistakes during this part of the lesson
has learned nothing. This is a very hard
concept for the trainers—they want their
dogs to be right—but it is learning by
trial-and-error on the dog’s part. To
reinforce the idea that “mistakes are
marvelous,” you could award a gold star
to the trainers that got to teach their dog
the meaning of the word “STAY” at this
lesson (they got to correct their dog
when he broke the stay).
This session will use mild distractions.
Bounce a ball in the center of the room
or walk a dog by the trainers. If the dog
glances at the distraction but returns
their attention to the trainer it should be
quietly praised.
PRE-NOVICE OBEDIENCE—LESSON F IVE
113–DogCare and Training, Level I
KANSAS 4–H
Begin with the rings of the collar under the dog’s chin.
1. (Instruct: “Sit Your Dogs”) Command your dog to “SIT.”
2. (Instruct: “Leave Your Dogs”) Command and signal your dog to“STAY.”
3. Step out briskly on your right foot, go to the end of your leash, andturn and face your dog.
4. Replace your dog when it breaks. Praise each time you replace yourdog once it is again in the correct position.
5. (Instruct after one minute: “Return to your dog”) Return to HeelPosition by walking quickly around behind your dog. If your doggets up as you are moving around, replace the dog.
6. (Instruct: Exercise Finished”) PAUSE, PRAISE, RELEASE,“FREE.”
SIT FOR EXAMINATIONGoal: Your dog will sit beside you when someone comes to pet it. Thistime we are going to have the examiner come up to greet you first andthen ask to pet your dog.
1. Begin with dog in Heel Position. Hold leash in left hand at the backof the dog’s neck.
2. An examiner will come up to you and ask “May I pet your dog?”
3. Tell them “Yes” and signal and command “STAY.”
4. The examiner will pet your dog. Your dog should not stand up, jumpup, or try to get away. Replace it into the Sit if he moves. If itaccepts the petting PRAISE, PAUSE, RELEASE, “FREE”!
DOWN—STAYGoal: Your dog will remain in a Down-Stay for one minute while youstand 6 feet in front of it.
Begin with your dog sitting at your left side.
1. (Instruct: “Down Your Dog”) Command “DOWN” and place yourdog into a down position by guiding with the collar.
2. Stand up straight beside the dog and hold the lead in your left hand.
3. (Instruct: “Leave Your Dog”) Command and signal “STAY.”
4. Step forward with your right foot and go to the end of your leash.
Leader Notes
Use your judgment, depending on the
dog as to how much you’ll do on this
exercise. This is not only to prepare for
the Novice Stand for Examination
exercise, but is also training for the
Canine Good Citizen Test. This time the
examiner could wear a hat or sun-
glasses—just to add a new dimension.
Approach the trainer and dog from the
front, with noisy steps and loud voice.
Greet the trainer and shake hands, then
ask to pet the dog. When the trainer tells
the dog to Stay it means that the dog
will be safe—so the dog should not be
allowed to bark, shy away, etc. Be
gentle, not boisterous, when actually
petting, however.
ACTIVITY:
114–DogCare and Training, Level I
5. (Instruct after 30 seconds: “Return to your dogs”) Return backaround your dog to Heel Position.
6. PAUSE 5 seconds, PRAISE, RELEASE, “FREE.”
WHEN YOUR DOG BREAKS THE STAYStep forward on your right foot, giving theDown hand signal and hittingthe leash downward. If needed, return to Heel Position and guide the dogdown with the collar. When the dog is Down, praise to let it know that itis now correct.
Add more time until your dog will stay for one minute.
Heeling
HEEL POSITION—RIGHT TURN, ABOUT TURN ANDLEFT TURN
RIGHT TURNREVIEW of the lesson from Week 4.
ABOUT TURNPractice 2 About Turns. (Instruct: “About Turn”)
LEFT TURNDog in Heel Position, Leash in Control Position.
1. (Instruct: “Prepare for Left Turn”) Place your left foot directly infront of your dog’s feet.
2. (Instruct: “Left Turn”) Command “ROVER, HEEL,” and step withyour right foot past your left and then step with your left.
3. Stop. Command “SIT.”
Repeat three times.
HEELING—CIRCLES LEFT AND RIGHTREVIEW from Week 4, Circles beginning from a stationary position.
HEELING—AUTOMATIC SITGoal: When heeling, your dog will Sit when you stop.
Begin with dog sitting in Heel Position. Hold leash in your left hand.
1. (Instruct: “Forward”) Command “ROVER, HEEL,” and walk straightahead.
ACTIVITYLeader Notes
Remember to have trainers facing
counterclockwise for the slow left circle
and facing clockwise for the fast right
circle.
PRE-NOVICE OBEDIENCE—LESSON F IVE
115–DogCare and Training, Level I
KANSAS 4–H
2. (Instruct: “Halt”) Stop. “Pop” straight up on the leash with your lefthand. If the dog is already sitting he will not feel the correction.
3. Praise for the “Sit.”
HEELING—LOOSE LEADHeeling for 3 minutes.
(Instruct: “Are you Ready?”) Trainers respond, “Ready.”
(Instruct: “Forward”) Command “ROVER, HEEL."
(Instruct other directions: “About Turn,” “Circle Left,” “About Turn,”“Halt.,” “Forward,” “Circle Right,” “Halt,” etc.)
Recalls
COME-FORE AND FINISH (USING A TREAT TO LUREINTO A SIT.)This is an introduction to the FINISH. This is a way to get your dog backto Heel Position after a recall. First let’s try it first without the recall.
1. Sit your dog and step directly in front of it. Leash in Control Posi-tion.
2. Command “ROVER, HEEL,” and step forward with your right footjust to the right of your dog and keep on walking for several steps.
3. As your dog turns to come with you, PRAISE and RELEASE,“FREE.”
Now let’s put it all together.
1. (Instruct: “Forward”) Command “ROVER, HEEL.”
2. (Instruct: “Call Your Dog”) Let some slack into the leash. Begin towalk backwards.
3. Command “ROVER, COME.”
4. When your dog catches up to you stop. Using the treat as a lure,Command “SIT.”
5. When the dog sits, Praise and give the treat. Your dog should now besitting in front of you.
6. (Instruct: “Forward”) Command, “ROVER, HEEL.” Starting on yourright foot heel straight forward past the right side of the dog.
Leader Notes
Have the trainers heel about six steps
before the HALT.
Continue to evaluate trainers on using a
loose lead. Trainers who are holding
their leads tightly will need to go back
to having their leash over their shoulder.
Include About turns, Circle Right (when
heeling clockwise), Circle Left (when
heeling counterclockwise), and
Automatic Sit. (If the dog does not sit
automatically then instruct the trainer to
hold onto the leash, heel forward three
steps, halt and “pop” up on lead.
Begin with this lesson to ask “Are you
ready?” before the start of the heeling
pattern. The trainers should respond
with “Ready.” This is what the judge
asks before the start of judging and the
dogs can learn this as an extra cue. It
also gets everyone listening to you.
It is very helpful to give a treat at this
point, not only to reward the Come and
lure into a Sit, but also to reinforce the
Sit in Front. Sometimes dogs will
automatically come to Heel Position
which is not allowed in competition.
ACTIVITY:
116–DogCare and Training, Level I
Repeat three times.
RECALLGoal: Your dog will come to you when you call, even if it is walkingaway from you.
1. Walk with your dog on a 6 foot leash. Use “LET’S GO.” Let the dogget distracted and move away from heel position.
2. When your dog is not paying attention to you, stop, command“ROVER, COME,” followed by a leash pop, and back up 5-6 stepsas quickly as you can. Encourage the dog to come to you, but do notrepeat the “COME!” command. Do not “reel” the dog into you.
3. Continue coaching your dog to you until it touches you. MAKESURE THE DOG TOUCHES YOU FIRST, DO NOT REACH OUTTO GRAB YOUR DOG. Once the dog has touched you, you mayPraise and pet it and give a treat.
4. If your dog comes toward you, but goes past you, turn and giveanother lead pop. Your dog should feel that the only safe place is byyou. Do not repeat the “COME” command.
LONG DOWN FOR 30 MINUTESGoal: Your dog will remain In a down position for 30 minutes while youremain in the room. Medium distractions may be added.
1. Command your dog to “DOWN.” You may move about the room,but do not leave your dog’s sight.
2. Replace the dog each time it BEGINS to get up. Don’t repeat“DOWN.” Each time you replace your dog, Praise. If you need toreplace twice, then stay beside your dog.
3. At the end of the 30 minutes, RELEASE and play with your dog fora few minutes.
4. Repeat this lesson three times this week.
DIALOGUE FOR CRITICAL THINKINGShare:
1. What has happened as you repeat all of the commands every week?
2. How do you feel about having to repeat so much?
Process3. Why do you think it is important to repeat the commands so often?
4. What can you do if your dog wants to jump up on someone who ispetting it?
PRE-NOVICE OBEDIENCE—LESSON F IVE
ACTIVITYLeader Notes
Work one dog at a time. You distract the
dog with treats but the dog does not get
a treat from you.
Help members plan training periods by
using Activity Sheet #13, Week Five
Training Plan and Record.
Distribute Member Training Guide.
117–DogCare and Training, Level I
KANSAS 4–H
5. Where should your dog be after it has come to you? Why?
6. When would be a good time to practice the 30 minute long down?Why?
Generalize:7. Why should you plan out a training session before you get your dog
ready?
8. When do you use repeating to learn something? (At school, home,etc.)
Apply:9. Why should you plan your work before starting?
GOING FURTHER:1. Visit a dog trainer and observe their methods.
2. Watch how these commands are used at a dog show.
REFERENCES:Authors:Chris Odell, Obedience and Agility Instructor, Hutchinson, KS, Kennel
ClubJames P. Adams, Specialist, 4–H and Youth Programs, K-State Research
and Extension
Reviewed by:Dog Care and Training Design Team
Leader NotesACTIVITY:
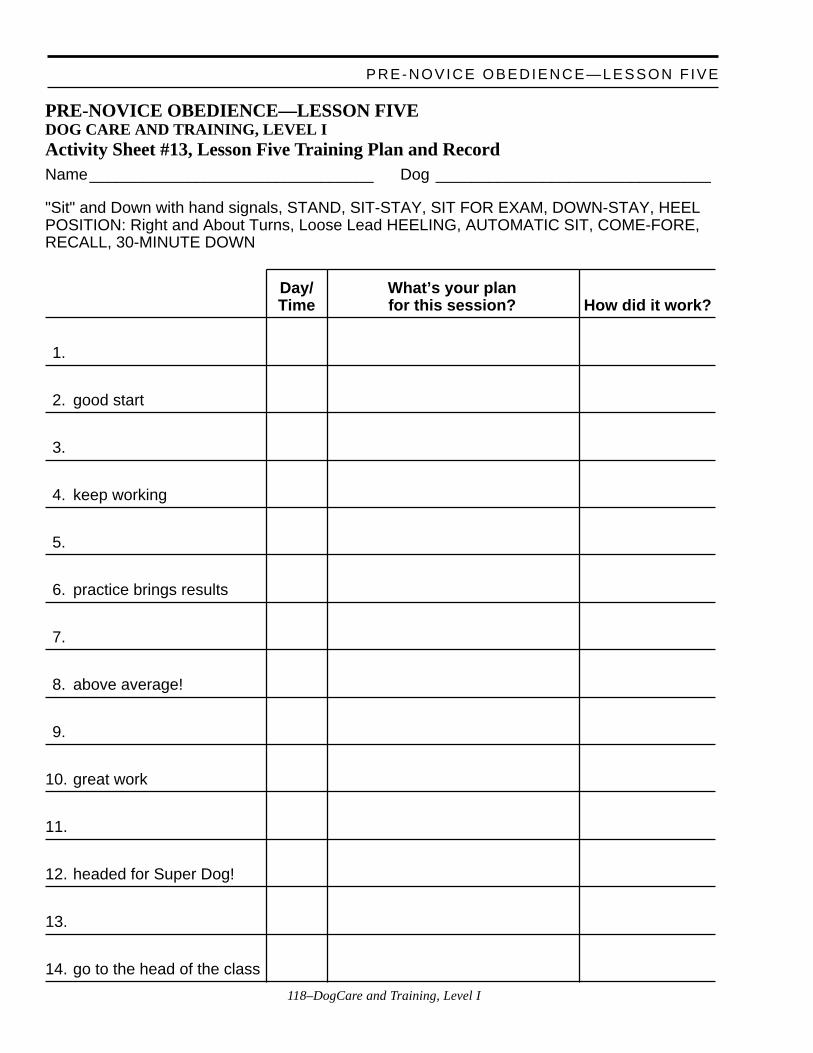
118–DogCare and Training, Level I
PRE-NOVICE OBEDIENCE—LESSON F IVE
PRE-NOVICE OBEDIENCE—LESSON FIVEDOG CARE AND TRAINING, LEVEL IActivity Sheet #13, Lesson Five Training Plan and RecordName________________________________ Dog _______________________________
"Sit" and Down with hand signals, STAND, SIT-STAY, SIT FOR EXAM, DOWN-STAY, HEELPOSITION: Right and About Turns, Loose Lead HEELING, AUTOMATIC SIT, COME-FORE,RECALL, 30-MINUTE DOWN
Day/ What’s your planTime for this session? How did it work?
1.
2. good start
3.
4. keep working
5.
6. practice brings results
7.
8. above average!
9.
10. great work
11.
12. headed for Super Dog!
13.
14. go to the head of the class
119–DogCare and Training, Level I
KANSAS 4–H
PRE-NOVICE OBEDIENCE—LESSON FIVEDOG CARE AND TRAINING, LEVEL IMember Training Guide
Training Tools:• Treats• Training collar• Leash• Your dog• A helper to examine your dog
ACTIVITY TIME NEEDED: 30 MINUTESTHREE TIMES THIS WEEK, 5-10 MINUTESAT LEAST SEVEN TIMES THIS WEEK
COMMANDS: “SIT.” “DOWN.” “STAND.”“STAY.” “HEEL.” “COME.” “FREE.”
SIT/DOWN/STAND/STAY
SIT AND DOWN WITH HAND SIGNALSGoal: Your dog will begin to respond to your handsignal with voice command.
1. REVIEW Lesson Four, Sit and DOWN.
2. Stand 3 feet in front of your dog. Have the leashwith slight tension.
3. Command and signal “DOWN” as you steptoward your dog with your right foot and slapdown on the leash. Praise.
4. With your dog still down, stand up in front of it.
5. Hold the leash in your left hand. It should be tautbut not tight.
6. Command “SIT,” step toward your dog withyour right foot and hit the leash with the upswingof your right hand. Praise.
PRACTICE each signal three times
STAND—Your dog will Stand and STAY for 30seconds while you stand in front of it.
1. Stand on the leash. Begin with your dog sittingat your left side, left hand in collar. Have a treatready in your right hand.
2. Command “STAND” and move the treat from infront of your dog’s nose straight forward. yourdog should stand as it follows the treat.
3. Put your left hand in front of the stifles (knees)to stop forward movement.
4. Praise, give the treat.
5. Command and signal “STAY.”
6. Drop your left hand and step in front of yourdog.
7. Count to 10 (silently).
8. Pivot back to Heel Position. PAUSE, PRAISE,RELEASE, “FREE.”
In your practice add more time until you can count to30.
SIT-STAYGoal: Your dog will Sit and Stay with mild distrac-tions while you are standing three feet in front of it.
Begin with the rings of the collar under your dog’schin. Leash in your left hand.
1. Command your dog to “SIT.”
2. Command and signal your dog to “STAY.”
3. Step out briskly on your right foot, and go 3 feetin front of your dog.
4. Introduce mild distractions. If your dog breaks,correct by stepping forward on your right footand slapping up on the leash with your righthand. (the Sit signal.)
5. Walk around behind your dog to get to HeelPosition.
6. PAUSE, PRAISE, RELEASE.
120–DogCare and Training, Level I
SIT-STAYGoal: Your dog will Sit and Stay for one minutewhile you are 6 feet in front of it. Your dog willremain sitting until you return to Heel Position andrelease it.
Begin with the rings of the collar under your dog’schin.
1. Command your dog to “SIT.”
2. Command and signal your dog to “STAY.”
3. Step out briskly on your right foot, go to the endof your leash, and turn and face your dog.
4. Replace your dog when it breaks. Praise eachtime you replace your dog once it is again in thecorrect position.
5. After one minute return to Heel Position bywalking quickly around behind your dog. If yourdog gets up as you are moving around, replaceyour dog.
6. PAUSE, PRAISE, RELEASE, “FREE.”
SIT FOR EXAMINATIONGoal: Your dog will sit beside you when someonecomes to pet it.
1. Begin with dog in Heel Position. Hold leash inleft hand at the back of your dog’s neck.
2. An examiner will come up to you and ask “MayI pet your dog"?
3. Tell them “Yes” and signal and command“STAY.”
4. The examiner will pet your dog. Your dogshould not stand up, jump up, or try to get away.Replace it into the Sit if it moves. If it acceptsthe petting, PRAISE, PAUSE, RELEASE,“FREE”!
DOWN—STAYGoal: Your dog will remain in a Down-Stay for oneminute while you stand 6 feet in front of it.
Begin with your dog sitting at your left side.
1. Command “DOWN” and place your dog into adown position by guiding with the collar.
2. Stand up straight beside your dog and hold thelead in your left hand.
3. Command and signal “STAY.”
4. Step forward with your right foot and go to theend of your leash.
5. After 30 seconds return back around your dog toHeel Position.
6. PAUSE 5 seconds, PRAISE and RELEASE,“FREE.”
WHEN YOUR DOG BREAKS THE STAYStep forward on your right foot, giving the Downhand signal and hitting the leash downward. Ifneeded, return to Heel Position and guide your dogdown with the collar. When your dog is Down, praiseto let it know that it is now correct.
Add more time until your dog will stay for oneminute.
Heeling
HEEL POSITION—RIGHT TURN, ABOUTTURN AND LEFT TURN
RIGHT TURN AND ABOUT TURNPractice Four Right Turns and Four About Turns..
LEFT TURNDog in Heel Position, Leash in Control Position.
1. Place your left foot directly in front of yourdog’s feet.
2. Command “ROVER, HEEL” and step with yourright foot past your left and then step with yourleft.
3. Stop. Command “SIT.”
Repeat three times.
PRE-NOVICE OBEDIENCE—LESSON F IVE
121–DogCare and Training, Level I
KANSAS 4–H
HEELING—AUTOMATIC SITGoal: When heeling, your dog will sit when youstop.)
Begin with dog sitting in Heel Position. Hold leash inyour left hand.
1. Command “ROVER, HEEL,” and walk straightahead.
2. Stop. “Pop” straight up on the leash with yourleft hand. If your dog is already sitting it will notfeel the correction.
3. Praise for the Sit.
HEELING—LOOSE LEADHeeling for 3 minutes. Include Circle Right, CircleLeft, About Turns and Halts.
Recalls
COME-FORE AND FINISH (USING ATREAT TO LURE INTO A SIT.)This is an introduction to the finish. This is a way toget your dog back to Heel Position after a RECALL.Now let’s put it all together.
1. Command “ROVER, HEEL.”
2. Let some slack into the leash. Begin to walkbackwards.
3. Command “ROVER, COME.”
4. When your dog catches up to you stop. Using thetreat as a lure, Command “SIT.”
5. When your dog sits, Praise and give the treat.Your dog should now be sitting in front of you.
6. Command, “ROVER, HEEL.” Starting on yourright foot heel straight forward past the right sideof your dog.
Repeat three times.
RECALLGoal: Your dog will come to you when you call, evenif it is walking away from you.
1. Walk with your dog on a 6 foot leash. Use“LET’S GO” (this is not a Heeling exercise). Letyour dog get distracted and move away fromheel position.
2. When your dog is not paying attention to you,stop, command “ROVER, COME,” followed bya leash pop, and back up 5-6 steps as quickly asyou can. Encourage your dog to come to you, butdo not repeat the “COME!” command. Do not“reel” your dog into you.
3. Continue coaching your dog to you until ittouches you. MAKE SURE YOUR DOGTOUCHES YOU FIRST, DO NOT REACHOUT TO GRAB YOUR DOG. Once your doghas touched you, you may Praise and pet it andgive a treat.
4. If your dog comes toward you, but goes pastyou, turn and give another lead pop. Your dogshould feel that the only safe place is by you. Donot repeat the “COME” command.
LONG DOWN FOR 30 MINUTESGoal: Your dog will remain n a down position for 30minutes while you remain in the room. Mediumdistractions may be added.
1. Command your dog to “DOWN.” You maymove about the room, but do not leave yourdog’s sight.
2. Replace your dog each time it BEGINS to getup. Don’t repeat “DOWN.” Each time youreplace your dog, Praise. If you need to replacetwice, then stay beside your dog.
3. At the end of the 30 minutes, RELEASE andplay with your dog for a few minutes.
4. Repeat this lesson three times this week.
122–DogCare and Training, Level I
PRE-NOVICE OBEDIENCE—LESSON F IVE
123–DogCare and Training, Level I
KANSAS 4–H
Have Dog—Will TravelDog Care and Training, Level I
What Members Will Learn . . .
ABOUT THE PROJECT:• Traveling with their dog—problems and solutions
ABOUT THEMSELVES:• Thinking through a problem, considering solutions
Materials Needed:• Whiteboard or flip chart• Paper and pencils
ACTIVITY TIME NEEDED: 45 MINUTES
ACTIVITY
When do you travel with your dog?
Short trips (1 hour or less)
Day trips
Long trips (Overnight or longer)
There are many hazards to taking a dog on a trip. Which of these wouldbe a problem for short trips, day trips, long trips?
1. Your dog gets car sick.
2. Your dog escapes and is injured or lost.
3. A motel or hotel will not allow pets.
4. Changes in food or water result in vomiting or diarrhea.
5. Your dog is sick or injured and you’re unable to locate a veterinarian.
6. Your dog cannot be left in the car in hot weather.
7. Your dog may be exposed to diseases.
8. Dog not kenneled when riding in a pickup or left in parking lot.
What are some solutions to these potential problems?
Leader Notes
Solicit ideas from the members. Make
three columns, each headed by the
length of a trip. List their ideas in the
appropriate column. Short trips may
include trips to training classes, to the
veterinarian, to the groomer, running
errands. Day trips may include going to
dog shows. Long trips may include
vacations. Once the members have listed
trips that they may take with their dog,
have them decide why they would take
their dog. Identify the trips where they
must take their dog and the trips where
taking their dog is a choice. Any time
that you take your dog on a trip you are
risking its safety. Before taking your
dog with you you should consider if
your reasons are more important than
the risks. Then consider how you can
minimize the risks, because traveling
with your dog can be fun.
124–DogCare and Training, Level I
Planning Ahead1. Train your dog to ride in the car, get it used to riding by taking short
trips for fun.
2. Train your dog to ride in a dog crate. It is not only safer but your dogmay feel more secure. If there is no room for a crate consider a seatbelt / harness to keep it safe.
3. Check with your veterinarian about tranquilizers for long trips. Youshould not plan on showing your dog until the effects of the tranquil-izer have worn off.
4. Be sure you are up-to-date on vaccinations and that your dog ishealthy. Ask your veterinarian about special precautions if you planto go to dog shows or for the area you are traveling to.
5. Keep a certificate of vaccination for rabies with you when you travelwith your dog. Will you need a health certificate?
6. Your dog should be wearing a collar (NOT A CHOKE OR PINCHCOLLAR) with a rabies tag and an identification tag on it. This tagshould have your phone number and/or the phone number of some-one who can be reached if you are on vacation. If your dog has amicro-chip you may also have a tag giving that information. Amicro-chip is implanted between the dog’s shoulders and carriespermanent identification for your dog which is listed with a nationalregistry. You may also choose to have your dog tattooed with anidentification number which can be listed with a national registry.
7. Call ahead for reservations at dog-friendly motels / hotels. Books areavailable of places where dogs are allowed but policies can changewithout notice so check before you arrive. Some will not allow dogsto be left in the room while you are gone. Confining your dog to acrate will be appreciated.
8. Pack your dog’s regular food and water. If it won’t drink strangewater on longer trips you may need to buy bottled water.
9. Plan your trip so you won’t need to leave your dog alone in a hot car.Will you need to pack lunches? What will you do if you want to goshopping or sight-seeing?
10. Do not let your dog loose at rest stops or picnic areas. There is toogreat a danger from traffic and other dogs. Also, your dog couldeasily get into garbage left by other visitors.
11. On long trips you will need to make safe plans for your dog toexercise. This may mean longer and more frequent walks—be sure topick up after your dog!
ACTIVITYLeader Notes
You could solicit ideas from the
members for solutions and then fill in
with the ideas in“Planning Ahead,” or
you could present the items in “Planning
Ahead,” and ask the members to identify
the problem that would be solved.
HAVE DOG—WILL TRAVEL

125–DogCare and Training, Level I
KANSAS 4–H
Make a packing list of things you’ll need when taking your dog on a longtrip.
DIALOGUE FOR CRITICAL THINKING:Share:
1. What types of trips does your dog take? Why?
2. What is one hazard of traveling with your dog?
Process:3. Why is it important to plan for long dog trips?
4. What is the difference between needing to travel with your dog andwanting to travel with your dog? Examples?
5. What conditions would make you avoid taking your dog on a trip?
6. What supplies will you need to take a dog on a trip? Why?
Generalize:7. Why is it important to plan ahead for things you want to do?
Apply:8. When have you given up something you have wanted to do because
of another’s needs?
GOING FURTHER:1. Give a talk to your class or group about traveling with your dog .
REFERENCES:Dr. Bill Fortney DVM, Department of Clinical Sciences, Kansas State
University
Authors:Chris Odell, Obedience and Agility Instructor, Hutchinson, KS, Kennel
ClubJames P. Adams, Specialist, 4–H and Youth Programs, K-State Research
and Extension
Reviewed by:Dog Care and Training Design Team
ACTIVITY Leader Notes
This list may be constructed as a group,
with partners, or individually. A group
list could be copied and distributed to
members at a later meeting. Some items
that could be included are food, water,
dishes, medications, toys, leash, long
leash, collar with tags, training collar,
rabies certificate, health record,
veterinarian’s phone number, grooming
equipment, towel for the dog to sleep
on, crate, seat belt, photo of your dog (in
case he gets lost).

126–DogCare and Training, Level I
HAVE DOG—WILL TRAVEL
127–DogCare and Training, Level I
KANSAS 4–H
Pre-Novice Obedience—Lesson SixDog Care and Training, Level I
What Members Will Learn . . .
ABOUT THE PROJECT:• Training the dog to heel with attention as the member changes pace.
ABOUT THEMSELVES:• Communication is through body language as well as spoken lan-
guage.
Materials Needed:• A demonstration dog with treats• Activity Sheet #14, Lesson Six, Training Plan and Record• Long Line—light line about 20 feet long with a clip on one end—one
per trainer.• Member Training Guide (Pre-Novice Week 6)
ACTIVITY TIME NEEDED: 60 MINUTES
ACTIVITY
Part 1—SIT/DOWN/STAND/STAY
SIT AND DOWN WITH HAND SIGNALSGoal: Your dog will begin to respond to your hand signal.
1. REVIEW Lesson Five, Sit and Down with hand signal and com-mand, 3 feet in front of the dog. (review the sequence once)
2. Stand 3 feet in front of your dog. Have the leash in your left hand.
3. (Instruct: “Down Your Dog”) (signal only) “DOWN” as you steptoward your dog with your right foot. Slap down on the leash withthe downsweep of your signal with your right hand. Praise.
4. With your dog still down, stand 3 feet in front of it.
5. Hold the leash in your left hand. It should be without slack but nottight.
6. (Instruct: “Sit your Dog”) Step toward your dog with your right footand hit the leash with the upswing of your right hand as you make theSit signal. Praise. Repeat this sequence.
Leader Notes
128–DogCare and Training, Level I
PRE-NOVICE OBEDIENCE—LESSON S IX
STAND—Your dog will Stand and Stay for 30 seconds while you stand 3feet in front of it.
1. Stand on the leash. Begin with your dog sitting at your left side, lefthand in collar.
2. (Instruct: “Stand Your Dog”) Command “STAND” and signal bymoving your right hand, palm down, from in front of your dog’s nosestraight forward. Use your left hand to guide into a stand if needed,
3. Put your left hand in front of the stifles (knees) to stop forwardmovement.
4. Praise. Stand up straight.
5. (Instruct: “Leave your Dog”) Command and signal “STAY” and stepthree feet in front of your dog and face it.
6. Count to 10 (silently).
7. Return around behind your dog to Heel Position. PAUSE, Praise,RELEASE, “FREE.”
In your practice add more time until you can count to 30 while you are 3feet in front.
STAND FOR EXAMINATION: Your dog will Stand and Stay whilebeing examined.
1. Stand on the leash. Begin with your dog sitting at your left side, lefthand in collar.
2. (Instruct: “Stand Your Dog and leave when ready”) Command andsignal “STAND.”
3. Put your left hand in front of the stifles (knees) to stop forwardmovement.
4. Praise.
5. Stand up straight.
6. Command and signal “STAY.”
7. Step in front of your dog.
8. The Instructor will examine your dog by touching the head, shoulder,and rump.
9. (Instruct: “Back to Your Dog.”)
ACTIVITYLeader Notes
129–DogCare and Training, Level I
KANSAS 4–H
10. Pivot back to Heel Position. PAUSE, PRAISE, RELEASE, “FREE.”
SIT-STAYGoal: Your dog will Sit and Stay with mild distractions while you arestanding six feet in front of it.
Begin with the rings of the collar under the dog’s chin. Leash in your lefthand.
1. (Instruct: “Sit Your Dogs”) Command your dog to “SIT.”
2. (Instruct: “ Leave Your Dogs”) Command and signal your dog to“STAY.”
3. Step out briskly on your right foot, and go to the end of your leash.
4. Introduce mild distractions. If your dog breaks, correct by steppingforward on your right foot and slapping up on the leash with yourright hand. (the Sit signal.)
5. (Instruct: “Return to Your Dog”) Walk around behind your dog toget to Heel Position.
6. (Instruct: “Exercise Finished”) PAUSE, PRAISE, RELEASE.
SIT-STAYGoal: Your dog will Sit and Stay for one minute while you are 15 feet infront of it. Your dog will remain sitting until you return to Heel Positionand release it.
Place your dog on a light line. Remove the regular leash.
1. (Instruct: “Sit Your Dogs”) Command your dog to “SIT.”
2. (Instruct: “Leave Your Dogs”) Command and signal your dog to“STAY.”
3. Step out briskly on your right foot, go to the end of the line, and turnand face your dog.
4. Return and replace your dog when it breaks. Praise each time youreplace your dog once it is again in the correct position. If it gets uptwo times only go 6 feet away.
5. (Instruct after one minute: “Return to Your Dog”) Return to HeelPosition by walking quickly around behind your dog. If your doggets up as you are moving around, replace the dog.
6. (Instruct: Exercise Finished”) PAUSE, PRAISE, RELEASE,“FREE.”
Leader Notes
The dog cannot be corrected with a light
line. It is being used to enable the trainer
to catch the dog if he gets up from the
Sit. It has a minor function as an
“anchor” to give the dog the impression
that it is still on leash.
ACTIVITY:
130–DogCare and Training, Level I
PRE-NOVICE OBEDIENCE—LESSON S IX
DOWN—STAYGoal: Your dog will remain in a Down-Stay for three minutes while youstand 15 feet in front of it.
Begin with your dog sitting at your left side. Put the dog on a light line.
First REVIEW DOWN- STAY at 6 feet. If a dog is not successful at 6feet DO NOT have them progress to 15 feet.
1. (Instruct: “Down Your Dog”) Command “DOWN” and place yourdog into a down position by guiding with the collar.
2. Stand up straight beside the dog.
3. (Instruct: “Leave Your Dog”) Command and signal “STAY.”
4. Step forward with your right foot and go out 15 feet.
5. (Instruct after 1 minute: “Return to Your Dogs”) Return back aroundyour dog to Heel Position.
6. PAUSE 5 seconds, PRAISE, RELEASE, “FREE.”
Heeling
HEEL POSITION—RIGHT TURN, ABOUT TURN ANDLEFT TURNRIGHT TURN and ABOUT TURN: Practice Four Right Turns and TwoAbout Turns.
LEFT TURNDog in Heel Position, Leash in Control Position: REVIEW from Week 5
1. (Instruct: “Prepare for Left Turn”) Place your left foot directly infront of your dog’s feet.
2. (Instruct: “Left Turn”) Command “ROVER, HEEL” and step withyour right foot past your left and then step with your left.
3. Stop. Command “SIT.”
Repeat three times.
ACTIVITYLeader Notes
Add more time until your dog will Stay
for three minutes.
131–DogCare and Training, Level I
KANSAS 4–H
HEELING—AUTOMATIC SITGoal: When heeling, your dog will Sit when you stop.Begin with dog sitting in Heel Position. Hold leash in your left hand. Tryto have your left hand directly above the dog’s neck.
1. (Instruct: “Forward”) Command “ROVER, HEEL,” and walk straightahead.
2. (Instruct: “Halt”) Stop. “Pop” straight up on the leash with your lefthand. If the dog is already sitting it will not feel the correction.
3. Praise for the “SIT.”
HEELING—CHANGES OF PACEGoal: Your dog will remain in Heel Position no matter what speed youare moving.
1. (Instruct: “Forward”) Command “ROVER, HEEL.”
2. (Instruct: “Slow”) Gradually change pace. Take slower, not shorter,steps. Work to keep your dog’s attention.
3. (Instruct: “Normal”) Step up to normal pace.
4. (Instruct: “Fast”) Gradually change pace to a slow run.
5. (Instruct: “Normal” ) Gradually slow to normal pace.
6. (Instruct: “Halt”) Stop and Sit your dog.
HEELING—LOOSE LEADHeeling for 3 minutes.
(Instruct: “Are you Ready?”) Members respond, “Ready”
(Instruct: “Forward”) Command “ROVER, HEEL.”
(Instruct other directions: “About Turn,” “Circle Left,” “About Turn,”“Fast,” “Normal” “Halt,” “Forward,” “Slow,” “Normal,” “Circle Right,”“Halt,” etc.)
Recalls
COME-FORE AND FINISH (USING A TREAT TO LURE INTOA SIT.)
1. (Instruct: “Forward”) Command “ROVER, HEEL”
2. (Instruct: “Call Your Dog”) Let some slack into the leash. Begin towalk backwards.
Leader Notes
Have the trainers heel about five steps
before the HALT.
Instruct, then lead practice.
Changes of pace as well as well as
starting and halting should not be the
abrupt “stop on dime” changes. Trainers
may take a couple of steps to make the
change which also allows the dog a
chance to respond. “Fast” and “Slow”
are always followed by “Normal.”
Continue to evaluate trainers on using a
loose lead. Trainers that are holding
their leads tightly will need to go back
to having their leash over their shoulder.
Include About turns, Circle Right (when
heeling clockwise), Circle Left (when
heeling counter-clockwise), Changes of
Pace and Automatic Sit. If the dog does
not sit automatically then instruct the
member to hold onto the leash, heel
forward three steps, halt and “pop” up
on lead.
ACTIVITY:
132–DogCare and Training, Level I
PRE-NOVICE OBEDIENCE—LESSON S IX
3. Command “ROVER, COME.”
4. When your dog catches up to you stop. Using the treat as a lure,Command “SIT.”
5. When the dog sits, Praise and give the treat. Your dog should now besitting in front of you.
6. (Instruct: “Forward”) Command, “ROVER, HEEL.” Starting on yourleft foot heel straight forward past the right side of the dog.
Repeat three times.
RECALL FROM A SIT WITH HAND SIGNALGoal: Your dog will stay until called.
Demonstrate the Recall Hand Signal. It is given with your left arm. Reachout with your left arm and scoop back toward your chest. This is like a“come here” sign you may give to a friend.
1. (Instruct: “Sit your Dogs”) Command “SIT.”
2. (Instruct: “Leave your Dogs”) Command and Signal “STAY.”
3. Go to the end of your lead, turn and face your dog.
4. Hold your lead in your right hand with your hand at your side. Itshould be without slack.
5. Command and signal “COME” and pop back on the leash.
6. Take 3 steps backwards as the dog is coming to you.
7. Command and signal “SIT.” PAUSE, PRAISE, RELEASE, “FREE”and step backwards.
LONG DOWN FOR 30 MINUTESGoal: Your dog will remain in a down position for 30 minutes while youremain in the room. Medium distractions may be added.
1. Command your dog to “DOWN.” You may move about the room,but do not leave your dog’s sight.
2. Replace the dog each time it BEGINS to get up. Don’t repeatDOWN. Each time you replace your dog, Praise. If you need toreplace twice, then stay beside your dog.
3. At the end of the 30 minutes, RELEASE and play with your dog fora few minutes.
4. Repeat this lesson three times this week.
ACTIVITYLeader Notes
Arrange the trainers in one or two lines.
It is likely that the dogs will exhibit
some confusion during this exercise and
will anticipate the recall. They will
improve!
If the dog is being difficult about sitting
don’t require a Sit this week. The
COME needs to be positive.
Help members plan training periouds by
Using Activity Sheet #14, Week Six
Training Plan and Record.
Pass out Member Training Guide.
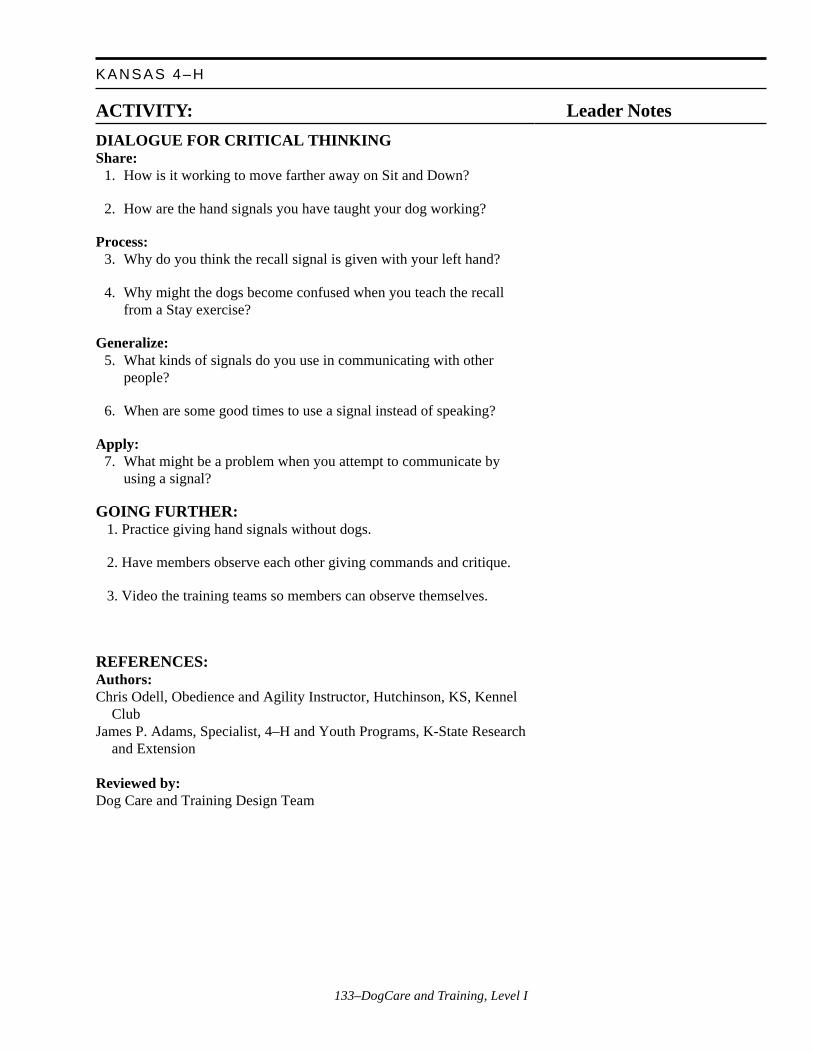
133–DogCare and Training, Level I
KANSAS 4–H
DIALOGUE FOR CRITICAL THINKINGShare:
1. How is it working to move farther away on Sit and Down?
2. How are the hand signals you have taught your dog working?
Process:3. Why do you think the recall signal is given with your left hand?
4. Why might the dogs become confused when you teach the recallfrom a Stay exercise?
Generalize:5. What kinds of signals do you use in communicating with other
people?
6. When are some good times to use a signal instead of speaking?
Apply:7. What might be a problem when you attempt to communicate by
using a signal?
GOING FURTHER: 1. Practice giving hand signals without dogs.
2. Have members observe each other giving commands and critique.
3. Video the training teams so members can observe themselves.
REFERENCES:Authors:Chris Odell, Obedience and Agility Instructor, Hutchinson, KS, Kennel
ClubJames P. Adams, Specialist, 4–H and Youth Programs, K-State Research
and Extension
Reviewed by:Dog Care and Training Design Team
Leader NotesACTIVITY:
134–DogCare and Training, Level I
PRE-NOVICE OBEDIENCE—LESSON S IX
PRE-NOVICE OBEDIENCE—LESSON SIXDOG CARE AND TRAINING, LEVEL IActivity Sheet #14, Lesson Six Training Plan and RecordName________________________________ Dog _______________________________
Sit and Down with hand signals, Stand, Stand for Exam, Sit-Stay, Down-Stay, Heel Position:Right, Left and About Turns, Automatic Sit, Loose Lead Heeling, Come-Fore,Recall, 30-minute Down
Day/ What’s your planTime for this session? How did it work?
1.
2. good start
3.
4. keep working
5.
6. practice brings results
7.
8. above average!
9.
10. great work
11.
12. headed for Super Dog!
13.
14. go to the head of the class
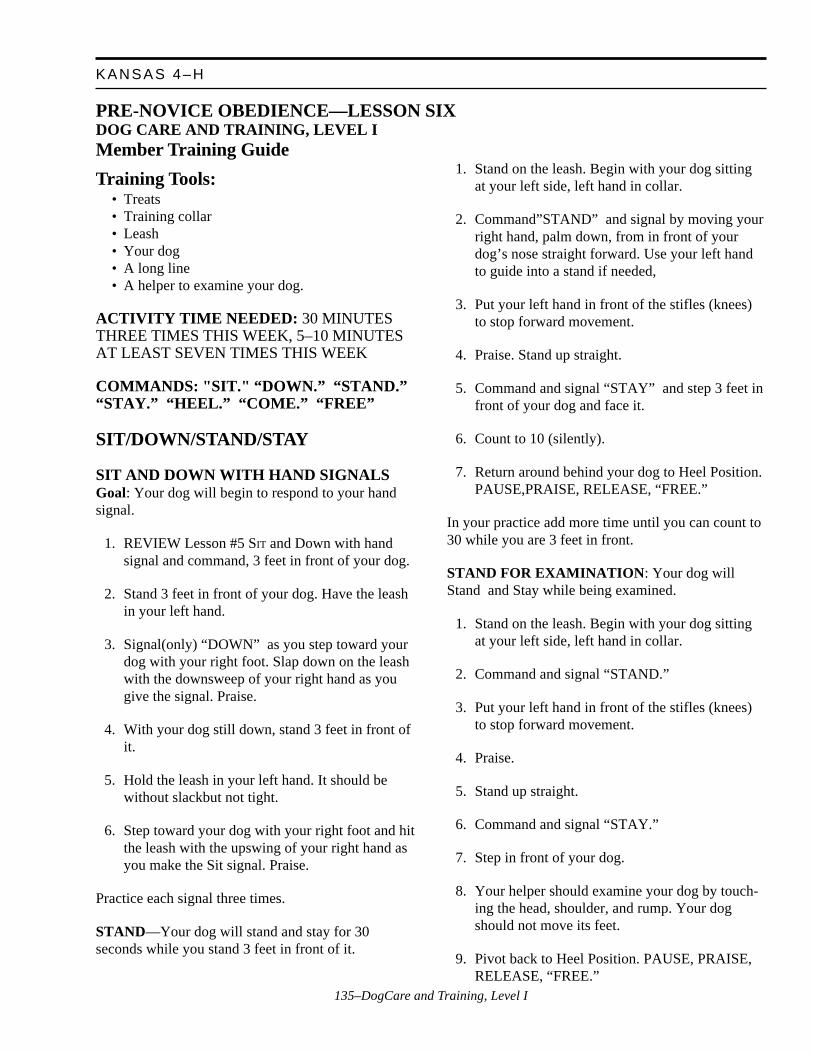
135–DogCare and Training, Level I
KANSAS 4–H
PRE-NOVICE OBEDIENCE—LESSON SIXDOG CARE AND TRAINING, LEVEL IMember Training Guide
Training Tools:• Treats• Training collar• Leash• Your dog• A long line• A helper to examine your dog.
ACTIVITY TIME NEEDED: 30 MINUTESTHREE TIMES THIS WEEK, 5–10 MINUTESAT LEAST SEVEN TIMES THIS WEEK
COMMANDS: "SIT." “DOWN.” “STAND.”“STAY.” “HEEL.” “COME.” “FREE”
SIT/DOWN/STAND/STAY
SIT AND DOWN WITH HAND SIGNALSGoal: Your dog will begin to respond to your handsignal.
1. REVIEW Lesson #5 SIT and Down with handsignal and command, 3 feet in front of your dog.
2. Stand 3 feet in front of your dog. Have the leashin your left hand.
3. Signal(only) “DOWN” as you step toward yourdog with your right foot. Slap down on the leashwith the downsweep of your right hand as yougive the signal. Praise.
4. With your dog still down, stand 3 feet in front ofit.
5. Hold the leash in your left hand. It should bewithout slackbut not tight.
6. Step toward your dog with your right foot and hitthe leash with the upswing of your right hand asyou make the Sit signal. Praise.
Practice each signal three times.
STAND—Your dog will stand and stay for 30seconds while you stand 3 feet in front of it.
1. Stand on the leash. Begin with your dog sittingat your left side, left hand in collar.
2. Command”STAND” and signal by moving yourright hand, palm down, from in front of yourdog’s nose straight forward. Use your left handto guide into a stand if needed,
3. Put your left hand in front of the stifles (knees)to stop forward movement.
4. Praise. Stand up straight.
5. Command and signal “STAY” and step 3 feet infront of your dog and face it.
6. Count to 10 (silently).
7. Return around behind your dog to Heel Position.PAUSE,PRAISE, RELEASE, “FREE.”
In your practice add more time until you can count to30 while you are 3 feet in front.
STAND FOR EXAMINATION: Your dog willStand and Stay while being examined.
1. Stand on the leash. Begin with your dog sittingat your left side, left hand in collar.
2. Command and signal “STAND.”
3. Put your left hand in front of the stifles (knees)to stop forward movement.
4. Praise.
5. Stand up straight.
6. Command and signal “STAY.”
7. Step in front of your dog.
8. Your helper should examine your dog by touch-ing the head, shoulder, and rump. Your dogshould not move its feet.
9. Pivot back to Heel Position. PAUSE, PRAISE,RELEASE, “FREE.”
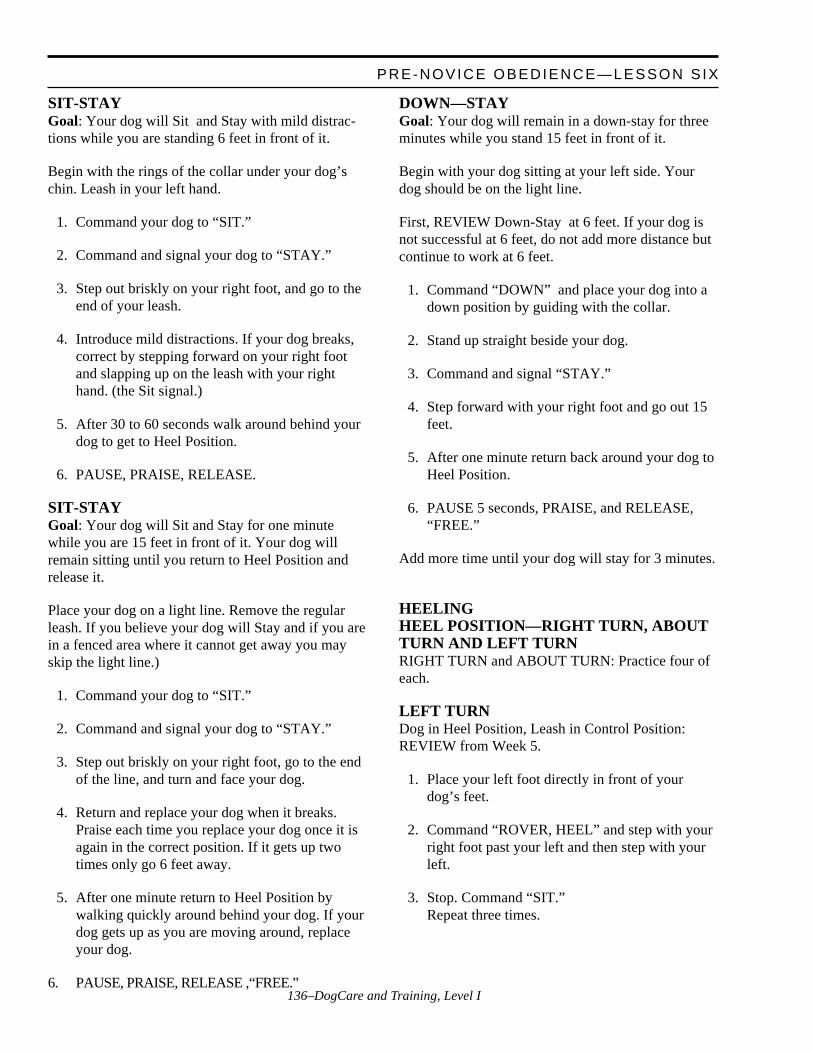
136–DogCare and Training, Level I
PRE-NOVICE OBEDIENCE—LESSON S IX
SIT-STAYGoal: Your dog will Sit and Stay with mild distrac-tions while you are standing 6 feet in front of it.
Begin with the rings of the collar under your dog’schin. Leash in your left hand.
1. Command your dog to “SIT.”
2. Command and signal your dog to “STAY.”
3. Step out briskly on your right foot, and go to theend of your leash.
4. Introduce mild distractions. If your dog breaks,correct by stepping forward on your right footand slapping up on the leash with your righthand. (the Sit signal.)
5. After 30 to 60 seconds walk around behind yourdog to get to Heel Position.
6. PAUSE, PRAISE, RELEASE.
SIT-STAYGoal: Your dog will Sit and Stay for one minutewhile you are 15 feet in front of it. Your dog willremain sitting until you return to Heel Position andrelease it.
Place your dog on a light line. Remove the regularleash. If you believe your dog will Stay and if you arein a fenced area where it cannot get away you mayskip the light line.)
1. Command your dog to “SIT.”
2. Command and signal your dog to “STAY.”
3. Step out briskly on your right foot, go to the endof the line, and turn and face your dog.
4. Return and replace your dog when it breaks.Praise each time you replace your dog once it isagain in the correct position. If it gets up twotimes only go 6 feet away.
5. After one minute return to Heel Position bywalking quickly around behind your dog. If yourdog gets up as you are moving around, replaceyour dog.
6. PAUSE, PRAISE, RELEASE ,“FREE.”
DOWN—STAYGoal: Your dog will remain in a down-stay for threeminutes while you stand 15 feet in front of it.
Begin with your dog sitting at your left side. Yourdog should be on the light line.
First, REVIEW Down-Stay at 6 feet. If your dog isnot successful at 6 feet, do not add more distance butcontinue to work at 6 feet.
1. Command “DOWN” and place your dog into adown position by guiding with the collar.
2. Stand up straight beside your dog.
3. Command and signal “STAY.”
4. Step forward with your right foot and go out 15feet.
5. After one minute return back around your dog toHeel Position.
6. PAUSE 5 seconds, PRAISE, and RELEASE,“FREE.”
Add more time until your dog will stay for 3 minutes.
HEELINGHEEL POSITION—RIGHT TURN, ABOUTTURN AND LEFT TURNRIGHT TURN and ABOUT TURN: Practice four ofeach.
LEFT TURNDog in Heel Position, Leash in Control Position:REVIEW from Week 5.
1. Place your left foot directly in front of yourdog’s feet.
2. Command “ROVER, HEEL” and step with yourright foot past your left and then step with yourleft.
3. Stop. Command “SIT.”Repeat three times.
137–DogCare and Training, Level I
KANSAS 4–H
HEELING—AUTOMATIC SITGoal: When heeling, your dog will Sit when youstop.)
Begin with dog sitting in Heel Position. Hold leash inyour left hand.
1. Command “ROVER, HEEL” and walk straightahead.
2. Stop. “Pop” straight up on the leash with yourleft hand. If your dog is already sitting it will notfeel the correction.
3. Praise for the Sit.
Practice three Automatic Sits.
HEELING—LOOSE LEADPractice Forward, Halt, Circle Left, Circle Right,About Turn, Fast, and Slow.
Heeling for three minutes.
Recalls
COME-FORE AND FINISH (USING ATREAT TO LURE INTO A SIT.)
1. Command “ROVER, HEEL,” and heel forward.
2. Let some slack into the leash. Begin to walkbackwards.
3. Command “ROVER, COME.”
4. When your dog catches up to you stop. Using thetreat as a lure, Command “SIT.”
5. When your dog sits, Praise and give the treat.Your dog should now be sitting in front of you.
6. Command, “ROVER, HEEL.” Starting on yourleft foot heel straight forward past the right sideof your dog.
Repeat three times.
RECALL FROM A SIT WITH HANDSIGNALGoal: Your dog will Stay until called.
The recall hand signal is given with your left arm.Reach out with your left arm and scoop back towardyour chest. This is like a “come here” sign you maygive to a friend.
1. Command “SIT.”
2. Command and Signal “STAY.”
3. Go to the end of your lead, turn and face yourdog.
4. Hold your lead in your right hand with your handat your side. It should be without slack.
5. Command and signal “COME” and pop back onthe leash with your right hand.
6. Take three steps backwards as your dog iscoming to you.
7. Command and signal “SIT.” PAUSE, PRAISE,RELEASE, “FREE” and step backwards.
LONG DOWN FOR 30 MINUTESGoal: Your dog will remain in a down position for 30minutes while you remain in the room. Mediumdistractions may be added.
1. Command your dog to “DOWN.” You maymove about the room, but do not leave yourdog’s sight.
2. Replace your dog each time it BEGINS to getup. Don’t repeat DOWN. Each time you replaceyour dog, Praise. If you need to replace twice,then stay beside your dog.
3. At the end of the 30 minutes, RELEASE andplay with your dog for a few minutes.
4. Repeat this lesson three times this week.

138–DogCare and Training, Level I
PRE-NOVICE OBEDIENCE—LESSON S IX
139–DogCare and Training, Level I
KANSAS 4–H
What Member Will Learn . . .
ABOUT THE PROJECT:• How to groom their dog
ABOUT THEMSELVES:• The importance of responsibility• The importance of good grooming
Materials Needed:• Sturdy table with a no-slip surface (such as a grooming table)• Nail clippers• Comb(s)• Slicker brush• Pin brush• Hound glove• Spray bottle with water• Blunt-end scissors (baby nail scissors will work)• Cotton balls• Soft toothbrush• Dog toothpaste (optional)• Examples of dog shampoo• Cream rinse• Blow dryer (for dogs, if possible)• Towels• Dog to be groomed (optional)• Member Handout #12, Fitting Your Dog• Activity Sheet #15, Grooming Schedule• Activity Sheet #16, Grooming Tools and Supplies• Product catalogs• Flip chart or board and markers
ACTIVITY TIME NEEDED: 55 MINUTES WITHDEMONSTRATION, 30 WITHOUT
ACTIVITY
QUESTION 1:Why should you groom your dog?
Answers may include: It makes the dog look good, it keeps the dog clean,it helps to control shedding, it allows you to examine the dog for burrs,
Basic GroomingDog Care and Training, Level I
Leader Notes
List group answers on flip chart or
board and discuss.
140–DogCare and Training, Level I
fleas and ticks, lumps, and cuts or scrapes, it gets the dog used to beinghandled, it is like a massage for the dog—it will make him feel good.Also, for longer haired dogs, regular grooming helps the coat function asinsulation against heat and cold. Grooming and handling long haireddogs helps to determine physical condition and weight.
QUESTION 2:What are the things you need to do when you groom a dog?
Answers may include: Giving him a bath (and drying), combing/brushing,trimming his toenails, cleaning his teeth, trimming his hair, cleaning hisears, checking for fleas and ticks.
Basic grooming involves the following, let’s check this dog for:
• Hair and Coat: clean, natural, not scaly, not matted, free from loose hair• General Absence of Parasites: fleas, lice, mites and ticks• Ears: clean inside• Toenails: not excessively long• Teeth: clean, free of tarter• Eyes: clean, free of matter
This is what a judge will look for when you enter in Showmanship. It isalso what we will look for each time you bring your dog to class. You willget a list to help you remember what to check each week.
Unlike you, your dog cannot groom itself. You should groom your dogevery day. Every time you groom it improves the bond between you andyour dog and makes it nicer to be around. Not all dogs like to be groomedat first, but most can be trained to enjoy most parts. It may take a lot ofwork on your part so be patient if your dog hasn’t yet learned to begroomed.
Always brush and comb your dog before a bath. Check your dog for fleasand ticks when you groom. A tick will feel like a bump that can be movedsince only the tick’s mouth parts are attached to the dog. Have an adulthelp with the removal of ticks since they can carry disease. Sometimesyou can see fleas when you comb your dog, but often the fleas are hiding.To check for them roll your dog onto its back and check the area wherehair is sparse on the belly. You still may not see fleas but look for specksof dirt. If you see some specks wipe them off with a damp cloth or cottonball and smear them. If they look brownish red then you have found fleadirt (actually flea feces with undigested blood in it) and your dog doeshave fleas! Be sure to let your parents know since it is time to get in-volved in the fight against fleas.
Daily grooming is ideal for all dogs, but it is a MUST if you have a dogwith long-and-fine hair. If these coats are neglected they quickly become
ACTIVITYLeader Notes
List group responses on flip chart or
board.
Pick a dog to be checked as a demon-
stration.
Pass out Member Handout #12, Fitting
Your Dog.
Consider requiring that all dogs be ready
for a grooming check every time they
come to class and make surprise checks
of all or some of the dogs whenever
time allows—you could even give a
gold star or post a list of “purple ribbon
groomers.” Note that this does not mean
that the dogs get a bath before each
class—they can be kept quite clean with
regular brushing/combing and occa-
sional baths. This grooming requirement
will also help keep your training/
meeting area cleaner—especially when
dogs are blowing coat (shedding a lot).
BASIC GROOMING
141–DogCare and Training, Level I
KANSAS 4–H
matted messes. Yorkshire Terriers and Afghan Hounds have this type ofcoat. Mist the coat with water to keep down static electricity and thenbrush out with the pin brush. Use a comb to tidy the coat.
Daily grooming is strongly recommended for dogs with medium to longcoats. However, if you miss a day or two it will not be a total disaster. Becertain to thoroughly groom your dog after it has been out in the field orin weeds since they can easily collect burrs, ticks and other debris in theirhair. Cocker Spaniels, Golden Retrievers, and Shetland Sheepdogs havethis type of coat. Mist the coat with water, then use a pin brush to brush asmall section of the coat at a time from the skin up to the ends of the hair.Be sure that you are not just smoothing out the hair on top—mats form atthe skin. After brushing comb through the tangly places, working outmats with your fingers and the comb.
Dogs with double coats have a soft undercoat beneath the long fur.Weekly brushing will prevent tangles in the soft undercoat and will alsohelp to keep the hair from matting down. If it gets matted it cannotinsulate from heat and cold. German Shepherds, Chow Chows, Pomera-nian, and Samoyeds have this type of coat.
Dogs with curly coats such as Poodles and Bichons can be brushed everyother day but will need daily attention if you want to keep the coat in afluffy style. Use a slicker brush.
Dogs with short coats can be groomed (brushed) once a week and willlook very tidy. This includes Beagles, Labrador Retrievers, and Whippetsas well as the wire-haired terriers. Use a stiff bristle brush or a houndglove (a mitt with bristles) on these coats.
If you find a mat that you can’t work out of the coat, get an adult to cut itout. Mats are so close to the skin that it is very easy to cut your dog whentrying to remove them. If the hair has tar or sap in it rub some mineral oilinto the hair, let it sit until the next day, and then try to work it out. If yourdog’s coat has become a hopeless mess take it to a groomer to get it fixedand promise that you’ll keep it in good condition after that.
BATHING YOUR DOGGive your dog a bath when it is dirty (check skin for dirt), when it smells,when it has rolled in something smelly, when it has been swimming inpolluted or salt water, or before going to a show. Some dogs (especiallythose that live outside) only get one bath a year while others get a bathevery week. Generally, once a month is more than enough for any dogunless there are special circumstances (such as allergies).
Be sure there are no tangles or mats in the coat before you begin.
Try to find a place with warm water to bathe your dog. Small dogs maybe bathed in a utility sink. Many people bathe their dogs in the bathtub. Awashtub will work if it won’t tip over. As a last resort you can use a hoseoutside if the weather is warm.
ACTIVITY Leader Notes
If you have a dog then demonstrate this
on a grooming table, if available. A
sturdy table with a mat such as an old
rubber bath mat will do fine. Members
may groom their large dogs with the dog
on the floor. Show the tools used for
different coats. Give the members
Activity Sheet #15, Grooming Shedule
and Activity Sheet #16, Grooming Tools
and supplies to complete as you
demonstrate. If there is a coat type that
is not represented among your members
skip it for this lesson.
Talk through the bathing steps unless
your meeting area has bathing facilities.
If so, go ahead and demonstrate!
Parasite control will be included in
another lesson.
142–DogCare and Training, Level I
You will get wet so dress accordingly! Put a mat or towel in the tub soyour dog won’t slip, get shampoo, rinse, and towels ready and them getyour dog. (Unless your dog likes taking baths do not call your dog to thetub. If it hates baths that would be punishment for coming.) Use a collarand leash to keep him in place if needed.
Wet your dog all over by using a gentle spray or by pouring water over it.Put some shampoo in your hands, work into a lather and soap the dog,massaging the shampoo through the coat. Begin with the neck, making acollar of soap, then work backward and down. Go to the chest , front legs,shoulders, back, sides, belly, rear legs and tail.
If you are using a flea shampoo you will need to leave it on the dog forthe time specified on the container.
Be very careful not to get soap in your dog’s eyes or ears.More importantthan the type of shampoo that you use is to be sure you get all of the soaprinsed out. Begin again at the neck and work backward and down. Rinseseveral times until you feel that all of the soap is out, then rinse oncemore. If you are using a cream rinse (for a longhaired dog) apply it afterthe first water rinse and then rinse it out, too. Soap left in the dog’s coatwill dry the skin and may make the hair look dull.
The dog has probably already shaken several times to try to dry off. Nowdry your dog off with towels to get off excess water. This may be a goodtime to wipe out the ears with a damp cloth or cotton ball. To finishdrying you can let it air dry—but don’t let the dog roll in the mud. Youcan also use a people hair dryer on “Low,” moving it frequently so youdon’t burn heat sensitive skin. If your dog’s coat is supposed to lay flatyou can let it air dry with a towel pinned around the body.
Some dogs need haircuts to keep them neat and looking like the breed thatthey are. A Poodle becomes a mass of hair if it is not clipped. For theaverage owner, however, a fancy “show” haircut is too much work. Manyowners of Poodles and other dogs that have elaborate “show” haircutchoose to have their dog get a “utility” haircut. Poodles, Bichon Frises,Cocker Spaniels, Yorkshire Terriers, Maltese, Pekingese, Shih Tzus,Lhasa Apsos, Old English Sheepdogs, Pulik, and Afghan Hounds arebreeds that frequently get a utility haircut to help the owners deal withgrooming. However, dogs do not need “summer haircuts” if the ownercan keep them well-groomed so the hair can act as an insulator. It isdangerous for a dog to be “shaved down” close to the skin since they canactually get sunburn!
If, after all the work of brushing and bathing your dog the coat still seemsdry and in poor condition it is time to see your veterinarian. A poor coatcan be an indication of poor health which may be caused by poor nutrition.
ACTIVITYLeader Notes
BASIC GROOMING
143–DogCare and Training, Level I
KANSAS 4–H
EARSYour dog’s ears should look clean and smell clean. Use a damp cloth orcotton ball to clean the parts of the ear that you can see. Never stick acotton swab into your dog’s ear—even veterinarians are very carefulabout probing into an ear! If your dog’s ears smell bad or have a greatdeal of dark brown wax in them or if your dog acts like its ears hurt,(They may rub them on the floor, shake their head frequently and hard,scratch at their ears, or not want you to touch them.) then it is time for atrip to your veterinarian. Dogs with long ears (such as spaniels) are at ahigh risk of ear infections and they should be treated without delay. Whenyou see your veterinarian ask what is recommended regarding an earcleaning solution. If your dog has a great deal of hair on the inside of itsears (like Poodles) ask if you should remove it and how to do that.
TOENAILS AND FEETTrimming toenails can be a scary thing for dogs but few dogs wear theirtoenails down so their owners must trim them. If you are lucky your dogwas trained as a puppy to accept its toenails being trimmed. If not, havean adult help with this step.
Use nail clippers made for dogs. There are two types: one is a scissors-style. The other is called a guillotine style. They have an opening that youslide over the tip of the nail and the blade cuts off the nail.
To train your dog to have its nails trimmed chose a time when it is calm.Get your clippers ready and have some treats close by. If it “fights” you atany step try to distract it with food while you do that step and then end thesession. Start again after an hour or the next day and keep working on thatstep until it accepts and then move to the next step. Be patient. It will nothelp to get mad or yell at your dog but neither should it be allowed to biteyou.
1. Begin by lifting up the feet and touching the pads and toenails. Youmay reward the dog for not fussing. You may use a command such as“paw” to indicate that it is to lift the foot and let you hold it.
2. Touch the toenails and pads with the clippers and reward.
3. Cut a tiny bit off of one nail and reward.
4. Cut a tiny bit off of one nail on each foot and reward with praise, atreat and play.
5. Cut two nails on each foot, reward with praise, a treat and play.
Continue until your dog will accept all toenails being trimmed. If thebreeder failed to have the dewclaws removed be sure to trim those nails, too.
ACTIVITY Leader Notes
144–DogCare and Training, Level I
If your dog has long hair you should trim the hair that grows and thebottom of the foot around the pads. Have an adult help with this since it iseasy to cut a pad or cause a puncture wound on the foot. Blunt-endscissors will be safer to use. Trimming this hair helps prevent mud ballsand ice balls from packing in between the toes and also helps preventmats from forming and burrs from sticking to the feet.
EYESYour dog’s eyes should be clean of matter. Use a damp cloth to cleanyour dog’s face around the eyes. A daily deposit of matter is normal andoften includes debris such as dirt and hair that has been washed out of theeye. However, if your dog’s eyes get red and you observe a change in theamount of matter collecting at the corners of the eyes it is time to takeyour dog to the veterinarian. The eye may have been injured in some wayor may have a weed seed irritating it. If you have a young dog the eye-lashes may be turning in towards the eye as it grows and causingscratches on the eye every time it blinks. Be especially observant of theeyes if you have a dog such as a Pekingese or a Pug which have protuber-ant eyes with little protection.
TEETHYour dog’s teeth should look white and the breath should smell sweet—orat least, it should not smell bad. If your dog has yellow teeth it is time totake it to the “dog dentist” (your veterinarian) for a thorough cleaning.You will be able to start with your dog having a clean mouth.
To keep the teeth in good condition you should brush them about twice aweek to prevent plaque from building up and becoming tartar (the yellowstuff). You can use a soft human-type toothbrush or a soft cloth. Wipe (orbrush) the outside surface of each tooth, using water or a dog toothpaste.Your veterinarian can prescribe a special dog food that has research-proven dental benefits.
Bad breath can be a sign of infected teeth or gums or other poor health.Also watch for broken teeth, red or swollen gums, your dog avoiding yourtouch on one side of the mouth, or not wanting to eat. See your veterinar-ian if you observe any of these problems that last for several days. Aninfected tooth can lead to infection throughout the body.
DIALOGUE FOR CRITICAL THINKING:Share:
1. What are some of the steps in grooming a dog?
2. What are three tools you will need to groom your dog?
Process:3. Why is it beneficial to regularly groom your dog?
4. When might you need to bathe your dog?
ACTIVITYLeader Notes
BASIC GROOMING
145–DogCare and Training, Level I
KANSAS 4–H
Generalize:5. How can being well-groomed make a difference in your life?
6. What grooming practices are required at school? Why?
Apply:7. What grooming practices do you need to do better? Why?
GOING FURTHER:1. Visit a groomer or a dog breeder and watch the steps they follow to
groom a dog.
2. Attend a dog show and observe the grooming practices.
3. Read a book from library or buy a magazine on dog grooming.
4. Learn to groom dog for others or pet sit to earn money for dog activi-ties.
REFERENCES:Authors:Chris Odell, Obedience and Agility Instructor, Hutchinson, KS, Kennel
ClubJames P. Adams, Specialist, 4–H and Youth Programs, K-State Research
and Extension
Reviewed by:Dog Care and Training Design Team
ACTIVITY Leader Notes
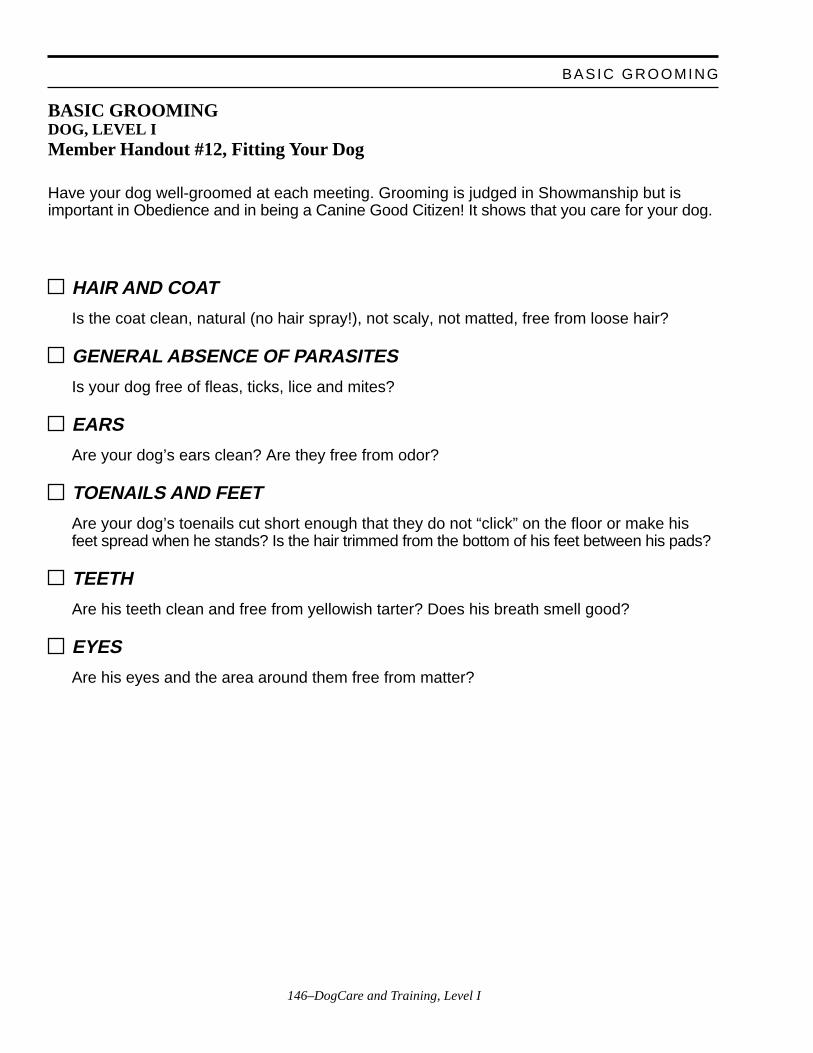
146–DogCare and Training, Level I
BASIC GROOMING
BASIC GROOMINGDOG, LEVEL IMember Handout #12, Fitting Your Dog
Have your dog well-groomed at each meeting. Grooming is judged in Showmanship but isimportant in Obedience and in being a Canine Good Citizen! It shows that you care for your dog.
HAIR AND COAT
Is the coat clean, natural (no hair spray!), not scaly, not matted, free from loose hair?
GENERAL ABSENCE OF PARASITES
Is your dog free of fleas, ticks, lice and mites?
EARS
Are your dog’s ears clean? Are they free from odor?
TOENAILS AND FEET
Are your dog’s toenails cut short enough that they do not “click” on the floor or make hisfeet spread when he stands? Is the hair trimmed from the bottom of his feet between his pads?
TEETH
Are his teeth clean and free from yellowish tarter? Does his breath smell good?
EYES
Are his eyes and the area around them free from matter?

147–DogCare and Training, Level I
KANSAS 4–H
BASIC GROOMINGDOG, LEVEL IActivity Sheet #15, Grooming Schedule
Dog's Name
When to do it?
TwiceWhat to do? Daily a Week Weekly Monthly Never
Comb and Brush
Give a Bath
Go to groomer forspecial haircut
Trim toenails
Trim hair on feet
Brush Teeth
Clean Ears
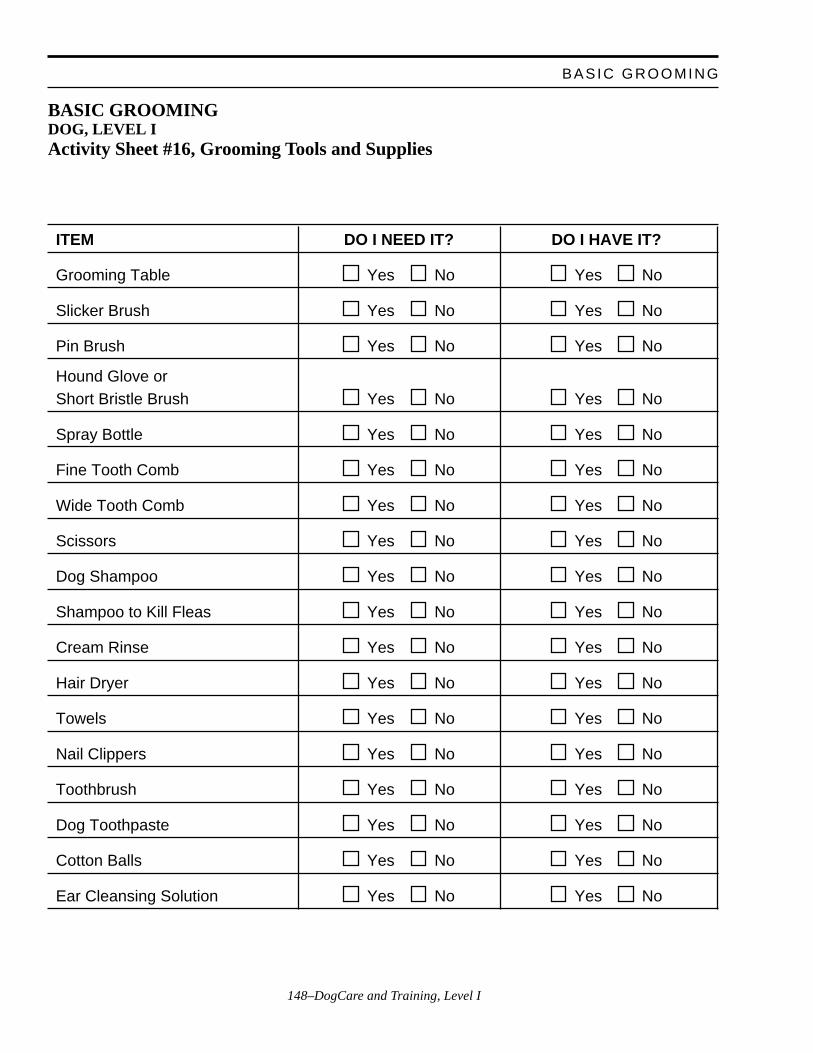
148–DogCare and Training, Level I
BASIC GROOMINGDOG, LEVEL IActivity Sheet #16, Grooming Tools and Supplies
ITEM DO I NEED IT? DO I HAVE IT?
Grooming Table Yes No Yes No
Slicker Brush Yes No Yes No
Pin Brush Yes No Yes No
Hound Glove orShort Bristle Brush Yes No Yes No
Spray Bottle Yes No Yes No
Fine Tooth Comb Yes No Yes No
Wide Tooth Comb Yes No Yes No
Scissors Yes No Yes No
Dog Shampoo Yes No Yes No
Shampoo to Kill Fleas Yes No Yes No
Cream Rinse Yes No Yes No
Hair Dryer Yes No Yes No
Towels Yes No Yes No
Nail Clippers Yes No Yes No
Toothbrush Yes No Yes No
Dog Toothpaste Yes No Yes No
Cotton Balls Yes No Yes No
Ear Cleansing Solution Yes No Yes No
BASIC GROOMING
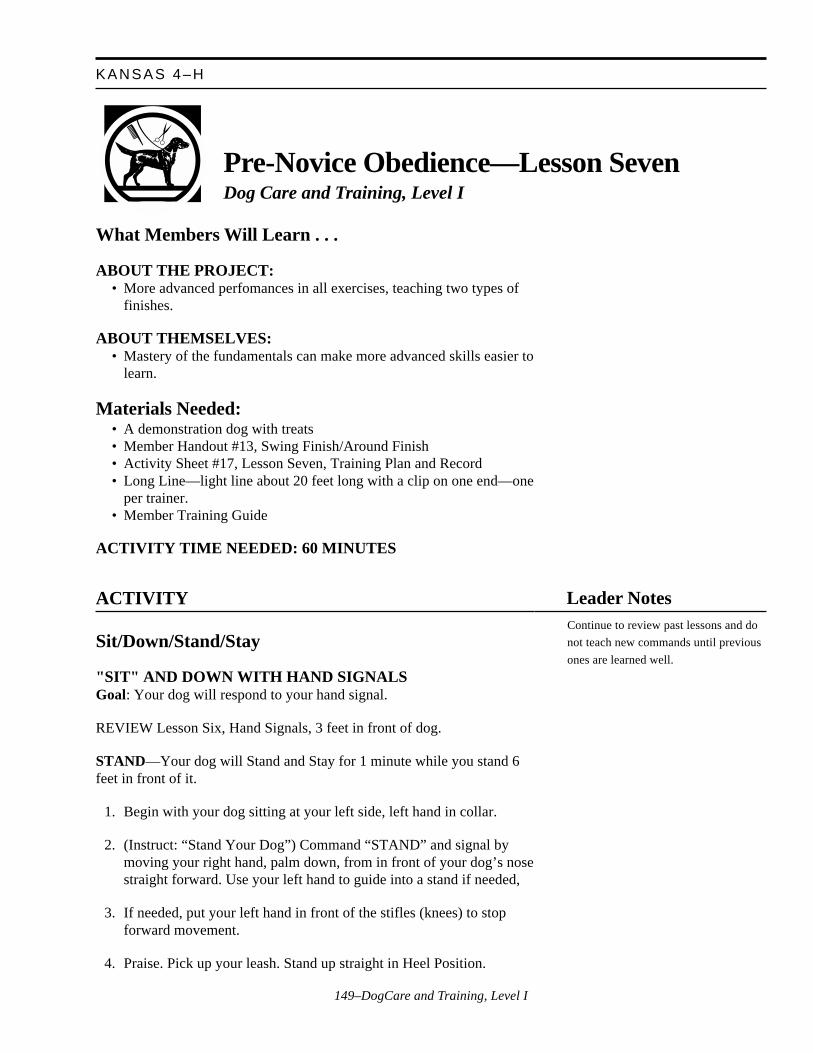
149–DogCare and Training, Level I
KANSAS 4–H
Pre-Novice Obedience—Lesson SevenDog Care and Training, Level I
What Members Will Learn . . .
ABOUT THE PROJECT:• More advanced perfomances in all exercises, teaching two types of
finishes.
ABOUT THEMSELVES:• Mastery of the fundamentals can make more advanced skills easier to
learn.
Materials Needed:• A demonstration dog with treats• Member Handout #13, Swing Finish/Around Finish• Activity Sheet #17, Lesson Seven, Training Plan and Record• Long Line—light line about 20 feet long with a clip on one end—one
per trainer.• Member Training Guide
ACTIVITY TIME NEEDED: 60 MINUTES
ACTIVITY
Sit/Down/Stand/Stay
"SIT" AND DOWN WITH HAND SIGNALSGoal: Your dog will respond to your hand signal.
REVIEW Lesson Six, Hand Signals, 3 feet in front of dog.
STAND—Your dog will Stand and Stay for 1 minute while you stand 6feet in front of it.
1. Begin with your dog sitting at your left side, left hand in collar.
2. (Instruct: “Stand Your Dog”) Command “STAND” and signal bymoving your right hand, palm down, from in front of your dog’s nosestraight forward. Use your left hand to guide into a stand if needed,
3. If needed, put your left hand in front of the stifles (knees) to stopforward movement.
4. Praise. Pick up your leash. Stand up straight in Heel Position.
Leader NotesContinue to review past lessons and do
not teach new commands until previous
ones are learned well.
150–DogCare and Training, Level I
5. (Instruct: “Leave Your Dog”) Command and signal "STAY,” step sixfeet in front of your dog (about one leash-length) and face him.
6. (Instruct: after 30 seconds, “Return to Your Dog.”
7. Return to Heel Position behind your dog.
8. (Instruct: “Exercise Finished”)
9. PAUSE, PRAISE, RELEASE, “FREE.”
In your practice add more time until your dog will stay 1 minute whileyou are 6 feet in front.
STAND FOR EXAMINATION: Your dog will Stand and Stay whilebeing examined.
1. Stand on the leash. Begin with your dog sitting at your left side, lefthand in collar.
2. (Instruct: “Stand Your Dog and leave when ready”) Command andsignal “STAND.”
3. If needed, put your left hand in front of the stifles (knees) to stopforward movement.
4. Praise. Pick up your leash. Stand up straight in Heel Position.
5. Command and signal “STAY,” step 3 feet in front of your dog, andface it.
6. Your dog will be examined by touching its head, shoulder, and rump.
7. (Instruct: “Back to Your Dog.” )
8. Walk around your dog to Heel Position.
9. PAUSE, PRAISE, RELEASE, “FREE.”
SIT-STAYGoal: Your dog will Sit and Stay with distractions while you are standing6 feet in front of it.
THE DISTRACTIONS (TRAINERS AT THE END OF THEIRLEASH, IN FRONT OF THEIR DOG.)A. Trainers all take a giant step or leap to the left. Take a step back to
center.
B. Trainers all take a giant step or leap to the right. Take a step back tocenter.
PRE-NOVICE OBEDIENCE—LESSON SEVEN
ACTIVITYLeader Notes
Do not have the dogs stand until the
examiner is ready to examine. This is
not a contest for the longest Stand—
Stay. In competition the time between
Stay and FREE will be about 30
seconds.
This week the distractions will be more
intense. It is a good time to remind the
trainers that their dogs are learning
when they make mistakes.
151–DogCare and Training, Level I
KANSAS 4–H
C. Trainers all take a giant step or jump toward the dog (be careful of itstoes). Take a step or jump away from the dog.
D. With the leash clipped to the buckle collar or through both rings of achain collar apply gentle pressure on the leash—just enough so thedog will brace against it. Release the pressure and praise. Repeat twotimes.
1. (Instruct: “Sit Your Dogs”) Command your dog to “SIT.”
2. (Instruct: “ Leave Your Dogs”) Command and signal your dog to“STAY.”
3. Step out briskly on your right foot, and go to the end of your leash.
4. Introduce distractions. If your dog does not get up Praise to let itknow it made the right choice. If your dog does get up, calmlyreplace it (with your Sit signal from in front, if possible), and tryagain. The dog is learning!
5. (Instruct: “Return to Your Dog”) Walk behind your dog to get toHeel Position.
6. (Instruct: “Exercise Finished”) PAUSE, PRAISE, RELEASE.
SIT-STAYGoal: Your dog will Sit and Stay for 1 minute while you are 20 feet infront of it. Your dog will remain sitting until you return to Heel Positionand release it.
Place your dog on a light line. Remove the regular leash.
1. (Instruct: “Sit Your Dogs”) Command your dog to “SIT.”
2. (Instruct: “Leave Your Dogs”) Command and signal your dog to“STAY.”
3. Step out briskly on your right foot, trailing the line through yourhand and dropping it as you go 20 feet away. Turn and face your dog.
5. Return and replace your dog when it breaks. Praise each time youreplace your dog once it is again in the correct position. If it gets uptwo times only go 6 feet away.
6. (Instruct after one minute: “Return to your Dog.”) Return to HeelPosition by walking quickly around behind your dog. If your doggets up as you are moving around, replace the dog into the SIT.
7. (Instruct: Exercise Finished”) PAUSE, PRAISE, RELEASE,“FREE.”
Leader Notes
The dog cannot be corrected with a light
line. It is being used to enable the trainer
to catch the dog if it gets up from the
Sit. It has a minor function as an
“anchor” to give the dog the impression
that it is still on a leash.
ACTIVITY:
152–DogCare and Training, Level I
DOWN—STAYGoal: Your dog will remain in a Down-Stay for 3 minutes while youstand 20 feet in front of it.
Begin with your dog sitting at your left side. Put the dogs on light lines.
First, REVIEW Down-Stay at 6 feet. If a dog is not successful at 6 feetDo Not have them progress to 20 feet.
1. (Instruct: “Down Your Dog”) Command “Down.” If needed, placeyour dog into a down position by guiding with the collar.
2. Stand up straight beside the dog.
3. (Instruct: “Leave Your Dog”) Command and signal “STAY.”
4. Step out briskly on your right foot, trailing the line through yourhand and dropping it as you go 20 feet away. Turn and face your dog.
5. (Instruct after 1 minute: “Return to Your Dogs”) Return back aroundyour dog to Heel Position.
6. (Instruct: “Exercise Finished”) PAUSE 5 seconds, PRAISE, andRELEASE, “FREE.”
Add more time until your dog will stay for 3 minutes.
Heeling
HEEL POSITION—RIGHT TURN, LEFT TURN ANDABOUT TURNPractice 4 Right Turns, 2 About Turns, and 4 Left Turns.
HEELING—LOOSE LEADHeeling for 3 minutes.
(Instruct: “Are you Ready?”) Trainers respond, “Ready.”
(Instruct: “Forward”) Command “ROVER, HEEL.”
(Instruct other directions: “About Turn.” “Circle Left.” “About Turn.”“Fast.” “Normal” “Halt.” “Forward.” “Slow.” “Normal.” “Circle Right.”“Halt.” etc.)
ACTIVITYLeader Notes
Continue to evaluate trainers on using a
loose lead. Trainers that are holding
their leads tightly will need to go back
to having their leash over their shoulder.
Include About turns, Circle Right (when
heeling clockwise), Circle Left (when
heeling counterclockwise), Changes of
Pace (Remember : “Fast” and “Slow”
are always followed by “Normal.”), and
Automatic Sit. (If the dog does not sit
automatically, then instruct the trainer to
hold onto the leash, heel forward three
steps, halt and “pop” up on lead.
PRE-NOVICE OBEDIENCE—LESSON SEVEN
153–DogCare and Training, Level I
KANSAS 4–H
Recalls
COME-FORE AND FINISH (USING A TREAT TO LURE INTOA SIT.)
1. (Instruct: “Forward”) Command “ROVER, HEEL.”
2. (Instruct: “Call Your Dog”) Let some slack into the leash. Begin towalk backwards.
3. Command “ROVER, COME.”
4. When your dog catches up to you stop. Using the treat as a lure,Command “SIT.”
5. When the dog sits, Praise and give the treat. Your dog should now besitting in front of you.
6. (Instruct: “Forward”) Command, “ROVER, HEEL.” Starting on yourleft foot, heel straight forward past the right of the dog (the dog’s leftshoulder).
Repeat twice.
FINISH—SWINGBegin with your dog sitting directly in front of you, toe-to-toe. This iswhere the dog will be at the end of a recall. The FINISH is when your dogreturns to Heel Position.
Demonstrate twice: facing the trainers and with your back to the trainers.Then have the trainers practice three swing finishes.
1. Leash and treat in left hand. Left hand should be centered in front ofyour body, dog’s attention on the treat.
2. (Instruct: “Finish”) Command “ROVER, SWING” as you move yourleft hand in a circle out to your left, behind your body, and back toyour hip and take two steps forward. Sit your dog in Heel Positionand give the treat.
3. (Instruct: “Exercise Finished”) PAUSE, PRAISE, RELEASE,“FREE.”
OPTION: FINISH—AROUNDSome trainers prefer to have their dogs return to Heel Position by walkingaround behind them and getting into their place. This is an allowable wayto have the dog finish and can be an advantage with a long-bodied dogthat has difficulties in getting straight with the SWING FINISH. Inaddition, you may wish to teach this finish for variety—many dogs knowboth. Then you can choose which way you want your dog to finish each
Leader Notes
This signal is given parallel to the floor
and is the path the dog’s nose should
take when doing a SWING FINISH. The
two steps forward are to get the rest of
the dog’s body in place. Trainers with
large dogs may need to take three steps,
those with small dogs may only need
one.
Do not practice the finish with the recall
from a Sit. The dogs will quickly learn
to anticipate the finish command and in
competition the dogs must sit in front
until the judge instructs, “FINISH.”
However, you may continue to have the
dogs FINISH as was taught with the
come-fore and the trainers may begin to
give the Command “Rover, Swing” , in
place of “Rover, Heel,” to get the dog
back in place for more heeling.
ACTIVITY:
154–DogCare and Training, Level I
time.
Practice the COME-FORE and FINISH—but this time practice with anAround FINISH. Step 6 will be different.
1. (Instruct: “Forward”) Command “ROVER, HEEL.”
2. (Instruct: “Call Your Dog”) Let some slack into the leash. Begin towalk backwards.
3. Command “ROVER, COME.”
4. When your dog catches up to you stop. Using the treat as a lure,Command “SIT.”
5. When the dog sits, Praise and give the treat. Your dog should now besitting in front of you.
6. Transfer the leash to your right hand.
7. (Instruct: “Forward”) Command, “ROVER, AROUND.” Starting onyour left foot heel straight forward past the left of the dog (the dog’sright shoulder).
8. Keep walking, passing the leash behind you from your right to lefthand and guiding the dog to Heel Position.
9. Praise the dog for getting to Heel Position.
Repeat two times before HALT and AUTOMATIC Sit.
Now set up for teaching the Around FINISH. Dog is sitting, you are infront of the dog, toe-to-toe. Lead and treat are in your right hand which iscentered on your body.
1. (Instruct: “Finish”) Command “ROVER, AROUND,” and signal bymoving your right hand out to your right, then around behind yourback where you will switch the leash to your left hand. During thismaneuver you will walk 2–3 steps forward, passing by the dog’sright shoulder. Keep the treat in your right hand.
2. As the dog comes around you to Heel Position, bring your right handwith the treat across the front of your body to lure into a Sit. Give thetreat.
3. (Instruct: “Exercise Finished”) PAUSE, PRAISE, RELEASE,“FREE.”
Practice three times.
ACTIVITYLeader Notes
Use Member Handout #13, Swing
Finish/Around Finish to further
illustrate.
PRE-NOVICE OBEDIENCE—LESSON SEVEN
155–DogCare and Training, Level I
KANSAS 4–H
RECALL FROM A SIT WITH HAND SIGNALGoal: Your dog will Stay until called.
Demonstrate the Recall Hand Signal. It is given with your left arm. Reachout with your left arm and scoop back toward your chest. This is like a“come here” sign you may give to a friend.
Arrange the trainers in one or two lines.
1. (Instruct: “Sit your Dogs”) Command “SIT.”
2. (Instruct: “Leave your Dogs”) Command and Signal “STAY.”
3. Go to the end of your lead, turn and face your dog, both hands atyour sides.
4. Hold your lead in your right hand with your hand at your side. Thelead should be without slack.
5. Command and signal “COME” with your left hand and pop back onthe leash with your right hand.
6. Take three steps backwards as the dog is coming to you.
7. Command and signal “SIT.’
8. (Instruct: “Exercise Finished”) PAUSE, PRAISE, RELEASE,“FREE.” stepping backwards.
Repeat with voice command only.
Repeat with signal only.
LONG DOWN FOR 30 MINUTESContinue working on the 30 minute down. Gradually increase the distanceand the distractions until your dog will remain down when you are eatingdinner, etc. Remember, when you give a command you have to be readyto replace your dog as many times as it gets up. Your dog isn’t allowed upuntil you RELEASE.
DIALOGUE FOR CRITICAL THINKINGShare:
1. What happened when you tried to distract your dog?
2. What was the difference in your dog at 20 feet compared to 6 feetaway? Why?
3. (If you had the members learn both the SWING and AROUNDFINISHES) Which FINISH was easier to teach to your dog? Why?
Leader Notes
If the dog is being difficult about sitting
don’t require a Sit this week. The
“come” needs to be positive.
In competition the trainer may give a
verbal command or a signal, not both.
Their hands must be at their sides except
when giving a signal.
Help members plan training periouds by
using Activity Sheet #17, Week Seven
Training Plan and Record.
Pass out Member Training Guide.
ACTIVITY:It is likely that the dogs will exhibit
some confusion during this exercise and
will anticipate the recall. They will
improve!
156–DogCare and Training, Level I
ACTIVITYLeader Notes
PRE-NOVICE OBEDIENCE—LESSON SEVEN
Process:4. What does it mean when a dog does a FINISH?
5. How does using food make teaching the SWING FINISH orAROUND FINISH hand signals easier?
6. What was done in earlier lessons that prepared the dog to learn theFINISH?
Generalize:7. If you needed to learn something complicated what could you do to
make it easier to learn?
Apply:8. How can you make large jobs seem like several small jobs? Why is
this helpful?
GOING FURTHER:
REFERENCES:Authors:Chris Odell, Obedience and Agility Instructor, Hutchinson, KS, Kennel
ClubJames P. Adams, Specialist, 4–H and Youth Programs, K-State Research
and Extension
Reviewed by:Dog Care and Training Design Team
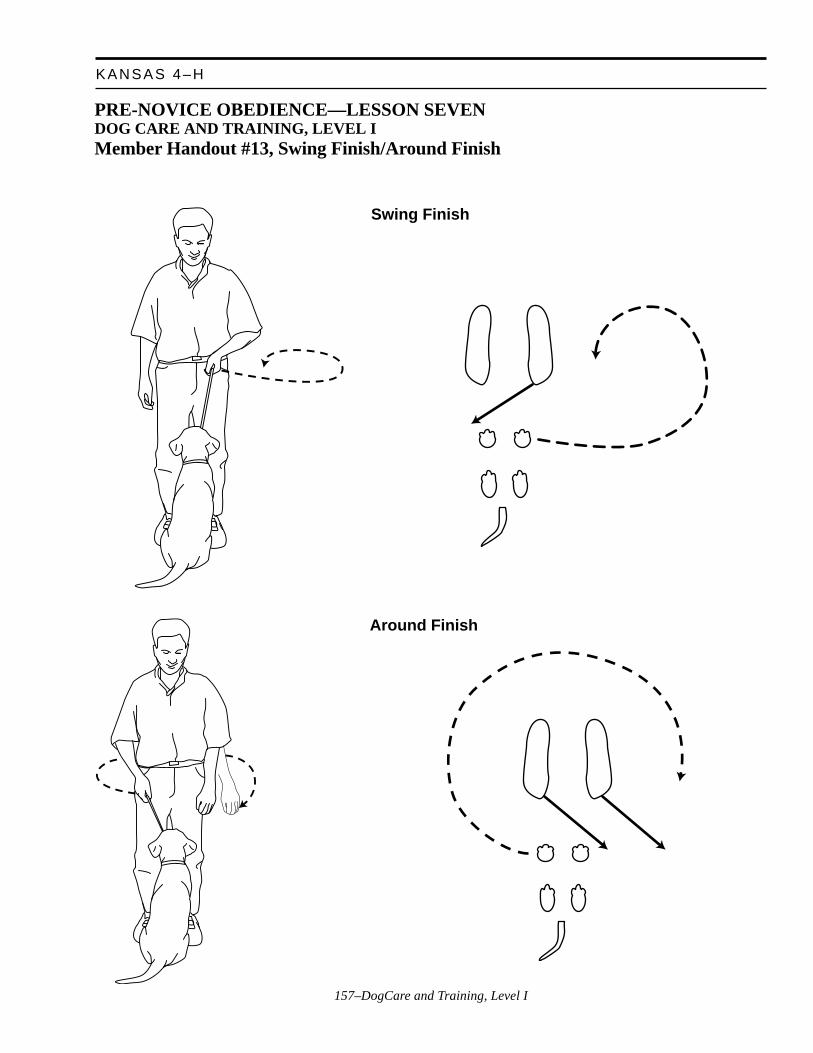
157–DogCare and Training, Level I
KANSAS 4–H
PRE-NOVICE OBEDIENCE—LESSON SEVENDOG CARE AND TRAINING, LEVEL IMember Handout #13, Swing Finish/Around Finish
Swing Finish
Around Finish

158–DogCare and Training, Level I
PRE-NOVICE OBEDIENCE—LESSON SEVEN
PRE-NOVICE OBEDIENCE—LESSON SEVENDOG CARE AND TRAINING, LEVEL IActivity Sheet #17, Lesson Seven Training Plan and RecordName________________________________ Dog _______________________________
Sit and Down with hand signals, Stand, Stand for Exam, Sit-Stay, Down-Stay, Heel Position:Right,Left, About Turns, Loose Lead Heeling, Come-Fore, Finish: Swing and/or Around, Re-call, 30-minute DOWN
Day/ What’s your planTime for this session? How did it work?
1.
2. good start
3.
4. keep working
5.
6. practice brings results
7.
8. above average!
9.
10. great work
11.
12. headed for Super Dog!
13.
14. go to the head of the class
159–DogCare and Training, Level I
KANSAS 4–H
PRE-NOVICE OBEDIENCE—LESSON SEVENDOG CARE AND TRAINING, LEVEL IMember Training Guide
Training Tools:• Treats• Training collar• Leash• Your dog• A long line• A helper to examine your dog.
ACTIVITY TIME NEEDED: 30 MINUTESTHREE TIMES THIS WEEK, 5–10 MINUTESAT LEAST SEVEN TIMES THIS WEEK
COMMANDS: “SIT.” “DOWN.” “STAND,.”“STAY,” “HEEL.” “COME.” “FREE.”“SWING.” “AROUND”
SIT/DOWN/STAND/STAY
SIT AND DOWN WITH HAND SIGNALSGoal: Your dog will respond to your hand signal.
REVIEW Lesson Six, Hand Signals, 3 feet in frontof dog.
STAND—Your dog will stand and stay for 1 minutewhile you stand 6 feet in front of him.
1. Begin with your dog sitting at your left side, lefthand in collar.
2. Command and signal “STAND.” Use your lefthand to guide into a stand if needed.
3. If needed, put your left hand in front of thestifles (knees) to stop forward movement.
4. Praise. Pick up your leash. Stand up straight inHeel Position.
5. Command and signal “STAY.” step six feet infront of your dog (about one leash-length) andface it.
6. After 30 seconds return around behind your dogto Heel Position.
7. PAUSE, PRAISE, RELEASE, “FREE.”
In your practice add more time until your dog willstay 1 minute while you are 6 feet in front.
STAND FOR EXAMINATION: Your dog willstand and stay while being examined.
1. Stand on the leash. Begin with your dog sittingat your left side, left hand in collar.
2. Command and signal “STAND.”
3. Praise. Pick up your leash. Stand up straight inHeel Position.
4. Command and signal “STAY.” Step 3 feet infront of your dog and face it.
5. Your dog will be examined by touching its head,shoulder, and rump.
6. Walk around your dog back to Heel Position.
7. PAUSE, PRAISE, RELEASE, “FREE.”
SIT-STAYGoal: Your dog will Sit and Stay with distractionswhile you are standing 6 feet in front of it.
THE DISTRACTIONS (START AT THE ENDOF YOUR LEASH IN FRONT OF YOURDOG.)A. Take a giant step or leap to the left. Take a step
back to center.
B. Take a giant step or leap to the right. Take a stepback to center.
C. Take a giant step or jump toward your dog. Takea step or jump away from your dog.
D. With the leash clipped to the buckle collar orthrough both rings of a chain collar apply gentlepressure on the leash—just enough so your dogwill brace against it. Release the pressure andPraise. Repeat two times.
160–DogCare and Training, Level I
PRE-NOVICE OBEDIENCE—LESSON SEVEN
1. Command your dog to “SIT.”
2. Command and signal your dog to “STAY.” Stepout briskly on your right foot, and go to the endof your leash.
3. Introduce distractions. If your dog does not getup, Praise to let it know it made the right choice.If your dog does get up, calmly replace it (withyour Sit signal from in front, if possible), and tryagain. Your dog is learning!
4. Walk around behind your dog to get to HeelPosition.
5. PAUSE, PRAISE, RELEASE.
SIT-STAYGoal: Your dog will Stay for one minute while youare 20 feet in front of it. Your dog will remain sittinguntil you return to Heel Position and release him.
Place your dog on a light line. Remove the regularleash.
1. Command your dog to “SIT.”
2. Command and signal your dog to “STAY.” Stepout briskly on your right foot, trailing the linethrough your hand and dropping it as you go 20feet away. Turn and face your dog.
3. Return and replace your dog when it breaks.Praise each time you replace your dog once it isagain in the correct position. If it gets up twotimes, only go 6 feet away.
4. After one minute return to Heel Position bywalking around behind your dog. If your doggets up as you are moving around, replace yourdog into the Sit.
5. PAUSE, PRAISE, RELEASE, “FREE.”
DOWN—STAYGoal: Your dog will remain in a Down-Stay for threeminutes while you stand 20 feet in front of it.
Begin with your dog sitting at your left side. Put thedog on a light line.
First REVIEW Down-Stay at 6 feet. If your dog isnot successful at 6 feet Do Not progress to 20 feet.
1. Command “DOWN.” If needed, place your doginto a down position by guiding with the collar.
2. Stand up straight beside your dog. Command andsignal “STAY.”
3. Step out briskly on your right foot, trailing theline through your hand and dropping it as you go20 feet away. Turn and face your dog.
4. After 1 minute return back around your dog toHeel Position.
5. PAUSE 5 seconds, PRAISE, and RELEASE,FREE.
Add more time until your dog will stay for threeminutes.
Heeling
HEEL POSITION—RIGHT TURN, LEFTTURN AND ABOUT TURNPractice 4 right turns, 2 about turns, 4 left turns.
HEELING—LOOSE LEADHeeling for 3 minutes.
Include Forward, Circle Right, Circle Left, AboutTurn, Fast, Slow, Halt.
Recalls
COME-FORE AND FINISH (USING ATREAT TO LURE INTO A SIT.)
1. Command “ROVER, HEEL,” and begin heelingforward.
2. Let some slack into the leash. Begin to walkbackwards.
3. Command “ROVER, COME.”
4. When your dog catches up to you stop. Using thetreat as a lure, Command “SIT.”
161–DogCare and Training, Level I
KANSAS 4–H
5. When your dog sits in front of you Praise andgive the treat.
6. Command, “ROVER, HEEL.” Starting on yourleft foot, heel straight forward past your dog’sleft shoulder.
Repeat twice.
FINISH—SWINGBegin with your dog sitting directly in front of you,toes-to-toes. This is where your dog will be at the endof a recall. The FINISH is when your dog returns toHeel Position.
1. Leash and treat in left hand. Left hand should becentered in front of your body, dog’s attention onthe treat.
2. Command “ROVER, SWING” as you moveyour left hand in a circle out to your left, behindyour body, and back to your hip and take twosteps forward. Sit your dog in Heel Position andgive the treat.
3. PAUSE, PRAISE, RELEASE, “FREE.”
OPTION: FINISH—AROUNDPractice the COME-FORE and FINISH—but thistime practice with an AROUND FINISH. Step 6 willbe different.
1. Command “ROVER, HEEL”
2. Let some slack into the leash. Begin to walkbackwards.
3. Command “ROVER, COME.”
4. When your dog catches up to you stop. Using thetreat as a lure, Command “SIT.”
5. When your dog sits, Praise and give the treat.Your dog should now be sitting in front of you.
6. Transfer the leash to your right hand.
7. Command, “ROVER, AROUND.” Starting onyour left foot heel straight forward past yourdog’s right shoulder (to the left of your dog).
8. Keep walking, passing the leash behind you fromyour right to left hand and guiding your dog toHeel Position.
9. Praise your dog for getting to Heel Position.
Repeat two times before HALT and AUTOMATICSit.
Now set up for teaching the AROUND FINISH. Yourdog is sitting, you are in front of your dog, toe-to-toe.Lead and treat are in your right hand which is cen-tered on your body.
1. Command “ROVER, AROUND” and signal bymoving your right hand out to your right, thenaround behind your back where you will switchthe leash to your left hand. During this maneuveryou will walk 2 - 3 steps forward, passing byyour dog’s right shoulder. Keep the treat in yourright hand.
2. As your dog comes around you to Heel Positionbring your right hand with the treat across thefront of your body to lure it into a Sit. Give thetreat.
3. PAUSE, PRAISE, RELEASE, “FREE.”
Practice three times.
RECALL FROM A SIT WITH HANDSIGNALGoal: Your dog will stay until called.
1. Command “SIT.” Command and signal“STAY.”
2. Go to the end of your lead, turn and face yourdog, both hands at your sides.
3. Hold your lead in your right hand with your handat your side. The lead should be without slack.
4. Command and signal with your left hand COMEand pop back on the leash with your right hand.
5. Take three steps backwards as your dog iscoming to you.
6. Command and signal “SIT.”
162–DogCare and Training, Level I
PRE-NOVICE OBEDIENCE—LESSON SEVEN
7. PAUSE, PRAISE, RELEASE, “FREE,” steppingbackwards.
Repeat with voice command only.
Repeat with signal only.
LONG DOWN FOR 30 MINUTESContinue working on the 30 minute down. Graduallyincrease the distance and the distractions until yourdog will remain down when you are eating dinner,etc. Remember, when you give a command you haveto be ready to replace your dog as many times as itgets up. Your dog isn’t allowed up until you RE-LEASE.
163–DogCare and Training, Level I
KANSAS 4–H
Introduction to ShowmanshipDog Care and Training, Level I
What Members Will Learn . . .
ABOUT THE PROJECT:• What is involved in 4-H Dog Showmanship
ABOUT THEMSELVES:• How to gain confidence and poise by working in front of an audience
Materials Needed:• Grooming or examination table (if your demonstration dog or any
dog in the class is 12 inches high or less)• Chalkboard or Whiteboard, etc.• Sample armbands
ACTIVITY TIME NEEDED: 30 MINUTES FOR ADEMONSTRATION. 50 MINUTES FOR MEMBERSPARTICIPATING WITH THEIR DOGS
ACTIVITY
ENTER THE SHOW RINGWhen the judge gives the signal, enter the ring and move your dog at itsnatural gait in a counter-clockwise circle around the ring. Always keepthe dog between you and the judge, even if the judge asks you to reversedirections.
Leader Notes
This lesson is intended as a brief
introduction to Ring Procedure and to
build their anticipation for the actual
showmanship lessons. It can be
presented in two ways. You could have
one or two older members experienced
in showmanship demonstrate as you (or
they) explain the procedures. A second
member could play the role of “Judge.”
This would allow the members to see
the “big picture” of how all the parts of
Showmanship Training will fit together
and maybe to decide if they want to
participate in that phase of the dog project.
The second way to use this lesson is as a
pre-lesson to showmanship training. The
members would bring their dogs and
actually try these procedures. This will
be too much information for them to
process in one session, but it will give
them a chance to get their dogs used to
the training site and you a chance to
164–DogCare and Training, Level I
ACTIVITYLeader Notes
INTRODUCTION TO SHOWMANSHIP
LINE UPWhile gaiting your dog around the ring, the judge will direct you to stop.Leave no less than three feet between your dog and the dog ahead of you.Stack your dog while waiting for your turn at the individual examination.As each dog is examined, the entire line of dogs move up a space towardthe judge.
STACKDogs 12 inches or under may be stacked for individual examination on anexamination or grooming table. Dogs over 12 inches are shown on theground or on a table at the member’s option.
Set your dog up on the table or the ground so the judge gets a side viewof the dog at its best according to its breed standard. If your dog is amixed breed, it should be shown by the standards of the breeds it mostresembles. When stacking a dog start with the front legs, move them intoplace by cupping your hand around the elbow joint. The hind legs aremoved into place by cupping the hand around the stifle joint by graspingthe hock joint.
You can now use the stand/stay command as you hold the head high andmake the dog look alert. You can do this with the collar or by holding thehead with your right hand.
INDIVIDUAL EXAMINATIONAfter your dog is stacked, each dog will have a hands-on examination bythe judge with particular attention paid to the head, eyes, ears and teeth.The judge is looking for a clean, well-groomed dog in good condition thathas been trained to stand calmly.
The judge will ask you to show the dog’s teeth. Place your hand over themuzzle and with thumb and fingers, gently pull the lips back and up.When the judge examines the hindquarters you may move in front of thedog to encourage it not to step forward.
informally evaluate their dogs. You will
be letting them learn by experience. If
you use the lesson in this way you can
have the members contribute to a list of
“things we need to learn.” This will give
them a goal for the Showmanship
Training lessons.
If the members are participating stop
now to ask some leading questions such
as: Did you see any problems with
entering and lining up? Did any of the
dogs seem to get bunched up? Why did
that happen?
If the members are participating be very
careful on the Examination. If a dog
does not want to be touched don’t push
it this time—just make a mental note for
future sessions. This member should be
instructed to practice handling the dog
all over—and to have family members
do the same.
The members will likely experience
frustration in getting their dog to stack.
This is a normal feeling. Leading
question: “Does anyone see anything we
may need to work on here”?
You could make a quick grooming
assessment (dog needs a bath, teeth need
some work, brushing would make the
coat look much better, etc.) as you
examine the dogs.

165–DogCare and Training, Level I
KANSAS 4–H
Leader NotesACTIVITY
GAITAfter the examination is completed, the judge will ask you to gait yourdog using a specific pattern. The “L” and “Triangle” patterns are fre-quently used. The triangle left pattern allows the dog to remain on yourleft side at all times. It does not require changing the lead from the left tothe right hand. The “L” pattern is trickier. You will need to move yourdog from your left side to your right at least once (and change the handyour lead is in).
If the members are participating keep
this part upbeat with positive comments.
You are intentionally creating a
frustration level to make the members
eager for more training but you do not
want to make them discouraged.
Comments that may be appropriate:
“Look at how the dog is watching its
handler,” “That was a good way to do
that turn,” “This dog has a nice gait,”
“Your speed is just right for this dog.”THE “L” PATTERN
APPROX. 25'
AP
PR
OX
. 25'
Judge
GOING AWAYFROM JUDGE
COMING BACKTO JUDGE
THE “TRIANGLE” PATTERN
APPROX. 25'
AP
PR
OX
. 25'
Judge
GOING AWAYFROM JUDGE
COMING BACKTO JUDGE
RETURNING TO THE JUDGEUpon returning to the judge, present your dog in a natural pose (notstacked). Return to the end of the line when the judge dismisses you fromthe individual portion of the judging.
KEY POINTSUse a lighter weight show collar and lead than you would use in obedi-ence training. It should give you control of your dog but not attractattention.
Wear your armband identification on your left arm.
Always have your dog under control and keep your composure. Smile.
Watch the judge and know where your dog is at all times.
Keep the dog between yourself and the judge at all times. This may meanyou move around the stationary dog or change the hand from the left tothe right as you turn corners while moving the dog.
Do not drape yourself over the dog’s back when stacking.
Do not step over the dog.
Stay alert. Keep your dog posed as best as you can the entire time you arein the ring.
166–DogCare and Training, Level I
ACTIVITYLeader Notes
Make a list of member’s ideas.
Refer to lessons on Grooming Basics,
Selecting Dog Equipment, Attention,
Dog Show Procedures—Basic and the
Showmanship Lessons for more
information.
INTRODUCTION TO SHOWMANSHIP
Keep the part of the lead not needed to control your dog neatly folded upin your hand.
We will be doing some more work with showmanship. What are some ofthe things that you see we’ll need to work on?
DIALOGUE FOR CRITICAL THINKINGShare:
1. What happened when you first tried to show your dog?
2. What was most difficult? Easiest?
Process:3. Why do you take the dogs around the ring in a counter-clockwise
direction?
4. When a judge is evaluating a dog he or she wants to see the dog’smovement from four different views. What are these views?
5. What are some things you could do to get your dog used to beingexamined by a judge?
Generalize:6. What can you do to keep from being nervous when doing something
in front of other people?
Apply:7. What will you do differently the next time you are in front of a
group?
GOING FURTHER:1. Attend a dog show to watch the handlers in conformation and the
showmanship classes. Observe how they move and how their dogsmove.
2. Watch a dog show on television to observe the showmanship.
167–DogCare and Training, Level I
KANSAS 4–H
REFERENCES:“Bounding Ahead: Dog 2. 4-H Skills for Life Animal Science Series.”
North Central Region Extension Publication 416-1993, c 1993.pp. 22-23
Kansas 4-H Dog Show Rule Book. Kansas State Cooperative ExtensionService, February, 2000. (S-46)
Authors:Chris Odell, Obedience and Agility Instructor, Hutchinson, KS, Kennel
ClubJames P. Adams, Specialist, 4–H and Youth Programs, K-State Research
and Extension
Reviewed by:Dog Care and Training Design Team
Leader NotesACTIVITY

168–DogCare and Training, Level I
INTRODUCTION TO SHOWMANSHIP
169–DogCare and Training, Level I
KANSAS 4–H
Pre-Novice Obedience—Lesson EightDog Care and Training, Level I
What Members Will Learn . . .
ABOUT THE PROJECT:• Polishing for competition• Learning the Figure 8 Heeling Pattern.
ABOUT THEMSELVES• Teaching is hard work but fun!
Materials Needed:• A demonstration dog with treats• Member Handout #14, Figure 8• Activity Sheet #18, Lesson 8 Eight, Training Plan and Record• Long Line—light line about 20 feet long with a clip on one end—one
per member.• Member Training Guide
ACTIVITY TIME NEEDED: 45 MINUTES
ACTIVITY
SIT/DOWN/STAND/STAY
SIT AND DOWN WITH HAND SIGNALSGoal: Your dog will respond to your hand signal.
REVIEW Lesson Six, Hand Signals, 3 feet in front of dog.
STAND FOR EXAMINATION: Your dog will stand and stay whilebeing examined.
1. Drop the leash. Begin with your dog sitting at your left side, left handin collar.
2. (Instruct: “Stand Your Dog and Leave When Ready”) Command andsignal “STAND.”
3. If needed, put your left hand in front of the stifles (knees) to stopforward movement.
4. Praise. Pick up your leash. Stand up straight in Heel Position.
Leader Notes
Continue to review past training lessons
and do not teach new commands until
previous ones are learned well!
Remember - Members and dogs are
NOT competing against each other.
They are working to achieve a standard
of excellence available to everyone.
170–DogCare and Training, Level I
5. Command and signal “STAY.” Step 6 feet in front of your dog, andface it.
6. Your dog will be examined by touching its head, shoulder, and rump.
7. (Instruct: “Back to Your Dog.” )
8. Walk around your dog back to Heel Position.
9. (Instruct: “Exercise Finished”)
10. PAUSE, PRAISE, RELEASE, “FREE.”
SIT-STAY WITH DISTRACTIONSGoal: Your dog will Sit and Stay with distractions while you are standing6 feet in front of it, holding the leash.
WEEK 8 DISTRACTIONSA. Any distractions from Lesson Seven.
B. Instructor play “fetch” with a dog behind the members.
C. Instructor standing at least 6 feet from any dog calling out “FREE.”
D. Knock on the door, “Who’s there?”
E. Have spectators clap.
F. Have spectators and members clap.
1. (Instruct: “Sit Your Dogs”) Command your dog to “SIT.”
2. (Instruct: “ Leave Your Dogs”) Command and signal your dog to“STAY.”
3. Step out briskly on your right foot, and go to the end of your leash.
4. Introduce distractions. If your dog does not get up, Praise to let itknow it made the right choice. If your dog does get up, calmlyreplace it (with your Sit signal from in front, if possible) and tryagain. Your dog is learning!
5. (Instruct: “Return to Your Dog”) Walk around behind your dog toget to Heel Position.
6. (Instruct: “Exercise Finished”) PAUSE, PRAISE, RELEASE.
ACTIVITYLeader Notes
PRE-NOVICE OBEDIENCE—LESSON E IGHT

171–DogCare and Training, Level I
KANSAS 4–H
SIT-STAY WITH DISTANCEGoal: Your dog will Sit and Stay for one minute while you are 20 feet infront of it. Your dog will remain sitting until you return to Heel Positionand release it.
Place your dog on a light line. Remove the regular leash.
1. (Instruct: “Sit Your Dogs”) Command your dog to “SIT.”
2. (Instruct: “Leave Your Dogs”) Command and signal your dog to“STAY.”
3. Step out briskly on your right foot, trailing the line through yourhand and dropping it as you go 20 feet away. Turn and face your dog.
4. Return and replace your dog when it breaks. Praise each time youreplace your dog once it is again in the correct position. If it gets uptwo times only go 6 feet away.
5. (Instruct after 1 minute: “Return to Your Dog”) Return to HeelPosition by walking quickly around behind your dog. If your doggets up as you are moving around, replace the dog into theSit.
6. (Instruct: Exercise Finished”) PAUSE, PRAISE, RELEASE,“FREE.”
Optional Extra Challenge: Have all of the members go 20 feet awayfrom their dogs, leave the room (or go out of sight behind a van, etc.) andimmediately return.
DOWN-STAY WITH DISTRACTIONSGoal: Your dog will down and stay with distractions while you arestanding six feet in front of it, holding the leash.
Follow same procedure as for Sit-Stay with Distractions.
DOWN-STAY WITH DISTANCEGoal: Your dog will remain in a Down-Stay for 3 minutes while youstand 20 feet in front of it.
Follow the same procedure as for Sit-Stay with Distance.
Heeling
HEEL POSITION—RIGHT TURN, LEFT TURN ANDABOUT TURNPractice: 4 Right Turns, 2 About Turns, Four Left Turns.
Leader NotesACTIVITY:
172–DogCare and Training, Level I
HEELING—LOOSE LEADHeeling for 3 minutes.
(Instruct: “Are you Ready?”) members respond, “Ready”
(Instruct: “Forward”) Command “ROVER, HEEL.”
(Instruct other directions: “About Turn.” “Circle Left.” “About Turn.”“Fast.” “Normal” “Halt.” “Forward.” “Slow.” “Normal.” “Circle Right.”“Call Your Dog.” etc.
HEELING—FIGURE 8Goal: Your dog will Stay in Heel Position as you change direction andspeed.
Set up for the Figure 8. Posts 8 feet apart, member and dog about 2 feetback from the center of the “8.”
1. (Instruct: “Forward”) Command, “ROVER, HEEL.” Heel withexaggerated slow steps around the post to your left.
2. Change to a normal pace as you get around the post.
3. Heel with exaggerated fast steps once you get to the center andaround the right post.
4. Normal pace as you get around the right post.
5. Slow pace as you begin to go around the left post.
6. (Instruct: “Halt”) Stop. Your dog should do an AUTOMATIC SIT.
In competition you will have 2 “halts” and you must halt when directed.
RECALLSFINISH—SWINGBegin with your dog sitting directly in front of you, toe-to-toe.
1. Leash and treat in left hand. Both hands should be at your sides,dog’s attention on your face.
2. (Instruct: “Finish”) Command “ROVER, SWING,” as you moveyour left hand to the front of of your body (above the dog’s nose), ina circle out to your left, behind your body, and back to your hip. Sityour dog in Heel Position and give the treat.
3. (Instruct: “Exercise Finished”) PAUSE, PRAISE, RELEASE,“FREE.”
Practice three times.
ACTIVITYLeader NotesContinue to evaluate members on using
a loose lead. Members that are holding
their leads tightly will need to go back
to having their leash over their shoulder.
Include About turns, Circle Right (when
heeling clockwise), Circle Left (when
heeling counterclockwise), Changes of
Pace (Remember : “Fast” and “Slow”
are always followed by “Normal.”)
AUTOMATIC SIT and COME-FORE.
For the training you will be using two
members and their dogs as the posts for
the Figure 8. They will be standing
facing each other with their dog in a Sit-
Stay beside them. In actual competition
the posts will be two people without
dogs. For training you will have the
members do an exaggerated slow and
fast with their dogs. In competition the
member keeps the same pace—the dog
must change pace to keep up as it is on
the inside or outside curves. Although
the member is allowed to begin the
Figure 8 by going around the left or the
right post, the left is what will be taught
as it generally will result in a better
performance.
Use Member Handout #14, Figure 8 to
further illustrate.
Have members switch places so all will
have practice.
The steps forward after the SWING are
eliminated in this lesson. Return to
Lesson Seven for those dogs that are not
getting their whole body into Heel
Position. This also applies to the
AROUND FINISH.
PRE-NOVICE OBEDIENCE—LESSON E IGHT
173–DogCare and Training, Level I
KANSAS 4–H
OPTION: FINISH-AROUNDBegin with your dog sitting directly in front of you, toe-to-toe.
1. Leash and treat in right hand. Both hands should be at your sides,dog’s attention on your face.
2. (Instruct: “Finish”) Command “ROVER, HEEL” and signal bymoving your right hand up toward your stomach (above your dog’snose), out to your right, then around behind your back where you willswitch the leash to your left hand. Keep the treat in your right hand.
3. As the dog comes around you to Heel Position, bring your right handwith the treat across the front of your body to lure into a Sit. Give thetreat.
4. (Instruct: “Exercise Finished”) PAUSE, PRAISE, RELEASE, FREE.
Practice three times.
RECALL FROM A SIT WITH HAND SIGNALGoal: Your dog will stay until called.
Arrange the members in one or two lines.
1. (Instruct: “Sit your Dogs”) Command “SIT.”
2. (Instruct: “Leave your Dogs”) Command and Signal “STAY.”
3. Go to the end of your lead, turn and face your dog, both hands atyour sides.
4. Hold your lead in your right hand with your hand at your side. Thelead should be without slack.
5. Command and signal “COME” and pop back on the leash with yourright hand. (Notice that the dog will not feel the correction if it isalready moving toward the member.)
6. If your dog does not sit in front switch the leash to your left hand andgive the Sit signal/correction.
7. (Instruct: “Exercise Finished”) PAUSE, PRAISE, RELEASE,“FREE.” stepping backwards.Repeat with voice command only. Repeat with signal only.
8. Test the dog. Will it sit in front if you do not command or signal Sit?You will not be allowed to Command Sit in competition.
Leader NotesACTIVITY:

174–DogCare and Training, Level I
DISTRACTIONS FOR RECALL:A. “Accidentally” give a slight pull on the leash as you turn to face your
dog.
B. When facing your dog, reach up and scratch your nose with your lefthand.
C. When facing your dog, open your mouth and take a breath as if youwere going to say “ROVER, COME.”
Praise your dog if it recognizes that you weren’t really calling it. Replaceit gently if it thought you were calling. Repeat until it learns to discrimi-nate.
RECALL with FINISH
Call the dog from 6 feet away, on lead. FINISH. Only do this twice. Forevery recall with a finish you should do 2 RECALLS without a FINISHand 2 FINISHES without a RECALL. Try to keep these two parts sepa-rate! In competition your dog must remain sitting in front of you until thejudge instructs you to FINISH.
1. (Instruct: “Are You Ready?”) Make sure your dog is sitting in HeelPosition before you answer “Ready.”
2. (Instruct: “Leave Your Dog”) Command and Signal “STAY.” stepout with your right foot, go 6 feet, and turn and face your dog.
3. (Instruct: “Call Your Dog”) Keep your hands at your sides unlessyou are giving a signal. Command or signal, “ROVER, COME.”Your dog should come to sit in front of you with no extra help.
4. (Instruct: “Finish”) Give a Signal or Command for the FINISH“ROVER, SWING” or “ROVER, AROUND.” Hands at your sidesunless giving a signal.
5. (Instruct: “Exercise Finished”) PRAISE, RELEASE, “FREE.”
LONG DOWN FOR 30 MINUTESContinue working on the 30 minute down. Gradually increase the distanceand the distractions until your dog will remain down when you are eatingdinner, etc. Remember, when you give a command you have to be readyto replace your dog as many times as it gets up.Your dog isn’t allowed upuntil you RELEASE.
ACTIVITYLeader Notes
Help members plan training periods by
using Activity Sheet #18, Week Eight
Training Plan and Record.
Pass out Member Training Guide.
PRE-NOVICE OBEDIENCE—LESSON E IGHT
175–DogCare and Training, Level I
KANSAS 4–H
DIALOGUE FOR CRITICAL THINKINGShare:
1. What are three of the exercises your dog has learned?
2. What was the hardest exercise to teach your dog? Why?
Process:3. What is different in the Figure 8 from what your dog has already
learned?
4. Some dogs seemed to do better in class than others. What could besome of the reasons?
5. Which of these reasons would a member have control over?
Generalize:6. When a lesson is presented at school what are some reasons some
students might do better than others?
Apply:7. How can you make learning fun?
GOING FURTHER:1. Observe a Pre-Novice Obedience class at a show.
2. Watch a Novice Obedience class to see what is next.
REFERENCES:Authors:Chris Odell, Obedience and Agility Instructor, Hutchinson, KS, Kennel
ClubJames P. Adams, Specialist, 4–H and Youth Programs, K-State Research
and Extension
Reviewed by:Dog Care and Training Design Team
Leader NotesACTIVITY:

176–DogCare and Training, Level I
PRE-NOVICE OBEDIENCE—LESSON E IGHT
PRE-NOVICE OBEDIENCE—LESSON EIGHTDOG CARE AND TRAINING, LEVEL IMember Handout #14, Figure 8
FAST
FA
ST
N O R M A L
SL
OW
NORMAL
NO
RM
A L
Post8'
2'
Post
LR
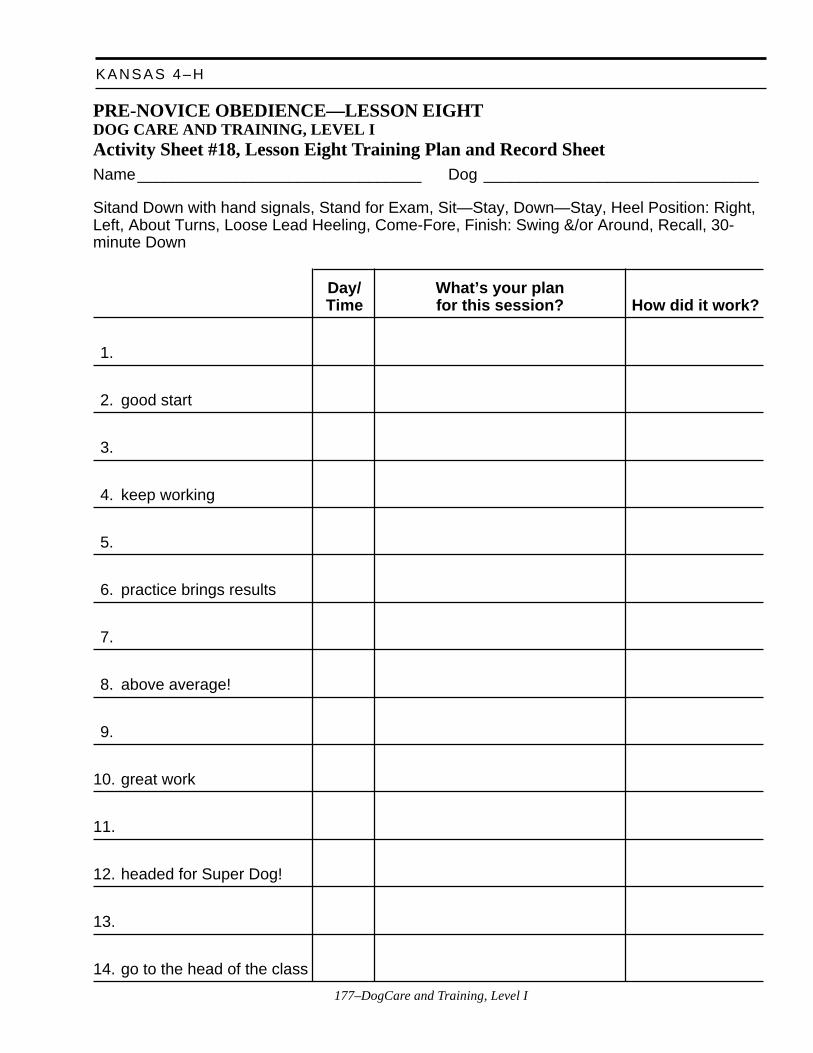
177–DogCare and Training, Level I
KANSAS 4–H
PRE-NOVICE OBEDIENCE—LESSON EIGHTDOG CARE AND TRAINING, LEVEL IActivity Sheet #18, Lesson Eight Training Plan and Record SheetName________________________________ Dog _______________________________
Sitand Down with hand signals, Stand for Exam, Sit—Stay, Down—Stay, Heel Position: Right,Left, About Turns, Loose Lead Heeling, Come-Fore, Finish: Swing &/or Around, Recall, 30-minute Down
Day/ What’s your planTime for this session? How did it work?
1.
2. good start
3.
4. keep working
5.
6. practice brings results
7.
8. above average!
9.
10. great work
11.
12. headed for Super Dog!
13.
14. go to the head of the class
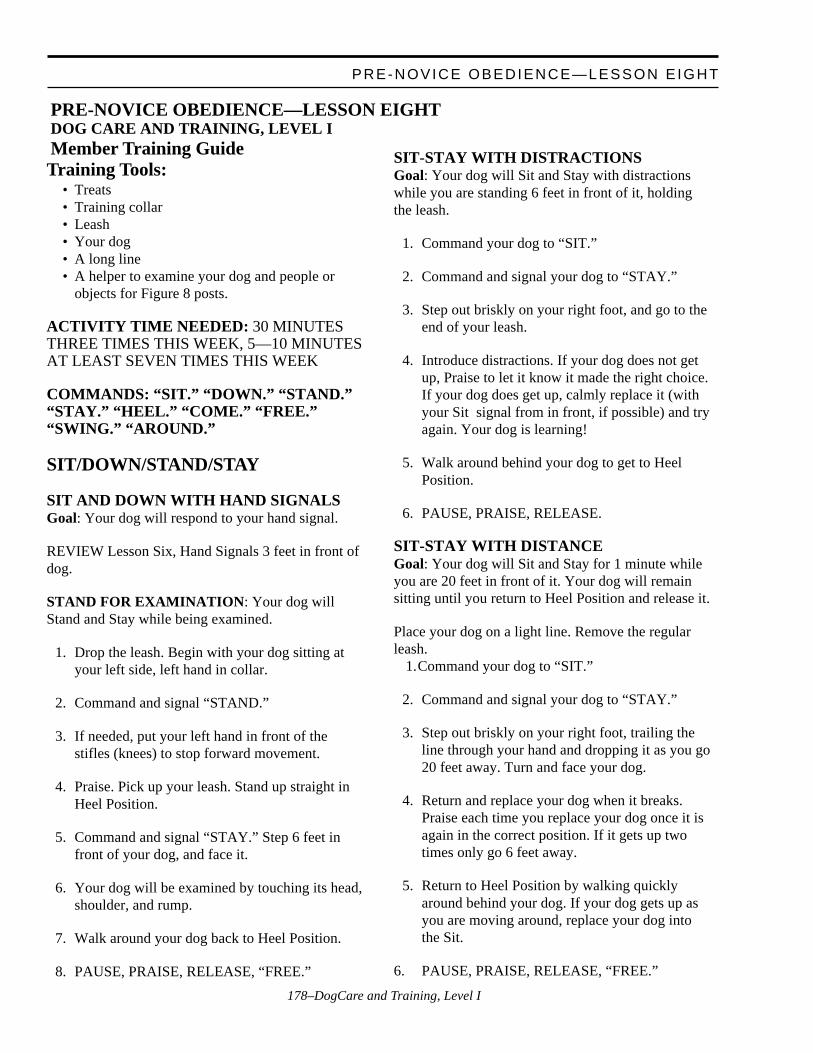
178–DogCare and Training, Level I
PRE-NOVICE OBEDIENCE—LESSON E IGHT
PRE-NOVICE OBEDIENCE—LESSON EIGHTDOG CARE AND TRAINING, LEVEL IMember Training GuideTraining Tools:
• Treats• Training collar• Leash• Your dog• A long line• A helper to examine your dog and people or
objects for Figure 8 posts.
ACTIVITY TIME NEEDED: 30 MINUTESTHREE TIMES THIS WEEK, 5—10 MINUTESAT LEAST SEVEN TIMES THIS WEEK
COMMANDS: “SIT.” “DOWN.” “STAND.”“STAY.” “HEEL.” “COME.” “FREE.”“SWING.” “AROUND.”
SIT/DOWN/STAND/STAY
SIT AND DOWN WITH HAND SIGNALSGoal: Your dog will respond to your hand signal.
REVIEW Lesson Six, Hand Signals 3 feet in front ofdog.
STAND FOR EXAMINATION: Your dog willStand and Stay while being examined.
1. Drop the leash. Begin with your dog sitting atyour left side, left hand in collar.
2. Command and signal “STAND.”
3. If needed, put your left hand in front of thestifles (knees) to stop forward movement.
4. Praise. Pick up your leash. Stand up straight inHeel Position.
5. Command and signal “STAY.” Step 6 feet infront of your dog, and face it.
6. Your dog will be examined by touching its head,shoulder, and rump.
7. Walk around your dog back to Heel Position.
8. PAUSE, PRAISE, RELEASE, “FREE.”
SIT-STAY WITH DISTRACTIONSGoal: Your dog will Sit and Stay with distractionswhile you are standing 6 feet in front of it, holdingthe leash.
1. Command your dog to “SIT.”
2. Command and signal your dog to “STAY.”
3. Step out briskly on your right foot, and go to theend of your leash.
4. Introduce distractions. If your dog does not getup, Praise to let it know it made the right choice.If your dog does get up, calmly replace it (withyour Sit signal from in front, if possible) and tryagain. Your dog is learning!
5. Walk around behind your dog to get to HeelPosition.
6. PAUSE, PRAISE, RELEASE.
SIT-STAY WITH DISTANCEGoal: Your dog will Sit and Stay for 1 minute whileyou are 20 feet in front of it. Your dog will remainsitting until you return to Heel Position and release it.
Place your dog on a light line. Remove the regularleash.
1.Command your dog to “SIT.”
2. Command and signal your dog to “STAY.”
3. Step out briskly on your right foot, trailing theline through your hand and dropping it as you go20 feet away. Turn and face your dog.
4. Return and replace your dog when it breaks.Praise each time you replace your dog once it isagain in the correct position. If it gets up twotimes only go 6 feet away.
5. Return to Heel Position by walking quicklyaround behind your dog. If your dog gets up asyou are moving around, replace your dog intothe Sit.
6. PAUSE, PRAISE, RELEASE, “FREE.”
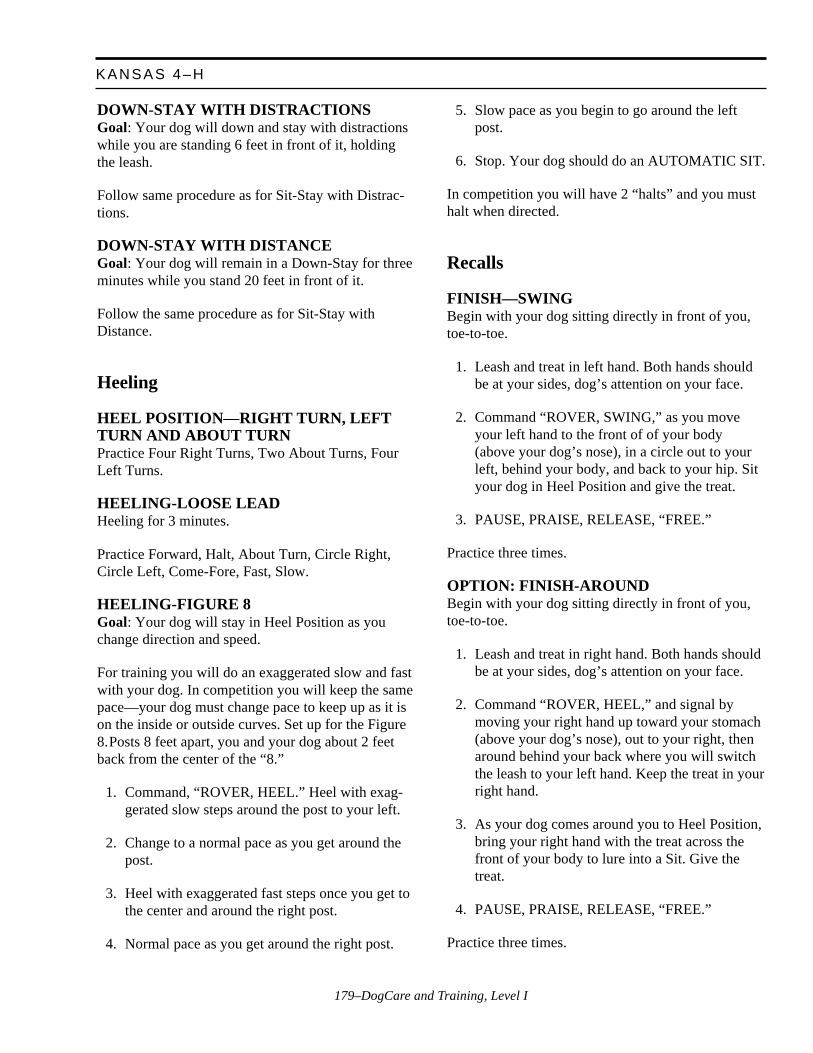
179–DogCare and Training, Level I
KANSAS 4–H
DOWN-STAY WITH DISTRACTIONSGoal: Your dog will down and stay with distractionswhile you are standing 6 feet in front of it, holdingthe leash.
Follow same procedure as for Sit-Stay with Distrac-tions.
DOWN-STAY WITH DISTANCEGoal: Your dog will remain in a Down-Stay for threeminutes while you stand 20 feet in front of it.
Follow the same procedure as for Sit-Stay withDistance.
Heeling
HEEL POSITION—RIGHT TURN, LEFTTURN AND ABOUT TURNPractice Four Right Turns, Two About Turns, FourLeft Turns.
HEELING-LOOSE LEADHeeling for 3 minutes.
Practice Forward, Halt, About Turn, Circle Right,Circle Left, Come-Fore, Fast, Slow.
HEELING-FIGURE 8Goal: Your dog will stay in Heel Position as youchange direction and speed.
For training you will do an exaggerated slow and fastwith your dog. In competition you will keep the samepace—your dog must change pace to keep up as it ison the inside or outside curves. Set up for the Figure8.Posts 8 feet apart, you and your dog about 2 feetback from the center of the “8.”
1. Command, “ROVER, HEEL.” Heel with exag-gerated slow steps around the post to your left.
2. Change to a normal pace as you get around thepost.
3. Heel with exaggerated fast steps once you get tothe center and around the right post.
4. Normal pace as you get around the right post.
5. Slow pace as you begin to go around the leftpost.
6. Stop. Your dog should do an AUTOMATIC SIT.
In competition you will have 2 “halts” and you musthalt when directed.
Recalls
FINISH—SWINGBegin with your dog sitting directly in front of you,toe-to-toe.
1. Leash and treat in left hand. Both hands shouldbe at your sides, dog’s attention on your face.
2. Command “ROVER, SWING,” as you moveyour left hand to the front of of your body(above your dog’s nose), in a circle out to yourleft, behind your body, and back to your hip. Sityour dog in Heel Position and give the treat.
3. PAUSE, PRAISE, RELEASE, “FREE.”
Practice three times.
OPTION: FINISH-AROUNDBegin with your dog sitting directly in front of you,toe-to-toe.
1. Leash and treat in right hand. Both hands shouldbe at your sides, dog’s attention on your face.
2. Command “ROVER, HEEL,” and signal bymoving your right hand up toward your stomach(above your dog’s nose), out to your right, thenaround behind your back where you will switchthe leash to your left hand. Keep the treat in yourright hand.
3. As your dog comes around you to Heel Position,bring your right hand with the treat across thefront of your body to lure into a Sit. Give thetreat.
4. PAUSE, PRAISE, RELEASE, “FREE.”
Practice three times.
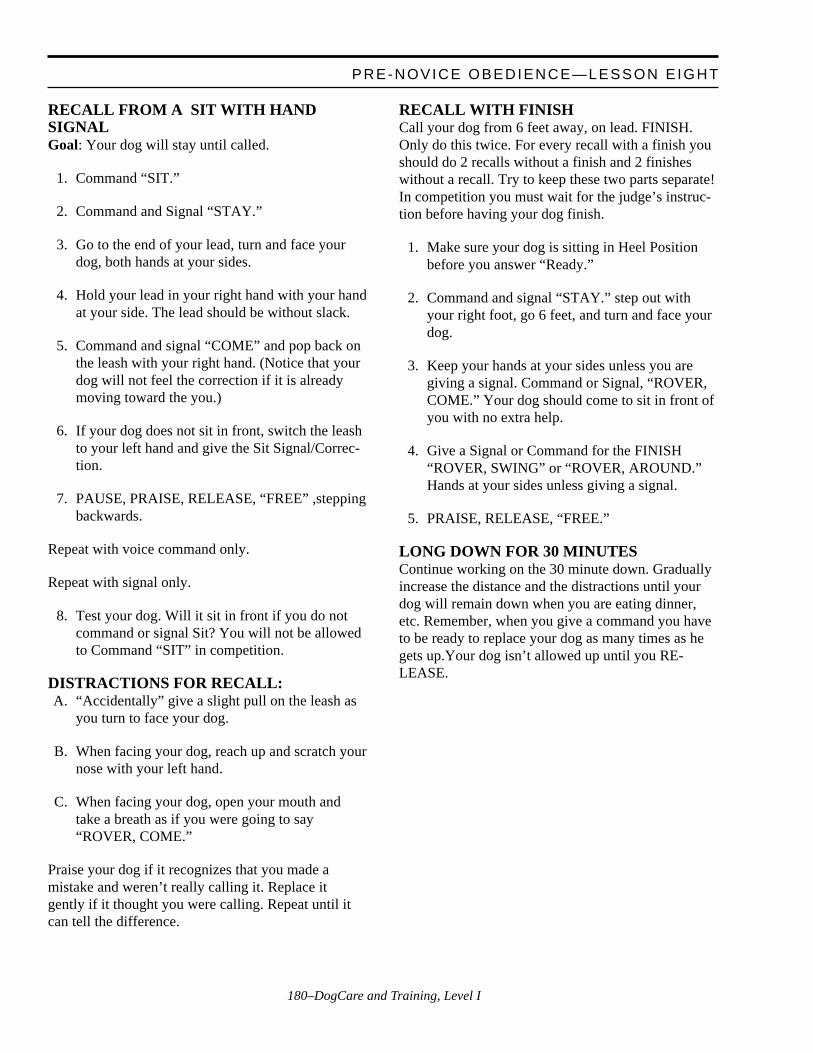
180–DogCare and Training, Level I
PRE-NOVICE OBEDIENCE—LESSON E IGHT
RECALL FROM A SIT WITH HANDSIGNALGoal: Your dog will stay until called.
1. Command “SIT.”
2. Command and Signal “STAY.”
3. Go to the end of your lead, turn and face yourdog, both hands at your sides.
4. Hold your lead in your right hand with your handat your side. The lead should be without slack.
5. Command and signal “COME” and pop back onthe leash with your right hand. (Notice that yourdog will not feel the correction if it is alreadymoving toward the you.)
6. If your dog does not sit in front, switch the leashto your left hand and give the Sit Signal/Correc-tion.
7. PAUSE, PRAISE, RELEASE, “FREE” ,steppingbackwards.
Repeat with voice command only.
Repeat with signal only.
8. Test your dog. Will it sit in front if you do notcommand or signal Sit? You will not be allowedto Command “SIT” in competition.
DISTRACTIONS FOR RECALL:A. “Accidentally” give a slight pull on the leash as
you turn to face your dog.
B. When facing your dog, reach up and scratch yournose with your left hand.
C. When facing your dog, open your mouth andtake a breath as if you were going to say“ROVER, COME.”
Praise your dog if it recognizes that you made amistake and weren’t really calling it. Replace itgently if it thought you were calling. Repeat until itcan tell the difference.
RECALL WITH FINISHCall your dog from 6 feet away, on lead. FINISH.Only do this twice. For every recall with a finish youshould do 2 recalls without a finish and 2 finisheswithout a recall. Try to keep these two parts separate!In competition you must wait for the judge’s instruc-tion before having your dog finish.
1. Make sure your dog is sitting in Heel Positionbefore you answer “Ready.”
2. Command and signal “STAY.” step out withyour right foot, go 6 feet, and turn and face yourdog.
3. Keep your hands at your sides unless you aregiving a signal. Command or Signal, “ROVER,COME.” Your dog should come to sit in front ofyou with no extra help.
4. Give a Signal or Command for the FINISH“ROVER, SWING” or “ROVER, AROUND.”Hands at your sides unless giving a signal.
5. PRAISE, RELEASE, “FREE.”
LONG DOWN FOR 30 MINUTESContinue working on the 30 minute down. Graduallyincrease the distance and the distractions until yourdog will remain down when you are eating dinner,etc. Remember, when you give a command you haveto be ready to replace your dog as many times as hegets up.Your dog isn’t allowed up until you RE-LEASE.
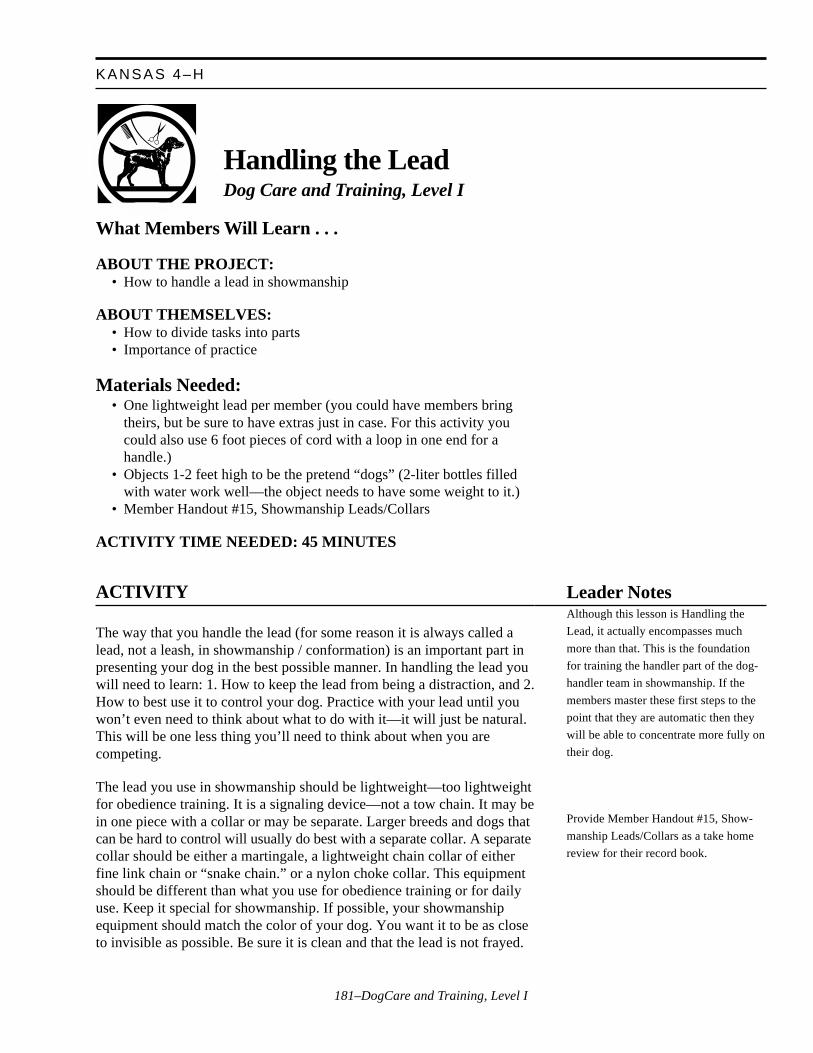
181–DogCare and Training, Level I
KANSAS 4–H
Handling the LeadDog Care and Training, Level I
What Members Will Learn . . .
ABOUT THE PROJECT:• How to handle a lead in showmanship
ABOUT THEMSELVES:• How to divide tasks into parts• Importance of practice
Materials Needed:• One lightweight lead per member (you could have members bring
theirs, but be sure to have extras just in case. For this activity youcould also use 6 foot pieces of cord with a loop in one end for ahandle.)
• Objects 1-2 feet high to be the pretend “dogs” (2-liter bottles filledwith water work well—the object needs to have some weight to it.)
• Member Handout #15, Showmanship Leads/Collars
ACTIVITY TIME NEEDED: 45 MINUTES
ACTIVITY
The way that you handle the lead (for some reason it is always called alead, not a leash, in showmanship / conformation) is an important part inpresenting your dog in the best possible manner. In handling the lead youwill need to learn: 1. How to keep the lead from being a distraction, and 2.How to best use it to control your dog. Practice with your lead until youwon’t even need to think about what to do with it—it will just be natural.This will be one less thing you’ll need to think about when you arecompeting.
The lead you use in showmanship should be lightweight—too lightweightfor obedience training. It is a signaling device—not a tow chain. It may bein one piece with a collar or may be separate. Larger breeds and dogs thatcan be hard to control will usually do best with a separate collar. A separatecollar should be either a martingale, a lightweight chain collar of eitherfine link chain or “snake chain.” or a nylon choke collar. This equipmentshould be different than what you use for obedience training or for dailyuse. Keep it special for showmanship. If possible, your showmanshipequipment should match the color of your dog. You want it to be as closeto invisible as possible. Be sure it is clean and that the lead is not frayed.
Leader NotesAlthough this lesson is Handling the
Lead, it actually encompasses much
more than that. This is the foundation
for training the handler part of the dog-
handler team in showmanship. If the
members master these first steps to the
point that they are automatic then they
will be able to concentrate more fully on
their dog.
Provide Member Handout #15, Show-
manship Leads/Collars as a take home
review for their record book.
182–DogCare and Training, Level I
Now, everyone get out your leads. Most leads will be about 6 feet longwhich is more than what you will usually need. You need to be sure thatthe extra length is not flopping about which will distract the judge’sattention from the dog and may also distract the dog.
Attach the lead to the “dog” and stand up with the “dog” on your left side.
Take the lead in your left hand. Some people like to hook the loop of thelead over their thumb but this may cause problems when you need toquickly switch the lead to your right hand. It is recommended to simplygather up the excess by folding the lead back on itself. Never hold thelead by putting the loop around your wrist!
Gather up the lead in your left hand until it is taut. You should end upwith excess in your fist with the end attached to the “dog” coming outfrom the bottom of your fist. Now let it out a little at a time. Repeat thistwice. Try it with your eyes closed!
We are going to add a couple more parts to lead handling. Hold your leftelbow at your side and your left forearm out to your left between waistlevel and chest level. This is a good place to hold this hand during muchof the gaiting. To keep your right hand from waving around, hold it onyour stomach. Smile—you’re proud of your dog and confident that you’lldo a good job. Even if you’re not, you can act like it! Finally, keepshifting your gaze from your dog to the judge since you need to watchboth at all times. Are you ready? Gather up your leads! Stand up straight,hands in place, smile, watch the judge and your dog. Repeat this twice.Practice this at home in front of a mirror.
Of course, there is more to showmanship than standing in one place—even before we add the dogs. You will be gaiting your dogs (walking/trotting them around) and will still need to follow all of the steps you justlearned. Now we will add gaiting to this leash handling. Everything willbe the same except you will be moving (and for today, you will need toleave your “dog” behind—these “dogs” just don’t move that well).
First, you will just add walking to all of the steps you’ve just learned.
The next step is to learn to move a little faster. Usually the judge willhave the dogs move together around the ring in a counter-clockwisedirection. Start lined up with your left side toward the center of the ring.The judge will say something like “take them around.” The first memberin line should make sure the person behind them is ready before takingoff. It is rude to leave the other exhibitors behind. Your dog will not beheeling so do not Command “Heel.” Instead, use a Command such as“LET’S GO” to let your dog know it is time to move out. Today, beginpracticing the command as you practice lead handling. You will usuallymove at a pace appropriate to your dog. Today practice at a slow run. Besure not to crowd the person ahead of you—leave a space of about onedog between you and the next person. Practice gathering up the lead and
ACTIVITYLeader Notes
It is important for the lead to come out
of the bottom of the fist. This gives the
member a stronger grip when needed to
hold the dog.
These steps should be practiced enough
that they become automatic. Although
they won’t always have their hands in
this position it is a very good start. For
this lesson you could be the judge that
they keep their attention on or they
could take turns being the judge. They
could work in pairs to critique each
other. At a later meeting you could have
them compete for the smoothest lead
handling.
Line up the members side-by-side with
the end of the lead in hand. Have them
walk to the end of your training area,
gathering up the lead as they go.
Remember: posture, hands, smile, watch
the judge and the dog. Have the members
repeat this on the way back to you.
HANDLING THE LEAD
183–DogCare and Training, Level I
KANSAS 4–H
then letting it out as you move around the ring. You should learn tohandle the lead smoothly at all speeds. The judge will tell the first personwhen or where to stop. When you stop you will be stacking the dog sotoday turn and face the center of the ring. If you have a smaller dog youwill need to kneel. Again, when you stop do not crowd the person in frontof you. Practice this twice, remembering hand positions, smile, watchboth the dog and the judge.
DIALOGUE FOR CRITICAL THINKINGShare
1. What type of lead did you choose for showmanship? Why?
2. What did this activity include besides handling the lead?
Process3. What is significant about your hand positions?
4. Why is it important for you to learn the steps before involving thedog?
Generalize:5. Why do we divide jobs into steps?
6. Why is it important to practice the steps of a skill?
Apply:7. What is something you do at home or school that could be broken
into parts to help you learn it better?
GOING FURTHER:1. Watch a showmanship class at a dog show.
REFERENCES:Jeff Brucker. “Preparation and Presentation of the Show Dog.” Denlinger,
c1982.LaVerne Buechting. “Kennelwood’s Conformation Training.”
Kennelwood Village, c1986.Lynn Hall. “Dog Showing for Beginners.” Howell, c1994.Joel M. McMains. “Dog Training Projects for Young People.” Howell,
c1995.Connie Vanacore. “The New Guide to Junior Showmanship.” Howell,
c1994.
Authors:Chris Odell, Obedience and Agility Instructor, Hutchinson, KS, Kennel
ClubJames P. Adams, Specialist, 4–H and Youth Programs, K-State Research
and Extension
Reviewed by:Dog Care and Training Design Team
Leader NotesACTIVITY:
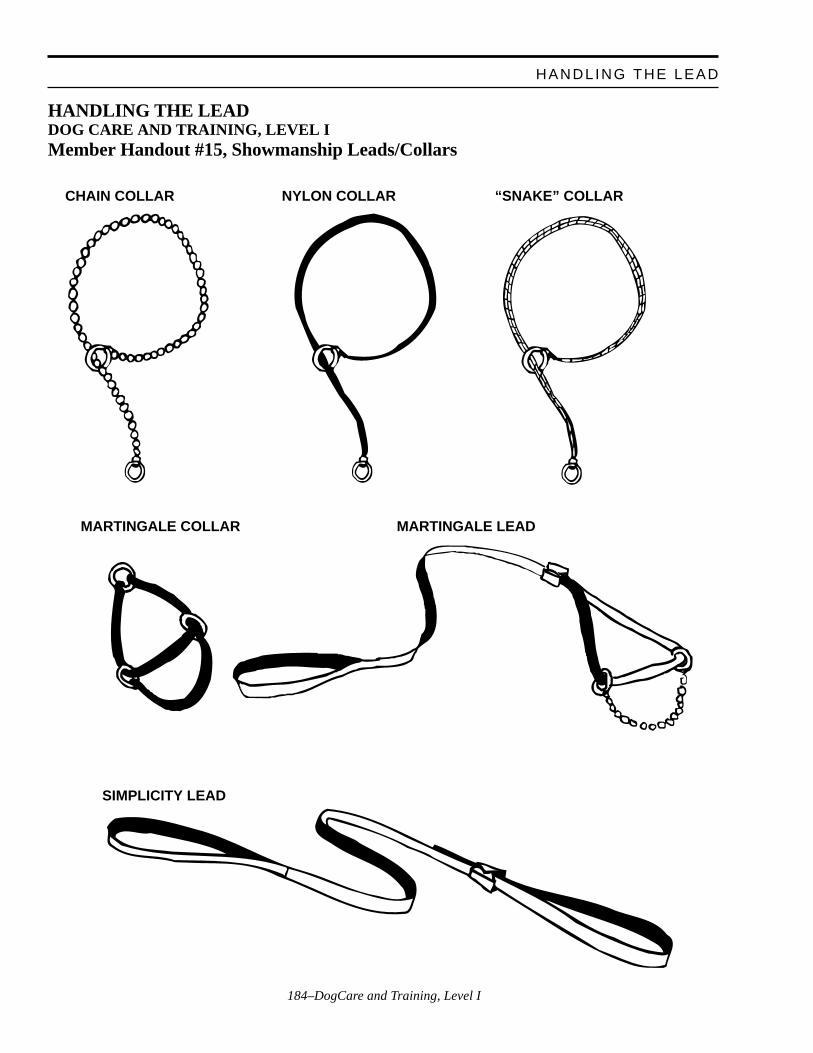
184–DogCare and Training, Level I
HANDLING THE LEADDOG CARE AND TRAINING, LEVEL IMember Handout #15, Showmanship Leads/Collars
HANDLING THE LEAD
CHAIN COLLAR NYLON COLLAR
MARTINGALE LEADMARTINGALE COLLAR
SIMPLICITY LEAD
“SNAKE” COLLAR
185–DogCare and Training, Level I
KANSAS 4–H
Showmanship Training PatternsDog Care and Training, Level I
Leader NotesAll dogs should be walking on lead
before they attempt this lesson. A
description of one way to teach this is in
Pre-Novice Lesson in the section on
“Controlled Walking.” This lesson should
also be preceded by the Showmanship
Lesson on “Handling the Lead” and it
would be useful to have had the Level I
Lesson #13, “Showmanship Introduc-
tion.” If possible, break this lesson into
three parts, covering two patterns per
session. Learning one or two patterns per
lesson will make things much less
confusing for the member and their dog!
Try video taping the gaiting from a judge’s
view. If the members brought a blank tape
they could have their own copy of their
gaiting to take home for a self critique.
What Members Will Learn . . .
ABOUT THE PROJECT:• Different patterns used in showmanship and how to gait the dog in
each of them.
ABOUT THEMSELVES:• Developing confidence and poise to work as a team with the dog in
showmanship.
Materials Needed:• Members with their dogs and their showmanship collars/leads.• Define a “ring” in some way. This could be a rope strung around
poles or chairs, or even laid out on the ground. You could make achalk line on the pavement.
• Colored pencils or fine line markers.• Member Handout #16, Gaiting (5 pages, figures A-J)• Optional: Video equipment
ACTIVITY TIME NEEDED: 45–90 MINUTES FOR THEENTIRE LESSON: 30–45 MINUTES PER PART IF DIVIDEDINTO THREE PARTS.
ACTIVITY:
Part 1—Gaiting and PatternsGaiting is moving your dog so the judge can check its movement andstructure. In Showmanship the way you handle the dog during the gaitingis being judged. It is important that you are able to communicate withyour dog and have it in control without having a tight lead. You and yourdog need to work as a team.
Generally, dogs are gaited at a speed where they are trotting, which, ofcourse, is a different speed for different-sized dogs. You will need todetermine the speed you will need to go to get the correct movement foryour dog. If different-sized dogs are being “moved” (gaited) together youmay need to go slower than your perfect speed, but you will get a chanceto gait individually, too. (Note: some breeds are best shown at other thana trot. Ask someone that shows your breed about the best speed, observeyour breed being shown, or try out different speeds and evaluate whichlooks best—a video camera can be a big help with this.)
186–DogCare and Training, Level I
Today we will begin to learn the patterns that a showmanship judge mayask you to use when gaiting your dog. Remember your lead handling—always keep your lead in the hand that is beside the dog. Always keepyour dog between you and the judge. Use the entire ring unless the judgetells you otherwise. If the ring is matted let your dog have the center ofthe mat.
GAITING IN A GROUP (FIGURE A)Generally, the judge will have all of the dogs in the class gait around thering at the start of the judging and again at or near the end of the judging.The judge is encouraged to put the larger dogs at the front of the group.However, size doesn’t always correspond to speed so you will need to becareful that you don’t run your dog into the one ahead of you. Leaveabout 3 feet between dogs. Be considerate of slower dogs and only pass adog that is refusing to move.
Usually this group gaiting will be in a counter-clockwise direction so yourdog will be on your left and the lead in your left hand. A judge maychoose to reverse this direction so be sure to practice with your dog onboth sides.
Once the judge indicates that the dogs should be gaited in the group it is acourtesy for the first person in the line to check to see that at least the nextin line is ready before starting the group gaiting (also referred to as“Taking Them Around”). Choose a gaiting command that you can use tosignal your dog to gait with you. This should not be a command you usein obedience. Suggestions are “Gait.” “Let’s Go.” “Show” or “ShowTime.” This command should signify to your dog that it will be trottingwith you, that he may move slightly ahead of you. You may verballyencourage your dog to gait with you, especially during the learningstages, but make it subtle—don’t chatter all the time.
As you move around the ring with your dog you should go in a straightline—moving in more of a rectangle than a circle, using as much of thering as possible. Remember what you have learned about handling the lead.
Practice moving clockwise, too, with your dog on your right and the leadin your right hand.After the group has gaited around the ring one or more times the judgewill signal to the first person in line to stop the gaiting. Be careful not torun into the dog ahead of you. You may give your dog a quiet commandto stop but once it learns to watch you this should not be needed. Yourdog should be standing, not sitting, when you stop. A command to“Stand” will be useful. In competition you may not position your dogwith your feet.
ACTIVITYLeader Notes
Use the appropriate page of Member
Handout #16, Gaiting as a visual aid.
SHOWMANSHIP TRAIN ING PATTERNS

187–DogCare and Training, Level I
KANSAS 4–H
DOWN-AND-BACK (FIGURE B)This is a very common pattern in conformation showing and gives yougood practice in gaiting your dog in a straight line. The judge may bestanding in a corner of the ring and direct you to go down along one sideof the ring and back, or direct you to go to the opposite corner and back ormay be in the middle of one side and direct you straight across the ring.This pattern gives the judge a good opportunity to see the dog’s move-ment from the front and back and is the simplest pattern for the handler.
An individual gaiting pattern ends with a stop in front of the judge withyou in front, or slightly in front of the dog. (FIGURE C) The judge willwatch your dog and will indicate for you to go to the end of the line. Youare still being judged at this time. Usually you will gait your dog aroundthe ring until you get to the end of the line.
Part 2—Patterns: “L’s” and Triangles
“L”To use the “L” pattern (Left), move with the dog under control in astraight line away from the judge briskly to the corner of the ring. Make asquare turn to the left and continue the next corner. Stop the dog, keepingit still. Turn and face the dog, smoothly changing the lead from the left tothe right hand. At the next corner let the dog go ahead of you and switchthe lead to your left hand. Turn the dog (now on your left) and yourself togait back to the judge. (FIGURE D). Practice this so that it will lookeffortless and the stopping / starting hardly noticeable. Always make asquare corner and trot your dog in straight lines. Now bring the dogstraight toward the judge.
Study (FIGURE E) for the less common “L” pattern (Right).
“TRIANGLE”Study FIGURE F. The Triangle patterns (Left and Right) allow you towork your dog on the “judge” side without needing to switch hands. TheLeft Triangle requires you to gait your dog on the left. The Right Trianglerequires you to gait your dog on the right. If you have a fast or a large doga circle at the second corner of the triangle will give you a straighter,more controlled approach to the judge. The circle may be made by havingthe dog circle in either direction and changing the lead to the other hand,then taking the dog straight to the judge. Use verbal commands to thedog, such as “Circle” or “Circle Out” to control the corner.
Leader NotesACTIVITY:
188–DogCare and Training, Level I
Part 3—Patterns: “T’s” and “I’s”Practice the “T” and “I” patterns. Determine the best way to make smoothcorners with your dog.
Use the handouts of the gaiting patterns. With two colors of markers tracethe dog’s path with one color when the dog is on the handler’s left side.Use the second color to trace the path of the dog when he is on thehandler’s right side.
PICK-A-PATTERN:Draw a card with the name of a pattern. Demonstrate this pattern.
DIALOGUE FOR CRITICAL THINKING:Share:
1. Which pattern did you find the most difficult? What could you do tomake it easier?
2. What position should the dog be in whenever you are gaiting it?
3. What are some other things to remember about all patterns of gait-ing?
Process:4. What things could you do without your dog that would make you a
better handler?
Generalize:5. How does repeating things help you feel better about what you do?
6. How does working with a friend to finish a job help you get moredone?
Apply:7. How can teamwork help you do things at home or school?
GOING FURTHER:1. Watch a dog show on TV or attend a dog show or match. Observe
the patterns used. Do these handlers follow the guidelines you havelearned?
2. Talk to someone involved in showing your breed. Do they have anyspecific suggestions on the best way to show your dog?
SHOWMANSHIP TRAIN ING PATTERNS
ACTIVITYLeader NotesThe “T” and the “I” patterns are more
complex, requiring change of pace,
change of direction, and at least two side
changes. However, members who have
mastered the “L” pattern should learn
the “T” and the “I” without too much
confusion. Study FIGURES G and H to
see the position of the handler and the
dog in each pattern. Refer to FIGURE I
to see a variety of methods of making
corners. As long as the handler and dog
are moving smoothly and the handler is
not blocking the judge’s view of the dog
any type of corner may be used.
Make up a set of cards with the name of
each pattern. When playing Pick-a-
Pattern you may want to have members
working in pairs. The object of this
game is to help the members learn the
patterns by name. This can be used as a
separate activity once the members have
learned all of the patterns. It can also be
practiced without the dogs, with
members playing the role of “dog.”
189–DogCare and Training, Level I
KANSAS 4–H
REFERENCESJeff Brucker. “Preparation and Presentation of the Show Dog.” Denlinger,
c1982.LaVerne Buechting. “Kennelwood’s Conformation Training.”
Kennelwood Village, c1986.Robert & Jane Forsyth. “Forsyth Guide to Successful Dog Showing.”
Howell, c1975.Lynn Hall. “Dog Showing for Beginners.” Howell, c1994.Joel M. McMains. “Dog Training Projects for Young People.” Howell,
c1995.Mario Migliorini. “Secrets of Show Dog Handling.” Prentice-Hall, c1982.Connie Vanacore. “The New Guide to Junior Showmanship.” Howell, e.
Authors:Chris Odell, Obedience and Agility Instructor, Hutchinson, KS, Kennel
ClubJames P. Adams, Specialist, 4–H and Youth Programs, K-State Research
and Extension
Reviewed by:Dog Care and Training Design Team
Leader NotesACTIVITY:
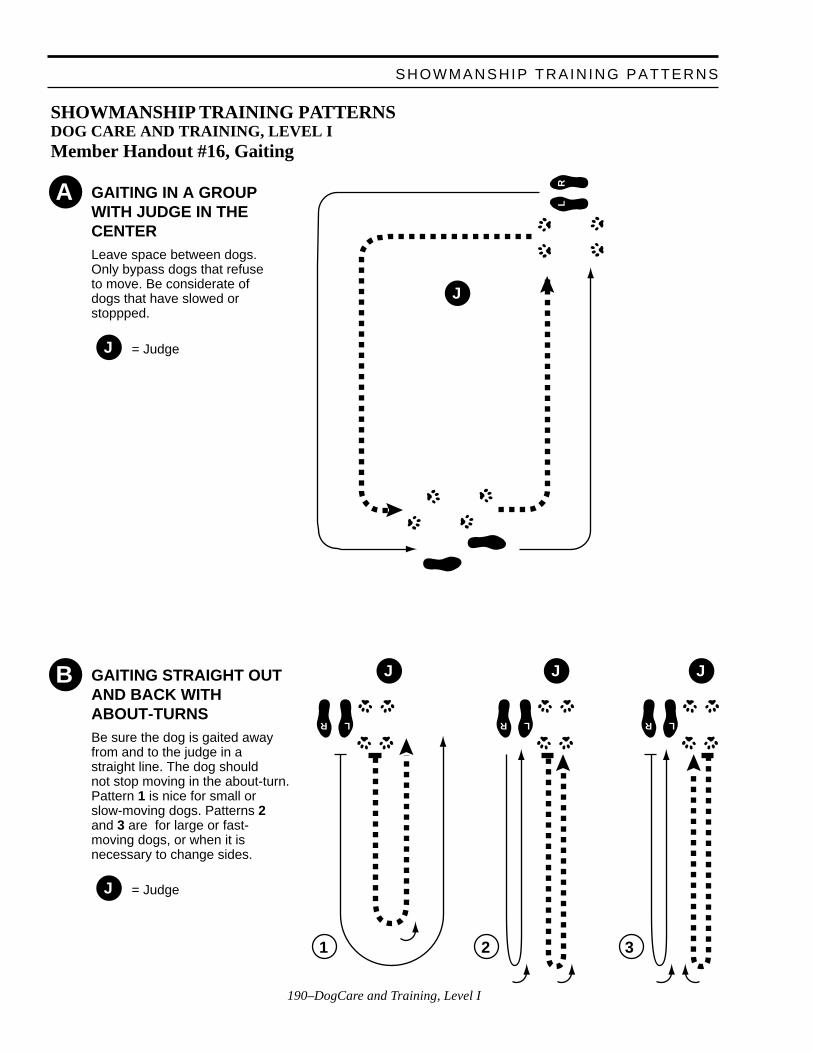
190–DogCare and Training, Level I
SHOWMANSHIP TRAINING PATTERNSDOG CARE AND TRAINING, LEVEL IMember Handout #16, Gaiting
LR
R L
J
J
J
GAITING IN A GROUP WITH JUDGE IN THE CENTERLeave space between dogs. Only bypass dogs that refuse to move. Be considerate of dogs that have slowed or stoppped.
A
GAITING STRAIGHT OUT AND BACK WITH ABOUT-TURNSBe sure the dog is gaited away from and to the judge in a straight line. The dog should not stop moving in the about-turn. Pattern 1 is nice for small or slow-moving dogs. Patterns 2 and 3 are for large or fast-moving dogs, or when it is necessary to change sides.
B
1 2
R L
J
3
R L
J
= Judge
J = Judge
SHOWMANSHIP TRAIN ING PATTERNS
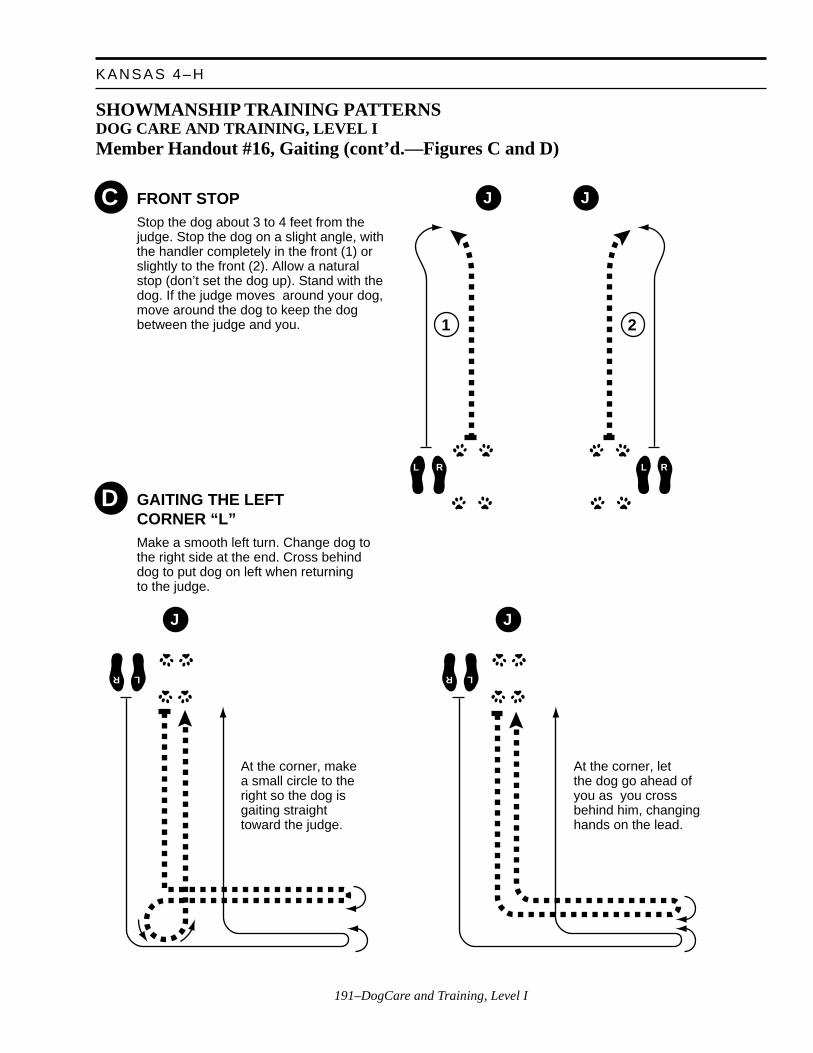
191–DogCare and Training, Level I
KANSAS 4–H
L RRL
R L
JJ
J
1
FRONT STOPStop the dog about 3 to 4 feet from the judge. Stop the dog on a slight angle, withthe handler completely in the front (1) or slightly to the front (2). Allow a naturalstop (don’t set the dog up). Stand with thedog. If the judge moves around your dog, move around the dog to keep the dogbetween the judge and you.
C
GAITING THE LEFTCORNER “L”Make a smooth left turn. Change dog to the right side at the end. Cross behind dog to put dog on left when returningto the judge.
D
2
At the corner, make a small circle to the right so the dog is gaiting straight toward the judge.
R L
J
At the corner, letthe dog go ahead ofyou as you crossbehind him, changinghands on the lead.
SHOWMANSHIP TRAINING PATTERNSDOG CARE AND TRAINING, LEVEL IMember Handout #16, Gaiting (cont’d.—Figures C and D)
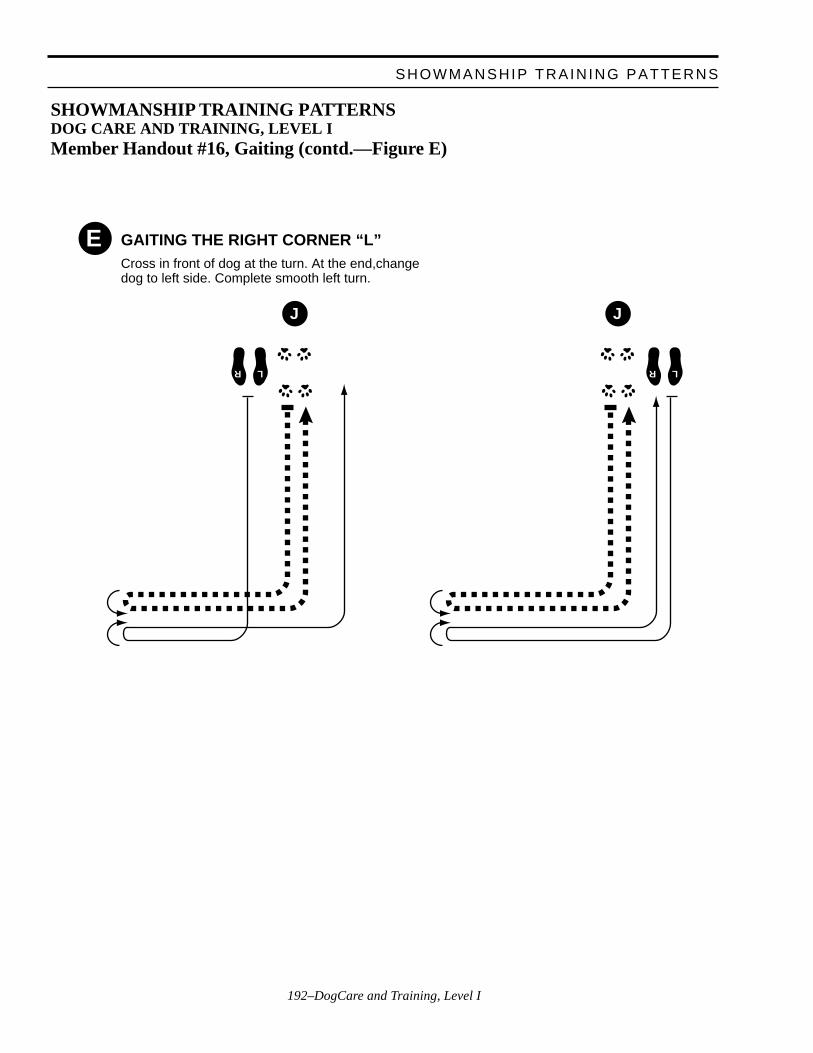
192–DogCare and Training, Level I
GAITING THE RIGHT CORNER “L”Cross in front of dog at the turn. At the end,change dog to left side. Complete smooth left turn.
E
LR
J
LR
J
SHOWMANSHIP TRAINING PATTERNSDOG CARE AND TRAINING, LEVEL IMember Handout #16, Gaiting (contd.—Figure E)
SHOWMANSHIP TRAIN ING PATTERNS
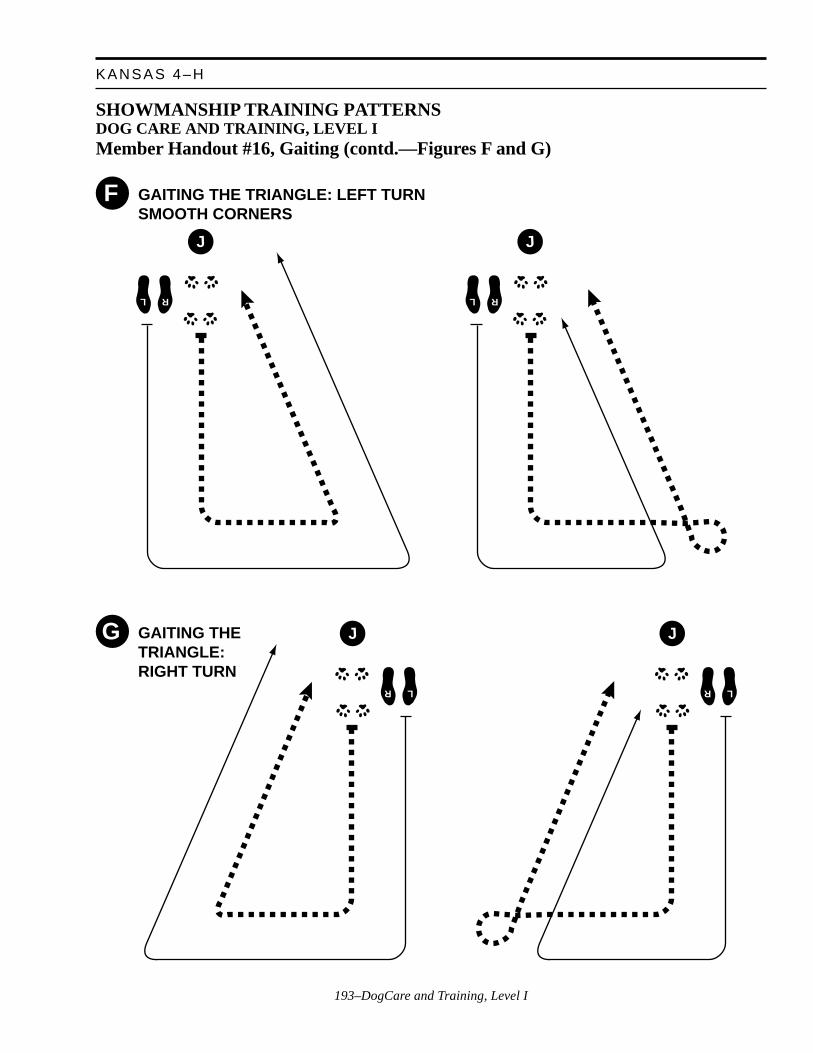
193–DogCare and Training, Level I
KANSAS 4–H
GAITING THE TRIANGLE: LEFT TURNSMOOTH CORNERS
F
L R
J
L R
J
GAITING THE TRIANGLE: RIGHT TURN
G
LR
J
LR
J
SHOWMANSHIP TRAINING PATTERNSDOG CARE AND TRAINING, LEVEL IMember Handout #16, Gaiting (contd.—Figures F and G)
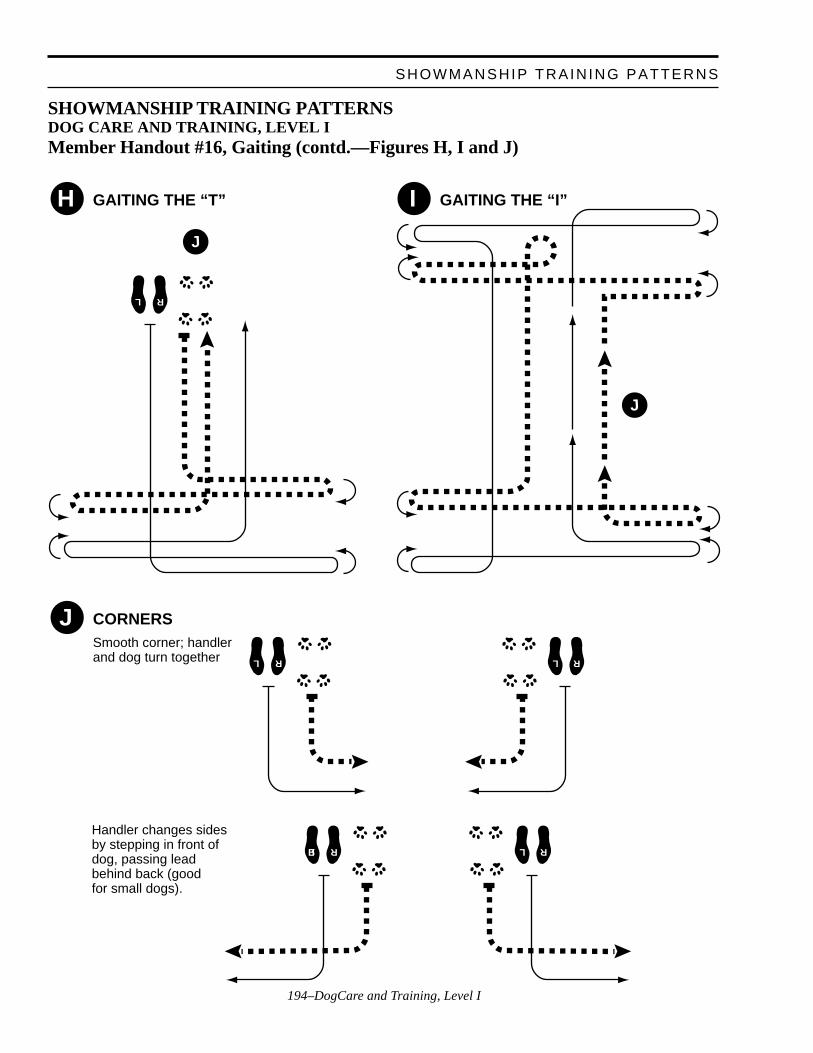
194–DogCare and Training, Level I
GAITING THE “T”H
L R
J
CORNERSSmooth corner; handlerand dog turn together
J
L R
L R
J
GAITING THE “I”I
RL
RR L
Handler changes sides by stepping in front of dog, passing lead behind back (good for small dogs).
SHOWMANSHIP TRAINING PATTERNSDOG CARE AND TRAINING, LEVEL IMember Handout #16, Gaiting (contd.—Figures H, I and J)
SHOWMANSHIP TRAIN ING PATTERNS
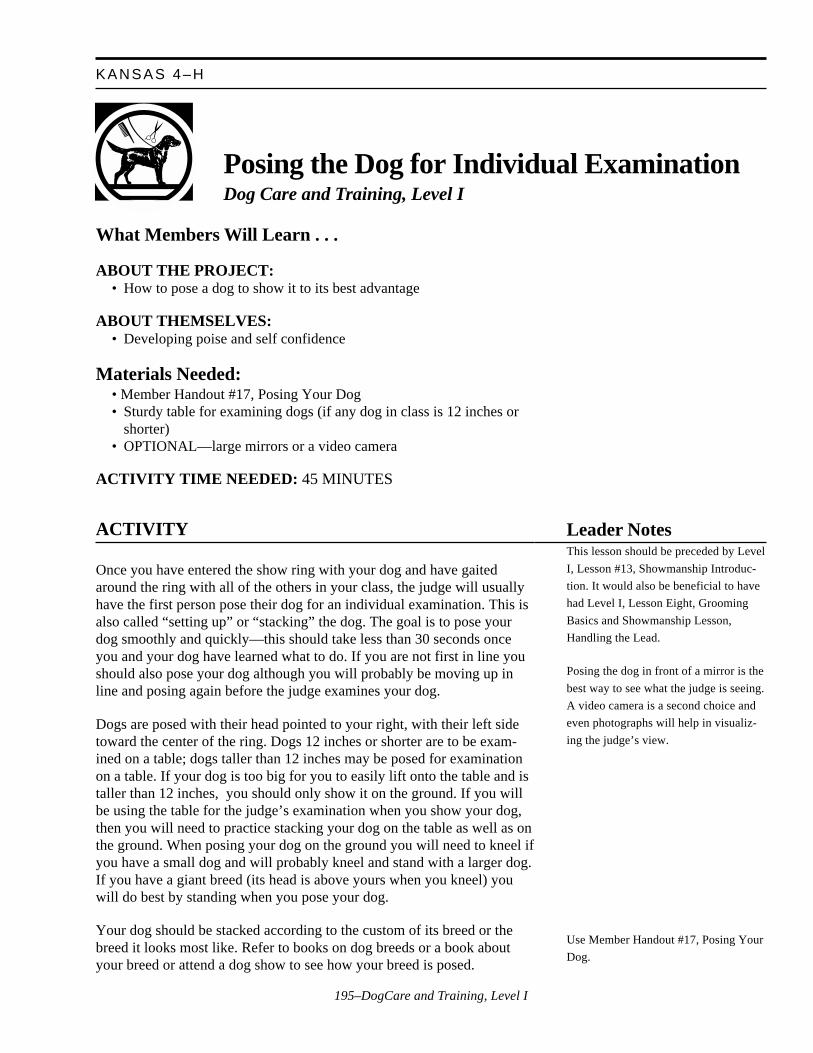
195–DogCare and Training, Level I
KANSAS 4–H
Posing the Dog for Individual ExaminationDog Care and Training, Level I
What Members Will Learn . . .
ABOUT THE PROJECT:• How to pose a dog to show it to its best advantage
ABOUT THEMSELVES:• Developing poise and self confidence
Materials Needed:• Member Handout #17, Posing Your Dog• Sturdy table for examining dogs (if any dog in class is 12 inches or
shorter)• OPTIONAL—large mirrors or a video camera
ACTIVITY TIME NEEDED: 45 MINUTES
ACTIVITY
Once you have entered the show ring with your dog and have gaitedaround the ring with all of the others in your class, the judge will usuallyhave the first person pose their dog for an individual examination. This isalso called “setting up” or “stacking” the dog. The goal is to pose yourdog smoothly and quickly—this should take less than 30 seconds onceyou and your dog have learned what to do. If you are not first in line youshould also pose your dog although you will probably be moving up inline and posing again before the judge examines your dog.
Dogs are posed with their head pointed to your right, with their left sidetoward the center of the ring. Dogs 12 inches or shorter are to be exam-ined on a table; dogs taller than 12 inches may be posed for examinationon a table. If your dog is too big for you to easily lift onto the table and istaller than 12 inches, you should only show it on the ground. If you willbe using the table for the judge’s examination when you show your dog,then you will need to practice stacking your dog on the table as well as onthe ground. When posing your dog on the ground you will need to kneel ifyou have a small dog and will probably kneel and stand with a larger dog.If you have a giant breed (its head is above yours when you kneel) youwill do best by standing when you pose your dog.
Your dog should be stacked according to the custom of its breed or thebreed it looks most like. Refer to books on dog breeds or a book aboutyour breed or attend a dog show to see how your breed is posed.
Leader NotesThis lesson should be preceded by Level
I, Lesson #13, Showmanship Introduc-
tion. It would also be beneficial to have
had Level I, Lesson Eight, Grooming
Basics and Showmanship Lesson,
Handling the Lead.
Posing the dog in front of a mirror is the
best way to see what the judge is seeing.
A video camera is a second choice and
even photographs will help in visualiz-
ing the judge’s view.
Use Member Handout #17, Posing Your
Dog.

196–DogCare and Training, Level I
Front: Begin with the dog in a stand—a “Stand -Stay” command isappropriate here. Keep control of your dog’s head with the lead or byholding under the dog’s chin. Pose the front end first. The leg should beperpendicular to the ground, solidly under the dog, and should not turnout at the elbows. Move the front leg into position by picking it up at theelbow and placing it where you want it. It is a good idea to start with theleg on the judge’s side first. Place the second leg the same way. Don’t putit ahead of or behind the other foot and be sure the toes point straightahead.
Back: Continue to keep control of your dog’s head when you are posingthe rear legs. Grasp the stifle joint and place each leg so the hocks areperpendicular to the ground. The toes should be pointed straight ahead.The rear feet will be further apart than the front feet. When you arepositioning the left leg reach over the dog if possible. If your dog is largeyou may need to position by reaching under your dog.
Posing on a Table: If you use a table when showing your dog it will onlybe used when you are posing your dog for examination by the judge.These smaller dogs will need to learn to pose on a table as well as on theground. Always lift your dog onto and off of the table. The dog should beposed on the upper left corner of the table (closest to the judge).
EXAMINATION BY THE JUDGE:It is important that the judge have as little trouble as possible whenexamining your dog. After taking a good look at the dog the judge willusually begin by examining the head. When the judge has the head youshould move your hand away from it to keep out of the judge’s way.Remember to stay on the opposite side of the dog from the judge. Thejudge will generally ask you to show the dog’s teeth. Pull the lips backfrom the teeth and open the mouth. Be sure to keep your head out of theway of the judge’s view. When the judge moves toward the rear of thedog you should move toward the front and may stand in front of the dogto encourage it not to move forward.
Once the individual examination has taken place the judge will ask you togait your dog in the pattern directed. Generally all dogs will be gaited inthe same pattern but listen to the judge’s instructions carefully—thepattern may be changed.
DIALOGUE FOR CRITICAL THINKING:Share:
1. What happened when you first tried to pose your dog? Why?
2. What was the most difficult thing to teach your dog when posing?
3. What part of the dog should you always control when posing? Why?
ACTIVITYLeader Notes
This lesson is an introduction to
posing—it will take a lot of practice. If
you teach the lesson(s) on patterns in
three parts, you could work on posing as
well as patterns in the same session. It
may be necessary to go back to the Pre-
Novice obedience lessons beginning
with Lesson #3, to teach the dogs to
Stand-Stay although in showmanship
the handler will not be leaving the dog.
You should enlist a variety of adults to
examine the dogs when they are posed.
This will help to train the dog, as well
as give the member practice in moving
so as not to black the judge’s view of
the dog.
POSING THE DOG FOR INDIV IDUAL EXAMINATION

197–DogCare and Training, Level I
KANSAS 4–H
Process:4. Where should you be when the judge is examining your dog?
5. Sometimes people refer to the dog’s “show side.” What side of thedog do you think this is?
6. What obedience skills would help when you are posing your dog?
Generalize:7. What should you do to prepare yourself for dog showmanship? Why?
8. What people skills do you use at school and other public places?Why?
Apply:9. How can you feel good about what you do and also help others feel
good about what they do?
GOING FURTHER:1. Go to the library to find books on your breed or all breeds. Study the
way the dogs are posed
2. Attend a dog show or watch one on TV. Study the way your breed isposed. Are other breeds posed the same way?
3. Watch for strategies that the handler uses to keep the judge’s atten-tion on the dog.
REFERENCES:“The Complete Dog Book : Official Publication of the American Kennel
Club.” Howell, c1992.“The Complete Dog Book for Kids: Official Publication of the American
Kennel Club.” Howell, c1996.Jeff Brucker.”Preparation and Presentation of the Show Dog.” Denlinger,
c1982.Lynn Hall. “Dog Showing for Beginners.” Howell, c1994.Joel M. McMains. “Dog Training Projects for Young People.” Howell,
c1995.Connie Vanacore. “The New Guide to Junior Showmanship.” Howell,
c1994.
Authors:Chris Odell, Obedience and Agility Instructor, Hutchinson, KS, Kennel
ClubJames P. Adams, Specialist, 4–H and Youth Programs, K-State Research
and Extension
Reviewed by:Dog Care and Training Design Team
Leader NotesACTIVITY:
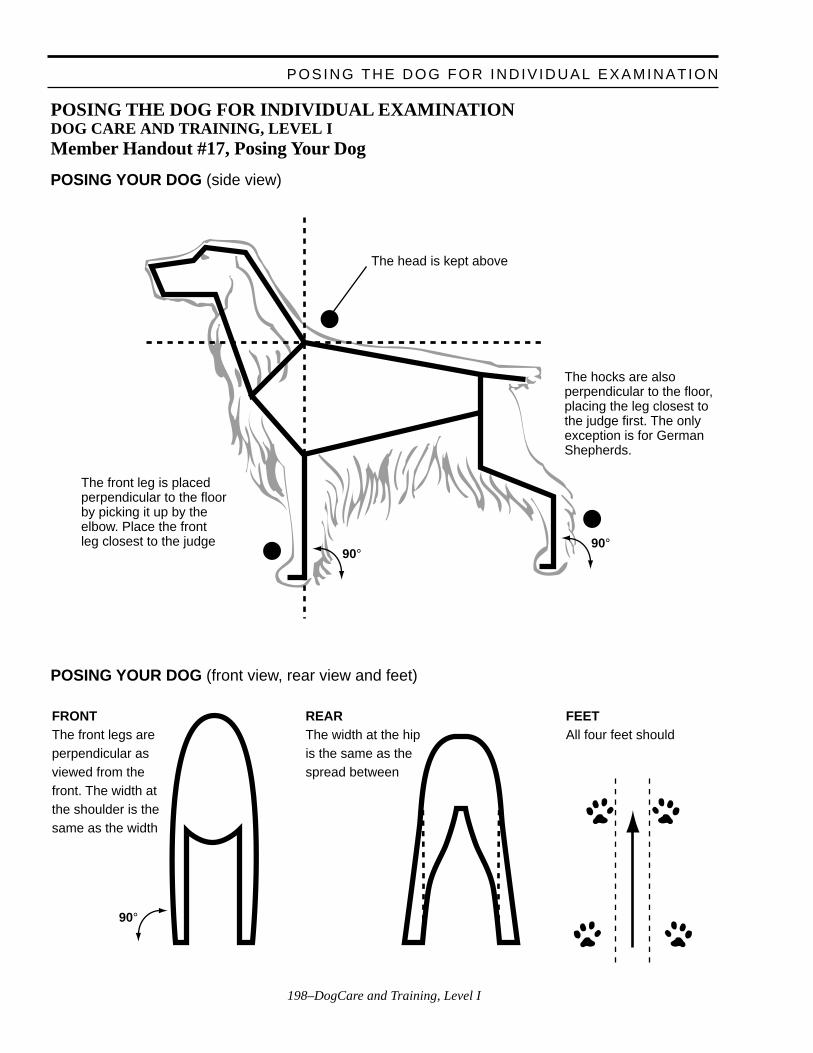
198–DogCare and Training, Level I
POSING THE DOG FOR INDIV IDUAL EXAMINATION
90°
90°
90°
The front leg is placedperpendicular to the floorby picking it up by theelbow. Place the frontleg closest to the judge
The hocks are alsoperpendicular to the floor,placing the leg closest tothe judge first. The onlyexception is for GermanShepherds.
The head is kept above
POSING YOUR DOG (side view)
POSING YOUR DOG (front view, rear view and feet)
FRONTThe front legs areperpendicular asviewed from thefront. The width atthe shoulder is thesame as the width
REARThe width at the hipis the same as thespread between
FEETAll four feet should
POSING THE DOG FOR INDIVIDUAL EXAMINATIONDOG CARE AND TRAINING, LEVEL IMember Handout #17, Posing Your Dog
199–DogCare and Training, Level I
KANSAS 4–H
What Members Will Learn . . .
ABOUT THE PROJECT:• How to enter and prepare for a 4-H Dog Show
ABOUT THEMSELVES:• The importance of making good decisions• Preparation can help your confidence
Materials Needed:• Samples of 4-H Dog Show entry forms• Activity Sheet #19, Entering a Dog Show• Flip chart and markers
ACTIVITY TIME NEEDED: 60 MINUTES
ACTIVITY
Entering a ShowYou think your dog is ready to go to a show and you’ve heard that there isa show coming up soon. What will you need to know about it before youmake plans to attend?
When you make your plans you need to get an entry form to get someinformation about the show. See what you can find out about this show.
PACKING FOR THE DOG SHOWNow that you’ve entered the show you’ll need to get ready. Check to besure that you have the equipment you’ll need to take with you. Get a bagor other container for all of your dog show supplies. Remember, youdon’t need to take everything you own to the dog show—just what you’lluse there. What would you need to take if you were entered in Showman-ship and Pre-Novice?
PREPARING FOR THE SHOWYou will need to plan what you will be wearing to show your dog. Checkthe entry form for the dress code and follow it. If you have a choice dresslike a winner! Choose clothes that are dressy but comfortable. Do notwear clothes that call attention to you—the judge is looking at your dog.In Showmanship try to wear a color different from your dog. A black dogdoesn’t show up very well if you are wearing black pants. In obedience agirl should not wear a skirt unless she has trained her dog when she was
Preparing for the ShowDog Care and Training, Level I
Leaders NotesSolicit answers from the group about
what they would need to know about a
show.
Then hand out sample entry forms and
have the members work in groups of
two or three to find the information for
Activity Sheet #19, Entering a Dog
Show. If possible, obtain actual entry
forms. It would be even better if you
had forms from several different shows
for com-
parison. Be aware that there may not be
answers for all of the questions. If time
allows, have the members share what
information they found or didn’t find.
Lead the members in making up a
“packing list” for the show. Be sure they
include water and a dish for their dog
and plastic bags for picking up after
their dog. They might include drinks or
lunch for themselves if there are no
concessions and something to sit on. It
is a good idea to bring copies of shot
records—required if they are entering at
the show.
200–DogCare and Training, Level I
wearing a skirt. Wear quiet shoes with good traction, such as sneakers.Sandals or boots are not recommended.
You will also need to prepare your dog for the show. You will probablyneed to plan on giving your dog a bath. How long does it take for its coatto dry—can you give it a bath the night before a show or will you need toplan further ahead? The coat is to be clean, natural, not scaly, not mattedand free from loose hair. Check for fleas and ticks before you go to theshow. Not only will you loose points but other dogs could get fleas fromyours. Clean the ears and teeth. Get the toenails trimmed and cut theexcess hair from the bottom of the feet. Just before showing, give yourdog another good brushing and clean off the corners of its eyes.
TRAVELING TO SHOWSHow well does your dog ride in the car? Dogs are much safer if they canride in a crate—it is their “safety seat.” If this is not possible you willneed to train it to stay in the back seat or on the floor. When you get to theshow you cannot leave your dog in the car unless it is cold outside and thesun isn’t shining on the car. Dogs can die very quickly from being in a hotcar. It is up to you to protect the dog since it can’t roll down the windows!This may mean that the whole family can’t go into a restaurant to eatwhen you have your dog with you—plan ahead.
ETIQUETTE AT SHOWSEtiquette is manners—both yours and your dog’s. You are responsible forboth. Others will remember you much longer for your behavior than theywill remember you for whether or not you won your class!
Do not let your dog:
• Urinate on buildings• Bark and threaten other dogs• Go up to other dogs• Bark in its crate• Jump up on people
Your show manners include:
• Picking up your dog’s feces and any hair you’ve combed out• Do not pet other people’s dogs without their permission• Be on time for the show• Be on time for your class—watch for your turn• If possible, enter the show early, not on the day of the show• Do not criticize another dog or handler• Do not criticize the judging• Thank the judge after you have shown• Congratulate the winners
ACTIVITYLeader Notes
You could plan a meeting where the
members would wear their “show
clothes.” For this lesson you could
invite older members to come dressed in
“what to wear” or “what not to wear”
and have the Level I members identify
what is wrong or right. To help
members practice good grooming you
can make it a practice to check their
dogs at every meeting/lesson with dogs.
An older member could do this or they
could check each other’s dogs. This
grooming should also be done for the
obedience-only dogs.
PREPARING FOR THE SHOW
Divide members into small groups. Let
them generate ideas for each topic. List
group responses on a flip chart and
discuss.
201–DogCare and Training, Level I
KANSAS 4–H
• Take your ribbons home—do not throw then away at the show• Before you leave the show, thank the people running it—it is a lot of
work!• Write a thank you note—especially if you received a trophy
IMPORTANT PEOPLE AT THE SHOWJudge—The judge (or judges) was selected by the club giving the show.Judges are chosen because they have experience in judging or showingdogs and the club respects their opinion.
Stewards—Stewards are like the judge’s secretaries. They make sure theright people are ready for the ring at the right time. In obedience they alsohelp the judge in the ring. Often stewards are club members. Stewards arevolunteers.
DIALOGUE FOR CRITICAL THINKING:Share:
1. What do you need to know about a show before you enter it?
2. What are three of the things you need to be sure to pack when you goto a dog show?
Process:3. What are some reasons you would not enter a show even if you and
your dog are ready?
4. Why do you have to have proof of a rabies vaccination to enter a dogshow?
Generalize:5. What are some events you have to prepare for?
6. Why is it necessary to prepare for special events?
7. How does preparation help you make decitions?
Apply:8. What decisions do you need to prepare for in the near future?
GOING FURTHER:1. Attend an American Kennel Club (AKC) or United Kennel Club
(UKC) Dog Show. Observe what is different in Showmanship andObedience.
2. Ask a professional dog showperson to visit your group to share howthey prepare for a show.
Leader NotesACTIVITY

202–DogCare and Training, Level I
REFERENCES:Authors:Chris Odell, Obedience and Agility Instructor, Hutchinson, KS, Kennel
ClubJames P. Adams, Specialist, 4–H and Youth Programs, K-State Research
and Extension
Reviewed by:Dog Care and Training Design Team
ACTIVITYLeader Notes
PREPARING FOR THE SHOW

203–DogCare and Training, Level I
KANSAS 4–H
PREPARING FOR THE SHOWDOG, LEVEL IActivity Sheet #19, Entering a Dog Show
Can you find this information about a 4–H Dog Show?
Who is holding this show?______________________________________________________
__________________________________________________________________________
Is there a phone number to call for more information? ________________________________
__________________________________________________________________________
What town is it in? ____________________________________________________________
__________________________________________________________________________
Will it be indoors or outdoors?___________________________________________________
__________________________________________________________________________
What is the date of the show? ___________________________________________________
__________________________________________________________________________
What time is check-in? ________________________________________________________
__________________________________________________________________________
What time does the show begin? ________________________________________________
__________________________________________________________________________
Are there any special qualifications to enter this show such as the county you live in, your age,the points your dog has earned, etc.? _____________________________________________
__________________________________________________________________________
Are there any health requirements for your dog? ____________________________________
__________________________________________________________________________
What is the dress code for you? _________________________________________________
__________________________________________________________________________
How much does it cost to enter one class?_________________________________________
__________________________________________________________________________
Is there a deadline for entries? __________________________________________________
__________________________________________________________________________
What SHOWMANSHIP Class could you enter? _____________________________________
__________________________________________________________________________
What OBEDIENCE Class could you enter? ________________________________________
__________________________________________________________________________
What information would you want to know that is not on the form? ______________________

204–DogCare and Training, Level I
PREPARING FOR THE SHOW
205–DogCare and Training, Level I
KANSAS 4–H
Graduation Games/Pre-Novice ObedienceDog Care and Training, Level I
What Members Will Learn . . .
ABOUT THE PROJECT:• Practice of skills learned in obedience training
ABOUT THEMSELVES:• Learning can be in the form of a game
Materials Needed:• Chairs, one per member• Chalk or string• Tape or CD player with a music tape or CD• Stopwatch
ACTIVITY TIME NEEDED: 45 MINUTESLeader NotesAfter your dog/handler teams have
mastered the pre-novice commands, it is
time for a graduation. You can have
older members judge the teams using
the pre-novice scoresheet (available
from Extension Office) or you can use
this lesson of graduation games.
Remind members that this is a game and
they should not put down or criticize
others! Make it fun or DO NOT USE!
206–DogCare and Training, Level I
ACTIVITY
Instructor Says! This game is played like the “Simon Says!” that youprobably played when you were younger. The leader will give youinstructions for heeling and other activities with your dog. If the instruc-tion begins with “Instructor says” then you should follow that instruction.If the instruction does not begin with the words “Instructor says” do notfollow that command—just continue the previous command. If youfollow an instruction without “Instructor says” then you will take yourdog and practice a Sit-Stay in the center of the area. But remember, this isstill training and you may correct your dog if it makes a mistake. Forexample, if the Instructor says to have your dog Sit-Stay and your doggets up you may replace it without penalty. Before we begin, does anyoneknow what this game is testing?
LONGEST DOWN AND / OR LONGEST SITWe will do a Sit-Stay and / or Down-Stay and will see which dog has thebest stay. We’ll add distractions to see if the dogs will be tempted intogetting up. You will go to the end of your lead (6 feet) for this game. Ifyour dog does get up then you will return to your dog, heel it to thecenter, and continue to practice the stay with the dog right in front of you.
MUSICAL CHAIRSSet up a double row of chairs, placed with the backs together, one foreach participating handler. With string or chalk mark a line around thechairs about 4 feet out from them.
Begin with the dogs on a Sit-Stay outside of the line with the memberssitting in the chairs holding their leashes. Start the music and the memberswill step outside the line and begin to heel their dogs in a clockwisedirection. Remove one of the chairs. When the music stops the membersare to sit their dogs, tell them to stay, and race for a chair. They do notneed to continue to hold the leash but the member may only sit down iftheir dog is sitting. If their dog gets up they will need to stand up (andreplace their dog) until the dog is sitting again which may mean theyloose their chair. The member ending up without a chair is out of thegame. Start the music and the game again.
RECALL RELAYDivide the members into two or more teams. Each member will have theirdog on lead. On the command, “Go.” the first member in line will run tothe target at the far end of the area, place their dog on a Stay (Sit orDown) and race back to the start-finish line. If the dog does not remainstaying the member has to return to the dog and replace it into a Stay.However, their is a helper option. Once the member has their dog at thetarget they may call “help” and another member of their team can rundown to hold the dog in a Stay position. The member will call their dogand as soon as their dog crosses the line the next team member will taketheir dog to the far line. The first team to complete the recall with all oftheir members is the winner.
Leader NotesOf course, this game tests how well the
members listen to your instructions!
This can be very difficult to get the
handlers “Out”—they can surprise you
by listening well.
Begin with the distractions as practiced
in the Pre-Novice lessons. Add more
distractions such as having the handlers
turn their backs on the dogs, sitting
down in front of the dog, laying down in
front of the dog, and eating a cookie
standing in front of the dog. Use your
imagination but it is not fair to the dog
to use its name or to use distractions that
would frighten or panic the dog.
GRADUATION GAMES
207–DogCare and Training, Level I
KANSAS 4–H
FASTEST RECALLEach member will take a turn at taking their dog to the start line and havetheir dog Sit. A helper will hold the dog for the Stay as the memberreturns to the finish line. An assistant will be ready to time the dog. Thetime starts as soon as the member says “COME” and ends as the dogcrosses the finish line. The member can do anything to get their dogcoming to them fast—short of pulling them in with a lead. You maydecide to let everyone have a second try and use their fastest time. If youare giving out prizes (such as dog treats) you could also give an award forthe slowest dog.
Share:1.
Which game did you and your dog enjoy the most? Why?
2. Which game was the most difficult? Why?
Process:3. What skills do you think were being practiced in these games?
Generalize:4. Why might playing games help you learn skills better than a regular
lesson?
5. What games have helped you to learn or practice a skill?
Apply:6. What other games might you play to help you or your dog learn new
skills? Why?
GOING FURTHER:1. Begin novice obedience training.
2. Take the Canine Good Citizen test.
3. Enter a local dog show.
RESOURCES:Hunter. “Fun and Games with Dogs.” c1993.Terry Ryan. “Games people Play...To Train Their Dogs.” c1994.
Authors:Chris Odell, Obedience and Agility Instructor, Hutchinson, KS, Kennel
ClubJames P. Adams, Specialist, 4-H and Youth Programs, K-State Research
and Extension
Reviewed by:Dog Care and Training Design Team
Leader NotesACTIVITY:

208–DogCare and Training, Level I
GRADUATION GAMES