Embed Size (px)
Citation preview

OWNER’S MANUAL
WASHING MACHINE
P/No.: MFL62644912 www.lg.com
WD14030FD6
Before beginning installation, read these instructions carefully. This will simplify installation and ensure that the washer is installed correctly and safely. Leave these instructions near the washer after installation for future reference.

Contents
2
Contents....................................2
Product Features......................3
Important safety instructionsImportant safety instructions .................4Basic safety precautions .......................5Save these instructions.........................6Safety instructions for use.....................7
Specifications ...........................8
InstallationRemoving packing ................................9Removing transit bolts ..........................9Installation place requirements ...........10Connecting water supply hose............12Installation of drain hose .....................14Leveling...............................................15
How to use washerOperating washing machine ...............17Care before washing...........................18Washing program table.......................19Drying program table ..........................20Extra options .......................................21Operating data ....................................21Control panel.......................................22Additional program..............................23- Time Delay........................................23- Steam Wash .....................................23- Favorite.............................................23- Pre Wash ..........................................23Options................................................24- Option ...............................................24- Spin...................................................24- Temp. ...............................................24Other functions....................................24- Spin Only .........................................24- Refresh Cycle ..................................24Child Lock ...........................................25Beep On/Off ........................................25Tub Clean ...........................................26Door Lock & Detecting ........................26Dry ......................................................27
Thank you for buying a LG FullyAutomatic Washing Machine.
Please read your owner’s manualcarefully, it provides instruction on safeinstallation, use and maintenance.Retain it for future reference.
Record the model and serial number ofyour washing machine.
Model No.
Serial No.
Date of Purchase
Adding detergentAdding detergent and fabric softener..29
MaintenanceThe water inlet filter.............................31
The drain pump filter ...........................32
Dispenser drawer................................33
The washing drum ..............................34
Cleaning your washer .........................34
Cold conditions ...................................34
Troubleshooting guideDiagnosing problems ..........................35
Error messages...................................37
Using SMARTDIAGNOSIS™..............38
Customer Information Center ...39
Terms of warranty ..................40

Product Features
3
추가선택 예약
Inverter Direct Drive systemThe advanced Brushless DC motor directly drives the drum without belt and pulley.
Low noise speed control systemBy sensing the amount of load and balance, it evenly distributes loadto minimize the spinning noise level.
Child LockThe Child Lock prevents children from pressing any button to changethe settings during operation.
More economical with Intelligent Wash systemIntelligent Wash System detects the size of load and water temperature,and then determines the optimum water level and washing time tominimize energy and water consumption.
Built-in heaterInternal heater automatically heats the water to the best temperatureon selected cycles.
Protection against creasesWith the alternating rotation of the drum, creasing is minimized.
6 MotionWasher is able to perform various drum actions or a combination ofdifferent actions depending on the wash program selected. Combined with a controlled spin speed and the ability of the drum torotate both left and right, the wash performance of the machine is greatlyimproved, giving you perfect results every time.

4
Important safety instructions
For your safety, the information in this manual must be followed to minimize the risk of fire orexplosion, electric shock, or to prevent property damage, injury to persons, or death.
READ ALL INSTRUCTIONS AND EXPLANATION OF THE INSTALLATIONBEFORE USE
WARNING
You can be killed or seriously injured if you don’t follow instructions.
Your Safety and the safety of others are very important.We have provided many important safety messages in this manual and on your appliance.Always read and obey all safety messages.
This is the safety alert symbol.This symbol alerts you to potential hazards that can kill or hurt you and others.
All safety messages will follow the safety alert symbol and either the word DANGER,WARNING or CAUTION.
These words mean:
WARNING
You may be slightly injured or cause damage to the product,if you do not follow instructions.
All safety messages will tell you what the potential hazard is, tell you how to reduce thechance of injury, and tell you what can happen if the instructions are not followed.
CAUTION
You will be killed or seriously injured if you don’t immediately follow instructions.
DANGER

5
Important safety instructions
To reduce the risk of fire, electric shock, or injury to persons when using the washer, follow basicprecautions, including the following:
WARNING
• Before installation, check for exteriordamages. If it has, do not install.
• Do not install or store the washerwhere it will be exposed to theweather.
• Do not tamper with controls.• Do not repair or replace any part of
the washer or attempt any servicingunless specifically recommended inthe user-maintenance instructions orpublished user-repair instructionsthat you understand and have theskills to carry out.
• Keep the area underneath and aroundyour appliances free of combustiblematerials such as lint, paper, rags,chemicals, etc.
• The appliance is not intended for useby young children or infirm personswithout supervision. Do not allowchildren to play on, with, or inside thisor any other appliance.
• Keep small animals away from theappliance.
• Do not leave the washer door open.An open door could entice children to hangon the door or crawl inside the washer.
• Never reach into washer while it ismoving. Wait until the drum hascompletely stopped.
• The laundry process can reduce the flameretardant of fabrics. To avoid such aresult, carefully follow the garmentmanufacturer’s wash and careinstructions.
• Do not wash or dry articles that havebeen cleaned in, washed in, soakedin, or spotted with combustible orexplosive substances (such as wax,oil, paint, gasoline, degreasers, dry-cleaning solvents, kerosene, etc.)which may ignite or explode. Oil mayremain in the tub after a whole cycle resultingin fire during drying. So, do not load oiled clothes.
• Do not slam the washer door closedor try to force the door open whenlocked. This could result in damage to thewasher.
• When the machine runs hightemperature, the front door may bevery hot. Don’t touch it.
• To minimize the possibility of electricshock, unplug this appliance from thepower supply or disconnect thewasher at the household distributionpanel by removing the fuse orswitching off the circuit breakerbefore attempting any maintenance orcleaning.
• When unplugging power cord, do notpull out by grasping the cord.Otherwise, the power cord may be damaged.
• Never attempt to operate thisappliance if it is damaged,malfunctioning, partiallydisassembled, or has missing orbroken parts, including a damagedcord or plug.
� Basic safety precautions

6
Important safety instructions
� Basic safety precautions
� Save these instructions
To reduce the risk of fire, electric shock, or injury to persons when using the washer, follow basicprecautions, including the following:
WARNING
Improper connection of the equipment-grounding conductor can result in electric shock. Check with a qualified electrician or serviceman if you are in doubt as to whether the appliance isproperly grounded. Do not modify the plug provided with the appliance - if it does not fit theoutlet, have a proper outlet installed by a qualified electrician.
GROUNDING INSTRUCTIONS
This appliance must be grounded. In the event of malfunction or breakdown, grounding willreduce the risk of electric shock by providing a path of least resistance for electric current.This appliance is equipped with a cord having an equipment-grounding conductor andgrounding plug. The plug must be plugged into an appropriate outlet that is properly installedand grounded in accordance with all local codes and ordinance.
• Do not use an adapter this will defeat the grounding plug.
• If you don’t have the proper outlet, consult an electrician.
WARNING
• Before discarding an old machineunplug it. Render the plug useless.Cut off the cable directly behind theappliance to prevent misuse.
• When a product was under water,Please call service center. There is arisk of electric shock and fire.
• Connect the appliance to the watermains using new hose-sets. Old hose-sets should not be reused.
• To reduce the risk of personal injury,adhere to all industry recommendedsafety procedures including the useof long sleeved gloves and safetyglasses. Failure to follow all of the safetywarnings in this manual could result inproperty, personal injury or death.
• Do not push down the doorexcessively, when washer door open.This could topple over the washer.
7
Important safety instructions
To minimize the risk of fire within the inner bowl, the following should be observed:
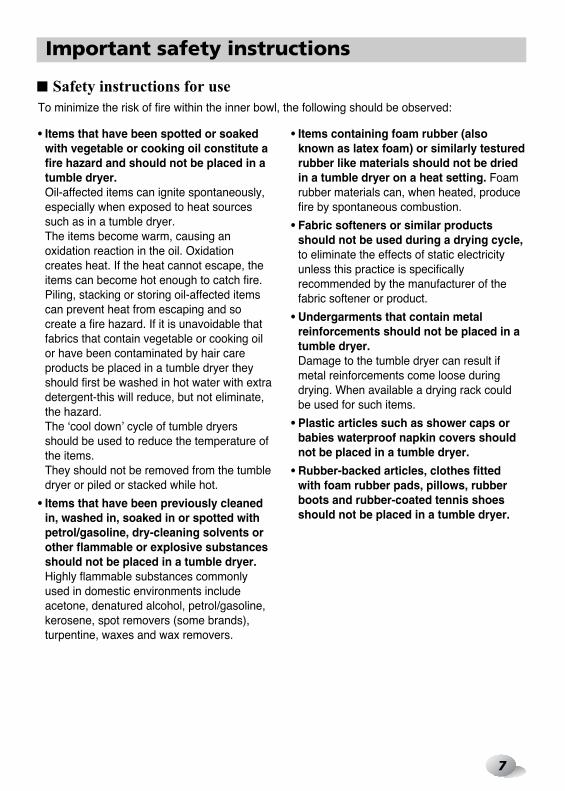
• Items that have been spotted or soakedwith vegetable or cooking oil constitute afire hazard and should not be placed in atumble dryer. Oil-affected items can ignite spontaneously,especially when exposed to heat sourcessuch as in a tumble dryer. The items become warm, causing anoxidation reaction in the oil. Oxidationcreates heat. If the heat cannot escape, theitems can become hot enough to catch fire.Piling, stacking or storing oil-affected itemscan prevent heat from escaping and socreate a fire hazard. If it is unavoidable thatfabrics that contain vegetable or cooking oilor have been contaminated by hair careproducts be placed in a tumble dryer theyshould first be washed in hot water with extradetergent-this will reduce, but not eliminate,the hazard. The ‘cool down’ cycle of tumble dryersshould be used to reduce the temperature ofthe items.They should not be removed from the tumbledryer or piled or stacked while hot.
• Items that have been previously cleanedin, washed in, soaked in or spotted withpetrol/gasoline, dry-cleaning solvents orother flammable or explosive substancesshould not be placed in a tumble dryer.Highly flammable substances commonlyused in domestic environments includeacetone, denatured alcohol, petrol/gasoline,kerosene, spot removers (some brands),turpentine, waxes and wax removers.
• Items containing foam rubber (alsoknown as latex foam) or similarly testuredrubber like materials should not be driedin a tumble dryer on a heat setting. Foamrubber materials can, when heated, producefire by spontaneous combustion.
• Fabric softeners or similar productsshould not be used during a drying cycle,to eliminate the effects of static electricityunless this practice is specificallyrecommended by the manufacturer of thefabric softener or product.
• Undergarments that contain metalreinforcements should not be placed in atumble dryer. Damage to the tumble dryer can result ifmetal reinforcements come loose duringdrying. When available a drying rack couldbe used for such items.
• Plastic articles such as shower caps orbabies waterproof napkin covers shouldnot be placed in a tumble dryer.
• Rubber-backed articles, clothes fittedwith foam rubber pads, pillows, rubberboots and rubber-coated tennis shoesshould not be placed in a tumble dryer.
� Safety instructions for use

8
Specifications
SpannerInlet hose: Hot/Cold(2EA)
� Accessories
� Name : Front loading washing machine� Power supply : 240 V~, 50 Hz� Size : 600 mm(W) ✕ 640 mm(D) ✕ 850 mm(H)� Weight : 73 kg� Max.Watt : 2100 W (Wash) / 1700 W (Dry) / 1200 W (Steam)� Wash capacity : 8.5 kg (Wash) / 4.5 kg (Dry)� Water consumption : 73 l � Permissible water pressure : 100 ~ 600 kPa (1.0 - 6.0 kgf / cm2)
• The external hot water supply MUST NOT exceed 65°C• Permissible cold water temperature : 4-25°C• No further backfl ow protection required for connection to the water supply.• The appearance and specifi cations may be varied without notice to lmprove the units quality.• Specifi cations subject to change by manufacturer.
The appearance and specifications may vary without notice to improve the quality of the unit.
(For detergent andfabric softener)
Drawer
Drain hose
Transit bolts Power plug
Control panel
Drain pump filter
Lower cover cap
• If the supply cord is damaged, it must be replaced by themanufacturer or its serviceagents or a similarly qualifiedperson in order to avoid ahazard.
Drum
Door Drain plug
Adjustable feet

9
Installation
� Removing packing
Base Packing
Washer
Spanner
1. Remove the cardboard box andstyrofoam packing.
2. Lift the washing machine and removethe base packing. This will require 2 ormore people or a lifting device.
3. Remove the tape securing the powersupply cord and drain hose.
4. Remove the inlet hoses from the drum.
1. Unscrew the 4 bolts with the spannersupplied.
2. Take out the 4 bolts along with therubber bungs by slightly twisting thebung.
3. Close the holes with the caps supplied.
To prevent internal damage during transport, the 4 special bolts are locked. Before operating the washer, remove the bolts along with the rubber bungs.If they are not removed, it may cause heavy vibration, noise and malfunction.
� Removing transit bolts
Transit bolt
• Keep the spanner provided forfuture use.
• Packaging material (e.g. Films, Styrofoam) can be dangerous for children.There is a risk of suffocation ! Keep all packaging well away from children.
• Keep the transit bolts for future use.
NOTE
NOTE
WARNING

10
Installation
Washer
approx.2cm
• Level floor :Allowable slope under entire washer is 1˚.
• Power outlet :Must be within 1.5 meters of either side of locationof washer. Do not overload the outlet with morethan one appliance.
• Additional Clearance :For Wall, 10cm:rear / 2cm : right & left sideDo not place, store or use laundry products on topof washer at any time. They can damage the finish or controls.
� Installation place requirements
❿ Positioning
❿ Location
• Install the washer on a flat hard floor.
• Make sure that air circulation around the washer is not impeded by carpets, rugs, etc.
• Never try to correct any unevenness in the floor with pieces of wood, cardboard or similarmaterials under the washer. Do not build the machine into a closed cupboard.
• If it is impossible to avoid positioning the washer next to a gas cooker or coal burningstove,an insulating(85x60cm) covered with aluminum foil on the side facing the cooker orstove,must be inserted between the two appliance.
• The washer must not be installed in rooms where the temperature can drop below 0°C.
• Please ensure that when the washer is installed, it is easily accessible for a ServiceTechnician in the event of a breakdown.
• With the washer installed, adjust all four feet using the transit bolt spanner providedensuring the appliance is stable, and a clearance of approximately 20mm is left betweenthe top of the washer and the underside of any work-top.
• This equipment is not designed for maritime use or for use in a mobile installations such ascaravans, aircraft etc.
• It is also not intended for commercial or outdoor applications, or washing of items such asfoot ware, mats etc.

11
Installation
• Do not use an extension cord or double adapter.
• If the supply cord is damaged, it must be replaced by the manufacturer or its serviceagents or similarly qualified person in order to avoid a hazard.
• Always unplug the machine and turn off the water supply after use.
• Connect the machine to an earthed socket in accordance with current wiring regulations.
• The appliance must be positioned so that the plug is easily accessible.
• Repairs to the washing machine must only be carried out by qualified personnel. Repairs carried out by inexperienced persons may cause serious injury or malfunction.Contact your local service center
• Do not install your washing machine in rooms where temperature below freezing mayoccur. Frozen hoses may burst under pressure. The reliability of the electronic controlunit may be impaired at temperatures below freezing point.
• If the appliance is delivered in the winter months and temperatures are below freezing :Place the washing machine at room temperature for a few hours before putting it intooperation.
❿ Electrical connection
CAUTION concerning the Power cord• Most appliances recommend they be placed upon a dedicated circuit; that is, a single
outlet circuit which powers only that appliance and has no additional outlets or branchcircuits. Check the specification page of this owner's manual to be certain.
• Do not overload wall outlets. Overloaded wall outlets, loose or damaged wall outlets,extension cords, frayed power cords, or damaged or cracked wire insulation aredangerous. Any of these conditions could result in an electric shock or fire.
• Periodically examine the cord of your appliance, and if its appearance indicatesdamage or deterioration, unplug it, discontinue use of the appliance, and have the cordreplaced with an exact replacement part by an authorized servicer.
• Protect the power cord from physical or mechanical abuse, such as being twisted,kinked, pinched, closed in a door, or walked upon. Pay particular attention to plugs,wall outlets, and the point where the cord exits the appliance.If the appliance is supplied from a cord extension set or an electrical portable outletdevice, the cord extension set on electrical portable outlet device must be positionedso that it is not subject to splashing or ingress of moisture.
• The appliance is not intended for use by young children or infirm persons withoutsupervision.
• Young children should be supervised to ensure that they do not play with appliance.
CAUTION
CAUTION

12
Installation
1. Unscrew the adapter ring plate and the4 adapter retaining screws.
2. Push the adapter onto the end of thetap so that the rubber seal forms awatertight connection. Tighten theadapter ring plate and the 4 screws.
3. Push the water supply hose verticallyupwards so that the rubber packingwithin the hose can adhere completelyto the tap and then tighten it byscrewing it to the right.
• Water supply pressure must be between 100 kPa and 600 kPa (1.0 - 6.0 kgf / cm2).• Do not strip or crossthread when connecting inlet hose to the valve.• If the water supply pressure is more than 600 kPa, a water pressure reduction device
should be installed.• Periodically check the condition of the hose and replace the hose if necessary.
Type-A : Connecting Screw-type hose to tap with thread
• Screw the hose connector onto watersupply tap.
� Connecting water supply hose
❿ Step1 : Check rubber seal inlet hose
❿ Step2 : Connect hose to water tap
• Two rubber seals are supplied with thewater inlet hoses. They are used for preventing waterleaks. Make sure the connections totaps are sufficiently tight.
• Do not use pliers,multi grips or leveragetools to tighten. Hand tighten only. Use a cloth if necessary.
Upperconnector
Rubberpacking
Plate
Water supplyhose
Fixing screw
HoseconnectorRubberseal
Type-B : Connecting Screw-type hose to tap without thread

13
1. Unscrew the adapter ring plate and the 4 adapter retaining screws.
2. Remove the guide plate if the tap is too large to fit the adapter.
3. Push the adapter onto the end of the tap so that the rubber seal forms a watertight connection. Tighten the adapter ring plate and the 4 screws.
4. Pull the connector latch plate down,push the inlet hose onto the adapter,and release the connector latch plate. Make sure the adapter locks into place.
Installation
Please use the horizontal tap
Horizontal tap Extension tap Square tap
Ring plate
Guide plate
Latch plate
Type-C : Connecting one touch type hose to tap without thread
❿�Step3: Connect hose to washer• Make sure that there are no kinks in the
hose and that they are not crushed.
❿ When your washer has two inletvalves
• The Inlet hose which has red connectoris for the hot water tap.
• When using warm or hot washes, Energycan be saved by connecting the hotwater hose to a hot water supply.
• After connecting inlet hose to watertap, turn on the water tap to flushout foreign substances (dirt, sand orsawdust) in the water lines. Letwater drain into a bucket, andcheck the water temperature.
• After completing connection, if water leaks from the hose, repeat the same steps.
NOTE
NOTE
14
Installation
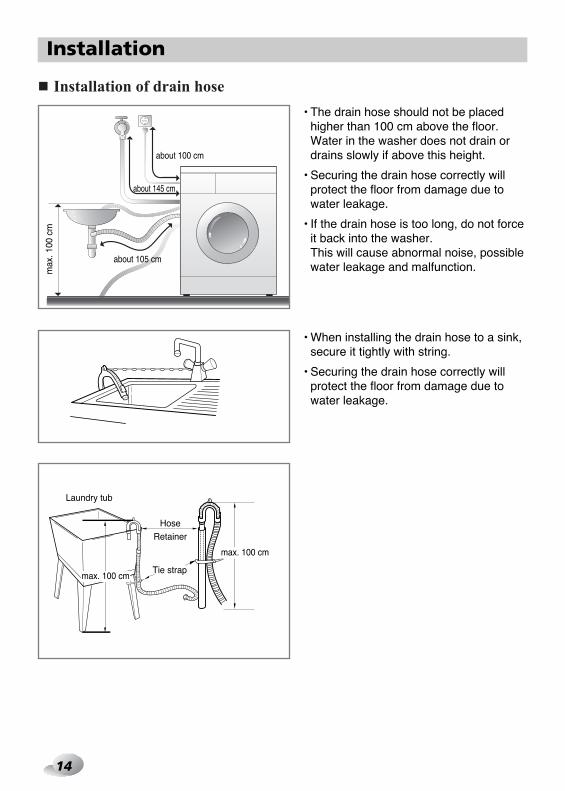
� Installation of drain hose
• The drain hose should not be placedhigher than 100 cm above the floor.Water in the washer does not drain ordrains slowly if above this height.
• Securing the drain hose correctly willprotect the floor from damage due towater leakage.
• If the drain hose is too long, do not forceit back into the washer. This will cause abnormal noise, possiblewater leakage and malfunction.
• When installing the drain hose to a sink,secure it tightly with string.
• Securing the drain hose correctly willprotect the floor from damage due towater leakage.
about 100 cm
about 145 cm
about 105 cm
max
. 100
cm
HoseRetainer
Tie strap
Laundry tub
max. 100 cm
max. 100 cm

15
2. If the floor is uneven, turn the adjustablefeet as required (do not insert pieces ofwood etc. under the feet).Make sure that all four feet are stable andresting on the floor and then check thatthe appliance is perfectly level (use a spiritlevel).
1. Leveling the washing machine properlyprevents excessive noise and vibration.Install the appliance on a solid and levelfloor surface, preferably in a corner of theroom.
Installation
� Leveling
• Once the washer is level, tighten the locknuts up towards the base of the washer. All lock nuts must be tightened.
• Diagonal CheckWhen pushing down the edges of thewashing machine top plate diagonally, the machine should not move up and downat all (Please, check both directions). If machine rocks when pushing themachine top plate diagonally, adjust thefeet again.
Raise Lower
LockNut
Tighten all 4locknuts securely
• Timber or suspended type flooringmay contribute to excessivevibration and unbalance.
• Do not install the machine on a raised platform.
NOTE
NOTE

16
Installation
❿�Concrete floors
❿�Wooden floors (Suspended floors)
• The installation surface must be clean, dry and level.
• Install washer on a flat hard floor.
❿�Tile floors (Slippery floors)• Position each foot on the Tread Mate and level the machine to suit. (Cut Tread Mate into
70x70 mm sections and stick the pieces on to the dry tile where machine is to be placed.)
• Tread Mate is a self adhesive material used on ladders & steps that prevents slipping.
• Wooden floors are particularly susceptible to vibration.
• To help reduce vibration we recommend you place rubber cupsunder each foot under washer at least 15mm thick, secured to atleast 2 floor beams with screws.
• If possible install the washer in one of the corners of the room, where the floor is morestable.
• Fit the rubber cups to reduce vibration.
• You can obtain the rubber cups (p/no.4620ER4002B) from the LG spares dept.
• If vibration persists with rubbers fitted. The flooring structure or rigidity may be inadequatefor proper operation.
Rubber Cup
• Proper placement and levelling of the washer will ensure long, regular and reliableoperation.
• The washer must be 100% horizontal and stand firmly in position.
• It must not “Seesaw” across corners under load.
• The installation surface must be clean, free from floor wax and other lubricant coatings.
• Do not let the feet of the washer get wet. If feet of the washer get wet, slipping mayoccur.
NOTE

17
How to use washer
� Operating washing machine
2. Open the door and load laundry.
1. Sort Laundry.(Refer to 18 page)
3. Press the Power button.
4. Select a Program.(Refer to 19~21 page)
5. Add detergent.(Refer to 29~30 page)
6. Press the Start/Pause button.
Select options at this time(Refer to 23~28 page)� Additional Program� Temperature� Spin Speed� Other functions

18
How to use washer
� Care before washing
3. Caring before loadingCombine large and small items in a load. Load largeitems first. Large items should not be more than half thetotal wash load. Do not wash single items. This may cause an out-of-balance load. Add one or twosimilar items.
• Check all pockets to make sure that they are empty.Items such as nails, hair clip, matches, pens, coins andkeys can damage both your washer and your clothes.
• Close zippers, hooks and strings to make sure thatthese items don’t snag on other clothes.
• Pre treat dirt and stains by brushing a little detergentdissolved in water onto stains like collars and cuffs tohelp lift dirt.
• Check the folds of the flexible gasket (gray) and removeany small articles.
• Check inside of the drum and remove any item from aprevious wash.
• Remove any clothing or items from the flexible gasketto prevent clothing and gasket damage.
2. SortingTo get the best results, sort clothes into loads that can bewashed with the same wash cycle. Water temperature and spin speed and different fabricsneed to be washed in different ways. Always sort dark colors from pale colors and whites.Wash separately as dye and lint transfer can occurcausing discolouration of white etc. If possible, do notwash heavily soiled items with lightly soiled one.
• Soil (Heavy, Normal, Light)Separate clothes according to amount of soil.
• Color (White, Lights, Darks)Separate white fabrics from colored fabrics.
• Lint (Lint producers, Collectors)Wash lint producers and lint collectors separately.
1. Care LabelsLook for a care label on your clothes. This will tell you about the fabric content of your garmentand how it should be washed.
Wash temperature
Normal machine wash
Permanent press
Hand wash
Sort laundry by...
Soiling
Colour
Washtemperature
Fabric type
Delicate
Do not wash
• Before the first wash, select a cycle (Cotton 60°C, add a half load of detergent) allow the unitto wash without clothing. This will remove residues and water from the drum that may havebeen left during manufacturing.
NOTE

19
How to use washer
�Washing program table• Recommended courses according to the laundry type.
Program Description Fabric type ProperTemp.
MaximumLoad
Cotton Provides better performance bycombining various drum motions.Provides optimized washingperformance with less energyconsumption.
CottonEco
40°C(Cold to 95°C)
60°C(Cold to 60°C)
Rating
Color fast garments (shirts,nightdresses, pajamas, etc) andnormally soiled cotton load(underwear).
This cycle provides nonstop processfrom washing to drying at once.
Use only drying cycle withoutwashing.
Use for laundy that need rinsing onlyor to add rinse-added fabric softenerto laundry.
Rinse+Spin
Dry Only
Wash+Dry
This cycle is suitable for casual shirtsthat do not need ironing afterwashing.
Polyamide, Acrylic, Polyester.EasyCare
40°C(Cold to 60°C)
Less than4.5 kg
Less than5.0 kg
Enables various fabrics to bewashed simultaneously.
Various kind of fabrics exceptspecial garments. (Silk/delicate,sports wear, dark clothes, wool,Duvet/Curtains).
Mix40°C
(Cold to 40°C)
AllergyCare
Removes allergens such as housemites, pollen, and cat fur.
Cotton, underwear, pillowcovers, bed sheets, baby wear.
60°C
Provides less noise and vibrationand saves money by usingovernight electricity.
Color fast garments (shirts,nightdresses, pajamas, etc)andlightly soiled white cotton(underwear).
SilentWash
40°C(Cold to 60°C)
40°C(Cold to 95°C)
Removes wrinkles within 20minswith steam.
Refresh Cotton mixed, Polyester mixedDress shirts, blouses.
No choice Rating
1 single sizeThis cycle is for large items such asbed cover, pillows, sofa covers, etc.
Cotton bedding except specialgarments (delicates, wool, silk,etc.) with filling: duvets, pillows,blankets, sofa covers with lightfilling.
Duvet
40°C(Cold to 40°C)Sports
Wear
This cycle is suitable for sportswear such as jogging clothes andrunning wear.
Less than4.5 kg
_
_ Rating
Coolmax, Gore-tex, fleece andSympatex.
WoolEnables to wash wool fabrics.(Please use detergent formachinewashable woolens).
Machine washable woolenswith pure new wool only.
Less than3.0 kg
Quick 30This cycle provides fast washingtime for small loads and lightlysoiled clothes.
Colored laundry which is lightlysoiled fast.
Wet laundry which need dryingonly.
A small amount of laundry whichcan be dried.
Normal fabrics which can bewashable.
30°C(Cold to 40°C)

20
How to use washer
The wool wash cycle of this machine has been approved by Woolmark forthe washing of machine washable Woolmark products provided that theproducts are washed according to the instructions on the garment label andthose issued by the manufacturer of this washing machine M1008.
• Water Temperature: Select water temperature to suit wash cycles. Always follow garment manufacture’s care label or instructions when washing.
• Set program at “Cotton Eco, 40°C, Intensive, 1400RPM” option for test in accordance orin conformity with AS/NZS 2040.1.
• Set program at “Dry only, 1400RPM, Eco dry” option for test in accordance or inconformity with AS/NZS 2442.1.
• For best washing results, we recommend to mix dry detergent with warm water.
• Neutral detergent is recommended. • The wool cycle features gentle tumbling and low-speed spin for garment care.
• Select maximun selectable spin speed of washing programme to ensure the dryingresult.
• Where the amount of laundry to be washed and dried in one programme does notexceed the maximum weight permitted for the drying programme, washing and dryingin one continuous sequence is recommended
� Drying program table
Program Fabric type Maximum Load
Eco Dry
Cupboard Dry
4.5 kg
3.0 kg
4.5 kg
4.5 kg
4.0 kg
0.5 kg
1.5 kg
Cotton or Linen Fabricssuch as cotton towel, t-shirts, linen laundryes.
Cotton or Linen Fabrics for ready to ironing. Iron Dry
Easy Care Textiles, Synthetic Fabrics Suitable for Easy care, Mix programm washable clothes.
Low Temp.
30 min.
60 min.
120 min.
–
–
–
NOTE
21
How to use washer
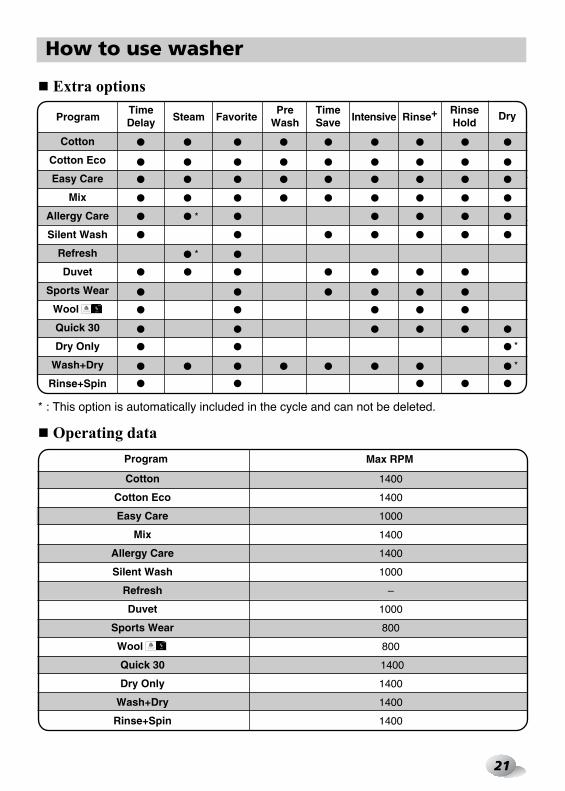
� Operating data
� Extra options
* : This option is automatically included in the cycle and can not be deleted.
Max RPMProgram
Cotton
Cotton Eco
Easy Care
Mix
Allergy Care
Silent Wash
Refresh
Duvet
Sports Wear
Wool
Quick 30
Dry Only
Wash+Dry
Rinse+Spin
1400
1400
1000
1400
1400
1000
–
1000
800
800
1400
1400
1400
1400
Cotton
Cotton Eco
Easy Care
Mix
Allergy Care
Silent Wash
Refresh
Duvet
Sports Wear
Wool
Quick 30
Dry Only
Wash+Dry
Rinse+Spin
TimeDelay Favorite IntensiveProgram
PreWash
TimeSave Rinse+ DryRinse
HoldSteam
*
*
*
*

22
How to use washer
� Control panel
Start/Pausebutton
Optionbuttons
BeepOn/Off
Powerbutton
Dry dial
TubClean
Temp.button
Spinbutton
Child Lock
Additional programbuttons LED display
Program dial
Power• Press the Power button to turn power on
and off.
• To cancel the Time Delay function, thepower button should be pressed.
Program dial• Turn the Dial to select the cycle appropriate
to the laundry type.
• Lamp will light up to indicate selectedprogram.
Additional program• Use these buttons to select the desired
cycle options for the selected cycle.
• Some options may be limited to certaincycles.
LED display• The display shows the settings, estimated
time remaining, options, and statusmessages for your washer. The display will remain on through thecycle.
Start/Pause• This Start/Pause button is used to start
wash cycle or pause the wash cycle.
• If temporary stop of wash cycle isneeded, press the Start/Pause button.
• When in Pause, the power is turned offautomatically after 4 minutes.
Options• This allows you to select an additional
option and will light when selected.
SMARTDIAGNOSIS™ function isavailable only for the products witha SMARTDIAGNOSIS™ mark.

23
How to use washer
• The delay time is the time to the end ofthe programme, not the start. Theactual running time may vary due towater temperature, wash load and otherfactors.
1. Press the Power button.
2. Select a cycle.
3. Press the Time Delay button and settime required.
4. Press the Start/Pause button.
You can set a time delay so that thewashing machine will start automaticallyand finish after a specified time interval.
Time Delay
� Additional program
Steam Wash features enhance washingperformance with low energy consumption.Refresh cycle reduces creases in clothes.
1. Press the Power button.2. Select steam course.3. Press the Steam Wash button.4. Press the Start/Pause button.
Steam Wash
• For heavily stained clothes, underwear, orbaby clothes.
• Avaible with the Cotton, Cotton Eco,Mix, Easy Care, Duvet, Allergy Careand Refresh programs.
• Refresh cycle is always Steam Wash.• Do not use Steam Wash for delicates
such as wool, silk, and easily discolouredclothes.
Steam Wash
If the laundry is heavily soiled, “Pre Wash”course is effective.
1. Press the Power button.
2. Select a cycle.
3. Press the Pre Wash button.
4. Press the Start/Pause button.
Pre Wash
Favorite program allows you to store a customized wash cycle for future use.
1. Press the Power button.
2. Select a cycle.
3. Select the course. (Washing method, number of rinses,spin speed, water temperature etc.)
4. Press and hold Favorite program button for 3 seconds.
The Favorite program is now stored forfuture use.
To reuse the program, select Favoriteprogram and press the Start/Pause.
Favorite
NOTE

24
How to use washer
• Spin Speed level can be selected bypressing 'Spin' button repeatedly.
1. Press the Power button.
2. Press only the Spin button to selectRPM.
3. Press the Start/Pause.
Spin only
• Time Save : This option can be used toreduce the time of a wash program. It is best used on lightly soiled loads.
• Intensive : If a normal load is heavilysoiled, “Intensive” option is effective.
• Rinse+ : Adds an additional rinse.
• Rinse Hold :
- Rinse Hold is selected by pressing thespin button repeatedly this functionleaves clothes in the machine;suspended in the water after the lastrinse without entering into spin.
- To proceed through to a drain orspin.once the rinse hold function iscompleted using to Program dial andSpin button to the required program.(Spin)
Option
• By pressing the Temp. button the watertemperature can be selected.
- Cold
- 30°C, 40°C, 60°C, 95°C
• Water temperature selection is limited incertain programs.
Temp.
Spin
� Options � Other functions
1. Press the Power button.
2. Select the Refresh program.
3. Press the Steam Wash buttonrepeatedly until the correct item isdisplayed.
4. Press the Start/Pause button.
Refresh Cycle
• For better performance load 3 item orless.
• When Refresh cycle finishes, laundrywill continue to be tumbled slowly forup to 30 minutes to prevent wrinkling.You can open the door in this time bypressing any button.
NOTE
When you select "No Spin", it will stillrotate for a short time with low speed todrain quickly.
NOTE
25
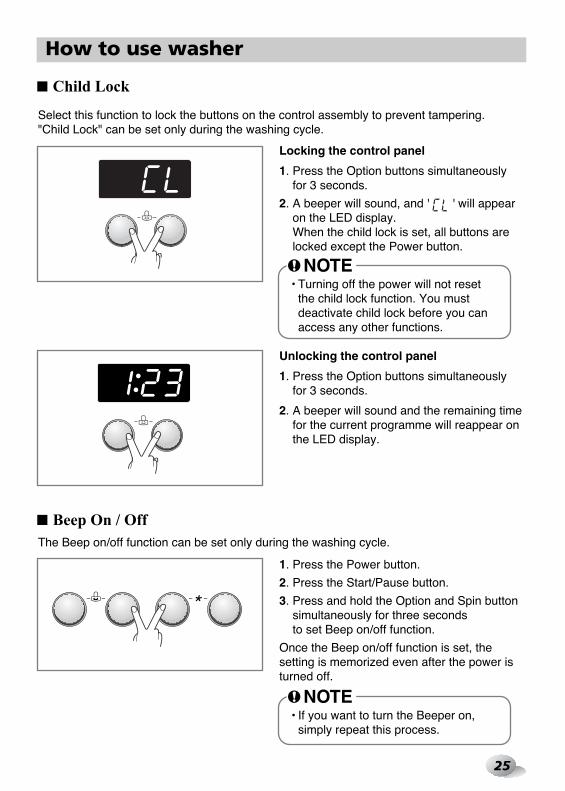
The Beep on/off function can be set only during the washing cycle.
1. Press the Power button.
2. Press the Start/Pause button.
3. Press and hold the Option and Spin buttonsimultaneously for three seconds to set Beep on/off function.
Once the Beep on/off function is set, thesetting is memorized even after the power isturned off.
How to use washer
Locking the control panel
1. Press the Option buttons simultaneously for 3 seconds.
2. A beeper will sound, and ' ' will appearon the LED display.When the child lock is set, all buttons arelocked except the Power button.
Select this function to lock the buttons on the control assembly to prevent tampering."Child Lock" can be set only during the washing cycle.
Unlocking the control panel
1. Press the Option buttons simultaneously for 3 seconds.
2. A beeper will sound and the remaining timefor the current programme will reappear onthe LED display.
� Child Lock
� Beep On / Off
• Turning off the power will not resetthe child lock function. You mustdeactivate child lock before you canaccess any other functions.
• If you want to turn the Beeper on,simply repeat this process.
NOTE
NOTE

26
How to use washer
Tub Clean is a special cycle to help clean the inside of the washing machine. A higher water level and higher spin speed is used in this cycle. Perform this cycle regularly.
1. Remove any clothing or items from thewasher and close the door.
2. Open the dispenser drawer and add Antilimescale(e.g. Calgon) to the main washcompartment.
3. Close the dispenser drawer slowly.
4. Power On and then press and hold Spinand Temp. button for 3 seconds. then “ ” will be displayed on the LED display.
5. Press the Start/Pause button to start.
6. After the cycle is complete, leave the dooropen to allow the washer door opening,flexible gasket and door glass to dry.
• “Door Lock” - For safety reasons, thedoor will lock while machine is in use and the“Door Lock” icon will light up. You can safelyopen the door after the “Door Lock” iconturns off. This can take up to 3 minutes.
• While "Detecting" is shown on thedisplay the washing machine rotates slowlyand detects how much laundry is loaded inthe drum.It will take a short time.
A
B
� Tub Clean
� Door Lock & Detecting
• Do not put clothes or soap detergents into the washer during this cycle. It can cause it to malfunction or become damaged.
• Do not add any detergent to the detergent compartments. • Excessive suds may generate and leak from the washer.
• If there is a child, be careful not to leave the door open for too long.
NOTE
CAUTION

27
• Use the automatic Drying Cycles to drymost loads. Electronic sensors measurethe temperature of the internal airflow inorder to increase or decrease dryingtemperatures and drying time.
• If a load is not as dry as you like,complete drying using a time cycle.
The standard laundry weight whichshows how much laundry to put into thewasher.
How to use washer
• This washer-dryer’s automatical processfrom washing to drying can be selectedeasily.
• For most even drying, make sure allclothes are similar in material andthickness.
• Do not overload dryer by stuffing too manyarticles into drum. Items must be able totumble freely.
• After the end of dry, “ ” is displayed.“ ” operates for around 4 hours, butcan be cancelled at any time by pressingthe Start/Pause button. It's purpose is toreduce wrinkles in the event that theclothes are left in the machine after thewash & dry cycle has ended.
Sorts oflaundry
Sorts oflaundry
Singleweight
Singleweight
Diaper
200g 300g100g
Short-sleeved
Shirt
Underwear
500g 1200g50g
JeanNightclothes
• Cold water tap must be left on duringdrying cycles.
� Dry
Drying Automatic guide
• The Estimated drying time varies fromthe actual drying time when using theAuto Dry selections. The type of fabric,size of the load, and the drynessselected affect drying time.
• During the last 11 minutes of dryingtime, a sensor (thermistor) detects theclothes moisture level. If moisture stillremains, 10 minutes will be added tothe drying time, but the time in thedisplay will remain on 11 minutes andonly continue to count down when it isthe actual time remaining.
• The maximum drying capacity for thismodel is 4.5kg. When loading, pleaseuse the maximum drying capacityindicator behind the door as shownbelow.
NOTE
NOTE

28
How to use washer
- Do not tumble dry woolen articles. Pullthem to their original shape, and Air drythem on a flat surface.
Woolen Articles
- Some woven and loopknit materials mayshrink, by varying amounts, depending ontheir quality.
- Always stretch them out immediately afterdrying.
Woven and Loopknit Materials
- Do not overload your dryer.- Take out permanent press articles as
soon as the dryer stops in order to reducewrinkles.
Permanent Press and Synthetics
- Always check the manufacture’sinstructions.
Fibre or Leather Materials
- Always check the manufacture’sinstructions.
Baby Clothes and Night Gowns
- Do not dry any items made from orcontaining rubber or plastics, such as:a) aprons, bibs, chair coversb) curtains and tablecloths
Rubber and Plastics
- Do not dry fiberglass articles in yourdryer. Glass particles left in the dryercould be picked up by your clothes thenext time you use the dryer and irritateyour skin.
Fiberglass
• By turnning the Dry dial, the drying timecan be selected.
• Drying course can last up to 150min.When selecting drying only, drying coursewill start after 15min spining. The spinoperation can be bypassed in a Dry onlymode if it is not required by continuallypressing the spin button until "no spin"appears.
• These drying times are given as a guide tohelp you set your dryer for manual drying.Drying times can vary greatly dependingon dampness, room temperature and typeof fabric and your own experience will beyour best guide.
• Low Temp. : For Synthetics select• Iron Dry : If you want to iron clothes• Cupboard Dry : For Cottons select• Eco Dry : A special cycle to reduce water
usage during the dry cycle.• Time (30/60/120 minutes)
- 30 min : Cotton / Towel 0.5 kg- 60 min : Cotton / Towel 1.5 kg- 120 min : Cotton / Towel 3.0 kg
• Your dryer can handle a load of up to4.5kg dry weight of articles.
• When loading, shake out each handful ofclothes so that they can tumble freely.Items should not be loaded in a tangledcondition, as this will lengthen the dryingtime.
Drying Time Guide (Manual operation)
• When drying cycle is completed, “ ”[COOL DOWN] is displayed on the Multidisplay.
• The COOL DOWN begins automaticallywhen a drying cycle is complete.
• The COOL DOWN function periodicallytumbles, rearranges and fluffs the load toavoid wrinkles without heat for up to 4hours.
• The COOL DOWN message will continueto display for 4 hours after the end of theDry Cycle, or until the Start/Pause buttonis pressed.
Completion of Drying

29
Adding detergent
• Main wash only ➔
• Pre Wash + Main Wash ➔
• Do not exceed the maximum fill line. Overfilling can cause early dispensing of thefabric softener which could stain clothes. Close the dispenser drawer slowly.
• Do not leave the fabric softener in the detergentdrawer for more than 2 days.(Fabric softener could be harden)
• Softener will automatically be added during the last rinse cycle.
• Do not open the drawer when water is supplied.
• Solvents(benzene, etc) should not be used.
❿�The dispenser drawer
❿�Adding fabric softener
� Adding detergent and fabric softener
• Keep all washing detergents away fromchildren as there is danger of poisoning.
• Too much detergent, bleach or softener maycause an overflow.• Be sure to use the appropriate amount of
detergent.
• Powdered detergent is recommended as it will not dispense prematurely during delaywashes or remain under the drawer.
• Do not pour fabric softener directly on the clothes.
NOTE
NOTE
WARNING

30
Adding detergent
• Detergent should be used according to the instruction of the detergent manufacture.• If too much detergent is used, too many suds can occur and this will decrease the washing
result or cause heavy load to the motor.• It is recommended that you use powdered detergent for best results.• If you wish to use liquid detergent follow guidelines provided by the detergent
manufacturer.• You can pour liquid detergent directly into the main detergent drawer if you are starting the
cycle immediately.• Please do not use liquid detergent if you are using 'Time Delay ' as the liquid may harden,
or if you have selected 'Pre Wash‘.• If too many suds occur, please reduce the detergent amount.• Detergent usage may need to be adjusted for water temperature, water hardness, size
and soil level of the load. For best results, avoid oversudsing.
• A water softener, such as Anti-limescale (e.g.Calgon) can be used to cut down on the use ofdetergent in extremely hard water areas.Dispense according to the amount specified onthe packaging. First add detergent and then thewater softener.
• Use the quantity of detergent as for soft water.
• Detergent is flushed from the dispenser at the beginning of the cycle.
1. Open the door and put tablets into the drum.
❿�Detergent dosage
❿�Adding water softener
❿�Using tablet
2. Load the laundry into the drum and close thedoor.
• Do not let the detergent harden. Doing so may lead to blockages, poor rinseperformance or bad odor.
• Full load : according to manufacturer’s recommendation. • Part load : 3/4 of the normal amount.• Minimum load : 1/2 of full load.
WARNING
NOTE

31
Maintenance
� The water inlet filter
• " " icon will be displayed on the control panel when water does not enter thedetergent drawer.
• If water is very hard or contains traces of lime deposit, the water inlet filter may becomeclogged.It is therefore a good idea to clean it from time to time.
• Before cleaning the washer interior, unplug the electrical power cord to avoid electricalshock hazards.
• Turn off the stopcock if the machine is to be left for any length of time (e.g. holiday),especially if there is no floor drain(gully) in the immediate vicinity.
1. Turn off the water tap.
2. Unscrew the water inlet hose.
3. Clean the filter using a hard bristle brush.
4. Refit and tighten up the inlet hose.

32
Maintenance
• Allow the water to cool down before cleaning the drain pump, carrying out emergencyemptying or opening the door in an emergency.
• The drain filter collects threads and small objects left in the laundry.Check regularly that the filter is clean to ensure smooth running of your machine.
� The drain pump filter
1. Open the lower cover cap. Pull out the hose.
2. Unplug the drain plug first to remove anyremaining water. Open the filter cap by turning to the left.
3. Remove any extraneous matter from the pumpfilter.
4. After cleaning, carefully refit the cap by slowlyturning it clockwise and insert the drain plug.
5. Close the lower cover cap.If water leaks from the cover after refitting thefilter cap. Repeat steps 1 and 2 and Refit thefilter cap as it may be cross threaded.
1
2Container tocollect thedrained water.
• First drain using the drain hose and then open the pump filter to remove any threads orobjects. Be careful when draining if the water is hot.
CAUTION

33
Maintenance
� Dispenser drawer• After a while, detergents and fabric softeners leave a deposit in the drawer.
• It should be cleaned from time to time with a jet of running water.
• If necessary it can be removed completely from the machine by pressing the catchdownwards and by pulling it out.
• To facilitate cleaning, the upper part of the fabric softener compartment can be removed.
1. Pull out the dispenser drawer.
4. Insert the dispenser drawer.
2. Clean the dispenser drawer under water.
3. Clean inside the recess with an old toothbrush.
34
Maintenance
• Proper care of your washer can extend its life.• The outside of the machine can be cleaned with warm water and a neutral non abrasive
household detergent.• Immediately wipe off any spills. Wipe with damp cloth.• Try not to hit surface with sharp objects.• Do not use methylated spirits, diluents or similar products.
If the washer is stored in an area where freezing may occur or moved in freezingtemperatures, follow these instructions to prevent damage to the washer:• Turn off water supply tap.• Disconnect hoses from water supply and drain water from hoses.• Plug electrical cord into a properly grounded electrical outlet.• Add 1gallon (3.8L) of nontoxic recreational vehicle(RV) antifreeze into an empty wash
drum. Close the door.• Set spin cycle and let washer spin for 1minute to drain out all water. Not all of the RV
antifreeze will be expelled.• Unplug electrical power cord, dry the drum interior, and close the door.• Remove dispenser drawer, drain and dry excess water from the compartments.• Store washer in an upright position.• To remove antifreeze from washer after storage, run empty washer through a complete
cycle using detergent. Do not add wash load.
� Cleaning your washer
� Cold conditions
� The washing drum• If you live in a hard water area, limescale may build up continuously in places where it
cannot be seen and thus not easily removed. Over time the build up of scale clogsappliances, and if it is not kept in check these may have to be replaced.
• Although the washing drum is made of Stainless steel, specks of rust can be caused bysmall metal articles (paper clips, safety pins) which have been left in the drum.
• The washing drum should be cleaned from time to time.• If you use descaling agents, dyes or bleaches, make sure they are suitable for washing
machine use.• Descaler may contain chemicals that may damage part of your washing machine.• Remove any spots with a stainless steel cleaning agent.• Never use steel wool.
❿�Exterior
• Dry around the washer door opening, flexible gasket and door glass. • Run washer through a complete cycle using hot water. • Repeat process if necessary.
❿�Interior
• To remove hard water deposits, use only cleaners labelled washer safe.NOTE

35
Troubleshooting guide
• This washing machine is equipped with automatic safety functions which detect anddiagnose faults at an early stage and react appropriately.When the machine does not function properly or does not function at all, check thefollowing points before you contact your service provider.
Symptom Possible Cause Solution
Rattling and clanking noise
Thumping sound
Vibrating noise
Water leaks.
Oversudsing
Water does not enterwasher or it entersslowly
Water in the washerdoes not drain ordrains slowly.
• Foreign objects such as coins orsafety pins maybe in drum orpump.
• Heavy wash loads may produce athumping sound. This is usuallynormal.
• Have all the transit bolts andpacking been removed?
• Are all the feet resting firmly onthe ground?
• Fill hoses or drain hose are looseat tap or washer.
• House drain pipes are clogged.
• Water supply is not adequate inarea.
• Water supply tap is not completelyopen.
• Water inlet hose(s) are kinked.
• The filter of the inlet hose(s)clogged.
• Drain hose is kinked or clogged.
• The drain filter is clogged.
Stop washer, check drum and drain filter.If noise continues after washeris restarted, call your authorisedservice centre.
If sound continues, washer is probably out of balance. Stop andredistribute wash load.
If not removed during installation,refer to Installation guide for removingtransit bolts. Wash load may be unevenly distributed in drum. Stop washer and rearrange wash load.
Check and tighten hose connections.
Unclog drain pipe. Contact plumberif necessary.
Too much detergent or unsuitable detergent may cause excessive foaming which may result in waterleaks.
Check another tap in the house.
Fully open tap.
Straighten hose.
Check the filter of the inlet hose.
Clean and straighten the drain hose.
Clean the drain filter.
� Diagnosing Problem

36
Washer does notstart
Washer will notspin
Door does notopen
Wash cycle timedelayed
Fabric softeneroverflow
Softenersdispensed tooearly
Dry problem
• Electrical power cord may not beplugged in or connection may beloose.
• House fuse blown, circuit breakertripped,or a power outage hasoccurred.
• Water supply tap is not turned on.
• Check that the door is firmly shut.
• Too much softener may cause anoverflow.
• Does not dry
Make sure plug fits tightly in walloutlet.
Reset circuit breaker or replacefuse. Do not increase fuse capacity.If problem is a circuit overload, haveit corrected by a qualified electrician.
Turn on water supply tap.
Close the door and press theStart/Pause button. After pressingthe Start/Pause button, it may take afew moments before the washerbegins to spin. The door must belocked before spin can be achieved.Add 1 or 2 similar items to helpbalance the load. Rearrange load toallow proper spinning.
Once machine has started, the doorcannot be opened for safetyreasons. Check if the "Door Lock"icon is illuminated. You can safelyopen the door after the "Door Lock"icon turns off.
The washing time may vary by theamount of laundry, water pressure,water temperature and other usageconditions.If an imbalance is detected or if thesuds removing programme is on, thewash time shall be increased.
Follow softener guidelines to ensureappropriate amount is used.Do not exceed the maximum fill line.
Close the dispenser drawer slowly.Do not open the drawer during thewash cycle.
Do not overload. Check that the washer is drainingproperly to extract adequate waterfrom the load. Clothes load is too small to tumbleproperty. Add a few towels.
Symptom Possible Cause Solution
Troubleshooting guide
37
Troubleshooting guide
Symptom Possible Cause Solution
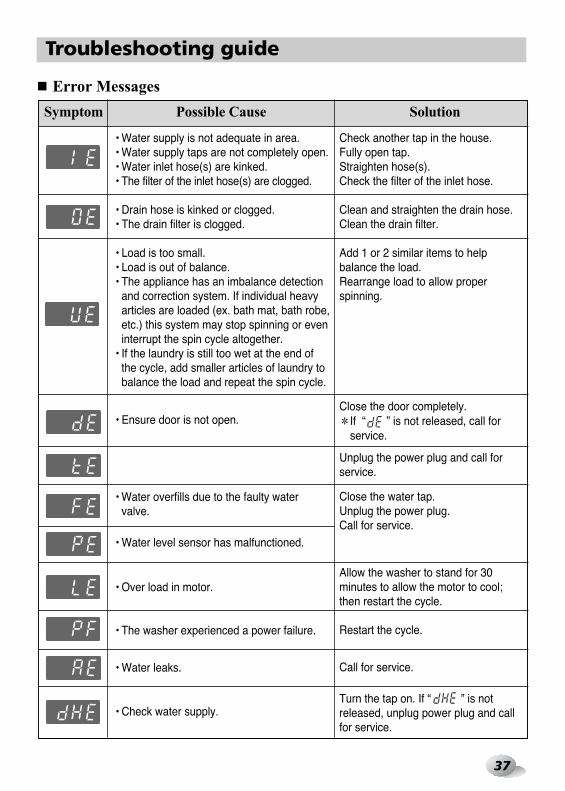
• Water supply is not adequate in area.• Water supply taps are not completely open.• Water inlet hose(s) are kinked.• The filter of the inlet hose(s) are clogged.
• Drain hose is kinked or clogged.• The drain filter is clogged.
• Load is too small.• Load is out of balance.• The appliance has an imbalance detection
and correction system. If individual heavyarticles are loaded (ex. bath mat, bath robe,etc.) this system may stop spinning or eveninterrupt the spin cycle altogether.
• If the laundry is still too wet at the end ofthe cycle, add smaller articles of laundry tobalance the load and repeat the spin cycle.
• Ensure door is not open.
• Water overfills due to the faulty water valve.
• Water level sensor has malfunctioned.
• Over load in motor.
• The washer experienced a power failure.
• Water leaks.
• Check water supply.
Check another tap in the house.Fully open tap.Straighten hose(s).Check the filter of the inlet hose.
Clean and straighten the drain hose.Clean the drain filter.
Add 1 or 2 similar items to help balance the load.Rearrange load to allow proper spinning.
Close the door completely.If “ ” is not released, call forservice.
Unplug the power plug and call forservice.
Close the water tap.Unplug the power plug.Call for service.
Allow the washer to stand for 30minutes to allow the motor to cool;then restart the cycle.
Restart the cycle.
Call for service.
Turn the tap on. If “ ” is notreleased, unplug power plug and callfor service.
� Error Messages
38
Troubleshooting guide
• Only use this feature when instructed to do so by the call center. The transmission sounds similar to a fax machine, and so has no meaning except to thecall center.
• SMARTDIAGNOSIS™ cannot be activated if the washer does not power up. If this happens, then troubleshooting must be done without SMARTDIAGNOSIS™.
If you experience problems with your washer, call to Customer information center. Follow the call center agent's instructions, and do the following steps when requested:
� Using SMARTDIAGNOSIS™
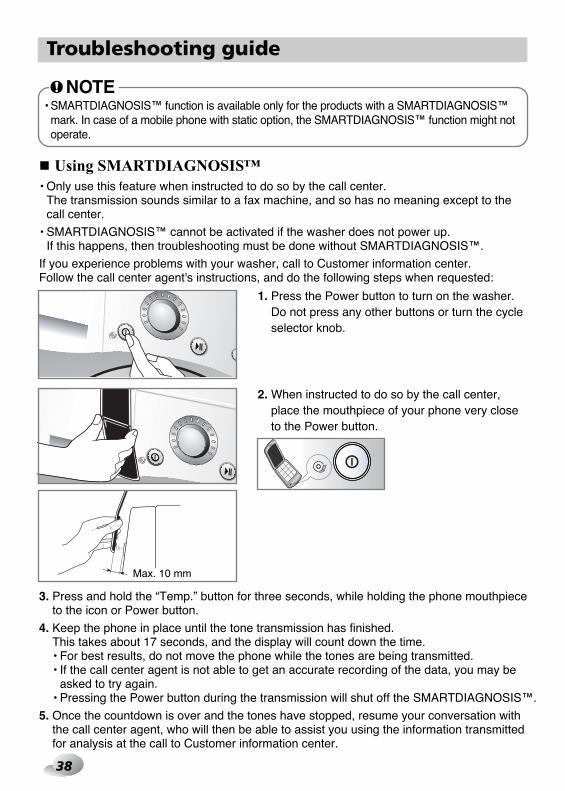
1. Press the Power button to turn on the washer.Do not press any other buttons or turn the cycleselector knob.
2. When instructed to do so by the call center,place the mouthpiece of your phone very closeto the Power button.
3. Press and hold the “Temp.” button for three seconds, while holding the phone mouthpieceto the icon or Power button.
4. Keep the phone in place until the tone transmission has finished. This takes about 17 seconds, and the display will count down the time.• For best results, do not move the phone while the tones are being transmitted.• If the call center agent is not able to get an accurate recording of the data, you may be
asked to try again.• Pressing the Power button during the transmission will shut off the SMARTDIAGNOSIS™.
5. Once the countdown is over and the tones have stopped, resume your conversation withthe call center agent, who will then be able to assist you using the information transmittedfor analysis at the call to Customer information center.
Max. 10 mm
NOTE• SMARTDIAGNOSIS™ function is available only for the products with a SMARTDIAGNOSIS™
mark. In case of a mobile phone with static option, the SMARTDIAGNOSIS™ function might notoperate.

39
Customer Information Center
U.S.A.
Canada
Mexico
Panama
Rep.Dominicana
Nicaragua
El Salvador
Costa Rica
Puerto Rico
Trinidad & Tobago
Grenada
St Kitts
St Lucia
St Vincent
Jamaica
Ecuador
Guatemala
Honduras
Venezuela
Chile
Bolivia
Paraguay
Brazil
Peru
Argentina
Uruguay
Colombia
Thailand
Philippines
Australia
Indonesia
Vietnam
India
Malaysia
Singapore
China
Taiwan
Hongkong
U.A.E.
Jordan
Syria
Iraq
Lebanon
Nigeria
Pakistan
Tunisia
1-800-243-0000
1-888-542-2623
018003471919 / 018002885454
800-5454
1-800-751-5454
001-800-507-0007
00-800-6309
0-800-507 5454
001-800-510-9564
1-877-4909112
1-877-8415314
1-800-2050547
1-877-8415311
1-877-8415310
1-800-2342675
1-800-545454
1-801-422-5454
800-7919270
0-800-5424477
800-26-1054
800-10-0545
009-800110021
0800-707-5454 / 4004-5400
0-800-1-2424
0800-888-5454 / 0810-555-5454
000-405-4089
01 8000 91 0683
02-878-5757 / 1800-545454
+632.9025544
1300 542 273
0800-123-7777
1800-1503
1800-180-9999
1-800-822-822
65 6512 0555 / 65 65120-550 /
65 6512-9207
400-819-9999
0800-89-8899
852-3543 7777
800-54
0800-221-54 / 06-560-8530
011-54-9-54
078 0199 7940 / 078 0199 7954
1273
01-2716520,21,22 / 070-9811-5454
0800 15454
80-100-543
Kenya
Israel
Algeria
Iran
South Africa
Morocco
Turkey
Egypt
Russia
Ukraine
Estonia
Latvia
Lithuania
Belarus
Kazakhstan
U.K.
Germany
Greece
Czech
Slovak
Spain
Sweden
Denmark
Finlan
Norway
Rumania
Bulgaria
Hungary
France
Netherlands
Belgium
Luxembourg
Italy
Portugal
Poland
Austria
Cote d’Ivoire
Ghana
Senegal
Cameroon
D.R Congo
Gabon
Angola
Gambia
Mali
800545454
1-700-700-909
021 36 54 54
9685
800545454
801005454
444 6 543
19960
8-800-200-7676
0-800-303-000
8009990
8 0003 271
8 800 30-800
8 820 0071 1111
8-8000-805-805
0844-847-5454
01805-4737-84
801-11-200-900
420-810 555 810
421-850 111 154
902-500-234
0771-41-4379
8088-5758
0800-116-587
800-18-740
40-31-2283542
0700-1-5454
36-06-40-545454
0825-825-592
0900-543-5454
015-200-255
32-15-200-255
019-960-0099
351-808-78-5454
801-54-54-54
438-1014-4131
800-00-777
21-22-3392
33-8596900
33420428
15167856
72-17-90
222-334394/7
222-338138
4396669
20 29 00 58

40
Terms of Warranty
What Is Not Covered:• Service trips to your home to teach you how to use the product.
• If the product is connected to any voltage other than that shown on the rating plate.
• If the fault is caused by accident, neglect, misuse or Act of God.
• If the fault is caused by factors other than normal domestic use or use in accordance with theowner's manual.
• Provide instruction on use of product or change the set-up of the product.
• If the fault is caused by pests for example, rats or cockroaches, etc.
• Noise or vibration that is considered normal, for example water drain sound, spin sound, or warning beeps.
• Correcting the installation. For example, levelling the product, adjustment of drain.
• Normal maintenance which is recommended by the owner's manual.
• Removal of foreign objects / substances from the machine, including the pump and inlet hosefilter, For example, grit, nails, bra wires, buttons etc.
• Replace fuses in or correct house wiring or correct house plumbing.
• Correction of unauthorized repairs.
• Incidental or consequential damage to personal property caused by possible defects with thisappliance.
• If this product is used for commercial purpose, it is not warranted.(Example : Public places such as public bathroom, lodging house, training center, dormitory)
If the product is installed outside the normal service area, any cost of transportation involved inthe repair of the product, or the replacement of a defective part, shall be borne by the owner.
When disposing of the appliance, cut off the mains cable, destroy the plug and disablethe door lock to prevent children being trapped inside.
NOTE

41
Memo

42
Memo

43
Memo