Embed Size (px)
Citation preview
402v01 RVDS 3.1 Introductory Tutorial 1
RVDS 3.1Introductory
Tutorial
402v01 RVDS 3.1 Introductory Tutorial 2
Introduction
AimThis tutorial provides you with a basic introduction to the tools provided with theRealView Development Suite version 3.1 (RVDS). This will include the use ofcommand line and GUI tools, to build and debug projects.
The tutorial is split into two practical sessions:
Session 1 – Command line tools and executing images in RealView Debugger.Session 2 – Creating projects using the Eclipse IDE and debugging using
RealView Debugger.
Pre-requisitesThis tutorial is intended for use with a Microsoft Windows version of RVDS v3.1.You should be familiar with Microsoft DOS/Windows, and have a basic knowledge ofthe C programming language.
Note: Explanation of File Extensions:
.c C source file
.h C header file
.o object file
.s assembly language source file
.axf ARM Executable file, as produced byarmlink
.txt ASCII text file
Additional informationThis tutorial is not designed to provide detailed documentation of RVDS. Fulldocumentation is provided with the product.
Further help can be accessed by pressing F1 when running RVD, from the help menu,or by using the --help switch for a command line tool. The documentation is alsoavailable in PDF format. This can be found by going to Start → Programs → ARM→ RealView Development Suite 3.1 → RVDS 3.1 Documentation Suite.
402v01 RVDS 3.1 Introductory Tutorial 3
Section 1: Command Line Tools and executingimages in RealView Debugger (RVD)This section covers the command line tools required to create and examine executableimages from the command line, and using RealView Debugger (RVD) to configure aconnection to a simulator and execute an image.
The command line tools include:
armcc ARM C compilertcc Thumb C compilerarmlink Object code linkerarmasm Assembler for ARM/Thumb source codefromelf File format conversion tool
Help is available from the command line for all of the tools covered inthis session by typing the name of the tool followed by --help.
For more details please refer to the following documentation: Compilerand Libraries Guide, Linker and Utilities Guide.
For the exercises in this section, you will receive a warning from thecompiler: “-g defaults to –O2 if no optimization level is specified”.You can ignore this warning, as we will not be debugging the imagefiles in this section.
Consider the following simple C program which calls a subroutine. This file isprovided as hello.c in c:\armprac\intro\session1\
/* hello.c Example code */
#include <stdio.h>#include <stdlib.h> /*for size_t*/
void subroutine(const char *message){printf(message);
}
int main(void){const char *greeting = "Hello from subroutine\n";printf("Hello World from main\n");subroutine(greeting);printf("And Goodbye from main\n\n");return 0;
}

402v01 RVDS 3.1 Introductory Tutorial 4
Exercise 1.1 - Compiling and running the example
Compile this program with the ARM C compiler:
armcc -g hello.c
The C source code is compiled and an ARM ELF object file, hello.o, is created.The compiler also automatically invokes the linker to produce an executable with thedefault executable filename __image.axf.
The -g option adds high level debugging information to the object/executable. If –gis not specified then the program will still produce the same results when executed butit will not be possible to perform high level language debugging operations.
Thus this command will compile the C code, link with the default C library andproduce an ARM ELF format executable called __image.axf.
Exercise 1.2 – Executing the example in RVDBefore the image can be executed it must be loaded to an appropriate target using thedebugger. This example will use the RealView Instruction Set Simulator (RVISS) asthe target to execute the image using RealView Debugger (RVD).
Start RVD by clicking on the icon in the Windows Start Menu folder.ARM →RealView Development Suite v3.1 → RealView Debugger v3.1
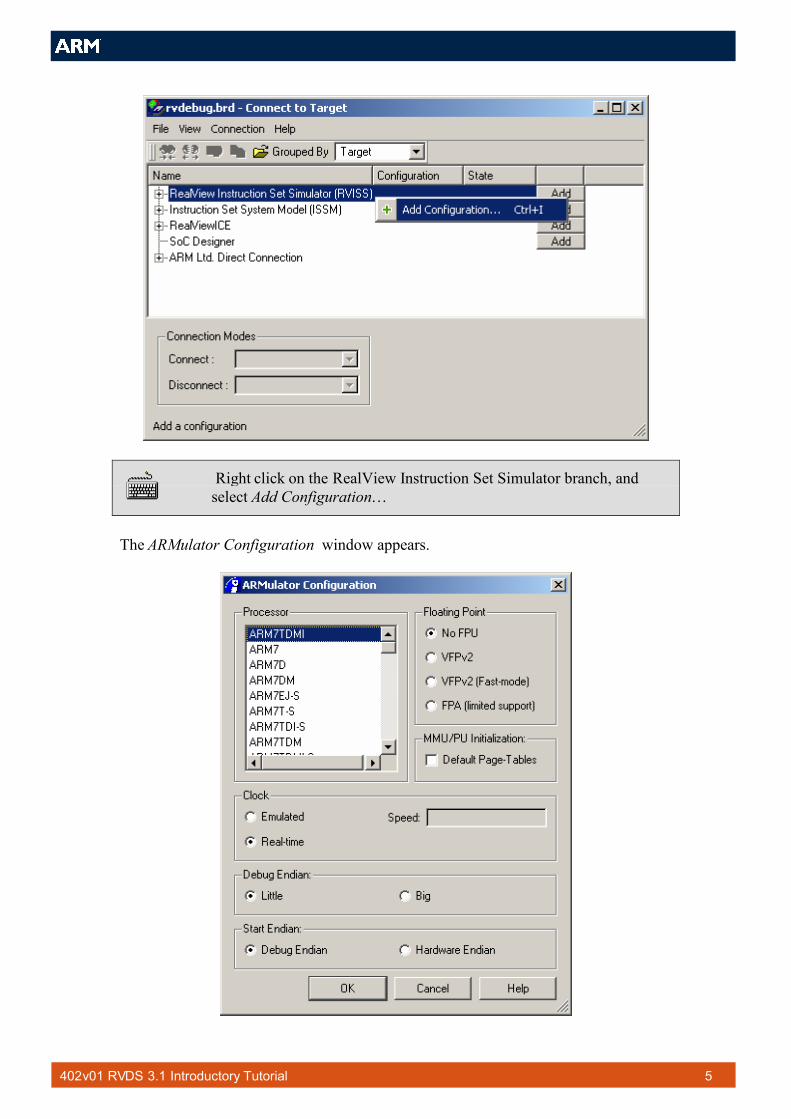
Select Target → Connect to Target… from the menu, or click thehyperlink to launch the Connection Control window.
402v01 RVDS 3.1 Introductory Tutorial 5
Right click on the RealView Instruction Set Simulator branch, andselect Add Configuration…
The ARMulator Configuration window appears.
402v01 RVDS 3.1 Introductory Tutorial 6
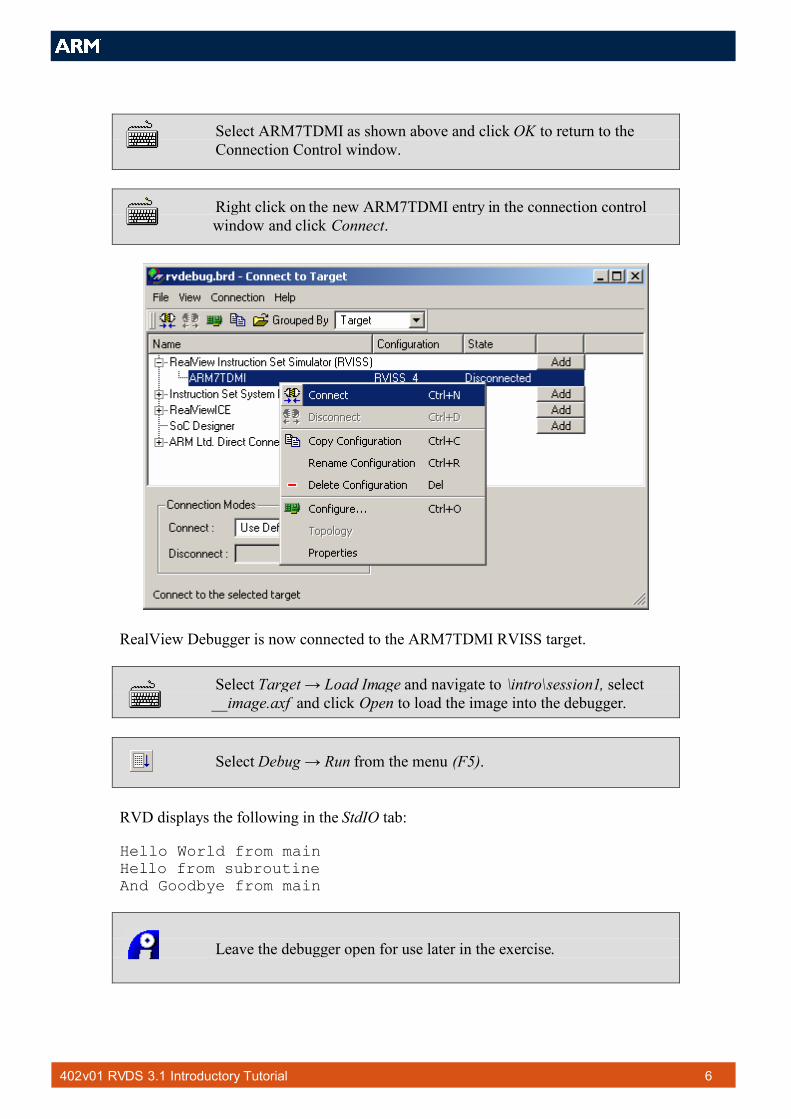
Select ARM7TDMI as shown above and click OK to return to theConnection Control window.
Right click on the new ARM7TDMI entry in the connection controlwindow and click Connect.
RealView Debugger is now connected to the ARM7TDMI RVISS target.
Select Target → Load Image and navigate to \intro\session1, select__image.axf and click Open to load the image into the debugger.
Select Debug → Run from the menu (F5).
RVD displays the following in the StdIO tab:
Hello World from mainHello from subroutineAnd Goodbye from main
Leave the debugger open for use later in the exercise.

402v01 RVDS 3.1 Introductory Tutorial 7
Exercise 1.3 - Compilation options
Different arguments can be passed to the compiler from the command line tocustomize the output generated. A list of the more common options, together withtheir effects, can be viewed by enteringarmcc --help at the command line. Someof these options are listed below:
-c Generate object code only, does not invoke the linker-o <filename> Name the generated output file as ‘filename’-S Generate an assembly language listing-S --interleave Generate assembly interleaved with source code
When the compiler is asked to generate a non-object output file, for example whenusing -c or -S, the linker is not invoked, and an executable image will not be created.These arguments apply to both the ARM and Thumb C compilers.
RVCT uses a -- prefix for multi character switches like interleave.
Use the compiler options with armcc or tcc to generate the followingoutput files from hello.c:
image.axf An ARM executable imagesource.s An ARM assembly sourceinter.s A listing of assembly interleaved with source codethumb.axf A Thumb executable imagethumb.s A Thumb assembly source
Use a suitable text editor to view the interleaved source file.
To use Notepad from the command line type notepad <filename>.
Note the sections of assembly source that correspond to the interleaved C source code.
402v01 RVDS 3.1 Introductory Tutorial 8
Exercise 1.4 - armlink
In previous exercises we have seen how the compiler can be used to automaticallyinvoke the linker to produce an executable image. armlink can be invoked explicitlyto create an executable image by linking object files with the required library files.This exercise will use the files, main.c and sub.c which can be linked to produce asimilar executable to the one seen in the previous exercises.
Use the compiler to produce ARM object code files from each of thetwo source files.
Remember to use the -c option to prevent automatic linking.
Use armlink main.o sub.o -o link.axf to create a new ARMexecutable called link.axf.
armlink is capable of linking both ARM and Thumb objects.If the -o option is not used an executable with the default filename,__image.axf, will be created.
Load the executable into RVD and run - check that the output is thesame as before.
The ability to link files in this way is particularly useful when link order is important,or when different C source modules have different compilation requirements. It isalso useful when linking with assembler object files.
402v01 RVDS 3.1 Introductory Tutorial 9
Exercise 1.5 - fromelf
ARM ELF format objects and ARM ELF executable images that are produced by thecompilers, assembler and/or linker can be decoded using the fromelf utility and theoutput examined. Shown below is an example using the –c option to producedecoded output, showing disassembled code areas, from the file hello.o:
fromelf –c hello.o
Alternatively re-direct the output to another file to enable viewing with a text editor:
fromelf –c hello.o > hello.txt
Use the fromelf utility to produce and view disassembled code listings from themain.o and sub.o object files.
A complete list of options available for ‘fromelf’ can be found fromthe command line using fromelf –-help, or by consulting the on-linedocumentation.
402v01 RVDS 3.1 Introductory Tutorial 10
Section 1 - Review
We have now seen how the command line tools can be used to compile and link andlink simple projects.
armcc The compiler can be called with many different options. The -g optionis required to enable source level debugging. The compiler can be usedto generate executable images, object files and assembly listings.
tcc The Thumb compiler can be used in the same way as armcc.
armasm The assembler can be used to construct object files directly fromassembly source code.
armlink The linker can be used to produce executable images from ARM orThumb object files.
fromelf The ‘fromelf’ utility can be used to generate disassembled codelistings from ARM or Thumb object or image files.
Help is available from the command line. Alternatively, consult theonline documentation for further information.
We have seen how RVD can be used to:
Set up and connect to an RVISS target.
Load and execute an image.
402v01 RVDS 3.1 Introductory Tutorial 11
Section 2: Creating projects using Eclipse and debuggingusing RVD
In this session we will see how the Eclipse Integrated Development Environment canbe used with RealView Debugger (RVD) to create and develop projects.
Exercise 2.1 - Creating a new project
In this exercise, we will create a new project in Eclipse.
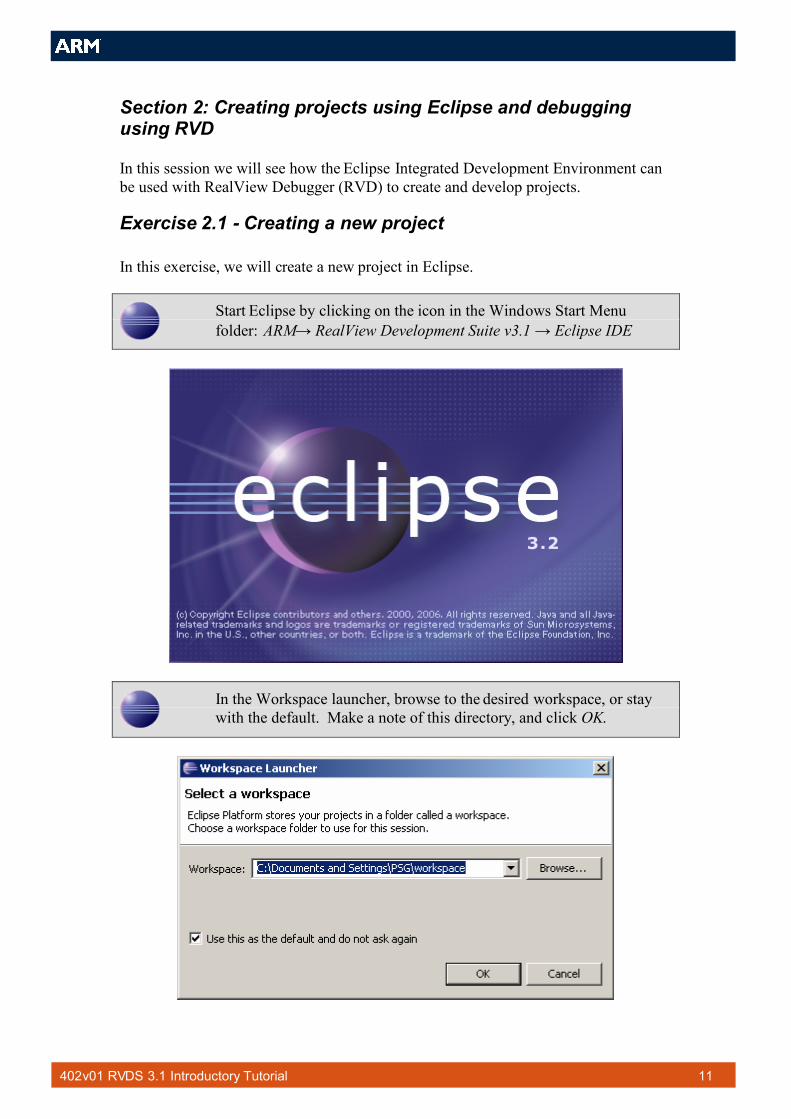
Start Eclipse by clicking on the icon in the Windows Start Menufolder: ARM→ RealView Development Suite v3.1 → Eclipse IDE
In the Workspace launcher, browse to the desired workspace, or staywith the default. Make a note of this directory, and click OK.
402v01 RVDS 3.1 Introductory Tutorial 12
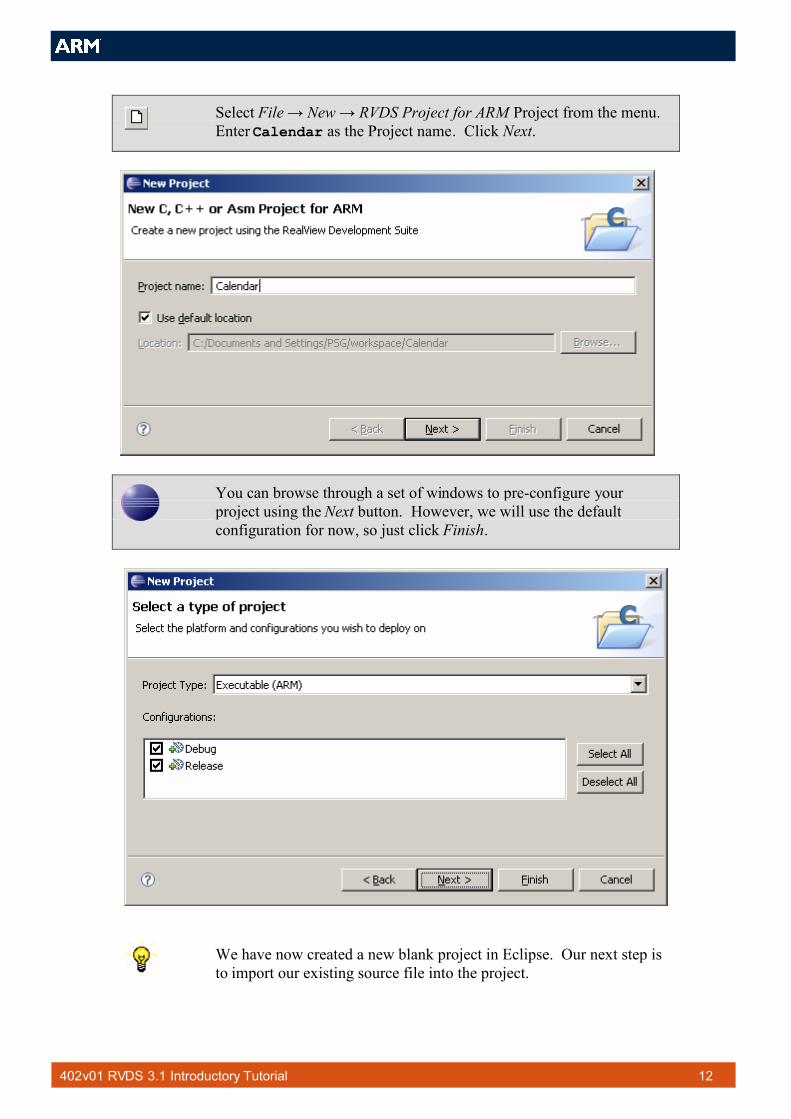
Select File → New → RVDS Project for ARM Project from the menu.Enter Calendar as the Project name. Click Next.
You can browse through a set of windows to pre-configure yourproject using the Next button. However, we will use the defaultconfiguration for now, so just click Finish.
We have now created a new blank project in Eclipse. Our next step isto import our existing source file into the project.
402v01 RVDS 3.1 Introductory Tutorial 13
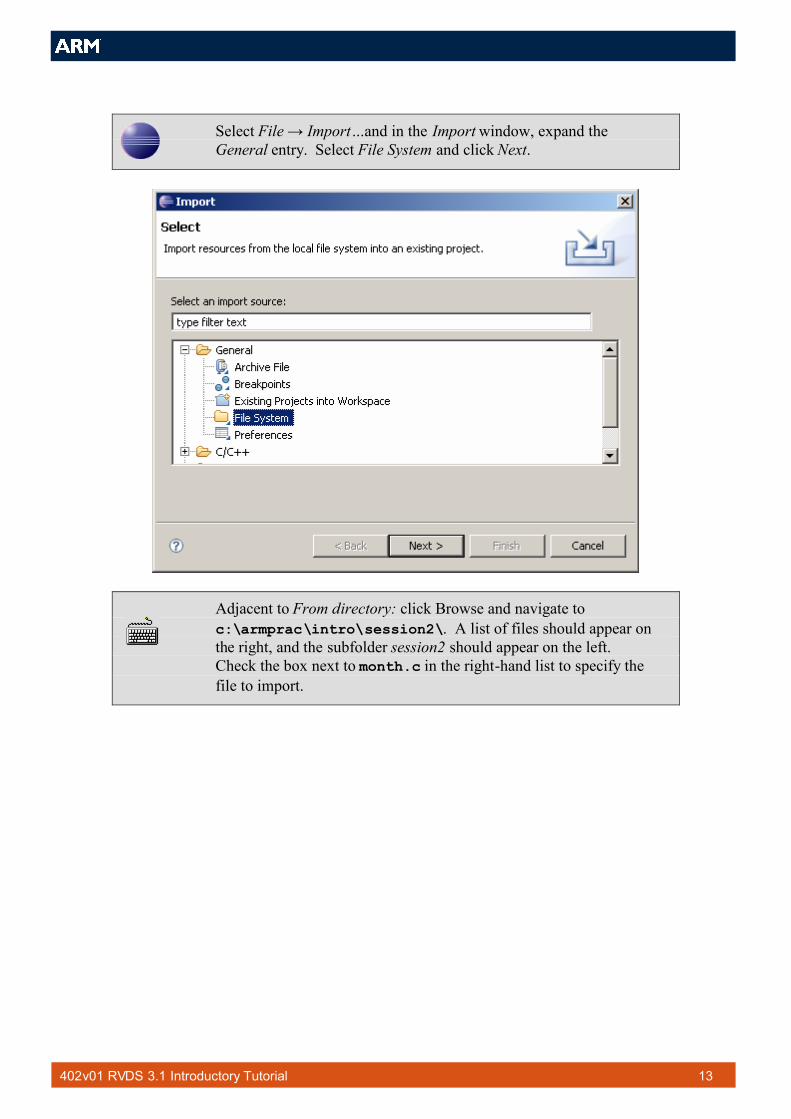
Select File → Import…and in the Import window, expand theGeneral entry. Select File System and click Next.
Adjacent to From directory: click Browse and navigate toc:\armprac\intro\session2\. A list of files should appear onthe right, and the subfolder session2 should appear on the left.Check the box next to month.c in the right-hand list to specify thefile to import.
402v01 RVDS 3.1 Introductory Tutorial 14
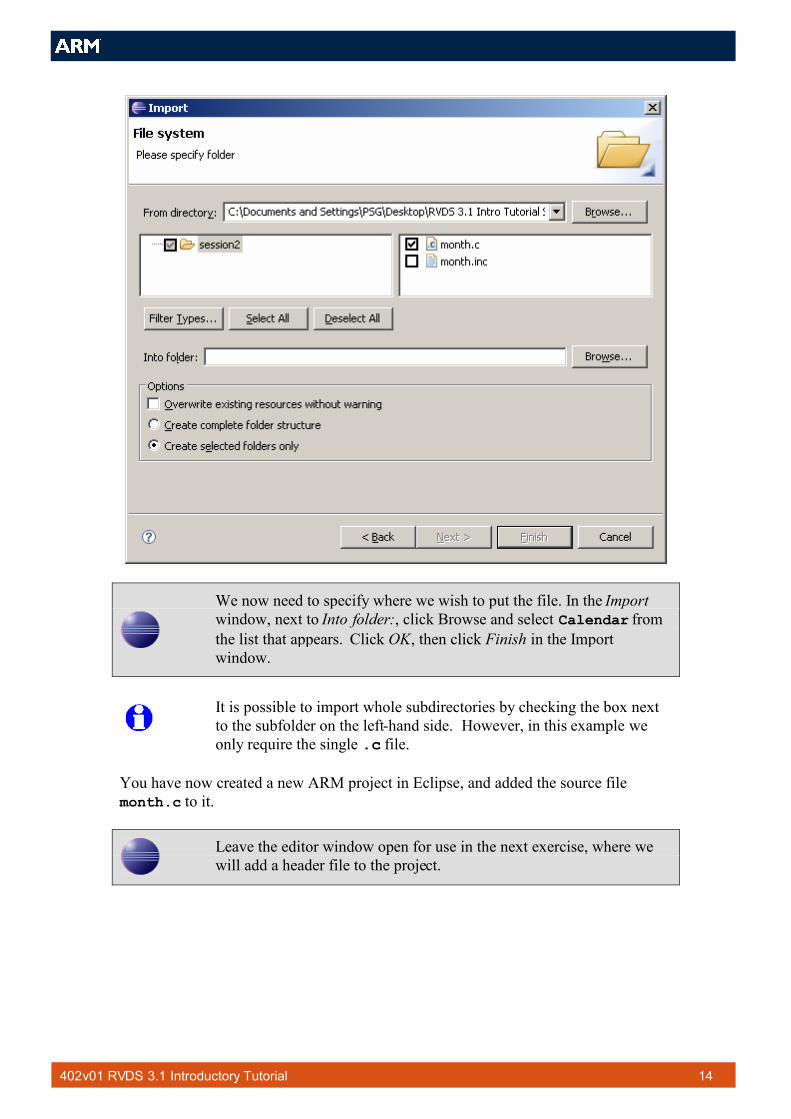
We now need to specify where we wish to put the file. In the Importwindow, next to Into folder:, click Browse and select Calendar fromthe list that appears. Click OK, then click Finish in the Importwindow.
It is possible to import whole subdirectories by checking the box nextto the subfolder on the left-hand side. However, in this example weonly require the single .c file.
You have now created a new ARM project in Eclipse, and added the source filemonth.c to it.
Leave the editor window open for use in the next exercise, where wewill add a header file to the project.

402v01 RVDS 3.1 Introductory Tutorial 15
Exercise 2.2 - Creating a header file
In this exercise, we will create a new header file using Eclipse.
Select File New Header File. The New Header File windowappears. Enter Calendar as the Source Folder, and date_format.has the Header File. Click Finish.
The file date_format.h now appears in Eclipse. Note that this file has now beenautomatically added to the Calendar project directory.
402v01 RVDS 3.1 Introductory Tutorial 16
We need to add some code to this file. Modify the file to include thefollowing C struct definition:
#ifndef DATE_FORMAT_H_#define DATE_FORMAT_H_
struct Date_Format{
int day;int month;int year;
};
#endif /*DATE_FORMAT_H_*/
Select File Save from the menu. This will cause the project torebuild. Ignore any project error messages for the time being.
Finally, we must check that the correct build target is selected.
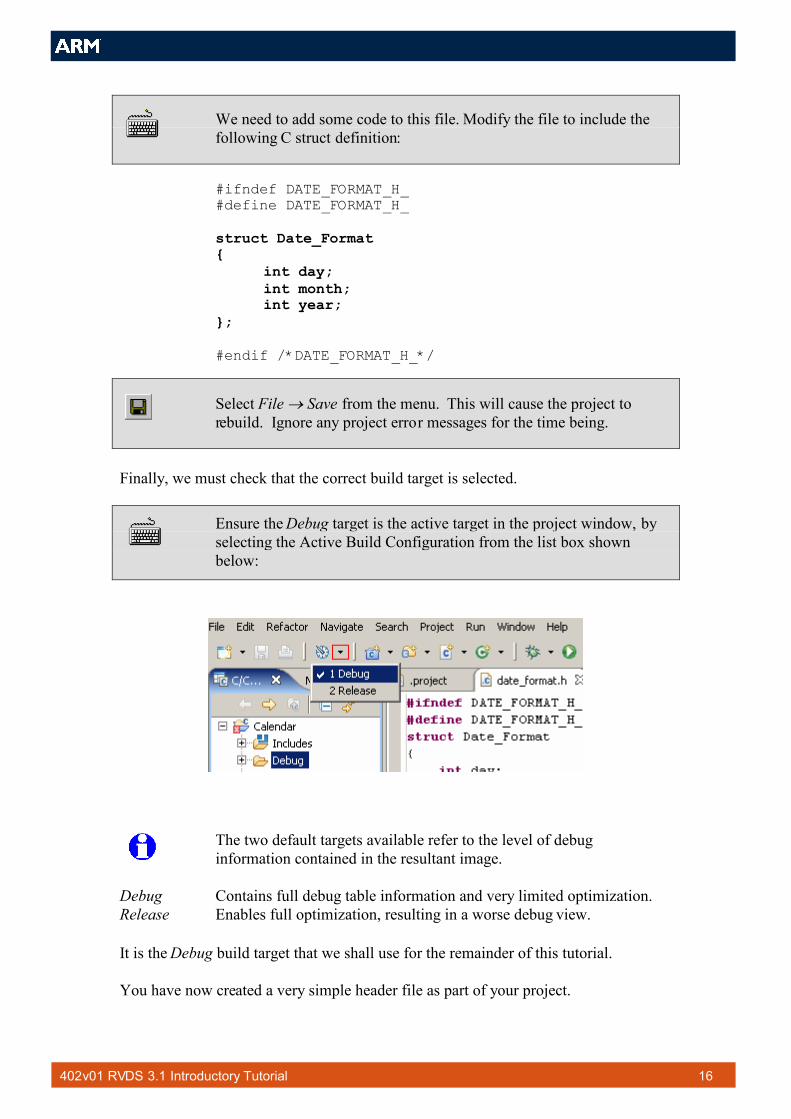
Ensure the Debug target is the active target in the project window, byselecting the Active Build Configuration from the list box shownbelow:
The two default targets available refer to the level of debuginformation contained in the resultant image.
Debug Contains full debug table information and very limited optimization.Release Enables full optimization, resulting in a worse debug view.
It is the Debug build target that we shall use for the remainder of this tutorial.
You have now created a very simple header file as part of your project.
402v01 RVDS 3.1 Introductory Tutorial 17
Leave the editor window open for use later in the exercise, where wewill build the project in Eclipse.
Exercise 2.3 - Building the project (Debug target)
In this exercise, we will build our Calendar Project.
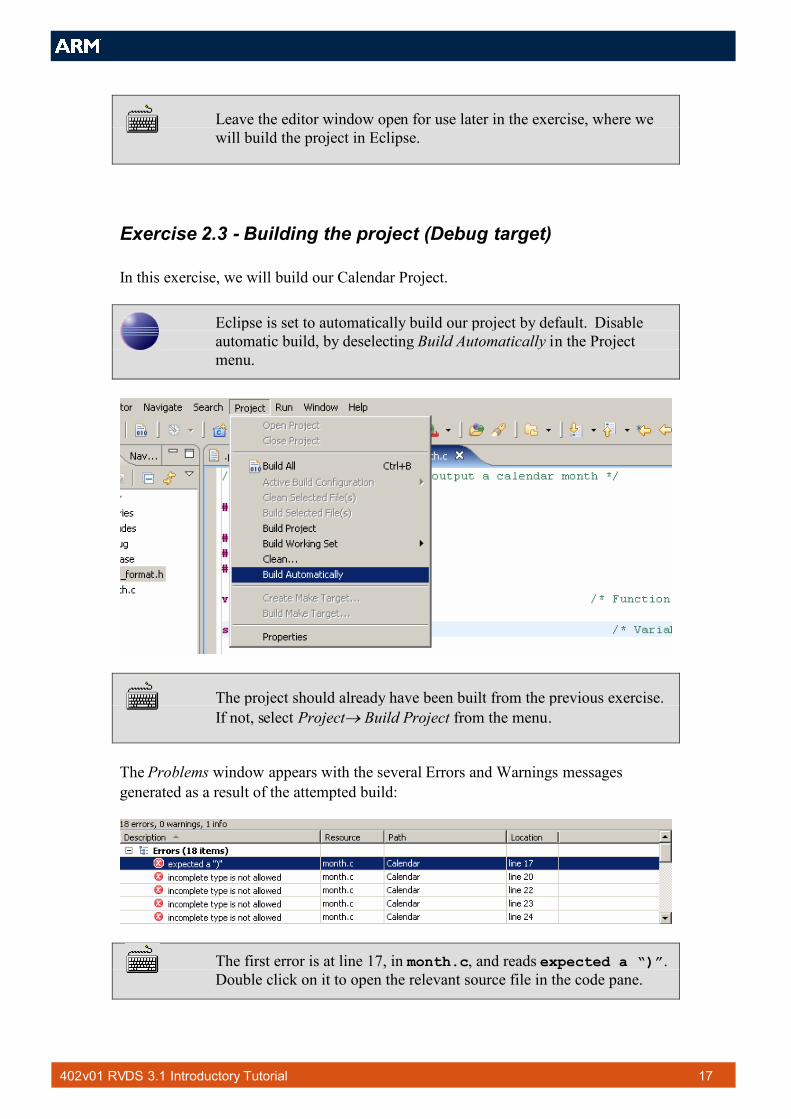
Eclipse is set to automatically build our project by default. Disableautomatic build, by deselecting Build Automatically in the Projectmenu.
The project should already have been built from the previous exercise.If not, select Project Build Project from the menu.
The Problems window appears with the several Errors and Warnings messagesgenerated as a result of the attempted build:
The first error is at line 17, in month.c, and reads expected a “)”.Double click on it to open the relevant source file in the code pane.
402v01 RVDS 3.1 Introductory Tutorial 18
There is something wrong with the code; a close bracket is missing. The line shouldread:
printf("\ne.g. 1972 02 17\n\n");
Correct the error by adding the missing bracket and then save theupdated source file. Rebuild the project.
The Errors & Warnings window again shows the errors associated with the failedbuild. The first error message is:
Error : #70: incomplete type is not allowedmonth.c line 20
Once again, the code pane of the Problems window displays the relevant source fileand an arrow highlights the line of code associated with the first error message. Youwill find that there is nothing wrong with the code on this line!
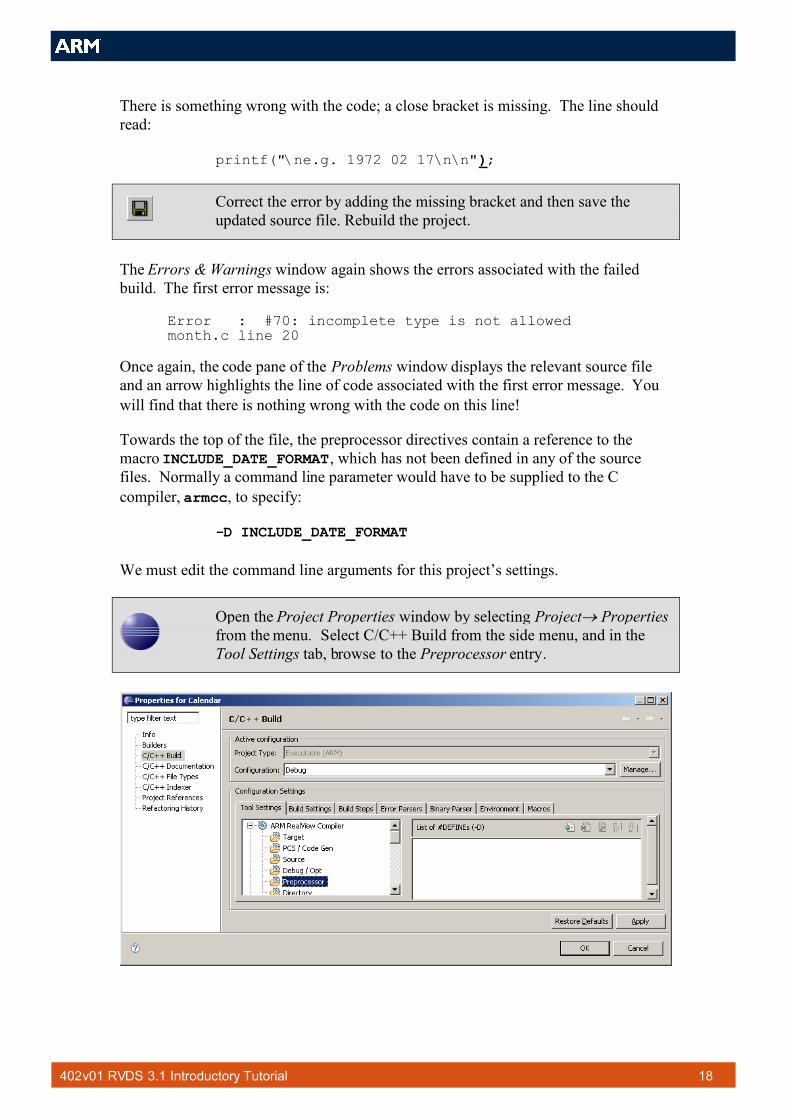
Towards the top of the file, the preprocessor directives contain a reference to themacro INCLUDE_DATE_FORMAT, which has not been defined in any of the sourcefiles. Normally a command line parameter would have to be supplied to the Ccompiler, armcc, to specify:
-D INCLUDE_DATE_FORMAT
We must edit the command line arguments for this project’s settings.
Open the Project Properties window by selecting Project Propertiesfrom the menu. Select C/C++ Build from the side menu, and in theTool Settings tab, browse to the Preprocessor entry.
402v01 RVDS 3.1 Introductory Tutorial 19
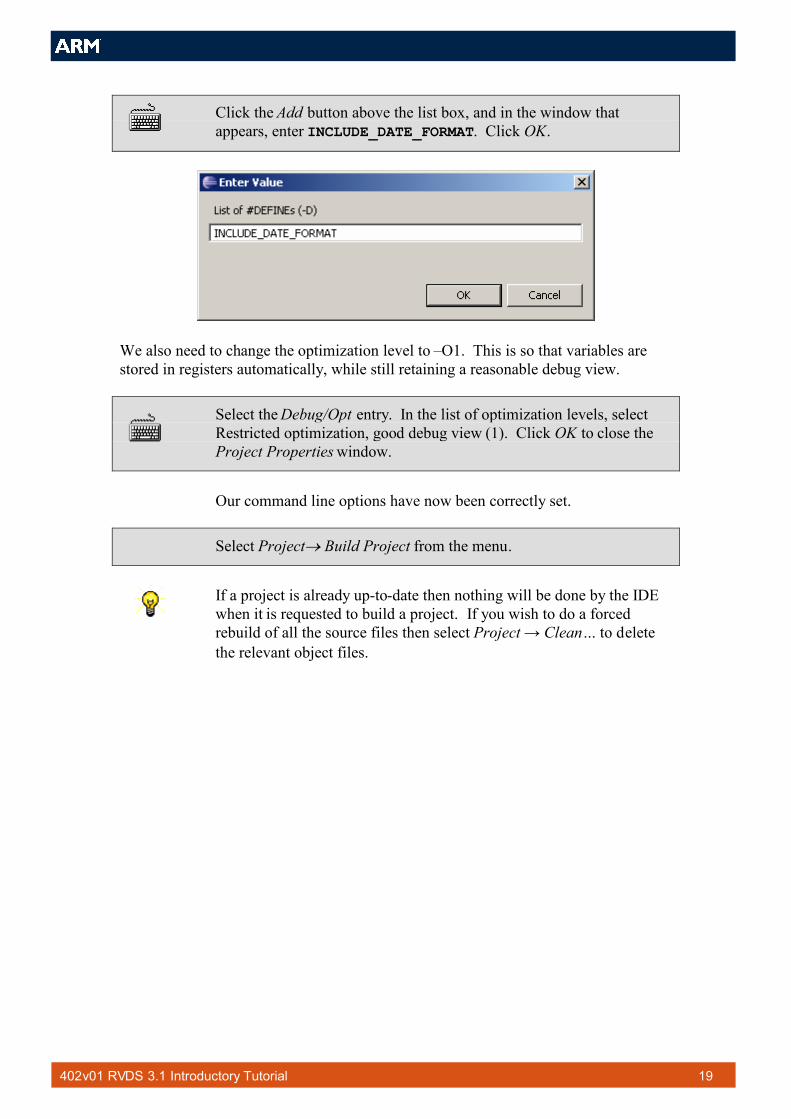
Click the Add button above the list box, and in the window thatappears, enter INCLUDE_DATE_FORMAT. Click OK.
We also need to change the optimization level to –O1. This is so that variables arestored in registers automatically, while still retaining a reasonable debug view.
Select the Debug/Opt entry. In the list of optimization levels, selectRestricted optimization, good debug view (1). Click OK to close theProject Properties window.
Our command line options have now been correctly set.
Select Project Build Project from the menu.
If a project is already up-to-date then nothing will be done by the IDEwhen it is requested to build a project. If you wish to do a forcedrebuild of all the source files then select Project → Clean… to deletethe relevant object files.
402v01 RVDS 3.1 Introductory Tutorial 20
Exercise 2.4 - Executing the example in RVD
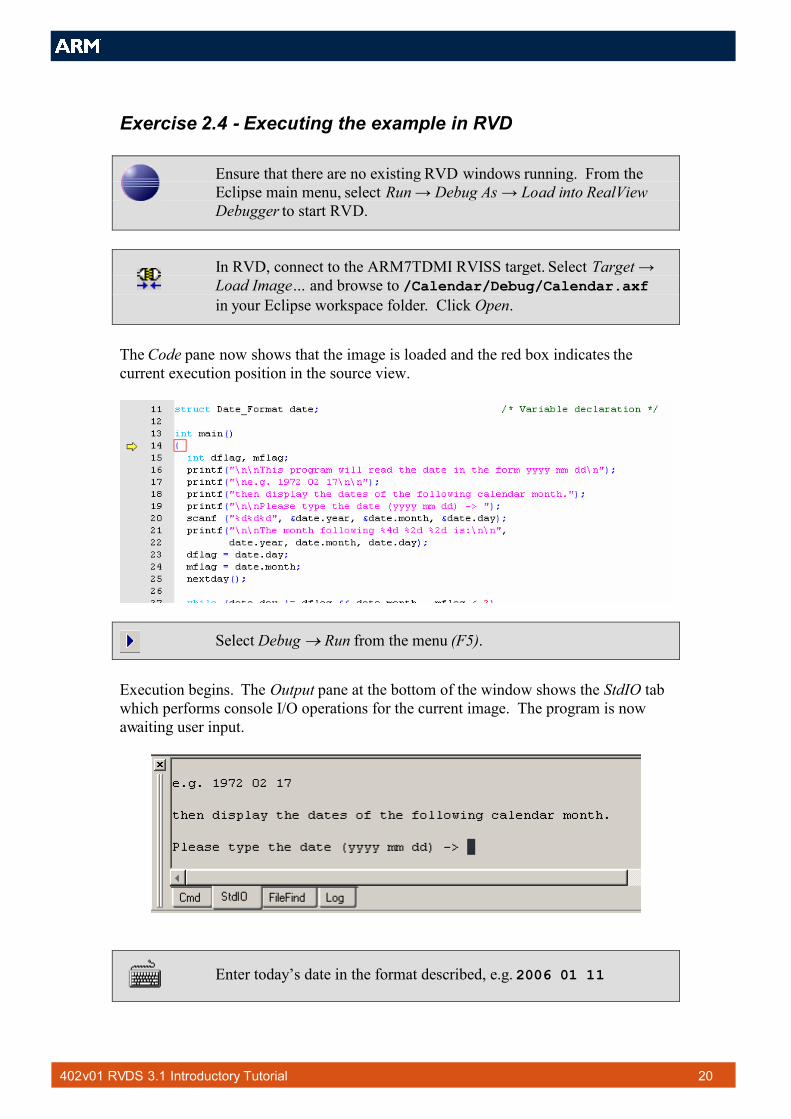
Ensure that there are no existing RVD windows running. From theEclipse main menu, select Run → Debug As → Load into RealViewDebugger to start RVD.
In RVD, connect to the ARM7TDMI RVISS target. Select Target →Load Image… and browse to /Calendar/Debug/Calendar.axfin your Eclipse workspace folder. Click Open.
The Code pane now shows that the image is loaded and the red box indicates thecurrent execution position in the source view.
Select Debug Run from the menu (F5).
Execution begins. The Output pane at the bottom of the window shows the StdIO tabwhich performs console I/O operations for the current image. The program is nowawaiting user input.
Enter today’s date in the format described, e.g. 2006 01 11
402v01 RVDS 3.1 Introductory Tutorial 21
The program will display the dates for the following calendar month and thenterminate.
Note that there is no source code available for the system exit routinesand RVD displays Stopped at 0x000097D4<Unknown>\_sys_exit in the CMD tab.
The disassembled project code can be viewed by selecting the Dsm tabin the Code pane.
All windows can be resized by clicking and dragging at the edges.
Docked panes can be changed to floating windows by dragging anddropping.

402v01 RVDS 3.1 Introductory Tutorial 22
Exercise 2.5 - Debugging the example
Select Target Reload Image to Target from the menu.
RVD will load the image ready for debugging. Again the current execution position isshown at the image entry point.
Select Debug Run from the menu (F5).
You will once again be prompted to enter a date.This time enter 2006 11 30. The program will terminate after it hasoutput the set of dates for the following month.
Use the scroll bar at the edge of the Output Pane to view the dates atthe end of November. You will find that there is an extra day!
Reload the image into the debugger.
Select View → Symbols from the menu to open a Symbols pane.Select the Functions tab.
402v01 RVDS 3.1 Introductory Tutorial 23
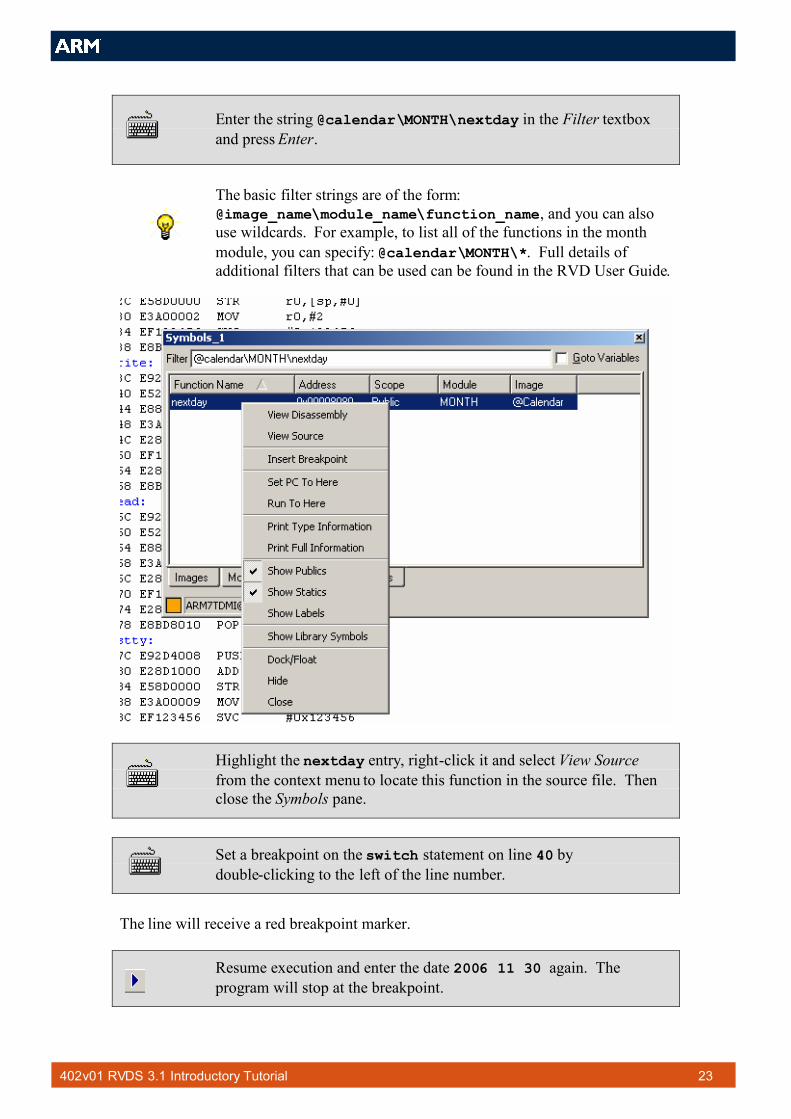
Enter the string @calendar\MONTH\nextday in the Filter textboxand press Enter.
The basic filter strings are of the form:@image_name\module_name\function_name, and you can alsouse wildcards. For example, to list all of the functions in the monthmodule, you can specify: @calendar\MONTH\*. Full details ofadditional filters that can be used can be found in the RVD User Guide.
Highlight the nextday entry, right-click it and select View Sourcefrom the context menu to locate this function in the source file. Thenclose the Symbols pane.
Set a breakpoint on the switch statement on line 40 bydouble-clicking to the left of the line number.
The line will receive a red breakpoint marker.
Resume execution and enter the date 2006 11 30 again. Theprogram will stop at the breakpoint.
402v01 RVDS 3.1 Introductory Tutorial 24
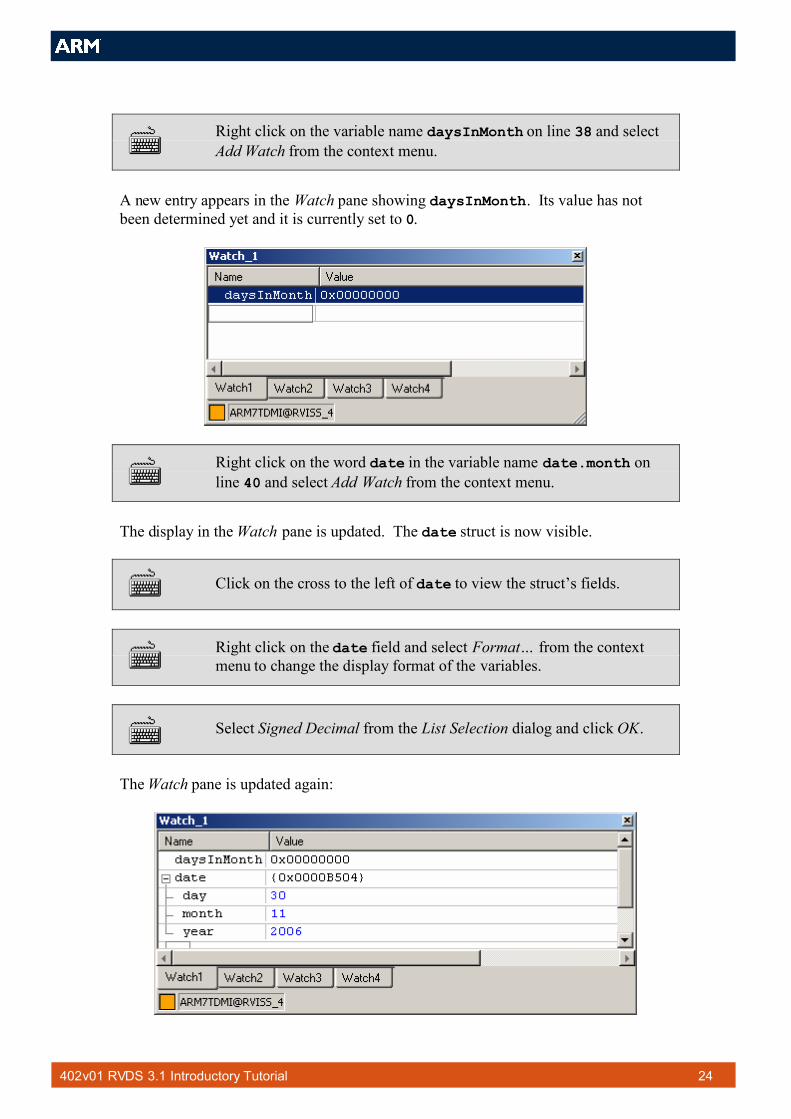
Right click on the variable name daysInMonth on line 38 and selectAdd Watch from the context menu.
A new entry appears in the Watch pane showing daysInMonth. Its value has notbeen determined yet and it is currently set to 0.
Right click on the word date in the variable name date.month online 40 and select Add Watch from the context menu.
The display in the Watch pane is updated. The date struct is now visible.
Click on the cross to the left of date to view the struct’s fields.
Right click on the date field and select Format… from the contextmenu to change the display format of the variables.
Select Signed Decimal from the List Selection dialog and click OK.
The Watch pane is updated again:
402v01 RVDS 3.1 Introductory Tutorial 25
Select Debug Step Over (next) (F10) to perform thenext step in the program.
You will note that the case statements have been skipped and that thedefault path will be taken.
The default path assumes the month has 31 days. This is not correct for November.There is a fragment of code, “case 11:”, missing from line 51. To rectify thispermanently we would have to edit the source file. For the purposes of this examplewe will modify the variable daysInMonth to produce the desired result.
Double-click on the breakpoint set on line 40 to remove it.
Set a new breakpoint on line 58 after the block of code containing theswitch statement.
Resume program execution, the debugger will stop at the newbreakpoint.
Right click on the daysInMonth variable in the Watch pane andchange the format of this variable to Signed Decimal.
You will see that the value of daysInMonth is 31, but we require it to be 30.
Click on the value to edit it and change the value to 30, then pressenter.
Remove the breakpoint on line 58.
Resume the program and finish executing the example.
Note that the output generated by the program is now correct.
402v01 RVDS 3.1 Introductory Tutorial 26
Exercise 2.6 – Viewing registers and memory
Reload the image into the debugger.
RVD will load the image ready for debugging. Again the current execution position isshown at main.
Set a breakpoint on the printf statement on line 29 by doubleclicking in the region to the left of the statement.
Select Debug Run from the menu (F5).
You will once again be prompted to enter a date.
This time enter 2006 12 25.
The program will stop at the breakpoint on the printf statement.
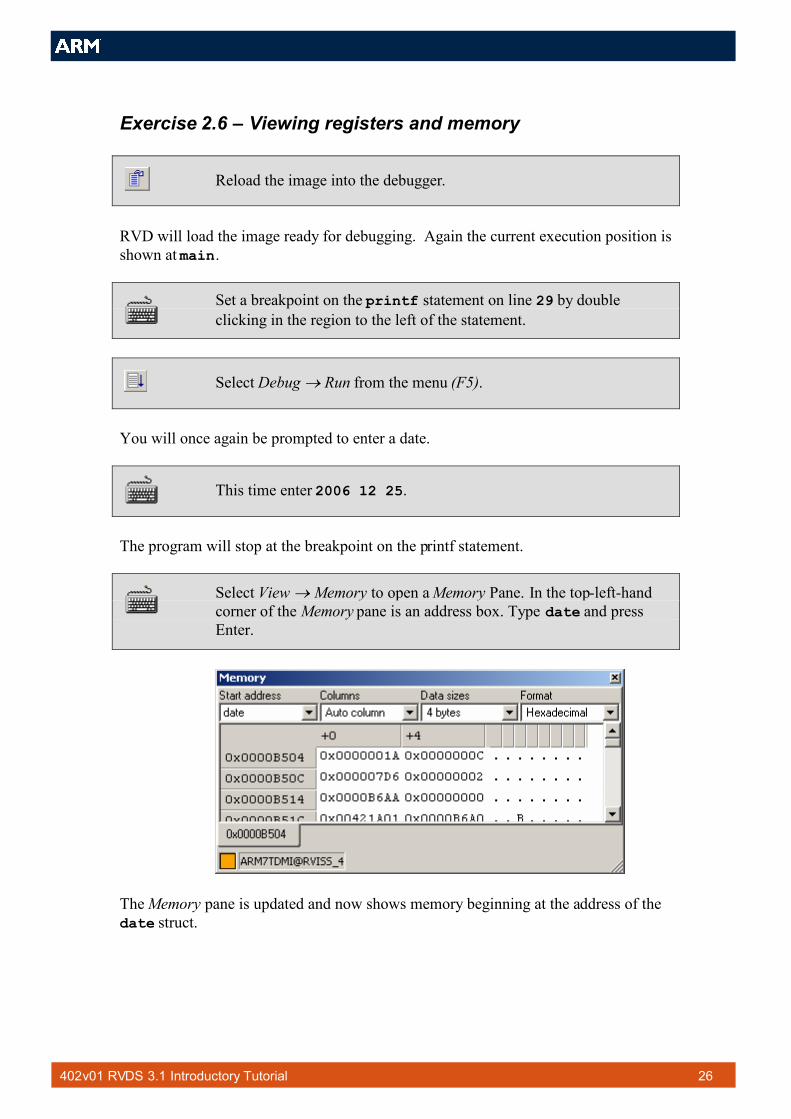
Select View Memory to open a Memory Pane. In the top-left-handcorner of the Memory pane is an address box. Type date and pressEnter.
The Memory pane is updated and now shows memory beginning at the address of thedate struct.

402v01 RVDS 3.1 Introductory Tutorial 27
Select Decimal from the Format list, and select 4 bytes from the DataSizes List.
Note how the three successive words in memory correspond to thethree fields in the date struct (26/12/2006).
Resume the program, execution will stop at the breakpoint again.
Open a register pane by selecting View → Registers from themenu. Right click on register r3 and select Format Decimal tochange the register display format.
402v01 RVDS 3.1 Introductory Tutorial 28
At this point in the program r3 holds the value stored in the day field of the datevariable in the Memory window (the value of day is now 27 as the nextday functionhas been called.).
Use the Go button to execute the while loop until r3 has the value 2.
Double click on the date.day value (2) in the Watch pane to edit it.Change it to 22 and press Enter.
Use the Go button to pass through the while loop until the programends.
Note how the value entered in the variable watch pane affects the value in the registerr3, the corresponding entry in the memory window and the program output.
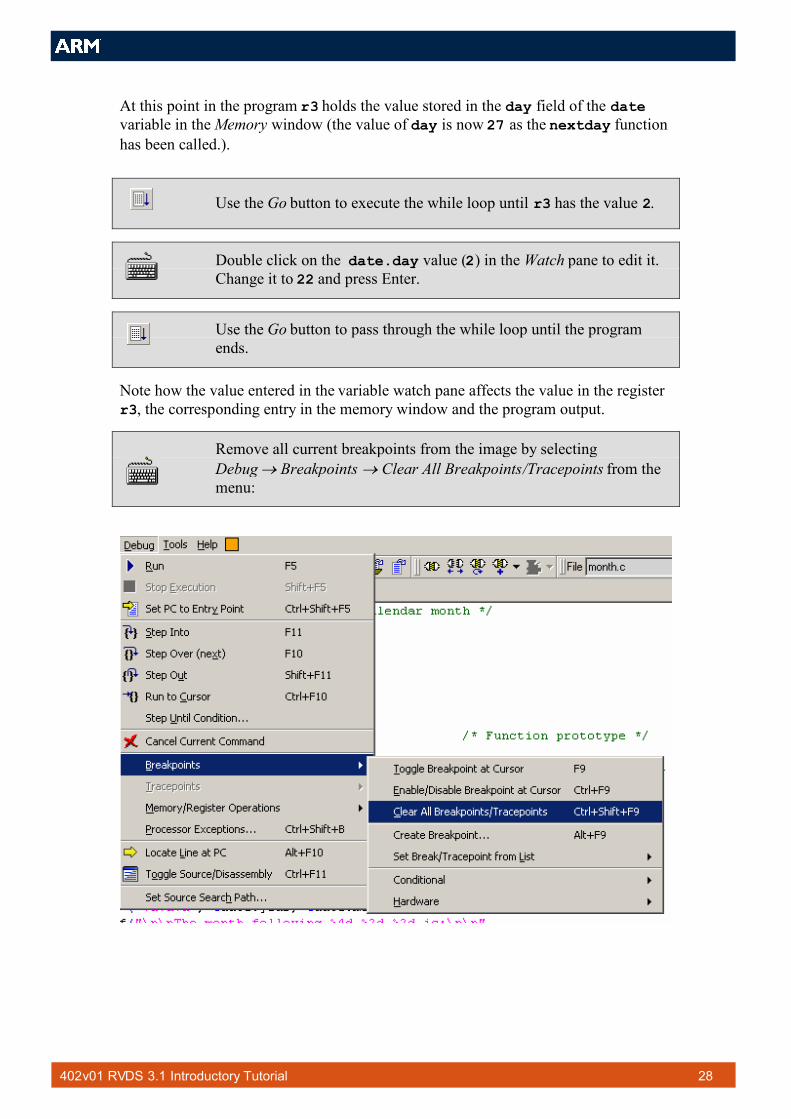
Remove all current breakpoints from the image by selectingDebug Breakpoints Clear All Breakpoints/Tracepoints from themenu:
402v01 RVDS 3.1 Introductory Tutorial 29
Exercise 2.7 – Using the command line
Reload the image into the debugger.
RVD will load the image ready for debugging. Again the current execution position isshown at main.
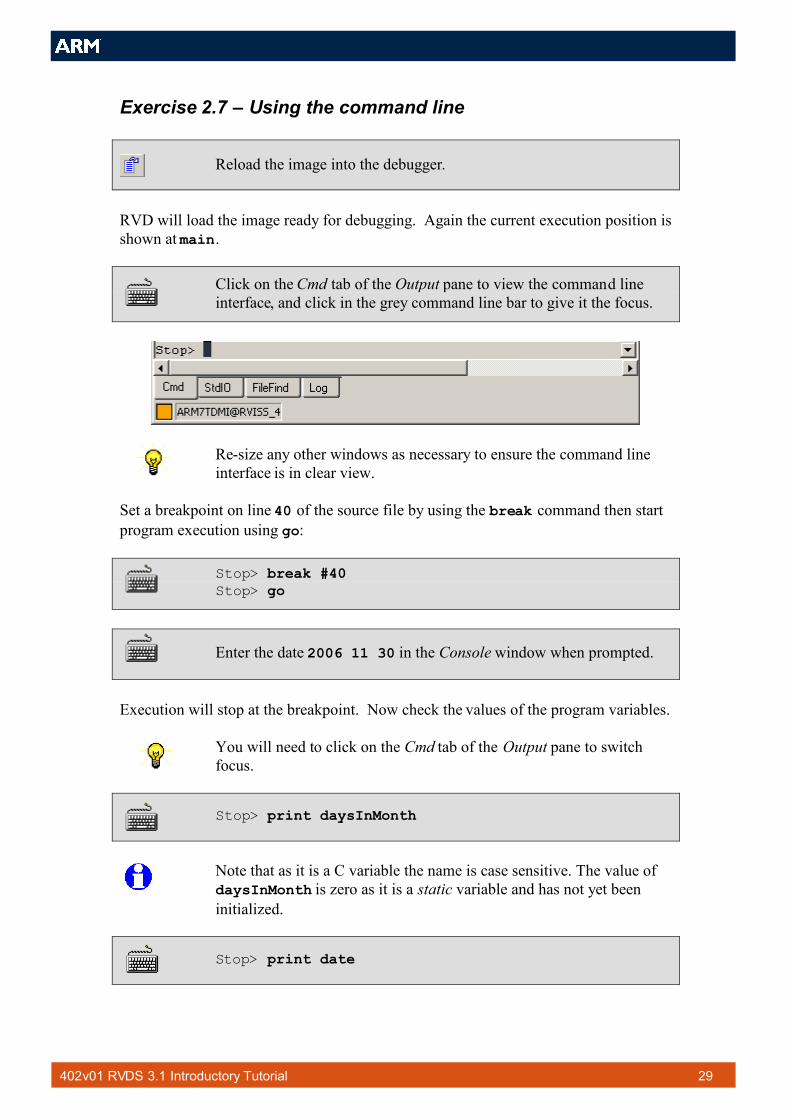
Click on the Cmd tab of the Output pane to view the command lineinterface, and click in the grey command line bar to give it the focus.
Re-size any other windows as necessary to ensure the command lineinterface is in clear view.
Set a breakpoint on line 40 of the source file by using the break command then startprogram execution using go:
Stop> break #40Stop> go
Enter the date 2006 11 30 in the Console window when prompted.
Execution will stop at the breakpoint. Now check the values of the program variables.
You will need to click on the Cmd tab of the Output pane to switchfocus.
Stop> print daysInMonth
Note that as it is a C variable the name is case sensitive. The value ofdaysInMonth is zero as it is a static variable and has not yet beeninitialized.
Stop> print date

402v01 RVDS 3.1 Introductory Tutorial 30
Remove the breakpoint on line 40 using the clear command.
The clear command will clear all breakpoints. If you need to clear aspecific breakpoint, you can find the reference for the breakpoint usingthe break command. This will print a list of current breakpoints. Forexample to clear the first breakpoint listed type: clear 1.
Stop> clear
Set another breakpoint immediately after the switch statement then resume programexecution.
Stop> break #58Stop> go
Check the value of the daysInMonth variable.
Stop> print daysInMonth
It is possible to use the cursor keys, ↑ and ↓, to recall recentcommands.
Correct the value from 31 to 30 using the ce command.
Stop> ce daysInMonth=30
ce is an abbreviation of the CExpression command. This can beused on its own to view the value of an expression, or with a modifier,such as = in this case, to change the value of an expression.
Use the go command to pass through the while loop until the output displays the date2006 12 3
Stop> go
You will need to toggle between the StdIO and Cmd tabs of theOutput pane.
402v01 RVDS 3.1 Introductory Tutorial 31
Use the dump command to view the date variable in memory.
Stop> dump /w &date
The /w argument specifies how to display the area of memory, in thiscase as words. &date specifies the address of the date variable.
Note how the successive words in memory correspond to the fields in the date struct.
Use the step command to execute the next two instructions.
Stop> stepStop> step
Use the dump command to view the date variable in memory again.
Stop> dump /w &date
Note how the value of date.day has been incremented.
Remove the breakpoint on line 58 and resume program execution.
Stop> clearStop> go
The program terminates normally.

402v01 RVDS 3.1 Introductory Tutorial 32
Exercise 2.8 – Using include files in RVD
In this exercise we will see how multiple commands can be combined in an includecommand file to control execution within the debugger.
Consider the file month.inc found in c:\armprac\intro\session2:
break #40goprint daysInMonthprint date.dayprint date.monthprint date.yearclearbreak #58goprint daysInMonthce daysInMonth=30gogogodump /w &datestepstepdump /w &datecleargo
The file consists of a simple selection of commands which will perform the same taskthat was performed in the previous exercise.
Reload the image into the debugger.
Invoke the include file by selecting Tools Include Commands fromFile from the menu.
Use the Select File dialog to locate and open the filec:\armprac\intro\session2\month.inc
Enter the date 2006 11 30 in the Console window when prompted.
When the program has terminated use the Cmd tab to view the values of the variablesdisplayed by the script file.
Check the output is correct then quit the debugger to finish theexercise.

402v01 RVDS 3.1 Introductory Tutorial 33
Section 2 - Review
We have seen how the Eclipse IDE can be used to:
Create source files and projects
Invoke the compiler and linker to generate executable images
Automatically open files for editing from a project, or a compilationwarning or error message
Invoke the compiler and linker to generate executable images
Automatically open files for editing from a project, or a compilationwarning or error message
We have seen how RVD can be used to:
Control and modify execution of code
View and modify locals, globals and memory
View and modify the contents of registers
Accept commands via the CLI or from a script file to automatedebugging
A complete range of debugging facilities is available within RVD.Consult the online documentation for complete information.