Embed Size (px)
Citation preview

8/18/2019
Run SEED VM on VirtualBox User Manual
Wenliang (Kevin) Du SYRACUSE UNIVERSITY
Table of Contents
How to Use Virtualbox to Run SEED Ubuntu VM
Appendix A: Creating Multiple VMs
Appendix B: Network Configuration
Appendix C: Taking Snapshots of VM
Appendix D: Creating Shared Folder
The account information
You will primarily use the following account:
• User ID: seed • Password: dees
You normally don’t need to log into the root account:
• User ID: root • Password: seedubuntu

SEED Document 1
How to use VirtualBox to Run SEED Ubuntu VM?
Install the free VirtualBox software first. We recommend Version 6.0.4 (please stay away from the newer versions, as they still have some issues with our VM).
Step 1: Create a New VM in VirtualBox
Step 2: Provide a Name and Select the OS Type and Version
Do NOT pick Ubuntu (64-bit), even though your machine is 64 bit. Our prebuilt VM is 32-bit Ubuntu.
Click this button
Choose Linux and 32-bit Ubuntu
Pick any name you like
SEED Document 2
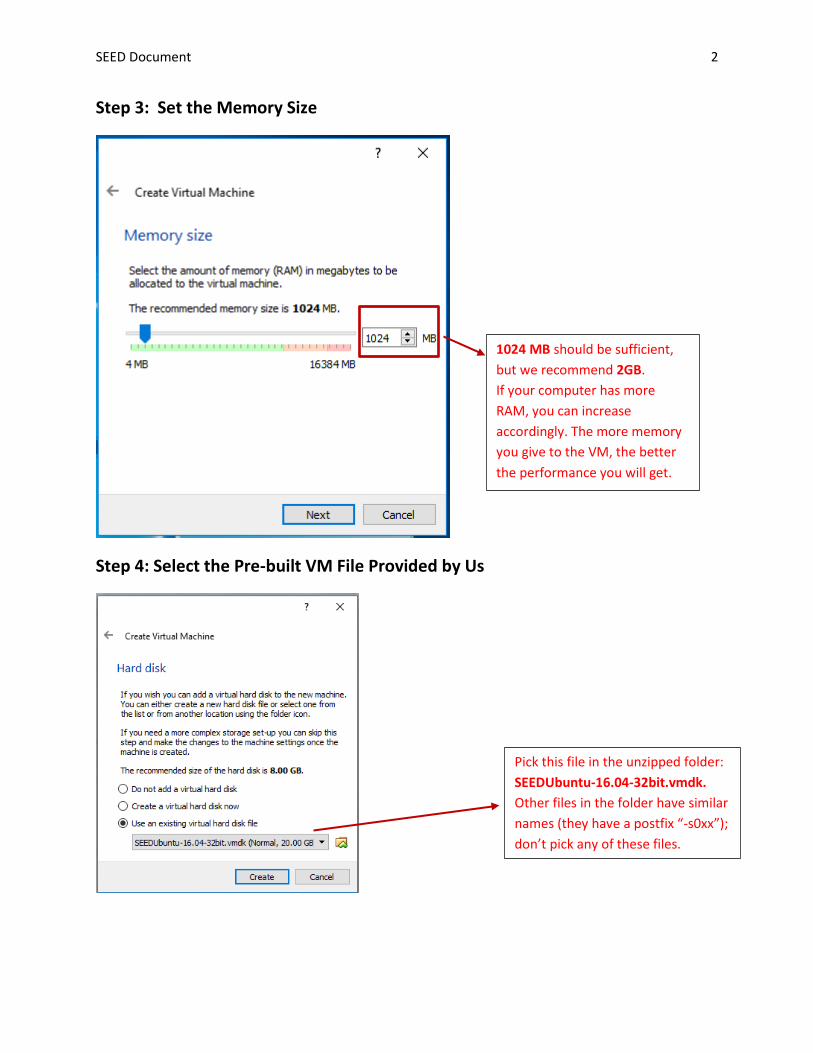
Step 3: Set the Memory Size
Step 4: Select the Pre-built VM File Provided by Us
1024 MB should be sufficient, but we recommend 2GB. If your computer has more RAM, you can increase accordingly. The more memory you give to the VM, the better the performance you will get.
Pick this file in the unzipped folder: SEEDUbuntu-16.04-32bit.vmdk. Other files in the folder have similar names (they have a postfix “-s0xx”); don’t pick any of these files.

SEED Document 3
In the above step, you may encounter the following error; otherwise, directly go to Step 5.
Reason and Solution: This is because you copied the VM files from another VM, which is already loaded into VirtualBox. These two VMs have the same UUID, which is not allowed by Virtualbox. Here are several solutions depending on your situations:
• If you plan to create multiple VMs using the same image, please use the clone mechanism (See Appendix A for details).
• If the older VM with the same UUID is no longer needed, remove it from VirtualBox will solve the problem.
• If you do want to keep the older VM, you can change the UUID of the new VM. The fastest way is to directly modify SEEDUbuntu16.04.vmdk, which is a text file. Search for the ddb.uuid.image entry, and change its value (e.g., change the last byte from ‘c’ to ‘d’)
Change this entry

SEED Document 4
If there is no error (or after you fix the error), your VM will be created successfully.
Step 5: Configure the VM
Successfully created
Click this button
Click the “Advanced” tab
Select “Bidirectional” for both items. The first item allows users to copy and paste between the VM and the host computer. The second item allows users to transfer files between the VM and the host computer using Drag’n Drop.

SEED Document 5
Assign more CPUs to this VM if you prefer. One is sufficient.
Make sure the VBoxVGA setting is selected.
If your computer screen has a very high resolution, your VM will look too small on the screen. You can adjust the scale factor to make it larger.

SEED Document 6
Step 6: Start the VM
Step 7: Stop the VM or Save the VM’s State
When you are done with your VM, you can always shut it down (from inside Ubuntu). A better alternative is to “freeze” the computer, so everything is saved. When you need it again, you can “unfreeze” it, and resume from where you left off. This is much faster and convenient than shutting down and rebooting the VM. To achieve this, you can use the “Save State” option.
Click the “Start” button

SEED Document 7
Appendix A: Use “Clone” to create Multiple VMs
Some SEED labs require multiple VMs. The easiest way to create multiple VMs is to create one first, and then use the “Clone” mechanism to clone it. Before doing the cloning, please ensure the following:
• IMPORTANT: make sure that the VM is fully shutdown (not in a “Saved” state), or there will be all sorts of problems.
• Configure network (see Appendix B); otherwise you have to do it for each VM. • Configure folder sharing (see Appendix D); otherwise you have to do it for each VM.
Right click the VM, and select “Clone…”
Make sure it is “Powered Off”
IMPORTANT: we don’t want to clone the MAC address. Select this option. If you don’t, both VMs will have the same MAC address, and therefore, they will get the same IP address. That will cause problems.
You can pick a meaningful name here.

SEED Document 8
The clone will take a few minutes, depending on the speed of your computer.
Select the “Full clone” option.

SEED Document 9
Appendix B: Network Configuration in VirtualBox for SEED Labs
In many of the SEED labs, we need to run multiple guest VMs, and these VMs should be able to (1) reach out to the Internet, (2) communicate with each other. In Virtualbox, if we use the “NAT” setting (default setting) for each VM, we can achieve 1, but not 2, because each VM will be placed in its own private network, not on a common one; they even have the same IP address, which is not a problem because each VM is the only computer on its own private network. On the other hand, if we use the “Host-only” setting for each VM, we can achieve 2, but not 1. Using this setting, all the VMs and the host will be put on a common network, so they can communicate with each other; however, due to the lack of NAT, the VMs cannot reach out to the outside.
Therefore, in order to achieve all these 2 goals, we have to use a network adapter called “NAT Network”. The adapter works in a similar way to “local area network” or LAN. It enable VMs communication within same local network as well as the communication to the internet. All the communication goes through this single adapter. As show in Figure 1, gateway router transfers the packets among the VMs and transfers the packets from local network to Internet.

SEED Document 10
Configuration Instruction
Step 1: Make sure you are using the most up-to-date VirtualBox. As show in the following figure, click the “File” on the top left of the VirtualBox main UI. Then choose “Preferences…” option.
Step 2: Click the “Network” tab on left panel. click the “+” button to create a new NAT Networks (NatNetwork) adaptor (if one does not exist). Double click on the NatNetwork, and look at its specifications. Set the specifications as the same as what is shown below.
Add a New “NAT Network” Adapter
“NAT Network” Specifications
SEED Document 11
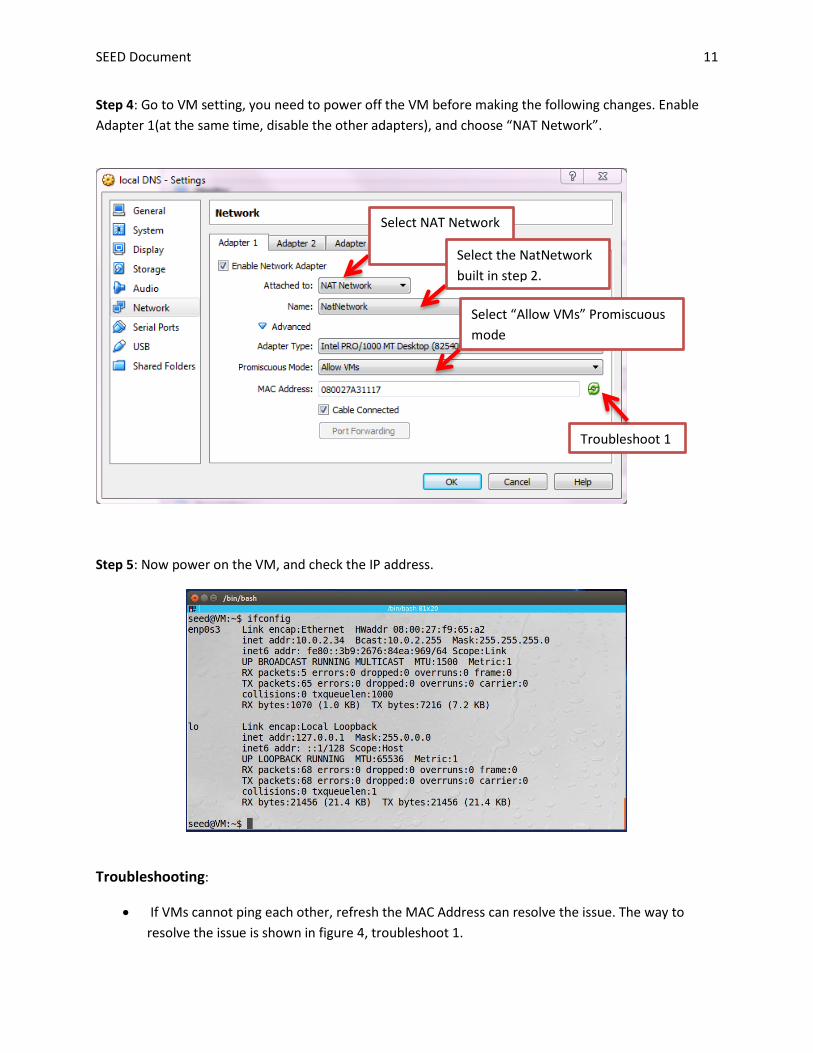
Step 4: Go to VM setting, you need to power off the VM before making the following changes. Enable Adapter 1(at the same time, disable the other adapters), and choose “NAT Network”.
Step 5: Now power on the VM, and check the IP address.
Troubleshooting:
• If VMs cannot ping each other, refresh the MAC Address can resolve the issue. The way to resolve the issue is shown in figure 4, troubleshoot 1.
Select NAT Network
Select “Allow VMs” Promiscuous mode
Select the NatNetwork built in step 2.
Troubleshoot 1

SEED Document 12
Appendix C: Take Snapshots and Recover from Snapshots
For some labs, you may need to make changes to the operating system. If you make a severe mistake, your VM may not be able to boot up again, and you will lost everything inside the failed VM. have done. To avoid such trouble, before doing anything dangerous to the OS, it is better to take a snapshot of your current VM. You can take as many snapshots as you want.
To restore from a snapshot that you have taken before, you can click the followings (you need to shut-down the VM first):
First click this
Then click this
SEED Document 13
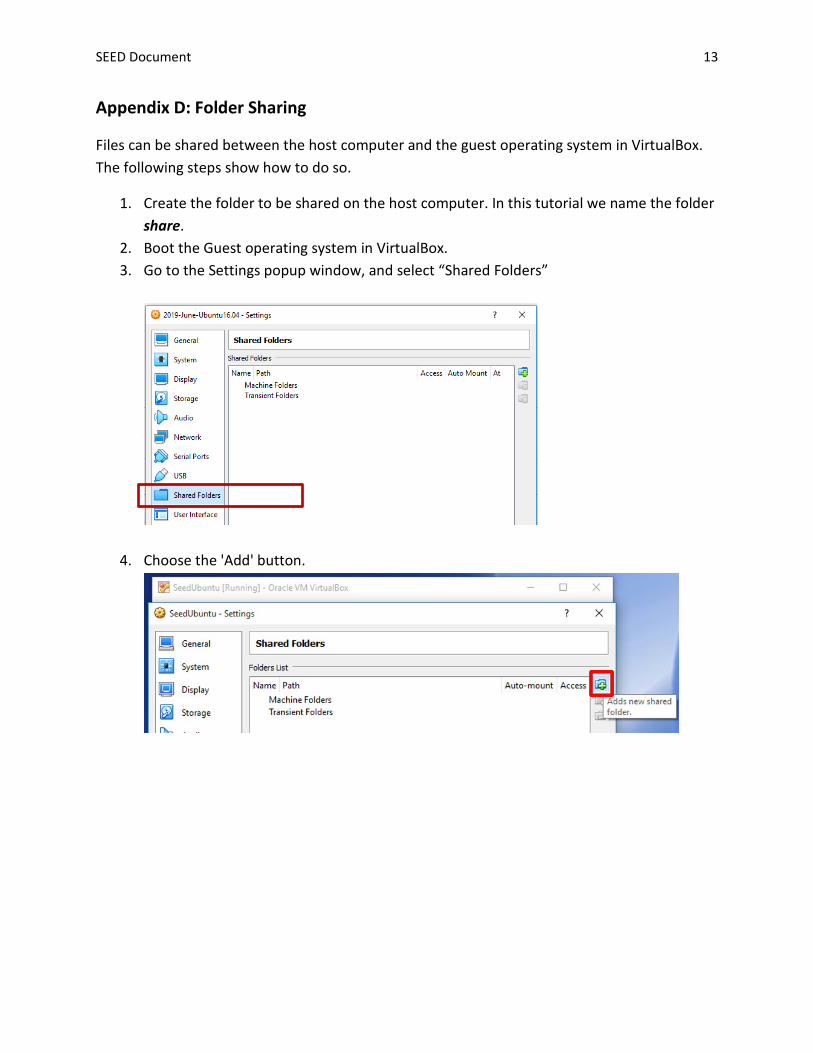
Appendix D: Folder Sharing
Files can be shared between the host computer and the guest operating system in VirtualBox. The following steps show how to do so.
1. Create the folder to be shared on the host computer. In this tutorial we name the folder share.
2. Boot the Guest operating system in VirtualBox. 3. Go to the Settings popup window, and select “Shared Folders”
4. Choose the 'Add' button.

SEED Document 14
5. Choose “Other …”, and select a folder from the popup window.
6. Select Auto Mount and Make Permanent option. Click OK. Click OK again to close the Settings Dialog.

SEED Document 15
7. Open a terminal in the VM. Make a directory and name it host (you can choose any name you like). Use command “mkdir /home/seed/host”
8. We want files in our mount point (~/host) to be owned by the current user. Also we want the mounted shared folder to persist after reboot. Hence, we will edit the /etc/rc.local file (using “sudo gedit /etc/rc.local”) and add the command below (1000 is the User ID and group ID of the user seed): sudo mount -t vboxsf -o rw,uid=1000,gid=1000 share /home/seed/host
9. Save the changes and reboot VM. Now anything placed in /home/seed/host inside the VM should be visible from the share folder on the host machine, and vice versa.