Embed Size (px)
Citation preview
Metro Broadband Gateway User’s Guide USM-Metro-RKS1-091807-01September 2007
Copyright © 2007 Ruckus Wireless, Inc. All rights reserved. September 2007.
Trademarks
Ruckus Wireless, BeamFlex™, MediaFlex™, MM2225 and MM2211 Metro Broadband Gateways are trademarks of RuckusWireless.
All other brand and product names are registered trademarks of their respective holders.
Statement of Conditions
In the interest of improving internal design, operational function, and/or reliability, Ruckus Wireless, Inc. reserves the right to makechanges to the products described in this document without notice.
Ruckus Wireless, Inc. does not assume any liability that may occur due to the use or application of the product(s) or circuit layout(s)described herein.
Federal Communications Commission (FCC) Compliance Notice: Radio Frequency Notice
The device has met the FCC 15.247 requirement. In order to comply with the FCC RF exposure requirement, the user must keep20cm away from the antenna.
This device has been tested and found to comply with the limits for a Class B digital device, pursuant to part 15 of the FCC Rules.These limits are designed to provide reasonable protection against harmful interference in a residential installation. This devicegenerates, uses, and can radiate radio frequency energy and, if not installed and used in accordance with the instructions, may causeharmful interference to radio communications. However, there is no guarantee that interference will not occur in a particularinstallation. If this device does cause harmful interference to radio or television reception, which can be determined by turning theequipment off and on, the user is encouraged to try to correct the interference by one or more of the following measures:
• Reorient or relocate the receiving antenna.
• Increase the separation between the equipment and receiver.
• Connect the equipment into an outlet on a circuit different from that to which the receiver is connected.
• Consult the dealer or an experienced radio/TV technician for help.
Changes or modifications not expressly approved by the party responsible for compliance could void the user's authority to operatethe equipment.
Information to the userThe user’s manual or instruction manual for an intentional or unintentional radiator shall caution the user that changes ormodifications not expressly approved by the party responsible for compliance could void the user’s authority to operate theequipment. In cases where the manual is provided only in a form other than paper, such as on a computer disk or over the Internet,the information required by this section may be included in the manual in that alternative form, provided the user can reasonably beexpected to have the capability to access information in that form.
EN 55 022 Declaration of Conformance
This is to certify that the MM2225 and MM2211 Metro Broadband Gateways are shielded against the generation of radiointerference in accordance with the application of Council Directive 89/336/EEC, Article 4a. Conformity is declared by theapplication of EN 55 022 Class B (CISPR 22).
ii Ruckus Wireless Metro Broadband Gateway USM-Metro-RKS1-091807-01
Table of Contents
PrefaceWho Should Use this Guide . . . . . . . . . . . . . . . . . . . . . . . . . . . . . . . . . . . . . . . . . . . . . . . . . . . . . . . . vWhat You’ll Find in this Guide . . . . . . . . . . . . . . . . . . . . . . . . . . . . . . . . . . . . . . . . . . . . . . . . . . . . . vTypographic conventions . . . . . . . . . . . . . . . . . . . . . . . . . . . . . . . . . . . . . . . . . . . . . . . . . . . . . . . . . . vSystem Requirements . . . . . . . . . . . . . . . . . . . . . . . . . . . . . . . . . . . . . . . . . . . . . . . . . . . . . . . . . . . . . viSupport and Warranty Information. . . . . . . . . . . . . . . . . . . . . . . . . . . . . . . . . . . . . . . . . . . . . . . . . . . vi
Chapter 1: Introduction . . . . . . . . . . . . . . . . . . . . . . . . . . . . . . . . . . . . . . . . . . . . 1MetroFlex™ . . . . . . . . . . . . . . . . . . . . . . . . . . . . . . . . . . . . . . . . . . . . . . . . . . . . . . . . . . . . . . . . . . . . 2BeamFlex™ . . . . . . . . . . . . . . . . . . . . . . . . . . . . . . . . . . . . . . . . . . . . . . . . . . . . . . . . . . . . . . . . . . . . 3Key Features . . . . . . . . . . . . . . . . . . . . . . . . . . . . . . . . . . . . . . . . . . . . . . . . . . . . . . . . . . . . . . . . . . . . 3
BeamFlex™ Smart MIMO Antenna Maximizes Wireless Range and Performance. . . . . . . . . . 3Simple Configuration and Installation . . . . . . . . . . . . . . . . . . . . . . . . . . . . . . . . . . . . . . . . . . . . . 3Standards-based Solution Protects User Investment, Minimizes Replacement Cost . . . . . . . . . 3
Dual Zone Virtual AP. . . . . . . . . . . . . . . . . . . . . . . . . . . . . . . . . . . . . . . . . . . . . . . . . . . . . . . . . . . . . 4Opening the Web User Interface . . . . . . . . . . . . . . . . . . . . . . . . . . . . . . . . . . . . . . . . . . . . . . . . . . . . 5
Key Features of the Web User Interface . . . . . . . . . . . . . . . . . . . . . . . . . . . . . . . . . . . . . . . . . . . 7
Chapter 2: Installation and Setup. . . . . . . . . . . . . . . . . . . . . . . . . . . . . . . . . . . . . 9Packing List . . . . . . . . . . . . . . . . . . . . . . . . . . . . . . . . . . . . . . . . . . . . . . . . . . . . . . . . . . . . . . . . . . . . 10Metro Broadband Gateway. . . . . . . . . . . . . . . . . . . . . . . . . . . . . . . . . . . . . . . . . . . . . . . . . . . . . . . . . 10
Front View . . . . . . . . . . . . . . . . . . . . . . . . . . . . . . . . . . . . . . . . . . . . . . . . . . . . . . . . . . . . . . . . . . 10LED Status Lights . . . . . . . . . . . . . . . . . . . . . . . . . . . . . . . . . . . . . . . . . . . . . . . . . . . . . . . . . . . . 11Rear View. . . . . . . . . . . . . . . . . . . . . . . . . . . . . . . . . . . . . . . . . . . . . . . . . . . . . . . . . . . . . . . . . . . 13
Placement Guidelines . . . . . . . . . . . . . . . . . . . . . . . . . . . . . . . . . . . . . . . . . . . . . . . . . . . . . . . . . . . . . 15Establishing a Good General Location . . . . . . . . . . . . . . . . . . . . . . . . . . . . . . . . . . . . . . . . . . . . 15Using the Air Quality Indicator to Fine-Tune the Placement . . . . . . . . . . . . . . . . . . . . . . . . . . . 15
Connecting to the Metro Broadband Gateway . . . . . . . . . . . . . . . . . . . . . . . . . . . . . . . . . . . . . . . . . . 16Connect and Configure the Metro Broadband Gateway. . . . . . . . . . . . . . . . . . . . . . . . . . . . . . . . . . . 19Captive Portal Feature . . . . . . . . . . . . . . . . . . . . . . . . . . . . . . . . . . . . . . . . . . . . . . . . . . . . . . . . . . . . 23
Chapter 3: Status and Configuration . . . . . . . . . . . . . . . . . . . . . . . . . . . . . . . . . . 25Wireless Settings Worksheet . . . . . . . . . . . . . . . . . . . . . . . . . . . . . . . . . . . . . . . . . . . . . . . . . . . . . . . 26Metro Broadband Gateway Settings Worksheet. . . . . . . . . . . . . . . . . . . . . . . . . . . . . . . . . . . . . . . . . 27Viewing Device, Internet, and System Status . . . . . . . . . . . . . . . . . . . . . . . . . . . . . . . . . . . . . . . . . . 28
Device Information . . . . . . . . . . . . . . . . . . . . . . . . . . . . . . . . . . . . . . . . . . . . . . . . . . . . . . . . . . . 28Internet Information . . . . . . . . . . . . . . . . . . . . . . . . . . . . . . . . . . . . . . . . . . . . . . . . . . . . . . . . . . . 30System Information . . . . . . . . . . . . . . . . . . . . . . . . . . . . . . . . . . . . . . . . . . . . . . . . . . . . . . . . . . . 31
Viewing Wireless Information . . . . . . . . . . . . . . . . . . . . . . . . . . . . . . . . . . . . . . . . . . . . . . . . . . . . . . 32Viewing Statistics of Connected Devices . . . . . . . . . . . . . . . . . . . . . . . . . . . . . . . . . . . . . . . . . . 34
Configuring Device Identification and Login Settings. . . . . . . . . . . . . . . . . . . . . . . . . . . . . . . . . . . . 36Configuring Internet Settings . . . . . . . . . . . . . . . . . . . . . . . . . . . . . . . . . . . . . . . . . . . . . . . . . . . . . . . 37
USM-Metro-RKS1-091807-01 Ruckus Metro Broadband Gateway iii
Changing the Connection Type . . . . . . . . . . . . . . . . . . . . . . . . . . . . . . . . . . . . . . . . . . . . . . . . . . 38Configuring System Settings . . . . . . . . . . . . . . . . . . . . . . . . . . . . . . . . . . . . . . . . . . . . . . . . . . . . . . . 39
Enabling an L2TP Connection . . . . . . . . . . . . . . . . . . . . . . . . . . . . . . . . . . . . . . . . . . . . . . . . . . . 42Configuring Wireless Settings . . . . . . . . . . . . . . . . . . . . . . . . . . . . . . . . . . . . . . . . . . . . . . . . . . . . . . 43
Reviewing the Advanced::Common Options. . . . . . . . . . . . . . . . . . . . . . . . . . . . . . . . . . . . . . . . 44Setting Threshold Options . . . . . . . . . . . . . . . . . . . . . . . . . . . . . . . . . . . . . . . . . . . . . . . . . . . . . . 45
Customizing Metro WLAN or Home WLAN Settings . . . . . . . . . . . . . . . . . . . . . . . . . . . . . . . . . . . 46Setting the Preferred BSSID . . . . . . . . . . . . . . . . . . . . . . . . . . . . . . . . . . . . . . . . . . . . . . . . . . . . 48Last Survey and Rescan . . . . . . . . . . . . . . . . . . . . . . . . . . . . . . . . . . . . . . . . . . . . . . . . . . . . . . . . 48Customizing WEP Encryption . . . . . . . . . . . . . . . . . . . . . . . . . . . . . . . . . . . . . . . . . . . . . . . . . . . 49Customizing WPA Encryption . . . . . . . . . . . . . . . . . . . . . . . . . . . . . . . . . . . . . . . . . . . . . . . . . . 50Customizing 802.1X Settings. . . . . . . . . . . . . . . . . . . . . . . . . . . . . . . . . . . . . . . . . . . . . . . . . . . . 52Certificate Management . . . . . . . . . . . . . . . . . . . . . . . . . . . . . . . . . . . . . . . . . . . . . . . . . . . . . . . . 53
Port Forwarding . . . . . . . . . . . . . . . . . . . . . . . . . . . . . . . . . . . . . . . . . . . . . . . . . . . . . . . . . . . . . . . . . 55Adding Entries to the Port Forwarding Table . . . . . . . . . . . . . . . . . . . . . . . . . . . . . . . . . . . . . . . 56
Access Controls . . . . . . . . . . . . . . . . . . . . . . . . . . . . . . . . . . . . . . . . . . . . . . . . . . . . . . . . . . . . . . . . . 57Access Controls Options . . . . . . . . . . . . . . . . . . . . . . . . . . . . . . . . . . . . . . . . . . . . . . . . . . . . . . . 57Changing Access Controls . . . . . . . . . . . . . . . . . . . . . . . . . . . . . . . . . . . . . . . . . . . . . . . . . . . . . . 58Access Control Table Columns . . . . . . . . . . . . . . . . . . . . . . . . . . . . . . . . . . . . . . . . . . . . . . . . . . 59Removing MAC Addresses from a List. . . . . . . . . . . . . . . . . . . . . . . . . . . . . . . . . . . . . . . . . . . . 59Showing/Hiding Locally Known MAC Addresses . . . . . . . . . . . . . . . . . . . . . . . . . . . . . . . . . . . 59
Smart Configuration . . . . . . . . . . . . . . . . . . . . . . . . . . . . . . . . . . . . . . . . . . . . . . . . . . . . . . . . . . . . . . 60Extending Your Home Wireless Coverage . . . . . . . . . . . . . . . . . . . . . . . . . . . . . . . . . . . . . . . . . 61Connecting Your Wireless Computer(s) to a Metro Wi-Fi Network. . . . . . . . . . . . . . . . . . . . . . 63Connecting Your Home Router to a Metro Wi-Fi Network . . . . . . . . . . . . . . . . . . . . . . . . . . . . 66
Chapter 4: Maintenance and Administrator . . . . . . . . . . . . . . . . . . . . . . . . . . . . 69Activating the Log and Sending the Log to a Syslog Server . . . . . . . . . . . . . . . . . . . . . . . . . . . . . . . 70
Reviewing the Latest Log File Entries. . . . . . . . . . . . . . . . . . . . . . . . . . . . . . . . . . . . . . . . . . . . . 71Sending a Copy of the Log File to Support Staff . . . . . . . . . . . . . . . . . . . . . . . . . . . . . . . . . . . . . . . . 71
Saving a copy of the Log to your computer. . . . . . . . . . . . . . . . . . . . . . . . . . . . . . . . . . . . . . . . . 72Running Diagnostics on Network Connections . . . . . . . . . . . . . . . . . . . . . . . . . . . . . . . . . . . . . . . . . 73Administrator Management . . . . . . . . . . . . . . . . . . . . . . . . . . . . . . . . . . . . . . . . . . . . . . . . . . . . . . . . 74
NUTTCP . . . . . . . . . . . . . . . . . . . . . . . . . . . . . . . . . . . . . . . . . . . . . . . . . . . . . . . . . . . . . . . . . . . 74Upgrading the Firmware. . . . . . . . . . . . . . . . . . . . . . . . . . . . . . . . . . . . . . . . . . . . . . . . . . . . . . . . . . . 76
Automatic Firmware Upgrade . . . . . . . . . . . . . . . . . . . . . . . . . . . . . . . . . . . . . . . . . . . . . . . . . . . 77Manual Firmware Upgrade . . . . . . . . . . . . . . . . . . . . . . . . . . . . . . . . . . . . . . . . . . . . . . . . . . . . . 77
Rebooting or Resetting the Device . . . . . . . . . . . . . . . . . . . . . . . . . . . . . . . . . . . . . . . . . . . . . . . . . . . 78
Appendix A: Technical Specifications . . . . . . . . . . . . . . . . . . . . . . . . . . . . . . . . . . . 79Physical Characteristics . . . . . . . . . . . . . . . . . . . . . . . . . . . . . . . . . . . . . . . . . . . . . . . . . . . . . . . . . . . 79Management . . . . . . . . . . . . . . . . . . . . . . . . . . . . . . . . . . . . . . . . . . . . . . . . . . . . . . . . . . . . . . . . . . . . 79
iv Ruckus Metro Broadband Gateway USM-Metro-RKS1-091807-01
Preface
This Metro Broadband Gateway User’s Guide will help you understand the Ruckus Wireless Metro Broadband Gateway, how to install it, and configure it using the Ruckus Wireless Web Interface.
Who Should Use this Guide
This User’s Guide assumes that the reader has basic to intermediate computer and Internet skills. All the basic computer networking, Internet, and other information required to configure this device is provided herein.
What You’ll Find in this Guide
The following topics are covered:
• Chapter 1: Introduction . . . . . . . . . . . . . . . . . . . . . . . . . . . . . . . . . . . . . . . . . . . . . . . . . . . . . . . . . . . . . . . . . . . 1• Chapter 2: Installation and Setup . . . . . . . . . . . . . . . . . . . . . . . . . . . . . . . . . . . . . . . . . . . . . . . . . . . . . . . . . . . 9• Chapter 3: Status and Configuration. . . . . . . . . . . . . . . . . . . . . . . . . . . . . . . . . . . . . . . . . . . . . . . . . . . . . . . . 25• Chapter 4: Maintenance and Administrator . . . . . . . . . . . . . . . . . . . . . . . . . . . . . . . . . . . . . . . . . . . . . . . . . . 69• Appendix A: Technical Specifications . . . . . . . . . . . . . . . . . . . . . . . . . . . . . . . . . . . . . . . . . . . . . . . . . . . . . . 79
Typographic conventions
This User’s Guide uses the following typographic conventions:Table 1—Typographic conventions
Typeface or Symbol
Meaning Example
italics Emphasis, book titles, CD names, special terms. Also used to denote optional input if surrounded by <brackets>
Read your User’s Guide thoroughly.
Enter an address in the range 192.168.0.<2-253>
bold System menu names, user input Open the Control Panel.
USM-Metro-RKS1-091807-01 Ruckus Metro Broadband Gateway v
System Requirements
System Requirements
The Metro Broadband Gateway is compatible with most contemporary personal computers and operating systems that are configured for Internet and wireless networking. The Metro Broadband Gateway is accessed and configured via a Web browser interface. Any of the following Web browsers are supported:
• Microsoft Internet Explorer 5.0 and higher• Netscape version 6.0 and higher• Apple Safari 1.0 and higher• Mozilla Firefox version 1.0 and higher
Support and Warranty Information
See the Warranty and Support card for detailed information about contacting Technical Support, and the Warranty terms for your Metro Broadband Gateway.
fixed Screen text, URLs, IP addresses Browse to the following IP address: http://192.168.0.254
Table 1—Typographic conventions
Typeface or Symbol
Meaning Example
vi Ruckus Metro Broadband GatewayUSM-Metro-RKS1-091807-01, June 2007
Chapter 1: Introduction
Congratulations on your purchase of the Ruckus Wireless Metro Broadband Gateway. The Metro Broadband Gateway is a purpose-built home gateway designed to deliver the best possible connectivity from subscriber homes to Mesh Networks. Mesh Networks provide coverage across wide areas using a mesh distribution of access points based on standard Wi-Fi protocols.
The installation uses outdoor high power Mesh routers to achieve coverage for outdoor wireless devices. Typically, the indoor coverage is inadequate to maintain an acceptable quality level for users within the home. The Metro Broadband Gateway is a Customer Premise Equipment that allows the extension of the Metro Wi-Fi signals to achieve a robust coverage within home. The Metro Broadband Gateway communicates with the Mesh Networks routers to allow home devices (such as PC or laptops) to access the Internet.
This chapter describes the features of the Metro Broadband Gateway.
• MetroFlex™. . . . . . . . . . . . . . . . . . . . . . . . . . . . . . . . . . . . . . . . . . . . . . . . . . . . . . . . . . . . . . . . . . . . .2• BeamFlex™ . . . . . . . . . . . . . . . . . . . . . . . . . . . . . . . . . . . . . . . . . . . . . . . . . . . . . . . . . . . . . . . . . . . . .3• Key Features . . . . . . . . . . . . . . . . . . . . . . . . . . . . . . . . . . . . . . . . . . . . . . . . . . . . . . . . . . . . . . . . . . . .3• Opening the Web User Interface . . . . . . . . . . . . . . . . . . . . . . . . . . . . . . . . . . . . . . . . . . . . . . . . . . . . .5
A typical installation consists of a Ruckus Wireless Metro Broadband Gateway connected to a PC. The Metro Broadband Gateway receives wireless signals from outdoor Mesh Routers or other remote AP that is connected to a DSL router or cable modem. With the Metro Broadband Gateway, home devices have the option of wireless association to the Ruckus device. Data traffic is distributed to all devices connected behind the Metro Broadband Gateway.
USM-Metro-RKS1-091807-01 Ruckus Metro Broadband Gateway 1
MetroFlex™
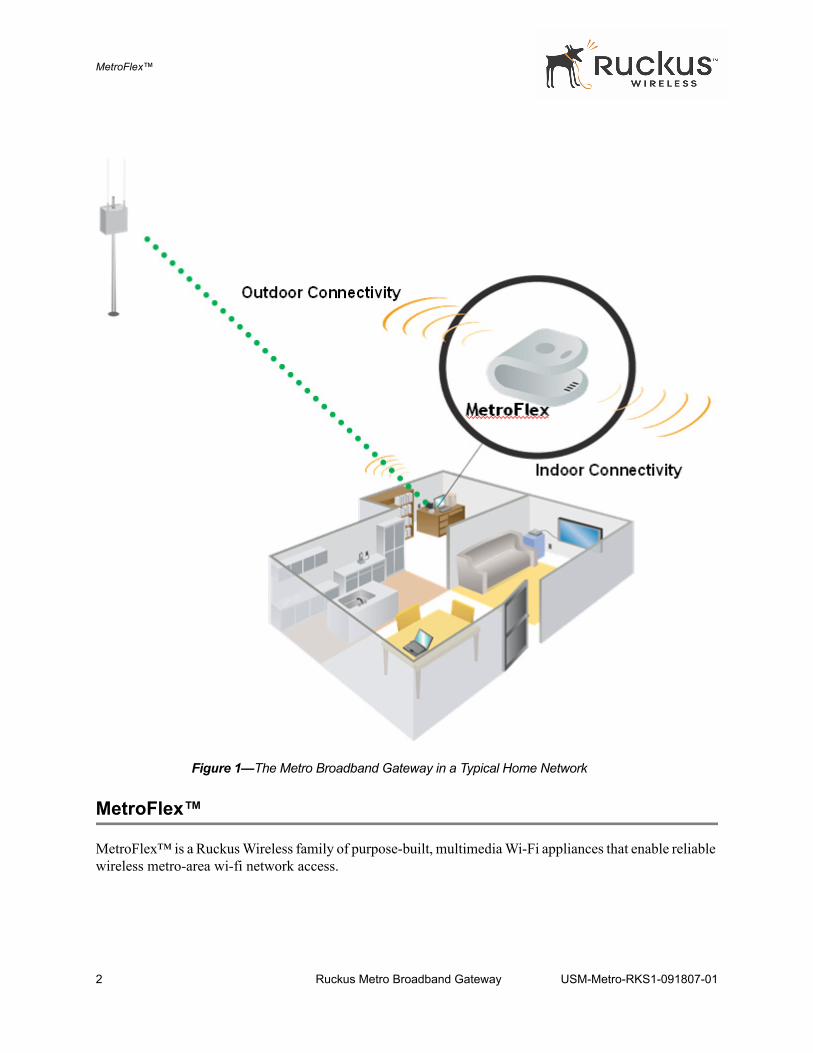
Figure 1—The Metro Broadband Gateway in a Typical Home Network
MetroFlex™
MetroFlex™ is a Ruckus Wireless family of purpose-built, multimedia Wi-Fi appliances that enable reliable wireless metro-area wi-fi network access.
2 Ruckus Metro Broadband Gateway USM-Metro-RKS1-091807-01
BeamFlex™
BeamFlex™
BeamFlex™ is a Ruckus Wireless patent-pending antenna technology that allows wireless signals to navigate around interference, extend wireless signal range, and increase speeds and capacity for 802.11b/g wireless networks. The BeamFlex™ antenna system consists of an array of six high-gain antenna elements, that allow the Metro Broadband Gateway to find quality signal paths in a changing environment, and sustain the baseline performance required in a metro wi-fi environment.
MetroFlex enhances the existing BeamFlex technology to use a dual-polarized (horizontal and vertical) antenna array.
Key Features
BeamFlex™ Smart MIMO Antenna Maximizes Wireless Range and Performance• Multiple-Input, Multiple-Output (MIMO) technology supports real time learning of radio frequency,
station, network and application conditions.• On-the-fly adaptation to each receiving device in response to environmental changes such as interference
to maximize signal quality, data rate and minimize packet errors and retransmissions.• Internal driver software controls an antenna array with 6 high-gain, directional antenna elements and 63
unique antenna combinations. • Expert system 802.11 driver controls data rate and retransmission policies on a per-packet basis.
Simple Configuration and Installation• Simple Web-based user interface for easy configuration and customization of features such as SSID, WEP
or WPA key, statistics monitoring and software upgrade.
Standards-based Solution Protects User Investment, Minimizes Replacement Cost • Compliant with 802.11b and 802.11g: supports 802.11g wireless networking at up to 54Mbps; and can
interoperate in 802.11g-only or mixed networks. • Supports Wi-Fi Protected Access-Pre-Shared Key (WPA-PSK) data encryption. WPA provides strong
data encryption and authentication based on a pre-shared key. • Supports 64-bit and 128-bit WEP encryption security. WEP keys can be generated manually or by
passphrase. • Attaches to home PC by Ethernet to optimize the reception of wireless signals from the outdoor Mesh
Networks nodes.The MM2211-DZ allows home PCs to associate to it wirelessly.
• Forward compatible with the emerging 802.11n WLAN standard.
USM-Metro-RKS1-091807-01 Ruckus Metro Broadband Gateway 3
Dual Zone Virtual AP
Dual Zone Virtual AP
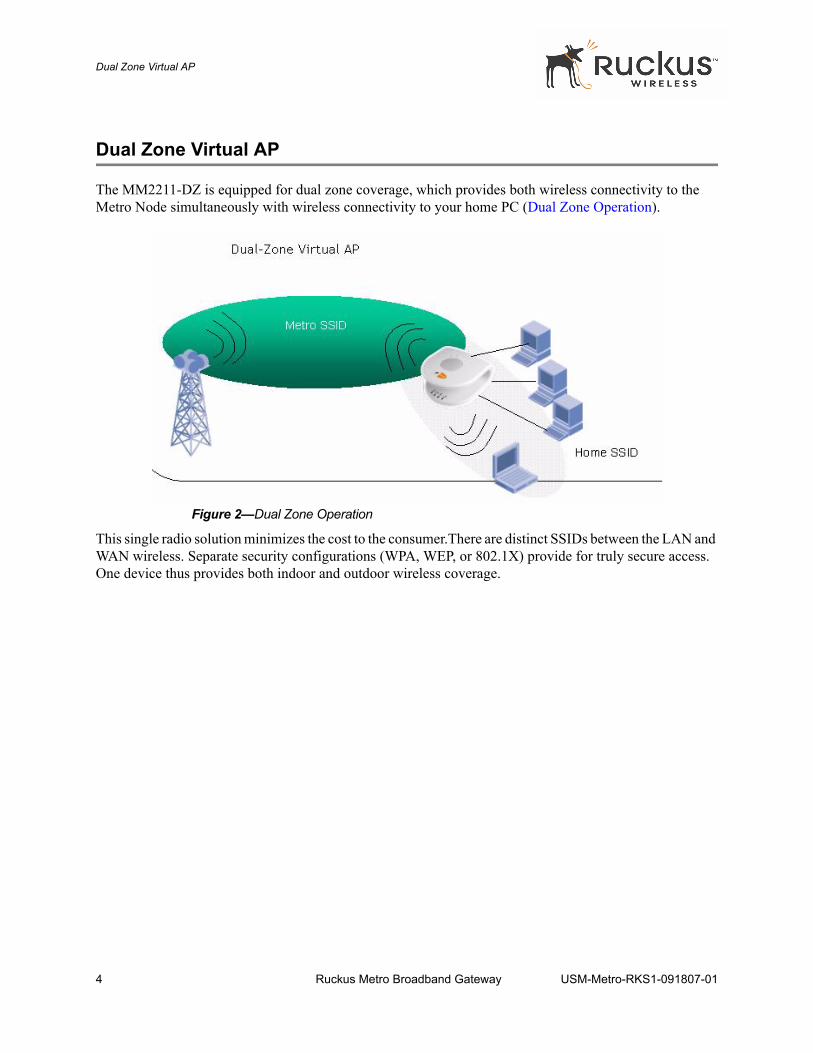
The MM2211-DZ is equipped for dual zone coverage, which provides both wireless connectivity to the Metro Node simultaneously with wireless connectivity to your home PC (Dual Zone Operation).
Figure 2—Dual Zone Operation
This single radio solution minimizes the cost to the consumer.There are distinct SSIDs between the LAN and WAN wireless. Separate security configurations (WPA, WEP, or 802.1X) provide for truly secure access. One device thus provides both indoor and outdoor wireless coverage.
4 Ruckus Metro Broadband Gateway USM-Metro-RKS1-091807-01
Opening the Web User Interface
Opening the Web User Interface
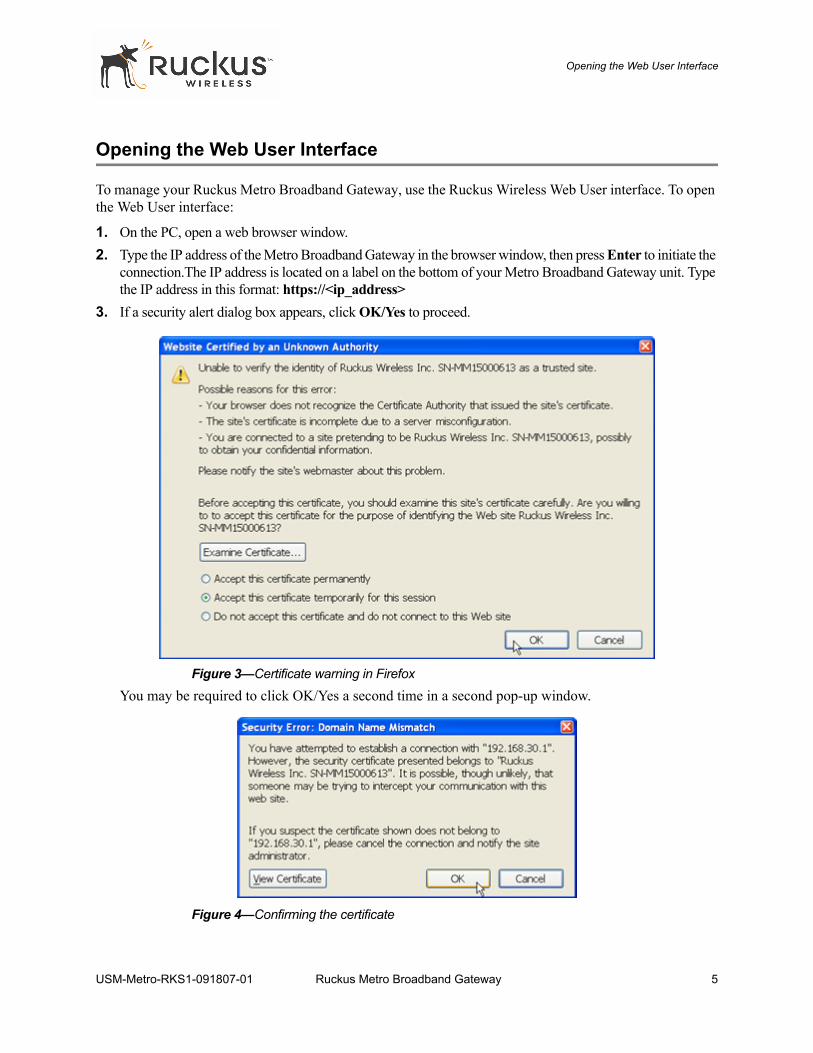
To manage your Ruckus Metro Broadband Gateway, use the Ruckus Wireless Web User interface. To open the Web User interface:
1. On the PC, open a web browser window.2. Type the IP address of the Metro Broadband Gateway in the browser window, then press Enter to initiate the
connection.The IP address is located on a label on the bottom of your Metro Broadband Gateway unit. Type the IP address in this format: https://<ip_address>
3. If a security alert dialog box appears, click OK/Yes to proceed.
Figure 3—Certificate warning in Firefox
You may be required to click OK/Yes a second time in a second pop-up window.
Figure 4—Confirming the certificate
USM-Metro-RKS1-091807-01 Ruckus Metro Broadband Gateway 5
Opening the Web User Interface
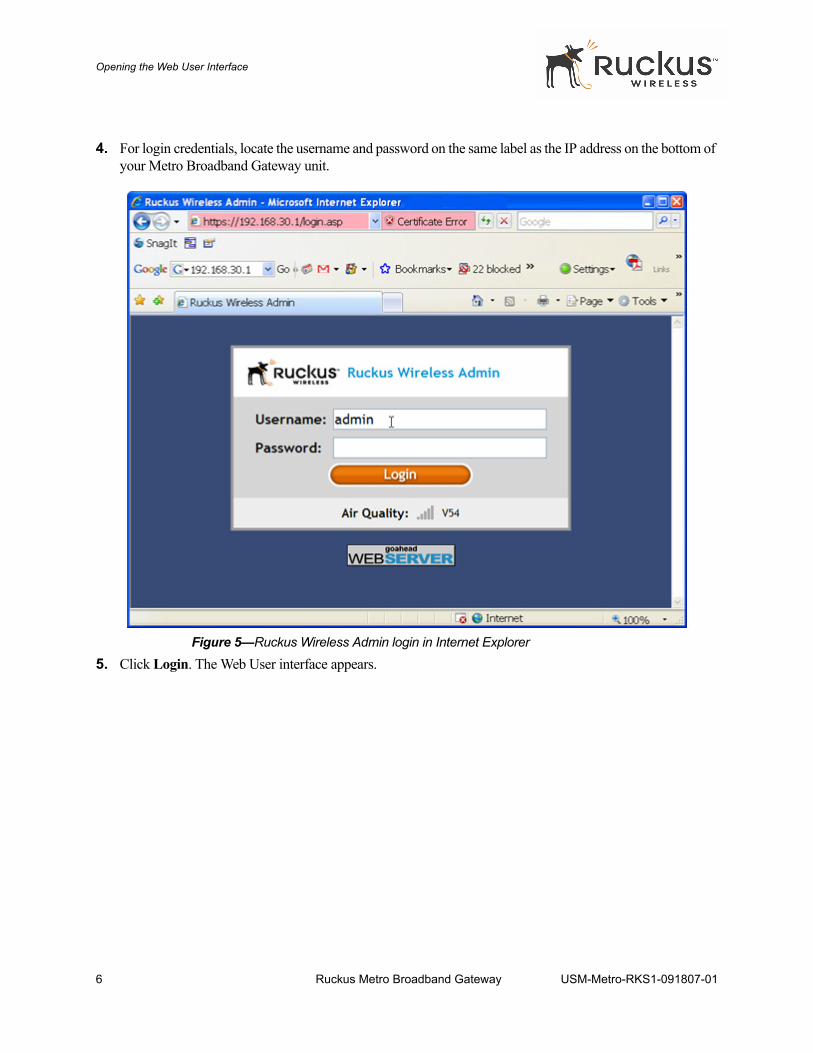
4. For login credentials, locate the username and password on the same label as the IP address on the bottom of your Metro Broadband Gateway unit.
Figure 5—Ruckus Wireless Admin login in Internet Explorer
5. Click Login. The Web User interface appears.
6 Ruckus Metro Broadband Gateway USM-Metro-RKS1-091807-01
Opening the Web User Interface
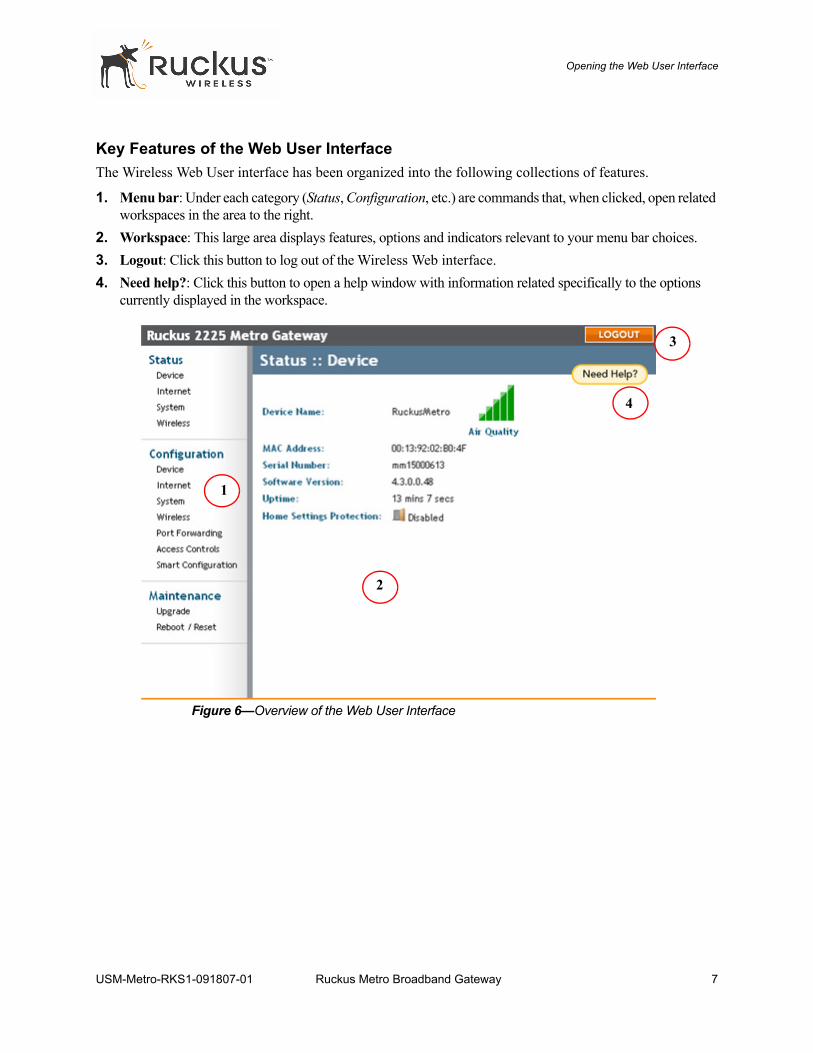
Key Features of the Web User InterfaceThe Wireless Web User interface has been organized into the following collections of features.
1. Menu bar: Under each category (Status, Configuration, etc.) are commands that, when clicked, open related workspaces in the area to the right.
2. Workspace: This large area displays features, options and indicators relevant to your menu bar choices.3. Logout: Click this button to log out of the Wireless Web interface.4. Need help?: Click this button to open a help window with information related specifically to the options
currently displayed in the workspace.
Figure 6—Overview of the Web User Interface
1
2
3
4
USM-Metro-RKS1-091807-01 Ruckus Metro Broadband Gateway 7

Opening the Web User Interface
(This page intentionally left blank.)
8 Ruckus Metro Broadband Gateway USM-Metro-RKS1-091807-01
Chapter 2: Installation and Setup
This chapter describes how to install your Metro Broadband Gateway, and how to set up your PC to connect to the Ruckus Wireless Web Interface.
Topics covered in this chapter include:
• Packing List . . . . . . . . . . . . . . . . . . . . . . . . . . . . . . . . . . . . . . . . . . . . . . . . . . . . . . . . . . . . . . . . . . . .10• Metro Broadband Gateway . . . . . . . . . . . . . . . . . . . . . . . . . . . . . . . . . . . . . . . . . . . . . . . . . . . . . . . .10• LED Status Lights . . . . . . . . . . . . . . . . . . . . . . . . . . . . . . . . . . . . . . . . . . . . . . . . . . . . . . . . . . . . . . . 11• Placement Guidelines. . . . . . . . . . . . . . . . . . . . . . . . . . . . . . . . . . . . . . . . . . . . . . . . . . . . . . . . . . . . .15• Connecting to the Metro Broadband Gateway. . . . . . . . . . . . . . . . . . . . . . . . . . . . . . . . . . . . . . . . . .16• Connect and Configure the Metro Broadband Gateway . . . . . . . . . . . . . . . . . . . . . . . . . . . . . . . . . .19• Captive Portal Feature . . . . . . . . . . . . . . . . . . . . . . . . . . . . . . . . . . . . . . . . . . . . . . . . . . . . . . . . . . . .23
USM-Metro-RKS1-091807-01 Ruckus Metro Broadband Gateway 9
Packing List
Packing List
1. Metro Broadband Gateway2. AC power adapter (Input DC 5-18V 1-2A)3. Category 5 (CAT5) Ethernet Cable4. Metro Broadband Gateway Quick Start Guide5. Limited Warranty Statement and Software License Agreement6. Federal Communications Commission Notices7. SupportMinds Special Support Offer for Ruckus Wireless Customers
Metro Broadband Gateway
Ruckus Wireless offers three Metro Broadband Gateway platforms: the MM2225-NG, the MM2211-NG, and the MM2211-EXT. The MM2225 has five 10/100 ports, while the MM2211 models have one 10/100 port. The MM2211-EXT can be used with an external antenna. All other features are equivalent on all three platforms.
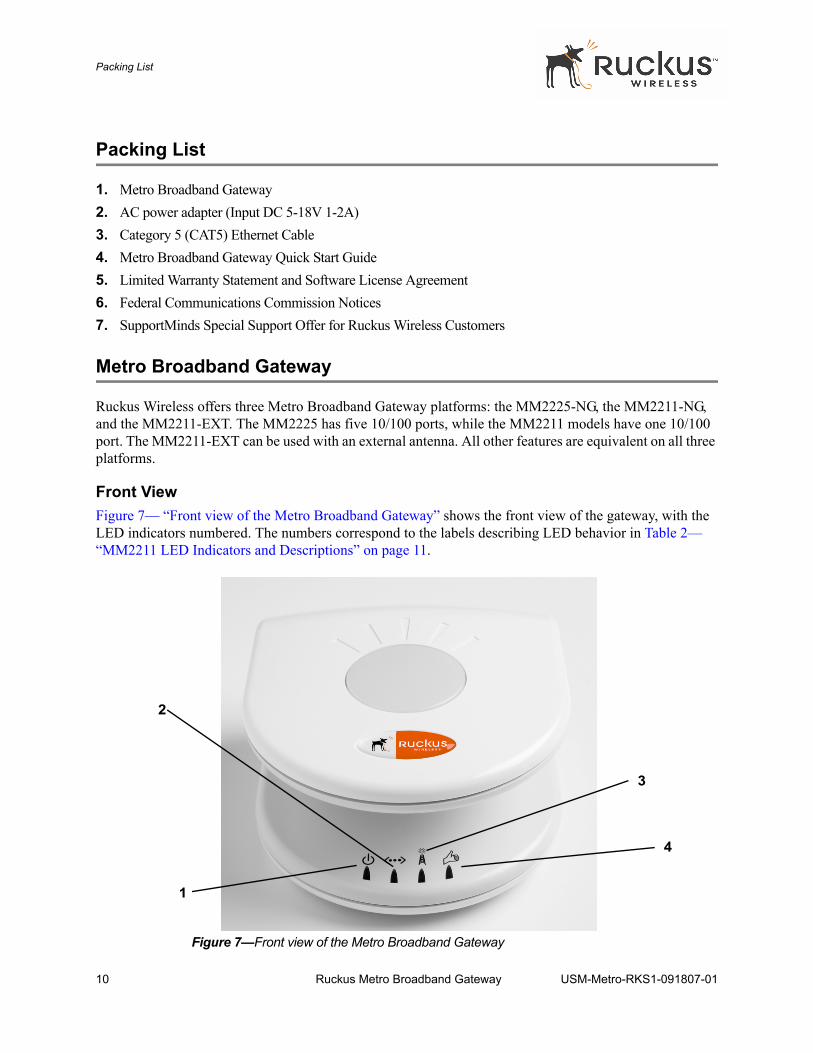
Front ViewFigure 7— “Front view of the Metro Broadband Gateway” shows the front view of the gateway, with the LED indicators numbered. The numbers correspond to the labels describing LED behavior in Table 2— “MM2211 LED Indicators and Descriptions” on page 11.
Figure 7—Front view of the Metro Broadband Gateway
1
2
3
4
10 Ruckus Metro Broadband Gateway USM-Metro-RKS1-091807-01
Metro Broadband Gateway
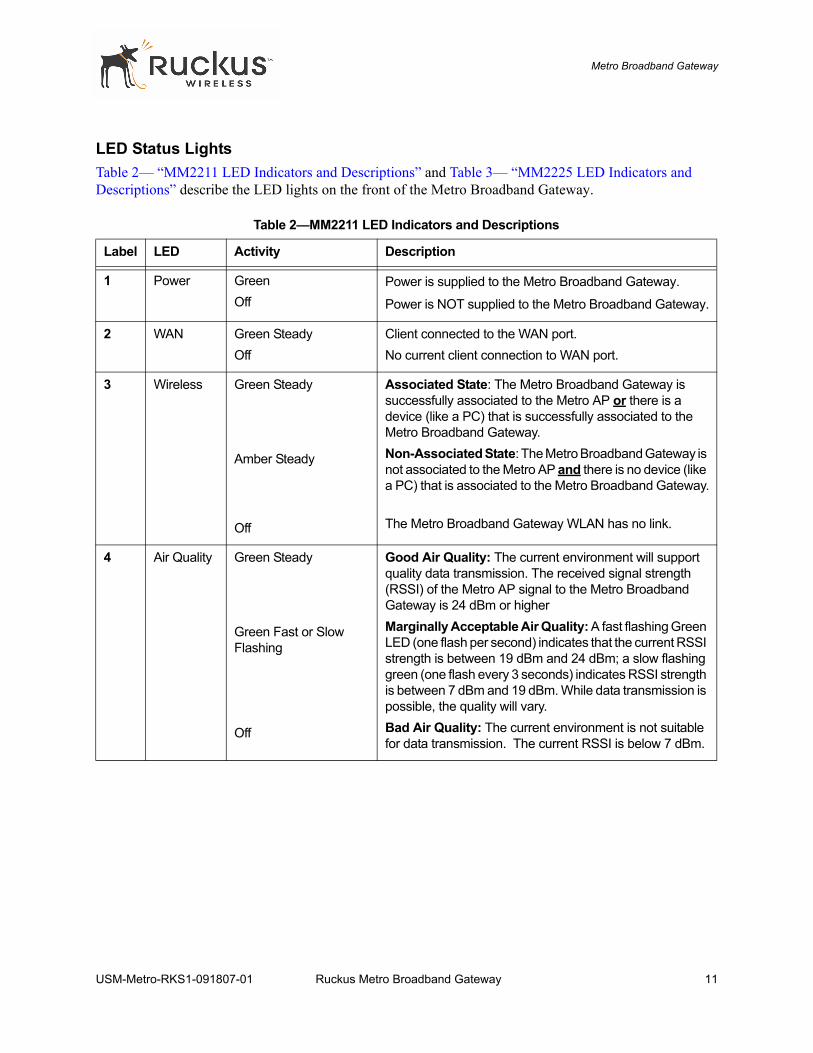
LED Status LightsTable 2— “MM2211 LED Indicators and Descriptions” and Table 3— “MM2225 LED Indicators and Descriptions” describe the LED lights on the front of the Metro Broadband Gateway.
Table 2—MM2211 LED Indicators and Descriptions
Label LED Activity Description
1 Power GreenOff
Power is supplied to the Metro Broadband Gateway.
Power is NOT supplied to the Metro Broadband Gateway.
2 WAN Green SteadyOff
Client connected to the WAN port.No current client connection to WAN port.
3 Wireless Green Steady
Amber Steady
Off
Associated State: The Metro Broadband Gateway is successfully associated to the Metro AP or there is a device (like a PC) that is successfully associated to the Metro Broadband Gateway.Non-Associated State: The Metro Broadband Gateway is not associated to the Metro AP and there is no device (like a PC) that is associated to the Metro Broadband Gateway.
The Metro Broadband Gateway WLAN has no link.
4 Air Quality Green Steady
Green Fast or Slow Flashing
Off
Good Air Quality: The current environment will support quality data transmission. The received signal strength (RSSI) of the Metro AP signal to the Metro Broadband Gateway is 24 dBm or higher Marginally Acceptable Air Quality: A fast flashing Green LED (one flash per second) indicates that the current RSSI strength is between 19 dBm and 24 dBm; a slow flashing green (one flash every 3 seconds) indicates RSSI strength is between 7 dBm and 19 dBm. While data transmission is possible, the quality will vary. Bad Air Quality: The current environment is not suitable for data transmission. The current RSSI is below 7 dBm.
USM-Metro-RKS1-091807-01 Ruckus Metro Broadband Gateway 11
Metro Broadband Gateway
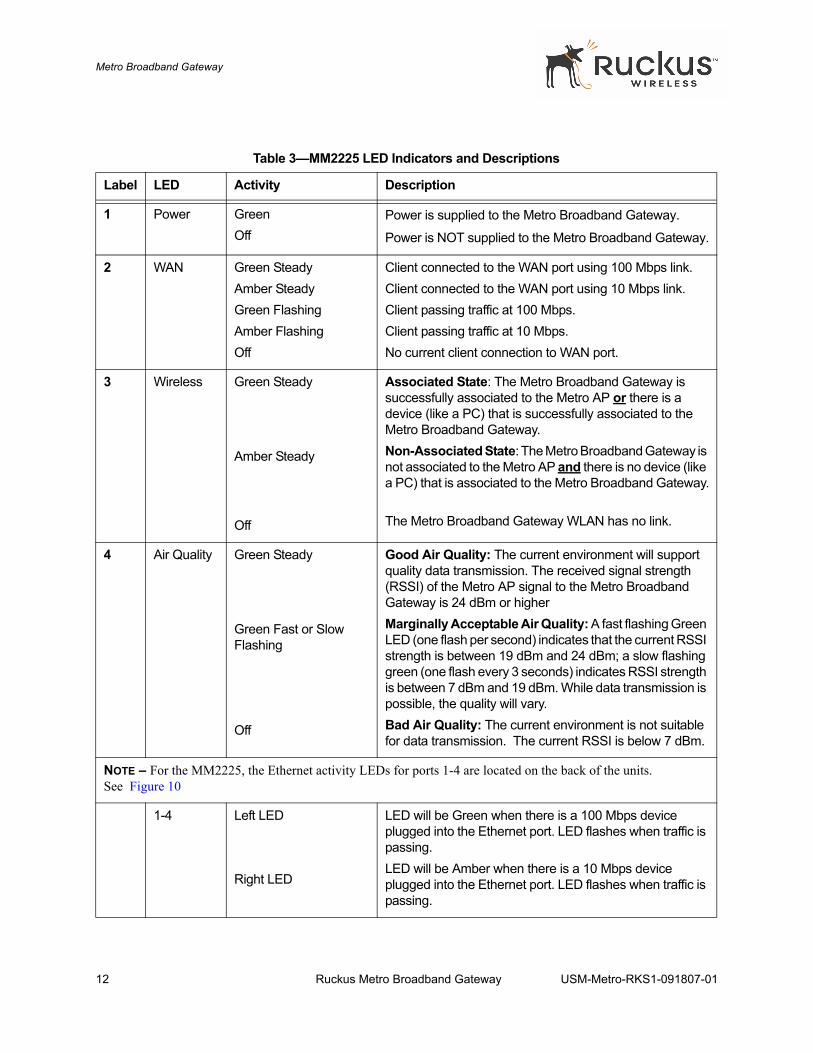
Table 3—MM2225 LED Indicators and Descriptions
Label LED Activity Description
1 Power GreenOff
Power is supplied to the Metro Broadband Gateway.
Power is NOT supplied to the Metro Broadband Gateway.
2 WAN Green SteadyAmber SteadyGreen FlashingAmber FlashingOff
Client connected to the WAN port using 100 Mbps link.Client connected to the WAN port using 10 Mbps link.Client passing traffic at 100 Mbps.Client passing traffic at 10 Mbps.No current client connection to WAN port.
3 Wireless Green Steady
Amber Steady
Off
Associated State: The Metro Broadband Gateway is successfully associated to the Metro AP or there is a device (like a PC) that is successfully associated to the Metro Broadband Gateway.Non-Associated State: The Metro Broadband Gateway is not associated to the Metro AP and there is no device (like a PC) that is associated to the Metro Broadband Gateway.
The Metro Broadband Gateway WLAN has no link.
4 Air Quality Green Steady
Green Fast or Slow Flashing
Off
Good Air Quality: The current environment will support quality data transmission. The received signal strength (RSSI) of the Metro AP signal to the Metro Broadband Gateway is 24 dBm or higher Marginally Acceptable Air Quality: A fast flashing Green LED (one flash per second) indicates that the current RSSI strength is between 19 dBm and 24 dBm; a slow flashing green (one flash every 3 seconds) indicates RSSI strength is between 7 dBm and 19 dBm. While data transmission is possible, the quality will vary. Bad Air Quality: The current environment is not suitable for data transmission. The current RSSI is below 7 dBm.
NOTE – For the MM2225, the Ethernet activity LEDs for ports 1-4 are located on the back of the units. See Figure 10
1-4 Left LED
Right LED
LED will be Green when there is a 100 Mbps device plugged into the Ethernet port. LED flashes when traffic is passing.LED will be Amber when there is a 10 Mbps device plugged into the Ethernet port. LED flashes when traffic is passing.
12 Ruckus Metro Broadband Gateway USM-Metro-RKS1-091807-01
Metro Broadband Gateway
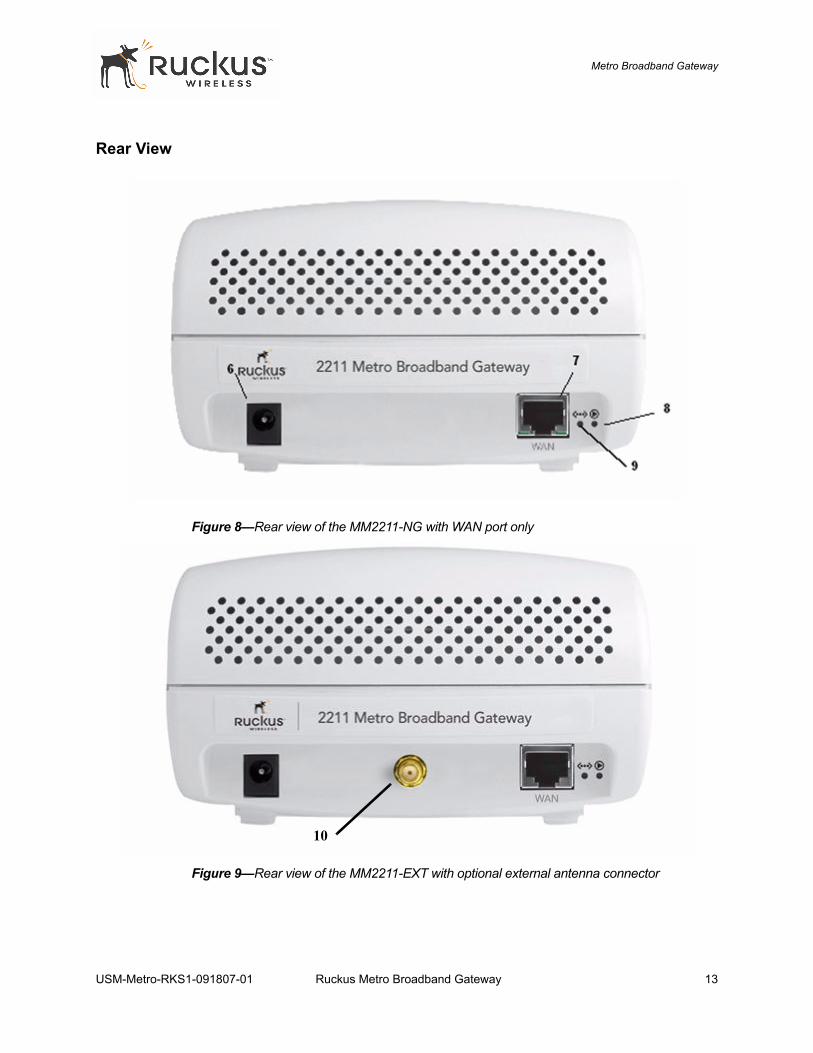
Rear View
Figure 8—Rear view of the MM2211-NG with WAN port only
Figure 9—Rear view of the MM2211-EXT with optional external antenna connector
10
USM-Metro-RKS1-091807-01 Ruckus Metro Broadband Gateway 13
Metro Broadband Gateway
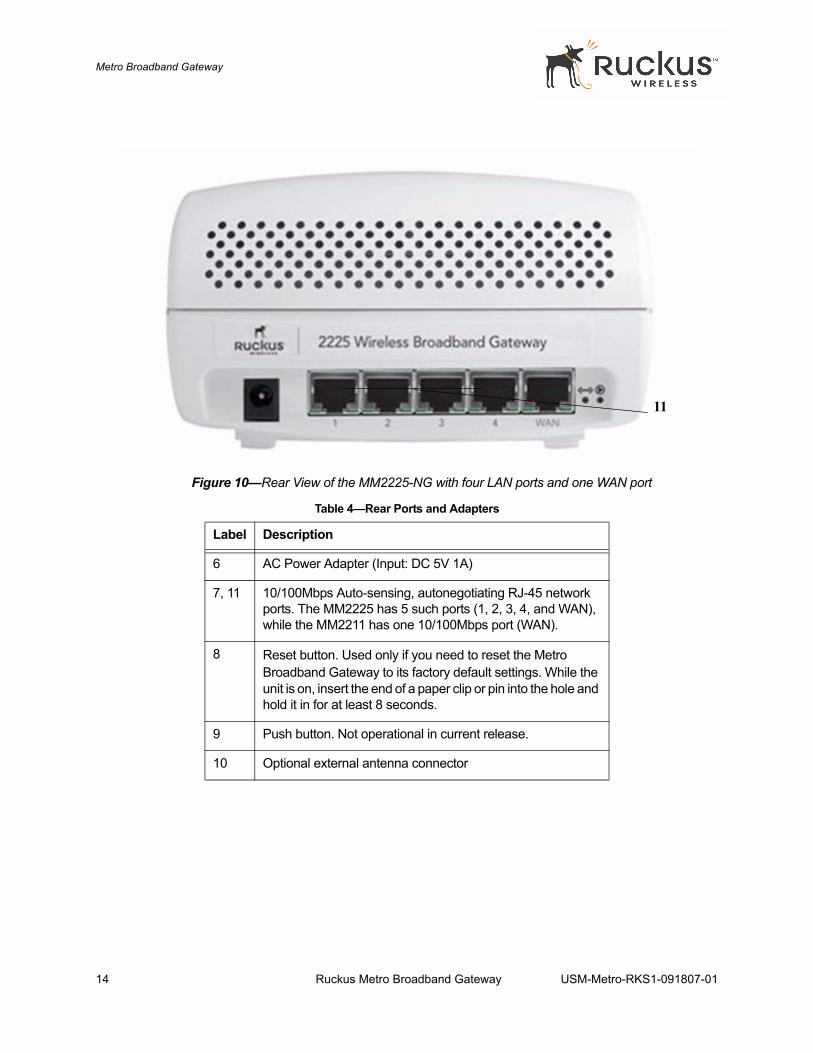
Figure 10—Rear View of the MM2225-NG with four LAN ports and one WAN port
Table 4—Rear Ports and Adapters
Label Description
6 AC Power Adapter (Input: DC 5V 1A)
7, 11 10/100Mbps Auto-sensing, autonegotiating RJ-45 network ports. The MM2225 has 5 such ports (1, 2, 3, 4, and WAN), while the MM2211 has one 10/100Mbps port (WAN).
8 Reset button. Used only if you need to reset the Metro Broadband Gateway to its factory default settings. While the unit is on, insert the end of a paper clip or pin into the hole and hold it in for at least 8 seconds.
9 Push button. Not operational in current release.
10 Optional external antenna connector
11
14 Ruckus Metro Broadband Gateway USM-Metro-RKS1-091807-01
Placement Guidelines
Placement Guidelines
You or your service provider or installer can determine the best placement for the Metro Broadband Gateway by using the following guidelines.
Establishing a Good General Location Your Metro Broadband Gateway should be placed:
• On a shelf or other elevated location away from any physical obstructions.• Away from other sources of electromagnetic interference (for example, microwave ovens, and cordless
phones).• Away from large metal surfaces, pictures or mirrors.• Away from large furniture or other physical obstructions.
Using the Air Quality Indicator to Fine-Tune the PlacementNOTE – The Air Quality Indicator represents the wireless condition of the WAN link.
Wireless environments are sensitive to the physical arrangement of both electronic devices and furniture in a room. You or your installer can observe the Air Quality Indicator LED to determine the best location. The Air Quality indicator LED is described in Table 2— “MM2211 LED Indicators and Descriptions” on page 11.
Your service provider or installer can guide you through a self-help troubleshooting session if data transmission quality deteriorates after an installation. Or, you may be able to determine a solution to the problem on your own.
If “bad” (red) or “possibly acceptable” (yellow) air quality is indicated, you can adjust the location of the Metro Broadband Gateway until a steady green LED indicates “good” air quality.
USM-Metro-RKS1-091807-01 Ruckus Metro Broadband Gateway 15
Connecting to the Metro Broadband Gateway
Connecting to the Metro Broadband Gateway
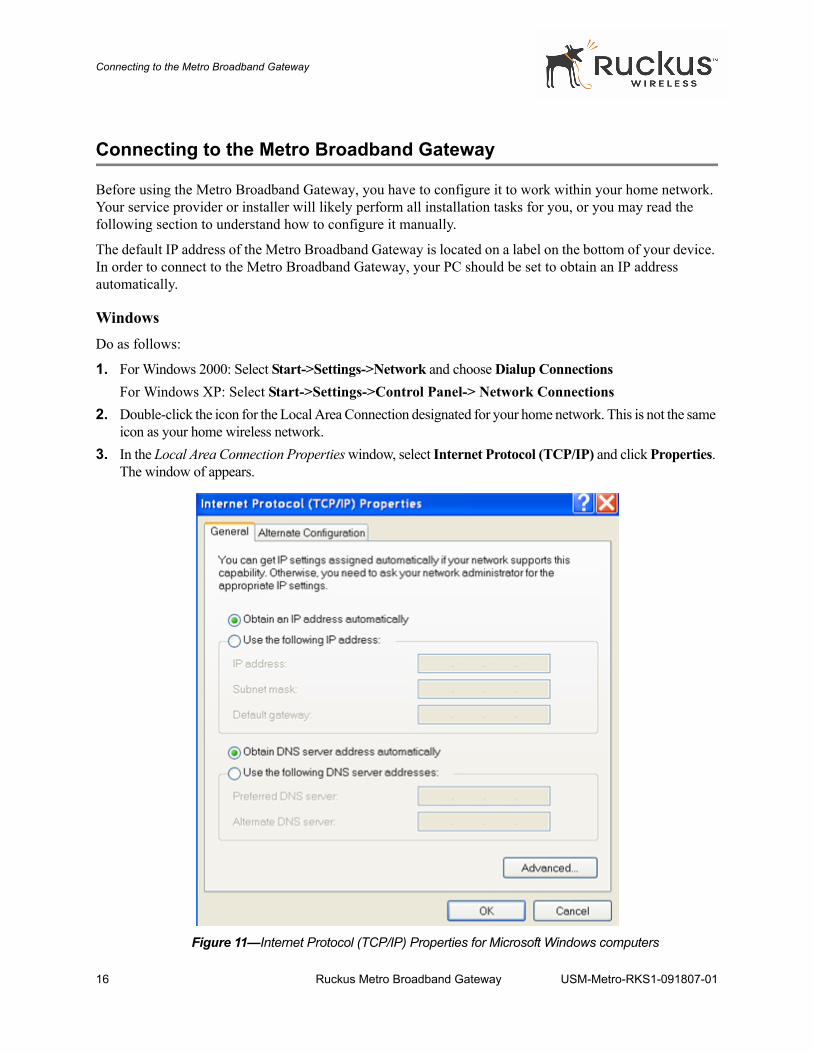
Before using the Metro Broadband Gateway, you have to configure it to work within your home network. Your service provider or installer will likely perform all installation tasks for you, or you may read the following section to understand how to configure it manually.
The default IP address of the Metro Broadband Gateway is located on a label on the bottom of your device. In order to connect to the Metro Broadband Gateway, your PC should be set to obtain an IP address automatically.
WindowsDo as follows:
1. For Windows 2000: Select Start->Settings->Network and choose Dialup ConnectionsFor Windows XP: Select Start->Settings->Control Panel-> Network Connections
2. Double-click the icon for the Local Area Connection designated for your home network. This is not the same icon as your home wireless network.
3. In the Local Area Connection Properties window, select Internet Protocol (TCP/IP) and click Properties. The window of appears.
Figure 11—Internet Protocol (TCP/IP) Properties for Microsoft Windows computers
16 Ruckus Metro Broadband Gateway USM-Metro-RKS1-091807-01
Connecting to the Metro Broadband Gateway
4. Select Obtain an IP address automatically, and click OK to exit the TCP/IP Properties window.5. Click OK to exit the Local Area Connection Properties window.
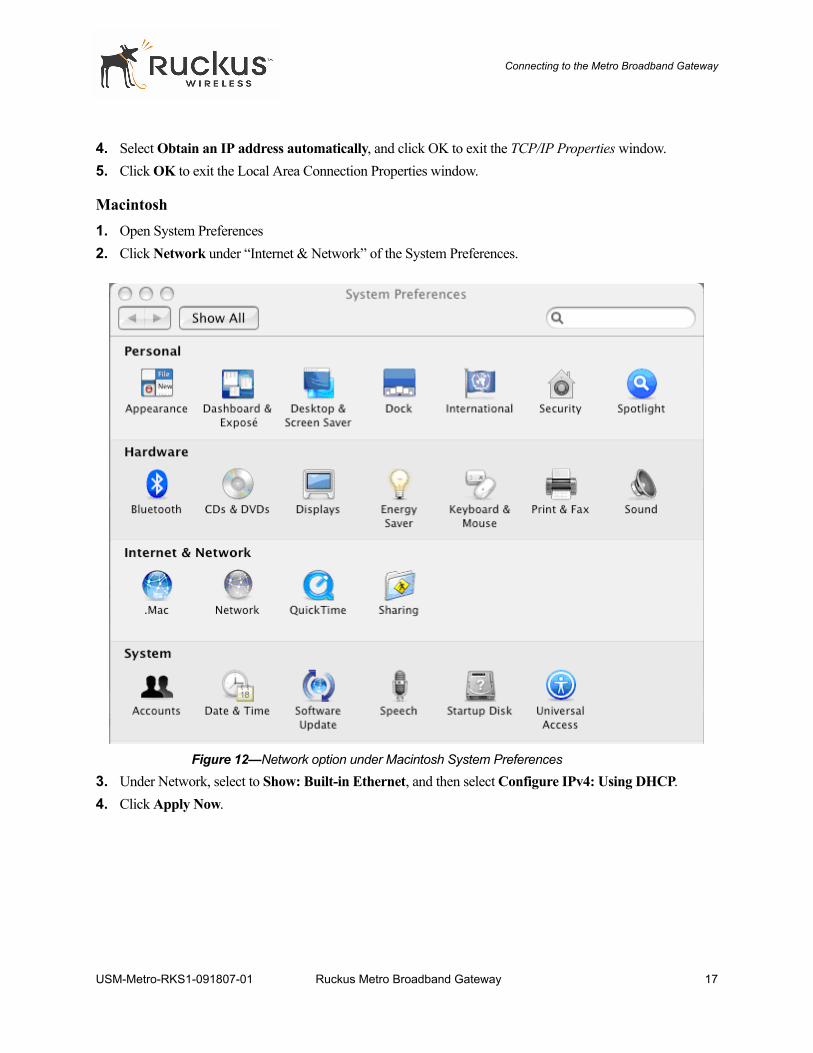
Macintosh1. Open System Preferences2. Click Network under “Internet & Network” of the System Preferences.
Figure 12—Network option under Macintosh System Preferences
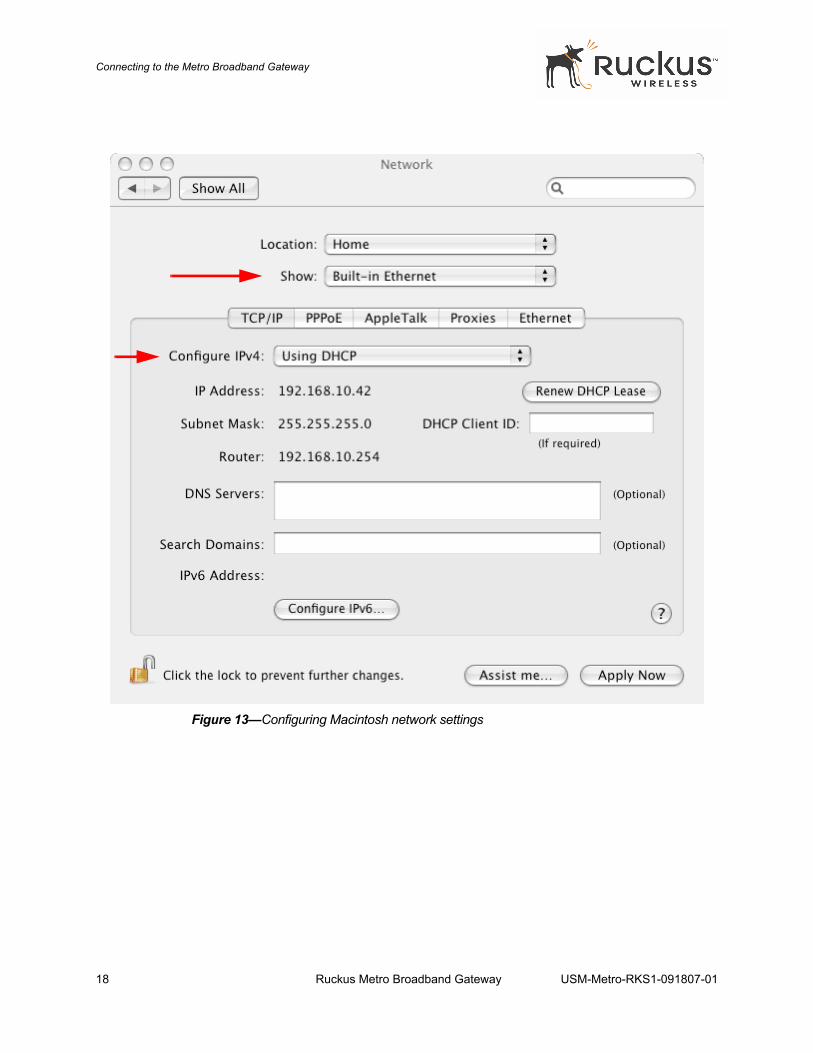
3. Under Network, select to Show: Built-in Ethernet, and then select Configure IPv4: Using DHCP.4. Click Apply Now.
USM-Metro-RKS1-091807-01 Ruckus Metro Broadband Gateway 17
Connecting to the Metro Broadband Gateway
Figure 13—Configuring Macintosh network settings
18 Ruckus Metro Broadband Gateway USM-Metro-RKS1-091807-01
Connect and Configure the Metro Broadband Gateway
Connect and Configure the Metro Broadband Gateway
The following steps will guide you to set up and gain administrative access to your Ruckus Metro Broadband Gateway.
1. Remove the Ruckus Metro Broadband Gateway from the packaging and place it next to your computer.2. Connect the AC power supply to the Metro Broadband Gateway and plug the other end into a power outlet
or to a surge protector that is plugged into a power outlet.3. Connect the CAT5 Ethernet cable to the Ethernet port on your computer, and to the Ethernet port on the
Ruckus Metro Broadband Gateway.4. On your PC, open a browser window. Type the IP address as noted on the bottom of the device.5. When the login screen appears, type the username and the password as noted on the bottom of the device. 6. Click the Login button.
NOTE – If your Metro Broadband Gateway is not properly configured, you will see the captive portal page.
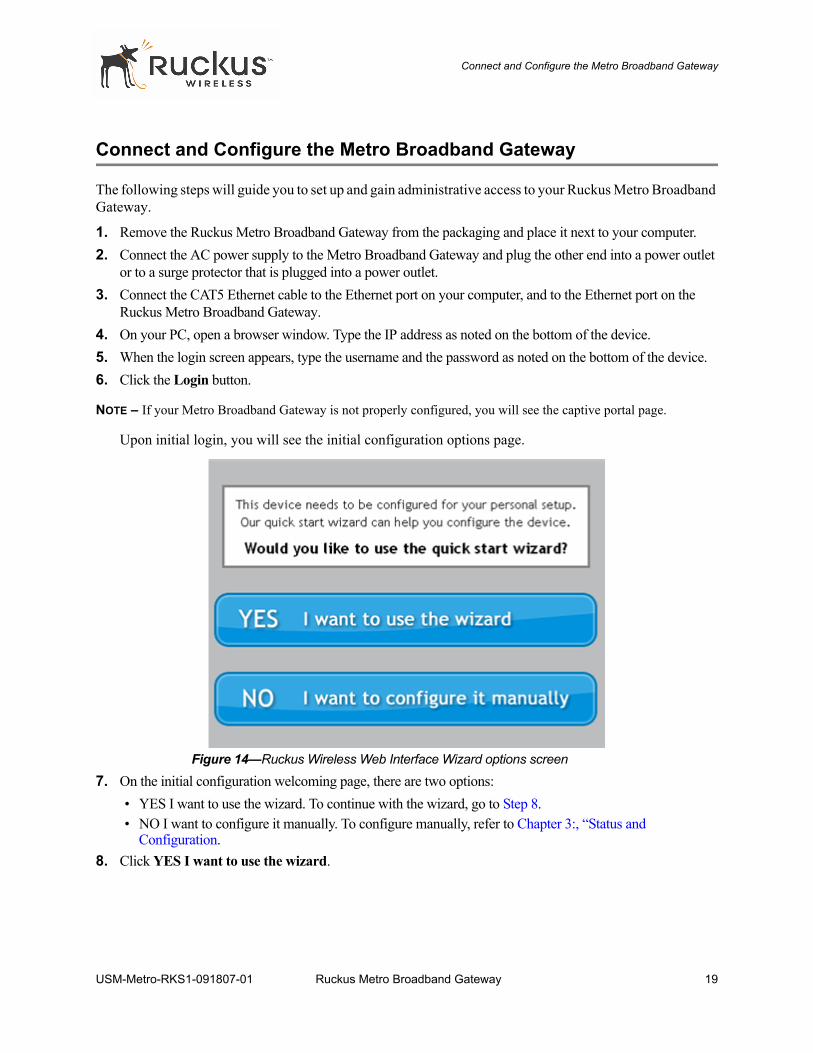
Upon initial login, you will see the initial configuration options page.
Figure 14—Ruckus Wireless Web Interface Wizard options screen
7. On the initial configuration welcoming page, there are two options:• YES I want to use the wizard. To continue with the wizard, go to Step 8.• NO I want to configure it manually. To configure manually, refer to Chapter 3:, “Status and
Configuration.8. Click YES I want to use the wizard.
USM-Metro-RKS1-091807-01 Ruckus Metro Broadband Gateway 19
Connect and Configure the Metro Broadband Gateway
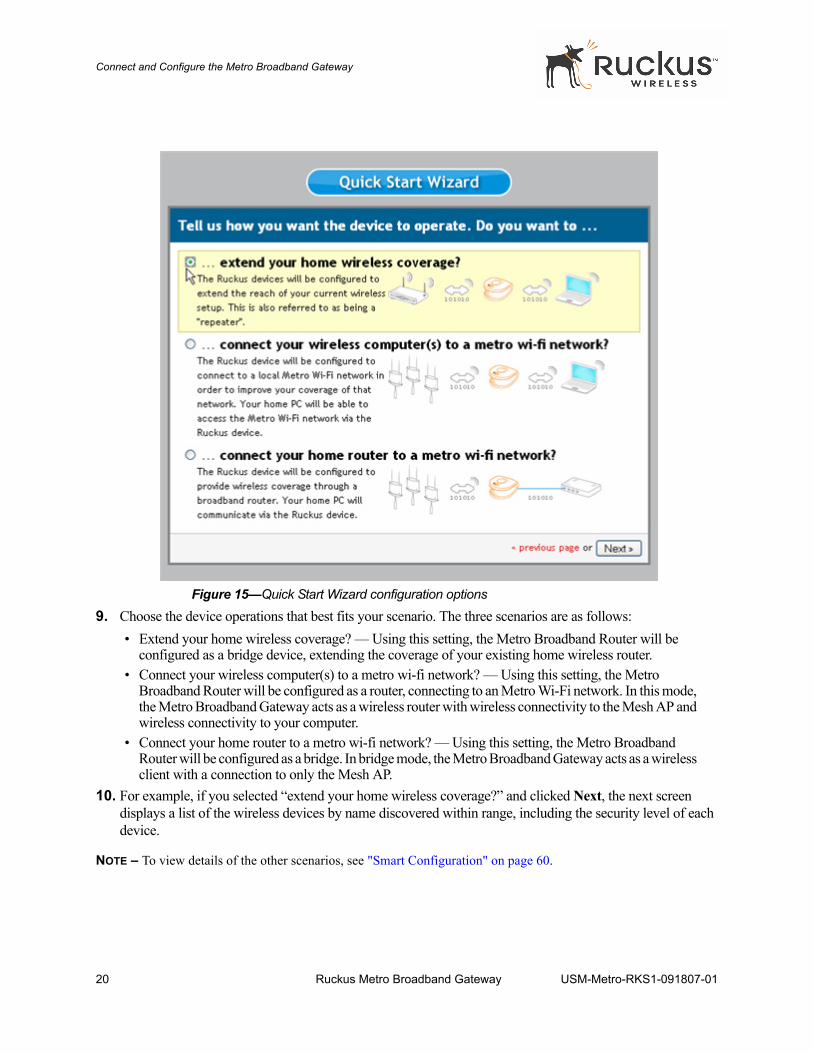
Figure 15—Quick Start Wizard configuration options
9. Choose the device operations that best fits your scenario. The three scenarios are as follows:• Extend your home wireless coverage? — Using this setting, the Metro Broadband Router will be
configured as a bridge device, extending the coverage of your existing home wireless router. • Connect your wireless computer(s) to a metro wi-fi network? — Using this setting, the Metro
Broadband Router will be configured as a router, connecting to an Metro Wi-Fi network. In this mode, the Metro Broadband Gateway acts as a wireless router with wireless connectivity to the Mesh AP and wireless connectivity to your computer.
• Connect your home router to a metro wi-fi network? — Using this setting, the Metro Broadband Router will be configured as a bridge. In bridge mode, the Metro Broadband Gateway acts as a wireless client with a connection to only the Mesh AP.
10. For example, if you selected “extend your home wireless coverage?” and clicked Next, the next screen displays a list of the wireless devices by name discovered within range, including the security level of each device.
NOTE – To view details of the other scenarios, see "Smart Configuration" on page 60.
20 Ruckus Metro Broadband Gateway USM-Metro-RKS1-091807-01
Connect and Configure the Metro Broadband Gateway
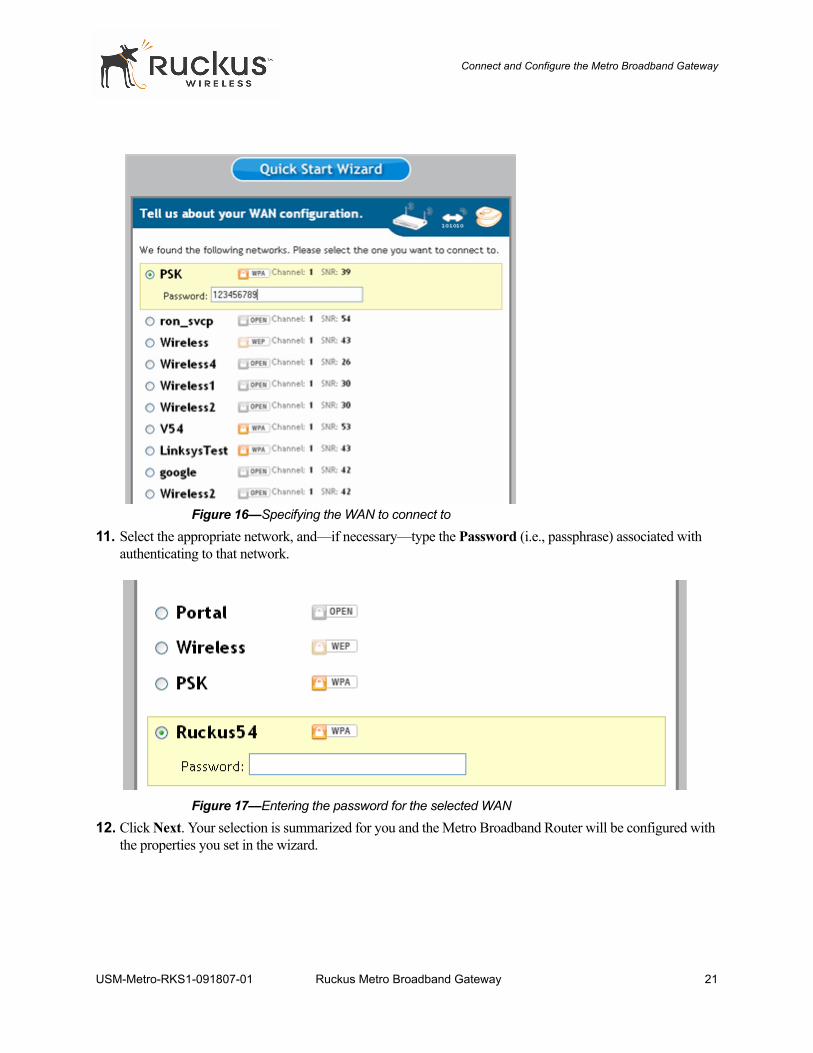
Figure 16—Specifying the WAN to connect to
11. Select the appropriate network, and—if necessary—type the Password (i.e., passphrase) associated with authenticating to that network.
Figure 17—Entering the password for the selected WAN
12. Click Next. Your selection is summarized for you and the Metro Broadband Router will be configured with the properties you set in the wizard.
USM-Metro-RKS1-091807-01 Ruckus Metro Broadband Gateway 21
Connect and Configure the Metro Broadband Gateway
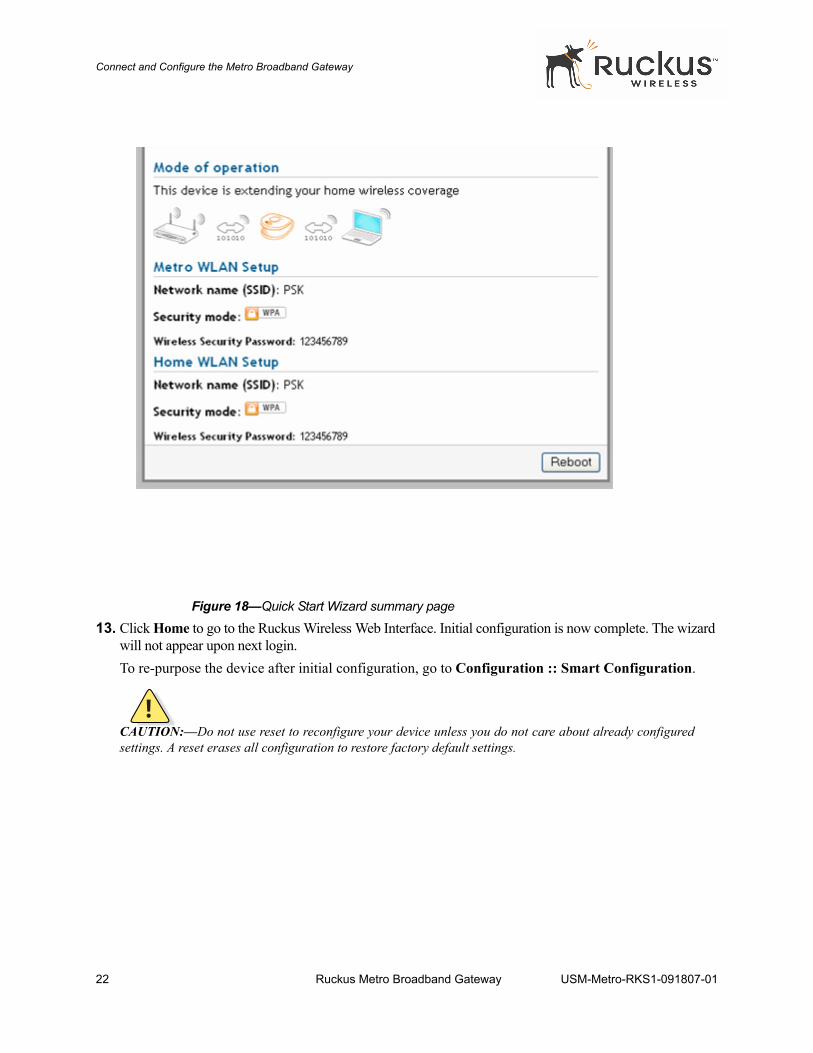
Figure 18—Quick Start Wizard summary page
13. Click Home to go to the Ruckus Wireless Web Interface. Initial configuration is now complete. The wizard will not appear upon next login.To re-purpose the device after initial configuration, go to Configuration :: Smart Configuration.
!CAUTION:—Do not use reset to reconfigure your device unless you do not care about already configuredsettings. A reset erases all configuration to restore factory default settings.
22 Ruckus Metro Broadband Gateway USM-Metro-RKS1-091807-01
Captive Portal Feature
Captive Portal Feature
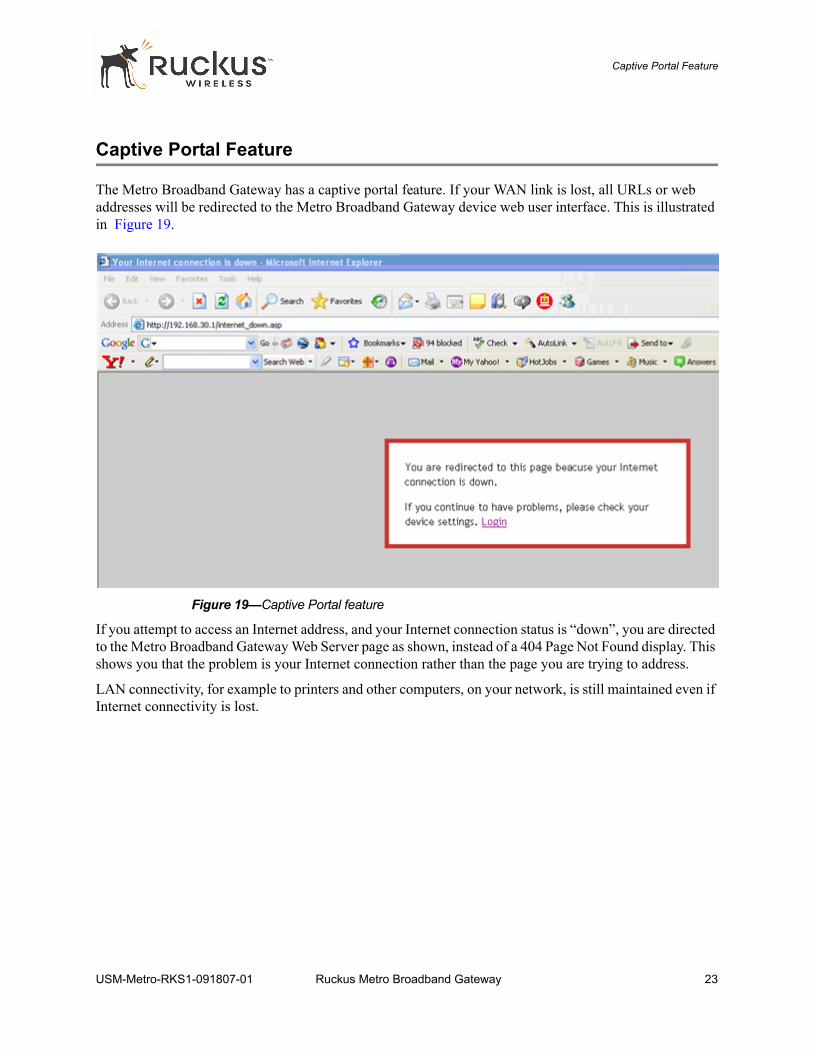
The Metro Broadband Gateway has a captive portal feature. If your WAN link is lost, all URLs or web addresses will be redirected to the Metro Broadband Gateway device web user interface. This is illustrated in Figure 19.
Figure 19—Captive Portal feature
If you attempt to access an Internet address, and your Internet connection status is “down”, you are directed to the Metro Broadband Gateway Web Server page as shown, instead of a 404 Page Not Found display. This shows you that the problem is your Internet connection rather than the page you are trying to address.
LAN connectivity, for example to printers and other computers, on your network, is still maintained even if Internet connectivity is lost.
USM-Metro-RKS1-091807-01 Ruckus Metro Broadband Gateway 23

Captive Portal Feature
24 Ruckus Metro Broadband Gateway USM-Metro-RKS1-091807-01
Chapter 3: Status and Configuration
This chapter describes the tasks you need to do to customize the Metro Broadband Gateway to run on your wireless network.
Topics covered in this chapter include:
• Wireless Settings Worksheet . . . . . . . . . . . . . . . . . . . . . . . . . . . . . . . . . . . . . . . . . . . . . . . . . . . . . . .26• Metro Broadband Gateway Settings Worksheet . . . . . . . . . . . . . . . . . . . . . . . . . . . . . . . . . . . . . . . .27• Viewing Device, Internet, and System Status . . . . . . . . . . . . . . . . . . . . . . . . . . . . . . . . . . . . . . . . . .28• Viewing Wireless Information . . . . . . . . . . . . . . . . . . . . . . . . . . . . . . . . . . . . . . . . . . . . . . . . . . . . . .32• Configuring Device Identification and Login Settings . . . . . . . . . . . . . . . . . . . . . . . . . . . . . . . . . . .36• Configuring Internet Settings. . . . . . . . . . . . . . . . . . . . . . . . . . . . . . . . . . . . . . . . . . . . . . . . . . . . . . .37• Enabling an L2TP Connection. . . . . . . . . . . . . . . . . . . . . . . . . . . . . . . . . . . . . . . . . . . . . . . . . . . . . .42• Configuring System Settings . . . . . . . . . . . . . . . . . . . . . . . . . . . . . . . . . . . . . . . . . . . . . . . . . . . . . . .39• Configuring Wireless Settings . . . . . . . . . . . . . . . . . . . . . . . . . . . . . . . . . . . . . . . . . . . . . . . . . . . . . .43• Customizing Metro WLAN or Home WLAN Settings . . . . . . . . . . . . . . . . . . . . . . . . . . . . . . . . . . .46• Customizing WEP Encryption. . . . . . . . . . . . . . . . . . . . . . . . . . . . . . . . . . . . . . . . . . . . . . . . . . . . . .49• Customizing WPA Encryption. . . . . . . . . . . . . . . . . . . . . . . . . . . . . . . . . . . . . . . . . . . . . . . . . . . . . .50• Customizing 802.1X Settings . . . . . . . . . . . . . . . . . . . . . . . . . . . . . . . . . . . . . . . . . . . . . . . . . . . . . .52• Certificate Management. . . . . . . . . . . . . . . . . . . . . . . . . . . . . . . . . . . . . . . . . . . . . . . . . . . . . . . . . . .53• Port Forwarding . . . . . . . . . . . . . . . . . . . . . . . . . . . . . . . . . . . . . . . . . . . . . . . . . . . . . . . . . . . . . . . . .55• Access Controls . . . . . . . . . . . . . . . . . . . . . . . . . . . . . . . . . . . . . . . . . . . . . . . . . . . . . . . . . . . . . . . . .57• Smart Configuration. . . . . . . . . . . . . . . . . . . . . . . . . . . . . . . . . . . . . . . . . . . . . . . . . . . . . . . . . . . . . .60• Extending Your Home Wireless Coverage . . . . . . . . . . . . . . . . . . . . . . . . . . . . . . . . . . . . . . . . . . . .61• Connecting Your Wireless Computer(s) to a Metro Wi-Fi Network . . . . . . . . . . . . . . . . . . . . . . . . .63• Connecting Your Home Router to a Metro Wi-Fi Network. . . . . . . . . . . . . . . . . . . . . . . . . . . . . . . .66
USM-Metro-RKS1-091807-01 Ruckus Metro Broadband Gateway 25
Wireless Settings Worksheet
Wireless Settings Worksheet
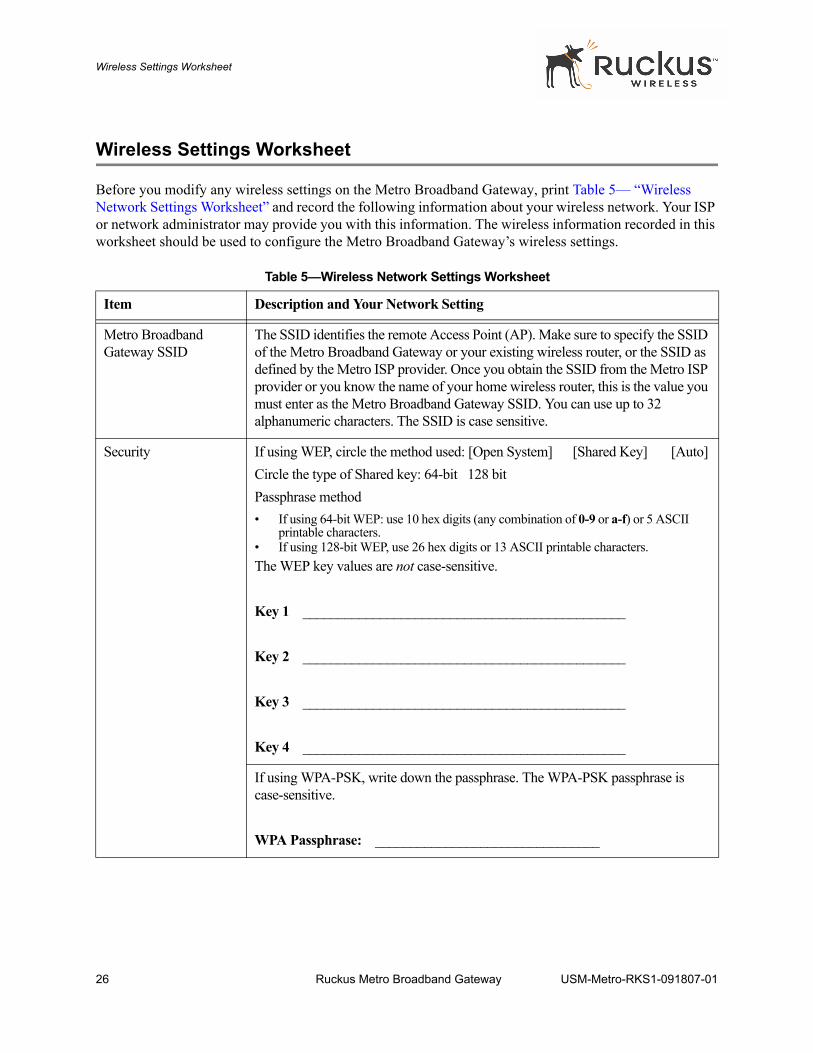
Before you modify any wireless settings on the Metro Broadband Gateway, print Table 5— “Wireless Network Settings Worksheet” and record the following information about your wireless network. Your ISP or network administrator may provide you with this information. The wireless information recorded in this worksheet should be used to configure the Metro Broadband Gateway’s wireless settings.
Table 5—Wireless Network Settings Worksheet
Item Description and Your Network Setting
Metro Broadband Gateway SSID
The SSID identifies the remote Access Point (AP). Make sure to specify the SSID of the Metro Broadband Gateway or your existing wireless router, or the SSID as defined by the Metro ISP provider. Once you obtain the SSID from the Metro ISP provider or you know the name of your home wireless router, this is the value you must enter as the Metro Broadband Gateway SSID. You can use up to 32 alphanumeric characters. The SSID is case sensitive.
Security If using WEP, circle the method used: [Open System] [Shared Key] [Auto]Circle the type of Shared key: 64-bit 128 bitPassphrase method• If using 64-bit WEP: use 10 hex digits (any combination of 0-9 or a-f) or 5 ASCII
printable characters.• If using 128-bit WEP, use 26 hex digits or 13 ASCII printable characters.The WEP key values are not case-sensitive.
Key 1 ______________________________________________
Key 2 ______________________________________________
Key 3 ______________________________________________
Key 4 ______________________________________________
If using WPA-PSK, write down the passphrase. The WPA-PSK passphrase is case-sensitive.
WPA Passphrase: ________________________________
26 Ruckus Metro Broadband Gateway USM-Metro-RKS1-091807-01
Metro Broadband Gateway Settings Worksheet
Metro Broadband Gateway Settings Worksheet
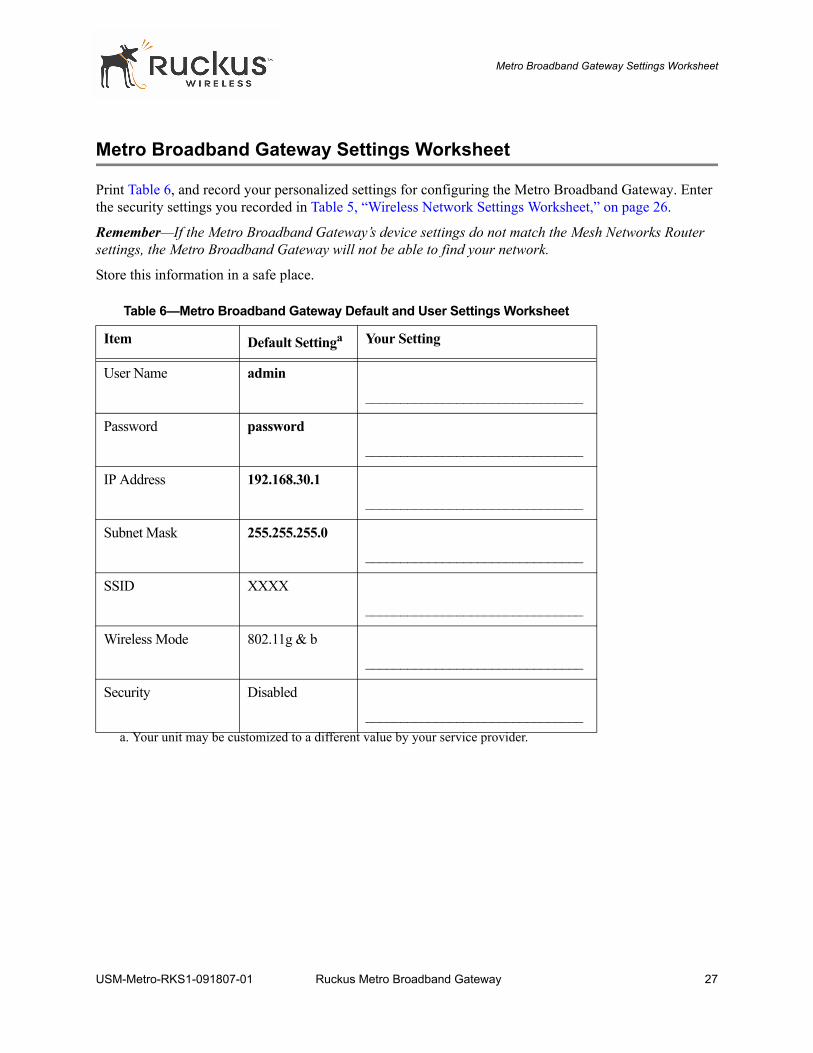
Print Table 6, and record your personalized settings for configuring the Metro Broadband Gateway. Enter the security settings you recorded in Table 5, “Wireless Network Settings Worksheet,” on page 26.
Remember—If the Metro Broadband Gateway’s device settings do not match the Mesh Networks Router settings, the Metro Broadband Gateway will not be able to find your network.
Store this information in a safe place.
Table 6—Metro Broadband Gateway Default and User Settings Worksheet
Item Default Settinga
a. Your unit may be customized to a different value by your service provider.
Your Setting
User Name admin_______________________________
Password password_______________________________
IP Address 192.168.30.1_______________________________
Subnet Mask 255.255.255.0_______________________________
SSID XXXX_______________________________
Wireless Mode 802.11g & b_______________________________
Security Disabled_______________________________
USM-Metro-RKS1-091807-01 Ruckus Metro Broadband Gateway 27
Viewing Device, Internet, and System Status
Viewing Device, Internet, and System Status
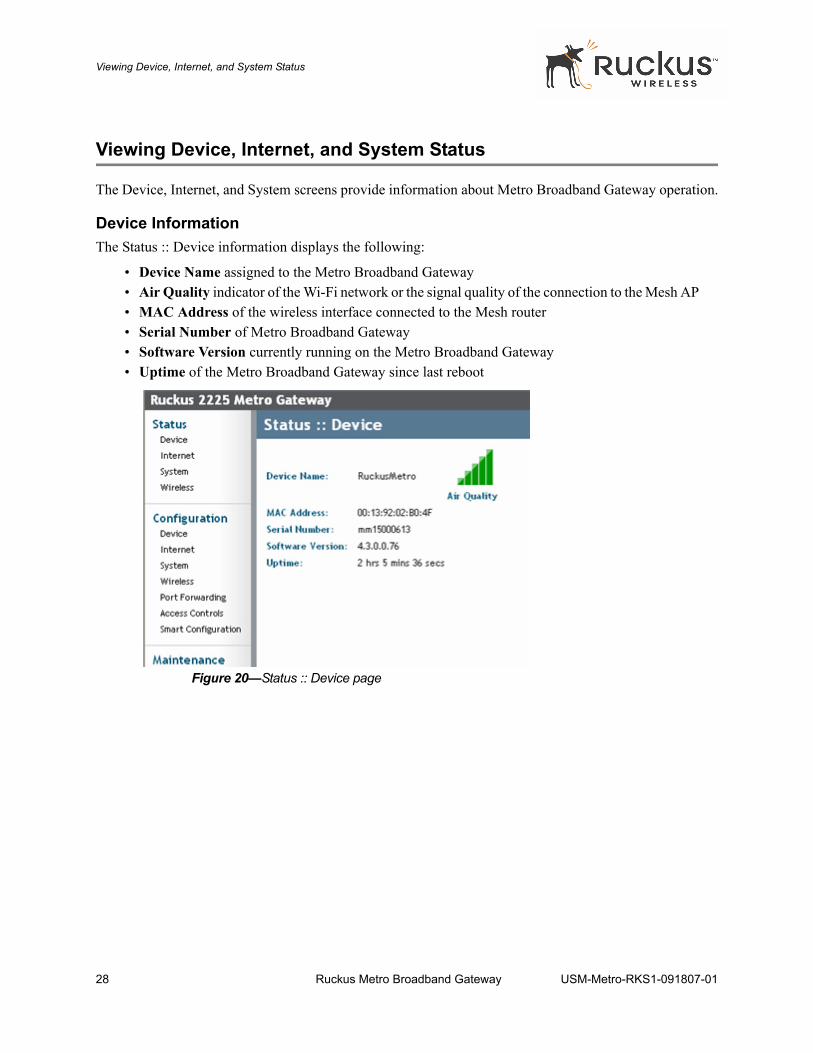
The Device, Internet, and System screens provide information about Metro Broadband Gateway operation.
Device InformationThe Status :: Device information displays the following:
• Device Name assigned to the Metro Broadband Gateway• Air Quality indicator of the Wi-Fi network or the signal quality of the connection to the Mesh AP• MAC Address of the wireless interface connected to the Mesh router• Serial Number of Metro Broadband Gateway• Software Version currently running on the Metro Broadband Gateway• Uptime of the Metro Broadband Gateway since last reboot
Figure 20—Status :: Device page
28 Ruckus Metro Broadband Gateway USM-Metro-RKS1-091807-01
Viewing Device, Internet, and System Status
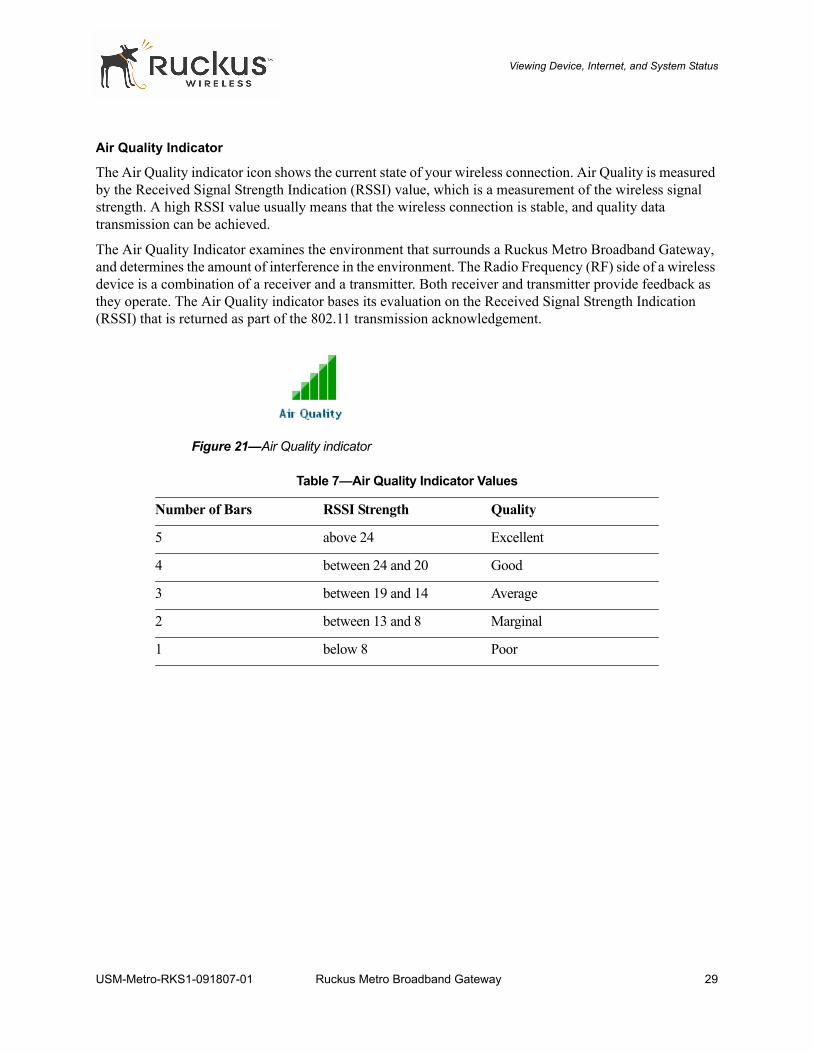
Air Quality Indicator
The Air Quality indicator icon shows the current state of your wireless connection. Air Quality is measured by the Received Signal Strength Indication (RSSI) value, which is a measurement of the wireless signal strength. A high RSSI value usually means that the wireless connection is stable, and quality data transmission can be achieved.
The Air Quality Indicator examines the environment that surrounds a Ruckus Metro Broadband Gateway, and determines the amount of interference in the environment. The Radio Frequency (RF) side of a wireless device is a combination of a receiver and a transmitter. Both receiver and transmitter provide feedback as they operate. The Air Quality indicator bases its evaluation on the Received Signal Strength Indication (RSSI) that is returned as part of the 802.11 transmission acknowledgement.
Figure 21—Air Quality indicator
Table 7—Air Quality Indicator Values
Number of Bars RSSI Strength Quality
5 above 24 Excellent
4 between 24 and 20 Good
3 between 19 and 14 Average
2 between 13 and 8 Marginal
1 below 8 Poor
USM-Metro-RKS1-091807-01 Ruckus Metro Broadband Gateway 29
Viewing Device, Internet, and System Status
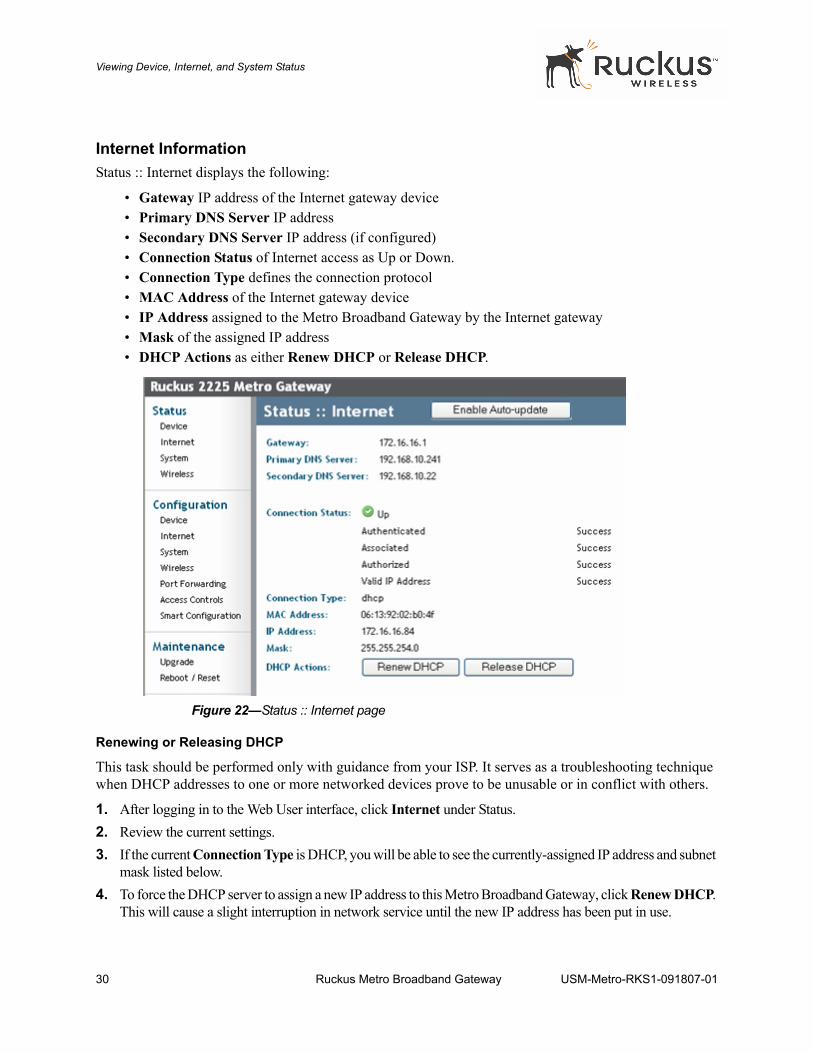
Internet InformationStatus :: Internet displays the following:
• Gateway IP address of the Internet gateway device• Primary DNS Server IP address• Secondary DNS Server IP address (if configured)• Connection Status of Internet access as Up or Down.• Connection Type defines the connection protocol• MAC Address of the Internet gateway device• IP Address assigned to the Metro Broadband Gateway by the Internet gateway• Mask of the assigned IP address• DHCP Actions as either Renew DHCP or Release DHCP.
Figure 22—Status :: Internet page
Renewing or Releasing DHCP
This task should be performed only with guidance from your ISP. It serves as a troubleshooting technique when DHCP addresses to one or more networked devices prove to be unusable or in conflict with others.
1. After logging in to the Web User interface, click Internet under Status.2. Review the current settings. 3. If the current Connection Type is DHCP, you will be able to see the currently-assigned IP address and subnet
mask listed below.4. To force the DHCP server to assign a new IP address to this Metro Broadband Gateway, click Renew DHCP.
This will cause a slight interruption in network service until the new IP address has been put in use.
30 Ruckus Metro Broadband Gateway USM-Metro-RKS1-091807-01
Viewing Device, Internet, and System Status
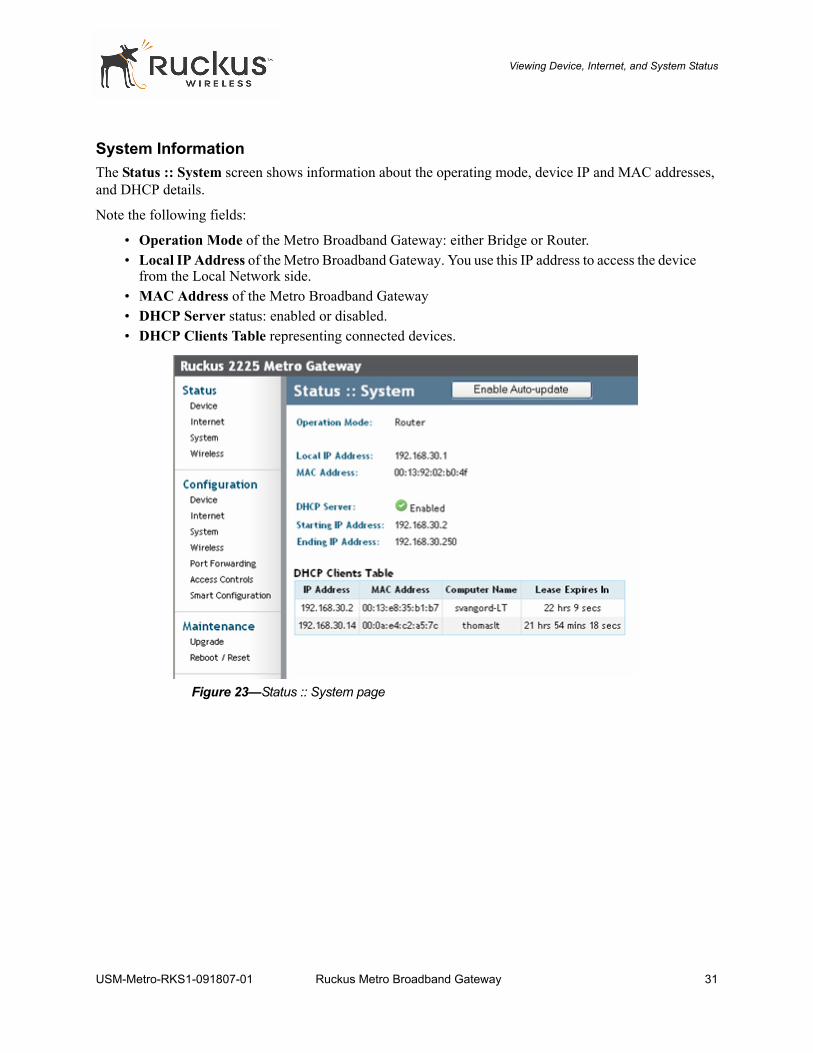
System InformationThe Status :: System screen shows information about the operating mode, device IP and MAC addresses, and DHCP details.
Note the following fields:
• Operation Mode of the Metro Broadband Gateway: either Bridge or Router.• Local IP Address of the Metro Broadband Gateway. You use this IP address to access the device
from the Local Network side.• MAC Address of the Metro Broadband Gateway• DHCP Server status: enabled or disabled.• DHCP Clients Table representing connected devices.
Figure 23—Status :: System page
USM-Metro-RKS1-091807-01 Ruckus Metro Broadband Gateway 31
Viewing Wireless Information
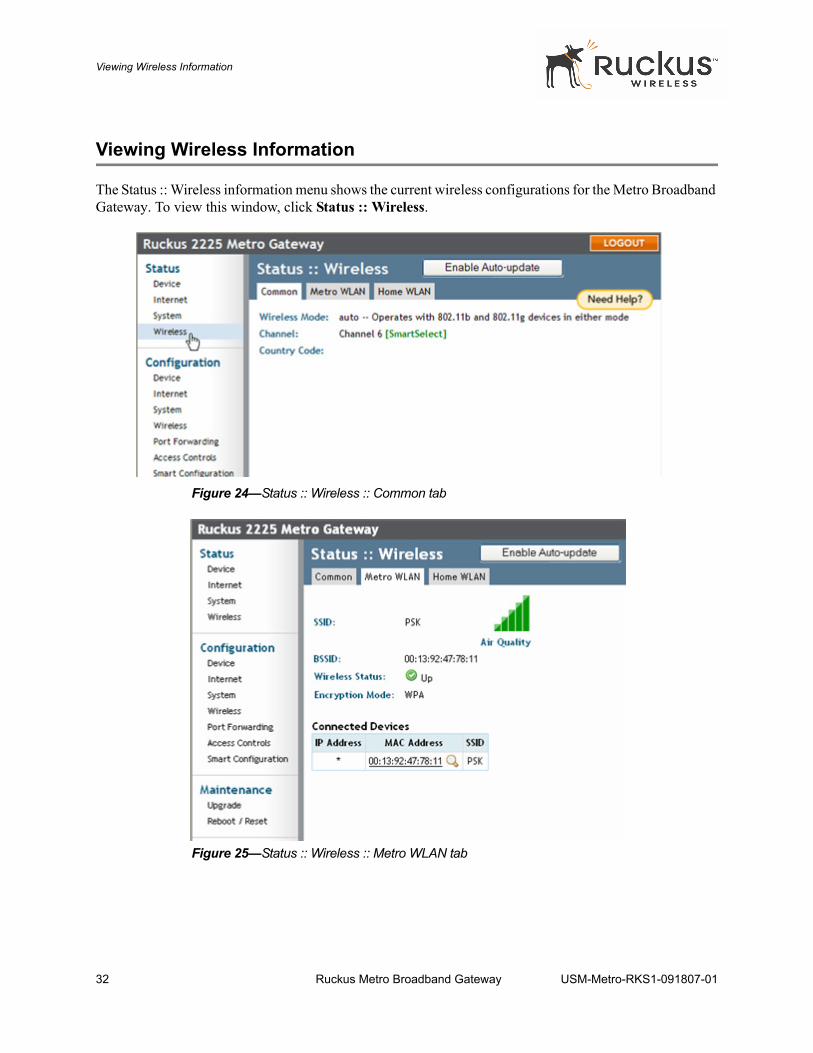
Viewing Wireless Information
The Status :: Wireless information menu shows the current wireless configurations for the Metro Broadband Gateway. To view this window, click Status :: Wireless.
Figure 24—Status :: Wireless :: Common tab
Figure 25—Status :: Wireless :: Metro WLAN tab
32 Ruckus Metro Broadband Gateway USM-Metro-RKS1-091807-01
Viewing Wireless Information
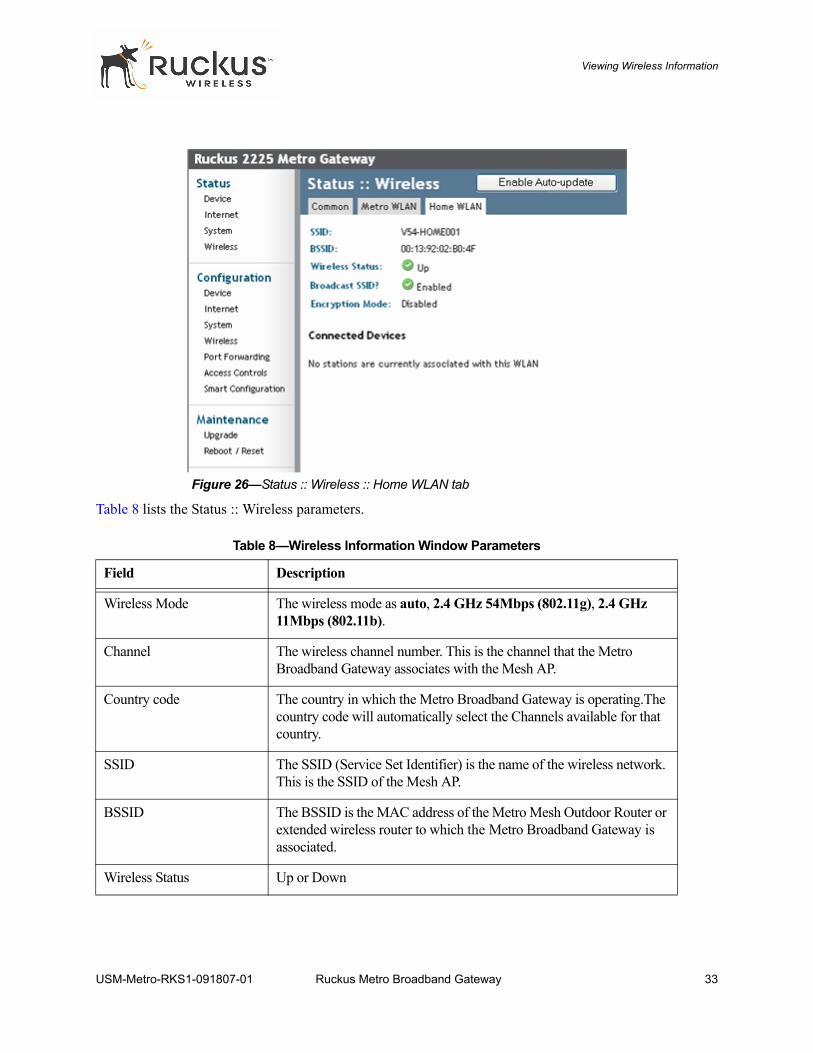
Figure 26—Status :: Wireless :: Home WLAN tab
Table 8 lists the Status :: Wireless parameters.
Table 8—Wireless Information Window Parameters
Field Description
Wireless Mode The wireless mode as auto, 2.4 GHz 54Mbps (802.11g), 2.4 GHz 11Mbps (802.11b).
Channel The wireless channel number. This is the channel that the Metro Broadband Gateway associates with the Mesh AP.
Country code The country in which the Metro Broadband Gateway is operating.The country code will automatically select the Channels available for that country.
SSID The SSID (Service Set Identifier) is the name of the wireless network. This is the SSID of the Mesh AP.
BSSID The BSSID is the MAC address of the Metro Mesh Outdoor Router or extended wireless router to which the Metro Broadband Gateway is associated.
Wireless Status Up or Down
USM-Metro-RKS1-091807-01 Ruckus Metro Broadband Gateway 33
Viewing Wireless Information
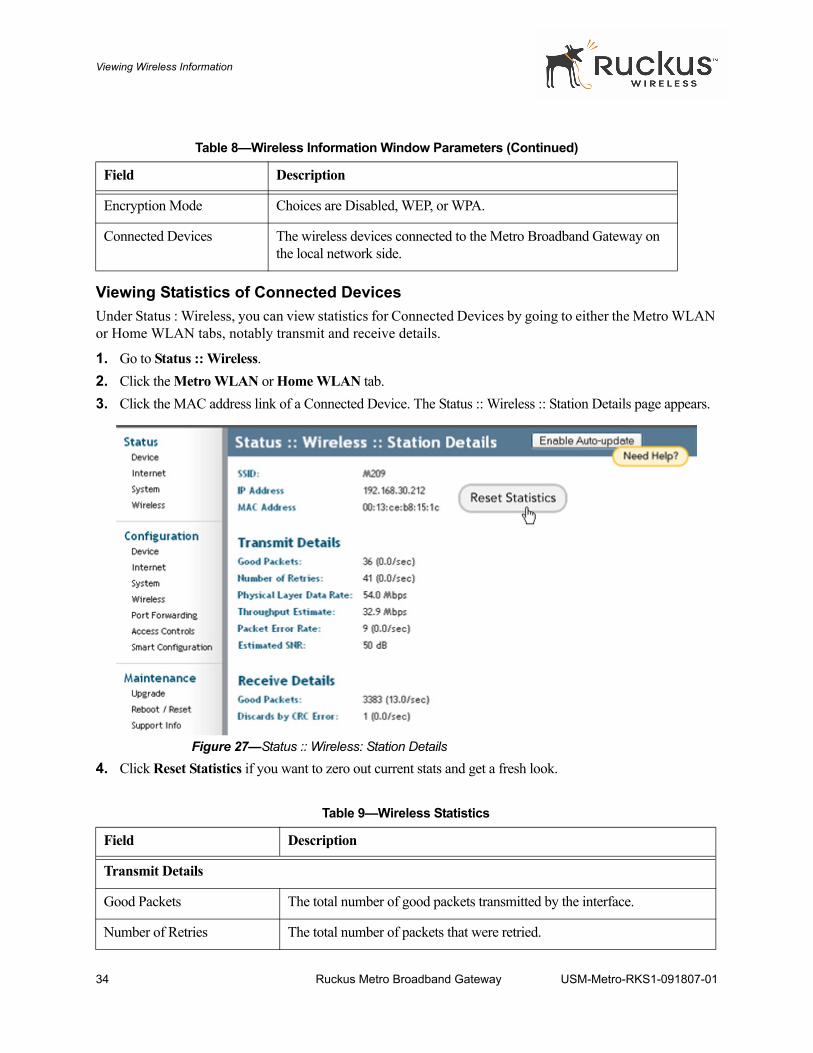
Viewing Statistics of Connected DevicesUnder Status : Wireless, you can view statistics for Connected Devices by going to either the Metro WLAN or Home WLAN tabs, notably transmit and receive details.
1. Go to Status :: Wireless.2. Click the Metro WLAN or Home WLAN tab.3. Click the MAC address link of a Connected Device. The Status :: Wireless :: Station Details page appears.
Figure 27—Status :: Wireless: Station Details
4. Click Reset Statistics if you want to zero out current stats and get a fresh look.
Encryption Mode Choices are Disabled, WEP, or WPA.
Connected Devices The wireless devices connected to the Metro Broadband Gateway on the local network side.
Table 9—Wireless Statistics
Field Description
Transmit Details
Good Packets The total number of good packets transmitted by the interface.
Number of Retries The total number of packets that were retried.
Table 8—Wireless Information Window Parameters (Continued)
Field Description
34 Ruckus Metro Broadband Gateway USM-Metro-RKS1-091807-01
Viewing Wireless Information
Physical Layer Data Rate (Mbps)
The data rate of the PHY in Mbps.
Throughput Estimate (Mbps) The theoretically possible receive or transmit throughput in megabits per second.
Packet Error Rate The PHY error rate expressed as a percent.
Estimated SNR The estimated signal to noise ratio in dB.
Receive Details
Good Packets The total number of good packets received by the interface.
Discards CRC Errors The number of packets with CRC error received or transmitted by the interface.
Table 9—Wireless Statistics (Continued)
Field Description
USM-Metro-RKS1-091807-01 Ruckus Metro Broadband Gateway 35

Configuring Device Identification and Login Settings
Configuring Device Identification and Login Settings
To replace the current login settings, follow these steps:
1. After logging in to the Web User interface (following the steps in the Quick Start Guide), click Device under Configuration.
Figure 28—Configure :: Device page
2. (Optional) Change the Device Name, Username, and/or Password (plus Password Confirmation) in the appropriate text fields.• The Device Name, Username, and Password fields must be between 6 and 32 characters in length,
and be comprised of letters and numbers only.• All fields are case-sensitive. • Do not use spaces.
3. Be sure to write down the new username or password if you make changes.4. When you're finished, click Update Settings. A confirmation message appears at the top of the workspace.
36 Ruckus Metro Broadband Gateway USM-Metro-RKS1-091807-01
Configuring Internet Settings
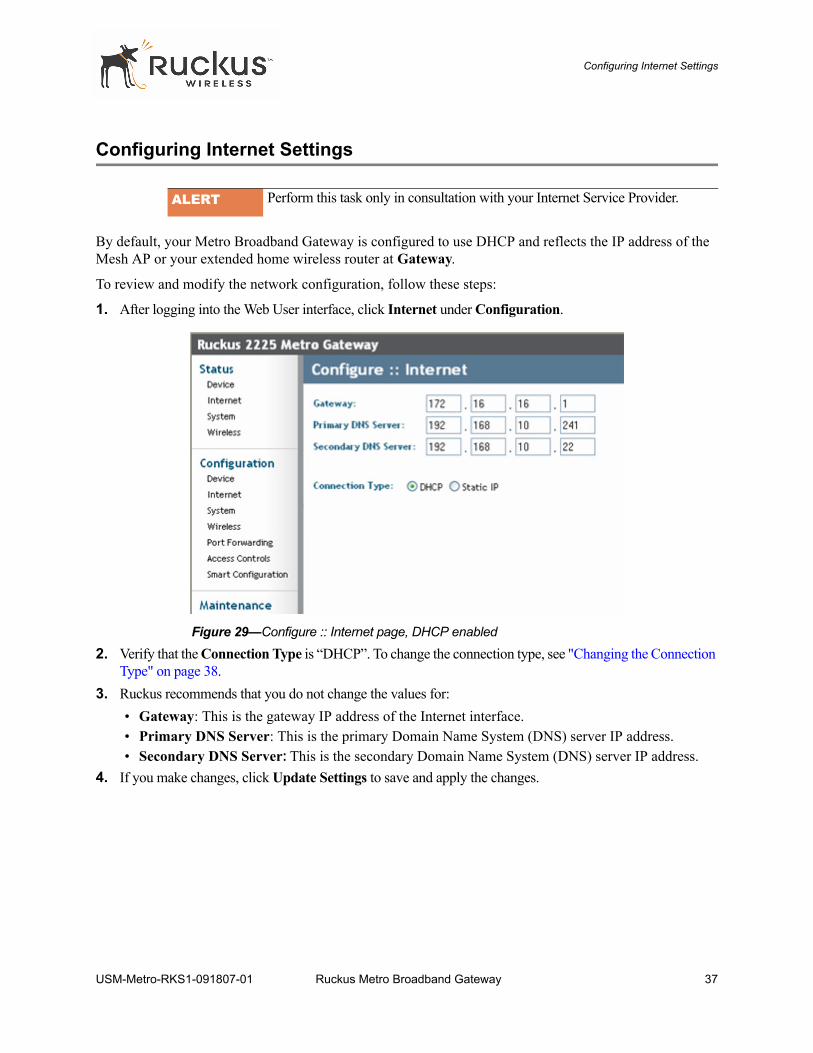
Configuring Internet Settings
By default, your Metro Broadband Gateway is configured to use DHCP and reflects the IP address of the Mesh AP or your extended home wireless router at Gateway.
To review and modify the network configuration, follow these steps:
1. After logging into the Web User interface, click Internet under Configuration.
Figure 29—Configure :: Internet page, DHCP enabled
2. Verify that the Connection Type is “DHCP”. To change the connection type, see "Changing the Connection Type" on page 38.
3. Ruckus recommends that you do not change the values for:• Gateway: This is the gateway IP address of the Internet interface.• Primary DNS Server: This is the primary Domain Name System (DNS) server IP address.• Secondary DNS Server: This is the secondary Domain Name System (DNS) server IP address.
4. If you make changes, click Update Settings to save and apply the changes.
ALERT Perform this task only in consultation with your Internet Service Provider.
USM-Metro-RKS1-091807-01 Ruckus Metro Broadband Gateway 37
Configuring Internet Settings
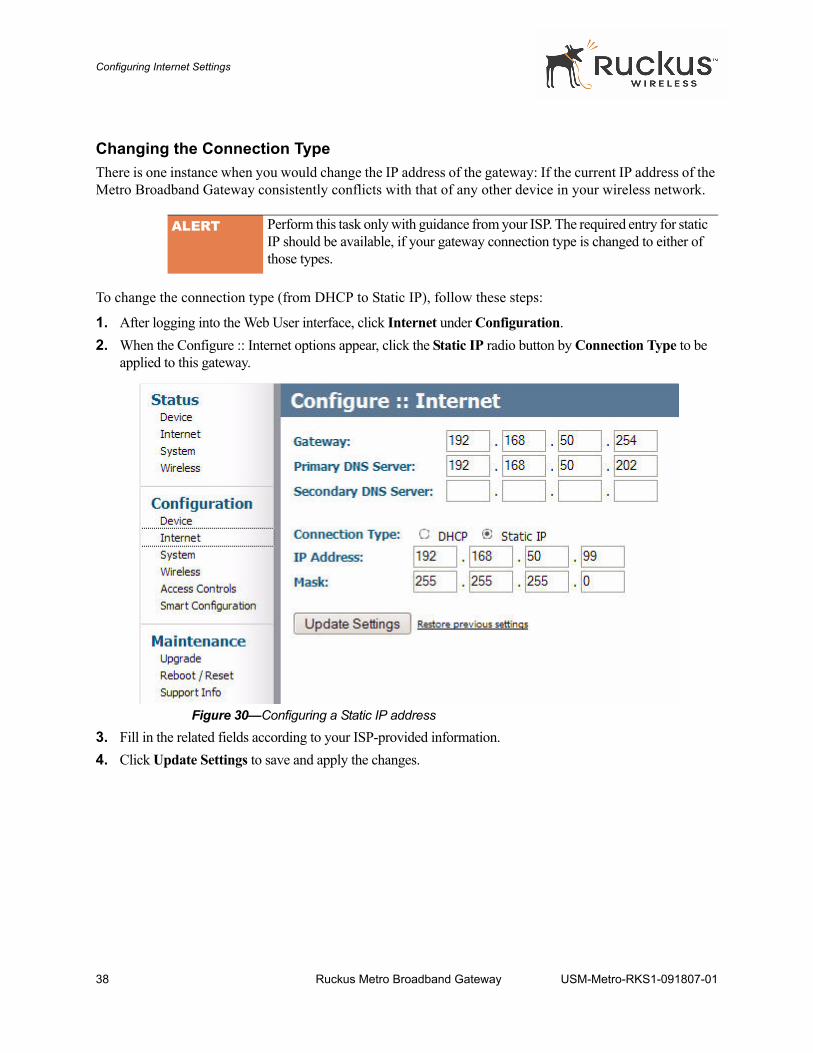
Changing the Connection Type There is one instance when you would change the IP address of the gateway: If the current IP address of the Metro Broadband Gateway consistently conflicts with that of any other device in your wireless network.
To change the connection type (from DHCP to Static IP), follow these steps:
1. After logging into the Web User interface, click Internet under Configuration.2. When the Configure :: Internet options appear, click the Static IP radio button by Connection Type to be
applied to this gateway.
Figure 30—Configuring a Static IP address
3. Fill in the related fields according to your ISP-provided information.4. Click Update Settings to save and apply the changes.
ALERT Perform this task only with guidance from your ISP. The required entry for static IP should be available, if your gateway connection type is changed to either of those types.
38 Ruckus Metro Broadband Gateway USM-Metro-RKS1-091807-01
Configuring System Settings
Configuring System Settings
This section describes the tasks and screens used to configure the Metro Broadband Gateway to run on your wireless network as a bridge or a router.
NOTE – If you used the wizard during initial login to configure your Metro Broadband Gateway, bridge or router mode has already been configured for you depending on your wizard selections.
Review the following topics before you change any system configuration settings:
• "Connecting to the Metro Broadband Gateway" on page 16• "Connect and Configure the Metro Broadband Gateway" on page 19.
Table 6, “Metro Broadband Gateway Default and User Settings Worksheet,” on page 27 shows the default settings used to login to the device.
The Configuration :: System window allows you to configure the system mode as either a router, a bridge, a repeater, or as an L2TP tunnel. In addition, this window allows you to configure IP address assignment.
• Router mode provides the capability to perform NAT (network address translation) of the traffic from the Internet (WAN Interface) to the local interface. Router mode allows home users to hide the privately assigned IP address from the Internet. Using Router mode, multiple devices can be connected behind the Metro Gateway.
• Bridge mode allows the Metro Broadband Gateway to act in Layer 2 (or bridge) mode. When Bridge mode is selected, the home PC will get the IP address from the upstream DHCP server, such as the DHCP server from the Metro ISP network.Using Bridge mode, all traffic behind the Metro Broadband Gateway will use the MAC address of the Metro Broadband Gateway to communicate with the Internet.
• Repeater mode enables the Metro Broadband Gateway to act as a repeater where there is only one SSID. Common usage is to repeat the signal from the DSL gateway or Cable modem to the repeater to extend effective coverage.
• Tunnel/L2TP mode allows a client’s MAC address to be exposed to the authentication server. This is often necessary in Metro Wi-Fi hotspots where authentication is required on a per-client basis.. To configure Tunnel/L2TP mode, see "Enabling an L2TP Connection" on page 42.
Perform the following steps to change the Metro Broadband Gateway to router or bridge mode, depending on your current configuration:
1. Connect to the Metro Broadband Gateway by following the instructions in "Connecting to the Metro Broadband Gateway" on page 16.
2. Choose Configuration :: System or Configuration :: Smart Configuration. For System configuration, go to Step 3. For Smart Configuration, see "Smart Configuration" on page 60.
USM-Metro-RKS1-091807-01 Ruckus Metro Broadband Gateway 39
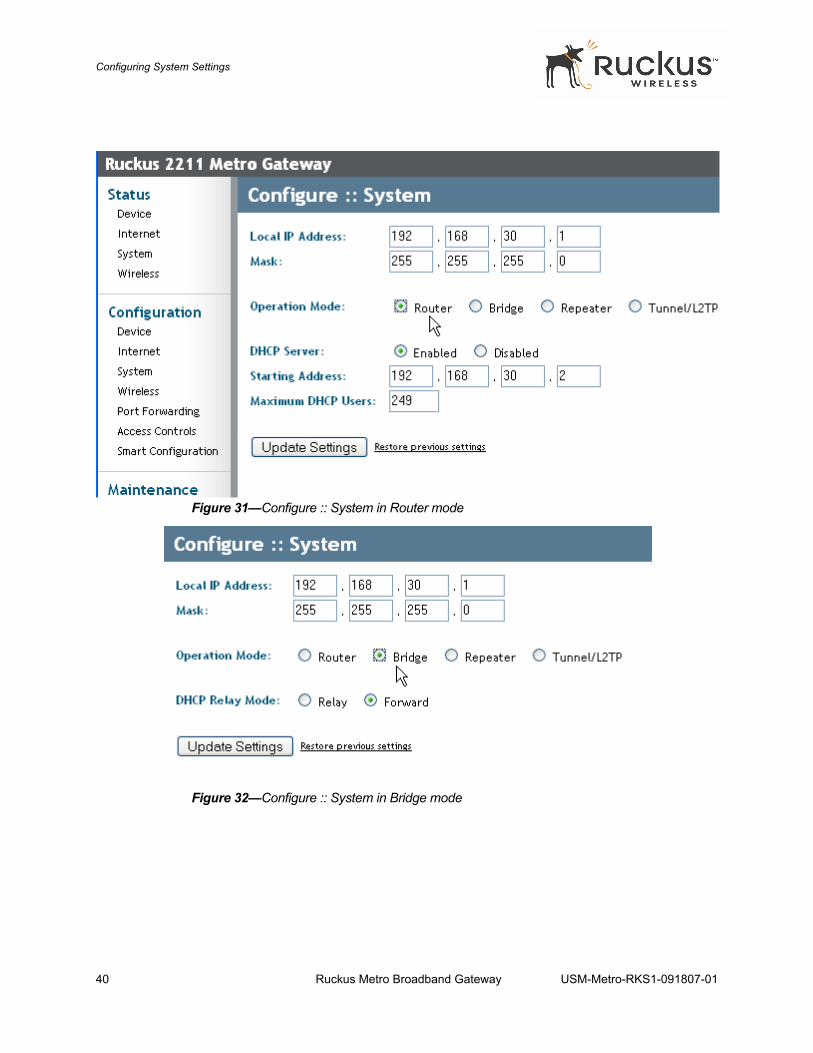
Configuring System Settings
Figure 31—Configure :: System in Router mode
Figure 32—Configure :: System in Bridge mode
40 Ruckus Metro Broadband Gateway USM-Metro-RKS1-091807-01
Configuring System Settings
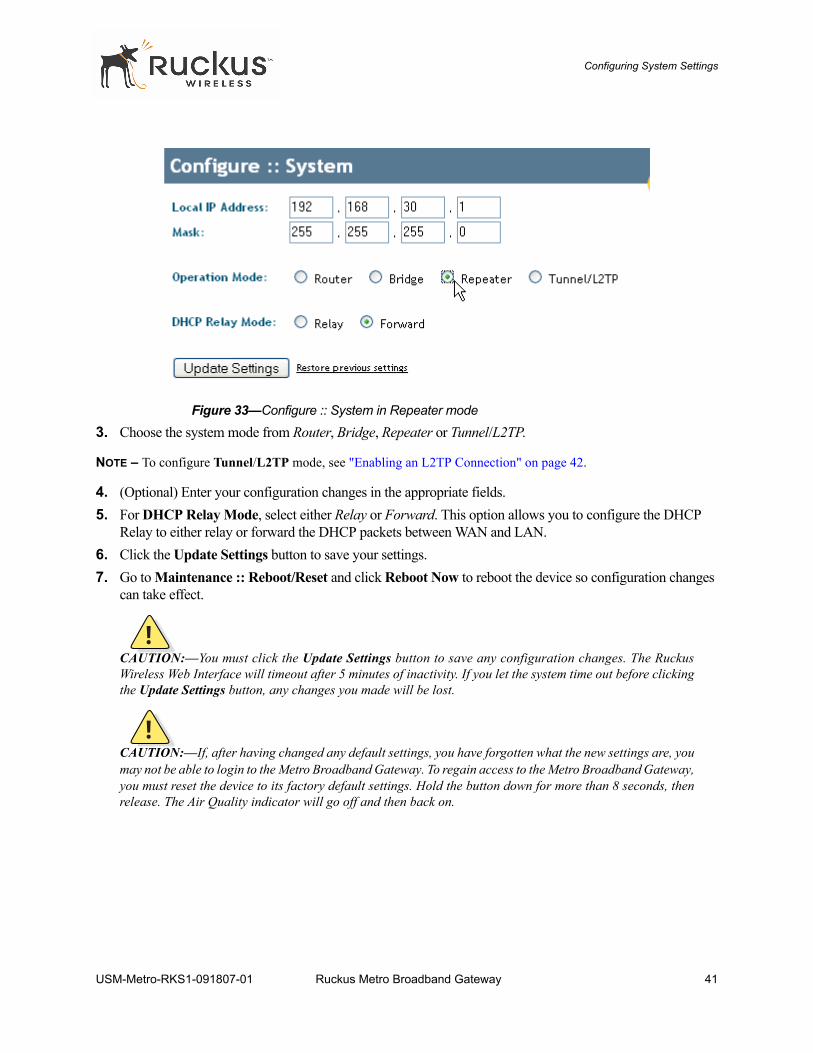
Figure 33—Configure :: System in Repeater mode
3. Choose the system mode from Router, Bridge, Repeater or Tunnel/L2TP.
NOTE – To configure Tunnel/L2TP mode, see "Enabling an L2TP Connection" on page 42.
4. (Optional) Enter your configuration changes in the appropriate fields.5. For DHCP Relay Mode, select either Relay or Forward. This option allows you to configure the DHCP
Relay to either relay or forward the DHCP packets between WAN and LAN.6. Click the Update Settings button to save your settings.7. Go to Maintenance :: Reboot/Reset and click Reboot Now to reboot the device so configuration changes
can take effect.
!CAUTION:—You must click the Update Settings button to save any configuration changes. The RuckusWireless Web Interface will timeout after 5 minutes of inactivity. If you let the system time out before clickingthe Update Settings button, any changes you made will be lost.
!CAUTION:—If, after having changed any default settings, you have forgotten what the new settings are, youmay not be able to login to the Metro Broadband Gateway. To regain access to the Metro Broadband Gateway,you must reset the device to its factory default settings. Hold the button down for more than 8 seconds, thenrelease. The Air Quality indicator will go off and then back on.
USM-Metro-RKS1-091807-01 Ruckus Metro Broadband Gateway 41
Configuring System Settings
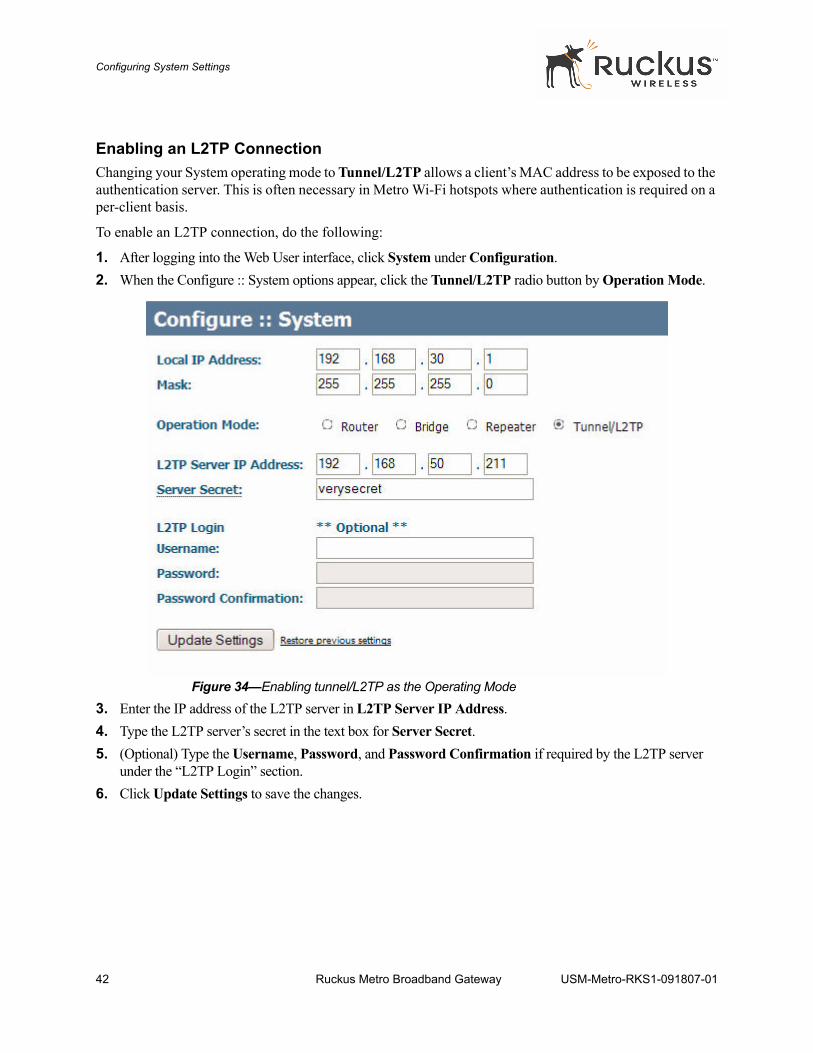
Enabling an L2TP ConnectionChanging your System operating mode to Tunnel/L2TP allows a client’s MAC address to be exposed to the authentication server. This is often necessary in Metro Wi-Fi hotspots where authentication is required on a per-client basis.
To enable an L2TP connection, do the following:
1. After logging into the Web User interface, click System under Configuration.2. When the Configure :: System options appear, click the Tunnel/L2TP radio button by Operation Mode.
Figure 34—Enabling tunnel/L2TP as the Operating Mode
3. Enter the IP address of the L2TP server in L2TP Server IP Address.4. Type the L2TP server’s secret in the text box for Server Secret.5. (Optional) Type the Username, Password, and Password Confirmation if required by the L2TP server
under the “L2TP Login” section.6. Click Update Settings to save the changes.
42 Ruckus Metro Broadband Gateway USM-Metro-RKS1-091807-01
Configuring Wireless Settings
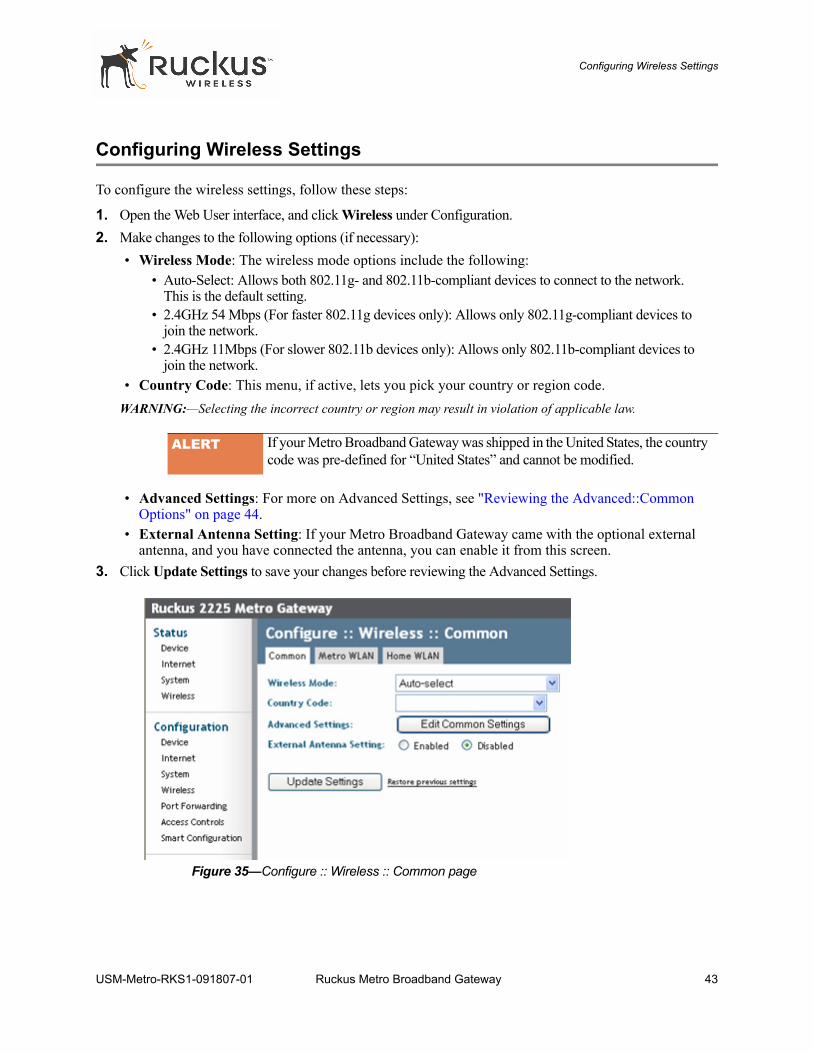
Configuring Wireless Settings
To configure the wireless settings, follow these steps:
1. Open the Web User interface, and click Wireless under Configuration.2. Make changes to the following options (if necessary):
• Wireless Mode: The wireless mode options include the following:• Auto-Select: Allows both 802.11g- and 802.11b-compliant devices to connect to the network.
This is the default setting.• 2.4GHz 54 Mbps (For faster 802.11g devices only): Allows only 802.11g-compliant devices to
join the network.• 2.4GHz 11Mbps (For slower 802.11b devices only): Allows only 802.11b-compliant devices to
join the network.• Country Code: This menu, if active, lets you pick your country or region code.
WARNING:—Selecting the incorrect country or region may result in violation of applicable law.
• Advanced Settings: For more on Advanced Settings, see "Reviewing the Advanced::Common Options" on page 44.
• External Antenna Setting: If your Metro Broadband Gateway came with the optional external antenna, and you have connected the antenna, you can enable it from this screen.
3. Click Update Settings to save your changes before reviewing the Advanced Settings.
Figure 35—Configure :: Wireless :: Common page
ALERT If your Metro Broadband Gateway was shipped in the United States, the country code was pre-defined for “United States” and cannot be modified.
USM-Metro-RKS1-091807-01 Ruckus Metro Broadband Gateway 43
Configuring Wireless Settings
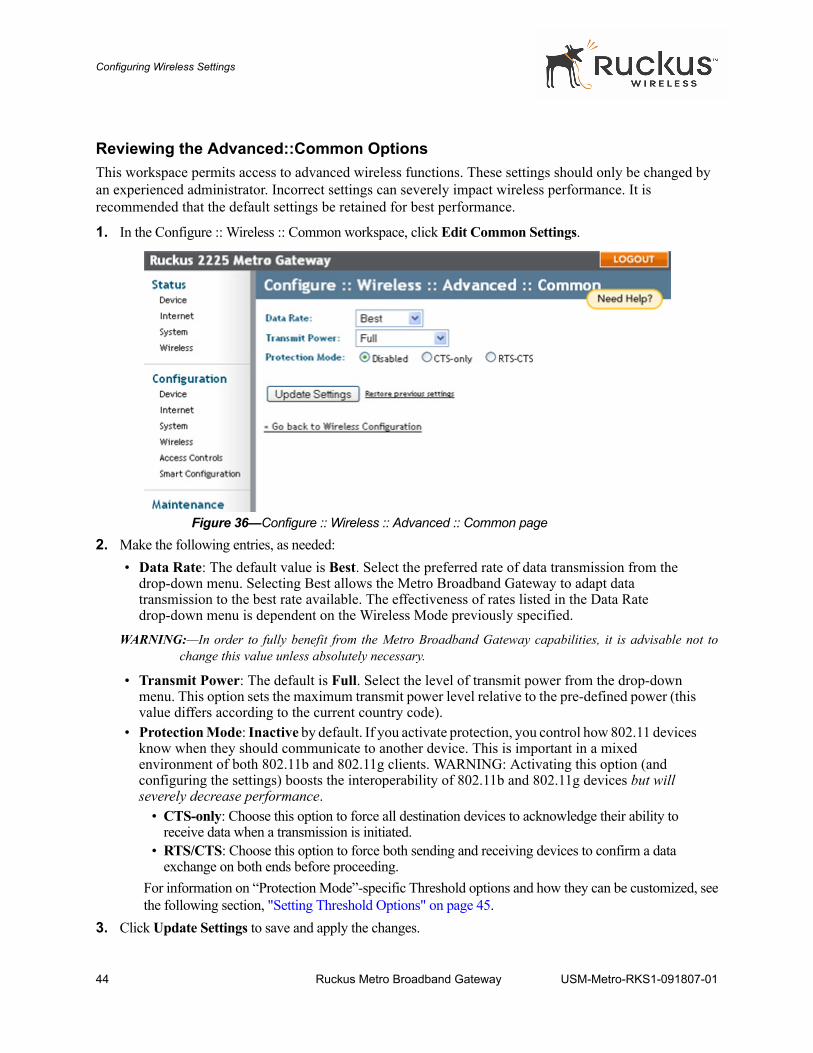
Reviewing the Advanced::Common OptionsThis workspace permits access to advanced wireless functions. These settings should only be changed by an experienced administrator. Incorrect settings can severely impact wireless performance. It is recommended that the default settings be retained for best performance.
1. In the Configure :: Wireless :: Common workspace, click Edit Common Settings.
Figure 36—Configure :: Wireless :: Advanced :: Common page
2. Make the following entries, as needed:• Data Rate: The default value is Best. Select the preferred rate of data transmission from the
drop-down menu. Selecting Best allows the Metro Broadband Gateway to adapt data transmission to the best rate available. The effectiveness of rates listed in the Data Rate drop-down menu is dependent on the Wireless Mode previously specified.
WARNING:—In order to fully benefit from the Metro Broadband Gateway capabilities, it is advisable not tochange this value unless absolutely necessary.
• Transmit Power: The default is Full. Select the level of transmit power from the drop-down menu. This option sets the maximum transmit power level relative to the pre-defined power (this value differs according to the current country code).
• Protection Mode: Inactive by default. If you activate protection, you control how 802.11 devices know when they should communicate to another device. This is important in a mixed environment of both 802.11b and 802.11g clients. WARNING: Activating this option (and configuring the settings) boosts the interoperability of 802.11b and 802.11g devices but will severely decrease performance.
• CTS-only: Choose this option to force all destination devices to acknowledge their ability to receive data when a transmission is initiated.
• RTS/CTS: Choose this option to force both sending and receiving devices to confirm a data exchange on both ends before proceeding.
For information on “Protection Mode”-specific Threshold options and how they can be customized, seethe following section, "Setting Threshold Options" on page 45.
3. Click Update Settings to save and apply the changes.
44 Ruckus Metro Broadband Gateway USM-Metro-RKS1-091807-01
Configuring Wireless Settings
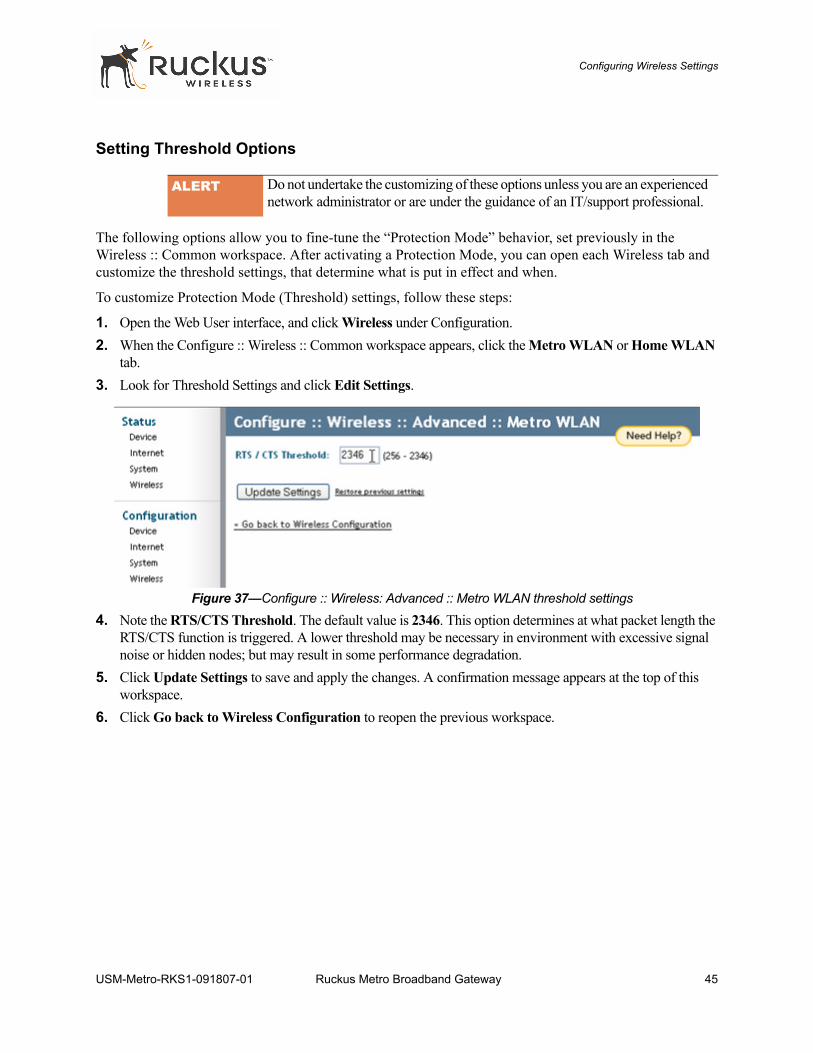
Setting Threshold Options
The following options allow you to fine-tune the “Protection Mode” behavior, set previously in the Wireless :: Common workspace. After activating a Protection Mode, you can open each Wireless tab and customize the threshold settings, that determine what is put in effect and when.
To customize Protection Mode (Threshold) settings, follow these steps:
1. Open the Web User interface, and click Wireless under Configuration.2. When the Configure :: Wireless :: Common workspace appears, click the Metro WLAN or Home WLAN
tab.3. Look for Threshold Settings and click Edit Settings.
Figure 37—Configure :: Wireless: Advanced :: Metro WLAN threshold settings
4. Note the RTS/CTS Threshold. The default value is 2346. This option determines at what packet length the RTS/CTS function is triggered. A lower threshold may be necessary in environment with excessive signal noise or hidden nodes; but may result in some performance degradation.
5. Click Update Settings to save and apply the changes. A confirmation message appears at the top of this workspace.
6. Click Go back to Wireless Configuration to reopen the previous workspace.
ALERT Do not undertake the customizing of these options unless you are an experienced network administrator or are under the guidance of an IT/support professional.
USM-Metro-RKS1-091807-01 Ruckus Metro Broadband Gateway 45
Customizing Metro WLAN or Home WLAN Settings
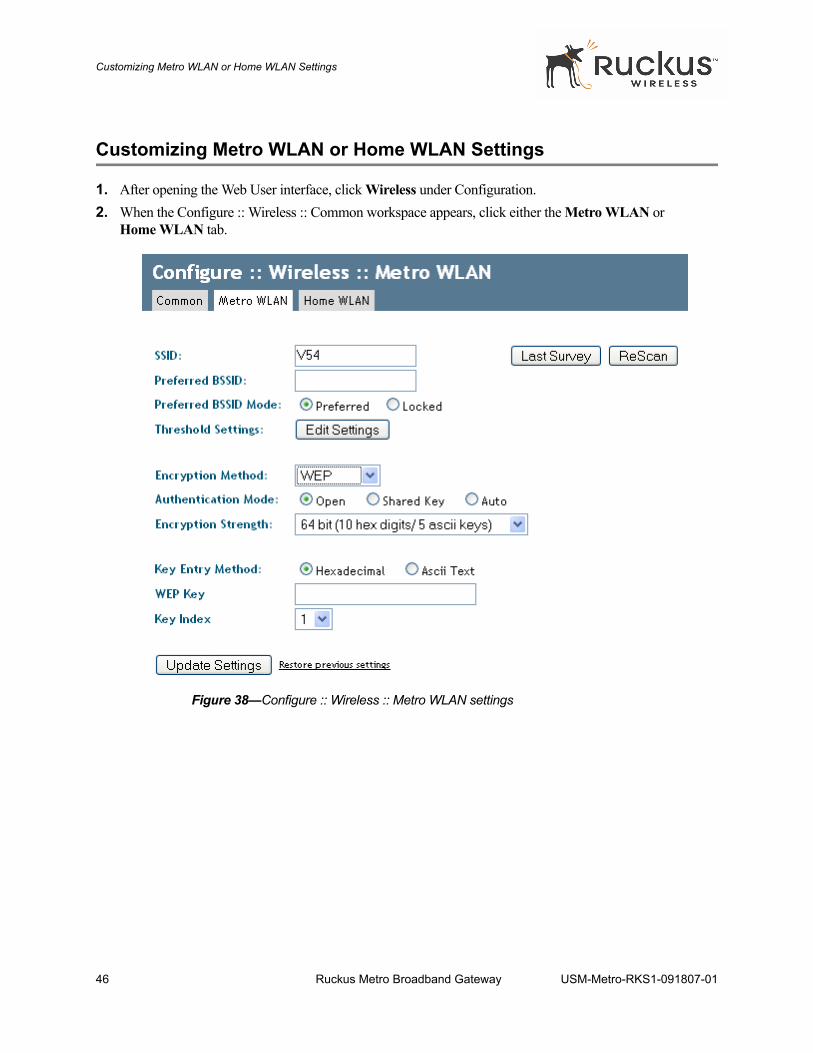
Customizing Metro WLAN or Home WLAN Settings
1. After opening the Web User interface, click Wireless under Configuration.2. When the Configure :: Wireless :: Common workspace appears, click either the Metro WLAN or
Home WLAN tab.
Figure 38—Configure :: Wireless :: Metro WLAN settings
46 Ruckus Metro Broadband Gateway USM-Metro-RKS1-091807-01
Customizing Metro WLAN or Home WLAN Settings
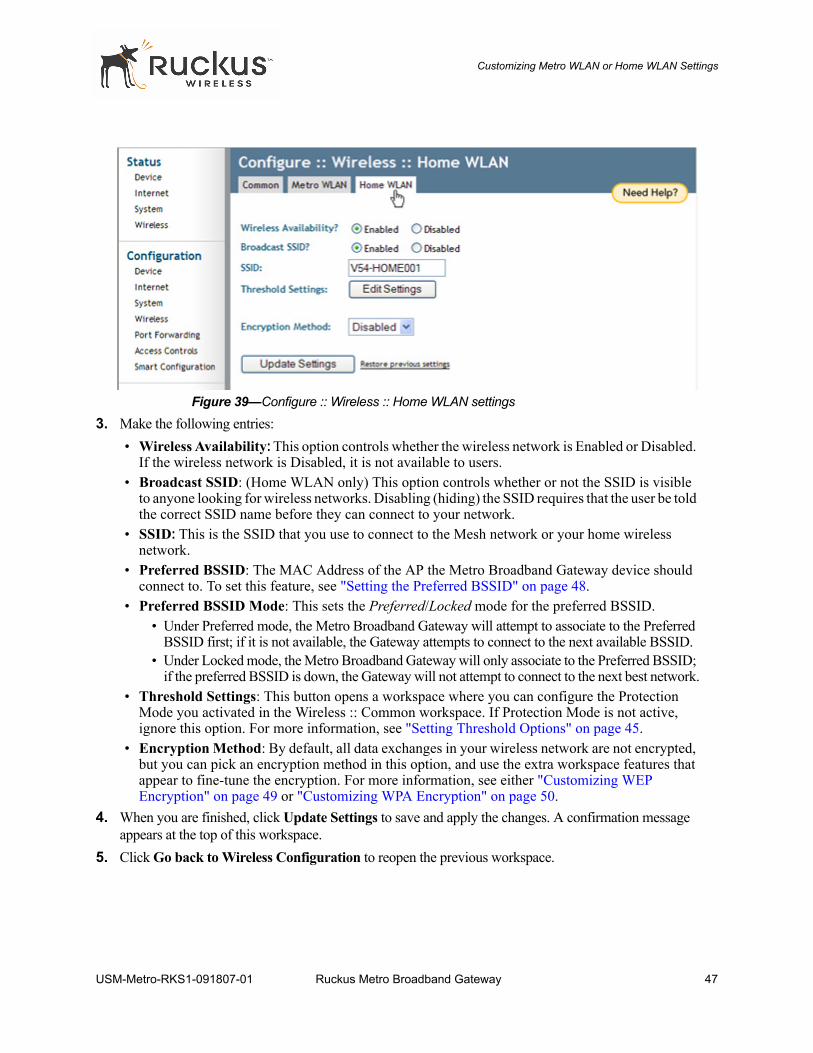
Figure 39—Configure :: Wireless :: Home WLAN settings
3. Make the following entries:• Wireless Availability: This option controls whether the wireless network is Enabled or Disabled.
If the wireless network is Disabled, it is not available to users.• Broadcast SSID: (Home WLAN only) This option controls whether or not the SSID is visible
to anyone looking for wireless networks. Disabling (hiding) the SSID requires that the user be told the correct SSID name before they can connect to your network.
• SSID: This is the SSID that you use to connect to the Mesh network or your home wireless network.
• Preferred BSSID: The MAC Address of the AP the Metro Broadband Gateway device should connect to. To set this feature, see "Setting the Preferred BSSID" on page 48.
• Preferred BSSID Mode: This sets the Preferred/Locked mode for the preferred BSSID. • Under Preferred mode, the Metro Broadband Gateway will attempt to associate to the Preferred
BSSID first; if it is not available, the Gateway attempts to connect to the next available BSSID. • Under Locked mode, the Metro Broadband Gateway will only associate to the Preferred BSSID;
if the preferred BSSID is down, the Gateway will not attempt to connect to the next best network.• Threshold Settings: This button opens a workspace where you can configure the Protection
Mode you activated in the Wireless :: Common workspace. If Protection Mode is not active, ignore this option. For more information, see "Setting Threshold Options" on page 45.
• Encryption Method: By default, all data exchanges in your wireless network are not encrypted, but you can pick an encryption method in this option, and use the extra workspace features that appear to fine-tune the encryption. For more information, see either "Customizing WEP Encryption" on page 49 or "Customizing WPA Encryption" on page 50.
4. When you are finished, click Update Settings to save and apply the changes. A confirmation message appears at the top of this workspace.
5. Click Go back to Wireless Configuration to reopen the previous workspace.
USM-Metro-RKS1-091807-01 Ruckus Metro Broadband Gateway 47
Customizing Metro WLAN or Home WLAN Settings
Setting the Preferred BSSIDTo set the Preferred BSSID, do the following:
1. From the Metro WLAN tab view, click Rescan or Last Survey.2. From the “Site Survey” table, click the BSSID MAC address link of the preferred network. You are returned
to the Metro WLAN tab view and the Preferred BSSID field is populated with the selected MAC address.3. To change the Preferred BSSID Mode, select either Preferred (default) or Locked.4. Click Update Settings to save this configuration.
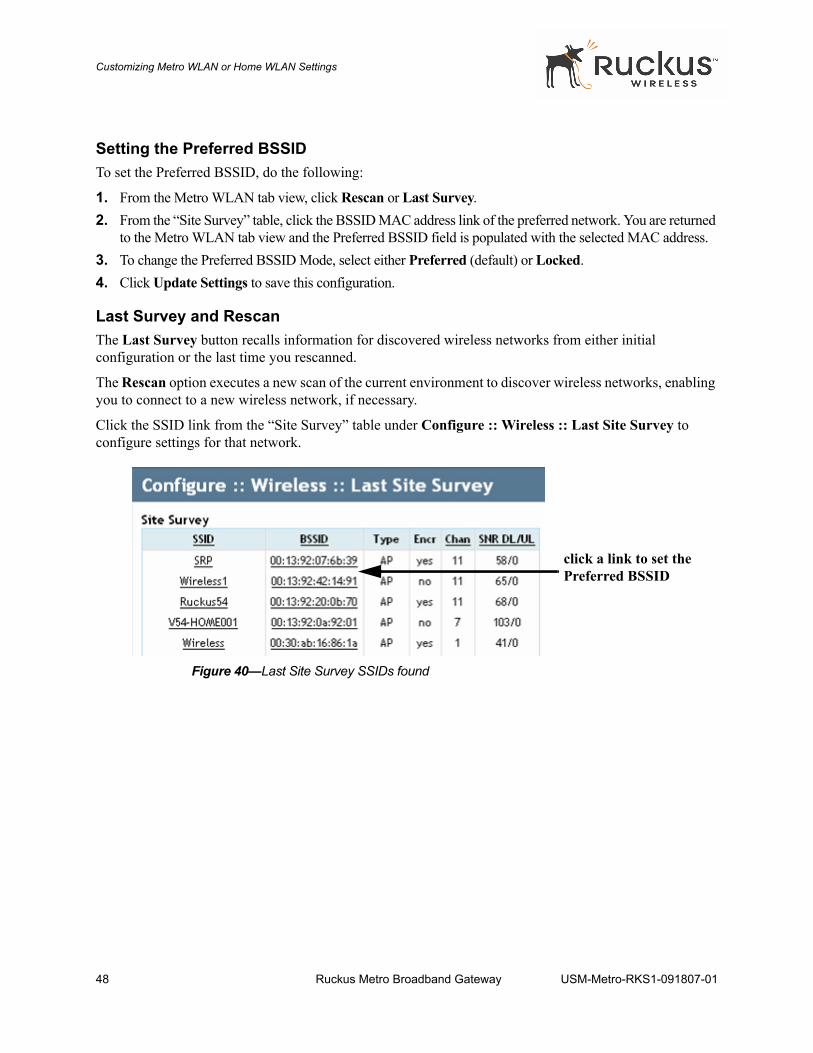
Last Survey and RescanThe Last Survey button recalls information for discovered wireless networks from either initial configuration or the last time you rescanned.
The Rescan option executes a new scan of the current environment to discover wireless networks, enabling you to connect to a new wireless network, if necessary.
Click the SSID link from the “Site Survey” table under Configure :: Wireless :: Last Site Survey to configure settings for that network.
Figure 40—Last Site Survey SSIDs found
click a link to set the Preferred BSSID
48 Ruckus Metro Broadband Gateway USM-Metro-RKS1-091807-01
Customizing Metro WLAN or Home WLAN Settings
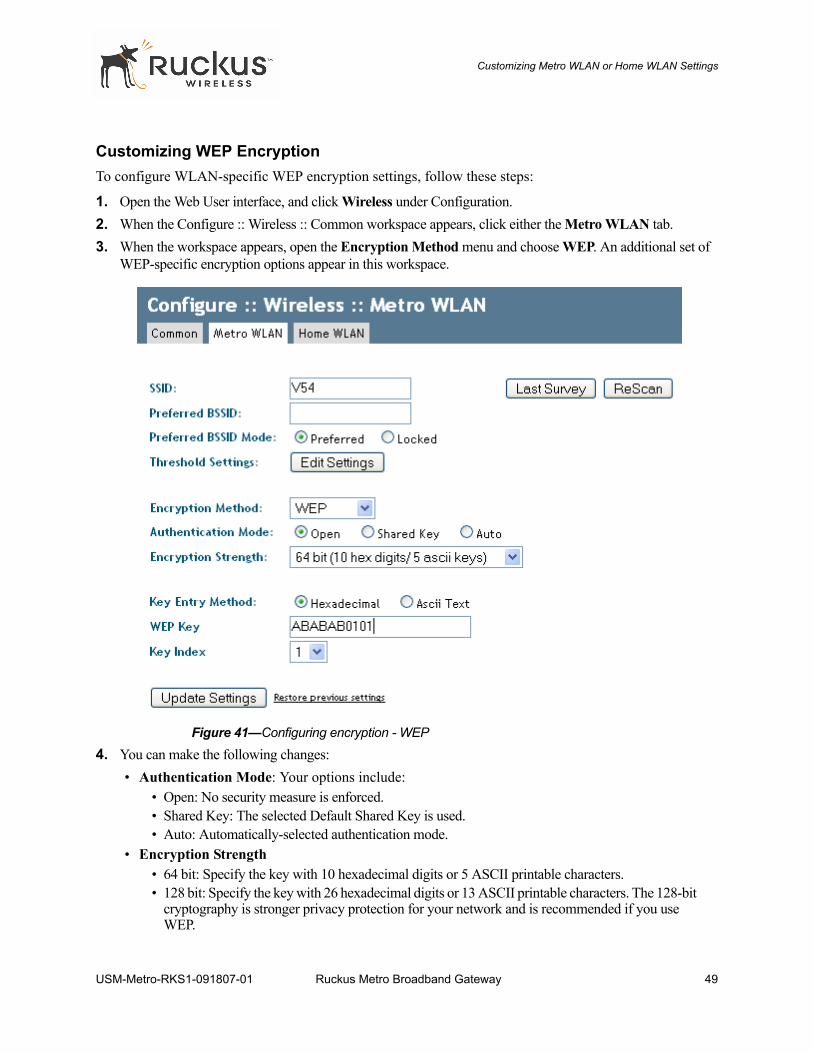
Customizing WEP EncryptionTo configure WLAN-specific WEP encryption settings, follow these steps:
1. Open the Web User interface, and click Wireless under Configuration.2. When the Configure :: Wireless :: Common workspace appears, click either the Metro WLAN tab.3. When the workspace appears, open the Encryption Method menu and choose WEP. An additional set of
WEP-specific encryption options appear in this workspace.
Figure 41—Configuring encryption - WEP
4. You can make the following changes:• Authentication Mode: Your options include:
• Open: No security measure is enforced.• Shared Key: The selected Default Shared Key is used.• Auto: Automatically-selected authentication mode.
• Encryption Strength• 64 bit: Specify the key with 10 hexadecimal digits or 5 ASCII printable characters. • 128 bit: Specify the key with 26 hexadecimal digits or 13 ASCII printable characters. The 128-bit
cryptography is stronger privacy protection for your network and is recommended if you use WEP.
USM-Metro-RKS1-091807-01 Ruckus Metro Broadband Gateway 49
Customizing Metro WLAN or Home WLAN Settings
• Key Entry Method• Hexadecimal: The encryption key only accepts hexadecimal characters (0-9, A-F). • ASCII Text: The encryption key accepts ASCII printable characters.
• Passphrase: This assists in automatic key generation. Enter some text and click the Generate button. The system will generate the WEP key automatically. You may specify a passphrase up to 32 characters. Please note that the algorithm used for key generation may vary from system to system. Checking the WEP keys used between wireless stations and the Metro Broadband Gateway is recommended.
• WEP Key: Enter the key manually according to the Key Entry Method and Encryption Strength settings.
• Key Index: Choose the index, from “1” to “4”, that the WEP key is to be stored in.5. Click Update Settings to save and apply the changes. A confirmation message appears at the top of this
workspace. 6. Click Go back to Wireless Configuration to reopen the previous workspace.
Customizing WPA Encryption
When WPA-Auto is selected, the wireless client decides the version of WPA will be used.• WPA is the recommended default compatibility-wise. Wi-Fi WPA-capable PDAs and other
gadgets are usually limited to WPA + TKIP. • WPA2 is an advanced option. WPA2 support on Windows requires a Microsoft patch and is only
available on Windows XP with Service pack 2 or later.• WPA-Auto is an advanced option. Only the best WPA 802.11i-conforming/Wi-Fi WPA-certified
client devices can operate in this mode.Use of WPA PSK allows automatic key generation based on a single passphrase. WPA-PSK provides very strong security, but may not be supported on older wireless devices. In some cases, the older devices can be upgraded with adapters to take advantage of WPA-PSK.
If you configure the Metro Broadband Gateway with WPA-PSK, some devices will not be able to connect to your WLAN unless the devices are manually set to WPA-PSK and configured with the same passphrase.
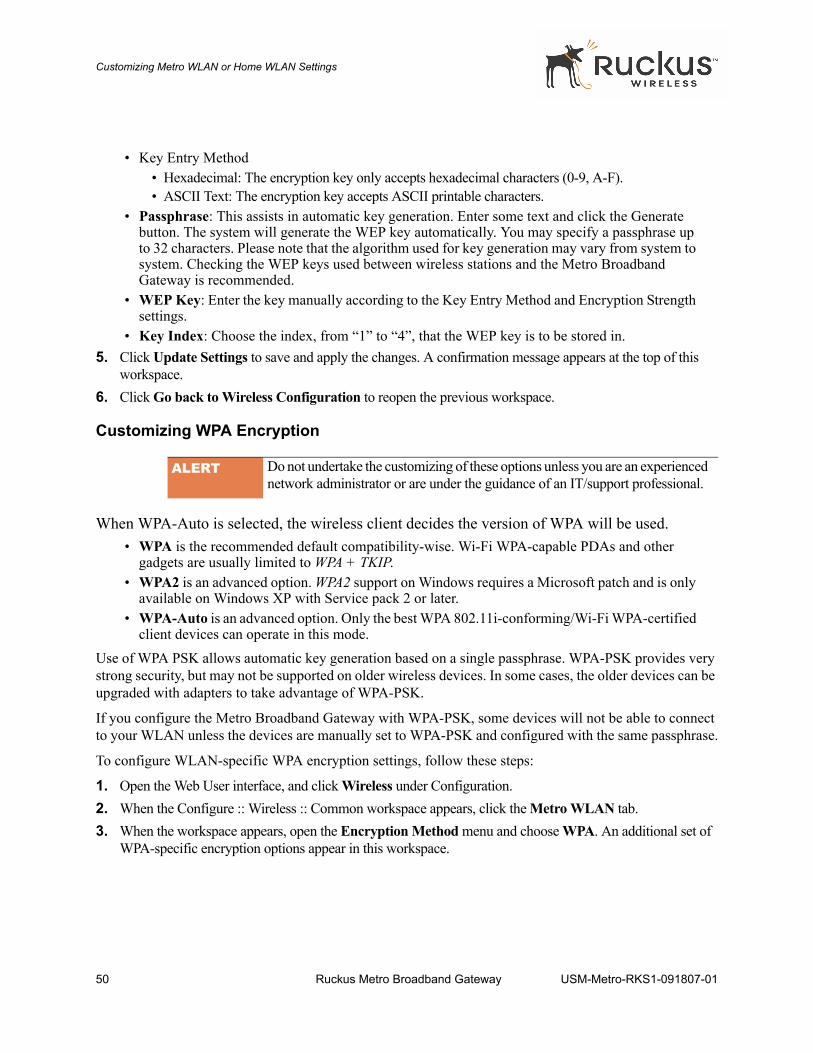
To configure WLAN-specific WPA encryption settings, follow these steps:
1. Open the Web User interface, and click Wireless under Configuration.2. When the Configure :: Wireless :: Common workspace appears, click the Metro WLAN tab.3. When the workspace appears, open the Encryption Method menu and choose WPA. An additional set of
WPA-specific encryption options appear in this workspace.
ALERT Do not undertake the customizing of these options unless you are an experienced network administrator or are under the guidance of an IT/support professional.
50 Ruckus Metro Broadband Gateway USM-Metro-RKS1-091807-01
Customizing Metro WLAN or Home WLAN Settings
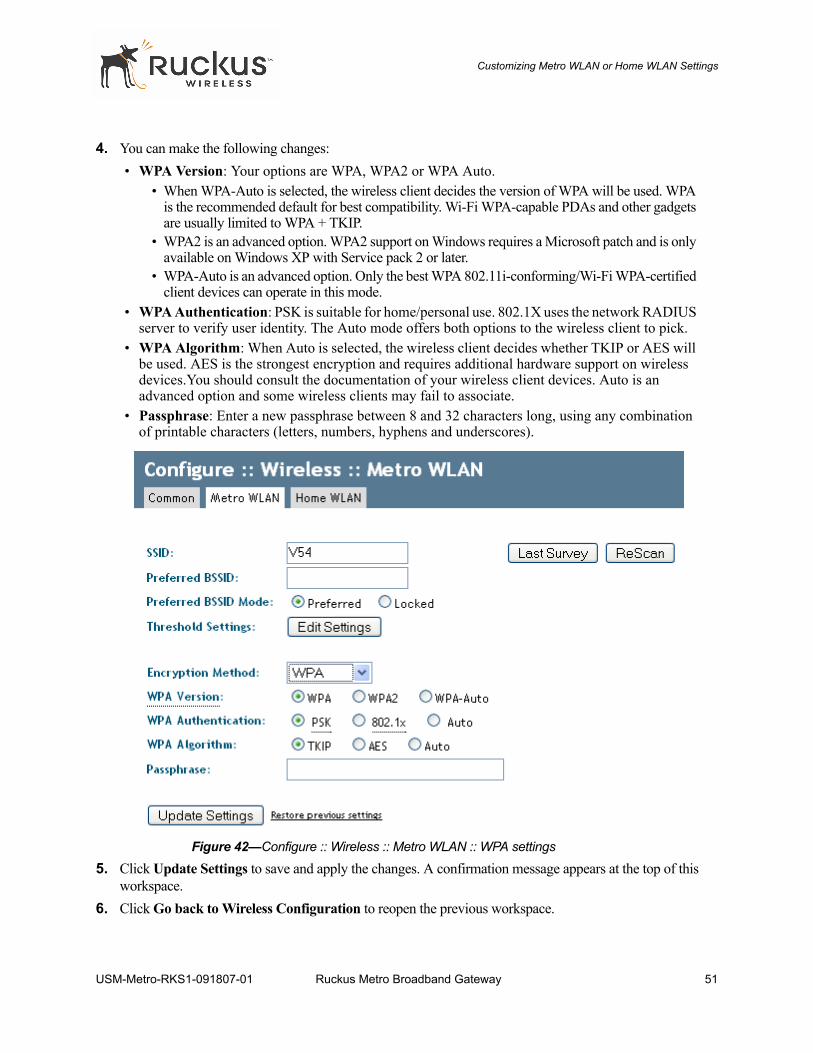
4. You can make the following changes:• WPA Version: Your options are WPA, WPA2 or WPA Auto.
• When WPA-Auto is selected, the wireless client decides the version of WPA will be used. WPA is the recommended default for best compatibility. Wi-Fi WPA-capable PDAs and other gadgets are usually limited to WPA + TKIP.
• WPA2 is an advanced option. WPA2 support on Windows requires a Microsoft patch and is only available on Windows XP with Service pack 2 or later.
• WPA-Auto is an advanced option. Only the best WPA 802.11i-conforming/Wi-Fi WPA-certified client devices can operate in this mode.
• WPA Authentication: PSK is suitable for home/personal use. 802.1X uses the network RADIUS server to verify user identity. The Auto mode offers both options to the wireless client to pick.
• WPA Algorithm: When Auto is selected, the wireless client decides whether TKIP or AES will be used. AES is the strongest encryption and requires additional hardware support on wireless devices.You should consult the documentation of your wireless client devices. Auto is an advanced option and some wireless clients may fail to associate.
• Passphrase: Enter a new passphrase between 8 and 32 characters long, using any combination of printable characters (letters, numbers, hyphens and underscores).
Figure 42—Configure :: Wireless :: Metro WLAN :: WPA settings
5. Click Update Settings to save and apply the changes. A confirmation message appears at the top of this workspace.
6. Click Go back to Wireless Configuration to reopen the previous workspace.
USM-Metro-RKS1-091807-01 Ruckus Metro Broadband Gateway 51
Customizing Metro WLAN or Home WLAN Settings
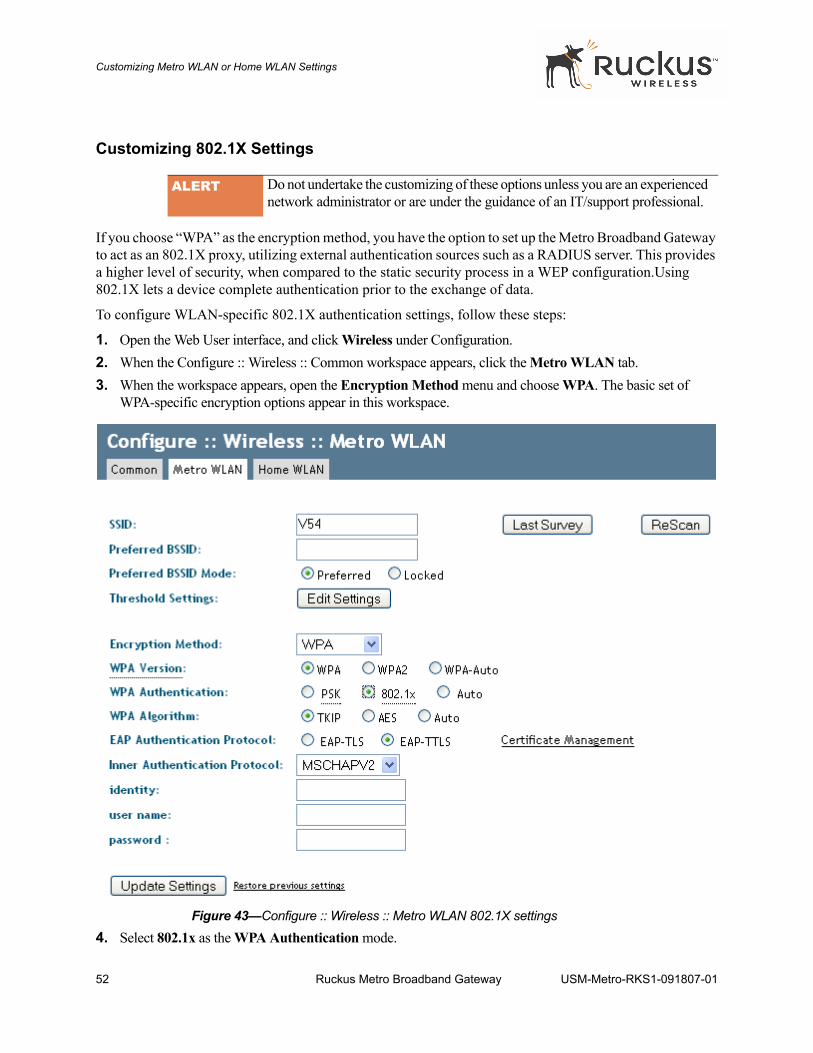
Customizing 802.1X Settings
If you choose “WPA” as the encryption method, you have the option to set up the Metro Broadband Gateway to act as an 802.1X proxy, utilizing external authentication sources such as a RADIUS server. This provides a higher level of security, when compared to the static security process in a WEP configuration.Using 802.1X lets a device complete authentication prior to the exchange of data.
To configure WLAN-specific 802.1X authentication settings, follow these steps:
1. Open the Web User interface, and click Wireless under Configuration.2. When the Configure :: Wireless :: Common workspace appears, click the Metro WLAN tab.3. When the workspace appears, open the Encryption Method menu and choose WPA. The basic set of
WPA-specific encryption options appear in this workspace.
Figure 43—Configure :: Wireless :: Metro WLAN 802.1X settings
4. Select 802.1x as the WPA Authentication mode.
ALERT Do not undertake the customizing of these options unless you are an experienced network administrator or are under the guidance of an IT/support professional.
52 Ruckus Metro Broadband Gateway USM-Metro-RKS1-091807-01
Customizing Metro WLAN or Home WLAN Settings
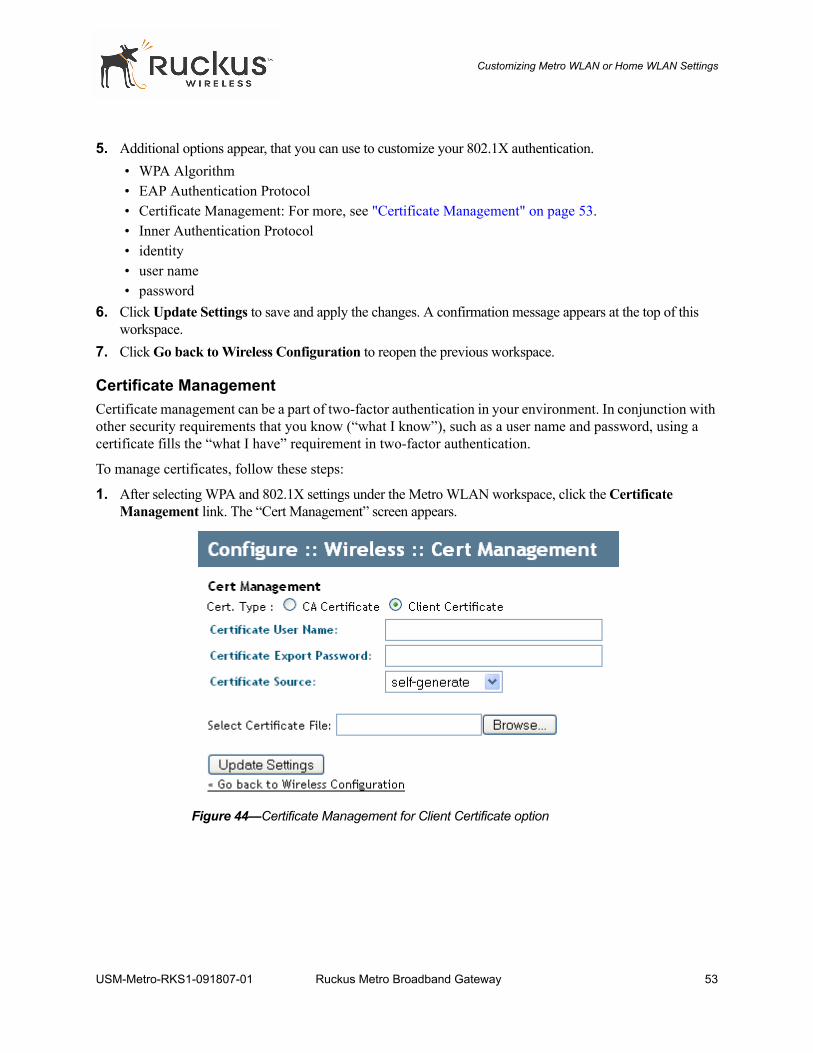
5. Additional options appear, that you can use to customize your 802.1X authentication.• WPA Algorithm• EAP Authentication Protocol• Certificate Management: For more, see "Certificate Management" on page 53.• Inner Authentication Protocol• identity• user name• password
6. Click Update Settings to save and apply the changes. A confirmation message appears at the top of this workspace.
7. Click Go back to Wireless Configuration to reopen the previous workspace.
Certificate ManagementCertificate management can be a part of two-factor authentication in your environment. In conjunction with other security requirements that you know (“what I know”), such as a user name and password, using a certificate fills the “what I have” requirement in two-factor authentication.
To manage certificates, follow these steps:
1. After selecting WPA and 802.1X settings under the Metro WLAN workspace, click the Certificate Management link. The “Cert Management” screen appears.
Figure 44—Certificate Management for Client Certificate option
USM-Metro-RKS1-091807-01 Ruckus Metro Broadband Gateway 53
Customizing Metro WLAN or Home WLAN Settings
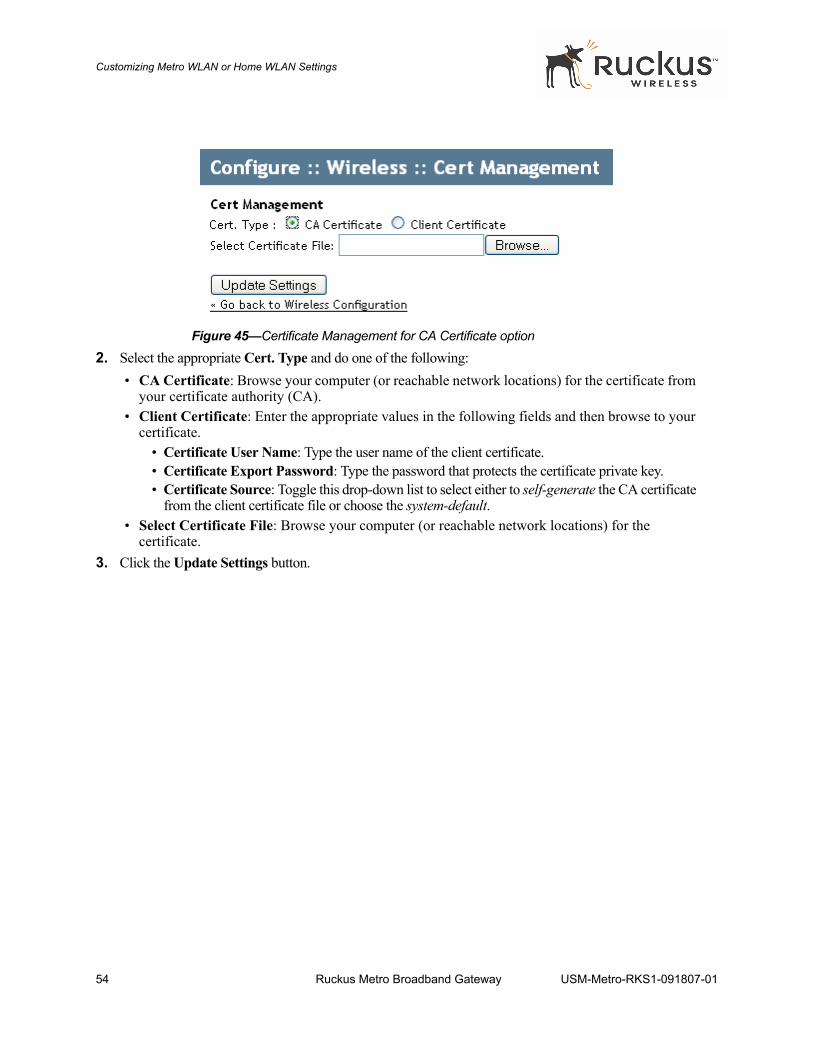
Figure 45—Certificate Management for CA Certificate option
2. Select the appropriate Cert. Type and do one of the following:• CA Certificate: Browse your computer (or reachable network locations) for the certificate from
your certificate authority (CA).• Client Certificate: Enter the appropriate values in the following fields and then browse to your
certificate.• Certificate User Name: Type the user name of the client certificate.• Certificate Export Password: Type the password that protects the certificate private key.• Certificate Source: Toggle this drop-down list to select either to self-generate the CA certificate
from the client certificate file or choose the system-default.• Select Certificate File: Browse your computer (or reachable network locations) for the
certificate.3. Click the Update Settings button.
54 Ruckus Metro Broadband Gateway USM-Metro-RKS1-091807-01
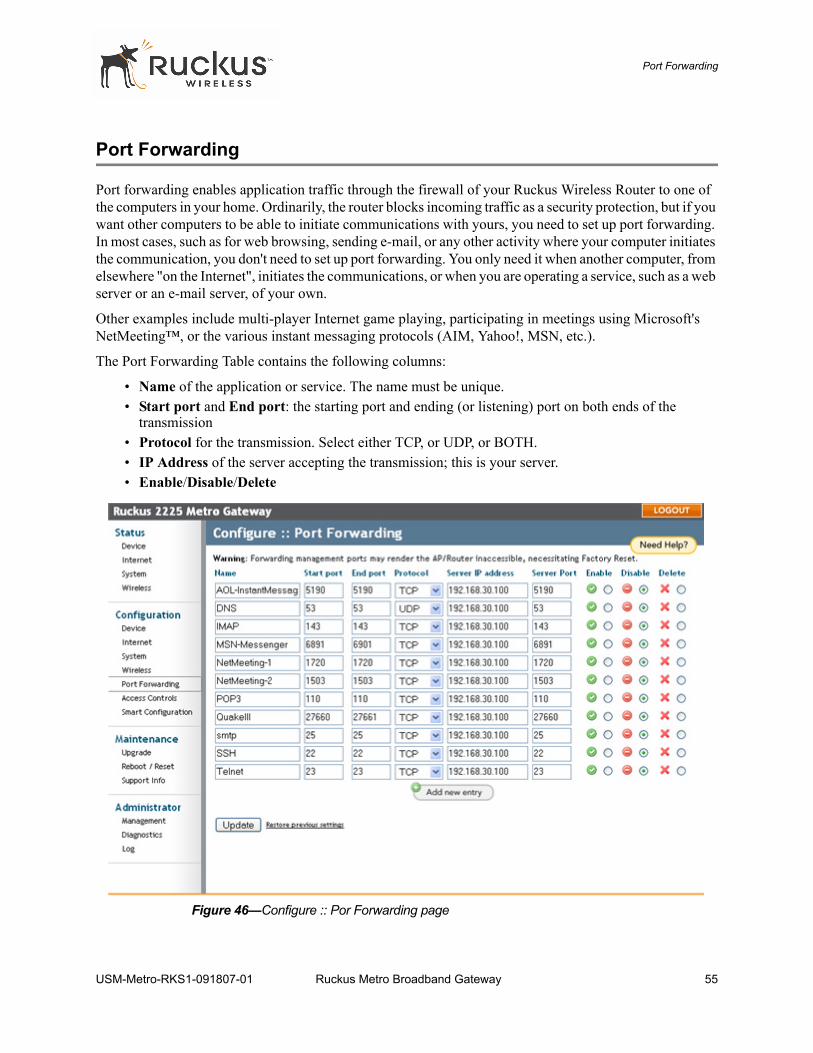
Port Forwarding
Port Forwarding
Port forwarding enables application traffic through the firewall of your Ruckus Wireless Router to one of the computers in your home. Ordinarily, the router blocks incoming traffic as a security protection, but if you want other computers to be able to initiate communications with yours, you need to set up port forwarding. In most cases, such as for web browsing, sending e-mail, or any other activity where your computer initiates the communication, you don't need to set up port forwarding. You only need it when another computer, from elsewhere "on the Internet", initiates the communications, or when you are operating a service, such as a web server or an e-mail server, of your own.
Other examples include multi-player Internet game playing, participating in meetings using Microsoft's NetMeeting™, or the various instant messaging protocols (AIM, Yahoo!, MSN, etc.).
The Port Forwarding Table contains the following columns:
• Name of the application or service. The name must be unique.• Start port and End port: the starting port and ending (or listening) port on both ends of the
transmission• Protocol for the transmission. Select either TCP, or UDP, or BOTH.• IP Address of the server accepting the transmission; this is your server.• Enable/Disable/Delete
Figure 46—Configure :: Por Forwarding page
USM-Metro-RKS1-091807-01 Ruckus Metro Broadband Gateway 55
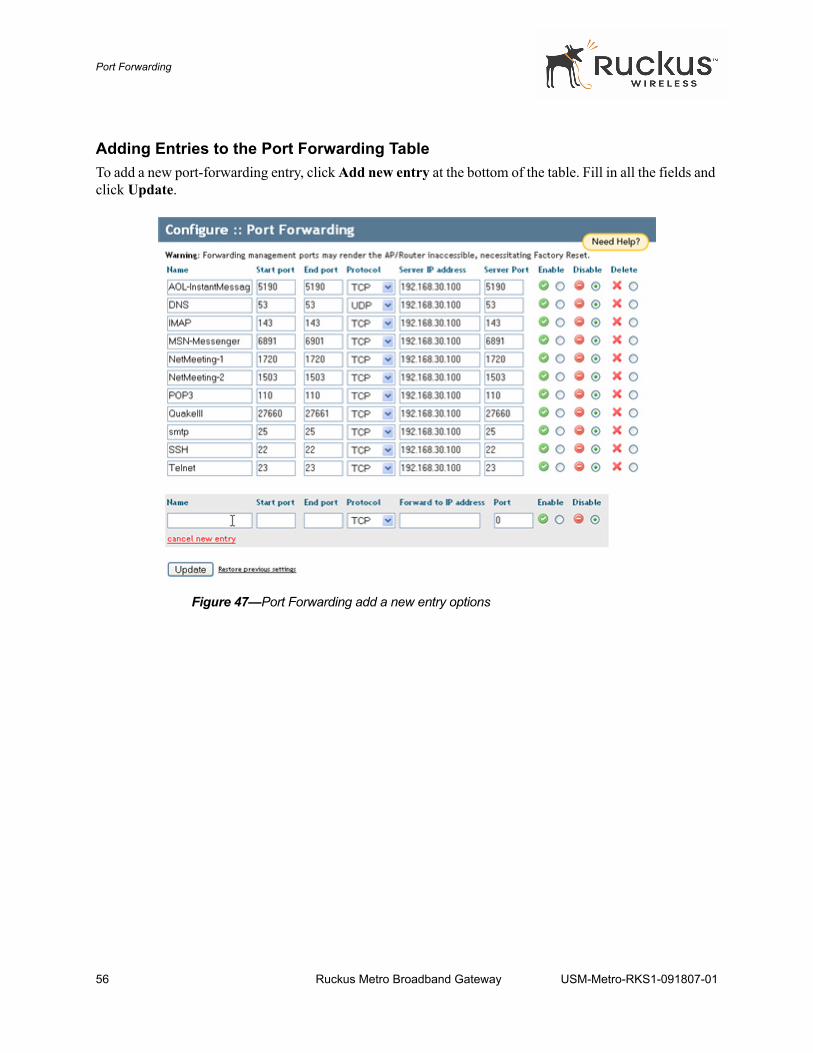
Port Forwarding
Adding Entries to the Port Forwarding TableTo add a new port-forwarding entry, click Add new entry at the bottom of the table. Fill in all the fields and click Update.
Figure 47—Port Forwarding add a new entry options
56 Ruckus Metro Broadband Gateway USM-Metro-RKS1-091807-01

Access Controls
Access Controls
Access Controls give you control over which stations are allowed to join (associate with) your WLAN networks.
Figure 48—Configuring Access Controls main page
Access Controls Options
Disabling WLAN access restrictions
If you select "Disable WLAN access restrictions", then MAC-address-based restrictions on which stations can join the WLAN are disabled; thus, any station can join. If the WLAN uses encryption, then the station must still supply the correct encryption pass-phrase.
The Access Controls table is hidden if the current mode is "Disable WLAN access restrictions".
Allowing only stations explicitly listed in the Access Controls Table
If you select "Allow only stations listed in the Access Controls Table", then stations entered into the access-controls table are allowed but all others are disallowed. To add MAC addresses, see "Changing Access Controls" on page 58.
Denying only stations explicitly listed in the Access Controls Table
If you select "Deny only stations listed in the Access Controls Table", then stations entered into the access-controls table are disallowed but all others are allowed. To add MAC addresses, see "Changing Access Controls" on page 58.
USM-Metro-RKS1-091807-01 Ruckus Metro Broadband Gateway 57
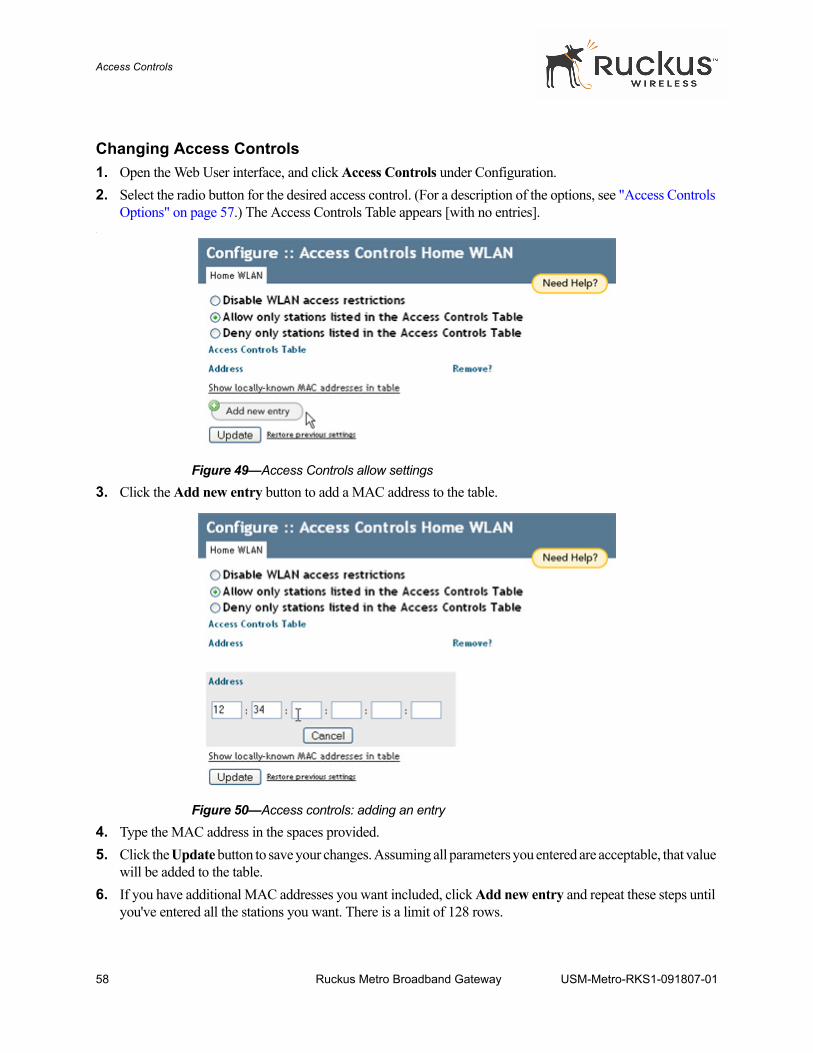
Access Controls
Changing Access Controls1. Open the Web User interface, and click Access Controls under Configuration.2. Select the radio button for the desired access control. (For a description of the options, see "Access Controls
Options" on page 57.) The Access Controls Table appears [with no entries]..
Figure 49—Access Controls allow settings
3. Click the Add new entry button to add a MAC address to the table.
Figure 50—Access controls: adding an entry
4. Type the MAC address in the spaces provided.5. Click the Update button to save your changes. Assuming all parameters you entered are acceptable, that value
will be added to the table. 6. If you have additional MAC addresses you want included, click Add new entry and repeat these steps until
you've entered all the stations you want. There is a limit of 128 rows.
58 Ruckus Metro Broadband Gateway USM-Metro-RKS1-091807-01
Access Controls
Access Control Table ColumnsThe Access Control Table, as seen in Figure 49 and Figure 50, contains the following columns:
• Address: Six text boxes appear in which you enter the desired MAC address in hexadecimal digit form, two characters in each box. You can specify a full 12-hex-digit MAC address or enter "wildcard" characters for "don't care" digits. Allowable hex-digit characters are 0-9, a-f, and A-F. Most address-tags and software where you find MAC addresses listed include colons or dashes to separate the address-pairs; that is provided for you on the page, so do not enter the colons or dashes. The wildcard characters are "x", "X" and blank (space character). Wildcards are useful when you want to specify all MAC addresses from a given manufacturer. Thus for example, by specifying only the Organizationally Unique Identifier (the first six hexadecimal digits of any MAC address from that manufacturer is its OUI) saves you having to enter all 24 million of them (the table size is limited in the AP/Router to 128 entries). Some manufacturers produce devices using more than one OUI, in which case you may need to enter each applicable one.
• Remove: Check the 'Remove' box for any row(s) you no longer want used.
Removing MAC Addresses from a ListSimply check the box under the Remove column for the MAC address entry(ies) you want to remove from the table and click Update.
Showing/Hiding Locally Known MAC AddressesThe AP/Router "knows" the MAC addresses of devices in the local network and this information can be shown by clicking the "Show locally-known MAC addresses" link. It will disappear when you click "Hide locally-known MAC addresses". By default, the "Remove" box is checked in each of these. Un-check it for those devices you want included in the table. When you click Update, only entries in the table whose “Remove” checkbox is un-checked will be included in the Access Controls table.
USM-Metro-RKS1-091807-01 Ruckus Metro Broadband Gateway 59
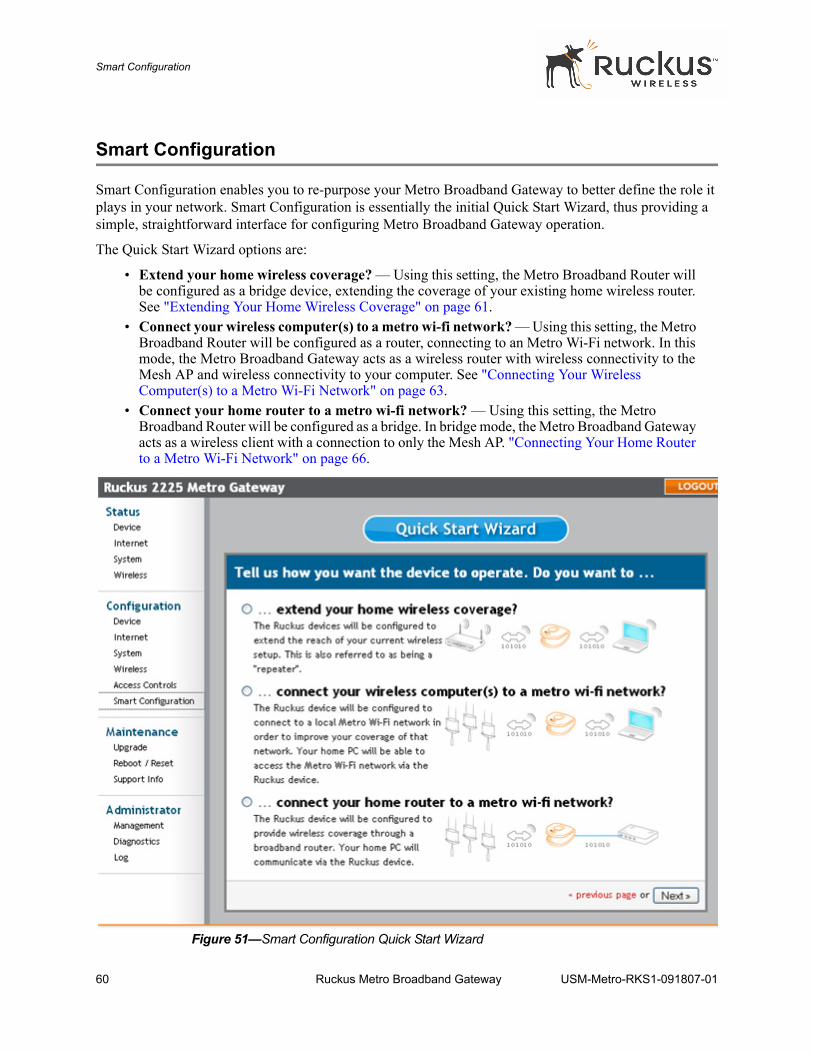
Smart Configuration
Smart Configuration
Smart Configuration enables you to re-purpose your Metro Broadband Gateway to better define the role it plays in your network. Smart Configuration is essentially the initial Quick Start Wizard, thus providing a simple, straightforward interface for configuring Metro Broadband Gateway operation.
The Quick Start Wizard options are:
• Extend your home wireless coverage? — Using this setting, the Metro Broadband Router will be configured as a bridge device, extending the coverage of your existing home wireless router. See "Extending Your Home Wireless Coverage" on page 61.
• Connect your wireless computer(s) to a metro wi-fi network? — Using this setting, the Metro Broadband Router will be configured as a router, connecting to an Metro Wi-Fi network. In this mode, the Metro Broadband Gateway acts as a wireless router with wireless connectivity to the Mesh AP and wireless connectivity to your computer. See "Connecting Your Wireless Computer(s) to a Metro Wi-Fi Network" on page 63.
• Connect your home router to a metro wi-fi network? — Using this setting, the Metro Broadband Router will be configured as a bridge. In bridge mode, the Metro Broadband Gateway acts as a wireless client with a connection to only the Mesh AP. "Connecting Your Home Router to a Metro Wi-Fi Network" on page 66.
Figure 51—Smart Configuration Quick Start Wizard
60 Ruckus Metro Broadband Gateway USM-Metro-RKS1-091807-01
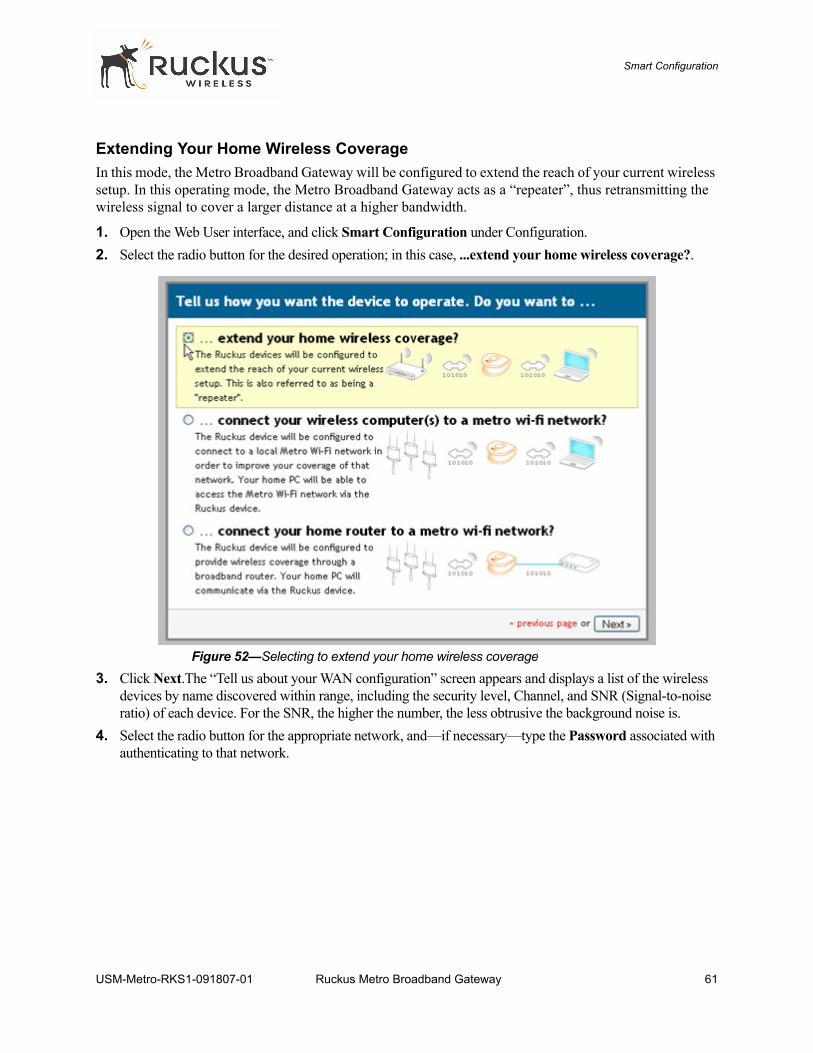
Smart Configuration
Extending Your Home Wireless CoverageIn this mode, the Metro Broadband Gateway will be configured to extend the reach of your current wireless setup. In this operating mode, the Metro Broadband Gateway acts as a “repeater”, thus retransmitting the wireless signal to cover a larger distance at a higher bandwidth.
1. Open the Web User interface, and click Smart Configuration under Configuration.2. Select the radio button for the desired operation; in this case, ...extend your home wireless coverage?.
Figure 52—Selecting to extend your home wireless coverage
3. Click Next.The “Tell us about your WAN configuration” screen appears and displays a list of the wireless devices by name discovered within range, including the security level, Channel, and SNR (Signal-to-noise ratio) of each device. For the SNR, the higher the number, the less obtrusive the background noise is.
4. Select the radio button for the appropriate network, and—if necessary—type the Password associated with authenticating to that network.
USM-Metro-RKS1-091807-01 Ruckus Metro Broadband Gateway 61
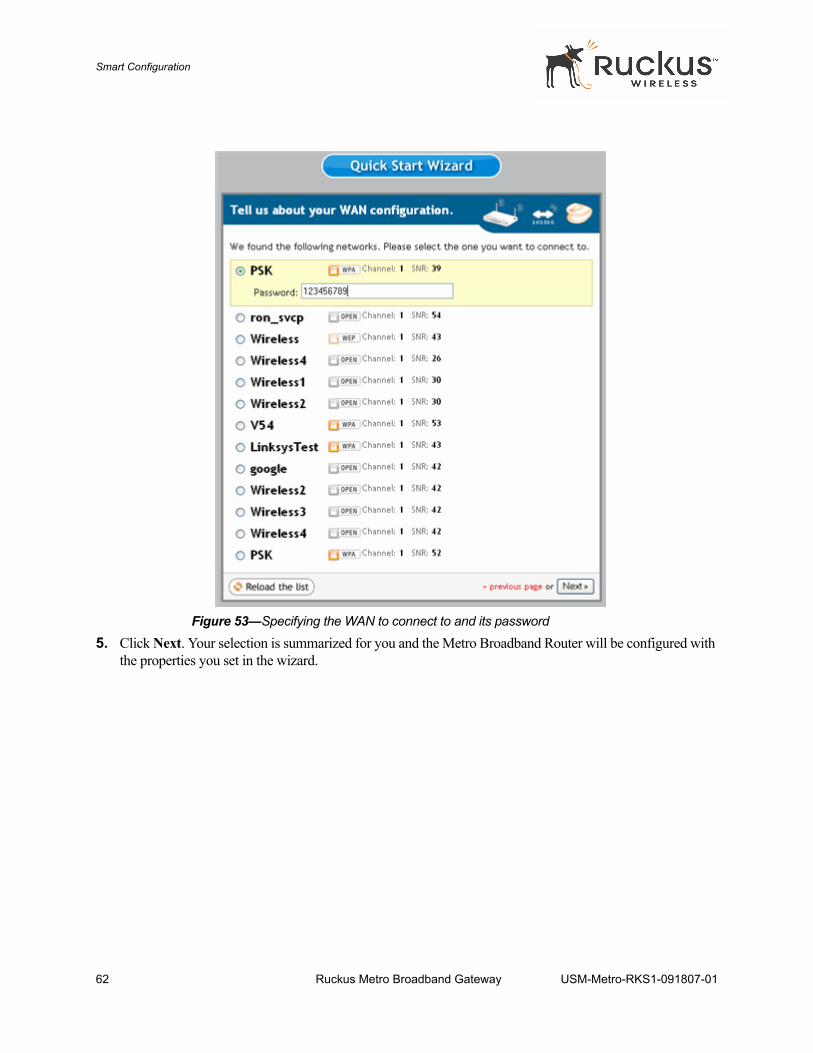
Smart Configuration
Figure 53—Specifying the WAN to connect to and its password
5. Click Next. Your selection is summarized for you and the Metro Broadband Router will be configured with the properties you set in the wizard.
62 Ruckus Metro Broadband Gateway USM-Metro-RKS1-091807-01
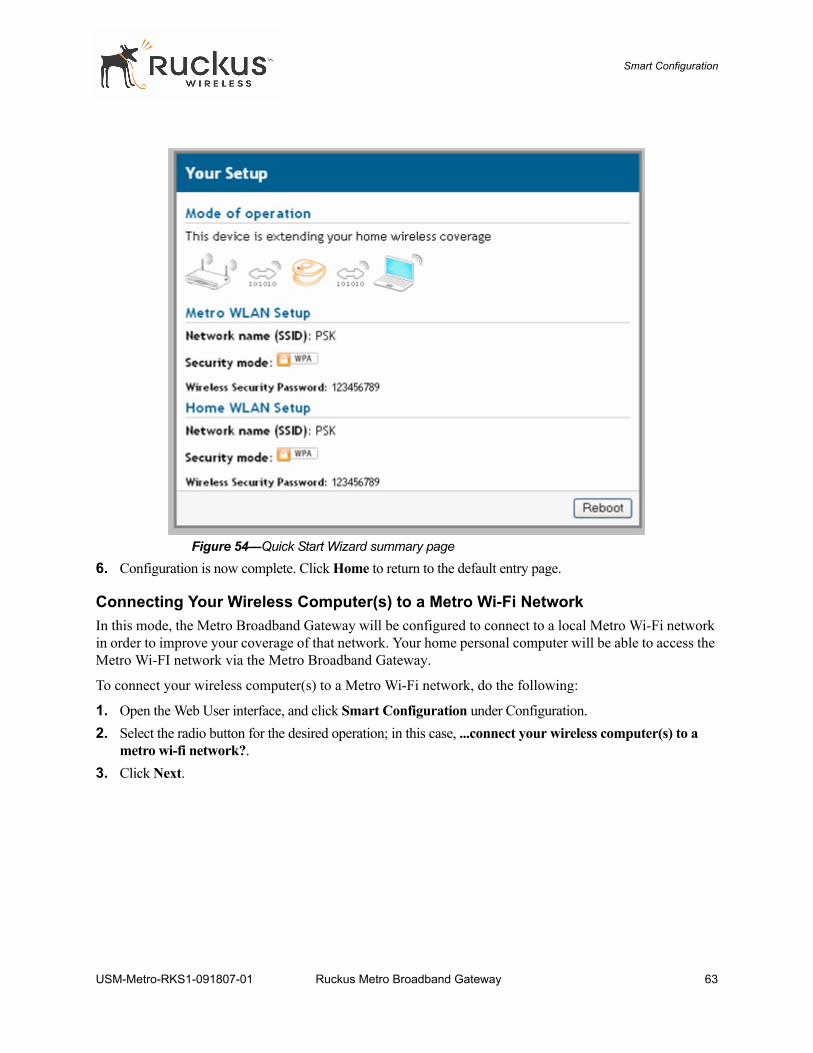
Smart Configuration
Figure 54—Quick Start Wizard summary page
6. Configuration is now complete. Click Home to return to the default entry page.
Connecting Your Wireless Computer(s) to a Metro Wi-Fi NetworkIn this mode, the Metro Broadband Gateway will be configured to connect to a local Metro Wi-Fi network in order to improve your coverage of that network. Your home personal computer will be able to access the Metro Wi-FI network via the Metro Broadband Gateway.
To connect your wireless computer(s) to a Metro Wi-Fi network, do the following:
1. Open the Web User interface, and click Smart Configuration under Configuration.2. Select the radio button for the desired operation; in this case, ...connect your wireless computer(s) to a
metro wi-fi network?.3. Click Next.
USM-Metro-RKS1-091807-01 Ruckus Metro Broadband Gateway 63
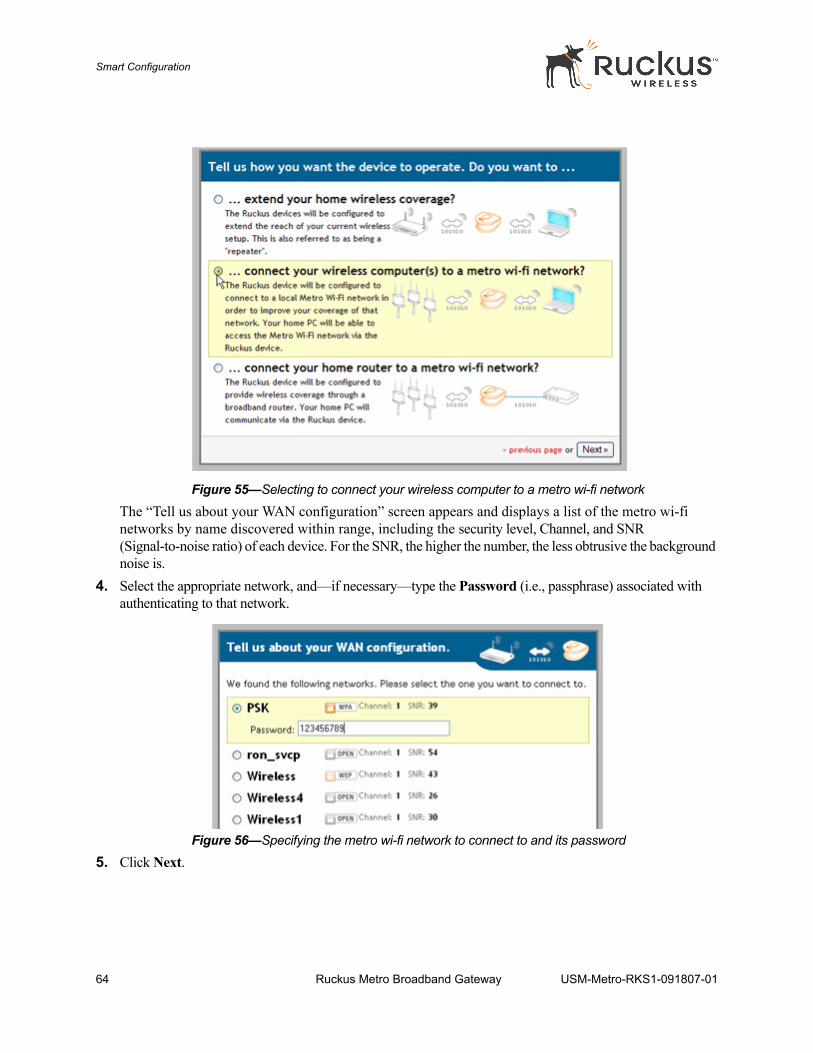
Smart Configuration
Figure 55—Selecting to connect your wireless computer to a metro wi-fi network
The “Tell us about your WAN configuration” screen appears and displays a list of the metro wi-fi networks by name discovered within range, including the security level, Channel, and SNR (Signal-to-noise ratio) of each device. For the SNR, the higher the number, the less obtrusive the background noise is.
4. Select the appropriate network, and—if necessary—type the Password (i.e., passphrase) associated with authenticating to that network.
Figure 56—Specifying the metro wi-fi network to connect to and its password
5. Click Next.
64 Ruckus Metro Broadband Gateway USM-Metro-RKS1-091807-01
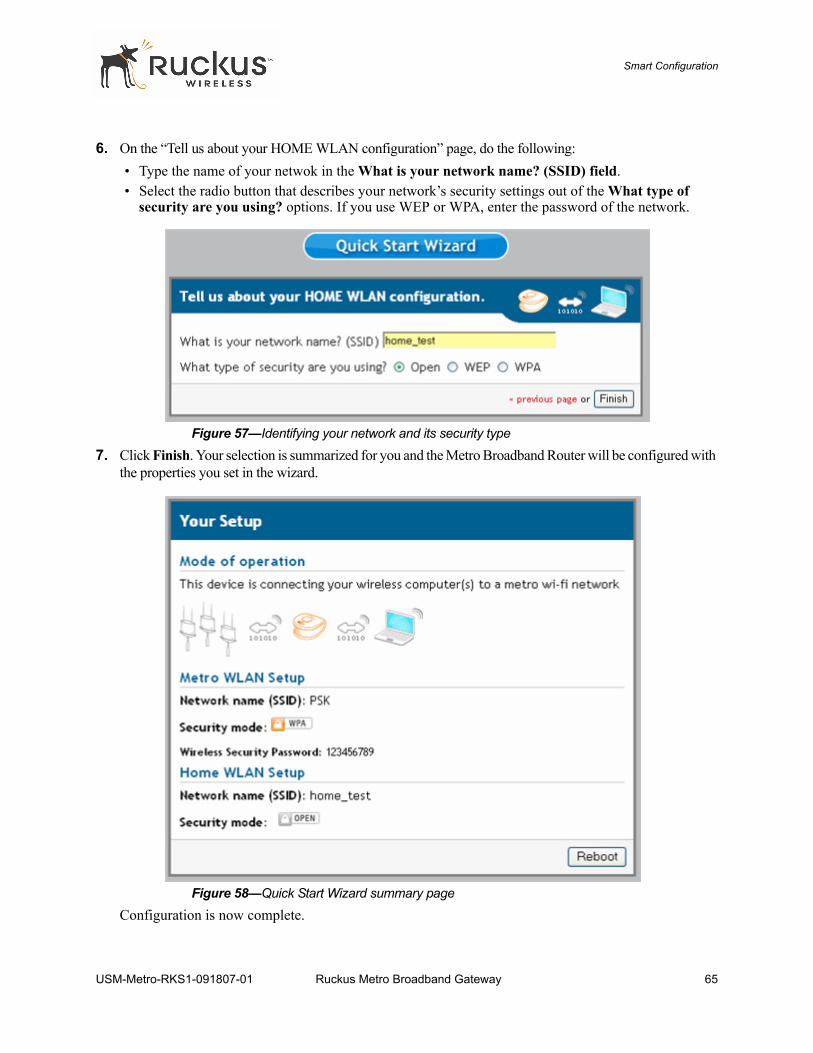
Smart Configuration
6. On the “Tell us about your HOME WLAN configuration” page, do the following:• Type the name of your netwok in the What is your network name? (SSID) field.• Select the radio button that describes your network’s security settings out of the What type of
security are you using? options. If you use WEP or WPA, enter the password of the network.
Figure 57—Identifying your network and its security type
7. Click Finish. Your selection is summarized for you and the Metro Broadband Router will be configured with the properties you set in the wizard.
Figure 58—Quick Start Wizard summary page
Configuration is now complete.
USM-Metro-RKS1-091807-01 Ruckus Metro Broadband Gateway 65
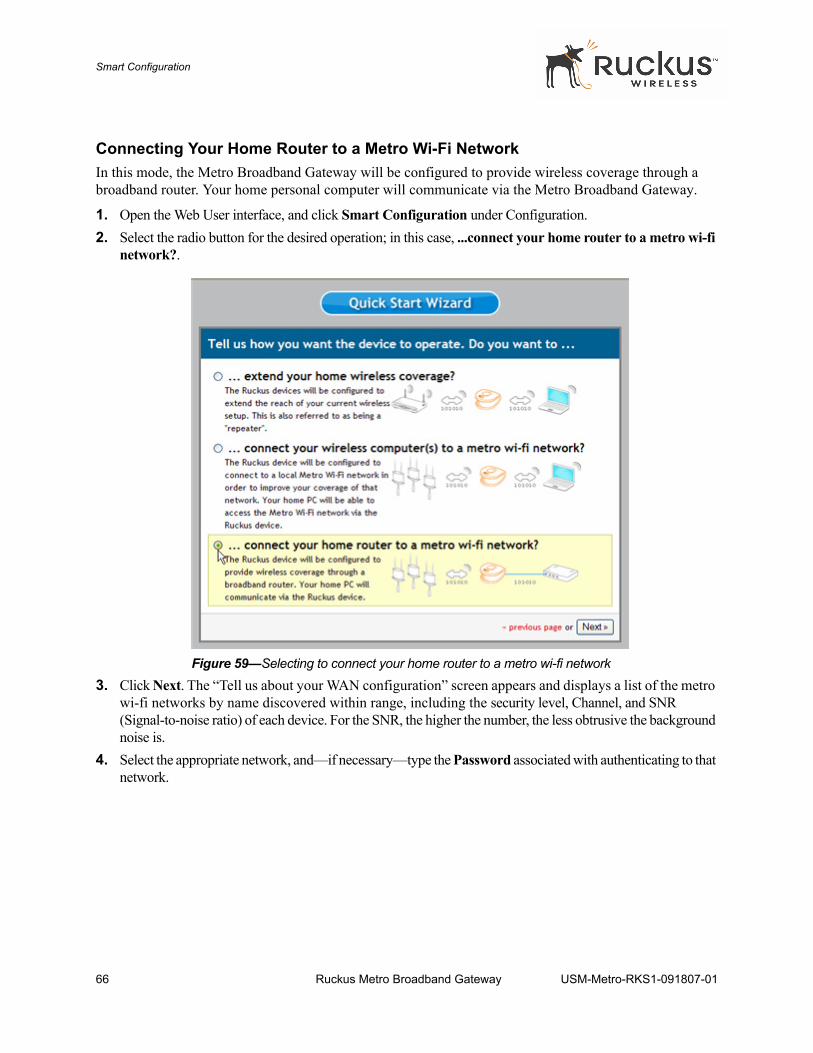
Smart Configuration
Connecting Your Home Router to a Metro Wi-Fi NetworkIn this mode, the Metro Broadband Gateway will be configured to provide wireless coverage through a broadband router. Your home personal computer will communicate via the Metro Broadband Gateway.
1. Open the Web User interface, and click Smart Configuration under Configuration.2. Select the radio button for the desired operation; in this case, ...connect your home router to a metro wi-fi
network?.
Figure 59—Selecting to connect your home router to a metro wi-fi network
3. Click Next. The “Tell us about your WAN configuration” screen appears and displays a list of the metro wi-fi networks by name discovered within range, including the security level, Channel, and SNR (Signal-to-noise ratio) of each device. For the SNR, the higher the number, the less obtrusive the background noise is.
4. Select the appropriate network, and—if necessary—type the Password associated with authenticating to that network.
66 Ruckus Metro Broadband Gateway USM-Metro-RKS1-091807-01
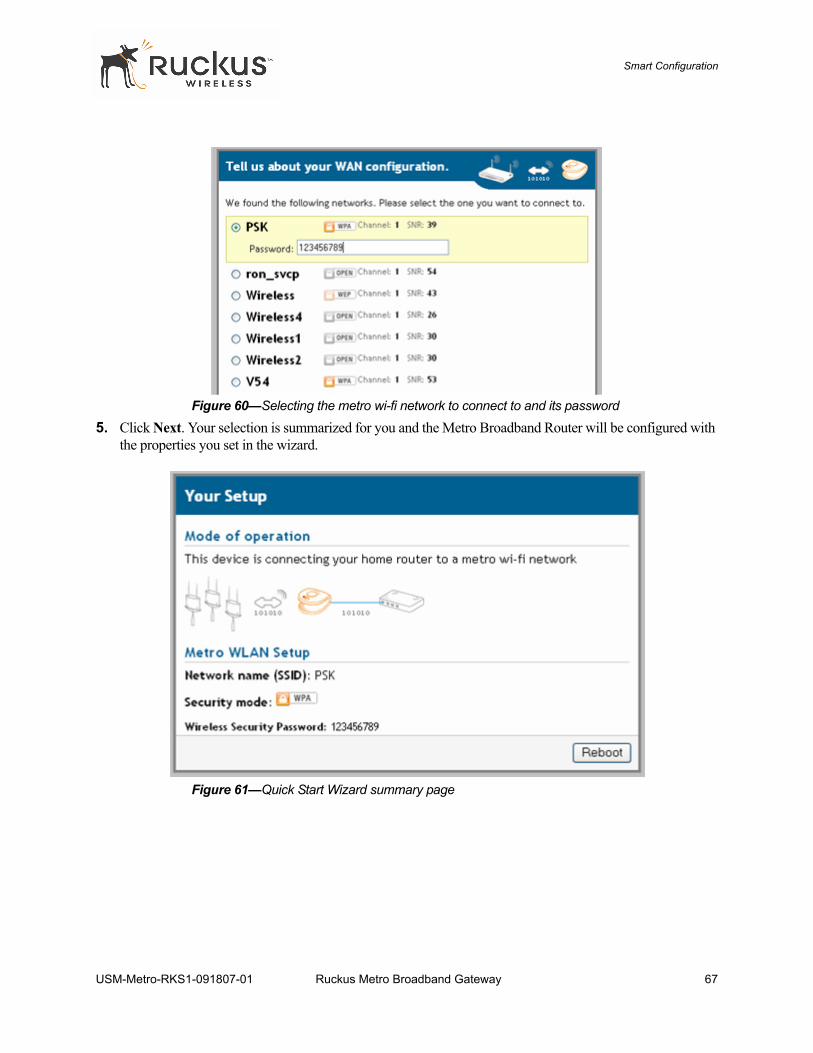
Smart Configuration
Figure 60—Selecting the metro wi-fi network to connect to and its password
5. Click Next. Your selection is summarized for you and the Metro Broadband Router will be configured with the properties you set in the wizard.
Figure 61—Quick Start Wizard summary page
USM-Metro-RKS1-091807-01 Ruckus Metro Broadband Gateway 67

Smart Configuration
(This page intentionally left blank.)
68 Ruckus Metro Broadband Gateway USM-Metro-RKS1-091807-01
Chapter 4: Maintenance and Administrator
This chapter provides information on how you can use the Web User Interface to monitor the activity and status of your Ruckus Wireless Metro Broadband Gateway.
Depending on your access, you may not see some of these options as they are privileged to Administrators only.
Topics covered in this chapter include:
• Activating the Log and Sending the Log to a Syslog Server . . . . . . . . . . . . . . . . . . . . . . . . . . . . . . .70• Sending a Copy of the Log File to Support Staff. . . . . . . . . . . . . . . . . . . . . . . . . . . . . . . . . . . . . . . .71• Running Diagnostics on Network Connections. . . . . . . . . . . . . . . . . . . . . . . . . . . . . . . . . . . . . . . . .73• Administrator Management . . . . . . . . . . . . . . . . . . . . . . . . . . . . . . . . . . . . . . . . . . . . . . . . . . . . . . . .74• Upgrading the Firmware . . . . . . . . . . . . . . . . . . . . . . . . . . . . . . . . . . . . . . . . . . . . . . . . . . . . . . . . . .76• Rebooting or Resetting the Device . . . . . . . . . . . . . . . . . . . . . . . . . . . . . . . . . . . . . . . . . . . . . . . . . .78
USM-Metro-RKS1-091807-01 Ruckus Metro Broadband Gateway 69
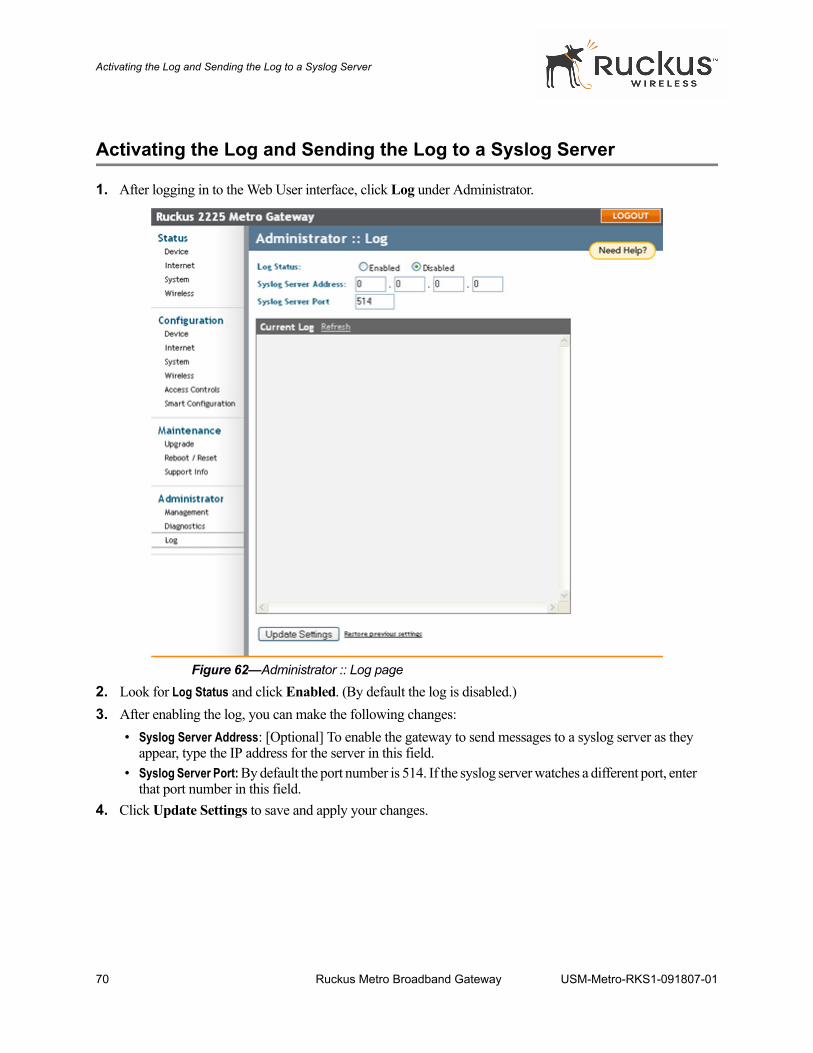
Activating the Log and Sending the Log to a Syslog Server
Activating the Log and Sending the Log to a Syslog Server
1. After logging in to the Web User interface, click Log under Administrator.
Figure 62—Administrator :: Log page
2. Look for Log Status and click Enabled. (By default the log is disabled.)3. After enabling the log, you can make the following changes:
• Syslog Server Address: [Optional] To enable the gateway to send messages to a syslog server as they appear, type the IP address for the server in this field.
• Syslog Server Port: By default the port number is 514. If the syslog server watches a different port, enter that port number in this field.
4. Click Update Settings to save and apply your changes.
70 Ruckus Metro Broadband Gateway USM-Metro-RKS1-091807-01
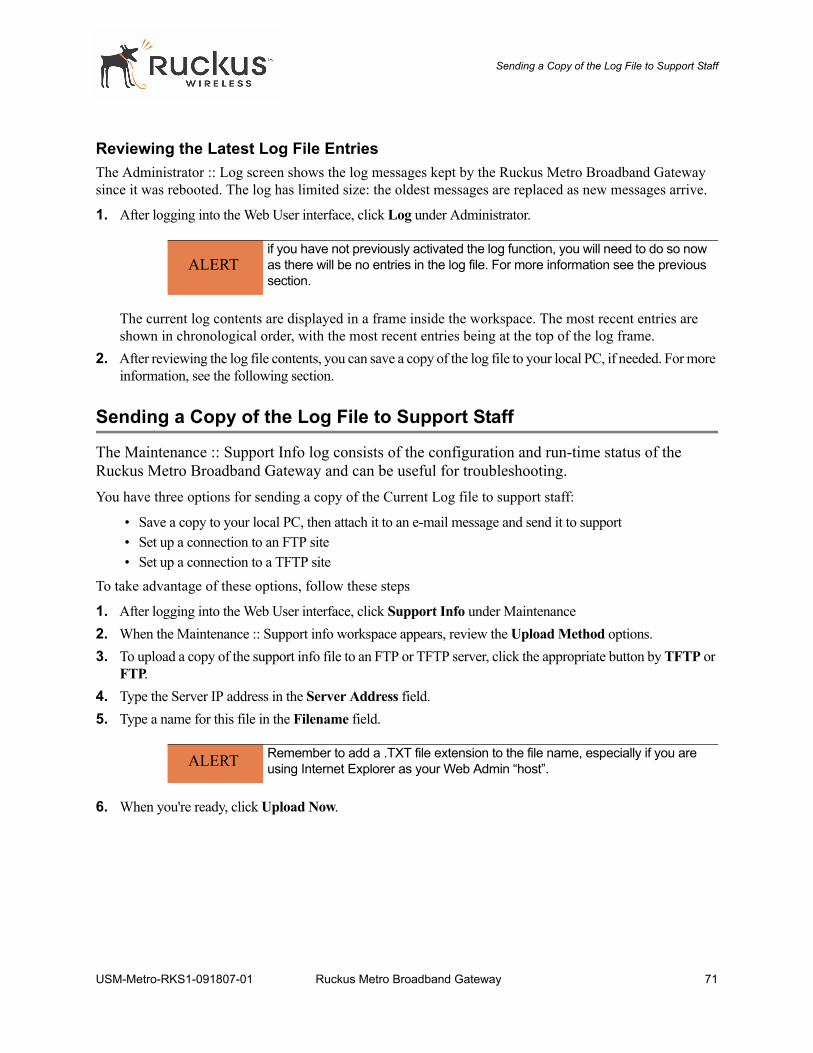
Sending a Copy of the Log File to Support Staff
Reviewing the Latest Log File EntriesThe Administrator :: Log screen shows the log messages kept by the Ruckus Metro Broadband Gateway since it was rebooted. The log has limited size: the oldest messages are replaced as new messages arrive.
1. After logging into the Web User interface, click Log under Administrator.
The current log contents are displayed in a frame inside the workspace. The most recent entries are shown in chronological order, with the most recent entries being at the top of the log frame.
2. After reviewing the log file contents, you can save a copy of the log file to your local PC, if needed. For more information, see the following section.
Sending a Copy of the Log File to Support Staff
The Maintenance :: Support Info log consists of the configuration and run-time status of the Ruckus Metro Broadband Gateway and can be useful for troubleshooting.You have three options for sending a copy of the Current Log file to support staff:
• Save a copy to your local PC, then attach it to an e-mail message and send it to support• Set up a connection to an FTP site• Set up a connection to a TFTP site
To take advantage of these options, follow these steps
1. After logging into the Web User interface, click Support Info under Maintenance2. When the Maintenance :: Support info workspace appears, review the Upload Method options. 3. To upload a copy of the support info file to an FTP or TFTP server, click the appropriate button by TFTP or
FTP.4. Type the Server IP address in the Server Address field.5. Type a name for this file in the Filename field.
6. When you're ready, click Upload Now.
ALERTif you have not previously activated the log function, you will need to do so now as there will be no entries in the log file. For more information see the previous section.
ALERT Remember to add a .TXT file extension to the file name, especially if you are using Internet Explorer as your Web Admin “host”.
USM-Metro-RKS1-091807-01 Ruckus Metro Broadband Gateway 71
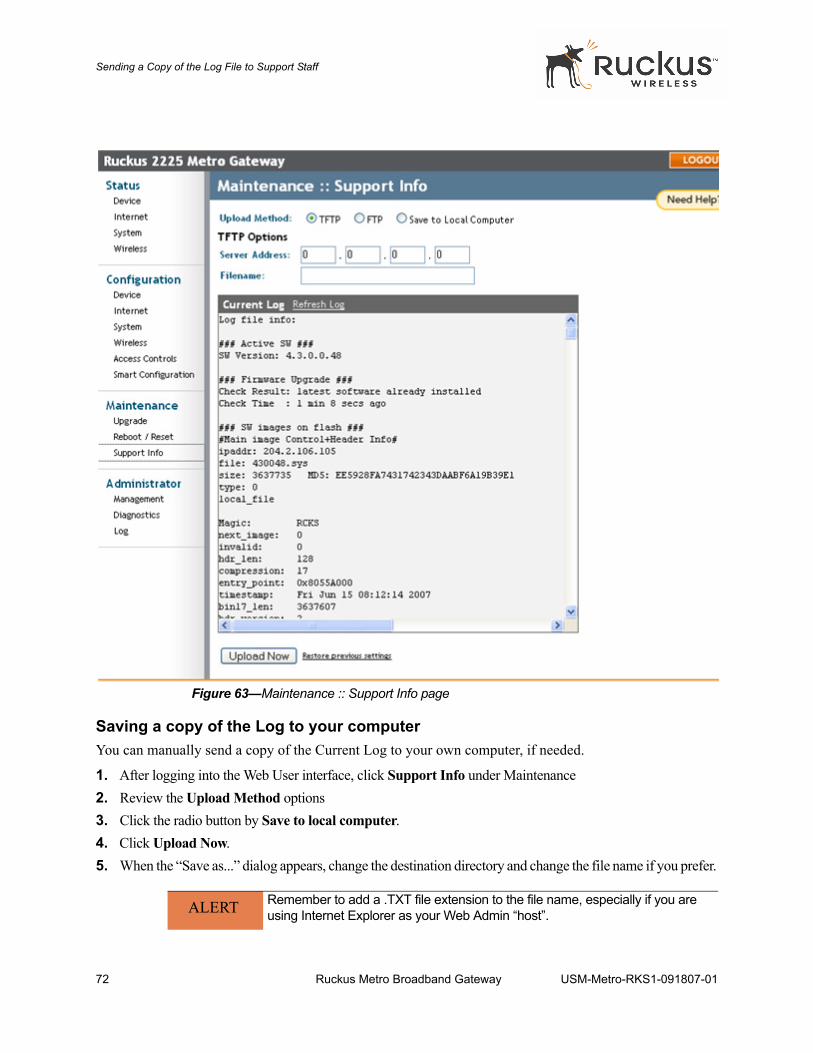
Sending a Copy of the Log File to Support Staff
Figure 63—Maintenance :: Support Info page
Saving a copy of the Log to your computerYou can manually send a copy of the Current Log to your own computer, if needed.
1. After logging into the Web User interface, click Support Info under Maintenance2. Review the Upload Method options3. Click the radio button by Save to local computer.4. Click Upload Now.5. When the “Save as...” dialog appears, change the destination directory and change the file name if you prefer.
ALERT Remember to add a .TXT file extension to the file name, especially if you are using Internet Explorer as your Web Admin “host”.
72 Ruckus Metro Broadband Gateway USM-Metro-RKS1-091807-01
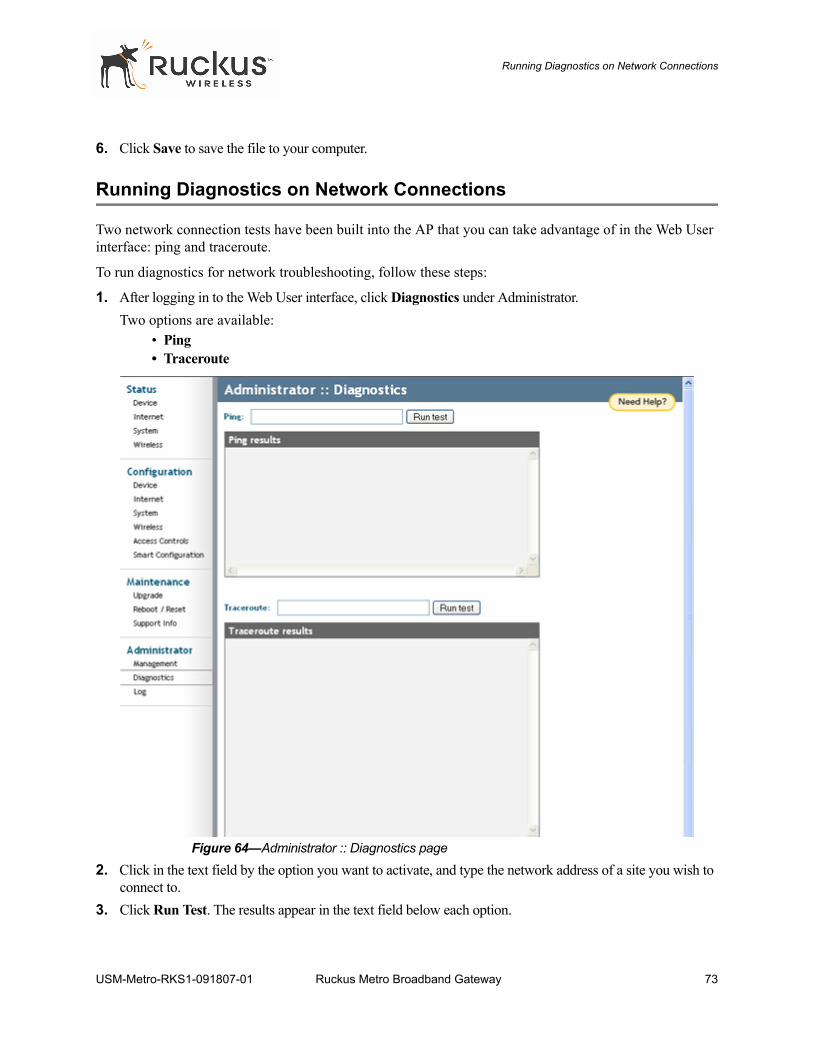
Running Diagnostics on Network Connections
6. Click Save to save the file to your computer.
Running Diagnostics on Network Connections
Two network connection tests have been built into the AP that you can take advantage of in the Web User interface: ping and traceroute.
To run diagnostics for network troubleshooting, follow these steps:
1. After logging in to the Web User interface, click Diagnostics under Administrator.Two options are available:
• Ping • Traceroute
Figure 64—Administrator :: Diagnostics page
2. Click in the text field by the option you want to activate, and type the network address of a site you wish to connect to.
3. Click Run Test. The results appear in the text field below each option.
USM-Metro-RKS1-091807-01 Ruckus Metro Broadband Gateway 73
Administrator Management
Administrator Management
In addition to using the Web User interface to connect to the AP for management and monitoring purposes, you can also take advantage of these network access options:
• Telnet access• Secure shell (SSH) access
This section shows you how to configure Telnet or SSH access, as well as how to direct your web browser to the AP through an HTTP or HTTPS connection.
To take advantage of these options, follow these steps.
1. After logging into the Web User interface, click Management under Administrator.2. Review the options and make changes as needed
• Telnet access: By default, this option is disabled (inactive).• Telnet port: This field lists the default Telnet port of 23—only if Telnet is active. You can manually
change this port number if required.• SSH access: By default, this option is enabled (active).• SSH port: This field lists the default SSH port of 22—only if SSH is active. You can manually change
this port number if required.• HTTP access: This option is disabled by default.• HTTP port: This field lists the default HTTP port of 80, if HTTP has been activated. You can manually
change this port number if required.• HTTPS access: By default this option is enabled. This connection mode requires a security certificate,
a copy of which has been pre-installed in the device.• HTTPS port: This field lists the default HTTPS port of 443—only if HTTPS has been activated. You
can manually change this port number if required.• NUTTCP Server Status: see “NUTTCP” .• Certification Verification: This notes whether the security certificate linked to the NUTTCP settings has
been passed or not.3. Click Update Settings to save your changes. A confirmation message appears at the top of the workspace.
NUTTCPNUTTCP is a network performance measurement tool that is used by service providers. A stream of data is sent to the Metro Broadband Gateway, and the expected performance result is displayed on the service provider’s console. The Metro Broadband Gateway implements the server side daemon to respond to queries from the service provider’s NUTTCP client.
NOTE – Your service provider cannot view any of your private data.
For superuser login, the Administrator :: Management window has a remote management section.
ALERT Do not undertake the customizing of these options unless you are an experienced network administrator or are under the guidance of an IT/support professional.
74 Ruckus Metro Broadband Gateway USM-Metro-RKS1-091807-01
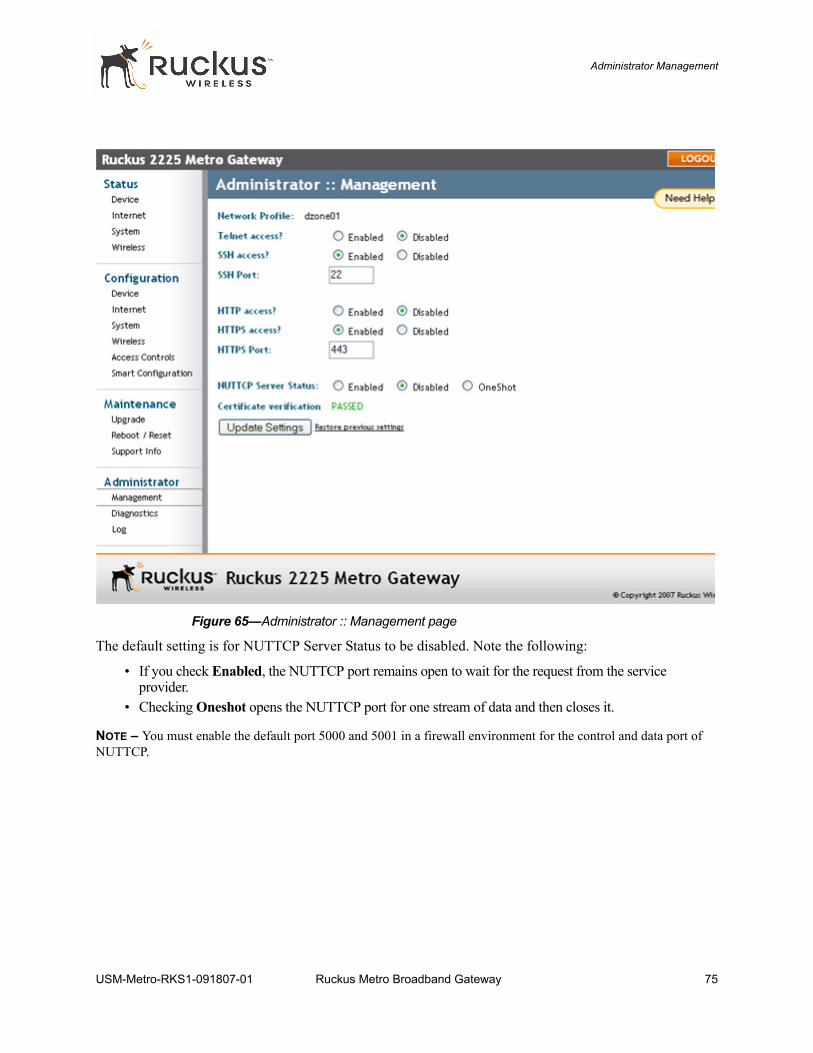
Administrator Management
Figure 65—Administrator :: Management page
The default setting is for NUTTCP Server Status to be disabled. Note the following:
• If you check Enabled, the NUTTCP port remains open to wait for the request from the service provider.
• Checking Oneshot opens the NUTTCP port for one stream of data and then closes it.
NOTE – You must enable the default port 5000 and 5001 in a firewall environment for the control and data port of NUTTCP.
USM-Metro-RKS1-091807-01 Ruckus Metro Broadband Gateway 75
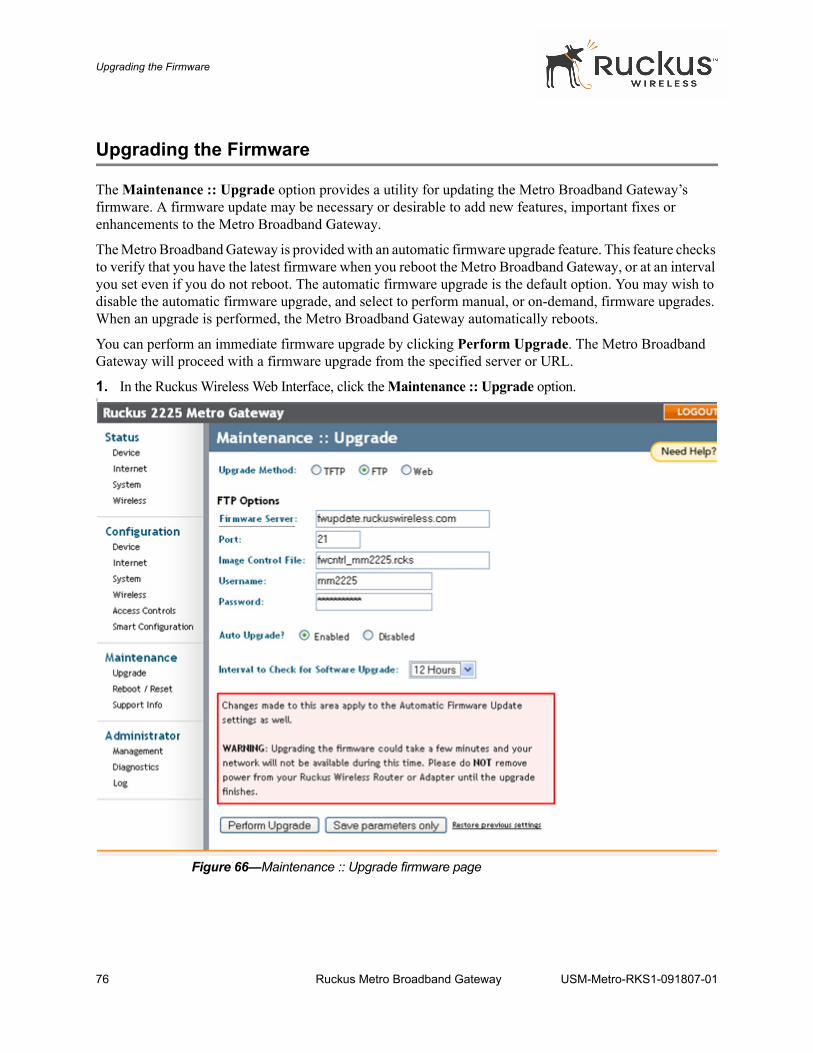
Upgrading the Firmware
Upgrading the Firmware
The Maintenance :: Upgrade option provides a utility for updating the Metro Broadband Gateway’s firmware. A firmware update may be necessary or desirable to add new features, important fixes or enhancements to the Metro Broadband Gateway.
The Metro Broadband Gateway is provided with an automatic firmware upgrade feature. This feature checks to verify that you have the latest firmware when you reboot the Metro Broadband Gateway, or at an interval you set even if you do not reboot. The automatic firmware upgrade is the default option. You may wish to disable the automatic firmware upgrade, and select to perform manual, or on-demand, firmware upgrades. When an upgrade is performed, the Metro Broadband Gateway automatically reboots.
You can perform an immediate firmware upgrade by clicking Perform Upgrade. The Metro Broadband Gateway will proceed with a firmware upgrade from the specified server or URL.
1. In the Ruckus Wireless Web Interface, click the Maintenance :: Upgrade option. T
Figure 66—Maintenance :: Upgrade firmware page
76 Ruckus Metro Broadband Gateway USM-Metro-RKS1-091807-01
Upgrading the Firmware
Automatic Firmware UpgradeFor TFTP and FTP, the Firmware Server, Port, Image Control File, User Name (FTP only), and Password (FTP only) have been preconfigured to automatically access Ruckus Wireless’s firmware update website. For Web, the URL has been pre-configured as well.
The default interval for checking for new updates is 12 hours, as shown in the Interval to Check for Software Upgrade drop-down list. You can set this to a longer or shorter interval as required.
1. If you have changed any of the upgrade parameters, such as the interval, click the Save Parameters only button.The system will update the firmware as configured.
Manual Firmware UpgradeContact your service provider for more information about Web sites or TFTP/FTP sites used to store firmware images for the Metro Broadband Gateway.
!CAUTION:—If you have recently made configuration changes to the Metro Broadband Gateway, make sureto reboot the system (see “Rebooting or Resetting the Device” on page 78) first so that your changes arepreserved. Then update the firmware.
To choose the manual firmware upgrade option, proceed as follows:
1. Go to Maintenance :: Upgrade and click Perform Upgrade.
USM-Metro-RKS1-091807-01 Ruckus Metro Broadband Gateway 77
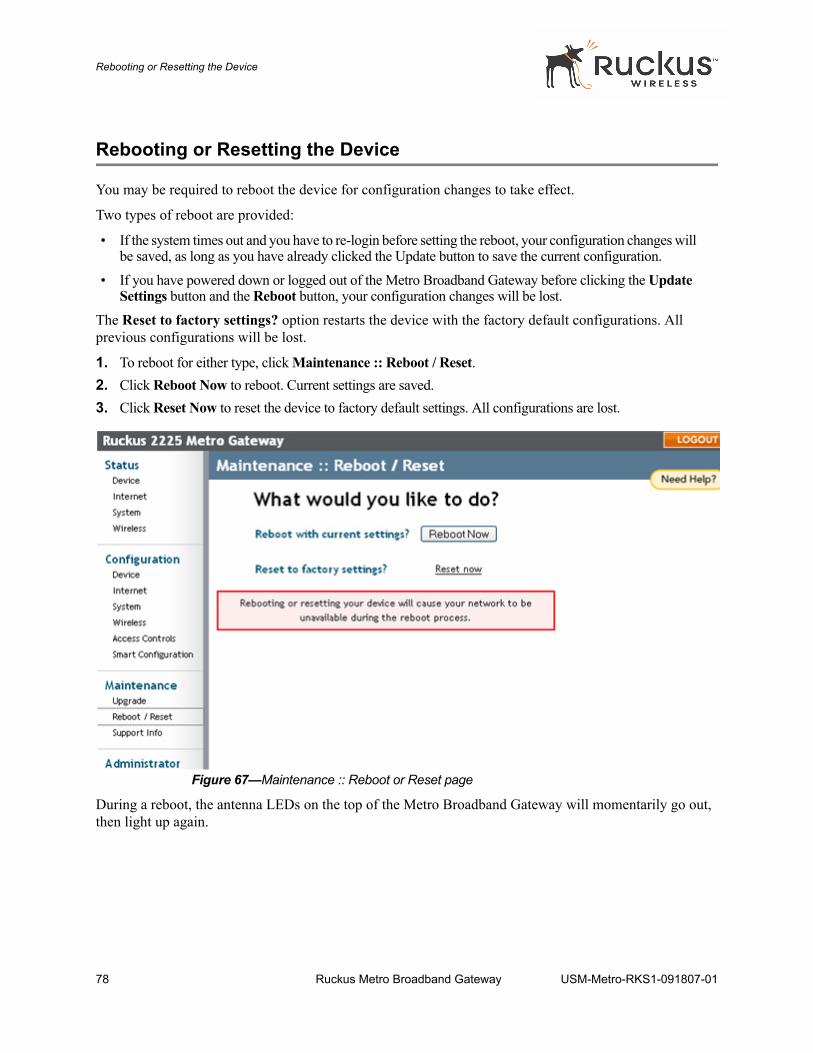
Rebooting or Resetting the Device
Rebooting or Resetting the Device
You may be required to reboot the device for configuration changes to take effect.
Two types of reboot are provided:
• If the system times out and you have to re-login before setting the reboot, your configuration changes will be saved, as long as you have already clicked the Update button to save the current configuration.
• If you have powered down or logged out of the Metro Broadband Gateway before clicking the Update Settings button and the Reboot button, your configuration changes will be lost.
The Reset to factory settings? option restarts the device with the factory default configurations. All previous configurations will be lost.
1. To reboot for either type, click Maintenance :: Reboot / Reset.2. Click Reboot Now to reboot. Current settings are saved.3. Click Reset Now to reset the device to factory default settings. All configurations are lost.
Figure 67—Maintenance :: Reboot or Reset page
During a reboot, the antenna LEDs on the top of the Metro Broadband Gateway will momentarily go out, then light up again.
78 Ruckus Metro Broadband Gateway USM-Metro-RKS1-091807-01
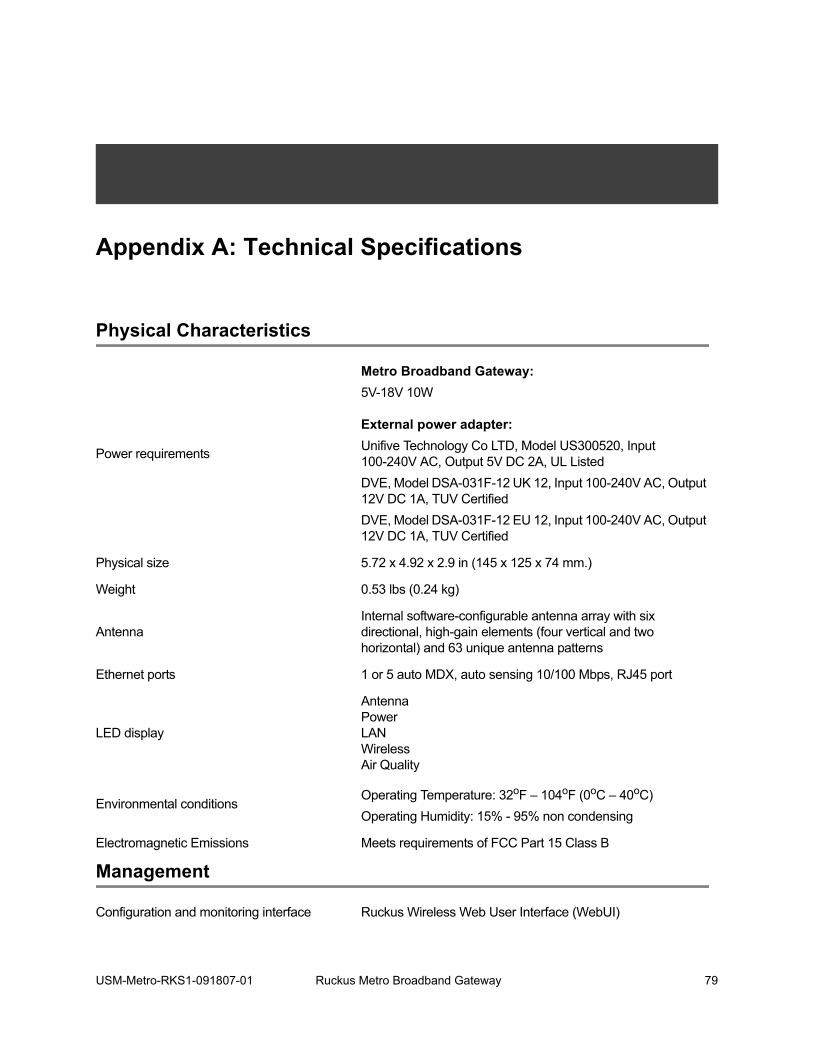
Appendix A: Technical Specifications
Physical Characteristics
Power requirements
Metro Broadband Gateway:5V-18V 10W
External power adapter:Unifive Technology Co LTD, Model US300520, Input 100-240V AC, Output 5V DC 2A, UL ListedDVE, Model DSA-031F-12 UK 12, Input 100-240V AC, Output 12V DC 1A, TUV CertifiedDVE, Model DSA-031F-12 EU 12, Input 100-240V AC, Output 12V DC 1A, TUV Certified
Physical size 5.72 x 4.92 x 2.9 in (145 x 125 x 74 mm.)
Weight 0.53 lbs (0.24 kg)
Antenna Internal software-configurable antenna array with six directional, high-gain elements (four vertical and two horizontal) and 63 unique antenna patterns
Ethernet ports 1 or 5 auto MDX, auto sensing 10/100 Mbps, RJ45 port
LED display
AntennaPowerLANWireless Air Quality
Environmental conditionsOperating Temperature: 32oF – 104oF (0oC – 40oC)Operating Humidity: 15% - 95% non condensing
Electromagnetic Emissions Meets requirements of FCC Part 15 Class B
Management
Configuration and monitoring interface Ruckus Wireless Web User Interface (WebUI)
USM-Metro-RKS1-091807-01 Ruckus Metro Broadband Gateway 79
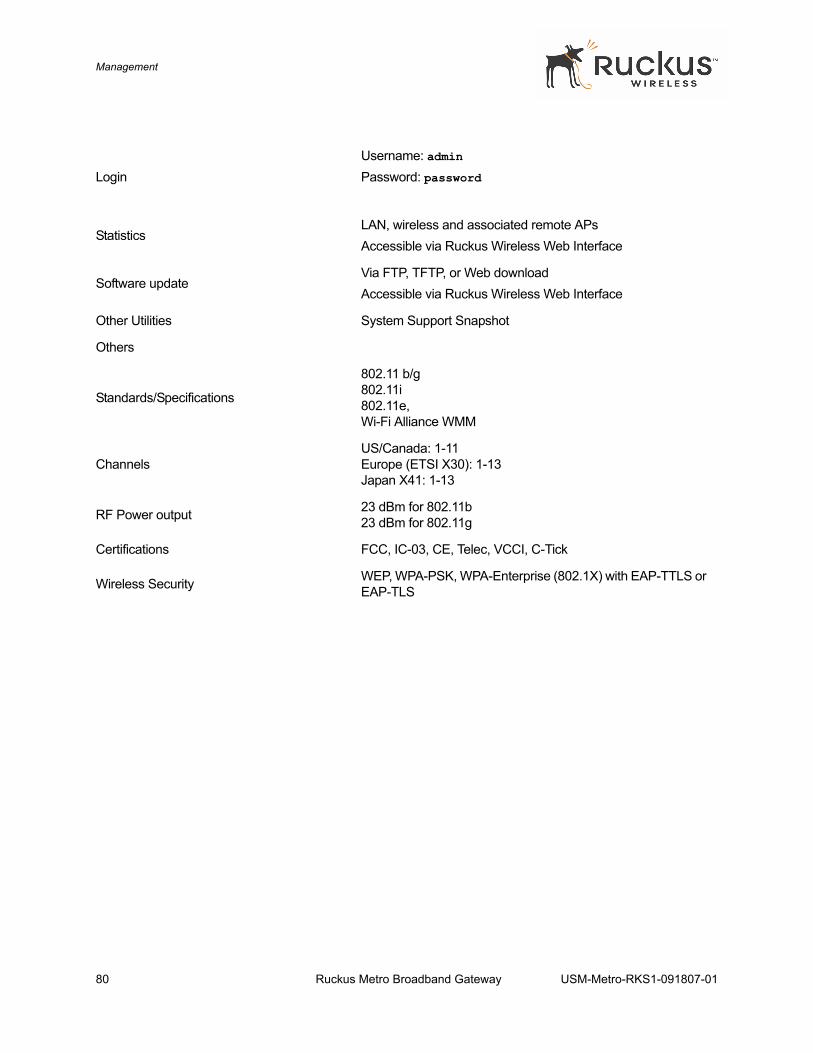
Management
LoginUsername: adminPassword: password
StatisticsLAN, wireless and associated remote APsAccessible via Ruckus Wireless Web Interface
Software updateVia FTP, TFTP, or Web downloadAccessible via Ruckus Wireless Web Interface
Other Utilities System Support Snapshot
Others
Standards/Specifications
802.11 b/g802.11i802.11e,Wi-Fi Alliance WMM
ChannelsUS/Canada: 1-11Europe (ETSI X30): 1-13Japan X41: 1-13
RF Power output 23 dBm for 802.11b 23 dBm for 802.11g
Certifications FCC, IC-03, CE, Telec, VCCI, C-Tick
Wireless Security WEP, WPA-PSK, WPA-Enterprise (802.1X) with EAP-TTLS or EAP-TLS
80 Ruckus Metro Broadband Gateway USM-Metro-RKS1-091807-01