Embed Size (px)
Citation preview

Page 1 of 7
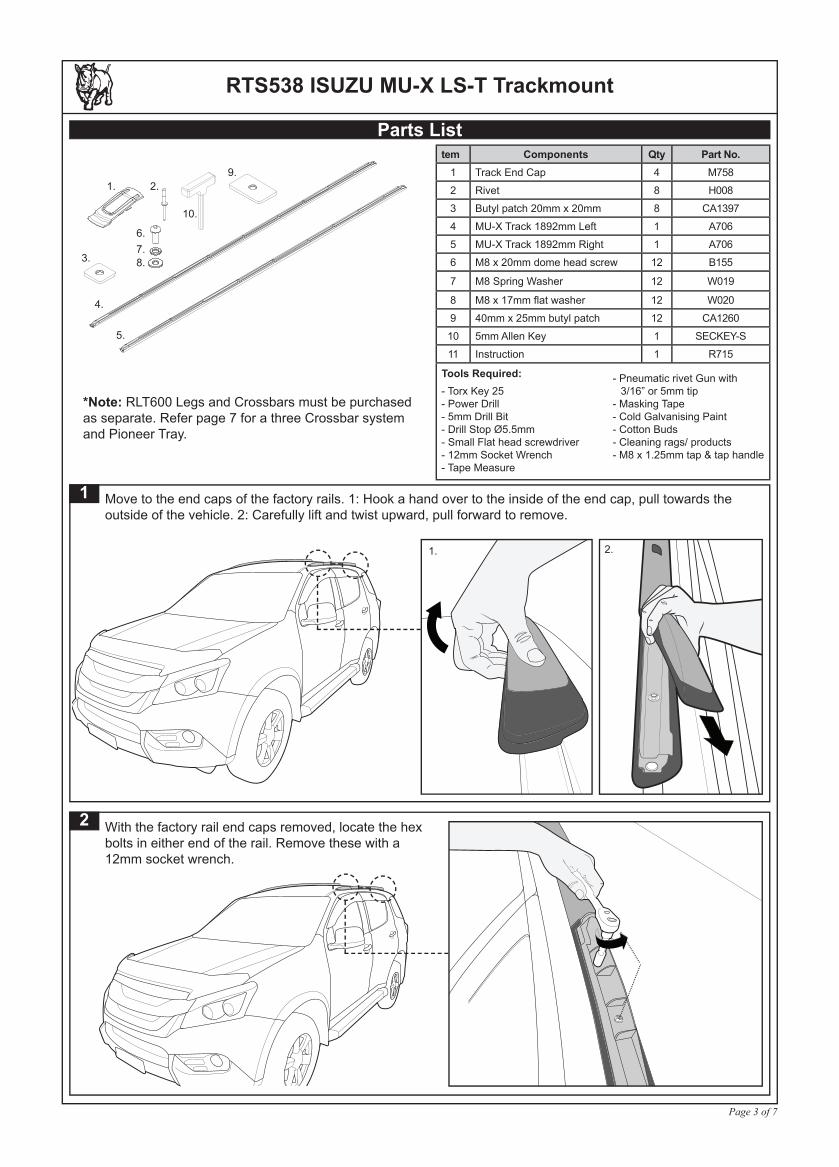
RTS538 ISUZU MU-X LS-T Trackmount
Max: 100kg/220lbs evenly distributed over all crossbars.
Recommendations:It is essential that all bolt connections be checked after driving a short distance when you fi rst install your crossbars. Bolt connections should be checked again at regular intervals (probably once a week is enough, depending on road conditions, usage, loads and distances travelled). You should also check the crossbars each time they are refi tted. Make sure to fasten your load securely with tie down straps or non stretch ropes. Please ensure that all loads are evenly distributed and that the centre of gravity is kept as low as possible.
Please remove crossbars when putting vehicle through an automatic car wash.
Load Ratings:Maximum permissible load is 100kg/220lbs for Two or Three crossbars including the weight of the crossbars, Two crossbars = 5kg/11lbs or three crossbars = 7.5kg/16.5lbs. When crossbars are to be used in off-road conditions, please build a safety factor of 1.5 into this load limit for off-road use. 66kg/145lbs for off-road use. Although the crossbars are tested and approved to AS1235-2000, off-road conditions can be much more rigorous. However, increasing the number of crossbars does not increase the vehicles maximum permissible roof loading.
Note for Dealers and Fitters:It is your responsibility to ensure instructions are given to the end user or client.
Rhino-Rack3 Pike Street, Rydalmere, Document No: R715 Fit Time: 2 HoursNSW 2116, Australia. Prepared By: Kayle Everett Issue No: 01(Ph) (02) 9638 4744 Authorised By: Chris Murty Issue Date: 16/10/2015(Fax) (02) 9638 4822
These instructions remain the property of Rhino-Rack Australia Pty. Ltd. and may not be used or changed for any other purpose than intended.
Important Information
Please read these instructions carefully prior to installation.Check the contents of kit before commencing fi tment and report any discrepancies.Please refer to your fi tting instruction to ensure that the roof racks are installed in the correct locations.

Page 2 of 7
WARNING! Important Load Carrying InstructionsWith utility vehicles, the cabin and the canopy move independently. Roofracks and vehicle can be damaged if the item transported is rigidly fi xed at points on both the cabin and canopy. Instead, rigidly fi x to either the cabin roofracks or the canopy roofracks.
Minimum recommended spacing for two crossbars is 700mm.
!
!
!
km/h X
YES
? kg2 x Crossbars = 5.0kg
100kg load rating (Urban road)
66kg load rating (Off road)=
Paddle/ Surfboards should be fi xed to the front of the vehicle.
700mm.
RTS538 ISUZU MU-X LS-T Trackmount
Page 3 of 7
1 Move to the end caps of the factory rails. 1: Hook a hand over to the inside of the end cap, pull towards the outside of the vehicle. 2: Carefully lift and twist upward, pull forward to remove.
2 With the factory rail end caps removed, locate the hex bolts in either end of the rail. Remove these with a 12mm socket wrench.
tem Components Qty Part No.1 Track End Cap 4 M758
2 Rivet 8 H008
3 Butyl patch 20mm x 20mm 8 CA1397
4 MU-X Track 1892mm Left 1 A706
5 MU-X Track 1892mm Right 1 A706
6 M8 x 20mm dome head screw 12 B155
7 M8 Spring Washer 12 W019
8 M8 x 17mm fl at washer 12 W020
9 40mm x 25mm butyl patch 12 CA1260
10 5mm Allen Key 1 SECKEY-S
11 Instruction 1 R715
Parts List
- Torx Key 25- Power Drill- 5mm Drill Bit- Drill Stop Ø5.5mm- Small Flat head screwdriver- 12mm Socket Wrench- Tape Measure
- Pneumatic rivet Gun with 3/16” or 5mm tip- Masking Tape- Cold Galvanising Paint- Cotton Buds- Cleaning rags/ products- M8 x 1.25mm tap & tap handle
*Note: RLT600 Legs and Crossbars must be purchased as separate. Refer page 7 for a three Crossbar system and Pioneer Tray.
1.
4.
2.
5.
Tools Required:
3.
6.
2.9.
10.
1.
7.8.
RTS538 ISUZU MU-X LS-T Trackmount

Page 4 of 7
3
Clean the roof ditch and surrounding area. Use masking tape and cover the door edges to prevent swarf getting into hard to reach areas.
Locate the two access caps on each roof rail. 1: Hook a fl at head screw driver under the inner edge of the cap. 2: Pull towards the outside of the vehicle, this will fl ip the cap up and away from the roof rail.
4 Use a Torx 25 Screw Driver to remove the screws in the newly opened cavities.
5 Pull the rails off by hooking hands under the inside edge of the rail and pulling towards the outside of the car.
6 Using a 12mm socket wrench, remove the two blocks within the exposed roof ditch. Repeat for each side of the vehicle.
7
1. 2.
RTS538 ISUZU MU-X LS-T Trackmount

Page 5 of 7
Note: If you experience diffi culties fastening the supplied M8 screws run an M8 x 1.25 tap through to clean the threads out. Note the orientation of each track before placing them into the roof ditch. Install four M8 dome head screws, spring and fl at washers to locate the track for spot drilling of the rivet holes.
Using a 5mm drill bit, spot drill the roof through the 4 track holes. Remove track then fi t drill stop and drill through all holes. Repeat for opposite side.
Remove the tracks. Vacuum any swarf left from drilling. Do not leave any swarf as it will cause corrosion.
After all holes have been drilled into the Roof and swarf removed, apply Cold Galvanising Paint. Make sure to spread around drilled hole as well as inside. Allow 10min to dry. Weather conditions may alter drying time.
Use a cotton bud to apply Cold Galvanising Paint.
Apply Cold Gal Paint inside EACH drilled hole. Make sure to cover the entire length of the hole.
4-6mm
8
Left Side
LEFT track
RIGHT track
Right Side
FRONT of track 431mmbetween M8 holes
REAR of track 507mmbetween M8 holes
This edge faces inside of roof.As viewed from Rear.
9 10
Top View:
11
- Ø 5mm Drill bit- Ø 5.5mm Drill Stop
RTS538 ISUZU MU-X LS-T Trackmount

Page 6 of 7
16 Fit the legs and crossbars as per the instructions included in their respective kits. Once the crossbars are secured in place, insert the Track end caps into place as shown.
Slide or clip the end caps into each end of the track.
12
1: 2:
13 Remove the white protective backing from each side and underneath off the foam strips on the track.
Note: Before applying butyl patches check all holes line up with track.1: Remove backing from the Butyl Patches.2: Place them over all holes. Remove backing from the top of the patches.Small patches for rivet holes.Large patches for M8 holes.
4.1.2.3.
14 Carefully place each track into the roof ditch on top of the Butyl patches making sure all holes are lined up. Locate one screw & washer assembly towards each end of the track to facilitate with track alignment, leave loose. Fit each of the rivets through the track and into the holes. Lightly tighten the remaining M8 dome screws. Apply downward pressure on the track while fastening all M8 dome screws to avoid pick up of the butyl patches.
Included 5mm Allen Key
15
FRONTREAR
Seat all rivets. Apply downward pressure while fi xing the rivets in place using a Pneumatic Rivet Gun. The fi xing order is shown below. Do not use a small hand rivet gun.
Trim the large butyl patches prior to adhering to vehicle for the 4 x end M8 holes to prevent excess protruding from the end of the track. 12mm
RTS538 ISUZU MU-X LS-T Trackmount

Page 7 of 7
Pioneer Platform/Tray & Heavy Duty Bar-QMHD20-QMW10
Vortex Bar-QMVA15-QMW10
Vortex Bar-QMVA10
Pioneer Platform/Tray & Heavy Duty Bar-QMHD05
Pioneer Platform/Tray & Heavy Duty Bar-QMHD15
For a 3 crossbar system or Pioneer Tray additional fi t kits are required to have all crossbars level, refer below. Meas-ure 80mm from rear edge of the track to the third or rear RLT600 base, then 700mm between third and second base and 605mm between second and fi rst RLT600 base.
80mm 605mm700mm
3 Crossbar and Pioneer Tray Setup
RTS538 ISUZU MU-X LS-T Trackmount


![SummaryMap ward2 [Converted] · 2019-10-01 · MU-2 MU-6 MU-16 MU-14 MU-6 MU-2 MU-20 MU-9 MU-4 MU-13 MU-15 MU-13 MU-16 MU-18 MU-22 MU-19 MU-16 MU-27 MU-4 MU-3A MU-17 MU-13 MU-4](https://img.pdfslide.us/doc/110x75/5f5e4f591750d150e9633369/summarymap-ward2-converted-2019-10-01-mu-2-mu-6-mu-16-mu-14-mu-6-mu-2-mu-20.jpg)