Embed Size (px)
Citation preview
RTI® DDS Toolkit for LabVIEW™
Getting Started Guide
Version 1.4.0
© 2013-2016 Real-Time Innovations, Inc. All rights reserved.
Printed in U.S.A. First printing. May 2016.
TrademarksReal-Time Innovations, RTI, NDDS, RTI Data Distribution Service, DataBus, Connext, Micro DDS, the RTI logo, 1RTI and the phrase, “Your Systems. Working as one,” are registered trademarks, trademarks or service marks of Real-Time Innovations, Inc. All other trademarks belong to their respective owners.
Copy and Use RestrictionsNo part of this publication may be reproduced, stored in a retrieval system, or transmitted in any form (including electronic, mechanical, photocopy, and facsimile) without the prior written permission of Real-Time Innovations, Inc. The software described in this document is furnished under and subject to the RTI software license agreement. The software may be used or copied only under the terms of the license agreement.
Technical Support Real-Time Innovations, Inc.232 E. Java Drive Sunnyvale, CA 94089Phone: (408) 990-7444Email: [email protected]: https://support.rti.com/
CONTENTS
1 Installation1.1 Introduction ........................................................................................................................................... 1-11.2 Installing ................................................................................................................................................. 1-1
1.2.1 Installing RTI DDS Toolkit for LabVIEW Support Files on a Target ................................... 1-31.3 Verifying Installation ............................................................................................................................ 1-6
1.3.1 LabVIEW Functions Palette ...................................................................................................... 1-71.3.2 LabVIEW Controls Palette......................................................................................................... 1-8
1.4 License Management ............................................................................................................................ 1-81.4.1 Activating the Add-on License on Windows Systems .......................................................... 1-81.4.2 License Management on LabVIEW RT Targets .....................................................................1-11
1.4.2.1 Installing a New License File on NI Linux Targets...............................................1-111.5 Upgrading .............................................................................................................................................1-11
1.5.1 Additional Steps when Upgrading from a Release Older than 1.2.0.90 ............................1-111.5.2 Additional Steps when Upgrading from a Release Older than 1.3.0.91 ........................... 1-14
1.6 Uninstalling.......................................................................................................................................... 1-151.6.1 Uninstalling RTI DDS Toolkit for LabVIEW Support Files from LabVIEW RT Targets. 1-16
1.7 LabVIEW Examples ............................................................................................................................ 1-171.8 Product Support .................................................................................................................................. 1-18
2 Communication Models2.1 Publish/Subscribe – A Simple Analogy ............................................................................................ 2-22.2 The DDS Paradigm ............................................................................................................................... 2-32.3 Quality of Service (QoS) ....................................................................................................................... 2-42.4 DDS—Example Application................................................................................................................ 2-5
3 A Simple Read/Write Example3.1 Publishing a String in DDS .................................................................................................................. 3-23.2 Subscribing to a String in DDS............................................................................................................ 3-23.3 What is Happening? ............................................................................................................................. 3-33.4 Usage Notes ........................................................................................................................................... 3-5
3.4.1 Preventing ‘Application Failed to Start’ Error when Opening Example VIs..................... 3-53.4.2 Communicating Unbounded Entities...................................................................................... 3-53.4.3 Preventing 'Type Code Incorrect' Error when Working with Arrays.................................. 3-53.4.4 Troubleshooting with Ping and Spy......................................................................................... 3-6
iii
4 Tutorial4.1 Lesson 1—Using DDS to Publish and Subscribe to Simple Data (Numeric) ............................... 4-1
4.1.1 Developing a VI to Publish Simple Data (Numeric) ............................................................. 4-24.1.1.1 Create a Writer Object to Publish a Numeric (DBL) .............................................. 4-24.1.1.2 Publish a Numeric (DBL)........................................................................................... 4-34.1.1.3 Release the Writer Object ........................................................................................... 4-4
4.1.2 Creating a VI to Subscribe to Simple Data (Numeric)........................................................... 4-54.1.2.1 Create a Reader Object to Subscribe to a Numeric (DBL)..................................... 4-54.1.2.2 Subscribe to a Numeric (DBL)................................................................................... 4-64.1.2.3 Release the Reader Object .......................................................................................... 4-7
4.1.3 Testing........................................................................................................................................... 4-84.2 Lesson 2—Using Templates to Publish and Subscribe to Complex Data (Clusters) ................... 4-9
4.2.1 Creating a VI to Publish a Cluster .......................................................................................... 4-104.2.2 Creating a VI to Subscribe to a Cluster.................................................................................. 4-124.2.3 Testing......................................................................................................................................... 4-15
4.3 Lesson 3—Filtering Data .................................................................................................................... 4-154.4 Lesson 4—Reading Only New Samples .......................................................................................... 4-184.5 Lesson 5—Using Keyed Types (RTI Shapes Demo) ....................................................................... 4-21
4.5.1 Working with Shapes Demo.................................................................................................... 4-214.5.2 Publishing a Shape (Square).................................................................................................... 4-224.5.3 Subscribing to Shapes .............................................................................................................. 4-24
4.6 Lesson 6—Used Nested and Multiple Keys.................................................................................... 4-274.6.1 Adding Multiple Top-Level Fields as Keys .......................................................................... 4-274.6.2 Adding Internal Cluster Fields as Keys (Nested Keys)....................................................... 4-28
4.7 Lesson 7—Reading All Samples (Reliable Communication)........................................................ 4-294.7.1 Writing and Reading Reliably Using the Default Configuration ...................................... 4-29
4.7.1.1 Writing Reliably ........................................................................................................ 4-294.7.1.2 Reading Reliably ....................................................................................................... 4-30
4.7.2 Writing and Reading using Strict Reliability ........................................................................ 4-324.7.2.1 Writing in Strictly Reliable Mode ........................................................................... 4-334.7.2.2 Reading in Strictly Reliable Mode .......................................................................... 4-34
4.8 Lesson 8—Debugging Your RTI Connext DDS Application......................................................... 4-364.8.1 Debugging an Application Using the Administration Panel ............................................. 4-36
4.8.1.1 Logging Messages Manually................................................................................... 4-374.8.1.2 Output Provided by RTI Monitor using Distributed Logger ............................. 4-39
4.8.2 Adapting a VI to Use RTI Monitoring Library ..................................................................... 4-394.8.2.1 Output Provided by RTI Monitor........................................................................... 4-40
4.9 Lesson 9—Using RTI DDS Toolkit on NI Targets (cRIO-9068 Example)..................................... 4-424.10 Reviewing Completed Solutions....................................................................................................... 4-45
5 Loading Quality of Service Profiles
6 Advanced Concepts and Settings6.1 Default Configuration: DDS Entities Created by Simple Create subVIs ...................................... 6-16.2 How to Configure Advanced Writer Settings ................................................................................... 6-36.3 How to Configure Advanced Reader Settings.................................................................................. 6-46.4 How to Debug an RTI Connext DDS LabVIEW Application ......................................................... 6-5
6.4.1 RTI DDS Toolkit Administration Panel (for Windows Systems only) ................................ 6-66.4.1.1 Configuration Section................................................................................................. 6-86.4.1.2 DDS State Info.............................................................................................................. 6-9
iv
6.4.1.3 Debugging Table ....................................................................................................... 6-106.4.2 Debugging SubVIs on Real-Time Targets and Windows Systems .................................... 6-10
6.4.2.1 Get Configuration Parameters ................................................................................ 6-106.4.2.2 Set Configuration Parameters ..................................................................................6-116.4.2.3 Get DL Configuration Parameters...........................................................................6-116.4.2.4 Configure Distributed Logger..................................................................................6-116.4.2.5 DDS State Info............................................................................................................ 6-126.4.2.6 Reading Logged Messages ...................................................................................... 6-12
6.4.3 Logging Messages from LabVIEW......................................................................................... 6-13
A VI DescriptionsA.1 Controls Palette Types ......................................................................................................................... A-1A.2 Functions Palette .................................................................................................................................. A-2
A.2.1 Writer ........................................................................................................................................... A-2A.2.2 Reader.......................................................................................................................................... A-4A.2.3 Complex-Type Templates ......................................................................................................... A-6
A.3 Tools ....................................................................................................................................................... A-6A.3.1 DDS Debugging SubPalette ..................................................................................................... A-7
B Creation and Release of DDS Entities
C Supported Data Types and Corresponding IDLC.1 Corresponding IDL for Complex Data Types .................................................................................. C-4
C.1.1 Clusters........................................................................................................................................ C-4C.1.2 Enums.......................................................................................................................................... C-5
D File Folders Installed within LabVIEWD.1 File Folders on Windows Systems ..................................................................................................... D-1D.2 File Folders on NI Linux Targets........................................................................................................ D-2
E TroubleshootingE.1 Enabling Debugging Mode..................................................................................................................E-1E.2 Error Codes and Possible Solutions....................................................................................................E-1E.3 Running without an Active Network Interface ................................................................................E-8E.4 Error Installing RTI DDS Toolkit for LabVIEW RT Support ...........................................................E-8
v
Chapter 1 Installation
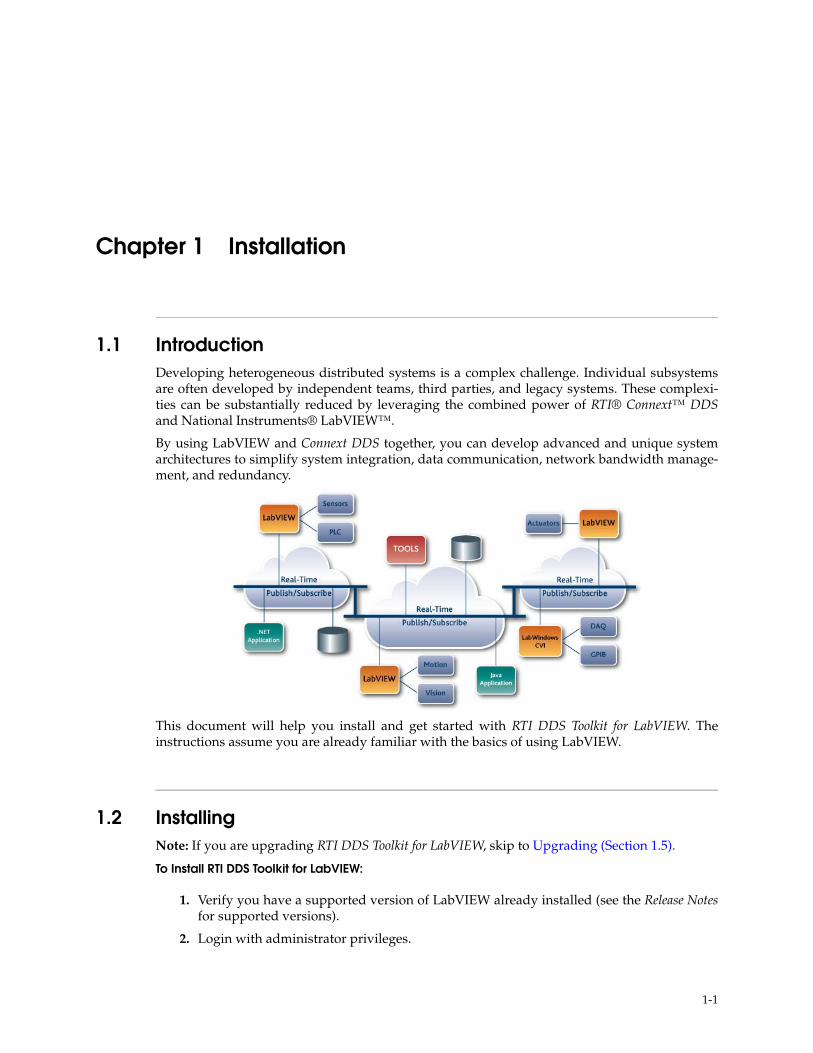
1.1 IntroductionDeveloping heterogeneous distributed systems is a complex challenge. Individual subsystems are often developed by independent teams, third parties, and legacy systems. These complexi-ties can be substantially reduced by leveraging the combined power of RTI® Connext™ DDSand National Instruments® LabVIEW™.
By using LabVIEW and Connext DDS together, you can develop advanced and unique system architectures to simplify system integration, data communication, network bandwidth manage-ment, and redundancy.
This document will help you install and get started with RTI DDS Toolkit for LabVIEW. The instructions assume you are already familiar with the basics of using LabVIEW.
1.2 InstallingNote: If you are upgrading RTI DDS Toolkit for LabVIEW, skip to Upgrading (Section 1.5).
To Install RTI DDS Toolkit for LabVIEW:
1. Verify you have a supported version of LabVIEW already installed (see the Release Notesfor supported versions).
2. Login with administrator privileges.
1-1
Installing
3. Install the JKI LabVIEW VI Package Manager (VIPM) if you have not done so already (available here: http://jki.net/vipm/download). It is typically installed in C:\Program Files (x86)\JKI\VI Package Manager.
4. Ensure that LabVIEW is not running.
5. Launch the VIPM, then:
a. From the File menu, select Open Package File(s).
b. Locate and open the RTI DDS Toolkit for LabVIEW .vip file provided by RTI, such as real-time_innovations_lvdds-<version>.vip.
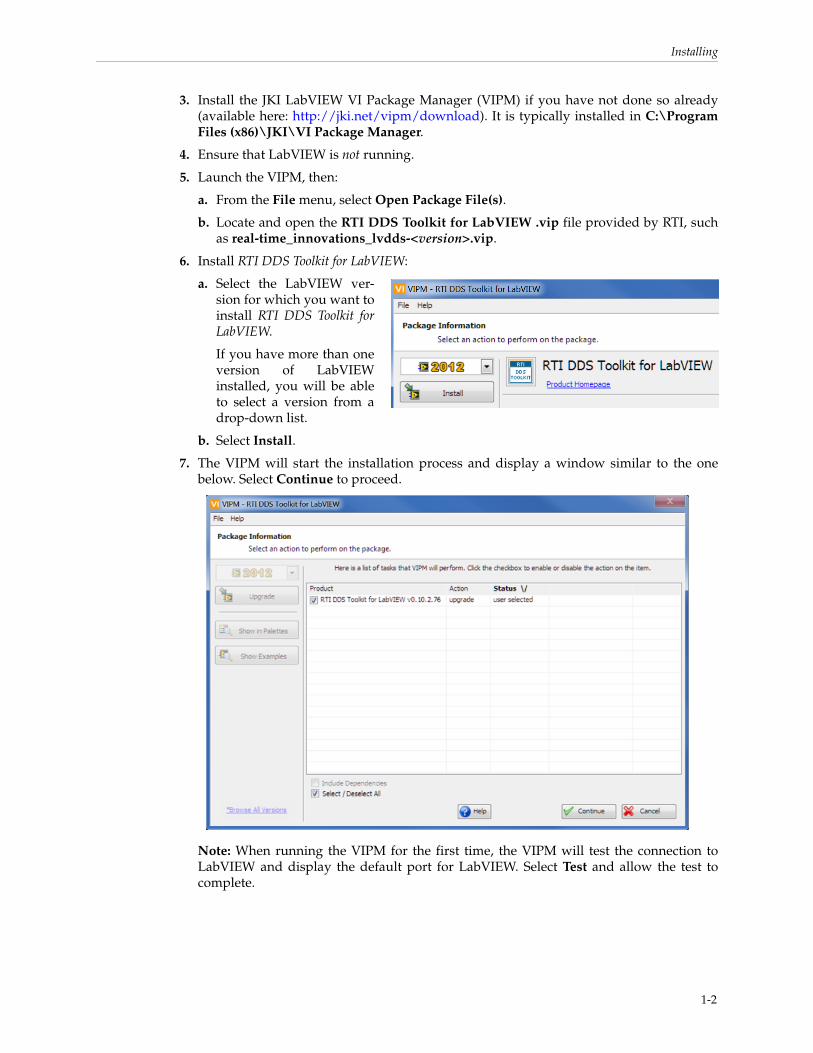
6. Install RTI DDS Toolkit for LabVIEW:
a. Select the LabVIEW ver-sion for which you want to install RTI DDS Toolkit for LabVIEW.
If you have more than one version of LabVIEW installed, you will be able to select a version from a drop-down list.
b. Select Install.
7. The VIPM will start the installation process and display a window similar to the one below. Select Continue to proceed.
Note: When running the VIPM for the first time, the VIPM will test the connection to LabVIEW and display the default port for LabVIEW. Select Test and allow the test to complete.
1-2
Installing
During this step, the VIPM launches the LabVIEW version selected for the RTI DDS Tool-kit for LabVIEW installation. The LabVIEW application will appear in the Windows Task Bar at the bottom of your screen. You may need to open the LabVIEW application from the Task Bar and select Launch LabVIEW before the VIPM test times out.
8. If offered, select Finish when the installation is complete.
1.2.1 Installing RTI DDS Toolkit for LabVIEW Support Files on a Target
Notes:
❏ You need administrator privileges to install the toolkit.
❏ Your target will be rebooted as part of the installation process.
To install Real-Time target support for RTI DDS Toolkit for LabVIEW:
RTI DDS Toolkit for LabVIEW support files allow you to deploy VIs using the RTI DDS Toolkit for LabVIEW into your target. The following instructions assume you have JKI VIPM and LabVIEW installed.
1. Ensure that LabVIEW is not running.
2. Launch the VIPM as administrator, then:
a. If you downloaded the RTI DDS Toolkit for LabVIEW support files, open them from the File menu by selecting Open Package File(s). Then locate and open the file provided by RTI, such as real-time_innovations_lvdds_rt_support-<version>.vip.
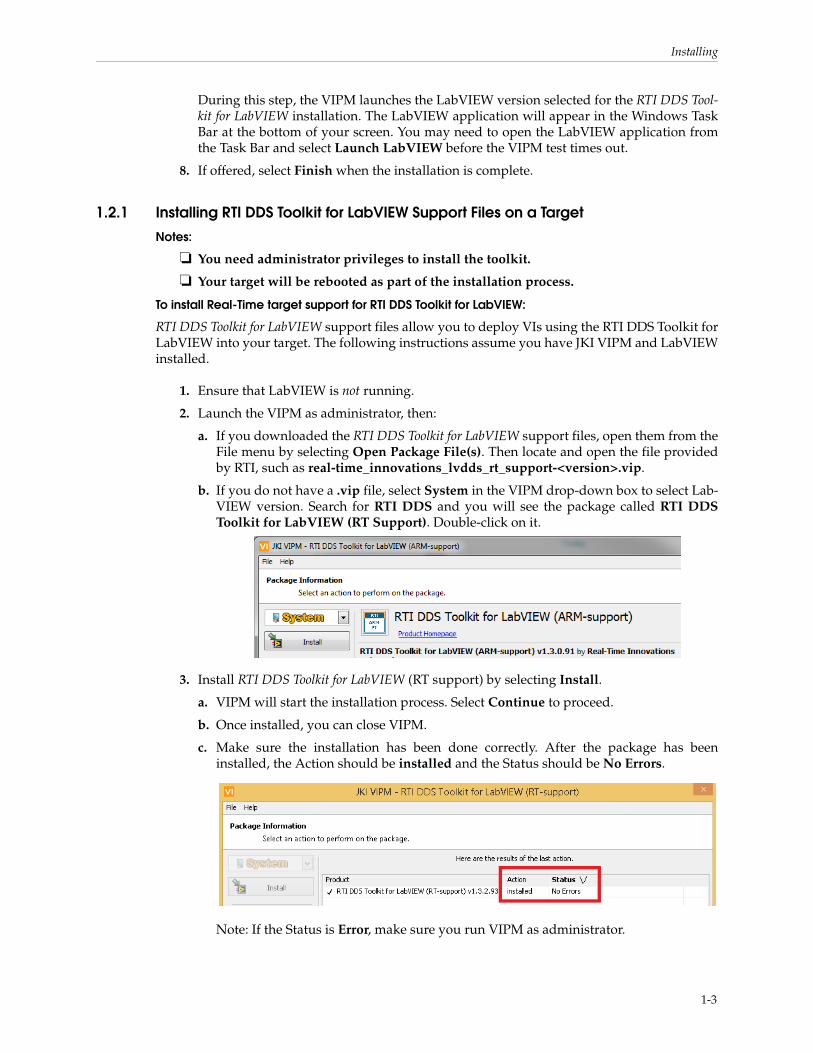
b. If you do not have a .vip file, select System in the VIPM drop-down box to select Lab-VIEW version. Search for RTI DDS and you will see the package called RTI DDS Toolkit for LabVIEW (RT Support). Double-click on it.
3. Install RTI DDS Toolkit for LabVIEW (RT support) by selecting Install.
a. VIPM will start the installation process. Select Continue to proceed.
b. Once installed, you can close VIPM.
c. Make sure the installation has been done correctly. After the package has been installed, the Action should be installed and the Status should be No Errors.
Note: If the Status is Error, make sure you run VIPM as administrator.
1-3
Installing
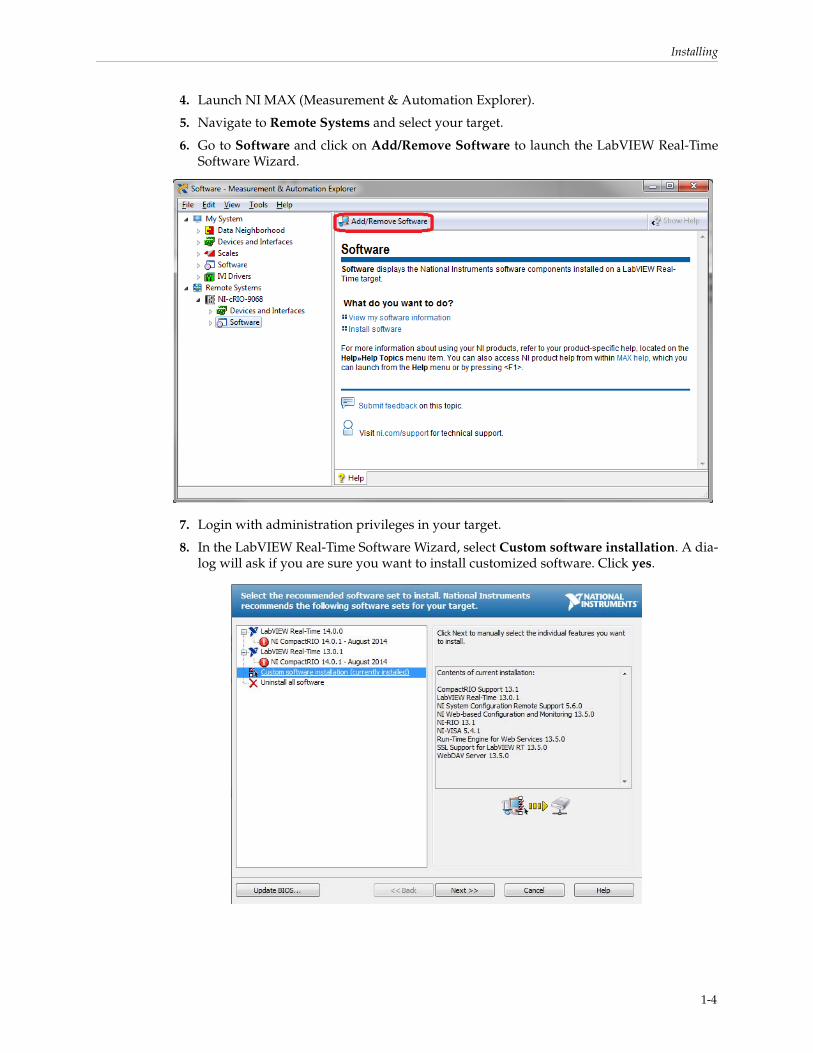
4. Launch NI MAX (Measurement & Automation Explorer).
5. Navigate to Remote Systems and select your target.
6. Go to Software and click on Add/Remove Software to launch the LabVIEW Real-Time Software Wizard.
7. Login with administration privileges in your target.
8. In the LabVIEW Real-Time Software Wizard, select Custom software installation. A dia-log will ask if you are sure you want to install customized software. Click yes.
1-4
Installing
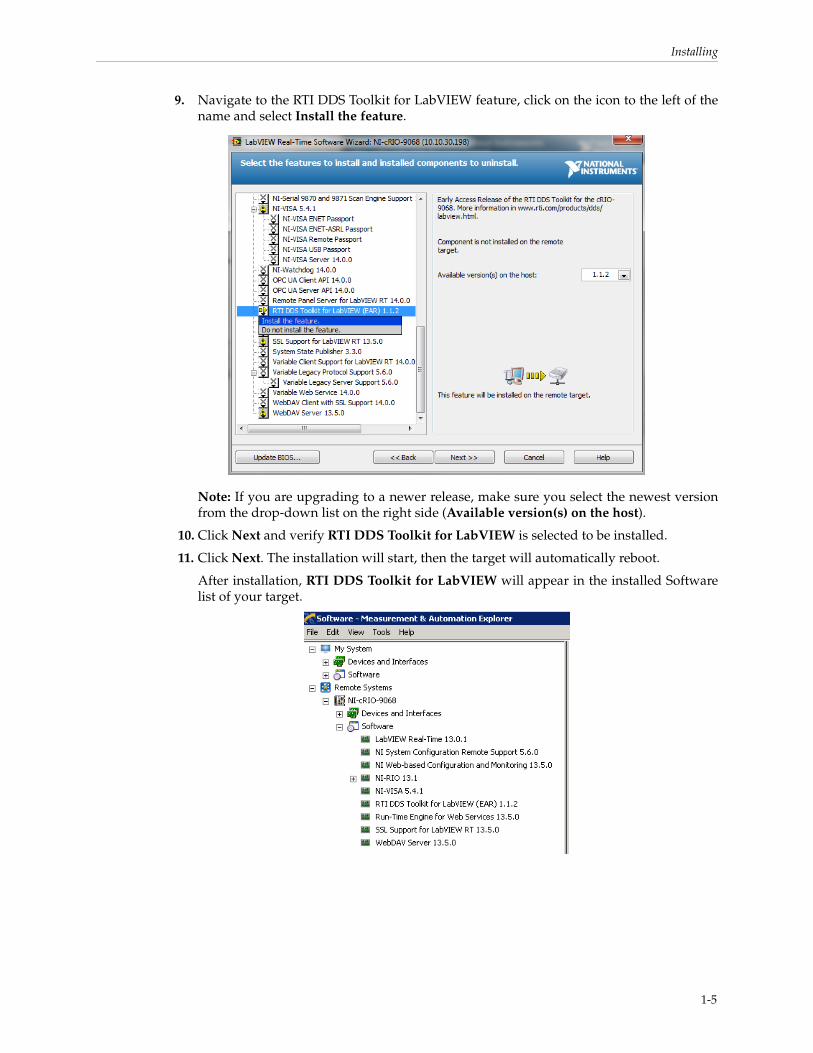
9. Navigate to the RTI DDS Toolkit for LabVIEW feature, click on the icon to the left of the name and select Install the feature.
Note: If you are upgrading to a newer release, make sure you select the newest version from the drop-down list on the right side (Available version(s) on the host).
10. Click Next and verify RTI DDS Toolkit for LabVIEW is selected to be installed.
11. Click Next. The installation will start, then the target will automatically reboot.
After installation, RTI DDS Toolkit for LabVIEW will appear in the installed Software list of your target.
1-5
Verifying Installation
1.3 Verifying Installation
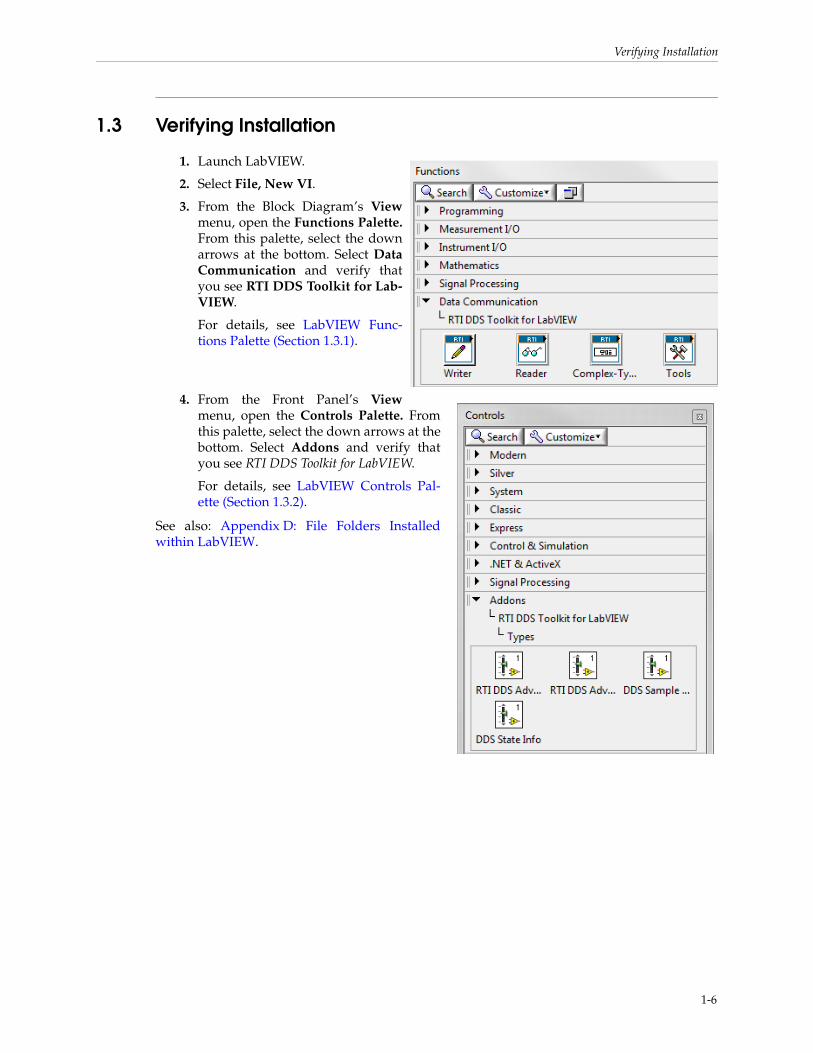
1. Launch LabVIEW.
2. Select File, New VI.
3. From the Block Diagram’s Viewmenu, open the Functions Palette.From this palette, select the down arrows at the bottom. Select Data Communication and verify that you see RTI DDS Toolkit for Lab-VIEW.
For details, see LabVIEW Func-tions Palette (Section 1.3.1).
4. From the Front Panel’s Viewmenu, open the Controls Palette. From this palette, select the down arrows at the bottom. Select Addons and verify that you see RTI DDS Toolkit for LabVIEW.
For details, see LabVIEW Controls Pal-ette (Section 1.3.2).
See also: Appendix D: File Folders Installed within LabVIEW.
1-6
Verifying Installation
1.3.1 LabVIEW Functions Palette
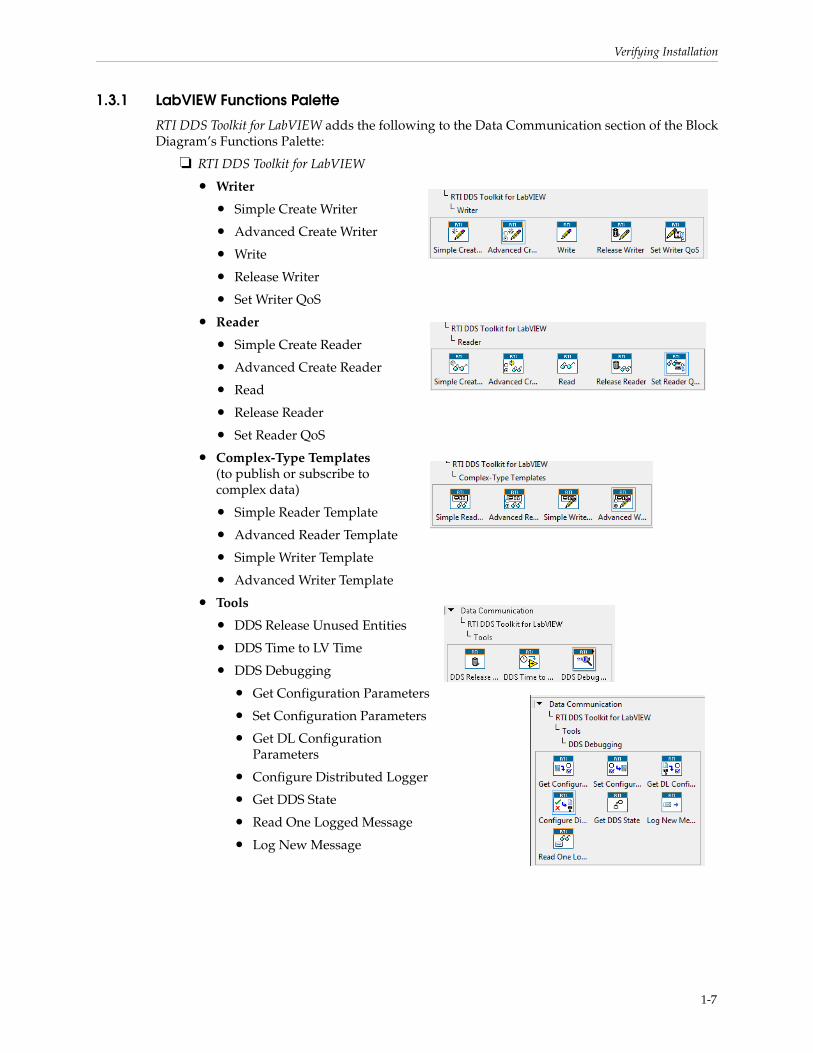
RTI DDS Toolkit for LabVIEW adds the following to the Data Communication section of the Block Diagram’s Functions Palette:
❏ RTI DDS Toolkit for LabVIEW
• Writer
• Simple Create Writer
• Advanced Create Writer
• Write
• Release Writer
• Set Writer QoS
• Reader
• Simple Create Reader
• Advanced Create Reader
• Read
• Release Reader
• Set Reader QoS
• Complex-Type Templates (to publish or subscribe to complex data)
• Simple Reader Template
• Advanced Reader Template
• Simple Writer Template
• Advanced Writer Template
• Tools
• DDS Release Unused Entities
• DDS Time to LV Time
• DDS Debugging
• Get Configuration Parameters
• Set Configuration Parameters
• Get DL Configuration Parameters
• Configure Distributed Logger
• Get DDS State
• Read One Logged Message
• Log New Message
1-7
License Management
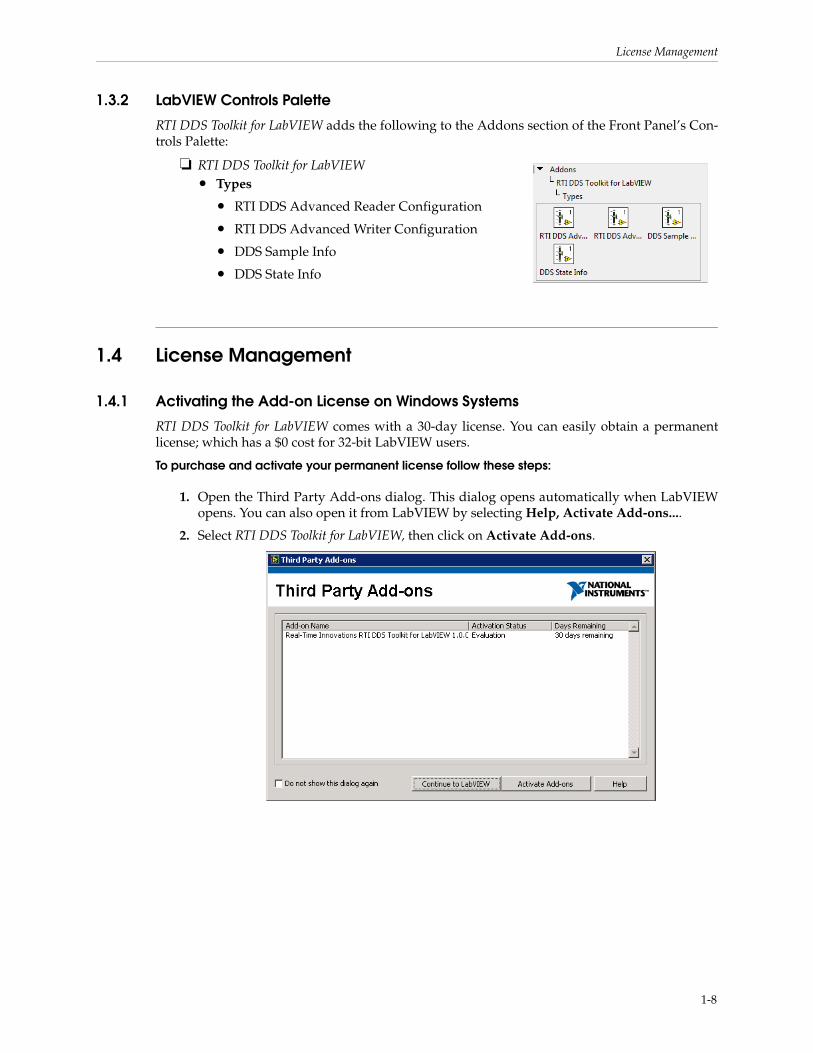
1.3.2 LabVIEW Controls Palette
RTI DDS Toolkit for LabVIEW adds the following to the Addons section of the Front Panel’s Con-trols Palette:
❏ RTI DDS Toolkit for LabVIEW• Types
• RTI DDS Advanced Reader Configuration
• RTI DDS Advanced Writer Configuration
• DDS Sample Info
• DDS State Info
1.4 License Management
1.4.1 Activating the Add-on License on Windows Systems
RTI DDS Toolkit for LabVIEW comes with a 30-day license. You can easily obtain a permanent license; which has a $0 cost for 32-bit LabVIEW users.
To purchase and activate your permanent license follow these steps:
1. Open the Third Party Add-ons dialog. This dialog opens automatically when LabVIEW opens. You can also open it from LabVIEW by selecting Help, Activate Add-ons....
2. Select RTI DDS Toolkit for LabVIEW, then click on Activate Add-ons.
1-8
License Management
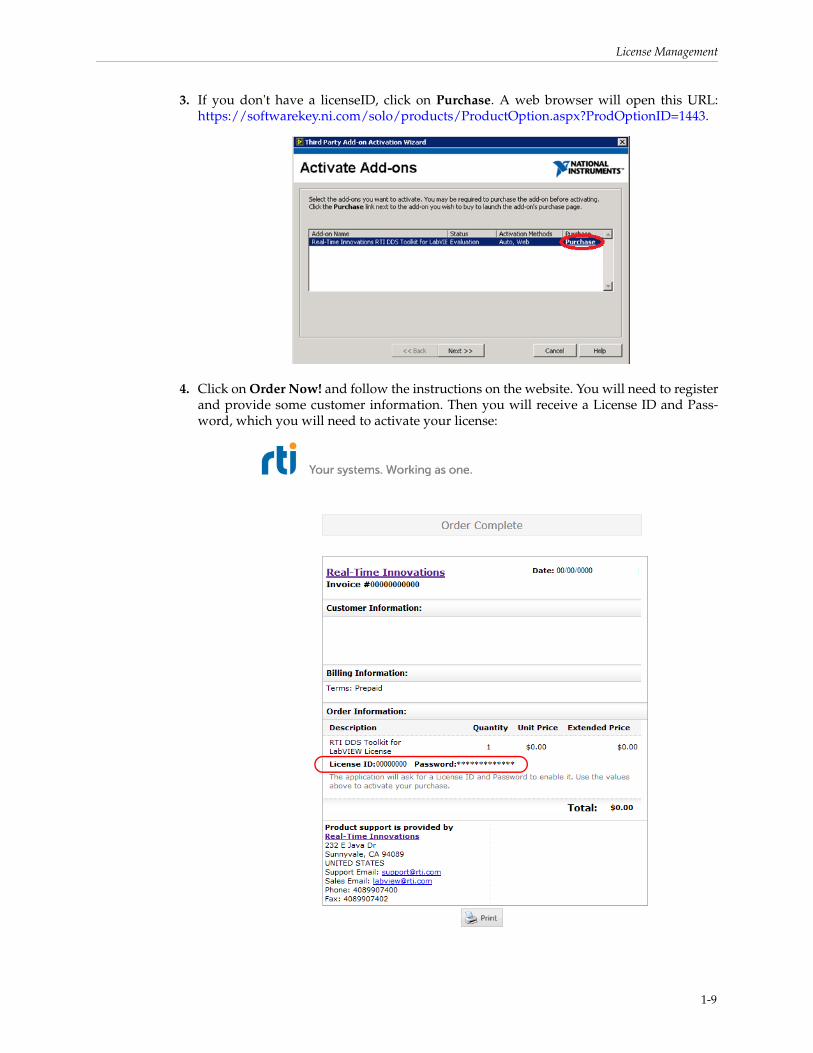
3. If you don't have a licenseID, click on Purchase. A web browser will open this URL: https://softwarekey.ni.com/solo/products/ProductOption.aspx?ProdOptionID=1443.
4. Click on Order Now! and follow the instructions on the website. You will need to register and provide some customer information. Then you will receive a License ID and Pass-word, which you will need to activate your license:
1-9
License Management
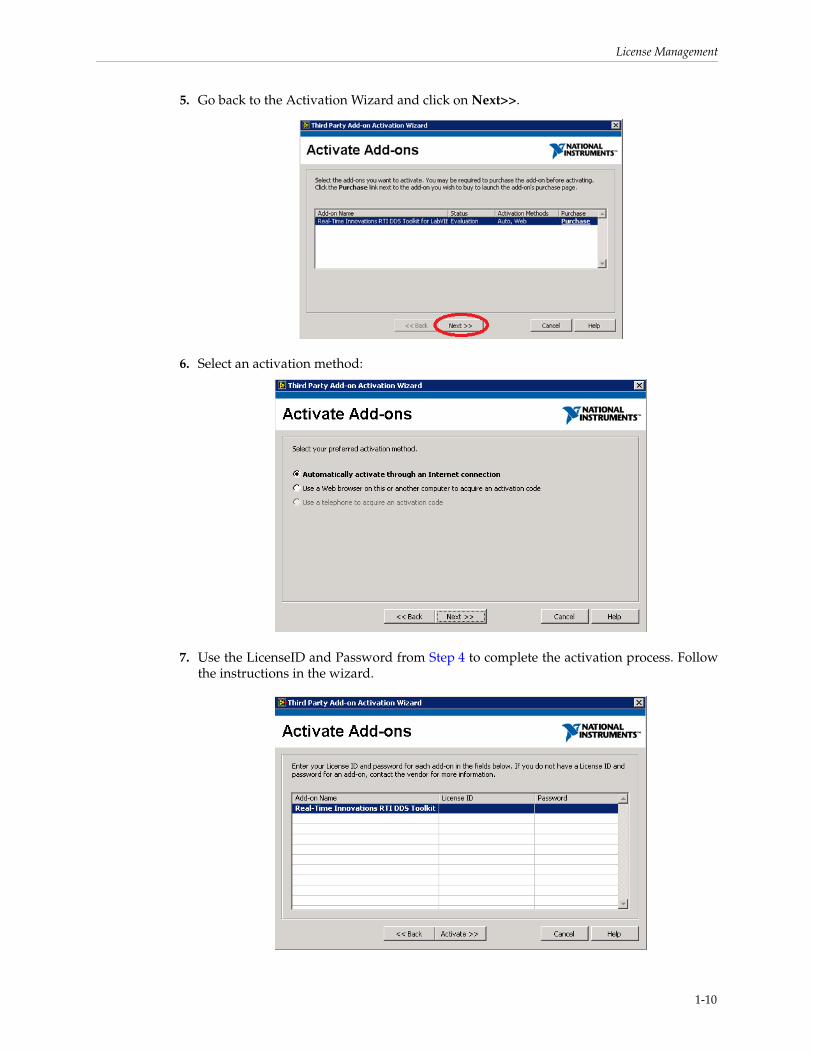
5. Go back to the Activation Wizard and click on Next>>.
6. Select an activation method:
7. Use the LicenseID and Password from Step 4 to complete the activation process. Follow the instructions in the wizard.
1-10
Upgrading
1.4.2 License Management on LabVIEW RT Targets
In general, RTI DDS Toolkit for LabVIEW requires a license file to run on a LabVIEW RT target. Our target licenses are associated to the target's MAC address, so each board requires its own license. This is why you will need to provide that MAC address as part of the license request process.
After purchasing the RTI DDS Toolkit for LabVIEW support files for your target, you will receive an email containing a Product Activation Code. Use this code and your target’s MAC address to request a license file in this website: www.rti.com/go/labview-license-request.
1.4.2.1 Installing a New License File on NI Linux Targets
After requesting your license as explained above, you will receive a new license file by email. Copy the license file to the following folder in your NI Linux target:
/home/lvuser/rti/rti_license.dat
You can copy the file using Secured FTP directly to your target. Use any FTP Client that sup-ports sftp protocol such as Filezilla and connect directly to your target’s IP. You will be prompt to introduce your user name and password.
If an old license file is already installed in the above folder, please replace it with the new one.
1.5 Upgrading If you have already installed RTI DDS Toolkit for LabVIEW and are upgrading to a newer release:
1. Login with administrator privileges.
2. Ensure that LabVIEW is not running.
3. Launch the VIPM, then:
a. Select File, Open Package File(s)
b. Find and open the latest RTI DDS Toolkit for LabVIEW .vip file
4. Upgrade RTI DDS Toolkit for LabVIEW
a. Select the LabVIEW version for which you want to upgrade RTI DDS Toolkit for Lab-VIEW.
• If you have more than one version of LabVIEW installed, you will be able to select the LabVIEW version from the LabVIEW version drop down list.
• The VIPM allows you to view all versions of RTI DDS Toolkit for LabVIEW available to your system by selecting *Browse All Versions in the lower-left corner.
b. Select Upgrade.
5. The VIPM will start the installation process. Select Continue to proceed.
6. If prompted, select Finish when the installation is complete.
1.5.1 Additional Steps when Upgrading from a Release Older than 1.2.0.90
If you have upgraded from a version previous to 1.2.0.90, you will need to follow these steps to upgrade your VIs to a newer version. Follow these instructions after upgrading the toolkit.
1-11
Upgrading
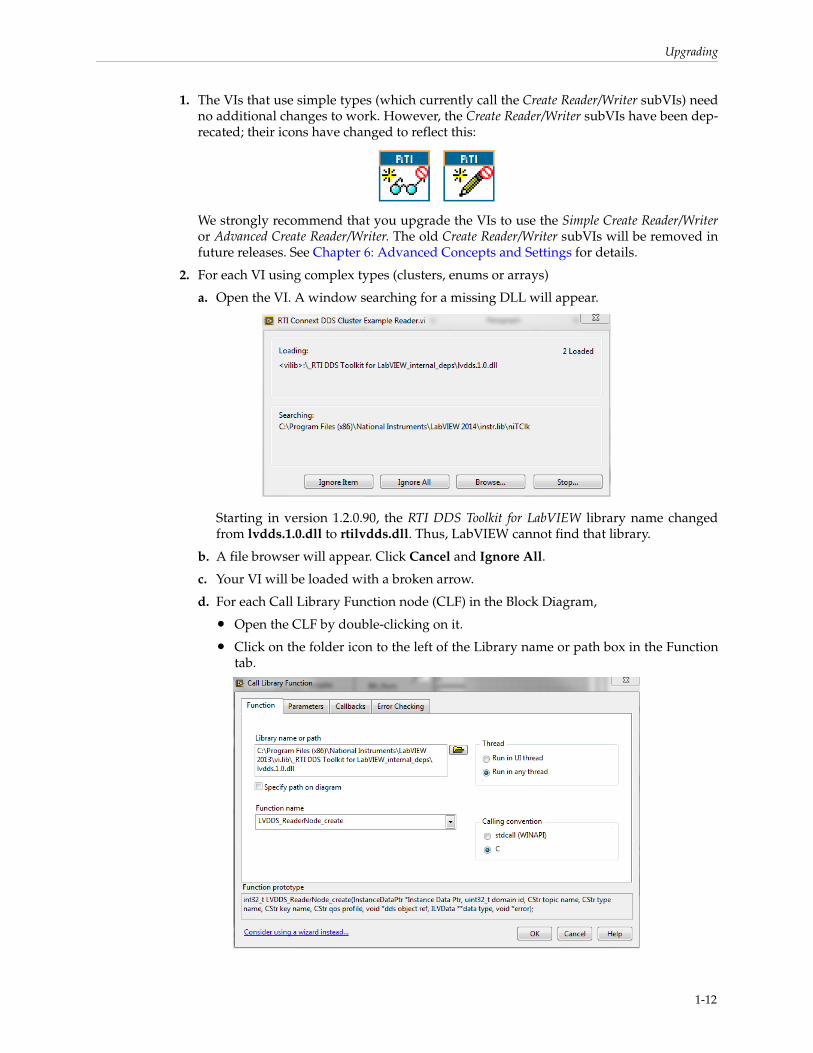
1. The VIs that use simple types (which currently call the Create Reader/Writer subVIs) need no additional changes to work. However, the Create Reader/Writer subVIs have been dep-recated; their icons have changed to reflect this:
We strongly recommend that you upgrade the VIs to use the Simple Create Reader/Writer or Advanced Create Reader/Writer. The old Create Reader/Writer subVIs will be removed in future releases. See Chapter 6: Advanced Concepts and Settings for details.
2. For each VI using complex types (clusters, enums or arrays)
a. Open the VI. A window searching for a missing DLL will appear.
Starting in version 1.2.0.90, the RTI DDS Toolkit for LabVIEW library name changed from lvdds.1.0.dll to rtilvdds.dll. Thus, LabVIEW cannot find that library.
b. A file browser will appear. Click Cancel and Ignore All.
c. Your VI will be loaded with a broken arrow.
d. For each Call Library Function node (CLF) in the Block Diagram,
• Open the CLF by double-clicking on it.
• Click on the folder icon to the left of the Library name or path box in the Function tab.
1-12
Upgrading
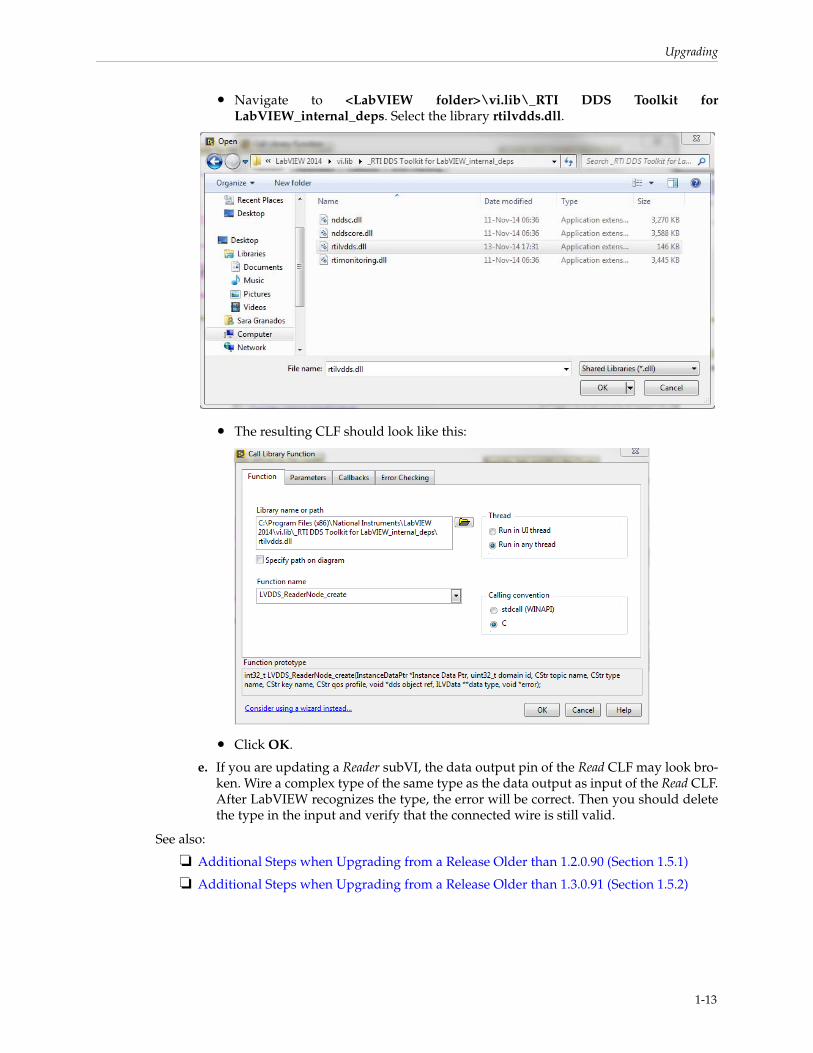
• Navigate to <LabVIEW folder>\vi.lib\_RTI DDS Toolkit for LabVIEW_internal_deps. Select the library rtilvdds.dll.
• The resulting CLF should look like this:
• Click OK.
e. If you are updating a Reader subVI, the data output pin of the Read CLF may look bro-ken. Wire a complex type of the same type as the data output as input of the Read CLF. After LabVIEW recognizes the type, the error will be correct. Then you should delete the type in the input and verify that the connected wire is still valid.
See also:
❏ Additional Steps when Upgrading from a Release Older than 1.2.0.90 (Section 1.5.1)
❏ Additional Steps when Upgrading from a Release Older than 1.3.0.91 (Section 1.5.2)
1-13

Upgrading
1.5.2 Additional Steps when Upgrading from a Release Older than 1.3.0.91
If you are upgrading from a version older than 1.3.0.91, you must follow these steps to upgrade your VIs to the newer version. Follow these instructions after upgrading the toolkit.
❏ If you are using RTI subVIs: In the writer application, delete the “DDS Write Object Ref-erence” indicator seen below.
❏ If you are using the template for Complex Types (or the CLF node directly) follow these steps (for Readers and Writers applications):
1. Delete the “DDS Write/Read Object Reference” for readers and writers.
2. Modify the Call Library Function Node:
a. Double-click on the node.
b. Select the Parameters tab.
c. Choose “dds object ref”.
d. Change the Type from “Adapt to Type” to ‘Numeric’.
e. Choose the Data Type “Unsigned Pointer-sized Integer”.
1-14
Uninstalling
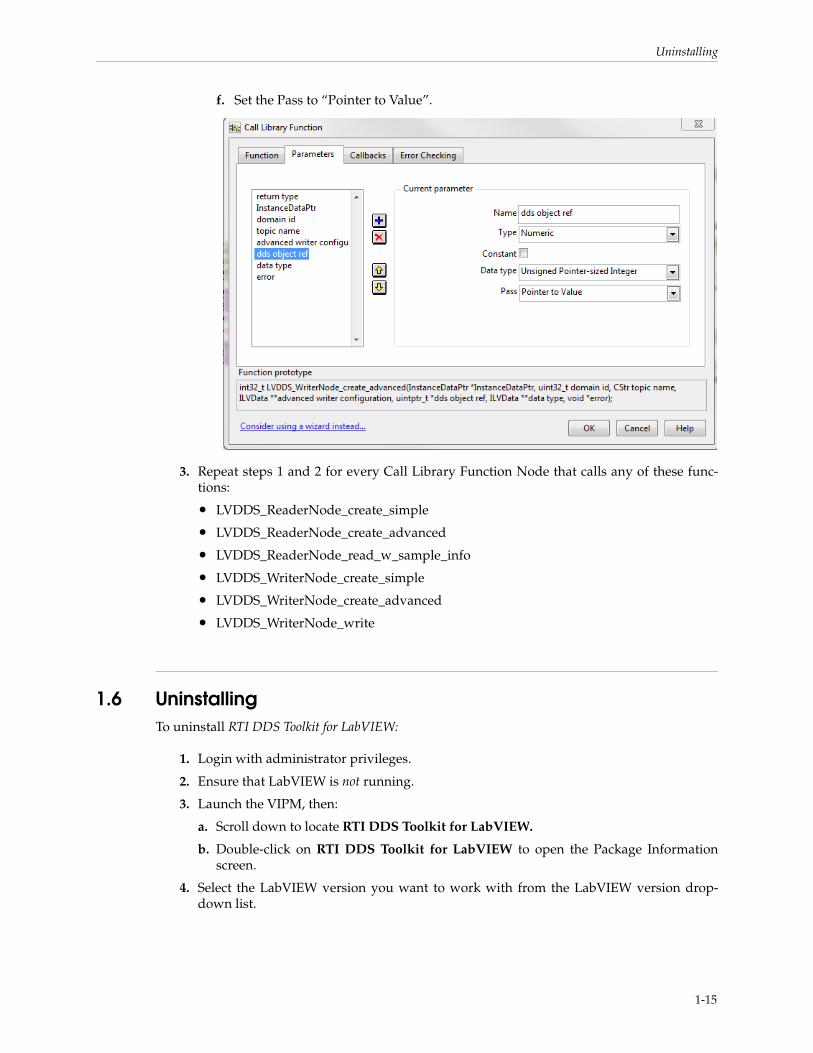
f. Set the Pass to “Pointer to Value”.
3. Repeat steps 1 and 2 for every Call Library Function Node that calls any of these func-tions:
• LVDDS_ReaderNode_create_simple
• LVDDS_ReaderNode_create_advanced
• LVDDS_ReaderNode_read_w_sample_info
• LVDDS_WriterNode_create_simple
• LVDDS_WriterNode_create_advanced
• LVDDS_WriterNode_write
1.6 UninstallingTo uninstall RTI DDS Toolkit for LabVIEW:
1. Login with administrator privileges.
2. Ensure that LabVIEW is not running.
3. Launch the VIPM, then:
a. Scroll down to locate RTI DDS Toolkit for LabVIEW.
b. Double-click on RTI DDS Toolkit for LabVIEW to open the Package Information screen.
4. Select the LabVIEW version you want to work with from the LabVIEW version drop-down list.
1-15
Uninstalling
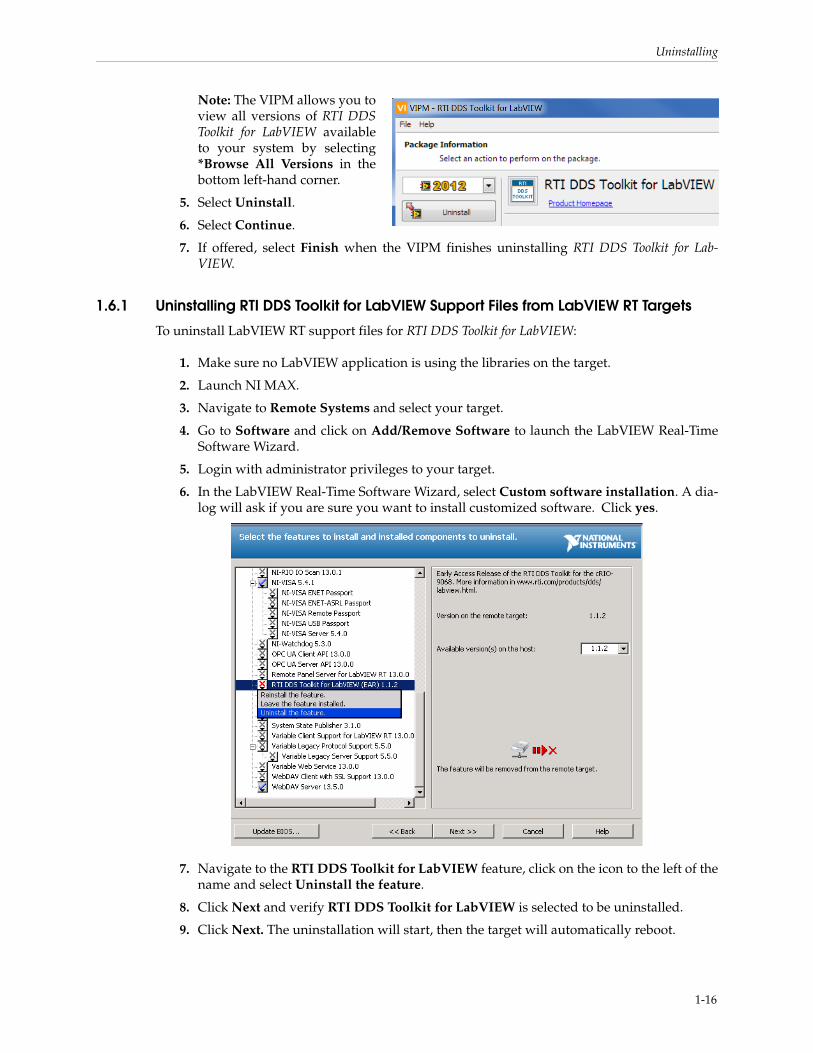
Note: The VIPM allows you to view all versions of RTI DDS Toolkit for LabVIEW available to your system by selecting *Browse All Versions in the bottom left-hand corner.
5. Select Uninstall.
6. Select Continue.
7. If offered, select Finish when the VIPM finishes uninstalling RTI DDS Toolkit for Lab-VIEW.
1.6.1 Uninstalling RTI DDS Toolkit for LabVIEW Support Files from LabVIEW RT Targets
To uninstall LabVIEW RT support files for RTI DDS Toolkit for LabVIEW:
1. Make sure no LabVIEW application is using the libraries on the target.
2. Launch NI MAX.
3. Navigate to Remote Systems and select your target.
4. Go to Software and click on Add/Remove Software to launch the LabVIEW Real-Time Software Wizard.
5. Login with administrator privileges to your target.
6. In the LabVIEW Real-Time Software Wizard, select Custom software installation. A dia-log will ask if you are sure you want to install customized software. Click yes.
7. Navigate to the RTI DDS Toolkit for LabVIEW feature, click on the icon to the left of the name and select Uninstall the feature.
8. Click Next and verify RTI DDS Toolkit for LabVIEW is selected to be uninstalled.
9. Click Next. The uninstallation will start, then the target will automatically reboot.
1-16
LabVIEW Examples
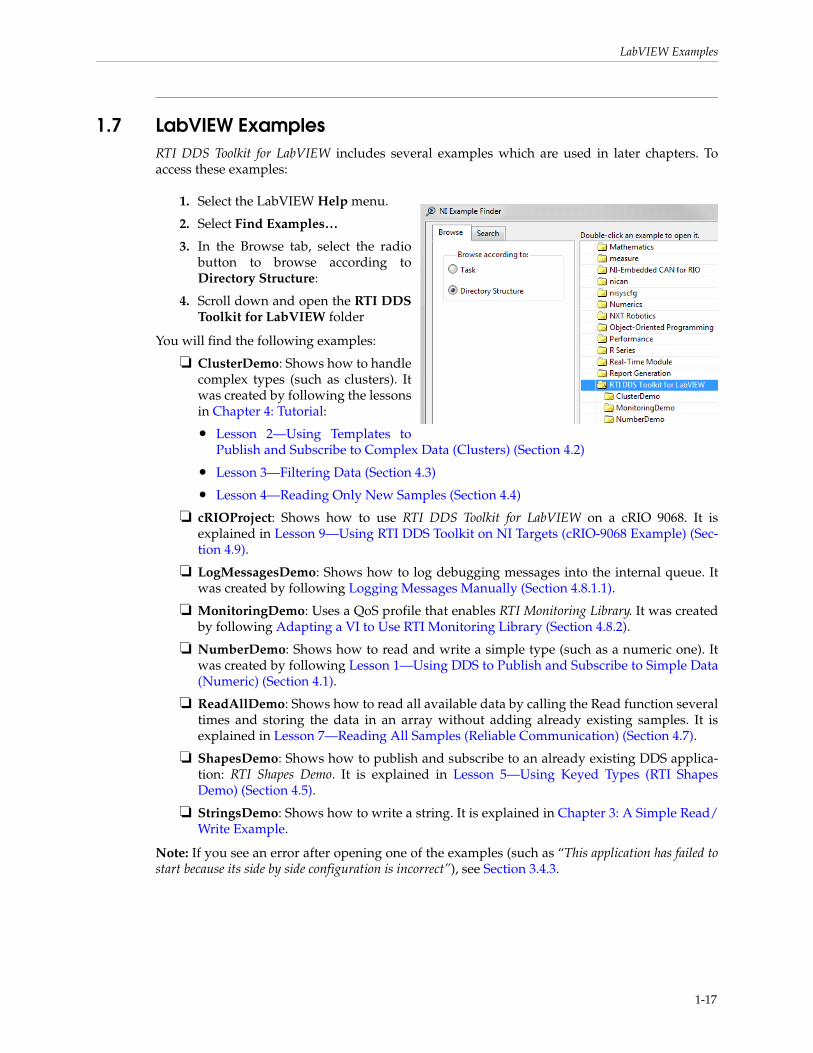
1.7 LabVIEW ExamplesRTI DDS Toolkit for LabVIEW includes several examples which are used in later chapters. To access these examples:
1. Select the LabVIEW Help menu.
2. Select Find Examples…
3. In the Browse tab, select the radio button to browse according to Directory Structure:
4. Scroll down and open the RTI DDS Toolkit for LabVIEW folder
You will find the following examples:
❏ ClusterDemo: Shows how to handle complex types (such as clusters). It was created by following the lessons in Chapter 4: Tutorial:
• Lesson 2—Using Templates to Publish and Subscribe to Complex Data (Clusters) (Section 4.2)
• Lesson 3—Filtering Data (Section 4.3)
• Lesson 4—Reading Only New Samples (Section 4.4)
❏ cRIOProject: Shows how to use RTI DDS Toolkit for LabVIEW on a cRIO 9068. It is explained in Lesson 9—Using RTI DDS Toolkit on NI Targets (cRIO-9068 Example) (Sec-tion 4.9).
❏ LogMessagesDemo: Shows how to log debugging messages into the internal queue. It was created by following Logging Messages Manually (Section 4.8.1.1).
❏ MonitoringDemo: Uses a QoS profile that enables RTI Monitoring Library. It was created by following Adapting a VI to Use RTI Monitoring Library (Section 4.8.2).
❏ NumberDemo: Shows how to read and write a simple type (such as a numeric one). It was created by following Lesson 1—Using DDS to Publish and Subscribe to Simple Data (Numeric) (Section 4.1).
❏ ReadAllDemo: Shows how to read all available data by calling the Read function several times and storing the data in an array without adding already existing samples. It is explained in Lesson 7—Reading All Samples (Reliable Communication) (Section 4.7).
❏ ShapesDemo: Shows how to publish and subscribe to an already existing DDS applica-tion: RTI Shapes Demo. It is explained in Lesson 5—Using Keyed Types (RTI Shapes Demo) (Section 4.5).
❏ StringsDemo: Shows how to write a string. It is explained in Chapter 3: A Simple Read/Write Example.
Note: If you see an error after opening one of the examples (such as “This application has failed to start because its side by side configuration is incorrect”), see Section 3.4.3.
1-17
Product Support
1.8 Product SupportFor technical support or questions about RTI DDS Toolkit for LabVIEW, please visit the RTI Com-munity portal (http://community.rti.com).
If you have an RTI support subscription, please contact [email protected]. If you do not have an RTI support subscription, you can acquire one by contacting [email protected].
1-18
Chapter 2 Communication Models
This section provides an overview of middleware communication paradigms, including pub-lish-subscribe, along with details of the OMG Data Distribution Service (DDS) standard.
Software applications are becoming increasingly distributed. A node in a distributed system must access the right data, know where to send it, and deliver it to the right place at the right time. Simplifying the access to this data would enable a whole new class of distributed applica-tions. The challenge, especially in mission-critical and time-critical networks, is to quickly access and disseminate information to many nodes.
Three major middleware communication paradigms have emerged to meet this need:
❏ Client/Server
❏ Message passing
❏ Publish/Subscribe
Client/Server is fundamentally a many-to-one design that works well for systems with central-ized information, such as databases, transaction processing systems, and central file servers. However, if multiple nodes generate information, client/server architectures require all the information be sent to the server for later redistribution to the clients, resulting in inefficient cli-ent-to-client communication.
The central server is a potential bottleneck and single-point of failure. It also adds inefficiencies and unknown delay (and therefore indeterminism) to the system, because the receiving client does not know when it has a message waiting, so it has to keep polling periodically.
Message Passing architectures work by implementing queues of messages. Processes can create queues, send messages, and service messages that arrive. Message passing makes it easier to exchange information between many nodes in the system. However, applications remain cou-pled. Each message placed in a queue goes to a single consumer and the addition of new con-sumers impacts the network.
In practice, applications find data indirectly by targeting specific sources (e.g., by process ID, "channel", or queue name) on specific nodes. So this architecture does not address how applica-tions know the location of a process/channel, what happens if that process/channel does not exist, etc. The application must determine where to get data, where to send it, and when to per-form the transaction. A message-passing architecture provides a model for the transfer of data, but no model for the data itself.
Publish/Subscribe decouples the producers and consumers of the information. Producer pub-lishes data they have and consumers subscribe to data based on their interests. The publish/subscribe middleware infrastructure is responsible for delivering each message published to all interested consumers. Applications remain decoupled because the presence of new consumers
2-1
Publish/Subscribe – A Simple Analogy
does not perturb existing consumers. Existing consumer’s requirements are met, regardless of how many other consumers subscribe to the same data.
The fundamental communications model implies both discovery (i.e., what data should be sent) and delivery (i.e., when and where to send the data). This design mirrors time-critical and mis-sion-critical information delivery systems in everyday life (e.g., television, radio, magazines and newspapers). The publish/subscribe network architecture is excellent at distributing large quantities of time-critical information quickly, even in the presence of unreliable delivery mech-anisms.
The publish/subscribe architecture maps well to high-performance and real-time communica-tion challenges. Finding the right data becomes straightforward; nodes just declare their interest once and the middleware handles all the details of the network and delivery. Sending the data quickly is also inherent; publishers send data when the data is available. Publish/subscribe is highly efficient because the data flows directly from source (publisher) to destination (sub-scriber) without requiring intermediate servers, brokers, or daemons. Multiple sources and des-tinations are easily defined within the model, providing inherent redundancy and fault tolerance.
Data-Centric Publish/Subscribe (DCPS) middleware, such as the OMG Data Distribution Ser-vice (DDS), defines a data model on top of the publish/subscribe infrastructure, allowing the data to be structured. The schema of the data being published is declared by the application and known to the middleware. Similar to the relational model in databases, each data type (a DDS Topic) has an associated schema and a set of attributes that identify the ‘key’ for that Topic. Data published on that Topic is understood by the middleware, allowing advanced capabilities such as content-based filtering, last value (or history) caching, and applying fine-grained Quality of Service (QoS) separately for each data-object written to the Topic.
In summary,
❏ Client/server middleware is best for centralized data designs and for systems where the dominant communication patter is request-reply, such as file servers and transaction sys-tems.
❏ Message passing, with its "send that there" semantics, maps well to systems with clear and simple data-flow requirements, and requires the application to discover where data resides.
❏ Publish/subscribe, by providing both discovery and messaging, decouples the produc-ers and consumers effectively. DCPS middleware provides publish/subscribe services to an application-defined data-model, allowing fine-grained control of QoS, enabling the infrastructure to do smart-caching of the information and provide content and time fil-tering at the source and destination. The data-centric architecture provides the best decoupling between application components and is best suited for time-critical and mis-sion critical distributed applications.
2.1 Publish/Subscribe – A Simple AnalogyThe publish/subscribe communications model is analogous to that of a traditional magazine or newspaper business model. A Topic represents the kind of publication (data or information), for example “Newspaper” or “Magazine”. If we use the Newspaper as the model, the Key is used to identify each different news corporation (“New York Times”, “San Francisco Chronicle”, “La Strada”, “Le Monde”, etc.). The type specifies the format of the information (how it is encoded). The user data is the contents (text and graphics) of each sample (weekly or daily issues). The middleware is the distribution service (US Postal Service or a paper delivery service) that deliv-
2-2
The DDS Paradigm
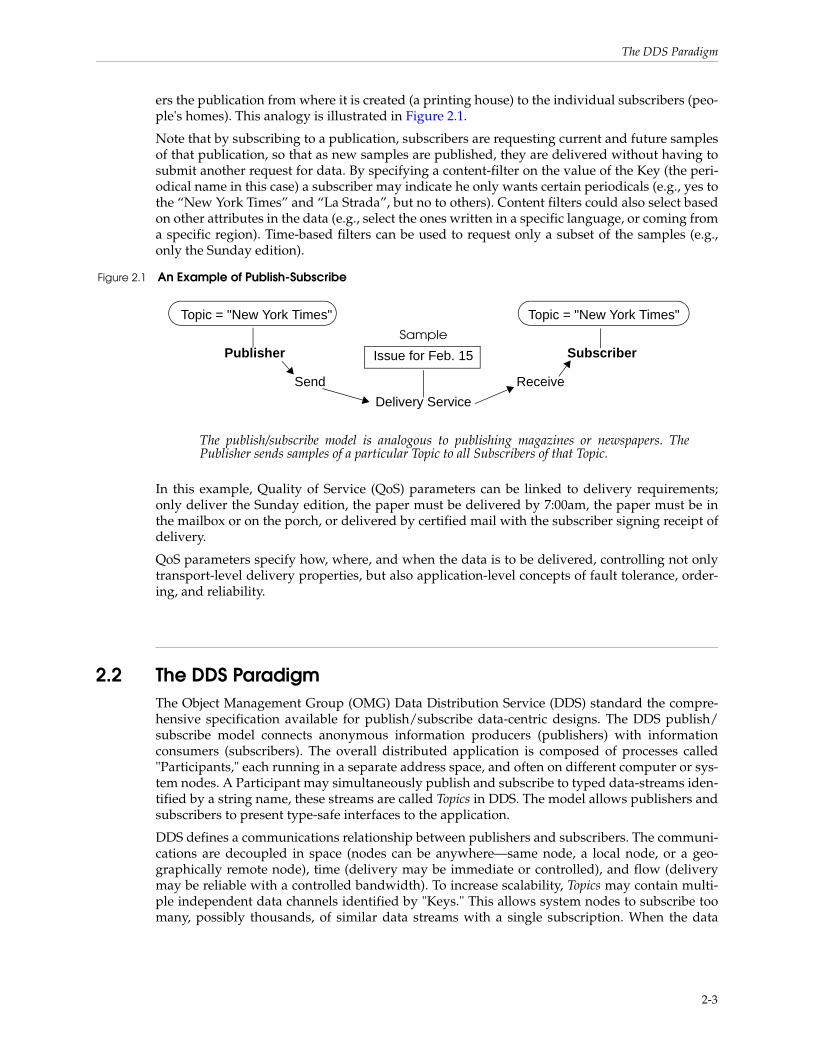
ers the publication from where it is created (a printing house) to the individual subscribers (peo-ple's homes). This analogy is illustrated in Figure 2.1.
Note that by subscribing to a publication, subscribers are requesting current and future samples of that publication, so that as new samples are published, they are delivered without having to submit another request for data. By specifying a content-filter on the value of the Key (the peri-odical name in this case) a subscriber may indicate he only wants certain periodicals (e.g., yes to the “New York Times” and “La Strada”, but no to others). Content filters could also select based on other attributes in the data (e.g., select the ones written in a specific language, or coming from a specific region). Time-based filters can be used to request only a subset of the samples (e.g., only the Sunday edition).
In this example, Quality of Service (QoS) parameters can be linked to delivery requirements; only deliver the Sunday edition, the paper must be delivered by 7:00am, the paper must be in the mailbox or on the porch, or delivered by certified mail with the subscriber signing receipt of delivery.
QoS parameters specify how, where, and when the data is to be delivered, controlling not only transport-level delivery properties, but also application-level concepts of fault tolerance, order-ing, and reliability.
2.2 The DDS ParadigmThe Object Management Group (OMG) Data Distribution Service (DDS) standard the compre-hensive specification available for publish/subscribe data-centric designs. The DDS publish/subscribe model connects anonymous information producers (publishers) with information consumers (subscribers). The overall distributed application is composed of processes called "Participants," each running in a separate address space, and often on different computer or sys-tem nodes. A Participant may simultaneously publish and subscribe to typed data-streams iden-tified by a string name, these streams are called Topics in DDS. The model allows publishers and subscribers to present type-safe interfaces to the application.
DDS defines a communications relationship between publishers and subscribers. The communi-cations are decoupled in space (nodes can be anywhere—same node, a local node, or a geo-graphically remote node), time (delivery may be immediate or controlled), and flow (delivery may be reliable with a controlled bandwidth). To increase scalability, Topics may contain multi-ple independent data channels identified by "Keys." This allows system nodes to subscribe too many, possibly thousands, of similar data streams with a single subscription. When the data
Publisher
Topic = "New York Times"
Subscriber
The publish/subscribe model is analogous to publishing magazines or newspapers. The Publisher sends samples of a particular Topic to all Subscribers of that Topic.
Figure 2.1 An Example of Publish-Subscribe
Send Receive
Sample
Issue for Feb. 15
Topic = "New York Times"
Delivery Service
2-3
Quality of Service (QoS)
arrives, the middleware can cache and sort data using the Key and deliver it for efficient pro-cessing.
Additionally, DDS is fundamentally designed to work over unreliable transports, such as UDP, wireless, or disadvantaged networks without the requirement for central servers or special nodes. Direct, peer-to-peer communications, and support for reliable multicasting, enable a highly efficient data distribution model.
2.3 Quality of Service (QoS)Fine-grained control over QoS is a powerful feature of DDS. Each publisher/subscriber pair can establish independent QoS agreements. Thus, DDS designs can support extremely sophisticated and flexible data-flow requirements.
QoS parameters control most aspects of the DDS paradigm and the underlying communication mechanisms. Many QoS parameters are implemented as “contracts” between publishers and subscribers; publishers offer and subscribers request levels of service. The middleware is responsible for determining if the offerer can satisfy the subscriber’s request, thereby establish-ing communication, or indicating an incompatibility error. Ensuring that publish/subscribe pairs meet the level-of-service contracts guarantees predictable operation. Information about some common QoS parameters is presented below.
❏ Deadline: Periodic publishers can indicate the speed at which they can publish by offer-ing guaranteed update deadlines. By setting a deadline, a compliant publisher promises to send a new update on each key at a minimum rate. Subscribers may then request data at that or any slower rate.
❏ Reliability: Publishers may offer levels of reliability, parameterized by the number of past issues they can store for the purpose of retrying transmissions. Subscribers may then request differing levels of reliable delivery, ranging from fast-but-unreliable "best effort" to highly reliable in-order delivery. This provides per-data stream reliability control.
❏ Strength: The middleware can automatically arbitrate between multiple publishers of the same data with a parameter called "strength." For each keyed data-object the sub-scriber receives data only from the strongest active publisher of that key. This provides automatic failover; if a strong publisher fails, all subscribers immediately receive updates from the backup (weaker) publishers.
❏ Durability: Publishers can declare "durability," a parameter that determines how long previously published data is saved. Late-joining subscribers to durable publications can then be updated with a snapshot containing the most current set of values for each Key.
Other QoS parameters control when the middleware detects nodes that have failed, suggest latency budgets, set delivery order, attach user data, prioritize messages, set resource utilization limits, partition the system into namespaces, and more. The DDS QoS facilities offer extensive flexibility and communications control.
RTI DDS Toolkit for LabVIEW includes a set of predefined QoS profiles. These profiles are embed-ded in RTI DDS Toolkit for LabVIEW and cannot be modified. You can inherent from them. For your convenience, you can find an XML file that shows you these profiles in C:/Program Files1/National Instruments/LabVIEW 20xx/vi.lib/_RTI DDS Toolkit for LabVIEW_internal_deps/RTI_LABVIEW_CONFIG.documentationONLY.xml (where 20xx depends on your LabVIEW version). As the filename suggests, this file is for documentation purposes only. This file is not
1. On 64-bit systems, the folder is “Program Files (x86)”
2-4
DDS—Example Application
loaded by the RTI DDS Toolkit for LabVIEW, so updating it will not affect the embedded QoS pro-files.
On RTI’s Community Forum (http://community.rti.com), you can find more information about QoS properties and XML configuration, as well as the XSD schema.
2.4 DDS—Example ApplicationAn air traffic control system provides sufficient details and requirements for as example applica-tion. An air traffic control system may monitor and direct all flights over an entire continent. The data distributed in such a system is in the form of aircraft tracks, which provides positional information (e.g., course, speed, etc.) about an airplane. Components of an air traffic control sys-tem would include radar systems, airplanes and air traffic control centers that provide current flight status information through real-time displays.
Managing the correct distribution of data in such a system can be complex. Each radar system can track many different airplanes, and each airplane may be tracked by more than one radar system. Real-time access to this information is needed for displays at air-traffic control centers so that air traffic controllers can make informed decisions. Air traffic controllers in the north-east may only want aircraft track information in their area, so only a subset of data needs to be pro-vide to them. Based on current local conditions (e.g., air traffic, weather, etc.) air traffic control-lers may issue flight plan updates to the pilot in order to route around inclement weather and other airplanes. Though a specific plane does not need flight plans from all other air planes, it would be useful to have information about planes in the immediate vicinity.
Defining the air traffic control system in terms of publishers, subscribers and QoS parameters reveals that DDS is a natural fit to address this data distribution problem. Each radar system can be thought of as a publisher that publishes the "tracks" Topic which describes an airplane's posi-tional information. Each airplane that the radar system is tracking can be thought of as an "instance" of the track Topic identified by a unique Key attribute (e.g., the Airline name and flight number). The real-time controller displays subscribe to the tracks Topic and publish "flight plan" Topic updates back to the specific airplane. QoS parameters can be used to manage and control deterministic behaviors and fault tolerance capabilities of the system.
2-5
Chapter 3 A Simple Read/Write Example
The best way to learn about RTI DDS Toolkit for LabVIEW is to begin building example applica-tions. The following example VIs provide a quick introduction to the capabilities:
❏ RTI Connext DDS Read String Example.vi
❏ RTI Connext DDS Write String Example.vi
After reading this chapter, we recommend completing the lessons in Chapter 4: Tutorial for a more in-depth look at the capabilities of RTI DDS Toolkit for LabVIEW.
Note: The instructions for this example assume you are already familiar with LabVIEW.
Before continuing, please make sure you have the following software installed:
❏ LabVIEW (32-bit) for Windows (see the Release Notes for supported versions)
❏ RTI DDS Toolkit for LabVIEW
If you are using a computer that does not have an active network interface, see Appendix A.
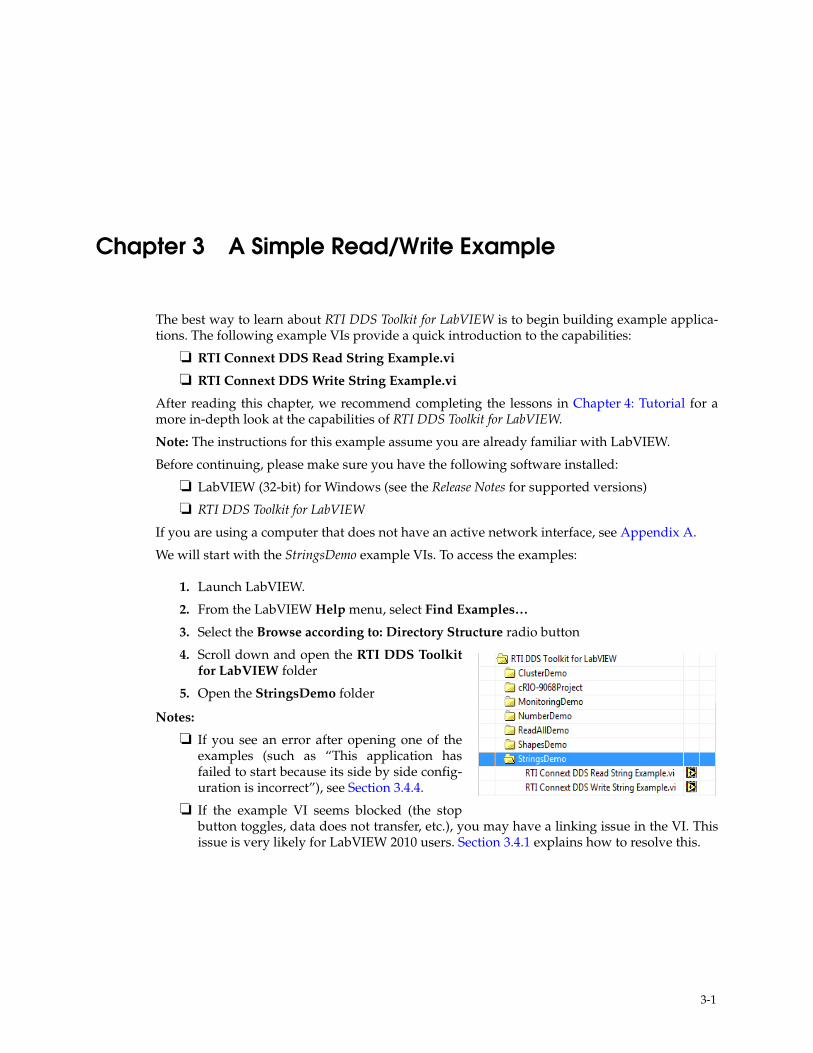
We will start with the StringsDemo example VIs. To access the examples:
1. Launch LabVIEW.
2. From the LabVIEW Help menu, select Find Examples…
3. Select the Browse according to: Directory Structure radio button
4. Scroll down and open the RTI DDS Toolkit for LabVIEW folder
5. Open the StringsDemo folder
Notes:
❏ If you see an error after opening one of the examples (such as “This application has failed to start because its side by side config-uration is incorrect”), see Section 3.4.4.
❏ If the example VI seems blocked (the stop button toggles, data does not transfer, etc.), you may have a linking issue in the VI. This issue is very likely for LabVIEW 2010 users. Section 3.4.1 explains how to resolve this.
3-1
Publishing a String in DDS
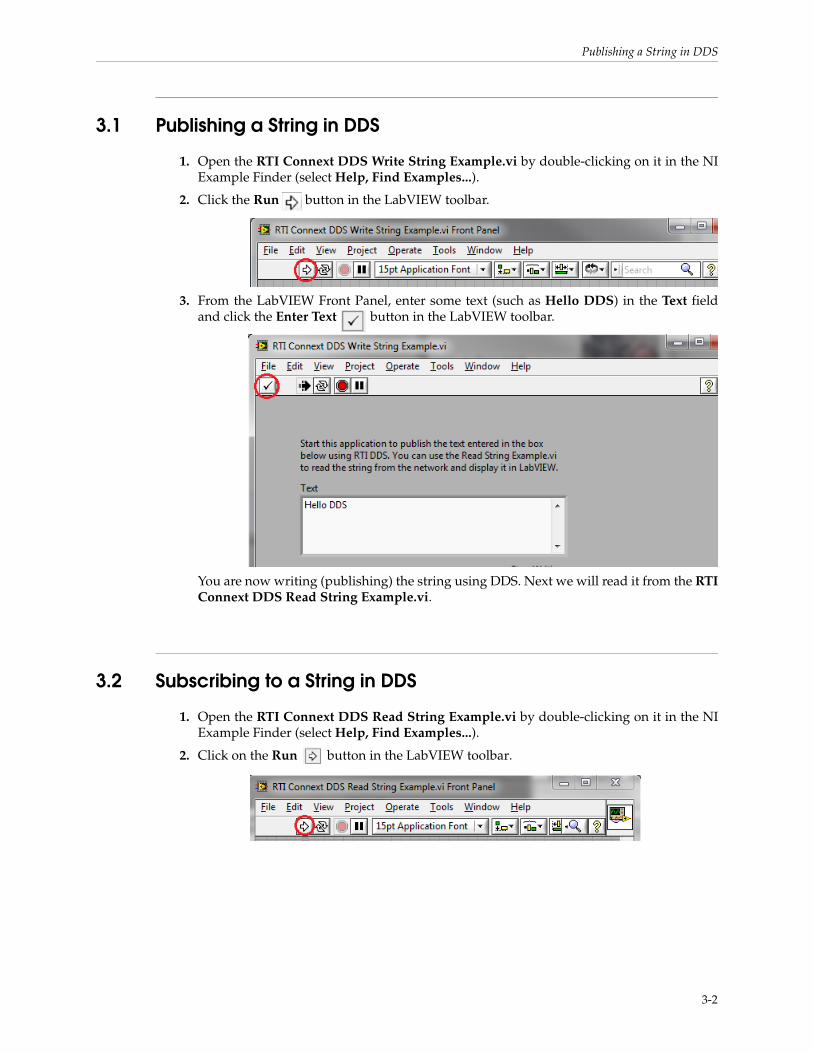
3.1 Publishing a String in DDS
1. Open the RTI Connext DDS Write String Example.vi by double-clicking on it in the NI Example Finder (select Help, Find Examples...).
2. Click the Run button in the LabVIEW toolbar.
3. From the LabVIEW Front Panel, enter some text (such as Hello DDS) in the Text field and click the Enter Text button in the LabVIEW toolbar.
You are now writing (publishing) the string using DDS. Next we will read it from the RTI Connext DDS Read String Example.vi.
3.2 Subscribing to a String in DDS
1. Open the RTI Connext DDS Read String Example.vi by double-clicking on it in the NI Example Finder (select Help, Find Examples...).
2. Click on the Run button in the LabVIEW toolbar.
3-2
What is Happening?
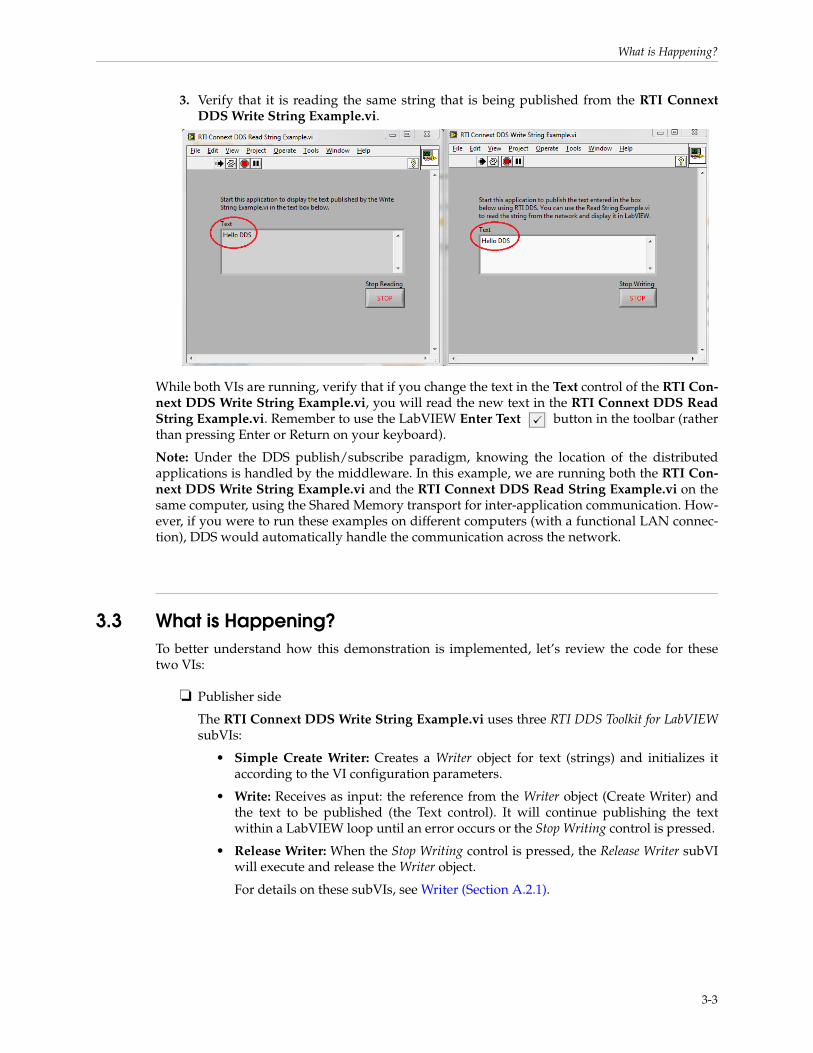
3. Verify that it is reading the same string that is being published from the RTI Connext DDS Write String Example.vi.
While both VIs are running, verify that if you change the text in the Text control of the RTI Con-next DDS Write String Example.vi, you will read the new text in the RTI Connext DDS Read String Example.vi. Remember to use the LabVIEW Enter Text button in the toolbar (rather than pressing Enter or Return on your keyboard).
Note: Under the DDS publish/subscribe paradigm, knowing the location of the distributed applications is handled by the middleware. In this example, we are running both the RTI Con-next DDS Write String Example.vi and the RTI Connext DDS Read String Example.vi on the same computer, using the Shared Memory transport for inter-application communication. How-ever, if you were to run these examples on different computers (with a functional LAN connec-tion), DDS would automatically handle the communication across the network.
3.3 What is Happening?To better understand how this demonstration is implemented, let’s review the code for these two VIs:
❏ Publisher side
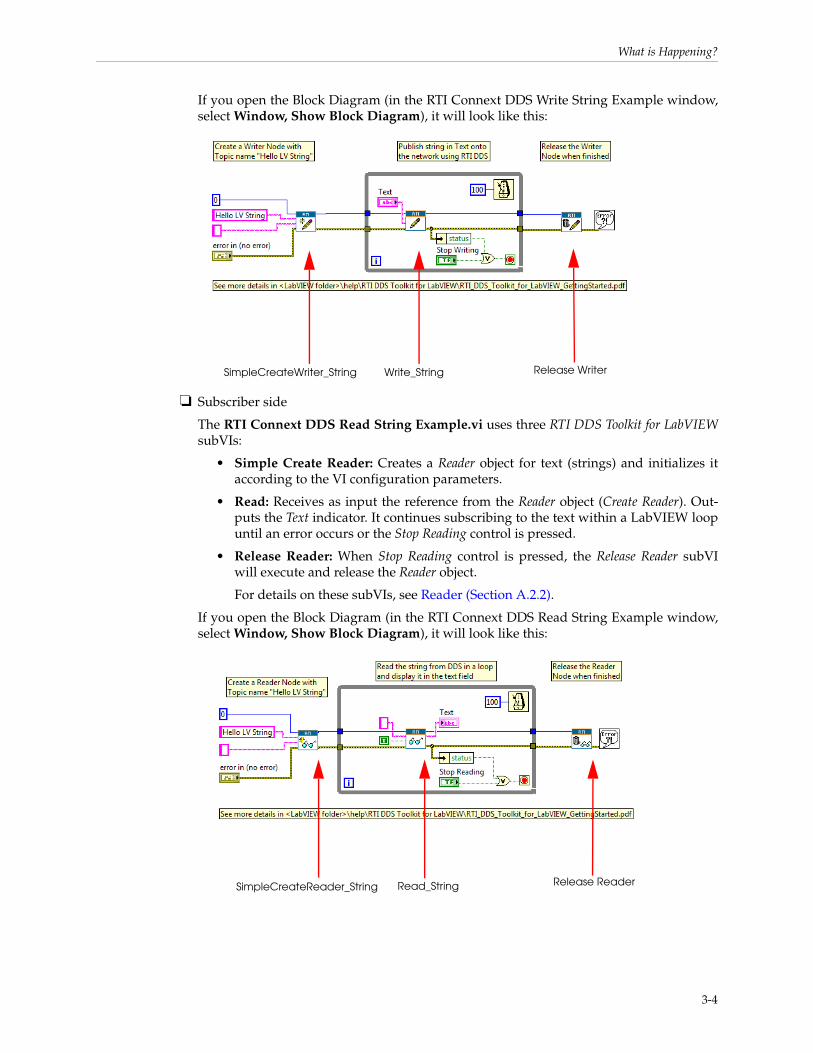
The RTI Connext DDS Write String Example.vi uses three RTI DDS Toolkit for LabVIEWsubVIs:
• Simple Create Writer: Creates a Writer object for text (strings) and initializes it according to the VI configuration parameters.
• Write: Receives as input: the reference from the Writer object (Create Writer) and the text to be published (the Text control). It will continue publishing the text within a LabVIEW loop until an error occurs or the Stop Writing control is pressed.
• Release Writer: When the Stop Writing control is pressed, the Release Writer subVI will execute and release the Writer object.
For details on these subVIs, see Writer (Section A.2.1).
3-3
What is Happening?
If you open the Block Diagram (in the RTI Connext DDS Write String Example window, select Window, Show Block Diagram), it will look like this:
❏ Subscriber side
The RTI Connext DDS Read String Example.vi uses three RTI DDS Toolkit for LabVIEWsubVIs:
• Simple Create Reader: Creates a Reader object for text (strings) and initializes it according to the VI configuration parameters.
• Read: Receives as input the reference from the Reader object (Create Reader). Out-puts the Text indicator. It continues subscribing to the text within a LabVIEW loop until an error occurs or the Stop Reading control is pressed.
• Release Reader: When Stop Reading control is pressed, the Release Reader subVI will execute and release the Reader object.
For details on these subVIs, see Reader (Section A.2.2).
If you open the Block Diagram (in the RTI Connext DDS Read String Example window, select Window, Show Block Diagram), it will look like this:
SimpleCreateWriter_String Write_String Release Writer
SimpleCreateReader_String Read_String Release Reader
3-4
Usage Notes
3.4 Usage Notes
3.4.1 Preventing ‘Application Failed to Start’ Error when Opening Example VIs
If you see an error when LabVIEW tries to load the RTI DDS Toolkit for LabVIEW DLL (such as “This application has failed to start because its side by side configuration is incorrect.”) after opening any of the example VIs, you need to install the Microsoft Visual C++ 2008 Redistributable Package (x86). This package provides the run-time components of the Visual C++ Libraries that are required to run applications developed with Visual C++ on a computer that does not have the Visual C++ 2008 development environment. You can download this package from http://www.microsoft.com/download/en/details.aspx?displaylang=en&id=29
3.4.2 Communicating Unbounded Entities.
By default, strings in the RTI DDS Toolkit for LabVIEW are bounded so their maximum length is 1024 characters. However, if you set the Advanced Reader/Writer Configuration flag forceUn-boundedString to true, they are created with a length equivalent to the maximum integer (2,147,483,647) (see Lesson 6—Used Nested and Multiple Keys (Section 4.6)). Despite that, DDS only sends the actual data the string contains, automatically reducing the sample size.
However, if you create a DataWriter of an unbounded type, it will not communicate with a DataReader of a bounded type out of the box. RTI DDS Toolkit for LabVIEW sets the following property in all its DomainParticipants:
<participant_qos> <property_qos> <value> <element> <name> dds.type_consistency.ignore_sequence_bounds </name> <value>1</value> </element> </value> </property_qos></participant_qos>
This property allows bounded DataReaders to communicate with unbounded DataWriters. Set this property in your external DDS applications that need to communicate with RTI DDS Toolkit for LabVIEW applications.
To Achieve Backward Compatibility:
If you need to create a bounded string, do not set to true the flag forceUnboundedString in the Advanced Reader/Writer Configuration controls. Setting this flag will force all strings to be unbounded.
3.4.3 Preventing 'Type Code Incorrect' Error when Working with Arrays
If you are forcing the usage of arrays, you may get an error when reading/writing them. To pre-vent this error, use sequences instead. Sequences, as well as LabVIEW arrays, can be resized and will not cause this error. Sequences are the default mapping of LabVIEW arrays.
If you must use arrays:
3-5
Usage Notes
When using an array as the input or output for one of the RTI DDS Toolkit for LabVIEW subVIs, you will need to initialize the array to its maximum size. Arrays within clusters must also be ini-tialized to their maximum size. The resize functionality available in LabVIEW is not compatible with RTI DDS Toolkit for LabVIEW.
To increase the size of an array, drag down on the bottom of the last element until you’ve reached the largest number of elements you need. Then assign a default value to each new ele-ment. It is usually sufficient to add one element at the end of the array.
3.4.4 Troubleshooting with Ping and Spy
If data is not flowing between the writer and reader, we suggest running the Connext DDS Ping and Spy utilities; they can show you what data is flowing through the network. These utilities are provided with the Connext DDS core1.
If you do not have Connext DDS installed, you can download RTI Connext DDS Professional from www.rti.com/downloads. Once you’ve installed RTI Connext DDS Professional, you can access DDS Ping and DDS Spy from RTI Launcher2 (in the Utilities tab).
For help using Ping and Spy, see the Connext DDS API Reference HTML documentation. For 5.1.0 and lower versions, open <Connext DDS core installation directory>/ndds.<version>/ReadMe.html. However if you are using 5.2.0 or a higher version, look for the file <Connext DDS core installation directory>\ReadMe.html. The documentation is also available here: http://community.rti.com/documentation. Choose an API (C, C++, .NET, or Java), then select Modules, Programming Tools.
You can also use RTI Distributed Logger to help debug your applications. Distributed Logger enables applications to publish their log messages to Connext DDS. The log message data can be visualized with RTI Monitor, a separate GUI application that can run on the same host as your application or on a different host. Since the data is provided in a Topic, you can also use DDS Spy or even write your own visualization tool.
RTI Monitor is included in RTI Connext DDS Professional. You can download a free trial from http://www.rti.com/downloads/index.html. For information about RTI Monitor, see http://www.rti.com/products/tools/monitor.html.
1. In the <Connext DDS installation directory>/ndds.<version>/scripts (5.1.0 or lower) or <Connext DDS installa-tion directory>/bin (5.2.0 or higher), look for rtiddsping and rtiddsspy.
2. RTI Launcher is a GUI-based tool provided with RTI Connext DDS Professional.
3-6
Chapter 4 Tutorial
This tutorial will help you become familiar with several key capabilities of RTI DDS Toolkit for LabVIEW. The tutorial assumes you have the following software installed:
❏ National Instruments LabVIEW 2012 (32-bit) or later for Windows
❏ RTI DDS Toolkit for LabVIEW for National Instruments LabVIEW 2012 (32-bit) or higher for Windows
The tutorial includes these lessons:
❏ Lesson 1—Using DDS to Publish and Subscribe to Simple Data (Numeric) (Section 4.1)
❏ Lesson 2—Using Templates to Publish and Subscribe to Complex Data (Clusters) (Sec-tion 4.2)
❏ Lesson 3—Filtering Data (Section 4.3)
❏ Lesson 4—Reading Only New Samples (Section 4.4)
❏ Lesson 5—Using Keyed Types (RTI Shapes Demo) (Section 4.5)
❏ Lesson 6—Used Nested and Multiple Keys (Section 4.6)
❏ Lesson 7—Reading All Samples (Reliable Communication) (Section 4.7)
❏ Lesson 8—Debugging Your RTI Connext DDS Application (Section 4.8)
❏ Lesson 9—Using RTI DDS Toolkit on NI Targets (cRIO-9068 Example) (Section 4.9)
We encourage you to follow along and perform the steps in each lesson yourself—there is no better teacher than hands-on experience. However, completed solutions are provided; see Section 4.10.
Notes:
❏ These lessons assume you are familiar with LabVIEW.
❏ For debugging information, see Enabling Debugging Mode (Section E.1)
4.1 Lesson 1—Using DDS to Publish and Subscribe to Simple Data (Numeric)In this first lesson, you will become familiar with the RTI DDS Toolkit for LabVIEW functions and capabilities by creating two LabVIEW VIs that can publish and subscribe to data. You can run these VIs on the same computer or separate computers connected to the same local area net-
4-1
Lesson 1—Using DDS to Publish and Subscribe to Simple Data (Numeric)
work. RTI DDS Toolkit for LabVIEW will automatically discover the location of each application and handle communication in either scenario without any changes to the VIs.
4.1.1 Developing a VI to Publish Simple Data (Numeric)
Let’s start by developing a VI to publish a simple data type: the value of a double-precision numeric control, a LabVIEW Numeric (DBL).
4.1.1.1 Create a Writer Object to Publish a Numeric (DBL)
1. Launch LabVIEW and create a new VI. Select File, New VI. Save the new VI with the name Tutorial_Write_Double.vi.
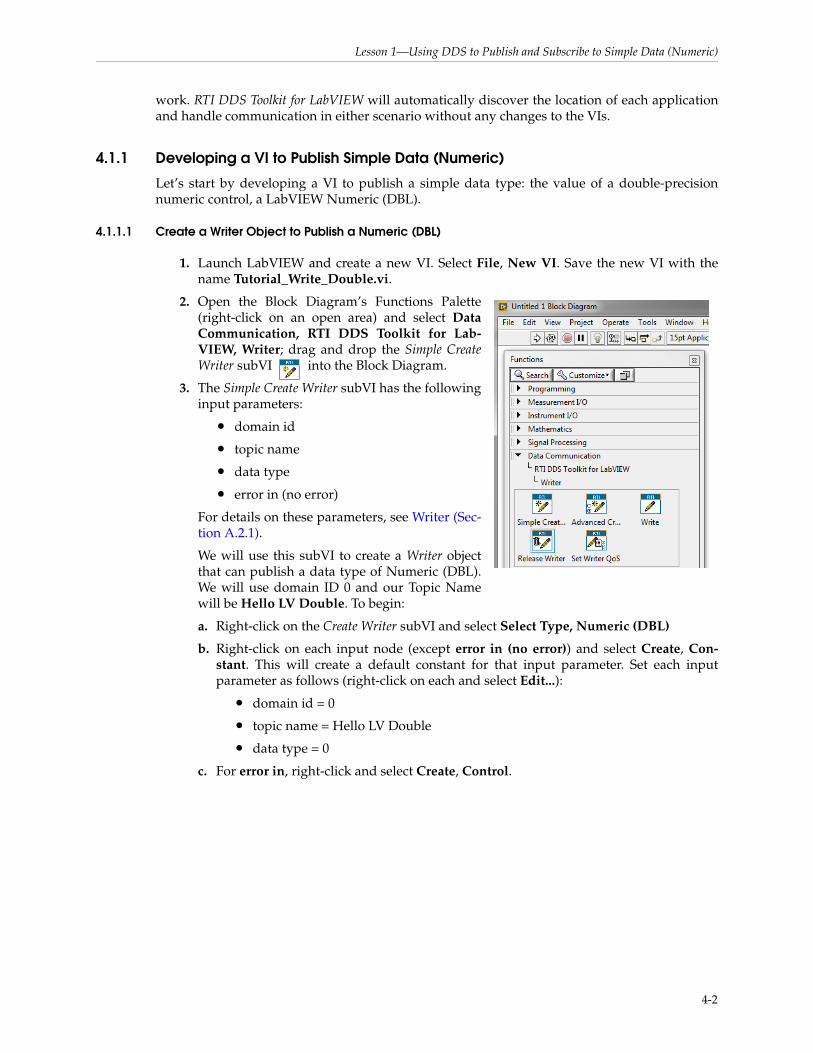
2. Open the Block Diagram’s Functions Palette (right-click on an open area) and select Data Communication, RTI DDS Toolkit for Lab-VIEW, Writer; drag and drop the Simple Create Writer subVI into the Block Diagram.
3. The Simple Create Writer subVI has the following input parameters:
• domain id
• topic name
• data type
• error in (no error)
For details on these parameters, see Writer (Sec-tion A.2.1).
We will use this subVI to create a Writer object that can publish a data type of Numeric (DBL). We will use domain ID 0 and our Topic Name will be Hello LV Double. To begin:
a. Right-click on the Create Writer subVI and select Select Type, Numeric (DBL)
b. Right-click on each input node (except error in (no error)) and select Create, Con-stant. This will create a default constant for that input parameter. Set each input parameter as follows (right-click on each and select Edit...):
• domain id = 0
• topic name = Hello LV Double
• data type = 0
c. For error in, right-click and select Create, Control.
4-2

Lesson 1—Using DDS to Publish and Subscribe to Simple Data (Numeric)
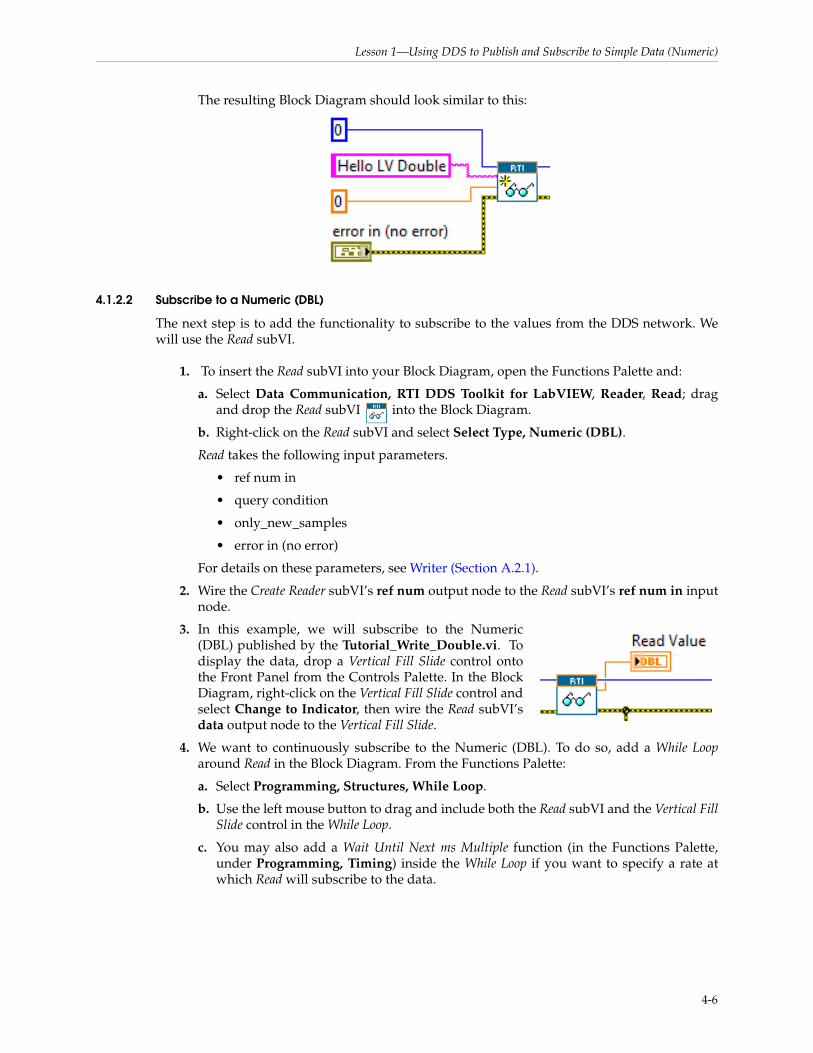
The resulting Block Diagram should look similar to this:
4.1.1.2 Publish a Numeric (DBL)
The next step is to add the functionality to publish values to the DDS network. We will use the Write subVI.
1. Open the Functions Palette and select Data Communication, RTI DDS Toolkit for Lab-VIEW, Writer, Write; drag and drop the Write subVI into the Block Diagram.
The Write subVI has the following input parameters:
• ref num in
• data
• error in
For details on these parameters, see Writer (Section A.2.1).
2. Wire the ref num out output of the Create Writer subVI (from Section 4.1.1.1) to the ref num in input of the Write subVI.
3. We will publish the value of a Horizontal Pointer Slide control (numeric control). Drop a Horizontal Pointer Slide control onto the Front Panel from the Controls Palette. In the Block Dia-gram, wire the Pointer Slide to the Write subVI’s Data input node. Rename the slide control to Data.
4. To continuously publish the Pointer Slide value, add a While Loop around the Write subVI in the Block Diagram. From the Functions Palette:
a. Select Programming, Structures, While Loop.
b. Use the left mouse button to drag and include both the Write subVI and the Horizontal Pointer Slide control in the While Loop.
c. You may also add a Wait Until Next ms Multiple subVI (under Programming, Timing from the Functions Palette) inside the While Loop if you want to specify a rate at which Write will publish the value.
4-3
Lesson 1—Using DDS to Publish and Subscribe to Simple Data (Numeric)
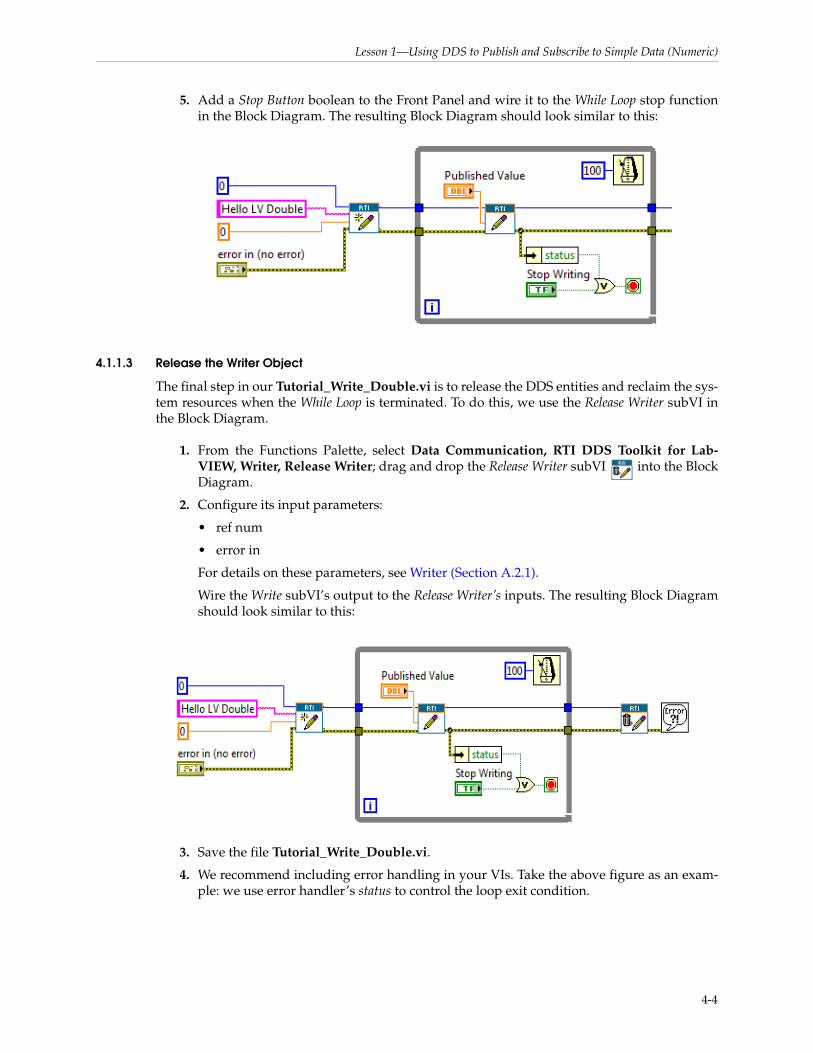
5. Add a Stop Button boolean to the Front Panel and wire it to the While Loop stop function in the Block Diagram. The resulting Block Diagram should look similar to this:
4.1.1.3 Release the Writer Object
The final step in our Tutorial_Write_Double.vi is to release the DDS entities and reclaim the sys-tem resources when the While Loop is terminated. To do this, we use the Release Writer subVI in the Block Diagram.
1. From the Functions Palette, select Data Communication, RTI DDS Toolkit for Lab-VIEW, Writer, Release Writer; drag and drop the Release Writer subVI into the Block Diagram.
2. Configure its input parameters:
• ref num
• error in
For details on these parameters, see Writer (Section A.2.1).
Wire the Write subVI’s output to the Release Writer’s inputs. The resulting Block Diagram should look similar to this:
3. Save the file Tutorial_Write_Double.vi.
4. We recommend including error handling in your VIs. Take the above figure as an exam-ple: we use error handler’s status to control the loop exit condition.
4-4
Lesson 1—Using DDS to Publish and Subscribe to Simple Data (Numeric)
4.1.2 Creating a VI to Subscribe to Simple Data (Numeric)
In Section 4.1.1, you learned how to develop a LabVIEW VI to use DDS to publish a simple data type, the value of a numeric (DBL). In the second part of the lesson, you will see how to develop an equivalent VI to read the published data.
4.1.2.1 Create a Reader Object to Subscribe to a Numeric (DBL)
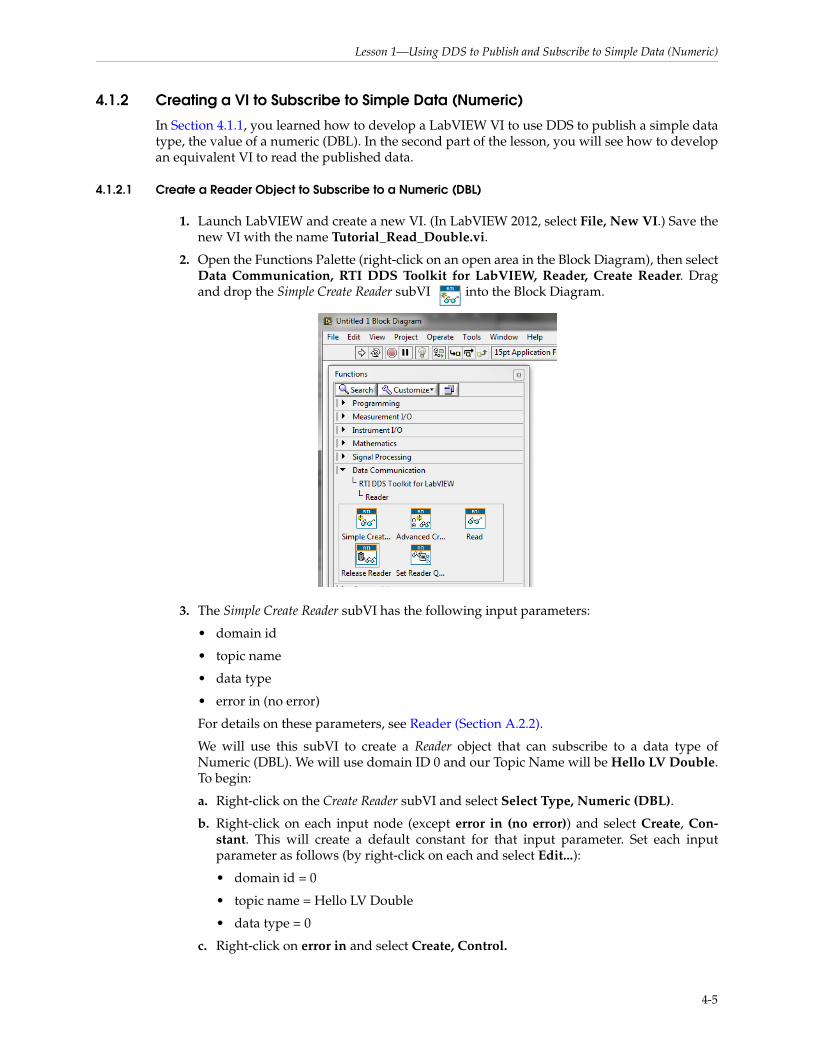
1. Launch LabVIEW and create a new VI. (In LabVIEW 2012, select File, New VI.) Save the new VI with the name Tutorial_Read_Double.vi.
2. Open the Functions Palette (right-click on an open area in the Block Diagram), then select Data Communication, RTI DDS Toolkit for LabVIEW, Reader, Create Reader. Drag and drop the Simple Create Reader subVI into the Block Diagram.
3. The Simple Create Reader subVI has the following input parameters:
• domain id
• topic name
• data type
• error in (no error)
For details on these parameters, see Reader (Section A.2.2).
We will use this subVI to create a Reader object that can subscribe to a data type of Numeric (DBL). We will use domain ID 0 and our Topic Name will be Hello LV Double. To begin:
a. Right-click on the Create Reader subVI and select Select Type, Numeric (DBL).
b. Right-click on each input node (except error in (no error)) and select Create, Con-stant. This will create a default constant for that input parameter. Set each input parameter as follows (by right-click on each and select Edit...):
• domain id = 0
• topic name = Hello LV Double
• data type = 0
c. Right-click on error in and select Create, Control.
4-5
Lesson 1—Using DDS to Publish and Subscribe to Simple Data (Numeric)
The resulting Block Diagram should look similar to this:
4.1.2.2 Subscribe to a Numeric (DBL)
The next step is to add the functionality to subscribe to the values from the DDS network. We will use the Read subVI.
1. To insert the Read subVI into your Block Diagram, open the Functions Palette and:
a. Select Data Communication, RTI DDS Toolkit for LabVIEW, Reader, Read; drag and drop the Read subVI into the Block Diagram.
b. Right-click on the Read subVI and select Select Type, Numeric (DBL).
Read takes the following input parameters.
• ref num in
• query condition
• only_new_samples
• error in (no error)
For details on these parameters, see Writer (Section A.2.1).
2. Wire the Create Reader subVI’s ref num output node to the Read subVI’s ref num in input node.
3. In this example, we will subscribe to the Numeric (DBL) published by the Tutorial_Write_Double.vi. To display the data, drop a Vertical Fill Slide control onto the Front Panel from the Controls Palette. In the Block Diagram, right-click on the Vertical Fill Slide control and select Change to Indicator, then wire the Read subVI’s data output node to the Vertical Fill Slide.
4. We want to continuously subscribe to the Numeric (DBL). To do so, add a While Looparound Read in the Block Diagram. From the Functions Palette:
a. Select Programming, Structures, While Loop.
b. Use the left mouse button to drag and include both the Read subVI and the Vertical Fill Slide control in the While Loop.
c. You may also add a Wait Until Next ms Multiple function (in the Functions Palette, under Programming, Timing) inside the While Loop if you want to specify a rate at which Read will subscribe to the data.
4-6
Lesson 1—Using DDS to Publish and Subscribe to Simple Data (Numeric)
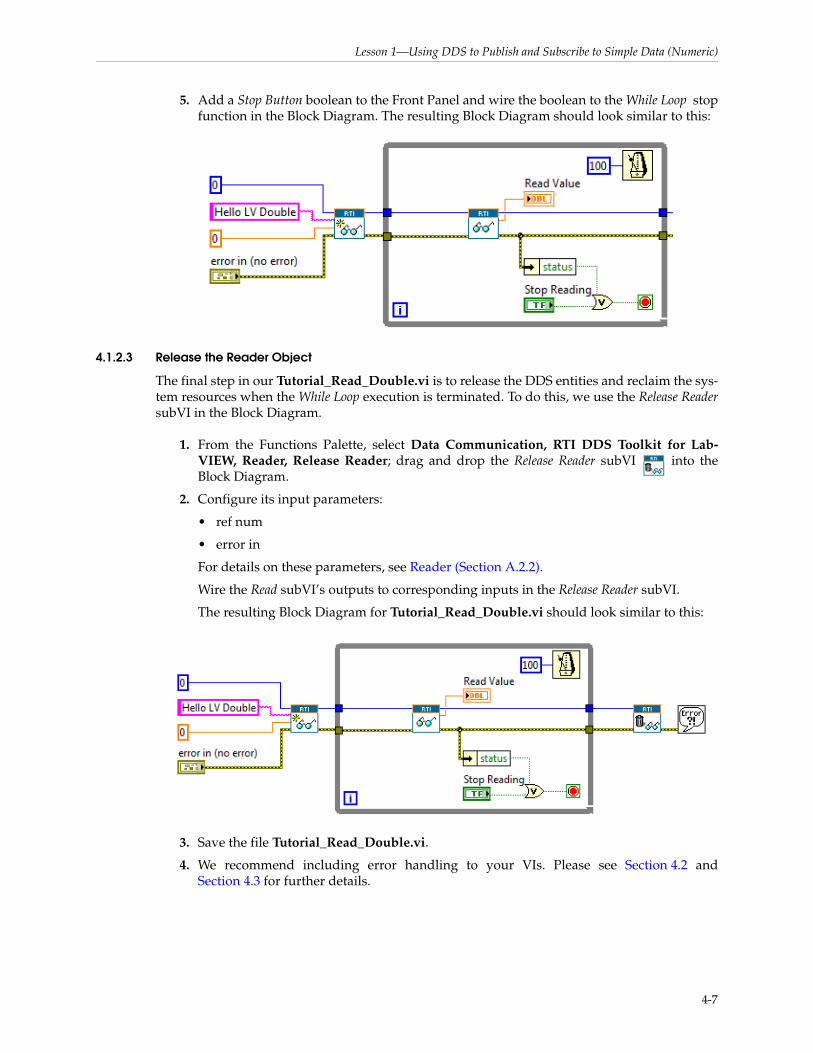
5. Add a Stop Button boolean to the Front Panel and wire the boolean to the While Loop stop function in the Block Diagram. The resulting Block Diagram should look similar to this:
4.1.2.3 Release the Reader Object
The final step in our Tutorial_Read_Double.vi is to release the DDS entities and reclaim the sys-tem resources when the While Loop execution is terminated. To do this, we use the Release Reader subVI in the Block Diagram.
1. From the Functions Palette, select Data Communication, RTI DDS Toolkit for Lab-VIEW, Reader, Release Reader; drag and drop the Release Reader subVI into the Block Diagram.
2. Configure its input parameters:
• ref num
• error in
For details on these parameters, see Reader (Section A.2.2).
Wire the Read subVI’s outputs to corresponding inputs in the Release Reader subVI.
The resulting Block Diagram for Tutorial_Read_Double.vi should look similar to this:
3. Save the file Tutorial_Read_Double.vi.
4. We recommend including error handling to your VIs. Please see Section 4.2 and Section 4.3 for further details.
4-7
Lesson 1—Using DDS to Publish and Subscribe to Simple Data (Numeric)
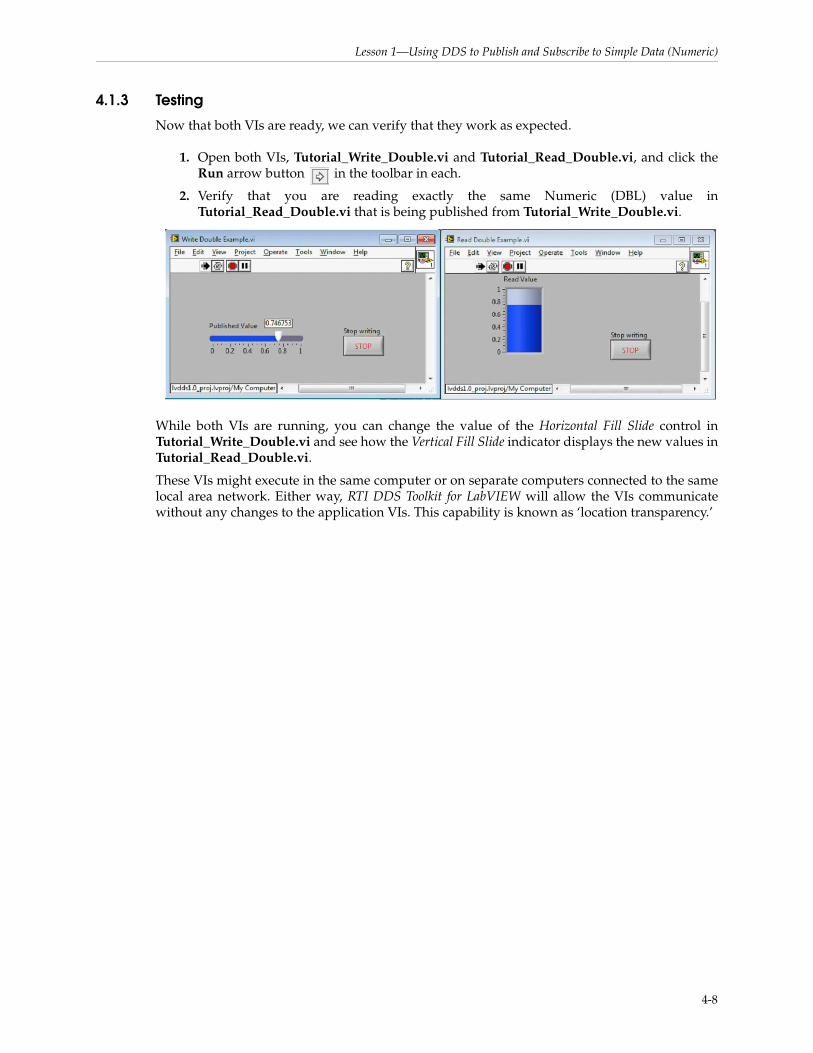
4.1.3 Testing
Now that both VIs are ready, we can verify that they work as expected.
1. Open both VIs, Tutorial_Write_Double.vi and Tutorial_Read_Double.vi, and click the Run arrow button in the toolbar in each.
2. Verify that you are reading exactly the same Numeric (DBL) value in Tutorial_Read_Double.vi that is being published from Tutorial_Write_Double.vi.
While both VIs are running, you can change the value of the Horizontal Fill Slide control in Tutorial_Write_Double.vi and see how the Vertical Fill Slide indicator displays the new values in Tutorial_Read_Double.vi.
These VIs might execute in the same computer or on separate computers connected to the same local area network. Either way, RTI DDS Toolkit for LabVIEW will allow the VIs communicate without any changes to the application VIs. This capability is known as ‘location transparency.’
4-8
Lesson 2—Using Templates to Publish and Subscribe to Complex Data (Clusters)
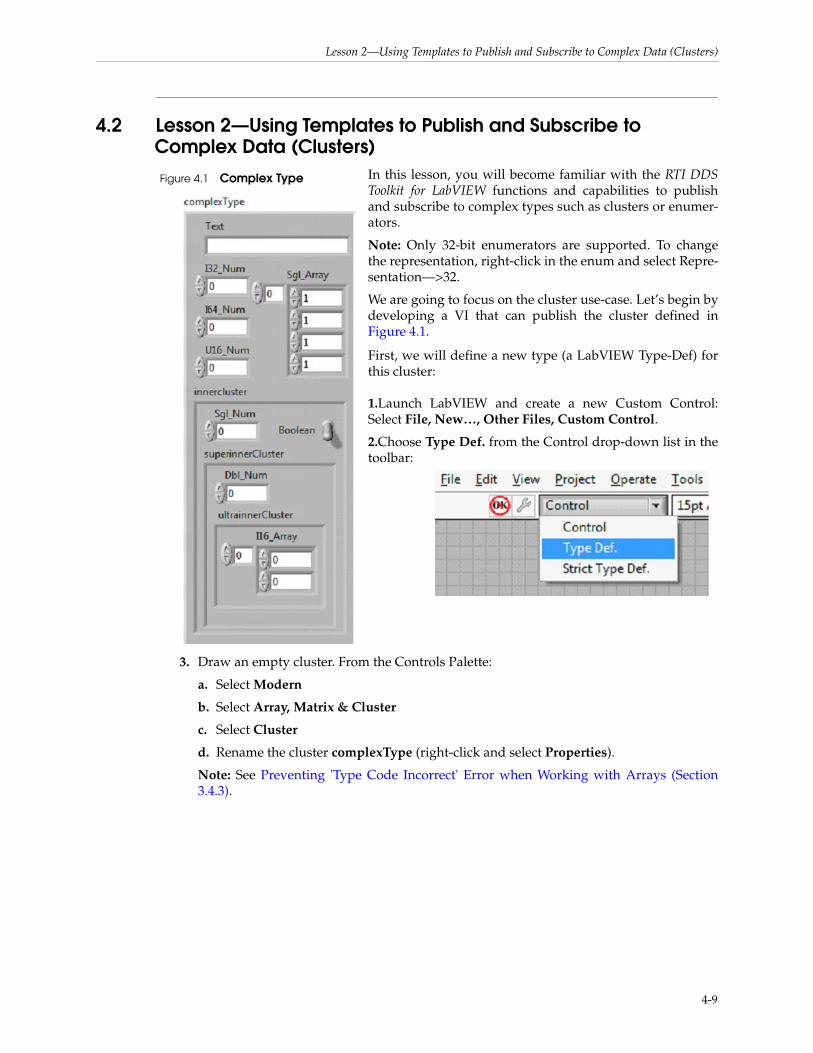
4.2 Lesson 2—Using Templates to Publish and Subscribe to Complex Data (Clusters)
In this lesson, you will become familiar with the RTI DDS Toolkit for LabVIEW functions and capabilities to publish and subscribe to complex types such as clusters or enumer-ators.
Note: Only 32-bit enumerators are supported. To change the representation, right-click in the enum and select Repre-sentation—>32.
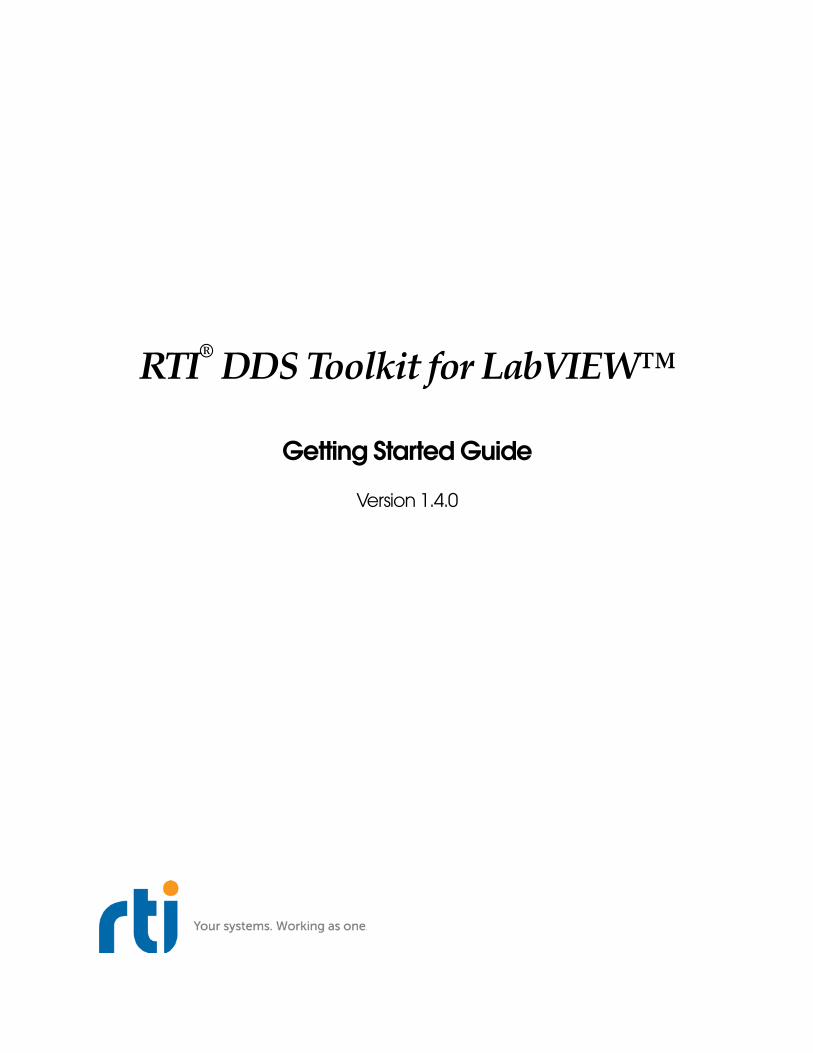
We are going to focus on the cluster use-case. Let’s begin by developing a VI that can publish the cluster defined in Figure 4.1.
First, we will define a new type (a LabVIEW Type-Def) for this cluster:
1.Launch LabVIEW and create a new Custom Control: Select File, New…, Other Files, Custom Control.
2.Choose Type Def. from the Control drop-down list in the toolbar:
3. Draw an empty cluster. From the Controls Palette:
a. Select Modern
b. Select Array, Matrix & Cluster
c. Select Cluster
d. Rename the cluster complexType (right-click and select Properties).
Note: See Preventing 'Type Code Incorrect' Error when Working with Arrays (Section 3.4.3).
Figure 4.1 Complex Type
4-9
Lesson 2—Using Templates to Publish and Subscribe to Complex Data (Clusters)
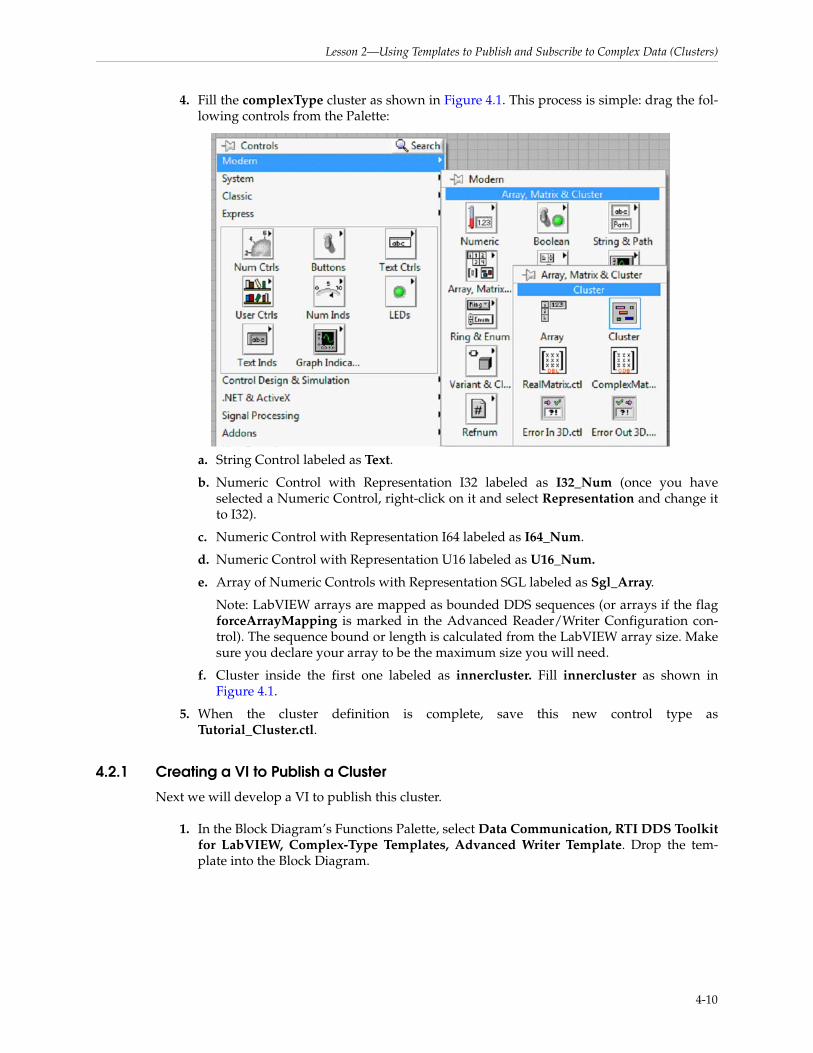
4. Fill the complexType cluster as shown in Figure 4.1. This process is simple: drag the fol-lowing controls from the Palette:
a. String Control labeled as Text.
b. Numeric Control with Representation I32 labeled as I32_Num (once you have selected a Numeric Control, right-click on it and select Representation and change it to I32).
c. Numeric Control with Representation I64 labeled as I64_Num.
d. Numeric Control with Representation U16 labeled as U16_Num.
e. Array of Numeric Controls with Representation SGL labeled as Sgl_Array.
Note: LabVIEW arrays are mapped as bounded DDS sequences (or arrays if the flag forceArrayMapping is marked in the Advanced Reader/Writer Configuration con-trol). The sequence bound or length is calculated from the LabVIEW array size. Make sure you declare your array to be the maximum size you will need.
f. Cluster inside the first one labeled as innercluster. Fill innercluster as shown in Figure 4.1.
5. When the cluster definition is complete, save this new control type as Tutorial_Cluster.ctl.
4.2.1 Creating a VI to Publish a Cluster
Next we will develop a VI to publish this cluster.
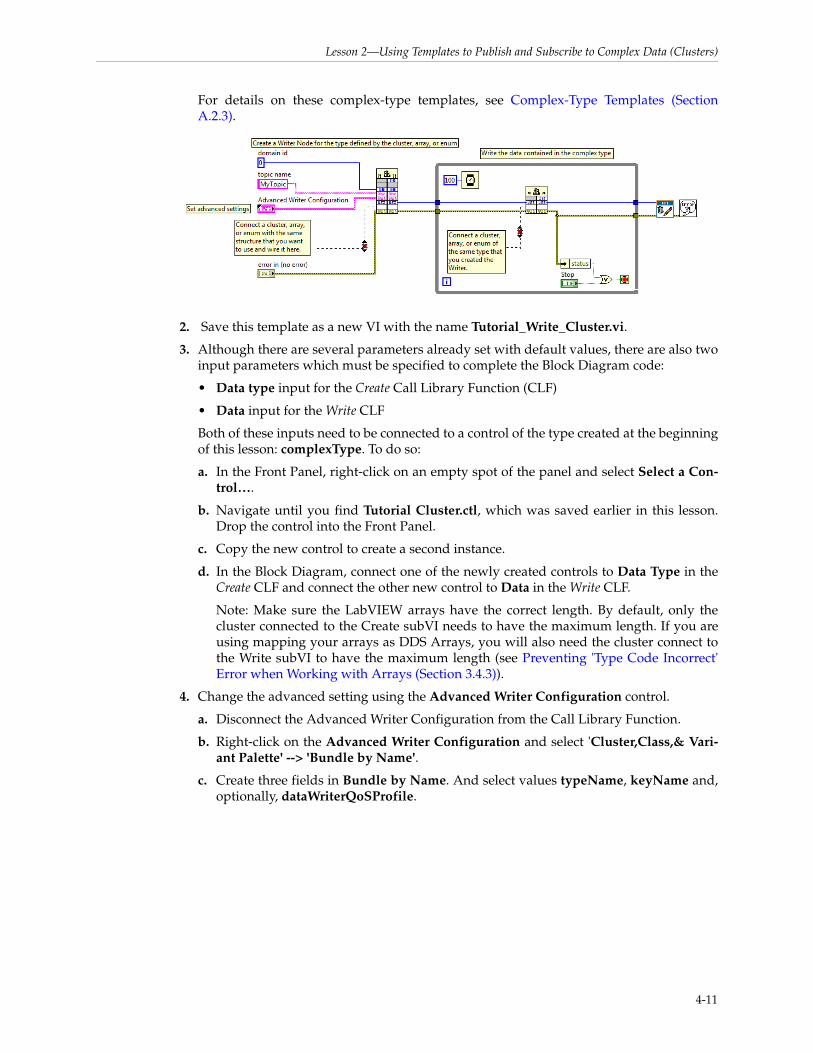
1. In the Block Diagram’s Functions Palette, select Data Communication, RTI DDS Toolkit for LabVIEW, Complex-Type Templates, Advanced Writer Template. Drop the tem-plate into the Block Diagram.
4-10
Lesson 2—Using Templates to Publish and Subscribe to Complex Data (Clusters)
For details on these complex-type templates, see Complex-Type Templates (Section A.2.3).
2. Save this template as a new VI with the name Tutorial_Write_Cluster.vi.
3. Although there are several parameters already set with default values, there are also two input parameters which must be specified to complete the Block Diagram code:
• Data type input for the Create Call Library Function (CLF)
• Data input for the Write CLF
Both of these inputs need to be connected to a control of the type created at the beginning of this lesson: complexType. To do so:
a. In the Front Panel, right-click on an empty spot of the panel and select Select a Con-trol….
b. Navigate until you find Tutorial Cluster.ctl, which was saved earlier in this lesson. Drop the control into the Front Panel.
c. Copy the new control to create a second instance.
d. In the Block Diagram, connect one of the newly created controls to Data Type in the Create CLF and connect the other new control to Data in the Write CLF.
Note: Make sure the LabVIEW arrays have the correct length. By default, only the cluster connected to the Create subVI needs to have the maximum length. If you are using mapping your arrays as DDS Arrays, you will also need the cluster connect to the Write subVI to have the maximum length (see Preventing 'Type Code Incorrect' Error when Working with Arrays (Section 3.4.3)).
4. Change the advanced setting using the Advanced Writer Configuration control.
a. Disconnect the Advanced Writer Configuration from the Call Library Function.
b. Right-click on the Advanced Writer Configuration and select 'Cluster,Class,& Vari-ant Palette' --> 'Bundle by Name'.
c. Create three fields in Bundle by Name. And select values typeName, keyName and, optionally, dataWriterQoSProfile.
4-11
Lesson 2—Using Templates to Publish and Subscribe to Complex Data (Clusters)
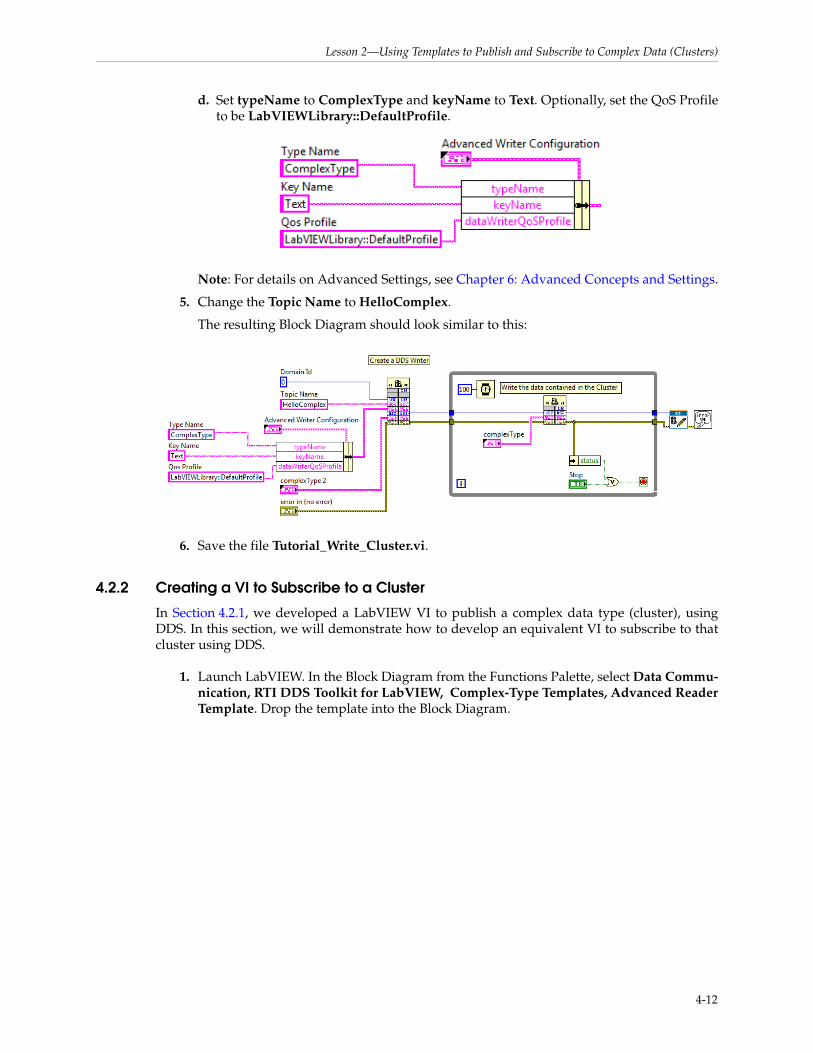
d. Set typeName to ComplexType and keyName to Text. Optionally, set the QoS Profile to be LabVIEWLibrary::DefaultProfile.
Note: For details on Advanced Settings, see Chapter 6: Advanced Concepts and Settings.
5. Change the Topic Name to HelloComplex.
The resulting Block Diagram should look similar to this:
6. Save the file Tutorial_Write_Cluster.vi.
4.2.2 Creating a VI to Subscribe to a Cluster
In Section 4.2.1, we developed a LabVIEW VI to publish a complex data type (cluster), using DDS. In this section, we will demonstrate how to develop an equivalent VI to subscribe to that cluster using DDS.
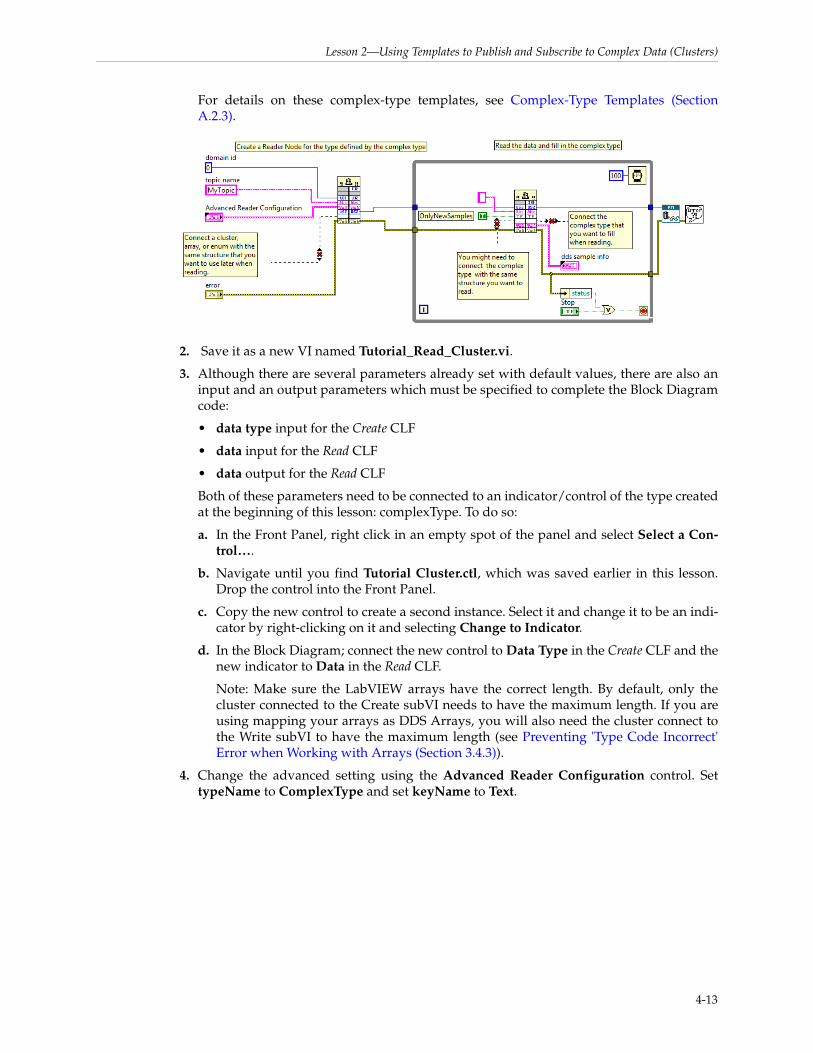
1. Launch LabVIEW. In the Block Diagram from the Functions Palette, select Data Commu-nication, RTI DDS Toolkit for LabVIEW, Complex-Type Templates, Advanced Reader Template. Drop the template into the Block Diagram.
4-12
Lesson 2—Using Templates to Publish and Subscribe to Complex Data (Clusters)
For details on these complex-type templates, see Complex-Type Templates (Section A.2.3).
2. Save it as a new VI named Tutorial_Read_Cluster.vi.
3. Although there are several parameters already set with default values, there are also an input and an output parameters which must be specified to complete the Block Diagram code:
• data type input for the Create CLF
• data input for the Read CLF
• data output for the Read CLF
Both of these parameters need to be connected to an indicator/control of the type created at the beginning of this lesson: complexType. To do so:
a. In the Front Panel, right click in an empty spot of the panel and select Select a Con-trol….
b. Navigate until you find Tutorial Cluster.ctl, which was saved earlier in this lesson. Drop the control into the Front Panel.
c. Copy the new control to create a second instance. Select it and change it to be an indi-cator by right-clicking on it and selecting Change to Indicator.
d. In the Block Diagram; connect the new control to Data Type in the Create CLF and the new indicator to Data in the Read CLF.
Note: Make sure the LabVIEW arrays have the correct length. By default, only the cluster connected to the Create subVI needs to have the maximum length. If you are using mapping your arrays as DDS Arrays, you will also need the cluster connect to the Write subVI to have the maximum length (see Preventing 'Type Code Incorrect' Error when Working with Arrays (Section 3.4.3)).
4. Change the advanced setting using the Advanced Reader Configuration control. Set typeName to ComplexType and set keyName to Text.
4-13

Lesson 2—Using Templates to Publish and Subscribe to Complex Data (Clusters)
Note: For details on Advanced Settings, see Chapter 6: Advanced Concepts and Set-tings.
5. Change the Topic Name to HelloComplex.
6. Optionally, wire a DDS Sample Info indicator to the Read subVI.
The resulting Block Diagram should look similar to this:
7. Save the file Tutorial_Read_Cluster.vi.
Note: If LabVIEW displays a wiring error, you will need to create a new constant for this cluster type. Wire the constant as the input of the Read subVI’s Data input node (on the left hand side of the Read function block). After LabVIEW recognizes the type, the error will be correct. Then you should delete the constant and verify that the wire connected remains valid.
4-14
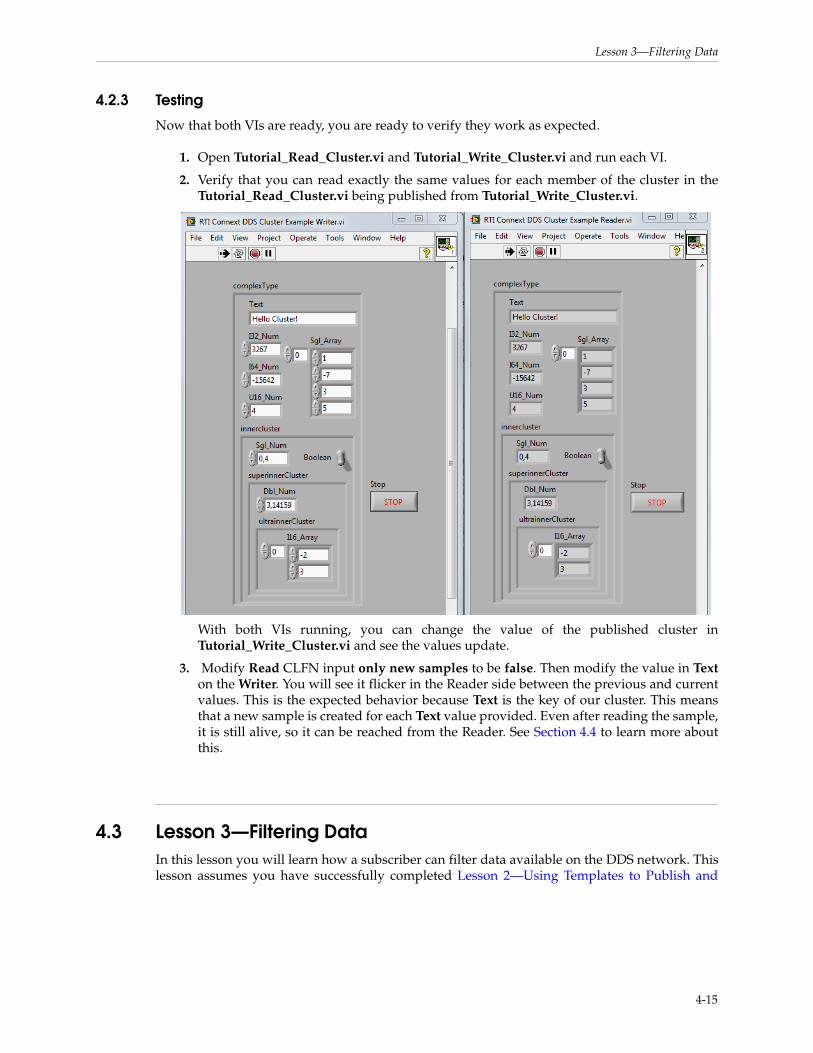
Lesson 3—Filtering Data
4.2.3 Testing
Now that both VIs are ready, you are ready to verify they work as expected.
1. Open Tutorial_Read_Cluster.vi and Tutorial_Write_Cluster.vi and run each VI.
2. Verify that you can read exactly the same values for each member of the cluster in the Tutorial_Read_Cluster.vi being published from Tutorial_Write_Cluster.vi.
With both VIs running, you can change the value of the published cluster in Tutorial_Write_Cluster.vi and see the values update.
3. Modify Read CLFN input only new samples to be false. Then modify the value in Texton the Writer. You will see it flicker in the Reader side between the previous and current values. This is the expected behavior because Text is the key of our cluster. This means that a new sample is created for each Text value provided. Even after reading the sample, it is still alive, so it can be reached from the Reader. See Section 4.4 to learn more about this.
4.3 Lesson 3—Filtering DataIn this lesson you will learn how a subscriber can filter data available on the DDS network. This lesson assumes you have successfully completed Lesson 2—Using Templates to Publish and
4-15
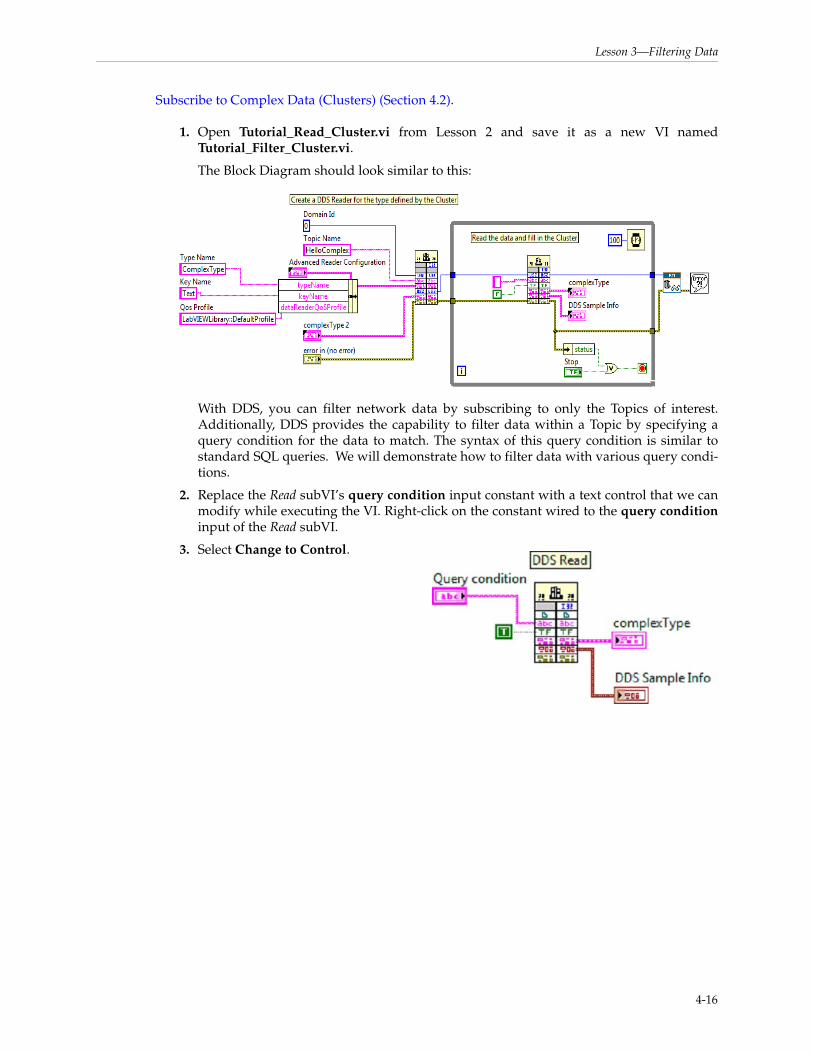
Lesson 3—Filtering Data
Subscribe to Complex Data (Clusters) (Section 4.2).
1. Open Tutorial_Read_Cluster.vi from Lesson 2 and save it as a new VI named Tutorial_Filter_Cluster.vi.
The Block Diagram should look similar to this:
With DDS, you can filter network data by subscribing to only the Topics of interest. Additionally, DDS provides the capability to filter data within a Topic by specifying a query condition for the data to match. The syntax of this query condition is similar to standard SQL queries. We will demonstrate how to filter data with various query condi-tions.
2. Replace the Read subVI’s query condition input constant with a text control that we can modify while executing the VI. Right-click on the constant wired to the query condition input of the Read subVI.
3. Select Change to Control.
4-16
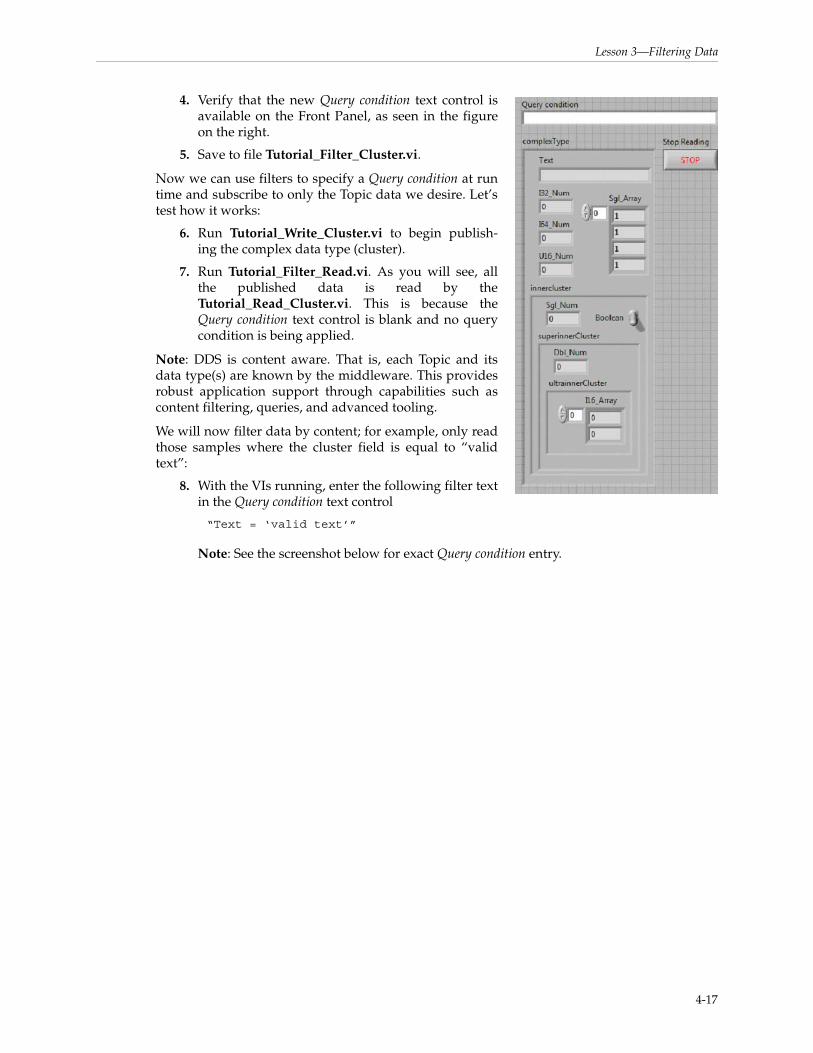
Lesson 3—Filtering Data
4. Verify that the new Query condition text control is available on the Front Panel, as seen in the figure on the right.
5. Save to file Tutorial_Filter_Cluster.vi.
Now we can use filters to specify a Query condition at run time and subscribe to only the Topic data we desire. Let’s test how it works:
6. Run Tutorial_Write_Cluster.vi to begin publish-ing the complex data type (cluster).
7. Run Tutorial_Filter_Read.vi. As you will see, all the published data is read by the Tutorial_Read_Cluster.vi. This is because the Query condition text control is blank and no query condition is being applied.
Note: DDS is content aware. That is, each Topic and its data type(s) are known by the middleware. This provides robust application support through capabilities such as content filtering, queries, and advanced tooling.
We will now filter data by content; for example, only read those samples where the cluster field is equal to “valid text”:
8. With the VIs running, enter the following filter text in the Query condition text control
“Text = ‘valid text’”
Note: See the screenshot below for exact Query condition entry.
4-17
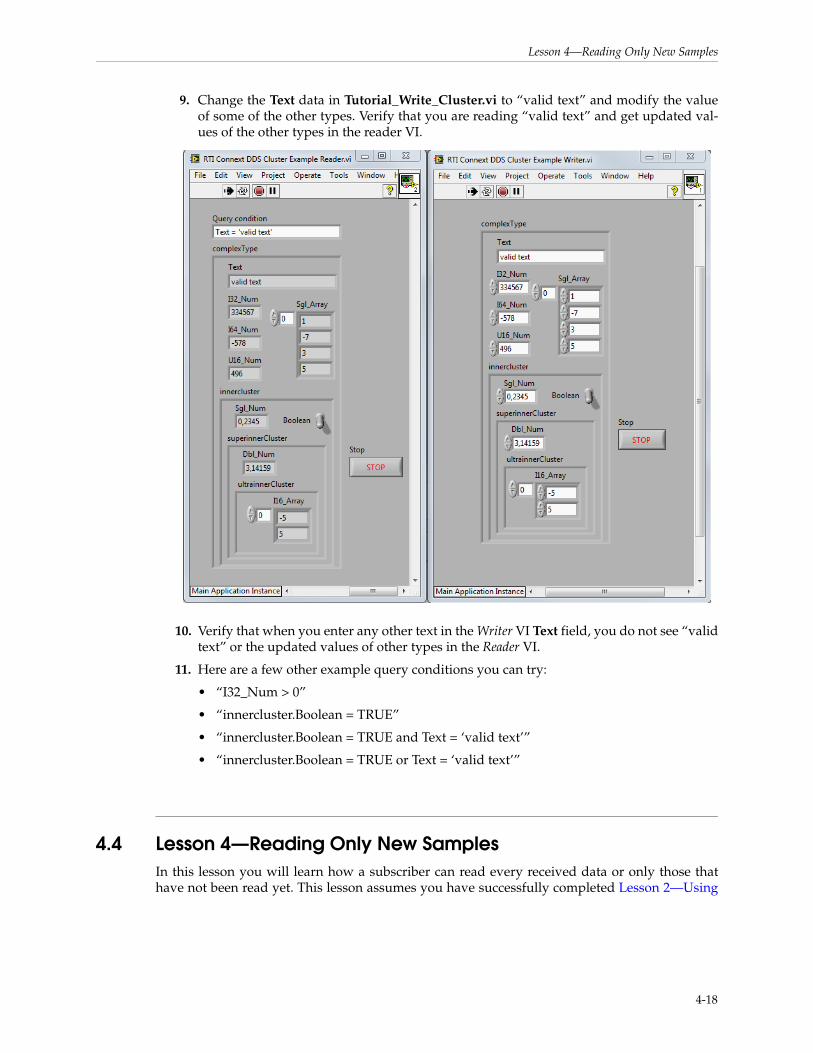
Lesson 4—Reading Only New Samples
9. Change the Text data in Tutorial_Write_Cluster.vi to “valid text” and modify the value of some of the other types. Verify that you are reading “valid text” and get updated val-ues of the other types in the reader VI.
10. Verify that when you enter any other text in the Writer VI Text field, you do not see “valid text” or the updated values of other types in the Reader VI.
11. Here are a few other example query conditions you can try:
• “I32_Num > 0”
• “innercluster.Boolean = TRUE”
• “innercluster.Boolean = TRUE and Text = ‘valid text’”
• “innercluster.Boolean = TRUE or Text = ‘valid text’”
4.4 Lesson 4—Reading Only New SamplesIn this lesson you will learn how a subscriber can read every received data or only those that have not been read yet. This lesson assumes you have successfully completed Lesson 2—Using
4-18
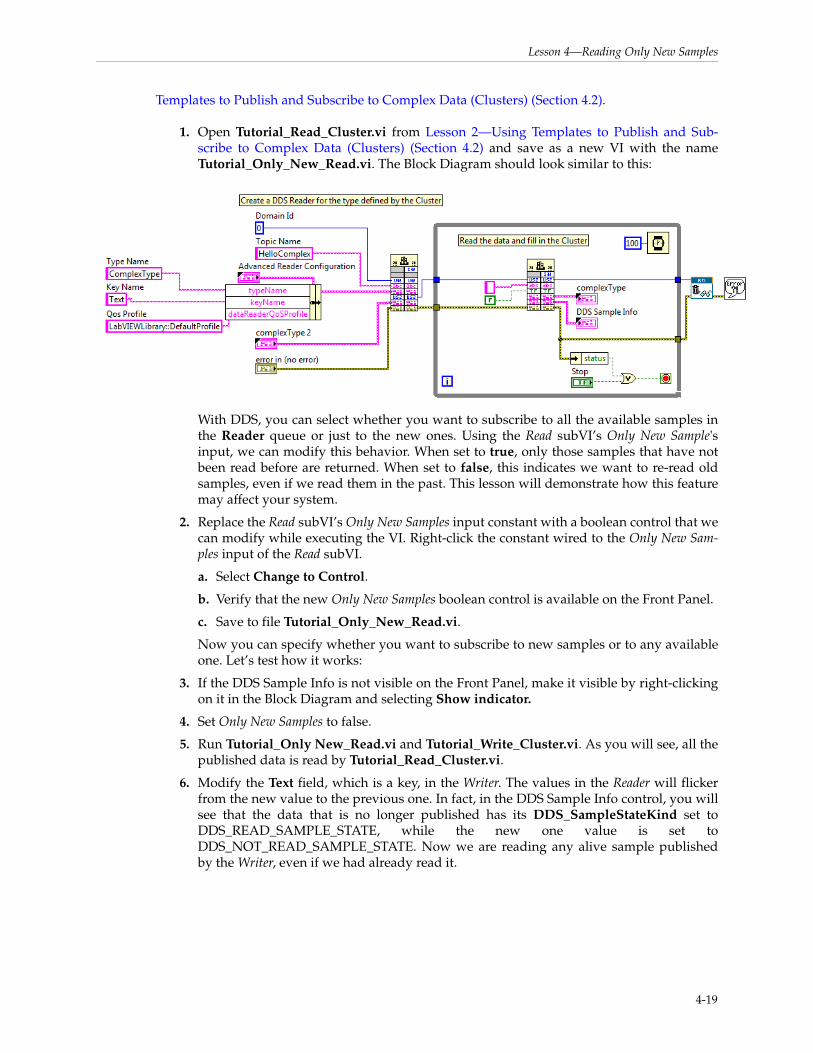
Lesson 4—Reading Only New Samples
Templates to Publish and Subscribe to Complex Data (Clusters) (Section 4.2).
1. Open Tutorial_Read_Cluster.vi from Lesson 2—Using Templates to Publish and Sub-scribe to Complex Data (Clusters) (Section 4.2) and save as a new VI with the name Tutorial_Only_New_Read.vi. The Block Diagram should look similar to this:
With DDS, you can select whether you want to subscribe to all the available samples in the Reader queue or just to the new ones. Using the Read subVI’s Only New Sample's input, we can modify this behavior. When set to true, only those samples that have not been read before are returned. When set to false, this indicates we want to re-read old samples, even if we read them in the past. This lesson will demonstrate how this feature may affect your system.
2. Replace the Read subVI’s Only New Samples input constant with a boolean control that we can modify while executing the VI. Right-click the constant wired to the Only New Sam-ples input of the Read subVI.
a. Select Change to Control.
b. Verify that the new Only New Samples boolean control is available on the Front Panel.
c. Save to file Tutorial_Only_New_Read.vi.
Now you can specify whether you want to subscribe to new samples or to any available one. Let’s test how it works:
3. If the DDS Sample Info is not visible on the Front Panel, make it visible by right-clicking on it in the Block Diagram and selecting Show indicator.
4. Set Only New Samples to false.
5. Run Tutorial_Only New_Read.vi and Tutorial_Write_Cluster.vi. As you will see, all the published data is read by Tutorial_Read_Cluster.vi.
6. Modify the Text field, which is a key, in the Writer. The values in the Reader will flicker from the new value to the previous one. In fact, in the DDS Sample Info control, you will see that the data that is no longer published has its DDS_SampleStateKind set to DDS_READ_SAMPLE_STATE, while the new one value is set to DDS_NOT_READ_SAMPLE_STATE. Now we are reading any alive sample published by the Writer, even if we had already read it.
4-19

Lesson 4—Reading Only New Samples
7. Change the Only New Samples control to True. Now we are only reading the latest pub-lished value. Take into account that only one data sample is read each time we call the
4-20
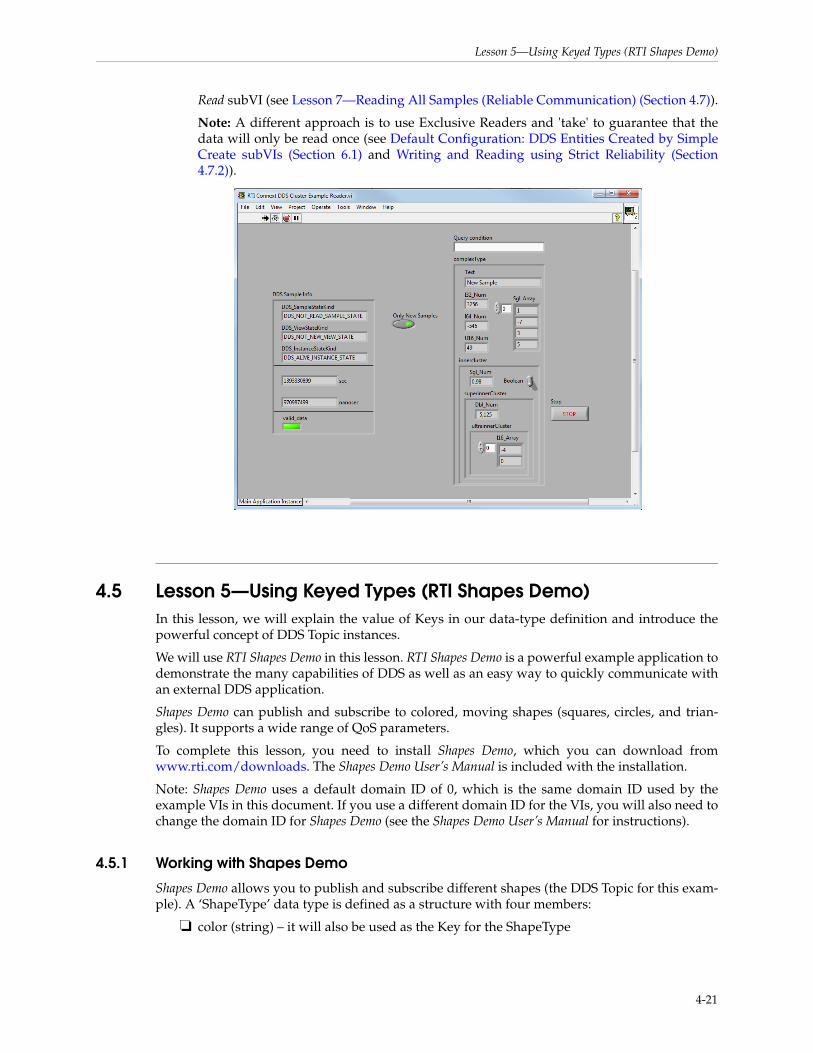
Lesson 5—Using Keyed Types (RTI Shapes Demo)
Read subVI (see Lesson 7—Reading All Samples (Reliable Communication) (Section 4.7)).
Note: A different approach is to use Exclusive Readers and 'take' to guarantee that the data will only be read once (see Default Configuration: DDS Entities Created by Simple Create subVIs (Section 6.1) and Writing and Reading using Strict Reliability (Section 4.7.2)).
4.5 Lesson 5—Using Keyed Types (RTI Shapes Demo)In this lesson, we will explain the value of Keys in our data-type definition and introduce the powerful concept of DDS Topic instances.
We will use RTI Shapes Demo in this lesson. RTI Shapes Demo is a powerful example application to demonstrate the many capabilities of DDS as well as an easy way to quickly communicate with an external DDS application.
Shapes Demo can publish and subscribe to colored, moving shapes (squares, circles, and trian-gles). It supports a wide range of QoS parameters.
To complete this lesson, you need to install Shapes Demo, which you can download from www.rti.com/downloads. The Shapes Demo User’s Manual is included with the installation.
Note: Shapes Demo uses a default domain ID of 0, which is the same domain ID used by the example VIs in this document. If you use a different domain ID for the VIs, you will also need to change the domain ID for Shapes Demo (see the Shapes Demo User’s Manual for instructions).
4.5.1 Working with Shapes Demo
Shapes Demo allows you to publish and subscribe different shapes (the DDS Topic for this exam-ple). A ‘ShapeType’ data type is defined as a structure with four members:
❏ color (string) – it will also be used as the Key for the ShapeType
4-21
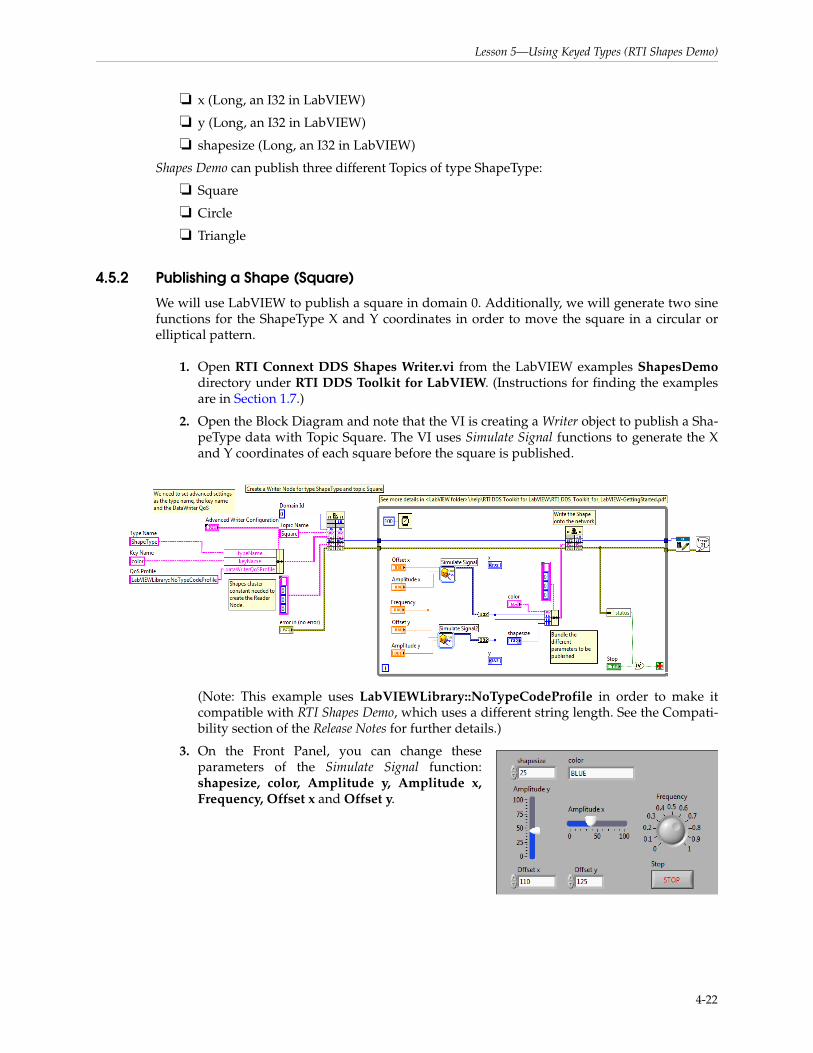
Lesson 5—Using Keyed Types (RTI Shapes Demo)
❏ x (Long, an I32 in LabVIEW)
❏ y (Long, an I32 in LabVIEW)
❏ shapesize (Long, an I32 in LabVIEW)
Shapes Demo can publish three different Topics of type ShapeType:
❏ Square
❏ Circle
❏ Triangle
4.5.2 Publishing a Shape (Square)
We will use LabVIEW to publish a square in domain 0. Additionally, we will generate two sine functions for the ShapeType X and Y coordinates in order to move the square in a circular or elliptical pattern.
1. Open RTI Connext DDS Shapes Writer.vi from the LabVIEW examples ShapesDemodirectory under RTI DDS Toolkit for LabVIEW. (Instructions for finding the examples are in Section 1.7.)
2. Open the Block Diagram and note that the VI is creating a Writer object to publish a Sha-peType data with Topic Square. The VI uses Simulate Signal functions to generate the X and Y coordinates of each square before the square is published.
(Note: This example uses LabVIEWLibrary::NoTypeCodeProfile in order to make it compatible with RTI Shapes Demo, which uses a different string length. See the Compati-bility section of the Release Notes for further details.)
3. On the Front Panel, you can change these parameters of the Simulate Signal function: shapesize, color, Amplitude y, Amplitude x, Frequency, Offset x and Offset y.
4-22
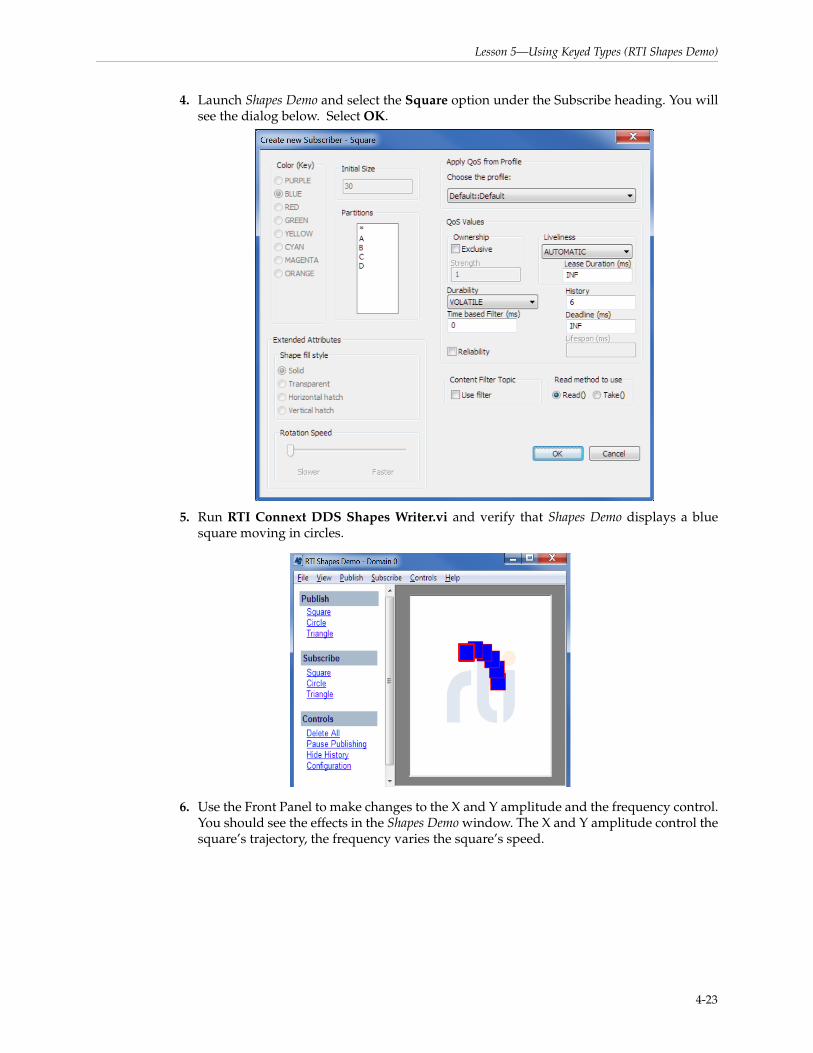
Lesson 5—Using Keyed Types (RTI Shapes Demo)
4. Launch Shapes Demo and select the Square option under the Subscribe heading. You will see the dialog below. Select OK.
5. Run RTI Connext DDS Shapes Writer.vi and verify that Shapes Demo displays a blue square moving in circles.
6. Use the Front Panel to make changes to the X and Y amplitude and the frequency control. You should see the effects in the Shapes Demo window. The X and Y amplitude control the square’s trajectory, the frequency varies the square’s speed.
4-23
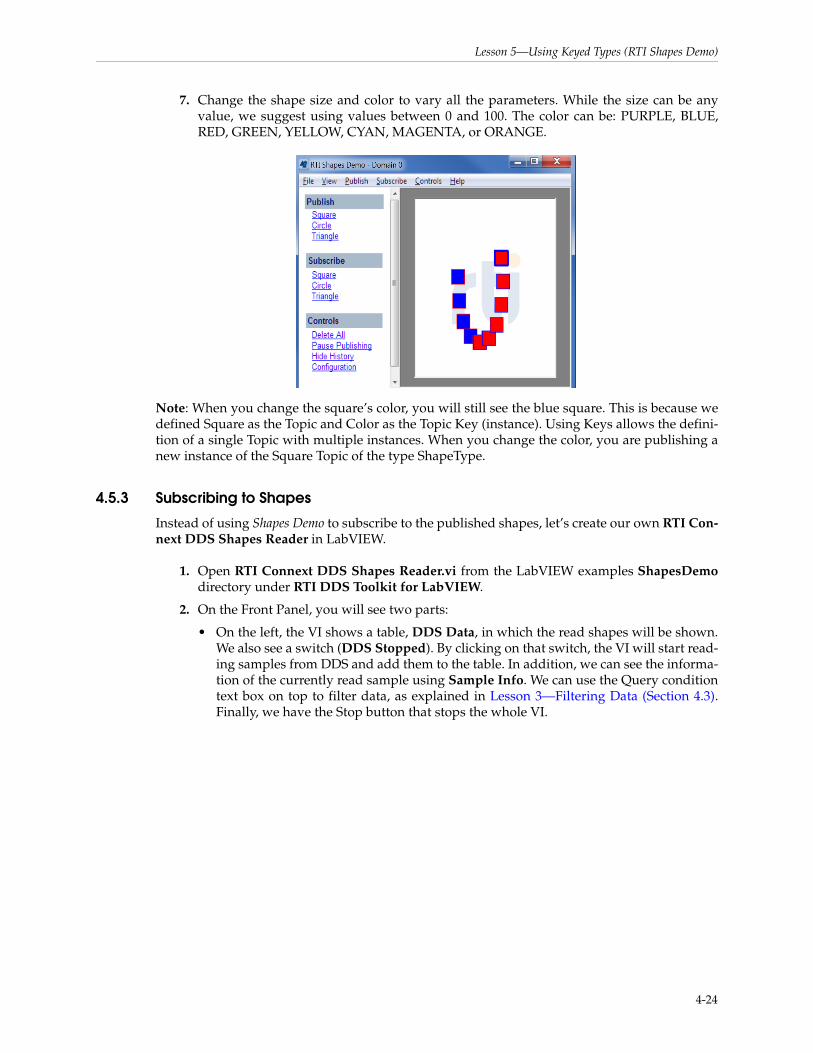
Lesson 5—Using Keyed Types (RTI Shapes Demo)
7. Change the shape size and color to vary all the parameters. While the size can be any value, we suggest using values between 0 and 100. The color can be: PURPLE, BLUE, RED, GREEN, YELLOW, CYAN, MAGENTA, or ORANGE.
Note: When you change the square’s color, you will still see the blue square. This is because we defined Square as the Topic and Color as the Topic Key (instance). Using Keys allows the defini-tion of a single Topic with multiple instances. When you change the color, you are publishing a new instance of the Square Topic of the type ShapeType.
4.5.3 Subscribing to Shapes
Instead of using Shapes Demo to subscribe to the published shapes, let’s create our own RTI Con-next DDS Shapes Reader in LabVIEW.
1. Open RTI Connext DDS Shapes Reader.vi from the LabVIEW examples ShapesDemodirectory under RTI DDS Toolkit for LabVIEW.
2. On the Front Panel, you will see two parts:
• On the left, the VI shows a table, DDS Data, in which the read shapes will be shown. We also see a switch (DDS Stopped). By clicking on that switch, the VI will start read-ing samples from DDS and add them to the table. In addition, we can see the informa-tion of the currently read sample using Sample Info. We can use the Query condition text box on top to filter data, as explained in Lesson 3—Filtering Data (Section 4.3). Finally, we have the Stop button that stops the whole VI.
4-24
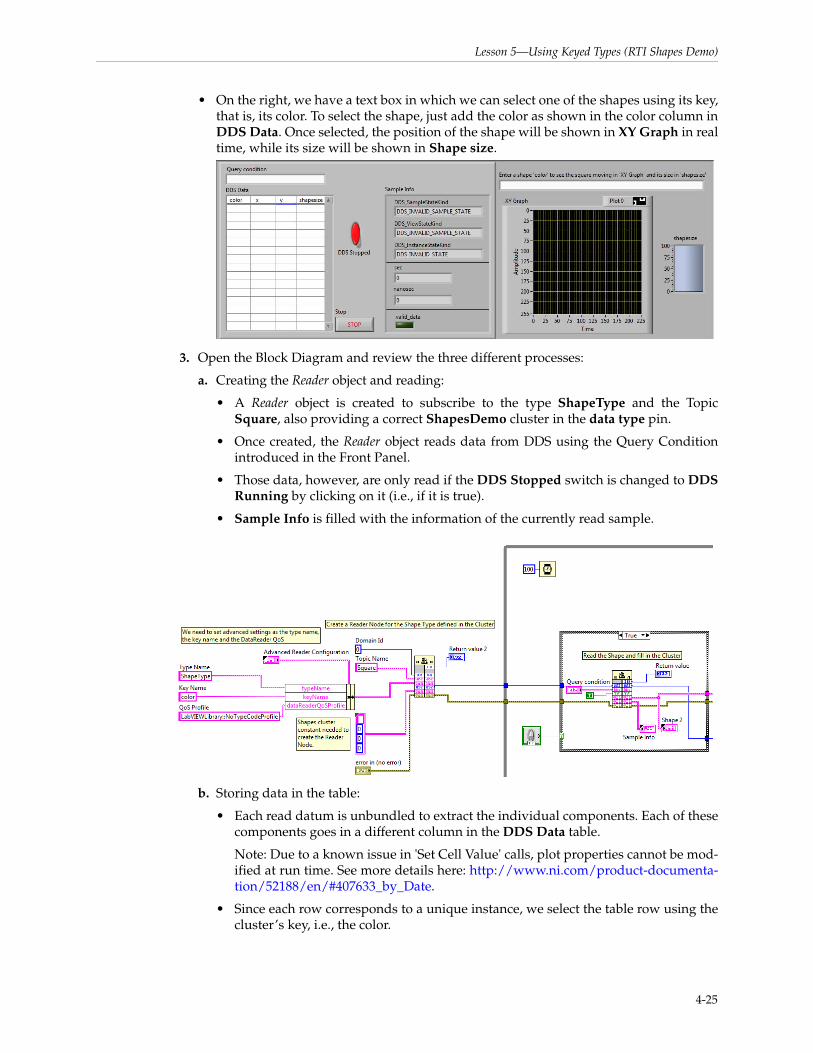
Lesson 5—Using Keyed Types (RTI Shapes Demo)
• On the right, we have a text box in which we can select one of the shapes using its key, that is, its color. To select the shape, just add the color as shown in the color column in DDS Data. Once selected, the position of the shape will be shown in XY Graph in real time, while its size will be shown in Shape size.
3. Open the Block Diagram and review the three different processes:
a. Creating the Reader object and reading:
• A Reader object is created to subscribe to the type ShapeType and the Topic Square, also providing a correct ShapesDemo cluster in the data type pin.
• Once created, the Reader object reads data from DDS using the Query Condition introduced in the Front Panel.
• Those data, however, are only read if the DDS Stopped switch is changed to DDS Running by clicking on it (i.e., if it is true).
• Sample Info is filled with the information of the currently read sample.
b. Storing data in the table:
• Each read datum is unbundled to extract the individual components. Each of these components goes in a different column in the DDS Data table.
Note: Due to a known issue in 'Set Cell Value' calls, plot properties cannot be mod-ified at run time. See more details here: http://www.ni.com/product-documenta-tion/52188/en/#407633_by_Date.
• Since each row corresponds to a unique instance, we select the table row using the cluster’s key, i.e., the color.
4-25
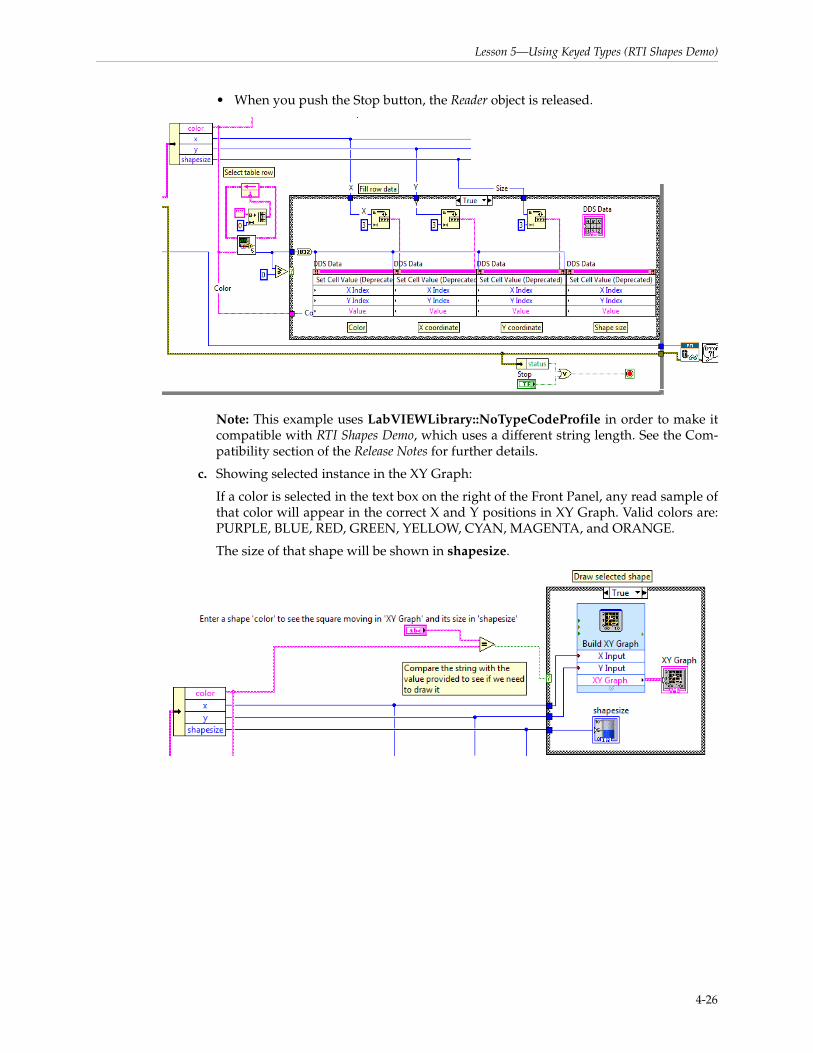
Lesson 5—Using Keyed Types (RTI Shapes Demo)
• When you push the Stop button, the Reader object is released.
Note: This example uses LabVIEWLibrary::NoTypeCodeProfile in order to make it compatible with RTI Shapes Demo, which uses a different string length. See the Com-patibility section of the Release Notes for further details.
c. Showing selected instance in the XY Graph:
If a color is selected in the text box on the right of the Front Panel, any read sample of that color will appear in the correct X and Y positions in XY Graph. Valid colors are: PURPLE, BLUE, RED, GREEN, YELLOW, CYAN, MAGENTA, and ORANGE.
The size of that shape will be shown in shapesize.
4-26
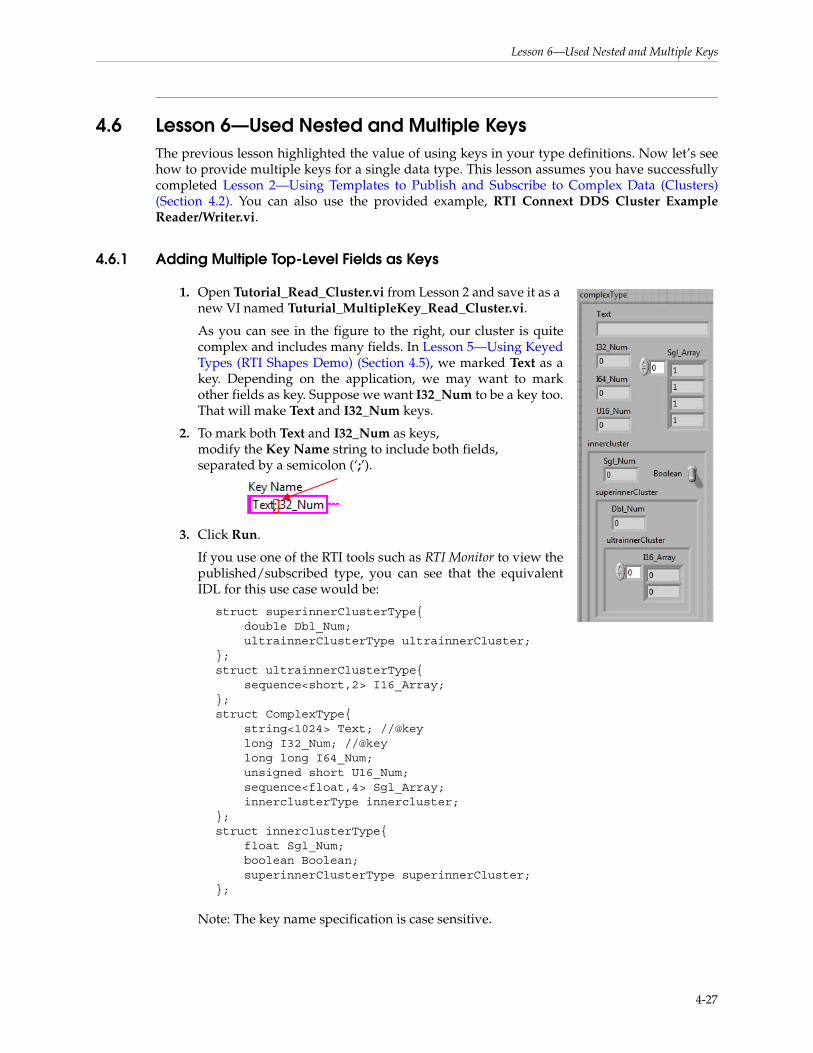
Lesson 6—Used Nested and Multiple Keys
4.6 Lesson 6—Used Nested and Multiple KeysThe previous lesson highlighted the value of using keys in your type definitions. Now let’s see how to provide multiple keys for a single data type. This lesson assumes you have successfully completed Lesson 2—Using Templates to Publish and Subscribe to Complex Data (Clusters) (Section 4.2). You can also use the provided example, RTI Connext DDS Cluster Example Reader/Writer.vi.
4.6.1 Adding Multiple Top-Level Fields as Keys
1. Open Tutorial_Read_Cluster.vi from Lesson 2 and save it as a new VI named Tuturial_MultipleKey_Read_Cluster.vi.
As you can see in the figure to the right, our cluster is quite complex and includes many fields. In Lesson 5—Using Keyed Types (RTI Shapes Demo) (Section 4.5), we marked Text as a key. Depending on the application, we may want to mark other fields as key. Suppose we want I32_Num to be a key too. That will make Text and I32_Num keys.
2. To mark both Text and I32_Num as keys, modify the Key Name string to include both fields, separated by a semicolon (‘;’).
3. Click Run.
If you use one of the RTI tools such as RTI Monitor to view the published/subscribed type, you can see that the equivalent IDL for this use case would be:
struct superinnerClusterType{ double Dbl_Num; ultrainnerClusterType ultrainnerCluster;};struct ultrainnerClusterType{ sequence<short,2> I16_Array;};struct ComplexType{ string<1024> Text; //@key long I32_Num; //@key long long I64_Num; unsigned short U16_Num; sequence<float,4> Sgl_Array; innerclusterType innercluster;};struct innerclusterType{ float Sgl_Num; boolean Boolean; superinnerClusterType superinnerCluster;};
Note: The key name specification is case sensitive.
4-27
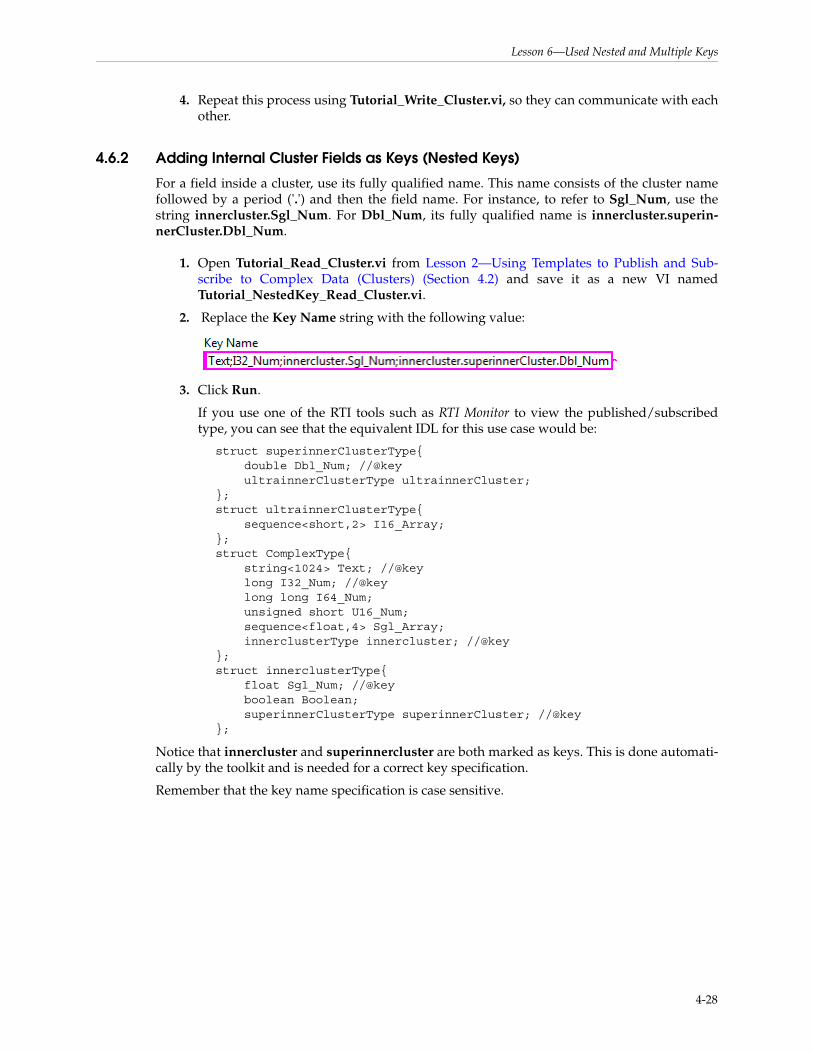
Lesson 6—Used Nested and Multiple Keys
4. Repeat this process using Tutorial_Write_Cluster.vi, so they can communicate with each other.
4.6.2 Adding Internal Cluster Fields as Keys (Nested Keys)
For a field inside a cluster, use its fully qualified name. This name consists of the cluster name followed by a period ('.') and then the field name. For instance, to refer to Sgl_Num, use the string innercluster.Sgl_Num. For Dbl_Num, its fully qualified name is innercluster.superin-nerCluster.Dbl_Num.
1. Open Tutorial_Read_Cluster.vi from Lesson 2—Using Templates to Publish and Sub-scribe to Complex Data (Clusters) (Section 4.2) and save it as a new VI named Tutorial_NestedKey_Read_Cluster.vi.
2. Replace the Key Name string with the following value:
3. Click Run.
If you use one of the RTI tools such as RTI Monitor to view the published/subscribed type, you can see that the equivalent IDL for this use case would be:
struct superinnerClusterType{ double Dbl_Num; //@key ultrainnerClusterType ultrainnerCluster;};struct ultrainnerClusterType{ sequence<short,2> I16_Array;};struct ComplexType{ string<1024> Text; //@key long I32_Num; //@key long long I64_Num; unsigned short U16_Num; sequence<float,4> Sgl_Array; innerclusterType innercluster; //@key};struct innerclusterType{ float Sgl_Num; //@key boolean Boolean; superinnerClusterType superinnerCluster; //@key};
Notice that innercluster and superinnercluster are both marked as keys. This is done automati-cally by the toolkit and is needed for a correct key specification.
Remember that the key name specification is case sensitive.
4-28
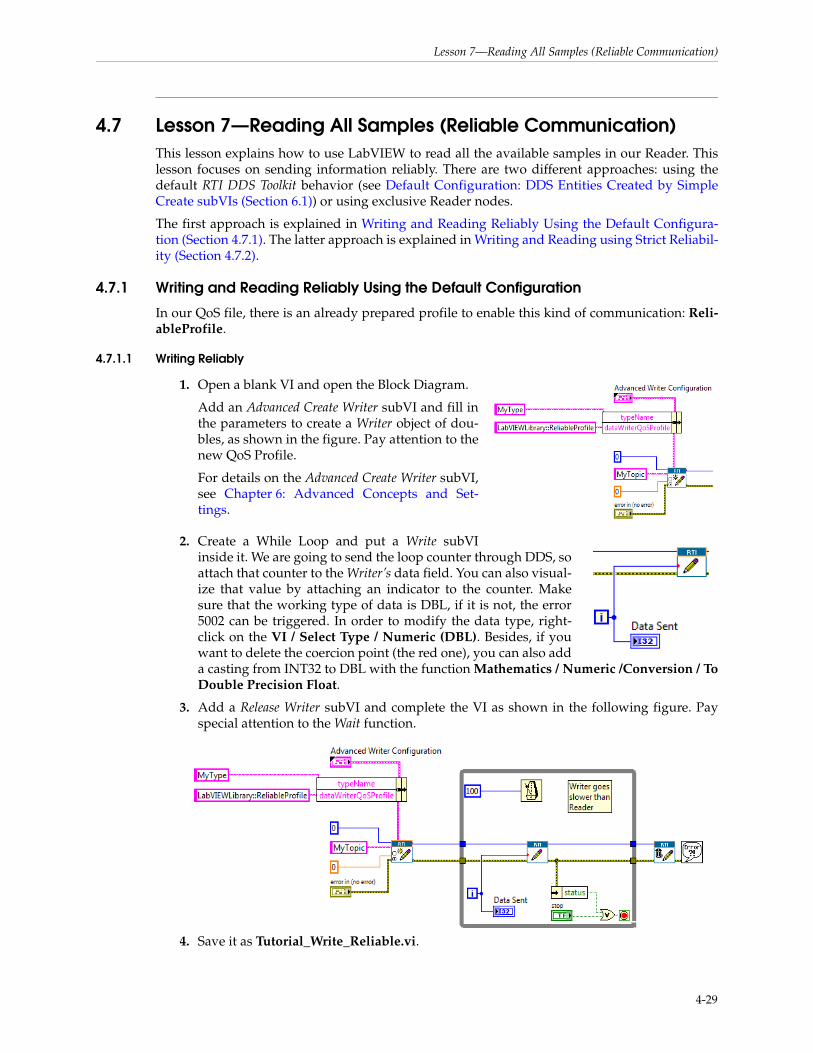
Lesson 7—Reading All Samples (Reliable Communication)
4.7 Lesson 7—Reading All Samples (Reliable Communication)This lesson explains how to use LabVIEW to read all the available samples in our Reader. This lesson focuses on sending information reliably. There are two different approaches: using the default RTI DDS Toolkit behavior (see Default Configuration: DDS Entities Created by Simple Create subVIs (Section 6.1)) or using exclusive Reader nodes.
The first approach is explained in Writing and Reading Reliably Using the Default Configura-tion (Section 4.7.1). The latter approach is explained in Writing and Reading using Strict Reliabil-ity (Section 4.7.2).
4.7.1 Writing and Reading Reliably Using the Default Configuration
In our QoS file, there is an already prepared profile to enable this kind of communication: Reli-ableProfile.
4.7.1.1 Writing Reliably
1. Open a blank VI and open the Block Diagram.
Add an Advanced Create Writer subVI and fill in the parameters to create a Writer object of dou-bles, as shown in the figure. Pay attention to the new QoS Profile.
For details on the Advanced Create Writer subVI, see Chapter 6: Advanced Concepts and Set-tings.
2. Create a While Loop and put a Write subVI inside it. We are going to send the loop counter through DDS, so attach that counter to the Writer’s data field. You can also visual-ize that value by attaching an indicator to the counter. Make sure that the working type of data is DBL, if it is not, the error 5002 can be triggered. In order to modify the data type, right-click on the VI / Select Type / Numeric (DBL). Besides, if you want to delete the coercion point (the red one), you can also add a casting from INT32 to DBL with the function Mathematics / Numeric /Conversion / To Double Precision Float.
3. Add a Release Writer subVI and complete the VI as shown in the following figure. Pay special attention to the Wait function.
4. Save it as Tutorial_Write_Reliable.vi.
4-29
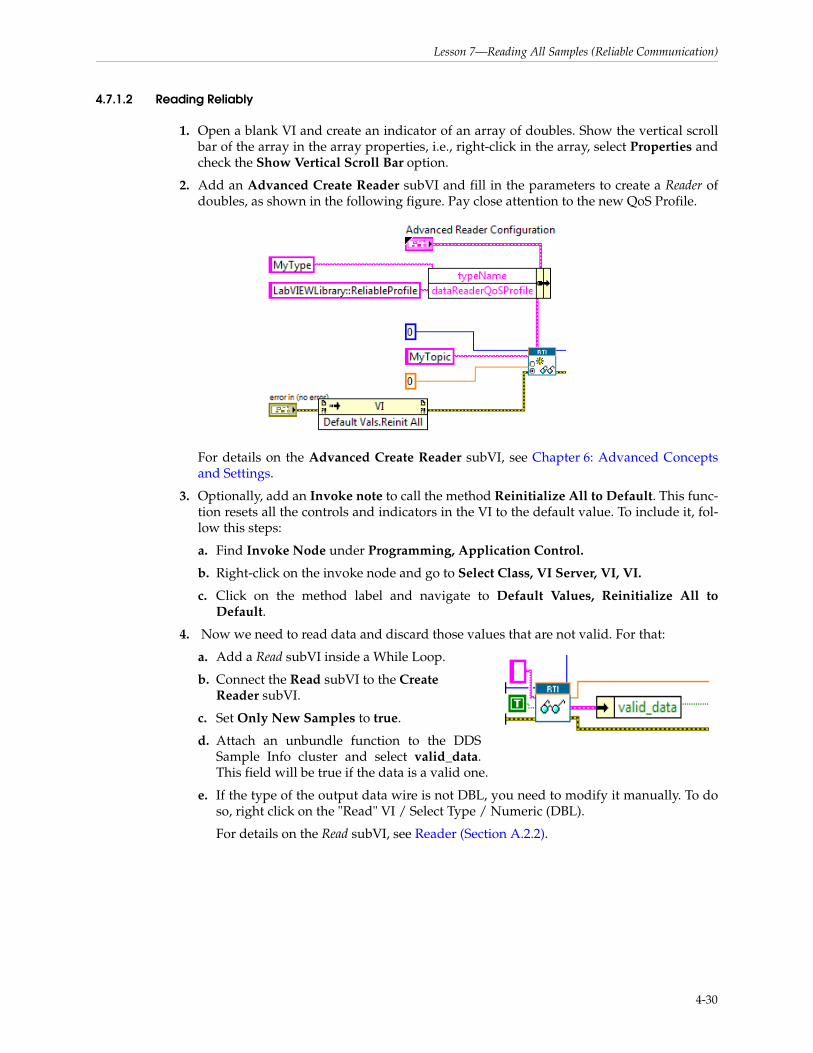
Lesson 7—Reading All Samples (Reliable Communication)
4.7.1.2 Reading Reliably
1. Open a blank VI and create an indicator of an array of doubles. Show the vertical scroll bar of the array in the array properties, i.e., right-click in the array, select Properties and check the Show Vertical Scroll Bar option.
2. Add an Advanced Create Reader subVI and fill in the parameters to create a Reader of doubles, as shown in the following figure. Pay close attention to the new QoS Profile.
For details on the Advanced Create Reader subVI, see Chapter 6: Advanced Concepts and Settings.
3. Optionally, add an Invoke note to call the method Reinitialize All to Default. This func-tion resets all the controls and indicators in the VI to the default value. To include it, fol-low this steps:
a. Find Invoke Node under Programming, Application Control.
b. Right-click on the invoke node and go to Select Class, VI Server, VI, VI.
c. Click on the method label and navigate to Default Values, Reinitialize All to Default.
4. Now we need to read data and discard those values that are not valid. For that:
a. Add a Read subVI inside a While Loop.
b. Connect the Read subVI to the Create Reader subVI.
c. Set Only New Samples to true.
d. Attach an unbundle function to the DDS Sample Info cluster and select valid_data. This field will be true if the data is a valid one.
e. If the type of the output data wire is not DBL, you need to modify it manually. To do so, right click on the "Read" VI / Select Type / Numeric (DBL).
For details on the Read subVI, see Reader (Section A.2.2).
4-30
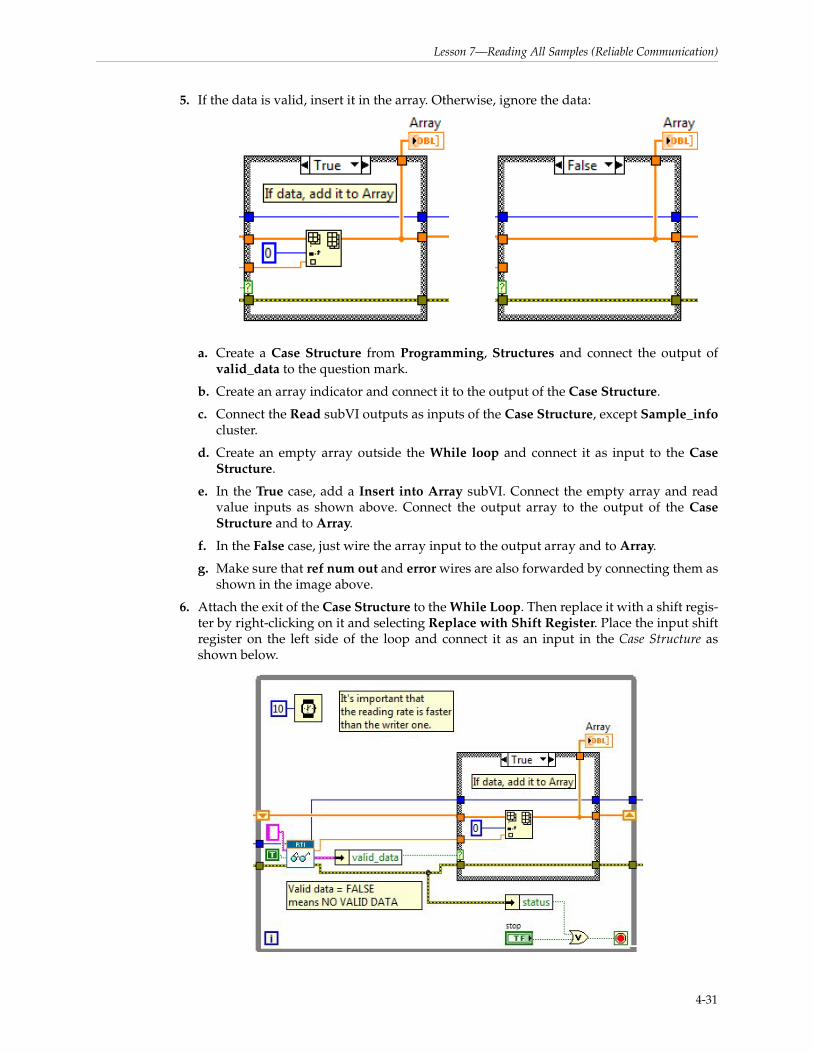
Lesson 7—Reading All Samples (Reliable Communication)
5. If the data is valid, insert it in the array. Otherwise, ignore the data:
a. Create a Case Structure from Programming, Structures and connect the output of valid_data to the question mark.
b. Create an array indicator and connect it to the output of the Case Structure.
c. Connect the Read subVI outputs as inputs of the Case Structure, except Sample_info cluster.
d. Create an empty array outside the While loop and connect it as input to the Case Structure.
e. In the True case, add a Insert into Array subVI. Connect the empty array and read value inputs as shown above. Connect the output array to the output of the Case Structure and to Array.
f. In the False case, just wire the array input to the output array and to Array.
g. Make sure that ref num out and error wires are also forwarded by connecting them as shown in the image above.
6. Attach the exit of the Case Structure to the While Loop. Then replace it with a shift regis-ter by right-clicking on it and selecting Replace with Shift Register. Place the input shift register on the left side of the loop and connect it as an input in the Case Structure as shown below.
4-31
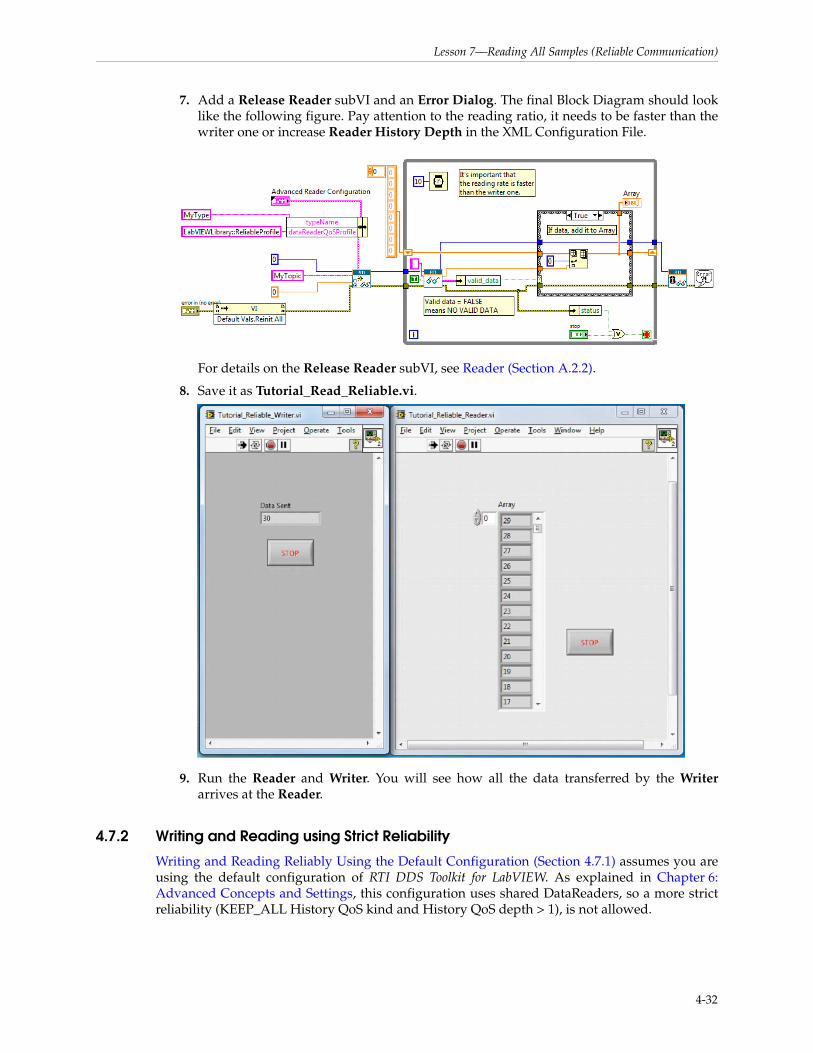
Lesson 7—Reading All Samples (Reliable Communication)
7. Add a Release Reader subVI and an Error Dialog. The final Block Diagram should look like the following figure. Pay attention to the reading ratio, it needs to be faster than the writer one or increase Reader History Depth in the XML Configuration File.
For details on the Release Reader subVI, see Reader (Section A.2.2).
8. Save it as Tutorial_Read_Reliable.vi.
9. Run the Reader and Writer. You will see how all the data transferred by the Writerarrives at the Reader.
4.7.2 Writing and Reading using Strict Reliability
Writing and Reading Reliably Using the Default Configuration (Section 4.7.1) assumes you are using the default configuration of RTI DDS Toolkit for LabVIEW. As explained in Chapter 6: Advanced Concepts and Settings, this configuration uses shared DataReaders, so a more strict reliability (KEEP_ALL History QoS kind and History QoS depth > 1), is not allowed.
4-32
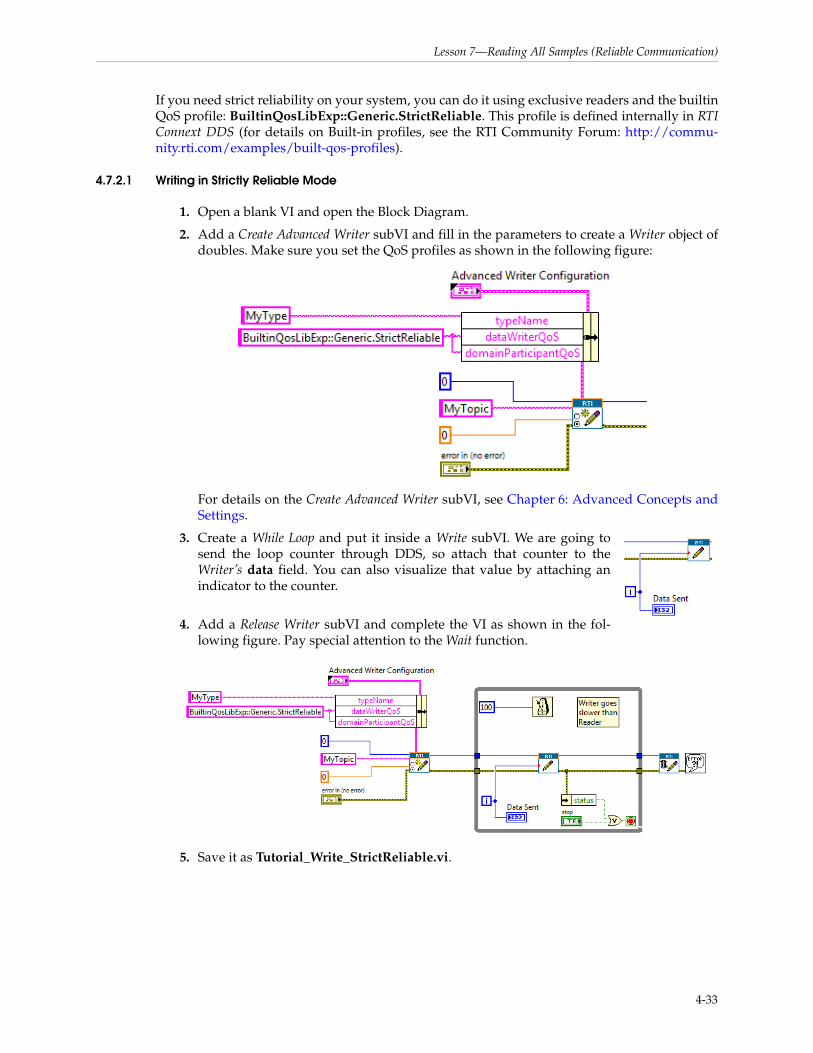
Lesson 7—Reading All Samples (Reliable Communication)
If you need strict reliability on your system, you can do it using exclusive readers and the builtin QoS profile: BuiltinQosLibExp::Generic.StrictReliable. This profile is defined internally in RTI Connext DDS (for details on Built-in profiles, see the RTI Community Forum: http://commu-nity.rti.com/examples/built-qos-profiles).
4.7.2.1 Writing in Strictly Reliable Mode
1. Open a blank VI and open the Block Diagram.
2. Add a Create Advanced Writer subVI and fill in the parameters to create a Writer object of doubles. Make sure you set the QoS profiles as shown in the following figure:
For details on the Create Advanced Writer subVI, see Chapter 6: Advanced Concepts and Settings.
3. Create a While Loop and put it inside a Write subVI. We are going to send the loop counter through DDS, so attach that counter to the Writer’s data field. You can also visualize that value by attaching an indicator to the counter.
4. Add a Release Writer subVI and complete the VI as shown in the fol-lowing figure. Pay special attention to the Wait function.
5. Save it as Tutorial_Write_StrictReliable.vi.
4-33
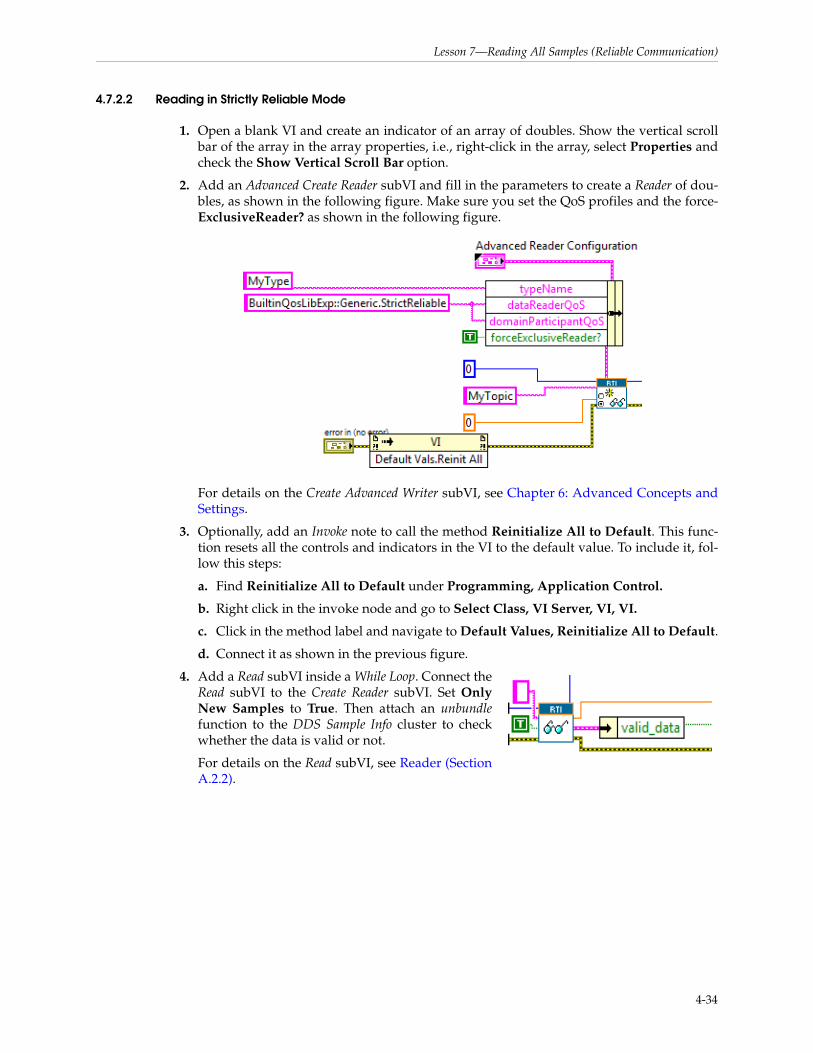
Lesson 7—Reading All Samples (Reliable Communication)
4.7.2.2 Reading in Strictly Reliable Mode
1. Open a blank VI and create an indicator of an array of doubles. Show the vertical scroll bar of the array in the array properties, i.e., right-click in the array, select Properties and check the Show Vertical Scroll Bar option.
2. Add an Advanced Create Reader subVI and fill in the parameters to create a Reader of dou-bles, as shown in the following figure. Make sure you set the QoS profiles and the force-ExclusiveReader? as shown in the following figure.
For details on the Create Advanced Writer subVI, see Chapter 6: Advanced Concepts and Settings.
3. Optionally, add an Invoke note to call the method Reinitialize All to Default. This func-tion resets all the controls and indicators in the VI to the default value. To include it, fol-low this steps:
a. Find Reinitialize All to Default under Programming, Application Control.
b. Right click in the invoke node and go to Select Class, VI Server, VI, VI.
c. Click in the method label and navigate to Default Values, Reinitialize All to Default.
d. Connect it as shown in the previous figure.
4. Add a Read subVI inside a While Loop. Connect the Read subVI to the Create Reader subVI. Set Only New Samples to True. Then attach an unbundlefunction to the DDS Sample Info cluster to check whether the data is valid or not.
For details on the Read subVI, see Reader (Section A.2.2).
4-34
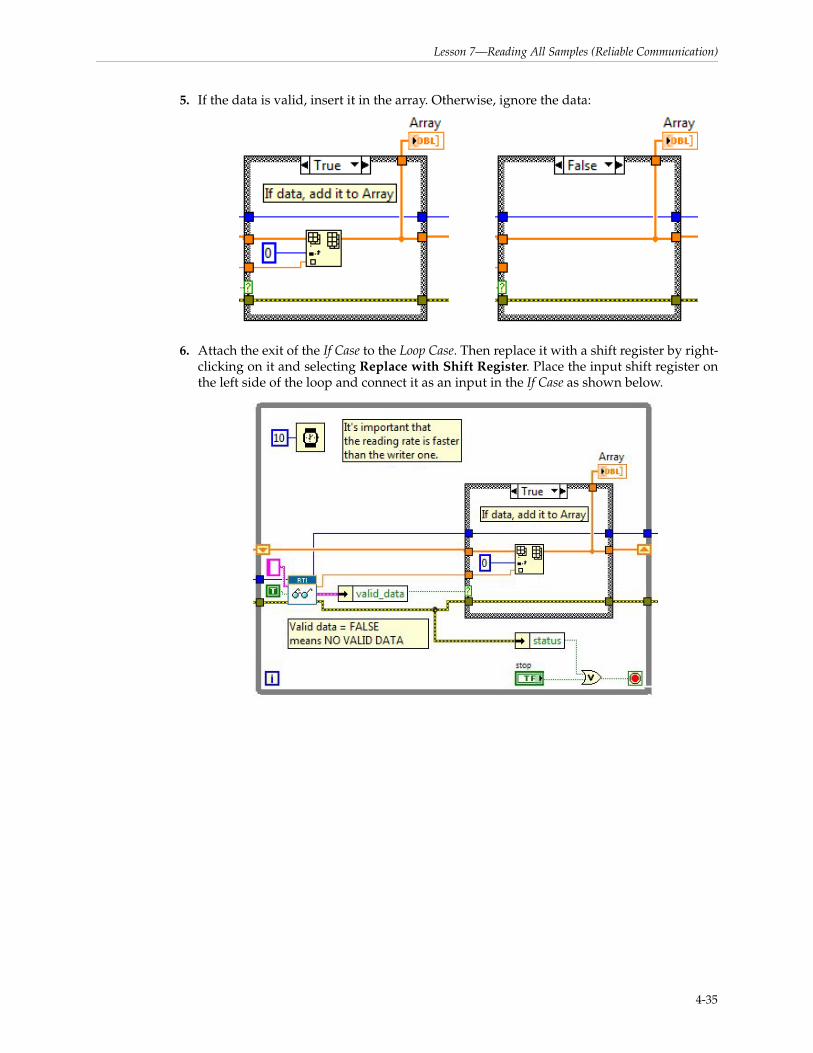
Lesson 7—Reading All Samples (Reliable Communication)
5. If the data is valid, insert it in the array. Otherwise, ignore the data:
6. Attach the exit of the If Case to the Loop Case. Then replace it with a shift register by right-clicking on it and selecting Replace with Shift Register. Place the input shift register on the left side of the loop and connect it as an input in the If Case as shown below.
4-35
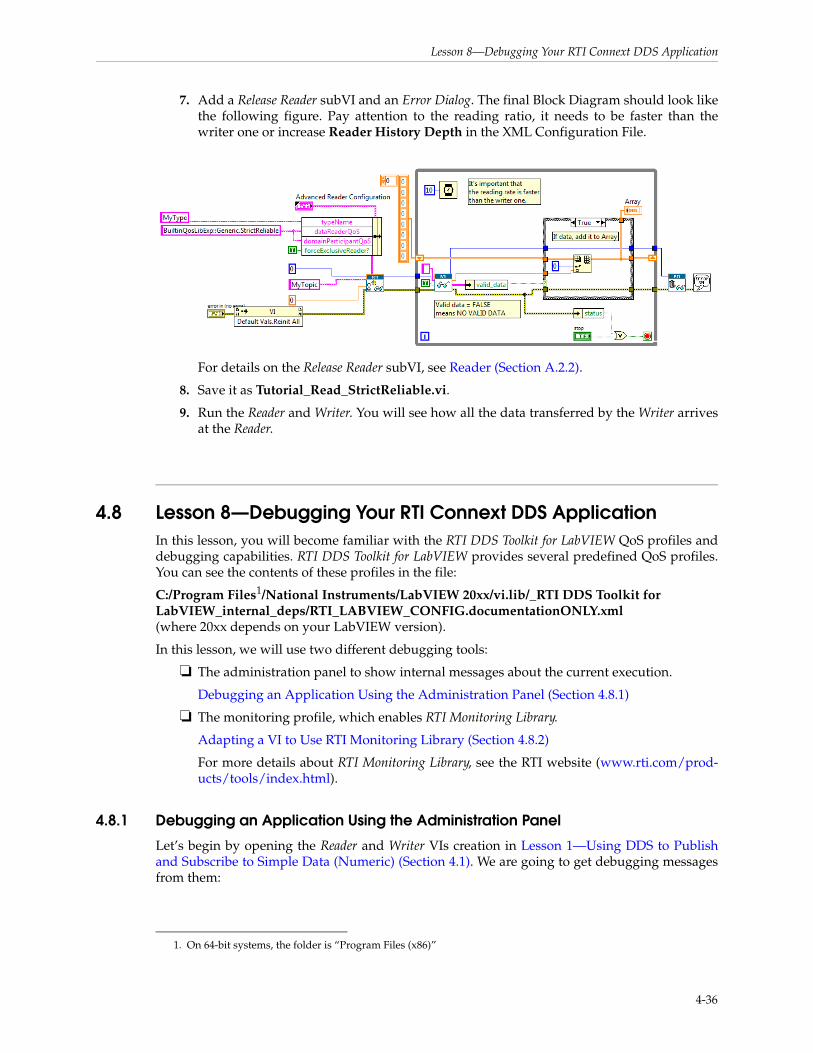
Lesson 8—Debugging Your RTI Connext DDS Application
7. Add a Release Reader subVI and an Error Dialog. The final Block Diagram should look like the following figure. Pay attention to the reading ratio, it needs to be faster than the writer one or increase Reader History Depth in the XML Configuration File.
For details on the Release Reader subVI, see Reader (Section A.2.2).
8. Save it as Tutorial_Read_StrictReliable.vi.
9. Run the Reader and Writer. You will see how all the data transferred by the Writer arrives at the Reader.
4.8 Lesson 8—Debugging Your RTI Connext DDS ApplicationIn this lesson, you will become familiar with the RTI DDS Toolkit for LabVIEW QoS profiles and debugging capabilities. RTI DDS Toolkit for LabVIEW provides several predefined QoS profiles. You can see the contents of these profiles in the file:
C:/Program Files1/National Instruments/LabVIEW 20xx/vi.lib/_RTI DDS Toolkit for LabVIEW_internal_deps/RTI_LABVIEW_CONFIG.documentationONLY.xml (where 20xx depends on your LabVIEW version).
In this lesson, we will use two different debugging tools:
❏ The administration panel to show internal messages about the current execution.
Debugging an Application Using the Administration Panel (Section 4.8.1)
❏ The monitoring profile, which enables RTI Monitoring Library.
Adapting a VI to Use RTI Monitoring Library (Section 4.8.2)
For more details about RTI Monitoring Library, see the RTI website (www.rti.com/prod-ucts/tools/index.html).
4.8.1 Debugging an Application Using the Administration Panel
Let’s begin by opening the Reader and Writer VIs creation in Lesson 1—Using DDS to Publish and Subscribe to Simple Data (Numeric) (Section 4.1). We are going to get debugging messages from them:
1. On 64-bit systems, the folder is “Program Files (x86)”
4-36
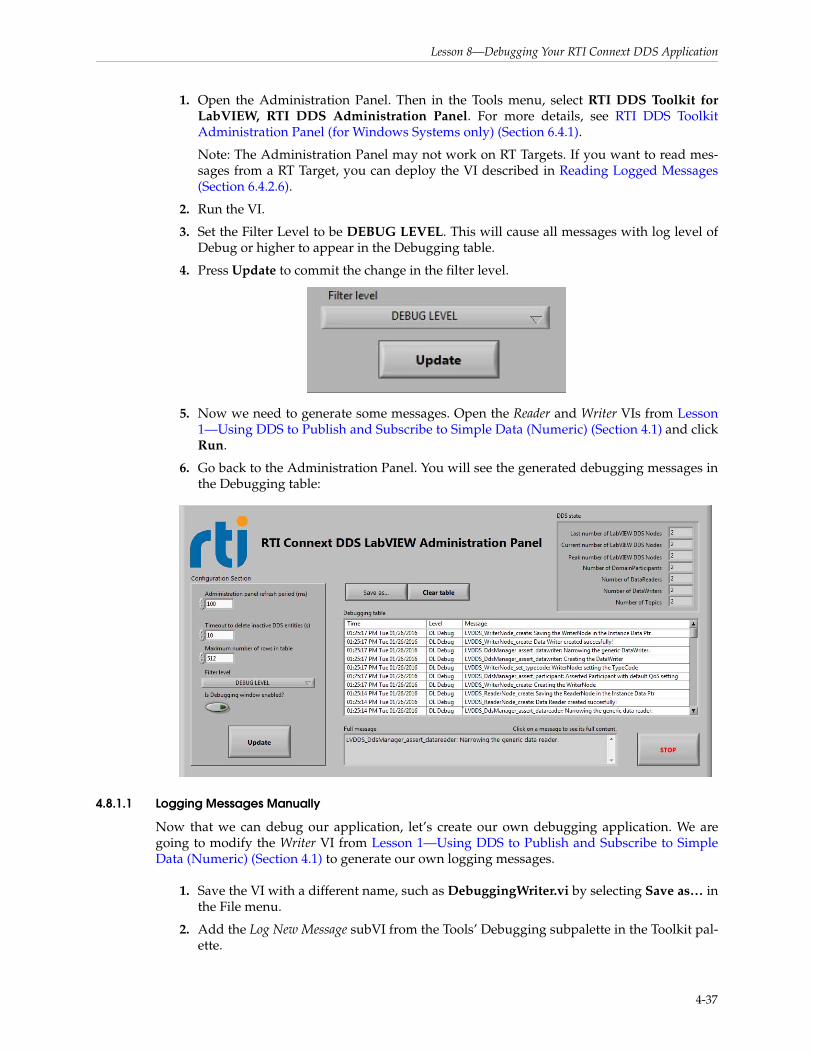
Lesson 8—Debugging Your RTI Connext DDS Application
1. Open the Administration Panel. Then in the Tools menu, select RTI DDS Toolkit for LabVIEW, RTI DDS Administration Panel. For more details, see RTI DDS Toolkit Administration Panel (for Windows Systems only) (Section 6.4.1).
Note: The Administration Panel may not work on RT Targets. If you want to read mes-sages from a RT Target, you can deploy the VI described in Reading Logged Messages (Section 6.4.2.6).
2. Run the VI.
3. Set the Filter Level to be DEBUG LEVEL. This will cause all messages with log level of Debug or higher to appear in the Debugging table.
4. Press Update to commit the change in the filter level.
5. Now we need to generate some messages. Open the Reader and Writer VIs from Lesson 1—Using DDS to Publish and Subscribe to Simple Data (Numeric) (Section 4.1) and click Run.
6. Go back to the Administration Panel. You will see the generated debugging messages in the Debugging table:
4.8.1.1 Logging Messages Manually
Now that we can debug our application, let’s create our own debugging application. We are going to modify the Writer VI from Lesson 1—Using DDS to Publish and Subscribe to Simple Data (Numeric) (Section 4.1) to generate our own logging messages.
1. Save the VI with a different name, such as DebuggingWriter.vi by selecting Save as… in the File menu.
2. Add the Log New Message subVI from the Tools’ Debugging subpalette in the Toolkit pal-ette.
4-37

Lesson 8—Debugging Your RTI Connext DDS Application
3. Create a Log Level control by right-clicking on the Log Level input in the Log New Mes-sage VI. Then choose Create, Control.
4. Add the Format into String function for building a debugging string. Our debugging string will be Published the value x, where x is a double number. To do that:
a. Connect a string constant with the text Published the value at the initial value pin.
b. Connect a string constant with the text %lf to the format string pin.
c. Wire the Published Value control to the input 1 pin.
d. Connect the resulting string to the Message input of the Log New Message subVI, as seen here:
5. Run the Writer VI.
6. Click on the Log Level control and select DEBUG LEVEL.
7. Run the RTI DDS Administration Panel: from the Tools menu, select RTI DDS Toolkit for LabVIEW, RTI DDS Administration Panel.
8. Set the Administration Panel’s Filter Level to DEBUG LEVEL as explained in Debugging an Application Using the Administration Panel (Section 4.8.1).
9. Run this new VI and you will see these messages on the administration panel debugging table. The output will be similar to this:
4-38
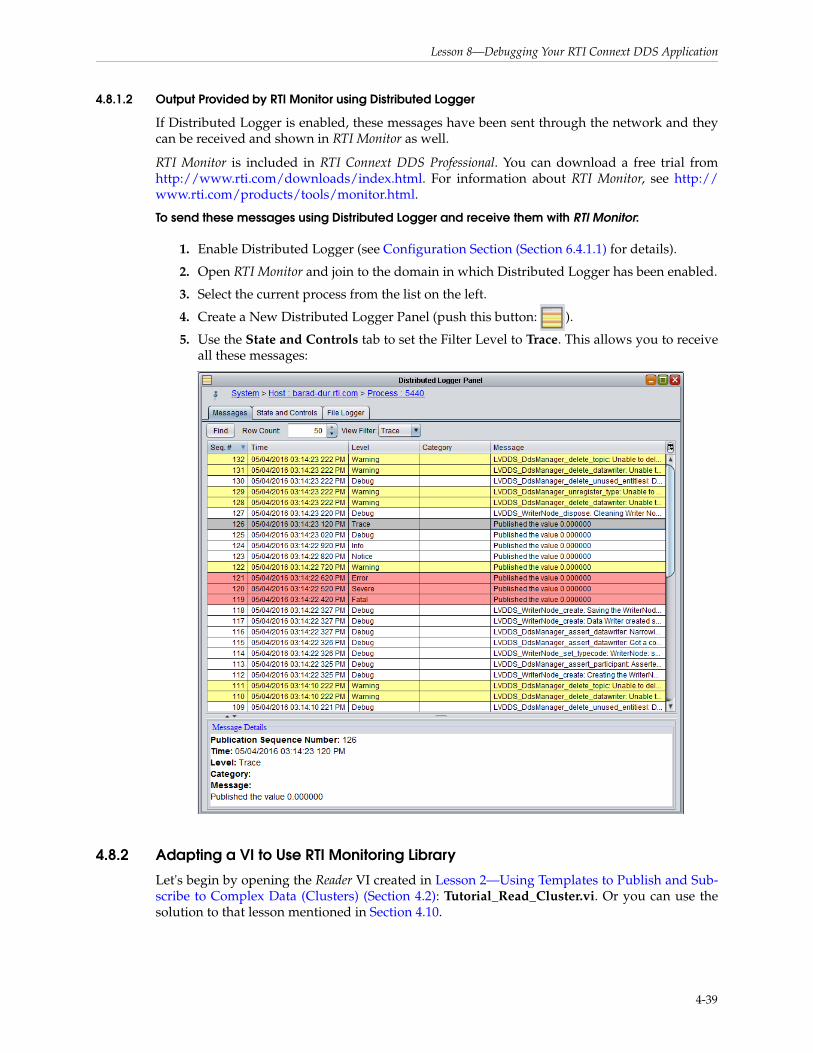
Lesson 8—Debugging Your RTI Connext DDS Application
4.8.1.2 Output Provided by RTI Monitor using Distributed Logger
If Distributed Logger is enabled, these messages have been sent through the network and they can be received and shown in RTI Monitor as well.
RTI Monitor is included in RTI Connext DDS Professional. You can download a free trial from http://www.rti.com/downloads/index.html. For information about RTI Monitor, see http://www.rti.com/products/tools/monitor.html.
To send these messages using Distributed Logger and receive them with RTI Monitor:
1. Enable Distributed Logger (see Configuration Section (Section 6.4.1.1) for details).
2. Open RTI Monitor and join to the domain in which Distributed Logger has been enabled.
3. Select the current process from the list on the left.
4. Create a New Distributed Logger Panel (push this button: ).
5. Use the State and Controls tab to set the Filter Level to Trace. This allows you to receive all these messages:
4.8.2 Adapting a VI to Use RTI Monitoring Library
Let's begin by opening the Reader VI created in Lesson 2—Using Templates to Publish and Sub-scribe to Complex Data (Clusters) (Section 4.2): Tutorial_Read_Cluster.vi. Or you can use the solution to that lesson mentioned in Section 4.10.
4-39
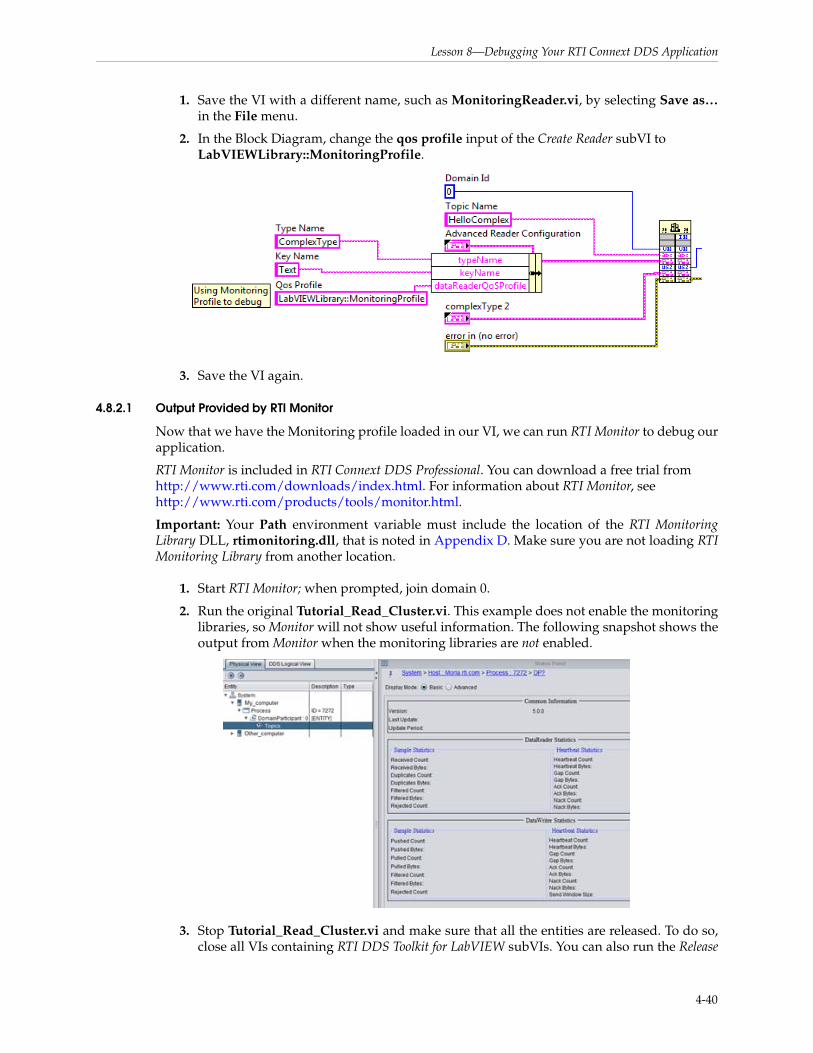
Lesson 8—Debugging Your RTI Connext DDS Application
1. Save the VI with a different name, such as MonitoringReader.vi, by selecting Save as…in the File menu.
2. In the Block Diagram, change the qos profile input of the Create Reader subVI to LabVIEWLibrary::MonitoringProfile.
3. Save the VI again.
4.8.2.1 Output Provided by RTI Monitor
Now that we have the Monitoring profile loaded in our VI, we can run RTI Monitor to debug our application.
RTI Monitor is included in RTI Connext DDS Professional. You can download a free trial from http://www.rti.com/downloads/index.html. For information about RTI Monitor, see http://www.rti.com/products/tools/monitor.html.
Important: Your Path environment variable must include the location of the RTI Monitoring Library DLL, rtimonitoring.dll, that is noted in Appendix D. Make sure you are not loading RTI Monitoring Library from another location.
1. Start RTI Monitor; when prompted, join domain 0.
2. Run the original Tutorial_Read_Cluster.vi. This example does not enable the monitoring libraries, so Monitor will not show useful information. The following snapshot shows the output from Monitor when the monitoring libraries are not enabled.
3. Stop Tutorial_Read_Cluster.vi and make sure that all the entities are released. To do so, close all VIs containing RTI DDS Toolkit for LabVIEW subVIs. You can also run the Release
4-40
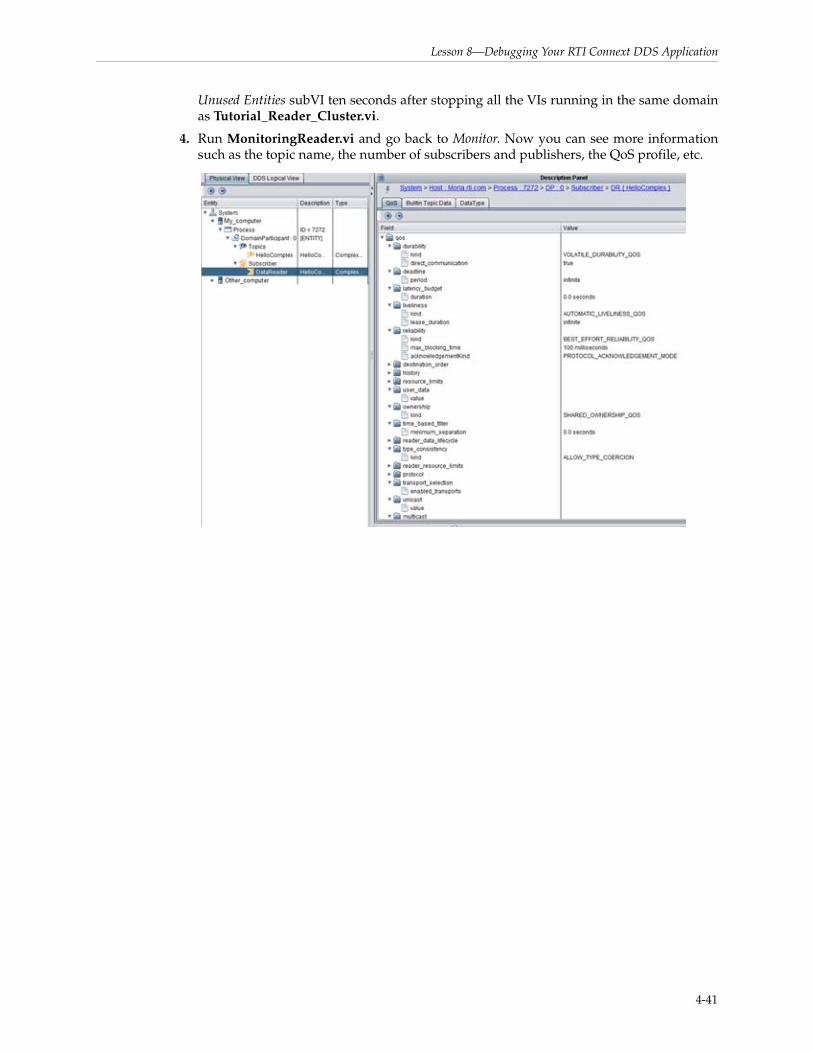
Lesson 8—Debugging Your RTI Connext DDS Application
Unused Entities subVI ten seconds after stopping all the VIs running in the same domain as Tutorial_Reader_Cluster.vi.
4. Run MonitoringReader.vi and go back to Monitor. Now you can see more information such as the topic name, the number of subscribers and publishers, the QoS profile, etc.
4-41
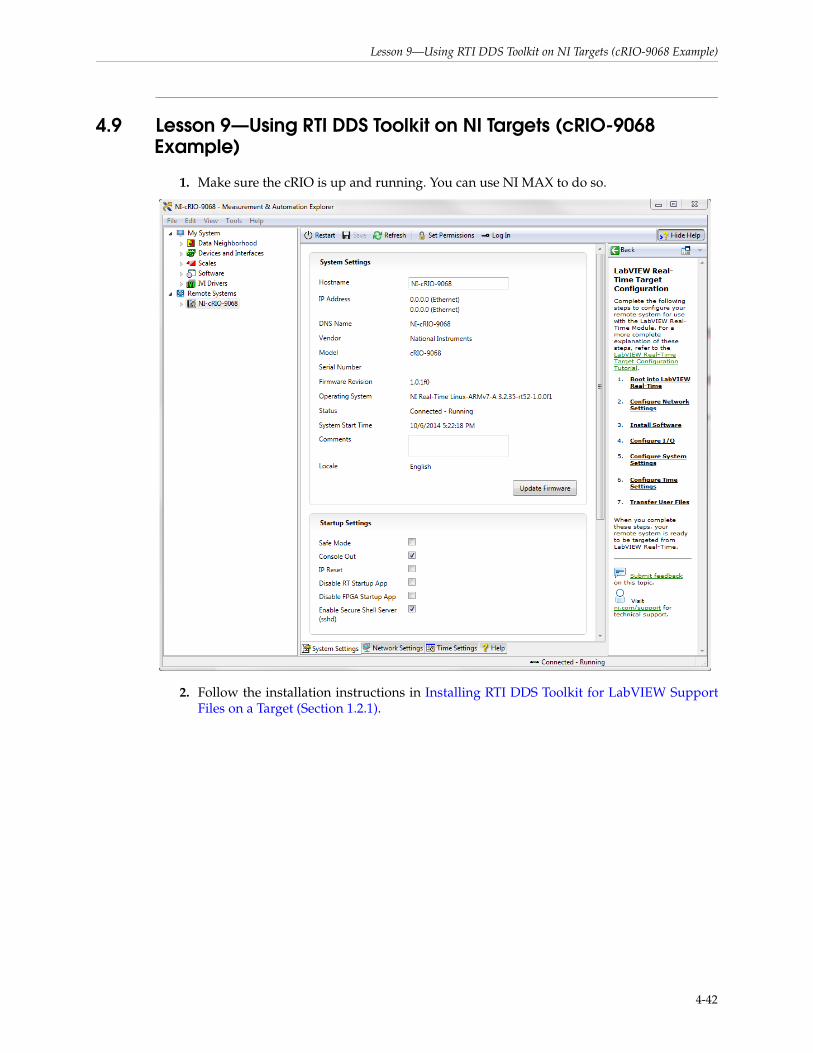
Lesson 9—Using RTI DDS Toolkit on NI Targets (cRIO-9068 Example)
4.9 Lesson 9—Using RTI DDS Toolkit on NI Targets (cRIO-9068 Example)
1. Make sure the cRIO is up and running. You can use NI MAX to do so.
2. Follow the installation instructions in Installing RTI DDS Toolkit for LabVIEW Support Files on a Target (Section 1.2.1).
4-42
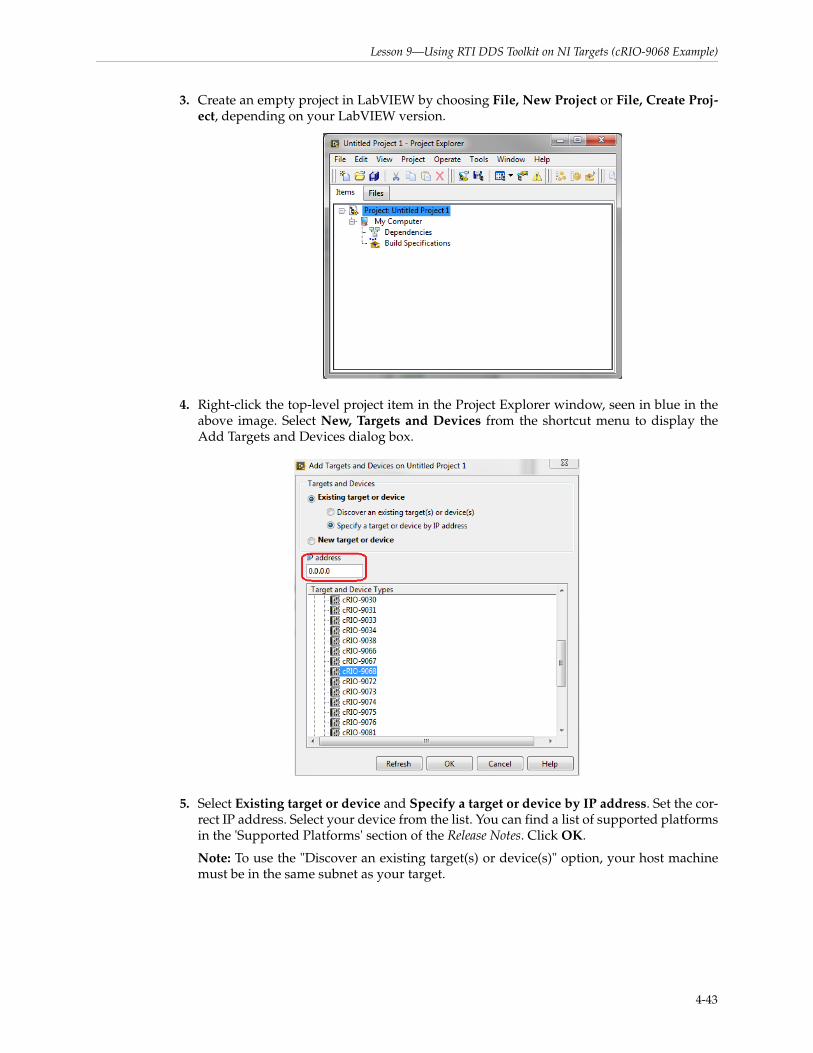
Lesson 9—Using RTI DDS Toolkit on NI Targets (cRIO-9068 Example)
3. Create an empty project in LabVIEW by choosing File, New Project or File, Create Proj-ect, depending on your LabVIEW version.
4. Right-click the top-level project item in the Project Explorer window, seen in blue in the above image. Select New, Targets and Devices from the shortcut menu to display the Add Targets and Devices dialog box.
5. Select Existing target or device and Specify a target or device by IP address. Set the cor-rect IP address. Select your device from the list. You can find a list of supported platforms in the 'Supported Platforms' section of the Release Notes. Click OK.
Note: To use the "Discover an existing target(s) or device(s)" option, your host machine must be in the same subnet as your target.
4-43
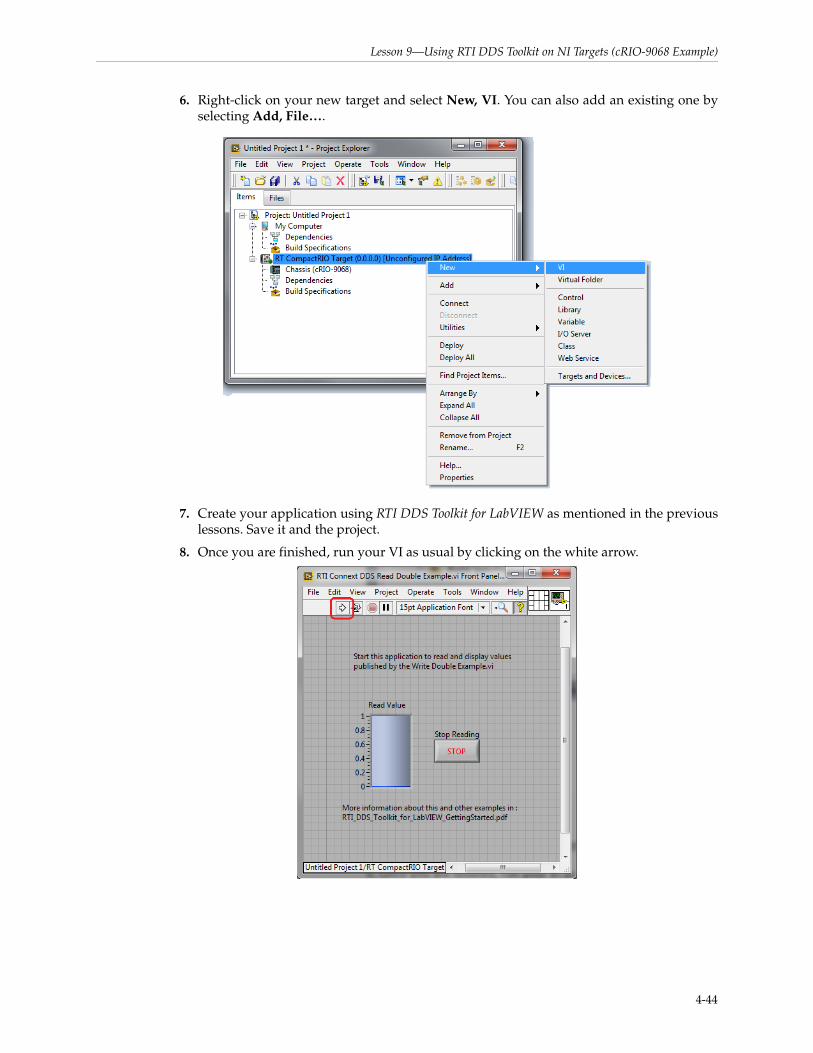
Lesson 9—Using RTI DDS Toolkit on NI Targets (cRIO-9068 Example)
6. Right-click on your new target and select New, VI. You can also add an existing one by selecting Add, File….
7. Create your application using RTI DDS Toolkit for LabVIEW as mentioned in the previous lessons. Save it and the project.
8. Once you are finished, run your VI as usual by clicking on the white arrow.
4-44
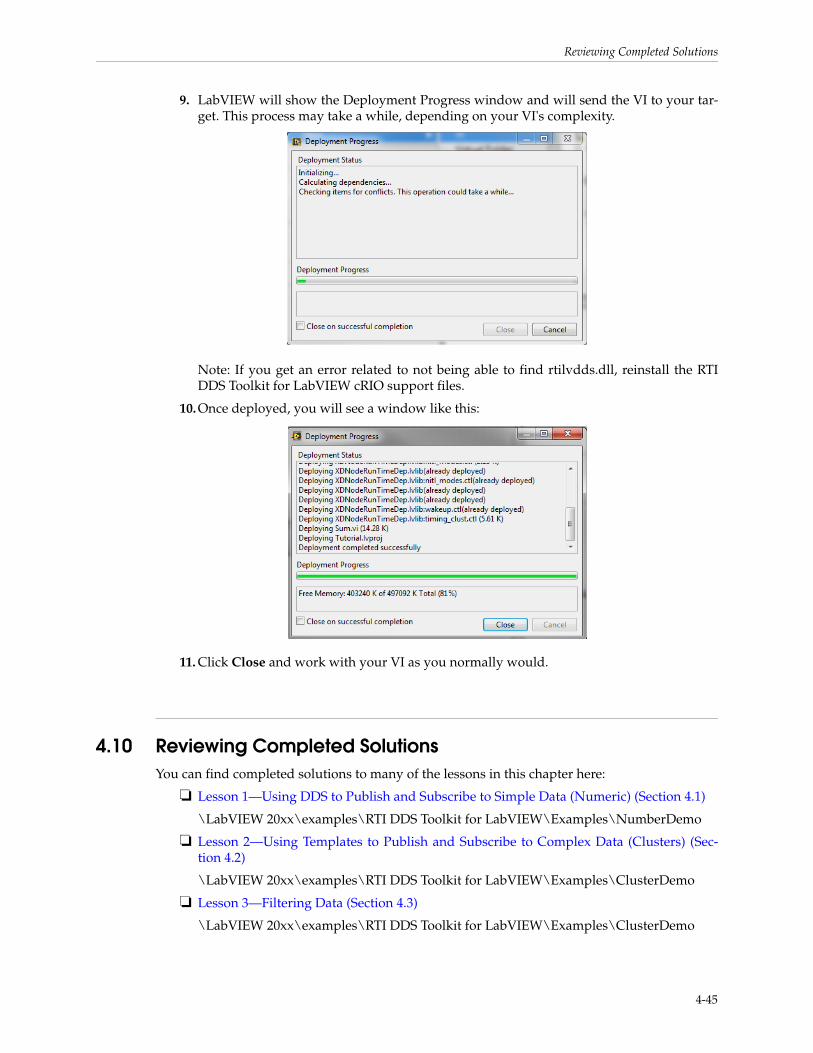
Reviewing Completed Solutions
9. LabVIEW will show the Deployment Progress window and will send the VI to your tar-get. This process may take a while, depending on your VI's complexity.
Note: If you get an error related to not being able to find rtilvdds.dll, reinstall the RTI DDS Toolkit for LabVIEW cRIO support files.
10. Once deployed, you will see a window like this:
11. Click Close and work with your VI as you normally would.
4.10 Reviewing Completed SolutionsYou can find completed solutions to many of the lessons in this chapter here:
❏ Lesson 1—Using DDS to Publish and Subscribe to Simple Data (Numeric) (Section 4.1)
\LabVIEW 20xx\examples\RTI DDS Toolkit for LabVIEW\Examples\NumberDemo
❏ Lesson 2—Using Templates to Publish and Subscribe to Complex Data (Clusters) (Sec-tion 4.2)
\LabVIEW 20xx\examples\RTI DDS Toolkit for LabVIEW\Examples\ClusterDemo
❏ Lesson 3—Filtering Data (Section 4.3)
\LabVIEW 20xx\examples\RTI DDS Toolkit for LabVIEW\Examples\ClusterDemo
4-45
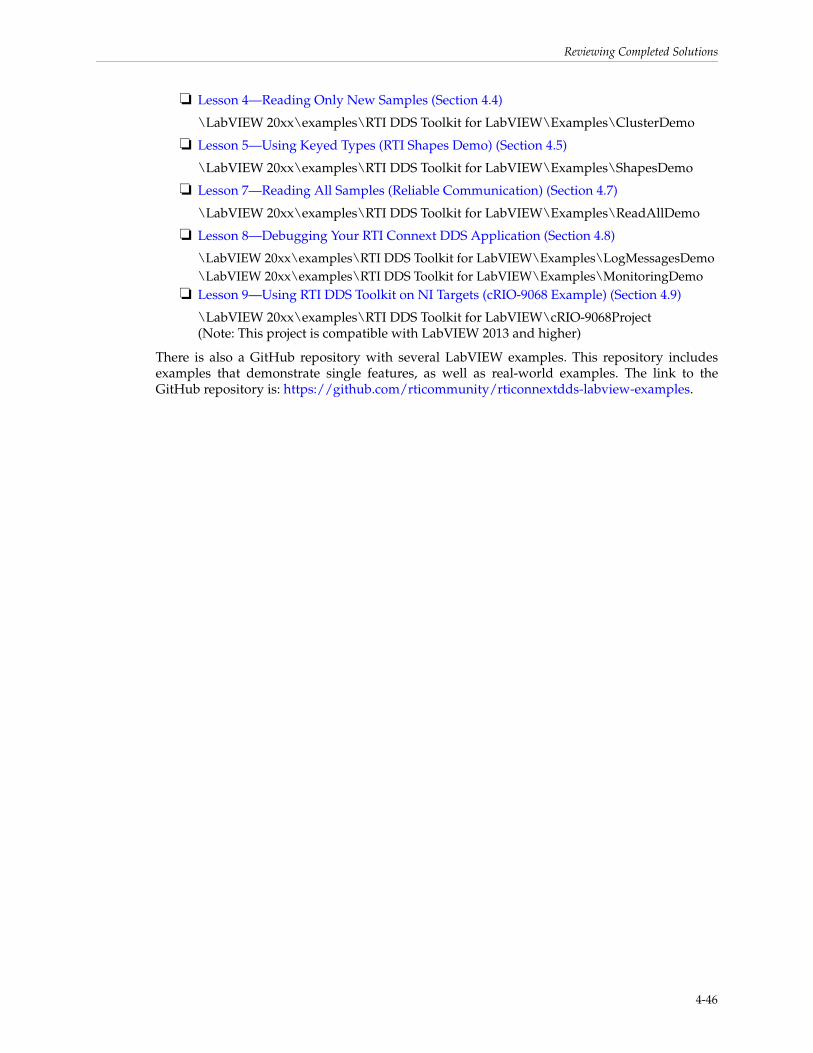
Reviewing Completed Solutions
❏ Lesson 4—Reading Only New Samples (Section 4.4)
\LabVIEW 20xx\examples\RTI DDS Toolkit for LabVIEW\Examples\ClusterDemo
❏ Lesson 5—Using Keyed Types (RTI Shapes Demo) (Section 4.5)
\LabVIEW 20xx\examples\RTI DDS Toolkit for LabVIEW\Examples\ShapesDemo
❏ Lesson 7—Reading All Samples (Reliable Communication) (Section 4.7)
\LabVIEW 20xx\examples\RTI DDS Toolkit for LabVIEW\Examples\ReadAllDemo
❏ Lesson 8—Debugging Your RTI Connext DDS Application (Section 4.8)
\LabVIEW 20xx\examples\RTI DDS Toolkit for LabVIEW\Examples\LogMessagesDemo\LabVIEW 20xx\examples\RTI DDS Toolkit for LabVIEW\Examples\MonitoringDemo
❏ Lesson 9—Using RTI DDS Toolkit on NI Targets (cRIO-9068 Example) (Section 4.9)
\LabVIEW 20xx\examples\RTI DDS Toolkit for LabVIEW\cRIO-9068Project (Note: This project is compatible with LabVIEW 2013 and higher)
There is also a GitHub repository with several LabVIEW examples. This repository includes examples that demonstrate single features, as well as real-world examples. The link to the GitHub repository is: https://github.com/rticommunity/rticonnextdds-labview-examples.
4-46
Chapter 5 Loading Quality of Service Profiles
This chapter describes how to load personalized QoS profiles in RTI DDS Toolkit for LabVIEW.
QoS profiles provide a way to configure your DDS application and define most aspects of the DDS paradigm and the underlying communication mechanisms.
❏ RTI DDS Toolkit for LabVIEW includes a set of predefined QoS profiles. These profiles solve general use-cases such as a Reliable Communication or including RTI Monitoring Library. These profiles are embedded in RTI DDS Toolkit for LabVIEW and cannot be mod-ified. You can inherent from them.
For your convenience, you can find an XML file that shows you these profiles in C:/Pro-gram Files1/National Instruments/LabVIEW 20xx/vi.lib/_RTI DDS Toolkit for LabVIEW_internal_deps/RTI_LABVIEW_CONFIG.documentationONLY.xml (where 20xx depends on your LabVIEW version). As the filename suggests, this file is for docu-mentation purposes only. This file is not loaded by the RTI DDS Toolkit for LabVIEW, so updating it will not affect the embedded QoS profiles.
❏ RTI Connext DDS also includes several predefined QoS profiles. You can use these directly from LabVIEW as starting points when creating your own QoS profiles. To access these builtin profiles, use their library name and profile name (for instance, Built-inQosLib::Generic.Monitoring.Common). For more information, consult the RTI Connext DDS Core Libraries User’s Manual (see the chapter on Configuring QoS with XML).
For information on the format and contents of a QoS profile, consult the RTI Connext DDS Core Libraries User’s Manual (see the chapter on Configuring QoS with XML).
The provided profiles are illustrative and might not fulfill all the desired functionalities. To adjust them to your needs, you can create your own XML configuration file (for instance, USER_QOS_PROFILES.xml). You can define several libraries and profiles in each unique XML file, then refer to their names in subVI calls. For instance, LabVIEWLibrary::DefaultProfile ref-erences the DefaultProfile, which you can see in RTI_LABVIEW_CONFIG.documentation-ONLY.xml.
Once you have defined your desired QoS settings and stored them in a file (or files), RTI DDS Toolkit for LabVIEW will load the settings automatically if you point it to the correct file; there are two ways to do this. We strongly recommend the first approach, which provides a more versa-tile solution.
1. On 64-bit systems, the folder is “Program Files (x86)”
5-1
❏ Environment variable NDDS_QOS_PROFILES (recommended):
You can define the environment variable NDDS_QOS_PROFILES and have it point to the XML file that you want to load. You can specify multiple locations for a single XML doc-ument via URL groups. The syntax of a URL group is: [URL1 | URL2 | URL2 | ... | URLn].
For example:
[file://C:/DDS_config/USER_QOS_PROFILES.xml | file://C:/DDS_config/ alternative_default_dds.xml]
❏ Working directory (not recommended):
You can save a file called USER_QOS_PROFILES.xml in the working directory of Lab-VIEW.
The working directory in LabVIEW depends on the application kind. If you are running a VI from LabVIEW, the working directory is the one where the LabVIEW.exe file is, such as C:/Program Files (x86)/National Instruments/LabVIEW 2012/. However, if your application is an independent one, it will use the Run-Time Engine to execute and the working directory will be C:/Program Files (x86)/National Instruments/Shared/Lab-VIEW Run-Time/2012/.
5-2
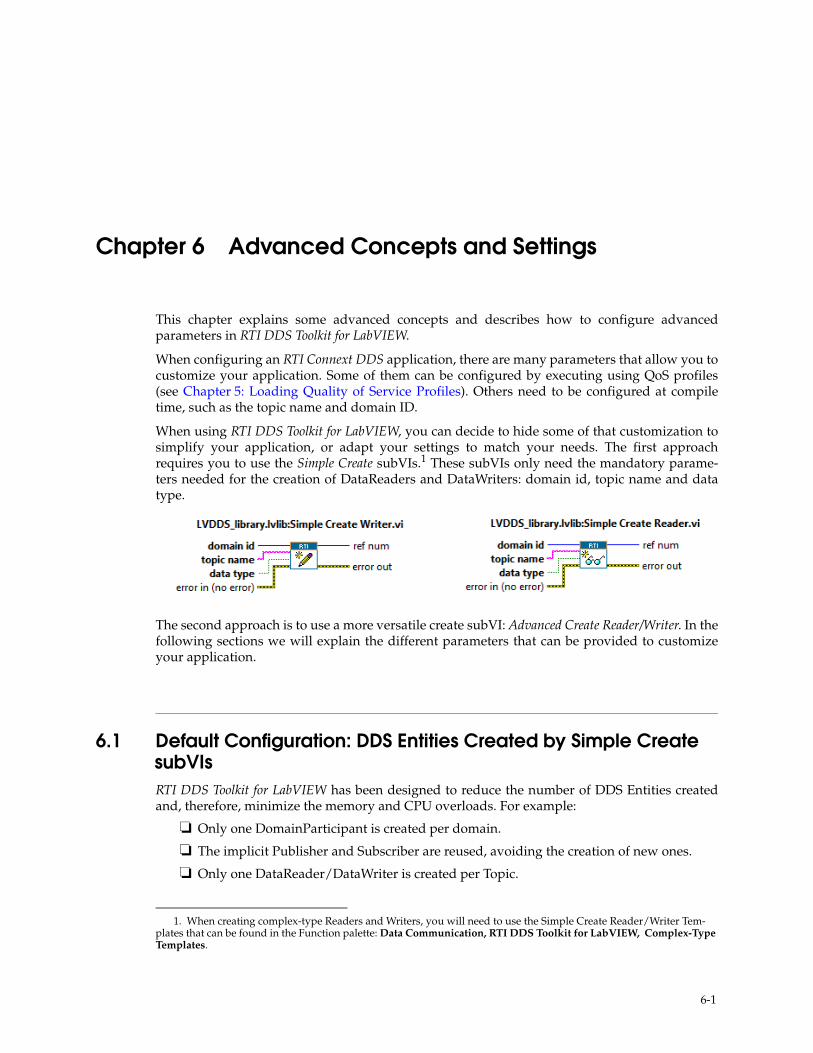
Chapter 6 Advanced Concepts and Settings
This chapter explains some advanced concepts and describes how to configure advanced parameters in RTI DDS Toolkit for LabVIEW.
When configuring an RTI Connext DDS application, there are many parameters that allow you to customize your application. Some of them can be configured by executing using QoS profiles (see Chapter 5: Loading Quality of Service Profiles). Others need to be configured at compile time, such as the topic name and domain ID.
When using RTI DDS Toolkit for LabVIEW, you can decide to hide some of that customization to simplify your application, or adapt your settings to match your needs. The first approach requires you to use the Simple Create subVIs.1 These subVIs only need the mandatory parame-ters needed for the creation of DataReaders and DataWriters: domain id, topic name and data type.
The second approach is to use a more versatile create subVI: Advanced Create Reader/Writer. In the following sections we will explain the different parameters that can be provided to customize your application.
6.1 Default Configuration: DDS Entities Created by Simple Create subVIsRTI DDS Toolkit for LabVIEW has been designed to reduce the number of DDS Entities created and, therefore, minimize the memory and CPU overloads. For example:
❏ Only one DomainParticipant is created per domain.
❏ The implicit Publisher and Subscriber are reused, avoiding the creation of new ones.
❏ Only one DataReader/DataWriter is created per Topic.
1. When creating complex-type Readers and Writers, you will need to use the Simple Create Reader/Writer Tem-plates that can be found in the Function palette: Data Communication, RTI DDS Toolkit for LabVIEW, Complex-Type Templates.
6-1
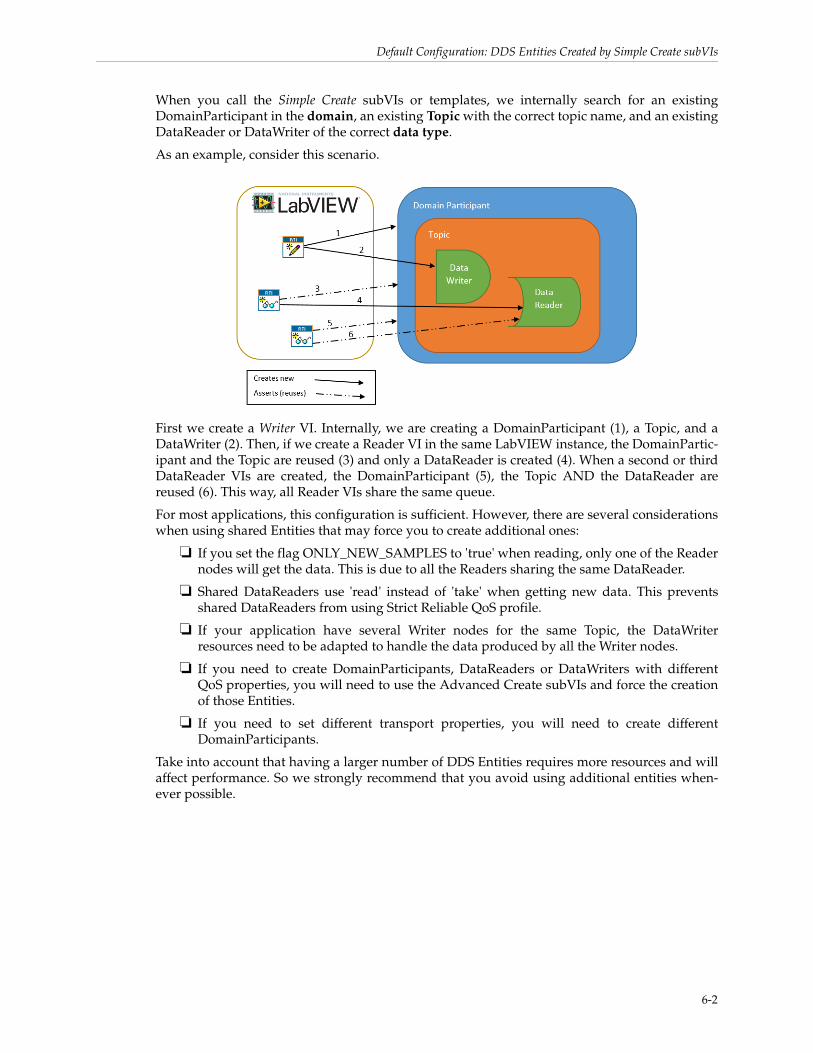
Default Configuration: DDS Entities Created by Simple Create subVIs
When you call the Simple Create subVIs or templates, we internally search for an existing DomainParticipant in the domain, an existing Topic with the correct topic name, and an existing DataReader or DataWriter of the correct data type.
As an example, consider this scenario.
First we create a Writer VI. Internally, we are creating a DomainParticipant (1), a Topic, and a DataWriter (2). Then, if we create a Reader VI in the same LabVIEW instance, the DomainPartic-ipant and the Topic are reused (3) and only a DataReader is created (4). When a second or third DataReader VIs are created, the DomainParticipant (5), the Topic AND the DataReader are reused (6). This way, all Reader VIs share the same queue.
For most applications, this configuration is sufficient. However, there are several considerations when using shared Entities that may force you to create additional ones:
❏ If you set the flag ONLY_NEW_SAMPLES to 'true' when reading, only one of the Reader nodes will get the data. This is due to all the Readers sharing the same DataReader.
❏ Shared DataReaders use 'read' instead of 'take' when getting new data. This prevents shared DataReaders from using Strict Reliable QoS profile.
❏ If your application have several Writer nodes for the same Topic, the DataWriter resources need to be adapted to handle the data produced by all the Writer nodes.
❏ If you need to create DomainParticipants, DataReaders or DataWriters with different QoS properties, you will need to use the Advanced Create subVIs and force the creation of those Entities.
❏ If you need to set different transport properties, you will need to create different DomainParticipants.
Take into account that having a larger number of DDS Entities requires more resources and will affect performance. So we strongly recommend that you avoid using additional entities when-ever possible.
6-2
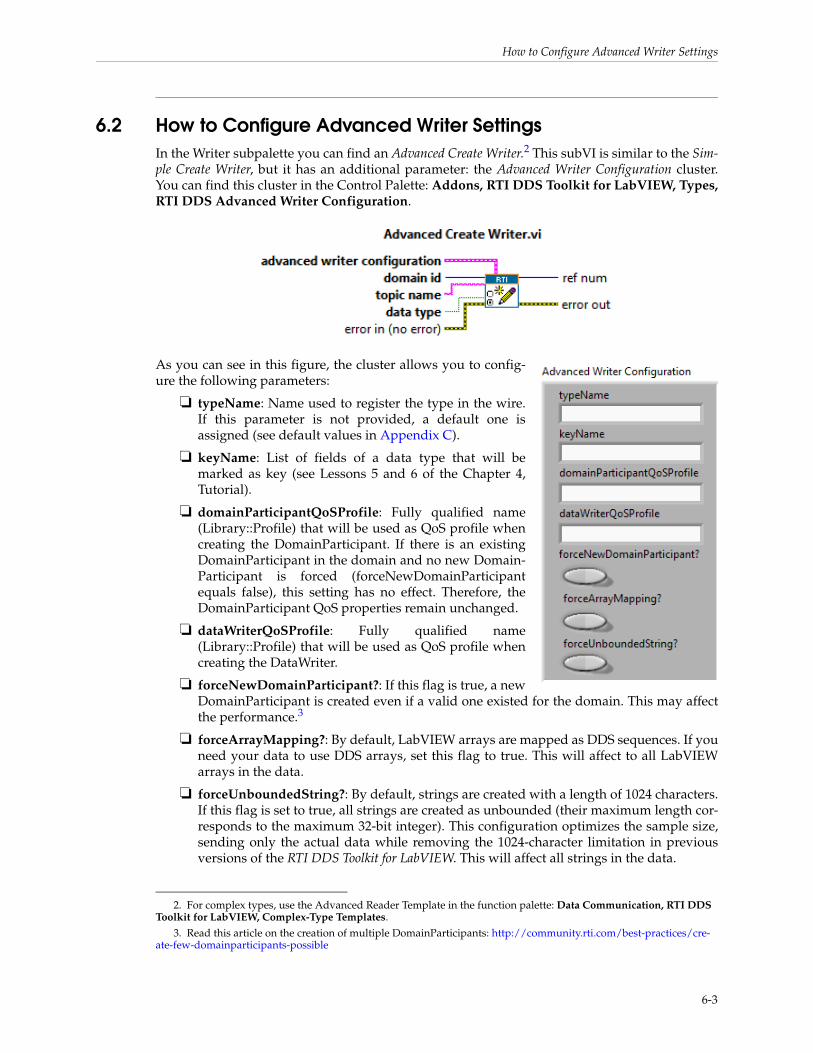
How to Configure Advanced Writer Settings
6.2 How to Configure Advanced Writer SettingsIn the Writer subpalette you can find an Advanced Create Writer.2 This subVI is similar to the Sim-ple Create Writer, but it has an additional parameter: the Advanced Writer Configuration cluster. You can find this cluster in the Control Palette: Addons, RTI DDS Toolkit for LabVIEW, Types, RTI DDS Advanced Writer Configuration.
As you can see in this figure, the cluster allows you to config-ure the following parameters:
❏ typeName: Name used to register the type in the wire. If this parameter is not provided, a default one is assigned (see default values in Appendix C).
❏ keyName: List of fields of a data type that will be marked as key (see Lessons 5 and 6 of the Chapter 4, Tutorial).
❏ domainParticipantQoSProfile: Fully qualified name (Library::Profile) that will be used as QoS profile when creating the DomainParticipant. If there is an existing DomainParticipant in the domain and no new Domain-Participant is forced (forceNewDomainParticipant equals false), this setting has no effect. Therefore, the DomainParticipant QoS properties remain unchanged.
❏ dataWriterQoSProfile: Fully qualified name (Library::Profile) that will be used as QoS profile when creating the DataWriter.
❏ forceNewDomainParticipant?: If this flag is true, a new DomainParticipant is created even if a valid one existed for the domain. This may affect the performance.3
❏ forceArrayMapping?: By default, LabVIEW arrays are mapped as DDS sequences. If you need your data to use DDS arrays, set this flag to true. This will affect to all LabVIEW arrays in the data.
❏ forceUnboundedString?: By default, strings are created with a length of 1024 characters. If this flag is set to true, all strings are created as unbounded (their maximum length cor-responds to the maximum 32-bit integer). This configuration optimizes the sample size, sending only the actual data while removing the 1024-character limitation in previous versions of the RTI DDS Toolkit for LabVIEW. This will affect all strings in the data.
2. For complex types, use the Advanced Reader Template in the function palette: Data Communication, RTI DDS Toolkit for LabVIEW, Complex-Type Templates.
3. Read this article on the creation of multiple DomainParticipants: http://community.rti.com/best-practices/cre-ate-few-domainparticipants-possible
6-3
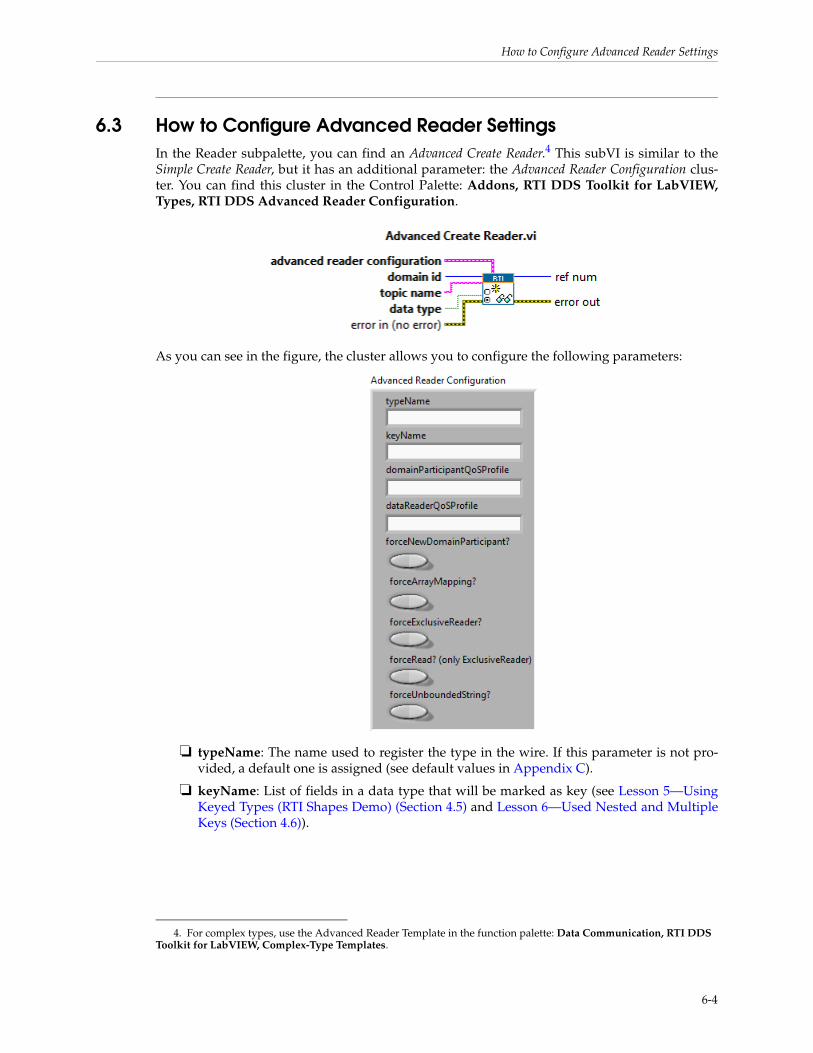
How to Configure Advanced Reader Settings
6.3 How to Configure Advanced Reader SettingsIn the Reader subpalette, you can find an Advanced Create Reader.4 This subVI is similar to the Simple Create Reader, but it has an additional parameter: the Advanced Reader Configuration clus-ter. You can find this cluster in the Control Palette: Addons, RTI DDS Toolkit for LabVIEW, Types, RTI DDS Advanced Reader Configuration.
As you can see in the figure, the cluster allows you to configure the following parameters:
❏ typeName: The name used to register the type in the wire. If this parameter is not pro-vided, a default one is assigned (see default values in Appendix C).
❏ keyName: List of fields in a data type that will be marked as key (see Lesson 5—Using Keyed Types (RTI Shapes Demo) (Section 4.5) and Lesson 6—Used Nested and Multiple Keys (Section 4.6)).
4. For complex types, use the Advanced Reader Template in the function palette: Data Communication, RTI DDS Toolkit for LabVIEW, Complex-Type Templates.
6-4
How to Debug an RTI Connext DDS LabVIEW Application
❏ domainParticipantQoSProfile: The fully qualified name (Library::Profile) that will be used as the QoS profile when creating the DomainParticipant. If there is an existing DomainParticipant in the domain and no new DomainParticipant is forced (forceNew-DomainParticipant equals false), this setting has no effect. Therefore, the DomainPartici-pant QoS properties remain unchanged.
❏ dataReaderQoSProfile: The fully qualified name (Library::Profile) that will be used as the QoS profile when creating the DataReader.
❏ forceNewDomainParticipant?: If this flag is true, a new DomainParticipant is created even if a valid one existed for the domain. This may affect performance.5
❏ forceArrayMapping?: By default, LabVIEW arrays are mapped as DDS sequences. If you need your data to use DDS arrays, set this flag to true. This will affect all LabVIEW arrays in the data.
❏ forceExclusiveReader?: By default, Reader Nodes of the same topic (and with the same QoS profile) share a DataReader. To avoid this behavior, set this flag to true and a new DataReader will be created. If you need all your Reader Nodes to have their own DataReader, make sure all of them are created setting this flag to true.
❏ forceRead?: By default, exclusive Readers call to the function take when getting the data. This allows you to use Strict Reliable QoS profile. If you want to use read instead, set this flag to true.
❏ forceUnboundedString?: By default, strings are created with a length of 1024 characters. If this flag is set to true, all strings are created as unbounded (their maximum length cor-responds to the maximum 32-bit integer). This configuration optimizes the sample size, receiving only the actual data while removing the 1024-character limitation in previous versions of the RTI DDS Toolkit for LabVIEW. This will affect all strings in the data.
If you need to use Strict Reliability QoS profile, make sure your Reader node is exclusive and for-ceRead is set to false (the default value).
6.4 How to Debug an RTI Connext DDS LabVIEW Application In the Tools’ DDS Debugging subpalette you can find several subVIs to debug your application. All applications that use the RTI DDS Toolkit for LabVIEW will create log messages that can be read from the queue in which they are stored. These messages are composed of three parame-ters:
1. Timestamp, which is the date and time when the message was logged. It is automatically taken from the system clock.
2. Log Level, which is an indicator of the severity of the message. The available levels, from highest severity to lowest are:
• Fatal
• Severe
• Error
• Warning
5. Read this article on the creation of multiple DomainParticipants: http://community.rti.com/best-practices/cre-ate-few-domainparticipants-possible
6-5
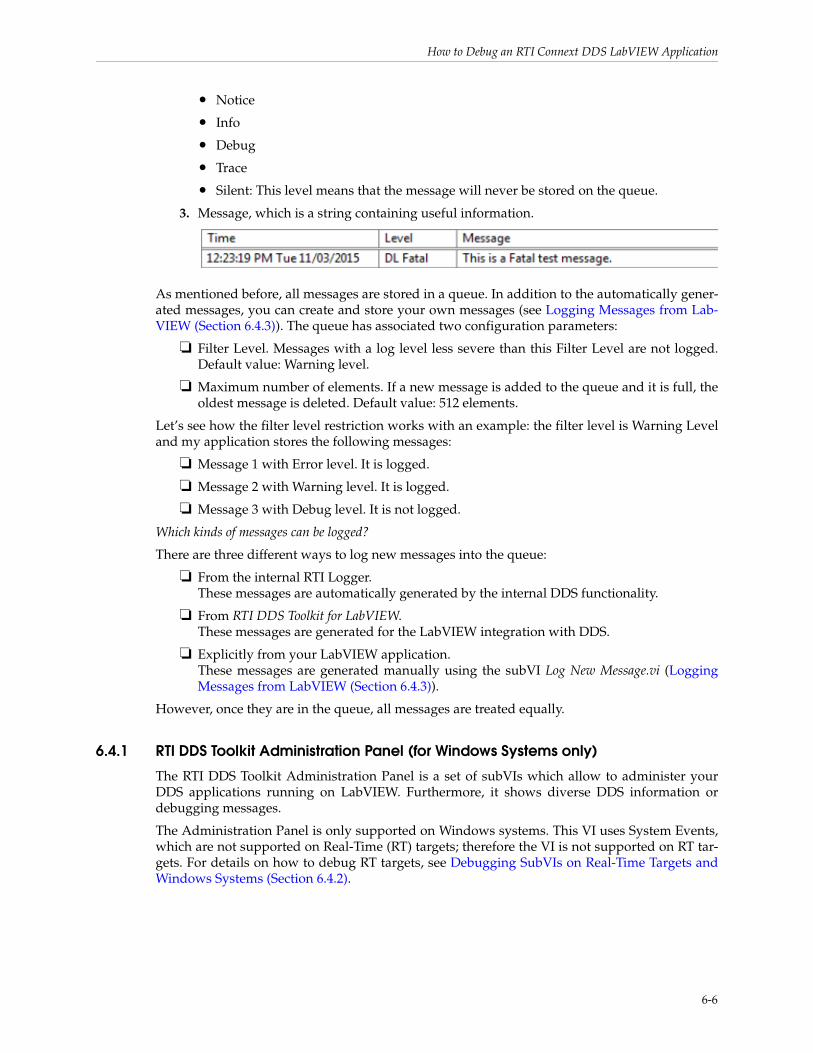
How to Debug an RTI Connext DDS LabVIEW Application
• Notice
• Info
• Debug
• Trace
• Silent: This level means that the message will never be stored on the queue.
3. Message, which is a string containing useful information.
As mentioned before, all messages are stored in a queue. In addition to the automatically gener-ated messages, you can create and store your own messages (see Logging Messages from Lab-VIEW (Section 6.4.3)). The queue has associated two configuration parameters:
❏ Filter Level. Messages with a log level less severe than this Filter Level are not logged. Default value: Warning level.
❏ Maximum number of elements. If a new message is added to the queue and it is full, the oldest message is deleted. Default value: 512 elements.
Let’s see how the filter level restriction works with an example: the filter level is Warning Level and my application stores the following messages:
❏ Message 1 with Error level. It is logged.
❏ Message 2 with Warning level. It is logged.
❏ Message 3 with Debug level. It is not logged.
Which kinds of messages can be logged?
There are three different ways to log new messages into the queue:
❏ From the internal RTI Logger. These messages are automatically generated by the internal DDS functionality.
❏ From RTI DDS Toolkit for LabVIEW. These messages are generated for the LabVIEW integration with DDS.
❏ Explicitly from your LabVIEW application. These messages are generated manually using the subVI Log New Message.vi (Logging Messages from LabVIEW (Section 6.4.3)).
However, once they are in the queue, all messages are treated equally.
6.4.1 RTI DDS Toolkit Administration Panel (for Windows Systems only)
The RTI DDS Toolkit Administration Panel is a set of subVIs which allow to administer your DDS applications running on LabVIEW. Furthermore, it shows diverse DDS information or debugging messages.
The Administration Panel is only supported on Windows systems. This VI uses System Events, which are not supported on Real-Time (RT) targets; therefore the VI is not supported on RT tar-gets. For details on how to debug RT targets, see Debugging SubVIs on Real-Time Targets and Windows Systems (Section 6.4.2).
6-6
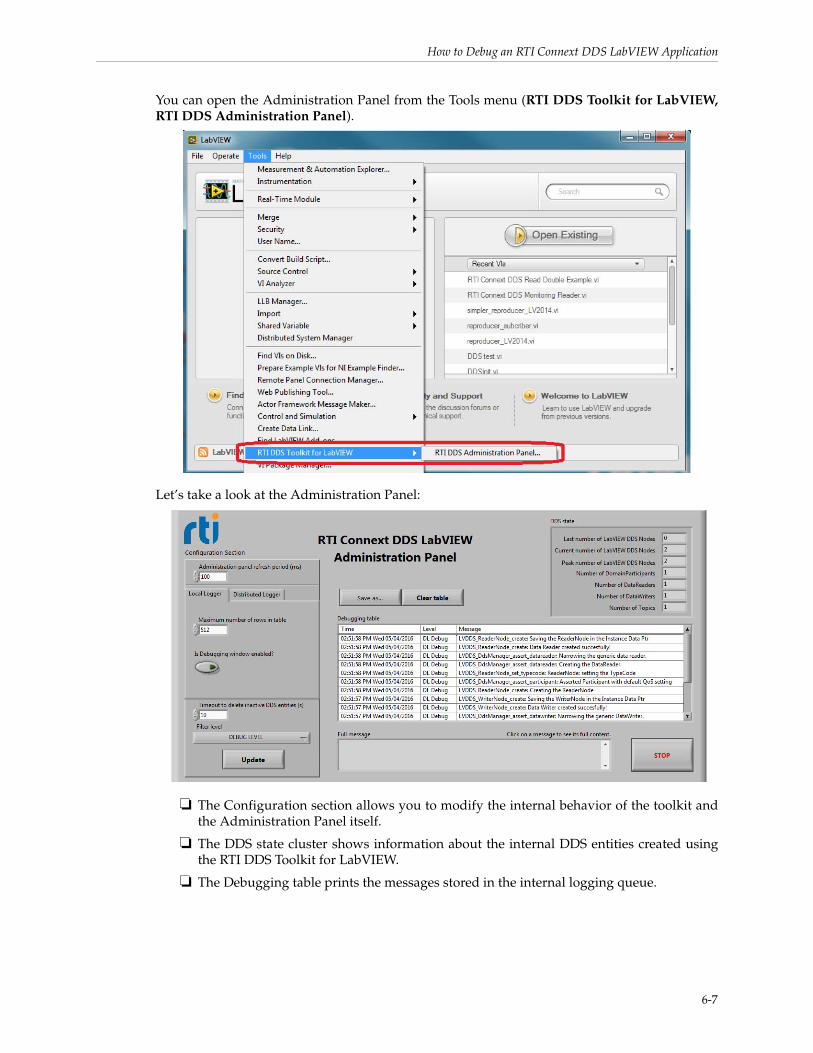
How to Debug an RTI Connext DDS LabVIEW Application
You can open the Administration Panel from the Tools menu (RTI DDS Toolkit for LabVIEW, RTI DDS Administration Panel).
Let’s take a look at the Administration Panel:
❏ The Configuration section allows you to modify the internal behavior of the toolkit and the Administration Panel itself.
❏ The DDS state cluster shows information about the internal DDS entities created using the RTI DDS Toolkit for LabVIEW.
❏ The Debugging table prints the messages stored in the internal logging queue.
6-7
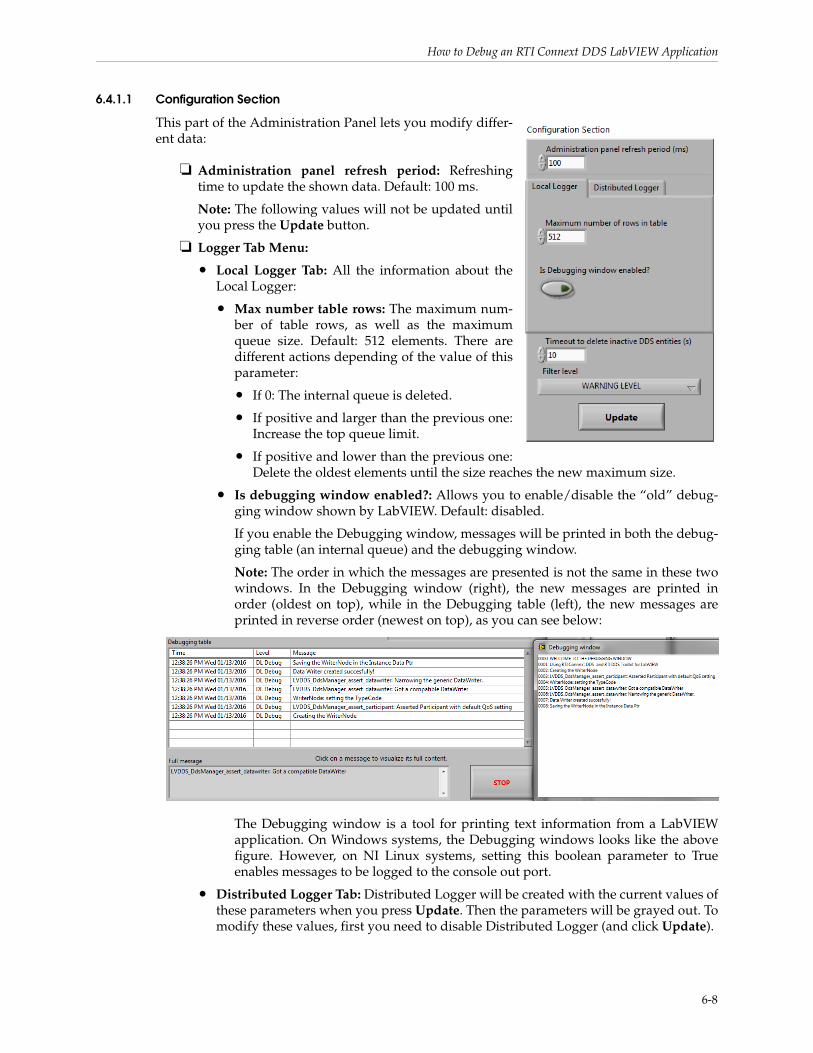
How to Debug an RTI Connext DDS LabVIEW Application
6.4.1.1 Configuration Section
This part of the Administration Panel lets you modify differ-ent data:
❏ Administration panel refresh period: Refreshing time to update the shown data. Default: 100 ms.
Note: The following values will not be updated until you press the Update button.
❏ Logger Tab Menu:
• Local Logger Tab: All the information about the Local Logger:
• Max number table rows: The maximum num-ber of table rows, as well as the maximum queue size. Default: 512 elements. There are different actions depending of the value of this parameter:
• If 0: The internal queue is deleted.
• If positive and larger than the previous one: Increase the top queue limit.
• If positive and lower than the previous one: Delete the oldest elements until the size reaches the new maximum size.
• Is debugging window enabled?: Allows you to enable/disable the “old” debug-ging window shown by LabVIEW. Default: disabled.
If you enable the Debugging window, messages will be printed in both the debug-ging table (an internal queue) and the debugging window.
Note: The order in which the messages are presented is not the same in these two windows. In the Debugging window (right), the new messages are printed in order (oldest on top), while in the Debugging table (left), the new messages are printed in reverse order (newest on top), as you can see below:
The Debugging window is a tool for printing text information from a LabVIEW application. On Windows systems, the Debugging windows looks like the above figure. However, on NI Linux systems, setting this boolean parameter to True enables messages to be logged to the console out port.
• Distributed Logger Tab: Distributed Logger will be created with the current values of these parameters when you press Update. Then the parameters will be grayed out. To modify these values, first you need to disable Distributed Logger (and click Update).
6-8

How to Debug an RTI Connext DDS LabVIEW Application
• Distributed Logger DomainParticipantQoSProfile: The QoS Profile that will be used by the Distributed Logger DomainParticipant. This should follow the next pattern Library::Profile. The default QoS profile will be used if the DomainPartici-pantQoSProfile is empty.
• Distributed Logger DomainParticipant ID: The domain ID to be used when creat-ing the next Distributed Logger DomainParticipant. The default is 0.
• Distributed Logger Queue Size: The number of messages Distributed Logger will be able to store without dropping any of them. The default is 512 (the same default as Max number table rows).
• Enable Distributed Logger: Allows you to enable/disable Distributed Logger.
Note: Disabling Distributed Logger will delete all the internal DDS entities that have been created, so it could take a while.
❏ Timeout to delete inactive DDS entities: Delay (in seconds) that internal DDS entities are kept as “active” after releasing them. After this period, the next release call will defi-nitely delete them. If you set it to 0, DDS entities will be deleted as soon as Release subVIs are called. Default: 10 seconds.
❏ Filter level: Determines the minimum log-level that messages must have in order to be added to the internal queue. The default value is WARNING LEVEL.
6.4.1.2 DDS State Info
This cluster shows the entities created by the RTI DDS Toolkit for LabVIEW, as well as the internal DDS entities:
❏ Last number of LabVIEW DDS Nodes:Number of nodes (Readers and Writers) that were created in the last execution.
❏ Current number of LabVIEW DDS Nodes:Number of nodes (Readers and Writers) that are currently running in the system.
❏ Peak number of LabVIEW DDS Nodes:Maximum number of nodes that has been created in the current execution.
❏ Number of DomainParticipants: Number of DDS DomainParticipants currently active.
❏ Number of DataReaders: Number of active DDS DataReaders.
❏ Number of DataWriters: Number of active DDS DataWriters.
6-9
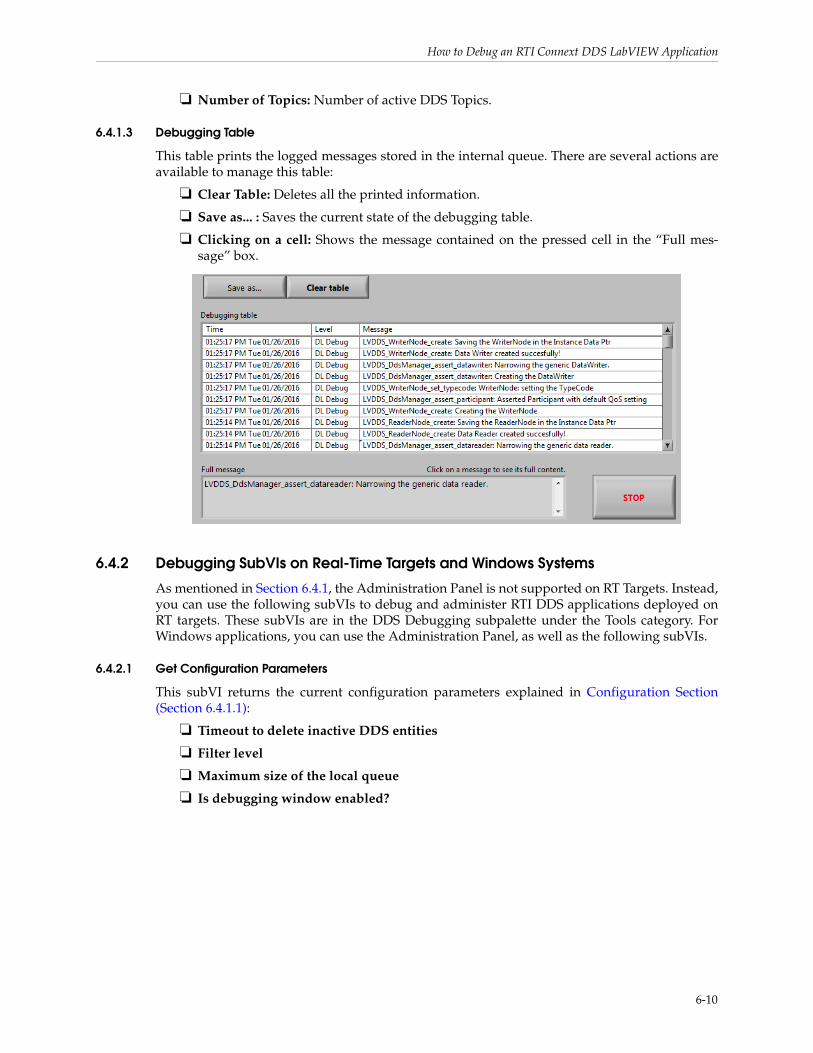
How to Debug an RTI Connext DDS LabVIEW Application
❏ Number of Topics: Number of active DDS Topics.
6.4.1.3 Debugging Table
This table prints the logged messages stored in the internal queue. There are several actions are available to manage this table:
❏ Clear Table: Deletes all the printed information.
❏ Save as... : Saves the current state of the debugging table.
❏ Clicking on a cell: Shows the message contained on the pressed cell in the “Full mes-sage” box.
6.4.2 Debugging SubVIs on Real-Time Targets and Windows Systems
As mentioned in Section 6.4.1, the Administration Panel is not supported on RT Targets. Instead, you can use the following subVIs to debug and administer RTI DDS applications deployed on RT targets. These subVIs are in the DDS Debugging subpalette under the Tools category. For Windows applications, you can use the Administration Panel, as well as the following subVIs.
6.4.2.1 Get Configuration Parameters
This subVI returns the current configuration parameters explained in Configuration Section (Section 6.4.1.1):
❏ Timeout to delete inactive DDS entities
❏ Filter level
❏ Maximum size of the local queue
❏ Is debugging window enabled?
6-10
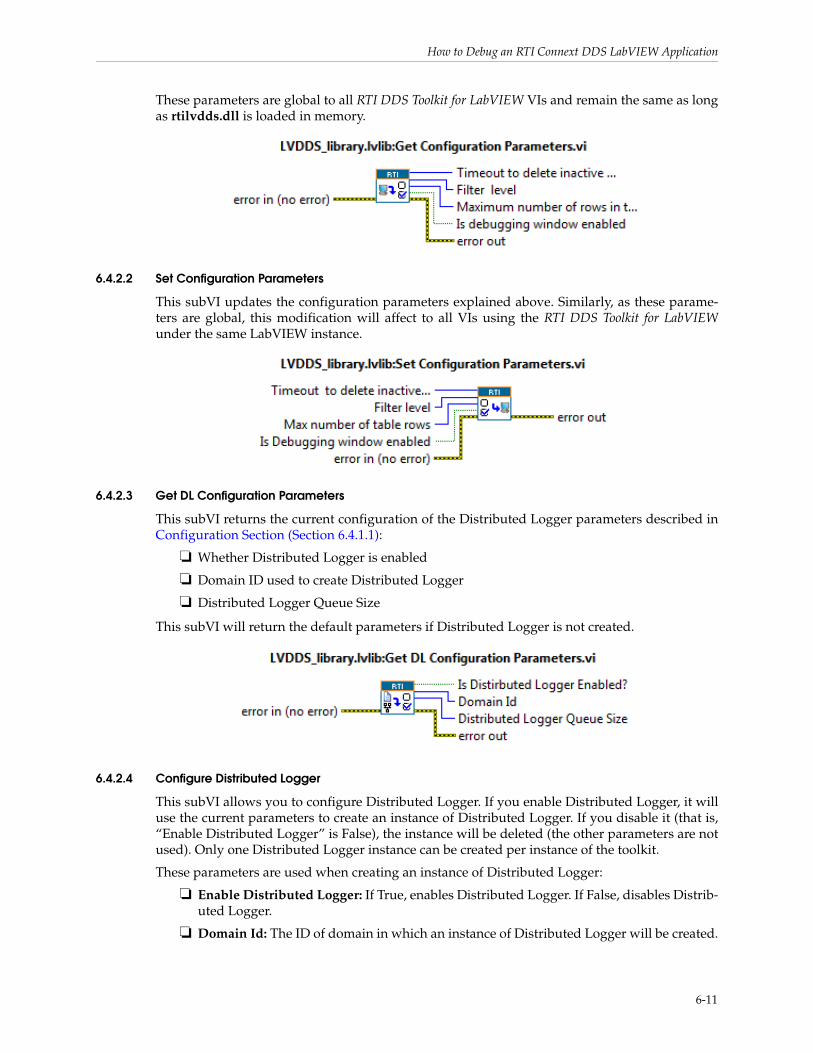
How to Debug an RTI Connext DDS LabVIEW Application
These parameters are global to all RTI DDS Toolkit for LabVIEW VIs and remain the same as long as rtilvdds.dll is loaded in memory.
6.4.2.2 Set Configuration Parameters
This subVI updates the configuration parameters explained above. Similarly, as these parame-ters are global, this modification will affect to all VIs using the RTI DDS Toolkit for LabVIEWunder the same LabVIEW instance.
6.4.2.3 Get DL Configuration Parameters
This subVI returns the current configuration of the Distributed Logger parameters described in Configuration Section (Section 6.4.1.1):
❏ Whether Distributed Logger is enabled
❏ Domain ID used to create Distributed Logger
❏ Distributed Logger Queue Size
This subVI will return the default parameters if Distributed Logger is not created.
6.4.2.4 Configure Distributed Logger
This subVI allows you to configure Distributed Logger. If you enable Distributed Logger, it will use the current parameters to create an instance of Distributed Logger. If you disable it (that is, “Enable Distributed Logger” is False), the instance will be deleted (the other parameters are not used). Only one Distributed Logger instance can be created per instance of the toolkit.
These parameters are used when creating an instance of Distributed Logger:
❏ Enable Distributed Logger: If True, enables Distributed Logger. If False, disables Distrib-uted Logger.
❏ Domain Id: The ID of domain in which an instance of Distributed Logger will be created.
6-11
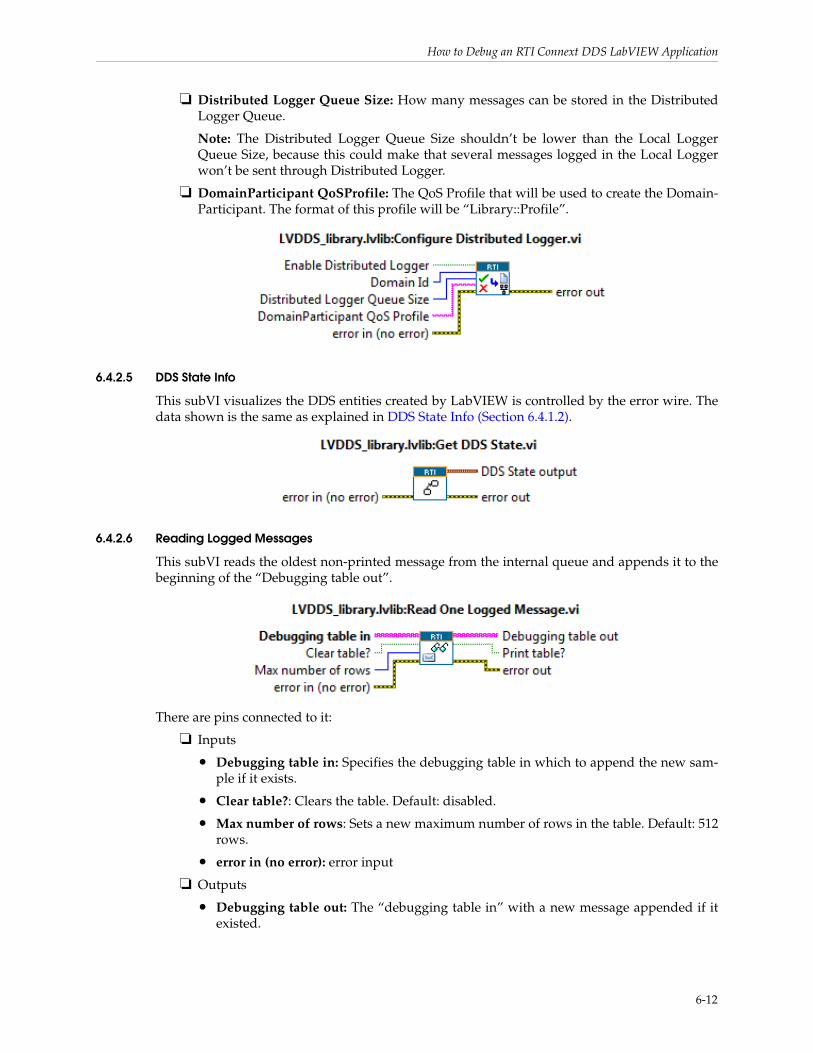
How to Debug an RTI Connext DDS LabVIEW Application
❏ Distributed Logger Queue Size: How many messages can be stored in the Distributed Logger Queue.
Note: The Distributed Logger Queue Size shouldn’t be lower than the Local Logger Queue Size, because this could make that several messages logged in the Local Logger won’t be sent through Distributed Logger.
❏ DomainParticipant QoSProfile: The QoS Profile that will be used to create the Domain-Participant. The format of this profile will be “Library::Profile”.
6.4.2.5 DDS State Info
This subVI visualizes the DDS entities created by LabVIEW is controlled by the error wire. The data shown is the same as explained in DDS State Info (Section 6.4.1.2).
6.4.2.6 Reading Logged Messages
This subVI reads the oldest non-printed message from the internal queue and appends it to the beginning of the “Debugging table out”.
There are pins connected to it:
❏ Inputs
• Debugging table in: Specifies the debugging table in which to append the new sam-ple if it exists.
• Clear table?: Clears the table. Default: disabled.
• Max number of rows: Sets a new maximum number of rows in the table. Default: 512 rows.
• error in (no error): error input
❏ Outputs
• Debugging table out: The “debugging table in” with a new message appended if it existed.
6-12
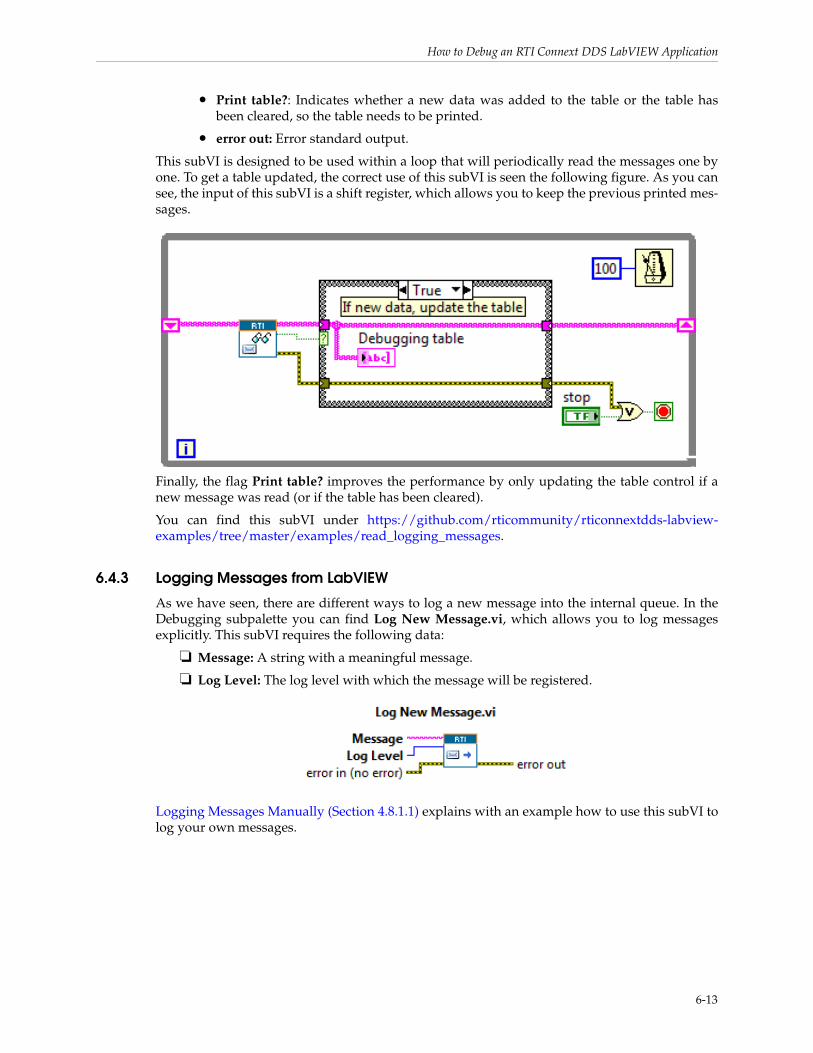
How to Debug an RTI Connext DDS LabVIEW Application
• Print table?: Indicates whether a new data was added to the table or the table has been cleared, so the table needs to be printed.
• error out: Error standard output.
This subVI is designed to be used within a loop that will periodically read the messages one by one. To get a table updated, the correct use of this subVI is seen the following figure. As you can see, the input of this subVI is a shift register, which allows you to keep the previous printed mes-sages.
Finally, the flag Print table? improves the performance by only updating the table control if a new message was read (or if the table has been cleared).
You can find this subVI under https://github.com/rticommunity/rticonnextdds-labview-examples/tree/master/examples/read_logging_messages.
6.4.3 Logging Messages from LabVIEW
As we have seen, there are different ways to log a new message into the internal queue. In the Debugging subpalette you can find Log New Message.vi, which allows you to log messages explicitly. This subVI requires the following data:
❏ Message: A string with a meaningful message.
❏ Log Level: The log level with which the message will be registered.
Logging Messages Manually (Section 4.8.1.1) explains with an example how to use this subVI to log your own messages.
6-13
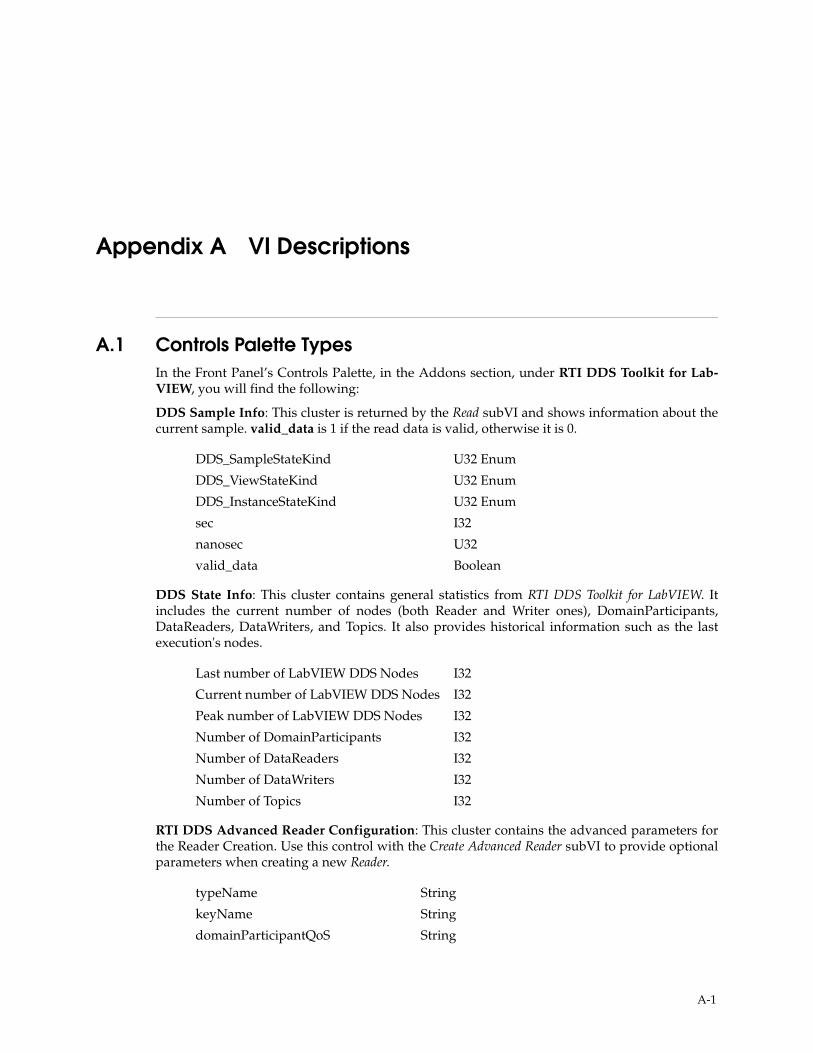
Appendix A VI Descriptions
A.1 Controls Palette TypesIn the Front Panel’s Controls Palette, in the Addons section, under RTI DDS Toolkit for Lab-VIEW, you will find the following:
DDS Sample Info: This cluster is returned by the Read subVI and shows information about the current sample. valid_data is 1 if the read data is valid, otherwise it is 0.
DDS State Info: This cluster contains general statistics from RTI DDS Toolkit for LabVIEW. It includes the current number of nodes (both Reader and Writer ones), DomainParticipants, DataReaders, DataWriters, and Topics. It also provides historical information such as the last execution's nodes.
RTI DDS Advanced Reader Configuration: This cluster contains the advanced parameters for the Reader Creation. Use this control with the Create Advanced Reader subVI to provide optional parameters when creating a new Reader.
DDS_SampleStateKind U32 Enum
DDS_ViewStateKind U32 Enum
DDS_InstanceStateKind U32 Enum
sec I32
nanosec U32
valid_data Boolean
Last number of LabVIEW DDS Nodes I32
Current number of LabVIEW DDS Nodes I32
Peak number of LabVIEW DDS Nodes I32
Number of DomainParticipants I32
Number of DataReaders I32
Number of DataWriters I32
Number of Topics I32
typeName String
keyName String
domainParticipantQoS String
A-1
Functions Palette
RTI DDS Advanced Writer Configuration: This cluster contains the advanced parameters for the Writer Creation. Use this control with the Create Advanced Writer subVI to provide optional parameters when creating a new Writer.
A.2 Functions PaletteIn the Block Diagram’s Functions Palette, in the Data Communication section, under RTI DDS Toolkit for LabVIEW, you will find the following:
❏ Writer (Section A.2.1)
❏ Reader (Section A.2.2)
❏ Complex-Type Templates (Section A.2.3)
A.2.1 Writer
Simple Create Writer: Creates a Writer node able to write data to the DDS network. Use the ref-erence generated by this subVI as input to the Write subVI to send data using DDS. Use the Release Writer subVI to release the allocated memory.
❏ Input parameters
❏ Output parameters
Advanced Create Writer: This subVI creates a Writer node able to write data to the DDS net-work. Introduce advanced configurations by using the control RTI DDS Advanced Writer Con-
dataReaderQos String
forceNewDomainParticipant? Boolean
forceArrayMapping? Boolean
forceExclusiveReader? Boolean
forceRead? (only ExclusiveReader) Boolean
forceUnboundedString? Boolean
typeName String
keyName String
domainParticipantQoS String
dataWriterQos String
forceNewDomainParticipant? Boolean
forceArrayMapping? Boolean
forceUnboundedString? Boolean
domain id ID of the domain the application intends to join
topic name Name of Topic for which the application will write data
data type Control of the data type to be published
error in (no error) LabVIEW Error cluster in (optional)
ref num Reference (pointer) to new Writer object
error out LabVIEW Error cluster out (optional)
A-2
Functions Palette
figuration.ctl. Use the reference generated by this subVI as input to the Write subVI to send data using DDS. Use the Release Writer subVI to release the allocated memory.
❏ Input parameters
❏ Output parameters
Write: Publishes data into a DDS network. It takes a Writer node (generated by Advanced/Simple Create Writer) as an input parameter. The data type of the data to be written must be the same as the data type attached to the Advanced/Simple Create Writer subVI.
❏ Input parameters
❏ Output parameters
Release Writer: Releases the memory allocated for a Writer node and prepares the contained entities to be deleted if nothing else is using them. To force the release of the contained entities, use 'Release Unused Entities' when the defined timeout has been reached after releasing the Writer node.
❏ Input parameters
❏ Output parameters
advanced writer configuration Controls of type RTI DDS Advanced Writer Configu-ration that contains the optional parameters
domain id ID of the domain the application intends to join
topic name Name of Topic for which the application will write data
data type Control of the data type to be published
error in (no error) LabVIEW Error cluster in (optional)
ref num Reference (pointer) to new Writer object
error out LabVIEW Error cluster out (optional)
ref num in Reference (pointer) to Writer object to be used
data Control with the data to be published by DDS. Must be of the same type as specified in the Data Type input for the Advanced/Simple Create Writer.
error in LabVIEW Error cluster in (optional)
ref num out Reference (pointer) to Writer object used
error out LabVIEW Error cluster out (optional)
ref num Reference (pointer) to Writer object to be released
error in LabVIEW Error cluster in (optional)
error out LabVIEW Error cluster out (optional)
A-3
Functions Palette
Set Writer QoS: Applies a new QoS profile to an existing Writer node. If the current QoS cannot be modified at run time, the Writer node remains unchanged.
❏ Input parameters
❏ Output parameters
A.2.2 Reader
Simple Create Reader: Creates a Reader node that is able to read data from the DDS network. Use the reference generated by this subVI as input to the Read subVI to get data from DDS and store it in the appropriate LabVIEW data. Use the Release Reader subVI to release the allocated memory.
❏ Input parameters
❏ Output parameters
Advanced Create Reader: This subVI creates a Reader node able to read data from the DDS net-work. Introduce advanced configurations by using the control RTI DDS Advanced Reader Configuration.ctl. Use the reference generated by this subVI as input to the Read subVI to get data from DDS and store it in the appropriate LabVIEW data. Use the Release Reader subVI to release the allocated memory.
❏ Input parameters
ref num in Reference (pointer) to Writer object whose QoS Profile will be changed
qos profile QoS profile to be applied. The expected value is a string providing the QoS library and profile to be read from the XML file (see Appendix D for details on where this file is located).
error in LabVIEW Error cluster in (optional)
ref num out Reference (pointer) to Writer object used
error out LabVIEW Error cluster out (optional)
domain id ID of the domain the application intends to join
topic name Name of the topic for which the application will read data
data type Control of the same data type to be read
error in (no error) LabVIEW Error cluster in (optional)
ref num Reference (pointer) to new Reader object
error out LabVIEW Error cluster out (optional)
advanced reader configuration Control of type RTI DDS Advanced Reader Configu-ration that contains the optional parameters
domain id ID of the domain the application intends to join
topic name Name of the topic for which the application will read data
data type Control of the same data type to be read
error in (no error) LabVIEW Error cluster in (optional)
A-4
Functions Palette
❏ Output parameters
Read: Gets data from the DDS network. It takes a Reader node (generated by the Advanced/Sim-ple Create Reader subVI) as an input parameter. The data is stored in the appropriate LabVIEW data, which is provided as an output parameter.
❏ Input parameters
❏ Output parameters
Release Reader: Releases memory allocated for a Reader node and prepares the contained enti-ties to be deleted if nothing else is using them. To force the release of the contained entities, use 'Release Unused Entities' when the defined timeout has been reached after releasing the Reader node.
❏ Input parameters
❏ Output parameters
Set Reader QoS: Applies a new QoS profile to an existing Reader node. If the current QoS can-not be modified at run time, the Reader node remains unchanged.
❏ Input parameters
ref num Reference (pointer) to new Reader object
error out LabVIEW Error cluster out (optional)
ref num in Reference (pointer) to Reader object to be used
query condition Query expression to use when filtering the read samples; empty means no filtering
only_new_samples Specifies whether to read only the new (unviewed) samples (true) or all the available ones (false)
error in (no error) LabVIEW Error cluster in (optional)
ref num out Reference (pointer) to Reader object used
data Indicator that will be filled with the data read from DDS. Must be of the same type as the one specified in the Data Type input of the Advanced/Simple Create Reader subVI
dds sample info DDS Sample Info cluster containing information about the sample read.
error out LabVIEW Error cluster out (optional)
ref num Reference (pointer) to Reader object to be released
error in LabVIEW Error cluster in (optional)
error out LabVIEW Error cluster out (optional)
ref num in Reference (pointer) to Reader object whose QoS Profile will be changed
qos profile QoS profile to be applied. The expected value is a string pro-viding the QoS library and profile to be read from the XML file (see Appendix D for details on where this file is located).
error in LabVIEW Error cluster in (optional)
A-5
Tools
❏ Output parameters
A.2.3 Complex-Type Templates
Simple Reader Template: Use this template to subscribe (read) to a complex type (cluster, array or enum) from a DDS network using RTI DDS Toolkit for LabVIEW. Follow the information in the Block Diagram and attach the cluster, array, or enum in the appropriate locations.
Advanced Reader Template: Use this template to subscribe (read) to a complex type (cluster, array or enum) from a DDS network using RTI DDS Toolkit for LabVIEW. Follow the information in the Block Diagram and attach the cluster, array, or enum in the appropriate locations.
Use the RTI DDS Advanced Reader Configuration control to provide additional configuration.
Simple Writer Template: Use this template to publish (write) a complex type (cluster, array, or enum) into a DDS network using RTI DDS Toolkit for LabVIEW. Follow the information in the Block Diagram and attach the cluster, array, or enum in the appropriate locations.
Advanced Writer Template: Use this template to publish (write) a complex type (cluster, array, or enum) into a DDS network using RTI DDS Toolkit for LabVIEW. Follow the information in the Block Diagram and attach the cluster, array, or enum in the appropriate locations.
Use the RTI DDS Advanced Writer Configuration control to provide additional configuration.
A.3 ToolsDDS Release Unused Entities: Releases all the entities generated by the Create Reader/Writer subVIs that are not currently in use. An entity is considered ‘not in use’' if no nodes have linked it within the defined timeout period. This is a useful way to resolve some of the errors produced when creating new Reader/Writer nodes.
❏ Input parameters
❏ Output parameters
DDS Time to LV Time: Converts a UNIX timestamp (in seconds) to a LabVIEW Time Stamp.
❏ Input parameters
❏ Output parameters
ref num out Reference (pointer) to Reader object used
error out LabVIEW Error cluster out (optional)
error in LabVIEW Error cluster in
error code RTI DDS Toolkit for LabVIEW Error Code (optional)error out LabVIEW Error cluster out (optional)
X DBL
time stamp Cluster
A-6
Tools
A.3.1 DDS Debugging SubPalette
Get configuration parameters: Returns the current values of the configuration parameters of the RTI DDS Toolkit for LabVIEW: timeout to release unused DDS entities, filter level, maximum size of the internal queue, and a boolean which indicates whether the debugging window is enabled.
❏ Input parameters:
❏ Output parameters:
Set configurations parameters: Updates the configuration parameters of the RTI DDS Toolkit for LabVIEW: timeout to release unused DDS entities, filter level, maximum size of the internal queue and a boolean to enable/disable the debugging window.
❏ Input parameters:
❏ Output parameters:
Get DL configurations parameters: Returns the current configuration values of the Distributed Logger: a boolean which indicates if Distributed Logger is enabled, the domain ID where the Distributed Logger Domain Participant has been created, and the Distributed Logger Queue Size.
❏ Input parameters:
❏ Output parameters:
error in LabVIEW Error cluster in
Timeout to delete inactive DDS entities I32 Filter level I32 RingMax number of table rows U32Is debugging window enabled Booleanerror out LabVIEW Error cluster out
Timeout to delete inactive DDS entities I32 - Default: 10Filter level I32 Ring - Default: WARNING LEVELMax number of table rows U32 - Default: 512Is debugging window enabled Boolean - Default: Falseerror in LabVIEW Error cluster in
error out LabVIEW Error cluster out
error in LabVIEW Error cluster in
Is Distributed Logger enabled? BooleanDomain ID U32Distributed Logger Queue Size I32error out LabVIEW Error cluster out
A-7
Tools
Configure Distributed Logger: Enables and disables Distributed Logger. When this subVI is enabling Distributed Logger, all the other parameters will be used to create it. These parameters are: enable Distributed Logger, Domain Id, Distributed Logger Queue Size, DomainParticipant QoS Profile.
❏ Input parameters:
❏ Output parameters:
Get DDS State: Returns general statistics from RTI DDS Toolkit for LabVIEW. This includes the current number of nodes (both Reader and Writer ones), DomainParticipants, DataReaders, DataWriters, and Topics. It also provides historical information such as the last execution's nodes.
❏ Input parameters:
❏ Output parameters:
Read One Logged Message: Appends a logging message to the table provided as input. It also allows you to limit the maximum number of table rows; and finally, it returns a flag indicating when the table has been modified, so it could be printed just if it has been modified.
❏ Input parameters:
❏ Output parameters:
Log New Message: Logs a new message into the internal queue.
❏ Input parameters:
❏ Output parameters:
Enable Distributed Logger Boolean - Default: FalseDomain Id U32 - Default: 0Distributed Logger Queue Size I32 - Default: 512DomainParticipant Qos Profile String - Default: empty stringerror in LabVIEW Error cluster in
error out LabVIEW Error cluster out
error in LabVIEW Error cluster in
DDS State output DDS State Info Cluster error out LabVIEW Error cluster out
Debugging table in 2D String tableClear table? BooleanMax number of rows U32error in LabVIEW Error cluster in
Debugging table out String 2D tablePrint table? Booleanerror out LabVIEW Error cluster out
Message StringLog level U32 Ringerror in LabVIEW Error cluster in
error out LabVIEW Error cluster out
A-8
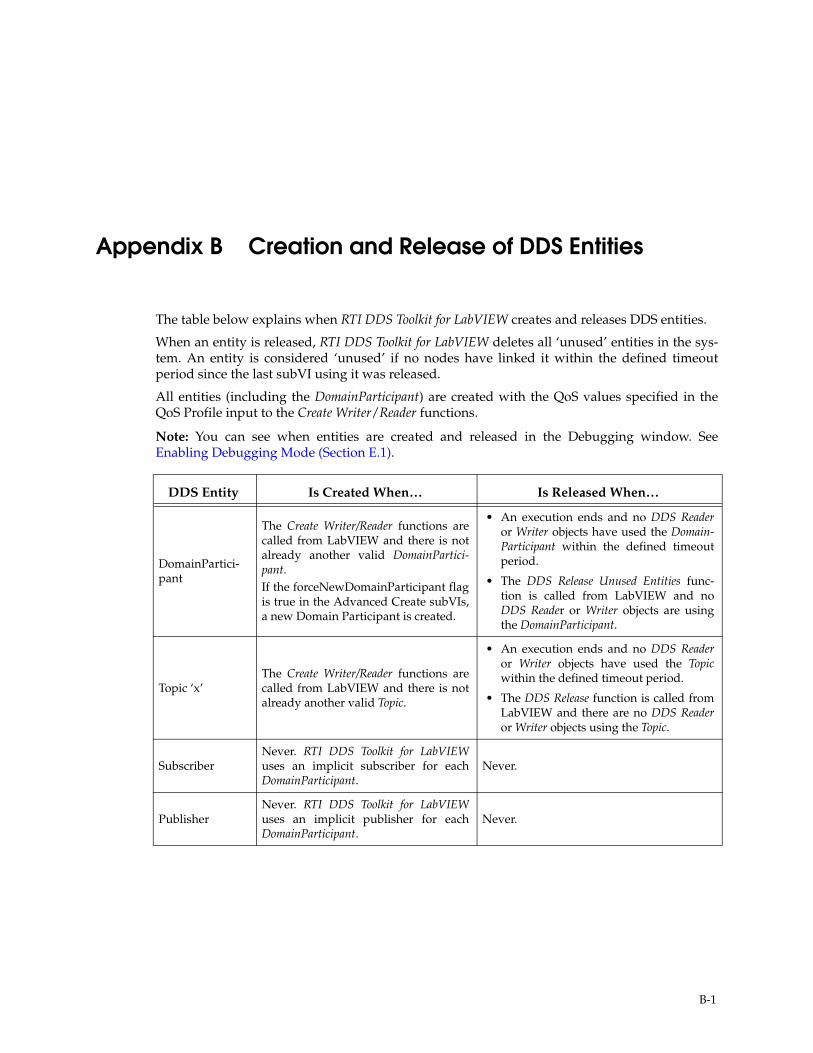
Appendix B Creation and Release of DDS Entities
The table below explains when RTI DDS Toolkit for LabVIEW creates and releases DDS entities.
When an entity is released, RTI DDS Toolkit for LabVIEW deletes all ‘unused’ entities in the sys-tem. An entity is considered ‘unused’ if no nodes have linked it within the defined timeout period since the last subVI using it was released.
All entities (including the DomainParticipant) are created with the QoS values specified in the QoS Profile input to the Create Writer/Reader functions.
Note: You can see when entities are created and released in the Debugging window. See Enabling Debugging Mode (Section E.1).
DDS Entity Is Created When… Is Released When…
DomainPartici-pant
The Create Writer/Reader functions are called from LabVIEW and there is not already another valid DomainPartici-pant.If the forceNewDomainParticipant flag is true in the Advanced Create subVIs, a new Domain Participant is created.
• An execution ends and no DDS Readeror Writer objects have used the Domain-Participant within the defined timeout period.
• The DDS Release Unused Entities func-tion is called from LabVIEW and no DDS Reader or Writer objects are using the DomainParticipant.
Topic ‘x’The Create Writer/Reader functions are called from LabVIEW and there is not already another valid Topic.
• An execution ends and no DDS Readeror Writer objects have used the Topic within the defined timeout period.
• The DDS Release function is called from LabVIEW and there are no DDS Reader or Writer objects using the Topic.
SubscriberNever. RTI DDS Toolkit for LabVIEWuses an implicit subscriber for each DomainParticipant.
Never.
PublisherNever. RTI DDS Toolkit for LabVIEWuses an implicit publisher for each DomainParticipant.
Never.
B-1
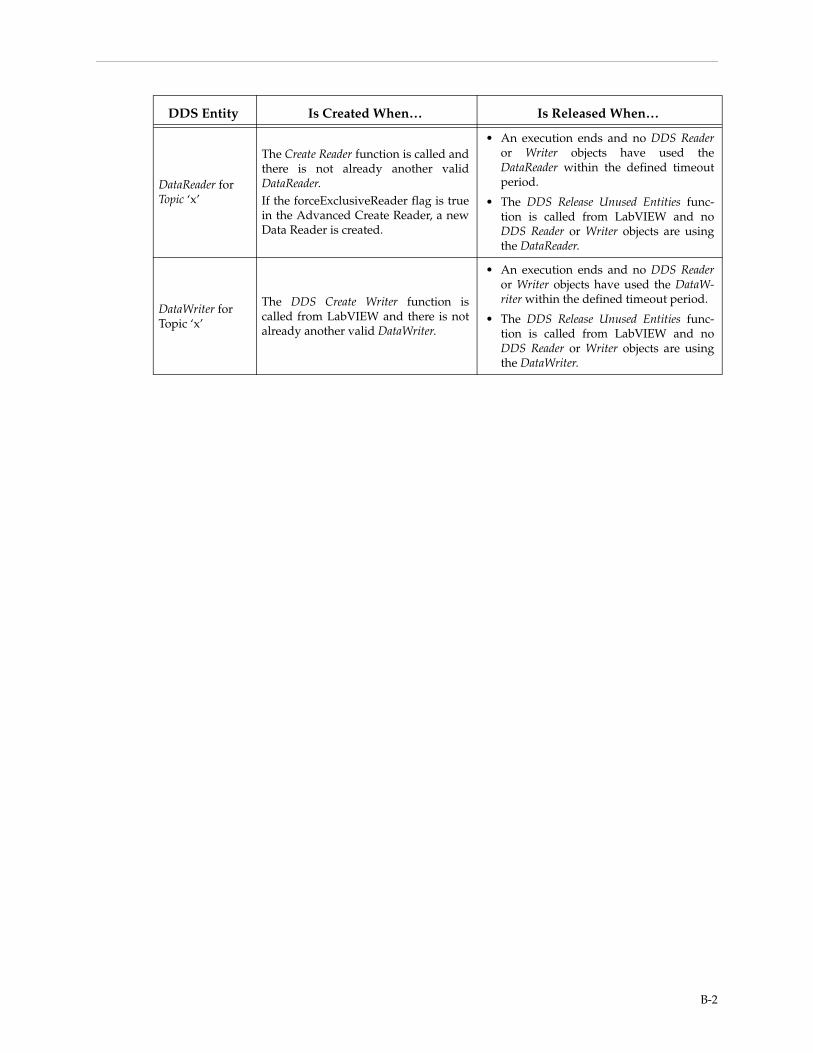
DataReader for Topic ‘x’
The Create Reader function is called and there is not already another valid DataReader.If the forceExclusiveReader flag is true in the Advanced Create Reader, a new Data Reader is created.
• An execution ends and no DDS Readeror Writer objects have used the DataReader within the defined timeout period.
• The DDS Release Unused Entities func-tion is called from LabVIEW and no DDS Reader or Writer objects are using the DataReader.
DataWriter for Topic ‘x’
The DDS Create Writer function is called from LabVIEW and there is not already another valid DataWriter.
• An execution ends and no DDS Readeror Writer objects have used the DataW-riter within the defined timeout period.
• The DDS Release Unused Entities func-tion is called from LabVIEW and no DDS Reader or Writer objects are using the DataWriter.
DDS Entity Is Created When… Is Released When…
B-2
Appendix C Supported Data Types and Corresponding IDL
RTI DDS Toolkit for LabVIEW supports these simple and complex data types:
❏ NUMERIC
❏ BOOLEAN
❏ TEXT (STRING)
❏ ENUM
• UINT 32
❏ ARRAYS OF TYPE
• NUMERIC (INT8, INT16, INT32, INT64, UINT8, UINT16, UINT32, UINT64, FLOAT, DOUBLE)
• BOOLEAN
• ENUM
❏ CLUSTER WITH ANY COMBINATION OF:
• NUMERIC
• BOOLEAN
• TEXT (STRING)
• ENUM
• ARRAY
• CLUSTER
For other DDS applications to communicate with VIs that use RTI DDS Toolkit for LabVIEW, you need to use compatible data types in both applications.
• INT8a
a. INT8 and UINT8 are both mapped as octets. We recommend using UINT8, since octets are not signed.
• UINT8a
• INT16 • UINT16
• INT32 • UINT32
• INT64 • UINT64
• FLOAT/SINGLE
• DOUBLE
C-1
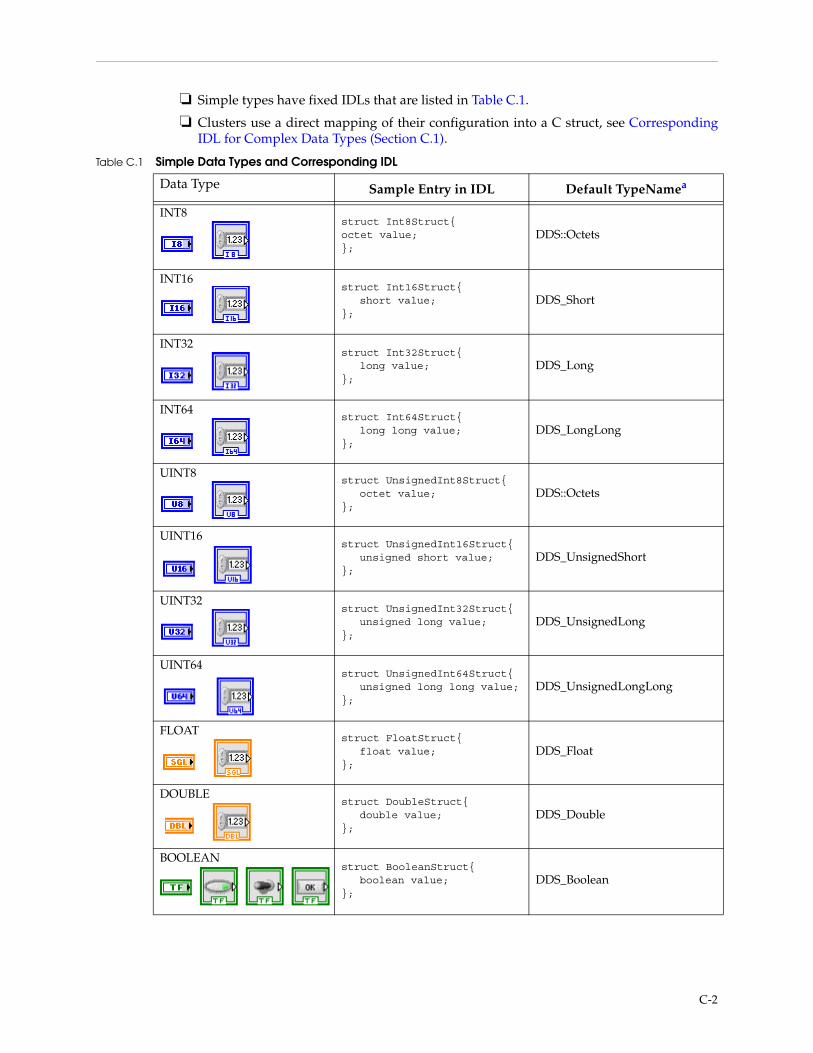
❏ Simple types have fixed IDLs that are listed in Table C.1.
❏ Clusters use a direct mapping of their configuration into a C struct, see Corresponding IDL for Complex Data Types (Section C.1).
Table C.1 Simple Data Types and Corresponding IDL
Data Type Sample Entry in IDL Default TypeNamea
INT8 struct Int8Struct{octet value;};
DDS::Octets
INT16 struct Int16Struct{
short value;};
DDS_Short
INT32 struct Int32Struct{
long value;};
DDS_Long
INT64 struct Int64Struct{
long long value;};
DDS_LongLong
UINT8 struct UnsignedInt8Struct{
octet value;};
DDS::Octets
UINT16 struct UnsignedInt16Struct{
unsigned short value;};
DDS_UnsignedShort
UINT32 struct UnsignedInt32Struct{
unsigned long value;};
DDS_UnsignedLong
UINT64 struct UnsignedInt64Struct{
unsigned long long value;};
DDS_UnsignedLongLong
FLOAT struct FloatStruct{
float value;};
DDS_Float
DOUBLE struct DoubleStruct{
double value;};
DDS_Double
BOOLEAN struct BooleanStruct{
boolean value;};
DDS_Boolean
C-2
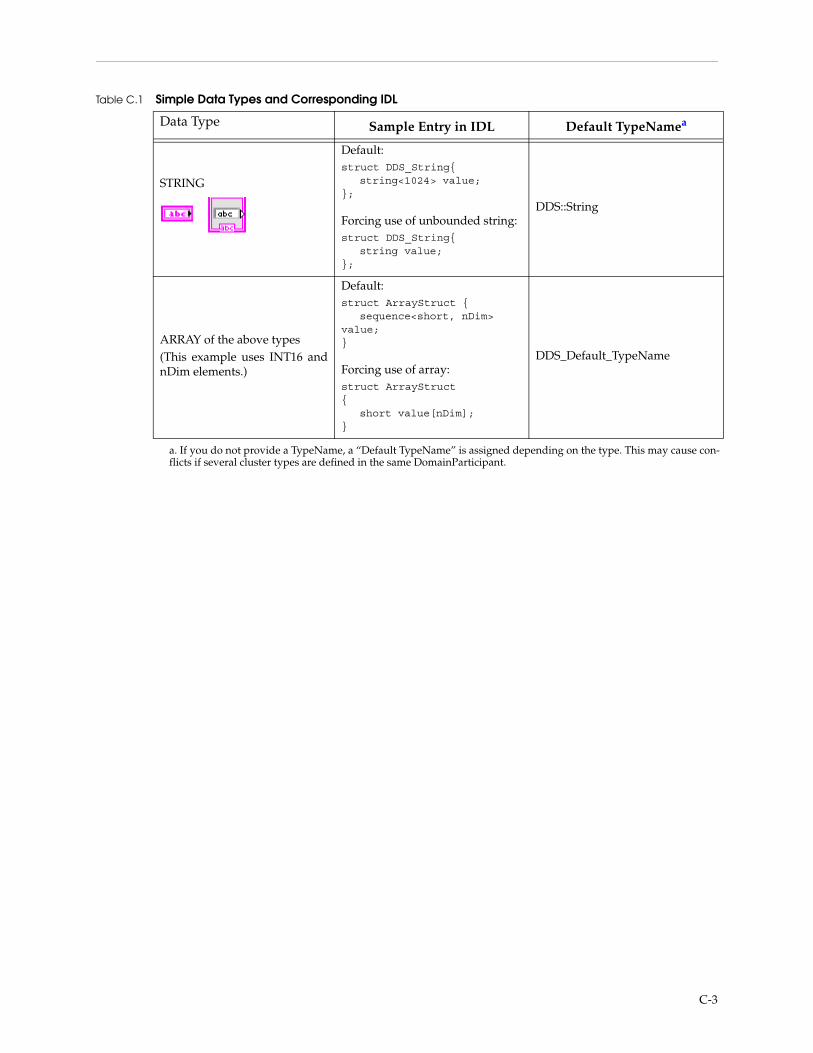
STRING
Default:struct DDS_String{
string<1024> value;};
Forcing use of unbounded string:struct DDS_String{
string value;};
DDS::String
ARRAY of the above types (This example uses INT16 and nDim elements.)
Default:struct ArrayStruct {
sequence<short, nDim> value;}
Forcing use of array:struct ArrayStruct{
short value[nDim];}
DDS_Default_TypeName
a. If you do not provide a TypeName, a “Default TypeName” is assigned depending on the type. This may cause con-flicts if several cluster types are defined in the same DomainParticipant.
Table C.1 Simple Data Types and Corresponding IDL
Data Type Sample Entry in IDL Default TypeNamea
C-3
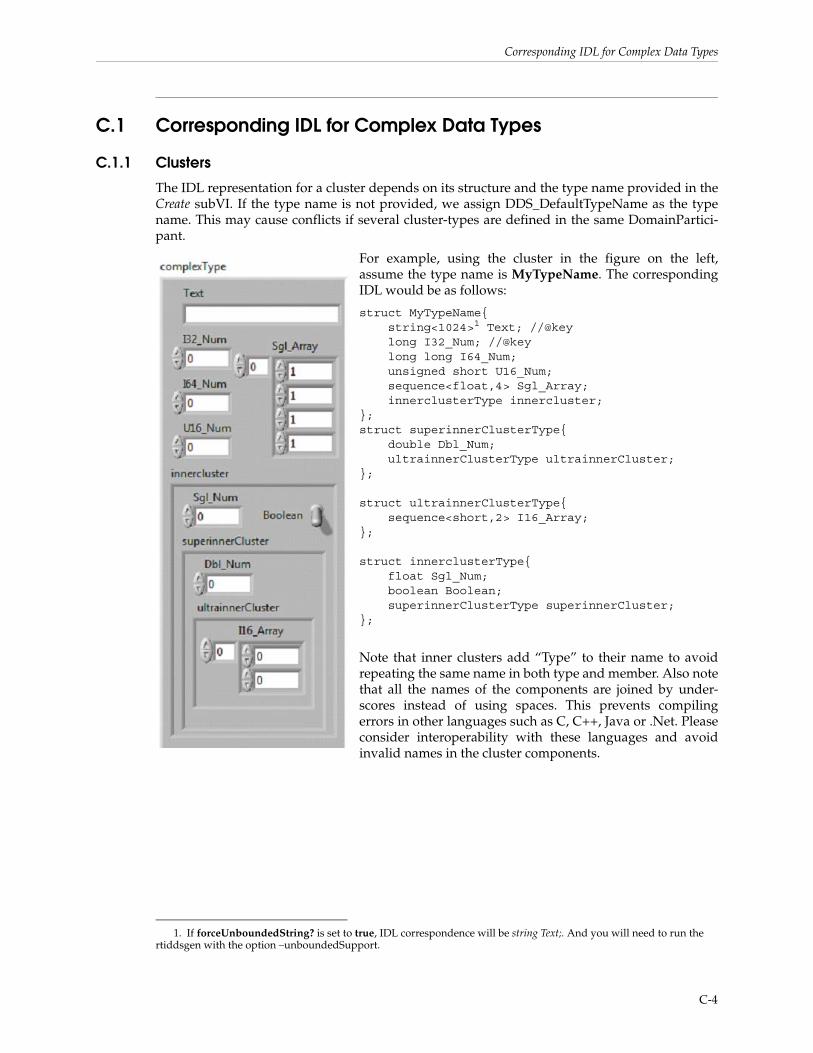
Corresponding IDL for Complex Data Types
C.1 Corresponding IDL for Complex Data Types
C.1.1 Clusters
The IDL representation for a cluster depends on its structure and the type name provided in the Create subVI. If the type name is not provided, we assign DDS_DefaultTypeName as the type name. This may cause conflicts if several cluster-types are defined in the same DomainPartici-pant.
For example, using the cluster in the figure on the left, assume the type name is MyTypeName. The corresponding IDL would be as follows:
struct MyTypeName{ string<1024>1 Text; //@key long I32_Num; //@key long long I64_Num; unsigned short U16_Num; sequence<float,4> Sgl_Array; innerclusterType innercluster;};struct superinnerClusterType{ double Dbl_Num; ultrainnerClusterType ultrainnerCluster;};
struct ultrainnerClusterType{ sequence<short,2> I16_Array;};
struct innerclusterType{ float Sgl_Num; boolean Boolean; superinnerClusterType superinnerCluster;};
Note that inner clusters add “Type” to their name to avoid repeating the same name in both type and member. Also note that all the names of the components are joined by under-scores instead of using spaces. This prevents compiling errors in other languages such as C, C++, Java or .Net. Please consider interoperability with these languages and avoid invalid names in the cluster components.
1. If forceUnboundedString? is set to true, IDL correspondence will be string Text;. And you will need to run the rtiddsgen with the option –unboundedSupport.
C-4
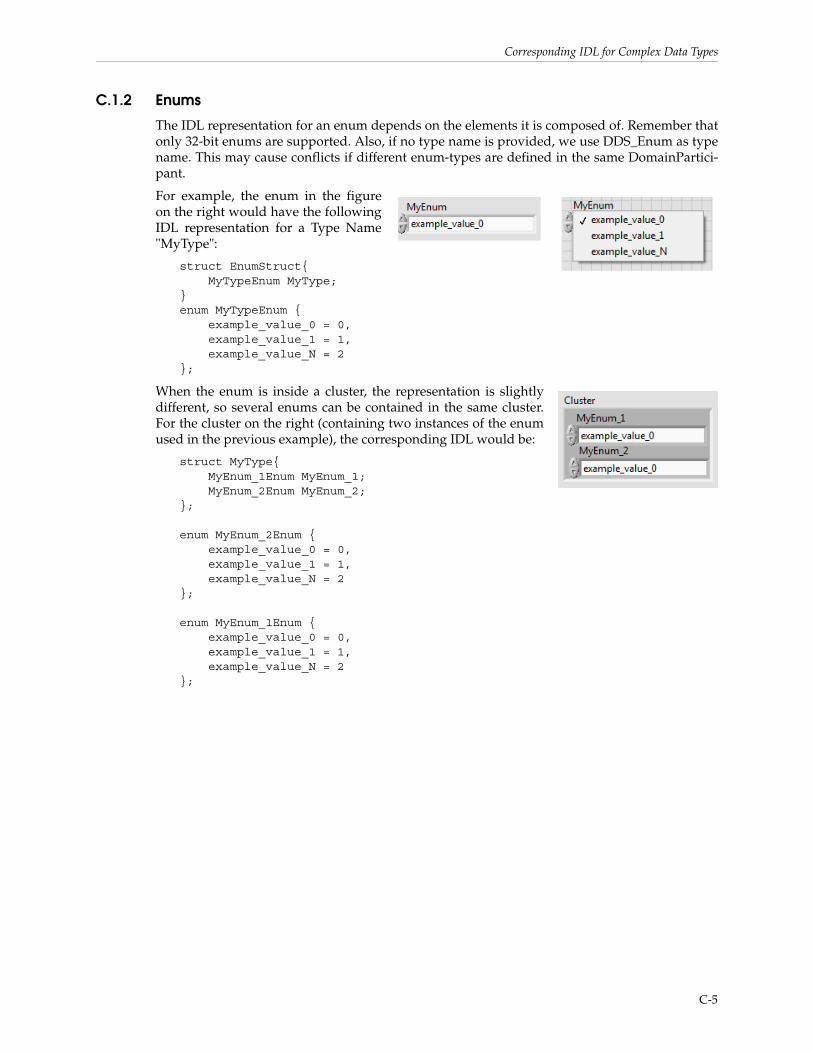
Corresponding IDL for Complex Data Types
C.1.2 Enums
The IDL representation for an enum depends on the elements it is composed of. Remember that only 32-bit enums are supported. Also, if no type name is provided, we use DDS_Enum as type name. This may cause conflicts if different enum-types are defined in the same DomainPartici-pant.
For example, the enum in the figure on the right would have the following IDL representation for a Type Name "MyType":
struct EnumStruct{ MyTypeEnum MyType; }enum MyTypeEnum { example_value_0 = 0, example_value_1 = 1, example_value_N = 2};
When the enum is inside a cluster, the representation is slightly different, so several enums can be contained in the same cluster. For the cluster on the right (containing two instances of the enum used in the previous example), the corresponding IDL would be:
struct MyType{ MyEnum_1Enum MyEnum_1; MyEnum_2Enum MyEnum_2; };
enum MyEnum_2Enum { example_value_0 = 0, example_value_1 = 1, example_value_N = 2};
enum MyEnum_1Enum { example_value_0 = 0, example_value_1 = 1, example_value_N = 2};
C-5
Appendix D File Folders Installed within LabVIEW
D.1 File Folders on Windows SystemsRTI DDS Toolkit for LabVIEW adds the following files to LabVIEW’s folders.
In the paths shown below, LabVIEW 20xx is:
❏ C:\Program Files1\National Instruments\LabVIEW 20xx
Where xx represents the LabVIEW version number (LabVIEW 2015, etc.)
❏ DLLs
• \LabVIEW 20xx\vi.lib\_RTI DDS Toolkit for LabVIEW_internal_deps
❏ Control Types and VIs
• \LabVIEW 20xx\vi.lib\RTI DDS Toolkit for LabVIEW\Types
• \LabVIEW 20xx\vi.lib\RTI DDS Toolkit for LabVIEW\VIs
❏ QoS Profile (for documentation purposes only)
• \LabVIEW 20xx\vi.lib\_RTI DDS Toolkit for LabVIEW_internal_deps\RTI_LABVIEW_CONFIG.documentationONLY.xml
❏ Examples
• \LabVIEW 20xx\examples\RTI DDS Toolkit for LabVIEW\ClusterDemo
• \LabVIEW 20xx\examples\RTI DDS Toolkit for LabVIEW\cRIO-9068Project
• \LabVIEW 20xx\examples\RTI DDS Toolkit for LabVIEW\LogMessagesDemo
• \LabVIEW 20xx\examples\RTI DDS Toolkit for LabVIEW\MonitoringDemo
• \LabVIEW 20xx\examples\RTI DDS Toolkit for LabVIEW\NumberDemo
• \LabVIEW 20xx\examples\RTI DDS Toolkit for LabVIEW\ReadAllDemo
• \LabVIEW 20xx\examples\RTI DDS Toolkit for LabVIEW\ShapesDemo
• \LabVIEW 20xx\examples\RTI DDS Toolkit for LabVIEW\StringsDemo
1. On 64-bit systems, the folder is “Program Files (x86)”
D-1
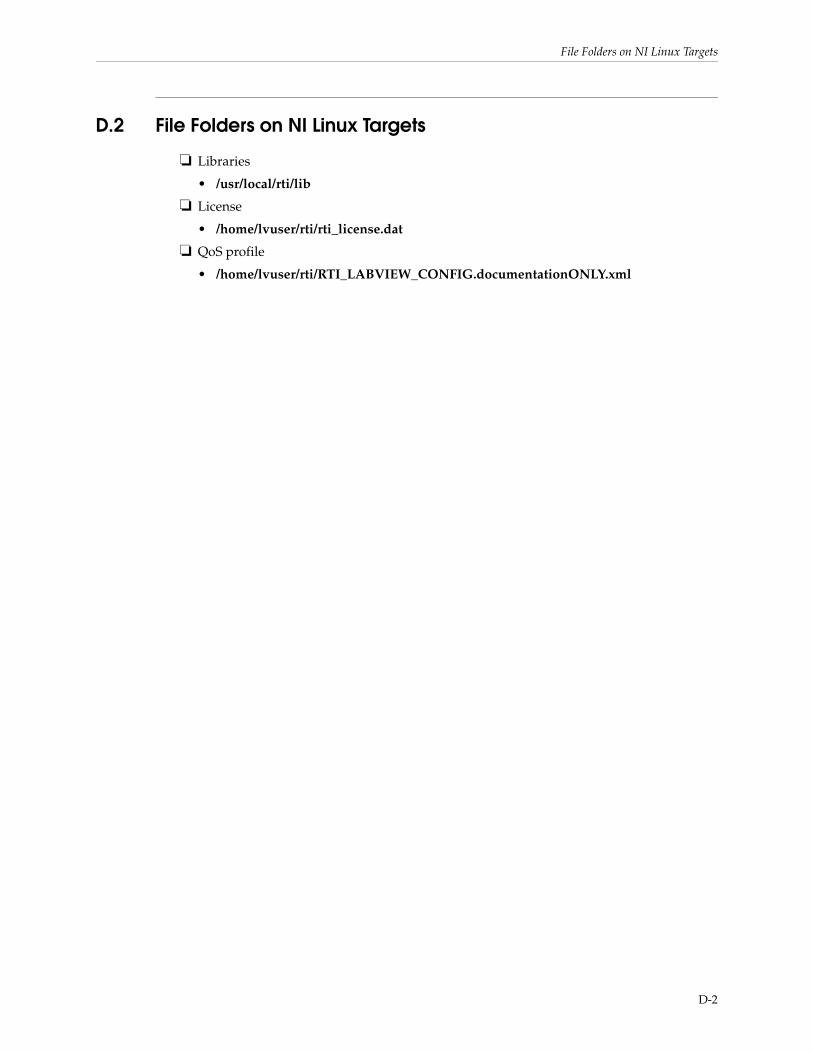
File Folders on NI Linux Targets
D.2 File Folders on NI Linux Targets
❏ Libraries
• /usr/local/rti/lib
❏ License
• /home/lvuser/rti/rti_license.dat
❏ QoS profile
• /home/lvuser/rti/RTI_LABVIEW_CONFIG.documentationONLY.xml
D-2
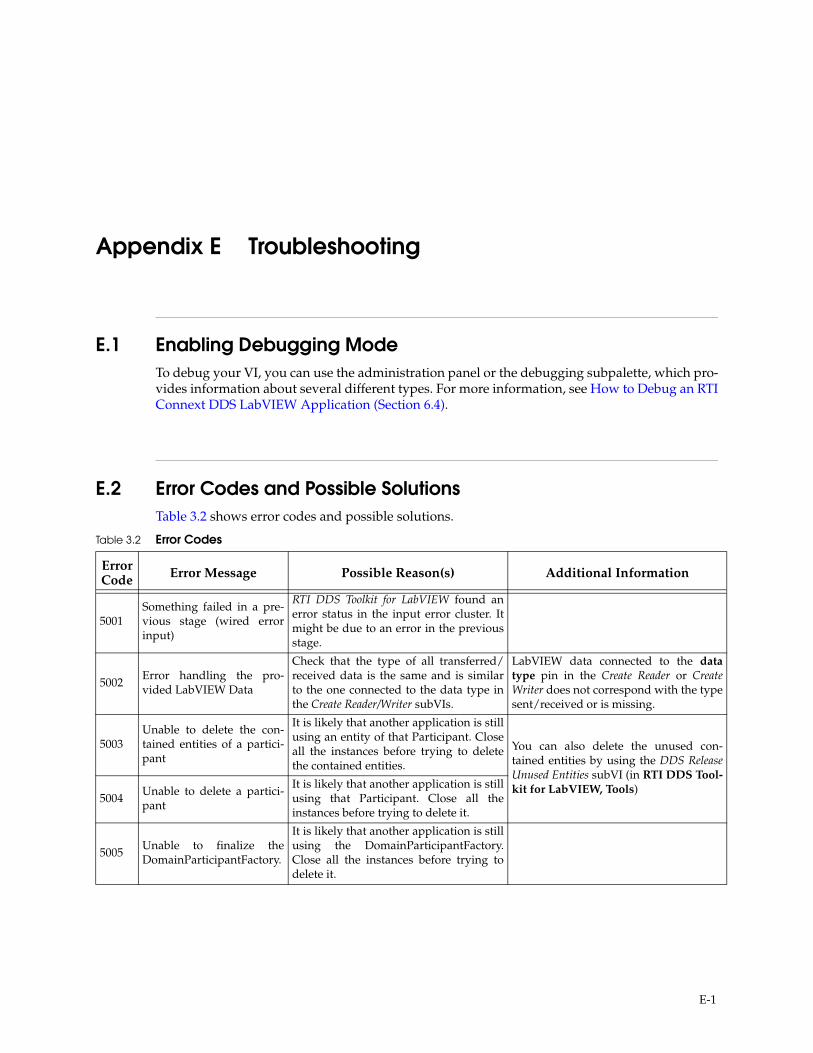
Appendix E Troubleshooting
E.1 Enabling Debugging ModeTo debug your VI, you can use the administration panel or the debugging subpalette, which pro-vides information about several different types. For more information, see How to Debug an RTI Connext DDS LabVIEW Application (Section 6.4).
E.2 Error Codes and Possible SolutionsTable 3.2 shows error codes and possible solutions.
Table 3.2 Error Codes
Error Code Error Message Possible Reason(s) Additional Information
5001Something failed in a pre-vious stage (wired error input)
RTI DDS Toolkit for LabVIEW found an error status in the input error cluster. It might be due to an error in the previous stage.
5002Error handling the pro-vided LabVIEW Data
Check that the type of all transferred/received data is the same and is similar to the one connected to the data type in the Create Reader/Writer subVIs.
LabVIEW data connected to the data type pin in the Create Reader or Create Writer does not correspond with the type sent/received or is missing.
5003Unable to delete the con-tained entities of a partici-pant
It is likely that another application is still using an entity of that Participant. Close all the instances before trying to delete the contained entities.
You can also delete the unused con-tained entities by using the DDS Release Unused Entities subVI (in RTI DDS Tool-kit for LabVIEW, Tools)
5004Unable to delete a partici-pant
It is likely that another application is still using that Participant. Close all the instances before trying to delete it.
5005Unable to finalize the DomainParticipantFactory.
It is likely that another application is still using the DomainParticipantFactory. Close all the instances before trying to delete it.
E-1
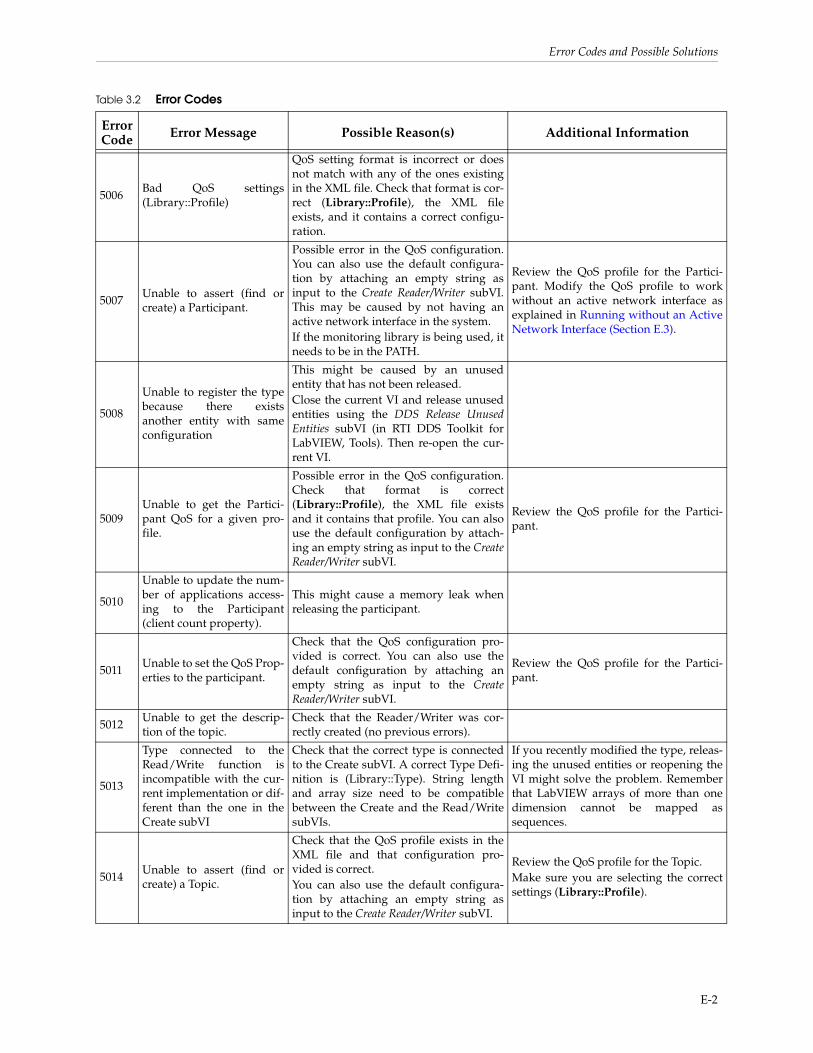
Error Codes and Possible Solutions
5006Bad QoS settings (Library::Profile)
QoS setting format is incorrect or does not match with any of the ones existing in the XML file. Check that format is cor-rect (Library::Profile), the XML file exists, and it contains a correct configu-ration.
5007Unable to assert (find or create) a Participant.
Possible error in the QoS configuration. You can also use the default configura-tion by attaching an empty string as input to the Create Reader/Writer subVI. This may be caused by not having an active network interface in the system.If the monitoring library is being used, it needs to be in the PATH.
Review the QoS profile for the Partici-pant. Modify the QoS profile to work without an active network interface as explained in Running without an Active Network Interface (Section E.3).
5008
Unable to register the type because there exists another entity with same configuration
This might be caused by an unused entity that has not been released.Close the current VI and release unused entities using the DDS Release Unused Entities subVI (in RTI DDS Toolkit for LabVIEW, Tools). Then re-open the cur-rent VI.
5009Unable to get the Partici-pant QoS for a given pro-file.
Possible error in the QoS configuration. Check that format is correct (Library::Profile), the XML file exists and it contains that profile. You can also use the default configuration by attach-ing an empty string as input to the Create Reader/Writer subVI.
Review the QoS profile for the Partici-pant.
5010
Unable to update the num-ber of applications access-ing to the Participant (client count property).
This might cause a memory leak when releasing the participant.
5011Unable to set the QoS Prop-erties to the participant.
Check that the QoS configuration pro-vided is correct. You can also use the default configuration by attaching an empty string as input to the Create Reader/Writer subVI.
Review the QoS profile for the Partici-pant.
5012Unable to get the descrip-tion of the topic.
Check that the Reader/Writer was cor-rectly created (no previous errors).
5013
Type connected to the Read/Write function is incompatible with the cur-rent implementation or dif-ferent than the one in the Create subVI
Check that the correct type is connected to the Create subVI. A correct Type Defi-nition is (Library::Type). String length and array size need to be compatible between the Create and the Read/Write subVIs.
If you recently modified the type, releas-ing the unused entities or reopening the VI might solve the problem. Remember that LabVIEW arrays of more than one dimension cannot be mapped as sequences.
5014Unable to assert (find or create) a Topic.
Check that the QoS profile exists in the XML file and that configuration pro-vided is correct. You can also use the default configura-tion by attaching an empty string as input to the Create Reader/Writer subVI.
Review the QoS profile for the Topic. Make sure you are selecting the correct settings (Library::Profile).
Table 3.2 Error Codes
Error Code Error Message Possible Reason(s) Additional Information
E-2

Error Codes and Possible Solutions
5015Unable to get the implicit publisher.
Implicit publisher is needed to create the Writer. Check that the participant config-uration is correct and that there are no previous errors.
Review the QoS profile for the Publisher. Make sure you are selecting the correct settings (Library::Profile).You can also use the default QoS setting by attaching an empty string to the qos profile pin of the Create Writer subVI.
5016Unable to get all the Data Writers in the given partici-pant.
It might be due to a memory restriction (not enough memory available to recover the existing Data Writers). Using the DDS Release Unused EntitiessubVI (in RTI DDS Toolkit for Lab-VIEW, Tools) might fix this problem.
5017Unable to create the Data Writer.
Check that the QoS configuration pro-vided for the Data Writer is correct.
Review the QoS profile for the Data Writer. Make sure you are selecting the correct settings (Library::Profile).You can also use the default QoS setting by attaching an empty string to the qos profile pin of the Create Writer subVI.
5018Unable to get the QoS Properties from a Data Writer.
Check that Create Writer was successful and that the reference passed to the Writefunction is the one provided as output from the Create function. It might also be a problem in the QoS setting provided (use default ones as a safest option).
5019Unable to set the QoS Prop-erties for a Data Writer.
Check that Create Writer was successful and that the reference passed to the Write/Set_QoS_Setting function is the correct one. It might also be a problem in the QoS setting provided (use default ones as a safest option).
5020Unable to update the num-ber of applications using a Data Writer.
This might cause a memory leak when releasing the Data Writer.
5021Unable to narrow the Dynamic Data Writer.
This is an unexpected error. Contact [email protected] or visit our Community Portal at http://community.rti.com to view current solutions and forum entries.
5022Unable to get the implicit subscriber.
Implicit subscriber is needed to create the Reader. Check that the participant configuration is correct and that there are no previous errors.
Review the QoS profile for the Sub-scriber. Make sure you are selecting the correct settings (Library::Profile).You can also use the default QoS setting by attaching an empty string to the qos profile pin of the Create Reader subVI.
5023Unable to get all the Data Writers in the given partici-pant.
It might be due to a memory restriction (not enough memory available to recover the existing Data Writers). Using the DDS Release Unused EntitiessubVI (in RTI DDS Toolkit for Lab-VIEW, Tools) might fix this.
Table 3.2 Error Codes
Error Code Error Message Possible Reason(s) Additional Information
E-3
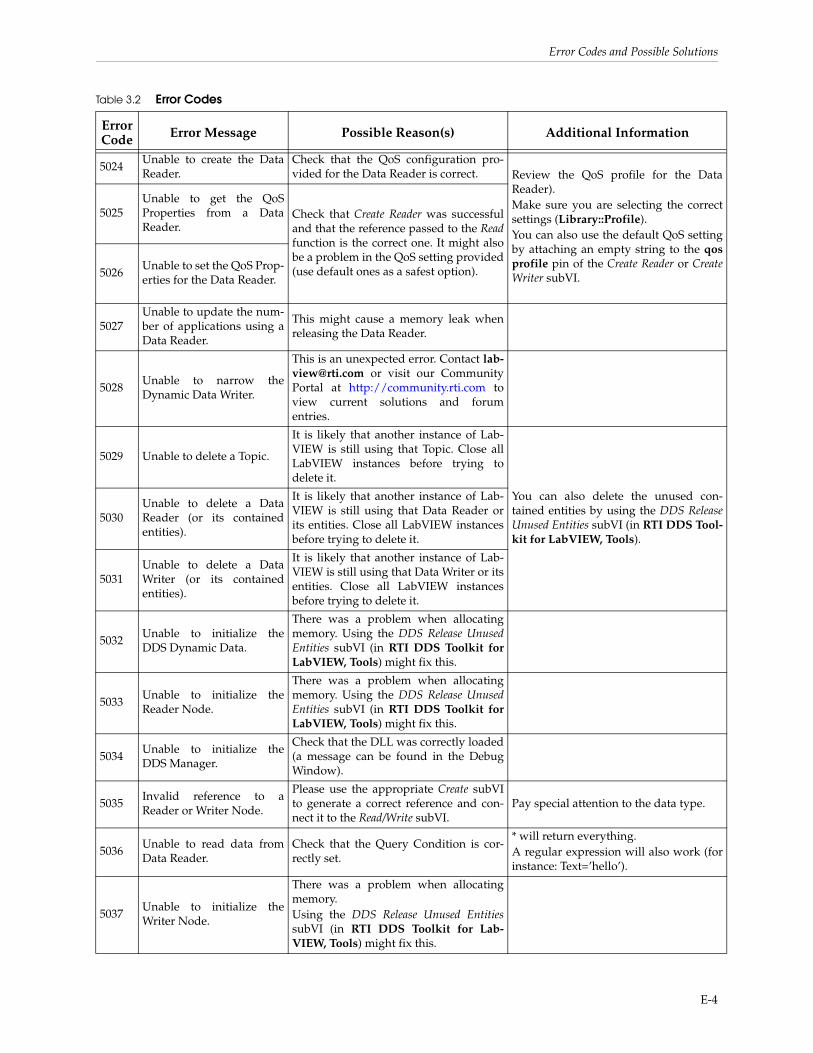
Error Codes and Possible Solutions
5024Unable to create the Data Reader.
Check that the QoS configuration pro-vided for the Data Reader is correct. Review the QoS profile for the Data
Reader). Make sure you are selecting the correct settings (Library::Profile).You can also use the default QoS setting by attaching an empty string to the qos profile pin of the Create Reader or Create Writer subVI.
5025Unable to get the QoS Properties from a Data Reader.
Check that Create Reader was successful and that the reference passed to the Readfunction is the correct one. It might also be a problem in the QoS setting provided (use default ones as a safest option).5026
Unable to set the QoS Prop-erties for the Data Reader.
5027Unable to update the num-ber of applications using a Data Reader.
This might cause a memory leak when releasing the Data Reader.
5028Unable to narrow the Dynamic Data Writer.
This is an unexpected error. Contact [email protected] or visit our Community Portal at http://community.rti.com to view current solutions and forum entries.
5029 Unable to delete a Topic.
It is likely that another instance of Lab-VIEW is still using that Topic. Close all LabVIEW instances before trying to delete it.
You can also delete the unused con-tained entities by using the DDS Release Unused Entities subVI (in RTI DDS Tool-kit for LabVIEW, Tools).
5030Unable to delete a Data Reader (or its contained entities).
It is likely that another instance of Lab-VIEW is still using that Data Reader or its entities. Close all LabVIEW instances before trying to delete it.
5031Unable to delete a Data Writer (or its contained entities).
It is likely that another instance of Lab-VIEW is still using that Data Writer or its entities. Close all LabVIEW instances before trying to delete it.
5032Unable to initialize the DDS Dynamic Data.
There was a problem when allocating memory. Using the DDS Release Unused Entities subVI (in RTI DDS Toolkit for LabVIEW, Tools) might fix this.
5033Unable to initialize the Reader Node.
There was a problem when allocating memory. Using the DDS Release Unused Entities subVI (in RTI DDS Toolkit for LabVIEW, Tools) might fix this.
5034Unable to initialize the DDS Manager.
Check that the DLL was correctly loaded (a message can be found in the Debug Window).
5035Invalid reference to a Reader or Writer Node.
Please use the appropriate Create subVI to generate a correct reference and con-nect it to the Read/Write subVI.
Pay special attention to the data type.
5036Unable to read data from Data Reader.
Check that the Query Condition is cor-rectly set.
* will return everything.A regular expression will also work (for instance: Text=’hello’).
5037Unable to initialize the Writer Node.
There was a problem when allocating memory. Using the DDS Release Unused EntitiessubVI (in RTI DDS Toolkit for Lab-VIEW, Tools) might fix this.
Table 3.2 Error Codes
Error Code Error Message Possible Reason(s) Additional Information
E-4
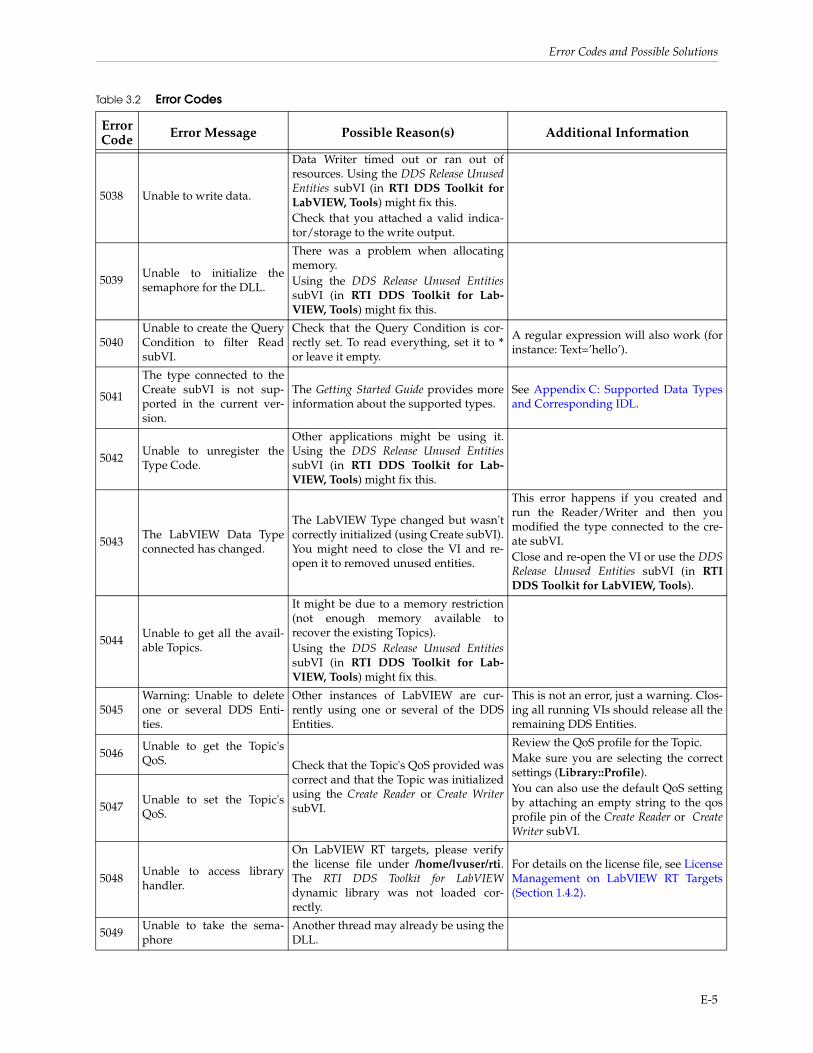
Error Codes and Possible Solutions
5038 Unable to write data.
Data Writer timed out or ran out of resources. Using the DDS Release Unused Entities subVI (in RTI DDS Toolkit for LabVIEW, Tools) might fix this.Check that you attached a valid indica-tor/storage to the write output.
5039Unable to initialize the semaphore for the DLL.
There was a problem when allocating memory. Using the DDS Release Unused EntitiessubVI (in RTI DDS Toolkit for Lab-VIEW, Tools) might fix this.
5040Unable to create the Query Condition to filter Read subVI.
Check that the Query Condition is cor-rectly set. To read everything, set it to * or leave it empty.
A regular expression will also work (for instance: Text=’hello’).
5041
The type connected to the Create subVI is not sup-ported in the current ver-sion.
The Getting Started Guide provides more information about the supported types.
See Appendix C: Supported Data Types and Corresponding IDL.
5042Unable to unregister the Type Code.
Other applications might be using it. Using the DDS Release Unused EntitiessubVI (in RTI DDS Toolkit for Lab-VIEW, Tools) might fix this.
5043The LabVIEW Data Type connected has changed.
The LabVIEW Type changed but wasn't correctly initialized (using Create subVI). You might need to close the VI and re-open it to removed unused entities.
This error happens if you created and run the Reader/Writer and then you modified the type connected to the cre-ate subVI.Close and re-open the VI or use the DDSRelease Unused Entities subVI (in RTI DDS Toolkit for LabVIEW, Tools).
5044Unable to get all the avail-able Topics.
It might be due to a memory restriction (not enough memory available to recover the existing Topics). Using the DDS Release Unused EntitiessubVI (in RTI DDS Toolkit for Lab-VIEW, Tools) might fix this.
5045Warning: Unable to delete one or several DDS Enti-ties.
Other instances of LabVIEW are cur-rently using one or several of the DDS Entities.
This is not an error, just a warning. Clos-ing all running VIs should release all the remaining DDS Entities.
5046Unable to get the Topic's QoS. Check that the Topic's QoS provided was
correct and that the Topic was initialized using the Create Reader or Create WritersubVI.
Review the QoS profile for the Topic. Make sure you are selecting the correct settings (Library::Profile).You can also use the default QoS setting by attaching an empty string to the qos profile pin of the Create Reader or Create Writer subVI.
5047Unable to set the Topic's QoS.
5048Unable to access library handler.
On LabVIEW RT targets, please verify the license file under /home/lvuser/rti. The RTI DDS Toolkit for LabVIEWdynamic library was not loaded cor-rectly.
For details on the license file, see License Management on LabVIEW RT Targets (Section 1.4.2).
5049Unable to take the sema-phore
Another thread may already be using the DLL.
Table 3.2 Error Codes
Error Code Error Message Possible Reason(s) Additional Information
E-5
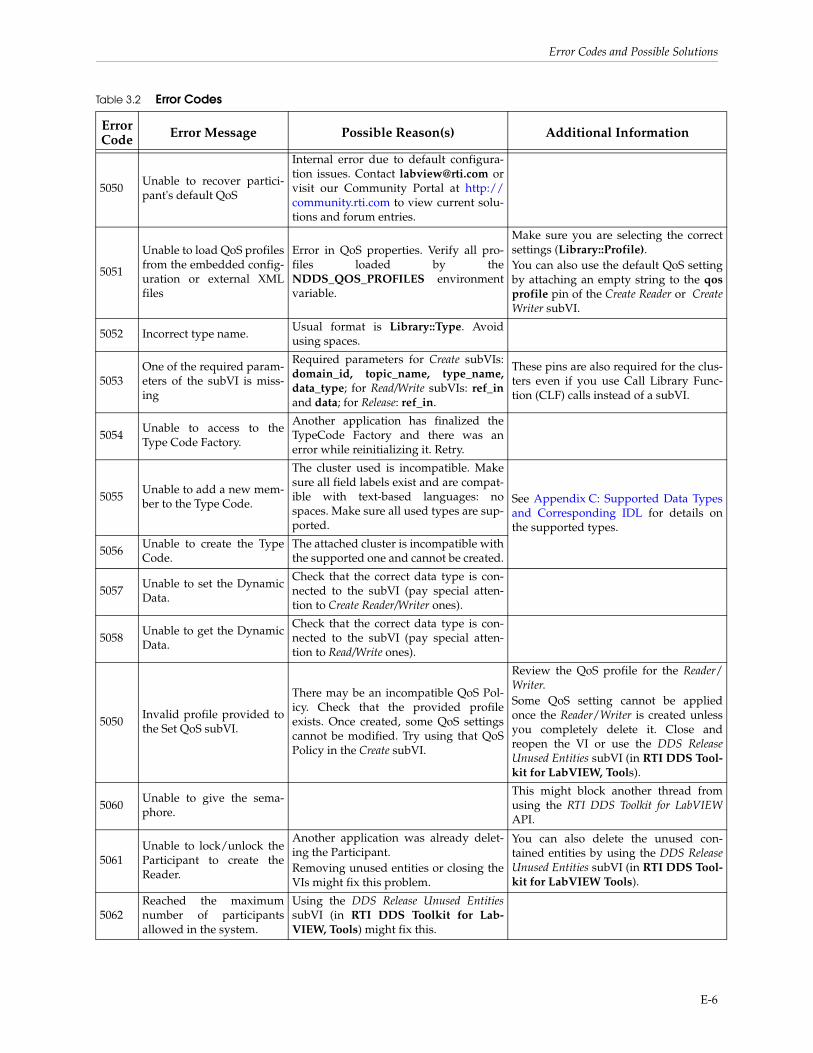
Error Codes and Possible Solutions
5050Unable to recover partici-pant's default QoS
Internal error due to default configura-tion issues. Contact [email protected] or visit our Community Portal at http://community.rti.com to view current solu-tions and forum entries.
5051
Unable to load QoS profiles from the embedded config-uration or external XML files
Error in QoS properties. Verify all pro-files loaded by the NDDS_QOS_PROFILES environment variable.
Make sure you are selecting the correct settings (Library::Profile).You can also use the default QoS setting by attaching an empty string to the qos profile pin of the Create Reader or Create Writer subVI.
5052 Incorrect type name.Usual format is Library::Type. Avoid using spaces.
5053One of the required param-eters of the subVI is miss-ing
Required parameters for Create subVIs: domain_id, topic_name, type_name, data_type; for Read/Write subVIs: ref_inand data; for Release: ref_in.
These pins are also required for the clus-ters even if you use Call Library Func-tion (CLF) calls instead of a subVI.
5054Unable to access to the Type Code Factory.
Another application has finalized the TypeCode Factory and there was an error while reinitializing it. Retry.
5055Unable to add a new mem-ber to the Type Code.
The cluster used is incompatible. Make sure all field labels exist and are compat-ible with text-based languages: no spaces. Make sure all used types are sup-ported.
See Appendix C: Supported Data Types and Corresponding IDL for details on the supported types.
5056Unable to create the Type Code.
The attached cluster is incompatible with the supported one and cannot be created.
5057Unable to set the Dynamic Data.
Check that the correct data type is con-nected to the subVI (pay special atten-tion to Create Reader/Writer ones).
5058Unable to get the Dynamic Data.
Check that the correct data type is con-nected to the subVI (pay special atten-tion to Read/Write ones).
5050Invalid profile provided to the Set QoS subVI.
There may be an incompatible QoS Pol-icy. Check that the provided profile exists. Once created, some QoS settings cannot be modified. Try using that QoS Policy in the Create subVI.
Review the QoS profile for the Reader/Writer.Some QoS setting cannot be applied once the Reader/Writer is created unless you completely delete it. Close and reopen the VI or use the DDS Release Unused Entities subVI (in RTI DDS Tool-kit for LabVIEW, Tools).
5060Unable to give the sema-phore.
This might block another thread from using the RTI DDS Toolkit for LabVIEW API.
5061Unable to lock/unlock the Participant to create the Reader.
Another application was already delet-ing the Participant. Removing unused entities or closing the VIs might fix this problem.
You can also delete the unused con-tained entities by using the DDS Release Unused Entities subVI (in RTI DDS Tool-kit for LabVIEW Tools).
5062Reached the maximum number of participants allowed in the system.
Using the DDS Release Unused EntitiessubVI (in RTI DDS Toolkit for Lab-VIEW, Tools) might fix this.
Table 3.2 Error Codes
Error Code Error Message Possible Reason(s) Additional Information
E-6
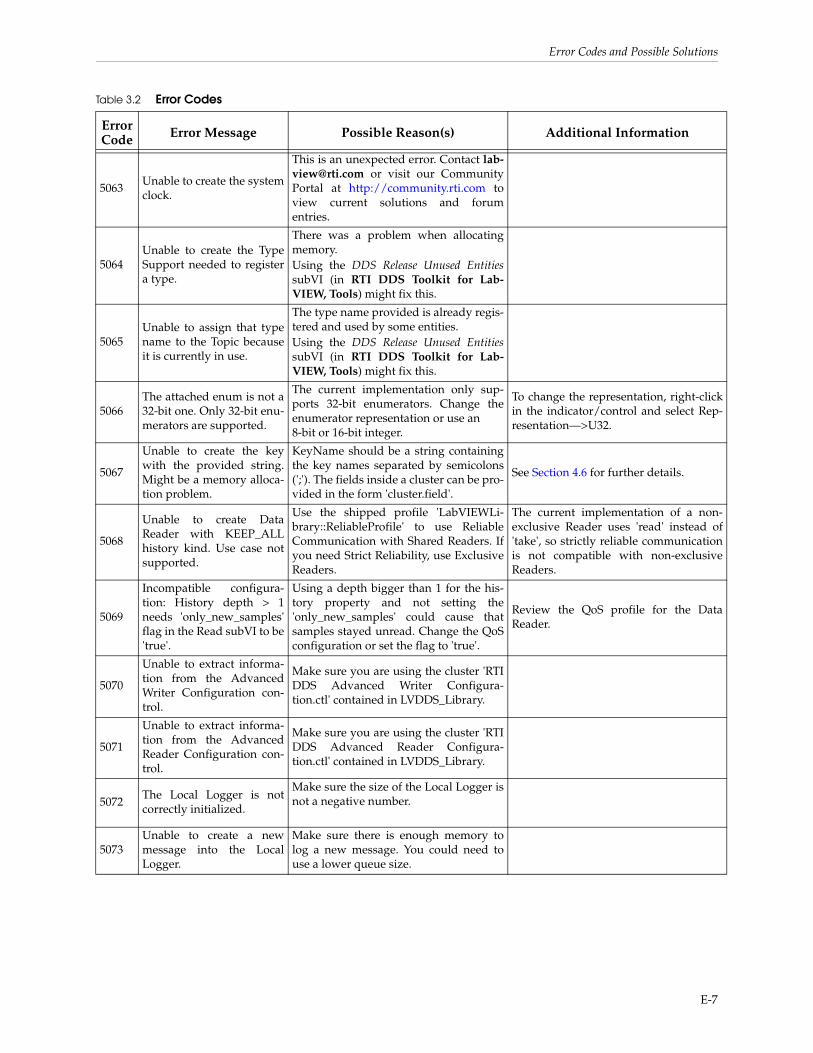
Error Codes and Possible Solutions
5063Unable to create the system clock.
This is an unexpected error. Contact [email protected] or visit our Community Portal at http://community.rti.com to view current solutions and forum entries.
5064Unable to create the Type Support needed to register a type.
There was a problem when allocating memory. Using the DDS Release Unused EntitiessubVI (in RTI DDS Toolkit for Lab-VIEW, Tools) might fix this.
5065Unable to assign that type name to the Topic because it is currently in use.
The type name provided is already regis-tered and used by some entities. Using the DDS Release Unused EntitiessubVI (in RTI DDS Toolkit for Lab-VIEW, Tools) might fix this.
5066The attached enum is not a 32-bit one. Only 32-bit enu-merators are supported.
The current implementation only sup-ports 32-bit enumerators. Change the enumerator representation or use an 8-bit or 16-bit integer.
To change the representation, right-click in the indicator/control and select Rep-resentation—>U32.
5067
Unable to create the key with the provided string. Might be a memory alloca-tion problem.
KeyName should be a string containing the key names separated by semicolons (';'). The fields inside a cluster can be pro-vided in the form 'cluster.field'.
See Section 4.6 for further details.
5068
Unable to create Data Reader with KEEP_ALL history kind. Use case not supported.
Use the shipped profile 'LabVIEWLi-brary::ReliableProfile' to use Reliable Communication with Shared Readers. If you need Strict Reliability, use Exclusive Readers.
The current implementation of a non-exclusive Reader uses 'read' instead of 'take', so strictly reliable communication is not compatible with non-exclusive Readers.
5069
Incompatible configura-tion: History depth > 1 needs 'only_new_samples' flag in the Read subVI to be 'true'.
Using a depth bigger than 1 for the his-tory property and not setting the 'only_new_samples' could cause that samples stayed unread. Change the QoS configuration or set the flag to 'true'.
Review the QoS profile for the Data Reader.
5070
Unable to extract informa-tion from the Advanced Writer Configuration con-trol.
Make sure you are using the cluster 'RTI DDS Advanced Writer Configura-tion.ctl' contained in LVDDS_Library.
5071
Unable to extract informa-tion from the Advanced Reader Configuration con-trol.
Make sure you are using the cluster 'RTI DDS Advanced Reader Configura-tion.ctl' contained in LVDDS_Library.
5072The Local Logger is not correctly initialized.
Make sure the size of the Local Logger is not a negative number.
5073Unable to create a new message into the Local Logger.
Make sure there is enough memory to log a new message. You could need to use a lower queue size.
Table 3.2 Error Codes
Error Code Error Message Possible Reason(s) Additional Information
E-7
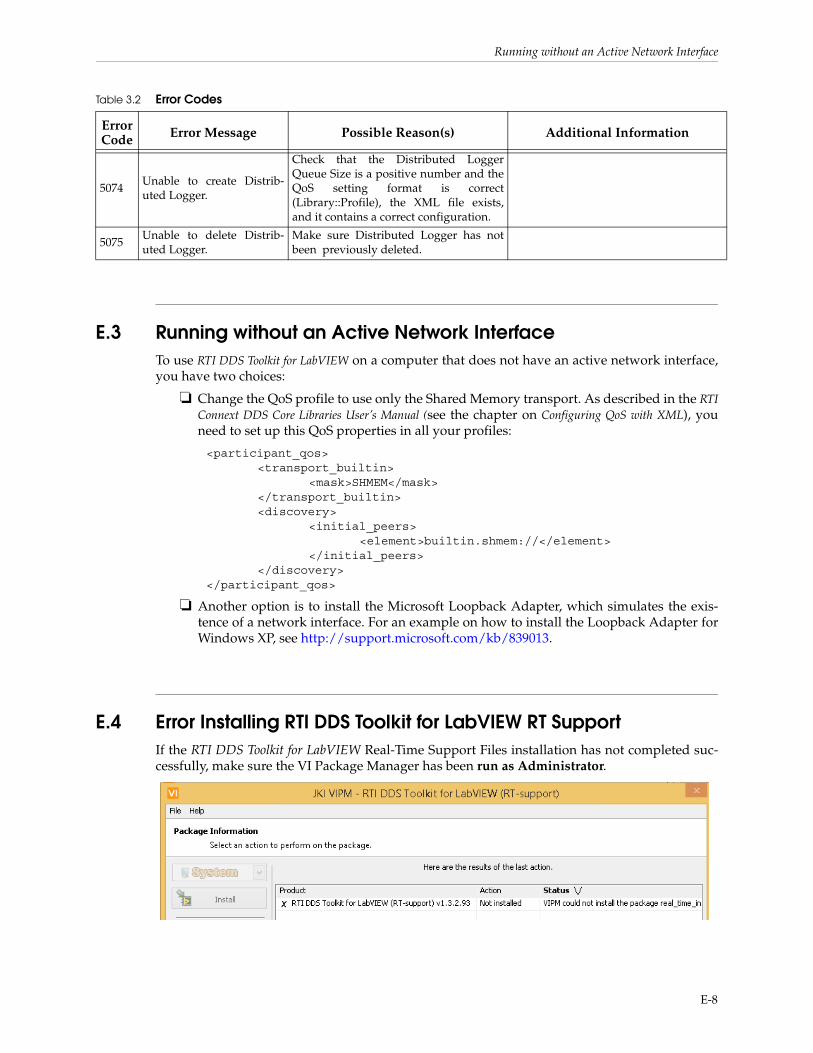
Running without an Active Network Interface
E.3 Running without an Active Network InterfaceTo use RTI DDS Toolkit for LabVIEW on a computer that does not have an active network interface, you have two choices:
❏ Change the QoS profile to use only the Shared Memory transport. As described in the RTI Connext DDS Core Libraries User’s Manual (see the chapter on Configuring QoS with XML), you need to set up this QoS properties in all your profiles:
<participant_qos><transport_builtin>
<mask>SHMEM</mask></transport_builtin><discovery>
<initial_peers><element>builtin.shmem://</element>
</initial_peers></discovery>
</participant_qos>
❏ Another option is to install the Microsoft Loopback Adapter, which simulates the exis-tence of a network interface. For an example on how to install the Loopback Adapter for Windows XP, see http://support.microsoft.com/kb/839013.
E.4 Error Installing RTI DDS Toolkit for LabVIEW RT SupportIf the RTI DDS Toolkit for LabVIEW Real-Time Support Files installation has not completed suc-cessfully, make sure the VI Package Manager has been run as Administrator.
5074Unable to create Distrib-uted Logger.
Check that the Distributed Logger Queue Size is a positive number and the QoS setting format is correct (Library::Profile), the XML file exists, and it contains a correct configuration.
5075Unable to delete Distrib-uted Logger.
Make sure Distributed Logger has not been previously deleted.
Table 3.2 Error Codes
Error Code Error Message Possible Reason(s) Additional Information
E-8