Embed Size (px)
Citation preview
SSttuuddeenntt GGuuiiddee
RReemmeeddyy
BBaassiicc FFeeaattuurreess
VVeerrssiioonn 22..22
MMooddiiffiieedd:: 1122//0011//22001177


RReemmeeddyy BBaassiicc FFeeaattuurreess
SSttuuddeenntt GGuuiiddee
Manitoba eHealth Page 3 of 28
TABLE OF CONTENTS
Introduction .................................................................................................................................... 4
Purpose .................................................................................................................................................................. 4
Scope ..................................................................................................................................................................... 4
Icons ...................................................................................................................................................................... 4
Getting Started ................................................................................................................................ 4
Logging In .............................................................................................................................................................. 5
Logging Out ............................................................................................................................................................ 5
Getting Help ............................................................................................................................................................ 6
Navigating ............................................................................................................................................................... 6
Working with Consoles .................................................................................................................... 8
Viewing Consoles ..................................................................................................................................................... 8
Filtering Records ...................................................................................................................................................... 9
Counts .................................................................................................................................................................. 13
Quick Links............................................................................................................................................................ 13
Details and Tasks .................................................................................................................................................. 14
Functions .............................................................................................................................................................. 14
Searching ...................................................................................................................................... 19
Using Search ......................................................................................................................................................... 19
Searching Work Details .......................................................................................................................................... 24
Performing a Global Search .................................................................................................................................... 25
Working with Forms ...................................................................................................................... 26
Auto-fill Fields ....................................................................................................................................................... 26
Mandatory Fields ................................................................................................................................................... 26
Field Icons ............................................................................................................................................................ 26
Best Practice View ................................................................................................................................................. 27
Error Messages ...................................................................................................................................................... 27
References .................................................................................................................................... 28
Manitoba eHealth Documents ................................................................................................................................. 28
BMC Remedy Help ................................................................................................................................................. 28

RReemmeeddyy BBaassiicc FFeeaattuurreess
SSttuuddeenntt GGuuiiddee
Manitoba eHealth Page 4 of 28
INTRODUCTION
Purpose
The purpose of this guide is to provide users with the necessary procedures to execute basic activities and tasks within Remedy.
Scope
The target audience for this document is second level support staff but the information may also benefit Manitoba
eHealth management and Service Desk staff.
Icons
The following icons are used throughout this guide.
Points to reference sources that contain more information on the topic
Indicates that the information is an important business rule, principle or standard in the Problem Management process
Warns of the consequences of doing or not doing a certain action
Identifies a tip or a shortcut
GETTING STARTED
The Remedy application is subject to WRHA policies, including but not limited to Privacy, Security, Confidentiality and Standards of Conduct Policies. See WRHA policies for further information: http://home.wrha.mb.ca/corp/policy/policy.php
Individuals must only utilize their Privileged Access to applications/systems and the information in such applications/systems (including Remedy) as required to perform their duties and responsibilities to Manitoba eHealth. See Privileged Access Guideline: https://ehealthsp.manitoba-ehealth.ca/HR/Shared%20Documents/Privileged%20Access/Guideline%20Privileged%20Access.pdf

RReemmeeddyy BBaassiicc FFeeaattuurreess
SSttuuddeenntt GGuuiiddee
Manitoba eHealth Page 5 of 28
Logging In
You may log in to Remedy from any internet connection. To log in:
1. Go to https://manitoba-ehealth.onbmc.com
2. Type your network ID and password into the User Name and Password fields.
3. Click Log In.
The home page appears.
Supported browsers in Remedy are Firefox and Internet Explorer.
You cannot change your password in Remedy. Your password is managed through your network login.
Logging Out
To log out of Remedy:
Click Logout in the top right corner of the Remedy window.
Do NOT end your Remedy session just by closing your browser window. This will leave your Remedy license running; it must be closed out when you leave Remedy.
RReemmeeddyy BBaassiicc FFeeaattuurreess
SSttuuddeenntt GGuuiiddee
Manitoba eHealth Page 6 of 28
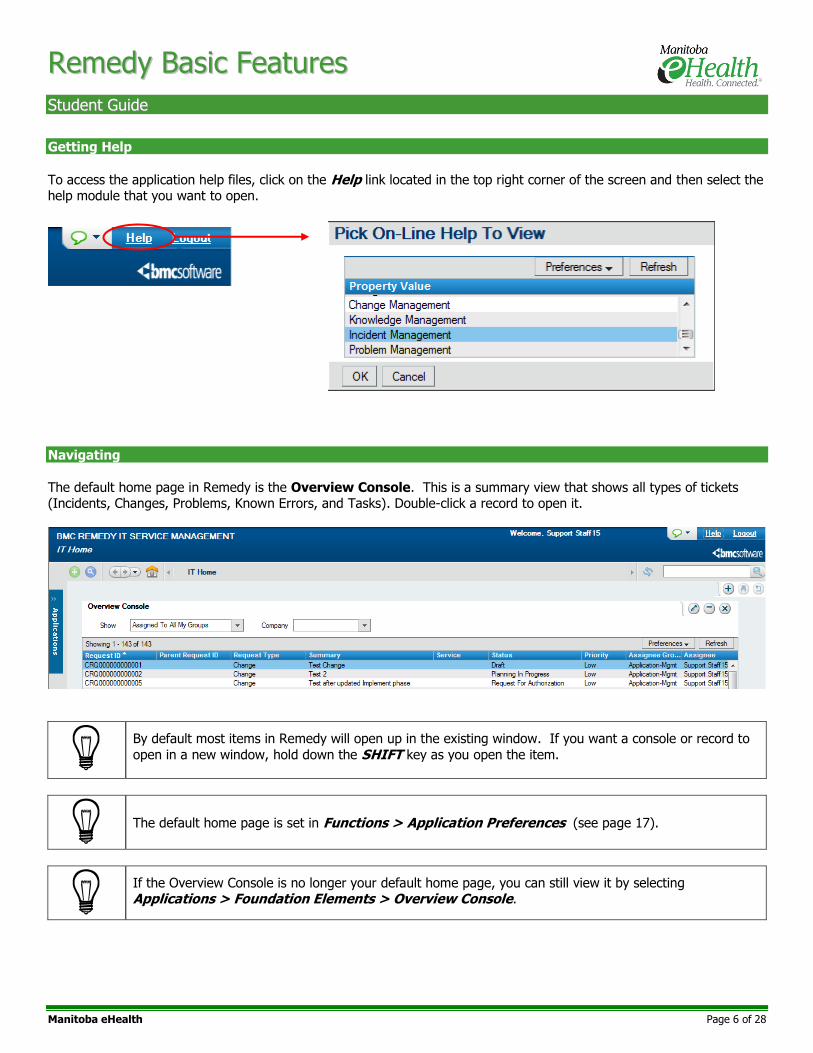
Getting Help
To access the application help files, click on the Help link located in the top right corner of the screen and then select the help module that you want to open.
Navigating
The default home page in Remedy is the Overview Console. This is a summary view that shows all types of tickets (Incidents, Changes, Problems, Known Errors, and Tasks). Double-click a record to open it.
By default most items in Remedy will open up in the existing window. If you want a console or record to
open in a new window, hold down the SHIFT key as you open the item.
The default home page is set in Functions > Application Preferences (see page 17).
If the Overview Console is no longer your default home page, you can still view it by selecting Applications > Foundation Elements > Overview Console.

RReemmeeddyy BBaassiicc FFeeaattuurreess
SSttuuddeenntt GGuuiiddee
Manitoba eHealth Page 7 of 28
The Breadcrumb area is located at the top of the Remedy window and will display a “trail” of items that you have recently opened in the application. You may return to any item in the Breadcrumb by clicking it.
The following buttons are located at the top of the Remedy window and may also be used for navigation.
Button Description
Allows you to navigate sequentially through various records and areas of the application that you have been
to within your current session
Displays a list of the most recent items that you have visited; you may return to any item in the list by
selecting it
Takes you to your default home page (as specified in Application Preferences)
Only active in a form such as Incident, Change, or Problem; creates a corresponding new item
Only active in a form such as Incident, Change, or Problem; opens the corresponding search form
The Applications list is an expandable menu that contains links to various consoles and quick actions such as creating a
new ticket or searching for a ticket. Click the double arrow on the Applications tab to expand/collapse the menu.
Browser navigation buttons such as Home, Forward and Back should not be used within Remedy. The
application has its own buttons that will emulate that functionality.
Breadcrumb area
RReemmeeddyy BBaassiicc FFeeaattuurreess
SSttuuddeenntt GGuuiiddee
Manitoba eHealth Page 8 of 28
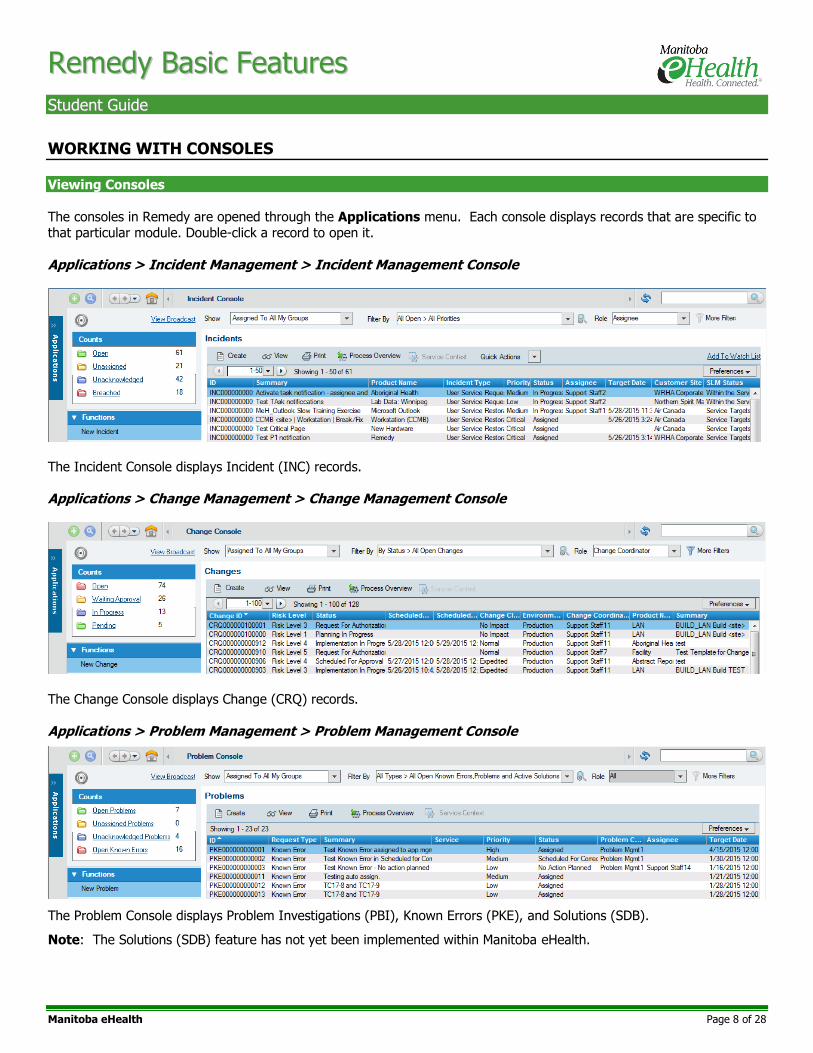
WORKING WITH CONSOLES
Viewing Consoles
The consoles in Remedy are opened through the Applications menu. Each console displays records that are specific to that particular module. Double-click a record to open it.
Applications > Incident Management > Incident Management Console
The Incident Console displays Incident (INC) records.
Applications > Change Management > Change Management Console
The Change Console displays Change (CRQ) records.
Applications > Problem Management > Problem Management Console
The Problem Console displays Problem Investigations (PBI), Known Errors (PKE), and Solutions (SDB).
Note: The Solutions (SDB) feature has not yet been implemented within Manitoba eHealth.

RReemmeeddyy BBaassiicc FFeeaattuurreess
SSttuuddeenntt GGuuiiddee
Manitoba eHealth Page 9 of 28
To refresh the list in a console, click the Refresh button in the top right corner of the window.
Filtering Records
At the top of each console, there are a number of options that allow you to control which records are displayed.
SHOW
Value Description
All Shows all tickets regardless of Group, Assignment, or Submitter
Submitted By Me Shows all tickets that you have submitted
Assigned To Me Shows all tickets in which you are the Assignee
Assigned to My Selected Groups Displays a window in which you can select which of your groups you want to see tickets for (based on Assigned Group)
Assigned to All My Groups Shows all tickets assigned to all groups that you are a member of
Watch List (Incident only) Shows all Incidents that you have added to your Watch List
The default value for the Show menu is set in Functions > Application Preferences (see page 17).

RReemmeeddyy BBaassiicc FFeeaattuurreess
SSttuuddeenntt GGuuiiddee
Manitoba eHealth Page 10 of 28
FILTER BY
Working in conjunction with the selected Show option, the Filter By field allows you to further filter the list. You can
choose from the defined filters, as well as create your own (see ”Manage My Filters” on page 11).
Incident Defined Searches
Filter Type Description
All Open Incidents that are not Resolved
All Open by Status Incidents that are not Resolved and have been changed to a specific status
All Open Escalated Incidents that are not Resolved and have triggered an escalation notification
All Open SLA Breached Incidents that are not Resolved and have exceeded the resolution target
All Open Submitted By Me Incidents that have submitted and are not Resolved
All Open Unacknowledged Incidents that are not Resolved and have not yet been changed to a Status of In Progress
All Open Unassigned Incidents that are not Resolved and have not yet been assigned to an individual
All Resolved Incidents that have been resolved
Change Defined Searches
Filter Type Description
By Status Changes that are in the selected Status

RReemmeeddyy BBaassiicc FFeeaattuurreess
SSttuuddeenntt GGuuiiddee
Manitoba eHealth Page 11 of 28
Problem Defined Searches
Filter Type Description
All Types Filter Known Errors, Problems, and Solutions by status
Known Error Filter Known Errors by status and impact
Problem Investigation Filter Problems by status and impact
Solution Database Filter Solutions by status
MANAGE MY FILTERS
Select the Manage My Filters button to create and save your own filters.
See “Syntax Examples” on page 22 for examples of how to build a search qualification.
Select Filter By > My Searches to apply a filter that you’ve saved.

RReemmeeddyy BBaassiicc FFeeaattuurreess
SSttuuddeenntt GGuuiiddee
Manitoba eHealth Page 12 of 28
ROLE
Working in conjunction with the other selected filters, the Role field allows you to further filter the list by role.
Incident
Change
Problem
MORE FILTERS
Select the More Filters button to apply a filter based on criteria that you enter into form field(s).
Note: The image shown above is the Incident More Filter Criteria form. The same form in the Change and Problem consoles will display fields that correspond with those types of tickets.
Once a filter has been applied using this form, the funnel icon next to this button will turn blue as shown below.
Select More Filters > Clear All to clear the filter.
The Role field is unavailable if you select All or Submitted By Me from the Show menu.
RReemmeeddyy BBaassiicc FFeeaattuurreess
SSttuuddeenntt GGuuiiddee
Manitoba eHealth Page 13 of 28
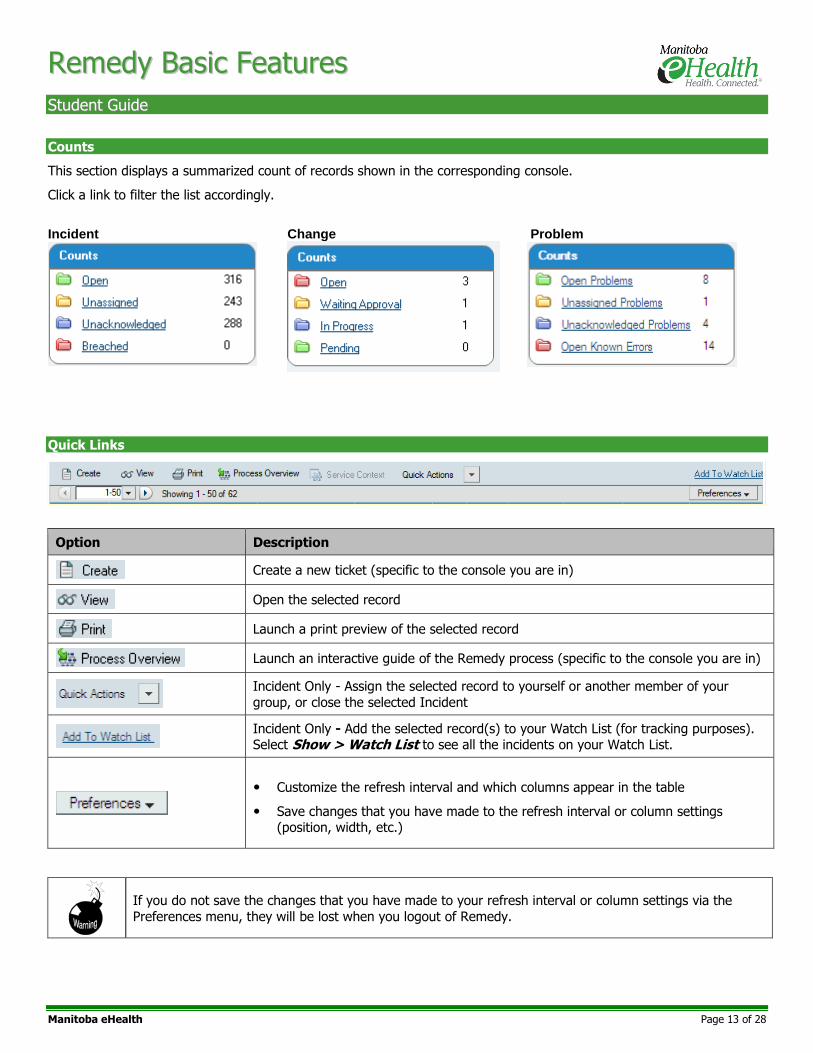
Counts
This section displays a summarized count of records shown in the corresponding console.
Click a link to filter the list accordingly.
Incident
Change
Problem
Quick Links
Option Description
Create a new ticket (specific to the console you are in)
Open the selected record
Launch a print preview of the selected record
Launch an interactive guide of the Remedy process (specific to the console you are in)
Incident Only - Assign the selected record to yourself or another member of your
group, or close the selected Incident
Incident Only - Add the selected record(s) to your Watch List (for tracking purposes). Select Show > Watch List to see all the incidents on your Watch List.
Customize the refresh interval and which columns appear in the table
Save changes that you have made to the refresh interval or column settings (position, width, etc.)
If you do not save the changes that you have made to your refresh interval or column settings via the
Preferences menu, they will be lost when you logout of Remedy.

RReemmeeddyy BBaassiicc FFeeaattuurreess
SSttuuddeenntt GGuuiiddee
Manitoba eHealth Page 14 of 28
Details and Tasks
This section is located at the bottom of the console and gives a quick summary of the selected record including the work
information added. The specific details shown will vary depending on which console you are in.
Click the button to quickly add additional work info without opening the ticket.
Select the link to view the Tasks that are related to the selected record.
Click the arrow next to Details and Tasks to hide/display this section.
Functions
OVERVIEW
Incident
Change
Problem

RReemmeeddyy BBaassiicc FFeeaattuurreess
SSttuuddeenntt GGuuiiddee
Manitoba eHealth Page 15 of 28
Option Description
New Create a new ticket (specific to the console you are in)
Search Launch the search form (specific to the console you are in);
see “Using Search” on page 19
Advanced Search Search for information that was entered on the Work Detail tab; see “Searching Work Details” on page 24
Atrium Impact Simulator Change only - Not presently used
View Calendar Change only - View all changes in a calendar format
Task Console Launch the Task Console
My Profile View and/or update your Remedy profile information; discussed further below
Application Preferences Customize how the application works for you; discussed further below
Reminders Create reminder emails for individuals or support groups
Reports Create web reports and run existing reports
Manage CIs Not presently used
KPIs Incident and Problem only - Display graphical metrics related to the module
Document Viewer View documents such as the Queue Manager Phone List, Process and Principle Guides,
Remedy Training Material, and Personal Health Information
RReemmeeddyy BBaassiicc FFeeaattuurreess
SSttuuddeenntt GGuuiiddee
Manitoba eHealth Page 16 of 28
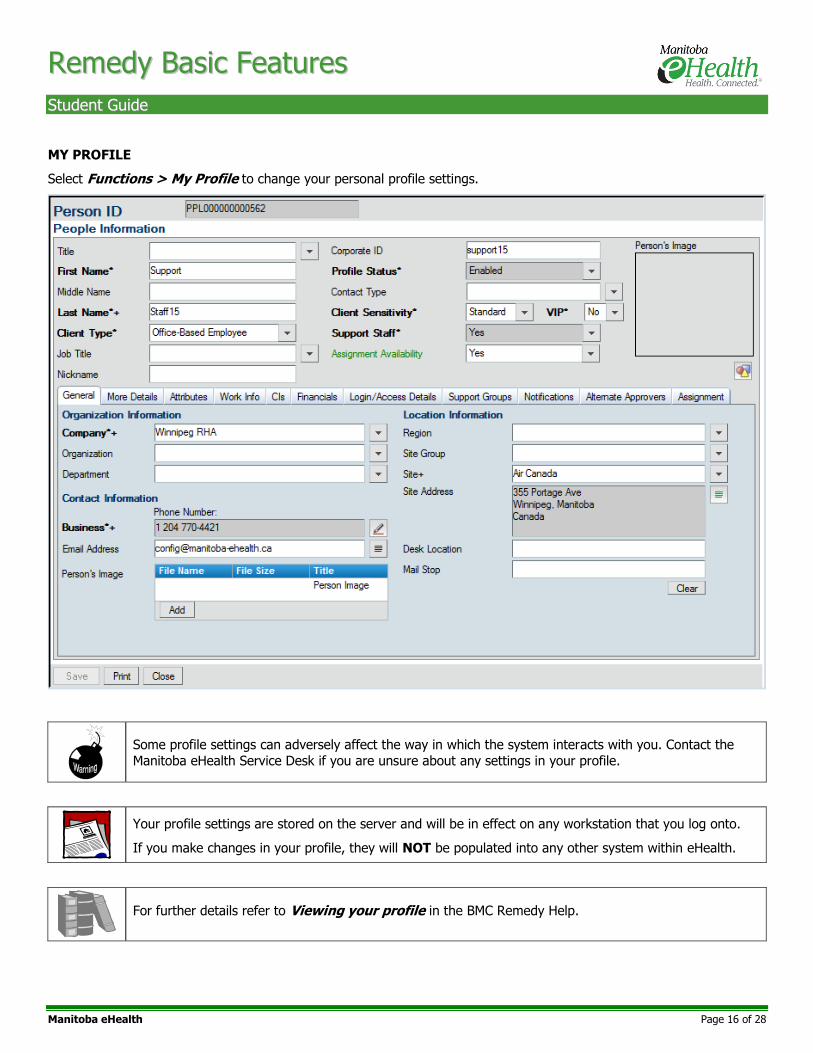
MY PROFILE
Select Functions > My Profile to change your personal profile settings.
Some profile settings can adversely affect the way in which the system interacts with you. Contact the
Manitoba eHealth Service Desk if you are unsure about any settings in your profile.
Your profile settings are stored on the server and will be in effect on any workstation that you log onto.
If you make changes in your profile, they will NOT be populated into any other system within eHealth.
For further details refer to Viewing your profile in the BMC Remedy Help.
RReemmeeddyy BBaassiicc FFeeaattuurreess
SSttuuddeenntt GGuuiiddee
Manitoba eHealth Page 17 of 28
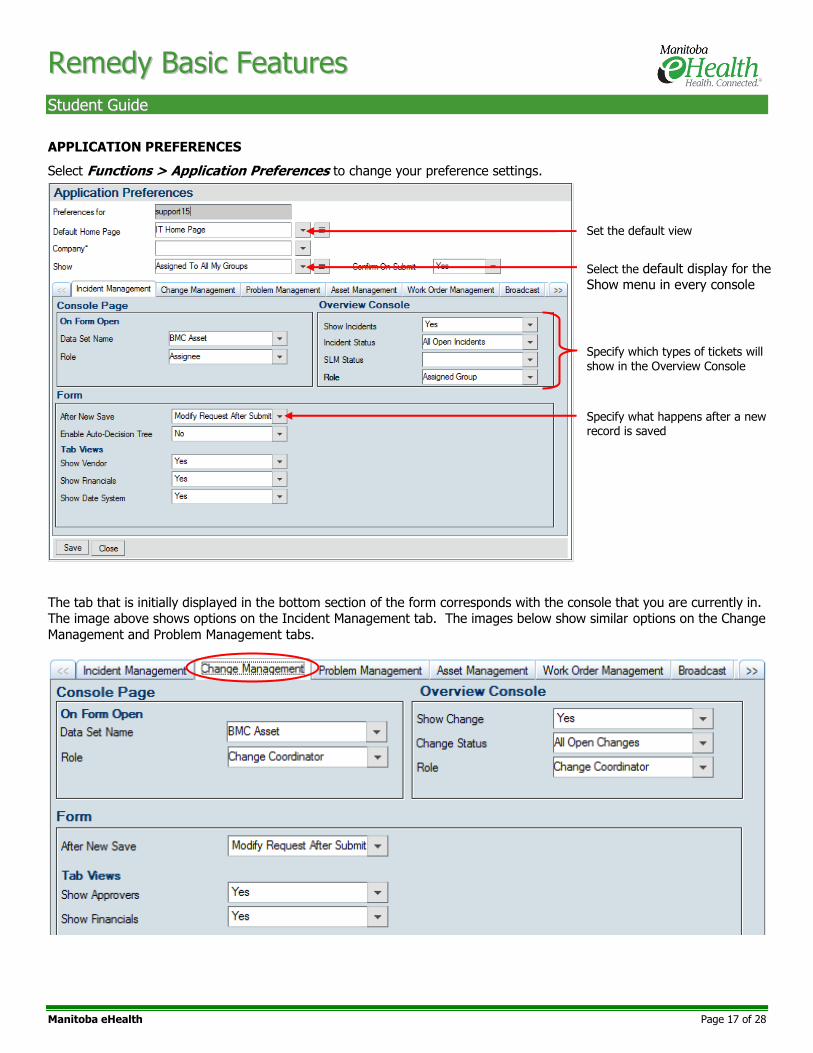
APPLICATION PREFERENCES
Select Functions > Application Preferences to change your preference settings.
The tab that is initially displayed in the bottom section of the form corresponds with the console that you are currently in. The image above shows options on the Incident Management tab. The images below show similar options on the Change
Management and Problem Management tabs.
Set the default view
Select the default display for the Show menu in every console
Specify which types of tickets will show in the Overview Console
Specify what happens after a new record is saved
RReemmeeddyy BBaassiicc FFeeaattuurreess
SSttuuddeenntt GGuuiiddee
Manitoba eHealth Page 18 of 28
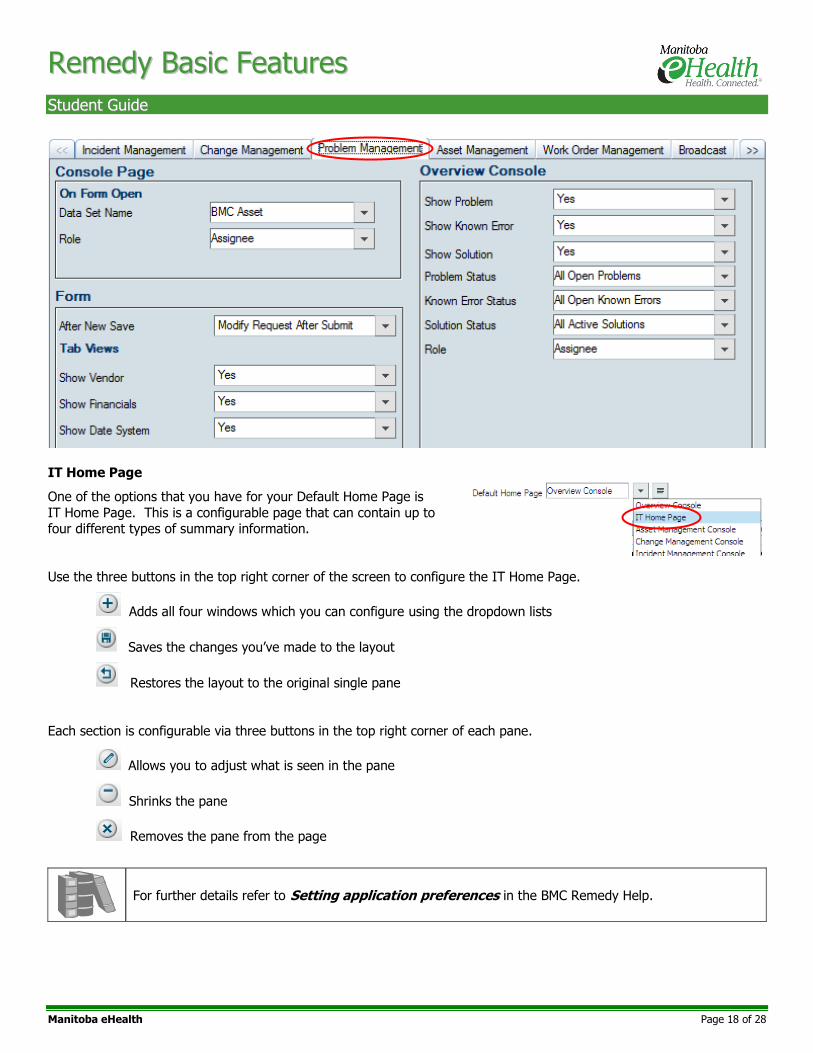
IT Home Page
One of the options that you have for your Default Home Page is
IT Home Page. This is a configurable page that can contain up to four different types of summary information.
Use the three buttons in the top right corner of the screen to configure the IT Home Page.
Adds all four windows which you can configure using the dropdown lists
Saves the changes you’ve made to the layout
Restores the layout to the original single pane
Each section is configurable via three buttons in the top right corner of each pane.
Allows you to adjust what is seen in the pane
Shrinks the pane
Removes the pane from the page
For further details refer to Setting application preferences in the BMC Remedy Help.

RReemmeeddyy BBaassiicc FFeeaattuurreess
SSttuuddeenntt GGuuiiddee
Manitoba eHealth Page 19 of 28
SEARCHING
Using Search
OPENING A SEARCH FORM
There is a separate search form that corresponds with each type of ticket in Remedy (Incident, Change, Problem, and
Known Error). Each search form can be opened from the Applications menu or from within the corresponding console. Applications > Incident Management > Search Incident
Applications > Change Management > Search Change
Applications > Problem Management > Search Problem or Known Error

RReemmeeddyy BBaassiicc FFeeaattuurreess
SSttuuddeenntt GGuuiiddee
Manitoba eHealth Page 20 of 28
Incident Console
Change Console
Problem Console
You can also open a search form from the Incident, Change, or Problem
consoles by clicking the Search button in the top left corner of the window.
The Incident search form is shown below. The Change, Problem, and Known Error search forms are similar but will
contain fields that correspond with the respective type of ticket.

RReemmeeddyy BBaassiicc FFeeaattuurreess
SSttuuddeenntt GGuuiiddee
Manitoba eHealth Page 21 of 28
PERFORMING A BASIC SEARCH
To do a basic search:
1. Enter criteria into the form field(s).
2. Click or press Enter. Records that match the criteria appear in a results pane at the top of the search form.
The percent symbol (%) may be used as a wildcard character.
Double-click a record in the top pane to open it in a separate window.
You cannot search Work Details using this form. See “Searching Work Details” on page 24 for further instructions.
PERFORMING AN ADVANCED SEARCH
To do an advanced search:
1. Click . A search bar appears at the bottom of the window.
2. Enter criteria into the search bar. (See tip and “Syntax Examples” below.)
3. Click . Records that match the criteria appear in a results pane at the top of the search form.
Results pane
To resize the panes, place the mouse pointer on this grey bar & drag
Details of the selected record
RReemmeeddyy BBaassiicc FFeeaattuurreess
SSttuuddeenntt GGuuiiddee
Manitoba eHealth Page 22 of 28
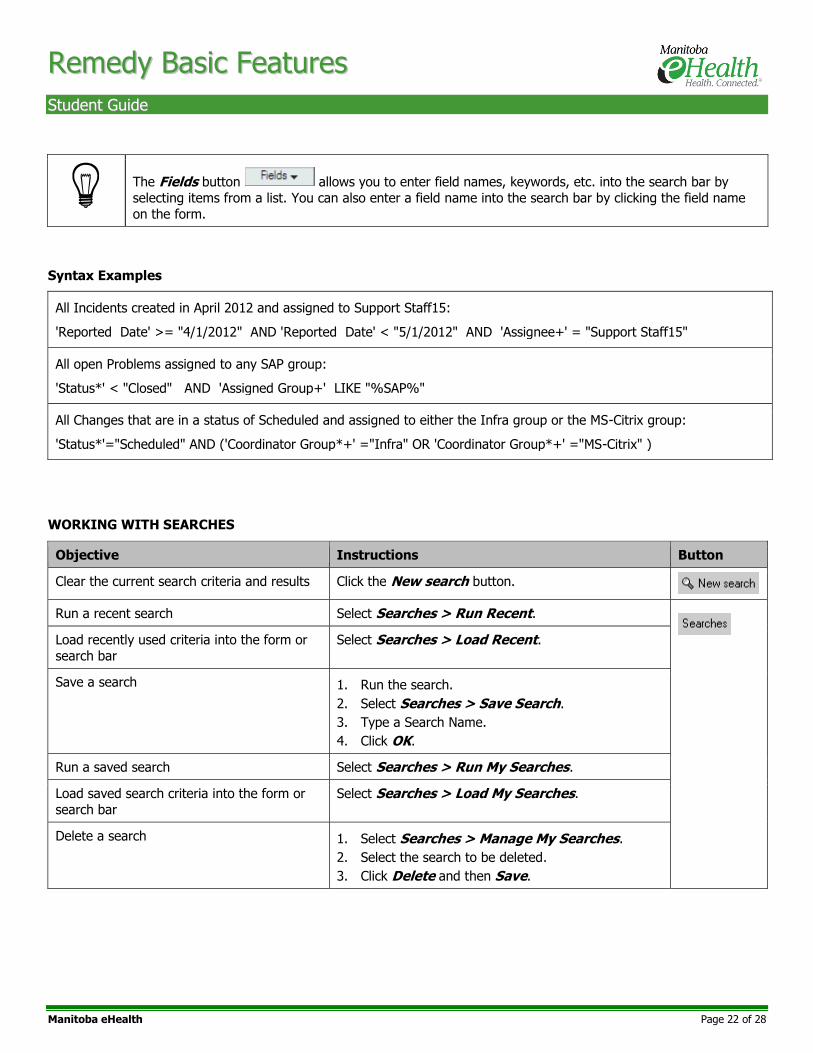
The Fields button allows you to enter field names, keywords, etc. into the search bar by
selecting items from a list. You can also enter a field name into the search bar by clicking the field name
on the form.
Syntax Examples
All Incidents created in April 2012 and assigned to Support Staff15:
'Reported Date' >= "4/1/2012" AND 'Reported Date' < "5/1/2012" AND 'Assignee+' = "Support Staff15"
All open Problems assigned to any SAP group:
'Status*' < "Closed" AND 'Assigned Group+' LIKE "%SAP%"
All Changes that are in a status of Scheduled and assigned to either the Infra group or the MS-Citrix group:
'Status*'="Scheduled" AND ('Coordinator Group*+' ="Infra" OR 'Coordinator Group*+' ="MS-Citrix" )
WORKING WITH SEARCHES
Objective Instructions Button
Clear the current search criteria and results Click the New search button.
Run a recent search Select Searches > Run Recent.
Load recently used criteria into the form or
search bar
Select Searches > Load Recent.
Save a search 1. Run the search.
2. Select Searches > Save Search.
3. Type a Search Name.
4. Click OK.
Run a saved search Select Searches > Run My Searches.
Load saved search criteria into the form or
search bar
Select Searches > Load My Searches.
Delete a search 1. Select Searches > Manage My Searches.
2. Select the search to be deleted.
3. Click Delete and then Save.
RReemmeeddyy BBaassiicc FFeeaattuurreess
SSttuuddeenntt GGuuiiddee
Manitoba eHealth Page 23 of 28
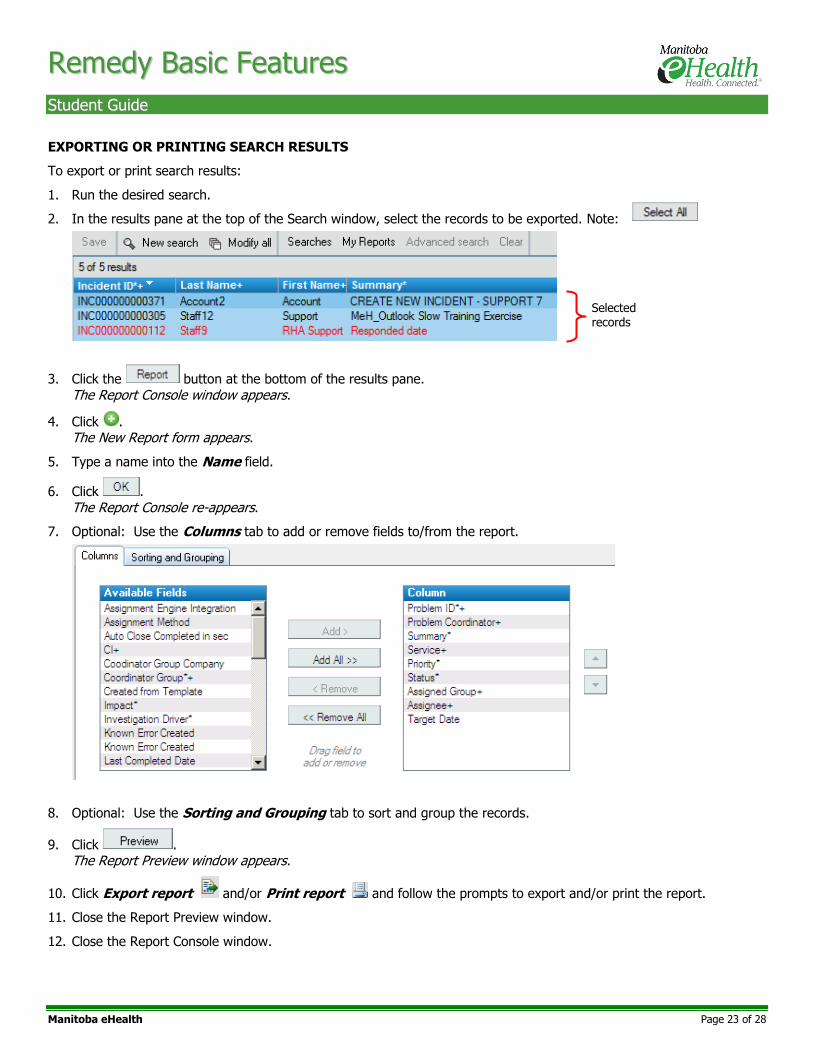
EXPORTING OR PRINTING SEARCH RESULTS
To export or print search results:
1. Run the desired search.
2. In the results pane at the top of the Search window, select the records to be exported. Note:
3. Click the button at the bottom of the results pane.
The Report Console window appears.
4. Click . The New Report form appears.
5. Type a name into the Name field.
6. Click .
The Report Console re-appears.
7. Optional: Use the Columns tab to add or remove fields to/from the report.
8. Optional: Use the Sorting and Grouping tab to sort and group the records.
9. Click . The Report Preview window appears.
10. Click Export report and/or Print report and follow the prompts to export and/or print the report.
11. Close the Report Preview window.
12. Close the Report Console window.
Selected records
RReemmeeddyy BBaassiicc FFeeaattuurreess
SSttuuddeenntt GGuuiiddee
Manitoba eHealth Page 24 of 28
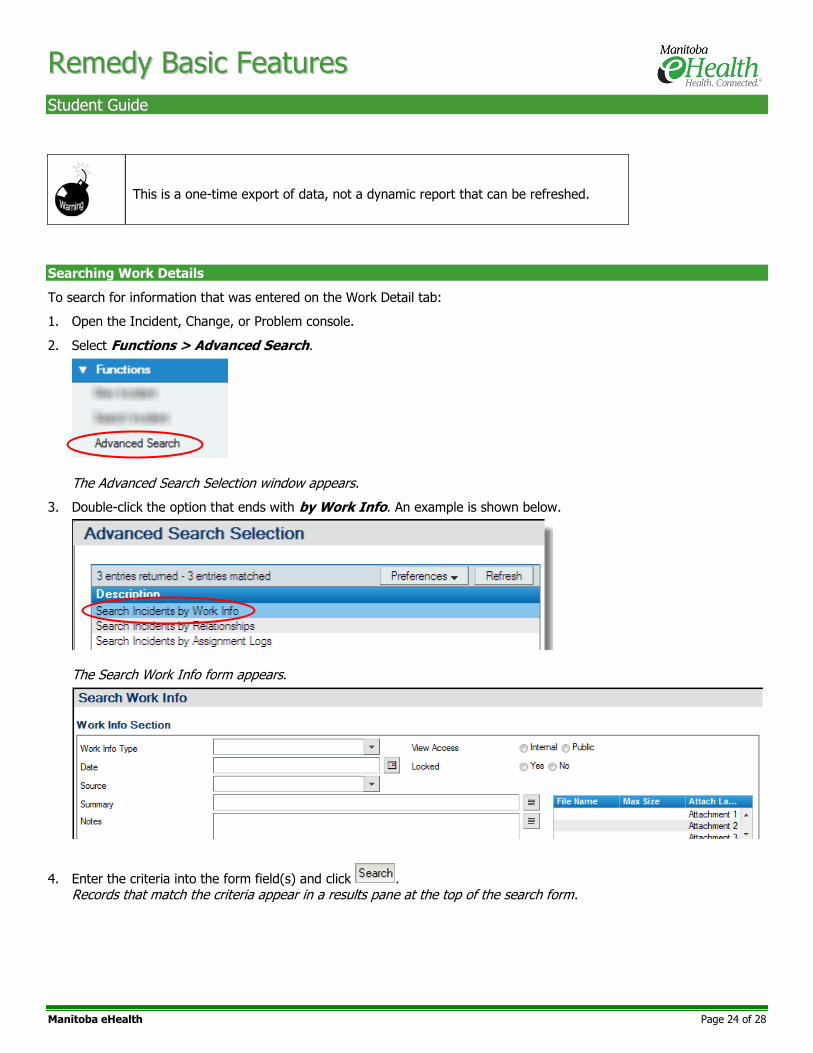
This is a one-time export of data, not a dynamic report that can be refreshed.
Searching Work Details
To search for information that was entered on the Work Detail tab:
1. Open the Incident, Change, or Problem console.
2. Select Functions > Advanced Search.
The Advanced Search Selection window appears.
3. Double-click the option that ends with by Work Info. An example is shown below.
The Search Work Info form appears.
4. Enter the criteria into the form field(s) and click . Records that match the criteria appear in a results pane at the top of the search form.

RReemmeeddyy BBaassiicc FFeeaattuurreess
SSttuuddeenntt GGuuiiddee
Manitoba eHealth Page 25 of 28
Performing a Global Search
You can search across multiple types of records by entering criteria into the
Global Search field in the top right corner of the Remedy window.
The percent symbol (%) may be used as a wildcard character.
E.g. Enter %1402 to display a list of all tickets ending in 1402 or enter inc%1402 to find all Incidents ending in 1402.
When using the Advanced Search option with the Global Search, select Problem Investigation and ITSM Known Errors to search within the PBI and PKE records.
For further details refer to Searching for records in the BMC Remedy Help.

RReemmeeddyy BBaassiicc FFeeaattuurreess
SSttuuddeenntt GGuuiiddee
Manitoba eHealth Page 26 of 28
WORKING WITH FORMS
The following features apply to most forms in Remedy including the Incident, Change, Problem, and Known Error forms.
Auto-fill Fields
When you see a plus sign (+) at the end of a field label, you
can type part of the information that you want to enter in the field and press Enter.
If an exact match is located, the system automatically
completes the field. If an exact match is not found, a Search window will appear and display possible matches. Double-click
the item you want to put in the field.
Alternatively, if a drop down list appears in the field as you are
typing, you can also select the value that you want from there.
Mandatory Fields
Fields with bold labels are mandatory. These fields must be filled in before the ticket can be saved. The fields that are
required will vary depending on the stage that the ticket is in.
Field Icons
The following icons are commonly found next to form fields in Remedy.
Icon Description Icon Description
Edit the field value
Search for a field value
Expand the field View information related to the current field value
Select a date Clear the current field value
Mandatory field

RReemmeeddyy BBaassiicc FFeeaattuurreess
SSttuuddeenntt GGuuiiddee
Manitoba eHealth Page 27 of 28
Best Practice View Remedy displays information in a Best Practice view which means that the fields most commonly used for creating and updating a ticket are immediately visible. You can access additional functionality from the tabbed section on the right side of the form or from links in the pane on the left.
Error Messages
Error messages appear at the top of the screen in Remedy. Click to close the message.
Additional Functionality
Commonly Used Fields
Additional Functionality
RReemmeeddyy BBaassiicc FFeeaattuurreess
SSttuuddeenntt GGuuiiddee
Manitoba eHealth Page 28 of 28
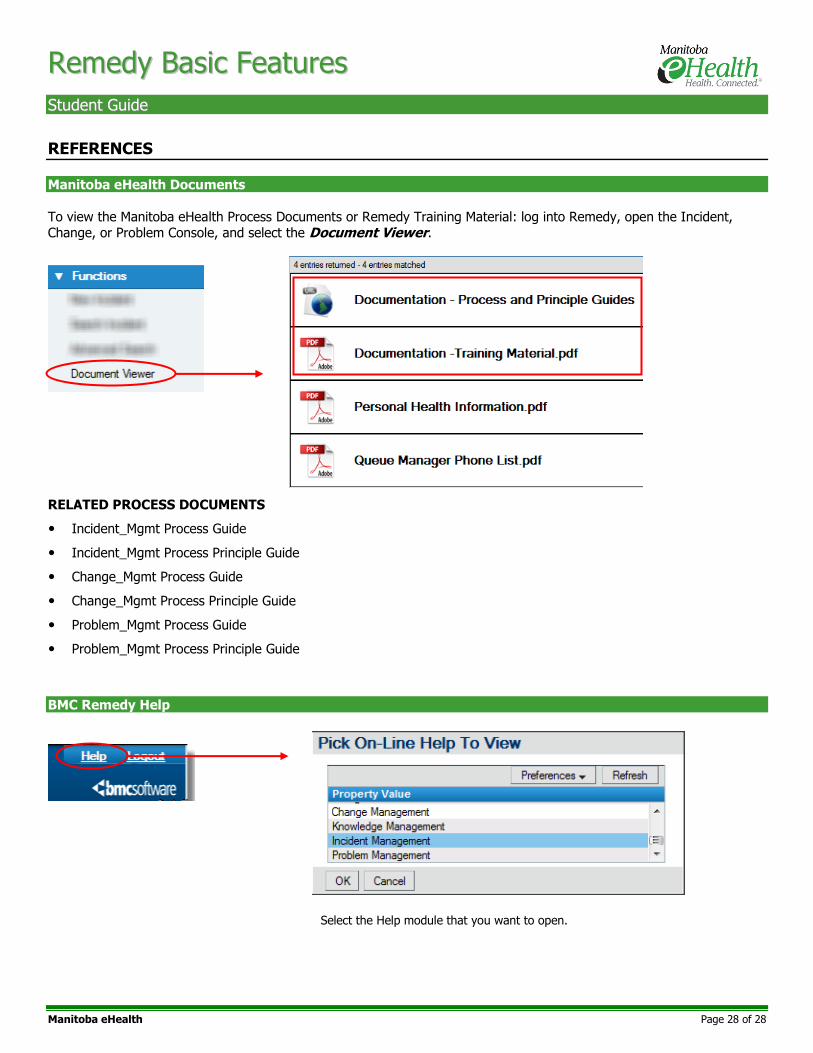
REFERENCES
Manitoba eHealth Documents
To view the Manitoba eHealth Process Documents or Remedy Training Material: log into Remedy, open the Incident, Change, or Problem Console, and select the Document Viewer.
RELATED PROCESS DOCUMENTS
Incident_Mgmt Process Guide
Incident_Mgmt Process Principle Guide
Change_Mgmt Process Guide
Change_Mgmt Process Principle Guide
Problem_Mgmt Process Guide
Problem_Mgmt Process Principle Guide
BMC Remedy Help
Select the Help module that you want to open.