Embed Size (px)
Citation preview
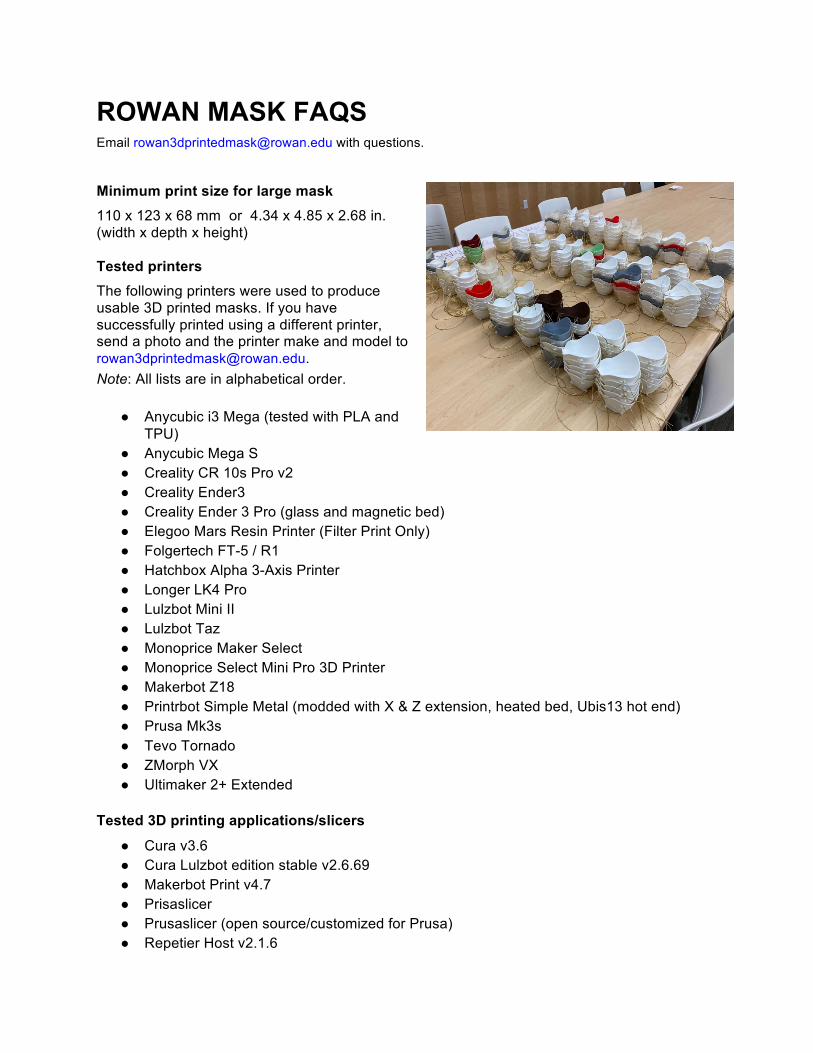
ROWAN MASK FAQS Email [email protected] with questions. Minimum print size for large mask 110 x 123 x 68 mm or 4.34 x 4.85 x 2.68 in. (width x depth x height) Tested printers The following printers were used to produce usable 3D printed masks. If you have successfully printed using a different printer, send a photo and the printer make and model to [email protected]. Note: All lists are in alphabetical order.
● Anycubic i3 Mega (tested with PLA and
TPU) ● Anycubic Mega S ● Creality CR 10s Pro v2 ● Creality Ender3 ● Creality Ender 3 Pro (glass and magnetic bed) ● Elegoo Mars Resin Printer (Filter Print Only) ● Folgertech FT-5 / R1 ● Hatchbox Alpha 3-Axis Printer ● Longer LK4 Pro ● Lulzbot Mini II ● Lulzbot Taz ● Monoprice Maker Select ● Monoprice Select Mini Pro 3D Printer ● Makerbot Z18 ● Printrbot Simple Metal (modded with X & Z extension, heated bed, Ubis13 hot end) ● Prusa Mk3s ● Tevo Tornado ● ZMorph VX ● Ultimaker 2+ Extended
Tested 3D printing applications/slicers
● Cura v3.6 ● Cura Lulzbot edition stable v2.6.69 ● Makerbot Print v4.7 ● Prisaslicer ● Prusaslicer (open source/customized for Prusa) ● Repetier Host v2.1.6
2
● Ultimaker Cura v4.5.0 ● XYZ Maker Suite
Tested filament The following filaments were used to create masks. If you have successfully printed using a different filament, send a photo and the filament brand, type and size to [email protected]. PLA
● Alchement PLA Wood Light Brown 1.75 mm ● BuMat PLA Gold Filament 1.75 mm ● Duramic 3D PLA Gray 1.75 mm ● eSUN PLA Bronze 1.75 mm ● FlexiSmart PLA Copper 1.75 mm ● Frontline Filament Metal PLA Copper 1.75 mm ● Hatchbox PLA True Black 1.75 mm ● Hatchbox PLA White 1.75 mm ● Hatchbox PLA Blue 1.75 mm ● Hatchbox PLA Beige 1.75 mm ● Hatchbox PLA Red 1.75 mm ● Hatchbox PLA Wood 1.75 mm ● Hatchbox PLA Yellow 1.75 mm ● Makerbot PLA True Black 1.75 mm ● Makerbot PLA True Gray 1.75 mm ● MatterHackers PLA Violet 1.75 mm ● MatterHackers PLA Magenta 1.75 mm ● Monoprice Premium 3D Printer Filament PLA 1.75 mm ● Overture PLA White 1.75 mm ● Polymaker PolyLite PLA Red 3 mm (2.85 mm actual) ● Zyktech PLA Glossy Black 1.75 mm
ABS
● IC3D ABS Blue 2.85 mm TPU
● FFFWorld Flexismart TPU (awaiting color) ● Sienoc TPU Yellow 1.75 mm
Tested nozzle sizes and known issues ● 0.3 mm
This nozzle size appears to print well. Only one printer so far has used this size, equipped on a PrintrBot using an Ubis hot end.
● 0.4 mm This nozzle size appears to print well. There are no fitting issues with filter and mask for majority of printers.
3
● 0.8 mm This nozzle size produces inconsistencies with prints (sometimes up to 50% failure rate) including:
○ Failure to capture all of the filter grill details ○ Filter fits too tight or too loose to the mask ○ Slight edge warping
Mask versions and overcompaction Why doesn’t the mask pictured on rowan.edu/mask look like the mask I downloaded?
Every one to two weeks, the mask design changes based on user feedback. Taking recent photos of the latest models is difficult with social distancing and the campus shutdown. The photos on the website show several different designs initially tested during early prototyping—before we received feedback from healthcare workers. One of the earliest versions of the mask used a dual grill design, with the mask having a gridded grill on the front and the filter piece inserted through the interior. However, this design was changed to the open design, based upon feedback from healthcare workers. Overcompacting the mask was one of the biggest issues with home users. It made breathing difficult and allowed air to escape out the sides, rather than the filter material itself. The additional grate on the front allowed users to overcompact the mask with filter material, causing air restriction issues. Users tended to push down very hard on the filter material against the grill in the mask and to force the filter piece in without wrapping gauze around it. Removing the front grill prevents users from overcompacting material easily and requires them to wrap gauze around the filter to secure it. Forcing users to use the wrapping technique also ensures that the cracks between the mask and filter are filled. This is important because the dimensions of the mask can vary by as much as 0.4 mm based on the 3D printer and settings used.
Common printing issues The following are common printing issues reported through [email protected]. When printing with PLA filament, my prints do not adhere to the print bed when the first layer is being extruded.
There are many different surfaces a 3D printer may print on—glass, aluminum, plastic, masking tape and specialized stick-on surfaces. Depending on the printer bed type, adhesion can fail for many reasons. Try these trouble-shooting tips.
1. Clean the build plate. Oils and residue from your hands, as well as dust, can prevent a print from adhering to the surface. Different surfaces are cleaned in different ways. One common cleaning material is isopropyl alcohol, which may now be in short supply due to the pandemic. If you use other solutions, be mindful of the composition of the printer and print bed. Some solutions may dissolve different materials and some printers are custom-designed or modified.
4
2. If you are using a heated bed, consider adjusting the temperature. Higher temperatures may seem desirable, but can cause a print to warp and peel at the corners. With an ambient temperature of around 22.7ºC, we had success with a heated bed as high as 40ºC for PLA for open air printers without an enclosure.
3. Consider using a light layer of hair spray or glue stick to enhance adhesion. Hair spray proved more effective for us and is easy to clean off the build plate.
4. If you are using a Makerbot printer without a heated bed and the print is not adhering, we had some success with the Z-18 by using a raft. This considerably increases print time and takes up to 10 minutes to remove the print cleanly from the raft.
5. If the printer requires manual setting of the z-height, it may have an incorrect offset. If the printer uses a sensor to detect z-height before crashing into the bed, that height may need to be adjusted. Make sure the printer head is close enough to the bed when printing the first layer. Consult the printer’s documentation, as printers use different systems.
When printing with PLA filament, my prints begin to warp on the corners after the first several layers have been printed.
If you have successful adhesion to the build plate but notice deformation later in the print, try these steps:
1. Adjust the heated bed temperature—it may be too high.
2. Adjust the nozzle temperature—it may be too high.
3. If using a cooling fan, make sure it is on and running. PLA should cool quickly, unlike ABS.
4. Pause or kill the print and poke the print with an instrument (not your hand) and see if it is soft and pliable. If so, the print is staying too hot for too long. Try one of the steps above.
My print finished but I have some lines in it and I’m worried it might not be structurally sound.
1. You may need to adjust the extrude rate on the printer in the EEPROM settings. If you are a beginner, watch this YouTube video, which shows how to check and adjust the extrude rate: youtu.be/6PL_rSPZ3M8
2. If the extrusion rate is correct, you may need to increase the temperature of the hot end. For instance, moving a 3D printer to a cooler location may result in very poor adhesion between layers. Increasing the hot end temperature by 5ºC will correct most of the problems.
3. One of the first steps of quality control is to look for seams and other issues. Some defects are superficial and do not matter; others can lead to structural failure. If a print looks bad, put the mask in your palm and curl your fingers around it. Do you hear a cracking sound? Does it begin to break apart? If so, discard the print. Here is a short video showing a print that looked okay, but when light pressure was applied it began cracking and falling apart: youtu.be/VYeQVC6Ryqg
5
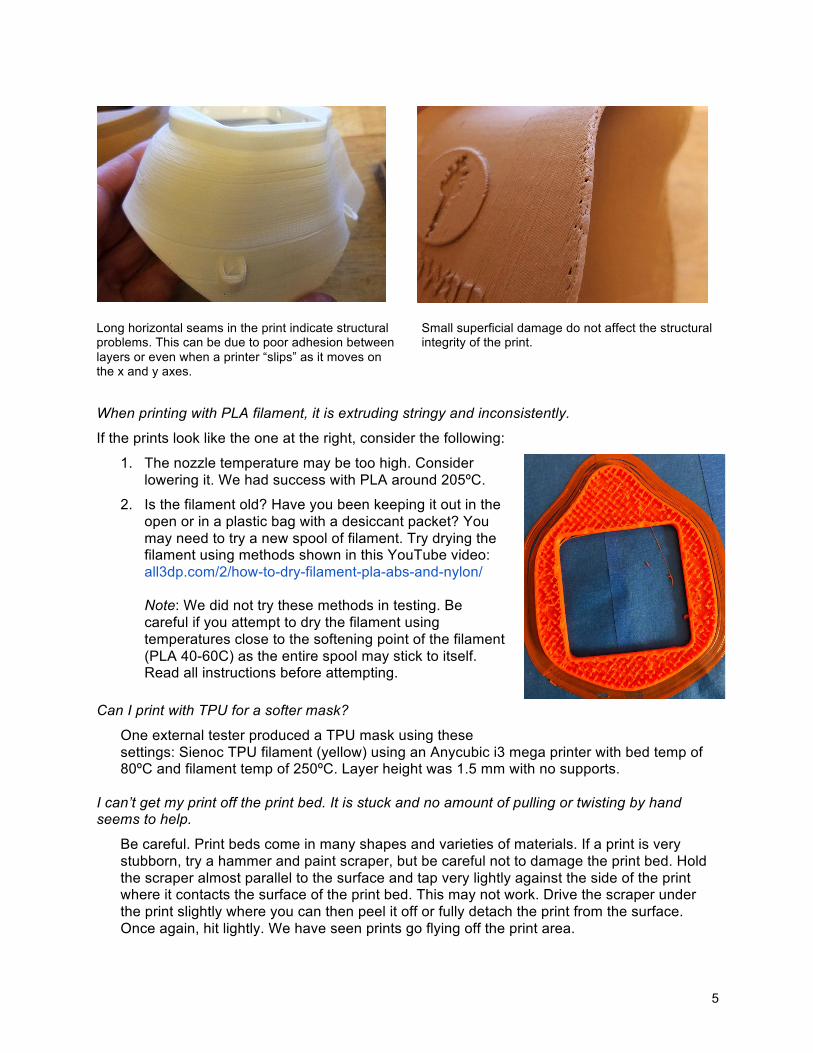
Long horizontal seams in the print indicate structural problems. This can be due to poor adhesion between layers or even when a printer “slips” as it moves on the x and y axes.
Small superficial damage do not affect the structural integrity of the print.
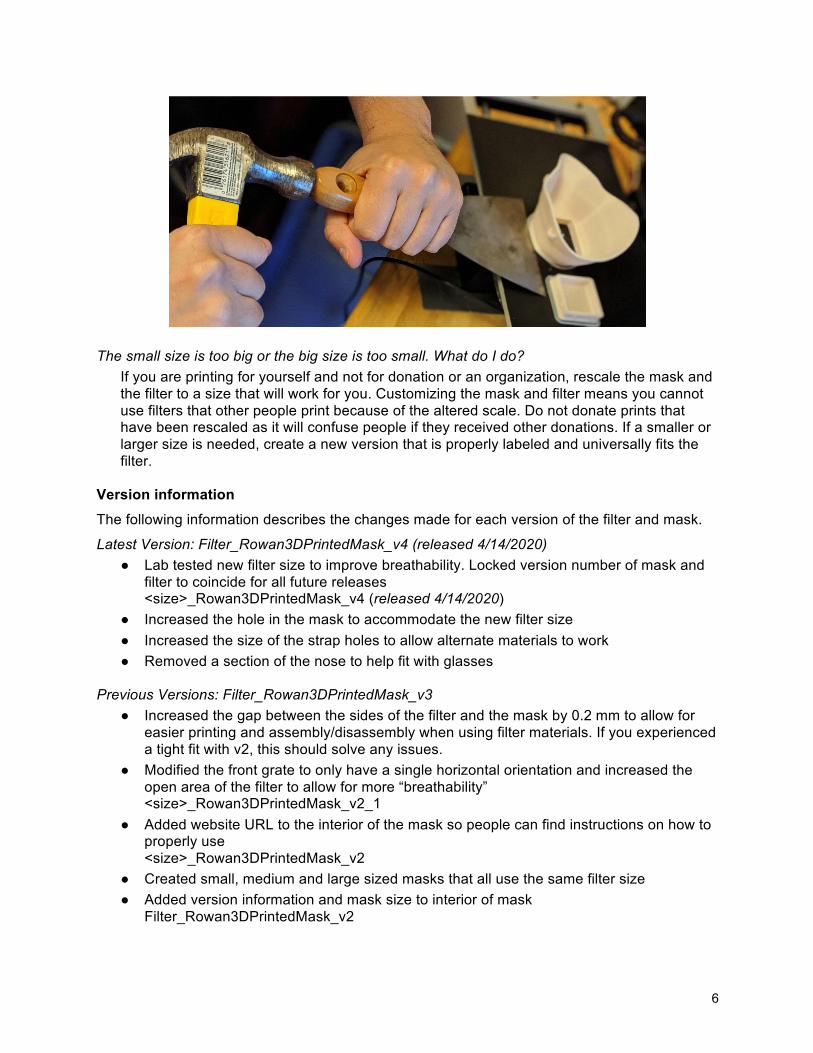
When printing with PLA filament, it is extruding stringy and inconsistently.
If the prints look like the one at the right, consider the following:
1. The nozzle temperature may be too high. Consider lowering it. We had success with PLA around 205ºC.
2. Is the filament old? Have you been keeping it out in the open or in a plastic bag with a desiccant packet? You may need to try a new spool of filament. Try drying the filament using methods shown in this YouTube video: all3dp.com/2/how-to-dry-filament-pla-abs-and-nylon/ Note: We did not try these methods in testing. Be careful if you attempt to dry the filament using temperatures close to the softening point of the filament (PLA 40-60C) as the entire spool may stick to itself. Read all instructions before attempting.
Can I print with TPU for a softer mask?
One external tester produced a TPU mask using these settings: Sienoc TPU filament (yellow) using an Anycubic i3 mega printer with bed temp of 80ºC and filament temp of 250ºC. Layer height was 1.5 mm with no supports.
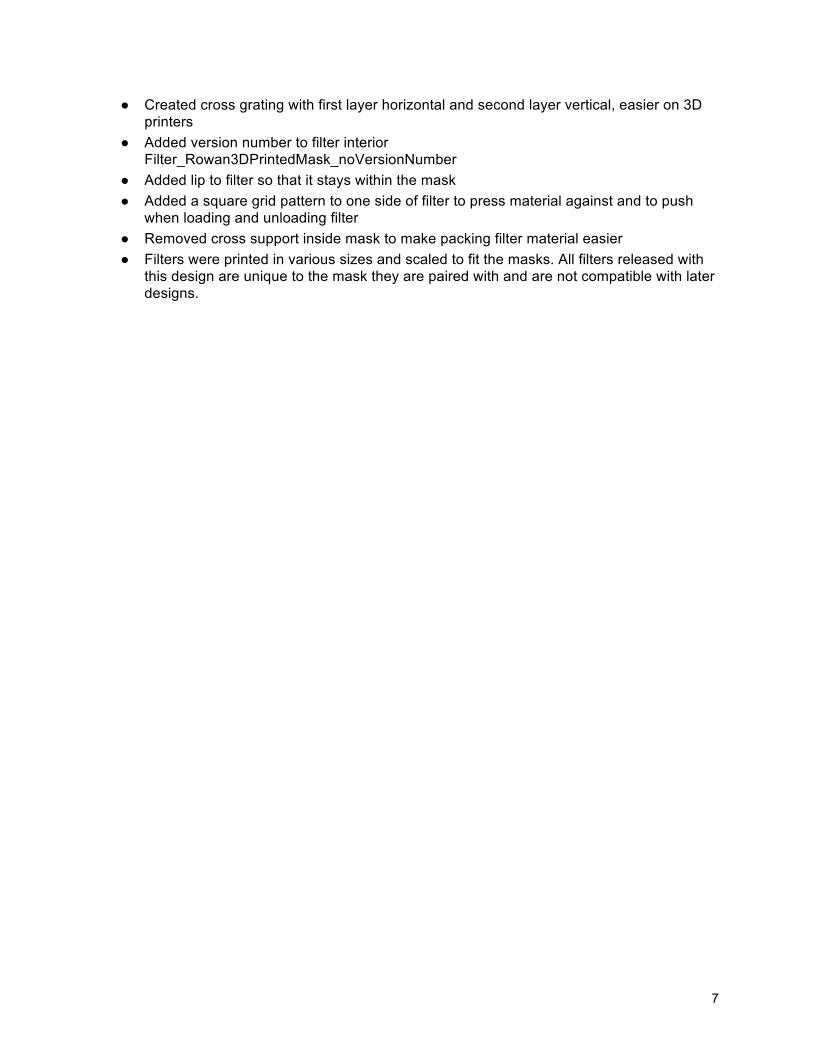
I can’t get my print off the print bed. It is stuck and no amount of pulling or twisting by hand seems to help.
Be careful. Print beds come in many shapes and varieties of materials. If a print is very stubborn, try a hammer and paint scraper, but be careful not to damage the print bed. Hold the scraper almost parallel to the surface and tap very lightly against the side of the print where it contacts the surface of the print bed. This may not work. Drive the scraper under the print slightly where you can then peel it off or fully detach the print from the surface. Once again, hit lightly. We have seen prints go flying off the print area.
6
The small size is too big or the big size is too small. What do I do?
If you are printing for yourself and not for donation or an organization, rescale the mask and the filter to a size that will work for you. Customizing the mask and filter means you cannot use filters that other people print because of the altered scale. Do not donate prints that have been rescaled as it will confuse people if they received other donations. If a smaller or larger size is needed, create a new version that is properly labeled and universally fits the filter.
Version information The following information describes the changes made for each version of the filter and mask.
Latest Version: Filter_Rowan3DPrintedMask_v4 (released 4/14/2020) ● Lab tested new filter size to improve breathability. Locked version number of mask and
filter to coincide for all future releases <size>_Rowan3DPrintedMask_v4 (released 4/14/2020)
● Increased the hole in the mask to accommodate the new filter size ● Increased the size of the strap holes to allow alternate materials to work ● Removed a section of the nose to help fit with glasses
Previous Versions: Filter_Rowan3DPrintedMask_v3
● Increased the gap between the sides of the filter and the mask by 0.2 mm to allow for easier printing and assembly/disassembly when using filter materials. If you experienced a tight fit with v2, this should solve any issues.
● Modified the front grate to only have a single horizontal orientation and increased the open area of the filter to allow for more “breathability” <size>_Rowan3DPrintedMask_v2_1
● Added website URL to the interior of the mask so people can find instructions on how to properly use <size>_Rowan3DPrintedMask_v2
● Created small, medium and large sized masks that all use the same filter size ● Added version information and mask size to interior of mask
Filter_Rowan3DPrintedMask_v2
7
● Created cross grating with first layer horizontal and second layer vertical, easier on 3D printers
● Added version number to filter interior Filter_Rowan3DPrintedMask_noVersionNumber
● Added lip to filter so that it stays within the mask ● Added a square grid pattern to one side of filter to press material against and to push
when loading and unloading filter ● Removed cross support inside mask to make packing filter material easier ● Filters were printed in various sizes and scaled to fit the masks. All filters released with
this design are unique to the mask they are paired with and are not compatible with later designs.