Embed Size (px)
DESCRIPTION
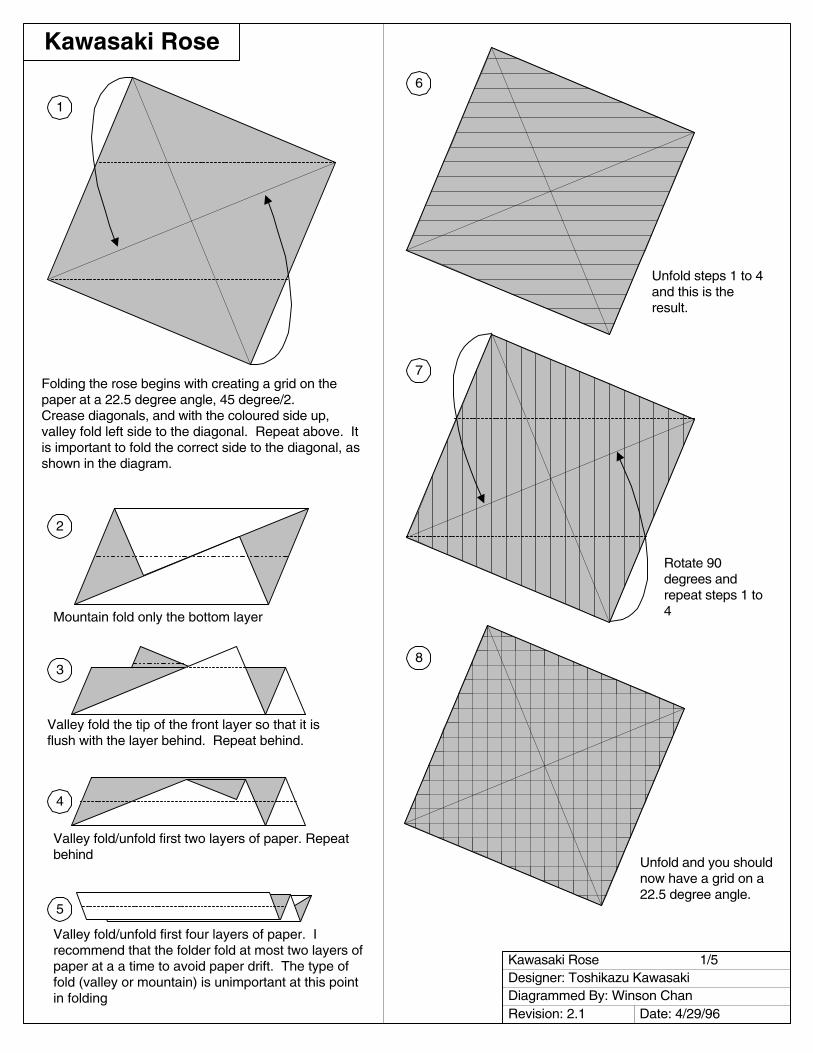
Folding the rose begins with creating a grid on the paper at a 22.5 degree angle, 45 degree/2. Crease diagonals, and with the coloured side up, valley fold left side to the diagonal. Repeat above. It is important to fold the correct side to the diagonal, as shown in the diagram. Unfold and you should now have a grid on a 22.5 degree angle. Valley fold the tip of the front layer so that it is flush with the layer behind. Repeat behind. Mountain fold only the bottom layer 2 3 1 7 8 6 4 5
Citation preview
Kawasaki Rose
Folding the rose begins with creating a grid on thepaper at a 22.5 degree angle, 45 degree/2.Crease diagonals, and with the coloured side up,valley fold left side to the diagonal. Repeat above. Itis important to fold the correct side to the diagonal, asshown in the diagram.
Mountain fold only the bottom layer
Valley fold/unfold first two layers of paper. Repeatbehind
Valley fold the tip of the front layer so that it isflush with the layer behind. Repeat behind.
Valley fold/unfold first four layers of paper. Irecommend that the folder fold at most two layers ofpaper at a a time to avoid paper drift. The type offold (valley or mountain) is unimportant at this pointin folding
Unfold steps 1 to 4and this is theresult.
Rotate 90degrees andrepeat steps 1 to4
Unfold and you shouldnow have a grid on a22.5 degree angle.
1
2
3
4
5
6
7
8
Kawasaki Rose 1/5Designer: Toshikazu KawasakiDiagrammed By: Winson ChanRevision: 2.1 Date: 4/29/96

Kawasaki Rose 2/5Designer: Toshikazu KawasakiDiagrammed By: Winson ChanRevision: 2.1 Date: 4/29/96
1/32/3
9
Make the following mountain andvalley folds. See enlargement. Noticethe position of the horizontal crease.Repeat on all four sides
This is what one of the crimps lookslike. Repeat on all four sets.
The paper should look like this aftercompleting each set. Renforce eachset of folds by crimping along thedarkened line.
Make the following mountain and valley folds.They are at 45 degrees relative to the grid. Thesquare in the centre can be used as a guide.When these creases are complete, mountain foldalong the crease indicated, the entire length of thepaper
Fold alongthis mountaincrease when
done
Form the twovalley foldsindicated
Mountain fold thetop point behind.Notice the locationof the light grayarea over the nextthree steps.
11
10
12
13
14
Kawasaki Rose 3/5Designer: Toshikazu KawasakiDiagrammed By: Winson ChanRevision: 2.1 Date: 4/29/96
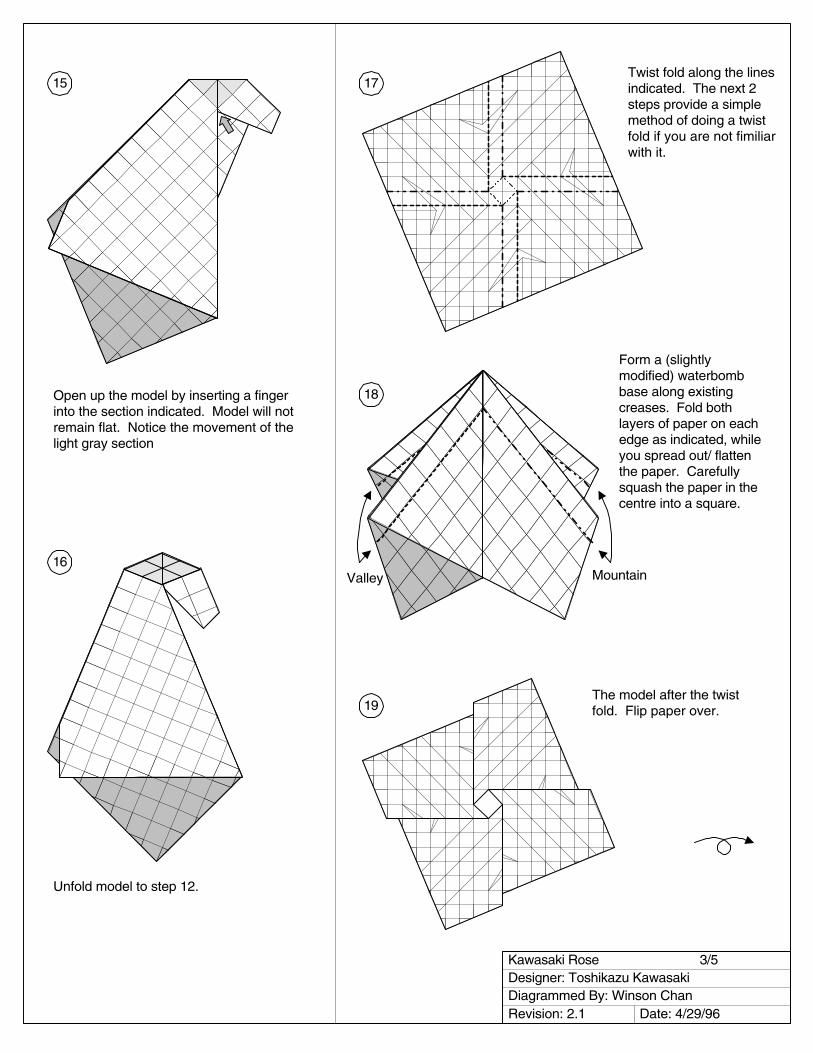
Open up the model by inserting a fingerinto the section indicated. Model will notremain flat. Notice the movement of thelight gray section
Unfold model to step 12.
Twist fold along the linesindicated. The next 2steps provide a simplemethod of doing a twistfold if you are not fimiliarwith it.
The model after the twistfold. Flip paper over.
Form a (slightlymodified) waterbombbase along existingcreases. Fold bothlayers of paper on eachedge as indicated, whileyou spread out/ flattenthe paper. Carefullysquash the paper in thecentre into a square.
MountainValley
15
16
17
18
19
Kawasaki Rose 4/5Designer: Toshikazu KawasakiDiagrammed By: Winson ChanRevision: 2.1 Date: 4/29/96
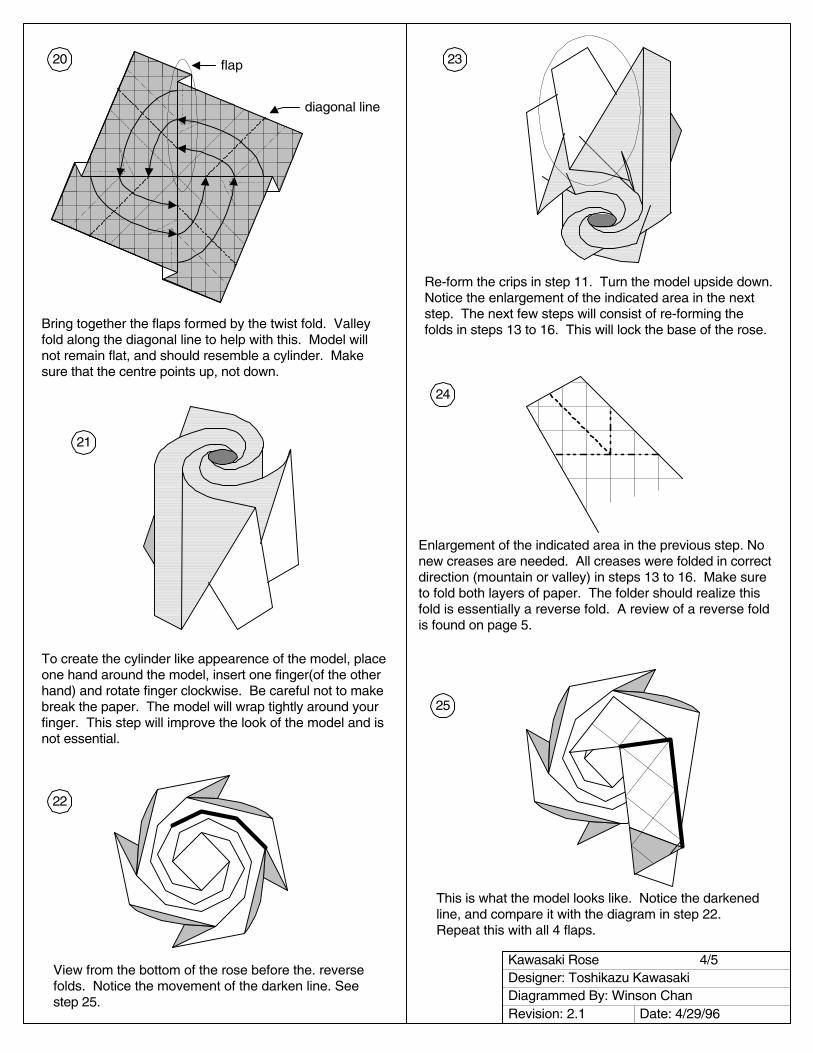
To create the cylinder like appearence of the model, placeone hand around the model, insert one finger(of the otherhand) and rotate finger clockwise. Be careful not to makebreak the paper. The model will wrap tightly around yourfinger. This step will improve the look of the model and isnot essential.
Bring together the flaps formed by the twist fold. Valleyfold along the diagonal line to help with this. Model willnot remain flat, and should resemble a cylinder. Makesure that the centre points up, not down.
flap
diagonal line
Re-form the crips in step 11. Turn the model upside down.Notice the enlargement of the indicated area in the nextstep. The next few steps will consist of re-forming thefolds in steps 13 to 16. This will lock the base of the rose.
Enlargement of the indicated area in the previous step. Nonew creases are needed. All creases were folded in correctdirection (mountain or valley) in steps 13 to 16. Make sureto fold both layers of paper. The folder should realize thisfold is essentially a reverse fold. A review of a reverse foldis found on page 5.
View from the bottom of the rose before the. reversefolds. Notice the movement of the darken line. Seestep 25.
This is what the model looks like. Notice the darkenedline, and compare it with the diagram in step 22.Repeat this with all 4 flaps.
20
21
22
23
24
25
Kawasaki Rose 5/5Designer: Toshikazu KawasakiDiagrammed By: Winson ChanRevision: 2.1 Date: 4/29/96
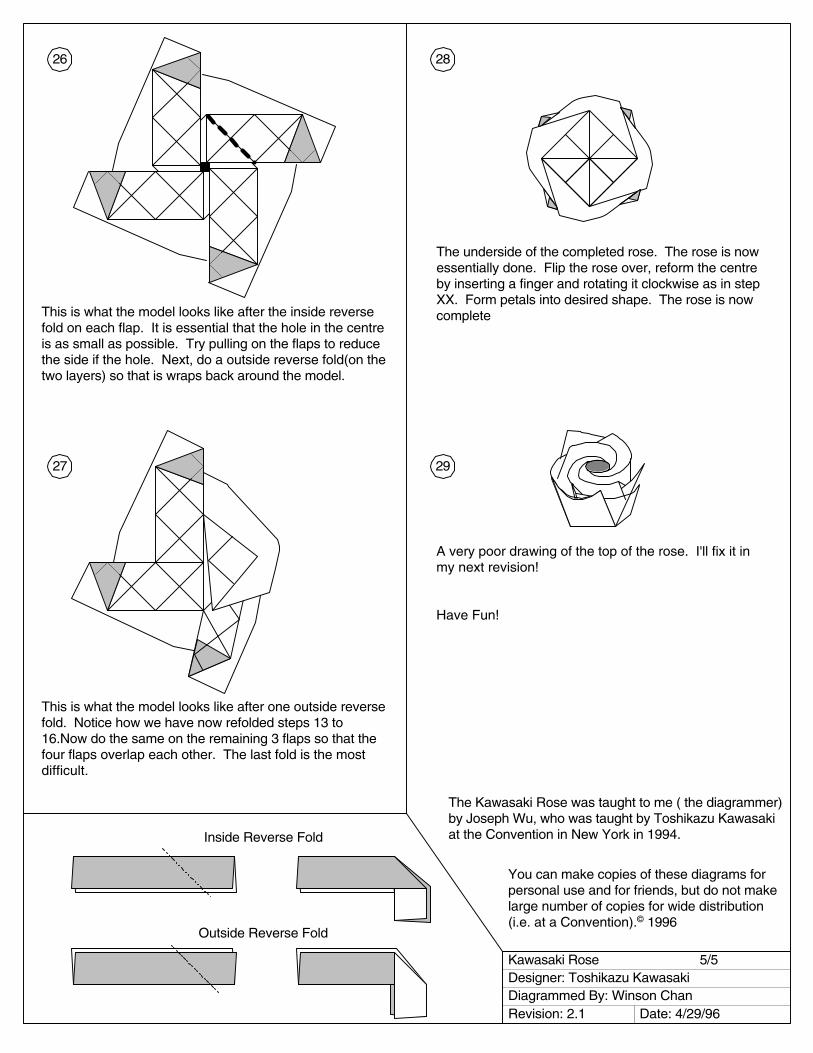
Inside Reverse Fold
Outside Reverse Fold
26
27
28
29
This is what the model looks like after the inside reversefold on each flap. It is essential that the hole in the centreis as small as possible. Try pulling on the flaps to reducethe side if the hole. Next, do a outside reverse fold(on thetwo layers) so that is wraps back around the model.
This is what the model looks like after one outside reversefold. Notice how we have now refolded steps 13 to16.Now do the same on the remaining 3 flaps so that thefour flaps overlap each other. The last fold is the mostdifficult.
The underside of the completed rose. The rose is nowessentially done. Flip the rose over, reform the centreby inserting a finger and rotating it clockwise as in stepXX. Form petals into desired shape. The rose is nowcomplete
A very poor drawing of the top of the rose. I'll fix it inmy next revision!
Have Fun!
You can make copies of these diagrams forpersonal use and for friends, but do not makelarge number of copies for wide distribution(i.e. at a Convention).© 1996
The Kawasaki Rose was taught to me ( the diagrammer)by Joseph Wu, who was taught by Toshikazu Kawasakiat the Convention in New York in 1994.