Embed Size (px)
Citation preview
Semi-scleral lens
ROSE TMK
TMNC
Post Graft TM
ROSE TMK2 XL
ROSE K2
TMROSE K2
ROSE K2
TMICIRREGULAR CORNEA ROSE K2
KeratoconusPMD
Post GraftPost Surgery
Practitioners Fitting Guide
ROSE K2 XL™ semi-scleral lens
• Primary indications: Keratoconus, Pellucid Marginal Degeneration (PMD), Post Graft, Post-LASIK ectasia and any irregular corneal condition that cannot be successfully fitted within the limbus.
• Secondary indications: Polluted work conditions, stability for sport or working environment. Corneal GP intolerance, Piggyback substitute.
• Daily wear.
Applications
• Aspheric back optic zone which decreases as BC steepens.
• Front surface aberration control.
• Precise edge lift control.
• Reverse geometry in flatter base curves.
Design
Parameter range
• BC range: 5.60 to 8.40 mm. (0.1mm steps) • Diameter range: 13.60 to 16.00 mm. (0.1 mm steps)
Standard diameter: 14.60 mm. • Power range: Varies depending on material. • Edge lifts: 13 options in 0.5 steps from -3.0 decreased lift to +3.0 increased lift.
5 standard lifts will optimally fit 90% of cases. Other options are available on request.
Diagnostic Set• 16 lenses manufactured in Lagado FLOSI material (Dk 26; Tint: Light Pink).• BC: from 6.00 to 8.00 mm. • Standard diameter: 14.60 mm. • Edge lift: Standard Lift (0).
ROSE K2 XL™ Handling
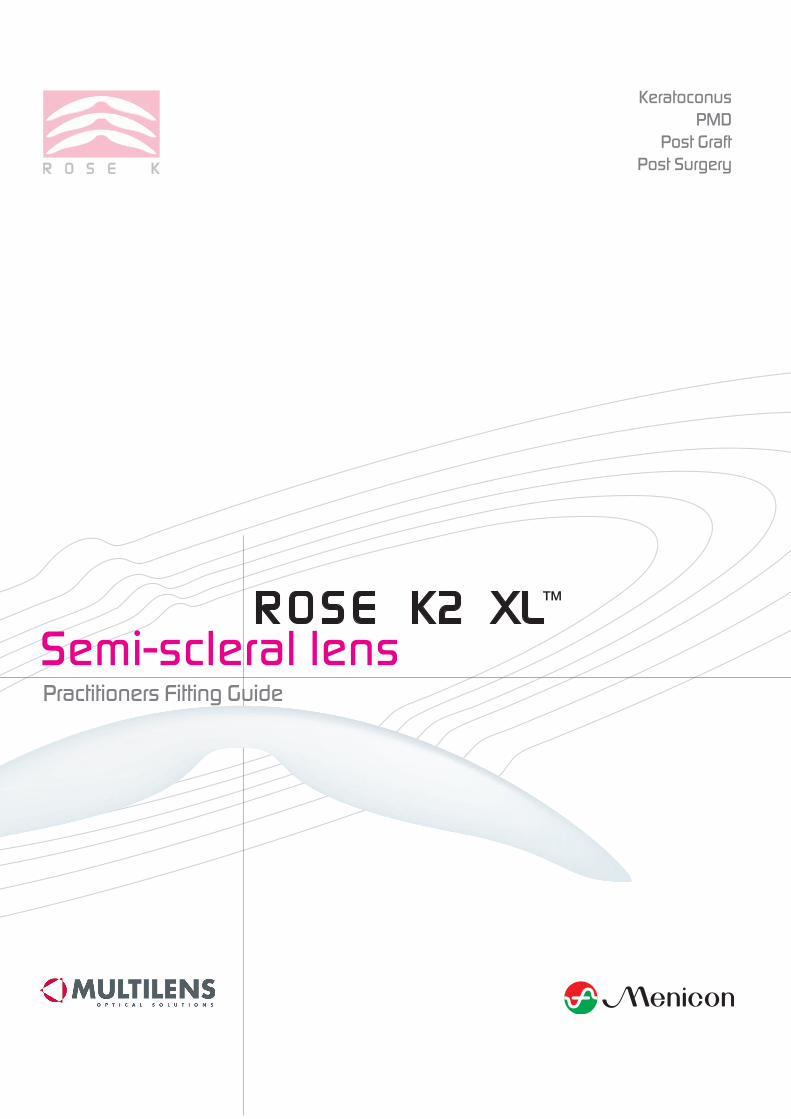
• Mount the lens concave side up, onto a large plunger (see diagram).
• Fill the lens with non preserved saline solution and add a small amount of fluorescein.
• Have the patient tilt their head down, so it is parallel with the floor, and centrally apply the lens directly onto the cornea so the solution remains in the lens.
• Patients can handle the lens with either a suction holder or by balancing the lens in a tripod between the thumb, index and middle finger.
Small insertion bubbles are of no consequence, but larger bubbles will disrupt both vision and assessment of the central fit and must be avoided. If bubbles are obvious under the central part of the lens after insertion, the lens must be removed and the insertion process repea-ted.
1. Gently rub the lens between thumb and forefinger with a few drops of an appropriate multipurpose GP cleaning and conditioning solu-tion (Menicon MeniCare Plus is recommended).
2. Rinse the lens with multipurpose solution.
3. Store the lens in appropriate lens case (flat lens case or large size container) filled with multipurpose GP cleaning and conditioning solution.
4. For the management of proteins and other deposits, treat with Menicon PROGENT once every month or more frequently if needed.
• Place a small solid wetted plunger (see diagram) between the outside of the lens and the temporal pupil margin.
• Peel the lens off by pulling outwards and across in an arc towards the nose.
• The lens may also be removed by using the lower lid to lift the lower contact lens edge up and outwards.
Patients should not have lenses dispensed until they have shown competence in being able to remove the lens.
Warning : Do not attempt to remove the lens with the suction holder placed centrally.
Lens insertion
Lens removal
Lens care instructionsHandling Tips1. Do not rub the lens in the
palm of the hand; this may cause lens breakage.
2. Excessive pressure to the lens surface during the cleaning procedure must be avoided otherwise lens breakage may result.
2 3
Handling Tips If there is difficulty at the initial fitting eliminating large bubbles under the lens, substitute saline solution with an appropriate solution of a higher viscosity.
ROSE K2 XL™ Fitting procedure
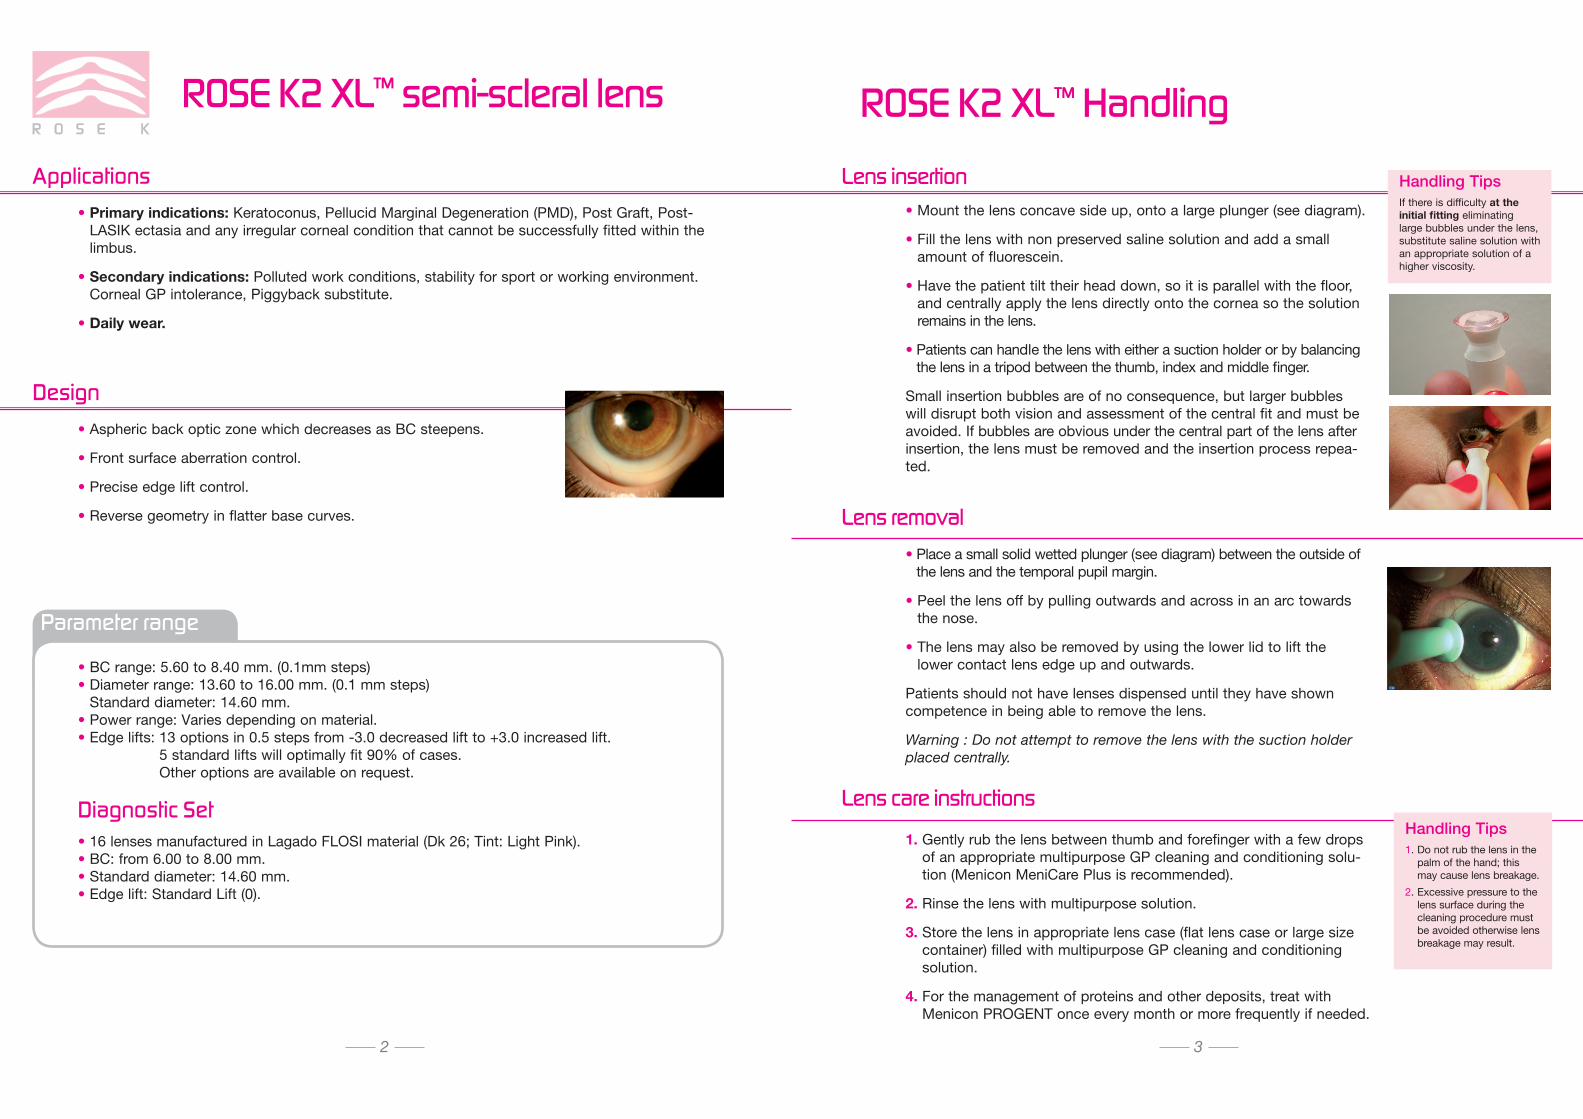
If topography is unavailable to accurately identify the condition you are fitting, choose your first trial lens 0.2 mm steeper than the average K’s.
• Instill saline with fluorescein into the concave side of lens.
• Judge the central fit immediately after insertion.
• Select flatter or steeper base curves until a very light feather touch is just discernable at the highest point on the cornea. Feather touch is defined as the Base Curve for *FDACL (BC to achieve the first apical clearance) plus +0.1. Nb: This may not be centrally.
• Once feather touch is achieved, allow the lens to settle for a further 20 minutes and re-evaluate the fit.
• If further fluorescein is required, place on the sclera at 12 o’clock just above the lens. Ask the patient to blink several times.
• If fluorescein does not circulate behind the lens, manipulate the lower and/or upper edge to encourage fluorescein to flush under the lens.
* FDACL = First definite apical clearence lens
Step 1: Base curve evaluation
• Keratoconus: See chart below. • PMD and Keratoglobus: 0.6 mm steeper than mean K’s. • Post Graft: 0.7 mm steeper than mean K’s. • Post LASIK: 0.7 mm steeper than mean K’s.
NB : the above is only an approximate guide.
Fitting Tips1. Judge fluorescein pattern
for BC selection, imme-diately after insertion and again after 20 minutes.
2. Excessive bearing at the highest point on the cornea must be avoided as it may result in corneal staining and lens discomfort.
Base Curve - Ideal
Fitting Tips1. 50% of patients can be optimally fitted with the standard edge lift.2. 90 % of patients can be optimally fitted using the normal 5 edge lifts - Standard (0), Standard Increased (+1.00), Double
Increased (+2.00), Standard Decreased (-1.00) and Double Decreased (-2.00).3. Judge edge lift immediately after insertion and again after 20 minutes.4. Lens discomfort on first insertion is most commonly associated with an excessive edge lift.5. Discomfort experienced on lens removal often indicates a tight edge; increase the edge lift.6. With the correct edge lift, with slight upward pressure on the edge of the lens at 6 o’clock via the lid, fluorescein should
be seen to enter under the edge of the lens. Having to use excessive force indicates a tight edge. 7. Judging the correct choice of edge lift is a combination of interpretation of the following 5 points. The fluorescein pattern,
movement, comfort, how easy the lens is to remove and how easily fluorescein enters under the lens edge with upward pressure on the lens lower edge.
8. Excessive force should not be required to remove the lens with a suction holder.9. Changing the edge lift in most cases does not effect the fit over the cornea. However if the trial lens has an excessively
tight edge causing the trial lens to bear mainly on the conjunctiva, increasing the edge lift may result in a flatter central fit than expected. To remedy, steepen the BC by 0.1 to 0.2mm.
10. With the correct amount of edge lift, the conjunctival vessels can still be observed through the fluorescein.
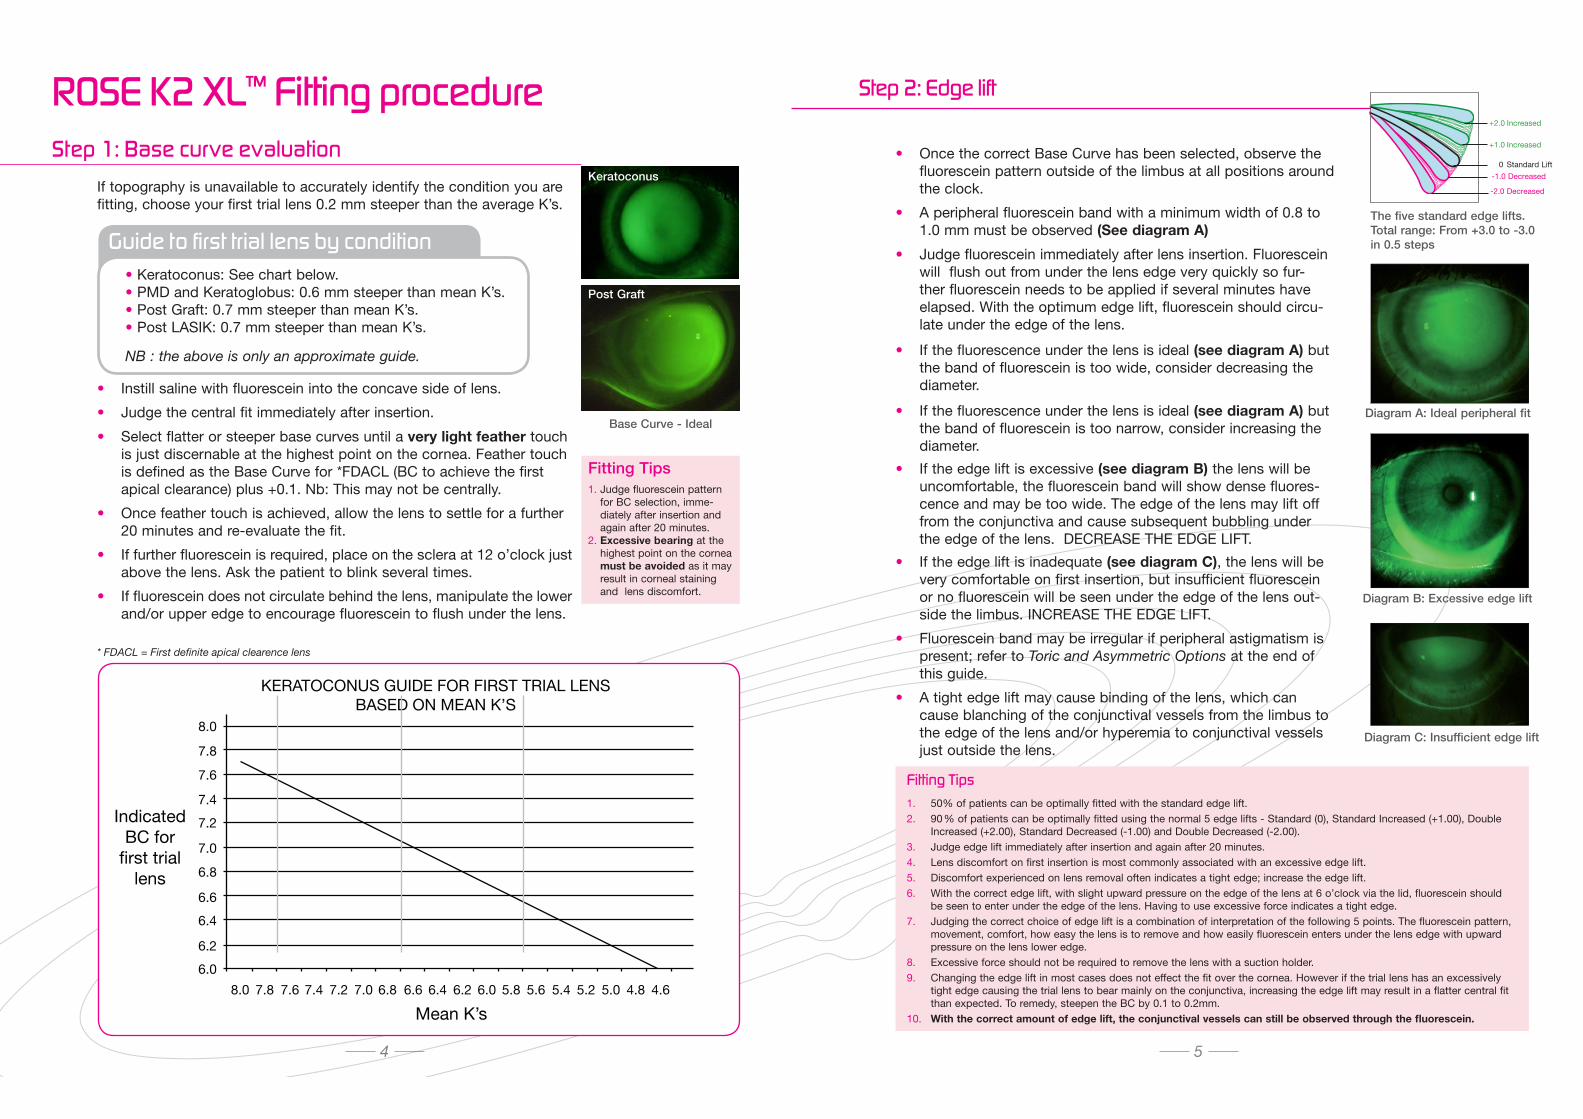
Diagram A: Ideal peripheral fit
Diagram C: Insufficient edge lift
6.0
6.2
6.4
6.6
6.8
7.0
7.2
7.4
7.6
7.8
8.0
8.0 7.8 7.6 7.4 7.2 7.0 6.8 6.6 6.4 6.2 6.0 5.8 5.6 5.4 5.2 5.0 4.8 4.6
KERATOCONUS GUIDE FOR FIRST TRIAL LENSBASED ON MEAN K’S
ROSE K2 XL™
Mean K’s
IndicatedBC for
first triallens
Step 2: Edge lift
4 5
• Once the correct Base Curve has been selected, observe the fluorescein pattern outside of the limbus at all positions around the clock.
• A peripheral fluorescein band with a minimum width of 0.8 to 1.0 mm must be observed (See diagram A)
• Judge fluorescein immediately after lens insertion. Fluorescein will flush out from under the lens edge very quickly so fur-ther fluorescein needs to be applied if several minutes have elapsed. With the optimum edge lift, fluorescein should circu-late under the edge of the lens.
• If the fluorescence under the lens is ideal (see diagram A) but the band of fluorescein is too wide, consider decreasing the diameter.
• If the fluorescence under the lens is ideal (see diagram A) but the band of fluorescein is too narrow, consider increasing the diameter.
• If the edge lift is excessive (see diagram B) the lens will be uncomfortable, the fluorescein band will show dense fluores-cence and may be too wide. The edge of the lens may lift off from the conjunctiva and cause subsequent bubbling under the edge of the lens. DECREASE THE EDGE LIFT.
• If the edge lift is inadequate (see diagram C), the lens will be very comfortable on first insertion, but insufficient fluorescein or no fluorescein will be seen under the edge of the lens out-side the limbus. INCREASE THE EDGE LIFT.
• Fluorescein band may be irregular if peripheral astigmatism is present; refer to Toric and Asymmetric Options at the end of this guide.
• A tight edge lift may cause binding of the lens, which can cause blanching of the conjunctival vessels from the limbus to the edge of the lens and/or hyperemia to conjunctival vessels just outside the lens.
Diagram B: Excessive edge lift
Keratoconus
Post Graft
Guide to first trial lens by conditionThe five standard edge lifts.Total range: From +3.0 to -3.0 in 0.5 steps
+2.0 Increased
+1.0 Increased
0 Standard Lift
-2.0 Decreased
-1.0 Decreased
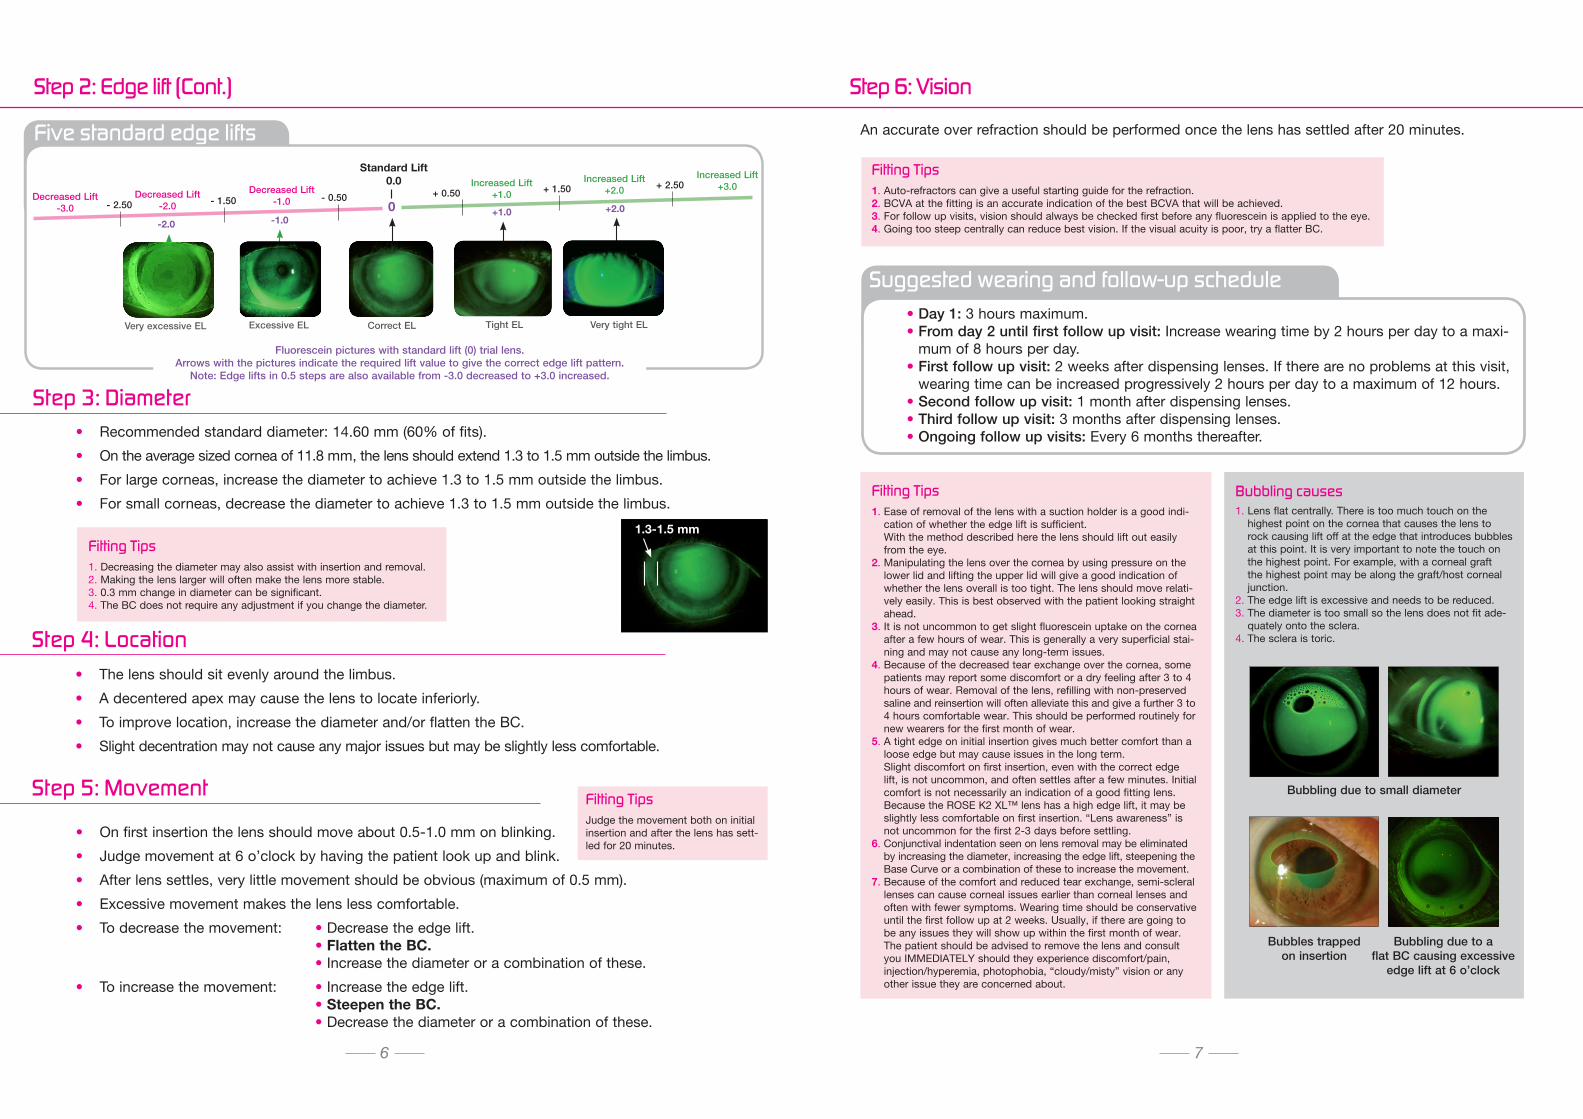
Five standard edge lifts
• The lens should sit evenly around the limbus.
• A decentered apex may cause the lens to locate inferiorly.
• To improve location, increase the diameter and/or flatten the BC.
• Slight decentration may not cause any major issues but may be slightly less comfortable.
Step 4: Location
• On first insertion the lens should move about 0.5-1.0 mm on blinking.
• Judge movement at 6 o’clock by having the patient look up and blink.
• After lens settles, very little movement should be obvious (maximum of 0.5 mm).
• Excessive movement makes the lens less comfortable.
• To decrease the movement: • Decrease the edge lift. • Flatten the BC. • Increase the diameter or a combination of these.
• To increase the movement: • Increase the edge lift. • Steepen the BC. • Decrease the diameter or a combination of these.
Step 5: Movement
• Recommended standard diameter: 14.60 mm (60% of fits).
• On the average sized cornea of 11.8 mm, the lens should extend 1.3 to 1.5 mm outside the limbus.
• For large corneas, increase the diameter to achieve 1.3 to 1.5 mm outside the limbus.
• For small corneas, decrease the diameter to achieve 1.3 to 1.5 mm outside the limbus.
Fitting Tips1. Decreasing the diameter may also assist with insertion and removal. 2. Making the lens larger will often make the lens more stable.3. 0.3 mm change in diameter can be significant.4. The BC does not require any adjustment if you change the diameter.
Fitting TipsJudge the movement both on initial insertion and after the lens has sett-led for 20 minutes.
An accurate over refraction should be performed once the lens has settled after 20 minutes.
Fitting Tips1. Auto-refractors can give a useful starting guide for the refraction.2. BCVA at the fitting is an accurate indication of the best BCVA that will be achieved.3. For follow up visits, vision should always be checked first before any fluorescein is applied to the eye. 4. Going too steep centrally can reduce best vision. If the visual acuity is poor, try a flatter BC.
1.3-1.5 mm
Fitting Tips1. Ease of removal of the lens with a suction holder is a good indi-
cation of whether the edge lift is sufficient. With the method described here the lens should lift out easily from the eye.
2. Manipulating the lens over the cornea by using pressure on the lower lid and lifting the upper lid will give a good indication of whether the lens overall is too tight. The lens should move relati-vely easily. This is best observed with the patient looking straight ahead.
3. It is not uncommon to get slight fluorescein uptake on the cornea after a few hours of wear. This is generally a very superficial stai-ning and may not cause any long-term issues.
4. Because of the decreased tear exchange over the cornea, some patients may report some discomfort or a dry feeling after 3 to 4 hours of wear. Removal of the lens, refilling with non-preserved saline and reinsertion will often alleviate this and give a further 3 to 4 hours comfortable wear. This should be performed routinely for new wearers for the first month of wear.
5. A tight edge on initial insertion gives much better comfort than a loose edge but may cause issues in the long term. Slight discomfort on first insertion, even with the correct edge lift, is not uncommon, and often settles after a few minutes. Initial comfort is not necessarily an indication of a good fitting lens. Because the ROSE K2 XL™ lens has a high edge lift, it may be slightly less comfortable on first insertion. “Lens awareness” is not uncommon for the first 2-3 days before settling.
6. Conjunctival indentation seen on lens removal may be eliminated by increasing the diameter, increasing the edge lift, steepening the Base Curve or a combination of these to increase the movement.
7. Because of the comfort and reduced tear exchange, semi-scleral lenses can cause corneal issues earlier than corneal lenses and often with fewer symptoms. Wearing time should be conservative until the first follow up at 2 weeks. Usually, if there are going to be any issues they will show up within the first month of wear. The patient should be advised to remove the lens and consult you IMMEDIATELY should they experience discomfort/pain, injection/hyperemia, photophobia, “cloudy/misty” vision or any other issue they are concerned about.
Bubbling causes1. Lens flat centrally. There is too much touch on the
highest point on the cornea that causes the lens to rock causing lift off at the edge that introduces bubbles at this point. It is very important to note the touch on the highest point. For example, with a corneal graft the highest point may be along the graft/host corneal junction.
2. The edge lift is excessive and needs to be reduced. 3. The diameter is too small so the lens does not fit ade-
quately onto the sclera. 4. The sclera is toric.
Bubbling due to small diameter
Bubbles trapped on insertion
Bubbling due to a flat BC causing excessive
edge lift at 6 o’clock
Suggested wearing and follow-up schedule• Day 1: 3 hours maximum.• From day 2 until first follow up visit: Increase wearing time by 2 hours per day to a maxi-
mum of 8 hours per day.• First follow up visit: 2 weeks after dispensing lenses. If there are no problems at this visit,
wearing time can be increased progressively 2 hours per day to a maximum of 12 hours.• Second follow up visit: 1 month after dispensing lenses.• Third follow up visit: 3 months after dispensing lenses.• Ongoing follow up visits: Every 6 months thereafter.
Step 6: Vision
6 7
Step 2: Edge lift (Continued)
1LFluorescein pictures with standard lift (0) trial lens.
Arrows with the pictures indicate the required lift value to give the correct edge lift pattern.Note: Edge lifts in 0.5 steps are also available from -3.0 decreased to +3.0 increased.
Step 2: Edge lift (Cont.)
Step 3: Diameter
Very excessive EL Excessive EL Correct EL Tight EL Very tight EL
-2.0 -1.0+1.0 +2.0
Decreased Lift
-2.0
Decreased Lift
-1.0
Increased Lift
+1.00
Standard Lift0.0
- 1.50 - 0.50 + 0.50
Increased Lift
+2.0+ 1.50
- 2.50
Decreased Lift
-3.0
Increased Lift
+3.0+ 2.50
Multilens AB Box 220, 435 25 Mölnlycke Sweden, Tel: +46 (0)31 88 75 50 Fax: +46 (0)31 88 39 77, [email protected], www.multilens.se
General Editor: Dr. Paul Rose
© 2014 ROSE K IS A TRADEMARK OF MENICON CO., LTD.3-21-19, AOI, NAKA-KU NAGOYA JAPAN 460-0006 US-RKAR403 03/2014
2016
-12-
01_v
ersio
n 6_
Rose
K2
XL fi
tting
Gui
de
The Rose K2 XL™ design is available in several toric and asymmetric options which include:
• Front surface toric for the correction of residual astigmatism up to -8.0 in cylinder.
• Toric Periphery (TP) application: Where the lens is tight on the sclera in one meridian and loose in the opposite meridian. The standard TP is 1.2 mm but can be ordered in 0.2 mm steps from 0.4 mm to 2.0 mm TP.
• Full back surface toric: Where the lens over its entire back surface has 2 different toricity values in two meridians, to accommodate high degrees of corneal astigmatism which extend out on to the sclera.
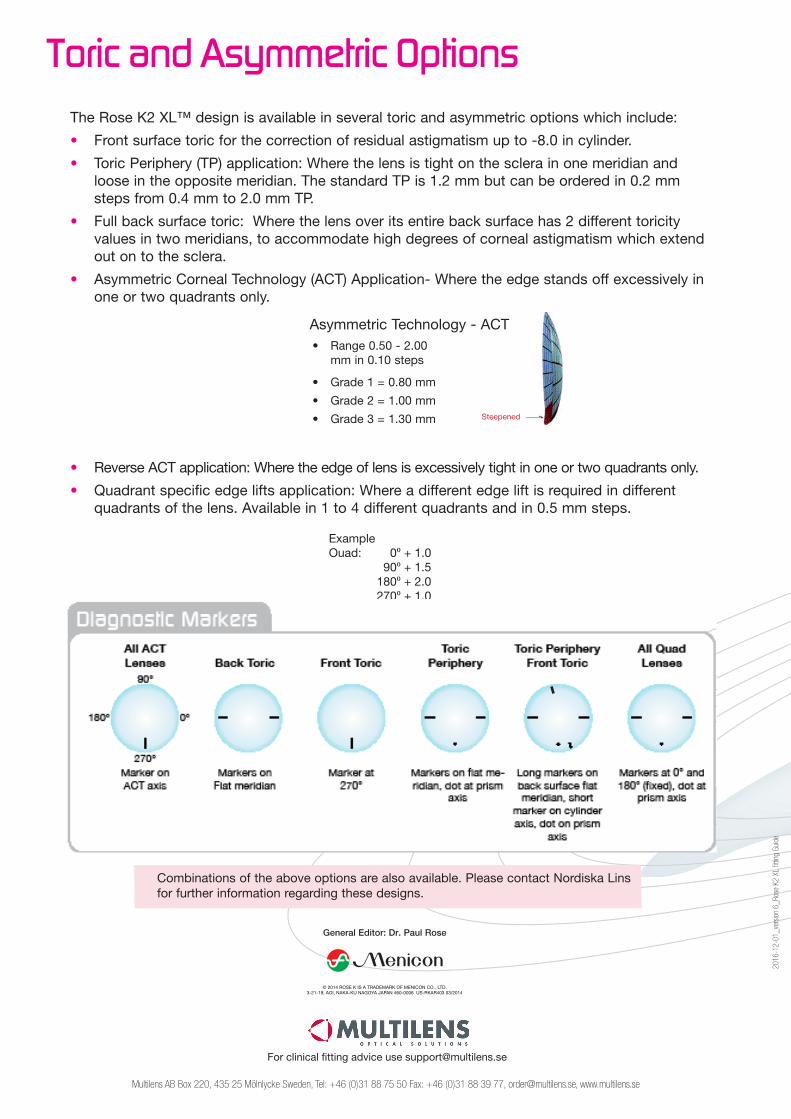
• Asymmetric Corneal Technology (ACT) Application- Where the edge stands off excessively in one or two quadrants only.
Asymmetric Technology - ACT
• Reverse ACT application: Where the edge of lens is excessively tight in one or two quadrants only.
• Quadrant specific edge lifts application: Where a different edge lift is required in different quadrants of the lens. Available in 1 to 4 different quadrants and in 0.5 mm steps.
Toric and Asymmetric Options
Combinations of the above options are also available. Please contact Nordiska Lins for further information regarding these designs.
ExampleOuad: 0⁰ + 1.0 90⁰ + 1.5 180⁰ + 2.0 270⁰ + 1.0
• Range 0.50 - 2.00 mm in 0.10 steps
• Grade 1 = 0.80 mm
• Grade 2 = 1.00 mm
• Grade 3 = 1.30 mm Steepened
For clinical fitting advice use [email protected]