Embed Size (px)
Citation preview
PICA CUBE™
USER’S MANUAL
DESIGNED BY THE BLACK TANK

Table of Contents
03
Your Rosco PICA Cube™Product Description....................................................................................... 5What’s In the Box............................................................................................ 6
PICA Cube™ Series
PICA Cube™ Interface................................................................................... 7
PICA Cube™ 4C................................................................................................. 9PICA Cube™ WNC.............................................................................................10PICA Cube™ UV................................................................................................. 11
PICA Cube™ ModesDMX Mode.......................................................................................................... 12Manual Mode..................................................................................................... 15Color Wash Mode.............................................................................................. 17Preset Mode....................................................................................................... 19Serial Mode........................................................................................................ 21
Beam AnglesDi�user............................................................................................................... 22Changing Di�users........................................................................................... 23
Table of Contents
04
Mounting and ConfigurationSafety Cables.................................................................................................... 24
Make Your Own CablesDMX & Power Cable Pinout Diagram............................................................ 25
PICA Cube™ SupportFCC Warning...................................................................................................... 26General Precautions....................................................................................... 27Warning Messages........................................................................................... 28
Product Description
05
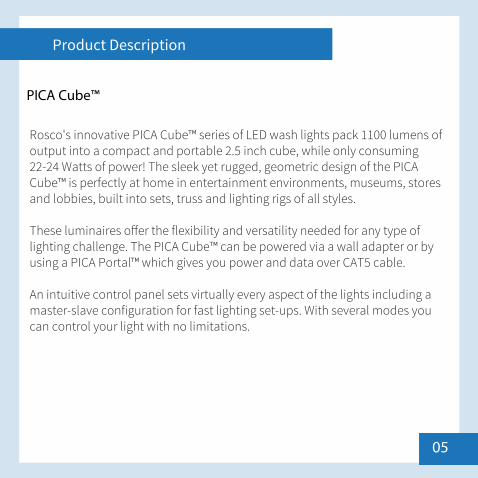
PICA Cube™
Rosco's innovative PICA Cube™ series of LED wash lights pack 1100 lumens of output into a compact and portable 2.5 inch cube, while only consuming 22-24 Watts of power! The sleek yet rugged, geometric design of the PICA Cube™ is perfectly at home in entertainment environments, museums, stores and lobbies, built into sets, truss and lighting rigs of all styles.
These luminaires o�er the flexibility and versatility needed for any type of lighting challenge. The PICA Cube™ can be powered via a wall adapter or by using a PICA Portal™ which gives you power and data over CAT5 cable.
An intuitive control panel sets virtually every aspect of the lights including a master-slave configuration for fast lighting set-ups. With several modes you can control your light with no limitations.
Product Description
06
Weighing just under 1 pound, mounting these compact 2 inch cubes is limited only by the imagination of the installer. The one sided bolted yoke design allows units to be easily mounted on any surface for greater output and coverage.
Available in versions that o�er full quad chip color mixing, tuneable color temperature white light and true UV LED blacklight, the PICA Cube™ luminaires are the smallest, most feature packed and a�ordable, professional grade LED lights on the market.
What’s In the Box
07
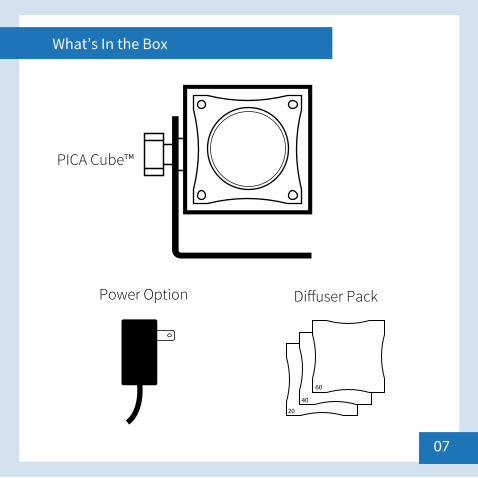
PICA Cube™
Power Option Di�user Pack
20
40
60
PICA Cube™ Interface
08
Ta = 45C MaxPat No. 8767398Made in USA
8 76
54
3210F
E
DC
BA9
AUX INPUTCLASS 2
12-24 VDC12 VAC
PICA CUBEDESIGNED BY THE BLACK TANK
TM
DMX OUT DMX IN
DM
X
MA
NU
AL
CLR
WSH
PR
ESET
SER
IAL
PW
R
FA
ULT
TOGGLECHANGE
MODE
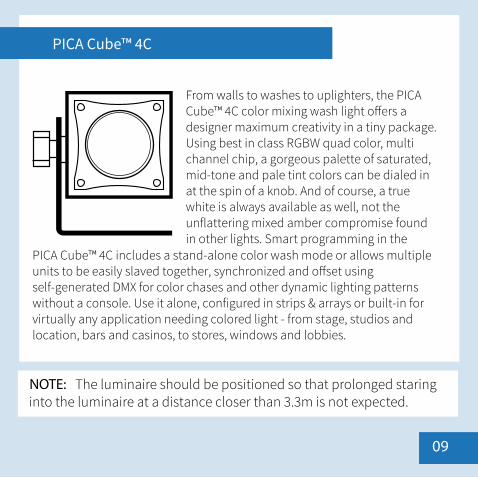
PICA Cube™ 4C
09
From walls to washes to uplighters, the PICACube™ 4C color mixing wash light o�ers a designer maximum creativity in a tiny package. Using best in class RGBW quad color, multi channel chip, a gorgeous palette of saturated, mid-tone and pale tint colors can be dialed in at the spin of a knob. And of course, a truewhite is always available as well, not theunflattering mixed amber compromise foundin other lights. Smart programming in the
PICA Cube™ 4C includes a stand-alone color wash mode or allows multipleunits to be easily slaved together, synchronized and o�set using self-generated DMX for color chases and other dynamic lighting patternswithout a console. Use it alone, configured in strips & arrays or built-in for virtually any application needing colored light - from stage, studios and location, bars and casinos, to stores, windows and lobbies.
NOTE: The luminaire should be positioned so that prolonged staring into the luminaire at a distance closer than 3.3m is not expected.
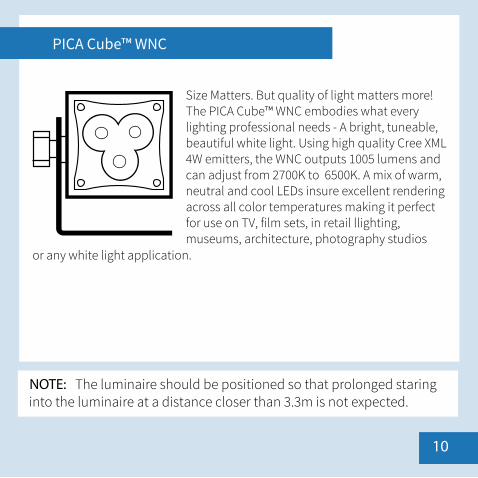
PICA Cube™ WNC
10
Size Matters. But quality of light matters more!The PICA Cube™ WNC embodies what every lighting professional needs - A bright, tuneable, beautiful white light. Using high quality Cree XML 4W emitters, the WNC outputs 1005 lumens and can adjust from 2700K to 6500K. A mix of warm, neutral and cool LEDs insure excellent rendering across all color temperatures making it perfect for use on TV, film sets, in retail llighting, museums, architecture, photography studios
or any white light application.
NOTE: The luminaire should be positioned so that prolonged staring into the luminaire at a distance closer than 3.3m is not expected.
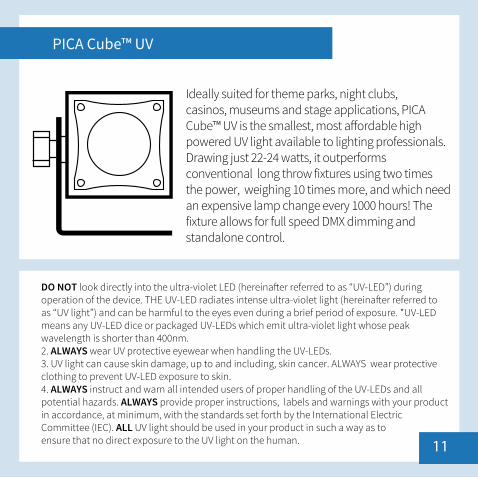
PICA Cube™ UV
11
Ideally suited for theme parks, night clubs,casinos, museums and stage applications, PICACube™ UV is the smallest, most a�ordable highpowered UV light available to lighting professionals. Drawing just 22-24 watts, it outperforms conventional long throw fixtures using two times the power, weighing 10 times more, and which need an expensive lamp change every 1000 hours! The fixture allows for full speed DMX dimming and standalone control.
DO NOT look directly into the ultra-violet LED (hereina�er referred to as “UV-LED”) during operation of the device. THE UV-LED radiates intense ultra-violet light (hereina�er referred to as “UV light”) and can be harmful to the eyes even during a brief period of exposure. *UV-LED means any UV-LED dice or packaged UV-LEDs which emit ultra-violet light whose peak wavelength is shorter than 400nm.2. ALWAYS wear UV protective eyewear when handling the UV-LEDs.3. UV light can cause skin damage, up to and including, skin cancer. ALWAYS wear protective clothing to prevent UV-LED exposure to skin.4. ALWAYS instruct and warn all intended users of proper handling of the UV-LEDs and all potential hazards. ALWAYS provide proper instructions, labels and warnings with your product in accordance, at minimum, with the standards set forth by the International Electric Committee (IEC). ALL UV light should be used in your product in such a way as to ensure that no direct exposure to the UV light on the human.
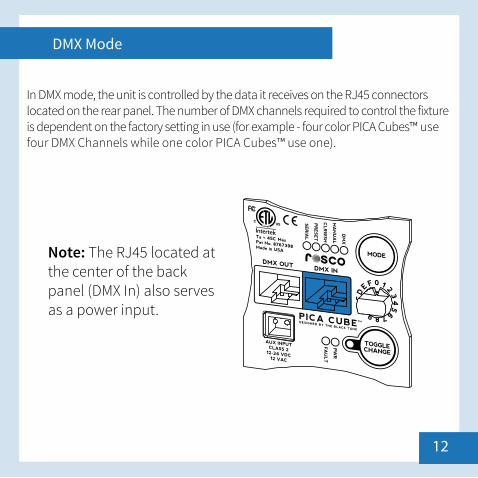
DMX Mode
12
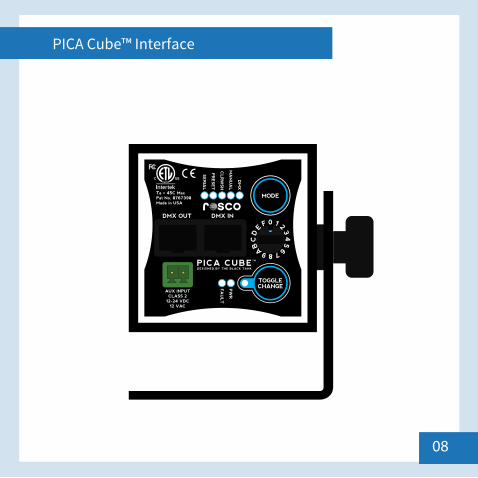
In DMX mode, the unit is controlled by the data it receives on the RJ45 connectors located on the rear panel. The number of DMX channels required to control the fixture is dependent on the factory setting in use (for example - four color PICA Cubes™ use four DMX Channels while one color PICA Cubes™ use one).
Note: The RJ45 located at the center of the back panel (DMX In) also serves as a power input.
DMX Mode
13
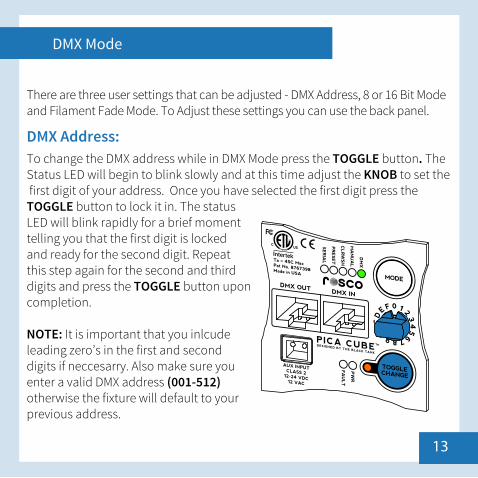
There are three user settings that can be adjusted - DMX Address, 8 or 16 Bit Mode and Filament Fade Mode. To Adjust these settings you can use the back panel.
DMX Address:To change the DMX address while in DMX Mode press the TOGGLE button. The Status LED will begin to blink slowly and at this time adjust the KNOB to set the first digit of your address. Once you have selected the first digit press the TOGGLE button to lock it in. The status LED will blink rapidly for a brief moment telling you that the first digit is locked and ready for the second digit. Repeat this step again for the second and third digits and press the TOGGLE button upon completion.
NOTE: It is important that you inlcude leading zero’s in the first and seconddigits if neccesarry. Also make sure youenter a valid DMX address (001-512) otherwise the fixture will default to yourprevious address.

DMX Mode
14
8 bit or 16 bit DMX:
The fixture can run in either 8 bit or 16 bit DMX Mode. In 8 bit mode, the PICA Cube™ accepts one DMX channel for each color. In 16 bit mode, two channelsare required for each color. To choose 8 or 16 bit press and hold TOGGLE untilthe status LED blinks rapidly. Then rotate the KNOB to desired bit setting (8 + TOGGLE = 8bit) and (1 +TOGGLE + 6 TOGGLE = 16bit ). The Status LEDwill blink rapidly notifying you the desired bit setting has been saved.
Filament Fade:
An incandescent lamp has a slight delay, or lag with changing intensities, whereas an LED responds instantly. The di�erence is most noticeable during a theatrical black out. The PICA CUBE™ can emulate an incandescent lamp by selecting one of the FIlament Fade settings.
To change the Filament Fade Setting switch the mode to SERIAL mode. Oncein Serial Mode you will hold the TOGGLE button until the status LED blinksrapidly. Then rotate the KNOB to desired Filament Fade setting as follows(0 = o�, 1 = low, 2 = medium, 3 = high). Press MODE to save and exit. Then change back to DMX Mode.

Manual Mode
15
In Manual Mode, the PICA Cube™ can be controlled directly from its rear panel without the need of a DMX console or a DMX control device. Standalone control capabilities vary according to the factory setting in use (Four Color, Three Color, or One Color). The PICA Cube™ has a self recognizing interface, meaning you don’t have to configure it at the possibility you changed LED boards.
(All standalone, DMX address and configuration settings are non-volatile, meaning they will not change if power is lost or switched o� and restored. When set to manual mode, the PICA Cube™ operates as a DMX Master and is sending DMX512 data.)
NOTE: Do not connect any PICA Cube™ in Manual Mode to any other DMX sending device as contention on the DMX512 input will result.
Manual Mode
16
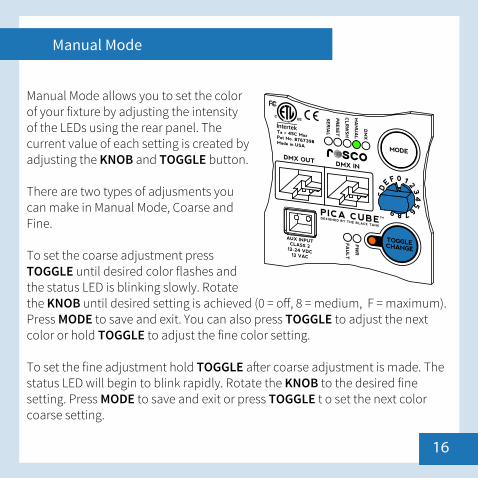
Manual Mode allows you to set the color of your fixture by adjusting the intensity of the LEDs using the rear panel. The current value of each setting is created by adjusting the KNOB and TOGGLE button.
There are two types of adjusments you can make in Manual Mode, Coarse andFine.
To set the coarse adjustment press TOGGLE until desired color flashes and the status LED is blinking slowly. Rotatethe KNOB until desired setting is achieved (0 = o�, 8 = medium, F = maximum). Press MODE to save and exit. You can also press TOGGLE to adjust the next color or hold TOGGLE to adjust the fine color setting.
To set the fine adjustment hold TOGGLE a�er coarse adjustment is made. Thestatus LED will begin to blink rapidly. Rotate the KNOB to the desired finesetting. Press MODE to save and exit or press TOGGLE t o set the next colorcoarse setting.
Color Wash Mode
17
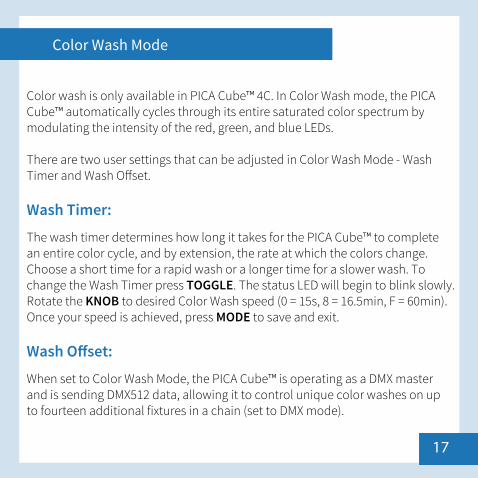
Color wash is only available in PICA Cube™ 4C. In Color Wash mode, the PICA Cube™ automatically cycles through its entire saturated color spectrum by modulating the intensity of the red, green, and blue LEDs.
There are two user settings that can be adjusted in Color Wash Mode - Wash Timer and Wash O�set.
Wash Timer:
The wash timer determines how long it takes for the PICA Cube™ to complete an entire color cycle, and by extension, the rate at which the colors change. Choose a short time for a rapid wash or a longer time for a slower wash. Tochange the Wash Timer press TOGGLE. The status LED will begin to blink slowly.Rotate the KNOB to desired Color Wash speed (0 = 15s, 8 = 16.5min, F = 60min).Once your speed is achieved, press MODE to save and exit.
Wash O�set:
When set to Color Wash Mode, the PICA Cube™ is operating as a DMX master and is sending DMX512 data, allowing it to control unique color washes on up to fourteen additional fixtures in a chain (set to DMX mode).
Color Wash Mode
18
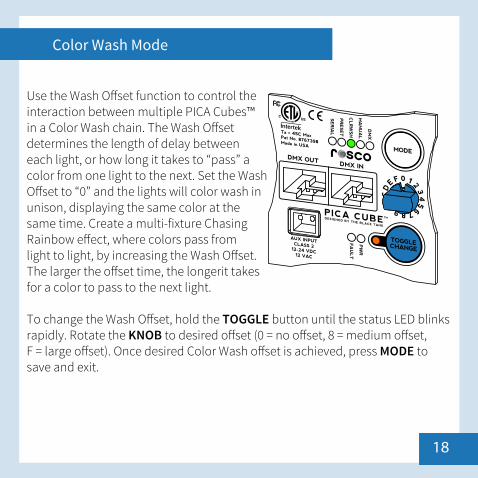
Use the Wash O�set function to control theinteraction between multiple PICA Cubes™ in a Color Wash chain. The Wash O�set determines the length of delay between each light, or how long it takes to “pass” a color from one light to the next. Set the Wash O�set to “0” and the lights will color wash in unison, displaying the same color at the same time. Create a multi-fixture Chasing Rainbow e�ect, where colors pass from light to light, by increasing the Wash O�set. The larger the o�set time, the longerit takes for a color to pass to the next light.
To change the Wash O�set, hold the TOGGLE button until the status LED blinksrapidly. Rotate the KNOB to desired o�set (0 = no o�set, 8 = medium o�set, F = large o�set). Once desired Color Wash o�set is achieved, press MODE to save and exit.
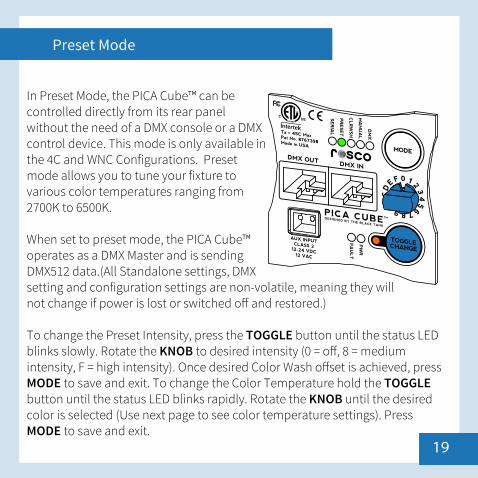
Preset Mode
19
In Preset Mode, the PICA Cube™ can be controlled directly from its rear panel without the need of a DMX console or a DMX control device. This mode is only available in the 4C and WNC Configurations. Preset mode allows you to tune your fixture to various color temperatures ranging from 2700K to 6500K.
When set to preset mode, the PICA Cube™ operates as a DMX Master and is sending DMX512 data.(All Standalone settings, DMX setting and configuration settings are non-volatile, meaning they will not change if power is lost or switched o� and restored.)
To change the Preset Intensity, press the TOGGLE button until the status LED blinks slowly. Rotate the KNOB to desired intensity (0 = o�, 8 = medium intensity, F = high intensity). Once desired Color Wash o�set is achieved, press MODE to save and exit. To change the Color Temperature hold the TOGGLEbutton until the status LED blinks rapidly. Rotate the KNOB until the desiredcolor is selected (Use next page to see color temperature settings). PressMODE to save and exit.
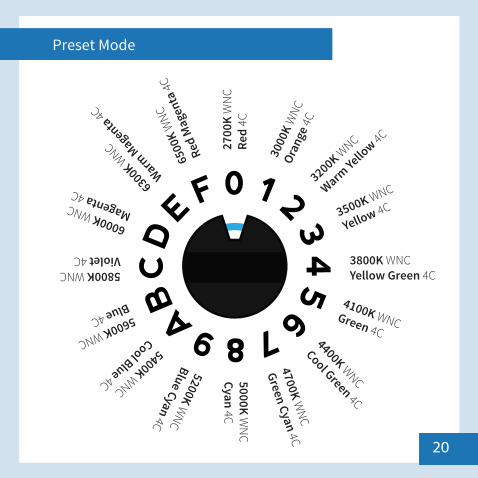
Preset Mode
20
3800K WNCYellow Green 4C5800K WNC
Violet 4C5000K W
NC
Cyan 4C
2700
K W
NC
Red
4C
3500K WNC
Yellow 4C
4100K WNCGreen 4C
5600K WNC
Blue 4C
6000K WNC Magenta 4C
3200K WNC
Warm Yello
w 4C
4400K WNC
Cool Green 4C5400K WNC
Cool Blue 4C
6300K WNC
Warm M
agenta 4C
3000
K W
NCOr
ange
4C
6500
K W
NC
Red
Mag
enta
4C
4700K WNC
Green Cyan 4C
5200K WNC
Blue Cyan 4C
Serial Mode
21
In Serial mode, the unit is controlled by the serial data it receives on the RJ45 connectors located on the rear panel. The serial address required to control the fixture is dependent on the factory setting in use (for example - four color PICA Cubes™ usefour DMX Channels whilte one color PICA Cubes™ use one).
Serial Address
To change the Serial address while in Serial Mode press the TOGGLE button. The Status LED will begin to blink slowly and at this time adjust the KNOB to set the first digit of your address. Once you have selected the first digit press the TOGGLE button to lock it in. The status LED will blink rapidly for a brief moment telling you that the first digit is locked and ready for the second digit. Repeat this step again for the second and third digits and press the TOGGLE buttonupon completion.
NOTE: It is important that you inlcude leading zero’s in the first and seconddigits if neccesarry. Also make sure you enter a valid Serial address (001-512) otherwise the fixture will default to your previous address.
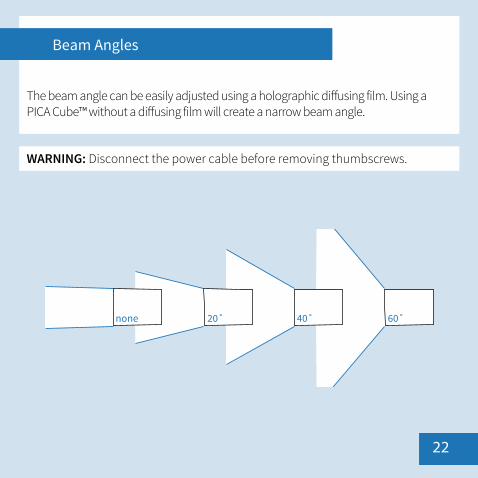
Beam Angles
22
The beam angle can be easily adjusted using a holographic di�using film. Using a PICA Cube™ without a di�using film will create a narrow beam angle.
WARNING: Disconnect the power cable before removing thumbscrews.
none 20˚ 40˚ 60˚
Beam Angles
23
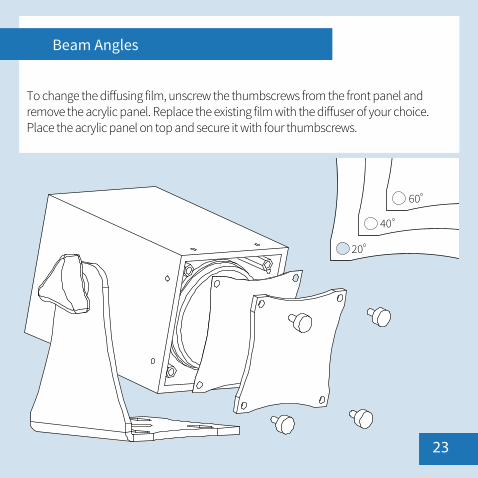
To change the di�using film, unscrew the thumbscrews from the front panel and remove the acrylic panel. Replace the existing film with the di�user of your choice. Place the acrylic panel on top and secure it with four thumbscrews.
Mounting
24
Safety Cables
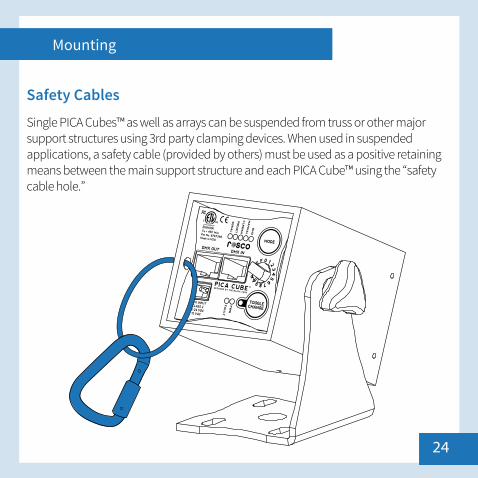
Single PICA Cubes™ as well as arrays can be suspended from truss or other major support structures using 3rd party clamping devices. When used in suspended applications, a safety cable (provided by others) must be used as a positive retaining means between the main support structure and each PICA Cube™ using the “safety cable hole.”
DMX & Power CAT5 Pinout Diagram
25
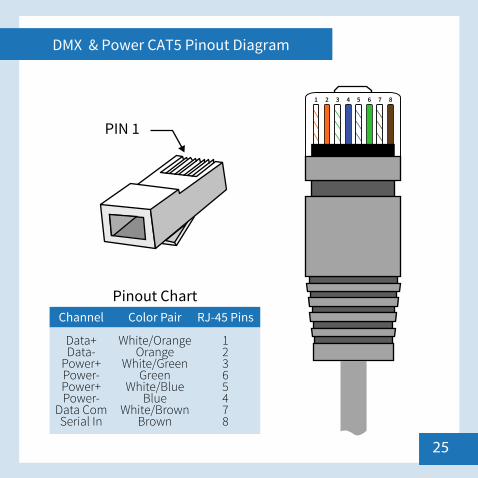
Pinout ChartChannel
Data+Data-
Power+Power-Power+Power-
Data ComSerial In
Color Pair
White/OrangeOrange
White/GreenGreen
White/BlueBlue
White/BrownBrown
RJ-45 Pins
12365478
1 2 3 4 5 6 7 8
PIN 1
FCC Warning
26
This equipment has been tested and found to comply with the regulations for a Class A digital device, pursuant to Part 15 of the FCC Rules. These limits are designed to provide reasonable protection against harmful interference whenthe equipment is operated in a commercial environment. This equipment generates, uses, and can radiate radio frequency energy and, if not installed and used in accordance with this user’s guide, may cause harmful interference to radio communications. Operation of this equipment in a residential area is likely to cause harmful interference, in which case the user will be required to correct the interference at his own expense.
General Precautions
27
1. The use of a safety cable is required when rigging the fixture.
2. Before use, make sure all screws and safety points are secured.
3. Make sure the light is unplugged before performing any service to the unit.
4. ALWAYS keep this product out of reach of children and untrainedpersons.
5. ALWAYS adhere to safety instructions and warnings, including any andall instructions set forth in the Product Specifications.
6. To allow for proper cooling, airflow must not be restricted through the front and rear of the fixture - do not block o� the front or rear panel.
7. For Dry locations/Indoor use only.
Warning Messages
28
The PICA Cube™ has warning messages built in that will instruct you when an action needs to be taken.
On startup, if a DMX signal is not present on the DMX connectors, and the fixture is set to DMX mode, all of the LEDS will glow dimly. This feature can be used for troubleshooting your DMX control lines. Once DMX is detected the fixture willinstantaneously respond to the command it is given.
The PICA Cube™ is equipped with an internal temperature sensor.If an overheat condition is experienced the Red (4C),Warm (WNC) or UV LED will glow dimly and the fault LED on the back of the fixture will turn on. If this occurs unplug the power connector from the unit and wait three seconds. Plug the fixture in again. If thesame condition occurs again contact the manufacturer.
The PICA Cube™ can also detect a fan speed fault. If this occurs the Blue (4C),Cool (WNC) or UV LED will glow dimly and the fault LED on the back of the fixture will turn on. If this occurs unplug the power connector from the unit and wait three seconds. Plug the fixture in again. If the same condition occurs again contact the manufacturer.


PICA CUBE™DESIGNED BY THE BLACK TANK