Embed Size (px)
Citation preview

Room Air Conditioners Owner's Manual
Manuel du proprietaireManual del propietario
Room Air Conditioner
Climatiseur domestiqueAire acondicionado para habitaci6nKeep manual for future reference. Be sure manual stays with air conditioner.
Conserver ce manuel pour r6f6rence ult6rieure. S'assurer que le manuelaccompagne toujours le climatiseur.
Conserve este manual para referencia futura. Asegfirese de que el manual
permanezca con el aire acondicionado.
I. DescriptionThis room air conditioner cools,dehumidifies and filters theair inside your home.
I. DescriptionCe climatiseur domestiquerafrafchit, d6shumidifie et filtrerair a I'int6rieur de la maison.
I. DescripcibnEste aire acondicionado parahabitaci6n enfria, deshumidificay filtra el aire interior de su casa.
A RECOGNIZE THIS SYMBOL
AS A SAFETY PRECAUTION
A APPRENEZ A RECONNAffRE
CE SYMBOLE CONSTITUANTUNE MESURE DE SECURITE
A RECONOZCA ESTE SiMBOLOCOMO UNA PRECAUCIONDE SEGURIDAD
Important:It is important, both foryour personal safety and to avoidpossible damage to your applianceor your home, that you observe thesafety instructions that are givenfollowing this symbol.
Important :il est important, autantpour la s6curit6 que pour 6viterd'endommager I'appareil ou lar6sidence, de respecter lesconsignes de s6curit6 suivant cesymbole.
Importante: Esimportantetanto parasu seguridad personal como paraevitar posibles dafios al aparato o asu hogar, que observe lasinstrucciones de seguridad que seproporcionan despu6s de estesimbolo.
0010554476

Thank You for buying a dependable, energy saving and easy to operateArnanaroom air conditioner. This manuaJ contains useful information for
you to maintain, operate, install and safely use your room air conditioner.
Your air conditioner cleans, cools and dehumidifies the air in your room to
provide yau with the ultimate bvel of comfort.
Please read instructions carefully before using the product. Also, do notforget to fill out and mail the Product Registration Cord.
Record Your Model and Serial Number.
Far all your service calls during the warranty period the fallowing
information will be needed. Attach the sales receipt to this guide and keep
far future reference. This information can be obtained from the serial plate,
which is on your air conditioner. This is either on the cabinet (side or back)
ar you may have to remove the front grilb to locate it.
Model Number:
Serial Number:
Date of Purchase: .........................................................
DeaJer's Name: ............................................................
Deabr's Address: ..........................................................
Deabr's Phone Number: .................................................
TABLERECEPTACLE AND FUSE TYPES
PJ_.TE D VOLTS 125/60 250/60
AMPS 15 20 15 20 30
FUSE SiZE 15 20* 15 20* 30
TiME DELAY FUSE
(or circuit braker) P|ug Plug Plug

ETYWARNING: Following these basic precautions will reduce the
risk of fire, electrical shock, injury or deathwhen using your air conditioner.
,_ 1) Air conditioner must be connected to proper electrical outlet with the
correct ebctricaJ supply. (see table)
2) Proper grounding must be ensured to reduce the risk of shock and fire.
DO NOT CUT OR REMOVE THE GROUNDING PRONG. if you do
not have a three-prong electric receptacle outlet in the wall, have a certified
electrician install the proper receptacle. The waJJreceptacle MUST be
properly grounded.
3) Do not use if power cord is frayed or otherwise damaged. Also avoid
using it if there are cracks or abrasion damage along the length, plug orconnector.
,_k 4) DO NOT USE AN ADAPTER OR AN EXTENSION CORD.
5) When installing your air conditioner in a window, make sure the window
is strong enough to hold the weight of the air conditioner. You also want to
secure and correctly install your air conditioner properly to prevent it from
falling. Extra brackets and or support may be required depending
on your window.
6) Do not block airflow inside or outside the air conditioner with blinds,
drapes, protective covers, shrubs or bushes.
7) Be careful of sharp edges on the front and rear fins of the unit that could
cut and cause serious injury.
8) Be careful when Jiltingthe air conditioner to install or remove the unit.
Always use two or more peopb for this.
9) Always unplug the air conditioner before servicing it or moving it.

PAGE
A Word From A.nana 1
Product Registration 1
Safety Precautions 2
Warnings 4
Electrica| Safety 4
Tips 5
Energy Saving Guide 5
Features 6-7
Operating Guide 8-12
Normal Operating Sounds 8
Operating instructions 8-12
|nstollations 13-20
Parts 14
Tools 14
Installing Unit into A Window 15-20
Clean and Care Guide 21-22
Troub|eshoating 22-23
Warranty information 24
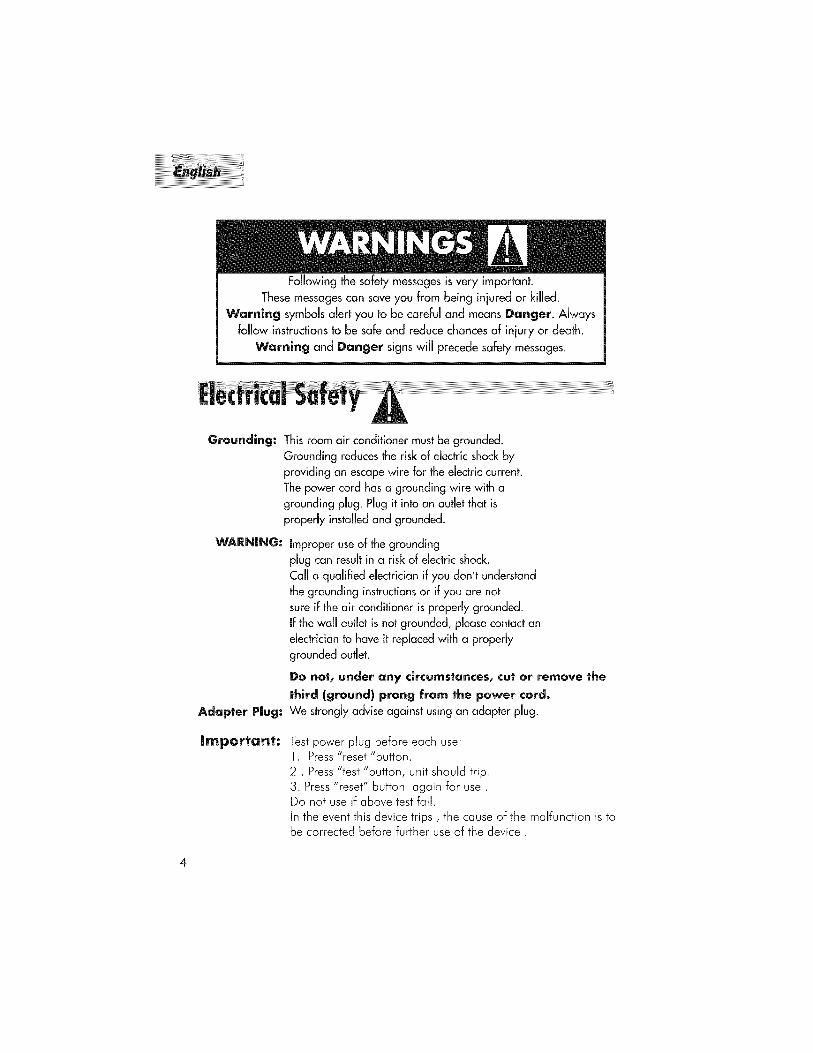
Following the safety messages is very important.
These messages can save you from being injured or kilbd.
Warning symbols alert you to be careful and means Danger. Always
follow instructions to be safe and reduce chances of injury or death.
Warning and Danger signs will precede safety messages.
Grounding: This room air conditioner must be grounded.
Grounding reduces the risk of electric shock byproviding an escape wire for the electric current.
The power cord has a grounding wire with a
grounding pbg. Plug it into an outbt that is
properly instalbd and grounded.
WARNING:
Adapter P|ug:
improper use of the grounding
plug can result in a risk of ebctric shock.Call a qualified electrician if you don't understand
the grounding instructions or if you are not
sure if the air conditioner is properly grounded.
if thewall outlet is not grounded, please contact an
electrician to have it replaced with a properly
grounded outlet.
Do not, under any circumstances, cut or remove the
third (ground) prong from the power cord.
We strongly advise against using an adapter plug.
|mporlant: Test power plug before each use:1. Press"reset "button.
2 . Press"test "button, unit should trip.3. Press "reset" button again for use.Do not use if above test fail.
In the event this device trips, the cause of the malfunction is tobe corrected before further use of the device .

o Air Conditioners are designed for use in a double hung window or
through the wall installation only. (As applicable in your model)
• While installing unit be sure to tilt air conditioner 5 degree outward to
have the water drip outside the house.
• Install the unit on the north side as normally that is the shaded side. Thiswill enhance the operation of your unit.
• Window has to be strong for installation. Extra brackets and or support
may be required depending on your window.
o Measure the window before installing, if the window is too big for the
unit you may require professional installation._ Use correct ebctric voltage and proper ampere for the unit to run
effectively._o Only bt a certified electrician do any modifications to your ebctrical
outbt.
• When installing your air conditioner make sure to seal all areas where
there is a possibility of air bakage.
Airflow should not be blocked inside either by curtains, drapes or
furniture or outside by shrubs or bushes.
• Do not needlessly use an electrical light or other appliances that
produce heat.
• Keep the vent closed on the air conditioner when in the cooling function.
• Keep the blinds and the drapes drawn on all the other windows.
• While cooking use an exhaust fan in the kitchen to remove the excess
heat produced.
• Always use the correct BTU size air conditioner to cool the room to
attain optimum efficiency.

ventcontroller
side vent
louvers
easy-accessfilters
-_. electronictouch pad
ACE185R,ACE245R,ACE156E,ACE185E,ACE245E,ACEX186E
]. Thermostat
This allows you to adjust the temperature of the air.
The lower the setting the cooler the air temperature.
with this you can set the temperature to your
desired comfort level. You can set the temperature
behveen 61 ° F and 86 ° F
2. Fan Speed
with this you can control the fan speed as wellas
the A/C (cooling} speed.
You hove 3 levels of A/C Speed for you to set at
your desired level LO wilm circulate air of the
_owest velocity, MED at medium vemocity and HIGHwill circulate at the maximum.
You have 3 levels of Fan Speed to set at yourdesired comfort level. HIGH, MED and LOW.
3. Function,
Your air conditioner has 3 Functions.
a) A/C.
Here the air conditioner wilm operate the compressor
and the desired fan speed set to give you chilled
cold air for your comfort.
b) Dehumid.
This enabbs your air conditioner to operate as adehumidifier as well. it will remove the excess
moisture from the air to keep your room at a
comfortable dry stage. You can usethis feature
alone in case you do not desire to use the airconditioner,
c) Fan Only
You can run the fen only on not so hot days. Thefan can be setto run at 3 speeds (HIGH fen, MEDfan, LOW fan)as desired by you.
4. Energy Saver
When this feature is "On" the fan will shut
off three minutes after the compressor cyclesoff. This will reduce energy consumption andnoise. When the compressor turn back onthe fan will turn on at the same time. In the
"OFF" position the fan will not shut off whenthe compressor cycles off.
5. Timer
Your air conditioner can be set to go on or off at
your desire, This can Be done up to 24 hours in
advance.
6. 4 Way Air Flow
These air directional louvers let you control the
direction of the airflow in your required direction.The airflow can be directed
up - down - right side - left side.

7. Vent
The Fresh Air Vent allows the air conditioner to
recirculate inside air, draw fresh air into the room
and exhaust stale air to the outside.
8. Slide Out Chassis
Your Air Conditioner becomes more versatile with
this feature. You have the option to install the unit ina window or the wd[
9. Window Install Kit
Enables you to install the air conditioner in a
double hung window. Extra brackets or su99ort
may Be needed depending on your window.
| 0. Remote Control
This full functional wireless remote allows you to
operate your air conditioner from a distance. You
need not have to get up to change the settings, thefunctions or to turn the unit on or ate
! |. LED Display Electronic Control Panel
The 4 function LED displays Room Temperature,
Temperature Setting, Timer Setting and Time
Remaining to Stop / Start the unit. Electronic
Control Panel Jetsyou set the temperature to the
Exact Temperature you desire.
12. UV Light
Filters Impurities for Cleaner Air
Unique Photocatdylic Air Purifier with UV Light
Active Tio2 Converts Oxygen&wafer into Hydroxyl Free
Radicals(OH)
Free Radicals Effectively Disintegrate Organisms in the Air
Air is Clean,Deodorized and Purified
Insfrudion to use UV Light function:
When pushing UV Light button,it will clean and purify the
air which circuleled through Ihe fronl grill.
13. Haw The Unlf Drains
On humid days with the air conditioner in
use, moisture may collect on the pan or
bottom of the air condifionen If the unit is
position properly the moisture will gather
towards the back of the unit. This will not
effect the operation of the unit and the
moisture will evaporate in time. Occasional
the moisture will flow over the back of the
pan but this will not effect the operation of
the unit. Never drill holes in the pan under
any condition.

Normal Operating SaundsThe following soundsare normally heard during the operation of an air conditioner.
* Cool airflow movementas dictated by the set fan speed.
° Water sounds.This is normal as your air conditioner actsas adehumidifier also.Thusyou will hear water soundsfrom water dropsfalling on the condenser.As the refrigerant flows through the inner sealedtubing a rushing noisemay be heard.
* Rattlingor vibrating noisesmay be heard due to poor wallor window installation.
* High pitchcompressorsound may be heard.
Operating Jn,structionsFallowing are the operatinginstructionsof your ebctronic air conditioner.
Remote contro| and contro| panel operations
After installingyour air conditioner plug it in to the proper electricaloutletin the wall. Keep the vent in the dosed position. Now set the airconditioner at your comfort level. This full functionalwireless remoteallowsyou to operate your air conditioner without having to get up and go to theunit.The fuji function featureallows you to change the settingsand turn the
unit on or off from the remote itself.Thiscontrol pad works the sameasthe control pad on the air conditioner.(SeeFig. # 1)
Fig. # 1Remote ControJ
orb/or _
iiiiiiiiiiiiiiiiiiiiiiiiiiiiiiiiiiiiiiiiiiiiiiiiiiiiiiiiiiiiiiiiiiiii!@i¸IIIII¸III¸IIIII¸III¸IIIII¸III¸IIIII¸III¸II¸
8

After you plug in the unit it will perform a selftest. AJJthe dispJay lightswill turn on for 3 seconds.The LEDdisplay wiJJread "88". If any displaylight fails to turn on you may need serviceon the unit. After the 3 seconds
self test the unit wiJJautomatically go to the stand by mode. Now aJJlightswiJl be off and you wiJJhave to turn "ON" by pressing the On/Off key.After pressing "On/Off", the unit starts to work and entersthe statusof"Fan" with low setting.
You wiJJhave to press the (A) or (T)key on the Temp/Time to set thetemperature at your desired comfort. Youcan choose between 61 °Fand 86°F.Once the temperature is set you can raise or lower it by pressingthe (A) or (T)keys. (Only when the unit is cooling, energy saver ordehumidifying, can the temperature setting be adjusted.) (SeeFig. # 2)
Having set the temperature you will set the function of the air conditioner.
Panel
/iz Z kz ; zF)ziz z zz z z F / zzFzMODE SPEED TIMER TEMP l TIME
Every time you press the MODE bulton, it wiJJ change between FAN, COOL, ENERGY
SAVER and DEHUM. (See Fig. # 3)

Fig.# 3
Control Panel
I
Once the function mode is decided you will have to set the fan speed.(See fig. #4)
Every time you press the SPEED button, fan speed will change between LOW,
HIGH,MED.
1) If you choose the COOL mode you can run the fan in one of the 3 speeds HIGH,
MED, LOW.
2) For cool days you may want to run the '_FAN'_function. The fan can be set to run at
3 speeds (HIGH fan, MED fan, LOW fan)as desired by you.
3) If you choose to use the Dehumid function. This will remove excess moisture
from the air on excessively humid days.
Tr: temperature inside the room.
Ts: the set temperature.
1 ) When Tr>Ts+3 °F, the compressor will run continuously the fan at the
selected speed.
2)When Ts-1 °F_Tr_Ts+3 °F the compressor will cycle for 10 minutes on
and 6 minutes off.
3)When Tr<Ts-1 °F, the compressor will shut off.
The dehumidification process takes place between the set temperature -1
and 3 °F above the set temperature.
4)Energy Saver : The unit runs the same as COOL setting in the ENERGY SAVER
mode. But the fan will be off 3 minutes after the compressor cycle off.
10

Fig. # 4Control Panel.
m
iiiiiiiiiiiiii¸
Timer on or Timer off mode is used to pre-start or shut off your unit in
advance. You can program this up to 24 hours in advance. You can use
the Timer in 4 functions i.e. COOL, Energy saver, Dehumid or Fan .
® Timer on (See Fig. # .5)
Unit must be on to set the timer. Unit will shut down automatically after it
accepts the settings in 5 seconds. Use this mode to pre-set the start time of
the unit 24 hours in advance.
a) Press TIMER ON, LED display will show "XX'' (time set last time) when power
is connected first time, LED display will show "01 ".
b) Set desired number of hours by pressing the (A) pad of the Temp/Time
buttons, one for each hour. If you passed the desired time use the (T) pad
key to lower the selection.
c) After set TIMER ON, LED display will show the time. This time displayed:
unit will starts after X hours.
Timer off (See Fig. # .5)
Unit must be running to set the timer off. Use this to preset the time you
would like the unit to shut off.
a) Press TIMER OFF, LED display will show II_J (time set last time) when power
is connected first time, LED display will show "01 ".
b) Set desired number by pressing the (A) pad of the TempMime buttons.
One for each hour. If you passed the desired time, use the (T) pad key to
lower the selection.
c) After set TIMER OFF, LED display will show the room temperature about .5 seconds
later.
When using the timer the unit will use/revert fo the last COOL and fan
seliings when activated. The timer must be reset every time you choose to
use it. II

Fig. # 5Control Panel.
Adjusting the Air Flow Direction
Airflow can be adjusted by changing the direction of the air conditioner's louvers.
This can also increase the cooling efficiency of the air conditioner.
Adiusting Horizontal Air Flow
Direction
Adjusting the vertical louvers left and
right will change horizontal airflow.
Adjusting Vertical Air Flow Direction
Adjusting the Horizontal vane up and down will
change vertical airflow. The vane can be adjusted
by nudging the back or up and down of the vane.
Adiusting Horizontal Air Flow Adiusting Vertical Air Flow
Recommended orientation of louvers
Adjust louvers to face upwards when cooling to maximize cooling efficiency.
12

Before you install your air conditioner check the following:
1}The unit is free of all obstructionsinsideand outside the room e.g. drapes,curtains, furniture, plants, shrubs,bushes,trees,other structureslike building,garage etc. Air conditioner musthave clear unobstructedairflow throughthecondenserto removethe heat.
2) Thewindow is strongenough to hold theweight of the air conditioner.Extra bracketsor supportsmay be neededdepending on your windows.
3) Thewindow sill and track are strongenough to hold theweight of theair conditioner.
4) Thewall is strong enough to hold the uniL Extra bracketsor supportsmay beneeded depending on the wall.
5}
kzl
kgl
There is adequate and proper power supply near the air conditioner.
DO NOT use adapter pbgs.
DO NOT use extension cords.
DO NOT cut or remove the ground prong.
DO NOT modify the plug or the electrical wall outbt in any way.
if plug does not fit the ebctrical outlet have a certified ebctrician do the
necessary change.
_10) DO NOT connect electrical power to the unit before installation.
_11 ) DO NOT use if power cord is worn out, frayed or otherwisedamaged.
Avoid using if there are cracksor abrasion damage along the length,plug or connection.
12) Be careful of exposed sharp edges of the cabinet and sharp coils (fins) on
the back of the unit that could cut and cause serious injury.
13

Parts
Pa4s Supplied
wood screws 31/32'
window seal
gasket
curtain
a_achmentscrews 13/32 '
19/32 _longscrew ad
basepan angle Iocknut Iocknul
insqallafion bracket Remote _i-_ left and right(left and right) control "CR2025" baHery side curtains
Model: ACE 185R,ACE245R,ACE 156E,ACE185E,ACE245E,ACEX 186E
Youwill need to have the following tools to help you in the installation ofyour air conditioner.
,Scissors
• PhiJlipsScrewdriveroStandard ScrewdriverPJiers
oWrencheDriJJand Drill Bits
•TapeMeasureeGJoves• LeveloSockets
14
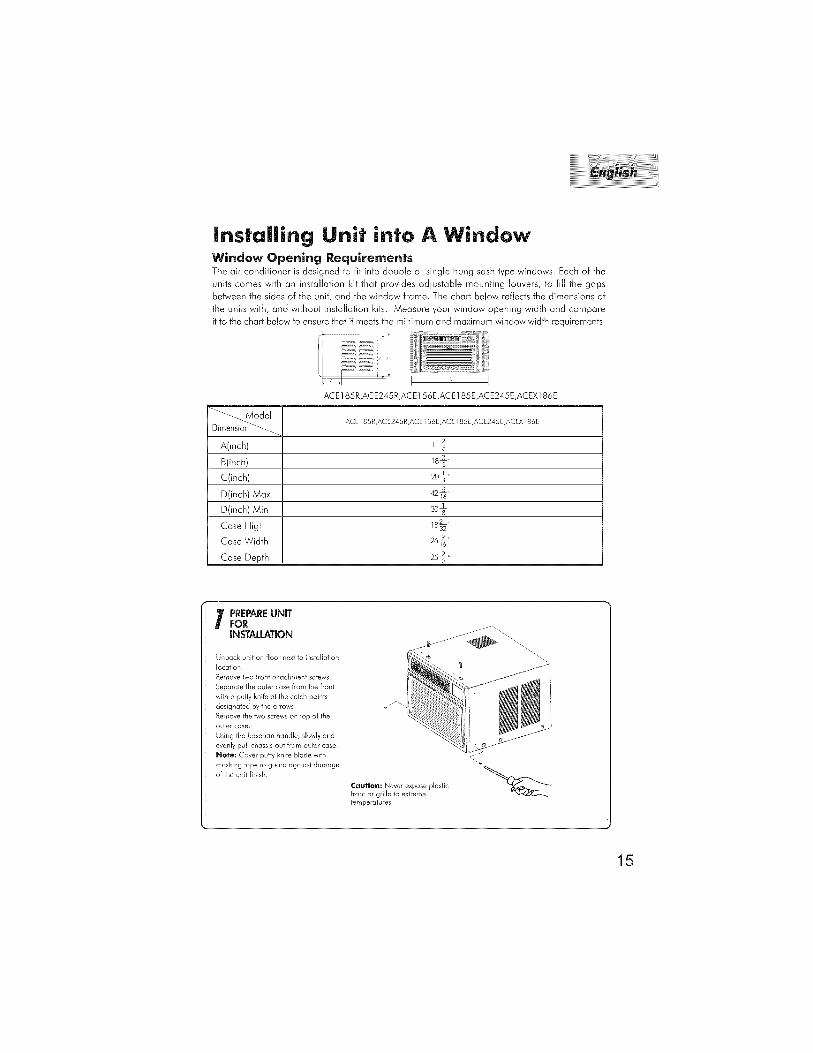
installing Unit into A WindowWindow Opening RequirementsThe air conditioner is designed to fit into double or single hung sash type windows. Each of the
units comes with an installation kit that provides adjustable mounting louvers, to fill the gaps
between the sides of the unit, and the window frame. The chart below reflects the dimensions of
the units with, and without installation kits. Measure your window opening width and compare
it to the chart below to ensure that it meets the minimum and maximum window width requirements.
/ iI. " .I
ACE185R,ACE245R,ACE 156E,ACE 185E,ACE245E,ACEX186E
1 ACE 8SR,ACE24SR,ACES6E,ACEmSE,ACE24SE,ACEX_86E
A(inch)
B(inch)
C(inch) 20_'
D(inch) Max
D(inch) Min
Case High 18_"
Case Width 2619'
Case Depth 25_ _'
I REPAREUNiTFORINSTALLATION
Unpack unit on fJoor next to installation
location
Remove _vo front attachment screws.
Separate the outer case from the front
with a putly knife at the catch points
designated by the arrows
Remove the two screws on lop of lhe
outer case.
Using the basepan handle, slowly and
evenly puJl chassis out from outer case_
Note: Cover putty knife blade with
masking tape 1o guard against damage
of the unit finish_
Caution: Never expose plastic
front or grille to extreme
ternperatures.
15

ASSEMBLECURTAINS/TOPRAIL
Install lop rail with four 13/32" screws.
Slide left-hand curtain assemblyinto left end of top and bottomrails. Repeat for right-hand curiainassembly, Fasten curtain retainerstrips to sides of outer case wit_six 13/32' screws.
PREPAREWINDOW FORINSTALLATION
Inspect window track, sash, and sillfor its ability to support the weight ofair conditioner.
Measure width between window
moldings to ensure Instant Mountwill fit window frame. Instant Mount
models are designed for windowswide (the detail see page 15)
InstantMount kit supplied with unit
is designed for mounting in mostdouble-hung windows wilhoutstorm windows.For inslallafion in
window frame with storm window,
Storm window installationIf slorm window frame does not allow
adequate clearance below sill (1/2"required), remove storm windowframe or create clearance by adding awood strip (at least 1 1/2" wide) alongentire width of sill, Fasten wood stripto sill with at least three countersunk
wood screws (no_ supplied wiih kit).This _rovides a smooth surface for
mounting air conditionen
1/2"
D
mmodify sill by adding wood strips(nol
included) to inner and outer sills. This SforrnWlndow Rraises unit and eliminates interference Frame
of storm window frame.
Mobile home window installation
Add wood srip (at leasi 1 1/2" wide)along entire width of window sill,Thickness of wood strip should matchheight of front lip on window frame.Fasten wood strip to sill with aminimum of three countersunk wood
screws (not supplied with kit), Thisprovides a smooth surface formounting air conditioner.
Must be a minimum
M1 1/2' _:_,. Window
i Woodi _tri
i iv°o_..... ....... o°
16

iNSTALL OUTERCASE IN WINDOWPlace outer case in window. Lowe_
sash until it rests behind _ront flangeof top rail. Boffom rail must restbehind window sill
rail
Use _wo wood screws 31/32' to fix 1hecase _o
windows sash. Install left & right installation bracket
and as shown in fig. Install bolt(2 1/2" long flat headbolt and Iocknut) 1o_he installation bracket and adiust
them to proper length ,then use 4 (I 9/32 )screws to fixthe bracket on the case.
Y
Expandwindow Jrame. install four woodscrews 31/32" Two in each upper right andleft of he curtains.InstalJthree wood screws 31/32" top mounting railscrews.NOTE: To make screws easier to
drive, drilJ a pilot hole into sashthrough clearance hale in curtains.
17

iNSTALL SASH B_CKET& SEAL GASKET
Installsash bracket on top of indoor window sash
with one wood screw 3 ]/32" to prevent raising of
window from the outside. Screw anchor d recfly intoside of window frame. For hard wood or metal window
frames, drill a pilot hole to start screw,
Imporlant:Be careful not to drill pilot hole too deep
Add a piece of tape to the drill bit as a depth gauge.Also stay clear of glass. Be careful not to damage thefunction of he window.
Cut window seal gasket to width of window Stuff windowseal strip be ween outdoor window glass and top of
indoor sash. This will stop air leakage which reducesefficiency.
RETURNCHASSISTOOUTERCASE
Find someone to help you
replace chassis in outer case.Replace front panel, and grille.Cautlon:For security purpose, reinstallscrews at cabinet's sides.
Where possible insqall lwo screwson op of the outer case, removed
in slep oneIMPORTANT: Because window
sash helps keep unit in window,make certain window sash contacts
outer case before reinstallingchassis.
18

WoB |nstoNotions: slide-out chassis only
Note: Remove the 2 shipping screws on the top of the air conditioner
that hdd the chassis to the outer shd[ casing. Once removed,
these do not have to be re-instdbd. To ensure that your air
conditioner is properly installed in the wall, it is recommended
that it be installed by a certified technician who is familiar with
through the wall installations.
1) Using wood, 1" or more in thickness, build a wooden frame to fit the
casing/cabinet dimensions of the unit which you have purchased.
2) Measure theoutside width and the height of the frame to determine thecutout dimensionsnecessaryfor theopening in thewall. The depth of theframe wi[[ depend on the depth of thewall. The finished frame mustbe setin the insidewall. The frame has to be squaredand bvded. Remembertheframe has to be nailed securelyto the wail studs. (SeeFig. # 19)
Fig. # 19
3) Now to install, insertthe casing into thewall opening. (Removethe
chassisout first following steps1 - 6 in Slide-outchassissection).Make sure that the cabinet is at least 1/2" inch inside the room. Also the
side louversshould not be blocked. This is to have proper air circulation inand around the compressor.(SeeFig, # 20)
lg

Fig. # 20
_/pical casingoutward tip
level
casing
4) The casing should be tilted 1/4" outside so as to drain the excessdehumidified water.
5) Properly insulate any opening bebveen the casing and the frame.
6) Using the screw holeson the sides of the unit, which are for the windowmounting kit and the screw hobs in the top mounting kit rail, attach the
casing to the wood frame.
7) With the help of another person lift and put the chassisof the
air conditioner in to the casing.
8) Screw the security screw into place and snap on the grille.
9) If the filter was removed during this process, reinsert the filter.
2O

• Always unplug your air conditioner before c|eanlng.
• The air filter behind the inlet grille should be checked and cleaned at least
once every 2 weeks (or as necessary) to maintain optimal performance ofthe air conditioner.How to remove the air filter
1. The grille may be opened from the top for easy maintenance after installation.
2. Open the inlet grille by pulling off the exposed door on the top of theunit(based on the installation).3. Pull the tab slightly to release the fifter. Pull the filter in the same direction
as the opening.4. Clean the filter with warm, soapy water. The water should be below
40°C(104°F).5. Rinse off and gently shake off excesswater from the filter. Let it dry before
replacing it.
DO NOT use your air conditioner without the air filter in p|ace.
• ?o dean the front panels or the cabinet DO NOT use harsh
chemlca|s, abrasives, ammonia, chlorine, b|each, concentrated
detergents, solvents or meta| scouring pads. Someof thesechemicaJs
may dissolve,damage and/or discolor your air conditioner.
• A|ways use a soft cloth dampened with water or mild soap
and water solution to wipe the front if the cabinet.
Wipe dry with a softcloth.21

To store your air conditioner, after the season, remove the unit from the
window as per the installation guide. Repack the unit in its original box
and store away. If your unit is installed in a wall or you do not intend toremove it from the window then cover the outside with a winter cover.
This can Be purchased from the retailer where you purchased your
air conditioner or from your local hardware store.
Before putting away your unit make sure any water left in the pan is
removed and drained away. Water left in the pan could lead to Rusting
or damage to the electrical connections.
|f air conditioner does not operate:
,, Check if unit is plugged in. The plug may have come loose.
* Check if the unit is in "Off" mode.
Air from air conditioner is warm:
* The A/C setting may need to be raised.
Ice formation on coo|ing colls:
• Outside temperature too cold. Set the unit on fan only
setting to defrost ice.
• Lower temperature setting. Temperature setting may be too cold.
o Unit BTU may be too high for the room.
22

Air conditioner working but room not coo|ing:
* Room may have appliances that produce heat. Use an exhaust fan toremove excess heat.
" Redirect the airflow. Remove any obstacles.o All doors and windows need to be closed so cool air does
not escape the room.
* Air filter may need cleaning.
* Unit BTU may be too low for the required cooling area.
e On extreme hot & humid days air conditioners may take
a little longer to cool.o Vent may be in the open position. Vent has to be closed for
optimum cooling.
Air conditioner is making noise when cooling:Youmay hear soundsof air movement,water, compressorclicking on andoff or window vibrations. ReadOperating Guide - Normal OperatingSounds.(Seepage 8)
Water in the air conditioner cabinet:
This is normal as your air conditioner not only cools but also dehumidifiesthe air. if there is water dripping inside the room, check the installation ofthe unit. Theunit may need to be reinstalled. (Seepage 15)
23

ROOMAIR CONDmONG ANDDEHUMIDIFIERPRODUCTS
Limited WarrantWhat is covered and for how long?This warranty covers all defects in workmanshipor materials for a period of:12 months for labor
12 months for parts (Functional Parts Only)5 years for sealed systemThe warranty commences on the date of item purchase.Customer shall provide Amana with proof of the date of0urchase, brand, model and serial number for verificationprior to any warranty service being provided.EXCEPTIONS: Commercial or Rental Use warranty90 days for labor90 days for partsNo other warranty applies
What is covered/Not covered?
1. The mechanical and electrical parts of the appliancewhich serve the functional purpose of this appliance arecovered for a period of 12 months. This includes all partsexcept finish and trirn.2. Manufacturing defects to the components of the sealedsyslem (e,g. hermetic compressor, condenser andevaporator) are covered for a period of 5 years from thedate of purchase. Any damages to such components causedby mechanical abuse, improper handling or shipping willnot be covered.3, The limited warranty does not cover any credit or refundfor any loss or injury caused by the product or defects tothe product including but not limited to incidental orconsequential damages.
What will be done?
1. Any mechanical or electrical part that proves to bedefective in normal usage during the specified warrantyperiod will be repaired or replaced at Amana's discretion.A&E factory service is the authorized service provider forAmana.
If it is determined that repair is hal appropriale orreplacement part is unavailable for repair, Amana willexchange the product with a refurbished or new productthe same or similar to the original at its discretion,2. There will be no charge to the purchaser for functionalreplacement parts and labor on any covered items duringthe initial 12- month period. Beyond this period, only thecomponents of the sealed system are covered, labor is not0rovided and must be paid for by the customer.3. To have your product serviced, please contact Amanacustomer service 1-888-842-2440.THiS WARRANTY COVERSAPPUANCES WiTHiN THECONTINENTAL UNITED STATES,PUERTO RICO AND CANADA,IT DOES NOT COVERTHE FOLLOWING:
Damages from improper installation.Damages incurredduring shipping.Defects other than manufacturing,
Damage from misuse, abuse, accident,alteration, Jack of proper care andmaintenance or incorrect current orvdtage,Damage from other than household use,Damage from service by other than anauthorized dealer or service center.Decorative trims or replaceablelight bulbs.Transportation and shipping,Labor (after the initial 12 months),Credit or Refund for products over 30 days past date ofpurchaseFood loss for food spoiled as a direct result of mechanicalfailure of the produd or of any delay in providing service,repair, replacement.This limited warranty doesn't apply to refurbished productor unit purchased as/like new or second-hand,THIS LIMITED WARRANTY IS GIVEN INLIEU OF ALL OTHER WARRANTIES,EXPRESSED OR INCLUDING THEWARRANTIES OF MERCHANTABILITYAND FITNESS FOR A PARTICULARPURPOSEThe remedy provided in this warranty isexclusive and is granted in lieu of allother remedies,
This warranty does not cover incidentalor consequential damages, so the abovelimitations may not apply to you, Somestales do not allow limitalions on howlong an implied warranty lasts, so theabove limitations may not apply to you.This warranty gives you specific legalrights, and you may have other rights,which vary from state to state.
For more information on this and other Amana
products, call Customer Affairs Department at:
1-888-842-2440
_ CONSUMER INFORMATIONLINE
AmanaToil-Free
1-888=842-2440(Not a tech_icaJ assistance line for deaJers.)
24