Embed Size (px)
DESCRIPTION
SYNTHESIZER
Citation preview
WE DESIGN THE FUTURE
Visit us online at www.Roland.com All specifications and appearances are subject to change without notice.All trademarks are the property of their respective companies.
Printed in Japan. May 2006 RAM-4077 B-4 P-S
Creating Sounds with Fun and Ease
Synthesizer 101: Learning the SH-201
Creating Sounds with Fun and Ease
Synthesizer 101: Learning the SH-201
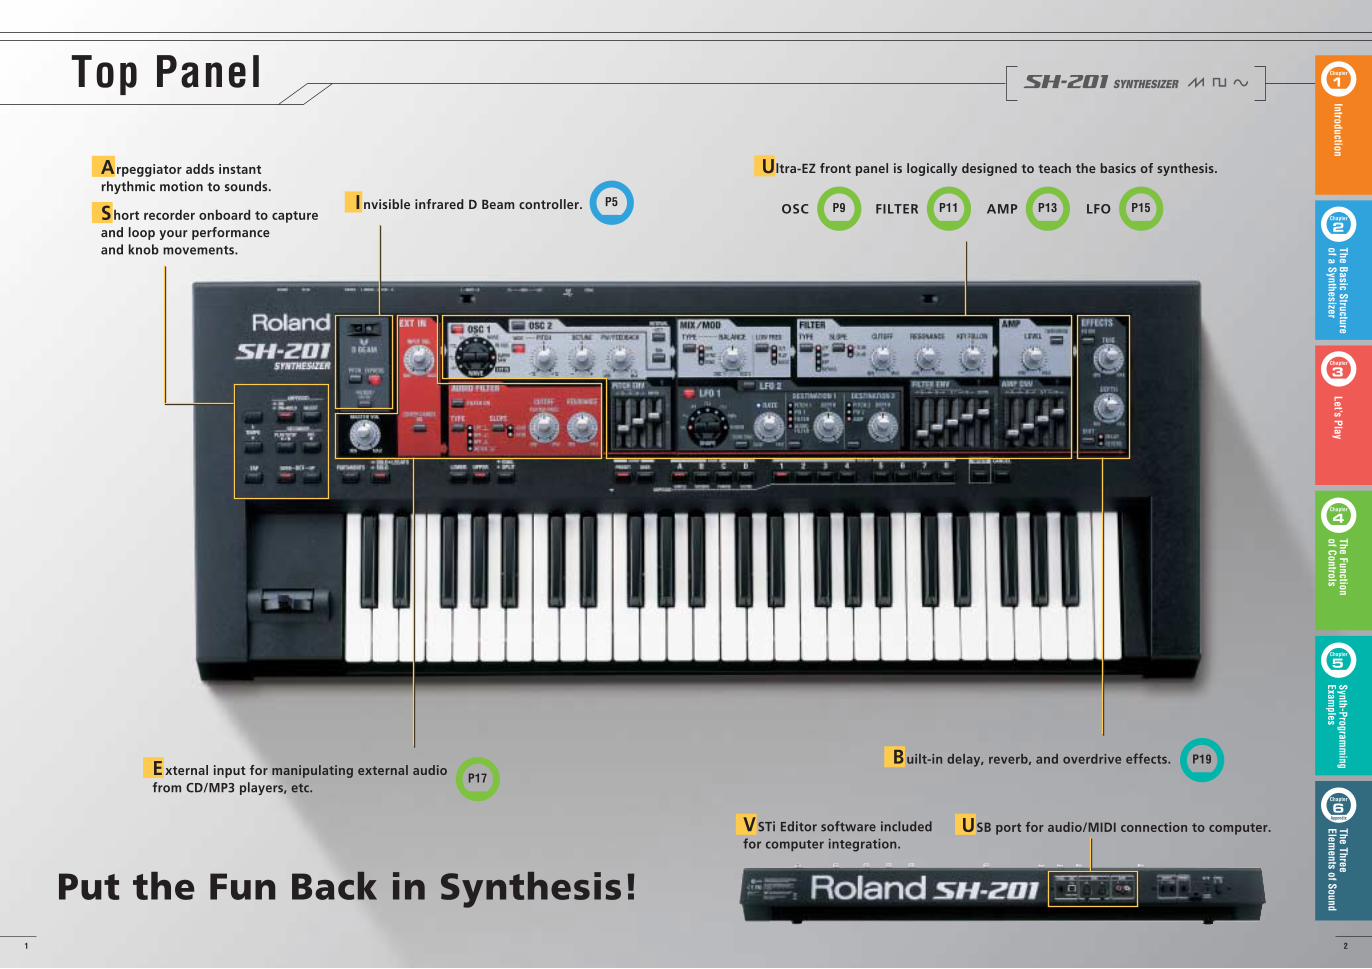
Put the Fun Back in Synthesis!
Top Panel
P5
P17
P19
P9OSC P13AMP P15LFOP11FILTER
Arpeggiator adds instant rhythmic motion to sounds.
Short recorder onboard to capture and loop your performance and knob movements.
I nvisible infrared D Beam controller.
Ultra-EZ front panel is logically designed to teach the basics of synthesis.
E xternal input for manipulating external audio from CD/MP3 players, etc.
B uilt-in delay, reverb, and overdrive effects.
USB port for audio/MIDI connection to computer.VSTi Editor software included for computer integration.
1 2
1Chapter
2Chapter
IntroductionThe Basic Structure of a Synthesizer
3Chapter
4Chapter
Let’s PlayThe Function of Controls
5Chapter
6Chapter
Synth-Programm
ing Exam
plesThe Three Elem
ents of Sound
Appendix
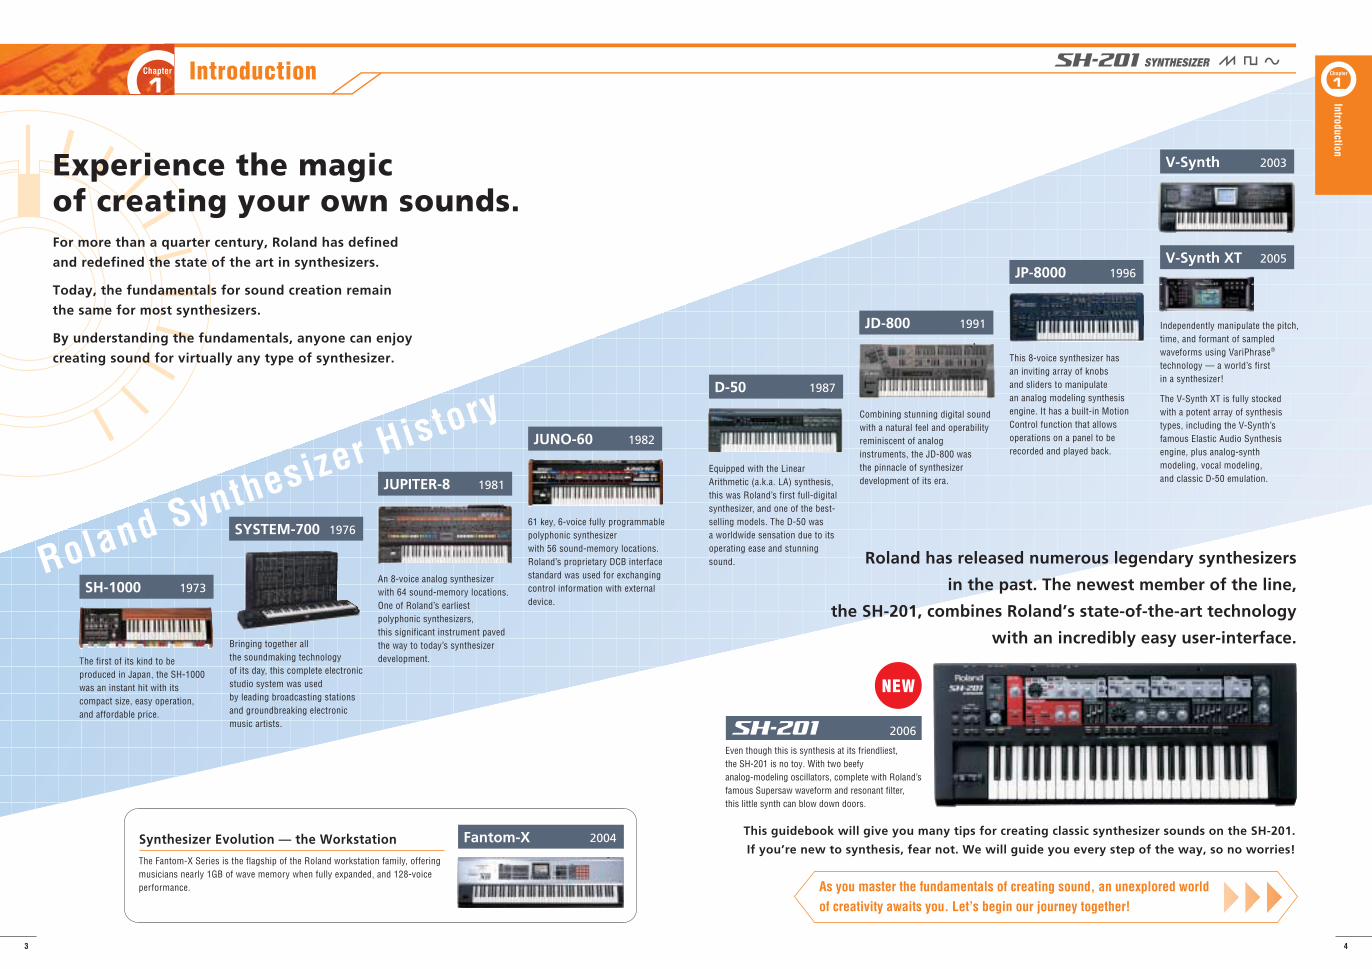
Roland has released numerous legendary synthesizers
in the past. The newest member of the line,
the SH-201, combines Roland’s state-of-the-art technology
with an incredibly easy user-interface.
This guidebook will give you many tips for creating classic synthesizer sounds on the SH-201.
If you’re new to synthesis, fear not. We will guide you every step of the way, so no worries!
SH-1000Roland Synthesizer History
1973
The first of its kind to be produced in Japan, the SH-1000 was an instant hit with its compact size, easy operation, and affordable price.
SYSTEM-700 1976
Bringing together all the soundmaking technology of its day, this complete electronic studio system was used by leading broadcasting stations and groundbreaking electronic music artists.
JUPITER-8 1981
An 8-voice analog synthesizer with 64 sound-memory locations. One of Roland’s earliest polyphonic synthesizers, this significant instrument paved the way to today’s synthesizer development.
The Fantom-X Series is the flagship of the Roland workstation family, offering musicians nearly 1GB of wave memory when fully expanded, and 128-voice performance.
JUNO-60 1982
61 key, 6-voice fully programmable polyphonic synthesizer with 56 sound-memory locations. Roland’s proprietary DCB interface standard was used for exchanging control information with external device.
D-50 1987
2006
JD-800 1991
JP-8000 1996
V-Synth 2003
Fantom-X 2004
V-Synth XT 2005
Equipped with the Linear Arithmetic (a.k.a. LA) synthesis, this was Roland’s first full-digital synthesizer, and one of the best-selling models. The D-50 was a worldwide sensation due to its operating ease and stunning sound.
Even though this is synthesis at its friendliest, the SH-201 is no toy. With two beefy analog-modeling oscillators, complete with Roland’s famous Supersaw waveform and resonant filter, this little synth can blow down doors.
Combining stunning digital sound with a natural feel and operability reminiscent of analog instruments, the JD-800 was the pinnacle of synthesizer development of its era.
This 8-voice synthesizer has an inviting array of knobs and sliders to manipulate an analog modeling synthesis engine. It has a built-in Motion Control function that allows operations on a panel to be recorded and played back.
Independently manipulate the pitch, time, and formant of sampled waveforms using VariPhrase® technology — a world’s first in a synthesizer!
The V-Synth XT is fully stocked with a potent array of synthesis types, including the V-Synth’s famous Elastic Audio Synthesis engine, plus analog-synth modeling, vocal modeling, and classic D-50 emulation.
Experience the magic of creating your own sounds.For more than a quarter century, Roland has defined
and redefined the state of the art in synthesizers.
Today, the fundamentals for sound creation remain
the same for most synthesizers.
By understanding the fundamentals, anyone can enjoy
creating sound for virtually any type of synthesizer.
Synthesizer Evolution — the Workstation
As you master the fundamentals of creating sound, an unexplored world of creativity awaits you. Let’s begin our journey together!
1Chapter Introduction
NEW
3 4
1Chapter
Introduction
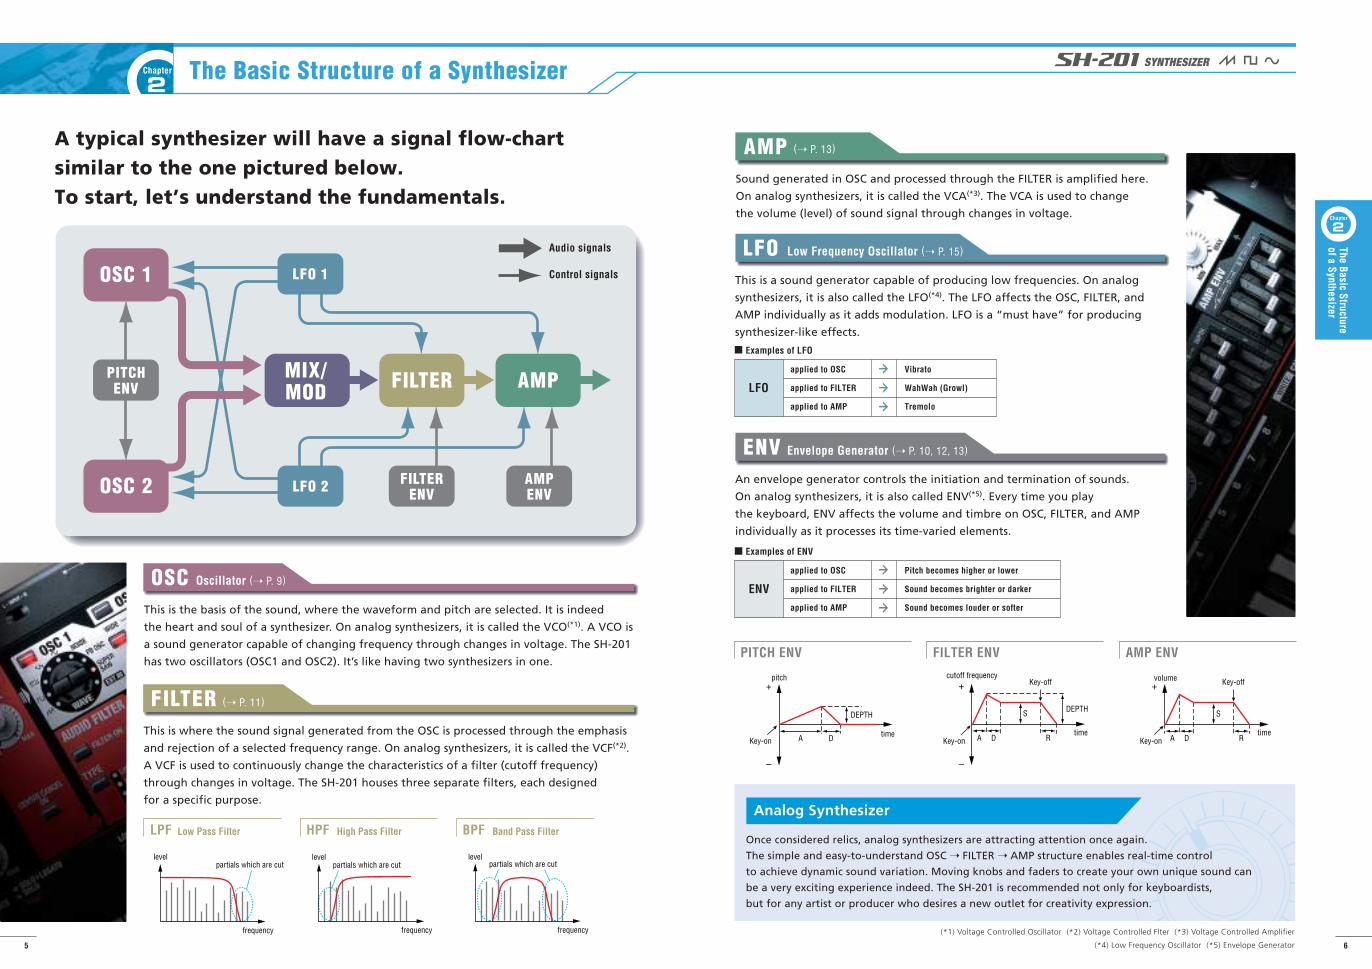
A typical synthesizer will have a signal flow-chart similar to the one pictured below. To start, let’s understand the fundamentals.
Oscillator (➝ P. 9)OSCThis is the basis of the sound, where the waveform and pitch are selected. It is indeed
the heart and soul of a synthesizer. On analog synthesizers, it is called the VCO(*1). A VCO is
a sound generator capable of changing frequency through changes in voltage. The SH-201
has two oscillators (OSC1 and OSC2). It’s like having two synthesizers in one.
AMPSound generated in OSC and processed through the FILTER is amplified here.
On analog synthesizers, it is called the VCA(*3). The VCA is used to change
the volume (level) of sound signal through changes in voltage.
FILTERThis is where the sound signal generated from the OSC is processed through the emphasis
and rejection of a selected frequency range. On analog synthesizers, it is called the VCF(*2).
A VCF is used to continuously change the characteristics of a filter (cutoff frequency)
through changes in voltage. The SH-201 houses three separate filters, each designed
for a specific purpose.
Low Frequency Oscillator (➝ P. 15)LFOThis is a sound generator capable of producing low frequencies. On analog
synthesizers, it is also called the LFO(*4). The LFO affects the OSC, FILTER, and
AMP individually as it adds modulation. LFO is a “must have” for producing
synthesizer-like effects.
Envelope Generator (➝ P. 10, 12, 13)ENVAn envelope generator controls the initiation and termination of sounds.
On analog synthesizers, it is also called ENV(*5). Every time you play
the keyboard, ENV affects the volume and timbre on OSC, FILTER, and AMP
individually as it processes its time-varied elements.
timeKey-on
Key-offcutoff frequency
A D
S DEPTH
R
Low Pass Filter High Pass Filter Band Pass Filter
Key-on
Key-off
timeA D
S
R
volume
A D time
DEPTH
Key-on
pitch
LPF BPF
PITCH ENV FILTER ENV AMP ENV
HPF
Examples of LFO
LFO
applied to OSC
applied to FILTER
applied to AMP
Vibrato
WahWah (Growl)
Tremolo
Examples of ENV
ENV
applied to OSC
applied to FILTER
applied to AMP
Pitch becomes higher or lower
Sound becomes brighter or darker
Sound becomes louder or softer
(*1) Voltage Controlled Oscillator (*2) Voltage Controlled Flter (*3) Voltage Controlled Amplifier
(*4) Low Frequency Oscillator (*5) Envelope Generator
2Chapter The Basic Structure of a Synthesizer
Audio signals
Control signals
(➝ P. 11)
(➝ P. 13)
frequency
partials which are cutlevel
frequency
levelpartials which are cut
frequency
levelpartials which are cut
Once considered relics, analog synthesizers are attracting attention once again.
The simple and easy-to-understand OSC ➝ FILTER ➝ AMP structure enables real-time control
to achieve dynamic sound variation. Moving knobs and faders to create your own unique sound can
be a very exciting experience indeed. The SH-201 is recommended not only for keyboardists,
but for any artist or producer who desires a new outlet for creativity expression.
Analog Synthesizer
OSC 2
OSC 1
MIX/MOD FILTERPITCH
ENV
FILTERENV
AMPENV
LFO 1
LFO 2
AMP
5 6
2Chapter
The Basic Structure of a Synthesizer
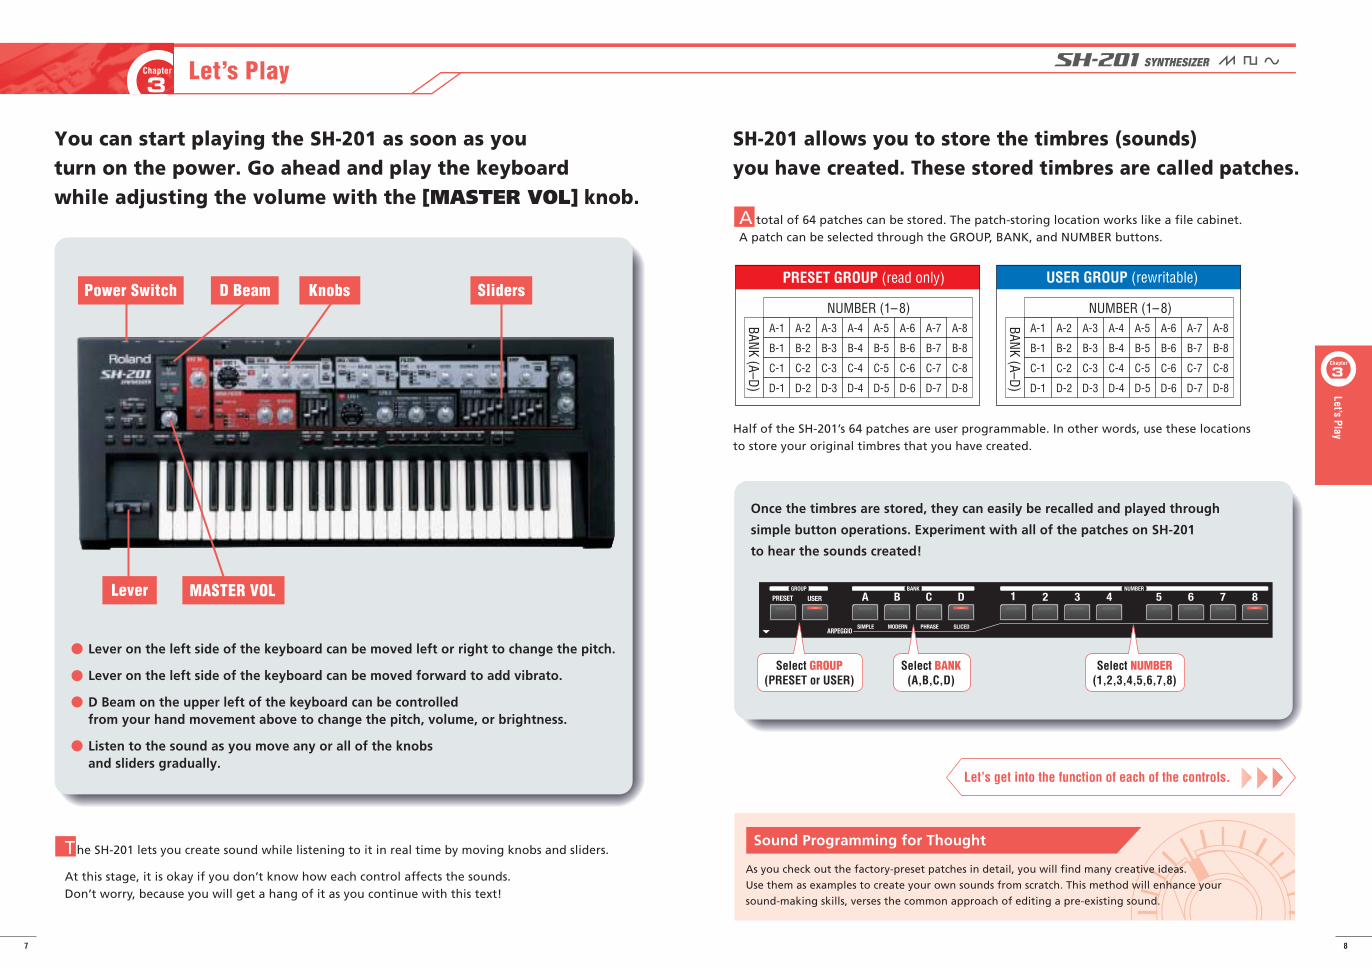
You can start playing the SH-201 as soon as you turn on the power. Go ahead and play the keyboard while adjusting the volume with the [MASTER VOL] knob.
SH-201 allows you to store the timbres (sounds) you have created. These stored timbres are called patches.
MASTER VOL
Half of the SH-201’s 64 patches are user programmable. In other words, use these locations to store your original timbres that you have created.
Lever on the left side of the keyboard can be moved left or right to change the pitch.
Lever on the left side of the keyboard can be moved forward to add vibrato.
D Beam on the upper left of the keyboard can be controlled from your hand movement above to change the pitch, volume, or brightness.
Listen to the sound as you move any or all of the knobs and sliders gradually.
D-1 D-2 D-3 D-4 D-5 D-6 D-7 D-8
C-1 C-2 C-3 C-4 C-5 C-6 C-7 C-8
B-1 B-2 B-3 B-4 B-5 B-6 B-7 B-8
A-1 A-2 A-3 A-4 A-5 A-6 A-7 A-8
NUMBER (1–8)
BANK (A–D ) D-1 D-2 D-3 D-4 D-5 D-6 D-7 D-8
C-1 C-2 C-3 C-4 C-5 C-6 C-7 C-8
B-1 B-2 B-3 B-4 B-5 B-6 B-7 B-8
A-1 A-2 A-3 A-4 A-5 A-6 A-7 A-8
NUMBER (1–8)
BANK (A–D )
PRESET GROUP (read only) USER GROUP (rewritable)
The SH-201 lets you create sound while listening to it in real time by moving knobs and sliders.
At this stage, it is okay if you don’t know how each control affects the sounds. Don’t worry, because you will get a hang of it as you continue with this text!
A total of 64 patches can be stored. The patch-storing location works like a file cabinet. A patch can be selected through the GROUP, BANK, and NUMBER buttons.
Once the timbres are stored, they can easily be recalled and played through
simple button operations. Experiment with all of the patches on SH-201
to hear the sounds created!
Let’s get into the function of each of the controls.
Power Switch D Beam Knobs Sliders
Lever
Select GROUP(PRESET or USER)
Select BANK(A,B,C,D)
Select NUMBER(1,2,3,4,5,6,7,8)
As you check out the factory-preset patches in detail, you will find many creative ideas.
Use them as examples to create your own sounds from scratch. This method will enhance your
sound-making skills, verses the common approach of editing a pre-existing sound.
Sound Programming for Thought
3Chapter Let’s Play
7 8
3Chapter
Let’s Play
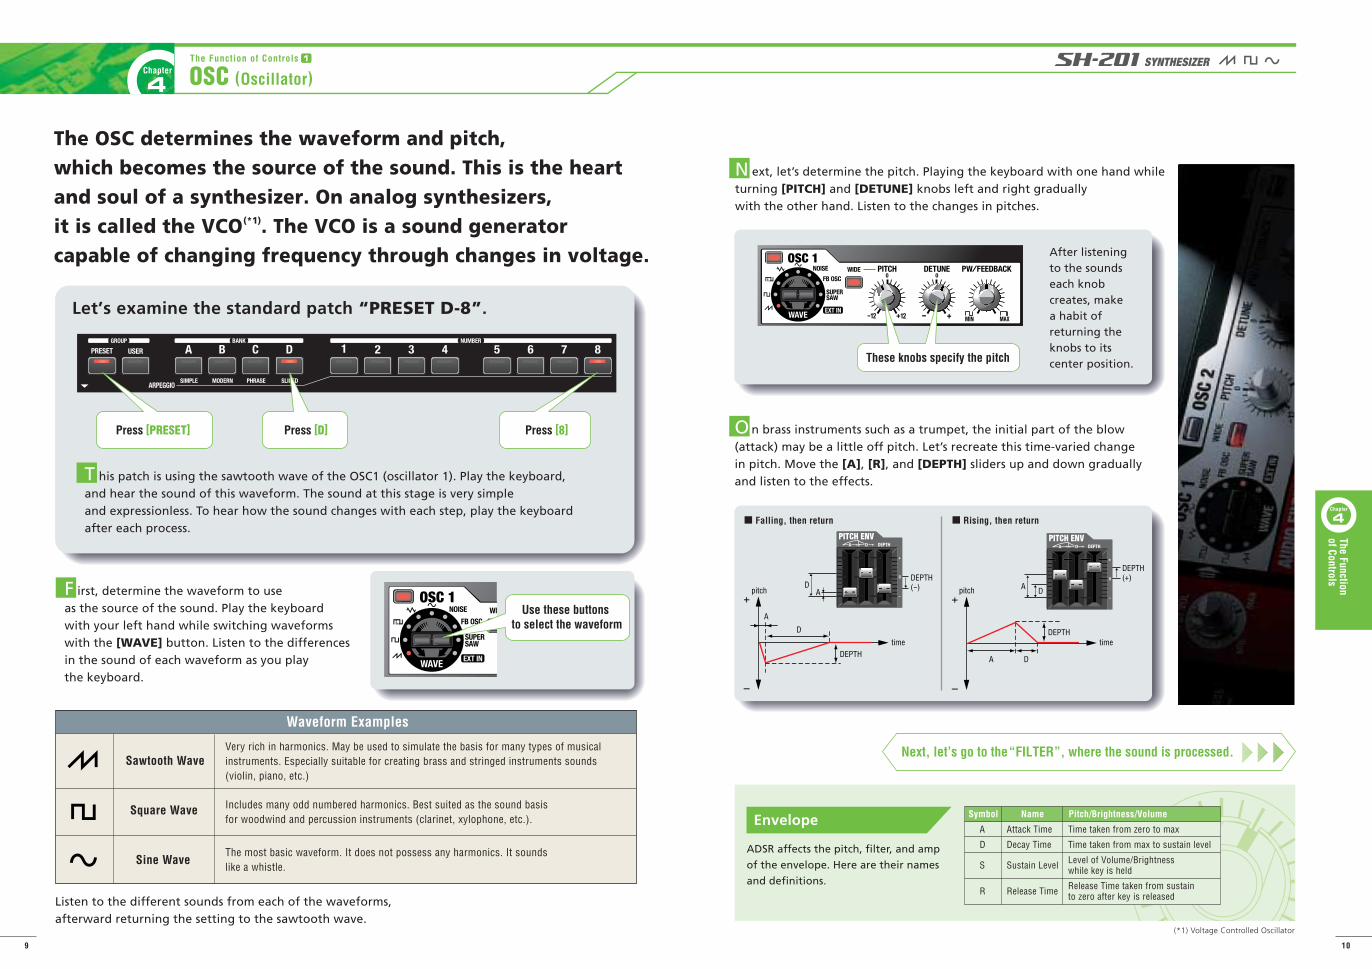
The OSC determines the waveform and pitch, which becomes the source of the sound. This is the heart and soul of a synthesizer. On analog synthesizers, it is called the VCO(*1). The VCO is a sound generator capable of changing frequency through changes in voltage.
Press [PRESET]
Let’s examine the standard patch “PRESET D-8”.
Waveform Examples
Sawtooth Wave
Square Wave
Sine Wave
Very rich in harmonics. May be used to simulate the basis for many types of musical instruments. Especially suitable for creating brass and stringed instruments sounds (violin, piano, etc.)
Includes many odd numbered harmonics. Best suited as the sound basis for woodwind and percussion instruments (clarinet, xylophone, etc.).
The most basic waveform. It does not possess any harmonics. It sounds like a whistle.
Listen to the different sounds from each of the waveforms, afterward returning the setting to the sawtooth wave.
After listening to the sounds each knob creates, make a habit of returning the knobs to its center position.
Next, let’s go to the“FILTER”, where the sound is processed.
T his patch is using the sawtooth wave of the OSC1 (oscillator 1). Play the keyboard, and hear the sound of this waveform. The sound at this stage is very simple and expressionless. To hear how the sound changes with each step, play the keyboard after each process.
F irst, determine the waveform to use as the source of the sound. Play the keyboard with your left hand while switching waveforms with the [WAVE] button. Listen to the differences in the sound of each waveform as you play the keyboard.
N ext, let’s determine the pitch. Playing the keyboard with one hand while turning [PITCH] and [DETUNE] knobs left and right gradually with the other hand. Listen to the changes in pitches.
O n brass instruments such as a trumpet, the initial part of the blow (attack) may be a little off pitch. Let’s recreate this time-varied change in pitch. Move the [A], [R], and [DEPTH] sliders up and down gradually and listen to the effects.
(*1) Voltage Controlled Oscillator
A
D
DEPTHtime
pitch
A D
DEPTHtime
pitch
Press [D] Press [8]
Use these buttons to select the waveform
These knobs specify the pitch
Falling, then return Rising, then return
ADSR affects the pitch, filter, and amp
of the envelope. Here are their names
and definitions.
DEPTH(-)D
A
DEPTH(+)
A D
Symbol
A
D
S
R
Attack Time
Decay Time
Sustain Level
Release Time
Time taken from zero to max
Time taken from max to sustain level
Level of Volume/Brightness while key is held
Release Time taken from sustain to zero after key is released
Name Pitch/Brightness/VolumeEnvelope
The Function of Controls 1
4Chapter OSC (Oscillator)
9 10
4Chapter
The Function of Controls
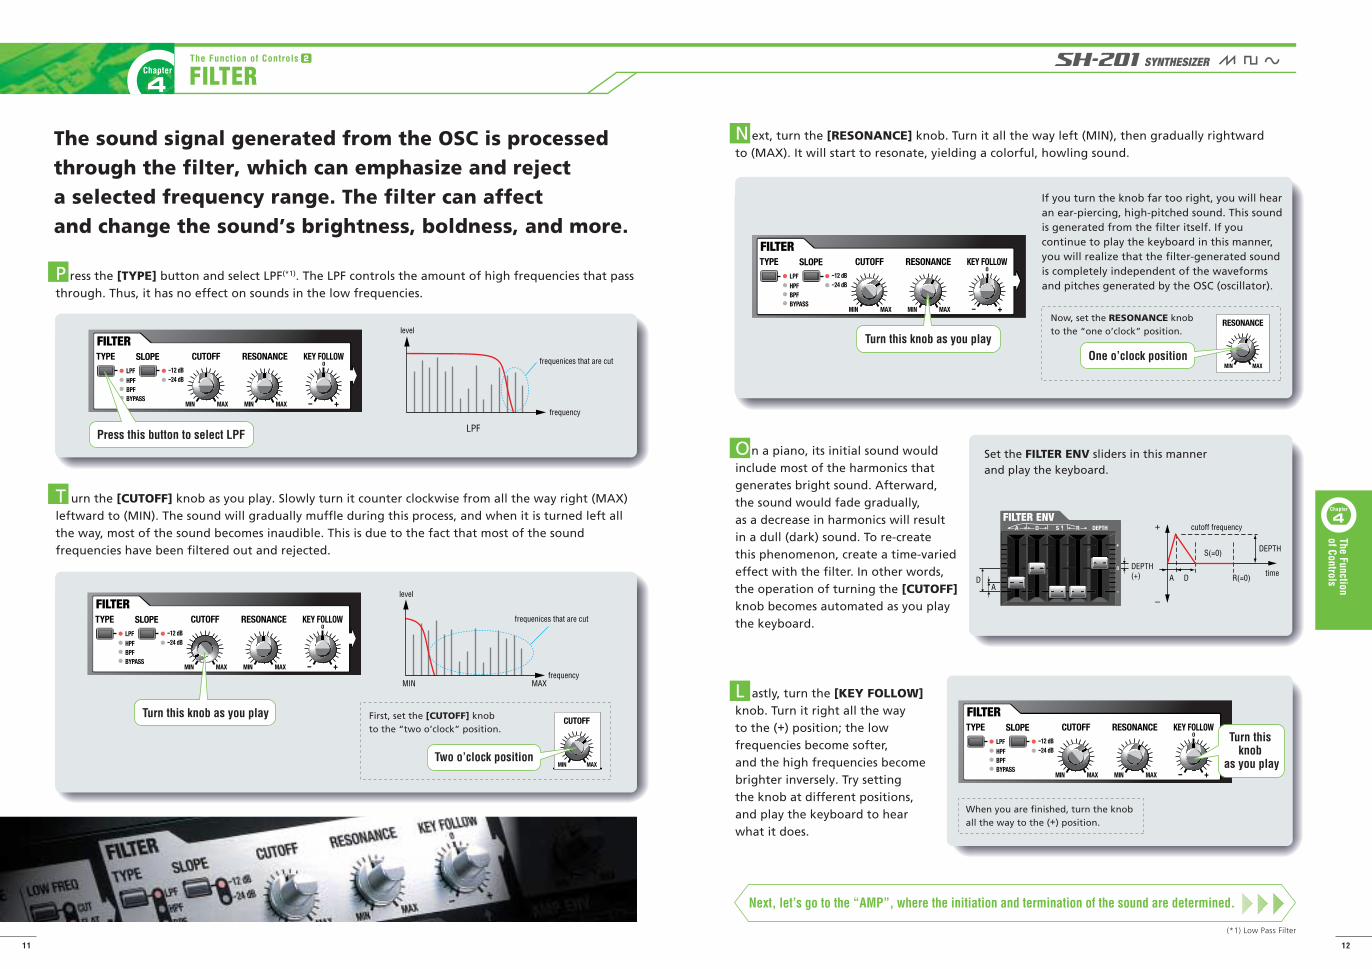
The sound signal generated from the OSC is processed through the filter, which can emphasize and reject a selected frequency range. The filter can affect and change the sound’s brightness, boldness, and more.
frequency
frequenices that are cut
LPF
level
frequenices that are cut
MIN MAXfrequency
level
If you turn the knob far too right, you will hear an ear-piercing, high-pitched sound. This sound is generated from the filter itself. If you continue to play the keyboard in this manner, you will realize that the filter-generated sound is completely independent of the waveforms and pitches generated by the OSC (oscillator).
Set the FILTER ENV sliders in this manner and play the keyboard.
First, set the [CUTOFF] knob to the “two o’clock” position.
P ress the [TYPE] button and select LPF(*1). The LPF controls the amount of high frequencies that pass through. Thus, it has no effect on sounds in the low frequencies.
T urn the [CUTOFF] knob as you play. Slowly turn it counter clockwise from all the way right (MAX) leftward to (MIN). The sound will gradually muffle during this process, and when it is turned left all the way, most of the sound becomes inaudible. This is due to the fact that most of the sound frequencies have been filtered out and rejected.
N ext, turn the [RESONANCE] knob. Turn it all the way left (MIN), then gradually rightward to (MAX). It will start to resonate, yielding a colorful, howling sound.
On a piano, its initial sound would include most of the harmonics that generates bright sound. Afterward, the sound would fade gradually, as a decrease in harmonics will result in a dull (dark) sound. To re-create this phenomenon, create a time-varied effect with the filter. In other words, the operation of turning the [CUTOFF] knob becomes automated as you play the keyboard.
L astly, turn the [KEY FOLLOW] knob. Turn it right all the way to the (+) position; the low frequencies become softer, and the high frequencies become brighter inversely. Try setting the knob at different positions, and play the keyboard to hear what it does.
Next, let’s go to the “AMP”, where the initiation and termination of the sound are determined.
(*1) Low Pass Filter
A D
S(=0) DEPTH
timeR(=0)
cutoff frequency
When you are finished, turn the knob all the way to the (+) position.
Press this button to select LPF
Turn this knob as you play
Two o’clock position
One o’clock position
Now, set the RESONANCE knob to the “one o’clock” position.
DA
DEPTH(+)
Turn this knob as you play
Turn this knob
as you play
The Function of Controls 2
4Chapter FILTER
1211
4Chapter
The Function of Controls
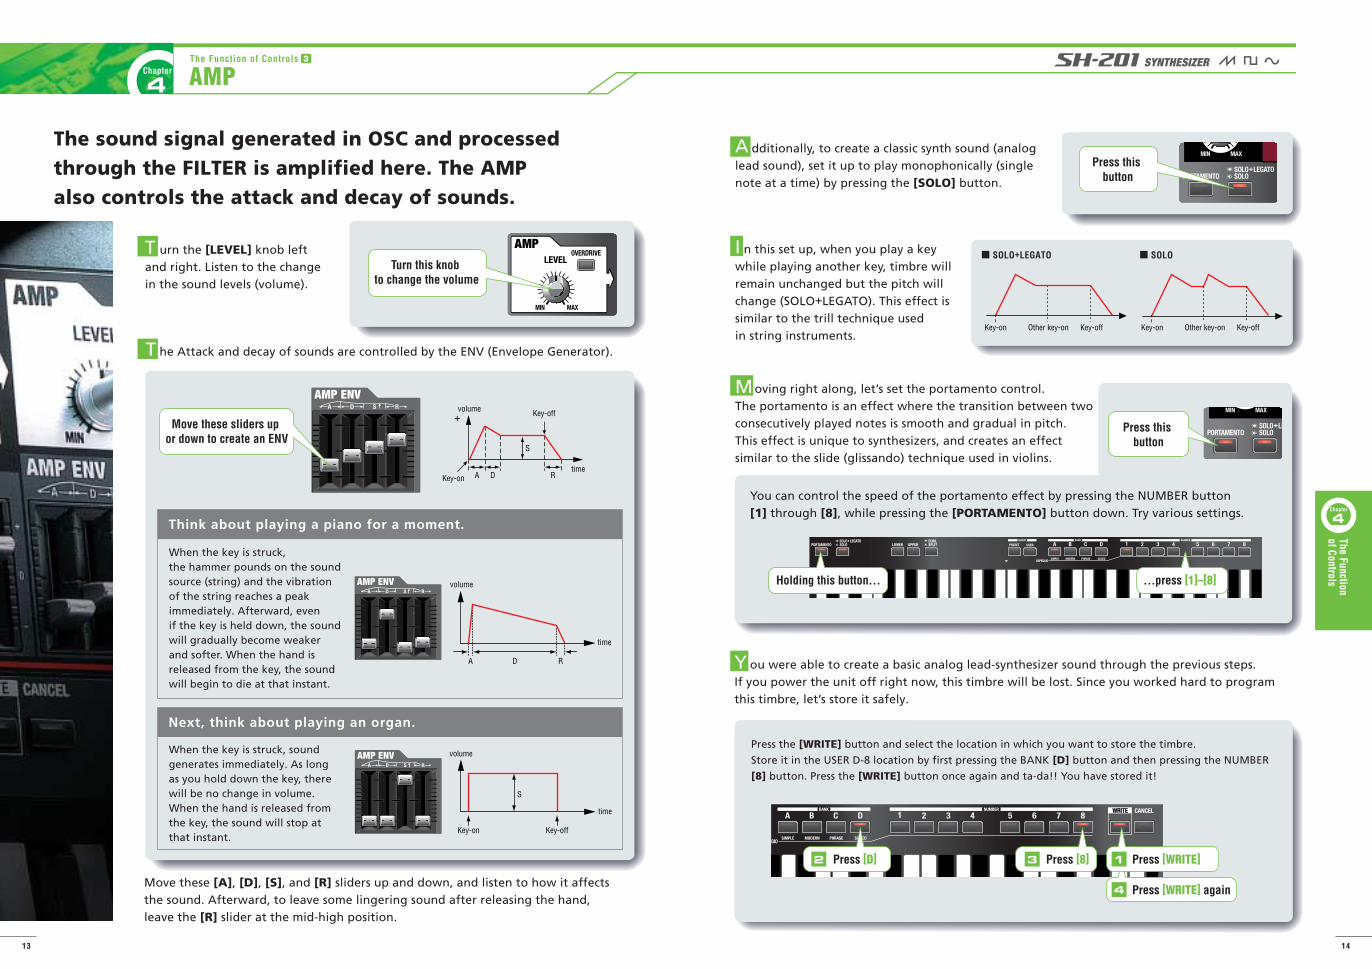
The sound signal generated in OSC and processed through the FILTER is amplified here. The AMP also controls the attack and decay of sounds.
Press this button
A D R
S
When the key is struck, the hammer pounds on the sound source (string) and the vibration of the string reaches a peak immediately. Afterward, even if the key is held down, the sound will gradually become weaker and softer. When the hand is released from the key, the sound will begin to die at that instant.
You can control the speed of the portamento effect by pressing the NUMBER button [1] through [8], while pressing the [PORTAMENTO] button down. Try various settings.
Think about playing a piano for a moment.
When the key is struck, sound generates immediately. As long as you hold down the key, there will be no change in volume. When the hand is released from the key, the sound will stop at that instant.
Next, think about playing an organ.
Move these [A], [D], [S], and [R] sliders up and down, and listen to how it affects the sound. Afterward, to leave some lingering sound after releasing the hand, leave the [R] slider at the mid-high position.
T urn the [LEVEL] knob left and right. Listen to the change in the sound levels (volume).
T he Attack and decay of sounds are controlled by the ENV (Envelope Generator).
A dditionally, to create a classic synth sound (analog lead sound), set it up to play monophonically (single note at a time) by pressing the [SOLO] button.
I n this set up, when you play a key while playing another key, timbre will remain unchanged but the pitch will change (SOLO+LEGATO). This effect is similar to the trill technique used in string instruments.
Moving right along, let’s set the portamento control. The portamento is an effect where the transition between two consecutively played notes is smooth and gradual in pitch. This effect is unique to synthesizers, and creates an effect similar to the slide (glissando) technique used in violins.
Press the [WRITE] button and select the location in which you want to store the timbre.
Store it in the USER D-8 location by first pressing the BANK [D] button and then pressing the NUMBER
[8] button. Press the [WRITE] button once again and ta-da!! You have stored it!
time
volume
time
volume
Turn this knob to change the volume
Press this button
Move these sliders up or down to create an ENV
Holding this button... ...press [1]–[8]
4
2 3 1Press [D] Press [8] Press [WRITE]
Press [WRITE] again
Key-on Key-off
Key-on Other key-on Key-off Key-on Other key-on Key-off
SOLO+LEGATO SOLO
Y ou were able to create a basic analog lead-synthesizer sound through the previous steps. If you power the unit off right now, this timbre will be lost. Since you worked hard to program this timbre, let’s store it safely.
Key-on
Key-off
timeA D
S
R
volume
The Function of Controls 3
4Chapter AMP
1413
4Chapter
The Function of Controls
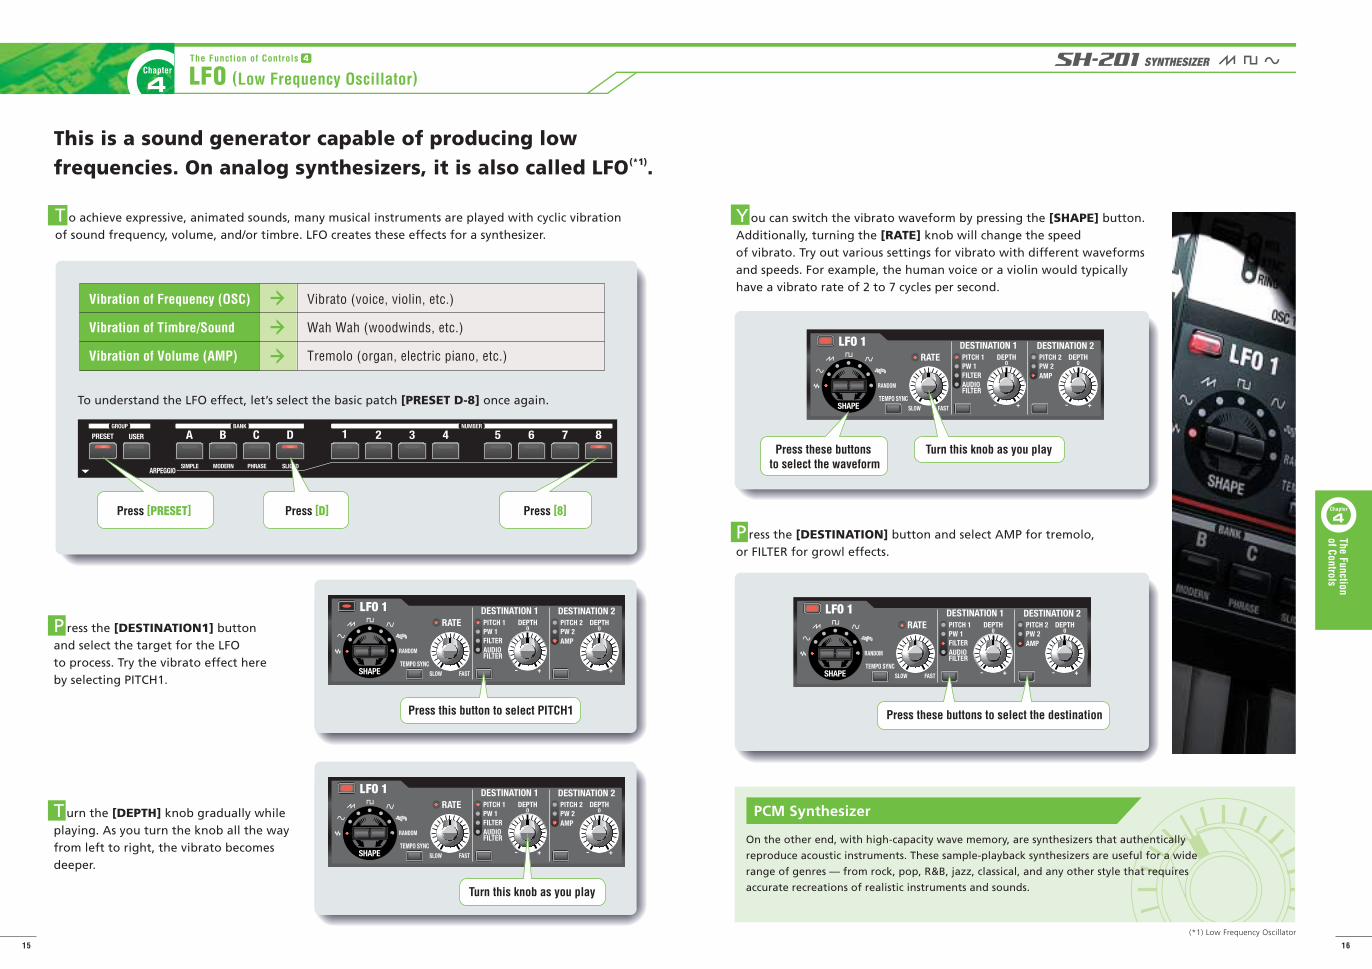
This is a sound generator capable of producing low frequencies. On analog synthesizers, it is also called LFO(*1).
To understand the LFO effect, let’s select the basic patch [PRESET D-8] once again.
Vibration of Frequency (OSC)
Vibration of Timbre/Sound
Vibration of Volume (AMP)
Vibrato (voice, violin, etc.)
Wah Wah (woodwinds, etc.)
Tremolo (organ, electric piano, etc.)
T o achieve expressive, animated sounds, many musical instruments are played with cyclic vibration of sound frequency, volume, and/or timbre. LFO creates these effects for a synthesizer.
P ress the [DESTINATION1] button and select the target for the LFO to process. Try the vibrato effect here by selecting PITCH1.
T urn the [DEPTH] knob gradually while playing. As you turn the knob all the way from left to right, the vibrato becomes deeper.
Y ou can switch the vibrato waveform by pressing the [SHAPE] button. Additionally, turning the [RATE] knob will change the speed of vibrato. Try out various settings for vibrato with different waveforms and speeds. For example, the human voice or a violin would typically have a vibrato rate of 2 to 7 cycles per second.
P ress the [DESTINATION] button and select AMP for tremolo, or FILTER for growl effects.
(*1) Low Frequency Oscillator
Press [PRESET] Press [D] Press [8]
Press these buttons to select the waveform
Press these buttons to select the destinationPress this button to select PITCH1
Turn this knob as you play
Turn this knob as you play
On the other end, with high-capacity wave memory, are synthesizers that authentically
reproduce acoustic instruments. These sample-playback synthesizers are useful for a wide
range of genres — from rock, pop, R&B, jazz, classical, and any other style that requires
accurate recreations of realistic instruments and sounds.
PCM Synthesizer
The Function of Controls 4
4Chapter LFO (Low Frequency Oscillator)
1615
4Chapter
The Function of Controls
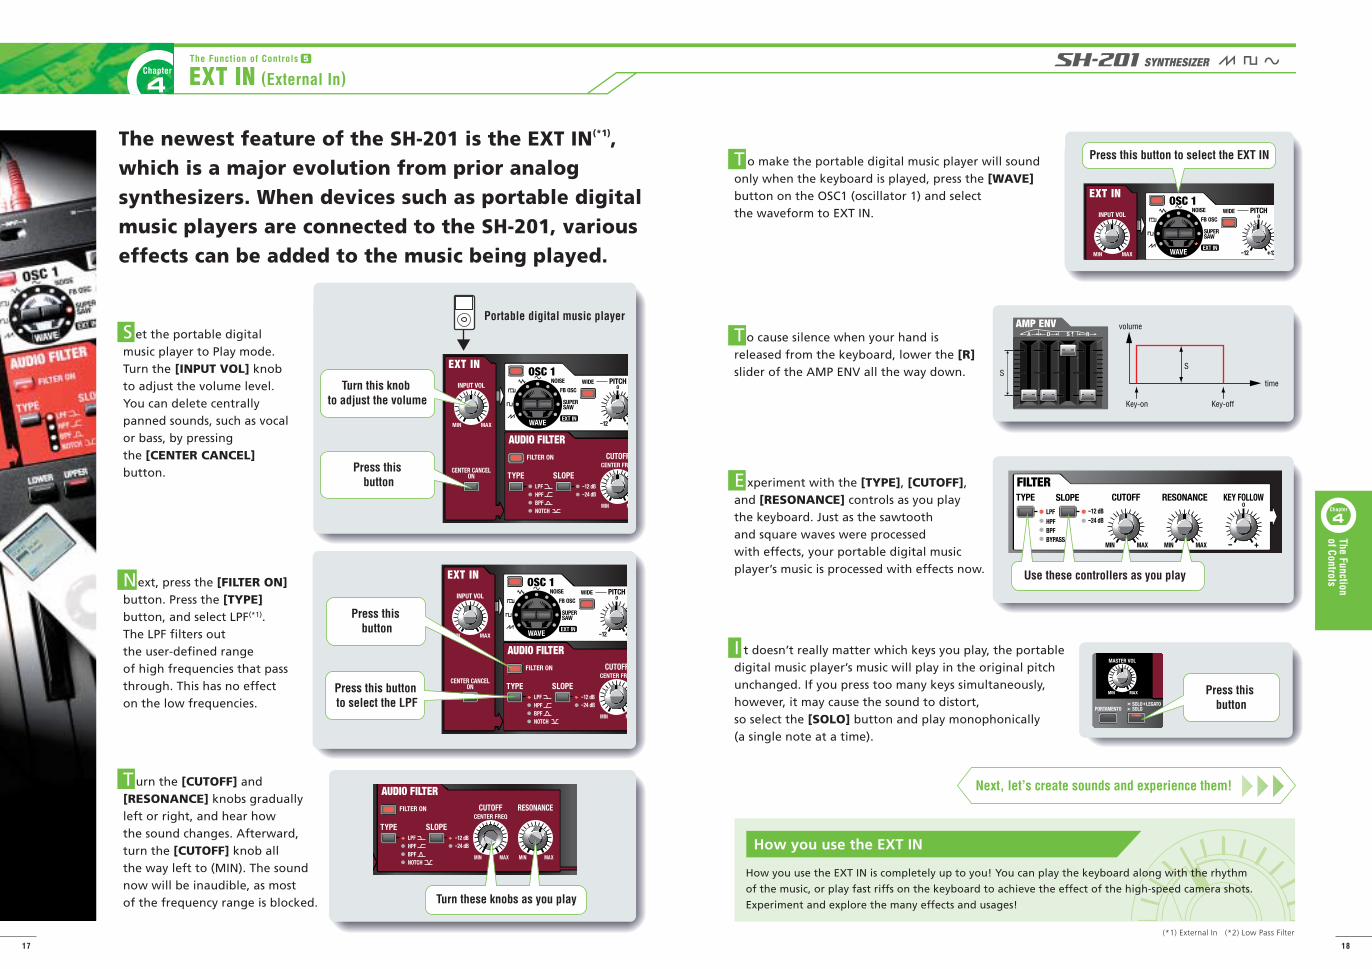
The newest feature of the SH-201 is the EXT IN(*1), which is a major evolution from prior analog synthesizers. When devices such as portable digital music players are connected to the SH-201, various effects can be added to the music being played.
(*1) External In (*2) Low Pass Filter
volume
time
S
S et the portable digital music player to Play mode. Turn the [INPUT VOL] knob to adjust the volume level. You can delete centrally panned sounds, such as vocal or bass, by pressing the [CENTER CANCEL] button.
Next, press the [FILTER ON] button. Press the [TYPE] button, and select LPF(*1). The LPF filters out the user-defined range of high frequencies that pass through. This has no effect on the low frequencies.
T urn the [CUTOFF] and [RESONANCE] knobs gradually left or right, and hear how the sound changes. Afterward, turn the [CUTOFF] knob all the way left to (MIN). The sound now will be inaudible, as most of the frequency range is blocked.
T o make the portable digital music player will sound only when the keyboard is played, press the [WAVE] button on the OSC1 (oscillator 1) and select the waveform to EXT IN.
To cause silence when your hand is released from the keyboard, lower the [R] slider of the AMP ENV all the way down.
E xperiment with the [TYPE], [CUTOFF], and [RESONANCE] controls as you play the keyboard. Just as the sawtooth and square waves were processed with effects, your portable digital music player’s music is processed with effects now.
I t doesn’t really matter which keys you play, the portable digital music player’s music will play in the original pitch unchanged. If you press too many keys simultaneously, however, it may cause the sound to distort, so select the [SOLO] button and play monophonically (a single note at a time).
Next, let’s create sounds and experience them!
Portable digital music player
How you use the EXT IN is completely up to you! You can play the keyboard along with the rhythm
of the music, or play fast riffs on the keyboard to achieve the effect of the high-speed camera shots.
Experiment and explore the many effects and usages!
Turn this knob to adjust the volume
Press this button to select the EXT IN
Use these controllers as you play
Press this button
Press this button
Press this button
Press this button to select the LPF
Turn these knobs as you play
Key-on Key-off
S
How you use the EXT IN
The Function of Controls 5
4Chapter EXT IN (External In)
1817
4Chapter
The Function of Controls

Choose “PRESET D-8”. The sawtooth wave is selected.
Since bass involves low frequencies, turn the [PITCH] knob on the OSC section all the way to left, and set to (-12). Now the sound is lowered by 1 octave.
Turn the [CUTOFF] knob on the FILTER section all the way left and set to (MIN). The sound becomes inaudible.
Let’s create the initial attack of the sound. Raise the [D] slider of the FILTER ENV a little.
Let’s determine the timbre of the sustained note. Raise the [S] slider of the FILTER ENV a little.
In order to achieve the effect of sliding over the frets while holding the string down (glissando), press the [SOLO] button.
Slightly raise the [DEPTH] slider of the FILTER ENV to determine the overall timbre. The attack is weakened, and sound will be darkened.
Press the [SLOPE] button and select -24dB. The core of the sound is retained, yet it sounds a little darker now.
Turn the [RESONANCE] knob and add a little bite to the sound as you like.
Press the [FX ON] button.
Turn the [TIME] knob in the EFFECTS section all the way left to (MIN). Turn the [DEPTH] knob and fatten the bass timbre.
Lastly, fine adjust the [DEPTH] slider of the FILTER ENV to determine the overall sound.
1
2
3
4
5
6
7
8
9
10
11
12
Choose “PRESET D-8”. The sawtooth wave is selected.
Turn the [CUTOFF] knob in the FILTER section to the “two o’clock” position.
Turn the [RESONANCE] knob in the FILTER section to the “one o’clock” position.
Let’s create the initial portion of the sound. Raise the [A] and [D] sliders of the FILTER ENV a little.
Determine the overall timbre by raising the [DEPTH] slider of the FILTER ENV.
Press the [SLOPE] button in the FILTER section and select -24dB. The sound gains more bite by doing so.
Press the [PORTAMENTO] button.
To further enhance the lead synth sound, press the [SOLO] button. Now it plays monophonic (a single note at a time). Also when you hold a key while pressing another key, the two notes will transition smoothly.
Press the [FX ON] button.
Position the [TIME] knob at “twelve o’clock”. Turn the [DEPTH] knob and add some echo effect to the lead sound (delay).
1
2
3
4
5
6
7
8
9
10
Synth Bass1 Synth Lead2Synth-Programming Examples Synth-Programming Examples
10 11
116
2
741 1
38 9 9 10
1087 54
26 3
12
5
5Chapter Synth-Programming Examples
19 20
5Chapter
Synth-Programm
ing Exam
ples
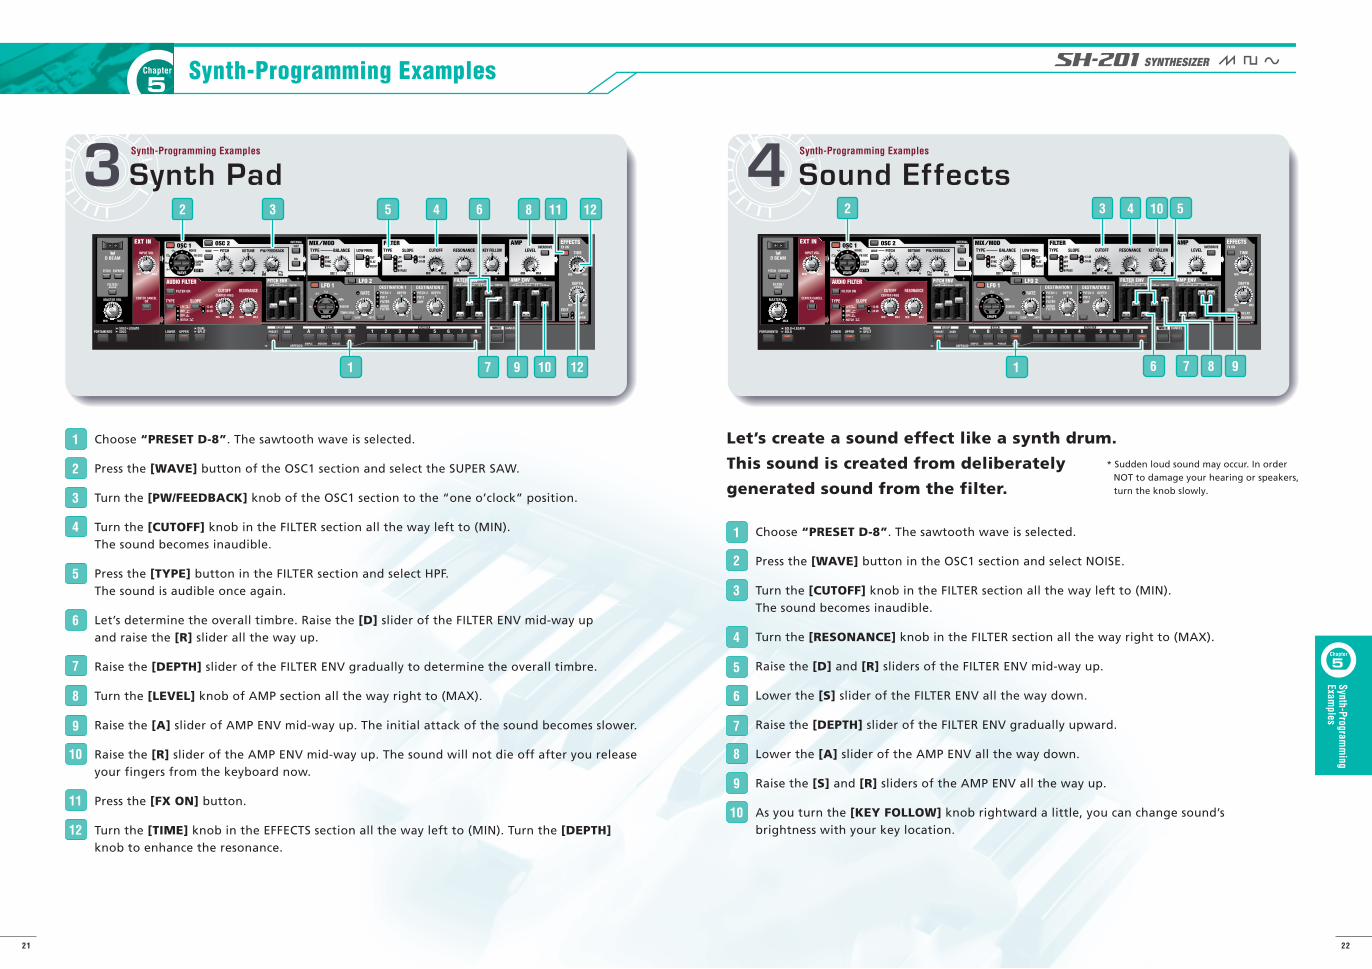
Choose “PRESET D-8”. The sawtooth wave is selected.
Press the [WAVE] button of the OSC1 section and select the SUPER SAW.
Turn the [PW/FEEDBACK] knob of the OSC1 section to the “one o’clock” position.
Turn the [CUTOFF] knob in the FILTER section all the way left to (MIN). The sound becomes inaudible.
Press the [TYPE] button in the FILTER section and select HPF. The sound is audible once again.
Let’s determine the overall timbre. Raise the [D] slider of the FILTER ENV mid-way up and raise the [R] slider all the way up.
Raise the [DEPTH] slider of the FILTER ENV gradually to determine the overall timbre.
Turn the [LEVEL] knob of AMP section all the way right to (MAX).
Raise the [A] slider of AMP ENV mid-way up. The initial attack of the sound becomes slower.
Raise the [R] slider of the AMP ENV mid-way up. The sound will not die off after you release your fingers from the keyboard now.
Press the [FX ON] button.
Turn the [TIME] knob in the EFFECTS section all the way left to (MIN). Turn the [DEPTH] knob to enhance the resonance.
4
1
2
3
4
5
6
7
8
9
10
11
12
Choose “PRESET D-8”. The sawtooth wave is selected.
Press the [WAVE] button in the OSC1 section and select NOISE.
Turn the [CUTOFF] knob in the FILTER section all the way left to (MIN). The sound becomes inaudible.
Turn the [RESONANCE] knob in the FILTER section all the way right to (MAX).
Raise the [D] and [R] sliders of the FILTER ENV mid-way up.
Lower the [S] slider of the FILTER ENV all the way down.
Raise the [DEPTH] slider of the FILTER ENV gradually upward.
Lower the [A] slider of the AMP ENV all the way down.
Raise the [S] and [R] sliders of the AMP ENV all the way up.
As you turn the [KEY FOLLOW] knob rightward a little, you can change sound’s brightness with your key location.
Let’s create a sound effect like a synth drum.
This sound is created from deliberately
generated sound from the filter.
1
2
3
4
5
6
7
8
9
10
* Sudden loud sound may occur. In order NOT to damage your hearing or speakers, turn the knob slowly.
3 Synth Pad Sound EffectsSynth-Programming Examples Synth-Programming Examples
11 12
12
8
7 109
4 63 52 1042 53
6 7 8 91 1
5Chapter Synth-Programming Examples
21 22
5Chapter
Synth-Programm
ing Exam
ples
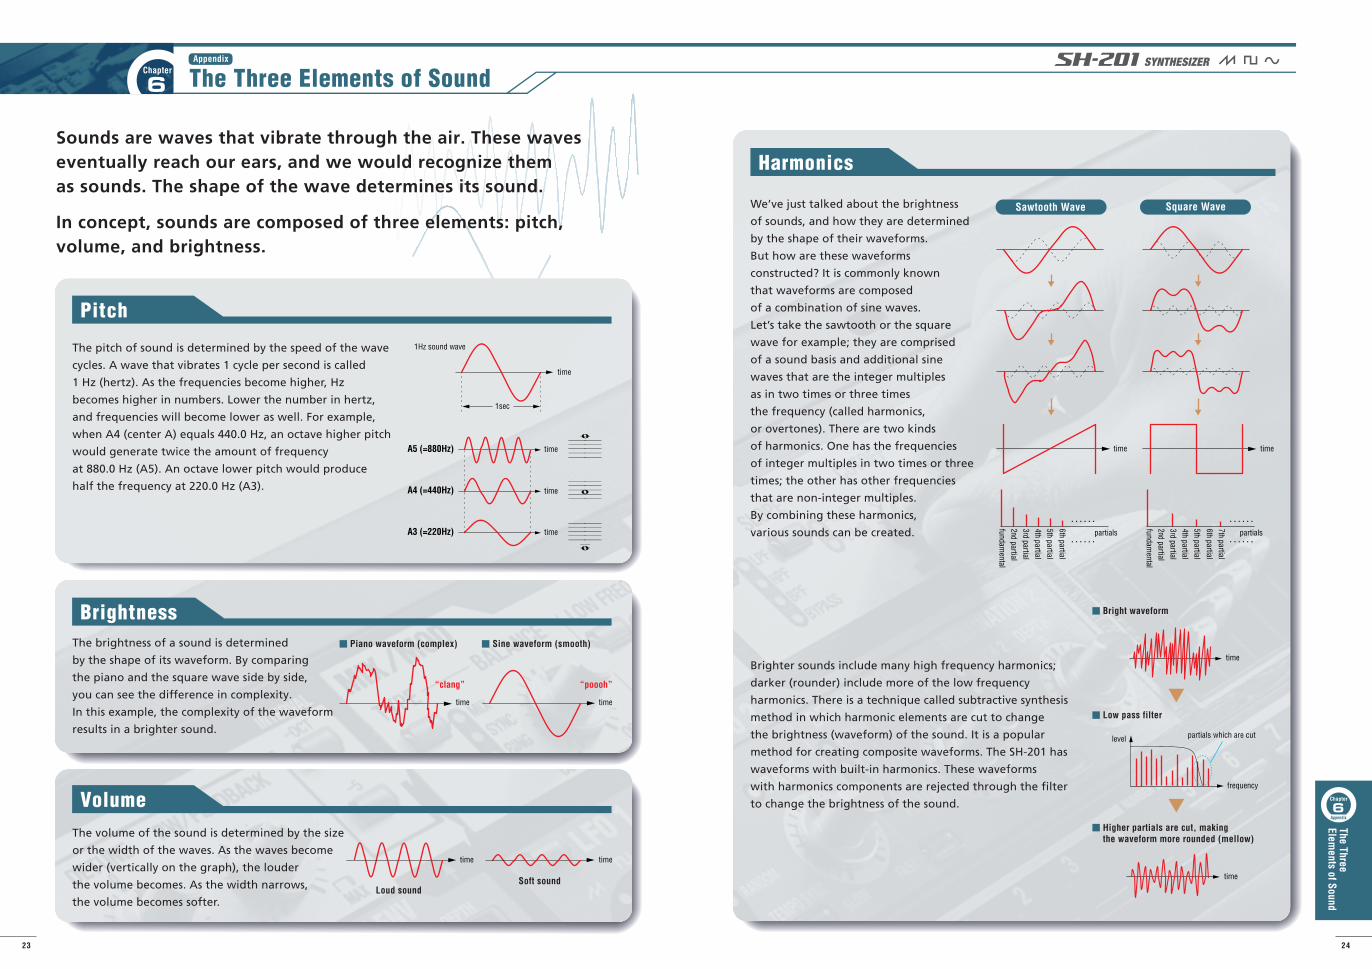
We’ve just talked about the brightness
of sounds, and how they are determined
by the shape of their waveforms.
But how are these waveforms
constructed? It is commonly known
that waveforms are composed
of a combination of sine waves.
Let’s take the sawtooth or the square
wave for example; they are comprised
of a sound basis and additional sine
waves that are the integer multiples
as in two times or three times
the frequency (called harmonics,
or overtones). There are two kinds
of harmonics. One has the frequencies
of integer multiples in two times or three
times; the other has other frequencies
that are non-integer multiples.
By combining these harmonics,
various sounds can be created.
Brighter sounds include many high frequency harmonics;
darker (rounder) include more of the low frequency
harmonics. There is a technique called subtractive synthesis
method in which harmonic elements are cut to change
the brightness (waveform) of the sound. It is a popular
method for creating composite waveforms. The SH-201 has
waveforms with built-in harmonics. These waveforms
with harmonics components are rejected through the filter
to change the brightness of the sound.
The pitch of sound is determined by the speed of the wave
cycles. A wave that vibrates 1 cycle per second is called
1 Hz (hertz). As the frequencies become higher, Hz
becomes higher in numbers. Lower the number in hertz,
and frequencies will become lower as well. For example,
when A4 (center A) equals 440.0 Hz, an octave higher pitch
would generate twice the amount of frequency
at 880.0 Hz (A5). An octave lower pitch would produce
half the frequency at 220.0 Hz (A3).
Pitch
Harmonics
VolumeThe volume of the sound is determined by the size
or the width of the waves. As the waves become
wider (vertically on the graph), the louder
the volume becomes. As the width narrows,
the volume becomes softer.
Sounds are waves that vibrate through the air. These waves eventually reach our ears, and we would recognize them as sounds. The shape of the wave determines its sound.
In concept, sounds are composed of three elements: pitch, volume, and brightness.
Sawtooth Wave Square Wave
BrightnessThe brightness of a sound is determined
by the shape of its waveform. By comparing
the piano and the square wave side by side,
you can see the difference in complexity.
In this example, the complexity of the waveform
results in a brighter sound.
1Hz sound wave
1sec
time
A5 (=880Hz)
A4 (=440Hz)
A3 (=220Hz)
time
time
time
time time
time
“clang”
time
“poooh”
Piano waveform (complex)
time
Loud sound
time
Soft sound
Sine waveform (smooth)
Bright waveform
Low pass filter
Higher partials are cut, making the waveform more rounded (mellow)
fundamental
2nd partial 3rd partial 4th partial 5th partial
6th partial
fundamental
2nd partial 3rd partial 4th partial 5th partial
6th partial 7th partial
partials partials
time
time
frequency
partials which are cutlevel
6Chapter The Three Elements of Sound
Appendix
23 24
6Chapter
The Three Elem
ents of Sound
Appendix
Prof i le
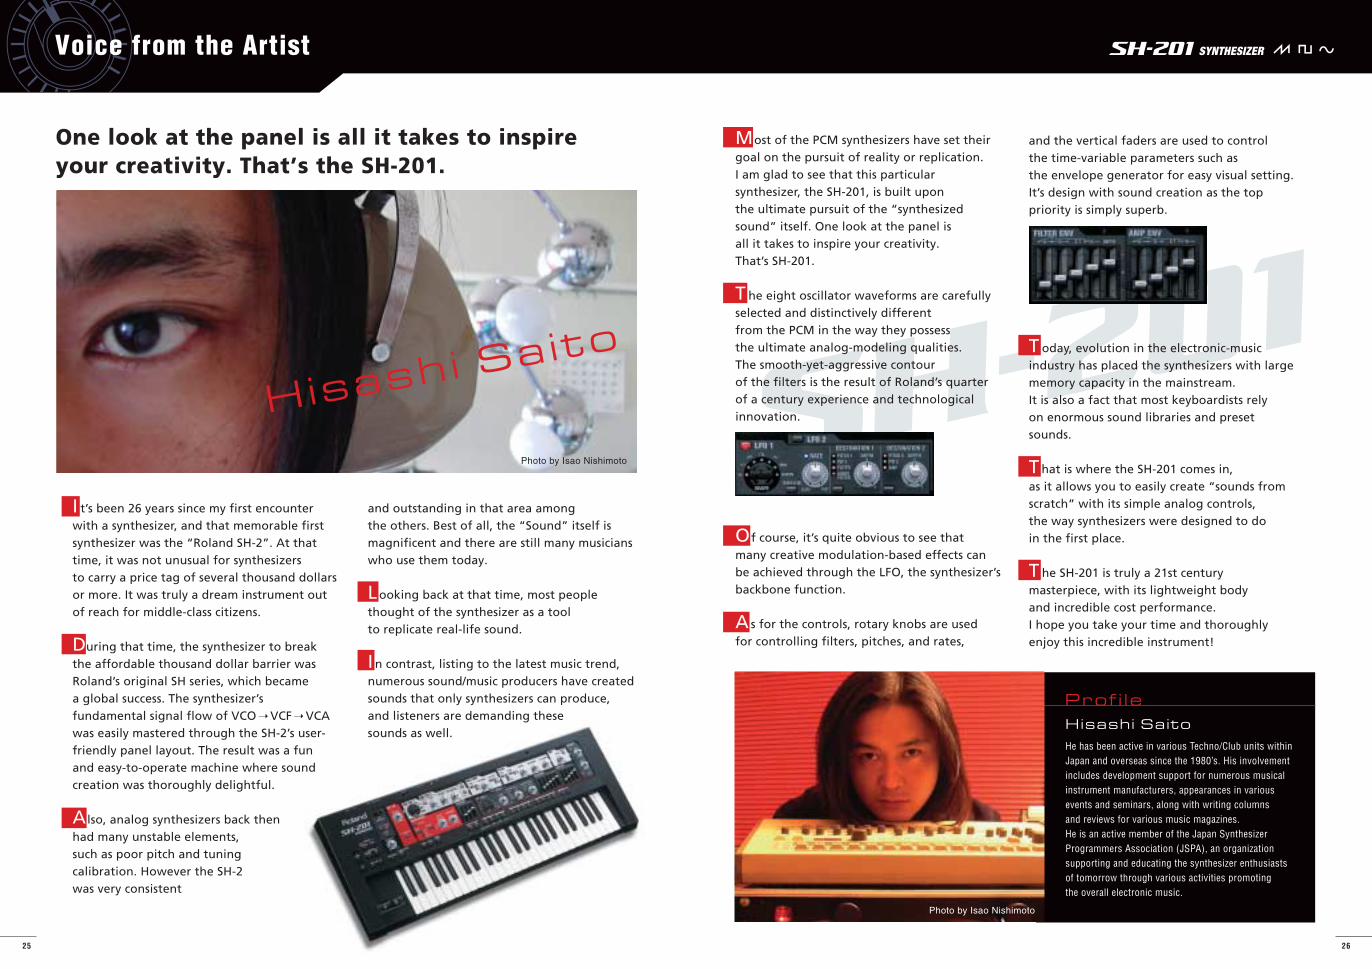
Hisashi Saito
Hisashi Saito
He has been active in various Techno/Club units within Japan and overseas since the 1980’s. His involvement includes development support for numerous musical instrument manufacturers, appearances in various events and seminars, along with writing columns and reviews for various music magazines. He is an active member of the Japan Synthesizer Programmers Association (JSPA), an organization supporting and educating the synthesizer enthusiasts of tomorrow through various activities promoting the overall electronic music.
Voice from the Artist
Photo by Isao Nishimoto
Photo by Isao Nishimoto
One look at the panel is all it takes to inspire your creativity. That’s the SH-201.
I t’s been 26 years since my first encounter with a synthesizer, and that memorable first synthesizer was the “Roland SH-2”. At that time, it was not unusual for synthesizers to carry a price tag of several thousand dollars or more. It was truly a dream instrument out of reach for middle-class citizens.
During that time, the synthesizer to break the affordable thousand dollar barrier was Roland’s original SH series, which became a global success. The synthesizer’s fundamental signal flow of VCO ➝ VCF ➝ VCA was easily mastered through the SH-2’s user-friendly panel layout. The result was a fun and easy-to-operate machine where sound creation was thoroughly delightful.
Also, analog synthesizers back then had many unstable elements, such as poor pitch and tuning calibration. However the SH-2 was very consistent
and outstanding in that area among the others. Best of all, the “Sound” itself is magnificent and there are still many musicians who use them today.
Looking back at that time, most people thought of the synthesizer as a tool to replicate real-life sound.
I n contrast, listing to the latest music trend, numerous sound/music producers have created sounds that only synthesizers can produce, and listeners are demanding these sounds as well.
Most of the PCM synthesizers have set their goal on the pursuit of reality or replication. I am glad to see that this particular synthesizer, the SH-201, is built upon the ultimate pursuit of the “synthesized sound” itself. One look at the panel is all it takes to inspire your creativity.That’s SH-201.
T he eight oscillator waveforms are carefully selected and distinctively different from the PCM in the way they possess the ultimate analog-modeling qualities. The smooth-yet-aggressive contour of the filters is the result of Roland’s quarter of a century experience and technological innovation.
Of course, it’s quite obvious to see that many creative modulation-based effects can be achieved through the LFO, the synthesizer’s backbone function.
As for the controls, rotary knobs are used for controlling filters, pitches, and rates,
and the vertical faders are used to control the time-variable parameters such as the envelope generator for easy visual setting. It’s design with sound creation as the top priority is simply superb.
T oday, evolution in the electronic-music industry has placed the synthesizers with large memory capacity in the mainstream. It is also a fact that most keyboardists rely on enormous sound libraries and preset sounds.
T hat is where the SH-201 comes in, as it allows you to easily create “sounds from scratch” with its simple analog controls, the way synthesizers were designed to do in the first place.
T he SH-201 is truly a 21st century masterpiece, with its lightweight body and incredible cost performance.I hope you take your time and thoroughly enjoy this incredible instrument!
25 26
WE DESIGN THE FUTURE
Visit us online at www.Roland.com All specifications and appearances are subject to change without notice.All trademarks are the property of their respective companies.
Printed in Japan. May 2006 RAM-4077 B-4 P-S
Creating Sounds with Fun and Ease
Synthesizer 101: Learning the SH-201
Creating Sounds with Fun and Ease
Synthesizer 101: Learning the SH-201