Embed Size (px)
Citation preview

Rochester Institute of Technology Oracle Training: Performing Inquiries and Requesting Reports in the Oracle Applications

Oracle Training: Performing Inquiries and Requesting Reports in the Oracle Applications Revised February 2008
2
Table of Contents Introduction Lesson 1: Perform an Account Inquiry Lesson 2: Request a FSG Report using Run Financial Statement Generator
program Lesson 3: Print a FSG Report on a Networked Printer Lesson 4: Request a FSG Report using Publish FSG Report program Lesson 5: Request and Print Standard Reports Appendix: Oracle FSG Reports
Item #1: How to Default Your Printer Name Item #2: Reprint Function Item #3: How to Schedule a Report

Oracle Training: Performing Inquiries and Requesting Reports in the Oracle Applications Revised February 2008
3
Introduction
RIT employees are able to request financial information for their departments and projects from the Oracle Financial applications directly from their personal computers. Objectives: After taking this course, you will understand the process to follow when performing on-line account inquiries and requesting and printing reports within the Oracle General Ledger application. You will be able to use the general ledger to: • Perform an on-line account inquiry • Drill down to journal entry, accounts payable or accounts receivable subledger detail • View the variance between actual and budgeted balances • Request and print FSG (custom) reports (department or project statements) • Request and print Oracle standard reports (detail reports) • Send an e-mail notification informing another user that a report has been run • Schedule a request (Appendix) • Reprint function (Appendix) • Default printer name (Appendix)
Advantages of the Oracle Financial Applications The Oracle Financial Applications provide many benefits to you such as: • Timely access to financial information for your department or project • On–line access to transactions • Ability to request and print reports when you need them • More control over your budget and financial activity Accounting Procedures Department and project managers or staff assistants monitor their actual expenditures as compared to their budgets and review transactions that occur in the general ledger. Various custom and standard reports are available within Oracle to assist departments with this task. As an Oracle user, you may perform account inquires to check an account balance or request reports on-line in the Oracle General Ledger and print them on your networked printer. Note: In order to perform any of the functions taught in this course, you must have access to a “RIT-GL-Report & Inquiry” responsibility within the Oracle General Ledger and you may only access information for the departments assigned to your responsibility. After attending this class, the Accounting Instructor will provide you a General Ledger Security Access Form to complete or you may download one from the

Oracle Training: Performing Inquiries and Requesting Reports in the Oracle Applications Revised February 2008
4
Controller’s Office web page: http://finweb.rit.edu/controller/forms.html. Once Accounting receives the completed form back from you, approved by your supervisor, they will forward the information to ITS for processing. Accounting will contact you as soon as you have access to your new responsibility and provide you with additional information to help you use the Oracle Financial Applications. If, after taking this course, you have further questions about performing account inquiries or requesting and printing reports, please contact Accounting at ext. 5-2237, or send an e-mail to [email protected].

Oracle Training: Performing Inquiries and Requesting Reports in the Oracle Applications Revised February 2008
5
Lesson 1: Perform an Account Inquiry The account inquiry function permits you to call up and view actual, budget, and encumbrance account balances for any of your 24-digit accounts. Account balance information changes throughout the month and is available to you on-line as soon as transactions are posted to the general ledger. At the end of this lesson, you will be able to perform an inquiry for a 24-digit general ledger account number. Performing an inquiry means you will be able to: • Call up and examine the actual balances for this account number (Lesson 1A) • View the details of each specific journal entry posted to the account number (Lesson
1B) • View the variance between actual and budgeted balances for this account number
(Lesson 1C)
Objective: At the end of this lesson, you will be able to perform an actual on-line account inquiry in the Oracle RIT General Ledger application. Scenario
Sam Doe, an employee in the College of Science, wants to check a balance on one of the 24-digit accounts in his department. As we follow the procedure for performing an on-line inquiry, Sam’s actions will appear in italics. At each step, your instructor will lead you through the process by following the bulleted items that follow. Directions: Perform an On-line Inquiry
• Log onto the system now. Your instructor will also walk you through it. You can also reference the Navigating through the Oracle Applications training materials handed out by your instructor. All of the responsibilities assigned to this user will appear on the user’s home page.
• From your list of responsibilities select the “RIT – GL – COS RPT & INQ – 67000-67099” responsibility.
Note: In order to access functions assigned to another responsibility, you must select that specific responsibility on the Responsibilities screen.

Oracle Training: Performing Inquiries and Requesting Reports in the Oracle Applications Revised February 2008
6
• From the “Inquiry” menu listed to the right of the list of responsibilities, click on “Account”.

Oracle Training: Performing Inquiries and Requesting Reports in the Oracle Applications Revised February 2008
7
• The Navigator – RIT – GL – CO RPT & INQ – 67000-67099 screen will appear first. The Account Inquiry (RIT) window will open automatically on top of your Navigator screen.
• The Account Inquiry (RIT) form is used to access information about a specific
24-digit account number or a range of accounts within the user’s responsibility for a specified period.
Sam’s cursor blinks in the “Name” field for the “Ledger/Ledger Set” section of the screen, which has automatically defaulted to “RIT”. Since the Ledger Name and Currency will always be “RIT” and “USD”, Sam presses the Tab key to move the cursor to the “From” field in the “Accounting Periods” section of the screen. The “From” field automatically displays the current open accounting period. However, he wants to check the actual balance on this account for the December 2007 period. He knows he can select the desired date by making his selection from the LOV (List of Values) to the right of the “From” field. He clicks once in the LOV field.
• Press the Tab key to move the cursor to the “From” field in the “Accounting Periods” section of the screen.
• Click once on the LOV field to the right of the “From” field.

Oracle Training: Performing Inquiries and Requesting Reports in the Oracle Applications Revised February 2008
8
When the “From Periods” list of values screen appears Sam scrolls down until he
finds “DEC-07”. He clicks once on “DEC-07” and then on the “OK” button.
• Scroll down to find “DEC-07” in the “From Periods” list of values. • Click once on “DEC-07”. • Click once on the “OK” button.
Sam sees that his selection automatically appears in the Accounting Periods “From” field, as well as the “To” field. NOTE: You can inquire into an accounting period that spans several months by entering the desired range in the “From” and “To” fields. With your cursor positioned in either the Accounting Periods “From” or “To” field, click once on the LOV field located to the right of the field. Highlight your choice of dates in the list of values that appears, and click once on the “OK” button.

Oracle Training: Performing Inquiries and Requesting Reports in the Oracle Applications Revised February 2008
9
Tabbing over to the next field, Sam sees a dotted outline boxing the Single Currency selection under the Currency portion of his screen.
• Press the Tab key once.
Sam knows this dotted outline identifies the location of his cursor. Since he will always leave the default values in place for the Currency Type (Total), he presses the Tab key twice to arrive at the primary Balance Type portion of the screen. The dotted outline now appears around the word “Actual”, indicating the location of his cursor.
• Press the Tab key twice.
There are three Balance Types to choose from: Actual, Budget and Encumbrance. In this class, we will cover the process for reviewing an Actual balance, since this is the option used most frequently. A brief summary of steps to follow in order to view a Budget balance and/or an Encumbrance balance is provided below. If you would like more information about “Budget” or Encumbrance Balances, please call Accounting at ext. 5-2237.
Actual Balance: The amount expended on a particular account line, for the selected period, at the time you are making your inquiry. Budget Balance: The amount of funds budgeted on a particular account line at the time you are making your inquiry.
To make a Budget Inquiry, under Primary Balance Type select “Budget”. The cursor will automatically move to the blank “Budget” field. Use the LOV to the right of the “Budget” field to select the appropriate budget organization from the list of values that appears. Highlight your choice, click once on the “OK” button.

Oracle Training: Performing Inquiries and Requesting Reports in the Oracle Applications Revised February 2008
10
Encumbrance Balance: The amount of funds reserved for future expenditures, at the time you are making your inquiry. There are 4 encumbrance types that RIT currently uses. • Commitment: A commitment encumbrance entry is made automatically when
a purchase requisition is approved. It is reversed when the requisition becomes a purchase order.
• Obligation: An obligation encumbrance entry is made automatically when the purchase order is approved. It is reversed when the purchase order is either matched to an invoice or the purchase order is cancelled.
• Invoice: An invoice encumbrance entry is made when an invoice is matched against a purchase order at the time the invoice in entered in Accounts Payable. It is reversed when the invoice is paid.
• Manual: An encumbrance entry created by the user within the Oracle Financial Applications. When the actual expense is charged to the general ledger the user must prepare another entry to reverse the encumbrance entry.
To make an Encumbrance Inquiry, under Primary Balance Type select “Encumbrance”. The cursor will automatically move to the blank “Encumbrance Type” field. Use the LOV to the right of the “Encumbrance Type” field to select the appropriate encumbrance type from the list of values that appears. Highlight your choice, and click once on the “OK” button.
Sam wants to review the Actual Balance on an account. The system defaults to this
selection. He notices that a small dot appears inside the radio button beside the word “Actual”, meaning this option is selected. Sam is now ready to enter the account number for his inquiry. He tabs three times, skipping over the Factor and Summary Template fields, to arrive at the next field called “Accounts”.
• Press the Tab key three times.

Oracle Training: Performing Inquiries and Requesting Reports in the Oracle Applications Revised February 2008
11
When Sam’s cursor arrives at the “Accounts” field, a Find Accounts screen pops into view. Here he enters the 24-digit number for his account, using the fields on this screen to guide him. When he enters each segment of the account number into a blank field on this screen, Sam notices that the system automatically repeats the entry under the High column. The “Program” segment should always be “00000’, so Sam leaves that field blank. To reach the next blank category field, he must press the Tab key.
• Enter the following information under the Low column in the Find Accounts screen: -Entity: “01” -Department: “67000” -Object: “73150” -Expense Category: “25” -Project: “00000”
• Click on the “OK” button.
• The account number now appears in the “Account” field on the Account Inquiry
screen. You are now ready to view the balance for the account number you just entered.
NOTE: You may inquire on a range of account numbers by entering the appropriate values in the Low and High columns.

Oracle Training: Performing Inquiries and Requesting Reports in the Oracle Applications Revised February 2008
12
Lesson 1A: Show Balances The Show Balances feature displays the Period-To-Date (PTD) and Year-To-Date (YTD) balances for the account number and period range you just entered on the Account Inquiry screen. Objective At the end of this lesson, you will be able to call up and view an actual account balance, select additional fields to view and print the screen at your desktop printer.
Scenario Sam wants to view the Dec-07 actual balance for the account he has selected.
Directions: View Actual Account Balance
From the Account Inquiry screen, Sam clicks once on the “Show Balances” button. • Click once on the “Show Balances” button.

Oracle Training: Performing Inquiries and Requesting Reports in the Oracle Applications Revised February 2008
13
A new Detail Balances (RIT) screen appears with the account number located in the title bar. The PTD (period-to-date) balance and the YTD (year-to-date) balance for the selected account number and period now appear on the screen. Note: To inquire on the total expenditures for an RIT operating account, view YTD (year-to-date) information. To inquire on the total expenditures for an NTID operating account or a Grant account (project 3XXXX), view PJTD (project-to-date) information.

Oracle Training: Performing Inquiries and Requesting Reports in the Oracle Applications Revised February 2008
14
Sam would like to print the information on his screen to keep for future reference. To do this, he knows that he can use the “Print” feature on the Menu Bar.
Note: Since we won’t actually be printing in class today, skip the last step below. • Click once on the “File” menu located in the upper left corner of the screen. • Click once on “Print”. • When the Print box appears, select your desktop printer and click the “OK”
button.
Now, Sam would like to determine the PJTD (project-to-date) balance for this
account, but that information is not available in the current view. He clicks once on the Folder Tools icon located on the Toolbar.
• Click once on the Folder Tools icon on your toolbar.
Sam wants to add the PJTD column after the YTD column so he places his cursor in
the YTD column. Since he wants to view an additional field, Sam clicks once on the Show Field icon within the Folder Tools screen.
• Click once on the Show Field icon within the Folder Tools screen.

Oracle Training: Performing Inquiries and Requesting Reports in the Oracle Applications Revised February 2008
15
A drop-down menu of fields appears. Here Sam can select “PJTD” by clicking once on it and then clicking on the “OK” button.
• Click once on “PJTD”. • Click once on the “OK” button.
A PJTD column now appears on the screen after the YTD column. Sam knows he can
expand the present view even further by using the scroll bar at the bottom of the screen. Instead he decides to return to the original view, so he clicks once on the Hide Field icon in the Folder Tools screen.

Oracle Training: Performing Inquiries and Requesting Reports in the Oracle Applications Revised February 2008
16
• Click once on the Hide Field icon. The screen returns to its original view. • Click once on the close box on the Folder Tools icon.
Note: The National Technical Institute for the Deaf, a college within RIT, operates on a different fiscal year than RIT. (RIT’s fiscal year is July through June. NTID’s fiscal year is October through September.) In order to view balances for their fiscal year, NTID employees should use the PJTD balance option when making account inquiries. Call Accounting at ext. 5-2237 to obtain more information about this process. You are now ready to review the individual journal entries that make up this account’s PTD balance.
Lesson 1B: View Journal Entry Details At this point in your inquiry, you may want to view the individual journal entries that make up the balance on the account. To do this, we will use another option on the Account Inquiry screen. Objective: At the end of this lesson, you will be able to call up and view journal detail for a particular balance. Scenario
Sam is ready to review the specific journal entries for one of the items in the list of Balances. Directions: View a Journal Entry
• In the Detail Balances (RIT) screen, place your cursor on the line that you would like to select.
• Click once on the “Journal Details” button.

Oracle Training: Performing Inquiries and Requesting Reports in the Oracle Applications Revised February 2008
17
The Journals (RIT) screen appears, showing the journal entry lines for the period on the account number that Sam entered. In this example, one of the journal entries was generated from the Accounts Payable subledger.

Oracle Training: Performing Inquiries and Requesting Reports in the Oracle Applications Revised February 2008
18
Journal batches generated from Accounts Payables or Purchasing will have a source of “Payables”. In order to view more information on Payables or Purchasing batches you would click on the “Drilldown” button. For all other types of journal batches you can obtain more information by clicking on the “Show Full Journal” button. In order to return to the previous screen, click on the “Detail Balances” button.
Sam wants to know more about the first journal entry. He places his cursor in the
first row and clicks on the “Show Full Journal” button. • Place your cursor in the first row. • Click on the “Show Full Journal” button.
When viewing Journal details through Account Inquiry you will only be able to see the journal entry lines using account numbers that you have access to through your Reporting & Inquiry responsibility.
The Journals (RIT) screen opens up and Sam can see the one line in the journal entry that he is allowed to see through his Reporting & Inquiry responsibility. If the journal entry had included more COS accounts he would have been able to see those as well.

Oracle Training: Performing Inquiries and Requesting Reports in the Oracle Applications Revised February 2008
19
Sam wants to know which Oracle user originally entered the journal entry. He clicks
on “Help” located on the Menu bar at the top of the screen and then clicks on “Record History”.
• Click once on “Help” on the menu bar at the top of the screen. • Click once on “Record History”.
Sam is able to view more information about the journal entry, including the Oracle user id of the individual who created it as well as the date it was created. He can also see when it was updated, and by whom. He clicks on the “OK” button to close this screen.
• Click on the “OK” button.
Oracle Training: Performing Inquiries and Requesting Reports in the Oracle Applications Revised February 2008
20
Sam is done reviewing the journal entry entered by user BDP2737. He closes the Journals (RIT)-152SFS1206-20 screen by clicking on the close button in the upper right hand corner of the screen.
• Click on the close button in the upper right hand corner of the screen. Sam wants to further review the payables journal entry. He can find out more about
the actual invoice information by selecting the line, and clicking on the “Drilldown” button.
• In the Journals (RIT) screen, click once on the first field in the fifth row to select it.
• Click once on the “Drilldown” button.

Oracle Training: Performing Inquiries and Requesting Reports in the Oracle Applications Revised February 2008
21
• The Drilldown button takes you into the Accounts Payable Oracle application in order to view the invoice information. The View Journal Entry Lines screen opens in a browser window. This screen shows a line for each item included on the invoice and the amount paid for each item that add up to the total amount charged.
From this screen you can choose to drilldown to the Invoice Workbench to view the Payables information, (Supplier, PO and Invoice number), detail behind a transaction, view the journal entry for a transaction or export the detail to Excel. .

Oracle Training: Performing Inquiries and Requesting Reports in the Oracle Applications Revised February 2008
22
On the “View Journal Entry Lines” screen Sam sees that the $1,873.28 that he drilled down on consists of payments for four items. Sam knows that in order to see a complete picture of this invoice payment he needs to get to the “Invoice Workbench” screen by selecting any of the Journal Entry lines at the bottom of the screen, and clicking on the “View Transaction” button. He clicks in the circle in the “Select” column for the first item and then clicks the “View Transaction” button.
• Select the circle in the “Select” column for the first journal entry line. • Click on the “View Transaction” button.
Sam sees that his browser window has changed to an Oracle e-business suite window. He knows that this screen is no longer necessary and can be closed. He clicks on the close button in the upper right hand corner of the screen. The Invoice Workbench form is displayed on his screen. After clicking on the “View Transaction” button, the Advanced Search screen is replaced by an Oracle e-business suite screen in your browser window. The browser window is no longer necessary and can be closed. In the background Oracle has opened up the Invoice Workbench form within the Applications.
• Close your browser window by clicking on the close button in the upper right hand corner.

Oracle Training: Performing Inquiries and Requesting Reports in the Oracle Applications Revised February 2008
23
In the upper section of the “Invoice Workbench” screen Sam can see that the Supplier name in the “Trading Partner” field is “CDW GOVERNMENT INC”, the Supplier number in the “Supplier Num” field is “5083”, the Supplier Site is “SUITE 1515”, the Invoice date is “04-DEC-2007”, and the Invoice number in the “Invoice Num” field is “HQW2516”.
In the upper section of this screen you can see the Trading Partner, Supplier number, Supplier Site, Invoice date and the Invoice number.
In the lower section of the “Invoice Workbench” screen there are six tabs that provide Invoice, Purchase Order and Payment information.
On the “General” tab Sam sees that invoice has been paid in full, since the total Invoice amount of $1,873.28 matches the total amount paid. He clicks on the “Lines” tab to see what items were paid for on this invoice.

Oracle Training: Performing Inquiries and Requesting Reports in the Oracle Applications Revised February 2008
24
• Click on the “Lines” tab.
On the “Lines” tab Sam can find out the Purchase Order number, the Quantity ordered for each item, and by using the scroll bar, can scroll to the right to see the unit prices and item descriptions.

Oracle Training: Performing Inquiries and Requesting Reports in the Oracle Applications Revised February 2008
25
In order to retrieve the check number he clicks on the “View Payments” tab. • Click on the “View Payments” tab.
On the “View Payments” tab Sam is able to take note of the check number within the
“Document Num” column. In order to see if the check has cleared the bank Sam clicks on the “Payment Overview” button. The “Payment Overview” screen opens.
• Click on the “Payments Overview” button.

Oracle Training: Performing Inquiries and Requesting Reports in the Oracle Applications Revised February 2008
26
On the “Payments Overview” screen Sam sees that the total amount for check number “1141263” is $1,975.28. The payment included payments for two different invoices. He knows that the check has been cashed since there is an amount in the “Cleared Amount” field and a date in the “Cleared Date” field.
Note: If the payment you are inquiring on is Electronic then the supplier’s Address field on the Payment Overview screen will be blank.
When Sam is done viewing the invoice information he closes the screens by clicking
on the close buttons in the upper right hand corner of the screens. He is back on the Journals (RIT) screen. Sam wants to view the journal line description in this screen. He clicks on the Folder Tools icon on his toolbar, and clicks once on the Show Field icon.
• Click on the Folder Tools icon on your toolbar. • Click once on the Show Field icon.
A list of values appears. Since he would like to view the line description for the
journals, Sam scrolls down to “Line Description” and clicks once. • In the Show Field screen, click once on “Line Description”. • Click once on the “OK” button.

Oracle Training: Performing Inquiries and Requesting Reports in the Oracle Applications Revised February 2008
27
A “Line Description” column now appears on the Journals (RIT) screen. • To return to the Account Inquiry screen, click on the Close box in the upper right
corner of the Journals (RIT) screen.

Oracle Training: Performing Inquiries and Requesting Reports in the Oracle Applications Revised February 2008
28
Summary of Steps to Perform an Account Inquiry: 1. Log on to the Oracle applications and select the “RIT – GL – REPORT & INQUIRY”
responsibility from your list of responsibilities on your home page. 2. From the “Inquiry” menu listed to the right of the list of responsibilities, click on
“Account”. 3. The Account Inquiry screen will appear, with the cursor blinking in the “Name” field
of the “Ledger/Ledger Set” section. Press the tab key to move the cursor to the “From” field in the “Accounting Periods” section. The system will automatically display the current accounting period in both the “From” and “To” fields. • If you would like to select a different accounting period, place your cursor in the
field you would like to change. Click once on the LOV field to the right of the “From” and “To” fields. In the list of values that appears, click once to highlight your selection and click on the “OK” button.
4. The system will automatically fill in the values for “Currency Type”. Press the Tab key to arrive at the middle portion of your screen.
5. “Actual” is the default select under Primary Balance. Hit your Tab key (unless you would like to select another Balance Type).
6. Tab over the “Factor” and “Summary Template” fields on your screen, until you arrive at the Accounts area of the screen.
7. When the Find Accounts screen appears, enter your 24-digit account number in the “Low” column. • If you would like to query a range of accounts, you can enter two different values
in the “High” and “Low” columns in this screen. 8. Click on the “OK” button. This brings up the Account Inquiry (RIT) screen. 9. In order to review the balance on any of the accounts listed, click on the box next to
the account number. 10. Click once on the “Show Balances” button.
• If the screen does not reflect all of the fields you are interested in viewing, click once on the Folder Tools icon on the Toolbar.
• Click once on the Show Field icon in the Folder Tools screen. • Make your selection from the list of field values that appears by clicking once on
it. • Click on the “OK” button. • To return to the original view, click once on the Hide Field icon on the Folder
Tools screen. 11. To print the account balance screen, go to the Menu Bar.
• Click on “File” • Click on “Print” • When the Print screen appears, select your desktop printer and click on “OK”.
12. To review an individual journal that makes up the balance on the account, click once in the “PTD” column in the first row to select it.
13. Click once on the “Journal Details” button. This brings up the Journals (RIT) screen, listing all of the entries in the selected journal.

Oracle Training: Performing Inquiries and Requesting Reports in the Oracle Applications Revised February 2008
29
14. To view journal entry detail click on the “Show Full Journal” button to view the actual journal entry.
15. To view the history of this entry, click once on “Help” in the menu bar at the top of this screen. • Select “Record History” and click on it. The Record History screen opens. • Click on “OK”
16. In order to examine a specific invoice from Accounts Payable, click once on the first field in the row containing Payables Purchase Invoices in the Journals (RIT) screen to select it.
17. Click once on the “Drilldown” button to go into the “View Journal Entry Lines” screen which will open in a new browser window.
18. From this screen click on the “View Journal Entry” button to view the journal entry or the “Export” button to export the details on this screen to Excel.
19. Click on the “View Transaction” button to view the “Invoice Workbench” screen which provides you with transaction details such as Supplier, PO number, and Invoice number. The Oracle e-business suite browser window can be closed at this time.
20. In the upper section of the Invoice Workbench screen you can see the Supplier name, Supplier number, Supplier Site, Invoice date and the Invoice number.
21. In the lower section of the “Invoice Workbench” screen there are six tabs that provide Invoice, Purchase Order and Payment information.
22. Click on the “Lines” tab to see item descriptions and the Purchase order number. 23. Click on the “View Payments” tab and then the “Payments Overview” button. From
the “Payments Overview” screen you can see whether the check has cleared the bank and on what date.
24. To return to the Account Inquiry screen from the Payables screens, click on the Close box in the upper right corner of each screen.
Quick Review You have just learned the process to follow to review an account balance and find the journal details on-line in the general ledger.

Oracle Training: Performing Inquiries and Requesting Reports in the Oracle Applications Revised February 2008
30
Lesson 2: Request an FSG Report (Dept. Statement), using the Run Financial Statement Generator program
The Oracle Financial Applications can be used to request various financial reports that you can view on your desktop or print at your networked printer. There are two different types of reports that you can request.
• FSG (custom) Reports (includes monthly department or project statements): These reports are designed to help you track your department’s budget, revenues and expenditures over a period of time specified by you, usually one month. Since only summary balances are reflected on statements, they give managers a high-level view of their operating or project accounts.
• Standard Reports: These reports contain transaction detail to assist you with
reconciling financial activity for your department or project. We will be learning about standard reports in lesson 4 of this course.
Refer to the Appendix at the end of these materials for more information about FSG and Standard Reports available to Oracle users including report names, descriptions and the purpose of the each report. Objective At the end of this lesson, you will be able to request and print a department statement using the program “Run Financial Statement Generator. You will also be able to run a department statement using the program “Publish FSG Report” which allows you to view your report in Excel. Scenario
Sam would like to determine what expenditures were incurred last month and how much money is left in his department budget. He knows that the system will provide the total amounts, as long as the revenues and expenditures have been accurately entered and updated in the general ledger. He is ready to request a department statement. Directions: Request an FSG Report
• At the “RIT – GL – COS RPT & INQ – 67000-67099” Navigator screen, make sure “Reports” is highlighted. Click on “Open”.

Oracle Training: Performing Inquiries and Requesting Reports in the Oracle Applications Revised February 2008
31
The Submit a New Request screen opens up asking Sam what type of request he wants to run, a Single Request or a Request Set, which is a pre-defined request made up of a set of reports. Since Sam only wants to run a department statement he makes sure “Single Request” is selected and clicks on the “OK” button
• Click the “OK” button.

Oracle Training: Performing Inquiries and Requesting Reports in the Oracle Applications Revised February 2008
32
The “Submit Request” screen opens. With the cursor blinking in the “Name” field within the “Run this Request” section, Sam clicks on the LOV field to the right of the Name field to present a list of reports that he has access to.
• Click on the LOV field to the right of the “Name” field.
The “Submit Request” screen opens. With the cursor blinking in the “Name” field within the “Run this Request” section, Sam clicks on the LOV field to the right of the Name field to present a list of reports that he has access to. Sam knows that in order to request a department statement, which is an FSG report, and have it print to an Oracle networked printer he must run a program called Financial Statement Generator.
• Click on the LOV field to the right of the “Name” field. • In the Reports screen that appears, click on “Program-Run Financial Statement
Generator”. • Click on the “OK” button.

Oracle Training: Performing Inquiries and Requesting Reports in the Oracle Applications Revised February 2008
33

Oracle Training: Performing Inquiries and Requesting Reports in the Oracle Applications Revised February 2008
34
When the “Parameter” screen appears, the “Ledger” field automatically defaults to “RIT”. Sam presses the Tab key once to go the “Report” field, where he can specify the type of report he wishes to run. He uses the LOV field located to the right of the “Report” field to make his selection.
• Click on the LOV field to the right of the “Report” field.
The Report screen appears. Here Sam sees a list of the various types of reports he can request, along with a short description of what each contains. He knows that he wants to run a department statement. Since the list is very long, and Sam knows his report starts with “RIT-“, he types this in the “Find” field followed by a “%” sign, and clicks on the “Find” button.
• Type “RIT-%” in the “Find” field. • Click on the “Find” button.

Oracle Training: Performing Inquiries and Requesting Reports in the Oracle Applications Revised February 2008
35
Note: Since NTID has a different fiscal year and budget organization than RIT, NTID departments use a different monthly statement. It is called the “NTID–Dept Stmt”. NTID employees would select this report from the list rather than “RIT–Dept Statement”. The following steps are the same regardless of the report selected.
A reduced list of reports starting with “RIT-“ appears. Sam selects the “RIT-Dept Statement” report and clicks the “OK” button. • Select the “RIT-Dept Statement” report and click the “OK” button.
The Parameters screen comes back into view. Sam sees that the “Report” field has been filled in, and that the “Period” field is now highlighted. He knows that the system defaults to the current open accounting period. However, he would like to review his department statement for the month of December 2007. He clicks on the LOV field to the right of the “Period” field and selects “DEC-07” from the list of values that appears.
• With the “Period” field highlighted, click on the LOV field to the right of the
“Period” field. A Period screen will appear. • Use the scrollbar at the right of this screen to scroll down to “DEC-07”. • Click on it to select it. • Click on the “OK” button.
Oracle Training: Performing Inquiries and Requesting Reports in the Oracle Applications Revised February 2008
36
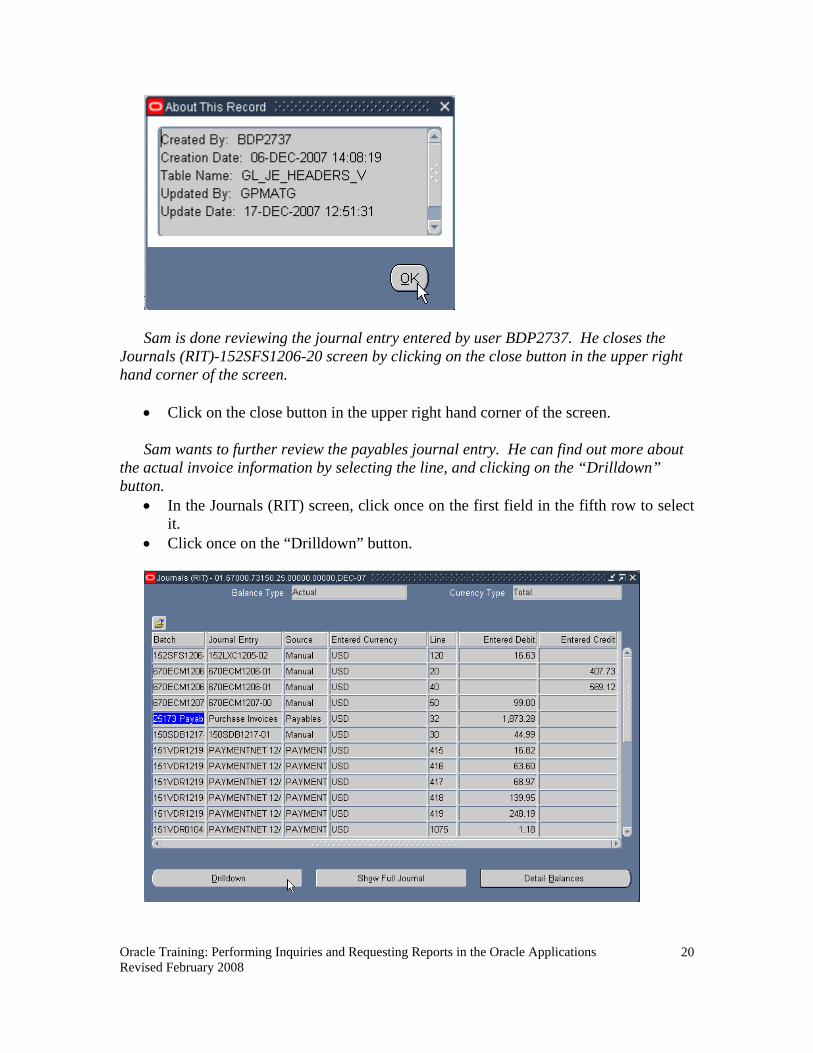
Sam sees he has returned to the Parameters screen, and that the selected date now fills the “Period” field. Sam knows that if he wants department statements for all of his departments he could skip the rest of the fields and click on the “OK” button at this point. However he only needs a department statement for department 67000, and in order to do this he needs to enter that department into the “Segment Override” field. NOTE: If you want to request department statements for all departments within your responsibility, tab past the “Segment Override” field. Security rules will allow you to run department statements for only those departments that you are authorized to access.
Sam tabs over to the “Segment Override” field. As soon as his cursor reaches this
field, the RIT Chart of Accounts dialog box pops into view. • Press the Tab key twice. The Chart of Accounts dialog box will appear on your
screen.

Oracle Training: Performing Inquiries and Requesting Reports in the Oracle Applications Revised February 2008
37
The system automatically fills in the “ENTITY” and “PROGRAM” fields. The cursor blinks in the “Ledger” field. Sam knows that the “Ledger” field can remain blank, he presses the Tab key twice to reach the “DEPARTMENT” field. Since Sam wants to run a statement for only one department within his responsibility, he enters “67000” in the “Department” field. Sam is requesting a department statement for an operating account therefore his project should be “00000”. He enters “00000” into the “Project” field, and leaves the remaining fields blank.
• Press the Tab key twice. • With your cursor blinking in the “Department” field in the Chart of Accounts
screen, type “67000”. • Place your cursor or tab to the “Project” field, type “00000”. • Click on the “OK” button.
Sam notices he has returned to the Parameters screen and the “Segment Override” field is filled in with the account he selected in the Chart of Accounts dialog box. The rest of the fields do not need to be changed. Sam clicks on the “OK” button.
• The remaining fields are not used. Click on the “OK” button.

Oracle Training: Performing Inquiries and Requesting Reports in the Oracle Applications Revised February 2008
38
You have now learned how to request a FSG report such as your Department Statement. In the next lesson you will learn how to print your report to your Oracle networked printer.

Oracle Training: Performing Inquiries and Requesting Reports in the Oracle Applications Revised February 2008
39
Summary of Steps to Request an FSG Report (Department Statement) 1. When the Submit Request screen opens the “Single Request” option will be
automatically selected. Click the “OK” button. 2. The Submit Request screen will open. Click on the LOV field located to the right of
the “Name” field. The Report screen comes into view. 3. Select the “Program – Run Financial Statement Generator” from the list of values. 4. Click on the “OK” button. The Parameters screen will appear. 5. Press the Tab key once to get to the “Report” field. 6. With your cursor blinking in the “Report” field, click on the LOV field located to the
right of the “Report” field. The Reports screen will appear. 7. Type “RIT-%” in the “Find” field and click on the “Find” button. 8. The Parameters screen will reappear, with the “Period” field highlighted. 9. The system automatically defaults to the current accounting period. If you would like
to view your department statement for a different period: • Making sure the “Period” field is highlighted, click on the LOV field to the right
of the “Period” field. • A Period screen will appear. Scroll down to view the desired period. Click on
your selection. • Click on the “OK” button to return to the Parameters screen.
10. Press the Tab key until the Chart of Accounts screen appears. Enter the department number in the “DEPARTMENT” field for the statement you wish to view using a project of “00000”. • To request statements for a range of departments, tab past the “Segment
Override” field. 11. Click on the “OK” button. This returns you to the Parameters screen. 12. Click on the “OK” button. 13. You will return to the Submit Request screen. Quick Review You have just learned how to request a department statement for one department or a range of departments. You are now ready to print this statement on a networked printer.

Oracle Training: Performing Inquiries and Requesting Reports in the Oracle Applications Revised February 2008
40
Lesson 3: Print an FSG Report on a Networked Printer Once you have requested an FSG report using “Program – Run Financial Statement Generator”, you can print it on a networked printer (that is set up to print Oracle reports), and view the output on your computer screen. Objective: At the end of this lesson, you will be able to view your report on your computer screen, e-mail a report notification automatically and print your department statement at your networked printer. Note: If there is a printer in your department that you would like to print Oracle reports on, call the ITS Help Desk at ext. 5-4357. Scenario Sam has requested all of his department statements. He now wants to print copies to his networked printer, and send a notification to the Department Head via e-mail. He notices that the Submit Requests screen has come back into view. Sam clicks on the “Options” button within the “Upon Completion” section. The “Upon Completion” screen opens, here he can enter the number of copies he would like to print, which printer(s) he wants to print to, and who he wants e-mail report notifications to be sent to. Directions: Print an FSG Report
• Click on the “Options” button within the “Upon Completion” section.

Oracle Training: Performing Inquiries and Requesting Reports in the Oracle Applications Revised February 2008
41
NOTE: Refer to the Appendix Tip #4, to find out how to schedule a report in the “At these Times…” section.
In the “Upon Completion” screen the cursor automatically selects “Save all Output
Files”. Sam places the cursor in the “Name” field within the “Notify the following people:” section. Here he clicks on the LOV field located to the right of the “Name” field.
• Click on the LOV field located to the right of the “Name” field in the “Upon
Completion” screen.
In the “People” screen that opens Sam enters the Department Head’s last name in
the “Find” field with a percent sign after it and clicks on the “Find” button. By querying on the last name Sam will be able to find the e-mail address attached to his HR record.
• Enter the name of the person and click on the “Find” button.

Oracle Training: Performing Inquiries and Requesting Reports in the Oracle Applications Revised February 2008
42
A reduced list of values appears and Sam selects the Department Head’s name and clicks the “OK” button. The Department Head will receive an e-mail, which will include a URL for the report itself, and notifies him that the report has been run.
• Select the person’s name and click on the “OK” button.
The Department Head’s name now appears in the “Name” field. Sam could add more employee’s names to notify via e-mail but he is done for now. In the “Print the Output To” section the style defaults to A4. Sam knows his report will print correctly with this style. Since there are several printers in his building, Sam must indicate which printer his computer is hooked up to. He clicks once within the “Printer” field to position his cursor in the “Printer” field. Sam uses the LOV field to the right of the “Printer” field to locate and designate the correct printer.
• Click once within the “Printer” field to position your cursor in the “Printer” field. • Click on the LOV field to the right of the “Printer” field. The Printers screen
appears.

Oracle Training: Performing Inquiries and Requesting Reports in the Oracle Applications Revised February 2008
43
• In order to reduce the list of printers, type “prcto%” in the ‘Find” field and click the “Find” button. The printer “prcto01_app” is the second one on the list. Click on it to select it. Click on the “OK” button.
The system fills in the “Printer” field screen, and automatically tabs to the “Copies”
field in the “Upon Completion” screen. Sam enters “1” to print 1 copy. Sam knows that if he wants to send his report to more than one printer he can add more printers in the “Print the Output To:” section, instead he clicks on the “OK” button.
• In the “Copies” field, enter the number of copies you would like to print. Note:
We won’t actually print in class today, therefore leave the default value in the “Copies” field at “0”.
• Click on the “OK” button.

Oracle Training: Performing Inquiries and Requesting Reports in the Oracle Applications Revised February 2008
44
Sam has returned to the Submit Request screen. He sees that the “Notify” and “Print to” fields have automatically filled in. He clicks on the “Submit” button to submit his request and send it to the printer.
• Click on the “Submit” button. (Remember, since we left a “0” in the “Copies”
field of the Options screen, we won’t actually be printing our report).
The Requests screen automatically opens with Sam’s request id highlighted in blue.
The “Phase” and “Status” columns allow Sam to view the phase and status of his job. When the Requests screen first opens the phase of his request is “Pending”, the status is “Normal”, and both are highlighted in green. At this point if Sam wanted to cancel his request or put it on hold he could click on the “Cancel” or “Hold” buttons. He updates the phase and status of his request by clicking on the “Refresh Data” button.
• Click on the “Refresh Data” button.

Oracle Training: Performing Inquiries and Requesting Reports in the Oracle Applications Revised February 2008
45
NOTE: The “Cancel” and “Hold” buttons are only active when a request has not yet completed.
He sees that the request for the “Program – Run Financial Statement Generator” has
completed normally. Sam knows that when this program runs it generates a second request id, (usually the next request id number) which actually creates the report. When the request for the “RIT- Dept Statement (Financial Statement Generator)” completes with a status of “Normal”, he knows his job is done. If his job had completed in error it would have been highlighted in red. NOTE: Another way to refresh the data on your “Requests” screen is to hold down the Control key and press the F11 key.
Sam wants to view his report online before he picks it up at the printer. He selects
the second request id for the “Financial Statement Generator” and clicks on the “View Output” button. His report opens up on the screen for him to view.
• Select your second request id and click on the “View Output” button.

Oracle Training: Performing Inquiries and Requesting Reports in the Oracle Applications Revised February 2008
46
Sam’s report opens up in a new browser window. Sam clicks on the maximize box in
the upper right hand corner of the browser window to maximize the screen. When Sam is finished looking at his report on-line he clicks on the close box in the upper right corner of the browser window and returns to the “Requests” screen.
• Click on the maximize box in the new browser window to maximize the window.

Oracle Training: Performing Inquiries and Requesting Reports in the Oracle Applications Revised February 2008
47
• Click on the close box in the browser window to close the window.
Sam wants to submit a request for another report, but rather than return to the
Navigator he simply clicks on the “Submit a New Request” button on the “Requests” screen. The “Submit a New Request” screen opens.
• Click on the “Submit a New Request” button.

Oracle Training: Performing Inquiries and Requesting Reports in the Oracle Applications Revised February 2008
48
Sam clicks on the “OK” button to select a single request. The “Submit Request” screen opens.
• Click on the “OK” button.
Back on the “Submit Request” screen Sam decides to request a department statement
for November, 2007 for the same department. He could use the LOV and select the department statement again, but he knows a quicker way. He clicks on the “Copy” button. The “Prior Requests” screen opens.
• Click on the “Copy” Button.
Oracle Training: Performing Inquiries and Requesting Reports in the Oracle Applications Revised February 2008
49
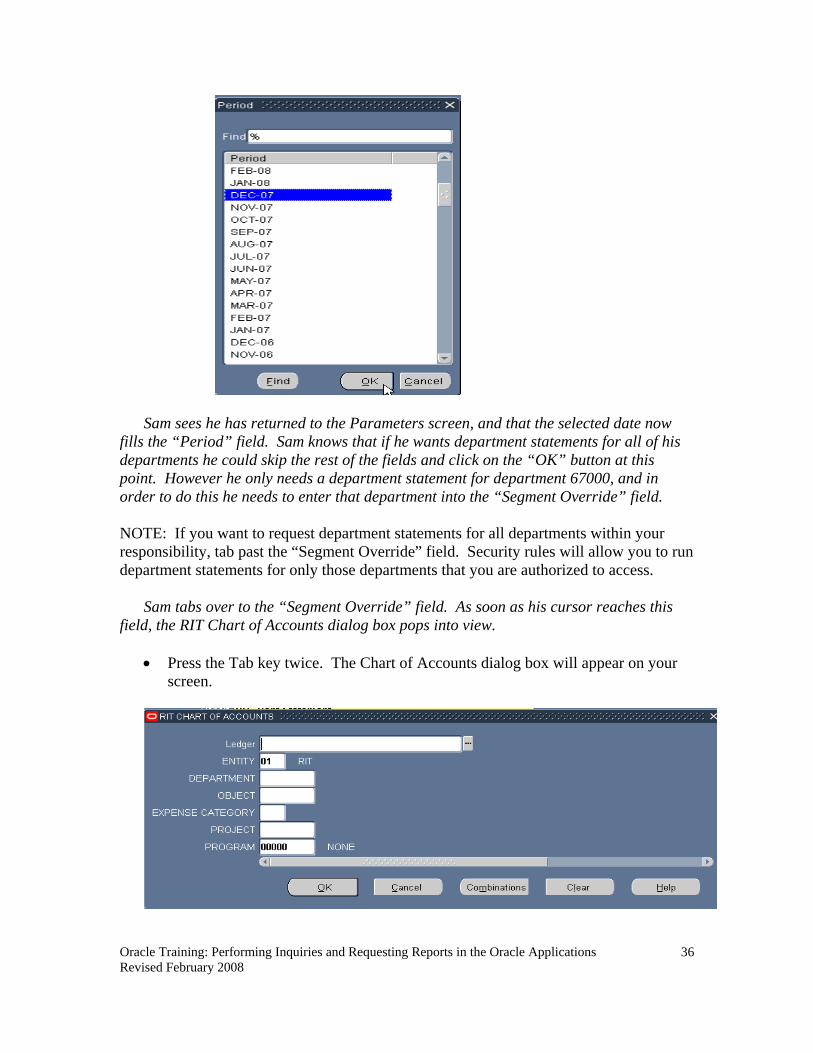
Sam wants to resubmit his last request for a department statement. He knows that by scrolling all the way over to the right he can see the request id’s of his previous requests.
• Scroll over to the right side of the screen using the scroll bar at the bottom of the screen.
Sam sees the request id he wants to copy. He makes sure it is selected and clicks on
the “OK” button.
• Click the “OK” button.

Oracle Training: Performing Inquiries and Requesting Reports in the Oracle Applications Revised February 2008
50
All the fields on the “Submit Request” screen fill in with the values from the previous request. Sam wants to change the period for this report so he clicks in the “Parameters” field. The “Parameters” screen opens.
• Place your cursor in the “Parameters” field.
Sam changes the period from “DEC-07” to “NOV-07” and clicks the “OK” button in the “Parameters” field to return to the “Submit Request” screen. All the other parameters remain the same.
• Click in the “Period” field. • Click on the LOV field to the right of the “Period” field. • Select “NOV-07” and click the “OK” button. • Click on the “OK” button in the “Parameters” field.

Oracle Training: Performing Inquiries and Requesting Reports in the Oracle Applications Revised February 2008
51
Sam is now ready to submit his request and view it in the “Requests” screen just like before. He clicks on the “Submit” button and goes to the “Requests” screen. NOTE: To view prior requests from the Navigator screen click on the “View” menu and select “Requests”. A “Find Requests” screen will open giving you the option to specify which request id you want to find or if you want to find all of your requests simply click the “OK” button.
You can also change the order your requests display in the “Requests” screen by using the “Order By” field in the “Find Requests” screen. You can put them in order by Request ID, Name or by Requesting Start Date.

Oracle Training: Performing Inquiries and Requesting Reports in the Oracle Applications Revised February 2008
52
Summary of Steps to Print an FSG Report from a Networked Printer 1. In the “Submit Request” screen click on the “Options” button. 2. To send an e-mail notification place your cursor in the “Name” field within the
“Notify the following People:” section on the “Upon Completion” screen. • Click on the LOV field to the right of the “Name” field. • Type the employee’s last name and a percent sign in the “Find” field. • Click on the “Find” button. • Select the employee’s name from the reduced list of values. • Click on the “OK” button. • Repeat for as many employees that you want to e-mail.
3. To select a printer and number of copies place your cursor in the “Printer” field within the “Print the Output To:” section on the “Upon Completion” screen.
• Click on the LOV field to the right of the “Printer” field. • If you know the printer’s name, type it in the “Find” field (or part of it with a
percent sign). • Click on the “Find” button. • Select the printer’s name from the reduced list of values. • Click on the “OK” button. • The cursor will automatically tab to the “Copies” field. Enter the number of
copies you want to print. • Repeat for as many printers as you need.
4. Click on the “OK” button. The Submit Requests screen reappears. 5. Click on the “Submit” button. 6. The “Requests” screen automatically opens with your request id highlighted in blue. 7. If the phase of your job is pending or running it will be highlighted in green until it is
completed. If your job errors out it will be highlighted in red. 8. Follow along the row in which your request id appears to view its phase and status in
the print queue. You must also check the request id for the “Financial Statement Generator” which is a second request generated by the first. This is the request that will create your report.
9. When the phase and status are “Completed” and “Normal” for the two jobs you can view the report online. Select the second request id and click on the “View Output” button.
10. To make your output screen larger click the maximize button in the upper right hand corner.
11. Use the scroll bar to scroll down and view the other pages in your report. 12. Close your output screen by clicking on the close box in the upper right corner. 13. You can submit a new request from the “Requests” screen by clicking on the “Submit
a New Request” button. The “Submit a New Request” screen will open. 14. By clicking the “OK” button you will be taken to the “Submit Request” screen where
you can create a new request or copy a previous request by clicking on the “Copy” button.

Oracle Training: Performing Inquiries and Requesting Reports in the Oracle Applications Revised February 2008
53
15. When you copy a previous request you can change the parameters (period, segment override, etc.) by clicking in the “Parameters” field. The parameters screen will open, allowing you to change the parameter values.
16. To view requests directly from the Navigator window click on the “View” menu and select “Requests”.
17. The “Find Requests” screen will open. From there you can enter a specific request id to find, or change the order in which your requests display. Click the “OK” button to go to the “Requests” screen.
Quick Review You have just learned how to print an FSG report, (department statement), from a networked printer and view it online. Now you will learn how to request an FSG report using the Publish FSG Report program.
Oracle Training: Performing Inquiries and Requesting Reports in the Oracle Applications Revised February 2008
54
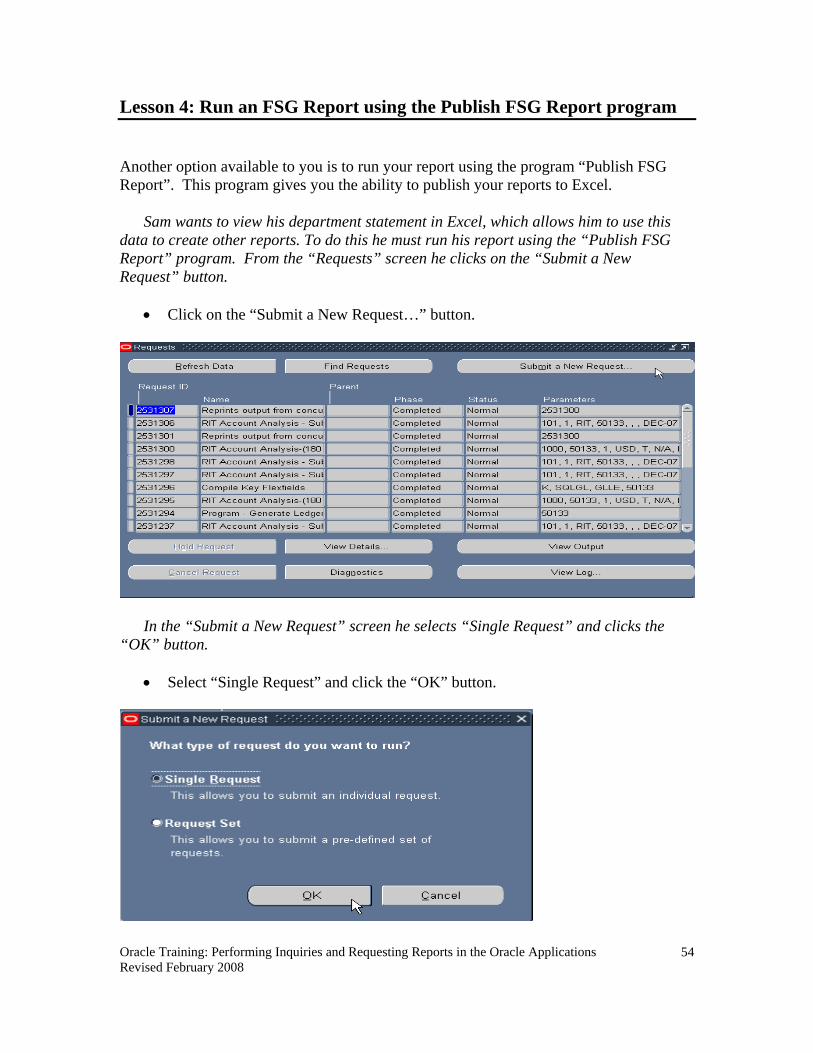
Lesson 4: Run an FSG Report using the Publish FSG Report program Another option available to you is to run your report using the program “Publish FSG Report”. This program gives you the ability to publish your reports to Excel.
Sam wants to view his department statement in Excel, which allows him to use this
data to create other reports. To do this he must run his report using the “Publish FSG Report” program. From the “Requests” screen he clicks on the “Submit a New Request” button.
• Click on the “Submit a New Request…” button.
In the “Submit a New Request” screen he selects “Single Request” and clicks the “OK” button.
• Select “Single Request” and click the “OK” button.

Oracle Training: Performing Inquiries and Requesting Reports in the Oracle Applications Revised February 2008
55
• In the “Submit Requests” window click on the LOV field to the right of the “Name” field.
• In the “Reports” screen that appears, click on “Program-Publish FSG Report”. • Click on the “OK” button.

Oracle Training: Performing Inquiries and Requesting Reports in the Oracle Applications Revised February 2008
56
Sam enters the RIT- Dept. Statement information in the “Parameters” window and clicks the “OK” button.
• Complete the “Parameters” window with the following information:
o Report: RIT- Dept Statement o Period: DEC-07 o Segment Override: Dept:67000; project:00000
• Click the “OK” button.
The Submit Requests screen appears on your terminal.

Oracle Training: Performing Inquiries and Requesting Reports in the Oracle Applications Revised February 2008
57
Sam wants to view this report in Excel so he can use the data to create other reports. He clicks on the “Options” button within the “Upon Completion…” section to change the report’s format.
• Click on the “Options” button within the “Upon Completion…” section.
In the “Upon Completion” screen the cursor automatically selects “Save all Output Files”. Sam makes sure this option is checked in order to be able to view his report output. Sam places his cursor in the Format field within the “Layout” section. Here he clicks on the LOV field located to the right of the “Format” field.
• Place your cursor in the “Format” field in the “Layout” section of the “Upon
Completion” screen.

Oracle Training: Performing Inquiries and Requesting Reports in the Oracle Applications Revised February 2008
58
Sam chooses “Excel” from the LOV and clicks on the “OK” button. • The “Format Type LOV” screen opens, select “Excel” and click the “OK” button.
The format type has changed from “PDF” to “Excel”. Sam knows that he cannot
print to a networked printer using this program. He skips the “Print Output To…” section and clicks on the “OK” button.
• Click on the “OK” button.

Oracle Training: Performing Inquiries and Requesting Reports in the Oracle Applications Revised February 2008
59
Back in the “Submit Requests” window, Sam is ready to submit his request. He clicks on the “Submit” button.
• Click on the “Submit” button.
The “Requests” window opens up and Sam sees his “Program – Publish FSG Report” request is in the first row with a phase of “Pending”. He clicks on the “Refresh” button to update the phase and status of his request.
• Click on the “Refresh” button.

Oracle Training: Performing Inquiries and Requesting Reports in the Oracle Applications Revised February 2008
60
Sam sees that the phase of his request has changed to “Completed” and his status is “Normal”. He is ready to view his report. He clicks on the “View Output” button.
• Click on the “View Output” button.
A “File Download” window opens, asking Sam if he wants to open or save the file. He clicks on the “Open” button.
• Click on the “Open” button.

Oracle Training: Performing Inquiries and Requesting Reports in the Oracle Applications Revised February 2008
61
The report opens up in Excel within a new browser window. From the “File” menu’s drop down list, Sam selects “Save As…”.
• Click on “File” and select “Save As…” from the drop down menu.
He enters the name of the report in the “File name” field and selects “Microsoft Office Excel Workbook” from the “Save as type” field’s LOV. He saves the report to his server and closes the browser window. He knows he can open it up in Excel and use it to create other reports. He can also format and print this report from Excel.

Oracle Training: Performing Inquiries and Requesting Reports in the Oracle Applications Revised February 2008
62
Summary of Steps to Request an FSG Report using the Publish FSG Report program 1. When the Submit Request screen opens the “Single Request” option will be
automatically selected. Click the “OK” button. 2. The Submit Request screen will open. Click on the LOV field located to the right of
the “Name” field. The Report screen comes into view. 3. Click on “Program – Publish FSG Report” to be able to publish your report to Excel. 4. Click on the “OK” button. The Parameters screen will appear. 5. Press the Tab key once to get to the “Report” field. 6. With your cursor blinking in the “Report” field, click on the LOV field located to the
right of the “Report” field. The Reports screen will appear. 7. Type “RIT-%” in the “Find” field and click on the “Find” button. 8. The Parameters screen will reappear, with the “Period” field highlighted. 9. The system automatically defaults to the current accounting period. If you would like
to view your department statement for a different period: • Making sure the “Period” field is highlighted, click on the LOV field to the right of
the “Period” field. • A Period screen will appear. Scroll down to view the desired period. Click on your
selection. • Click on the “OK” button to return to the Parameters screen. 10. Press the Tab key until the Chart of Accounts screen appears. Enter the department
number in the “DEPARTMENT” field for the statement you wish to view using a project of “00000”.
• To request statements for a range of departments, tab past the “Segment Override” field.
11. Click on the “OK” button. This returns you to the Parameters screen. 12. Click on the “OK” button. 13. Click on the “Options” button in the “Upon Completion…” section to change the
format of your report. 14. In the Upon Completion screen, place your cursor in the “Format” field in the
“Layout” section. Select “Excel” from the drop down menu. 15. Click the “OK” button to return to the Submit Request screen. 16. Click the “Submit” button to submit your “Publish FSG Report” request. 17. Once your request has completed, click on the “View Output” button in the Requests
screen. The report output will publish in Excel within a browser window. From here you can save the report to your server.
Quick Review You have just learned how to run an FSG report using the Publish FSG Report program and publish it to Excel. Now you will learn how to request and print a Standard report.

Oracle Training: Performing Inquiries and Requesting Reports in the Oracle Applications Revised February 2008
63
Lesson 5: Request and Print Standard Reports There are two Oracle Standard Reports that are useful for reconciling your department or project financial activity. The RIT Account Analysis-(180 Char) report provides you with transaction detail by period. This report can be sorted by department or project, then by object code and then sent to your networked printer. There is a page break after each department or project, depending on the sort. The RIT Account Analysis - Subledger with AP report provides you with additional information about transactions processed in Accounts Payable. The transactions can be sorted by department or project, then by object code. This report can be viewed in PDF, HTML or Excel format. At the time this manual was printed, this report could not be sent to a networked printer for printing. It can be printed using the print function from the PDF, HTML or Excel windows. The report will page break base on the sort, department or project. Objective:
At the end of this lesson, you will be able to request and print a RIT Account Analysis-(180 Char) report. Scenario
Sam would like to request and view an Account Analysis report for his department in the College of Science. Directions: Request a Standard Report (RIT Account Analysis-(180 Char))
• Beginning at the Navigator screen, click on “Reports”, and then on “Open”. Your instructor can help you if you need assistance.

Oracle Training: Performing Inquiries and Requesting Reports in the Oracle Applications Revised February 2008
64
The Submit a New Request screen opens up asking Sam what type of request he wants to run, a Single Request or a Request Set, which is a pre-defined request made up of a set of reports. Since Sam only wants to run an Account Analysis report, he makes sure Single Request is selected and clicks on the “OK” button • Click the “OK” button.
The “Submit Request” screen opens. With the cursor blinking in the “Name” field
within the “Run this Request” section, Sam clicks on the LOV field to the right of the “Name” field to present a list of reports that he has access to.
• Click on the LOV field to the right of the “Name” field.

Oracle Training: Performing Inquiries and Requesting Reports in the Oracle Applications Revised February 2008
65
From the “Reports” screen he chooses the “RIT Account Analysis-(180 Char)” report.
• Making sure the “RIT Account Analysis–(180 Char)” report is highlighted, click
once on the “OK” button.
The Parameters screen pops into view, with the “Ledger Currency” field highlighted.
The first four fields have defaulted in. Sam presses the Tab key four times to tab to the “Starting Period” field. He uses the LOV field to make his selection. He clicks once on “DEC-07” and then on the “OK” button.
• Press the Tab key four times. • Click once on the LOV field located to the right of the “Starting Period” field.

Oracle Training: Performing Inquiries and Requesting Reports in the Oracle Applications Revised February 2008
66
• Making sure “DEC-07” is highlighted, click once on the “OK” button.
Note: To run a report to show budget transaction detail, change the “Balance Type” field to “B” for budget.
The cursor has automatically jumped to the “Ending Period” field. By clicking once
on the LOV field to the right of the “Ending Period” field, the Ending Period screen appears, and Sam makes his selection.
• With your cursor positioned in the “Ending Period” field, click once on the LOV
field to the right of the “Ending Period” field. In the “Ending Period” screen that appears, click on “DEC-07” to select it, and click on the “OK” button.

Oracle Training: Performing Inquiries and Requesting Reports in the Oracle Applications Revised February 2008
67
The cursor has automatically moved to the “Flexfield From” field and a “RIT Chart of Accounts” screen opens.
Sam wants to request the detail for his operating account for the month of December
2007 to back up the Department Statement he requested in the previous lesson. Therefore he enters the operating account range for department 67000 revenue and expenses. If unsure of a value he could use the LOV field to the right of the segment value fields. Because he already is familiar with the account range he types directly into the blank fields, and clicks the “OK” button.
• In the Chart of Accounts screen, enter the following values in the specified fields:
Low High • Entity: “01” “01” • Department “67000” “67000” • Object “50000” “99999” • Expense Category “00” “99” • Project “00000” “00000” • Program “00000” “00000”
• Click on the “OK” button.

Oracle Training: Performing Inquiries and Requesting Reports in the Oracle Applications Revised February 2008
68
Sam has returned to the Parameters screen. Sam’s cursor automatically jumped to the “Order By” field, which defaults to “Account Segment”. The next field is the “Report By” field which has defaulted to “Department”. This means the report will sort and page break by department number. If Sam was running this report for a range of project numbers he could change the “Report By” field to “Project” to have it sort and page break by project number instead. He clicks on the “OK” button to return to the Submit Requests screen.
• In the Parameters screen, click once on the “OK” button.
From the Submit Requests screen, he is able set up his report to a networked printer just as he did with the department statement. At this point, you can submit your report directly to the network print queue. You would follow the steps for printing an FSG Report (department statement) in Lessons 3.

Oracle Training: Performing Inquiries and Requesting Reports in the Oracle Applications Revised February 2008
69
Lesson 4A: Request a Standard Report (RIT Account Analysis - Subledger with AP)
Sam wants to see the Payables detail for the Dec-07 Payables transactions in his department. He opens up the “Submit Requests” window and selects the “RIT Account Analysis – Subledger with AP” report from the LOV in the “Name” field.
• Following the same process you used to run a RIT Account Analysis – (180 Char)
report, open up the “Submit Requests” window. • Click on the LOV in the “Name” field. • Select the “RIT Account Analysis – Subledger with AP” report. • Click on the “OK” button.
In the “Parameters” window Sam enters “DEC-07” in the “Period From” and “Period To” fields. He presses the Tab key and the Chart of Accounts window opens up. In the Chart of Accounts window he enters his department number, 67000, the expense object code range, 70000-99999 and his operating project, 00000. The Journal Source field defaults to “Payables”.
Since he is only running this report for one department and one project he isn’t
concerned about the sort order. If he was running a report for multiple departments or projects he could change the “First order by”, “Second order by” or “Third order by” fields to have the report sort appropriately. He clicks the “OK” button to return to the “Submit Request” window. Below are the parameters to use when requesting an “RIT Account Analysis - Subledger with AP”. Since this report provides detail for payable transactions, by entering a source

Oracle Training: Performing Inquiries and Requesting Reports in the Oracle Applications Revised February 2008
70
of “Payables” you reduce the transactions to only those for which you need detail. For the non-payable transactions you can get your detail from the “RIT Account Analysis – (180 Char)” report.
• Enter the parameters as seen in the picture below. • Click the “OK” button.
Sam is ready to choose the format he wants to use for this report. Unlike the “RIT Account Analysis – (180 Char)” report, this report is viewed in PDF, HTML or Excel format. Sam clicks on the “Options” button in the “Upon Completion” section to select his report format.
• Click on the “Options” button.

Oracle Training: Performing Inquiries and Requesting Reports in the Oracle Applications Revised February 2008
71
In the “Upon Completion…” window Sam makes sure that the “Save all Output Files” checkbox is checked. He clicks on the LOV field in the “Format” column of the “Layout” section. He knows that with the PDF format he won’t need to adjust the margins or the layout. With the HTML and the Excel, he will have to do both. He decides to leave the format on PDF and clicks on the “Cancel” button.
• Click in the “Format” column of the “Layout” section. • Click on the LOV field. • Click the “Cancel” button.
The PDF, HTML or Excel formats can be used to view and print this report. The right one to choose depends on personal preference and reporting needs.
Sam will be using the print function from the PDF window to print his report so he skips the “Print the Output To:” section and clicks the “OK” button to return to the “Submit Request” window.
• Click the “OK” button in the “Upon Completion…” window.

Oracle Training: Performing Inquiries and Requesting Reports in the Oracle Applications Revised February 2008
72
Sam is ready to submit his request. He clicks on the “Submit” button in the “Submit Request” window.
• Click on the “Submit” button.

Oracle Training: Performing Inquiries and Requesting Reports in the Oracle Applications Revised February 2008
73
When the “Requests” window opens, Sam clicks on the “Refresh Data” button to update the “Phase” of his report.
• Click the “Refresh Data” button.
Once his report has completed successfully Sam clicks on the “View Output” button to view his report and print it from the PDF window.
• Click on the “View Output” button.

Oracle Training: Performing Inquiries and Requesting Reports in the Oracle Applications Revised February 2008
74
The report opens up in a new browser window in PDF format. Sam clicks on the printer icon on the PDF toolbar.
• Click on the printer icon on the PDF toolbar.
The “Printer” screen opens. From here Sam selects a printer name and clicks the “OK” button.
• Select a printer name in the “Name” field and click the “OK” button.
Oracle Training: Performing Inquiries and Requesting Reports in the Oracle Applications Revised February 2008
75
Summary of Steps to Request and Print a Standard Report 1. In the Navigator screen, make sure “Reports” is highlighted. Click once on “Open”.
This will bring up the “Submit a New Request” screen. 2. Press the “OK” button to request a single request and open the “Submit Request”
screen. 3. Click once on the LOV field to the right of the “Name” field. The Reports screen
appears. 4. Click once on your selection, choosing one of the reports in the list of values, in this
case a RIT Account Analysis-(180 Char). 5. Click once on the “OK” button. The Parameters screen appears. 6. Press the Tab key four times to go to the “Starting Period” field. 7. With your cursor positioned in the “Starting Period” field, click once again on the
LOV field to the right of the “Starting Period” field. 8. Click on the period you wish to start with. 9. Click on the “OK” button. 10. Repeat steps #7-9 for the “Ending Period” field. 11. Your cursor is now in the “Flexfield From” field and a RIT Chart of Accounts screen
appears. Enter the values in each of the segment fields for low and high. 12. Click on the “OK” button. 13. Your cursor will move to the “Order By” field, which defaults to “Account Segment”. 14. The “Report By” field defaults to “Department”. If you want to have the report sort
and page break by project number, select “Project” from the LOV. 15. Click on the “OK” button. You are returned to the Parameters screen. 16. Click on the “OK” button to return to the Submit Requests screen. 17. Click on the “Options” button to select a networked printer and number of copies.
The RIT Account Analysis – Subledger with AP report will not print from a networked printer.
18. If running the RIT Account Analysis – Subledger with AP report you can change the report layout format by clicking on the “Options” button in the “Submit Request” window.
19. In the “Layout” section place your cursor in the “Format” column and click on the LOV field to select a PDF, HTML or Excel format.
20. Skip over the “Print Output To:” section and click on the “OK” button. Quick Review You have just learned how to request and print the RIT Account Analysis and RIT Account Analysis – Subledger with AP reports. Use this same process to request other Oracle Standard Reports. Summary This ends the practice exercises. You have covered all of the options that should arise when you use Oracle Financial Applications to make an account inquiry and to request and print department or project statements and selected standard reports. If you have any questions, ask the instructor now.

Oracle Training: Performing Inquiries and Requesting Reports in the Oracle Applications Revised February 2008
76
Appendix: Oracle FSG Reports Report Name Description Purpose
RIT– DEPT STATEMENT (USE FOR ALL RIT DEPARTMENTS WHEN PROJECT = 00000)
Current fiscal YTD & PTD Permanent & Working Budget, Encumbrance & Actual totals for revenue and expense categories in RIT operating accounts (project = 00000).
To give department managers a high-level view of their current YTD RIT operating account expenditures as compared to their Permanent & Working budget at a given point in time.
CAPITAL EQUIPMENT STATEMENT (USE FOR ALL DEPARTMENTS WHEN PROJECT = 84200)
YTD & PTD Encumbrance and Actual totals for Capital Equipment Accounts.
To give department managers a high-level view of their Capital Equipment account expenditures at a given point in time.
RIT PLANT FD CAP- PROJ (USE FOR ALL DEPARTMENTS WHEN PROJECT = 83XXX)
PTD, YTD & PJTD (project-to-date), Actual totals for revenue and expense categories in Capital projects.
To give department managers a high-level view of only their department’s Capital project expenditures, not to be used with Physical Plant departments.
SPA GRANTS STATEMENT (USE FOR ALL DEPARTMENTS WHEN PROJECT = 30000-39999)
PJTD & PTD Budget, Encumbrance, and Actual totals for Grant/Contract projects.
To give Principal Investigators a high-level view of their grant/contract expenditures as compared to their budget at a given point in time.
OTHER PROJECTS STATEMENT (USE FOR ALL DEPARTMENTS WHEN PROJECT = 10000-79999, EXCLUDING 30000-59999)
YTD & PTD Budget, Encumbrance, and Actual totals for Special Projects, Designated Funds, Gifts, and Endowment Earnings projects.
To give department managers a high-level view of their Special Projects, Designated Funds, Gifts and Endowment Earnings projects at a given point in time.
NTID – DEPT STMT (USE FOR DEPARTMENTS 40000-49999, WHEN PROJECT > 02000)
FY 2XXX YTD & PTD Budget, Encumbrance, and Actual totals for Revenue and Expense categories in NTID Operating accounts.
To give NTID department managers a high-level view of their current YTD operating expenditures as compared to their budget at a given point in time.
RIT– AUX STMT (USE FOR ALL DEPARTMENTS 20000-29999 WHEN PROJECT = 00000)
Current fiscal YTD & PTD Permanent & Working Budget, Encumbrance & Actual totals for revenue and expense categories for Auxiliary Departments. Benefits and ITS charges are not broken out separately.
To give department managers a high-level view of their current YTD Auxiliary account expenditures as compared to their Permanent & Working budget at a given point in time.
AGENCY PROJECT STATMENT (USE FOR ALL DEPARTMENTS WHEN PROJECT = 90000-99999)
YTD & PTD Budget, Encumbrance, and Actual totals for Agency Fund projects.
To give department managers a high-level view of their Agency Fund project expenditures at a given point in time.
HIERARCHICAL REPORT (USE FOR ALL RIT DEPARTMENTS WHEN PROJECT = 00000)
YTD Budget and Actual totals by revenue and expenses for RIT operating accounts by college or division.
To give Deans and Division heads a high-level view of their RIT operating revenue and expense categories for departments reporting in their college or division.

Oracle Training: Performing Inquiries and Requesting Reports in the Oracle Applications Revised February 2008
77
Appendix: Oracle Standard Reports
Report Name Description Purpose RIT Account Analysis-(180 Char)
Detail of account activity by period, can be sorted by department or project, and then by object code. There is a page break after each department or project.
To provide detail of transactions to assist with reconciliation of RIT and NTID department statements, and project statements including grants, gifts, capital, etc.
RIT Account Analysis - Subledger with AP
Detail of payments made through Accounts Payable by period, sorted by department or project then by object code. There is a page break after each department or project depending on the sort order.
To provide additional information regarding payments made to suppliers including supplier name and invoice number. Expenditures included on this report are also included in the total expenditures on the Account Analysis identified by a Source of “Payables”.
General Ledger – Detail Detail of account activity by period, including beginning and ending balance for each 24-digit account number.
To provide detail information for asset and liability account reconciliations.
Journals – General Detail of all journal entries within a batch in journal entry number order.
To provide journal entry detail to assist with account reconciliations.
Encumbrance Detail Report Detail of encumbrance activity by a range of dates, for a range of accounts and vendors.
To provide encumbrance detail information to assist with account reconciliations.
ITS Chargeback Employee Detail Report
ITS Chargeback detail including employee name, FTE and payroll date by account number.
To provide detail information for ITS Chargebacks to assist with account reconciliations.
ITS Chargeback Student Detail Report
ITS Chargeback detail including student id, FTE and college program code by dept number.
To provide detail information for ITS Chargebacks to assist with account reconciliations.

Oracle Training: Performing Inquiries and Requesting Reports in the Oracle Applications Revised February 2008
78
Appendix
1. In the Navigator screen double click on the “Other” menu option, and then on
“Profile”.
2. Under the “View / Query By Example” menu click on “Enter”.
TIP #1: How to Default Your Printer Name

Oracle Training: Performing Inquiries and Requesting Reports in the Oracle Applications Revised February 2008
79
3. In the “Profile Name” field type “Prin%”.
4. Under the “View / Query By Example” menu click on “Run”.

Oracle Training: Performing Inquiries and Requesting Reports in the Oracle Applications Revised February 2008
80
5. Place the cursor in the first field in the “User Value” column. 6. Click on the “List of Values” field to the right of the “User Value” field. Select
your Printer’s name from the list.

Oracle Training: Performing Inquiries and Requesting Reports in the Oracle Applications Revised February 2008
81
7. Click on the “Save” icon on the tool bar to save the settings.

Oracle Training: Performing Inquiries and Requesting Reports in the Oracle Applications Revised February 2008
82
1. Occasionally you may want to reprint a report that you recently requested. 2. In the Navigator screen click on the “View” menu and select “Requests” to go to the
“Requests” screen.
3. When the “Find Requests” screen opens click the “Find” button.
TIP #2: Reprint Function

Oracle Training: Performing Inquiries and Requesting Reports in the Oracle Applications Revised February 2008
83
4. In the “Requests” screen select the request id you want to reprint, click on the “Tools” menu and select “Reprint”.
5. The “Republish and Reprint Request” window will open in a new browser window.

Oracle Training: Performing Inquiries and Requesting Reports in the Oracle Applications Revised February 2008
84
6. If you selected a printer when you originally submitted this request, it will show in the “Printer” field. If not or if you want to change the printer click on the LOV button to the right of the “Printer” field.
7. The “Search and Select: Printer” window will open. In the “Search” section type in
the first few letters of the printer name you want to find, and put a “%” sign after, then click on the “Go” button.

Oracle Training: Performing Inquiries and Requesting Reports in the Oracle Applications Revised February 2008
85
8. A list of printers will show in the “Results” section. Click in the “Select” column to the left of the printer name you want to select. Click on the “Select” button in the upper right hand corner of the screen.
9. In the “Republish and Reprint Request” window press the Tab key four times to tab
to the “Copies” field. Enter the number of copies you want to print.

Oracle Training: Performing Inquiries and Requesting Reports in the Oracle Applications Revised February 2008
86
10. Click on the “Apply” button.
11. To confirm your reprint request, click on the “OK” button in the “Republish” section.

Oracle Training: Performing Inquiries and Requesting Reports in the Oracle Applications Revised February 2008
87
12. The “Republish and Reprint Request” window will not close automatically. Click on the “Close Window” link at the bottom of the page to close this window.

Oracle Training: Performing Inquiries and Requesting Reports in the Oracle Applications Revised February 2008
88
1. To schedule a report to run at a designated time click on the “Schedule” button in the
“Submit Request” screen when requesting the report.
2. The “Schedule” screen will open giving you the option to run the job:
• As Soon as Possible – right away • Once – You pick a date and time for the report to run only once.
TIP #3: How to Schedule a Report

Oracle Training: Performing Inquiries and Requesting Reports in the Oracle Applications Revised February 2008
89
• Periodically – Select a start and end date, how often you want the report rerun (monthly, weekly, daily, hourly or once every minute), and if you want the report to start at the same time as the previous one or at the time the previous one ended. If your request contains date parameters, you can choose "Increment date parameters each run" to have the value for that parameter be adjusted to match the resubmission interval. For example, if the value for the parameter is 25-DEC-2007 07:00:00 and your interval is monthly, the parameter is adjusted to 25-JAN-2008 07:00:00 for the next submission.
• On Specific Days – You can pick multiple dates within a month or the same days
every week for a designated time frame.

Oracle Training: Performing Inquiries and Requesting Reports in the Oracle Applications Revised February 2008
90
• You can use a schedule that already exists by clicking on the “Apply a Saved Schedule” button and picking from a list of values to use a pre-defined schedule.