Embed Size (px)
Citation preview
© Neustar, Inc. 2012 Neustar Proprietary and Confidential 1
Version 1.0
March 5, 2012
Routing Number Administration System
(RNAS) User Registration Guide

© Neustar, Inc. 2012 Neustar Proprietary and Confidential 2
Change History
Date Revision Change

RNAS User Registration Guide 03/05/2012
© Neustar, Inc. 2012 Neustar Proprietary and Confidential 3
Table of Contents User Registration ................................................................................................................ 4
Task Overview ................................................................................................................ 4 Service Provider (SP) and Service Provider Consultant (SPC) User Registration ............. 4
Required Information ...................................................................................................... 4 Preparations..................................................................................................................... 4 Procedure ........................................................................................................................ 4
State Commission, FCC and 9-1-1 Governing Authority User Registration .................... 11 Required Information .................................................................................................... 11 Preparations................................................................................................................... 11 Procedure ...................................................................................................................... 11
9-1-1 System Service Provider and Public Safety Answering Point (PSAP) User Registration ....................................................................................................................... 18
Required Information .................................................................................................... 18 Preparations................................................................................................................... 18 Procedure ...................................................................................................................... 18

RNAS User Registration Guide 03/05/2012
© Neustar, Inc. 2012 Neustar Proprietary and Confidential 4
User Registration
Task Overview The purpose of this user guide is to guide you through the process of registering as one of the following users in the Routing Number Administration System (RNAS): Service Provider (SP), Service Provider Consultant (SPC), State Commission, FCC, 9-1-1 Governing Authority, 9-1-1 System Service Provider and Public Safety Answering Point (PSAP).
Service Provider (SP) and Service Provider Consultant (SPC) User Registration Service Provider (SP) and Service Provider Consultant (SPC) users with RNAS access will be allowed to submit p-ANI forecasts, applications and annual reports, and view p-ANI data based on the OCN(s), NENA ID(s), state(s) and NPA(s) in their approved user profile.
Required Information To complete the registration process, you will need the following information: • Basic user information (name, phone number, fax number, email address, title,
address) • Company Name • Operating Company Number(s) [OCN(s)] • National Emergency Number Association Identification number [NENA ID(s)] • Doing Business As (DBA) Name(s), if any • Company’s FCC Registration Number [FRN(s)] (Only if your company is not
required to file an NRUF with NANPA) • Name, phone number, email address and title of the company official who can confirm that you require access to RNAS • The state(s) in which your company operates • The Number Plan Area(s) [NPA(s)] in which your company operates
Preparations None
Procedure The following procedure describes how to register as a Service Provider (SP) or Service Provider Consultant (SPC) user:
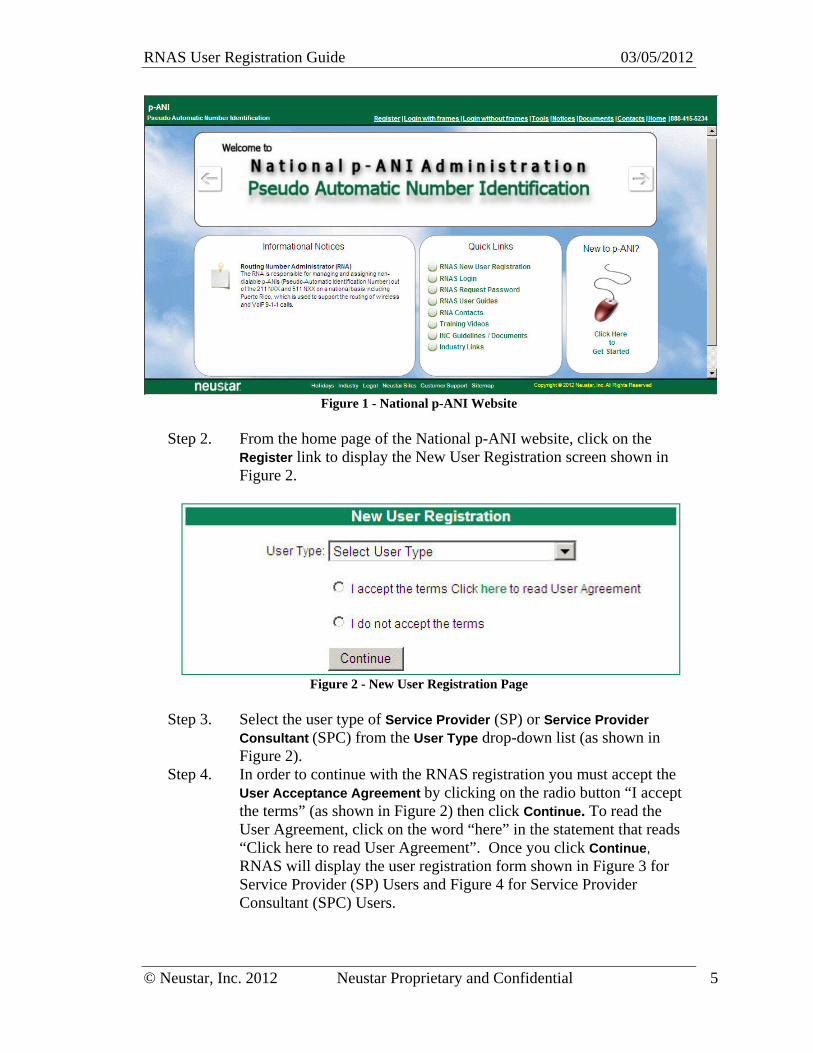
Step 1. Using your Internet browser, access the Neustar Routing Number Administrator website at http://www.nationalpani.com (shown in Figure 1).
RNAS User Registration Guide 03/05/2012
© Neustar, Inc. 2012 Neustar Proprietary and Confidential 5
Figure 1 - National p-ANI Website
Step 2. From the home page of the National p-ANI website, click on the
Register link to display the New User Registration screen shown in Figure 2.
Figure 2 - New User Registration Page
Step 3. Select the user type of Service Provider (SP) or Service Provider
Consultant (SPC) from the User Type drop-down list (as shown in Figure 2).
Step 4. In order to continue with the RNAS registration you must accept the User Acceptance Agreement by clicking on the radio button “I accept the terms” (as shown in Figure 2) then click Continue. To read the User Agreement, click on the word “here” in the statement that reads “Click here to read User Agreement”. Once you click Continue, RNAS will display the user registration form shown in Figure 3 for Service Provider (SP) Users and Figure 4 for Service Provider Consultant (SPC) Users.

RNAS User Registration Guide 03/05/2012
© Neustar, Inc. 2012 Neustar Proprietary and Confidential 6
Figure 3 - Service Provider (SP) User Registration Page

RNAS User Registration Guide 03/05/2012
© Neustar, Inc. 2012 Neustar Proprietary and Confidential 7
Figure 4 - Service Provider Consultant (SPC) User Registration Page

RNAS User Registration Guide 03/05/2012
© Neustar, Inc. 2012 Neustar Proprietary and Confidential 8
Step 5. User Information and Address - In the fields provided, enter the registration information in each of the sections. Information is required for all fields except the Middle Initial, Telephone Extension, Fax, Doing Business As (DBA) Name(s), if any, Company’s FRN and the Additional Contact fields. (Required fields are marked with a red asterisk (*).
NOTE: For SPC users the Doing Business As (DBA) Name(s), if any field will not be provided during user registration. NOTE: All telephone and fax numbers must be entered as 10-digit numbers.
Step 6. Company Contact to Verify Authorization – Enter the name, telephone number, email address and title of the company official who can confirm your RNAS registration.
Step 7. Additional Contacts – The Additional Contact fields are provided to allow you to have RNAS send emails to persons other than yourself. For each Additional Contact desired, enter the email address of the person, then select which of the specific emails you wish to have sent to the designated contact by placing a checkmark in each of the appropriate checkboxes to the right of the contact name. NOTE: Additional Contacts do not have to be registered RNAS users.
Step 8. Select States – To select and add a state or states in which your company operates to your profile:
a. Click on the state or states/U.S. territories. Please note that multiple states may be selected to be moved at one time by using the control button when selecting states from the list.
b. Click the > button to move only selected state(s)/territory(s) to the list on the right side of the page. Another option is to click the >> button to move all states/territories at the same time to the right side of the page.
c. Repeat steps 8a and 8b until all desired states appear in the list on the right side of the page.
Step 9. After you have entered the required information, click Continue to display the final Service Provider or Service Provider Consultant User Registration screen shown in Figure 5.
NOTE: At any time during the user registration process, you can click the Cancel button to exit the registration form. If you click Cancel, the registration process will be stopped and the information entered will be deleted.

RNAS User Registration Guide 03/05/2012
© Neustar, Inc. 2012 Neustar Proprietary and Confidential 9
Figure 5 – Service Provider (SP)/Service Provider Consultant (SPC) Registration Step 3
Step 10. Select NPAs - The field labeled NPA(s) will display all of the NPAs
for the state(s) selected in step 8. To select and add an NPA or NPAs in which your company operates to your profile:
a. Click on the NPAs. Please note that multiple NPAs may be selected to be moved at one time by using the control button when selecting NPAs from the list.
b. Click the > button to move only selected NPA(s) to the list on the right side of the page. Another option is to click the >> button to move all NPAs at the same time to the right side of the page.
c. Repeat steps 10a and 10b until all desired NPAs appear in the list on the right side of the page.
Step 11. Click Submit to complete your registration request. The message shown in Figure 6 will appear confirming that your request has been successfully submitted. Note the tracking number for future reference if needed.
Step 12. Click OK to acknowledge the confirmation message. Step 13. After the RNAS Login Administrator has processed your request,
RNAS will send an email message indicating the registration has been processed. The email will include the status of the registration, (either approved or denied). NOTE: The email provided in your user registration will also be your RNAS username.
Step 14. When you receive the email approving your user registration, you must respond to the email to acknowledge receipt. Upon receipt of your acknowledgement email, the Login Administrator will contact you via phone to provide you with a temporary RNAS password. The temporary password will only be good the first time you log in to RNAS.

RNAS User Registration Guide 03/05/2012
© Neustar, Inc. 2012 Neustar Proprietary and Confidential 10
Step 15. You must log in within 10 days of receipt of your password, or your account will be disabled. When you log in for the first time after registration, RNAS will prompt you to reset your password. Make note of the new password for future use.
NOTE: Usernames and passwords may not be shared at any time. If the RNA discovers that a username and password has been shared, the user will be disabled. To be re-enabled the user will need to contact the RNA customer support desk.
Figure 6 - Confirmation Screen

RNAS User Registration Guide 03/05/2012
© Neustar, Inc. 2012 Neustar Proprietary and Confidential 11
State Commission, FCC and 9-1-1 Governing Authority User Registration State Commission users with RNAS access will be allowed to view data based on the state they provided in their contact information. FCC users with RNAS access will be allowed to view data for all states. 9-1-1 Governing Authority users with RNAS access will be allowed to view data based on the state(s) and NPA(s) selected in their user profile.
Required Information To complete the registration process, you will need the following information: • Basic user information (name, phone number, fax number, email address, title,
address) • Regulatory Agency Name • Name, phone number, email address and title of the agency official who can confirm that you require access to RNAS • The state(s) in which your company operates (9-1-1 Governing Authority users
only) • The Number Plan Area(s) [NPA(s)] in which your company operates (9-1-1
Governing Authority users only)
Preparations None
Procedure The following procedure describes how to register as a State Commission, FCC or 9-1-1 Governing Authority user:
Step 1. Using your Internet browser, access the Neustar Routing Number Administrator website at http://www.nationalpani.com (shown in Figure 7).

RNAS User Registration Guide 03/05/2012
© Neustar, Inc. 2012 Neustar Proprietary and Confidential 12
Figure 7 - National p-ANI Website
Step 2. From the home page of the National p-ANI website, click on the
Register link to display the New User Registration screen shown in Figure 8.
Figure 8 - New User Registration Page
Step 3. Select the user type of State Commission, FCC or 9-1-1 Governing
Authority from the User Type drop-down list (as shown in Figure 8). Step 4. In order to continue with the RNAS registration you must accept the
User Acceptance Agreement by clicking on the radio button “I accept the terms” (as shown in Figure 8) then click Continue. To read the User Agreement, click on the word “here” in the statement that reads “Click here to read User Agreement”. Once you click Continue RNAS will display the user registration form shown in Figure 9 for State Commission and FCC Users and Figure 10 for 9-1-1 Governing Authority Users.

RNAS User Registration Guide 03/05/2012
© Neustar, Inc. 2012 Neustar Proprietary and Confidential 13
Figure 9 – State Commission and FCC User Registration Page

RNAS User Registration Guide 03/05/2012
© Neustar, Inc. 2012 Neustar Proprietary and Confidential 14
Figure 10 – 9-1-1 Governing Authority User Registration Page
Step 5. User Information and Address - In the fields provided, enter the
registration information in each of the sections. Information is required for all fields except the Middle Initial, Telephone Extension, and the Fax fields. (Required fields are marked with a red asterisk (*). NOTE: All telephone and fax numbers must be entered as 10-digit numbers.
Step 6. Agency Contact to Verify Authorization – Enter the name, telephone number, email address and title of the agency official who can confirm your RNAS registration.
RNAS User Registration Guide 03/05/2012
© Neustar, Inc. 2012 Neustar Proprietary and Confidential 15
Step 7. Select States – To select and add a state or states where you are designated under state law or regulation to have decision-making and oversight responsibilities for a 9-1-1 Emergency Number System for one or more PSAPs to your profile:
a. Click on the state or states/U.S. territories. Please note that multiple states may be selected to be moved at one time by using the control button when selecting states from the list.
b. Click the > button to move only selected state(s)/territory(s) to the list on the right side of the page. Another option is to click the >> button to move all states/territories at the same time to the right side of the page.
c. Repeat steps 7a and 7b until all desired states appear in the list on the right side of the page.
NOTE: For State and FCC users the Select States field will not be provided during user registration. Please continue to Step 10. NOTE: At any time during the user registration process, you can click the Cancel button to exit the registration form. If you click Cancel, the registration process will be stopped and the information entered will be deleted.
Step 8. After you have entered the required information, click Continue to
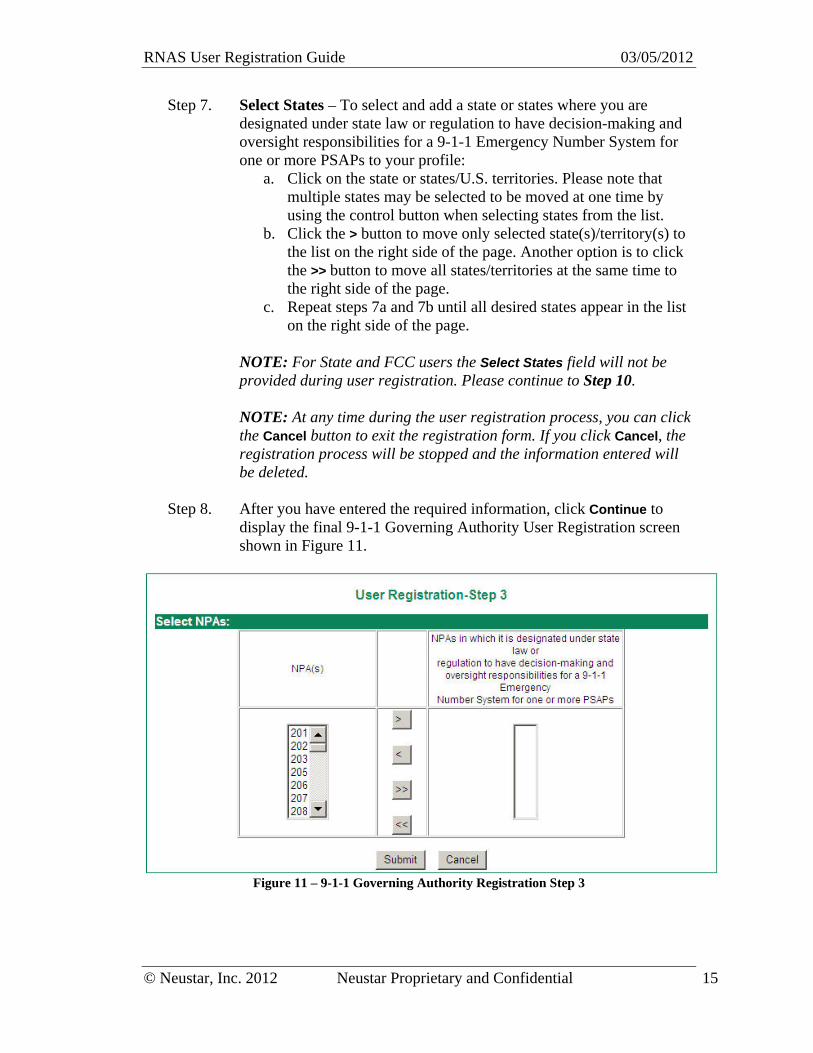
display the final 9-1-1 Governing Authority User Registration screen shown in Figure 11.
Figure 11 – 9-1-1 Governing Authority Registration Step 3

RNAS User Registration Guide 03/05/2012
© Neustar, Inc. 2012 Neustar Proprietary and Confidential 16
Step 9. Select NPAs – The field labeled NPA(s) will display all of the NPAs for the state(s) selected in step 7. To select and add an NPA or NPAs where you are designated under state law or regulation to have decision-making and oversight responsibilities for a 9-1-1 Emergency Number System for one or more PSAPs to your profile:
a. Click on the NPAs. Please note that multiple NPAs may be selected to be moved at one time by using the control button when selecting NPAs from the list.
b. Click the > button to move only selected NPA(s) to the list on the right side of the page. Another option is to click the >> button to move all NPAs at the same time to the right side of the page.
c. Repeat steps 9a and 9b until all desired NPAs appear in the list on the right side of the page.
NOTE: For State and FCC users the Select NPAs field/screen will not be provided during user registration.
Step 10. Click Submit to complete your registration request. The message shown in Figure 12 will appear confirming that your request has been successfully submitted. Note the tracking number for future reference if needed.
Step 11. Click OK to acknowledge the confirmation message. Step 12. After the RNAS Login Administrator has processed your request,
RNAS will send an email message indicating the registration has been processed. The email will include the status of the registration, (either approved or denied). NOTE: The email provided in your user registration will also be your RNAS username.
Step 13. When you receive the email approving your user registration, you must respond to the email to acknowledge receipt. Upon receipt of your acknowledgement email, the Login Administrator will contact you via phone to provide you with a temporary RNAS password. The temporary password will only be good the first time you log in to RNAS.
Step 14. You must log in within 10 days of receipt of your password, or your account will be disabled. When you log in for the first time after registration, RNAS will prompt you to reset your password. Make note of the new password for future use.
NOTE: Usernames and passwords may not be shared at any time. If the RNA discovers that a username and password has been shared, the user will be disabled. To be re-enabled, the user will need to contact the RNA customer support desk.

RNAS User Registration Guide 03/05/2012
© Neustar, Inc. 2012 Neustar Proprietary and Confidential 17
Figure 12 - Confirmation Screen

RNAS User Registration Guide 03/05/2012
© Neustar, Inc. 2012 Neustar Proprietary and Confidential 18
9-1-1 System Service Provider and Public Safety Answering Point (PSAP) User Registration 9-1-1 System Service Provider and Public Safety Answering Point (PSAP) users with RNAS access will be allowed to view data based on the state(s) and NPA(s) selected in their user profile.
Required Information To complete the registration process, you will need the following information: • Basic user information (name, phone number, fax number, email address, title,
address) • Company Name or Public Safety Answering Point (PSAP) Name and PSAP
County/Municipality • Name, phone number, email address and title of the company or agency official
who can confirm that you require access to RNAS • The state(s) in which your company or PSAP operates or has regional jurisdiction • The Number Plan Area(s) [NPA(s)] in which your company or PSAP operates or
has regional jurisdiction
Preparations None
Procedure The following procedure describes how to register as a 9-1-1 System Service Provider (911 SSP) or Public Service Answering Point (PSAP) user:
Step 1. Using your Internet browser, access the Neustar Routing Number Administrator website at http://www.nationalpani.com (shown in Figure 13).

RNAS User Registration Guide 03/05/2012
© Neustar, Inc. 2012 Neustar Proprietary and Confidential 19
Figure 13 - National p-ANI Website
Step 2. From the home page of the National p-ANI website, click on the
Register link to display the New User Registration screen shown in Figure 14.
Figure 14 - New User Registration Page
Step 3. Select the user type of 9-1-1 System Service Provider or PSAP from the
User Type drop-down list (as shown in Figure 14). Step 4. In order to continue with the RNAS registration you must accept the
User Acceptance Agreement by clicking on the radio button “I accept the terms” (as shown in Figure 14) then click Continue. To read the User Agreement, click on the word “here” in the statement that reads “Click here to read User Agreement”. Once you click Continue, RNAS will display the user registration form shown in Figure 15Figure 3 for 9-1-1 System Service Provider Users and Figure 16 for Public Safety Answering Points (PSAP) Users.

RNAS User Registration Guide 03/05/2012
© Neustar, Inc. 2012 Neustar Proprietary and Confidential 20
Figure 15 – 9-1-1 System Service Provider User Registration Page

RNAS User Registration Guide 03/05/2012
© Neustar, Inc. 2012 Neustar Proprietary and Confidential 21
Figure 16 – Public Safety Answering Point (PSAP) User Registration Page
Step 5. User Information and Address - In the fields provided, enter the
registration information in each of the sections. Information is required for all fields except the Middle Initial, Telephone Extension, and Fax fields. (Required fields are marked with a red asterisk (*).
NOTE: All telephone and fax numbers must be entered as 10-digit numbers.
Step 6. Company or Agency Contact to Verify Authorization – Enter the name, telephone number, email address and title of the company official who can confirm your RNAS registration.
Step 7. Select States – To select and add a state or states in which your company operates or agency has regional jurisdiction to your profile:
RNAS User Registration Guide 03/05/2012
© Neustar, Inc. 2012 Neustar Proprietary and Confidential 22
a. Click on the state or states/U.S. territories. Please note that multiple states may be selected to be moved at one time by using the control button when selecting states from the list.
b. Click the > button to move only selected state(s)/territory(s) to the list on the right side of the page. Another option is to click the >> button to move all states/territories at the same time to the right side of the page.
c. Repeat steps 7a and 7b until all desired states appear in the list on the right side of the page.
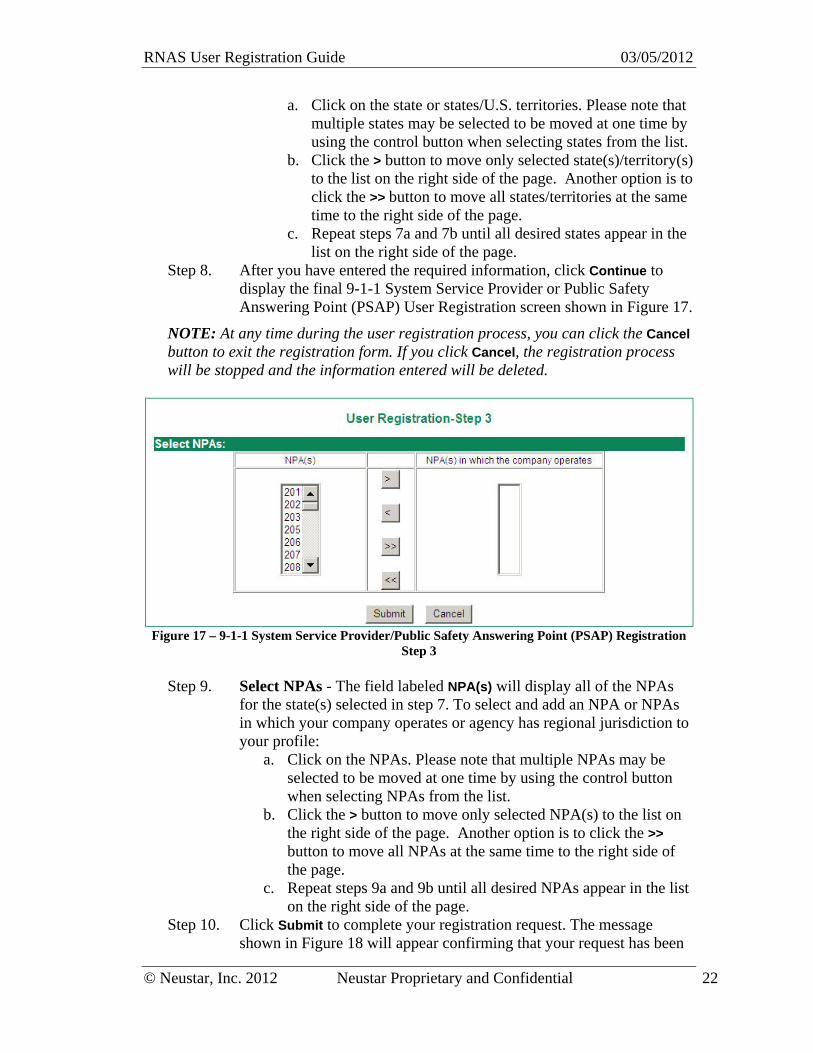
Step 8. After you have entered the required information, click Continue to display the final 9-1-1 System Service Provider or Public Safety Answering Point (PSAP) User Registration screen shown in Figure 17.
NOTE: At any time during the user registration process, you can click the Cancel button to exit the registration form. If you click Cancel, the registration process will be stopped and the information entered will be deleted.
Figure 17 – 9-1-1 System Service Provider/Public Safety Answering Point (PSAP) Registration
Step 3
Step 9. Select NPAs - The field labeled NPA(s) will display all of the NPAs for the state(s) selected in step 7. To select and add an NPA or NPAs in which your company operates or agency has regional jurisdiction to your profile:
a. Click on the NPAs. Please note that multiple NPAs may be selected to be moved at one time by using the control button when selecting NPAs from the list.
b. Click the > button to move only selected NPA(s) to the list on the right side of the page. Another option is to click the >> button to move all NPAs at the same time to the right side of the page.
c. Repeat steps 9a and 9b until all desired NPAs appear in the list on the right side of the page.
Step 10. Click Submit to complete your registration request. The message shown in Figure 18 will appear confirming that your request has been

RNAS User Registration Guide 03/05/2012
© Neustar, Inc. 2012 Neustar Proprietary and Confidential 23
successfully submitted. Note the tracking number for future reference if needed.
Step 11. Click OK to acknowledge the confirmation message. Step 12. After the RNAS Login Administrator has processed your request,
RNAS will send an email message indicating the registration has been processed. The email will include the status of the registration, (either approved or denied). NOTE: The email provided in your user registration will also be your RNAS username.
Step 13. When you receive the email approving your user registration, you must respond to the email to acknowledge receipt. Upon receipt of your acknowledgement email, the Login Administrator will contact you via phone to provide you with a temporary RNAS password. The temporary password will only be good the first time you log in to RNAS.
Step 14. You must log in within 10 days of receipt of your password, or your account will be disabled. When you log in for the first time after registration, RNAS will prompt you to reset your password. Make note of the new password for future use.
NOTE: Usernames and passwords may not be shared at any time. If the RNA discovers that a username and password has been shared the user will be disabled. To be re-enabled the user will need to contact the RNA customer support desk.
Figure 18 - Confirmation Screen