Embed Size (px)
Citation preview
Apex RMS User Manual
Page | 1
RMS User Manual
Version 1.8 June 2016
Apex RMS User Manual
Page | 2
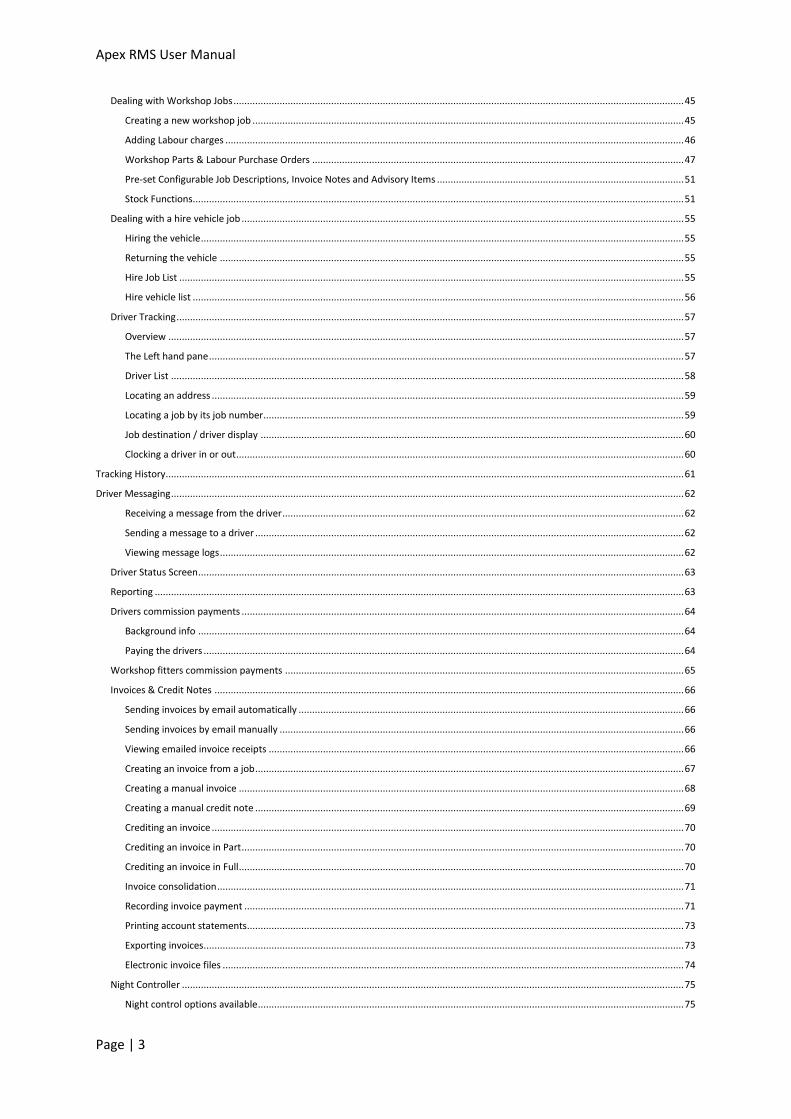
RMS Overview ................................................................................................................................................................................................... 5
What is RMS? ............................................................................................................................................................................................... 5
Modules and Permissions ............................................................................................................................................................................ 5
Starting to use RMS ........................................................................................................................................................................................... 7
Getting Started ............................................................................................................................................................................................ 7
Noticeboard ................................................................................................................................................................................................. 7
Logging In ..................................................................................................................................................................................................... 7
Main Menu ........................................................................................................................................................................................................ 8
R & R Module .................................................................................................................................................................................................... 9
Setting Sales Account Options ..................................................................................................................................................................... 9
Recovery Section .................................................................................................................................................................................... 9
Financial Section ................................................................................................................................................................................... 11
Dealing with recovery jobs ......................................................................................................................................................................... 12
Menu Bar .............................................................................................................................................................................................. 12
Live Job List ........................................................................................................................................................................................... 14
Processing a simple job ........................................................................................................................................................................ 16
Job-Related Driver Messages ................................................................................................................................................................ 19
Advanced job features .......................................................................................................................................................................... 24
RMS Mapping Features ........................................................................................................................................................................ 29
Job geo-location & Re-playing the Drivers Route for a Job ................................................................................................................... 29
PinPoint ................................................................................................................................................................................................ 31
Sending a PinPoint Request .................................................................................................................................................................. 31
POI’s ..................................................................................................................................................................................................... 32
Adding POI’s ......................................................................................................................................................................................... 32
Create POI’s using the supplier list ....................................................................................................................................................... 32
Creating a POI manually ....................................................................................................................................................................... 33
Using/Displaying POI’s on the map ....................................................................................................................................................... 34
Sending a job to a subcontractor .......................................................................................................................................................... 35
Accepting and processing jobs electronically ....................................................................................................................................... 35
Accepting a job ..................................................................................................................................................................................... 35
Sending information back to the job originator .................................................................................................................................... 36
Finding a particular job .............................................................................................................................................................................. 37
Job Search ............................................................................................................................................................................................ 37
Simple Search ....................................................................................................................................................................................... 37
Advanced Search .................................................................................................................................................................................. 37
Dealing with Redelivery jobs ...................................................................................................................................................................... 38
Creating a redelivery job from recovery ............................................................................................................................................... 38
Dealing with parking jobs ........................................................................................................................................................................... 39
Creating from the Parking Jobs Screen ................................................................................................................................................. 39
DVLA Fees ............................................................................................................................................................................................. 39
Moving a job into the parking module ................................................................................................................................................. 40
Scheduled and ad-hoc parking letters .................................................................................................................................................. 41
Ad-Hoc Parking Letters ......................................................................................................................................................................... 43
Vehicle Disposal .................................................................................................................................................................................... 44
Apex RMS User Manual
Page | 3
Dealing with Workshop Jobs ...................................................................................................................................................................... 45
Creating a new workshop job ............................................................................................................................................................... 45
Adding Labour charges ......................................................................................................................................................................... 46
Workshop Parts & Labour Purchase Orders ......................................................................................................................................... 47
Pre-set Configurable Job Descriptions, Invoice Notes and Advisory Items ........................................................................................... 51
Stock Functions..................................................................................................................................................................................... 51
Dealing with a hire vehicle job ................................................................................................................................................................... 55
Hiring the vehicle .................................................................................................................................................................................. 55
Returning the vehicle ........................................................................................................................................................................... 55
Hire Job List .......................................................................................................................................................................................... 55
Hire vehicle list ..................................................................................................................................................................................... 56
Driver Tracking ........................................................................................................................................................................................... 57
Overview .............................................................................................................................................................................................. 57
The Left hand pane ............................................................................................................................................................................... 57
Driver List ............................................................................................................................................................................................. 58
Locating an address .............................................................................................................................................................................. 59
Locating a job by its job number........................................................................................................................................................... 59
Job destination / driver display ............................................................................................................................................................ 60
Clocking a driver in or out ..................................................................................................................................................................... 60
Tracking History............................................................................................................................................................................................... 61
Driver Messaging ............................................................................................................................................................................................. 62
Receiving a message from the driver .................................................................................................................................................... 62
Sending a message to a driver .............................................................................................................................................................. 62
Viewing message logs ........................................................................................................................................................................... 62
Driver Status Screen ................................................................................................................................................................................... 63
Reporting ................................................................................................................................................................................................... 63
Drivers commission payments ................................................................................................................................................................... 64
Background info ................................................................................................................................................................................... 64
Paying the drivers ................................................................................................................................................................................. 64
Workshop fitters commission payments ................................................................................................................................................... 65
Invoices & Credit Notes ............................................................................................................................................................................. 66
Sending invoices by email automatically .............................................................................................................................................. 66
Sending invoices by email manually ..................................................................................................................................................... 66
Viewing emailed invoice receipts ......................................................................................................................................................... 66
Creating an invoice from a job .............................................................................................................................................................. 67
Creating a manual invoice .................................................................................................................................................................... 68
Creating a manual credit note .............................................................................................................................................................. 69
Crediting an invoice .............................................................................................................................................................................. 70
Crediting an invoice in Part ................................................................................................................................................................... 70
Crediting an invoice in Full .................................................................................................................................................................... 70
Invoice consolidation ............................................................................................................................................................................ 71
Recording invoice payment .................................................................................................................................................................. 71
Printing account statements................................................................................................................................................................. 73
Exporting invoices................................................................................................................................................................................. 73
Electronic invoice files .......................................................................................................................................................................... 74
Night Controller ......................................................................................................................................................................................... 75
Night control options available ............................................................................................................................................................. 75
Apex RMS User Manual
Page | 4
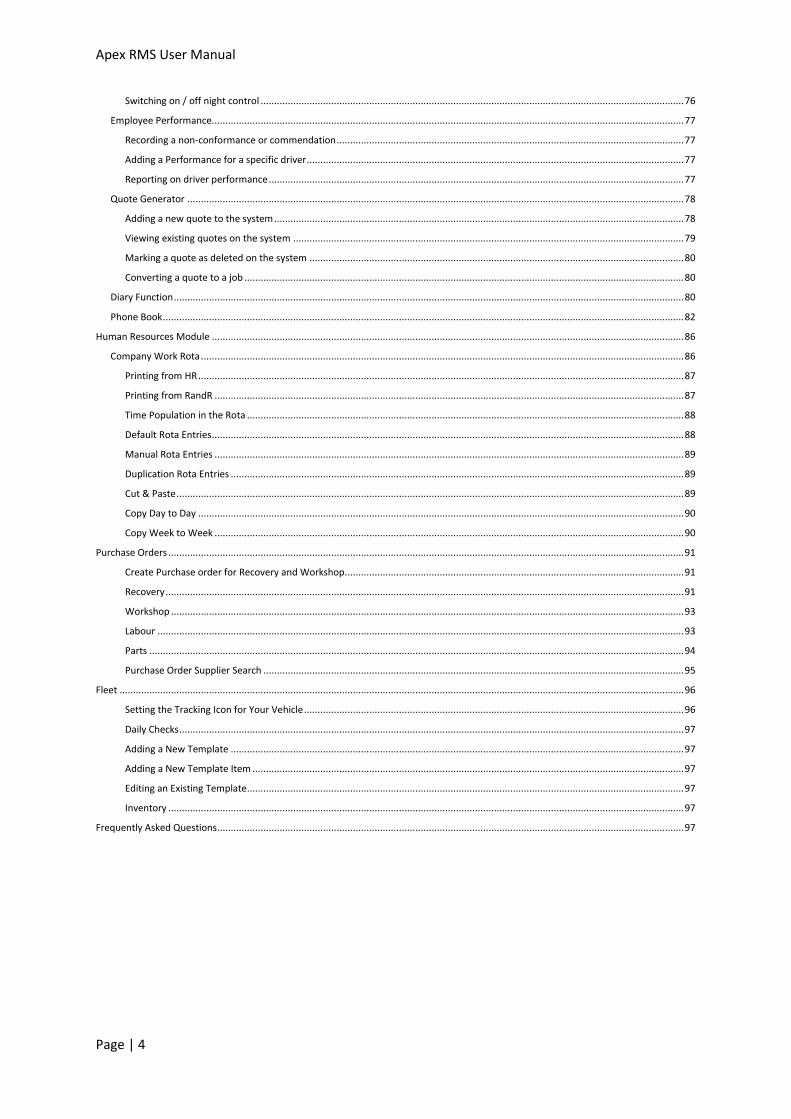
Switching on / off night control ............................................................................................................................................................ 76
Employee Performance.............................................................................................................................................................................. 77
Recording a non-conformance or commendation ................................................................................................................................ 77
Adding a Performance for a specific driver ........................................................................................................................................... 77
Reporting on driver performance ......................................................................................................................................................... 77
Quote Generator ....................................................................................................................................................................................... 78
Adding a new quote to the system ....................................................................................................................................................... 78
Viewing existing quotes on the system ................................................................................................................................................ 79
Marking a quote as deleted on the system .......................................................................................................................................... 80
Converting a quote to a job .................................................................................................................................................................. 80
Diary Function ............................................................................................................................................................................................ 80
Phone Book ................................................................................................................................................................................................ 82
Human Resources Module .............................................................................................................................................................................. 86
Company Work Rota .................................................................................................................................................................................. 86
Printing from HR ................................................................................................................................................................................... 87
Printing from RandR ............................................................................................................................................................................. 87
Time Population in the Rota ................................................................................................................................................................. 88
Default Rota Entries.............................................................................................................................................................................. 88
Manual Rota Entries ............................................................................................................................................................................. 89
Duplication Rota Entries ....................................................................................................................................................................... 89
Cut & Paste ........................................................................................................................................................................................... 89
Copy Day to Day ................................................................................................................................................................................... 90
Copy Week to Week ............................................................................................................................................................................. 90
Purchase Orders .............................................................................................................................................................................................. 91
Create Purchase order for Recovery and Workshop............................................................................................................................. 91
Recovery ............................................................................................................................................................................................... 91
Workshop ............................................................................................................................................................................................. 93
Labour .................................................................................................................................................................................................. 93
Parts ..................................................................................................................................................................................................... 94
Purchase Order Supplier Search ........................................................................................................................................................... 95
Fleet ................................................................................................................................................................................................................ 96
Setting the Tracking Icon for Your Vehicle ............................................................................................................................................ 96
Daily Checks .......................................................................................................................................................................................... 97
Adding a New Template ....................................................................................................................................................................... 97
Adding a New Template Item ............................................................................................................................................................... 97
Editing an Existing Template ................................................................................................................................................................. 97
Inventory .............................................................................................................................................................................................. 97
Frequently Asked Questions ............................................................................................................................................................................ 97
Apex RMS User Manual
Page | 5
RMS Overview
What is RMS? Apex Recovery Management System (RMS) is specifically designed for the vehicle rescue and recovery industry and provides all of the key functions and facilities required to assist both control room operators and management teams alike. With RMS rescue and recovery companies are able to fully manage their daily workload by easily dealing with numerous tasks from job receipt, either electronically via the ANS network, over the telephone, or by using our unique RMS Web Portal facility (which is designed to allow clients that are not on the ANS network such as Councils to electronically create and send jobs into the system), through the complete job life-cycle and on to producing invoices. RMS also provides a quick and easy way to export transactions ready to be imported into an accounts package. RMS comes complete with 24/7 emergency support of the system and we’re always ready to help. In summary, RMS is pretty much a one stop shop combining all of the functions and tools that you need to run your business into one nice neat package. RMS sits on its own self-contained server which houses everything that you need to run it including; the SQL Server databases and web applications along with of the background services and tools it requires, as well as a client to the ANS network if you have a subscription. The location of the server will depend on which package you have subscribed to and will either be at your own premises or hosted remotely in a data centre. Each of the system users then accesses it from a special desktop client application which runs from their own PC. Please make sure that you follow the Client Setup Guide to install the desktop client application on each and every PC where RMS will be used. The first time that the application is run you’ll be required to enter a six digit PIN number provided by Apex Networks Ltd, once entered the application will auto-configure so that it is ready to use.
Modules and Permissions Modular in design, RMS is sub-divided to organise its main functions and features into separate logical areas. We find that doing this makes navigating the system much easier for its users and it allows us to provide you with better control over who can access which parts within it. The permissions are extremely easy to set up and can be applied at a very granular level that is to say; you can really limit a user so that they can access only the areas of the system that they need to for their job role. All this is done with a few clicks of the mouse. Aside from the Rescue and Recovery functionality we have provided tools so that you can record all of the background data that is required for the general running of your business. Below is a description of each of the modules however, you may decide that you do not need to use these Purchase Manager: Create and monitor your purchase orders through RMS, here you can order goods and mark them as received when they are. Users with permission to place orders are given a purchase order limit and if the limit is reached on a single purchase order, the order will need to be authorised by someone with a higher limit, otherwise the user can self-authorise. To help the ordering process run smoothly, orders placed can be emailed directly from RMS to the supplier in an official Purchase Order. The Purchase manager interacts with the fleet side of the system allowing you to see at a glance any purchases made for a particular fleet vehicle. We also have the facility to allow purchase transactions to be exported from RMS and are ready for importing directly into an accounts package.
Apex RMS User Manual
Page | 6
Asset Manager: Keep track of all of your company assets from fleet vehicles through to equipment which you need to operate effectively. The Asset manager of RMS allows you to generate reports of both current and disposed assets. The system also provides the tools for you to calculate its depreciation. You are able to upload scanned in documents and store them against each asset. HR Manager: The HR part of RMS provides those with access to it, a means of allowing you to record just enough information about each individual employee without pretending to be a fully functional Human Resources package. In the HR side of the system, you are able to record personal details including a photograph, employment information, next of kin details, medical information, bank and PAYE details, absences and holiday entitlement, personal licences. You are also able to view any employee’s clocking in details and you can record both commendations and non-conformance activities which is useful for staff appraisals. There are a number of reports available within the HR side of the system. We are fully aware that this section of the system is likely to hold very private and personal information so to that end we force users to enter a four digit PIN number at the time they attempt to access it. Even once the user is in the HR side of the system, they will only be able to access those parts that they specifically have permission to access. Fleet Manager: This is a management suite for your entire vehicle fleet including recovery trucks, service vans and any courtesy and hire cars you may have. Not only are you able to record all vehicle’s details and produce a number of reports, you are also able to create maintenance schedules and book vehicles in for planned maintenances and MOTs. There are facilities to record the fuel usage per vehicle, defects, accidents that the vehicle has been involved in, and upload documentation as well. The Fleet Manager provides automatic notifications for when certain things are due and this is easy to configure by simply selecting a user from a drop down list and ticking various checkboxes. If a vehicle is to be off the road for any reason you can mark it as such in the Fleet Manager and this will remove the vehicle from rescue and recovery until you set its status back to active. Backup: As part of your contractual agreement Apex will routinely take backups of you entire systems data. This is done on a daily basis and should the need arise; we will be in a position to restore to the latest backup. However for your personal peace of mind we do provide you with a tool on the main menu that allows you to take a backup at any time of the day and store it wherever you like. SMS Messaging: Apex RMS is capable of allowing its users to send SMS messages commonly known as texts, in a very simple way. This feature does have an additional charge associated with it. Please contact Apex Networks for further information on this.

Apex RMS User Manual
Page | 7
Starting to use RMS
Getting Started Assuming that you have correctly followed the Client Setup Guide, you should have the Apex RMS icon on the desktop of each of the PCs. Double clicking this icon in the usual way will launch the application. Be aware that the first time that you run the application; you’ll
be prompted to enter the six-digit PIN which is supplied by Apex Networks Ltd. If you do not have a PIN call Apex for assistance. Once entered, the application self-configures itself so that it is ready for use. If the icon is not present, please speak with your network administrator or IT support department to arrange to have it installed.
Noticeboard RMS provides a notice board which is displayed each time that you run RMS. The purpose of the notice board is to publish important information such as company policy changes or anything that RMS users need to be aware of. Some companies use the notice board as a shift hand-over sheet so that the new shift are able to easily know what is currently on going. Clicking on the ‘Continue to RMS’ button located at the top right of the screen will allow you to log in.
Logging In To log in to RMS simply enter your username and password and click on the Log In button. If you need to change the invoicing date because you are back dating invoices, you can do this by using the date selector provided.
The current RMS version is shown under the login panel, clicking this will display a summary of all of the changes made to RMS from one version to the next. Your RMS installation code is shown below this for your reference as this may be required for updates and new installations. Finally, at the bottom of the page, there is a globe icon and this is a direct link to the Apex RMS downloads website where you can find useful software, and documentation relating to RMS. Our download website can also be accessed by visiting http://download.apex-rms.com from your favourite web browser.
Link to the Apex RMS downloads website
Apex RMS User Manual
Page | 8
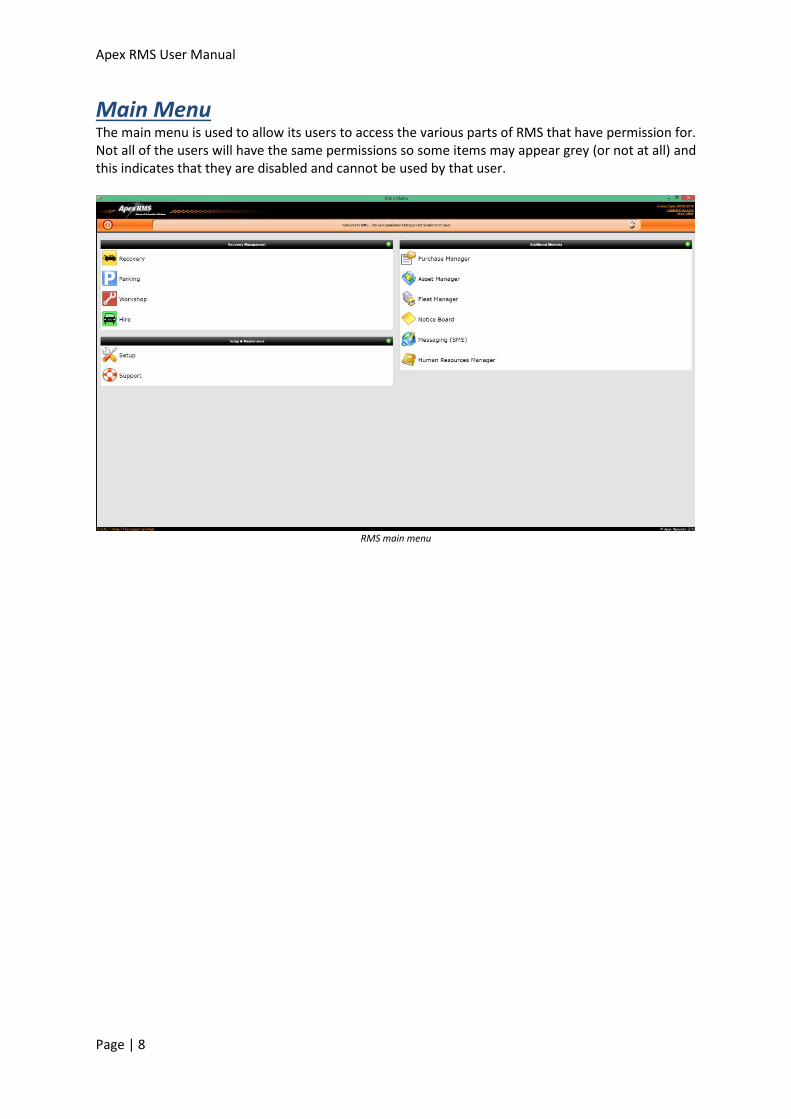
Main Menu The main menu is used to allow its users to access the various parts of RMS that have permission for. Not all of the users will have the same permissions so some items may appear grey (or not at all) and this indicates that they are disabled and cannot be used by that user.
RMS main menu
Apex RMS User Manual
Page | 9
R & R Module
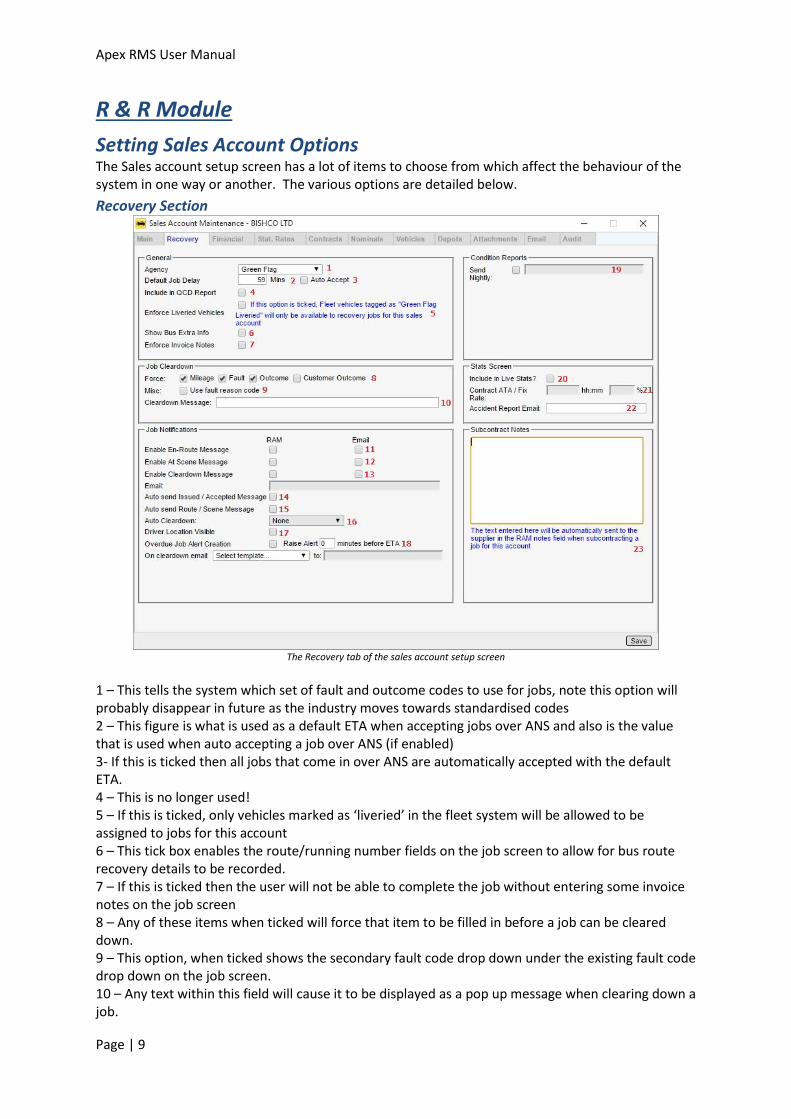
Setting Sales Account Options The Sales account setup screen has a lot of items to choose from which affect the behaviour of the system in one way or another. The various options are detailed below.
Recovery Section
The Recovery tab of the sales account setup screen
1 – This tells the system which set of fault and outcome codes to use for jobs, note this option will probably disappear in future as the industry moves towards standardised codes 2 – This figure is what is used as a default ETA when accepting jobs over ANS and also is the value that is used when auto accepting a job over ANS (if enabled) 3- If this is ticked then all jobs that come in over ANS are automatically accepted with the default ETA. 4 – This is no longer used! 5 – If this is ticked, only vehicles marked as ‘liveried’ in the fleet system will be allowed to be assigned to jobs for this account 6 – This tick box enables the route/running number fields on the job screen to allow for bus route recovery details to be recorded. 7 – If this is ticked then the user will not be able to complete the job without entering some invoice notes on the job screen 8 – Any of these items when ticked will force that item to be filled in before a job can be cleared down. 9 – This option, when ticked shows the secondary fault code drop down under the existing fault code drop down on the job screen. 10 – Any text within this field will cause it to be displayed as a pop up message when clearing down a job.
Apex RMS User Manual
Page | 10
11 – This tells the system that either an email or ANS message is required to be sent back to the job originator when the job is marked as on route. 12 – This tells the system that either an email or ANS message is required to be sent back to the job originator when the job is marked as at scene. 13 – This tells the system that either an email or ANS message is required to be sent back to the job originator when the job is cleared down. 14 – When this is ticked, when a job for this account is sent to a driver electronically then an ANS message is sent to the job originator notifying them the job has been issued. When the driver accepts the job on their device another message is sent back to the job originator notifying them of this. 15 – When this is ticked, when a job for this account is marked as on route or at scene by the driver an ANS message is automatically sent back to the job originator notifying them of this. 16 – Sets the auto clear-down setting for jobs for this account. Auto clear-down means that when a job is completed by the driver on the PDA (Not Navman or TomTom) then the clear down message is sent back to the job originator without any user intervention, because of this only accounts that use ANS standard fault/outcome codes can use this option. The setting options are:
None – No auto clear-down
Night Control Only – Auto clear-down on night control only
Always – Always auto clear-down. 17 – If this is ticked then driver location data will be sent back in appropriate ANS messages (i.e. on-route, at-scene) and the system will respond to ‘where’s my truck’ requests from the job originator. 18 – This option allows the system to create an alert (using the reminder system) for jobs that are not on scene within the required threshold minutes before the ETA. 19 – This option allows all condition reports (generated by the PDAs) to be sent to the given email address nightly. 20 – If this option is ticked then this account will feature in the live stats account breakdown section. 21 – Allows the target fix rate percentage and ATA time to be set for this account in the live stats screen. Until the ANS standard codes are completely adopted, the fix rate cannot be correctly calculated on the live stats screen. 22 – Specifies the default email address when emailing an accident report from the job screen. 23 – Any text in this field will be sent in the notes field when subcontracting a job for this account to another supplier over ANS.
Apex RMS User Manual
Page | 11
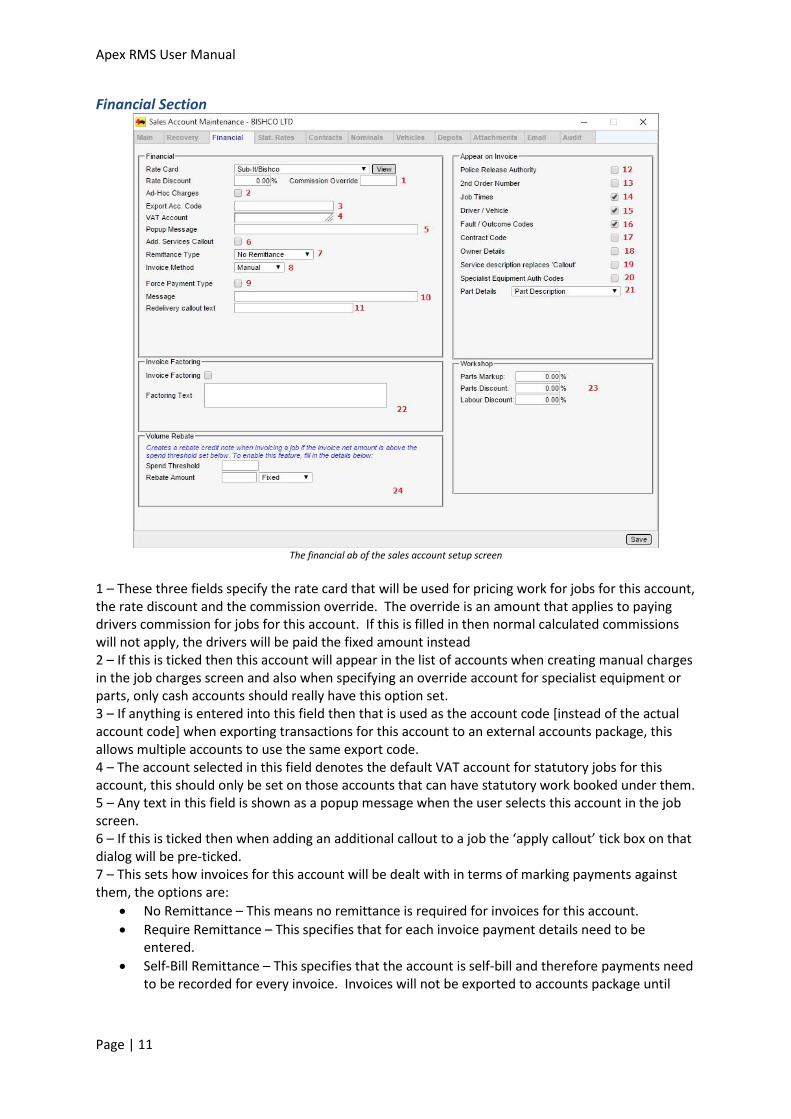
Financial Section
The financial ab of the sales account setup screen
1 – These three fields specify the rate card that will be used for pricing work for jobs for this account, the rate discount and the commission override. The override is an amount that applies to paying drivers commission for jobs for this account. If this is filled in then normal calculated commissions will not apply, the drivers will be paid the fixed amount instead 2 – If this is ticked then this account will appear in the list of accounts when creating manual charges in the job charges screen and also when specifying an override account for specialist equipment or parts, only cash accounts should really have this option set. 3 – If anything is entered into this field then that is used as the account code [instead of the actual account code] when exporting transactions for this account to an external accounts package, this allows multiple accounts to use the same export code. 4 – The account selected in this field denotes the default VAT account for statutory jobs for this account, this should only be set on those accounts that can have statutory work booked under them. 5 – Any text in this field is shown as a popup message when the user selects this account in the job screen. 6 – If this is ticked then when adding an additional callout to a job the ‘apply callout’ tick box on that dialog will be pre-ticked. 7 – This sets how invoices for this account will be dealt with in terms of marking payments against them, the options are:
No Remittance – This means no remittance is required for invoices for this account.
Require Remittance – This specifies that for each invoice payment details need to be entered.
Self-Bill Remittance – This specifies that the account is self-bill and therefore payments need to be recorded for every invoice. Invoices will not be exported to accounts package until
Apex RMS User Manual
Page | 12
they are marked as fully paid, in addition to this when entering remittance for an invoice the invoice date is set to the date of the remittance.
8 – This denotes how the invoices are sent to the customer:
Manual – Invoices are not automatically sent, it’s up to the user to print or email them.
Auto Email – Invoices are automatically emailed to the specified address when they are created. They are sent as PDF attachments.
Electronic – This method [at the time of writing] is only used by Green Flag and is being phased out. It allows nightly ‘club emails’ to be automatically sent out containing the invoices for that day.
RAM – Invoices are sent over the ANS network as and when they are created. 9 – If this is ticked then when creating an invoice for a job for this account the user will be forced to enter a payment type (cash/card etc.) and details. 10 – The contents of this field are shown as a popup message when creating an invoice for this account from the job screen. 11 – This specifies the text for redelivery callout as it appears on the invoice, by default the text is “Callout”. 12-21 – These define what appear on the invoice for a recovery job 22 – This section deals with invoice factory and simply allows some extra text (specified in the input field) to be added to invoices for this account. Invoice factoring is used when management of payment of invoices has been contracted to a third party. 23 – This section specifies the mark-up for workshop parts and discounts from the standard rates for labour and parts for this account. 24 – This section deals with volume rebates for invoices for this account. It is possible to set up an automatic process that triggers when invoices are created for this account that are over the spend threshold. The process will generate a credit note for either a percentage of the original invoice amount or for a fixed value.
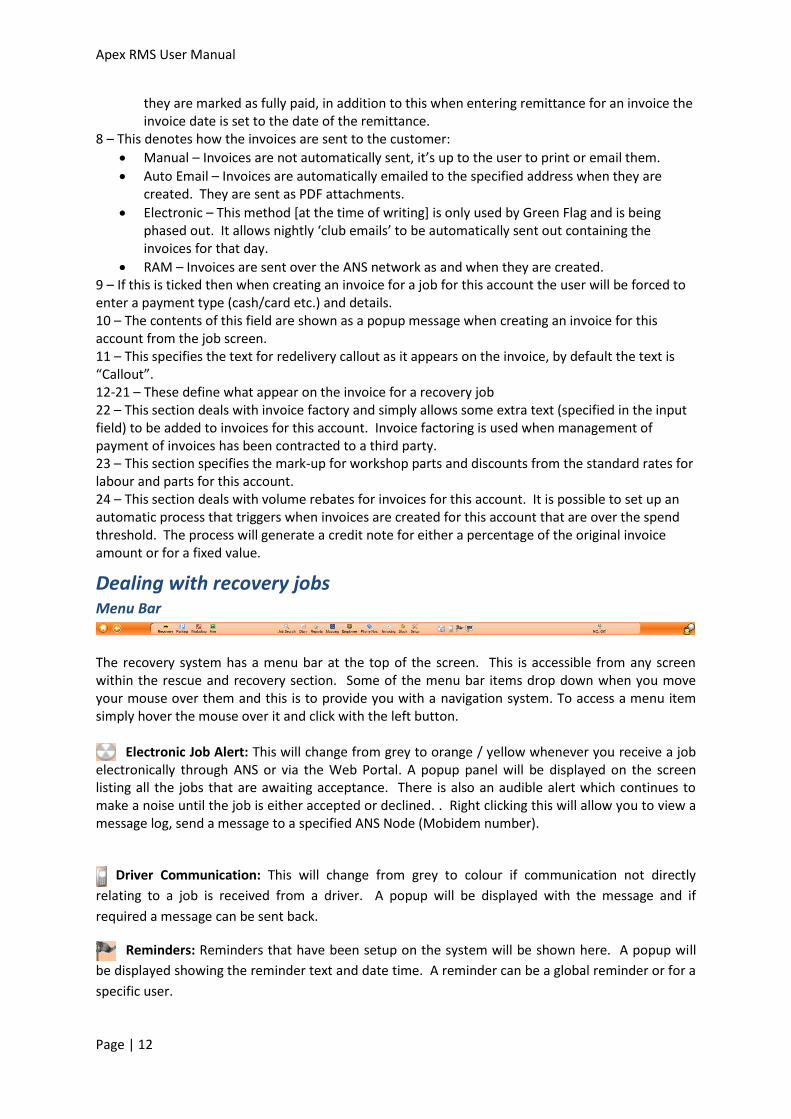
Dealing with recovery jobs Menu Bar
The recovery system has a menu bar at the top of the screen. This is accessible from any screen within the rescue and recovery section. Some of the menu bar items drop down when you move your mouse over them and this is to provide you with a navigation system. To access a menu item simply hover the mouse over it and click with the left button.
Electronic Job Alert: This will change from grey to orange / yellow whenever you receive a job electronically through ANS or via the Web Portal. A popup panel will be displayed on the screen listing all the jobs that are awaiting acceptance. There is also an audible alert which continues to make a noise until the job is either accepted or declined. . Right clicking this will allow you to view a message log, send a message to a specified ANS Node (Mobidem number).
Driver Communication: This will change from grey to colour if communication not directly
relating to a job is received from a driver. A popup will be displayed with the message and if
required a message can be sent back.
Reminders: Reminders that have been setup on the system will be shown here. A popup will
be displayed showing the reminder text and date time. A reminder can be a global reminder or for a
specific user.

Apex RMS User Manual
Page | 13
Night Controller: Here you can set RMS to process any jobs that have been received by RMS and are out of your normal working hours. The Night Control feature has a few different ways that it can handle these jobs. Please see the table below for an explanation of each one:
MODE EXPLANATION
Off Night Controller Disabled
Auto Accept Accepts the job coming in and sends a message back to the originator asking that the call a pre-defined number.
PDA Divert
This night control option automatically accepts the job then allocates the job to the specified driver and vehicle and issues the job to the drivers PDA.
Sub Contract This night control option automatically accepts the job then subcontracts it to the specified supplier
Auto Divert
This night control option forwards all RAM messages to the specified ANS node. The night controller then carries out the job on your behalf with all updates coming back into your system and also to the job originator.
PDA Divert and Request Confirmation Call This night control option automatically accepts the job then allocates the job to the specified driver and vehicle and issues the job to the drivers PDA
PDA Divert for Acceptance This night control option automatically accepts the job then allocates the job to the specified driver and vehicle and issues the job to the drivers PDA.
RMS Night Control Options
Apex RMS User Manual
Page | 14
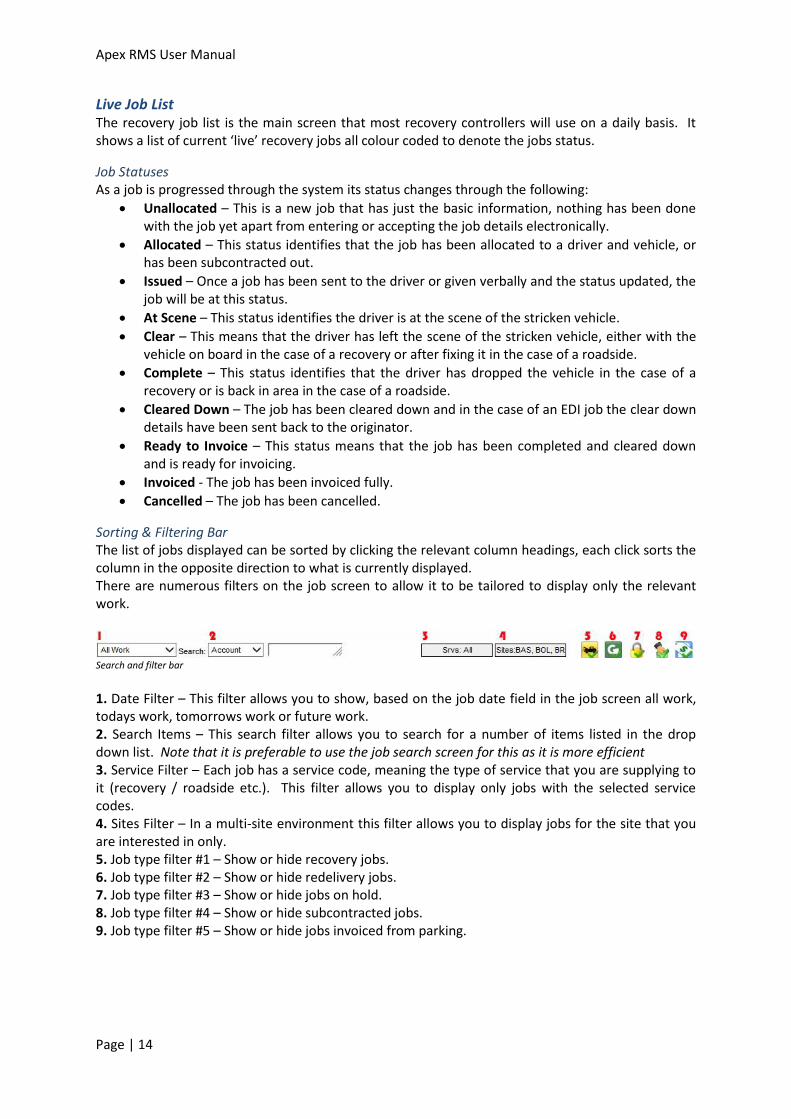
Live Job List The recovery job list is the main screen that most recovery controllers will use on a daily basis. It shows a list of current ‘live’ recovery jobs all colour coded to denote the jobs status.
Job Statuses As a job is progressed through the system its status changes through the following:
Unallocated – This is a new job that has just the basic information, nothing has been done with the job yet apart from entering or accepting the job details electronically.
Allocated – This status identifies that the job has been allocated to a driver and vehicle, or has been subcontracted out.
Issued – Once a job has been sent to the driver or given verbally and the status updated, the job will be at this status.
At Scene – This status identifies the driver is at the scene of the stricken vehicle.
Clear – This means that the driver has left the scene of the stricken vehicle, either with the vehicle on board in the case of a recovery or after fixing it in the case of a roadside.
Complete – This status identifies that the driver has dropped the vehicle in the case of a recovery or is back in area in the case of a roadside.
Cleared Down – The job has been cleared down and in the case of an EDI job the clear down details have been sent back to the originator.
Ready to Invoice – This status means that the job has been completed and cleared down and is ready for invoicing.
Invoiced - The job has been invoiced fully.
Cancelled – The job has been cancelled.
Sorting & Filtering Bar The list of jobs displayed can be sorted by clicking the relevant column headings, each click sorts the column in the opposite direction to what is currently displayed. There are numerous filters on the job screen to allow it to be tailored to display only the relevant work.
Search and filter bar
1. Date Filter – This filter allows you to show, based on the job date field in the job screen all work, todays work, tomorrows work or future work. 2. Search Items – This search filter allows you to search for a number of items listed in the drop down list. Note that it is preferable to use the job search screen for this as it is more efficient 3. Service Filter – Each job has a service code, meaning the type of service that you are supplying to it (recovery / roadside etc.). This filter allows you to display only jobs with the selected service codes. 4. Sites Filter – In a multi-site environment this filter allows you to display jobs for the site that you are interested in only. 5. Job type filter #1 – Show or hide recovery jobs. 6. Job type filter #2 – Show or hide redelivery jobs. 7. Job type filter #3 – Show or hide jobs on hold. 8. Job type filter #4 – Show or hide subcontracted jobs. 9. Job type filter #5 – Show or hide jobs invoiced from parking.
Apex RMS User Manual
Page | 15
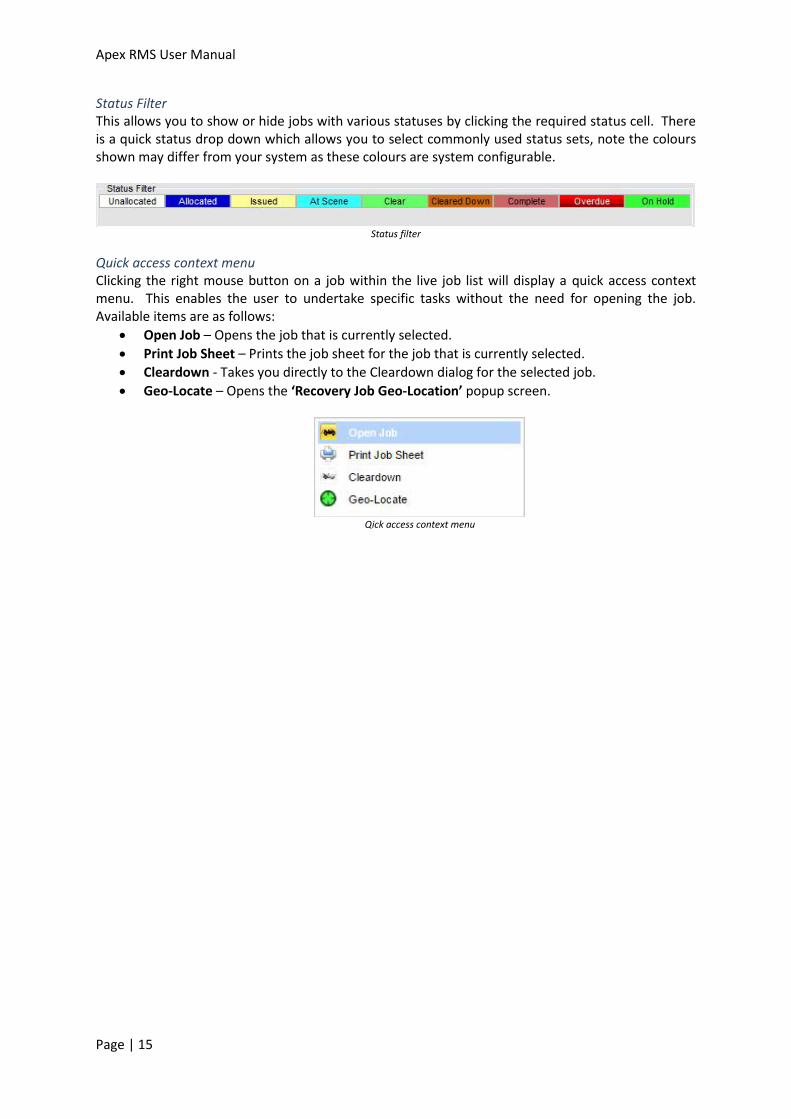
Status Filter This allows you to show or hide jobs with various statuses by clicking the required status cell. There is a quick status drop down which allows you to select commonly used status sets, note the colours shown may differ from your system as these colours are system configurable.
Status filter
Quick access context menu Clicking the right mouse button on a job within the live job list will display a quick access context menu. This enables the user to undertake specific tasks without the need for opening the job. Available items are as follows:
Open Job – Opens the job that is currently selected.
Print Job Sheet – Prints the job sheet for the job that is currently selected.
Cleardown - Takes you directly to the Cleardown dialog for the selected job.
Geo-Locate – Opens the ‘Recovery Job Geo-Location’ popup screen.
Qick access context menu
Apex RMS User Manual
Page | 16
Processing a simple job
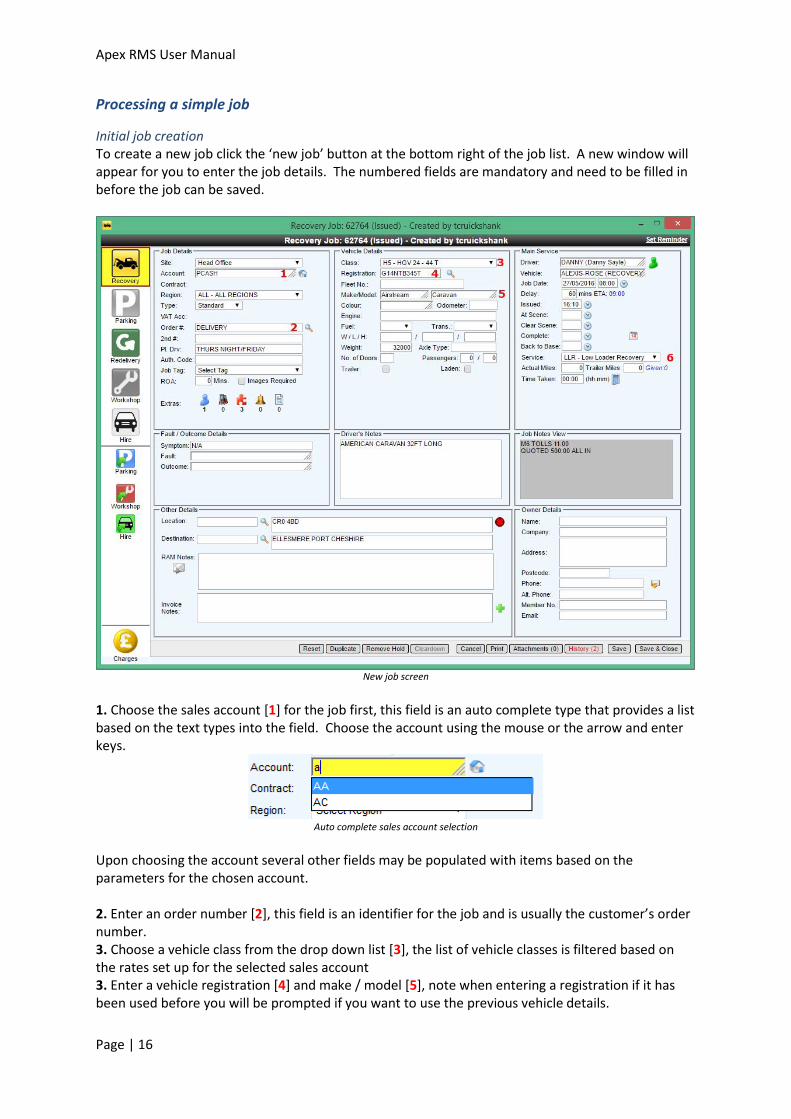
Initial job creation To create a new job click the ‘new job’ button at the bottom right of the job list. A new window will appear for you to enter the job details. The numbered fields are mandatory and need to be filled in before the job can be saved.
New job screen
1. Choose the sales account [1] for the job first, this field is an auto complete type that provides a list based on the text types into the field. Choose the account using the mouse or the arrow and enter keys.
Auto complete sales account selection
Upon choosing the account several other fields may be populated with items based on the parameters for the chosen account. 2. Enter an order number [2], this field is an identifier for the job and is usually the customer’s order number. 3. Choose a vehicle class from the drop down list [3], the list of vehicle classes is filtered based on the rates set up for the selected sales account 3. Enter a vehicle registration [4] and make / model [5], note when entering a registration if it has been used before you will be prompted if you want to use the previous vehicle details.
Apex RMS User Manual
Page | 17
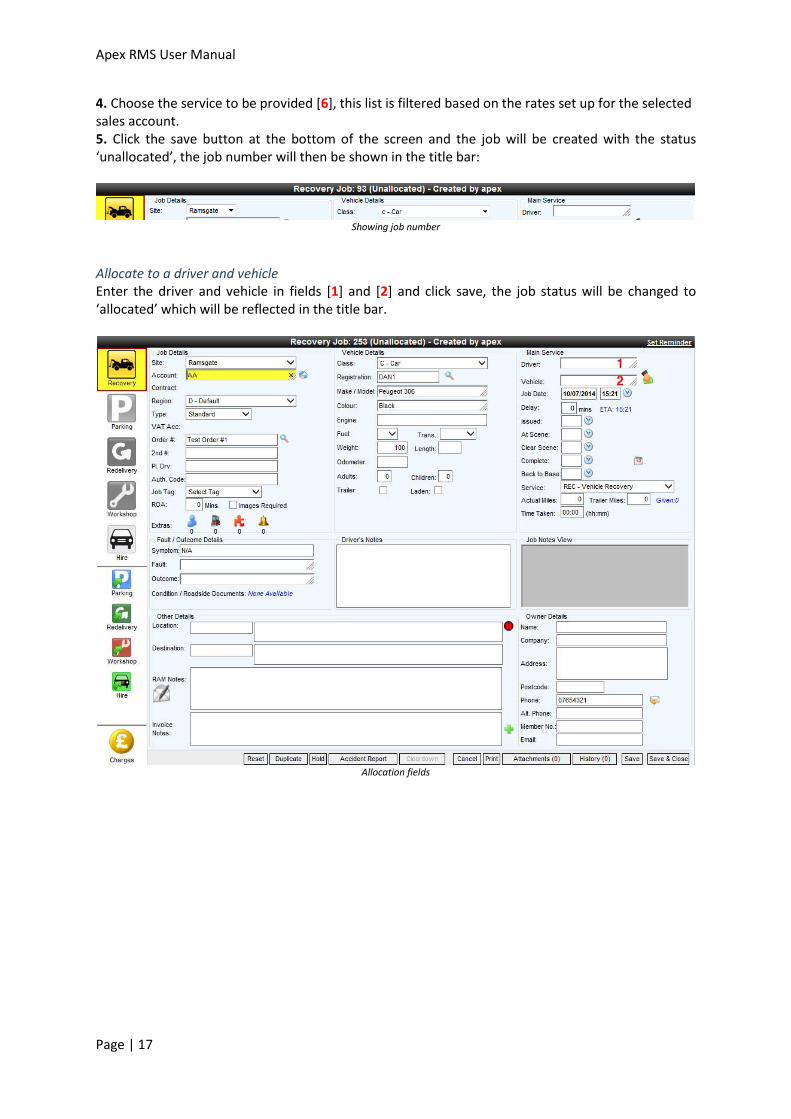
4. Choose the service to be provided [6], this list is filtered based on the rates set up for the selected sales account. 5. Click the save button at the bottom of the screen and the job will be created with the status ‘unallocated’, the job number will then be shown in the title bar:
Showing job number
Allocate to a driver and vehicle Enter the driver and vehicle in fields [1] and [2] and click save, the job status will be changed to ‘allocated’ which will be reflected in the title bar.
Allocation fields
Apex RMS User Manual
Page | 18
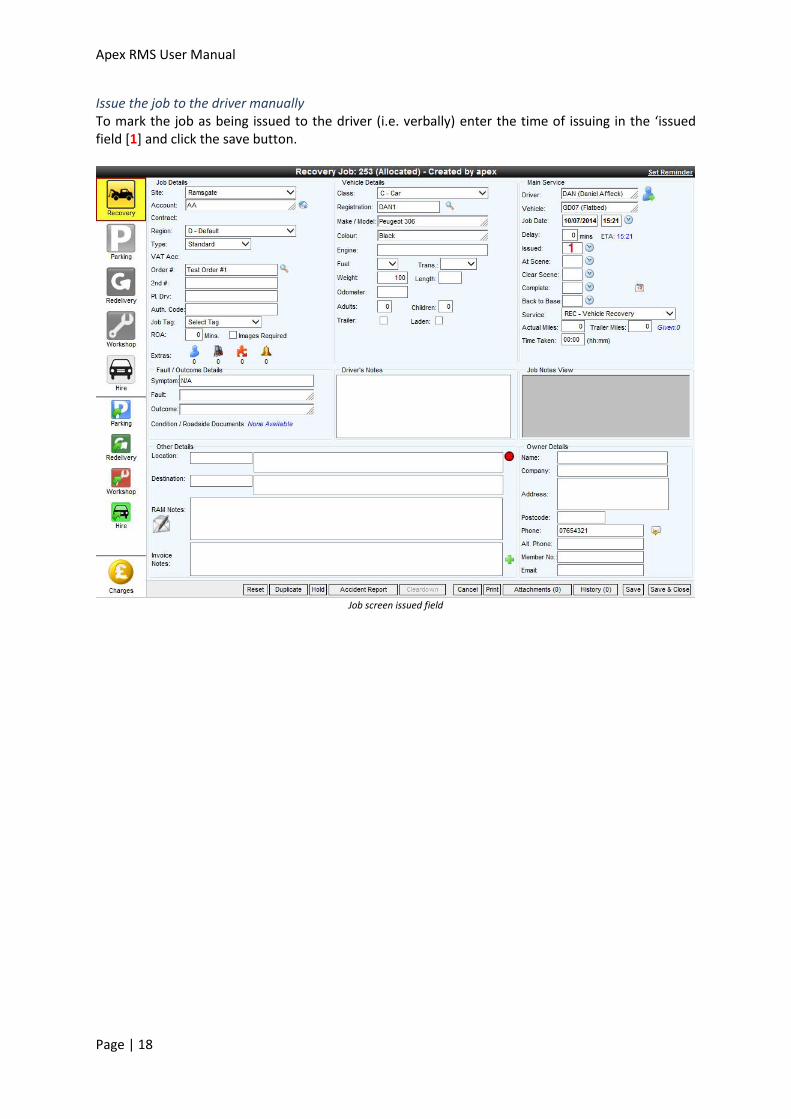
Issue the job to the driver manually To mark the job as being issued to the driver (i.e. verbally) enter the time of issuing in the ‘issued field [1] and click the save button.
Job screen issued field
Apex RMS User Manual
Page | 19
Job-Related Driver Messages
Overview It is possible from RMS and the Drivers PDA to send a job-related text message. These messages do not notify in the normal manner (i.e. notification sound) but are instead linked to an icon on the job list to show a message is pending.
Sending from the PDA to control To send a job-related message from the PDA to control, open the required job and click the PDA menu key, from the menu choose ‘Message…’ and type the required message (or use the pre-set messages if any are set up).
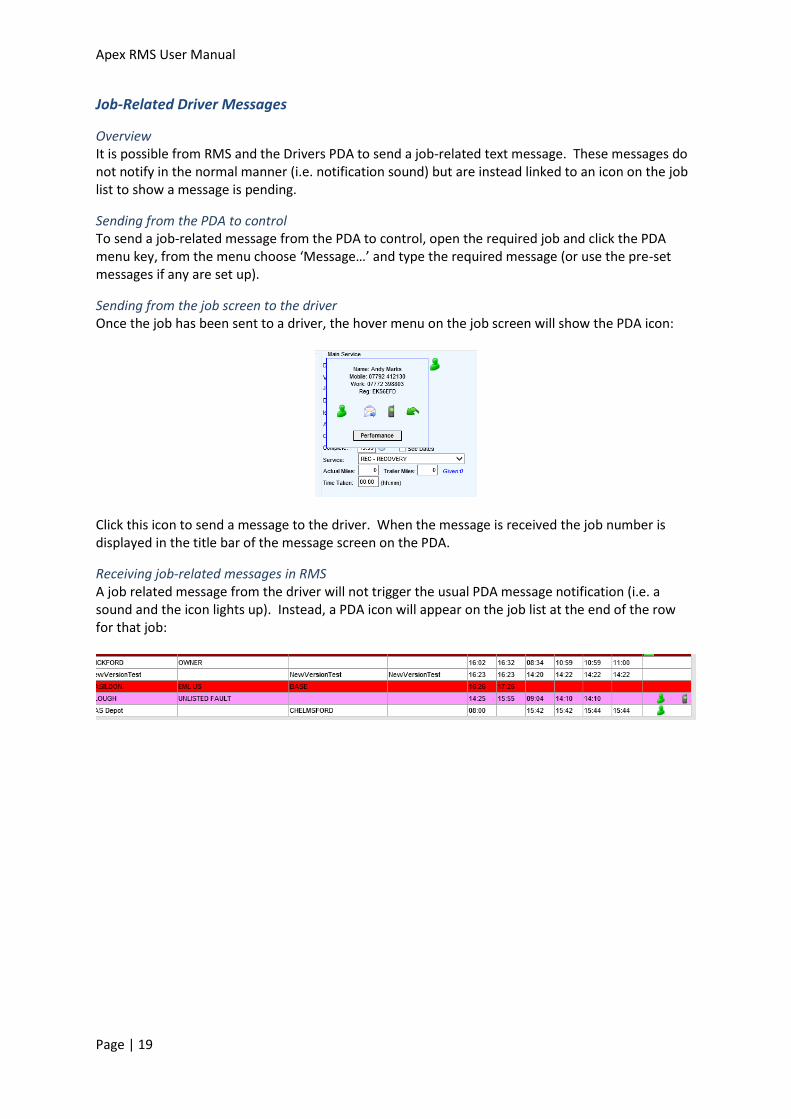
Sending from the job screen to the driver Once the job has been sent to a driver, the hover menu on the job screen will show the PDA icon:
Click this icon to send a message to the driver. When the message is received the job number is displayed in the title bar of the message screen on the PDA.
Receiving job-related messages in RMS A job related message from the driver will not trigger the usual PDA message notification (i.e. a sound and the icon lights up). Instead, a PDA icon will appear on the job list at the end of the row for that job:
Apex RMS User Manual
Page | 20
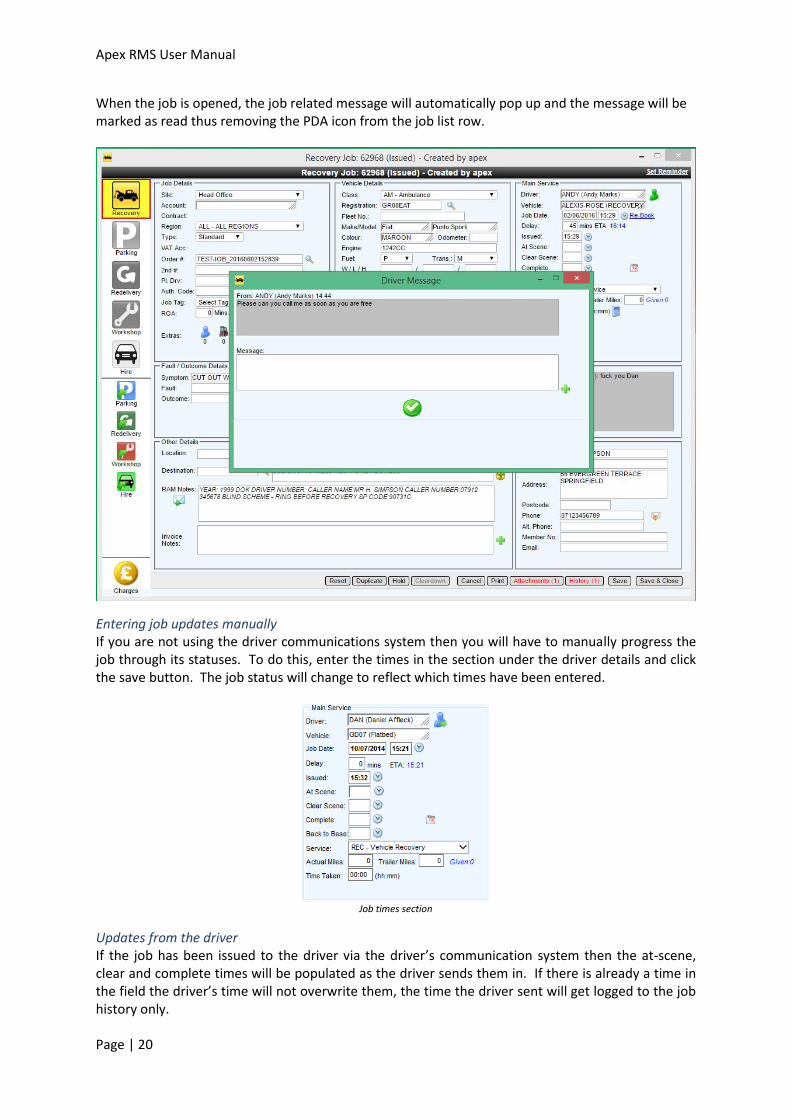
When the job is opened, the job related message will automatically pop up and the message will be marked as read thus removing the PDA icon from the job list row.
Entering job updates manually If you are not using the driver communications system then you will have to manually progress the job through its statuses. To do this, enter the times in the section under the driver details and click the save button. The job status will change to reflect which times have been entered.
Job times section
Updates from the driver If the job has been issued to the driver via the driver’s communication system then the at-scene, clear and complete times will be populated as the driver sends them in. If there is already a time in the field the driver’s time will not overwrite them, the time the driver sent will get logged to the job history only.

Apex RMS User Manual
Page | 21
Finishing a job When all times have been entered the job will be at status ‘complete’, the last thing to do before the job becomes ready to invoice and disappears from the job screen is to clear it down. To do this click the ‘clear down’ button at the bottom of the job screen (or from the job list use the ‘clear down’ quick button). If the job requires an electronic clear down to be sent back to the originator then you will see the clear down dialog:
The cleardown dialog
This screen prompts you for the information required by the job originator when a job is cleared down. Check / enter any required information and click the green tick, the job will be set to status ‘ready to invoice’ and the clear down message is sent back to the originator.
Apex RMS User Manual
Page | 22
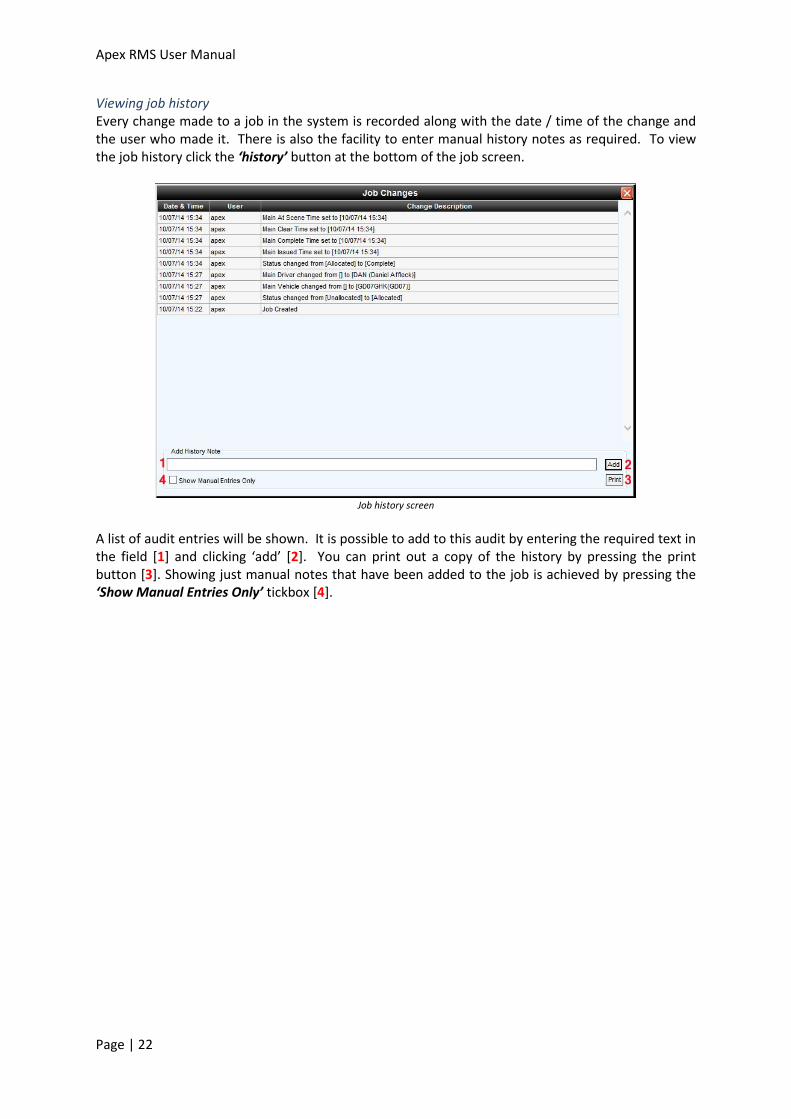
Viewing job history Every change made to a job in the system is recorded along with the date / time of the change and the user who made it. There is also the facility to enter manual history notes as required. To view the job history click the ‘history’ button at the bottom of the job screen.
Job history screen
A list of audit entries will be shown. It is possible to add to this audit by entering the required text in the field [1] and clicking ‘add’ [2]. You can print out a copy of the history by pressing the print button [3]. Showing just manual notes that have been added to the job is achieved by pressing the ‘Show Manual Entries Only’ tickbox [4].
Apex RMS User Manual
Page | 23
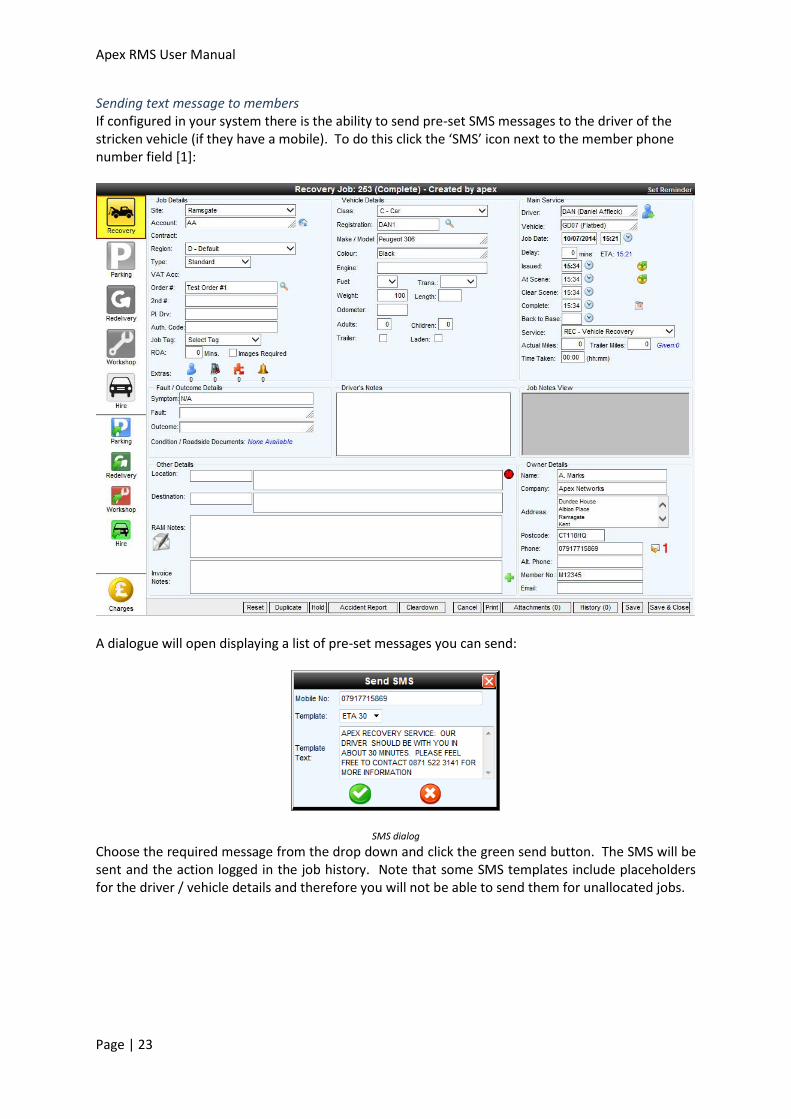
Sending text message to members If configured in your system there is the ability to send pre-set SMS messages to the driver of the stricken vehicle (if they have a mobile). To do this click the ‘SMS’ icon next to the member phone number field [1]:
A dialogue will open displaying a list of pre-set messages you can send:
SMS dialog
Choose the required message from the drop down and click the green send button. The SMS will be sent and the action logged in the job history. Note that some SMS templates include placeholders for the driver / vehicle details and therefore you will not be able to send them for unallocated jobs.
Apex RMS User Manual
Page | 24
Advanced job features This section of the manual explains some of the more advanced features that you can use on a job. As well as the ability to record basic job information such as the vehicle details and times , it is also capable of allowing the users to be able to record other information which may or may not be used for invoicing purposes.
Adding another service Because of the way the vehicle recovery industry works, you may need to have several services or resources on a single job. For example, just supposing that a job comes in and the fault is reported as a flat battery and you dispatch a service van to the scene however, when the driver gets there he find that the car won’t start due to a failed immobiliser and the vehicle needs a recovery not a repair, you may need to send a recovery lorry to the scene. This is treated in RMS as an additional service and will incur its own charges against it.
Using Specialist Equipment Specialist equipment is defined as any piece of equipment that you use to carry out the job that you normally charge for. This could be the use of Skates, Granules or even an extra person. To be able to use specialist equipment click on the fork lift truck icon on the job screen and select from the drop down list. You are able to enter an authorisation code to against each item used and you can also select which Sales Account will be responsible for paying for the use of the item. For example maybe the end customer at the roadside needs to pay for the use of the Skates instead of the club.
Using a stock part on a job Should your driver need to use a part from the roadside for example a tyre, you are able to record this fact directly in the job so that you can charge for it. If you have chosen to run the stock system then when you come to use a part, RMS will ask which stock location the part is coming from and then deduct the appropriate amount from stock. Deleting a part that has been taken from stock from the job will return the item back to the stock location. You may if you wish create parts on the fly if you do not have it in stock or it is a one off item.
Apex RMS User Manual
Page | 25
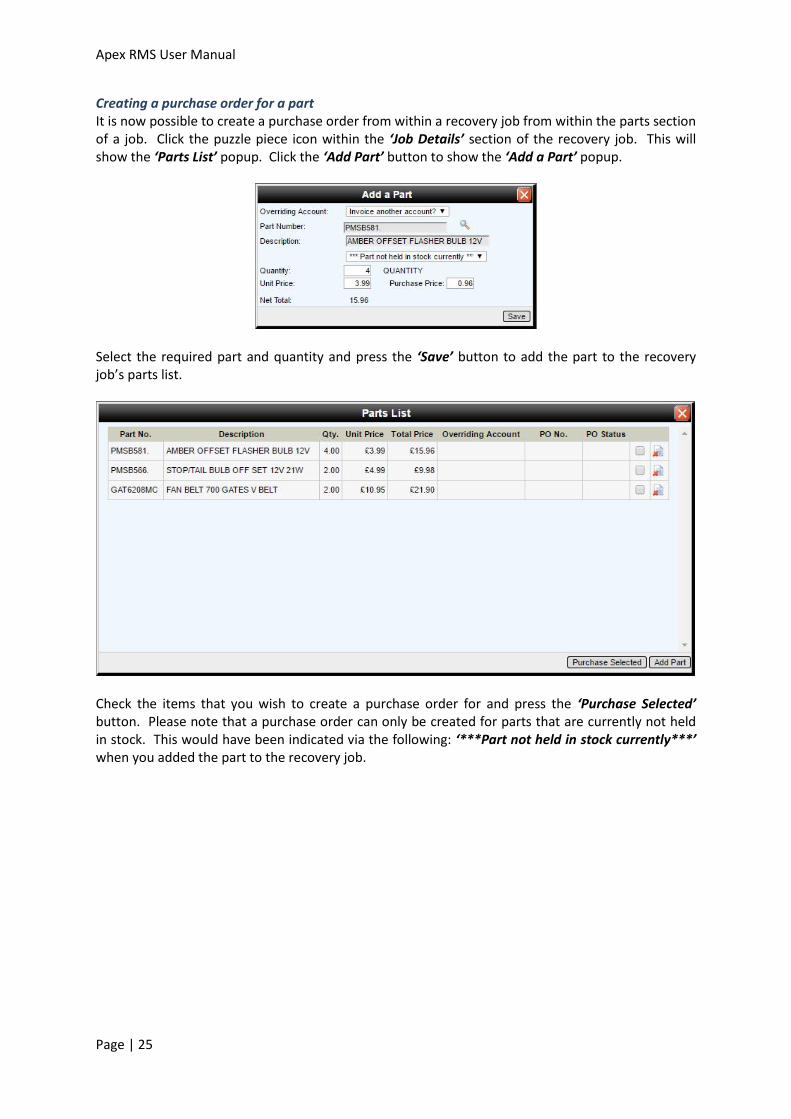
Creating a purchase order for a part It is now possible to create a purchase order from within a recovery job from within the parts section of a job. Click the puzzle piece icon within the ‘Job Details’ section of the recovery job. This will show the ‘Parts List’ popup. Click the ‘Add Part’ button to show the ‘Add a Part’ popup.
Select the required part and quantity and press the ‘Save’ button to add the part to the recovery job’s parts list.
Check the items that you wish to create a purchase order for and press the ‘Purchase Selected’ button. Please note that a purchase order can only be created for parts that are currently not held in stock. This would have been indicated via the following: ‘***Part not held in stock currently***’ when you added the part to the recovery job.
Apex RMS User Manual
Page | 26
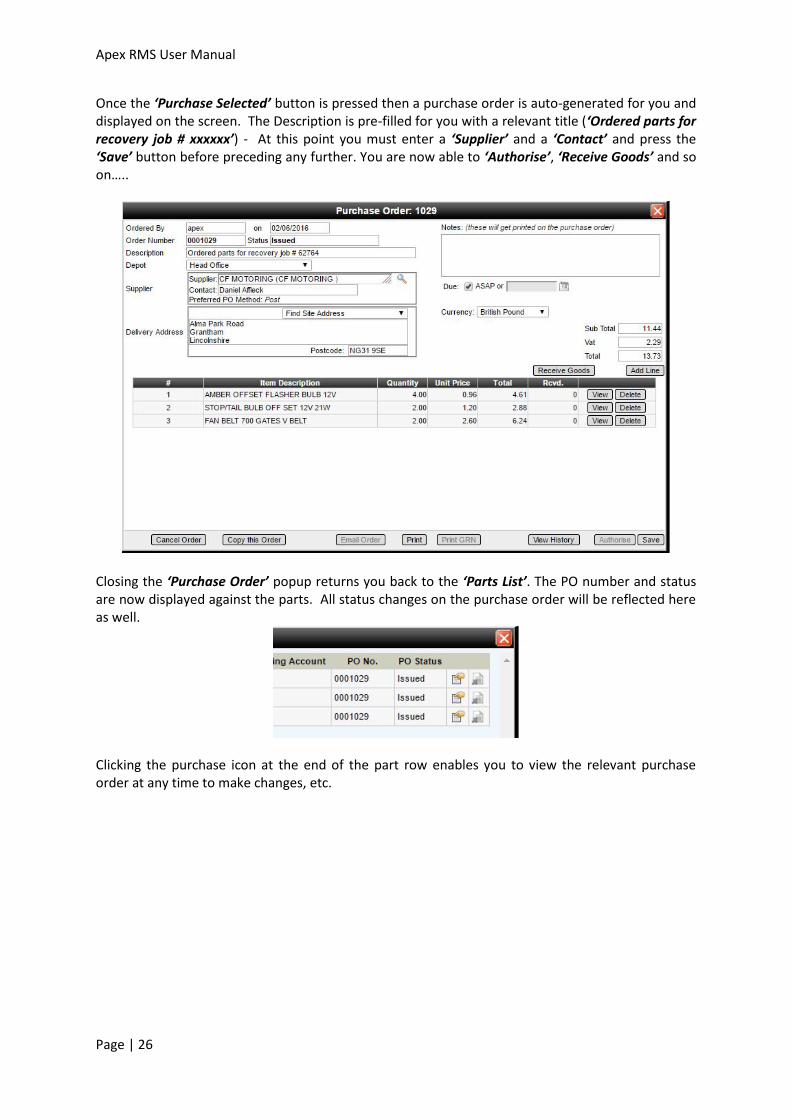
Once the ‘Purchase Selected’ button is pressed then a purchase order is auto-generated for you and displayed on the screen. The Description is pre-filled for you with a relevant title (‘Ordered parts for recovery job # xxxxxx’) - At this point you must enter a ‘Supplier’ and a ‘Contact’ and press the ‘Save’ button before preceding any further. You are now able to ‘Authorise’, ‘Receive Goods’ and so on…..
Closing the ‘Purchase Order’ popup returns you back to the ‘Parts List’. The PO number and status are now displayed against the parts. All status changes on the purchase order will be reflected here as well.
Clicking the purchase icon at the end of the part row enables you to view the relevant purchase order at any time to make changes, etc.
Apex RMS User Manual
Page | 27
Sending an SMS to a roadside customer You can if you have set up the feature, send an SMS or text message to your customer at the roadside. To do this, ensure that the phone number entered is a valid mobile number and then click on the envelope icon. A small panel will be displayed asking you which SMS you would like to send. Select the SMS from the template list and confirm that the text is correct. Once you are happy click on the green tick icon to send the SMS. This is a very quick and efficient way of keeping you customers informed of when the driver is likely to arrive. Some people use this facility to offer customers special offers.
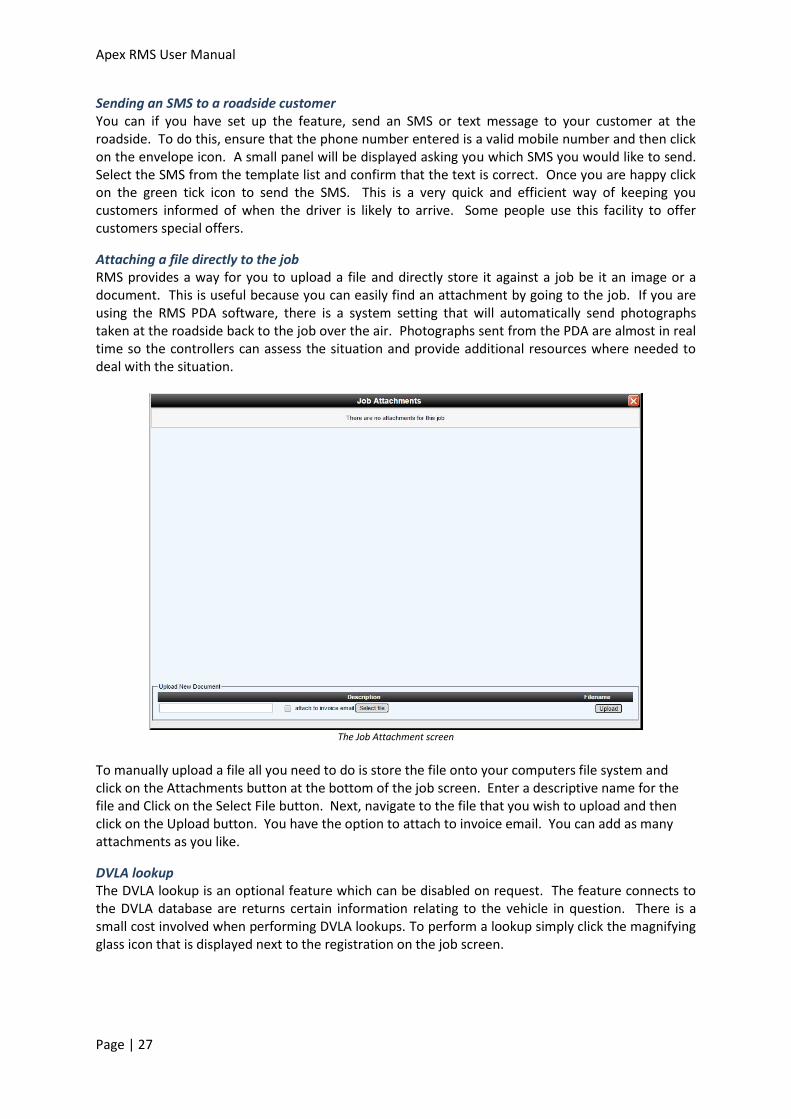
Attaching a file directly to the job RMS provides a way for you to upload a file and directly store it against a job be it an image or a document. This is useful because you can easily find an attachment by going to the job. If you are using the RMS PDA software, there is a system setting that will automatically send photographs taken at the roadside back to the job over the air. Photographs sent from the PDA are almost in real time so the controllers can assess the situation and provide additional resources where needed to deal with the situation.
The Job Attachment screen
To manually upload a file all you need to do is store the file onto your computers file system and click on the Attachments button at the bottom of the job screen. Enter a descriptive name for the file and Click on the Select File button. Next, navigate to the file that you wish to upload and then click on the Upload button. You have the option to attach to invoice email. You can add as many attachments as you like.
DVLA lookup The DVLA lookup is an optional feature which can be disabled on request. The feature connects to the DVLA database are returns certain information relating to the vehicle in question. There is a small cost involved when performing DVLA lookups. To perform a lookup simply click the magnifying glass icon that is displayed next to the registration on the job screen.

Apex RMS User Manual
Page | 28
Job Hold At the bottom of the job screen there is a button which enables you to put a job on hold. You may need to do this if for example, a customer is not home until later; payment is being disputed or any other reason. Putting a job on hold causes the job row on the lookup screen to turn green and pin to the top of the list. If you hover your mouse over this row and wait a second the reason for the hold will be displayed. Removing a hold is simple too just click the Remove hold button on the job screen.
Apex RMS User Manual
Page | 29
RMS Mapping Features RMS has a fully integrated mapping/tracking system. This section outlines the use of this feature.
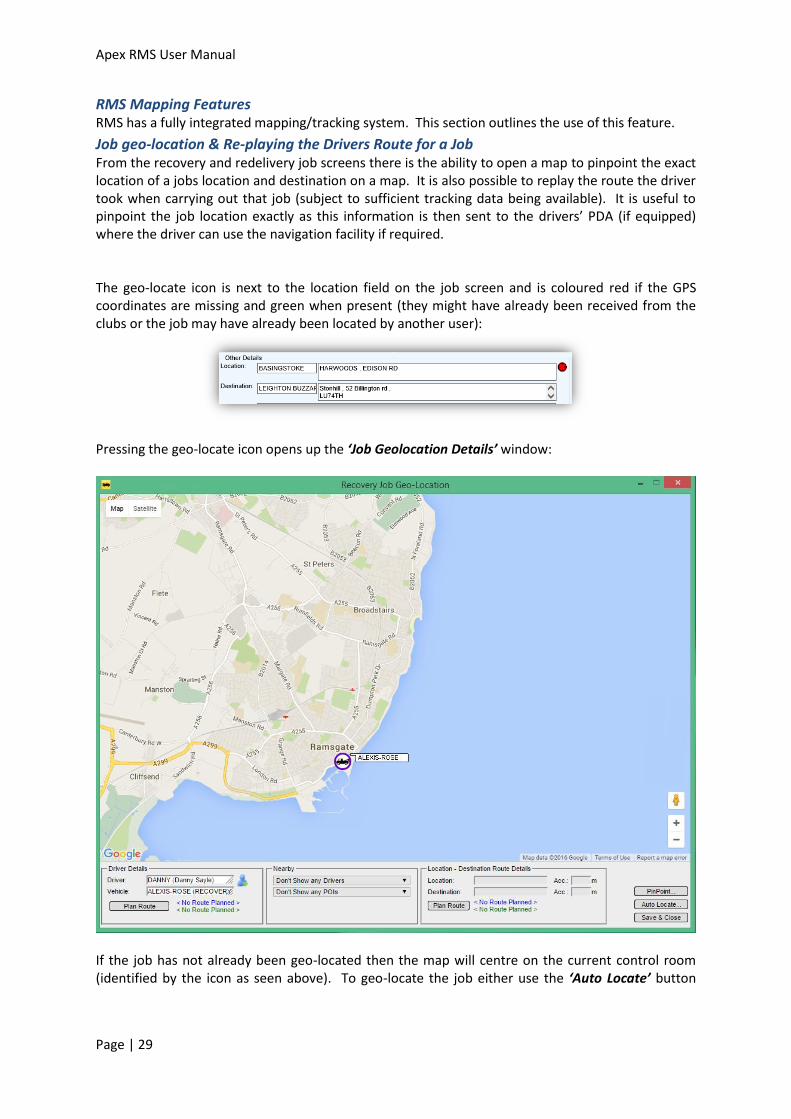
Job geo-location & Re-playing the Drivers Route for a Job From the recovery and redelivery job screens there is the ability to open a map to pinpoint the exact location of a jobs location and destination on a map. It is also possible to replay the route the driver took when carrying out that job (subject to sufficient tracking data being available). It is useful to pinpoint the job location exactly as this information is then sent to the drivers’ PDA (if equipped) where the driver can use the navigation facility if required. The geo-locate icon is next to the location field on the job screen and is coloured red if the GPS coordinates are missing and green when present (they might have already been received from the clubs or the job may have already been located by another user):
Pressing the geo-locate icon opens up the ‘Job Geolocation Details’ window:
If the job has not already been geo-located then the map will centre on the current control room (identified by the icon as seen above). To geo-locate the job either use the ‘Auto Locate’ button
Apex RMS User Manual
Page | 30
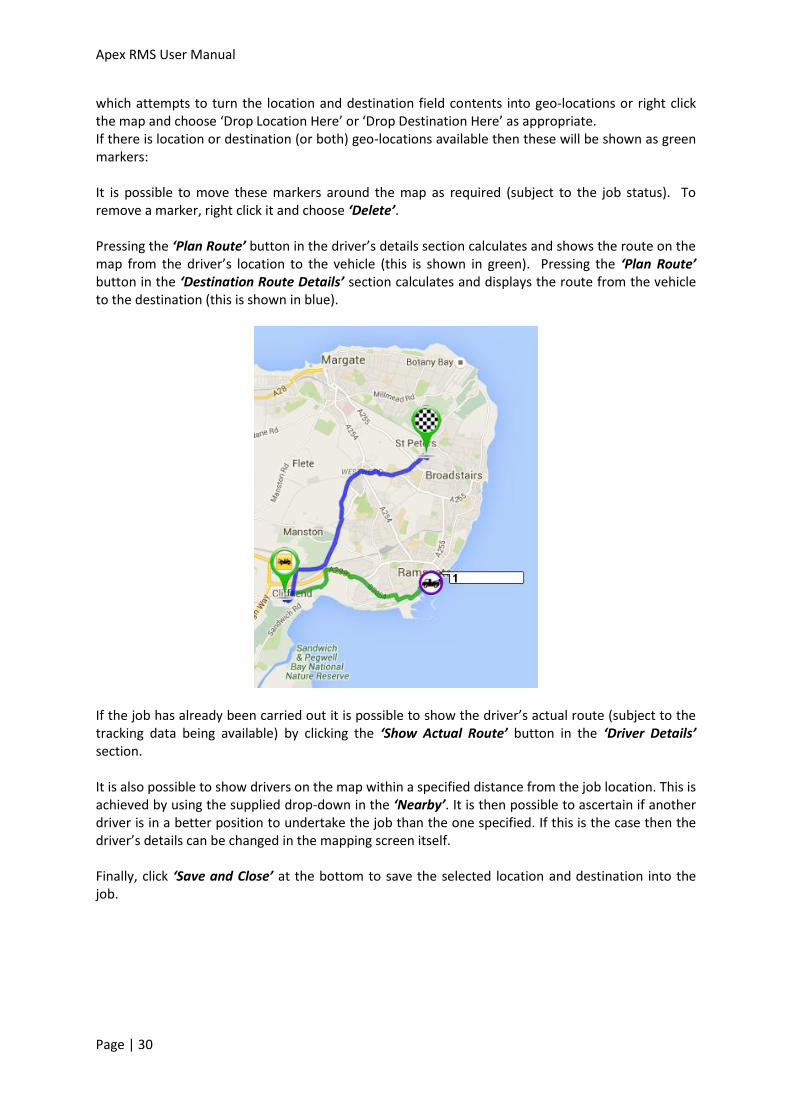
which attempts to turn the location and destination field contents into geo-locations or right click the map and choose ‘Drop Location Here’ or ‘Drop Destination Here’ as appropriate. If there is location or destination (or both) geo-locations available then these will be shown as green markers:
It is possible to move these markers around the map as required (subject to the job status). To remove a marker, right click it and choose ‘Delete’. Pressing the ‘Plan Route’ button in the driver’s details section calculates and shows the route on the map from the driver’s location to the vehicle (this is shown in green). Pressing the ‘Plan Route’ button in the ‘Destination Route Details’ section calculates and displays the route from the vehicle to the destination (this is shown in blue).
If the job has already been carried out it is possible to show the driver’s actual route (subject to the tracking data being available) by clicking the ‘Show Actual Route’ button in the ‘Driver Details’ section. It is also possible to show drivers on the map within a specified distance from the job location. This is achieved by using the supplied drop-down in the ‘Nearby’. It is then possible to ascertain if another driver is in a better position to undertake the job than the one specified. If this is the case then the driver’s details can be changed in the mapping screen itself. Finally, click ‘Save and Close’ at the bottom to save the selected location and destination into the job.
Apex RMS User Manual
Page | 31
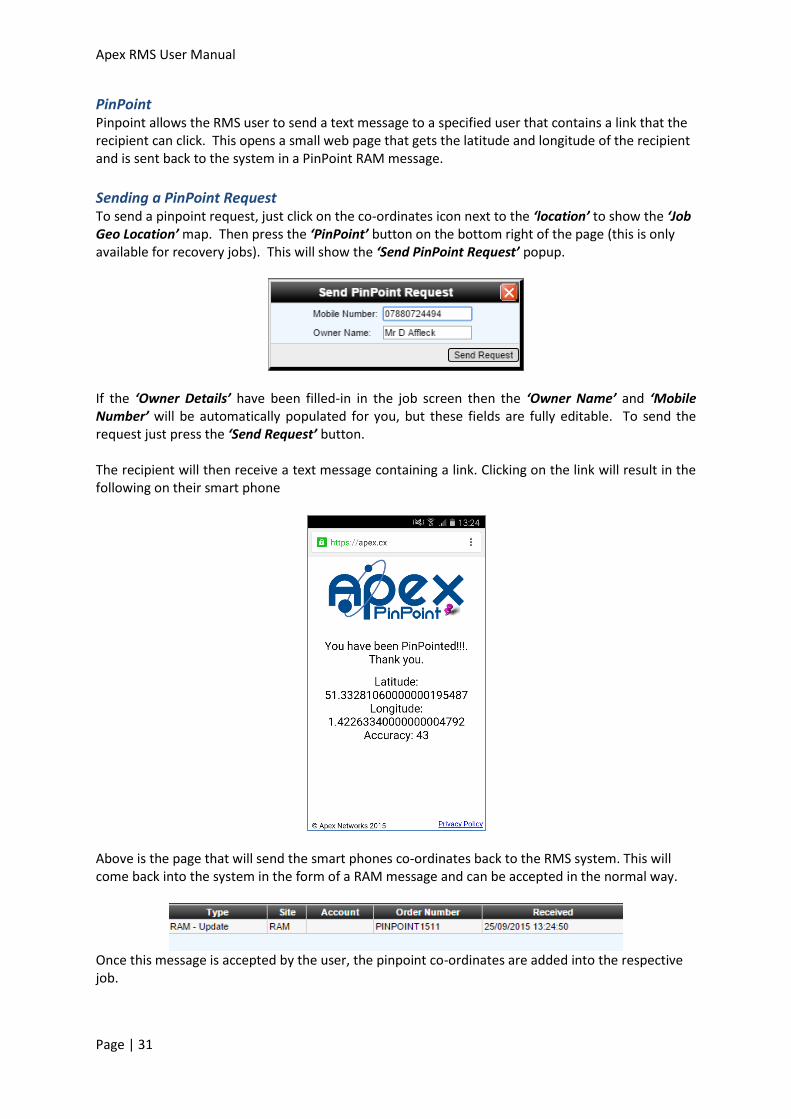
PinPoint Pinpoint allows the RMS user to send a text message to a specified user that contains a link that the recipient can click. This opens a small web page that gets the latitude and longitude of the recipient and is sent back to the system in a PinPoint RAM message.
Sending a PinPoint Request To send a pinpoint request, just click on the co-ordinates icon next to the ‘location’ to show the ‘Job Geo Location’ map. Then press the ‘PinPoint’ button on the bottom right of the page (this is only available for recovery jobs). This will show the ‘Send PinPoint Request’ popup.
If the ‘Owner Details’ have been filled-in in the job screen then the ‘Owner Name’ and ‘Mobile Number’ will be automatically populated for you, but these fields are fully editable. To send the request just press the ‘Send Request’ button. The recipient will then receive a text message containing a link. Clicking on the link will result in the following on their smart phone
Above is the page that will send the smart phones co-ordinates back to the RMS system. This will come back into the system in the form of a RAM message and can be accepted in the normal way.
Once this message is accepted by the user, the pinpoint co-ordinates are added into the respective job.
Apex RMS User Manual
Page | 32
POI’s This section gives an overview of the new POI (Points of Interest) functionality that has now been added to the mapping/tracking within the RMS system.
Adding POI’s There are currently two ways to add POI’s to the mapping within the RMS system.
Create from the supplier list.
Manual addition.
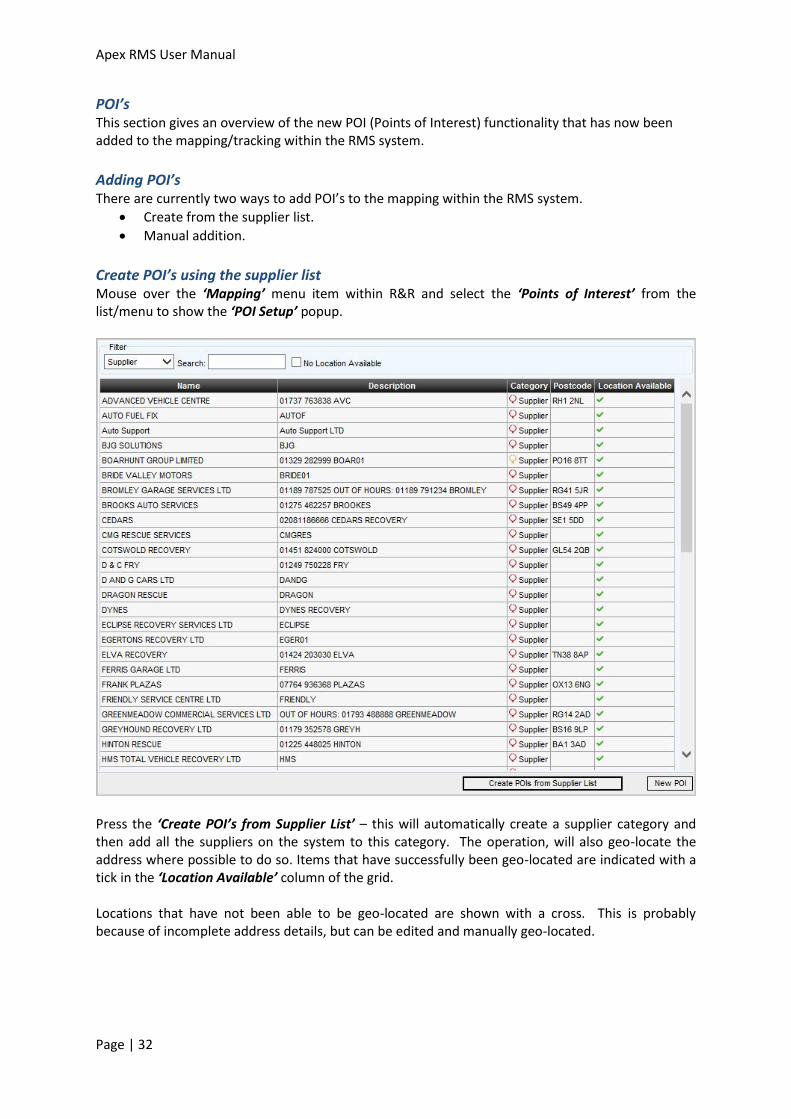
Create POI’s using the supplier list Mouse over the ‘Mapping’ menu item within R&R and select the ‘Points of Interest’ from the list/menu to show the ‘POI Setup’ popup.
Press the ‘Create POI’s from Supplier List’ – this will automatically create a supplier category and then add all the suppliers on the system to this category. The operation, will also geo-locate the address where possible to do so. Items that have successfully been geo-located are indicated with a tick in the ‘Location Available’ column of the grid. Locations that have not been able to be geo-located are shown with a cross. This is probably because of incomplete address details, but can be edited and manually geo-located.
Apex RMS User Manual
Page | 33
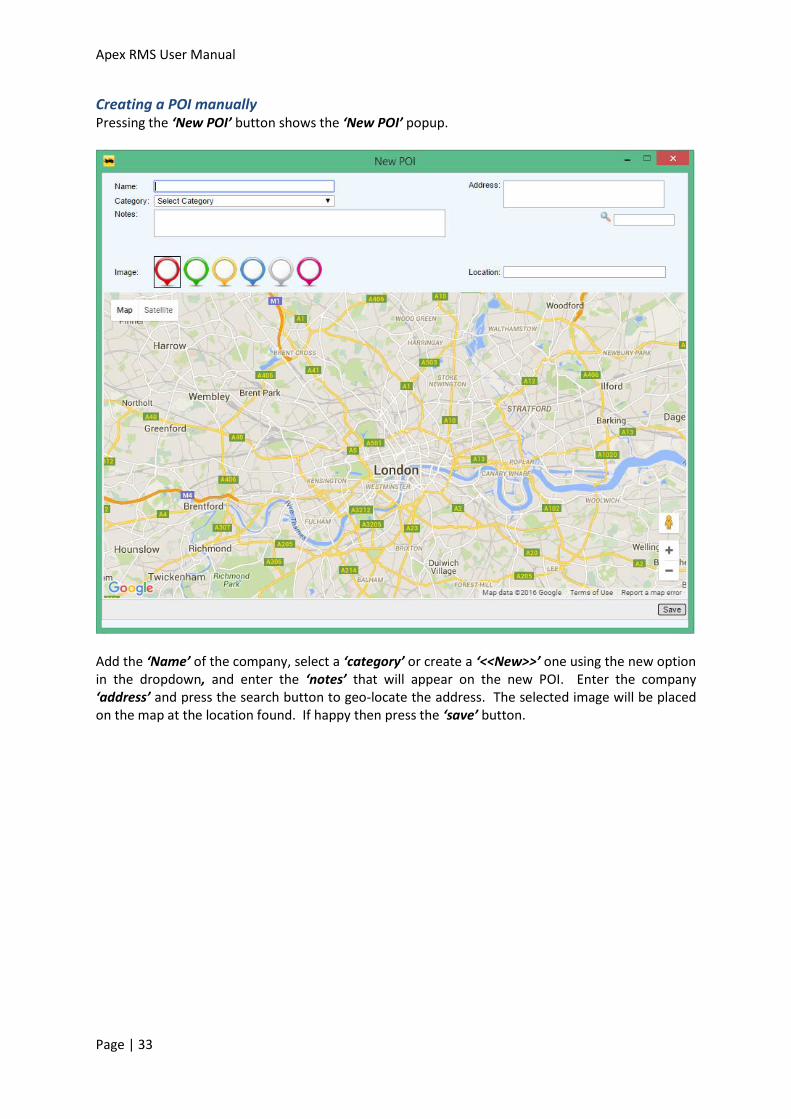
Creating a POI manually Pressing the ‘New POI’ button shows the ‘New POI’ popup.
Add the ‘Name’ of the company, select a ‘category’ or create a ‘<<New>>’ one using the new option in the dropdown, and enter the ‘notes’ that will appear on the new POI. Enter the company ‘address’ and press the search button to geo-locate the address. The selected image will be placed on the map at the location found. If happy then press the ‘save’ button.
Apex RMS User Manual
Page | 34
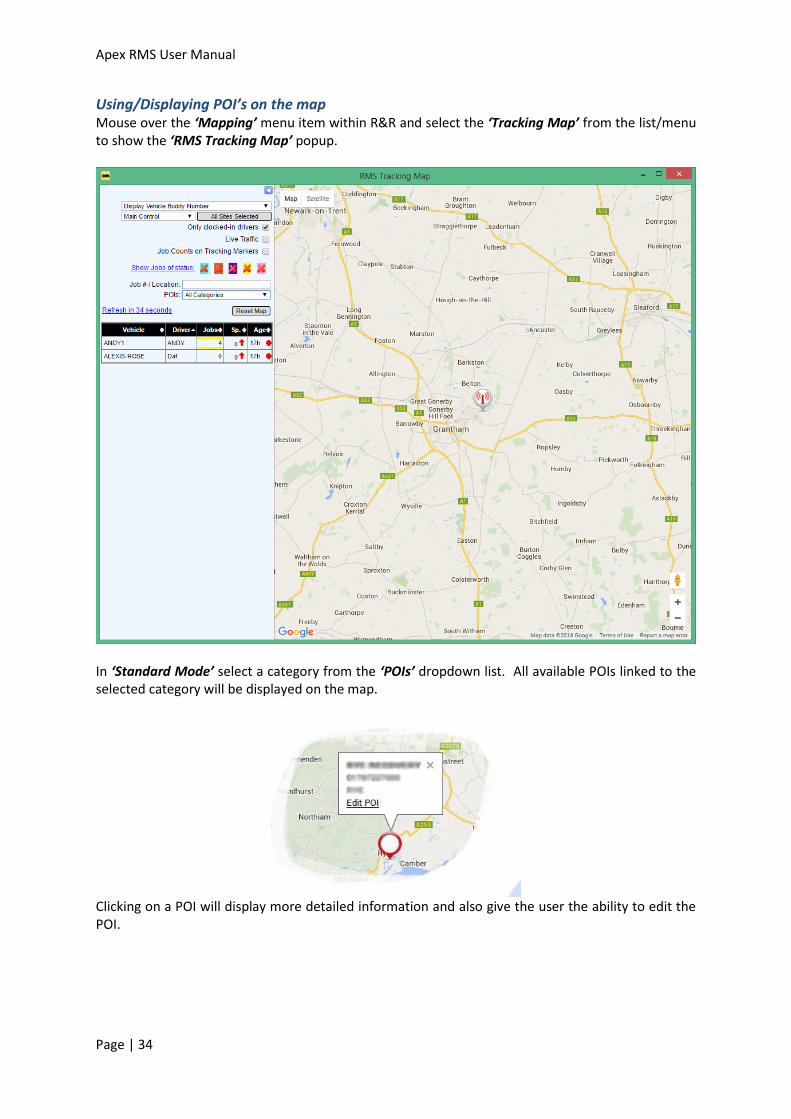
Using/Displaying POI’s on the map Mouse over the ‘Mapping’ menu item within R&R and select the ‘Tracking Map’ from the list/menu to show the ‘RMS Tracking Map’ popup.
In ‘Standard Mode’ select a category from the ‘POIs’ dropdown list. All available POIs linked to the selected category will be displayed on the map.
Clicking on a POI will display more detailed information and also give the user the ability to edit the POI.
Apex RMS User Manual
Page | 35
Sending a job to a subcontractor You can easily subcontract a job to another organisation to deal with from within RMS. Once you have created a job and it has been saved and has an actual job number, you can click on the hand icon in the main service panel. This will prompt you to select a subcontractor allows you to type any notes that are related to the job. Once a job has been subcontracted, the subcontractor will be able to update you with job times as the job moves through its life cycle.
Accepting and processing jobs electronically This section deals with the processing of electronic jobs.
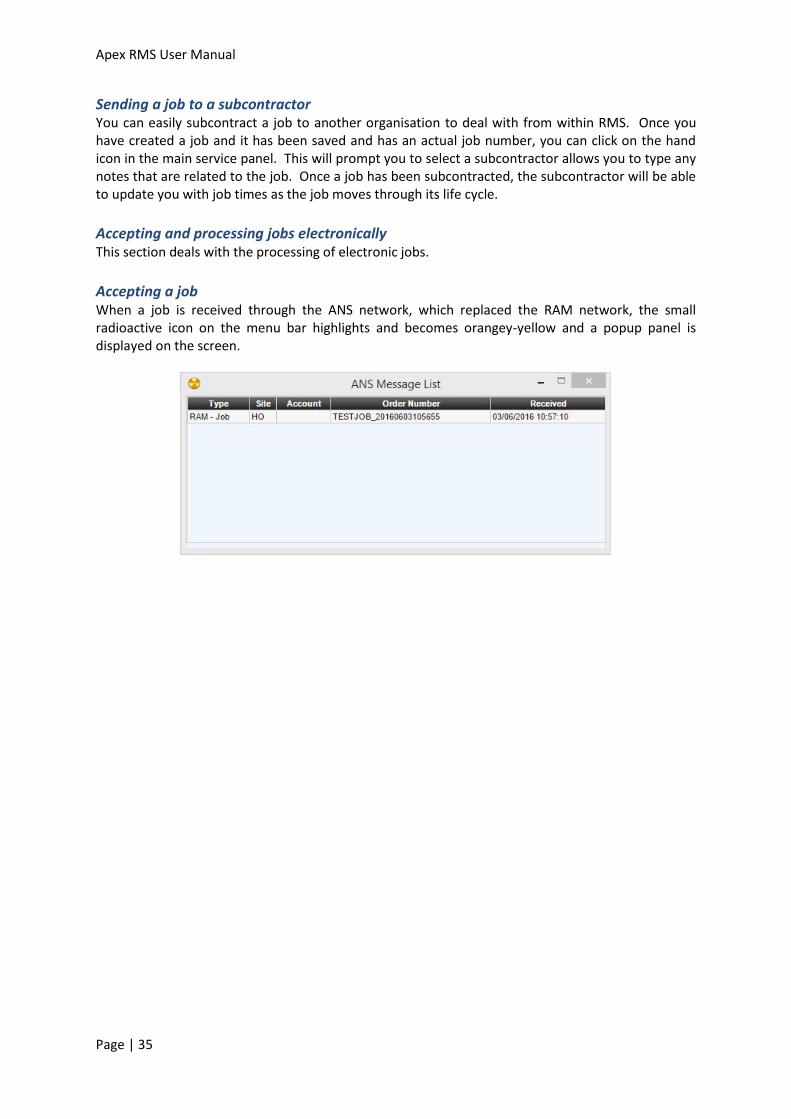
Accepting a job When a job is received through the ANS network, which replaced the RAM network, the small radioactive icon on the menu bar highlights and becomes orangey-yellow and a popup panel is displayed on the screen.
Apex RMS User Manual
Page | 36
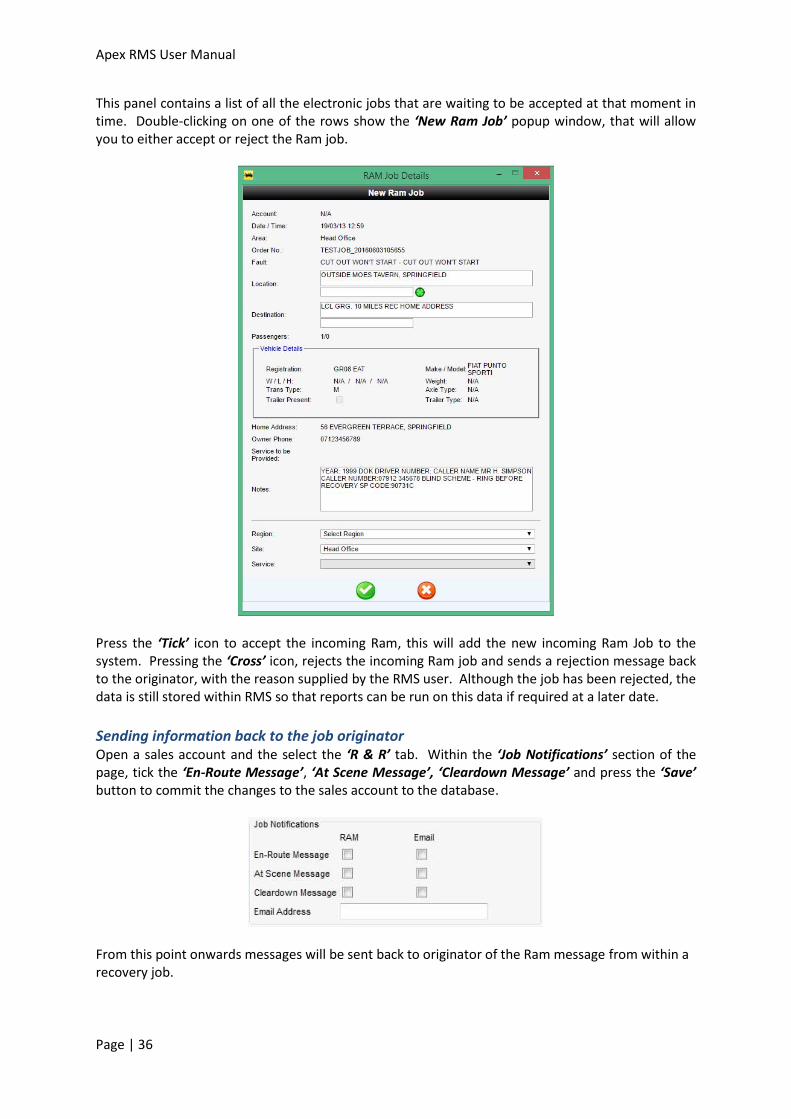
This panel contains a list of all the electronic jobs that are waiting to be accepted at that moment in time. Double-clicking on one of the rows show the ‘New Ram Job’ popup window, that will allow you to either accept or reject the Ram job.
Press the ‘Tick’ icon to accept the incoming Ram, this will add the new incoming Ram Job to the system. Pressing the ‘Cross’ icon, rejects the incoming Ram job and sends a rejection message back to the originator, with the reason supplied by the RMS user. Although the job has been rejected, the data is still stored within RMS so that reports can be run on this data if required at a later date.
Sending information back to the job originator Open a sales account and the select the ‘R & R’ tab. Within the ‘Job Notifications’ section of the page, tick the ‘En-Route Message’, ‘At Scene Message’, ‘Cleardown Message’ and press the ‘Save’ button to commit the changes to the sales account to the database.
From this point onwards messages will be sent back to originator of the Ram message from within a recovery job.
Apex RMS User Manual
Page | 37
Finding a particular job You are able to search for particular jobs within the RMS system as follows:
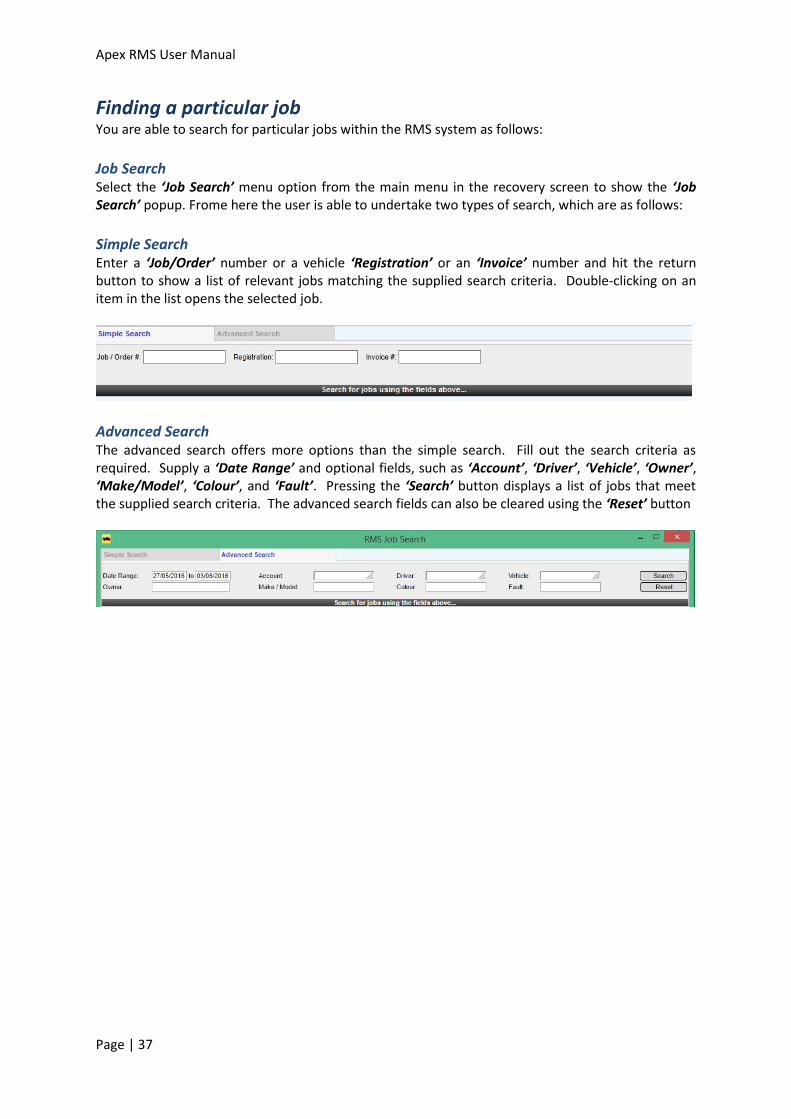
Job Search Select the ‘Job Search’ menu option from the main menu in the recovery screen to show the ‘Job Search’ popup. Frome here the user is able to undertake two types of search, which are as follows:
Simple Search Enter a ‘Job/Order’ number or a vehicle ‘Registration’ or an ‘Invoice’ number and hit the return button to show a list of relevant jobs matching the supplied search criteria. Double-clicking on an item in the list opens the selected job.
Advanced Search The advanced search offers more options than the simple search. Fill out the search criteria as required. Supply a ‘Date Range’ and optional fields, such as ‘Account’, ‘Driver’, ‘Vehicle’, ‘Owner’, ‘Make/Model’, ‘Colour’, and ‘Fault’. Pressing the ‘Search’ button displays a list of jobs that meet the supplied search criteria. The advanced search fields can also be cleared using the ‘Reset’ button
Apex RMS User Manual
Page | 38
Dealing with Redelivery jobs RMS enables the user to attach a redelivery job to a recovery job.
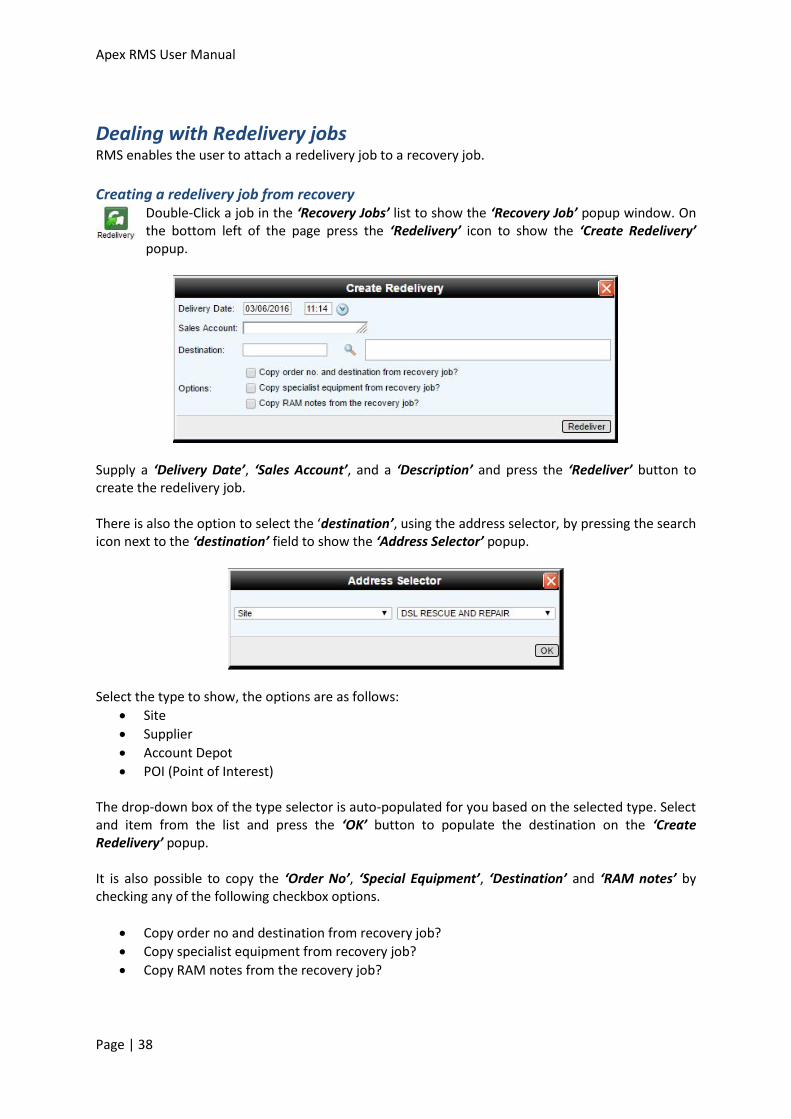
Creating a redelivery job from recovery Double-Click a job in the ‘Recovery Jobs’ list to show the ‘Recovery Job’ popup window. On the bottom left of the page press the ‘Redelivery’ icon to show the ‘Create Redelivery’ popup.
Supply a ‘Delivery Date’, ‘Sales Account’, and a ‘Description’ and press the ‘Redeliver’ button to create the redelivery job. There is also the option to select the ‘destination’, using the address selector, by pressing the search icon next to the ‘destination’ field to show the ‘Address Selector’ popup.
Select the type to show, the options are as follows:
Site
Supplier
Account Depot
POI (Point of Interest) The drop-down box of the type selector is auto-populated for you based on the selected type. Select and item from the list and press the ‘OK’ button to populate the destination on the ‘Create Redelivery’ popup. It is also possible to copy the ‘Order No’, ‘Special Equipment’, ‘Destination’ and ‘RAM notes’ by checking any of the following checkbox options.
Copy order no and destination from recovery job?
Copy specialist equipment from recovery job?
Copy RAM notes from the recovery job?
Apex RMS User Manual
Page | 39
Dealing with parking jobs RMS enables the user to create Parking jobs in two ways:
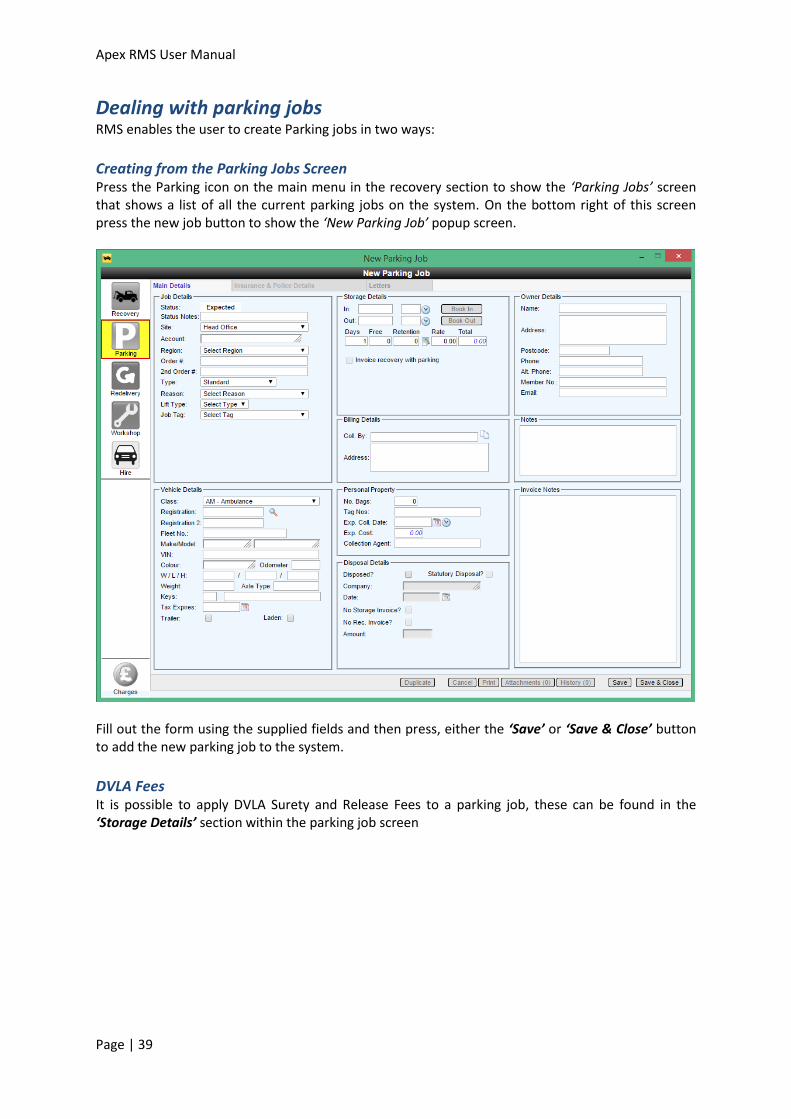
Creating from the Parking Jobs Screen Press the Parking icon on the main menu in the recovery section to show the ‘Parking Jobs’ screen that shows a list of all the current parking jobs on the system. On the bottom right of this screen press the new job button to show the ‘New Parking Job’ popup screen.
Fill out the form using the supplied fields and then press, either the ‘Save’ or ‘Save & Close’ button to add the new parking job to the system.
DVLA Fees It is possible to apply DVLA Surety and Release Fees to a parking job, these can be found in the ‘Storage Details’ section within the parking job screen
Apex RMS User Manual
Page | 40
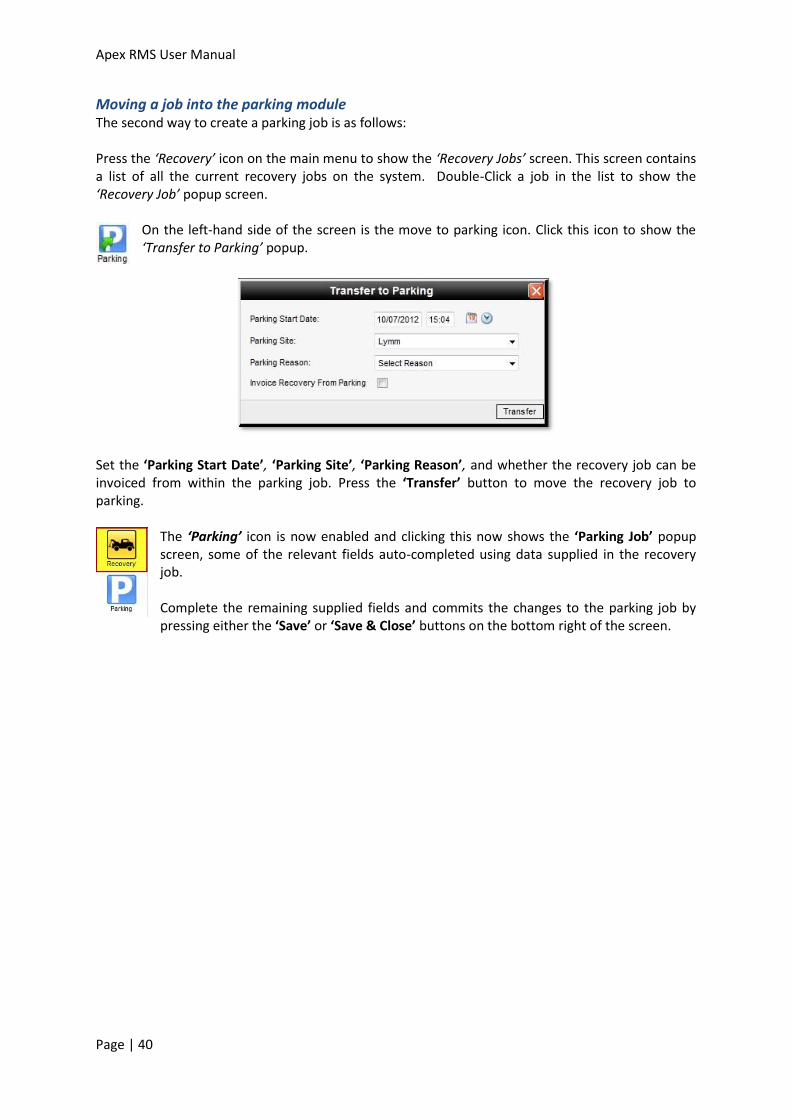
Moving a job into the parking module The second way to create a parking job is as follows: Press the ‘Recovery’ icon on the main menu to show the ‘Recovery Jobs’ screen. This screen contains a list of all the current recovery jobs on the system. Double-Click a job in the list to show the ‘Recovery Job’ popup screen.
On the left-hand side of the screen is the move to parking icon. Click this icon to show the ‘Transfer to Parking’ popup.
Set the ‘Parking Start Date’, ‘Parking Site’, ‘Parking Reason’, and whether the recovery job can be invoiced from within the parking job. Press the ‘Transfer’ button to move the recovery job to parking.
The ‘Parking’ icon is now enabled and clicking this now shows the ‘Parking Job’ popup screen, some of the relevant fields auto-completed using data supplied in the recovery job. Complete the remaining supplied fields and commits the changes to the parking job by pressing either the ‘Save’ or ‘Save & Close’ buttons on the bottom right of the screen.
Apex RMS User Manual
Page | 41
Scheduled and ad-hoc parking letters There are two ways to generate parking letters and they are as follows:
Scheduled Parking Letter
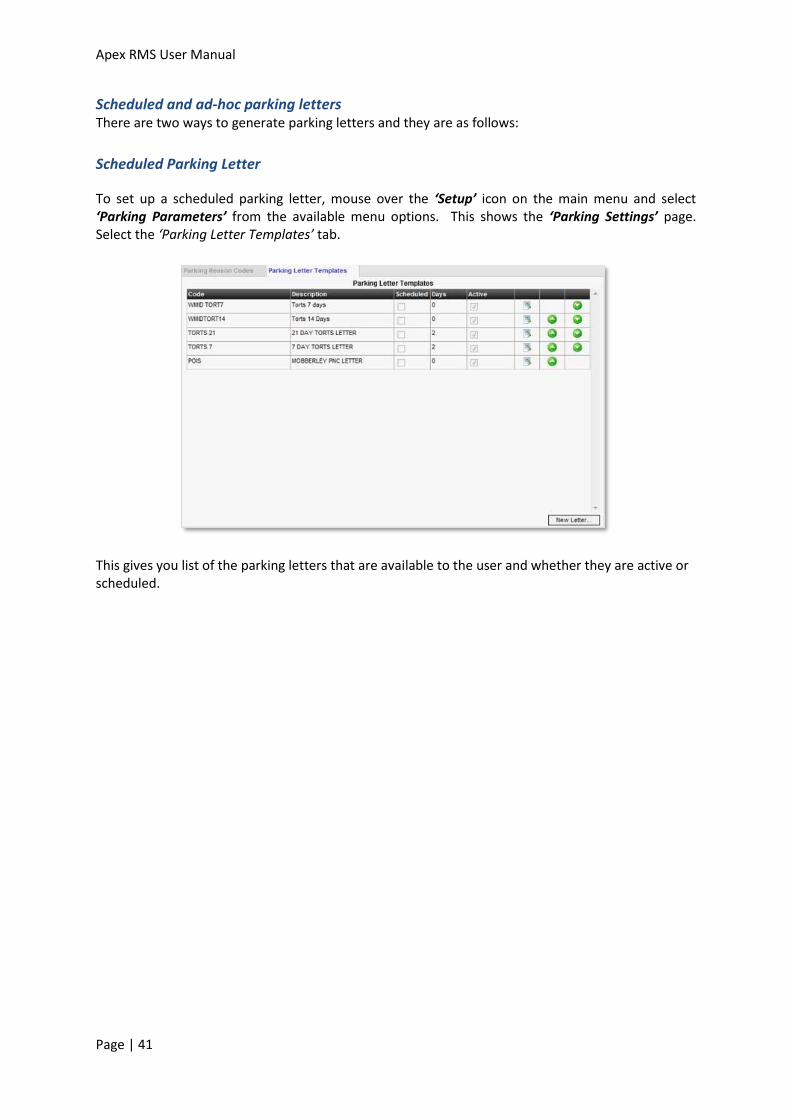
To set up a scheduled parking letter, mouse over the ‘Setup’ icon on the main menu and select ‘Parking Parameters’ from the available menu options. This shows the ‘Parking Settings’ page. Select the ‘Parking Letter Templates’ tab.
This gives you list of the parking letters that are available to the user and whether they are active or scheduled.
Apex RMS User Manual
Page | 42
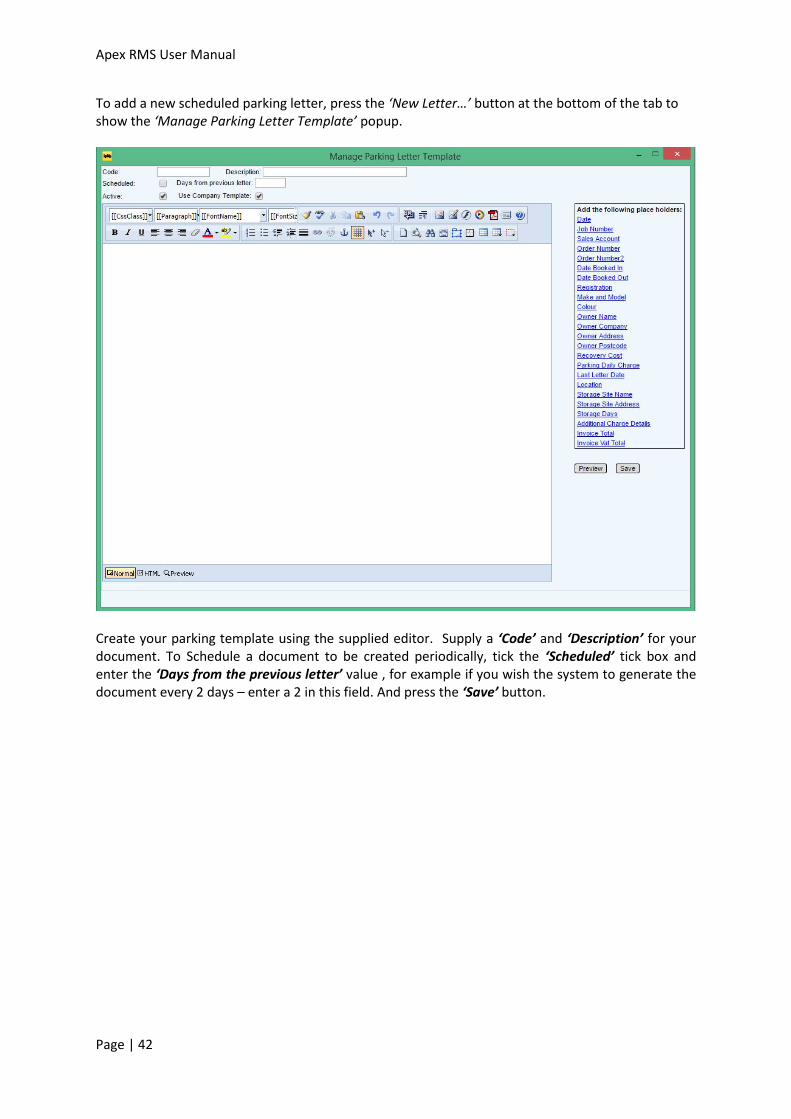
To add a new scheduled parking letter, press the ‘New Letter…’ button at the bottom of the tab to show the ‘Manage Parking Letter Template’ popup.
Create your parking template using the supplied editor. Supply a ‘Code’ and ‘Description’ for your document. To Schedule a document to be created periodically, tick the ‘Scheduled’ tick box and enter the ‘Days from the previous letter’ value , for example if you wish the system to generate the document every 2 days – enter a 2 in this field. And press the ‘Save’ button.

Apex RMS User Manual
Page | 43
Ad-Hoc Parking Letters To send an ad-hoc parking letter – open the parking job screen – select the ‘Letters’ tab at the top of the page. This shows a list of all the previously printed letters. These letters can be re-printed by clicking on the printer icon on the left-hand-side of each row.
To create a new parking letter, select a document from the dropdown list at the bottom of the page and press the ‘Print Letter’ button. RMS then creates the requested document in pdf format and displays it on the screen. The generated documents details are then added to the list of previously produced documents.
Apex RMS User Manual
Page | 44
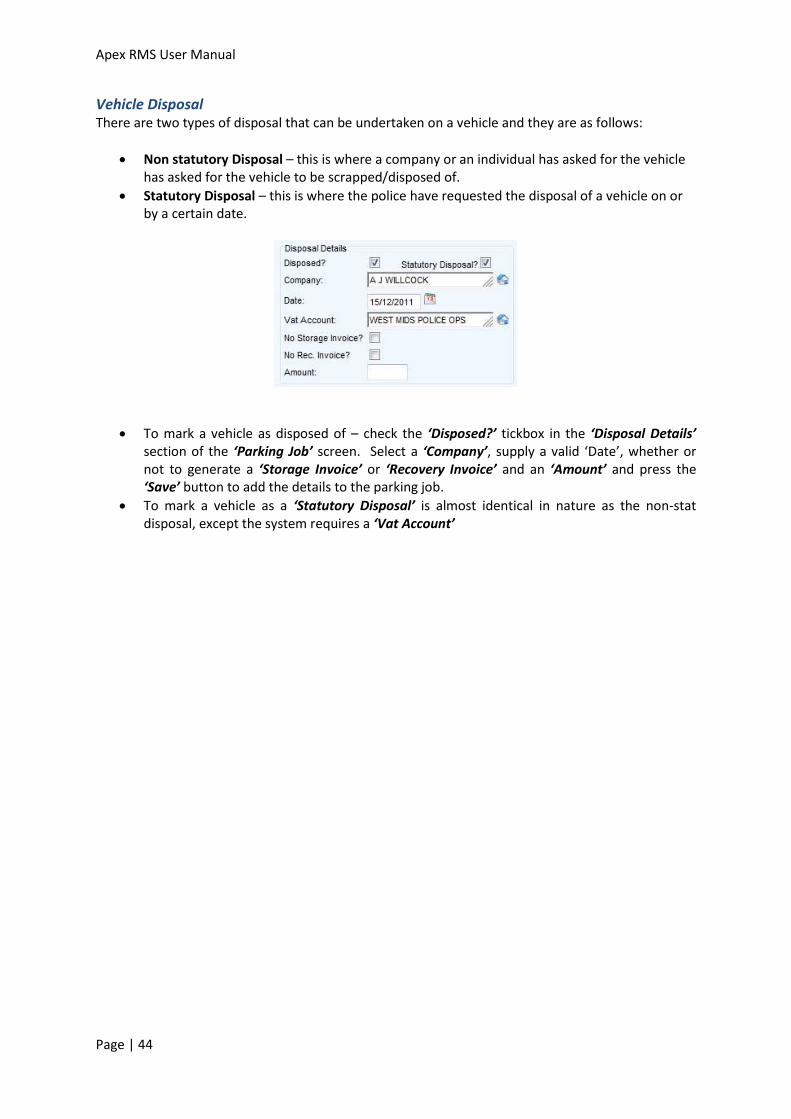
Vehicle Disposal There are two types of disposal that can be undertaken on a vehicle and they are as follows:
Non statutory Disposal – this is where a company or an individual has asked for the vehicle has asked for the vehicle to be scrapped/disposed of.
Statutory Disposal – this is where the police have requested the disposal of a vehicle on or by a certain date.
To mark a vehicle as disposed of – check the ‘Disposed?’ tickbox in the ‘Disposal Details’ section of the ‘Parking Job’ screen. Select a ‘Company’, supply a valid ‘Date’, whether or not to generate a ‘Storage Invoice’ or ‘Recovery Invoice’ and an ‘Amount’ and press the ‘Save’ button to add the details to the parking job.
To mark a vehicle as a ‘Statutory Disposal’ is almost identical in nature as the non-stat disposal, except the system requires a ‘Vat Account’
Apex RMS User Manual
Page | 45
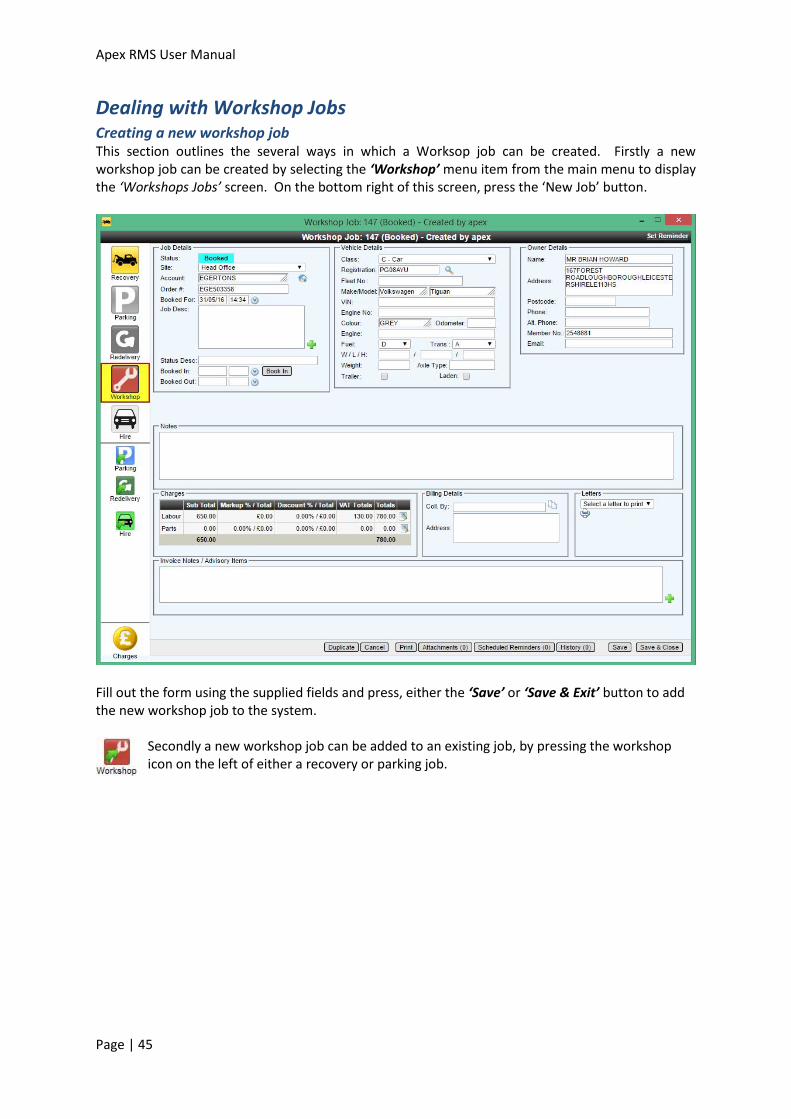
Dealing with Workshop Jobs Creating a new workshop job This section outlines the several ways in which a Worksop job can be created. Firstly a new workshop job can be created by selecting the ‘Workshop’ menu item from the main menu to display the ‘Workshops Jobs’ screen. On the bottom right of this screen, press the ‘New Job’ button.
Fill out the form using the supplied fields and press, either the ‘Save’ or ‘Save & Exit’ button to add the new workshop job to the system.
Secondly a new workshop job can be added to an existing job, by pressing the workshop icon on the left of either a recovery or parking job.
Apex RMS User Manual
Page | 46
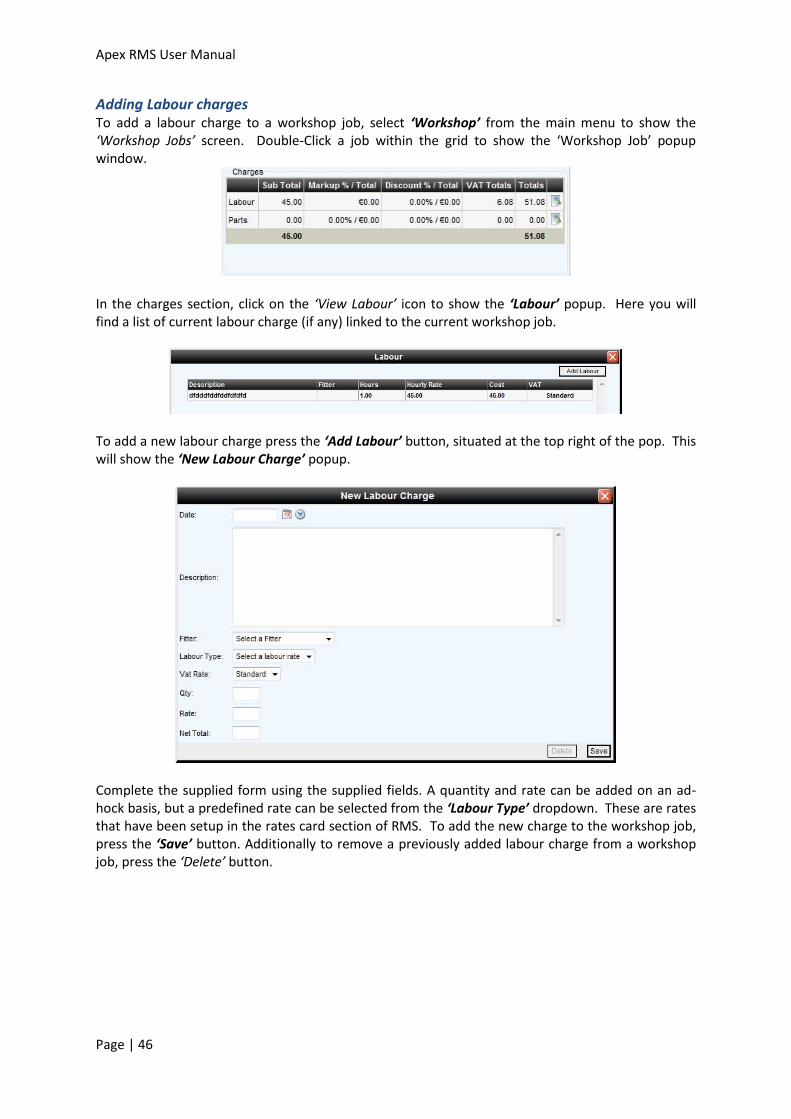
Adding Labour charges To add a labour charge to a workshop job, select ‘Workshop’ from the main menu to show the ‘Workshop Jobs’ screen. Double-Click a job within the grid to show the ‘Workshop Job’ popup window.
In the charges section, click on the ‘View Labour’ icon to show the ‘Labour’ popup. Here you will find a list of current labour charge (if any) linked to the current workshop job.
To add a new labour charge press the ‘Add Labour’ button, situated at the top right of the pop. This will show the ‘New Labour Charge’ popup.
Complete the supplied form using the supplied fields. A quantity and rate can be added on an ad-hock basis, but a predefined rate can be selected from the ‘Labour Type’ dropdown. These are rates that have been setup in the rates card section of RMS. To add the new charge to the workshop job, press the ‘Save’ button. Additionally to remove a previously added labour charge from a workshop job, press the ‘Delete’ button.
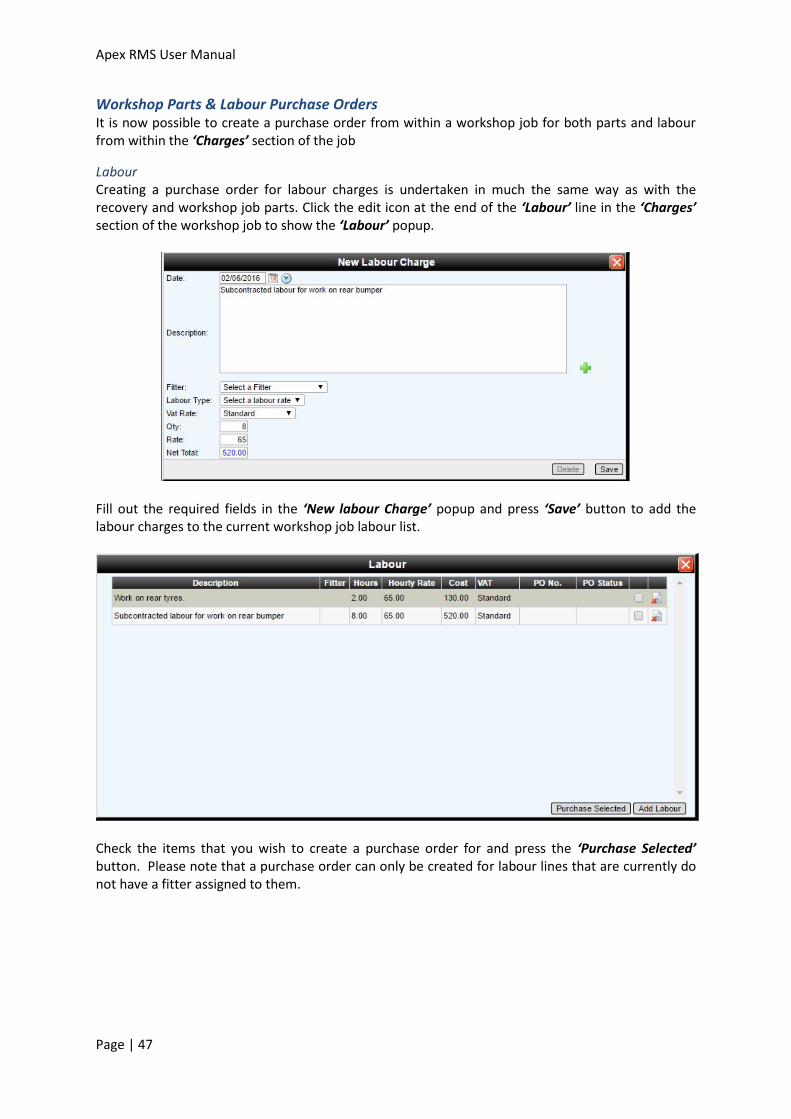
Apex RMS User Manual
Page | 47
Workshop Parts & Labour Purchase Orders It is now possible to create a purchase order from within a workshop job for both parts and labour from within the ‘Charges’ section of the job
Labour Creating a purchase order for labour charges is undertaken in much the same way as with the recovery and workshop job parts. Click the edit icon at the end of the ‘Labour’ line in the ‘Charges’ section of the workshop job to show the ‘Labour’ popup.
Fill out the required fields in the ‘New labour Charge’ popup and press ‘Save’ button to add the labour charges to the current workshop job labour list.
Check the items that you wish to create a purchase order for and press the ‘Purchase Selected’ button. Please note that a purchase order can only be created for labour lines that are currently do not have a fitter assigned to them.
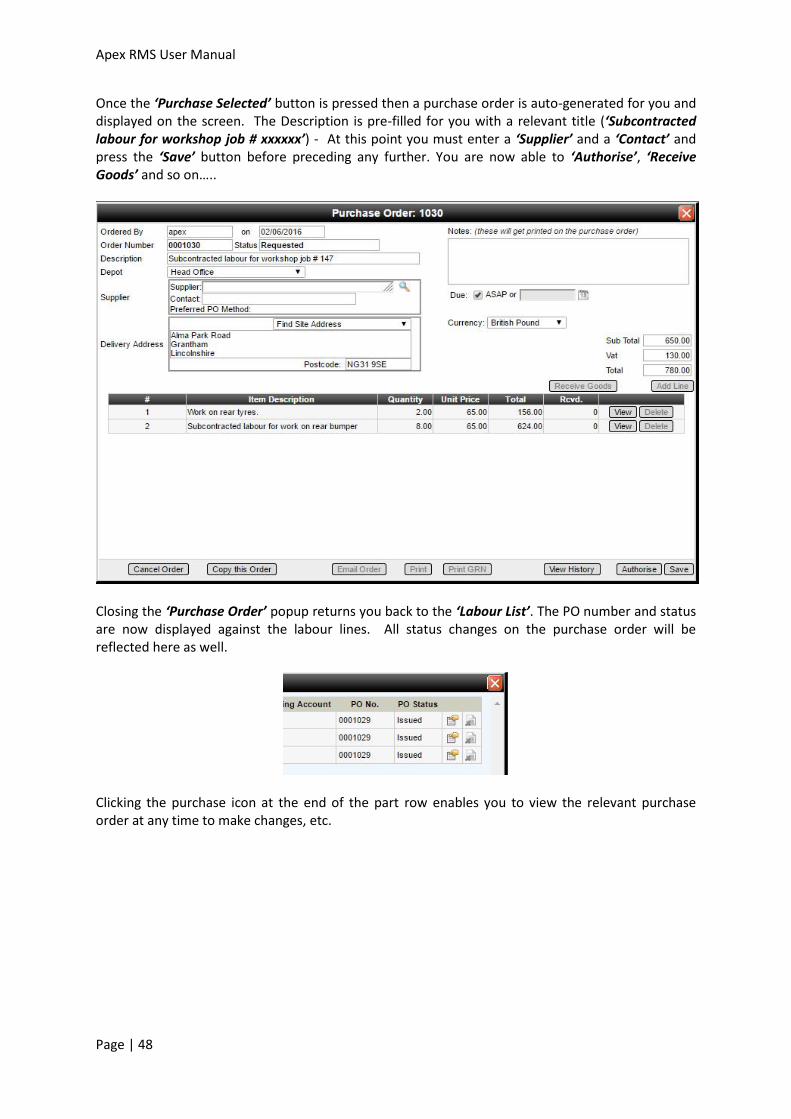
Apex RMS User Manual
Page | 48
Once the ‘Purchase Selected’ button is pressed then a purchase order is auto-generated for you and displayed on the screen. The Description is pre-filled for you with a relevant title (‘Subcontracted labour for workshop job # xxxxxx’) - At this point you must enter a ‘Supplier’ and a ‘Contact’ and press the ‘Save’ button before preceding any further. You are now able to ‘Authorise’, ‘Receive Goods’ and so on…..
Closing the ‘Purchase Order’ popup returns you back to the ‘Labour List’. The PO number and status are now displayed against the labour lines. All status changes on the purchase order will be reflected here as well.
Clicking the purchase icon at the end of the part row enables you to view the relevant purchase order at any time to make changes, etc.
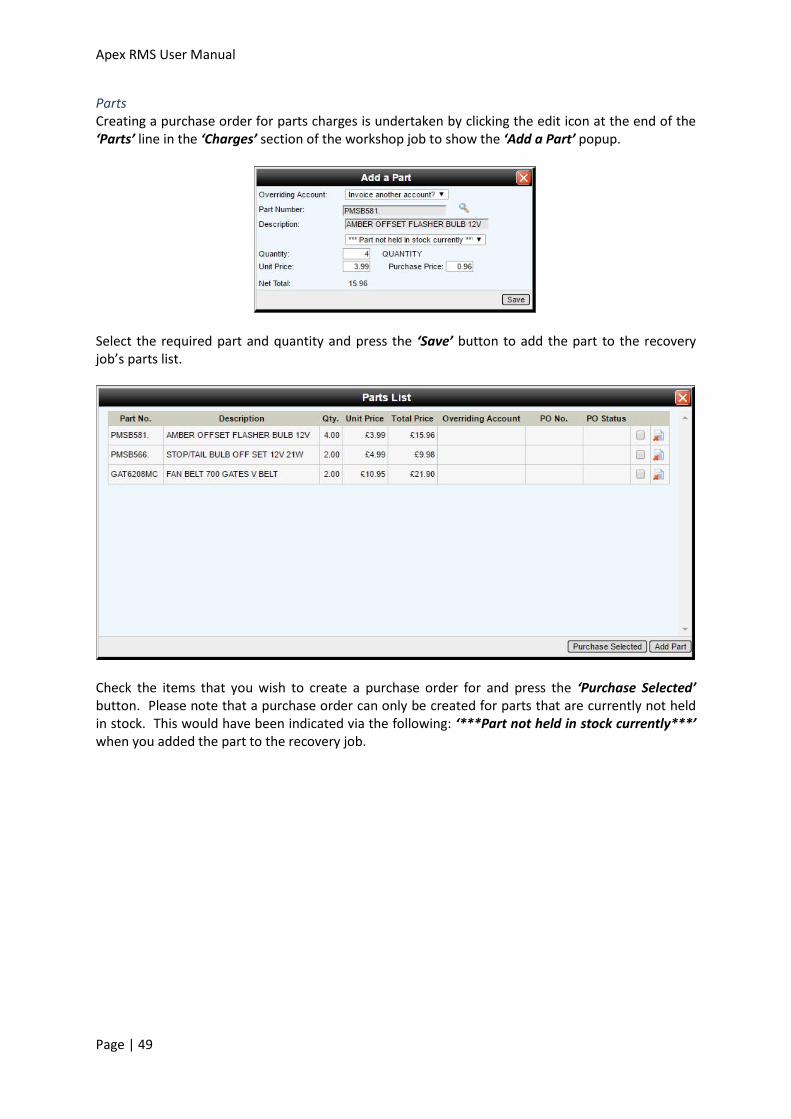
Apex RMS User Manual
Page | 49
Parts Creating a purchase order for parts charges is undertaken by clicking the edit icon at the end of the ‘Parts’ line in the ‘Charges’ section of the workshop job to show the ‘Add a Part’ popup.
Select the required part and quantity and press the ‘Save’ button to add the part to the recovery job’s parts list.
Check the items that you wish to create a purchase order for and press the ‘Purchase Selected’ button. Please note that a purchase order can only be created for parts that are currently not held in stock. This would have been indicated via the following: ‘***Part not held in stock currently***’ when you added the part to the recovery job.
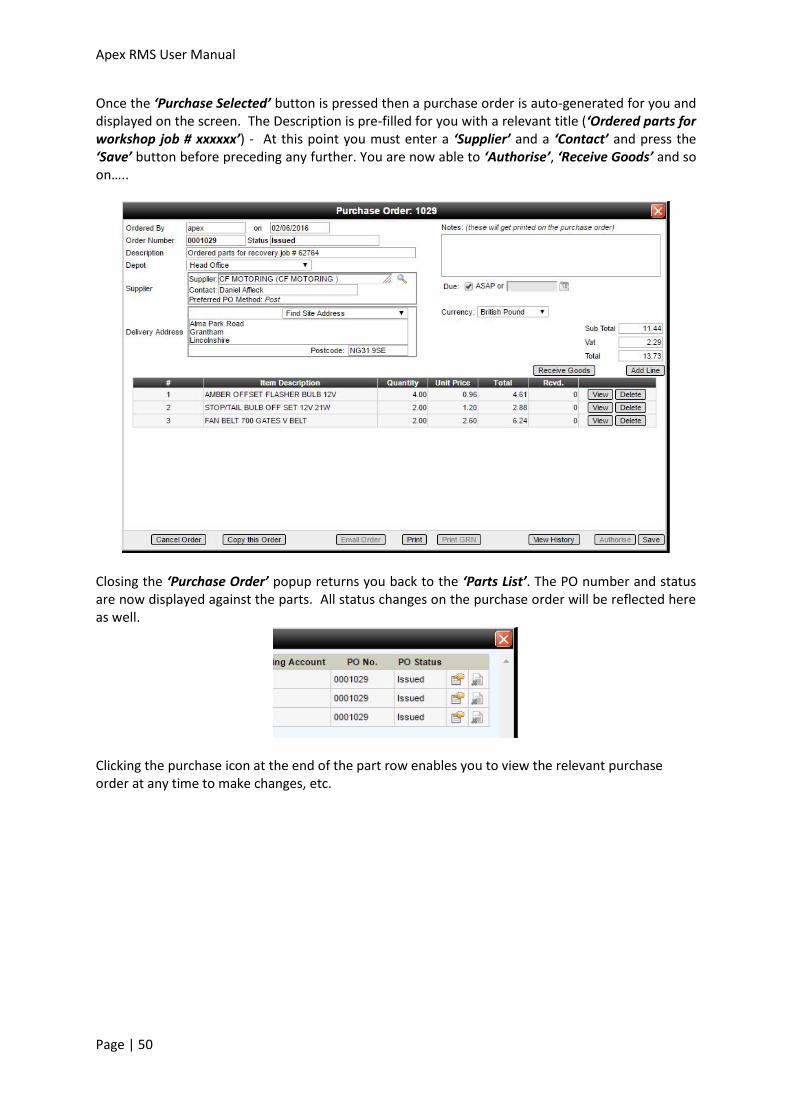
Apex RMS User Manual
Page | 50
Once the ‘Purchase Selected’ button is pressed then a purchase order is auto-generated for you and displayed on the screen. The Description is pre-filled for you with a relevant title (‘Ordered parts for workshop job # xxxxxx’) - At this point you must enter a ‘Supplier’ and a ‘Contact’ and press the ‘Save’ button before preceding any further. You are now able to ‘Authorise’, ‘Receive Goods’ and so on…..
Closing the ‘Purchase Order’ popup returns you back to the ‘Parts List’. The PO number and status are now displayed against the parts. All status changes on the purchase order will be reflected here as well.
Clicking the purchase icon at the end of the part row enables you to view the relevant purchase order at any time to make changes, etc.
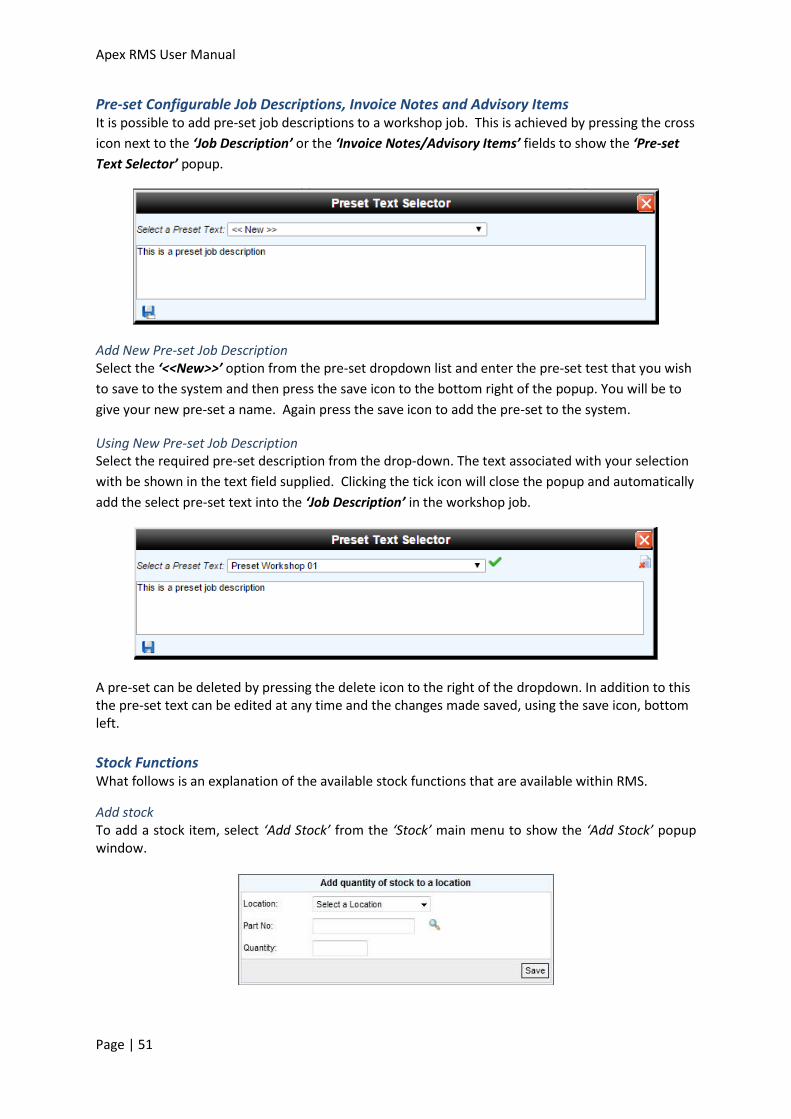
Apex RMS User Manual
Page | 51
Pre-set Configurable Job Descriptions, Invoice Notes and Advisory Items It is possible to add pre-set job descriptions to a workshop job. This is achieved by pressing the cross
icon next to the ‘Job Description’ or the ‘Invoice Notes/Advisory Items’ fields to show the ‘Pre-set
Text Selector’ popup.
Add New Pre-set Job Description Select the ‘<<New>>’ option from the pre-set dropdown list and enter the pre-set test that you wish
to save to the system and then press the save icon to the bottom right of the popup. You will be to
give your new pre-set a name. Again press the save icon to add the pre-set to the system.
Using New Pre-set Job Description Select the required pre-set description from the drop-down. The text associated with your selection
with be shown in the text field supplied. Clicking the tick icon will close the popup and automatically
add the select pre-set text into the ‘Job Description’ in the workshop job.
A pre-set can be deleted by pressing the delete icon to the right of the dropdown. In addition to this the pre-set text can be edited at any time and the changes made saved, using the save icon, bottom left.
Stock Functions What follows is an explanation of the available stock functions that are available within RMS.
Add stock To add a stock item, select ‘Add Stock’ from the ‘Stock’ main menu to show the ‘Add Stock’ popup window.
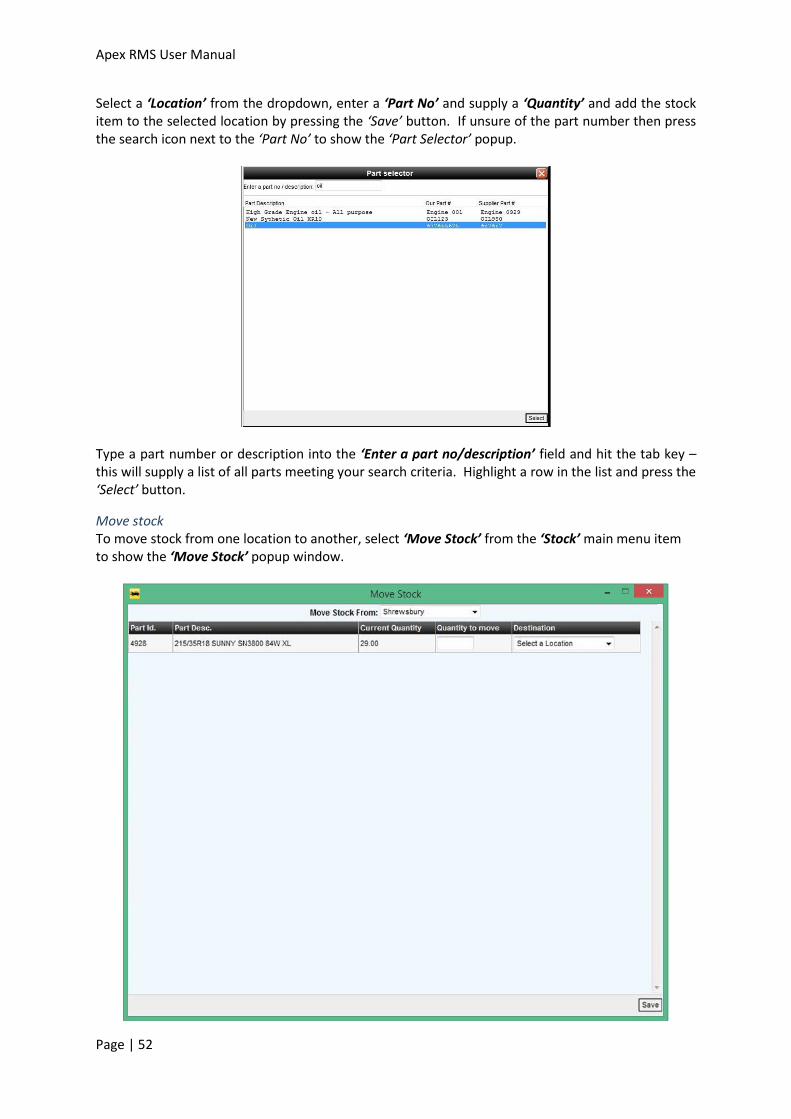
Apex RMS User Manual
Page | 52
Select a ‘Location’ from the dropdown, enter a ‘Part No’ and supply a ‘Quantity’ and add the stock item to the selected location by pressing the ‘Save’ button. If unsure of the part number then press the search icon next to the ‘Part No’ to show the ‘Part Selector’ popup.
Type a part number or description into the ‘Enter a part no/description’ field and hit the tab key – this will supply a list of all parts meeting your search criteria. Highlight a row in the list and press the ‘Select’ button.
Move stock To move stock from one location to another, select ‘Move Stock’ from the ‘Stock’ main menu item to show the ‘Move Stock’ popup window.

Apex RMS User Manual
Page | 53
Select a location from the ‘Move Stock Location’ dropdown, which displays a list of available stock items. Enter the number of items to move in the ‘Quantity To Move’ text field for the selected part, then select the ‘Destination’ from the selected dropdown and press the ‘Save’ button to move the specified stock quantity to its new location.
Stock enquiry To perform a stock enquiry, select ‘Stock Enquiry’ from the ‘Stock’ main menu item to show the ‘Stock Enquiry’ popup window.
A search can be undertaken using the supplied search options at the top of the popup – show stock for all locations, or specific location, by selecting an item form the ‘Location’ dropdown. A ‘Type’ can be specified, either:
Impress – stock items held for another company.
Non Impress – own stock items. A ‘Part No’ can also be specified if know or again use the search facility out lined in the previous section (Move Stock). Print a list of stock items by pressing the ‘Print’ button.
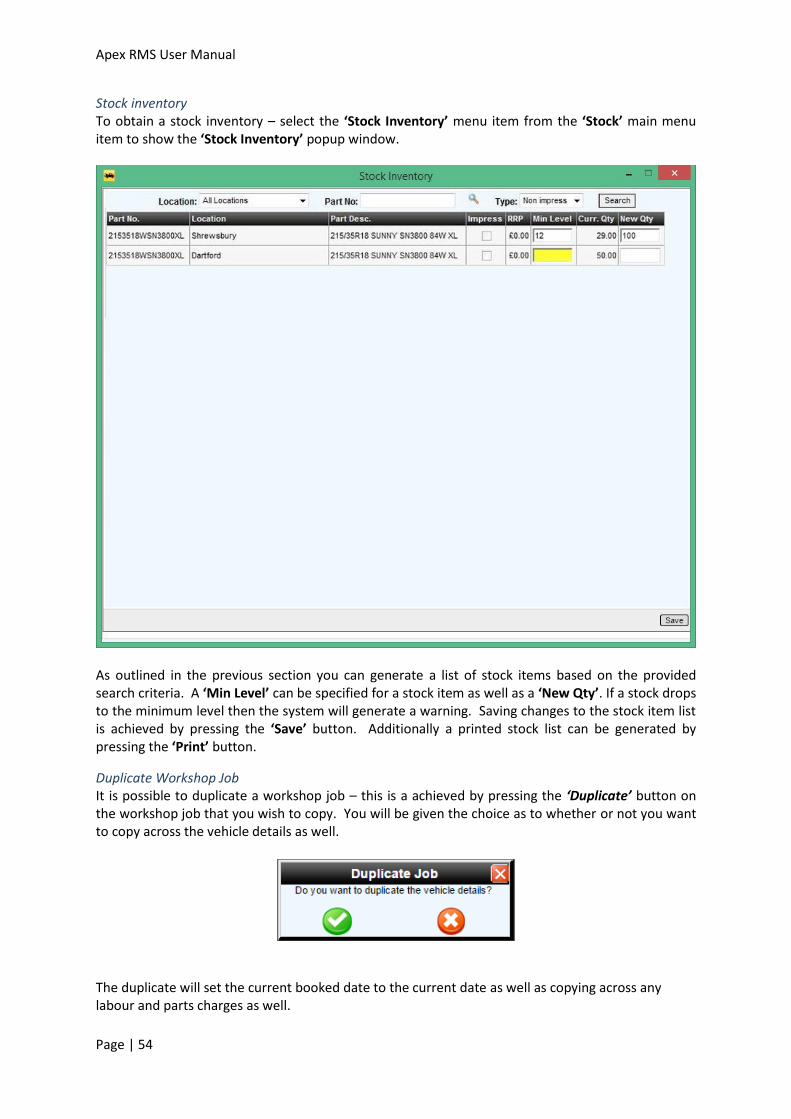
Apex RMS User Manual
Page | 54
Stock inventory To obtain a stock inventory – select the ‘Stock Inventory’ menu item from the ‘Stock’ main menu item to show the ‘Stock Inventory’ popup window.
As outlined in the previous section you can generate a list of stock items based on the provided search criteria. A ‘Min Level’ can be specified for a stock item as well as a ‘New Qty’. If a stock drops to the minimum level then the system will generate a warning. Saving changes to the stock item list is achieved by pressing the ‘Save’ button. Additionally a printed stock list can be generated by pressing the ‘Print’ button.
Duplicate Workshop Job It is possible to duplicate a workshop job – this is a achieved by pressing the ‘Duplicate’ button on the workshop job that you wish to copy. You will be given the choice as to whether or not you want to copy across the vehicle details as well.
The duplicate will set the current booked date to the current date as well as copying across any labour and parts charges as well.
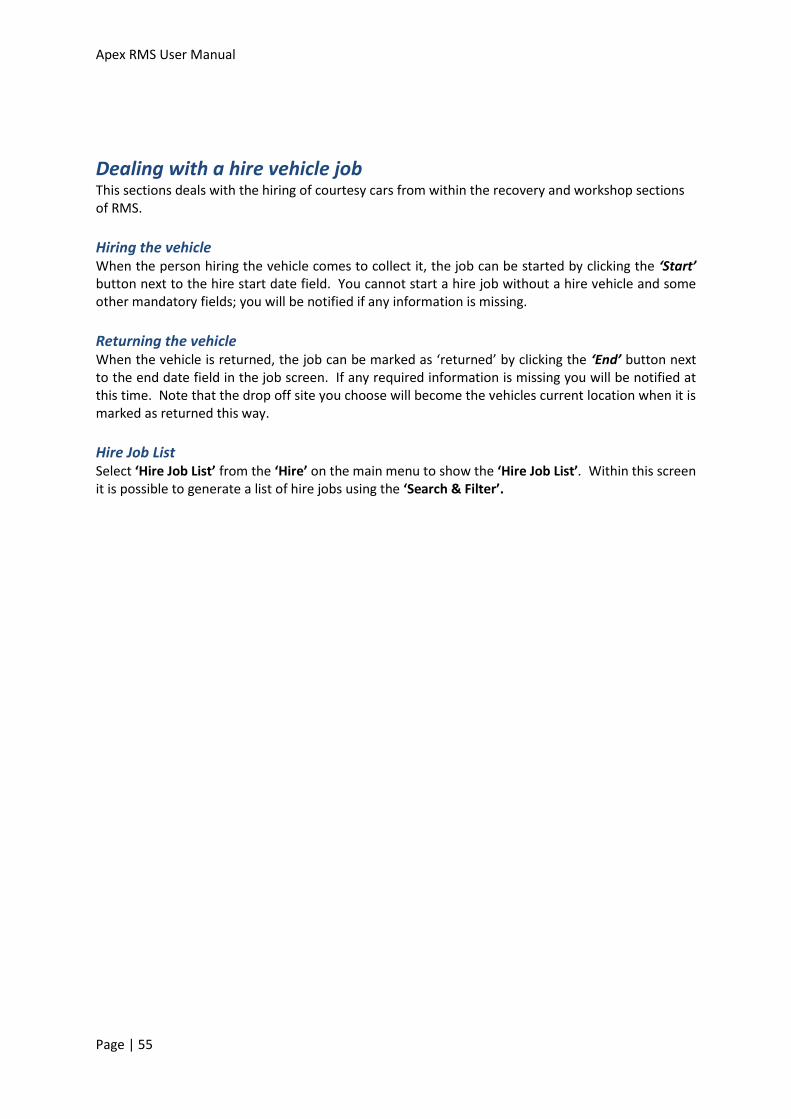
Apex RMS User Manual
Page | 55
Dealing with a hire vehicle job This sections deals with the hiring of courtesy cars from within the recovery and workshop sections of RMS.
Hiring the vehicle When the person hiring the vehicle comes to collect it, the job can be started by clicking the ‘Start’ button next to the hire start date field. You cannot start a hire job without a hire vehicle and some other mandatory fields; you will be notified if any information is missing.
Returning the vehicle When the vehicle is returned, the job can be marked as ‘returned’ by clicking the ‘End’ button next to the end date field in the job screen. If any required information is missing you will be notified at this time. Note that the drop off site you choose will become the vehicles current location when it is marked as returned this way.
Hire Job List Select ‘Hire Job List’ from the ‘Hire’ on the main menu to show the ‘Hire Job List’. Within this screen it is possible to generate a list of hire jobs using the ‘Search & Filter’.
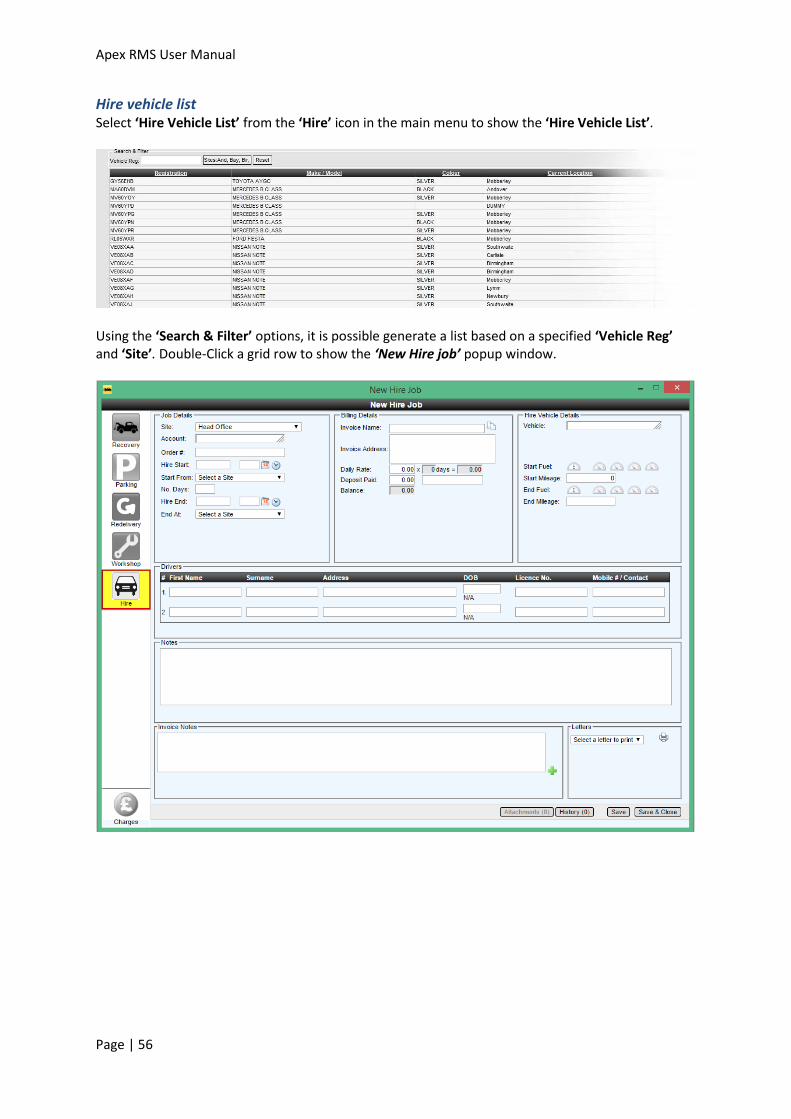
Apex RMS User Manual
Page | 56
Hire vehicle list Select ‘Hire Vehicle List’ from the ‘Hire’ icon in the main menu to show the ‘Hire Vehicle List’.
Using the ‘Search & Filter’ options, it is possible generate a list based on a specified ‘Vehicle Reg’ and ‘Site’. Double-Click a grid row to show the ‘New Hire job’ popup window.
Apex RMS User Manual
Page | 57
Driver Tracking Overview RMS has an optional driver tracking module which (amongst other features) allows all the drivers locations to be displayed on a map. To open the tracking map, select ‘Tracking Map’ from the mapping menu in the recovery system. If this option is greyed out it means that tracking is not enabled in your system, please speak to Apex if you wish it to be enabled.
The tracking map opens in a new screen:
The Left hand pane On the left is a pane to allow you to manipulate the map. The map will initially centre round the postcode of your current control room. The drivers whose PDAs have tracking information stored for them will be displayed on the map in their last known location. Each driver icon will have a circle of colour round the tracking icon to denote the [highest] status job they are currently assigned to. There are several controls in the left hand pane when to allow you to perform several functions with the map in terms of drivers, jobs and locations
Apex RMS User Manual
Page | 58
Display – Display items on the map by the following: o Vehicle Buddy Number o Vehicle Registration o Driver Buddy Number o Driver Name
Control Room / Site selection – Allows filtering of the drivers based on the site they belong to.
Only clocked-In drivers – Will only show drivers on the map that are clocked in. Clocking in can be done from the PDA software (as from version 1.0.4.9), from the touch screen application provided by Apex or from the HR system.
Live Traffic – Switches on or off an overlay showing live traffic conditions.
Job Counts on Tracking Markers – This allows the markers to show the number of jobs assigned to the driver.
Show Jobs of Status – This allows jobs of the selected statuses to show on the tracking map (assuming those jobs have a location of course)
Job No / Location – This is a field used for searching for a given job number or location (see the section below for details on how to use this)
Reset Map – This button will reset the map to its first-loaded settings when clicked, centred around the current control room.
Driver List
The list of drivers shows the following information:
Vehicle Buddy Number
Driver Buddy Number
# Jobs assigned to that driver, also shows the highest status of those jobs by colouring the border.
Speed / Direction
Age & Connection status – Shows the age of the last tracking point and also whether the drivers PDA is currently connected to the server.

Apex RMS User Manual
Page | 59
All columns can be sorted by clicking the column header. Clicking on any driver in the list will ‘solo’ that driver, meaning that all other drivers are hidden and the driver is centred on the screen. Clicking the driver again will return to the original view.
Locating an address To locate an address type in the field labelled ‘Job No / Location’ and press enter
If multiple matches are found you will be asked to choose which one you meant:
Clicking the required row will navigate the map to that address; close the dialog when you are finished.
Locating a job by its job number To locate a job given its job number, type the job number into the field labelled ‘job no / location’ and press enter. A prompt will show to tell you whether a recovery or redelivery (or both) jobs have been found for the given job number and also if location co-ordinates are present in those jobs:
Closing the prompt will show the jobs on the map:
Apex RMS User Manual
Page | 60
Recovery jobs show with the yellow recovery icon and redelivery jobs use the green redelivery icon.
Job destination / driver display If you hover your mouse over a job that has destination coordinates, the destination will appear on the map. Likewise, if the job is assigned to a driver then that driver will be highlighted, this makes it easy to tell where a driver is in respect to the job and allows easier forward planning:
Clocking a driver in or out Right click the required driver in the list on the left hand pane, a menu option will be show that will either be ‘clock in’ or ‘clock out’ depending on the current clock in status of that driver. Click this menu to perform the listed action.
Apex RMS User Manual
Page | 61
Tracking History It is possible to replay the route a driver took within a given date / time period (as long as that driver was tracked in that time) by choosing ‘Tracking History’ from the mapping menu in recovery.
Choose a date / time range to show a list of drivers that have tracking points within it, select a driver and the route will be shown:
Zooming in on the route will show the tracking points in detail with the speed and direction of travel:
Apex RMS User Manual
Page | 62
Driver Messaging Assuming that you communicate with your drivers in an electronic form (Navman, Tom-Tom, or RMS PDA Solution) you are able to send messages and jobs to the driver from within RMS.
Receiving a message from the driver The driver is able to send messages back that either relates to a job (Job times, photographs etc.) and messages that are not directly related to a job. If the driver sends a job related message, usually this information or update is stored inside the job and no notification is given. If the driver sends a message that is not related to a job then both an audible alert and a visual alert will occur. The mobile phone icon on the menu bar will light up. To read the message simply click on the phone icon and a small window will appear with the message in it. Once you have read the message you can either send a response by typing in the text box and clicking the green tick or close the window by clicking the red-cross in the top right corner.
Sending a message to a driver Right Click the mobile phone Icon on the Menu Bar then select New Message. You are then able to type a message and send it by clicking on the green tick icon.
Viewing message logs Message logs can be viewed by right-clicking on the phone icon on the main menu to show the context menu – Select ‘Message Log’ to show the ‘Driver Message History’ to show the ‘Driver Message History’
Within ‘Search & Filter’ section, specify a date period using the ‘Messages From’ date period picker and whether you wish to view:
Incoming messages
Outgoing messages
Both Incoming and Outgoing messages Press the ‘Search’ button to generate a list of driver messages based on your search criteria.
Apex RMS User Manual
Page | 63
Driver Status Screen The driver status screen is provided to act as a quick visual reference as to what each driver is currently doing. You are able to display this on its own window on a large wall mounted screen so that all controllers can see it. The screen automatically updates and refreshes so you have the latest information at all times.
Reporting RMS has a report facility in each of its modules. Because the Rescue and Recovery module is the largest and most comprehensive, there are many reports. The report menu is organised into five tabs to allow you to locate the report that you want to run more easily. To run a report all you need to do is select the report from the list on the left of the screen and click the Go button where a small popup will be displayed asking you for the criteria of the report. Once you have set the criteria click the run report button. All of the RMS reports open either as a PDF or an Excel spread sheet (You will need to have Microsoft Office™ 2003 or higher installed on the computer to be able to open the reports).
The report menu
Apex RMS User Manual
Page | 64
Drivers commission payments Background info When a recovery job is priced, RMS is able to calculate the associated commissions to pay to the driver(s) - the same applies to redelivery jobs. The commission’s basic amounts are stored in the rate card used to price the job. Rate Card commissions consists of Callout, Time, Mileage, Specialist Equipment. It is also possible to record commission amount against additional charges on a job as well as any parts. For instance, pay any driver a fixed commission of £5 for each battery sold at the roadside. Drivers have allocated a percentage (typically 25%), which is applied to the job commission amount to determine how much the driver will be paid. All these commissions get posted to each driver’s ledger when a job is invoiced and each commission updates the driver’s current balance.
Paying the drivers Commission payments are made to drivers using the ‘Drivers Ledger’ popup – to view the popup, select ‘Ledger’ from within the ‘Drivers menu option in the ‘Recovery and Rescue’ section of RMS.
The ‘Drivers Ledgers’ popup contains a grid list drivers and the commissions that are owed – to pay drivers, select the tick box to the right of the drivers name, or alternatively select all the drivers in the list by selecting the ‘Select All’ tick box in the header and press the ‘Pay Selected’ button. To obtain a list of drivers and their balances in Microsoft Excel format click the ‘Export’ button and to obtain a hard copy of drivers and their balances in Adobe PDF format press the print ‘Print Selected’ button. For a more detailed view of a drivers commissions, double-click on a driver in the grid to show the ‘Drivers Ledger Details’ popup. Here you can search for a driver’s commission between a lower and upper date period for the selected fitter. Again you can select commissions from the list and pay them using the ‘Pay Driver’ button and export the list to Microsoft Excel format by pressing the ‘Export’ button.
Apex RMS User Manual
Page | 65
To add a manual transaction – press the ‘Manual Transaction’ button to show the ‘Manual Transaction’ popup
Fill out the form with the relevant information and press the ‘Add Transaction’ to add the manual commission to the selected drivers.
Workshop fitters commission payments Commission payments are made to fitters using the ‘Fitters Ledger’ popup – to view the popup, select ‘Ledger’ from within the ‘Fitters’ menu option in the ‘Recovery and Rescue’ section of RMS.
The ‘Fitters Ledgers’ popup contains a grid list fitters and the commissions that are owed – to pay fitters, select the tick box to the right of the fitters name, or alternatively select all the fitters in the list by selecting the ‘Select All’ tick box in the header and press the ‘Pay Selected’ button. To obtain a list of fitters and their balances in Microsoft Excel format click the ‘Export’ button and to obtain a hard copy of fitters and their balances in Adobe PDF format press the print ‘Print Selected’ button. For a more detailed view of a fitters commissions, double-click on a fitter in the grid to show the ‘Fitters Ledger Details’ popup. Here you can search for a fitter’s commission between a lower and upper date period for the selected fitter. Again you can select commissions from the list and pay them using the ‘Pay Fitter’ button and export the list to Microsoft Excel format by pressing the ‘Export’ button. To add a manual transaction – press the ‘Manual Transaction’ button to show the ‘Manual Transaction’ popup
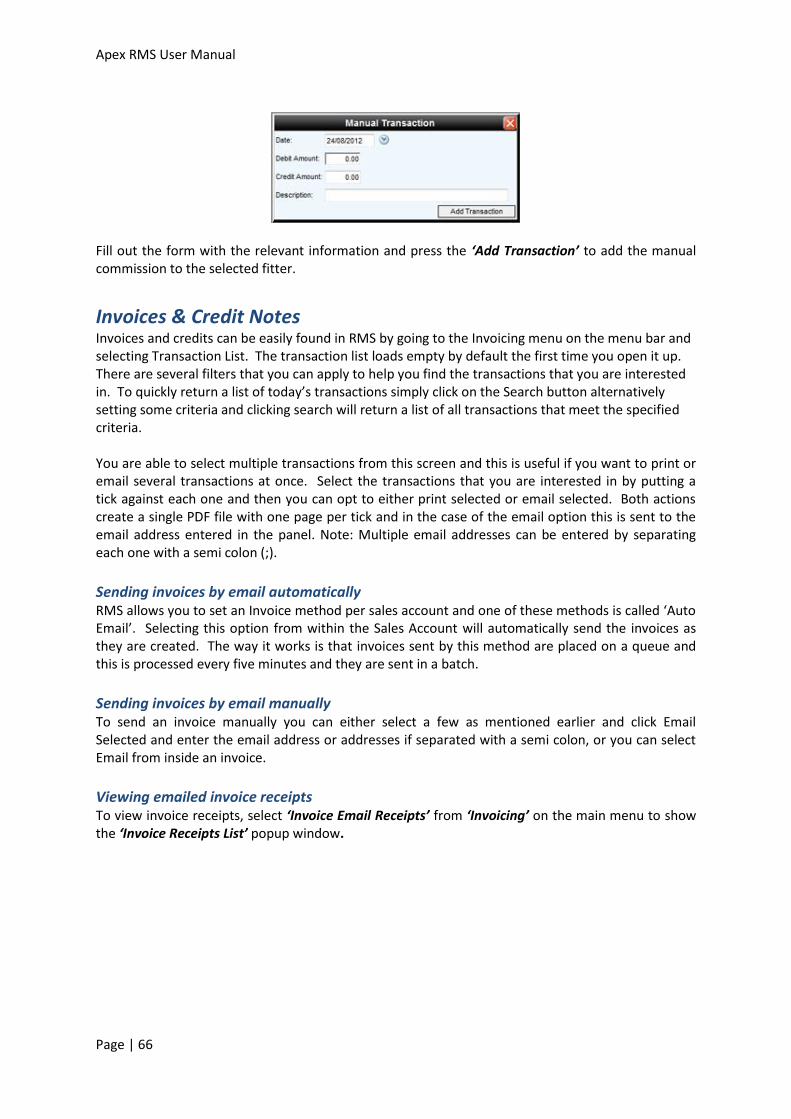
Apex RMS User Manual
Page | 66
Fill out the form with the relevant information and press the ‘Add Transaction’ to add the manual commission to the selected fitter.
Invoices & Credit Notes Invoices and credits can be easily found in RMS by going to the Invoicing menu on the menu bar and selecting Transaction List. The transaction list loads empty by default the first time you open it up. There are several filters that you can apply to help you find the transactions that you are interested in. To quickly return a list of today’s transactions simply click on the Search button alternatively setting some criteria and clicking search will return a list of all transactions that meet the specified criteria. You are able to select multiple transactions from this screen and this is useful if you want to print or email several transactions at once. Select the transactions that you are interested in by putting a tick against each one and then you can opt to either print selected or email selected. Both actions create a single PDF file with one page per tick and in the case of the email option this is sent to the email address entered in the panel. Note: Multiple email addresses can be entered by separating each one with a semi colon (;).
Sending invoices by email automatically RMS allows you to set an Invoice method per sales account and one of these methods is called ‘Auto Email’. Selecting this option from within the Sales Account will automatically send the invoices as they are created. The way it works is that invoices sent by this method are placed on a queue and this is processed every five minutes and they are sent in a batch.
Sending invoices by email manually To send an invoice manually you can either select a few as mentioned earlier and click Email Selected and enter the email address or addresses if separated with a semi colon, or you can select Email from inside an invoice.
Viewing emailed invoice receipts To view invoice receipts, select ‘Invoice Email Receipts’ from ‘Invoicing’ on the main menu to show the ‘Invoice Receipts List’ popup window.
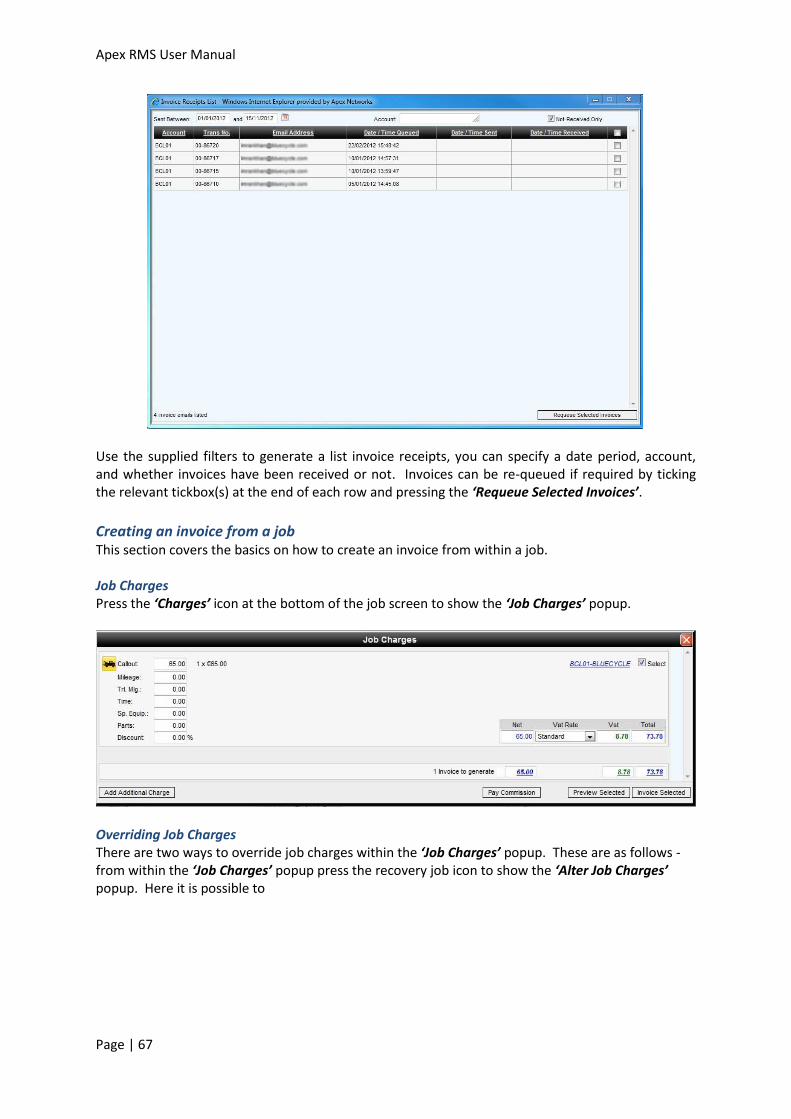
Apex RMS User Manual
Page | 67
Use the supplied filters to generate a list invoice receipts, you can specify a date period, account, and whether invoices have been received or not. Invoices can be re-queued if required by ticking the relevant tickbox(s) at the end of each row and pressing the ‘Requeue Selected Invoices’.
Creating an invoice from a job This section covers the basics on how to create an invoice from within a job. Job Charges Press the ‘Charges’ icon at the bottom of the job screen to show the ‘Job Charges’ popup.
Overriding Job Charges There are two ways to override job charges within the ‘Job Charges’ popup. These are as follows - from within the ‘Job Charges’ popup press the recovery job icon to show the ‘Alter Job Charges’ popup. Here it is possible to
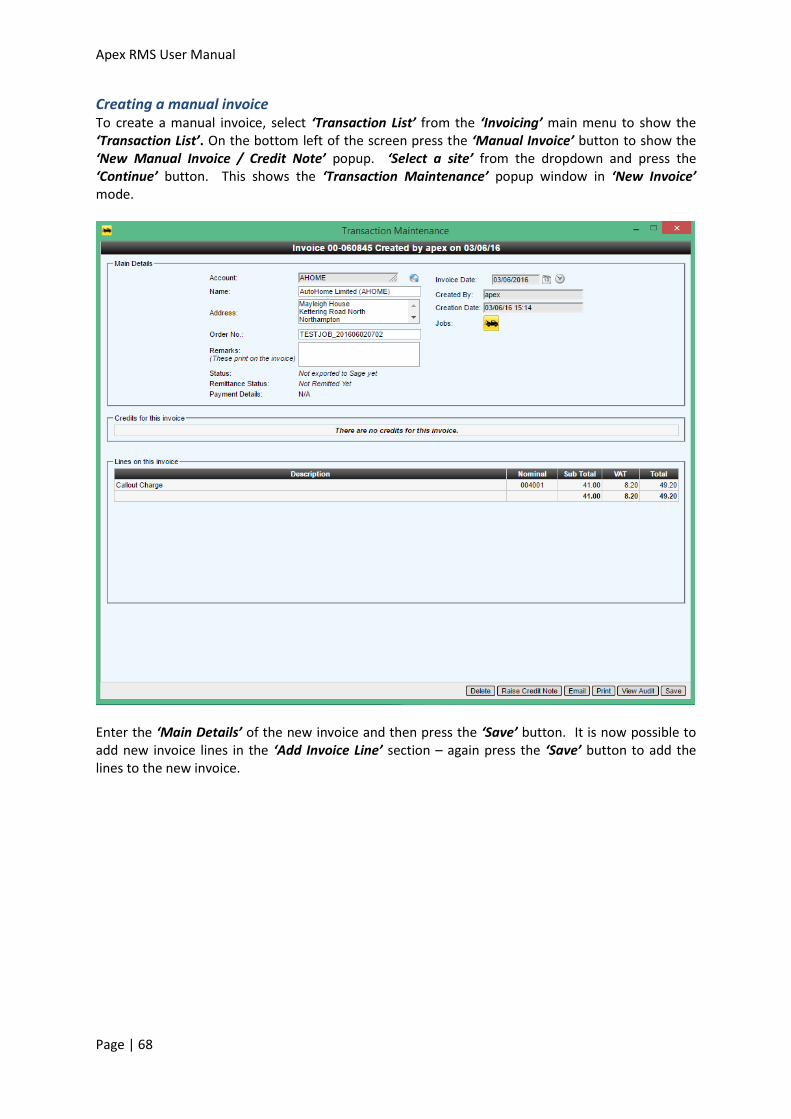
Apex RMS User Manual
Page | 68
Creating a manual invoice To create a manual invoice, select ‘Transaction List’ from the ‘Invoicing’ main menu to show the ‘Transaction List’. On the bottom left of the screen press the ‘Manual Invoice’ button to show the ‘New Manual Invoice / Credit Note’ popup. ‘Select a site’ from the dropdown and press the ‘Continue’ button. This shows the ‘Transaction Maintenance’ popup window in ‘New Invoice’ mode.
Enter the ‘Main Details’ of the new invoice and then press the ‘Save’ button. It is now possible to add new invoice lines in the ‘Add Invoice Line’ section – again press the ‘Save’ button to add the lines to the new invoice.
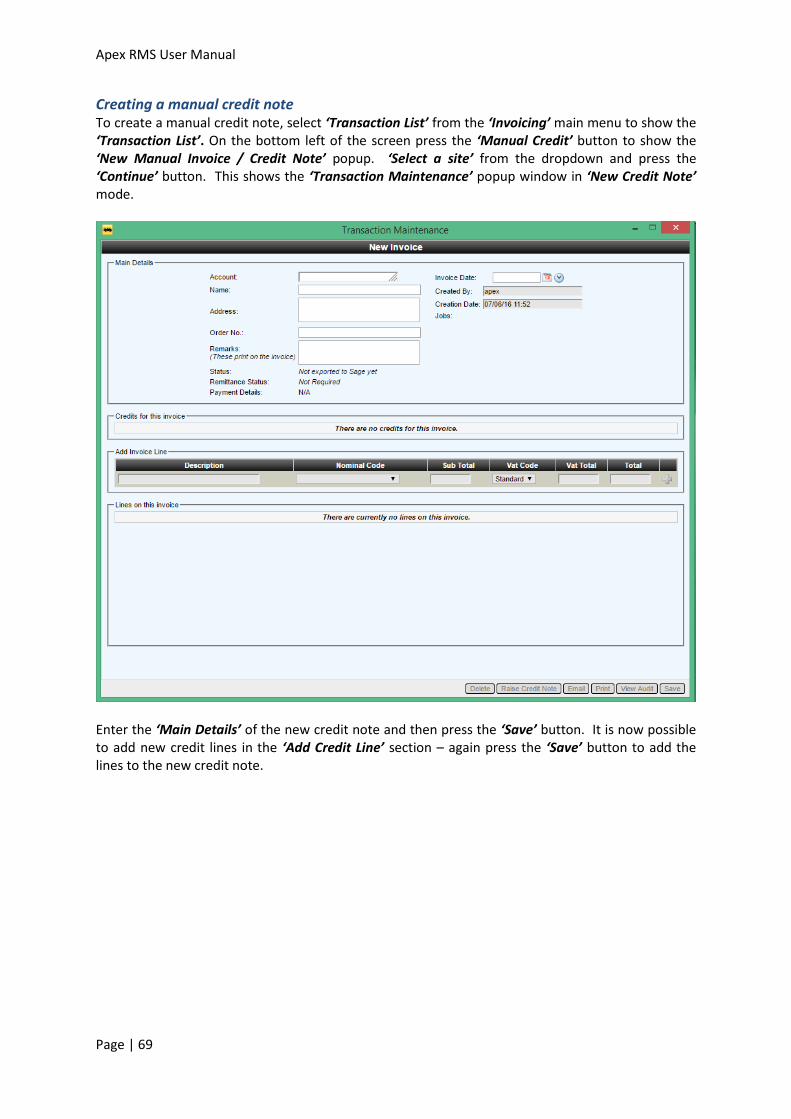
Apex RMS User Manual
Page | 69
Creating a manual credit note To create a manual credit note, select ‘Transaction List’ from the ‘Invoicing’ main menu to show the ‘Transaction List’. On the bottom left of the screen press the ‘Manual Credit’ button to show the ‘New Manual Invoice / Credit Note’ popup. ‘Select a site’ from the dropdown and press the ‘Continue’ button. This shows the ‘Transaction Maintenance’ popup window in ‘New Credit Note’ mode.
Enter the ‘Main Details’ of the new credit note and then press the ‘Save’ button. It is now possible to add new credit lines in the ‘Add Credit Line’ section – again press the ‘Save’ button to add the lines to the new credit note.
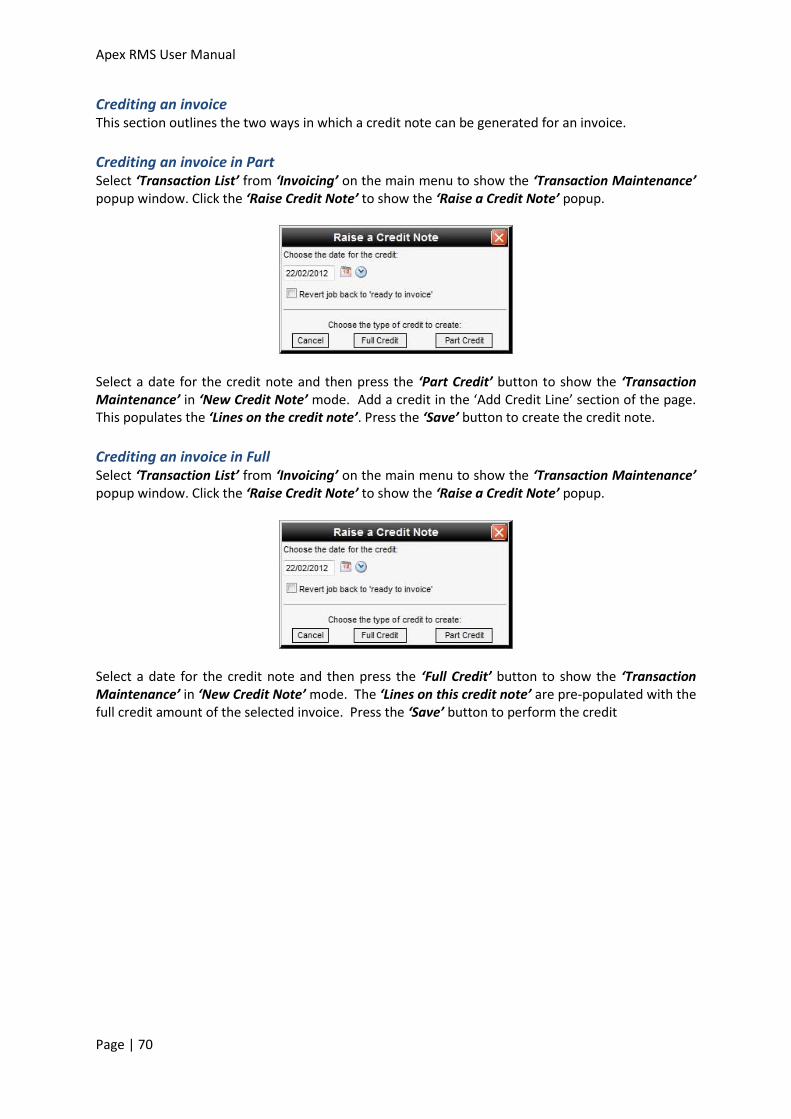
Apex RMS User Manual
Page | 70
Crediting an invoice This section outlines the two ways in which a credit note can be generated for an invoice.
Crediting an invoice in Part Select ‘Transaction List’ from ‘Invoicing’ on the main menu to show the ‘Transaction Maintenance’ popup window. Click the ‘Raise Credit Note’ to show the ‘Raise a Credit Note’ popup.
Select a date for the credit note and then press the ‘Part Credit’ button to show the ‘Transaction Maintenance’ in ‘New Credit Note’ mode. Add a credit in the ‘Add Credit Line’ section of the page. This populates the ‘Lines on the credit note’. Press the ‘Save’ button to create the credit note.
Crediting an invoice in Full Select ‘Transaction List’ from ‘Invoicing’ on the main menu to show the ‘Transaction Maintenance’ popup window. Click the ‘Raise Credit Note’ to show the ‘Raise a Credit Note’ popup.
Select a date for the credit note and then press the ‘Full Credit’ button to show the ‘Transaction Maintenance’ in ‘New Credit Note’ mode. The ‘Lines on this credit note’ are pre-populated with the full credit amount of the selected invoice. Press the ‘Save’ button to perform the credit
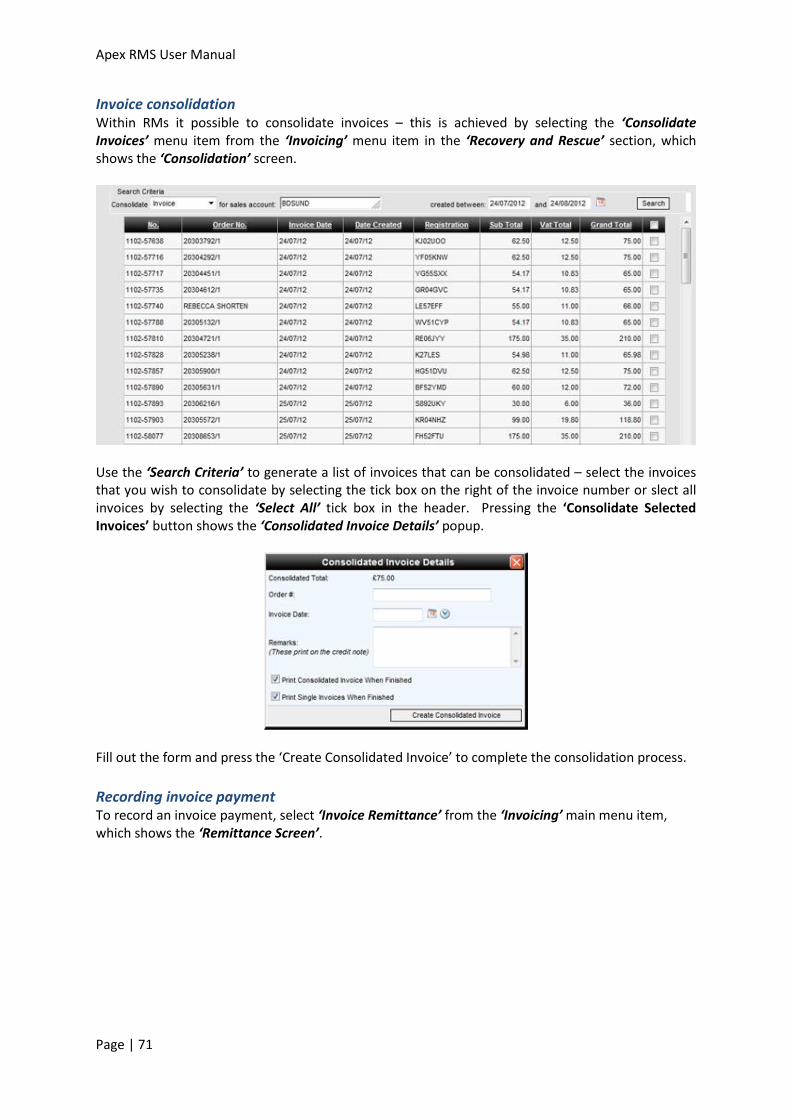
Apex RMS User Manual
Page | 71
Invoice consolidation Within RMs it possible to consolidate invoices – this is achieved by selecting the ‘Consolidate Invoices’ menu item from the ‘Invoicing’ menu item in the ‘Recovery and Rescue’ section, which shows the ‘Consolidation’ screen.
Use the ‘Search Criteria’ to generate a list of invoices that can be consolidated – select the invoices that you wish to consolidate by selecting the tick box on the right of the invoice number or slect all invoices by selecting the ‘Select All’ tick box in the header. Pressing the ‘Consolidate Selected Invoices’ button shows the ‘Consolidated Invoice Details’ popup.
Fill out the form and press the ‘Create Consolidated Invoice’ to complete the consolidation process.
Recording invoice payment To record an invoice payment, select ‘Invoice Remittance’ from the ‘Invoicing’ main menu item, which shows the ‘Remittance Screen’.

Apex RMS User Manual
Page | 72
Double-click a row to show the ‘Remittance Entry’. If the invoice is fully paid then check the ‘Fully Paid’ tickbox and press the ‘Save’ to mark the invoice as fully paid.
To mark a remittance as completed – tick the ‘Remittance Complete’ and press the ‘Save’ button.
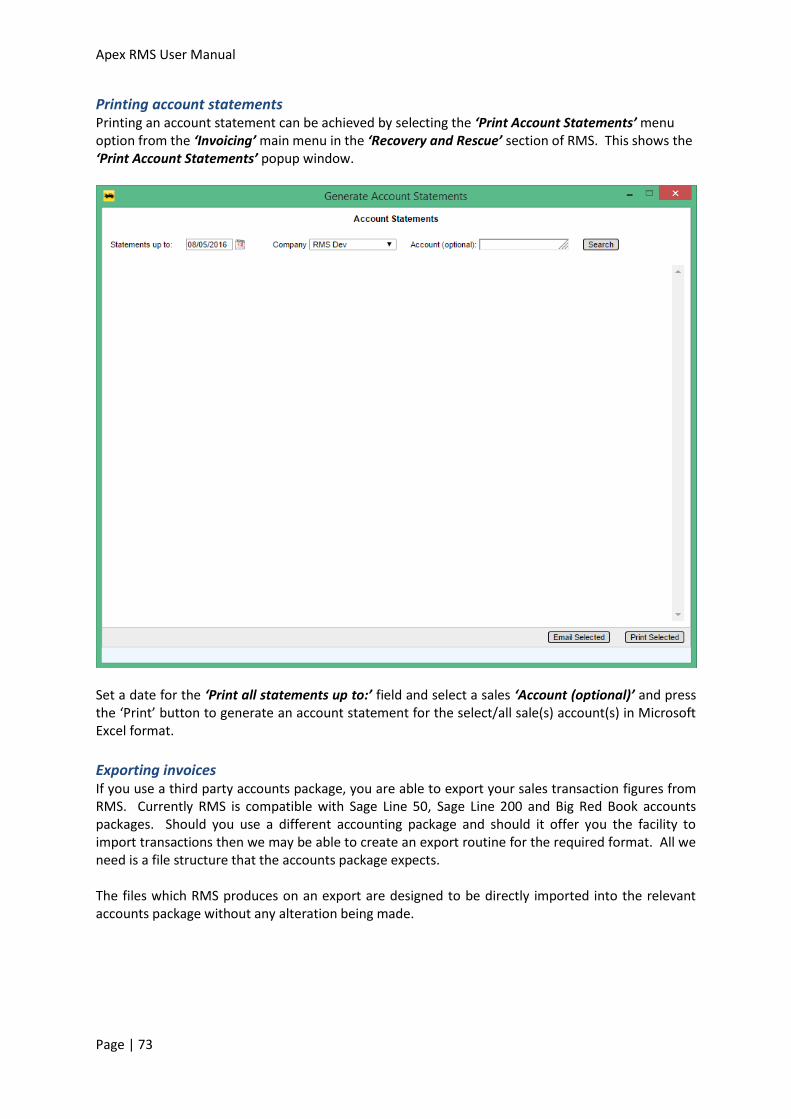
Apex RMS User Manual
Page | 73
Printing account statements Printing an account statement can be achieved by selecting the ‘Print Account Statements’ menu option from the ‘Invoicing’ main menu in the ‘Recovery and Rescue’ section of RMS. This shows the ‘Print Account Statements’ popup window.
Set a date for the ‘Print all statements up to:’ field and select a sales ‘Account (optional)’ and press the ‘Print’ button to generate an account statement for the select/all sale(s) account(s) in Microsoft Excel format.
Exporting invoices If you use a third party accounts package, you are able to export your sales transaction figures from RMS. Currently RMS is compatible with Sage Line 50, Sage Line 200 and Big Red Book accounts packages. Should you use a different accounting package and should it offer you the facility to import transactions then we may be able to create an export routine for the required format. All we need is a file structure that the accounts package expects. The files which RMS produces on an export are designed to be directly imported into the relevant accounts package without any alteration being made.

Apex RMS User Manual
Page | 74
Electronic invoice files This is option in the menu allows you to view previously sent Electronic invoice files (Previously known as ‘Club discs’). Electronic invoice files are only used and generated for Green Flag and they are automatically created and sent by RMS usually around 3am each day. The files themselves are in a format that the Green Flag invoice analyser can read and process.
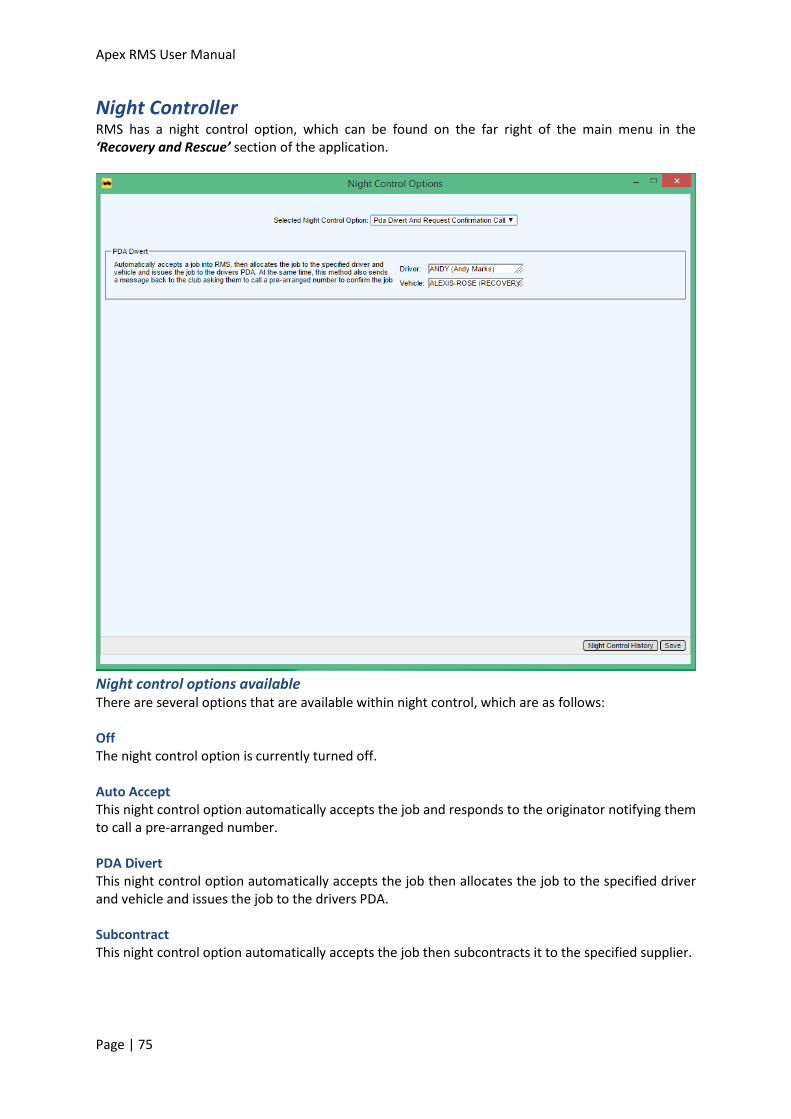
Apex RMS User Manual
Page | 75
Night Controller RMS has a night control option, which can be found on the far right of the main menu in the ‘Recovery and Rescue’ section of the application.
Night control options available There are several options that are available within night control, which are as follows: Off The night control option is currently turned off. Auto Accept This night control option automatically accepts the job and responds to the originator notifying them to call a pre-arranged number. PDA Divert This night control option automatically accepts the job then allocates the job to the specified driver and vehicle and issues the job to the drivers PDA. Subcontract This night control option automatically accepts the job then subcontracts it to the specified supplier.

Apex RMS User Manual
Page | 76
Auto Divert This night control option forwards all RAM messages to the specified ANS node. The night controller then carries out the job on your behalf with all updates coming back into your system and also to the job originator. PDA Divert and Request Confirmation Call This night control option automatically accepts the job then allocates the job to the specified driver and vehicle and issues the job to the drivers PDA. In addition to PDA divert, this method also sends a message back to the club asking them to call a pre-arranged number to confirm the job PDA Divert for Acceptance This night control option automatically accepts the job then allocates the job to the specified driver and vehicle and issues the job to the drivers PDA.
Switching on / off night control To turn on night control using one of the following options outlined above, click the ‘Night Control’ Icon on the main within the ‘Recovery and Rescue’ section of RMS to show the ‘Night Control Options’ popup window. Select a night control option from the dropdown list, fill out the relevant fields, if any, and press the ‘Save’ button to turn on the night control. To turn off night control – bring up the Night Control Options’ popup as described above and select the ‘Off’ option form the ‘Selected Night Control Option’
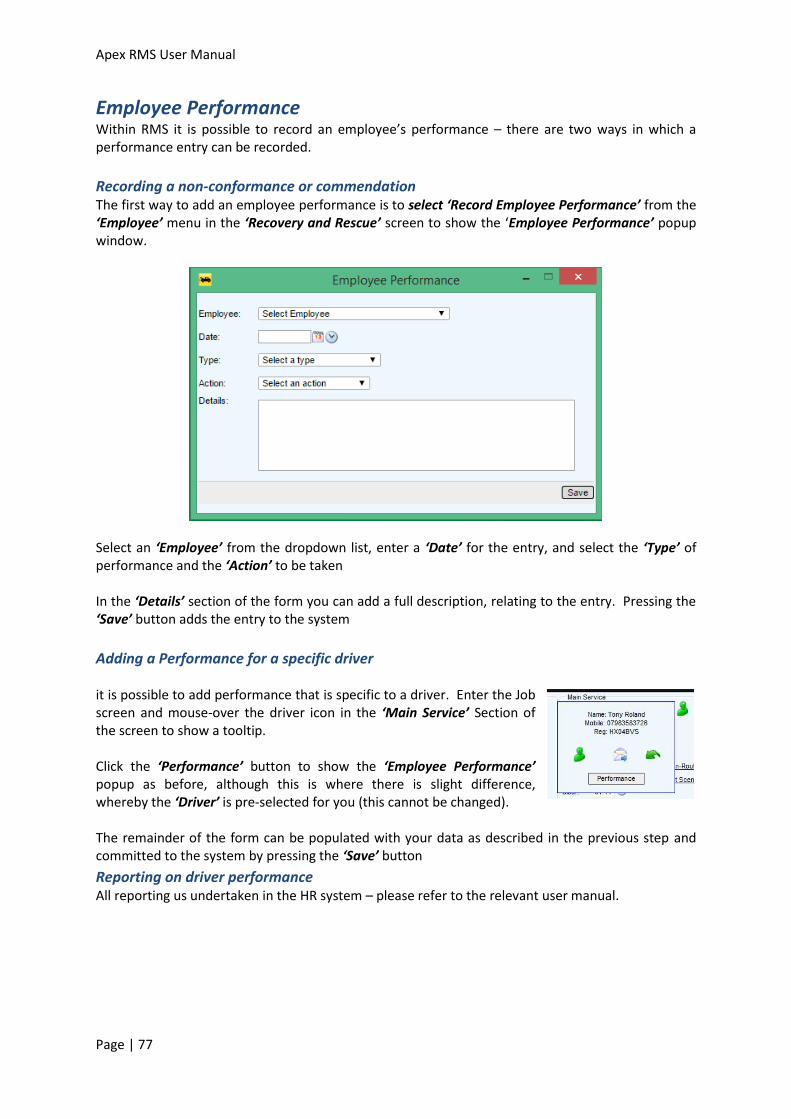
Apex RMS User Manual
Page | 77
Employee Performance Within RMS it is possible to record an employee’s performance – there are two ways in which a performance entry can be recorded.
Recording a non-conformance or commendation The first way to add an employee performance is to select ‘Record Employee Performance’ from the ‘Employee’ menu in the ‘Recovery and Rescue’ screen to show the ‘Employee Performance’ popup window.
Select an ‘Employee’ from the dropdown list, enter a ‘Date’ for the entry, and select the ‘Type’ of performance and the ‘Action’ to be taken In the ‘Details’ section of the form you can add a full description, relating to the entry. Pressing the ‘Save’ button adds the entry to the system
Adding a Performance for a specific driver it is possible to add performance that is specific to a driver. Enter the Job screen and mouse-over the driver icon in the ‘Main Service’ Section of the screen to show a tooltip. Click the ‘Performance’ button to show the ‘Employee Performance’ popup as before, although this is where there is slight difference, whereby the ‘Driver’ is pre-selected for you (this cannot be changed). The remainder of the form can be populated with your data as described in the previous step and committed to the system by pressing the ‘Save’ button
Reporting on driver performance All reporting us undertaken in the HR system – please refer to the relevant user manual.
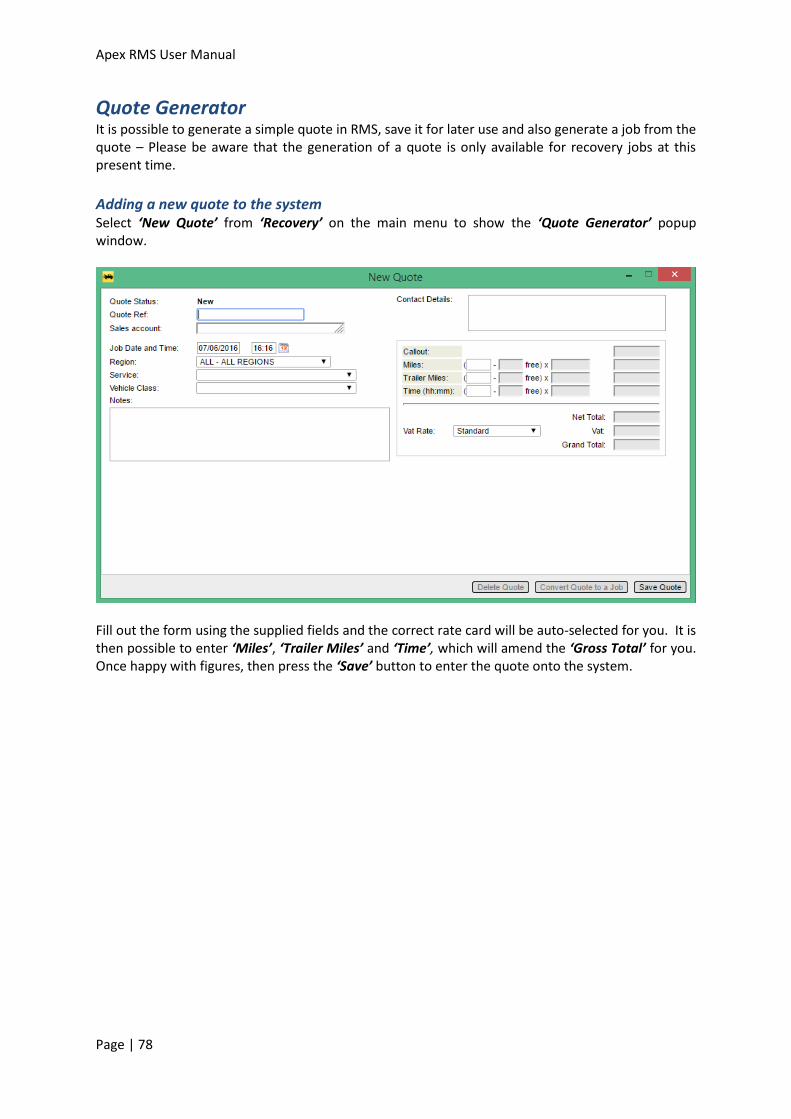
Apex RMS User Manual
Page | 78
Quote Generator It is possible to generate a simple quote in RMS, save it for later use and also generate a job from the quote – Please be aware that the generation of a quote is only available for recovery jobs at this present time.
Adding a new quote to the system Select ‘New Quote’ from ‘Recovery’ on the main menu to show the ‘Quote Generator’ popup window.
Fill out the form using the supplied fields and the correct rate card will be auto-selected for you. It is then possible to enter ‘Miles’, ‘Trailer Miles’ and ‘Time’, which will amend the ‘Gross Total’ for you. Once happy with figures, then press the ‘Save’ button to enter the quote onto the system.
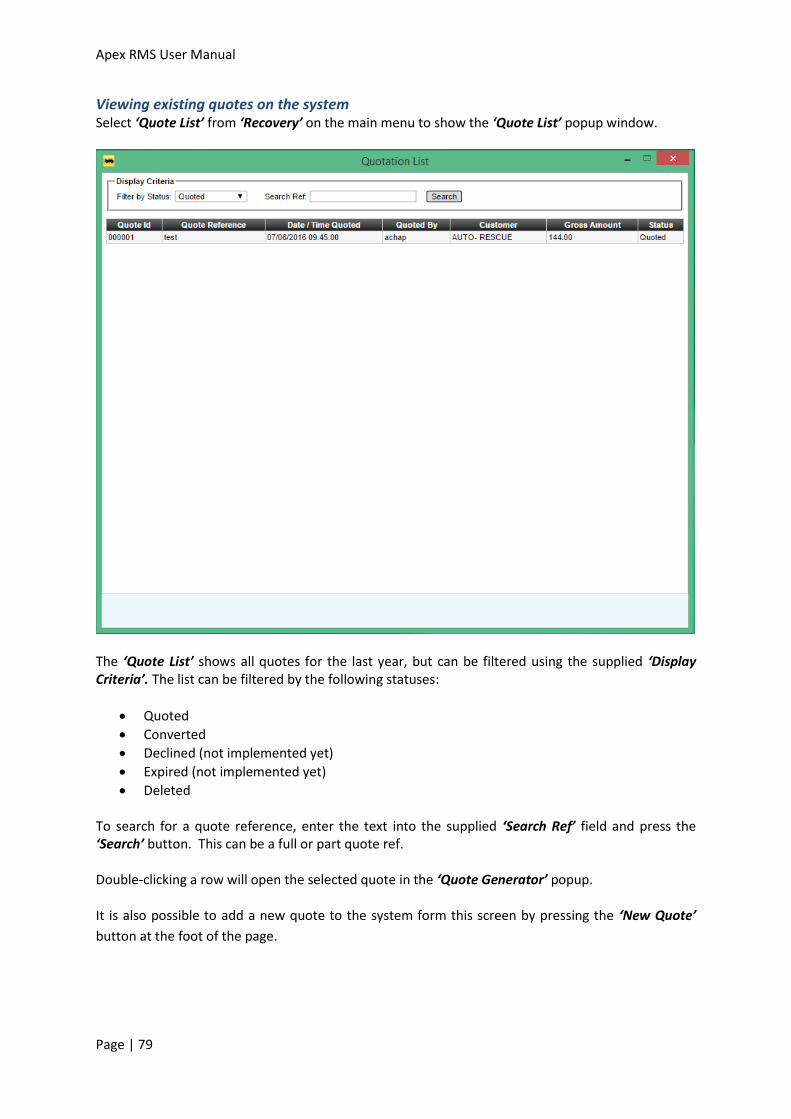
Apex RMS User Manual
Page | 79
Viewing existing quotes on the system Select ‘Quote List’ from ‘Recovery’ on the main menu to show the ‘Quote List’ popup window.
The ‘Quote List’ shows all quotes for the last year, but can be filtered using the supplied ‘Display Criteria’. The list can be filtered by the following statuses:
Quoted
Converted
Declined (not implemented yet)
Expired (not implemented yet)
Deleted
To search for a quote reference, enter the text into the supplied ‘Search Ref’ field and press the ‘Search’ button. This can be a full or part quote ref. Double-clicking a row will open the selected quote in the ‘Quote Generator’ popup. It is also possible to add a new quote to the system form this screen by pressing the ‘New Quote’
button at the foot of the page.
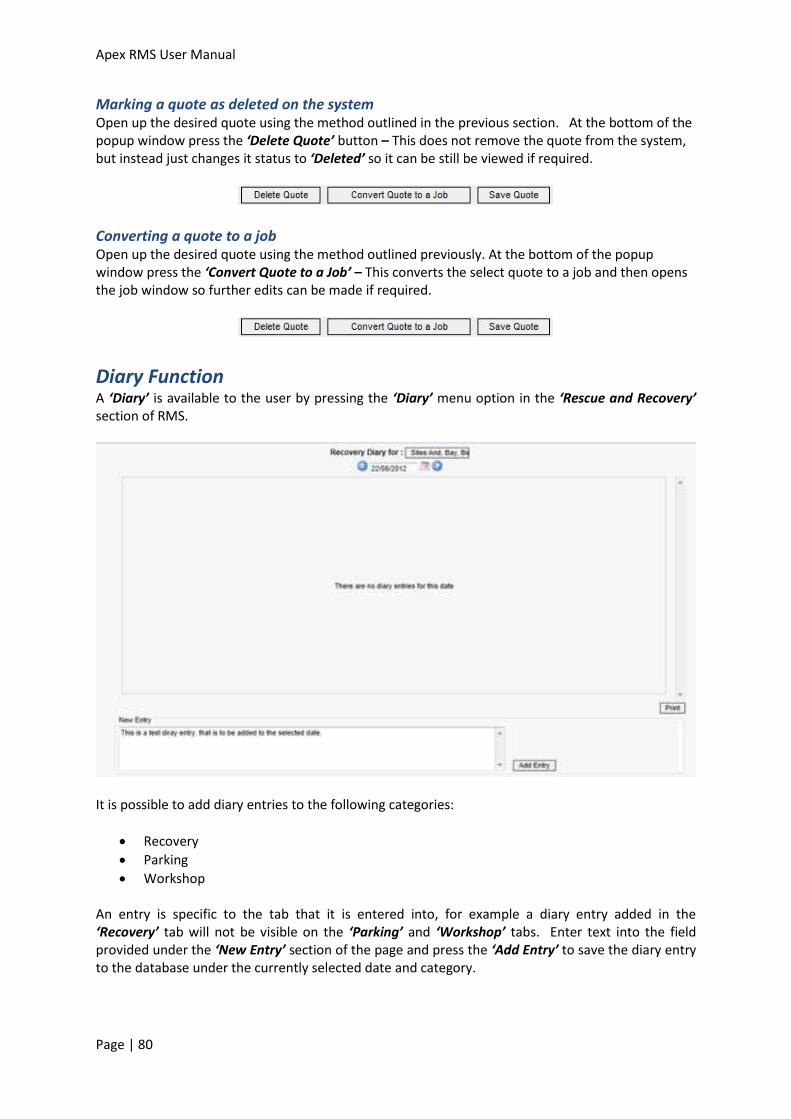
Apex RMS User Manual
Page | 80
Marking a quote as deleted on the system Open up the desired quote using the method outlined in the previous section. At the bottom of the popup window press the ‘Delete Quote’ button – This does not remove the quote from the system, but instead just changes it status to ‘Deleted’ so it can be still be viewed if required.
Converting a quote to a job Open up the desired quote using the method outlined previously. At the bottom of the popup window press the ‘Convert Quote to a Job’ – This converts the select quote to a job and then opens the job window so further edits can be made if required.
Diary Function A ‘Diary’ is available to the user by pressing the ‘Diary’ menu option in the ‘Rescue and Recovery’ section of RMS.
It is possible to add diary entries to the following categories:
Recovery
Parking
Workshop An entry is specific to the tab that it is entered into, for example a diary entry added in the ‘Recovery’ tab will not be visible on the ‘Parking’ and ‘Workshop’ tabs. Enter text into the field provided under the ‘New Entry’ section of the page and press the ‘Add Entry’ to save the diary entry to the database under the currently selected date and category.

Apex RMS User Manual
Page | 81
It is not possible to edit an item once it has been entered into the system, although it is possible to append existing diary entry, by pressing the ‘+’ button to show an append field.
To obtain a hard copy of the diary entries for the select date, just press the ‘Print’ button for a list of entries in adobe acrobat format.
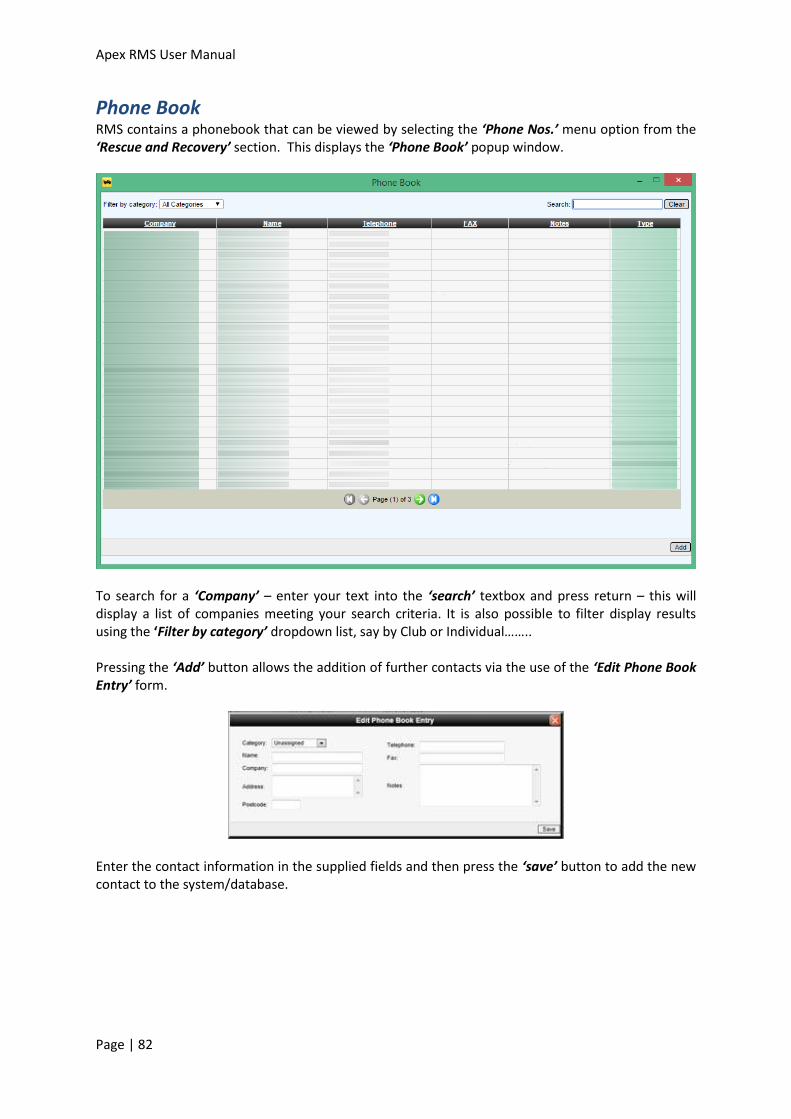
Apex RMS User Manual
Page | 82
Phone Book RMS contains a phonebook that can be viewed by selecting the ‘Phone Nos.’ menu option from the ‘Rescue and Recovery’ section. This displays the ‘Phone Book’ popup window.
To search for a ‘Company’ – enter your text into the ‘search’ textbox and press return – this will display a list of companies meeting your search criteria. It is also possible to filter display results using the ‘Filter by category’ dropdown list, say by Club or Individual…….. Pressing the ‘Add’ button allows the addition of further contacts via the use of the ‘Edit Phone Book Entry’ form.
Enter the contact information in the supplied fields and then press the ‘save’ button to add the new contact to the system/database.
Apex RMS User Manual
Page | 83
What night control options does RMS have? You have the following night control options in RMS:
Auto Accept - This night control option automatically accepts the job and responds to the originator notifying them to call a pre-arranged number.
PDA Divert - This night control option automatically accepts the job then allocates the job to the specified driver and vehicle and issues the job to the drivers PDA.
Subcontract - This night control option automatically accepts the job then subcontracts it to the specified supplier.
Auto Divert – This night control option forwards all RAM messages to the specified ANS node. The night controller then carries out the job on your behalf with all updates coming back into your system and also to the job originator.
PDA Divert and Request Confirmation Call - This night control option automatically accepts the job then allocates the job to the specified driver and vehicle and issues the job to the drivers PDA.
PDA Divert for Acceptance – This night control option is only available when using Android® PDAs (it is not compatible with the Windows Mobile phones). When a this option is selected any jobs that come in via the ANS network will be automatically diverted to the selected driver’s PDA. The driver will then be able to either accept the job (with an ETA) or reject the job (with a refusal code). It is also possible for the driver to select another driver to send the job to. The acceptance / refusal will be sent back to the job originator as normal. No other updates are automatically sent back to the job originator.
How do I send a job to a subcontractor? To send a job to a subcontractor, click the Subcontract (hand) icon next to the Vehicle field in the Main Service section of the job screen. This brings up the Subcontractor Selection popup. Select a subcontractor from the Subcontractor selector and press the Subcontract button to send the job to the subcontractor. How do I add information to my invoice (i.e. like payment information)? You can add addition information to an invoice in RMS easily. Simply go to the job screen and in the Other Details section is an Invoice Notes field. Here you can type free text that will appear on your invoice.
Apex RMS User Manual
Page | 84
How do I credit an invoice? To raise a credit note in RMS. Select the Transaction List from the Invoicing main menu to show the transaction list. Use the Search & Filter options to generate a list of relevant invoices. Double-click the desired grid line to show the invoice details. To raise the credit note, press the Raise Credit Note button to show the Raise a Credit Note popup – here you have two options:
Full Credit - shows the New Credit Note screen and gives you the option to generate a full credit note.
Part Credit - shows the New Credit Note screen and gives you the options to generate a part credit note.
Is it possible to delete an invoice? Yes, this is possible from the job screen go into ‘charges’ then ‘view invoices’, click the delete button at the end of the row for the required invoice. How can I set up the SMS feature in RMS?
Please contact Apex for further guidance in setting up the SMS feature.
Can I export sales accounts from RMS into Sage to prevent me retyping everything? It is possible to export sales accounts so that they can be imported into Sage. Select the Sales Accounts menu option from the Setup main menu to show the list of sales accounts on the system. Pressing the Sales Account Sage Export button at the bottom of the screen generates a CSV file named AccountExport.csv, which can be saved to the HD and used to import sales accounts into Sage.
Invoices for cash jobs are not showing the owner’s name and address, why is this? Make sure the Sales Account is set as a “Cash account”: go to the Sales account maintenance screen, open the sales account details and verify that the checkbox “Cash Account” is ticked. Why are no services displayed on the recovery job’s dropdown list? Make sure the required services are added to the rate card for the job account. Open the rate required rate card (either via the sales account maintenance screen ‘R&R’ tab then press ‘View’ next to the rate card drop down, which will open the rate card for that account, or via setup -> rate cards).
Apex RMS User Manual
Page | 85
On the printed invoices, the address and telephone numbers of the depots are showing blank or incorrectly? Please check the setup system in particular the sites and control rooms to make sure the addresses are correct there. If they are then call Apex support. Why are no fault codes available in the list on the recovery job screen? Select Agencies form the Setup menu to show a list of agencies. Double-click an agency to show the Agency Details popup. On the Main Details tab make sure that you have Sales Accounts linked to the selected agency. Additionally……
Make sure that your Fault Codes are setup correctly on the Fault Codes tab.
Make sure that your Outcome Codes are setup correctly on the Outcome Codes tab.
Ensure that the sales account for the job belongs to an agency with fault codes. Why cannot I find a Sales Account in the Sales Account list on the job screen? Select the Sales Account menu item form the Setup menu. This will open show a list of all Sales Account on the system. Make sure that the Status of the account is set to Current (Misc section) and make sure that the R&R Account tick-box is ticked
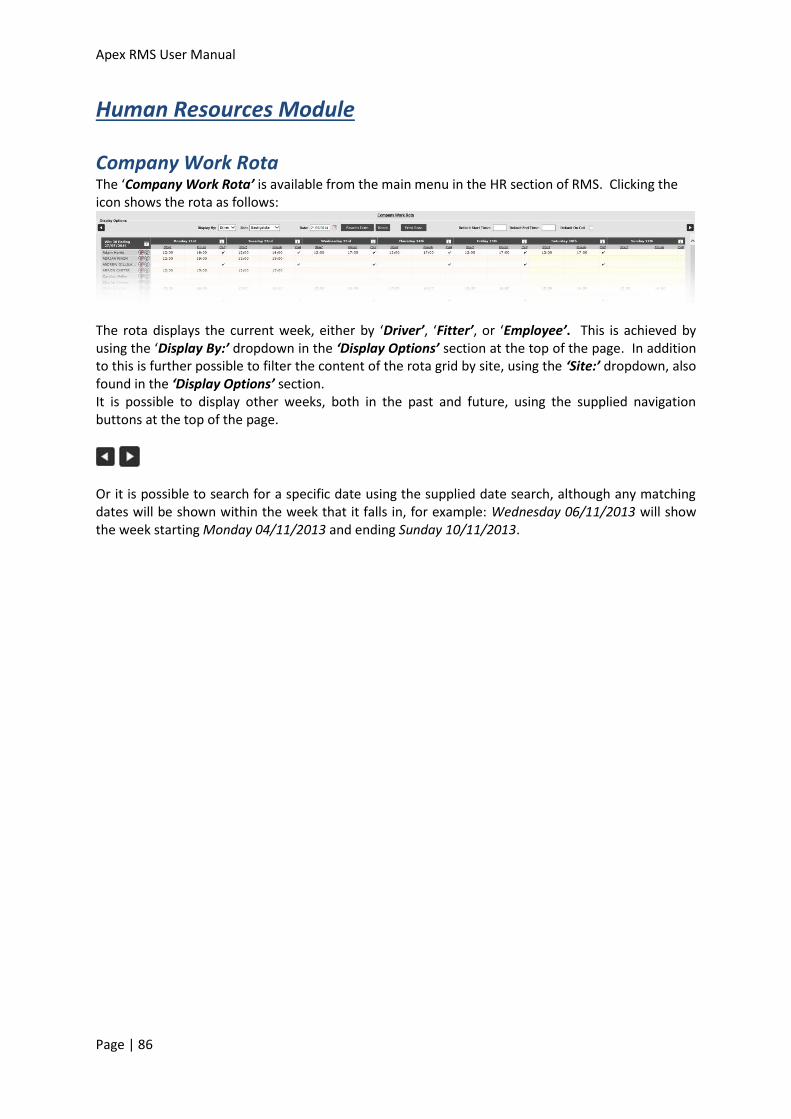
Apex RMS User Manual
Page | 86
Human Resources Module
Company Work Rota The ‘Company Work Rota’ is available from the main menu in the HR section of RMS. Clicking the icon shows the rota as follows:
The rota displays the current week, either by ‘Driver’, ‘Fitter’, or ‘Employee’. This is achieved by using the ‘Display By:’ dropdown in the ‘Display Options’ section at the top of the page. In addition to this is further possible to filter the content of the rota grid by site, using the ‘Site:’ dropdown, also found in the ‘Display Options’ section. It is possible to display other weeks, both in the past and future, using the supplied navigation buttons at the top of the page.
Or it is possible to search for a specific date using the supplied date search, although any matching dates will be shown within the week that it falls in, for example: Wednesday 06/11/2013 will show the week starting Monday 04/11/2013 and ending Sunday 10/11/2013.
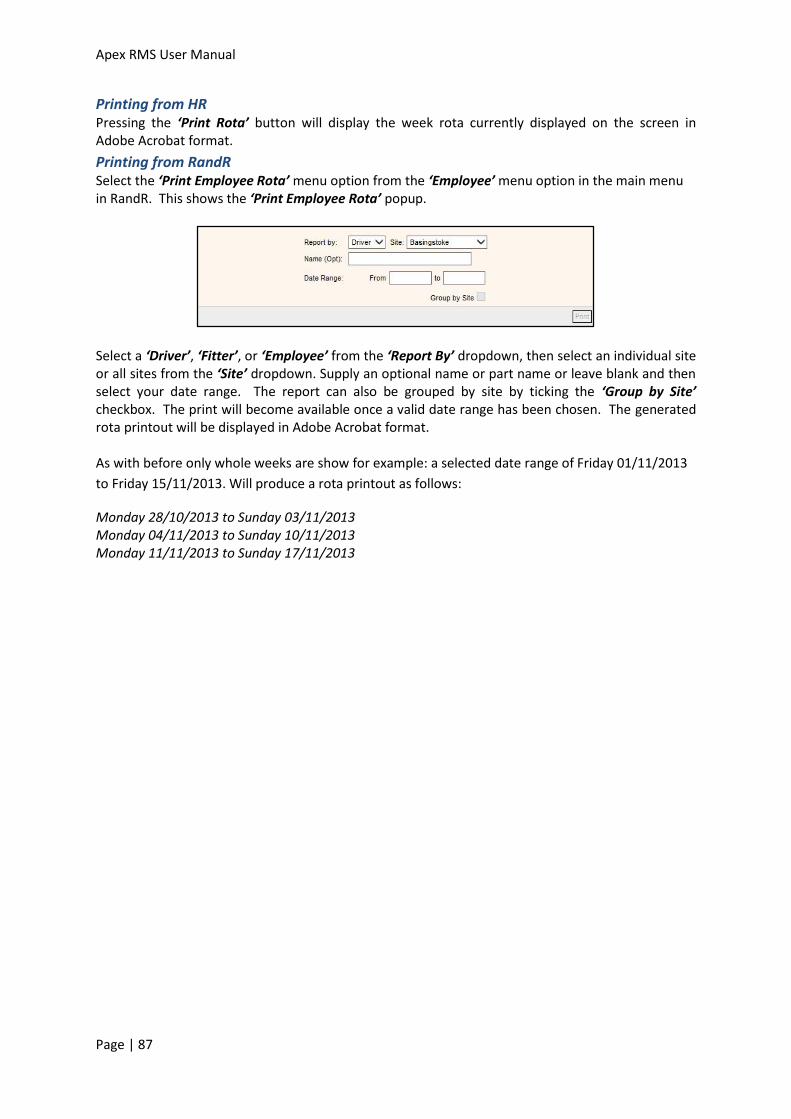
Apex RMS User Manual
Page | 87
Printing from HR Pressing the ‘Print Rota’ button will display the week rota currently displayed on the screen in Adobe Acrobat format.
Printing from RandR Select the ‘Print Employee Rota’ menu option from the ‘Employee’ menu option in the main menu in RandR. This shows the ‘Print Employee Rota’ popup.
Select a ‘Driver’, ‘Fitter’, or ‘Employee’ from the ‘Report By’ dropdown, then select an individual site or all sites from the ‘Site’ dropdown. Supply an optional name or part name or leave blank and then select your date range. The report can also be grouped by site by ticking the ‘Group by Site’ checkbox. The print will become available once a valid date range has been chosen. The generated rota printout will be displayed in Adobe Acrobat format. As with before only whole weeks are show for example: a selected date range of Friday 01/11/2013
to Friday 15/11/2013. Will produce a rota printout as follows:
Monday 28/10/2013 to Sunday 03/11/2013 Monday 04/11/2013 to Sunday 10/11/2013 Monday 11/11/2013 to Sunday 17/11/2013
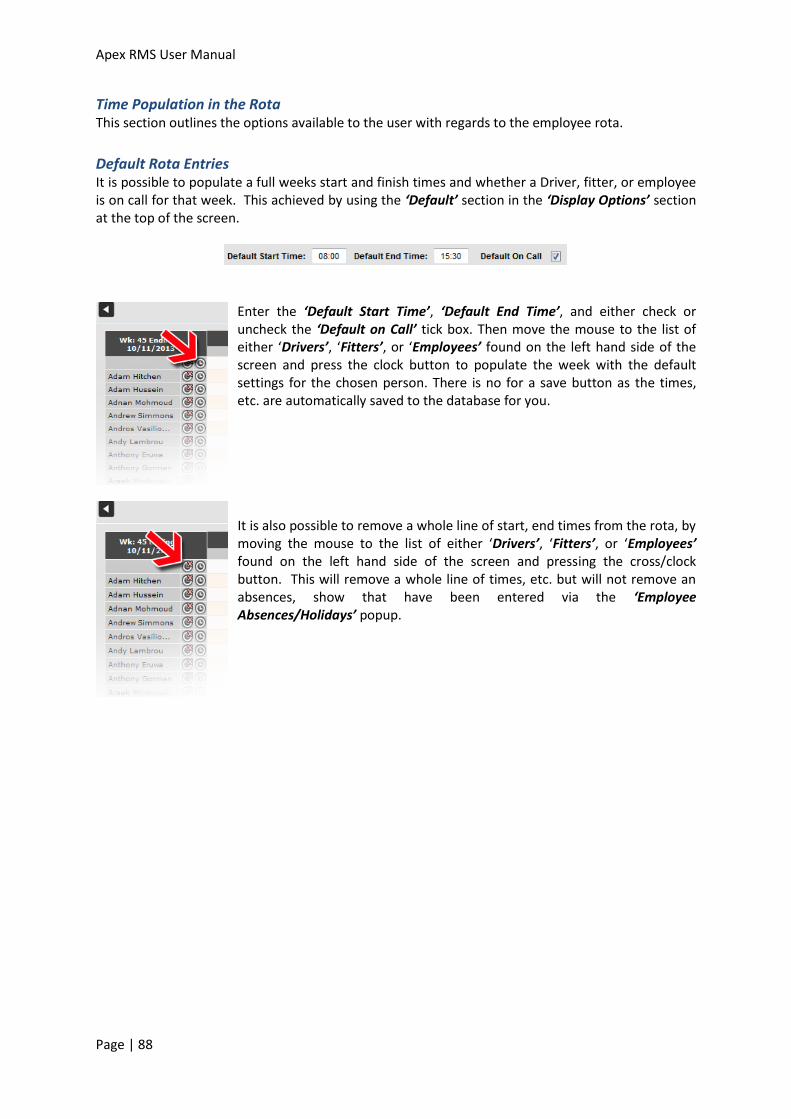
Apex RMS User Manual
Page | 88
Time Population in the Rota This section outlines the options available to the user with regards to the employee rota.
Default Rota Entries It is possible to populate a full weeks start and finish times and whether a Driver, fitter, or employee is on call for that week. This achieved by using the ‘Default’ section in the ‘Display Options’ section at the top of the screen.
Enter the ‘Default Start Time’, ‘Default End Time’, and either check or uncheck the ‘Default on Call’ tick box. Then move the mouse to the list of either ‘Drivers’, ‘Fitters’, or ‘Employees’ found on the left hand side of the screen and press the clock button to populate the week with the default settings for the chosen person. There is no for a save button as the times, etc. are automatically saved to the database for you. It is also possible to remove a whole line of start, end times from the rota, by moving the mouse to the list of either ‘Drivers’, ‘Fitters’, or ‘Employees’ found on the left hand side of the screen and pressing the cross/clock button. This will remove a whole line of times, etc. but will not remove an absences, show that have been entered via the ‘Employee Absences/Holidays’ popup.
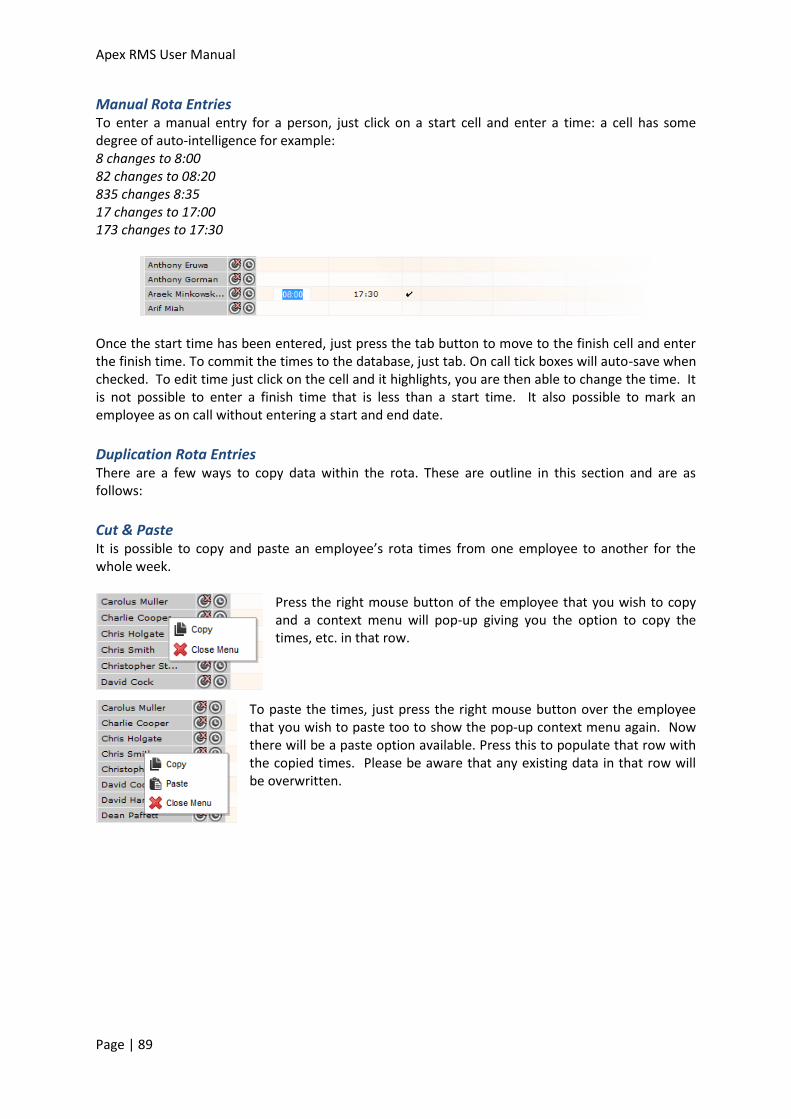
Apex RMS User Manual
Page | 89
Manual Rota Entries To enter a manual entry for a person, just click on a start cell and enter a time: a cell has some degree of auto-intelligence for example: 8 changes to 8:00 82 changes to 08:20 835 changes 8:35 17 changes to 17:00 173 changes to 17:30
Once the start time has been entered, just press the tab button to move to the finish cell and enter the finish time. To commit the times to the database, just tab. On call tick boxes will auto-save when checked. To edit time just click on the cell and it highlights, you are then able to change the time. It is not possible to enter a finish time that is less than a start time. It also possible to mark an employee as on call without entering a start and end date.
Duplication Rota Entries There are a few ways to copy data within the rota. These are outline in this section and are as follows:
Cut & Paste It is possible to copy and paste an employee’s rota times from one employee to another for the whole week.
Press the right mouse button of the employee that you wish to copy and a context menu will pop-up giving you the option to copy the times, etc. in that row.
To paste the times, just press the right mouse button over the employee that you wish to paste too to show the pop-up context menu again. Now there will be a paste option available. Press this to populate that row with the copied times. Please be aware that any existing data in that row will be overwritten.
Apex RMS User Manual
Page | 90
Copy Day to Day In the top of every day on the rota is the copy day icon. Pressing this will copy all the rota times, etc. to the next day. There is no need to save as this is automatically undertaken for you. Copying a Sunday’s data will place it on the next Monday as you would expect.
Copy Week to Week In the week ending section of the rota (top left) is the copy week icon. Pressing this will copy all the rota times, etc. for the week to the next week. There is no need to save as this is automatically undertaken for you.
Apex RMS User Manual
Page | 91
Purchase Orders
Create Purchase order for Recovery and Workshop
Recovery It is now possible to create a purchase order from within a recovery job from within the parts section of a job. Click the ‘parts’ icon within the ‘Job Details’ section of the recovery job. This will show the ‘Parts List’ popup. Click the ‘Add Part’ button to show the ‘Add a Part’ popup.
Select the required part and quantity and press the ‘Save’ button to add the part to the recovery job’s parts list.
Select the items that you wish to create a purchase order for and press the ‘Purchase Selected’ button. Please note that a purchase order can only be created for parts that are currently not held in stock. This would have been indicated via the following: ‘***Part not held in stock currently***’ when you added the part to the recovery job.
Apex RMS User Manual
Page | 92
Once the ‘Purchase Selected’ button is pressed then a purchase order is auto-generated for you and displayed on the screen. The Description is pre-filled for you with a relevant title (‘Ordered parts for recovery job # xxxxxx’) - At this point you must enter a ‘Supplier’ and a ‘Contact’ and press the ‘Save’ button before preceding any further. You are now able to ‘Authorise’, ‘Receive Goods’ and so on…..
Closing the ‘Purchase Order’ popup returns you back to the ‘Parts List’. The PO number and status are now displayed against the parts. All status changes on the purchase order will be reflected here as well.
Clicking the purchase icon at the end of the part row enables you to view the relevant purchase order at any time to make changes, etc.
Apex RMS User Manual
Page | 93
Workshop It is now possible to create a purchase order from within a workshop job for both parts and labour from within the ‘Charges’ section of the job
Labour Creating a purchase order for labour charges is undertaken in much the same way as with the recovery and workshop job parts. Click the edit icon at the end of the ‘Labour’ line in the ‘Charges’ section of the workshop job to show the ‘Labour’ popup.
Fill out the required fields in the ‘New labour Charge’ popup and press ‘Save’ button to add the labour charges to the current workshop job labour list.
Check the items that you wish to create a purchase order for and press the ‘Purchase Selected’ button. Please note that a purchase order can only be created for labour lines that are currently do not have a fitter assigned to them.
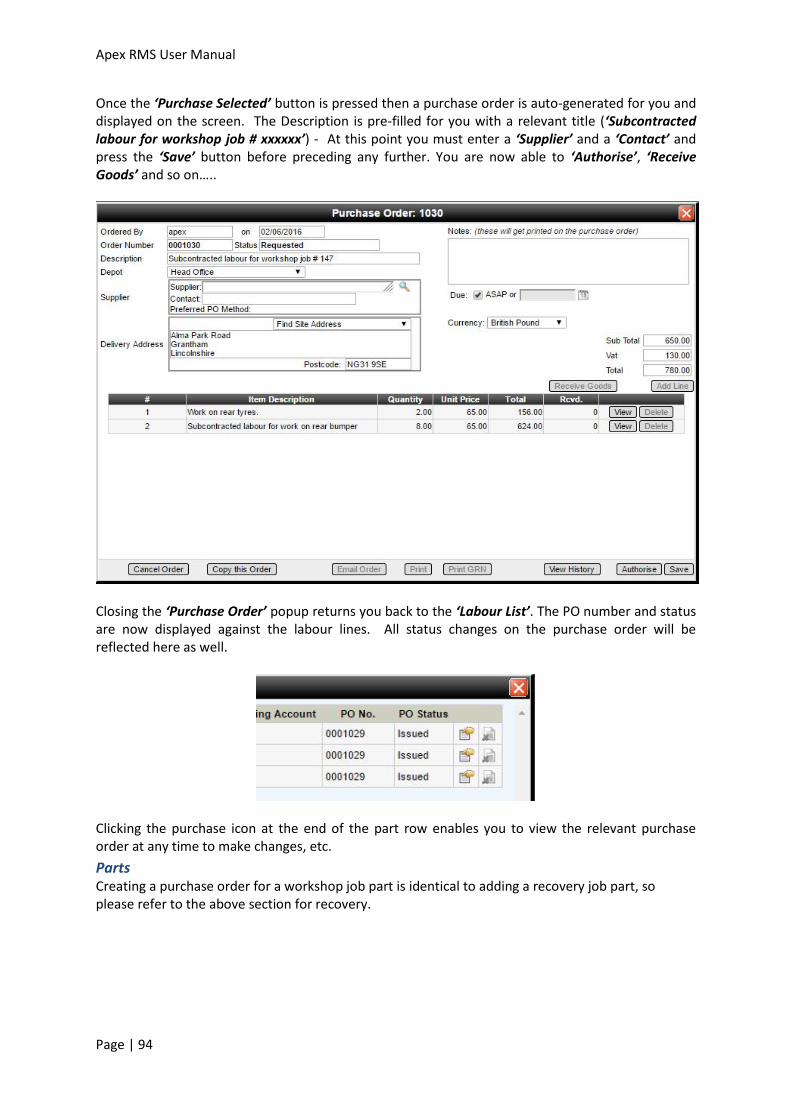
Apex RMS User Manual
Page | 94
Once the ‘Purchase Selected’ button is pressed then a purchase order is auto-generated for you and displayed on the screen. The Description is pre-filled for you with a relevant title (‘Subcontracted labour for workshop job # xxxxxx’) - At this point you must enter a ‘Supplier’ and a ‘Contact’ and press the ‘Save’ button before preceding any further. You are now able to ‘Authorise’, ‘Receive Goods’ and so on…..
Closing the ‘Purchase Order’ popup returns you back to the ‘Labour List’. The PO number and status are now displayed against the labour lines. All status changes on the purchase order will be reflected here as well.
Clicking the purchase icon at the end of the part row enables you to view the relevant purchase order at any time to make changes, etc.
Parts Creating a purchase order for a workshop job part is identical to adding a recovery job part, so please refer to the above section for recovery.
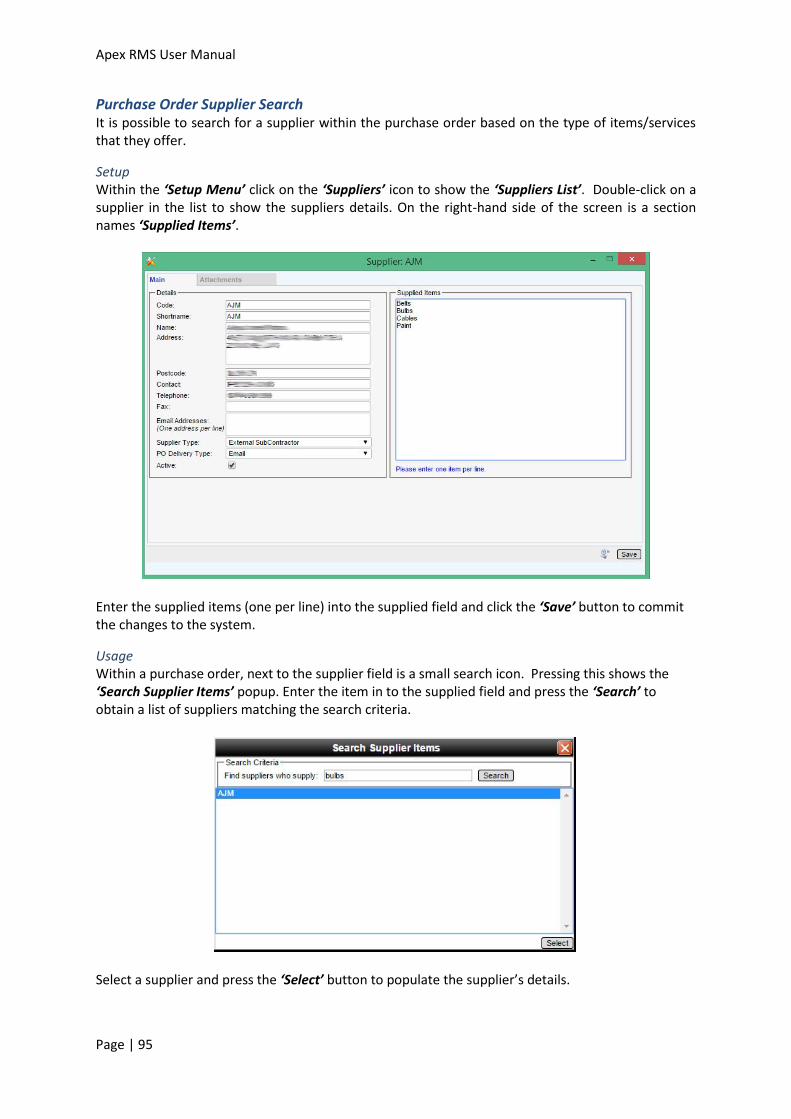
Apex RMS User Manual
Page | 95
Purchase Order Supplier Search It is possible to search for a supplier within the purchase order based on the type of items/services that they offer.
Setup Within the ‘Setup Menu’ click on the ‘Suppliers’ icon to show the ‘Suppliers List’. Double-click on a supplier in the list to show the suppliers details. On the right-hand side of the screen is a section names ‘Supplied Items’.
Enter the supplied items (one per line) into the supplied field and click the ‘Save’ button to commit the changes to the system.
Usage Within a purchase order, next to the supplier field is a small search icon. Pressing this shows the ‘Search Supplier Items’ popup. Enter the item in to the supplied field and press the ‘Search’ to obtain a list of suppliers matching the search criteria.
Select a supplier and press the ‘Select’ button to populate the supplier’s details.
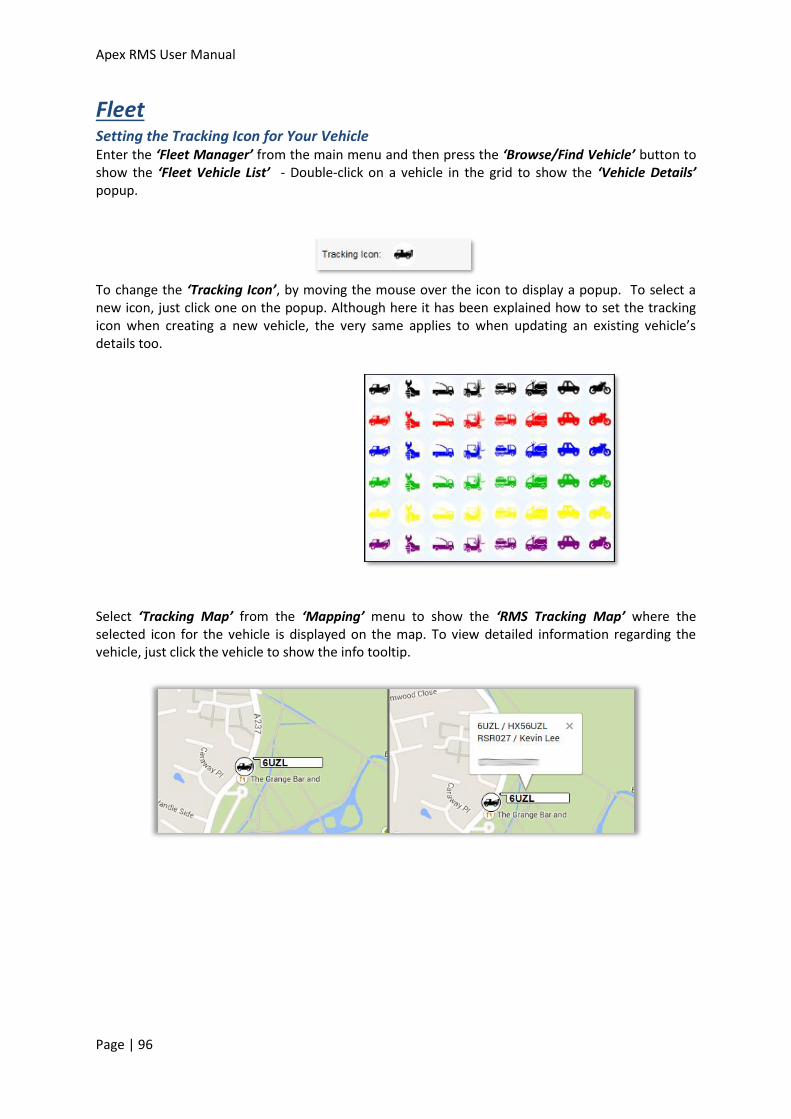
Apex RMS User Manual
Page | 96
Fleet Setting the Tracking Icon for Your Vehicle Enter the ‘Fleet Manager’ from the main menu and then press the ‘Browse/Find Vehicle’ button to show the ‘Fleet Vehicle List’ - Double-click on a vehicle in the grid to show the ‘Vehicle Details’ popup.
To change the ‘Tracking Icon’, by moving the mouse over the icon to display a popup. To select a new icon, just click one on the popup. Although here it has been explained how to set the tracking icon when creating a new vehicle, the very same applies to when updating an existing vehicle’s details too.
Select ‘Tracking Map’ from the ‘Mapping’ menu to show the ‘RMS Tracking Map’ where the selected icon for the vehicle is displayed on the map. To view detailed information regarding the vehicle, just click the vehicle to show the info tooltip.
Apex RMS User Manual
Page | 97
Daily Checks
Adding a New Template
Adding a New Template Item
Editing an Existing Template
Inventory
Frequently Asked Questions
How can I check that an emailed invoice has been sent properly or received? It is possible view electronically sent invoices and resend if required. This is achieved by selecting the Invoice Email Receipts menu option in the Invoicing main menu, which brings up the Invoice Receipts List. The list is populated with all electronic emails that have been sent over the last week for all accounts, although an individual account can be specified, as well as a custom date range. To re-queue an un-received invoice, tick the relevant checkbox associated with the invoice and press the re-queue selected Invoices button. The date time received is set when the recipient, by way of an acknowledgment link. How do I mark invoices as paid in RMS? It’s is possible to mark an invoice as paid. There is some initial setup that is required to mark invoices as paid (This only has to be undertaken once for each sales account). This is achieved by selecting the Sales Accounts menu option in the Setup main menu, which brings up a list of the sales accounts on the system. Double-click a sales account to show the Sales Account Maintenance screen. Navigate to the R & R tab and within the Invoicing section tick the Requires Remittance and press the Save button. To mark an invoice as paid is achieved by selecting the Invoice Remittance menu option in the Invoicing main menu, which brings the Remittance Details screen. Use the supplied search options to generate a list of relevant invoices. Double-click a row to show the Remittance Entry popup. Here you can mark an invoice as paid by ticking the Fully Paid? Checkbox and pressing the Save button. How do I change the name or address on an invoice once it has been created? To change the name or address on an invoice, select the Transaction List from the Invoicing main menu to show the transaction list. Use the Search & Filter options to generate a list of relevant invoices. Double-click the desired grid line to show the Transaction Maintenance screen, form here you can specify a new Name or Address and update the invoice details by pressing the Save button.