Embed Size (px)
DESCRIPTION
Microsoft Dynamics RMS HQ Getting Started Guide V2
Citation preview

Getting Started Guide

Information in this document, including URL and other Internet Web site references, is subject to change without notice. Unless otherwise noted, the example companies, organizations, products, domain names, e-mail addresses, logos, people, places and events depicted herein are fictitious, and no association with any real company, organization, product, domain name, e-mail address, logo, person, place or event is intended or should be inferred. Complying with all applicable copyright laws is the responsibility of the user. Without limiting the rights under copyright, no part of this document may be reproduced, stored in or introduced into a retrieval system, or transmitted in any form or by any means (electronic, mechanical, photocopying, recording, or otherwise), or for any purpose, without the express written permission of Microsoft Corporation.
Microsoft may have patents, patent applications, trademarks, copyrights, or other intellectual property rights covering subject matter in this document. Except as expressly provided in any written license agreement from Microsoft, the furnishing of this document does not give you any license to these patents, trademarks, copyrights, or other intellectual property.
© 2006 Microsoft Corporation. All rights reserved.
Microsoft, Microsoft Dynamics, Windows, and Windows Server are either registered trademarks or trademarks of Microsoft Corporation in the United States and/or other countries.
The names of actual companies and products mentioned herein may be the trademarks of their respective owners.
Part number: X13-35084-01
Publication date: November 2006


Contents
Welcome 3
What’s new 3
Microsoft support services 4
Getting started 5
Headquarters components 5
Before installing Headquarters 6
Installing Headquarters 10
Practicing with the sample database 12
Bringing stores online 15
Getting ready 15
Creating the Headquarters database 19
Defining and exporting stores 20
Setting up stores 24
Initiating communication 27
What's next 31
Using Headquarters Administrator 32
Configuring Headquarters 32
Maintaining the Headquarters database 35
Using Headquarters Server 43
Configuring Headquarters Server 43
Monitoring communication 43
Using Headquarters Client 45
The client window 45
Configuring the connection 46
Setting logging options 46
Managing log files 47
Appendix A - Accessibility products and services 49
Index 53


Welcome 3
Welcome Welcome to Microsoft Dynamics™ Retail Management System Headquarters.
With Headquarters, you can control and manage inventory at each store and for
your entire business; control pricing, sales, and promotions; speed up purchase
ordering and item transfers; and generate detailed active reports.
What’s new
SQL Server Express is included Microsoft SQL Server 2005 Express Edition (SQL Server Express) is included on
your Headquarters CD. The maximum database size has been increased to 4 GB,
the workload governor that was present in SQL Server 2000 Desktop Edition
(MSDE 2000) has been removed, and overall server performance has been
enhanced.
Improved matrix item support Create and manage matrix items with ease. Use dimension sets to quickly load
frequently used dimensions, such as sizes and colors.
More discount options Both Mix and Match and Buy X, Get Y for Z discounts are now available on either
a unit price or percentage discount basis.
No more copy protection devices (dongles) Use an Internet connection or the telephone to activate the software.
Automatic Headquarters item cost management The new ―Calculate HQ Item Cost as weighted average‖ configuration option
delegates cost management to the stores. Headquarters displays the
organization-wide cost for an item.

4 Headquarters Getting Started Guide
Microsoft support services Get technical support for Microsoft Dynamics Retail Management System (RMS)
at the product support Web site, www.microsoft.com/dynamics/support. For
telephone support for U.S. customers, please call 888-477-7877.
For the latest news about Microsoft Dynamics RMS, visit the Using Microsoft
Dynamics Retail Management System Web site at
http://www.microsoft.com/msrms/customer
Also, you can find additional product support information at the Microsoft Help
and Support Web site at http://support.microsoft.com
Maintenance plans Your Microsoft Dynamics RMS maintenance plan gives you access to Microsoft
CustomerSource, product newsgroups, Knowledge Base articles, and other
exclusive Internet offerings. For information about continuing support options,
see http://www.microsoft.com/dynamics/support
Microsoft CustomerSource CustomerSource is a Microsoft Web site that provides Microsoft customers
around-the-clock access to support resources and a multitude of tools to improve
their business processes and practices. Site access is available to Microsoft
customers currently on a service plan at
https://mbs.microsoft.com/customersource
Microsoft Certified Partners You can also take advantage of an ongoing relationship with a Microsoft Certified
Partner who understands the unique service needs of your business. To find a
partner near you, visit the Microsoft Dynamics RMS Web site at
http://www.microsoft.com/msrms

Getting started 5
Getting started Before you can use Headquarters to manage your retail store enterprise, you must
first install the software, set up your database, and deploy your stores
Headquarters components Installed on a computer at the head office, Headquarters ties all the data from all
your stores together. You can use it to set policies and procedures for each store
to follow and to enforce those rules for the entire retail enterprise. Headquarters
includes four separate components:
Headquarters Administrator — Use Headquarters Administrator to create
your Headquarters database and bring your stores online. You can connect to
the database server, create databases, run database queries, upgrade the
database, and back up data.
Headquarters Server — Headquarters Server is installed on a machine at the
head office and manages the exchange of data between the Headquarters
database and remote stores. It listens for incoming messages from remote
stores, processes and stores the data in the Headquarters database, and
forwards Headquarters data to remote stores as directed by means of
Headquarters worksheets.
Headquarters Client — Headquarters Client enables remote stores to
communicate with the head office database. Headquarters Client is installed
at each remote store, where it can automatically initiate connections to the
head office based on a schedule specified in Headquarters Manager.
Headquarters Client sends the information from the store's Store Operations
database via the Internet or virtual private network (VPN) to Headquarters
Server, which then passes the information on to the Headquarters database.
Headquarters Manager— Headquarters Manager controls and tracks
inventory at every store in the enterprise. For centrally managed operations,
use Headquarters Manager to manage a master inventory database for the
enterprise and transfer that data to remote stores. This allows all your stores
to maintain consistent stock identification.
This book discusses in detail the features and settings in Headquarters
Administrator, Headquarters Server, and Headquarters Client. Once Headquarters
and your databases are set up, consult the Headquarters User's Guide for
information about Headquarters Manager.

6 Headquarters Getting Started Guide
Before installing Headquarters The following information will help you maximize the efficiency and stability of
your Store Operations installation. Carefully review these guidelines.
System requirements The system requirements for Headquarters are:
PC with a Pentium 600 MHz or higher processor (1 GHz recommend)
Microsoft Windows XP Home or Professional Edition with Service Pack (SP) 2
or later, Windows Server 2003 with SP1 or later, Windows 2000 with SP4 or
later, or Windows Vista Business
Minimum 192 megabytes (MB) of RAM (512 MB or higher recommended)
Approximately 50 MB of available hard disk space for the Headquarters
application files (will vary depending on the configuration and location of
database files)
A CD-ROM drive
VGA (1024x768) or higher resolution monitor
Microsoft SQL Server 2005 Express Edition (SQL Server Express) with SP1 or
later [SQL Server Express with SP1 is included]
-or-
Microsoft SQL Server 2005 Standard or Enterprise Edition with SP1 or later
[available separately]
-or-
Microsoft SQL Server 2000 Desktop Engine (MSDE 2000) with SP4 or later
[available separately]
-or-
Microsoft SQL Server 2000 Standard or Enterprise Edition with SP4 or later
[available separately]
Microsoft Mouse or compatible pointing device
To send and retrieve data to stores running Microsoft Dynamics RMS Store
Operations you will need communication equipment (modem, Internet
connection, VPN, ISDN, WAN, etc.)
Getting started 7
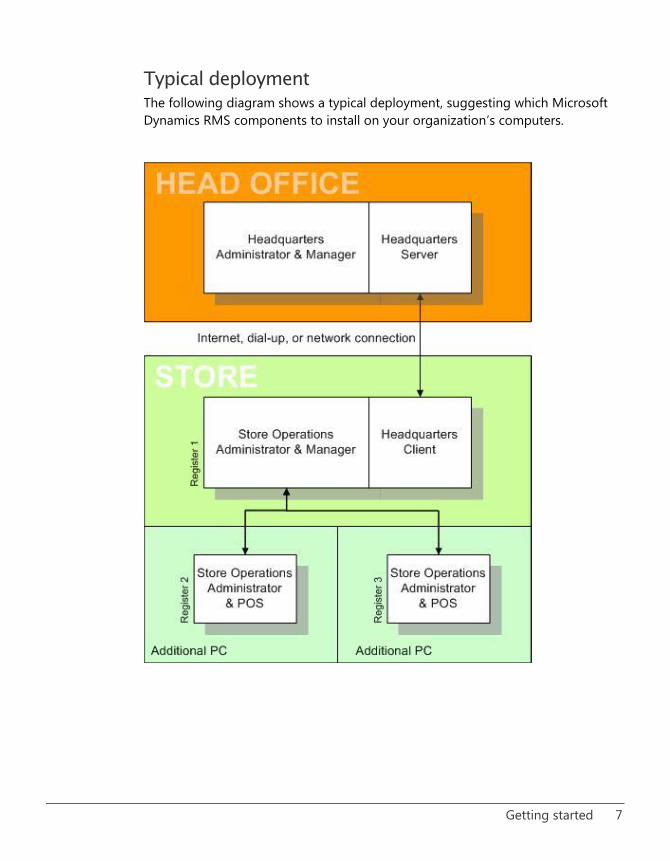
Typical deployment The following diagram shows a typical deployment, suggesting which Microsoft
Dynamics RMS components to install on your organization’s computers.

8 Headquarters Getting Started Guide
Activating Headquarters Activation reduces software piracy by authenticating your software as a genuine,
fully licensed copy. You will need to purchase one copy of Headquarters for each
store that will connect to the Headquarters database. When you first run
Headquarters Client at the store, you will be prompted to activate the software.
Note Activation is not required to run Headquarters Administrator,
Headquarters Server, or Headquarters Manager, so you can install
Headquarters on as many machines as you want at your Headquarters
location.
If you ever need to reinstall Headquarters on the same computer where it was
installed previously, you will need to activate the software again. Usually, you can
use the same product key you used before.
If you have an Internet connection, you can quickly and easily activate
Headquarters over the Internet. Otherwise, you can activate the software by
telephone.
1 Start Headquarters Client.
The Activation Wizard starts.
2 Follow the instructions in the Activation Wizard.

Getting started 9
Database-specific installation tips Microsoft SQL Server is a client-server database management system. Solutions
based on SQL Server are highly scalable, from a single processor laptop and a
database maximum size of two gigabytes (2 GB) to a cluster of servers that can
comfortably manipulate multi-terabyte databases and thousands of users. Unlike
file-based databases, client-server database engines manage read-write
operations to the database, enabling them to handle many more concurrent users
and vastly greater amounts of data. Microsoft SQL Server is offered in different
editions based upon database size, number of users, and hardware requirements.
SQL Server 2005 Express Edition (SQL Server Express) is a fully SQL Server-
compatible database engine that supports multiple concurrent users and can be
used with databases of up to 4 GB in size. SQL Server Express is provided free of
charge with Headquarters and will be installed during Headquarters installation
unless an existing instance of another SQL Server product is present.
If you need to store more than 4 GB of data, you will need to purchase the
Standard or Enterprise Edition of SQL Server 2005.
The term SQL Server is used in this book to refer to any edition of SQL Server.
Keep the following notes in mind when installing and setting up SQL Server:
Do not change your computer name after SQL Server has been installed on
the machine. SQL Server uses the computer name internally; if you change the
computer name, SQL Server detects a different name and generates an error
message. If this happens, you will need to run SQL Server Setup again.
SQL Server can operate in one of two security (authentication) modes:
Windows authentication or SQL Server authentication. SQL Server
authentication is much easier to manage than Windows authentication, which
uses domain user and group accounts. For example, a single SQL Server user
name and password can be created for all Headquarters computers, rather
than creating all the necessary Windows domain user and group accounts.
Also, Windows authentication is available only when all of your computers are
part of a Windows domain.
You will need to use SQL Server authentication with Microsoft Dynamics RMS.
Be sure to make a note of the user name and password you define when you
set up SQL Server.

10 Headquarters Getting Started Guide
Like many Windows applications, the more RAM you have on your PC, the
faster SQL Server will run. You should never have less than 192MB of RAM on
any PC running SQL Server.
Note See the ReadMe file accompanying this release for the latest Microsoft
SQL Server security updates. You can find more information about SQL
Server security updates at the Microsoft SQL Server Web site,
www.microsoft.com/sql
Installing Headquarters 1 Insert the Headquarters CD in your computer's CD drive.
Note Install Headquarters on the local computer, not on a remote
computer over a network.
2 Click Before you install, and then read the guidelines and information in the
ReadMe file.
3 Close the ReadMe file, and then click Install Headquarters.
Note If you are installing Headquarters Client at a store, select Install
Headquarters Client, and then follow the on-screen instructions.
4 In the Setup Type box, select Headquarters Manager and Server if you
plan to run the Headquarters Server and Headquarters Manager on the same
computer. If you are installing Headquarters Server on a computer of its own,
select Headquarters Server Only.
5 Follow the on-screen instructions.

Getting started 11
Client Network Utility For successful Headquarters communication, all machines must be using the same
network protocols. The Microsoft Dynamics RMS installation program enables the
TCP/IP and Named Pipes protocols by default. If your server uses a different
protocol, use the Client Network Utility to enable the protocol you want to use.
The Client Network Utility is available on the Start menu in the Microsoft
Dynamics RMS program group. For more information, click the Help button in the
utility.
Note If you want to enable TCP/IP on your server instead and you are running
SQL Server 2005, use the SQL Server Configuration Manager. For SQL
Server 2000, the Client Network Utility is available in the Microsoft SQL
Server program group on the Start menu. For more information, see
"Configuring Client Network Protocols" in SQL Server 2005 Books Online.
Windows Firewall Because of the security features in Windows XP Service Pack 2, if you install
Microsoft Dynamics RMS on a computer that is remote from SQL Server, you
must set up the Windows Firewall to allow your server to communicate with
Microsoft Dynamics RMS. You must also set up the Windows Firewall to allow
Headquarters Client and Headquarters Server to communicate with each other.
For detailed instructions for setting up the Windows Firewall for network
installation, see Microsoft Knowledge Base article 884102, "How to configure
Retail Management System programs for use with Windows XP Service Pack 2,"
available at http://support.microsoft.com.

12 Headquarters Getting Started Guide
Practicing with the sample database You can use the sample database to get acquainted with the features in
Headquarters. The following procedures will help you connect to the database
server, create the sample Headquarters database, and perform some basic tasks in
Headquarters Manager.
Note For more complete information about using Headquarters Manager, see
Headquarters Online Help or the Headquarters User’s Guide.
To set up the sample database
1 On the File menu in Headquarters Administrator, click Connect.
2 In the Server box, enter the name of the server where you want the sample
database to be located. To create the database on the local computer, type
(local) in this box.
3 In the User name and Password boxes, enter valid SQL Server logon
credentials for the database server.
4 Click OK.
5 On the Database menu, click Create, and then click Next.
6 On the Database Size page, type a name for the sample database, and then
click Next.
7 On the Database Growth page, click Next to accept the default values.
8 On the Populate Database page, click the Browse button, double-click
the DBFiles folder, select the Rmshqsample.bck file, click Open, and then
click Next.
9 On the final wizard page, click Finish, and then click OK in both completion
messages.
10 On the File menu, click Configuration.
11 Enter the server, logon credentials, and name for the sample database you
just created, and then verify the accuracy of the information you entered by
clicking Test Database Connection. When the database connects
successfully, click OK to save the configuration settings.

Getting started 13
To log on to Headquarters Manager
1 Start Headquarters Manager.
2 Type "administrator" in the User ID box and "password" in the Password
box, and then click OK.
To view an item record
1 On the Database menu, click Items.
2 Select an item, and then click Properties.
Note If you want to make changes to the item properties, you will need to
enter maintenance mode (on the File menu, click Maintenance Mode).
Changes made while in maintenance mode will not be downloaded to
stores until the appropriate worksheets are issued.
To generate a report
You can use the reports in Headquarters to monitor your entire organization. You
can customize each report to make it more meaningful for your organization. You
can also view properties for a specific record from within a report.
1 On the Reports menu, point to Items, click Snapshot Store Quantity List,
and then click OK. Take note of the information provided by the report.
2 Click and drag the Store heading in the report until a line appears between
the LookUp Code and Description columns, and then release the mouse
button. Take note of the information provided by the report.
3 Move the mouse over the item lookup code for the Football until the pointer
turns into a magnifying glass, and then double-click the lookup code.

14 Headquarters Getting Started Guide
To issue a worksheet
Worksheets are used to send or request store information. You can use
Worksheet Style 250, described in this example, to make changes to those item
properties that should be identical organization-wide, such as item lookup codes
and descriptions.
1 On the Worksheets menu, click Style 250: Update Inventory – Items.
2 On both the Select Stores and Enter Title and Effective Date pages, click
Next.
3 On the Select Items page, click All, and then click Next.
4 Click Finish.
5 In the Worksheet – Update Inventory – Items workpad, click the Contents
tab and review the list of items.
6 Click Approve.
To view worksheet status and history
The Worksheet Status window opens automatically whenever Headquarters
Manager is started. The flag color next to a listed worksheet shows the status of
that worksheet.
1 In the folder list, click All styles.
2 On the toolbar, click the green flag to show completed worksheets in the list.
3 Double-click a worksheet, and then click the History tab.

Bringing stores online 15
Bringing stores online In this section, we'll cover the processes for getting ready to create the
Headquarters and store databases, creating and configuring the Headquarters
database, defining and exporting stores, and setting up Headquarters/store
communication. Plan carefully to make sure that your databases contain complete
information; it will save you a lot of time in the long run.
Getting ready The most efficient method of implementing Headquarters begins with time spent
working in Store Operations. When you deploy Headquarters, you will need two
store databases, the master store database and the template store database.
Creating the master store database The master store database is a store database that will become the basis of your
Headquarters database. For that reason, it should contain all of the centrally
maintained data for your entire retail enterprise. Centrally maintained data
includes:
Items (except quantity, price, cost, and reorder information)
Departments and categories
Suppliers
Sales and item taxes
Item messages
Tender types and currencies
Reason codes
Shipping carriers
Account types
Discount schemes and weekly sales schedules
Global customers

16 Headquarters Getting Started Guide
All stores will be required to use the same naming and numbering schemes for
these record types.
If you have stores that are already running Store Operations, you might be able to
use a copy of an existing store database as the master store database, but keep in
mind that it will need to be modified, perhaps extensively, so that it contains
information for all of your stores.
If you don't have any stores already running Store Operations, you will need to
create the master store database from scratch, as described in the following
procedure. Creating the database itself will only take a few moments, but be sure
to allow sufficient time for entering complete and accurate data into the
database. The more complete the master database is, the more successful your
Headquarters implementation will be, and the fewer synchronization problems
you will experience later on.
To set up the master store database from scratch
1 Open Store Operations Administrator.
2 On the File menu, click Connect, and then specify your server and logon
information. If you cannot connect, make sure that your database server is
running.
3 On the Database menu, click Create, and then use the Create Database
Wizard to create your master store database. In the wizard, select the
rmsdb.bck blank database file – located in the DBFiles folder in your Store
Operations installation directory – as the basis of the master store database.
For detailed wizard instructions, see "Deployment Guide" in Store Operations
Administrator Online Help.
4 On the File menu, click Configuration, and then, on the Database tab, enter
the connection information for the database you just created. Click Test
Database Connection to make sure that you have entered the correct
information.
5 Open Store Operations Manager and log on by typing "1: in the User ID box
and "password" in the Password box.
6 Set up your departments, categories, suppliers, items, sales and item taxes,
and other data that will be used by all stores. For more information, see
"Setting up your Store Operations database" in Store Operations Online Help.

Bringing stores online 17
Creating the template store database The template store database is a database that contains the store-specific data that
will be the same at all (or most) stores in your organization. This common store-
specific data might include:
Register and peripheral hardware information
Store configuration settings
Security levels and settings
Receipt formats
Custom keyboards
Custom POS buttons
Net display channels
Pole display messages
Note While it might be possible to use the master store database as the
template store database, you should keep in mind that these two
databases serve very different purposes. The master store database is
intended to provide complete centrally maintained data for inclusion in
the Headquarters database, while the template store database is intended
to provide standardized store-specific data for inclusion in the store
databases.
If you have stores that are already running Store Operations, you might be able to
use a copy of an existing store database as the template store database, provided
most or all of the store-specific data in the database is applicable to most or all of
your stores.
If you don't have any stores already running Store Operations, you will need to
create the template store database from scratch, as described in the following
procedure.

18 Headquarters Getting Started Guide
To set up the template store database from scratch
1 Open Store Operations Administrator.
2 On the File menu, click Connect, and then specify your server and logon
information. If you cannot connect, make sure that your database server is
running.
3 On the Database menu, click Create, and then use the Create Database
Wizard to create your template store database. In the wizard, select the
rmsdb.bck blank database file – located in the DBFiles folder in your Store
Operations installation directory – as the basis of the template store database.
For detailed wizard instructions, see "Deployment Guide" in Store Operations
Administrator Online Help.
4 On the File menu, click Configuration, and then, on the Database tab, enter
the connection information for the database you just created. Click Test
Database Connection to make sure that you have entered the correct
information.
5 Open Store Operations Manager and log on by typing "1" in the User ID box
and "password" in the Password box.
6 On the File menu, click Configuration. Set up the basic store-wide
parameters. Include all pertinent store information that will be common to all
stores in the enterprise, such as the tender types, store account policies, and
inventory methods. Use the Options tab to set up your store policies and
operating procedures. For more information, click the Help button in the
dialog box.
7 On the File menu, point to Security, click Set Security to put the system into
Security mode, and then set up security as described in "Setting up security
structure" in Store Operations Online Help.
8 On the Database menu, use the commands on the Registers submenu to set
up register and hardware settings, receipt formats, custom POS buttons and
keyboards, pole display messages, and net display channels. For more
information, see the relevant topics in "Working with your database" in Store
Operations Online Help.

Bringing stores online 19
Creating the Headquarters database With the master store and template store databases prepared, you are ready to
create the Headquarters database. This is where the time you spent in Store
Operations will really pay off.
To create the Headquarters database
1 Open Headquarters Administrator.
2 On the File menu, click Connect, and then specify your server and logon
information. If you cannot connect, make sure that your database server is
running.
3 On the Database menu, click Create.
4 On the Welcome page of the Create Database Wizard, click Next.
5 On the Database Size page, enter a name and initial size for the database
you are creating, and then click Next.
6 On the Database Growth page, specify how the database file should grow,
and then click Next. In most cases, you can accept the defaults.
7 On the Create Database page, click the Browse button, and then
navigate to the DBFiles folder in your Headquarters installation directory.
Locate and select the backup file of the blank database, rmshqdb.bck, click
Open, and then click Next.
8 On the final wizard screen, click Finish. After you click OK twice, your new
database will be the current database in Headquarters Administrator (shown
in the status bar at the bottom of the window).

20 Headquarters Getting Started Guide
To import the master store database into the Headquarters database
1 Make sure both the blank Headquarters database and the master store
database are on servers that are accessible by Headquarters Administrator.
2 On the Database menu in Headquarters Administrator, click Import Store
Operations Data, and then click Yes.
2 In the Store Operations Database window, select the server where the
master store database is located, enter the appropriate logon information for
the server, select the database, and then click OK.
3 When Headquarters asks if you want to continue, click Yes. Depending on the
size of your database, it may take several minutes for all of the data to be
imported. When Headquarters notifies you that the import was successful,
click OK.
To configure the Headquarters database
1 On the File menu in Headquarters Administrator, click Configuration.
2 On the Database tab, make sure the information in the SQL Server name,
User name, Password, and SQL Database boxes is correct for your
Headquarters database.
3 To make sure that Headquarters will successfully connect to the specified
database, click Test Database Connection.
4 Use the Settings, Paths, and Templates tabs to configure your Headquarters
database, and then click OK. For more information about these tabs, see
"Using Headquarters Administrator" later in this book.
Defining and exporting stores Now that your Headquarters database exists and is configured, you can create a
record there for each of your stores. This process is called defining stores. Next,
you will export a store database for each of your stores that is not already
running Store Operations. Note that you must define each store in Headquarters
Manager regardless of whether Store Operations is already in use at the store, but
you will only export a database for a store if it doesn't yet have a Store
Operations database.

Bringing stores online 21
To define stores in Headquarters Manager
1 Open Headquarters Manager.
2 In the Login window, type "administrator" in the User ID box and "password"
in the Password box. After you log on, you must change the password for
this default account.
3 On the File menu, click Maintenance Mode. When Headquarters asks you to
confirm that you want to enter this mode, click Yes.
4 On the Admin menu, click Stores.
5 Click New to define a new store, and then, on the Welcome page of the New
Store Wizard, click Next.
6 On the Store Identification Number and Name page, enter your store
information, and then click Next.
Note It is very important to assign a unique store ID to each store.
7 On the Store Address and Telephone Numbers page, enter your store
information, and then click Next.
8 On the Copy from Existing Store page, select a store from which to copy
profile information, such as the connection schedule, item quantity, and sales
tax information. If you are defining your first store, leave <none>, and then
click Next.
9 On the Connection Schedule page, select the store's connection schedule,
and then click Next.
Note Microsoft recommends staggering connection schedules so that
stores connect to Headquarters at different times.
10 On the Quantity and Reorder Information page, specify the initial item
quantity (entering zero is typical), layaway commitment quantity, reorder
point, and restock level for the store, and then click Next.
Note These settings are applied to all items, as initial values only. You can
make item-by-item changes later or update these values by means of
worksheets issued to stores.

22 Headquarters Getting Started Guide
11 On the Sales Tax Information page, click the New Sales Tax box, select a
sales tax from the list to specify the initial sales tax setting for the items in the
store, and then click Next.
12 If all the store information is correct, click Finish. Headquarters will create a
profile for the store using the information you provided.
13 In the Store Properties dialog box, review the information on the Location
tab, and then click the Connection Schedule tab. Make any desired changes
to the connection schedule, choose the connection method, and define the
password for Headquarters Client. Click Retry Logic to specify how
Headquarters Client will handle connection failures. Click OK to save changes.
Note Be sure to make a note of the password you enter on the
Connection Schedule tab. You will need to enter this password
again when you configure Headquarters Client at the store.
14 Repeat this procedure for any other stores you wish to create.
To export store databases for stores that are not yet running Store Operations
1 Open Headquarters Administrator.
2 On the File menu, click Connect, select the server where your Headquarters
database is located, enter your logon information, and then select your
Headquarters database. If you cannot connect, make sure that your database
server is running.
3 On the Database menu, click Export.
4 On the Welcome page of the Export Database Wizard, click Next.
5 On the Select Destination Store page, select the store you want to create a
new database for, and then click Next.
6 On the Select Template Database page, click Connect. Select the server
where the template store database is located, enter your logon information,
select the template store database, and then click OK. When your database
information is displayed in the Server and Database boxes, click Next.

Bringing stores online 23
7 On the Create New Store Database page, click Create, specify the server
where you want the new store database to be created, enter your logon
information, and then click OK.
8 On the Welcome page of the Create Database Wizard, click Next.
9 On the Database Size page, enter a name and initial size for the new store
database, and then click Next.
10 On the Database Growth page, specify how the store database should grow,
and then click Next. In most cases, you can accept the defaults.
11 On the final page of the Create Database Wizard, click Finish. When
Headquarters notifies you that the database was successfully created, click
OK. At this point, you have specified the template store database and created
a blank database for one new store.
12 Back in the Export Database Wizard, review the location and name of the
new Store Operations database, and then click Next.
13 On the Copy Template Data page, click Copy, and then click OK in the Copy
Database dialog box. The wizard will copy the common store-specific data
from the template store database into the new store database. This process
may take a few minutes. When it is complete, click Next.
14 On the Export Database page, click Export. The centrally maintained data in
your Headquarters database will be exported to the store database you just
created. When the process is complete, click OK, and then click Next.
15 On the Backup New Store Database page, you can choose to create a
backup of your new store database, or click Next to continue.
If you are moving your database from one server to another and want to
delete the original, select the Delete store database after backup is
successful check box.
To back up the new store database, click Backup, specify the location and
name of the backup file, and then click Save. When Headquarters notifies you
that the backup is complete, click OK, and then click Next.
16 Confirm the summary export information, and then click Finish.

24 Headquarters Getting Started Guide
17 When Headquarters asks if you have other stores to export, click Yes to avoid
having to select the template store database for subsequent exports. If you
don't want to export other stores at this time, click No.
Note The template store database selected in the Export Database Wizard is
stored in memory until Headquarters Administrator is closed or the
computer is disconnected from the database. If you want to choose a
different template store database for subsequent exports, disconnect,
reconnect, and then run the wizard again.
Setting up stores Once databases exist for all of the stores in the enterprise, you need to set up the
stores. This involves performing these tasks at each store:
Restoring the store database. This step is required only for stores that are
not yet running Store Operations.
Entering or revising the store's locally originated data using Store
Operations Manager. Locally originated data is the information maintained
by the store, such as cashiers, sales reps, local customers, and certain item
properties (regular price, price levels, sale prices and dates, costs, quantities,
tax code, reorder information, and serial numbers).
Note For a store where Store Operations is already in use, you may also
need to revise the unique names, numbers, and lookup codes of
centrally maintained records. These names, numbers, and codes must
match those in the Headquarters database.
Entering accurate inventory information into the store database. Any
inaccuracies in the store's item quantities will be passed on to the
Headquarters database. For this reason, it is important to perform a physical
inventory count using the features in Store Operations Manager, and then
enter correct item quantities into the store database.
Configure Headquarters Client. Headquarters Client is a program, installed
at each store, that handles communications with the Headquarters database.
It exchanges information with Headquarters Server by means of your Internet,
dial-up, or network connection.

Bringing stores online 25
To restore store databases for stores that are not yet running Store Operations
1 At the store, open Store Operations Administrator.
2 On the File menu, click Connect, and then enter the server name and logon
information for the computer that holds the backup (.bck) file for the
exported store database.
3 On the Database menu, click Create, and then follow the instructions in the
wizard.
To enter or revise the locally originated data at each store
1 Open Store Operations Manager.
Note You can log on the first time using the default logon account by
typing "1" in the User ID box and "password" in the Password box.
After you log on, you should change the password for employee 1.
2 As needed, use the lists accessed via the Database menu to revise your
store's locally originated data. This is also a good time to make any needed
changes to the store-specific data inherited from the template store database,
such as pole display messages, receipt formats, register configuration, and so
on.
Note Take care not to modify any centrally maintained data except to make
it match the information in the Headquarters database. Any
inconsistencies could lead to communication problems later on.
For detailed instructions on making changes to a store database, see "Setting
up your Store Operations database" in the Store Operations User's Guide.
To enter accurate item quantities into the store database
1 On the Inventory menu in Store Operations Manager, click Physical
Inventory, and then click New.
2 In the Create Physical Inventory Count dialog box, click OK. (To learn more
about the options in this dialog box, click Help.)
3 Enter a reference number and description for this count.
4 To print a count sheet, click Print.
26 Headquarters Getting Started Guide
5 To enter a counted quantity, click the box in the appropriate row of the
Counted column, and then type the quantity.
6 When all counted quantities have been entered, click Calculate. If there are
discrepancies you want to resolve, click Recount, enter corrected quantities,
and then click Calculate again.
7 When all discrepancies have been resolved or verified as accurate and you are
ready to modify the quantities in the database to match your count sheet,
click Commit, and then click Yes.
To configure Headquarters Client at each store
1 Open Headquarters Client and, if necessary, activate the software.
2 On the File menu, click Configuration.
3 On the Database tab, specify the server, logon information, and name of the
Store Operations database for this store, and then make sure that
Headquarters Client will successfully connect to the specified store database
by clicking Test Database Connection.
4 On the HQ Server tab, enter the address of the computer where
Headquarters Server is running. You can also enter a Web site address.
5 In the Port box, enter a number between 34000 and 35000. This port must be
identical to the port you define in Headquarters Server. If you are using a
firewall to access the Internet for communications with Headquarters, make
sure the SOCKS protocol using the port you selected is allowed to pass
through the firewall.
6 In the Password box, if required, enter the password Headquarters Client
must supply in order to connect to Headquarters Server.
Note This password was set at the head office in Headquarters Manager
when you defined the store. To look up this password, open
Headquarters Manager, click Stores on the Admin menu, select the
applicable store, click Properties, and then click the Connection
Schedule tab.
7 If you are sure that Headquarters Server is running, click Test Network
Connection. If Headquarters Server is not running when you click this button,
Headquarters Client will notify you that the server could not be contacted.

Bringing stores online 27
8 If you will be using a dial-up connection, use the Connection tab to create a
new connection or select an existing connection, and then enter the
appropriate logon information.
9 Use the Schedule, Options, and HQ Client tabs to modify other client
settings as needed. Usually, you can accept the default settings on these tabs.
For more information, see "Using Headquarters Client" later in this book.
Initiating communication Before stores can communicate with Headquarters, you must perform the
following tasks:
Configure Headquarters Server. Enter settings in Headquarters Server that
will enable it to connect to the Headquarters database and communicate with
Headquarters Client at each of the stores.
Synchronize store IDs. Whenever a new store is created, Headquarters
automatically issues Worksheet Style 101: Synchronize Store Database. This
worksheet synchronizes the internal reference numbers, or index, of the store
and Headquarters databases. However, it will only run successfully if the store
IDs assigned in the Headquarters database match the store IDs in the actual
store databases.
Note Worksheet 101 does not modify values either at Headquarters or at
the store, and it does not adjust any item properties. It simply gives
Headquarters and the store the same index number.
Issue the first data upload worksheet. Worksheet Style 401: Request Data
Upload is the primary communications worksheet. Typically, this worksheet is
processed automatically, with no user intervention required, at each of a
store's scheduled connections. It effects the transfer of most of the data
exchanged between Headquarters and the stores, including the upload of
sales data, customer information, purchase orders, and inventory transfers
and the download of interstore transfers and new global customers. You have
the option to upload the data that has been created or modified after a
certain date and time.
You must manually create and issue the first Worksheet 401. As it is
processed by each store, a new Worksheet 401 is automatically issued and
approved, with an effective date set to coincide with the store's next
scheduled connection.
28 Headquarters Getting Started Guide
Request and commit inventory counts for stores already running Store
Operations. If you have any stores that have already been running Store
Operations – that is, stores for which you did not export a new store database
– the Headquarters database will not initially contain any inventory
information for those stores. To get this inventory information into the
Headquarters database, you will need to issue an extra worksheet, Worksheet
Style 501: Request a Full Item Count, which uploads an item quantity list for
each store selected in the worksheet. After the worksheet has been processed
by all of your pre-existing stores, run the Inventory Wizard, Task 190: Perform
Full Item Count Reconciliation, in order to commit the stores' quantities to the
Headquarters database.
Connect and process worksheets. At each store, connect to Headquarters
and process the worksheets you've issued. You will probably want to connect
manually, since this initial connection is part of the deployment process rather
than a regular scheduled connection.
To configure Headquarters Server
1 At Headquarters, open Headquarters Server.
2 On the File menu, click Stop. The server cannot be configured while it is
running.
3 On the File menu, click Configuration.
4 On the Database tab, specify the server, logon information, and name of the
Headquarters database, and then make sure that Headquarters Server will
successfully connect to the specified database by clicking Test Database
Connection.
5 On the HQ Server tab, enter a port number between 34000 and 35000. This
port must be identical to the port you define in Headquarters Client. If you
are using a firewall to access the Internet for communications with the stores,
make sure the SOCKS protocol using the port you selected is allowed to pass
through the firewall.
6 On the File menu, click Start.

Bringing stores online 29
To synchronize store IDs
1 At Headquarters, open Headquarters Manager and log on. On the Admin
menu, click Stores. Select the store in question, and then click Properties.
Note the number defined in the Store ID box on the Location tab.
2 At the store, open Store Operations Manager and log on. On the File menu,
click Configuration, click the Multi-Store tab, and then make sure the store
ID shown matches the one defined in Headquarters Manager. If it does not,
change it, keeping in mind that each store in the enterprise must have a
unique store ID.
3 Repeat for each of the stores in your organization.
Note Once Worksheet 101 has been processed (this happens automatically
during the initial communication with the store), the store IDs in the Store
Operations databases cannot be modified.
To issue the first data upload worksheet
1 At Headquarters, open Headquarters Manager and log on.
2 On the Worksheets menu, click Style 401: Request Data Upload.
3 On the Select Stores page, click All, and then click Next.
4 On the Enter Title and Effective Date page, type a title for the worksheet (if
desired), select the date and enter the time when you want the worksheet to
become effective, and then click Next.
5 Click Finish to issue the worksheet.
6 Review the worksheet contents, make any desired changes to the title,
effective date, from date, or stores list, and then click Approve.
Note In the Worksheet Status window, blue flags indicate worksheets that have
been approved for processing. After the worksheets are successfully
completed, the flags turn green. If no worksheets are listed in the
window, click the All Styles folder. To update the information in the
Worksheet Status window, click the Refresh Data button on the
toolbar.
30 Headquarters Getting Started Guide
To request item counts for stores already running Store Operations
1 Open Headquarters Manager and log on.
2 On the Worksheets menu, click Style 501: Request a full item count.
3 Follow the wizard prompts, selecting only those stores that were running
Store Operations prior to implementation of Headquarters, and then click
Finish to issue the worksheet.
Note The data upload for Worksheet 501 will take some time; it is best to
schedule the worksheet during non-peak hours.
4 Review the worksheet contents, and then click Approve to approve the
worksheet for processing.
To connect each store to Headquarters and process worksheets
1 At Headquarters, open Headquarters Server, and then start the server by
clicking Start on the File menu.
2 At each store, open Headquarters Client and click Connect on the Server
menu, or click the Connect button on the toolbar.
3 Review the log for any warnings or errors.
Tip If the error "Message contained an invalid Store ID / Password. Message
was not accepted" appears in the Headquarters Client window, make sure
that the store ID number for each store is the same in Headquarters
Manager (located at the head office) and Store Operations Manager
(located at the store). For more information, refer to "To synchronize
store IDs" above.
To commit item counts for stores already running Store Operations
1 At Headquarters, open Headquarters Manager and log on.
2 In the Worksheet Status window, confirm that Worksheet 501 was processed
successfully by all pre-existing stores. Successfully completed worksheets are
marked with green flags.
3 On the File menu, click Maintenance Mode, and then click Yes.
4 On the Wizards menu, click Inventory Wizard.

Bringing stores online 31
5 On the Select Inventory Task page, select Task 190: Perform Full Item
Count Reconciliation, and then click Next.
6 On the Compare Item Count page, select the first of your stores that were
already running Store Operations (that is, select a store that already had a
Store Operations database), click Next, and then click Finish.
7 In the Inventory Wizard Workpad window, review the item quantities in the
New HQ Qty column and make any desired changes, and then click Commit.
8 Repeat steps 4 through 7 for each of your other stores that were already
running Store Operations.
What's next With your databases and communication software set up, you are ready to begin
using Microsoft Dynamics RMS for the daily operations of your retail enterprise.
For information about using Headquarters Manager, see Headquarters Online
Help or the Headquarters User's Guide. For information about using Store
Operations Manager and Store Operations POS, see Store Operations Online Help
or the Store Operations User's Guide.
The remainder of this book goes into more detail about using Headquarters
Administrator, Headquarters Server, and Headquarters Client. Help files for each
of those programs are also available; they can be opened from the program's
Help menu.

32 Headquarters Getting Started Guide
Using Headquarters Administrator "Bringing stores online" describes the basics of configuring your Headquarters
installation. In this section, we'll cover the remaining configuration settings in
Headquarters Administrator and describe how to use Headquarters Administrator
to maintain the Headquarters database.
Configuring Headquarters The settings in Headquarters Administrator control the way Headquarters
Manager accesses database and other information. You need to configure these
settings for each Headquarters workstation. The database name and location
settings should be duplicated on each workstation, but logo, file, and template
locations can vary from one workstation to the next.
Providing connection information to Headquarters Manager Settings in Headquarters Administrator provide the information Headquarters
Manager needs to connect to the Headquarters database.
Note If you only have one Headquarters workstation and you followed the
instructions in "Bringing stores online," you have already completed this
task.
To provide connection information to Headquarters Manager
1 On the File menu in Headquarters Administrator, click Configuration.
2 On the Database tab, enter the name of the server where the Headquarters
database is located, valid SQL Server logon credentials for that server, the
name of the Headquarters database, and the amount of time, in seconds, that
Headquarters should attempt to connect to the database before it times out.
3 To confirm that you've entered accurate connection information, click Test
Database Connection.
4 Click OK.

Using Headquarters Administrator 33
Setting the Headquarters logo location You can supply a logo that will appear on your Headquarters reports.
To set the Headquarters logo
1 On the File menu in Headquarters Administrator, click Configuration.
2 Click the Settings tab.
3 In the HQ logo filename box, type the location and name of your
Headquarters logo, or click the Browse button to select it.
4 Click OK.
Setting file locations Headquarters uses the path settings in Headquarters Administrator to find and
save the files used in day-to-day operations. You can enter path settings for each
of these types of files:
Custom definition files for standard reports
Custom definition files for Crystal Reports
Pictures (other than the Headquarters logo) that are used by Headquarters
Add-ins (third-party software or custom programs and tools) that should
appear on the Utilities menu in Headquarters Manager
Note Use Windows Folder Options to define what action Windows should take
when files are opened that have the extensions used by your add-ins.

34 Headquarters Getting Started Guide
To set file locations
1 On the File menu in Headquarters Administrator, click Configuration.
2 Click the Paths tab.
3 In each of the boxes, click the Browse button to navigate to the folder
where your files will be stored, such as C:\Program Files\Microsoft Retail
Management System\Headquarters\AddIns.
If the folder exists, select it, and then click OK.
If the folder does not exist, select the directory where you want the new
folder, click Make New Folder, type the folder's name, press ENTER, and then
click OK.
4 Click OK.
Setting template locations You can also use Headquarters Administrator to set the locations of the templates
used for purchase orders, inventory transfers, and account statements. These
settings are especially helpful when accessing templates that are written in
foreign languages.
To set template locations
1 On the File menu in Headquarters Administrator, click Configuration.
2 Click the Templates tab.
3 In each of the boxes, click the Browse button to navigate to the folder
where your templates will be stored, such as C:\Program Files\Microsoft Retail
Management System\Headquarters\ReceiptTemplates.
If the folder exists, select it, and then click OK.
If the folder does not exist, select the directory where you want the new
folder, click Make New Folder, type the folder's name, press ENTER, and then
click OK.
4 Click OK.

Using Headquarters Administrator 35
Maintaining the Headquarters database Headquarters Administrator offers a number of tools for maintaining your
Headquarters database.
Connecting to a database Headquarters Administrator should already be configured so that Headquarters
Manager is able to connect to the Headquarters database automatically. Within
Headquarters Administrator, however, you will need to use the Connect
command to manually connect to the database server in order to use the
program's database and query commands. Once connected, you can use the
Select command to quickly connect to a different database.
To connect to the database server
1 On the File menu, click Connect.
2 In the Server box, enter or select the name of the SQL Server where your
database is located.
3 Under Connection Information, select the appropriate authentication
method (SQL authentication is preferred), and then enter a valid logon name
and password.
4 In the Database box, select your database. You can only access the list of
databases after you've entered your logon information. If you have not
created your database yet, clear this box.
5 Click OK.
To select or connect to a different database
1 With a connection to the database server already established, click Select on
the Database menu.
2 Select the database that you want to connect to, and then click OK.
3 When Headquarters informs you that your database is the currently selected
database, click OK.

36 Headquarters Getting Started Guide
Backing up the Headquarters database You should regularly back up your Headquarters database to safeguard critical
data. The more frequently you back up, the more data you will be able to retrieve
and restore in the event of a system failure or natural disaster.
A backup is a copy of one or more files on your computer. Typically, a backup
contains everything you need to restore a program or database. When you back
up a database, you make a copy of the database on another computer or device.
Microsoft recommends keeping your backup files at a different physical location
than your database server.
For Headquarters installations that use SQL Server Express or MSDE 2000,
Headquarters Administrator includes a backup utility that you can use to back up
and restore your database.
Notes If you are using a server edition of SQL Server, Microsoft recommends
using SQL Server 2000 Enterprise Manager or SQL Server 2005
Management Studio to set up a maintenance schedule for backing up the
database, and to restore the database if that becomes necessary. For
more information, refer to the SQL Server Books Online.
The locations of the Headquarters database and your backup need to be
accessible by both Headquarters Administrator and SQL Server;
otherwise, you cannot create, back up, or restore the database. The paths
to these devices should be the paths as seen by SQL Server.

Using Headquarters Administrator 37
To back up the Headquarters database
1 In Headquarters Administrator, use the Connect command on the File menu
to connect to the database that you want to back up.
2 On the Database menu, click Backup.
3 In the Save As dialog box, select the drive and folder where you want to save
the backup file.
4 In the File name box, enter a name for the backup file.
5 In the Save as type box, select Backup files (*.bck).
6 Click Save.
Tip Use the universal naming convention (UNC) instead of drive letters. For
example, \\dbserver\backup\ is a valid path for both machines; whereas
mapped drives may only pertain to a local machine.
To restore the Headquarters database
1 In Headquarters Administrator, use the Connect command on the File menu
to connect to the database server where you want to restore the database.
2 On the Database menu, click Create.
3 On the Welcome screen of the Create Database Wizard, click Next.
4 On the Database Size screen, enter a name and initial size for the database
you are creating, and then click Next.
5 On the Database Growth screen, specify how the database file should grow,
and then click Next. In most cases, you can accept the defaults.
6 On the Create Database screen, click the Browse button to locate the
backup (.bck) file, select the file, click Open, and then click Next.
7 On the final wizard screen, click Finish.

38 Headquarters Getting Started Guide
Deleting a database If a database is damaged or becomes obsolete, you can remove it from your
server by first selecting the database and then deleting it.
Note Use extreme caution when you delete a database. This is a permanent
operation. Once a database is deleted, it cannot be retrieved except by
restoring from a backup. Any data added or updated since the last
backup will be lost.
To delete a database
1 Close Headquarters Manager on all workstations.
2 In Headquarters Administrator, use the Connect command on the File menu
to connect to the database server that holds the database that you want to
delete.
3 On the Database menu, click Select.
4 In the Select Database window, select the database you want to delete, and
then click OK. When Headquarters notifies you that your database is the
currently selected database, click OK.
5 Make sure the database shown in the status bar at the bottom of the
Headquarters Administrator window is the database that you want to delete.
6 On the Database menu, click Delete.
7 When Headquarters warns you that you are about to permanently destroy
your database, click Yes to continue.
8 When Headquarters warns you that deleting a database is an irreversible
operation, click Yes to continue.

Using Headquarters Administrator 39
Reindexing the database Over time, a database's tables and indexes can become unsynchronized. If you
experience slow database performance or unusual errors, you can reindex the
database. Reindexing should not be necessary more than a few times each year.
To reindex the database
1 In Headquarters Administrator, use the Connect command on the File menu
to connect to the database that you want to reindex.
2 On the Database menu, click Reindex.
3 When Headquarters asks if you want to continue, click Yes.
Checking the database You can use Headquarters Administrator to troubleshoot any database errors or
problems you encounter. When you check your database, Headquarters analyzes
the allocation and structural integrity of all the objects in the database.
Headquarters does not fix any errors; it will only notify you of existing problems
so that you can quickly find possible solutions.
Note If Headquarters finds any errors in the database, they should be
addressed by someone with experience in SQL Server and database
programming. Any errors in modifying the database can cause the
Headquarters software to be inoperable.
For more information about checking databases, see "DBCC CHECKDB (T-SQL)" in
SQL Server 2000 Books Online.
To check the database
1 In Headquarters Administrator, use the Connect command on the File menu
to connect to the database that you want to check.
2 On the Database menu, click Check.
3 When Headquarters asks if you want to continue, click Yes.
4 When Headquarters notifies you that DBCC execution is complete, click OK.

40 Headquarters Getting Started Guide
Changing collation The physical storage of character strings in SQL Server is controlled by collations.
A collation specifies the bit patterns that represent each character and the rules
by which characters are sorted and compared.
When you create a Headquarters database from the blank or sample database on
the CD-ROM, its collation is set to SQL_Latin1_General_CP1_CI_AS, the default for
U.S. English installations. If your SQL Server default collation is other than U.S.
English, you must change the Headquarters database collation to match your SQL
Server setting.
While earlier versions of SQL Server supported only one collation for each
instance of SQL Server, SQL Server 2000 and SQL Server 2005 support databases
that have different collations on the same server. When you install an instance of
SQL Server, you can specify the default collation for that instance during setup.
The default collation for the instance also becomes the default collation of the
system databases: master, model, tempdb, msdb, and Distribution. Most
organizations use U.S. English and the same collation for all of their SQL Server
databases, thereby eliminating all collation compatibility issues.
To change collation
1 In Headquarters Administrator, use the Connect command on the File menu
to connect to the database that you want to modify.
2 On the Database menu, click Change Collation.
3 In the New Collation box, select the new collation for the current database,
and then click OK.
4 When Headquarters asks if you want to proceed, click Yes.

Using Headquarters Administrator 41
Issuing queries Headquarters Administrator lets you make direct queries to the SQL Server in
order to view data from selected tables and columns. You can enter queries in a
full-text window, execute SQL statements, and view the results in a display
window.
Note This feature is intended for troubleshooting and diagnostic purposes only
and should not be used for normal operations. It is designed only for
experienced users in SQL Server and database programming. Any errors
in modifying the database can cause Headquarters to be inoperable.
Queries are SQL scripts constructed using Transact-SQL (T-SQL) statements. These
scripts are stored as files, usually with the *.sql extension. Whenever you run a
query, you make a specific request for information from the SQL Server database.
You can then retrieve, modify, or delete data. For example, this SQL query:
SELECT * FROM Item WHERE Quantity > 0 and Cost > 10
requests all records in which the quantity field has a value greater than 0 and the
cost field has a value greater than 10.
To create and run a new query
1 On the Query menu in Headquarters Administrator, click New.
2 On the SQL tab, type the T-SQL script.
3 Click the Run button. The results of your query are displayed in the
Result tab.

42 Headquarters Getting Started Guide
To save a new query so it can be used more than once
1 Make the Query window the active window by clicking in the title bar.
2 On the File menu, click Save As. (If you are saving changes to an existing
query, you can click Save and skip the remaining steps.)
3 Browse to the folder where you want to save your query.
4 In the File name box, type a name for the query.
5 In the Save as type box, select SQL Files (*.sql).
6 Click Save.
To open a saved query
1 On the File menu, click Open.
2 In the Open dialog box, locate and select the query file you want, and then
click Open.
Using Headquarters Server 43
Using Headquarters Server Headquarters Server exchanges data between headquarters and remote stores. It
listens for incoming messages, processes and saves data in the Headquarters
database, and forwards Headquarters data to remote stores as directed by
worksheets that you issue in Headquarters Manager.
You can use Headquarters Server to configure and monitor the server side of
Headquarters communication.
Configuring Headquarters Server For information about configuring Headquarters Server, see "Initiating
communication" in "Bringing stores online," earlier in this book.
Monitoring communication In Headquarters Server, you can view the state of the server connection and see
what stores are currently connected to Headquarters. Available controls let you
start and stop the server, configure the server to start automatically, and set the
refresh rate (the frequency with which the information in the window is updated).
To start or stop the server
On the File menu, click Start or Stop.
- or -
On the toolbar, click Start or Stop .

44 Headquarters Getting Started Guide
To start the server automatically when Headquarters Server is opened
1 On the File menu, click Configuration.
2 On the Options tab, select the Autostart Headquarters Server check box.
3 Click OK.
To change the refresh rate
1 On the File menu, click Configuration.
2 On the Options tab, enter the new refresh rate, in milliseconds.
3 Click OK.

Using Headquarters Client 45
Using Headquarters Client Headquarters Client enables your remote stores to communicate with the
Headquarters database. It is installed at each of your stores and sends
information from the store's Store Operations database to Headquarters Server
by means of an Internet, dial-up, or network connection. As discussed in "Bringing
stores online" earlier in this book, you can set up a connection schedule so that
Headquarters Client will connect to Headquarters automatically.
Before you can run Headquarters Client, you will need to activate the software.
Follow the instructions in the Activation Wizard.
The client window The Headquarters Client window displays information about the connections
attempted, the type of information exchanged with Headquarters Server, and any
errors that were encountered. The toolbar in the window allows you to perform
common tasks quickly and easily. The toolbar buttons are described in the
following list.
Button Purpose
Open log file
Save log file
Export log file
Print log file
Connect to Headquarters server
Disconnect from Headquarters server
Edit configuration
Debug
Mode Running in debug mode (only displayed when debug
mode is activated)

46 Headquarters Getting Started Guide
Configuring the connection For information about configuring the connection in Headquarters Client, see
"Initiating communication" in "Bringing stores online," earlier in this book.
Setting logging options Headquarters Client provides options that let you control what information
appears in the communication log, both on screen and in the HQClient.log file.
To display error messages in the log
1 On the File menu, click Configuration.
2 On the Options tab, select the Display error messages as they occur check
box.
3 Click OK.
To enter debug mode and log debug messages
1 On the File menu, click Configuration.
2 On the Options tab, select the Log debug messages check box.
3 Click OK.
Note In debug mode, Headquarters Client will display detailed logs that may
help you to troubleshoot connection issues or problems. While in this
mode, the words 'Debug Mode' appear in red on your toolbar and
messages with the debug icon will appear in the log.

Using Headquarters Client 47
Managing log files The event descriptions that appear in the Headquarters Client window are also
written to the HQClient.log file, typically located in C:\Program Files\Microsoft
Retail Management System\Headquarters Client. The size of this file can be
limited by setting a smaller maximum size for the log file. When the size limit is
reached, the older entries in the log file will be removed to make room for new
entries.
There are three ways to preserve older log files. One is to save a copy of
HQClient.log at any desired time. When you want to view this older log file, you
can open it in Headquarters Client, as described below. The second option is to
periodically export the log file to a text file. These text files are in a columnar
format that is easy to read in Notepad, Microsoft Office programs, or other
software. Finally, you can print the log file and save it in your files.
To set the maximum size of the log file
1 On the File menu in Headquarters Client, click Configuration.
2 On the Options tab, type a new maximum size for the log file. The size must
be at least 1MB.
3 If you entered a smaller size than the current size, click Yes when
Headquarters Client warns you that historical data may be lost.
4 Click OK.
To save the log file
1 On the File menu, click Save.
2 Browse to the folder where you want to save the log file, type a name for the
file, and then click Save.

48 Headquarters Getting Started Guide
To open a different log file
1 On the File menu, click Open.
2 Browse to the folder where the log file is located, select the file, and then click
Open.
Note Opening a different log file does not change which log file Headquarters
Client writes to. Communication events that occur while the alternate log
file is open will still be written to the default log file, C:\Program
Files\Microsoft Retail Management System\Headquarters
Client\HQClient.log.
To export a log file to a text file
1 On the File menu, click Export.
2 Browse to the folder where you want the new text file to be created, type a
name for the text file, and then click Save.
3 Click OK when Headquarters Client informs you that the file was successfully
exported.
To print the current log file
Open the log file that you want to print, and then, on the File menu, click Print.

Appendix A 49
Appendix A - Accessibility products and services Microsoft is committed to making its products and services easier for everyone to
use. The following topics provide information about the features, products, and
services that make Microsoft® Windows® more accessible for people with
disabilities:
Accessibility features of Windows
Documentation in alternative formats
Customer service for people with hearing impairments
For more information
Note The information in this section may apply only to users who license
Microsoft products in the United States. If you obtained this product
outside of the United States, you can use the subsidiary information card
that came with your software package or visit the Microsoft Accessibility
Web site at www.microsoft.com/enable for a list of Microsoft support
services telephone numbers and addresses. You can contact your
subsidiary to find out whether the type of products and services
described in this section are available in your area. Information about
accessibility is available in other languages, including Japanese and
French.
Accessibility features of Windows The Windows operating system has many built-in accessibility features that are
useful for individuals who have difficulty typing or using a mouse, are blind or
have low vision, or who are deaf or hard-of-hearing. The features are installed
during Setup. For more information about these features, see Help in Windows
and the Microsoft Accessibility Web site at www.microsoft.com/enable.
Free step-by-step tutorials
Microsoft offers a series of step-by-step tutorials that provide detailed
procedures for adjusting the accessibility options and settings on your computer.
This information is presented in a side-by-side format so that you can learn how
to use the mouse, the keyboard, or a combination of both.
50 Headquarters Getting Started Guide
To find step-by-step tutorials for Microsoft products, visit the Microsoft
Accessibility Web site at www.microsoft.com/enable.
Assistive technology products for Windows A wide variety of assistive technology products are available to make computers
easier to use for people with disabilities. You can search a catalog of assistive
technology products that run on Windows at the Microsoft Accessibility Web site
at www.microsoft.com/enable.
If you use assistive technology, be sure to contact your assistive technology
vendor before you upgrade your software or hardware to check for possible
compatibility issues.
Documentation in alternative formats If you have difficulty reading or handling printed materials, you can obtain the
documentation for many Microsoft products in more accessible formats. You can
view an index of accessible product documentation on the Microsoft Accessibility
Web site at www.microsoft.com/enable.
In addition, you can obtain additional Microsoft publications from Recording for
the Blind & Dyslexic, Inc. (RFB&D). RFB&D distributes these documents to
registered, eligible members of their distribution service. For information about
the availability of Microsoft product documentation and books from Microsoft
Press, contact:
Recording for the Blind & Dyslexic, Inc.
20 Roszel Road
Princeton, NJ 08540
Telephone number in the United States: (800) 221-4792
Telephone number outside the United States and Canada: (609) 452-0606
Fax: (609) 987-8116
Visit the Recording for the Blind & Dyslexic Web site at www.rfbd.org.
Note that Web addresses can change, so you might be unable to connect to the
web sites mentioned here.

Appendix A 51
Customer service for people with hearing impairments If you are deaf or hard-of-hearing, complete access to Microsoft product and
customer services is available through a text telephone (TTY/TDD) service:
For customer service, contact Microsoft Sales Information Center at (800)
892-5234 between 6:30 A.M. and 5:30 P.M. Pacific Time, Monday through
Friday, excluding holidays.
For technical assistance in the United States, contact Microsoft Product
Support Services at (800) 892-5234 between 6:00 A.M. and 6:00 P.M. Pacific
Time, Monday through Friday, excluding holidays. In Canada, dial (905) 568-
9641 between 8:00 A.M. and 8:00 P.M. Eastern Time, Monday through Friday,
excluding holidays.
Microsoft Support Services are subject to the prices, terms, and conditions in
place at the time the service is used.
For more information For more information about how accessible technology for computers helps to
improve the lives of people with disabilities, see the Microsoft Accessibility Web
site at www.microsoft.com/enable.

Index 53
Index
A
accessibility products and services 49
account statements template 34
activating Headquarters 8
add-ins location 33
Administrator See Headquarters Administrator
analyzing databases 39
approving worksheets 14, 29, 30
assistive technology products 50
authentication 9
automatically starting Headquarters Server 44
available hard disk space 6
B
backing up
exported store databases 23
Headquarters Client log files 47
Headquarters database 36
Backup command, Headquarters
Administrator 37
bringing stores online 15
buttons, Headquarters Client 45
C
centrally maintained data 14, 15, 23, 25
Change Collation command, Headquarters
Administrator 40
changing database collation 40
changing databases 35
Check command, Headquarters
Administrator 39
checking the Headquarters database 39
Client See Headquarters Client
Client Network Utility 11
communications
configuring Headquarters Client 26
configuring Headquarters Server 28
initiating 27
communications (continued)
network protocols and 11
port numbers 26, 28
processing worksheets 30
requesting data upload from stores 27, 29
requesting item counts from existing stores
28, 30
system requirements 6
Windows Firewall and 11
communications server
See Headquarters Server
components of Headquarters 5, 7
computers
deployment diagram 7
names 9
system requirements 6
Configuration command
Headquarters Administrator 20, 32
Headquarters Client 26, 46, 47
Headquarters Server 28, 44
configuring Headquarters 20, 32
configuring Headquarters Client 26
configuring Headquarters Server 28
Connect command, Headquarters
Administrator 35
Connect command, Headquarters Client 30
connecting to Headquarters Server 30
connecting to the Headquarters database 35
connection schedules 21, 22
connections
configuring 26, 28
dial-up, creating or selecting 27
network protocols and 11
scheduling 21, 22
setting up 26, 27, 28
system requirements 6
Windows Firewall and 11
copy protection devices 3
counts, physical inventory 25, 28, 30

54 Headquarters Getting Started Guide
Create Database Wizard, Headquarters
Administrator 19
creating backups 23, 36
creating databases
Headquarters database 19
master store database 15
sample Headquarters database 12
template store database 17
creating queries 41
creating worksheets See issuing worksheets
Crystal Reports definition files 33
customer support 4, 51
CustomerSource 4
D
data, types of
centrally maintained data 15
locally originated data 24
store-specific data 17
data upload from stores, requesting 27, 29
database engines See Microsoft SQL Server
database server
See also Headquarters Server and Microsoft
SQL Server
connecting to 35
naming, UNC 37
network protocols and 11
starting 28
databases
collations 40
exported See exported store databases
Headquarters 19
master store database 15
new store databases 22
queries See queries
sample Headquarters database 12
size of 9, 19
template store database 17
DBCC CHECKDB 39
debug mode, Headquarters Client 46
defining network protocols 11
defining stores 20
Delete command, Headquarters
Administrator 38
deleting Headquarters databases 38
deployment diagram 7
dial-up connections 6, 27
direct queries See queries
disabilities, products and services for users
with 49
disk space 6
documentation
described 31
in alternative formats 50
dongles 3
E
errors, checking the Headquarters database
for 39
errors, displaying in Headquarters Client 46
executing queries 41
Export command, Headquarters Client 48
Export Database Wizard, Headquarters
Administrator 22
exported store databases
backing up 23
centrally maintained data in 23
restoring 25
store-specific data in 23
exporting log files, Headquarters Client 48
exporting store databases 22
F
file locations
logo 33
report definition files, pictures, and
add-ins 33
templates 34
finding information using queries 41
finding problems in databases 39
firewalls 11
flags in Worksheet Status window,
Headquarters Manager 14, 29
full item count reconciliation 28, 30
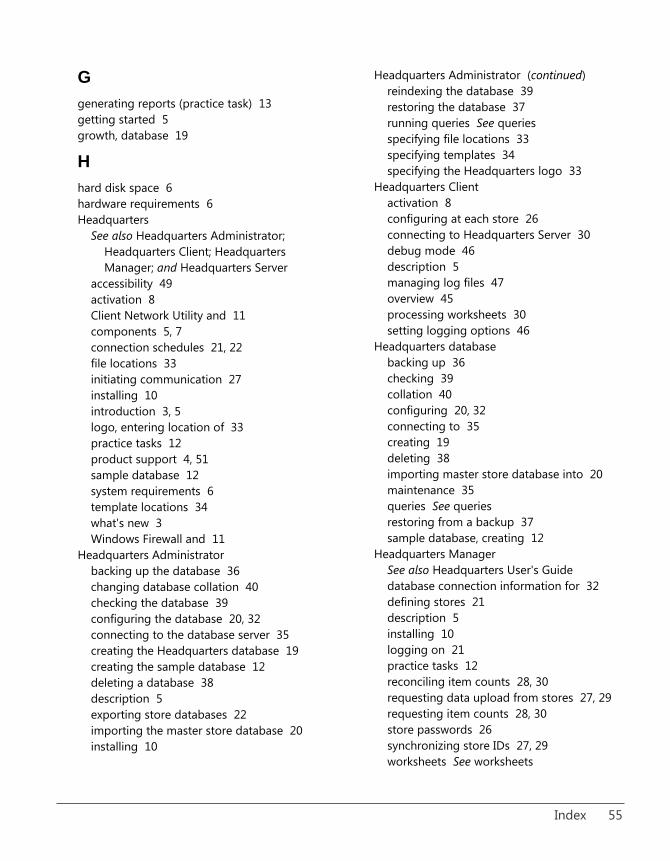
Index 55
G
generating reports (practice task) 13
getting started 5
growth, database 19
H
hard disk space 6
hardware requirements 6
Headquarters
See also Headquarters Administrator;
Headquarters Client; Headquarters
Manager; and Headquarters Server
accessibility 49
activation 8
Client Network Utility and 11
components 5, 7
connection schedules 21, 22
file locations 33
initiating communication 27
installing 10
introduction 3, 5
logo, entering location of 33
practice tasks 12
product support 4, 51
sample database 12
system requirements 6
template locations 34
what's new 3
Windows Firewall and 11
Headquarters Administrator
backing up the database 36
changing database collation 40
checking the database 39
configuring the database 20, 32
connecting to the database server 35
creating the Headquarters database 19
creating the sample database 12
deleting a database 38
description 5
exporting store databases 22
importing the master store database 20
installing 10
Headquarters Administrator (continued)
reindexing the database 39
restoring the database 37
running queries See queries
specifying file locations 33
specifying templates 34
specifying the Headquarters logo 33
Headquarters Client
activation 8
configuring at each store 26
connecting to Headquarters Server 30
debug mode 46
description 5
managing log files 47
overview 45
processing worksheets 30
setting logging options 46
Headquarters database
backing up 36
checking 39
collation 40
configuring 20, 32
connecting to 35
creating 19
deleting 38
importing master store database into 20
maintenance 35
queries See queries
restoring from a backup 37
sample database, creating 12
Headquarters Manager
See also Headquarters User's Guide
database connection information for 32
defining stores 21
description 5
installing 10
logging on 21
practice tasks 12
reconciling item counts 28, 30
requesting data upload from stores 27, 29
requesting item counts 28, 30
store passwords 26
synchronizing store IDs 27, 29
worksheets See worksheets

56 Headquarters Getting Started Guide
Headquarters Server
configuring 28
connecting to 30
description 5
installing 10
overview 43
refresh rate 44
starting the server 28, 30, 43
stopping the server 43
help
accessibility products and services 49
documentation in alternative formats 50
online Help files 31
product support 4, 51
history, worksheet 14
HQClient.log 46, 47
I
identifying the Headquarters database for
Headquarters Manager 20, 32
IDs, store 21, 27, 29, 30
IDs, user 9, 16, 21
Import Store Operations Data command,
Headquarters Administrator 20
importing master store database into
Headquarters 20
indexes, database 39
initial item quantities 21
installing Headquarters
deployment diagram 7
instructions 10
system requirements 6
installing Microsoft SQL Server 9
integrity of databases, analyzing 39
Internet connections 6
invalid store IDs or passwords 30
inventory counts 25, 28, 30
inventory transfers template 34
Inventory Wizard, Headquarters Manager
28, 30
ISDN connections 6
issuing queries 41
issuing worksheets
practice task 14
requesting data upload 27, 29
requesting item counts from existing stores
28, 30
synchronizing store IDs 27, 29
item quantities
initial values in Headquarters database 21
requesting from existing stores 28, 30
updating at stores 25
items, viewing (practice task) 13
L
LAN connections 6
layaway commitment quantities 21
licensing 8
local area network connections 6
locally originated data 24, 25
log files, Headquarters Client
exporting 48
managing size and location of 47
opening 48
printing 48
saving 47
setting logging options 46
logging on
default Headquarters account 21
default Store Operations account 16
Microsoft SQL Server authentication 9
practice task 13
logo, Headquarters 33
M
maintaining the Headquarters database 35
maintenance mode 13, 21, 30
Manager See Headquarters Manager
manual connection to Headquarters 30
master store database
creating 15
importing into the Headquarters
database 20
memory requirements 6, 10

Index 57
Microsoft Dynamics RMS Headquarters
See Headquarters
Microsoft product support 4, 51
Microsoft SQL Server
authentication 9
computer names and 9
description 9
editions 6, 9
installation notes 9
queries See queries
RAM recommendation 10
support for SQL Server Express 3
system requirements 6
Microsoft Windows
accessibility features 49
system requirements 6
modes
authentication modes 9
debug mode, Headquarters Client 46
maintenance mode 13, 21, 30
MSDE 2000 3, 6
N
Named Pipes 11
names
computer 9
database server 37
UNC 37
user 9, 16, 21
network connections 6
network protocols 11
network setup
Client Network Utility 11
Microsoft SQL Server notes 9
Windows Firewall 11
New command, Headquarters
Administrator 41
new features 3
O
online Help 31
Open command, Headquarters
Administrator 42
Open command, Headquarters Client 48
opening log files, Headquarters Client 48
opening queries 42
operating systems 6
orders template 34
P
passwords
default Headquarters account 21
default Store Operations account 16
Microsoft SQL Server authentication 9
store 26, 30
pending worksheets, processing 30
phone support 4, 51
physical inventory counts 25, 28, 30
picture locations
general 33
logo 33
port numbers 26, 28
practicing Headquarters tasks 12
Print command, Headquarters Client 48
printing log files, Headquarters Client 48
problems, checking the Headquarters database
for 39
processing worksheets 30
processor requirements 6
product support 4, 51
profiles, store 21, 22
protocols, network 11
purchase orders template 34
Q
quantities
initial values in Headquarters database 21
requesting from existing stores 28, 30
updating at stores 25
queries
creating and running 41
opening saved queries 42
overview 41
saving 42

58 Headquarters Getting Started Guide
R
RAM requirements 6, 10
reconciling item counts for existing stores
28, 30
Recording for the Blind & Dyslexic 50
refresh rate, Headquarters Server 44
Reindex command, Headquarters
Administrator 39
reindexing the Headquarters database 39
remote connections
Client Network Utility 11
universal naming convention and 37
Windows Firewall and 11
removing Headquarters databases 38
reorder points 21
reporting database errors 39
reports
definition files 33
generating (practice task) 13
logo for 33
requesting data upload from stores 27, 29
requesting item counts from existing stores
28, 30
restock levels 21
restoring exported store databases 25
restoring the Headquarters database 37
results of queries, viewing 41
Retail Management System Headquarters
See Headquarters
rmshqdb.bck 19
rmshqsample.bck 12
running queries 41
S
sales taxes 22
sample database
collation 40
practicing with 12
sample query 41
Save command, Headquarters Client 47
Save commands, Headquarters
Administrator 42
saved queries, opening 42
saving copies of the Headquarters database
36
saving log files, Headquarters Client 47
saving queries 42
scanning for database errors 39
schedules, connection 21, 22
scripts See queries
security
adding security levels to the template store
database 18
authentication 9
default passwords 16, 21
Microsoft SQL Server updates 10
store passwords 26
Select command, Headquarters Administrator
35, 38
selecting Headquarters database 35
Server See Headquarters Server
server names 37
service plans 4
setup
bringing stores online 15
configuring Headquarters Client 26
configuring Headquarters Server 28
configuring Windows Firewall 11
creating the Headquarters database 19
creating the master store database 15
creating the sample Headquarters
database 12
creating the template store database 17
defining and exporting stores 20
deployment diagram 7
initiating communication 27
installing Headquarters 10
installing Headquarters Client 10
installing Microsoft SQL Server 9
running Client Network Utility 11
setting up stores 24
size, database 9, 19
size limit, Headquarters Client log file 47
software requirements 6
.sql query files See queries
SQL Server See Microsoft SQL Server

Index 59
staggered connection schedules 21, 22
Start command, Headquarters Server
28, 30, 43
starting Headquarters Server 28, 30, 43
statements template 34
status, worksheet 14, 29
Stop command, Headquarters Server 43
stopping Headquarters Server 43
store databases
creating master store database 15
creating template store database 17
exported See exported store databases
exporting 22
importing the master store database into
Headquarters 20
uploading data from 27, 29
store IDs 21, 27, 29, 30
Store Operations Administrator
creating the master store database 16
creating the template store database 18
restoring exported store databases 25
Store Operations Manager
logging on 16
physical inventory counts 25
revising locally originated data 25
viewing or changing store IDs 29
store passwords 26, 30
store profiles 21, 22
stores
connection schedules 21, 22
counting physical inventory 25, 30
defining and exporting 20
IDs 21, 27, 29, 30
initiating communication 27
installing Headquarters Client 10, 26
passwords 26, 30
profiles 21, 22
requesting data upload from 27, 29
requesting item counts from existing stores
28, 30
setting up 24
updating data for 25
store-specific data 17, 23, 25
structural integrity of databases 39
support services 4, 51
switching between databases 35
synchronizing store IDs 27, 29
system databases, collation 40
system requirements 6, 11
T
tables, database 39
TCP/IP 11
technical support 4, 51
telephone support 4, 51
template store database
clearing from memory 24
creating 17
loading into exported store databases 22
revising data inherited from 25
switching to another 24
templates location 34
text files, exporting Headquarters Client log
files as 48
text telephone service 51
toolbar, Headquarters Client 45
Transact-SQL 39, 41
transfers template 34
troubleshooting
Headquarters Client connections 46
Headquarters database issues 39
T-SQL 39, 41
TTY/TDD service 51
tutorials for setting accessibility options 49
types of data
centrally maintained data 15
locally originated data 24
store-specific data 17
U
UNC (universal naming convention) 37
uploading data from stores 27, 29
user IDs 9, 16, 21

60 Headquarters Getting Started Guide
V
viewing items (practice task) 13
viewing query results 41
virtual private network connections 6
VPN connections 6
W
WAN connections 6
what's new 3
wide area network connections 6
Windows See Microsoft Windows
Windows authentication 9
Windows Firewall 11
workload governor 3
worksheets
issuing (practice task) 14
processing 30
requesting data upload 27, 29
requesting item counts from existing stores
28, 30
status 14, 29
synchronizing store IDs 27, 29
viewing history (practice task) 14
viewing status (practice task) 14
writing queries 41


![cpwd.gov.incpwd.gov.in/WriteReadData/deptexams_cir/25110.pdf · ZONE-PNB PROJECT DIVN Ill [Field] HQ-DG-HQ- HQ-HQ-HQ NR-RECìlONAL OFFICE- REGIONAL ... VS 104 1964JEC106 1 985 Copy](https://img.pdfslide.us/doc/110x75/5aa856407f8b9a95188b6e36/cpwdgov-project-divn-ill-field-hq-dg-hq-hq-hq-hq-nr-reclonal-office-regional.jpg)