Embed Size (px)
Citation preview

RM200QC
User Manual

RM200QC User Manual
2
Equipment Information
Use of this equipment in a manner other than that specified by X-Rite, Incorporated may compromise design integrity and become unsafe.
Warning: This instrument is not for use in explosive environments.
No user serviceable parts in this product.
For your safety, do not look directly into the measurement optics when the instrument is on.
Do not immerse the instrument in liquid.
Cold weather may affect the speed of the display and the accuracy of matches.
Do not expose the instrument to extreme heat; do not leave in the sun.
Transportation: This product contains a lithium-ion battery. Should you need to ship this device, you may wish to consult published guidance documents by one or more of these organizations for advice on how to comply with the regulations: IATA, ICOA, IMDG & PHMSA. The single cell battery contained in the RM200QC device is 25g in weight, 3.7V, 1030mAh, and complies with the UN 38.3 tests in effect the year it was originally shipped.
Instructions for disposal: Please dispose of Waste Electrical and Electronic Equipment (WEEE) at designated collection points for the recycling of such equipment.
CE Declaration
Hereby, X-Rite, Incorporated, declares that this RM200 Series is in compliance with the essential requirements and other relevant provisions of Directive(s) EMC 2004/108/EC, LVD 2006/95/EC, and RoHS 2011/65/EU.
FCC Notice
NOTE: This equipment has been tested and found to comply with the limits for a Class B digital device, pursuant to Part 15 of the FCC Rules. These limits are designed to provide reasonable protection against harmful interference in a residential installation. This equipment generates, uses and can radiate radio frequency energy and, if not installed and used in accordance with the instructions, may cause harmful interference to radio communications. However, there is no guarantee that interference will not occur in a particular installation. If this equipment does cause harmful interference to radio or television reception, which can be determined by turning the equipment off and on, the user is encouraged to try to correct the interference by one or more of the following measures:
• Reorient or relocate the receiving antenna. • Increase the separation between the equipment and receiver. • Connect the equipment into an outlet on a circuit different from that to which the
receiver is connected. • Consult the dealer or an experienced radio/TV technician for help.

RM200QC User Manual
3
Industry Canada Compliance Statement
This Class B digital apparatus complies with Canadian ICES-003.
Cet appareil numérique de la classe B est conforme à la norme NMB-003 du Canada.
Limited Warranty
X-Rite warrants this Product against defects in material and workmanship for a period of twelve (12) months from the date of shipment from X-Rite’s facility, unless mandatory law provides for longer periods. During such time, X-Rite will either replace or repair at its discretion defective parts free of charge. The battery is warranted for 6 months and replaceable at an authorized X-Rite service center.
X-Rite’s warranties herein do not cover failure of warranted goods resulting from: (i) damage after shipment, accident, abuse, misuse, neglect, alteration or any other use not in accordance with X-Rite’s recommendations, accompanying documentation, published specifications, and standard industry practice; (ii) using the device in an operating environment outside the recommended specifications or failure to follow the maintenance procedures in X-Rite’s accompanying documentation or published specifications; (iii) repair or service by anyone other than X-Rite or its authorized representatives; (iv) the failure of the warranted goods caused by use of any parts or consumables not manufactured, distributed, or approved by X-Rite; (v) any attachments or modifications to the warranted goods that are not manufactured, distributed or approved by X-Rite. Consumable parts and Product cleaning are also not covered by the warranty.
X-Rite‘s sole and exclusive obligation for breach of the above warranties shall be the repair or replacement of any part, without charge, which within the warranty period is proven to X-Rite‘s reasonable satisfaction to have been defective. Repairs or replacement by X-Rite shall not revive an otherwise expired warranty, nor shall the same extend the duration of a warranty.
Customer shall be responsible for packaging and shipping the defective product to the service center designated by X-Rite. X-Rite shall pay for the return of the product to Customer if the shipment is to a location within the region in which the X-Rite service center is located. Customer shall be responsible for paying all shipping charges, duties, taxes, and any other charges for products returned to any other locations. Proof of purchase in the form of a bill of sale or receipted invoice which is evidence that the unit is within the Warranty period must be presented to obtain warranty service. Do not try to dismantle the Product. Unauthorized dismantling of the equipment will void all warranty claims. Contact the X-Rite Support or the nearest X-Rite Service Center, if you believe that the unit does not work anymore or does not work correctly.
THESE WARRANTIES ARE GIVEN SOLELY TO BUYER AND ARE IN LIEU OF ALL OTHER WARRANTIES, EXPRESSED OR IMPLIED, INCLUDING BUT NOT LIMITED TO THE IMPLIED
RM200QC User Manual
4
WARRANTIES OF MERCHANTABILITY, FITNESS FOR A PARTICULAR PURPOSE OR APPLICATION, AND NON-INFRINGEMENT. NO EMPLOYEE OR AGENT OF X-RITE, OTHER THAN AN OFFICER OF X-RITE, IS AUTHORIZED TO MAKE ANY WARRANTY IN ADDITION TO THE FOREGOING.
Proprietary Notice
The information contained in this manual is derived from patent and proprietary data. The contents of this manual are the property of X-Rite, Incorporated and are copyrighted. Any reproduction in whole or part is strictly prohibited. Publication of this information does not imply any rights to reproduce or use this manual for any purpose other than installing, operating, or maintaining this instrument. No part of this manual may be reproduced, transcribed, transmitted, stored in a retrieval system, or translated into any language or computer language, in any form.
This product may be covered by one or more patents. Refer to the instrument for actual patent numbers.
© 2013 by X-Rite, Incorporated “ALL RIGHTS RESERVED”
X-Rite is a registered trademark of X-Rite, Incorporated. All other logos, brand names, and product names mentioned are the properties of their respective holders.

RM200QC User Manual
5
Table of Contents
Description ............................................................................................................................................................ 6 Package Contents .................................................................................................................................................. 7 Important Information .......................................................................................................................................... 7
Getting Started ..................................................................................................... 8 Installing the Software .......................................................................................................................................... 8 Charging the Battery ............................................................................................................................................. 8 Powering On and Off (battery operation only) ..................................................................................................... 9 Initial Startup ........................................................................................................................................................ 9
Function Screens ................................................................................................... 11
Using the RM200QC Instrument ........................................................................... 12 General Use ........................................................................................................................................................... 12 Changing Aperture View ....................................................................................................................................... 13 Navigating the Screens .......................................................................................................................................... 13
Selecting Samples ................................................................................................. 15 Obtaining a Good Measurement .......................................................................................................................... 15 Non-ideal Samples ................................................................................................................................................ 15
Calibration ............................................................................................................ 16 Recertification ....................................................................................................................................................... 17
Operation ............................................................................................................. 18 Settings Menu ....................................................................................................................................................... 18
Language ...................................................................................................................................................... 18 USB Report Mode ........................................................................................................................................ 18 Calibrate ....................................................................................................................................................... 20 Aperture ....................................................................................................................................................... 20 Display Options ............................................................................................................................................ 21 Measurement Setup .................................................................................................................................... 21 Tolerance ..................................................................................................................................................... 22 Volume ......................................................................................................................................................... 23 Product Info ................................................................................................................................................. 23 Date and Time .............................................................................................................................................. 24 Tutorial ......................................................................................................................................................... 24 Reset Device ................................................................................................................................................ 25 Security ........................................................................................................................................................ 25
Standard Menu ..................................................................................................................................................... 27 Creating a Standard ..................................................................................................................................... 27 Editing a Standard ........................................................................................................................................ 29
Color QC Menu ...................................................................................................................................................... 31 Measuring Samples ...................................................................................................................................... 31 Saving a Tag with a Measurement ............................................................................................................... 33
Quick Check Menu ................................................................................................................................................ 35 Color Compare ............................................................................................................................................. 35 Opacity Mode .............................................................................................................................................. 36
Sample Records Menu .......................................................................................................................................... 38 Delete All Sample ......................................................................................................................................... 39
Appendices ........................................................................................................... 40 Troubleshooting .................................................................................................................................................... 40 Screen Messages ................................................................................................................................................... 40 Cleaning................................................................................................................................................................. 41
Cleaning the Optics ...................................................................................................................................... 41 Cleaning the Calibration Reference ............................................................................................................. 42
Technical Specifications ........................................................................................................................................ 43 FAQs ...................................................................................................................................................................... 43

RM200QC User Manual
6
Introduction
Thank you for purchasing the X-Rite RM200QC, this handheld spectrocolorimeter provides an inexpensive yet powerful way to record and communicate color difference to speed introduction of new products and reduce instances of scrap.
It simplifies how textiles, coatings, plastic molding and other industries can compare color parts in production with set standards, and then create reports.
Description
1 - Lanyard loop: Provides a secure way to carry your device.
2 - Power on/off: Used to turn the instrument on and off.
3 - Measure button: Two stage button; press lightly to start preview and firmly to measure. Lightly pressing this button always returns you to the Color QC screen.
4 - Navigation control: Navigates the on screen menus and function bar in four directions. Pressing on the left side moves the focus to the next available item to the left. Pressing on the right side moves the focus to the next available item to the right. The top and bottom sides perform the same function, only in an up and down direction.
5 -Enter button: Selects menu items and opens tag menu.
6 - USB connection: For charging the battery and interface to the software.
7 - Speaker and Microphone: For recording and playback of voice tags.
8 - Display: Communicates color information, instrument status, and option.
9 - Targeting marks: Allows for easy positioning on samples.
10 - White Reference slider: Positions the calibration tile for measurement or calibration/storage.
11 - Measurement optics: Area that illuminates and measures the color.
12 – Information label: Provides compliance, serial number and other information.
(2)
(1)
(3) (4)
(5)
(6)
(8)
(7) (11)
(10)
(9)
(12)

RM200QC User Manual
7
Package Contents
This package should contain the following:
• RM200QC instrument
• Software and manuals CD
• Lanyard
• Protective zipper carry case
• Protective pouch with belt clip
• USB interface cable
• Quick Start Guide
Important Information
The color display of RM200QC has limited capabilities dependant on viewing conditions. Colors on screen are for guidance only, verify with samples for visual accuracy or use Delta E for color difference comparison.
Variables that may affect the results given by the instrument include:
• Obstructions to the sensors located within the target window.
• Cold weather, which may cause the display to react slowly and matches to be less accurate.
• Improper use of the instrument or attempting to make a match from an unsuitable sample:
- The instrument was not flat against the sample - The sample is highly textured - The sample contains fluorescent colorants

RM200QC User Manual
8
Getting Started
Installing the Software
The software that is included with your instrument must be installed before plugging the USB cable into the computer. The software installs the required USB drivers for the instrument and application.
1. Insert the CD into the CD drive. If the CD does not autorun, double-click the Setup.exe file on the CD.
2. The setup program guides you through the rest of the installation process. Follow the instructions on each setup screen to complete the installation. When finished, remove the CD and store in a safe location.
3. Refer to the software help system for information on using the application.
Charging the Battery
Before using for the first time it is important that you charge the battery. If these guidelines are not followed, the internal lithium-ion battery may experience a shortened life.
1. Install the software that accompanied the instrument if you have not already done so.
2. Connect the USB cable to the RM200QC and your computer’s USB port. A battery charging screen momentarily appears. For the first time connection, a language selection screen also appears. Refer to the Initial Startup section on the following page for first time operation. Note: Some computers have low power USB ports which are typically located at the front. It is recommended that RM200QC is ONLY connected to high power ports.
During charging, the instrument switches on and indicates charging with a “lightning bolt” in the battery icon. The RM200QC will not power off while plugged into the computer USB port.
A full charge from empty will take 6 hours connected to a computer USB port.
Battery Icon Information
This icon at the top of the screen would indicate the battery is fully charged.
This icon at the top of the screen would indicate the battery has a sufficient charge for a substantial number of measurements.
This icon at the top of the screen would indicate the battery pack is low, but measurements are still possible. Battery should be charged soon.
This icon momentarily appears in the center of the screen and at the top when the instrument is connected to the computer, indicating the battery is charging.
The “lightning bolt” in the center of the icon at the top of the screen indicates the battery is charging.
This icon momentarily appears in the center of the screen when the instrument is disconnected from the computer.
Battery status is also reported in the Product Info menu item of the Settings window.

RM200QC User Manual
9
Powering On and Off (battery operation only)
Turn the instrument on by pressing and releasing the Power button.
You are asked to calibrate the instrument. Please follow the on screen instructions for calibration (refer to the Calibration section later in this manual for details).
The instrument automatically powers down into a sleep mode between 40 to 80 seconds of inactivity to conserver battery power. Any button press from the sleep mode will wake up the instrument.
After 75 minutes of inactivity, the instrument powers completely off. From this state, you will need to press the Power button to turn on the instrument.
You can manually power down the instrument by pressing the Power button, highlighting Yes from on the screen, and pressing the Enter button. Make sure to always position the white reference slider over the optics when powering down the instrument. You will need to press the Power button to turn on the instrument when this power down method is used.
Initial Startup
The very first time RM200QC is powered on, you are asked to select the desired operating language for the instrument. After the language is selected, you can go through a short tutorial on using the instrument and then perform a calibration.
The initial startup options are also chosen from within the Settings menu. Refer to the Setting menu in the Operation section to review and set other options, such as time and date.
Language Selection
1. Select the language from the list by pressing the up and down sides of the Navigation control. Refer to the Introduction section for button locations.
2. Press the Enter (Select) button to activate the language and continue with the Tutorial.
Press Enter to continue
Power button

RM200QC User Manual
10
View Tutorial
1. View the tutorial by pressing the right side of the Navigation control. Pressing the left side of the Navigation control takes you back one screen.
2. After the last Tutorial screen appears, the calibration screen appears.
Instrument Calibration
1. Perform a calibration as described on the screen. For additional information on calibration, refer to the Calibration section later in this manual.
Press Right Nav.
Press Right Nav.
Continue with remaining Tutorial screens

RM200QC User Manual
11
Function Screens
The RM200QC has been designed to allow easy navigation between functions.
Functions are selected by pressing the left or right sides of the Navigation control. The active function is indicated by the highlighted icon on the function bar and the title of the window.
Settings Standard Color QC Quick Check Smp Records
Configure the instrument.
Select from a list or measure a new
standard.
Perform Color QC sample
measurements.
Perform Color Compare and Opacity
measurements.
View and delete saved sample records.
Press Enter (tag highlighted) Press Navigation control (bottom)
Tag
Arrows indicate additional views
are available.
Nav. left Nav. left Nav. right Nav. right
Tag menu is for adding notes to a sample measurement.
Sample image, Color Plot, and Indices views are also available.
Nav. bottom
Battery indicator gauge Active function
Function bar (active function is highlighted)
Approximate standard and sample colors
Measurement information
RM200QC User Manual
12
Using the RM200QC Instrument
General Use
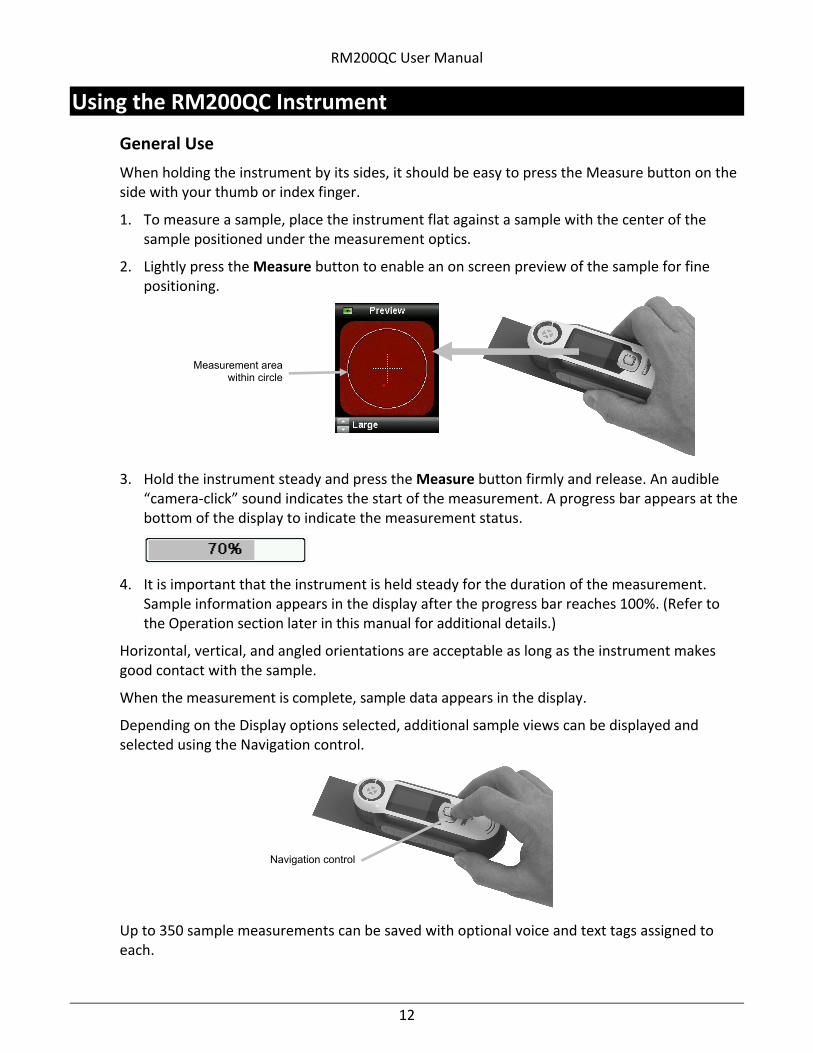
When holding the instrument by its sides, it should be easy to press the Measure button on the side with your thumb or index finger.
1. To measure a sample, place the instrument flat against a sample with the center of the sample positioned under the measurement optics.
2. Lightly press the Measure button to enable an on screen preview of the sample for fine positioning.
3. Hold the instrument steady and press the Measure button firmly and release. An audible “camera-click” sound indicates the start of the measurement. A progress bar appears at the bottom of the display to indicate the measurement status.
4. It is important that the instrument is held steady for the duration of the measurement. Sample information appears in the display after the progress bar reaches 100%. (Refer to the Operation section later in this manual for additional details.)
Horizontal, vertical, and angled orientations are acceptable as long as the instrument makes good contact with the sample.
When the measurement is complete, sample data appears in the display.
Depending on the Display options selected, additional sample views can be displayed and selected using the Navigation control.
Up to 350 sample measurements can be saved with optional voice and text tags assigned to each.
Navigation control
Measurement area within circle

RM200QC User Manual
13
Changing Aperture View
1. Lightly press and hold the Measure button to activate the preview. The area to be measured is indicated in the preview by the circle.
Two measurement areas are available:
• Small (4 mm aperture)
• Large (8 mm aperture)
2. Adjust the measurement area by pressing on the up or down side of the Navigation control while lightly holding down the Measure button.
(4 mm) (8 mm)
Note: You can preset your aperture preference in the Settings menu.
Navigating the Screens
Many secondary screens contain the words “Back”, “Select”, and “Exit” at the bottom. This refers to actions that take place when using the Navigation control and Enter button.
Back – indicates that the display is jumping back to the previous screen. This is selected by pressing the left side of the Navigation control.
Select – indicates that the option or item highlighted in the screen will be selected. This is chosen by pressing the Enter button.
Exit – indicates that the current screen will be closed and returned to the main match screen. This is selected by pressing the right side of the Navigation control.
Nav. up or down
RM200QC User Manual
14
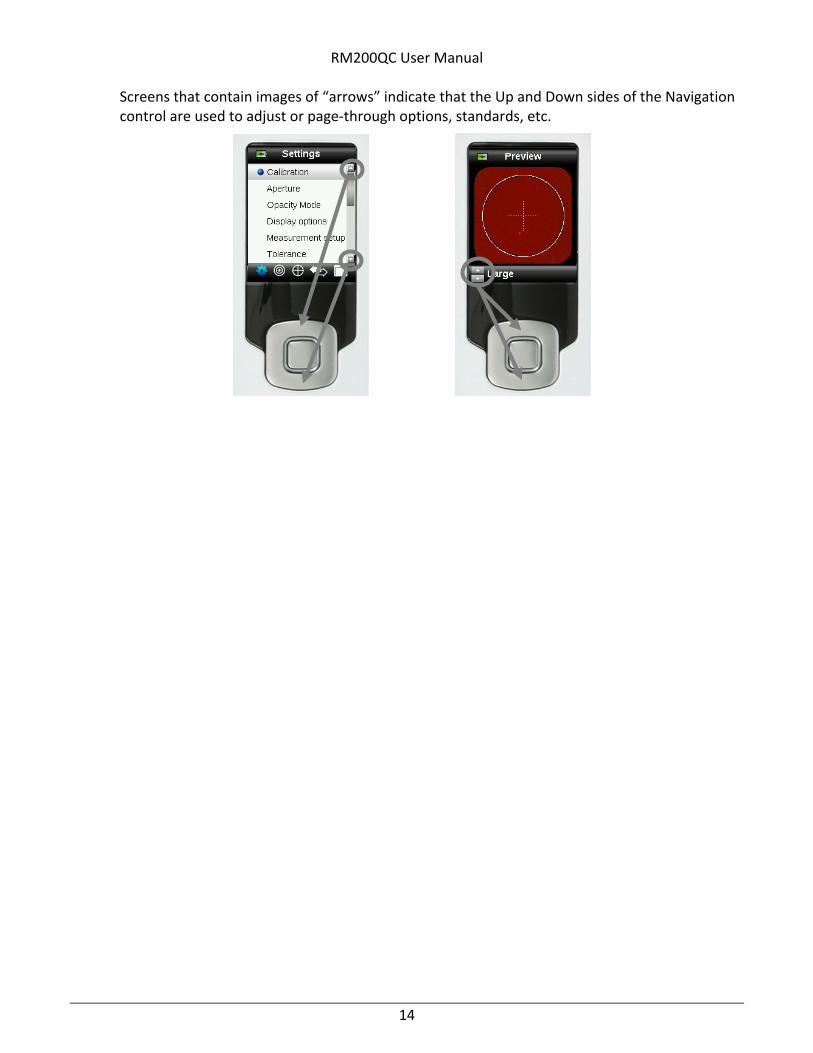
Screens that contain images of “arrows” indicate that the Up and Down sides of the Navigation control are used to adjust or page-through options, standards, etc.

RM200QC User Manual
15
Selecting Samples
The RM200QC instrument is unique in that is has been designed to measure a wide variety of samples without the limitations on minimum size or surface textures. RM200QC employs the principle of WYSIWYG (What You See Is What You Get).
The advanced X-Rite camera technology and state of the art multi directional LED illumination enables the instrument to:
• Compensate for surface irregularities with the use of a surface flatten algorithm. This enables comparison between textured sample measurements.
• Measure Small (4 mm) and Large (8 mm) sample areas.
Obtaining a Good Measurement
The instrument works best on samples that are dry and opaque. Samples can be oriented horizontally (on a table top), vertically, or at an angle. To obtain a good measurement, make sure the instrument is flat against the sample and is held steady during the measurement.
Curved or uneven sample: If the standard or sample has a curved or uneven surface, use the averaging option (refer to the Settings menu section). This allows you to take more than one measurement of a sample to obtain an average value.
Thin or translucent sample: If the sample is thin, place it on a flat surface before taking a measurement. If the sample is not opaque, place it on a white (plain paper) backing before taking a measurement.
Non-ideal Samples
Successful measurements will be difficult or impossible to obtain if samples appear unusually bright (may contain fluorescing pigments).

RM200QC User Manual
16
Calibration
IMPORTANT: The calibration reference is dramatically affected by smudge marks and dust, and must be kept clean. It is recommended that the instrument is cleaned regularly. Refer to the Cleaning section later in this manual for procedure on cleaning the calibration reference and optics.
When your instrument is first turned on, you are asked to perform a calibration. Thereafter, a calibration is required every 30 minutes or if a 3°C temperature change has occurred. Calibration of the instrument ensures optimum sample measurement performance. If desired, a calibration can be manually initiated by selecting Calibrate from the Settings menu.
The instrument includes an integrated white reference slider that protects the white reference when not in use.
1. When displayed to do so, move the white reference slider to the closed/calibration position over the optics.
2. Press Measure to initiate the calibration when the reference slider is positioned. A progress bar appears at the bottom of the display to indicate the calibration status.
3. After a successful calibration, you are prompted to reposition the slider back to its storage location before measuring samples.
Note: An error will be displayed if the white reference slider was not in the correct position for calibration. If this occurs, close the slider and repeat the calibration process. After recalibration this message continues, refer to Troubleshooting in the Appendices.
If at any time the instrument requests “Repeat Calibration” this is due to exceeding the current temperature variation tolerance. Please recalibrate by initiating from the Settings menu.

RM200QC User Manual
17
Recertification
Your device requires an annual certification to guarantee the performance of the device.
One month before your recertification is due a warning message will be displayed on the screen.
“Your device is due recertification in XX days”
This message will automatically close after 3 seconds or if a button is pressed.
For details on how to get your RM200QC recertified or serviced, please contact your local X-Rite representative. Details available at www.xrite.com

RM200QC User Manual
18
Operation
Settings Menu
The Setting menu is used to set instrument options, initiate a calibration and view production information from this menu. You should review and set the options as needed before using your instrument for the first time.
1. Select the Settings icon in the function bar by pressing the left side of the Navigation control.
2. Select the setting option from the list by pressing the up and down sides of the Navigation control.
3. Press the Enter button to select the option.
Refer below for an explanation of each option.
Language The language option allows you to select the languages that the instrument operates in. This screen also appears when the instrument is turned on for the first time.
1. Select the language option from the list by pressing the up and down sides of the Navigation control.
2. Press the Enter (Select) button to select the language and return to the Settings window.
USB Report Mode The USB report mode option is used to set the device USB mode for output of reports to computer. When the device is in this mode, it will work with your computer with similar function to a USB memory stick.

RM200QC User Manual
19
1. Plug your device into the USB port of your computer.
2. Select the USB Report Mode option from the list by pressing the up and down sides of the Navigation control.
3. Press the Enter button to switch the device into the USB Report mode.
The device will display the USB Report Mode Active window.
The device will now be recognized on your computer as a removable disk “RM200QC”. If this is the first time you have plugged in your device running in the USB Report mode, the new device installation prompt will be seen and the required drivers will automatically be installed.
4. Double click the RM200QC icon to explore the contents.
Two report options are provided:
• QCREPORT.PDF: This provides a multipage formatted report ready for you to use directly for your quality records.

RM200QC User Manual
20
• DATA.CSV – This provides data for the measured standards and samples that is easily manipulated in Excel to a format of your preference, or for more advanced data collection and analysis.
5. Unplug the USB cable from the device to exit from the USB Report Mode.
Calibrate The calibration option allows you to manually initiate a calibration. Refer to the Calibration section earlier in this manual for information on performing a calibration.
Aperture The aperture option is used to set the aperture size that the instrument defaults to when a measurement is started. You can select Large (8 mm) or Small (4 mm).

RM200QC User Manual
21
1. Select the aperture option from the list by pressing the up and down sides of the Navigation control.
2. Press the Enter (Select) button to select the option and return to the Settings window.
Display Options The display options are used to turn on and off what information is displayed on the Color QC screen.
1. Select the display option(s) from the list by pressing the up and down sides of the Navigation control.
2. Press the Enter (Select) button to activate (green) or deactivate (red) the option.
3. When finished, press the right side of the Navigation control (Save) to go to the Settings window.
Measurement Setup The measurement setup is used to set the averaging number when measuring standards and samples. The default settings are “3” for standards and “1” for samples.
1. Select the Standard avg. or Sample avg. option from the list by pressing the up and down sides of the Navigation control.
2. Press the Enter (Edit) button and then use the up and down sides of the Navigation control to select the average number.
3. Press the Enter (Edit) button to set the number.

RM200QC User Manual
22
4. When finished, press the right side of the Navigation control (Save) to go to the Settings window.
Tolerance The tolerance option is used to set the global tolerance for all standards and samples.
1. Select Color Equation by pressing the up and down sides of the Navigation control, and then press the Enter (Edit) button.
2. Press the up and down sides of the Navigation control to toggle through CIE LAB, CMC, CIE 94, and CIE 2000.
3. Press the Enter (Select) button to set the selection.
4. Select ∆E Limit by pressing the up and down sides of the Navigation control, and then press the Enter (Edit) button.
5. Press the up and down sides of the Navigation control to set the limit value between 0.8 to 10.0 ∆E (the lowest value of 0.8 is applied in accordance to the device limitations).
6. Select Illumination by pressing the up and down sides of the Navigation control, and then press the Enter (Edit) button.
7. Press the up and down sides of the Navigation control to select D65 10° or A 10°. A/10°: represents an incandescent light source with a 10° wide view standard observer. D65/10°: represents noon daylight with a 10° wide view standard observer.
8. Press the Enter (Edit) button to set the selection.
9. When finished, press the right side of the Navigation control (Save) to go to the Settings window.

RM200QC User Manual
23
Volume The volume option is used to set the system volume and the voice tag volume.
1. Select System volume or Voice tag volume by pressing the up and down sides of the Navigation control.
2. Press the Enter (Select) button to open the volume level screen.
3. Press the up or down sides of the Navigation control to set the desired volume level.
4. Press the Enter (Select) button to save the volume level and return to the Volume window.
or
5. Set the other volume level or press the right side of the Navigation control (Exit) to go to the Color QC screen.
Product Info This screen displays important instrument information.
1. Press the bottom side of the Navigation control to view additional information.
2. Press the left side of the Navigation control (Back) to exit to go to the Settings window.

RM200QC User Manual
24
Date and Time The date and time option is used to set the current time, date and format for the instrument.
1. Select the date and time attribute by pressing the left and right sides of the Navigation control. Select the month/day/year, hours/minutes/seconds, and format (DD:MM:YY or MM:DD:YY).
2. Once highlighted, press the up and down sides of the Navigation control to set the attribute.
3. Continue with additional attributes until complete.
4. Press the Enter button to save your settings and return to the Settings window.
Tutorial The Tutorial option provides information on using the instrument.
1. Select the tutorial option from the list by pressing the up and down sides of the Navigation control.
2. Press the Enter button to view the tutorial.
3. Refer to the Initial Startup section earlier in this manual for information on viewing the tutorial.

RM200QC User Manual
25
Reset Device The reset device option is used to reset the instrument back to the factory defaults. All stored standards and records that exist will also be deleted.
1. Select the reset device option from the list by pressing the up and down sides of the Navigation control.
2. Press the Enter button. You are asked to confirm that you want to reset the device.
3. Highlighting Yes on the screen and press the Enter button. The instrument is now reset and all stored standards and records are deleted.
Security The security option is used to password protect the standards and settings menu from any unauthorized entry.
1. Activating or deactivating the security option can be made by selecting the security option from the settings menu.
2. Press the Enter button.
RM200QC User Manual
26
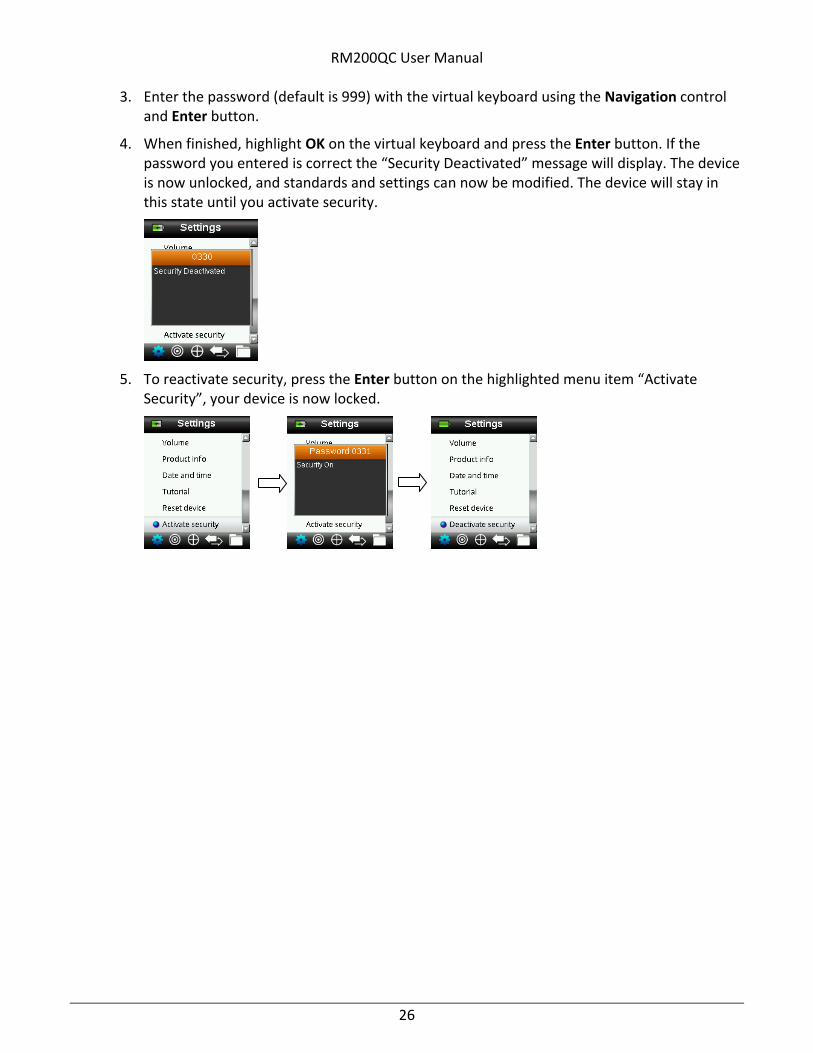
3. Enter the password (default is 999) with the virtual keyboard using the Navigation control and Enter button.
4. When finished, highlight OK on the virtual keyboard and press the Enter button. If the password you entered is correct the “Security Deactivated” message will display. The device is now unlocked, and standards and settings can now be modified. The device will stay in this state until you activate security.
5. To reactivate security, press the Enter button on the highlighted menu item “Activate Security”, your device is now locked.

RM200QC User Manual
27
Standard Menu
The RM200QC can store a maximum of 20 standards with L*a*b* data. When a standard is measured, the instrument automatically assigned it a generic color name that can be changed. More than one standard can be set active (star icon) to allow the instrument to automatically selected the closest standard during a Color QC measurement. The tolerance assigned in the Settings menu applies to all stored standards.
Creating a Standard 1. Select the Standard icon in the function bar by pressing on the right or left side of the
Navigation control.
2. Press the up and down sides of the Navigation control to select the next available standard location.
3. Press the left side of the Navigation control (Edit) to enter the Edit Standard screen.
If your device has security enabled you will be prompted to enter the password “999” to unlock. Refer to the Security Settings section of this manual for further information.
4. Make sure the white reference slider is in the storage location and position the RM200QC on to the standard as previously explained.
5. Lightly press and hold the Measure button to activate the preview. The area to be measured is indicated in the preview by the circle.
If desired, adjust the measurement area by pressing on the up or down side of the Navigation control while lightly holding down the Measure button. Note: You can preset your aperture preference in the Settings menu.
6. When you have located the area you wish to measure, press the Measure button firmly. An audible “camera-click” sound indicates the start of the measurement. A progress bar
Star indicates selected standard for QC measurements
Available standard location
Standards active for auto selection

RM200QC User Manual
28
appears at the bottom of the display to indicate the measurement status. It is important that the instrument is held steady for the duration of the measurement.
A simulated color patch for the standard appears. This screen indicates that standard averaging is activated in the Settings menu.
Note: If you do not want the current measurement to be used, use the Navigation control to select Reset and press the Enter (Select) button.
7. Continue with additional measurements to obtain an average value if standard averaging is activated in the Settings (default setting is 3).
8. To enter a name for the standard, use the up or down sides of the Navigation control to select “Edit Standard Name” and then press the Enter (Select) button.
NOTE: Entering a standard name is optional. A generic color name and timestamp appear in place of the name if you do not want to enter a standard name.
9. Enter the name with the virtual keyboard using the Navigation control and Enter button. When finished, highlight OK on the virtual keyboard and press the Enter Button.
Square indicates 1 of 3 measurements
Standard data
Reset

RM200QC User Manual
29
10. Exit the name window by selecting Back from the list and pressing the Enter button.
11. When finished, press the left side of the Navigation control (Save) to save the new standard.
12. Press the right side of the Navigation control (Exit) to main Standard screen.
Editing a Standard 1. From the Standards screen, use the up or down sides of the Navigation control to select the
standard to edit.
2. Press the left side of the Navigation control (Edit) to enter the Edit Standard screen.
3. Measure the standard as required.
4. After measurement(s), press the left side of the Navigation control (Save). A confirmation screen appears asking if you want to delete any samples associated with the previous standard.
Selected standard

RM200QC User Manual
30
5. Use the up and down side of the Navigation control to select “Yes” and then press the Enter (Select) button to save changes.
6. Press the right side of the Navigation control (Exit) back to the Standard screen.
RM200QC User Manual
31
Color QC Menu
The Color QC menu is used for sample measurement comparisons against the selected standard(s). Each measured sample can have a text or voice tag applied. Refer to Saving a Tag with a Measurement for the procedure. The following display methods can be used to view measurement data.
- PASS/FAIL indication based on tolerance setting
- Standard/Sample L*a*b*C*h° absolute and difference values
- Color swatches with verbal description indication
- Sample image
- L*a*b* Color plot
- Gray Scale comparison of standard V sample and Strength calculation using tristimulus
Note: Measurement screens that appear are based on the display options selected in the Setting menu.
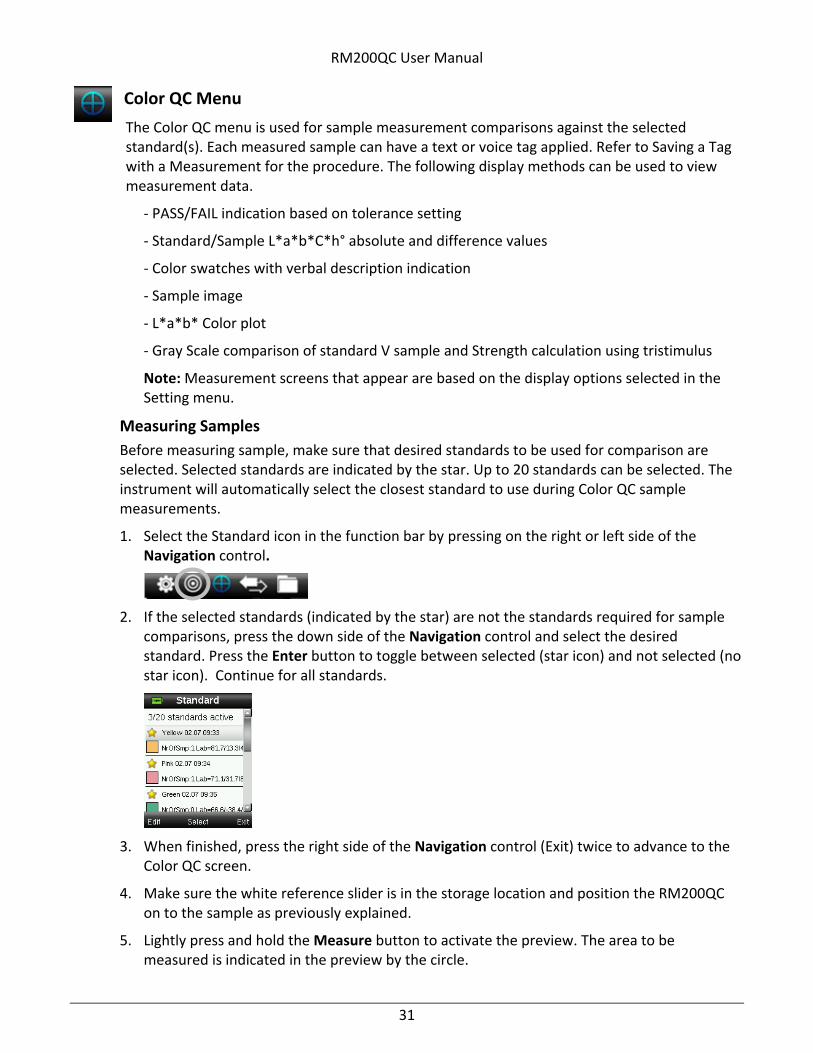
Measuring Samples Before measuring sample, make sure that desired standards to be used for comparison are selected. Selected standards are indicated by the star. Up to 20 standards can be selected. The instrument will automatically select the closest standard to use during Color QC sample measurements.
1. Select the Standard icon in the function bar by pressing on the right or left side of the Navigation control.
2. If the selected standards (indicated by the star) are not the standards required for sample comparisons, press the down side of the Navigation control and select the desired standard. Press the Enter button to toggle between selected (star icon) and not selected (no star icon). Continue for all standards.
3. When finished, press the right side of the Navigation control (Exit) twice to advance to the Color QC screen.
4. Make sure the white reference slider is in the storage location and position the RM200QC on to the sample as previously explained.
5. Lightly press and hold the Measure button to activate the preview. The area to be measured is indicated in the preview by the circle.

RM200QC User Manual
32
If desired, adjust the measurement area by pressing on the up or down side of the Navigation control while lightly holding down the Measure button. Note: You can preset your aperture preference in the Settings menu.
6. When you have located the area you wish to measure, press the Measure button firmly. An audible “camera-click” sound indicates the start of the measurement. A progress bar appears at the bottom of the display to indicate the measurement status. It is important that the instrument is held steady for the duration of the measurement.
7. Continue with additional measurements to obtain an average value if sample averaging is activated in the Settings.
After the measurement, a simulated color patch of the sample appears along with the Pass/Fail indication. The sample below would indicate that the sample failed based on the tolerance set in the Setting menu.
Note: Flashing arrows indicate that additional measurement views can be selected by pressing the up or down sides of the Navigation control. The “arrow” option can be turned off using the Display Options settings.
8. Press the down side of the Navigation control to advance to the QC Sample data screen.
9. Press the down side of the Navigation control to advance to the Description screen.
10. Press the down side of the Navigation control to advance to the Sample Image screen.

RM200QC User Manual
33
11. Press the down side of the Navigation control to advance to the Color Plot screen.
12. Press the down side of the Navigation control to advance to the Indices screen.
Saving a Tag with a Measurement Each measurement is automatically saved in the sample record. A voice tag or text tag can be saved with each sample measurement.
RM200QC can store a maximum of 350 sample measurements which are stored in date & time order. When the limit of 350 stored records is reached the oldest record is automatically deleted.
1. From the Color QC window, press the Enter button to display the Tag window.
2. Voice Tag To record a voice tag for the current sample, select Record voice tag from the list and press and hold the Enter button down. Speak into the microphone located below the power
Enter button

RM200QC User Manual
34
button. You have a maximum of 30 seconds recording time per record. When finished, release the Enter button.
To listen to the voice tag you just recorded, select Play voice tag from the list and press the Enter button.
To delete the voice tag you just recorded, select Clear voice tag from the list and press the Enter button.
3. Text Tag To add a text tag to the current sample, select Edit text tag from the list and press Enter. Add your note with the virtual keyboard using the Navigation control and Enter button. When finished, highlight OK on the virtual keyboard and press the Enter Button.
4. Exit the Tag window by selecting Back from the list and pressing the Enter button.

RM200QC User Manual
35
Quick Check Menu
The Quick Check menu contains functions which allow you to make quick comparison measurements that are not stored to the instrument. The following functions can be selected from the menu.
- Color Compare is a quick function to measure a standard and then a sample and display results.
- Opacity Check displays the percent opacity of a drawn down sample on an opacity card.
1. Select the Quick Check icon in the function bar by pressing on the right side of the Navigation control.
2. Use the up and down sides of the Navigation control to select Color Compare or Opacity Check, and then press the Enter button. Refer to the following pages for procedures.
Color Compare 1. Position the instrument on the standard to use as previously explained and take a
measurement.
A simulated color patch of the standard appears.

RM200QC User Manual
36
If you do not want to use the last measurement taken, press the left side of the Navigation control to clear (Reset) the measurement.
2. Continue with additional standard measurements if averaging is used. Example above indicated that 3 measurements are required for the standard.
3. Position the instrument on the sample to use as previously explained and take a measurement.
If you do not want to use the last measurement taken, press the left side of the Navigation control to clear (Reset) the measurement.
4. Continue with additional sample measurements if averaging is used.
After the measurement(s), a simulated color patch of the sample appears along with the Pass/Fail indication. The sample below would indicate that the sample passed based on the tolerance set in the Setting menu.
5. Press the bottom side of the Navigation control to view additional display screens for the measurement. Display screens that appear are the same screens that are available for Color QC measurements.
6. Press the right side of the Navigation control to exit and return to the Quick Check window.
Opacity Mode 1. Make sure Over White is selected in the screen and position the instrument on the sample
over the white portion of the opacity card. Take the measurement.

RM200QC User Manual
37
If you do not want to use the last measurement taken, press the left side of the Navigation control to clear (Reset) the measurement.
2. Continue with additional measurements if averaging is used.
3. After Over White measurement, the device will jump to the Over Black measurement. Position the instrument on the sample over the black portion of the opacity card. Take the measurement.
If you do not want to use the last measurement taken, press the left side of the Navigation control to clear (Reset) the measurement.
4. Continue with additional measurements if averaging is used.
View the Contrast Ratio results (Y over black/Y over white *100).
5. If you want to make another opacity measurement, press the left side of the Navigation control to clear (Reset) the result and restart the measurement process.
6. Press the right side of the Navigation control to exit and return to the Quick Check window.
RM200QC User Manual
38
Sample Records Menu
The Sample Records function enables you to retrieve a stored sample from the instruments database, delete an individual sample, or delete all stored samples.
1. Select the Sample Records icon in the function bar by pressing on the right side of the Navigation control.
2. Scroll through the stored records by pressing the up and down sides of the Navigation control.
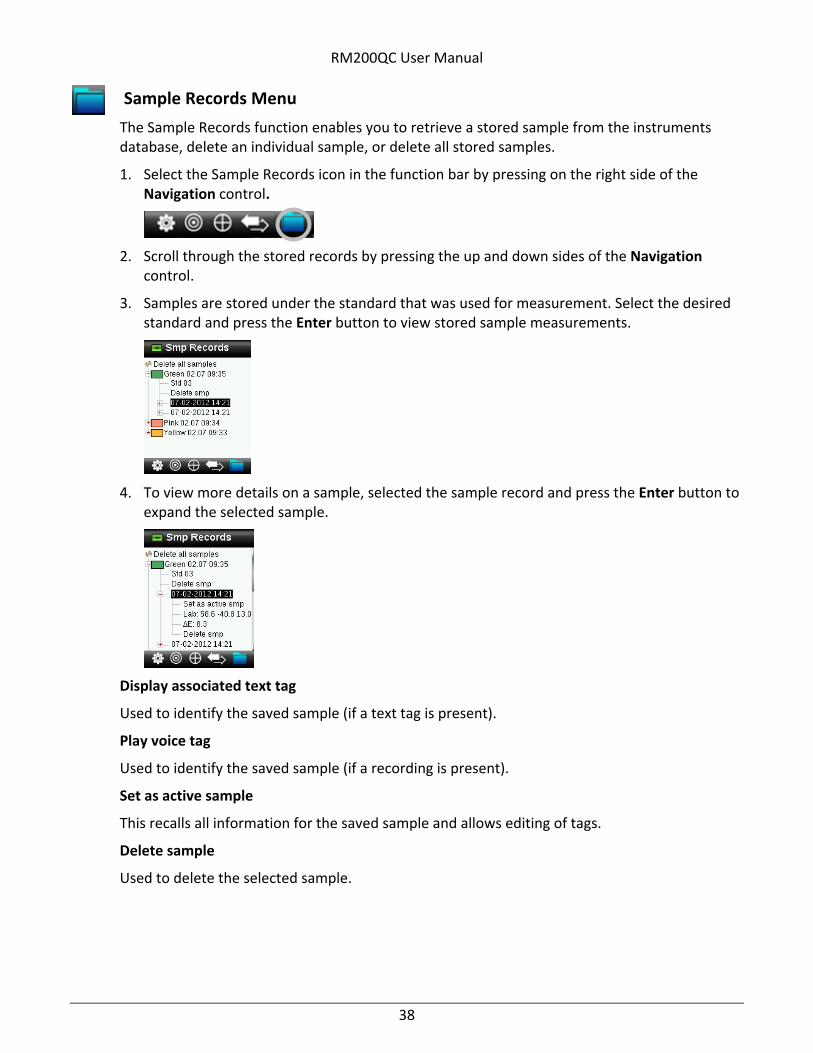
3. Samples are stored under the standard that was used for measurement. Select the desired standard and press the Enter button to view stored sample measurements.
4. To view more details on a sample, selected the sample record and press the Enter button to expand the selected sample.
Display associated text tag
Used to identify the saved sample (if a text tag is present).
Play voice tag
Used to identify the saved sample (if a recording is present).
Set as active sample
This recalls all information for the saved sample and allows editing of tags.
Delete sample
Used to delete the selected sample.

RM200QC User Manual
39
Delete All Sample This option allows you to delete all samples that are stored to the selected standard.
1. Press the up and down sides of the Navigation control to highlight the desired standard, and press the Enter button.
2. Press the up and down sides of the Navigation control to highlight Delete smp. All samples for the selected standard are now deleted from the instrument.
RM200QC User Manual
40
Appendices
Troubleshooting
Symptom Action
Will not turn on Press and hold the Power button.
Charge battery / plug in to USB port.
Instrument not responding
1. Unplug the USB connection.
2. Hold down on/off button 10 seconds to turn off then restart.
Instrument will not switch off
1. Unplug the USB connection.
2. Hold down on/off button 10 seconds to turn off then restart.
Too much ambient light detected
Make sure you keep the instrument on the sample until the end of the measurement.
Shield the sample to keep light from entering the optics during a measurement on very rough or curved samples.
On transparent samples try to prevent light from entering the samples from sides or back. Place sample on a white background.
Instrument requests a “Recalibrate”
Recalibrate the instrument using the Calibrate function in the Settings menu.
“Reference slider not closed!” continually displays after calibrating more than once.
You will need to perform seven calibration procedures in a row. This will set a new reference point and correct the problem.
I can’t hear the voice recording
Increase the volume in the Settings menu.
Make sure you hold down the Enter button during recording.
Screen Messages
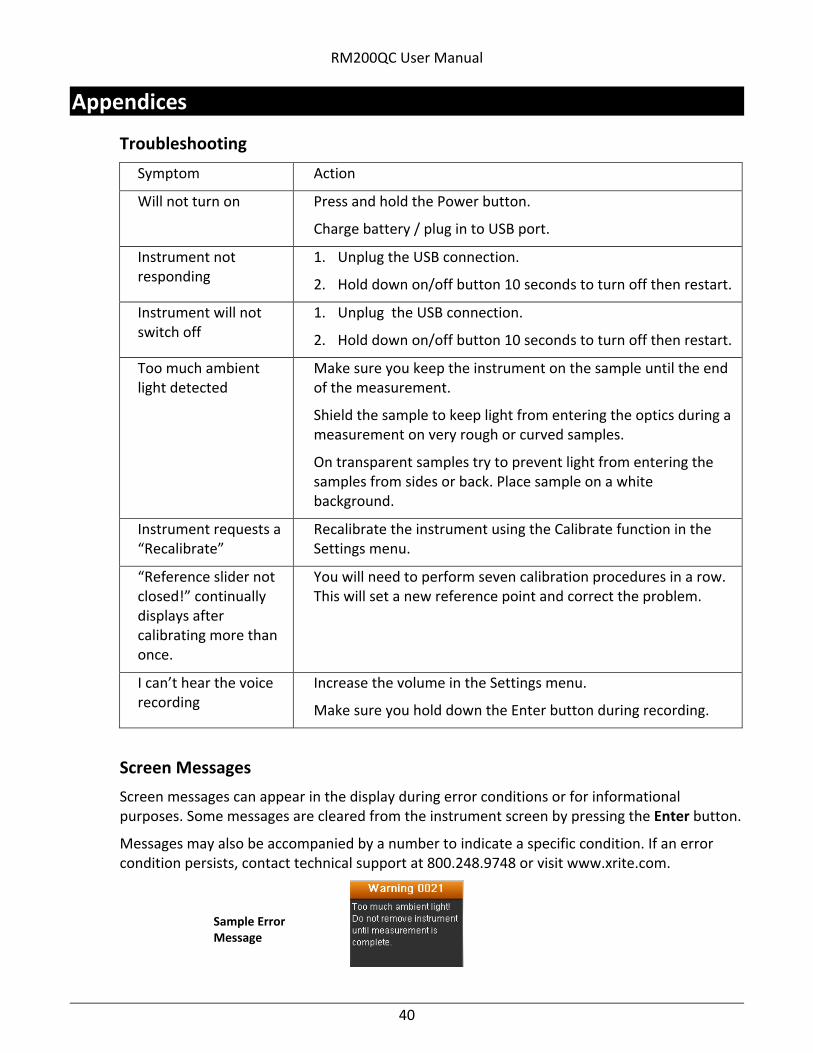
Screen messages can appear in the display during error conditions or for informational purposes. Some messages are cleared from the instrument screen by pressing the Enter button.
Messages may also be accompanied by a number to indicate a specific condition. If an error condition persists, contact technical support at 800.248.9748 or visit www.xrite.com.
Sample Error Message

RM200QC User Manual
41
Cleaning
The instrument should be stored with calibration slider in the closed position when not in use.
Do not immerse the instrument in liquid, and do not use anything other than a water-dampened cloth for cleaning the exterior.
The measurement optics and calibration plaque should be kept clean from dust and dirt for the highest level of accuracy.
Cleaning the Optics The optics are recessed and therefore protected from dirt during normal usage. However, if the optics do require cleaning, follow the procedure below.
IMPORTANT: If can air is used for cleaning, do not invert or tilt the can during use. This could cause damage to the optics.
1. Carefully place your thumb over the optics opening and rotate the aperture 45° counterclockwise.
2. Remove the aperture from the optics housing and set aside.
Aperture rotated 45°
Aperture

RM200QC User Manual
42
3. Blow short bursts of clean, dry air into the optics port. This should remove any accumulated debris from the optics.
4. Reposition the aperture over the optics housing and turn 45° clockwise to lock into place.
Cleaning the Calibration Reference The calibration tile is imbedded in the underside of the white reference slider.
1. Opening reference slider to a halfway position.
2. Blow short bursts of clean, dry air onto the calibration tile. This should remove any accumulated debris.
Calibration tile
Canned air straw
Optics port
Canned air straw

RM200QC User Manual
43
Technical Specifications
Measurement time: 1.8 seconds
Operating Temp: 0° to 40°C (50° to 104°F)
Storage temp: -20° to 60°C (-4° to 140°F)
Humidity Range: 20- 80% RH (non-condensing)
Usage: Indoor use only
Altitude: 2000m
Pollution Degree: 2
Transient Overvoltage: Category II
FAQs
1. How many standards and samples does the instrument store? 20 standards and 350 samples.
2. How do I clean the instrument? Please see the instructions in the Cleaning section.
3. What should I do if the instrument doesn't power-up? If the battery is too low the instrument will not power-up. Charge the unit through its USB connection.
4. How do I contact technical support? Phone: 800.248.9748 USA (+41) 44 842 24 00 Europe (+852) 2 568 6283 Asia Website: www.xrite.com

Corporate Headquarters X-Rite, Incorporated 4300 44th Street SE Grand Rapids, Michigan 49512 Phone 1 800 248 9748 or 1 616 803 2100 Fax 1 800 292 4437 or 1 616 803 2705 European Headquarters X-Rite Europe GmbH Althardstrasse 70 8105 Regensdorf Switzerland Phone (+41) 44 842 24 00 Fax (+41) 44 842 22 22 Asia Pacific Headquarters X-Rite Asia Pacific Limited 36th Floor, No. 169 Electric Road Hong Kong, China Phone (852) 2568 6283 Fax (852) 2885 8610 Please visit www.xrite.com for a local office near you.
P/N RM200QC-EN Rev. B