Embed Size (px)
Citation preview

Rivet Wars: Eastern Front
Blitzkrieg Campaign

2 | Rivet WaRs - Get in the fiGht!
© 2014 Super Robot Punch LLCRivet Wars® is a registered trademark of Super Robot Punch LLC.Unauthorized reproduction is prohibited.
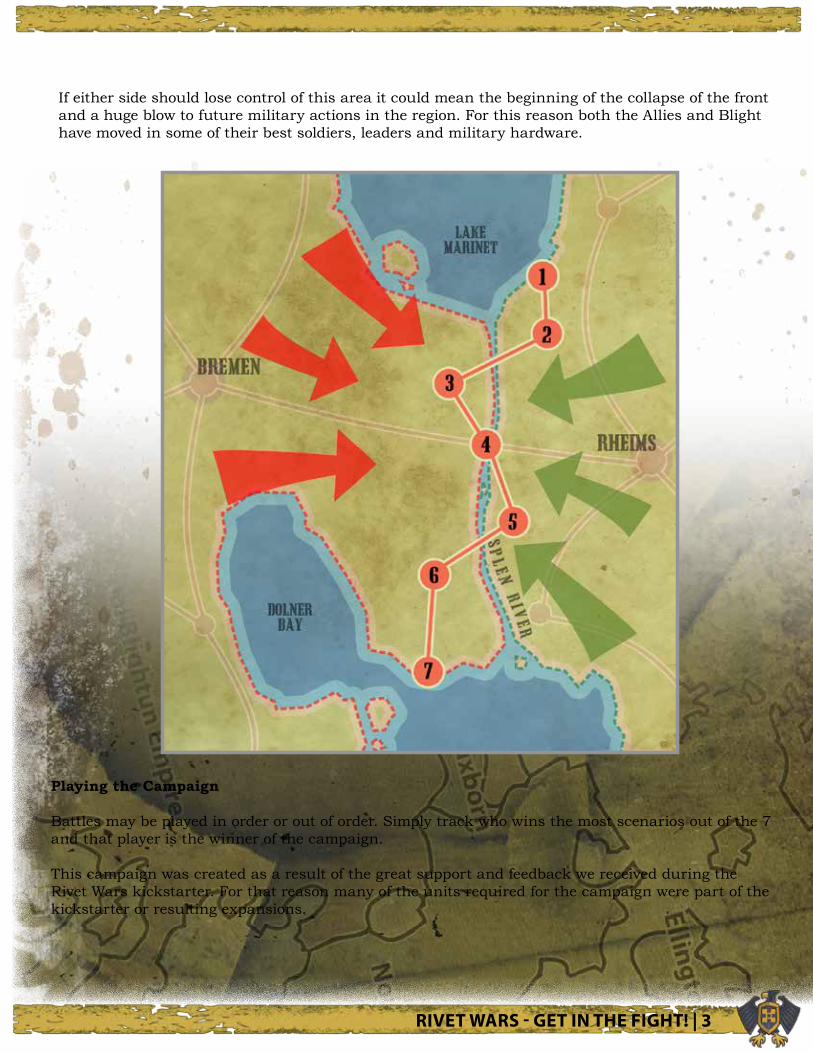
Offensive on the River Splen
For years the River Splen has formed a natural border between the Allied nation of Normandy and the Blightun Empire to the West. Small skirmishes and artillery barrages are a constant reminder of the tensions between the forces separated only by the water flowing from Lake Marinet. Now both sides have decided it is time to strike. The Blight and Allied commanders have been receiving re-ports of increased troop movements and unusual activities in the area. Now is the moment to strike first or wait and be attacked and possibly be bogged down by the approaching winter storms.
The Blight center their attack around a water born invasion to the North. Using the relatively calm waters of the Marinet, the Blightun troops will ferry across to enemy territory in landing craft. Landing to the north of Rheims they hope to catch the Allies off guard. If they move now they can beat the first snows of the season and be dug in with supply lines in place before the first frosts.
The Allied attack will be in the South. Using large transport gliders the allies plan to stage a daring attack landing their troops just east of the Dolner Bay. They hope to secure the pennisula there and
then move North after securing a bridgehead near the mouth of the Splen. The weather has been good and the allies feel that the time is right to get their gliders airborne. If they wait to long the strong winter winds will make the gliders useless and their plans will have to be scrapped.
The allies are also motivated by reports of a Doctor Vorne conducting unusual experiments East of Bremen. Local informants have made note of unusual activity in the area around the Blight labo-ratory. Missing civilians as well as unaccounted for prisoners of war have all motivated the Allies to get into the area and find out what is going on and put a stop to it. It is believed that Vorne’s facil-ity is located so close to the front because the Doctor plans to unleash his latest “invention” on the nearby forces across the river.
Rivet WaRs - Get in the fiGht! | 3
If either side should lose control of this area it could mean the beginning of the collapse of the front and a huge blow to future military actions in the region. For this reason both the Allies and Blight have moved in some of their best soldiers, leaders and military hardware.
Playing the Campaign
Battles may be played in order or out of order. Simply track who wins the most scenarios out of the 7 and that player is the winner of the campaign.
This campaign was created as a result of the great support and feedback we received during the Rivet Wars kickstarter. For that reason many of the units required for the campaign were part of the kickstarter or resulting expansions.
4 | Rivet WaRs - Get in the fiGht!
BLITZ #1
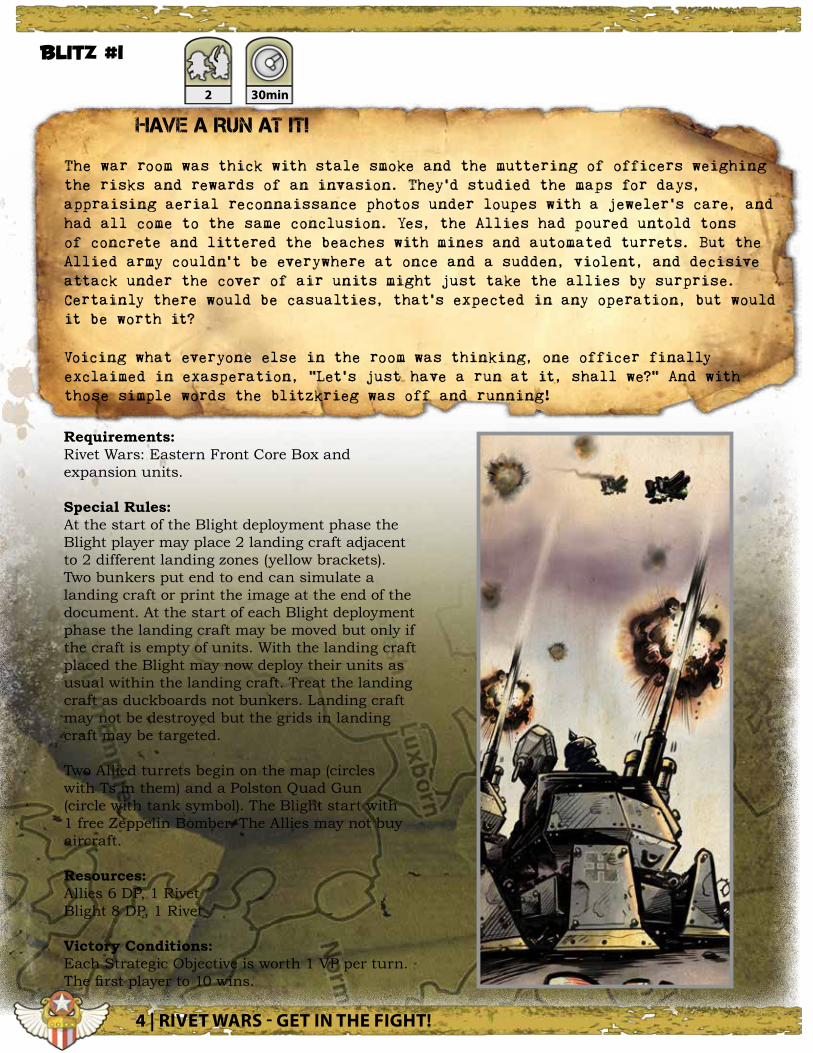
Have a Run at it!
The war room was thick with stale smoke and the muttering of officers weighing the risks and rewards of an invasion. They’d studied the maps for days, appraising aerial reconnaissance photos under loupes with a jeweler’s care, and had all come to the same conclusion. Yes, the Allies had poured untold tons of concrete and littered the beaches with mines and automated turrets. But the Allied army couldn’t be everywhere at once and a sudden, violent, and decisive attack under the cover of air units might just take the allies by surprise. Certainly there would be casualties, that’s expected in any operation, but would it be worth it?
Voicing what everyone else in the room was thinking, one officer finally exclaimed in exasperation, “Let’s just have a run at it, shall we?” And with those simple words the blitzkrieg was off and running!
Requirements:Rivet Wars: Eastern Front Core Box and expansion units.
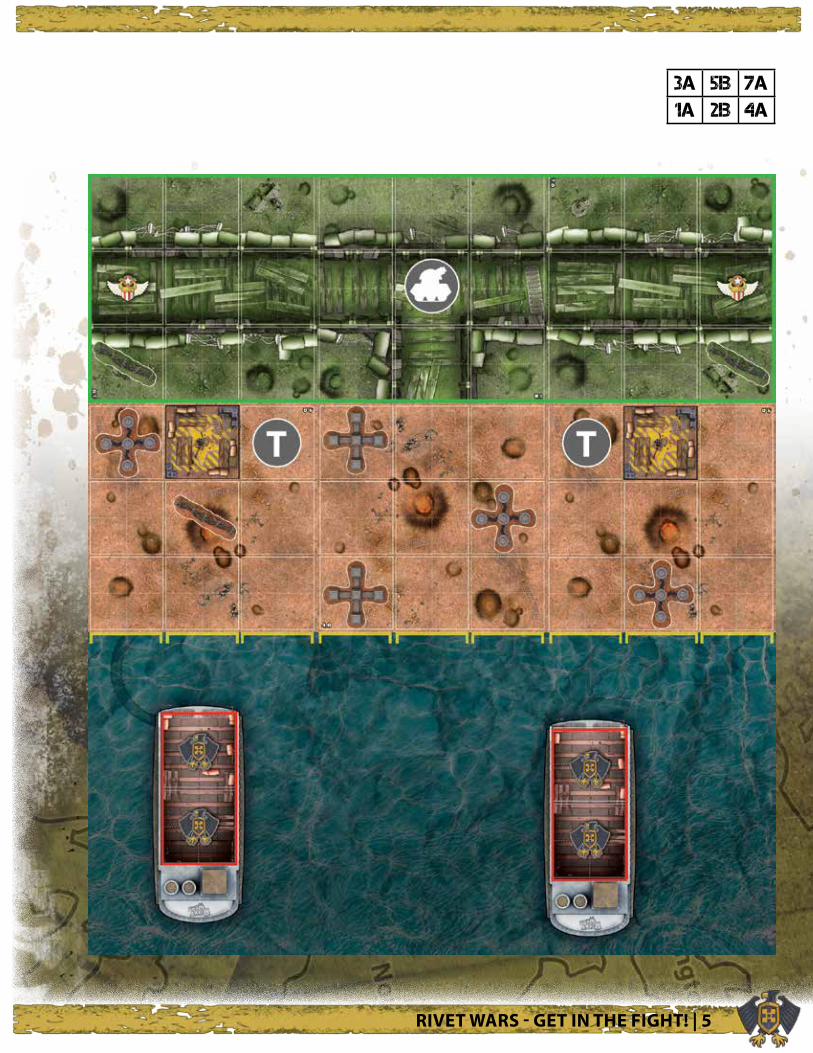
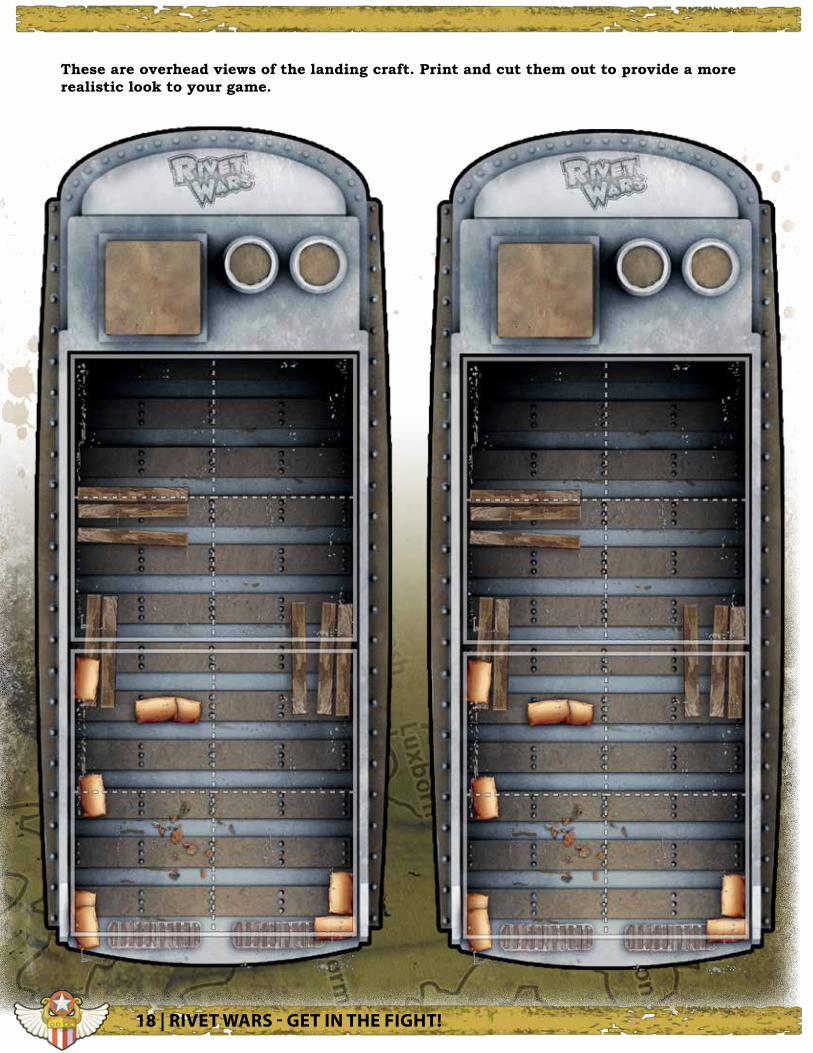
Special Rules:At the start of the Blight deployment phase the Blight player may place 2 landing craft adjacent to 2 different landing zones (yellow brackets). Two bunkers put end to end can simulate a landing craft or print the image at the end of the document. At the start of each Blight deployment phase the landing craft may be moved but only if the craft is empty of units. With the landing craft placed the Blight may now deploy their units as usual within the landing craft. Treat the landing craft as duckboards not bunkers. Landing craft may not be destroyed but the grids in landing craft may be targeted.
Two Allied turrets begin on the map (circles with Ts in them) and a Polston Quad Gun (circle with tank symbol). The Blight start with 1 free Zeppelin Bomber. The Allies may not buy aircraft.
Resources:Allies 6 DP, 1 RivetBlight 8 DP, 1 Rivet
Victory Conditions:Each Strategic Objective is worth 1 VP per turn. The first player to 10 wins.
2 30min
Rivet WaRs - Get in the fiGht! | 5
3a 5b 7a1a 2b 4a
6 | Rivet WaRs - Get in the fiGht!
BLITZ #2
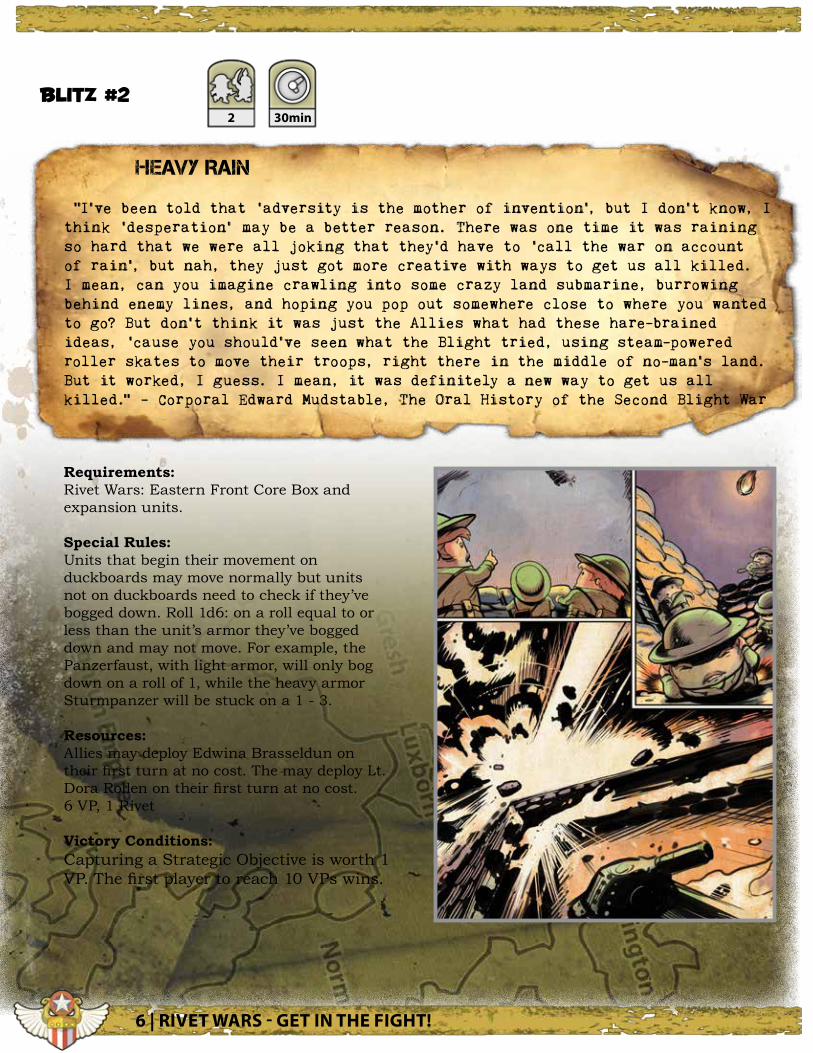
Heavy Rain
“I’ve been told that ‘adversity is the mother of invention’, but I don’t know, I think ‘desperation’ may be a better reason. There was one time it was raining so hard that we were all joking that they’d have to ‘call the war on account of rain’, but nah, they just got more creative with ways to get us all killed. I mean, can you imagine crawling into some crazy land submarine, burrowing behind enemy lines, and hoping you pop out somewhere close to where you wanted to go? But don’t think it was just the Allies what had these hare-brained ideas, ‘cause you should’ve seen what the Blight tried, using steam-powered roller skates to move their troops, right there in the middle of no-man’s land. But it worked, I guess. I mean, it was definitely a new way to get us all killed.” - Corporal Edward Mudstable, The Oral History of the Second Blight War
Requirements:Rivet Wars: Eastern Front Core Box and expansion units.
Special Rules:Units that begin their movement on duckboards may move normally but units not on duckboards need to check if they’ve bogged down. Roll 1d6: on a roll equal to or less than the unit’s armor they’ve bogged down and may not move. For example, the Panzerfaust, with light armor, will only bog down on a roll of 1, while the heavy armor Sturmpanzer will be stuck on a 1 - 3.
Resources:Allies may deploy Edwina Brasseldun on their first turn at no cost. The may deploy Lt. Dora Rollen on their first turn at no cost.6 VP, 1 Rivet
Victory Conditions:Capturing a Strategic Objective is worth 1 VP. The first player to reach 10 VPs wins.
2 30min

Rivet WaRs - Get in the fiGht! | 7
8a 4a 9b7a 2b 5a 6b 1a 3b

8 | Rivet WaRs - Get in the fiGht!
blitz #3
DR. VORNE’S LabORaTORY
“It all seemed so easy. As we pushed forward the Blight kept falling back, giving up without much of fight. We should have known better. We should have know it was a trap. Because before we knew it we were surrounded by hell on earth. Undead soldiers crawled from fresh graves, clawing at us with their cold, vise-like hands! And commanding the enemy was the craziest Blightin’ bastard I’d ever seen, the evil Dr. Vorne.” - Diary excerpt, Private Irving Rames, 195th Regiment
Requirements:Rivet Wars: Eastern Front Core Box and expansion units.
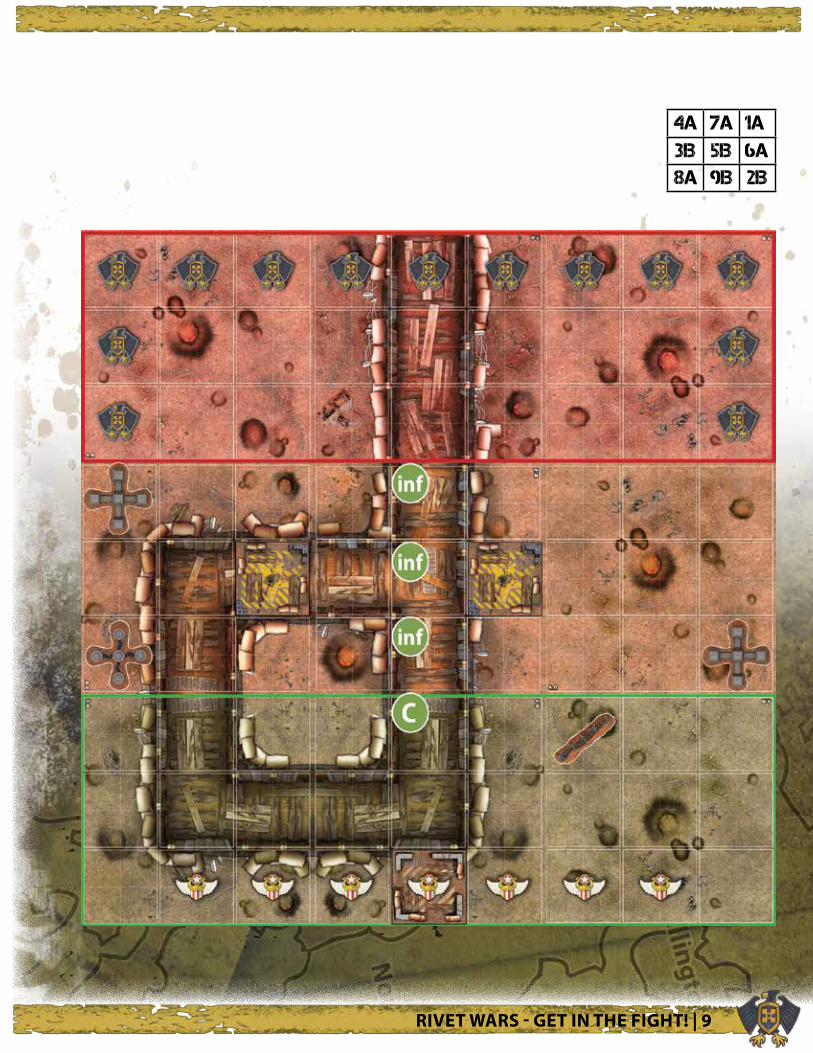
Special Rules:The Blight player begins the game with Dr. Vorne at no cost. Place him before game play begins. On the first turn the Blight may deploy a Plague Trooper at no cost; for placement, pick a grid in neutral territory and flip for Deviation. Any Blight Deployment Phase when there are no Plague Troopers on the board a new trooper may be Deployed by the same rules at no DP cost.
The Allies start with 3 Riflemen (INF) and 1 Clockwork Trooper (C), as shown on the map. The Blight player moves first. Place these units before game play begins.
Resources:Deployment Points: 8Rivets: 1
Victory Conditions:Capturing a Strategic Objective is worth 1 VP. The first player to reach 10 VPs wins.
2 30min
Rivet WaRs - Get in the fiGht! | 9
4a 7a 1a3b 5b 6a 8a 9b 2b

10 | Rivet WaRs - Get in the fiGht!
blitz #4
Trouble a brewin’
Egads! Brewmeister supreme Volker Steuben has been tasting his product a little too much and inadvertently wandered into no-man’s land. The creator of such masterpieces as the legendary “Resurrecter Ale” (said to be strong enough to breathe life into an injured soldier) is equally prized by both Blight and Allied troops.
His random stumblings are witnessed by both armies and it quickly becomes clear--whoever can rescue the brewmeister to their side will be able to secure a supply of the finest beer in the world! Men rush from their trenches but gingerly aim their weapons, afraid to injure the brewmeister.
Requirements:Rivet Wars: Eastern Front Core Box and expansion units.
Special Rules:The goal of the mission is to rescue the brewmeister (B), returning him to your deployment zone. Use the Iron Chancellor or other mini to represent the Brewmeister. Before game play begins place him on the map as indicated.
If the brewmeister is in a grid with any player’s units at start of the movement phase that player can activate and move the meister 1 grid. If the meister is alone in a grid at the start of the movement phase roll 1 die: on a 1-2 Brewmeister stays where he is, 3 - 6 check for deviation and move him 1 grid. Once he has moved he can not move again that turn.
Brewmeister cannot be buffed or harmed in any way and is unaffected by tank traps, barbed wire, or minefields. He is affected by tank shock.
Resources:Deployment Points: 6Rivets: 1
Victory Conditions:First player to have the Brewmeister in one of their Deployment Zones wins. Do not use Secret Mission cards.
2 30min

Rivet WaRs - Get in the fiGht! | 11
8a 9a 7a5b 4b 1b3a 2b 6b

12 | Rivet WaRs - Get in the fiGht!
blitz #5
Winter WaR
The snow makes everything look clean. Even the battlefield. A soft white blanket to cover the horror we’d inflicted on the land. But that blanket also hid a threat. The hundreds of landmines both factions had sprinkled upon the ground now lay concealed beneath a few inches of snow. From now on each movement might come at a very high cost.
Requirements:Rivet Wars: Eastern Front Core Box and expansion units.
Special Rules:Roll for initiative. Starting with the first player, each alternate placing 3 minefield and 3 tank traps each, face-down in any grid in no-man’s land except on Strategic Objectives. During play, the first time a unit enters a grid with a face-down marker, flip the marker over: if the marker is a tank trap immediately discard; if a minefield immediately make an attack, even if the unit is infantry, and place the marker in the grid. Minefields attack infantry for this scenario.
Each turn at the start of Player 1’s Deployment phase roll 1 die to determine any weather effects for the turn:
1 - 2: Heavy Snow. Visibility is so limited that the maximum range for all attacks is 2 grids. 3 - 4: Icy conditions: each time a unit moves to a new grid roll 1 die; on a result of 1, use deviation to determine which grid the units moves to. If they’re blocked from entering this space (e.g. occupied by enemies) they remain in their current grid.5 - 6: Clear conditions: no weather effects this turn.
Resources:Deployment Points: 6Rivets: 1
Victory Conditions:Capturing a Strategic Objective is worth 1 VP. The first player to reach 10 VPs wins.
2 30min

Rivet WaRs - Get in the fiGht! | 13
8a 4a 9b7a 2b 5a 6b 1b 3b

14 | Rivet WaRs - Get in the fiGht!
blitz #6
dogs of war
A plane carrying the Duke of York has crashed in no man’s land! It’s too late to help (or capture!) the hapless Duke but when the plane broke apart an important cache of top secret documents spilled out. It’s now a race by both sides to retrieve them before the enemy does!
Requirements:Rivet Wars: Eastern Front Core Box and expansion units.
Special Rules:Each side starts with 1 handler and 3 dog units appropriate to their side. Spread across the battlefield are 7 documents, represented by damage markers (D). These may be picked up by any dog that starts its Movement Phase in that grid. Place the marker in the dog’s damage slot to show that it’s been picked up, the dog may now move with it. A dog that begins its Deployment Phase in a Deployment Zone may drop it off for 1 VP.
No Secret Mission cards may be played. Roll for initiative.
Resources:Deployment Points: 6Rivets: 1
Victory Conditions:The first player to reach 4 VPs wins.
2 30min

Rivet WaRs - Get in the fiGht! | 15
1a 6a 3b8a 5a 2a 9b 4a 7b

16 | Rivet WaRs - Get in the fiGht!
blitz #7
On the Wings of Parrots
While the Blight have been experimenting with large scale paratrooper assaults, the Allied Command prefers the flexibility of gliders, which allow support and cavalry to accompany the infantry, “right to the enemy’s front door!” as Allied Air Marshall, Sir Benjamin Sparkletrout puts it. Unfortunately these “Plywood Parrots” haven’t progressed much beyond the experimental phase and can be a bit tricky to land accurately.
But now they’re being put to the test as the Allies launch a daring attack over enemy lines in the hope of cutting off the enemy and ending the war. But with limited resources available, it may come down to a war of attrition.
Requirements:Rivet Wars: Eastern Front Core Box and expansion units.
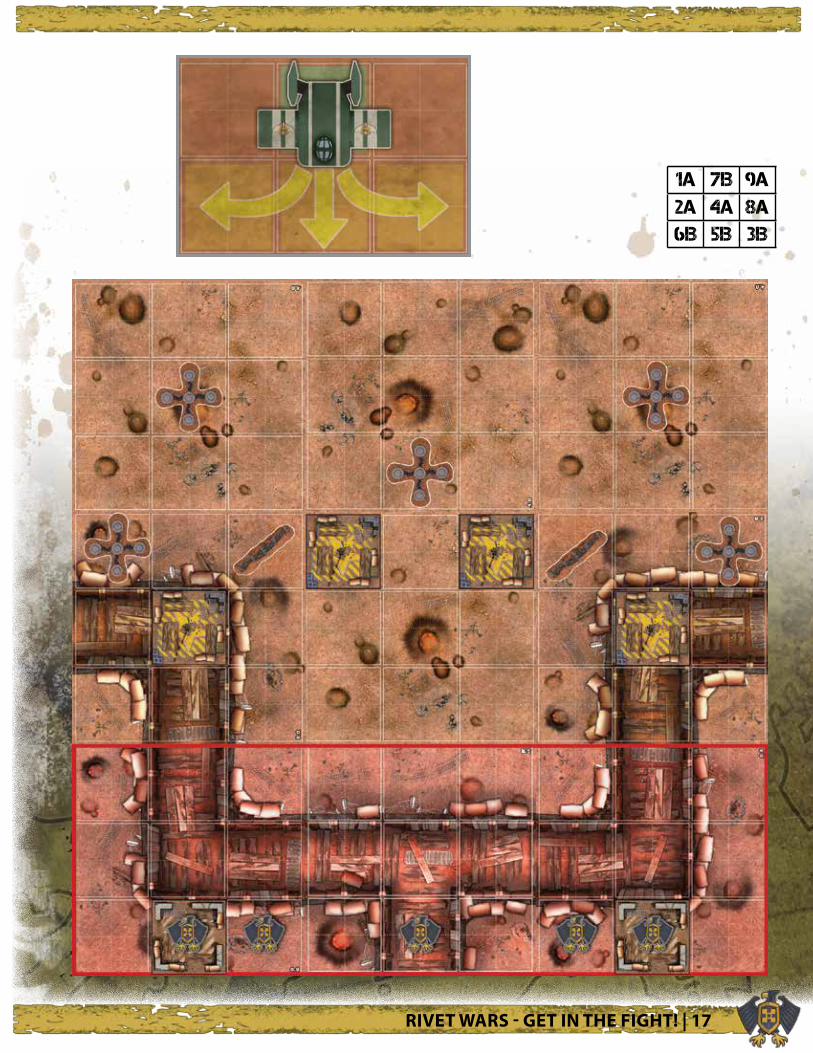
Special Rules:Allies move first. After the Allied player has purchased units for the turn the Allied player places them on up to 3 gliders, each of which are 1 grid in size (a spare bunker may be used for this). Tanks may not be placed in gliders, effectively barring them from play for the Allies. The player then designates an empty grid (containing no units, bunkers, Strategic Objectives, or obstacles) in neutral territory in which to land.
However, due to the glider’s lack of brakes the allied player needs to roll a 5 or 6 on a D6 to stop in that grid, otherwise they must move forward into one of the 3 grids (allied player’s choice) towards the bottom of the board and try again. Gliders automatically slide again if they land in a grid occupied by units, tank obstacles, bunkers, or Strategic Objectives but may stop in a grid occupied by barbed wire or mines. If they land or stop in a grid with mines then every unit receives a 1 die attack. Barbed wire is destroyed if a glider stops on or slides through it. Gliders that move off the map are
destroyed along with any units on them.
Resources:Deployment Points: 6Rivets: 1
Victory Conditions:Allies receive 1 VP per Strategic Objective and need 10 to win. The Blight receive 1 VP per Allied DP that they destroy (dp cost of destroyed unit) and need 25 to win.
2 30min
Rivet WaRs - Get in the fiGht! | 17
1a 7b 9a2a 4a 8a 6b 5b 3b
18 | Rivet WaRs - Get in the fiGht!
These are overhead views of the landing craft. Print and cut them out to provide a more realistic look to your game.