Embed Size (px)
Citation preview

RIGHT ANGLE MITER GAUGE99782
SET Up ANd OpERATING INSTRUcTIONS
distributed exclusively by Harbor Freight Tools®.
3491 Mission Oaks Blvd., Camarillo, CA 93011
Visit our website at: http://www.harborfreight.com
Read this material before using this product. Failure to do so can result in serious injury. SAVE THIS MANUAL.
Copyright© 2008 by Harbor Freight Tools®. All rights reserved. No portion of this manual or any artwork contained herein may be reproduced in any shape or form without the express written consent of Harbor Freight Tools. Diagrams within this manual may not be drawn proportionally. Due to continuing improvements, actual product may differ slightly from the product described herein. Tools required for assembly and service may not be included.
For technical questions or replacement parts, please call 1-800-444-3353.

SKU 99782 For technical questions, please call 1-800-444-3353. Page 2
SAVE THIS MANUALKeep this manual for the safety warnings and precautions, assembly, operating,
inspection, maintenance and cleaning procedures. Write the product’s serial number in the back of the manual near the assembly diagram (or month and year of purchase if product has no number). Keep this manual and the receipt in a safe and dry place for future reference.
General Tool Safety Warnings WARNING Read all safety warnings and instructions. Failure to follow the warnings and instructions may result in electric shock, fire and/or serious injury. Save all warnings and instructions for future reference.
Work area safety1. Keep work area clean and well lit. a. Cluttered or dark areas invite accidents.Keep children and bystanders away while operating a power tool. b. Distrac-tions can cause you to lose control.
personal safety2. Stay alert, watch what you are doing and use common sense when operating a. a power tool. Do not use a power tool while you are tired or under the influ-ence of drugs, alcohol or medication. A moment of inattention while operating power tools may result in serious personal injury.Use personal protective equipment. Always wear eye protection.b. Safety equipment such as dust mask, non-skid safety shoes, hard hat, or hearing protec-tion used for appropriate conditions will reduce personal injuries.do not overreach. Keep proper footing and balance at all times.c. This enables better control of the power tool in unexpected situations.dress properly. do not wear loose clothing or jewelry. Keep your hair, cloth-d. ing and gloves away from moving parts. Loose clothes, jewelry or long hair can be caught in moving parts.Only use safety equipment that has been approved by an appropriate stan-e. dards agency. Unapproved safety equipment may not provide adequate protec-tion. Eye protection must be ANSI-approved and breathing protection must be NIOSH-approved for the specific hazards in the work area.

SKU 99782 For technical questions, please call 1-800-444-3353. Page 3
ASSEMBLY
UnpackingWhen unpacking, make sure that the items shown below are intact and undam-
aged. If any parts are missing or broken, please call Harbor Freight Tools at the number shown throughout the manual as soon as possible.
pARTS LIST ANd ASSEMBLY dIAGRAM
part description Qty.1 Steel Bar 12 Handle 13 Miter Body 14 Nut 15 Miter Slot Bolt 16 Handle Threaded Rod 17 Pin 18 Angle Pointer 19 Screw 1
1
2
3
4 5 6 7 8 9
Place the Steel Bar (1) on a flat, hard surface. Thread the Handle Threaded Rod 1. (6) into the Steel Rod. Thread the Nut (4) onto the Threaded Rod (6). Tighten the Nut (4) onto the Threaded Rod (6) so that the the Threaded Rod (6) is locked into place. See Figure A below.NOTE2. : Do not extend the Threaded Bolt (6) beyond the bottom surface of the the Steel Bar. It must be flush with the bottom of the Steel Bar (1).Thread the Miter Slot Bolt (5) into the Steel Bar (6). Attach the Angle Pointer (8) 3. onto the Miter Slot Bolt (5), secure it using the Screw (9). See Figure A below.
Figure A (6)(8)(4)
(5)
(9)pivot pin Hole
No replacement parts are available.
SKU 99782 For technical questions, please call 1-800-444-3353. Page 4
Figure B
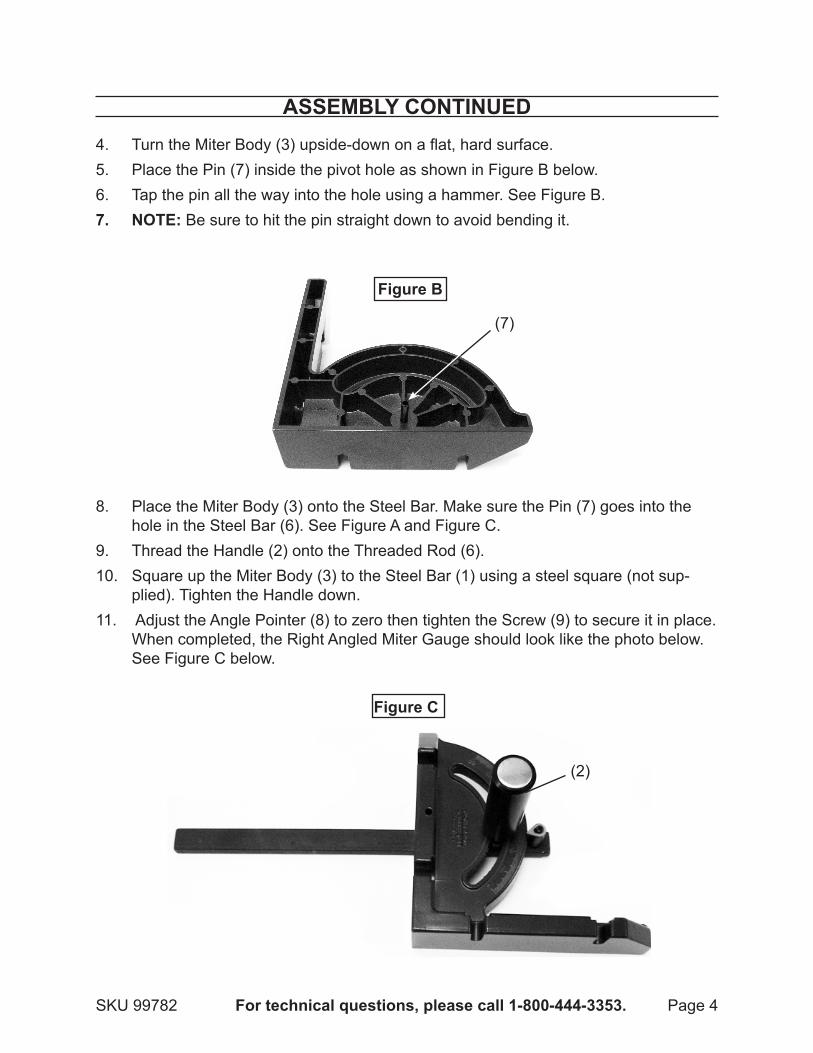
Turn the Miter Body (3) upside-down on a flat, hard surface. 4. Place the Pin (7) inside the pivot hole as shown in Figure B below.5. Tap the pin all the way into the hole using a hammer. See Figure B.6. NOTE:7. Be sure to hit the pin straight down to avoid bending it.
ASSEMBLY cONTINUEd
(7)
Place the Miter Body (3) onto the Steel Bar. Make sure the Pin (7) goes into the 8. hole in the Steel Bar (6). See Figure A and Figure C.Thread the Handle (2) onto the Threaded Rod (6).9. Square up the Miter Body (3) to the Steel Bar (1) using a steel square (not sup-10. plied). Tighten the Handle down. Adjust the Angle Pointer (8) to zero then tighten the Screw (9) to secure it in place. 11. When completed, the Right Angled Miter Gauge should look like the photo below. See Figure C below.
Figure B
(2)
Figure c

SKU 99782 For technical questions, please call 1-800-444-3353. Page 5
OpERATION

SKU 99782 For technical questions, please call 1-800-444-3353. Page 6

SKU 99782 For technical questions, please call 1-800-444-3353. Page 7
LIMITEd 90 dAY WARRANTYHarbor Freight Tools Co. makes every effort to assure that its products meet high
quality and durability standards, and warrants to the original purchaser that this prod-uct is free from defects in materials and workmanship for the period of 90 days from the date of purchase. This warranty does not apply to damage due directly or indirectly, to misuse, abuse, negligence or accidents, repairs or alterations outside our facilities, criminal activity, improper installation, normal wear and tear, or to lack of maintenance. We shall in no event be liable for death, injuries to persons or property, or for incidental, contingent, special or consequential damages arising from the use of our product. Some states do not allow the exclusion or limitation of incidental or consequential damages, so the above limitation of exclusion may not apply to you. THIS WARRANTy IS exPReSS-ly IN lIeU OF All OTHeR WARRANTIeS, exPReSS OR IMPlIeD, INClUDING THe WARRANTIeS OF MeRCHANTABIlITy AND FITNeSS.
To take advantage of this warranty, the product or part must be returned to us with transportation charges prepaid. Proof of purchase date and an explanation of the com-plaint must accompany the merchandise. If our inspection verifies the defect, we will ei-ther repair or replace the product at our election or we may elect to refund the purchase price if we cannot readily and quickly provide you with a replacement. We will return re-paired products at our expense, but if we determine there is no defect, or that the defect resulted from causes not within the scope of our warranty, then you must bear the cost of returning the product.
This warranty gives you specific legal rights and you may also have other rights which vary from state to state.
3491 Mission Oaks Blvd. • PO Box 6009 • Camarillo, CA 93011 • (800) 444-3353
NOTE: No replacement parts are available for this product.