Embed Size (px)
Citation preview

The tool of thought for software solutions
RIDE User Guide RIDE Version 4.1
Dyalog Limited
Minchens Court, Minchens Lane Bramley, Hampshire
RG26 5BH United Kingdom
tel: +44 1256 830030 fax: +44 1256 830031
email: [email protected] https://www.dyalog.com
Dyalog is a trademark of Dyalog Limited Copyright 1982-2018
RIDE User Guide 2
Dyalog is a trademark of Dyalog Limited Copyright 1982 – 2018 by Dyalog Limited.
All rights reserved.
Version 4.1
Revision: 20180706_410
No part of this publication may be reproduced in any form by any means without the prior written permission of Dyalog Limited, Minchens Court, Minchens Lane, Bramley, Hampshire, RG26 5BH, United Kingdom.
Dyalog Limited makes no representations or warranties with respect to the contents hereof and specifically disclaims any implied warranties of merchantability or fitness for any particular purpose. Dyalog Limited reserves the right to revise this publication without notification.
SQAPL is copyright of Insight Systems ApS. Array Editor is copyright of davidliebtag.com UNIX® is a registered trademark in the United States and other countries, licensed exclusively through X/Open Company Limited. Windows® is a registered trademark of Microsoft Corporation in the United States and other countries. Oracle®, Javascript™ and Java™ are registered trademarks of Oracle and/or its affiliates. macOS® and OS X® (operating system software) are trademarks of Apple Inc., registered in the U.S. and other countries. All other trademarks and copyrights are acknowledged.
RIDE User Guide 3
Contents
1 ABOUT THIS DOCUMENT . . . . . . . . . . . . . . . . . . . . . . . . . . . . . . . . . . . . . . . . . . . . . . . . . . . . . . . . . . . . . . 6 1.1 Audience ........................................................................................................... 6
2 INTRODUCTION . . . . . . . . . . . . . . . . . . . . . . . . . . . . . . . . . . . . . . . . . . . . . . . . . . . . . . . . . . . . . . . . . . . . . . . . . . 7
3 INSTALLATION . . . . . . . . . . . . . . . . . . . . . . . . . . . . . . . . . . . . . . . . . . . . . . . . . . . . . . . . . . . . . . . . . . . . . . . . . . . . 8 3.1 Pre-requisites .................................................................................................... 8 3.2 Installation ........................................................................................................ 8
3.2.1 Zero Footprint ........................................................................................ 8 3.2.2 Linux ....................................................................................................... 9 3.2.3 macOS .................................................................................................... 9 3.2.4 Microsoft Windows ................................................................................ 9
4 STARTIN G A DYALOG SESSION . . . . . . . . . . . . . . . . . . . . . . . . . . . . . . . . . . . . . . . . . . . . . . . . . . . . 10 4.1 The RIDE-Dyalog Session Dialog Box ............................................................... 10
4.1.1 Dyalog Menu ........................................................................................ 11 4.1.2 List of Configurations ........................................................................... 11 4.1.3 Types .................................................................................................... 12
4.1.3.1 Type: Start ........................................................................... 12 4.1.3.2 Type: Connect ..................................................................... 14 4.1.3.3 Type: Listen ......................................................................... 16
4.1.4 The Zero Footprint RIDE ....................................................................... 17
5 THE DYALOG DE VELOPMENT EN VIRONMEN T . . . . . . . . . . . . . . . . . . . . . . . . . . . . . . . . 19 5.1 Session User Interface ..................................................................................... 19
5.1.1 Caption ................................................................................................. 20 5.1.2 Menu Bar ............................................................................................. 20
5.1.2.1 File Menu ............................................................................ 20 5.1.2.2 Edit Menu ............................................................................ 21 5.1.2.3 View Menu .......................................................................... 21 5.1.2.4 Window Menu .................................................................... 22 5.1.2.5 Action Menu........................................................................ 22 5.1.2.6 Help Menu .......................................................................... 23
5.1.3 Language Bar........................................................................................ 23 5.1.4 Session Window ................................................................................... 24 5.1.5 Status Bar ............................................................................................. 24 5.1.6 Workspace Explorer ............................................................................. 24 5.1.7 Debug Information Window ................................................................ 25
5.2 Keyboard Key Mappings for APL Glyphs ......................................................... 25 5.2.1 Other Keyboard Options ...................................................................... 25
6 INPUT WINDOWS . . . . . . . . . . . . . . . . . . . . . . . . . . . . . . . . . . . . . . . . . . . . . . . . . . . . . . . . . . . . . . . . . . . . . . 27 6.1 Session Window .............................................................................................. 27 6.2 Edit Window .................................................................................................... 27
6.2.1 Toolbar ................................................................................................. 28 6.2.2 Search and Replace .............................................................................. 29
RIDE User Guide 4
6.2.3 Exiting the Edit Window ....................................................................... 31 6.3 Trace Window ................................................................................................. 31
6.3.1 Toolbar ................................................................................................. 31 6.3.2 Search .................................................................................................. 32 6.3.3 Exiting the Trace Window .................................................................... 33
7 WORKIN G IN A DYALOG SESSION . . . . . . . . . . . . . . . . . . . . . . . . . . . . . . . . . . . . . . . . . . . . . . . . 34 7.1 Keyboard Shortcuts and Command Codes ...................................................... 34 7.2 Navigating the Windows ................................................................................. 34 7.3 Display of Windows ......................................................................................... 34 7.4 Entering APL Characters .................................................................................. 35 7.5 Entering Expressions ....................................................................................... 36
7.5.1 Paired Enclosures ................................................................................. 36 7.5.2 Autocomplete ...................................................................................... 36 7.5.3 Context-Sensitive Help ......................................................................... 37 7.5.4 Syntax Colouring .................................................................................. 37
7.6 Executing Expressions ..................................................................................... 38 7.6.1 Executing a New Expression ................................................................ 38 7.6.2 Re-executing a Previous Expression..................................................... 38 7.6.3 Re-executing Multiple Previous Expressions ....................................... 38
7.7 Threads ............................................................................................................ 39 7.8 Suspending Execution ..................................................................................... 39
7.8.1 Breakpoints .......................................................................................... 39 7.8.2 Interrupts ............................................................................................. 40
7.9 Terminating a Dyalog Session Running Through the RIDE .............................. 40
8 RIDE-SPE CIF IC LANGUAGE FEATURES . . . . . . . . . . . . . . . . . . . . . . . . . . . . . . . . . . . . . . . . . . . 41 8.1 I-Beams............................................................................................................ 41
8.1.1 3500⌶ : Send HTML to RIDE .............................................................. 41 8.1.2 3501⌶ : Connected to the RIDE? ....................................................... 41 8.1.3 3502⌶ : Manage RIDE Connections................................................... 42
8.2 Configuration Parameters ............................................................................... 43 8.2.1 RIDE_EDITOR ........................................................................................ 43 8.2.2 RIDE_INIT ............................................................................................. 43
8.3 Unsupported Language Elements ................................................................... 44 8.3.1 Underscored Characters ..................................................................... 44
8.3.1.1 Underscored Characters in Window Captions ................... 44 8.3.1.2 Underscored Characters in the Session ............................. 45
8.3.2 Function Key Configuration ................................................................. 45 8.3.3 Operating System Terminal/Command Window Interaction .............. 45
9 CUSTOMISIN G YOUR SE SSION . . . . . . . . . . . . . . . . . . . . . . . . . . . . . . . . . . . . . . . . . . . . . . . . . . . . . 46 9.1 View Menu ...................................................................................................... 46 9.2 Preferences Dialog Box ................................................................................... 46
9.2.1 General Tab .......................................................................................... 47 9.2.2 Keyboard Tab ....................................................................................... 49 9.2.3 Shortcuts Tab ....................................................................................... 50 9.2.4 Colours Tab .......................................................................................... 51 9.2.5 Title Tab ............................................................................................... 52 9.2.6 Menu Tab ............................................................................................. 53 9.2.7 Windows Tab ....................................................................................... 53
9.3 Configuration Parameters ............................................................................... 54

RIDE User Guide 5
APPEN DIX A KE YBOARD SHORTCUTS . . . . . . . . . . . . . . . . . . . . . . . . . . . . . . . . . . . . . . . . . 55
APPEN DIX B SAMPLE CONFIGURATION FILE . . . . . . . . . . . . . . . . . . . . . . . . . . . . . . . 63 B.1 TLS Flags .......................................................................................................... 65
RIDE User Guide 6
1 About This Document
This document introduces the Remote Integrated Development Environment (RIDE). It describes the installation process and the RIDE's user interface (windows, menus, customisation options, keycode/keystroke mappings, etc.).
RIDE can be extensively customised; this document assumes that the default configuration is in use.
1.1 Audience It is assumed that the reader has a working knowledge of Dyalog (for information on the resources available to help develop your Dyalog knowledge, see http://www.dyalog.com/introduction.htm – new users might also find that it is helpful to select the Show tips for glyphs check box in the General tab of the Preferences dialog box, as detailed in section 9.2.1).
RIDE User Guide 7
2 Introduction
The use of the RIDE is subject to the conditions of the MIT licence (see https://github.com/Dyalog/ride/blob/master/licence). The installation and use of the RIDE does not convey any additional rights to use Dyalog or any other Dyalog products. Specifically, although the interpreter can be configured to allow the RIDE to debug runtime executables, you should only do this if your Dyalog licence also allows it.
The Remote Integrated Development Environment (RIDE) is a cross-platform, graphical development environment capable of producing a rich user experience on a variety of platforms. It supports the interactive use of APL notation to explore data, discover algorithms and create solutions – or diagnose problems, resolve issues and resume the execution of running applications.
The RIDE runs separately from the APL interpreter, and communicates with it using TCP/IP sockets. The RIDE can be run on macOS, Microsoft Windows and Linux (including the Raspberry Pi). In addition to being used as a front end for APL running locally, it can also be used to launch APL sessions on remote machines or to connect to APL interpreters that are already running – either locally or remotely.
From Dyalog version 17.0, the interpreter can easily be configured to act as a web server which provides the RIDE application as a web page. This makes it possible to run the RIDE in a browser on any platform, without installing it locally. The RIDE needs to be installed on the machine where the interpreter is running, so the files can be provided as a webpage. Because no client-side installation is necessary, this mode is known as Zero Footprint.
The RIDE has two main modes of use:
• Providing a user interface to an interpreter engine (local or remote). The RIDE is the recommended IDE for Dyalog on macOS or Linux (including the Raspberry Pi). In these environments, an application icon is provided to launch RIDE and an APL interpreter together. In this mode, the RIDE and the interpreter can be thought of as a single unit. Under Microsoft Windows, the native Dyalog IDE continues to provide the richest environment for the development of APL applications for Microsoft Windows users.
• As a tool for managing connections to a collection of interpreter sessions.
In this mode, the RIDE-Dyalog Session dialog box is used to launch or connect to one or more interpreters.
Although the RIDE can manage multiple concurrent Dyalog Sessions, each Dyalog Session can only be connected to a single instance of the RIDE at any one time.
RIDE User Guide 8
3 Installation
This chapter describes how to install the RIDE.
3.1 Pre-requisites
RIDE 4.1 can only connect to a Dyalog interpreter that is version 15.0 or later.
The RIDE is supported on the following operating systems: • Linux x86_64 – the following distributions:
o Debian 8 onwards o Fedora 25 onwards o Open SUSE 13.2 onwards o Ubuntu 14.04 onwards
distributions built on top of these should also work (Linux distribution must also have libnss version 3.26 onwards)
• macOS – OS X Mavericks onwards • Microsoft Windows – Windows 7 onwards
For the zero-footprint RIDE: • a compatible browser must be installed
If Dyalog is not installed on the machine that the RIDE is being installed on, then the APL385 font and keyboard mappings installed with the RIDE mean that they are available when running a Dyalog Session through the RIDE. However, to be able to enter APL glyphs outside a Dyalog Session (for example, in text files or emails) you will need to download and install the appropriate files (files and instructions are available from http://www.dyalog.com/apl-font-keyboard.htm, as is the Dyalog Unicode IME for Microsoft Windows).
3.2 Installation
Installation instructions are dependent on operating system.
3.2.1 Zero Footprint
The use of the RIDE from a browser requires no installation on the machine where the RIDE will run. However, the RIDE must be installed on the machine where APL is installed, so that Dyalog can act as a web server, making the necessary files available to the browser.
When installing the RIDE, if you select the default location suggested by the installer then APL can be launched as a RIDE server without creating a configuration file (see Appendix B).
RIDE User Guide 9
3.2.2 Linux
The installation process for the RIDE is the same irrespective of whether it is installed as a stand-alone product or on a machine that already has Dyalog installed.
To install the RIDE:
1. Download the RIDE's .deb or .rpm file (whichever is appropriate for your Linux distribution) from my.dyalog.com. If your Linux distribution does not support either .deb or .rpm files, then please contact [email protected].
2. From the command line, use standard installation commands to install the package.
The RIDE is now installed and ready to use. The RIDE icon (shortcut) is added to the desktop.
3.2.3 macOS
The RIDE is the default UI for Dyalog on macOS and is installed at the same time as Dyalog (see the Dyalog for macOS Installation and Configuration Guide); no further installation is required.
To install the RIDE as a separate, stand-alone, product: 1. Download the RIDE's .pkg file from my.dyalog.com. 2. Double-click on the RIDE's .pkg file.
The RIDE Installer window is displayed. 3. Follow the instructions in the RIDE Installer window to successful
completion of the installation process. The RIDE is now installed and ready to use. The RIDE icon is added to the Applications directory (accessed by selecting Applications from the Go menu in the Finder menu bar).
Starting the RIDE adds its icon to the dock. To keep the RIDE icon in the dock permanently, right-click on the icon and select Options > Keep in Dock from the drop-down list that appears.
3.2.4 Microsoft Windows
The installation process for the RIDE is the same irrespective of whether it is installed as a stand-alone product or on a machine that already has Dyalog installed.
To install the RIDE:
1. Download the RIDE's .zip file from my.dyalog.com.
2. Unzip the downloaded .zip file, placing the setup_ride.exe and setup_ride.msi files in the same location as each other.
3. Double-click on the setup_ride.exe file.
The RIDE Installation window is displayed.
4. Follow the instructions in the RIDE Installation window to successful completion of the installation process.
The RIDE is now installed and ready to use. The RIDE icon (shortcut) is added to the desktop.
RIDE User Guide 10
4 Starting a Dyalog Session
When running a Dyalog Session through the RIDE, that Session should only be accessed through the RIDE. One exception to this rule is when developing or running applications that are ⎕SM/⎕SR based; access to the ⎕SM window cannot be made through the RIDE.
When running a Dyalog Session through the RIDE, the Session can be: • local to the machine on which the RIDE is running.
This requires Dyalog to be installed on the machine on which the RIDE is running.
• remote from the machine on which the RIDE is running. The RIDE can start a Session using an interpreter installed on a remote machine irrespective of whether Dyalog is installed on the machine on which the RIDE is running. In this situation: o The operating system on which the remote interpreter is running is
irrelevant – the instructions given in this chapter apply to the operating system on which the RIDE is running (the two operating systems do not have to be the same).
o The remote machine does not need to have the RIDE installed but the Dyalog Session must be RIDE-enabled (see section 8.2.2).
Connections between the RIDE and Dyalog interpreters are initialised through the RIDE-Dyalog Session dialog box. The exception to this is Zero Footprint use, which always requires Dyalog to be started first with suitable configuration parameters, after which the RIDE will appear when you direct a web browser at the APL interpreter. See section 4.1.4 for more information on Zero Footprint mode.
This chapter describes how to use the RIDE to run Dyalog Sessions, both local and remote.
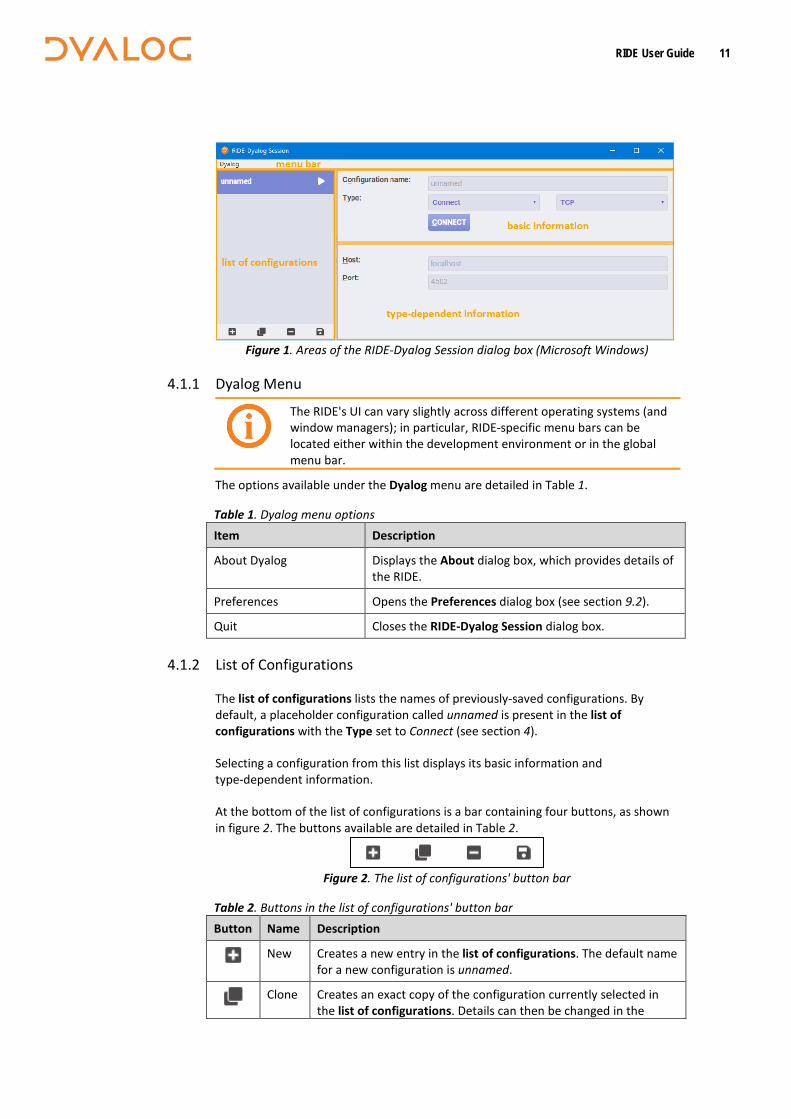
4.1 The RIDE-Dyalog Session Dialog Box When the RIDE is started, the RIDE-Dyalog Session dialog box is displayed. The RIDE-Dyalog Session dialog box comprises four areas, as shown in figure 1:
• the menu bar • the list of configurations • the basic information for the configuration selected in the configuration list • the type-dependent information for the configuration selected in the
configuration list
RIDE User Guide 11
Figure 1. Areas of the RIDE-Dyalog Session dialog box (Microsoft Windows)
4.1.1 Dyalog Menu
The RIDE's UI can vary slightly across different operating systems (and window managers); in particular, RIDE-specific menu bars can be located either within the development environment or in the global menu bar.
The options available under the Dyalog menu are detailed in Table 1.
Table 1. Dyalog menu options Item Description
About Dyalog Displays the About dialog box, which provides details of the RIDE.
Preferences Opens the Preferences dialog box (see section 9.2).
Quit Closes the RIDE-Dyalog Session dialog box.
4.1.2 List of Configurations
The list of configurations lists the names of previously-saved configurations. By default, a placeholder configuration called unnamed is present in the list of configurations with the Type set to Connect (see section 4).
Selecting a configuration from this list displays its basic information and type-dependent information.
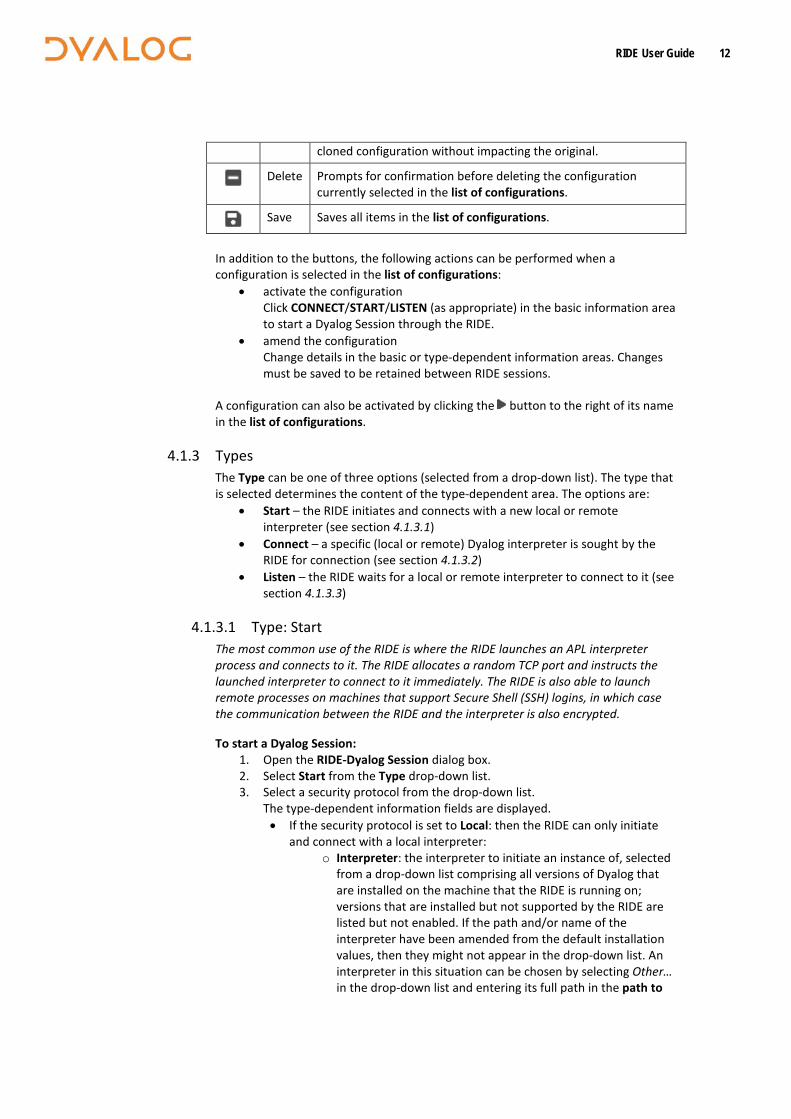
At the bottom of the list of configurations is a bar containing four buttons, as shown in figure 2. The buttons available are detailed in Table 2.
Figure 2. The list of configurations' button bar
Table 2. Buttons in the list of configurations' button bar Button Name Description
New Creates a new entry in the list of configurations. The default name for a new configuration is unnamed.
Clone Creates an exact copy of the configuration currently selected in the list of configurations. Details can then be changed in the
RIDE User Guide 12
cloned configuration without impacting the original.
Delete Prompts for confirmation before deleting the configuration currently selected in the list of configurations.
Save Saves all items in the list of configurations.
In addition to the buttons, the following actions can be performed when a configuration is selected in the list of configurations:
• activate the configuration Click CONNECT/START/LISTEN (as appropriate) in the basic information area to start a Dyalog Session through the RIDE.
• amend the configuration Change details in the basic or type-dependent information areas. Changes must be saved to be retained between RIDE sessions.
A configuration can also be activated by clicking the button to the right of its name in the list of configurations.
4.1.3 Types The Type can be one of three options (selected from a drop-down list). The type that is selected determines the content of the type-dependent area. The options are:
• Start – the RIDE initiates and connects with a new local or remote interpreter (see section 4.1.3.1)
• Connect – a specific (local or remote) Dyalog interpreter is sought by the RIDE for connection (see section 4.1.3.2)
• Listen – the RIDE waits for a local or remote interpreter to connect to it (see section 4.1.3.3)
4.1.3.1 Type: Start The most common use of the RIDE is where the RIDE launches an APL interpreter process and connects to it. The RIDE allocates a random TCP port and instructs the launched interpreter to connect to it immediately. The RIDE is also able to launch remote processes on machines that support Secure Shell (SSH) logins, in which case the communication between the RIDE and the interpreter is also encrypted.
To start a Dyalog Session: 1. Open the RIDE-Dyalog Session dialog box. 2. Select Start from the Type drop-down list. 3. Select a security protocol from the drop-down list.
The type-dependent information fields are displayed. • If the security protocol is set to Local: then the RIDE can only initiate
and connect with a local interpreter: o Interpreter: the interpreter to initiate an instance of, selected
from a drop-down list comprising all versions of Dyalog that are installed on the machine that the RIDE is running on; versions that are installed but not supported by the RIDE are listed but not enabled. If the path and/or name of the interpreter have been amended from the default installation values, then they might not appear in the drop-down list. An interpreter in this situation can be chosen by selecting Other… in the drop-down list and entering its full path in the path to
RIDE User Guide 13
executable field. The value of the path to executable field is remembered across invocations of the RIDE.
o Working directory: optionally, specify the fully-qualified path to, and name of, a directory that overrides the interpreter's default working directory.
o Arguments: optionally, specify additional arguments for the interpreter (one argument per line).
o Environment variables: optionally, specify additional configuration parameters for the interpreter. These should be specified as <key>=<value> pairs, with one pair per line, no extra spaces and no quoting or escaping of value.
• If the security protocol is set to SSH then the RIDE connects to a local or remote interpreter using the secure shell network protocol:
The use of SSH is not applicable when the interpreter is running on the Microsoft Windows operating system.
o Host: the IP address/unique DNS name of the machine that the interpreter will be running on.
o Port: the number of the port that the RIDE and the interpreter will connect through. By default, this is port 4502.
o SSH Port: the number of the port to use for SSH. The default is 22.
o User: the user name on the machine that the interpreter is running on.
o Key file: the fully-qualified filename of the SSH identity file. o Password/passphrase: either the password corresponding to
the specified User or, if an encrypted key file is being used for authentication, the passphrase. If an encrypted Key File is specified, a passphrase is
required for authentication. If an unencrypted Key File is specified, a
password/passphrase is not required. If a Key File is not specified, then the password
corresponding to the specified User is required. o Interpreter: the interpreter to initiate an instance of, selected
from a drop-down list comprising all versions of Dyalog installed on the machine specified in the Host field (click the button to populate this list). The path to the interpreter selected in the drop-down list is displayed in the path to executable field. If the required interpreter is not included in the drop-down list, select Other… in the drop-down list and enter its fully-qualified path in the path to executable field. The value of the path to executable field is remembered across invocations of the RIDE.
o Arguments: optionally, specify additional arguments for the interpreter (one argument per line).
o Environment variables: optionally, specify additional configuration parameters for the interpreter. These should be specified as <key>=<value> pairs, with one pair per line, no extra spaces and no quoting or escaping of value.
4. Click START.
RIDE User Guide 14
In the Dyalog Session, selecting New Session in the File menu (see section 5.1.2.1) launches another instance of the interpreter whose path is specified in the path to executable field.
4.1.3.2 Type: Connect The RIDE connects to a specific running (local or remote) Dyalog interpreter that is listening for connections. This is typically used when the RIDE is monitoring processes that have been started to provide some kind of service and to debug them if something unexpected happens.
You should only configure a Dyalog interpreter to listen for connections if either of the following apply:
• you have a firewall that allows you specify which client machines will be able to connect
• you use a configuration file (see Appendix B) to specify suitable security filters to limit access to the interpreter.
Your application can use 3502⌶ to enable debugging when it is appropriate (see section 8.1.3).
To safely experiment with configuring APL to listen for connections, leave the address field in the following examples empty, for example RIDE_INIT="SERVE::4502". If the address field is empty, only local connections are allowed. The * used below instructs the interpreter to listen on all available network adapters.
To start a Dyalog Session:
1. On the machine that the interpreter will run on, start a Dyalog Session, optionally specifying an IP address/DNS name and port that it will listen for RIDE connections on using the RIDE_INIT configuration parameter. If specified, these will override any stored RIDE_INIT values (see section 8.2.2). For example, if the RIDE is on a different machine and will connect to a Dyalog version 16.0 Unicode 64-bit interpreter through port 4502, then enter the following in a command window/at the command prompt: • on AIX:
$ RIDE_INIT="SERVE:*:4502" /opt/mdyalog/16.0/64/unicode/p7/mapl
• on Linux: $ RIDE_INIT="SERVE:*:4502" dyalog
• on macOS: $ RIDE_INIT="SERVE:*:4502" /Dyalog/ Dyalog-16.0.app/Contents/Resources/Dyalog/mapl
• on Microsoft Windows: > cd "C:\Program Files\Dyalog\Dyalog APL-64 16.0 Unicode" > dyalog RIDE_INIT=SERVE:*:4502 Alternatively, create a shortcut with the appropriate settings: a. Select the appropriate Dyalog installation and create a shortcut
to it.
RIDE User Guide 15
b. Right-click on the shortcut icon and select Properties from the context menu that is displayed. The Properties dialog box is displayed.
c. In the Shortcut tab, go to the Target field and: o place " marks around the path o append RIDE_INIT=SERVE:*:4502 For example: "C:\Program Files\Dyalog\Dyalog APL-64 16.0 Unicode\dyalog.exe" RIDE_INIT=SERVE:*:4502
d. Click OK.
Alternatively, start a Dyalog Session and enter: 3502⌶'SERVE:*:4502' ⍝ Set RIDE_INIT 3502⌶1 ⍝ enable RIDE
2. On the machine that the RIDE is running on: a. Open the RIDE-Dyalog Session dialog box. b. Select Connect from the Type drop-down list. c. Select a security protocol from the drop-down list.
The type-dependent information fields are displayed. • If the security protocol is set to TCP:
o Host: the IP address/unique DNS name of the machine that the interpreter is running on.
o Port: the number of the port that the interpreter is listening on. By default, the interpreter listens on port 4502.
• If the security protocol is set to SSH then the RIDE connects to a remote interpreter using the secure shell network protocol:
The use of SSH is not applicable when the interpreter is running on the Microsoft Windows operating system.
o Host: the IP address/unique DNS name of the machine that the interpreter is running on.
o Port: the number of the port that the interpreter is listening on. By default, the interpreter listens on port 4502.
o SSH Port: the number of the port to use for SSH. The default is 22.
o User: the user name on the machine that the interpreter is running on.
o Key file: the fully-qualified filename of the SSH identity file. Password/passphrase: either the password corresponding to the specified User or, if an encrypted key file is being used for authentication, the passphrase. If an encrypted Key File is specified, a passphrase is
required for authentication. If an unencrypted Key File is specified, a
password/passphrase is not required. If a Key File is not specified, then the password
corresponding to the specified User is required. • If the security protocol is set to TLS/SSL then secure connections
are enabled:
By default, the RIDE qualifies the server certificate using the root authority certificates available in the Microsoft Certificate Store.
RIDE User Guide 16
o Host: the IP address/unique DNS name of the machine that the interpreter is running on.
o Port: the number of the port that the interpreter is listening on. By default, the interpreter listens on port 4502.
o Three optional check boxes (and associated fields) are relevant if you have not added your root certificate to the Microsoft Certificate Store or are not running on the Microsoft Windows operating system: Provide user certificate: if selected, populate the Cert and
Key fields with the fully-qualified paths to, and names of, the PEM-encoded certificate file and key file respectively – the interpreter (RIDE server) uses this to verify that the RIDE client is permitted to connect to it.
Custom root certificates: if selected, populate the Directory field with the fully-qualified path to, and name of, the directory that contains multiple root certificates and key files to use for authentication.
Validate server subject common name matches hostname: verifies that the CN (Common Name) field of the server's certificate matches the hostname.
d. Click CONNECT.
4.1.3.3 Type: Listen The RIDE waits for a local or remote interpreter to connect to it. This approach is more secure than configuring the interpreter to listen for connections, because an intruder will only be able to communicate with the RIDE rather than an APL system. An application that needs to be debugged can initiate the connection to a listening RIDE using 3502⌶ to set RIDE_INIT when debugging is desired (see section 8.1.3).
To start a Dyalog Session: 1. On the machine that the RIDE is running on:
a. Open the RIDE-Dyalog Session dialog box. b. Select Listen from the Type drop-down list.
The type-dependent information fields are displayed. • In the Host field, specify the IP address/unique DNS name that
the RIDE will bind to. By default, the RIDE will bind to all interfaces.
• In the Port field, specify the number of the port that the RIDE should listen on. By default, the RIDE listens on port 4502.
c. Click LISTEN. The Waiting for connection... dialog box is displayed.
2. On the machine that the interpreter will run on, start a Dyalog Session from the command prompt. When doing this, the IP address/DNS name for the machine that the RIDE is running on and the same port number as the RIDE is listening on must be specified as connection properties. For example, if the RIDE is running on a machine that has DNS name jay-pc.dyalog.bramley and is listening on port 4502, then enter the following in a command window/at the command prompt: • on AIX:
$ RIDE_INIT="CONNECT: jay-pc.dyalog.bramley:4502" /opt/mdyalog/16.0/64/unicode/p7/mapl
RIDE User Guide 17
• on Linux: $ RIDE_INIT="CONNECT: jay-pc.dyalog.bramley:4502" dyalog
• on macOS: $ RIDE_INIT="CONNECT: jay-pc.dyalog.bramley:4502" /Dyalog/ Dyalog-16.0.app/Contents/Resources/Dyalog/mapl
• on Microsoft Windows: > cd "C:\Program Files\Dyalog\Dyalog APL-64 16.0 Unicode" > dyalog RIDE_INIT=CONNECT: jay-pc.dyalog.bramley:4502
The Dyalog Session starts.
Alternatively, start a Dyalog Session and enter: 3502⌶'CONNECT:jay-pc.dyalog.bramley:4502' 3502⌶1
The new Dyalog Session will connect to the RIDE and remain connected until the Dyalog Session is terminated.
On Microsoft Windows, an alternative to using the command window is to create a shortcut with the appropriate settings.
To configure the shortcut: 1. Select the appropriate Dyalog installation and create a shortcut
to it. 2. Right-click on the shortcut icon and select Properties from the
context menu that is displayed. The Properties dialog box is displayed.
3. In the Shortcut tab, go to the Target field and: • place " marks around the path • append RIDE_INIT=CONNECT:10.0.38.1:4502 For example: "C:\Program Files\Dyalog\Dyalog APL-64 16.0 Unicode\dyalog.exe" RIDE_INIT=CONNECT:10.0.38.1:4502
4. Click OK.
4.1.4 The Zero Footprint RIDE The RIDE is an application that is implemented using a combination of HTML and Javascript. A full RIDE installation includes a small web server framework called Node/JS, which acts as a host for the application, and an embedded web browser that renders it to the user as a desktop application.
Dyalog is able to act as a web server, hosting the RIDE application and making it available to any compatible web browser – this is known as "Zero Footprint" operation as the RIDE is not installed on the client machine but is downloaded by the web browser on demand. The advantage of the Zero Footprint RIDE is that an APL session can be monitored and maintained from any device with a suitable browser installed; no installation of RIDE is required.

RIDE User Guide 18
The functionality of the Zero Footprint RIDE is slightly restricted. Specifically: • The RIDE can only interact with the APL interpreter that it is connected to;
none of the functionality related to launching new sessions or connecting to running APL sessions is available.
• Preferences are persisted in browser storage using cookies. • Behaviour that is provided by the browser (undo/redo, cut/copy/paste,
change font size) does not appear in the RIDE's menus. • Floating windows are not supported; all windows appear within the main
browser window. • Window captions cannot be controlled.
Apart from these limitations, the Zero Footprint RIDE provides exactly the same features for viewing and developing APL code as the desktop RIDE.
RIDE User Guide 19
5 The Dyalog Development Environment
When a Dyalog Session is started through the RIDE, the Dyalog development environment is displayed. This means that:
• the Dyalog Session user interface is displayed (see section 5.1) • the keyboard key mappings for APL glyphs are enabled (see section 5.2)
5.1 Session User Interface
The menu bar menu options on macOS are different to those on Microsoft Windows and Linux. This section details the options for Microsoft Windows and Linux; for the macOS options see the Dyalog for macOS UI Guide.
The RIDE's UI can vary slightly across different operating systems (and window managers); in particular, RIDE-specific menu bars can be located either within the development environment or in the global menu bar.
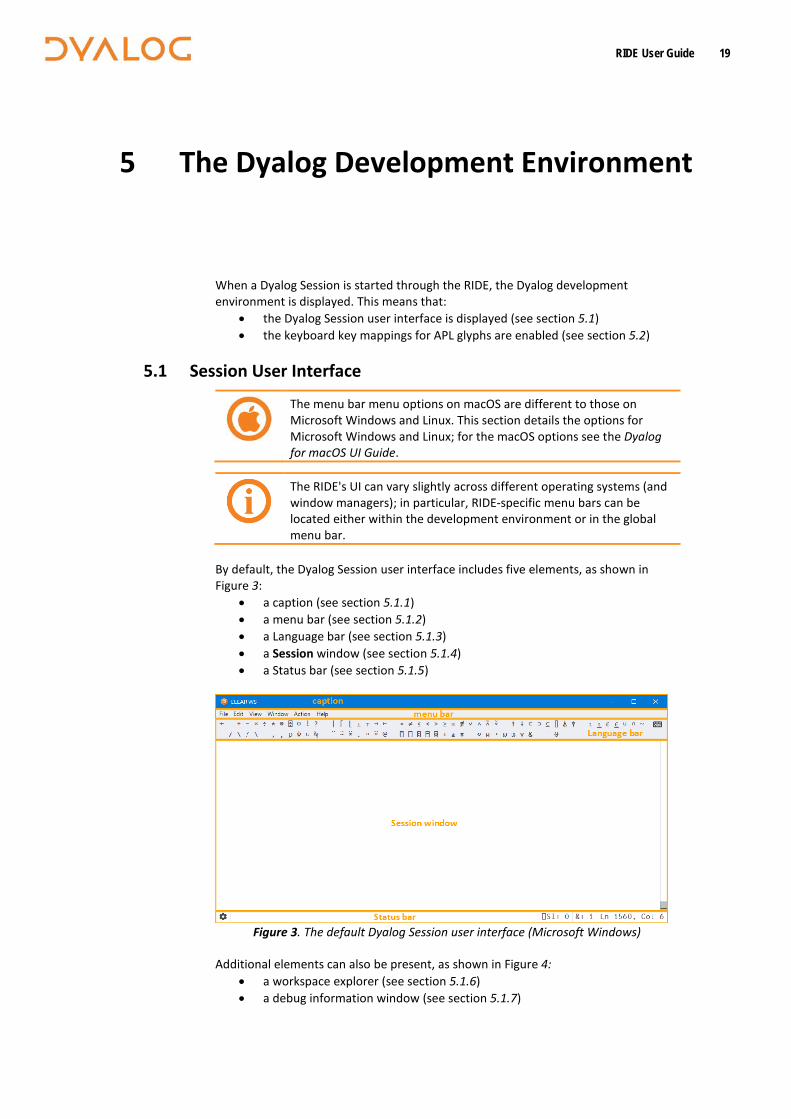
By default, the Dyalog Session user interface includes five elements, as shown in Figure 3:
• a caption (see section 5.1.1) • a menu bar (see section 5.1.2) • a Language bar (see section 5.1.3) • a Session window (see section 5.1.4) • a Status bar (see section 5.1.5)
Figure 3. The default Dyalog Session user interface (Microsoft Windows)
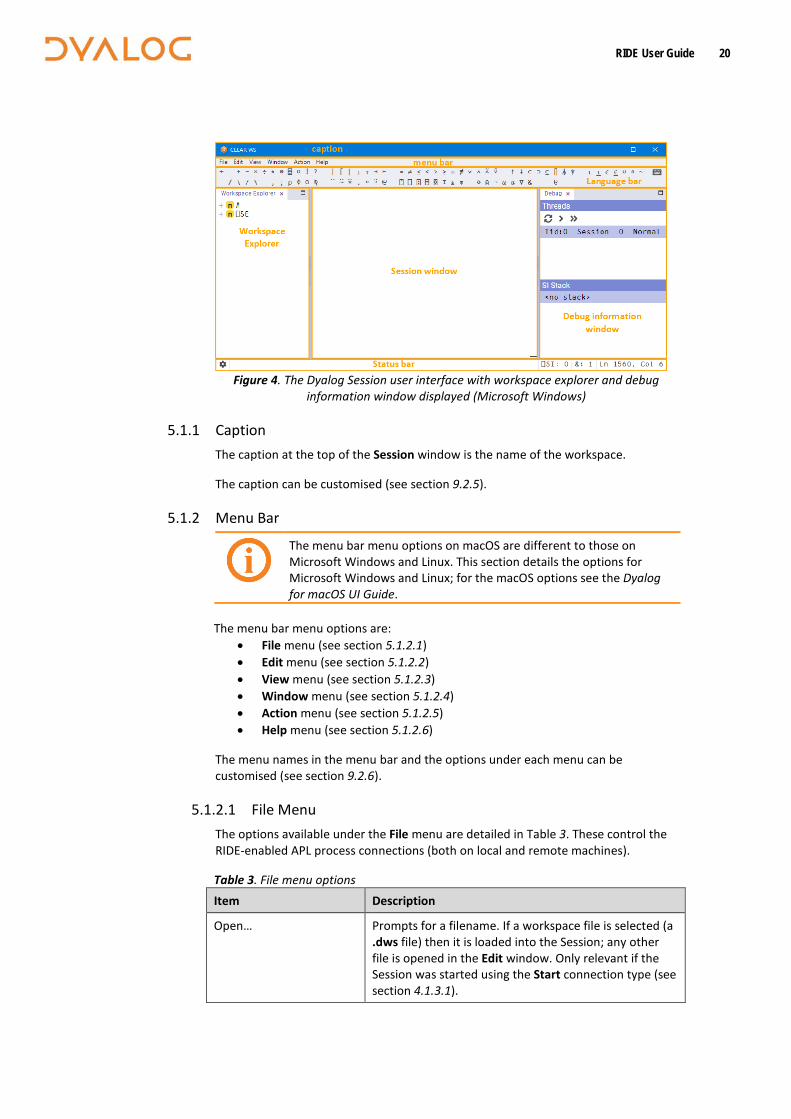
Additional elements can also be present, as shown in Figure 4: • a workspace explorer (see section 5.1.6) • a debug information window (see section 5.1.7)
RIDE User Guide 20
Figure 4. The Dyalog Session user interface with workspace explorer and debug
information window displayed (Microsoft Windows)
5.1.1 Caption The caption at the top of the Session window is the name of the workspace.
The caption can be customised (see section 9.2.5).
5.1.2 Menu Bar
The menu bar menu options on macOS are different to those on Microsoft Windows and Linux. This section details the options for Microsoft Windows and Linux; for the macOS options see the Dyalog for macOS UI Guide.
The menu bar menu options are: • File menu (see section 5.1.2.1) • Edit menu (see section 5.1.2.2) • View menu (see section 5.1.2.3) • Window menu (see section 5.1.2.4) • Action menu (see section 5.1.2.5) • Help menu (see section 5.1.2.6)
The menu names in the menu bar and the options under each menu can be customised (see section 9.2.6).
5.1.2.1 File Menu The options available under the File menu are detailed in Table 3. These control the RIDE-enabled APL process connections (both on local and remote machines).
Table 3. File menu options Item Description
Open… Prompts for a filename. If a workspace file is selected (a .dws file) then it is loaded into the Session; any other file is opened in the Edit window. Only relevant if the Session was started using the Start connection type (see section 4.1.3.1).
RIDE User Guide 21
New Session Starts a new Dyalog Session (a new instance of the interpreter). Only relevant if the Session was started using the Start connection type (see section 4.1.3.1).
Connect… Opens the RIDE-Dyalog Session dialog box (see section 4.1).
Quit Terminates the Dyalog Session (see section 7.9).
5.1.2.2 Edit Menu The options available under the Edit menu are detailed in Table 4. These assist with manipulating text within (and between) windows.
Table 4. Edit menu options Item Description
Undo Reverses the previous action
Redo Reverses the effect of the previous Undo
Cut Deletes the selected text from the active window and places it on the clipboard.
Copy Copies the selected text to the clipboard.
Paste Pastes the text contents of the clipboard into the active window at the current location.
Preferences Opens the Preferences dialog box (see section 9.2).
A context menu that includes the Cut, Copy and Paste options from the Edit menu is available in the Session window, all Edit windows and the Trace window.
5.1.2.3 View Menu The options available under the View menu are detailed in Table 5. These enable the appearance of the Dyalog Session to be changed.
Table 5. View menu options Item Description
Show Language Bar Toggles display of the Language bar (see section 5.1.3) at the top of the Session window.
Show Status bar Toggles display of the Status bar (see section 5.1.5) at the bottom of the Session window.
Show Workspace Explorer Toggles display of the workspace explorer (see section 5.1.6) to the left of the Session window.
Show Debug Toggles display of the debug information window (see section 5.1.7) to the right of the Session window.
Line Wrapping in Session Toggles line wrapping. When off, ⎕PW is used to determine line length. When on, a combination of ⎕PW and line wrapping is used.
Stops Toggles display of an additional column at the left-hand side of the Edit/Trace windows in which break-points
RIDE User Guide 22
can be set/unset. Hiding this column does not remove any previously-set break-points.
Line Numbers Toggles display of line numbers in the Edit/Trace windows.
Outline Toggles code folding/outlining for control structures (including :Section structures) and functions in Edit windows. When toggled, existing code in an open Edit window is automatically updated to reflect the new rules.
Increase Font Size Increases the size of the font in all the windows
Decrease Font Size Decreases the size of the font in all the windows
Reset Font Size Sets the size of the font in all the windows to its default value.
Toggle Full Screen Toggles the entire session between its current size and full screen size.
5.1.2.4 Window Menu The option available under the Window menu is detailed in Table 6. This closes all open Edit and Trace windows.
Table 6. Window menu options
Item Description
Close All Windows Closes all open Edit and Trace windows (the Session window, workspace explorer and debug information window remain open).
5.1.2.5 Action Menu The options available under the Action menu are detailed in Table 7. These enable Edit and Trace windows to be opened and allow currently-running APL code to be interrupted with trappable events.
Table 7. Action menu options Item Description
Edit If the cursor is on or immediately after <object name>, then opens an Edit window on that name.
Trace In the Session window: • If the cursor is on a line containing calls to multi-line
functions, a Trace window is opened and the functions traced (explicit trace).
• If the cursor is on a line containing no text and there is a suspended function (or operator) on the execution stack, open a Trace window for that function (naked trace)
In a Trace window: • Open a new Trace window for any multi-line function
(or operator) in that line and trace that line as it is
RIDE User Guide 23
evaluated.
Clear all trace/stop/monitor
Removes any trace/stop/monitor flags (as set by ⎕TRACE/⎕STOP/⎕MONITOR) from all functions in the workspace.
Weak Interrupt Suspends execution at the start of the next line.
Strong Interrupt Suspends execution after the current primitive operation.
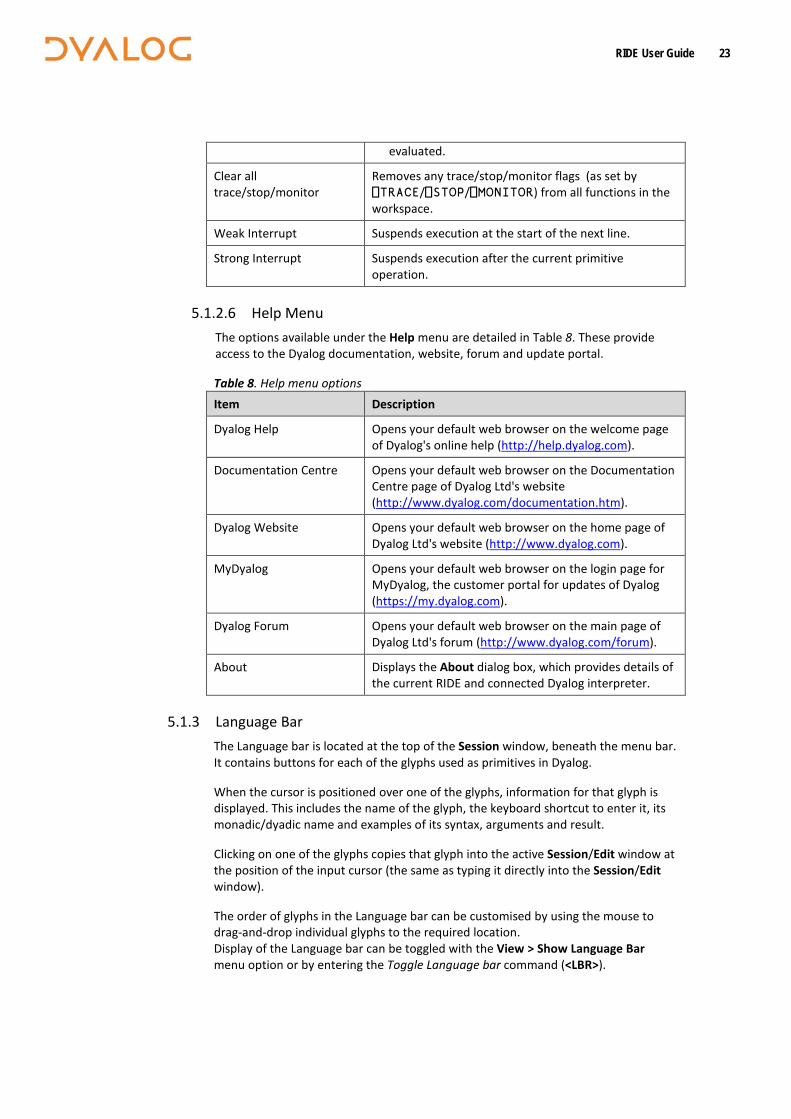
5.1.2.6 Help Menu The options available under the Help menu are detailed in Table 8. These provide access to the Dyalog documentation, website, forum and update portal.
Table 8. Help menu options Item Description
Dyalog Help Opens your default web browser on the welcome page of Dyalog's online help (http://help.dyalog.com).
Documentation Centre Opens your default web browser on the Documentation Centre page of Dyalog Ltd's website (http://www.dyalog.com/documentation.htm).
Dyalog Website Opens your default web browser on the home page of Dyalog Ltd's website (http://www.dyalog.com).
MyDyalog Opens your default web browser on the login page for MyDyalog, the customer portal for updates of Dyalog (https://my.dyalog.com).
Dyalog Forum Opens your default web browser on the main page of Dyalog Ltd's forum (http://www.dyalog.com/forum).
About Displays the About dialog box, which provides details of the current RIDE and connected Dyalog interpreter.
5.1.3 Language Bar The Language bar is located at the top of the Session window, beneath the menu bar. It contains buttons for each of the glyphs used as primitives in Dyalog.
When the cursor is positioned over one of the glyphs, information for that glyph is displayed. This includes the name of the glyph, the keyboard shortcut to enter it, its monadic/dyadic name and examples of its syntax, arguments and result.
Clicking on one of the glyphs copies that glyph into the active Session/Edit window at the position of the input cursor (the same as typing it directly into the Session/Edit window).
The order of glyphs in the Language bar can be customised by using the mouse to drag-and-drop individual glyphs to the required location. Display of the Language bar can be toggled with the View > Show Language Bar menu option or by entering the Toggle Language bar command (<LBR>).
RIDE User Guide 24
On the right hand side of the Language bar is the button: • Positioning the cursor over the button displays a dynamic tooltip showing
all configured keyboard shortcuts for command codes – for more information on these, see section 7.1.
• Clicking on the button displays the Preferences dialog box (the same as selecting the Edit > Preferences menu option) – for more information on the Preferences dialog box, see section 9.2.
5.1.4 Session Window The primary purpose of the Session window is to provide a scrolling area within which a user can enter APL expressions and view results. See section 6.1 for more information on the Session window.
You can move, resize, maximise and minimise the Session window using the standard facilities provided by your operating system.
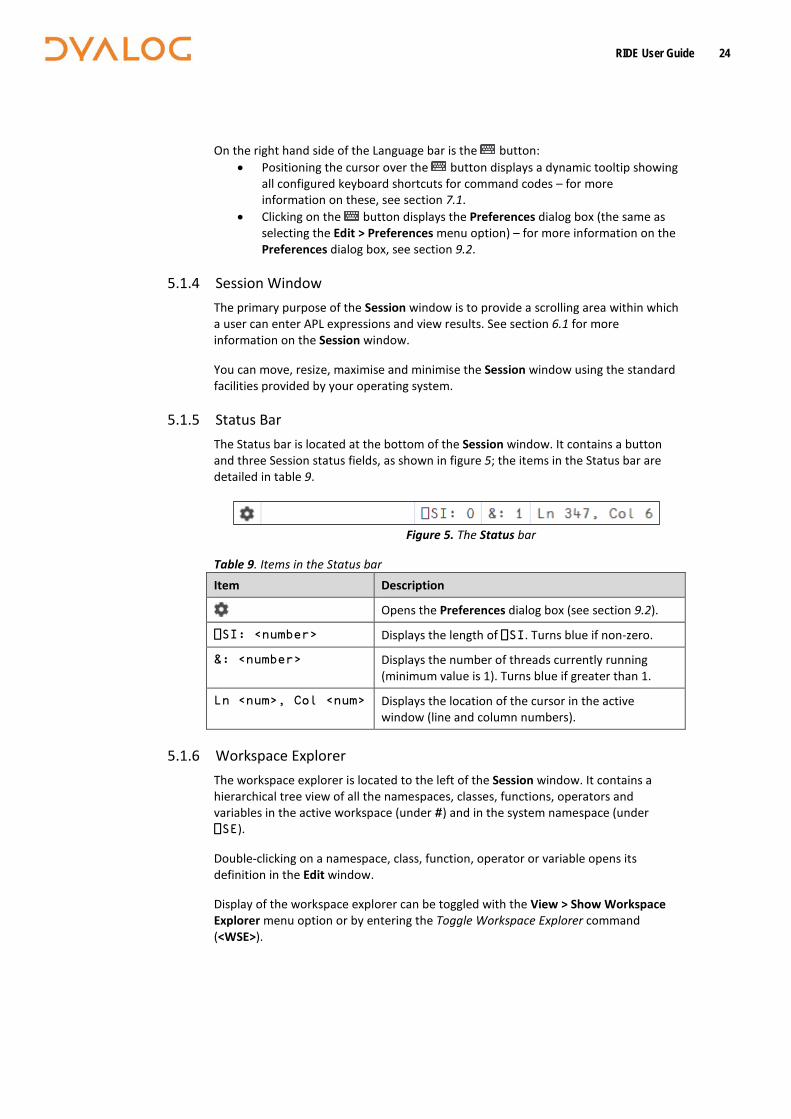
5.1.5 Status Bar The Status bar is located at the bottom of the Session window. It contains a button and three Session status fields, as shown in figure 5; the items in the Status bar are detailed in table 9.
Figure 5. The Status bar
Table 9. Items in the Status bar Item Description
Opens the Preferences dialog box (see section 9.2).
⎕SI: <number> Displays the length of ⎕SI. Turns blue if non-zero.
&: <number> Displays the number of threads currently running (minimum value is 1). Turns blue if greater than 1.
Ln <num>, Col <num> Displays the location of the cursor in the active window (line and column numbers).
5.1.6 Workspace Explorer The workspace explorer is located to the left of the Session window. It contains a hierarchical tree view of all the namespaces, classes, functions, operators and variables in the active workspace (under #) and in the system namespace (under ⎕SE).
Double-clicking on a namespace, class, function, operator or variable opens its definition in the Edit window.
Display of the workspace explorer can be toggled with the View > Show Workspace Explorer menu option or by entering the Toggle Workspace Explorer command (<WSE>).
RIDE User Guide 25
5.1.7 Debug Information Window The debug information window is located to the right of the Session window. It comprises two areas:
• The Threads area lists the threads that are currently in existence. For each thread the following information is provided:
o a description comprising the thread ID (⎕TID) and name (⎕TNAME) o the state of the thread, that is, what it is doing (for example,
Session, Pending, :Hold, ⎕NA) o the thread requirements (⎕TREQ) o a flag indicating whether the thread is Normal or Paused
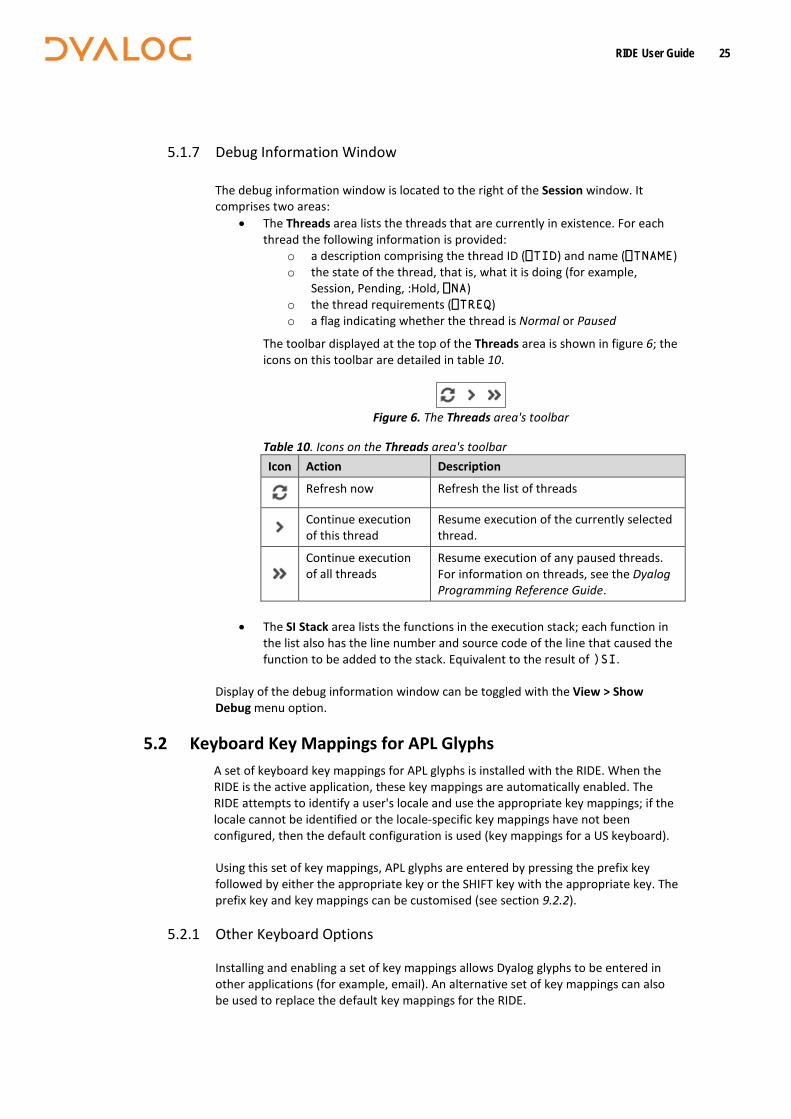
The toolbar displayed at the top of the Threads area is shown in figure 6; the icons on this toolbar are detailed in table 10.
Figure 6. The Threads area's toolbar
Table 10. Icons on the Threads area's toolbar Icon Action Description
Refresh now Refresh the list of threads
Continue execution of this thread
Resume execution of the currently selected thread.
Continue execution of all threads
Resume execution of any paused threads. For information on threads, see the Dyalog Programming Reference Guide.
• The SI Stack area lists the functions in the execution stack; each function in
the list also has the line number and source code of the line that caused the function to be added to the stack. Equivalent to the result of )SI.
Display of the debug information window can be toggled with the View > Show Debug menu option.
5.2 Keyboard Key Mappings for APL Glyphs A set of keyboard key mappings for APL glyphs is installed with the RIDE. When the RIDE is the active application, these key mappings are automatically enabled. The RIDE attempts to identify a user's locale and use the appropriate key mappings; if the locale cannot be identified or the locale-specific key mappings have not been configured, then the default configuration is used (key mappings for a US keyboard).
Using this set of key mappings, APL glyphs are entered by pressing the prefix key followed by either the appropriate key or the SHIFT key with the appropriate key. The prefix key and key mappings can be customised (see section 9.2.2).
5.2.1 Other Keyboard Options
Installing and enabling a set of key mappings allows Dyalog glyphs to be entered in other applications (for example, email). An alternative set of key mappings can also be used to replace the default key mappings for the RIDE.

RIDE User Guide 26
Information and the requisite downloadable files are available at http://www.dyalog.com/apl-font-keyboard.htm.
If you have the Dyalog Unicode IME installed, then the RIDE activates it by default. It can be disabled by unchecking the Also enable Dyalog IME checkbox in the Keyboard tab of the Preferences dialog box (see section 9.2.2).
If Dyalog is not installed on the machine that the RIDE is running on, then the Dyalog Unicode IME can be downloaded and installed from http://www.dyalog.com/apl-font-keyboard.htm.
Most Linux distributions released after mid-2012 support Dyalog glyphs by default. For more information, see the Dyalog for UNIX Installation and Configuration Guide.
RIDE User Guide 27
6 Input Windows
Instead of just a single Session window, the Dyalog Development Environment can comprise multiple windows:
• Session window – created when a Dyalog Session is started through the RIDE and always present while the Session is live. There is only one Session window.
• Edit windows – created and destroyed dynamically as required. There can be multiple Edit windows (one for each APL object).
• Trace window – created and destroyed dynamically as required. There is only one Trace window.
When multiple windows are open, the window that has the focus is referred to as the active window.
6.1 Session Window The Session window contains:
• the input line – the last line entered in the Session window; this is (usually) the line into which you type an expression to be evaluated.
• the Session log – a history of previously-entered expressions and the results they produced.
If a log file is being used, then the Session log is loaded into memory when a Dyalog Session is started. When the Dyalog Session is closed, the Session log is written to the log file, replacing its previous contents.
6.2 Edit Window
This section applies to the RIDE's built-in editor. A different editor can be specified by setting the RIDE_EDITOR configuration parameter to the fully-qualified path of the desired editor's executable file.
The Edit window is used to define new objects as well as view/amend existing objects.
An Edit window can be opened from the Session window in any of the following ways:
• Enter )ED <object name> • Enter ⎕ED '<object name>' • Enter <object name> <ED>
(for an explanation of the <ED> syntax, see section 7.1) • Double-click on/after <object name>
If the object name does not already exist, then it is assumed to be of type function/operator. Different types can be explicitly specified using the )ED or ⎕ED options – see )ED or ⎕ED in the Dyalog APL Language Reference Guide.
RIDE User Guide 28
An Edit window can be opened from the Trace window by entering the Edit command (<ED>), double-clicking the cursor or clicking the button in the toolbar (see section 6.3.1). The position of the cursor when this is done determines the name of the object that the Edit window is for:
• If the cursor is on or immediately after <object name>, then the Edit window opens on that name.
• If the cursor is anywhere else, then the Edit window opens for the most recently-referenced function on the stack. This is a naked edit.
An Edit window can be opened from another Edit window in any of the following ways:
• Move the cursor over/after <object name> and enter the Edit command (<ED>)
• Double-click on/after <object name>
By default, the Edit window is docked to the right of the Session Window.
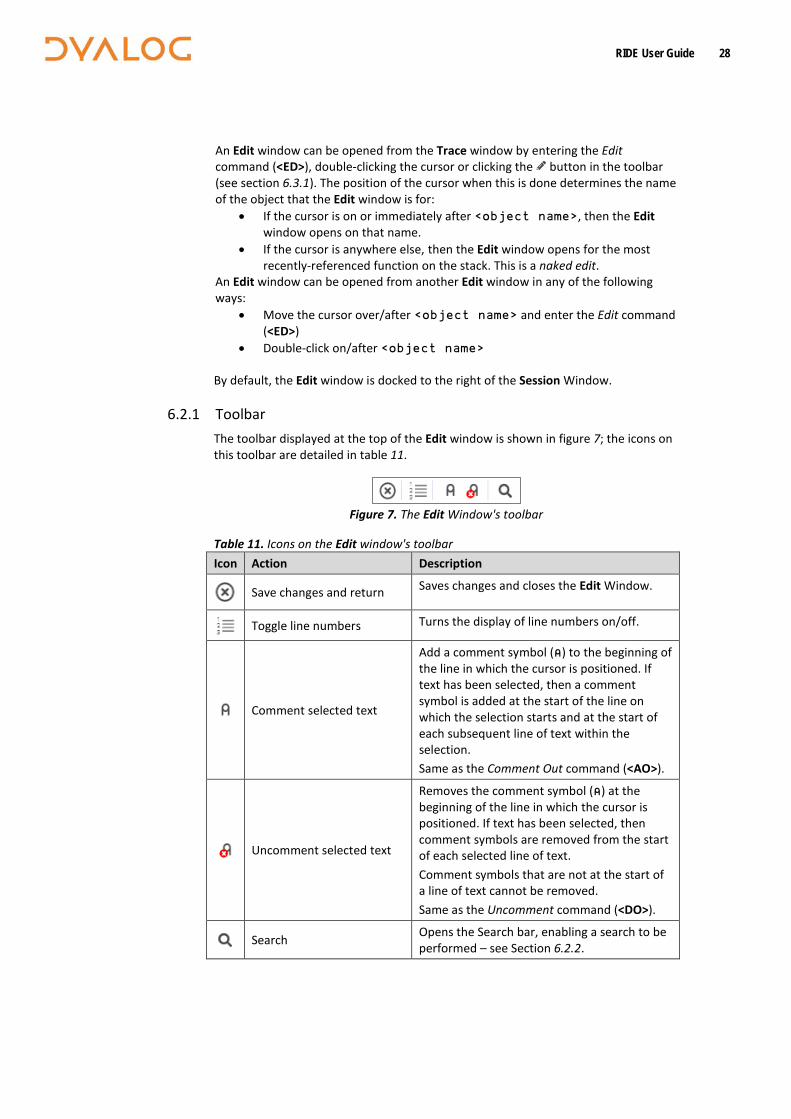
6.2.1 Toolbar The toolbar displayed at the top of the Edit window is shown in figure 7; the icons on this toolbar are detailed in table 11.
Figure 7. The Edit Window's toolbar
Table 11. Icons on the Edit window's toolbar Icon Action Description
Save changes and return Saves changes and closes the Edit Window.
Toggle line numbers Turns the display of line numbers on/off.
Comment selected text
Add a comment symbol (⍝) to the beginning of the line in which the cursor is positioned. If text has been selected, then a comment symbol is added at the start of the line on which the selection starts and at the start of each subsequent line of text within the selection. Same as the Comment Out command (<AO>).
Uncomment selected text
Removes the comment symbol (⍝) at the beginning of the line in which the cursor is positioned. If text has been selected, then comment symbols are removed from the start of each selected line of text. Comment symbols that are not at the start of a line of text cannot be removed. Same as the Uncomment command (<DO>).
Search Opens the Search bar, enabling a search to be performed – see Section 6.2.2.
RIDE User Guide 29
6.2.2 Search and Replace The icon in the Edit window's toolbar opens the Search bar, enabling a search for every occurrence of a specified string (this can include APL glyphs) to be performed within the code in the active Edit window; optionally, a replacement string can be applied on an individual basis.
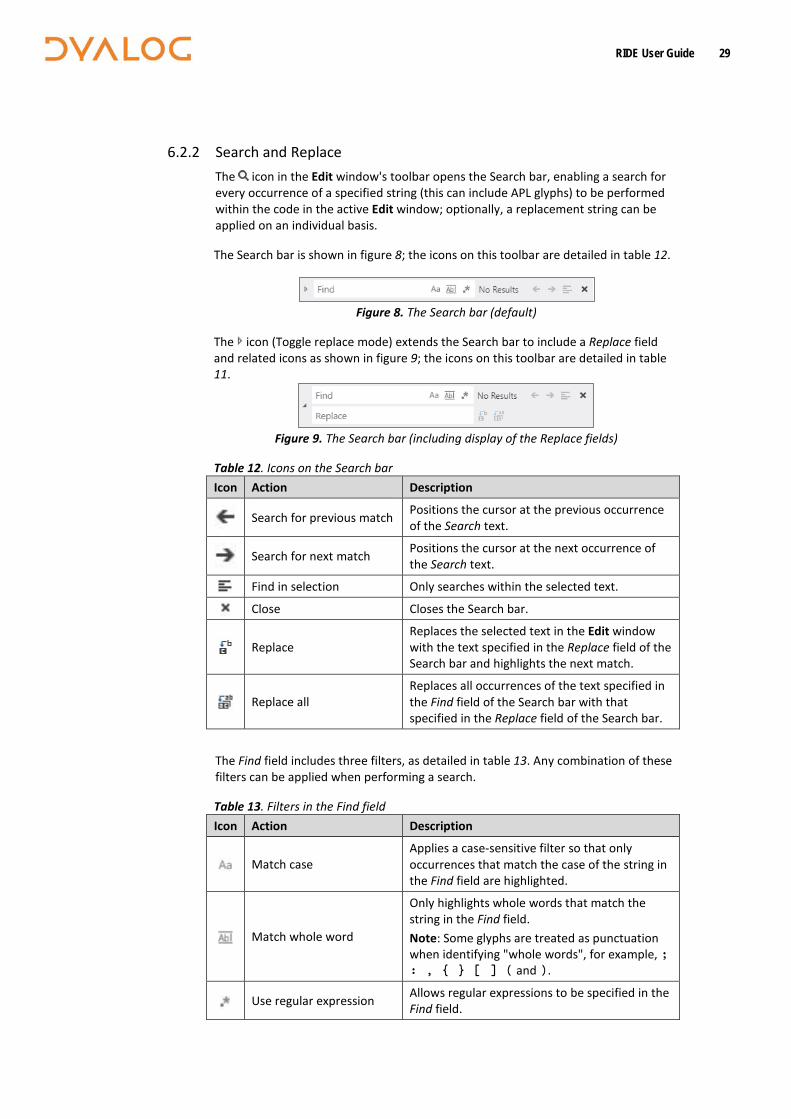
The Search bar is shown in figure 8; the icons on this toolbar are detailed in table 12.
Figure 8. The Search bar (default)
The icon (Toggle replace mode) extends the Search bar to include a Replace field and related icons as shown in figure 9; the icons on this toolbar are detailed in table 11.
Figure 9. The Search bar (including display of the Replace fields)
Table 12. Icons on the Search bar Icon Action Description
Search for previous match Positions the cursor at the previous occurrence of the Search text.
Search for next match Positions the cursor at the next occurrence of the Search text.
Find in selection Only searches within the selected text.
Close Closes the Search bar.
Replace Replaces the selected text in the Edit window with the text specified in the Replace field of the Search bar and highlights the next match.
Replace all Replaces all occurrences of the text specified in the Find field of the Search bar with that specified in the Replace field of the Search bar.
The Find field includes three filters, as detailed in table 13. Any combination of these filters can be applied when performing a search.
Table 13. Filters in the Find field Icon Action Description
Match case Applies a case-sensitive filter so that only occurrences that match the case of the string in the Find field are highlighted.
Match whole word
Only highlights whole words that match the string in the Find field. Note: Some glyphs are treated as punctuation when identifying "whole words", for example, ; : , { } [ ] ( and ).
Use regular expression Allows regular expressions to be specified in the Find field.
RIDE User Guide 30
To search for a string:
1. Enter the string to search for in the Find field in one of the following ways:
• Press the Search button and enter the string directly in the Find field.
• Enter the Search command (<SC>) and enter the string directly in the Find field.
• select the string in the Edit window or position the cursor over a word and enter the Search command (<SC>) or press the Search button ; the selected string or the word under the cursor is copied to the Find field.
All occurrences of the specified string are highlighted in the Edit window. If the content of the Edit window is sufficiently long for there to be a vertical scroll bar, then the locations of occurrences of the specified string within the entire content are identified by yellow marks overlaid on the scroll bar.
2. Press the Enter key to select the first occurrence of the search string after the last position of the cursor.
3. Press the Search for next match button to advance the selection to the next occurrence of the search string.
4. Repeat step 3 as required (the search is cyclic).
5. Use the Esc key to exit the search functionality.
To replace a string:
1. Do one of the following:
• Enter the string to be replaced in the Find field in one of the following ways:
o Press the Search button and enter the string directly in the Find field.
o Enter the Search command (<SC>) and enter the string directly in the Find field.
o Select the string in the Edit window and enter the Search command (<SC>) or press the Search button ; the selected string is copied to the Find field.
Press to extend the Search bar to display the Replace field.
• Enter the Replace command (<RP>) and enter the string directly in the Find field.
• select the string in the Edit window and enter the Replace command (<RP>); the selected string is copied to the Find field and the Replace field is displayed.
2. Enter the replacement string directly in the Replace field.
3. Press the Enter key to select the first occurrence of the search string after the last position of the cursor.
RIDE User Guide 31
4. Do one of the following:
• Press the Enter key or the Replace button to replace the selected occurrence of the search string and to advance the selection to the next occurrence of the search string.
• Press the Search for next match button to leave the selected occurrence of the search string unaltered and to advance the selection to the next occurrence of the search string.
• Press the Replace all button to replaces all occurrences of the search string.
5. Press the Close button to exit the search and replace functionality.
6.2.3 Exiting the Edit Window To save changes and close the Edit window:
• click in the Edit window's tab and select yes when prompted whether to save changes
• click in the Edit window's toolbar • use the Escape command (<EP>)
To close the Edit window without saving changes: • click in the Edit window's tab and select no when prompted whether to
save changes • use the Quit command (<QT>)
6.3 Trace Window
The Trace window aids debugging by enabling you to step through your code line by line, display variables in Edit windows and watch them change as the execution progresses. Alternatively, you can use the Session window and Edit windows to experiment with and correct your code.
A Trace window can be opened from the Session window by entering <expression> <TC>. This is an explicit trace and lets you step through the execution of any non-primitive functions/operators in the expression.
By default, Dyalog is also configured to initiate an automatic trace whenever an error occurs, that is, the Trace window opens and becomes the active window and the line that caused the execution to suspend is selected. This is controlled by the interpreter configuration parameter TRACE_ON_ERROR (for information on configuration parameters, see the Dyalog for <operating system> Installation and Configuration Guide specific to the operating system that you are using).
By default, the Trace window is docked beneath the Session and Edit windows. Other than setting/removing breakpoints (see section 7.8.1), Trace windows are read-only.
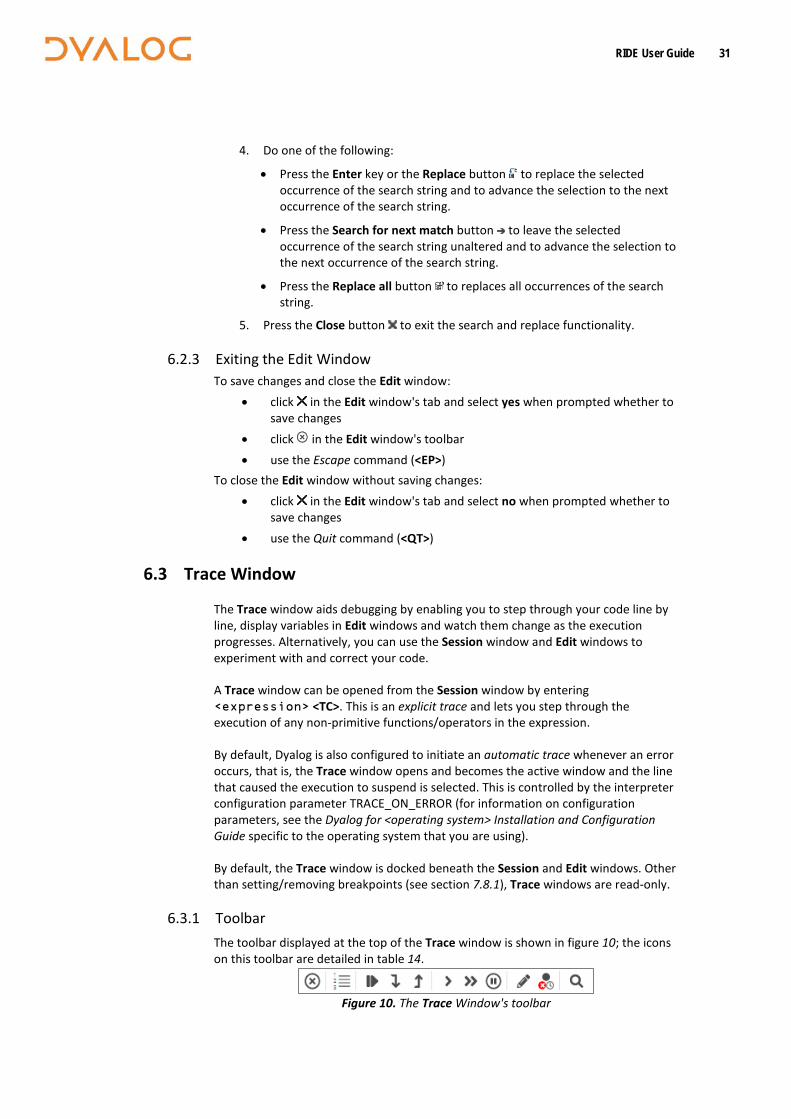
6.3.1 Toolbar The toolbar displayed at the top of the Trace window is shown in figure 10; the icons on this toolbar are detailed in table 14.
Figure 10. The Trace Window's toolbar
RIDE User Guide 32
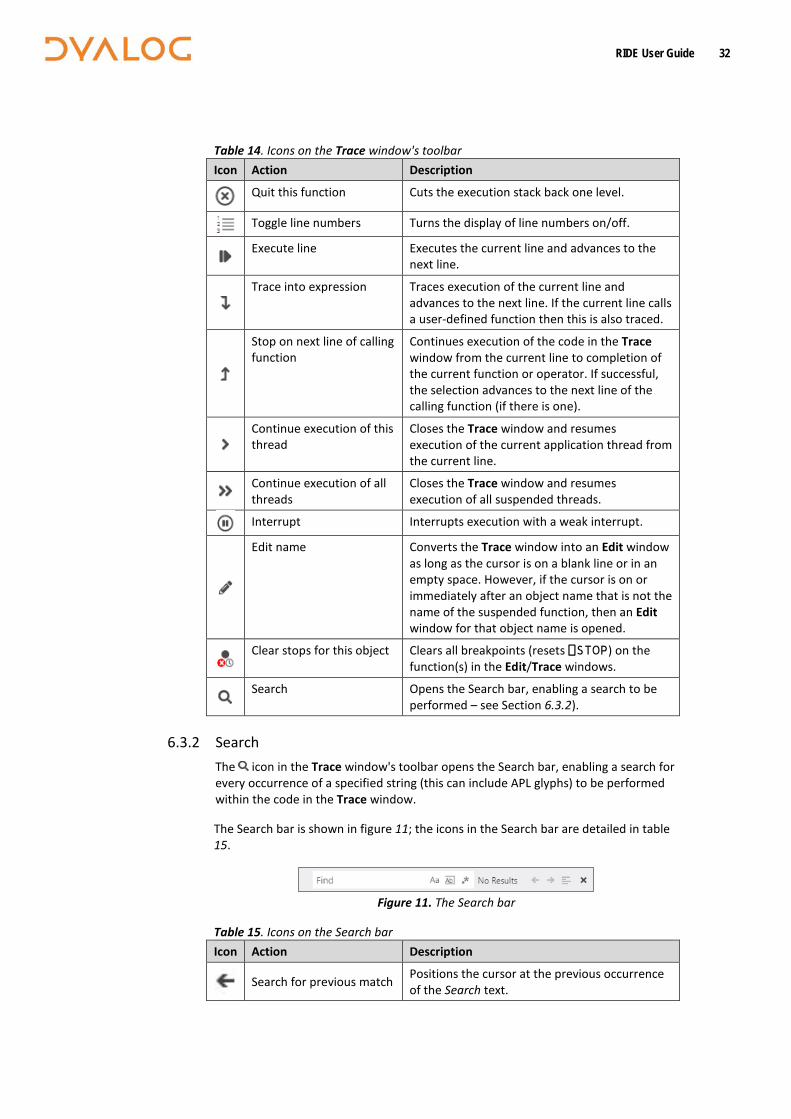
Table 14. Icons on the Trace window's toolbar Icon Action Description
Quit this function Cuts the execution stack back one level.
Toggle line numbers Turns the display of line numbers on/off.
Execute line Executes the current line and advances to the
next line.
Trace into expression Traces execution of the current line and advances to the next line. If the current line calls a user-defined function then this is also traced.
Stop on next line of calling function
Continues execution of the code in the Trace window from the current line to completion of the current function or operator. If successful, the selection advances to the next line of the calling function (if there is one).
Continue execution of this thread
Closes the Trace window and resumes execution of the current application thread from the current line.
Continue execution of all threads
Closes the Trace window and resumes execution of all suspended threads.
Interrupt Interrupts execution with a weak interrupt.
Edit name Converts the Trace window into an Edit window as long as the cursor is on a blank line or in an empty space. However, if the cursor is on or immediately after an object name that is not the name of the suspended function, then an Edit window for that object name is opened.
Clear stops for this object Clears all breakpoints (resets ⎕STOP) on the
function(s) in the Edit/Trace windows.
Search Opens the Search bar, enabling a search to be
performed – see Section 6.3.2).
6.3.2 Search The icon in the Trace window's toolbar opens the Search bar, enabling a search for every occurrence of a specified string (this can include APL glyphs) to be performed within the code in the Trace window.
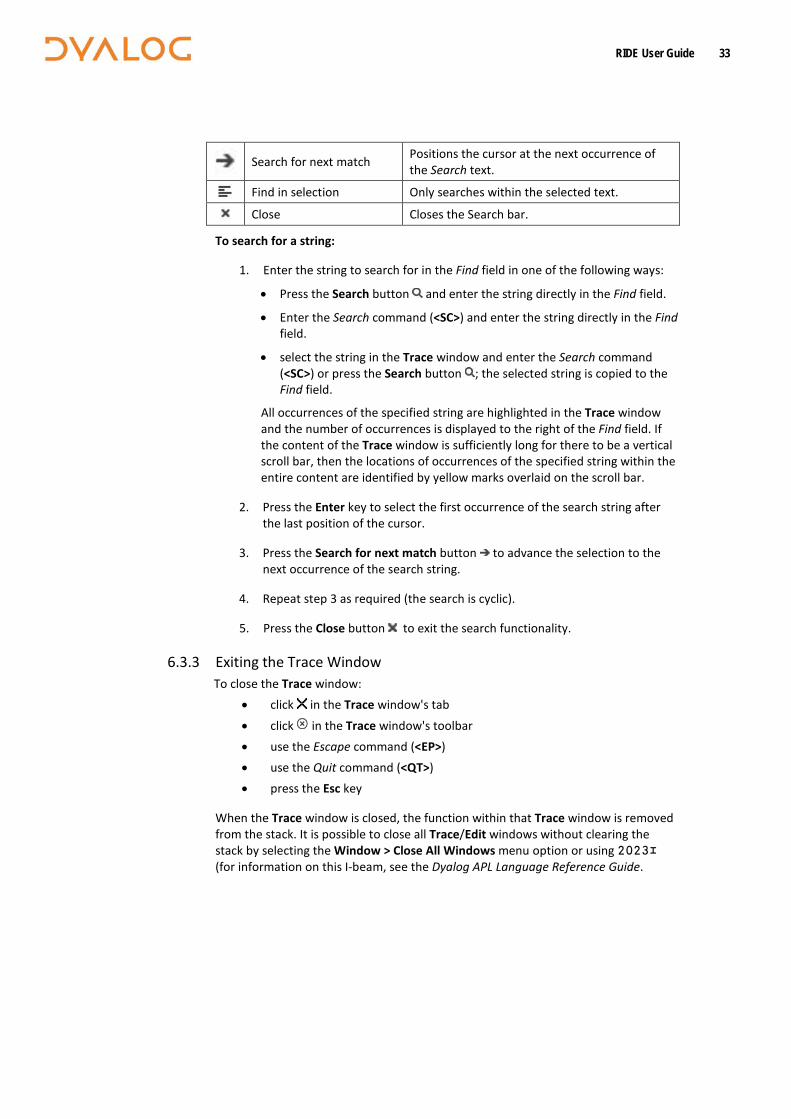
The Search bar is shown in figure 11; the icons in the Search bar are detailed in table 15.
Figure 11. The Search bar
Table 15. Icons on the Search bar Icon Action Description
Search for previous match Positions the cursor at the previous occurrence of the Search text.
RIDE User Guide 33
Search for next match Positions the cursor at the next occurrence of the Search text.
Find in selection Only searches within the selected text.
Close Closes the Search bar.
To search for a string:
1. Enter the string to search for in the Find field in one of the following ways:
• Press the Search button and enter the string directly in the Find field.
• Enter the Search command (<SC>) and enter the string directly in the Find field.
• select the string in the Trace window and enter the Search command (<SC>) or press the Search button ; the selected string is copied to the Find field.
All occurrences of the specified string are highlighted in the Trace window and the number of occurrences is displayed to the right of the Find field. If the content of the Trace window is sufficiently long for there to be a vertical scroll bar, then the locations of occurrences of the specified string within the entire content are identified by yellow marks overlaid on the scroll bar.
2. Press the Enter key to select the first occurrence of the search string after the last position of the cursor.
3. Press the Search for next match button to advance the selection to the next occurrence of the search string.
4. Repeat step 3 as required (the search is cyclic).
5. Press the Close button to exit the search functionality.
6.3.3 Exiting the Trace Window To close the Trace window:
• click in the Trace window's tab
• click in the Trace window's toolbar • use the Escape command (<EP>) • use the Quit command (<QT>) • press the Esc key
When the Trace window is closed, the function within that Trace window is removed from the stack. It is possible to close all Trace/Edit windows without clearing the stack by selecting the Window > Close All Windows menu option or using 2023⌶ (for information on this I-beam, see the Dyalog APL Language Reference Guide.
RIDE User Guide 34
7 Working in a Dyalog Session
The main purpose of a development environment is to enable a user to enter and execute expressions; this chapter describes how this can be achieved when running a Dyalog Session through the RIDE and explains the functionality that is provided to simplify the process.
7.1 Keyboard Shortcuts and Command Codes Keyboard shortcuts are keystrokes that execute an action rather than produce a symbol. The RIDE supports numerous keyboard shortcuts, each of which is identified by a command code and mapped to a keystroke combination; for example, the action to open the Trace window is identified by the code TC (described in the documentation as <TC>). For a complete list of the command codes that can be used in a Dyalog Session running through the RIDE and the keyboard shortcuts for those command codes, see Appendix A.
Positioning the cursor over the button on the right hand side of the Language bar displays a dynamic tooltip showing all configured keyboard shortcuts for command codes. Clicking on the button displays the Preferences dialog box (the same as selecting the Edit > Preferences menu option), through which keyboard shortcuts can be customised (see section 9.2.3).
7.2 Navigating the Windows
When multiple windows are open, the window that has the focus is referred to as the active window. A window can be made the active window by clicking within it.
The Session, Edit and Trace windows form a closed loop for the purpose of navigation:
• to make the next window in this loop the active window, enter the Tab Window command (<TB>)
• to make the previous window in this loop the active window, enter the Back Tab Window command (<BT>)
An active Edit/Trace window can be closed after changes have been made to its content:
• to save any changes in the content of the active window before closing it, enter the Escape command (<EP>), press the Close button in its menu bar or, if the window is docked, press in the window's tab.
• to discard any changes in the content of the active window before closing it, enter the Quit command (<QT>)
7.3 Display of Windows By default, the Trace window and Edit windows are docked beneath and to the right of the Session window respectively. If the menu option View > Show Workspace
RIDE User Guide 35
Explorer is checked, then the workspace explorer is docked to the far left of any open windows; if the menu option View > Show Debug is checked, then the debug information window is docked to the far right of any open windows.
Docked windows can be selected (by clicking within them), resized (by moving the splitter bar) and maximised/minimised (by toggling the icon at the top right of each window).
New Edit and Trace windows can be floating rather than docked by selecting the Floating windows checkbox in the Windows tab of the Preferences dialog box (see section 9.2.7).
Clicking in the tab of any window enables that window to be dragged to a different location.
7.4 Entering APL Characters APL glyphs can be entered in a Dyalog Session running through the RIDE by:
• typing the glyph in the Session window or Edit window using the appropriate key combination (see section 5.2).
• clicking the appropriate glyph on the Language bar (see section 5.1.3) – this inserts that glyph into the active Session/Edit window at the position of the cursor.
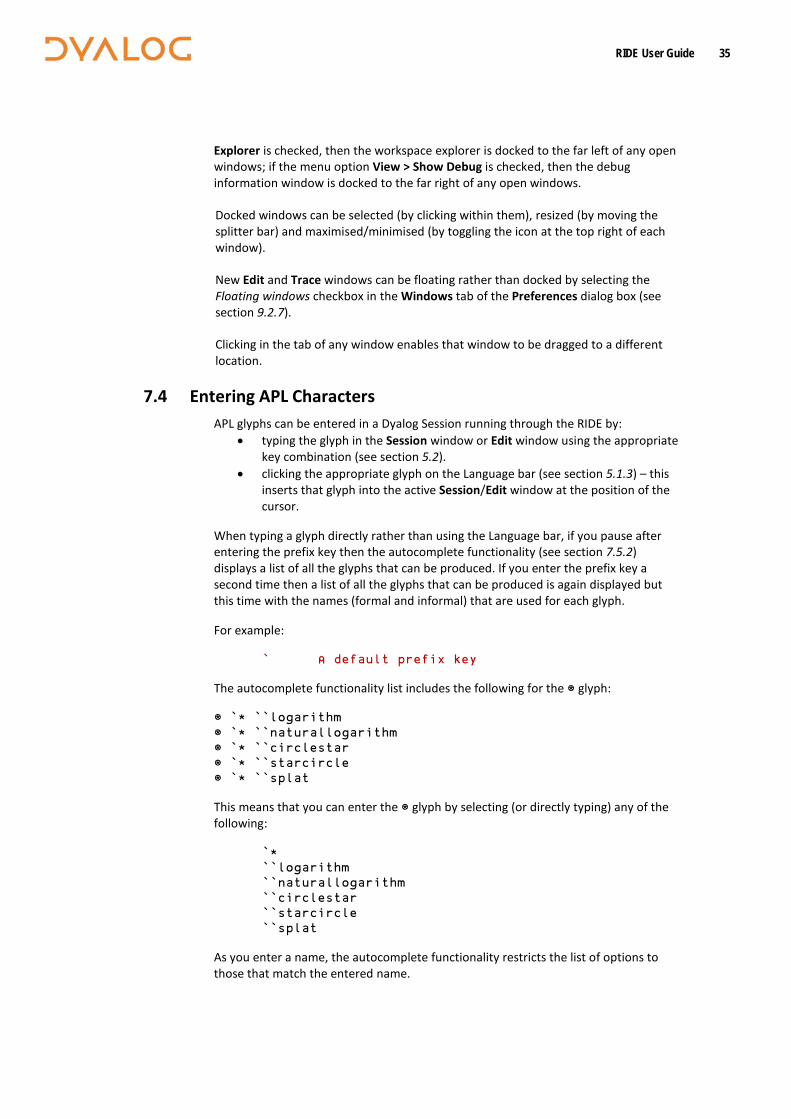
When typing a glyph directly rather than using the Language bar, if you pause after entering the prefix key then the autocomplete functionality (see section 7.5.2) displays a list of all the glyphs that can be produced. If you enter the prefix key a second time then a list of all the glyphs that can be produced is again displayed but this time with the names (formal and informal) that are used for each glyph.
For example:
` ⍝ default prefix key
The autocomplete functionality list includes the following for the ⍟ glyph:
⍟ `* ``logarithm ⍟ `* ``naturallogarithm ⍟ `* ``circlestar ⍟ `* ``starcircle ⍟ `* ``splat
This means that you can enter the ⍟ glyph by selecting (or directly typing) any of the following:
`* ``logarithm ``naturallogarithm ``circlestar ``starcircle ``splat
As you enter a name, the autocomplete functionality restricts the list of options to those that match the entered name.
RIDE User Guide 36
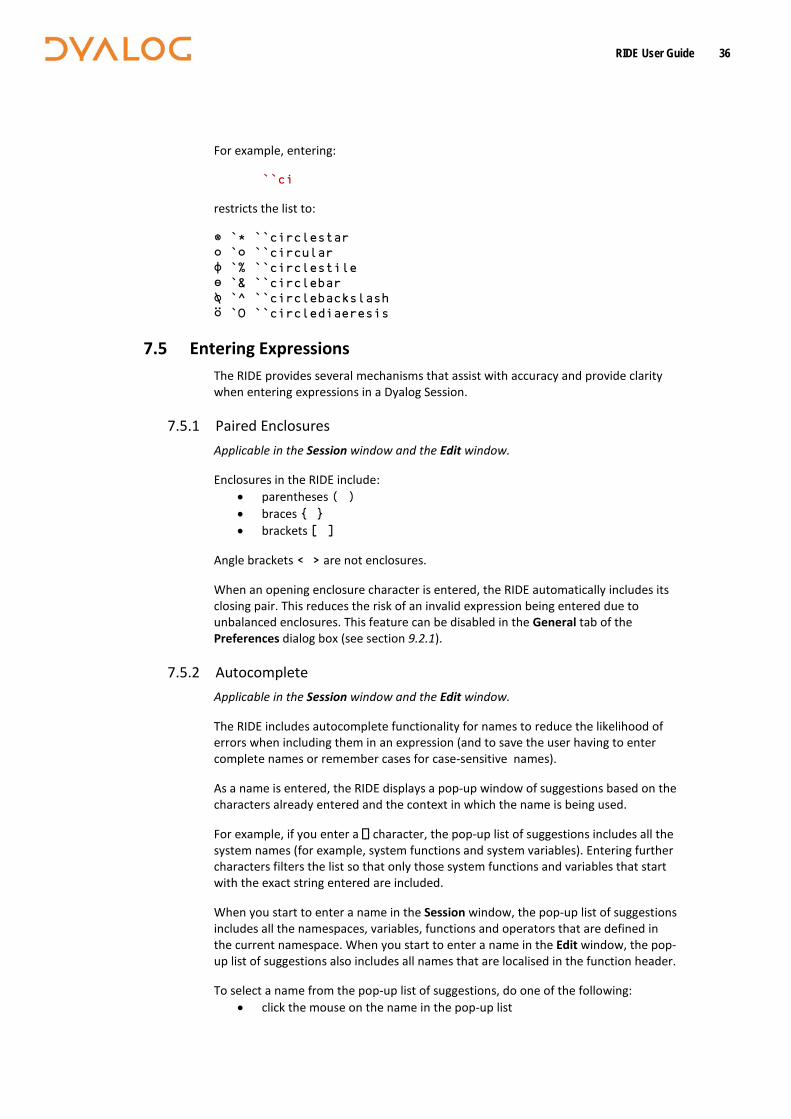
For example, entering:
``ci
restricts the list to:
⍟ `* ``circlestar ○ `○ ``circular ⌽ `% ``circlestile ⊖ `& ``circlebar ⍉ `^ ``circlebackslash ⍥ `O ``circlediaeresis
7.5 Entering Expressions The RIDE provides several mechanisms that assist with accuracy and provide clarity when entering expressions in a Dyalog Session.
7.5.1 Paired Enclosures Applicable in the Session window and the Edit window.
Enclosures in the RIDE include: • parentheses ( ) • braces { } • brackets [ ]
Angle brackets < > are not enclosures.
When an opening enclosure character is entered, the RIDE automatically includes its closing pair. This reduces the risk of an invalid expression being entered due to unbalanced enclosures. This feature can be disabled in the General tab of the Preferences dialog box (see section 9.2.1).
7.5.2 Autocomplete Applicable in the Session window and the Edit window.
The RIDE includes autocomplete functionality for names to reduce the likelihood of errors when including them in an expression (and to save the user having to enter complete names or remember cases for case-sensitive names).
As a name is entered, the RIDE displays a pop-up window of suggestions based on the characters already entered and the context in which the name is being used.
For example, if you enter a ⎕ character, the pop-up list of suggestions includes all the system names (for example, system functions and system variables). Entering further characters filters the list so that only those system functions and variables that start with the exact string entered are included.
When you start to enter a name in the Session window, the pop-up list of suggestions includes all the namespaces, variables, functions and operators that are defined in the current namespace. When you start to enter a name in the Edit window, the pop-up list of suggestions also includes all names that are localised in the function header.
To select a name from the pop-up list of suggestions, do one of the following: • click the mouse on the name in the pop-up list
RIDE User Guide 37
• use the right arrow key to select the top name in the pop-up list • use the up and down arrow keys to navigate through the suggestions and
the right arrow key or the TAB key to enter the currently-highlighted name
The selected name is then completed in the appropriate window.
This feature can be disabled or customised in the General tab of the Preferences dialog box (see section 9.2.1).
7.5.3 Context-Sensitive Help Applicable in the Session window, Edit window and Trace window
With the cursor on or immediately after any system command, system name, control structure keyword or primitive glyph, enter the Help command (<HLP>). The documentation for that system command, system name, control structure keyword or primitive glyph will be displayed.
7.5.4 Syntax Colouring Applicable in the Edit window and Trace window
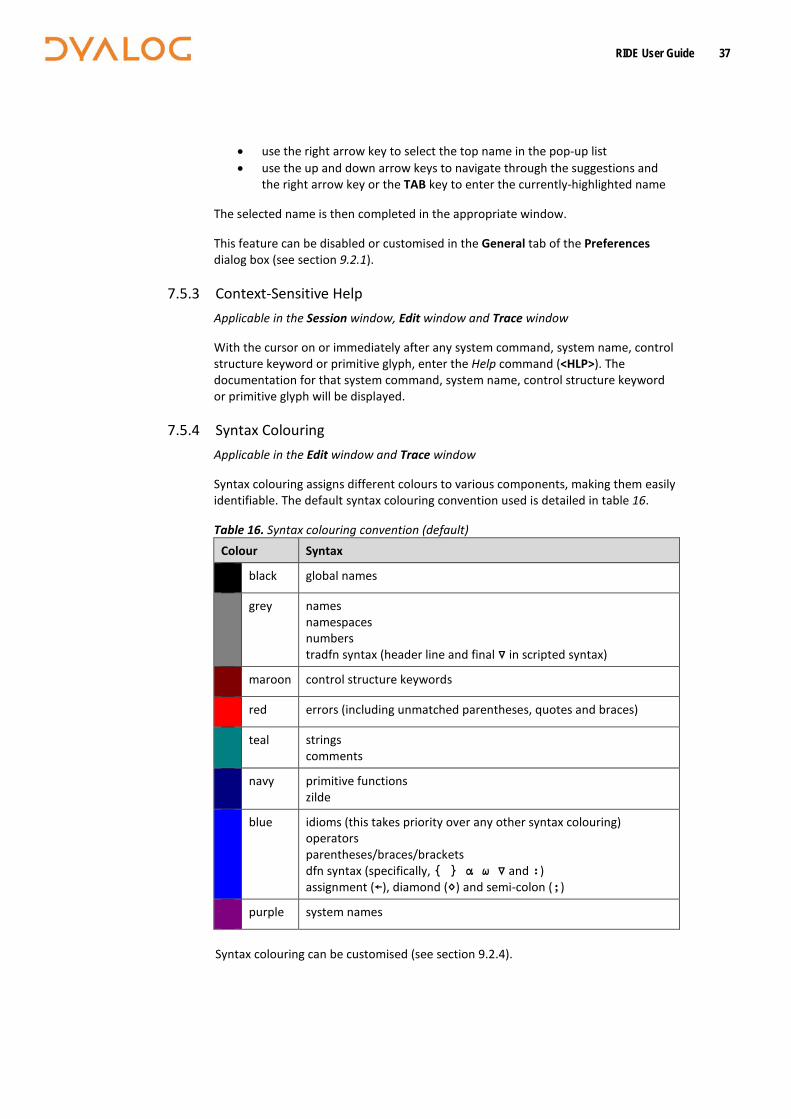
Syntax colouring assigns different colours to various components, making them easily identifiable. The default syntax colouring convention used is detailed in table 16.
Table 16. Syntax colouring convention (default) Colour Syntax black global names
grey names namespaces numbers tradfn syntax (header line and final ∇ in scripted syntax)
maroon control structure keywords
red errors (including unmatched parentheses, quotes and braces)
teal strings comments
navy primitive functions zilde
blue idioms (this takes priority over any other syntax colouring) operators parentheses/braces/brackets dfn syntax (specifically, { } ⍺ ⍵ ∇ and :) assignment (←), diamond (⋄) and semi-colon (;)
purple system names
Syntax colouring can be customised (see section 9.2.4).
RIDE User Guide 38
7.6 Executing Expressions
7.6.1 Executing a New Expression Applicable in the Session window
After entering a new expression in the input line, that expression is executed by pressing the Enter key or with the Enter command (<ER>). Following execution, the expression (and any displayed results) become part of the Session log.
7.6.2 Re-executing a Previous Expression Applicable in the Session window
Instead of entering a new expression in the input line, you can move back through the Session log and re-execute a previously-entered expression.
To re-execute a previously-entered expression: 1. Locate the expression to re-execute in one of the following ways:
• Scroll back through the Session log. • Use the Backward command (<BK>) and the Forward command (<FD>)
to cycle backwards and forwards through the input history, successively copying previously-entered expressions into the input line.
2. Position the cursor anywhere within the expression that you want to re-execute and press the Enter key or use the Enter command (<ER>).
If required, a previously-entered expression can be amended prior to execution. In this situation, when the amended expression is executed it is copied to the input line; the original expression in the Session log is not changed. If you start to edit a previous expression and then decide not to, use the Quit command (<QT>) to return the previous expression to its unaltered state.
7.6.3 Re-executing Multiple Previous Expressions Applicable in the Session window
Multiple expressions can be re-executed together irrespective of whether they were originally executed sequentially (certain system commands cause re-execution to stop once they have been completed, for example, )LOAD and )CLEAR).
To re-execute multiple previously-entered expressions: 1. Locate the first expression to re-execute in one of the following ways by
scrolling back through the Session log. 2. Change the expression in some way. The change does not have to impact the
purpose of the expression; it could be an additional space character. 3. Scroll through the Session log to locate the next expression to re-execute
and change it in some way. Repeat until all the required expressions have been changed.
4. Press the Enter key or enter the Enter command (<ER>)
The amended expressions are copied to the input line and executed in the order in which they appear in the Session log; the modified expressions in the Session log are restored to their original content.
To re-execute contiguous previously-entered expressions: 1. Position the cursor at the start of the first expression to re-execute.
RIDE User Guide 39
2. Press and hold the mouse button (left-click)+ and drag the cursor to the end of the last expression to re-execute.
3. Copy the selected lines to the clipboard using the Copy command (<CP>) or the Cut command (<CT>) or the Copy/Cut options in the Edit menu.
4. Position the cursor in the input line and paste the content of the clipboard back into the Session using the Paste command (<PT>), the Paste option in the Edit menu or the Paste option in the context menu.
5. Press the Enter key or enter the Enter command (<ER>).
This technique can also be used to move lines from the Edit window into the Session window and execute them.
7.7 Threads The RIDE supports multithreading. For information on threads, see the Dyalog Programming Reference Guide.
The number of threads currently in use is displayed in the Status bar (see section 5.1.5).
7.8 Suspending Execution To assist with investigations into the behaviour of a set of statements (debugging), the system can be instructed to suspend execution just before a particular statement. This is done by setting a breakpoint – see section 7.8.1.
It is sometimes necessary to suspend the execution of a function, for example, if an endless loop has been inadvertently created or a response is taking an unacceptably long time. This is done using an interrupt – see section 7.8.2.
Suspended functions can be viewed through the stack; the most recently-referenced function is at the top of the stack. The content of the stack can be queried with the )SI system command; this generates a list of all suspended and pendent (that is, awaiting the return of a called function) functions, where suspended functions are indicated by a *. For more information on the stack and the state indicator, see the Dyalog Programming Reference Guide.
7.8.1 Breakpoints Applicable in the Edit window and the Trace window.
When a function that includes a breakpoint is run, its execution is suspended immediately before executing the line on which the breakpoint is set and the Trace window is automatically opened (assuming that automatic trace is enabled – see section 6.3).
Breakpoints are defined by dyadic ⎕STOP and can be toggled on and off in an Edit or Trace window by left-clicking on the far left of the line before which the breakpoint is to be applied or by placing the cursor anywhere in the line before which the breakpoint is to be applied and entering the Toggle Breakpoint command (<BP>). Note that:
• Breakpoints set or cleared in an Edit window are not established until the function is fixed.
• Breakpoints set or cleared in a Trace window are established immediately.
RIDE User Guide 40
When a breakpoint is reached during code execution, event 1001 is generated; this can be trapped. For more information, see ⎕TRAP in the Dyalog APL Language Reference Guide.
7.8.2 Interrupts A Dyalog Session running through the RIDE responds to both strong and weak interrupts.
Entering a strong interrupt suspends execution as soon as possible (generally after completing execution of the primitive currently being processed). A strong interrupt is issued by selecting Actions > Strong Interrupt in the menu options or by entering the Strong Interrupt command (<SI>).
Entering a weak interrupt suspends execution at the start of the next line (generally after completing execution of the statement currently being processed). A weak interrupt is issued by selecting Actions > Weak Interrupt in the menu options or by entering the Weak Interrupt command (<WI>).
When a strong or weak interrupt is issued during code execution, event 1003 or 1002 (respectively) is generated; these can be trapped. For more information, see ⎕TRAP in the Dyalog APL Language Reference Guide.
7.9 Terminating a Dyalog Session Running Through the RIDE The Dyalog Session can be terminated (without having to close any open windows first) in any of the following ways:
• From the menu options: o Linux: Select File > Quit o macOS : Dyalog > Quit Dyalog o Microsoft Windows: Select File > Quit
• Enter: o Linux: Ctrl + Q o macOS : ⌘ + Q o Microsoft Windows: Ctrl + Q
(only if the Dyalog Unicode IME is not enabled – see section 9.2.2)
In addition, when the Session window is the active window, the Dyalog Session can be terminated cleanly in any of the following ways:
• Enter )OFF • Enter ⎕OFF • Enter <QIT> • macOS: enter ⌘ + W
RIDE User Guide 41
8 RIDE-Specific Language Features
When running a Dyalog Session through the RIDE, the majority of language features remain unaltered. However, there are a few additional features and some existing functionality that is meaningless when a Session is running through the RIDE.
8.1 I-Beams I-Beam is a monadic operator that provides a range of system-related services.
Syntax: R←{X}(A⌶)Y
Any service provided using an I-Beam should be considered as experimental and subject to change – without notice – from one release to the next. Any use of I-Beams in applications should, therefore, be carefully isolated in cover-functions that can be adjusted if necessary.
There are three I-Beams that are only relevant to the RIDE.
8.1.1 3500⌶ : Send HTML to RIDE Syntax: R←{X}(3500⌶)Y
Optionally, X is a simple character vector or scalar, the contents of which are used as the caption of an embedded browser window opened by the RIDE client. If omitted, then the caption defaults to "3500⌶".
Y is a simple character vector of HTML markup, the contents of which are displayed in the embedded browser tab.
R identifies whether the write to the RIDE was successful. Possible values are: • 0 : the write to the RIDE client was successful • ¯1 : the RIDE client is not enabled
8.1.2 3501⌶ : Connected to the RIDE? Syntax: R←{X}(3501⌶)Y
X and Y can be any value (ignored).
R identifies whether the Dyalog Session is running through the RIDE. Possible values are:
• 0 : the Session is not running through the RIDE • 1 : the Session is running through the RIDE
RIDE User Guide 42
8.1.3 3502⌶ : Manage RIDE Connections
By default, the RIDE is not enabled on run-time executables. For security reasons, enabling the RIDE is a two-step process rather than using (for example) a single configuration parameter. To enable the RIDE, two steps must be taken: 1. Set the RIDE_INIT configuration parameter (see section 8.2.2) on
the machine on which the run-time interpreter is running to an appropriate value.
2. Execute 3502⌶1 in your application code.
The run-time interpreter can then attempt to connect to a RIDE client. Enabling the RIDE to access applications that use the run-time interpreter means that the APL code of those applications can be accessed. The I-Beam mechanism described above means that the APL code itself must grant the right for a RIDE client to connect to the run-time interpreter. Although Dyalog Ltd might change the details of this mechanism, the APL code will always need to grant connection rights. In particular, no mechanism that is only dependent on configuration parameters will be implemented.
Syntax: R←3502⌶Y
R is 0 if the call is successful, otherwise an integer (positive or negative) is returned.
Y can be any of the following possible values: • 0 : disable any active RIDE connections.
o R is always 0 • 1 : enable the RIDE using the initialisation string defined in the RIDE_INIT
configuration parameter: o if R is 0, then the RIDE was disabled and is now successfully enabled o if R is ¯1, then the RIDE was already active o if R is 32, then the RIDE DLL/shared library is not available o if R is 64, then the RIDE_INIT configuration parameter is not
correctly defined • a simple character vector : replace the RIDE_INIT configuration parameter
with the specified initialisation string, which should be in the format specified in section 8.2.2.
o if R is 0, then the RIDE was disabled o if R is ¯2, then the RIDE was active
On a run-time interpreter, 3502⌶1 is the only way to enable the RIDE. If the RIDE_INIT configuration parameter is set but the RIDE DLLs/shared libraries are not available then a run-time interpreter will start but the subsequent call to 3502⌶ will be unsuccessful.
RIDE User Guide 43
8.2 Configuration Parameters There are two configuration parameters that are relevant to the RIDE:
• RIDE_EDITOR (set on the machine that the RIDE is running on) • RIDE_INIT (set on the machine that the interpreter is running on)
8.2.1 RIDE_EDITOR The fully-qualified path to the executable of the editor to use in a Dyalog Session instead of the RIDE's built-in editor (for example, vim, Emacs or Notepad++).
8.2.2 RIDE_INIT How the interpreter should behave with respect to the RIDE protocol. Setting this configuration parameter on the machine that hosts the interpreter enables the interpreter-RIDE connection.
The format of the value is {mode:setting}[,mode:setting]
where mode is the action that the interpreter should take and determines the content of the setting. Valid (case-insensitive) values are:
• serve – listen for incoming connections from the RIDE client • connect – attempt to connect to the specified RIDE client and end the
session if this fails • poll – attempt to connect to the specified RIDE client at regular intervals and
reconnect if the connection is lost • config – retrieve values to use from a .ini configuration file
If two modes are specified, then: • one of the modes must be config • the serve/connect/poll values always override the equivalent
values in the .ini configuration file.
If mode is serve then setting is address:port, where: • address is the machine that is listening for a connection (the machine
running the interpreter). Valid values are: o <empty> – the interpreter only listens for connections from the
local machine o * – the interpreter listens for connections from any (local or
remote) machine/interface o the host/DNS name of the machine/interface running the
interpreter o the IPv4 address of the machine/interface running the interpreter o the IPv6 address of the machine/interface running the interpreter
• <port> is the TCP port to listen on
If mode is connect or poll then setting is address:port, where: • address is the machine to attempt to connect to (the machine running the
RIDE client). Valid values are: o the host/DNS name of a machine running the RIDE client o the IPv4 address of a machine running the RIDE client o the IPv6 address of a machine running the RIDE client
• <port> is the TCP port to connect to
RIDE User Guide 44
If mode is config then setting is filename, where: • filename is the fully-qualified path to, and name of, a .ini configuration
file containing name-value pairs related to mode, certificate details, and so on. For a sample .ini configuration file, see Appendix B.
Examples
To listen on port 4502 for connection requests from a RIDE client running on any machine: RIDE_INIT=SERVE:*:4502
To attempt to connect to a RIDE client running on a different machine (with IPv4 address 10.0.38.1) and listening on port 4502 and end the Session if unable to do so: RIDE_INIT=CONNECT:10.0.38.1:4502
To establish a connection using the settings in the ride_sample.ini file: RIDE_INIT=CONFIG:C:/Users/Tom/Desktop/ride_sample.ini
To attempt to establish a secure connection with a RIDE client running on a different machine (with IPv4 address 10.0.38.1) and listening on port 4502 using certificate details specified in the ride_sample.ini file: RIDE_INIT=CONFIG:C:\Users\Tom\Desktop\ride_sample.ini,CONNECT:10.0.38.1:4502 or RIDE_INIT=CONNECT:10.0.38.1:4502,CONFIG:C:\Users\Tom\Desktop\ride_sample.ini
The RIDE_INIT configuration parameter is set automatically when launching a new Dyalog Session from the RIDE (see section 4.1.3.1).
If the RIDE_INIT configuration parameter is set but the RIDE DLLs/shared libraries are not available then a run-time interpreter will start but the subsequent call to 3502⌶ will be unsuccessful – see section 8.1.3.
8.3 Unsupported Language Elements When running a Dyalog Session through the RIDE, a few of the features that are available with non-RIDE Sessions do not function as might be expected.
8.3.1 Underscored Characters Underscored characters can be entered into the Session window and Edit windows using the ``_<letter> method, for example, enter ``_f to produce Ⓕ.
8.3.1.1 Underscored Characters in Window Captions The RIDE is restricted by the operating system when it comes to displaying underscored characters in window titles (captions). This restriction means that:
• if the APL385 font is installed (and the operating system has been configured to allow the title bar to use it), underscored characters are displayed as circled characters.
• if the APL385 font is not installed, underscored characters are displayed as a white rectangle, a black rectangle containing a question mark, or some other Unicode-compliant substitution.
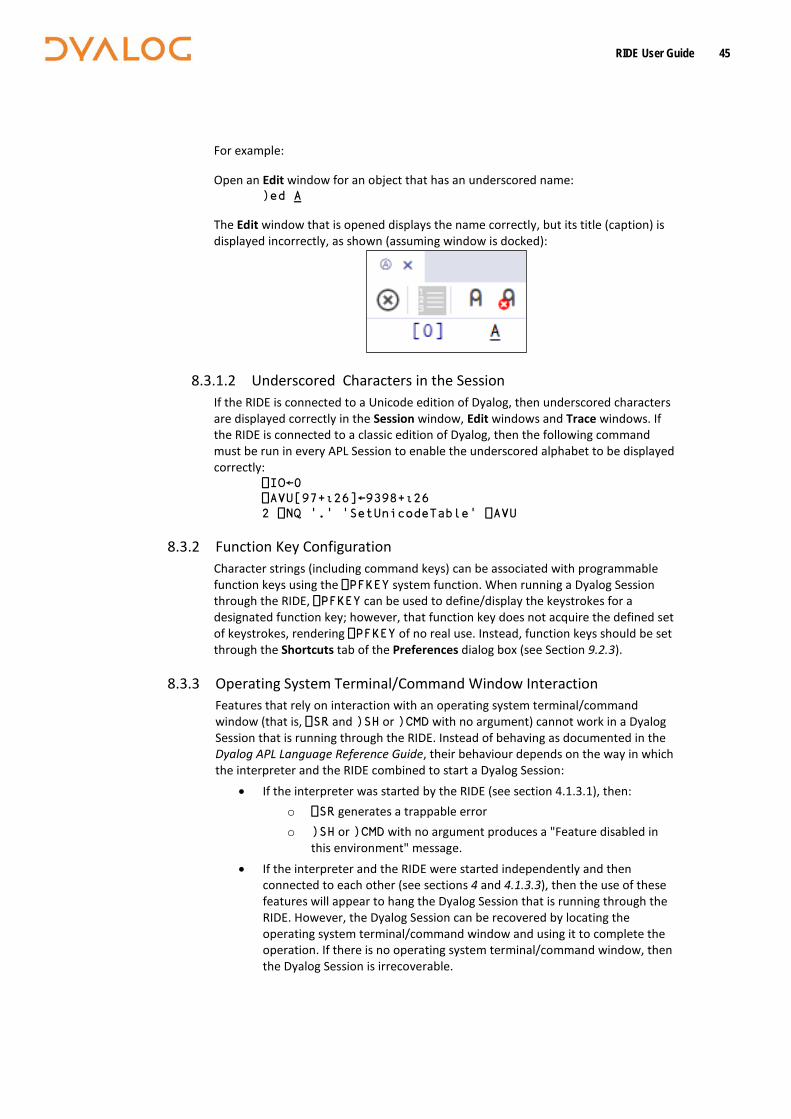
RIDE User Guide 45
For example:
Open an Edit window for an object that has an underscored name: )ed Ⓐ
The Edit window that is opened displays the name correctly, but its title (caption) is displayed incorrectly, as shown (assuming window is docked):
8.3.1.2 Underscored Characters in the Session If the RIDE is connected to a Unicode edition of Dyalog, then underscored characters are displayed correctly in the Session window, Edit windows and Trace windows. If the RIDE is connected to a classic edition of Dyalog, then the following command must be run in every APL Session to enable the underscored alphabet to be displayed correctly: ⎕IO←0 ⎕AVU[97+⍳26]←9398+⍳26 2 ⎕NQ '.' 'SetUnicodeTable' ⎕AVU
8.3.2 Function Key Configuration Character strings (including command keys) can be associated with programmable function keys using the ⎕PFKEY system function. When running a Dyalog Session through the RIDE, ⎕PFKEY can be used to define/display the keystrokes for a designated function key; however, that function key does not acquire the defined set of keystrokes, rendering ⎕PFKEY of no real use. Instead, function keys should be set through the Shortcuts tab of the Preferences dialog box (see Section 9.2.3).
8.3.3 Operating System Terminal/Command Window Interaction Features that rely on interaction with an operating system terminal/command window (that is, ⎕SR and )SH or )CMD with no argument) cannot work in a Dyalog Session that is running through the RIDE. Instead of behaving as documented in the Dyalog APL Language Reference Guide, their behaviour depends on the way in which the interpreter and the RIDE combined to start a Dyalog Session:
• If the interpreter was started by the RIDE (see section 4.1.3.1), then: o ⎕SR generates a trappable error o )SH or )CMD with no argument produces a "Feature disabled in
this environment" message. • If the interpreter and the RIDE were started independently and then
connected to each other (see sections 4 and 4.1.3.3), then the use of these features will appear to hang the Dyalog Session that is running through the RIDE. However, the Dyalog Session can be recovered by locating the operating system terminal/command window and using it to complete the operation. If there is no operating system terminal/command window, then the Dyalog Session is irrecoverable.
RIDE User Guide 46
9 Customising Your Session
The appearance and behaviour of a Dyalog Session running through the RIDE can be customised to meet personal preferences and corporate guidelines. Configuration can be performed:
• through the View menu – see section 9.1 • through the Preferences dialog box – see section 9.2 • using configuration parameters – see section 9.3
Customisations performed using any of these methods persist between Sessions (they also persist when the installed version of Dyalog is upgraded).
To remove all customisations, reset all RIDE-specific settings and return to the initial default settings, rename/delete the following directory:
• Microsoft Windows: %APPDATA%\Ride-<version> • Linux: $HOME/.config/Ride-<version> • macOS: $HOME/Library/Application Support/Ride-<version>
(hidden directory – access from the command line)
9.1 View Menu The View menu (see section 9.1) includes options that enable the appearance of the Dyalog Session running through the RIDE to be changed. Select these options to:
• show/hide the Language bar (see section 5.1.3) • show/hide the Status bar (see section 5.1.5) • show/hide the Workspace Explorer (see section 5.1.6) • show/hide the debug information window (see section 5.1.7) • change the font size in all windows in the Session • configure the display/functionality of the Edit/Trace windows
9.2 Preferences Dialog Box The Preferences dialog box can be used to customise:
• the automatic formatting of text in an Edit window (see section 9.2.1) • the default keyboard key mappings for APL glyphs (see section 9.2.2) • the keyboard shortcuts for command codes (see section 9.2.3) • the syntax colouring and background colour (see section 9.2.4) • the caption of the Session window (see section 9.2.5) • the menu options presented by the menu bar (see section 9.2.6) • the display of floating Edit/Trace windows (see section 9.2.7)
The Preferences dialog box can be opened in any of the following ways: • selecting the Edit > Preferences menu option • clicking the icon on the left hand side of the Status bar • clicking on the button on the right hand side of the Language bar • entering the Show Preferences command (<PRF>)

RIDE User Guide 47
The Preferences dialog box comprises multiple tabs. A button enables the contents of the Keyboard and Shortcuts tabs to be printed.
9.2.1 General Tab Allows customisation of a variety of features.
To change the general configuration options
1. Open the General tab.
2. Select the appropriate check boxes and set the variables as required:
• Indent content when an editor is opened Select this to apply the indentation rules to the contents of an Edit window when it is opened.
• Handle formatting through the interpreter Select this to use the interpreter to reformat code. This is useful to avoid formatting changes that could be detected by source code management systems when the RIDE is used to maintain a body of code that is also edited directly using the interpreter.
• Auto-indent <number> spaces Only relevant when Handle formatting through the interpreter is not selected. Select this and define the number of spaces by which each level of nested code should be indented relative to the previous level of indentation in the Edit window. If not selected, code in the Edit window will be left justified.
o in methods: <number> spaces Only relevant when Handle formatting through the interpreter is not selected. Select this and define the number of spaces by which the contents of tradfns should be indented relative to the start/end ∇ glyphs.
When changes to auto-indentation are applied, the indentation of existing code in an open Edit window does not change unless you enter the Reformat command (<RD>) when the Edit window is the active window. However, any new code entered in the Edit window follows the new rules.
• Indent lines that contain only a comment Only relevant when Handle formatting through the interpreter is not selected. Select this to apply the appropriate indentation to lines that start with the ⍝ glyph. If this is not selected, then lines that start with the ⍝ glyph remain as positioned by the user.
• Highlight matching brackets: () [] {} Select this to automatically highlight the matching start and end enclosures when positioning the cursor before or after one of them (with contiguous brackets, the bracket immediately before the cursor has its other enclosure highlighted).
• Auto-close brackets Select this to automatically add the paired enclosure when an opening enclosure is entered (see section 7.5.1).
• Autocompletion Select an autocompletion option from the drop-down list (autocompletion makes suggestions when entering the name of, for
RIDE User Guide 48
example, namespaces, variables, functions, operators, user commands and system names). Options include: o off – disables autocomplete functionality. o classic – displays a pop-up window of suggestions based on the
characters already entered and the context in which the name is being used (see section 7.5.2).
o shell – resembles the autocomplete functionality of the Linux bash shell in its use of the tab key.
• Autocompletion after <time> ms Specify a time interval after which the RIDE's autocompletion functionality is activated.
• Autocomplete control structure with snippets Select this to be be presented with auto-completion template options for control structures in the Edit window.
• Highlight matching words Select this to highlight all occurrences of a selected string in the same window.
• Show value tips Select this to display the referent of a name. When the cursor is positioned over or immediately after a name, the name is highlighted and its referent is displayed (for example, the value of a variable or the body of a function).
• Show tips for glyphs Select this to show the tooltip for a glyph. When the cursor is positioned over or immediately after a glyph, the glyph is highlighted and information about it is displayed – this includes the name of the glyph, the keyboard shortcut to enter it, its monadic/dyadic name and examples of its syntax, arguments and result.
• Persistent history <number> lines Select this and define the number of lines that are available to recall using the Backward/Undo command (<BK>). This specifies how many input lines RIDE remembers from the end of one RIDE session to the start of the next session.
• Block cursor Select this to display the cursor as a solid rectangular block rather than a vertical line.
• Cursor blinking Select a cursor animation from the drop-down list (for example, blink or solid).
• Highlight current line Select an option from the drop-down list to indicate how the line that the cursor is currently positioned on should be emphasised (applies to all windows). Options include: o none – do not indicate the current line. o gutter – display a small grey rectangle in the first column of the
line. o line – display a grey rectangle around the entire line except the
first column. o all – gutter and line.
RIDE User Guide 49
• Minimap enabled Select this to display a dynamic impression of the entire (or very large portion of) contents of the Session/Edit window in a column on the right-hand side of that window. Clicking within the minimap moves the display to that location.
• Minimap render characters Only relevant when Minimap enabled is selected. Select this to use tiny rendered font in the minimap rather than greeking.
• Minimap show slider Only relevant when Minimap enabled is selected. Select an option from the drop-down list to indicate how the currently-displayed content of the window is highlighted in the minimap. Options include: o always – the current display is always highlighted in the minimap. o mouseover – the current display is only highlighted in the
minimap when the mouse is positioned over the minimap.
• Show quit prompt Select this to display a confirmation dialog box when exiting the RIDE session.
• Show toolbar in editor/trace windows Select this to display the toolbar in the Edit/Trace windows.
• Connect on quit Select this to be returned to the RIDE-Dyalog Session dialog box on exiting a Session.
3. Click OK to save your changes and close the Preferences dialog box, Apply to save your changes without closing the Preferences dialog box or Cancel to close the Preferences dialog box without saving your changes.
Settings that impact the automatic reformatting of code can cause changes to whitespace – this can be interpreted as changes to the source code. This means that: • opening a scripted object in the Edit window can cause the source
of that object to change (when closing an Edit window, you might be prompted to save a function even though you have not made any changes to it).
• viewing an object can change its file timestamp; source code management systems can subsequently report changes due to the changed file timestamp.
• source code changes resulting from reformatting will be evident in the results of system functions such as ⎕AT, ⎕SRC, ⎕CR, ⎕VR and ⎕NR.
9.2.2 Keyboard Tab Allows customisation of the default keyboard key mappings for APL glyphs (see section 5.2). This is only relevant if a locale-specific keyboard has not been installed.
To replace the keyboard with a locale-specific keyboard in the Session, or to enter Dyalog glyphs in other applications (for example, email), see http://www.dyalog.com/apl-font-keyboard.htm.
RIDE User Guide 50
If you have the Dyalog Unicode IME installed, then the RIDE activates it at start-up when the Also enable Dyalog IME (requires RIDE restart) checkbox is selected (selected by default).
If Dyalog is not installed on the machine that the RIDE is running on, then the Dyalog Unicode IME can be downloaded and installed from http://www.dyalog.com/apl-font-keyboard.htm.
Most Linux distributions released after mid-2012 support Dyalog glyphs by default, for example, openSUSE 12.2, Ubuntu 12.10 and Fedora 17. For more information, see the Dyalog for UNIX Installation and Configuration Guide.
To customise the default keyboard's Prefix key
1. Open the Keyboard tab and select the appropriate keyboard from the drop-down list of options.
2. In the Prefix key field, enter the new prefix key (by default this is `).
In locales in which ` is a dead key, $ is a viable alternative.
Be careful when selecting a new prefix key – although there are no restrictions, choosing certain keys (for example, alphanumeric characters) would restrict the information that could be entered in a Session.
3. Click OK to save your changes and close the Preferences dialog box, Apply to save your changes without closing the Preferences dialog box or Cancel to close the Preferences dialog box without saving your changes.
To customise the default keyboard's key mappings
1. Open the Keyboard tab and select the appropriate keyboard from the drop-down list of options.
2. In the image of a keyboard, click on the glyph to be replaced (bottom right of the key for unshifted mode and top right of the key for shifted mode).
3. Enter the glyph to replace the selected glyph with.
4. Repeat steps 2 and 3 until the key mappings are as required.
5. Click OK to save your changes and close the Preferences dialog box, Apply to save your changes without closing the Preferences dialog box or Cancel to close the Preferences dialog box without saving your changes.
Your selection of keyboard key mappings is unrestricted – you can choose to map the same glyph to multiple keys or have glyphs that are not represented on the keyboard at all. For example, when dealing with dfns on a Danish keyboard, it might be convenient to map { and } to a simpler key combination.
9.2.3 Shortcuts Tab Allows customisation of the keyboard shortcuts for command codes (see section 7.1 and Appendix A). Multiple shortcuts can be defined for any command code, but each shortcut must be unique.
RIDE User Guide 51
To change the keyboard shortcut for a command code
1. Open the Shortcuts tab.
2. Locate the command code that you want to define a new keyboard shortcut for. This can be done by scrolling through the list of possible command codes or by entering a string in the Search field. If a string is entered in the Search field then a dynamic search of both the command codes and descriptions is performed.
3. Optionally, delete any existing shortcuts for the command by clicking the red cross to the right of the shortcut.
4. Optionally, add a new shortcut. To do this:
a. Click the plus symbol that appears to the right of any existing shortcuts when the shortcut is moused over. A field in which to enter the shortcut is displayed.
b. In this field, enter the keystrokes to map to this action. The field closes when the keystrokes have been entered and the new shortcut is displayed on the Shortcuts tab.
If the keystrokes that you enter are already used for a different command code, then both occurrences will be highlighted and you should remove any duplicate entries (an error message will be displayed if you attempt to apply/save settings that contain duplicate entries).
5. Click OK to save your changes and close the Preferences dialog box, Apply to save your changes without closing the Preferences dialog box or Cancel to close the Preferences dialog box without saving your changes.
The tooltip showing keyboard shortcuts for command codes (obtained by positioning the cursor over the button on the right hand side of the Language bar) is dynamically updated to any customisation.
9.2.4 Colours Tab Allows customisation of the syntax colouring (see section 7.5.4). Several schemes are provided, any of which can be used as they are or further customised.
To change the syntax colouring to a predefined scheme
1. Open the Colours tab.
2. In the Scheme field, select the syntax colouring scheme that you want to use. When a scheme is selected, the example shown is updated to use that colour scheme.
3. Click OK to save your changes and close the Preferences dialog box, Apply to save your changes without closing the Preferences dialog box or Cancel to close the Preferences dialog box without saving your changes.
To define a new syntax colouring scheme
1. Open the Colours tab.
2. In the Scheme field, select the syntax colouring scheme that is closest to the scheme that you want to define. When a scheme is selected, the example shown is updated to use that colour scheme.
RIDE User Guide 52
3. Click Clone. A copy is made of the selected scheme and additional options are displayed to allow customisation of the scheme's name and syntax colouring.
4. Define your colour scheme. To do this:
a. Select the element that you would like to change the display of from the drop-down list or by clicking in the example. The customisation options reflect the current settings for the selection made. Some elements have a limited set of options, for example, the cursor element has no bold/italic/underline option.
b. Select a foreground colour and background (highlighting) colour for that syntax as required. If a background colour is selected, then the slide bar can be used to set its transparency.
c. Select the appropriate check boxes to make that syntax bold, italic or underlined as required.
d. Repeat as required.
5. Optionally, rename your colour scheme. To do this:
a. Click Rename. The name in the Scheme field becomes editable.
b. Edit the name in the Scheme field.
6. Click OK to save your changes and close the Preferences dialog box, Apply to save your changes without closing the Preferences dialog box or Cancel to close the Preferences dialog box without saving your changes.
9.2.5 Title Tab Allows customisation of the caption at the top of the Session (see section 5.1.1).
To change the caption
1. Open the Title tab.
2. In the Window title field, enter the new name for the Session. Some variable options that can be included are listed beneath this field – clicking on these inserts them into the Window title field.
3. Click OK to save your changes and close the Preferences dialog box, Apply to save your changes without closing the Preferences dialog box or Cancel to close the Preferences dialog box without saving your changes.
The default value is {WSID}.
Changing this to {WSID} – {HOST}:{PORT} (PID: {PID}) gives a different result on every machine. For example: /Users/nick/myws.dws – 127.0.0.1:4502 (PID: 293)
Changing this to {CHARS} {BITS} gives information that could be the same on multiple machines. For example: Unicode 64
RIDE User Guide 53
9.2.6 Menu Tab Allows customisation of the menu options in the menu bar (see section 5.1.2).
Great care should be taken when customising the menu options; although the ability to make changes is provided, it is not an activity that Dyalog Ltd supports.
If menu options are customised, then updates to menu items are ignored when updating the installed version of RIDE (this can be avoided by resetting the menu options before upgrading RIDE).
Top-level options (menu names in the menu bar) can be: • created • renamed • reordered • deleted
Options within each of the menus can be: • moved to be under a different menu name in the menu bar • reordered under the same menu name in the menu bar • renamed • deleted
Changes do not take effect until the next time a Dyalog Session is started through the RIDE.
9.2.7 Windows Tab Allows customisation of the size and position of floating Edit/Trace windows.
To change the size/position of floating Edit/Trace windows
1. Open the Windows tab.
2. Select the appropriate check boxes and set the variables as required:
• Floating windows Toggles whether new Edit and Trace windows are docked inside the Session or floating (undocked). The remaining fields on this tab are only relevant if windows are floating, that is, this option is selected.
• Single floating window Select this to display a single floating window with multiple tabs for different Edit/Trace windows. If this option is not selected, then multiple floating windows are displayed for individual Edit/Trace windows.
• Remember previous window position Select this to open new floating windows in the positions that were occupied by previously-opened windows when they were closed. The location of the first floating window opened persists between sessions.
• Size width and height Specifies the width and height of new Edit and Trace windows.
RIDE User Guide 54
• Posn x and y Specifies the x-y co-ordinates of the screen position for the top left corner of the first Edit/Trace window opened.
• Offset x and y Specifies the x-y offsets for the top left corner of Edit/Trace windows opened relative to the previously-opened window. Only relevant if Single floating window is not selected.
9.3 Configuration Parameters Some customisation can be performed using configuration parameters outside a Session. For details of other configuration parameters that can be set, and the syntax used to set them, see the Dyalog for <operating system> Installation and Configuration Guide specific to the operating system that you are using.
Changes made to configuration parameters in the dyalog.config file only impact local interpreters (that is, interpreters that are configured by that file) and do not impact interpreters that the RIDE can connect with on other machines.

RIDE User Guide 55
Appendix A Keyboard Shortcuts
The Dyalog keyboard shortcuts that are supported on the RIDE are listed in table 17; those that can be configured in the Shortcuts tab of the Preferences dialog box (see section 9.2.3) are indicated with a * character.
Table 17. Dyalog keyboard shortcuts supported on the RIDE
Code Command Default Keystrokes Description
ABT * About Dyalog Shift + F1 Display the About Dyalog dialog box
AC * Align comments Edit: Align comments to current column
AO * Comment out lines
Session/Edit: Add comment symbol at start of each tagged or current line
BH * Run to exit (in tracer)
Trace: Continue execution from the current line to completion of the current function or operator. If successful, the selection advances to the next line of the calling function (if there is one).
BK * Backward or Undo
Ctrl + Shift + Backspace Session: Show previous line in input history Edit: Undo last change (where possible) Trace: Skip back one line
BP * Toggle breakpoint
Edit: Toggle a breakpoint on the current line Trace: Toggle a breakpoint on the current line
BT * Back Tab between windows
Ctrl + Shift + Tab Move to previous window in loop
CAM * Clear all trace/ stop/monitor
Remove any trace/stop/monitor flags (as set by ⎕TRACE, ⎕STOP and ⎕MONITOR) from all functions in the workspace
CAW * Close all windows
Close all open Edit and Trace windows
CBP * Clear stops for active object
Edit/Trace: Clear all breakpoints (resets ⎕STOP) on the function(s).
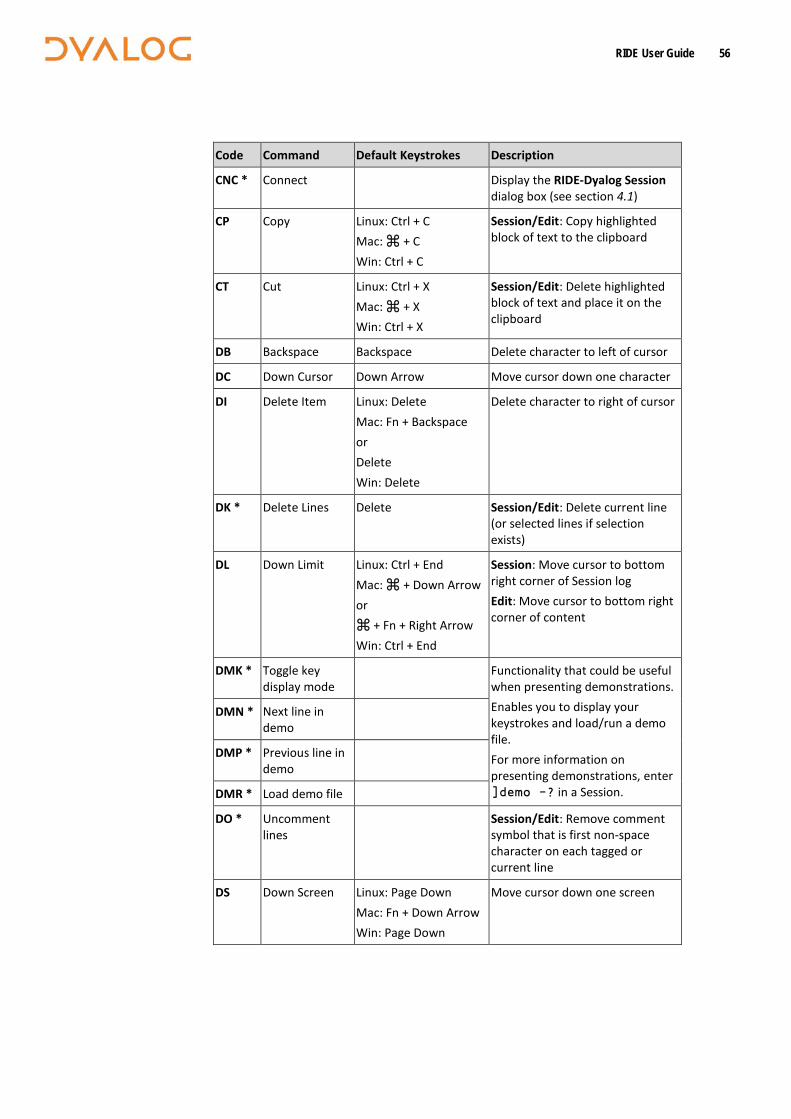
RIDE User Guide 56
Code Command Default Keystrokes Description
CNC * Connect Display the RIDE-Dyalog Session dialog box (see section 4.1)
CP Copy Linux: Ctrl + C Mac: ⌘ + C Win: Ctrl + C
Session/Edit: Copy highlighted block of text to the clipboard
CT Cut Linux: Ctrl + X Mac: ⌘ + X Win: Ctrl + X
Session/Edit: Delete highlighted block of text and place it on the clipboard
DB Backspace Backspace Delete character to left of cursor
DC Down Cursor Down Arrow Move cursor down one character
DI Delete Item Linux: Delete Mac: Fn + Backspace or Delete Win: Delete
Delete character to right of cursor
DK * Delete Lines Delete Session/Edit: Delete current line (or selected lines if selection exists)
DL Down Limit Linux: Ctrl + End Mac: ⌘ + Down Arrow or ⌘ + Fn + Right Arrow Win: Ctrl + End
Session: Move cursor to bottom right corner of Session log Edit: Move cursor to bottom right corner of content
DMK * Toggle key display mode
Functionality that could be useful when presenting demonstrations. Enables you to display your keystrokes and load/run a demo file. For more information on presenting demonstrations, enter ]demo -? in a Session.
DMN * Next line in demo
DMP * Previous line in demo
DMR * Load demo file
DO * Uncomment lines
Session/Edit: Remove comment symbol that is first non-space character on each tagged or current line
DS Down Screen Linux: Page Down Mac: Fn + Down Arrow Win: Page Down
Move cursor down one screen
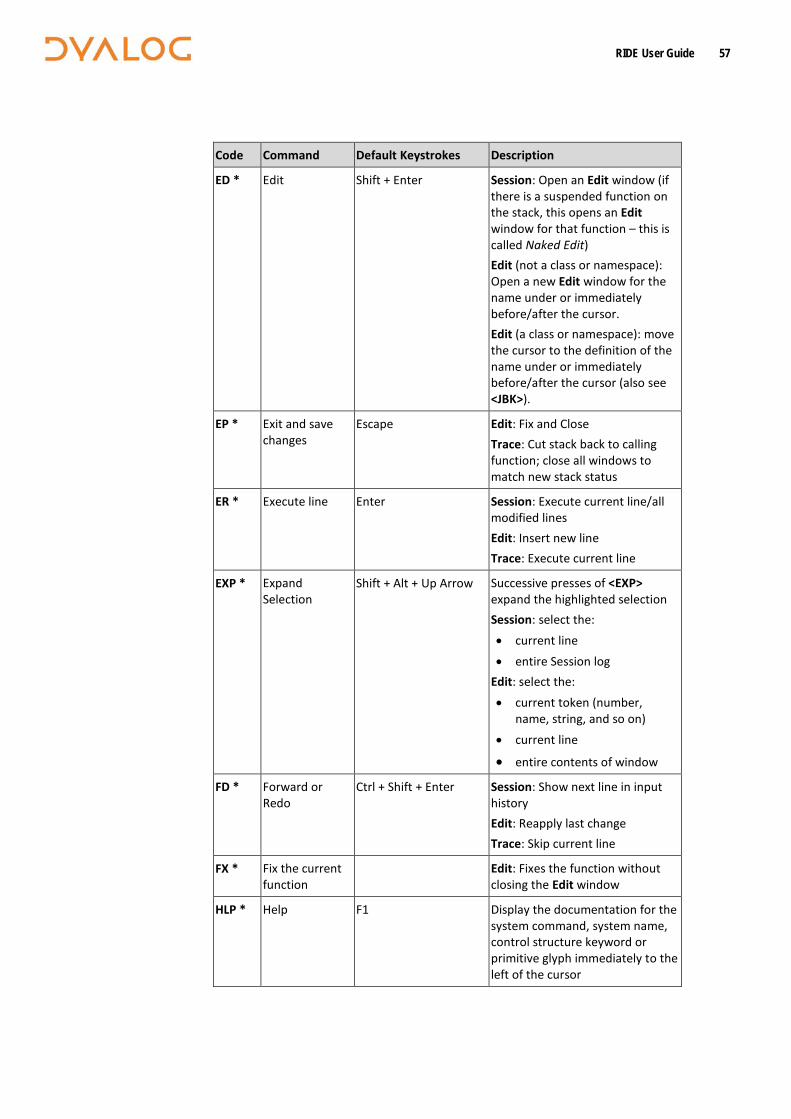
RIDE User Guide 57
Code Command Default Keystrokes Description
ED * Edit Shift + Enter Session: Open an Edit window (if there is a suspended function on the stack, this opens an Edit window for that function – this is called Naked Edit) Edit (not a class or namespace): Open a new Edit window for the name under or immediately before/after the cursor. Edit (a class or namespace): move the cursor to the definition of the name under or immediately before/after the cursor (also see <JBK>).
EP * Exit and save changes
Escape Edit: Fix and Close Trace: Cut stack back to calling function; close all windows to match new stack status
ER * Execute line Enter Session: Execute current line/all modified lines Edit: Insert new line Trace: Execute current line
EXP * Expand Selection
Shift + Alt + Up Arrow Successive presses of <EXP> expand the highlighted selection Session: select the: • current line • entire Session log
Edit: select the: • current token (number,
name, string, and so on) • current line
• entire contents of window
FD * Forward or Redo
Ctrl + Shift + Enter Session: Show next line in input history Edit: Reapply last change Trace: Skip current line
FX * Fix the current function
Edit: Fixes the function without closing the Edit window
HLP * Help F1 Display the documentation for the system command, system name, control structure keyword or primitive glyph immediately to the left of the cursor
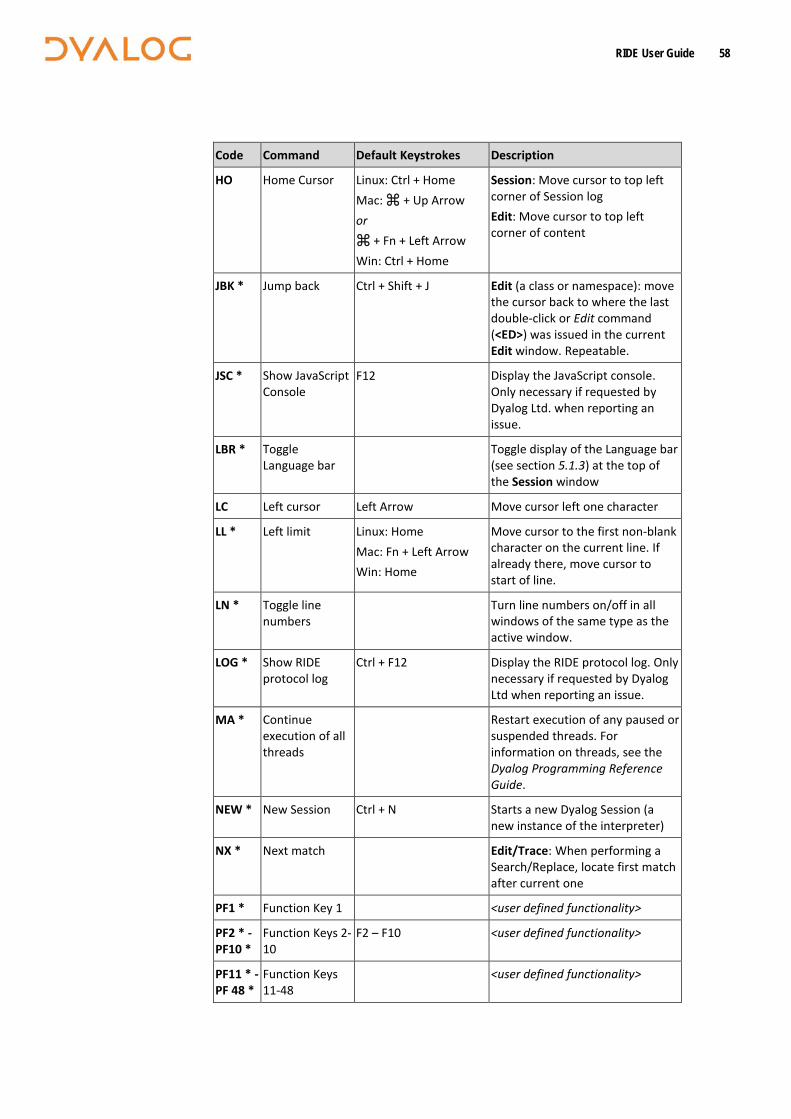
RIDE User Guide 58
Code Command Default Keystrokes Description
HO Home Cursor Linux: Ctrl + Home Mac: ⌘ + Up Arrow or ⌘ + Fn + Left Arrow Win: Ctrl + Home
Session: Move cursor to top left corner of Session log Edit: Move cursor to top left corner of content
JBK * Jump back Ctrl + Shift + J Edit (a class or namespace): move the cursor back to where the last double-click or Edit command (<ED>) was issued in the current Edit window. Repeatable.
JSC * Show JavaScript Console
F12 Display the JavaScript console. Only necessary if requested by Dyalog Ltd. when reporting an issue.
LBR * Toggle Language bar
Toggle display of the Language bar (see section 5.1.3) at the top of the Session window
LC Left cursor Left Arrow Move cursor left one character
LL * Left limit Linux: Home Mac: Fn + Left Arrow Win: Home
Move cursor to the first non-blank character on the current line. If already there, move cursor to start of line.
LN * Toggle line numbers
Turn line numbers on/off in all windows of the same type as the active window.
LOG * Show RIDE protocol log
Ctrl + F12 Display the RIDE protocol log. Only necessary if requested by Dyalog Ltd when reporting an issue.
MA * Continue execution of all threads
Restart execution of any paused or suspended threads. For information on threads, see the Dyalog Programming Reference Guide.
NEW * New Session Ctrl + N Starts a new Dyalog Session (a new instance of the interpreter)
NX * Next match Edit/Trace: When performing a Search/Replace, locate first match after current one
PF1 * Function Key 1 <user defined functionality>
PF2 * - PF10 *
Function Keys 2-10
F2 – F10 <user defined functionality>
PF11 * - PF 48 *
Function Keys 11-48
<user defined functionality>
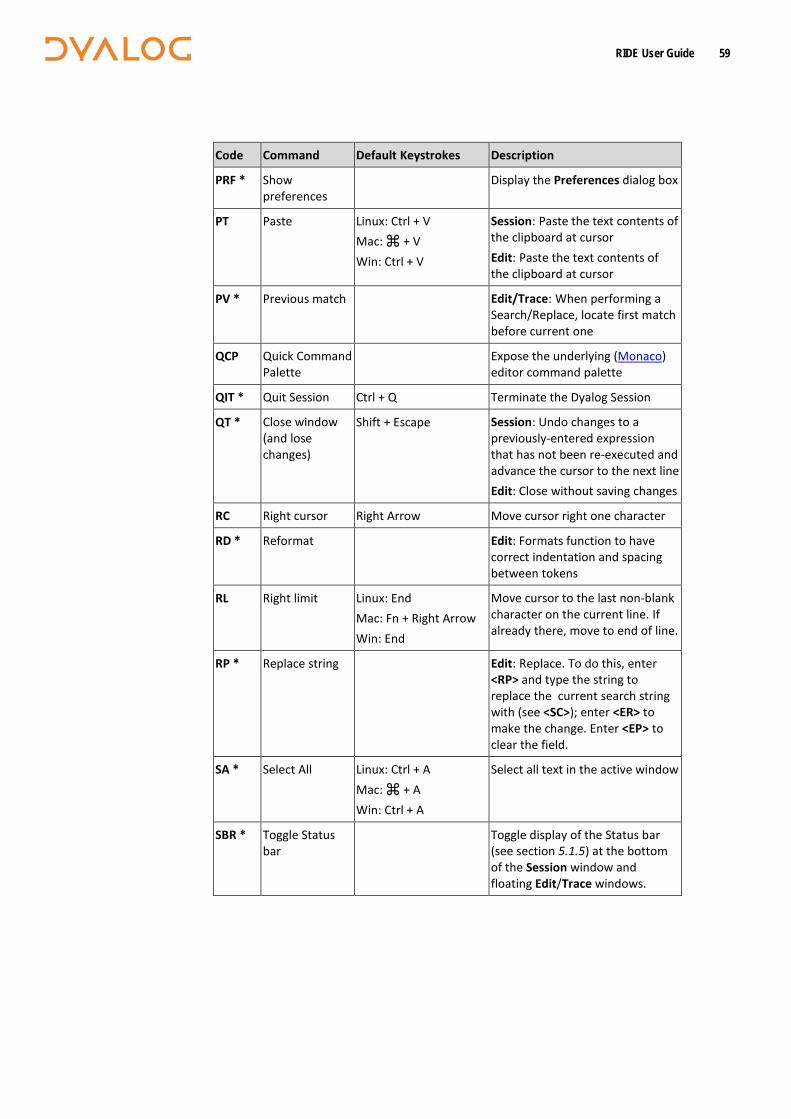
RIDE User Guide 59
Code Command Default Keystrokes Description
PRF * Show preferences
Display the Preferences dialog box
PT Paste Linux: Ctrl + V Mac: ⌘ + V Win: Ctrl + V
Session: Paste the text contents of the clipboard at cursor Edit: Paste the text contents of the clipboard at cursor
PV * Previous match Edit/Trace: When performing a Search/Replace, locate first match before current one
QCP Quick Command Palette
Expose the underlying (Monaco) editor command palette
QIT * Quit Session Ctrl + Q Terminate the Dyalog Session
QT * Close window (and lose changes)
Shift + Escape Session: Undo changes to a previously-entered expression that has not been re-executed and advance the cursor to the next line Edit: Close without saving changes
RC Right cursor Right Arrow Move cursor right one character
RD * Reformat Edit: Formats function to have correct indentation and spacing between tokens
RL Right limit Linux: End Mac: Fn + Right Arrow Win: End
Move cursor to the last non-blank character on the current line. If already there, move to end of line.
RP * Replace string Edit: Replace. To do this, enter <RP> and type the string to replace the current search string with (see <SC>); enter <ER> to make the change. Enter <EP> to clear the field.
SA * Select All Linux: Ctrl + A Mac: ⌘ + A Win: Ctrl + A
Select all text in the active window
SBR * Toggle Status bar
Toggle display of the Status bar (see section 5.1.5) at the bottom of the Session window and floating Edit/Trace windows.
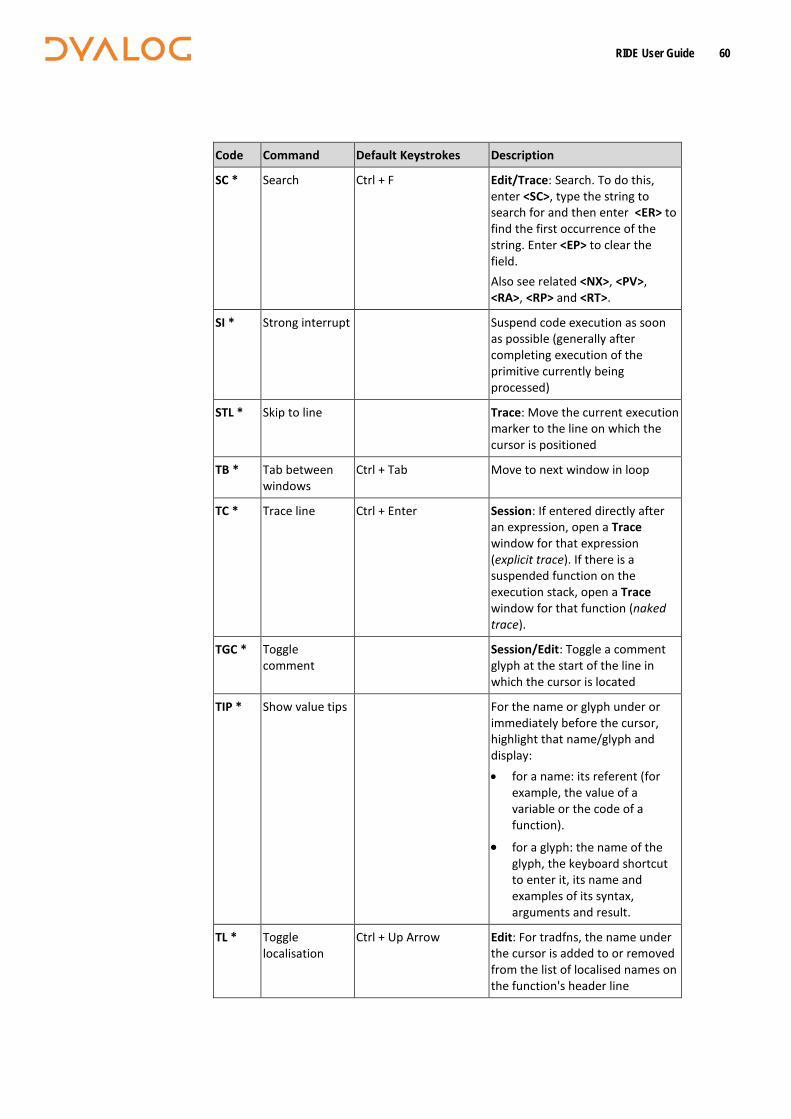
RIDE User Guide 60
Code Command Default Keystrokes Description
SC * Search Ctrl + F Edit/Trace: Search. To do this, enter <SC>, type the string to search for and then enter <ER> to find the first occurrence of the string. Enter <EP> to clear the field. Also see related <NX>, <PV>, <RA>, <RP> and <RT>.
SI * Strong interrupt Suspend code execution as soon as possible (generally after completing execution of the primitive currently being processed)
STL * Skip to line Trace: Move the current execution marker to the line on which the cursor is positioned
TB * Tab between windows
Ctrl + Tab Move to next window in loop
TC * Trace line Ctrl + Enter Session: If entered directly after an expression, open a Trace window for that expression (explicit trace). If there is a suspended function on the execution stack, open a Trace window for that function (naked trace).
TGC * Toggle comment
Session/Edit: Toggle a comment glyph at the start of the line in which the cursor is located
TIP * Show value tips For the name or glyph under or immediately before the cursor, highlight that name/glyph and display: • for a name: its referent (for
example, the value of a variable or the code of a function).
• for a glyph: the name of the glyph, the keyboard shortcut to enter it, its name and examples of its syntax, arguments and result.
TL * Toggle localisation
Ctrl + Up Arrow Edit: For tradfns, the name under the cursor is added to or removed from the list of localised names on the function's header line
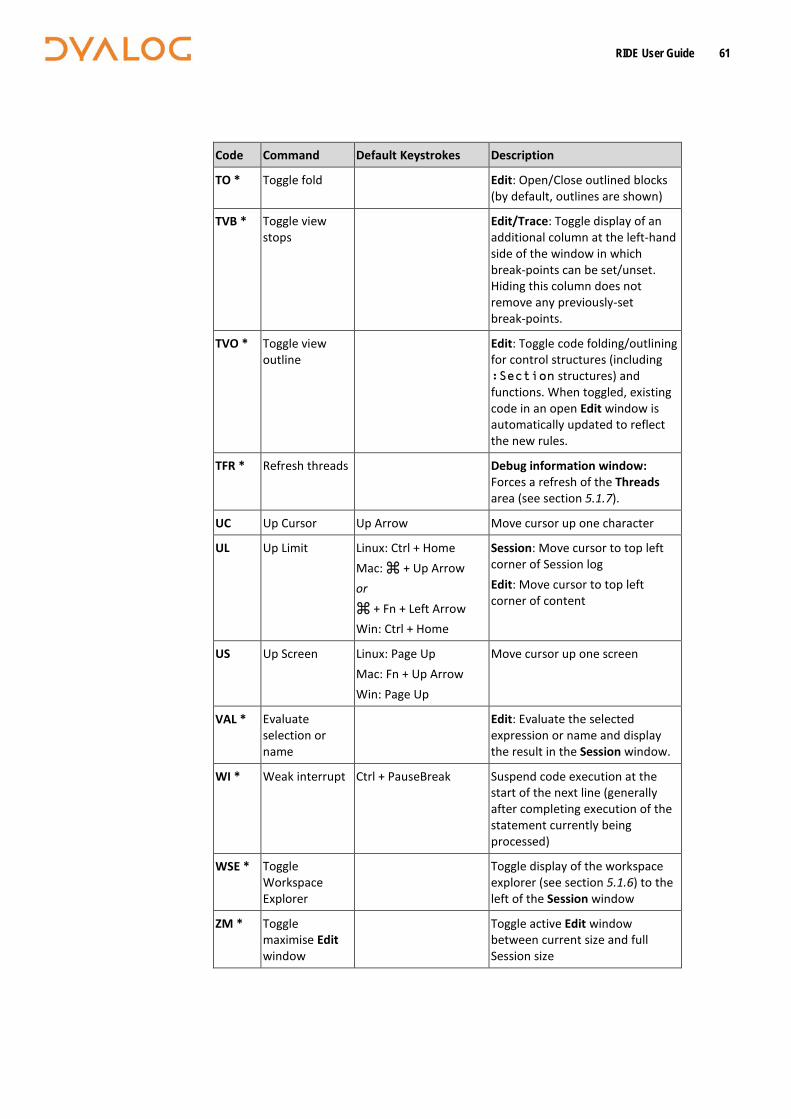
RIDE User Guide 61
Code Command Default Keystrokes Description
TO * Toggle fold Edit: Open/Close outlined blocks (by default, outlines are shown)
TVB * Toggle view stops
Edit/Trace: Toggle display of an additional column at the left-hand side of the window in which break-points can be set/unset. Hiding this column does not remove any previously-set break-points.
TVO * Toggle view outline
Edit: Toggle code folding/outlining for control structures (including :Section structures) and functions. When toggled, existing code in an open Edit window is automatically updated to reflect the new rules.
TFR * Refresh threads Debug information window: Forces a refresh of the Threads area (see section 5.1.7).
UC Up Cursor Up Arrow Move cursor up one character
UL Up Limit Linux: Ctrl + Home Mac: ⌘ + Up Arrow or ⌘ + Fn + Left Arrow Win: Ctrl + Home
Session: Move cursor to top left corner of Session log Edit: Move cursor to top left corner of content
US Up Screen Linux: Page Up Mac: Fn + Up Arrow Win: Page Up
Move cursor up one screen
VAL * Evaluate selection or name
Edit: Evaluate the selected expression or name and display the result in the Session window.
WI * Weak interrupt Ctrl + PauseBreak Suspend code execution at the start of the next line (generally after completing execution of the statement currently being processed)
WSE * Toggle Workspace Explorer
Toggle display of the workspace explorer (see section 5.1.6) to the left of the Session window
ZM * Toggle maximise Edit window
Toggle active Edit window between current size and full Session size

RIDE User Guide 62
Code Command Default Keystrokes Description
ZMI * Increase font size
Ctrl + = or Ctrl + Shift + =
Increase the size of the font in all the windows
ZMO * Decrease font size
Ctrl + - Decrease the size of the font in all the windows
ZMR * Reset font size Ctrl + 0 Reset the size of the font in all the windows to its default value.

RIDE User Guide 63
Appendix B Sample Configuration File
A .ini configuration file can be used to define settings for the RIDE_INIT configuration parameter.
Examples of the fields that you might want to include within the .ini configuration file are:
[RIDE] Direction=Listen Address= Port=5002 MaxBlockSize=52428800 SSLValidation=0 Protocol=IPv4 Secure=Secure PublicCertFile= C:\apps\d150U64\TCerts\server\localhost-cert.pem PrivateKeyFile= C:\apps\d150U64\TCerts\server\localhost-key.pem RootCertDir= C:\apps\d150U64\TCertss\ca Priority= AcceptCertDir= C:\apps\d150U64\TCerts\accept
where: • Direction , Address and Port – as defined for the RIDE_INIT configuration
parameter (see section 8.2.2). Direction in the .ini file is equivalent to mode in the RIDE_INIT configuration parameter and has possible values of Listen (equivalent to RIDE_INIT's Serve), Connect and Poll. No defaults are defined for Direction and Address; the default for Port is 4502. Overridden if defined in RIDE_INIT.
An additional Direction value, HTTP, sets the RIDE to Zero Footprint mode (see section 4.1.4). If this is set then an HttpDir field can be included to specify the full path to (and name of) the directory in which to load the RIDE HTML files in Zero Footprint mode (no default).
• MaxBlockSize is the maximum size (in bytes) allocated to the buffer that receives data transamissions. The default is 16,777,216.
• SSLValidation is the sum of the relevant TLS flags (see section 1B.1). The default is 0. Validity depends on the value of the Secure field.
• Protocol is the communication protocol to use. Possible values are: o IPv4: use the Ipv4 connection protocol; if this is not possible then
generate an error. o IPv6: use the Ipv6 connection protocol; if this is not possible then
generate an error. o <empty>: use the Ipv6 connection protocol; if this is not possible then use
the Ipv4 connection protocol. This is the default.
RIDE User Guide 64
• Secure specifies the security of the connection. Possible values depend on the value of Direction: o If Direction is Listen, then Secure can be:
Secure – the connection is secure and certificates are provided. The PublicCertFile, PrivateKeyFile, SSLValidation and Priority fields are valid..
<empty> – the connection is unencrypted. This is the default. o If Direction is Connect or Poll, then Secure can be:
Secure – the connection is secure and certificates are provided. The PublicCertFile, PrivateKeyFile, SSLValidation and Priority fields are valid.
<empty> – the connection is unencrypted. This is the default. Anonymous – the connection is secure but no certificate is provided
on the client side. The SSLValidation and Priority fields are valid.
• PublicCertFile is the fully-qualified path to, and name of, the file containing the public certificate. Empty by default. Validity depends on the value of the Secure field.
• PrivateKeyFile is the fully-qualified path to, and name of, the file containing the private key. Empty by default. Validity depends on the value of the Secure field.
• RootCertDir is the full path to (and name of) the directory that contains Certificate Authority root certificates. Empty by default (on the Microsoft Windows operating system, the RIDE uses the Microsoft certicate store).
• Priority is the GnuTLS priority string (for complete documentation of this, see http://www.gnutls.org/manual/gnutls.html#Priority-Strings). Empty by default. Validity depends on the value of the Secure field.
• AcceptCertDir is the full path to (and name of) the directory that contains the public certificates of all users that are allowed to connect. Empty by default.
Two additional sections can be included within the .ini configuration file to control the IP addresses that are allowed or denied access to the connection. These are:
[AllowEndPoints] [DenyEndPoints]
For each of these, IPv6/IPv4 addresses and/or address ranges can be specified (multiple entries must be separated by commas). For example:
[AllowEndPoints] IPV4=192.168.100.0/24,192.168.17.0/24,127.0.0.0/10 IPV6= fe80:ccbd:aa34:3cfb::0/64
[DenyEndPoints] IPV4=212.0.0.0/8 IPV6= 2a02:2658:1012::35/64
If AllowEndPoints is not included, all IP addresses are allowed to access the connection unless explicitly denied access with the DenyEndPoints field.
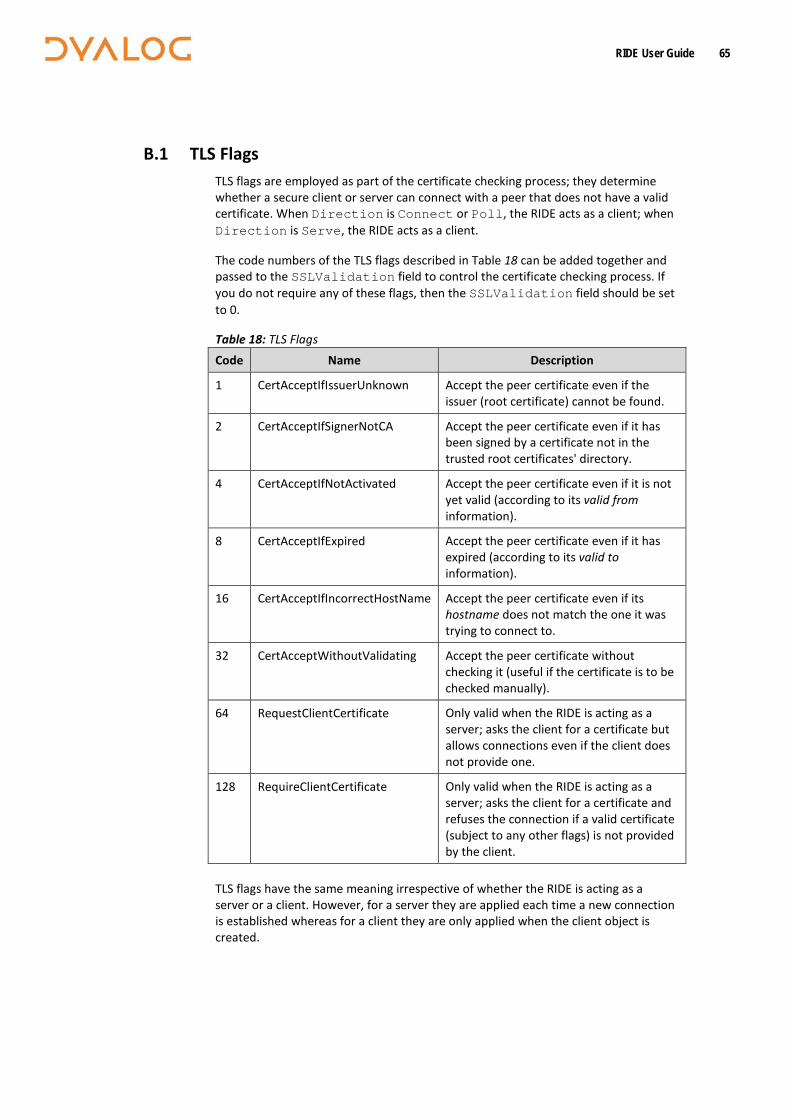
RIDE User Guide 65
B.1 TLS Flags TLS flags are employed as part of the certificate checking process; they determine whether a secure client or server can connect with a peer that does not have a valid certificate. When Direction is Connect or Poll, the RIDE acts as a client; when Direction is Serve, the RIDE acts as a client.
The code numbers of the TLS flags described in Table 18 can be added together and passed to the SSLValidation field to control the certificate checking process. If you do not require any of these flags, then the SSLValidation field should be set to 0.
Table 18: TLS Flags Code Name Description
1 CertAcceptIfIssuerUnknown Accept the peer certificate even if the issuer (root certificate) cannot be found.
2 CertAcceptIfSignerNotCA Accept the peer certificate even if it has been signed by a certificate not in the trusted root certificates' directory.
4 CertAcceptIfNotActivated Accept the peer certificate even if it is not yet valid (according to its valid from information).
8 CertAcceptIfExpired Accept the peer certificate even if it has expired (according to its valid to information).
16 CertAcceptIfIncorrectHostName Accept the peer certificate even if its hostname does not match the one it was trying to connect to.
32 CertAcceptWithoutValidating Accept the peer certificate without checking it (useful if the certificate is to be checked manually).
64 RequestClientCertificate Only valid when the RIDE is acting as a server; asks the client for a certificate but allows connections even if the client does not provide one.
128 RequireClientCertificate Only valid when the RIDE is acting as a server; asks the client for a certificate and refuses the connection if a valid certificate (subject to any other flags) is not provided by the client.
TLS flags have the same meaning irrespective of whether the RIDE is acting as a server or a client. However, for a server they are applied each time a new connection is established whereas for a client they are only applied when the client object is created.