Embed Size (px)
Citation preview

Desktop Configuration version 9 – Oct 29, 2009 i Posted on Site –Oct 29, 2009
RIAS PHASE II
User Guide
Desktop Configurations
Desktop Configuration version 9 – Oct 29, 2009 Posted on Site – Oct 29, 2009 ii
2
Contents
Checking for Java Client on your Desktop ..................................................................................................1 Classic View................................................................................................................................................................. 1 Category View ............................................................................................................................................................. 2
Installing Java Client .....................................................................................................................................4
Web Application Desktop Integrator (ADI) Desktop Setups .....................................................................7 Excel ............................................................................................................................................................................. 7 Excel File Type Setup ................................................................................................................................................. 9 Excel 2007 .................................................................................................................................................................. 11 Pop-Up Blocker ......................................................................................................................................................... 14 Internet Explorer 7.0 ................................................................................................................................................ 15 Security Warnings .................................................................................................................................................... 18
Security Certificate ......................................................................................................................................19
Desktop Configuration version 10 – May 15, 2013 1 Posted on Site – May 22, 2013
Checking for Java Client on your Desktop
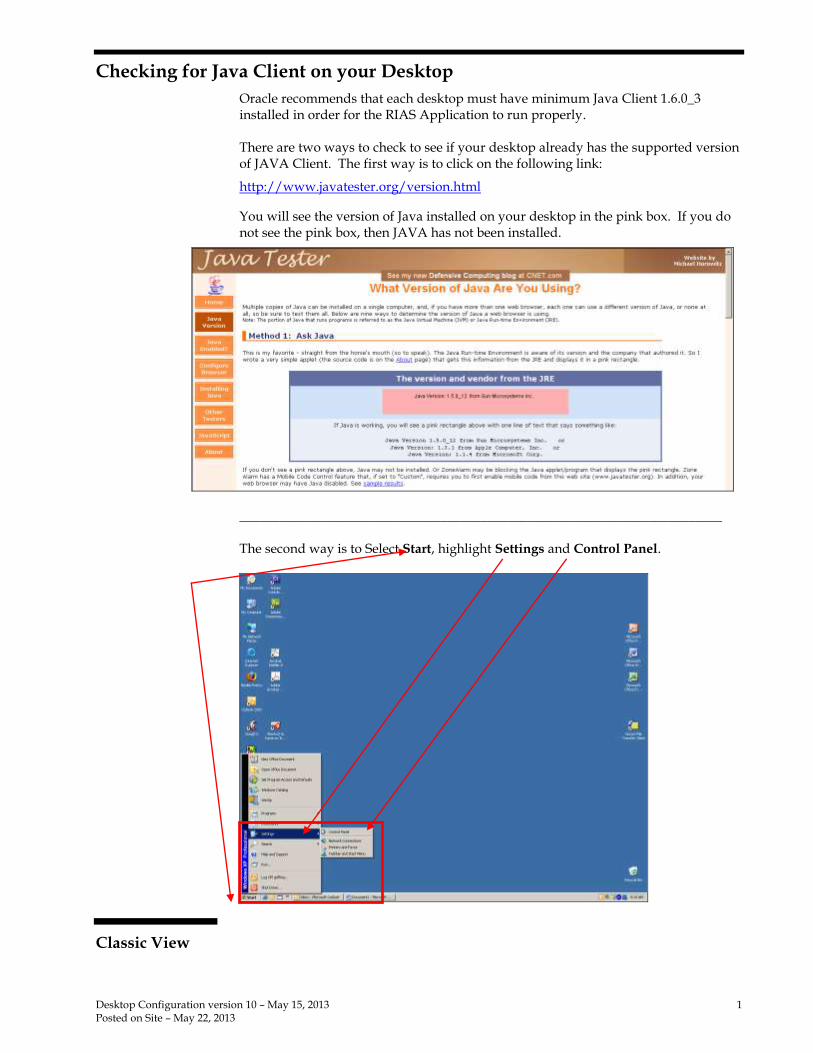
Oracle recommends that each desktop must have minimum Java Client 1.6.0_3 installed in order for the RIAS Application to run properly. There are two ways to check to see if your desktop already has the supported version of JAVA Client. The first way is to click on the following link:
http://www.javatester.org/version.html
You will see the version of Java installed on your desktop in the pink box. If you do not see the pink box, then JAVA has not been installed.
________________________________________________________________________
The second way is to Select Start, highlight Settings and Control Panel.
Classic View
Desktop Configuration version 10 – May 15, 2013 2 Posted on Site – May 22, 2013
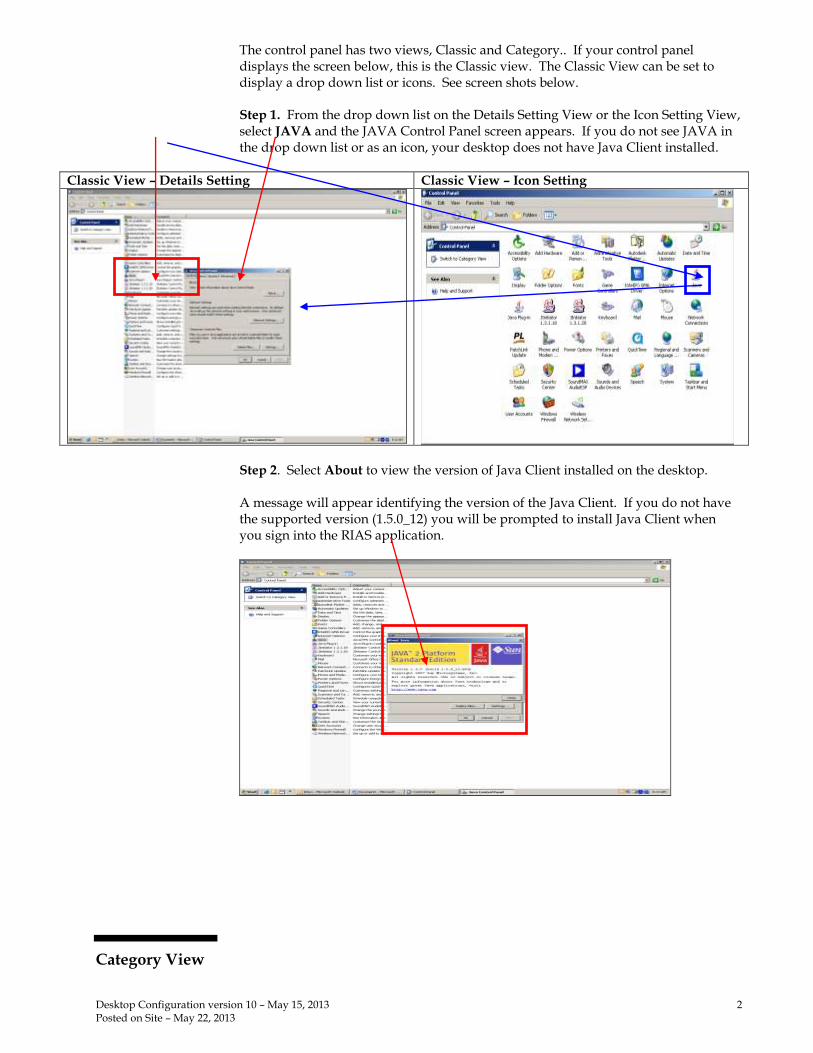
The control panel has two views, Classic and Category.. If your control panel displays the screen below, this is the Classic view. The Classic View can be set to display a drop down list or icons. See screen shots below. Step 1. From the drop down list on the Details Setting View or the Icon Setting View, select JAVA and the JAVA Control Panel screen appears. If you do not see JAVA in the drop down list or as an icon, your desktop does not have Java Client installed.
Classic View – Details Setting Classic View – Icon Setting
Step 2. Select About to view the version of Java Client installed on the desktop. A message will appear identifying the version of the Java Client. If you do not have the supported version (1.5.0_12) you will be prompted to install Java Client when you sign into the RIAS application.
Category View

Desktop Configuration version 10 – May 15, 2013 3 Posted on Site – May 22, 2013
If your control panel displays the screen below, this is the Category view. Click on Other Control Panel Options. You can change your view to Classic View by clicking on Switch to Classic. Then follow the instructions above under Classic View.
Select JAVA and the JAVA Control Panel screen appears. Follow Step 2 outlined in the Classic View instructions above. If you do not see JAVA in the drop down list, your desktop does not have Java Client installed.
Desktop Configuration version 10 – May 15, 2013 4 Posted on Site – May 22, 2013
Installing Java Client
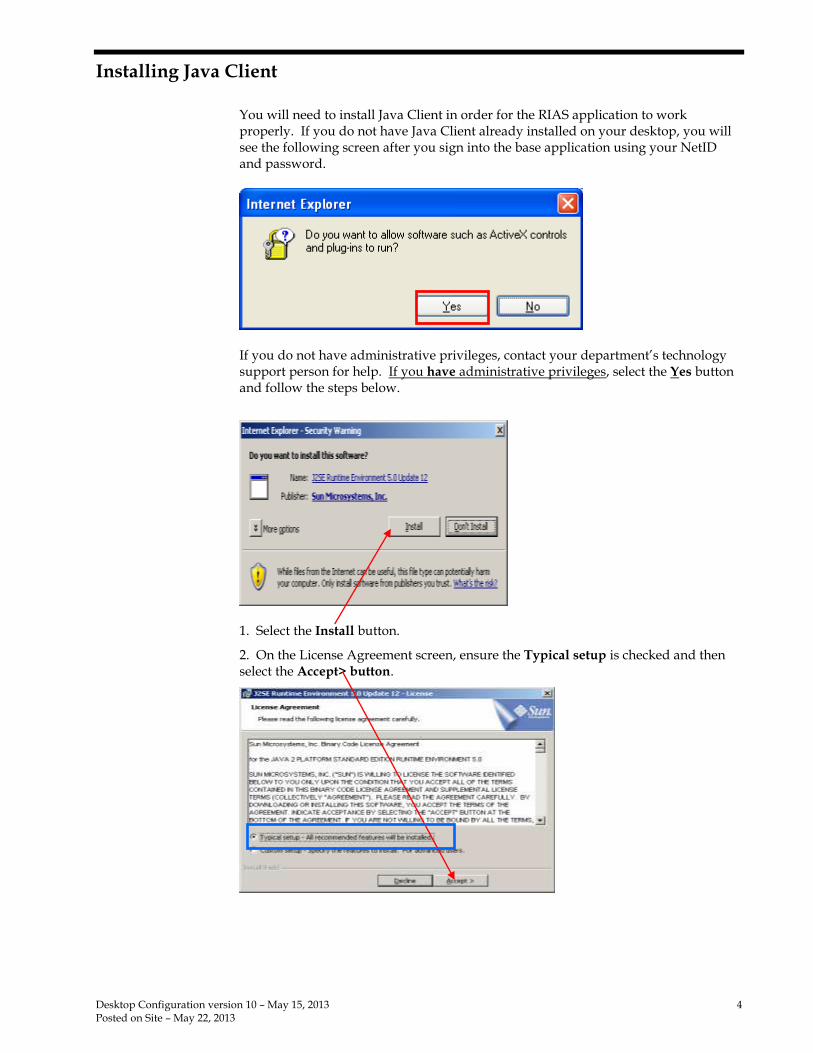
You will need to install Java Client in order for the RIAS application to work properly. If you do not have Java Client already installed on your desktop, you will see the following screen after you sign into the base application using your NetID and password.
If you do not have administrative privileges, contact your department’s technology support person for help. If you have administrative privileges, select the Yes button and follow the steps below.
1. Select the Install button.
2. On the License Agreement screen, ensure the Typical setup is checked and then select the Accept> button.
Desktop Configuration version 10 – May 15, 2013 5 Posted on Site – May 22, 2013
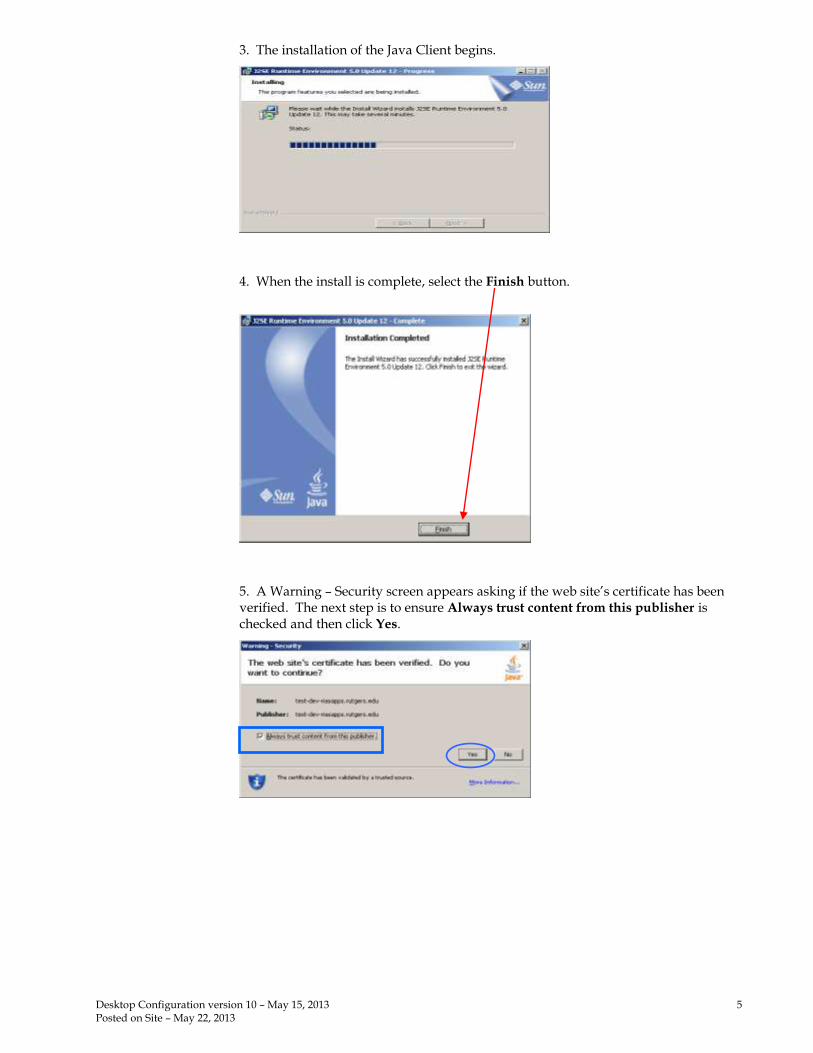
3. The installation of the Java Client begins.
4. When the install is complete, select the Finish button.
5. A Warning – Security screen appears asking if the web site’s certificate has been verified. The next step is to ensure Always trust content from this publisher is checked and then click Yes.
Desktop Configuration version 10 – May 15, 2013 6 Posted on Site – May 22, 2013
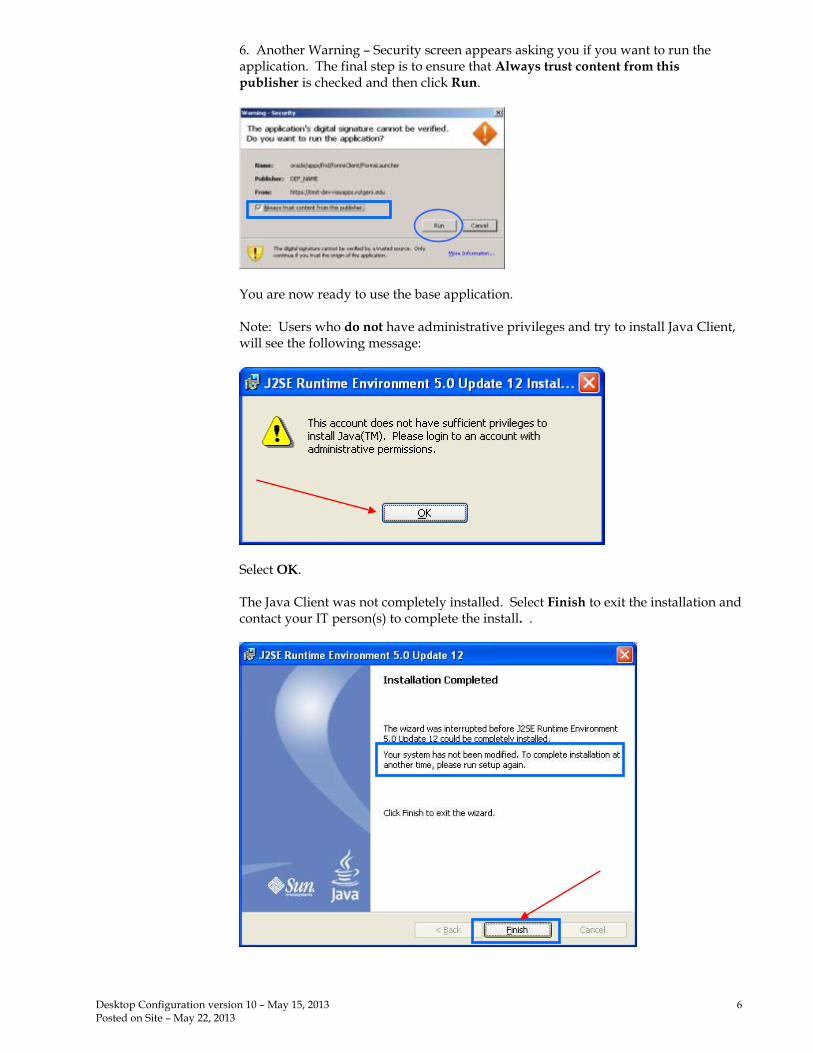
6. Another Warning – Security screen appears asking you if you want to run the application. The final step is to ensure that Always trust content from this publisher is checked and then click Run.
You are now ready to use the base application. Note: Users who do not have administrative privileges and try to install Java Client, will see the following message:
Select OK. The Java Client was not completely installed. Select Finish to exit the installation and contact your IT person(s) to complete the install. .
Desktop Configuration version 10 – May 15, 2013 7 Posted on Site – May 22, 2013
Web Application Desktop Integrator (ADI) Desktop Setups
Excel
Web ADI is a customized Excel spreadsheet that is used to create journal entries and upload them to the new General Ledger system. Web ADI supports Excel 2000 and above.
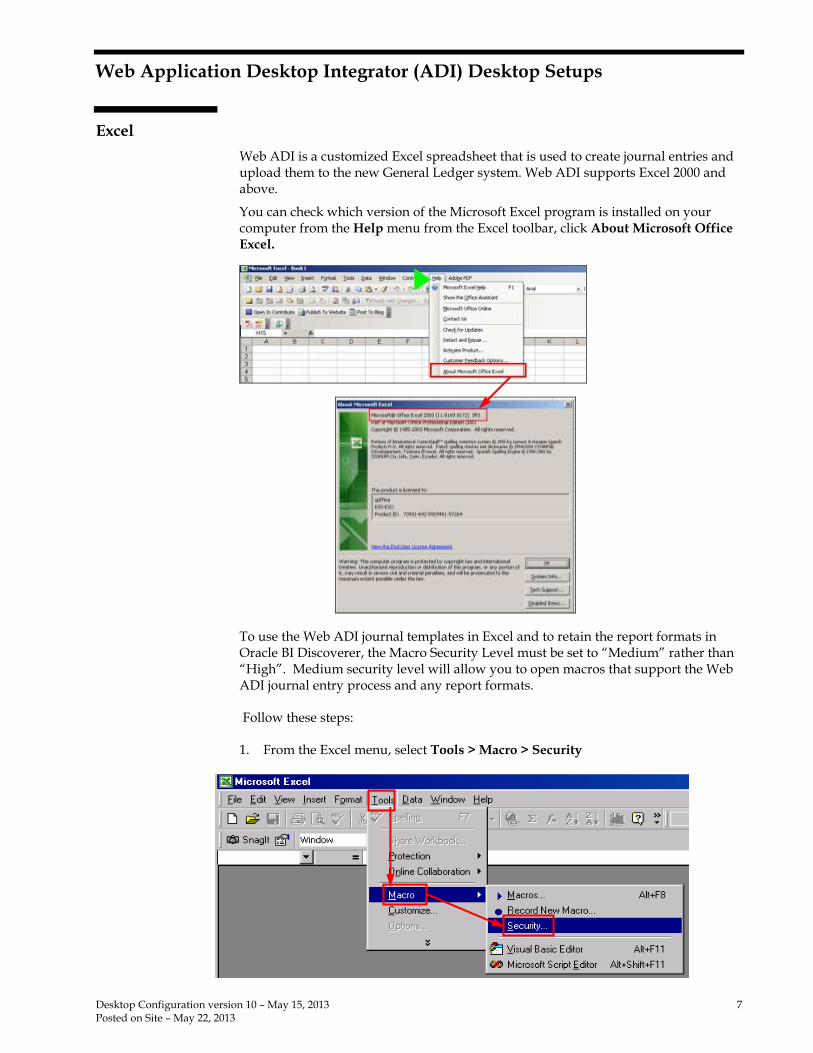
You can check which version of the Microsoft Excel program is installed on your computer from the Help menu from the Excel toolbar, click About Microsoft Office Excel.
To use the Web ADI journal templates in Excel and to retain the report formats in Oracle BI Discoverer, the Macro Security Level must be set to “Medium” rather than “High”. Medium security level will allow you to open macros that support the Web ADI journal entry process and any report formats.
Follow these steps:
1. From the Excel menu, select Tools > Macro > Security
Desktop Configuration version 10 – May 15, 2013 8 Posted on Site – May 22, 2013
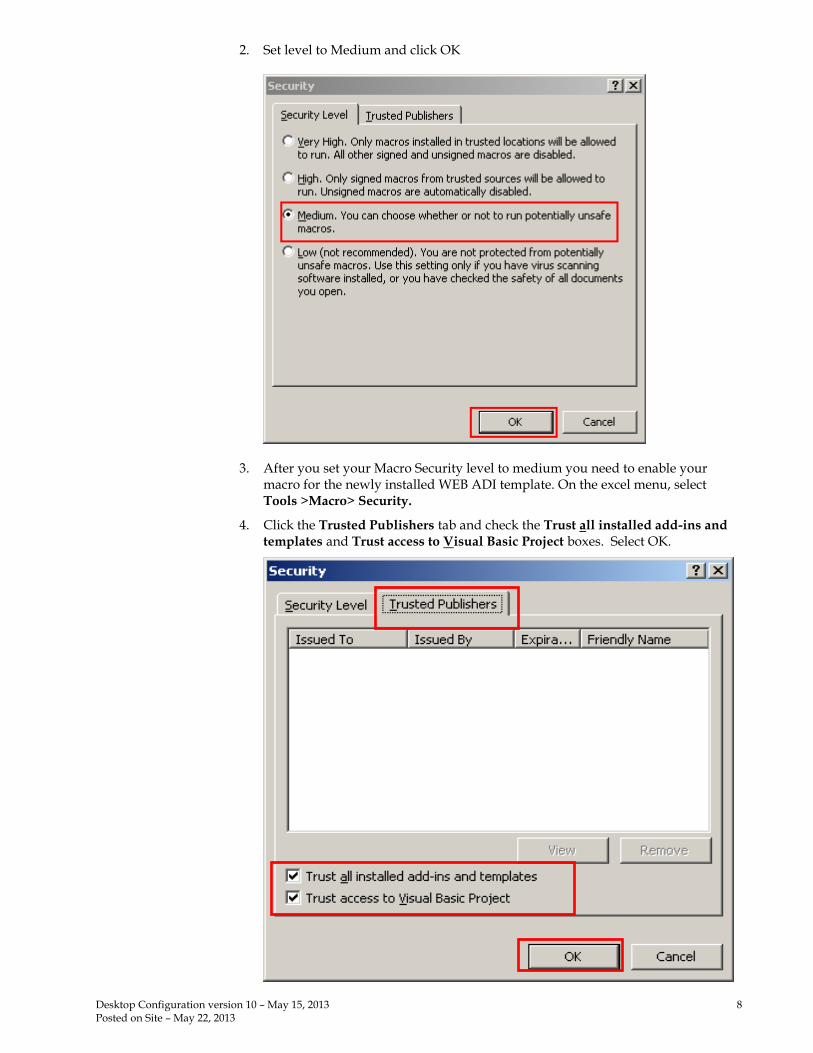
2. Set level to Medium and click OK
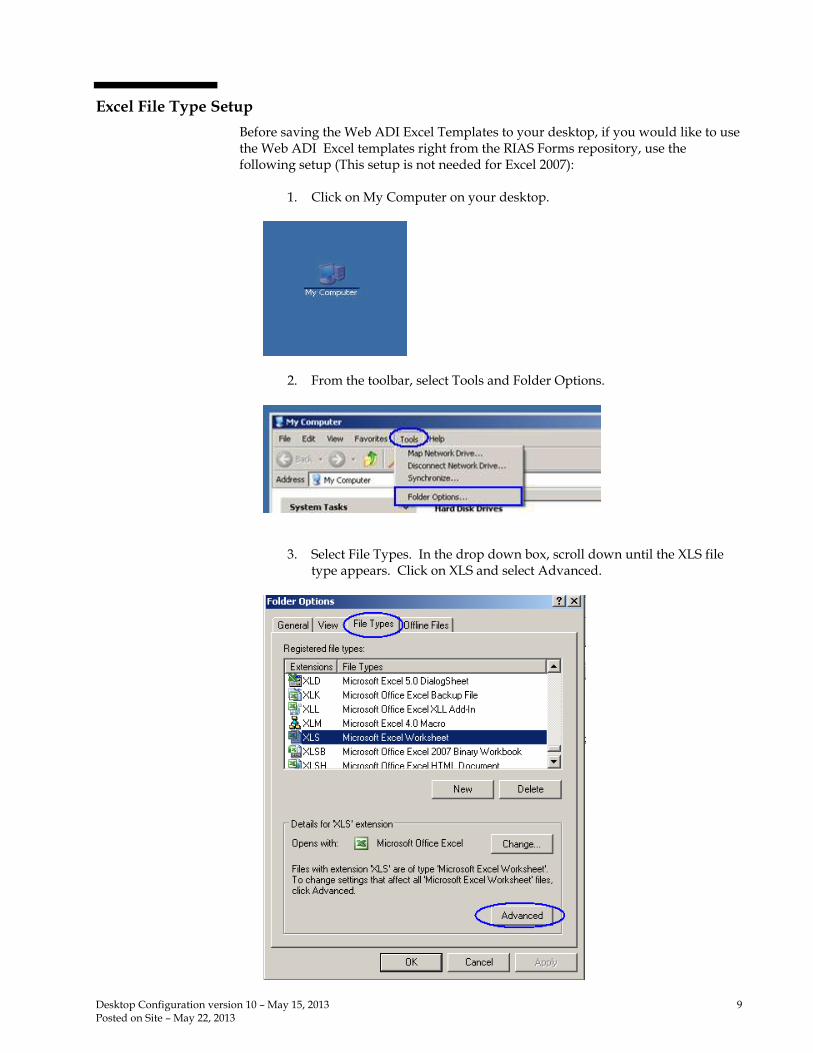
3. After you set your Macro Security level to medium you need to enable your macro for the newly installed WEB ADI template. On the excel menu, select Tools >Macro> Security.
4. Click the Trusted Publishers tab and check the Trust all installed add-ins and templates and Trust access to Visual Basic Project boxes. Select OK.
Desktop Configuration version 10 – May 15, 2013 9 Posted on Site – May 22, 2013
Excel File Type Setup
Before saving the Web ADI Excel Templates to your desktop, if you would like to use the Web ADI Excel templates right from the RIAS Forms repository, use the following setup (This setup is not needed for Excel 2007):
1. Click on My Computer on your desktop.
2. From the toolbar, select Tools and Folder Options.
3. Select File Types. In the drop down box, scroll down until the XLS file type appears. Click on XLS and select Advanced.
Desktop Configuration version 10 – May 15, 2013 10 Posted on Site – May 22, 2013
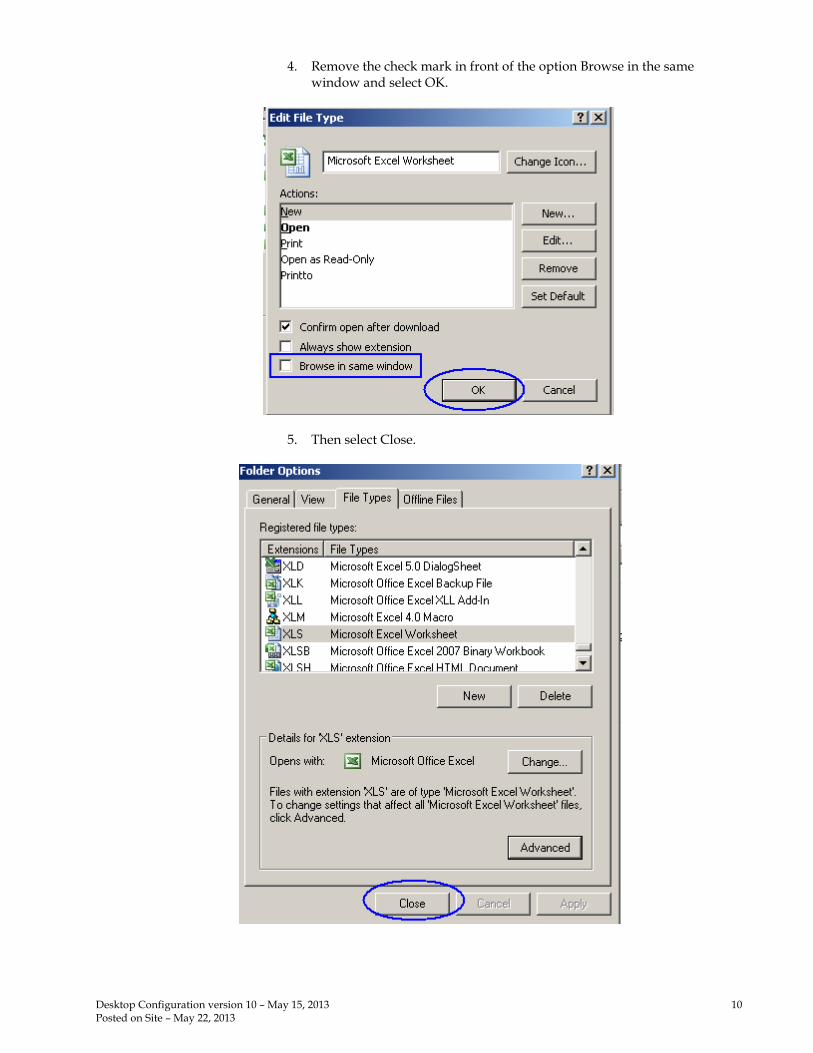
4. Remove the check mark in front of the option Browse in the same
window and select OK.
5. Then select Close.
Desktop Configuration version 10 – May 15, 2013 11 Posted on Site – May 22, 2013
Excel 2007
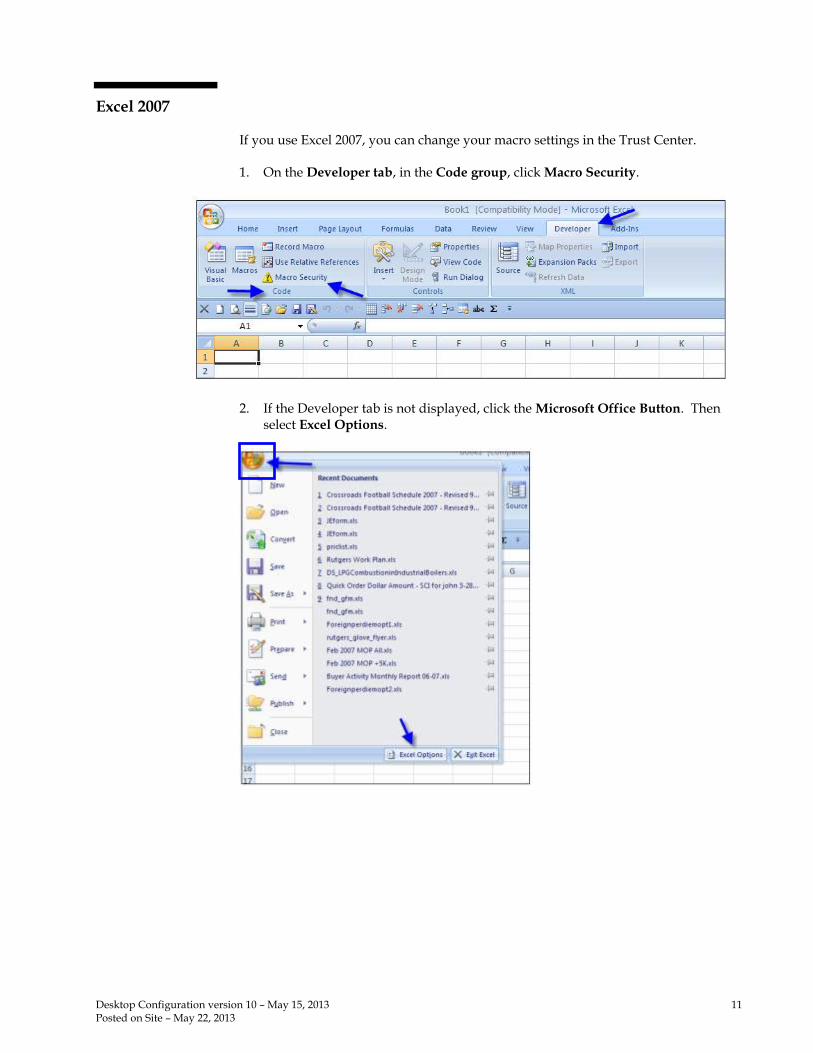
If you use Excel 2007, you can change your macro settings in the Trust Center.
1. On the Developer tab, in the Code group, click Macro Security.
2. If the Developer tab is not displayed, click the Microsoft Office Button. Then select Excel Options.
Desktop Configuration version 10 – May 15, 2013 12 Posted on Site – May 22, 2013
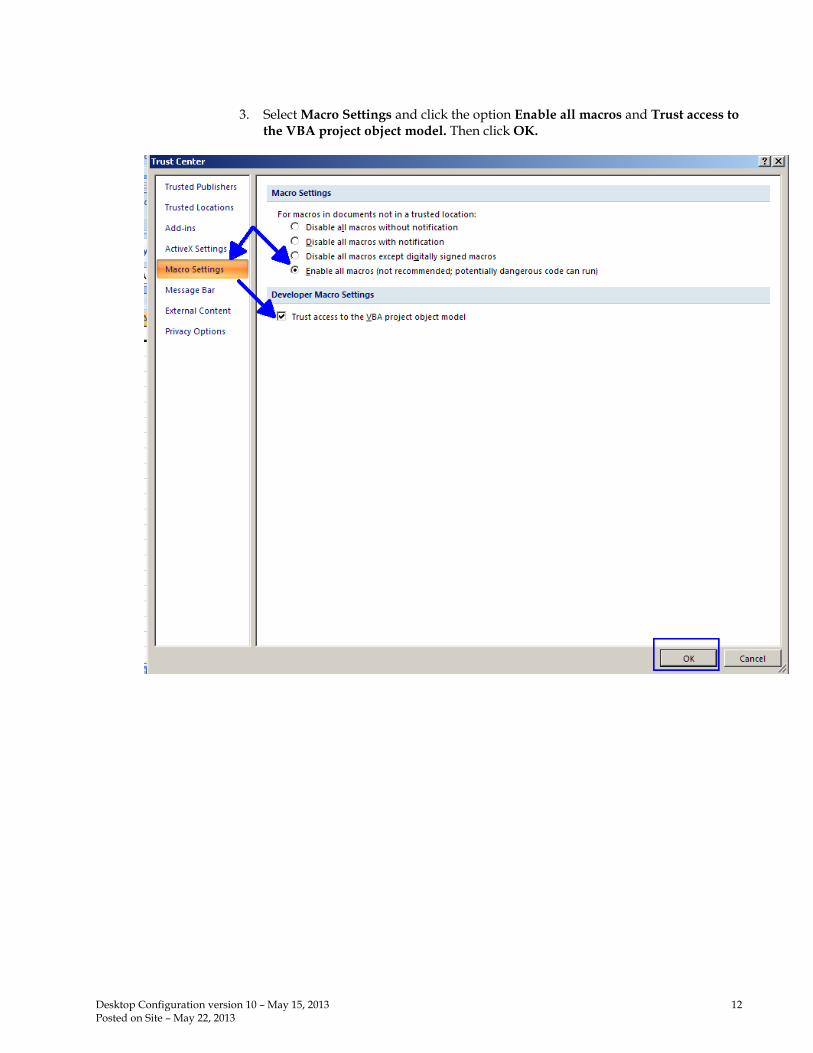
3. Select Macro Settings and click the option Enable all macros and Trust access to the VBA project object model. Then click OK.
Desktop Configuration version 10 – May 15, 2013 13 Posted on Site – May 22, 2013
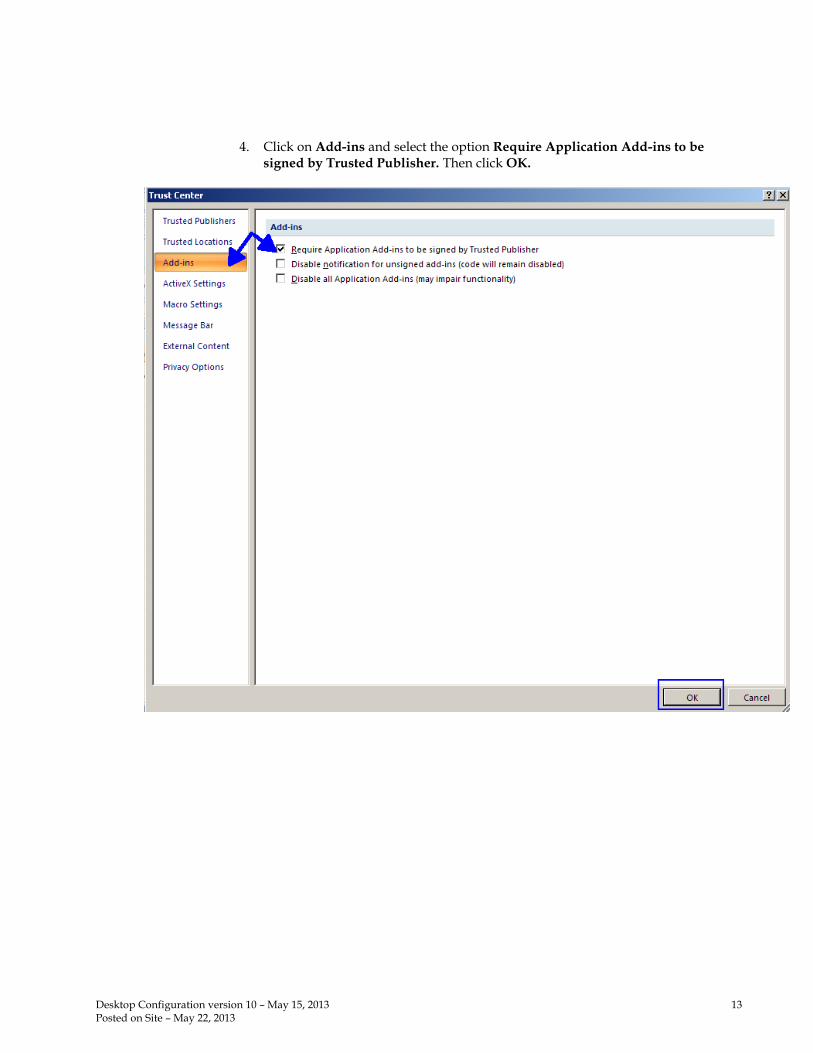
4. Click on Add-ins and select the option Require Application Add-ins to be signed by Trusted Publisher. Then click OK.
Desktop Configuration version 10 – May 15, 2013 14 Posted on Site – May 22, 2013
Pop-Up Blocker
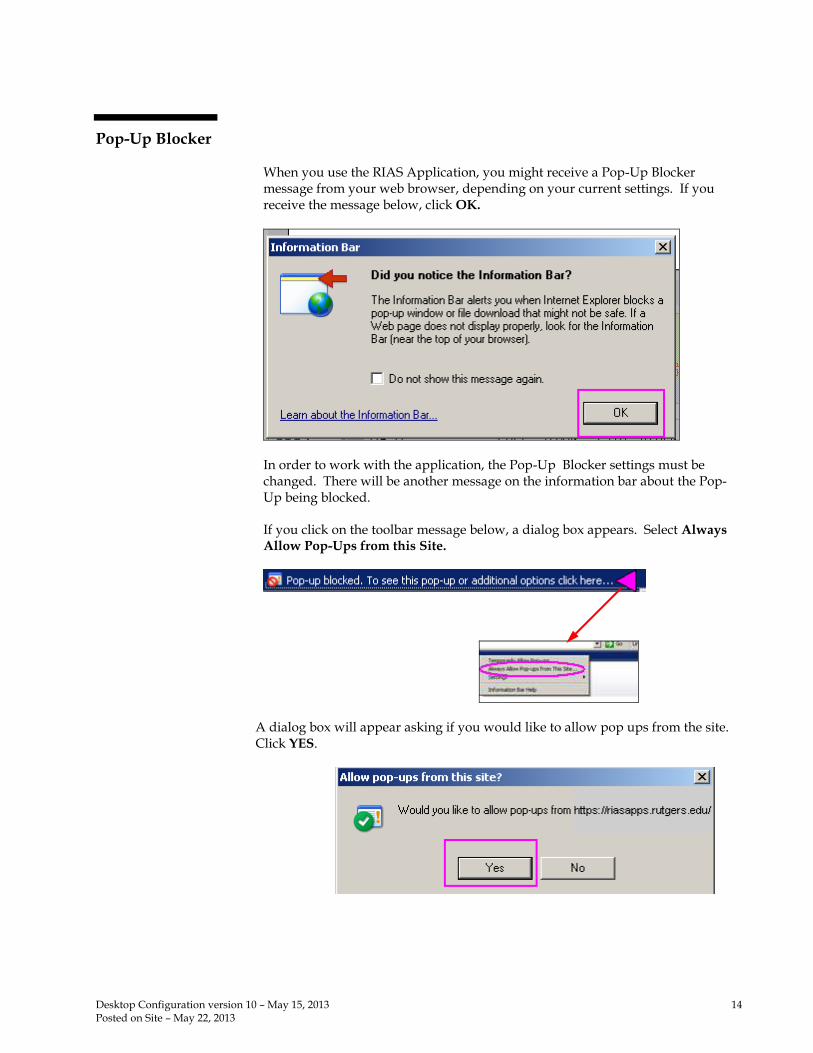
When you use the RIAS Application, you might receive a Pop-Up Blocker message from your web browser, depending on your current settings. If you receive the message below, click OK.
In order to work with the application, the Pop-Up Blocker settings must be changed. There will be another message on the information bar about the Pop-Up being blocked.
If you click on the toolbar message below, a dialog box appears. Select Always Allow Pop-Ups from this Site.
A dialog box will appear asking if you would like to allow pop ups from the site. Click YES.
Desktop Configuration version 10 – May 15, 2013 15 Posted on Site – May 22, 2013
Internet Explorer 7.0
When you upload your journal entry using Web ADI, Internet Explorer must have specific settings for the upload to be successful. If you have Internet Explorer 7.0 you must change your settings.
Follow these steps:
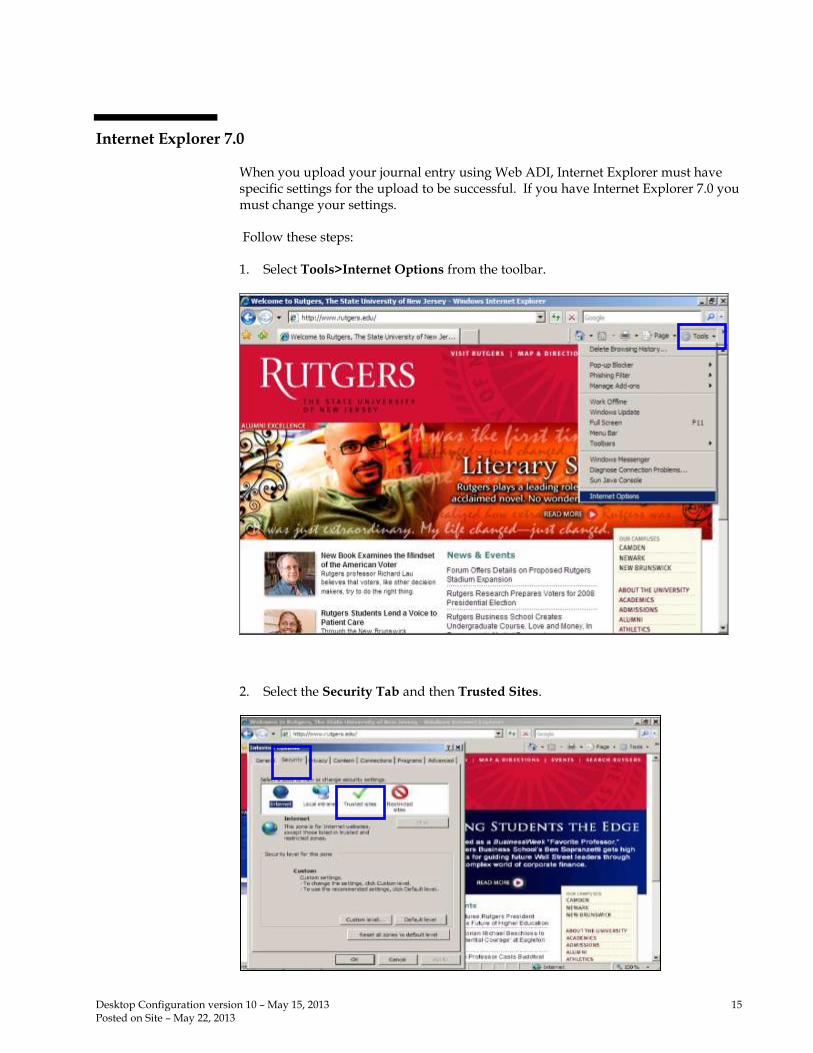
1. Select Tools>Internet Options from the toolbar.
2. Select the Security Tab and then Trusted Sites.
Desktop Configuration version 10 – May 15, 2013 16 Posted on Site – May 22, 2013
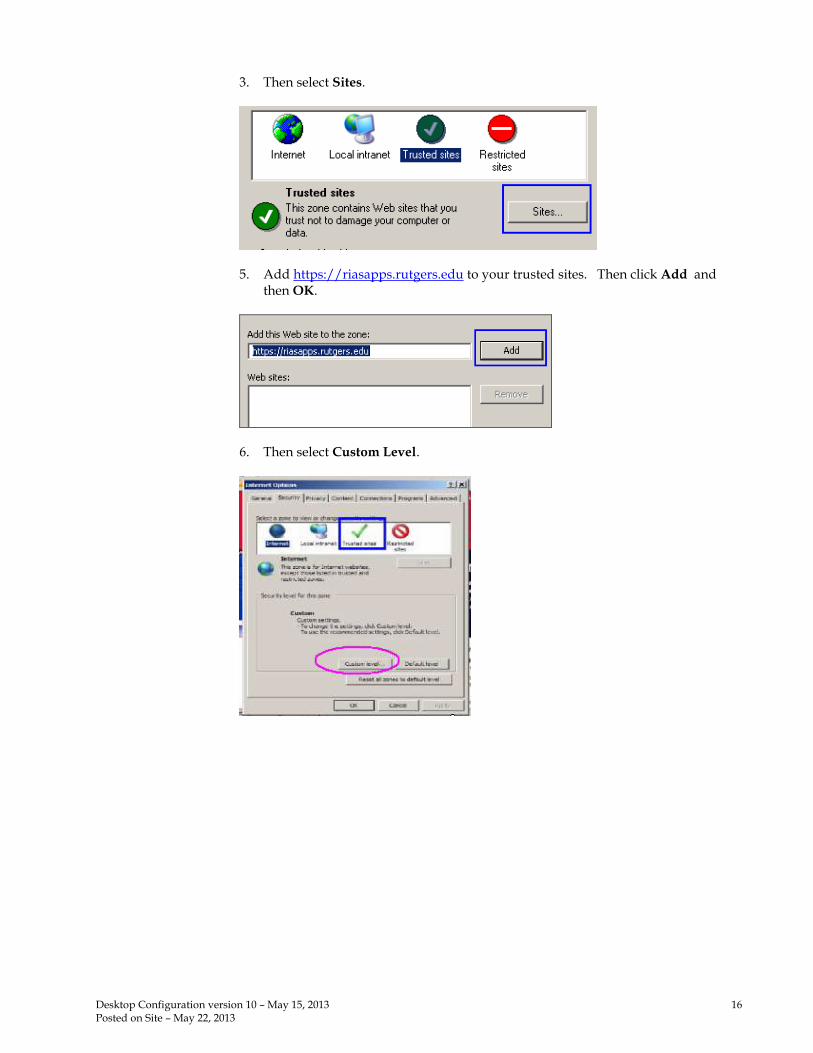
3. Then select Sites.
5. Add https://riasapps.rutgers.edu to your trusted sites. Then click Add and then OK.
6. Then select Custom Level.

Desktop Configuration version 10 – May 15, 2013 17 Posted on Site – May 22, 2013
4. Locate the Download section and enable all items.
5. Locate the Scripting section and enable all items. Then select OK. In the Reset to: box, select either Medium-high or Medium.
6. A warning message appears. Select Yes.
Desktop Configuration version 10 – May 15, 2013 18 Posted on Site – May 22, 2013
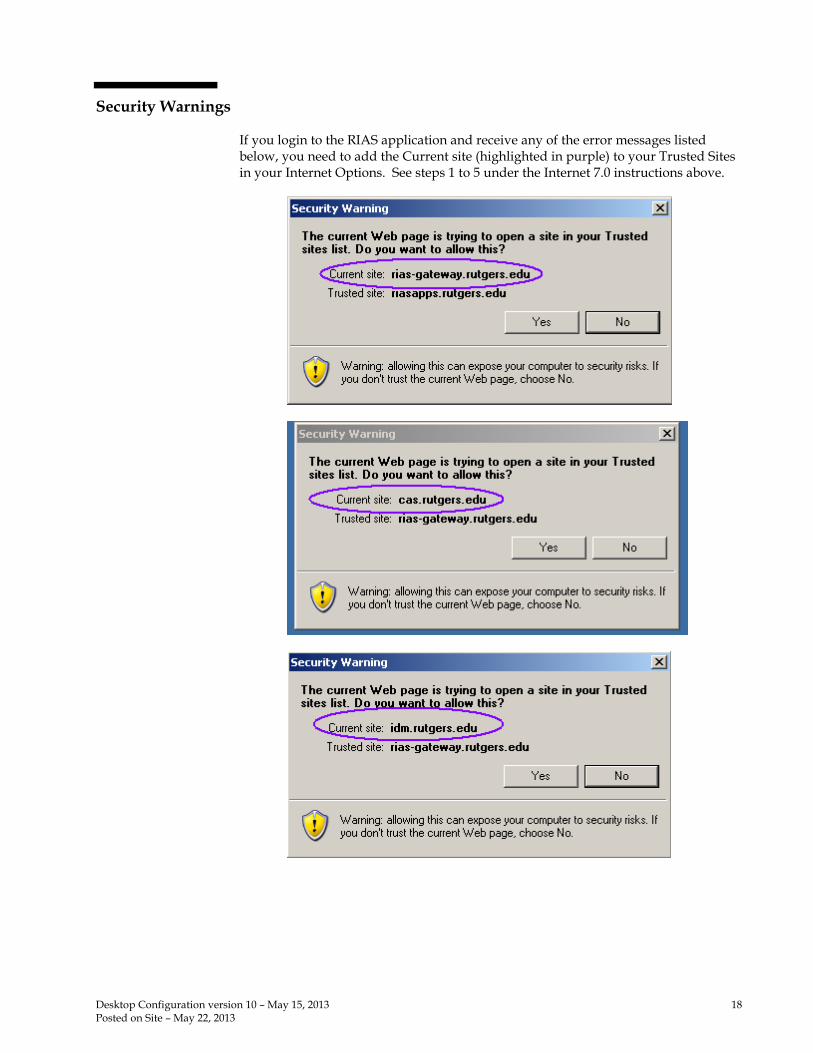
Security Warnings
If you login to the RIAS application and receive any of the error messages listed below, you need to add the Current site (highlighted in purple) to your Trusted Sites in your Internet Options. See steps 1 to 5 under the Internet 7.0 instructions above.
Desktop Configuration version 10 – May 15, 2013 19 Posted on Site – May 22, 2013
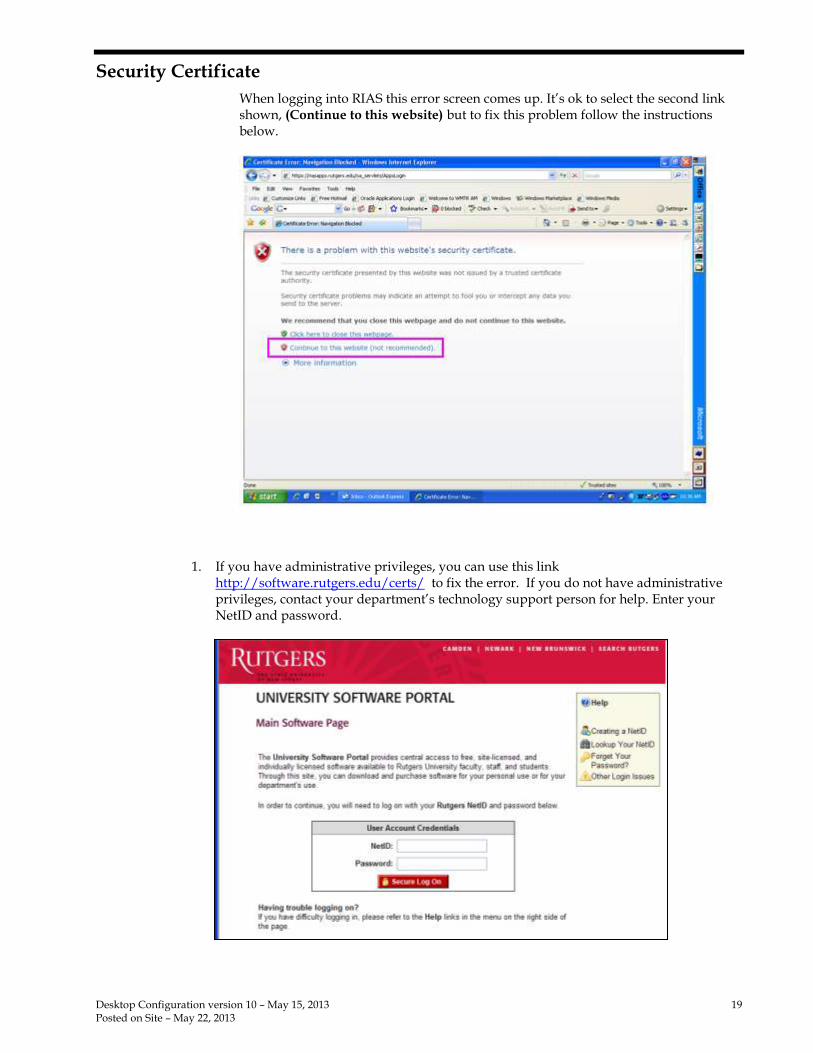
Security Certificate
When logging into RIAS this error screen comes up. It’s ok to select the second link shown, (Continue to this website) but to fix this problem follow the instructions below.
1. If you have administrative privileges, you can use this link http://software.rutgers.edu/certs/ to fix the error. If you do not have administrative privileges, contact your department’s technology support person for help. Enter your NetID and password.
Desktop Configuration version 10 – May 15, 2013 20 Posted on Site – May 22, 2013
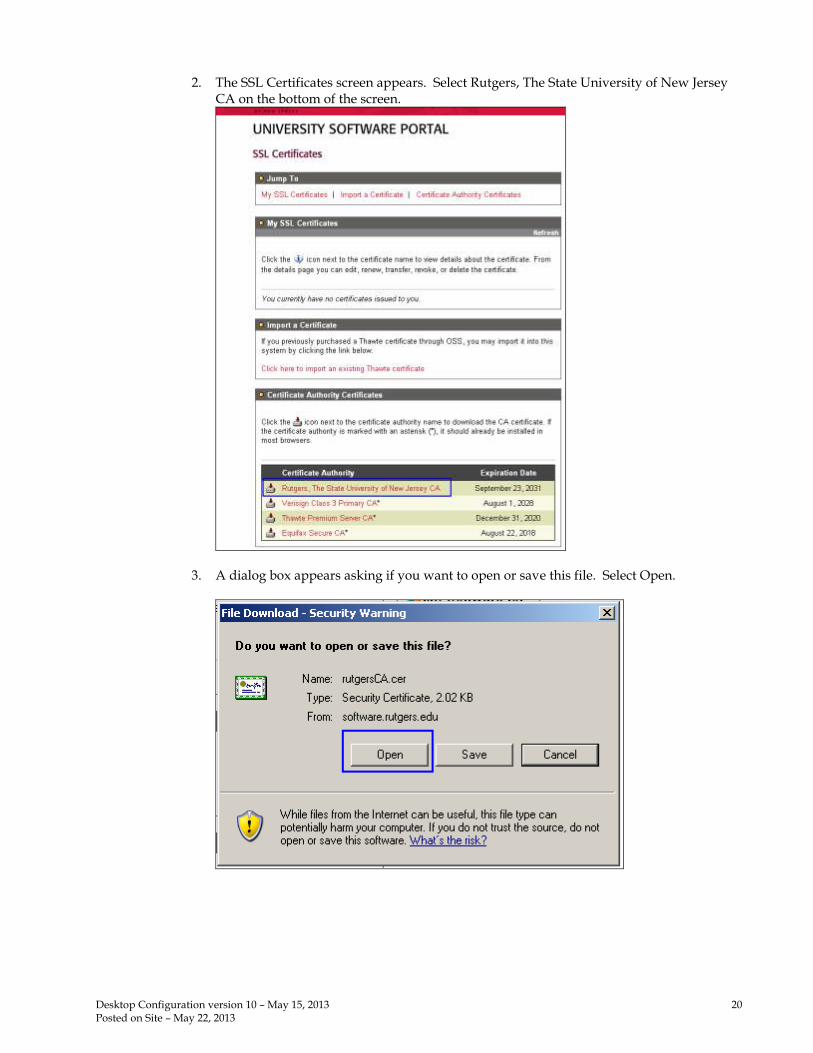
2. The SSL Certificates screen appears. Select Rutgers, The State University of New Jersey CA on the bottom of the screen.
3. A dialog box appears asking if you want to open or save this file. Select Open.
Desktop Configuration version 10 – May 15, 2013 21 Posted on Site – May 22, 2013
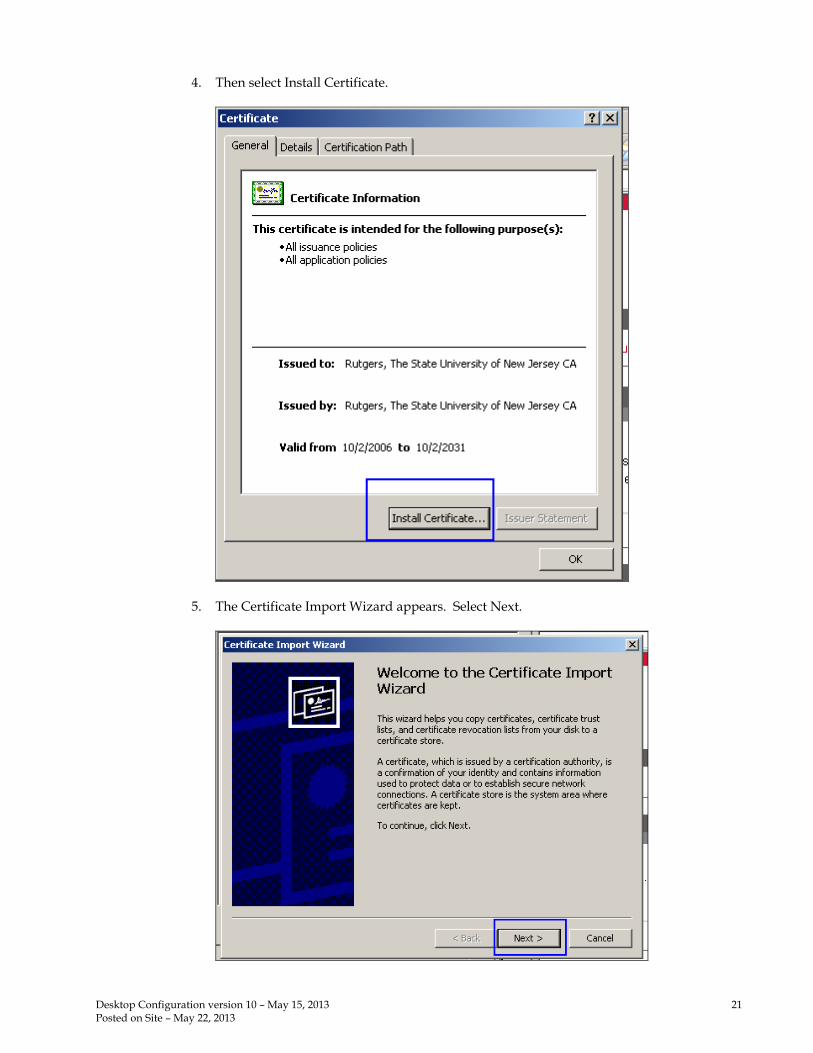
4. Then select Install Certificate.
5. The Certificate Import Wizard appears. Select Next.
Desktop Configuration version 10 – May 15, 2013 22 Posted on Site – May 22, 2013
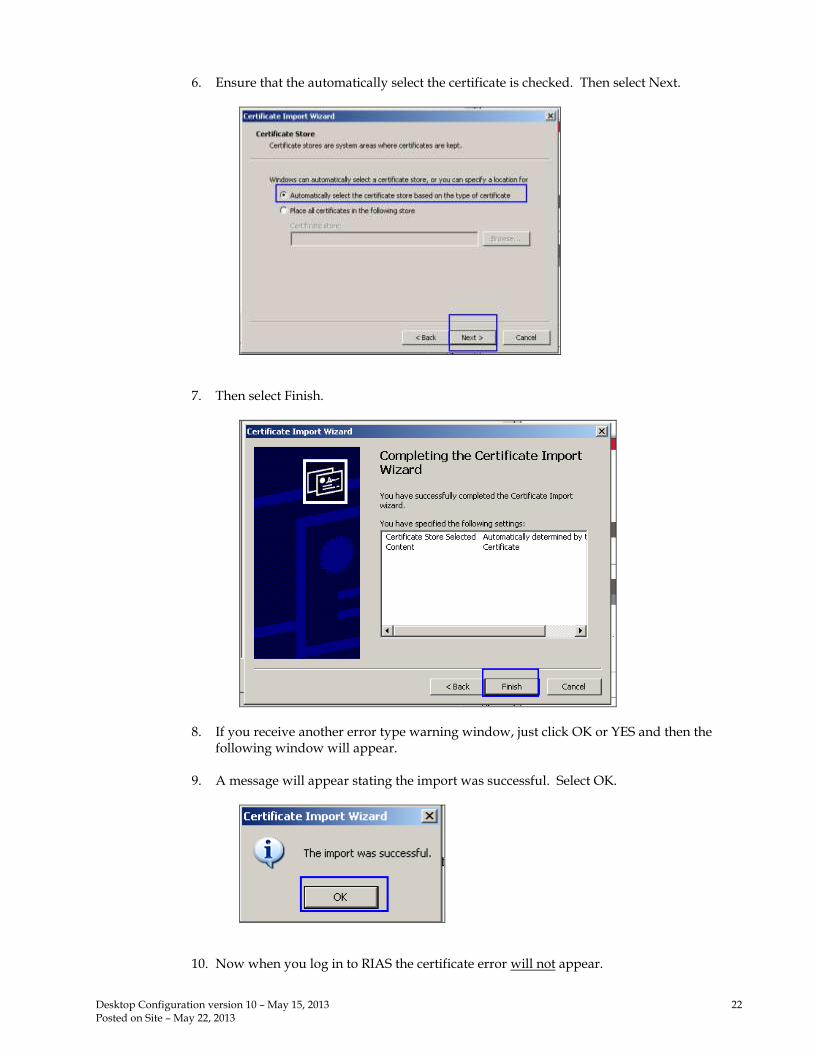
6. Ensure that the automatically select the certificate is checked. Then select Next.
7. Then select Finish.
8. If you receive another error type warning window, just click OK or YES and then the following window will appear.
9. A message will appear stating the import was successful. Select OK.
10. Now when you log in to RIAS the certificate error will not appear.