Embed Size (px)
Citation preview
Read this manual carefully before you use this machine and keep it handy for future reference. For safe and correct use, be sure to read “Safety Information for This Machine” in this manual before using the machine.
RICOH
Ri 3000/ Ri 6000
Safety Information
and Quick Installation
Guide

1
TABLE OF CONTENTS
TABLE OF CONTENTS ......................................................................................................................................... 1 Introduction ............................................................................................................................................................ 2
Before You Begin... ............................................................................................................................................ 2 How to Read the Manuals .................................................................................................................................. 2
Disclaimer ....................................................................................................................................................... 2 Notes .............................................................................................................................................................. 2
Safety Symbols for This Machine ........................................................................................................................... 3 Safety Information for This Machine ....................................................................................................................... 4
Safety during Operation ...................................................................................................................................... 4 Safety Precautions to Be Followed ..................................................................................................................... 4
Environments where the machine can be used ............................................................................................... 4 Handling power cords and power plugs .......................................................................................................... 5 Handling the main machine ............................................................................................................................. 6 Handling the machine's interior ....................................................................................................................... 7 Handling the consumables .............................................................................................................................. 8 Adjustment ...................................................................................................................................................... 9 Removing the Fabric ....................................................................................................................................... 9 Maintenance (Cleaning the Units and Disposing of Waste Ink) ....................................................................... 9
Safety Labels of This Machine ............................................................................................................................. 10
Positions of WARNING and CAUTION labels ....................................................................................... 10 Front ............................................................................................................................................................. 10 Back .............................................................................................................................................................. 10 Machine's Interior .......................................................................................................................................... 11
Symbols on Power Switch ................................................................................................................................ 12 User's Notes ........................................................................................................................................................ 12 Other Information for This Machine ...................................................................................................................... 12
Laws and Regulations ...................................................................................................................................... 13 Legal Prohibition ........................................................................................................................................... 13 FCC Statement (USA): .................................................................................................................................. 13 Note to Users in California (USA): ................................................................................................................. 13 Laser Emitter Warning and Laser Aperture Warning ..................................................................................... 13 Laser ............................................................................................................................................................. 13
Quick Installation Guide ....................................................................................................................................... 15 Guide to Components .......................................................................................................................................... 16 Installation Procedure .......................................................................................................................................... 17
2
Introduction
This manual contains detailed instructions and notes on the operation and use of this machine. For your safety and benefit, read this manual carefully before using the machine. Keep this manual in a handy place for quick reference.
Before You Begin...
Only appropriately trained users operate the machine.
How to Read the Manuals
Disclaimer
Contents of this manual are subject to change without prior notice. To the maximum extent permitted by applicable laws, in no event will the manufacturer be liable for any damages whatsoever arising out of failures of this machine, losses of the registered data, or the use or non-use of this product and operation manuals provided with it. Make sure that you always copy or have backups of the data registered in this machine. Documents or data might be erased due to your operational errors or malfunctions of the machine. In no event will the manufacturer be responsible for any documents created by you using this machine or any results from the data executed by you.
Notes
The manufacturer shall not be responsible for any damage or expense that might result from the use of parts other than genuine parts from the manufacturer with your products. For good output quality, the manufacturer recommends that you use genuine ink from the manufacturer. Some illustrations in this manual might be slightly different from the machine. Certain options might not be available in some countries. For details, please contact your local dealer. Depending on which country you are in, certain units may be optional. For details, please contact your local dealer.
3
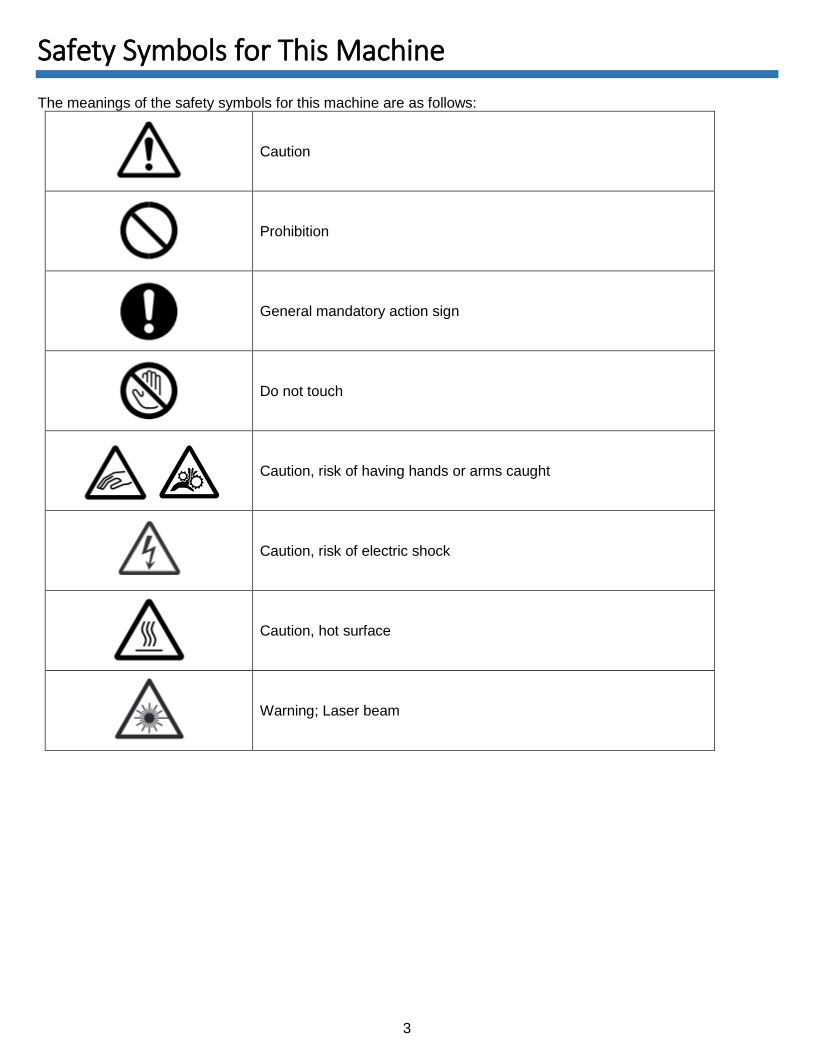
Safety Symbols for This Machine
The meanings of the safety symbols for this machine are as follows:
Caution
Prohibition
General mandatory action sign
Do not touch
Caution, risk of having hands or arms caught
Caution, risk of electric shock
Caution, hot surface
Warning; Laser beam
4
Safety Information for This Machine
Safety during Operation
In this manual, the following important symbols are used:
Indicates a potentially hazardous situation which, if instructions are not followed, could result in death or serious injury.
Indicates a potentially hazardous situation which, if instructions are not followed, may result in minor or moderate injury or damage to property.
Safety Precautions to Be Followed
Environments where the machine can be used
• Do not use flammable sprays or solvents in the vicinity of this machine. Also, avoid placing these items in the vicinity of this machine. Doing so could result in fire or electric shock.
• Do not place vases, plant pots, cups, toiletries, medicines, small metal objects, or containers holding water or any other liquids, on or close to this machine. Fire or electric shock could result from spillage or if such objects or substances fall inside this machine.
• Keep the machine away from humidity and dust. Otherwise a fire or an electric shock might occur.
• Do not place the machine on an unstable or tilted surface. If it topples over, an injury might occur.
• Do not obstruct the machine's vents. Doing so risks fire caused by overheated internal components.
• Make sure the room where you are using the machine is well ventilated and spacious. Good ventilation is especially important when the machine is used heavily. When you detect an odd smell, sufficiently ventilate and circulate the air in the room.
• Keep children away from the machine. Otherwise, their hands or fingers may be caught in the gap and injury may result.
• Keep people other than operators away from the machine. Otherwise, their hands or fingers may be caught in the gap and injury may result.
• Use at an altitude of 2000 m or less. There is a possibility of electric shock, electric leakage, fire if it is used in an environment exceeding 2000 m altitude.
5
Handling power cords and power plugs
• Do not use any power sources other than those that match the specifications shown in this manual. Doing so could result in fire or electric shock.
• Do not use any frequencies other than those that match the specifications shown. Doing so could result in fire or electric shock.
• Do not use multi-socket adaptors. Doing so could result in fire or electric shock.
• Do not use extension cords. Doing so could result in fire or electric shock.
• Do not use a power cord that has been damaged, broken, or modified. Also, do not use a power cord that has been trapped under heavy objects, pulled hard, or bent severely. Doing so could result in fire or electric shock.
• It is dangerous to handle the power cord plug with wet hands. Doing so could result in electric shock.
• Touching the pins of the power plug with anything metallic constitutes a fire and electric shock hazard.
• The supplied power cord is for use with this machine only. Do not use it with other appliances. Doing so could result in fire or electric shock.
• If the power cord is damaged and its inner wires are exposed or broken, contact your service representative for a replacement. Use of damaged power cords could result in fire or electric shock.
• Be sure to disconnect the plug from the wall outlet at least once a year and check for the following:
• There are burn marks on the plug.
• The prongs on the plug are deformed.
• The power cord's inner wires are exposed, broken, etc.
• The power cord's coating has a crack or dent.
• When bending the power cord, the power turns off and on.
• Part of the power cord becomes hot.
• The power cord is damaged.
• If any of the above conditions exist, do not use the plug and consult your dealer or service representative. Use of the plug could result in fire or electric shock.
6
• When unplugging the machine, always pull the plug, not the cord. Pulling the cord can damage it. Use of a damaged power cord could result in fire or electric shock.
• Be sure to push the power plug fully into the wall outlet. A partially inserted plug creates an unstable connection that can result in an unsafe buildup of heat.
• Be sure to disconnect the plug from the wall outlet and clean the pins and the area around the pins at least once a year. Allowing dust to build up on the plug constitutes a fire hazard.
• When maintaining the machine, always turn off the power at the back of the machine.
Power source
• 100-240V, 2A, 50/60Hz
Voltage must not fluctuate more than 10%. Please be sure to connect the power cable to a power source as above. Confirm that the wall outlet is near the machine and freely accessible, so that in event of an emergency, it can be unplugged easily.
Handling the main machine
• Keep infants away from polythene materials (bags, etc.) used to wrap the machine and its accessories. Suffocation may result if polythene materials are brought into contact with the mouth or nose.
• If the machine emits smoke or odor, or if it behaves unusually, you must turn off its power immediately. After turning off the power, be sure to unplug the machine. Then contact your service representative and report the problem. Do not use the machine. Doing so could result in fire or electric shock.
• If a metal object, water or some other fluid gets inside the machine, you must turn off its power immediately. After turning off the power, be sure to unplug the machine. Then contact your service representative and report the problem. Do not use the machine. Doing so could result in fire or electric shock.
• Do not touch this machine if a lightning strike occurs in the immediate vicinity. Doing so could result in electric shock.
• The machine weights around 81.6 kg (180 lb.).
• Four or more people are required to lift the printer. When moving the printer, lift it slowly so that you do not strain yourself. Lifting the printer forcibly or handling it roughly to drop it will risk injury.
7
• Unplug the machine before you move it. While moving the machine, take care that the power cord does not get caught under the machine. Failing to take these precautions could result in fire or electric shock.
• Before installing or removing options, always turn off the power at the back of the machine and allow time for the main unit to fully cool down. Failing to take these precautions could result in burns.
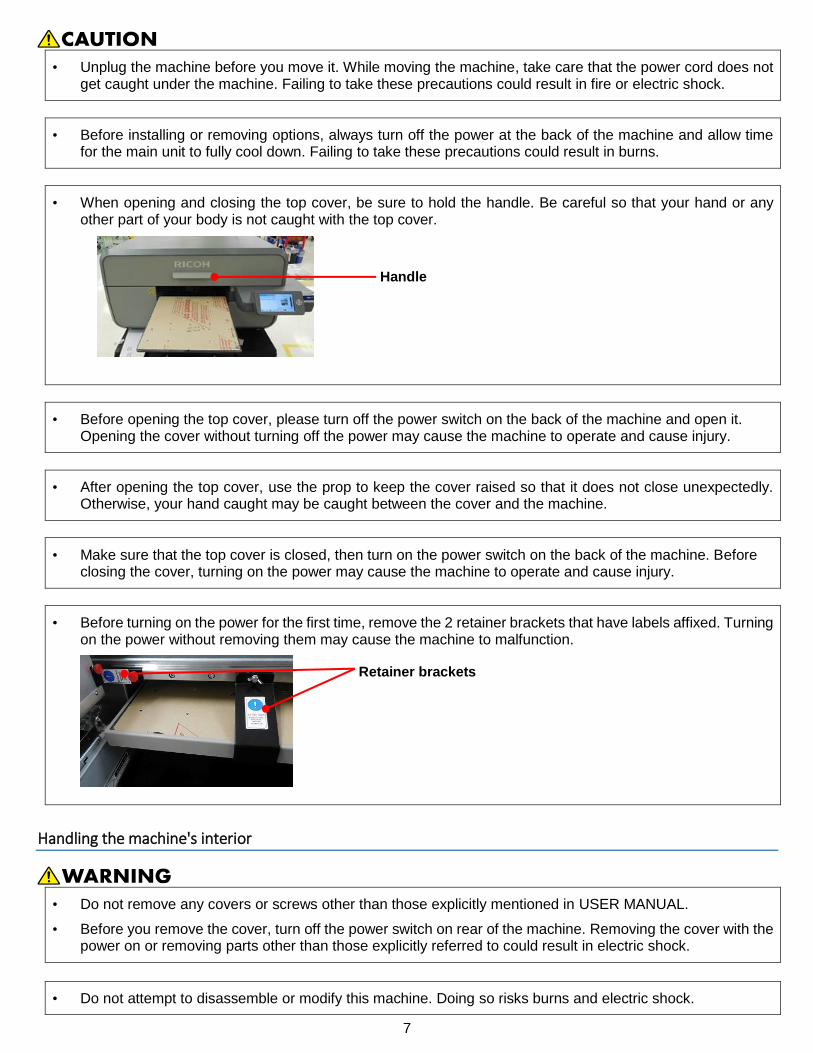
• When opening and closing the top cover, be sure to hold the handle. Be careful so that your hand or any other part of your body is not caught with the top cover.
• Before opening the top cover, please turn off the power switch on the back of the machine and open it. Opening the cover without turning off the power may cause the machine to operate and cause injury.
• After opening the top cover, use the prop to keep the cover raised so that it does not close unexpectedly. Otherwise, your hand caught may be caught between the cover and the machine.
• Make sure that the top cover is closed, then turn on the power switch on the back of the machine. Before closing the cover, turning on the power may cause the machine to operate and cause injury.
• Before turning on the power for the first time, remove the 2 retainer brackets that have labels affixed. Turning on the power without removing them may cause the machine to malfunction.
Handling the machine's interior
• Do not remove any covers or screws other than those explicitly mentioned in USER MANUAL.
• Before you remove the cover, turn off the power switch on rear of the machine. Removing the cover with the power on or removing parts other than those explicitly referred to could result in electric shock.
• Do not attempt to disassemble or modify this machine. Doing so risks burns and electric shock.
Retainer brackets
Handle
8
• Do not open the cover while the machine is operating. Doing so might cause your hand or fingers to get trapped in the machine, and an injury might occur.
Handling the consumables
• Keep infants away from polythene materials (bags, etc.) used to wrap options and cartridges/bottles for ink, cleaning solution, HV storage solution, and pretreatment liquid. Suffocation may result if polythene materials are brought into contact with the mouth or nose.
• When swallowing or inhaling ink, cleaning solution, HV storage solution or pretreatment liquid, or when getting them in the eye, follow the guidance in the appropriate safety data sheet (SDS). Download the SDS from the AnaJet website at http://anajet.com/technical-documentation/.
• Place ink, cleaning solution, HV storage solution, and pretreatment liquid in a cool, well-ventilated place out of the reach of children.
• Keep waste ink, containers for ink, cleaning solution, HV storage solution, and pretreatment liquid, and components that have been in contact with ink out of the reach of children.
• When handling ink, cleaning solution, HV storage solution, or pretreatment liquid, avoid getting anything on your clothing. If you do, wash the stained area with cold water.
• When replacing a cartridge containing ink, cleaning solution, HV storage solution, or pretreatment liquid, avoid getting anything on your clothing. If you do, wash the stained area with cold water.
• When replacing a cartridge containing ink, cleaning solution, HV storage solution, or pretreatment liquid, avoid getting anything on your skin. If you do, wash the affected area thoroughly with soap and water.
• When removing a cartridge containing ink, cleaning solution, HV storage solution, or pretreatment liquid, avoid putting your hand near the location in which the cartridge is installed (such as the ink supply nozzle and its surrounding areas). If you get anything on your hands, wash them thoroughly with soap and water.
• The ink cartridge surface may have ink on it, so be careful to avoid ink stains.
• Do not disassemble a cartridge containing ink, cleaning solution, HV storage solution, or pretreatment liquid. Doing so could leave ink stains or cleaning solution on your hands and fingers.
• When shaking a cartridge containing ink, cleaning solution, HV storage solution, or pretreatment liquid, be careful about safety of your surroundings and ink stains. Otherwise, injury or stains on household items may result.
9
Adjustment
• When moving the Print Table, be careful so that your hands or fingers are caught with it. Otherwise, injury may result.
• When adjusting the machine feet to level the machine, be careful so that your hand is not caught between the machine foot and stand. If it is caught, injury may result.
Removing the Fabric
• When removing the fabric, be careful so that your hand or any other part of your body does not come in contact with ink. If your skin comes in contact with ink, wash the affected area thoroughly with soap and water. If your clothing comes into contact with ink, wash the stained area with cold water.
Maintenance (Cleaning the Units and Disposing of Waste Ink)
• When maintenance is performed, the carriage may move while the top cover is open. Do not touch the carriage while it is moving. Touching it may result in injury.
• Be sure to wear commercially available goggles and gloves when performing the following maintenance:
• Cleaning the Maintenance Station and nozzle plates
• Cleaning and replacing the wiper blade
• Cleaning the left and right ink drip foam trays
• Replacing the drip pan foam
• Disposing of the waste ink (in the waste ink tank and auxiliary waste ink tank)
• Cartridge replacement
• Follow the procedures in the user's manual for maintenance and securely install parts and covers. Failure to do reliable work may cause injury or malfunction.
• When using a flat head screwdriver, be careful so that the tip of the flat head screwdriver does not hurt you.
10
Safety Labels of This Machine
This section explains the machine’s safety information labels.
Positions of WARNING and CAUTION labels
This machine has labels for WARNING and CAUTION at the positions shown below. For safety, please follow the instructions and handle the machine as indicated.
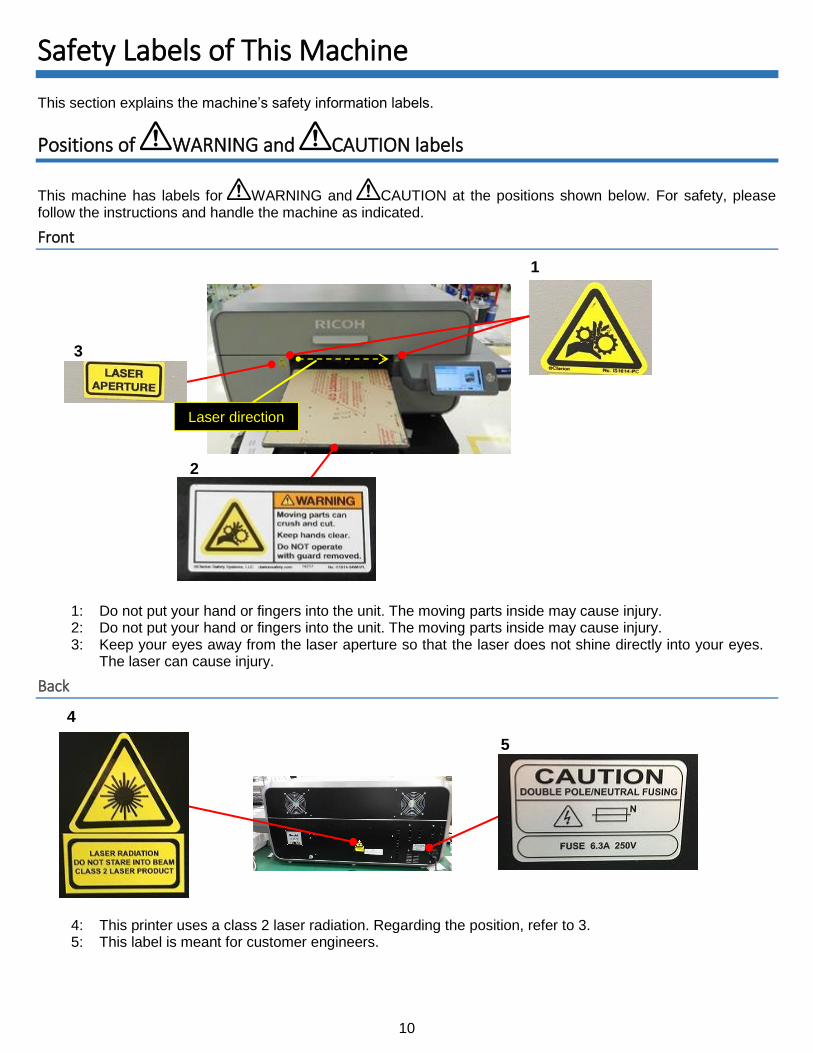
Front
1: Do not put your hand or fingers into the unit. The moving parts inside may cause injury. 2: Do not put your hand or fingers into the unit. The moving parts inside may cause injury. 3: Keep your eyes away from the laser aperture so that the laser does not shine directly into your eyes.
The laser can cause injury.
Back
4: This printer uses a class 2 laser radiation. Regarding the position, refer to 3. 5: This label is meant for customer engineers.
5
4
1
3
2
Laser direction
11
Machine's Interior
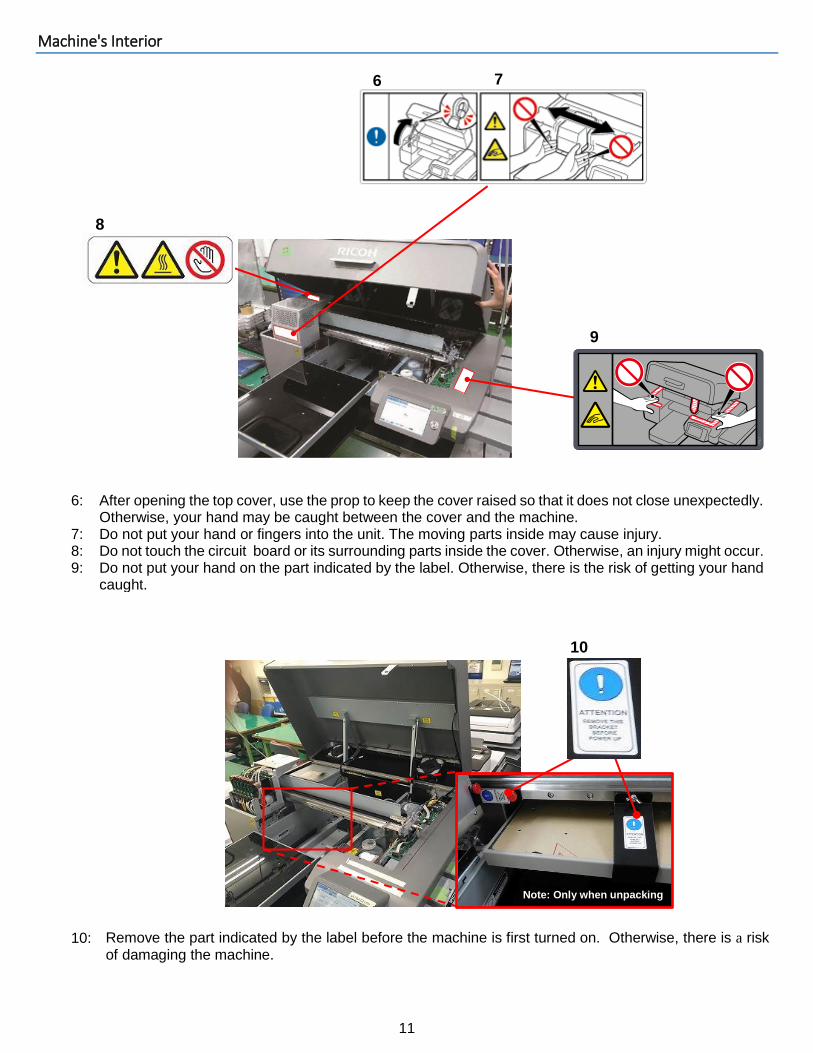
6: After opening the top cover, use the prop to keep the cover raised so that it does not close unexpectedly. Otherwise, your hand may be caught between the cover and the machine.
7: Do not put your hand or fingers into the unit. The moving parts inside may cause injury. 8: Do not touch the circuit board or its surrounding parts inside the cover. Otherwise, an injury might occur. 9: Do not put your hand on the part indicated by the label. Otherwise, there is the risk of getting your hand
caught.
10: Remove the part indicated by the label before the machine is first turned on. Otherwise, there is a risk of damaging the machine.
10
9
Note: Only when unpacking
8
6 7
>PS<

12
11: Do not touch the circuit board. Doing so could result in injury.
12: Be careful so that your hand is not caught with the main scanning pulley. If it is caught, injury may result.
Symbols on Power Switch
The symbols on the machine’s power switch have the following meanings:
• :POWER ON
• :POWER OFF
User's Notes
• During operation, do not touch the carriage. Do not put your hand into the gap between the top cover and Print Table.
• For information about how to use the heat press device, see the user manual.
• When removing the fabric, be careful so that your clothing is not stained with ink. If your clothing comes into contact with ink, wash the stained area with cold water.Other Information for This Machine
12
11
13
Laws and Regulations
Legal Prohibition
Do not copy or print any item for which reproduction is prohibited by law. Copying or printing the following items is generally prohibited by local law: bank notes, revenue stamps, bonds, stock certificates, bank drafts, checks, passports, driver's licenses. The preceding list is meant as a guide only and is not inclusive. We assume no responsibility for its completeness or accuracy. If you have any questions concerning the legality of copying or printing certain items, consult with your legal advisor.
FCC Statement (USA):
• Note: This equipment has been tested and found to comply with the limits for a Class A digital device, pursuant to Part 15 of the FCC Rules. These limits are designed to provide reasonable protection against harmful interference when the equipment is operated in a commercial environment. This equipment generates, uses, and can radiate radio frequency energy and, if not installed and used in accordance with the instruction manual, may cause harmful interference to radio communications. Operation of this equipment in a residential area is likely to cause harmful interference in which case the user will be required to correct the interference at his own expense.
• Caution: Changes or modifications not expressly approved by the party responsible for compliance could void the user’s authority to operate the equipment.
• Caution: Properly shielded and grounded cables and connectors must be used for connections to host computer (and/or peripheral) in order to meet FCC emission limits.
Note to Users in California (USA):
• Perchlorate Material - special handling may apply. See: www.dtsc.ca.gov/hazardouswaste/perchlorate
Laser Emitter Warning and Laser Aperture Warning
• The Obstruction Sensor detects any obstruction on the Print Table, such as wrinkles on the shirts, which can damage the print heads. On the left-hand side of the printer, there is an Obstruction Laser Diode, which generates the laser. On the right-hand side, there is the Obstruction Laser Sensor.
Laser(North America)
• This equipment complies with 21 CFR 1040.10 and 1040.11 except for deviations pursuant to Laser Notice No. 50, dated June 24, 2007 for class II laser product. This equipment contains one AlGaInP laser diode, 660 nanometer wavelength. The beam divergence angle is 21 degrees (minimum) and 29 degrees (maximum) in the vertical direction, and 7 degrees (minimum) and 11 degrees (maximum) in the horizontal direction, and laser beams are generated in Continuous Wave (CW) mode. The maximum output power of the light source is 1 milliwatt.
• WARNING: Although the laser used in the Ri 3000 and Ri 6000 printer is low power, exercise care so that laser does not shine directly into the eyes. The laser can cause injury.
• CAUTION—Use of controls or adjustments or performance of procedures other than those specified herein may result in hazardous radiation exposure.
• Mangled Hand Warning: Keep body parts away from gears and moving parts.
•
14
Laser(others)
• This machine complies with the requirements of IEC 60825-1:2014 (EN 60825-1:2014) for class 2 laser product. This equipment contains one AlGaInP laser diode, 660 nanometer wavelength. The beam divergence angle is 21 degrees (minimum) and 29 degrees (maximum) in the vertical direction, and 7 degrees (minimum) and 11 degrees (maximum) in the horizontal direction, and laser beams are generated in Continuous Wave (CW) mode. The maximum output power of the light source is 1 milliwatt.
• WARNING: Although the laser used in the Ri 3000 and Ri 6000 printer is low power, exercise care so that laser does not shine directly into the eyes. The laser can cause injury.
• CAUTION—Use of controls or adjustments or performance of procedures other than those specified herein may result in hazardous radiation exposure.
• Mangled Hand Warning: Keep body parts away from gears and moving parts.
15
Quick Installation Guide
Before going further, contact your printer supplier to schedule your setup and training session with your certified technician.
Download the User Manual and RIP software at
Anajet.com/downloads
STOP
16
Guide to Components
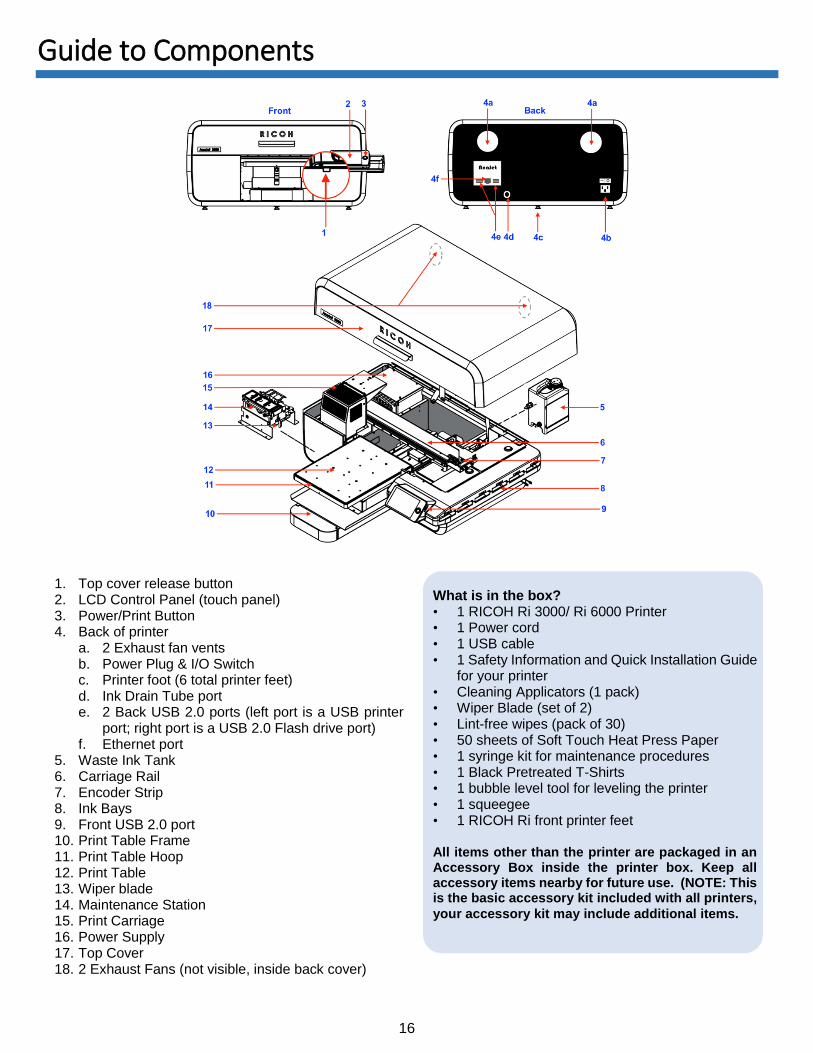
1. Top cover release button 2. LCD Control Panel (touch panel) 3. Power/Print Button 4. Back of printer
a. 2 Exhaust fan vents b. Power Plug & I/O Switch c. Printer foot (6 total printer feet) d. Ink Drain Tube port e. 2 Back USB 2.0 ports (left port is a USB printer
port; right port is a USB 2.0 Flash drive port) f. Ethernet port
5. Waste Ink Tank 6. Carriage Rail 7. Encoder Strip 8. Ink Bays 9. Front USB 2.0 port 10. Print Table Frame 11. Print Table Hoop 12. Print Table 13. Wiper blade 14. Maintenance Station 15. Print Carriage 16. Power Supply 17. Top Cover 18. 2 Exhaust Fans (not visible, inside back cover)
What is in the box? • 1 RICOH Ri 3000/ Ri 6000 Printer • 1 Power cord • 1 USB cable • 1 Safety Information and Quick Installation Guide
for your printer • Cleaning Applicators (1 pack) • Wiper Blade (set of 2) • Lint-free wipes (pack of 30) • 50 sheets of Soft Touch Heat Press Paper • 1 syringe kit for maintenance procedures • 1 Black Pretreated T-Shirts • 1 bubble level tool for leveling the printer • 1 squeegee • 1 RICOH Ri front printer feet All items other than the printer are packaged in an Accessory Box inside the printer box. Keep all accessory items nearby for future use. (NOTE: This is the basic accessory kit included with all printers,
your accessory kit may include additional items.
17
Installation Procedure
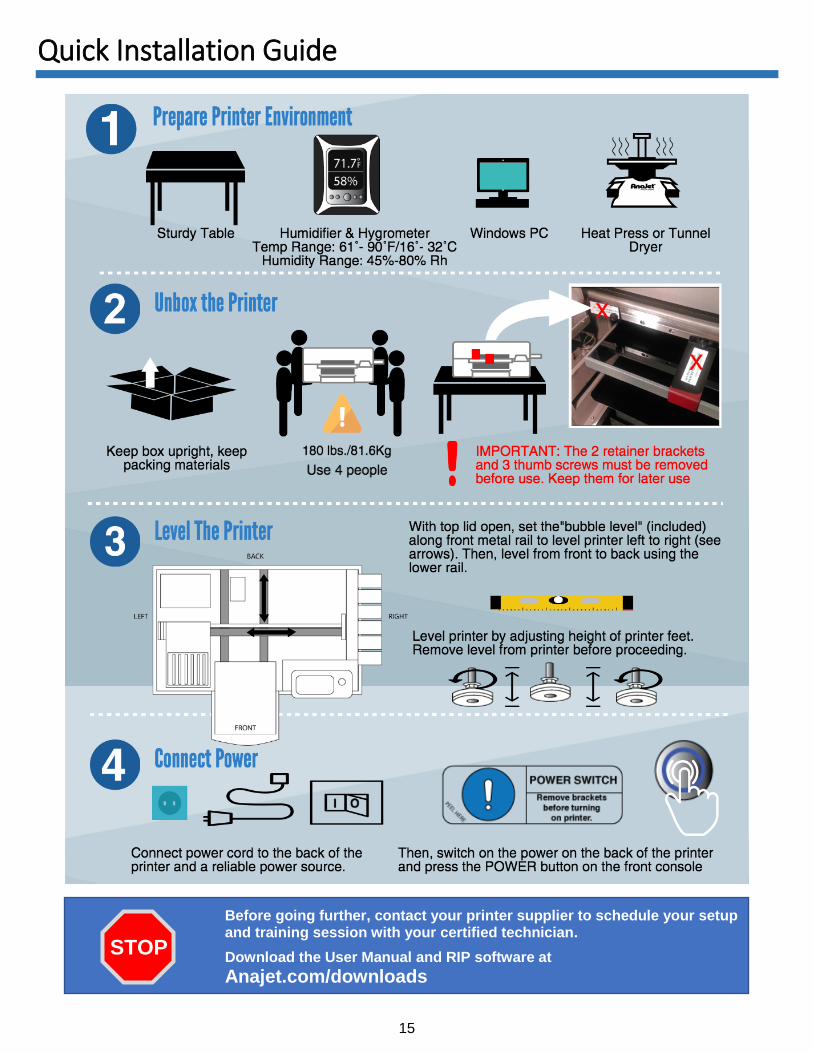
1. PREPARE PRINTER ENVIRONMENT
• Reliable Power source/outlet. Consider using a UPS if your area’s power is unreliable
• Electronic hygrometer/thermometer (to monitor the relative humidity of the room the printer is operating in). Keep it near the printer at all times 15°C to 32°C (59°F to 90 °F).
• Humidifier to increase humidity if it falls below 45% humidity. Humidity needs to remain between 45% to 80% RH, non-condensing.
• Heat Press or tunnel dryer for heat curing the ink (THIS NEEDS ITS OWN CIRCUIT)
• Stable, Sturdy, and Level Table for the 81.6 kg (180 lb.) printer.
• PC computer with Windows 7, Windows 8.1 or Windows 10 operating system.
• Graphics software installed in the PC, such as Photoshop, CorelDraw, Photoshop Elements or Illustrator.
• High Volume Low Pressure (HVLP) electric sprayer or other type of sprayer for applying pretreatment for dark garments.
• Use at an altitude of 2000 m or less.
2. UNPACK THE PRINTER
• Keep shipping box right side up (see arrows)
• Remove poly wrap and strapping
• Remove top lid, upper foam and separator sleeve
• DO NOT LIFT BY PRINT TABLE FRAME, LIFT FROM BOX WITH HELP OF 4 PEOPLE
• Place printer on your table
• Unlatch top cover by pressing button below control panel (see diagram) to lift top cover
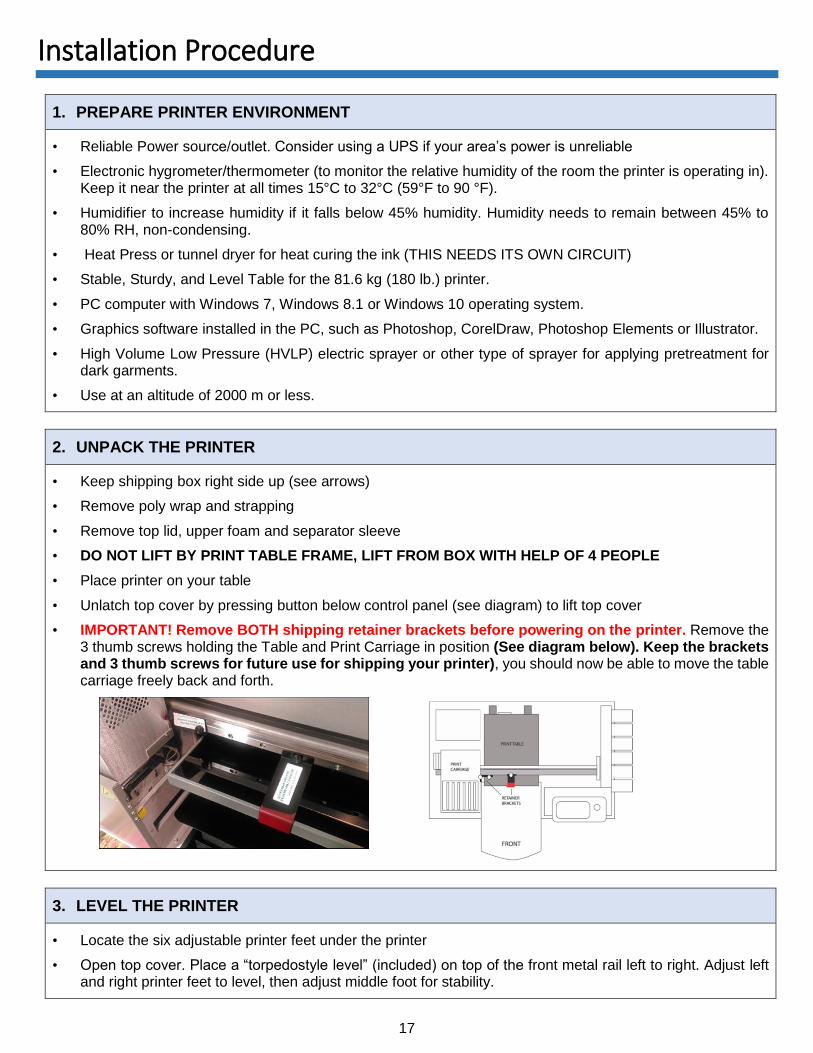
• IMPORTANT! Remove BOTH shipping retainer brackets before powering on the printer. Remove the 3 thumb screws holding the Table and Print Carriage in position (See diagram below). Keep the brackets and 3 thumb screws for future use for shipping your printer), you should now be able to move the table carriage freely back and forth.
3. LEVEL THE PRINTER
• Locate the six adjustable printer feet under the printer
• Open top cover. Place a “torpedostyle level” (included) on top of the front metal rail left to right. Adjust left and right printer feet to level, then adjust middle foot for stability.
18
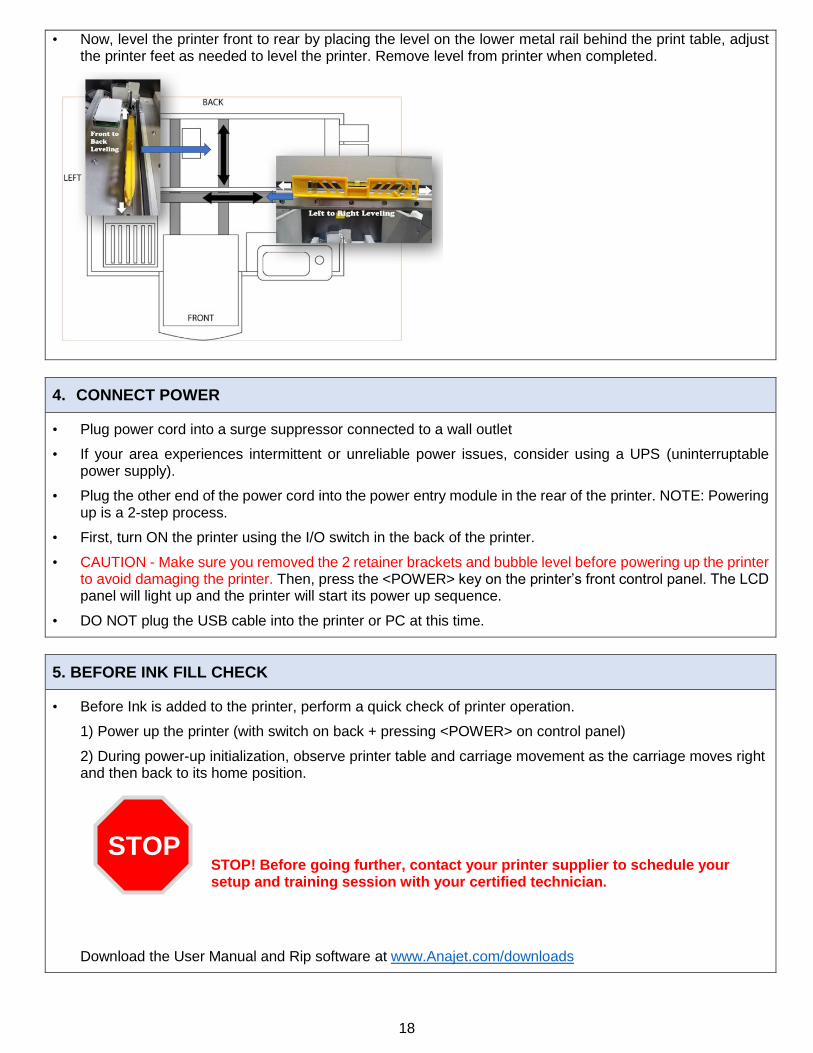
• Now, level the printer front to rear by placing the level on the lower metal rail behind the print table, adjust the printer feet as needed to level the printer. Remove level from printer when completed.
4. CONNECT POWER
• Plug power cord into a surge suppressor connected to a wall outlet
• If your area experiences intermittent or unreliable power issues, consider using a UPS (uninterruptable power supply).
• Plug the other end of the power cord into the power entry module in the rear of the printer. NOTE: Powering up is a 2-step process.
• First, turn ON the printer using the I/O switch in the back of the printer.
• CAUTION - Make sure you removed the 2 retainer brackets and bubble level before powering up the printer to avoid damaging the printer. Then, press the <POWER> key on the printer’s front control panel. The LCD panel will light up and the printer will start its power up sequence.
• DO NOT plug the USB cable into the printer or PC at this time.
5. BEFORE INK FILL CHECK
• Before Ink is added to the printer, perform a quick check of printer operation.
1) Power up the printer (with switch on back + pressing <POWER> on control panel)
2) During power-up initialization, observe printer table and carriage movement as the carriage moves right and then back to its home position.
STOP! Before going further, contact your printer supplier to schedule your setup and training session with your certified technician.
Download the User Manual and Rip software at www.Anajet.com/downloads
STOP

19
MEMO

20
MEMO
EN US J097-1588D

© 2017 Ricoh Co., Ltd.

Printed in USA EN US J097-1588D