Embed Size (px)
Citation preview
8/14/2019 RHN Satellite en 410
http://slidepdf.com/reader/full/rhn-satellite-en-410 1/80
RHN Satellite Server 4.1.0
Installation Guide

8/14/2019 RHN Satellite en 410
http://slidepdf.com/reader/full/rhn-satellite-en-410 2/80
RHN Satellite Server 4.1.0: Installation GuideCopyright © 2001 - 2005 Red Hat, Inc.
Red Hat, Inc.
1801 Varsity Drive
Raleigh NC 27606-2072 USA
Phone: +1 919 754 3700
Phone: 888 733 4281
Fax: +1 919 754 3701
PO Box 13588
Research Triangle Park NC 27709 USA
RHNsatellite(EN)-4.1.0-RHI (2005-04-20T13:40)
Copyright © 2005 by Red Hat, Inc. This material may be distributed only subject to the terms and conditions set
forth in the Open Publication License, V1.0 or later (the latest version is presently available at
http://www.opencontent.org/openpub/).
Distribution of substantively modified versions of this document is prohibited without the explicit permission of
the copyright holder.
Distribution of the work or derivative of the work in any standard (paper) book form for commercial purposes is
prohibited unless prior permission is obtained from the copyright holder.
Red Hat and the Red Hat "Shadow Man" logo are registered trademarks of Red Hat, Inc. in the United States
and other countries.
All other trademarks referenced herein are the property of their respective owners.
The GPG fingerprint of the [email protected] key is:
CA 20 86 86 2B D6 9D FC 65 F6 EC C4 21 91 80 CD DB 42 A6 0E
8/14/2019 RHN Satellite en 410
http://slidepdf.com/reader/full/rhn-satellite-en-410 3/80
Table of Contents
1. Introduction .................................................................................................................... 1
1.1. Red Hat Network ............................................................................................. . 1
1.2. RHN Satellite Server........................................................................................ . 21.3. Terms to Understand ........................................................................................ . 21.4. How it Works ................................................................................................... . 31.5. Summary of Steps ............................................................................................ . 5
2. Requirements.................................................................................................................. 9
2.1. Software Requirements .................................................................................... . 92.2. Hardware Requirements................................................................................. .102.3. Database Requirements .................................................................................. .112.4. Additional Requirements ............................................................................... .13
3. Example Topologies .................................................................................................... . 173.1. Single Satellite Topology ............................................................................... .173.2. Multiple Satellite Horizontally Tiered Topology ........................................... .183.3. Satellite-Proxy Vertically Tiered Topology ................................................... .19
4. Installation .................................................................................................................... 21
4.1. Base Install ..................................................................................................... . 214.2. RHN Satellite Server Installation Program ............................................... .21
4.2.1. Options to the Satellite Installation Program .................................. .304.3. Automated RHN Satellite Server Installation ................................................ .324.4. Sendmail Configuration ................................................................................. .324.5. MySQL Installation ....................................................................................... .33
5. Entitlements .................................................................................................................. 35
5.1. Receiving the Certificate ................................................................................ .355.2. Uploading the RHN Entitlement Certificate .................................................. .365.3. Managing the RHN Certificate with RHN Satellite Activate .......................36
5.3.1. Command Line Entitlement Options .............................................. .375.3.2. Activating the Satellite .................................................................... .37
6. Importing and Synchronizing .................................................................................... .39
6.1. Exporting with RHN Satellite Exporter ...................................................... .396.1.1. rhn-satellite-exporter ......................................................... .396.1.2. Exporting......................................................................................... .41
6.2. Importing with RHN Satellite Synchronization Tool ................................. .416.2.1. satellite-sync .......................................................................... .426.2.2. Preparing for Import from Local Media ......................................... .446.2.3. Running the Import ......................................................................... .46
6.3. Synchronizing ................................................................................................ .476.3.1. Synchronizing Errata and Packages Directly via RHN ...................486.3.2. Synchronizing Errata and Packages via Local Media......................48
8/14/2019 RHN Satellite en 410
http://slidepdf.com/reader/full/rhn-satellite-en-410 4/80
7. Troubleshooting........................................................................................................... . 51
7.1. Log Files ........................................................................................................ . 517.2. General Problems ........................................................................................... .527.3. Host Not Found/Could Not Determine FQDN .............................................. .53
7.4. Connection Errors .......................................................................................... .547.5. Satellite Debugging by Red Hat .................................................................... .55
8. Maintenance ................................................................................................................ . 57
8.1. Managing the Satellite Service ...................................................................... .578.2. Updating the Satellite ..................................................................................... .578.3. Backing Up the Satellite ................................................................................ .588.4. Using RHN DB Control ............................................................................... .59
8.4.1. DB Control Options ........................................................................ .598.4.2. Backing up the Database ................................................................. .60
8.4.3. Verifying the Backup ...................................................................... .618.4.4. Restoring the Database ................................................................... .61
8.5. Cloning the Satellite with Embedded DB ...................................................... .628.6. Establishing Redundant Satellites with Stand-Alone DB .............................. .628.7. Conducting Satellite-Specific Tasks .............................................................. .63
8.7.1. Using the Tools menu ..................................................................... .648.7.2. Deleting Users................................................................................. .65
8.8. Automating Synchronization ......................................................................... .678.9. Implementing PAM Authentication ............................................................... .688.10. Enabling Push to Clients .............................................................................. .69
A. Sample RHN Satellite Server Configuration File.................................................... .71Index.................................................................................................................................. 73
8/14/2019 RHN Satellite en 410
http://slidepdf.com/reader/full/rhn-satellite-en-410 5/80
Chapter 1.
IntroductionRHN Satellite Server provides a solution to organizations requiring absolute control overand privacy of the maintenance and package deployment of their servers. It allows RedHat Network customers the greatest flexibility and power in keeping servers secure andupdated.
Two types of RHN Satellite Server are available: One with a stand-alone database on aseparate machine and one with an embedded database installed on the same machine asthe Satellite. This guide describes the installation of both types of Satellite.
Although the two types of RHN Satellite Server are functionally similar, some differencesdo exist. These variations are primarily isolated to hardware requirements, installationsteps, and maintenance activities. They may also appear during troubleshooting. This guideidentifies distinctions between the Satellite types by marking the differing instructions aseither Stand-Alone Database or Embedded Database.
1.1. Red Hat Network
Red Hat Network (RHN) is the environment for system-level support and management of
Red Hat systems and networks of systems. Red Hat Network brings together the tools,services, and information repositories needed to maximize the reliability, security, and per-formance of their systems. To use RHN, system administrators register the software andhardware profiles, known as System Profiles, of their client systems with Red Hat Network.When a client system requests package updates, only the applicable packages for the clientare returned (based upon the software profile stored on the RHN Servers).
Advantages of using Red Hat Network include:
• Scalability — with Red Hat Network, a single system administrator can set up and main-
tain hundreds or thousands of Red Hat systems more easily, accurately, and quickly thanthey could maintain a single system without Red Hat Network.
• Standard Protocols — standard protocols are used to maintain security and increasecapability. For example, XML-RPC gives Red Hat Network the ability to do much morethan merely download files.
• Security — all communication between registered systems and Red Hat Network takesplace over secure Internet connections.
• View Errata Alerts — easily view Errata Alerts for all your client systems through onewebsite.
8/14/2019 RHN Satellite en 410
http://slidepdf.com/reader/full/rhn-satellite-en-410 6/80
2 Chapter 1. Introduction
• Scheduled Actions — use the website to schedule actions, including Errata Updates,package installs, and software profile updates.
• Simplification — maintaining Red Hat systems becomes a simple, automated process.
1.2. RHN Satellite Server
RHN Satellite Server allows organizations to utilize the benefits of Red Hat Network with-out having to provide public Internet access to their servers or other client systems. SystemProfiles are stored locally on the customer’s RHN Satellite Server. The Red Hat Network website is served from a local Web server and is not accessible from the Internet. All pack-age management tasks, including Errata Updates, are performed through the local areanetwork.
Advantages of using RHN Satellite Server include:
• Security — an end-to-end secure connection is maintained from the client systems tothe RHN Satellite Server without connecting to the public Internet.
• Efficiency — packages are delivered significantly faster over a local area network.
• Control — clients’ System Profiles are stored on the local RHN Satellite Server, not onthe central Red Hat Network Servers.
• Customized updates — create a truly automated package delivery system for custom
software packages required by client systems, as well as Red Hat packages. Customchannels allow fine-grained control of the delivery of custom packages.
• Access control — system administrators can be restricted to access only those systemswithin their maintenance responsibilities.
• Bandwidth management — the bandwidth used for transactions between the clients andthe RHN Satellite Server is controlled by the organization on the local area network;RHN Satellite Server clients do not have to compete with other clients accessing thecentral Red Hat Network file servers.
• Scalability — RHN Satellite Server may oversee an entire organization’s servers in com-
bination with RHN Proxy Server.
1.3. Terms to Understand
Before understanding RHN Satellite Server, it is important to become familiar with thefollowing Red Hat Network terms:
• Channel — A channel is a list of software packages. There are two types of channels:base channels and child channels. A base channel consists of a list of packages based on
8/14/2019 RHN Satellite en 410
http://slidepdf.com/reader/full/rhn-satellite-en-410 7/80
Chapter 1. Introduction 3
a specific architecture and Red Hat release. A child channel is a channel associated witha base channel that contains extra packages.
• Organization Administrator — An Organization Administrator is a user role with thehighest level of control over an organization’s Red Hat Network account. Members of this role can add other users, systems, and system groups to the organization as wellas remove them. A Red Hat Network organization must have at least one OrganizationAdministrator.
• INCLUDE — A Channel Administrator is a user role with full access to channel man-agement capabilities. Users with this role are capable of creating channels, assigningpackages to channels, cloning channels, and deleting channels. This role can be assignedby an Organization Administrator through the Users tab of the RHN website.
• Red Hat Update Agent — The Red Hat Update Agent is the Red Hat Network clientapplication (up2date) that allows users to retrieve and install new or updated packages
for the client system on which the application is run.
• Traceback — A traceback is a detailed description of "what went wrong" that is usefulfor troubleshooting the RHN Satellite Server. Tracebacks are automatically generatedwhen a critical error occurs and are mailed to the individual(s) designated in the RHNSatellite Server’s configuration file.
For more detailed explanations of these terms and others, refer to the Red Hat Network Reference Guide.
1.4. How it Works
RHN Satellite Server consists of the following components:
• Database — for the Stand-Alone Database, this may be the organization’s existingdatabase or, preferably, a separate machine. RHN Satellite Server 4.1.0 supports Oracle9i R2. For the Embedded Database, the database comes bundled with RHN SatelliteServer and is installed on the same machine as the Satellite during the installationprocess.
• RHN Satellite Server — core "business logic" and entry point for Red Hat UpdateAgent running on client systems. The RHN Satellite Server also includes an ApacheHTTP Server (serving XML-RPC requests).
• RHN Satellite Server Web interface — advanced system, system group, user, and chan-nel management interface.
• RPM Repository — package repository for Red Hat RPM packages and custom RPMpackages identified by the organization.
• Management Tools:
•
Database and file system synchronization tools
8/14/2019 RHN Satellite en 410
http://slidepdf.com/reader/full/rhn-satellite-en-410 8/80
4 Chapter 1. Introduction
• RPM importing tools
• Channel maintenance tools (Web-based)
• Errata management tools (Web-based)
• User management tools (Web-based)
• Client system and system grouping tools (Web-based)
• Red Hat Update Agent on the client systems
The Red Hat Update Agent on the client systems must be reconfigured to retrieve up-dates from the organization’s internal RHN Satellite Server instead of the central Red HatNetwork Servers. After this one-time reconfiguration, client systems may retrieve updateslocally using the Red Hat Update Agent, or system administrators may schedule actions
through the RHN Satellite Server website.
Important
Red Hat strongly recommends that clients connected to RHN Satellite Server be runningthe latest update of Red Hat Enterprise Linux to ensure proper connectivity.
When a client requests updates, the organization’s internal RHN Satellite Server queries its
database, authenticates the client system, identifies the updated packages available for theclient system, and sends the requested RPMs back to the client system. Depending uponthe client’s preferences, the package may also be installed. If the packages are installed,the client system sends an updated package profile to the database on the RHN SatelliteServer; those packages are removed from the list of outdated packages for the client.
The organization can configure the website for the RHN Satellite Server to be accessiblefrom the local area network only or from both the local area network and the Internet.The Satellite’s version of the RHN website allows full control over client systems, systemgroups, and users.
The RHN Satellite Server management tools are used to synchronize the RHN SatelliteServer database and package repository with Red Hat Network. The RHN Satellite Serverimport tool allows the system administrator to include custom RPM packages in the pack-age repository.
RHN Satellite Server can be used in conjunction with RHN Proxy Server to deliver a dis-tributed, self-contained Red Hat Network deployment for the organization. For example,an organization can maintain one RHN Satellite Server in a secure location. Red Hat sys-tems with local network access to the RHN Satellite Server can connect to it. Other remoteoffices can maintain RHN Proxy Server installations that connect to the RHN SatelliteServer. The different locations inside the organization must be networked, but this can be a
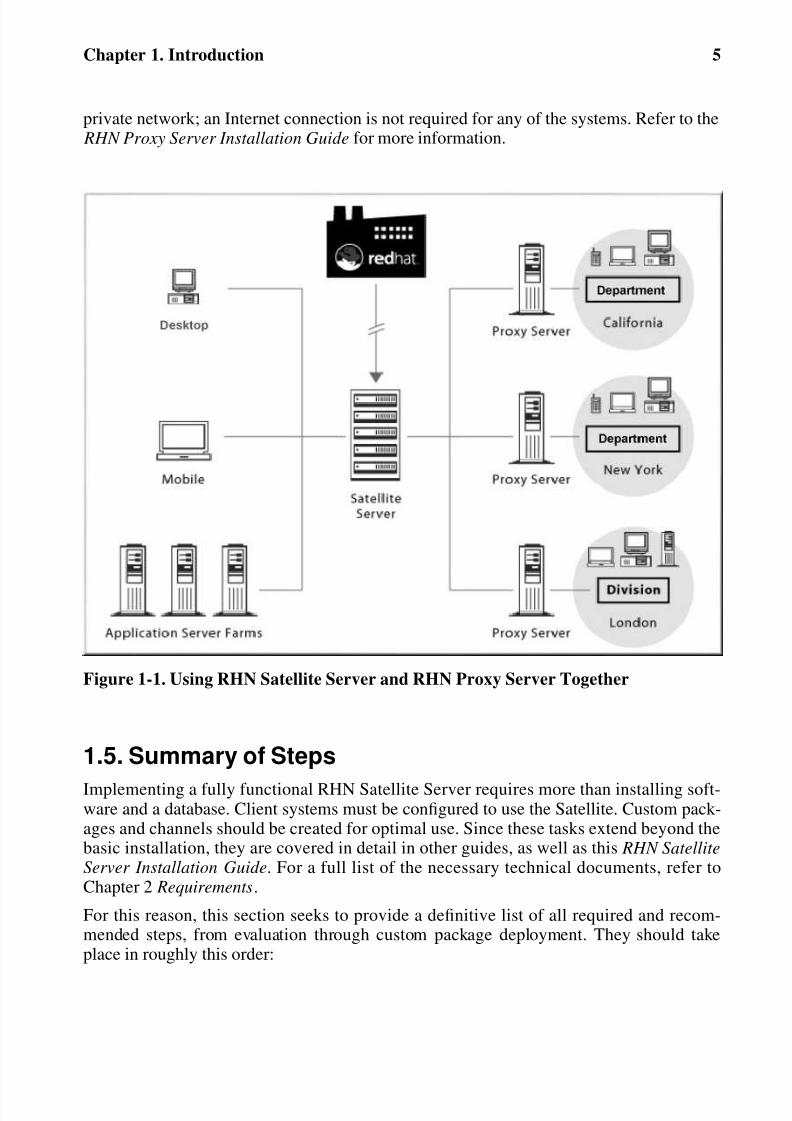
8/14/2019 RHN Satellite en 410
http://slidepdf.com/reader/full/rhn-satellite-en-410 9/80
Chapter 1. Introduction 5
private network; an Internet connection is not required for any of the systems. Refer to the RHN Proxy Server Installation Guide for more information.
Figure 1-1. Using RHN Satellite Server and RHN Proxy Server Together
1.5. Summary of Steps
Implementing a fully functional RHN Satellite Server requires more than installing soft-ware and a database. Client systems must be configured to use the Satellite. Custom pack-ages and channels should be created for optimal use. Since these tasks extend beyond thebasic installation, they are covered in detail in other guides, as well as this RHN SatelliteServer Installation Guide. For a full list of the necessary technical documents, refer toChapter 2 Requirements.
For this reason, this section seeks to provide a definitive list of all required and recom-mended steps, from evaluation through custom package deployment. They should takeplace in roughly this order:
8/14/2019 RHN Satellite en 410
http://slidepdf.com/reader/full/rhn-satellite-en-410 10/80
6 Chapter 1. Introduction
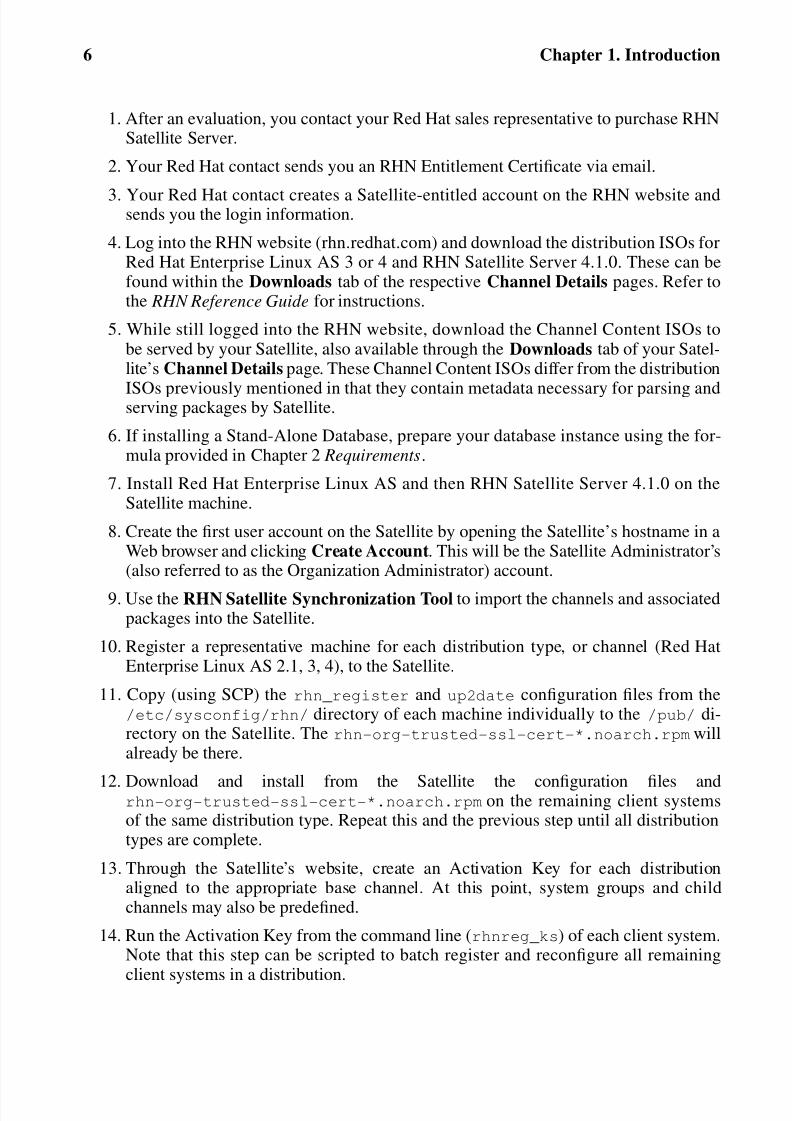
1. After an evaluation, you contact your Red Hat sales representative to purchase RHNSatellite Server.
2. Your Red Hat contact sends you an RHN Entitlement Certificate via email.
3. Your Red Hat contact creates a Satellite-entitled account on the RHN website andsends you the login information.
4. Log into the RHN website (rhn.redhat.com) and download the distribution ISOs forRed Hat Enterprise Linux AS 3 or 4 and RHN Satellite Server 4.1.0. These can befound within the Downloads tab of the respective Channel Details pages. Refer tothe RHN Reference Guide for instructions.
5. While still logged into the RHN website, download the Channel Content ISOs tobe served by your Satellite, also available through the Downloads tab of your Satel-lite’s Channel Details page. These Channel Content ISOs differ from the distribution
ISOs previously mentioned in that they contain metadata necessary for parsing andserving packages by Satellite.
6. If installing a Stand-Alone Database, prepare your database instance using the for-mula provided in Chapter 2 Requirements.
7. Install Red Hat Enterprise Linux AS and then RHN Satellite Server 4.1.0 on theSatellite machine.
8. Create the first user account on the Satellite by opening the Satellite’s hostname in aWeb browser and clicking Create Account. This will be the Satellite Administrator’s(also referred to as the Organization Administrator) account.
9. Use the RHN Satellite Synchronization Tool to import the channels and associatedpackages into the Satellite.
10. Register a representative machine for each distribution type, or channel (Red HatEnterprise Linux AS 2.1, 3, 4), to the Satellite.
11. Copy (using SCP) the rhn_register and up2date configuration files from the/etc/sysconfig/rhn/ directory of each machine individually to the /pub/ di-rectory on the Satellite. The rhn-org-trusted-ssl-cert-*.noarch.rpm willalready be there.
12. Download and install from the Satellite the configuration files andrhn-org-trusted-ssl-cert-*.noarch.rpm on the remaining client systemsof the same distribution type. Repeat this and the previous step until all distributiontypes are complete.
13. Through the Satellite’s website, create an Activation Key for each distributionaligned to the appropriate base channel. At this point, system groups and childchannels may also be predefined.
14. Run the Activation Key from the command line (rhnreg_ks) of each client system.Note that this step can be scripted to batch register and reconfigure all remaining
client systems in a distribution.

8/14/2019 RHN Satellite en 410
http://slidepdf.com/reader/full/rhn-satellite-en-410 11/80
Chapter 1. Introduction 7
15. Record all relevant usernames, passwords and other login information and store inmultiple secure places.
16. Now that the Satellite is populated with standard Red Hat channels and packages andall clients are connected to it, you may begin creating and serving custom channelsand packages. Once the custom RPMs are developed, you can import them into theSatellite using RHN Push and add custom channels in which to store them throughthe Satellite’s website. Refer to the RHN Channel Management Guide for details.

8/14/2019 RHN Satellite en 410
http://slidepdf.com/reader/full/rhn-satellite-en-410 12/80
8 Chapter 1. Introduction
8/14/2019 RHN Satellite en 410
http://slidepdf.com/reader/full/rhn-satellite-en-410 13/80
Chapter 2.
RequirementsThese requirements must be met before installation.
2.1. Software Requirements
To perform an installation, the following software components must be available:
•Base operating system — RHN Satellite Server is supported with Red Hat EnterpriseLinux AS 3 Update 5 or later, or Red Hat Enterprise Linux AS 4 only. The operatingsystem can be installed from disc, local ISO image, kickstart, or any of the methodssupported by Red Hat, but must contain certain packages not included in a standardinstallation.
Note
When Red Hat Enterprise Linux is mentioned, it refers to the x86, 32-bit version. Allother variants of Red Hat Enterprise Linux are currently unsupported as a base oper-
ating system for the Satellite.
Warning
Security-enhanced Linux (SELinux) must be disabled or in permissive mode prior to in-stallation of RHN Satellite Server. To do this during CD or ISO image installation, selectPermissive when presented with options for SELinux support. To do this for kickstartinstallation, include the command selinux --permissive or wait for the install to com-plete, edit the /etc/selinux/config file to read SELINUX=permissive and reboot the
system.
More in-depth coverage of SELinux is available at http://www.redhat.com/docs/. You mayalso refer to the Red Hat Knowledgebase article on SELinux and RHN Satellite Server athttp://kbase.redhat.com/faq/.
• Satellite installation disc or ISO — this contains the RHN Satellite Server InstallationProgram. All packages required in order to suport the Program are installed automati-
cally, and require no intervention from the user.
8/14/2019 RHN Satellite en 410
http://slidepdf.com/reader/full/rhn-satellite-en-410 14/80
10 Chapter 2. Requirements
Note
Installing packages other than the packages contained in the @ Base package group canlead to package conflicts.
• Channel content — All software packages and data exported for all entitled Red Hatchannels. This content may be loaded directly on the Satellite after installation using theRHN Satellite Synchronization Tool or obtained from your Red Hat representative if synchronization is not possible, such as in a disconnected environment.
When installing Red Hat Enterprise Linux AS 3 or 4 from CD or ISO image, there is no
need to select any package groups, only the base install is required. When installing eitheroperating system via kickstart, select the @ Base package group.
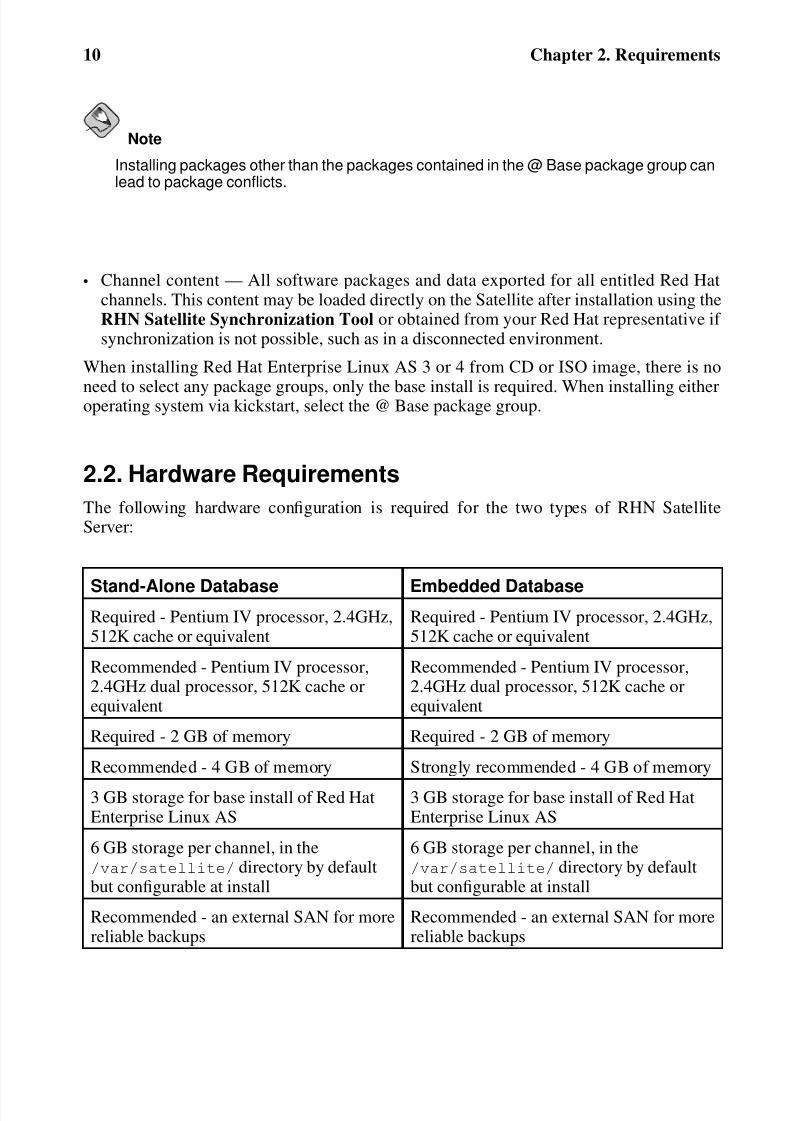
2.2. Hardware Requirements
The following hardware configuration is required for the two types of RHN SatelliteServer:
Stand-Alone Database Embedded DatabaseRequired - Pentium IV processor, 2.4GHz,512K cache or equivalent
Required - Pentium IV processor, 2.4GHz,512K cache or equivalent
Recommended - Pentium IV processor,2.4GHz dual processor, 512K cache orequivalent
Recommended - Pentium IV processor,2.4GHz dual processor, 512K cache orequivalent
Required - 2 GB of memory Required - 2 GB of memory
Recommended - 4 GB of memory Strongly recommended - 4 GB of memory
3 GB storage for base install of Red HatEnterprise Linux AS
3 GB storage for base install of Red HatEnterprise Linux AS
6 GB storage per channel, in the/var/satellite/ directory by defaultbut configurable at install
6 GB storage per channel, in the/var/satellite/ directory by defaultbut configurable at install
Recommended - an external SAN for morereliable backups
Recommended - an external SAN for morereliable backups
8/14/2019 RHN Satellite en 410
http://slidepdf.com/reader/full/rhn-satellite-en-410 15/80
Chapter 2. Requirements 11
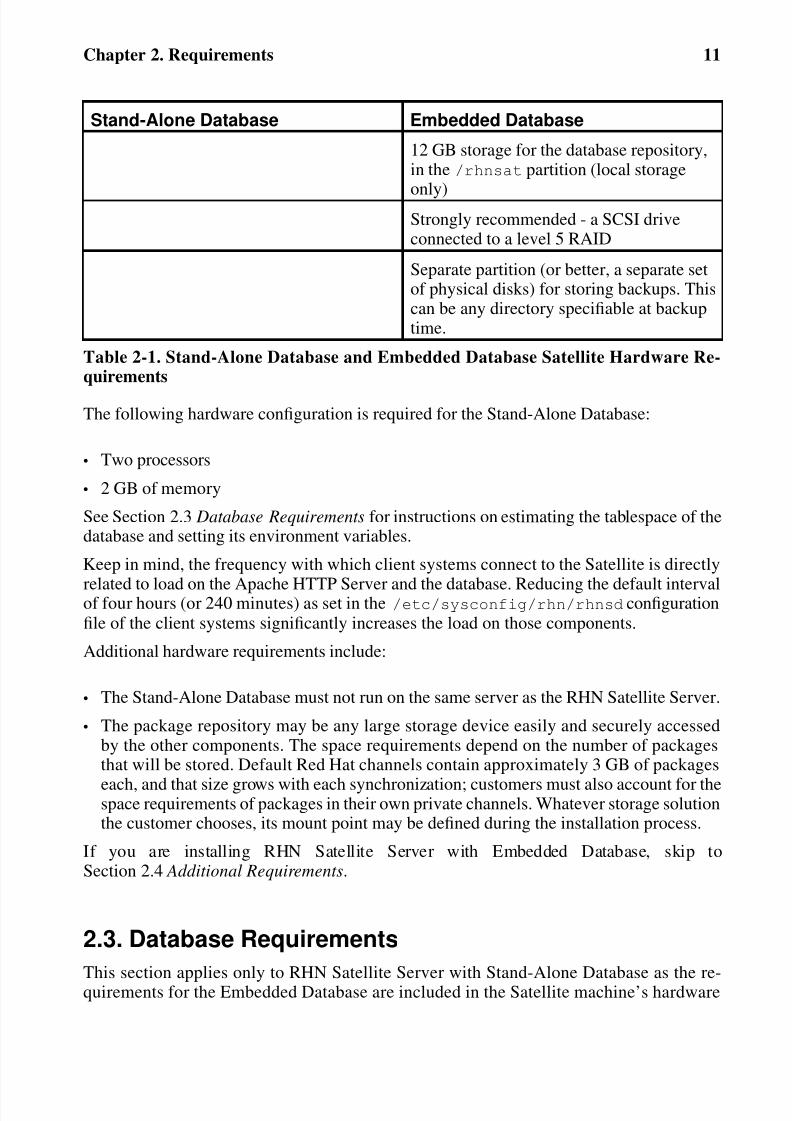
Stand-Alone Database Embedded Database
12 GB storage for the database repository,in the /rhnsat partition (local storage
only)Strongly recommended - a SCSI driveconnected to a level 5 RAID
Separate partition (or better, a separate setof physical disks) for storing backups. Thiscan be any directory specifiable at backuptime.
Table 2-1. Stand-Alone Database and Embedded Database Satellite Hardware Re-quirements
The following hardware configuration is required for the Stand-Alone Database:
• Two processors
• 2 GB of memory
See Section 2.3 Database Requirements for instructions on estimating the tablespace of thedatabase and setting its environment variables.
Keep in mind, the frequency with which client systems connect to the Satellite is directly
related to load on the Apache HTTP Server and the database. Reducing the default intervalof four hours (or 240 minutes) as set in the /etc/sysconfig/rhn/rhnsd configurationfile of the client systems significantly increases the load on those components.
Additional hardware requirements include:
• The Stand-Alone Database must not run on the same server as the RHN Satellite Server.
• The package repository may be any large storage device easily and securely accessedby the other components. The space requirements depend on the number of packagesthat will be stored. Default Red Hat channels contain approximately 3 GB of packages
each, and that size grows with each synchronization; customers must also account for thespace requirements of packages in their own private channels. Whatever storage solutionthe customer chooses, its mount point may be defined during the installation process.
If you are installing RHN Satellite Server with Embedded Database, skip toSection 2.4 Additional Requirements.
2.3. Database Requirements
This section applies only to RHN Satellite Server with Stand-Alone Database as the re-quirements for the Embedded Database are included in the Satellite machine’s hardware
8/14/2019 RHN Satellite en 410
http://slidepdf.com/reader/full/rhn-satellite-en-410 16/80
12 Chapter 2. Requirements
requirements. Red Hat supports RHN Satellite Server 4.1.0 installations in conjunctionwith Oracle 9i R2. The Stand-Alone Database must not run on the same server as the RHNSatellite Server.
A single 6 GB tablespace is recommended as more than sufficient for most installations. Itis possible for many customers to function with a smaller tablespace. An experienced Ora-cle database administrator (DBA) will be necessary to assess sizing issues. The followingformula should be used to determine the required size of your database:
• 192 KB per client system
• 64 MB per channel
For instance, an RHN Satellite Server containing 10 channels serving 10,000 systemswould require 1.92 GB for its clients and 640 MB for its channels. If custom channels
are to be established for testing and staging of packages, they must be included in thisformula.
Keep in mind, the database storage needs may grow rapidly, depending upon the varianceof the following factors:
• The number of public Red Hat packages imported (typical: 5000)
• The number of private packages to be managed (typical: 500)
• The number of systems to be managed (typical: 1000)
• The number of packages installed on the average system (typical: 500)Although you should be generous in your database sizing estimates, you must considerthat size affects the time to conduct backups and adds load to other system resources. If thedatabase is shared, its hardware and spacing are entirely dependent on what else is usingit.
The Oracle database should have a user assigned to RHN Satellite Server with full DDLand DML access to that user’s default tablespace. The user needs standard connectioninformation for the database at the time of installation.
The precise access levels required by the Oracle user are as follows:
• ALTER SESSION
• CREATE SEQUENCE
• CREATE SYNONYM
• CREATE TABLE
• CREATE VIEW
• CREATE PROCEDURE
• CREATE TRIGGER
8/14/2019 RHN Satellite en 410
http://slidepdf.com/reader/full/rhn-satellite-en-410 17/80
8/14/2019 RHN Satellite en 410
http://slidepdf.com/reader/full/rhn-satellite-en-410 18/80
14 Chapter 2. Requirements
The system upon which the RHN Satellite Server will be installed must resolve its ownFQDN properly. If this is not the case, cookies will not work properly on the website.
• Functioning Domain Name Service (DNS)
For the RHN Satellite Server’s domain name to be resolved by its clients, it and theymust all be linked to a working DNS server in the customer environment.
•
An Entitlement Certificate
The customer will receive, via email from the sales representative, a signed EntitlementCertificate explaining the services provided by Red Hat through RHN Satellite Server.This certificate will be required during the installation process.
• A Red Hat Network Account
Customers who connect to the central Red Hat Network Servers to receive incrementalupdates must have an external account with Red Hat Network. This account should beset up at the time of purchase with the sales representative.
• Backups of Login Information
It is imperative that customers keep track of all primary login information. For RHNSatellite Server, this includes usernames and passwords for the Organization Admin-istrator account on rhn.redhat.com, the primary administrator account on the Satelliteitself, SSL certificate generation, and database connection (which also requires a SID,or net service name). Red Hat strongly recommends this information be copied onto two
separate floppy disks, printed out on paper, and stored in a fireproof safe.
In addition to these requirements, it is recommended that the RHN Satellite Server beconfigured in the following manner:
• The entire RHN Satellite Server solution should be protected by a firewall if the Satelliteaccesses or is accessed via the Internet. An Internet connection is not required for RHNSatellite Servers running in completely disconnected environments. This feature insteaduses Channel Content ISOs that can be downloaded to a separate system to synchronizethe Satellite with the central Red Hat Network Servers. All other RHN Satellite Servers
should be synchronized directly over the Internet.•
All unnecessary ports should be firewalled off. Client systems connect to RHN Satel-lite Server over ports 80, 443, and 4545 (if Monitoring is enabled). In addition, if youplan to enable the pushing of actions from the Satellite to client systems, as describedin Section 8.10 Enabling Push to Clients , you must allow inbound connections on port5222. Finally, if the Satellite will also push to an RHN Proxy Server, you must also allowinbound connections on port 5269.
• No system components should be directly, publicly available. No user other than the
system administrators should have shell access to these machines.
8/14/2019 RHN Satellite en 410
http://slidepdf.com/reader/full/rhn-satellite-en-410 19/80
Chapter 2. Requirements 15
•
All unnecessary services should be disabled using ntsysv or chkconfig.
•
The httpd service should be enabled.
•
If the Satellite serves Monitoring-entitled systems and you wish to acknowledge viaemail the alert notifications you receive, you must configure sendmail to properly handleincoming mail as described in Section 4.4 Sendmail Configuration.
Finally, you should have the following technical documents in hand for use in roughly thisorder:
1. The RHN Satellite Server Installation Guide — This guide, which you are now read-ing, provides the essential steps necessary to get an RHN Satellite Server up andrunning.
2. The RHN Client Configuration Guide — This guide explains how to configure thesystems to be served by an RHN Proxy Server or RHN Satellite Server. (This willalso likely require referencing The RHN Reference Guide, which contains steps forregistering and updating systems.)
3. The RHN Channel Management Guide — This guide identifies in great detail therecommended methods for building custom packages, creating custom channels, and
managing private Errata.4. The RHN Reference Guide — This guide describes how to create RHN accounts, reg-
ister and update systems, and use the RHN website to its utmost potential. This guidewill probably come in handy throughout the installation and configuration process.

8/14/2019 RHN Satellite en 410
http://slidepdf.com/reader/full/rhn-satellite-en-410 20/80
8/14/2019 RHN Satellite en 410
http://slidepdf.com/reader/full/rhn-satellite-en-410 21/80
Chapter 3.
Example TopologiesThe RHN Satellite Server can be configured in multiple ways. Select one method depend-ing on the following factors:
• The total number of client systems to be served by the RHN Satellite Server.
• The maximum number of clients expected to connect concurrently to the RHN SatelliteServer.
• The number of custom packages and channels to be served by the RHN Satellite Server.• The number of RHN Satellite Servers being used in the customer environment.
• The number of RHN Proxy Servers being used in the customer environment.
The rest of this chapter describes possible configurations and explains their benefits.
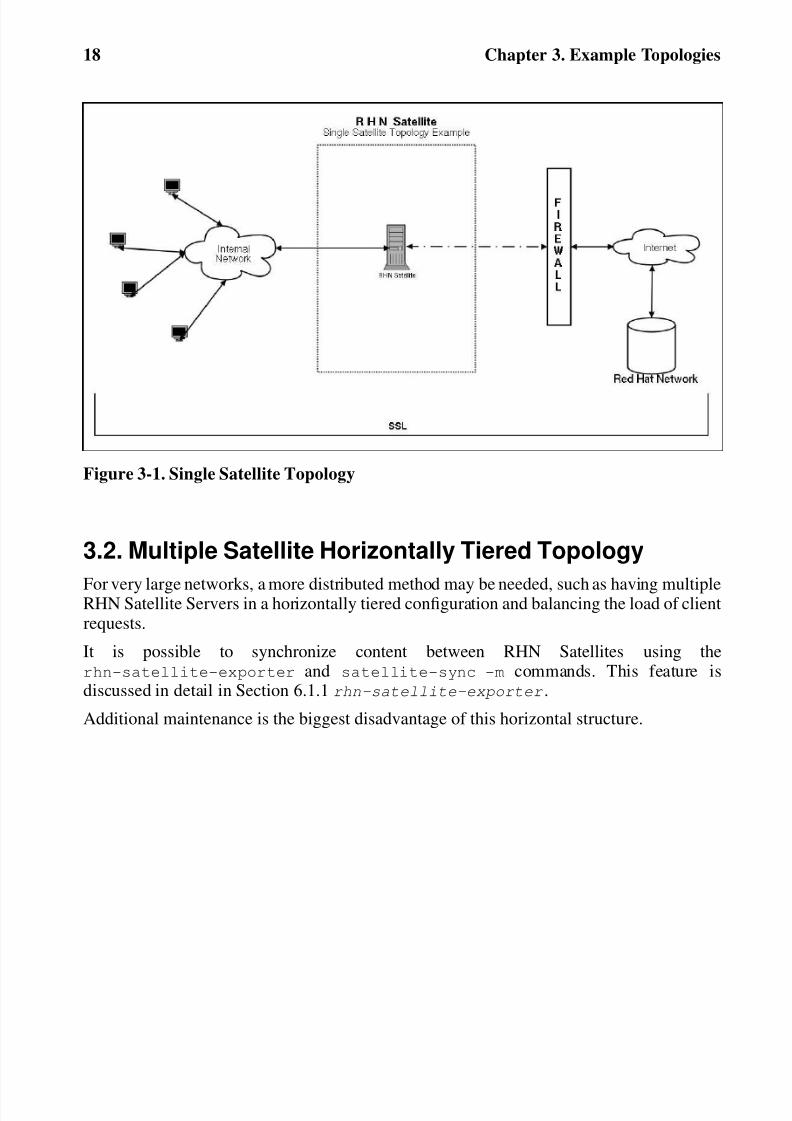
3.1. Single Satellite Topology
The simplest configuration is to use a single RHN Satellite Server to serve your entire
network. This configuration is adequate to service a medium-size group of clients andnetwork.
The disadvantage of using one RHN Satellite Server is that performance will be compro-mised as the number of clients requesting packages grows.
8/14/2019 RHN Satellite en 410
http://slidepdf.com/reader/full/rhn-satellite-en-410 22/80
8/14/2019 RHN Satellite en 410
http://slidepdf.com/reader/full/rhn-satellite-en-410 23/80
Chapter 3. Example Topologies 19
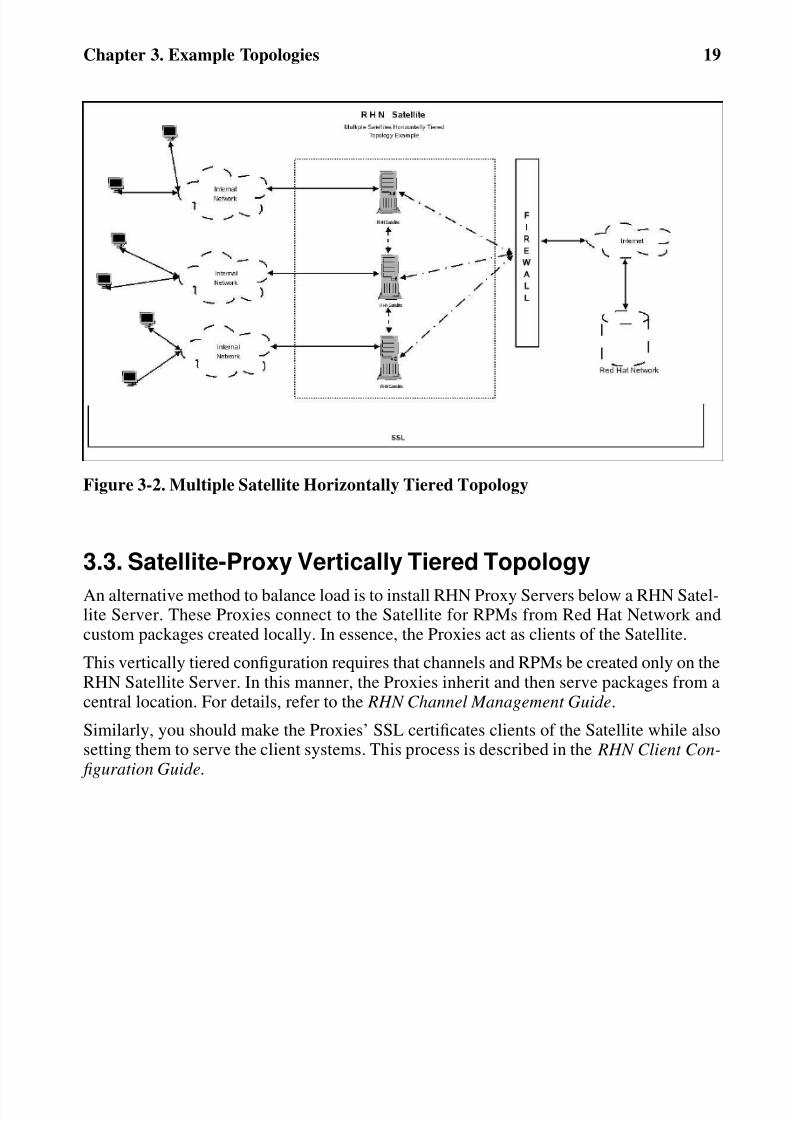
Figure 3-2. Multiple Satellite Horizontally Tiered Topology
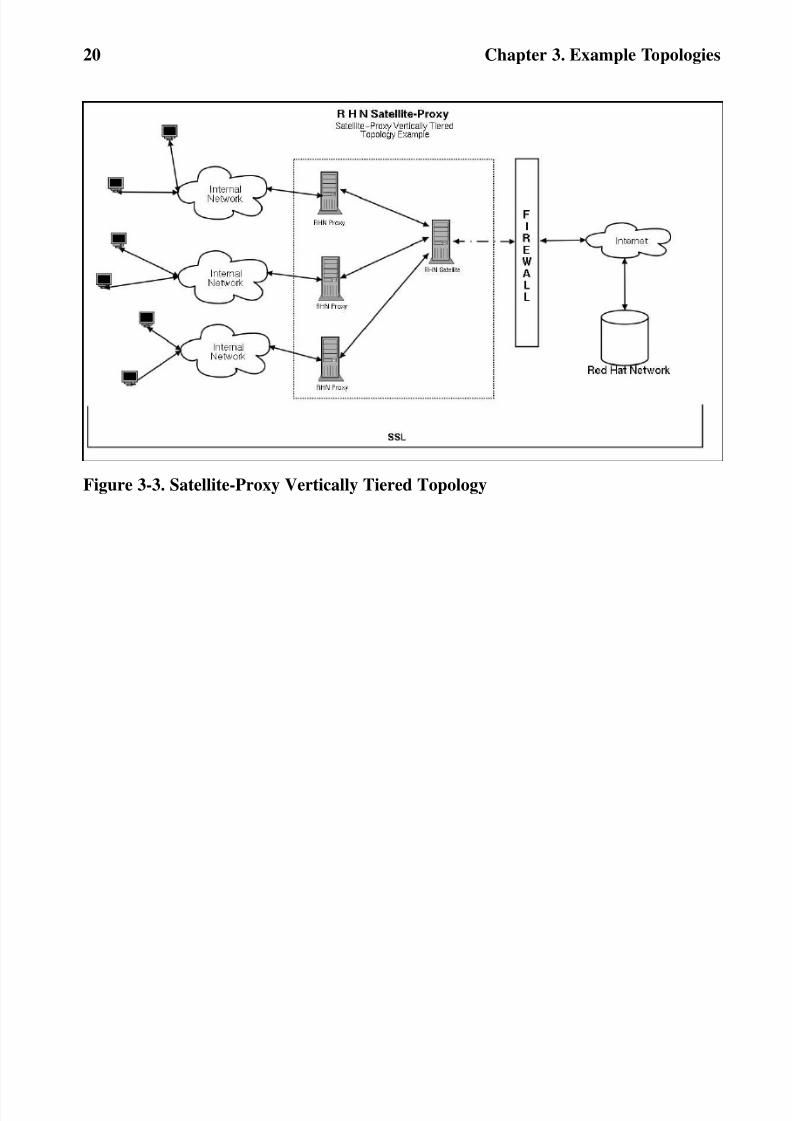
3.3. Satellite-Proxy Vertically Tiered Topology
An alternative method to balance load is to install RHN Proxy Servers below a RHN Satel-lite Server. These Proxies connect to the Satellite for RPMs from Red Hat Network andcustom packages created locally. In essence, the Proxies act as clients of the Satellite.
This vertically tiered configuration requires that channels and RPMs be created only on theRHN Satellite Server. In this manner, the Proxies inherit and then serve packages from acentral location. For details, refer to the RHN Channel Management Guide.
Similarly, you should make the Proxies’ SSL certificates clients of the Satellite while alsosetting them to serve the client systems. This process is described in the RHN Client Con- figuration Guide.
8/14/2019 RHN Satellite en 410
http://slidepdf.com/reader/full/rhn-satellite-en-410 24/80
20 Chapter 3. Example Topologies
Figure 3-3. Satellite-Proxy Vertically Tiered Topology
8/14/2019 RHN Satellite en 410
http://slidepdf.com/reader/full/rhn-satellite-en-410 25/80
Chapter 4.
InstallationThis chapter describes the initial installation of the RHN Satellite Server. It presumes theprerequisites listed in Chapter 2 Requirements have been met. If you are instead upgrad-ing to a newer version of RHN Satellite Server, contact your Red Hat representative forassistance.
4.1. Base Install
The RHN Satellite Server is designed to run on the Red Hat Enterprise Linux AS operatingsystem. Therefore, the first phase is to install the base operating system, either from disc,ISO image, or kickstart. During and after operating system installation, make sure you:
• Allocate plenty of space to the partitions storing data. The default location for channelpackages is /var/satellite/. For RHN Satellite Server with Embedded Database,remember the database RPMs go in the /opt/ partition, while the database itself is builtin /rhnsat/. Refer to Section 2.2 Hardware Requirements for precise specifications.
• Enable Network Time Protocol (NTP) on the Satellite and separate database, if it exists,
and select the appropriate time zone. All client systems should already be running thentpd daemon and be set to the correct time zone.
• Due to potential complications, it is strongly advised that the /home/ partition is locallymounted.
4.2. RHN Satellite Server Installation Program
The following instructions describe how to run the RHN Satellite Server InstallationProgram:
1. Log into the machine as root.
2. Insert the RHN Satellite Server CD containing the installation files or download theISO image from the RHN website.
3. If you are installing from CD, Red Hat Enterprise Linux may automount the CD. If it does so, it will mount the CD to the /media/cdrom/ directory.
If Red Hat Enterprise Linux does not automount the CD, manually mount it to the/media/cdrom/ directory with the following command:
mount /dev/cdrom /media/cdrom
8/14/2019 RHN Satellite en 410
http://slidepdf.com/reader/full/rhn-satellite-en-410 26/80
22 Chapter 4. Installation
If you are installing from an ISO, mount the file from within the directory containingit using the command:mount -o loop iso_filename /media/cdrom
The remaining instructions assume it is mounted in /media/cdrom/.
4. Ensure that the RHN Entitlement Certificate has been loaded onto the Satellite. Itcan be named anything and located in any directory. The installation program willask you for its location. Also, make sure your account has been granted the necessaryentitlements to conduct the installation. For instance, a new Satellite will require botha Management or Provisioning entitlement for Red Hat Enterprise Linux AS and anRHN Satellite Server entitlement.
Warning
Users should note that the RHN Satellite Server Installation Program updatesthe kernel, as well as all required packages.
5. From the /media/cdrom/ directory, enter the following command to start the RHNSatellite Server Installation Program:./install.pl
This script has several options to assist with your installation process. To view theseoptions, enter the following command:./install.pl --help
6. The script first runs through a pre-requisite check. These checks make certain that
all prerequisites from Chapter 2 Requirements are met before proceeding with theinstallation.* Performing pre-install checks.
* Pre-install checks complete. Beginning installation.
7. At the prompt, enter the email address to which you would like notifications from theSatellite to be sent. It may be a good idea to choose a general email address ratherthan the address of an individual, as there can be a large volume of emails.? Admin email address? [email protected]
8. The Satellite is then registered with your RHN Hosted account, and all required
packages are installed and updated.
* RHN Registration
* Installing updates.
* Installing RHN packages.
9. Next, the RHN Satellite Server Installation Program downloads and installs the RHNGPG key, including setting up the /root/.gnupg/ directory, if required.
* Setting up environment and users
** GPG: Initializing GPG and importing RHN key.
** GPG: Creating /root/.gnupg directory
8/14/2019 RHN Satellite en 410
http://slidepdf.com/reader/full/rhn-satellite-en-410 27/80
Chapter 4. Installation 23
10. The next step creates and populates the initial database, if you have opted for theRHN Satellite Server with Embedded Database. If you are installing RHN SatelliteServer with Stand-Alone Database, the installer connects with the database. This stepcan take quite a while. If you would like to monitor the progress of the installation,
use tail in a separate window to monitor the /var/log/rhn/install_db.logfile.
* Setting up database.
** Database: Installing the embedded database (not the schema).
** Database: Shutting down the database first.
** Database: Installing the database first.
11. Once database installation is complete, or once the connection to the database isestablished, the Satellite is configured.
* Setting up environment and users.
12. In order to activate the Satellite, you must provide it with the location of your Satellitecertificate.
* Activating Satellite.
Where is your satellite certificate file? /root/example.cert
13. The next step is to create a CA cert for the Satellite. To do so, you must answer a fewquestions.
CA cert
Enter a password for the certificate.
Organization
Enter the name of your organization
Email Address
Enter an email address to be associated with this certificate, such as the adminemail entered in the steps above.
City
Enter the city where the Satellite resides.
Country
Enter the country where the Satellite resides. The country code must be exactlytwo letters, or the certificate generation fails.
14. Once the CA Cert certificate is generated, the RHN Satellite Server InstallationProgram performs final configuration and restarts the associated services.
8/14/2019 RHN Satellite en 410
http://slidepdf.com/reader/full/rhn-satellite-en-410 28/80
24 Chapter 4. Installation
* Final configuration.
* Restarting services.
Installation complete.
Visit https://your-satellite.example.com to create the satellite administrato
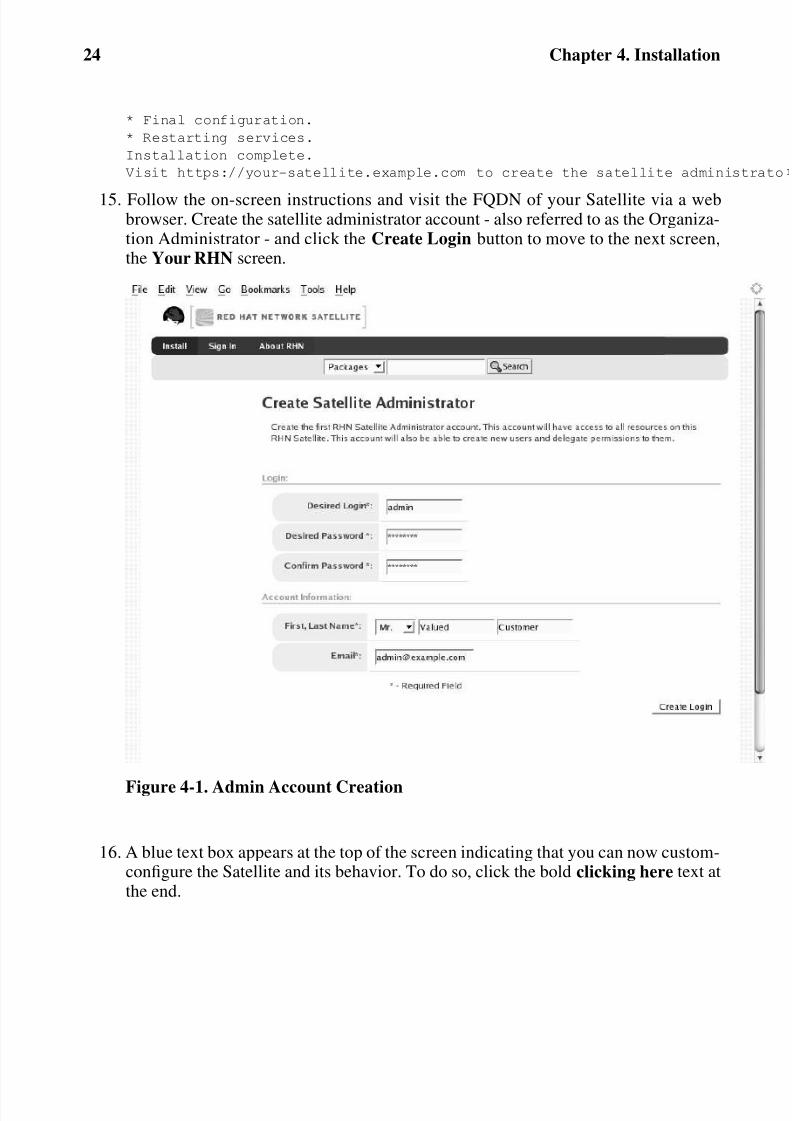
15. Follow the on-screen instructions and visit the FQDN of your Satellite via a webbrowser. Create the satellite administrator account - also referred to as the Organiza-tion Administrator - and click the Create Login button to move to the next screen,the Your RHN screen.
Figure 4-1. Admin Account Creation
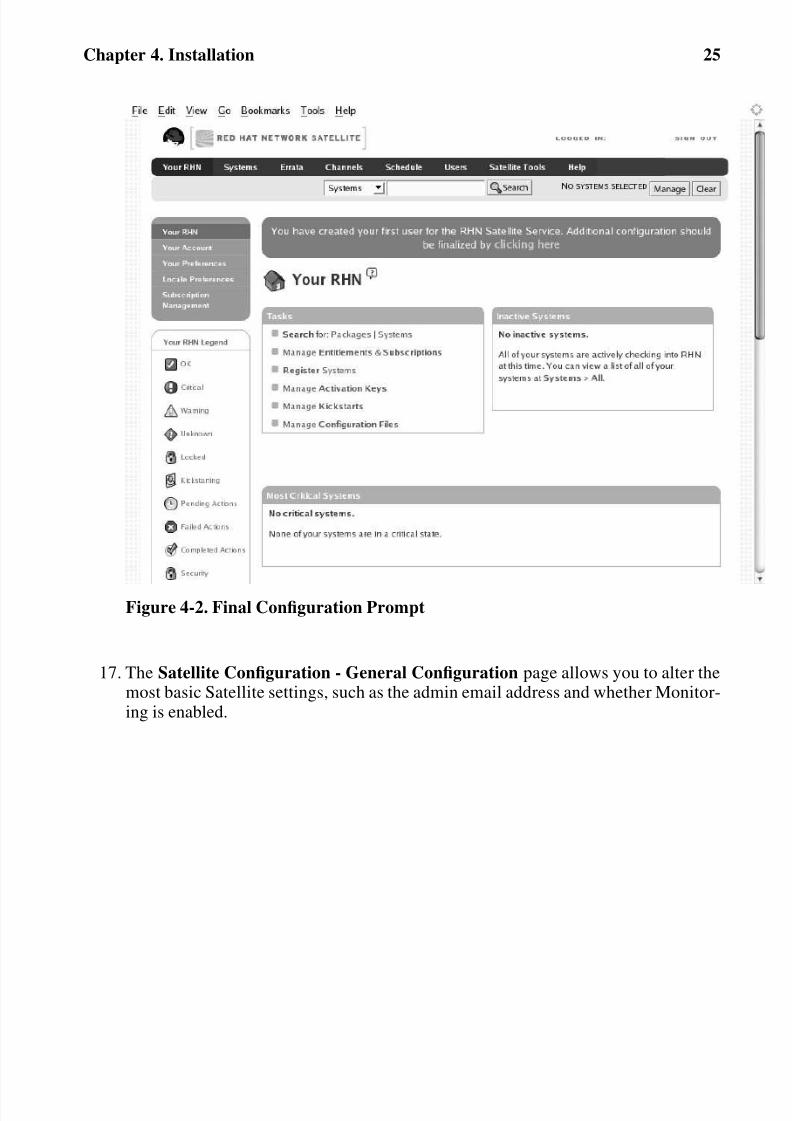
16. A blue text box appears at the top of the screen indicating that you can now custom-configure the Satellite and its behavior. To do so, click the bold clicking here text atthe end.
8/14/2019 RHN Satellite en 410
http://slidepdf.com/reader/full/rhn-satellite-en-410 29/80
Chapter 4. Installation 25
Figure 4-2. Final Configuration Prompt
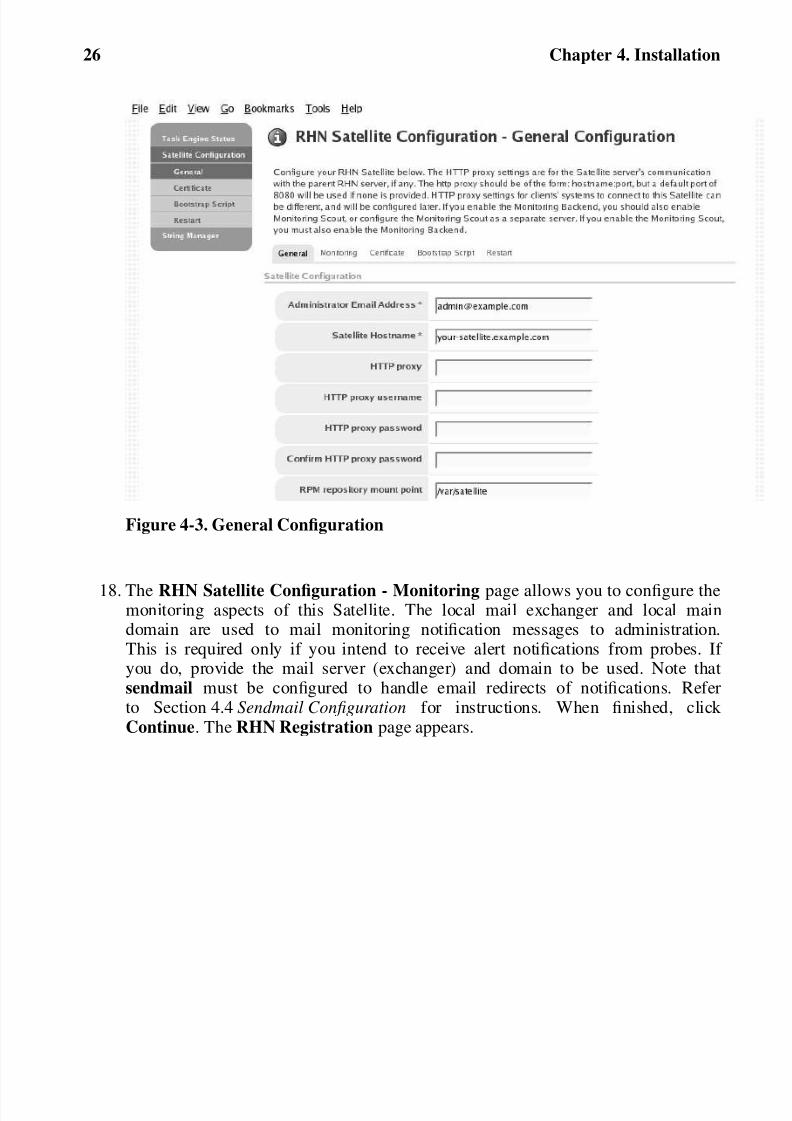
17. The Satellite Configuration - General Configuration page allows you to alter themost basic Satellite settings, such as the admin email address and whether Monitor-ing is enabled.
8/14/2019 RHN Satellite en 410
http://slidepdf.com/reader/full/rhn-satellite-en-410 30/80
26 Chapter 4. Installation
Figure 4-3. General Configuration
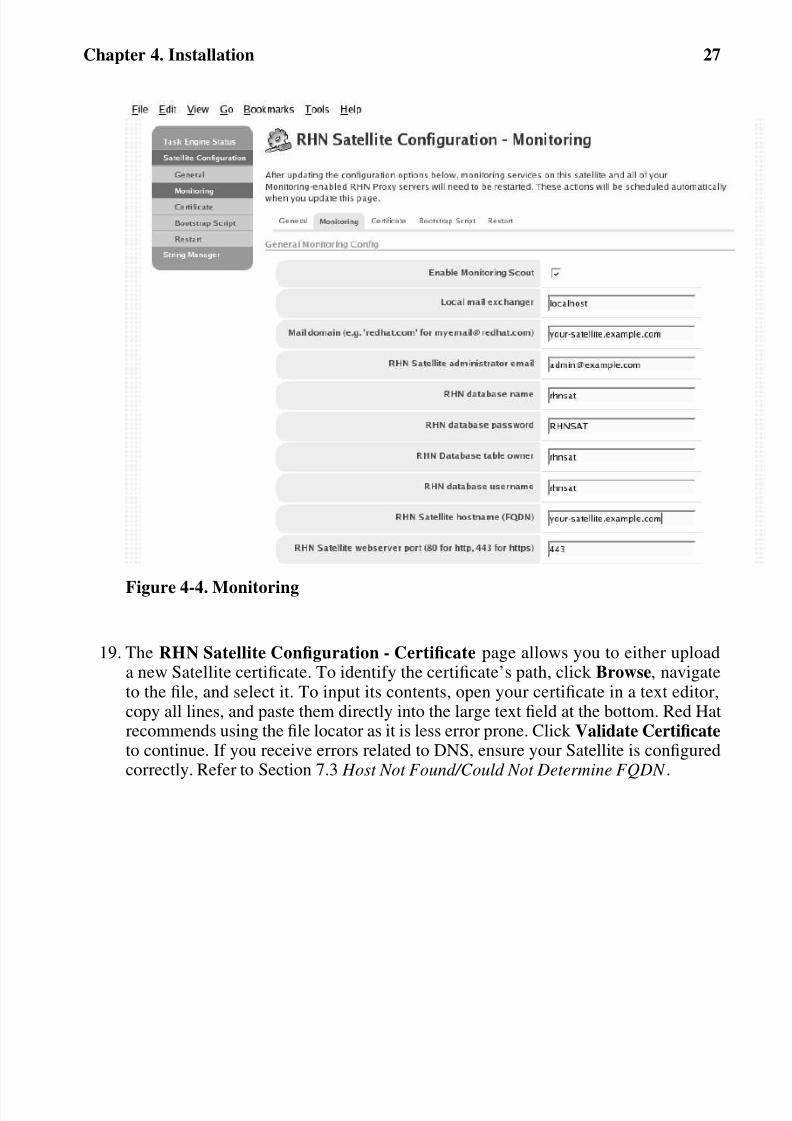
18. The RHN Satellite Configuration - Monitoring page allows you to configure themonitoring aspects of this Satellite. The local mail exchanger and local maindomain are used to mail monitoring notification messages to administration.This is required only if you intend to receive alert notifications from probes. If you do, provide the mail server (exchanger) and domain to be used. Note thatsendmail must be configured to handle email redirects of notifications. Referto Section 4.4 Sendmail Configuration for instructions. When finished, click Continue. The RHN Registration page appears.
8/14/2019 RHN Satellite en 410
http://slidepdf.com/reader/full/rhn-satellite-en-410 31/80
Chapter 4. Installation 27
Figure 4-4. Monitoring
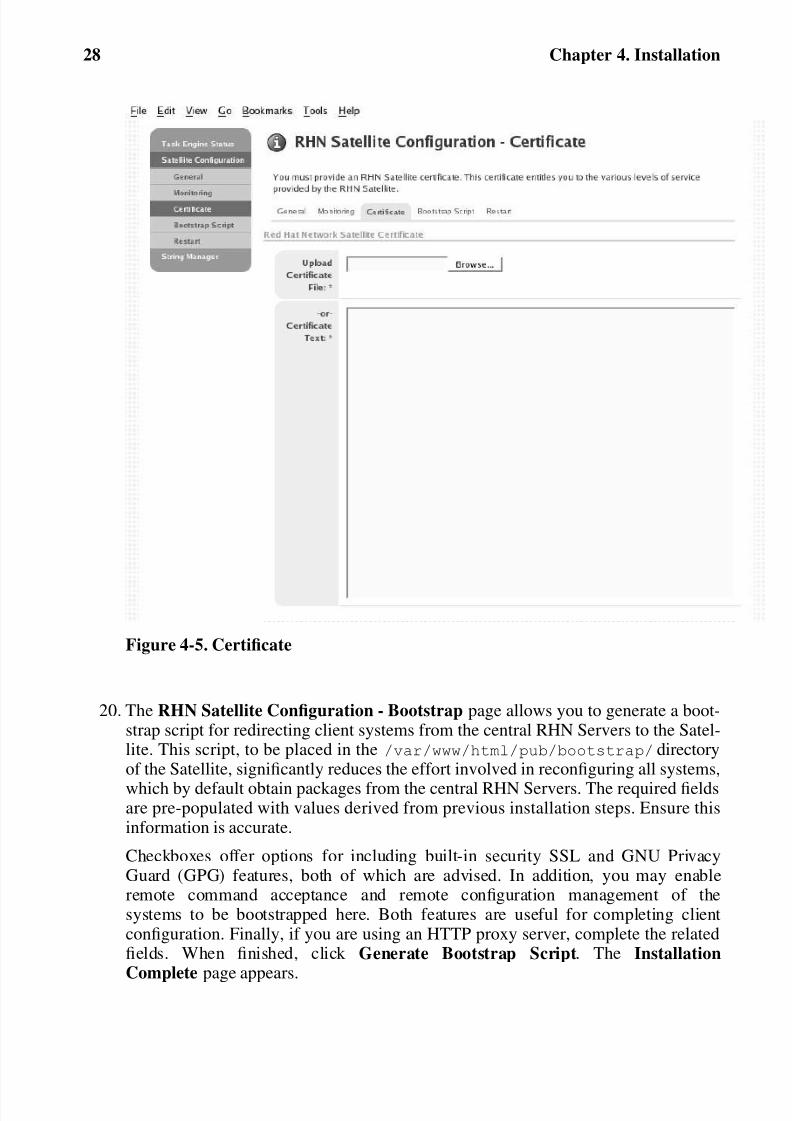
19. The RHN Satellite Configuration - Certificate page allows you to either uploada new Satellite certificate. To identify the certificate’s path, click Browse, navigateto the file, and select it. To input its contents, open your certificate in a text editor,copy all lines, and paste them directly into the large text field at the bottom. Red Hatrecommends using the file locator as it is less error prone. Click Validate Certificateto continue. If you receive errors related to DNS, ensure your Satellite is configuredcorrectly. Refer to Section 7.3 Host Not Found/Could Not Determine FQDN .
8/14/2019 RHN Satellite en 410
http://slidepdf.com/reader/full/rhn-satellite-en-410 32/80
28 Chapter 4. Installation
Figure 4-5. Certificate
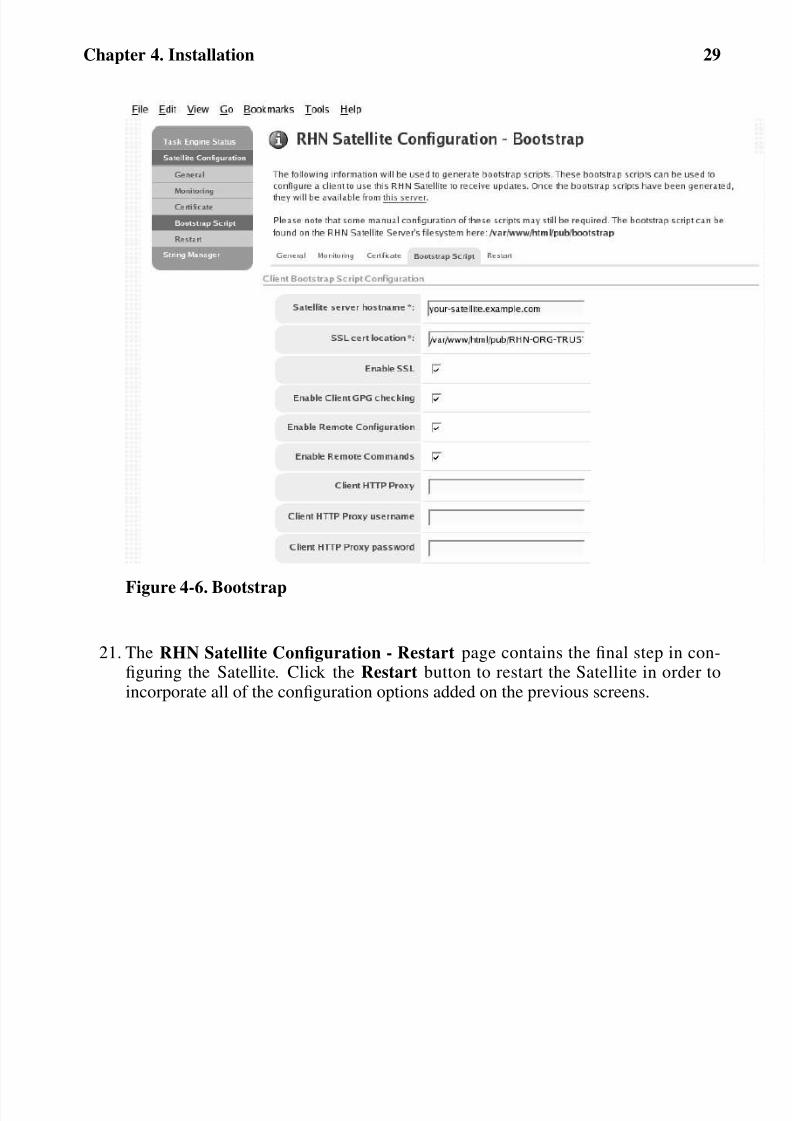
20. The RHN Satellite Configuration - Bootstrap page allows you to generate a boot-strap script for redirecting client systems from the central RHN Servers to the Satel-lite. This script, to be placed in the /var/www/html/pub/bootstrap/ directoryof the Satellite, significantly reduces the effort involved in reconfiguring all systems,
which by default obtain packages from the central RHN Servers. The required fieldsare pre-populated with values derived from previous installation steps. Ensure thisinformation is accurate.
Checkboxes offer options for including built-in security SSL and GNU PrivacyGuard (GPG) features, both of which are advised. In addition, you may enableremote command acceptance and remote configuration management of thesystems to be bootstrapped here. Both features are useful for completing clientconfiguration. Finally, if you are using an HTTP proxy server, complete the relatedfields. When finished, click Generate Bootstrap Script. The InstallationComplete page appears.
8/14/2019 RHN Satellite en 410
http://slidepdf.com/reader/full/rhn-satellite-en-410 33/80
Chapter 4. Installation 29
Figure 4-6. Bootstrap
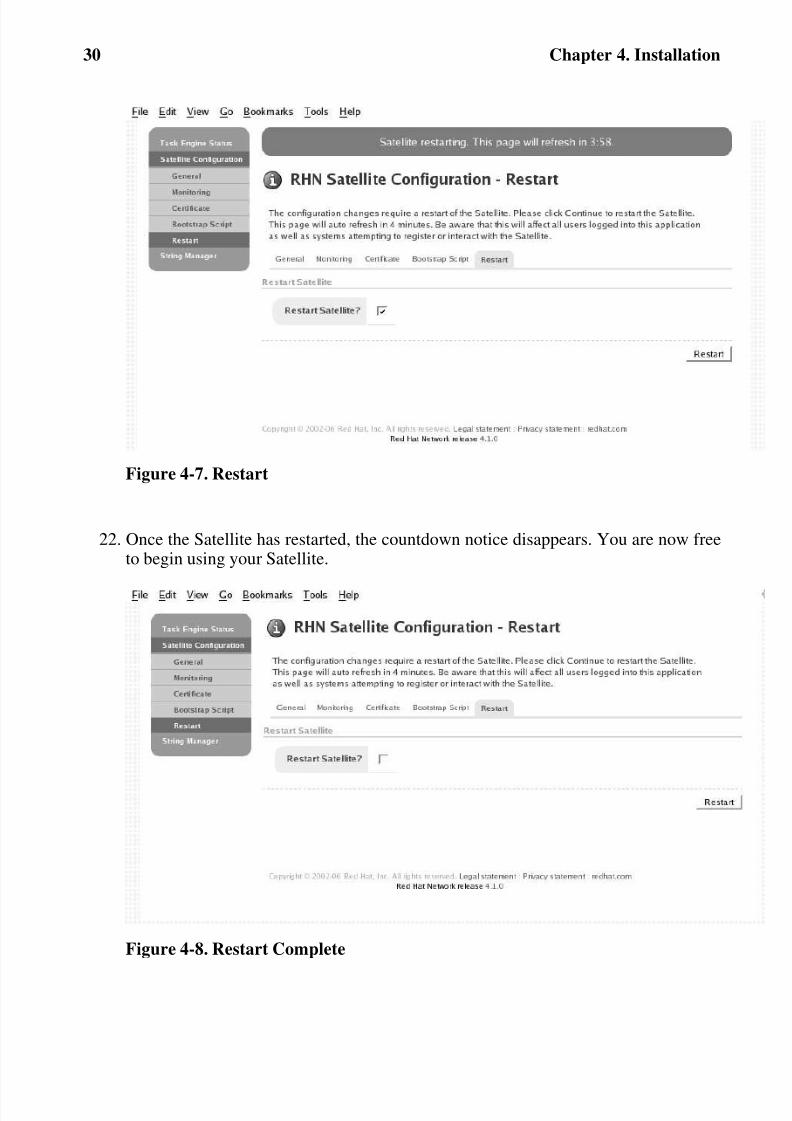
21. The RHN Satellite Configuration - Restart page contains the final step in con-figuring the Satellite. Click the Restart button to restart the Satellite in order toincorporate all of the configuration options added on the previous screens.
8/14/2019 RHN Satellite en 410
http://slidepdf.com/reader/full/rhn-satellite-en-410 34/80
30 Chapter 4. Installation
Figure 4-7. Restart
22. Once the Satellite has restarted, the countdown notice disappears. You are now freeto begin using your Satellite.
Figure 4-8. Restart Complete
8/14/2019 RHN Satellite en 410
http://slidepdf.com/reader/full/rhn-satellite-en-410 35/80
Chapter 4. Installation 31
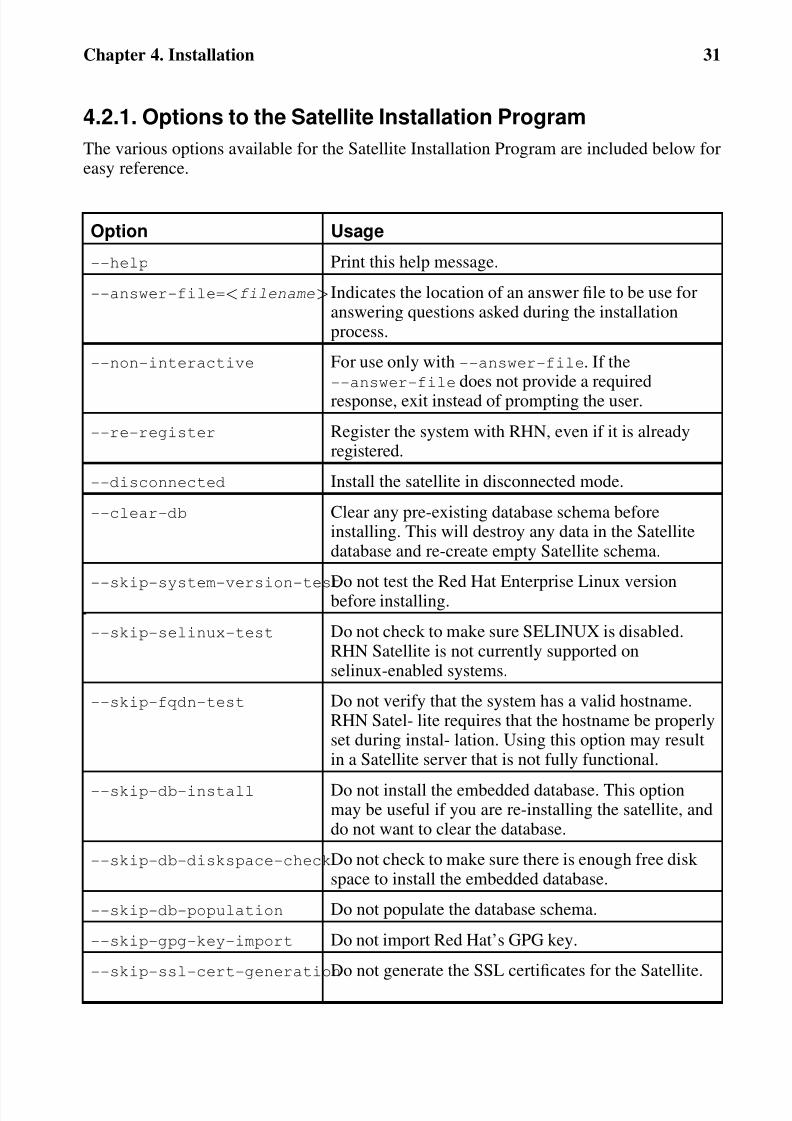
4.2.1. Options to the Satellite Installation Program
The various options available for the Satellite Installation Program are included below foreasy reference.
Option Usage
--help Print this help message.
--answer-file=<filename>Indicates the location of an answer file to be use foranswering questions asked during the installationprocess.
--non-interactive For use only with --answer-file. If the--answer-file does not provide a requiredresponse, exit instead of prompting the user.
--re-register Register the system with RHN, even if it is alreadyregistered.
--disconnected Install the satellite in disconnected mode.
--clear-db Clear any pre-existing database schema beforeinstalling. This will destroy any data in the Satellitedatabase and re-create empty Satellite schema.
--skip-system-version-testDo not test the Red Hat Enterprise Linux versionbefore installing.
--skip-selinux-test Do not check to make sure SELINUX is disabled.RHN Satellite is not currently supported onselinux-enabled systems.
--skip-fqdn-test Do not verify that the system has a valid hostname.RHN Satel- lite requires that the hostname be properlyset during instal- lation. Using this option may resultin a Satellite server that is not fully functional.
--skip-db-install Do not install the embedded database. This optionmay be useful if you are re-installing the satellite, anddo not want to clear the database.
--skip-db-diskspace-checkDo not check to make sure there is enough free disk space to install the embedded database.
--skip-db-population Do not populate the database schema.
--skip-gpg-key-import Do not import Red Hat’s GPG key.
--skip-ssl-cert-generationDo not generate the SSL certificates for the Satellite.
8/14/2019 RHN Satellite en 410
http://slidepdf.com/reader/full/rhn-satellite-en-410 36/80
32 Chapter 4. Installation
Table 4-1. Installation Options
4.3. Automated RHN Satellite Server Installation
One option of the RHN Satellite Server Installation Program allows the user to referencean answer file. This file contains pre-determined responses to all, or some, of the questionsasked by the installer program. This allows the installer to run without human interaction,and may be useful in instances where Satellite deployment must be automated. An exam-ple answer file can be found in the install/ directory of the CD or ISO, and is titledanswers.txt.
Follow the steps below to perform an automated install with an answer file:
1. Follow steps 1 through 5 fromSection 4.2 RHN Satellite Server Installation Program.
2. Copy the example answers.txt file to /tmp/answers.txt
cp answers.txt /tmp/answers.txt
3. Edit the file and add your organization’s desired options.
4. Once the answer file is ready, use the --answer-file option when starting theinstallation process from the command line:
./install.pl --answer-file=/tmp/answers.txt
The RHN Satellite Server Installation Program then looks for answers in the file. Forany option no filled out in the file, the Installer Program prompts the user for themissing information.
4.4. Sendmail Configuration
If your RHN Satellite Server will serve Monitoring-entitled systems and you wish to ac-knowledge via email the alert notifications you receive, you must configure sendmail to
properly handle incoming mail. This is required by the email redirect feature, which allowsyou to stop notifying users about a Monitoring-related event with a single reply.
Important
Some more restrictive corporate mail configurations will not allow mail to be sent froman address that is not recognized as valid. Therefore, it may be necessary to configurerogerthat01@{mail domain} as a valid email address in your corporate environ-ment. Check with your mail systems administrator.
8/14/2019 RHN Satellite en 410
http://slidepdf.com/reader/full/rhn-satellite-en-410 37/80
Chapter 4. Installation 33
To configure sendmail correctly, run the following commands as root. First, create a sym-bolic link allowing sendmail to run the notification enqueuer with the following command:
ln -s /opt/notification/scripts/ack_enqueuer.pl /etc/smrsh/.
Next, edit the /etc/aliases file on the mail server and add the following line:
rogerthat01: | /etc/smrsh/ack_enqueuer.pl
Next, edit the /etc/mail/sendmail.mc file and change:
"DAEMON_OPTIONS(‘Port=smtp,Addr=127.0.0.1, Name=MTA’)dnl"
to:
"DAEMON_OPTIONS(‘Port=smtp, Name=MTA’)dnl"
Then, have the alias processed like so:
newaliases
Finally, update the sendmail-cf package:
up2date sendmail-cf
Note, disconnected installs must obtain this package from the ISO.Restart sendmail:
service sendmail restart
4.5. MySQL Installation
This sections is applicable only if your RHN Satellite Server will serve Monitoring-entitled
systems and you wish to run MySQL probes against them. Refer to the Probes appendixof the RHN Reference Guide for a list of available probes.
If you do wish to run MySQL probes, subscribe the Satellite to the Red Hat EnterpriseLinux AS Extras channel and install the mysql-server package either through the RHNwebsite or up2date.
Two extra packages will also be downloaded in the transaction. These are needed for themysql-server package to be installed and run successfully. Once finished, your Satellitemay be used to schedule MySQL probes.

8/14/2019 RHN Satellite en 410
http://slidepdf.com/reader/full/rhn-satellite-en-410 38/80
34 Chapter 4. Installation
8/14/2019 RHN Satellite en 410
http://slidepdf.com/reader/full/rhn-satellite-en-410 39/80
Chapter 5.
EntitlementsThe RHN Satellite Server, like RHN itself, provides all services to customers through thesetting of entitlements. For RHN, entitlements are purchased by customers as needed; how-ever, for RHN Satellite Server, entitlements are contractually agreed-upon beforehand, andthey are set at installation time. All public channels are automatically available; the privatechannels that should also be made available through the Satellite are determined by the RHN Entitlement Certificate.
The RHN Entitlement Certificate, which contains the precise set of entitlements attributed
to your organization, is provided by your Red Hat representative. Red Hat reserves the rightto compare the contents of that RHN Entitlement Certificate with the database’s entitlementsettings at any time to ensure compliance with the terms of the customer’s contract withRed Hat.
The steps referenced in this section are typically carried out by the RHN Satellite ServerInstallation Program itself and do not need to be repeated during initial installation. In-stead, they are listed here for use by customers who have received a new RHN EntitlementCertificate, such as one reflecting an increase in the number of entitlements.
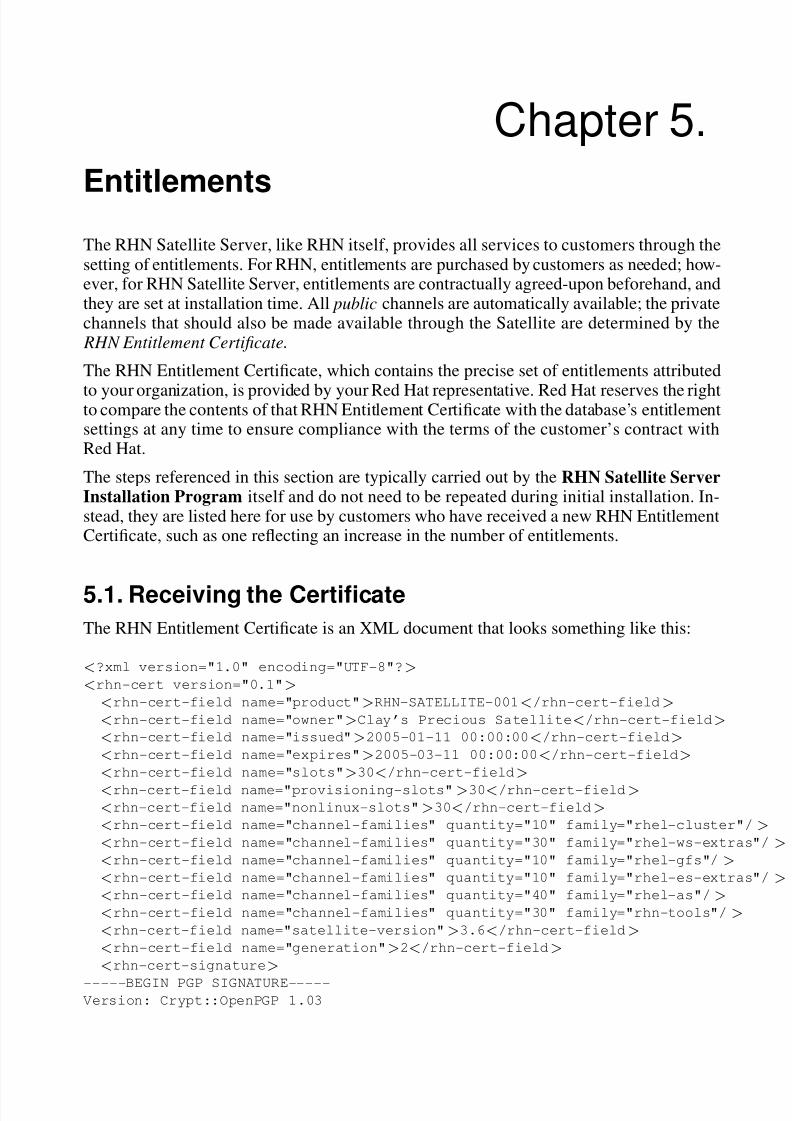
5.1. Receiving the CertificateThe RHN Entitlement Certificate is an XML document that looks something like this:
<?xml version="1.0" encoding="UTF-8"?>
<rhn-cert version="0.1">
<rhn-cert-field name="product">RHN-SATELLITE-001</rhn-cert-field>
<rhn-cert-field name="owner">Clay’s Precious Satellite</rhn-cert-field>
<rhn-cert-field name="issued">2005-01-11 00:00:00</rhn-cert-field>
<rhn-cert-field name="expires">2005-03-11 00:00:00</rhn-cert-field>
<rhn-cert-field name="slots">30</rhn-cert-field>
<rhn-cert-field name="provisioning-slots">30</rhn-cert-field>
<rhn-cert-field name="nonlinux-slots">30</rhn-cert-field>
<rhn-cert-field name="channel-families" quantity="10" family="rhel-cluster"/>
<rhn-cert-field name="channel-families" quantity="30" family="rhel-ws-extras"/>
<rhn-cert-field name="channel-families" quantity="10" family="rhel-gfs"/>
<rhn-cert-field name="channel-families" quantity="10" family="rhel-es-extras"/>
<rhn-cert-field name="channel-families" quantity="40" family="rhel-as"/>
<rhn-cert-field name="channel-families" quantity="30" family="rhn-tools"/>
<rhn-cert-field name="satellite-version">3.6</rhn-cert-field>
<rhn-cert-field name="generation">2</rhn-cert-field>
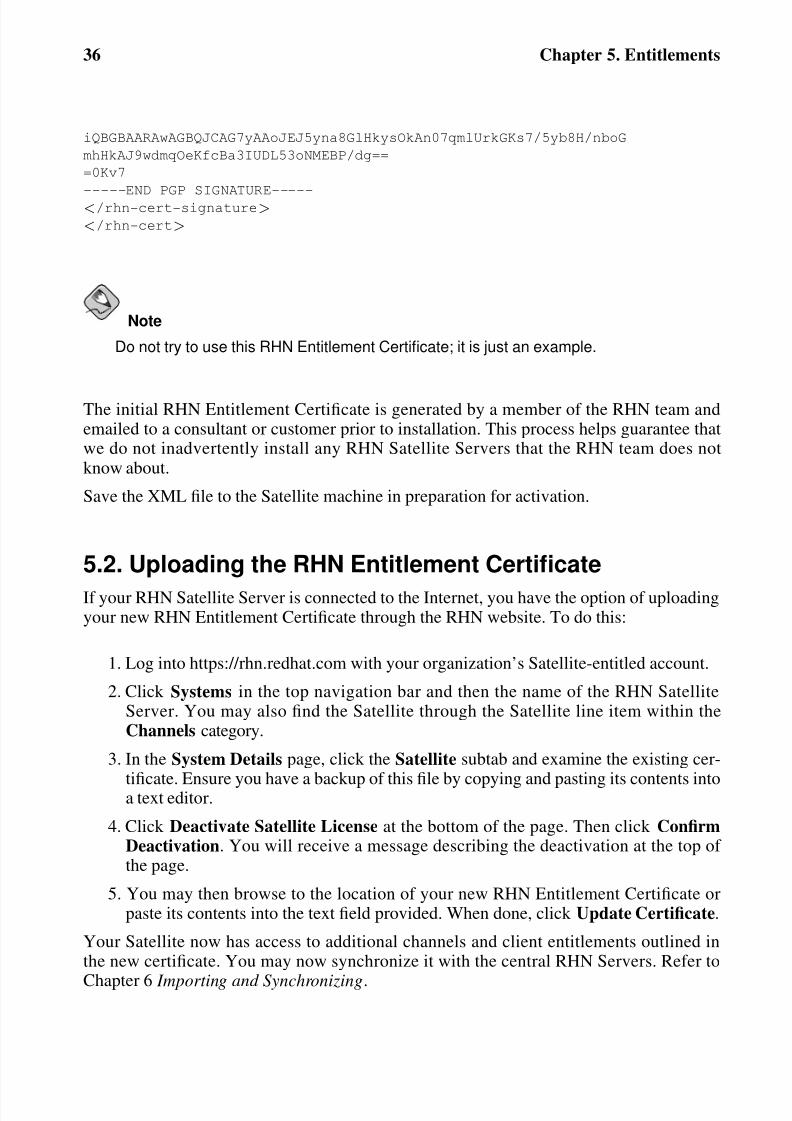
<rhn-cert-signature>
-----BEGIN PGP SIGNATURE-----Version: Crypt::OpenPGP 1.03
8/14/2019 RHN Satellite en 410
http://slidepdf.com/reader/full/rhn-satellite-en-410 40/80
36 Chapter 5. Entitlements
iQBGBAARAwAGBQJCAG7yAAoJEJ5yna8GlHkysOkAn07qmlUrkGKs7/5yb8H/nboG
mhHkAJ9wdmqOeKfcBa3IUDL53oNMEBP/dg==
=0Kv7
-----END PGP SIGNATURE-----</rhn-cert-signature>
</rhn-cert>
Note
Do not try to use this RHN Entitlement Certificate; it is just an example.
The initial RHN Entitlement Certificate is generated by a member of the RHN team andemailed to a consultant or customer prior to installation. This process helps guarantee thatwe do not inadvertently install any RHN Satellite Servers that the RHN team does notknow about.
Save the XML file to the Satellite machine in preparation for activation.
5.2. Uploading the RHN Entitlement Certificate
If your RHN Satellite Server is connected to the Internet, you have the option of uploadingyour new RHN Entitlement Certificate through the RHN website. To do this:
1. Log into https://rhn.redhat.com with your organization’s Satellite-entitled account.
2. Click Systems in the top navigation bar and then the name of the RHN SatelliteServer. You may also find the Satellite through the Satellite line item within theChannels category.
3. In the System Details page, click the Satellite subtab and examine the existing cer-
tificate. Ensure you have a backup of this file by copying and pasting its contents intoa text editor.
4. Click Deactivate Satellite License at the bottom of the page. Then click ConfirmDeactivation. You will receive a message describing the deactivation at the top of the page.
5. You may then browse to the location of your new RHN Entitlement Certificate orpaste its contents into the text field provided. When done, click Update Certificate.
Your Satellite now has access to additional channels and client entitlements outlined inthe new certificate. You may now synchronize it with the central RHN Servers. Refer to
Chapter 6 Importing and Synchronizing.
8/14/2019 RHN Satellite en 410
http://slidepdf.com/reader/full/rhn-satellite-en-410 41/80
Chapter 5. Entitlements 37
5.3. Managing the RHN Certificate with RHN SatelliteActivate
For disconnected Satellites or customers who prefer to work locally, Red Hat provides
a command line tool for managing your RHN Entitlement Certificate and activating theSatellite using that certificate: RHN Satellite Activate (rhn-satellite-activate).This is included with the Satellite installation as part of the rhns-satellite-tools
package.
5.3.1. Command Line Entitlement Options
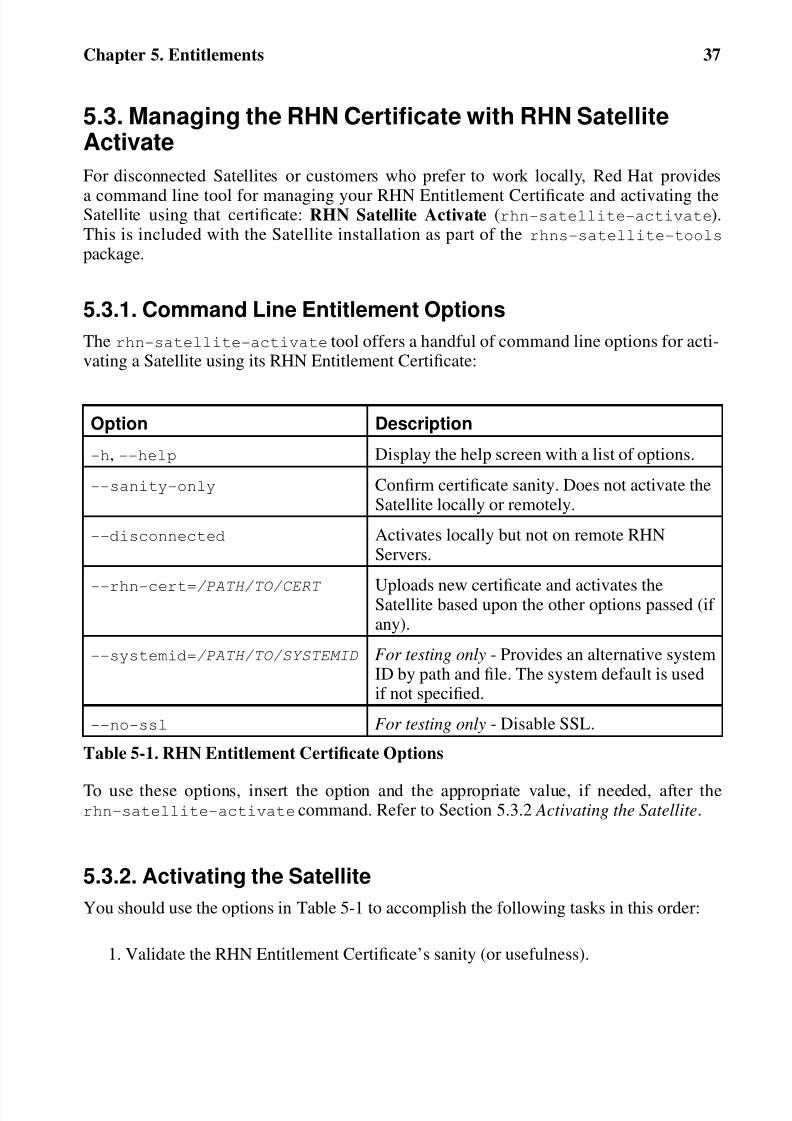
The rhn-satellite-activate tool offers a handful of command line options for acti-vating a Satellite using its RHN Entitlement Certificate:
Option Description
-h, --help Display the help screen with a list of options.
--sanity-only Confirm certificate sanity. Does not activate theSatellite locally or remotely.
--disconnected Activates locally but not on remote RHNServers.
--rhn-cert=/PATH/TO/CERT Uploads new certificate and activates theSatellite based upon the other options passed (if any).
--systemid=/PATH/TO/SYSTEMID For testing only - Provides an alternative systemID by path and file. The system default is usedif not specified.
--no-ssl For testing only - Disable SSL.
Table 5-1. RHN Entitlement Certificate Options
To use these options, insert the option and the appropriate value, if needed, after therhn-satellite-activate command. Refer to Section 5.3.2 Activating the Satellite.
5.3.2. Activating the Satellite
You should use the options in Table 5-1 to accomplish the following tasks in this order:
1. Validate the RHN Entitlement Certificate’s sanity (or usefulness).
8/14/2019 RHN Satellite en 410
http://slidepdf.com/reader/full/rhn-satellite-en-410 42/80
38 Chapter 5. Entitlements
2. Activate the Satellite locally by inserting the RHN Entitlement Certificate into thelocal database.
3. Activate the Satellite remotely by inserting the RHN Entitlement Certificate into thecentral RHN (remote) database. This is typically accomplished during local activa-tion but may require a second step if you chose the --disconnected option.
Here are some examples depicting use of the tool and these options.
To validate an RHN Entitlement Certificate’s sanity only:
rhn-satellite-activate --sanity-only --rhn-cert=/path/to/demo.cert
To validate an RHN Entitlement Certificate and populate the local database:
rhn-satellite-activate --disconnected --rhn-cert=/path/to/demo.cert
To validate an RHN Entitlement Certificate and populate both the local and the RHNdatabase:
rhn-satellite-activate --rhn-cert=/path/to/demo.cert
Once you run this final command, the Satellite is running and able to servepackages locally and synchronize with the central RHN Servers. Refer toChapter 6 Importing and Synchronizing.
8/14/2019 RHN Satellite en 410
http://slidepdf.com/reader/full/rhn-satellite-en-410 43/80
Chapter 6.
Importing and SynchronizingAfter installing the RHN Satellite Server, you must provide it with the packages and chan-nels to be served to client systems. This chapter explains how to import that data and keepit up to date whether the content is from RHN’s central servers, local media, or from oneSatellite within your organization to another.
Two tools, RHN Satellite Exporter and RHN Satellite Synchronization Tool, come in-stalled as part of the rhns-sat-tools package.
6.1. Exporting with RHN Satellite Exporter
The RHN Satellite Exporter (rhn-satellite-exporter) tool exports Satellite contentin an XML format that can then be imported into another identical Satellite. The contentis exported into a directory specified by the user with the -d option. Once that directoryhas been transported to another Satellite, the RHN Satellite Synchronization Tool maybe used to import the contents, synchronizing two Satellites.
6.1.1.rhn-satellite-exporter
The RHN Satellite Exporter can export the following content:
• Channel Families
• Architectures
• Channel metadata
• Blacklists
• RPMs
• RPM metadata
• Errata
• Kickstarts
The amount of time it takes rhn-satellite-exporter to export data is dependenton the number and size of the channels being exported. Using the --no-packages,--no-kickstarts, --no-errata, and --no-rpms options reduces the amount of timerequired for rhn-satellite-exporter to run, but also prevents potentially usefulinformation from being exported. For that reason, these options should only be used when
you are certain that you will not need the content that they exclude. Additionally, youmust use the matching options for satellite-sync when importing the data. For
8/14/2019 RHN Satellite en 410
http://slidepdf.com/reader/full/rhn-satellite-en-410 44/80
40 Chapter 6. Importing and Synchronizing
example, if you use --no-kickstarts with rhn-satellite-exporter you mustspecify the --no-kickstarts option when importing the data.
When exporting an RHN base channel, you must also export the tools channel associatedwith that base channel in order to kickstart machines to the distribution in the base channel.For instance, if you export rhel-i386-as-4 you must also export the rhn-tools-rhel-4-as-i386 channel in order to kickstart machines to Red Hat Enterprise Linux 4 AS. This isbecause the tools channels contain the auto-kickstart packages that install packages forkickstarting a machine through the Satellite.
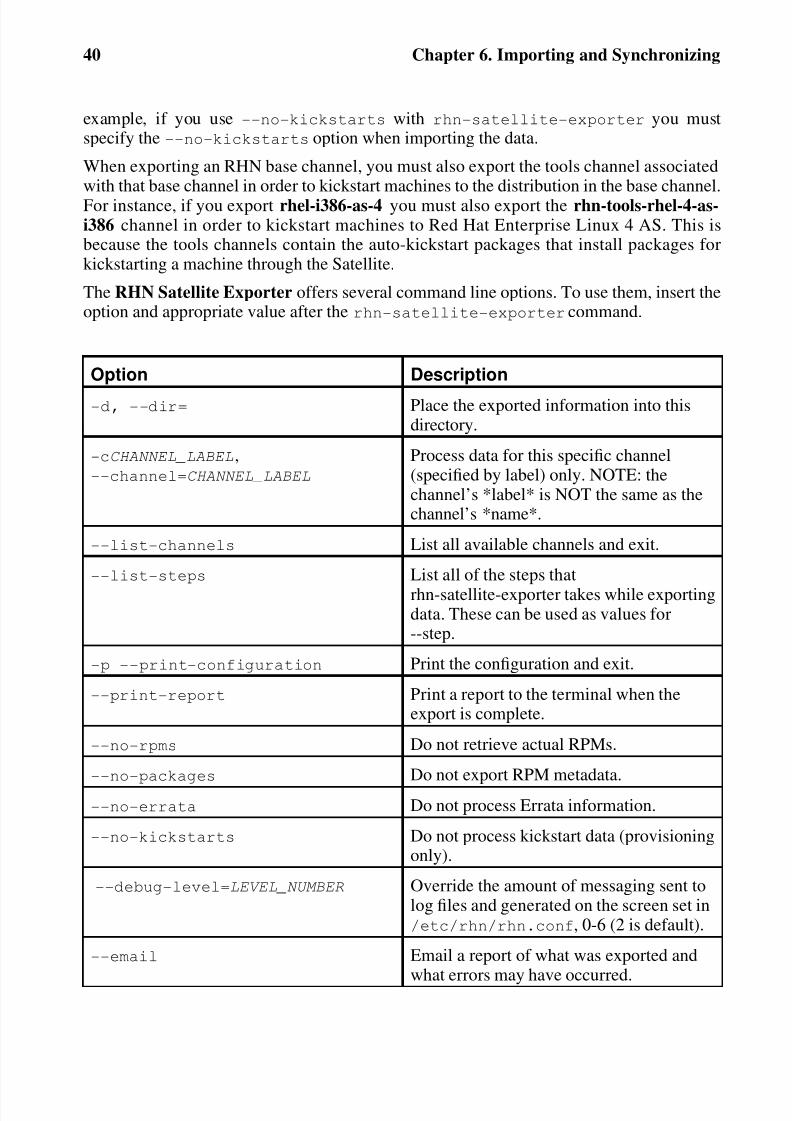
The RHN Satellite Exporter offers several command line options. To use them, insert theoption and appropriate value after the rhn-satellite-exporter command.
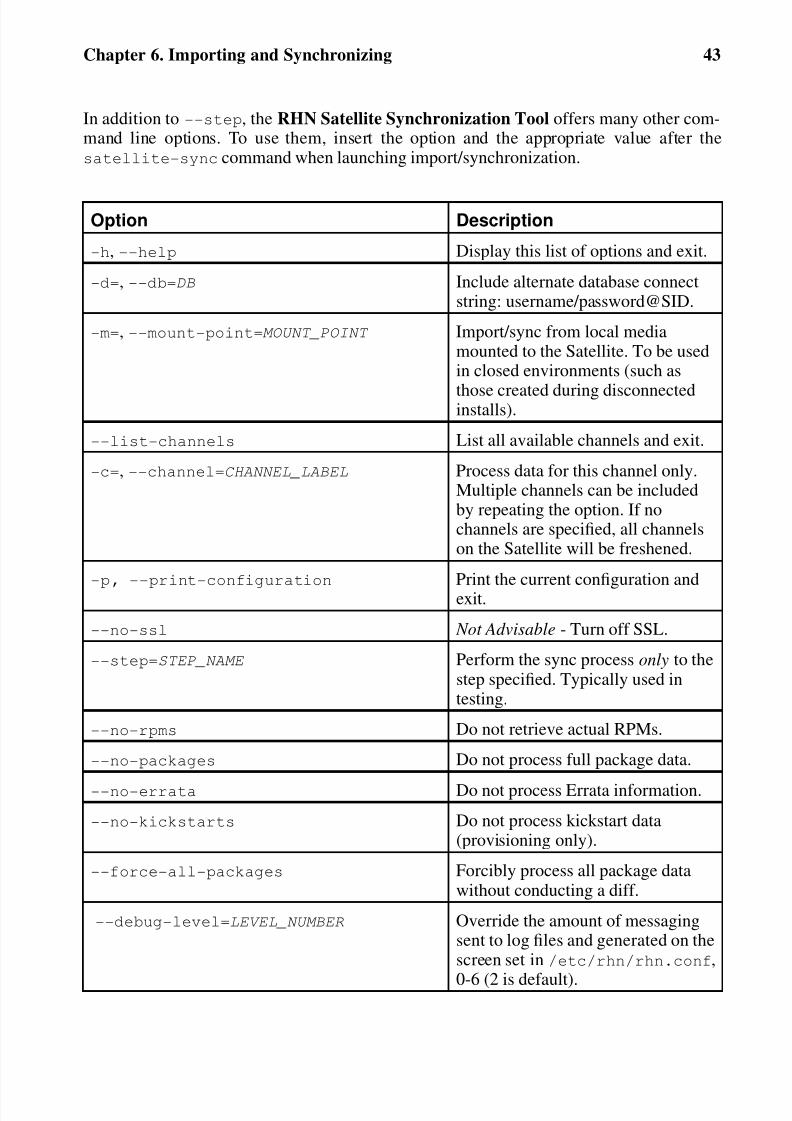
Option Description
-d, --dir= Place the exported information into thisdirectory.
-cCHANNEL_LABEL,--channel=CHANNEL_LABEL
Process data for this specific channel(specified by label) only. NOTE: thechannel’s *label* is NOT the same as thechannel’s *name*.
--list-channels List all available channels and exit.
--list-steps List all of the steps that
rhn-satellite-exporter takes while exportingdata. These can be used as values for--step.
-p --print-configuration Print the configuration and exit.
--print-report Print a report to the terminal when theexport is complete.
--no-rpms Do not retrieve actual RPMs.
--no-packages Do not export RPM metadata.
--no-errata Do not process Errata information.
--no-kickstarts Do not process kickstart data (provisioningonly).
--debug-level=LEVEL_NUMBER Override the amount of messaging sent tolog files and generated on the screen set in/etc/rhn/rhn.conf, 0-6 (2 is default).
--email Email a report of what was exported and
what errors may have occurred.
8/14/2019 RHN Satellite en 410
http://slidepdf.com/reader/full/rhn-satellite-en-410 45/80
Chapter 6. Importing and Synchronizing 41
Option Description
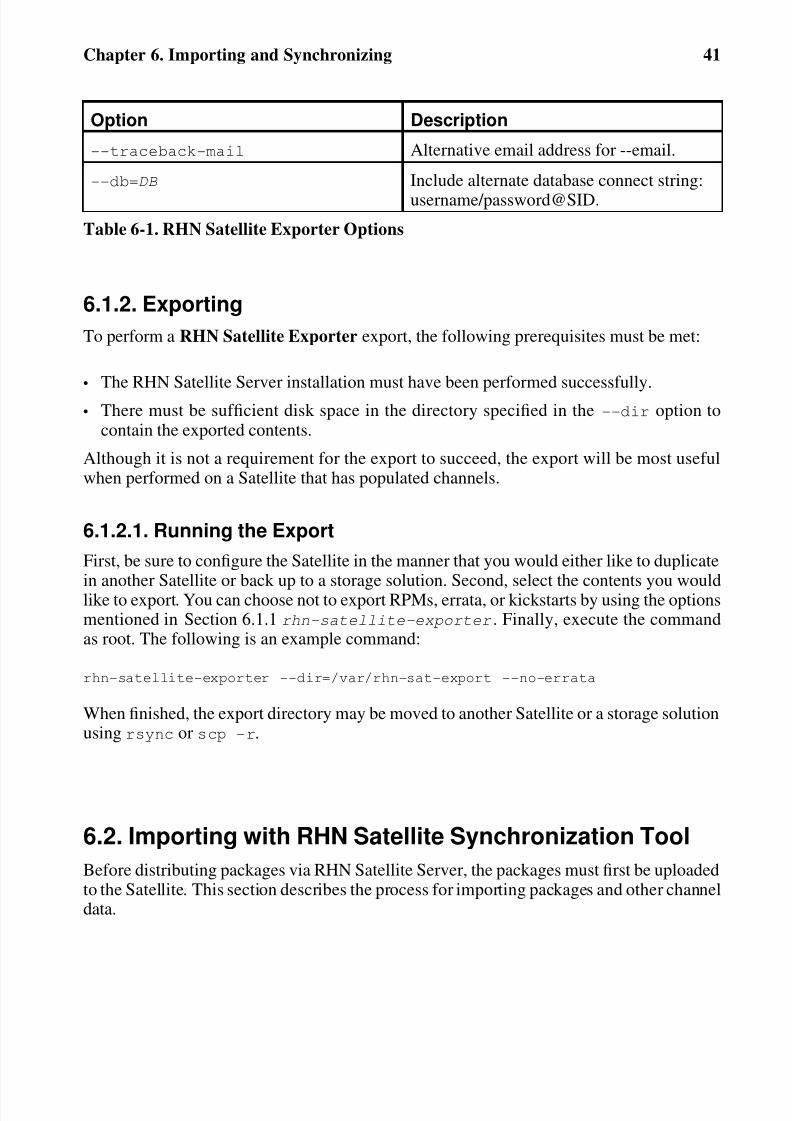
--traceback-mail Alternative email address for --email.
--db=DB Include alternate database connect string:
username/password@SID.
Table 6-1. RHN Satellite Exporter Options
6.1.2. Exporting
To perform a RHN Satellite Exporter export, the following prerequisites must be met:
• The RHN Satellite Server installation must have been performed successfully.
• There must be sufficient disk space in the directory specified in the --dir option tocontain the exported contents.
Although it is not a requirement for the export to succeed, the export will be most usefulwhen performed on a Satellite that has populated channels.
6.1.2.1. Running the Export
First, be sure to configure the Satellite in the manner that you would either like to duplicate
in another Satellite or back up to a storage solution. Second, select the contents you wouldlike to export. You can choose not to export RPMs, errata, or kickstarts by using the optionsmentioned in Section 6.1.1 rhn-satellite-exporter . Finally, execute the commandas root. The following is an example command:
rhn-satellite-exporter --dir=/var/rhn-sat-export --no-errata
When finished, the export directory may be moved to another Satellite or a storage solutionusing rsync or scp -r.
6.2. Importing with RHN Satellite Synchronization Tool
Before distributing packages via RHN Satellite Server, the packages must first be uploadedto the Satellite. This section describes the process for importing packages and other channeldata.
8/14/2019 RHN Satellite en 410
http://slidepdf.com/reader/full/rhn-satellite-en-410 46/80
8/14/2019 RHN Satellite en 410
http://slidepdf.com/reader/full/rhn-satellite-en-410 47/80
8/14/2019 RHN Satellite en 410
http://slidepdf.com/reader/full/rhn-satellite-en-410 48/80
44 Chapter 6. Importing and Synchronizing
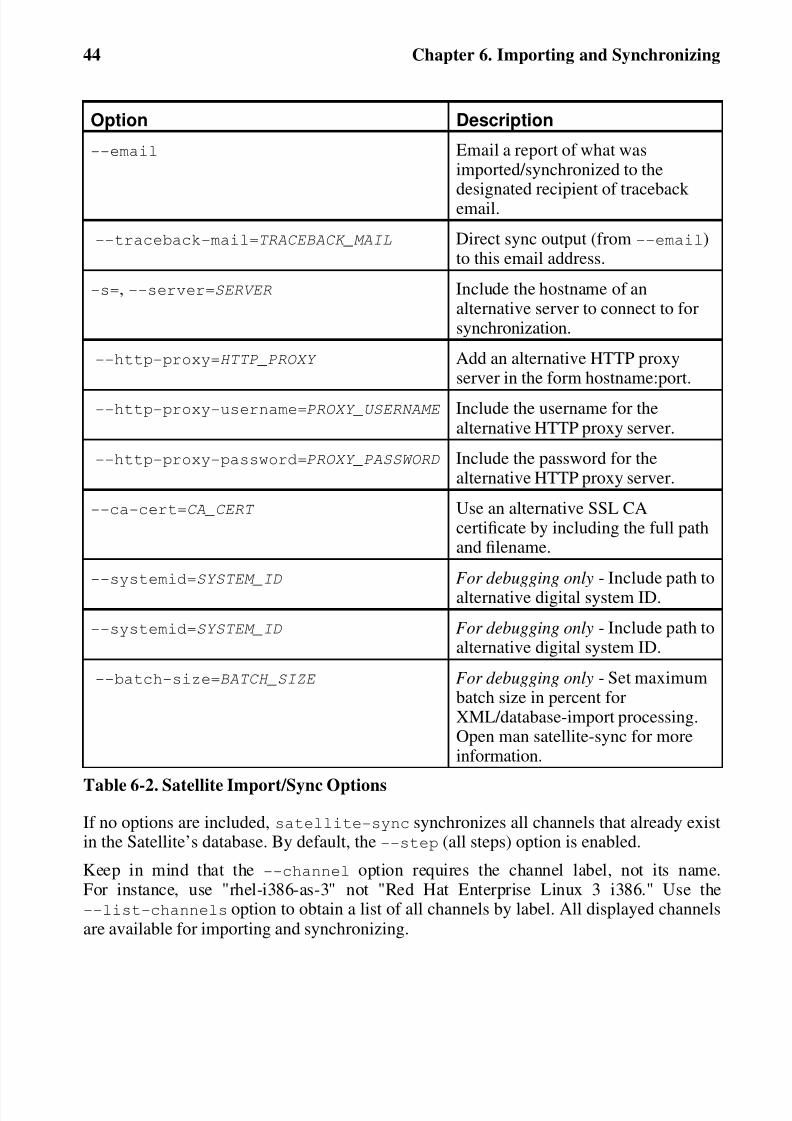
Option Description
--email Email a report of what wasimported/synchronized to the
designated recipient of traceback email.
--traceback-mail=TRACEBACK_MAIL Direct sync output (from --email)to this email address.
-s=, --server=SERVER Include the hostname of analternative server to connect to forsynchronization.
--http-proxy=HTTP_PROXY Add an alternative HTTP proxyserver in the form hostname:port.
--http-proxy-username=PROXY_USERNAME Include the username for thealternative HTTP proxy server.
--http-proxy-password=PROXY_PASSWORD Include the password for thealternative HTTP proxy server.
--ca-cert=CA_CERT Use an alternative SSL CAcertificate by including the full pathand filename.
--systemid=SYSTEM_ID For debugging only - Include path toalternative digital system ID.
--systemid=SYSTEM_ID For debugging only - Include path toalternative digital system ID.
--batch-size=BATCH_SIZE For debugging only - Set maximumbatch size in percent forXML/database-import processing.Open man satellite-sync for moreinformation.
Table 6-2. Satellite Import/Sync Options
If no options are included, satellite-sync synchronizes all channels that already existin the Satellite’s database. By default, the --step (all steps) option is enabled.
Keep in mind that the --channel option requires the channel label, not its name.For instance, use "rhel-i386-as-3" not "Red Hat Enterprise Linux 3 i386." Use the--list-channels option to obtain a list of all channels by label. All displayed channelsare available for importing and synchronizing.
8/14/2019 RHN Satellite en 410
http://slidepdf.com/reader/full/rhn-satellite-en-410 49/80
Chapter 6. Importing and Synchronizing 45
6.2.2. Preparing for Import from Local Media
To perform the RHN Satellite Server import, the following prerequisites must be met:
• The RHN Satellite Server installation must have been performed successfully.
• The Red Hat Network Channel Content ISOs or RHN Satellite Exporter data must beavailable, or the Satellite must have access to the Internet and the RHN website.
Although it is possible to conduct the import directly from the RHN website, this shouldbe done only if Channel Content ISOs are not available. It takes a long time to populate achannel from scratch over the Internet. For this reason, Red Hat urges you to use ISOs, if they are available, for initial import.
6.2.2.1. Preparing Channel Content ISOsChannel Content ISOs are special collections that contain both packages and XML dumpsof metadata. The ISO images can be downloaded from the RHN website on a machine con-nected to the Internet and then transferred to the Satellite. After logging in, click Channelsin the top navigation bar and then the name of the channel for your version of RHN Satel-lite Server. Click the Downloads tab and use the instructions on the page to obtain theChannel Content ISOs, available by version of Red Hat Enterprise Linux. If the desiredChannel Content ISOs do not appear, ensure your RHN Entitlement Certificate has beenuploaded to RHN and correctly identifies the target channels.
Channel Content ISOs are mounted and then copied to a temporary repository directory.Before mounting the ISOs, ensure the temporary repository has enough disk space to copyall the contents into a single directory. For a single channel, the approximate required spaceis 3 GB. The process to copy Channel Content ISOs is to mount each one, copy its contentsto the temporary repository, and then unmount the ISO. Each channel consists of severalISOs. Once finished, the administrator should delete the temporary directory and all of itscontents. Follow these steps:
1. Log into the machine as root.
2. Insert the first Channel Content ISO that has been burned to disc.
3. Create a directory in /mnt/ to store the file(s) with the command:mkdir /mnt/import/
4. Mount the ISO file from within the directory containing it using the command:mount iso_filename /mnt/import -o loop
5. Create a target directory for the files, such as:mkdir /var/rhn-sat-import/
6. This sample command assumes the administrator wants to copy the contents of theISO (mounted in /mnt/import/) into /var/rhn-sat-import/:
cp -ruv /mnt/import/* /var/rhn-sat-import/
8/14/2019 RHN Satellite en 410
http://slidepdf.com/reader/full/rhn-satellite-en-410 50/80
46 Chapter 6. Importing and Synchronizing
7. Then unmount /mnt/import in preparation for the next CD or ISO:umount /mnt/import
8. Repeat these steps for each Channel Content ISO of every channel to be imported.
6.2.2.2. Preparing RHN Satellite Exporter Data
In order to perform the import from data previously exported using RHN Satellite Exporter,you must first copy that data onto the local system. Steps such as the following will enableyou to procede to running the import as described in Section 6.2.3 Running the Import .
1. Log into the machine as root.
2. Create a target directory for the files, such as:
mkdir /var/rhn-sat-import/
3. Make the export data available on the local machine in the directory created in theprevious step. This can be done by copying the data directly, or by mounting the datafrom another machine using NFS. It is perhaps easiest to copy the data into the newdirectory with a command such as the following:scp -r [email protected]:/var/sat-backup/* /var/rhn-sat-import
Now that the data is available, you can procede to performing the import.
6.2.3. Running the Import
The rhns-satellite-tools package provides the satellite-sync program for man-aging all package, channel, and errata imports and synchronizations.
The following process assumes in the previous step the user has copied all data to/var/rhn-sat-import.
The first step in importing channels into the database is listing the channels available forimport. This is accomplished with the command:
satellite-sync --list-channels --mount-point /var/rhn-sat-import
The next step is to initiate the import of a specific channel. Do this using a channel labelpresented in the previous list. The command will look like:
satellite-sync -c rhel-i386-as-3 --mount-point /var/rhn-sat-import
8/14/2019 RHN Satellite en 410
http://slidepdf.com/reader/full/rhn-satellite-en-410 51/80
Chapter 6. Importing and Synchronizing 47
Note
Importing package data can take up to two hours per channel. You may begin registeringsystems to channels as soon as they appear in the RHN Satellite Server’s website. No
packages are necessary for registration, although updates cannot be retrieved from theSatellite until the channel is completely populated.
You may repeat this step for each channel or include them all within a single command bypassing each channel label preceded by an additional -c flag, like so:
s
atellite-sync -c channel-label-1 \
-c channel-label-2 \
--mount-point /var/rhn-sat-import
This conducts the following tasks in this order:
1. Populating the tables describing common features for channels (channel families). This can also be accomplished individually by passing the--step=channel-families option to satellite-sync.
2. Creating a particular channel in the database and importing the metadata describingthe channel. Individually, use the --step=channels option.
3. Moving the RPM packages from the temporary repository into their final location.Individually, use the --step=rpms option.
4. Parsing the header metadata for each package in the channel, uploading the packagedata, and associating it with the channel. Individually, use the --step= packages
option.
5. Identifying Errata associated with the packages and including them in the repository.Individually, use the --step=errata option.
After running the preceding sample command, the population of the channel should becomplete. All of the packages should have been moved out of the repository; this can be
verified with the command cd /var/rhn-sat-import/; ls -alR | grep rpm. If all RPMs have been installed and moved to their permanent locations, then this count willbe zero, and the administrator may safely remove the temporary repository (in this case,/var/rhn-sat-import/).
6.3. Synchronizing
An update channel is only as useful as the freshness of the information in that channel.
Since the RHN Satellite Server is designed to be a standalone environment, any update
8/14/2019 RHN Satellite en 410
http://slidepdf.com/reader/full/rhn-satellite-en-410 52/80
48 Chapter 6. Importing and Synchronizing
advisories published by RHN must be manually imported and synchronized by the admin-istrator of the RHN Satellite Server.
During synchronization over the Internet, the RHN Satellite Synchronization Tool per-forms the following steps:
1. Connects over SSL to central RHN Servers, authenticates itself as an RHN Satel-lite Server, and triggers an export of RHN data — unless a local mount point forRHN-exported data is specified, in which case no connection is necessary. Referto Section 6.3.2 Synchronizing Errata and Packages via Local Media for an expla-nation.
2. Examines the export and identifies differences between the RHN Satellite Serverdata set and the exported RHN data set. For a particular channel, the following infor-mation is analyzed:
• Channel metadata
• Metadata of all packages in that channel
• Metadata for all Errata that affect that channel
Note
All analysis is performed on the RHN Satellite Server; the central RHN Servers
deliver only an export of its channel information and remain ignorant of any detailsregarding the RHN Satellite Server.
3. After the analysis of the export data, any differences are imported into the RHNSatellite Server database. Please note that importing new packages may take variablelengths of time. For a large update, an import can take many hours.
The satellite-sync command can be used in two modes: via RHN and via local media.
6.3.1. Synchronizing Errata and Packages Directly via RHNFor customers who want to sync data as frequently as possible and who can initiate con-nections outside of their own environments, the satellite sync can be run over the Internetthrough SSL. This is the default setting for the satellite sync script. For example:
satellite-sync -c rhel-i386-as-3
This connects to central Red Hat Network Servers and performs the process describedabove. Multiple channels can be included by repeating the option. If no channels are spec-ified, all channels on the Satellite will be refreshed.
8/14/2019 RHN Satellite en 410
http://slidepdf.com/reader/full/rhn-satellite-en-410 53/80
Chapter 6. Importing and Synchronizing 49
6.3.2. Synchronizing Errata and Packages via Local Media
For customers who cannot connect their Satellite directly to RHN, RedHat recommends downloading Channel Content ISOs to a separate,
Internet-connected system and then transferring them to the Satellite. Refer toSection 6.2.2.1 Preparing Channel Content ISOs for instructions on downloading theISOs. For ease of import, we recommend that the data be copied from media directly intoa common repository through a command such as the following:
cp -rv /mnt/cdrom/* /var/rhn-sat-sync/
Then, the following command:
satellite-sync -c rhel-i386-as-3 --mount-point /var/rhn-sat-sync
This can be used to perform the sync process described above, using the dump files in/var/rhn-sat-sync to perform the necessary comparisons and imports. SeeSection 6.2.3 Running the Import for precise steps.

8/14/2019 RHN Satellite en 410
http://slidepdf.com/reader/full/rhn-satellite-en-410 54/80
50 Chapter 6. Importing and Synchronizing
8/14/2019 RHN Satellite en 410
http://slidepdf.com/reader/full/rhn-satellite-en-410 55/80
Chapter 7.
TroubleshootingThis chapter provides tips for determining the cause of and resolving the most commonerrors associated with RHN Satellite Server. If you need additional help, contact Red HatNetwork support at https://rhn.redhat.com/help/contact.pxt. Log in using your Satellite-entitled account to see your full list of options.
In addition, you may package configuration information and logs fromthe Satellite and send them to Red Hat for further diagnosis. Refer toSection 7.5 Satellite Debugging by Red Hat for instructions.
7.1. Log Files
Virtually every troubleshooting step should start with a look at the associated log file orfiles. These provide invaluable information about the activity that has taken place on thedevice or within the application that can be used to monitor performance and ensure properconfiguration. See Table 7-1 for the paths to all relevant log files:
Component/Task Log File LocationApache HTTP Server /var/log/httpd/ directory
RHN Satellite Server /var/log/rhn/ directory
RHN Satellite ServerInstallation Program
/var/log/rhn_satellite_install.log
Database installation - Embedded Database
/var/log/rhn/rhn-database-installation.log
Database population/var/log/rhn/populate_db.log
RHN SatelliteSynchronization Tool
/var/log/rhn/rhn_server_satellite.log
Monitoring infrastructure /home/nocpulse/var/ directory
Monitoring notifications /opt/notification/var/ directory
RHN DB Control - Embedded Database
/var/log/rhn/rhn_database.log
RHN Task Engine
(taskomatic)
/var/log/messages
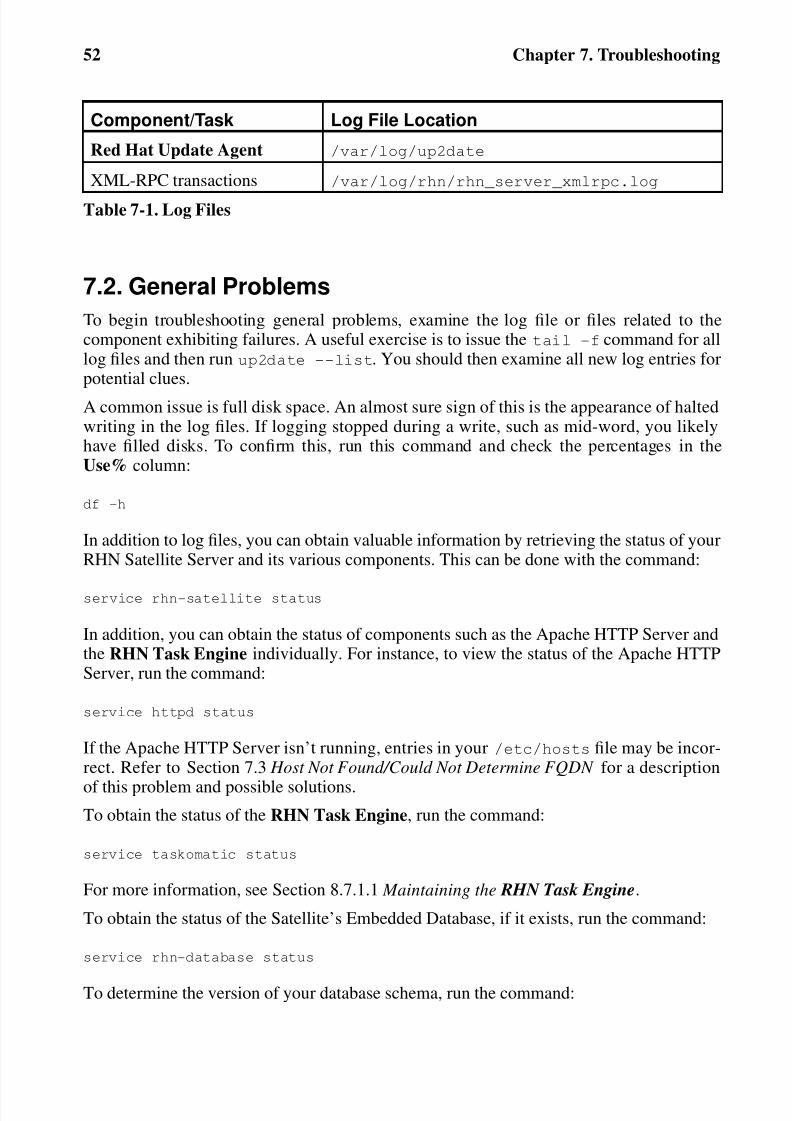
8/14/2019 RHN Satellite en 410
http://slidepdf.com/reader/full/rhn-satellite-en-410 56/80
52 Chapter 7. Troubleshooting
Component/Task Log File Location
Red Hat Update Agent /var/log/up2date
XML-RPC transactions /var/log/rhn/rhn_server_xmlrpc.log
Table 7-1. Log Files
7.2. General Problems
To begin troubleshooting general problems, examine the log file or files related to thecomponent exhibiting failures. A useful exercise is to issue the tail -f command for alllog files and then run up2date --list. You should then examine all new log entries forpotential clues.
A common issue is full disk space. An almost sure sign of this is the appearance of haltedwriting in the log files. If logging stopped during a write, such as mid-word, you likelyhave filled disks. To confirm this, run this command and check the percentages in theUse% column:
df -h
In addition to log files, you can obtain valuable information by retrieving the status of yourRHN Satellite Server and its various components. This can be done with the command:
service rhn-satellite status
In addition, you can obtain the status of components such as the Apache HTTP Server andthe RHN Task Engine individually. For instance, to view the status of the Apache HTTPServer, run the command:
service httpd status
If the Apache HTTP Server isn’t running, entries in your /etc/hosts file may be incor-rect. Refer to Section 7.3 Host Not Found/Could Not Determine FQDN for a description
of this problem and possible solutions.
To obtain the status of the RHN Task Engine, run the command:
service taskomatic status
For more information, see Section 8.7.1.1 Maintaining the RHN Task Engine.
To obtain the status of the Satellite’s Embedded Database, if it exists, run the command:
service rhn-database status
To determine the version of your database schema, run the command:
8/14/2019 RHN Satellite en 410
http://slidepdf.com/reader/full/rhn-satellite-en-410 57/80
Chapter 7. Troubleshooting 53
rhn-schema-version
To derive the character set types of your Satellite’s database, run the command:
rhn-charsets
If the administrator is not getting email from the RHN Satellite Server, confirm the correctemail addresses have been set for traceback_mail in /etc/rhn/rhn.conf.
If the traceback mail is marked from [email protected] and you would like theaddress to be valid for your organization, include the web.default_mail_from optionand appropriate value in /etc/rhn/rhn.conf.
If importing/synchronizing a channel fails and you can’t recover it in any other way, runthis command to delete the cache:
rm -rf temporary-directory
Note that Section 6.2.2.1 Preparing Channel Content ISOs suggested that this temporarydirectory be /var/rhn-sat-import/.
Next, restart the importation or synchronization.
If up2date or the push capability of the RHN Satellite Server ceases to function, it ispossible that old log files may be at fault. Stop the jabberd daemon before removing thesefiles. To do so, issue the following commands as root:
service jabberd stop
cd /var/lib/jabberd
rm -f _db*
service jabberd start
7.3. Host Not Found/Could Not Determine FQDN
Because RHN configuration files rely exclusively on fully qualified domain names(FQDN), it is imperative key applications are able to resolve the name of the RHNSatellite Server into an IP address. Red Hat Update Agent, Red Hat NetworkRegistration Client, and the Apache HTTP Server are particularly prone to this problemwith the RHN applications issuing errors of "host not found" and the Web server stating"Could not determine the server’s fully qualified domain name" upon failing to start.
This problem typically originates from the /etc/hosts file. You may confirm this byexamining /etc/nsswitch.conf, which defines the methods and the order by whichdomain names are resolved. Usually, the /etc/hosts file is checked first, followed byNetwork Information Service (NIS) if used, followed by DNS. One of these has to succeedfor the Apache HTTP Server to start and the RHN client applications to work.
8/14/2019 RHN Satellite en 410
http://slidepdf.com/reader/full/rhn-satellite-en-410 58/80
54 Chapter 7. Troubleshooting
To resolve this problem, identify the contents of the /etc/hosts file. It may look likethis:
127.0.0.1 this_machine.example.com this_machine localhost.localdomain \
localhost
First, in a text editor, remove the offending machine information, like so:
127.0.0.1 localhost.localdomain.com localhost
Then, save the file and attempt to re-run the RHN client applications or the Apache HTTPServer. If they still fail, explicitly identify the IP address of the Satellite in the file, such as:
127.0.0.1 localhost.localdomain.com localhost
123.45.67.8 this_machine.example.com this_machine
Replace the value here with the actual IP address of the Satellite. This should resolve theproblem. Keep in mind, if the specific IP address is stipulated, the file will need to beupdated when the machine obtains a new address.
7.4. Connection Errors
A common connection problem, indicated by SSL_CONNECT errors, is the result of aSatellite being installed on a machine whose time had been improperly set. During theSatellite installation process, SSL certificates are created with inaccurate times. If the Satel-lite’s time is then corrected, the certificate start date and time may be set in the future,making it invalid.
To troubleshoot this, check the date and time on the clients and the Satellite with the fol-lowing command:
date
The results should be nearly identical for all machines and within the "notBefore" and
"notAfter" validity windows of the certificates. Check the client certificate dates and timeswith the following command:
openssl x509 -dates -noout -in /usr/share/rhn/RHN-ORG-TRUSTED-SSL-CERT
Check the Satellite server certificate dates and times with the following command:
openssl x509 -dates -noout -in /etc/httpd/conf/ssl.crt/server.crt
By default, the server certificate has a one-year life while client certificates are good for 10years. If you find the certificates are incorrect, you can either wait for the valid start time,
if possible, or create new certificates, preferably with all system times set to GMT.

8/14/2019 RHN Satellite en 410
http://slidepdf.com/reader/full/rhn-satellite-en-410 59/80
Chapter 7. Troubleshooting 55
The following measures can be used to troubleshoot general connection errors:
• Attempt to connect to the RHN Satellite Server’s database at the command line usingthe correct connection string as found in /etc/rhn/rhn.conf:sqlplus username/password@sid
• Ensure the RHN Satellite Server is using Network Time Protocol (NTP) and set to theappropriate time zone. This also applies to all client systems and the separate databasemachine in RHN Satellite Server with Stand-Alone Database.
• Confirm the correct package:rhn-org-httpd-ssl-key-pair-MACHINE_NAME-VER-REL.noarch.rpm
is installed on the RHN Satellite Server and the correspondingrhn-org-trusted-ssl-cert-*.noarch.rpm or raw CA SSL public (client)
certificate is installed on all client systems.• Verify the client systems are configured to use the appropriate certificate.
• If also using one or more RHN Proxy Servers, ensure each Proxy’s SSL certificates areprepared correctly. The Proxy should have both its own server SSL key-pair and CA SSLpublic (client) certificate installed, since it will serve in both capacities. Refer to the SSLCertificates chapter of the RHN Client Configuration Guide for specific instructions.
• Make sure client systems are not using firewalls of their own, blocking required ports asidentified in Section 2.4 Additional Requirements.
7.5. Satellite Debugging by Red Hat
If you’ve exhausted these troubleshooting steps or want to defer them to Red Hat Network professionals, Red Hat recommends you take advantage of the strong support that comeswith RHN Satellite Server. The most efficient way to do this is to aggregate your Satellite’sconfiguration parameters, log files, and database information and send this package directlyto Red Hat.
RHN provides a command line tool explicitly for this purpose: The Satellite Diagnostic
Info Gatherer, commonly known by its commandsatellite-debug
. To use this tool,issue the command as root. You will see the pieces of information collected and the singletarball created, like so:
[root@miab root]# satellite-debug
Collecting and packaging relevant diagnostic information.
Warning: this may take some time...
* copying configuration information
* copying logs
* querying RPM database (versioning of RHN Satellite, etc.)
* querying schema version and database character sets
* get diskspace available* timestamping

8/14/2019 RHN Satellite en 410
http://slidepdf.com/reader/full/rhn-satellite-en-410 60/80
56 Chapter 7. Troubleshooting
* creating tarball (may take some time): /tmp/satellite-debug.tar.bz2
* removing temporary debug tree
Debug dump created, stored in /tmp/satellite-debug.tar.bz2
Deliver the generated tarball to your RHN contact or support channel.
Once finished, email the new file from the /tmp/ directory to your Red Hat representativefor immediate diagnosis.
8/14/2019 RHN Satellite en 410
http://slidepdf.com/reader/full/rhn-satellite-en-410 61/80
Chapter 8.
MaintenanceBecause of the RHN Satellite Server’s unique closed environment, its users are providedwith abilities not available to any other Red Hat Network customers. In addition, the Satel-lite itself also requires maintenance. This chapter discusses the procedures that should befollowed to carry out administrative functions outside of standard use, as well as to applypatches to the RHN Satellite Server.
8.1. Managing the Satellite ServiceSince the RHN Satellite Server consists of a multitude of individual components, Red Hatprovides a master service that allows you to stop, start, or retrieve status information fromthe various services in the appropriate order: rhn-satellite. This helper service acceptsall of the typical commands:
service rhn-satellite start
service rhn-satellite stop
service rhn-satellite restart
service rhn-satellite status
Use the rhn-satellite service to shut down and bring up the entire RHN Satellite Serverand retrieve status messages from all of its services at once.
8.2. Updating the Satellite
If any critical updates are made to RHN Satellite Server, they will be released in the formof an Erratum for the RHN Satellite Server.
For RHN Satellite Server systems that may be connected to the Internet, the best method for
applying these Errata Updates is using the Red Hat Update Agent via Red Hat Network.Since the RHN Satellite Server is subscribed to Red Hat Network during initial installation,the user should be able to run up2date -u on the RHN Satellite Server or use the websiteat https://rhn.redhat.com to apply the updates.
Important
Apache RPMs do not restart the httpd service upon installation. Therefore, after conduct-ing a full update of an RHN Satellite Server (such as with the command up2date -uf),
Apache may fail. To avoid this, make sure you restart the httpd service after upgrading it.
8/14/2019 RHN Satellite en 410
http://slidepdf.com/reader/full/rhn-satellite-en-410 62/80
58 Chapter 8. Maintenance
For RHN Satellite Server systems that may not be connected to the Internet, the packagesthemselves may be retrieved using a customer account at https://rhn.redhat.com. Then, they
can be applied manually by the customer according to instructions in the Errata Advisory.
Warning
It is very important to read the Errata Advisory before applying any RHN Satellite ServerErrata Updates. Additional configuration steps may be required to apply certain RHNSatellite Server updates, especially if they involve the database. In such cases, the ad-visory will contain specific and detailed information about necessary steps that may berequired.
If instead of installing new Satellite packages, you are attempting to update the server’sRHN Entitlement Certificate, such as to increase its number of client systems, refer toChapter 5 Entitlements for instructions.
8.3. Backing Up the Satellite
Backing up an RHN Satellite Server can be done in several ways. Regardless of the method
chosen, the associated database also needs to be backed up. For the Stand-Alone Database,consult your organization’s database administrator. For the Embedded Database, refer toSection 8.4 Using RHN DB Control for a complete description of this process and the op-tions available.
Here are the minimum files and directories Red Hat recommends backing up:
• /rhnsat/ - Embedded Database only (never to be backed up while the database isrunning - refer to Section 8.4.2 Backing up the Database)
• /etc/sysconfig/rhn/
• /etc/rhn/
• /etc/tnsnames.ora
• /var/www/html/pub/
• /var/satellite/redhat/1 - custom RPMs
• /etc/pxtdb.conf - pertains only to RHN Satellite Server 1.1.x.
• /root/ssl-build/
If possible, back up /var/satellite/, as well. In case of failure, this
will save lengthy download time. Since /var/satellite/ (specifically
8/14/2019 RHN Satellite en 410
http://slidepdf.com/reader/full/rhn-satellite-en-410 63/80
Chapter 8. Maintenance 59
/var/satellite/redhat/NULL/) is primarily a duplicate of Red Hat’s RPMrepository, it can be regenerated with satellite-sync. Red Hat recommends theentire /var/satellite/ tree be backed up. In the case of disconnected satellites,/var/satellite/ must be backed up.
Backing up only these files and directories would require reinstalling the RHNSatellite Server ISO RPMs and reregistering the Satellite. In addition, RedHat packages would need to be resynchronized using the satellite-sync
tool. Finally, you would have to reinstall the /root/ssl-build/\
rhn-org-httpd-ssl-key-pair-MACHINE_NAME-VER-REL.noarch.rpm.
Another method would be to back up all of the files and directories mentioned above butreinstall the RHN Satellite Server without reregistering it. During the installation, cancelor skip the RHN registration and SSL certificate generation sections.
The final and most comprehensive method would be to back up the entire machine. This
would save time in downloading and reinstalling but would require additional disk spaceand back up time.
8.4. Using RHN DB Control
RHN Satellite Server with Embedded Database requires a utility for managing thatdatabase. Red Hat provides just such a tool: RHN DB Control. This command line utilityallows you to do everything from make, verify, and restore backups to obtain databasestatus and restart it when necessary. You must be the oracle user to invoke RHN DBControl. To begin, switch to the oracle user:
su - oracle
Next, issue the following command:
db-control option
8.4.1. DB Control Options
RHN DB Control offers many command line options. To use them, as oracle insert theoption and the appropriate value, if needed, after the db-control command.
Option Description
help Lists these db-control options withadditional details.
backup DIRNAME Backs up the database to the directory specified.
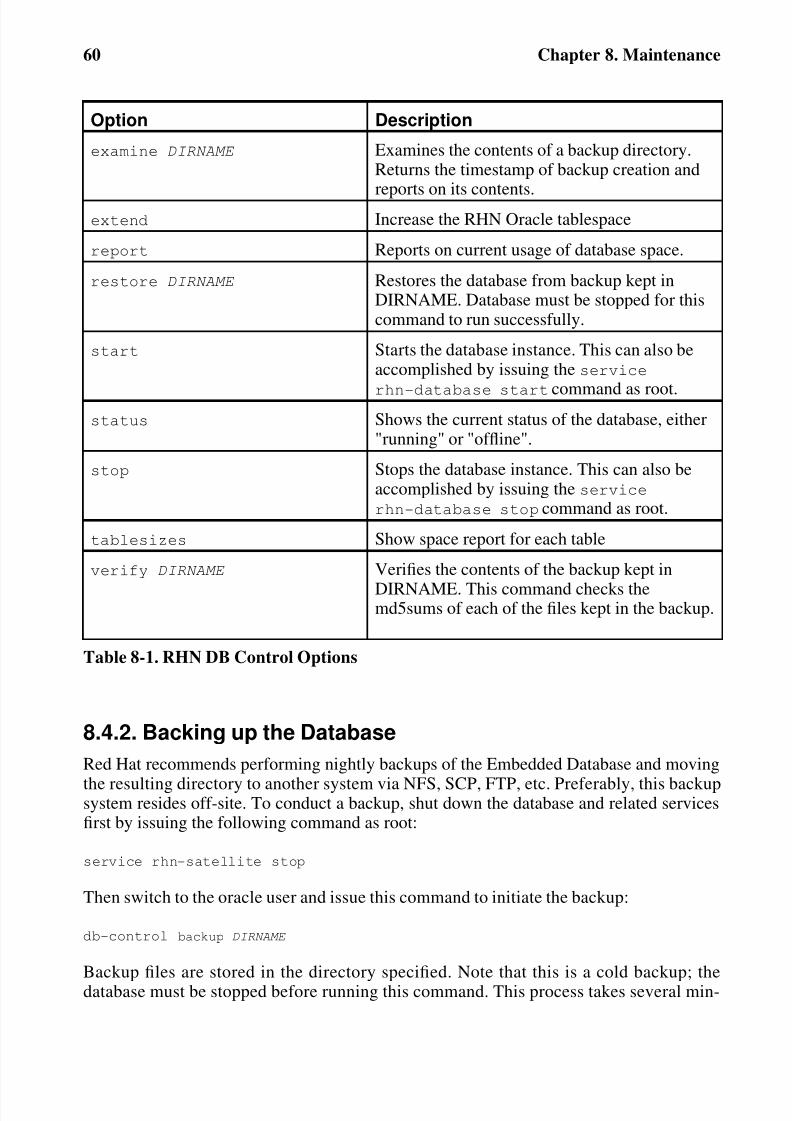
8/14/2019 RHN Satellite en 410
http://slidepdf.com/reader/full/rhn-satellite-en-410 64/80
60 Chapter 8. Maintenance
Option Description
examine DIRNAME Examines the contents of a backup directory.Returns the timestamp of backup creation and
reports on its contents.extend Increase the RHN Oracle tablespace
report Reports on current usage of database space.
restore DIRNAME Restores the database from backup kept inDIRNAME. Database must be stopped for thiscommand to run successfully.
start Starts the database instance. This can also beaccomplished by issuing the service
rhn-database start command as root.
status Shows the current status of the database, either"running" or "offline".
stop Stops the database instance. This can also beaccomplished by issuing the service
rhn-database stop command as root.
tablesizes Show space report for each table
verify DIRNAME Verifies the contents of the backup kept in
DIRNAME. This command checks themd5sums of each of the files kept in the backup.
Table 8-1. RHN DB Control Options
8.4.2. Backing up the Database
Red Hat recommends performing nightly backups of the Embedded Database and moving
the resulting directory to another system via NFS, SCP, FTP, etc. Preferably, this backupsystem resides off-site. To conduct a backup, shut down the database and related servicesfirst by issuing the following command as root:
service rhn-satellite stop
Then switch to the oracle user and issue this command to initiate the backup:
db-control backup DIRNAME
Backup files are stored in the directory specified. Note that this is a cold backup; thedatabase must be stopped before running this command. This process takes several min-
8/14/2019 RHN Satellite en 410
http://slidepdf.com/reader/full/rhn-satellite-en-410 65/80
Chapter 8. Maintenance 61
utes. The first backup is a good indicator of how long subsequent backups will take.
Once the backup is complete, return to root user mode and restart the database and relatedservices with the following command:
service rhn-satellite start
You should then copy that backup to another system using rsync or another file-transferutility. Red Hat strongly recommends scheduling the backup process automatically usingcron jobs. For instance, back up the system at 3 a.m. and then copy the backup to theseparate repository (partition, disk, or system) at 6 a.m.
8.4.3. Verifying the Backup
Backing up the Embedded Database is useful only if you can ensure the integrity of the re-sulting backup. RHN DB Control provides two methods for reviewing backups, one brief,one more detailed. To conduct a quick check of the backup’s timestamp and determine anymissing files, issue this command as oracle:
db-control examine DIRNAME
To conduct a more thorough review, including checking the md5sum of each of the files inthe backup, issue this command as oracle:
db-control verify DIRNAME
8.4.4. Restoring the Database
RHN DB Control makes Embedded Database restoration a relatively simple process. Asin the creation of backups, you will need to shut down the database and related servicesfirst by issuing the following commands in this order as root:
service rhn-satellite stop
Then switch to the oracle user and issue this command, including the directory containingthe backup, to begin the restoration:
db-control restore DIRNAME
This not only restores the Embedded Database but first verifies the contents of the backupdirectory using md5sums. Once the restoration is complete, return to root user mode andrestart the database and related services with these commands in this order:
service rhn-satellite start
8/14/2019 RHN Satellite en 410
http://slidepdf.com/reader/full/rhn-satellite-en-410 66/80
62 Chapter 8. Maintenance
8.5. Cloning the Satellite with Embedded DB
You may limit outages caused by hardware or other failures by cloning the Satellite withEmbedded Database in its entirety. The secondary Satellite machine can be prepared for
use if the primary fails. To clone the Satellite, perform these tasks:
1. Install RHN Satellite Server with Embedded Database (and a base install of Red HatEnterprise Linux AS) on a separate machine, skipping the SSL Certificate generationstep.
2. Back up the primary Satellite’s database daily using the commands described inSection 8.4.2 Backing up the Database. If this is done, only changes made the dayof the failure will be lost.
3. Establish a mechanism to copy the backup to the secondary Satellite and keep these
repositories synchronized using a file transfer program such as rsync. If you’re usinga SAN, copying isn’t necessary.
4. Use RHN DB Control’s restore option to import the duplicate data.
5. If the primary Satellite fails, transfer the SSL certificates from it to the secondary.Refer to the Sharing Certificates section of the RHN Client Configuration Guide forprecise instructions.
6. Change DNS to point to the new machine or configure your load balancer appropri-ately.
8.6. Establishing Redundant Satellites with Stand-AloneDB
In keeping with the cloning option available to Satellite with Embedded Database, you maylimit outages on Satellites with Stand-Alone Database by preparing redundant Satellites.Unlike cloning a Satellite with Embedded Database, redundant Satellites with Stand-AloneDatabase may be run as active, as well as standby. This is entirely up to your network topology and is independent of the steps listed here.
To establish this redundancy, first install the primary Satellite normally, except the valuespecified in the Common Name field for the SSL certificate must represent your high-availability configuration, rather than the hostname of the individual server. Then:
1. Prepare the Stand-Alone Database for failover using Oracle’s recommendations forbuilding a fault-tolerant database. Consult your database administrator.
2. Install RHN Satellite Server with Stand-Alone Database (and a base install of RedHat Enterprise Linux AS) on a separate machine, skipping the database configura-tion, database schema, SSL certificate, and bootstrap script generation steps. Include
the same RHN account and database connection information provided during theinitial Satellite install and register the new Satellite.

8/14/2019 RHN Satellite en 410
http://slidepdf.com/reader/full/rhn-satellite-en-410 67/80
Chapter 8. Maintenance 63
If your original SSL certificate does not take your high-availability solution intoaccount, you may create a new one with a more appropriate Common Name valuenow. In this case, you may also generate a new bootstrap script that captures this newvalue.
3. After installation, copy the following files from the primary Satellite to the secondarySatellite:
• /etc/rhn/rhn.conf
• /etc/tnsnames.ora
• /var/www/rhns/server/secret/rhnSecret.py
4. Copy and install the server-side SSL certificate RPMs from the primary Satellite to
the secondary. Refer to the Sharing Certificates section of the RHN Client Config-uration Guide for precise instructions. Remember, the Common Name value mustrepresent the combined Satellite solution, not a single machine’s hostname.
If you generated a new SSL certificate during Satellite installation that included anew Common Name value, copy the SSL certificate RPMs from the secondary tothe primary Satellite and redistribute the client-side certificate. If you also createdanother bootstrap script, you may use this to install the certificate on client systems.
5. If you did not create a new bootstrap script, copy the contents of /var/www/html/pub/bootstrap/ from the primary Satellite to the secondary. If you did generate a new one, copy that directory’s contents to the primary Satellite.
6. Turn off the RHN Task Engine on the secondary Satellite with the following com-mand:/sbin/service taskomatic stop
You may use custom scripting or other means to establish automatic start-up/failoverof the RHN Task Engine on the secondary Satellite. Regardless, it will need to bestarted upon failover.
7. Share channel package data (by default located in /var/satellite) between theSatellites over some type of networked storage device. This eliminates data replica-
tion and ensures a consistent store of data for each Satellite.8. Make the various Satellites available on your network via Common Name and a
method suiting your infrastructure. Options include round-robin DNS, a network load balancer, and a reverse-proxy setup.
8.7. Conducting Satellite-Specific Tasks
Using a RHN Satellite Server is quite similar to using the hosted version of Red Hat Net-work. For this reason, you should consult the RHN Reference Guide to obtain detailed in-structions to standard tasks, such as editing System Profiles and updating packages. Tasks
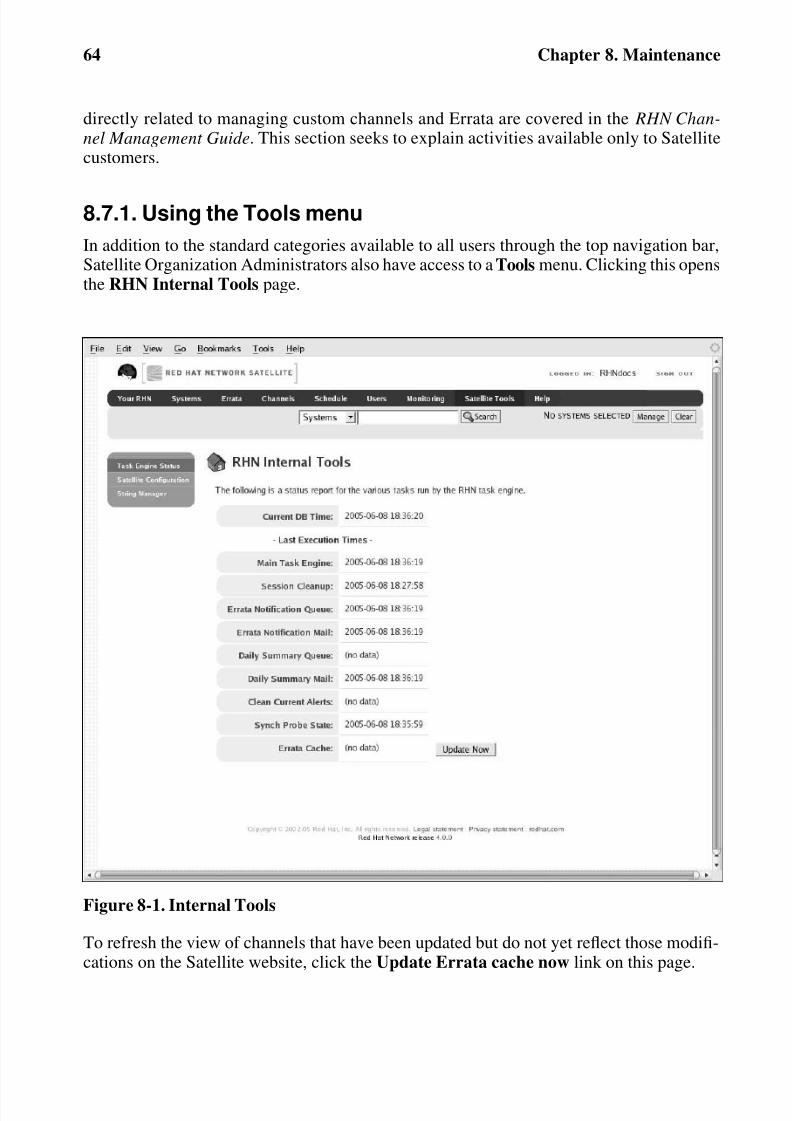
8/14/2019 RHN Satellite en 410
http://slidepdf.com/reader/full/rhn-satellite-en-410 68/80
64 Chapter 8. Maintenance
directly related to managing custom channels and Errata are covered in the RHN Chan-nel Management Guide. This section seeks to explain activities available only to Satellitecustomers.
8.7.1. Using the Tools menu
In addition to the standard categories available to all users through the top navigation bar,Satellite Organization Administrators also have access to a Tools menu. Clicking this opensthe RHN Internal Tools page.
Figure 8-1. Internal Tools
To refresh the view of channels that have been updated but do not yet reflect those modifi-cations on the Satellite website, click the Update Errata cache now link on this page.
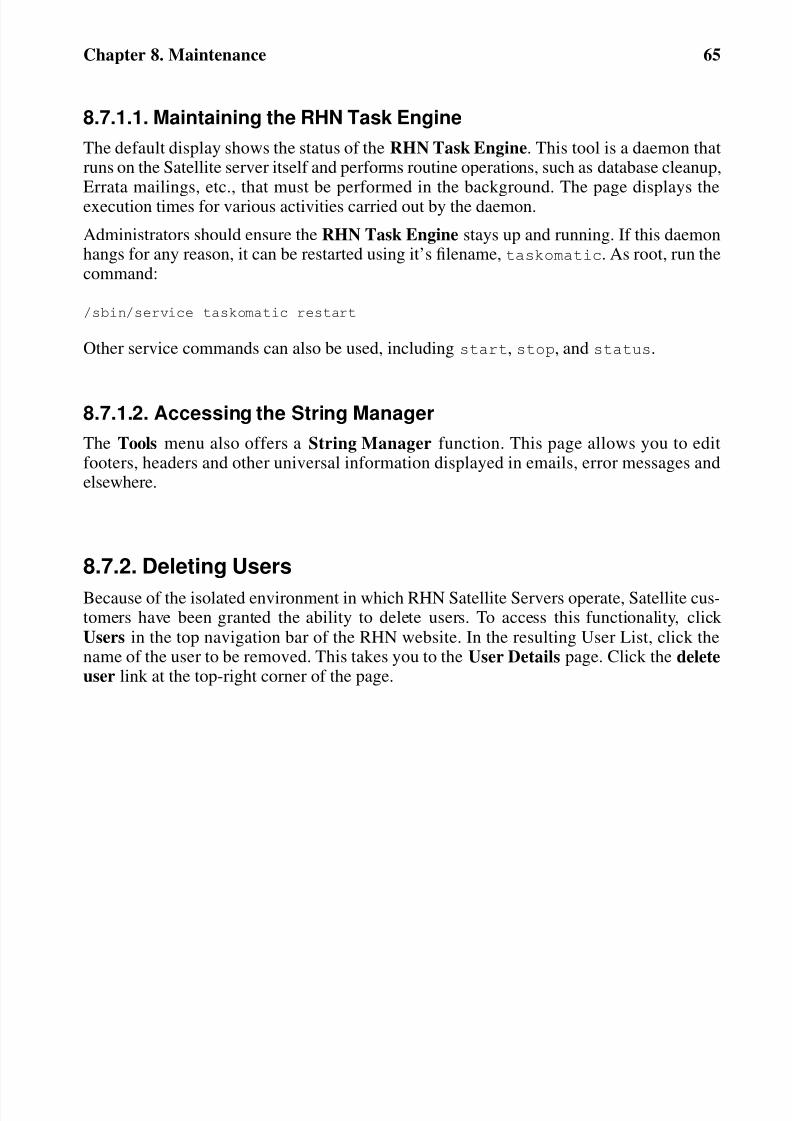
8/14/2019 RHN Satellite en 410
http://slidepdf.com/reader/full/rhn-satellite-en-410 69/80
Chapter 8. Maintenance 65
8.7.1.1. Maintaining the RHN Task Engine
The default display shows the status of the RHN Task Engine. This tool is a daemon thatruns on the Satellite server itself and performs routine operations, such as database cleanup,Errata mailings, etc., that must be performed in the background. The page displays theexecution times for various activities carried out by the daemon.
Administrators should ensure the RHN Task Engine stays up and running. If this daemonhangs for any reason, it can be restarted using it’s filename, taskomatic. As root, run thecommand:
/sbin/service taskomatic restart
Other service commands can also be used, including start, stop, and status.
8.7.1.2. Accessing the String Manager
The Tools menu also offers a String Manager function. This page allows you to editfooters, headers and other universal information displayed in emails, error messages andelsewhere.
8.7.2. Deleting Users
Because of the isolated environment in which RHN Satellite Servers operate, Satellite cus-tomers have been granted the ability to delete users. To access this functionality, click Users in the top navigation bar of the RHN website. In the resulting User List, click thename of the user to be removed. This takes you to the User Details page. Click the deleteuser link at the top-right corner of the page.
8/14/2019 RHN Satellite en 410
http://slidepdf.com/reader/full/rhn-satellite-en-410 70/80
66 Chapter 8. Maintenance
Figure 8-2. User Deletion
A confirmation page appears explaining that this removal is permanent. To continue, click Delete User at the bottom-right corner of the page.
Note
The Organization Administrator role must be removed from the user’s profile before delet-ing the user from the RHN Satellite Server. Failing to do so causes the delete operationto fail.
The Organization Administrator role may be removed by any Organization Administrator
(provided they are not the sole Organization Administrator for the organization) by clickingon the Users tab and then visiting the Details sub-tab.

8/14/2019 RHN Satellite en 410
http://slidepdf.com/reader/full/rhn-satellite-en-410 71/80
Chapter 8. Maintenance 67
Figure 8-3. User Delete Confirmation
Many other options exist for managing users. You can find instructions for them in theRHN website chapter of the RHN Reference Guide.
8.8. Automating Synchronization
Manually synchronizing the RHN Satellite Server repository with Red Hat Network can bea time-intensive task. United States business hours tend to be the peak usage time for RedHat Network, so synchronization at that time may be slow. For these reasons, Red Hat en-
courages you to automate synchronization at other times to better balance load and ensurequick synchronization. Continental United States business hours are roughly 8:00 AM to9:00 PM EST (UTC -5), due to four time zones, Monday through Friday. These hours mayvary seasonally by one hour. Further, Red Hat strongly recommends that synchronizationoccur randomly for best performance.
This automation can be set easily by the addition of a simple cron job. To do this, edit thecrontab as root:
crontab -e
8/14/2019 RHN Satellite en 410
http://slidepdf.com/reader/full/rhn-satellite-en-410 72/80
8/14/2019 RHN Satellite en 410
http://slidepdf.com/reader/full/rhn-satellite-en-410 73/80
Chapter 8. Maintenance 69
Please note that changing the password on the RHN website changes only the local pass-word on the RHN Satellite Server, which may not be used at all if PAM is enabled for thatuser. In the above example, for instance, the Kerberos password will not be changed.
8.10. Enabling Push to Clients
In addition to allowing client systems to regularly poll the Satellite for scheduled actions,you may enable the Satellite to immediately initiate those tasks on Provisioning-entitledsystems. This bypasses the typical delay between scheduling an action and the client sys-tem checking in with RHN to retrieve it.
ImportantSSL must be employed between the Satellite and its clients systems for this feature towork. If the SSL certificates are not available, the daemon on the client system fails toconnect.
To take advantage of this feature, you must first configure your firewall rules to allowconnections on the required port(s), as described in Section 2.4 Additional Requirements.
Then you must install the osa-dispatcher package, which can be found in the RHNSatellite Server software channel for the Satellite within the central RHN website. Onceinstalled, start the service on the Satellite as root using the command:
service osa-dispatcher start
Finally, install the osad package on all client systems to receive pushed actions. The pack-age can be found within the RHN Tools child channel for the systems on the RHN SatelliteServer. Once installed, start the service on the client systems as root using the command:
service osad start
Like other services, osa-dispatcher and osad accept stop, restart, and statuscommands, as well.
Keep in mind, this feature depends on the client system recognizing the fully qualifieddomain name (FQDN) of the Satellite. This name and not the IP address of the servermust be used when configuring the Red Hat Update Agent. Refer to the RHN Client Configuration Guide for details.
Now when you schedule actions from the Satellite on any of the push-enabled systems, thetask will begin immediately rather than wait for the system to check in.

8/14/2019 RHN Satellite en 410
http://slidepdf.com/reader/full/rhn-satellite-en-410 74/80
70 Chapter 8. Maintenance
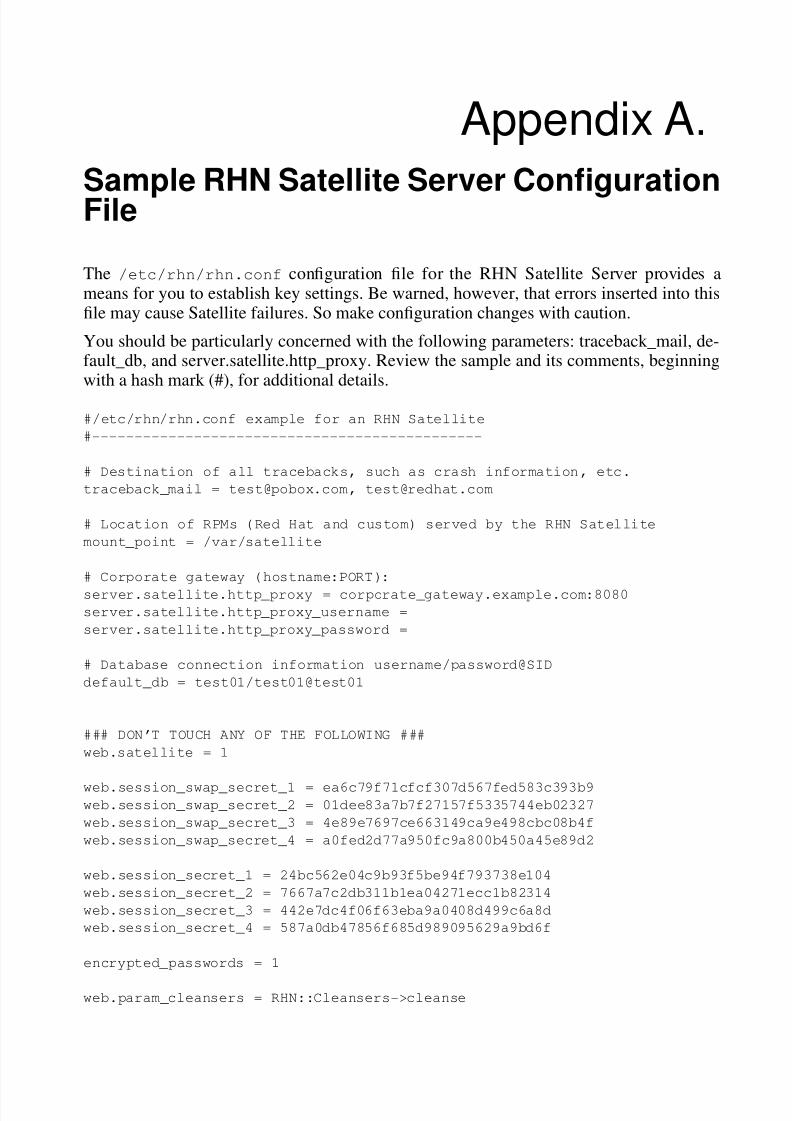
8/14/2019 RHN Satellite en 410
http://slidepdf.com/reader/full/rhn-satellite-en-410 75/80
Appendix A.
Sample RHN Satellite Server ConfigurationFile
The /etc/rhn/rhn.conf configuration file for the RHN Satellite Server provides ameans for you to establish key settings. Be warned, however, that errors inserted into thisfile may cause Satellite failures. So make configuration changes with caution.
You should be particularly concerned with the following parameters: traceback_mail, de-fault_db, and server.satellite.http_proxy. Review the sample and its comments, beginningwith a hash mark (#), for additional details.
#/etc/rhn/rhn.conf example for an RHN Satellite
#----------------------------------------------
# Destination of all tracebacks, such as crash information, etc.
traceback_mail = [email protected], [email protected]
# Location of RPMs (Red Hat and custom) served by the RHN Satellite
mount_point = /var/satellite
# Corporate gateway (hostname:PORT):
server.satellite.http_proxy = corporate_gateway.example.com:8080
server.satellite.http_proxy_username =
server.satellite.http_proxy_password =
# Database connection information username/password@SID
default_db = test01/test01@test01
### DON’T TOUCH ANY OF THE FOLLOWING ###
web.satellite = 1
web.session_swap_secret_1 = ea6c79f71cfcf307d567fed583c393b9web.session_swap_secret_2 = 01dee83a7b7f27157f5335744eb02327
web.session_swap_secret_3 = 4e89e7697ce663149ca9e498cbc08b4f
web.session_swap_secret_4 = a0fed2d77a950fc9a800b450a45e89d2
web.session_secret_1 = 24bc562e04c9b93f5be94f793738e104
web.session_secret_2 = 7667a7c2db311b1ea04271ecc1b82314
web.session_secret_3 = 442e7dc4f06f63eba9a0408d499c6a8d
web.session_secret_4 = 587a0db47856f685d989095629a9bd6f
encrypted_passwords = 1
web.param_cleansers = RHN::Cleansers->cleanse
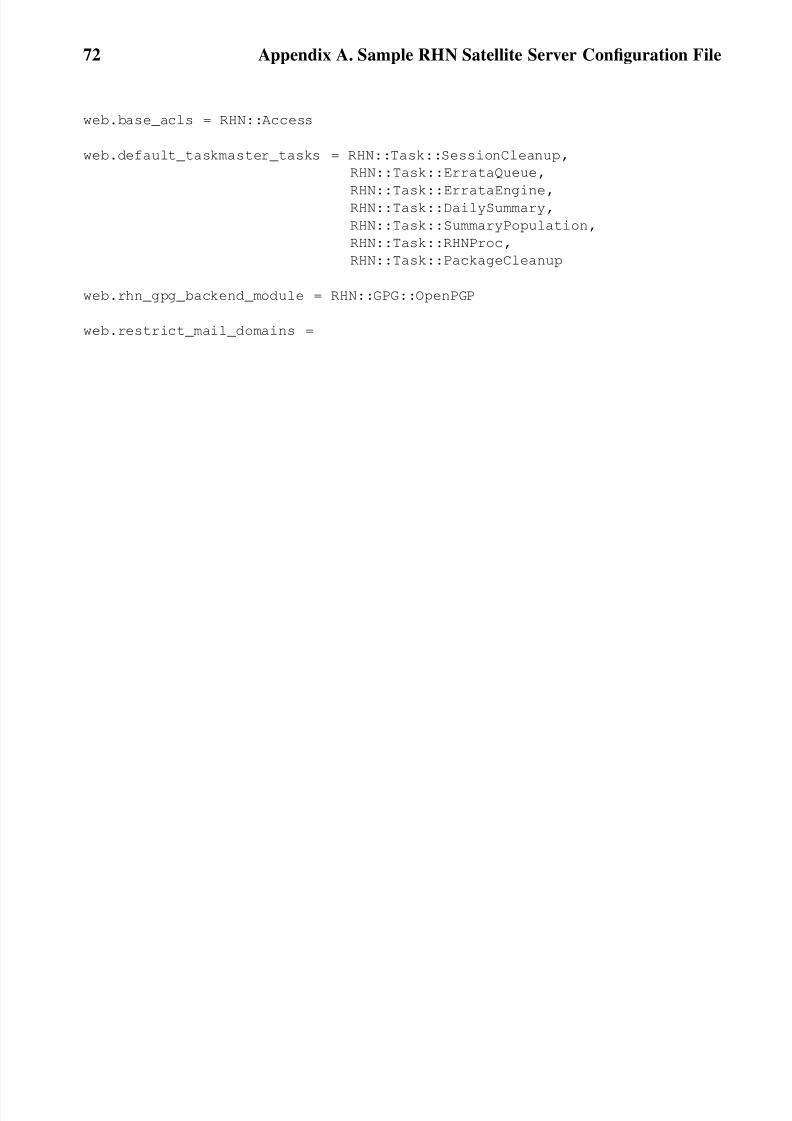
8/14/2019 RHN Satellite en 410
http://slidepdf.com/reader/full/rhn-satellite-en-410 76/80
72 Appendix A. Sample RHN Satellite Server Configuration File
web.base_acls = RHN::Access
web.default_taskmaster_tasks = RHN::Task::SessionCleanup,
RHN::Task::ErrataQueue,
RHN::Task::ErrataEngine,RHN::Task::DailySummary,
RHN::Task::SummaryPopulation,
RHN::Task::RHNProc,
RHN::Task::PackageCleanup
web.rhn_gpg_backend_module = RHN::GPG::OpenPGP
web.restrict_mail_domains =
8/14/2019 RHN Satellite en 410
http://slidepdf.com/reader/full/rhn-satellite-en-410 77/80
Index
Symbols /etc/nsswitch.conf, 53
/etc/rhn/rhn.conf, 53
A
advantages, 2
Apache, 57
Apache HTTP, 3
automating Satellite synchronization, 67
B
backing up the RHN Satellite Server, 58
C
channel
definition, 2
channel content
import process, 45
channel package
default location
/var/satellite/, 21
chkconfig, 15
cloning satellite, 62
connection errors, 54
D
database RPMs
default location
/opt/, 21
db-control
options, 59
db-control use, 59
disable services
ntsysvchkconfig, 15
E
embedded database
default location
/rhnsat/, 21enabling push to clients, 69
entitlement certificate, 14, 21
F
firewall rules, 13
Ggeneral problems, 52
GPG keys, 21
H
host not found error
could not determine FQDN, 53
how it works, 3httpd, 15
I
implementing PAM authentication, 68
import
channel content
process, 45
importing
satellite data, 39
importing data
placing Errata in repository, 47
populating the channel, 47
running the import, 46
INCLUDE
definition, 2
installation
base, 21MySQL, 33
8/14/2019 RHN Satellite en 410
http://slidepdf.com/reader/full/rhn-satellite-en-410 78/80
74
of RHN Satellite Server, 21
sendmail, 32
installation task list, 5
L
log files, 51
table, 51
M
maintenance, 57mysql-server, 33
N
Network Time Protocol, 13
ntsysv, 15
O
operating system
supported, 9
Oracle 9i R2, 3
Organization Administrator
definition, 2
osa-dispatcher, 69
osad, 69
P
port 443, 13
port 4545, 13
port 5222, 14
port 5269, 14
port 80, 13
R
Red Hat Network
introduction, 1
Red Hat Update Agent
definition, 2
redundant satellite, 62
requirements, 9
additional, 13
database, 11
hardware, 10
software, 9
RHN
components, 3
RHN DB Control
backup, 60
options, 59
restore, 61
verify, 61
RHN Entitlement Certificate
options, 37RHN Entitlement Certificates, 35
receiving, 35
RHN Satellite Activate, 37
RHN Satellite Server entitlement, 21
RHN Satellite Synchronization Tool, 41
options, 43
RHN Task Engine, 65, 65
rhn-satelliteservice, 57
rhn-satellite-activate, 37
activating, 37
options, 37
rhn.conf
sample file, 71
rhns-satellite-tools, 37, 46
rogerthat01@{mail domain}, 32
8/14/2019 RHN Satellite en 410
http://slidepdf.com/reader/full/rhn-satellite-en-410 79/80
75
S
satellite redundancy, 62
satellite-debug, 55
satellite-sync, 46, 48--step=channel-families, 47
--step=channels, 47
--step=rpms, 47
cron job, 67
sendmail, 15
summary of steps, 5
synchronizing
keeping channel data in sync, 47
satellite data, 39
T
terms to understand, 2
tool use, 63
topologies, 17
multiple satellites horizontally tiered, 18
satellite and proxies vertically tiered, 19
single satellite, 17
traceback, 3
definition, 2
troubleshooting, 51
/etc/hosts, 52
Embedded Database, 52
full disk space, 52
SSL_CONNECT errors, 54
traceback email address, 53
U
updating the RHN Satellite Server, 57

8/14/2019 RHN Satellite en 410
http://slidepdf.com/reader/full/rhn-satellite-en-410 80/80