Embed Size (px)
Citation preview
Rhapsody®
Tutorial
in Ada
tutorialada.book Page i Thursday, June 12, 2003 11:43 AM

tutorialada.book Page ii Thursday, June 12, 2003 11:43 AM
Rhapsody®
tutorialada.book Page i Thursday, June 12, 2003 11:43 AM
Tutorial for Rhapsody in Ada
Release 4.2
tutorialada.book Page ii Thursday, June 12, 2003 11:43 AM
I-Logix Inc.Three Riverside DriveAndover, Massachusetts 01810
The software described in this document is furnished under a license and may be used or copied only in accordance with the terms of such license. Rhapsody software contains proprietary information, as well as trade secrets of I-Logix Inc., and is protected under copyright law. Duplication of this manual, in whole or in part, is strictly prohibited, except with the prior written consent of I-Logix Inc.
The information in this manual is subject to change without notice, and I-Logix assumes no responsibility for any errors which may appear herein. No warranties, either expressed or implied, are made regarding Rhapsody software and its fitness for any particular purpose.
Rhapsody is a registered trademark of I-Logix Inc. I-Logix, and the I-Logix logo are trademarks of I-Logix Inc. Other products mentioned may be trademarks or registered trademarks of their respective companies.
Romeo Music International provides the sounds clips used in the Radio demo:Bali.wav, Bg_Clas1.wav, Bg_Jazz.wav, Bohm.wav, Drunken.wav, Heavymtl.wav, Ireland.wav, Latingrv.wav, Russia.wav, Stabs.wav, Tarrega.wav
OMG marks and logos are trademarks or registered trademarks, service marks and/or certification marks of Object Management Group, Inc. registered in the United States.
© and (P) Copyright 1989-1997
Romeo Music International
ALL RIGHTS RESERVED
© Copyright 2003 by I-Logix, Inc. All rights reserved.
Part No. 2446
tutorialada.book Page iii Thursday, June 12, 2003 11:43 AM
Preface
Document Structure . . . . . . . . . . . . . . . . . . . . . . . . . . . . . . . . . . . . . . . . . . . . . . ix
Conventions . . . . . . . . . . . . . . . . . . . . . . . . . . . . . . . . . . . . . . . . . . . . . . . . . . . . x
Documentation Set. . . . . . . . . . . . . . . . . . . . . . . . . . . . . . . . . . . . . . . . . . . . . . . xiRhapsody Documentation Set. . . . . . . . . . . . . . . . . . . . . . . . . . . . . . . . . . . . . xiReference Documentation. . . . . . . . . . . . . . . . . . . . . . . . . . . . . . . . . . . . . . . .xiiGetting Started with Rhapsody . . . . . . . . . . . . . . . . . . . . . . . . . . . . . . . . . . . xiiiRhapsody Samples . . . . . . . . . . . . . . . . . . . . . . . . . . . . . . . . . . . . . . . . . . . . xiiiRebuilding the GUI Samples . . . . . . . . . . . . . . . . . . . . . . . . . . . . . . . . . . . . . xvi
Contacting I-Logix . . . . . . . . . . . . . . . . . . . . . . . . . . . . . . . . . . . . . . . . . . . . . xviiUsing the Web or E-Mail . . . . . . . . . . . . . . . . . . . . . . . . . . . . . . . . . . . . . . . .xviiUsing the Phone or Fax. . . . . . . . . . . . . . . . . . . . . . . . . . . . . . . . . . . . . . . . xviii
Introduction
UML Analysis Tools . . . . . . . . . . . . . . . . . . . . . . . . . . . . . . . . . . . . . . . . . . . . .1-1
UML Design Tools . . . . . . . . . . . . . . . . . . . . . . . . . . . . . . . . . . . . . . . . . . . . . .1-1
System Implementation and Test . . . . . . . . . . . . . . . . . . . . . . . . . . . . . . . . . .1-2
Tutorial Examples. . . . . . . . . . . . . . . . . . . . . . . . . . . . . . . . . . . . . . . . . . . . . . .1-2
Hello World
Goals for This Lesson . . . . . . . . . . . . . . . . . . . . . . . . . . . . . . . . . . . . . . . . . . .2-1
Getting Started with Rhapsody . . . . . . . . . . . . . . . . . . . . . . . . . . . . . . . . . . . .2-1
Understanding the Rhapsody GUI . . . . . . . . . . . . . . . . . . . . . . . . . . . . . . . . .2-4Rhapsody Windows. . . . . . . . . . . . . . . . . . . . . . . . . . . . . . . . . . . . . . . . . . . .2-4Rhapsody Toolbars . . . . . . . . . . . . . . . . . . . . . . . . . . . . . . . . . . . . . . . . . . . .2-7
Tutorial iii
tutorialada.book Page iv Thursday, June 12, 2003 11:43 AM
Creating a Class . . . . . . . . . . . . . . . . . . . . . . . . . . . . . . . . . . . . . . . . . . . . . . . 2-7
Creating an Object Model Diagram . . . . . . . . . . . . . . . . . . . . . . . . . . . . . . . . 2-8Adding an Operation . . . . . . . . . . . . . . . . . . . . . . . . . . . . . . . . . . . . . . . . . 2-10Creating an Entry Point . . . . . . . . . . . . . . . . . . . . . . . . . . . . . . . . . . . . . . . 2-12
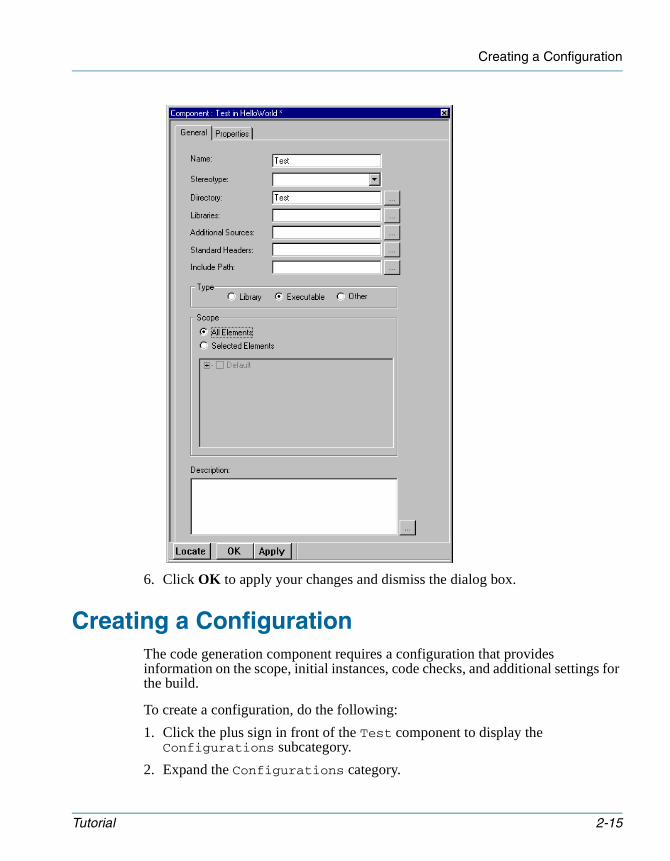
Creating a Component 14
Creating a Configuration . . . . . . . . . . . . . . . . . . . . . . . . . . . . . . . . . . . . . . . 2-15
Generating Code . . . . . . . . . . . . . . . . . . . . . . . . . . . . . . . . . . . . . . . . . . . . . . 2-17The Code Toolbar . . . . . . . . . . . . . . . . . . . . . . . . . . . . . . . . . . . . . . . . . . . 2-19Building the Application . . . . . . . . . . . . . . . . . . . . . . . . . . . . . . . . . . . . . . . 2-19Running the Application . . . . . . . . . . . . . . . . . . . . . . . . . . . . . . . . . . . . . . . 2-25Examining the Code. . . . . . . . . . . . . . . . . . . . . . . . . . . . . . . . . . . . . . . . . . 2-26
Closing the Project . . . . . . . . . . . . . . . . . . . . . . . . . . . . . . . . . . . . . . . . . . . . 2-27
Summary . . . . . . . . . . . . . . . . . . . . . . . . . . . . . . . . . . . . . . . . . . . . . . . . . . . . 2-27
Creating a Use Case Diagram
Goals for This Lesson . . . . . . . . . . . . . . . . . . . . . . . . . . . . . . . . . . . . . . . . . . 3-1
Overview . . . . . . . . . . . . . . . . . . . . . . . . . . . . . . . . . . . . . . . . . . . . . . . . . . . . . 3-1
Analyzing the Dishwasher System . . . . . . . . . . . . . . . . . . . . . . . . . . . . . . . . 3-3
Creating the New Dishwasher Project . . . . . . . . . . . . . . . . . . . . . . . . . . . . . 3-3
Creating a UCD . . . . . . . . . . . . . . . . . . . . . . . . . . . . . . . . . . . . . . . . . . . . . . . . 3-4Using the Browser . . . . . . . . . . . . . . . . . . . . . . . . . . . . . . . . . . . . . . . . . . . . 3-4Using the Tools Menu or Diagram Shortcut Toolbar . . . . . . . . . . . . . . . . . . 3-4
Use Case Diagram Toolbar . . . . . . . . . . . . . . . . . . . . . . . . . . . . . . . . . . . . . . 3-6
Drawing the Dishwasher Use Case Diagram . . . . . . . . . . . . . . . . . . . . . . . . 3-6Step 1: Drawing the Boundary Box . . . . . . . . . . . . . . . . . . . . . . . . . . . . . . . 3-7Step 2: Drawing the Actors . . . . . . . . . . . . . . . . . . . . . . . . . . . . . . . . . . . . . 3-7Step 3: Drawing the Use Cases. . . . . . . . . . . . . . . . . . . . . . . . . . . . . . . . . . 3-9Step 4: Associating Actors with Use Cases . . . . . . . . . . . . . . . . . . . . . . . . 3-11Step 5: Labeling the Diagram with the Note Tool . . . . . . . . . . . . . . . . . . . 3-12
iv Rhapsody in Ada
tutorialada.book Page v Thursday, June 12, 2003 11:43 AM
Summary . . . . . . . . . . . . . . . . . . . . . . . . . . . . . . . . . . . . . . . . . . . . . . . . . . . . .3-14
Creating an Object Model Diagram
Goals for This Lesson . . . . . . . . . . . . . . . . . . . . . . . . . . . . . . . . . . . . . . . . . . .4-1
Overview . . . . . . . . . . . . . . . . . . . . . . . . . . . . . . . . . . . . . . . . . . . . . . . . . . . . . .4-1
Creating an OMD . . . . . . . . . . . . . . . . . . . . . . . . . . . . . . . . . . . . . . . . . . . . . . .4-3
Object Model Diagram Toolbar . . . . . . . . . . . . . . . . . . . . . . . . . . . . . . . . . . . .4-4
Drawing the Dishwasher OMD . . . . . . . . . . . . . . . . . . . . . . . . . . . . . . . . . . . .4-5Creating a Singleton . . . . . . . . . . . . . . . . . . . . . . . . . . . . . . . . . . . . . . . . . . .4-6Adding Attributes . . . . . . . . . . . . . . . . . . . . . . . . . . . . . . . . . . . . . . . . . . . . . .4-6Creating Operations . . . . . . . . . . . . . . . . . . . . . . . . . . . . . . . . . . . . . . . . . . .4-9Displaying Attributes and Operations in the OMD. . . . . . . . . . . . . . . . . . . .4-10Adding the setup Operation. . . . . . . . . . . . . . . . . . . . . . . . . . . . . . . . . . . . .4-12
Adding a main() . . . . . . . . . . . . . . . . . . . . . . . . . . . . . . . . . . . . . . . . . . . . . . .4-13
Creating an Entry Point . . . . . . . . . . . . . . . . . . . . . . . . . . . . . . . . . . . . . . . . .4-15
Adding Predefined Packages . . . . . . . . . . . . . . . . . . . . . . . . . . . . . . . . . . . .4-16
Creating a Component . . . . . . . . . . . . . . . . . . . . . . . . . . . . . . . . . . . . . . . . . .4-19
Creating a Configuration . . . . . . . . . . . . . . . . . . . . . . . . . . . . . . . . . . . . . . . .4-19
Summary . . . . . . . . . . . . . . . . . . . . . . . . . . . . . . . . . . . . . . . . . . . . . . . . . . . . .4-20
Creating a Statechart
Goals for This Lesson . . . . . . . . . . . . . . . . . . . . . . . . . . . . . . . . . . . . . . . . . . .5-1
Overview . . . . . . . . . . . . . . . . . . . . . . . . . . . . . . . . . . . . . . . . . . . . . . . . . . . . . .5-1
Creating a Statechart . . . . . . . . . . . . . . . . . . . . . . . . . . . . . . . . . . . . . . . . . . . .5-3Using the Browser . . . . . . . . . . . . . . . . . . . . . . . . . . . . . . . . . . . . . . . . . . . . .5-3Using the Tools Menu or Diagram Shortcut Toolbar . . . . . . . . . . . . . . . . . . .5-3
Statechart Toolbar . . . . . . . . . . . . . . . . . . . . . . . . . . . . . . . . . . . . . . . . . . . . . .5-4
Drawing the Dishwasher Statechart . . . . . . . . . . . . . . . . . . . . . . . . . . . . . . . .5-5Step 1: Drawing the States . . . . . . . . . . . . . . . . . . . . . . . . . . . . . . . . . . . . . .5-5Step 2: Drawing History and Diagram Connectors . . . . . . . . . . . . . . . . . . . .5-6Step 3: Drawing Default Connectors . . . . . . . . . . . . . . . . . . . . . . . . . . . . . . .5-8Step 4: Adding the Operations . . . . . . . . . . . . . . . . . . . . . . . . . . . . . . . . . . .5-9Step 5: Drawing the Transitions . . . . . . . . . . . . . . . . . . . . . . . . . . . . . . . . . .5-9
Tutorial v
tutorialada.book Page vi Thursday, June 12, 2003 11:43 AM
Step 6: Adding Actions to States . . . . . . . . . . . . . . . . . . . . . . . . . . . . . . . . 5-13
Examining the Browser . . . . . . . . . . . . . . . . . . . . . . . . . . . . . . . . . . . . . . . . 5-15
Generating and Running Your Model . . . . . . . . . . . . . . . . . . . . . . . . . . . . . 5-17How the Program Works . . . . . . . . . . . . . . . . . . . . . . . . . . . . . . . . . . . . . . 5-19Opening and Closing the Door. . . . . . . . . . . . . . . . . . . . . . . . . . . . . . . . . . 5-19
Summary . . . . . . . . . . . . . . . . . . . . . . . . . . . . . . . . . . . . . . . . . . . . . . . . . . . . 5-19
Advanced Topics
Goals for This Lesson . . . . . . . . . . . . . . . . . . . . . . . . . . . . . . . . . . . . . . . . . . 6-1
Setting Up the New Project . . . . . . . . . . . . . . . . . . . . . . . . . . . . . . . . . . . . . . 6-1
Altering the Collaboration OMD. . . . . . . . . . . . . . . . . . . . . . . . . . . . . . . . . . . 6-1Creating the Event Handler . . . . . . . . . . . . . . . . . . . . . . . . . . . . . . . . . . . . . 6-2Adding a Directed Association . . . . . . . . . . . . . . . . . . . . . . . . . . . . . . . . . . . 6-3
Modifying the Package OMD . . . . . . . . . . . . . . . . . . . . . . . . . . . . . . . . . . . . . 6-5
Modifying the Dishwasher Class to Use a Pointer. . . . . . . . . . . . . . . . . . . . 6-6Modifying the dec_ Operations . . . . . . . . . . . . . . . . . . . . . . . . . . . . . . . . . . 6-7Modifying the Other Statechart Operations . . . . . . . . . . . . . . . . . . . . . . . . . 6-8
Changing the Triggered Events to Asynchronous Events . . . . . . . . . . . . 6-10
Examining the Code for Events and States . . . . . . . . . . . . . . . . . . . . . . . . 6-11Statechart Event Dispatching Code. . . . . . . . . . . . . . . . . . . . . . . . . . . . . . 6-13Event Dispatch Mechanism . . . . . . . . . . . . . . . . . . . . . . . . . . . . . . . . . . . . 6-13Initiating a Reactive Object . . . . . . . . . . . . . . . . . . . . . . . . . . . . . . . . . . . . 6-13
vi Rhapsody in Ada
tutorialada.book Page vii Thursday, June 12, 2003 11:43 AM
Changing the main . . . . . . . . . . . . . . . . . . . . . . . . . . . . . . . . . . . . . . . . . . . . .6-14
Setting Up the FrontPanel Class. . . . . . . . . . . . . . . . . . . . . . . . . . . . . . . . . .6-14
Running the Model . . . . . . . . . . . . . . . . . . . . . . . . . . . . . . . . . . . . . . . . . . . . .6-16
Animating the Application
Goals for This Lesson . . . . . . . . . . . . . . . . . . . . . . . . . . . . . . . . . . . . . . . . . . .7-1
Overview . . . . . . . . . . . . . . . . . . . . . . . . . . . . . . . . . . . . . . . . . . . . . . . . . . . . . .7-1
Animation Mode . . . . . . . . . . . . . . . . . . . . . . . . . . . . . . . . . . . . . . . . . . . . . . . .7-3
Animation Toolbar . . . . . . . . . . . . . . . . . . . . . . . . . . . . . . . . . . . . . . . . . . . . . .7-4
Viewing the Animated Statechart . . . . . . . . . . . . . . . . . . . . . . . . . . . . . . . . . .7-5Sending Events to Your Model . . . . . . . . . . . . . . . . . . . . . . . . . . . . . . . . . . .7-6Setting Breakpoints . . . . . . . . . . . . . . . . . . . . . . . . . . . . . . . . . . . . . . . . . . . .7-8Generating an Output Trace . . . . . . . . . . . . . . . . . . . . . . . . . . . . . . . . . . . . .7-9
Quitting Animation . . . . . . . . . . . . . . . . . . . . . . . . . . . . . . . . . . . . . . . . . . . . .7-10
Index
Tutorial vii

tutorialada.book Page viii Thursday, June 12, 2003 11:43 AM
viii Rhapsody in Ada
tutorialada.book Page ix Thursday, June 12, 2003 11:43 AM
Welcome to the Tutorial for Rhapsody® in Ada by I-Logix™ Inc. Rhapsody is the visual programming environment (VPE) of choice for real-time, embedded software developers. Rhapsody goes beyond defining requirements and designing a software solution. Rhapsody actually implements your solution from design diagrams, automatically generating code that is optimized for the most widely used real-time, embedded target environments.
This tutorial provides step-by-step instructions on how to use Rhapsody. The tutorial begins by having you generate a simple HelloWorld program. This short exercise demonstrates all the steps required to write a more complex piece of code. Subsequent chapters of the tutorial describe an embedded system, using a dishwasher as an example.
Document StructureThis guide contains the following chapters:• Chapter 1, Introduction, provides a brief introduction to Rhapsody.• Chapter 2, Hello World, provides step-by-step instructions for creating a
simple HelloWorld example using Rhapsody.• Chapter 3, Creating a Use Case Diagram, provides instructions for creating use
case diagrams. A use case diagram shows typical interactions between the system being designed and the external actors who might interact with it.
• Chapter 4, Creating an Object Model Diagram, provides instructions for creating object model diagrams. Object model diagrams show the static structure of a system. They show the types of objects in the system, the attributes and operations that belong to those objects, and the static relationships that can exist between classes (types) and constraints that might apply.
• Chapter 5, Creating a Statechart, provides instructions for creating a statechart. Statecharts define the behavior of objects, including the various states that an
Tutorial ix
Preface
tutorialada.book Page x Thursday, June 12, 2003 11:43 AM
object can enter into over its lifetime, and the messages or events that cause it to transition from one state to another.
• Chapter 6, Advanced Topics, provides information on more advanced topics, such as using the this pointer and creating an event handler.
• Chapter 7, Animating the Application, provides instructions on animating your model.
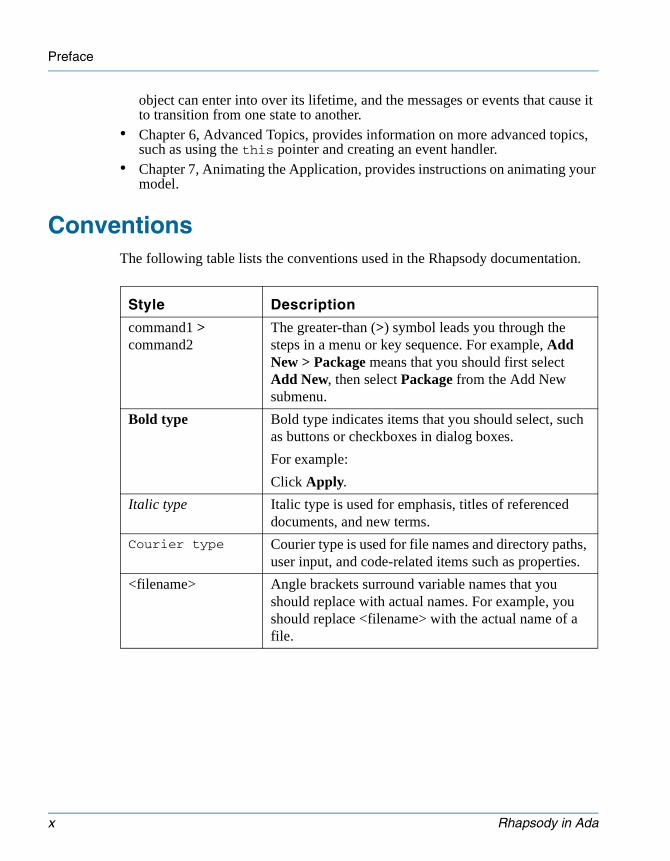
ConventionsThe following table lists the conventions used in the Rhapsody documentation.
Style Description
command1 > command2
The greater-than (>) symbol leads you through the steps in a menu or key sequence. For example, Add New > Package means that you should first select Add New, then select Package from the Add New submenu.
Bold type Bold type indicates items that you should select, such as buttons or checkboxes in dialog boxes.
For example:
Click Apply.
Italic type Italic type is used for emphasis, titles of referenced documents, and new terms.
Courier type Courier type is used for file names and directory paths, user input, and code-related items such as properties.
<filename> Angle brackets surround variable names that you should replace with actual names. For example, you should replace <filename> with the actual name of a file.
x Rhapsody in Ada
Documentation Set
tutorialada.book Page xi Thursday, June 12, 2003 11:43 AM
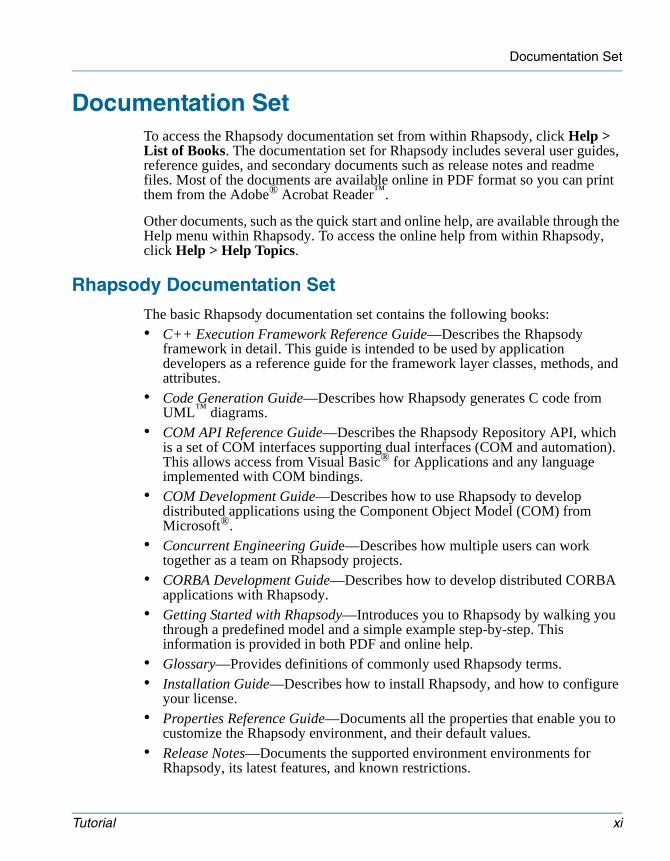
Documentation SetTo access the Rhapsody documentation set from within Rhapsody, click Help > List of Books. The documentation set for Rhapsody includes several user guides, reference guides, and secondary documents such as release notes and readme files. Most of the documents are available online in PDF format so you can print them from the Adobe® Acrobat Reader™.
Other documents, such as the quick start and online help, are available through the Help menu within Rhapsody. To access the online help from within Rhapsody, click Help > Help Topics.
Rhapsody Documentation Set
The basic Rhapsody documentation set contains the following books:• C++ Execution Framework Reference Guide—Describes the Rhapsody
framework in detail. This guide is intended to be used by application developers as a reference guide for the framework layer classes, methods, and attributes.
• Code Generation Guide—Describes how Rhapsody generates C code from UML™ diagrams.
• COM API Reference Guide—Describes the Rhapsody Repository API, which is a set of COM interfaces supporting dual interfaces (COM and automation). This allows access from Visual Basic® for Applications and any language implemented with COM bindings.
• COM Development Guide—Describes how to use Rhapsody to develop distributed applications using the Component Object Model (COM) from Microsoft®.
• Concurrent Engineering Guide—Describes how multiple users can work together as a team on Rhapsody projects.
• CORBA Development Guide—Describes how to develop distributed CORBA applications with Rhapsody.
• Getting Started with Rhapsody—Introduces you to Rhapsody by walking you through a predefined model and a simple example step-by-step. This information is provided in both PDF and online help.
• Glossary—Provides definitions of commonly used Rhapsody terms.• Installation Guide—Describes how to install Rhapsody, and how to configure
your license.• Properties Reference Guide—Documents all the properties that enable you to
customize the Rhapsody environment, and their default values.• Release Notes—Documents the supported environment environments for
Rhapsody, its latest features, and known restrictions.
Tutorial xi
Preface
tutorialada.book Page xii Thursday, June 12, 2003 11:43 AM
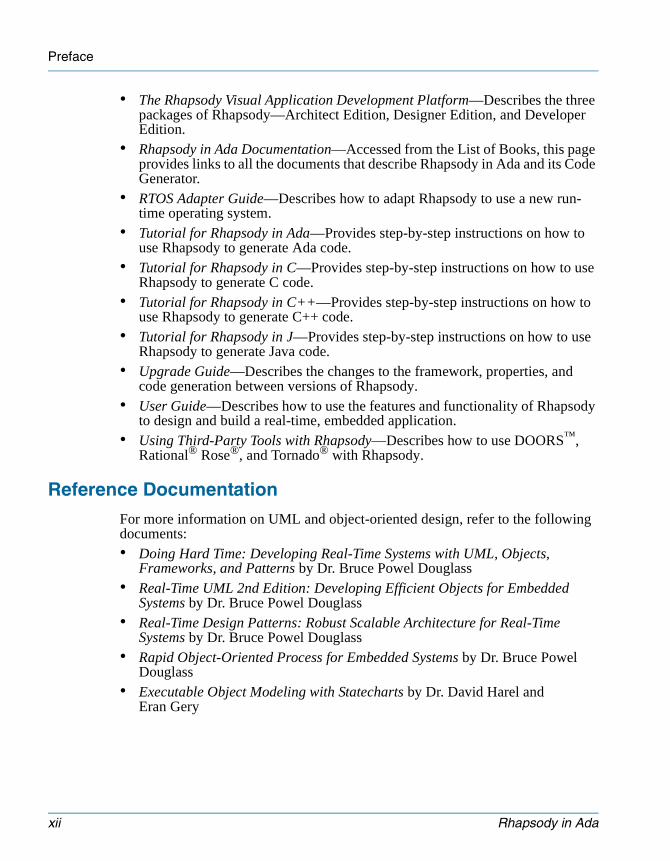
• The Rhapsody Visual Application Development Platform—Describes the three packages of Rhapsody—Architect Edition, Designer Edition, and Developer Edition.
• Rhapsody in Ada Documentation—Accessed from the List of Books, this page provides links to all the documents that describe Rhapsody in Ada and its Code Generator.
• RTOS Adapter Guide—Describes how to adapt Rhapsody to use a new run-time operating system.
• Tutorial for Rhapsody in Ada—Provides step-by-step instructions on how to use Rhapsody to generate Ada code.
• Tutorial for Rhapsody in C—Provides step-by-step instructions on how to use Rhapsody to generate C code.
• Tutorial for Rhapsody in C++—Provides step-by-step instructions on how to use Rhapsody to generate C++ code.
• Tutorial for Rhapsody in J—Provides step-by-step instructions on how to use Rhapsody to generate Java code.
• Upgrade Guide—Describes the changes to the framework, properties, and code generation between versions of Rhapsody.
• User Guide—Describes how to use the features and functionality of Rhapsody to design and build a real-time, embedded application.
• Using Third-Party Tools with Rhapsody—Describes how to use DOORS™, Rational® Rose®, and Tornado® with Rhapsody.
Reference Documentation
For more information on UML and object-oriented design, refer to the following documents:• Doing Hard Time: Developing Real-Time Systems with UML, Objects,
Frameworks, and Patterns by Dr. Bruce Powel Douglass • Real-Time UML 2nd Edition: Developing Efficient Objects for Embedded
Systems by Dr. Bruce Powel Douglass• Real-Time Design Patterns: Robust Scalable Architecture for Real-Time
Systems by Dr. Bruce Powel Douglass• Rapid Object-Oriented Process for Embedded Systems by Dr. Bruce Powel
Douglass • Executable Object Modeling with Statecharts by Dr. David Harel and
Eran Gery
xii Rhapsody in Ada
Getting Started with Rhapsody
tutorialada.book Page xiii Thursday, June 12, 2003 11:43 AM
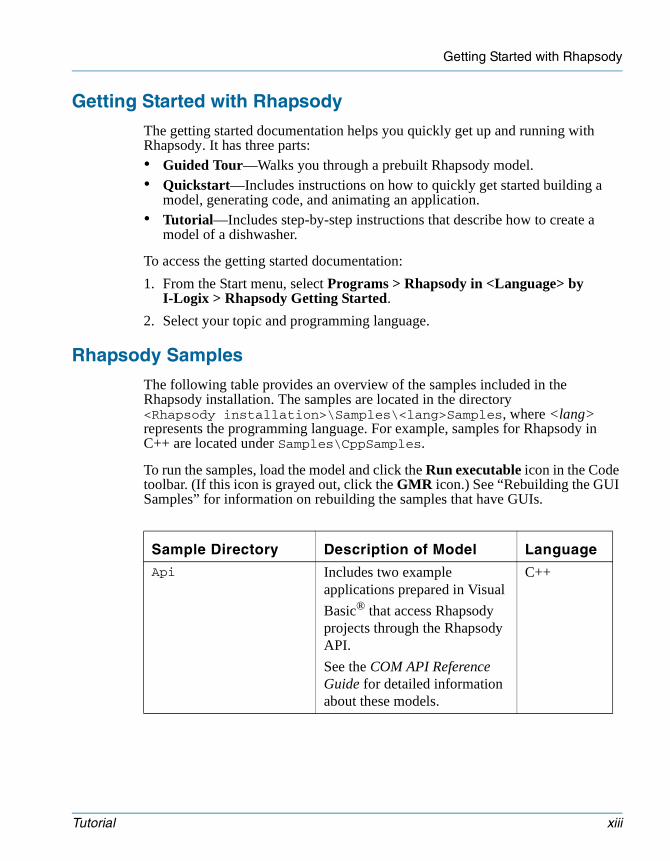
Getting Started with Rhapsody
The getting started documentation helps you quickly get up and running with Rhapsody. It has three parts:• Guided Tour—Walks you through a prebuilt Rhapsody model.• Quickstart—Includes instructions on how to quickly get started building a
model, generating code, and animating an application.• Tutorial—Includes step-by-step instructions that describe how to create a
model of a dishwasher.
To access the getting started documentation:
1. From the Start menu, select Programs > Rhapsody in <Language> by I-Logix > Rhapsody Getting Started.
2. Select your topic and programming language.
Rhapsody Samples
The following table provides an overview of the samples included in the Rhapsody installation. The samples are located in the directory <Rhapsody installation>\Samples\<lang>Samples, where <lang> represents the programming language. For example, samples for Rhapsody in C++ are located under Samples\CppSamples.
To run the samples, load the model and click the Run executable icon in the Code toolbar. (If this icon is grayed out, click the GMR icon.) See “Rebuilding the GUI Samples” for information on rebuilding the samples that have GUIs.
Sample Directory Description of Model Language
Api Includes two example applications prepared in Visual
Basic® that access Rhapsody projects through the Rhapsody API.
See the COM API Reference Guide for detailed information about these models.
C++
Tutorial xiii
Preface
tutorialada.book Page xiv Thursday, June 12, 2003 11:43 AM
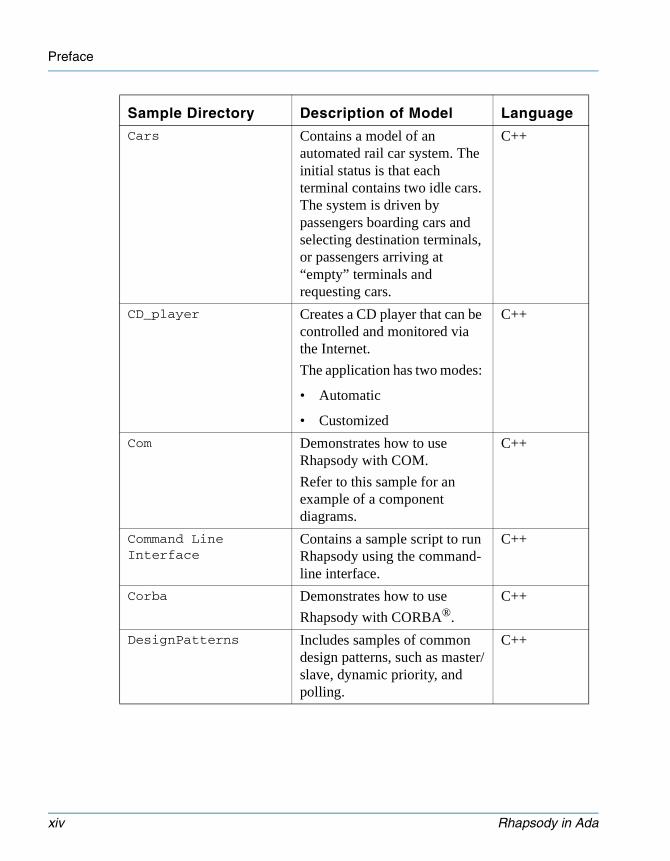
Cars Contains a model of an automated rail car system. The initial status is that each terminal contains two idle cars. The system is driven by passengers boarding cars and selecting destination terminals, or passengers arriving at “empty” terminals and requesting cars.
C++
CD_player Creates a CD player that can be controlled and monitored via the Internet.
The application has two modes:
• Automatic
• Customized
C++
Com Demonstrates how to use Rhapsody with COM.
Refer to this sample for an example of a component diagrams.
C++
Command Line Interface
Contains a sample script to run Rhapsody using the command-line interface.
C++
Corba Demonstrates how to use
Rhapsody with CORBA®.
C++
DesignPatterns Includes samples of common design patterns, such as master/slave, dynamic priority, and polling.
C++
Sample Directory Description of Model Language
xiv Rhapsody in Ada
Rhapsody Samples
tutorialada.book Page xv Thursday, June 12, 2003 11:43 AM
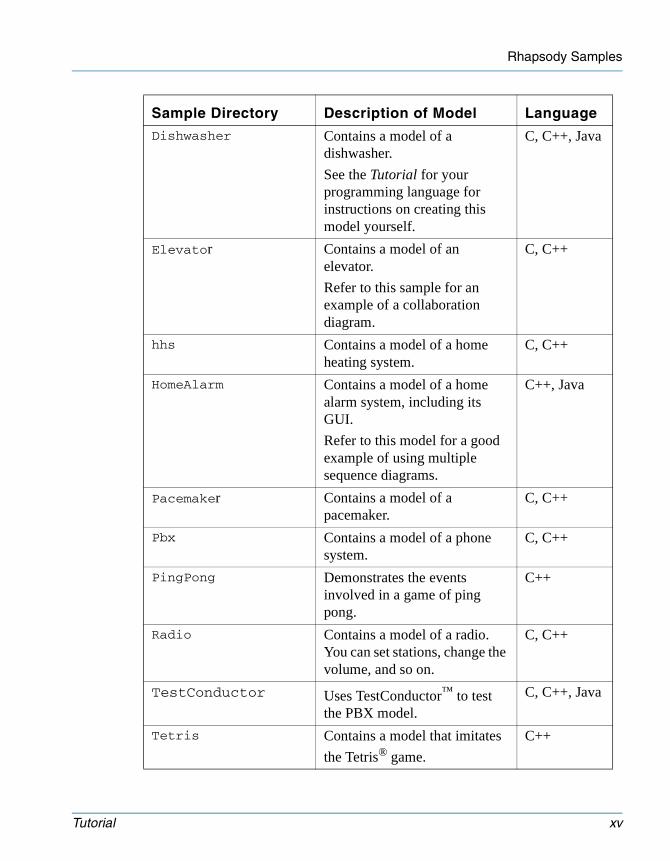
Dishwasher Contains a model of a dishwasher.
See the Tutorial for your programming language for instructions on creating this model yourself.
C, C++, Java
Elevator Contains a model of an elevator.
Refer to this sample for an example of a collaboration diagram.
C, C++
hhs Contains a model of a home heating system.
C, C++
HomeAlarm Contains a model of a home alarm system, including its GUI.
Refer to this model for a good example of using multiple sequence diagrams.
C++, Java
Pacemaker Contains a model of a pacemaker.
C, C++
Pbx Contains a model of a phone system.
C, C++
PingPong Demonstrates the events involved in a game of ping pong.
C++
Radio Contains a model of a radio. You can set stations, change the volume, and so on.
C, C++
TestConductor Uses TestConductor™ to test the PBX model.
C, C++, Java
Tetris Contains a model that imitates
the Tetris® game.
C++
Sample Directory Description of Model Language
Tutorial xv
Preface
tutorialada.book Page xvi Thursday, June 12, 2003 11:43 AM
Rebuilding the GUI Samples
Some of the Rhapsody models use GUIs. These applications have been built separate from Rhapsody using Microsoft Visual C++ 6.0. Because the Microsoft DLLs are not compatible between versions of MSVC, you might need to rebuild the GUIs.
For example, the Radio sample contains the following components and configurations:• guilib—Rhapsody-generated code compiled into a library. The library is
linked in MSVC with MFC code for the GUI to create the executable. The guilib component has a configuration of the same name.
• gui—Does not generate code, but runs the GUI created in MSVC.
To rebuild the Radio GUI, do the following:
1. In the browser, expand the Components folder.
2. Right-click the guilib component, then select Set as Active Component from the pop-up menu. As a side-effect, the guilib configuration also becomes the active configuration.
3. Select Code > Generate > guilib to generate code for the library. If prompted, answer Yes to create a folder.
4. Select Code > Build guilib.lib to compile the library.
5. Open a DOS command prompt and set the OMROOT variable to the location of your Rhapsody\Share directory. For example:
> set OMROOT=D:\Rhapsody\Share
Use 8.3 format for the path. For example, if Rhapsody is installed in the directory C:\Program Files\Rhapsody, specify the following:
C:\Progra~1\Rhapsody\Share
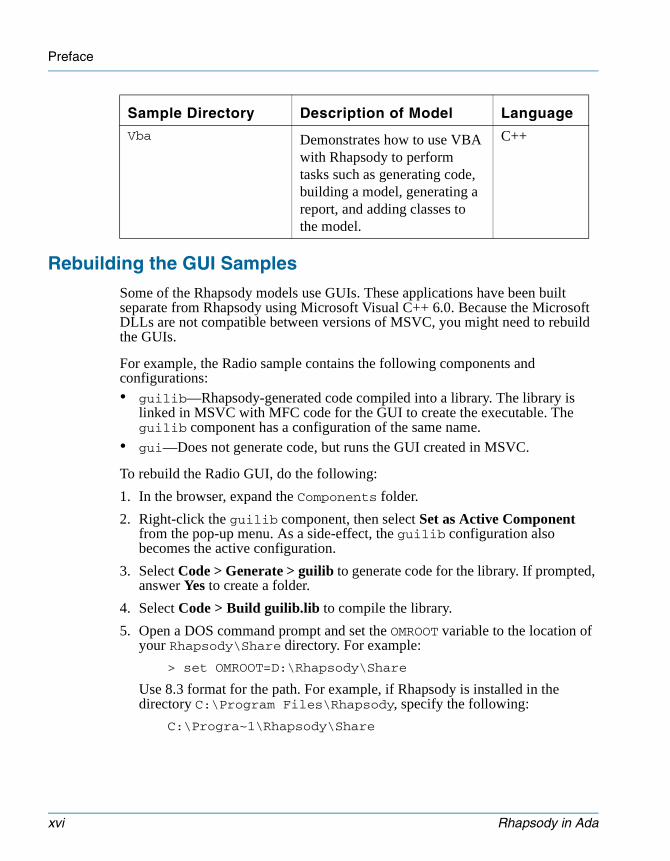
Vba Demonstrates how to use VBA
with Rhapsody to perform tasks such as generating code, building a model, generating a report, and adding classes to the model.
C++
Sample Directory Description of Model Language
xvi Rhapsody in Ada
Contacting I-Logix
tutorialada.book Page xvii Thursday, June 12, 2003 11:43 AM
6. From the command prompt, invoke MSDEV.EXE (Developer Studio). For example:
> D:\Program Files\Microsoft Visual Studio\ -Common\MSDev98\Bin\MSDEV.EXE
7. In Developer Studio, open the MFCGUI.dsw file for the sample (located in the folder radio_gui) and rebuild the project by selecting Build > Rebuild All.
8. In Rhapsody, set the active component and configuration to gui.
9. In Rhapsody, select Code > Run gui.exe to run the executable.
All the samples with GUIs are set up in a similar way. Follow the procedure described for the Radio sample, changing the names as necessary for that model.
Contacting I-LogixThe I-Logix Technical Support Help Desk provides assistance with installation, application issues, product defect reporting, and documentation questions. Technical support engineers, in conjunction with sales application engineers, assist prospective customers with product evaluations and provide timely responses to user issues to ensure maximum productivity.
Using the Web or E-Mail
For the quickest and most effective response from anywhere in the world, contact Technical Support by filling out the support form found on the I-Logix Web site (http://www.ilogix.com).
You can contact I-Logix via e-mail at the address [email protected]. In your message, include the following information:
Contact Information:
Your nameE-mail addressPhoneCompanyLocation
Software Information:
Version and build number of Rhapsody softwareOperating systemVersion and/or patch level or service pack appliedAny third-party tools you are using
Computer System Information:
Computer modelProcessor speed
Tutorial xvii
Preface
tutorialada.book Page xviii Thursday, June 12, 2003 11:43 AM
RAMFree disk space
Details of your problem:
Describe the nature of the problem, and the exact sequence of steps that caused the problem. Also note any error messages that you have received.
Using the Phone or Fax
To contact I-Logix by phone or fax, use the following numbers:
Telephone:
In the US:
In Europe:
(978)682-4884
+44(1249)467600
8:30 am to 8:30 pm EST
9:00 am to 5:30 pm UKT
Fax:
In the US:
In Europe:
(978)682-5995
+44(1249)467610
xviii Rhapsody in Ada
tutorialada.book Page 1 Thursday, June 12, 2003 11:43 AM
Rhapsody is a “visual” design tool for developing object-oriented, embedded software. It enables you to do the following:• Analyze—Define system requirements, identify necessary objects, and define
their structure and behavior using the Unified Modeling Language™ (UML™) diagrams.
• Design—Trace requirements to the design, taking into account architectural, mechanistic, and detailed design considerations.
• Implement—Automatically generate code from the analysis model, then build and run it from within Rhapsody.
• Test—Animate the application on the local host or a remote target to perform design-level debugging within animated views.
UML Analysis ToolsThe mst common UML tools for analyzing the system are as follows:• Use Case Diagrams—Show general interaction between the system and
external objects. • Sequence Diagrams—Show sequences of steps and messages passed between
objects when executing a particular instance of a use case.
UML Design ToolsThe main UML tools for designing the system are as follows:• Object Model Diagrams—Show the structure of the system in terms of
classes and objects, and define relationships between these objects. You will build an object model diagram in Chapter 4.
• Statecharts—Show the behavior of a particular class over its entire life cycle. You will build a statechart in Chapter 5.
Tutorial 1-1
Introduction
tutorialada.book Page 2 Thursday, June 12, 2003 11:43 AM
System Implementation and TestTo implement and test the system, you:• Define a configuration (either an executable or a library).• Generate code for any of several target processors. Rhapsody-generated code
is “bare-metal” code with no scheduler or run-time engine. Automatic code generation from the UML model ensures that the design and its implementation are always in sync.
• Build the configuration using the supplied make files. • Test an executable compiled using animation instrumentation by running the
application and observing its progress in various animated views, such as animated sequence diagrams and animated statecharts.
Tutorial ExamplesThis tutorial includes two examples:• HelloWorld
In Chapter 2, you generate a simple HelloWorld program that uses all the steps required to write a more complex piece of code.
• Embedded system example (dishwasher)The remaining chapters in this tutorial develop an example of an embedded system for a dishwasher. Embedded systems are everywhere in our daily lives. Many homes have alarm clocks, stereos, telephones, and microwave ovens. Most of these devices have embedded processors with software controlling their operations. The tutorial uses a dishwasher as a typical example of a simple, real-time, embedded system. Everyone knows dishwashers: you put dirty dishes in and they come out clean—that’s the easy part. The hard part is building the software to control the dishwasher so it performs all of its functions on schedule and without errors. The dishwasher example in this tutorial shows you how to use Rhapsody to create the software that controls the simplified operation of a dishwasher. The operations of the dishwasher are simplified to minimize the complexity of the tutorial.
1-2 Rhapsody in Ada
tutorialada.book Page 1 Thursday, June 12, 2003 11:43 AM
Goals for This LessonAfter completing this lesson, you should know how to do the following tasks in Rhapsody:• Create a project. • Create a class.• Create an object model diagram.• Automatically generate code.• Create a configuration.• Build and run your application.• Examine the generated code.
This tutorial assumes that Rhapsody is already installed on your system and you have a valid permanent license. If you need assistance with installation or licensing, contact I-Logix Customer Support using any of the methods listed in the Preface.
Getting Started with RhapsodyThis section provides a quick start to using Rhapsody. It describes how to start Rhapsody, create a project, and save the project.
Follow these steps:
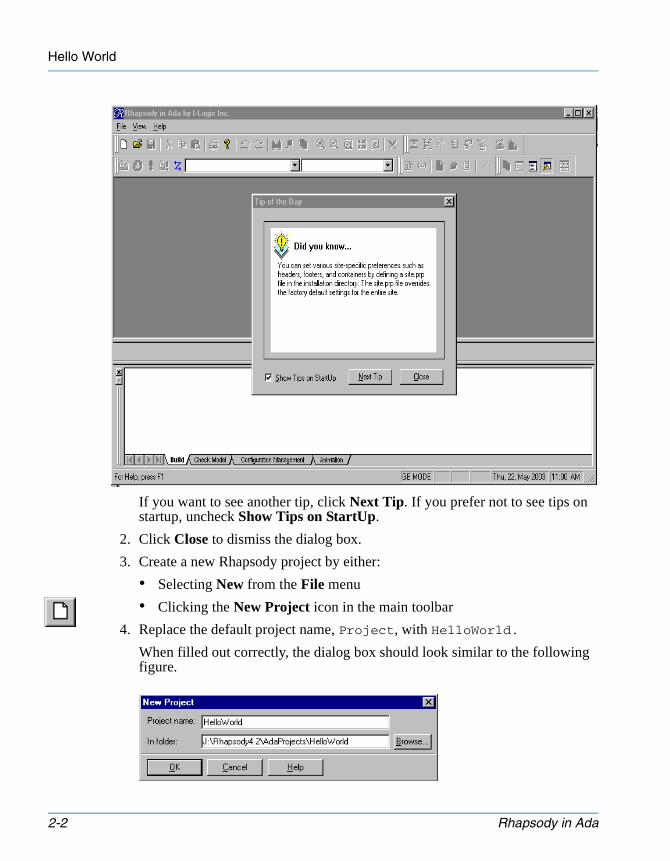
1. To start Rhapsody, click Start > Programs > Rhapsody <Version> > Rhapsody Development Edition > Rhapsody in Ada.
The Rhapsody main window opens with the Tip of the Day displayed, as shown in the following figure.
Tutorial 2-1
Hello World
tutorialada.book Page 2 Thursday, June 12, 2003 11:43 AM
If you want to see another tip, click Next Tip. If you prefer not to see tips on startup, uncheck Show Tips on StartUp.
2. Click Close to dismiss the dialog box.
3. Create a new Rhapsody project by either:
• Selecting New from the File menu
• Clicking the New Project icon in the main toolbar
4. Replace the default project name, Project, with HelloWorld.
When filled out correctly, the dialog box should look similar to the following figure.
2-2 Rhapsody in Ada
Getting Started with Rhapsody
tutorialada.book Page 3 Thursday, June 12, 2003 11:43 AM
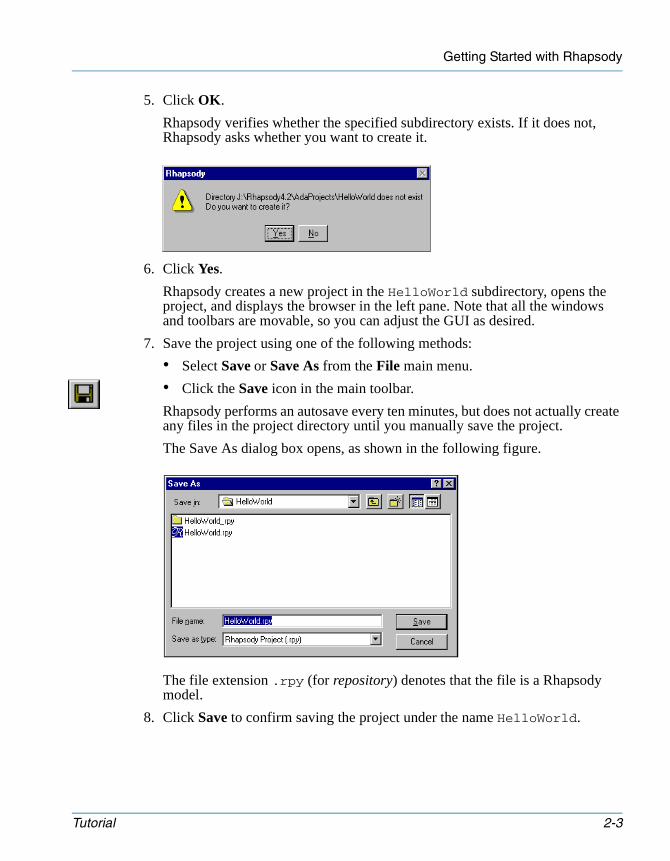
5. Click OK.
Rhapsody verifies whether the specified subdirectory exists. If it does not, Rhapsody asks whether you want to create it.
6. Click Yes.
Rhapsody creates a new project in the HelloWorld subdirectory, opens the project, and displays the browser in the left pane. Note that all the windows and toolbars are movable, so you can adjust the GUI as desired.
7. Save the project using one of the following methods:
• Select Save or Save As from the File main menu.
• Click the Save icon in the main toolbar.
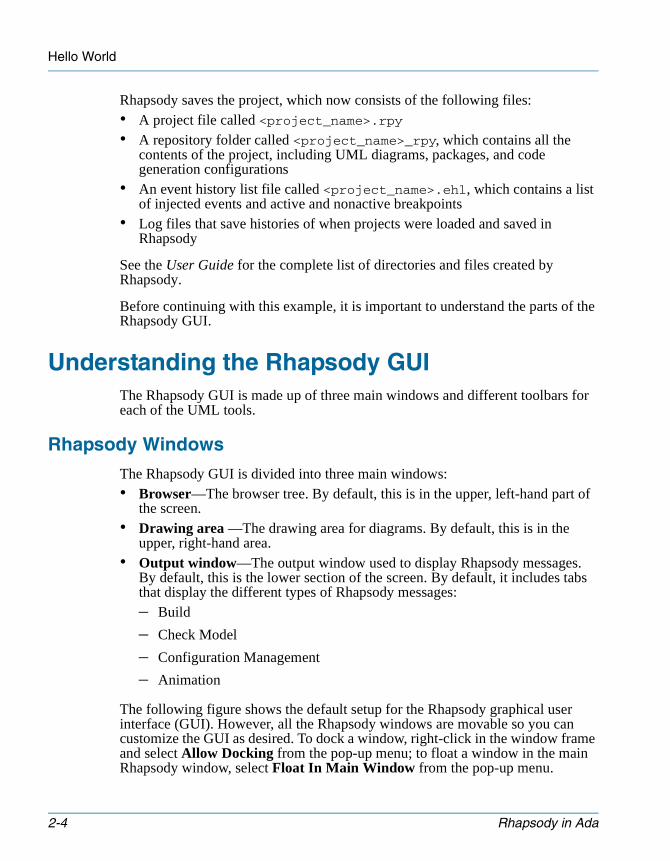
Rhapsody performs an autosave every ten minutes, but does not actually create any files in the project directory until you manually save the project.
The Save As dialog box opens, as shown in the following figure.
The file extension .rpy (for repository) denotes that the file is a Rhapsody model.
8. Click Save to confirm saving the project under the name HelloWorld.
Tutorial 2-3
Hello World
tutorialada.book Page 4 Thursday, June 12, 2003 11:43 AM
Rhapsody saves the project, which now consists of the following files:• A project file called <project_name>.rpy• A repository folder called <project_name>_rpy, which contains all the
contents of the project, including UML diagrams, packages, and code generation configurations
• An event history list file called <project_name>.ehl, which contains a list of injected events and active and nonactive breakpoints
• Log files that save histories of when projects were loaded and saved in Rhapsody
See the User Guide for the complete list of directories and files created by Rhapsody.
Before continuing with this example, it is important to understand the parts of the Rhapsody GUI.
Understanding the Rhapsody GUIThe Rhapsody GUI is made up of three main windows and different toolbars for each of the UML tools.
Rhapsody Windows
The Rhapsody GUI is divided into three main windows:• Browser—The browser tree. By default, this is in the upper, left-hand part of
the screen.• Drawing area —The drawing area for diagrams. By default, this is in the
upper, right-hand area.• Output window—The output window used to display Rhapsody messages.
By default, this is the lower section of the screen. By default, it includes tabs that display the different types of Rhapsody messages:– Build
– Check Model
– Configuration Management
– Animation
The following figure shows the default setup for the Rhapsody graphical user interface (GUI). However, all the Rhapsody windows are movable so you can customize the GUI as desired. To dock a window, right-click in the window frame and select Allow Docking from the pop-up menu; to float a window in the main Rhapsody window, select Float In Main Window from the pop-up menu.
2-4 Rhapsody in Ada
Using the Browser
tutorialada.book Page 5 Thursday, June 12, 2003 11:43 AM
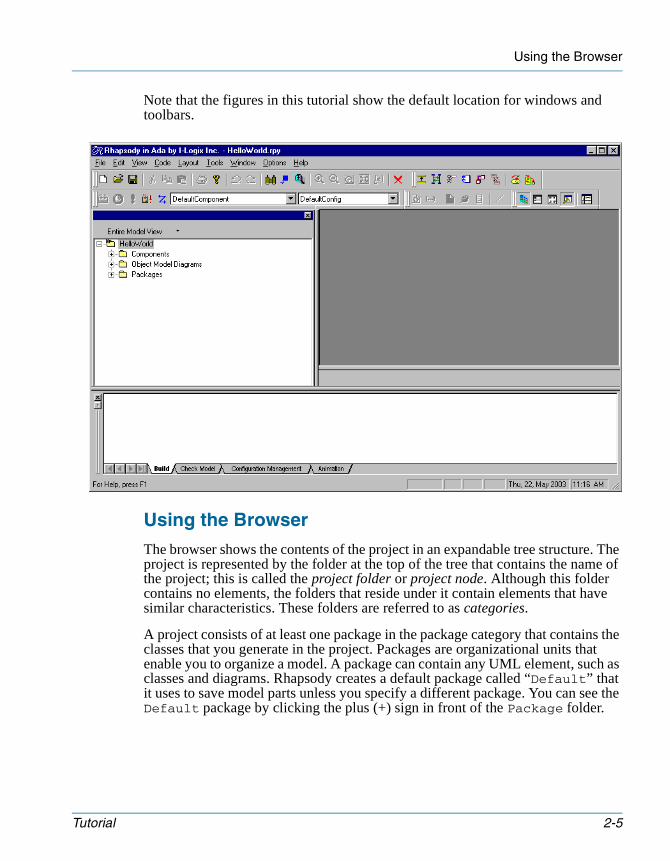
Note that the figures in this tutorial show the default location for windows and toolbars.
Using the Browser
The browser shows the contents of the project in an expandable tree structure. The project is represented by the folder at the top of the tree that contains the name of the project; this is called the project folder or project node. Although this folder contains no elements, the folders that reside under it contain elements that have similar characteristics. These folders are referred to as categories.
A project consists of at least one package in the package category that contains the classes that you generate in the project. Packages are organizational units that enable you to organize a model. A package can contain any UML element, such as classes and diagrams. Rhapsody creates a default package called “Default” that it uses to save model parts unless you specify a different package. You can see the Default package by clicking the plus (+) sign in front of the Package folder.
Tutorial 2-5
Hello World
tutorialada.book Page 6 Thursday, June 12, 2003 11:43 AM
To create more room, you can move the browser out of the Rhapsody GUI area as a separate window. Do the following:
1. Left-click on the browser window.
2. While holding the button down, move the browser to the desired location on your desktop. As you move the window, you will see the outline of the window.
3. Release the mouse button.
Using the Drawing Area
Using the drawing area, you can create the following types of diagrams:• Object model diagrams• Statecharts• Use case diagrams• Sequence diagrams• Activity diagrams• Deployment diagrams• Collaboration diagrams• Component diagrams
By default, Rhapsody displays each diagram with a tab that includes the name of the diagram and an icon that denotes the diagram type. Rhapsody displays an asterisk after the name of the diagram and in the title bar to show that you have made changes to the model that must be explicitly saved, or they will be lost. The remaining chapters in this tutorial explain diagrams in detail.
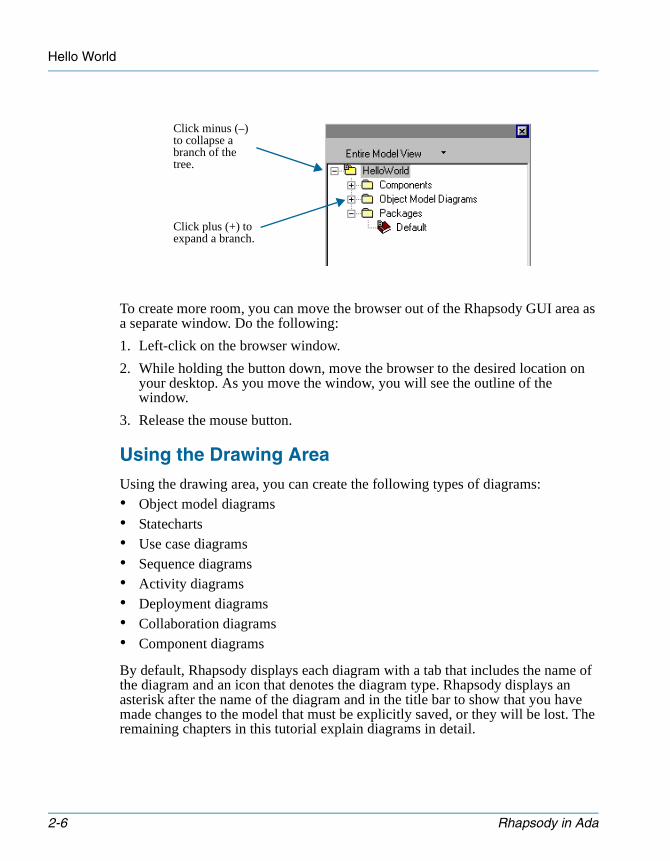
Click plus (+) to expand a branch.
Click minus (–) to collapse a branch of the tree.
2-6 Rhapsody in Ada
Using the Output Window
tutorialada.book Page 7 Thursday, June 12, 2003 11:43 AM
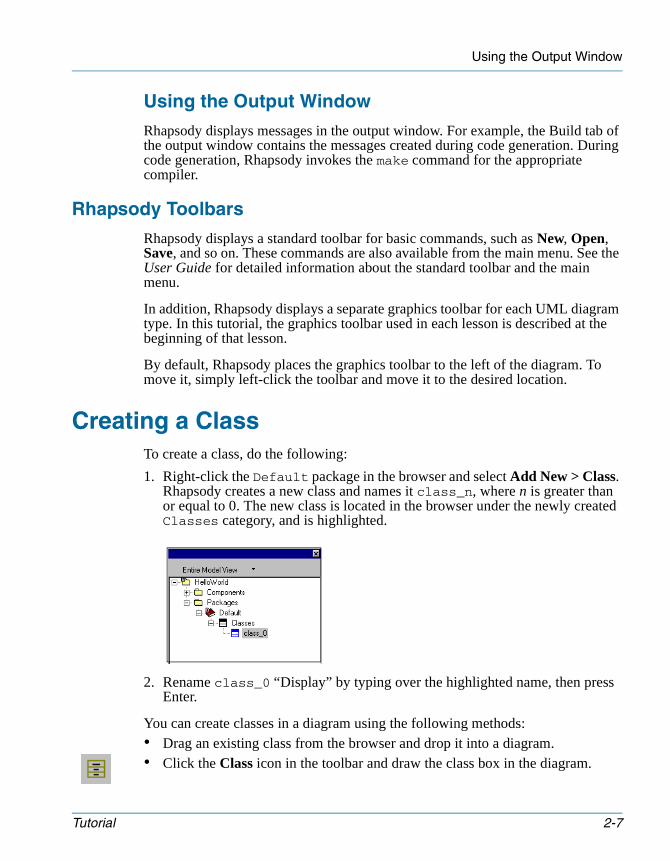
Using the Output Window
Rhapsody displays messages in the output window. For example, the Build tab of the output window contains the messages created during code generation. During code generation, Rhapsody invokes the make command for the appropriate compiler.
Rhapsody Toolbars
Rhapsody displays a standard toolbar for basic commands, such as New, Open, Save, and so on. These commands are also available from the main menu. See the User Guide for detailed information about the standard toolbar and the main menu.
In addition, Rhapsody displays a separate graphics toolbar for each UML diagram type. In this tutorial, the graphics toolbar used in each lesson is described at the beginning of that lesson.
By default, Rhapsody places the graphics toolbar to the left of the diagram. To move it, simply left-click the toolbar and move it to the desired location.
Creating a ClassTo create a class, do the following:
1. Right-click the Default package in the browser and select Add New > Class. Rhapsody creates a new class and names it class_n, where n is greater than or equal to 0. The new class is located in the browser under the newly created Classes category, and is highlighted.
2. Rename class_0 “Display” by typing over the highlighted name, then press Enter.
You can create classes in a diagram using the following methods:• Drag an existing class from the browser and drop it into a diagram.• Click the Class icon in the toolbar and draw the class box in the diagram.
Tutorial 2-7
Hello World
tutorialada.book Page 8 Thursday, June 12, 2003 11:43 AM
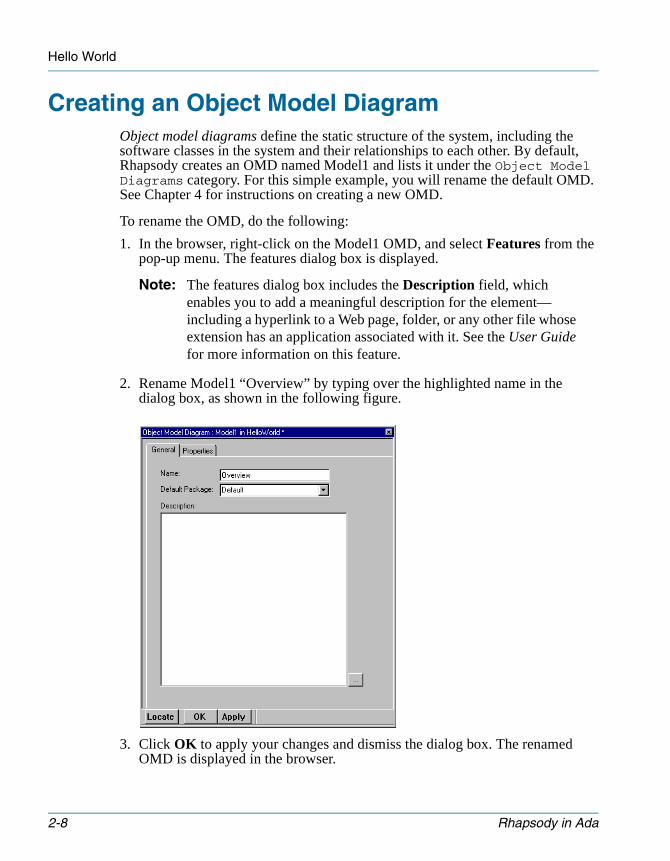
Creating an Object Model DiagramObject model diagrams define the static structure of the system, including the software classes in the system and their relationships to each other. By default, Rhapsody creates an OMD named Model1 and lists it under the Object Model Diagrams category. For this simple example, you will rename the default OMD. See Chapter 4 for instructions on creating a new OMD.
To rename the OMD, do the following:
1. In the browser, right-click on the Model1 OMD, and select Features from the pop-up menu. The features dialog box is displayed.
Note: The features dialog box includes the Description field, which enables you to add a meaningful description for the element—including a hyperlink to a Web page, folder, or any other file whose extension has an application associated with it. See the User Guide for more information on this feature.
2. Rename Model1 “Overview” by typing over the highlighted name in the dialog box, as shown in the following figure.
3. Click OK to apply your changes and dismiss the dialog box. The renamed OMD is displayed in the browser.
2-8 Rhapsody in Ada
Creating an Object Model Diagram
tutorialada.book Page 9 Thursday, June 12, 2003 11:43 AM
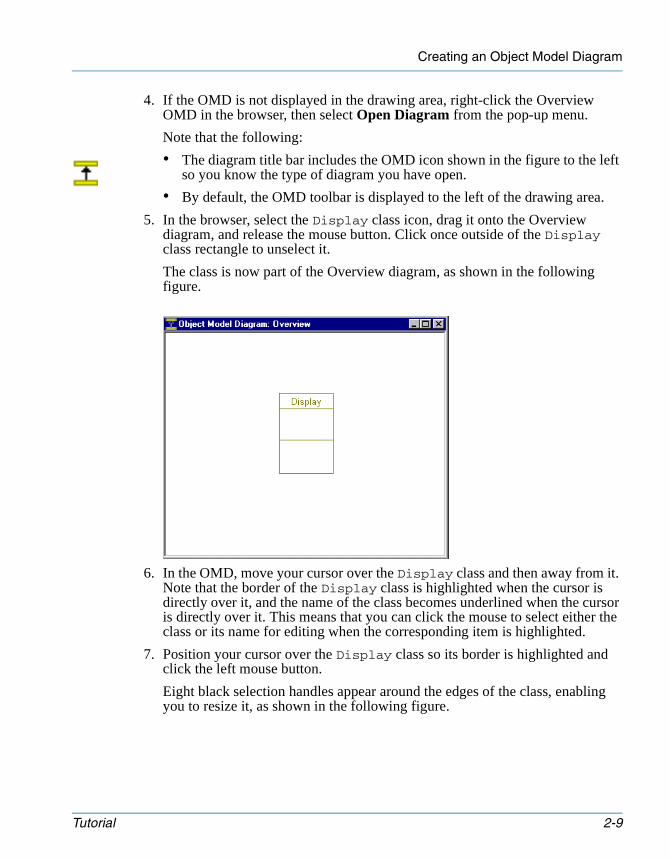
4. If the OMD is not displayed in the drawing area, right-click the Overview OMD in the browser, then select Open Diagram from the pop-up menu.
Note that the following:
• The diagram title bar includes the OMD icon shown in the figure to the left so you know the type of diagram you have open.
• By default, the OMD toolbar is displayed to the left of the drawing area.
5. In the browser, select the Display class icon, drag it onto the Overview diagram, and release the mouse button. Click once outside of the Display class rectangle to unselect it.
The class is now part of the Overview diagram, as shown in the following figure.
6. In the OMD, move your cursor over the Display class and then away from it. Note that the border of the Display class is highlighted when the cursor is directly over it, and the name of the class becomes underlined when the cursor is directly over it. This means that you can click the mouse to select either the class or its name for editing when the corresponding item is highlighted.
7. Position your cursor over the Display class so its border is highlighted and click the left mouse button.
Eight black selection handles appear around the edges of the class, enabling you to resize it, as shown in the following figure.
Tutorial 2-9
Hello World
tutorialada.book Page 10 Thursday, June 12, 2003 11:43 AM
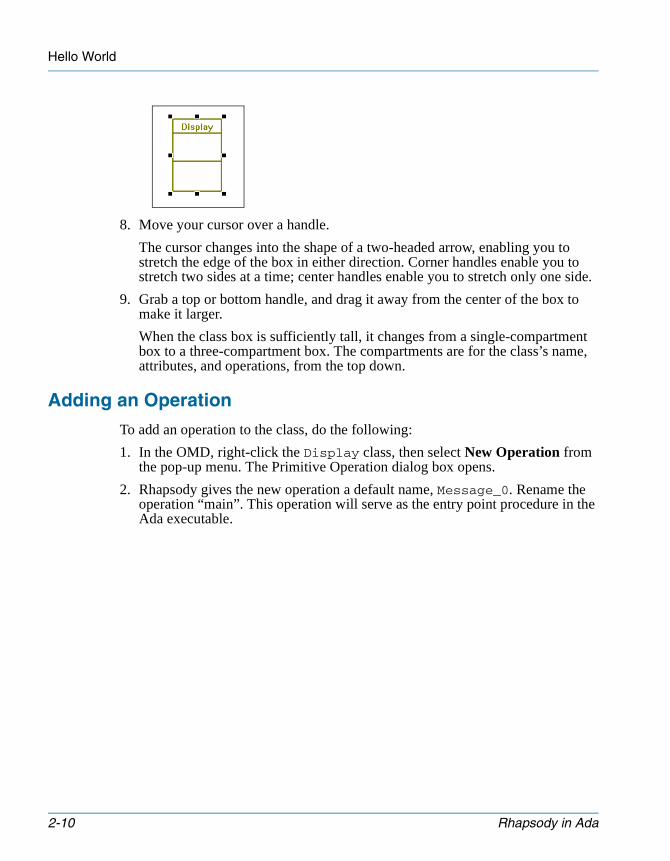
8. Move your cursor over a handle.
The cursor changes into the shape of a two-headed arrow, enabling you to stretch the edge of the box in either direction. Corner handles enable you to stretch two sides at a time; center handles enable you to stretch only one side.
9. Grab a top or bottom handle, and drag it away from the center of the box to make it larger.
When the class box is sufficiently tall, it changes from a single-compartment box to a three-compartment box. The compartments are for the class’s name, attributes, and operations, from the top down.
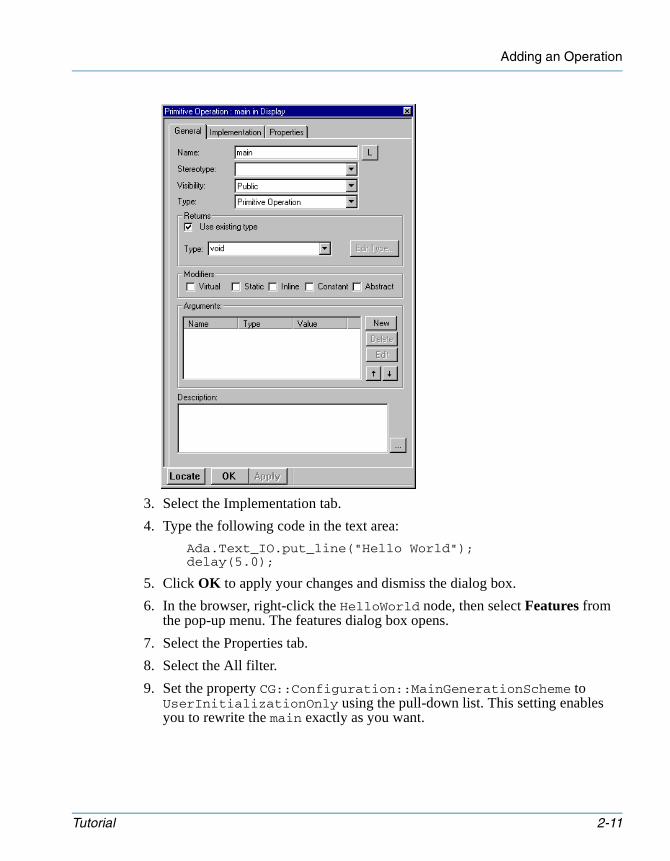
Adding an Operation
To add an operation to the class, do the following:
1. In the OMD, right-click the Display class, then select New Operation from the pop-up menu. The Primitive Operation dialog box opens.
2. Rhapsody gives the new operation a default name, Message_0. Rename the operation “main”. This operation will serve as the entry point procedure in the Ada executable.
2-10 Rhapsody in Ada
Adding an Operation
tutorialada.book Page 11 Thursday, June 12, 2003 11:43 AM
3. Select the Implementation tab.
4. Type the following code in the text area:
Ada.Text_IO.put_line("Hello World"); delay(5.0);
5. Click OK to apply your changes and dismiss the dialog box.
6. In the browser, right-click the HelloWorld node, then select Features from the pop-up menu. The features dialog box opens.
7. Select the Properties tab.
8. Select the All filter.
9. Set the property CG::Configuration::MainGenerationScheme to UserInitializationOnly using the pull-down list. This setting enables you to rewrite the main exactly as you want.
Tutorial 2-11
Hello World
tutorialada.book Page 12 Thursday, June 12, 2003 11:43 AM
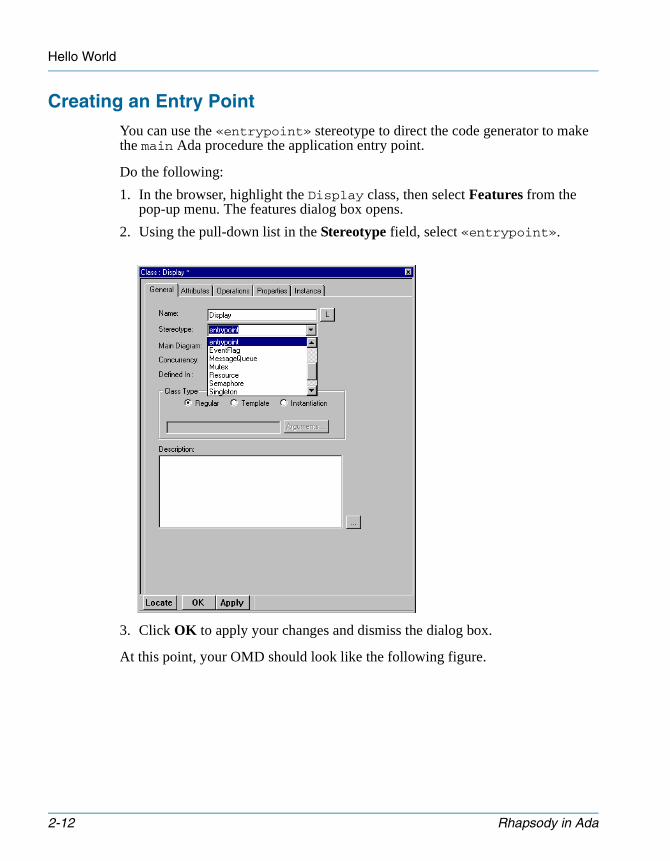
Creating an Entry Point
You can use the «entrypoint» stereotype to direct the code generator to make the main Ada procedure the application entry point.
Do the following:
1. In the browser, highlight the Display class, then select Features from the pop-up menu. The features dialog box opens.
2. Using the pull-down list in the Stereotype field, select «entrypoint».
3. Click OK to apply your changes and dismiss the dialog box.
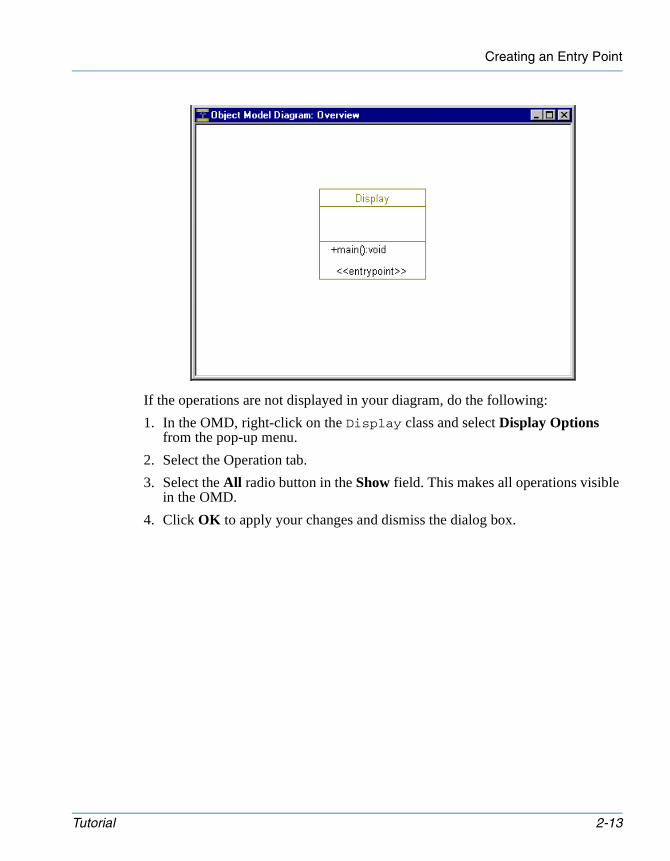
At this point, your OMD should look like the following figure.
2-12 Rhapsody in Ada
Creating an Entry Point
tutorialada.book Page 13 Thursday, June 12, 2003 11:43 AM
If the operations are not displayed in your diagram, do the following:
1. In the OMD, right-click on the Display class and select Display Options from the pop-up menu.
2. Select the Operation tab.
3. Select the All radio button in the Show field. This makes all operations visible in the OMD.
4. Click OK to apply your changes and dismiss the dialog box.
Tutorial 2-13
Hello World
tutorialada.book Page 14 Thursday, June 12, 2003 11:43 AM
Creating a ComponentBefore generating code, you must construct a component for the HelloWorld application. A component is a physical subsystem in the form of a library or executable program. The name of the component becomes the name of the executable application to build. This component defines classes for which to generate code, and options to apply to the generated code.
To define a new component for the HelloWorld application, do the following:
1. In the browser, click the plus sign in front of the Components category to expand it. You can see the default component that comes with Rhapsody, called DefaultComponent.
2. Right-click the Components category in the browser, and select Add New Component. Rhapsody creates a new component called component_n, where n is greater than or equal to 0.
3. Rename the component “Test” and press Enter. Rhapsody displays the renamed component in the browser.
4. Right-click the Test component, and select Features from the pop-up menu.
5. Verify the following settings:
• The Type field should be set to Executable.
• The Scope should be set to All Elements.
Note: Currently, the Ada code generator builds the model regardless of the scope setting.
The following figure shows the complete dialog box.
2-14 Rhapsody in Ada
Creating a Configuration
tutorialada.book Page 15 Thursday, June 12, 2003 11:43 AM
6. Click OK to apply your changes and dismiss the dialog box.
Creating a ConfigurationThe code generation component requires a configuration that provides information on the scope, initial instances, code checks, and additional settings for the build.
To create a configuration, do the following:
1. Click the plus sign in front of the Test component to display the Configurations subcategory.
2. Expand the Configurations category.
Tutorial 2-15
Hello World
tutorialada.book Page 16 Thursday, June 12, 2003 11:43 AM
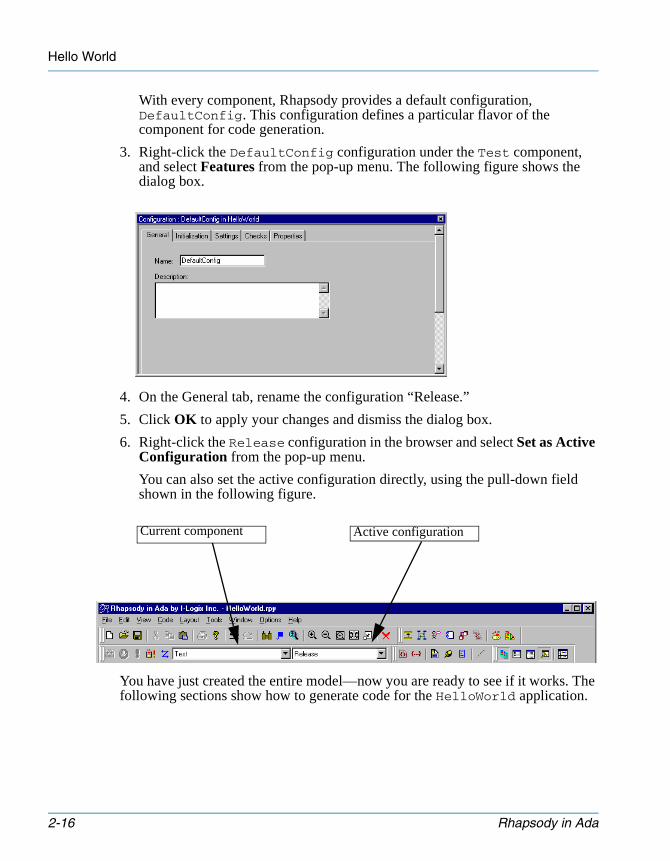
With every component, Rhapsody provides a default configuration, DefaultConfig. This configuration defines a particular flavor of the component for code generation.
3. Right-click the DefaultConfig configuration under the Test component, and select Features from the pop-up menu. The following figure shows the dialog box.
4. On the General tab, rename the configuration “Release.”
5. Click OK to apply your changes and dismiss the dialog box.
6. Right-click the Release configuration in the browser and select Set as Active Configuration from the pop-up menu.
You can also set the active configuration directly, using the pull-down field shown in the following figure.
You have just created the entire model—now you are ready to see if it works. The following sections show how to generate code for the HelloWorld application.
Active configurationCurrent component
2-16 Rhapsody in Ada
Generating Code
tutorialada.book Page 17 Thursday, June 12, 2003 11:43 AM
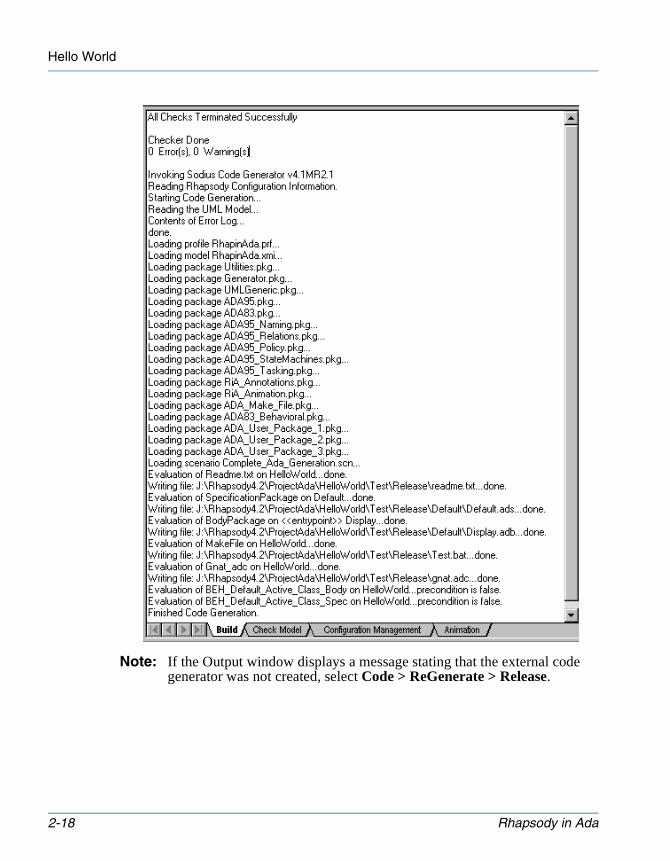
Generating CodeTo generate the code, do the following:
1. In the Rhapsody main menu, select Code > Generate > Release.
2. The subdirectory Release, which Rhapsody needs to store the generated files, does not yet exist. Rhapsody asks you to confirm its creation. Click Yes.
In the output window, Rhapsody displays code generation messages that inform you of the following:• The files being generated for classes and packages in the model and for the
main function• Where Rhapsody is generating the makefile for the configuration• When code generation is done
Rhapsody automatically performs some checks to make sure that the model has no syntax or semantic errors before generating code.
Note: The first time you generate code during the Rhapsody session, the tool invokes the rules engine and loads the selected ruleset, which can be time-consuming. However, because the rules remain loaded throughout the session, subsequent code generations are significantly shorter.
The following figure shows the code generation messages for the HelloWorld program.
Tutorial 2-17
Hello World
tutorialada.book Page 18 Thursday, June 12, 2003 11:43 AM
Note: If the Output window displays a message stating that the external code generator was not created, select Code > ReGenerate > Release.
2-18 Rhapsody in Ada
The Code Toolbar
tutorialada.book Page 19 Thursday, June 12, 2003 11:43 AM
The Code Toolbar
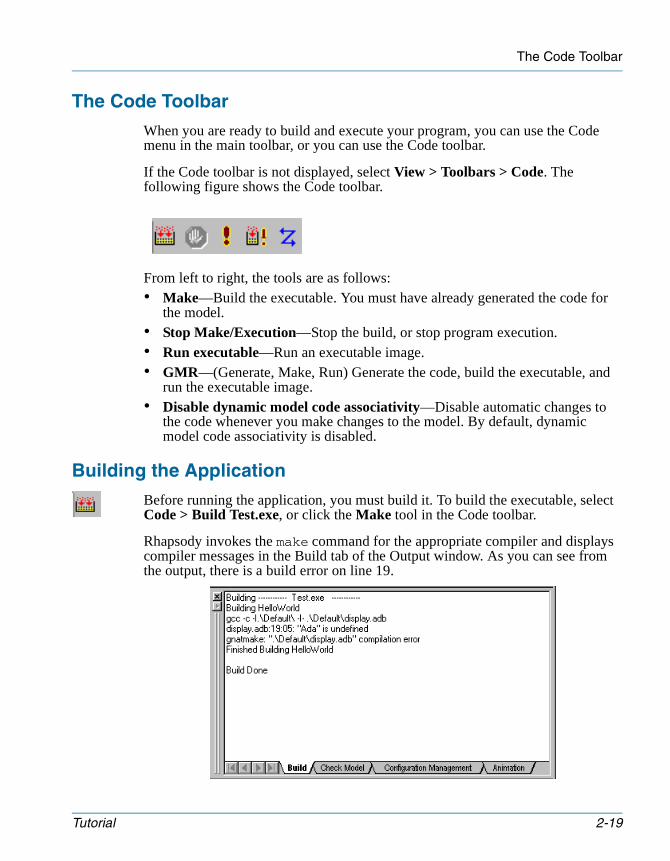
When you are ready to build and execute your program, you can use the Code menu in the main toolbar, or you can use the Code toolbar.
If the Code toolbar is not displayed, select View > Toolbars > Code. The following figure shows the Code toolbar.
From left to right, the tools are as follows:• Make—Build the executable. You must have already generated the code for
the model.• Stop Make/Execution—Stop the build, or stop program execution.• Run executable—Run an executable image.• GMR—(Generate, Make, Run) Generate the code, build the executable, and
run the executable image.• Disable dynamic model code associativity—Disable automatic changes to
the code whenever you make changes to the model. By default, dynamic model code associativity is disabled.
Building the Application
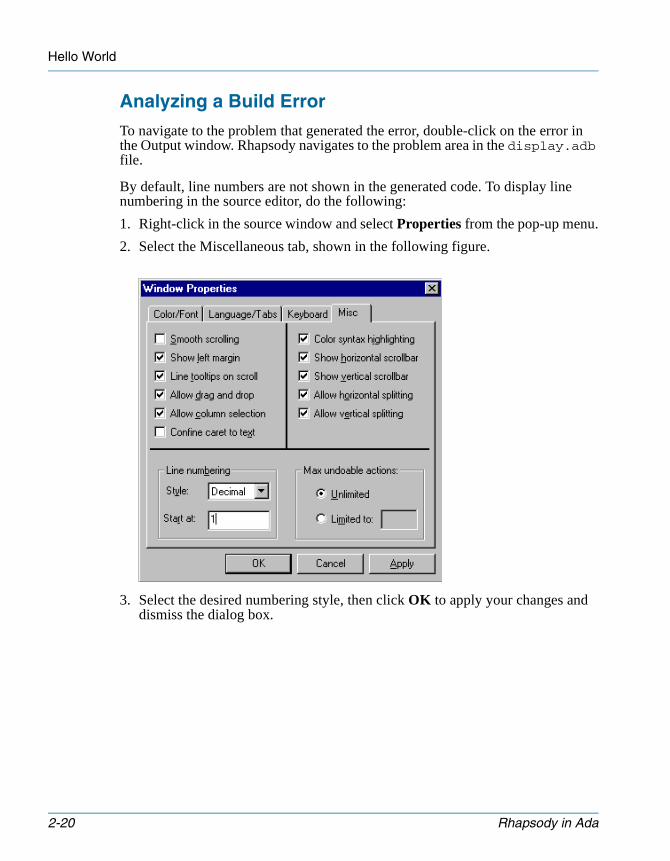
Before running the application, you must build it. To build the executable, select Code > Build Test.exe, or click the Make tool in the Code toolbar.
Rhapsody invokes the make command for the appropriate compiler and displays compiler messages in the Build tab of the Output window. As you can see from the output, there is a build error on line 19.
Tutorial 2-19
Hello World
tutorialada.book Page 20 Thursday, June 12, 2003 11:43 AM
Analyzing a Build Error
To navigate to the problem that generated the error, double-click on the error in the Output window. Rhapsody navigates to the problem area in the display.adb file.
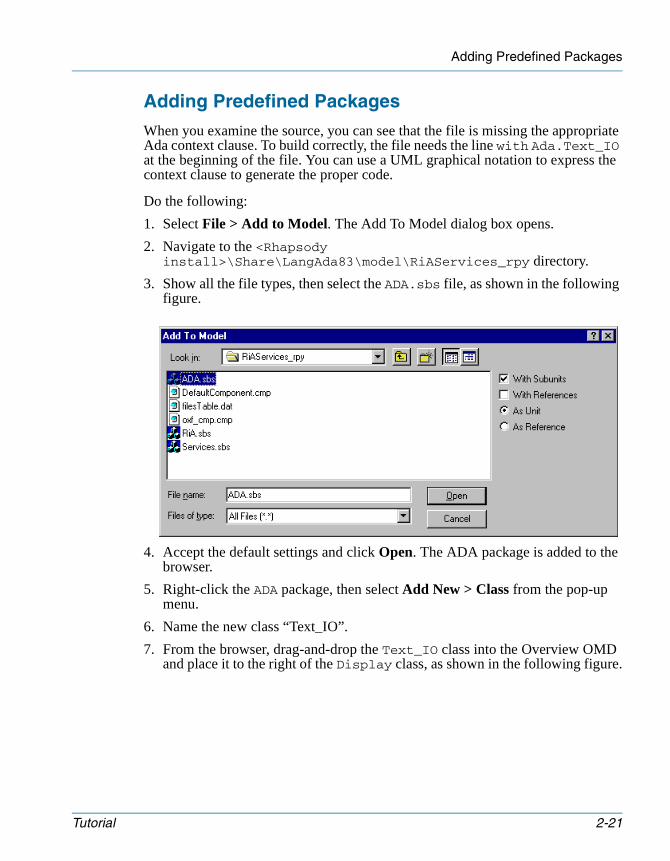
By default, line numbers are not shown in the generated code. To display line numbering in the source editor, do the following:
1. Right-click in the source window and select Properties from the pop-up menu.
2. Select the Miscellaneous tab, shown in the following figure.
3. Select the desired numbering style, then click OK to apply your changes and dismiss the dialog box.
2-20 Rhapsody in Ada
Adding Predefined Packages
tutorialada.book Page 21 Thursday, June 12, 2003 11:43 AM
Adding Predefined Packages
When you examine the source, you can see that the file is missing the appropriate Ada context clause. To build correctly, the file needs the line with Ada.Text_IO at the beginning of the file. You can use a UML graphical notation to express the context clause to generate the proper code.
Do the following:
1. Select File > Add to Model. The Add To Model dialog box opens.
2. Navigate to the <Rhapsody install>\Share\LangAda83\model\RiAServices_rpy directory.
3. Show all the file types, then select the ADA.sbs file, as shown in the following figure.
4. Accept the default settings and click Open. The ADA package is added to the browser.
5. Right-click the ADA package, then select Add New > Class from the pop-up menu.
6. Name the new class “Text_IO”.
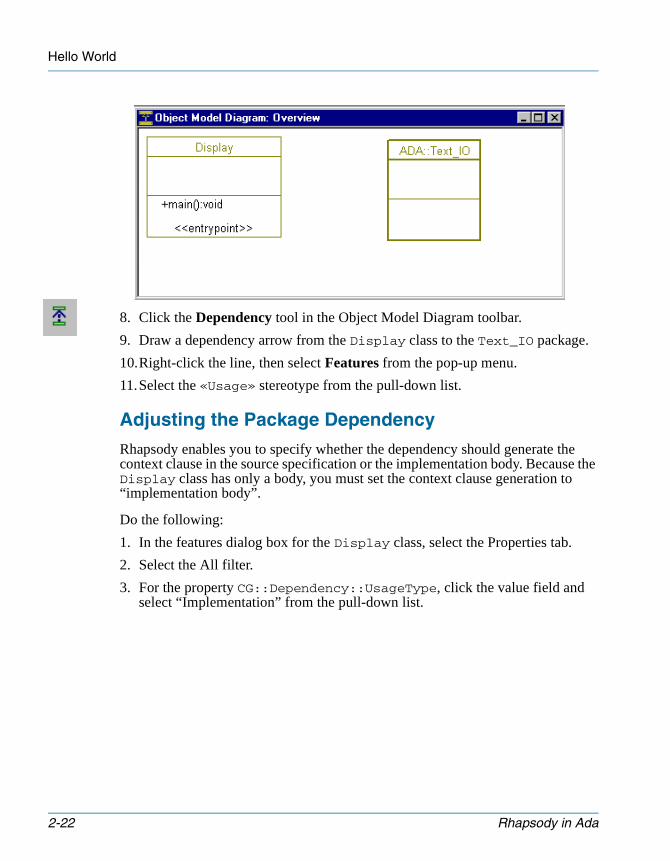
7. From the browser, drag-and-drop the Text_IO class into the Overview OMD and place it to the right of the Display class, as shown in the following figure.
Tutorial 2-21
Hello World
tutorialada.book Page 22 Thursday, June 12, 2003 11:43 AM
8. Click the Dependency tool in the Object Model Diagram toolbar.
9. Draw a dependency arrow from the Display class to the Text_IO package.
10.Right-click the line, then select Features from the pop-up menu.
11.Select the «Usage» stereotype from the pull-down list.
Adjusting the Package Dependency
Rhapsody enables you to specify whether the dependency should generate the context clause in the source specification or the implementation body. Because the Display class has only a body, you must set the context clause generation to “implementation body”.
Do the following:
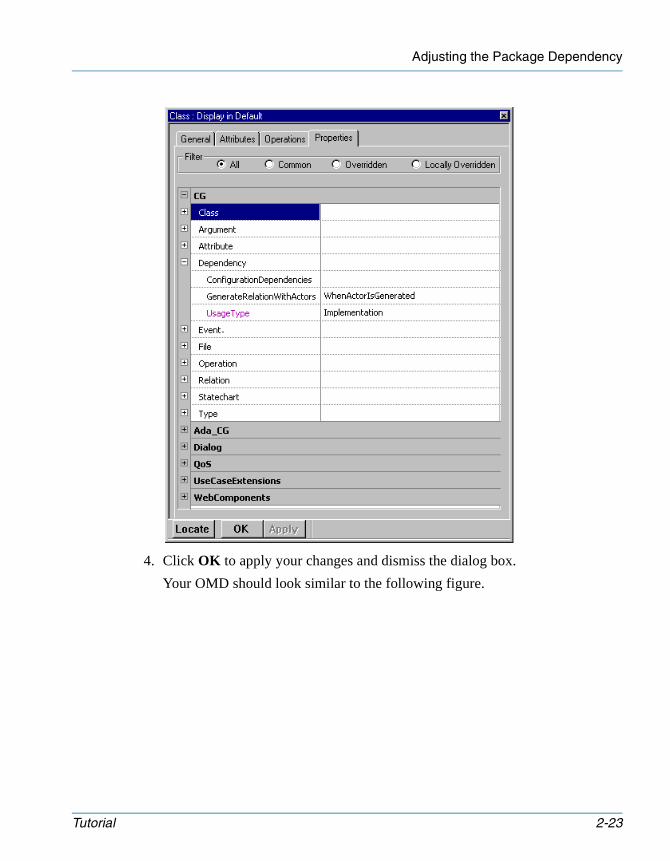
1. In the features dialog box for the Display class, select the Properties tab.
2. Select the All filter.
3. For the property CG::Dependency::UsageType, click the value field and select “Implementation” from the pull-down list.
2-22 Rhapsody in Ada
Adjusting the Package Dependency
tutorialada.book Page 23 Thursday, June 12, 2003 11:43 AM
4. Click OK to apply your changes and dismiss the dialog box.
Your OMD should look similar to the following figure.
Tutorial 2-23
Hello World
tutorialada.book Page 24 Thursday, June 12, 2003 11:43 AM
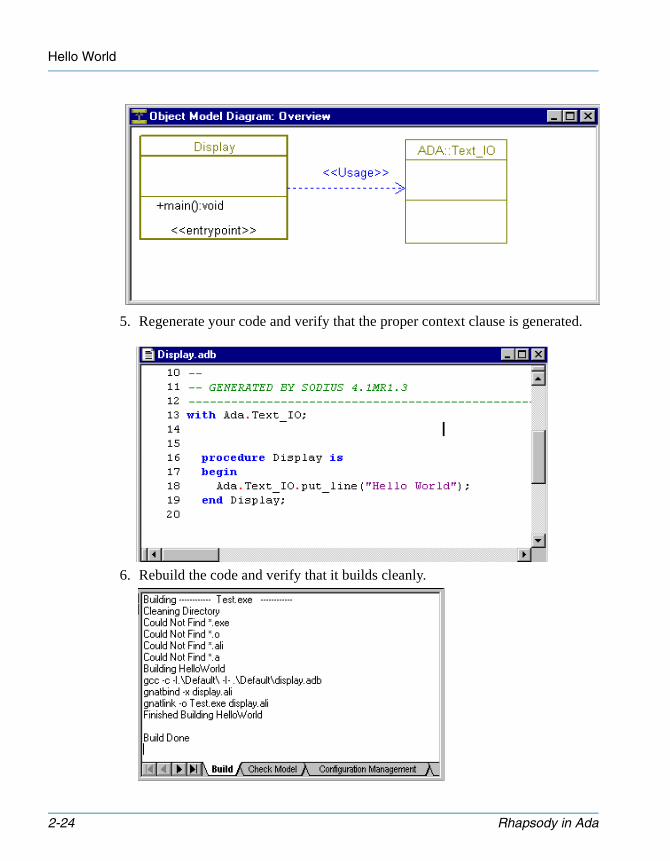
5. Regenerate your code and verify that the proper context clause is generated.
6. Rebuild the code and verify that it builds cleanly.
2-24 Rhapsody in Ada
Running the Application
tutorialada.book Page 25 Thursday, June 12, 2003 11:43 AM
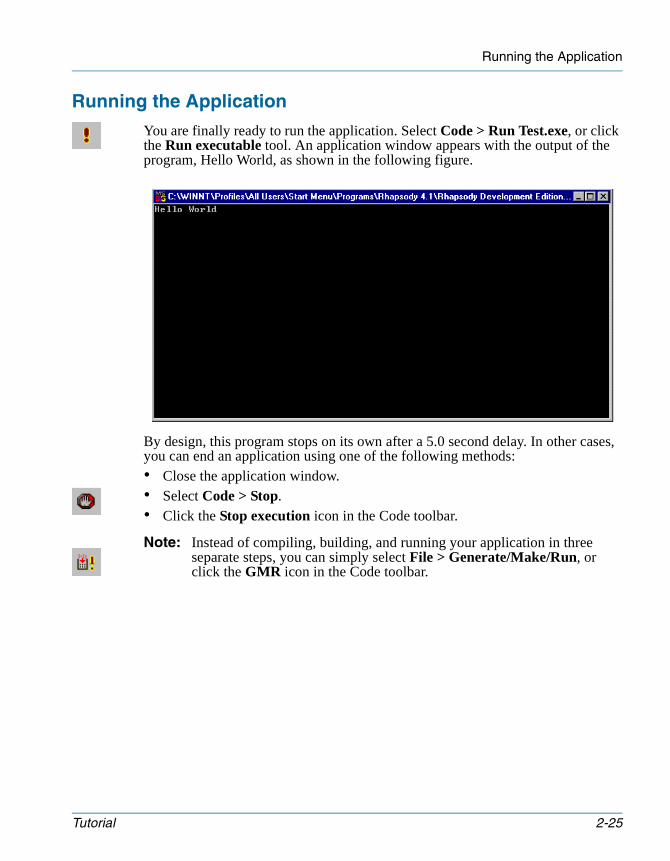
Running the Application
You are finally ready to run the application. Select Code > Run Test.exe, or click the Run executable tool. An application window appears with the output of the program, Hello World, as shown in the following figure.
By design, this program stops on its own after a 5.0 second delay. In other cases, you can end an application using one of the following methods:• Close the application window.• Select Code > Stop.• Click the Stop execution icon in the Code toolbar.
Note: Instead of compiling, building, and running your application in three separate steps, you can simply select File > Generate/Make/Run, or click the GMR icon in the Code toolbar.
Tutorial 2-25
Hello World
tutorialada.book Page 26 Thursday, June 12, 2003 11:43 AM
Examining the Code
Rhapsody has generated the code for this example in the Release folder, which is in the same folder as the HelloWorld.rpy project file. You can examine the generated code in either an internal or external editor.
Using the Internal Editor
To view generated source files in the browser using the Rhapsody internal editor, do one of the following:• In the browser, select the package or class whose code you want to view, then
select Code > Edit > Selected classes.• In the browser, right-click the Default package, and select Edit Package
from the pop-up menu.• In the browser, right-click the Display class, and select Edit Class from the
pop-up menu.
Selecting an External Editor
To view long text fields, such as operation bodies, or to view the generated code, Rhapsody calls an external editor.
To specify which editor should be invoked, do the following:
1. Select File > Project Properties.
2. On the Properties tab, browse to the General subject and Model metaclass.
3. Click the ellipsis (...) button in the EditorCommandLine value field to browse to your preferred editor (for example, C:\WINNT\Notepad.exe).
4. Browse to the property General::Model::ClassCodeEditor and set it to the value CommandLine.
5. Click OK to apply your changes and dismiss the dialog box.
Now when you edit code, Rhapsody opens the code in the specified external editor.
2-26 Rhapsody in Ada
Closing the Project
tutorialada.book Page 27 Thursday, June 12, 2003 11:43 AM
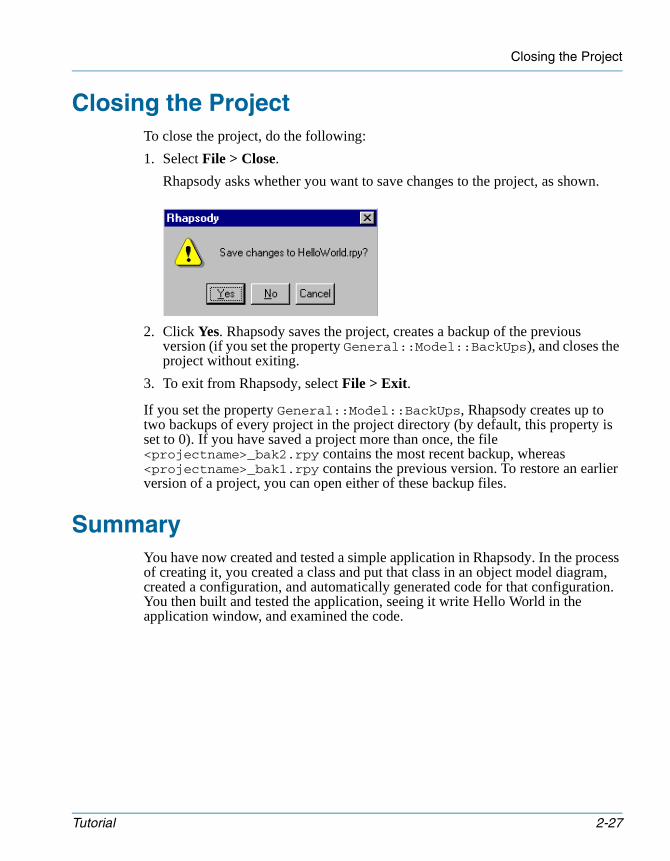
Closing the ProjectTo close the project, do the following:
1. Select File > Close.
Rhapsody asks whether you want to save changes to the project, as shown.
2. Click Yes. Rhapsody saves the project, creates a backup of the previous version (if you set the property General::Model::BackUps), and closes the project without exiting.
3. To exit from Rhapsody, select File > Exit.
If you set the property General::Model::BackUps, Rhapsody creates up to two backups of every project in the project directory (by default, this property is set to 0). If you have saved a project more than once, the file <projectname>_bak2.rpy contains the most recent backup, whereas <projectname>_bak1.rpy contains the previous version. To restore an earlier version of a project, you can open either of these backup files.
SummaryYou have now created and tested a simple application in Rhapsody. In the process of creating it, you created a class and put that class in an object model diagram, created a configuration, and automatically generated code for that configuration. You then built and tested the application, seeing it write Hello World in the application window, and examined the code.
Tutorial 2-27

Hello World
tutorialada.book Page 28 Thursday, June 12, 2003 11:43 AM
2-28 Rhapsody in Ada
tutorialada.book Page 1 Thursday, June 12, 2003 11:43 AM
Goals for This LessonAfter completing this lesson, you should know how to perform the following tasks in Rhapsody:• Create a use case diagram.• Edit use cases.• Generalize a use case.• Label a use case.
OverviewA use case diagram (UCD) shows typical interactions between the system being designed and the external actors who might interact with it.
Use case diagrams can have the following parts:
ActorCan be either a user of the system or an external component (such as a sensor or actuator) that either provides information to the system or uses information provided by the system.
Use CaseCaptures some user-visible function. A use case can be big or small, but it must capture an important goal of a user for the system.
Association LineShows the relationship between an actor and a use case.
Tutorial 3-1
Creating a Use Case Diagram
tutorialada.book Page 2 Thursday, June 12, 2003 11:43 AM
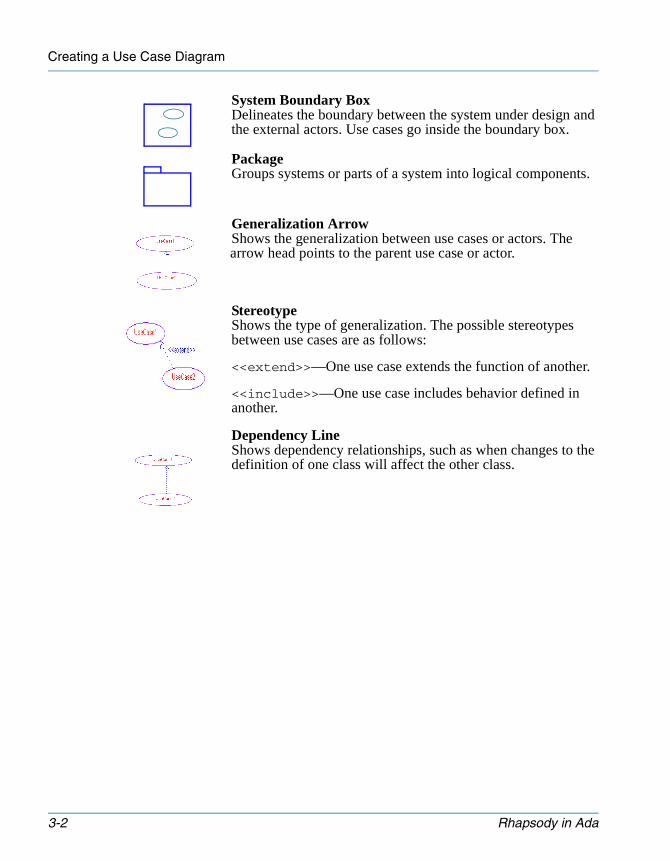
System Boundary BoxDelineates the boundary between the system under design and the external actors. Use cases go inside the boundary box.
PackageGroups systems or parts of a system into logical components.
Generalization ArrowShows the generalization between use cases or actors. The arrow head points to the parent use case or actor.
StereotypeShows the type of generalization. The possible stereotypes between use cases are as follows:
<<extend>>—One use case extends the function of another.
<<include>>—One use case includes behavior defined in another.
Dependency LineShows dependency relationships, such as when changes to the definition of one class will affect the other class.
3-2 Rhapsody in Ada
Analyzing the Dishwasher System
tutorialada.book Page 3 Thursday, June 12, 2003 11:43 AM
Analyzing the Dishwasher SystemThe process of analyzing the dishwasher involves identifying who might want to use the system and how they might want to use it. You need to identify the major function points of the system and any possible relationships, similarities, or differences between them. These function points are the system requirements.
First, consider all those who interact with the dishwasher. These are the system “actors” and they include: • A “cleansing engineer”• A service person
The actors interact with the dishwasher in the following ways:• A cleansing engineer washes the dishes.• A service person services the dishwasher.
Creating the New Dishwasher ProjectTo create the Dishwasher project, do the following:
1. Start Rhapsody, if it is not already running.
2. To create the new project, either select File > New, or click the New project icon in the main toolbar.
3. Name the new project “Dishwasher,” and be sure to create it in a folder called Dishwasher.
Note: To avoid overwriting the Dishwasher sample project provided with Rhapsody, make sure you do not create your project in the Rhapsody\Samples\Dishwasher directory.
4. Confirm the creation of the new directory.
5. Save the project.
Tutorial 3-3
Creating a Use Case Diagram
tutorialada.book Page 4 Thursday, June 12, 2003 11:43 AM
Creating a UCDThere are two ways to create a UCD: using the browser and using the Tools menu.
Using the Browser
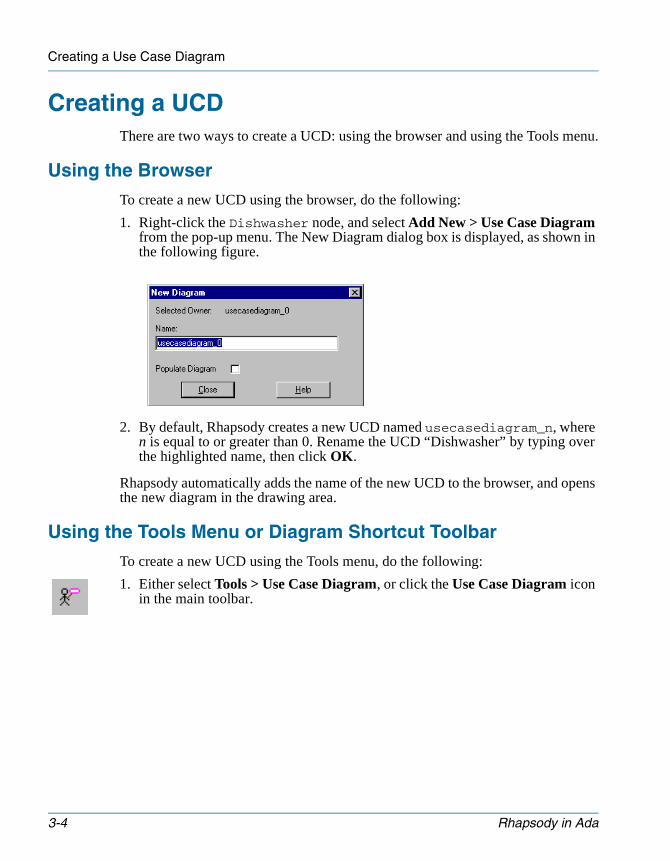
To create a new UCD using the browser, do the following:
1. Right-click the Dishwasher node, and select Add New > Use Case Diagram from the pop-up menu. The New Diagram dialog box is displayed, as shown in the following figure.
2. By default, Rhapsody creates a new UCD named usecasediagram_n, where n is equal to or greater than 0. Rename the UCD “Dishwasher” by typing over the highlighted name, then click OK.
Rhapsody automatically adds the name of the new UCD to the browser, and opens the new diagram in the drawing area.
Using the Tools Menu or Diagram Shortcut Toolbar
To create a new UCD using the Tools menu, do the following:
1. Either select Tools > Use Case Diagram, or click the Use Case Diagram icon in the main toolbar.
3-4 Rhapsody in Ada

Using the Tools Menu or Diagram Shortcut Toolbar
tutorialada.book Page 5 Thursday, June 12, 2003 11:43 AM
2. Rhapsody displays a dialog box that lists all the existing UCDs for all the packages.
3. Click New. Rhapsody displays the dialog box shown in the following figure.
4. Type in the name for the new UCD, “Dishwasher”, and click OK. Rhapsody displays the new UCD in the drawing area.
Tutorial 3-5
Creating a Use Case Diagram
tutorialada.book Page 6 Thursday, June 12, 2003 11:43 AM
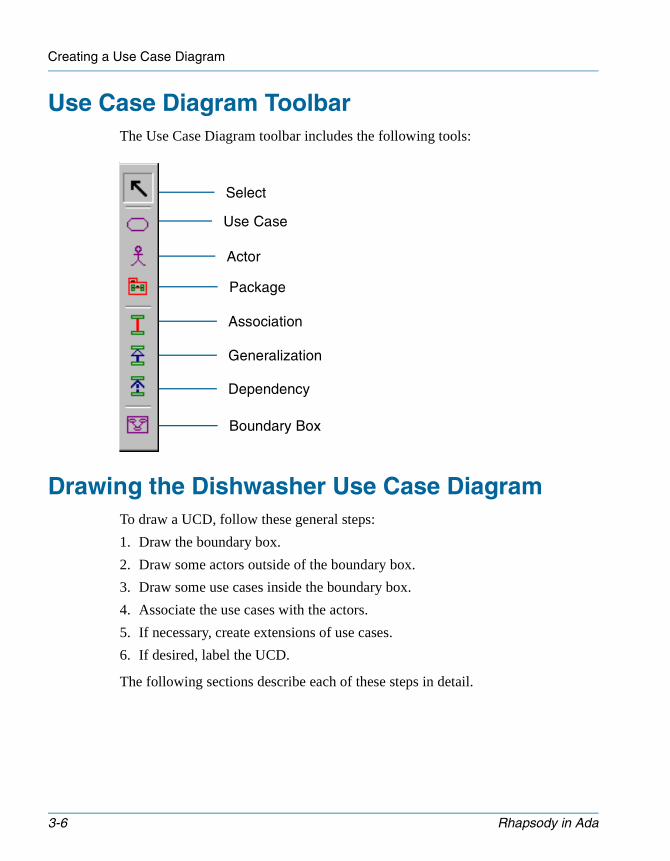
Use Case Diagram ToolbarThe Use Case Diagram toolbar includes the following tools:
Drawing the Dishwasher Use Case DiagramTo draw a UCD, follow these general steps:
1. Draw the boundary box.
2. Draw some actors outside of the boundary box.
3. Draw some use cases inside the boundary box.
4. Associate the use cases with the actors.
5. If necessary, create extensions of use cases.
6. If desired, label the UCD.
The following sections describe each of these steps in detail.
Select
Use Case
Actor
Boundary Box
Package
Generalization
Association
Dependency
3-6 Rhapsody in Ada
Step 1: Drawing the Boundary Box
tutorialada.book Page 7 Thursday, June 12, 2003 11:43 AM
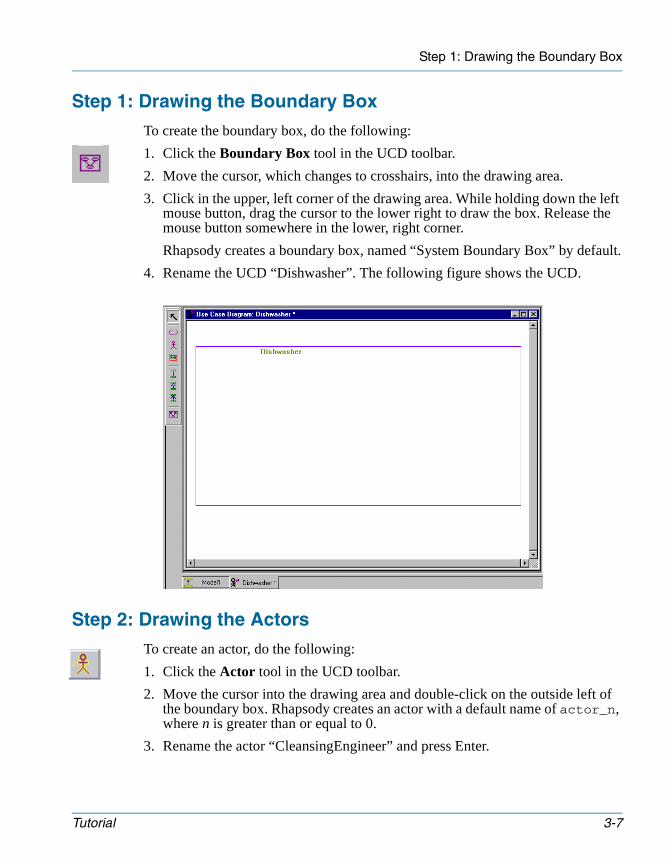
Step 1: Drawing the Boundary Box
To create the boundary box, do the following:
1. Click the Boundary Box tool in the UCD toolbar.
2. Move the cursor, which changes to crosshairs, into the drawing area.
3. Click in the upper, left corner of the drawing area. While holding down the left mouse button, drag the cursor to the lower right to draw the box. Release the mouse button somewhere in the lower, right corner.
Rhapsody creates a boundary box, named “System Boundary Box” by default.
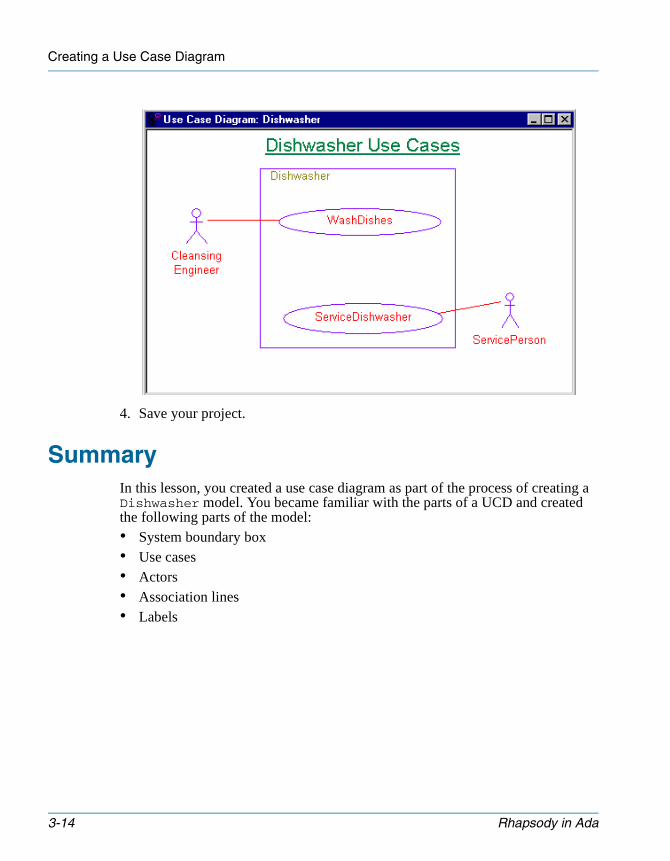
4. Rename the UCD “Dishwasher”. The following figure shows the UCD.
Step 2: Drawing the Actors
To create an actor, do the following:
1. Click the Actor tool in the UCD toolbar.
2. Move the cursor into the drawing area and double-click on the outside left of the boundary box. Rhapsody creates an actor with a default name of actor_n, where n is greater than or equal to 0.
3. Rename the actor “CleansingEngineer” and press Enter.
Tutorial 3-7

Creating a Use Case Diagram
tutorialada.book Page 8 Thursday, June 12, 2003 11:43 AM
Note: Because code is generated using the specified names, do not include spaces in the names of actors.
4. Create another actor on the other side of the boundary box, change its name to “ServicePerson,” and press Enter.
At this point, the Dishwasher UCD should look like the following figure.
5. In the browser, expand the Packages category. You can see that Rhapsody has added the two new actors to the Default package.
3-8 Rhapsody in Ada
Step 3: Drawing the Use Cases
tutorialada.book Page 9 Thursday, June 12, 2003 11:43 AM
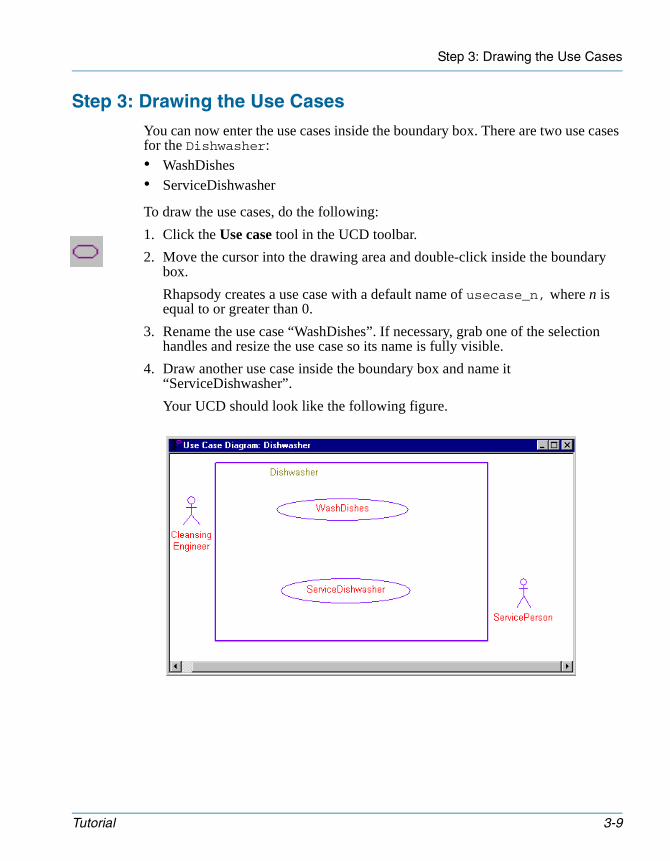
Step 3: Drawing the Use Cases
You can now enter the use cases inside the boundary box. There are two use cases for the Dishwasher:• WashDishes• ServiceDishwasher
To draw the use cases, do the following:
1. Click the Use case tool in the UCD toolbar.
2. Move the cursor into the drawing area and double-click inside the boundary box.
Rhapsody creates a use case with a default name of usecase_n, where n is equal to or greater than 0.
3. Rename the use case “WashDishes”. If necessary, grab one of the selection handles and resize the use case so its name is fully visible.
4. Draw another use case inside the boundary box and name it “ServiceDishwasher”.
Your UCD should look like the following figure.
Tutorial 3-9
Creating a Use Case Diagram
tutorialada.book Page 10 Thursday, June 12, 2003 11:43 AM
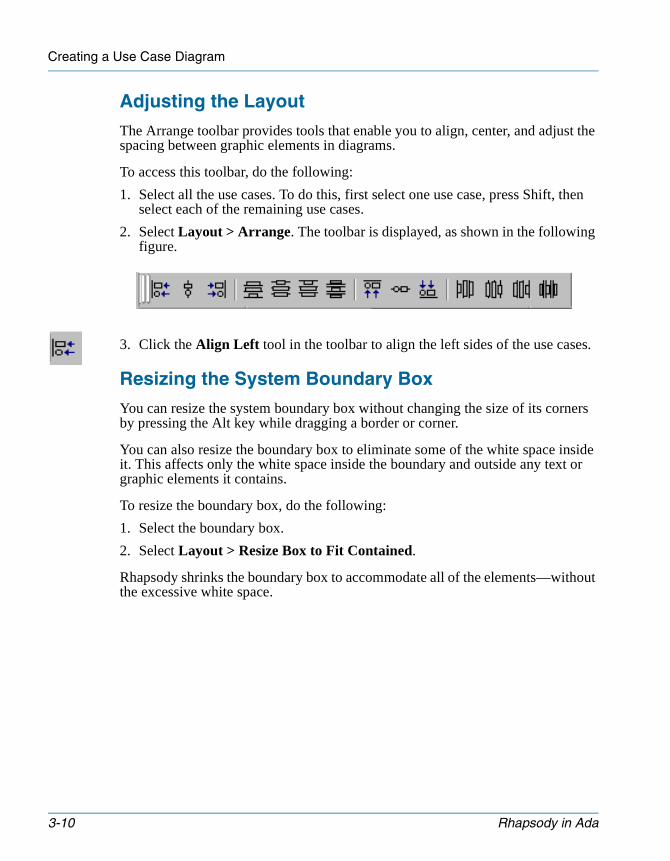
Adjusting the Layout
The Arrange toolbar provides tools that enable you to align, center, and adjust the spacing between graphic elements in diagrams.
To access this toolbar, do the following:
1. Select all the use cases. To do this, first select one use case, press Shift, then select each of the remaining use cases.
2. Select Layout > Arrange. The toolbar is displayed, as shown in the following figure.
3. Click the Align Left tool in the toolbar to align the left sides of the use cases.
Resizing the System Boundary Box
You can resize the system boundary box without changing the size of its corners by pressing the Alt key while dragging a border or corner.
You can also resize the boundary box to eliminate some of the white space inside it. This affects only the white space inside the boundary and outside any text or graphic elements it contains.
To resize the boundary box, do the following:
1. Select the boundary box.
2. Select Layout > Resize Box to Fit Contained.
Rhapsody shrinks the boundary box to accommodate all of the elements—without the excessive white space.
3-10 Rhapsody in Ada
Step 4: Associating Actors with Use Cases
tutorialada.book Page 11 Thursday, June 12, 2003 11:43 AM
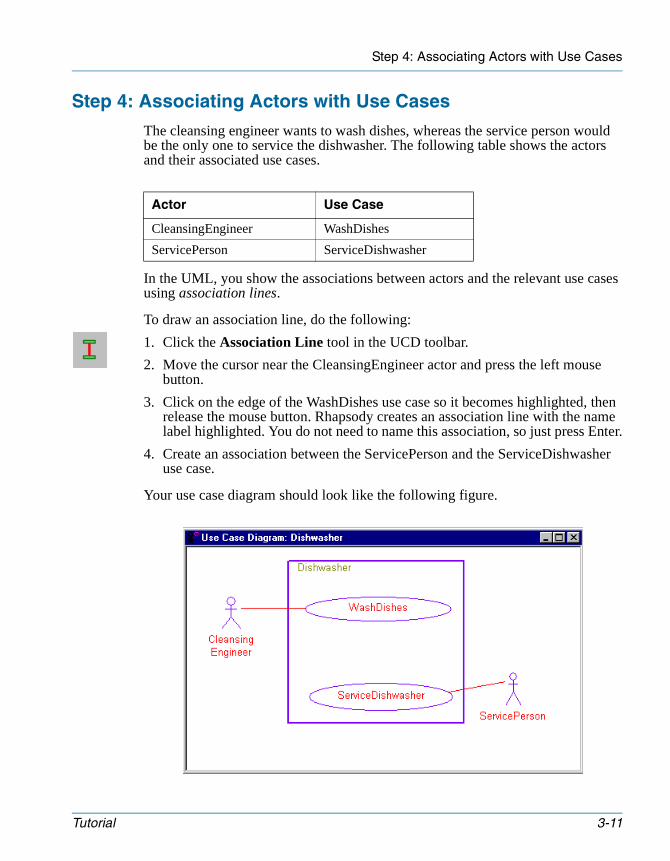
Step 4: Associating Actors with Use Cases
The cleansing engineer wants to wash dishes, whereas the service person would be the only one to service the dishwasher. The following table shows the actors and their associated use cases.
In the UML, you show the associations between actors and the relevant use cases using association lines.
To draw an association line, do the following:
1. Click the Association Line tool in the UCD toolbar.
2. Move the cursor near the CleansingEngineer actor and press the left mouse button.
3. Click on the edge of the WashDishes use case so it becomes highlighted, then release the mouse button. Rhapsody creates an association line with the name label highlighted. You do not need to name this association, so just press Enter.
4. Create an association between the ServicePerson and the ServiceDishwasher use case.
Your use case diagram should look like the following figure.
Actor Use Case
CleansingEngineer WashDishes
ServicePerson ServiceDishwasher
Tutorial 3-11
Creating a Use Case Diagram
tutorialada.book Page 12 Thursday, June 12, 2003 11:43 AM
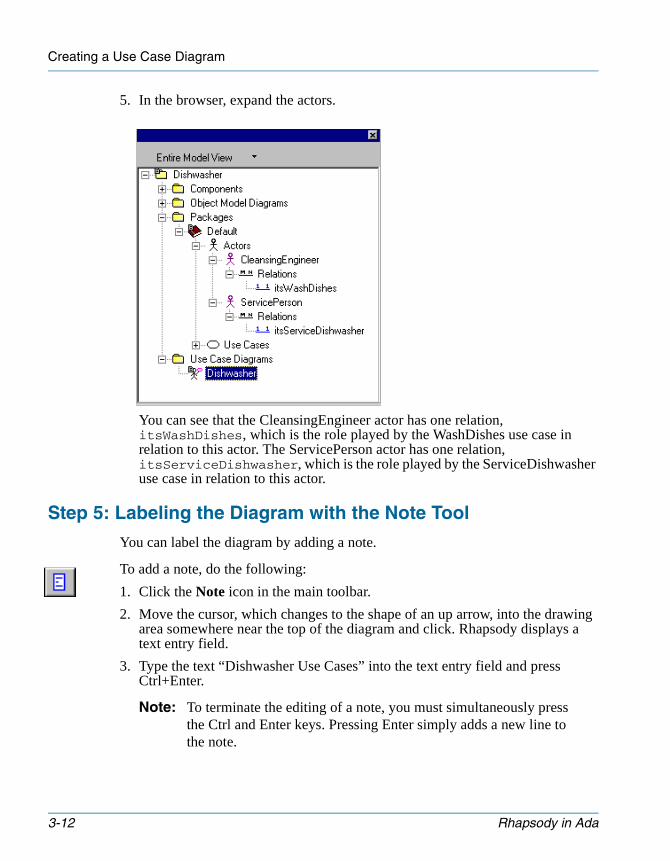
5. In the browser, expand the actors.
You can see that the CleansingEngineer actor has one relation, itsWashDishes, which is the role played by the WashDishes use case in relation to this actor. The ServicePerson actor has one relation, itsServiceDishwasher, which is the role played by the ServiceDishwasher use case in relation to this actor.
Step 5: Labeling the Diagram with the Note Tool
You can label the diagram by adding a note.
To add a note, do the following:
1. Click the Note icon in the main toolbar.
2. Move the cursor, which changes to the shape of an up arrow, into the drawing area somewhere near the top of the diagram and click. Rhapsody displays a text entry field.
3. Type the text “Dishwasher Use Cases” into the text entry field and press Ctrl+Enter.
Note: To terminate the editing of a note, you must simultaneously press the Ctrl and Enter keys. Pressing Enter simply adds a new line to the note.
3-12 Rhapsody in Ada
Changing the Text Font
tutorialada.book Page 13 Thursday, June 12, 2003 11:43 AM
When you are finished entering the note, there are four selection handles displayed at its corners. This means that the note is still selected so you can move it or edit its format.
Changing the Text Font
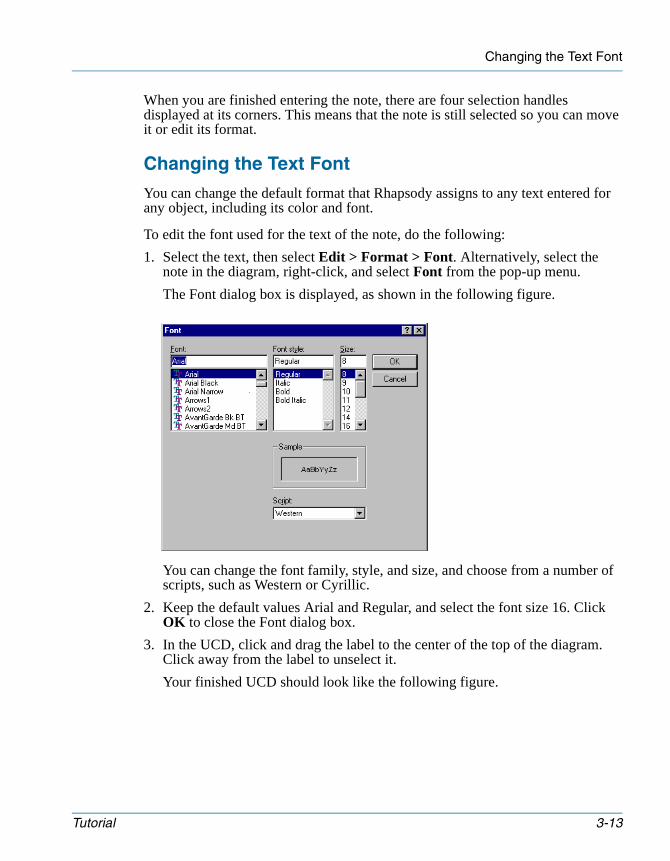
You can change the default format that Rhapsody assigns to any text entered for any object, including its color and font.
To edit the font used for the text of the note, do the following:
1. Select the text, then select Edit > Format > Font. Alternatively, select the note in the diagram, right-click, and select Font from the pop-up menu.
The Font dialog box is displayed, as shown in the following figure.
You can change the font family, style, and size, and choose from a number of scripts, such as Western or Cyrillic.
2. Keep the default values Arial and Regular, and select the font size 16. Click OK to close the Font dialog box.
3. In the UCD, click and drag the label to the center of the top of the diagram. Click away from the label to unselect it.
Your finished UCD should look like the following figure.
Tutorial 3-13
Creating a Use Case Diagram
tutorialada.book Page 14 Thursday, June 12, 2003 11:43 AM
4. Save your project.
SummaryIn this lesson, you created a use case diagram as part of the process of creating a Dishwasher model. You became familiar with the parts of a UCD and created the following parts of the model:• System boundary box• Use cases• Actors• Association lines• Labels
3-14 Rhapsody in Ada
tutorialada.book Page 1 Thursday, June 12, 2003 11:43 AM
Goals for This LessonAfter completing this lesson, you should know how to do the following in Rhapsody:• Draw an object model diagram.• Create a class in the diagram.• Draw dependencies.• Specify features of a class.• Set attributes of a class.• Add operations to a class.
OverviewObject model diagrams (OMDs) show the static structure of a system. They show the types of objects in the system, attributes and operations that belong to those objects, and static relationships that can exist between classes (types) and constraints that might apply.
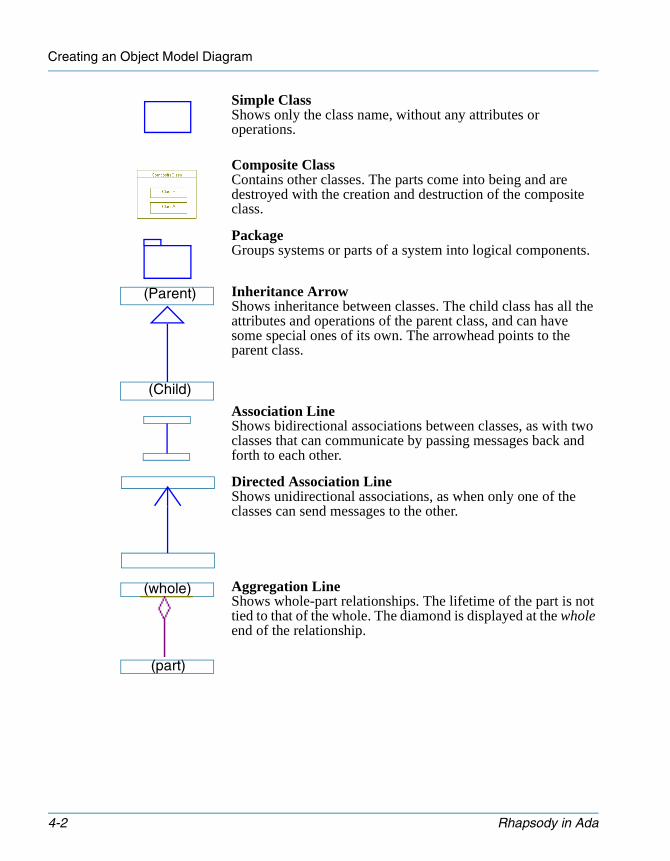
OMDs can have the following parts:
ClassGroups similar kinds of objects into types. All instances of a class have the same attributes and operations, although their individual values can vary. The top compartment holds the name of the class, the middle compartment holds the attributes, and the bottom compartment holds the operations.
Tutorial 4-1
Creating an Object Model Diagram
tutorialada.book Page 2 Thursday, June 12, 2003 11:43 AM
Simple ClassShows only the class name, without any attributes or operations.
Composite ClassContains other classes. The parts come into being and are destroyed with the creation and destruction of the composite class.
PackageGroups systems or parts of a system into logical components.
Inheritance ArrowShows inheritance between classes. The child class has all the attributes and operations of the parent class, and can have some special ones of its own. The arrowhead points to the parent class.
Association LineShows bidirectional associations between classes, as with two classes that can communicate by passing messages back and forth to each other.
Directed Association LineShows unidirectional associations, as when only one of the classes can send messages to the other.
Aggregation LineShows whole-part relationships. The lifetime of the part is not tied to that of the whole. The diamond is displayed at the whole end of the relationship.
(Parent)
(Child)
(whole)
(part)
4-2 Rhapsody in Ada
Creating an OMD
tutorialada.book Page 3 Thursday, June 12, 2003 11:43 AM
Composite
Shows strong aggregation (composite aggregation).
If you want the component class to come into being and die with the composite class as a whole, use composition. If, however, you want the parts to have lifetimes of their own separate from that of the whole, use aggregation.
Dependency LineShows dependency relationships, such as when changes to the definition of one class will affect the other class.
ActorCan be either a user of the system or an external component, such as a sensor or an actuator, that either provides information to the system or uses information provided by the system.
Creating an OMDTo create an OMD, do the following:
1. Start Rhapsody, if it is not already running.
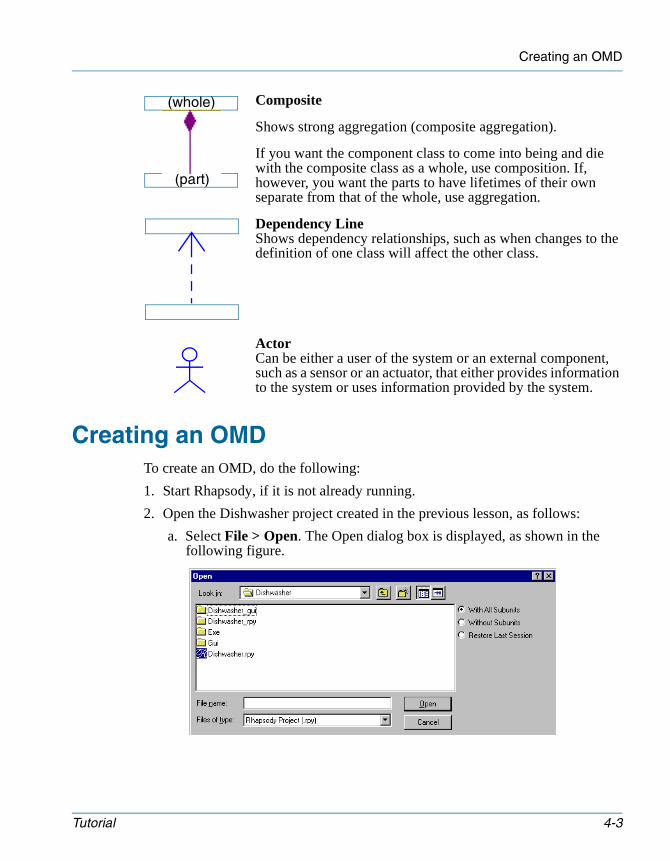
2. Open the Dishwasher project created in the previous lesson, as follows:
a. Select File > Open. The Open dialog box is displayed, as shown in the following figure.
(whole)
(part)
Tutorial 4-3
Creating an Object Model Diagram
tutorialada.book Page 4 Thursday, June 12, 2003 11:43 AM
b. Select the .rpy file, or type the name of the project file in the File name field.
c. Accept the default option, With All Subunits. See the Concurrent Engineering Guide for information about the other options.
d. Click Open.
5. In the browser, right-click the Default package, then select Add New > Object Model Diagram.
6. The New Diagram dialog box opens. Replace the default diagram name with “Dishwasher”.
7. Click OK to dismiss the dialog box. Rhapsody opens the empty OMD in the drawing area.
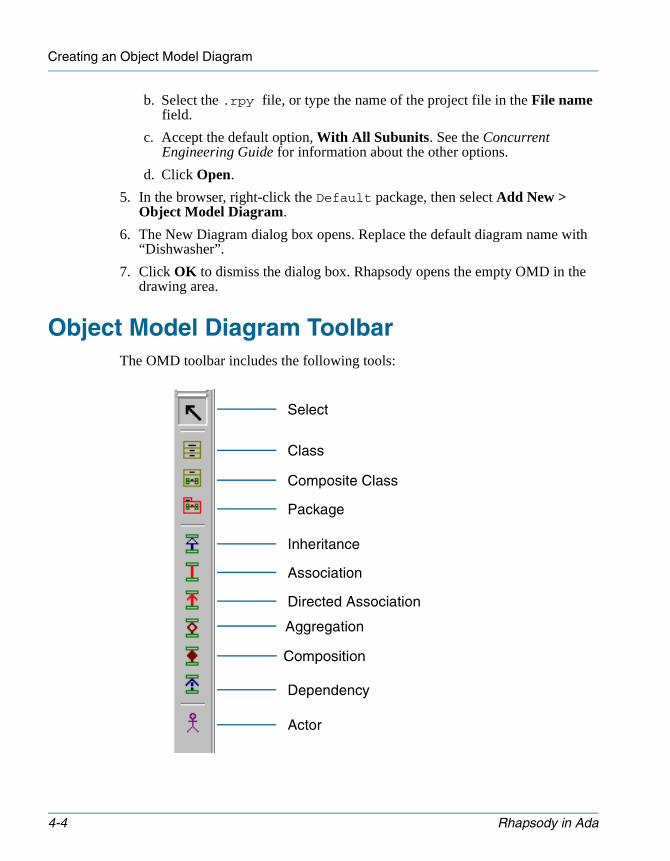
Object Model Diagram ToolbarThe OMD toolbar includes the following tools:
Select
Class
Composite Class
Package
Inheritance
Association
Directed Association
Aggregation
Dependency
Actor
Composition
4-4 Rhapsody in Ada
Drawing the Dishwasher OMD
tutorialada.book Page 5 Thursday, June 12, 2003 11:43 AM
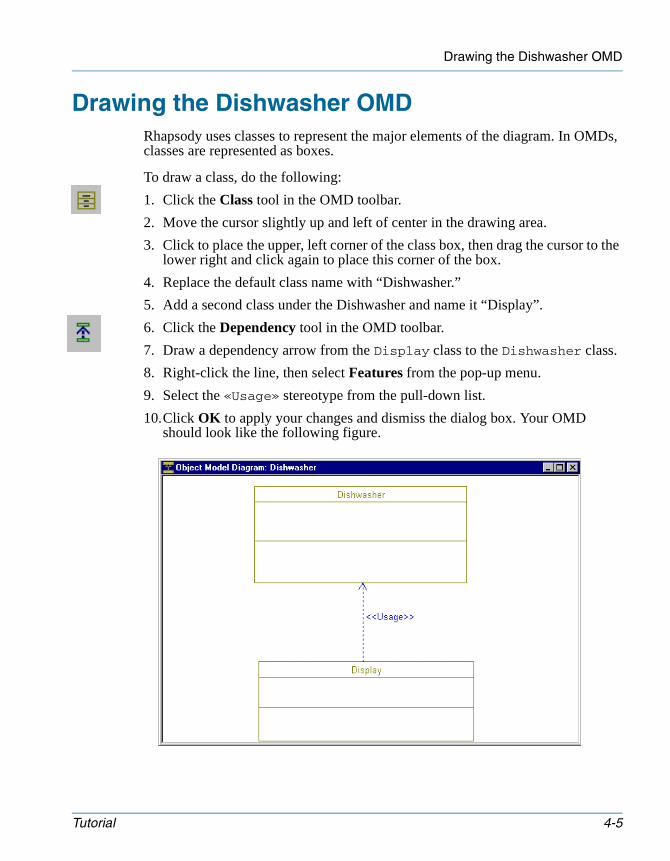
Drawing the Dishwasher OMDRhapsody uses classes to represent the major elements of the diagram. In OMDs, classes are represented as boxes.
To draw a class, do the following:
1. Click the Class tool in the OMD toolbar.
2. Move the cursor slightly up and left of center in the drawing area.
3. Click to place the upper, left corner of the class box, then drag the cursor to the lower right and click again to place this corner of the box.
4. Replace the default class name with “Dishwasher.”
5. Add a second class under the Dishwasher and name it “Display”.
6. Click the Dependency tool in the OMD toolbar.
7. Draw a dependency arrow from the Display class to the Dishwasher class.
8. Right-click the line, then select Features from the pop-up menu.
9. Select the «Usage» stereotype from the pull-down list.
10.Click OK to apply your changes and dismiss the dialog box. Your OMD should look like the following figure.
Tutorial 4-5
Creating an Object Model Diagram
tutorialada.book Page 6 Thursday, June 12, 2003 11:43 AM
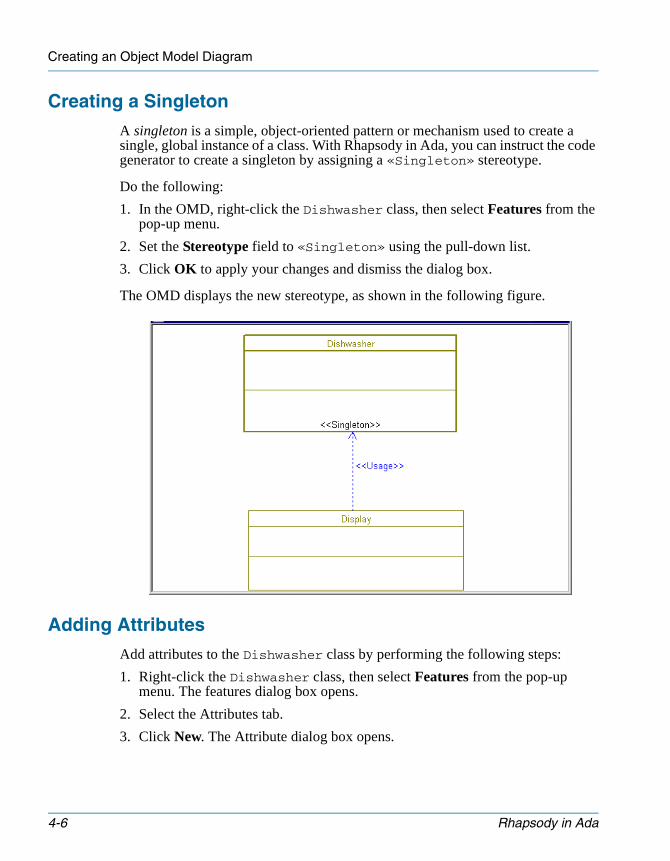
Creating a Singleton
A singleton is a simple, object-oriented pattern or mechanism used to create a single, global instance of a class. With Rhapsody in Ada, you can instruct the code generator to create a singleton by assigning a «Singleton» stereotype.
Do the following:
1. In the OMD, right-click the Dishwasher class, then select Features from the pop-up menu.
2. Set the Stereotype field to «Singleton» using the pull-down list.
3. Click OK to apply your changes and dismiss the dialog box.
The OMD displays the new stereotype, as shown in the following figure.
Adding Attributes
Add attributes to the Dishwasher class by performing the following steps:
1. Right-click the Dishwasher class, then select Features from the pop-up menu. The features dialog box opens.
2. Select the Attributes tab.
3. Click New. The Attribute dialog box opens.
4-6 Rhapsody in Ada
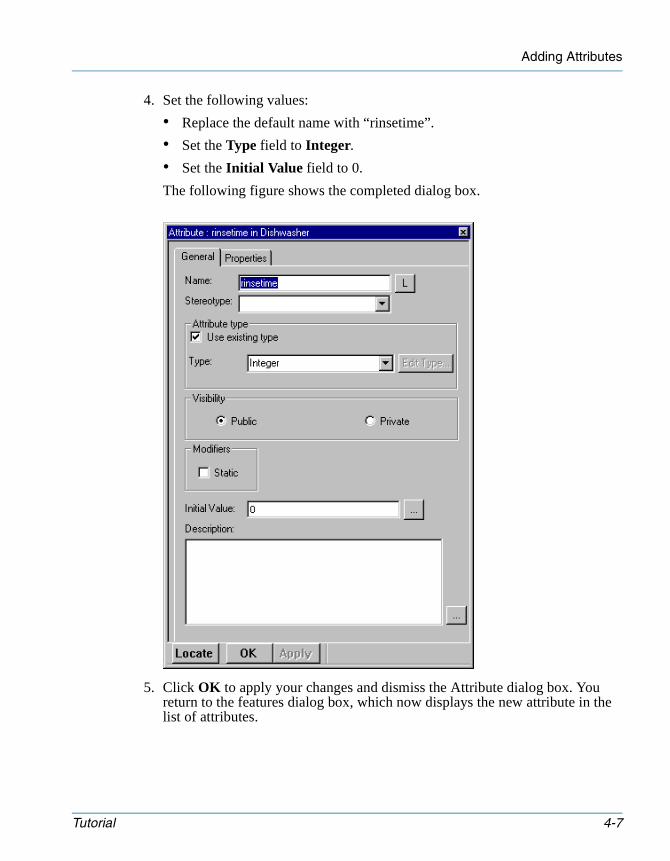
Adding Attributes
tutorialada.book Page 7 Thursday, June 12, 2003 11:43 AM
4. Set the following values:
• Replace the default name with “rinsetime”.
• Set the Type field to Integer.
• Set the Initial Value field to 0.
The following figure shows the completed dialog box.
5. Click OK to apply your changes and dismiss the Attribute dialog box. You return to the features dialog box, which now displays the new attribute in the list of attributes.
Tutorial 4-7
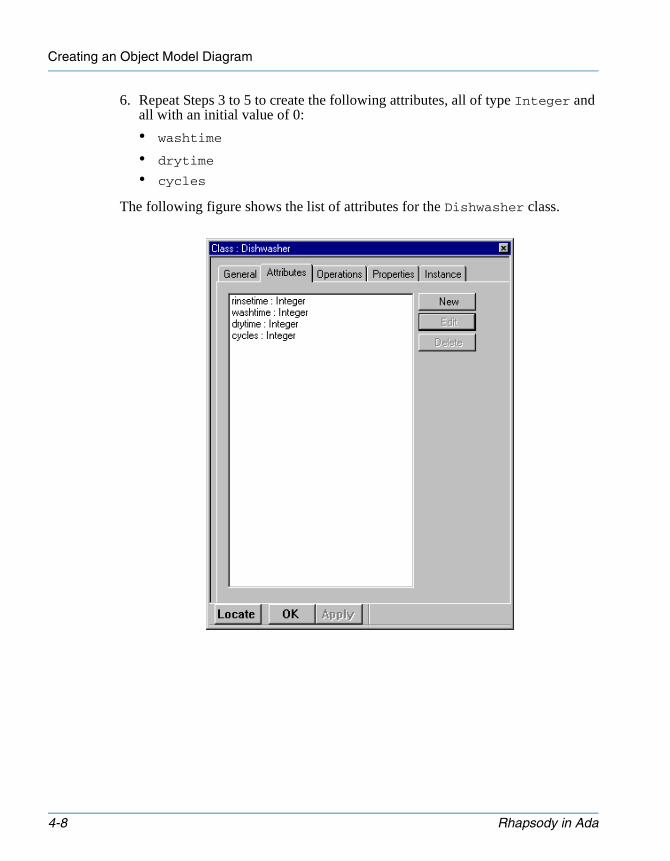
Creating an Object Model Diagram
tutorialada.book Page 8 Thursday, June 12, 2003 11:43 AM
6. Repeat Steps 3 to 5 to create the following attributes, all of type Integer and all with an initial value of 0:
• washtime
• drytime
• cycles
The following figure shows the list of attributes for the Dishwasher class.
4-8 Rhapsody in Ada
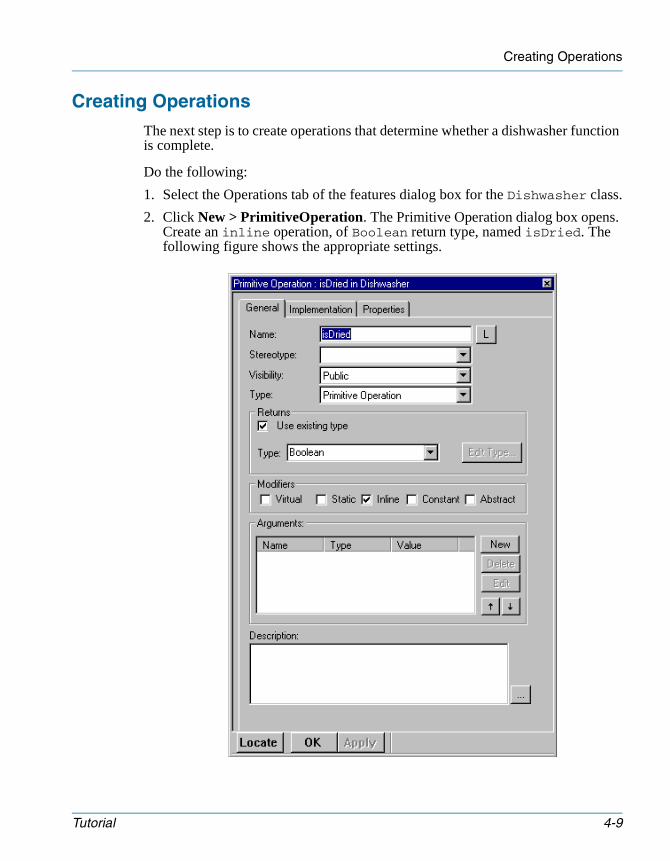
Creating Operations
tutorialada.book Page 9 Thursday, June 12, 2003 11:43 AM
Creating Operations
The next step is to create operations that determine whether a dishwasher function is complete.
Do the following:
1. Select the Operations tab of the features dialog box for the Dishwasher class.
2. Click New > PrimitiveOperation. The Primitive Operation dialog box opens. Create an inline operation, of Boolean return type, named isDried. The following figure shows the appropriate settings.
Tutorial 4-9
Creating an Object Model Diagram
tutorialada.book Page 10 Thursday, June 12, 2003 11:43 AM
3. Select the Implementation tab. Type the following code in the text area:
return (Dishwasher_unique_instance.drytime = 0);
4. Click OK to apply your changes and dismiss the dialog box. You return to the features dialog box, which now displays the new operation in the list of operations.
5. Repeat Steps 2 to 4 to create the following inline operations, of type Boolean:
• isRinsed
Implementation:
return (Dishwasher_unique_instance.rinsetime = 0);
• isWashed
Implementation:
return (Dishwasher_unique_instance.washtime = 0);
6. Click OK to apply your changes and dismiss the dialog box.
Displaying Attributes and Operations in the OMD
To display the attributes and operations defined for the Dishwasher class, do the following:
1. In the OMD, right-click the Dishwasher class, then select Display Options from the pop-up menu. The Display Options dialog box is displayed.
2. Select the Attributes tab.
3. Click Explicit, then move all the Dishwasher attributes into the Shown in Diagram column by highlighting each individual attribute, then clicking the Display button. The completed dialog box should look like the following figure.
4-10 Rhapsody in Ada
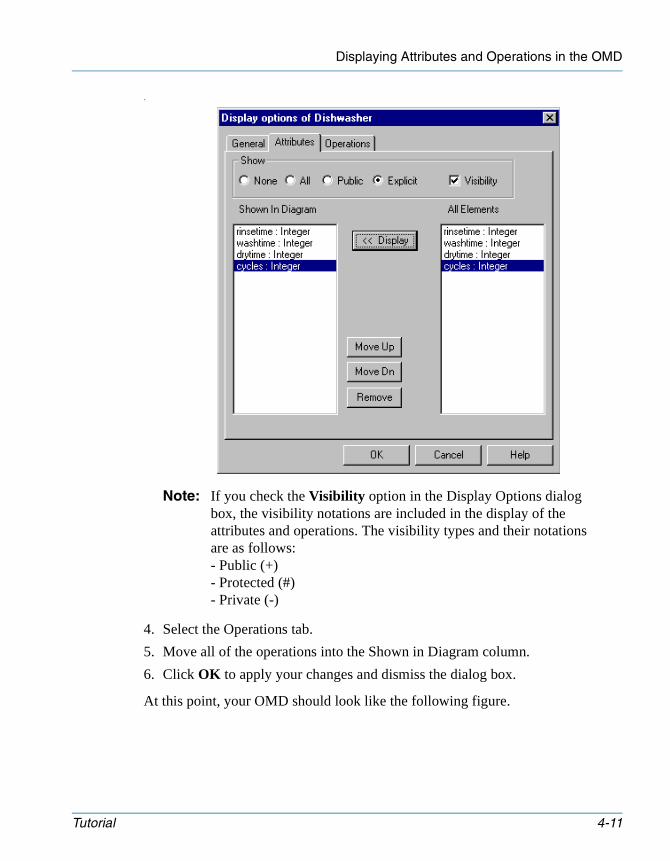
Displaying Attributes and Operations in the OMD
tutorialada.book Page 11 Thursday, June 12, 2003 11:43 AM
.
Note: If you check the Visibility option in the Display Options dialog box, the visibility notations are included in the display of the attributes and operations. The visibility types and their notations are as follows:- Public (+)- Protected (#)- Private (-)
4. Select the Operations tab.
5. Move all of the operations into the Shown in Diagram column.
6. Click OK to apply your changes and dismiss the dialog box.
At this point, your OMD should look like the following figure.
Tutorial 4-11
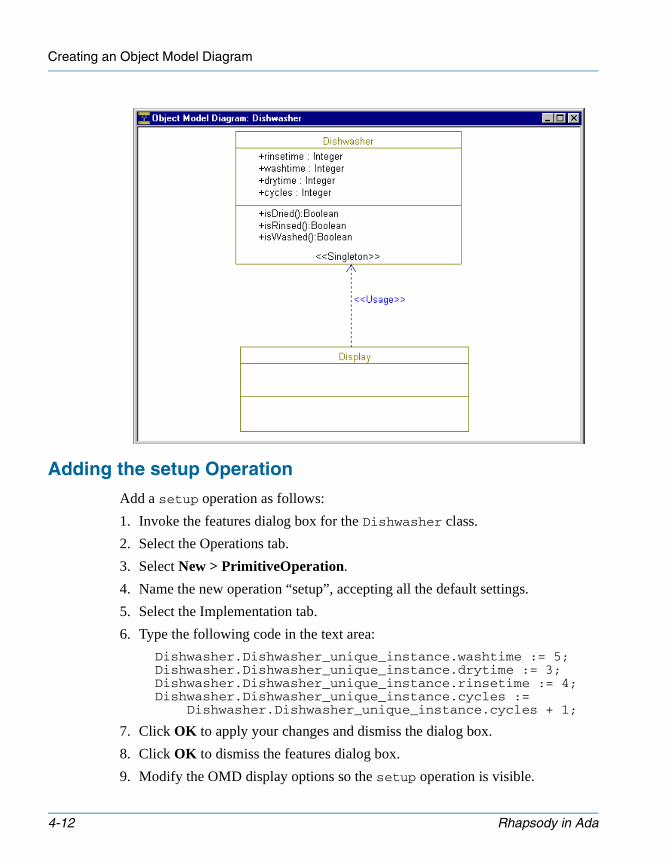
Creating an Object Model Diagram
tutorialada.book Page 12 Thursday, June 12, 2003 11:43 AM
Adding the setup Operation
Add a setup operation as follows:
1. Invoke the features dialog box for the Dishwasher class.
2. Select the Operations tab.
3. Select New > PrimitiveOperation.
4. Name the new operation “setup”, accepting all the default settings.
5. Select the Implementation tab.
6. Type the following code in the text area:
Dishwasher.Dishwasher_unique_instance.washtime := 5; Dishwasher.Dishwasher_unique_instance.drytime := 3; Dishwasher.Dishwasher_unique_instance.rinsetime := 4; Dishwasher.Dishwasher_unique_instance.cycles := Dishwasher.Dishwasher_unique_instance.cycles + 1;
7. Click OK to apply your changes and dismiss the dialog box.
8. Click OK to dismiss the features dialog box.
9. Modify the OMD display options so the setup operation is visible.
4-12 Rhapsody in Ada
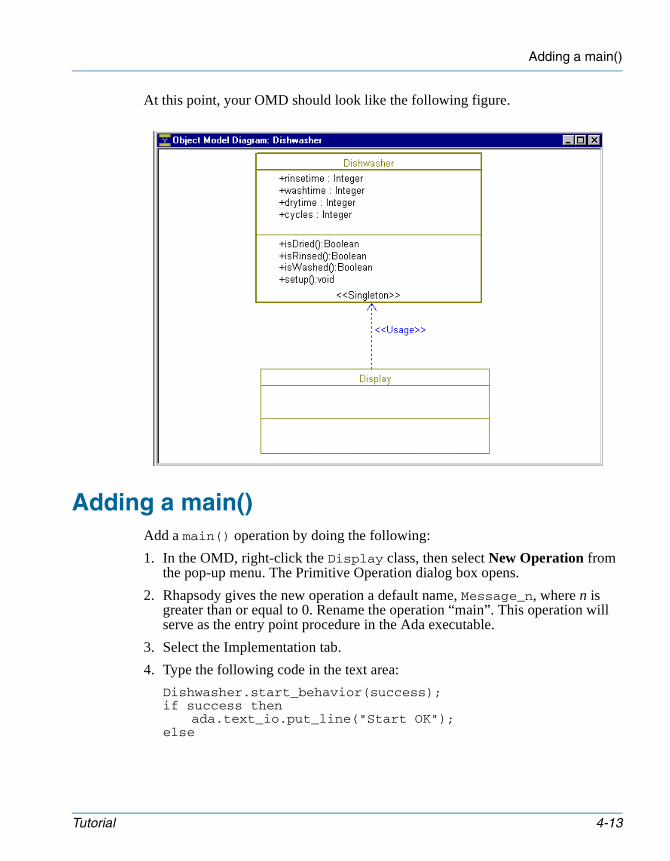
Adding a main()
tutorialada.book Page 13 Thursday, June 12, 2003 11:43 AM
At this point, your OMD should look like the following figure.
Adding a main()Add a main() operation by doing the following:
1. In the OMD, right-click the Display class, then select New Operation from the pop-up menu. The Primitive Operation dialog box opens.
2. Rhapsody gives the new operation a default name, Message_n, where n is greater than or equal to 0. Rename the operation “main”. This operation will serve as the entry point procedure in the Ada executable.
3. Select the Implementation tab.
4. Type the following code in the text area:
Dishwasher.start_behavior(success);if success then
ada.text_io.put_line("Start OK");else
Tutorial 4-13
Creating an Object Model Diagram
tutorialada.book Page 14 Thursday, June 12, 2003 11:43 AM
ada.text_io.put_line("Start NOT OK");end if;
loopada.text_io.get_immediate(c,success);case c is
when 's' => Dishwasher.op_start; when 'o' => Dishwasher.op_open;when 'c' => Dishwasher.op_close;when 'x' => exit;when others => null;
end case;delay (1.0);Dishwasher.op_tick;Ada.text_io.put("Tick = ");
int_Io.put(Dishwasher.get_washtime);int_Io.put(Dishwasher.get_rinsetime);int_Io.put(Dishwasher.get_drytime); int_Io.put(Dishwasher.get_cycles);
ada.text_io.new_line;end loop;
Note: You will define the op_ operations in the next lesson.
5. Click the Properties tab.
6. Click the All filter.
7. Click in the value field for the property Ada_CG::Operation::LocalVariablesDeclaration to display the ellipsis (...) button.
8. Click the ellipsis to open the text editor and type the following code:
success : Boolean := false; c: character; package int_Io is new ada.text_io.integer_io(Integer);
9. Click OK to apply your changes and dismiss the text editor.
10.Click OK to apply your changes and dismiss the dialog box.
11.In the browser, right-click the Dishwasher node, then select Features from the pop-up menu. The features dialog box opens.
12.Select the Properties tab.
13.Select the All filter.
14.Set the property CG::Configuration::MainGenerationScheme to UserInitializationOnly using the pull-down list. This setting enables you to rewrite the main exactly as you want.
4-14 Rhapsody in Ada
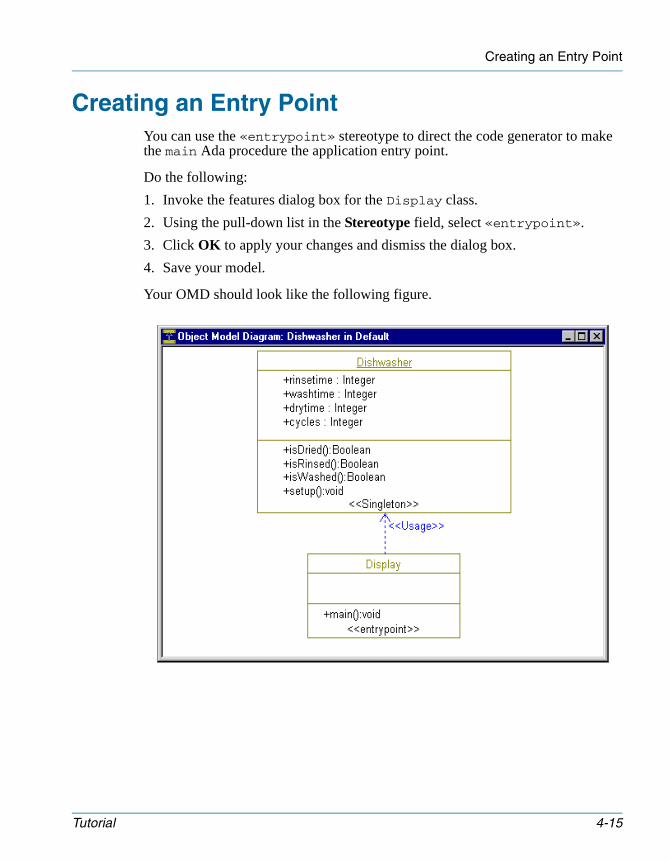
Creating an Entry Point
tutorialada.book Page 15 Thursday, June 12, 2003 11:43 AM
Creating an Entry PointYou can use the «entrypoint» stereotype to direct the code generator to make the main Ada procedure the application entry point.
Do the following:
1. Invoke the features dialog box for the Display class.
2. Using the pull-down list in the Stereotype field, select «entrypoint».
3. Click OK to apply your changes and dismiss the dialog box.
4. Save your model.
Your OMD should look like the following figure.
Tutorial 4-15
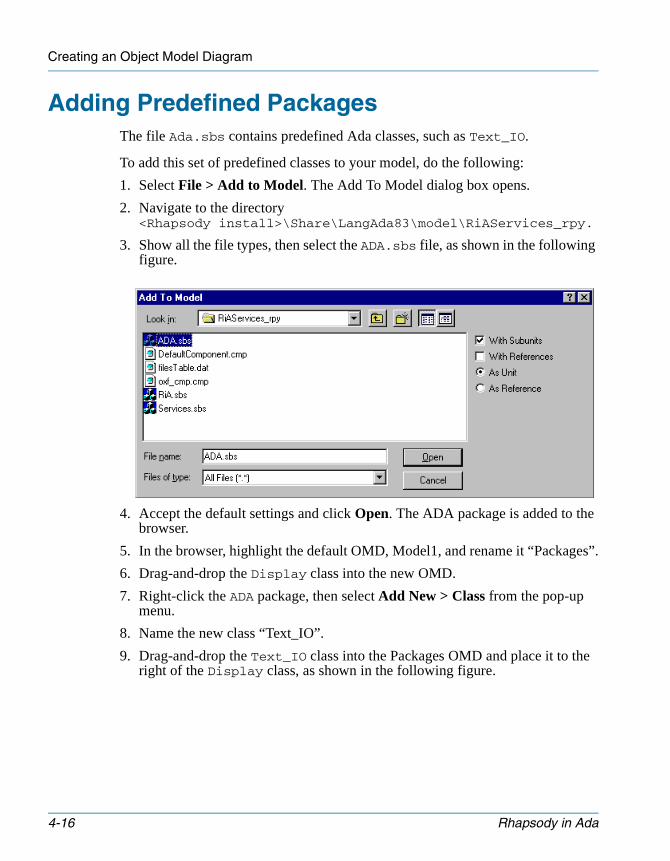
Creating an Object Model Diagram
tutorialada.book Page 16 Thursday, June 12, 2003 11:43 AM
Adding Predefined PackagesThe file Ada.sbs contains predefined Ada classes, such as Text_IO.
To add this set of predefined classes to your model, do the following:
1. Select File > Add to Model. The Add To Model dialog box opens.
2. Navigate to the directory <Rhapsody install>\Share\LangAda83\model\RiAServices_rpy.
3. Show all the file types, then select the ADA.sbs file, as shown in the following figure.
4. Accept the default settings and click Open. The ADA package is added to the browser.
5. In the browser, highlight the default OMD, Model1, and rename it “Packages”.
6. Drag-and-drop the Display class into the new OMD.
7. Right-click the ADA package, then select Add New > Class from the pop-up menu.
8. Name the new class “Text_IO”.
9. Drag-and-drop the Text_IO class into the Packages OMD and place it to the right of the Display class, as shown in the following figure.
4-16 Rhapsody in Ada
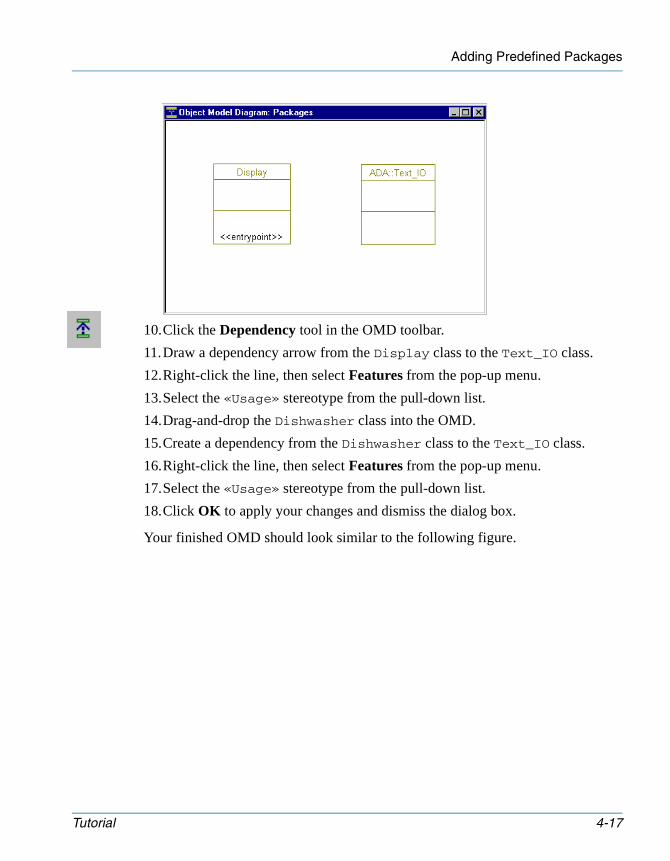
Adding Predefined Packages
tutorialada.book Page 17 Thursday, June 12, 2003 11:43 AM
10.Click the Dependency tool in the OMD toolbar.
11.Draw a dependency arrow from the Display class to the Text_IO class.
12.Right-click the line, then select Features from the pop-up menu.
13.Select the «Usage» stereotype from the pull-down list.
14.Drag-and-drop the Dishwasher class into the OMD.
15.Create a dependency from the Dishwasher class to the Text_IO class.
16.Right-click the line, then select Features from the pop-up menu.
17.Select the «Usage» stereotype from the pull-down list.
18.Click OK to apply your changes and dismiss the dialog box.
Your finished OMD should look similar to the following figure.
Tutorial 4-17
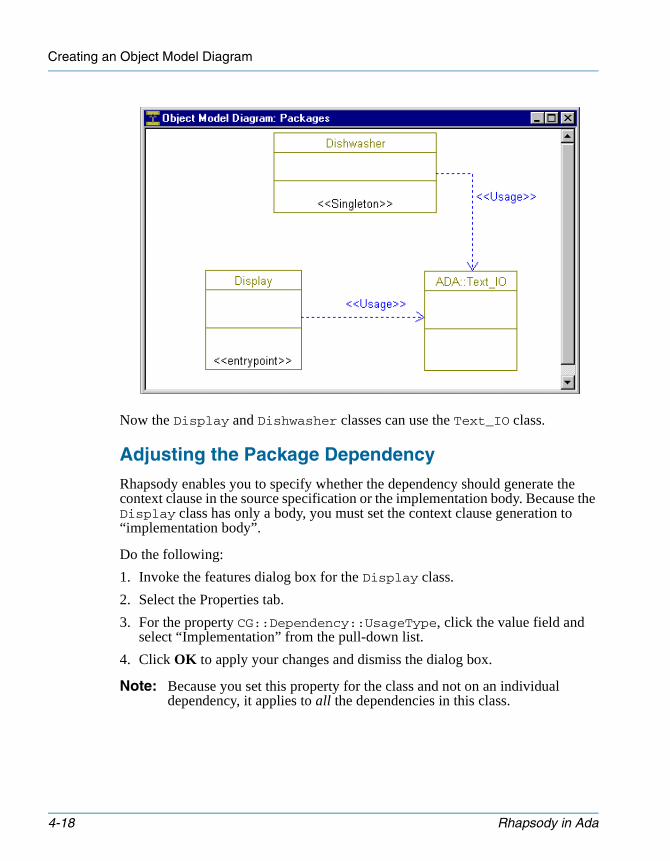
Creating an Object Model Diagram
tutorialada.book Page 18 Thursday, June 12, 2003 11:43 AM
Now the Display and Dishwasher classes can use the Text_IO class.
Adjusting the Package Dependency
Rhapsody enables you to specify whether the dependency should generate the context clause in the source specification or the implementation body. Because the Display class has only a body, you must set the context clause generation to “implementation body”.
Do the following:
1. Invoke the features dialog box for the Display class.
2. Select the Properties tab.
3. For the property CG::Dependency::UsageType, click the value field and select “Implementation” from the pull-down list.
4. Click OK to apply your changes and dismiss the dialog box.
Note: Because you set this property for the class and not on an individual dependency, it applies to all the dependencies in this class.
4-18 Rhapsody in Ada
Creating a Component
tutorialada.book Page 19 Thursday, June 12, 2003 11:43 AM
Creating a ComponentBefore generating code, you must construct a component for the Dishwasher application. A component is a physical subsystem in the form of a library or executable program. The name of the component becomes the name of the executable application to build. This component defines classes for which to generate code, and options to apply to the generated code.
To define a new component for the Dishwasher application, do the following:
1. In the browser, click the plus sign in front of the Components category to expand it. You can see the default component that comes with Rhapsody, called DefaultComponent.
2. Right-click the Components category in the browser, and select Add New Component. Rhapsody creates a new component called component_n, where n is greater than or equal to 0.
3. Rename the component “EXE” and press Enter. Rhapsody displays the renamed component in the browser.
4. Right-click the EXE component, and select Features from the pop-up menu.
5. Set the Scope field to All Elements.
6. Click OK to apply your changes and dismiss the dialog box.
Creating a ConfigurationThe code generation component requires a configuration that provides information on the scope, initial instances, code checks, and additional settings for the build.
To create a configuration, do the following:
1. Click the plus sign in front of the EXE component to display the Configurations subcategory.
2. Expand the Configurations category.
With every component, Rhapsody provides a default configuration, DefaultConfig. This configuration defines a particular flavor of the component for code generation.
3. Right-click the DefaultConfig configuration under the EXE component, and select Features from the pop-up menu. The following figure shows the dialog box.
Tutorial 4-19
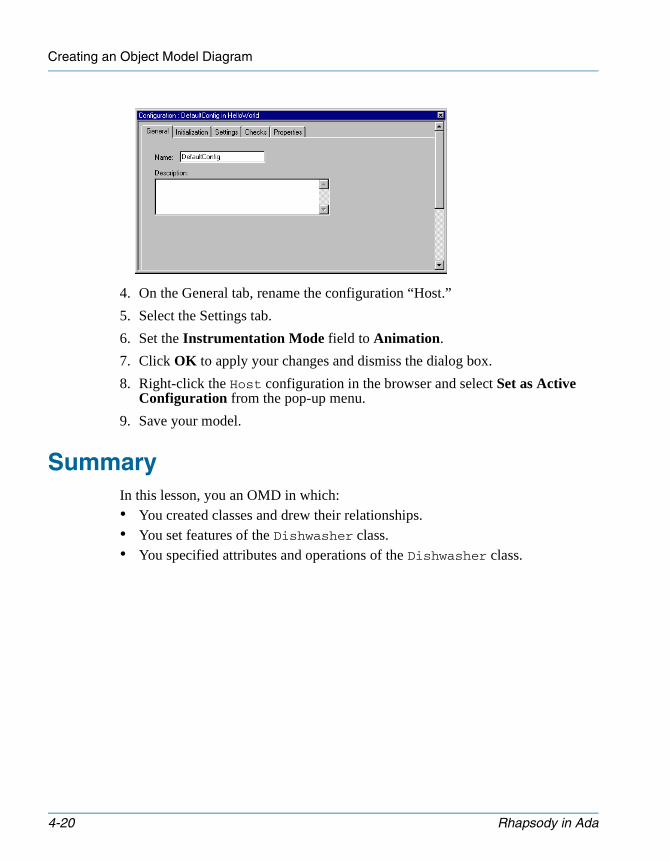
Creating an Object Model Diagram
tutorialada.book Page 20 Thursday, June 12, 2003 11:43 AM
4. On the General tab, rename the configuration “Host.”
5. Select the Settings tab.
6. Set the Instrumentation Mode field to Animation.
7. Click OK to apply your changes and dismiss the dialog box.
8. Right-click the Host configuration in the browser and select Set as Active Configuration from the pop-up menu.
9. Save your model.
SummaryIn this lesson, you an OMD in which:• You created classes and drew their relationships.• You set features of the Dishwasher class.• You specified attributes and operations of the Dishwasher class.
4-20 Rhapsody in Ada
tutorialada.book Page 1 Thursday, June 12, 2003 11:43 AM
Goals for This LessonAfter completing this lesson, you should know how to perform the following tasks in Rhapsody:• Draw a statechart.• Draw states, transitions, and nested states.• Put timeouts on transitions.• Put actions on transitions.• Specify entry and exit actions.• Draw history connectors.
OverviewStatecharts (SCs) define the behavior of objects, including the various states that an object can enter into over its lifetime and the messages or events that cause it to transition from one state to another.
You can create either a statechart or an activity diagram to model the behavior of your system. In this case, because the Dishwasher needs to transition from state to state in reaction to events, you should draw a statechart instead of an activity diagram.
Tutorial 5-1
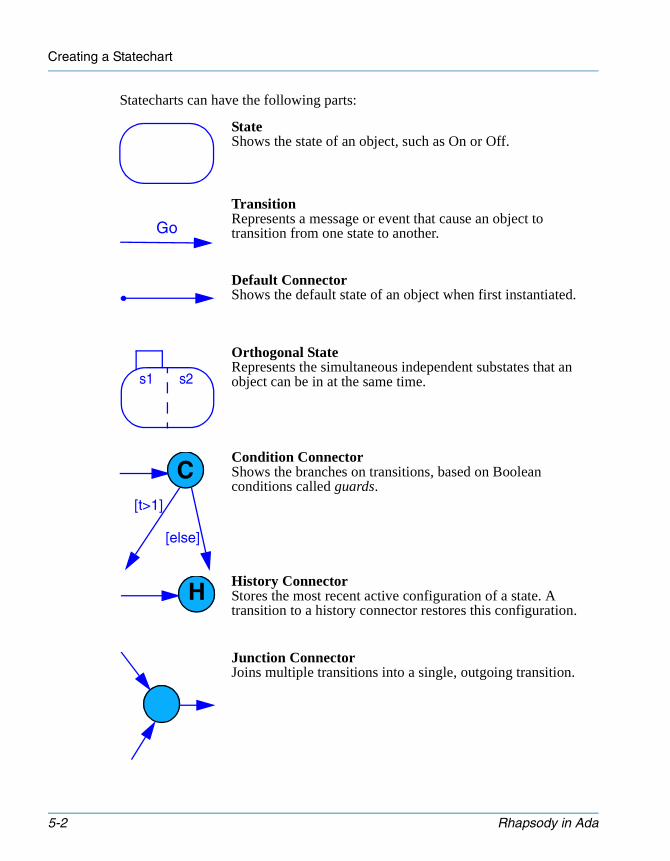
Creating a Statechart
tutorialada.book Page 2 Thursday, June 12, 2003 11:43 AM
Statecharts can have the following parts:
StateShows the state of an object, such as On or Off.
TransitionRepresents a message or event that cause an object to transition from one state to another.
Default ConnectorShows the default state of an object when first instantiated.
Orthogonal StateRepresents the simultaneous independent substates that an object can be in at the same time.
Condition ConnectorShows the branches on transitions, based on Boolean conditions called guards.
History ConnectorStores the most recent active configuration of a state. A transition to a history connector restores this configuration.
Junction ConnectorJoins multiple transitions into a single, outgoing transition.
Go
s1 s2
[t>1]
[else]
C
H
5-2 Rhapsody in Ada
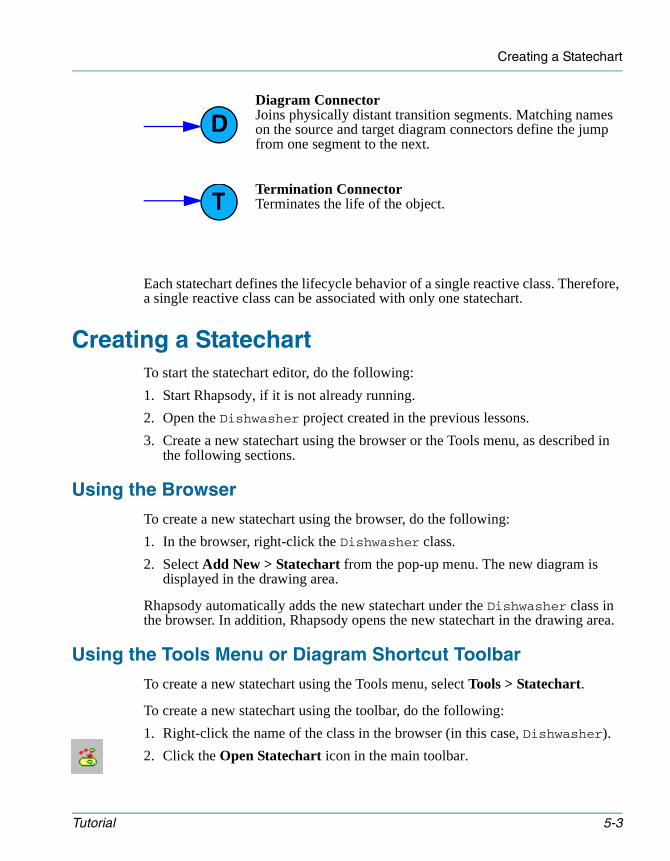
Creating a Statechart
tutorialada.book Page 3 Thursday, June 12, 2003 11:43 AM
Diagram ConnectorJoins physically distant transition segments. Matching names on the source and target diagram connectors define the jump from one segment to the next.
Termination ConnectorTerminates the life of the object.
Each statechart defines the lifecycle behavior of a single reactive class. Therefore, a single reactive class can be associated with only one statechart.
Creating a StatechartTo start the statechart editor, do the following:
1. Start Rhapsody, if it is not already running.
2. Open the Dishwasher project created in the previous lessons.
3. Create a new statechart using the browser or the Tools menu, as described in the following sections.
Using the Browser
To create a new statechart using the browser, do the following:
1. In the browser, right-click the Dishwasher class.
2. Select Add New > Statechart from the pop-up menu. The new diagram is displayed in the drawing area.
Rhapsody automatically adds the new statechart under the Dishwasher class in the browser. In addition, Rhapsody opens the new statechart in the drawing area.
Using the Tools Menu or Diagram Shortcut Toolbar
To create a new statechart using the Tools menu, select Tools > Statechart.
To create a new statechart using the toolbar, do the following:
1. Right-click the name of the class in the browser (in this case, Dishwasher).
2. Click the Open Statechart icon in the main toolbar.
D
T
Tutorial 5-3
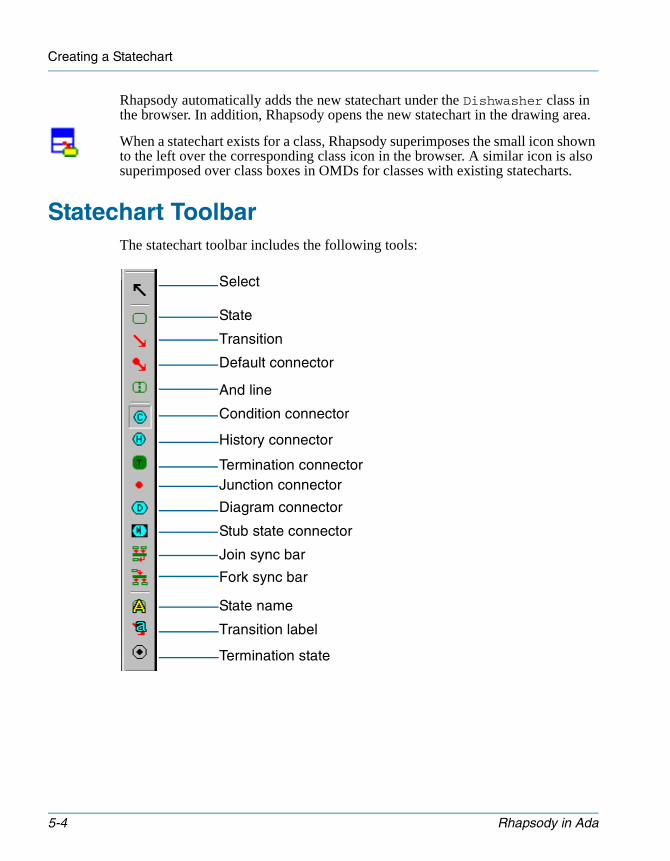
Creating a Statechart
tutorialada.book Page 4 Thursday, June 12, 2003 11:43 AM
Rhapsody automatically adds the new statechart under the Dishwasher class in the browser. In addition, Rhapsody opens the new statechart in the drawing area.
When a statechart exists for a class, Rhapsody superimposes the small icon shown to the left over the corresponding class icon in the browser. A similar icon is also superimposed over class boxes in OMDs for classes with existing statecharts.
Statechart ToolbarThe statechart toolbar includes the following tools:
Select
State
Transition
Default connector
And line
Condition connector
History connector
Termination connectorJunction connector
Diagram connector
Stub state connector
Join sync bar
Fork sync bar
State name
Transition label
Termination state
5-4 Rhapsody in Ada

Drawing the Dishwasher Statechart
tutorialada.book Page 5 Thursday, June 12, 2003 11:43 AM
Drawing the Dishwasher StatechartThe general steps for drawing the Dishwasher statechart are as follows:
1. Draw states.
2. Draw history and diagram connectors.
3. Draw default connectors.
4. Add operations.
5. Draw transitions.
6. Add actions to states.
The following sections describe these steps in detail.
Step 1: Drawing the States
To draw a state, do the following:
1. Click the State tool in the statechart toolbar.
2. Click-and-drag or double-click in the drawing area to create a large state with a default name of state_n, where n is greater than or equal to 0.
3. Rename the state “Running”.
4. Using Figure 5.1 on page 5-6 as a model, draw three more states inside the Running state—Washing, Rinsing, and Drying.
5. To the left of the Running state, draw two more states, Off and Open.
Tutorial 5-5
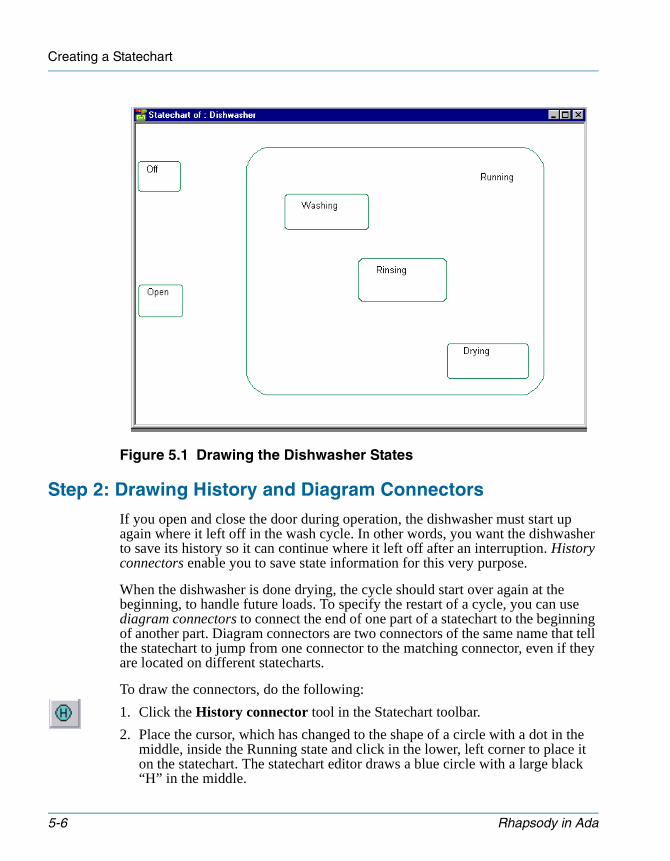
Creating a Statechart
tutorialada.book Page 6 Thursday, June 12, 2003 11:43 AM
Figure 5.1 Drawing the Dishwasher States
Step 2: Drawing History and Diagram Connectors
If you open and close the door during operation, the dishwasher must start up again where it left off in the wash cycle. In other words, you want the dishwasher to save its history so it can continue where it left off after an interruption. History connectors enable you to save state information for this very purpose.
When the dishwasher is done drying, the cycle should start over again at the beginning, to handle future loads. To specify the restart of a cycle, you can use diagram connectors to connect the end of one part of a statechart to the beginning of another part. Diagram connectors are two connectors of the same name that tell the statechart to jump from one connector to the matching connector, even if they are located on different statecharts.
To draw the connectors, do the following:
1. Click the History connector tool in the Statechart toolbar.
2. Place the cursor, which has changed to the shape of a circle with a dot in the middle, inside the Running state and click in the lower, left corner to place it on the statechart. The statechart editor draws a blue circle with a large black “H” in the middle.
5-6 Rhapsody in Ada
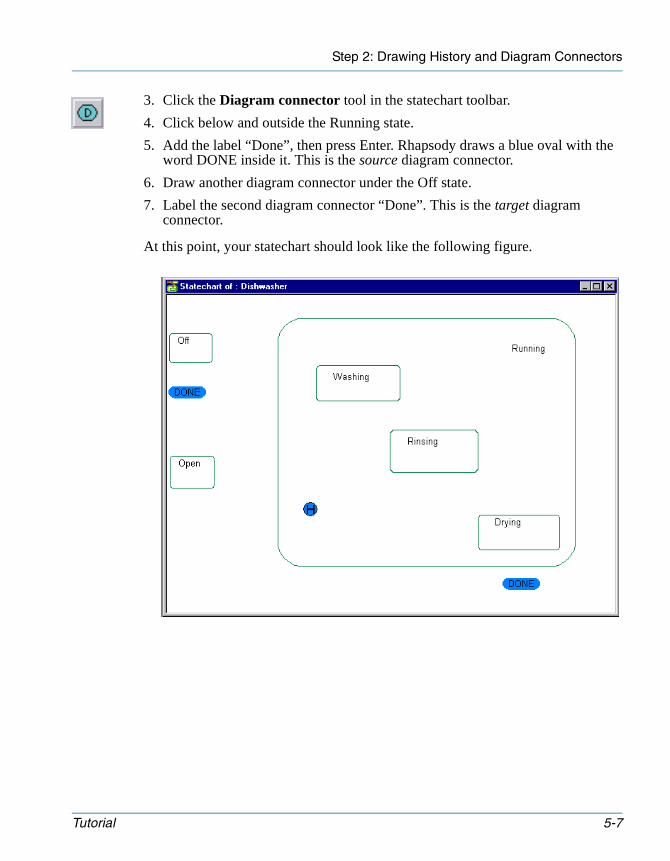
Step 2: Drawing History and Diagram Connectors
tutorialada.book Page 7 Thursday, June 12, 2003 11:43 AM
3. Click the Diagram connector tool in the statechart toolbar.
4. Click below and outside the Running state.
5. Add the label “Done”, then press Enter. Rhapsody draws a blue oval with the word DONE inside it. This is the source diagram connector.
6. Draw another diagram connector under the Off state.
7. Label the second diagram connector “Done”. This is the target diagram connector.
At this point, your statechart should look like the following figure.
Tutorial 5-7
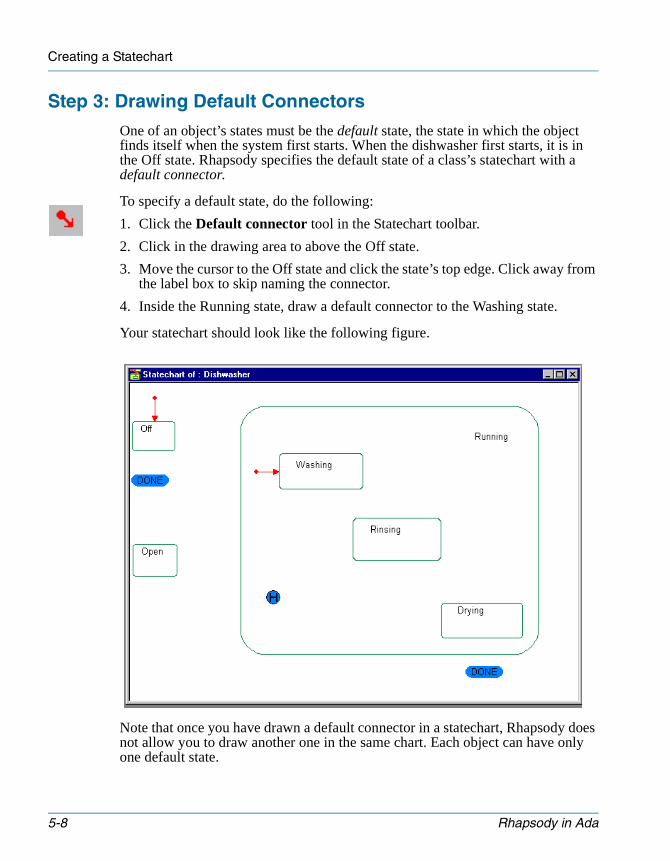
Creating a Statechart
tutorialada.book Page 8 Thursday, June 12, 2003 11:43 AM
Step 3: Drawing Default Connectors
One of an object’s states must be the default state, the state in which the object finds itself when the system first starts. When the dishwasher first starts, it is in the Off state. Rhapsody specifies the default state of a class’s statechart with a default connector.
To specify a default state, do the following:
1. Click the Default connector tool in the Statechart toolbar.
2. Click in the drawing area to above the Off state.
3. Move the cursor to the Off state and click the state’s top edge. Click away from the label box to skip naming the connector.
4. Inside the Running state, draw a default connector to the Washing state.
Your statechart should look like the following figure.
Note that once you have drawn a default connector in a statechart, Rhapsody does not allow you to draw another one in the same chart. Each object can have only one default state.
5-8 Rhapsody in Ada
Step 4: Adding the Operations
tutorialada.book Page 9 Thursday, June 12, 2003 11:43 AM
Step 4: Adding the Operations
In this step, you will create three operations that determine the length of time spent on each of the dishwasher operations.
Do the following:
1. In the browser, right-click the Dishwasher class and select Features from the pop-up menu.
2. Select the Operations tab.
3. Click New > PrimitiveOperation. The Primitive Operation dialog box opens.
4. Create a new operation called dec_dry_time using the default settings.
5. Select the Implementation tab.
6. Type the following implementation in the text area:
Dishwasher_unique_instance.drytime := Dishwasher_unique_instance.drytime - 1;
7. Click OK to apply your changes and dismiss the dialog box. You return to the features dialog box, which now includes the dec_dry_time() operation in the list of operations.
8. Repeat Steps 3 to 7 to create the following operations:
• dec_rinse_time
Implementation:
Dishwasher_unique_instance.rinsetime := Dishwasher_unique_instance.rinsetime - 1;
• dec_wash_time
Implementation:
Dishwasher_unique_instance.washtime := Dishwasher_unique_instance.washtime - 1;
9. Click OK to dismiss the features dialog box.
Step 5: Drawing the Transitions
Using Figure 5.2 on page 5-11 as a model, draw the statechart’s transitions as follows:
1. Click the Transition tool in the toolbar.
2. Click the edge of the Off state to anchor the start of the transition.
3. Move the cursor to the Running state and click to anchor the transition line.
Tutorial 5-9
Creating a Statechart
tutorialada.book Page 10 Thursday, June 12, 2003 11:43 AM
4. In the label box, type the event name op_start/setup;. Press Ctrl+Enter to dismiss the edit box.
Note: Pressing Enter in a transition name, without simultaneously pressing Ctrl, simply adds a new line.
5. Create a transition on an event called op_open going from the Running state to the Open state.
6. Create a transition on an event called op_close going from the Open state to the history connector.
7. Inside the Running state, draw a transition from the Washing state to the Rinsing state and label it [isWashed].
The square brackets denote a guard condition. Until now, you have been specifying transitions only with event triggers. However, transition labels can have up to three parts, all of which are optional: trigger, guard, action.
A guard is a Boolean condition that, if specified, must be true for the transition to be taken. In this case, if the dishes have been washed (isWashed is true), the dishwasher transitions from the Washing state to the Rinsing state.
An action is a statement, or sequence of statements, in a high-level language, that is executed when the object takes the transition.
In the transition label, the trigger and action are separated by a forward slash (/) character. The full notation is as follows:
trigger[guard]/action
You can specify the trigger, guard, and action textually in the transition, or enter them in the features dialog box for the transition.
8. Draw a transition from the Rinsing state to the Drying state and label it [isRinsed].
9. Draw a transition from the Drying state to the diagram connector and label it [isDried].
10.Draw a self-directed transition (shown by an arrow that bends back to the sending state) on the Washing state and add the following label:
op_tick/dec_wash_time;
This transition keeps the Dishwasher in Washing mode for dec_wash_time; when the specified time is up and the guard [isWashed] is true, the Dishwasher transitions from Washing to Rinsing mode.
11.Add a self-directed message on the Rinsing state with the following label:
op_tick/dec_rinse_time;
5-10 Rhapsody in Ada
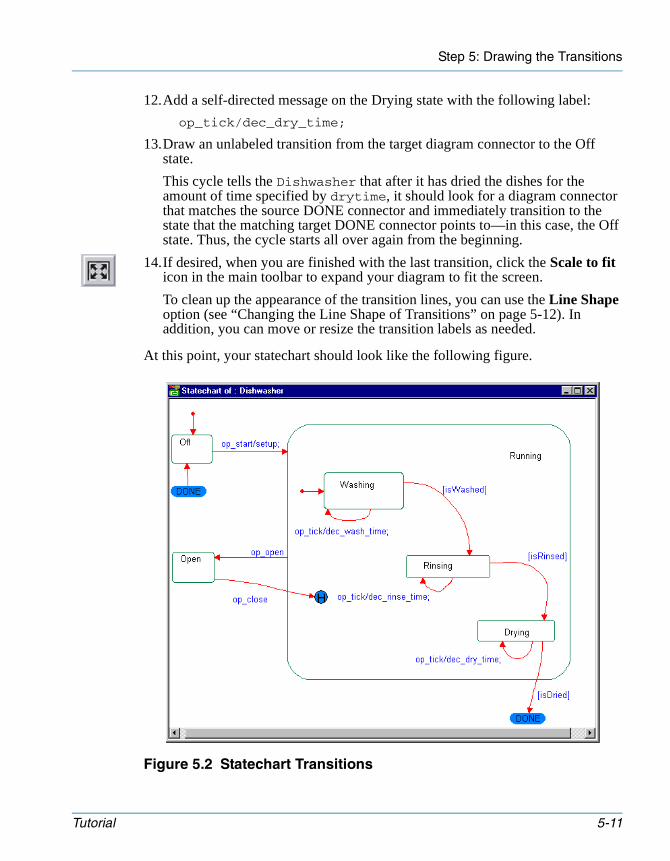
Step 5: Drawing the Transitions
tutorialada.book Page 11 Thursday, June 12, 2003 11:43 AM
12.Add a self-directed message on the Drying state with the following label:
op_tick/dec_dry_time;
13.Draw an unlabeled transition from the target diagram connector to the Off state.
This cycle tells the Dishwasher that after it has dried the dishes for the amount of time specified by drytime, it should look for a diagram connector that matches the source DONE connector and immediately transition to the state that the matching target DONE connector points to—in this case, the Off state. Thus, the cycle starts all over again from the beginning.
14.If desired, when you are finished with the last transition, click the Scale to fit icon in the main toolbar to expand your diagram to fit the screen.
To clean up the appearance of the transition lines, you can use the Line Shape option (see “Changing the Line Shape of Transitions” on page 5-12). In addition, you can move or resize the transition labels as needed.
At this point, your statechart should look like the following figure.
Figure 5.2 Statechart Transitions
Tutorial 5-11
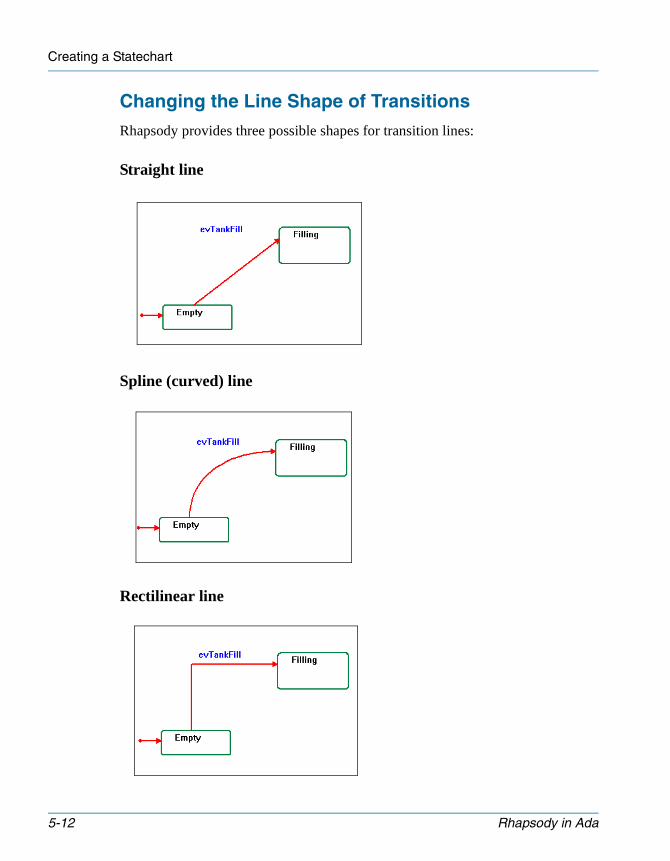
Creating a Statechart
tutorialada.book Page 12 Thursday, June 12, 2003 11:43 AM
Changing the Line Shape of Transitions
Rhapsody provides three possible shapes for transition lines:
Straight line
Spline (curved) line
Rectilinear line
5-12 Rhapsody in Ada
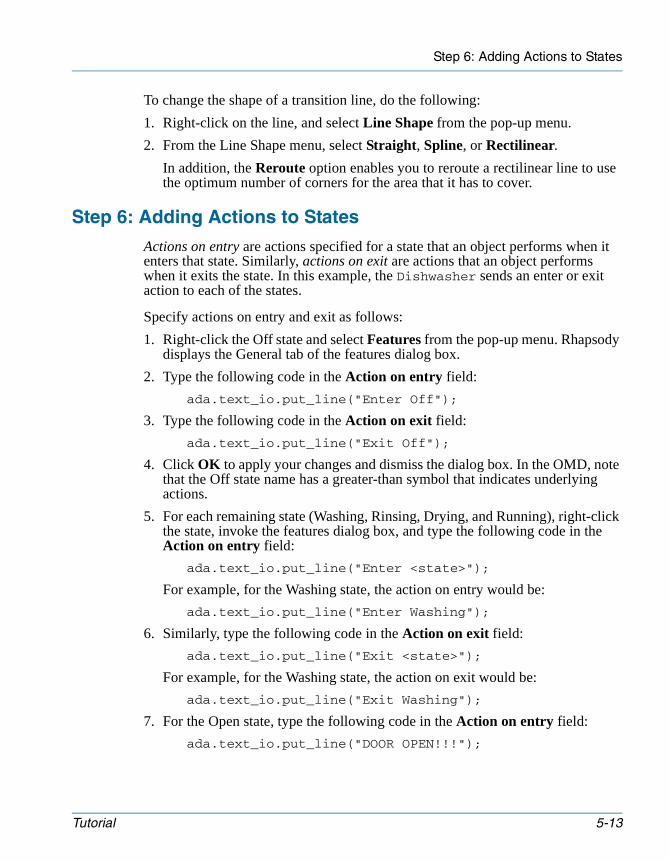
Step 6: Adding Actions to States
tutorialada.book Page 13 Thursday, June 12, 2003 11:43 AM
To change the shape of a transition line, do the following:
1. Right-click on the line, and select Line Shape from the pop-up menu.
2. From the Line Shape menu, select Straight, Spline, or Rectilinear.
In addition, the Reroute option enables you to reroute a rectilinear line to use the optimum number of corners for the area that it has to cover.
Step 6: Adding Actions to States
Actions on entry are actions specified for a state that an object performs when it enters that state. Similarly, actions on exit are actions that an object performs when it exits the state. In this example, the Dishwasher sends an enter or exit action to each of the states.
Specify actions on entry and exit as follows:
1. Right-click the Off state and select Features from the pop-up menu. Rhapsody displays the General tab of the features dialog box.
2. Type the following code in the Action on entry field:
ada.text_io.put_line("Enter Off");
3. Type the following code in the Action on exit field:
ada.text_io.put_line("Exit Off");
4. Click OK to apply your changes and dismiss the dialog box. In the OMD, note that the Off state name has a greater-than symbol that indicates underlying actions.
5. For each remaining state (Washing, Rinsing, Drying, and Running), right-click the state, invoke the features dialog box, and type the following code in the Action on entry field:
ada.text_io.put_line("Enter <state>");
For example, for the Washing state, the action on entry would be:
ada.text_io.put_line("Enter Washing");
6. Similarly, type the following code in the Action on exit field:
ada.text_io.put_line("Exit <state>");
For example, for the Washing state, the action on exit would be:
ada.text_io.put_line("Exit Washing");
7. For the Open state, type the following code in the Action on entry field:
ada.text_io.put_line("DOOR OPEN!!!");
Tutorial 5-13
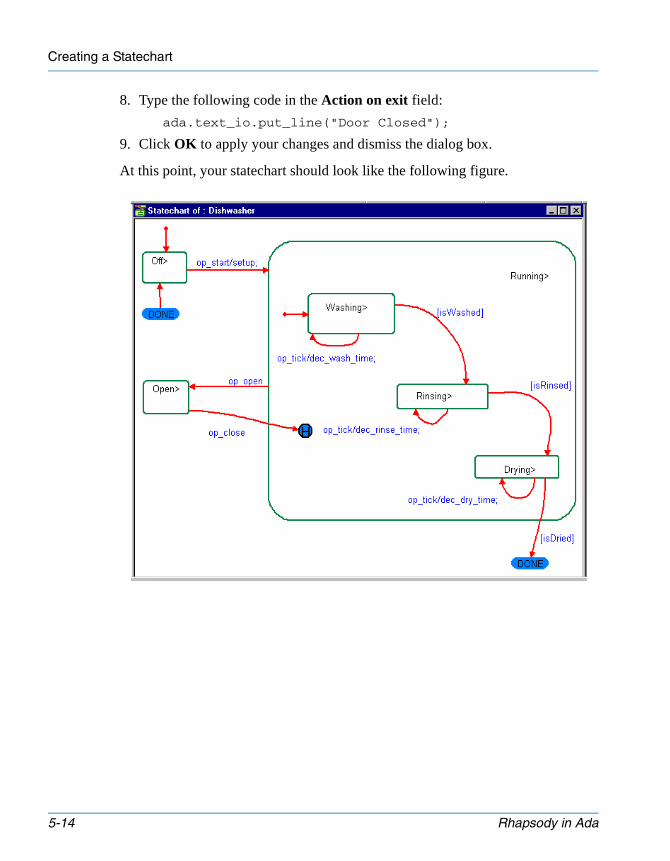
Creating a Statechart
tutorialada.book Page 14 Thursday, June 12, 2003 11:43 AM
8. Type the following code in the Action on exit field:
ada.text_io.put_line("Door Closed");
9. Click OK to apply your changes and dismiss the dialog box.
At this point, your statechart should look like the following figure.
5-14 Rhapsody in Ada
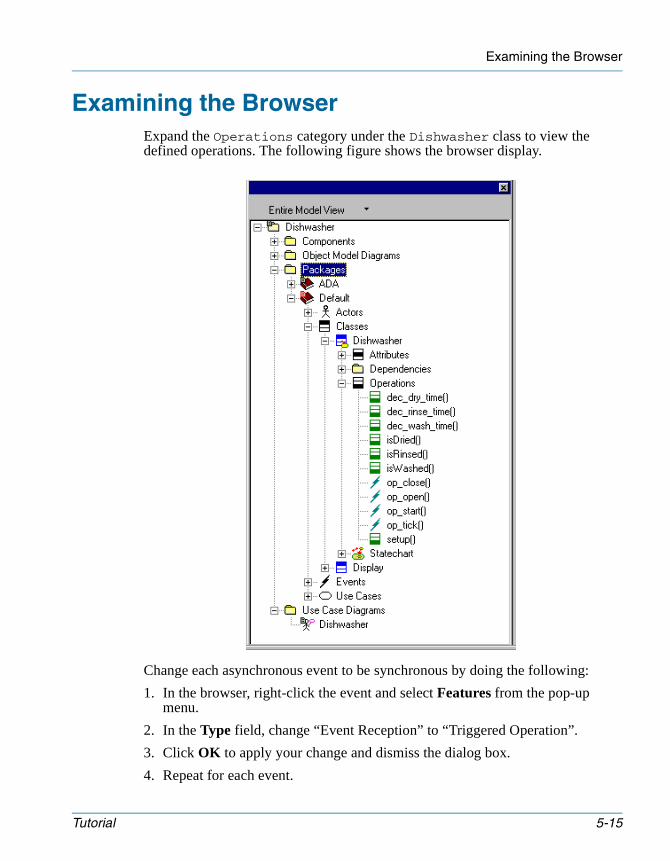
Examining the Browser
tutorialada.book Page 15 Thursday, June 12, 2003 11:43 AM
Examining the BrowserExpand the Operations category under the Dishwasher class to view the defined operations. The following figure shows the browser display.
Change each asynchronous event to be synchronous by doing the following:
1. In the browser, right-click the event and select Features from the pop-up menu.
2. In the Type field, change “Event Reception” to “Triggered Operation”.
3. Click OK to apply your change and dismiss the dialog box.
4. Repeat for each event.
Tutorial 5-15
Creating a Statechart
tutorialada.book Page 16 Thursday, June 12, 2003 11:43 AM
The revised browser should match the following figure.
5. Save your project.
5-16 Rhapsody in Ada
Generating and Running Your Model
tutorialada.book Page 17 Thursday, June 12, 2003 11:43 AM
Generating and Running Your ModelTo run your model, do the following:
1. Select Code > Generate > Host.
2. The subdirectory Host, which Rhapsody needs to store the generated files, does not yet exist. Rhapsody asks you to confirm its creation. Click Yes.
3. The Output window displays code generation messages. When code generation is complete, the message “Finished Code Generation” is displayed.
Note: If the Output window displays a message stating that the external code generator was not created, select Code > ReGenerate > Host.
4. Select Code > Build EXE.exe.
Note: If the build reports errors related to the version of GNAT you have, you must rebuild the Rhapsody in Ada framework files with your current GNAT compiler before continuing. See “Building the Ada Framework” on page 1-19 in the RTOS Adapter Guide for information on rebuilding the framework.
5. Select Run > EXE.exe. An application window opens. The first lines of output are as follows:
Entering OffStart OKTick = 0 0 0 0
6. In the command window, type an “s” to transition the statechart from Off to Running. The following figure shows part of the output.
Tutorial 5-17
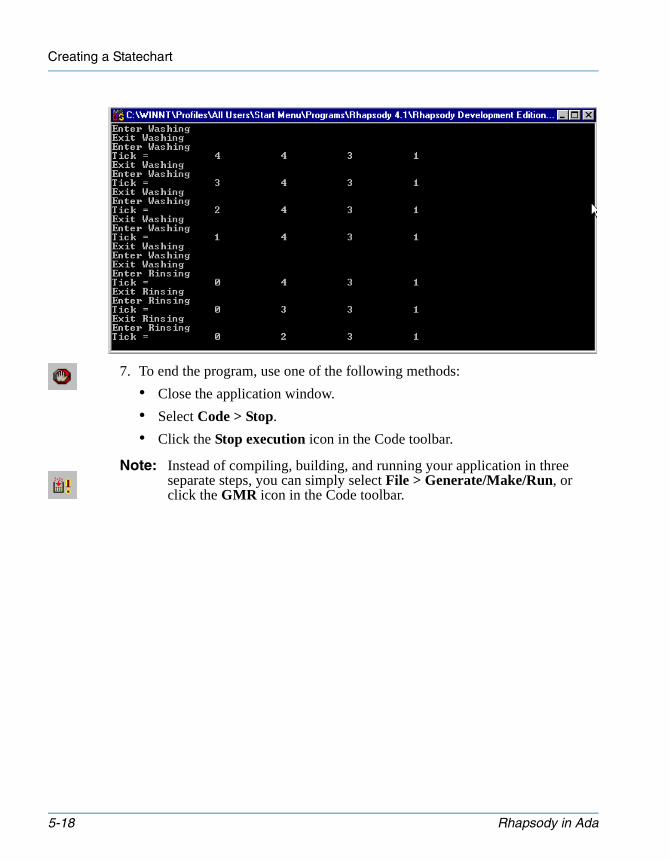
Creating a Statechart
tutorialada.book Page 18 Thursday, June 12, 2003 11:43 AM
7. To end the program, use one of the following methods:
• Close the application window.
• Select Code > Stop.
• Click the Stop execution icon in the Code toolbar.
Note: Instead of compiling, building, and running your application in three separate steps, you can simply select File > Generate/Make/Run, or click the GMR icon in the Code toolbar.
5-18 Rhapsody in Ada
How the Program Works
tutorialada.book Page 19 Thursday, June 12, 2003 11:43 AM
How the Program Works
In the application:• The main() loop in Display checks for a character every second.• The one-second timer message, op_tick, is delivered in every iteration
through the loop.• Each character relates to a triggered event in the Dishwasher, as follows:
– s—Dispatches the op_start message to start the processing.
– o—Dispatches the op_open message to the door.
– c—Dispatches the op_close message to close the door.
Opening and Closing the Door
Try running the program again, typing “o” in the command prompt window to cause the door to open. Type “c” to close the door. As you can see, the Dishwasher stops running as long as the door is open; once you close the door, the cycle resumes where it left off.
SummaryIn this lesson, you learned how to create a statechart. In this statechart, you:• Indicated states and transitions between those states.• Nested states within another state.• Put timeouts and guards on transitions.• Indicated actions to take on entry into a state, as well as actions to take on
exiting.• Used a history connector.
Tutorial 5-19

Creating a Statechart
tutorialada.book Page 20 Thursday, June 12, 2003 11:43 AM
5-20 Rhapsody in Ada
tutorialada.book Page 1 Thursday, June 12, 2003 11:43 AM
Goals for This LessonAfter completing this lesson, you should know how to do the following in Rhapsody:• Create non-singleton classes.• Use the this pointer.• Use asynchronous events.• Use an active dispatching class.
Setting Up the New ProjectTo set up the new project for this lesson, do the following:
1. Create a new directory called DwCollab for this lesson’s project.
2. Save your Dishwasher project as a new project called DwCollab by selecting File > Save As. Be sure to save it to the DwCollab folder.
3. In the new project, rename the Dishwasher OMD “Collaboration Overview”.
Altering the Collaboration OMDOpen the Collaboration OMD and make the following changes, using the following figure as a model:
1. Add two new classes, TheActive and FrontPanel.
2. Invoke the features dialog box for the Dishwasher class.
3. Change the stereotype from «Singleton» to none (blank) using the pull-down list.
4. Click OK to apply your changes and dismiss the dialog box.
Tutorial 6-1
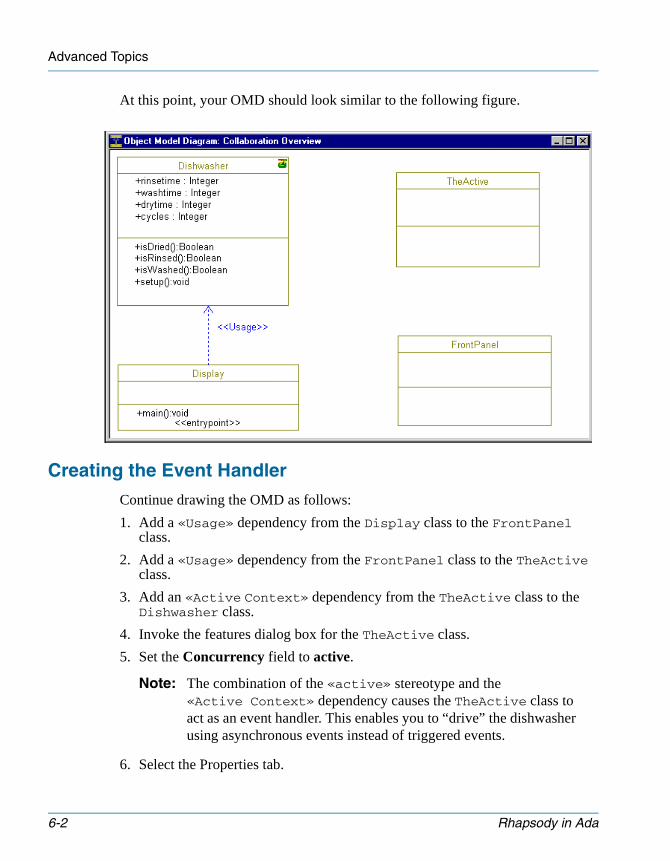
Advanced Topics
tutorialada.book Page 2 Thursday, June 12, 2003 11:43 AM
At this point, your OMD should look similar to the following figure.
Creating the Event Handler
Continue drawing the OMD as follows:
1. Add a «Usage» dependency from the Display class to the FrontPanel class.
2. Add a «Usage» dependency from the FrontPanel class to the TheActive class.
3. Add an «Active Context» dependency from the TheActive class to the Dishwasher class.
4. Invoke the features dialog box for the TheActive class.
5. Set the Concurrency field to active.
Note: The combination of the «active» stereotype and the «Active Context» dependency causes the TheActive class to act as an event handler. This enables you to “drive” the dishwasher using asynchronous events instead of triggered events.
6. Select the Properties tab.
6-2 Rhapsody in Ada
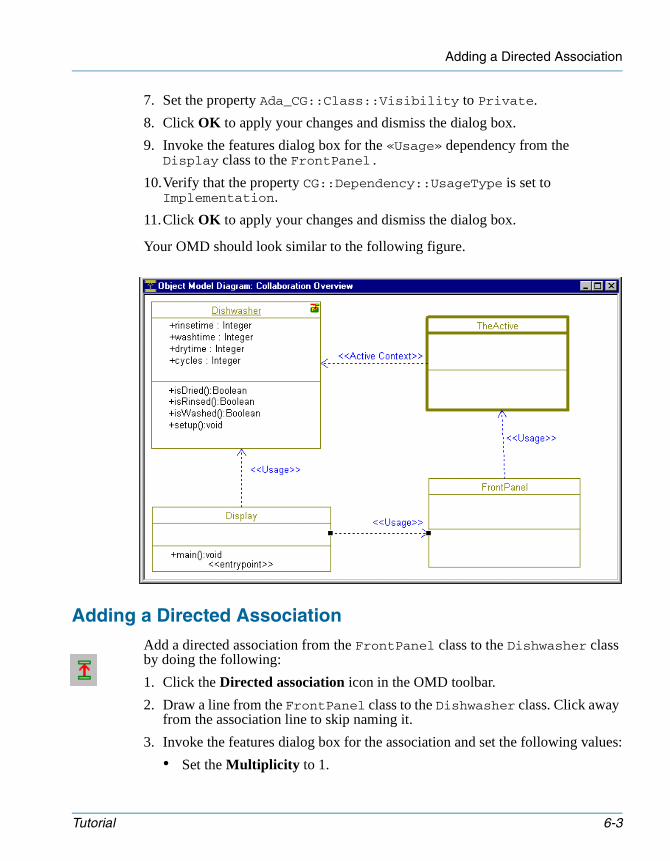
Adding a Directed Association
tutorialada.book Page 3 Thursday, June 12, 2003 11:43 AM
7. Set the property Ada_CG::Class::Visibility to Private.
8. Click OK to apply your changes and dismiss the dialog box.
9. Invoke the features dialog box for the «Usage» dependency from the Display class to the FrontPanel.
10.Verify that the property CG::Dependency::UsageType is set to Implementation.
11.Click OK to apply your changes and dismiss the dialog box.
Your OMD should look similar to the following figure.
Adding a Directed Association
Add a directed association from the FrontPanel class to the Dishwasher class by doing the following:
1. Click the Directed association icon in the OMD toolbar.
2. Draw a line from the FrontPanel class to the Dishwasher class. Click away from the association line to skip naming it.
3. Invoke the features dialog box for the association and set the following values:
• Set the Multiplicity to 1.
Tutorial 6-3
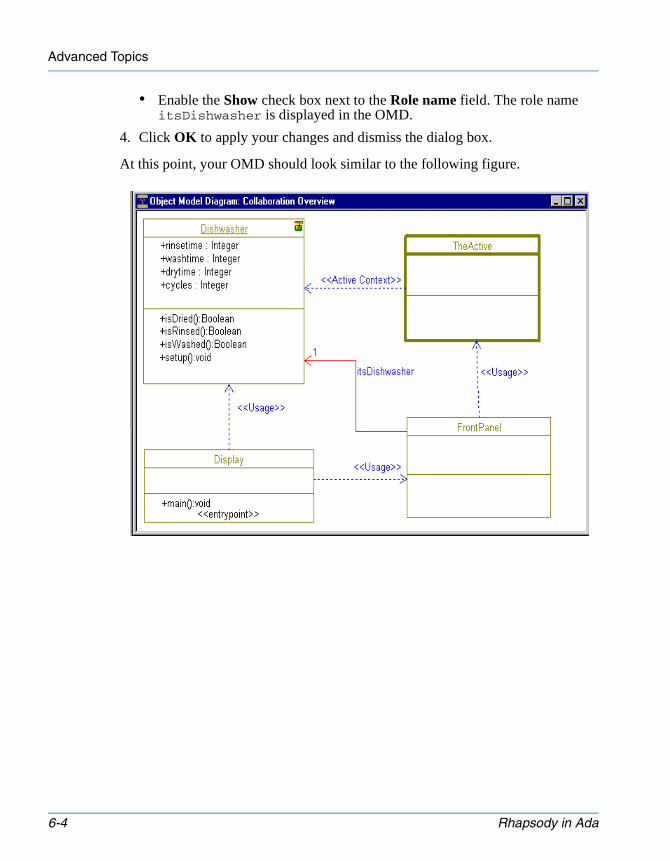
Advanced Topics
tutorialada.book Page 4 Thursday, June 12, 2003 11:43 AM
• Enable the Show check box next to the Role name field. The role name itsDishwasher is displayed in the OMD.
4. Click OK to apply your changes and dismiss the dialog box.
At this point, your OMD should look similar to the following figure.
6-4 Rhapsody in Ada
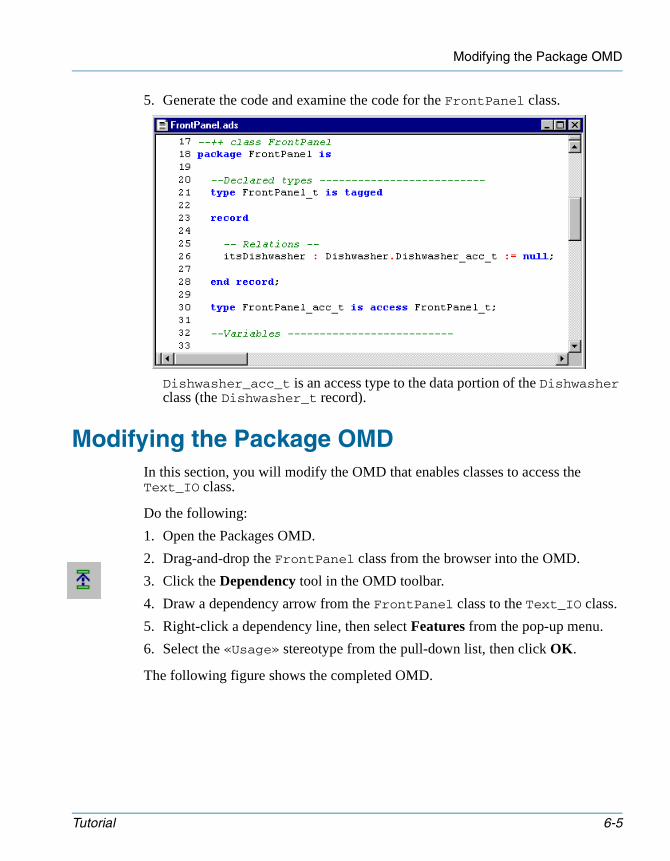
Modifying the Package OMD
tutorialada.book Page 5 Thursday, June 12, 2003 11:43 AM
5. Generate the code and examine the code for the FrontPanel class.
Dishwasher_acc_t is an access type to the data portion of the Dishwasher class (the Dishwasher_t record).
Modifying the Package OMDIn this section, you will modify the OMD that enables classes to access the Text_IO class.
Do the following:
1. Open the Packages OMD.
2. Drag-and-drop the FrontPanel class from the browser into the OMD.
3. Click the Dependency tool in the OMD toolbar.
4. Draw a dependency arrow from the FrontPanel class to the Text_IO class.
5. Right-click a dependency line, then select Features from the pop-up menu.
6. Select the «Usage» stereotype from the pull-down list, then click OK.
The following figure shows the completed OMD.
Tutorial 6-5
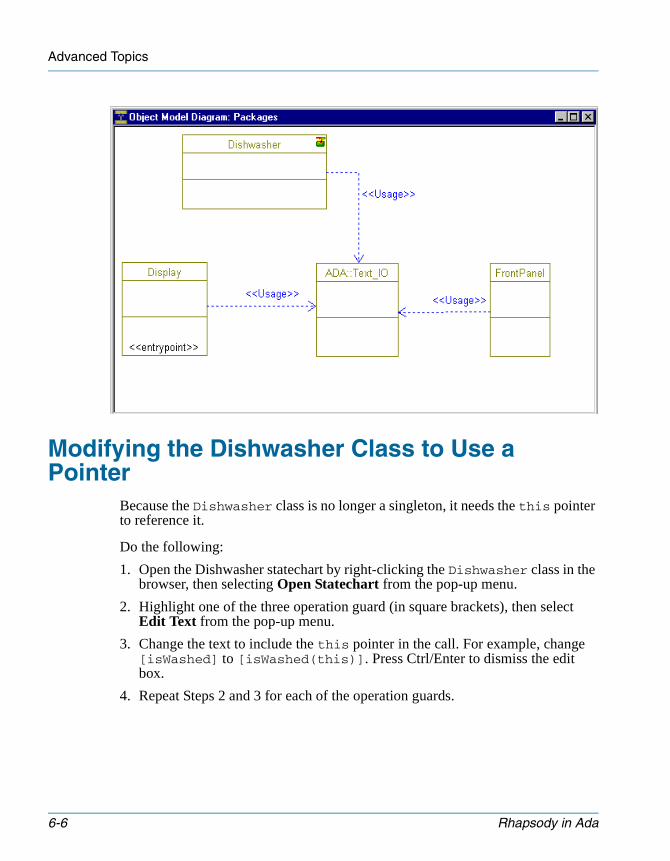
Advanced Topics
tutorialada.book Page 6 Thursday, June 12, 2003 11:43 AM
Modifying the Dishwasher Class to Use a Pointer
Because the Dishwasher class is no longer a singleton, it needs the this pointer to reference it.
Do the following:
1. Open the Dishwasher statechart by right-clicking the Dishwasher class in the browser, then selecting Open Statechart from the pop-up menu.
2. Highlight one of the three operation guard (in square brackets), then select Edit Text from the pop-up menu.
3. Change the text to include the this pointer in the call. For example, change [isWashed] to [isWashed(this)]. Press Ctrl/Enter to dismiss the edit box.
4. Repeat Steps 2 and 3 for each of the operation guards.
6-6 Rhapsody in Ada
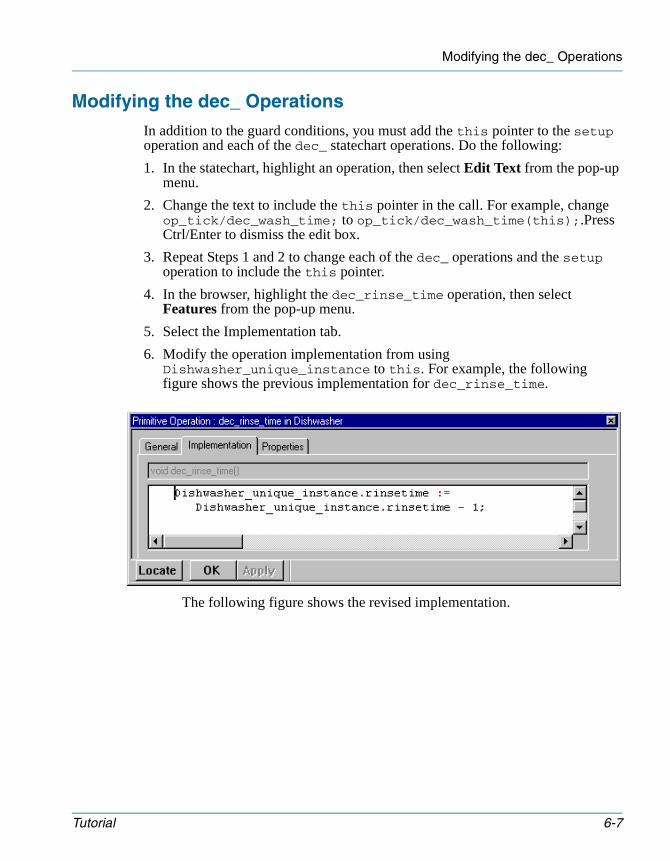
Modifying the dec_ Operations
tutorialada.book Page 7 Thursday, June 12, 2003 11:43 AM
Modifying the dec_ Operations
In addition to the guard conditions, you must add the this pointer to the setup operation and each of the dec_ statechart operations. Do the following:
1. In the statechart, highlight an operation, then select Edit Text from the pop-up menu.
2. Change the text to include the this pointer in the call. For example, change op_tick/dec_wash_time; to op_tick/dec_wash_time(this);.Press Ctrl/Enter to dismiss the edit box.
3. Repeat Steps 1 and 2 to change each of the dec_ operations and the setup operation to include the this pointer.
4. In the browser, highlight the dec_rinse_time operation, then select Features from the pop-up menu.
5. Select the Implementation tab.
6. Modify the operation implementation from using Dishwasher_unique_instance to this. For example, the following figure shows the previous implementation for dec_rinse_time.
The following figure shows the revised implementation.
Tutorial 6-7
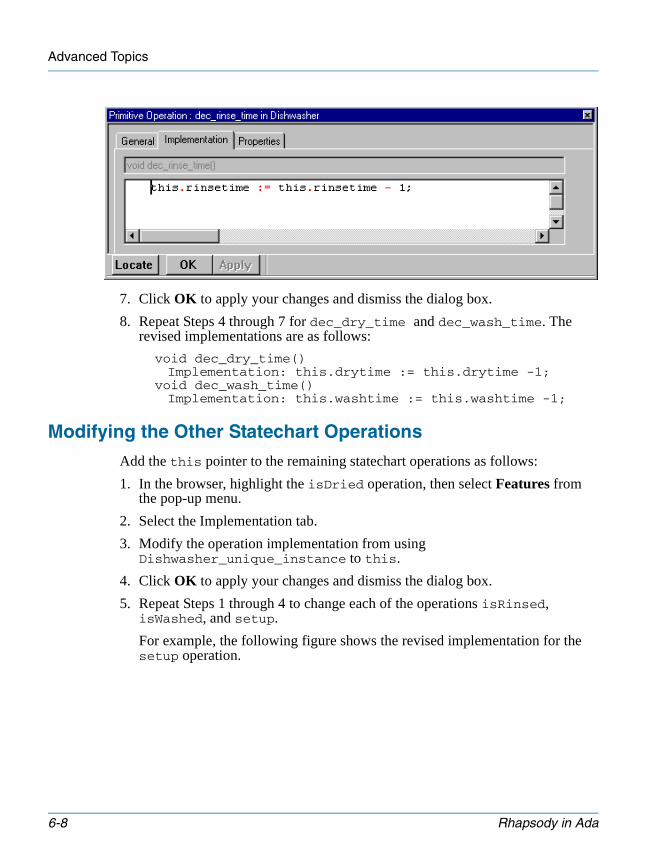
Advanced Topics
tutorialada.book Page 8 Thursday, June 12, 2003 11:43 AM
7. Click OK to apply your changes and dismiss the dialog box.
8. Repeat Steps 4 through 7 for dec_dry_time and dec_wash_time. The revised implementations are as follows:
void dec_dry_time()Implementation: this.drytime := this.drytime -1;
void dec_wash_time()Implementation: this.washtime := this.washtime -1;
Modifying the Other Statechart Operations
Add the this pointer to the remaining statechart operations as follows:
1. In the browser, highlight the isDried operation, then select Features from the pop-up menu.
2. Select the Implementation tab.
3. Modify the operation implementation from using Dishwasher_unique_instance to this.
4. Click OK to apply your changes and dismiss the dialog box.
5. Repeat Steps 1 through 4 to change each of the operations isRinsed, isWashed, and setup.
For example, the following figure shows the revised implementation for the setup operation.
6-8 Rhapsody in Ada
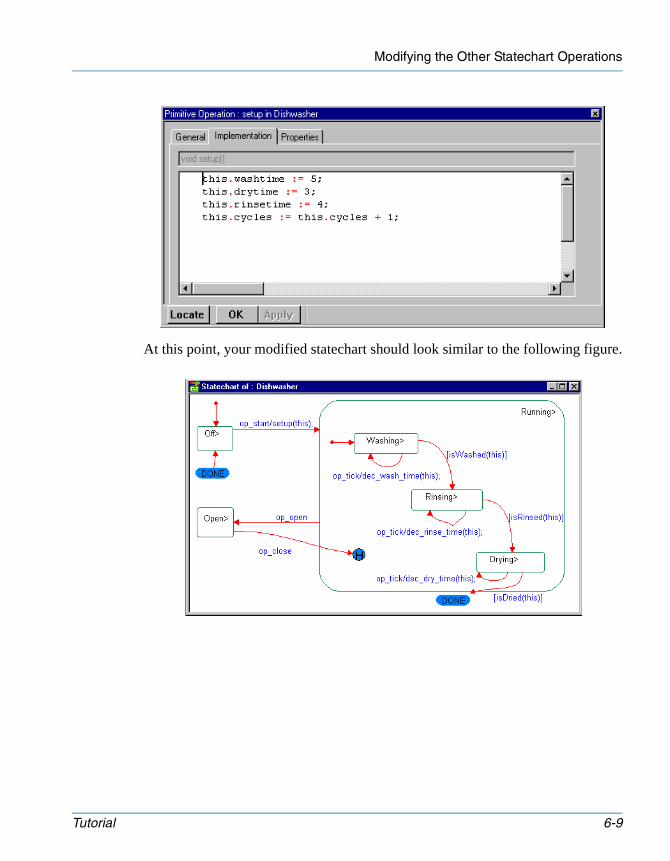
Modifying the Other Statechart Operations
tutorialada.book Page 9 Thursday, June 12, 2003 11:43 AM
At this point, your modified statechart should look similar to the following figure.
Tutorial 6-9
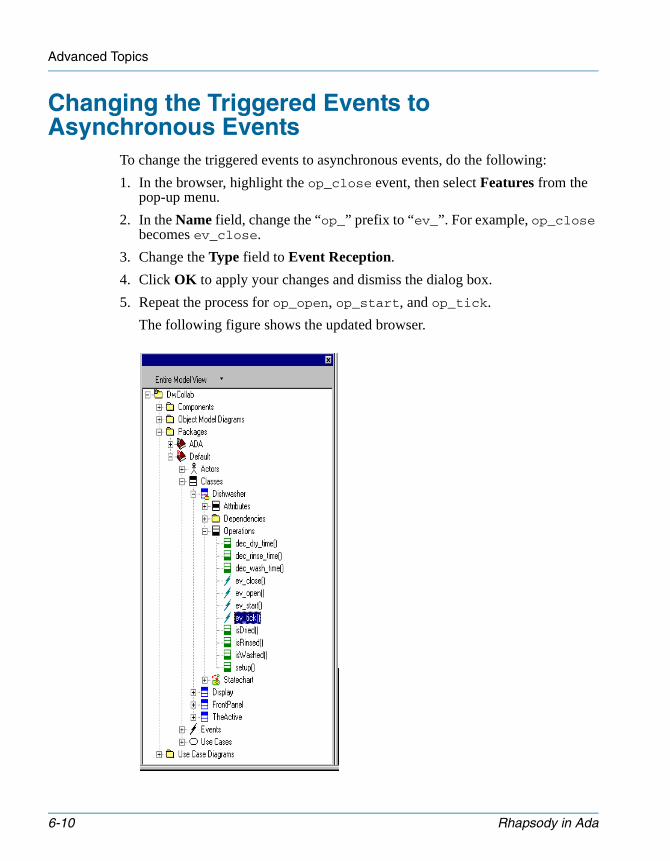
Advanced Topics
tutorialada.book Page 10 Thursday, June 12, 2003 11:43 AM
Changing the Triggered Events to Asynchronous Events
To change the triggered events to asynchronous events, do the following:
1. In the browser, highlight the op_close event, then select Features from the pop-up menu.
2. In the Name field, change the “op_” prefix to “ev_”. For example, op_close becomes ev_close.
3. Change the Type field to Event Reception.
4. Click OK to apply your changes and dismiss the dialog box.
5. Repeat the process for op_open, op_start, and op_tick.
The following figure shows the updated browser.
6-10 Rhapsody in Ada

Examining the Code for Events and States
tutorialada.book Page 11 Thursday, June 12, 2003 11:43 AM
Examining the Code for Events and StatesEvents are defined at the package level. For example, the following figure shows the events defined for the Default package.
The corresponding definition in the code (in the file Default.ads) is as follows:
--++ package Defaultpackage Default is
ev_start_id : constant Integer := 1;ev_open_id : constant Integer := 2;ev_close_id : constant Integer := 3;ev_tick_id : constant Integer := 4;
Although events are defined at the package level, they are declared in the class specification file, as shown in the file Dishwasher.ads.
Tutorial 6-11
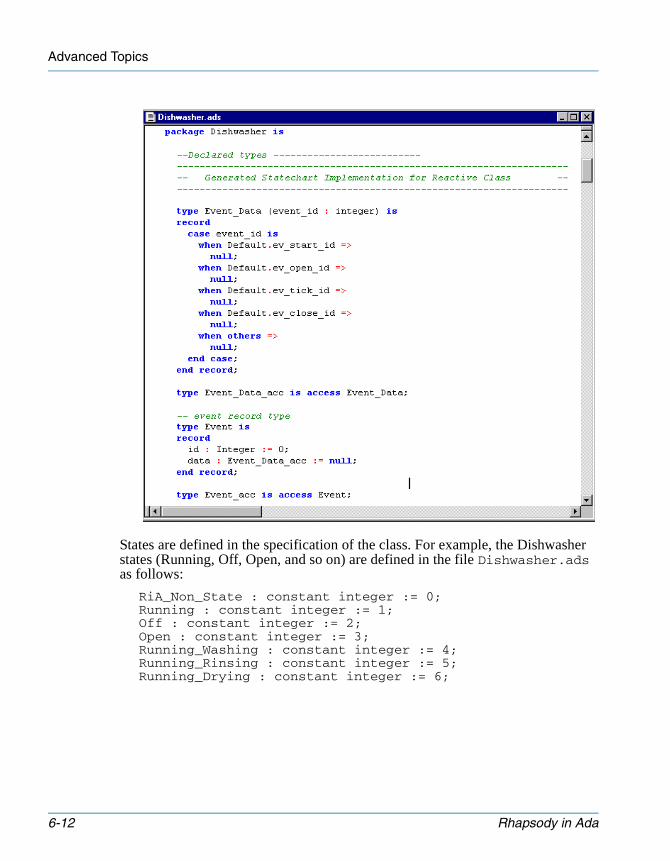
Advanced Topics
tutorialada.book Page 12 Thursday, June 12, 2003 11:43 AM
States are defined in the specification of the class. For example, the Dishwasher states (Running, Off, Open, and so on) are defined in the file Dishwasher.ads as follows:
RiA_Non_State : constant integer := 0;Running : constant integer := 1;Off : constant integer := 2;Open : constant integer := 3;Running_Washing : constant integer := 4;Running_Rinsing : constant integer := 5;Running_Drying : constant integer := 6;
6-12 Rhapsody in Ada
Statechart Event Dispatching Code
tutorialada.book Page 13 Thursday, June 12, 2003 11:43 AM
Statechart Event Dispatching Code
Rhapsody generates the following procedures for statecharts:• procedure start_behavior—Starts the statechart.• procedure gen_eventname—Generates an event and passes it to its active
context (to be placed on a queue). One procedure is generated for each event. For example, gen_ev_start.
• procedure take_event(Event)—Consumes the event and causes a state transition. This procedure is called by the active context.
• procedure Initialize and procedure Finalize—The constructor and destructor.
Event Dispatch Mechanism
When you send an event to a reactive object (one with a statechart) using a call to take_eventname(this), the following actions occur:• The gen_eventname operation puts event data in a queue associated with an
active class (running in its own Ada task).• Each reactive object that uses events has an associated active object (using the
«Active Context» dependency).• The active object reads its queue and executes state change operations in the
reactive class that run in the context of the active object task.
Initiating a Reactive Object
Rhapsody initiates a reactive object using the following steps:
1. Create the event handler and initialize it.
-- create active objectactive_object := new TheEventHandler.TheEventHandler_t;TheEventHandler.Initialize(active_object.all);
2. Create the reactive object and initialize it.
-- create reactive objectTheTimer := new Timer.Timer_t;Timer.Initialize(TheTimer.all);
3. Register the reactive object with the event handler.
-- register the reactive object on its activeTheEventHandler.register_context_Timer(active_object.all,
TheTimer.all);
Tutorial 6-13

Advanced Topics
tutorialada.book Page 14 Thursday, June 12, 2003 11:43 AM
4. Start the event handler task. This causes Rhapsody to spawn a thread and process its object queue repeatedly.
-- start the active instance taskTheEventHandler.start(active_object.all);
5. Start the reactive object’s statemachine.
-- Start the reactive object behaviorTimer.start_behavior(TheTimer.all, timer_status);
Changing the mainTo change the implementation of the main, do the following:
1. In the browser, expand the Display class and its operations.
2. Right-click main, then select Features from the pop-up menu.
3. Select the Implementation tab.
4. Change the implementation to the following:
FrontPanel.start;
5. Click OK to apply your changes and dismiss the dialog box.
Setting Up the FrontPanel ClassTo set up the FrontPanel class, do the following:
1. In the browser, highlight the FrontPanel class, then select Features from the pop-up menu.
2. Set the Stereotype field to «Singleton».
3. Select the Operations tab.
4. Click New > PrimitiveOperation to define a new operation called start. Its implementation is as follows:
-- Create Active Objectactive_object := new TheActive.TheActive_t;TheActive.Initialize(active_object.all);
-- Create Reactive ObjectFrontPanel_unique_instance.itsDishwasher := new
Dishwasher.Dishwasher_t;
6-14 Rhapsody in Ada

Setting Up the FrontPanel Class
tutorialada.book Page 15 Thursday, June 12, 2003 11:43 AM
Dishwasher.Initialize(FrontPanel_unique_instance.itsDishwasher.all);
-- Register the Active Object on its ActiveTheActive.register_context_Dishwasher(active_object.all,
FrontPanel_unique_instance.itsDishwasher.all);
-- Start the Active Instance TaskTheActive.start(active_object.all);Dishwasher.start_behavior(
FrontPanel_unique_instance.itsDishwasher.all,start_behavior_status);
doLoop;Dishwasher.Finalize(
FrontPanel_unique_instance.itsDishwasher.all);TheActive.Finalize(active_object.all);
5. Select the Properties tab.
6. For the property Ada_CG::Operation::LocalVariablesDeclaration, select the value field, then click the ellipsis to open the text editor. Type the following code in the editor:
active_object : TheActive.TheActive_acc_t := null;start_behavior_status : Boolean := false;
7. Click OK to dismiss the text editor.
8. Click OK to return to the features dialog box.
9. Select New > PrimitiveOperation to define a new operation named doLoop. Its implementation is as follows:
loopada.text_io.get_immediate(c,success);case c is
when 's' =>Dishwasher.gen_ev_start(FrontPanel_unique_instance.itsDishwasher.all);
when 'o' => Dishwasher.gen_ev_open(FrontPanel_unique_instance.itsDishwasher.all);
when 'c' =>Dishwasher.gen_ev_close(FrontPanel_unique_instance.itsDishwasher.all);
when 'x' =>exit;
when others => null;end case;delay(1.0);Dishwasher.gen_ev_tick(
FrontPanel_unique_instance.itsDishwasher.all);end loop;
Tutorial 6-15
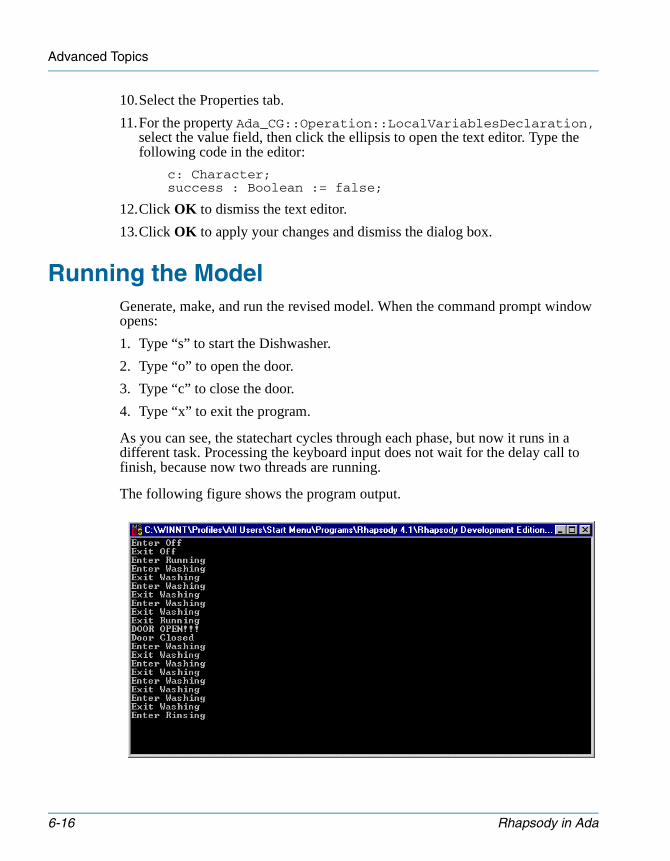
Advanced Topics
tutorialada.book Page 16 Thursday, June 12, 2003 11:43 AM
10.Select the Properties tab.
11.For the property Ada_CG::Operation::LocalVariablesDeclaration, select the value field, then click the ellipsis to open the text editor. Type the following code in the editor:
c: Character;success : Boolean := false;
12.Click OK to dismiss the text editor.
13.Click OK to apply your changes and dismiss the dialog box.
Running the ModelGenerate, make, and run the revised model. When the command prompt window opens:
1. Type “s” to start the Dishwasher.
2. Type “o” to open the door.
3. Type “c” to close the door.
4. Type “x” to exit the program.
As you can see, the statechart cycles through each phase, but now it runs in a different task. Processing the keyboard input does not wait for the delay call to finish, because now two threads are running.
The following figure shows the program output.
6-16 Rhapsody in Ada
tutorialada.book Page 1 Thursday, June 12, 2003 11:43 AM
Goals for This LessonAfter completing this lesson, you should know how to perform the following tasks in Rhapsody:• Animate an application.• Send events to the model.• Set and use breakpoints and tracing on the model.
OverviewRhapsody animates the actual running application, rather than just simulating it. Animated views such as the animated browser, animated sequence diagrams, and animated statecharts enable you to observe the application as it is running and perform design-level debugging. Using the animation control panel, you can step through the program, set and clear breakpoints, and inject events to observe the system’s reactions to hypothetical situations in quasi-real time. In addition, you can generate an output trace.
To enable your model for animation, do the following:
1. In the browser, expand the Components category until the Host configuration is visible.
2. Right-click the Host configuration, then select Features from the pop-up menu.
3. Select the Settings tab.
4. Set the Instrumentation Mode field to Animation, as shown in the following figure.
Tutorial 7-1
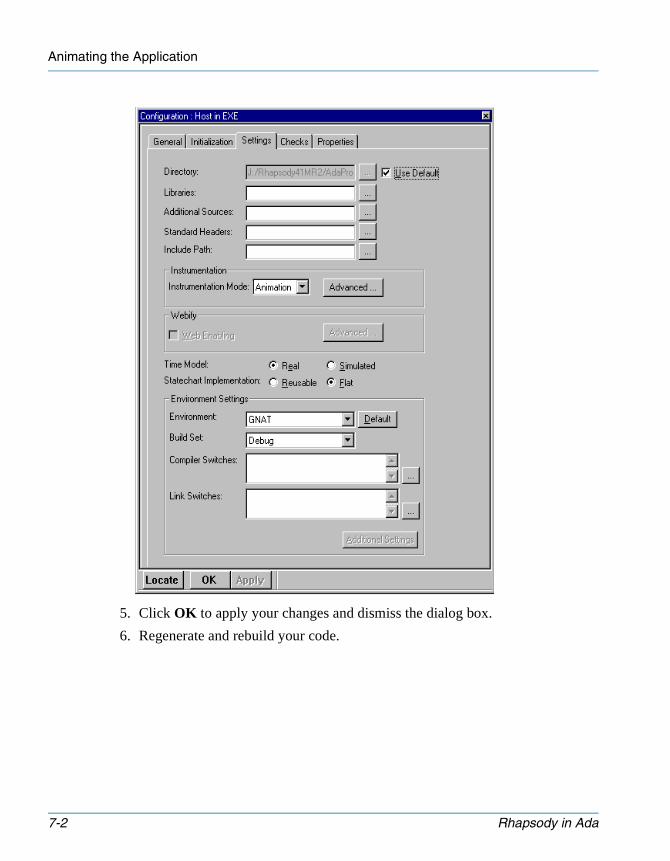
Animating the Application
tutorialada.book Page 2 Thursday, June 12, 2003 11:43 AM
5. Click OK to apply your changes and dismiss the dialog box.
6. Regenerate and rebuild your code.
7-2 Rhapsody in Ada
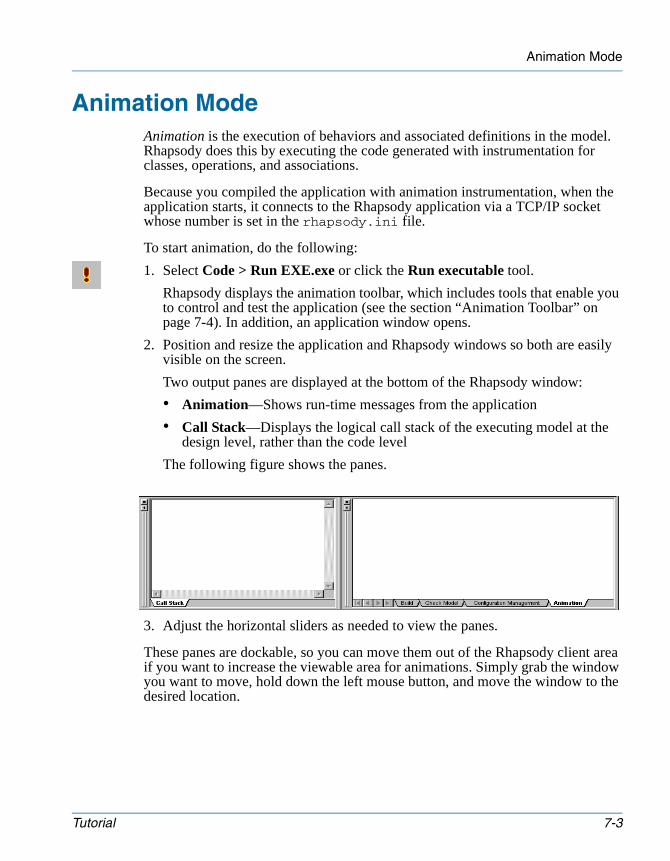
Animation Mode
tutorialada.book Page 3 Thursday, June 12, 2003 11:43 AM
Animation ModeAnimation is the execution of behaviors and associated definitions in the model. Rhapsody does this by executing the code generated with instrumentation for classes, operations, and associations.
Because you compiled the application with animation instrumentation, when the application starts, it connects to the Rhapsody application via a TCP/IP socket whose number is set in the rhapsody.ini file.
To start animation, do the following:
1. Select Code > Run EXE.exe or click the Run executable tool.
Rhapsody displays the animation toolbar, which includes tools that enable you to control and test the application (see the section “Animation Toolbar” on page 7-4). In addition, an application window opens.
2. Position and resize the application and Rhapsody windows so both are easily visible on the screen.
Two output panes are displayed at the bottom of the Rhapsody window:
• Animation—Shows run-time messages from the application
• Call Stack—Displays the logical call stack of the executing model at the design level, rather than the code level
The following figure shows the panes.
3. Adjust the horizontal sliders as needed to view the panes.
These panes are dockable, so you can move them out of the Rhapsody client area if you want to increase the viewable area for animations. Simply grab the window you want to move, hold down the left mouse button, and move the window to the desired location.
Tutorial 7-3
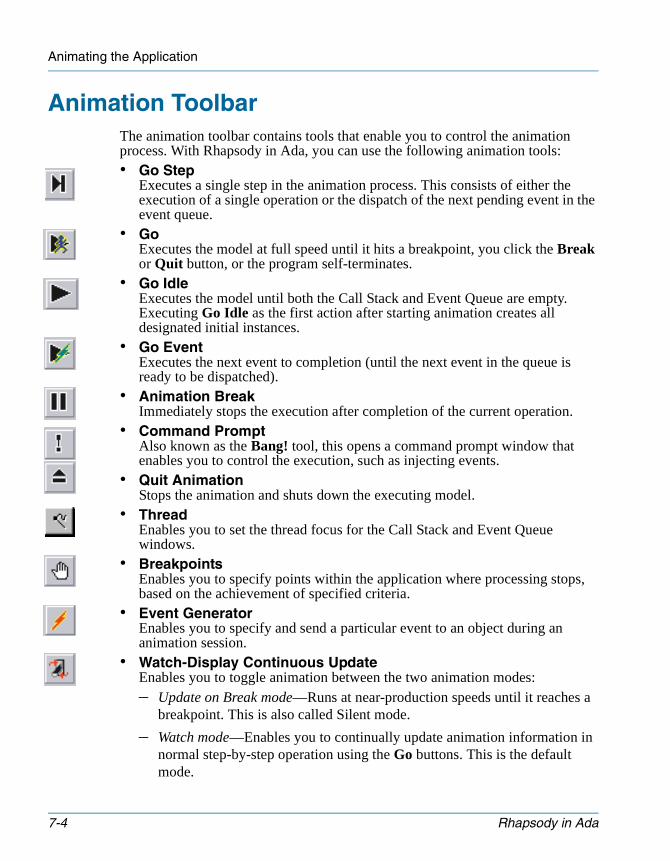
Animating the Application
tutorialada.book Page 4 Thursday, June 12, 2003 11:43 AM
Animation ToolbarThe animation toolbar contains tools that enable you to control the animation process. With Rhapsody in Ada, you can use the following animation tools:• Go Step
Executes a single step in the animation process. This consists of either the execution of a single operation or the dispatch of the next pending event in the event queue.
• GoExecutes the model at full speed until it hits a breakpoint, you click the Break or Quit button, or the program self-terminates.
• Go IdleExecutes the model until both the Call Stack and Event Queue are empty. Executing Go Idle as the first action after starting animation creates all designated initial instances.
• Go EventExecutes the next event to completion (until the next event in the queue is ready to be dispatched).
• Animation BreakImmediately stops the execution after completion of the current operation.
• Command PromptAlso known as the Bang! tool, this opens a command prompt window that enables you to control the execution, such as injecting events.
• Quit AnimationStops the animation and shuts down the executing model.
• ThreadEnables you to set the thread focus for the Call Stack and Event Queue windows.
• BreakpointsEnables you to specify points within the application where processing stops, based on the achievement of specified criteria.
• Event GeneratorEnables you to specify and send a particular event to an object during an animation session.
• Watch-Display Continuous UpdateEnables you to toggle animation between the two animation modes:– Update on Break mode—Runs at near-production speeds until it reaches a
breakpoint. This is also called Silent mode.
– Watch mode—Enables you to continually update animation information in normal step-by-step operation using the Go buttons. This is the default mode.
7-4 Rhapsody in Ada

Viewing the Animated Statechart
tutorialada.book Page 5 Thursday, June 12, 2003 11:43 AM
Note: You can toggle between modes at any break, or when the executable is idle.
Viewing the Animated StatechartTo animate your model, do the following:
1. Click the Go Step tool in the Animation toolbar. The Call Stack displays the message NULL->start().
2. Click Go Step. The Call Stack displays the message Initialize().
3. Click Go Step. The Initialize() message is removed from the Call Stack.
4. Click Go Step. The browser shows the new instance, Dishwasher[0]. To see it in the browser, expand the Instances category under the Dishwasher class.
5. In the browser, right-click the Dishwasher[0] instance, then select Open Instance Statechart from the pop-up menu. Rhapsody displays an animated version of your Dishwasher statechart. In the default color scheme, currently active states are highlighted in magenta.
6. Click Go Step. The message Dishwasher[0]-> Start Behavior is displayed in the Call Stack.
7. Click Go Step. The message is removed from the Call Stack.
8. Click Go Step. The message NULL-> doLoop is displayed in the Call Stack. In the statechart, the Off state is highlighted in magenta to show that it is the current state.
Tutorial 7-5
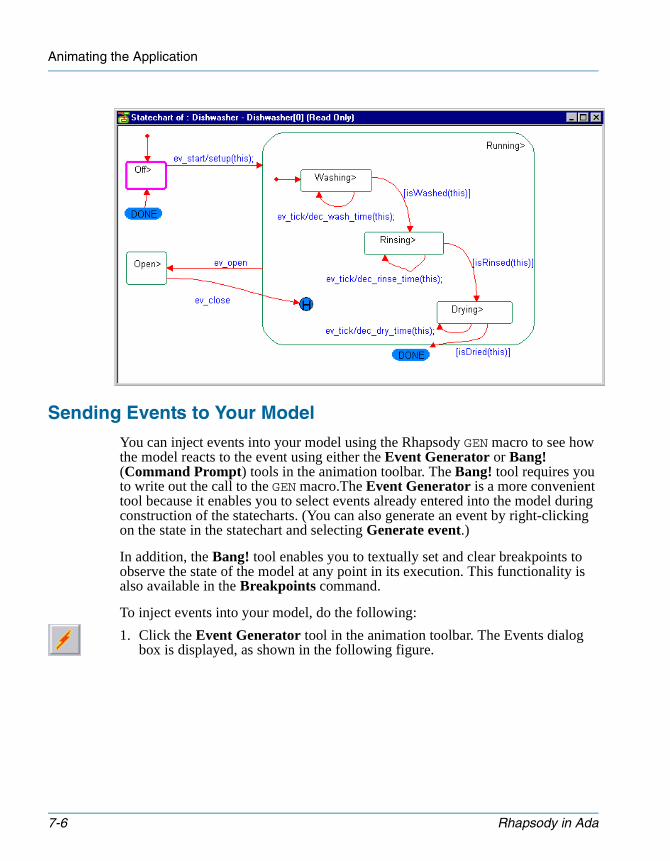
Animating the Application
tutorialada.book Page 6 Thursday, June 12, 2003 11:43 AM
Sending Events to Your Model
You can inject events into your model using the Rhapsody GEN macro to see how the model reacts to the event using either the Event Generator or Bang! (Command Prompt) tools in the animation toolbar. The Bang! tool requires you to write out the call to the GEN macro.The Event Generator is a more convenient tool because it enables you to select events already entered into the model during construction of the statecharts. (You can also generate an event by right-clicking on the state in the statechart and selecting Generate event.)
In addition, the Bang! tool enables you to textually set and clear breakpoints to observe the state of the model at any point in its execution. This functionality is also available in the Breakpoints command.
To inject events into your model, do the following:
1. Click the Event Generator tool in the animation toolbar. The Events dialog box is displayed, as shown in the following figure.
7-6 Rhapsody in Ada
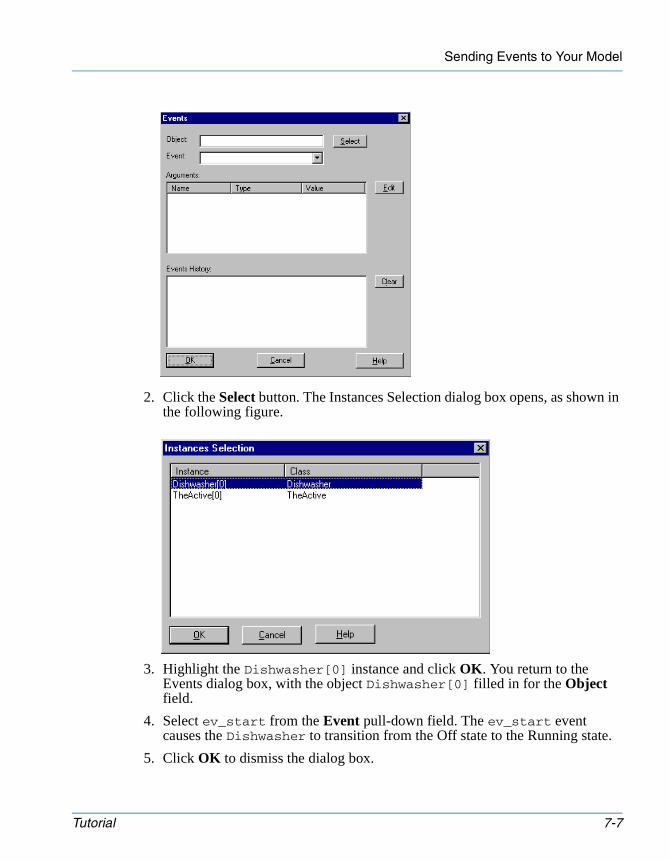
Sending Events to Your Model
tutorialada.book Page 7 Thursday, June 12, 2003 11:43 AM
2. Click the Select button. The Instances Selection dialog box opens, as shown in the following figure.
3. Highlight the Dishwasher[0] instance and click OK. You return to the Events dialog box, with the object Dishwasher[0] filled in for the Object field.
4. Select ev_start from the Event pull-down field. The ev_start event causes the Dishwasher to transition from the Off state to the Running state.
5. Click OK to dismiss the dialog box.
Tutorial 7-7
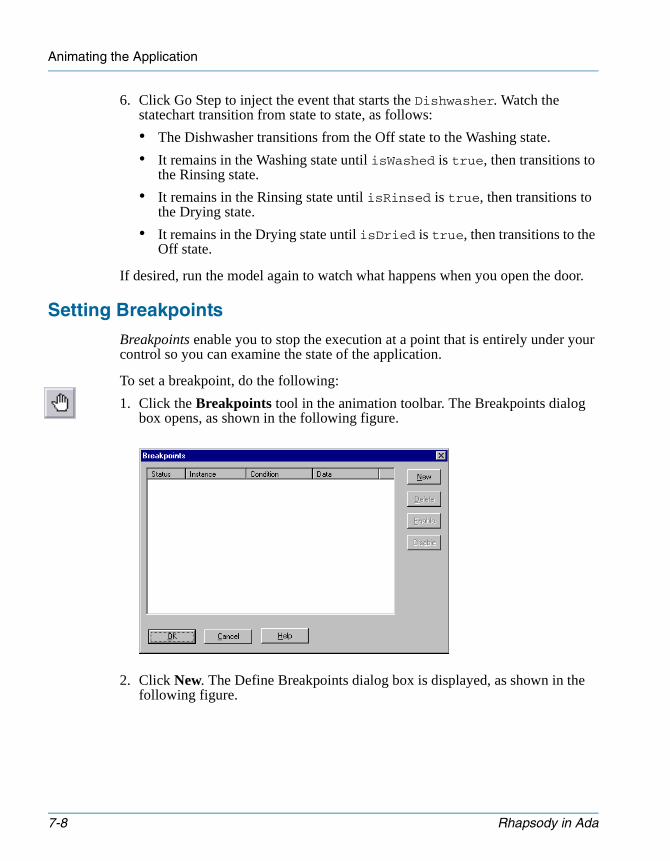
Animating the Application
tutorialada.book Page 8 Thursday, June 12, 2003 11:43 AM
6. Click Go Step to inject the event that starts the Dishwasher. Watch the statechart transition from state to state, as follows:
• The Dishwasher transitions from the Off state to the Washing state.
• It remains in the Washing state until isWashed is true, then transitions to the Rinsing state.
• It remains in the Rinsing state until isRinsed is true, then transitions to the Drying state.
• It remains in the Drying state until isDried is true, then transitions to the Off state.
If desired, run the model again to watch what happens when you open the door.
Setting Breakpoints
Breakpoints enable you to stop the execution at a point that is entirely under your control so you can examine the state of the application.
To set a breakpoint, do the following:
1. Click the Breakpoints tool in the animation toolbar. The Breakpoints dialog box opens, as shown in the following figure.
2. Click New. The Define Breakpoints dialog box is displayed, as shown in the following figure.
7-8 Rhapsody in Ada
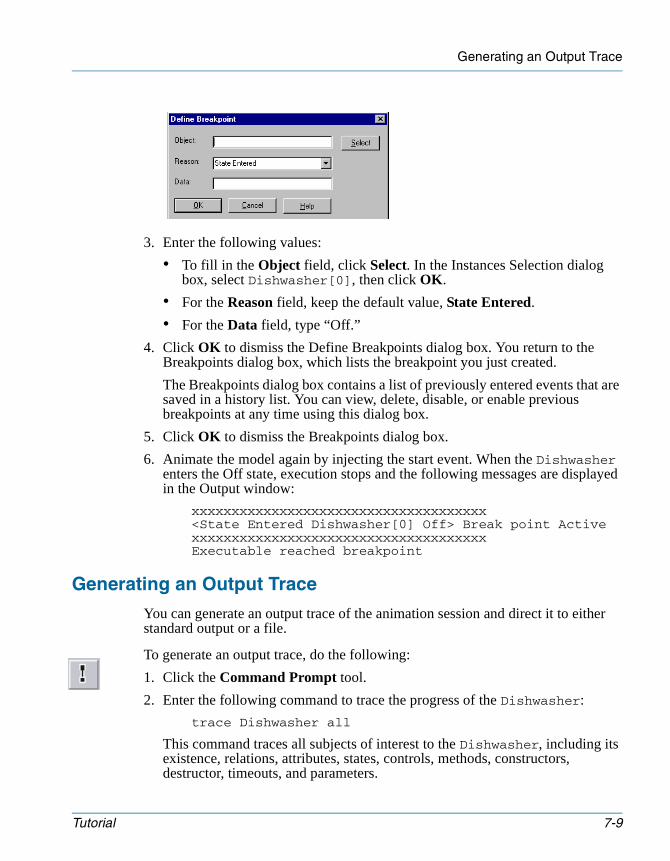
Generating an Output Trace
tutorialada.book Page 9 Thursday, June 12, 2003 11:43 AM
3. Enter the following values:
• To fill in the Object field, click Select. In the Instances Selection dialog box, select Dishwasher[0], then click OK.
• For the Reason field, keep the default value, State Entered.
• For the Data field, type “Off.”
4. Click OK to dismiss the Define Breakpoints dialog box. You return to the Breakpoints dialog box, which lists the breakpoint you just created.
The Breakpoints dialog box contains a list of previously entered events that are saved in a history list. You can view, delete, disable, or enable previous breakpoints at any time using this dialog box.
5. Click OK to dismiss the Breakpoints dialog box.
6. Animate the model again by injecting the start event. When the Dishwasher enters the Off state, execution stops and the following messages are displayed in the Output window:
xxxxxxxxxxxxxxxxxxxxxxxxxxxxxxxxxxxxx<State Entered Dishwasher[0] Off> Break point ActivexxxxxxxxxxxxxxxxxxxxxxxxxxxxxxxxxxxxxExecutable reached breakpoint
Generating an Output Trace
You can generate an output trace of the animation session and direct it to either standard output or a file.
To generate an output trace, do the following:
1. Click the Command Prompt tool.
2. Enter the following command to trace the progress of the Dishwasher:
trace Dishwasher all
This command traces all subjects of interest to the Dishwasher, including its existence, relations, attributes, states, controls, methods, constructors, destructor, timeouts, and parameters.
Tutorial 7-9
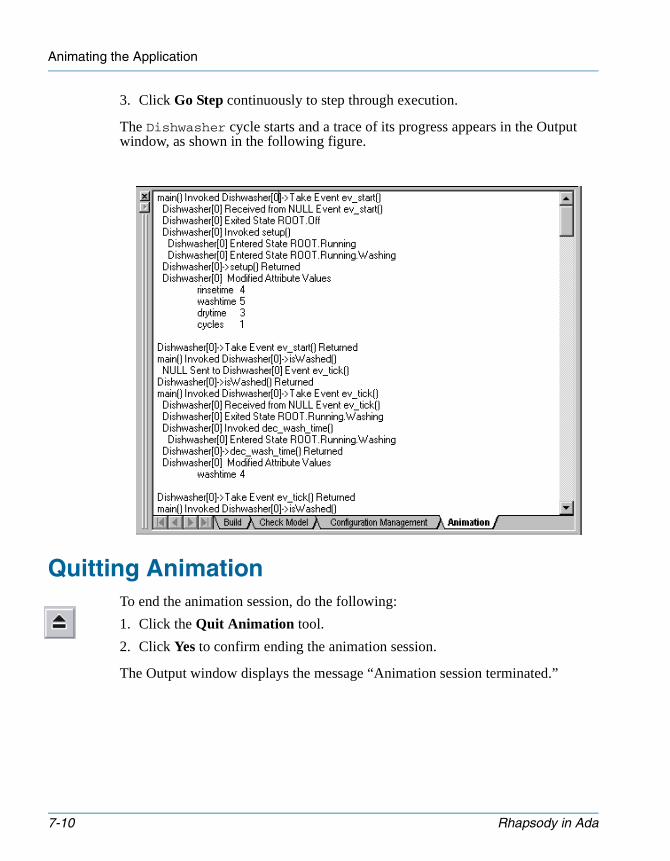
Animating the Application
tutorialada.book Page 10 Thursday, June 12, 2003 11:43 AM
3. Click Go Step continuously to step through execution.
The Dishwasher cycle starts and a trace of its progress appears in the Output window, as shown in the following figure.
Quitting AnimationTo end the animation session, do the following:
1. Click the Quit Animation tool.
2. Click Yes to confirm ending the animation session.
The Output window displays the message “Animation session terminated.”
7-10 Rhapsody in Ada
tutorialada.book Page 1 Thursday, June 12, 2003 11:43 AM
Symbols«active» stereotype 6-2«entrypoint» stereotype 2-12«Singleton» stereotype 4-6
AAction
notation 5-10on entry 5-13on exit 5-13
Active configurationsetting
Dishwasher example 4-20HelloWorld example 2-16
Active context dependency 6-2Actor
associating with use cases 3-11default name 3-7description 3-1drawing 3-7tool
UCD 3-6using in UCD 3-7
Actor tool 4-4Ada
rebuild framework 5-17ADA.sbs file 2-21Add
attributes 4-6predefined packages 2-21
Add to Model option 2-21, 4-16Adjust
layout 3-10Aggregation
lines 4-2tool 4-4
Align Left tool 3-10
All Elements radio buttonsetting for the Dishwasher example 4-19setting for the HelloWorld example 2-14
Analysis tool 1-1Analyze
build errors 2-20Dishwasher system 3-3
Animationanimated statecharts 7-5breakpoints 7-8
setting 7-8definition 7-3enabling 7-1modes 7-4output panes 7-3output window 7-3quitting 7-10running the application 7-3sending events 7-6starting 7-3toolbar 7-4trace 7-9view 7-5
Animation break tool 7-4Application
building and running 2-19generating code 2-17running 7-3stopping 2-25, 5-18tracing 7-9
Arrange toolbar 3-10Arrow
generalization 3-2inheritance 4-2
Associationdirected
drawing 6-3icon 4-2
Association line
Tutorial Index–1
tutorialada.book Page 2 Thursday, June 12, 2003 11:43 AM
description 3-1tool
using 3-11UCD 3-1
Association tool 3-6Asynchronous event 6-10Attribute
adding 4-6Autosave 2-3
BBackup files 2-27Bang! tool 7-6Boundary box
creating 3-7description 3-2drawing 3-7resizing 3-10tool 3-2
Break 7-4Breakpoints tool 7-4
using 7-8Browser
categories 2-5overview 2-4using to create
OMD 4-4SC 5-3UCD 3-4
BuildDishwasher example 5-17errors 2-20HelloWorld example 2-19
CCategory 2-5Change
font 3-13Class
attributes 4-6composite 4-2creating 2-7default name 2-7OMD 4-1operations
creating 4-9resizing 2-9simple 4-2
Text_IO 4-16tool 4-4
using 4-5ClassCodeEditor property 2-26Close project 2-27Code
examining 2-26numbering style 2-20
Code generationcreating component
for Dishwasher 4-19for HelloWorld 2-14
creating configurationfor Dishwasher 4-19for HelloWorld 2-15
messages 2-17Code toolbar 2-19Command prompt tool 7-4
using 7-9Compiler messages 2-25Component
default name 2-14definition 2-14
Composite classdescription 4-2tool 4-4
Concurrency field 6-2Condition connector 5-2Configuration
activeDishwasher example 4-20HelloWorld example 2-16
Connectorcondition 5-2default 5-8diagram 5-3
drawing 5-7history 5-2
drawing 5-6junction 5-2termination 5-3
Createboundary box 3-7class 2-7component
for Dishwasher 4-19for HelloWorld 2-14
configurationfor Dishwasher 4-19for HelloWorld 2-15
Dishwasher project 3-3
Index–2 Rhapsody in Ada
tutorialada.book Page 3 Thursday, June 12, 2003 11:43 AM
entrypointfor Dishwasher 4-15for HelloWorld 2-12
event handler 6-2new project 2-2note 3-12OMD 2-8, 4-3operation 4-9singleton 4-6statechart 5-3UCD 3-4
general steps 3-6using the browser 3-4using the toolbar 3-4
DData field 7-9Default connector
description 5-2drawing 5-8
Default nameactor 3-7class 2-7component 2-14UCD 3-4
Define Breakpoints dialog box 7-8Dependency tool 4-4
UCD 3-6Design tool 1-1Diagram
labeling 3-12Diagram connector
description 5-3purpose 5-6using 5-7
Directed associationdrawing 6-3tool 4-4
Disable DMCA tool 2-19Dishwasher example
actors 3-3adding
actions to states 5-13attributes 4-6event handler 6-2main() 4-13predefined packages 4-16
analysis 3-3animating the model 7-5
creating 3-3entry point 4-15OMD 4-3operations 4-9singleton 4-6statechart 5-3
how it works 5-19running the model 5-17setting the display options 4-10setup operation 4-12UCD 3-6using
asynchronous events 6-10this pointer 6-6
Dispatch event 6-13Display Options 2-13Display options 4-10Draw
connectors 5-6default connector 5-8directed association 6-3statechart
general steps 5-5states 5-5transition 5-9UCD
general steps 3-6Drawing window 2-4
using 2-6
EEdit Class option 2-26Edit Package option 2-26Edit Text option 6-6Editor
external 2-26internal 2-26
EditorCommandLine property 2-26ehl file 2-4Entry
action on 5-13Entrypoint
creatingfor Dishwasher 4-15for HelloWorld 2-12
Erroranalyzing build errors 2-20GNAT 5-17
Event
Tutorial Index–3
tutorialada.book Page 4 Thursday, June 12, 2003 11:43 AM
asynchronous 6-10dispatching 6-13handler 6-2sending to model 7-6triggered 6-10
Event Generator tooloverview 7-4using 7-6
Event Reception option 6-10Events dialog box 7-6Example
DishwasherUCD 3-1
HelloWorld 2-1Executable radio button 2-14Exit
action on 5-13Rhapsody 2-27
External editor 2-26
FFeatures dialog box
invoking 2-8File
ADA.sbs 2-21backup 2-27ehl 2-4rpy 2-3
Folderproject 2-5
Fontchanging 3-13
Framework 5-17
GGeneralization
arrow 3-2Generalization tool 3-6Generate
codeconfiguration 2-15displayed messages 2-17
trace 7-9Generate event option 7-6Generate⁄⁄Make⁄Run option 2-25, 5-18GMR option 2-25, 5-18GNAT
errors 5-17
Go Event tool 7-4Go Idle tool 7-4Go Step tool 7-4Go tool 7-4Guard 5-10
HHandle 2-10HelloWorld example
building the application 2-19creating a class 2-7creating a component 2-14creating a configuration 2-15creating an entry point 2-12creating an OMD 2-8running the application 2-25
History connectordescription 5-2drawing 5-6
IIcon
Actor 4-4using in UCD 3-7
Aggregation 4-4Align Left 3-10Animation break 7-4Association 4-4Association line 3-11Boundary box 3-7
UCD toolbar 3-2Breakpoints 7-4
using 7-8Class 4-4
using 4-5Command prompt 7-4
using 7-9Composite class 4-4Default connector 5-8Dependency 4-4Diagram connector 5-4
using 5-7Directed association 4-4Disable DMCA 2-19Event Generator 7-4Go 7-4Go Event 7-4Go Idle 7-4
Index–4 Rhapsody in Ada
tutorialada.book Page 5 Thursday, June 12, 2003 11:43 AM
Go Step 7-4History connector 5-4
using 5-6Inheritance 4-4Make 2-19New project 3-3Note
using 3-12Open statechart 5-3Package 4-4Quit animation 7-4Run executable 2-19
using 7-3Save 2-3Scale to fit 5-11Select 4-4State 5-5Stop Make/Execution 2-19Thread 7-4Transition
using 5-9Use case 3-6
using 3-9Use case diagram 3-4Watch-Display Continuous Update 7-4
Inheritance tool 4-4Initiate reactive object 6-13Instances Selection dialog box 7-7Instrumentation Mode 7-1Internal editor 2-26
JJunction connector 5-2
LLabel
changing font 3-13diagrams 3-12
Layoutadjusting 3-10
Lineaggregation 4-2association 4-2
UCD 3-1dependency 3-2, 4-3directed association 4-2numbers 2-20shapes of 5-12
LocalVariablesDeclaration propertyvalue for doLoop 6-16value for main 4-14value for start() 6-15
Mmain
Dishwasher example 4-13HelloWorld example 2-10
MainGenerationScheme property 2-11, 4-14Make tool 2-19Message
code generationHelloWorld 2-17
compiler 2-25Model
sending events to 7-6
NName
actor 3-7class 2-7component 2-14UCD 3-4
New Diagram dialog boxOMD 4-4UCD 3-5
New option 2-2New Project dialog box 2-2New Project icon 2-2New project icon 3-3Node 2-5Note
changing font 3-13creating 3-12text font 3-13tool 3-12
OObject
field 7-9reactive 6-13
Object model diagramactors 4-3aggregation line 4-2association line 4-2
Tutorial Index–5
tutorialada.book Page 6 Thursday, June 12, 2003 11:43 AM
classcomposite 4-2description 4-1simple 4-2
composite class 4-2creating 2-8
using browser 4-4definition 4-1dependency 3-2, 4-3directed association line 4-2icon 2-9inheritance arrow 4-2overview 4-1package 4-2parts of 4-1resizing classes 2-9simple class 4-2viewing operations 4-10
OMDdisplaying operations 2-13
Open Instance Statechart option 7-5Open Statechart option 6-6Open statechart tool 5-3Open Use Case Diagram dialog box 3-5Operation
creating 4-9Operations
displaying 2-13Orthogonal state
description 5-2Output trace 7-9Output window
overview 2-4panes 7-3
PPackage
predefined 2-21tool
UCD 3-6Package tool 4-4Pointer
this 6-6Predefined package 2-21PrimitiveOperation option 4-9Project
closing 2-27creating 2-2creating the Dishwasher 3-3files 2-4
folder 2-5New project icon 3-3node 2-5saving 2-3
PropertiesClassCodeEditor 2-26EditorCommandLine 2-26LocalVariablesDeclaration
value for doLoop 6-16value for main 4-14value for start() 6-15
MainGenerationScheme 2-11, 4-14UsageType 2-22, 6-3Visibility 6-3
QQuit animation 7-10
RReactive object
initiating 6-13Reason field 7-9Rebuild
framework 5-17Rectilinear line 5-12ReGenerate option 5-17Relation
display in the browser 3-12Resize
boundary box 3-10Resize class 2-9Rhapsody
autosave 2-3backup files 2-27browser 2-4close project 2-27code generation 2-14, 4-19code generation messages 2-17compiler messages 2-25configuration 2-15, 4-19default window setup 2-3drawing window 2-4exiting 2-27external editor 2-26GUI 2-4handle 2-10internal editor 2-26main window 2-1
Index–6 Rhapsody in Ada
tutorialada.book Page 7 Thursday, June 12, 2003 11:43 AM
output window 2-4project
creating 2-2saving 2-3
sending events to model 7-6starting 2-1tips 2-2toolbars 2-7UML tools 1-1
rhapsody.ini file 7-3rpy file 2-4Run
Dishwasher example 7-3executable tool 2-19
using 7-3HelloWorld example 2-19
SSave
icon 2-3option 2-3project 2-3
Save As dialog box 2-3Scale to fit button 5-11Scale to fit icon 5-11Scope group box
for Dishwasher 4-19for HelloWorld 2-14
Select tool 4-4UCD 3-6
Selected Classes option 2-26Set as Active Configuration
settingfor Dishwasher 4-20for HelloWorld 2-16
Set breakpoint 7-8Settings tab 7-2setup operation 4-12Simple class 4-2Singleton
creating 4-6Spline line 5-12Start
animation 7-3Rhapsody 2-1
Statedrawing 5-5overview 5-2tool 5-5
Statechartcondition connector 5-2creating 5-3default connector 5-2
drawing 5-8definition 5-1diagram connector 5-3drawing
general steps 5-5history connector 5-2junction connector 5-2line types 5-12opening 5-3, 6-6orthogonal state 5-2overview 5-1parts of 5-2state 5-2termination connector 5-3toolbar 5-4transition 5-2
action 5-10drawing 5-9guard 5-10
Stereotype«active» 6-2«entrypoint» 2-12«Singleton» 4-6description 3-2
Stop execution tool 2-25, 5-18Stop Make/Execution tool 2-19Straight line 5-12System implementation 1-2
TTest systems 1-2Text font 3-13Text_IO class 4-16this pointer 6-6Thread tool 7-4Tip 2-2Tool
Actor 4-4using in UCD 3-7
Aggregation 4-4Align Left 3-10Animation break 7-4Association line 3-11Boundary box 3-7
UCD 3-2
Tutorial Index–7
tutorialada.book Page 8 Thursday, June 12, 2003 11:43 AM
Breakpoints 7-4using 7-8
Class 4-4Command prompt 7-4Composite class 4-4default connector 5-8Dependency 4-4Diagram connector 5-7Directed association 4-4Disable DMCA 2-19Event Generator 7-4Go 7-4Go Event 7-4Go Idle 7-4Go Step 7-4History connector 5-6Make 2-19Quit animation 7-4Run executable 2-19
using 7-3Select 4-4State 5-5Stop execution 2-25, 5-18Stop Make/Execution 2-19Thread 7-4Transition 5-9Use case 3-6
using 3-9Watch-Display Continuous Update 7-4
Toolbaranimation 7-4Arrange 3-10code 2-19OMD 4-4Rhapsody 2-7statechart 5-4UCD 3-6
Trace 7-9Transition
default 5-8description 5-2drawing 5-9line shape 5-12tool
using 5-9Trigger
notation 5-10Type
line 5-12
UUML 1-1UsageType property 2-22, 6-3Use case
associating with actors 3-11description 3-1drawing 3-9tool 3-6
using 3-9Use case diagram
actor 3-1adjusting layout 3-10association line 3-1boundary box 3-2
creating 3-7creating 3-4default name 3-4drawing
actors 3-7boundary box 3-7general steps 3-6use cases 3-9
generalization arrow 3-2icon 3-4labeling 3-12overview 3-1package 3-2parts of 3-1stereotype 3-2toolbar 3-6use cases 3-1
Use Case Diagram option 3-4Use case tool 3-6
VView
animated 7-5operations in OMD 4-10
Visibility property 6-3
WWatch-Display Continuous Update tool 7-4Window
browser 2-4drawing 2-4output 2-4
Index–8 Rhapsody in Ada