Embed Size (px)
Citation preview
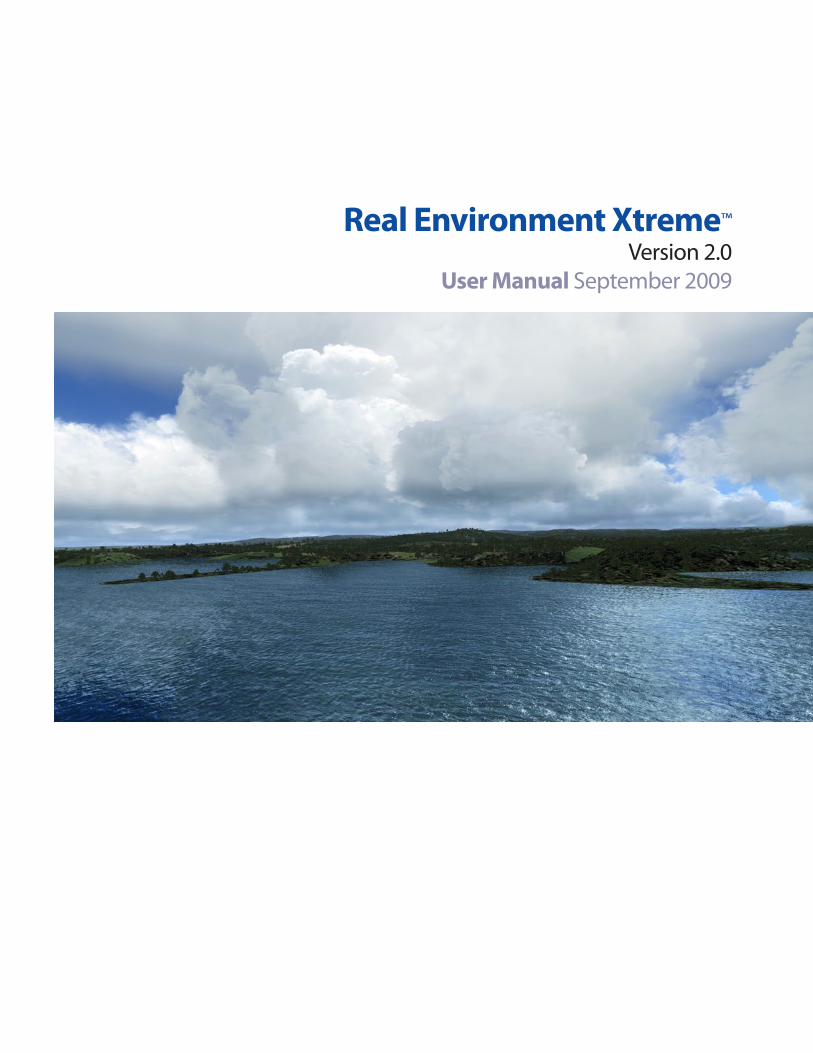
Real Environment Xtreme™
Version 2.0 User Manual September 2009
Table of Contents
Introduction ..................................................................................................................................................................... 3
Overview ........................................................................................................................................................................... 4
Installation and Configuration Manager................................................................................................................ 6
Uninstall Procedure .....................................................................................................................................................12
Options ............................................................................................................................................................................13
Main Menu ......................................................................................................................................................................16
Theme Creation Menu ................................................................................................................................................23
Flight Planner Menu ....................................................................................................................................................40
Weather Menu ...............................................................................................................................................................51
FLY NOW! .........................................................................................................................................................................61
WASys ...............................................................................................................................................................................62
Contact & Product Technical Support ...................................................................................................................65
Development and Beta Team...................................................................................................................................66
EULA ..................................................................................................................................................................................67
Real Environment Xtreme™ – Version 2.0 User Manual – September 2009 Page 2

REX2 IntroductionWelcome to Real Environment Xtreme 2.0 (REX2), a complete weather, environment, and flight plan-ning add-on for Microsoft Flight Simulator X. So many things have been upgraded, improved, fixed and changed since REX1 that it is more of a full upgrade than just a service pack update, hence we have decided to call this version REX2. Users of REX1 will find the interfaces used in REX2 quite familiar and will also find the newer version easier to use and full of more features. New users will find REX2 very easy to learn and use. The development team of Real Environment Xtreme is committed to maximizing the weather and flight realism experienced by its flight simulator customers and we feel the REX2 has come a long way towards achieving this goal. REX2 is not a finished product, but a living breathing work in prog-ress and we have plans to introduce new features in the future as we develop and evaluate them.
This User Manual is divided into several parts:
1. An overview to give new and previous users alike an idea of what REX2 is capable of.
2. An installation section.
3. A large section detailing every feature of REX2.
Real Environment Xtreme™ – Version 2.0 User Manual – September 2009 Page 3
OverviewREX2 is a full weather environment creation, display, and manipulation program which includes a robust selection of beautiful user or automatically selectable sky, cloud themes and other environment textures, real world and custom weather generators, and real time weather reporting & updating.
Two new features that we have added is the automatic selection of real time, real world textures based on the actual weather at the arrival and departure airports and the ability to adjust low altitude visibility. But REX2 is much more than that. In addition, REX2 allows you to control many of the FSX water textures and effects, airport environment textures, sun textures, and lighting effects that are so critical to the enjoyment of and immersion in the flight simulator experience.
Finally, REX2 also has full flight planning and in-flight weather monitoring tools to enhance the realism. All of these features can be fully manipulated to your individual taste.
Once REX2 is installed and the various setup options have been selected, you will be presented with a Main Menu that consists of several Quick Start buttons that allow you to choose using real-world weather or create custom weather and:
1. Just fly, without the need to perform any actions. REX2 will select all texture themes at random, download real weather or custom build the weather, depending on what you choose, install the weather textures needed for the particular weather conditions, generate a flight plan, and start FSX.
2. Create custom texture themes, but allow REX2 to accomplish all other tasks.
3. Create a flight plan but allow REX2 to accomplish all other tasks.
Additionally you can access any of the REX2 sub-menus that will allow complete customization and manipulation via a row of tabs across the top of the user interface. The flight planner can now import flight plans created in FSX, flight plans created by REX2 previously, as well as import flight plans from some of the more popular third party flight planning tools available on the market. We will continue to implement the ability to import different formats as users request them. If you choose not to use the Quick Start buttons on the Main Menu, REX2 offers full customization of all textures, as well as the flight plan and weather creation.
New in REX2 is a weather page that displays weather details, including surface and aloft winds, pressure, temperature, symbolized metars, TAF and PIREP reports of any airport entered into the search box, as well as links to the weather avoidance maps and flight planner. The weather data can also be refreshed at any time with the use of a LOAD WX button and this weather can then be immediately loaded into FSX. The REX2 weather engine icon in the taskbar has also been reworked, as well as the WASys. The WASys now includes a refresh weather button, which re-downloads and updates the weather in FSX, a minimize button that allows the WASys to be dropped to the icon on the taskbar and a TURN OFF button that shuts down the weather engine if needed or desired.
Real Environment Xtreme™ – Version 2.0 User Manual – September 2009 Page 4

Real Environment Xtreme™ – Version 2.0 User Manual – September 2009 Page 5
Additionally, the overall flow of how all components work together have been completely reworked, including functionality of the weather engine, flight planner, random weather generator, WASys, and general operations.
In this manual, buttons and tabs that can be clicked or pressed are spelled exactly as seen on screen and highlighted in bold, such as the FLY NOW! button or the main tab, as are references to options and choices that can be selected/unselected or checked/unchecked, such as Enable REX Weather Engine option. Menu names are also spelled exactly as you can see them on screen and highlighted in bold as in this example FLIGHT PLANNER. Messages and notations that are on screen in color will also be in color in this manual in their color, such as Completed!. Drive, directory, folder and file names and other computer locations and commands will be shown in italics and bolded, such as C:\Program Files\RealEnvironmentXtreme\
Thank you for choosing REX2 for your flight simulator environment add-on. We are confident that you will enjoy this latest update.
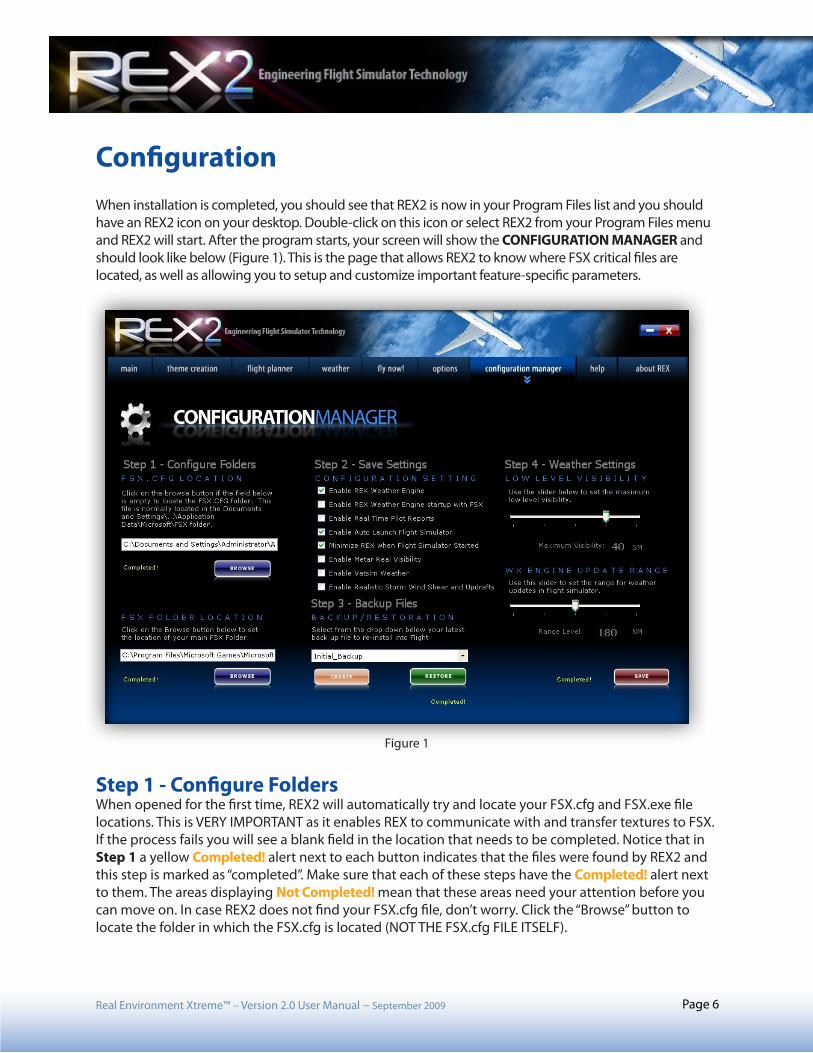
ConfigurationWhen installation is completed, you should see that REX2 is now in your Program Files list and you should have an REX2 icon on your desktop. Double-click on this icon or select REX2 from your Program Files menu and REX2 will start. After the program starts, your screen will show the CONFIGURATION MANAGER and should look like below (Figure 1). This is the page that allows REX2 to know where FSX critical files are located, as well as allowing you to setup and customize important feature-specific parameters.
Step 1 - Configure FoldersWhen opened for the first time, REX2 will automatically try and locate your FSX.cfg and FSX.exe file locations. This is VERY IMPORTANT as it enables REX to communicate with and transfer textures to FSX. If the process fails you will see a blank field in the location that needs to be completed. Notice that in Step 1 a yellow Completed! alert next to each button indicates that the files were found by REX2 and this step is marked as “completed”. Make sure that each of these steps have the Completed! alert next to them. The areas displaying Not Completed! mean that these areas need your attention before you can move on. In case REX2 does not find your FSX.cfg file, don’t worry. Click the “Browse” button to locate the folder in which the FSX.cfg is located (NOT THE FSX.cfg FILE ITSELF).
Figure 1
Real Environment Xtreme™ – Version 2.0 User Manual – September 2009 Page 6
Real Environment Xtreme™ – Version 2.0 User Manual – September 2009 Page 7
Configuration - continued
For Windows XP users, this is normally located here: [Drive letter]:\Documents and Settings\[User]\Application Data\Microsoft\FSX folder location.
For Vista users, this is normally located here: [Drive letter]:\[Users][Your Name]\AppData\Roaming\Microsoft\FSX folder location.
REX2 needs to know where the FSX.cfg file is located so that it can set the TEXTURE_MAX_LOAD=4096 for use with the High Definition textures. This is the ONLY modification that REX2 makes to the FSX.cfg file. Users of the 2048 and 4096 textures, please be aware that FSX will automatically reset this value to the default value of 1024 if you enter the FSX settings menu and change any settings in the Display section!
If REX2 does not find your FSX.exe folder, click on “Browse” and browse to wherever you installed FSX and click on the folder containing the FSX.exe.
When these two areas show the yellow Completed! It is safe to move on to Step 2.
Step 2 - Configuration SettingsUnder Step 2 you will see a number of choices regarding how REX2 will function. These settings are described below:
Enable REX Weather Engine - This will allow the REX2 weather engine to be used for weather related tasks inside FSX. If you wish to use another weather engine, simply uncheck this box and the REX2 weather engine will not start. Users can still enjoy the wonderful textures that REX2 provides.
Enable REX Weather Engine Startup with FSX - This is a handy new feature that will allow the REX2 weather engine to automatically start when FSX is started. Once FSX is started and a flight is loaded, the REX2 weather engine will automatically download real-world, real-time data and inject it into FSX. This features allows you to start the weather engine simply by starting FSX, bypassing the REX2 GUI (Graphical User Interface) and getting on with flying using real world weather.
NOTE: Another thing that can be done at this time is to navigate to your REX2 program folder (typically C:\Program Files\RealEnvironmentXtreme\) and locate the file rexwxengine2.exe with its new icon. Right click on this file and select and select Create Shortcut. This will place a shortcut to the weather engine on your desktop. You can drag this icon to your desktop Quick Launch area if you like. Clicking on this icon will start the weather engine whether FSX or the REX2 GUI is running or not. This can come in handy for a number of reasons, but mainly it gives you a convenient way to restart the weather engine in the event a problem arises and you need to stop and start it, OR you stopped the weather engine by accident and need to restart, OR because you haven’t selected the Enable REX Weather Engine Startup with FSX option and need a way to manually start it.

Real Environment Xtreme™ – Version 2.0 User Manual – September 2009 Page 8
Configuration - continued
Enable Real Time Pilot Reports - This allows real-time pilot reports (PIREPS) to scroll across the screen within FSX, advising you of any conditions in the area that you are flying that have been reported by other pilots. These are difficult to interpret and will result in green scrolling messages on your screen during flight.But if you like viewing this information as you fly, check this option.
Enable Auto Launch Flight Simulator - This allows REX2 to autostart FSX from within the REX2 GUI. This is a handy feature that is activated any time you select FLY NOW! when in REX2.
Minimize REX when Flight Simulator Started - So that you don’t have to manually minimize the REX2 GUI after you have started a flight, we have provided this option. Whenever FLY NOW! is pressed, the menu will return to the MAIN menu and the REX2 GUI will minimize to the taskbar. As we’ll be described later in the manual, FLY NOW! is the button that actually starts your flight and is used after you have finished with all your tasks in the REX2 GUI.
Enable Metar Real Visibility - This is a new option for REX2 that overrides the visibility slider whenever the weather station metar of the airport you are flying around shows a visibility of less than 10 SM. It is well known that FSX has a low-level haze problem that has been particularly difficult for 3rd party developers to design around and many users have complained about. REX2 allows (with user-control) the visibility level to be forced from 10-50 SM. When selected, this completely eliminates the low level visibility no matter what the visibility actually is supposed to be. However, many users will find this solution somewhat unrealistic and so we made an effort to allow low level visibility under conditions when the metar is calling for limited visibility. Checking this option allows the lower visibility to be displayed if the metar is calling for this.
Enable VATSIM Weather - Many of our users fly regularly on the VATSIM Network (Virtual Air Traffic Simulation Network-www.vatsim.net). This network has its own weather servers. Because this can cause a lot of trouble with REX’s own weather, many users have asked if we could have the REX2 weather engine be able to download the weather data from the VATSIM servers instead of only from the server normally used. Check this box if you want REX2 to download weather data from the VATSIM servers. We are considering adding this feature in the future for other networks, such as IVAO.
Enable Realistic Storm Wind Shear and Updrafts - Many users have asked us to make the experience of flying in stormy weather more realistic. The REX2 weather engine enables users to have that scary experience of flying in thunderstorms and other severe weather. If it is found that this also increases the FSX wind shifts and other wind anomalies to an unacceptable and/or unrealistic level, disable this feature to give more smooth realistic transition experience between clear, cloudy, and storm conditions. Enabling will force drastic shear and turbulence with stormy conditions.
After all choices are considered and made in Step 2, move on to Step 3. If you want to change these settings later or aren’t sure yet what settings you want now, don’t worry, these can all be changed anytime by clicking on the Configuration Manager tab on the top Navigation Menu.
Real Environment Xtreme™ – Version 2.0 User Manual – September 2009 Page 9
Configuration - continued
Step 3 - Backup FilesNEW REX2 USERS: In case an uninstall or reinstall is necessary, REX2 saves a backup copy of all the texture and other files that REX2 will modify. If necessary, clicking on Restore will restore all the files to the condition that existed before REX2 was installed. It’s important to realize that REX is going to backup whatever textures you have installed now. If no other add-ons have been installed that modify clouds, water, airport environment, sun, or lights, then the backup will consist of the FSX default files. If you have installed any of these other add-ons, the backup will contain these files, not FSX default files. If default FSX textures are desired in the backup, the other add-ons must be restored/uninstalled before running the REX2 backup. If you are new to REX and REX hasn’t created a backup folder of your FSX textures, you probably won’t have the Initial_Backup folder showing in your drop down menu and will need to create a backup folder containing your original FSX textures. When ready to create the backup file, click on CREATE and REX2 will create this folder for you.
When this backup process is finished, a folder with the name “Initial_Backup” will be displayed in the backup window and the yellow Completed! alert will be displayed below the RESTORE button. Simply clicking on the RESTORE button will restore the files to what they were before REX2 was installed. Finally, move on to Step 4.
PREVIOUS REX2 USERS: For most users of REX1, you will have the Initial_Backup folder showing in the drop down menu and you will have a choice of CREATE, RESTORE, and SAVE. If Initial_Backup shows in the drop down window, this means that REX has found your previous backup file and all you need to do is click on SAVE in the lower right hand corner after Step 4 is finished and the process will complete after a few minutes. If you wish to restore your original FSX textures, click on RESTORE and this process will commence.
Warning: If you are a previous user of REX1 or REX2 and already have a backup folder and have already installed REX textures in FSX and DID NOT restore them, clicking on CREATE now will overwrite your original FSX textures with whatever textures are currently in FSX so be careful. If you do this and previously saved your copy of Initial_Backup to a disk you can simply replace the Initial_Backup folder with the one you saved from before.
Real Environment Xtreme™ – Version 2.0 User Manual – September 2009 Page 10
Configuration - continued
Step 4 - Weather SettingsThe settings in this section will allow you to control some of the parameters that the weather engine will use to depict visibility and weather update frequency.
Low Level Visibility Slider - This is a new feature for REX and as discussed under the Enable Metar Real Visibility section above, this slider is how you can eliminate the low level haze issue seen in FSX. The slider has the following values, by using the mouse to grab the slider and moving it left and right: 10, 20, 30, 40 and 50 Statute Miles (SM). Move this slider further to the right to see what value is best. This will take some experimenting and combined with the Enable Metar Real Visibility option may allow a satisfactory solution to the haze problem. Every user will have their own ideas about this and hopefully most users can arrive at a satisfactory compromise between haze and reality. We realize that this is not an optimum solution for everyone but FSX does not allow many other choices in this regard.
WX Engine Update Range - The REX2 weather engine does not use time as a basis for when to update but rather, uses distance traveled instead. You therefore can adjust the frequency the weather engine updates by adjusting this slider to the left or right, increasing or decreasing the update radius. This effectively adjusts the distance you have to travel before the weather engine will update. If you want the weather engine to update less frequently, increase the update radius by moving the slider to the right. Move the slider to the left if you want the weather engine to update more frequently. The slider can be moved by grabbing the slider bar with the mouse and moving it to the desired position. The available distances are 60, 120 240, and 300 nm. Once the aircraft has traveled beyond this radius from the last update position, the weather engine will update again.
Below are a few tips in order to better assist in your choice:
1) It’s vital to realize that the weather engine will not update if the aircraft has not traveled approximately the distance the slider is set at. This means that if aircraft is flying in a relatively small area around the departure airport, such as sightseeing, but has not traveled far enough to fly beyond the update radius, the weather engine will not update. It doesn’t matter how long the aircraft has been flying or what route the aircraft has used nor other airports the aircraft has been to; what is critical is that the aircraft needs to fly beyond that radius in order to update. Also, the weather will not update while the aircraft is sitting on the ground at the airport, no matter how long it sits there. At this point the user has two choices: 1) Force a weather update by using the LOAD WX button on the WASys or 2) set the slider at a low enough value that the aircraft will easily fly beyond it.
2) You will need to consider what type of aircraft you want to fly and how fast it flies. A single engine Cessna has a speed of around 100 kts. If the update radius is set at 300 nm, that aircraft will have to fly 3 hours before the weather will update even once. That is just about the maximum range of that aircraft. Similarly, a jet flying at 36,000’ is flying at 500-600 kts, which is about 8-10 nm/min. This means that an update radius of 60 nm will result in an update every 6-7 minutes. For slow and low fliers, a value of 60 nm is about right and for heavy iron fliers, 240 works well when over populated areas. 300 nm is good if flying long distances over desert, oceans, or where there aren’t many weather stations.
Real Environment Xtreme™ – Version 2.0 User Manual – September 2009 Page 11
Configuration - continued
3) Users that want to fly near and around the poles will find some very unexpected behavior as the weather engine will update every 30 seconds, even more often if very close to the pole, N89 for example. The solution here is to just turn off the weather engine with the TURN OFF button on the WASys screen as described later until lower latitudes are reached again, lower being around 80N or S. This is just an unavoidable consequence of how distance is calculated by the weather engine.
4) You may not want the weather engine to update during climbs or descent into the airport. In this case, you must evaluate what these distances are and set the sliders accordingly. If the slider is set too high the weather may not update for some time and the weather could not be what you expect. Set it too low and updates will be occurring during critical phases of flight. Jets are a good example here. Typically the descent point is about 100-120 nm away from the airport. If the slider is set at 300 nm, the weather may not update at all again until arrival at the airport. Another danger with this is that the airport may lie just outside this radius and the weather will update just upon final approach. A good strategy if using 240 or 300 nm slider settings is to force a weather update either just before descent or somewhere along the descent path that is convenient (NOT when there is a long line of online traffic behind you carefully set up by the controller with very little room for error) by use of the LOAD WX button on the WASys screen described later.
5) The slider can be changed during a flight by first closing down the weather engine, changing the slider in the REX GUI followed by restarting the weather engine and re-downloading the weather. This is one of those cases where having the weather engine icon in your taskbar as described earlier is convenient as it makes this task quick and easy.
6) The update radius slider also determines how much data will be downloaded and processed at each update. The higher settings will require the weather engine to download more data than the lower settings. During the time that the weather engine is downloading and processing data, you may experience a moment or two of stuttering or a drop in frame rate. This effect will be heightened for the 300 nm setting and less noticeable with the 60 nm setting. If you are experiencing an unacceptable loss of performance, try lowering the slider setting until the performance loss is acceptable. After the update is finished, the new weather will be injected into FSX. Sometimes this weather can be quite different than what was depicted before the update started. This effect will be more dramatic when using high update radius settings than with lower settings. If you want less pronounced weather changes after weather updating, try using lower slider settings.
After this Step 4 is completed, the SAVE button can be clicked and all settings from Steps 1 to 4 will be saved. Upon reopening this page all the Steps should display a yellow Completed! alert by each step. After the save process is complete, you will be taken to the OPTIONS page.
We highly recommend at this point to save to a DVD all the files you downloaded as well as the Initial_Backup folder you just made found in the Real Environment Xtreme program folder in the Themes\Backup folder in case you need to reinstall REX2 again for some reason. This will save you the time and trouble of re-downloading them all again.
Real Environment Xtreme™ – Version 2.0 User Manual – September 2009 Page 12
Uninstall ProcedureIf you ever need to uninstall REX2, be sure to first restore your FSX default textures by going to the CONFIGURATION MANAGER page and click on the RESTORE button. After this restore has completed, close REX2 and go to the Windows Control Panel\Add or Remove Programs and click on Real Environment Xtreme and select Remove. This will uninstall REX2 from your system. After this process completes, browse to the location where you installed REX2 (normally C:\Program Files\Real Environment Xtreme) and delete any remaining REX2 folders. After this is finished, browse to C:\User\Documents and Settings\Local Settings\Application Data for Windows XP and C:\Users\Your Name\AppData\Local\Real Environment Xtreme for Windows Vista and delete ALL REX folders (usually 2 folders are present.)
You can use a registry cleaner to remove any REX registry entries if you want to make sure that REX2 is completely uninstalled. However, if you do this and are planning to reinstall REX2 you will have to enter all of your validation data before the program will install. If you leave the registry alone, you will not have to do this.
Although FSX will eventually do this for you automatically, you may want to reset your TEXTURE_MAX_LOAD setting back to the default 1024 by navigating to your FSX.cfg file (C:\User\Documents and Setting\ Application Data\Microsoft\FSX, for Windows XP for example), opening it with Notepad and manually editing the value back to 1024. This parameter is found under the [GRAPHICS] heading in the file.
Real Environment Xtreme™ – Version 2.0 User Manual – September 2009 Page 13
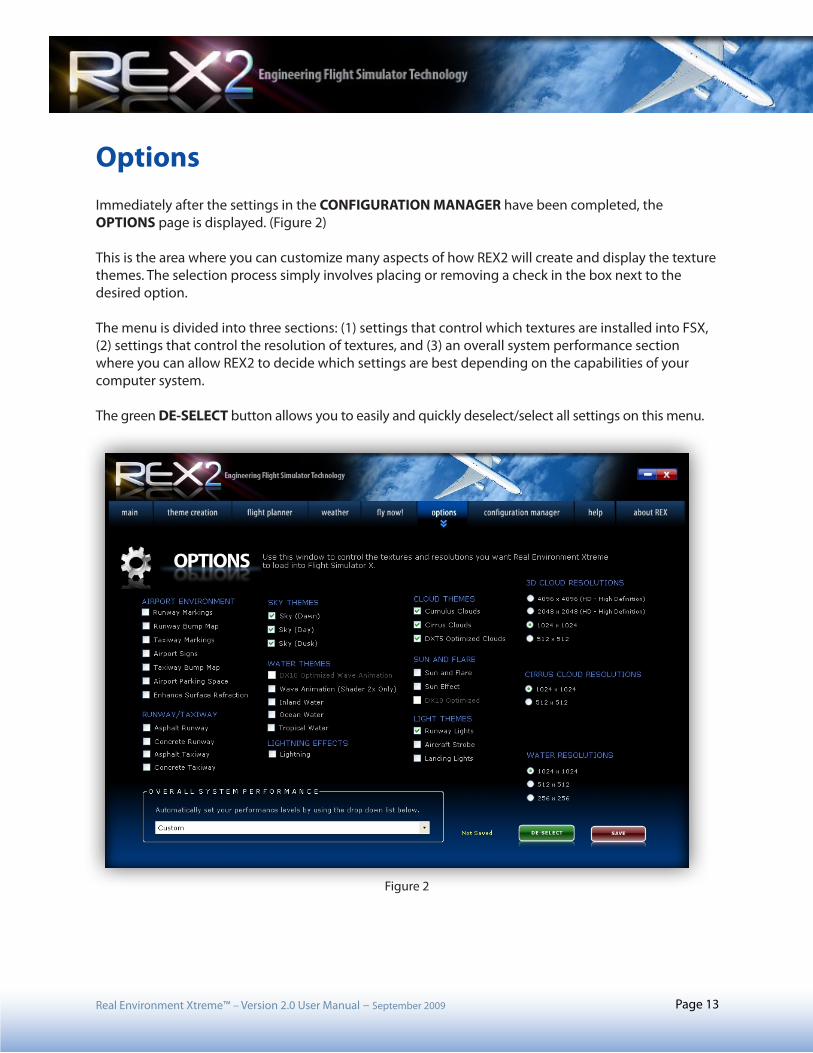
OptionsImmediately after the settings in the CONFIGURATION MANAGER have been completed, the OPTIONS page is displayed. (Figure 2)
This is the area where you can customize many aspects of how REX2 will create and display the texture themes. The selection process simply involves placing or removing a check in the box next to the desired option.
The menu is divided into three sections: (1) settings that control which textures are installed into FSX, (2) settings that control the resolution of textures, and (3) an overall system performance section where you can allow REX2 to decide which settings are best depending on the capabilities of your computer system.
The green DE-SELECT button allows you to easily and quickly deselect/select all settings on this menu.
Figure 2
Real Environment Xtreme™ – Version 2.0 User Manual – September 2009 Page 14
Options - continued
When the selection of settings is complete, you must save them by clicking the SAVE button. A few notes about this menu need to be mentioned here:
1. This menu controls what textures are installed into FSX. As such, any changes made to this menu will not take affect until the textures are reloaded into FSX.
2. Textures cannot be loaded into FSX while FSX is running. Many users have made the mistake of trying to install textures while FSX was running. The result is a crash in FSX, REX2 or both. So if you get a crash, a hang, or some other unexplained behavior while doing this process, quickly check to see if FSX is running.
3. Use of the 4096 or 2048 textures can and will cause serious performance issues for some lower end systems. Use of the higher resolution textures will result in lower frame rates and performance whereas use of the lower resolution textures will result in lower quality. If performance issues are experienced, try the lower resolution textures. These lower resolution textures are still exceptional and many people find that they like and use these textures even though they have higher end systems.
4. Once the textures have been loaded into FSX, un-checking the box does NOT cause them to be uninstalled. It means that you can load the textures into FSX and then uncheck that box and REX2 won’t install them again in the future. As described below for the water textures, this can save a lot of time. The down side is that the RESTORE feature on the CONFIGURATION MANAGER page must be used if you desire to uninstall textures that aren’t going to be overwritten by REX2. REX2 does not currently have the ability to uninstall individual texture groups.
5. It will require anywhere from 6 to 15 minutes, depending on your system, to load the textures if all the boxes are checked. This time can be significantly reduced (down to 1 minute or so) by un-checking all the water texture boxes. For those folks that want water textures and want to continue to experiment with various non-water texture sets, but don’t want to wait the required 6-15 minutes, we recommend that you load the water textures you like once, then uncheck all the water texture boxes for the subsequent texture installs. Because the water textures were already installed, they will remain installed throughout subsequent texture installs as described above and the install time will drop significantly. If you want to experiment with different water textures, those water settings boxes must be checked and you will have no choice but to wait the extra time to install them.
6. The water texture animations will only be visible in FSX when the water settings of Low 2X or higher is selected in the FSX/Display Settings dialog box.
We highly recommend the use of the DXT5 Optimized Clouds setting. DXT5 is the most flexible general purpose compression codec, so if problems are experienced using REX clouds at higher resolutions, select the DXT5 Optimized Clouds setting. Many of the problems users experienced and reported in our user forums are easily fixed by checking this option.
Options - continued
Overall System Performance Settings - This drop down menu contains four system performance levels you may choose from. The bottom three are pretty self explanatory. Choose one of these three and watch how the settings in the other areas of this page change. If you want to set your own custom settings, choose CUSTOM.
You need to save the settings in the OPTIONS and CONFIGURATION MANAGER pages every time one or both of these pages are visited. We have found that a significant number of users had problems because one or more of these settings either changed without them knowing or they refused to save. A typical example; the texture resolution setting changing from say 1024 to 4096 resulting in very poor performance for the user. To ensure that these settings remain, we have decided to require the users to save them each time they visit these pages, whether changes are actually made or not. We apologize for this apparent nuisance but we feel it is necessary.
Once you have selected your desired options, click on the SAVE button to save them. Once the options have been saved, the MAIN menu will appear. The setup of REX2 is now finished!
Real Environment Xtreme™ – Version 2.0 User Manual – September 2009 Page 15
Real Environment Xtreme™ – Version 2.0 User Manual – September 2009 Page 16
Main Menu Congratulations, you have successfully installed and set up REX2 and are now ready to use the program. Have a look at the MAIN menu window shown below in Figure 3.
There are three large buttons along the bottom and nine small tabs along the top. The three large buttons are the QUICK START BUTTONS discussed earlier and allow you to quickly perform certain actions. These will each be described in more detail below.
The main button takes you from any place in the program to this page. The theme creation button takes you to the area where the textures for clouds, water, airport environment, runway/taxiways, sky, sun, lightning and lights can be experimented with, selected, and installed into FSX. The flight planner tab takes you to the flight planning and preflight weather section. Weather can also be injected into FSX from this page. The weather tab takes you to the custom weather/real time weather center. The fly now! tab starts the weather engine and is usually the last step prior to flying. The options and configuration manager tabs take you to the pages that have already been discussed. The help button sends you to the area where this manual is located and the about REX button takes you to the area containing information on REX2, the version number, the people behind it, and a message of gratitude to you, the user, for having purchased our product!
Figure 3

Real Environment Xtreme™ – Version 2.0 User Manual – September 2009 Page 17
Main Menu - continued
Quick Start Buttons This section is for those that don’t like messing around with selecting textures, weather, generating flight plans, or reading through page after page of manuals to learn how to use these features. REX2 has 3 large buttons on the MAIN menu page and are designed to provide a flow from start to finish. The button on the far left is the I just want to fly button. It’s the choice if you want the program to do everything. It will randomly select the textures from the THEME CREATION page according to the settings selected on the OPTIONS page, and will then create a flight plan according to the departure and destination airports selected, create or download the real weather and finally will start FSX and inject the weather into FSX.
The second button from the left is the I like to create button, and pressing this will allow you to create themes chosen from the THEME CREATION page, but makes REX2 select the weather and inject it into FSX. The third button from the left is the I want to follow a flight plan button. This allows you to generate a flight plan by using the FLIGHT PLANNER menu. Below is a step by step description of what each button actually performs.
I just want to fly
Clicking on this button brings up the window shown in Figure 5.
Figure 4
Real Environment Xtreme™ – Version 2.0 User Manual – September 2009 Page 18
Main Menu - continued Quick Start Buttons - continued
Notice the pop-up dialogue box. This is asking you if you want REX2 to choose a set of textures to load into FSX that best fits the current weather conditions at your location.
There are two choices here: (1) click on CANCEL and FSX will immediately start up (if enabled on the CONFIGURATION MANAGER page. If checked on the CONFIGURATION MANAGER page, REX2 will also minimize to the taskbar and the REX2 weather engine will also start up and use whatever textures were last loaded into FSX to depict the weather or (2) click on OK and the page shown in Figure 6 displays.
Figure 5
Real Environment Xtreme™ – Version 2.0 User Manual – September 2009 Page 19
Main Menu - continued Quick Start Buttons - continued
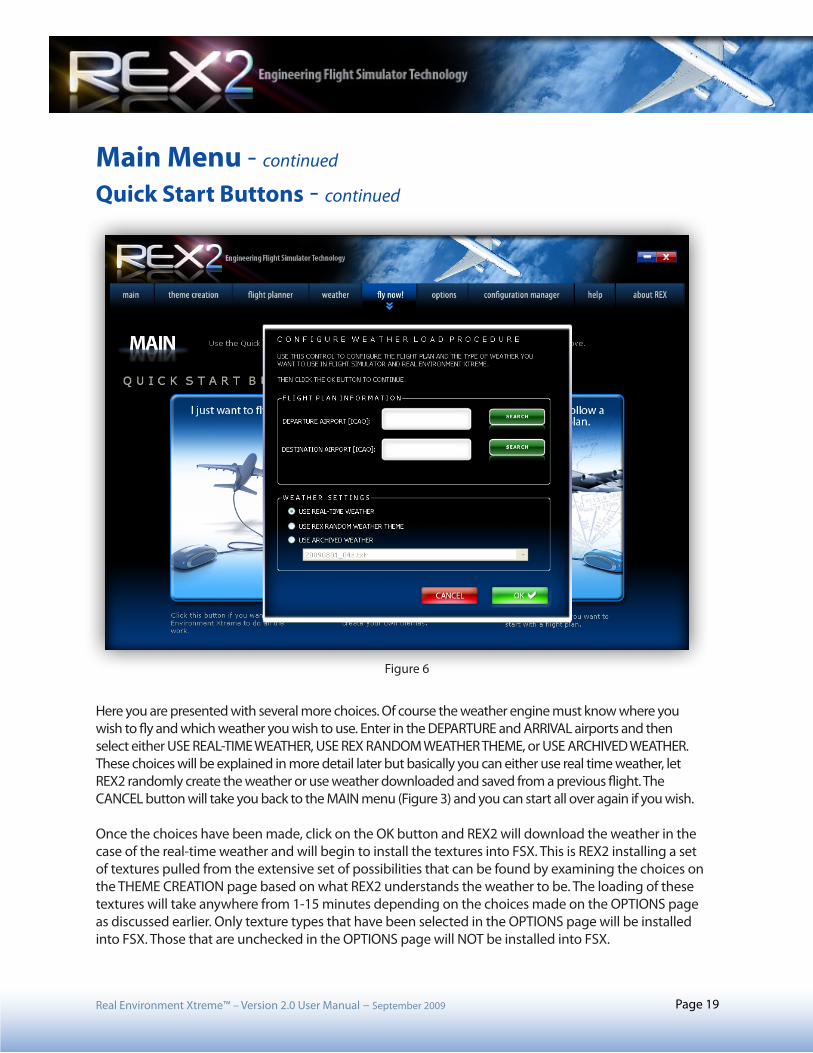
Here you are presented with several more choices. Of course the weather engine must know where you wish to fly and which weather you wish to use. Enter in the DEPARTURE and ARRIVAL airports and then select either USE REAL-TIME WEATHER, USE REX RANDOM WEATHER THEME, or USE ARCHIVED WEATHER. These choices will be explained in more detail later but basically you can either use real time weather, let REX2 randomly create the weather or use weather downloaded and saved from a previous flight. The CANCEL button will take you back to the MAIN menu (Figure 3) and you can start all over again if you wish.
Once the choices have been made, click on the OK button and REX2 will download the weather in the case of the real-time weather and will begin to install the textures into FSX. This is REX2 installing a set of textures pulled from the extensive set of possibilities that can be found by examining the choices on the THEME CREATION page based on what REX2 understands the weather to be. The loading of these textures will take anywhere from 1-15 minutes depending on the choices made on the OPTIONS page as discussed earlier. Only texture types that have been selected in the OPTIONS page will be installed into FSX. Those that are unchecked in the OPTIONS page will NOT be installed into FSX.
Figure 6
Real Environment Xtreme™ – Version 2.0 User Manual – September 2009 Page 20
Main Menu - continued Quick Start Buttons - continued Be aware that this process will overwrite any textures that were previously installed into FSX and that there is no way to recover what was there unless the theme was saved. Please note: whenever you install a theme, make sure to save that theme, even if it is a Random theme as you may want to use it again.
Whenever textures load in FSX, from this menu or other menus described in this manual, you might experience a period of flashing black squares on the screen. Although alarming at first, these black squares won’t do anything and will go away after the texture load process is finished. In particular, everything will go smoothly until the cumulus.bmp texture begins the conversion process. This behavior results from the ImageTool program that is used to decompress and convert the textures and there is nothing that we can do about it at this time unless we were to completely change the entire process by which textures are un-encrypted, decompressed and converted into useable bitmaps. We are working on considering other means to deal with this.
If there are still black squares remaining on the screen or some parts of the REX2 GUI are not completely visible, opening up a program, any program, maximizing it and then closing it again usually returns the screen to a normal state. Alternatively you can try pressing F5 to refresh the screen after returning to the desktop.
After this process has finished you are returned to the MAIN menu (Figure 3) and all you need to do at this point is to click on the fly now! tab at the top of the menu to start flying. FSX will start, as will the REX2 weather engine as evidenced by the presence of the WASys screen (Figure 49) if these options are enabled in the CONFIGURATION page. If they are not enabled, you will get a prompt stating you must now start FSX. If the Enable the REX weather Engine is not checked, you will need to manually start the weather engine or another weather engine of your choice. You now start a flight as normal in FSX, press the FSX Fly Now button and once FSX has loaded up the flight, the REX2 weather engine will download and inject the weather as evidence by a series of green informational bars that appear in FSX informing you of the weather process progress.
Real Environment Xtreme™ – Version 2.0 User Manual – September 2009 Page 21
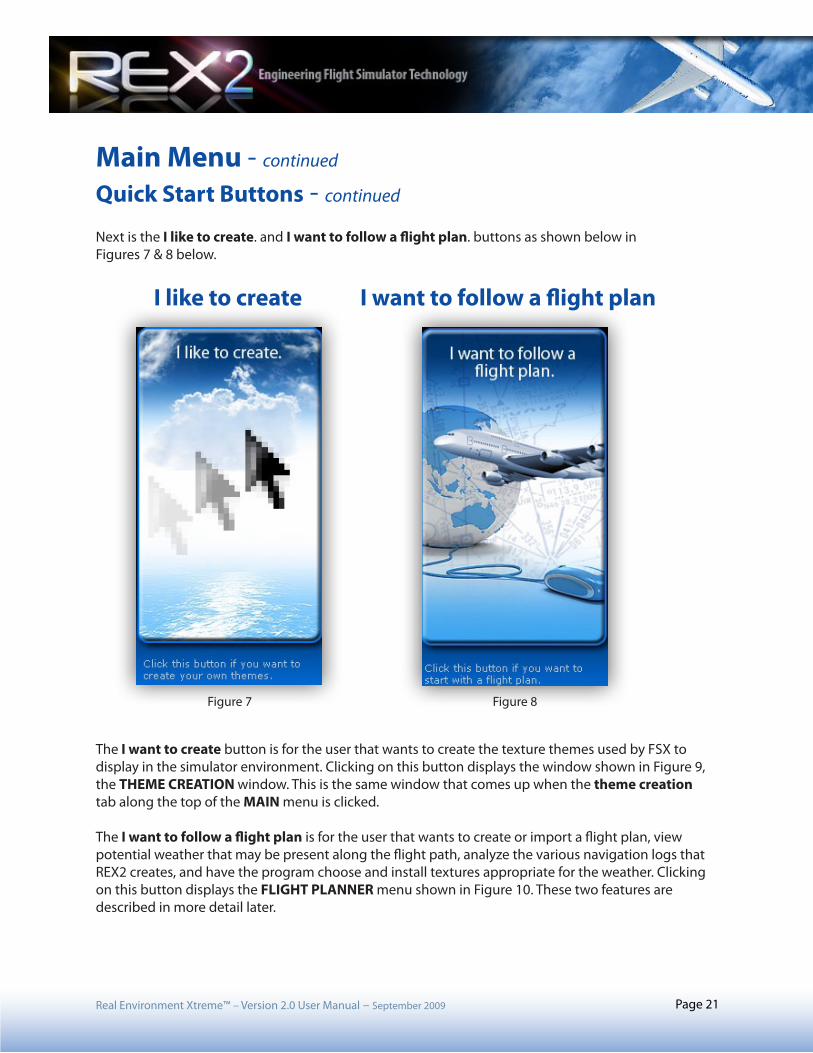
Main Menu - continued Quick Start Buttons - continued Next is the I like to create. and I want to follow a flight plan. buttons as shown below in Figures 7 & 8 below.
I like to create I want to follow a flight plan
The I want to create button is for the user that wants to create the texture themes used by FSX to display in the simulator environment. Clicking on this button displays the window shown in Figure 9, the THEME CREATION window. This is the same window that comes up when the theme creation tab along the top of the MAIN menu is clicked.
The I want to follow a flight plan is for the user that wants to create or import a flight plan, view potential weather that may be present along the flight path, analyze the various navigation logs that REX2 creates, and have the program choose and install textures appropriate for the weather. Clicking on this button displays the FLIGHT PLANNER menu shown in Figure 10. These two features are described in more detail later.
Figure 7 Figure 8
Real Environment Xtreme™ – Version 2.0 User Manual – September 2009 Page 22
Main Menu - continued Quick Start Buttons - continued
Figure 9
Figure 10
Real Environment Xtreme™ – Version 2.0 User Manual – September 2009 Page 23
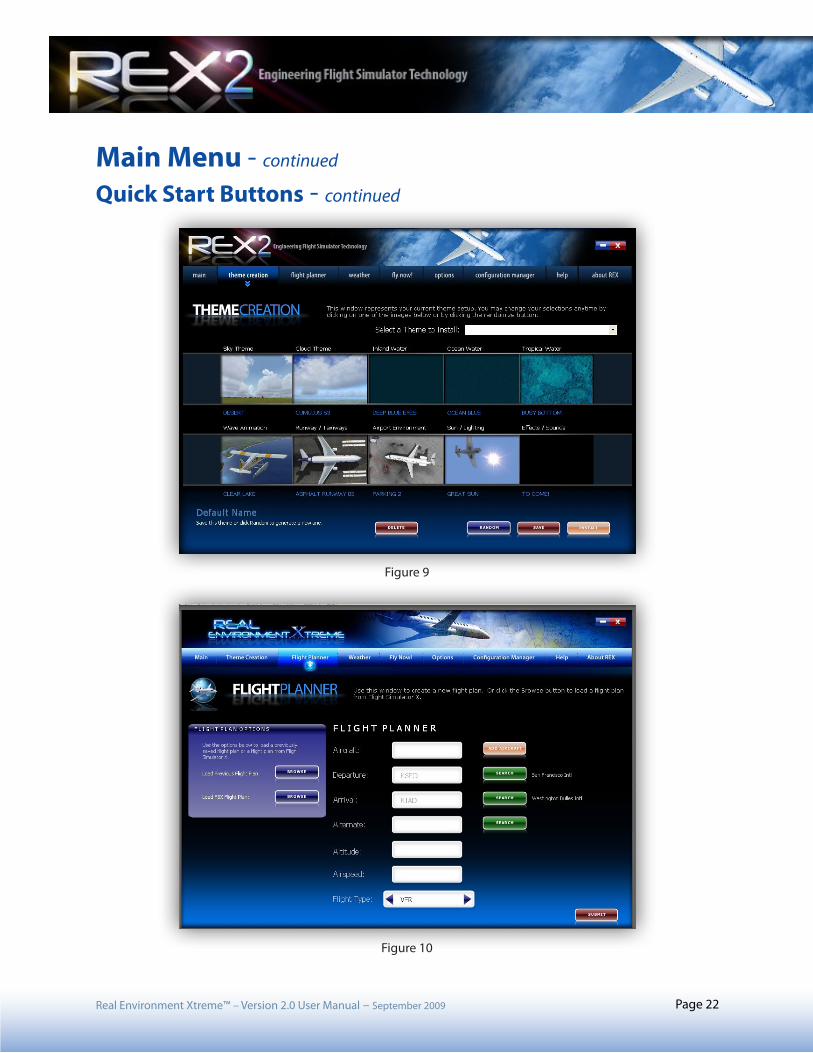
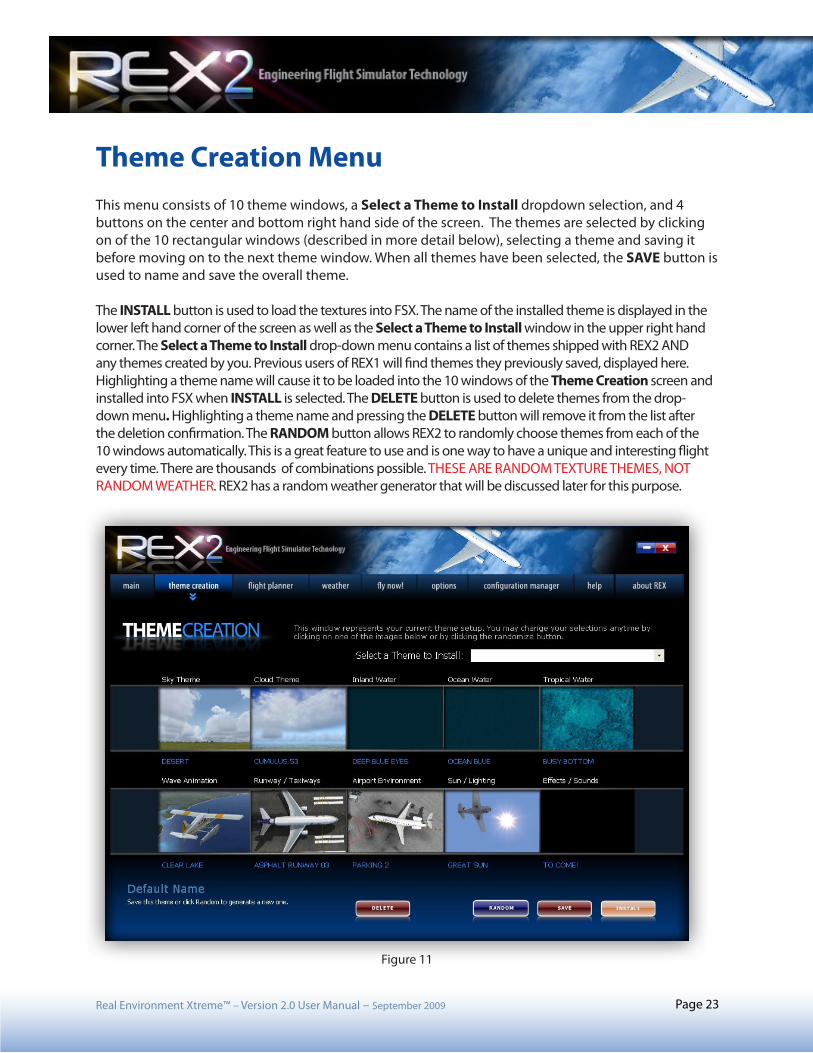
Theme Creation MenuThis menu consists of 10 theme windows, a Select a Theme to Install dropdown selection, and 4 buttons on the center and bottom right hand side of the screen. The themes are selected by clicking on of the 10 rectangular windows (described in more detail below), selecting a theme and saving it before moving on to the next theme window. When all themes have been selected, the SAVE button is used to name and save the overall theme.
The INSTALL button is used to load the textures into FSX. The name of the installed theme is displayed in the lower left hand corner of the screen as well as the Select a Theme to Install window in the upper right hand corner. The Select a Theme to Install drop-down menu contains a list of themes shipped with REX2 AND any themes created by you. Previous users of REX1 will find themes they previously saved, displayed here. Highlighting a theme name will cause it to be loaded into the 10 windows of the Theme Creation screen and installed into FSX when INSTALL is selected. The DELETE button is used to delete themes from the drop-down menu. Highlighting a theme name and pressing the DELETE button will remove it from the list after the deletion confirmation. The RANDOM button allows REX2 to randomly choose themes from each of the 10 windows automatically. This is a great feature to use and is one way to have a unique and interesting flight every time. There are thousands of combinations possible. THESE ARE RANDOM TEXTURE THEMES, NOT RANDOM WEATHER. REX2 has a random weather generator that will be discussed later for this purpose.
Figure 11
Real Environment Xtreme™ – Version 2.0 User Manual – September 2009 Page 24
Theme Creation Menu - continued
The Ten Theme Windows These ten windows are the meat and potatoes of creating custom themes in REX2. The ten windows consist of Sky Theme, Cloud Theme, Inland Water, Ocean Water, Tropical Water, Wave Animation, Runway/Taxiways, Airport Environment, Sun/Lighting, and Effects. We will discuss each window and how to use them. However, after setting up one window, the other windows will be easily understood.
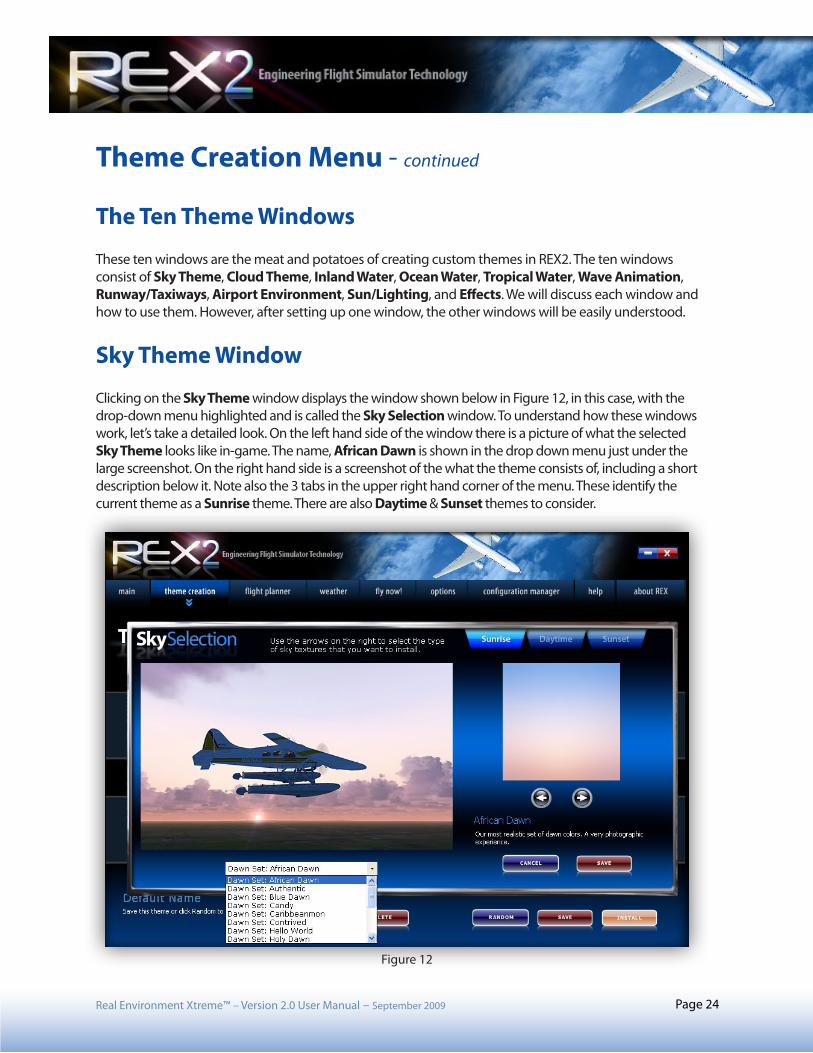
Sky Theme Window Clicking on the Sky Theme window displays the window shown below in Figure 12, in this case, with the drop-down menu highlighted and is called the Sky Selection window. To understand how these windows work, let’s take a detailed look. On the left hand side of the window there is a picture of what the selected Sky Theme looks like in-game. The name, African Dawn is shown in the drop down menu just under the large screenshot. On the right hand side is a screenshot of the what the theme consists of, including a short description below it. Note also the 3 tabs in the upper right hand corner of the menu. These identify the current theme as a Sunrise theme. There are also Daytime & Sunset themes to consider.
Figure 12
Real Environment Xtreme™ – Version 2.0 User Manual – September 2009 Page 25
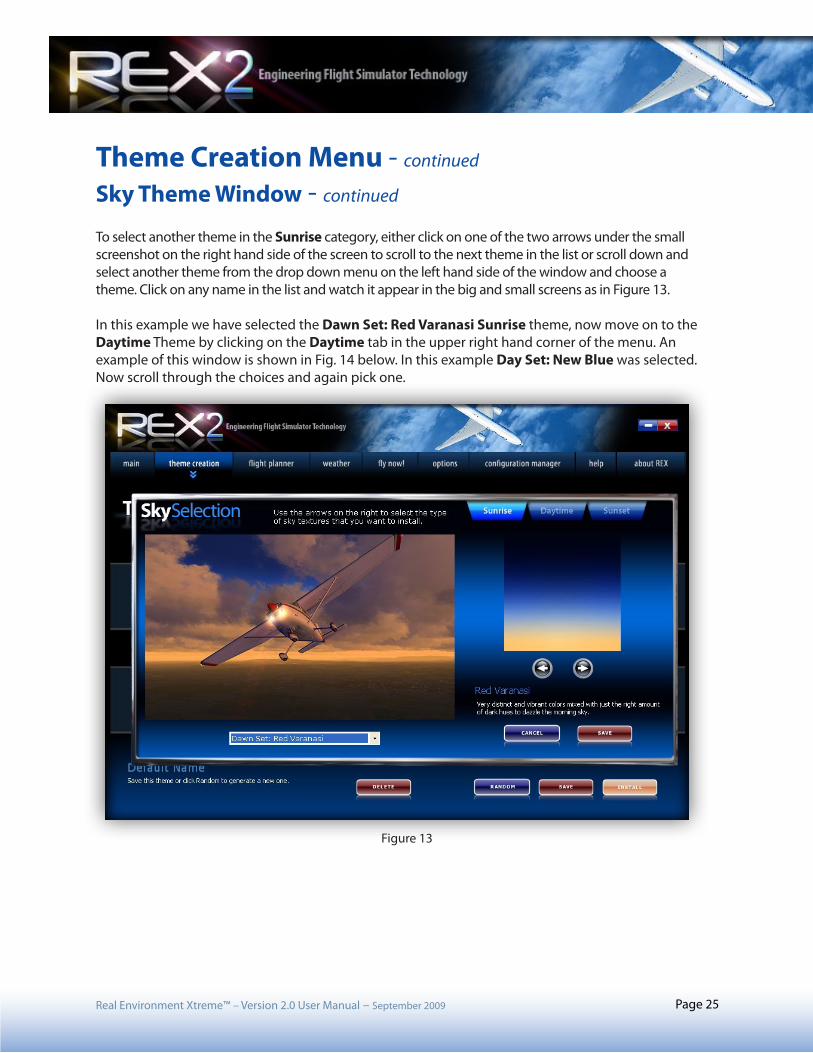
Theme Creation Menu - continued Sky Theme Window - continued To select another theme in the Sunrise category, either click on one of the two arrows under the small screenshot on the right hand side of the screen to scroll to the next theme in the list or scroll down and select another theme from the drop down menu on the left hand side of the window and choose a theme. Click on any name in the list and watch it appear in the big and small screens as in Figure 13.
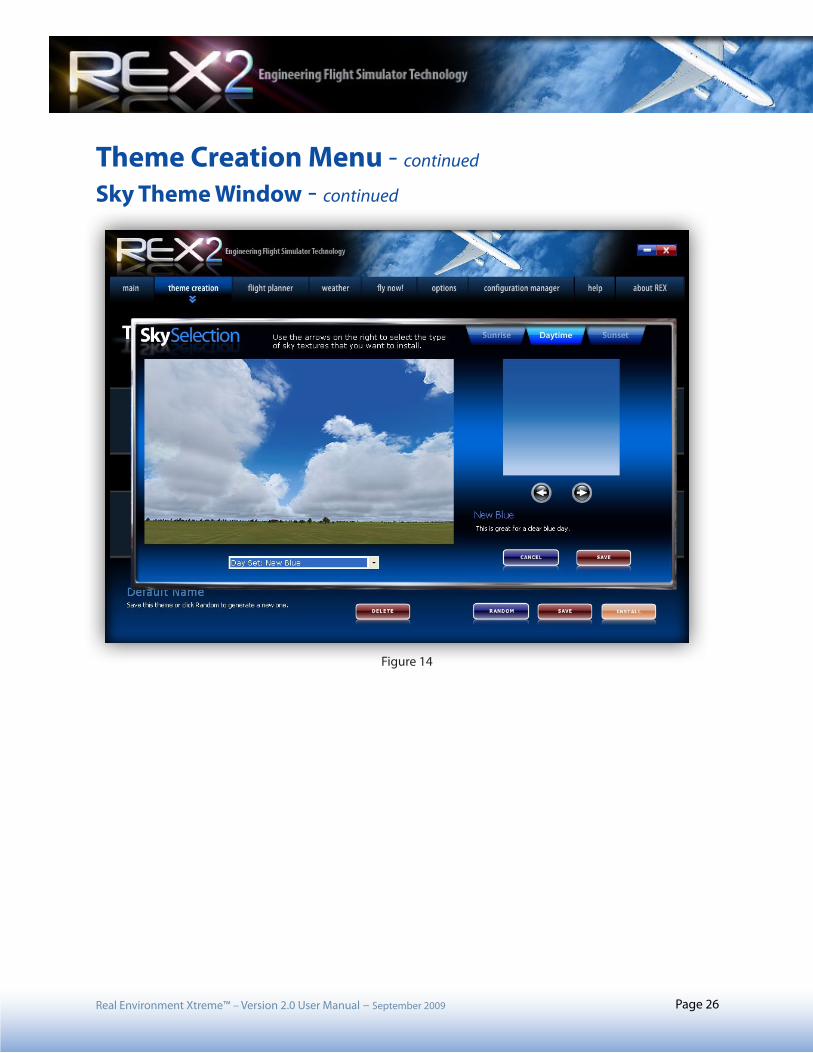
In this example we have selected the Dawn Set: Red Varanasi Sunrise theme, now move on to the Daytime Theme by clicking on the Daytime tab in the upper right hand corner of the menu. An example of this window is shown in Fig. 14 below. In this example Day Set: New Blue was selected. Now scroll through the choices and again pick one.
Figure 13
Real Environment Xtreme™ – Version 2.0 User Manual – September 2009 Page 26
Theme Creation Menu - continued Sky Theme Window - continued
Figure 14
Real Environment Xtreme™ – Version 2.0 User Manual – September 2009 Page 27
Theme Creation Menu - continued Sky Theme Window - continued
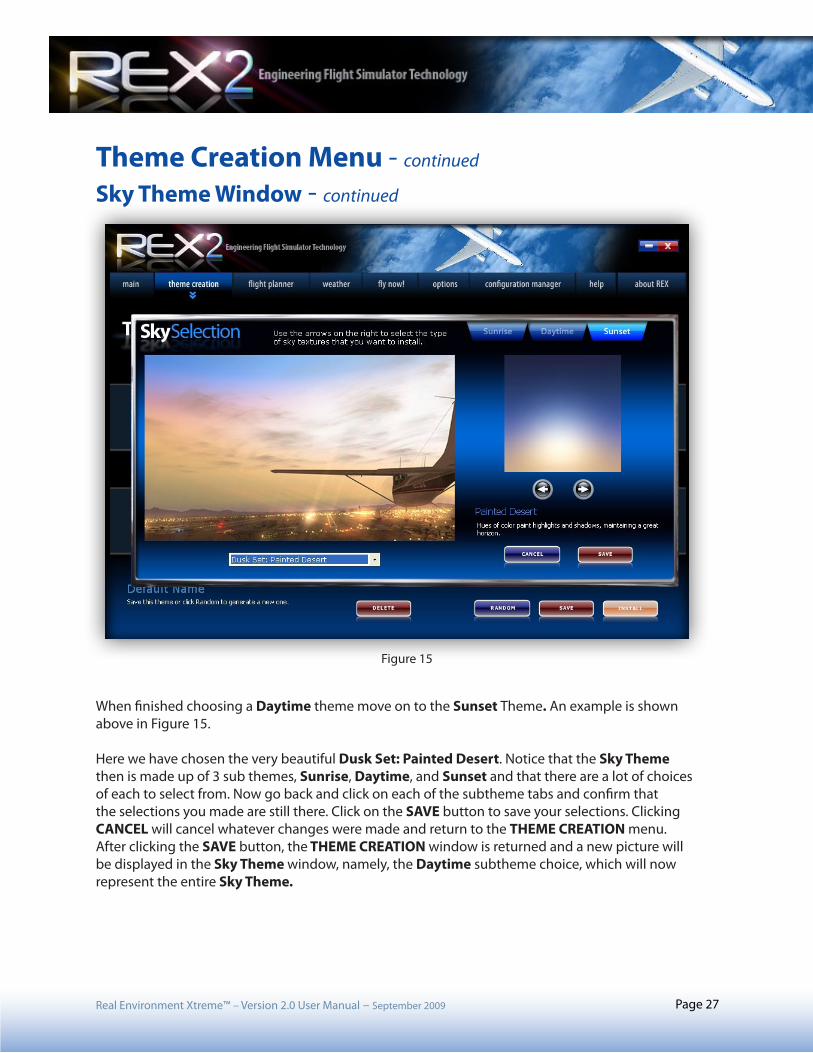
When finished choosing a Daytime theme move on to the Sunset Theme. An example is shown above in Figure 15.
Here we have chosen the very beautiful Dusk Set: Painted Desert. Notice that the Sky Theme then is made up of 3 sub themes, Sunrise, Daytime, and Sunset and that there are a lot of choices of each to select from. Now go back and click on each of the subtheme tabs and confirm that the selections you made are still there. Click on the SAVE button to save your selections. Clicking CANCEL will cancel whatever changes were made and return to the THEME CREATION menu. After clicking the SAVE button, the THEME CREATION window is returned and a new picture will be displayed in the Sky Theme window, namely, the Daytime subtheme choice, which will now represent the entire Sky Theme.
Figure 15
Real Environment Xtreme™ – Version 2.0 User Manual – September 2009 Page 28
Theme Creation Menu - continued
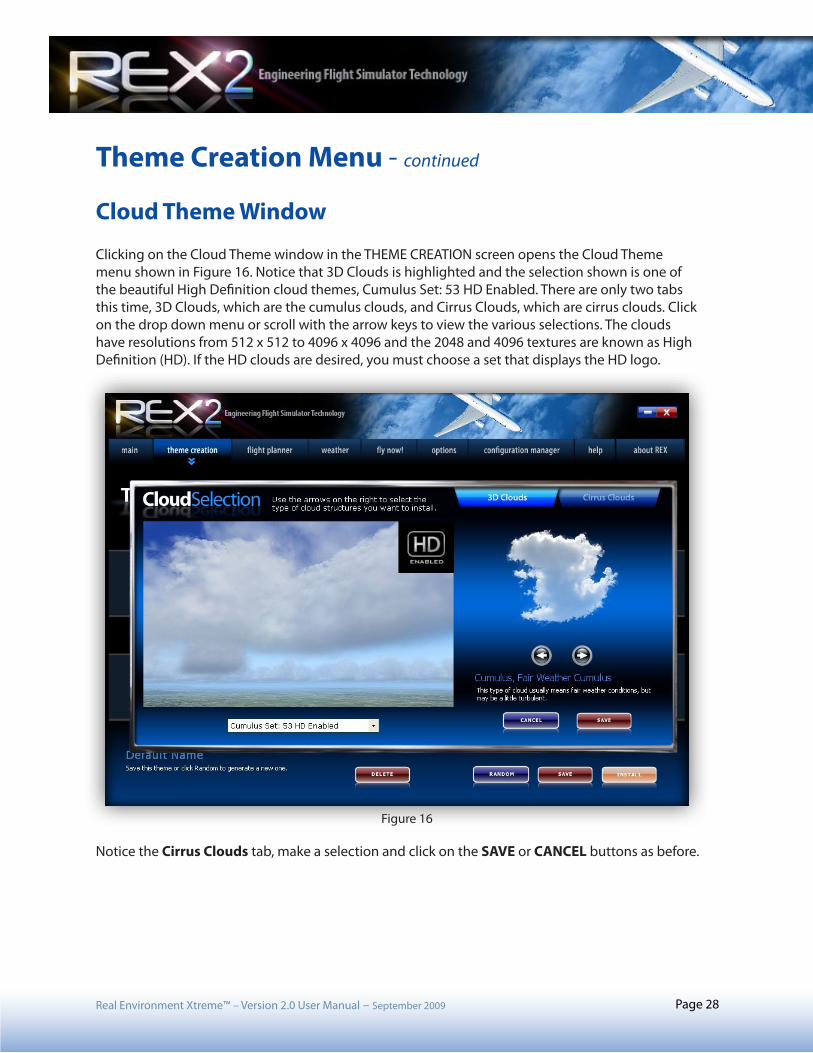
Cloud Theme Window Clicking on the Cloud Theme window in the THEME CREATION screen opens the Cloud Theme menu shown in Figure 16. Notice that 3D Clouds is highlighted and the selection shown is one of the beautiful High Definition cloud themes, Cumulus Set: 53 HD Enabled. There are only two tabs this time, 3D Clouds, which are the cumulus clouds, and Cirrus Clouds, which are cirrus clouds. Click on the drop down menu or scroll with the arrow keys to view the various selections. The clouds have resolutions from 512 x 512 to 4096 x 4096 and the 2048 and 4096 textures are known as High Definition (HD). If the HD clouds are desired, you must choose a set that displays the HD logo.
Notice the Cirrus Clouds tab, make a selection and click on the SAVE or CANCEL buttons as before.
Figure 16
Real Environment Xtreme™ – Version 2.0 User Manual – September 2009 Page 29
Theme Creation Menu - continued
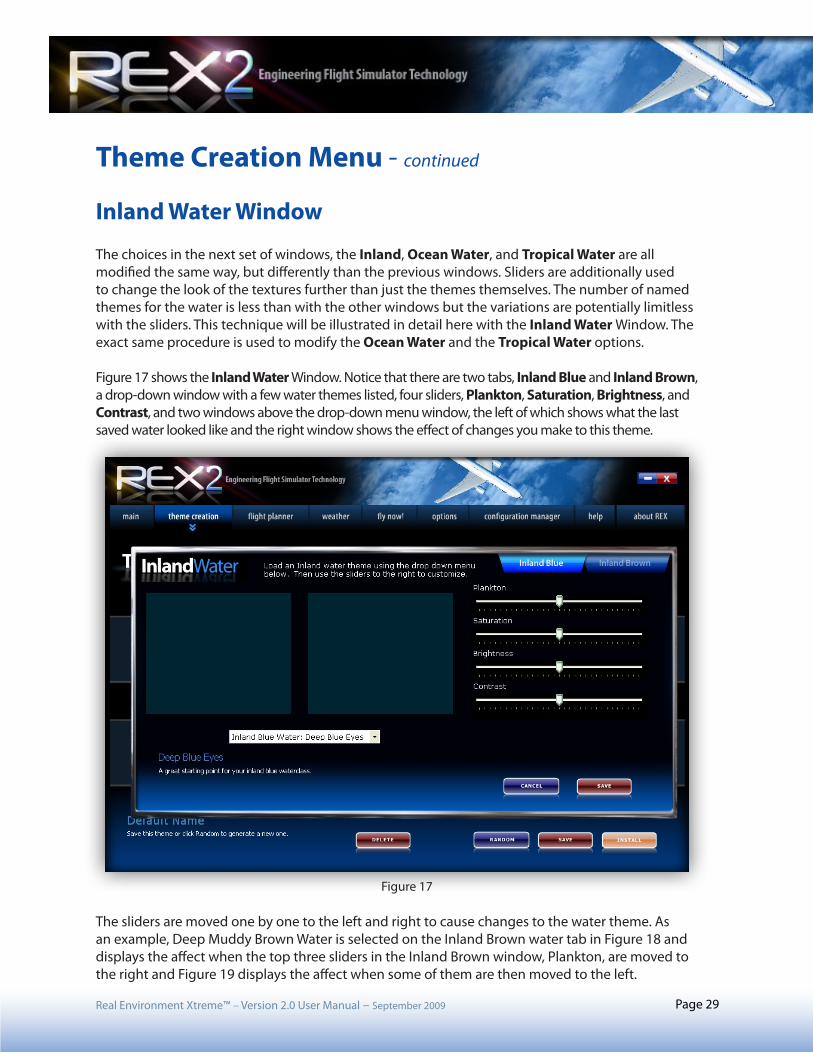
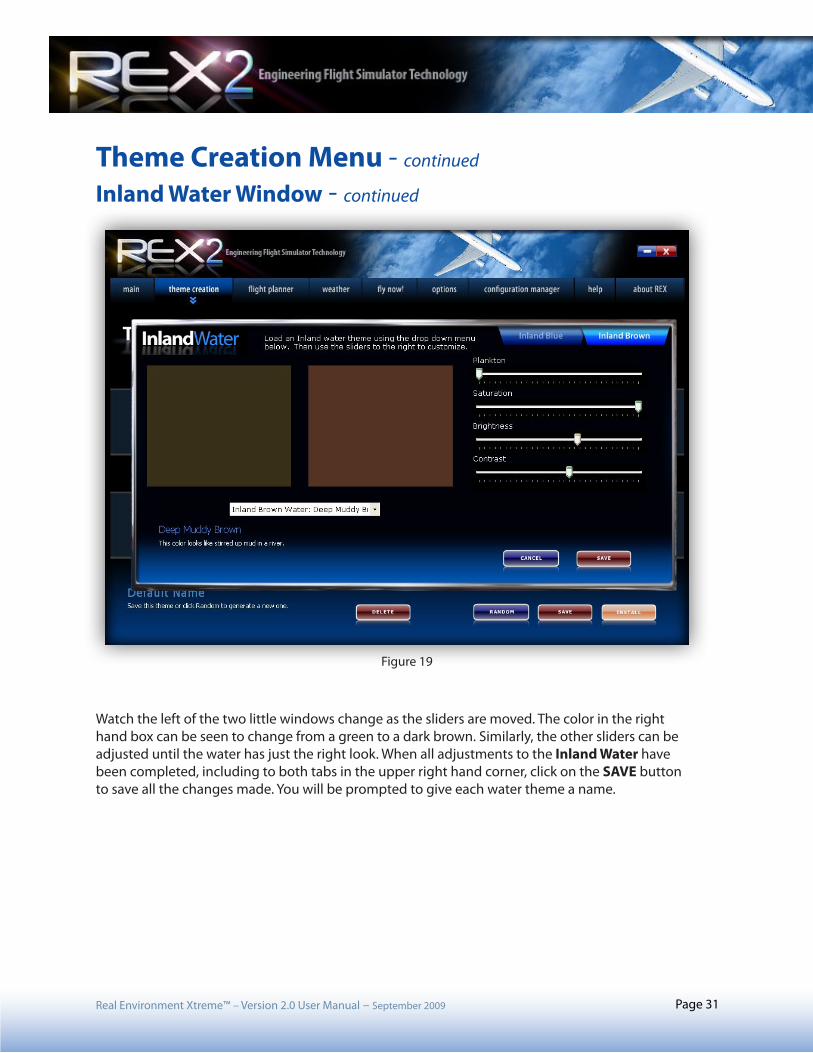
Inland Water Window The choices in the next set of windows, the Inland, Ocean Water, and Tropical Water are all modified the same way, but differently than the previous windows. Sliders are additionally used to change the look of the textures further than just the themes themselves. The number of named themes for the water is less than with the other windows but the variations are potentially limitless with the sliders. This technique will be illustrated in detail here with the Inland Water Window. The exact same procedure is used to modify the Ocean Water and the Tropical Water options.
Figure 17 shows the Inland Water Window. Notice that there are two tabs, Inland Blue and Inland Brown, a drop-down window with a few water themes listed, four sliders, Plankton, Saturation, Brightness, and Contrast, and two windows above the drop-down menu window, the left of which shows what the last saved water looked like and the right window shows the effect of changes you make to this theme.
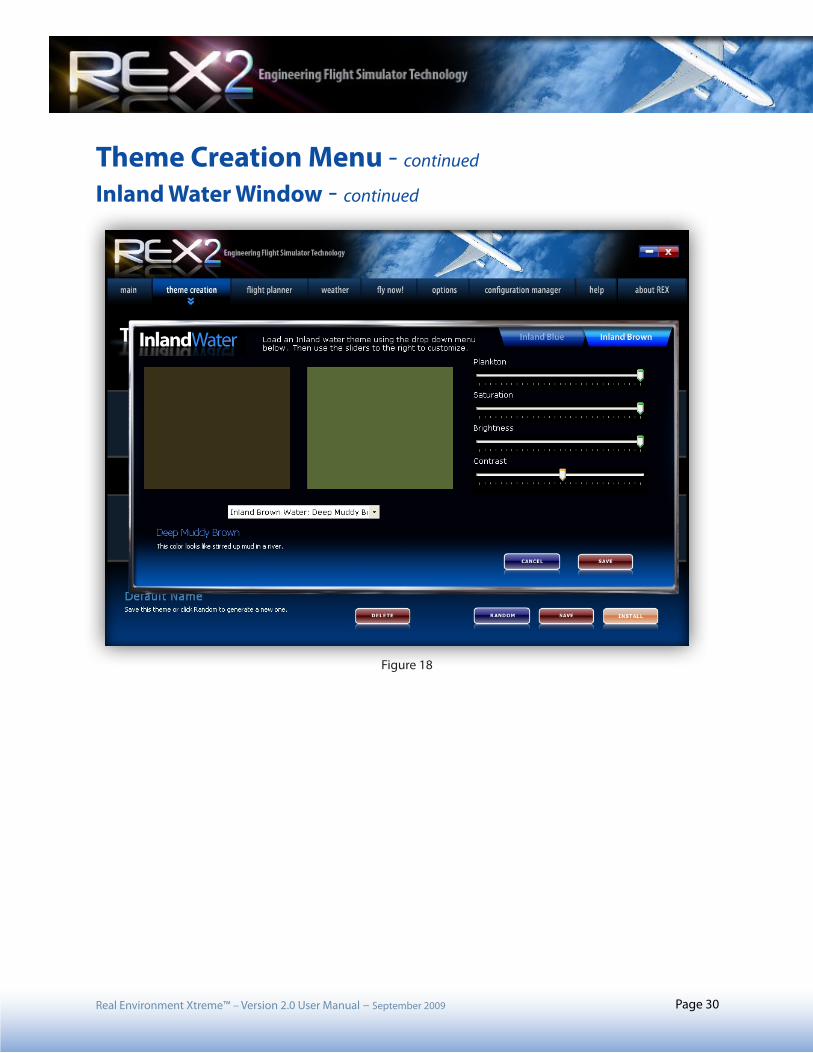
The sliders are moved one by one to the left and right to cause changes to the water theme. As an example, Deep Muddy Brown Water is selected on the Inland Brown water tab in Figure 18 and displays the affect when the top three sliders in the Inland Brown window, Plankton, are moved to the right and Figure 19 displays the affect when some of them are then moved to the left.
Figure 17
Real Environment Xtreme™ – Version 2.0 User Manual – September 2009 Page 30
Theme Creation Menu - continued Inland Water Window - continued
Figure 18
Real Environment Xtreme™ – Version 2.0 User Manual – September 2009 Page 31
Theme Creation Menu - continued Inland Water Window - continued
Watch the left of the two little windows change as the sliders are moved. The color in the righthand box can be seen to change from a green to a dark brown. Similarly, the other sliders can beadjusted until the water has just the right look. When all adjustments to the Inland Water havebeen completed, including to both tabs in the upper right hand corner, click on the SAVE buttonto save all the changes made. You will be prompted to give each water theme a name.
Figure 19
Real Environment Xtreme™ – Version 2.0 User Manual – September 2009 Page 32
Theme Creation Menu - continued
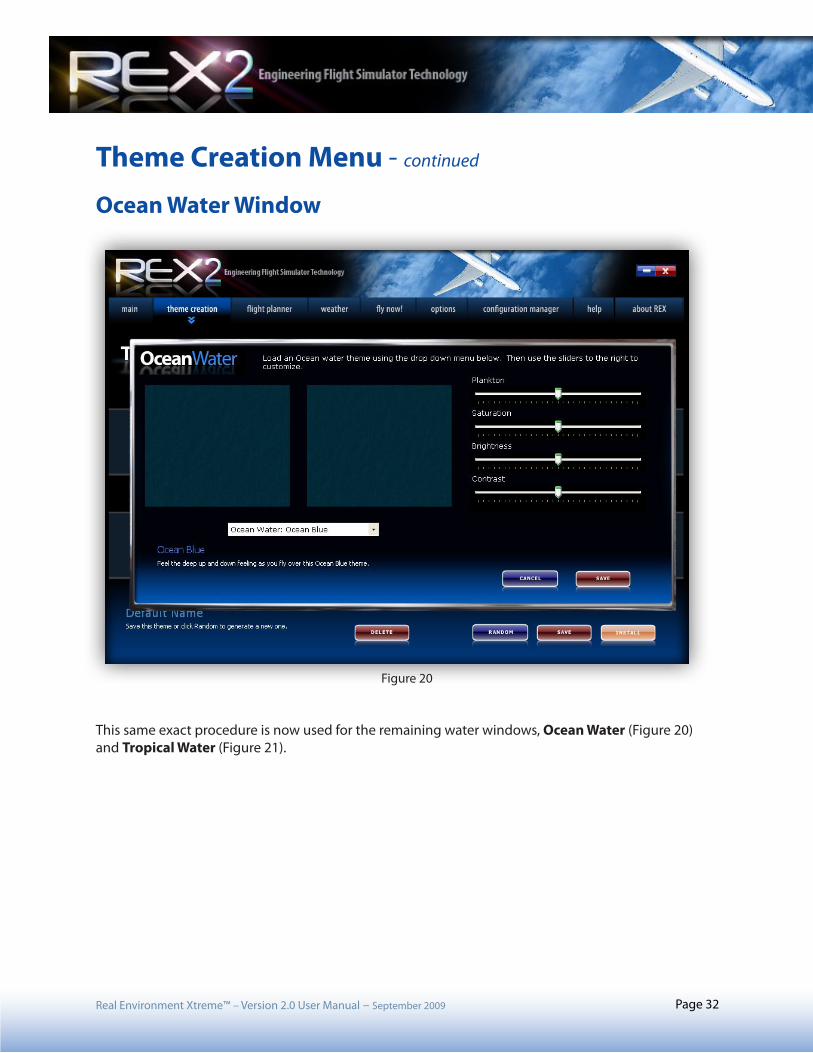
Ocean Water Window
This same exact procedure is now used for the remaining water windows, Ocean Water (Figure 20)and Tropical Water (Figure 21).
Figure 20
Real Environment Xtreme™ – Version 2.0 User Manual – September 2009 Page 33
Theme Creation Menu - continued
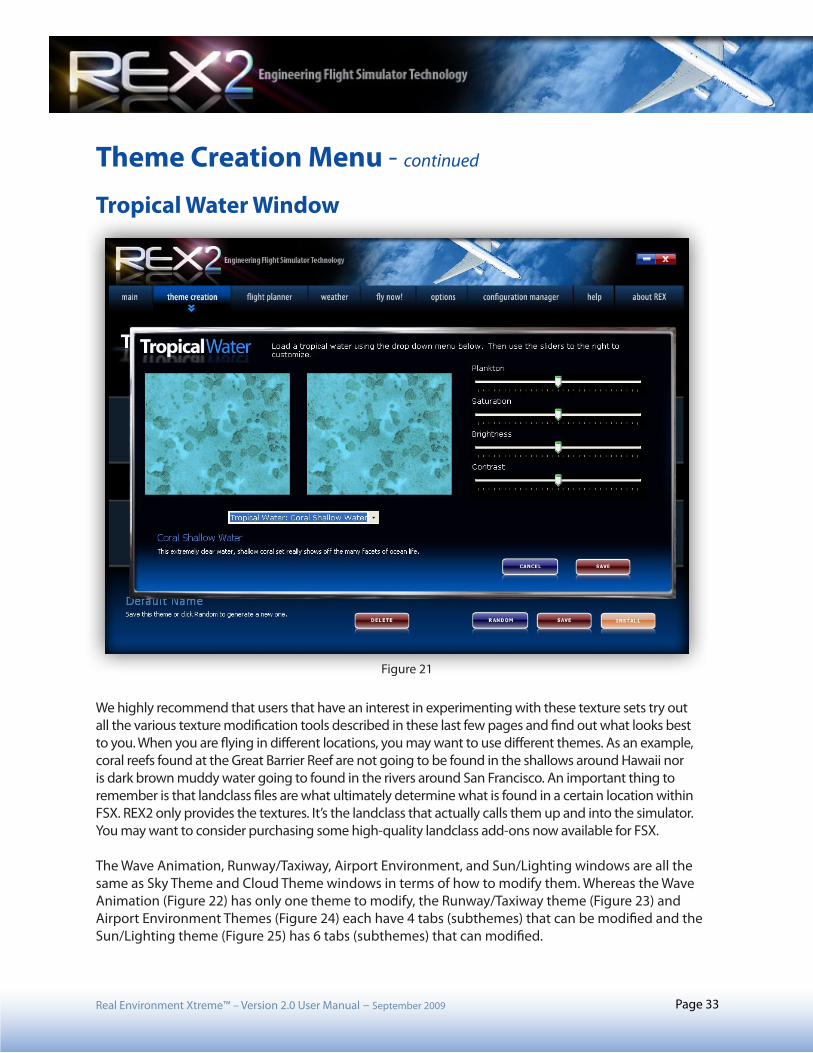
Tropical Water Window
We highly recommend that users that have an interest in experimenting with these texture sets try out all the various texture modification tools described in these last few pages and find out what looks best to you. When you are flying in different locations, you may want to use different themes. As an example, coral reefs found at the Great Barrier Reef are not going to be found in the shallows around Hawaii nor is dark brown muddy water going to found in the rivers around San Francisco. An important thing to remember is that landclass files are what ultimately determine what is found in a certain location within FSX. REX2 only provides the textures. It’s the landclass that actually calls them up and into the simulator. You may want to consider purchasing some high-quality landclass add-ons now available for FSX.
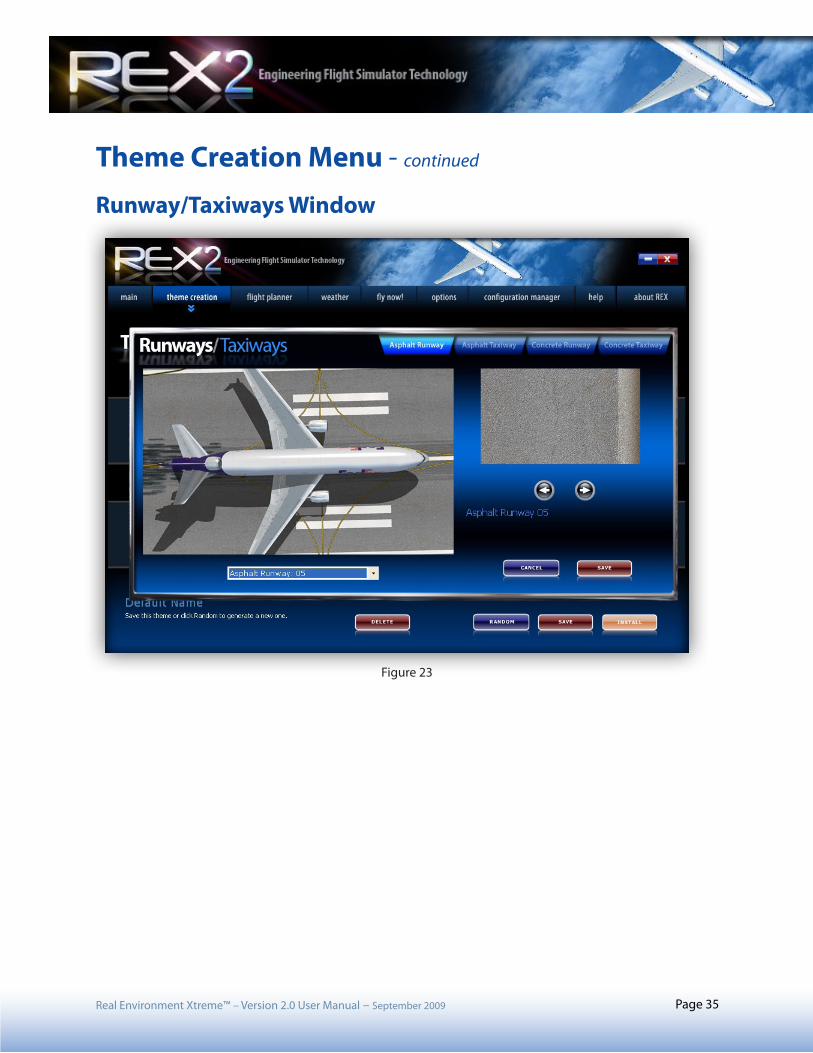
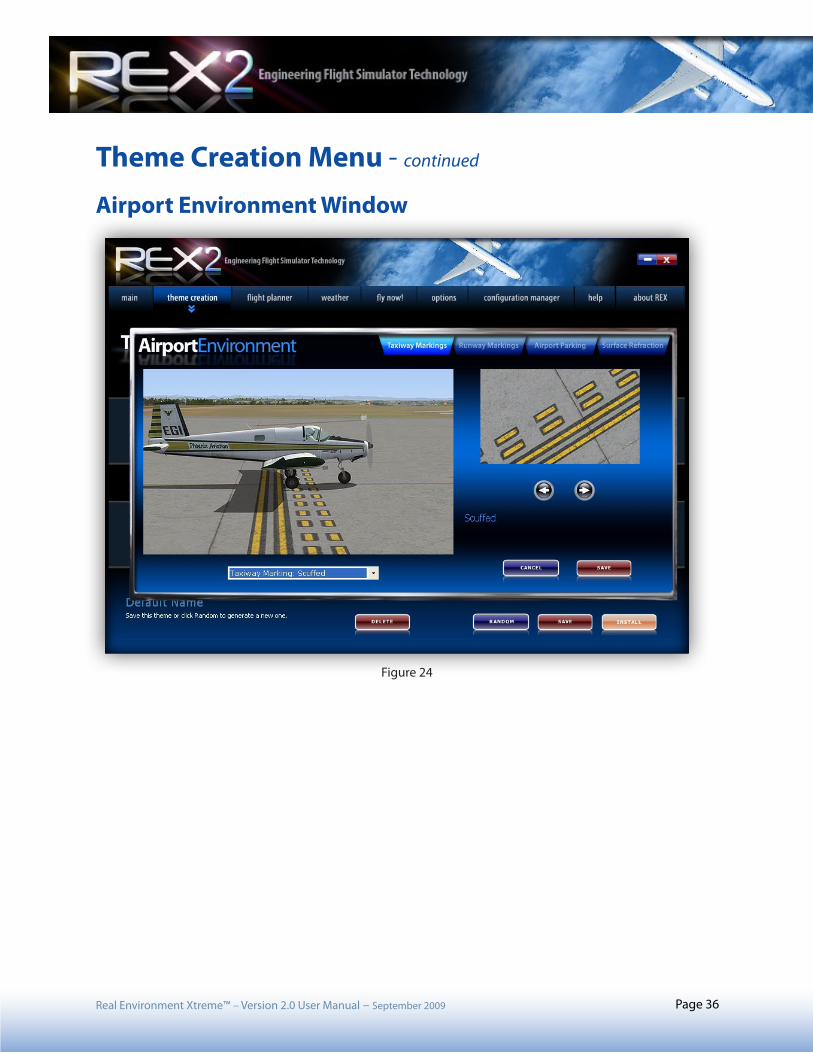
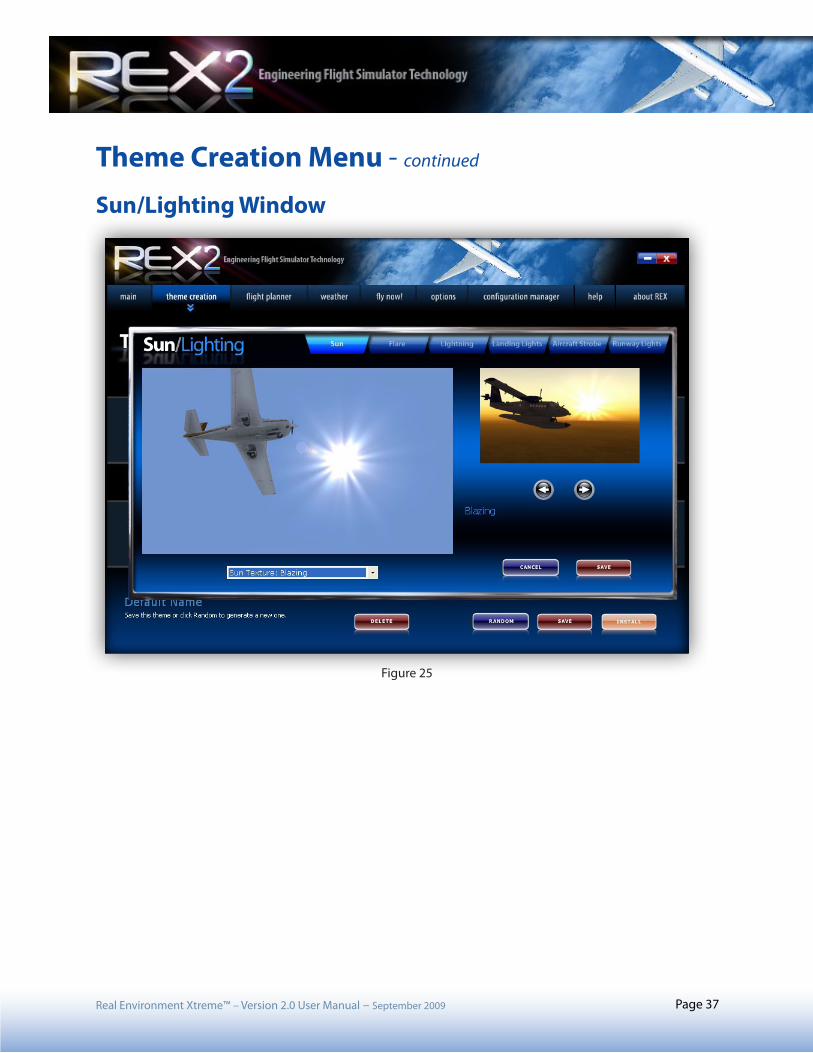
The Wave Animation, Runway/Taxiway, Airport Environment, and Sun/Lighting windows are all the same as Sky Theme and Cloud Theme windows in terms of how to modify them. Whereas the Wave Animation (Figure 22) has only one theme to modify, the Runway/Taxiway theme (Figure 23) and Airport Environment Themes (Figure 24) each have 4 tabs (subthemes) that can be modified and the Sun/Lighting theme (Figure 25) has 6 tabs (subthemes) that can modified.
Figure 21
Real Environment Xtreme™ – Version 2.0 User Manual – September 2009 Page 34
Theme Creation Menu - continued
Wave Animation Window
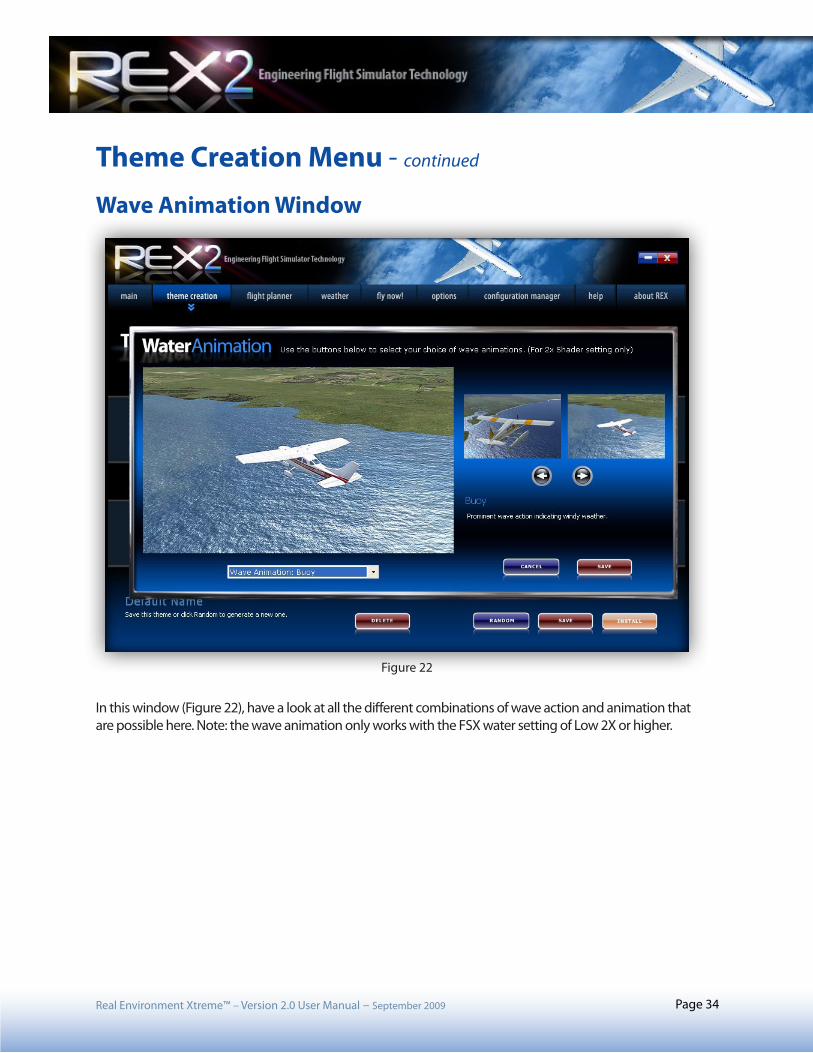
In this window (Figure 22), have a look at all the different combinations of wave action and animation that are possible here. Note: the wave animation only works with the FSX water setting of Low 2X or higher.
Figure 22
Theme Creation Menu - continued
Runway/Taxiways Window
Real Environment Xtreme™ – Version 2.0 User Manual – September 2009 Page 35
Figure 23
Theme Creation Menu - continued
Airport Environment Window
Real Environment Xtreme™ – Version 2.0 User Manual – September 2009 Page 36
Figure 24
Theme Creation Menu - continued
Sun/Lighting Window
Real Environment Xtreme™ – Version 2.0 User Manual – September 2009 Page 37
Figure 25
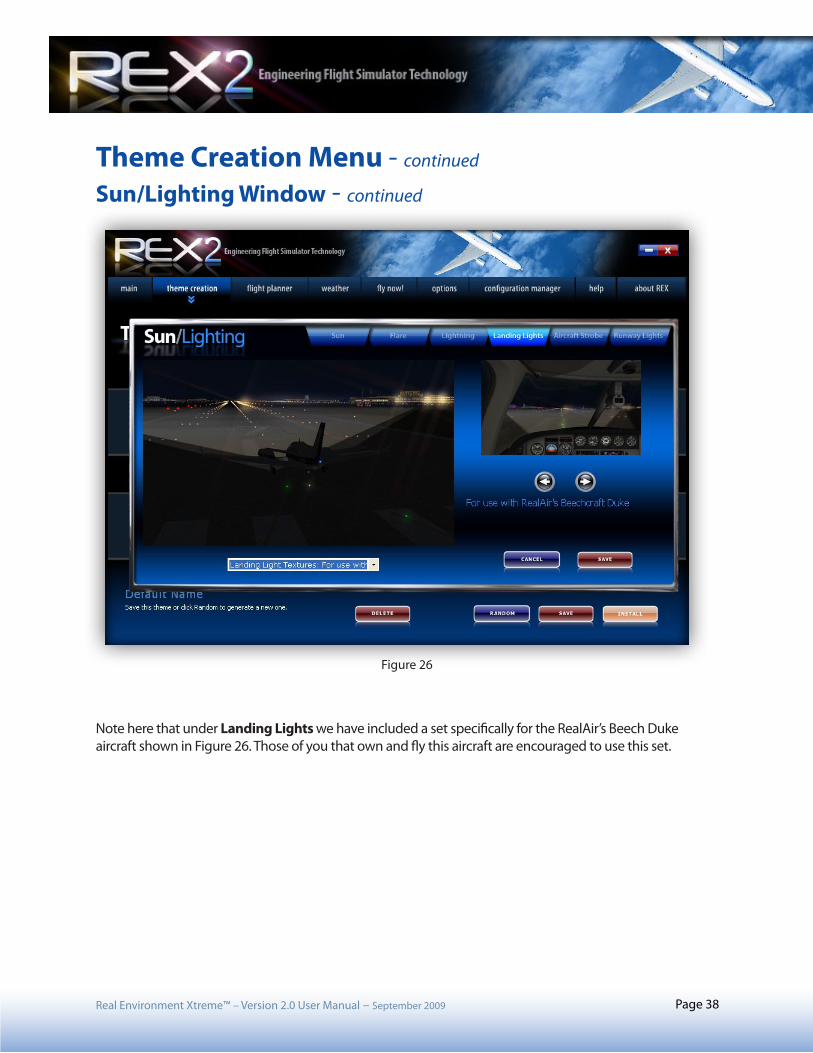
Theme Creation Menu - continued Sun/Lighting Window - continued
Note here that under Landing Lights we have included a set specifically for the RealAir’s Beech Duke aircraft shown in Figure 26. Those of you that own and fly this aircraft are encouraged to use this set.
Real Environment Xtreme™ – Version 2.0 User Manual – September 2009 Page 38
Figure 26

Theme Creation Menu - continued
EFFECT/SOUNDS Window
The EFFECTS/SOUNDS window is for themes under development. There are currently no windows or choices that can be made under this theme however, we have some very exciting things planned for this. Stay tuned!
After all selections have been made in the THEME CREATION area, click SAVE and you will be prompted to give a name to the newly created theme. If desired, click on INSTALL now and the new theme will be installed into FSX. The next time FSX is started, these textures will show in all their glory no matter what weather engine is used.
Textures cannot be loaded into FSX while FSX is running. Many users have made the mistake of trying to install textures while FSX was running. The result is a crash in FSX, REX2 or both. So if you get a crash, a hang, or some other unexplained behavior while doing this process, quickly check to see if FSX is running.
Real Environment Xtreme™ – Version 2.0 User Manual – September 2009 Page 39

Real Environment Xtreme™ – Version 2.0 User Manual – September 2009 Page 40
Flight Planner MenuThe FLIGHT PLANNER is used when you desire to create or import an existing flight plan, review the weather along the route, and review and print out nav logs, flight plans, and weather logs. Use the capabilities of REX2 to examine this weather and carefully choose and install into FSX the textures that best represent the weather in the area you wish to fly. This tool has been significantly improved since REX1. As the various features are described in detail below, previous users of REX will appreciate how much has improved.
The FLIGHT PLANNER main menu is shown below in Figure 27 and is accessed by clicking on either the I want to follow a flight plan large quick start button on the MAIN menu (Figure 3) or by clicking on the flight planner tab along the top of the MAIN menu.
Figure 27
Real Environment Xtreme™ – Version 2.0 User Manual – September 2009 Page 41
Flight Planner Menu - continued
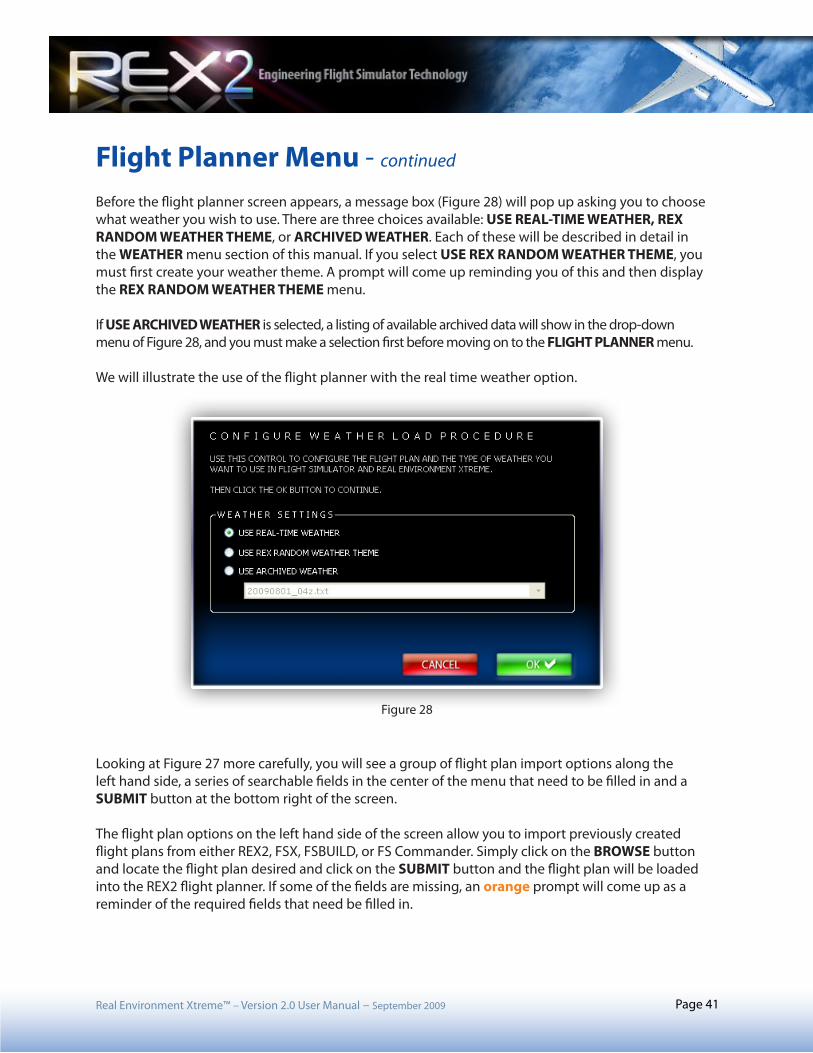
Before the flight planner screen appears, a message box (Figure 28) will pop up asking you to choose what weather you wish to use. There are three choices available: USE REAL-TIME WEATHER, REX RANDOM WEATHER THEME, or ARCHIVED WEATHER. Each of these will be described in detail in the WEATHER menu section of this manual. If you select USE REX RANDOM WEATHER THEME, you must first create your weather theme. A prompt will come up reminding you of this and then display the REX RANDOM WEATHER THEME menu.
If USE ARCHIVED WEATHER is selected, a listing of available archived data will show in the drop-down menu of Figure 28, and you must make a selection first before moving on to the FLIGHT PLANNER menu.
We will illustrate the use of the flight planner with the real time weather option.
Looking at Figure 27 more carefully, you will see a group of flight plan import options along the left hand side, a series of searchable fields in the center of the menu that need to be filled in and a SUBMIT button at the bottom right of the screen.
The flight plan options on the left hand side of the screen allow you to import previously created flight plans from either REX2, FSX, FSBUILD, or FS Commander. Simply click on the BROWSE button and locate the flight plan desired and click on the SUBMIT button and the flight plan will be loaded into the REX2 flight planner. If some of the fields are missing, an orange prompt will come up as a reminder of the required fields that need be filled in.
Figure 28
Real Environment Xtreme™ – Version 2.0 User Manual – September 2009 Page 42
Flight Planner Menu - continued
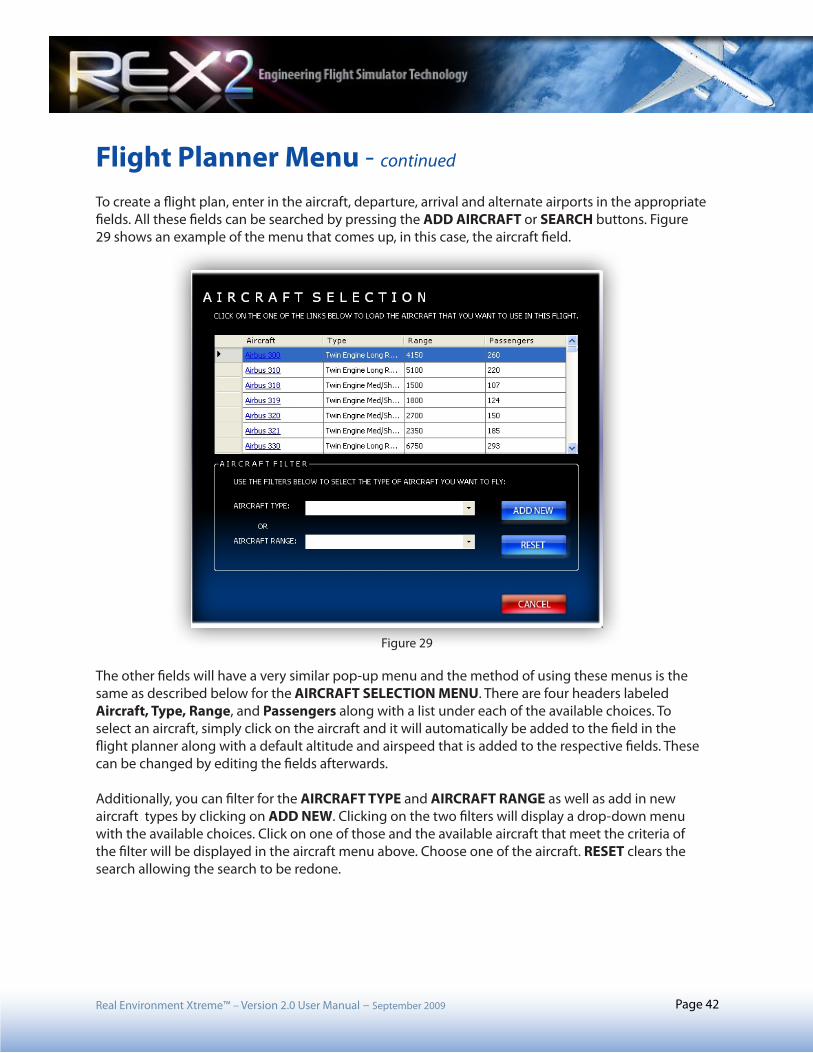
To create a flight plan, enter in the aircraft, departure, arrival and alternate airports in the appropriate fields. All these fields can be searched by pressing the ADD AIRCRAFT or SEARCH buttons. Figure 29 shows an example of the menu that comes up, in this case, the aircraft field.
The other fields will have a very similar pop-up menu and the method of using these menus is the same as described below for the AIRCRAFT SELECTION MENU. There are four headers labeled Aircraft, Type, Range, and Passengers along with a list under each of the available choices. To select an aircraft, simply click on the aircraft and it will automatically be added to the field in the flight planner along with a default altitude and airspeed that is added to the respective fields. These can be changed by editing the fields afterwards.
Additionally, you can filter for the AIRCRAFT TYPE and AIRCRAFT RANGE as well as add in new aircraft types by clicking on ADD NEW. Clicking on the two filters will display a drop-down menu with the available choices. Click on one of those and the available aircraft that meet the criteria of the filter will be displayed in the aircraft menu above. Choose one of the aircraft. RESET clears the search allowing the search to be redone.
Figure 29
Real Environment Xtreme™ – Version 2.0 User Manual – September 2009 Page 43
Flight Planner Menu - continued
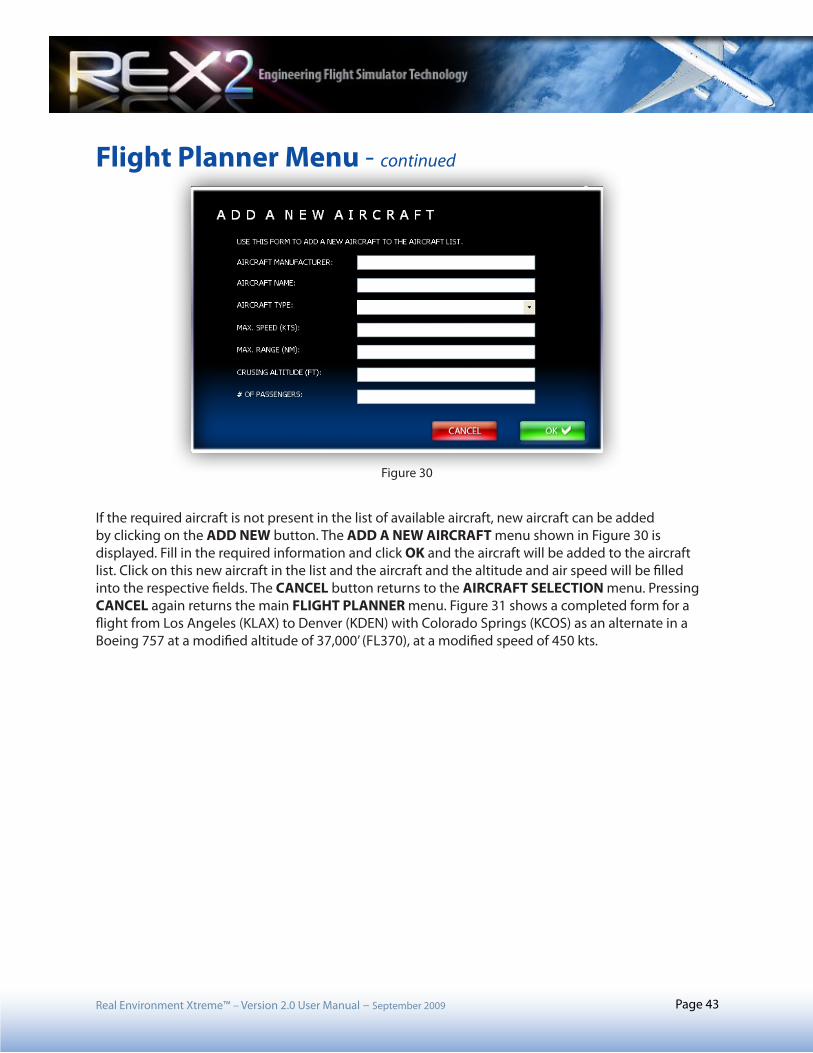
If the required aircraft is not present in the list of available aircraft, new aircraft can be added by clicking on the ADD NEW button. The ADD A NEW AIRCRAFT menu shown in Figure 30 is displayed. Fill in the required information and click OK and the aircraft will be added to the aircraft list. Click on this new aircraft in the list and the aircraft and the altitude and air speed will be filled into the respective fields. The CANCEL button returns to the AIRCRAFT SELECTION menu. Pressing CANCEL again returns the main FLIGHT PLANNER menu. Figure 31 shows a completed form for a flight from Los Angeles (KLAX) to Denver (KDEN) with Colorado Springs (KCOS) as an alternate in a Boeing 757 at a modified altitude of 37,000’ (FL370), at a modified speed of 450 kts.
Figure 30

Real Environment Xtreme™ – Version 2.0 User Manual – September 2009 Page 44
Flight Planner Menu - continued
At this point the data entry is finished and the plan can be submitted by pressing the SUBMIT button. A message will be displayed stating that REX2 is processing the flight plan. When finished, another menu appears, as illustrated in Figure 32. This is the result when a flight plan is imported into REX2 as discussed earlier and the SUBMIT button is selected.
Figure 31
Real Environment Xtreme™ – Version 2.0 User Manual – September 2009 Page 45
Flight Planner Menu - continued
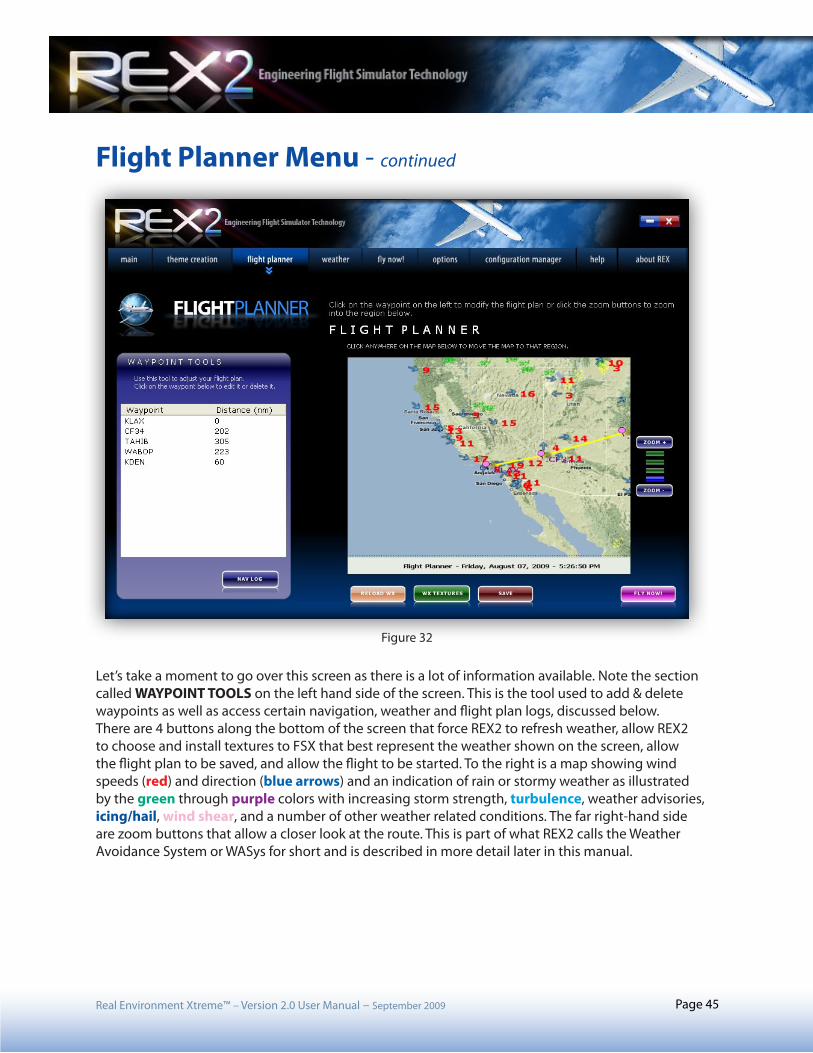
Let’s take a moment to go over this screen as there is a lot of information available. Note the section called WAYPOINT TOOLS on the left hand side of the screen. This is the tool used to add & delete waypoints as well as access certain navigation, weather and flight plan logs, discussed below. There are 4 buttons along the bottom of the screen that force REX2 to refresh weather, allow REX2 to choose and install textures to FSX that best represent the weather shown on the screen, allow the flight plan to be saved, and allow the flight to be started. To the right is a map showing wind speeds (red) and direction (blue arrows) and an indication of rain or stormy weather as illustrated by the green through purple colors with increasing storm strength, turbulence, weather advisories, icing/hail, wind shear, and a number of other weather related conditions. The far right-hand side are zoom buttons that allow a closer look at the route. This is part of what REX2 calls the Weather Avoidance System or WASys for short and is described in more detail later in this manual.
Figure 32
Flight Planner Menu - continued
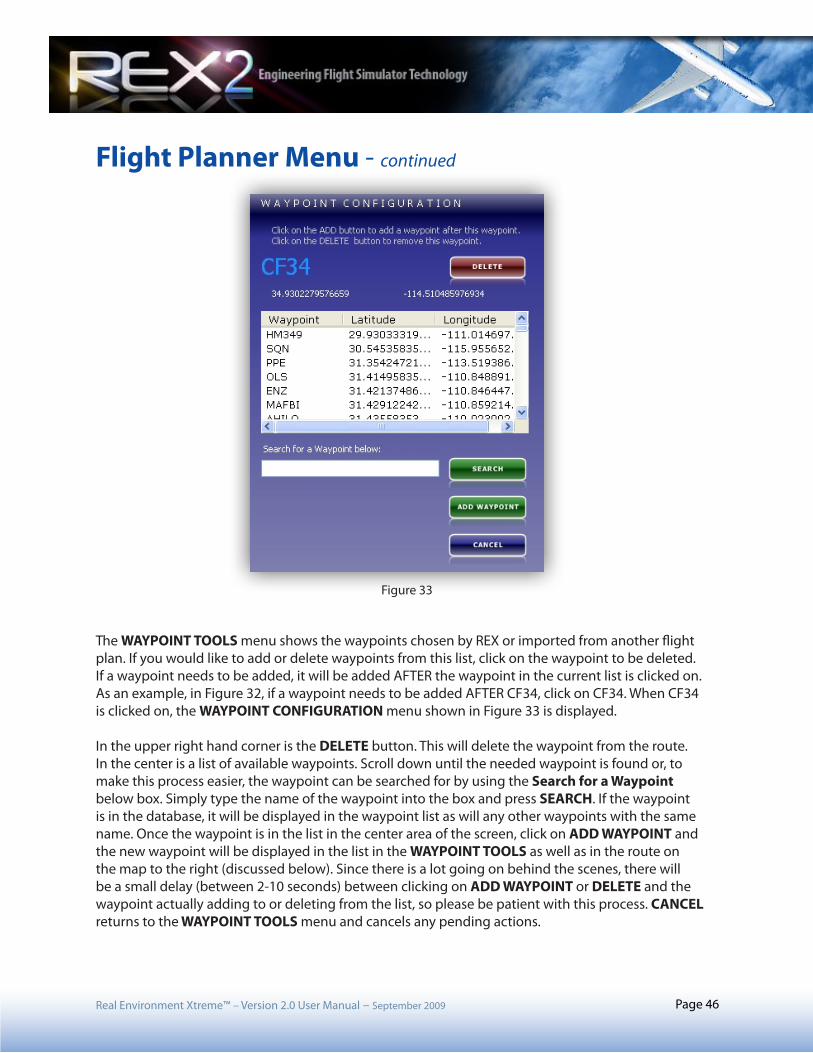
The WAYPOINT TOOLS menu shows the waypoints chosen by REX or imported from another flight plan. If you would like to add or delete waypoints from this list, click on the waypoint to be deleted. If a waypoint needs to be added, it will be added AFTER the waypoint in the current list is clicked on. As an example, in Figure 32, if a waypoint needs to be added AFTER CF34, click on CF34. When CF34 is clicked on, the WAYPOINT CONFIGURATION menu shown in Figure 33 is displayed.
In the upper right hand corner is the DELETE button. This will delete the waypoint from the route. In the center is a list of available waypoints. Scroll down until the needed waypoint is found or, to make this process easier, the waypoint can be searched for by using the Search for a Waypoint below box. Simply type the name of the waypoint into the box and press SEARCH. If the waypoint is in the database, it will be displayed in the waypoint list as will any other waypoints with the same name. Once the waypoint is in the list in the center area of the screen, click on ADD WAYPOINT and the new waypoint will be displayed in the list in the WAYPOINT TOOLS as well as in the route on the map to the right (discussed below). Since there is a lot going on behind the scenes, there will be a small delay (between 2-10 seconds) between clicking on ADD WAYPOINT or DELETE and the waypoint actually adding to or deleting from the list, so please be patient with this process. CANCEL returns to the WAYPOINT TOOLS menu and cancels any pending actions.
Real Environment Xtreme™ – Version 2.0 User Manual – September 2009 Page 46
Figure 33
Real Environment Xtreme™ – Version 2.0 User Manual – September 2009 Page 47
Flight Planner Menu - continued
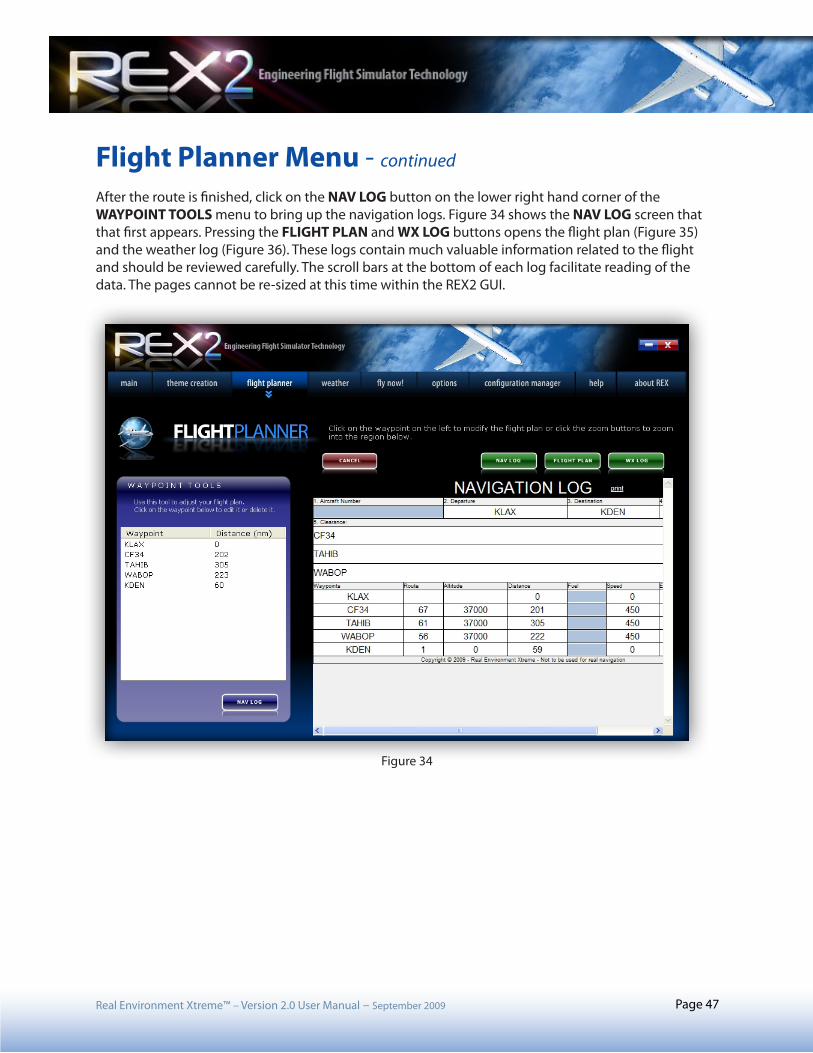
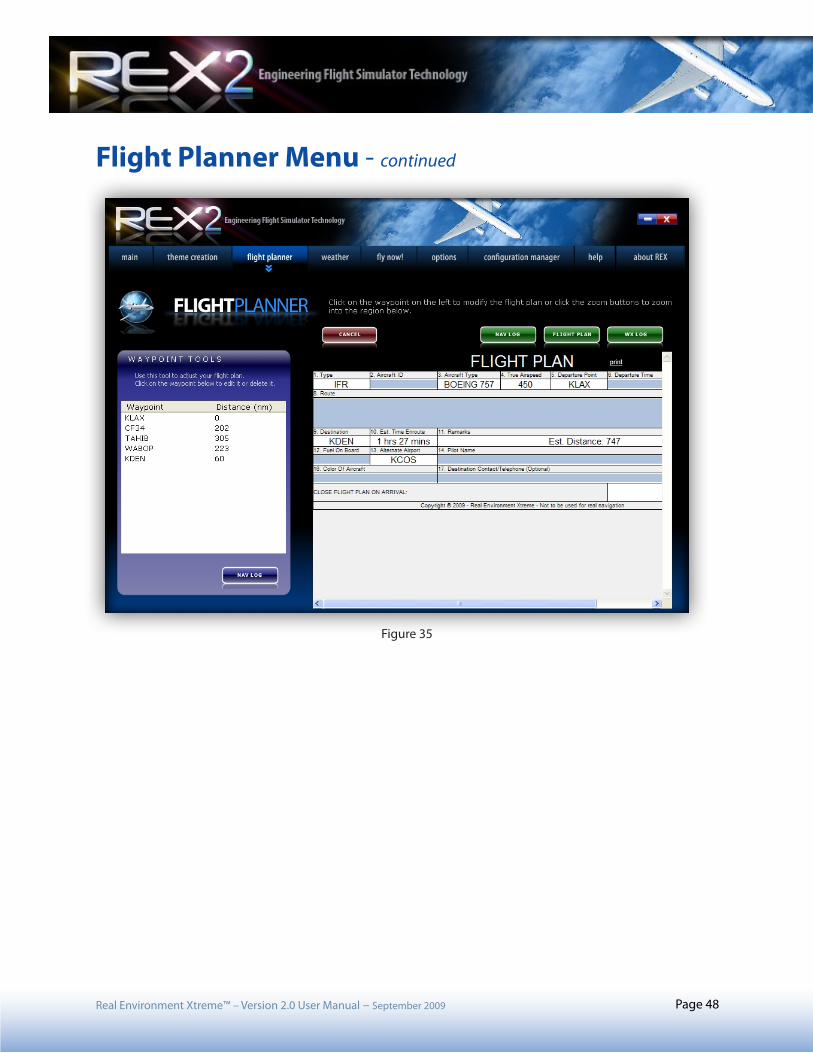
After the route is finished, click on the NAV LOG button on the lower right hand corner of the WAYPOINT TOOLS menu to bring up the navigation logs. Figure 34 shows the NAV LOG screen that that first appears. Pressing the FLIGHT PLAN and WX LOG buttons opens the flight plan (Figure 35) and the weather log (Figure 36). These logs contain much valuable information related to the flight and should be reviewed carefully. The scroll bars at the bottom of each log facilitate reading of the data. The pages cannot be re-sized at this time within the REX2 GUI.
Figure 34
Real Environment Xtreme™ – Version 2.0 User Manual – September 2009 Page 48
Flight Planner Menu - continued
Figure 35
Real Environment Xtreme™ – Version 2.0 User Manual – September 2009 Page 49
Flight Planner Menu - continued
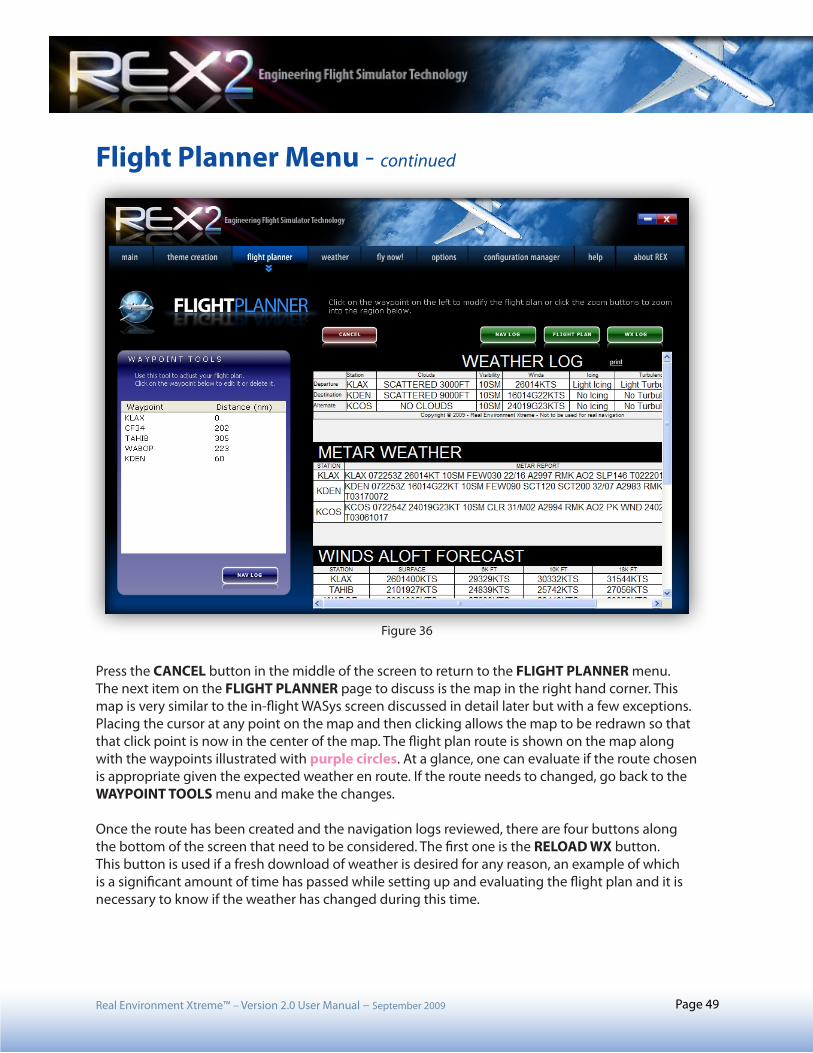
Press the CANCEL button in the middle of the screen to return to the FLIGHT PLANNER menu. The next item on the FLIGHT PLANNER page to discuss is the map in the right hand corner. This map is very similar to the in-flight WASys screen discussed in detail later but with a few exceptions. Placing the cursor at any point on the map and then clicking allows the map to be redrawn so that that click point is now in the center of the map. The flight plan route is shown on the map along with the waypoints illustrated with purple circles. At a glance, one can evaluate if the route chosen is appropriate given the expected weather en route. If the route needs to changed, go back to the WAYPOINT TOOLS menu and make the changes.
Once the route has been created and the navigation logs reviewed, there are four buttons along the bottom of the screen that need to be considered. The first one is the RELOAD WX button. This button is used if a fresh download of weather is desired for any reason, an example of which is a significant amount of time has passed while setting up and evaluating the flight plan and it is necessary to know if the weather has changed during this time.
Figure 36

Real Environment Xtreme™ – Version 2.0 User Manual – September 2009 Page 50
Flight Planner Menu - continued
Next is the WX TEXTURES button. This button is used if you would like REX2 to analyze the weather conditions and pick a set of textures that match the weather conditions downloaded by REX2, either real-time, REX2 generated random, or archived weather. Press this button and REX2 will begin installing textures into FSX. IT IS IMPORTANT THAT FSX IS NOT RUNNING DURING THIS STEP and that only textures selected in the OPTIONS page will be installed.
Since REX2 can only load textures when FSX is not running, some of you may be interested to know how REX2 picks textures when you are flying between airports that are far apart and the weather is potentially very different. The program will look at both airports as well as the en route weather, and make the best estimation of the textures that are going to be needed. If the two airports are different, such as one being tropical and one is not, then the program can select textures that will represent tropical thunderstorms (typical of Hawaii) as well as clouds (more typical of San Francisco) and there will be little overlap. For a trip from San Francisco to Los Angeles where the clouds are somewhat the same, REX2 selects and downloads enough textures that the weather engine has enough variety to choose from so that it can pick which textures to use from that pool and depict two different BUT similar weather scenarios fairly accurately.
Pressing the SAVE button displays a dialogue box that will allow the current flight plan to be saved in .pln format. Type in a name and the file will be saved to the REX program folder under Flight Plans (typically C:\Program Files\Real Environment Xtreme\FlightPlans\. This flight plan can be imported into FSX via the use of the FSX flight planner load function after browsing to the REX flight plans folder.
Pressing the FLY NOW! button this starts the process by starting FSX (if enabled in the CONFIGURATION menu), the weather engine (if enabled in the CONFIGURATION menu) and minimizing REX to the taskbar (if enabled in the CONFIGURATION menu) after returning to the MAIN menu.
If the FLIGHT PLANNER menu is left for any reason, it can be returned to without losing the previous work by clicking on the flight planner tab of the MAIN menu, however, the weather will have to be refreshed. After the weather has refreshed, the previous flight plan will show up in the FLIGHT PLANNER menu. Clicking SUBMIT again will return to the previous menu with the WAYPOINT TOOLS, NAV LOGS and WASys map.
Real Environment Xtreme™ – Version 2.0 User Manual – September 2009 Page 51
Weather Menu
Real-Time Weather
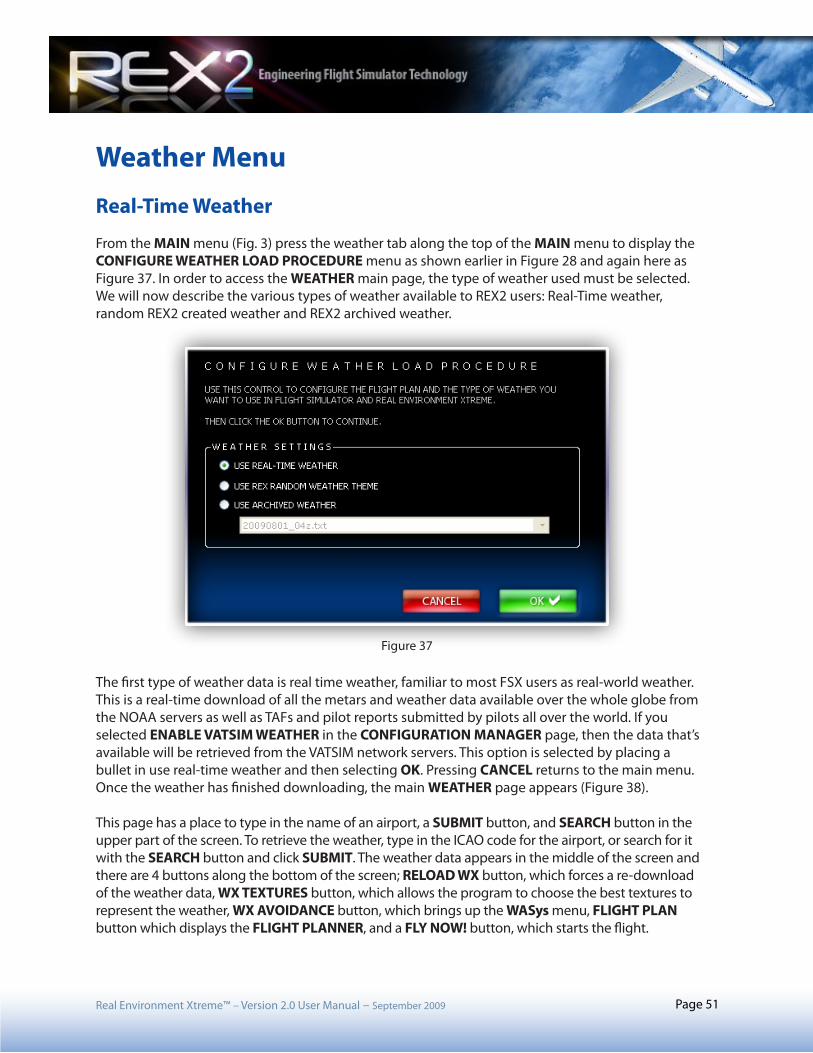
From the MAIN menu (Fig. 3) press the weather tab along the top of the MAIN menu to display the CONFIGURE WEATHER LOAD PROCEDURE menu as shown earlier in Figure 28 and again here as Figure 37. In order to access the WEATHER main page, the type of weather used must be selected. We will now describe the various types of weather available to REX2 users: Real-Time weather, random REX2 created weather and REX2 archived weather.
The first type of weather data is real time weather, familiar to most FSX users as real-world weather. This is a real-time download of all the metars and weather data available over the whole globe from the NOAA servers as well as TAFs and pilot reports submitted by pilots all over the world. If you selected ENABLE VATSIM WEATHER in the CONFIGURATION MANAGER page, then the data that’s available will be retrieved from the VATSIM network servers. This option is selected by placing a bullet in use real-time weather and then selecting OK. Pressing CANCEL returns to the main menu. Once the weather has finished downloading, the main WEATHER page appears (Figure 38).
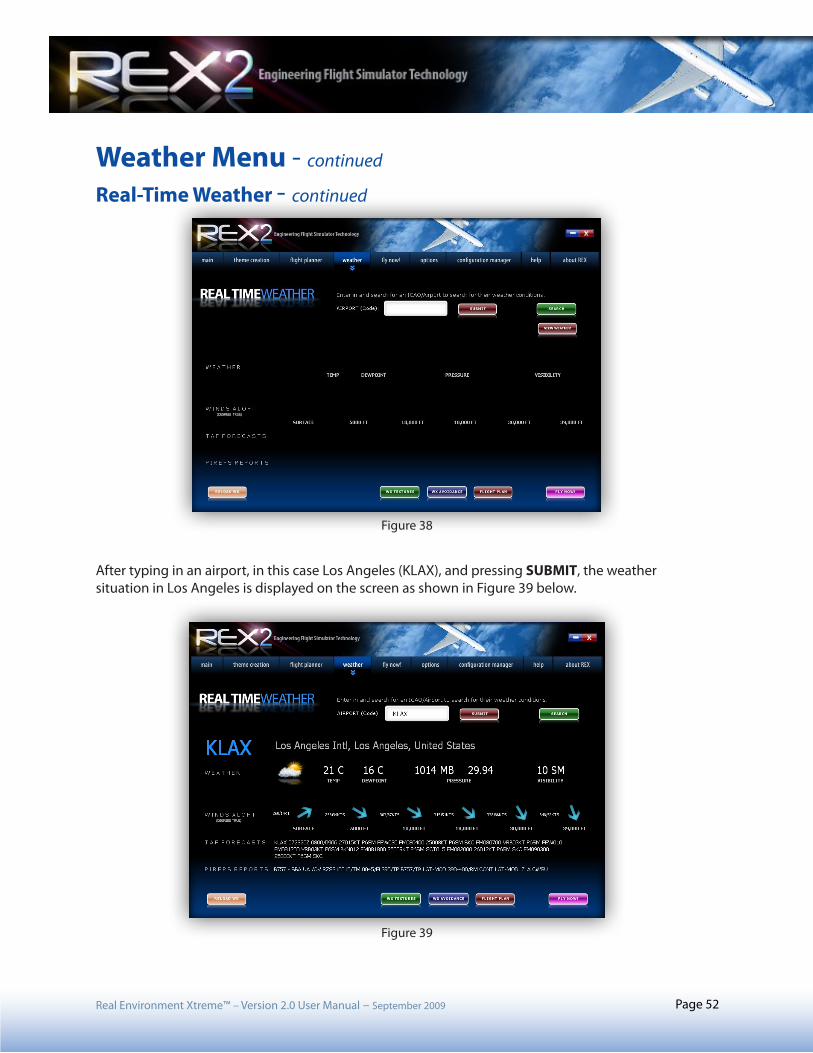
This page has a place to type in the name of an airport, a SUBMIT button, and SEARCH button in the upper part of the screen. To retrieve the weather, type in the ICAO code for the airport, or search for it with the SEARCH button and click SUBMIT. The weather data appears in the middle of the screen and there are 4 buttons along the bottom of the screen; RELOAD WX button, which forces a re-download of the weather data, WX TEXTURES button, which allows the program to choose the best textures to represent the weather, WX AVOIDANCE button, which brings up the WASys menu, FLIGHT PLAN button which displays the FLIGHT PLANNER, and a FLY NOW! button, which starts the flight.
Figure 37
Real Environment Xtreme™ – Version 2.0 User Manual – September 2009 Page 52
Weather Menu - continued
Real-Time Weather - continued
After typing in an airport, in this case Los Angeles (KLAX), and pressing SUBMIT, the weather situation in Los Angeles is displayed on the screen as shown in Figure 39 below.
Figure 38
Figure 39
Real Environment Xtreme™ – Version 2.0 User Manual – September 2009 Page 53
Weather Menu - continued
Real-Time Weather - continued
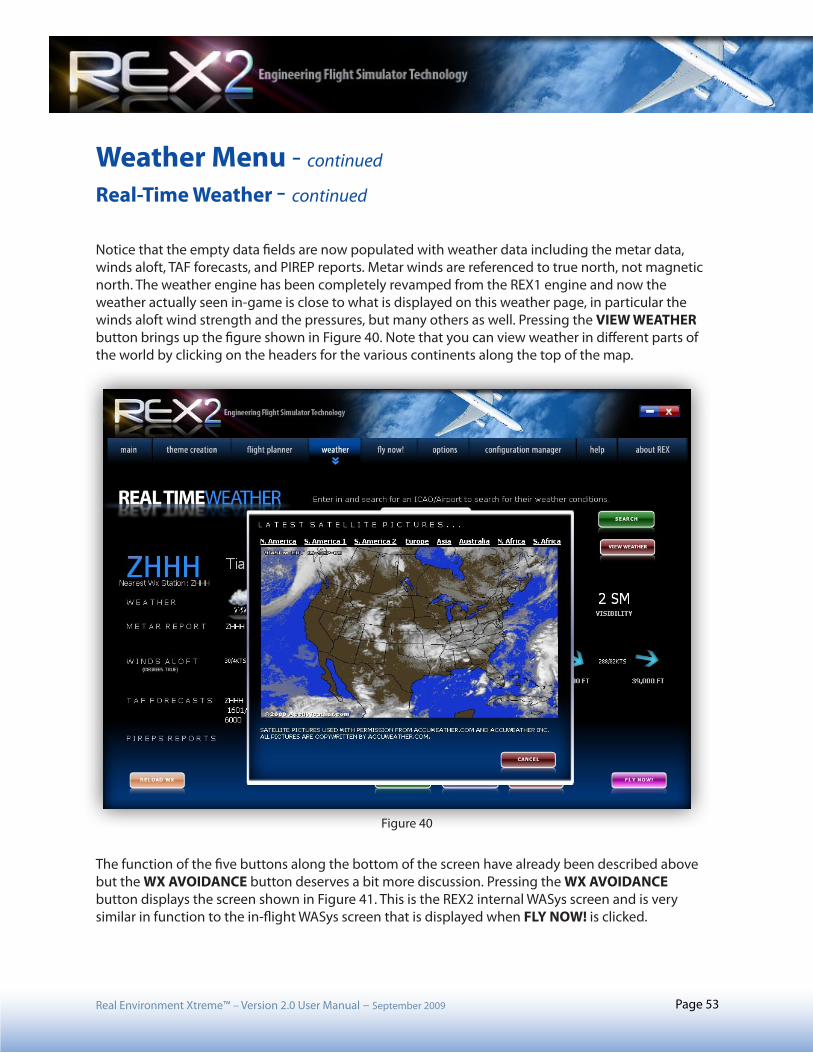
Notice that the empty data fields are now populated with weather data including the metar data, winds aloft, TAF forecasts, and PIREP reports. Metar winds are referenced to true north, not magnetic north. The weather engine has been completely revamped from the REX1 engine and now the weather actually seen in-game is close to what is displayed on this weather page, in particular the winds aloft wind strength and the pressures, but many others as well. Pressing the VIEW WEATHER button brings up the figure shown in Figure 40. Note that you can view weather in different parts of the world by clicking on the headers for the various continents along the top of the map.
The function of the five buttons along the bottom of the screen have already been described above but the WX AVOIDANCE button deserves a bit more discussion. Pressing the WX AVOIDANCE button displays the screen shown in Figure 41. This is the REX2 internal WASys screen and is very similar in function to the in-flight WASys screen that is displayed when FLY NOW! is clicked.
Figure 40
Real Environment Xtreme™ – Version 2.0 User Manual – September 2009 Page 54
Weather Menu - continued
Real-Time Weather - continued
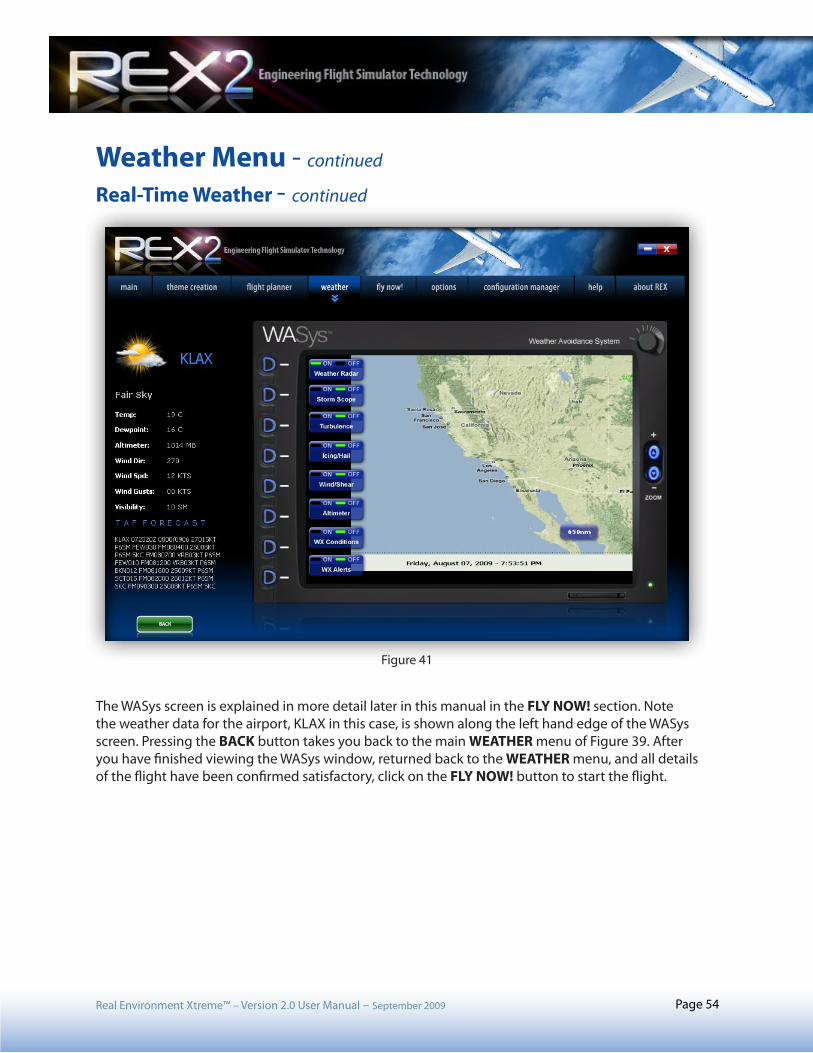
The WASys screen is explained in more detail later in this manual in the FLY NOW! section. Note the weather data for the airport, KLAX in this case, is shown along the left hand edge of the WASys screen. Pressing the BACK button takes you back to the main WEATHER menu of Figure 39. After you have finished viewing the WASys window, returned back to the WEATHER menu, and all details of the flight have been confirmed satisfactory, click on the FLY NOW! button to start the flight.
Figure 41
Real Environment Xtreme™ – Version 2.0 User Manual – September 2009 Page 55
Weather Menu - continued
REX Random Weather
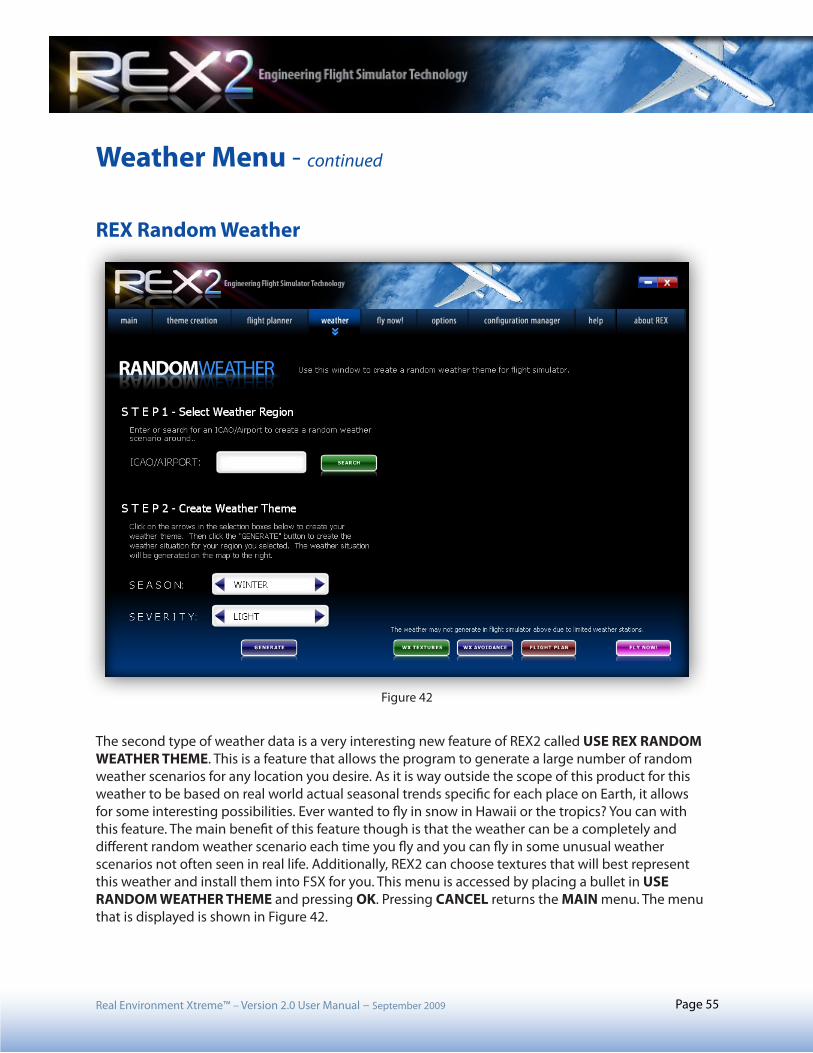
The second type of weather data is a very interesting new feature of REX2 called USE REX RANDOM WEATHER THEME. This is a feature that allows the program to generate a large number of random weather scenarios for any location you desire. As it is way outside the scope of this product for this weather to be based on real world actual seasonal trends specific for each place on Earth, it allows for some interesting possibilities. Ever wanted to fly in snow in Hawaii or the tropics? You can with this feature. The main benefit of this feature though is that the weather can be a completely and different random weather scenario each time you fly and you can fly in some unusual weather scenarios not often seen in real life. Additionally, REX2 can choose textures that will best represent this weather and install them into FSX for you. This menu is accessed by placing a bullet in USE RANDOM WEATHER THEME and pressing OK. Pressing CANCEL returns the MAIN menu. The menu that is displayed is shown in Figure 42.
Figure 42
Real Environment Xtreme™ – Version 2.0 User Manual – September 2009 Page 56
Weather Menu - continued
REX Random Weather - continued
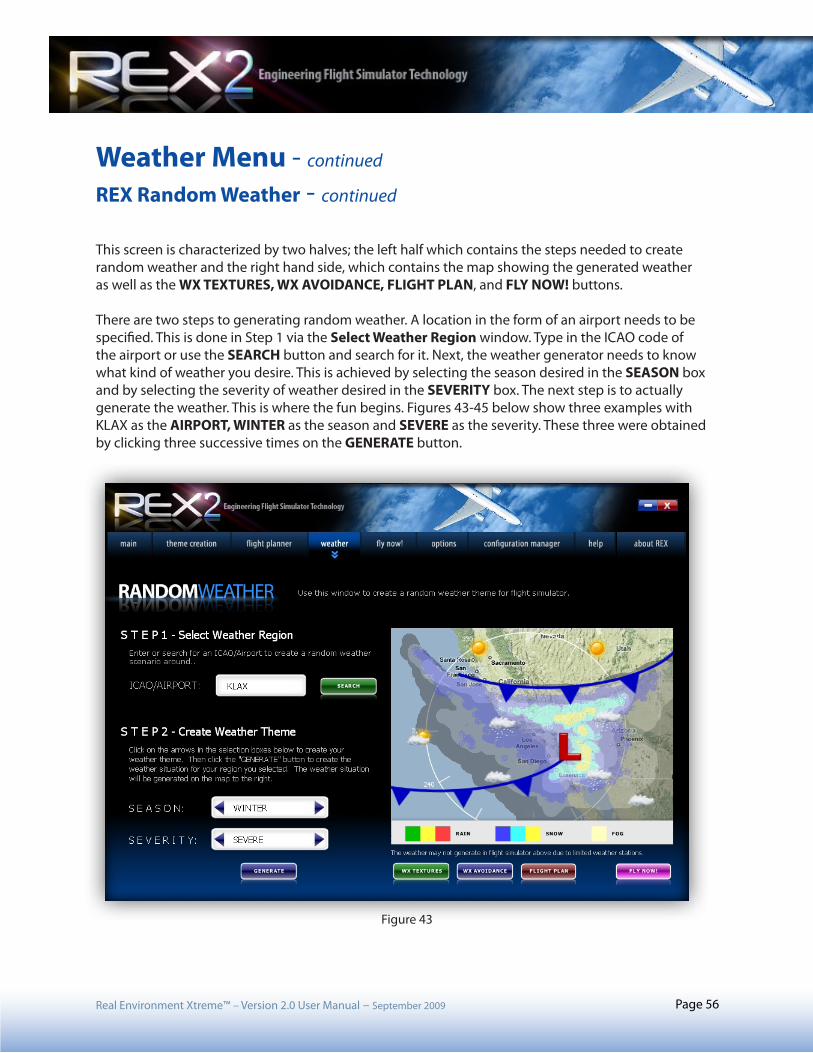
This screen is characterized by two halves; the left half which contains the steps needed to create random weather and the right hand side, which contains the map showing the generated weather as well as the WX TEXTURES, WX AVOIDANCE, FLIGHT PLAN, and FLY NOW! buttons.
There are two steps to generating random weather. A location in the form of an airport needs to be specified. This is done in Step 1 via the Select Weather Region window. Type in the ICAO code of the airport or use the SEARCH button and search for it. Next, the weather generator needs to know what kind of weather you desire. This is achieved by selecting the season desired in the SEASON box and by selecting the severity of weather desired in the SEVERITY box. The next step is to actually generate the weather. This is where the fun begins. Figures 43-45 below show three examples with KLAX as the AIRPORT, WINTER as the season and SEVERE as the severity. These three were obtained by clicking three successive times on the GENERATE button.
Figure 43

Real Environment Xtreme™ – Version 2.0 User Manual – September 2009 Page 57
Weather Menu - continued
REX Random Weather - continued
Figure 44

Real Environment Xtreme™ – Version 2.0 User Manual – September 2009 Page 58
Weather Menu - continued
REX Random Weather - continued
Figure 45
Real Environment Xtreme™ – Version 2.0 User Manual – September 2009 Page 59
Weather Menu - continued
REX Random Weather - continued
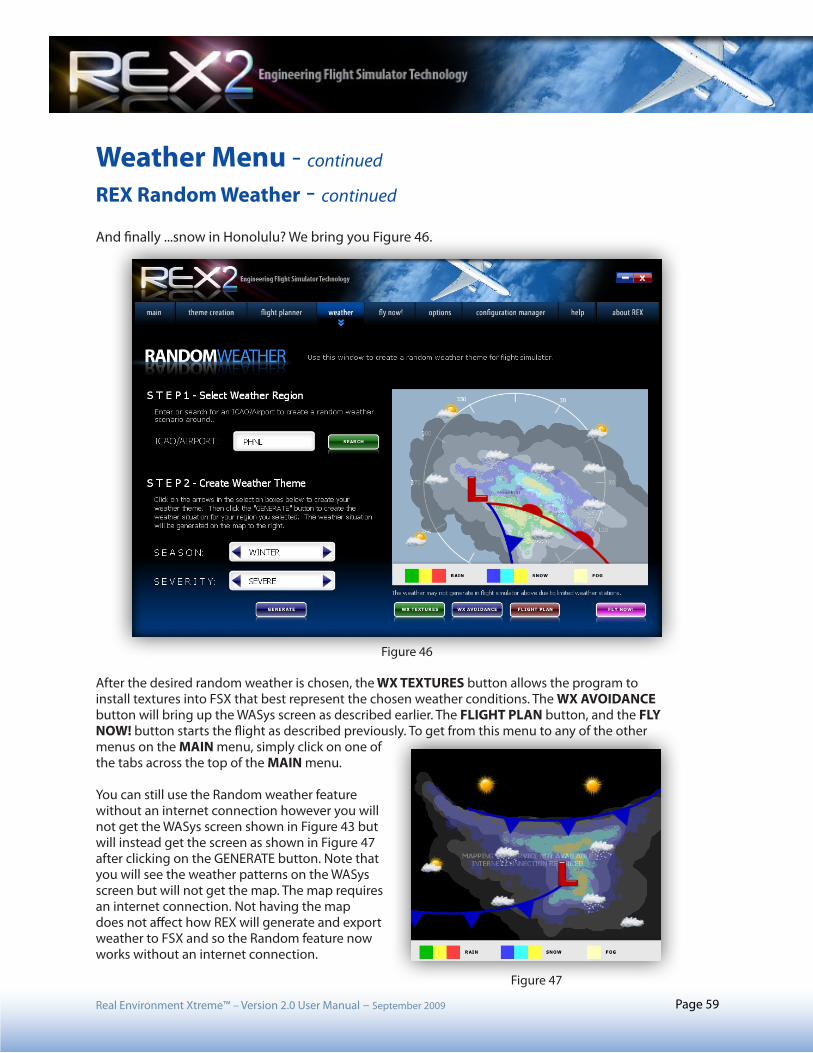
And finally ...snow in Honolulu? We bring you Figure 46.
After the desired random weather is chosen, the WX TEXTURES button allows the program to install textures into FSX that best represent the chosen weather conditions. The WX AVOIDANCE button will bring up the WASys screen as described earlier. The FLIGHT PLAN button, and the FLY NOW! button starts the flight as described previously. To get from this menu to any of the other menus on the MAIN menu, simply click on one of the tabs across the top of the MAIN menu.
You can still use the Random weather feature without an internet connection however you will not get the WASys screen shown in Figure 43 but will instead get the screen as shown in Figure 47 after clicking on the GENERATE button. Note that you will see the weather patterns on the WASys screen but will not get the map. The map requires an internet connection. Not having the map does not affect how REX will generate and export weather to FSX and so the Random feature now works without an internet connection.
Figure 46
Figure 47
Real Environment Xtreme™ – Version 2.0 User Manual – September 2009 Page 60
Weather Menu - continued
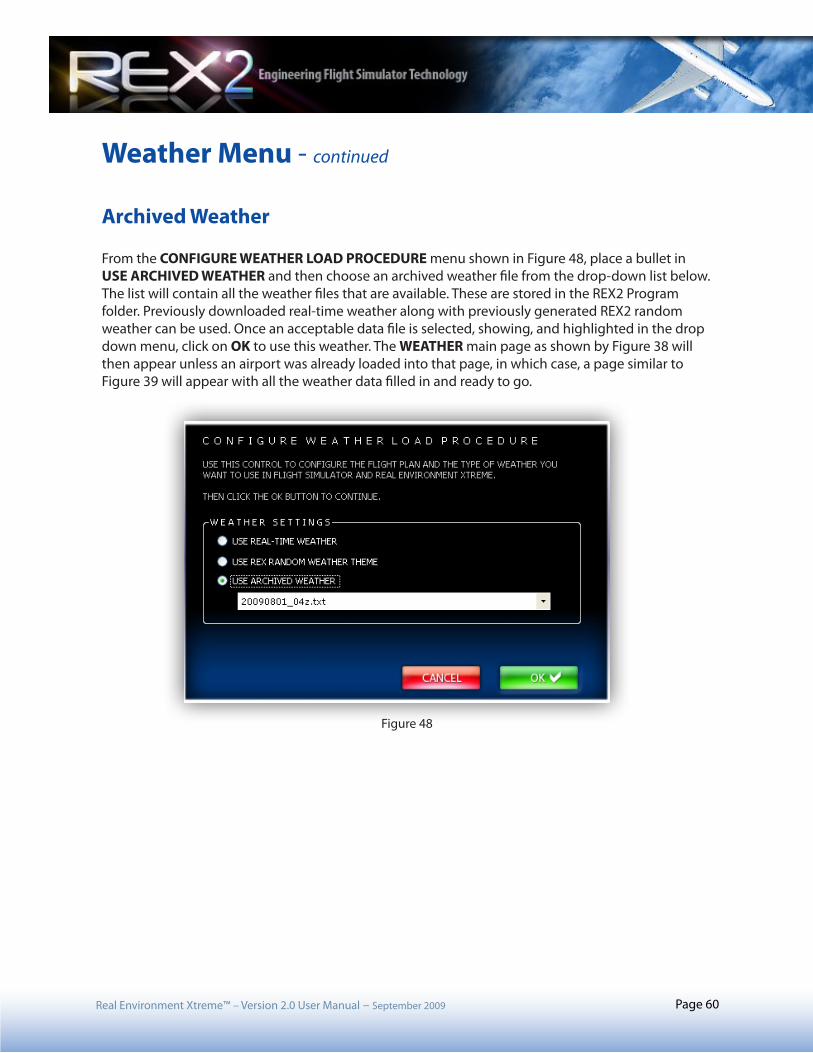
Archived Weather
From the CONFIGURE WEATHER LOAD PROCEDURE menu shown in Figure 48, place a bullet in USE ARCHIVED WEATHER and then choose an archived weather file from the drop-down list below. The list will contain all the weather files that are available. These are stored in the REX2 Program folder. Previously downloaded real-time weather along with previously generated REX2 random weather can be used. Once an acceptable data file is selected, showing, and highlighted in the drop down menu, click on OK to use this weather. The WEATHER main page as shown by Figure 38 will then appear unless an airport was already loaded into that page, in which case, a page similar to Figure 39 will appear with all the weather data filled in and ready to go.
Figure 48
Real Environment Xtreme™ – Version 2.0 User Manual – September 2009 Page 61
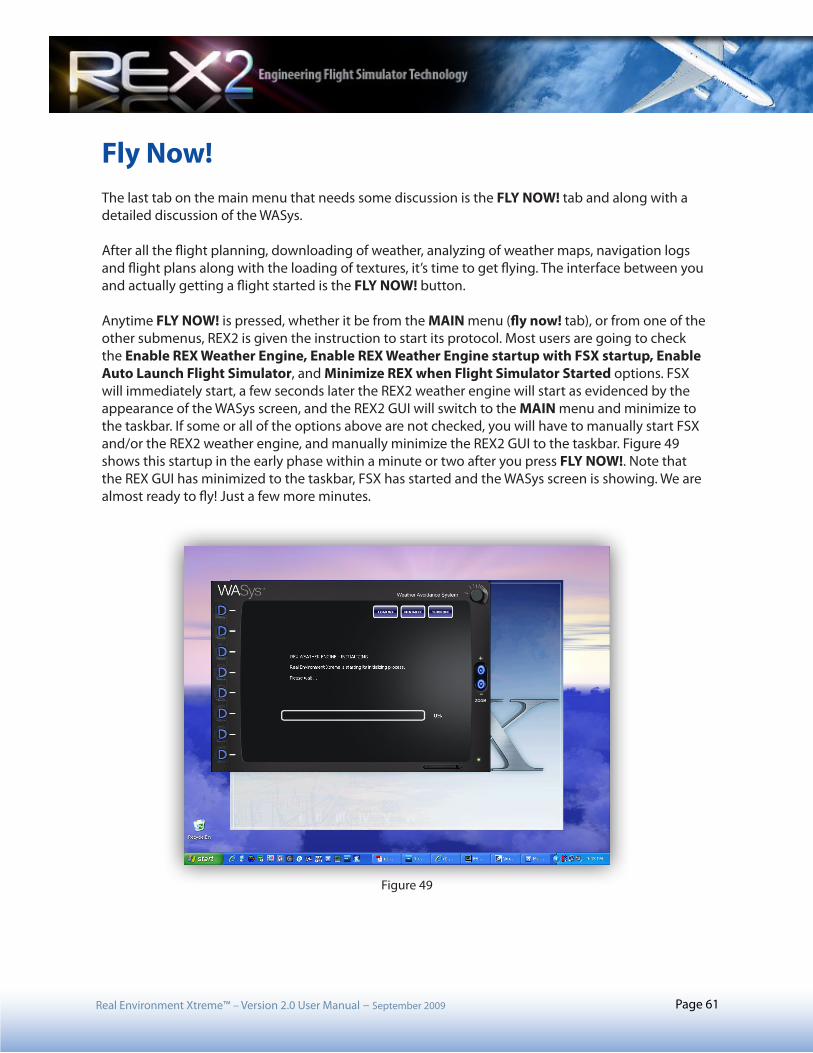
Fly Now! The last tab on the main menu that needs some discussion is the FLY NOW! tab and along with adetailed discussion of the WASys.
After all the flight planning, downloading of weather, analyzing of weather maps, navigation logs and flight plans along with the loading of textures, it’s time to get flying. The interface between you and actually getting a flight started is the FLY NOW! button.
Anytime FLY NOW! is pressed, whether it be from the MAIN menu (fly now! tab), or from one of the other submenus, REX2 is given the instruction to start its protocol. Most users are going to check the Enable REX Weather Engine, Enable REX Weather Engine startup with FSX startup, Enable Auto Launch Flight Simulator, and Minimize REX when Flight Simulator Started options. FSX will immediately start, a few seconds later the REX2 weather engine will start as evidenced by the appearance of the WASys screen, and the REX2 GUI will switch to the MAIN menu and minimize to the taskbar. If some or all of the options above are not checked, you will have to manually start FSX and/or the REX2 weather engine, and manually minimize the REX2 GUI to the taskbar. Figure 49 shows this startup in the early phase within a minute or two after you press FLY NOW!. Note that the REX GUI has minimized to the taskbar, FSX has started and the WASys screen is showing. We are almost ready to fly! Just a few more minutes.
Figure 49
Real Environment Xtreme™ – Version 2.0 User Manual – September 2009 Page 62
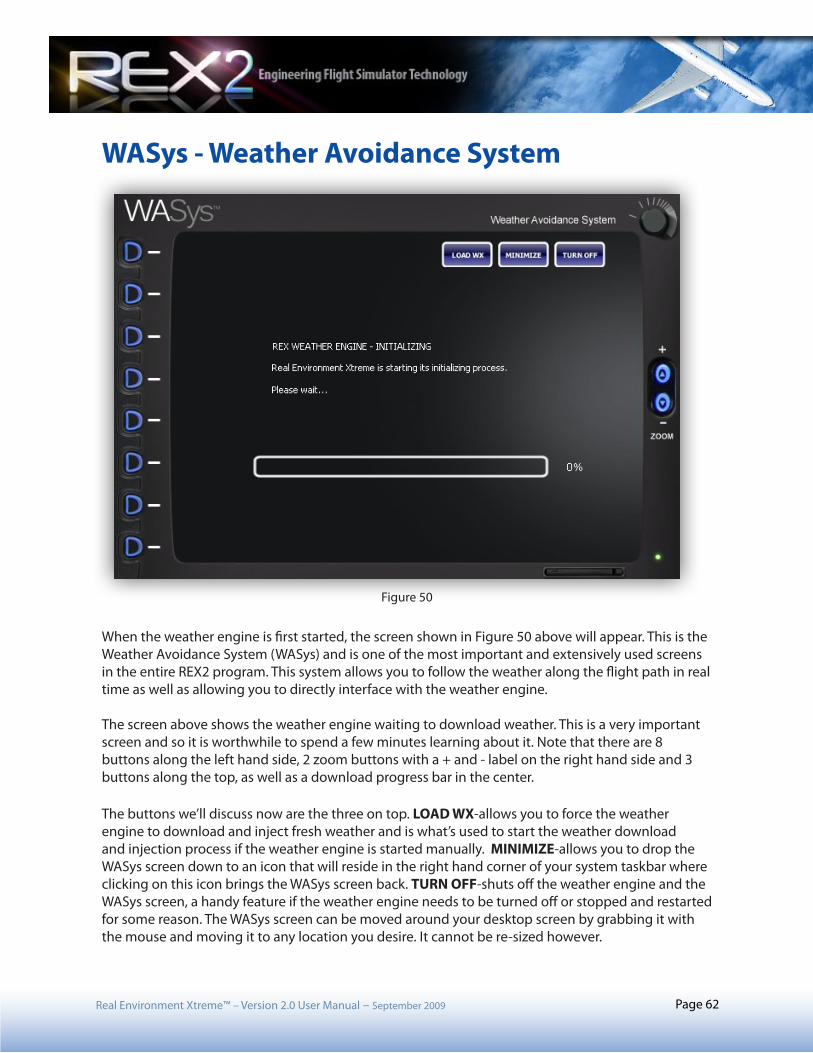
WASys - Weather Avoidance System
When the weather engine is first started, the screen shown in Figure 50 above will appear. This is the Weather Avoidance System (WASys) and is one of the most important and extensively used screens in the entire REX2 program. This system allows you to follow the weather along the flight path in real time as well as allowing you to directly interface with the weather engine.
The screen above shows the weather engine waiting to download weather. This is a very important screen and so it is worthwhile to spend a few minutes learning about it. Note that there are 8 buttons along the left hand side, 2 zoom buttons with a + and - label on the right hand side and 3 buttons along the top, as well as a download progress bar in the center.
The buttons we’ll discuss now are the three on top. LOAD WX-allows you to force the weather engine to download and inject fresh weather and is what’s used to start the weather download and injection process if the weather engine is started manually. MINIMIZE-allows you to drop the WASys screen down to an icon that will reside in the right hand corner of your system taskbar where clicking on this icon brings the WASys screen back. TURN OFF-shuts off the weather engine and the WASys screen, a handy feature if the weather engine needs to be turned off or stopped and restarted for some reason. The WASys screen can be moved around your desktop screen by grabbing it with the mouse and moving it to any location you desire. It cannot be re-sized however.
Figure 50
Real Environment Xtreme™ – Version 2.0 User Manual – September 2009 Page 63
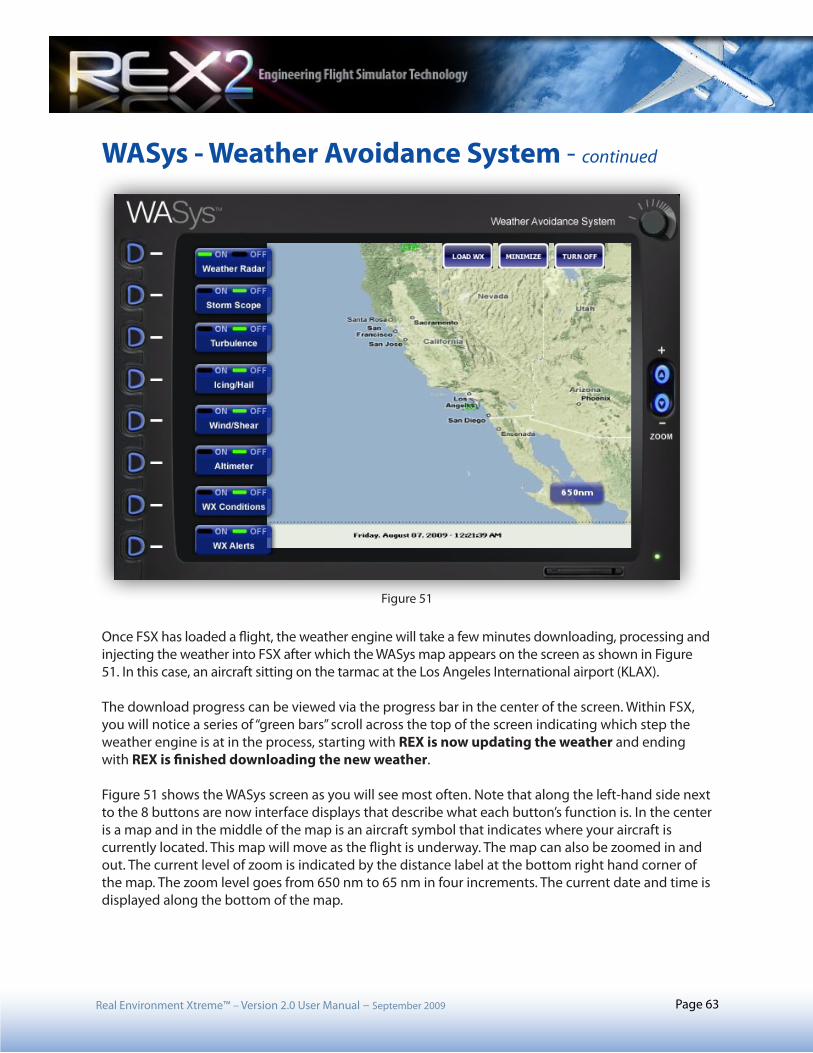
WASys - Weather Avoidance System - continued
Once FSX has loaded a flight, the weather engine will take a few minutes downloading, processing and injecting the weather into FSX after which the WASys map appears on the screen as shown in Figure 51. In this case, an aircraft sitting on the tarmac at the Los Angeles International airport (KLAX).
The download progress can be viewed via the progress bar in the center of the screen. Within FSX, you will notice a series of “green bars” scroll across the top of the screen indicating which step the weather engine is at in the process, starting with REX is now updating the weather and ending with REX is finished downloading the new weather.
Figure 51 shows the WASys screen as you will see most often. Note that along the left-hand side next to the 8 buttons are now interface displays that describe what each button’s function is. In the center is a map and in the middle of the map is an aircraft symbol that indicates where your aircraft is currently located. This map will move as the flight is underway. The map can also be zoomed in and out. The current level of zoom is indicated by the distance label at the bottom right hand corner of the map. The zoom level goes from 650 nm to 65 nm in four increments. The current date and time is displayed along the bottom of the map.
Figure 51
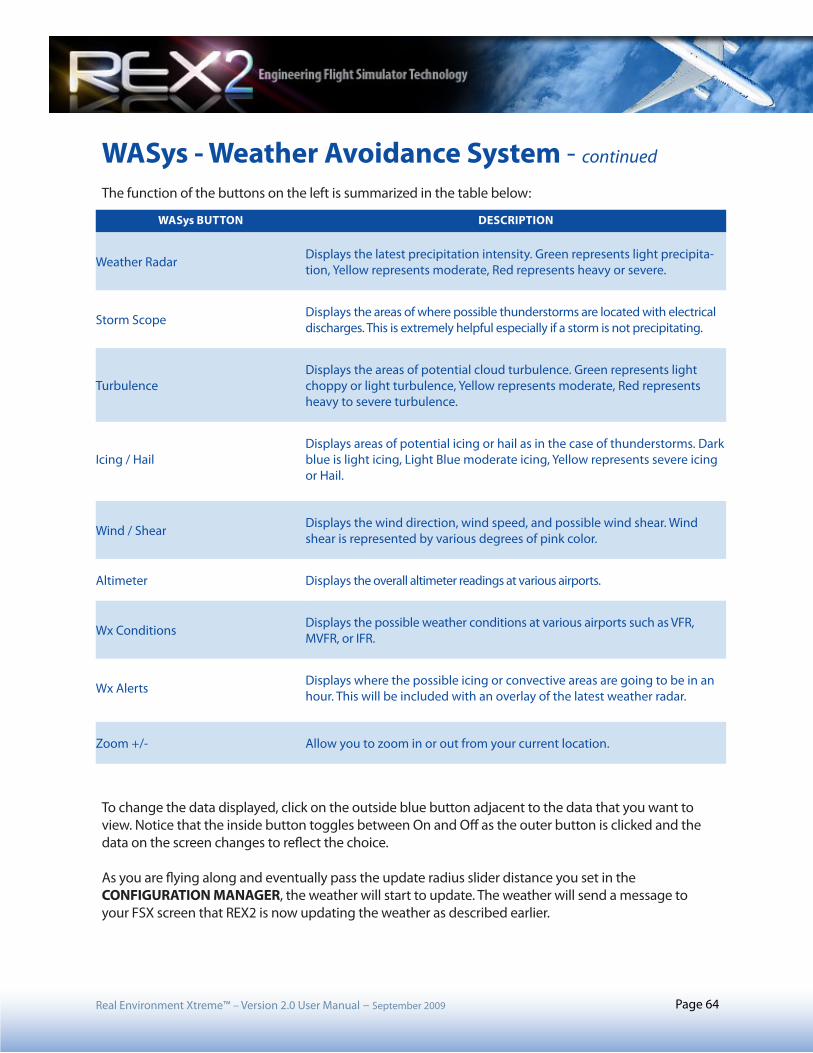
Real Environment Xtreme™ – Version 2.0 User Manual – September 2009 Page 64
WASys - Weather Avoidance System - continued
The function of the buttons on the left is summarized in the table below:
To change the data displayed, click on the outside blue button adjacent to the data that you want to view. Notice that the inside button toggles between On and Off as the outer button is clicked and the data on the screen changes to reflect the choice.
As you are flying along and eventually pass the update radius slider distance you set in the CONFIGURATION MANAGER, the weather will start to update. The weather will send a message to your FSX screen that REX2 is now updating the weather as described earlier.
WASys BUTTON DESCRIPTION
Weather Radar Displays the latest precipitation intensity. Green represents light precipita-tion, Yellow represents moderate, Red represents heavy or severe.
Storm Scope Displays the areas of where possible thunderstorms are located with electrical discharges. This is extremely helpful especially if a storm is not precipitating.
TurbulenceDisplays the areas of potential cloud turbulence. Green represents light choppy or light turbulence, Yellow represents moderate, Red represents heavy to severe turbulence.
Icing / HailDisplays areas of potential icing or hail as in the case of thunderstorms. Dark blue is light icing, Light Blue moderate icing, Yellow represents severe icing or Hail.
Wind / Shear Displays the wind direction, wind speed, and possible wind shear. Wind shear is represented by various degrees of pink color.
Altimeter Displays the overall altimeter readings at various airports.
Wx Conditions Displays the possible weather conditions at various airports such as VFR, MVFR, or IFR.
Wx Alerts Displays where the possible icing or convective areas are going to be in an hour. This will be included with an overlay of the latest weather radar.
Zoom +/- Allow you to zoom in or out from your current location.

Real Environment Xtreme™ – Version 2.0 User Manual – September 2009 Page 65
Contact & Product Technical SupportThe developers at Real Environment Simulations prides itself on top forum support. Our public support forum is located at http://realenvironmentxtreme.com/forum/index.php
OUR METHOD OF SERVICE PACKS AND UPDATESAlthough we try to perfect our products before release, we know there will be unique times when not everything will work quite as we would have liked. Thus, we strive to provide the latest updates and service packs in a timely manner.
These will be made available for download through our forum section marked “Knowledge Base and Techni-cal Support”. We will announce when a new service pack and update has been made available.
For definition purposes, a service pack is small fix that needed to be made to the program. An update is an enhancement to the original product; this might include additional features, or textures for download. We will try to make all the service packs and updates as minimal as possible when it comes to download size.
READ THE FAQ ON OUR SUPPORT FORUM FIRST!There will be a Frequently Asked Questions (FAQ) pinned topic in the support forums. We ask that you please read through this topic *before* you post a support question. Often you may find that a certain question has already been asked by someone else.
What to Include in Your Support Forum RequestsIf at all possible, this is what we’d like to see provided for each request you log:• A separate post on the REX support forum for each issue• Include your ORDER NUMBER from your REX purchase at the Flightsimstore.com• A screen shot to highlight what you are talking about• Detailed comments in your post about what you are reporting on

Real Environment Xtreme™ – Version 2.0 User Manual – September 2009 Page 66
Development & Beta Testing TeamTim Fuchs Lead Texture Artist, GUI DesignerReed Stough Software Architect, GUI ProgrammerChan Raiu Mapping SystemBill Collin Texture ArtistStephen Lyon Reference PhotographerBill Barrette Product Manual
Website DevelopmentFD&CM - www.fuchsdesign.com
PublisherThe FlightSim Store - www.flightsimstore.com
Beta Testing TeamAdrian Lehmann, Jay Kae, John Venema, Heiko Glatthorn, Siggi Palma, Bart Bartholomay, Phil Hore, John Murcutt, Eberhard Haberkorn, Wolter van der Spoel, Rick Brown, Bill Barrette, Luke Lewis, Victor N. Merculief Jr. and Nick Vanderbilt.
Product Websitewww.realenvironmentxtreme.com
Support Forumwww.realenvironmentxtreme.com/forum/index.php
Message of GratitudeWe would like to extend a very special thanks to our families who have endured the hardships with us as we developed REX. Your support and encouragement saw us through the tough development cycle and we are happy to share this excitement with you.
Also a huge shout of appreciation goes out to our beta testing team. Their service and expertise has been vital to REX. We selected a talented and patient group of individuals and we are very grateful to you all. We consider each of you dear friends.
Finally, we would like to thank all of you in the flight sim community; your patience, support and feed-back inspired us to create the best product possible. This is your milestone too and we hope that you are as proud of it as we are! Enjoy.
Real Environment Xtreme™ – Version 2.0 User Manual – September 2009 Page 67
END USER LICENSE AGREEMENT (EULA)END-USER LICENSE AGREEMENT FOR Real Environment Xtreme™ (REX) Enhancement Add-on For Microsoft Flight Simulator X
IMPORTANT — PLEASE READ CAREFULLY: This End-User License Agreement (“EULA”) is a legal agreement between you (either an individual or a single entity) and Real Environment Simulations for the REX software product identified above, which includes computer software and includes associated media and “online” or electronic documentation (“SOFTWARE PRODUCT”). The SOFTWARE PRODUCT also includes any updates and supplements to the original SOFTWARE PROD-UCT which may be provided to you by REX. By accessing or otherwise using the SOFTWARE PRODUCT, you agree to be bound by the terms of this EULA. If you do not agree to the terms of this EULA, do not use the SOFTWARE PRODUCT.
SOFTWARE PRODUCT LICENSE
The SOFTWARE PRODUCT is protected by copyright laws and international copyright treaties, as well as other intellectual property laws and treaties. The SOFT-WARE PRODUCT is sold as a single user license and no ownership is transferred, only the right to use the license software. The SOFTWARE PRODUCT may not be re-distributed, sold for non-profit or profit or subscription fees, repackaged, delivered on CD or DVD media or any other form of electronic media by any other persons or party, website, organization or entity, other than the official e-commerce seller website(s) as contracted or authorized by REX.
1. GRANT OF LICENSE. This EULA grants you the following rights:
a. You may install, access, and run a SINGLE copy of the SOFTWARE PRODUCT on a SINGLE personal computer for your personal, non-commercial, non-profit use. Any party or organization seeking to use the SOFTWARE PRODUCT under license for commercial use should contact REX at www.realenvironmentxtreme.com
b. This SOFTWARE PRODUCT is for personal entertainment purposes only and may not be used for flight training purposes. This SOFTWARE PRODUCT is not part of an approved training program under the standards of any aviation regulatory agency or body worldwide, whether private or government.
c. Separation of Components. The SOFTWARE PRODUCT is licensed as a single product. Its original component parts created by REX may not be separated for use for other software or projects.
d. Trademarks. This EULA does not grant you any rights in connection with any trademarks or service marks of REX.
e. Rental. You may not rent, lease, or lend the SOFTWARE PRODUCT. You may not charge admission or fees for any simulator, entertainment or training device which breaches this EULA by use of the SOFTWARE PRODUCT therein.
f. Support Services. This SOFTWARE PRODUCT is provided “as is”, however REX will provide provision of support services in relation to the operation, installation or remedy of issues arising to the use of the SOFTWARE at its official support website at www.realenvironmentxtreme.com
g. Termination. Without prejudice to any other rights, REX may terminate this EULA if you fail to comply with the terms and conditions of this EULA. In such event, you must destroy all copies of the SOFTWARE PRODUCT and all of its component parts.
2. COPYRIGHT. All title and copyrights in and to the original created components of the SOFTWARE PRODUCT (including but not limited to any images, pho-tographs, animations, video, audio, music, and text incorporated into the SOFTWARE PRODUCT), the accompanying online documentation materials, and any copies of the SOFTWARE PRODUCT are owned by REX or its suppliers. All title and intellectual property rights in and to additional third party libraries and con-tent (which are used under the terms of those components’ distribution) which may be accessed through use of the SOFTWARE PRODUCT is the property of the respective content owner and may be protected by applicable copyright or other intellectual property laws and treaties. This EULA grants you no rights to use such content. This SOFTWARE PRODUCT contains documentation which is provided only in electronic form, and you may printmultiple copies of such electronic documentation.
3. LEGAL JURISDICTION. This EULA is governed by the laws of the United States.
4. LIMITATION OF LIABILITY. TO THE MAXIMUM EXTENT PERMITTED BY APPLICABLE LAW, IN NO EVENT SHALL REX BE LIABLE FOR ANY SPECIAL, INCIDENTAL, INDIRECT, OR CONSEQUENTIAL DAMAGES WHATSOEVER (INCLUDING, WITHOUTLIMITATION, DAMAGES FOR LOSS OF BUSINESS PROFITS, BUSINESS INTERRUPTION, LOSS OF BUSINESS INFORMATION, OR ANY OTHER PECUNIARY LOSS) ARIS-ING OUT OF THE USE OF OR INABILITY TO USE THE SOFTWARE PRODUCT OR THE PROVISION OF OR FAILURE TO PROVIDE SUPPORT SERVICES, EVEN IF REX HAS BEEN ADVISED OF THE POSSIBILITY OF SUCH DAMAGES.
Microsoft Flight Simulator X is a © Copyrighted trademark of Microsoft CorporationREX and Real Environment Xtreme are brands of Real Environment Simulations, Inc.